Mastering Ionic 2 The Definitive Guide James Griffiths
User Manual:
Open the PDF directly: View PDF ![]() .
.
Page Count: 636 [warning: Documents this large are best viewed by clicking the View PDF Link!]

Mastering Ionic 2
James Grifths
Saints at Play Limited
Find us on the web at: www.saintsatplay.com and www.masteringionic2.com
To report errors with the book or its contents: support@masteringionic2.com
Copyright © 2016 by James Grifths
Notice of rights
All rights reserved. No part of this book may be reproduced or transmitted in any form by any means
(electronic, mechanical, photocopying, recording or otherwise) without the prior written permission of the
author.
If you have a copy of this e-book and did not pay for it you are depriving the author and publisher of their
rightful royalties. Please pay for your copy by purchasing it online at Amazon.
For all enquiries regarding obtaining permission for book reprints and excerpts please contact the author
directly at: support@masteringionic2.com.
Notice of liability
The information contained within this book is distributed on an “As Is” basis without warranty.
While every precaution has been taken in the preparation of the book and its supplied computer code,
neither the author, Saints at Play Limited (including its agents, associates and any third parties) nor the
publisher shall be held liable to any person or entity for any loss or damage howsoever caused, or alleged
to be caused, whether directly or indirectly, by the content and instructions contained within this book and/or
the supplied computer code or by the computer hardware and software products described within its pages.
Trademarks
This e-book identies product names and services known to be trademarks, registered trademarks, or
service marks of their respective holders which are used purely in an editorial fashion throughout this
e-book.
In addition, terms suspected of being trademarks, registered trademarks, or service marks have been
appropriately capitalised, although neither the author, Saints at Play Limited (including its agents,
associates and any third parties) nor the publisher cannot attest to the accuracy of this information.
Use of a term in this book should not be regarded as affecting the validity of any trademark, registered
trademark, or service mark. Neither the author, Saints at Play Limited (including its agents, associates and
any third parties) nor the publisher are associated with any product or vendor mentioned in this book.
Thanks to...
The team at Ionic for creating such a phenomenal product that allows
millions of developers worldwide to realise their ideas quickly and easily
To every developer who ever helped me with a question that I had or a
software bug that I was trying to x - I may not remember all of your
names but that doesn’t mean I don’t appreciate the assistance you
provided at the time!
To those who believed in me and gave me a chance when many others
didn’t or wouldn’t
Table of contents
Version History 6
Introduction 7
The last decade 15
Changes from Ionic 1 19
Core tools & technologies 29
The Ionic ecosystem 45
Conguring your environment 50
Beginning Ionic 2 development 58
The architecture of an Ionic 2 App 68
Decorators & Classes 76
Ionic 2 Navigation 100
Templates 117
Theming Ionic 2 Apps 158
Plugins 175
Loading Data 209
Forms & Data Input 224
Data Storage 247
Animations 287
Troubleshooting your Ionic 2 App 302
Debugging & Proling Apps 321
Documenting your code 341
Preparing apps for release 354
Code signing for iOS & Android 366
Submitting your iOS App to the Apple App Store 390
Submitting your Android App to the Google Play Store 404
Case Study #1 - Movies App 413
Case Study #2 - SoopaDoopaGames App 481
Case Study #3 - Appy Mapper App 561
In Closing 629
Author Biography 630
Index 631
Project download links 636

6
Version History
Date Changes
November 23rd 2016 Mastering Ionic 2 published!
November 25th 2016 Resolved some page formatting issues
Changed URL’s for le downloads
December 1st 2016 Updated content to reect changes in
Ionic 2 RC3
Added further links to le downloads
December 30th 2016 Updated forms section to cover alternate
FormControl syntax in HTML eld
Added note to The ionic white screen
of death section in Troubleshooting your
Ionic 2 App

Introduction

Mastering Ionic 2
8
Thank you for purchasing this copy of Mastering Ionic 2.
My goal with this book is to take you through using Ionic 2; beginning with an
understanding of the individual products and services of the Ionic ecosystem and
their underlying technologies before moving on to the different features of Ionic 2.
Later chapters of the book guide you through creating fully edged mobile apps and
understanding how to submit those to both the Apple App and Google Play stores.
If you are familiar with using Ionic 1 you might be surprised, and possibly feel a little
overwhelmed, at the changes within Ionic 2. If this is the case, or you’re maybe a
little hesitant at moving straight into Ionic 2 development, I’ll take you through those
changes, helping you to not only understand them but also familiarise yourself and
become comfortable working with the new syntax - I promise that before you know it
you’ll be hitting the ground running!
Please be aware that this book will not cover Ionic 1 development, unless mentioned
in passing, and the development focus will be solely from a Mac OS X perspective -
you will, however, be able to use all of the non Xcode related coding examples
regardless of what platform you use.
Prerequisites
You should already understand and be familiar with using HTML5, CSS3, Sass,
Angular JS and JavaScript in your projects as this book will not teach you how to
use those languages other than providing examples for you to build on your existing
knowledge with.
If you are not familiar with any of these languages I recommend you start with the
following resources before reading this book:
• HTML5 and CSS3 for the real world
• Beginning JavaScript 5th Edition
• Jump Start Sass

Introduction
Although this isn’t mandatory you should already have some familiarity with using
the command line interface (CLI). If you’re new to this don’t worry - it’s very quick
and easy to learn from the examples that I take you through.
You should also be familiar with object-oriented programming (OOP) concepts such
as classes, inheritance and access modiers.
I will explain and elaborate on these concepts in the context of Ionic 2 but it will help
greatly if you already have some prior knowledge of and experience working with
object-oriented programming.
If you don’t I would recommend the following resource to start with: https://develop-
er.mozilla.org/en-US/docs/Learn/JavaScript/Object-oriented
So why choose Ionic 2?
Out of the numerous other mobile development frameworks that are available why
should you choose to develop with Ionic 2?
In my humble opinion Ionic 2 offers the best feature set and related product/service
ecosystem of any mobile development framework on the market today.
Built on Apache Cordova and Angular Ionic 2 brings the features and functionality
of those frameworks while providing a generous library of pre-built components and
device plugins to choose from.
All of which are based on modern standards and able to be built on top of by other
developers (and I’ll cover all of these points throughout the book so you have a
thorough understanding of what Ionic 2 is from the ground up).
Oh, and in addition to these technologies Ionic 2 is free to download and use in your
projects.
Need I say more?
9

My background
My rst introduction to cross-platform mobile development frameworks started with
jqTouch back in mid-2010 followed by jQuery Mobile and then a brief irtation with
Sencha Touch before nally settling on Ionic Framework in August 2014 when it was
nearing version 1 of the SDK.
Since then I’ve used Ionic to develop a number of mobile/tablet apps for both iOS
and Android on client projects as well as internal projects for my own company,
Saints at Play Limited.
So what made me choose Ionic over other frameworks that I’ve used (or could have
used instead)?
Well, where to start?
With Ionic I get access to the plug-in/device API architecture of Apache Cordova, in
addition to being able to publish my app to different mobile platforms, as well as the
modularity, rich event handling and data binding capabilities of Angular 2.
Then there’s the considerable library of pre-built UI components, command line
tools, support for modern web technologies, extensive online API documentation of
the framework itself and, if all else fails, the well managed and helpful support
forums to nd answers to those seemingly unanswerable questions that often
plague us as developers.
All of these, in particular the seamless integration with Apache Cordova and Angular
2, makes developing mobile apps with the Ionic framework not only easier but also
quicker - and a lot more fun too!
And, for the purposes of disclosure, I am NOT afliated with either the Angular or
Ionic teams nor am I sponsored to promote their products in any way, shape or form
whatsoever - I’m just a developer who likes using their tools.
Just so you know!
Mastering Ionic 2
10

Important information covered within each chapter is prexed with the capitalised
word important like so:
IMPORTANT - pay attention here
Code that has been previously covered will, where further additions to that example
are being shown, be displayed using a placeholder in the following format:
...
Code may sometimes run onto a second line with a hyphen inserted into the code
to show that the rst line is connected with the second line. Such hyphens do NOT
form part of the code.
Summaries are provided at the end of most chapters to help quickly consolidate key
concepts and topics covered.
Resources for further learning are also listed as hyperlinks, if and where necessary,
throughout each chapter to help the reader build upon what they learn at each stage
of this book.
Support
To accompany this e-book I’ve developed a website: http://masteringionic2.com
11
// Installing the Ionic CLI
sudo npm install -g ionic cordova
Conventions used within this book
You’ll be pleased to know that there’s only a small number of conventions used in
this book (which means you can spend more time reading and learning than trying
to remember what such and such a convention is used for!)
Where code examples are listed these are always displayed within grey rounded
rectangles, and may (or may not) contain comments for further context, like so:
Introduction

which contains the following resources:
• Articles covering aspects of developing with Ionic 2
• Video screencast tutorials
• Lists any book errors that have been found
• Contains downloads for code covered in this e-book (you WILL need these!)
• Support forms where you can contact me directly
• Links to further e-books and products
Please feel free to drop me a line and get in touch; whether it’s potential issues with
the e-book, sharing your thoughts, suggestions for content or just to say hello, I’d
love to hear from you!
Links to the project code samples for this book are listed on page 636.
Technical Terms
Before we complete our introduction there are some programming related terms that
will be popping up throughout the book that, to avoid any confusion, should best be
explained here.
If you’re already familiar with these terms, and I imagine most of you reading this
book will be, then press on to the next chapter! If not, please take a moment to read
through the following terms and their denitions:
Bootstrapping
A term used in programming to describe the rst piece of code that runs when an
application starts and is responsible for loading the remainder of the application
code
Class based language
A style of object-oriented programming where objects are generated through the use
of classes
12
Mastering Ionic 2
CLI
Short for Command Line Interface which is a means of interacting with a program
through inputting text commands on the screen
DOM
Short for Document Object Model - a cross platform API that implements a tree-like
structure to represent HTML, XHTML and XML documents
ECMAScript
The language standard that governs the core features of JavaScript (which is a
superset of ECMAScript)
ES6
Short for ECMAScript 6 (also known as ECMAScript 2015) which is the next version
of the JavaScript language that introduces class based object oriented programming
features to the language
Hybrid Apps
These are applications developed using web based languages such as HTML, CSS
and JavaScript and then published within a native wrapper so they are able to run
on different mobile platforms such as iOS & Android
JSON
Short for JavaScript Object Notation - a language independent data format based on
a subset of JavaScript
Keychain Access
An Apple software utility that lists all the passwords, private/public keys and digital
certicates that you have previously generated and stored
Native Apps
Applications that have been developed to be used only on a specic platform or
device and are often able to interact with the operating system/software of that
specic platform
13
Introduction
Node
An open-source, cross platform JavaScript environment for developing server-side
web applications
Object-oriented programming
An approach to programming organised around the concept of objects
OS
Short for operating System
Package Manager
A tool, or collection of tools, for managing the installation, conguration, upgrading,
removal and, in some cases, browsing of software modules on a user’s computer
Prototype based language
A style of object-oriented programming that, instead of using classes, relies on the
cloning of objects, with each generated object inheriting behaviour from their parent
Superset
A programming language that contains all of the features of its parent or associated
language but implements additional features not found within the parent language
Version control
Both software tools for and an approach to the management of changes to les and
applications over time
Virtual machine
A software representation of a physical computer running an operating system and
applications on the same device as the native operating system. For example, a
virtual machine can allow a host OS such as Mac OS X to run a Windows OS or
Linux OS on the same computer
Xcode
An integrated development environment developed and maintained by Apple that is
used to create, test, compile and publish Mac OS X & iOS applications
Mastering Ionic 2
14

The last decade
16
Mastering Ionic 2
It’s been an interesting journey.
As mobile app developers we’ve come a long way since the introduction of the rst
iPhone at the Macworld Conference & Expo in January 2007, followed by the rst
commercial release of Android in September 2008.
Following from both of these global interest in smartphones exploded and public
adoption quickly followed but there was one major stumbling block for developers...
Unless you used platform specic APIs you couldn’t join the party.
This meant you had to learn, if you weren’t already familiar with, Objective-C (iOS),
Java (Android) and C# (Windows Mobile Apps) if you wanted to develop apps for
these popular mobile platforms (despite Windows Mobile rating a very distant third
compared to iOS & Android).
Unfortunately this issue of platform specic APIs also brought with it the cost,
complications and headaches of having to plan, create, debug, publish, maintain
and coordinate separate codebases for the same app for each mobile platform
being targeted.
Predictably, and understandably, this was not the most attractive proposition for any
development team or client looking to manage their time, resources and, ultimately,
expenditure.
In 2009 an iPhoneDevCamp event in San Francisco was to provide an opportunity
for two developers to start exploring an idea that would change this approach.
Rob Ellis and Brock Whitten began work on a development framework that would
allow web developers to create mobile apps through simply packaging HTML5, CSS
& JavaScript code that they had written into native containers that could then be
published for specic mobile platforms.
This framework would eventually morph into the free, open-source Apache Cordova
project - as well as the separate but similar Adobe PhoneGap service.
The last decade
Now there was no need for a developer to have to learn Objective-C, Java or C# in
order to develop mobile apps. They could simply stick with the familiar day-to-day
web technologies that they used and package these into native containers instead.
As if this wasn’t groundbreaking enough developers could now use one codebase to
publish to different platforms with. Opportunities for mobile app development were
nally accessible to web developers without the burden of having to learn multiple
different languages.
Thanks to this innovation hybrid apps were not only a reality but were now able to
be created at a fraction of the cost and time of “traditional” native apps.
Aside from the cost and time benets of not having to create and maintain a number
of separate codebases for the same app, these hybrid app development frameworks
also provided developers with one very important tool: a plugin architecture offering
a simple but powerful JavaScript API.
This allowed device functionality such as geolocation, capturing images using the
camera hardware or accessing address book contacts to be integrated directly
through JavaScript - giving hybrid apps a tremendous amount of parity with their
native counterparts (although, at the time, there were still some notable differences
in performance, particularly with intensive gaming applications).
And the aesthetics/user experience - such as implementing the smooth transition
from one screen view to the next or providing a standardised, user friendly UI?
These could now be handled using different front-end development frameworks
such as Onson UI, Framework 7, jQuery Mobile, Sencha Touch, Kendo UI or Ionic
Framework.
And so it is, within the space of a decade since the release of the rst iPhone, that
app development has evolved, and continues to evolve, at such a rapid pace with no
signs of slowing down any time soon.
As a developer you now have the exibility and freedom to be able to code for iOS,
17
18
Mastering Ionic 2
Android, Windows or all 3 platforms using a set of, mostly free, open-source tools
without having to learn a variety of programming languages in the process -
something that was impossible to accomplish back in the nascent days of mobile
app development.
Ionic 2 is just one of these open-source tools and it’s this particular app develop-
ment framework that we will focus our attention on over the remaining chapters of
this book...

Changes
from Ionic 1

Ionic 2 brings with it a whole different way of developing mobile apps compared to
version 1 of the framework. Built on top of Angular 2 Ionic can now take advantage
of a number of improved and additional features that the previous version of the
framework couldn’t (or didn’t) offer which include:
• Web Components
• TypeScript
• Native support for Promises
• Observables
• Improved navigation
• Arrow functions
• Ahead-of-Time compilation
• Improved error handling/reporting
Web Components
A concept inherited from Angular 2 components are self contained packages of
HTML, TypeScript and Sass which help form the individual pages for our Ionic apps.
If, for example, we created an about page for an Ionic 2 app all of the logic, markup
and styling information for that page would be self-contained within a directory
named after the page like so:
about
about.html
about.scss
about.ts
TypeScript
TypeScript is a superset of JavaScript - which means it contains all of the features
of JavaScript but implements additional features not found within the language - and
provides class based object oriented programming and static typing.
Mastering Ionic 2
20

21
We’ll be covering TypeScript in more detail in subsequent chapters, particularly for
those developers not familiar with the language, but we’ll quickly examine a sample
TypeScript le (which is always identied by the sufx .ts) below:
import { Component } from '@angular/core';
import { NavController } from 'ionic-angular';
import {LegalPage} from '../legal/legal';
import {NetworkService} from './providers/network-service/network-service';
/*
Generated class for the AboutPage page.
See http://ionicframework.com/docs/v2/components/#navigation for more info
on
Ionic pages and navigation.
*/
@Component({
selector: 'page-about',
templateUrl: 'about.html'
})
export class AboutPage
{
constructor(public navCtrl: NavController, public navParams: NavParams)
{
}
}
Even though this is a very basic example there’s quite a few things going on here:
• All modules used in the page are imported using the import command (this will
include default Ionic/Angular components as well as custom pages, providers,
directives and pipes created by the developer)
• The @Component decorator provides metadata about the class such as which
Changes from Ionic 1

22
Mastering Ionic 2
view template to use (we’ll cover decorators and templates in later chapters)
• A class named AboutPage contains the necessary logic for our page and this is
able to be imported as a module into other pages of the app through use of the
export declaration
• The constructor for our class uses dependency injection to allow access to the
modules we imported (NavController and NavParams)
• Use of types within our constructor parameters to allow the injected modules
to be accessed by reference (I.e. navCtrl for the NavController module and
navParams for the NavParams module)
• Use of access modiers (I.e. public or private keywords) which declares the
“availability” of the references to the injected modules in our class constructor
Promises
Promises are essentially an agreement for how asynchronous operations, such as
managing ajax calls or retrieving records from an SQLite database, will handle data
that is expected but hasn’t been returned to the application yet.
Traditionally JavaScript developers would have used callbacks to handle these but
Promises provide a much more efcient way of handling the success or failure of
such an operation.
The following example demonstrates how a Promise can be created using the new
Promise() constructor along with the use of the resolve and reject functions:
var promise = new Promise(function(resolve, reject)
{
// Perform a task here, probably asynchronous
if (/* task was successful */)
{
resolve("Everything worked");
}
else
{

promise.then(() =>
{
// Handle the result here
})
.catch(() =>
{
// Handle error situation here
});
Results from the Promise can then be accessed like so:
23
The then() method returns the results of the Promise object which can then be
handled and manipulated by the script as required.
If the Promise is rejected this is able to be handled using the catch() method.
Mozilla Developer Network - the Promise object
Promise then method
Promise catch method
Promise resolve method
Promise reject method
Observables
Introduced with Angular 2 Observables, similar to Promises, are also used to
handle asynchronous operations but, unlike Promises, provide the following
advantages:
• Allows for the detection of real-time changes
• Can handle multiple values over time
• Supports array operators such as lter, map and reduce
Changes from Ionic 1
reject(Error("Big time fail!"));
}
});

nameOfService.load().subscribe(
data =>
{
console.dir(data);
},
error =>
{
console.log(error);
});
24
Doesn’t look all that different from how a Promise handles returned data does it?
The important difference though is the use of the subscribe() method which allows
for events to be “listened” to and the detection of changes in real-time.
Ionic 2 implements Observables through Angular 2’s use of the Reactive Extensions
for JavaScript library, otherwise known as RxJS.
We’ll be looking at Observables in action in subsequent chapters.
Reactive Extensions library
Introducing the Observable
RxJS and Observables
Improved navigation
In Ionic 1 you might have relied on the underlying Angular stateProvider or similar
for implementing navigation logic within your app, like so:
Mastering Ionic 2
• Are able to be cancelled
This would make features like live updates, such as those found in a Twitter feed for
example, a perfect case use for Observables.
So what might an Observable look like?

import { Component } from '@angular/core';
import { NavController } from 'ionic-angular';
import {AccessoryDetailPage} from '../accessory-detail/accessory-detail';
@Component({
selector: 'page-accessories',
templateUrl: 'accessories.html'
})
export class AccessoriesPage
{
25
Changes from Ionic 1
Ionic 2, in contrast, streamlines navigation making it even easier by using the
NavController and NavParams components to simply pass and receive data
between pages of the app.
This allows for navigation to be controlled on a page by page basis directly from
within the TypeScript le for each specic page.
We’ll be looking at navigation in more detail in a subsequent chapter but for now an
example of what this might look is as follows (key aspects highlighted in bold):
.cong(function($stateProvider, $urlRouterProvider)
{
$stateProvider
.state('index',
{
url : '/',
templateUrl : 'assets/templates/home.html',
controller : 'HomeController'
});
$urlRouterProvider.otherwise("/");
});

How the above TypeScript le implements navigation is as follows:
• Imports the NavController component (for setting navigation items)
• Imports the page that we want to navigate to (AccessoryDetailPage)
• In the class constructor we inject our imported component as a dependency to be
used by our script - assigning that to a public property named navCtrl
• A function called viewAccessory, which can be called via a click event in the
page template, is used to implement the actual page navigation
• This function, using the navCtrl property as a reference, implements the push
method of the NavController component to state which page to navigate to and
what parameters will be passed to this page
And the page that we want to receive the passed in data to?
That script might look something like this (key aspects highlighted in bold):
26
Mastering Ionic 2
constructor(
public navCtrl: NavController)
{
}
viewAccessory(accessory)
{
this.navCtrl.push(AccessoryDetailPage, accessory);
}
}
import { Component } from '@angular/core';
import { NavController, NavParams } from 'ionic-angular';
@Component({

27
So what our above TypeScript le does is:
• Import the NavParams component (for managing received navigation data that
was set in our previous TypeScript le by the NavController component)
• In the class constructor we inject our imported components as dependencies to
be used by our script making reference to the NavParams component through
the navParams property
• Render the passed data from the navParams property to the browser console
Compared to the Ionic 1 way of implementing navigation this is actually a much
more streamlined and vastly simplied way of navigating between pages.
NavController
NavParams
Arrow functions
TypeScript (as well as the latest version of JavaScript, which is guided by the
ECMAScript 6, or ES6 for short, language specication) supports a feature known
as Arrow Functions (often referred to as fat arrow syntax):
selector: 'page-accessory-detail',
templateUrl: 'accessory-detail.html'
})
export class AccessoryDetailPage
{
constructor(
public navCtrl: NavController,
public navParams: NavParams)
{
console.dir(navParams.data);
}
}
Changes from Ionic 1

28
Mastering Ionic 2
() =>
{
// logic executed inside here
}
Arrow functions may look a little odd at rst but they are, essentially, a simplied way
of writing function expressions.
We’ll be making use of these throughout the code samples displayed over following
chapters so don’t worry if they feel a little “uncomfortable” at rst.
ES6 Arrow functions
Ahead-of-Time compilation
The underlying Angular 2 framework compiles apps using one of two approaches:
• Just-in-Time (JiT) - Executed at runtime (in the browser)
• Ahead-of-Time (AoT) - Executed once at build time
Ionic 2 implements AoT to pre-compile templates during the build process instead of
during the browser runtime or on the y. Doing so helps to catch TypeScript errors
as well as increase overall performance through decreasing app boot-up times and
optimising the code to run faster.
Ahead-of-Time compilation
Ionic 2 AoT
Angular 2 Ahead-of-Time compilation
Improved error handling/reporting
Ever encountered the dreaded “white screen of death” during development?
If so, you’ll be all too familiar with how much time can be lost trying to gure out
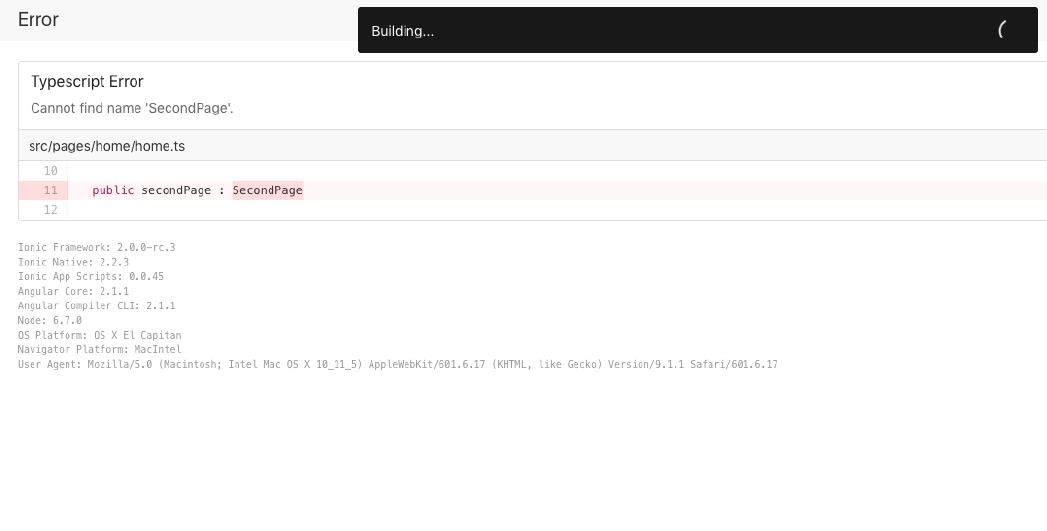
29
Changes from Ionic 1
what is causing your app to break.
The team at Ionic have been hard at work building tools and features into the
latest version of the software to make this experience a thing of the past.
When build processes fail with the new App Scripts library detailed information about
the failure is printed to the screen allowing the developer to diagnose with greater
precision the cause of the problem:
As you might appreciate this is a hugely useful feature - being able to track the
causes of build failure with greater accuracy has the knock-on effect of reducing
time on app development and debugging.
Always good where deadlines and budgets are concerned!
We’ve only really scratched the surface with this overview of the changes and new
features in Ionic 2 but I’m sure you get a feel for how useful they will be as part of
your app development toolkit.
Over subsequent chapters we’ll explore these in more detail but for now let’s take a
look at the underlying core technologies used in Ionic 2...

Core tools
& technologies

Core tools & technologies
31
Ionic 2 is built on and uses the following tools & languages:
• Apache Cordova
• Angular 2
• Sass
• TypeScript
If we take a little time to understand each of these tools then we’ll have a much
clearer picture of why Ionic is one of the most popular app development tools on the
market right now.
Apache Cordova
Apache Cordova is a free, open-source mobile development framework that:
• Allows standard web development technologies (HTML5, CSS3 and JavaScript)
to be used for cross platform development
• Packages apps in native wrappers targeted at different platforms
• Supports a variety of platforms including - iOS, Android, Blackberry 10, Window
Phone 8, Windows, OSX and Ubuntu
• Allows apps to access device level API’s such as geolocation, media capture,
network and accelerometer through an easy to implement plug-in architecture
The simple fact that you can target different platforms with the same codebase,
instead of having to write for each platform separately, is incredibly powerful and
drastically cuts down on both development time and costs.
As Ionic 2 is built directly on top of Apache Cordova this means that you can directly
benet from the tools and features of that architecture when developing your mobile
apps.
To learn more about Apache Cordova visit the following resources:
• Apache Cordova
• Apache Cordova Internals
Mastering Ionic 2
32
Angular 2
Angular 2 is an MVVM (Model-View View-Model) front-end development framework,
created by Google, that provides developers with the following key features and
functionality:
• Separation of template manipulation from application logic
• Extends the HTML language through directives to make page templates more
dynamic and customisable
• Supports dependency injection
• Implements data binding to avoid DOM manipulation
• Provides routing and deep linking for SPA’s (Single Page Applications) to improve
SEO and Usability
• Implements Providers (external scripts which can be injected as dependencies)
• Well documented development API
Angular 2 is a signicant overhaul of the framework, representing a departure
from the way in which developers would have worked in Angular 1, focussing on,
amongst other changes and improvements, the following:
• Built around Web Components for improved modularity
• Implements Promises and Observables for handling asynchronous operations
• Use of TypeScript or JavaScript for creating applications
• Improved form handling (better validation options)
• Improved performance
As the Ionic 2 architecture makes heavy use of Angular 2 - particularly with
components - we will, over the course of following chapters, be familiarising
ourselves with some of the tools and syntax of this particular front-end development
framework when developing our apps.
Some good online resources to learn more about Angular 2 are listed below:
• Angular IO
• Angular 2 Github repository
• Learning Angular 2

33
TypeScript
We touched on TypeScript in the last chapter describing how it’s a superset of the
JavaScript language - which means it contains all of the features of JavaScript but
offers additional features not found within the language such as:
• Static typing
• Class based object oriented programming
For the beginning JavaScript developer who might not be familiar with higher level
programming concepts such as classes and static typing the benets of TypeScript
might not be immediately obvious.
To explain this we rst have to realise that part of JavaScript’s strength (as well as
its appeal and popularity) has always been its exibility.
For example, if we wanted to dene/create an object in JavaScript we could choose
any of the following approaches:
#1 - Use an Object constructor
var myObj = new Object();
myObj.property1 = "Value 1";
myObj.property2 = "Value 2";
console.log("Value is: " + a.property1);
#2 - Use an object literal
var myObj = {
property1 : "Value 1",
property2 : "Value 2"
};
console.log("Value is: " + myObj.property1);
Core tools & technologies

34
#3 - Use a factory function
function myObj()
{
return {
property1: "Value 1",
property2: "Value 2"
};
}
var o = myObj();
console.log("Value is: " + o.property1);
#4 - Use prototypes
function myObj()
{
this.property1 = "Value 1",
this.property2 = "Value 2"
}
myObj.prototype.getProperty1 = function()
{
console.log("Value is: " + this.property1);
}
var o = new myObj();
o.getProperty1();
Mastering Ionic 2

Now that’s a lot of different ways to accomplish the same result!
This exibility though is also part of JavaScript’s weakness as there was, until very
recently, no one standardised way to create objects - until ECMAScript 6 that is (the
latest language specication that helps guide the evolution of JavaScript).
This might not sound like a bad thing but it can, and often does, create problems for
the following reasons:
• When you have to work on another developer’s code (especially if you are having
to familiarise yourself with different ways of generating objects)
#5 - Use Self-invoking function expressions
var OBJ = (function()
{
var _privateMethodOne = function()
{
_privateMethodTwo();
},
_privateMethodTwo = function()
{
console.log('Hello!');
};
return {
publicMethodOne : _privateMethodOne
}
})();
OBJ.publicMethodOne();
35
Core tools & technologies

36
• If you’re learning JavaScript as a beginner (particularly if you come from a class
based object oriented programming language)
• Managing the scalability of the codebase over large projects
• Understanding the potential quirks and bugs that can come with different ways of
object generation in JavaScript
• All object members are public (only revealing module/prototype pattern provides
emulation of private members in pre-ES6 JavaScript)
• Performance variations between different ways of generating objects
Additionally as JavaScript variables are mutable - which means that variables can
change data types (I.e. from string to number) - this can clearly present problems
in development as it’s easy to introduce bugs into scripts without necessarily being
aware of what has been happening.
The following is, admittedly, a somewhat silly example but it illustrates the point:
var prop = 2;
console.log(typeof prop);
// number
prop = "Man"; // We now assign a different value to the variable
console.log(typeof prop);
// string
These were precisely the type of problems that TypeScript was designed to help
overcome by providing developers with a much stricter language syntax that uses
class based object oriented programming principles over a looser, more exible
approach that long-term JavaScript developers are familiar with (although ES6, the
latest specication for the language, provides many of the features of TypeScript).
Some of the useful features that TypeScript introduces are as follows:
• Modules
• Data types
• Classes
Mastering Ionic 2

• Access modiers
• Multiline Strings/String interpolation
Modules
A module is simply a container for organising and grouping your code that is then
able to be exported and imported for use into another script like so:
Data types
Until ES6 JavaScript didn’t provide the ability for developers to specify the data type
for their variables so they would simply have been declared like so:
#1 - Import modules
import {Page, NavController, NavParams} from 'ionic-angular';
#2 - Export modules
export class AboutPage { // class properties & methods contained in here }
var rstName,
lastName,
age;
With TypeScript we can explicitly declare the data types for each variable - these are
known as type annotations - which help us to ensure strict data/logic integrity in our
coding.
If, for example, we were to assign a numeric value to a variable with a string data
type the TypeScript compiler would throw an error and our scripts would not work.
As you might already have gathered this makes type annotations pretty useful for
avoiding logic errors.
If we were to now use type annotations our previous example would look like this:
Core tools & technologies
37

38
By default the following type annotations are supported in TypeScript:
• string (for text data types)
• number (for numeric data types)
• boolean (for true/false data types)
• any (catch all data type)
• void (used with a method where no return type is required)
There are additional types available for use within TypeScript such as the Union,
Intersection and Tuple types but these are generally used in more advanced case
scenarios.
TypeScript annotations
Classes
Classes are used in object-oriented programming as a kind of blueprint to generate
objects from.
Classes allow scripts to be structured and organised by purpose (I.e. a class for
dening a person, another class for dening their activities etc.) and contain
properties and methods relevant to the purpose of that class (I.e. a property of name
for a person class and a method of walk for an activity class).
Classes in TypeScript are simply dened as follows:
var rstName : string,
lastName : string,
age : number;
class nameOfClassHere {
// Properties and methods for the class within here
}
Mastering Ionic 2

39
#1 - public
class Human {
public gender: string;
public constructor(genderType: string)
{
this.gender = genderType;
}
public sleep(durationOfSleep: number) {
console.log(`${this.gender} slept ${durationOfSleep} hours.`);
}
}
#2 - private
class Human {
private gender: string;
Access modiers
Access modiers control access to a class member, such as a property or method,
which is a highly technical way of stating whether or not that member can be used
solely within that class or outside of that class too.
TypeScript provides 3 access modiers:
• Public (can be accessed by all scripts)
• Private (can only be used within the class where the member is dened)
• Protected (can be accessed by a sub-class)
By default each member in TypeScript is public.
The following examples show how we might use each of the above access modiers
in TypeScript:
Core tools & technologies

40
constructor(genderType: string)
{
this.gender = genderType;
}
}
new Human("Male").gender; // Error - ‘gender’ is private
#3 - protected
class Human {
protected gender: string;
protected name: string;
constructor(theirName : string, genderType: string)
{
this.gender = genderType;
this.name = theirName;
}
}
class Activity extends Human {
private sleeping: number;
constructor(genderType: string, hoursSlept: number)
{
super(name);
this.sleeping = hoursSlept;
}
public sleepDuration() {
return `${this.name} slept for ${this.sleeping} hours.`;
}
}
Mastering Ionic 2

41
The above syntax is very similar to that used within languages such as Java or PHP
and provides a more consistent, uniform way in which to implement object-oriented
programming for front-end development (instead of the numerous different ways
with which we could have created objects in pre-ES6 JavaScript).
Not all developers agree that using TypeScript or ES6 is the right way to go.
They point to JavaScript being a prototype based language, not a class based
language, and that introducing such enhancements actually limit the exibility,
power, expressiveness and appeal of JavaScript.
I personally don’t think it’s a bad thing, even though I fully understand and respect
the arguments presented, as any tools or language enhancements that can improve
the way in which we as developers work has to have its merits.
Multiline Strings/String Interpolation
Ironically this might be one of the most under-appreciated, yet incredibly useful,
features of TypeScript.
In JavaScript, if you needed a newline within a string value, you’d usually escape
the string with the backslash character followed by a space and then the \n newline
character as shown in the following example:
Core tools & technologies
var sentence = "To be or not to be \
\nThat is the question";
In TypeScript we can simply use a template string instead:
let activity = new Activity("Gabriel", 6);
console.log(activity.sleepDuration());
console.log(activity.name); // error

42
Mastering Ionic 2
The backtick characters are used to create the template string while the interpolation
( the ${ } construct ) allows the value contained within it to be treated and evaluated
as a JavaScript expression.
This is so simple yet so powerful as it makes situations where we need to write
strings that require variables to be contained within them so much quicker and
easier to accomplish.
Before we forget.....transpiling
One last, and very important, point concerning TypeScript.
TypeScript has to be converted, or - in its technical term - transpiled, into a format
that browsers can understand (which at this moment in time is ECMAScript 5).
var sentence = `To be or not to be
That is the question`;
Notice the use of the backtick character to start and end the string in addition to the
absence of the backslash and newline characters?
Much simpler.
Similarly a template string also allows us to mix string values and variables together
using templating logic and interpolation so instead of resorting to something like this
(as we would have done in the ‘old days’ of JavaScript):
var sentence = 'To be or not to be',
elem = '<div>' + sentence + '</div>';
TypeScript instead allows us to do this:
var sentence = 'To be or not to be',
elem = `<div>${sentence}</div>`;

43
Core tools & technologies
This means that you will code your Ionic 2 app in TypeScript but your published
script will be converted into JavaScript instead.
We will be exploring TypeScript in greater detail in following chapters but you can
learn more about the language through the following resources:
• Ofcial TypeScript language website
• TypeScript blog
Sass
Syntactically awesome style sheets (or simply Sass) is a popular CSS pre-processor
(a software tool that converts the input data into a format that is able to be read by a
web browser - in this case CSS) that allows developers to:
• Use variables, functions and similar programmatic objects to create CSS
• Nest CSS rules for more logical grouping and organisation
• Create reusable scripts to generate specic CSS rules (Mixins and functions)
• Import CSS rules from other Sass les
• Publish their Sass les into CSS
Sass makes writing and organising CSS rules so much more manageable and, dare
I say, interesting? This is great for both the individual developer and also for teams
as it makes style editing less prone to overwrite conicts when multiple developers
are working on a project’s CSS rules.
Ionic 2 uses Sass to set default styles for theming apps which are able to be easily
customised and we’ll look at how to theme our app in a later chapter.
To learn more about Sass feel free to visit the following resources:
• Sass language
• The Sass Way
44
Summary
• Ionic 2 makes use of the following core technologies: Apache Cordova, Angular
2, TypeScript & Sass
• Angular 2 is built around the concept of Web Components (essentially these are
self-packaged modules of HTML, JavaScript & CSS)
• TypeScript is a programming language that provides static typing and class
based object oriented programming features that JavaScript lacks (or rather - did
lack prior to ES6)
• Sass is a CSS pre-processor that allows developers to structure their CSS in a
more modular fashion and adds functionality such as loops, variables & functions
to help create style rules
Now that we’ve looked into the core tools & technologies used within Ionic 2 let’s
take a look at the different products & services that form the Ionic ecosystem and
see how Ionic 2 ts into this...
Mastering Ionic 2

The Ionic
ecosystem

Originally conceived back in 2012 by Ben Sperry, Adam Bradley and Max Lynch
the Ionic framework is actually one tool in a broader, interconnected ecosystem that
consists of the following core products and services:
• Ionic Lab (deprecated)
• Ionic View
• Ionic Creator
• Ionic Market
• Ionic Cloud
• Ionic Framework
• Ionic Framework Enterprise
• Ionic Native
• Ion Icons
Each of these offer additional benets and incentives to developing with the Ionic
framework so it’s important that we have, at the very least, an understanding of what
they are designed to do, how this can help us as app developers and how each one
ts into and complements the broader ecosystem of product and services that are
available to us.
Ionic Lab
NOTE: Product is considered deprecated as of late December 2016 and the team
at Ionic have stated that Ionic Lab will no longer be available for download after this
time.
Lab is a free desktop app for Mac, Linux and Windows platforms that provides
developers with a software GUI through which to create apps, install platforms &
plugins, preview, test, build and deploy their apps to simulators/handheld devices
and also share with other team members if required.
Available for the following platforms:
• Mac OS X 10.9 or later
• Windows 7, 8 & 10
The Ionic ecosystem
46

• Linux X86/X64
Lab is able to be downloaded here: http://lab.ionic.io
Ionic View
Ionic View is an iOS/Android app that allows developers to load, test and view the
apps that they are currently developing in addition to being able to share those with
other interested parties such as fellow developers or clients.
Further information here: http://view.ionic.io
Ionic Creator
Creator is an iOS/Android app prototyping tool that provides a selection of pre-made
mobile components that can be dragged and dropped to create mock-ups which can
then be previewed and shared with colleagues and clients and even exported as an
Ionic project or even native IPA and APK les for device installation.
Further information here: http://ionic.io/products/creator
Ionic Market
An online marketplace for developers to access community made resources for their
Ionic app development; from pre-built starter apps to plugin and themes.
Further information here: http://market.ionic.io
Ionic Cloud
Scalable cross platform app development from the Cloud offering a variety of
backend services including push notication, user authentication, app version
rollback, deployment of UI and code updates to published apps and app binary
deployment.
47
Mastering Ionic 2

48
Further information here: http://ionic.io/cloud
Ionic Framework
A free, open source mobile SDK built on top of Apache Cordova, Angular 2 & Sass
which offers a library of pre-built HTML and CSS (and sometimes JavaScript)
components as well as a command line interface for the rapid development of native
and progressive web apps.
The SDK supports the following platforms:
• iOS 7+
• Android 4.1+
• Windows Phone 8
• Windows 10 Universal Apps (as of version 2 of the SDK)
Further information here: http://ionicframework.com
Ionic Framework Enterprise
Provides all the features of the free Ionic Framework SDK with additional enterprise
level features including support SLA, code support and access to xes for the Ionic
framework that don’t have publicly available solutions.
Further information here: https://ionic.io/enterprise
Ionic Native
A repository of ES5/ES6 & TypeScript wrappers for Cordova & PhoneGap plugins
that allow developers to implement native functionality within their apps - such as
detecting network connection capabilities, accessing geolocation features etc.
Further information here: http://ionicframework.com/docs/v2/native/
The Ionic ecosystem

Ion Icons
Free, open source font icons for use with the Ionic framework.
Further information here: http://ionicons.com
The main driver behind all of these products and services however is the Ionic
framework itself and it’s this particular aspect of the Ionic ecosystem that we shall
work with throughout the entire book (although we will explore and use some of the
aforementioned products and services along the way).
Let’s begin by familiarising ourselves with conguring our development environment,
installing version 2 of the SDK and creating a very basic app.
Mastering Ionic 2
49

Conguring
your environment

Conguring your environment
51
Getting started with the Ionic framework requires that you install and congure the
following software on your system - if you haven’t already (this does presume you
are using an Apple Mac computer, as stated in the introduction):
• Apache Cordova (version 5+)
• Node JS (version 5+)
• NPM (Node Package Manager - version 3+)
• Xcode (for iOS app development)
• Android SDK (for Android development)
You will nd that there are additional dependencies required while installing some of
the above applications and you may even need to update core system software too
(such as the version of the JDK you might have currently installed).
The following documentation should be helpful in ensuring that you have all the
necessary software & related dependencies installed and congured correctly for
your system:
• https://cordova.apache.org/docs/en/latest/guide/platforms/ios/index.html
• https://cordova.apache.org/docs/en/latest/guide/platforms/android/index.html
• https://developer.android.com/studio/intro/update.html
As you work through the installation process you’ll also need to set the paths for
certain software. This is typically performed, on unix based systems, using a le
called .bash_prole which is usually located at the root of your user directory.
The .bash_prole is specic to each user on your system and is used to set and
congure environment variables, software paths and preferences for the command
line interface you’ll be using (normally the Terminal application if you’re on Mac OS
X).
More information on the .bash_prole le, along with example congurations, can
be found here: https://natelandau.com/my-mac-osx-bash_prole/.

Windows users
Unfortunately Xcode is available for Mac OS X only but if you’re developing on
Windows and want to create iOS apps it’s not all bad news - you do have a number
of alternative options available to you which we’ll explore below:
1. VirtualBox
This free application from Oracle allows you to set up virtual machines through
which you can install and run multiple operating systems - whether those be former
versions of the host OS or those from different vendors is entirely up to the
developer. Unfortunately it appears that you would have to install downloadable
pirated versions of Mac OS X (which is not something I would condone or
recommend) in order for this method to work.
Virtual Box can be downloaded here: http://virtualbox.org
2. Visual Studio 2015
Microsoft’s Visual Studio 2015 provides a range of cross platform development tools
specically for developers looking to create, amongst others, iOS apps.
Visual Studio 2015 can be downloaded here: https://www.visualstudio.com/en-us/
features/mobile-app-development-vs.aspx
3. Ionic Cloud
Alternatively you could opt to use the Ionic Platform, take advantage of the cloud
based services on offer and develop cross platform apps through this suite of online
tools instead.
Further information here: http://ionic.io/cloud
Linux Users
Like Windows users those using Linux and looking to develop iOS apps will have to
explore using alternatives such as:
1. Buddy Build
52
Mastering Ionic 2

Buddy Build provides a continuous integration and delivery service that allows
developers to push code to Git based source control repositories which the service
will then use to create a build environment, securely compile the app, run unit tests
and prepare the app for the Apple App Store.
More information here: https://buddybuild.com
2. Mac In Cloud
A cloud based service that allows a user to rent a remote Mac computer which can
be accessed from the user’s mobile device or desktop browser.
More information here: http://www.macincloud.com
3. Ionic Cloud
Using Ionic’s cloud service and suite of available tools cross platform apps can be
developed, deployed, packaged and submitted here instead.
Further information here: http://ionic.io/cloud
Okay, at this point I assume you’ve installed the dependencies listed at the start of
this chapter? If you haven’t then do so now and come back to this page once all has
been successfully installed.
If you have then let’s start installing Ionic 2!
Installing the Ionic SDK
On your Mac open up a Terminal shell (the Terminal software application is available
at the following location: Applications/Utilities/Terminal - I would recommend adding
the Terminal to your Mac OS X dock, if you haven’t already done so, for faster
access in the future) and type out the following command:
53
sudo npm install -g ionic cordova
Conguring your environment

Mastering Ionic 2
54
You will be prompted for your system password, once you’ve entered this and hit the
enter key sit back and wait for the software to be installed (which should only take a
couple of minutes or less depending on the speed of your internet connection).
If you’re curious here’s what each part of the above command breaks down to:
• The sudo command grants temporary root like privileges to install the software to
the system (and helps to avoid any permission denied errors)
• npm is the node package manager tool which identies the software package to
be installed from the last part(s) of our command
• -g is a ag to inform the node package manager that we want this to be globally
available to our system
• ionic indicates that this is the ionic framework that we want installed
• cordova indicates this is the apache cordova framework that we want installed
Windows users
As the sudo command is only specic to unix based systems you can simply type
the following instead in the Command Prompt:
npm install -g ionic cordova
To test that your installation has been successful type the following command in the
Terminal/Command Prompt:
ionic -v
This should return back the version and build number of the Ionic SDK that has just
been installed.
A little NPM primer
Before we begin building our rst Ionic App it’s probably best that we look at the
Node Package Manager (NPM) and understand, for those who may not be familiar
with NPM, how this relates to Ionic development as we’re going to be spending time
dipping in and out of using this package manager throughout remaining chapters.
55
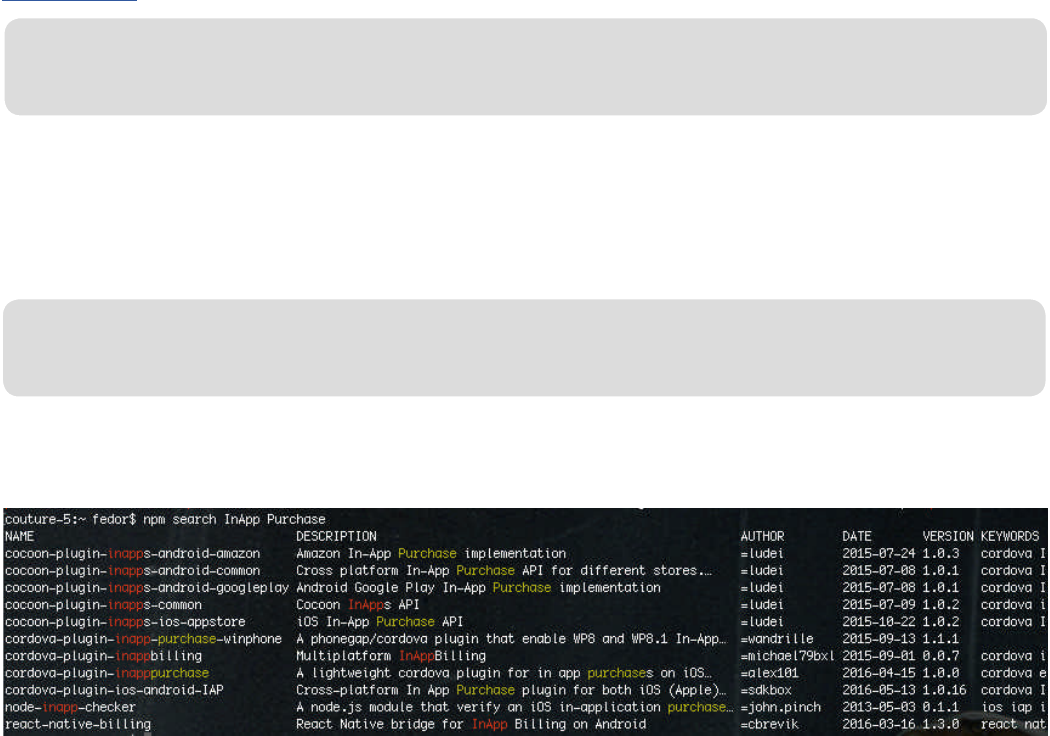
npm search <name of package here>
Pretty straightforward right?
So, if I wanted to search for available In-App Purchase plugins for example, I could
type the following command in my Terminal/Command Prompt:
Which, if any packages can be found that match the provided search term, should
return results akin to the following:
npm search In-App Purchase
Conguring your environment
As the name implies NPM is a package manager which allows developers to source
self contained modules, or packages, of JavaScript code that have been specically
developed to solve particular tasks (such as generating code documentation from
inline comments or optimising images for best compression rates for example) from
an ofcial online registry.
This is particularly useful for developers as the NPM registry provides high quality,
pre-existing solutions, built to an agreed standard, that can be quickly and easily
integrated into projects where required.
No having to invent solutions when they already exist - and, with the NPM registry,
the chances are very high that should you require a pre-existing solution for a
particular task you’ll be able to nd it there.
As for sourcing packages this can be done through browsing the registry directly at
npmjs.com or via the CLI using the following command:

Mastering Ionic 2
56
Packages can then be installed into our Ionic projects directly via the Ionic CLI tool
using the following command:
ionic plugin add <name of package here>
So, if we wanted to install, for example, the cordova-plugin-inapppurchase package
from the above search results we would simply run the following in our Terminal/
Command Prompt:
ionic plugin add cordova-plugin-inapppurchase
If you’re working on a Mac/Linux platform you may need to prex the above
command with sudo (to overcome any permission denied errors):
sudo ionic plugin add cordova-plugin-inapppurchase
To see all plugins installed in your project simply type out the following (prex with
sudo if you are on a Mac/Linux platform and experience permission denied errors):
ionic plugins ls
This will print out a list of all installed plugins displaying their NPM package title,
version number and name.
Ionic and NPM
Currently the important core Ionic 2 packages available through NPM are:
• Ionic CLI
• Ionic-Angular
The Ionic CLI tool comes with an in-built development server, build & debugging
tools and allows developers to create a project, generate components, deploy to
simulators and build native apps (more on all of these later on in the book).

This was previously installed with the following command:
sudo npm install -g ionic
57
The Ionic-Angular package is the actual framework of core HTML, CSS and JS
components for Ionic that’s installed when you create a project through the CLI tool.
We’ll start exploring the Ionic CLI in more detail throughout the next chapter.
Resources
Android Studio/SDK Manager: https://developer.android.com/studio/index.html
Apache Cordova: https://cordova.apache.org
Node & NPM: https://nodejs.org/en/
When installing the above software follow the documentation and pay attention to
any dependencies that may also be required - particularly when conguring system
paths - doing so will pay dividends later on as we work through different code
examples while building sample Ionic apps.
Conguring your environment

Beginning Ionic 2
Development

Using Ionic
Now that we’re familiar with the core technologies behind Ionic 2, understand why
they’re there and we’ve installed the Ionic CLI, along with all required dependencies,
let’s begin using the tool by creating a project.
Open up your Terminal, navigate to a directory on your machine where you want this
project to be located and then type the following commands:
59
mkdir apps
chmod -R 775 apps
cd apps
ionic start myApp blank --v2
For those of you not familiar with the command line what we are doing here is quite
simple:
• We create a directory called apps (where we want to store all the Ionic apps we’ll
be creating)
• The permissions of the apps directory and its contents are set to be readable,
writeable & executable by the owner and only readable/executable by others
• Change into the apps directory
• Run the Ionic CLI tool to create a project called myApp with Ionic 2 (denoted via
the use of the --v2 ag) from a blank template
Depending on the speed of your internet connection you should see the progress of
your project build being printed to your Terminal window like so:
Creating Ionic app in folder /apps/myApp based on blank project
Downloading: https://github.com/driftyco/ionic2-app-base/archive/master.zip
[=============================] 100% 0.0s
Downloading: https://github.com/driftyco/ionic2-starter-blank/archive/master.zip
[=============================] 100% 0.0s
Installing npm packages...
Beginning Ionic 2 development

.... (*MY COMMENT HERE - CLI will print LOTS of scripts and modules that
are being installed)
Adding initial native plugins
Initializing cordova project without CLI
|
Adding in iOS application by default
Saving your Ionic app state of platforms and plugins
Saved platform
Saved plugins
Saved package.json
♬ ♬ ♬ ♬ Your Ionic app is ready to go! ♬ ♬ ♬ ♬
Some helpful tips:
Run your app in the browser (great for initial development):
ionic serve
Run on a device or simulator:
ionic run ios[android,browser]
Test and share your app on device with Ionic View:
http://view.ionic.io
Build better Enterprise apps with expert Ionic support:
http://ionic.io/enterprise
New! Add push notications, live app updates, and more with Ionic Cloud!
https://apps.ionic.io/signup
New to Ionic? Get started here: http://ionicframework.com/docs/v2/get-
ting-started
60
Mastering Ionic 2

61
From this we have learned that the Ionic CLI has:
• Created a blank project
• Installed NPM packages
• Added initial native plugins (more on these later)
• Added the iOS platform by default (only mobile platform to be installed)
• Provided us with hints about what we might want to do next
Instead of a blank project we could have chosen any of the following instead:
If you had omitted the project type the Ionic CLI would have defaulted to using tabs
for your project.
Before we go any further though we need to understand one very important point
about how we set the project up.
We instructed the CLI to build for Ionic 2 (using the --v2 ag).
If we had omitted this ag when creating our project then we would have ended up
with an Ionic 1 codebase that uses JavaScript instead of TypeScript.
I’ll be driving this point home throughout the book - if you want to create Ionic 2 apps
then you MUST add the --v2 ag when creating a project from the command line.
Added to this is also remembering to specify the project type (I almost always
choose a blank template for my project builds) otherwise you end up with tabs by
// Create a project with the sidemenu template
ionic start myApp sidemenu --v2
//Create a project with the tabs template
ionic start myApp tabs --v2
//Create a project with the tutorial template
ionic start myApp tutorial --v2
Beginning Ionic 2 development

62
default.
Now let’s take a look at some of the Ionic CLI commands that you’ll most likely use
for development:
Note: cd into the root directory of your Ionic 2 app before running the following
commands
// Add Android platform
ionic platform add android
// Remove Android platform
ionic platform rm android
// Remove iOS platform
ionic platform rm ios
// Run your Ionic app in the web browser
ionic serve
// Display Ionic app in the web browser as separate iOS / Android / Windows
// Phone views by adding a lowercase L as a ag
ionic serve -l
// Run your app on a connected iOS device
ionic run ios
// Run your app on a connected Android device
ionic run android
// Prepare & compile your app for iOS
ionic build ios
// Prepare & compile your app for Android
Mastering Ionic 2

As you can see that’s quite a powerful range of commands that we have available
for app development and it’s not hard to see why the Ionic CLI is the digital Swiss
army knife of developing Ionic apps.
Let’s use some of these commands to see our app in action.
63
ionic build Android
// Print details about your system environment
ionic info
// Install plugins
ionic plugin add <name-of-plugin-here>
// Remove installed plugin
ionic plugin remove <name-of-plugin-here>
// List all installed plugins
ionic plugin ls
// Add a page to your Ionic app
ionic g page name-of-page-here
// Add a service to your Ionic app
ionic g provider name-of-service-here
// Add a pipe to your Ionic app
ionic g pipe name-of-pipe-here
// Add a directive to your Ionic app
ionic g directive name-of-directive-here
// We’ll explore adding pages, services, directives & pipes in following chapters
// so don’t worry if these make no sense to you at the moment!
Beginning Ionic 2 development

ionic serve
This will run the built in server for the Ionic CLI and allow us to preview our app in
a web browser. As the command is being executed you’ll see that the CLI runs the
following tasks, prior to serving the app in the browser:
> ionic-hello-world@ ionic:serve /apps/myApp
> ionic-app-scripts serve
[20:02:29] ionic-app-scripts 0.0.45
[20:02:29] watch started ...
[20:02:29] build dev started ...
[20:02:29] clean started ...
[20:02:29] clean nished in 2 ms
[20:02:29] copy started ...
[20:02:29] transpile started ...
[20:02:34] transpile nished in 4.93 s
[20:02:34] webpack started ...
[20:02:35] copy nished in 5.48 s
[20:02:46] webpack nished in 11.27 s
[20:02:46] sass started ...
[20:02:48] sass nished in 2.99 s
[20:02:49] build dev nished in 19.22 s
[20:02:49] watch ready in 19.37 s
[20:02:49] dev server running: http://localhost:8100/
64
Mastering Ionic 2
Making sure you are at the root directory of your newly created app run the following
command in the Terminal:
The tasks that are run by this command consist of:
• Cleaning the contents of the www directory
• Linting TypeScript les for the app then transpiling and concatenating those into a
single JavaScript le
• Compiling Sass to CSS and concatenating all of the app stylesheets into a single
CSS le
65
Beginning Ionic 2 development
Congratulations, you’ve just run your rst Ionic 2 app!
Granted there’s not much to see and it’s certainly not going to win any design
awards but, incredibly, we can go one step further with our browser output.
Using Ionic serve, in and of itself, is pretty useful but there’s one great additional
feature - we can actually preview our app is if it were running on the following 3
platforms simultaneously:
• iOS
• Android
• Windows Phone
And we accomplish this using the following (slightly modied) command:
// Add the letter L (in lowercase) as a ag after the ionic serve command
ionic serve -l
• Copying the newly generated JavaScript and CSS les to the re-created www/
build directory
• Copying custom assets, such as images, from the src/assets directory to the
www/assets directory
• Listening for changes to the Sass/TypeScript/HTML les used within the app,
re-running these tasks and reloading the app within the browser to display these
changes
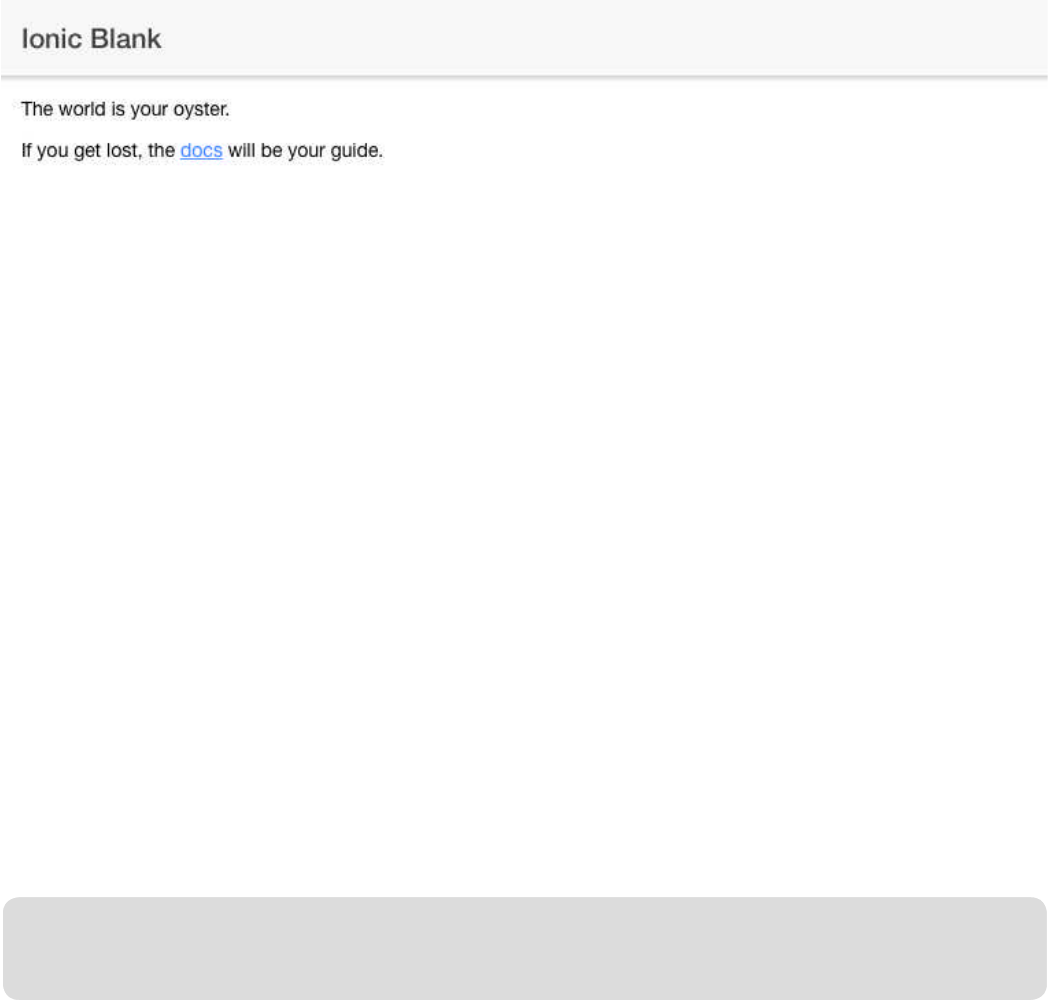
And here’s what our initial Ionic 2 app looks like when previewed in the browser:
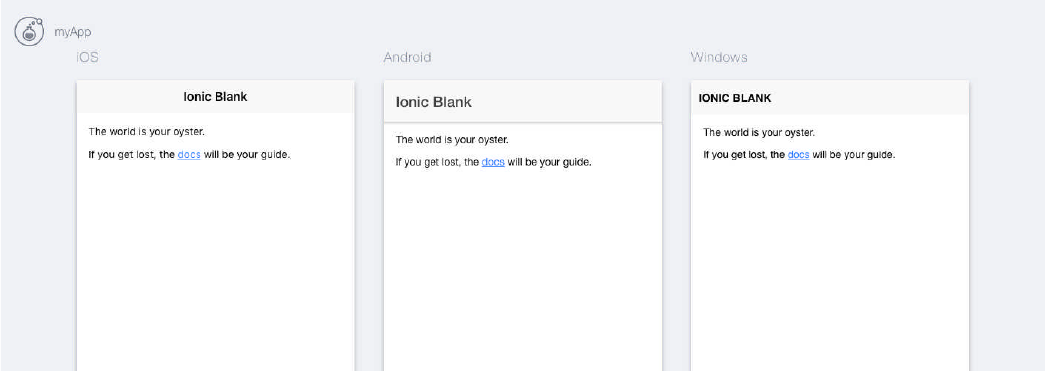
Which, once the command has successfully completed, will render the following
output to the browser window:
That’s pretty incredible isn’t it?
You can see, from the above screen capture, the subtle changes in typography and
styling between the different platform views.
These are implemented through the following platform specic Sass les found in
the node_modules/ionic-angular/themes directory:
• ionic.globals.ios.scss
• ionic.globals.md.scss
• ionic.globals.wp.scss
Platform styles are also imported for use in each Ionic UI component through the
following Sass le:
• node_modules/ionic-angular/themes/ionic.components.scss
And this is how Ionic 2 manages the separation and customisation of the app styling
on a platform by platform basis.
We’re going to look into theming our Ionic 2 app a little later on in the chapter titled
Theming your Ionic 2 Apps.
66
Mastering Ionic 2

67
Beginning Ionic 2 development
IMPORTANT - when attempting to run CLI instructions on Unix based systems such
as Mac OS X you might nd yourself running into permission denied errors.
If this should happen re-run the failed command with the sudo prex such as:
sudo npm install -g ionic
You will be prompted for your account password and, once entered, this should be
enough to overcome any permission denied errors.
Bear this in mind for future command line work!
That concludes everything we need to cover in this chapter so now lets spend time
familiarising ourselves with the structure of the Ionic 2 app we created earlier...

The architecture
of an Ionic 2 app

Mastering Ionic 2
69
If we navigate to the root directory of the Ionic app that we created in the previous
chapter we should see a structure that resembles the following:
.editorcong
.gitignore
cong.xml
hooks/
ionic.cong.json
node_modules/
package.json
platforms/
plugins/
resources/
tscong.json
www/
// myApp root directory
For those new to Ionic 2 development the above structure, with all its different les
and directories, might seem a little intimidating at rst but over the following pages
we’ll break each part of the app down so we fully understand their function and why
they are there.
.editorcong
This le denes the coding styles to be used for the app across different editors and
IDE’s - which might be helpful for development teams to ensure consistency in code
formatting is maintained between different developers working on Ionic 2 projects.
tslint.json
src/
The architecture of an Ionic 2 app
70
.gitignore
If you’re using a git based repository (such as Github or Bitbucket) for your version
control then this le simply states what should be excluded from commits/pushes to
the repository.
cong.xml
Provides global conguration options for the app which can include:
• Meta-data for app store listings (such as the app description and author name)
• Control options for certain plugins used within the application (I.e. splash screen
settings)
• Platform specic settings (I.e. iOS, Android)
• Determining the level of access to external URLs for the app
• Congure app launch icon and splash screen images per platform
We’ll be working with this le and relevant conguration options later on in the book,
particularly in the chapter where we prepare our apps for submission to the Apple
App and Google Play stores.
hooks
Deriving from the underlying Apache Cordova framework this directory is used to
store scripts, known as hooks, which could be added to the application to execute
Cordova related commands prior to, for example, adding a new platform, before
compiling and building our app or after installing a plugin.
These hooks might perform actions such as, for example, linting JavaScript so as to
avoid any potential script execution errors when using the app.
This directory is now considered deprecated (although this can still be used
deprecated simply means that future versions of the Cordova framework won’t
support using this directory and might even remove it altogether).
The ofcial Apache Cordova documentation recommends that developers looking to

71
Mastering Ionic 2
use hooks in their application should dene these in the following les instead:
• cong.xml (for all application related hooks)
• plugins/plugin-name-here/plugin.xml (for hooks related to a plugin)
More information on Cordova hooks can be found here: https://cordova.apache.org/
docs/en/latest/guide/appdev/hooks/index.html.
ionic.cong.json
A JSON le displaying the conguration options for the Ionic app. These are created
from the initial CLI start command but additional options can be added to the le if
required.
node_modules
Contains all of the different software modules used within the Ionic 2 app, the most
notable being the angular 2 framework.
It is highly unlikely that you will ever need to, and it’s strongly advised that you
refrain from, performing any code edits to the les contained with these directories
as these form the core default logic for the app. Doing so could have unintended
consequences for your app.
Mess with these at your peril!
IMPORTANT - When you create a new app you will need to run the npm install
command within the root of the newly created app directory. This will install all the
required dependencies listed in the package.json le, along with any additional
packages that they may depend on.
package.json
This serves to manage locally installed NPM packages (those in the node_modules
directory) and Cordova plugins, helps document which NPM packages & versions
72
are installed in your project and makes a project easier to share with other
developers (as they can quickly see what software dependencies the project
requires).
platforms
Contains the different mobile platforms that the app is being developed for. Ionic 2
by default adds iOS when creating your app from the command line.
All other supported mobile platforms have to be manually added to the app through
the Ionic CLI.
plugins
Contains all of the Cordova and third party supported plugins for the app.
Default plugins that were installed on app creation are as follows:
• Console
• Device
• Splashscreen
• Status Bar
• Whitelist
• Ionic Keyboard
We’ll look into managing and using plugins in the aptly named Plugins chapter.
resources
Contains all of the default iOS & Android launch icons and splash screen images,
contained within their own sub-directories, for use on both mobile and tablet screen
sizes and orientations.
These assets can be updated/replaced and we’ll look at how to do that in the
Preparing apps for release chapter.
The architecture of an Ionic 2 app

73
Mastering Ionic 2
src
This is the directory where all of the development work for your app will take place
as well as storing any custom assets used within your app.
The src directory, by default, contains the following:
• app/ - Contains application congurations and bootstrapping - see below
• assets/ - Contains assets to be used for the app such as, for example: images,
videos or JSON les
• declarations.d.ts - Provides information to the TypeScript compiler about the
type information for scripts and third-party libraries used within the app
• index.html - the HTML wrapper for the app which includes links to the base
styles and JavaScript les to be used by the app
• manifest.json - Provides support for Progressive Web Apps
• pages/ - contains all of the pages - aka components - for the app (each of which
are separately packaged into named directories, that correspond to each page,
and include HTML templates, TypeScript and Sass les)
• service-worker.js - provides basic functionality, which can be customised and
extended further, to control how the Ionic 2 app accesses and uses the network it
connects to
• theme/ - contains all of the default Sass les for styling the app
The app/ directory is one of the most important directories within an Ionic 2
application as it helps structure and bootstrap the app through the following les:
• app.component.ts - the app’s root component (every app has a root component
which controls the rest of the application)
• app.module.ts - the root module for your app which basically describes how the
application ts together and what it’s constituent parts are (this helps instruct the
Ionic compiler on how to prepare the app for being launched)
• app.scss - used to store and organise style rules that a developer may want to
be implemented globally within the application
• main.dev.ts - used during application development
• main.prod.ts - used for production of the application

In addition any services and pipes that you create using the Ionic CLI will be stored
in their own named sub-directories within the src directory - such as src/pipes/ or
src/providers/ for example.
Any directives generated via the CLI will be stored in the src/components directory
instead.
We’ll be working a lot with the src directory in following chapters.
For more information on service workers please access the following links:
• An introduction to Service Workers
• Progressive Web App support in Ionic
• Service Workers Cookbook
tscong.json
A conguration le that indicates the directory it is contained within is the root of a
TypeScript project. This le, amongst other options, lists the TypeScript les to be
processed and what compiler settings should be used when converting, or
transpiling, TypeScript into JavaScript for web/mobile browsers to be able to
execute.
More information on the different tscong.json conguration options is available
here: http://www.typescriptlang.org/docs/handbook/tscong-json.html.
tslint.json
A conguration le used to lint, or check, TypeScript les for any formatting issues
and code errors.
www
Directory that contains the index.html le, and assets and build sub-directories
which are copied and replaced from the src directory whenever we build an app
74
The architecture of an Ionic 2 app
using the Ionic CLI tool.
The index.html le loads the necessary CSS and JavaScript les for the Ionic app
as well as containing the <ion-app> directive within the body of the HTML document
(which is the wrapper where view templates are rendered for display).
The app stylesheet, generated from ALL of the imported Sass les used within the
node_modules/ionic-angular/themes, src/theme and src/pages component
directories, is loaded within the head of the document HTML.
All JavaScript les are loaded underneath the <ion-app> root component, towards
the bottom of the document, and consist of the following 3 les:
• cordova.js - Required for Cordova apps (remember that Apache Cordova is the
framework that Ionic uses for publishing to mobile/tablet devices)
• polylls.js - A polyll for legacy browsers that don’t support certain ES6 features
such as Promises
• main.js - Transpiled TypeScript code from the src/ directory that contains the
custom logic for your app
IMPORTANT - Any images, fonts and other assets (such as JSON les or video
media) that are to be used within your app should be stored within the src/assets
directory. After a successful build operation these will be copied to the www/assets
directory.
So that’s a very basic introduction and breakdown to the structure of a freshly
created Ionic 2 App which will hopefully give you a good understanding of what all
the various parts do and how they t together.
We’ll keep revisiting some of the topics that we’ve covered here, as well as those
from previous chapters, as we continue with our learning so don’t worry if it seems a
little overwhelming right now - you’ll be up to speed with Ionic 2 in no time!
In the next chapter we’ll start digging into some code and familiarising ourselves
with decorators and classes in Ionic 2.
75
Mastering Ionic 2

Decorators
& Classes

77
Within the recently created myApp open the src/pages/home/home.ts component
le contained within there.
This is the automatically generated TypeScript le for your app’s home page and
consists of a very simple code structure which the page logic can be entered into
and built up from.
This le should look like the following:
Mastering Ionic 2
import {Component} from '@angular/core';
import {NavController} from 'ionic-angular';
@Component({
selector: 'page-home',
templateUrl: 'home.html'
})
export class HomePage {
constructor(public navCtrl: NavController) {
}
}
There are 3 main elements to this le:
• Modules
• Decorator
• Class
Modules
At the top of the page a couple of import statements were automatically added when
we created our app using the Ionic CLI tool.

78
By default these import the Component and NavController modules (which are
pre-existing classes that provide functionality to help manage our component as well
as navigation related tasks for the page) but we can, of course, import additional
modules into this page, such as custom providers or further core Angular/Ionic
specic modules.
We’ll look at doing this a little later on in the chapter.
IMPORTANT - Whenever you create a component, pipe, directive or provider using
the Ionic CLI import statements for specic modules are automatically added for
each generated le. Further modules can then be manually added as and where
required.
Decorators
After the import statements for our modules we come across the following decorator:
@Component({
selector: 'page-home',
templateUrl: 'home.html'
})
It might look a little odd if you’ve not come across one before but the role of a
decorator, which accompanies every class created in an Ionic 2 application (and
always sits above the class), is to provide metadata for the class itself.
In the src/pages/home/home.ts le the decorator declares that the class is a
component and contains metadata concerning the template and the CSS selector
the class will use.
Decorators can declare a variety of meta data such as:
• The page selector
• The URL to the template this class will use
• Which providers, directives and pipes (or lters) that the class might use
Decorators & Classes

Don’t worry if you don’t know what providers, directives and pipes are - we will be
covering these in subsequent chapters!
A more complex decorator might look like the following:
79
IMPORTANT - Any components, directives, pipes or providers declared in the
decorator would rst have to be imported into the script through an import statement
towards the top of the le.
Decorators used within Ionic 2 come in a few different types:
• @Component
• @Directive
• @Pipe
• @Injectable
@Component({
selector: 'page-home',
templateUrl: 'home.html'
entryComponents: [
AboutPage,
Contact,
TechnologiesPage,
Tweets
]
})
For your initial Ionic 2 development needs though you will probably only use very
basic decorators like the following:
@Component({
selector: 'page-home',
templateUrl: 'home.html'
})
Mastering Ionic 2

@Component
This is the most common decorator that you will be using when developing your
Ionic 2 applications. The @Component decorator simply denes that the class, and
its associated template, will be published as a component.
Before we go any further it’s important to be aware that the term component can be
a little misleading in Ionic 2 as it is often used to refer to 3 different contexts:
• Custom components (these, typically, would be the pages for your app that are
packaged into sub-directories consisting of the prerequisite TypeScript, Sass and
HTML les - although, just to confuse matters, they could be singular UI elements
to be implemented on a page such as a shopping cart or captcha widget)
• Existing Ionic components for building the app interface (such as modals, form
buttons, checkboxes etc. - which primarily consist of HTML & CSS although some
components also include JavaScript functionality)
• A type of decorator that provides metadata about the class
As components are a major feature of Angular 2 it makes sense that Ionic 2 would
not only implement components but also make heavy use of them with a library of
pre-built components.
Further information here: http://ionicframework.com/docs/v2/components/
@Directive
When you are looking to modify the behaviour of an existing component then you
would create your own custom directives using this decorator to provide metadata
about the directive.
Use of this decorator might look something like the following:
80
Decorators & Classes
@Directive({
selector: '[custom-map]'
})

81
Which might then be added as an attribute to an HTML element to implement that
directive’s functionality like so:
<section custom-map></section>
@Pipe
This decorator is used when creating classes to handle the ltering of data within
your app template (I.e. capitalising the rst letter of each word in a string).
Use of this decorator might look something like the following:
@Pipe({
name: 'CapitaliseWordsPipe'
})
Which might, when implemented as a data lter in your app templates, look like the
following (this assumes the logic for the pipe has also been written!):
<p>{{ stringBeingRendered | CapitaliseWordsPipe }}</p>
The pipe would then parse the data it is assigned to, ltering that before it is nally
rendered to the template.
Personally I would always try to lter the data within the component class itself, or
through using a provider, so that it is already ‘sanitised’ before being parsed in the
page template. This can be helpful with improving the performance of the app too.
Sometimes this isn’t always possible though which is where pipes come in handy for
performing those necessary transformations on data values in your app templates.
@Injectable
This decorator denes a provider - also known as a service (which is simply a class
that contains re-usable code that can be shared across an application).
This provider can then be used in other classes as a dependency.
Mastering Ionic 2

For example, if you nd yourself using an SQLite database to handle data storage
and retrieval in your app it really wouldn’t make much sense to re-create the same
database methods on each page where such functionality is required.
A much more sensible solution would involve creating a dedicated database
provider - which can then be “injected” where required for classes to access those
methods - which might look something like the following:
82
import { Injectable } from '@angular/core';
import { Http } from '@angular/http';
import 'rxjs/add/operator/map';
@Injectable()
export class Database {
public storage : any = null;
public records : any;
constructor(public http: Http)
{ }
createDatabase()
{
this.storage = new SQLite();
this.storage.openDatabase({
name : 'myDatabase.db',
location : 'default' // the location eld is required
})
.then((data) => {
this.createTable();
});
}
createTable()
{
Decorators & Classes

83
this.storage.executeSql('CREATE TABLE IF NOT EXISTS myTable (id
INTEGER PRIMARY KEY AUTOINCREMENT, name TEXT)', {})
.then((data) =>
{
console.log("myTable created: " + JSON.stringify(data));
});
}
retrieveData()
{
return new Promise(resolve =>
{
this.storage.executeSql('SELECT * FROM myTable', {})
.then((data) =>
{
this.records = [];
if(data.rows.length > 0)
{
var k;
for(k = 0; k < data.rows.length; k++)
{
this.record.push({
name: data.rows.item(k).name
});
}
}
resolve(this.records);
});
});
}
}
This provider would then be imported into the src/app/app.module.ts le and listed
in the providers array like so:
Mastering Ionic 2

import { NgModule, ErrorHandler } from '@angular/core';
import { IonicApp, IonicModule, IonicErrorHandler } from 'ionic-angular';
import { MyApp } from './app.component';
import { Database } from '../providers/database';
import { HomePage } from '../pages/home/home';
@NgModule({
declarations: [
MyApp,
HomePage
],
imports: [
IonicModule.forRoot(MyApp)
],
bootstrap: [IonicApp],
entryComponents: [
MyApp,
HomePage
],
providers: [Database]
})
export class AppModule {}
84
Decorators & Classes
Providers can also be imported and used within the src/app/app.components.ts
le if, for example, we needed to run or make certain functionality available
BEFORE importing and using the provider directly in our page components.
An example of how this might look is as follows (amendments highlighted in bold):
import { Component } from '@angular/core';
import { Platform } from 'ionic-angular';
import { StatusBar, Splashscreen } from 'ionic-native';
import { Database } from '../providers/database';
import { HomePage } from '../pages/home/home';

Mastering Ionic 2
85
@Component({
template: `<ion-nav [root]="rootPage"></ion-nav>`
})
export class MyApp {
rootPage = HomePage;
constructor(platform: Platform, private db: Database)
{
platform.ready().then(() =>
{
// Okay, so the platform is ready and our plugins are available.
// Here you can do any higher level native things you might need.
StatusBar.styleDefault();
Splashscreen.hide();
db.createDatabase();
});
}
}
In this example we import the Database provider, inject that as a parameter into the
MyApp class constructor - setting that to a private property of db - then we run the
createDatabase() method of the Database provider within the platform.ready()
method (which ensures that any native plugin calls can be run as the platform is
loaded and accessible).
Within a page component (in this case the src/pages/home/home.ts le) we might
use the Database provider like so (amendments highlighted in bold):
import { Component } from '@angular/core';
import { NavController, Platform } from 'ionic-angular';
import { Database } from '../../providers/database';
@Component({
selector: 'page-home',

86
Decorators & Classes
templateUrl: 'home.html'
})
export class HomePage {
public movies : any = [];
public storedData : any;
constructor(
public navCtrl : NavController,
public db : Database,
public platform : Platform)
{
platform.ready().then(() =>
{
setTimeout(() => {
this.renderData();
}, 750);
});
}
renderData()
{
this.db.retrieveData()
.then(
(data) =>
{
let existingData = Object.keys(data).length;
if(existingData !== 0)
{
this.storedData = data;
}
});
}
}
Notice that we perform the following to use the database provider in the above
class:
• Import the provider
• Pass the provider as a parameter within the class constructor
• Call the retrieveData method from our provider (using a promise to handle return
of asynchronous data through the then method)
Using providers (more commonly referred to as services) is an effective way to
create a scalable and modular codebase that allows for better structuring and
management of an application’s logic while avoiding code duplication.
Simply plan out the requirements for your application, determine where reusable
logic can be implemented and structure your code accordingly.
Spending time doing so will save you a great deal of hassle in the future should you
need to grow the codebase or debug/troubleshoot any issues that may arise.
That pretty much concludes our discussion of decorators and the different types that
are used within Ionic 2:
• @Component
• @Pipe
• @Directive
• @Injectable
The important thing to take away from this is that decorators are simply used to
provide information about the class that they are associated with.
Essentially they are metadata for the application logic.
Classes
In the chapter titled Core tools & technologies we discussed the importance and
relevance of classes in providing a standardised method of generating a blueprint
Mastering Ionic 2
87

88
import { Component } from '@angular/core';
import { NavController, NavParams } from 'ionic-angular';
import { EquipmentItemPage } from '../equipment-item/equipment-item';
import { DB } from '../../providers/db/db';
@Component({
selector: 'page-equipment',
templateUrl: 'equipment-items.html'
})
export class EquipmentItemsPage {
public items : any;
public name : string;
constructor(
public nav : NavController,
public np : NavParams,
public db : DB)
{
this.items = this.db.retrieveSingleRecord(np.data.id);
this.name = np.data.name;
}
viewEquipmentItem(item)
{
console.log(item.name);
this.nav.push(EquipmentItemPage, item);
}
}
Decorators & Classes
from which objects could be created (or, for the more technical term, instantiated).
Class based object oriented programming is implemented within Ionic 2 through the
use of Angular 2/TypeScript and would resemble something akin to the following
ctional component:

Mastering Ionic 2
Looking at this script here’s how the structure breaks down:
• Imported modules
• Class decorator
• Class declaration
• Constructor
Modules
Modules and packages that are required for use in Ionic 2 classes are brought in
through the use of import statements.
In the above example we are importing the following modules:
• Component from @angular/core that implements the @Component decorator
for our class
• NavController from ionic-angular which provides the ability to navigate to other
pages in our app
• NavParams from ionic-angular which provides the ability for our app to retrieve
data passed through navigation from the previous page
• EquipmentItemPage which is a custom created class
• DB which is a custom created database provider
Class decorator
The @Component decorator, using the Component module that was imported
earlier, provides metadata about the CSS page selector and the HTML template
used for this class (which we covered earlier in this chapter).
Class declaration
The actual class itself is dened as follows:
89
export class EquipmentItemsPage
{

90
// Class contents displayed in here
}
The export keyword allows our class of EquipmentItemsPage to be able to be
imported as a module for use in other classes if we so wish.
Constructor
A constructor is used in class based object oriented programming to help prepare
and set up the class for creating objects; often setting member properties based on
parameters passed into the constructor.
The constructor function in Ionic 2 must be named constructor (as a rule from the
design of the TypeScript language) and can be used to instantiate properties from
any parameters that are injected into it.
These properties are public by default but can be set to private or protected access
(as discussed in the chapter Core tools & technologies).
IMPORTANT - IF you want to reference such properties in your HTML templates
they MUST be set to public access, due to Ionic 2’s Ahead of Time compiling logic,
otherwise the TypeScript compiler will throw a warning and such properties will not
be able to be accessed through the HTML template.
So in our previous class example we have the following constructor function:
constructor(
public nav : NavController,
public np : NavParams,
public db : DB)
{
this.items = this.db.retrieveSingleRecord(np.data.id);
this.name = np.data.name;
}
Decorators & Classes

Mastering Ionic 2
Which contains the following parameters:
• NavController
• NavParams
• DB
Remember - these parameters were imported as modules at the beginning of our
class le before they were injected into the constructor.
Each of these parameters is then associated with a public property (nav, np and db)
and subsequently used within the constructor to access methods and data.
IMPORTANT - If a class extends another class then the class that is performing the
extending (known as the derived class) must include a call to the super method in its
constructor function.
The super method simply refers to the parent class constructor and allows for both
public/protected variables and methods from the parent class (known as the base
class) to be used in the derived class - for example:
class Human {
protected gender: string;
protected name: string;
constructor(theirName : string, genderType: string)
{
this.gender = genderType;
this.name = theirName;
}
}
class Activity extends Human {
private sleeping: number;
constructor(genderType: string, hoursSlept: number)
91

{
super(name);
this.sleeping = hoursSlept;
}
public sleepDuration()
{
return `${this.name} slept for ${this.sleeping} hours.`;
}
}
92
Decorators & Classes
Creating new components
Okay, so that pretty much covers the use of decorators and classes in Ionic 2, now
let’s create a new component for our app.
In the Mac OS X Terminal make sure that you are within the root of the myApp
project before using the Ionic CLI to issue the generate page command:
ionic g page about
And, with one simple command, we should have generated a new component for
our app (which as the name suggests will be the about page) which contains the
following les:
• about.html (the template for our page)
• about.scss (the style rules for our page)
• about.ts (the logic for our page)
Each time you generate a component using the Ionic CLI you will end up with a
named directory which contains Sass, TypeScript and HTML les.
Our newly generated component can be found in the following directory structure:

93
src/
// app root directory
app/
pages/
about/
about.html
about.scss
about.ts
home/
theme/
Mastering Ionic 2
assets/
index.html
service-worker.js
Let’s take a look at each of the above les for the about component and see what
the Ionic CLI has generated for us.
myApp/src/pages/about/about.html
This is the template for our page and contains the necessary HTML for rendering
output to the app user.
declarations.d.ts
manifest.json

94
<ion-header>
<ion-navbar>
<ion-title>about</ion-title>
</ion-navbar>
</ion-header>
<ion-content padding>
</ion-content>
In the about.html template le we see the following core Ionic directives being used
(these core Ionic directives are simply custom HTML tags that can be dropped into
an app to quickly add specic types of interface elements):
• <ion-header>
• <ion-navbar>
• <ion-title>
• <ion-content>
The <ion-header> directive in our template contains the header bar navigation for
our app with the title for this page.
The <ion-content> directive is where we will display our page content. You can see
that it has an attribute of padding which, as you might have guessed, adds padding
to the inside of the content area.
We can add different HTML tags and/or ionic directives inside the <ion-content>
directive if we want to, as well as display data and use functions that are dened in
the class associated with this template - if we couldn’t, it wouldn’t be much use!
We’ll go through templates in more detail in the Templates chapter.
Decorators & Classes

95
myApp/src/pages/about/about.scss
page-about {
}
Here we have a selector which would be used to nest any style rules that we may
wish to add that are applicable for the about page.
This selector is referenced in the @Component decorator for the class as follows:
@Component({
selector: 'page-about',
templateUrl: 'about.html'
})
Style rules entered into the about.scss le, along with other core and custom
component Sass les, will be published into a single CSS stylesheet for the app
whenever a build process is run through the Ionic CLI.
We’ll go through theming in more detail in the chapter Theming Ionic 2 Apps.
myApp/src/pages/about/about.ts
import { Component } from '@angular/core';
import { NavController } from 'ionic-angular';
@Component({
selector: 'page-about',
templateUrl: 'about.html'
})
export class AboutPage {
constructor(public navCtrl: NavController) { }
Mastering Ionic 2

96
ionViewDidLoad() {
console.log('Hello AboutPage Page');
}
}
We can see that the Component and NavController modules are imported for use
in the class, the @Component decorator states which template will be used for the
page, the AboutPage class itself is able to be exported for use as a dependency in
other classes (through the implementation of the export keyword) and our
constructor contains a single parameter of NavController which is set to a public
property of navCtrl.
There’s also an ionViewDidLoad method which is triggered when the view template
has loaded - in this instance to print a simple console log.
There’s one further step we must take when adding a new component to our Ionic 2
projects - importing and registering the component with the root module for the app:
the myApp/src/app/app.module.ts le.
The following amendments to the myApp/src/app/app.module.ts le demonstrate
how a new component must be registered (highlighted in bold):
Decorators & Classes
import { NgModule, ErrorHandler } from '@angular/core';
import { IonicApp, IonicModule, IonicErrorHandler } from 'ionic-angular';
import { MyApp } from './app.component';
import { HomePage } from '../pages/home/home';
import { AboutPage } from '../pages/about/about';
@NgModule({
declarations: [
MyApp,
HomePage,
AboutPage
],

Mastering Ionic 2
97
var __decorate$104 = (undened && undened.__decorate) || function (deco-
rators, target, key, desc) {
var c = arguments.length, r = c < 3 ? target : desc === null ? desc = Object.
getOwnPropertyDescriptor(target, key) : desc, d;
if (typeof Reect === "object" && typeof Reect.decorate === "function") r =
Reect.decorate(decorators, target, key, desc);
else for (var i = decorators.length - 1; i >= 0; i--) if (d = decorators[i]) r = (c <
You MUST import and declare all page components used within your app (whether
they are imported into other page components or not) inside of the app.module.ts
le otherwise the compiler will complain when trying to publish your app.
Component output
We can add our own logic, in the form of properties and methods, to the AboutPage
class and subsequently transpile and publish this to a single JavaScript le (which
contains all of the necessary logic from different TypeScript les used for our app)
whenever we run a build process through the Ionic CLI.
This le - www/build/main.js - renders the transpiled AboutPage class using the
JavaScript revealing module pattern:
imports: [
IonicModule.forRoot(MyApp)
],
bootstrap: [IonicApp],
entryComponents: [
MyApp,
HomePage,
AboutPage
],
providers: [{provide: ErrorHandler, useClass: IonicErrorHandler}]
})
export class AppModule {}

98
3 ? d(r) : c > 3 ? d(target, key, r) : d(target, key)) || r;
return c > 3 && r && Object.deneProperty(target, key, r), r;
};
var __metadata$3 = (undened && undened.__metadata) || function (k, v) {
if (typeof Reect === "object" && typeof Reect.metadata === "function")
return Reect.metadata(k, v);
};
/*
Generated class for the About page.
See http://ionicframework.com/docs/v2/components/#navigation for more info
on
Ionic pages and navigation.
*/
var AboutPage = (function () {
function AboutPage(navCtrl) {
this.navCtrl = navCtrl;
}
AboutPage.prototype.ionViewDidLoad = function () {
console.log(‘Hello About Page’);
};
AboutPage = __decorate$104([
Component({
selector: 'page-about',
template: '<!--\n Generated template for the About page.\n\n See
http://ionicframework.com/docs/v2/components/#navigation for more info on\n
Ionic pages and navigation.\n-->\n<ion-header>\n\n <ion-navbar>\n <ion-ti-
tle>about</ion-title>\n </ion-navbar>\n\n</ion-header>\n\n\n<ion-content pad-
ding>\n\n</ion-content>\n'
}),
__metadata$3('design:paramtypes', [NavController])
], AboutPage);
return AboutPage;
}());
Decorators & Classes
Decorators & Classes
99
As you can see the transpiled version of the class is quite messy and somewhat
convoluted as a result of the conversion to ES5 compliant syntax.
That covers this initial introduction into components; from their generation
using the Ionic CLI tool through to the architecture of a component and the
separation of styles, logic and presentation into different les.
We’ll be exploring and using components throughout the rest of the book so don’t
worry if it’s not quite sunk in yet - it will!
One of the great things about the Ionic CLI is that, whenever you create a page, it
automatically generates a basic TypeScript/Sass/HTML structure for you to build
upon.
As you might appreciate this is a great timesaver as it means you don’t have to keep
typing out the same structure for each new page you create.
Summary
We’ve covered decorators and classes quite a bit in this chapter as well creating our
rst basic page component using the Ionic CLI.
Unfortunately, if we launch our app using the ionic serve command, we won’t be
able to see the about page as there’s currently no way to navigate there.
So let’s take a look at how we can implement navigation in our Ionic 2 apps in the
next chapter...

Ionic 2
Navigation

101
If you cut your teeth developing with Ionic 1 you’ll probably be familiar with the
Angular 1 concept of routing using URL’s or states, like so:
Ionic 2 navigation
.cong(function($stateProvider, $urlRouterProvider)
{
$stateProvider
// Home
.state('index',
{
url : '/',
templateUrl : 'assets/templates/home.html',
controller : 'HomeController'
});
$urlRouterProvider.otherwise("/");
});
Ionic 2 changes all of that completely with root pages and navigation stacks - the
latter of which we’ll turn our attention to rst.
Welcome to your stack
App navigation in Ionic 2 centres around the concept of a navigation stack:
• To navigate to a page you push that page onto the top of the stack
• To go back you pop that page off the stack
It might help to visualise your app navigation as essentially a stack of pages with the
currently viewed page being at the top of that stack. When you navigate backwards
the last viewed page is popped (or removed) from that stack.
To push and pop pages for this navigation stack Ionic 2 provides the NavController
class (which you’ll notice, the more you develop with Ionic 2, is always imported into
every new page you create using the Ionic CLI).
Navigate to the root of the myApp project directory and open the src/pages/home/

102
Mastering Ionic 2
home.ts le to see the following TypeScript:
import {Component} from '@angular/core';
import {NavController} from 'ionic-angular';
@Component({
selector: 'page-home',
templateUrl: 'home.html'
})
export class HomePage {
constructor(public navCtrl: NavController) {
}
}
This imports the NavController class which is passed into the HomePage class
constructor and set to a property of navCtrl. Using the navCtrl property we can start
navigating to other pages within our app (which, as we currently only have one other
page in our app, would be the about page).
To navigate to the About page we would begin by importing that page and then
pushing that into our navigation stack like so (amendments to the src/pages/home/
home.ts le are highlighted in bold):
import {Component} from '@angular/core';
import {NavController} from 'ionic-angular';
import {AboutPage} from '../about/about';
@Component({
selector: 'page-home',
templateUrl: 'home.html'
})
export class HomePage {
constructor(public navCtrl: NavController)
{

103
Ionic 2 navigation
}
setNavigationLink() {
this.navCtrl.push(AboutPage);
}
}
The above setNavigationLink method uses the NavController push method to add
the AboutPage to the navigation stack.
Now we need to incorporate the setNavigationLink method into our Home page
template so we can actually link from the Home page to the About page.
If we open the src/pages/home/home.html template we can add some custom
HTML to accomplish this (shown in bold below):
<ion-header>
<ion-navbar>
<ion-title>
Ionic Blank
</ion-title>
</ion-navbar>
</ion-header>
<ion-content padding>
The world is your oyster.
<span (click)="setNavigationLink()">Why not explore it?</span>
<p>
If you get lost, the <a href="http://ionicframework.com/docs/v2">docs</a>
will be your guide.
</p>
</ion-content>
Mastering Ionic 2
104
In our custom HTML snippet we add a click event to a span tag which triggers the
setNavigationLink method in the HomePage class to be red.
This method, when called, pushes the AboutPage into the navigation stack allowing
us to navigate directly to that page.
To see this working in our web browser we need to open up our Terminal application,
navigate to the root directory of our project and run the following command:
ionic serve
And, providing you’ve added the highlighted code into the same areas of both your
home.ts and home.html les, you should be able to click on the Why not explore it?
text and navigate directly to the about page like so:
Congratulations!
It might not be the most visually appealing or exciting of pages but our navigation
logic works and Ionic helpfully adds a back button into our app header so we can
return to the home page (which will ‘pop’ the visited about page from our navigation
stack).
If we wanted to manually remove a page from the navigation stack we would use the
following command within our class:
this.navCtrl.pop(NameOfPageToRemoveFromNavigationStackHere);

Ionic 2 navigation
105
As you can see navigating between pages is pretty simple but there will be
situations where we want to pass data from one page to another.
Within the src/pages/home/home.ts le add the following (highlighted in bold):
import {Component} from '@angular/core';
import {NavController} from 'ionic-angular';
import {AboutPage} from '../about/about';
@Component({
selector: 'page-home',
templateUrl: 'home.html'
})
export class HomePage {
public params : any;
constructor(public navCtrl: NavController)
{
this.params = {
id: 1,
name: "Sample App",
description : "A sample application for helping to learn Ionic 2"
}
}
setNavigationLink()
{
this.navCtrl.push(AboutPage, this.params);
}
}
Now that a navigation parameter has been added to the NavController push method
the receiving page needs to be able to process the supplied data.

import { Component } from '@angular/core';
import { NavController, NavParams } from 'ionic-angular';
@Component({
selector: 'page-about',
templateUrl: 'about.html'
})
export class AboutPage {
constructor(public navCtrl: NavController, private np: NavParams)
{
console.dir(np.data);
}
}
Mastering Ionic 2
106
We’ve only made 3 very simple additions to the script:
• Imported the NavParams class to help us access parameters that have been
passed via the NavController object from the home page of our app
• Injected the NavParams object into the constructor for the AboutPage class and
then associate that with the private property of np
• Within our constructor we then print to the web browser console all the supplied
navigation parameters using the data member of the NavParams object
If Ionic serve is running it will automatically rebuild our app and refresh the web
browser for us after saving the changes to the src/pages/about/about.ts le.
If not, run the ionic serve command and, once the app is published in the browser,
if we navigate to the about page we should see the following output rendered to the
Web browser console:
Within the src/pages/about/about.ts le add the following (highlighted in bold):
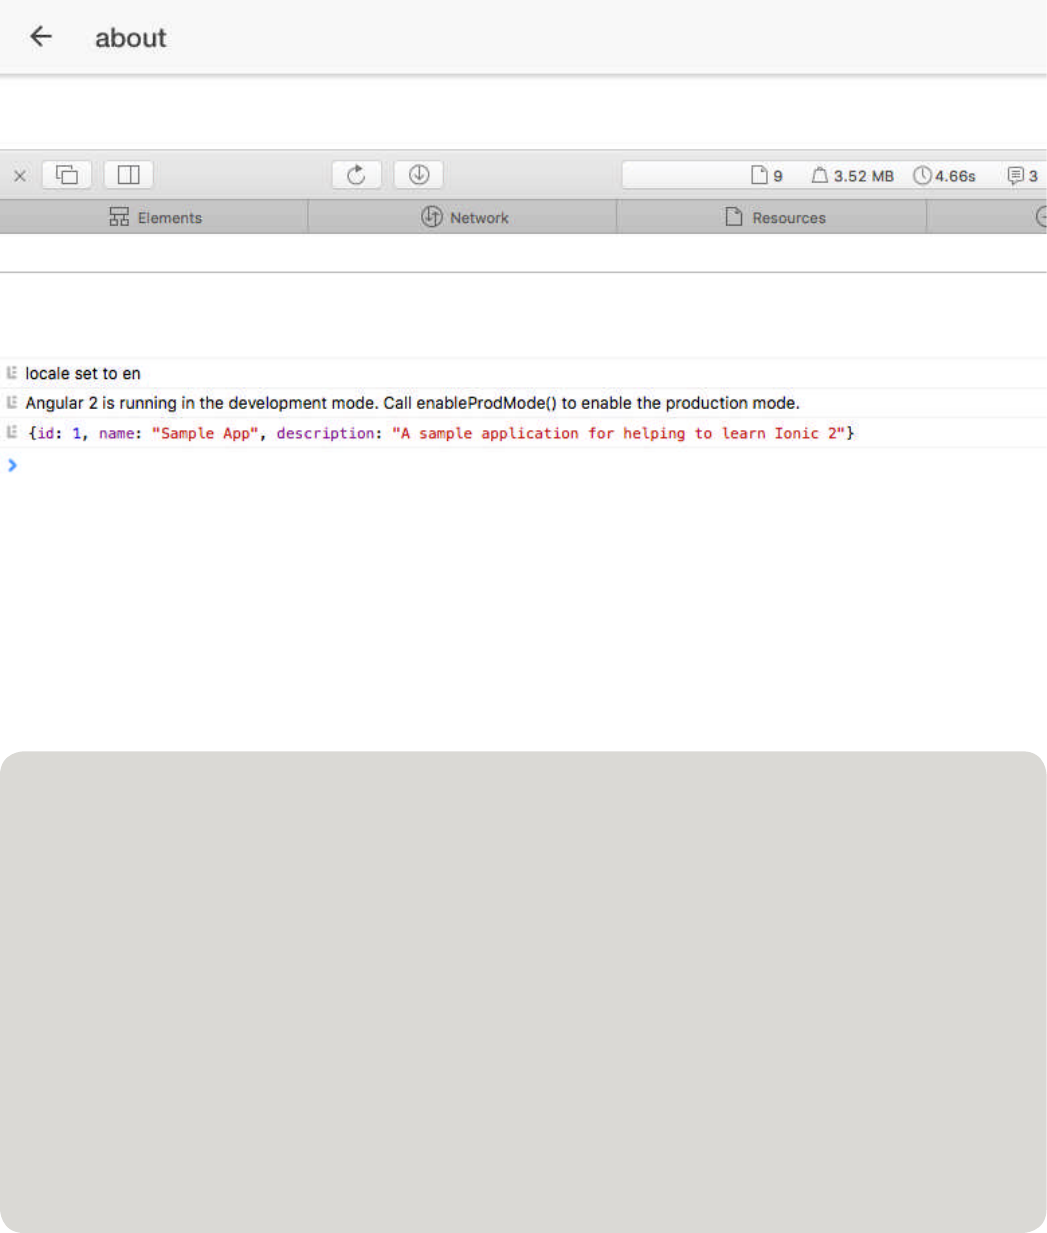
Ionic 2 navigation
107
Nice and easy!
What if we only want to access certain parameters though?
Simple - just append the names of those supplied parameters to the end of the data
member in the src/pages/about/about.ts le like so (highlighted in bold):
export class AboutPage {
constructor(
public navCtrl: NavController,
public np: NavParams)
{
console.log(np.data.id);
console.log(np.data.name);
console.log(np.data.description);
}
}
Now each supplied navigation parameter will be individually printed to the browser
console.
In the next chapter we’ll render this supplied data to the page template (which is, of

108
Mastering Ionic 2
course, a lot more useful than console logging when developing our applications!)
Now that we’ve covered passing data between templates let’s look at some further
options we have available to us for managing navigation within our Ionic 2 apps.
Customising the transition
The NavController class provides the following methods which allow developers to
control how the current transition behaves:
• animate (Whether or not the transition should animate - accepts a boolean value)
• animation (The type of animation the transition should use - currently any of the
following strings: md-transition [android animation], ios-transition [iOS animation]
and wp-transition [Windows Phone animation])
• direction (The direction in which the user is navigating - accepts a string value of
forward or back)
• duration (The length in milliseconds that the animation will take to complete)
• easing (The type of easing for the animation to use)
These can be supplied as an optional conguration object to the NavController push
method in the src/pages/home/home.ts le like so (highlighted in bold):
export class HomePage {
public params : any;
constructor(public navCtrl: NavController) {
...
}
setNavigationLink()
{
let opts = { animate: true, animation: "wp-transition", duration: 2500}
this.navCtrl.push(AboutPage, this.params, opts);
}
}

109
Ionic 2 navigation
Take some time to play around with different values for these conguration options
and get a feel for how your app behaves accordingly.
Lifecycle events
We can also control what happens within our app before, during and after pages
have loaded with the following navigation life cycle events:
• ionViewDidLoad (triggered only once per page after the page has completed
loading and is now the active page)
• ionViewWillEnter (run when the requested page is about to enter and become
the active page)
• ionViewDidEnter (run when the page has completed entering and is now the
active page)
• ionViewWillLeave (run when the page is about to leave and no longer be the
active page)
• ionViewDidLeave (run when the previously active page has completed leaving)
• ionViewWillUnload (run when the page is about to be destroyed and all of its
elements removed)
• ionViewCanEnter (runs before the page view can enter)
• ionViewCanLeave (runs before the page view can leave)
Within the src/pages/about/about.ts le add the following (highlighted in bold):
export class AboutPage {
constructor(
public navCtrl: NavController,
public np: NavParams)
{
...
}
ionViewWillEnter()
{

console.log("We are now entering the About view");
}
ionViewWillLeave()
{
console.log("We are now leaving the About view");
}
}
Once you’ve saved these changes to the src/pages/about/about.ts le and Ionic
serve has nished rebuilding and refreshing the app you should see console logs
being generated on entry to and exit from the about page.
Such life cycle events might be useful for tasks such as setting up/initialising page
values or clearing values from a localStorage object for example.
Setting the root page
In Ionic 2 the root page is the rst page to be loaded by the app and is dened in the
src/app/app.component.ts le with the following code (highlighted in bold):
Mastering Ionic 2
110
import { HomePage } from '../pages/home/home';
@Component({
template: `<ion-nav [root]="rootPage"></ion-nav>`
})
export class MyApp {
rootPage = HomePage;
So we can see that Ionic knows which page to display when our app loads as:
• The root property is set on the <ion-nav> component to a value of rootPage
• The rootPage property is dened in the MyApp class with a value of HomePage

Ionic 2 navigation
111
You do however have the exibility to change what you want the rootPage to be at
any point in your application using the setRoot method of the NavController object:
this.nav.setRoot(whateverPageYouWantToBeTheRootPage);
This is something you might want when, for example, dealing with the following:
• Redirecting an authenticated user to the "logged-in" experience of the app
• Redirecting a user after a successful account sign-up
I’m sure you’ll agree - having the ability to change the root page denitely makes for
a better user experience with the above scenarios.
You will see the terms root component and root page often used throughout this
book - it’s important to note at this point that the root component is NOT the same as
the root page.
Every app has a root component, driven from the app.component.ts le, which is
the rst component to be loaded for the app and is used to load other components.
The root page, as we’ve recently covered, is essentially the rst page that is loaded
for our app. The root page can, if required, be changed at any point throughout our
application whereas the root component cannot.
Additional navigation options
As briey mentioned in the chapter titled Beginning Ionic 2 development we can also
create Ionic apps that use navigation features such as tabs or side menus with the
following CLI commands:
//Create a project with the tabs template
ionic start myApp tabs --v2
// Create a project with the sidemenu template
ionic start myApp sidemenu --v2

Tabs template
If you open the src/pages/tabs/tabs.html le of a newly created Ionic 2 app that
uses the tabs template you’ll see the following markup:
Mastering Ionic 2
112
<ion-tabs>
<ion-tab [root]="tab1Root" tabTitle="Home" tabIcon="home"></ion-tab>
<ion-tab [root]="tab2Root" tabTitle="About" tabIcon="information-circle"></
ion-tab>
<ion-tab [root]="tab3Root" tabTitle="Contact" tabIcon="contacts"></ion-tab>
</ion-tabs>
The multiple root pages references displayed here are dened in the tabs.ts le
(that is contained within the same directory as the tabs.html le):
import { Component } from '@angular/core';
import { HomePage } from '../home/home';
import { AboutPage } from '../about/about';
import { ContactPage } from '../contact/contact';
@Component({
templateUrl: 'tabs.html'
})
export class TabsPage {
// this tells the tabs component which Pages
// should be each tab’s root Page
tab1Root: any = HomePage;
tab2Root: any = AboutPage;
tab3Root: any = ContactPage;
constructor() {
}
}

Ionic 2 navigation
113
As you can see each tab has its own root page and, like a blank ionic app, the root
page for each tab can use the NavController object to push or pop and manage the
navigation history for that tab.
Side Menu template
Implementing a side menu within an Ionic app is really only a UI enhancement as,
unlike the tabs template, there is only a single root page and the NavController
object is used to push and, if necessary, pop pages for the navigation stack based
on the selected menu option.
That said there are a few things to be aware of when developing apps using this
particular template.
If you create a new Ionic 2 app using the sidemenu template and open the src/app/
app.html le you’ll see the following markup:
<ion-menu [content]="content">
<ion-header>
<ion-toolbar>
<ion-title>Menu</ion-title>
</ion-toolbar>
</ion-header>
<ion-content>
<ion-list>
<button menuClose ion-item *ngFor="let p of pages" (click)="open-
Page(p)">
{{p.title}}
</button>
</ion-list>
</ion-content>
</ion-menu>
<!-- Disable swipe-to-go-back because it’s poor UX to combine STGB with side
menus -->
<ion-nav [root]="rootPage" #content swipeBackEnabled="false"></ion-nav>

There are a few things to pay attention to here:
• The <ion-menu> element is used to create the side menu
• This has a [content] property with a value of content
• The content value for this property is a reference to the local variable set on the
<ion-nav> element as #content
• The navigation items for the side menu are injected as buttons through the use
of an ngFor loop (we’ll cover these in the next section) which pulls values from a
pages object
• Each button injected into the menu by the ngFor loop has a click event which
calls an openPage function that is passed the page object from the loop
If we take a look at the src/app/app.component.ts le (which is the root component
for the app) we can understand the logic behind the side menu template:
import { Component, ViewChild } from '@angular/core';
import { Nav, Platform } from 'ionic-angular';
import { StatusBar, Splashscreen } from 'ionic-native';
import { Page1 } from '../pages/page1/page1';
import { Page2 } from '../pages/page2/page2';
@Component({
templateUrl: 'app.html'
})
export class MyApp {
@ViewChild(Nav) nav: Nav;
rootPage: any = Page1;
pages: Array<{title: string, component: any}>;
constructor(public platform: Platform) {
Mastering Ionic 2
114

this.initializeApp();
// used for an example of ngFor and navigation
this.pages = [
{ title: 'Page One', component: Page1 },
{ title: 'Page Two', component: Page2 }
];
}
initializeApp() {
this.platform.ready().then(() => {
// Okay, so the platform is ready and our plugins are available.
// Here you can do any higher level native things you might need.
StatusBar.styleDefault();
Splashscreen.hide();
});
}
openPage(page) {
// Reset the content nav to have just this page
// we wouldn’t want the back button to show in this scenario
this.nav.setRoot(page.component);
}
}
Ionic 2 navigation
115
Okay, so there’s a few things to understand here:
• Our class imports and uses the Angular 2 ViewChild component (which allows
access to a different component class and its methods) to allow the side menu
template to be able to implement the methods of the NavController object
• The menu options are dened as an array called pages, which is subsequently
initialised within the class constructor (this is then able to be iterated through and
used to create navigation buttons for the <ion-menu> element in the src/app/
app.html template using the ngFor directive)
• The openPage function uses the setRoot method of the NavController class
to avoid usability issues with the back button being displayed when a side menu
navigation option is selected
That pretty much wraps up the basics of navigation within Ionic 2 apps but, if you
should nd yourself struggling with any development challenges when it comes to
working with navigation, the following resources should be a good place for nding
answers:
http://ionicframework.com/docs/v2/api/components/nav/NavController/
http://ionicframework.com/docs/v2/api/components/menu/Menu/
http://ionicframework.com/docs/v2/api/components/tabs/Tabs/
In the next chapter we’ll turn our attention to a pretty important part of developing
apps using Ionic 2: Templates.
Resources
All project les for this chapter can be found listed in the download links on page
636.
Mastering Ionic 2
116

Templates

Mastering Ionic 2
118
As the public facing part of your app templates are pretty important when it comes to
rendering content in an aesthetic, usable interface that users can enjoy interacting
with - get this right and you’re off to a good start!
When you create pages for your app using the Ionic CLI tool (these pages, as we
covered in previous chapters, are actually components) you’ll nd very basic HTML
templates being generated like the following:
<ion-header>
<ion-navbar>
<ion-title>Name of page here</ion-title>
</ion-navbar>
</ion-header>
<ion-content padding>
</ion-content>
You’ll notice the template contains the following pre-built Ionic components which, if
you haven’t used previous versions of the Ionic framework, you might not be familiar
with:
• <ion-header>
• <ion-navbar>
• <ion-title>
• <ion-content>
The <ion-header> component is a parent wrapper that is displayed as the header
bar at the top of the page. This contains the <ion-navbar> component which is used
to provide the navigational toolbar for the app.
The <ion-navbar> component displays the page title for the app, using the <ion-title>
component, and can contain any number of buttons, a searchbar or dividers.
A back button will be automatically displayed here whenever a new page is pushed
to the navigation stack.
The <ion-content> component is where the main content for our page is displayed
and is a scrollable area able to be controlled with various methods listed here:

Templates
119
http://ionicframework.com/docs/v2/api/components/content/Content/
A full list of the available UI components for interface development can be accessed
through the online API documentation: http://ionicframework.com/docs/v2/api/
In this chapter we’ll be implementing the following Ionic UI components in our app:
• List
• Slides
• Modal
Let’s begin by modifying the myApp/src/pages/home/home.html template to use a
List component with the following changes (highlighted in bold):
<ion-header>
<ion-navbar>
<ion-title>
Ionic Blank
</ion-title>
</ion-navbar>
</ion-header>
<ion-content padding>
<ion-list>
<ion-item
*ngFor="let page of pages"
(click)="setNavigationLink(page)">
{{ page.title }}
</ion-item>
</ion-list>
</ion-content>
If we break the above code down here is what we have implemented:
• Created a list using the <ion-list> component

Mastering Ionic 2
120
• Used the Angular ngFor directive (more on this in a moment) to iterate through
an array of data called pages (which we’ll dene in our class shortly)
• On each loop iteration we attach a click event to an <ion-item> component which
res the setNavigationLink method (that we created in the Navigation chapter),
that receives the current iterated item from the array as a parameter
• Using "handlebar" syntax we display the title property for each iterated array item
between the <ion-item> tags
If we try to preview this using ionic serve we will receive an error as the pages array
object does not exist.
Let’s correct that by opening the myApp/src/pages/home/home.ts le and making
the following changes to the class (highlighted in bold):
import {Component} from '@angular/core';
import {NavController} from 'ionic-angular';
import {AboutPage} from '../about/about';
@Component({
selector: 'page-home',
templateUrl: 'home.html'
})
export class HomePage {
public pages : Array<{title: string, link: any}>;
constructor(public navCtrl: NavController)
{
this.pages = [
{ title : 'About',
link : AboutPage
},
{ title : 'Contact Us',
link : ContactPage
},
{ title : 'Tweets',

Templates
121
link : TweetsPage
}
];
}
setNavigationLink(page)
{
this.navCtrl.push(page);
}
}
You’ll see that we have dened our pages array and initialised that within the class
constructor.
There is a problem here however. We have added entries for the following pages:
• ContactPage
• TweetsPage
But these don’t exist yet and if we run ionic serve from the command line we will be
greeted with the following errors:
TypeScript error: /myApp/src/pages/home/home.ts(17,16): Error TS2304: Can-
not nd name 'ContactPage'.
TypeScript error: myApp/src/pages/home/home.ts(20,16): Error TS2304: Can-
not nd name 'TweetsPage'.
If you come from a JavaScript background and are new to TypeScript you might nd
such compiler errors irritating at rst but over time you’ll come to appreciate just how
invaluable these are when trying to understand why your code might not be working.
In the beginning it does take some getting used to though!
Okay, so the next thing we need to do is create these pages before we can preview
the app using ionic serve.

122
Mastering Ionic 2
Whilst in the terminal press the Ctrl + C keys on your keyboard to quit ionic serve
and then type out the following commands to create both the ContactPage and
TweetsPage components (waiting for the rst component to be generated before
issuing the next command):
ionic g page contact
ionic g page tweets
With these components successfully generated lets add the following to the
myApp/src/pages/home/home.ts le (amendments highlighted in bold):
import {Component} from '@angular/core';
import {NavController} from 'ionic-angular';
import {AboutPage} from '../about/about';
import {ContactPage} from '../contact/contact';
import {TweetsPage} from '../tweets/tweets';
The next step is to register these newly added components with the root module for
the app - the myApp/src/app/app.module.ts le (amendments highlighted in bold):
import { NgModule } from '@angular/core';
import { IonicApp, IonicModule } from 'ionic-angular';
import { MyApp } from './app.component';
import { HomePage } from '../pages/home/home';
import { AboutPage } from '../pages/about/about';
import { ContactPage } from '../pages/contact/contact';
import { TweetsPage } from '../pages/tweets/tweets';
@NgModule({
declarations: [
MyApp,
HomePage,
AboutPage,
ContactPage,
TweetsPage,

Mastering Ionic 2
123
With the saved changes for the following les:
• myApp/src/pages/home/home.ts
• myApp/src/pages/home/home.html
• myApp/src/app/app.module.ts
Return to the terminal and run the ionic serve command to preview the app in the
browser. Assuming you have implemented those changes correctly you should see
your app being rendered like so:
],
imports: [
IonicModule.forRoot(MyApp)
],
bootstrap: [IonicApp],
entryComponents: [
MyApp,
HomePage,
AboutPage,
ContactPage,
TweetsPage
],
providers: []
})
export class AppModule {}
Templates
124
Which although basic is pretty cool nonetheless.
It might not seem like much but you’ve successfully modied your template to build
navigation links from an array of pages that was dened in the component class
and, when you click on those links in the browser, you’re able to quickly and easily
navigate to and from those pages.
Not bad!
IMPORTANT - DON’T forget, when creating new components to be used within your
app, to import these into the src/app/app.module.ts le and then add their class
names to the following areas of the @NgModule conguration:
• declarations
• entryComponents
Next steps
There’s a lot more we can do with our List component though but before we do that
let’s take a little detour and familiarise ourselves with the following concepts and
features when working with templates:
• Event binding
• Angular 2 template directives
• Property binding
Event binding
Angular event binding allows our pages to be able to detect and respond to user
interactions such as typing text into an input eld, submitting a form or selecting
options from lists for example.
Without event binding our apps would be both limited in usability and provide a
pretty poor experience for our users!

Mastering Ionic 2
The syntax for event binding consists of a target event (such as a mouse click or key
press) within parentheses to the left of the equals sign followed by a template
statement (which is used to respond to the event) appearing in quotes on the right.
In the above example we can see that the target event, in parentheses, is the click
event and the template statement, in quotes, is the setNavigationLink method that
we dened in the myApp/src/pages/home/home.ts class le.
This pretty much covers the basics of event binding, their syntax and how to use
that within our templates.
For further information on the topic visit the following Angular 2 documentation:
https://angular.io/docs/ts/latest/guide/template-syntax.html#!#event-binding
Angular 2 template directives
One of the major hurdles when learning a new framework is getting to grips with the
syntax that needs to be used.
Thankfully with Angular 2 that isn’t as difcult as it might rst appear.
When templating our application Angular 2 provides the following built-in directives
that we can use for manipulating elements/rendering data:
• ngFor
• ngSwitch
• ngIf
• ngStyle
• ngClass
125
We’ve already used event binding in our myApp/src/pages/home/home.html
template to set the navigation link for each list item:
<ion-item *ngFor="let page of pages" (click)="setNavigationLink(page)">

126
<div *ngFor="let page of pages">
Essentially the asterisk functions as shorthand for managing template embedding
without displaying the actual background HTML modications involved.
This might sound a little confusing or complex but for a more in-depth explanation of
the asterisk prex and embedded templates please view the following Angular 2
documentation: https://angular.io/docs/ts/latest/guide/template-syntax.htm-
l#!#star-template
You’ll also notice from the above ngFor example the use of the let keyword.
Introduced in both TypeScript and ES6 the let keyword allows for block level or
lexical scoping of variables.
This provides 3 advantages for declaring variables over the traditional JavaScript
method of using var:
Templates
ngFor
The ngFor directive is used to iterate through items in an array and render those to
the page. This can be applied as an attribute on both Ionic 2 UI components as well
as standard HTML tags.
The ngFor directive is prexed with an asterisk like so:
This might look a little odd (especially if you come from using Angular 1) but the
asterisk is simply used to signify that on each loop iteration the current element will
be transformed into an embedded template where the data will be rendered to.
An embedded template for the above would look like the following:
<template [ngFor]="let page of pages">
// Render each template content here
</template>

127
• Variables declared as block scope are not visible outside of their parent block
• Block scope variables cannot be read from or written to before they are actually
declared
• Block scope variables cannot be redeclared inside the same scope
This helps avoid problems with variable overwriting and hoisting (which you will, if
you’ve spent an appreciable amount of time coding in JavaScript, be aware of the
bugs that can be caused with this behaviour and the difculty involved in tracking
these down and resolving them).
The following examples will demonstrate these advantages of using block scoped
variables when writing our code:
// 1 - Error will be thrown as the variable cannot be used before being declared
i++;
let i;
// 2 - Error will be thrown as variable "i" is not accessible outside of for loop
var tech = ["Ionic 2", "Angular 2", "Apache Cordova", "TypeScript"];
for(let i = 0; i < tech.length; i++)
{
console.log(`Technology: ${tech[i]}`);
}
console.log(i);
// 3 - Error will be thrown as variable cannot be redeclared in the same scope
let technology = "TypeScript";
let technology = "Angular 2";
Believe it or not this is actually a good thing as it forces developers to write cleaner,
better structured code that is less prone to bugs (not to mention making it easier for
other developers working with that code to understand the logic ow).
We can also extend our ngFor directive to provide an index for each item that has
been iterated through like so (highlighted in bold):
Mastering Ionic 2

<div *ngFor="let page of pages; let i = index">{{ i + 1 }}</div>
Notice the use of the curly braces (referred to as interpolation braces) for displaying
the value of the index variable?
Interpolation braces are used to render values to the page and they additionally
provide automatic escaping of any HTML content that might be pulled through from
the component class.
ngSwitch
This would be used where we want to display one possible option, from a range of
options, based on a condition being met.
For example:
128
<span [ngSwitch]="technology">
<span *ngSwitchCase="Apache Cordova">Apache Cordova</span>
<span *ngSwitchCase="TypeScript">TypeScript</span>
<span *ngSwitchCase="Angular 2">Angular 2</span>
<span *ngSwitchCase="Ionic 2">Ionic 2</span>
<span *ngSwitchDefault>Other</span>
</span>
In the above example we have 3 built-in directives at work:
• ngSwitch
• ngSwitchCase
• ngSwitchDefault
If the <span> match value is equal to that of the switch value then only that <span>
element is added to the page.
If no matches are found then the default <span> (signied by the *ngSwitchDefault
Templates

129
directive) is added to the page instead.
ngSwitch (and its associated directives) could be applied to any HTML element or
Ionic UI component not just <span> tags.
Be aware that only the ngSwitchCase and ngSwitchDefault are prexed with an
asterisk.
ngIf
Any HTML element or Ionic UI component can be added or removed from the page
by binding the ngIf directive to it.
That element/component will then only be added to the page if a certain condition is
true.
For example:
<div *ngIf="technology">Technology used is {{ technology.name }}</div>
Note this directive is also prexed with an asterisk like the ngFor, ngSwitchCase &
ngSwitchDefault directives.
ngStyle
Inline styles can be set dynamically on an HTML element or UI component, based
on its state (such as a form that is currently submitting data to a remote server script
or refreshing an embedded twitter feed with the latest tweets for example), using the
ngStyle directive.
These inline styles would be dened within the component class using a key/value
object structure. Each key would be a particular style name and its value would
directly relate to that particular style.
In our component TypeScript class we could, for example, create a method to dene
Mastering Ionic 2
elementStyles() {
let styles = {
'color': 'rgb(68, 68, 68)',
'font-weight': 'bold',
'font-size': '1.1em'
};
return styles;
}
Templates
130
We could then use a property binding to add these inline styles to a HTML element
in our template like so:
<div [ngStyle]="elementStyles()">
Text content will now be bold, set at 1.1em’s in size and rendered in charcoal
black.
</div>
Property binding is an Angular 2 syntax for using brackets to bind values to an
element’s property - and even though this might look a little strange the square
brackets are actually valid HTML.
For a more detailed look at Angular 2 property binding feel free to visit the following
blog article: http://blog.thoughtram.io/angular/2015/08/11/angular-2-template-syn-
tax-demystied-part-1.html
ngClass
Multiple CSS classes can be added dynamically to elements within a template using
the ngClass directive.
These classes would rstly be dened within the Sass le for the page component
these inline styles like the following:

Mastering Ionic 2
131
and then programmatically assigned through a method within the component class
before nally being bound to an element (or elements) within the template using the
ngClass directive.
Here’s how this process might look across a page component’s Sass, TypeScript
and HTML les (changes highlighted in bold):
// 1 - src/pages/home/home.scss
page-home {
.isSuccess {
color: #1E88E5 !important;
}
.isError {
color: #D43669 !important;
}
.isWarning {
color: #d4d34f !important;
}
.canProceed {
background-color: #deeae8;
}
}
// 2 - src/pages/home/home.ts
export class HomePage {
...
public isSuccess: boolean;
public isError: boolean;
public isWarning: boolean;
public canProceed: boolean;

constructor(public navCtrl: NavController) {
...
this.isSuccess = true;
this.isError = false;
this.isWarning = false;
this.canProceed = true;
}
elementClasses() {
let classes = {
isSuccess: this.isSuccess,
isError: this.isError,
isWarning: this.isWarning,
canProceed: this.canProceed
};
return classes;
}
...
}
// 3 - src/pages/home/home.html
<ion-content padding>
<ion-list>
<ion-item *ngFor="let page of pages" (click)="setNavigationLink(page.link)"
[ngClass]="elementClasses()">
Templates
132
The important thing to note here is that multiple styles are bound within a key/value
object (dened within the elementClasses method) within the component class.
Each key in this object is the name of a CSS class (as dened in our Sass le) with
a corresponding boolean value to determine whether that class will be rendered in
the component HTML template.
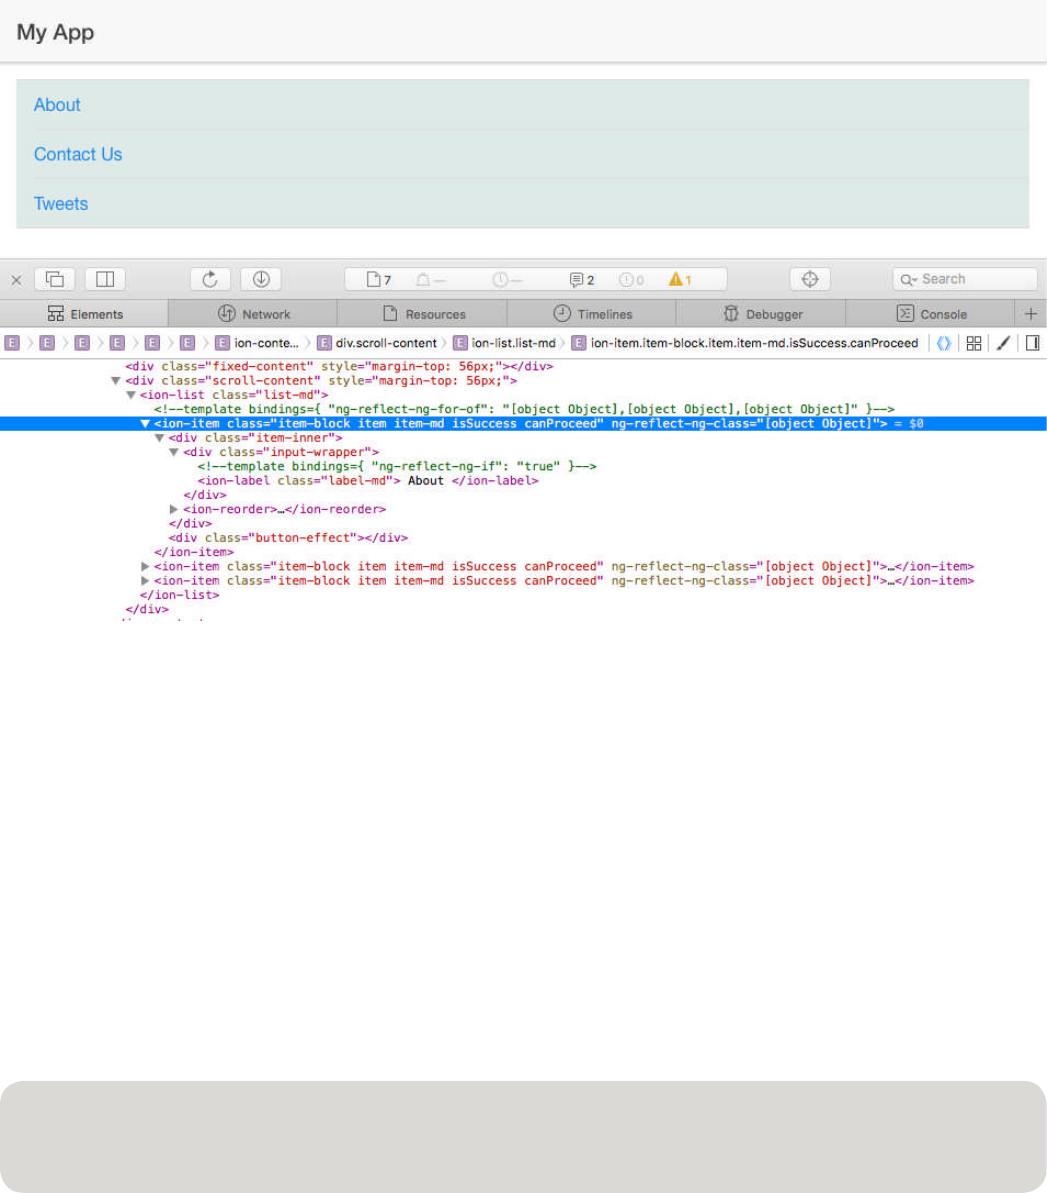
Mastering Ionic 2
133
Which, when previewed in our browser using ionic serve, will display the following
style changes to our HTML template:
We can also see in the Web Inspector console that the isSuccess and canProceed
CSS classes have been attached to the <ion-item> UI component.
ngClass is useful for attaching multiple classes to a page element but what if we
only wanted to attach/remove a single class?
This is easily achieved using a class binding which allows a CSS class to be added
or removed from an element depending on whether a certain condition is true or not.
Say we only wanted to attach the isSuccess CSS class to each iterated item in our
home page template we would use a class binding like so (highlighted in bold):
<ion-item *ngFor="let page of pages" (click)="setNavigationLink(page.link)"
[class.isSuccess]="isSuccess">
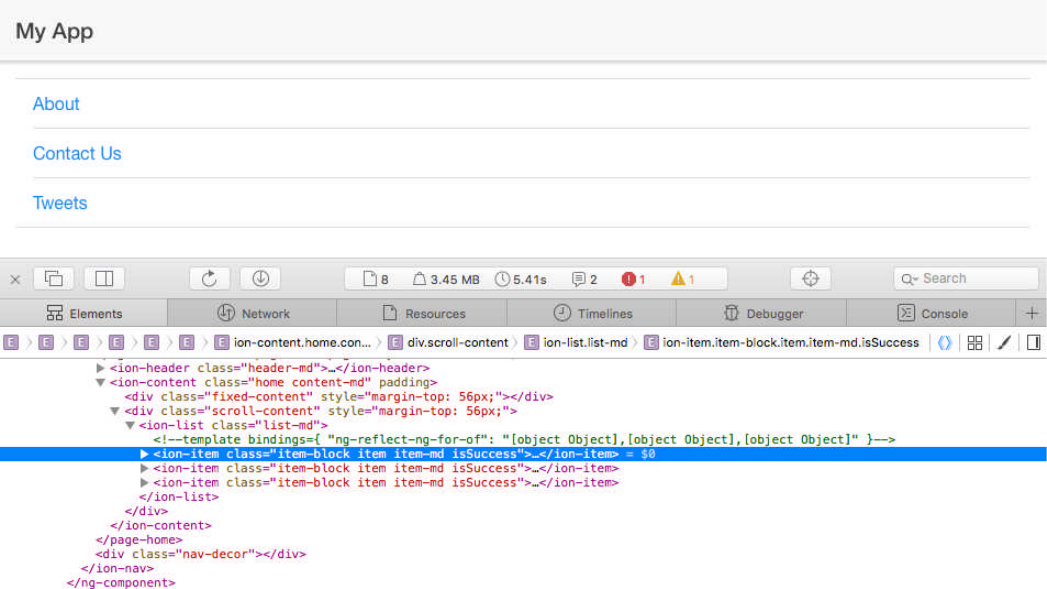
134
Templates
You’ll notice that we bind to a CSS class of isSuccess and then assign its value to
the related isSuccess property from our component class. This will then determine
whether this CSS class is displayed or not.
When we view our app in the browser now we should see something like the
following being displayed:
Voilà!
Now the isSuccess CSS class is attached to each list item.
That pretty much covers all we really need to know about using Angular 2’s built-in
template directives (and we will be revisiting and using some of these in subsequent
chapters) so let’s return to working with our Ionic List component.
Managing our home page list
As you can see our list looks plain and, well, kind of boring if I’m going to be honest.
It’s not particularly appealing even if it does get the job done (and that job is done
quite well I might add) and denitely needs some further design enhancements.

135
Mastering Ionic 2
We could modify the styling for our List component using the application Sass les
but that would be a little overkill when we can rely on a far easier option instead.
Let’s look at what the Ionic Component API offers and how we might be able to use
that to give our list a little more “oomph”.
At the moment we have implemented a basic list but there’s lots of list variations we
could choose from:
• Inset Lists
• List Dividers
• List Headers
• Icon List
• Avatar List
• Multi-line List
• Sliding List
• Thumbnail List
Further information on the List Component API options is available via the Ionic
online docs: http://ionicframework.com/docs/v2/components/#lists
Let’s play with a couple of these List variations in our app.
Exercise 1 - Adding a Multi-line List
As the name implies a Multi-line List displays multiple items in each <ion-item>
component over more than one line.
When an <ion-item> component contains multiple lines of content its height will be
automatically adjusted to t these items making it an ideal choice for displaying
elements such as headings, thumbnail images and short summaries.
To implement this list type in our home page component rstly take a moment to
navigate to the following location in the download les for this chapter: Templates/
multi-line-list/myApp/src/assets/

export class HomePage {
public pages : Array<{title: string, thumb: string, description: string, link:
any}>;
constructor(public navCtrl: NavController) {
this.pages = [
{ title : 'About',
thumb : 'assets/images/about.png',
description: 'Who we are. What we do. Why we’re here',
link : AboutPage
},
{ title : 'Contact Us',
thumb : 'assets/images/contact.png',
description: 'Drop us a line and get in touch we’d love to
hear from you!',
link : ContactPage
},
{ title : 'Tweets',
thumb : 'assets/images/tweet.png',
description: 'The latest news updates from our Twitter account',
link : TweetsPage
}
];
}
...
}
Templates
136
and copy the images directory contained within there to the myApp/src/assets
project directory on your own machine.
Once this is completed (and you will need the images located within that directory
for this exercise) open your local myApp/src/pages/home/home.ts le and make
the following changes to the class (highlighted in bold):

All we’ve done here is add 2 additional keys to our pages object:
• thumb (reference to the thumbnail image we want to use for each list entry)
• description (a quick summary helping to describe the page)
It’s also important to note that we’ve added these as type denitions to the pages
property towards the top of our class.
Without these type denitions the TypeScript compiler would throw up errors as we
have modied the pages object and need to state the property types in the pages
Array denition.
Now open your myApp/src/pages/home/home.html le and make the following
changes (highlighted in bold):
Mastering Ionic 2
137
<ion-list>
<ion-item *ngFor="let page of pages" (click)="setNavigationLink(page.link)">
<ion-avatar item-left>
<img src="{{ page.thumb }}">
</ion-avatar>
<h2>{{ page.title }}</h2>
<p [innerHTML]="page.description"></p>
</ion-item>
We’ve added an <ion-avatar> component, aligned it to the left of the row (using the
item-left attribute), embedded the thumb image from our pages object along with an
additional description for the page.
Before we go any further though what’s this [innerHTML] property binding syntax on
the page.description paragraph tag?
This is an Angular 2 property which allows us to embed HTML content. As some of
the values for the page descriptions contain entity encoded characters we need to
ensure they display properly which is why we use the [innerHTML] property.
This is a handy little tool to use whenever you’re working with entity encoded
content (such as HTML returned in JSON from an Ajax call) that might need to be
displayed within your apps.
Okay, so now those amendments have been made and saved the ionic server (if
running in your Terminal) should refresh your browser and display the following list:
138
Templates
Now isn’t that a much nicer list?
Let’s take a look at one more type of list we can make use of in our apps before
exploring some additional components that we can add to our page templates.
Exercise 2 - Adding a Sliding List
This type of list contains items that can be swiped left or right to reveal previously
hidden button options. For those of you with iPhones you’ll probably be most familiar
with this feature when using the Messages or Mail applications to delete individual
messages.
Now we’ll return to the home page component for our app and make adjustments to
implement a Sliding List.
Open up the myApp/src/pages/home/home.html template and implement the
following changes (highlighted in bold):

139
Mastering Ionic 2
<ion-list>
<ion-item-sliding *ngFor="let page of pages">
<ion-item (click)="setNavigationLink(page.link)">
<ion-avatar item-left>
<img src="{{ page.thumb }}">
</ion-avatar>
<h2>{{ page.title }}</h2>
<p [innerHTML]="page.description"></p>
</ion-item>
<ion-item-options side="right">
<button ion-button color="primary" (click)="buttonOne(page.title)">
<ion-icon name="text"></ion-icon>
BUTTON 1
</button>
<button ion-button color="secondary"
(click)="buttonTwo(page.title)">
<ion-icon name="call"></ion-icon>
BUTTON 2
</button>
</ion-item-options>
</ion-item-sliding>
</ion-list>
We’ve added an <ion-item-sliding> component inside of the <ion-list> on which we
place our ngFor directive for looping through the pages object.
Within our <ion-item-sliding> component we have 2 components:
• <ion-item> for organising the content for the list
• <ion-item-options> which contains two hidden buttons (with click events bound to
them) that are activated when swiping in from the right

Templates
140
We will now add the following methods for these click events to the component class
in the myApp/src/pages/home/home.ts le (highlighted in bold):
...
export class HomePage {
...
constructor(public navCtrl: NavController) {
...
}
...
buttonOne(page)
{
console.log(`I could do a lot more than just print out this message for
the ${page} page to the browser console`);
}
buttonTwo(page)
{
console.log(`Yep, I’m an under-performer for the ${page} page too :(`);
}
...
}
Nothing terribly exciting here - all we’re doing is printing a message to the browser
console.
If we preview our app in the browser now we should see those hidden buttons being
revealed when we swipe our links to the right and, when we click onto each button,
a console log being generated in the Web Inspector window like so:
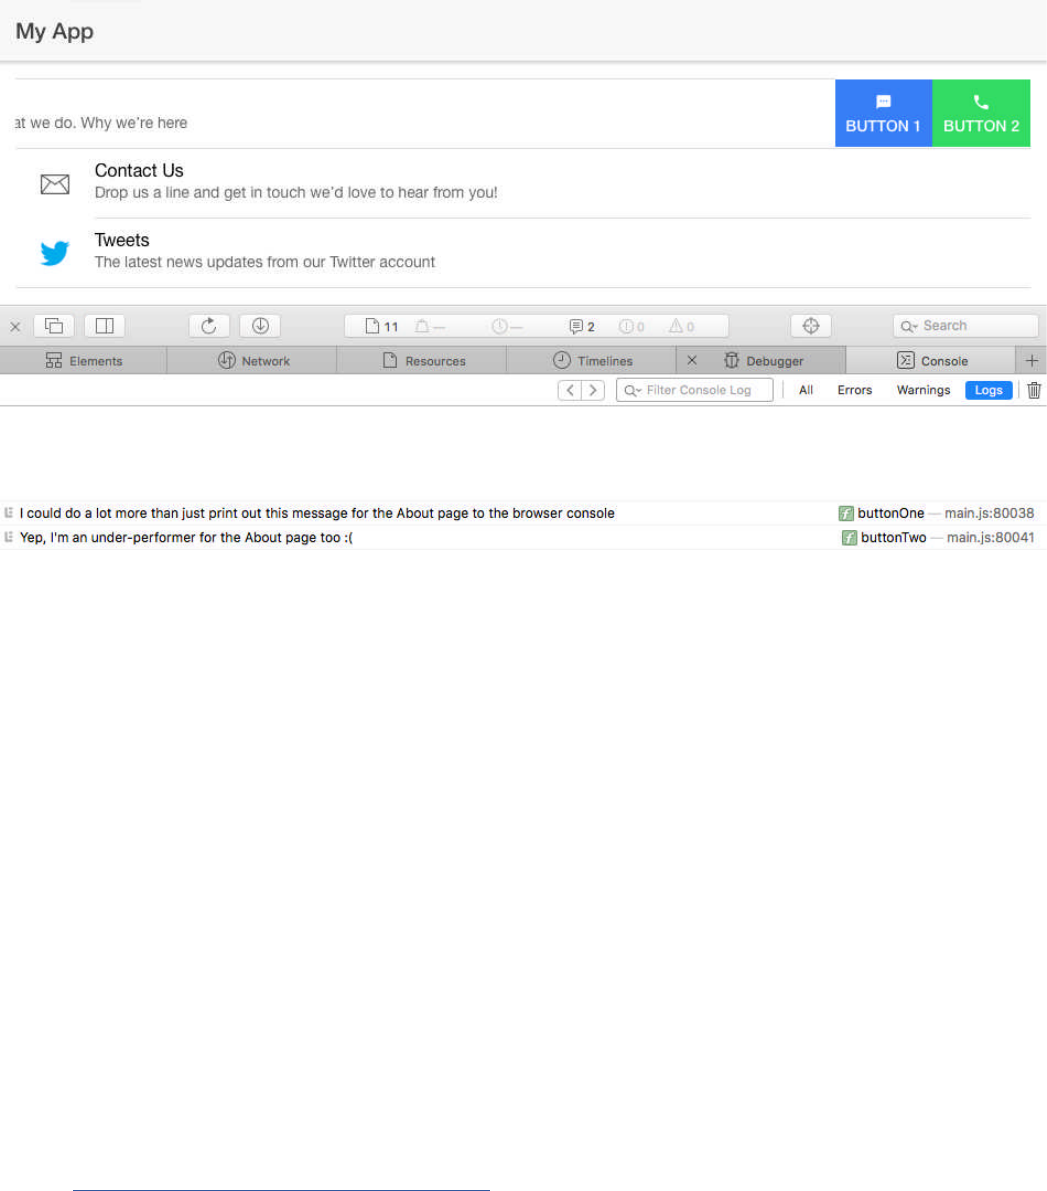
Mastering Ionic 2
141
Now that’s pretty impressive isn’t it?
With a handful of pre-existing components we can create an attractive, usable and
engaging interface for our users in very little time at all.
Exercise 3 - Adding the Slides component
The Slides component allows multiple content to be loaded (I.e. images, video or
plain text), as individual slides, into a single container which can then be swiped
through without the user leaving the current page - similar to a jQuery slideshow
plugin.
The slides container is dened with the <ion-slides> component and each slide is
created using the <ion-slide> child component.
From the download les for this chapter copy the images in the following directory:
Slides/myApp/src/assets/images/ to the same directory in your own local app.
Let’s make the following changes to the myApp/src/pages/about/about.html
template (highlighted in bold):

Templates
142
<ion-content padding>
<ion-slides #picSlider
(ionDidChange)="onSlideMoved()" [options]="opts">
<ion-slide>
<ion-item>
<h1># 1</h1>
<img src="assets/images/slide1.jpg">
<h2>Paris (2007)</h2>
<p>Monument to the tomb of the unknown soldier</p>
</ion-item>
</ion-slide>
<ion-slide>
<ion-item>
<h1># 2</h1>
<img src="assets/images/slide2.jpg">
<h2>Paris (2007)</h2>
<p>Parisian sculpture/monument</p>
</ion-item>
</ion-slide>
<ion-slide>
<ion-item>
<h1># 3</h1>
<img src="assets/images/slide3.jpg">
<h2>Paris (2007)</h2>
<p>View from the Arc d’triomphe</p>
</ion-item>
</ion-slide>
</ion-slides>
</ion-content>
Mastering Ionic 2
143
If we break the above code snippet down here’s what we’ve done:
• Added a slide container with the <ion-slides> component
• On the <ion-slides> component we’ve added a local template reference variable
called picSlider, a target event for the ionDidChange event (which triggers a
method called onSlideMoved) and set the options property of the component to
a value of opts, using property binding
• We then created 3 separate slides within our <ion-slides> component using the
<ion-slide> component
• Within each <ion-slide> component we wrap our content for the slide within an
<ion-item> component
Template reference variables
This is the rst time we’ve used a template reference variable in our templates so
let’s cover what these are and why they’re useful.
A template reference variable is a reference to a native DOM element, Angular 2
directive or any custom web component and can be added on the same element,
sibling elements or child elements within the template.
The hash prex for the #picSlider template reference variable simply means we are
dening a variable called picSlider. This could also be written as ref-picSlider
instead of #picSlider.
So, in the above code #picSlider is a reference to the <ion-slides> container.
We will then make this reference available in the associated TypeScript class so we
can access the <ion-slides> component methods where necessary.
Scripting the logic for our Slides component
Now that we have set up our template with the slides and their content we need to
add the necessary logic in the TypeScript class to be able to interact with the slides.

Templates
144
Actually we could use the Slides component without adding any logic to our
TypeScript class but it’s more fun to see how we could interact with this component’s
API methods and properties instead.
In the myApp/src/pages/about/about.ts le add the following (highlighted in bold):
import { Component, ViewChild } from '@angular/core';
import { NavController, Slides } from 'ionic-angular';
@Component({
selector: 'page-about',
templateUrl: 'about.html'
})
export class AboutPage {
@ViewChild('picSlider') viewer: Slides;
constructor(public navCtrl: NavController) { }
slideOpts = {
pager: true,
speed: 750
};
onSlideMoved()
{
let currIndex = this.viewer.getActiveIndex(),
numSlides = this.viewer.length(),
rstSlide = this.viewer.isBeginning(),
lastSlide = this.viewer.isEnd();
console.log(`Current index is, ${currIndex}`);
if(rstSlide)
{
console.log(`This is the rst slide of ${numSlides} slides`);

}
else if(lastSlide)
{
console.log(`This is the last slide of ${numSlides} slides`);
}
}
}
There’s quite a bit going on here so let’s look at each key change in further detail:
• We import the ViewChild and Slides components at the top of our le
• We use the @ViewChild annotation to access the methods for the Ionic Slides
component, passing in the template reference variable of picSlider, assign that
to a property of viewer while providing a type denition of Slides
• Next we create an object called slideOpts which stores the conguration options
for our Slides component (these are part of the Slides component API - the pager
property denes whether we display pagination bullets and the speed property
denes, in milliseconds, how long the transition between slides will last
• Following from this we then create a method of onSlideMoved which utilises the
viewer property (created from the @ViewChild annotation earlier in the class) to
access the Slides component API methods
• The onSlideMoved method simply logs the current slide index and whether or
not this is the rst or last slide to the browser console
All in all, this is a pretty basic script, it doesn’t do anything particularly useful or fancy
but that’s not the point.
What we’re really interested in here is seeing the Slides component in action and
how we can plug into its methods using the template reference variable of picSlider.
Save the changes to both of these les and then, if Ionic serve is still running (and if
it isn’t - then run it from your terminal!), you should be able to navigate to the about
page and preview these changes in your browser like so:
145
Mastering Ionic 2
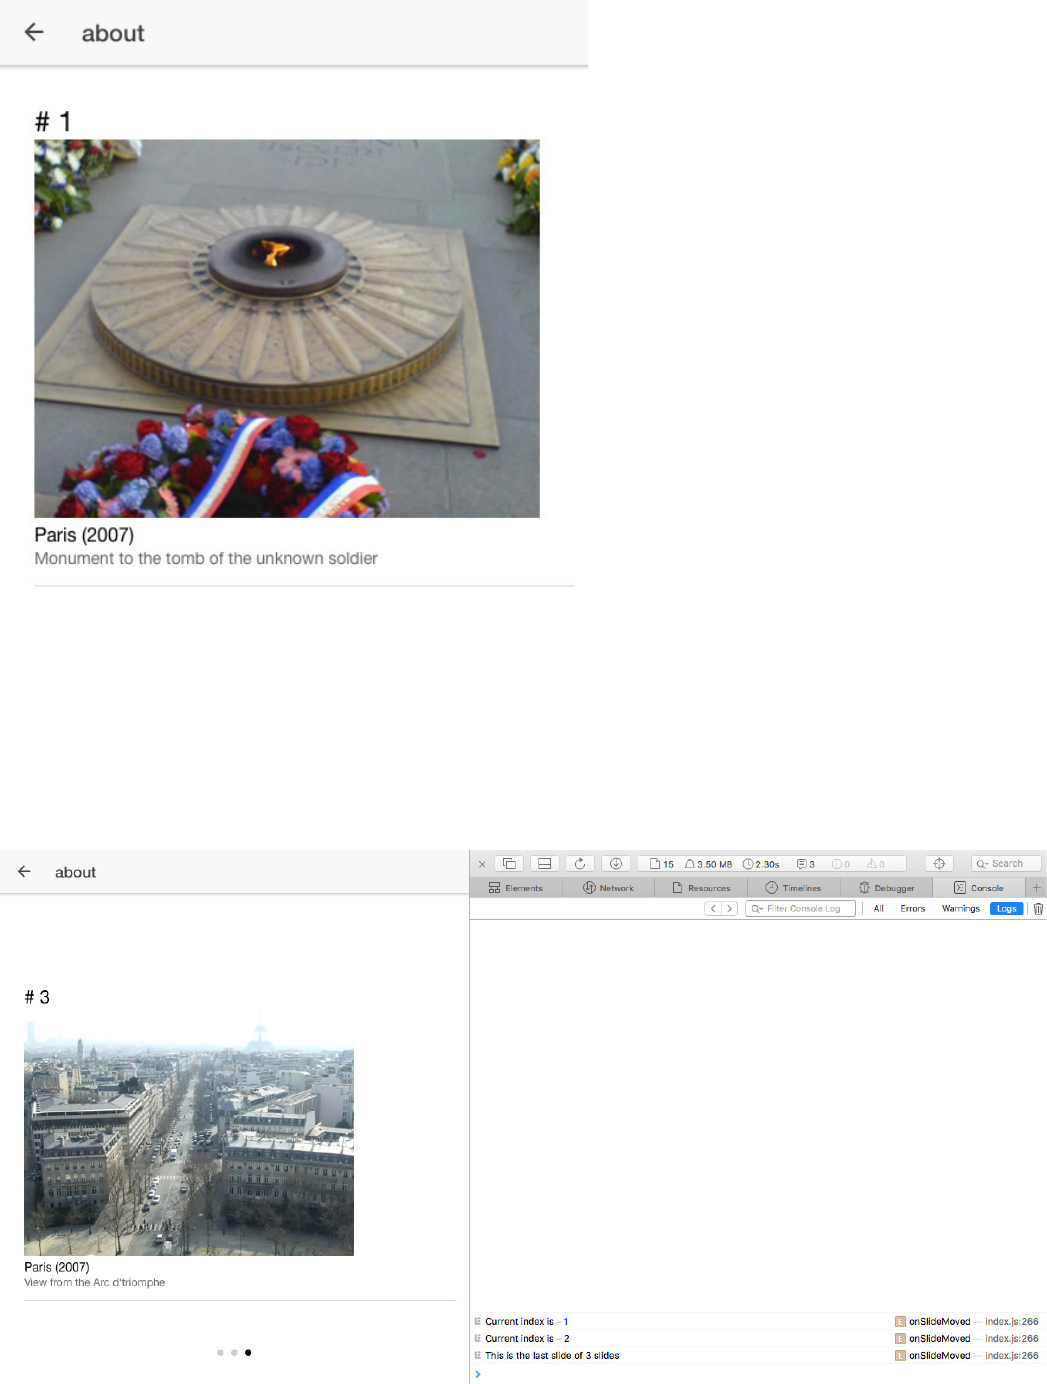
Templates
You should see, as shown in the
image on the left, the rst of the
slides being displayed with a
paging indicator towards the
bottom of the screen.
Basic but nice.
Now if you drag with your mouse
(or trackpad if using a laptop) from
the right of the current slide to the
left of the screen you should see
this slide starting to disappear and
the next slide in our series
transition into view instead.
And the logic that we added into the class for the myApp/src/pages/about/about.ts
le?
Open the browser Web Inspector, select the console tab (if it isn’t already selected),
and, when the transition from one slide to the next has completed, you should see
the following output printed to the console:
146

Mastering Ionic 2
147
For the eagle eyed amongst you’ll notice that the current index for the last slide is
logged to the web console as 2 yet we have a total of 3 slides.
No - this isn’t a mistake. The index for the rst slide in the <ion-slides> container
always starts at 0 not 1.If you swipe back to the rst slide you’ll see the current index
being listed in the browser console as 0.
In this exercise not only have we added the Slides component to our page but also
hooked into its methods and used those to extract data about the current slide and
then print that to the browser console once the slide has completed transitioning into
view.
For further information about this component and its available methods visit the
online documentation here: http://ionicframework.com/docs/v2/api/components/
slides/Slides/
Exercise 4 - Adding the Modal component
A modal is a form of temporary UI that slides into the screen, over the page content,
and is often used for login/registration forms, composing messages or presenting
app conguration options for example.
For the last exercise in this chapter we’ll incorporate the Modal component into a
template within our app and play with some of the available methods and properties
in the process.
Let’s create a new page for our app with the following command in our Terminal:
ionic g page technologies
This page will contain a list of technologies used within the app that, when an
individual technology listing is clicked on, will open a modal overlay with further
information about that selected listing.
Once this page has been successfully created through the Ionic CLI open the

Templates
148
myApp/src/pages/technologies/technologies.html template and make the
following changes (highlighted in bold):
<ion-header>
<ion-navbar>
<ion-title>Technologies</ion-title>
</ion-navbar>
</ion-header>
<ion-content padding>
<ion-list>
<ion-list-header>
Technologies
</ion-list-header>
<ion-item
*ngFor="let technology of technologies"
(click)="activateModal(technology)">
{{ technology.name }}
</ion-item>
</ion-list>
</ion-content>
The only “surprise” in the above code would be the inclusion of the <ion-list-header>
component which adds a header to our list.
The <ion-list> and <ion-item> components, Angular 2 *ngFor directive and event
binding should be familiar from previous examples in this chapter.
Now we need to amend our myApp/src/pages/technologies/technologies.ts le
to create the technologies object and the activateModal method which are being
implemented into each iterated <ion-item> component in the above template.
Open the myApp/src/pages/technologies/technologies.ts le and make the
following changes (highlighted in bold):

Mastering Ionic 2
149
import { Component } from '@angular/core';
import { ModalController, NavController} from 'ionic-angular';
import { Modals } from '../modals/modals';
@Component({
selector: 'page-technologies',
templateUrl: 'technologies.html'
})
export class TechnologiesPage {
public technologies: Array<{name: string, date: string, summary:
string, website: any}>;
constructor(public nav: NavController, public modalCtrl: ModalController)
{
this.technologies = [
{
name: "Angular JS",
date: "October 20th 2010",
summary: "Web application framework developed and maintained
by Google",
website: "http://www.angular.org"
},
{
name: "Apache Cordova",
date: "2009",
summary: "Develop mobile apps with HTML, CSS & JS and
publish to multiple platforms from one single codebase",
website: "https://cordova.apache.org"
},
{
name: "TypeScript",
date: "October 1st 2012",
summary: "Strict superset of JavaScript developed and maintained

Templates
150
by Microsoft",
website: "http://typescriptlang.org"
}];
}
activateModal(link)
{
let modal = this.modalCtrl.create(Modals, link);
modal.present();
}
}
If we break this down here’s what we are accomplishing with the above class:
• Imported the ModalController component
• Imported a custom component called Modals (which we will create shortly!)
• Created a technologies array - which is then initialised within the constructor
• Created the activateModal method which calls the create and present methods
of the ModalController class
At this point we need to pay attention to the activateModal method and its use of
one particular method of the ModalController class - create.
This method accepts 3 parameters:
• Component Type - The modal view
• Data - Any data to be passed to the modal (optional)
• Modal options - Conguration options for the modal (optional)
The rst parameter - the component type - refers to a class which is used to dene
the modal view.

151
Mastering Ionic 2
There’s only one little snag with our use of this class in the activateModal method.
The Modals class doesn’t exist!
Using the Ionic CLI let’s create a new page called modals:
import { Component } from '@angular/core';
import { NavController, ViewController, NavParams } from 'ionic-angular';
@Component({
selector: 'page-modals',
templateUrl: 'modals.html'
})
export class Modals {
public name : string;
public summary : string;
public website : string;
constructor(
public navCtrl: NavController,
public params: NavParams,
public viewCtrl: ViewController
)
{
this.name = this.params.get('name');
this.summary = this.params.get('summary');
this.website = this.params.get('website');
}
ionic g page modals
Now open the newly created myApp/src/pages/modals/modals.ts le and make
the following amendments (highlighted in bold):

152
Templates
In the Modals class we use the NavParams object to extract the data passed to our
modal through the activateModal method from the TechnologiesPage class.
We then assign this data to properties which will then be implemented in the
myApp/src/pages/modals/modals.html template.
Finally we create a closeModal method which will allow the modal window when
open to be closed.
In your favourite IDE (I’m a fan of Sublime Text but take your pick of whichever
software works best for you) open the myApp/src/pages/modals/modals.html le
and make the following amendments (highlighted in bold):
<ion-header>
<ion-toolbar>
<ion-title>
Description
</ion-title>
<ion-buttons start>
<button ion-button color="primary" (click)="closeModal()">
<span>Close</span>
<span showWhen="ios">Cancel</span>
<ion-icon name="md-close" showWhen="android,windows"></
ion-icon>
</button>
</ion-buttons>
</ion-toolbar>
closeModal()
{
this.viewCtrl.dismiss();
}
}

</ion-header>
<ion-content>
<ion-list>
<ion-item>
<h2>{{ name }}</h2>
<p [innerHTML]="summary"></p>
<p>
<br>
<a href="{{ website }}" target="_blank">Visit website</a>
</p>
</ion-item>
</ion-list>
</ion-content>
Mastering Ionic 2
153
Okay, nothing too involved or complex here.
Within our <ion-header> component we add an <ion-toolbar> component which
contains an <ion-buttons> component to display the button to close our modal.
In our <ion-content> section we create a list to display the properties from the
ModalsPage class.
Unfortunately, if we try to run this in our browser with Ionic serve we won’t actually
be able to get to the technologies page as we don’t have any link from our home
page to get there!
Let’s change that by adding the following addition to the pages object in the
myApp/src/pages/home/home.ts le (highlighted in bold):
import {TechnologiesPage} from '../technologies/technologies';
...
constructor(public navCtrl: NavController) {

this.pages = [
{
...
},
{
...
},
{
title : 'Technologies',
thumb : 'assets/images/tech.png',
description: 'Third party resources used by this app',
link : TechnologiesPage
},
{
...
}
];
Templates
154
import { NgModule } from '@angular/core';
import { IonicApp, IonicModule } from 'ionic-angular';
import { MyApp } from './app.component';
import { HomePage } from '../pages/home/home';
import { AboutPage } from '../pages/about/about';
import { ContactPage } from '../pages/contact/contact';
import { TechnologiesPage } from '../pages/technologies/technologies';
import { TweetsPage } from '../pages/tweets/tweets';
import { Modals } from '../pages/modals/modals';
@NgModule({
The penultimate step now involves registering the technologies and modals
components with the root module for the app - the myApp/src/app/app.module.ts
le (amendments highlighted in bold):

Mastering Ionic 2
155
Finally, from the download les for this chapter copy the images in the Modal/
myApp/src/assets/images/ directory to the same directory in your own local app.
Once this has been done we can then preview the app in the browser by running the
ionic serve command from the Terminal/Command Prompt.
When published to the browser navigate to the Technologies page, click on the
Apache Cordova link and you should be greeted with the following modal window:
declarations: [
MyApp,
HomePage,
AboutPage,
ContactPage,
TechnologiesPage,
TweetsPage,
Modals
],
imports: [
IonicModule.forRoot(MyApp)
],
bootstrap: [IonicApp],
entryComponents: [
MyApp,
HomePage,
AboutPage,
ContactPage,
TechnologiesPage,
TweetsPage,
Modals
],
providers: []
})
export class AppModule {}
Result!
Of course there’s a lot more we could do with the Modal component but I’ll leave that
to you to play around with and subsequently build on the above example.
You can read the API docs for the Modal component here: http://ionicframework.
com/docs/v2/api/components/modal/ModalController/.
What’s impressive about Ionic 2’s component API is that we can quickly and easily
implement functionality such as Lists, Slides and Modals into our pages - and these
are only a fraction of the UI components provided by the framework.
For further information the online documentation for all Ionic 2 UI components is
available here: http://ionicframework.com/docs/v2/components/.
If you’re feeling brave, you might try devoting some time to peering into the source
code for each Ionic UI component located within the following app directory:
node_modules/ionic-angular/components/.
During subsequent chapters we’ll start to use more of these components but here
we conclude our basic introduction to templating and instead turn our attention in the
156
Templates

Mastering Ionic 2
157
next chapter to theming Ionic 2 apps.
Resources
All project les for this chapter can be found listed in the download links on page
636.

Theming
Ionic 2 apps
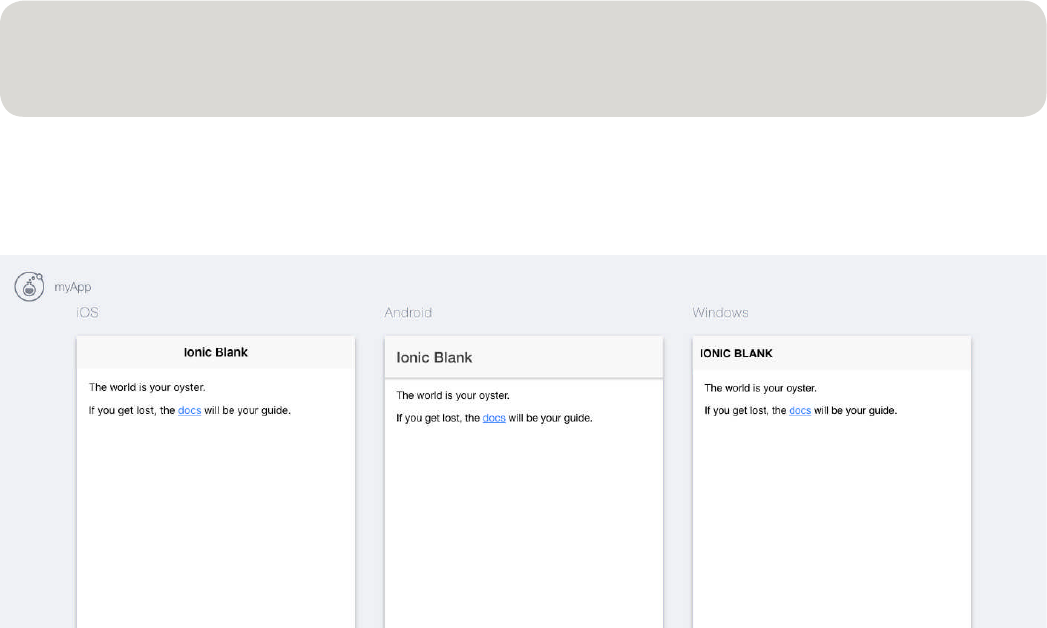
159
Mastering Ionic 2
By default every app you develop with Ionic 2 comes with pre-built themes for iOS,
Android & Windows Phone. This means that UI components that are added to our
templates are already styled to not only appear aesthetically pleasing but also match
the style conventions of the platform that the app is being published to.
If we take a look at the technologies screen of the myApp project, for example,
across iOS, Android & Windows Phone using the following command:
// Add lowercase L as a ag after the command
ionic serve -l
We can see the following variations, displayed side by side, in how font sizes &
styles, header bars and the alignment of page headings are rendered on the screen
for each different platform:
These style variations are driven through the use of the following platform specic
Sass les:
• node_modules/ionic-angular/themes/ionic.globals.ios.scss
• node_modules/ionic-angular/themes/ionic.globals.scss
• node_modules/ionic-angular/themes/ionic.globals.md.scss
• node_modules/ionic-angular/themes/ionic.globals.wp.scss
We’ll take a look at each of these les in more detail below.

ionic.globals.ios.scss
This Sass le imports globally shared style rules and iOS specic rules only - all of
which are targeted, as you might have guessed, for use on Apple mobile & tablet
devices.
The Apple human interface guidelines for iOS design/development are available
here: https://developer.apple.com/ios/human-interface-guidelines/
ionic.globals.scss
This Sass le imports Sass functions, mixins and denes variables that will be used
globally for the app.
ionic.globals.md.scss
Imports style rules, globally shared and Android specic only, targeted specically
for use on the Android platform.
The md in the name of the le stands for Material Design which is a visual language
developed by Google that aims to describe and promote good design principles and
practice for the Android platform.
More information on Material Design is available here: https://material.google
ionic.globals.wp.scss
This is where style rules, globally shared and those that are Windows Phone only,
are imported for use on the Windows Phone platform.
Design & UI information for developers targeting Windows 10 based devices is
available here: https://developer.microsoft.com/en-us/windows/design.
You’ll never have a call to amend these les but it’s important to be aware of how
each platform is initially themed through their use.
160
Theming

Mastering Ionic 2
161
Custom Themes
The src/themes directory allows us Sass variables to be implemented through the
variables.scss le.
Global styles
Style rules to be applied globally as well as those that are platform specic should
be written within the src/app/app.scss le.
Variables
The src/themes/variables.scss le contains various Ionic Sass functions, mixins
and variables (which are applicable across all targeted platforms) imported from the
node_modules/ionic-angular/themes/ionic.globals.scss le as well as sections
that are devoted solely for implementing platform specic variables.
Some of the cross-platform variables are displayed in the following $colors map:
$colors: (
primary: #387ef5,
secondary: #32db64,
danger: #f53d3d,
light: #f4f4f4,
dark: #222,
favorite: #69BB7B
);
Ionic uses keys from the above $colors map as component properties, typically on
buttons, to provide their CSS style which we can see implemented in some of the
components that we worked with during the last chapter.
For example, if you go back to the Sliding Lists exercise in the last chapter you’ll see
this little snippet of code which denes the hidden buttons for our list that are
revealed when an item is swiped:

Theming
162
<ion-item-options side="right">
<button ion-button color="primary" (click)="buttonOne(page.title)">
<ion-icon name="text"></ion-icon>
BUTTON 1
</button>
<button ion-button color="secondary" (click)="buttonTwo(page.title)">
<ion-icon name="call"></ion-icon>
BUTTON 2
</button>
</ion-item-options>
Notice the primary and secondary values (highlighted in bold)?
These are keys drawn from the $colors map in our variables.scss le which can,
of course, be edited to use whatever colors you desire and there’s nothing stopping
you from adding new key/value pairs too.
Let’s say you wanted to provide specic style rules for different types of social media
sharing buttons.
We could add these to the $colors map like so:
$colors: (
...
twitter:(
base: #55acee,
contrast: #ffffff
),
facebook:(
base: #38669f,
contrast: #ffffff
)
);
Mastering Ionic 2
163
This is a little different to the existing key/value pairs but what we have done in the
above is dene the key for each social media component and then supply multiple
values in the form of a map for each key.
The keys that are supplied in the twitter and facebook maps are as follows:
• base (acts as the background color for a component)
• contrast (acts as the text color for the component)
The base and contrast keys are recognised defaults and parsed by Ionic using
colour handling functions provided by the node_modules/ionic-angular/themes/
ionic.functions.scss le.
By supplying a map of key/value pairs to our social media keys we have greater
exibility in how we can customise style data that we want to add to the $colors
map.
UI Components
If you look inside the node_modules/ionic-angular/components directory of your
app you’ll see all of the available UI components for quickly implementing interface
elements such as an alert box, modal window or slideshow.
With a few exceptions almost all of these UI components mirror one another in
terms of the Sass les they contain:
• component-name-here.scss
• component-name-here.ios.scss
• component-name-here.md.scss
• component-name-here.wp.scss
Each platform specic Sass le imports the global Sass le for that platform into
itself as shown in the following for the List component list.ios.scss le:

Theming
164
@import " ../../themes/ionic.globals.ios";
This is a pattern that you’ll notice throughout the pre-built Sass les contained within
your app - the segregation and modularisation of different types of style rules that
are then imported into other Sass les as and where required.
Themes
In addition to each component’s respective Sass les our app also contains a
node_modules/ionic-angular/themes directory which contains the following two
pre-baked themes:
• Dark
• Default
The Default theme (which IS the default theme for the app if you hadn’t already
guessed from the name!) for each platform is imported into their respective les:
• node_modules/ionic-angular/themes/ionic.globals.ios.scss
• node_modules/ionic-angular/ themes/ionic.globals.md.scss
• node_modules/ionic-angular/ themes/ionic.globals.wp.scss
These themes are then imported into the platform specic Sass les for each UI
component and the following specic Sass les:
• node_modules/ionic-angular/themes/components.scss
• node_modules/ionic-angular/platform/cordova.ios.scss
What this means is that the team at Ionic have already done the work of not only
providing theming for your app but also ensuring that such theming is also tailored
on a platform by platform basis too.
This is pretty powerful and gives you the exibility to develop and publish your app
without any CSS modications whatsoever.

Mastering Ionic 2
A word of warning here though - Do not EVER manually edit these theme les or the
Sass UI component les to change any of the existing Sass rules/variable values
that are contained within.
First off, there should NEVER be a need to do this and secondly, doing so could
introduce some pretty serious layout & styling bugs or have other unforeseen and
unintended consequences - just sayin’!
And if you want to change the default Ionic theme to use the dark theme instead?
Simply include the following import statement for the dark theme towards the top of
your src/theme/variables.scss le like so:
165
This change would then be seen across all targeted platforms.
Simple as!
This pre-built theming does create a problem though with the potential for many
Ionic apps to look the same as one another on the Apple App or Google Play stores
unless some level of CSS customisation involved.
Okay, with that said how do we roll our own themes then?
Custom Theming
If all App Store apps looked the same it would be pretty bad - not to mention being
downright suspicious, bland, boring and ultimately unattractive right?
If we want our apps to look unique, communicate their own specic branding and
ultimately stand out amongst others apps in the online marketplace then we have to
implement our own custom theming.
With Ionic 2 there are a number of ways we could achieve this:
@import "ionic.build.dark";

Theming
166
• Modifying attributes & theme values
• Override existing Sass variables
• Dene custom Sass variables
• Dene custom component styles
• Setting mode congurations
Modifying attributes & theme values
The quickest and least disruptive method of customising the app design would be to
edit the src/app/app.scss le and/or src/theme/variables.scss le.
Editing the src/theme/variables.scss le gives us the advantage of simply
amending preset values to match those of the design palette for our app.
In this le, as we saw earlier in the chapter, we can add additional key/value pairs to
the $colors map (amendments displayed in bold):
$colors: (
primary: #387ef5,
secondary: #32db64,
danger: #f53d3d,
light: #f4f4f4,
dark: #222,
favorite: #69BB7B,
twitter:(
base: #55acee,
contrast: #ffffff
),
facebook:(
base: #38669f,
contrast: #ffffff
)
);

Mastering Ionic 2
167
The twitter and facebook keys can then be used as attributes on UI components and
DOM elements in our page templates.
Let’s see this at work in our app.
In the myApp/src/pages/home/home.html le replace the primary and secondary
color values with twitter and facebook values instead (displayed in bold below):
<ion-item-options side="right">
<button ion-button color="facebook" (click)="buttonOne(page.title)">
<ion-icon name="text"></ion-icon>
BUTTON 1
</button>
<button ion-button color="twitter" (click)="buttonTwo(page.title)">
<ion-icon name="call"></ion-icon>
BUTTON 2
</button>
</ion-item-options>
All we’re doing here is simply changing the colours of the background/text
colour for the buttons that are revealed when we swipe our list item to the left.
And yes, I DO know they’re not social media buttons!
That’s not the point for this example though as we’re doing this to prove that we can
add/change attributes to the myApp/src/theme/variables.scss le that can then be
used in our page templates as and where required.
If we run the ionic serve command (with or without the lowercase L as an additional
ag - the choice is yours!) we should be able to see the changes to these buttons as
shown in the following screenshot:
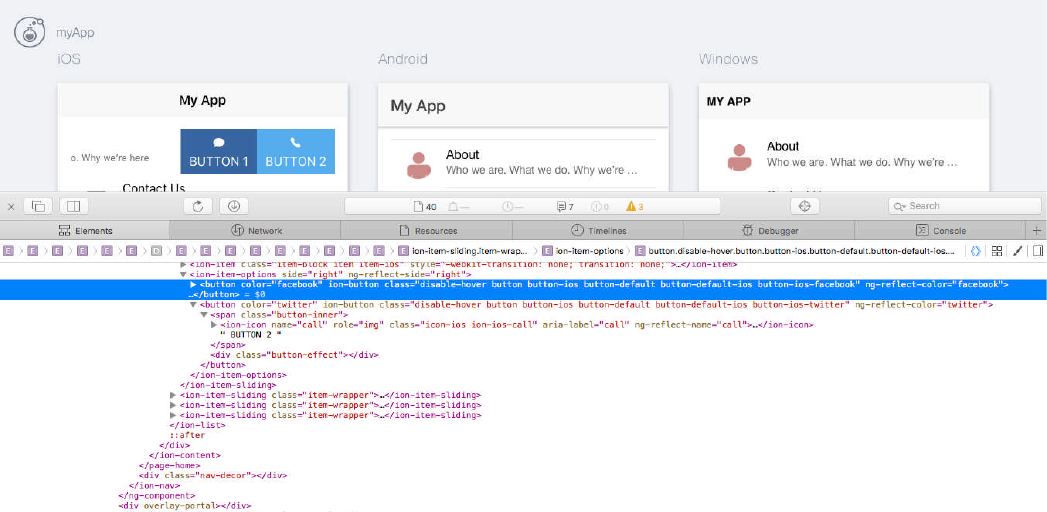
Theming
168
Here we see the facebook and twitter styles being applied and those attributes
displayed on each button component in the browser console.
It’s important to note that we could dene any type of CSS property, not just
background/text colours, in the myApp/src/theme/variables.scss le.
If, for example, we wanted to change font sizes, paddings, margins or positioning of
elements doing so would be relatively simple using this Sass le.
Using attributes is one of the easiest, fastest and most effective ways to style your
app as there are so many pre-existing attributes that can be used and/or modied as
required.
Now let’s look at overriding existing Sass variables.
Overriding Sass variables
We can also override Ionic Sass variables used in both the themes directory and
UI components by simply adding the desired variable name(s) of our choice to the
myApp/src/theme/variables.scss le like so (indicated in bold):

169
Mastering Ionic 2
Notice in the above examples we have specic platform variants of the same style
rules, signied through the presence of ios, md or wp in the naming of the style rule.
This gives you the option of modifying existing styles for a single platform or multiple
platforms - the choice is entirely yours.
For a complete list (and be warned - it is a VERY large list) of all the Ionic Sass
variables that can be overwritten using the src/theme/variables.scss le refer to
the following: http://ionicframework.com/docs/v2/theming/overriding-ionic-variables/.
Custom Sass variables
Of course there may be elements in your app design that require Sass variables that
have to be created from scratch.
As in previous examples, these can be added to the src/theme/variables.scss le
but, before you do this, it really is worth your time to check the Ionic variables
documentation to ensure that you’re not recreating the wheel!
The beauty of creating your own variables is that they can be referenced in multiple
classes/Sass les but any edits that are required will only ever involve a change to
that variable denition in the src/theme/variables.scss le.
$colors: (
...
);
$text-color: #686868;
$font-size-base: 1.6rem;
$list-ios-background-color: #ffffff;
$list-md-background-color: #ffffff;
$list-wp-background-color: #ffffff;

170
Theming
For example, if we have a variable called $my-padding which is used to provide the
padding values for page elements we could supply something like the
following in our src/theme/variables.scss le:
$colors: (
...
);
...
$my-padding: 20px;
Then we could supply this as a value for style rules in other classes for our
application like so:
padding: $my-padding;
Now if we want to edit the padding value we only need to make a change in one
location: the $my-padding variable in the src/theme/variables.scss le.
This makes the inclusion of Sass a no-brainer when it comes to effectively managing
the styling for your Ionic app.
Custom component styles
Components generated through the Ionic CLI will contain Sass les that can be
used for adding style rules specic to that page only.
The freshly generated myApp/src/pages/about/about.scss le, for example, will
contain the following selector:
page-about {
}

Mastering Ionic 2
171
This selector matches that listed in the @Component decorator for the myApp/src/
pages/about/about.ts le (highlighted in bold):
When the build process is triggered through the Ionic CLI all of the application’s
Sass les - both Ionic UI and custom Sass les - are converted and compiled into a
single CSS le which is published to the following location: www/build/main.css.
For example, style rules entered in the myApp/src/pages/home/home.scss le are
published in the www/build/main.css le as:
@Component({
selector: 'page-about',
templateUrl: 'about.html'
})
Setting mode congurations
Each platform has a specic mode associated with it by default:
• md (Android)
• ios (iOS)
• wp (Windows Phone)
• md (Core - used for any platform other than the above)
You will have seen examples of variables using these modes earlier in this chapter
in the section titled Overriding Sass variables.
We can also congure mode values for each platform using the Cong API - typically
within the imports section of our src/app/app.modules.ts le like so:
page-home .isSuccess {
color: #1E88E5 !important;
}
page-home .isError {
color: #D43669 !important;
}

172
Theming
imports: [
IonicModule.forRoot(MyApp, {
backButtonText: "",
backButtonIcon: "md-arrow-back",
iconMode: "md",
modalEnter: "modal-md-slide-in",
modalLeave: "modal-md-slide-out",
pageTransition: "md",
});
],
The above conguration settings give us the ability to theme our current iOS app to
adopt an Android material design look (this is purely for demonstrative purposes as
altering the expected iOS UI look & feel/conventions isn’t recommended for
providing a good user experience - not to mention it might just work against you
when submitting your app for Apple’s App Store moderation process).
We can however ne tune our conguration settings so they are targeted at specic
platforms instead (amendments highlighted in bold):
imports: [
IonicModule.forRoot(MyApp, {
platforms: {
android: {
backButtonText: "",
backButtonIcon: "md-arrow-back",
iconMode: "md",
modalEnter: "modal-md-slide-in",
modalLeave: "modal-md-slide-out",
pageTransition: "md",
},
ios : {
backButtonText: "Previous",
backButtonIcon: "ios-arrow-back",

iconMode: "ios",
modalEnter: "modal-ios-slide-in",
modalLeave: "modal-ios-slide-out",
pageTransition: "ios",
}
}
});
],
Now we have far more granular control of conguring mode settings for each target
platform.
The Cong API also gives us the ability to individually set platform specic options in
our TypeScript classes using the following method:
cong.set('ios', 'textColor', '#AE1245');
This method accepts 3 parameters:
• platform (optional - 'ios' or 'android', if omitted this will apply to all platforms)
• key (optional - The name of the key used to store our value I.e. 'textColor')
• value (optional - The value for the key I.e. '#AE1245')
Keys that are set can then be retrieved using the Cong API get method:
cong.get('textColor');
Mastering Ionic 2
173
Finally, we also have the ability to set available conguration values at a component
level like so:
<ion-tabs tabsPlacement="bottom">
<ion-tab tabTitle="Dash" tabIcon="pulse" [root]="tabRoot"></ion-tab>
</ion-tabs>
Personally I prefer to supply a Cong object within the import section of the src/app/
app.modules.ts le (as displayed earlier) but however you want to congure your
app Ionic 2 gives you plenty of options to choose from.
That concludes our coverage of the different ways in which we can implement
styling and theming for our Ionic 2 apps.
As a general rule, stick to modifying and using existing Sass variables wherever
possible as this will denitely help in the long run to limit any potential difculties with
managing your app styling.
Doing so also has the hugely important advantage of not interfering with the
pre-congured iOS/Android/Windows Phone styling conventions either - as this is
not a behaviour you want to or should break!
With that said let’s now turn our attention to using native plugins within our app.
Theming
174

Plugins

176
Mastering Ionic 2
One of the key selling points of the Ionic framework is its integration with Apache
Cordova allowing mobile/tablet developers to take advantage of its powerful but
streamlined plugin API.
Native functionality such as network detection, In-App purchases & media capture,
to name but a few, are able to be accessed and used within Cordova based apps on
a plugin by plugin basis simply and quickly thanks to this API.
These plugins expose methods that are made accessible through both JavaScript
and TypeScript which can then be used to interact with the mobile/tablet device for
the purposes that the plugin was designed for.
Without this API our apps would be little more than pre-packaged mobile websites;
incredibly limited in scope and not particularly compelling for an end user to want to
interact with.
When we create an Ionic app using the CLI tool there are a number of pre-installed
plugins available for immediate use within our apps:
• Console (Provides additional console logging functionality for native platforms)
• Device (Provides information about the device hardware and software)
• Splashscreen (Helps control the app splashscreen loading & display)
• Statusbar (Provides ability to customise iOS/Android StatusBar)
• Whitelist (Controls access to external website content)
• Ionic Plugin Keyboard (Assists with keyboard events and interactions)
These are installed in the plugins directory which is the designated location for all
Cordova based plugins that are to be used within an Ionic 2 app.
If you take a peek inside this directory you’ll see most of the plugins are prexed
with cordova-plugin (which, as you’ve probably guessed, indicates they are Apache
Cordova plugins) but the last listed plugin is prexed with ionic-plugin instead.
This is installed from a Cordova based plugin system called Ionic Native.

Plugins
177
Ionic Native
Ionic Native is simply a curated set of Cordova plugins that have been modied to
provide wrappers for ES5/ES6 & TypeScript making them compatible with and
available for use in Ionic 2 based apps.
This is the successor to the previous ngCordova plugin ecosystem that provided
Cordova based plugins for use within Ionic 1 apps.
Using Ionic Native we can choose from over 80 plugins that provide anything from
Background Geolocation and accessing the device camera to managing phone
contacts and working with SQLite databases.
We’ll be working with some of the Ionic Native plugins a little later on in this chapter,
and throughout the remainder of this book, but for now further information about this
aspect of the Ionic ecosystem, and a full list of curated plugins, can be found here:
http://ionicframework.com/docs/v2/native/
A full listing of available plugins for the Apache Cordova framework’s can be found
here: https://cordova.apache.org/plugins/ and the API methods for non-third party
plugins can be found here: https://cordova.apache.org/docs/en/latest/#plugin-apis.
Managing plugins
Even though we have a basic set of initial plugins already installed our app would be
pretty limited in functionality if we couldn’t add more plugins as and where required.
To add a plugin to your app you would simply use the Ionic CLI tool and, providing
you’ve navigated to the root of your app directory, run the following command:
ionic plugin add name-of-plugin-to-be-installed-here
And that’s pretty much it - Mac/Unix users might need to prex the above with sudo.
Depending on the speed of your network connection and the plugin repository status
the process of installing your plugin can take up to a few minutes to complete.
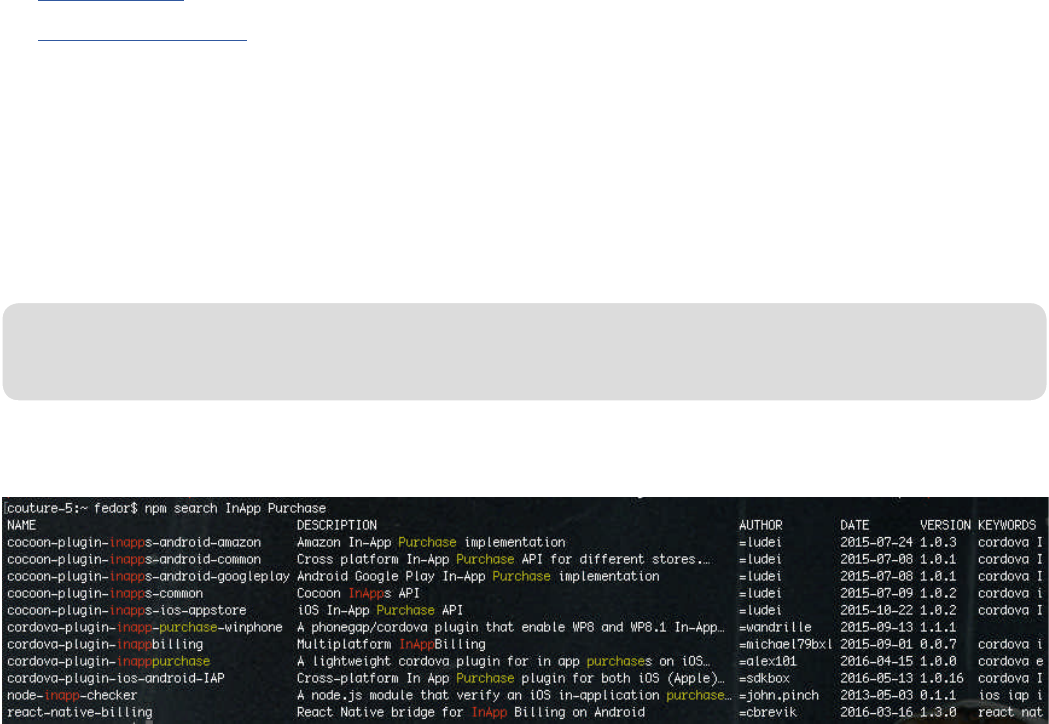
Mastering Ionic 2
178
But how would we know the name of the plugin we want to install?
There’s a couple of methods we can use to ascertain this information.
The rst method would be to browse either of the following online resources, select
the plugin you’re most interested in and follow the related instructions:
• Ionic Native
• Apache Cordova
The second method involves using the npm CLI tool to search the NPM registry and
browse available Cordova plugins.
Let’s say I wanted to source all the possible plugins for being able to implement
In-App purchase functionality I could perform a search like the following:
Which, if any packages can be found that match the provided search term, should
return results akin to the following:
npm search InApp Purchase
Notice the Cordova prexed plugin listings under the NAME column? These are the
ones we’re interested in.
Browsing online is far more effective than searching the npm registry from the
command line (but it’s kind of interesting to know that you can nd plugins this way).
Let’s say though that we wanted to install one of the above Cordova packages.
We could do this using the following ionic command (prex with the sudo command
on Mac/Unix systems to overcome any permission errors that you may encounter):

ionic plugin add cordova-plugin-inapppurchase
This would then be installed to the plugins directory of our app and also for the
device platform directories, such as Android, that we may have installed too.
Currently in our app there is only the iOS platform and you will have noticed that the
Ionic CLI informs us that the plugin is being installed for iOS.
Now that this plugin has been successfully installed we can also use the Ionic CLI to
provide a complete listing of all the currently installed plugins:
179
Plugins
ionic plugin ls
Which will output the following list to the CLI console:
cordova-plugin-console 1.0.3 "Console"
cordova-plugin-device 1.1.2 "Device"
cordova-plugin-inapppurchase 1.0.0 "In App Purchase"
cordova-plugin-splashscreen 3.2.2 "Splashscreen"
cordova-plugin-statusbar 2.1.3 "StatusBar"
cordova-plugin-whitelist 1.2.2 "Whitelist"
ionic-plugin-keyboard 2.2.1 "Keyboard"
There may be times when we need to remove plugins though.
This might, for example, be the case should a plugin we’ve installed be causing our
app to crash (it’s rare but it can happen) or we simply don’t need to use that
particular plugin.
Accomplishing this is fairly straightforward - as shown in the following command
where we remove the plugin that we installed earlier:
ionic plugin rm cordova-plugin-inapppurchase

Mastering Ionic 2
180
Now if we list the installed plugins via the Ionic CLI we should see the following
output displayed (minus the removed In-App Purchase plugin):
cordova-plugin-console 1.0.3 "Console"
cordova-plugin-device 1.1.2 "Device"
cordova-plugin-splashscreen 3.2.2 "Splashscreen"
cordova-plugin-statusbar 2.1.3 "StatusBar"
cordova-plugin-whitelist 1.2.2 "Whitelist"
ionic-plugin-keyboard 2.2.1 "Keyboard"
That pretty much covers the basics of plugins and their management, now let’s take
a look at one example of how we can use some of these Cordova plugins within our
Ionic 2 apps.
Geolocation
One of the handiest features of modern smartphones is geolocation functionality
which allows apps to determine/display the user’s current geographic location (or
closest approximation to).
We’ll use the Ionic Native Geolocation and Google Map plugins to implement this
functionality in a brand new app.
Start by running the following commands at the root of your apps/ projects directory:
ionic start geoApp blank --v2
cd geoApp
npm install
ionic platform add android
ionic plugin add cordova-plugin-geolocation
Notice that we haven’t installed the Google Maps plugin?
Before we do that there’s a couple of steps we need to take:

Plugins
181
This amendment might seem insignicant but the App ID will be important when you
create and congure the API keys for Google Maps.
Make a note of this as you will be needing the App ID during the next step!
Now that amendment has been made to your cong.xml le log into your Google
Developers Console account (if you’re not already registered with the service create
a free account now - https://console.developers.google.com - and, once completed,
return back to this page) where you will subsequently:
• Enable the Google Map API
• Generate iOS & Android API keys
There’s quite a bit involved with generating the iOS & Android API keys so follow
closely and be patient!
Once you’re logged in to your Developers Console account you should see the
following screen displayed:
• Edit the cong.xml le to set the ID for our app
• Generate Google Map API keys for both iOS & Android
In your cong.xml le enter a suitable ID for your app - typically this would follow
a reverse domain naming convention - such as the following (highlighted in bold
- please note I’ve broken the tag attributes/values over separate lines to help with
readability):
<widget
id="com.saintsatplay.geoApp"
version="0.0.1"
xmlns="http://www.w3.org/ns/widgets"
xmlns:cdv="http://cordova.apache.org/ns/1.0">
182
Mastering Ionic 2
If you’re not seeing the API Manager dashboard click on to the menu icon at the top
left hand side of the page and select the API Manager link from the sidebar that
animates into view.
The API Manager displays all of the Google API’s that you have enabled for your
projects.
You’ll need to enable the following API’s (if they aren’t already listed):
• Google Maps Android API
• Google Maps SDK for iOS
To do this click on the ENABLE API link at the top of the Dashboard.
A list of all the publicly available Google API’s is then displayed as shown in the
following screenshot:
Plugins
183
From the list click onto and enable the following API’s:
• Google Maps Android API
• Google Maps SDK for iOS
Once these have been enabled you’ll need to perform a little command line work
before being ready to generate API keys for both iOS and Android.
Prior to commencing with this though you’ll need to ensure that the latest versions of
the following software are installed on your system in the Android SDK Manager:
• Android SDK Tools
• Android SDK Platform Tools
• Android SDK Build Tools
• Android Support Repository
• Android Support Library
These are shown highlighted in red in the following screenshots:
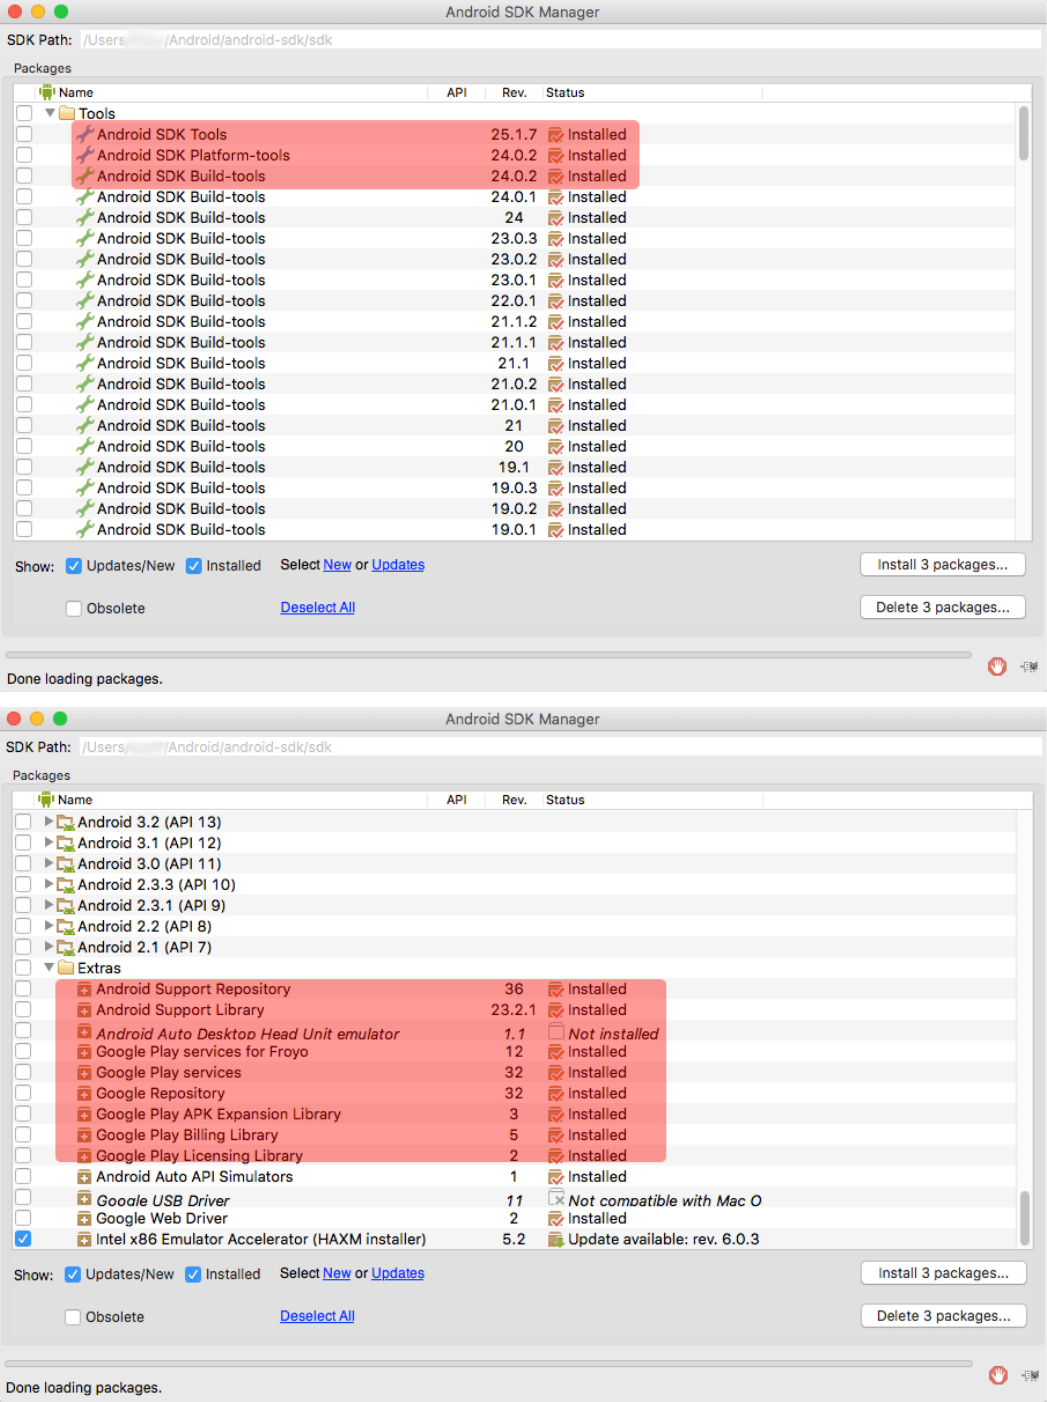
Mastering Ionic 2
184

185
Plugins
You’ll also need to make sure you’ve congured your system properly as explained
in the Conguring your Environment chapter.
Generating your signing key
Assuming that this has all been done you’ll now be generating a signing key for the
Android version of the GeoApp example project.
This signing key can be used to authenticate generated APK les for the app so that
they can be submitted to the Google Play store. That’s beyond what we’re looking
to achieve in this chapter - instead we want to simply obtain the SHA-1 ngerprint
for this signing key.
This SHA-1 ngerprint is required by Google when we generate our Android API key
so as to restrict usage for that API key to a specied app. Put simply - no SHA-1
signing certicate ngerprint, no Android API key.
To obtain that SHA-1 ngerprint though we need to rstly generate our signing key.
In your Terminal, and while at the root of the geoApp project, run the following
command:
keytool -genkey -v -keystore geo-app-release-key.keystore -alias geoAppKey
-keyalg RSA -keysize 2048 -validity 10000
The keytool application (which comes installed with your system’s JDK software) is
used to manage cryptographic keys and trusted certicates.
In the above command we are using this utility to generate a private key that we are
naming geo-app-release-key.keystore.
When you run this command you will be prompted to create a password for the
keystore and then answer a series of questions before the key is created. When this
process has been completed the generated le - geo-app-release-key.keystore -
will be saved in the root directory of your app.

186
Mastering Ionic 2
IMPORTANT - It would be wise, in future projects, to move this le out of any
project directories and store it somewhere safe.
You denitely do NOT want this le to be added, or made available, to version
control (as this would present a huge security risk) and nor should it be in the
published IPA/APK binaries for your apps that are distributed via the Apple & Google
Play App stores or via ad-hoc distribution.
If someone were to reverse-engineer the code for those binaries this means they
would gain access to the keystore if it were present in the codebase.
Remember, a good developer is a security conscious developer!
For the purposes of this example though we can keep the keystore where it is (as
we aren’t going to be adding this app to version control or distributing the app for
other users to interact with) but in your own projects denitely move the keystore le
out of your Ionic apps and store it somewhere safe.
If you’ve tried running the above command and are experiencing problems please
refer to the following Android installation guide to make sure that the necessary
software is installed on your environment and system paths are correctly congured:
http://cordova.apache.org/docs/en/latest/guide/platforms/android/index.html.
Obtaining the keystore SHA-1 ngerprint
You should, assuming there were no errors with running the keytool command, now
have a keystore le residing in the root directory of the geoApp project.
In order to generate an Android API key we need to obtain the SHA-1 ngerprint for
this signing key.
In your Terminal application run the following command:

187
keytool -list -v -keystore geo-app-release-key.keystore
Plugins
You’ll be prompted for the password you used to create the keystore with and, once
successfully entered, you should see output akin to the following being displayed in
the Terminal:
Keystore type: JKS
Keystore provider: SUN
Your keystore contains 1 entry
Alias name: alias_name
Creation date: 01-Sep-2016
Entry type: PrivateKeyEntry
Certicate chain length: 1
Certicate[1]:
Owner: CN=Saints at Play, OU=Saints at Play Limited, O=Saints at Play Limit-
ed, L=London, ST=Greater London, C=UK
Issuer: CN=Saints at Play, OU=Saints at Play Limited, O=Saints at Play Limit-
ed, L=London, ST=Greater London, C=UK
Serial number: aaaaaaa0
Valid from: Thu Sep 01 13:57:31 BST 2016 until: Mon Jan 18 12:57:31 GMT
2044
Certicate ngerprints:
MD5: 15:4A:1C:BD:45:6B:E9:76:87:43:A1:43:76:C4:E0:2E
SHA1: 86:8F:54:4F:B5:C9:3E:19:0B:E8:11:3F:C5:56:CB:23:1E:B7:89
SHA256: 02:91:47:03:23:27:4A:50:1B:CE:B8:CE:11:B8:75:AD:B0:57:F6
Signature algorithm name: SHA256withRSA
Version: 3
Extensions:
#1: ObjectId: 1.7.12.31 Criticality=false
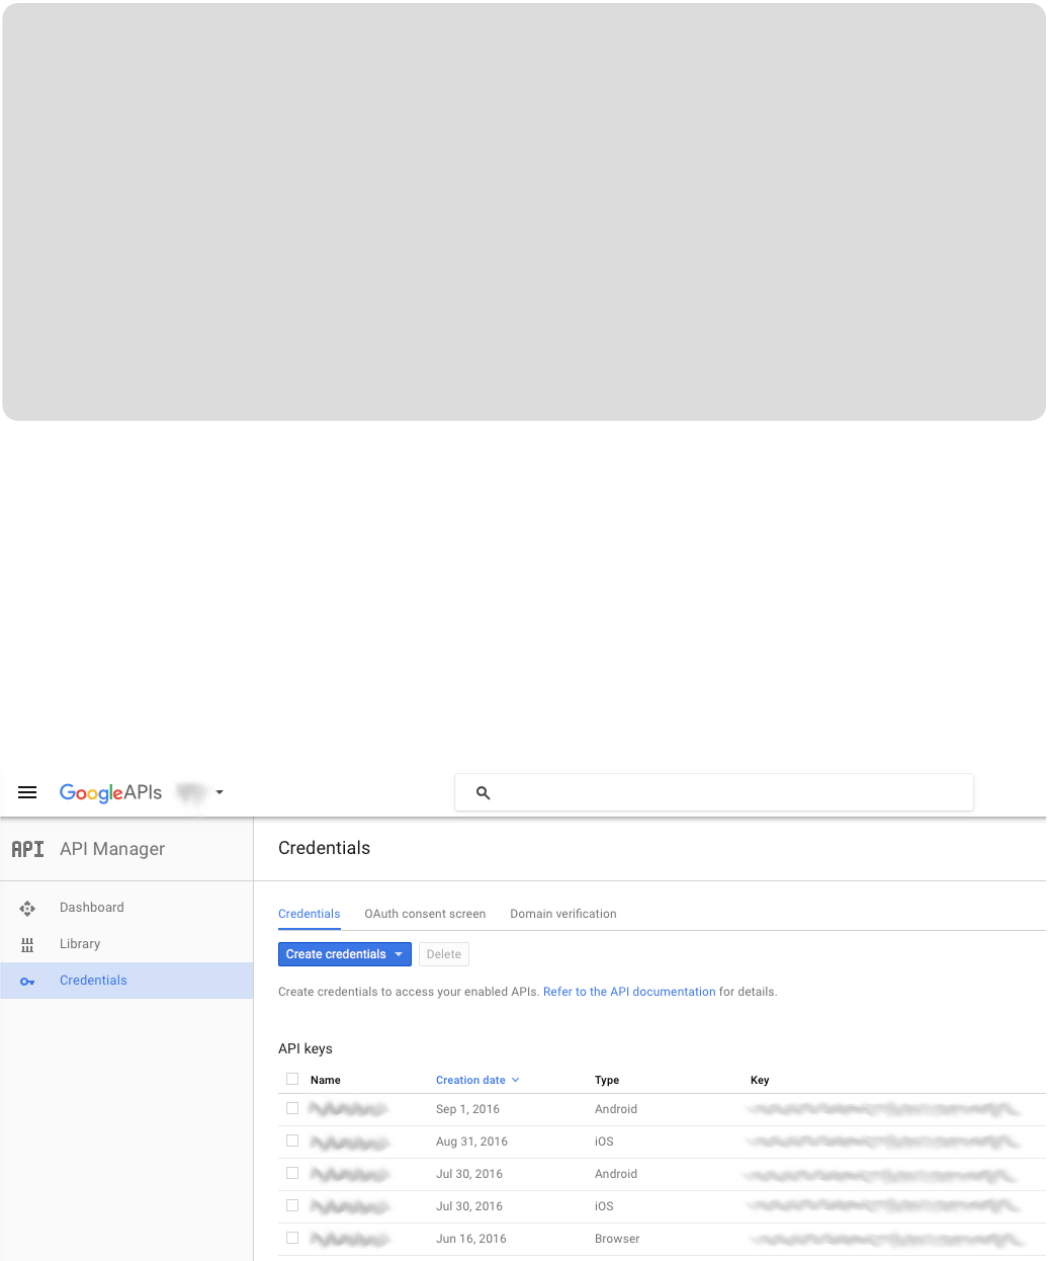
SubjectKeyIdentier [
KeyIdentier [
0000: AD 62 FC 20 04 0B DB DB F3 8B 11 B4 EC 48 33 39 .b. .........H39
0010: D3 79 29 94 .y).
]
]
*******************************************
*******************************************
In the section titled Certicate ngerprints locate the SHA-1 entry and, from your
own generated output, proceed to copy the output that is shown in bold.
Generating Google API Keys
Now that you’ve obtained the SHA-1 ngerprint for your own signing key return to
your Google Console Developer account and select the Credentials link under the
API manager.
If you have any pre-existing credentials these will be displayed here.
Open the Create credentials menu and select API key from the displayed options.
188
Mastering Ionic 2
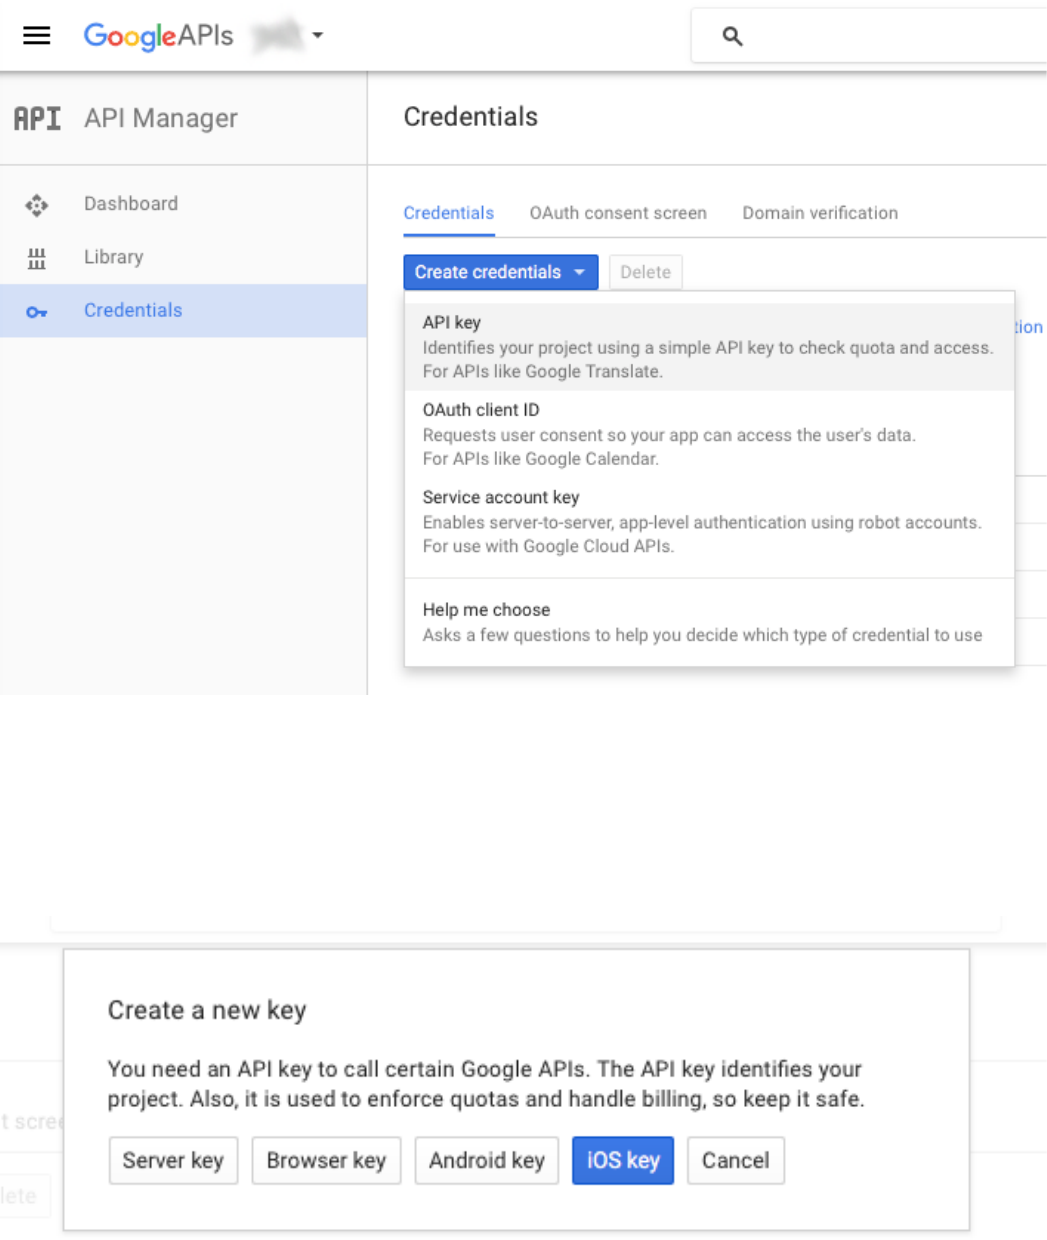
Plugins
189
We’ll need to create both an iOS key and an Android key from the available key
types.
Let’s start by creating an Android key as we already have the SHA-1 ngerprint that
we generated in the previous section copied and waiting for this purpose.
When the Create Android API Key screen loads click on the Add package name
and ngerprint button to reveal the Package name and SHA-1 certicate ngerprint
elds.
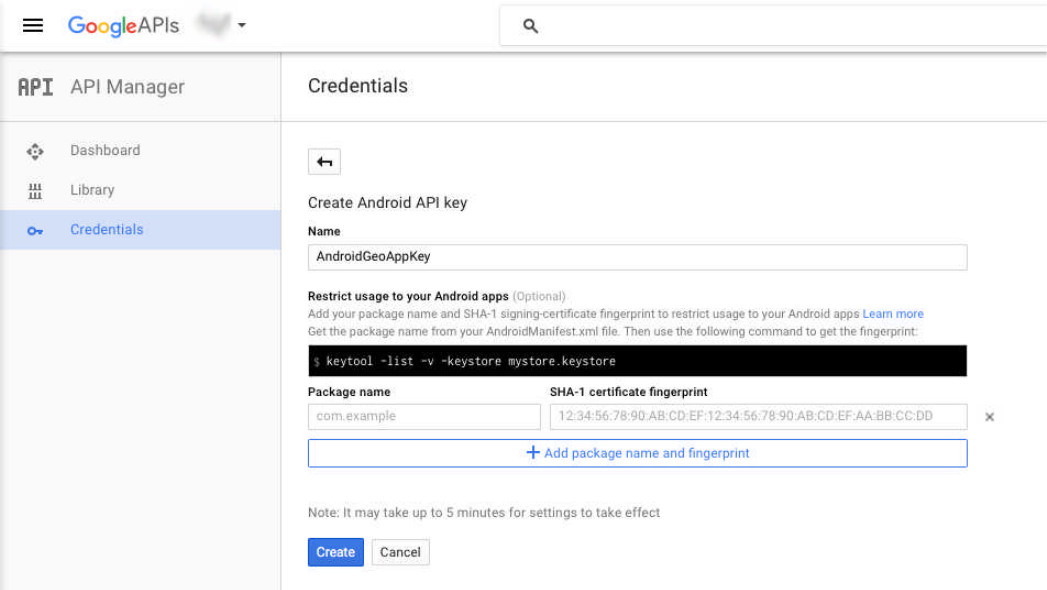
Mastering Ionic 2
190
I’ve used the name AndroidGeoAppKey to identify this Android API key but you can
use whatever name you feel works best.
In the Package name eld enter the same App ID value that was entered into the
geoApp cong.xml le (which, in this example, would be com.saintsatplay.geoApp).
In the SHA-1 certicate ngerprint eld paste the keystore SHA-1 ngerprint you
copied from the Terminal in the previous section.
Once this is completed, click on the Create button and, after being returned to the
Credentials dashboard, you’ll see your newly generated API key listed.
Copy the string that is displayed under the Key column for our newly created API
key and paste this into a temporary text le. We’ll use this value in the next section
when we install the Google maps plugin.
Now we need to generate the iOS key.
Repeat this process but select iOS key from the Create a new key options.
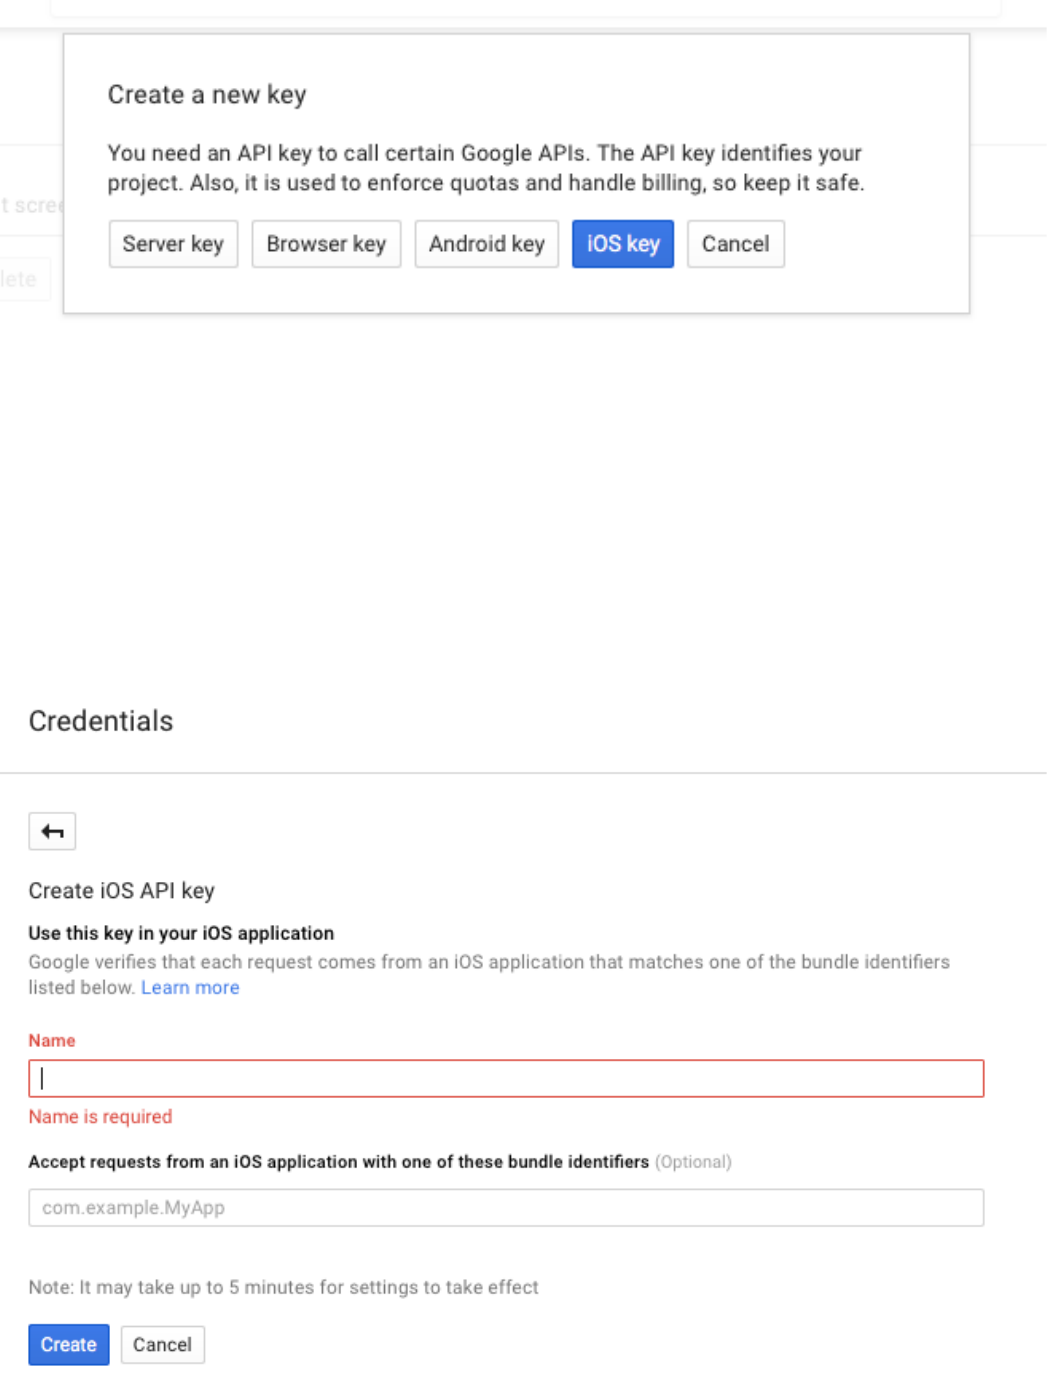
Plugins
191
On the Create iOS API key screen you’ll only have to be concerned with entering the
name and bundle identier for your key.
By default Google already prells the name for you but you can always change this
value to something more project specic (such as, for example, iOSGeoAppKey).
In the bundle identiers eld enter the App ID value found in the widget id eld of the
geoApp cong.xml le (which, in this example, would be com.saintsatplay.geoApp).
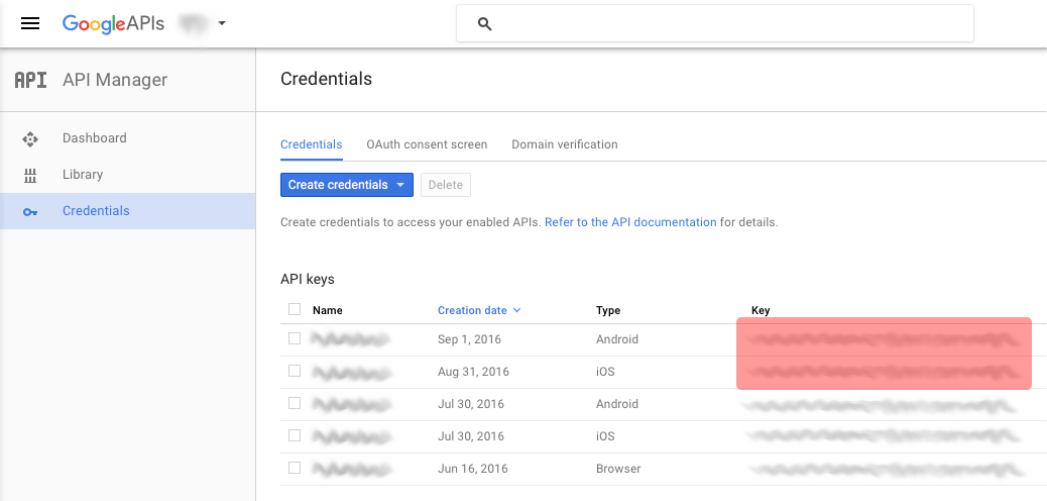
Mastering Ionic 2
192
Once this is completed click on the Create button and after you’ve been returned to
the Credentials dashboard, you’ll see your newly generated iOS API key listed.
Repeat the action you performed for the Android API key and copy the string
value displayed for the iOS API key under the Key column and also paste this into
the same temporary text le we used for the Android API key value.
We’ll use both of these values in the next section when we install the Google maps
plugin - just remember which key value is which!
The below screenshot shows where these string values need to be copied from
(highlighted in red):
Now we’ve created and congured the required API keys let’s move on to installing
the Google Maps plugin.
Installing Googlemaps
There are a few Google Maps plugins available for use with the Apache Cordova
framework (remember that Ionic 2 is built on top of this framework and, as a result,
is able to take advantage of its extensive range of publicly available plugins).

Plugins
193
We’re going to use the cordova-googlemaps-plugin which is available through Ionic
Native but we’ll install that directly from the github master link for the plugin instead.
We do this because, at the time of writing, this is the only stable version of the plugin
that won’t cause errors that break our app when we run a build process.
In your Terminal and at the root of the geoApp project directory enter the following
command (substitute YOUR_APP_KEY_VALUE_HERE for the respective iOS and
Android key values you copied and stored for safekeeping in the last section - BUT
do make sure you enter the iOS key value for iOS and the Android key value for
Android otherwise the Google Maps functionality won’t work!):
cordova plugin add https://github.com/phonegap-googlemaps-plugin/cordo-
va-plugin-googlemaps --variable API_KEY_FOR_ANDROID="YOUR_APP_
KEY_VALUE_HERE" --variable API_KEY_FOR_IOS="YOUR_APP_KEY_VAL-
UE_HERE"
This might take a few minutes depending on the speed of your network connection
and possible server latency where the requested plugins are being downloaded and
installed from.
The App
Now that we’ve installed these plugins let’s take a look at the app that we’re going to
be developing over the following pages.
It’s pretty basic in terms of both appearance and functionality but we’re going to
generate a Google Maps view that displays our current location, using the
Geolocation and Google Maps plugins that we’ve just installed.
We’ll make use of Google Maps markers & infoWindows as well as adding in some
animation just to add a little something extra to the user experience.
The end result of our development should resemble something like the following
screenshots (I am assuming here that your location WILL be different to my own!):
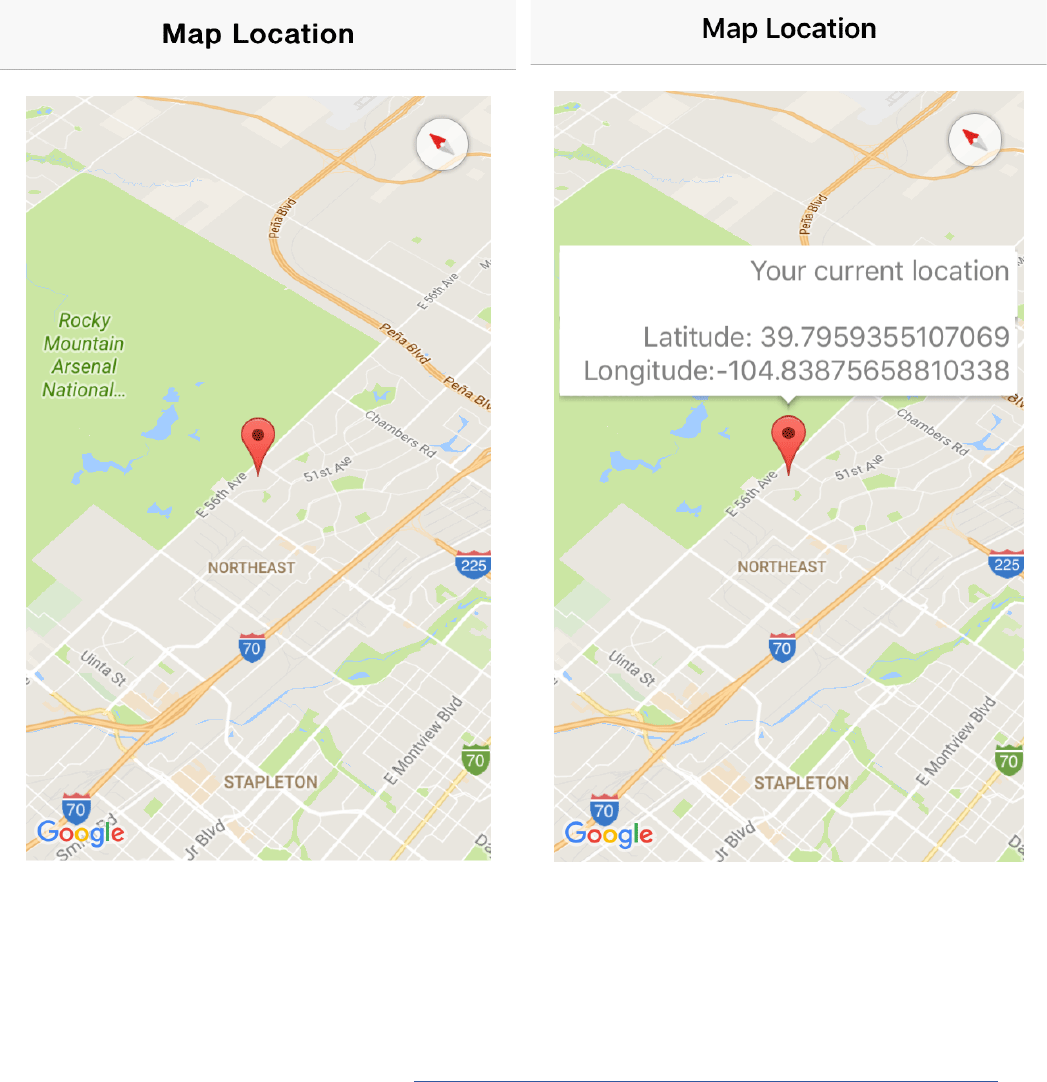
Mastering Ionic 2
194
Nothing earth shattering I’m sure you’ll agree but it will provide some nice visuals
and functionality for us to play with while we acquaint ourselves with using the
Google Maps and Geolocation plugins.
IMPORTANT - you might want to understand how the Google Maps plugin works.
With the preview covered for what we’re aiming to build we can now get cracking
with the actual development!
Open the geoApp/src/pages/home/home.ts le and make the following
amendments to the code (highlighted in bold):

195
Plugins
import { Component } from '@angular/core';
import { NavController, Platform } from 'ionic-angular';
import { Geolocation } from 'ionic-native';
@Component({
selector: 'page-home',
templateUrl: 'home.html'
})
export class HomePage {
public coords : any;
public isActive : boolean = false;
constructor(
public navCtrl: NavController,
public platform: Platform
)
{
this.platform.ready().then(() =>
{
Geolocation.getCurrentPosition().then((resp) =>
{
this.coords = {
lat: resp.coords.latitude,
lng: resp.coords.longitude
};
this.isActive = true;
})
.catch((error) => {
console.dir(error);
});
});
}
}

Mastering Ionic 2
So what we’re doing here is:
• Importing the Geolocation class from Ionic Native
• Importing the Platform class which will allow us to obtain information about the
device the app will be running on
• Call the ready method of the Platform class within our class constructor so that
any native functionality we want to implement can be triggered when the DOM is
fully loaded and available for use
• Call the GetCurrentPosition method of the Geolocation class inside a platform
ready call so that the plugin is triggered only when the device is ready
• Use a Promise on the GetCurrentPosition method to handle how information
about the device’s location is returned back to the script
• If the Promise is resolved, then retrieve the user’s current latitude/longitude
• If the Promise is rejected, then handle the error that is returned
Now turn your attention to the geoApp/src/pages/home/home.html le and make
the following amendments (highlighted in bold):
196
<ion-header>
<ion-navbar>
<ion-title>
Map Location
</ion-title>
</ion-navbar>
</ion-header>
<ion-content padding>
<div *ngIf="isActive">
<p>My current location is: {{ coords.lat }}, {{ coords.lng }}</p>
</div>
</ion-content>
There shouldn’t be any surprises with the above additions.
We simply detect whether or not there’s any location data to render to the screen
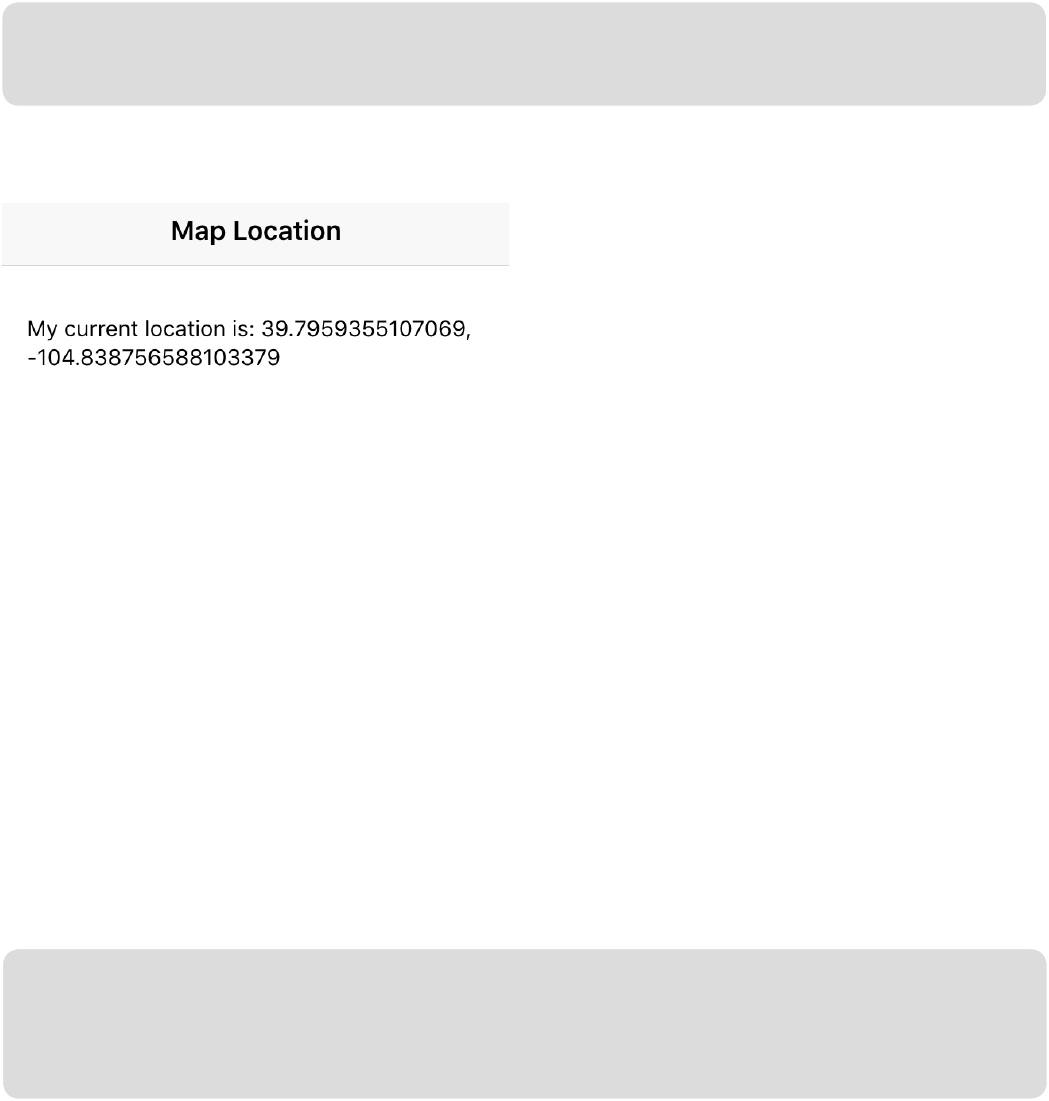
Plugins
197
(using the isActive boolean property that we dened in our class) and, if there is,
we simply use the coords object to output the lat and lng properties.
Now connect your mobile device to the computer and, in your console of choice, run
the following commands, one after the other - waiting for the rst CLI command to
successfully execute before running the next command (substitute android for iOS if
you’re using that platform):
Assuming all went well we should see output akin to the following being published to
your handheld device:
ionic build ios
ionic run ios --device
Good stuff! We’ve successfully implemented the Geolocation plugin, used this to
determine our current location and then render that to the HTML for our page in the
form of latitude and longitude coordinates.
Not a bad result but it is a little boring and limited isn’t it?
Let’s build on this by integrating our existing code with the Google Maps plugin we
installed a few pages back using that to help make our app a little more useful.
In the geoApp/src/pages/home/home.html le locate and replace everything
between the <ion-content></ion-content> tags with the following (amendments
highlighted in bold):
<ion-content padding>
<div id="map"></div>
</ion-content>

Mastering Ionic 2
198
Now open the geoApp/src/pages/home/home.ts le and make the following
changes (highlighted in bold):
...
import { Geolocation,
GoogleMap,
GoogleMapsAnimation,
GoogleMapsEvent,
GoogleMapsLatLng } from 'ionic-native';
@Component({
selector: 'page-home',
templateUrl: 'home.html'
})
export class HomePage {
...
private map: GoogleMap;
private location: any;
constructor( ...)
{
this.platform.ready().then(() =>
{
GoogleMap.isAvailable()
.then((isAvailable: boolean)=>
{
if(!isAvailable)
{
console.log('GoogleMap plugin is NOT available');
}
else
{
console.log('GoogleMap plugin is available');

Geolocation.getCurrentPosition().then((resp) =>
{
...
this.location = new GoogleMapsLatLng(this.coords.lat, this.
coords.lng);
this.map = new GoogleMap('map', {
'backgroundColor': 'white',
'controls' : {
'compass': true,
'indoorPicker': true,
'zoom': true
},
'camera': {
'latLng': this.location,
'tilt': 90,
'zoom': 12,
'bearing': 50
},
'gestures': {
'scroll': true,
'tilt': true,
'rotate': true,
'zoom': true
}
});
this.map.on(GoogleMapsEvent.MAP_READY).subscribe(() =>
{
console.log('Map is ready!')
});
})
.catch((error) =>
{
199
Plugins

Mastering Ionic 2
ionic run ios --device
Surprisingly, and unexpectedly, we see a black screen right where the Google Maps
object should be displayed.
Breaking the above additions to the script down here’s what we’re doing:
• Importing classes from the Google Maps plugin that we will use to implement
map related functionality later on in the class
• Used the isAvailable method of the GoogleMap class to determine whether we
can access the API
• Created a GoogleMap object that references the DOM element in our HTML with
an ID of map and passes in a JSON object of map keys/values for initialising the
GoogleMap
• Created a GoogleMapsLatLng object that uses the returned Geolocation latitude
and longitude coordinates for the GoogleMap object to be centred to
• Use the MAP_READY event to run any code we might want to be triggered once
the GoogleMap object is fully initialised (currently we’re just logging a message
to the browser console)
For a full list of the different options available for map initialisation visit the online
Google Maps API documentation: https://developers.google.com/maps/documenta-
tion/javascript/reference#MapOptions
With your mobile device connected to the computer and in the Terminal run the
following command (substitute android for iOS if you’re running an android device):
console.dir(error);
});
}
});
});
}
}
200

201
Plugins
If you should encounter this (oddly, on visits to online forums, not all developers
have experienced this issue when using the plugin) it appears to be a bug with the
current version of Ionic 2 that is caused by a <div> with a class of nav-decor that
overlays and hides the Google Maps object from view.
More information on this bug can be accessed via the following forum threads:
• https://github.com/driftyco/ionic/issues/7205
• https://forum.ionicframework.com/t/why-appears-nav-decor-after-pressing-back-
button/59791
Other rendering issues with the Google Maps plugin that developers have reported
experiencing are covered in the following resource: https://github.com/mapsplugin/
cordova-plugin-googlemaps/wiki/TroubleShooting:-Blank-Map
Developing from these online resources the current bug x for this issue involves
using CSS to set the background colour to a transparent value for elements with the
following classes:
ion-app.gmapscdv_ .nav-decor,
._gmaps_cdv_,
.nav-decor{
background-color: rgba(0, 0, 0, 0) !important;
}
While we’re here we should also set a style rule for rendering the Google Maps
container to full screen (highlighted in bold):
page-home {
ion-app.gmapscdv_ .nav-decor {
background-color: rgba(0,0,0,0) !important;
}
#map {
height: 100%;
width: 100%;
}
}
202
Mastering Ionic 2
With these style tweaks added save the geoApp/src/pages/home/home.scss le
and, returning back to the console, re-run the following Ionic CLI command:
ionic run ios --device
Once the changes have been published the Google Maps object should be clearly
rendered to your current location like so:
• nav-decor
• _gmaps_cdv_
In the geoApp/src/pages/home/home.scss le let’s target these classes with the
following style rule added to the bottom of the le:
Plugins
203
Amazing what a simple style rule can do isn’t it?
Aside from the additional CSS rule the key piece of the code that enables the map
to be rendered to the screen is the Google Maps plugin conditional check:
GoogleMap.isAvailable()
.then((isAvailable: boolean)=>
{
if(!isAvailable)
{
console.log('GoogleMap plugin is NOT available');
}
else
{
}
})

Chances are that this error is caused by one of the following:
• The API for that platform has not been enabled
• You entered an incorrect API key when installing the plugin
Fixing the rst possible cause is pretty simple - log into your Google Console
Developer account and ensure the following API’s are enabled for use:
• Google Maps Android API
• Google Maps SDK for iOS
Fixing the second possible cause (if the above remedy didn’t work) involves
removing the plugin and then reinstalling that while paying close attention that the
API key being entered matches that platform (I.e. Android API key for Android).
Enhancing our app
Okay, so now that we’ve successfully rendered our location to the map let’s add two
nal enhancements before we close out this chapter.
ClientParametersRequest failed, 7 attempts remaining (0 vs 7). Error Do-
main=com.google.HTTPStatus Code=400 "(null)" UserInfo={data=<3c48544d
4c3e0a3c 48454144 3e0a3c54 49544c45 3e426164 20526571 75657374
3c2f5449 544c453e 0a3c2f48 4541443e 0a3c424f 44592042 47434f4c
4f523d22 23464646 46464622 20544558 543d2223 30303030 3030223e
0a3c4831 3e426164 20526571 75657374 3c2f4831 3e0a3c48 323e4572
726f7220 3430303c 2f48323e 0a3c2f42 4f44593e 0a3c2f48 544d4c3e 0a>}
One potential error to be aware of
The <div> overlay issue is frustrating to encounter but thankfully easy to resolve with
some simple CSS style rules.
There is one other occasion that I’ve experienced where the map might not render
and it’s not immediately obvious why this is happening. If you’re trying to run the app
on your device and see the following error being output to the Terminal:
Mastering Ionic 2
204

Plugins
205
A map marker should animate into view and, once situated on the map, should be
able to display an infoWindow listing the coordinates for our current location.
This infoWindow will be able to be toggled into and out of view by clicking directly on
the marker itself - its default state will be non-active.
In the geoApp/src/pages/home/home.ts le make the following amendments
(displayed in bold):
...
export class HomePage {
...
constructor( ...)
{
this.platform.ready().then(() =>
{
GoogleMap.isAvailable()
.then((isAvailable: boolean)=>
{
if(!isAvailable)
{
...
}
else
{
Geolocation.getCurrentPosition().then((resp) =>
{
...
this.map.on(GoogleMapsEvent.MAP_READY).subscribe(() =>
{
console.log('Map is ready!')
this.listLocation();
});
})

.catch((error) =>
{
...
});
}
});
});
}
listLocation()
{
let title = `Your current location\n\nLatitude: ${this.coords.lat}\
nLongitude:${this.coords.lng}`;
this.map.addMarker({
'position': this.location,
'title': title,
animation: GoogleMapsAnimation.DROP,
'styles' : {
'text-align': 'right',
'color': 'grey'
}
});
}
}
206
Mastering Ionic 2
In the above code the Google map MAP_READY event now calls a method named
listLocation().
This method creates 2 items: a map marker, which is animated into view using the
GoogleMapsAnimation object, and an infoWindow to displays coordinates for our
current location that are styled in grey and aligned to the right of the infoWindow.
Save these additions to the script and execute the ionic run ios --device command in
your Terminal.
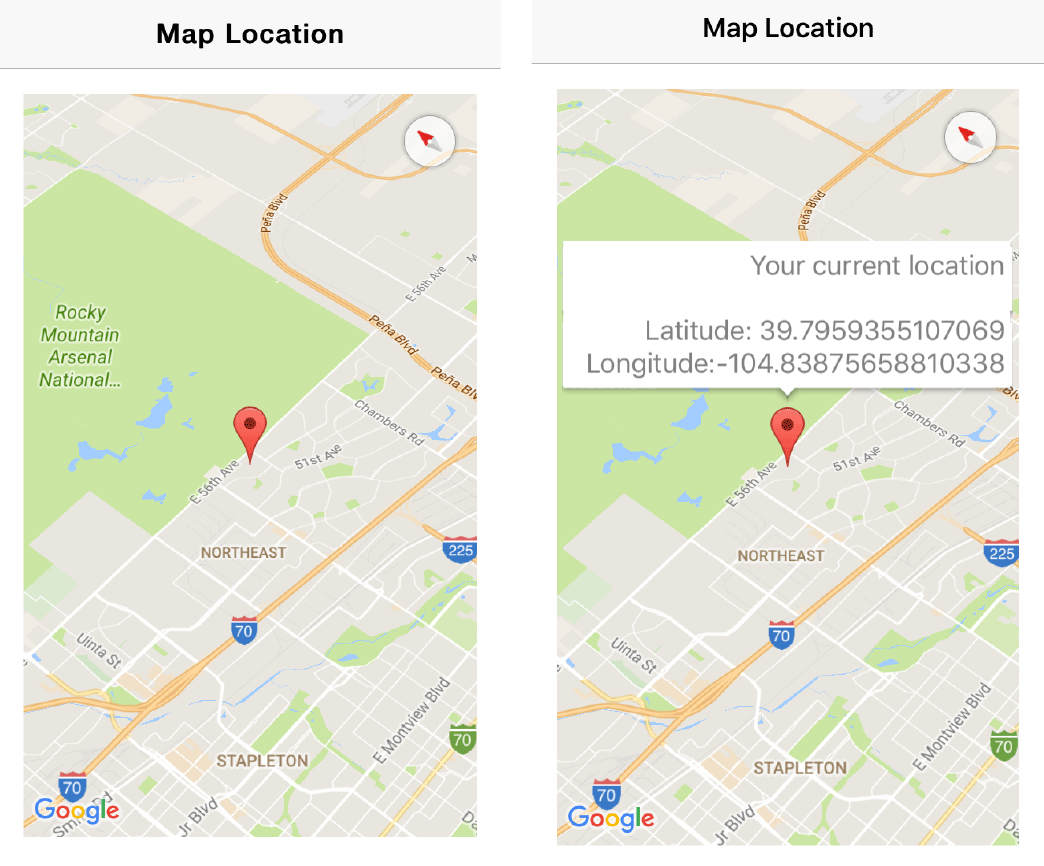
Plugins
207
Once successfully executed you should now see something akin to the following
being rendered to your device:
Congratulations! You’ve successfully created an Ionic app using the Geolocation
and Google Maps plugins.
Your location has been plotted to the map with a marker that can be tapped on to
toggle an infoWindow revealing the coordinates for your current location and you
can also zoom in, zoom out, drag and rotate the map to view the location from
different perspectives.
Not bad eh? You’ve learnt how to install, un-install and congure plugins while
building a basic but interactive and engaging app along the way.

208
Mastering Ionic 2
Of course there’s a lot more that could be done with the app that we’ve built; such
as plotting multiple markers, changing marker icons, creating overlays etc. but that’s
beyond the scope of this example.
If you’re feeling adventurous you can always dive into the online documentation and
start experimenting with the different plugin options in your own time through the
following link: https://github.com/mapsplugin/cordova-plugin-googlemaps/wiki
In the next chapter we turn our attention to loading and parsing data in our Ionic 2
apps.
Resources
Ionic Native
Cordova Googlemaps Plugin
Geolocation Plugin
Google Developer Console
How the Google Map Plugin works
All project les for this chapter can be found listed in the download links on page
636.

Loading Data
Mastering Ionic 2
210
From working with social media API’s, remote database driven records or handling
content stored in external JSON les most modern apps rely, to some degree, on
imported data.
Without this data to drive the content for such apps even the most shiny, sparkling
UI isn’t going to count for much.
Thankfully, as Ionic 2 is built on top of the Angular 2 framework, we can use the
built-in HTTP service to simplify the process of loading, retrieving and parsing
external data for our apps.
Before we do this though we need to familiarise ourselves with the following:
• Promises
• Observables
• Maps
• Filters
Promises
A Promise is used to handle asynchronous operations (meaning that our scripts do
not wait for a certain piece of code to nish executing before moving onto the next
line), such as retrieving remote server data or completing an SQLite transaction, by
providing an object that represents the value of that operation.
This value may be available immediately, at some point in the near future or never
returned at all but the Promise object acts as a kind of agreement that whatever the
outcome it will handle the operation while the rest of the script continues executing
without interruption.
If you’ve been working with JavaScript for a while you’re probably familiar with
using callbacks to handle asynchronous operations (I.e. when processing a SQLite
database transaction).
As useful as callbacks are Promises provide a much ner tuned mechanism for

Loading Data
211
handling asynchronous requests, especially the success or failure of the operation.
In our Ionic apps we can use the then method of the Promise object to handle how
the returned value is processed. Let’s say for example that we have a method that
retrieves data from a remote server, the Promise object might handle the success or
failure of the asynchronous request in the following way:
In the above snippet the then method allows us to handle the fullment or rejection
of the Promise within a few simple lines of code.
For more information on Promises visit this Mozilla Developer Network article:
https://developer.mozilla.org/en/docs/Web/JavaScript/Reference/Global_Objects/
Promise
Observables
If you’ve ever implemented listeners for DOM events then essentially what you are
doing is observing the DOM for a specied event and then performing some action
based on this event taking place.
An Observable, in practice, is doing pretty much the same thing except it can
listen for multiple values emitted over time in both DOM events and asynchronous
events.
This makes it ideal for real-time change detection such as retrieving stock market
data or city trafc updates, where values will consistently be changing in relatively
short periods of time.
retrieveRemoteData.then((data) => { // Success
console.dir(data);
},
(data) => { // Failure
console.dir(data);
});

Mastering Ionic 2
212
Using Observables in Ionic 2 is made easy through the Reactive Extensions for
JavaScript library (abbreviated to rxJS) which comes with the Angular 2 framework.
The rxJS library handles asynchronous and event based operations using both
Observable collections and ES5 Array extras such as ForEach, reduce, map and
lter (we’ll explore some of these features shortly).
When we use Observables in our Angular/Ionic 2 apps we are, for all intents and
purposes, subscribing to the data stream that it emits, and we accomplish this using
the subscribe method.
An example of how this might look is as follows:
retrieveRemoteData.subscribe((data) =>
{
console.dir(data);
});
Observables provide a number of methods for managing data streams, a handful of
which are listed below:
• dispose - Cancel the observable stream
• retry - Repeats the sequence a specied number of times (or until accomplished)
• toArray - Creates a list from the Observable stream
• toPromise - Converts an Observable stream into a Promise
• concat - Concatenates specied Observable streams
• merge - Merges specied observable streams into a single observable stream
A full list of all the Observable methods can be found here: https://github.com/Reac-
tive-Extensions/RxJS/blob/master/doc/api/core/observable.md
Map
The map method is used to create a new array from an existing array. It takes the
supplied array, runs that through a function (which can be used to perform certain

Loading Data
213
operations on the supplied array - such as, for example, converting each array item
value to uppercase) and subsequently returns a new array once completed.
Let’s say we have a situation where we need to retrieve only the country name from
an associative array of data.
Using the map method we might accomplish this in the following way:
var newArr = [
{ id: 1, country: "England" },
{ id: 2, country: "Scotland" },
{ id: 3, country: "Wales" },
{ id: 4, country: "Northern Ireland" },
{ id: 5, country: "Republic of Ireland" },
{ id: 6, country: "France" },
{ id: 7, country: "Germany" },
{ id: 8, country: "Italy" },
{ id: 9, country: "Spain" },
{ id: 10, country: "Belgium" },
{ id: 11, country: "Holland" },
{ id: 12, country: "Czech Republic" }
];
countries = newArr.map(function(x)
{
return x.country
});
console.dir(countries);
// Outputs following to web console
["England", "Scotland", "Wales", "Northern Ireland", "Republic of Ireland",
"France", "Germany", "Italy", "Spain", "Belgium", "Holland", "Czech Republic"]

Mastering Ionic 2
214
Filter
When using the map method to create new arrays every value from the original
array is mapped to the new array. As useful as this is there are times when you only
want to retrieve specic values from an array.
Using the lter method values can be retrieved if they meet a specic criteria.
Let’s take our previous example and use the lter method to only return every 4th
item from the associative array:
var newArr = [
{ id: 1, country: "England" },
{ id: 2, country: "Scotland" },
{ id: 3, country: "Wales" },
{ id: 4, country: "Northern Ireland" },
{ id: 5, country: "Republic of Ireland" },
{ id: 6, country: "France" },
{ id: 7, country: "Germany" },
{ id: 8, country: "Italy" },
{ id: 9, country: "Spain" },
{ id: 10, country: "Belgium" },
{ id: 11, country: "Holland" },
{ id: 12, country: "Czech Republic" }
];
var countries = newArr.lter(function(x)
{
if(x.id % 4 === 0)
{
return x;
}
});
console.dir(countries);

Loading Data
215
var newArr = [
{ id: 1, country: "England" },
{ id: 2, country: "Scotland" },
{ id: 3, country: "Wales" },
{ id: 4, country: "Northern Ireland" },
{ id: 5, country: "Republic of Ireland" },
{ id: 6, country: "France" },
{ id: 7, country: "Germany" },
{ id: 8, country: "Italy" },
{ id: 9, country: "Spain" },
{ id: 10, country: "Belgium" },
{ id: 11, country: "Holland" },
{ id: 12, country: "Czech Republic" }
],
countries = newArr.lter(function(x)
{
if(x.id % 4 === 0)
{
return x;
}
})
.map(function(x)
// Outputs following to web console
[{id: 4, country: “Northern Ireland”},
{id: 8, country: “Italy”},
{id: 12, country: “Czech Republic”}]
By using the modulus operator within the lter method we successfully retrieve
every 4th item from the original array.
We can also combine the lter and map methods for the above examples so we
end up with an array populated solely with the names of every 4th country like so:

Mastering Ionic 2
216
{
return x.country
});
console.dir(countries);
// Outputs following to web console
["Northern Ireland", "Italy", "Czech Republic"]
Maps and lters are quite handy when parsing data retrieved with Observables so
you’ll nd yourself using these quite a bit in your own Ionic 2 projects.
That covers the concepts behind retrieving data now let’s explore the Angular 2
HTTP service and learn how Promises and Observables can be used within our
apps.
Angular and HTTP methods
Angular 2’s http service allows developers to perform asynchronous requests using
the following methods (all of which return an Observable):
• request (accepts any type of http method I.e. GET, POST etc.)
• get (Retrieve any information identied by the URI)
• post (Usually used to create a new resource I.e. posting data to be added to a
remote database)
• put (Most often used to update existing resources I.e. posting data to update an
existing record in a remote database)
• delete (Most often used to remove an existing resource I.e. removing a remote
database record)
• patch (Used to make changes to a resource not the complete resource itself)
• head (identical to the HTTP GET method except the server must not return a
message-body in the response)
• options (Request for information about communication options that are available
when communicating with a specic resource)

Loading Data
217
The more seasoned developers amongst you will no doubt have noticed that these
angular methods are named exactly the same as the HTTP protocol methods
themselves.
This is no accident as it makes sense to identify the purpose of each method by its
associated HTTP counterpart (when working with RESTful services this is especially
important).
An explanation of the different methods used by the HTTP protocol are available
here: http://www.w3.org/Protocols/rfc2616/rfc2616-sec9.html
We will typically be working with just the get and post methods in our apps so let’s
start with how we would retrieve data and import that for use.
Importing data
Using the get method of the angular http service we might asynchronously request a
resource and parse any retrieved data in the following manner:
import { Component } from '@angular/core';
import { NavController } from 'ionic-angular';
import { Http } from '@angular/http';
import 'rxjs/add/operator/map';
@Component({
selector: 'page-home',
templateUrl: 'home.html'
})
export class MyPage {
constructor(
public navCtrl : NavController,
private http : Http)
{

Mastering Ionic 2
218
}
this.http.get('http://www.mywebsite.com/data/remote.php')
.map(res => res.json())
.subscribe(data => {
console.dir(data);
});
}
We begin by importing the Http service and map operator from the rxJS library
towards the top of our script.
We then inject the Http service into the class constructor, assigning that to a
property of http which is subsequently used to create a request to a remote PHP
script using a get method.
The http service returns an Observable so we use the map method to convert any
returned data into a JavaScript object (thanks to the json method) which makes
iterating through and parsing the data so much easier.
As this request is asynchronous this means that our script will continue to execute
while the request is being made and we will only be able to act on any returned data
from within the subscribe method of the Observable (as data values will be
available at this stage).
This is very important - You can only access the returned data for an Observable
from within the subscribe method. If you need to implement any data handling logic
this is where you would place that.
In the above example the console.dir() call has been placed there and NOT outside
of the Observable as it wouldn’t be able to output the returned data to the console
otherwise.
We could have used a Promise instead of an Observable to make this request but

Observables provide quite a few advantages over Promises such as the ability to
cancel a request, repeat a request a specied number of times, merge separate
request streams and a lot more besides.
A full list of all Observable methods is available here: https://github.com/Reac-
tive-Extensions/RxJS/tree/master/doc/api/core/operators
Now let’s take a look at posting data to a remote script.
Posting data
With the post method of the angular http service data can be submitted to a remote
script asynchronously like so:
import { Component } from '@angular/core';
import { NavController } from 'ionic-angular';
import { Http, Headers, RequestOptions } from '@angular/http';
import 'rxjs/add/operator/map';
@Component({
selector: 'page-home',
templateUrl: 'home.html'
})
export class HomePage {
constructor(
public navCtrl : NavController,
private http : Http)
{
this.postURI();
}
postURI()
{
Loading Data
219

let body = "name=James&description=Web%20developer",
type = "application/x-www-form-urlencoded; charset=UTF-8",
headers = new Headers({ 'Content-Type': type}),
options = new RequestOptions({ headers: headers }),
url = "http://www.saintsatplay.com/remote.php";
this.http.post(url, body, options)
.map(res => res.json())
.subscribe(data =>
{
console.log(data);
});
}
}
Mastering Ionic 2
220
We import modules to be used in our script with particular emphasis on the
following for sending and parsing remote data:
• Http
• Headers
• RequestOptions
• The rxJS map operator
We call a postURI method in our constructor so that it is triggered upon initialisation
of the class.
This creates an Observable using the Angular http service post method which:
• Denes the remote URI we want to access
• Supplies a string of data to be posted to the remote URI
• Declares the content type for the request headers
• Fires off a post request - using the above conguration and supplied data
• Converts returned data into a JavaScript object

Loading Data
221
• Logs the returned data within the subscribe method of the Observable
The remote script that handles this request might look something like this:
<?php
header('Access-Control-Allow-Origin: *');
// Retrieve posted data
$name = strip_tags($_POST['name']);
$description = strip_tags($_POST['description']);
echo json_encode("Hello. My name is " . $name . " and I am a " . $description);
exit;
This is, of course, a very basic script using PHP (which could be implemented using
any server side language such as Ruby, Perl or ASP.net instead) that rstly sets a
header allowing universal access to help overcome CORS (Cross-Origin Resource
Sharing) related problems (in a real-world situation you might not be so permissive
and instead limit the scope for access to the script).
Then posted data is retrieved using the strip_tags function to remove any potential
script injection attacks (as a developer you should always sanitise user-submitted
data to prevent, as far as possible, any malicious attempts to hack your scripts and/
or server).
Finally the json_encode function is used to encode a message populated with
values from the posted data.
We could have made this example more functional by storing the submitted data,
once sanitised, into a remote database or providing the scripting to e-mail that to our
inbox but all we’re interested in doing here is demonstrating how data can be posted
and retrieved using Angular 2’s Http service.
If we ran this example with ionic serve we should see the http service executing and
returning a message that is then logged to the browser console like so:
222
As you can see the Angular 2 Http service makes loading and retrieving remote data
relatively straightforward and quick to implement.
That pretty much covers all we need to know for this chapter. We’ve learnt about
Promises and Observables (and some of the available ES5 array methods), why
Observables are preferred over Promises for data handling and explored how the
get and post methods of the Angular 2 Http service can be used to retrieve and
submit data for our Ionic apps.
As mentioned previously there’s a lot more we can do with Observables but we’ll be
exploring that in further detail in the Case Studies section.
In the next chapter we turn our attention to using forms and handling data input in
our Ionic 2 apps.
Mastering Ionic 2


Forms
& Data Input

Mastering Ionic 2
225
Handling data input is an integral part of most web & mobile applications and thanks
to the Angular 2 framework we have a number of ways in which we can handle data
input in our Ionic 2 apps:
• Two-way data binding using ngModel
• Formbuilder
• Template-driven forms
Option 1 - Two-way data binding using ngModel
Angular 2’s ngModel directive allows us to implement a concept known as two-way
data binding to form input elds in our templates.
Two-way data binding is a term used to describe the association between the value
of a template input eld and the value of a variable in the component class.
Using the ngModel directive values can be set in both directions, hence the term
two-way data binding.
For example, in the component class we can set a value for a variable that is bound
to the template input eld. We can then update the value of that variable by
modifying the value in the template input eld.
Let’s make a start with exploring two-way data binding by creating a new Ionic app,
in the root of your apps directory, with the following commands:
ionic start simpleForm blank --v2
cd simpleForm
npm install // Install additional node modules
We won’t be adding any platforms or plugins here, just some straightforward code in
our class and template les.
In your code editor open the simpleForm/src/pages/home/home.html template
and make the following amendments (highlighted in bold):

Forms & Data Input
226
<ion-header>
<ion-navbar>
<ion-title>
Your personal details
</ion-title>
</ion-navbar>
</ion-header>
<ion-content padding>
<form (ngSubmit)="saveDetails()">
<ion-list>
<ion-item>
<ion-label>Your Name</ion-label>
<ion-input
type="text"
[(ngModel)]="details.name"
name="name"></ion-input>
</ion-item>
<ion-item>
<ion-label>Your Occupation</ion-label>
<ion-input
type="text"
[(ngModel)]="details.occupation"
name="occupation"></ion-input>
</ion-item>
<ion-item>
<ion-label>Favourite Platform</ion-label>
<ion-select
[(ngModel)]="details.platform"
name="platform">
<ion-option value="Android">Android</ion-option>

Mastering Ionic 2
227
<ion-option value="iOS">iOS</ion-option>
<ion-option value="WP">Windows Phone</ion-option>
<ion-option value="Other">Other</ion-option>
</ion-select>
</ion-item>
<button
ion-button
color="primary"
text-center
block>
Save Details
</button>
</ion-list>
</form>
</ion-content>
Each of the 3 elds in our above form has an ngModel directive attached to it whose
value links that template input eld to a specied property in the component
TypeScript class.
The value for each ngModel directive is declared in dot syntax form to represent the
name of the object and its property that the input eld is being linked with.
Each eld also has a name attribute whose value matches that of the property
declared in the related ngModel directive.
IMPORTANT - If you are using the ngModel directive in a form you MUST supply the
name property on an input eld OR use the [ngModelOptions]="{standalone: true}"
directive wherever the ngModel directive is also being used.
The following example illustrates how this would be implemented on a form input
eld (displayed in bold):

Forms & Data Input
228
<ion-input
type="text"
[(ngModel)]="details.occupation"
[ngModelOptions]="{standalone : true}"></ion-input>
Now that we’ve created a form and used ngModel directives to begin implementing
two-way data binding for our input elds let’s modify the class for this template and
script the logic to enable this functionality.
Open your simpleForm/src/pages/home/home.ts le and make the following
amendments (displayed in bold):
import { Component } from '@angular/core';
import { NavController } from 'ionic-angular';
@Component({
selector: 'page-home',
templateUrl: 'home.html'
})
export class HomePage {
public details : any = {
name : 'James Grifths',
occupation : 'Code Monkey',
platform : 'Other'
};
constructor(public navCtrl: NavController)
{
}
saveDetails()
{
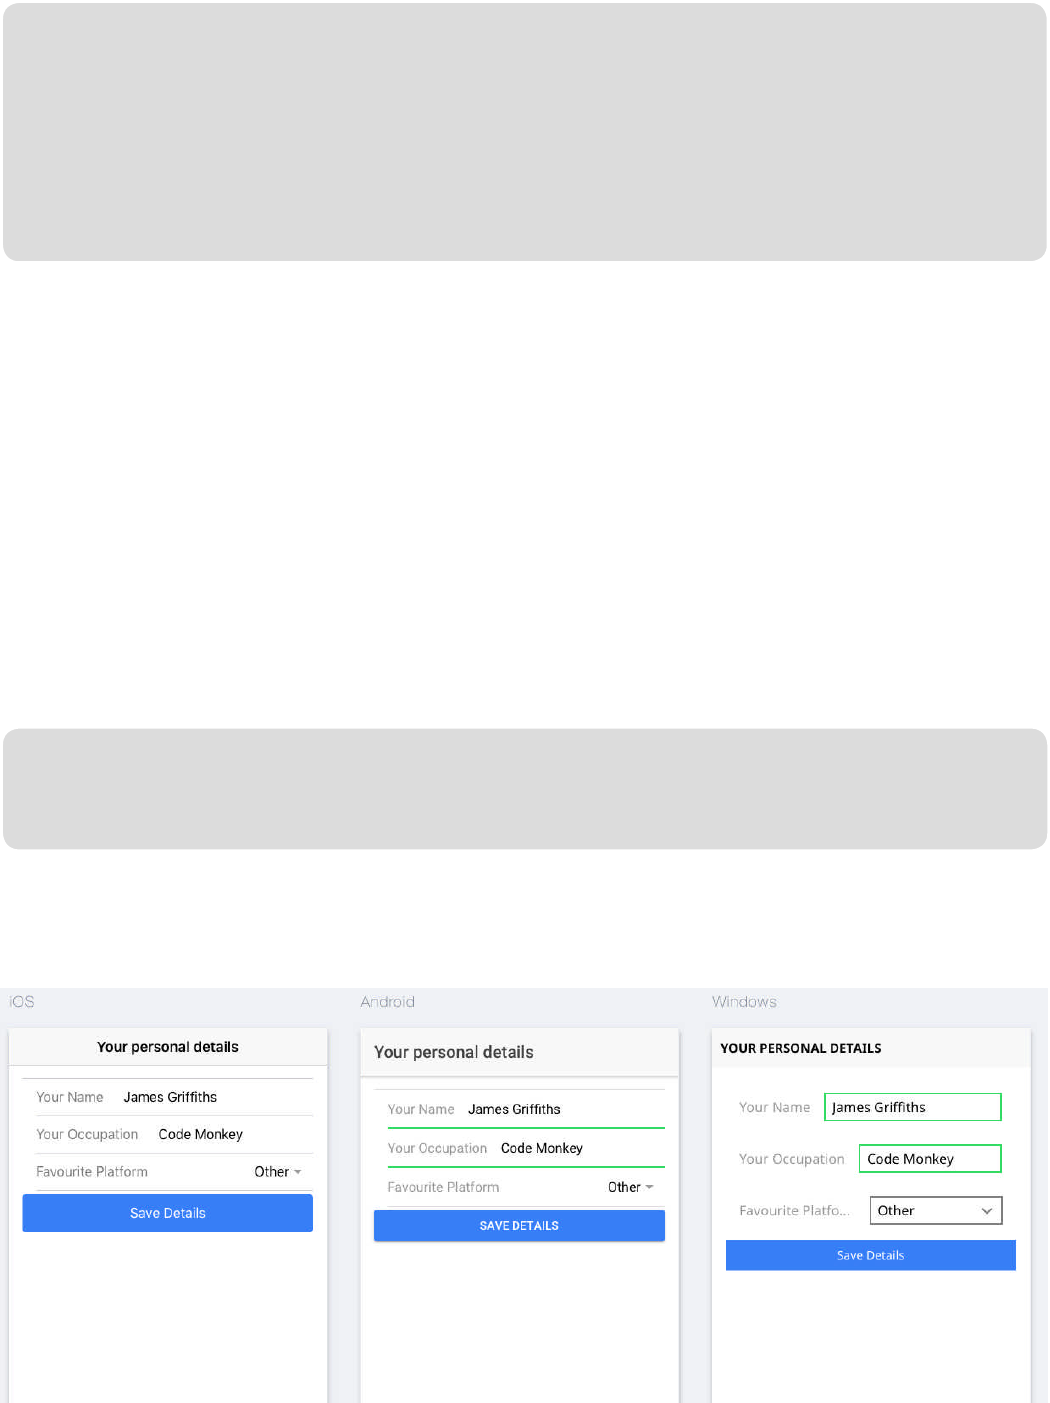
Mastering Ionic 2
229
console.log(`My name is ${this.details.name}`);
console.log(`I work as a ${this.details.occupation}`);
console.log(`My favourite platform is ${this.details.platform}`);
}
}
You’ll notice that we set a public property named details which is an object that
contains the name, occupation and platform keys that the template input elds
reference through the ngModel directives.
In the above example I’ve pre-lled this object with key/value pairings but I could
easily have opted to initialise an empty object instead of supplying these values.
The saveDetails method, which the ngSubmit directive in our form template uses,
simply console logs out the value for each form input eld.
Let’s preview this in the browser using the following command:
// Preview this across iOS, Android & Windows Phone with lowercase L ag
ionic serve -l
And you should now see the following screen being rendered with those form input
elds pre-lled/pre-selected with the values supplied from the details object in the
component class:
230
Forms & Data Input
Feel free to change these input eld values in one of the displayed platforms, submit
the form and then inspect the values that are logged to the console window in the
web inspector like so:
Two-way data binding is pretty neat - and is similar to how forms were handled in
Angular 1/Ionic 1 - but using this approach does present the following challenges:
• Hard to unit test
• Less programmatic control over the form by the class
Option 2 - Formbuilder
Angular 2 introduces the FormBuilder, a helper class that allows developers to build
forms that are able to take advantage of the following functionality:
• Implementing validation rules for input elds
• Updating the form UI to help guide user behaviour (I.e. disabling buttons where
required input elds have not been completed & displaying error messages)
• Listening for value changes on input elds
Using the FormBuilder we can programmatically build our forms and use that logic
to control the input elds and form state in our templates.
Navigate to the root of your apps directory and, using the Ionic CLI, run the following
commands:

Mastering Ionic 2
231
ionic start advancedForm blank --v2
cd advancedForm
npm install // Install additional node modules
ionic g provider Validator
With this new project we’re going to use the Angular 2 FormBuilder service to
implement validation functionality and update the form UI to reect changes such as
errors and successfully completed elds.
Let’s start by generating some validation rules to use with the FormBuilder service.
Open the advancedForm/src/providers/validator/validator.ts le and make the
following changes (highlighted in bold):
import { Injectable } from '@angular/core';
import { FormControl } from '@angular/forms';
import { Http } from '@angular/http';
import 'rxjs/add/operator/map';
@Injectable()
export class Validator {
constructor(private http: Http)
{
}
emailValid(control: FormControl)
{
return new Promise(resolve =>
{
let emailPattern = /^\w+([\.-]?\w+)*@\w+([\.-]?\w+)*(\.\w{2,3})+$/;

Forms & Data Input
232
if(!emailPattern.test(control.value))
{
resolve({ InvalidEmail : true });
}
resolve(null);
});
}
nameValid(control: FormControl)
{
return new Promise(resolve =>
{
let pattern = /[0-9]/;
if(pattern.test(control.value))
{
resolve({ InvalidName : true });
}
resolve(null);
});
}
}
In our service we begin by importing the Angular Forms FormControl class which
we will use in our subsequent methods to obtain the value from the input eld that
we are looking to validate.
We then create 2 methods: emailValid and nameValid; each of which use promises
to return the results of tests that we perform on the supplied input eld value using
regular expressions.
If our regular expressions fail we return a JSON object that we will use to display
error messages in the HTML template, otherwise we return a null value (which,

Mastering Ionic 2
233
believe it or not, means our validation was successful).
Now that we’ve created the validation service let’s plug this into our class using the
FormBuilder service.
Open the advancedForm/src/pages/home/home.ts le and make the following
amendments (displayed in bold):
import { Component } from '@angular/core';
import { NavController } from 'ionic-angular';
import {
FormBuilder,
FormGroup,
Validators
} from '@angular/forms';
import { Validator } from '../../providers/validator';
@Component({
selector: 'page-home',
templateUrl: 'home.html'
})
export class HomePage {
private form : FormGroup;
private name : any;
constructor(
private navCtrl : NavController,
private fb : FormBuilder,
private val : Validator
)
{

Forms & Data Input
234
this.form = fb.group({
'name' : ['', Validators.required, val.nameValid],
'email' : ['', Validators.required, val.emailValid],
'platform' : ['', Validators.required]
});
this.name = this.form.controls['name'];
this.name.valueChanges.subscribe(
(value: string) =>
{
console.log(`Entered name is ${value}`);
});
}
saveDetails(value)
{
console.dir(value);
}
}
Here we import the Validator service that we previously created as well as the
following Angular services:
• FormBuilder
• FormGroup
• Validators
These will be used to manage the input eld logic and validation functionality for the
page template.
Mastering Ionic 2
235
A FormGroup allows us to manage more than one input eld (which is quite handy
if we have forms with multiple elds that we need to work with) allowing our app to
programmatically determine the state of each specied input eld (I.e. whether it is
valid, has changed etc.) and its value.
Validators, as the name implies, provide the ability to validate input elds.
The FormBuilder service will be used as a utility wrapper to help manage the
FormControl and FormGroup services.
In the class constructor we inject the FormBuilder and Validator services, assign
those to their respective private properties and then use the FormBuilder service to
create a new FormGroup.
This FormGroup contains 3 FormControls (rendered as key/value pairs) which are
used to target each individual input eld in our form.
Each FormControl is assigned its respective Validators where, for the name and
email controls we assign our custom validation methods from the Validator service.
We also listen to value changes in the name input eld using the valueChanges
method of the FormControl object (which gives us access to the EventEmitter, an
Observable that allows us to track custom events in our applications).
Finally we implement the saveDetails method which will be used to retrieve the
submitted form data.
Now we’ll turn our attention to rendering the HTML for our template and tying in the
FormBuilder logic.
Open the advancedForm/src/pages/home/home.html template and make the
following amendments (highlighted in bold):

Forms & Data Input
236
<ion-header>
<ion-navbar>
<ion-title>
Your Personal Details
</ion-title>
</ion-navbar>
</ion-header>
<ion-content padding>
<form [formGroup]="form" (ngSubmit)="saveDetails(form.value)">
<ion-list>
<ion-item margin-bottom>
<ion-label>Your Name</ion-label>
<ion-input
type="text"
[formControl]="form.controls['name']"></ion-input>
</ion-item>
<ion-item margin-bottom>
<ion-label>Your Email address</ion-label>
<ion-input
type="email"
[formControl]="form.controls['email']"></ion-input>
</ion-item>
<ion-item margin-bottom>
<ion-label>Favourite Platform</ion-label>
<ion-select [formControl]="form.controls['platform']">
<ion-option value="Android">Android</ion-option>
<ion-option value="iOS">iOS</ion-option>
<ion-option value="WP">Windows Phone</ion-option>
<ion-option value="Other">Other</ion-option>

237
Mastering Ionic 2
</ion-select>
</ion-item>
<button
ion-button
color="primary"
text-center
block [disabled]="!form.valid">Save Details</button>
</ion-list>
</form>
<div *ngIf="form.controls['name'].dirty && !form.controls['name'].
valid">
<p *ngIf="form.controls['name'].errors.InvalidName">
Your name cannot contain any numbers.
</p>
</div>
<div *ngIf="form.controls['email'].dirty && !form.controls['email'].valid">
<p *ngIf="form.controls['email'].errors.InvalidEmail">
You must enter a valid e-mail address
</p>
</div>
</ion-content>
Here we implement the formGroup property on our HTML form to create a link
with the FormBuilder logic in the component class and the template input elds.
You’ll notice the formGroup property is set to a value of form which matches the
same property name used in the component class (where we created a FormGroup
using the FormBuilder helper).
Each input eld has a formControl assigned to it whose value is mapped to the

238
Forms & Data Input
specied FormControl object in the component class (this relationship allows the
FormBuilder helper to retrieve each eld’s input value).
We can implement our HTML FormControl with either of the following syntax:
import { NgModule } from '@angular/core';
import { IonicApp, IonicModule } from 'ionic-angular';
import { MyApp } from './app.component';
import { Validator } from '../providers/validator/';
import { HomePage } from '../pages/home/home';
@NgModule({
declarations: [
MyApp,
HomePage
],
Either way is perfectly valid.
The ability to submit the form is determined through the FormBuilder object
assessing the state of each input eld, whether it has data and has successfully
passed all applied validation criteria - if not the submit button state remains disabled.
This is quite a nice, default UX touch as the button state visually guides the user in
understanding that the form cannot be submitted until data entry has been
successfully completed.
The FormBuilder component logic listens for data entered, determines its validity
and whether any errors have occurred (and, if so, displays these under the form).
Add the following to advancedForm/src/app/app.module.ts (highlighted in bold):
[formControl]="form.controls['name']"
// OR
formControlName="name"
239
Mastering Ionic 2
With the Validator service in place along with the completed component class and
template we can now preview and test our FormBuilder example in the browser
using the following command:
ionic serve
We should be greeted with a basic form consisting of three elds and a disabled
submit button (in its initial state) like the following screen capture:
imports: [
IonicModule.forRoot(MyApp)
],
bootstrap: [IonicApp],
entryComponents: [
MyApp,
HomePage
],
providers: [Validator]
})
export class AppModule {}
When validation errors are detected (thanks to the use of our custom validation
methods and the FormBuilder helper) the app will display a message to the user
informing them of the nature of the error and what they must do to rectify this:
240
Forms & Data Input
The above error for the name input eld is triggered by numbers being entered for a
person’s name.
Notice how the form border colour changed to red to indicate that there was an error
with the data entry for this eld?
The underlying Angular 2 framework detects the state of the input eld and applies
its own specic classes to reect those states:
• ng-dirty (Input eld has been interacted with)
• ng-touched (Input eld has received focus)
• ng-valid (Data entry has passed validation)
• ng-invalid (Data entry has not passed validation)
These add quite a nice UX touch and provide helpful visual feedback to the user
concerning their data entry.
Finally, remember how we added an EventEmitter to track real-time changes to the
name input eld?
The following screenshot displays how the browser console logs each time a
character is entered into this eld:
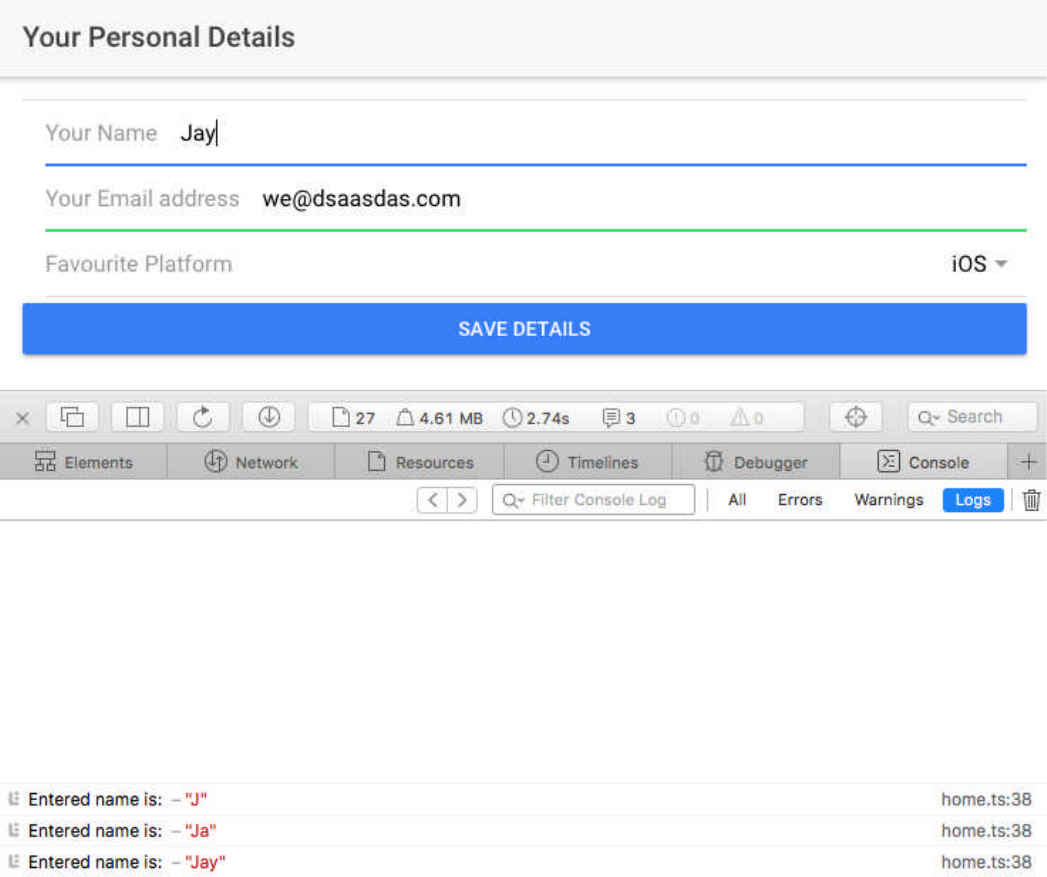
And that wraps up our exploration of using the FormBuilder to programmatically
generate forms for our apps.
This approach might seem like a lot more work than using simple model driven
forms but through the FormBuilder service we get a lot more control over error
detection, state change and handling our data through one single object instead of
tracking multiple objects.
Now we’ll turn our attention to the third way in which we can implement forms in
Ionic 2 - template driven forms.
Mastering Ionic 2
241

Forms & Data Input
242
Option #3 - Template-driven forms
The nal way in which we can build forms for our apps involves removing the logic
from the class and implementing that directly within the form itself.
Let’s look at how this works by creating a template driven form.
Navigate to the root of your apps directory and, using the Ionic CLI, run the following
commands:
ionic start templateForm blank --v2
cd templateForm
npm install // Install additional node modules
We’ll start by editing the class as this is the simplest part of our application to work
with.
Open the templateForm/src/pages/home/home.ts le and make the following
amendment (highlighted in bold):
import { Component } from '@angular/core';
import { NavController } from 'ionic-angular';
@Component({
selector: 'page-home',
templateUrl: 'home.html'
})
export class HomePage {
constructor(public navCtrl: NavController)
{ }
saveDetails(value)
{
console.dir(value);
}
}

Mastering Ionic 2
243
We add a single method of saveDetails to the class which will be used to retrieve
data entered into the form.
Now onto the amendments for the templateForm/src/pages/home/home.html le
(highlighted in bold):
<ion-header>
<ion-navbar>
<ion-title>
Your Personal Details
</ion-title>
</ion-navbar>
</ion-header>
<ion-content padding>
<form #f="ngForm" (ngSubmit)="saveDetails(f.value)">
<ion-list>
<ion-item margin-bottom>
<ion-label>Your Name</ion-label>
<ion-input
type="text"
name="name"
ngModel></ion-input>
</ion-item>
<ion-item margin-bottom>
<ion-label>Your Email address</ion-label>
<ion-input
type="email"
name="email"
ngModel></ion-input>
</ion-item>
<ion-item margin-bottom>

Forms & Data Input
244
<ion-label>Favourite Platform</ion-label>
<ion-select name="platform" ngModel>
<ion-option value="Android">Android</ion-option>
<ion-option value="iOS">iOS</ion-option>
<ion-option value="WP">Windows Phone</ion-option>
<ion-option value="Other">Other</ion-option>
</ion-select>
</ion-item>
<button
ion-button
color="primary"
text-center
block>
Save Details
</button>
</ion-list>
</form>
</ion-content>
Here we use a local template variable, referenced as #f, and pass in the NgForm
directive as a value. Doing this allows us to create a FormGroup on the template
itself (in this case the form IS the FormGroup). When we submit the form we pass
the value of the form itself as arguments in the saveDetails method on the
ngSubmit action.
The value of the form is submitted in key/value pairs, making it easy to iterate
through the data.
Our input elds are each assigned an ngModel attribute with no value. This creates
a one-way data binding which sends data from the form to the component class
only.
Using the ngModel directive as a value-less attribute implicitly adds a FormControl
to each input eld (the name for each FormControl is generated from the value of
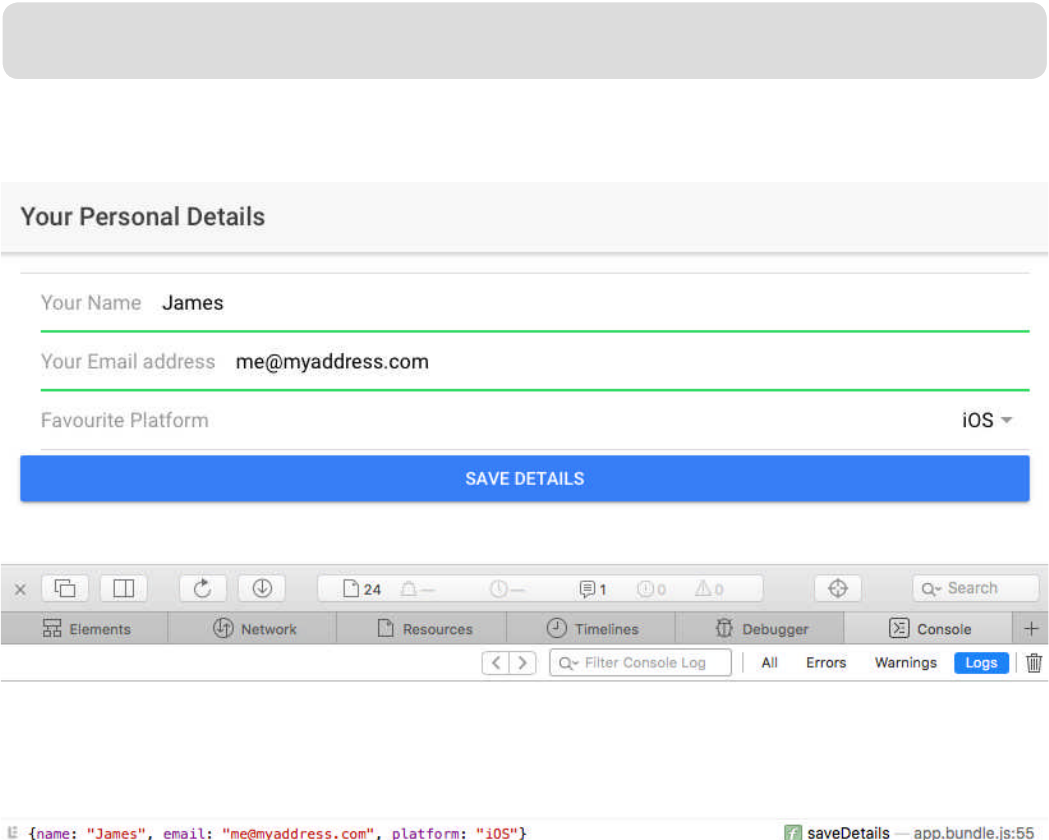
245
Mastering Ionic 2
the name attribute on that input eld).
This FormControl is automatically added to the FormGroup which, in turn, is able
to simply pass the value of the entire form as an argument through the ngSubmit
action.
This approach places all of the logic directly in the form template itself and all our
component class has to do is parse the received data - which we can test in the
browser with the following command:
ionic serve
We should be greeted with the same basic form as we’ve seen displayed in the
previous two examples:
You can see the form object being logged to the browser console, as key/value
pairs, after the form has been submitted.
Template driven forms are relatively simple to implement and are, essentially, a
slightly modied version of model driven forms.

246
Forms & Data Input
That covers our exploration into the different approaches to handling form input
within Ionic 2.
Before we wrap up though let’s take one last look at the ngModel syntax we used in
our model driven forms example.
We wrote our model, encapsulated with parentheses and brackets, like so:
[(ngModel)]
Which looks a little weird on rst encounter right?
There is a reasoning behind this syntax though, which, believe it or not, is referred to
as banana in a box!
As we are implementing two-way data binding the brackets are intended to signify
the input aspect of the binding while the parentheses signify the output aspect of the
binding.
In the next chapter we turn our attention to the most effective ways in which we can
store and persist data for use in our Ionic 2 apps.
Resources
All project les for this chapter can be found listed in the download links on page
636.

Data Storage
248
Data Storage
Let’s face it, without some way of persisting data your apps are going to be pretty
useless in the long run.
Whether you want to, for example, load & display a list of user scores for previous
sessions of a game or allow users to manage personal data they’ve entered into the
app the ability to both store & retrieve data is hugely important.
In this chapter we’ll explore how we can persist data across different sessions of the
app using the following approaches:
• Local Storage
• SQLite database
If you’ve been exploring the Ionic Native repository you’ll probably be aware that
there’s a couple of plugins we can use to help us implement the above functionality
(and throughout this chapter we’ll certainly make use of both of those plugins!)
Let’s make a start though with Local Storage and explore how this technology can
be used to manage data storage and retrieval in our apps.
Local Storage
Local Storage was rst introduced with HTML5 and provided developers with a
mechanism through which they could store data that would overcome some of the
limitations inherent with using browser cookies.
These had traditionally been relied upon by front-end developers to persist data
across that particular session or subsequent browser sessions but relying on using
cookies presented one major problem.
The amount of data that could be stored was limited to a maximum size of 4KB.
This severely restricted what and how much data could be stored in the front-end
and often meant that a server side solution, such as PHP and a MySQL database,
had to be used in conjunction with the front-end in order to store/retrieve data.

249
Mastering Ionic 2
Just to be clear, there’s absolutely nothing wrong with this approach (I regularly work
with this setup for various client projects) but it does add additional layers of different
technologies that have to be integrated with one another.
Even for experienced developers you know what a pain this can be at times.
For individual developers or small teams though this can prove quite challenging
if there are multiple specialisms required such as server conguration, back-end
scripting and database administration. Add on top of this the constraints of a limited
budget and project deadlines and things can get pretty tight in a hurry.
This is where Local Storage can help BUT, and it’s a pretty big but......
Not all browsers support Local Storage.
Yep, there’s always a gotcha in the world of web/mobile development and quite
often that comes down to whether or not the browser/device will support the specic
technology we want to use.
The following list displays, at the time of writing, the minimum browser versions that
support LocalStorage:
• IE 8+
• Edge 12+
• Firefox 3.5+
• Chrome 4+
• Safari 4+
• Opera 11.5+
• iOS 3.2+
• Android 2.1+
• IE Mobile 10+
It’s worth looking at the following resource for known issues/further information with
the Local Storage API: http://caniuse.com/#search=Local%20Storage - particularly
when, even with 100% iOS & Android support for LocalStorage, there is a

Data Storage
250
problem with its persistence of data in the WebView on both platforms.
The Cordova plugin NativeStorage project (available through Ionic Native - http://
ionicframework.com/docs/v2/native/nativestorage/ was designed to address and
overcome this problem, as well as other limitations, to present a more effective
option for data persistence.
We’ll explore using this plugin in an app that we’re going to build called moviesApp
(that will be located within the apps directory that was created in the Beginning
Ionic 2 development chapter).
Using the Ionic CLI run the following commands:
ionic start moviesApp blank --v2
cd moviesApp
npm install
ionic platform add android
ionic plugin add cordova-plugin-nativestorage
ionic g provider localStorage
There’s a fair bit going on here so let’s break it down step by step:
• We create a new blank Ionic 2 app called moviesApp
• Changing into the root directory of our newly created app we install the required
additional node modules using the npm install command
• Next we install the android platform
• We then install the NativeStorage plugin
• And, nally, we create a localStorage service to handle API calls to NativeStorage
The moviesApp (as if you probably haven’t already guessed from the name) will
allow details of favourite movies to be entered/displayed and the localStorage
service will retain these details for later retrieval.
Open the moviesApp/src/providers/local-storage/local-storage.ts service and
make the following modications (displayed in bold):

Mastering Ionic 2
251
import { Injectable } from '@angular/core';
import { Http } from '@angular/http';
import { NativeStorage } from 'ionic-native';
import 'rxjs/add/operator/map';
@Injectable()
export class LocalStorage {
private storedData : any;
constructor(private http: Http) { }
setItem(itemName, itemValue) : any
{
return new Promise(resolve => {
NativeStorage.setItem(itemName, itemValue)
.then(
(data) => {
resolve(true);
},
(error) => {
console.log("Fail to set storage key value");
}
);
});
}
getItems(itemKey)
{
return new Promise(resolve => {
NativeStorage.getItem(itemKey)
.then(
(data) => {

252
Data Storage
this.storedData = JSON.parse(data);
resolve(this.storedData);
},
(error) => {
console.log("We don’t get data!");
}
)
});
}
}
We could have placed these NativeStorage API methods directly within the
moviesApp/src/pages/home/home.ts le but by implementing them in a service
we make our code more modular, portable and scalable.
If we had multiple pages in our app that required the use of NativeStorage we could
simply import the service for those pages instead of repeatedly coding the same
methods for each page.
As you can see within the service we provide our own method wrappers around the
NativeStorage API methods, which themselves are contained within Promises that
return the results of the NativeStorage API method that is being executed.
We are only implementing 2 methods for this example: setItem and getItem.
We could also choose to remove items that have been set in the NativeStorage
object or completely remove the NativeStorage object altogether.
In the Movies App Case study, featured later on in this book, we’ll explore using
these methods as well as redeveloping and extending the example app for this
section.

253
Mastering Ionic 2
For now though we’ll simply explore setting items to and retrieving items from
NativeStorage.
Open the moviesApp/src/app/app.module.ts le and make the following additions
(highlighted in bold):
import { NgModule, ErrorHandler } from '@angular/core';
import { IonicApp, IonicModule, IonicErrorHandler } from 'ionic-angular';
import { MyApp } from './app.component';
import { HomePage } from '../pages/home/home';
import { LocalStorage } from '../providers/local-storage';
@NgModule({
declarations: [
MyApp,
HomePage
],
imports: [
IonicModule.forRoot(MyApp)
],
bootstrap: [IonicApp],
entryComponents: [
MyApp,
HomePage
],
providers: [{provide: ErrorHandler, useClass: IonicErrorHandler}, LocalStor-
age]
})
export class AppModule {}
There should be nothing complicated here, we’re just importing the LocalStorage
provider and then passing that into the ngModule as part of the app initialisation.
Now implement the following amendments in the moviesApp/src/pages/home/

Data Storage
254
home.html le (highlighted in bold) so we actually have some method of inputting
movie data as well as listing saved movies to the page:
<ion-header>
<ion-navbar>
<ion-title>
My Fave Films
</ion-title>
</ion-navbar>
</ion-header>
<ion-content padding>
<form
[formGroup]="form"
(ngSubmit)="saveMovie()">
<ion-list>
<ion-item margin-bottom>
<ion-label>Title</ion-label>
<ion-input
type="text"
formControlName="movieName"
[(ngModel)]="lmTitle"></ion-input>
</ion-item>
<button
ion-button
color="primary"
text-center
block
[disabled]="!form.valid">Save Movie</button>
</ion-list>
</form>
<ion-list *ngIf="isData">

255
Mastering Ionic 2
<ion-list-header>
Your saved movies
</ion-list-header>
<ion-item *ngFor="let data of storedData">
{{ data.movie }}
</ion-item>
</ion-list>
</ion-content>
There are a few things to pay attention to here.
Firstly, we create a form template and bind that to a model using the formGroup
attribute. Doing this helps us to implement validation rules for our form.
This binding is then used to enable/disable the form button depending on whether or
not any data has been added to the form.
Our form only has a single input eld which uses a formControlName directive to
retrieve data entered into the eld on submission of the form. We also add the
ngModel directive to initialise and reset the eld on page load and form submission.
Secondly, we use an <ion-list> component to display our list of retrieved movies
from the NativeStorage object. This list is only displayed depending on the value of
isData being true for the attached ngIf directive.
Now we proceed onto the nal part of the code; implementing the necessary logic to
use the LocalStorage service to set and retrieve movies for the app.
In the moviesApp/src/pages/home/home.ts le make the following amendments
(highlighted in bold):

Data Storage
256
import { Component } from '@angular/core';
import { NavController,
Platform,
ToastController } from 'ionic-angular';
import { FormGroup,
FormControl,
Validators,
FormBuilder } from '@angular/forms';
import { LocalStorage } from '../../providers/local-storage';
@Component({
selector: 'page-home',
templateUrl: 'home.html'
})
export class HomePage {
public form : FormGroup;
public storageKey : string = "MoviesObj";
public isData : boolean = false;
public storedData : any = null;
public movies : any = [];
public lmTitle : any;
constructor(
public navCtrl : NavController,
public localStore : LocalStorage,
public fb : FormBuilder,
public toastCtrl : ToastController,
public platform : Platform
)
{
platform.ready().then(() => {
this.renderMovies();

Mastering Ionic 2
257
});
this.form = fb.group({
"movieName" : ["", Validators.required]
});
this.clearFieldValues();
}
renderMovies() : void
{
this.localStore.getItems(this.storageKey)
.then(
(data) => {
let existingData = Object.keys(data).length;
if(existingData !== 0)
{
this.storedData = data;
this.isData = true;
}
this.resetMovies(this.storedData);
}
);
}
resetMovies(data)
{
let k;
this.movies.length = 0;
for(k in data)
{
this.movies.push(

258
Data Storage
{
movie : data[k].movie
});
}
}
saveMovie()
{
let movie : string = this.form.controls["movieName"].value,
i : number = 0,
k;
for(k in this.storedData)
{
if(this.storedData[k].movie === movie)
{
i++;
}
}
if(i === 0)
{
this.movies.push(
{
movie : movie
});
this.storeMovie(this.movies, movie);
}
else
{
let message = `The movie ${movie} has already been stored.
Please enter a different movie title.`;

259
Mastering Ionic 2
this.storageNotication(message);
}
}
storeMovie(movies, movie)
{
let moviesStored = JSON.stringify(movies);
this.localStore.setItem(this.storageKey, moviesStored).then(
(data) => {
this.renderMovies();
let message = `The movie title ${movie} was added successfully`;
this.clearFieldValues();
this.storageNotication(message);
},
(error) => {
let message = `Whoops! Something went wrong. The movie title
${movie} was NOT added`;
this.storageNotication(message);
}
);
}
clearFieldValues()
{
this.lmTitle = "";
}
storageNotication(message) : void
{
let notication = this.toastCtrl.create({

Data Storage
260
message : message,
duration : 3000
});
notication.present();
}
}
That’s quite a lot of code to digest!
Let’s break each part of the code down in more detail so we understand exactly
what each stage is designed to accomplish and how it ts into the overall purpose of
the application.
import { Component } from '@angular/core';
import { NavController,
Platform,
ToastController } from 'ionic-angular';
import { FormGroup,
FormControl,
Validators,
FormBuilder } from '@angular/forms';
import { LocalStorage } from '../../providers/local-storage';
Here we import specic Ionic/Angular classes that we want to use - in particular the
angular 2 form building and validation classes.
These will allow us to declare form bindings and validation routines for the movie
input eld in the page HTML template.
We also import the ToastController which we’ll use to provide user notications for
the success or failure of certain operations while using the app.

Mastering Ionic 2
261
export class HomePage {
public form : FormGroup;
public storageKey : string = "MoviesObj";
public isData : boolean = false;
public storedData : any = null;
public movies : any = [];
public lmTitle : any;
constructor(
public navCtrl : NavController,
public localStore : LocalStorage,
public fb : FormBuilder,
public toastCtrl : ToastController,
public platform : Platform
)
{
platform.ready().then(() =>
{
this.renderMovies();
});
this.form = fb.group({
"movieName" : ["", Validators.required]
});
this.clearFieldValues();
}
At the top of our class we dene some public properties that will be used within both
the methods of the class and the HTML template.
The form property is used to create the model binding for the HTML form and the
storageKey property is used to dene the name of our NativeStorage object.

Data Storage
262
Within our constructor we call the renderMovies method (which will be used to
retrieve all of the saved movies in the NativeStorage object and output those to the
HTML template) within the platform.ready() method.
Using the platform.ready() method allows the NativeStorage plugin to access
device storage once the DOM has been loaded and the device is ready.
We then create a form validation rule that we associate with the formControlName
directive that is bound to the HTML form input eld.
Finally, we initialise the HTML input eld using the clearFieldValues method.
renderMovies() : void
{
this.localStore.getItems(this.storageKey)
.then(
(data) =>
{
let existingData = Object.keys(data).length;
if(existingData !== 0)
{
this.storedData = data;
this.isData = true;
}
this.resetMovies(this.storedData);
}
);
}
The renderMovies method, as previously explained, calls the getItems method of
the LocalStorage class, passing in the name of the NativeStorage object we want
to retrieve all saved movie data from.
If the NativeStorage object returns any data back we allow this to be rendered to the

Mastering Ionic 2
263
HTML template using the storedData property while also setting the isData property
to true so that the returned data can be displayed in the HTML template.
Finally we call the resetMovies method:
resetMovies(data)
{
let k;
this.movies.length = 0;
for(k in data)
{
this.movies.push(
{
movie : data[k].movie
});
}
}
This method allows us to reset and repopulate the movies array so as to avoid any
duplicate data whenever we save/retrieve movie data from the NativeStorage object.
saveMovie()
{
let movie : string = this.form.controls["movieName"].value,
i : number = 0,
k;
for(k in this.storedData)
{
if(this.storedData[k].movie === movie)
{
i++;
}
}

if(i === 0)
{
this.movies.push(
{
movie : movie
});
this.storeMovie(this.movies, movie);
}
else
{
let message = `The movie ${movie} has already been stored. Please
enter a different movie title.`;
this.storageNotication(message);
}
}
Data Storage
264
Our SaveMovie method retrieves the value for the movieName formControlName
directive from the input eld in the HTML template, loops through the storedData
object to determine whether the movie name already exists.
If it doesn’t the movie name is pushed into the movies array and then passed into
the storeMovie method.
If the movie name already exists then a notication is published informing the user of
this fact.
storeMovie(movies, movie)
{
let moviesStored = JSON.stringify(movies);
this.localStore.setItem(this.storageKey, moviesStored).then(
(data) =>
{

Mastering Ionic 2
265
this.renderMovies();
let message = `The movie title ${movie} was added successfully`;
this.clearFieldValues();
this.storageNotication(message);
},
(error) =>
{
let message = `Whoops! Something went wrong. The movie title
${movie} was NOT added`;
this.storageNotication(message);
}
);
}
The storeMovie method accepts 2 parameters: the array of movies to be saved to
the NativeStorage object and the name of the movie that is being added.
If the movies are able to be saved we clear the input eld in the HTML template and
inform the user that the movie was added successfully. Otherwise we return a
notication to the user informing them that something went wrong.
clearFieldValues()
{
this.lmTitle = "";
}
The clearFieldValues method simply sets the lmTitle property to an empty string.
As this property is bound by the ngModel directive to the input eld in the HTML
template any value that has been entered into there will be removed.
This ensures that our form is kept clean as well as disallowing the same value to be
immediately re-submitted.

Data Storage
storageNotication(message) : void
{
let notication = this.toastCtrl.create({
message : message,
duration : 3000
});
notication.present();
}
266
Our nal method, storageNotication, is used to inform the user of the outcome of
submitting/saving their movies.
Using the ToastController class this method receives a message as its parameter
which is subsequently displayed for 3 seconds at the bottom of the screen.
That covers the breakdown of the code so now let’s see the app in action.
Connect your handheld device to the computer (the following example assumes
iOS but you can change this to android if that’s the device you’re connecting with)
and from the Terminal application, while situated in the root of the movieApp project
directory, run the following commands (waiting for the rst command to complete
before running the next one):
ionic prepare ios && ionic build ios
ionic run ios --device
If this is the rst time you are publishing the app to a handheld device run the ionic
prepare ios && ionic build ios commands to congure/set up the app for iOS.
If you should experience any errors with this process refer to the chapter titled
Troubleshooting your Ionic app for potential workarounds/solutions.
Assuming the build/run process ran smoothly the app will be published to the
connected device where we should see something resembling the following screens:
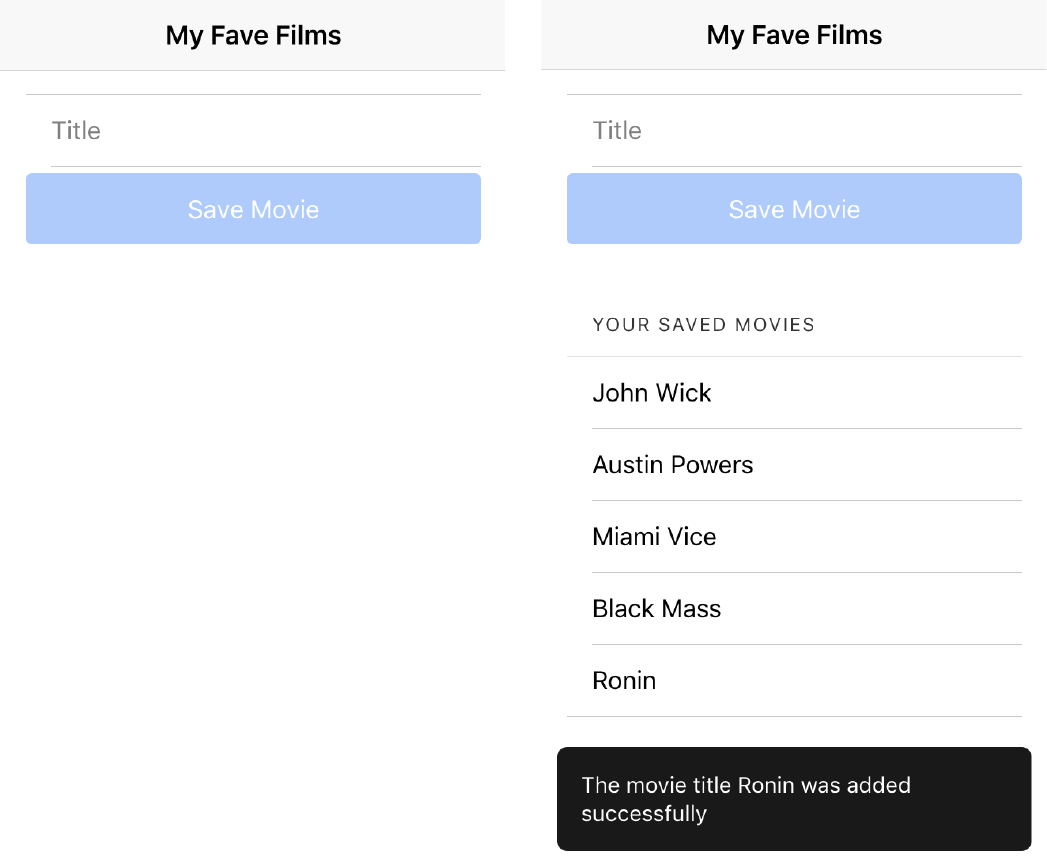
Mastering Ionic 2
267
The screen capture at the top left of the page depicts the app in its initial state: no
saved movies are displayed (as none currently exist) and the screen displays a
single input eld with a disabled form button.
The screen capture at the top right of the page depicts the app when a movie has
been successfully saved to the NativeStorage object.
A notication message is displayed at the bottom of the screen and the saved movie
is retrieved from the NativeStorage object and displayed in the Your Saved Movies
list under the cleared form.
In the following screen capture we see what happens when we enter the name of a
movie that already exists in the NativeStorage object:

Data Storage
268
There’s denitely a lot of room for improvement with what we’ve built here and, as
mentioned earlier, we’ll be revisiting this app later on in the case study
chapter titled: Your Favourite Movies, where we’ll add the following:
• Additional form elds for storing genre and ratings
• Sort movies by title
• Allow the user to edit/remove any previously saved movies
• Filter the display of movies by genre and rating
Now we’ll look into the second method of persisting data for Ionic 2 apps using the
SQLite database plugin.

Mastering Ionic 2
269
The case for SQLite
As useful as the NativeStorage plugin is for data persistence in Cordova/Ionic apps
it does come with certain limitations:
• The plugin authors recommend that no more than a few hundred kilobytes of
data be stored using the plugin (https://github.com/TheCocoaProject/cordova-pl-
ugin-nativestorage#when-to-use-the-plugin)
• More complex data structures/requirements are better handled with a database
approach
On this last point, given the complexity of certain apps and their requirements, a
database solution is often the preferred approach for structuring and managing data.
With that in mind, and given iOS, Android & Windows Phone support for the SQLite
database standard, we’re going to explore using the Cordova SQLite Storage plugin
to persist data within our apps so let’s recreate our last example using this plugin.
From the Terminal, and while in the root of your projects directory, run the following
Ionic CLI commands:
ionic start moviesSQLiteApp blank --v2
cd moviesSQLiteApp
npm install
ionic platform add android
ionic plugin add cordova-sqlite-storage
ionic g provider database
Similar to what we did with the NativeStorage example we:
• Create a new blank Ionic 2 app (this time called moviesSQLiteApp)
• Change into the root directory of the newly created app and install all additional
required node modules with the npm install command
• Next we install the android platform
• Followed by installing the Cordova SQLite Storage plugin
• Finally, we create a database service to handle API calls to the Cordova SQLite

270
Storage plugin
Open the moviesSQLiteApp/src/providers/database/database.ts service and
make the following modications (displayed in bold):
Data Storage
import { Injectable } from '@angular/core';
import {SQLite} from 'ionic-native';
import { Http } from '@angular/http';
import 'rxjs/add/operator/map';
@Injectable()
export class DatabaseService {
public data : any = null;
public storage : any = null;
public dbName : string = "movies.db";
public movies : any = [];
constructor(public http: Http)
{
this.data = null;
}
createDatabase()
{
this.storage = new SQLite();
this.storage.openDatabase({
name : this.dbName,
location : 'default' // the location eld is required
})
.then((data) => {
console.log("Opened database");
this.createDatabaseTables();
}, (err) => {
console.error('Unable to open database: ', err);

Mastering Ionic 2
271
});
}
createDatabaseTables()
{
this.createMoviesTable();
}
createMoviesTable()
{
this.storage.executeSql('CREATE TABLE IF NOT EXISTS movies (id
INTEGER PRIMARY KEY AUTOINCREMENT, movie TEXT)', {})
.then((data) =>
{
console.log("movies table created");
},
(error) => {
console.log("Error: " + JSON.stringify(error.err));
});
}
retrieveMovies()
{
return new Promise(resolve =>
{
this.storage.executeSql('SELECT * FROM movies', {})
.then((data) =>
{
this.movies = [];
if(data.rows.length > 0)

Data Storage
272
{
var k;
for(k = 0; k < data.rows.length; k++)
{
this.movies.push({
movie: data.rows.item(k).movie
});
}
}
resolve(this.movies);
},
(error) => {
console.log("Error: " + JSON.stringify(error.err));
});
});
}
insertMoviesToTable(movie)
{
return new Promise(resolve =>
{
let sql = "INSERT INTO movies(movie) VALUES('" + movie + "')";
this.storage.executeSql(sql, {})
.then((data) => {
resolve(true);
}, (error) => {
console.log("Error " + JSON.stringify(error.err));
});
});
}
}

Mastering Ionic 2
273
There’s a fair amount of code for our database service so let’s break each part down
so we have a better understanding of what the script is designed to accomplish.
import { Injectable } from '@angular/core';
import {SQLite} from 'ionic-native';
import { Http } from '@angular/http';
import 'rxjs/add/operator/map';
@Injectable()
export class DatabaseService {
public data : any = null;
public storage : any = null;
public dbName : string = "movies.db";
public movies : any = [];
...
}
We start by importing the SQLite plugin that we installed earlier in this section and,
at the top of the Database class, we create a handful of public properties, most
notably declaring the name for the app database.
createDatabase()
{
this.storage = new SQLite();
this.storage.openDatabase({
name : this.dbName,
location : 'default' // the location eld is required
})
.then((data) => {
console.log("Opened database");
this.createDatabaseTables();
},
Data Storage
274
(err) => {
console.error('Unable to open database: ', err);
});
}
The createDatabase method, as the name suggests, is used to create the app
database by triggering the openDatabase method of the SQLite plugin.
If the database is successfully created then database tables are generated for the
app through calling the createDatabaseTables method.
createMoviesTable()
{
this.storage.executeSql('CREATE TABLE IF NOT EXISTS movies (id
INTEGER PRIMARY KEY AUTOINCREMENT, movie TEXT)', {})
.then((data) =>
{
console.log("movies table created");
},
(error) => {
console.log("Error: " + JSON.stringify(error.err));
});
}
The createDatabaseTables method calls a single method: createMoviesTable.
This generates the database table, if it doesn’t already exist, to store the names of
favourite movies for the app using the executeSql method of the SQLite plugin.
The executeSql method accepts 2 parameters: a SQL query and any additional
supplied arguments.
As for data types the SQLite database standard supports the following:

Mastering Ionic 2
275
• NULL (Null values)
• INTEGER (signed integer values - look up this article for an explanation on what
a signed integer is: http://kias.dyndns.org/comath/13.html)
• TEXT (string values)
• REAL (oating point values)
• BLOB (Blob - Binary Large Object - values I.e. for storing images or les directly
within the database table itself)
If you’re familiar with databases like MySQL or Oracle you’ll probably feel a little
limited by the data types available. As you can guess this limitation requires you to
be a little more creative with storing certain types of data.
If, for example, you wanted to store a date value in an SQLite table you could
choose one of the following data types:
• INTEGER (I.e. in a Unix time format - this would be as the number of seconds
since 1970-01-01 00:00:00 UTC)
• TEXT (In this format - "YYYY-MM-DD HH:MM:SS.SSS")
• REAL (I.e. As a Julian day number I.e. 2451557.5)
In this basic example we’re setting 2 elds:
• id (set as an INTEGER data type and PRIMARY KEY - which means values must
be unique and cannot be null - with the value for the eld automatically generated
and incremented using AUTOINCREMENT)
• movie (set as a TEXT data type to store the titles for the movies that we will be
entering into the database table)
retrieveMovies()
{
return new Promise(resolve =>
{
this.storage.executeSql('SELECT * FROM movies', {})
.then((data) =>

Data Storage
276
{
this.movies = [];
if(data.rows.length > 0)
{
var k;
for(k = 0; k < data.rows.length; k++)
{
this.movies.push({
movie: data.rows.item(k).movie
});
}
}
resolve(this.movies);
},
(error) => {
console.log("Error: " + JSON.stringify(error.err));
});
});
}
We return all movies stored in the database using the retrieveMovies method which
utilises a Promise to handle the asynchronous nature of the request.
insertMoviesToTable(movie)
{
return new Promise(resolve =>
{
let sql = "INSERT INTO movies(movie) VALUES('" + movie + "')";
this.storage.executeSql(sql, {})
.then((data) =>
{
resolve(true);

Mastering Ionic 2
277
},
(error) =>
{
console.log("Error: " + JSON.stringify(error.err));
});
});
}
Finally, we handle adding individual movies to the database table using the
insertMoviesToTable method which uses a Promise to manage returning the result
of the asynchronous database operation.
For more information on SQLite: https://www.sqlite.org/datatype3.html
For more information on the SQLite Cordova Storage plugin, its methods and
potential gotchas: https://github.com/litehelpers/Cordova-sqlite-storage
Rendering the template
For the moviesSQLiteApp/src/pages/home/home.html template we’ll simply use
the HTML code from the NativeStorage example.
Replace the current content in this le with the below code instead:
<ion-header>
<ion-navbar>
<ion-title>
My Fave Films
</ion-title>
</ion-navbar>
</ion-header>
<ion-content padding>
<form

[formGroup]="form"
(ngSubmit)="saveMovie()">
<ion-list>
<ion-item margin-bottom>
<ion-label>Title</ion-label>
<ion-input
type="text"
formControlName="movieName"
[(ngModel)]="lmTitle"></ion-input>
</ion-item>
<button
ion-button
color="primary"
text-center
block
[disabled]="!form.valid">Save Movie</button>
</ion-list>
</form>
<ion-list *ngIf="isData">
<ion-list-header>
Your saved movies
</ion-list-header>
<ion-item *ngFor="let data of storedData">
{{ data.movie }}
</ion-item>
</ion-list>
</ion-content>
Data Storage
278

Mastering Ionic 2
279
Scripting the page logic
With the HTML side covered we can now turn our attention to implementing the logic
for our moviesSQLiteApp/src/pages/home/home.ts script.
Make the following amendments (highlighted in bold):
import { Component } from '@angular/core';
import { NavController, Platform, ToastController } from 'ionic-angular';
import { FormGroup,
FormControl,
Validators,
FormBuilder } from '@angular/forms';
import { DatabaseService } from '../../providers/database';
@Component({
selector: 'page-home',
templateUrl: 'home.html'
})
export class HomePage {
public form : FormGroup;
public isData : boolean = false;
public storedData : any = null;
public movies : any = [];
public lmTitle : any;
constructor(
public navCtrl : NavController,
public db : DatabaseService,
public fb : FormBuilder,
public toastCtrl : ToastController,
public platform : Platform
)

{
platform.ready().then(() =>
{
setTimeout(() =>
{
this.renderMovies();
}, 750);
});
this.form = fb.group({
"movieName" : ["", Validators.required]
});
this.clearFieldValues();
}
renderMovies()
{
this.db.retrieveMovies()
.then(
(data) =>
{
let existingData = Object.keys(data).length;
if(existingData !== 0)
{
this.storedData = data;
this.isData = true;
}
this.resetMovies(this.storedData);
});
}
Data Storage
280

resetMovies(data)
{
let k;
this.movies.length = 0;
for(k in data)
{
this.movies.push(data[k].movie);
}
}
saveMovie()
{
let movie : string = this.form.controls["movieName"].value,
i : number = 0,
k;
for(k in this.storedData)
{
if(this.storedData[k].movie === movie)
{
i++;
}
}
if(i === 0)
{
this.movies.push(movie);
this.storeMovie(movie);
}
else
{
let msg = `The movie ${movie} has already been stored. Please
Mastering Ionic 2
281

enter a different movie title.`;
this.storageNotication(msg);
}
}
storeMovie(movie)
{
this.db.insertMoviesToTable(movie).then(
(data) =>
{
this.storageNotication(data);
this.renderMovies();
let msg = `The movie title ${movie} was added`;
this.clearFieldValues();
this.storageNotication(msg);
},
(error) =>
{
let message = `Whoops! Something went wrong. The movie title
${movie} was NOT added`;
this.storageNotication(message);
});
}
clearFieldValues()
{
this.lmTitle = "";
}
storageNotication(message) : void
{
let notication = this.toastCtrl.create({
Data Storage
282

message : message,
duration : 3000
});
notication.present();
}
}
Mastering Ionic 2
283
As this is essentially a reworking of the NativeStorage example all we’re doing here
is making modications to use the Database class instead.
Notice that we wrap the renderMovies method within a setTimeout function in the
class constructor? This is to avoid errors with the method being called before the
database is ready - VERY important!
Before we publish our app to a device we need to modify the existing code within
the moviesSQLiteApp/src/app.module.ts le (amendments highlighted in bold):
import { NgModule, ErrorHandler } from '@angular/core';
import { IonicApp, IonicModule, IonicErrorHandler } from 'ionic-angular';
import { MyApp } from './app.component';
import { Database } from '../providers/database';
import { HomePage } from '../pages/home/home';
@NgModule({
declarations: [
MyApp,
HomePage
],
imports: [
IonicModule.forRoot(MyApp)
],
bootstrap: [IonicApp],

Data Storage
284
Assuming there are no build or run errors (and, if you do experience errors, please
read through the chapter titled Troubleshooting your Ionic app for common errors
and possible workarounds/solutions) you should see the database driven app being
published to your device.
Granted the app won’t look or feel any different to the NativeStorage example (even
though the underlying data persistence strategy is driven via SQLite) but it’s always
a nice feeling to see your code actually working!
The reworked app should look and behave like the screen captures displayed on the
following page:
ionic prepare ios && ionic build ios
ionic run ios --device
Here we import our database service and then declare that as a provider within the
NgModule metadata.
Now connect your mobile device to your computer, navigate to the root of the
moviesSQLite project directory in the Terminal application and run the following
commands one after the other (substituting iOS with android in the run command if
you’re using that platform instead):
entryComponents: [
MyApp,
HomePage
],
providers: [{provide: ErrorHandler, useClass: IonicErrorHandler}, Database]
})
export class AppModule {}

Mastering Ionic 2
285
If it does then congratulations!
If not, go back through the code featured in this section and double check you
haven’t missed or misspelt anything. Failing that inspect the downloadable code for
this example (which is listed in the resources at the end of this chapter).
And with that we wrap up our exploration of persisting data using the NativeStorage
and Cordova SQLite plugins.
Both approaches have their respective pros and cons but, as a general rule, when it
comes to data persistence; the larger and/or more complex the volume of data
always go with a database.

Data Storage
286
• For storing/persisting relatively small amounts of data (no larger than a maximum
size of a few hundred kilobytes) opt for NativeStorage
• For persisting larger volumes of data and/or more complex data structures opt for
Cordova SQLite instead (or a similar database solution)
Resources
• Cordova SQLite Storage plugin: https://github.com/litehelpers/cordova-sqlite-stor-
age
• Cordova Native Storage plugin: https://github.com/TheCocoaProject/cordova-pl-
ugin-nativestorage
All project les for this chapter can be found listed in the download links on page
636.
In the next chapter we’ll be exploring animations and their usage within Ionic 2 apps.
Summary
• When testing Ionic Native/Apache Cordova plugins DON’T use ionic serve as a
web browser will NOT be able to run those plugins. DO publish to a connected
mobile/tablet device though as this will enable real-world testing compared to that
of a simulator.
• When testing your apps on a connected device don’t forget to prepare and build
your apps before you run them for the rst time using the following commands:
ionic prepare ios && ionic build ios
• To run your app on a mobile device connected to your computer use the following
command (substituting android for ios if you’re on an Android device)
ionic run ios --device

Animations

Animations
288
Most modern web and mobile applications make use of animation in some form;
whether this be a simple sliding carousel, animated modal windows or full blown
parallax scrolling.
Used wisely such animation can enhance the user experience, adding a level of
interactivity that delights and engages. If implemented poorly though the user
experience suffers and app performance can very quickly degrade, particularly on
older devices and even modern devices where heavy amounts of animation are
being triggered.
This cannot be understated - use technology wisely, particularly when it comes to
animations as there’s nothing that kills the user experience faster than an app that’s
so "busy" it becomes unusable.
Ionic, Angular and animation
Ionic already uses animations for events such as page transitions but the underlying
Angular 2 framework adds support for developers to craft and implement their own
animations using an, at the time of writing, experimental technology known as the
Web Animations API.
This technology was designed to unify the different approaches to web based
animation (such as taking the logic for CSS animations and transitions out of the
stylesheet and moving those into JavaScript where doing so can help reduce the
load on the DOM and also allow such animations to be controlled programmatically).
Unfortunately, as this technology is still undergoing development, browser support is
limited to the following:
• Chrome (v36+)
• Firefox (v48+)
• Opera (29+)
As you can see the list is pretty short and, as there is NO support for iOS safari, this
would make using the technology a serious issue on that platform were it not for a

Mastering Ionic 2
289
polyll which helps provide support for that missing functionality.
This polyll falls back to native implementations of the Web Animations API methods
where the browser does not provide support for these.
Be aware that this polyll only provides support for the following browsers:
• Firefox 27+
• Chrome
• IE10+
• Edge
• iOS Safari 7.1+
• Mac Safari 9+
Realistically this should be more than sufcient for most app development needs.
If not you’ll need to think carefully about implementing animations using the Web
Animations API & polyll and possibly opt for a graceful degradation approach on all
non-supported platforms instead.
Angular 2 Animations
Let’s get acquainted with the Web Animations API (via the Angular 2 framework) by
building a new Ionic app (which we’ll call animationsApp - project les are available
in the resources section for this chapter).
Within this app we’ll be looking to create a very simple photo gallery that reveals
information about each thumbnail in a sidebar that animates into view after that
thumbnail is selected.
In the root of your apps directory run the following commands in your Terminal:
ionic start animationsApp blank --v2 // Once completed cd into project directory
npm install // Don’t forget to install the required node modules!

Animations
290
Remember that browser support for the Web Animations API is, at the time of
writing, extremely limited so the next thing we’ll need to do is download the Web
Animations polyll if we want to support iOS safari (amongst other platforms).
Once the polyll has been downloaded create a directory titled js within the root of
the src/assets directory for the app and place the polyll script inside of there.
There’s one nal step we need to perform before we can jump into coding the
animations for our app:
• Create a directory titled images inside the root of the src/assets directory
• Copy all of the images from the following location in the download les for this
chapter: animationsApp/src/assets/images
• Paste these images into the src/assets directory of your animationsApp project
With all of the necessary assets in place we now need to place a link to the recently
downloaded polyll script (highlighted in bold) within the displayed section of the
animationsApp/src/index.html le:
<ion-app></ion-app>
<script src="assets/js/web-animations.min.js"></script>
<!-- The polylls js is generated during the build process -->
<script src="build/polylls.js"></script>
<!-- The bundle js is generated during the build process -->
<script src="build/main.js"></script>
When we run our Ionic build/serve commands the index.html le will be copied from
the src/ directory to the www/ directory, replacing the le of the same name.
The images and js folders inside the src/assets directories will also be copied to
the www directory.
Now that older supported browsers will be able to implement native fallbacks for the
Web Animations API we then open the animationsApp/src/pages/home/home.ts
le and import the following modules (highlighted in bold):

Mastering Ionic 2
@Component({
selector: 'page-home',
templateUrl: 'home.html',
animations: [
trigger('animatePanel', [
state('hidden', style({
right: '-35%'
})),
state('displayed', style({
right: ‘0’
})),
transition('hidden => displayed', animate(‘1200ms ease-in-out’)),
transition('displayed => hidden', animate(‘1200ms ease-in-out’))
]),
]
})
export class HomePage {
public panelTitle : string;
291
import {
Component,
Input,
trigger,
state,
style,
transition,
animate } from '@angular/core';
import { NavController } from 'ionic-angular';
With the necessary modules imported we can now implement the animation logic
directly within the component metadata and build out the class like so (amendments
highlighted in bold):

292
Animations
public panelDesc : string;
public panelImage : string;
public panelState : string = 'hidden';
public expanded : boolean = false;
public isActive : boolean = false;
public items : any = [
{
title : "London Underground",
description : "Rarely deserted Tube platform",
thumbnail : "assets/images/gallery-thumbnail-1.jpg",
image : "assets/images/gallery-1.jpg"
},
{
title : "Bolsover Castle",
description : "A ne piece of English heritage",
thumbnail : "assets/images/gallery-thumbnail-2.jpg",
image : "assets/images/gallery-2.jpg"
},
{
title : "Atomium",
description : "Brussels architecture and attractions",
thumbnail : "assets/images/gallery-thumbnail-3.jpg",
image : "assets/images/gallery-3.jpg"
},
{
title : "Venice",
description : "Authentic Venetian experience",
thumbnail : "assets/images/gallery-thumbnail-4.jpg",
image : "assets/images/gallery-4.jpg"
},
{
title : "Paris",
description : "Louvre Pyramid",

Animations
293
thumbnail : "assets/images/gallery-thumbnail-5.jpg",
image : "assets/images/gallery-5.jpg"
},
{
title : "Greenwich",
description : "Interesting and unusual sundial",
thumbnail : "assets/images/gallery-thumbnail-6.jpg",
image : "assets/images/gallery-6.jpg"
},
{
title : "Piccadilly Circus",
description : "Heart of the City",
thumbnail : "assets/images/gallery-thumbnail-7.jpg",
image : "assets/images/gallery-7.jpg"
},
{
title : "Erasmusbrug",
description : "Rotterdam’s mighty red bridge",
thumbnail : "assets/images/gallery-thumbnail-8.jpg",
image : "assets/images/gallery-8.jpg"
},
{
title : "Rotterdam",
description : "Dutch parking",
thumbnail : "assets/images/gallery-thumbnail-9.jpg",
image : "assets/images/gallery-9.jpg"
},
{
title : "Henry Moore",
description : "Fine English sculpture",
thumbnail : "assets/images/gallery-thumbnail-10.jpg",
image : "assets/images/gallery-10.jpg"
}];

Mastering Ionic 2
294
constructor(public navCtrl: NavController)
{
}
togglePanel(item = null)
{
this.expanded = !this.expanded;
if(this.expanded)
{
this.panelState = 'displayed';
this.isActive = true;
}
else
{
this.panelState = 'hidden';
this.isActive = false;
}
if(item !== null)
{
this.panelTitle = item.title;
this.panelDesc = item.description;
this.panelImage = item.image;
}
}
}
At rst glance this might appear a little overwhelming but the logic is actually quite
straightforward.
We begin by adding an animations array which contains the following elements:

Animations
295
animations: [
trigger('animatePanel', [
state('hidden', style({
right: '-35%'
})),
state('displayed', style({
right: ‘0’
})),
transition('hidden => displayed', animate('1200ms ease-in-out')),
transition('displayed => hidden', animate('1200ms ease-in-out'))
]),
]
We then dene a series of properties within the HomePage class which will be used
to store data for the page (not least of which is referencing the thumbnail and large
images that will be rendered to the template) and set up conditional controls for the
animation logic.
Finally we create a togglePanel method which will be used to control the animation
of the sidebar panel for the app and populate this with content.
Now we need to link the custom animation logic to the page template.
Open the animationsApp/src/pages/home/home.html le and make the following
amendments (highlighted in bold):
• trigger (This denes a property of animatePanel which will be attached to a
DOM element on the page and act, as the name implies, as an animation trigger)
• state (Declares style properties that will be used to animate to and from)
• transition (Denes the order in which the declared states will be animated, the
duration of that animation and what easing function may be applied)

Mastering Ionic 2
296
<ion-header>
<ion-navbar>
<ion-title>
Travel Gallery
</ion-title>
</ion-navbar>
</ion-header>
<ion-content padding>
<div class="background" [class.isActive]="isActive"></div>
<ul class="gallery">
<li *ngFor="let item of items" (click)="togglePanel(item)">
<img src="{{ item.thumbnail }}" alt="{{ item.description }}">
<p>{{ item.title }}</p>
</li>
</ul>
<section class="panel" [@animatePanel]="panelState">
<section class="inner">
<span class="close-panel" (click)="togglePanel()">X Close</span>
<h1>{{ panelTitle }}</h1>
<img src="{{ panelImage }}">
<p>{{ panelDesc }}</p>
</section>
</section>
</ion-content>
Here we add the following elements:
• A <div> tag that will only be displayed when the value for the programmatically
assigned class of isActive is true
• A list of thumbnail images dynamically generated from the items array dened in
the component class.

.panel {
background: #1a2580;
color: #fff;
position: xed;
top: 0;
right: -35%;
bottom: 0;
width: 35%;
z-index: 9997;
font-family: Arial, Helvetica, sans-serif;
}
.inner {
position: absolute;
top: 75px;
left: 35px;
z-index: 9999;
width: 86%;
img {
display: block;
width: 100%;
}
p {
Animations
297
• Each list item implements a click event which triggers the togglePanel method
passing in the data from the current array iteration as a parameter
• Finally we come to the content sidebar which we assign the animation trigger of
animatePanel too (this is set to the value of the panelState property - which is
used to determine whether the panel is displayed or hidden)
Now all that remains is to add to the animationsApp/src/pages/home/home.scss
le the following style rules as shown below:

color: rgb(255, 255, 255);
}
}
.close-panel {
font-size: 1em;
color: rgb(68,68,68);
cursor:pointer;
}
.background {
background: rgba(68, 68, 68, 0.7);
position: xed;
z-index: 1000;
top: 0;
bottom: 0;
left: 0;
width: 100%;
display: none;
}
.isActive {
display: block;
}
.isHidden {
display: none;
}
.gallery {
width: 75%;
font-size: 18px;
line-height: 3;
font-weight: 400;
Mastering Ionic 2
298

padding-top: 50px;
list-style: none;
color: rgb(255, 255, 255);
li {
oat:left;
width: 18%;
margin: 0 20px 20px 0;
background: rgba(68, 68, 68, 0.35);
text-align: center;
cursor: pointer;
position: relative;
img {
display: block;
width: 100%;
}
p {
position: absolute;
bottom: 0;
left: 0;
width: 100%;
padding: 0;
margin: 0;
background: rgba(255, 255, 255, 0.7);
font-size: 0.85em;
}
}
}
299
Animations

300
Mastering Ionic 2
Now that we’ve completed the necessary coding for the app let’s preview this in the
browser using the ionic serve command from the Terminal.
Initially you should see the following image gallery/layout being displayed:
To see the animation logic working select any thumbnail and watch as the content
sidebar transitions into view to display a title, description and larger version of the
thumbnail image as shown in the following screen capture:
Animations
301
Even though this is only a basic use of Angular 2 animations this simple example
demonstrates how they can be implemented within Ionic 2 apps (thanks to a little
help from the addition of the animations polyll for wider browser support).
In the next chapter we’ll look at troubleshooting common bugs, issues & errors in
Ionic 2 development.
Summary
• Angular 2 introduces animation capabilities through an experimental technology
known as the Web Animations API
• Platform support for the Web Animations API is, at the time of writing, very limited
requiring that an additional polyll be used for wider browser support
• Angular 2 denes animations in terms of a trigger, state and transition
• Angular 2 animation logic is constructed inside of an array that is dened within
the @Component metadata for the class
• Heavy use of animations can degrade performance especially on older devices
• Animation may be best avoided on older devices/browsers, depending on support
and performance issues
Resources
Web Animations API
Web animations API polyll
Angular 2 Animations
All project les for this chapter can be found listed in the download links on page
636.

Troubleshooting
your Ionic 2 App

303
Even with the best will in the world there’s going to be times when we inevitably run
into bugs and issues while developing our Ionic apps.
Over the course of this chapter I’m going to cover common development bugs,
potential workarounds/solutions and, where possible, links to further resources.
Problem #1 - The Ionic white screen of death
IMPORTANT - IF you are developing Ionic 2 apps on a Windows platform you MUST
install windows and/or android as your platform in your app root directory:
Mastering Ionic 2
If you don’t you WILL get the white screen of death when trying to publish the app!
NOTE - The following section has been left for posterity as Ionic 2, since Release
Candidate 3, features error reporting functionality that makes the “white screen of
death” a thing of the past - see here for more details.
The White Screen of Death is quite possibly one of, if not the most, frustrating bugs
that you will ever encounter as an Ionic 2 developer - you publish your app to a
testing device but all you see is a blank white page instead of the UI you expected.
The TypeScript compiler might not have thrown up any errors during the Ionic CLI
build process and nothing jumps out as erroneous when inspecting the code itself.
The rst thing to do here (presuming you’re not trying to test any Cordova plugin
functionality) is run the app in a web browser using ionic serve. You can then use
the browser console to see what errors might be thrown up from the transpiled
JavaScript - some potential culprits here might include:
• The Root @Component decorator has no template or templateUrl declaration
• The template value in the Root @Component decorator has no root property on
the <ion-nav> element (it should look something like the following snippet)
ionic platform add android
// and/or
ionic platform add windows

304
@Component({
template: '<ion-nav [root]="rootPage"></ion-nav>'
})
If you’re working with a fresh Ionic app generated directly through the Ionic CLI then
there won’t be a problem with template declarations within the Root @Component
decorator.
If this is the case then perform the following checks:
1. Conrm that all plugins you are importing into your classes are denitely installed
using the following command in the Terminal application: ionic plugin ls - and, if
present, that those plugins have been installed correctly (always follow the online
instructions for each plugin to be installed as there may be specic conguration
options that need to be implemented). If necessary un-install each plugin, test
without that plugin and then reinstall that plugin to determine whether or not the
problem resides there
2. Similarly, if you are importing custom components/directives/services/pipes then
conrm that the paths to these les are correct, that they are loaded correctly into
the class and that any requested methods are spelt correctly/actually exist (you
would be surprised at how easy it is to call a method that is misspelt or quite sim-
ply doesn’t exist!)
3. Ensure that any code that requires plugin method calls is initialised/triggered
within the Platform.ready method (if the device isn’t ready the code won’t work!)
4. The TypeScript compiler should report any syntax errors in your code - double
check that your classes/templates are formatted correctly
5. Prepare and build your app using the Ionic CLI with platform specic commands
(I.e. If you’re targeting iOS devices then you would use ionic prepare ios && ionic
build ios)
6. In more extreme cases remove and reinstall the platform you want to publish to
(as this can sometimes correct issues with older versions of the target platform
causing bugs/errors)
If the above measures fail to solve the issue then visit the Ionic forums for further
Troubleshooting your Ionic 2 App

Mastering Ionic 2
305
help & assistance: https://forum.ionicframework.com
Don’t be too disheartened if you do encounter the Ionic white screen of death as you
won’t be the rst or last developer to have done so!
Problem #2 - Build failure
This issue can be quite easy or daunting to resolve depending on the cause (or
causes) of the build failure.
The Ionic CLI doesn’t always provide the most intuitive or helpful of errors when a
build fails and this can sometimes lead to hours spent online trying to nd a solution.
Here are the most common causes/xes that I’ve encountered for build errors.
Code signing
If you’re trying to build for an iOS device and receive the following error:
Code Sign error: No provisioning proles found: No non–expired provisioning
proles were found.
Thankfully this is relatively simple to x although there’s a few steps you’ll need to
take:
• In the cong.xml le enter the app bundle identier, using a reverse domain
name style string (I.e. com.saintsatplay.appNameHere), in the widget ID eld
• If you don’t already have existing signing certicates installed on your system log
into your Apple Developer Account and generate new iOS app development &
distribution certicates
• Once you’ve completed generating your certicates download and install them to
your Mac OS X Keychain application
• In Apple’s Xcode ensure that the following settings are congured:
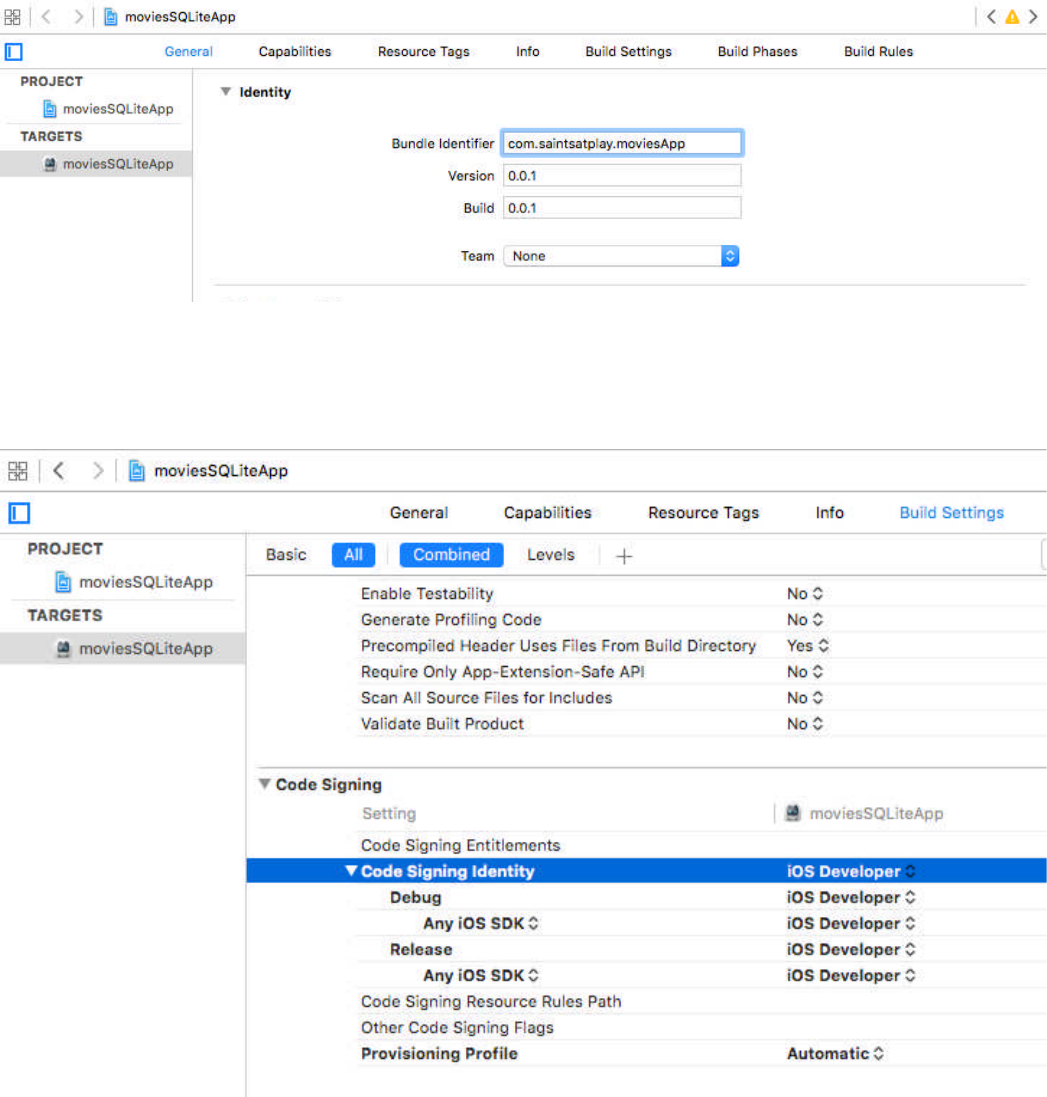
306
Ensure that the Apple ID for your developer account is associated with the project
by adding or selecting that from the Team menu. Xcode will automatically detect and
assign the signing identities and provisioning proles connected with that Apple ID.
In your Xcode project editor, select the name of your project under the Targets
settings, select the Build Settings tab then scroll down and ensure that the Code
Signing Identity eld has code signing values selected (Xcode should automatically
assign these for you - as shown in the above screen capture).
Following these steps should resolve any issues with code signing when building
your app for publishing to an iOS device.
Troubleshooting your Ionic 2 App

Mastering Ionic 2
307
Cannot determine the module for component
There’s nothing more frustrating than running the Ionic CLI Build process only to
encounter the following error:
[21:34:41] Error: Cannot determine the module for component NAMEHERE!
[21:34:41] ngc failed
[21:34:41] ionic-app-script task: "build"
[21:34:41] Error: Error
The rst time you experience this might seem a little mind-boggling because you’ll
no doubt have double checked your imported components and found that they’re all
there.
What gives?
Thankfully the solution is quick and simple to implement.
In the src/app/app.module.ts le ensure that you have performed the following
steps:
• Imported the component at the top of the le
• Included the component in the @NgModule declarations array
• Included the component in the @NgModule entryComponents array
As displayed in the below app.module.ts le (highlighted in bold):
import { NgModule } from '@angular/core';
import { IonicApp, IonicModule } from 'ionic-angular';
import { MyApp } from './app.component';
import { HomePage } from '../pages/home/home';
import { ComponentA } from '../pages/componentA/componentA';
@NgModule({
declarations: [
MyApp,

Troubleshooting your Ionic 2 App
308
HomePage,
ComponentA
],
imports: [
IonicModule.forRoot(MyApp)
],
bootstrap: [IonicApp],
entryComponents: [
MyApp,
HomePage,
ComponentA
],
providers: []
})
export class AppModule {}
Cannot nd...did you mean the instance member...
The Ionic CLI TypeScript transpiler, will, when encountering an error, print messages
such as the following to the Terminal window:
transpile update started ...
[18:55:09] typescript: src/pages/home/home.ts, line: 33
Cannot nd name 'pageWidth'. Did you mean the instance member
'this.pageWidth'?
L33: pageWidth = platform.width();
Unlike some of the errors that are thrown up by the transpiler this one is actually
quite helpful - we are actually presented with the solution that we need to implement
through a helpful suggestion along with the line where the error occurs.
Don’t worry if you encounter errors similar to the above as you make the transition
from Ionic 1/JavaScript to Ionic 2/TypeScript - you’ll become a dab hand with the
required syntax fairly quickly!
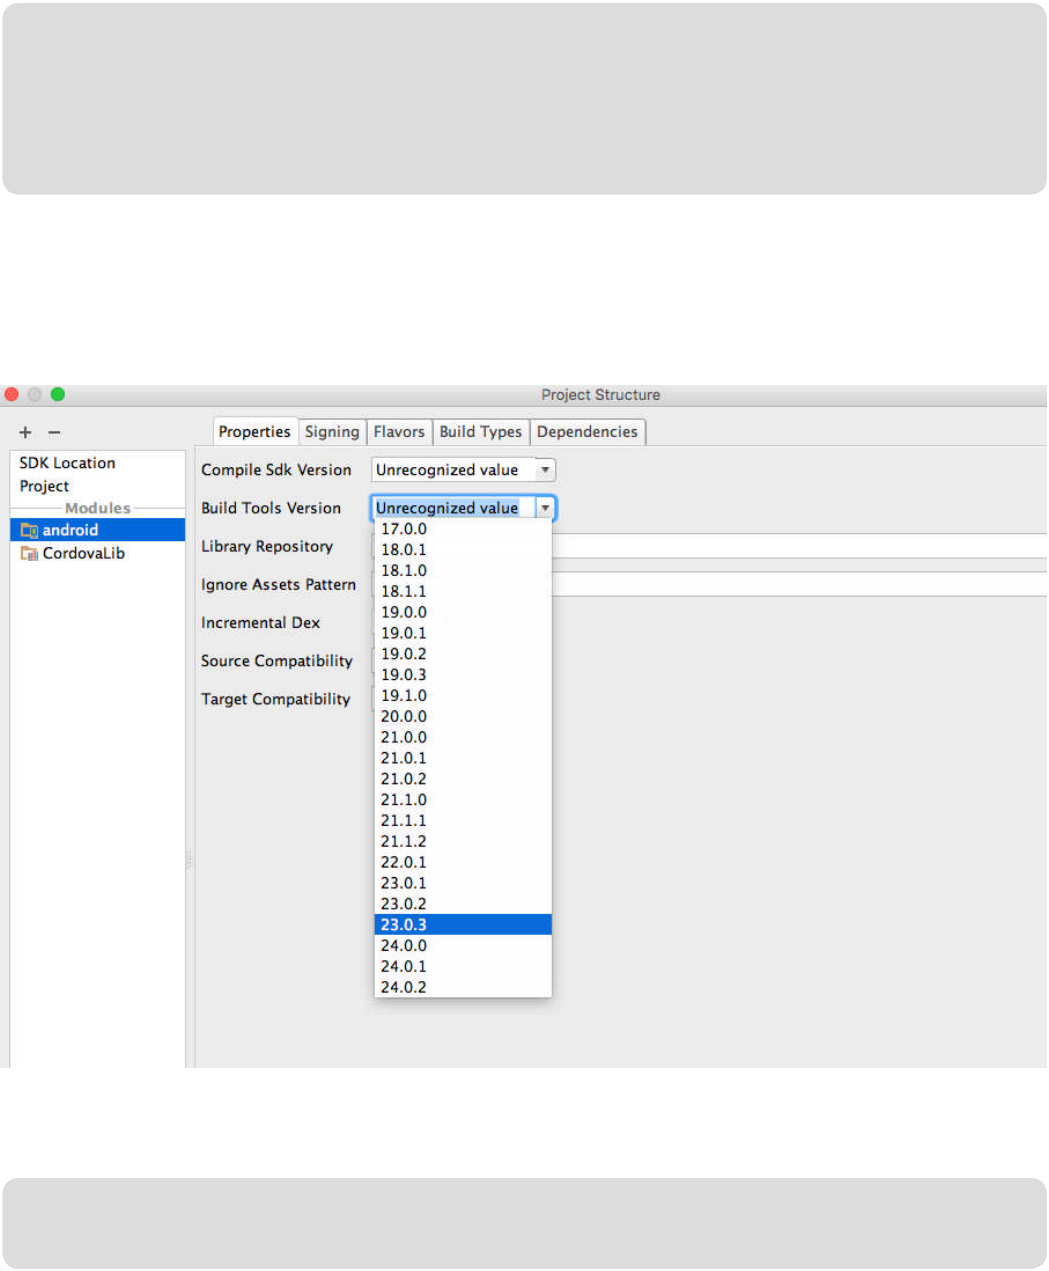
309
Android transformClasseswithDexforDebug error
If you’re trying to run a build process for an Android project through the Ionic CLI
and encounter the following error:
FAILURE: Build failed with an exception.
* What went wrong:
Execution failed for task ‘:transformClassesWithDexForDebug’.
Open up Android Studio and, if you have updated the Android SDK manager to the
latest API’s and libraries (which of course, as a good developer, you will have done)
set the Build Tools Version to 23.0.3 (as demonstrated in the below screen capture)
in your Project Structure settings (File > Project Structure):
Save these settings return to the Terminal and once you’ve run the following
commands your Android project should build without throwing that error again:
ionic prepare android && ionic build android
Mastering Ionic 2

310
Error code 65
If you’re trying to run an iOS build process using the Ionic CLI and are confronted
with an error like the following:
** BUILD FAILED **
The following build commands failed:
Ld build/emulator/myApp.app/myApp normal i386
(1 failure)
Error: Error code 65 for command: xcodebuild with args: -xccong,/projects/
myApp/platforms/ios/Cordova/build-debug.xccong,-project,myApp.xco-
deproj,ARCHS=i386,-target,myApp,-conguration,Debug,-sdk,iphonesimu-
lator,build,VALID_ARCHS=i386,CONFIGURATION_BUILD_DIR=/projects/
myApp/platforms/ios/build/emulator,SHARED_PRECOMPS_DIR=/projects/
myApp/platforms/ios/build/sharedpch
The rst thing you should do is run the ionic info command in your Terminal to
check your system’s Ionic environment and dependencies.
You may think you’ve already installed all the software you need but then discover
that there’s one or more applications that you still require.
The ionic info command might output something like the following to the Terminal:
Your system information:
Cordova CLI: 6.3.0
Gulp version: CLI version 1.2.1
Gulp local: Local version 3.9.1
Ionic Framework Version: 2.0.0-beta.11
Ionic CLI Version: 2.0.0-beta.37
Ionic App Lib Version: 2.0.0-beta.20
Troubleshooting your Ionic 2 App

Mastering Ionic 2
311
You’ll notice from the above output that the ios-deploy and ios-sim applications are
not installed.
ios-deploy allows developers to install and debug iPhone apps directly from the
command line without Xcode.
ios-sim is a command line application launcher for the iOS simulator.
The Ionic Info output even provides the following installation instructions for these
applications:
ios-deploy version: Not installed
ios-sim version: Not installed
OS: Mac OS X El Capitan
Node Version: v0.12.0
Xcode version: Xcode 7.3.1 Build version 7D1014
______________________________________________________________
Dependency warning - for the CLI to run correctly,
it is highly recommended to install/upgrade the following:
Please install your Cordova CLI to version >=4.2.0 `npm install -g Cordova`
Install ios-sim to deploy iOS applications. npm install -g ios-sim (may require
sudo)
Install ios-deploy to deploy iOS applications to devices. `npm install -g ios-de-
ploy` (may require sudo)
npm install -g ios-sim
npm install -g ios-deploy
If you are developing on Mac OS X 10.11 El Capitan you might need to modify the
command for installing ios-deploy to the following:

312
ionic platform rm ios
ionic platform add ios
Read here for further information on this ag: https://docs.npmjs.com/misc/cong#-
unsafe-perm.
If installing the previously mentioned software fails to resolve the Error code 65
issue the most reliable solution I have found involves removing and re-adding the ios
platform using the following Ionic CLI commands (which you may need to prex with
sudo to overcome possible permission errors):
npm install -g ios-deploy --unsafe-perm=true
Troubleshooting your Ionic 2 App
After running these commands my next build process was error free.
Unsupported major.minor version 52.0
This error was encountered while running an android build process using the Ionic
CLI.
The solution that I’ve found works? Upgrade your JDK installation to version 8.
Problem #3 - Plugin methods don’t appear to execute
If you’re importing Ionic Native/Apache Cordova plugins for use in your app make
sure that those plugin methods are triggered within the Platform.ready() method.
Doing so determines that the device is ready, the DOM has fully loaded and calls to
Cordova based plugins can access native functionality such as, for example,
Geolocation.
Problem #4 - Permission denied error
This can crop up when you’re trying to perform an operation in the Ionic CLI and nd
yourself greeted with a message akin to the following:

Error: EACCES, permission denied '/Users/myNameHere/.cong/congstore/
insight-cordova.json'
You don’t have access to this le.
Mastering Ionic 2
313
To solve this simply prex the command you were trying to run with sudo (a unix
utility which grants temporary root like privileges to the user - the word sudo is short
for super user do) and then enter your system user password at the prompt.
If you nd yourself getting tired of having to keep entering sudo to prex certain
CLI commands you can always change the ownership permissions on your user
directory like so (this example pertains to Mac OS X):
cd ~ // Change to your home directory
whoami // Determine your system user name
// Change ownership of your home directory and its contents to your username
sudo chown -R yourName /Users/yourName
Problem #5 - Black screen on Ionic Native Google Maps
You’ve installed the Google Maps plugin from Ionic Native (or, more preferably, from
the Github repository that it links to) and having followed the installation instructions
correctly see a black screen rendering where the Google Map should be displayed.
This appears to be a bug with the current version of Ionic 2 that is caused by a <div>
with a class of nav-decor that overlays and hides the Google map from view.
More information on this bug can be accessed via the following forum threads:
• https://github.com/driftyco/ionic/issues/7205
• https://forum.ionicframework.com/t/why-appears-nav-decor-after-pressing-back-
button/59791

314
Other rendering issues with the Google map plugin that other developers have
experienced are covered in the following resource: https://github.com/mapsplugin/
cordova-plugin-googlemaps/wiki/TroubleShooting:-Blank-Map
Developing from these online resources the current bug x for this issue involves
using CSS to set the background colour to a transparent value for elements with the
following classes:
• nav-decor
• _gmaps_cdv_
In the scss le for the component that handles the logic and rendering for the
Google Map plugin you can target those classes with the following style rule:
._gmaps_cdv_, .nav-decor{
background-color: transparent !important;
}
If you’ve implemented this style rule and the black screen issue still persists double
check that you’re using the isAvailable method of the GoogleMap plugin API within
the Ionic platform ready call like so (highlighted in bold):
this.platform.ready().then(() =>
{
GoogleMap.isAvailable()
.then((isAvailable: boolean)=>
{
if(!isAvailable)
{
console.log('GoogleMap plugin is NOT available');
}
else
{
console.log('GoogleMap plugin is available');
Troubleshooting your Ionic 2 App

Mastering Ionic 2
// Dene necessary logic and execute GoogleMap calls inside here
}
});
});
Problem 6 - Your key may be invalid for your bundle ID
Here’s another Ionic Native GoogleMap plugin related error.
After trying, and failing, to connect to the Google Maps service the following error is
printed to the Xcode console when running your app:
Your key may be invalid for your bundle ID: com.company.id
There are 2 possible causes of this problem:
• The Google Maps SDK for iOS API is not enabled (double check whether this is
the case or not in your Google Developers Console)
• You’ve registered a different bundle ID for your iOS API key in the Google Maps
API service to the one that is stored in the cong.xml le for your published app
(simply correct the bundle ID in your cong.xml le to match that of the iOS API
key)
Ensuring that the Google Maps SDK for iOS API is enabled and that the Bundle ID
stored in the cong.xml le matches that entered for the iOS API key will x this
problem.
315
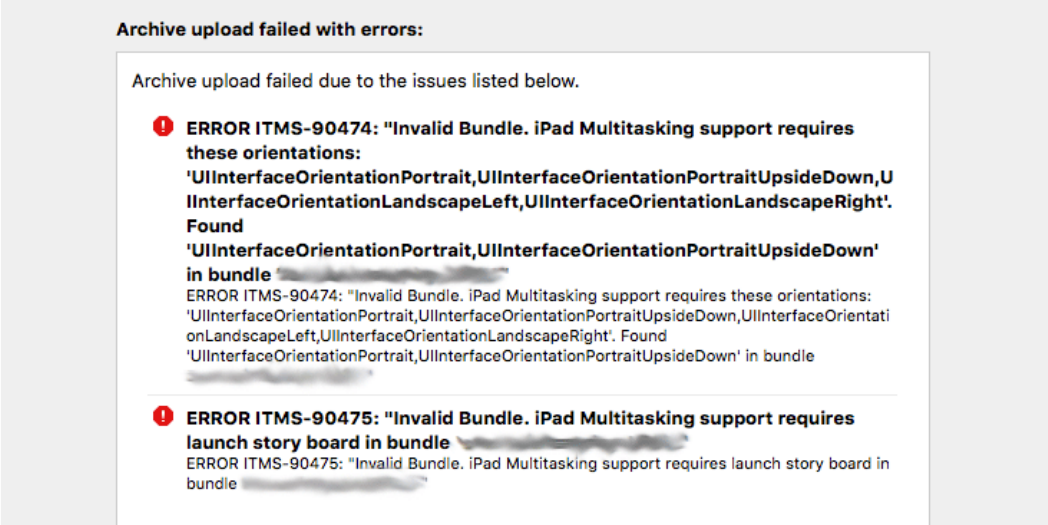
316
This one caught me out at rst as I had selected the required orientations for the
app that I was submitting.
Apple App Store upload errors
We’ll cover submitting an archive to the Apple App Store in the Submitting your
iOS app to the Apple App Store chapter but here we’ll go over some common
issues and errors that I’ve experienced while validating and/or submitting archives to
the Apple App Store.
All errors occurred on a system with the following specications:
• Mac OS X El Capitan (v 10.11.4)
• Xcode 7.3 / Apache Cordova 6.1.1
Whether other developers experience the same issues with a different operating
system/software set-up remains to be seen but hopefully the following will help
anyone else experiencing the same problem.
iPad Multitasking support requires these orientations
The following error was reported when an archive upload failed:
Troubleshooting your Ionic 2 App
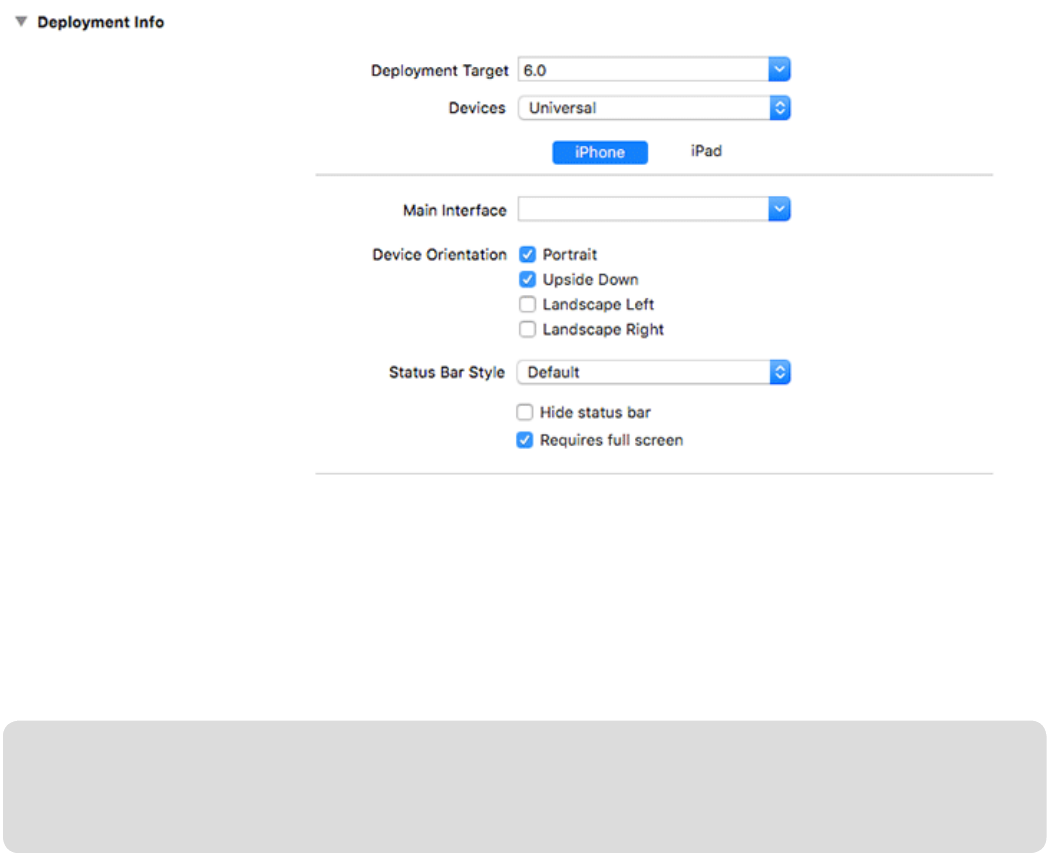
Mastering Ionic 2
317
Thankfully the solution was very simple.
This simply involves selecting Xcode’s Requires full screen checkbox in the
Deployment Info section of the General settings for the project Targets like so:
Xcode CFBundleIcons no image found error
If you encounter the following error message while trying to upload your archive:
ERROR ITMS-90032:"Invalid Image Path - No image found at the path refer-
enced under key 'CFBundleIcons': icon.png"
The problem is that Xcode is trying to reference a launch icon that cannot be found.
To solve this simply delete the highlighted Icon Key listing in Xcode as displayed in
the following screen capture:
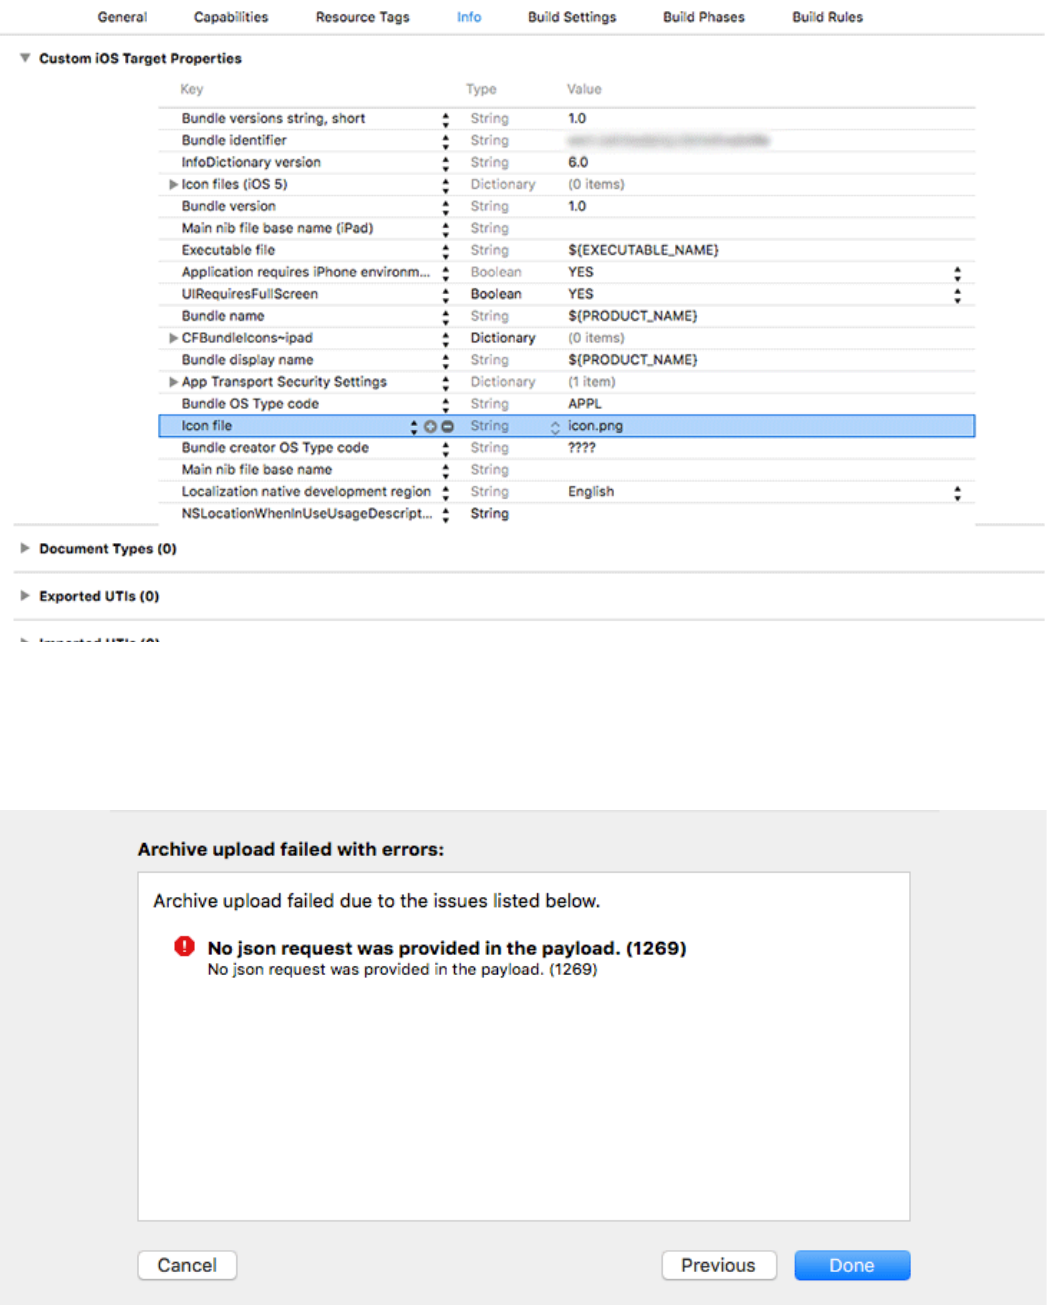
318
Troubleshooting your Ionic 2 App
No JSON request provided in the payload
The following is a very strange and unusual archive upload error:
The solution?

Mastering Ionic 2
319
Simply re-upload the archive.
This solved the error and I’m still none the wiser as to why the archived upload
originally failed.
Fixing Xcode issue with Missing iOS Distribution signing identity error
The following occurred during the archive validation process:
Failed to locate or generate matching signing assets
Xcode attempted to locate or generate matching signing assets and failed
to do so because of the following issues.
Missing iOS Distribution signing identity for ... Xcode can request one for you.
Fixing this requires you follow these steps:
1. Download the Apple provided certicate
2. Install this certicate in your Keychain Access application (double clicking on the
downloaded certicate will do this automatically)
3. Within the Keychain Access application navigate to the View menu and select
Show Expired Certicates
4. Go to the Keychains section, on the left hand side of the Keychain Access appli-
cation window
5. In both the login and System links delete the expired Apple Worldwide Developer
Relations Certication Authority certicates that are displayed
6. (optional) You can also delete ALL other expired certicates here as well (but be
sure to add any replacement/updated certicates where necessary
Now, if you return to Xcode and attempt to validate your archived package, prior to
submission to the Apple App store, you should see the previous distribution identity
warning message is no longer displayed.
Apple have released a statement explaining, in greater detail, the expiration of the

320
Worldwide Developer Relations Intermediate Certicate and what developers need
to be aware of with regards to this issue.
As the newly installed Apple Worldwide Developer Relations Certication Authority
certicate expires on the 7th February 2023 you shouldn’t see this error message for
some time to come (all things being well with software updates and Apple mandated
changes!)
Troubleshooting your Ionic 2 App

Debugging
& Proling Apps

Mastering Ionic 2
322
“Always code as if the guy who ends up maintaining your code will be a
violent psychopath who knows where you live”
John F. Woods - post to a comp.lang.c++ newsgroup
In this chapter we’re going to look at some tips to help ne-tune the performance of
your Ionic 2 app’s as well as testing techniques to ensure your application logic is t
for purpose.
Testing is a huge part of software development and there’s nothing enjoyable about
picking up another developer’s work to nd bug after bug in what appears to be an
impenetrable mess of undocumented, spaghetti like code (particularly when you’ve
got deadlines to meet and a million and one other tasks simultaneously weighing
down on you).
It therefore pays when we’re developing our apps, regardless of which individual will
be responsible for maintaining the codebase, to observe best practice standards for
coding, testing & optimising those apps for best results.
When testing our Ionic 2 apps there are a number of approaches we can take:
• Browser debugging
• Unit testing
• UI testing
This chapter will only focus on browser based debugging and proling techniques
using, predominantly, the Console API to test the performance of our code.
Console API
The Console API gives us quite a few methods to choose from, the most commonly
used being:
• log
• dir
• dirxml

323
Debugging & Proling Apps
• prole/proleEnd
• time/timeEnd
• trace
We can then use any single one of these, or a combination of, to determine how well
our code is performing; whether there are any bugs in the application logic or
optimisations required (such as where code might be performing slowly in the case
of iterating through large chunks of data).
Further information on the Console API can be found here.
Most of you are no doubt familiar with using console.log() but let’s put a handful
of different methods to work in a sample application that we’re going to build which
allows us to retrieve information on selected Apple Store locations in Europe.
At the root of your apps project directory run each of the following commands, one
after the other, using the Ionic CLI:
ionic start appleStores --v2 blank
cd appleStores
npm install
ionic g provider loadFiles
Here we’re creating a brand new app named appleStores, which, once generated,
we change into the project directory to install all the required node modules and
dependencies before nally creating a loadFiles service
Before making a start on coding the application logic you’ll need to take a moment to
add the necessary data les for the app:
• Create a directory titled data located inside the appleStores/src/assets directory
• Copy all of the JS les for the download les for this chapter from the following
location: /Testing-and-proling-apps/appleStores/src/assets/data/
• These les will be titled: apple-store-locations.js and european-countries.js
• Paste both of these copied JS les into your appleStores/src/assets/data app
project directory

Mastering Ionic 2
324
These les, as their names suggest, contain the Apple Store locations and country
listings for the following European states:
• Belgium
• France
• Germany
• Netherlands
• United Kingdom
Using Ionic serve our appleStores app will output data to the browser console
window through the following Console API methods:
• count
• dir
• log
• table
• time
• timeEnd
Nothing terribly fancy or complex here just a handful of console tools to help us
understand how the app’s code is performing.
Open the appleStores/src/providers/load-le.ts provider and let’s start the ball
rolling with the following amendments (highlighted in bold):
import { Injectable } from '@angular/core';
import { Http } from '@angular/http';
import 'rxjs/add/operator/map';
@Injectable()
export class LoadFiles {
private countries : any = [];
private locations : any = [];

325
Debugging & Proling Apps
constructor(public http: Http)
{
}
loadCountries()
{
return new Promise(resolve =>
{
this.http.get('assets/data/european-countries.js')
.map(res => res.json())
.subscribe(countries =>
{
for(var k in countries.countries)
{
this.countries.push({
id: countries.countries[k].id,
country: countries.countries[k].country,
lat: countries.countries[k].lat,
lng: countries.countries[k].lng,
zoom: countries.countries[k].zoom,
active: countries.countries[k].active
});
}
resolve(this.countries);
});
});
}

Mastering Ionic 2
326
loadLocations()
{
return new Promise(resolve =>
{
this.http.get('assets/data/apple-store-locations.js')
.map(res => res.json())
.subscribe(locations =>
{
for(var k in locations.locations)
{
this.locations.push({
id: locations.locations[k].id,
country: locations.locations[k].country,
name: locations.locations[k].name,
address: locations.locations[k].address,
lat: locations.locations[k].lat,
lng: locations.locations[k].lng,
zoom: locations.locations[k].zoom,
active: locations.locations[k].active
});
}
resolve(this.locations);
});
});
}
}
Okay, nothing too drastic or complicated here; just 2 methods: loadCountries and
loadLocations which fetch their respective JSON les and parse that data into
objects which are then returned through use of a Promise.

327
Debugging & Proling Apps
These methods will be called in the appleStores/src/pages/home/home.ts le
which we’ll now make the following amendments too (highlighted in bold):
import { Component } from '@angular/core';
import { NavController } from 'ionic-angular';
import { LoadFiles } from '../../providers/load-les';
@Component({
selector: 'page-home',
templateUrl: 'home.html'
})
export class HomePage {
public stores : any = [];
public locations : any;
constructor( public navCtrl : NavController,
public les : LoadFiles)
{
console.time("Loading Apple Store Locations");
this.les.loadLocations().then((data) =>
{
let i,
k,
locations = data;
console.timeEnd("Loading Apple Store Locations");
console.time("Loading European Countries");
this.les.loadCountries().then((data) =>
{
let countries = data;
console.timeEnd("Loading European Countries");
console.time("Combining Countries & Locations");

Mastering Ionic 2
328
for(i in locations)
{
for(k in countries)
{
if(countries[k].id === locations[i].country)
{
console.log(`Country:${countries[k].country}`);
this.stores.push(
{
name: locations[i].name,
address: locations[i].address,
country: countries[k].country,
lat: locations[i].lat,
lng: locations[i].lng,
zoom: locations[i].zoom,
active: locations[i].active
});
console.count();
}
}
}
this.renderDataToTable(this.stores);
this.renderDataToConsole("Apple Stores & countries", this.
stores);
console.timeEnd("Combining Countries & Locations");
this.locations = this.stores;
});
});
}

329
Debugging & Proling Apps
// Render object data to tabular data format
renderDataToTable(stores)
{
console.table(stores);
}
// Make console logging pretty :)
renderDataToConsole(name, values)
{
console.log(`Begin output for ${name}`);
console.dir(values);
console.log(`End output for ${name}`);
}
}
At rst glance this might seem like a lot to take in but it’s relatively simple code:
• We begin with importing the LoadFiles provider followed by initialising two public
properties: stores and locations
• Within the class constructor a property of les is initialised for the LoadFiles
module
• We then run a console.time method to start measuring how long it takes for the
loadLocations method to return data
• Once the Apple Store locations data has been returned by the loadLocations
method the timer is then ended (which will output, to the browser console window,
the length of time the operation took to complete)
• Straight afterwards a new timer is set to measure the amount of time it takes for
data to be returned from the loadCountries method
• Once that data has loaded this timer is ended (once again outputting, to the
browser console window, the time taken from calling the method to retrieving the
data)
• We then create a new timer to measure how long it takes to iterate through a
Mastering Ionic 2
330
nested loop that compares keys between the locations and countries data objects
• Within this nested loop we use the console.log method to output the name of the
country where a match has been found on the keys that are being compared
• We then combine the country name with the Apple Store location, pushing this
into the stores object, and print to the console window the current loop iteration
where a match has been found using the console.count method
• After the nested loop the renderDataToTable method is called which the stores
object is passed into. This method uses the supplied stores object to generate a
table view of its data in the browser console window
• Following from this the renderDataToConsole method is called that is passed a
custom message and the stores object, which it then uses to generate opening
and closing log messages around a collapsible tree view of the stores object to
the browser console
• The last timer that was set is then ended
• Finally, the stores object is passed to the locations object which will be used by
the home page component’s HTML le to output those locations for viewing
That seems like a lot but the logic is fairly simple - we’re just testing how long it
takes for:
• Each provider method: loadCountries and loadLocations to retrieve and return
data
• A nested loop to iterate through both sets of returned data, nd a match between
the 2 and then create a hybrid object from selected keys of each of the 2 data
sets
Along the way we’re just playing with some of the Console API methods!
That covers all of the necessary logic for the appleStores app now we need to open
the appleStores/src/pages/home/home.html le and implement the necessary
mark-up changes for this to work (highlighted in bold):

Debugging & Proling Apps
331
<ion-header>
<ion-navbar>
<ion-title>
European Apple Stores
</ion-title>
</ion-navbar>
</ion-header>
<ion-content padding>
<ion-card *ngFor="let location of locations">
<ion-card-header>
<ion-item class="heading">
<ion-icon ios="logo-apple" md="logo-apple" item-left></ion-icon>
<h2>{{ location.name }}</h2>
</ion-item>
</ion-card-header>
<ion-card-content>
<h2>{{ location.country }}</h2>
<div [innerHTML]="location.address"></div>
<p>Latitude: {{ location.lat }}</p>
<p>Longitude: {{ location.lng }}</p>
</ion-card-content>
</ion-card>
</ion-content>
Here we use the ngFor directive to loop through the locations data object, which, on
each iteration, generates a location listing contained within an <ion-card> tag.
There’s nothing here that we aren’t already familiar with from previous examples of
working with data in page templates.
Now that the HTML for the component has been covered all that remains is to
congure the appleStores/src/app.module.ts le with the following amendments
(highlighted in bold):

Mastering Ionic 2
332
import { NgModule, ErrorHandler } from '@angular/core';
import { IonicApp, IonicModule, IonicErrorHandler } from 'ionic-angular';
import { MyApp } from './app.component';
import { HomePage } from '../pages/home/home';
import { LoadFiles } from '../providers/load-les';
@NgModule({
declarations: [
MyApp,
HomePage
],
imports: [
IonicModule.forRoot(MyApp)
],
bootstrap: [IonicApp],
entryComponents: [
MyApp,
HomePage
],
providers: [{provide: ErrorHandler, useClass: IonicErrorHandler}, LoadFiles]
})
export class AppModule {}
Now that all the necessary code and conguration settings are in place we can run
the appleStore app in a desktop browser and see the console logging functionality at
work.
Using the Ionic CLI, and at the root of the appleStore project directory (you know the
drill by now!), run the following command (feel free to add a lowercase L as a ag to
this command if you want to simultaneously preview the app across iOS, Android &
Windows Phone platforms):
ionic serve
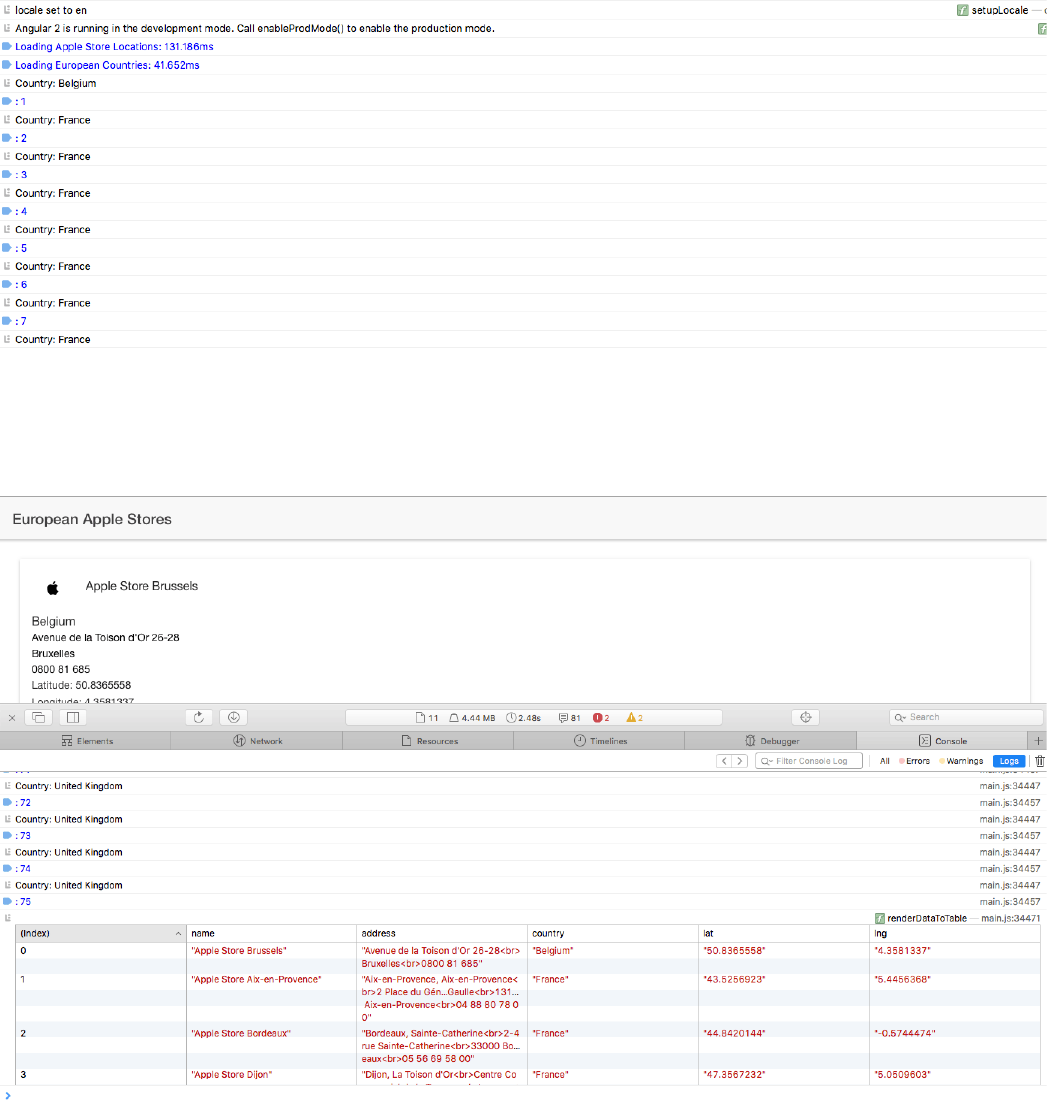
Debugging & Proling Apps
333
All things being well you should see various output being printed to the console
which includes the times taken for the loadLocations and loadCountries methods
to retrieve data (as well as the matching country and count value for each iteration
of the nested loop):
This is then followed by the stores object being rendered into tabular data within
the browser console window (courtesy of the console.table method - which makes
visual analysis of data so much nicer and easier):
Next up is the console.dir method allowing the stores data object to be displayed in
a tree-like structure where each item can be opened/collapsed:
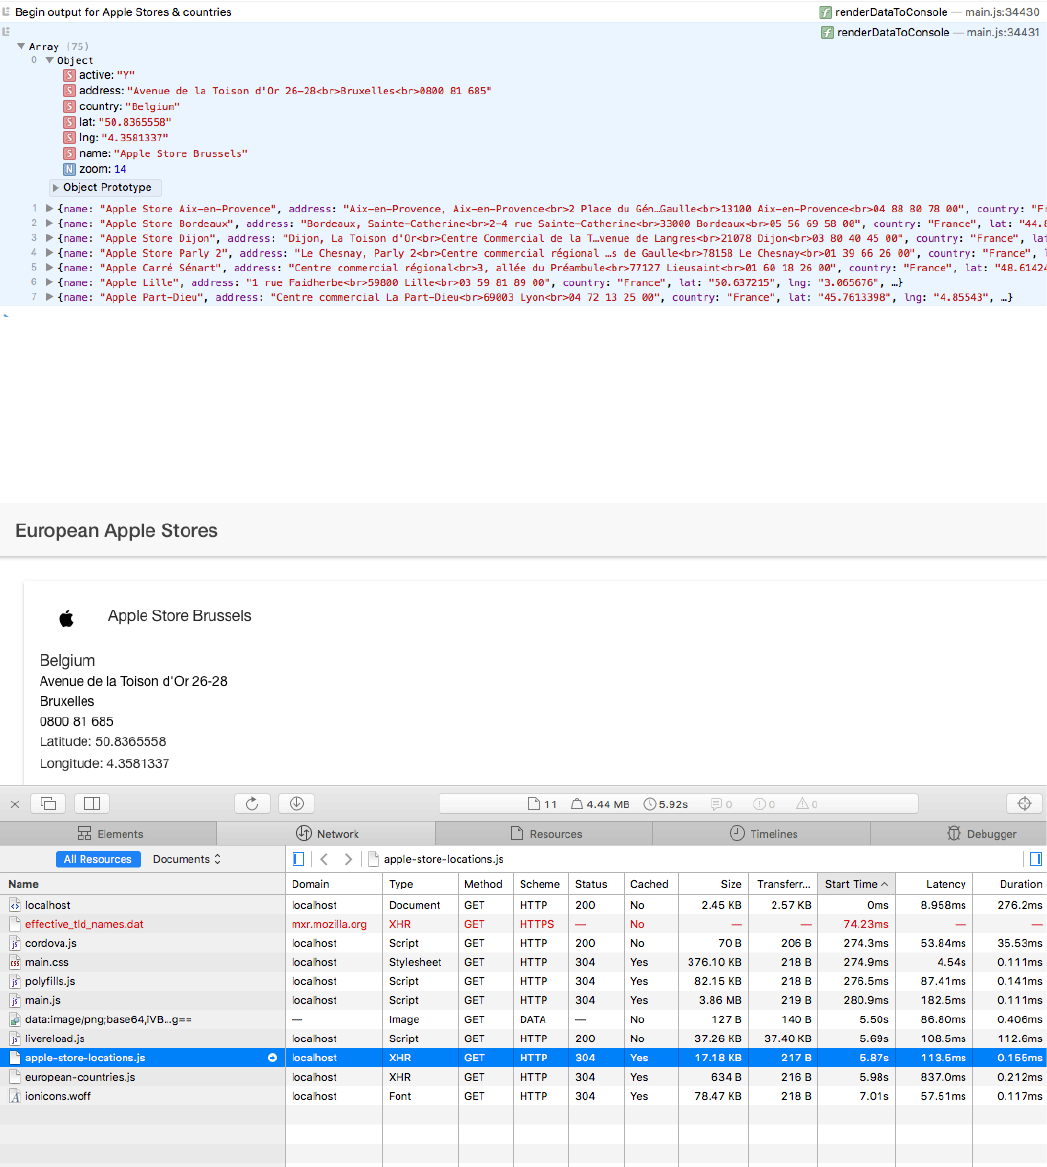
This is useful when trying to determine whether there are any loading issues with
the app.
Similarly the Timelines tab in Safari allows us to investigate any potential bottlenecks
with processing times for drawing items to the screen:
334
Mastering Ionic 2
While we’re using the browser DOM inspector we can also explore the Network tab
which allows us to determine any problems with the size of requested les, les not
being loaded or similar request/response issues for application assets such as
images, JSON les etc.:
335
Debugging & Proling Apps
App Scripts error reporting
There’s nothing worse as a developer than being greeted with the dreaded “white
screen of death” after publishing your Ionic app to a browser, device or simulator.
Sometimes the cause of the problem is obvious, sometimes it isn’t but either way
the lack of helpful feedback can often lead to precious time lost in trying to get to
grips with the issue.
Since Ionic RC 3 that’s no longer an issue thanks to the improved reporting tools
that come bundled with the @ionic/app-scripts library.
This library provides a variety of different build related scripts that handle processes
such as:
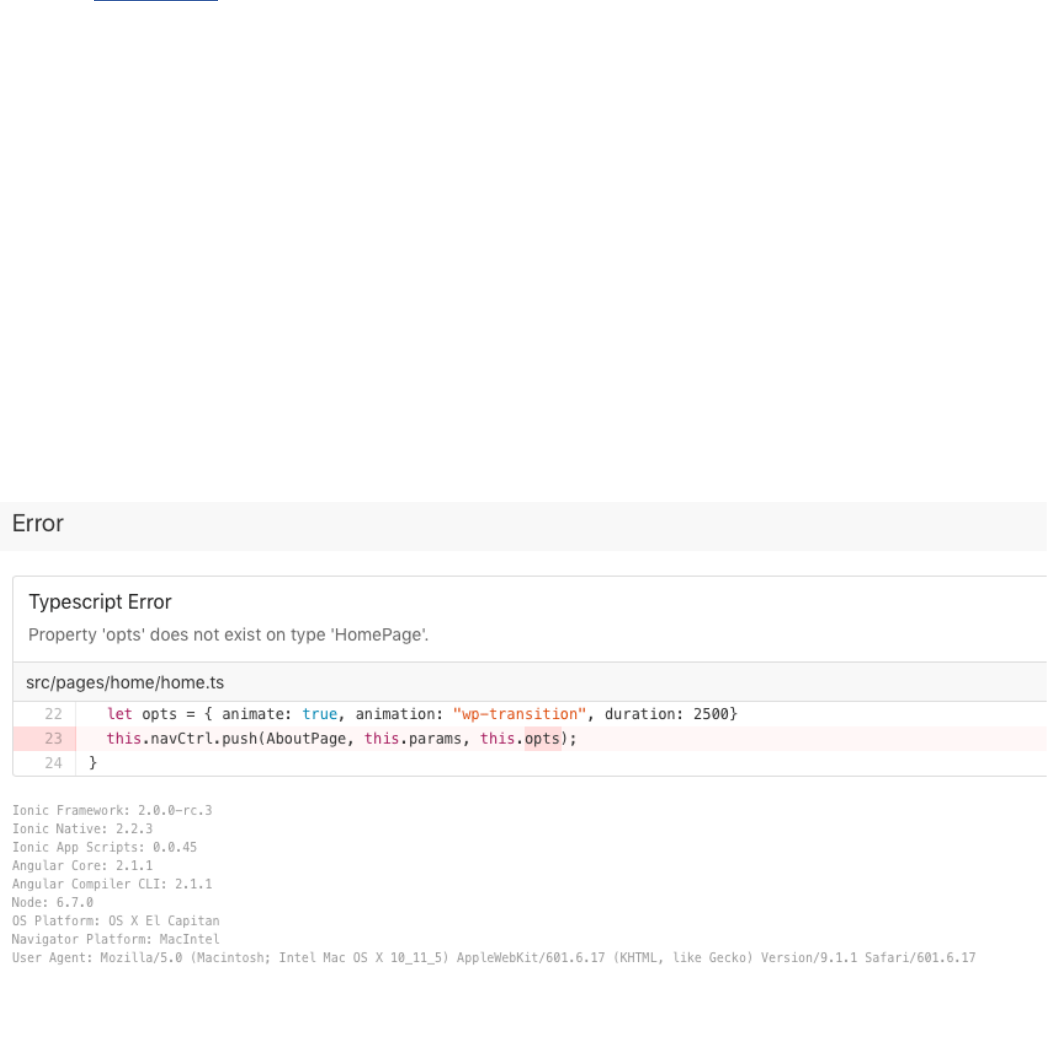
336
Mastering Ionic 2
• Cleaning les prior to a (or from a previous) build process (I.e. deleting the www
directory)
• Linting TypeScript les (requires the tslint.json le located at the root of the Ionic
2 project)
• Calling the Angular Ahead-of-Time (AoT) compiler
• Transpiling TypeScript into JavaScript
• Minifying JavaScript
• And a lot more besides the above
Thanks to this library with the latest version of Ionic 2 any compilation errors that are
caught during a build process are returned to the screen with the following
contextual information:
• A detailed description of the error
• Which le the error can be traced back to
• Which line the error occured on
• Where on the line the error is located (this will be highlighted)
• Information about your environment
As displayed in the following example encountered while running ionic serve :
337
Debugging & Proling Apps
I’m sure you’ll agree that this is a huge improvement on a blank screen with no
output whatsoever!
Now, with build feedback, we can accurately diagnose the cause of the problem,
what we need to do to x this and where the problem is located.
Simple, but massively helpful.
Additionally the App Scripts error reporting functionality also works with Sass
parsing errors as well as TypeScript compilation issues.
FYI - The Ionic team are reportedly developing the App Scripts functionality over the
coming weeks and months so the error reporting tool will host even more useful
debugging features (this will be interesting to see as anything that cuts down on time
spent guring out bugs and their causes is always a welcome development).
Further Information
https://ionicframework.com/docs/v2/resources/app-scripts/
http://blog.ionic.io/rc3-error-reporting-nal-oh-my/
https://www.youtube.com/watch?v=Nu-XuqCXszY
Sourcemaps
Here’s a nice little debugging trick featured in the following YouTube video (credit to
Raja Yogan for sharing this with the wider Ionic community).
Using the Google Chrome Inspctor we could actually debug the TypeScript for an
Ionic 2 app by making the following small addition to the app’s package.json le
(highlighted in bold):
{
"name": "PROJECT-NAME-HERE",
"author": "AUTHOR-NAME-HERE",
"homepage": "URL HERE",

338
Mastering Ionic 2
"private": true,
"scripts": {
...
},
"dependencies": {
...
},
"devDependencies": {
...
},
"cordovaPlugins": [
...
],
"cong": {
"ionic_source_map": "source-map"
},
"cordovaPlatforms": [
"ios",
{
...
}
],
"description": "PROJECT DESCRIPTION HERE"
}
When we run ionic serve this addition to the package.json le will allow us to view
the actual source les for the app.
As you can imagine this is useful as it gives us the ability to set breakpoints in the
web browser on key parts of the original code so we can determine if the logic ow
is behaving as expected (trying to do this on the transpiled JavaScript would be
utterly pointless as we wouldn’t be able to clearly reference the same location in
the original TypeScript le - at best, it would be nothing more than an exercise in
over-complicating matters).
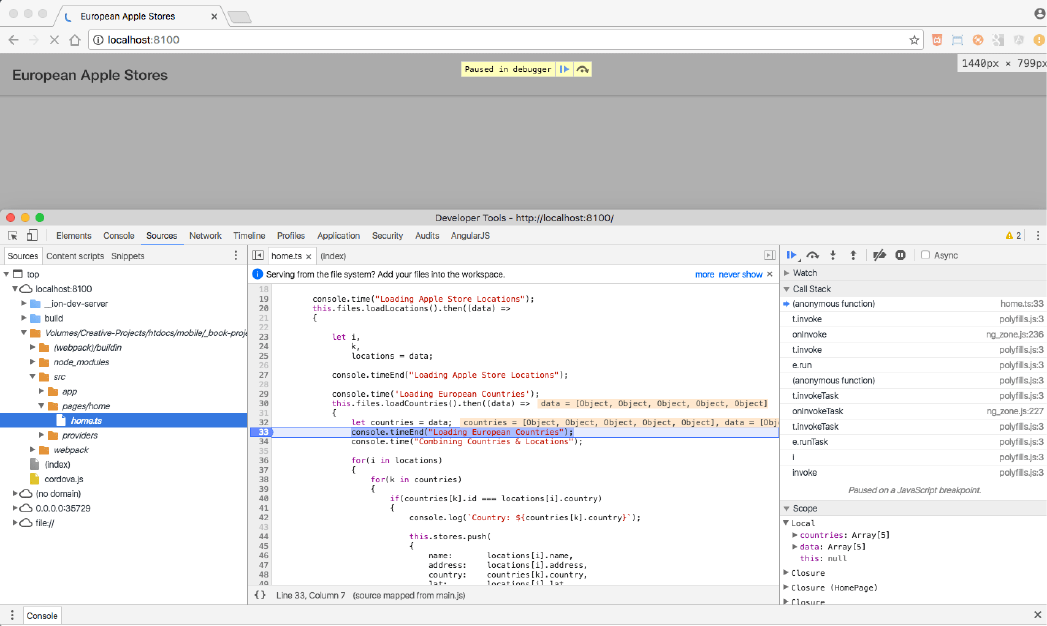
339
Debugging & Proling Apps
Here you can see the expanded debugging folder (which has been added thanks to
the conguration option in the package.json le) displayed in the left-hand side of
the Chrome inspector window with the home.ts le selected for use.
Breakpoints have then been added to lines within the home.ts le and then, once
the page has been reloaded, the debugger pauses at each of these breakpoints.
It’s a simple little tweak to the package.json le but what a powerful debugging tool
that gives us. Thanks to this addition you can now access your TypeScript logic in
the same way that you would regular JavaScript.
Summary
Here we conclude our exploration into different browser based debugging and
proling techniques that we can use for app testing.
The error reporting tools introduced in the latest version of Ionic 2, particularly the
build feedback functionality, are incredibly useful and will save you no end of time in
tracking down development bugs and solving them.

Similarly Raja Yogan’s simple debugging trick, via modifying the package.json le,
provides a great way to debug TypeScript in the browser using sourcemaps.
You’ll probably nd though (if you haven’t done so already) that the console API
methods are the most widely used debugging technique in your development
arsenal.
Just be sure to clear these out, along with the package.json le addition for helping
debug through sourcemaps, when it comes time to submit your production ready
app to the respective App Store(s).
Resources
Web Console API
Ionic 2 error handling
Debugging your Ionic 2 apps
Ionic 2 App Scripts
All project les for this chapter can be found listed in the download links on page
629.
340
Mastering Ionic 2

Documenting
your code

Mastering Ionic 2
342
Some developers love it, most developers seem to hate it but documenting our code
is something that we really should get into the habit of doing regularly.
Nowhere is this more true than when working as part of a team, particularly if we
need to hand off our code to another developer. Helping them get up to speed on
what we’ve written with clear, concise and helpful documentation makes everyone’s
life easier in the long run (especially where project deadlines are concerned!)
If nothing else it also helps us to understand our code should we ever need to come
back to that in 6 months time or more so we can remember what we wrote and why.
Over the following pages of this chapter we’ll look into how we can document the
following code used in our Ionic 2 apps:
• TypeScript
• Sass
We’ll be setting up a custom gulple.js script and using the Sassdoc and Typedoc
npm packages to help document the classes and styles from the animationsApp
project we worked on in the Animations chapter.
Open the package.json le at the root of the animationsApp project directory and
add the following to the devDependencies section (amendments highlighted in bold):
"devDependencies": {
"@ionic/app-scripts": "^0.0.23",
"typescript": "^2.0.3",
"gulp": "latest",
"gulp-notify": "latest",
"gulp-imagemin": "latest",
"gulp-typedoc": "latest",
"sassdoc": "latest",
"typedoc": "latest"
}

343
Documenting your code
Here we’re simply stating that we want the latest versions of the listed packages to
be installed when we run npm install.
In case you didn’t know - the devDependencies section of the package.json le is
used to indicate that the installed packages are to be used for development and are
not essential for the application to run.
Now, at the root of the animationsApp project directory, run the npm install
command from the Terminal to install those devDependencies.
Once the requested npm packages, and all related dependencies, have been
successfully installed create a new directory in the root of the animationsApp project
named workow.
We’ll use the workow directory to run our custom gulple.js script (which we’ll
create next) from and store all generated documentation too - this keeps everything
neatly packaged in one central location.
In your code editor create the following gulple.js script and save this to the
workow directory you created in the root of your animationsApp project:
var paths = {
docs : {
src: '../src/pages/home/home.ts',
dest: '../workow/docs/'
},
Sass : {
src: '../src/theme/app.mixins.scss',
dest: '../workow/sassdoc'
}
};
var gulp = require('gulp'),
sassdoc = require('sassdoc'),

Mastering Ionic 2
344
typedoc = require('gulp-typedoc'),
notify = require('gulp-notify');
/* ----- TypeDoc ----- */
gulp.task('TypeDoc', function() {
return gulp
.src([paths.docs.src])
.pipe(typedoc({
module: "commonjs",
mode: "le",
target: "es5",
includeDeclarations: false,
excludeExternals: true,
out: paths.docs.dest,
name: "AnimationApp",
ignoreCompilerErrors: true,
version: true,
}))
.pipe(notify({message: 'Documentation published'}));
});
/*----- SassDoc ----- */
gulp.task('SassDoc', function () {
return gulp.src(paths.Sass.src)
.pipe(sassdoc())
.pipe(gulp.dest(paths.Sass.dest))
.pipe(notify({message: 'Documentation published'}));
});
gulp.task('default', ['SassDoc', 'TypeDoc']);
Documenting your code
345
In our custom gulp script we start by dening a paths object which lists the input and
output paths for les that we want to run our tasks on, we then import the necessary
packages that we require before creating 2 tasks:
• TypeDoc
• SassDoc
Finally we instruct gulp to run both of these as default tasks at the end of the script.
We’ve supplied quite a few conguration options for our TypeDoc task so let’s break
these down in a bit more detail so as to understand their function and what we’re
looking to achieve here:
• module
Species the type of module to be used for code generation - available options
are: "commonjs", "amd", "system" or "umd"
• mode
Species the output mode for the project to be compiled with - available options
are: "le" or "modules"
• target
Species the ECMAScript target version - available options are: "ES3", "ES5" or
"ES6"
• includeDeclarations
Parse d.ts declaration les - available options are true or false
• excludeExternals
Prevents externally resolved TypeScript les from being documented
• out
Species the location the documentation should be published to
• name

Mastering Ionic 2
346
Sets the name of the project that will be displayed in the header of the generated
documentation
• ignoreCompilerErrors
Ignores TypeScript compiler errors - available options are true or false
• version
Displays the version number of TypeDoc - available options are true or false
Further information about the conguration options available for the TypeDoc
package are listed here:
• Github TypeDoc
• TypeDoc usage guide
Marking up your classes
Currently the options for documenting your classes with TypeDoc are limited to
using only the following tags:
• @param <param_name>
• @return
If you’re familiar with using a documenting library such as JSDoc or YUIDoc this
might feel restricted at rst. Surprisingly though this is quite adequate as the
TypeDoc plugin actually generates quite detailed documentation on our behalf.
All we need to do is mark up our document correctly supplying information about
each property and method, using the necessary tags and the TypeDoc plugin will do
the rest of the work for us.
Open the animationsApp/src/pages/home/home.ts le and add the following
comments (highlighted in bold):

347
Documenting your code
...
export class HomePage {
/**
* Stores the title to be displayed on the sliding animation panel
*/
public panelTitle : string;
/**
* Stores the description to be displayed on the sliding animation
* panel
*/
public panelDesc : string;
/**
* Stores the image value to be displayed on the sliding animation
* panel
*/
public panelImage : string;
/**
* Flag used to determine visibility of animation panel
*/
public panelState : string = 'hidden';
/**
* Flag used to determine whether animation panel is currently open
* or not
*/
public expanded : boolean = false;
/**
* Flag used to determine whether animation panel is active
*/

348
Mastering Ionic 2
public isActive : boolean = false;
/**
* Array of gallery locations to be rendered to the HTML template
*/
public items : any = [
...
];
constructor(public navCtrl: NavController)
{
}
/**
* Determines the state of the sidebar panel
* @param item Optional object for the gallery location data
* @return void
*/
togglePanel(item = null)
{
...
}
}
Now that we’ve marked up our HomePage class the last remaining task is to
create the following Sass le - animationsApp/src/theme/app.mixins.scss - that
we listed as an input source for the SassDoc plugin in our custom gulple.js script.
Once this le is in place we can start to generate documentation for the app.
Open your code editor and create the animationsApp/src/theme/app.mixins.scss
le with the following styles and comments (using SassDoc’s mark-up syntax - ///):

Documenting your code
349
/// Generates CSS3 transitions for all supporting browsers
/// @name transition
/// @access public
/// @param {String} $args The transition arguments (I.e. property to be
/// affected, duration of transition, type of transition)
/// @author Saints at Play Limited
/// @example
/// @include transition(color .5s ease);
@mixin transition($args...) {
-webkit-transition: $args;
-ms-transition: $args;
transition: $args;
}
/// Generates a border radius effect around all edges of an HTML element
/// @name borderRadiusFull
/// @access public
/// @param {Number | String} $sizeValue The radius value (including pixels
/// sufx)
/// @author Saints at Play Limited
/// @example
/// @include borderRadiusFull(5px);
@mixin borderRadiusFull($radii) {
-webkit-border-radius: $radii;
border-radius: $radii;
}
/// Generates a border radius effect along the top of an HTML element
/// Supports -webkit prexes as well as W3C standards compliant syntax
///
/// @name topBorderRadius
/// @access public
/// @param {Number | String} $sizeValue
The radius value (including pixels sufx)

Mastering Ionic 2
350
/// @author Saints at Play Limited
/// @example
/// @include topBorderRadius(5px);
@mixin topBorderRadius($radii){
-webkit-border-radius:$radii $radii 0 0;
border-radius:$radii $radii 0 0;
}
/// Generates a border radius effect along the bottom of an HTML element
/// Supports -webkit prexes as well as W3C standards compliant syntax
/// @name bottomBorderRadius
/// @access public
/// @param {Number | String} $sizeValue
The radius value (including pixels sufx)
/// @author Saints at Play Limited
/// @example
/// @include bottomBorderRadius(5px);
@mixin bottomBorderRadius($radii){
-webkit-border-radius:0 0 $radii $radii;
border-radius:0 0 $radii $radii;
}
/// Allows an image to be responsive across desktop, tablet & mobile views
/// @name makeImageResponsive
/// @access public
/// @author Saints at Play Limited
/// @example
/// @include makeImageResponsive();
@mixin makeImageResponsive() {
display:block;
width:100%;
max-width:100%;
}
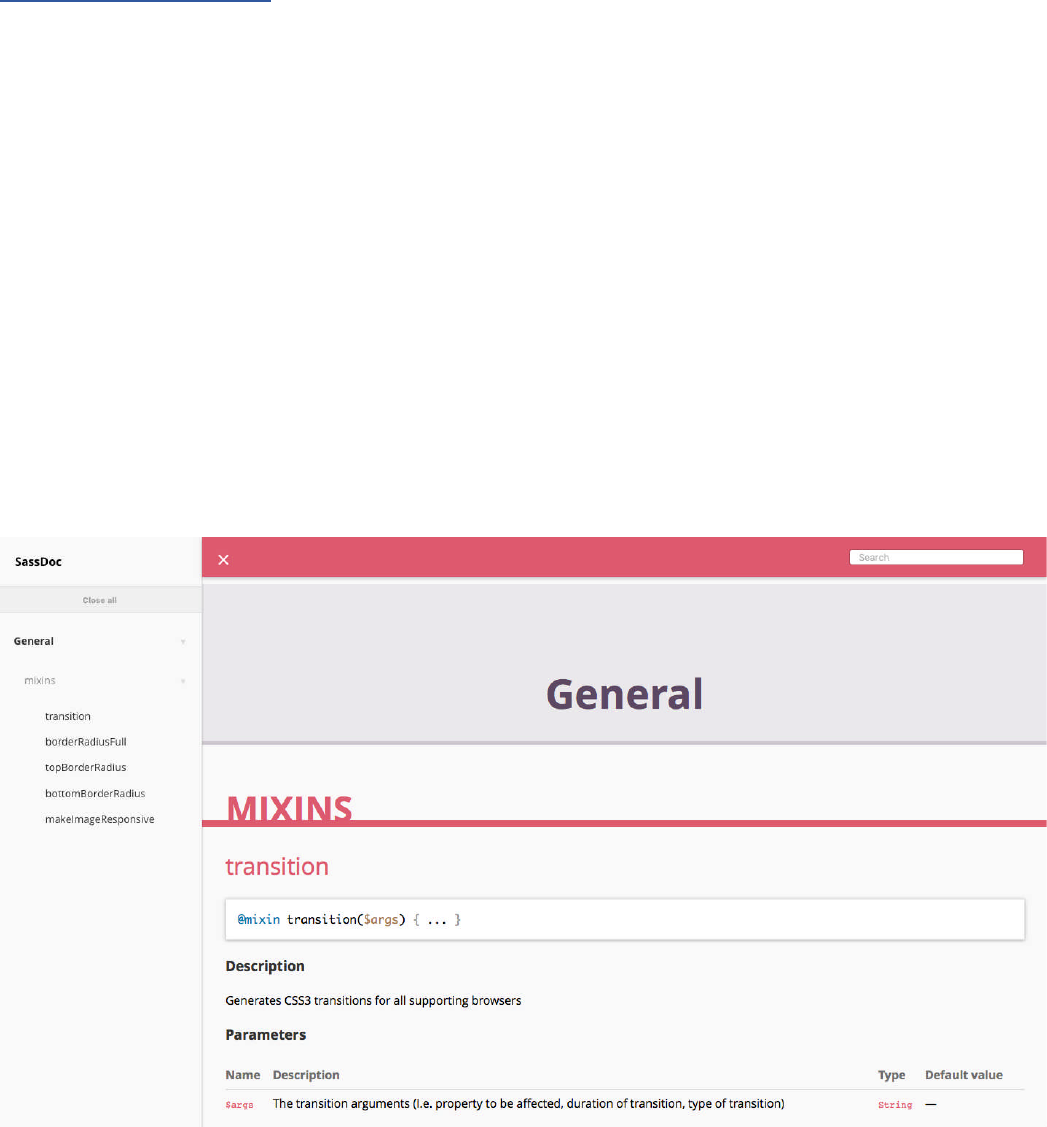
351
Documenting your code
Even though I’m not a big fan of the /// syntax the annotations available for SassDoc
are quite impressive (and comparable with those from the YuiDoc/JSDoc libraries)
which makes documenting Sass les that much easier to accomplish.
Further information on the available SassDoc markup options can be found in the
ofcial documentation.
Now save the animationsApp/src/theme/app.mixins.scss le and, using the
Terminal application, navigate to the workow directory and run the gulp command
to execute both the TypeDoc and SassDoc tasks.
While output from the gulp tasks are logged to the console the generated Typescript
documentation is subsequently published to the animationsApp/workow/docs
directory and the Sass documentation published to the animationsApp/workow/
sassdoc directory (both of these directories will be automatically created).
Open the animationsApp/workow/sassdoc/index.html le in your browser and
you should be greeted with the following page beautifully documenting all of your
Sass mixins:
352
Mastering Ionic 2
Similarly if you open the animationsApp/ workow/docs/index.html le you
should see documentation for the HomePage TypeScript class being displayed:
Granted the TypeDoc published documentation is not as pleasing to the eye as the
SassDoc documentation but all the class properties & methods are listed along with
a legend for the different types of class structural elements.

Documenting your code
353
Summary
Whatever your take on code documentation, whether you’re an advocate, reluctant
participant or indifferent to the whole issue, TypeDoc and SassDoc are denitely
worth spending some time exploring and familiarising yourself with.
If nothing else the ability to quickly and easily share documented code with a
development team or provide a user friendly reference guide for developers new to
an existing project is pretty handy when deadlines and, dare I say, politics rear their
ugly heads (and if you’ve worked in an agency/corporate environment you’ll have
some experience of both).
As an aside, we aren’t compelled to use gulp in terms of implementing any front-end
based workow in our projects. We could have used another task runner such as
Grunt or opted for running tasks via npm command line usage instead.
In the next chapter we’ll take a look at preparing apps for release.
Resources
SassDoc annotations
SassDoc gulp plugin
TypeDoc guide
TypeDoc gulp plugin
All project les for this chapter can be found listed in the download links on page
636.

Preparing apps
for release

Mastering Ionic 2
355
Before you can distribute your app (I.e. through the Apple App Store and/or Google
Play Store) you’ll need to devote some time towards preparing the following:
• cong.xml
• Launch icons
• Splash Screens
• Asset compression
• Code optimisations
Let’s take a look at each of these in depth, understand why they’re important and
what changes we might need to make prior to app distribution.
cong.xml
Located at the root of your Ionic 2 app the cong.xml le contains global and
platform specic conguration values used to control different aspects of your app’s
behaviour.
These behaviours can include splashscreen settings, which URL’s the system is
allowed to open, Cordova plugins to be restored during app preparation and dening
the starting page of the app.
Typically when working with the cong.xml le you’ll nd yourself focusing on the
following elements:
• widget id (a reverse domain name style identier for your app - this MUST match
the bundle ID you use when code signing your app - see next chapter )
• widget version (the version number for your app - I.e. 1.0.0)
• name (formal name for the app as it’s displayed in App Store listings and on the
device home screen)
• description (metadata about the app that may appear in App Store listings)
• author (Contact information for the app developer which includes website and
e-mail addresses)
These are located towards the top of the le like so:

Preparing apps for release
356
This however is only a small part of what a developer might need to congure in
their app’s cong.xml le (and, to be honest, will probably be all that you ever need
to amend in this le).
Additionally Apache Cordova provides the option to congure preferences and
elements on a platform by platform basis within the cong.xml le through use of
the <platform> and <preference> tags.
For example, if you wanted to target Android devices:
<widget id="com.saintsatplay.blahdeblah" version="0.0.1" xmlns="http://www.
w3.org/ns/widgets" xmlns:cdv="http://cordova.apache.org/ns/1.0">
<name>Animator</name>
<description>Saints at Play demonstration app.</description>
<author email="info@saintsatplay.com" href="http://www.saintsatplay.com">-
Saints at Play Limited</author>
<platform name="android">
<preference name="KeepRunning" value="false"/>
<preference name="LoadUrlTimeoutValue" value="10000"/>
<preference name="InAppBrowserStorageEnabled" value="true"/>
<preference name="LoadingDialog" value="My Title,My Message"/>
<preference name="ErrorUrl" value="myErrorPage.html"/>
<preference name="ShowTitle" value="true"/>
<preference name="LogLevel" value="VERBOSE"/>
<preference name="AndroidLaunchMode" value="singleTop"/>
<preference name="DefaultVolumeStream" value="call" />
<preference name="OverrideUserAgent" value="Mozilla/5.0 My Browser" />
<preference name="AppendUserAgent" value="My Browser" />
</platform>
Further information on cong.xml le conguration settings can be found at the
online Cordova documentation: https://cordova.apache.org/docs/en/latest/cong_ref/
Mastering Ionic 2
357
Launch icons and splash screens
One of the most prolonged aspects of preparing your app for distribution across the
Apple App and Google Play stores involves conguring the different launch icon and
splash screen sizes required for different devices.
Depending on how your app is to be viewed you may also need to congure
different splash screens based on orientation too.
As any mobile developer who’s had to spend time doing this knows it can be a real
chore to get done right - particularly with everything else weighing on your time!
Thankfully the Ionic CLI can help simplify this process with commands to automate
the generation of these assets from supplied source les.
At the root of your Ionic 2 app you’ll nd a directory named resources.
Within this directory you’ll nd ios and android directories which contain all of the
icon and splash screen assets for each platform.
You’ll also notice the following les:
• icon.png
• splash.png
These are the les we need to pay attention to as we’ll be replacing these with our
own versions which will then be used to generate the required launch icons and
splash screens from for each platform.
The icon.png le will be used for the app launch icon and the splash.png le as the
app splash screen le.
The les we’ll use to replace these with must follow some basic rules which are
listed in the table below:
Preparing apps for release
358
Launch Icon Splash Screen
Name (without le
sufx)
icon splash
Dimensions Minimum - 192 x 192 pixels 2208 x 2208 pixels
Accepted le
formats
AI
PNG
PSD
AI
PNG
PSD
Image safe zone 10 pixel border around the
edge of the le
1200 x 1200 pixels
(Must be aligned to the centre
of the le)
Considerations NO rounded corners Align splash screen design to
centre of le to avoid cropping
important parts of design on
different orientations
(within the Image safe zone
dimensions)
The following resources are useful in helping guide your own icon & splash screen
development:
• Launch Icon photoshop template
• Splash Screen photoshop template
• iOS Human Interface guidelines
• Android Material design guidelines
Once you have created your own replacement design for the icon and splash.png
les drop those into the root of the resources directory (replacing the existing les
that are there), then within your Terminal (having navigated to the root of your app),
run the following command:
ionic resources
As each le is automatically generated by the Ionic server you’ll see the output being
printed to the Terminal and, once completed, these icon and splash screen les are
able to be accessed in the following directories:
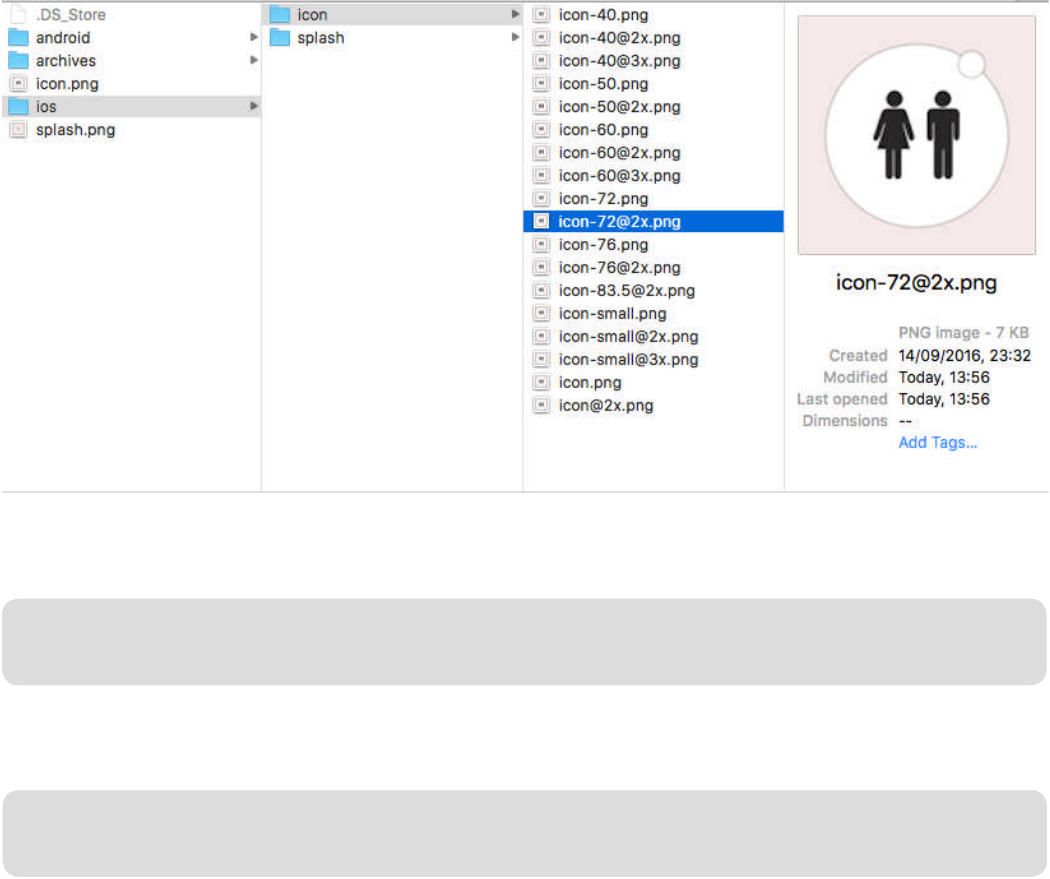
Mastering Ionic 2
359
• resources/android/icon
• resources/android/splash
• resources/ios/icon
• resources/ios/splash
Like so:
If you only wanted to generate launch icons you could do so with the following ag
added to the command:
ionic resources --icon
Conversely, if it’s just splash screen les you want to generate then use the following
command instead:
ionic resources --splash
Maybe you want to use different launch icon and splash screen designs for iOS and
Android?
Not a problem.
Design your iOS specic icon.png and/or splash.png les then place these at the
root of the resources/ios directory.
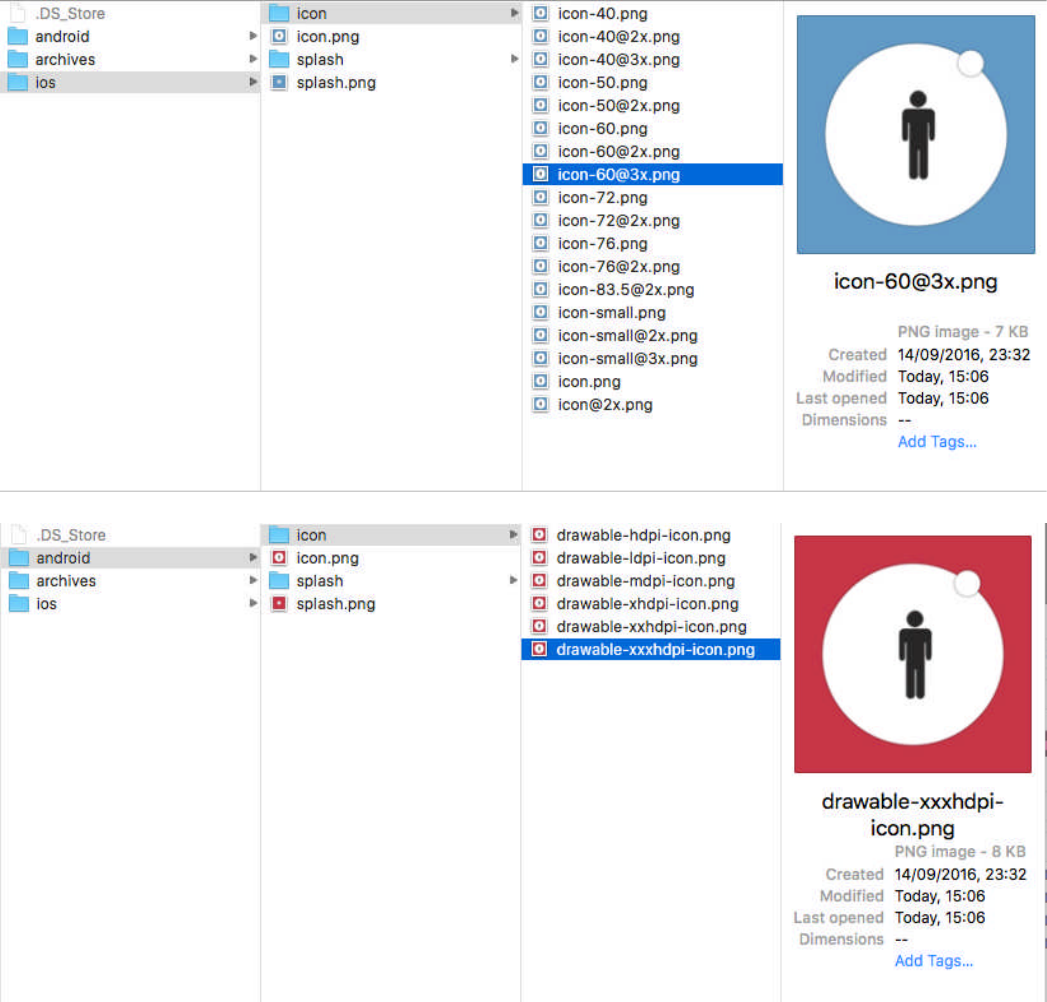
Preparing apps for release
360
Similarly place your Android specic icon.png and/or splash.png les at the root of
the resources/android directory.
Run the ionic resources command to automatically generate the different versions of
these les and, once completed, you’ll see that each platform uses only the design
assigned to it for those icons and/or splash screens:
If you re-open your cong.xml le after running the ionic resources command you’ll
notice that the generated icon and/or splash screen images for are listed in full for
each platform.

Mastering Ionic 2
361
You can, if required, add an orientation value to the cong.xml le to only allow the
app to be displayed in a specic orientation, either globally or on a platform basis.
The orientation values are as follows:
• portrait
• landscape
• default (allows the platform to fall back to its own default behaviour)
If this conguration is present in the cong.xml le and set to portrait or landscape
then only those splash screen images for that orientation will be generated when
running the ionic resources command.
Personally I nd the ionic resources command to be one of the most under-rated
features of the Ionic CLI and it’s certainly saved me a lot of time and effort when
preparing the launch icons and splash screen images for my apps.
Just design your assets wisely and ionic will take care of the rest!
Asset compression
Reducing the size of assets used within your app will help reduce the overall size of
the nal build le which means less time spent uploading this to the respective App
Stores.
This involves compressing media assets used within your app such as images and
videos wherever possible.
To help compress images there are a number of online service we could use such
as:
• Compress.io
• TinyPNG
• TinyJPG

Preparing apps for release
362
Alternatively you can create your own gulp script for handling image compression.
Implementing a Gulp workow for your Ionic 2 app has the advantage of being able
to implement specic task runners, if and where required, such as:
• Optimising SVG les
• Compressing JPEG, GIF & PNG images for smaller le sizes
• Publishing documentation for Sass les
• Publishing documentation for TypeScript les
• Running unit tests
• Generating browser specic prexes for existing CSS (I.e. adding rules prexed
with -webkit or -moz)
• Minifying published JS/CSS les if required
• Generating responsive videos
The list of potential Gulp tasks could go on ad innitum and is only limited by what
the app would truly benet from.
When implementing my own custom gulp tasks I create a directory at the root of the
Ionic app which I name workow and then place my gulple.js script inside of this.
For compressing images my custom gulple.js would look like this:
var paths = {
images : {
src : '../www/src/*',
dest : '../www/images/'
}
},
gulp = require('gulp'),
imagemin = require('gulp-imagemin'),
notify = require('gulp-notify');
gulp.task('Images', function() {
return gulp.src(paths.images.src)
Mastering Ionic 2
363
.pipe(imagemin({ optimizationLevel: 3, progressive: true, interlaced: true}))
.pipe(gulp.dest(paths.images.dest))
.pipe(notify({message: 'Images compressed'}));
});
gulp.task('default', ['Images']);
Within the Terminal, at the root of my app directory, I would install the following node
modules to be used by my custom gulp script:
npm install --save-dev gulp-imagemin
npm install --save-dev gulp-notify
Finally I would place the images that I want to optimise within a directory named src
located in the root of the www directory.
I would also place a directory named images inside the root of the www directory as
this is where I am instructing the gulp script to publish my compressed images to.
I would then, using the Terminal, navigate inside the workow directory and run this
custom gulple.js script as follows:
gulp
This would then copy and compress each individual image from the src directory
before copying each optimised version to the images directory.
Whether you want to implement your own custom gulp workow set-up for
compressing images or rely on web-based tools such as TinyPNG or Compress.Io is
entirely up to you.
I personally prefer to implement a custom gulp workow as this can be extended to
include additional workow tasks where required.

Preparing apps for release
364
Video optimisation
For optimising video les to be included within your build le I can’t recommend the
excellent Miro video converter highly enough.
This cross platform utility provides a number of export formats and can drastically
reduce the size of the exported video le without sacricing any of the quality in the
process.
Another free alternative is FFmpeg although some developers might nd this a lot
more cumbersome as this does require working from the command line.
The world wide web is awash with many different options for compressing and
optimising video so nd the solution that works best for your particular needs and
run with that.
Code optimisations
Within the component classes, services, pipes and directives that you may have
created be sure to remove all console logs and similar debugging code.
Make micro-optimisations wherever possible, such as grouping variables under a
single var or let pattern and implementing more effective incrementation in for loops:
// Single var Pattern
var i,
technologies = ["Ionic 2", "Angular 2", "Apache Cordova", "TypeScript"],
total;
// for Loop optimisation
for(i = 0; total = technologies.length; i < total; i+=1)
{
// Code to be implemented on each loop iteration
}

Mastering Ionic 2
365
It might seem trivial to make such adjustments in your code, particularly when the
performance improvements may only be measured in hundreds of milliseconds at
most, but doing so can help reduce the overall load on device resources (particularly
when working with large volumes of data).
The recommendations in this chapter may, if you’re not familiar with optimising
assets and implementing performance enhancements to your code, seem a little
overkill in parts but it’s a good practice to get into over the long run.
Doing so helps minimise load on system resources, speed up code execution times
and reduce build sizes - all of which are worthy goals to be pursued.
When implementing similar tactics for web applications I’ve seen immediate results
with quicker page rendering times, reduced network requests/download speeds and
smaller le sizes - all of which help improve the user experience.
In the next chapter I’ll take you through code signing your app for iOS & Android.
Resources
All project les for this chapter can be found listed in the download links on page
636.

Code signing
for iOS & Android

Mastering Ionic 2
367
Code Signing
Before you can publish your apps to the Apple App and Google Play stores they
must be digitally signed with a valid certicate.
This ensures that the app can be "trusted" by end users, as the signing certicate(s)
prove the app originates from a known source and hasn’t been modied by any
party other than the developer.
Code Signing is implemented differently on iOS and Android platforms though.
Over the following pages I’ll take you through how to sign an application for both
platforms, starting with iOS (which is the most lengthy and complex to implement).
Code signing an iOS application
There are a few steps involved here:
• Creating a Certicate Signing Request (CSR) le
• Generating development & distribution certicates
• Adding Devices/App ID’s
• Generating provisioning proles
We’ll start by creating a Certicate Signing Request (CSR) le which will provide
encrypted information to be used within the App Store Development and Distribution
Certicates that are used to code sign iOS apps.
Open the Keychain Access utility on your Mac (located in Applications/Utilities/)
and from the Keychain Access menu select Preferences. In the dialog window that
appears, select the Certicates tab and ensure the following options are set to off:
• Online Certicate Status Protocol (OCSP)
• Certicate Revocation List (CRL)
As shown in the following screen capture:
Code signing for iOS & Android
368
Now we need to request a Certicate from a Certicate Authority as demonstrated
below:
The Certicate Assistant window will subsequently be displayed to help guide you
through the process of generating the Certicate Request.
In this window complete the following elds:
• User Email Address
• Common Name
• CA Email Address

Mastering Ionic 2
369
Select Saved to disk from the radio buttons options and select the checkbox for the
Let me specify key pair information option:
Click Continue and select a location on your computer to save the Certicate
Signing Request le to:
Once this has been signed you’ll be prompted to select a key size and algorithm for
the digital certicate’s key pair.
• Your key size should be 2048 bits
• Your algorithm should be RSA
Code signing for iOS & Android
370
Click Continue and the Certicate Signing Request le will be saved to the location
you specied earlier.
With the Keys Category in the sidebar of the Keychain Access utility selected you
should see the newly generated public/private key pair being displayed like so:
Generating Development and Distribution Certicates
Now that the Certicate Signing Request le has been created and saved to a
location on your computer you’ll need to log into your Apple Developer account and
generate the following certicates:
• Development (We want to be able to code sign iOS apps for development)
• Production (We want to be able to code sign iOS apps for either submission to
the Apple Store or Ad Hoc distribution)
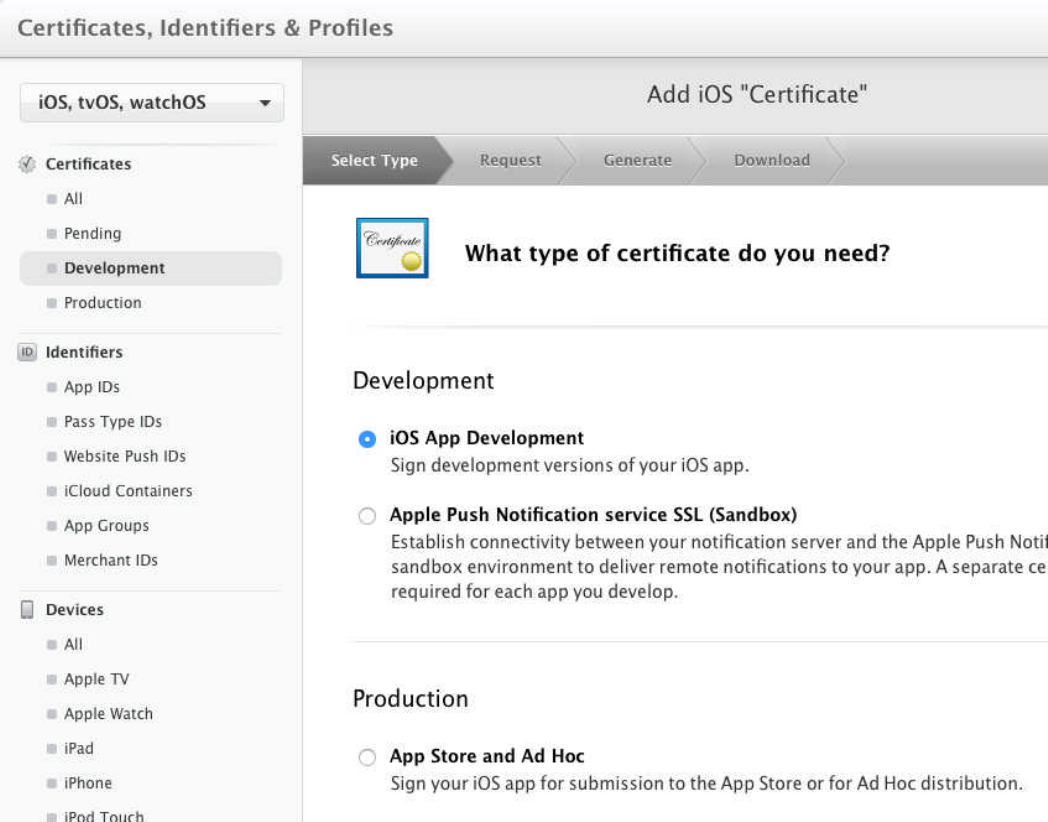
Mastering Ionic 2
371
These will allow you to develop and test your app locally on your own devices and
then distribute that app, when ready, through either the Apple App Store or Ad Hoc
distribution (such as where you want to release the app to a private audience or for
testing with a select number of third parties).
From the Certicates, Identiers & Proles section of your account, create a new
Development Certicate and, under the Development section, select the iOS App
Development option from the displayed radio buttons as shown below:
Scroll to the bottom of the page and click continue where the next screen will prompt
you to Create a Certicate Signing Request le.
As this has already been done proceed to the next screen and upload the CSR le
that you created earlier.
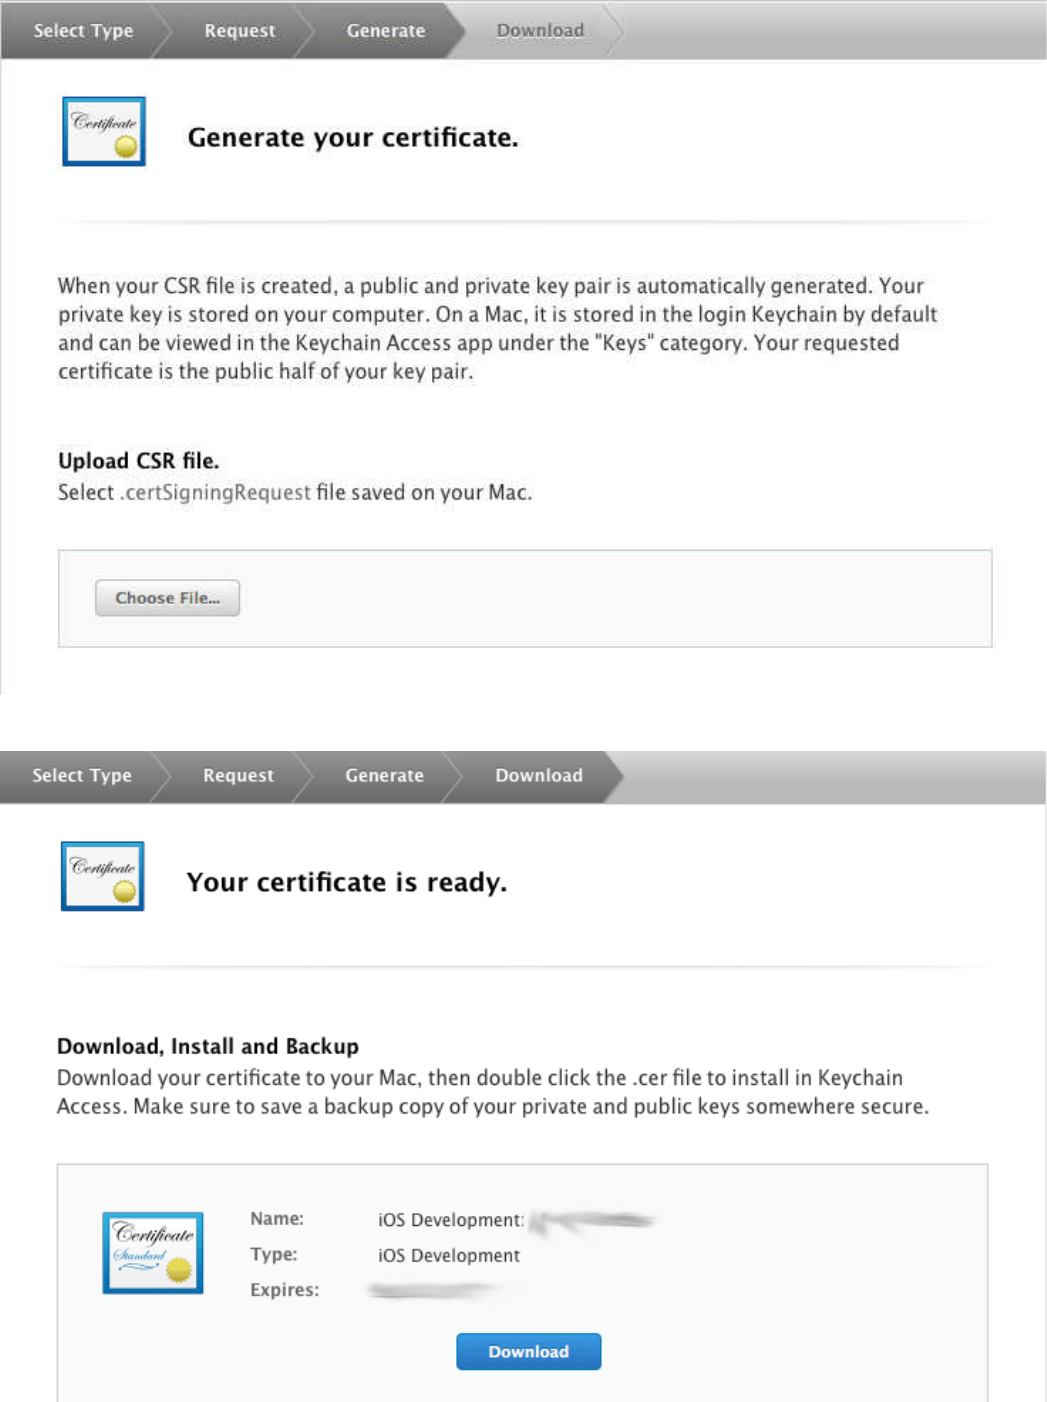
Code signing for iOS & Android
372
On the following screen your generated certicate will be available for download:
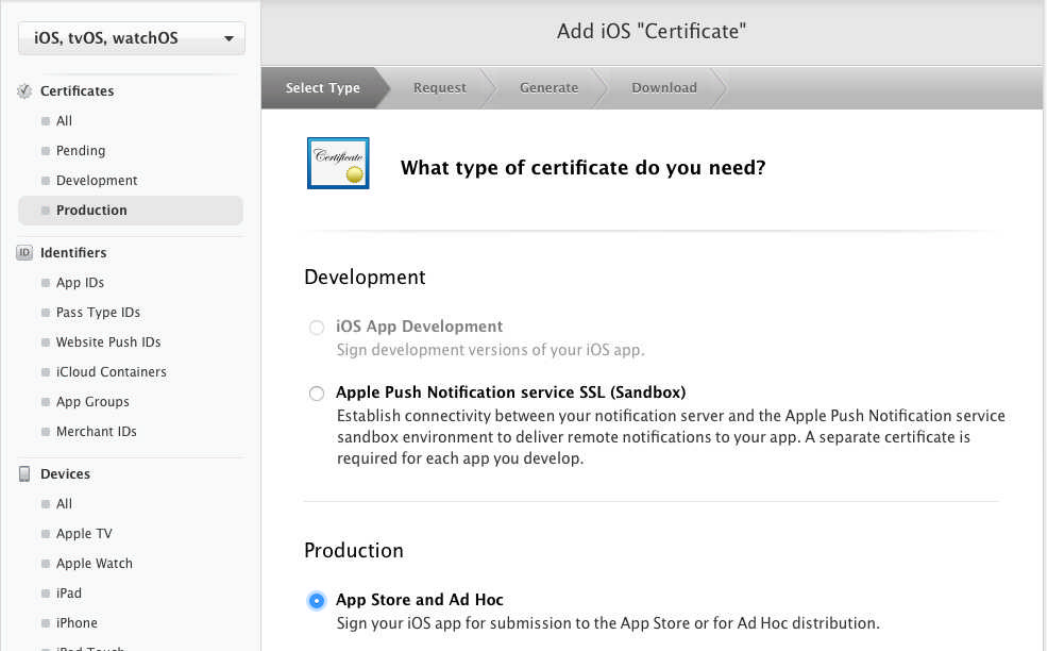
373
Mastering Ionic 2
Download the newly generated Development certicate and store that somewhere
safe.
You can repeat the same process for creating a Production certicate but be sure
to select the App Store and Ad Hoc Certicate option from the displayed radio
buttons:
Once completed download the generated Production certicate and save to the
same location as your Development certicate.
Double click on both of these les to install them to your Keychain Access utility.
Okay, so we’re halfway through setting up our environment for Code Signing iOS
apps. Now all we need to do is generate the provisioning proles for our devices.
Before we can do this though we’ll need to ensure that iOS devices that we use for
development & testing have been added to the Devices section of our Apple
Developer account.
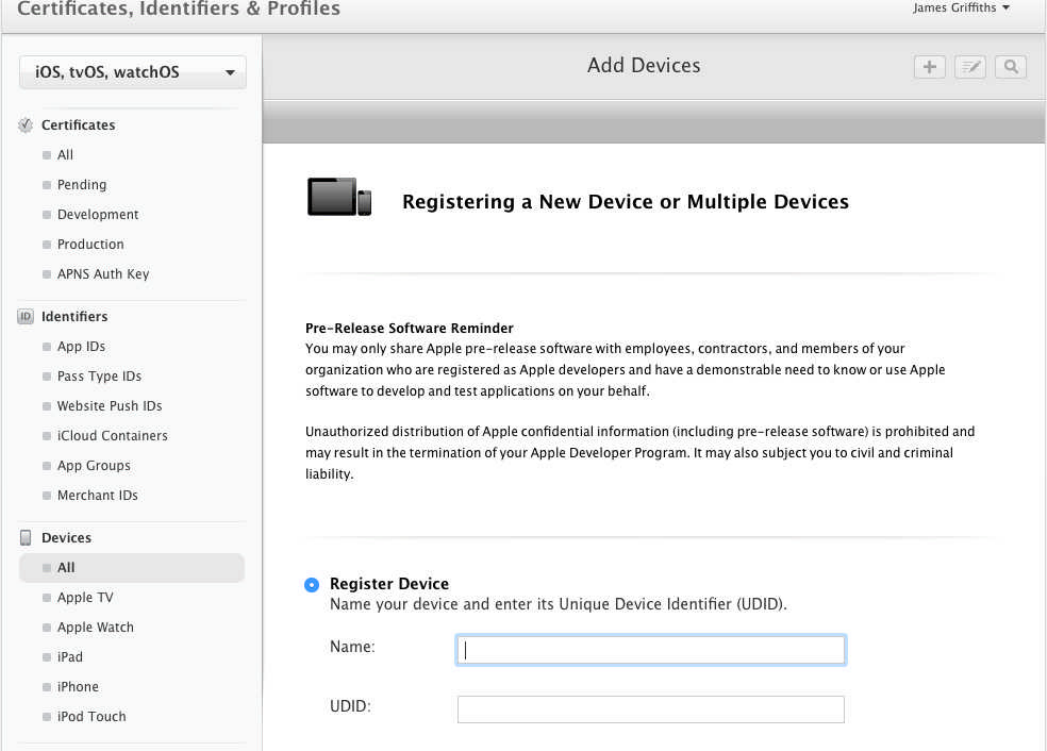
374
Code signing for iOS & Android
Let’s do that now.
In your Apple Developer account navigate to the Certicates, Identiers & Proles
section, select All from under the Devices menu link and you can begin adding an
iOS device to your account.
Doing so will allow a development provisioning prole (which we’ll generate shortly)
to launch your app on a registered device for testing.
Currently Apple allows developers to register a maximum of 100 iOS devices for
their accounts. Removing previously registered devices from your account doesn’t
decrease the number of devices you have added though.
When adding an iOS device you need to enter a name to identify that device by and
the UDID (Unique Device Identier) code for the device - which is a sequence of 40
alphanumeric characters.
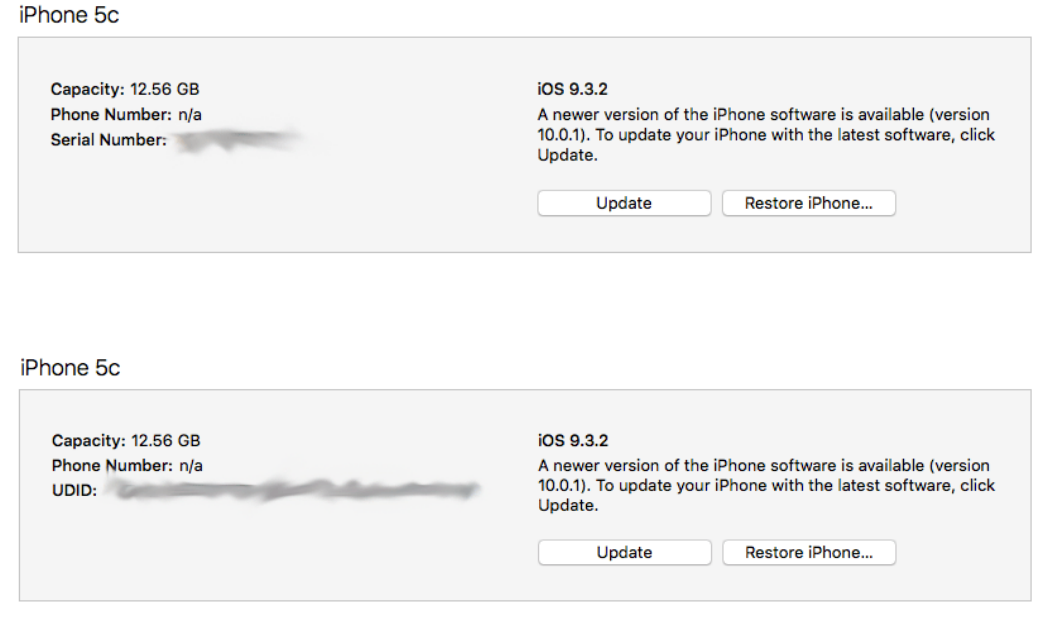
375
There are 2 ways in which you can nd the UDID for your device:
• iTunes
• Xcode
To nd your device UDID in iTunes, connect your iOS device to your Mac and on the
Device summary screen click on the Serial Number eld:
This will then cycle to the UDID eld and display the value for your device:
Right-click on the displayed value, select Copy from the contextual menu that
appears and then paste this copied identier into the UDID eld on the Add Devices
form in your Apple Developer account (see previous page).
This is the rst, and most cumbersome, method of nding your device UDID.
Alternatively, Xcode will automatically display the UDID for a connected iPhone/
iPod/iPad, along with other information, in the Devices window (accessible from
Window > Devices) as shown in the following screen capture:
Mastering Ionic 2
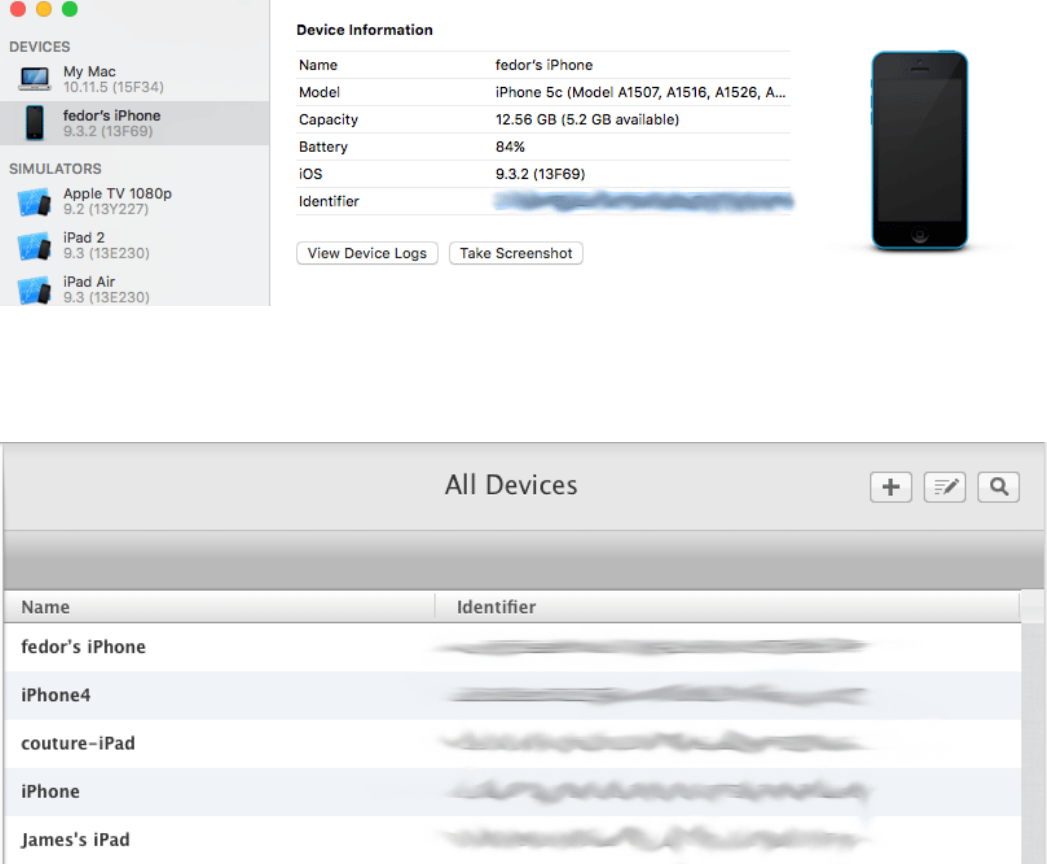
Code signing for iOS & Android
376
Now that you have the device identier you can complete adding a device to your
Apple Developer account and, once completed, should see all your registered
devices being displayed like so:
In addition to registering your device(s) for developing/testing your iOS apps you’ll
also need to generate unique App ID’s.
An App ID can be used to identify each App submitted by a developer/development
team to the App Store and register the services that the App can use such as Apple
Pay, HealthKit or In-App Purchases for example.
App ID’s can be created in two ways:
• Wildcards (using asterisks - which match one or more apps)
• Explicit App ID (which matches the bundle ID for a specic app)
Xcode can be used to generate Wildcard App ID’s but usually you’ll generate an
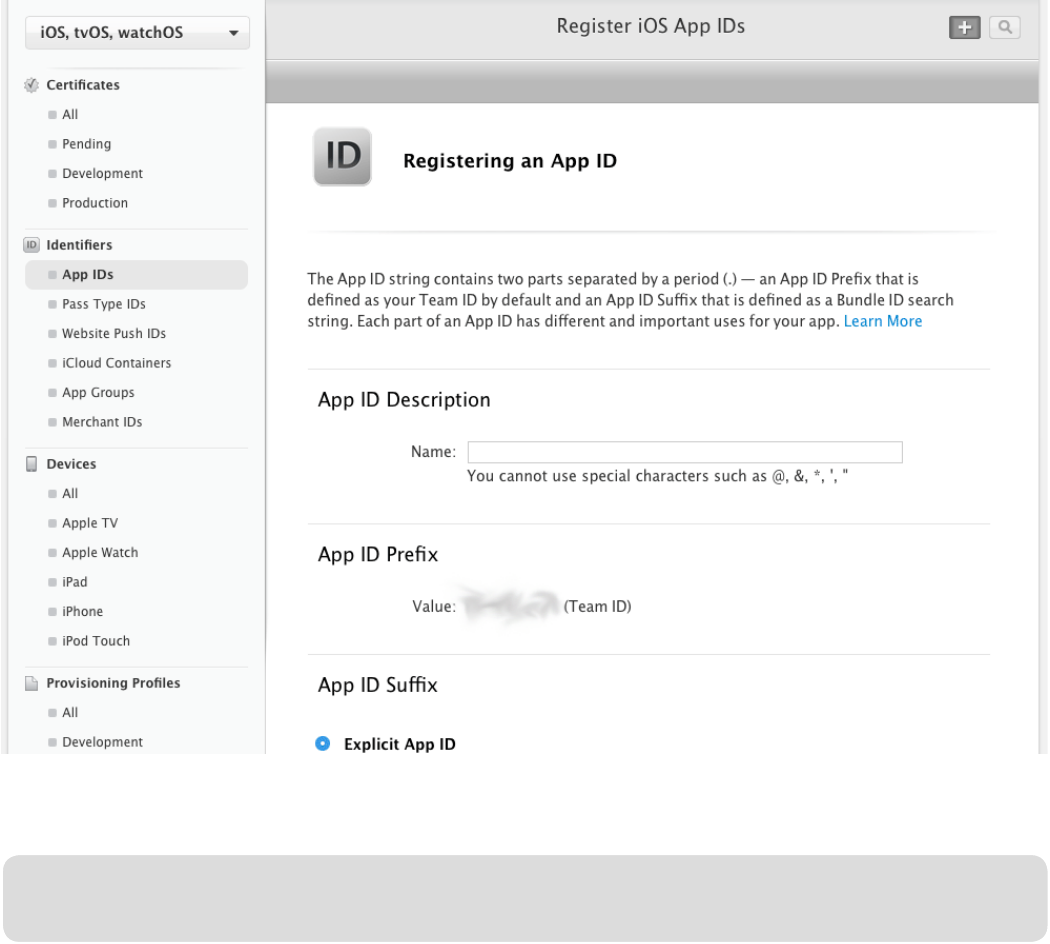
Mastering Ionic 2
377
Explicit App ID from within the Certicates, Identiers & Proles portal of your
Apple Developer account by selecting the App IDs link under the Identiers menu
section and then clicking on the + icon as demonstrated below:
Explicit App ID’s are written in a reverse domain style notation (using alphanumeric
characters with no spaces, asterisks or special characters) such as:
com.saintsatplay.nameofAppHere
This must match the Widget ID contained within your cong.xml le.
Once you’ve created your Explicit App ID and saved this to your Apple Developer
account you can start creating provisioning proles for your iOS app.
A provisioning prole comes in 2 forms:
• Development (for testing on your authorised devices)
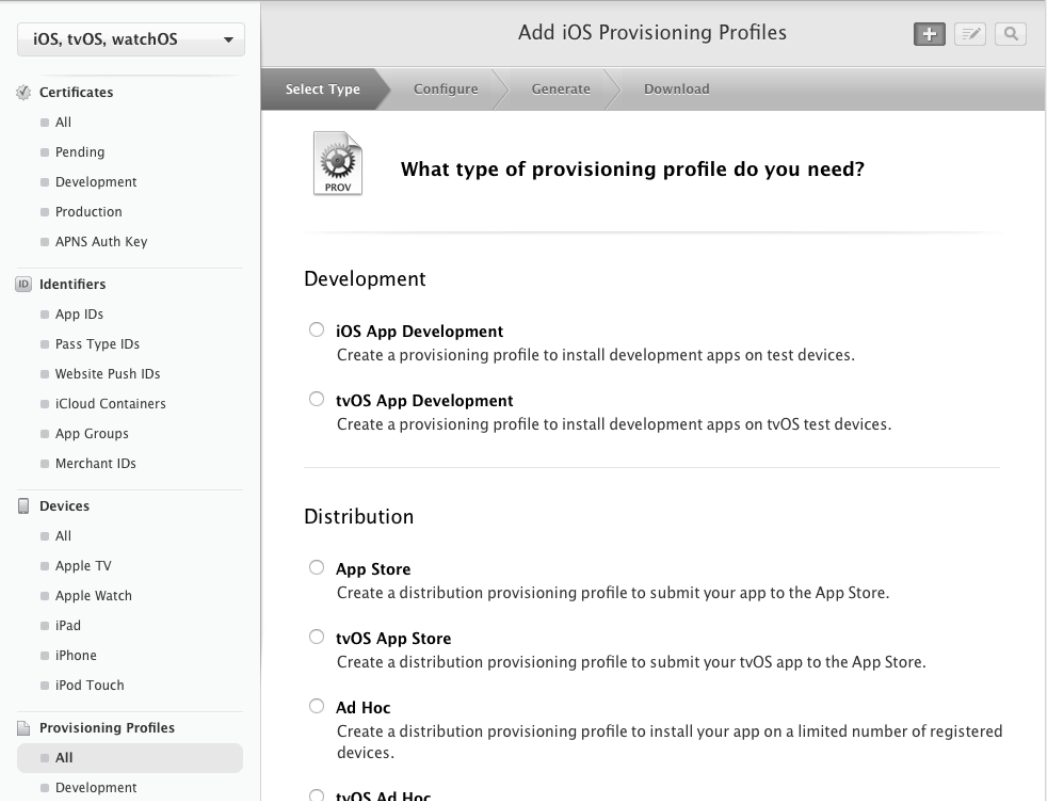
• Distribution (for Apple App Store or Ad-hoc distribution)
These provisioning proles associate devices with their developers through iOS
Certicates and identiers allowing apps to be authorised for testing/publishing to
the Apple App Store.
To generate a Development provisioning prole so you can test your apps navigate
to the Certicates, Identiers & Proles portal of your Apple Developer account,
select the Development link under the Provisioning Proles section and click on
the + icon to see the following form:
Code signing for iOS & Android
378
Select iOS App Development from the Development section towards the top of the
form, scroll to the bottom of the screen and press Continue.
Now select the App ID for this development prole:

Mastering Ionic 2
379
Once you have selected the desired App ID from the drop down menu, scroll to the
bottom of the page and press Continue.
Now select the Development certicate(s) for this prole:
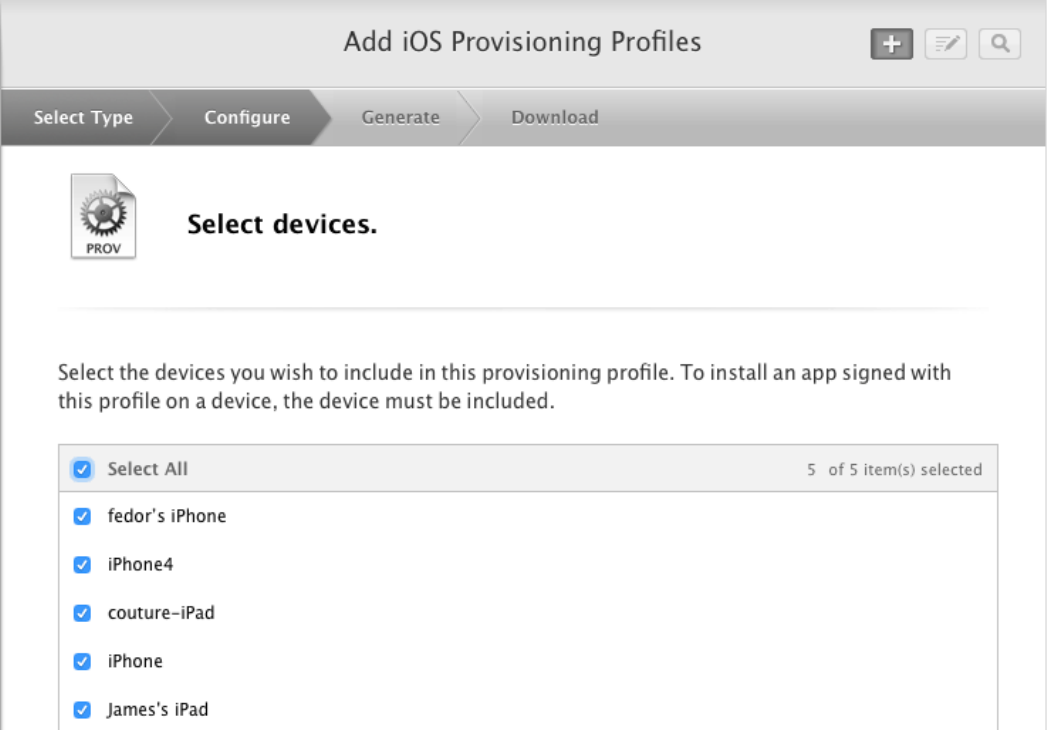
Code signing for iOS & Android
380
Once selected scroll to the bottom of the page and press Continue.
On the next screen select the devices for this provisioning prole:
Once selected scroll to the bottom of the page and press Continue.
Now you will be prompted to name the development provisioning prole so that it
can be identied in the Provisioning Proles portal of the Certicates, Identiers &
Proles section of your Apple Developer account.
Choose a name that is both distinctive and easily identiable (as you may, over the
course of your app development career, populate the Provisioning Proles portal
with LOTS of proles - it’s best to make each one unique!)
As a rule of thumb I always name my proles depending on the project they are
associated with (but you can choose whatever naming convention works best for
your particular needs).
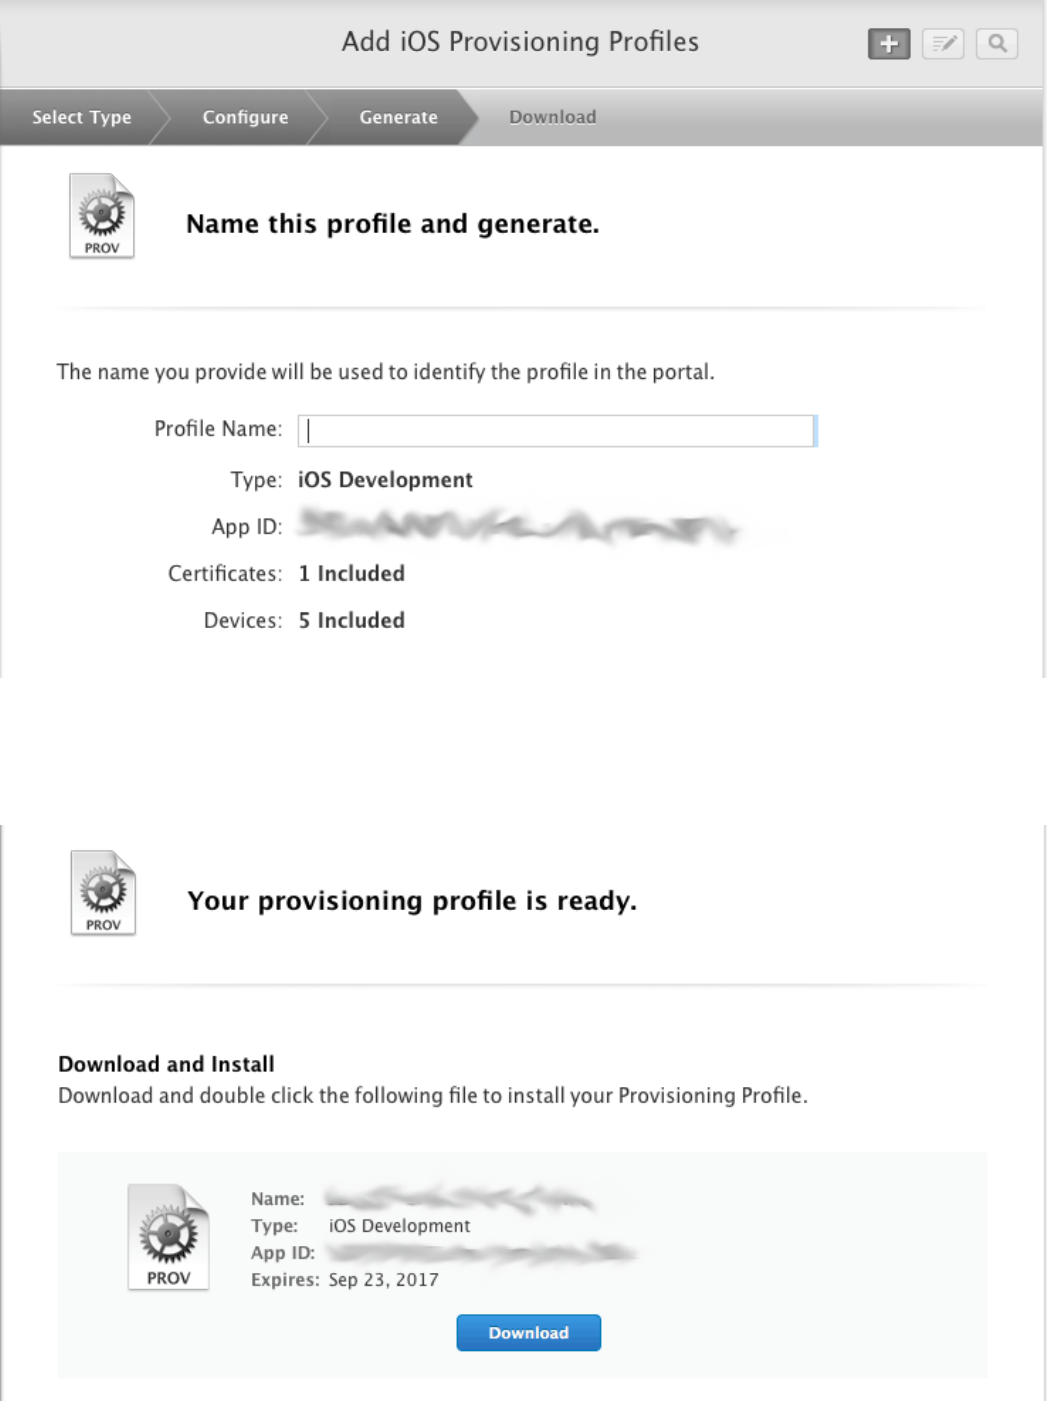
Mastering Ionic 2
381
Once you’ve entered your uniquely identiable Prole name click Continue and your
Development Provisioning Prole will be generated and ready for download on the
nal screen:
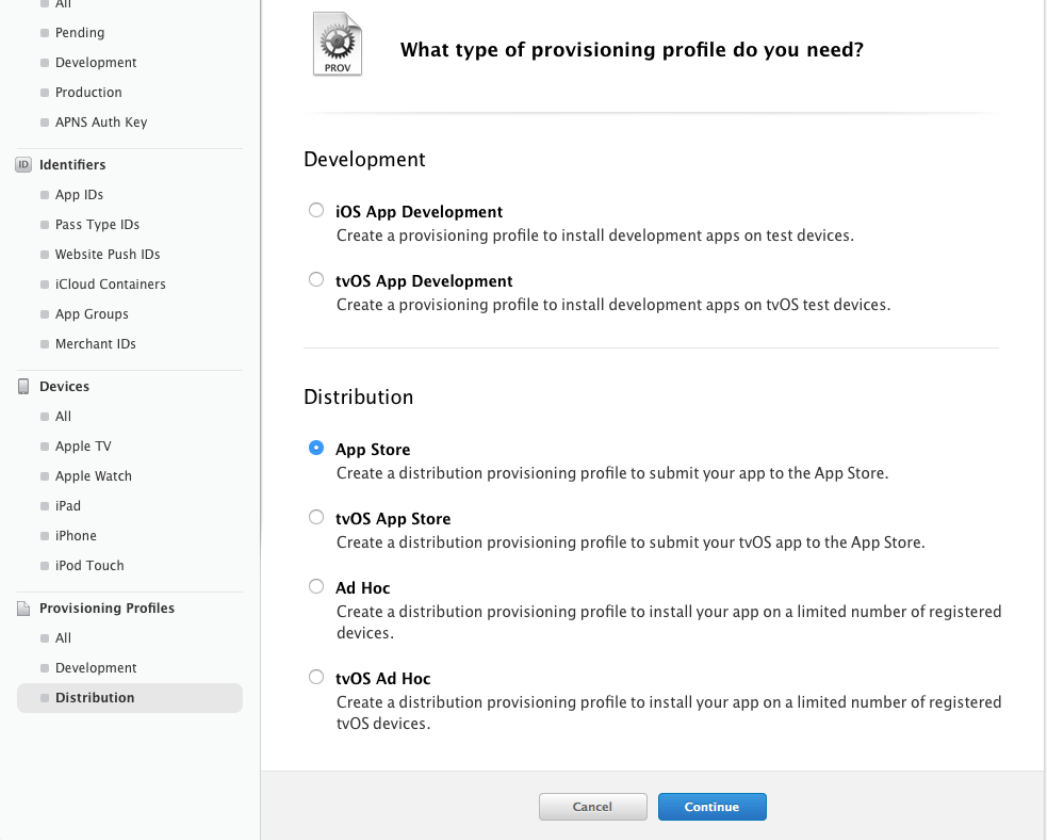
382
Code signing for iOS & Android
Creating a distribution prole (to allow your app to be submitted to the Apple App
Store or via select third parties through Ad Hoc distribution for example) follows a
similar process.
Select the Distribution link under the Provisioning Proles section in the
Certicates, Identiers & Proles portal of your Apple Developer account and
click on the + icon to begin creating a new Distribution prole.
Select App Store from the Distribution section, scroll to the bottom of the screen
and press Continue:
On the following screen select the App ID that this Distribution prole will apply to:
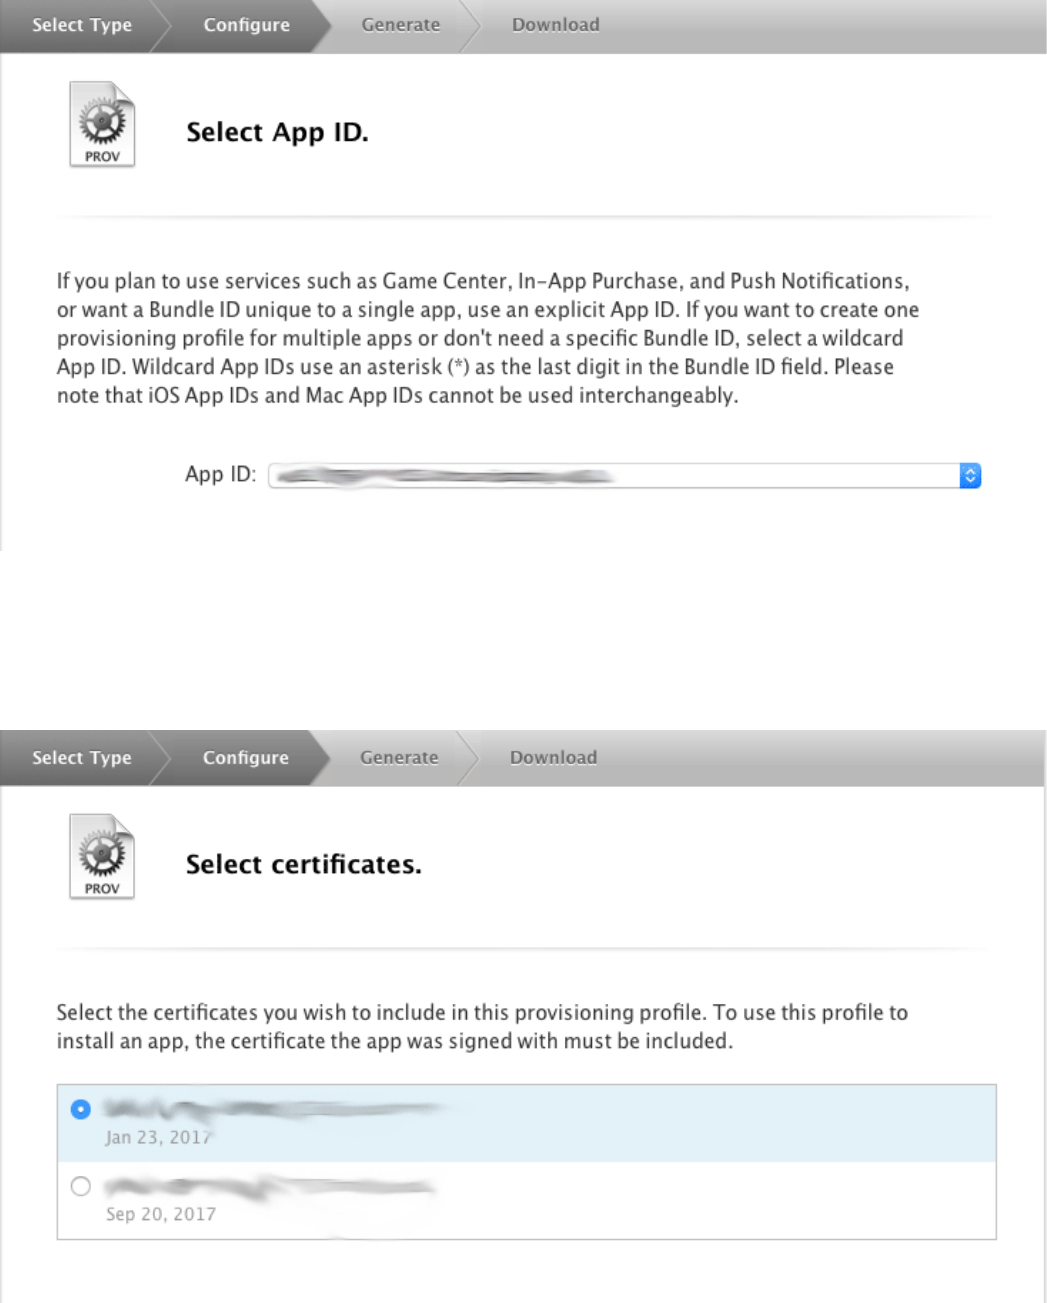
383
Mastering Ionic 2
Once you have selected the desired App ID from the drop down menu, scroll to the
bottom of the page and press Continue.
Now select the Distribution certicate for this prole:
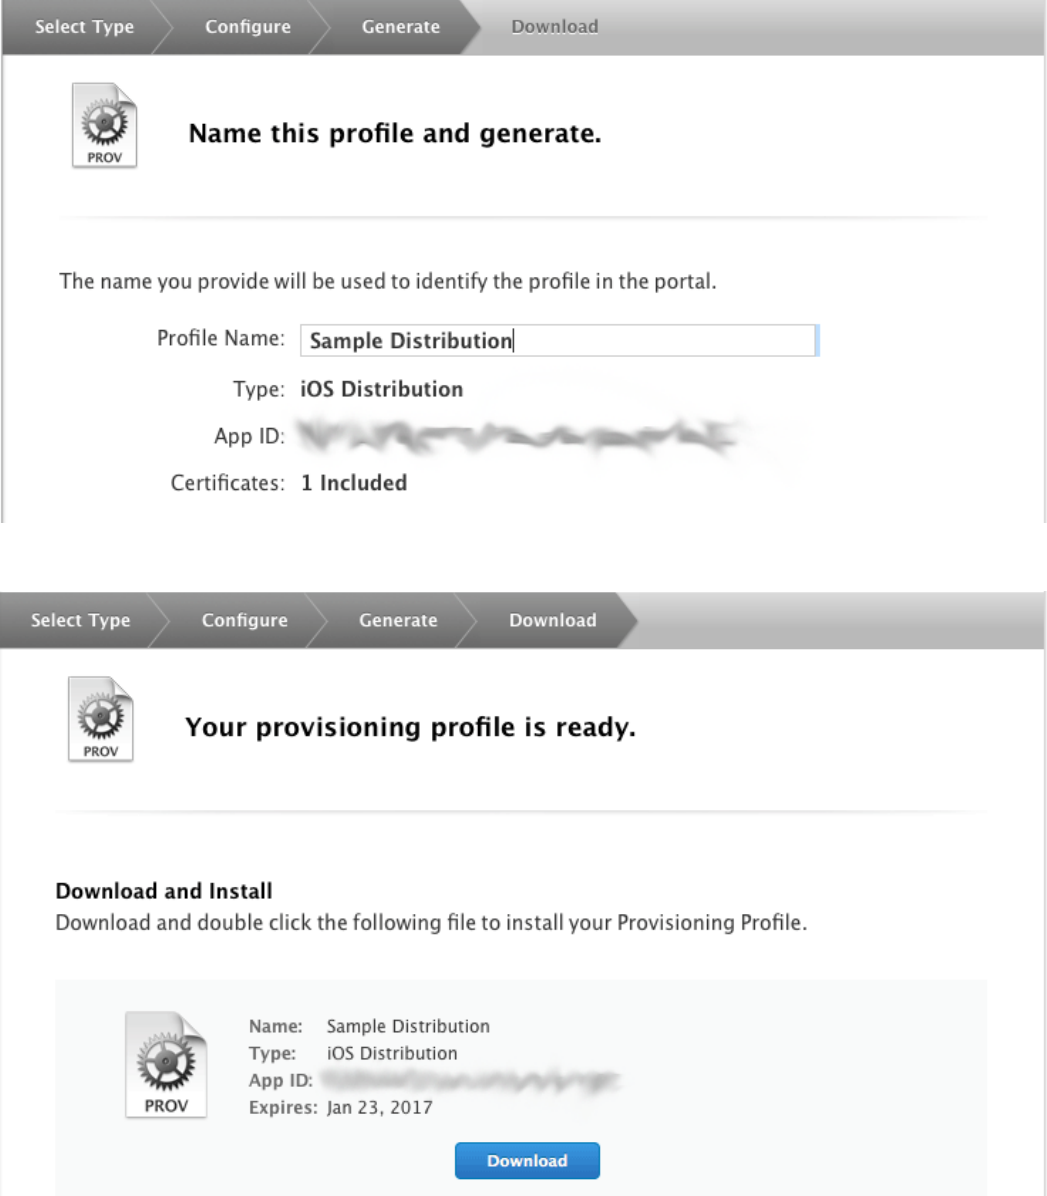
384
Code signing for iOS & Android
On the following screen you’ll be prompted to name your Distribution prole.
As with generating the Development prole choose a name for your Distribution
prole that is both distinctive and easily identiable - as the Provisioning Proles
portal can easily ll with LOTS of proles over time.
On the nal screen your generated Distribution Prole will be ready to download:

385
Mastering Ionic 2
Within Xcode you should now be able to access all of the Signing Certicates and
Provisioning Proles that you have generated in your Apple Developer account.
To do so open the following menu option: Xcode > Preferences
From the top of the window that appears select the Accounts option.
In the sidebar on the left hand side of this window select your Apple ID from those
listed, then click on the relevant Team listing (if you’re a single developer you will
likely only have the one Team member - yourself!) and press View Details.
You should now see all of the Signing Certicates and Provisioning Proles from
your Apple Developer account displayed like so:
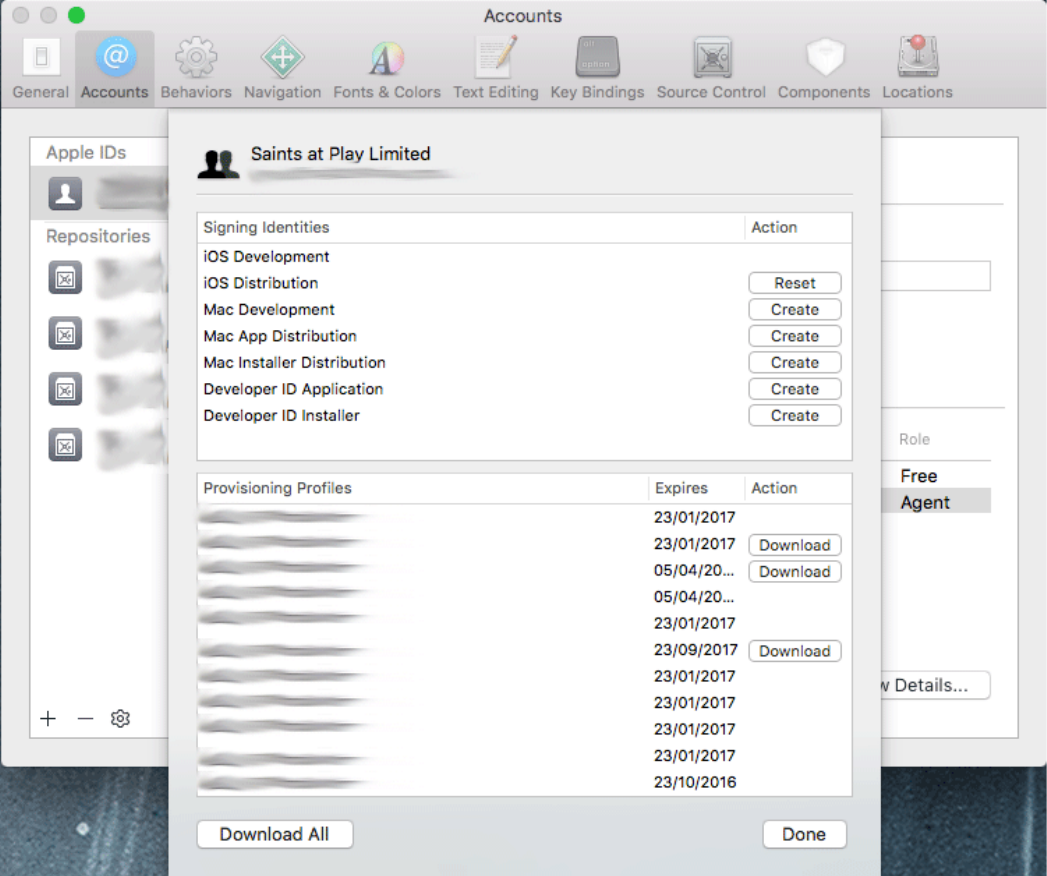
Code signing for iOS & Android
386
Now that all your Certicates and Proles are in place you can deploy your iOS apps
for testing and distribution directly through Xcode.
As you can see there’s quite a lot of steps involved in code signing an iOS app:
• Generating a Certicate Signing Request (CSR) le
• Publishing signing certicates for development and production
• Creating App ID’s
• Registering Device UDID’s
• Generating provisioning proles for development and distribution
Code signing an Android app is, in comparison, far quicker and less complicated.

Mastering Ionic 2
387
Code signing an Android application
Where iOS requires signing certicates and provisioning proles for development
and distribution Android simply requires an app be signed only when it is ready to be
published to the Google Play Store.
Prior to releasing for Google Play you can publish a debug (non-signed) version of
the app to your Android device(s) for testing (which, compared to the different iOS
conguration and set-up requirements, does make life a lot easier as a developer).
Signing Android applications is quite simple though and involves working from the
command line using the Keystore utility (a free software tool - that comes included
with your system JDK - which is used to manage cryptographic keys and trusted
certicates).
In the Terminal navigate to the root of your app directory and issue the following
command (replacing app-name with the name of your actual app and alias_name
with a suitable alias for the keystore le):
keytool -genkey -v -keystore app-name-release-key.keystore -alias alias_name
-keyalg RSA -keysize 2048 -validity 10000
When the above command is run we will be prompted to create a password for the
keystore and then answer a series of questions before the le is nally created.
When this process has been completed the generated keystore le will be saved in
the root directory of your app.
IMPORTANT - It would be wise, for future reference, to save the keystore le to
another location outside of your project (do NOT lose this keystore le as you won’t
be able to make updates to your Android app if you do).
You denitely do NOT want this le to be added, or made available, to version
control (as this would present a huge security risk) and nor should it be in the
published IPA/APK binaries for your apps that are distributed via the Apple & Google
Play App stores or via ad-hoc distribution.
If someone were to reverse-engineer the code for those binaries this means they
would gain access to the keystore if it were present in the codebase - not good!
Remember, a good developer is a security conscious developer!
If you’ve tried running the above command and are experiencing problems please
refer to the following Android installation guide to make sure that the necessary
software is installed on your environment and system paths are correctly congured
(this is hugely important so DON’T overlook this): http://cordova.apache.org/docs/en/
latest/guide/platforms/android/index.html.
Signing your Android app
You should now have a keystore le residing in the root directory of your project.
In order to sign your Android app you’ll rstly need to generate a build le with the
following Terminal command:
388
Code signing for iOS & Android
ionic build --release android
Once successfully completed this will generate an unsigned APK le, based on the
values you entered in your cong.xml le, located in the following directory:
platforms/android/build/outputs/apk/
To sign this unsigned APK le you’ll need to run the jarsigner utility (another tool
included with the JDK installation on your system) which generates the necessary
digital signature for the APK le based on the information contained within the
keystore.
From the Terminal issue the following command:
jarsigner -verbose -sigalg SHA1withRSA -digestalg SHA1 -keystore app-name-
release-key.keystore nameOfYourApp-release-unsigned.apk alias_name
IMPORTANT - Be sure to change the following from the above command to match
the values on your own system:

389
Mastering Ionic 2
• app-name-release-key.keystore (change this to the name of the keystore le
that you generated earlier and, if required, prex with any path to this le)
• nameOfYourApp-release-unsigned.apk (change to the path/name of the un-
signed APK le)
• alias_name (the alias you used when generating the keystore le)
Once you’ve generated the signed APK le the last step will involve optimising this
using the zipalign tool (which will have been installed as part of Android Studio):
zipalign -v 4 nameOfYourApp-release-unsigned.apk nameOfYourApp.apk
As before change the following to match the values of your own project (and don’t
forget to prex with the path to each le):
• nameOfYourApp-release-unsigned.apk
• nameOfYourApp.apk
Once completed you should nd the signed and optimised APK le
(nameOfYourApp.apk) located in the platforms/android/build/outputs/apk/ directory.
Now your android app is signed and ready for submission to the Google Play store!
In the next chapter we’ll look at how to submit iOS apps to the Apple App Store.

Submitting
your iOS app
to the Apple App Store

Submitting your iOS app to the Apple App Store
391
In this chapter I’ll take you through how to submit your own iOS apps to the Apple
App Store (this should go without saying but DON’T submit any of the example
projects included in or with this book - feel free to use the code how you see t BUT
make sure the apps you submit genuinely are your own - just to avoid legal compli-
cations and accusations of plagiarism/theft if nothing else).
Before you can submit your app you’ll need to ensure that you have completed the
following steps:
• Registered as an Apple Developer
• Registered with the iOS developer program
• Ensured that your app complies with the Apple Store Review Guidelines (if it
doesn’t the chances of your app being rejected are quite high)
• Have tested your app thoroughly (and xed any bugs/issues in the process)
Be aware that membership to the iOS Developer program incurs an annual fee of
$100. If you don’t renew your annual payment your apps will no longer be available
on the Apple App Store (unlike Google Play which has a one-off registration fee for
membership).
Assuming that the above conditions are met we’ll proceed with the following steps:
• Create an app listing on the App Store
• Submit an iOS app through Xcode
• Use Apple’s TestFlight to test the submitted iOS app
• Publish our app for App Store review
Creating an app listing on the App Store
There’s a few hurdles to clear when setting up your App Store listing but they are,
thankfully, quite straightforward and simple to work through.
The following screen captures and explanations will document this process visually
and help guide you through each step.
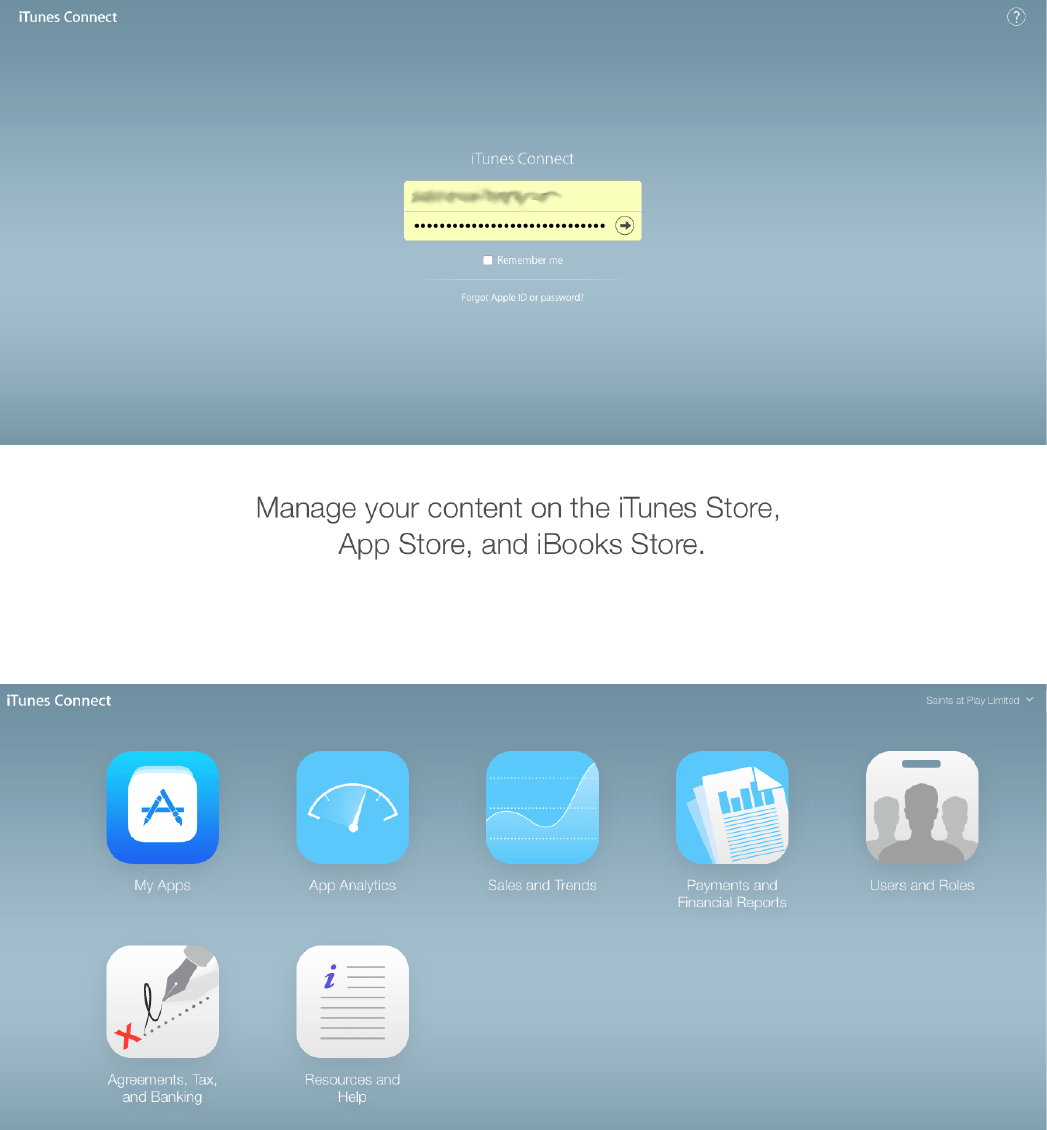
Mastering Ionic 2
392
In your web browser, navigate to the iTunes Connect portal and log into your
developer account:
Once logged in select the My Apps link from the displayed navigation options on the
iTunes Connect dashboard page:
Click on the + icon at the top left of the page, under the iTunes Connect heading,
and, from the menu options that are subsequently displayed, select New App:
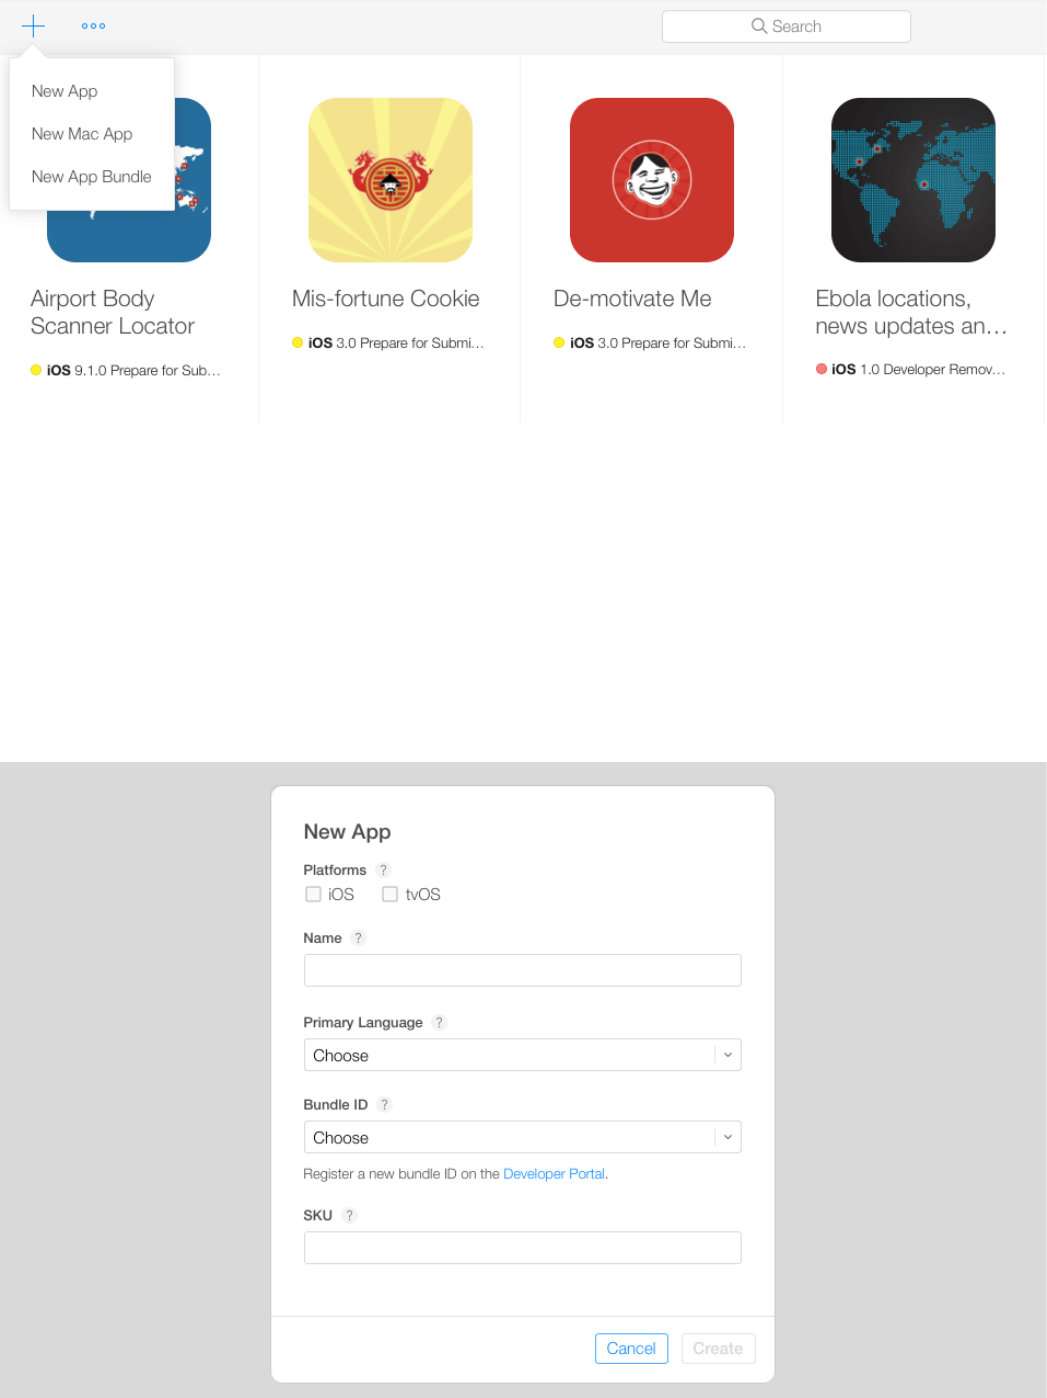
Submitting your iOS app to the Apple App Store
393
A modal window will then be displayed with the following input elds:
• Platforms (iOS or tvOS - select iOS)
• Name (app name as it will appear on the App Store - maximum of 50 characters)
• Primary Language
• Bundle ID (select an App ID - that was created in the Developer Portal - from the
menu. See next step for details)
• SKU (a unique ID for the app that won’t be visible on the App Store)
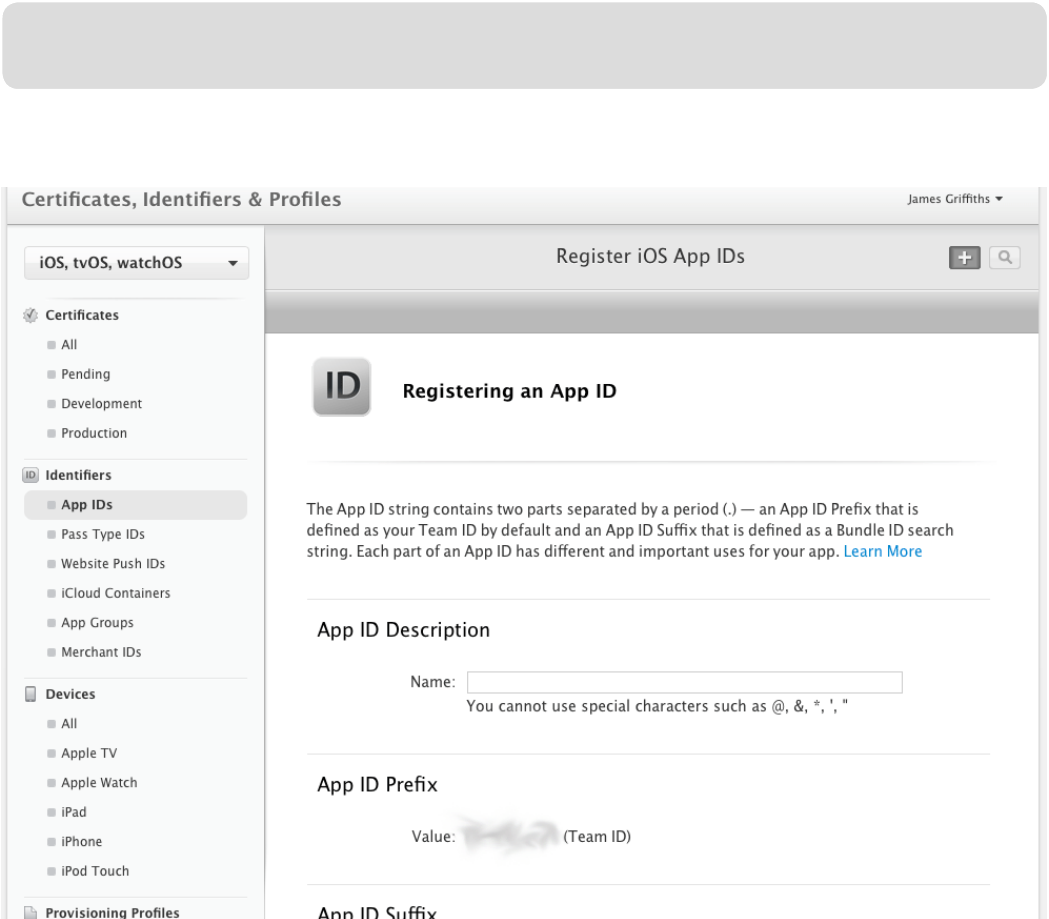
Mastering Ionic 2
394
Creating App ID’s
An App ID can be used to identify each App submitted by a developer/development
team to the App Store and register the services that the App can use such as Apple
Pay, HealthKit or In-App Purchases for example.
App ID’s can be created in two ways:
• Wildcards (using asterisks - which match one or more apps)
• Explicit App ID (which matches the bundle ID for a specic app)
Explicit App ID’s are written in a reverse domain style notation (using alphanumeric
characters with no spaces, asterisks or special characters) such as:
com.saintsatplay.nameofAppHere
These can be generated from within Xcode itself or directly through your Apple
Developer account - as shown on the following screen:
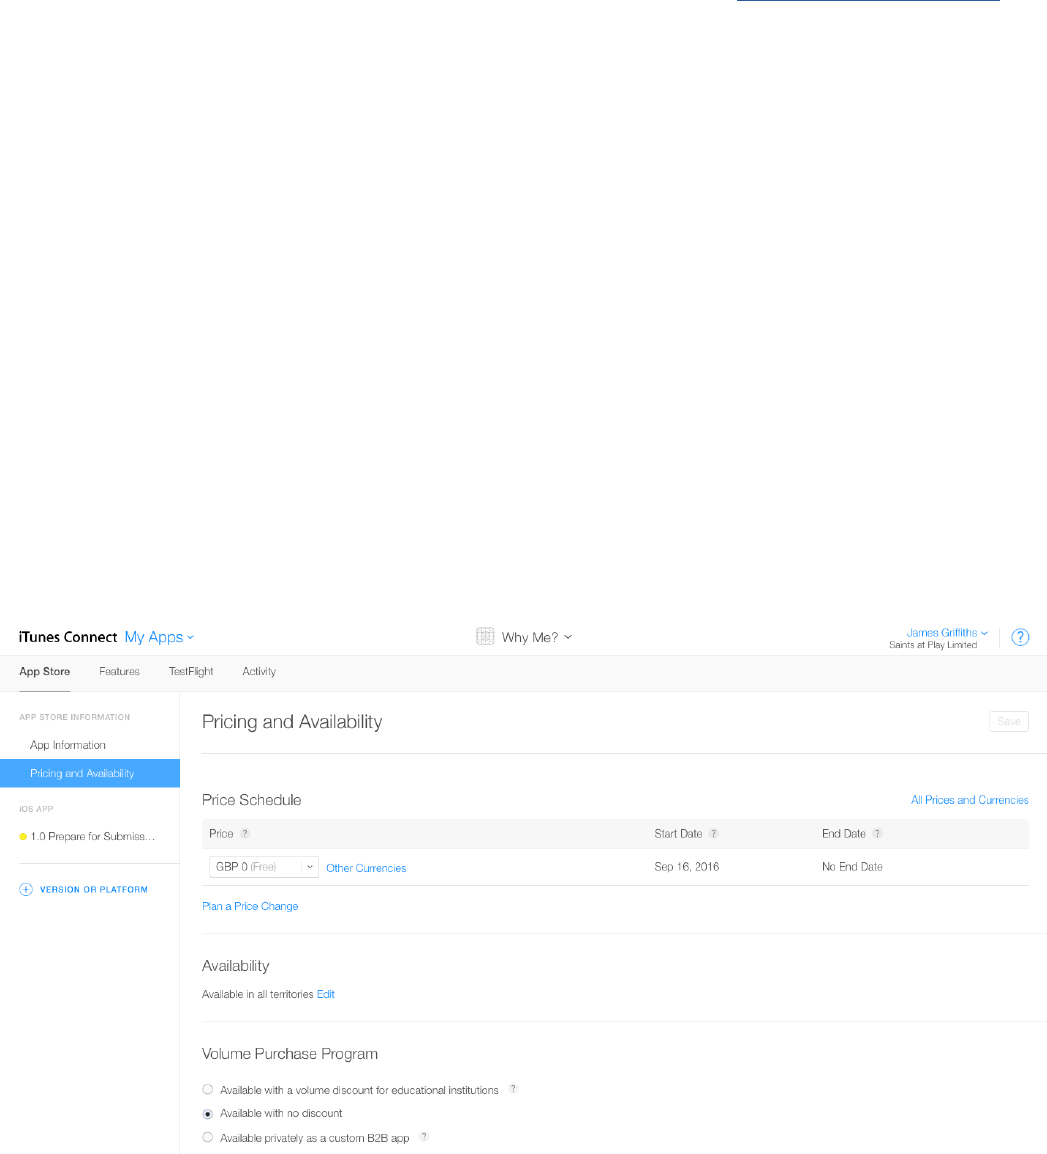
Submitting your iOS app to the Apple App Store
395
For further information concerning App ID’s view the ofcial Apple documentation.
Going back to your iTunes Connect account, once you’ve entered data into the elds
on the New App modal form and clicked on the Create button you will, presuming no
errors were encountered, see your new app displayed on the dashboard.
Click on the blank icon for your new app and enter the required data and assets for
the following dashboard pages:
• App Information
• Pricing and Availability
• Prepare for Submission
IMPORTANT - If you select a paid tier option from the Pricing and Availability
screen you’ll be required to accept the Paid Applications contract located in the
Agreements, Tax and Banking section of your iTunes Connect account:
The Prepare for Submission screen requires, amongst other content, that you
submit screenshots displaying your app on different sized devices (which can be
handled through the iTunes Connect Media Manager) and an App Build le (which
will be subsequently uploaded using Xcode or the Application Loader software -
which we’ll cover in the next section - once this Build le is uploaded you will then be
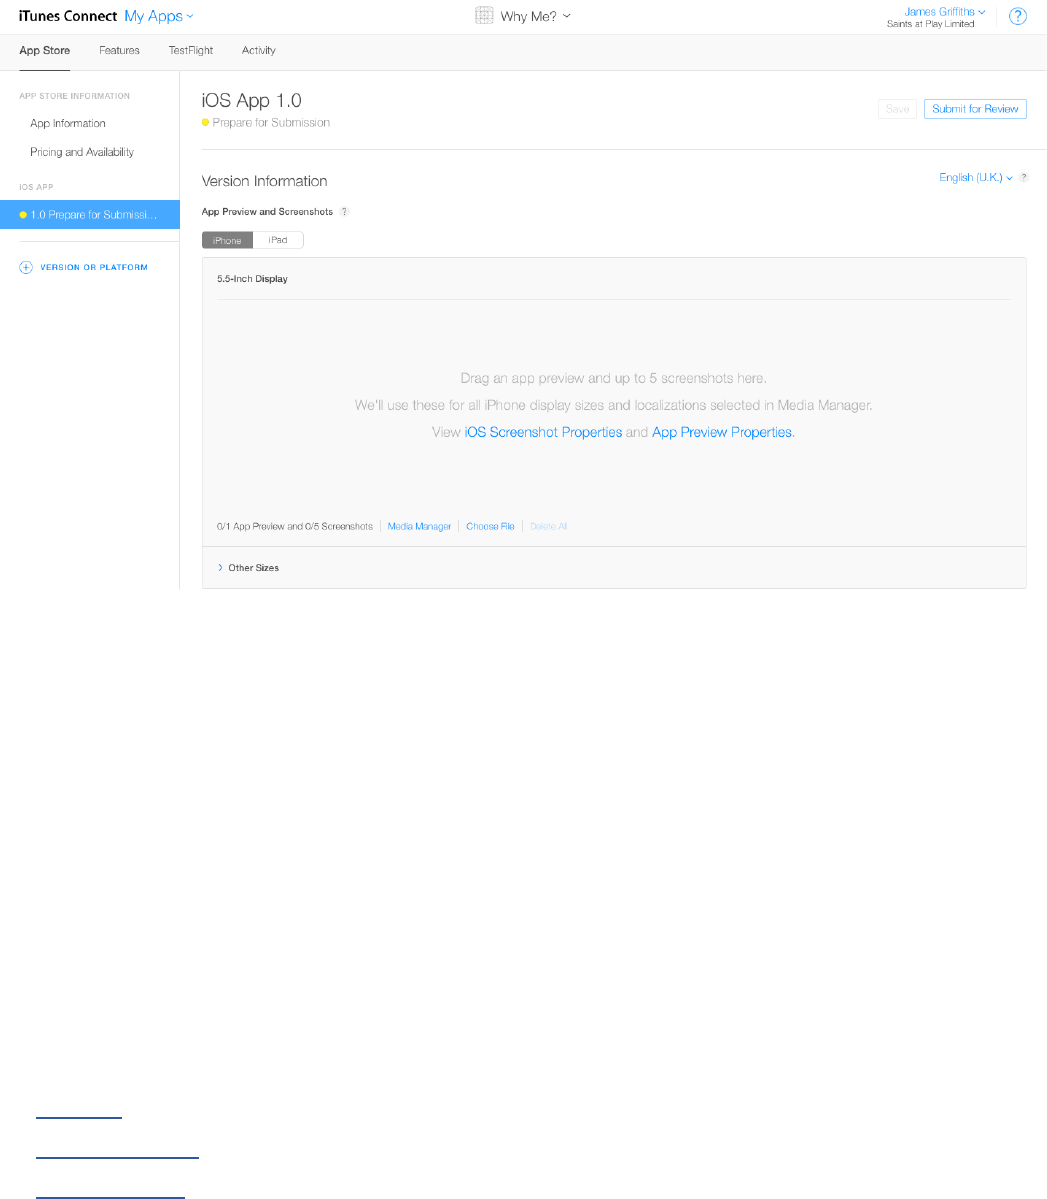
Mastering Ionic 2
396
able to select the uploaded le).
Note - It’s worth spending time getting the required screenshots right as these will
help potential customers decide if they want to interact with your App Store listing
and download your app:
Uploading your App
Depending on which operating system you are using there are a few ways in which
your iOS app can be uploaded to the Apple App Store.
If you’re using a Mac you can use either of the following applications:
• Xcode
• Application Loader
If you’re using Windows or Linux as your development platform you would have to
use an online service such as the following:
• Xcloud
• Mac in Cloud
• Buddy Build

Submitting your iOS app to the Apple App Store
397
In this section I’ll show you how to prepare and upload your app to the Apple App
Store using Xcode (this presumes you have set up the necessary certicates and
proles as discussed in the Code signing for iOS & Android chapter - if you
haven’t done this go back now, read through that chapter and ensure you have
followed the instructions contained within).
Okay, let’s begin.
Open the cong.xml le for your app (located in the root of your project) and edit
the following elds/attributes to your particular requirements:
• widget ID (use reverse domain name notation - I.e. com.saintsatplay.nameOfApp
- this must match the Bundle ID you set for the app when creating the App Store
listing in iTunes Connect)
• Name (What your app is called)
• Description (A brief summary of the app; what it does, its purpose etc.)
• Author (Developer/team name, e-mail address and website address)
If necessary, add or amend any platform specic preferences in this le too (refer
back to the Preparing apps for release chapter for further details on the available
options for this le).
Save this le and now, using your Terminal navigate to the root of your ionic project
and run the following Ionic CLI command:
ionic build ios
This will generate the necessary source code which allow the app to be tested on a
mobile emulator or be deployed to a mobile/tablet device for the same purposes.
This will NOT however generate the IPA le which will be needed to submit to the
Apple App Store.
For this we will need to use Xcode.
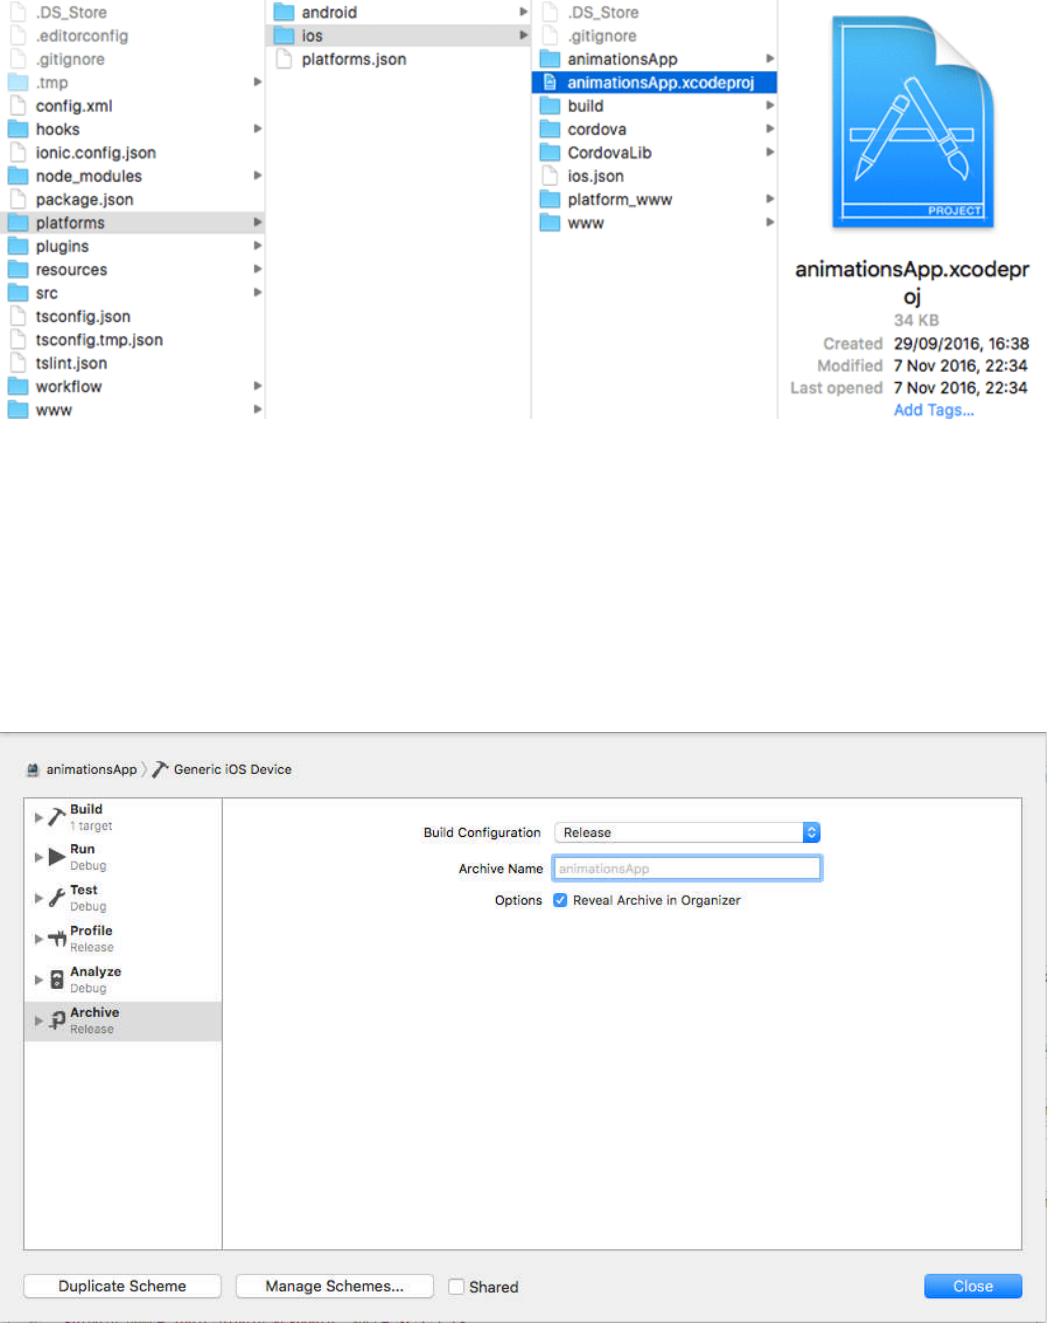
Mastering Ionic 2
398
Navigate to your app’s iOS directory and double-click on the Xcode project le to
open this within Xcode:
Once your project has been opened in Xcode select Product > Scheme > Edit
Scheme from the application menu and, in the window that appears:
• Select the name of the app (from the top left hand side of the window) and iOS
Device or Generic iOS Device (do NOT select an emulator)
• Select Archive from the left hand menu
• Select Release from the Build Conguration menu

Submitting your iOS app to the Apple App Store
399
Close this window and run the following commands from the application menu:
• Product > Clean
• Product > Archive
The rst command will clean the project code of any product les and/or any other
intermediate les created during the build process. This ensures the project isn’t
trying to reference les which may have been removed by the developer - think of it
as spring cleaning if nothing else!
The latter command generates the necessary iOS App archive, which if no errors
are returned during the archiving process, should be displayed in the Archives tab of
the Organizer window like so:
You will want to validate your archive before you submit this to the Apple App Store
so as to ensure there are no errors with the generated le.
You might think this unnecessary after thoroughly testing your app from the code
level to device level with different procedures such as unit tests, proling, testing
across different devices etc. to ensure there are no bugs/performance issues.
You would be wrong though.
The validation check can still throw up errors and issues (that would get your app
rejected by the App Store moderators) that you otherwise may not have been aware
of so DO take the time to run this.
Select your app archive and on the right hand side of the window click on the
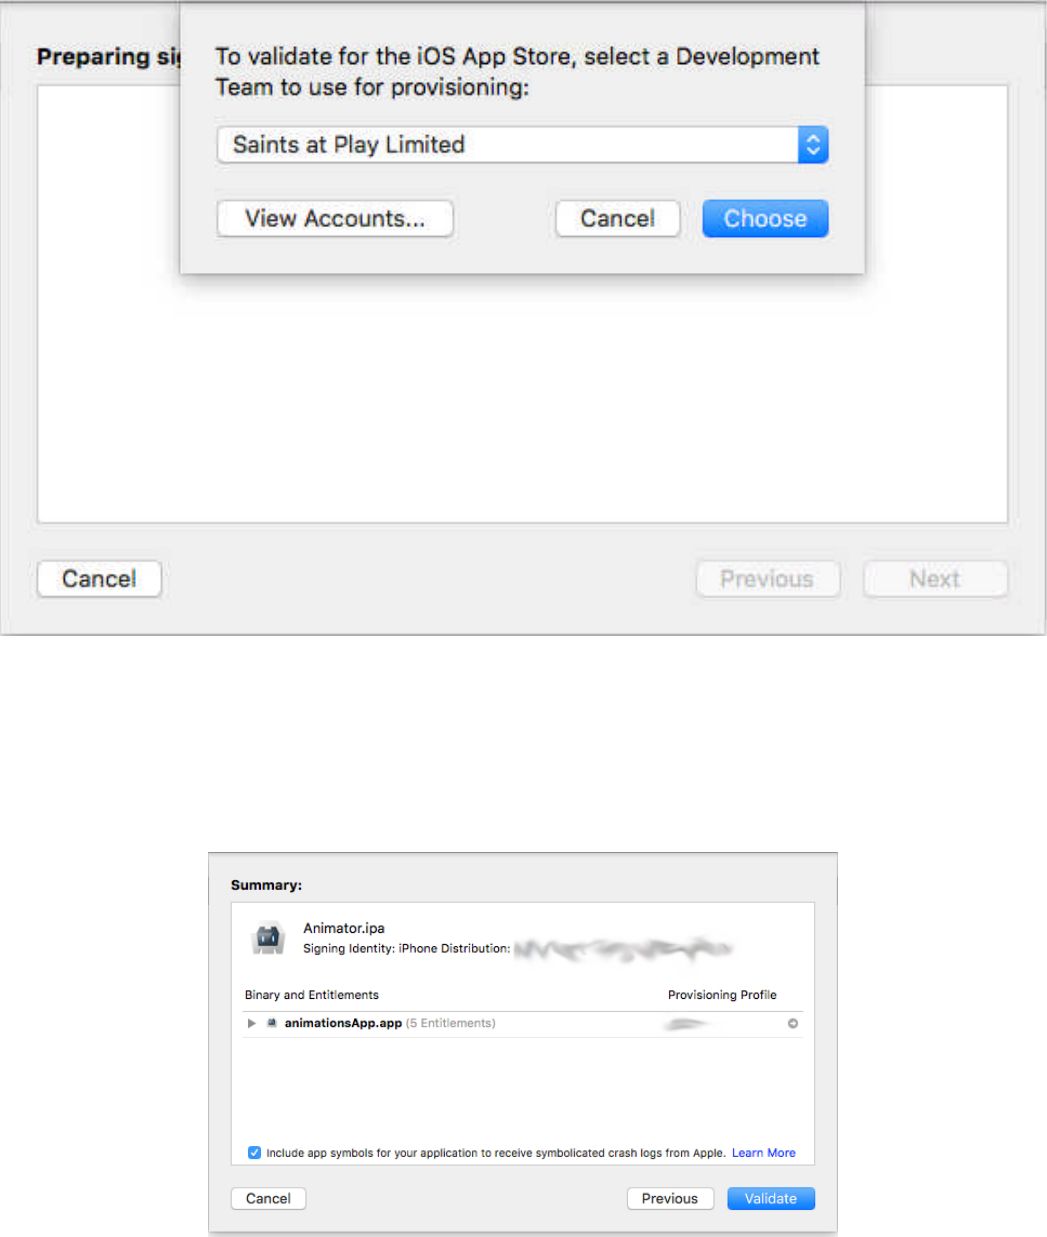
Mastering Ionic 2
400
Validate button (located directly underneath the Upload to App Store... button).
As this process runs you will be prompted to select a development team account for
provisioning:
Xcode will automatically attempt to detect the correct prole for you but you can
override this if you need to from the options displayed within the prompt itself.
Once you’ve done this Xcode will prepare the archive for validation and display a
summary of the IPA le and its entitlements:
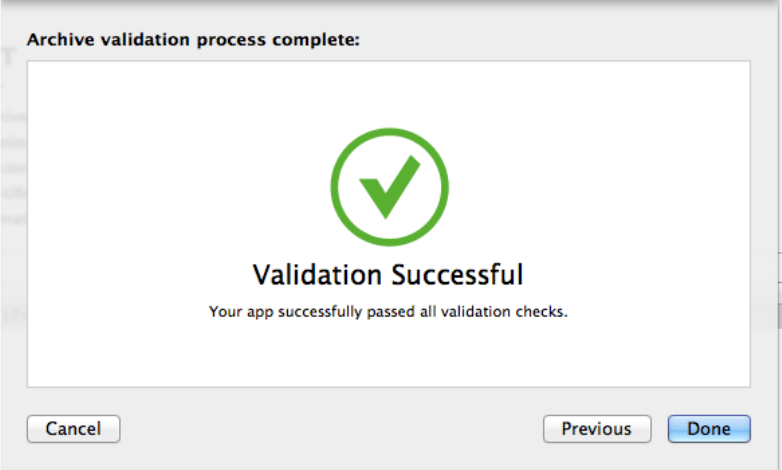
Submitting your iOS app to the Apple App Store
401
Click on the Validate button to begin the process of Xcode submitting app data to
Apple’s Servers for validation and, if the check is successful, you should be greeted
with a message like so:
If the validation check should fail ensure that:
• The cong.xml widget ID matches the Bundle ID for the app (as congured on
the App Store listing for the app)
• All required certicates and proles have been congured and assigned correctly
• There are no unused launch icons for the app
Usually the error message that is returned should be enough to guide you as to the
source of the validation failure, follow what this states (even if you have to spend
some time googling the answer!) and make the necessary amendments before
running the validation check again.
Once the app has been successfully validated you can submit the archive to the
Apple App Store using the Upload to Apple App Store button on the right hand side
of the Organizer window (as displayed in the following screen capture):
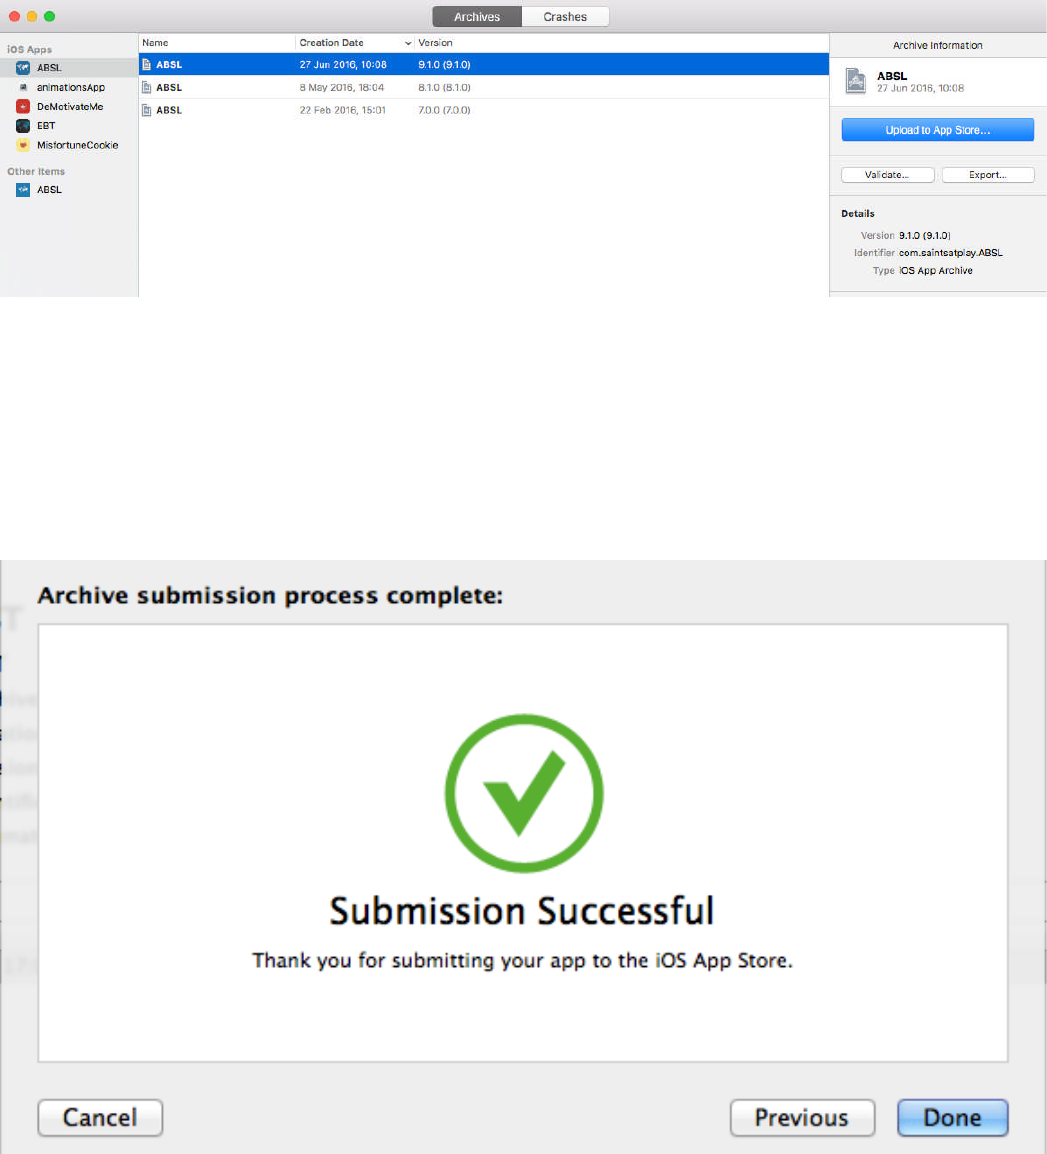
Mastering Ionic 2
402
This will repeat a similar process to that of the validation check where you will be
prompted to select the development team account.
The submission process should take a few minutes, depending on the size of your
archive, the speed of your network connection and any server latency at Apple’s
end, and, if all runs smoothly, you should see the following message returned:
If the submission fails, use the returned error message to guide you in resolving this.
You can also revisit the Troubleshooting your Ionic App chapter for possible
causes of failed App Store submissions & solutions to this problem.
Now there’s one nal step remaining before you can submit your app for review.
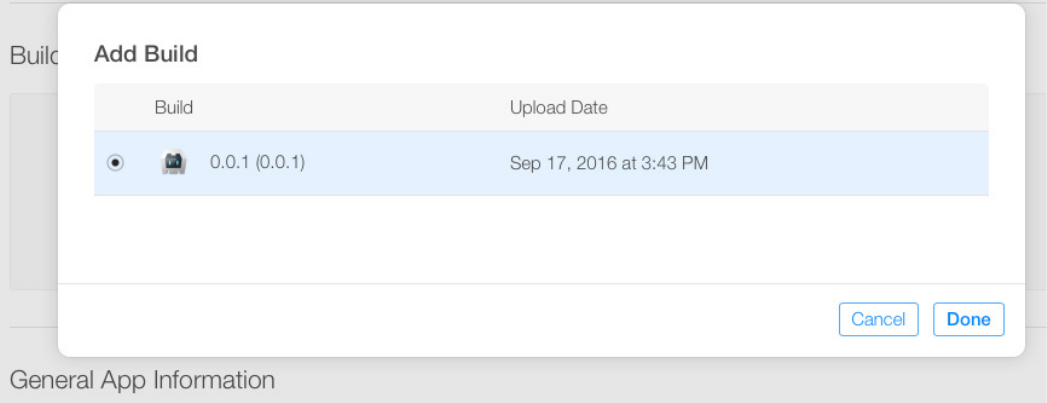
403
Submitting your iOS app to the Apple App Store
Assuming that your archive submission was successful you will eventually receive
an automated e-mail from Apple informing you that your build has been processed.
Once this has happened log into your iTunes Connect account, navigate to the App
Store listing for your recently uploaded archive and select that le from the Build
section on the Prepare for Submission screen like so:
Save this selection and spend time going back over your listing; double checking all
of the supplied assets and content to ensure you are satised with everything before
you nally submit the app for review.
The review process can take between 2 - 10 days, which can seem frustratingly long
(particularly if you’re on the latter end of that scale) although in my experiences over
recent months, the turnaround time has been 2 - 3 days.
Just be sure that, prior to submission, you have tested your app thoroughly and
checked that it complies with the App Store guidelines otherwise the app might be
rejected. Then it will be time spent xing, where possible, the reason(s) for rejection
and then waiting for the app to be reviewed again which is not a situation you want
to nd yourself in!

Submitting
your Android App
to the Google Play Store

Submitting your Android App to the Google Play Store
405
In this chapter I’ll take you through how to submit your own Android apps to the
Google Play Store (as I stated in the last chapter DON’T submit any of the
example projects included in or with this book - feel free to use the code how you
see t BUT make sure the apps you submit genuinely are your own - just to avoid
legal complications and accusations of plagiarism/theft if nothing else).
Before you can submit your Android app to the Google Play store you’ll need to
ensure that you have completed the following steps:
• Registered as a Google Play Developer
• Ensured that your app complies with the Material Design Guidelines and Core
App Quality Guidelines
• Have tested your app thoroughly (and xed any bugs/issues in the process)
Unlike Apple Developer membership the Google Play Developer program incurs a
one-off fee of $25 which makes this option a very cost-effective purchase for
developers on a limited budget.
Assuming that the above conditions are met we’ll proceed with the following steps:
• Create an app listing on the Google Play Store
• Submit our Android App to the Google Play Store
• Publish our app for App Store review
Creating an app listing on the Google Play Store
Similar to creating an app listing on the Apple App Store there’s a few hurdles to
clear when setting up your Google Play Store listing but they are, thankfully, quite
straightforward and simple to accomplish.
The following screen captures and explanations will document this process visually
and help guide you through each step.
Log into your Google Play developer account at https://play.google.com/apps/pub-
lish/:
Mastering Ionic 2
406
Once logged in the Google Play Developer dashboard will be displayed, listing any
existing apps you may already have published:
To add a new Android Application simply click on the Add new application button
towards the top right of the dashboard.
Submitting your Android App to the Google Play Store
407
This presents a modal window which allows you to select the default language and
enter a title for the app as well as a choice of uploading an APK le or preparing a
Play Store listing.
Preparing a Play Store listing involves entering product details for the App:
Mastering Ionic 2
408
Further down the Store Listing page there’s a section for uploading media assets
so that potential customers can get a visual impression of the app and its features.
Followed by a section for categorising the app (the sector/industry type, content type
etc.) as well as providing contact details:
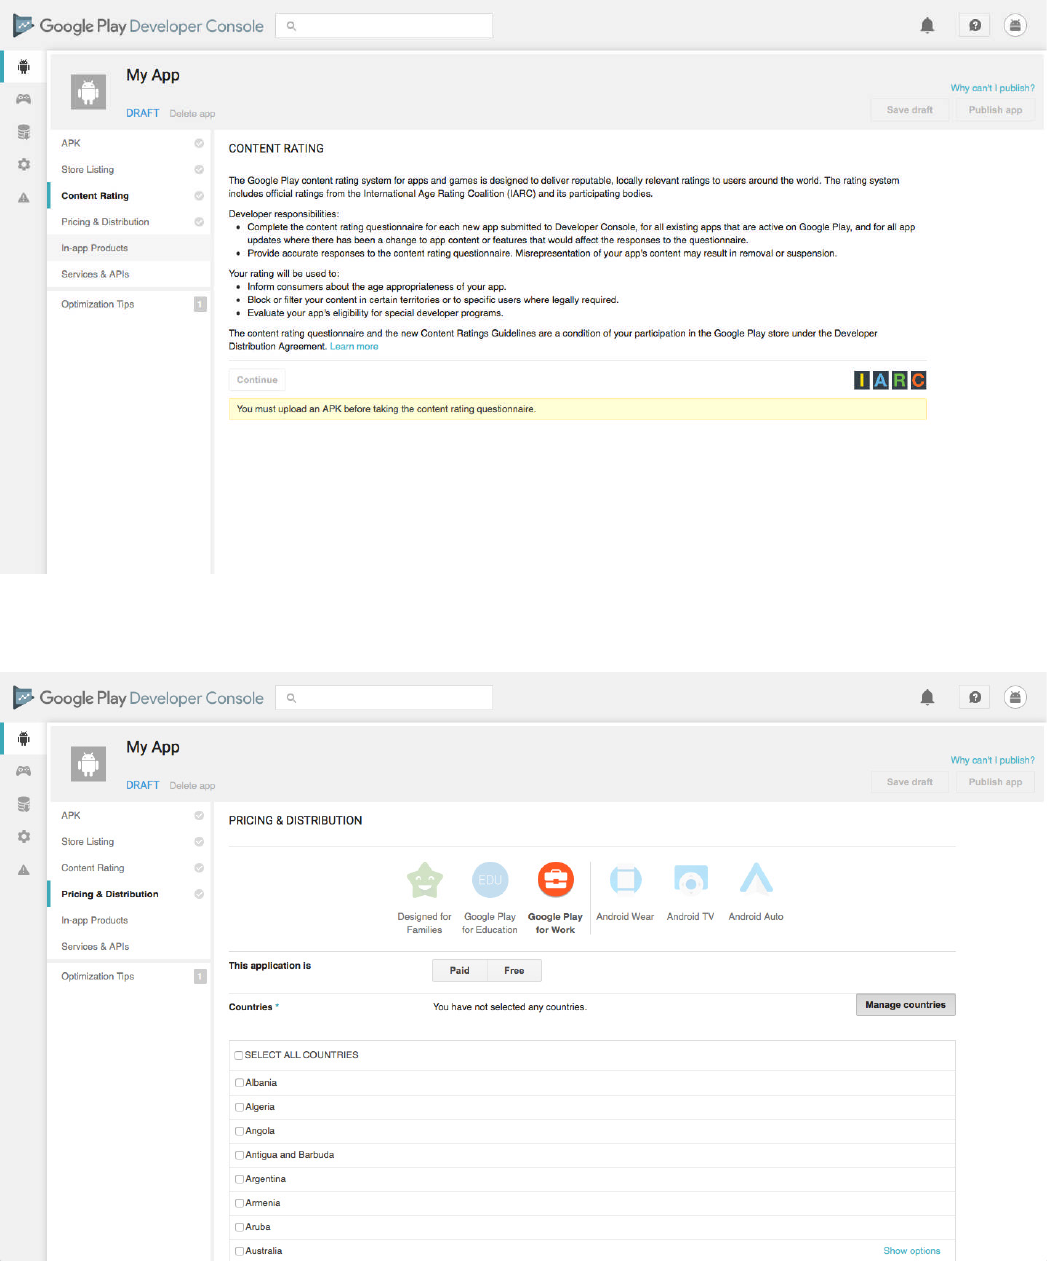
Submitting your Android App to the Google Play Store
409
The Content Rating screen allows developers to determine the appropriate age/
type of audience for their app.
The Pricing & Distribution screen is where we can determine whether or not our
app is free and what prices our app will be charged for (IF a paid app) based on
territory - amongst other options available on this section.
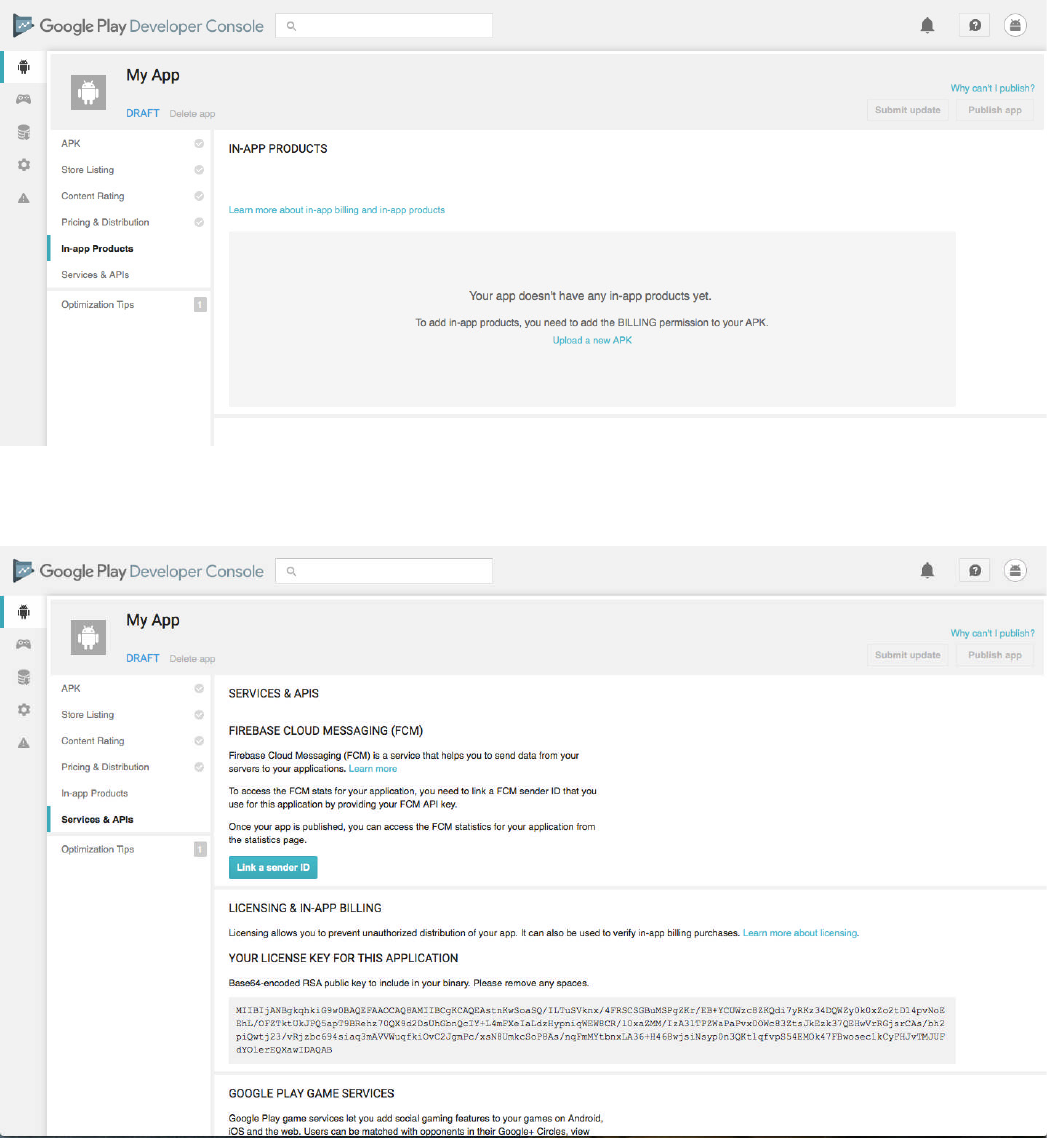
Mastering Ionic 2
410
If your app has any In-App Products for providing consumer purchases they can be
declared on the In-App Products screen.
The Services & APIs screen allows developers to implement licensing keys for their
apps (which are used to prevent unauthorised distribution of apps and verify In-App
Billing purchases) as well as declaring other services for use in apps.
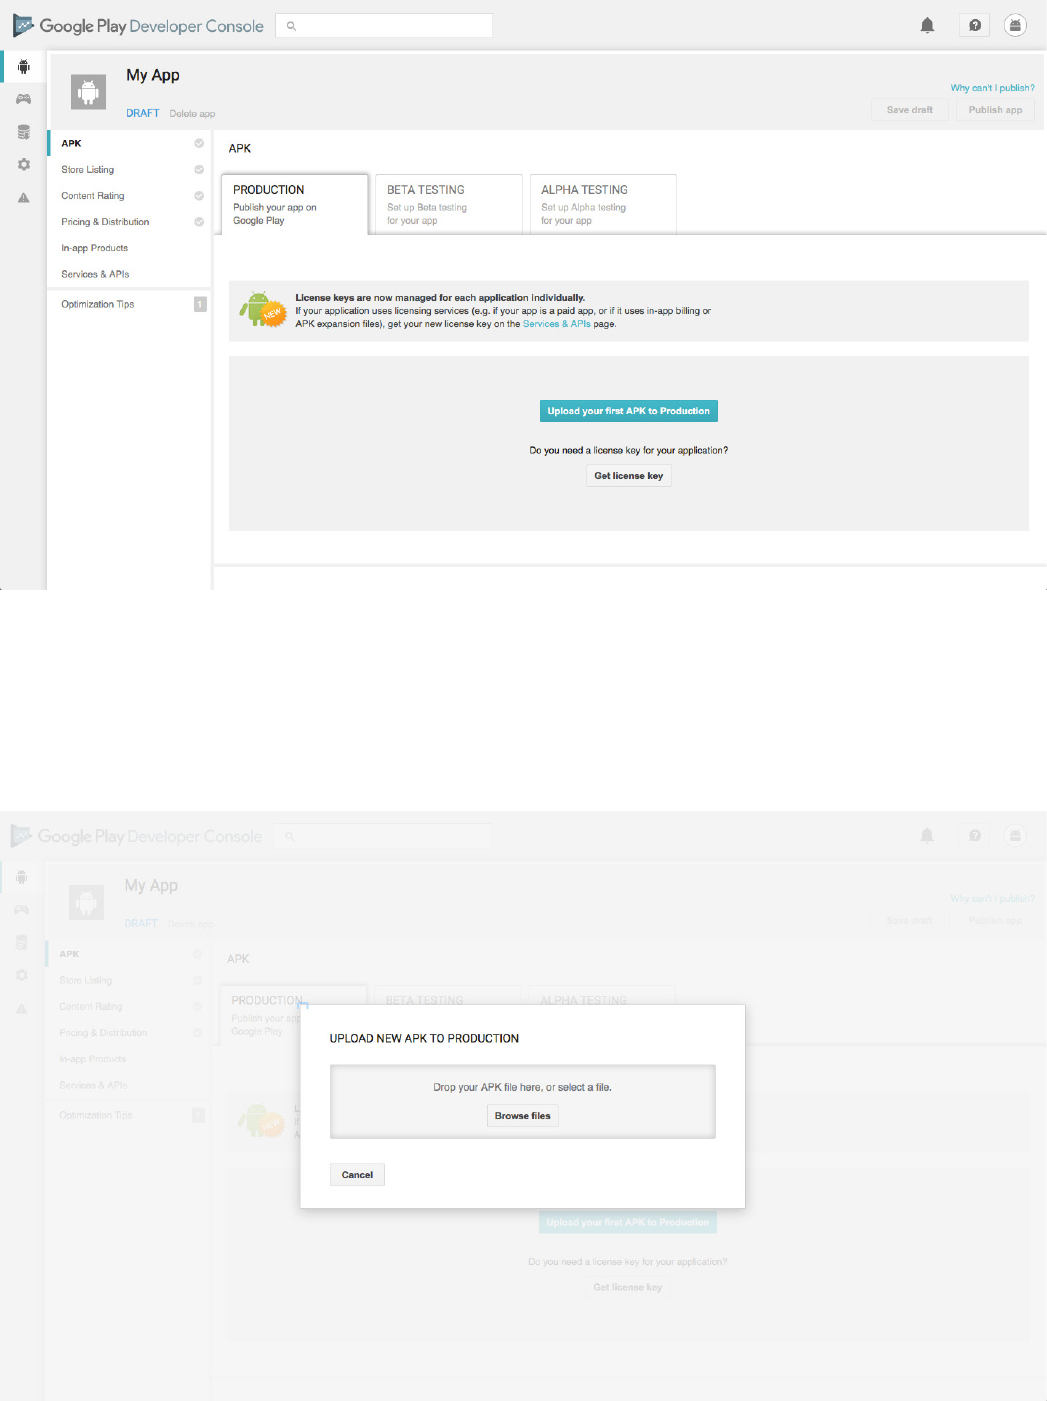
Submitting your Android App to the Google Play Store
411
The APK link from the App dashboard screen allows tested and completed APK les
to be uploaded for the Play Store Listing for the app.
Additionally APK les can also be uploaded for beta and alpha testing prior to nal
release of the app.
412
Mastering Ionic 2
I personally nd creating a Google Play store listing and uploading the Android app
APK le less time consuming than I do when setting up an Apple App Store listing
and submitting the required IPA le through Xcode.
One other plus of developing for the Google Play Store is that the app moderation
process generally takes less than 24 hours to complete and receive notication
from.

Case Study #1
Movies App
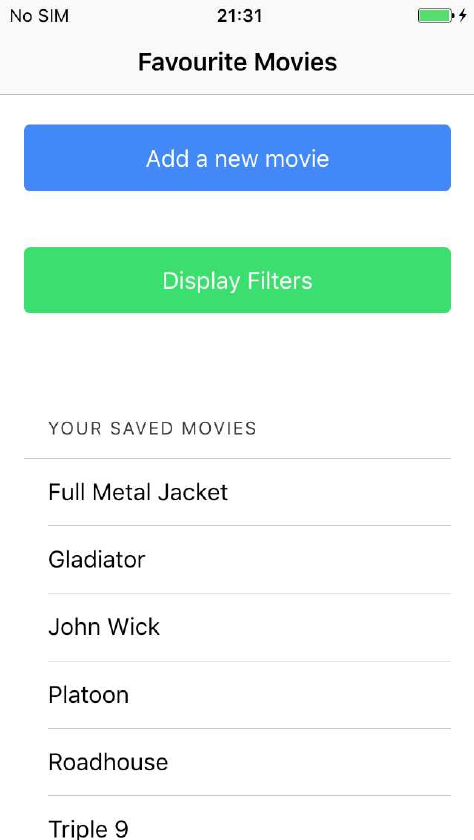
414
Case Study #1 - Movies App
We’ve covered a lot of ground throughout this book; exploring the different aspects
of Ionic 2 - from the underlying technologies, tools and principles to working with
components, services and plugins - now it’s time to put that learning into practice!
In this case study we’re going to use Ionic 2 to develop an app offering functionality
that we explored in the Data Storage chapter - a single page app that will allow us to
store and manage our favourite movies.
We’ll implement Ionic’s built-in UI components, services, promises, animations, data
validation and last, but not least, the Cordova NativeStorage plugin. With these at
our disposal the app will allow us to seamlessly display, add, edit and remove
movies through a simple but aesthetically pleasing interface.
The following screens demonstrate what we should see by the end of this chapter:
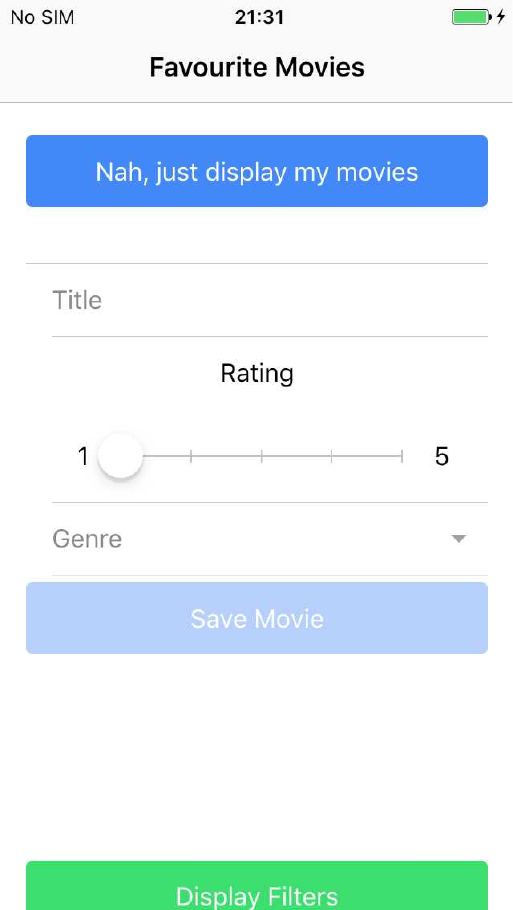
415
Mastering Ionic 2
So that’s what the app will look like when displaying your saved movies (make of
my choices what you will because you’ll be adding your own favourites as you work
through this chapter!)
When the Add a new movie button is activated the above form will transition into
view displaying the following UI components:
• <ion-input>
• <ion-range>
• <ion-select>
The Save Movie button will be deactivated until data is entered into the form.
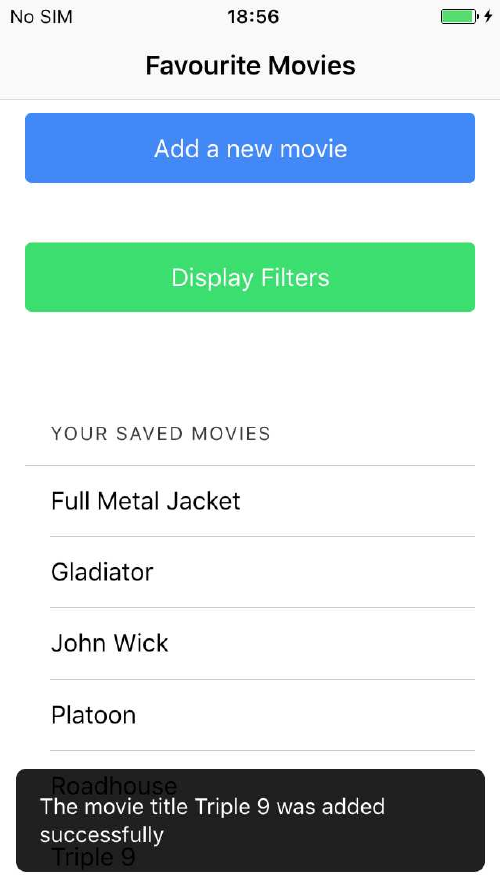
416
Case Study #1 - Movies App
When a movie has been added to the app a notication message is displayed to the
user for 3 seconds at the bottom of the screen.
The movie, upon being added to the NativeStorage object, is immediately displayed
in alphabetical order with the list of movies already on the screen.
The form elds where those movie details were entered/selected are cleared of data
and the form itself is closed.
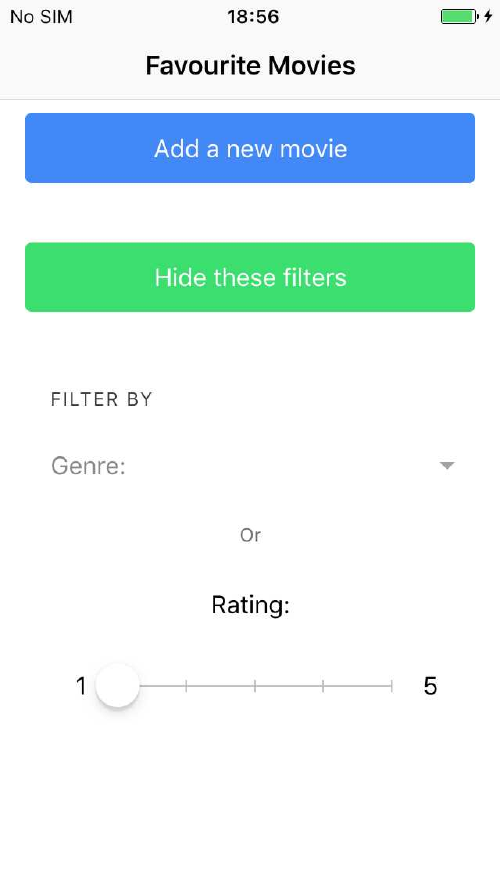
Mastering Ionic 2
417
Movies can then be ltered and displayed based on either the type of genre or rating
that was previously assigned to those movies.
These lters, once selected, will instantaneously update the movies listed on the
page if matches are found.
And if there are no movies to display (as will be the case when we launch the app
for the rst time)?
Then we are greeted with the following screen:

Case Study #1 - Movies App
418
That gives a taste of what we’ll be developing as we make our way through this
chapter.
So, that said, let’s get started!
At the root of your apps projects directory run the following commands in the Ionic
CLI to generate our new app, install the Cordova NativeStorage plugin and create a
storage service:
ionic start myMovies blank --v2
cd myMovies
npm install
ionic plugin add cordova-plugin-nativestorage
ionic g provider storage

Mastering Ionic 2
419
We’ll begin by dening the following storage methods (highlighted in bold) for the
myMovies/src/providers/storage.ts le:
import { Injectable } from '@angular/core';
import { Http } from '@angular/http';
import { NativeStorage } from 'ionic-native';
import 'rxjs/add/operator/map';
@Injectable()
export class Storage {
public storedData : any;
constructor(public http: Http)
{
}
setItem(itemName, itemValue) : any
{
return new Promise(resolve =>
{
NativeStorage.setItem(itemName, itemValue)
.then(
(data) =>
{
resolve(true);
},
(error) =>
{
console.log("Fail to set storage key value");
});
});
}
getItems(itemKey)

Case Study #1 - Movies App
420
{
return new Promise(resolve =>
{
NativeStorage.getItem(itemKey)
.then(
(data) =>
{
this.storedData = JSON.parse(data);
resolve(this.storedData);
},
(error) =>
{
console.log("We don’t get data!");
})
});
}
removeItem(itemKey)
{
return new Promise(resolve =>
{
NativeStorage.remove(itemKey)
.then(
(data) =>
{
resolve(true);
},
(error) =>
{
console.log("Failed to remove item");
});
});
}
}

421
We’ve covered these methods before in the Data Storage chapter so they should be
fairly familiar to you (if not, revisit that chapter then come back here!)
Now switch your attention to the myMovies/src/pages/home/home.html le and
make the following amendments (highlighted in bold):
<ion-header>
<ion-navbar>
<ion-title>
My Fave Films
</ion-title>
</ion-navbar>
</ion-header>
<ion-content padding>
<form
[formGroup]="form"
(ngSubmit)="saveMovie()">
<ion-list>
<ion-item margin-bottom>
<ion-label>Title</ion-label>
<ion-input
type="text"
formControlName="movieName"
[(ngModel)]="lmTitle"></ion-input>
</ion-item>
<button
ion-button
color="primary"
text-center
block
[disabled]="!form.valid">Save Movie</button>
Mastering Ionic 2

422
</ion-list>
</form>
<ion-list *ngIf="isData">
<ion-list-header>
Your saved movies
</ion-list-header>
<ion-item *ngFor="let data of storedData">
{{ data.movie }}
</ion-item>
</ion-list>
</ion-content>
Again, nothing new here as this is code we’re already familiar with from the Data
Storage chapter.
We’re simply using an ngIf directive to iterate through any saved movies and render
those to the page using Ionic 2 <ion-list> and <ion-item> directives.
The nal le we need to ‘set the stage’ for will be the myMovies/src/pages/home/
home.ts le with the following amendments (highlighted in bold):
import { Component } from '@angular/core';
import { NavController, Platform, ToastController } from 'ionic-angular';
import { FormGroup,
FormControl,
Validators,
FormBuilder } from '@angular/forms';
import { Storage } from '../../providers/storage';
@Component({
selector: 'page-home',
templateUrl: 'home.html'
Case Study #1 - Movies App

Mastering Ionic 2
423
})
export class HomePage {
public form : FormGroup;
public storageKey : string = "MoviesObj";
public isData : boolean = false;
public storedData : any = null;
public movies : any = [];
public lmTitle : any;
constructor(
public navCtrl : NavController,
public storage : Storage,
public fb : FormBuilder,
public toastCtrl : ToastController,
public platform : Platform
)
{
platform.ready().then(() => {
setTimeout(() => {
this.renderMovies();
}, 750);
});
this.form = fb.group({
"movieName" : ["", Validators.required]
});
this.clearFieldValues();
}
renderMovies() : void
{
this.storage.getItems(this.storageKey)

424
.then(
(data) => {
let existingData = Object.keys(data).length;
if(existingData !== 0)
{
this.storedData = data;
this.isData = true;
}
this.resetMovies(this.storedData);
}
);
}
resetMovies(data)
{
let k;
this.movies.length = 0;
for(k in data)
{
this.movies.push(
{
movie : data[k].movie
});
}
}
saveMovie()
{
let movie : string = this.form.controls["movieName"].value,
i : number = 0,
k;
for(k in this.storedData)
Case Study #1 - Movies App

Mastering Ionic 2
425
{
if(this.storedData[k].movie === movie)
{
i++;
}
}
if(i === 0)
{
this.movies.push(
{
movie : movie
});
this.storeMovie(this.movies, movie);
}
else
{
let message = `The movie ${movie} has already been stored.
Please enter a different movie title.`;
this.storageNotication(message);
}
}
storeMovie(movies, movie)
{
let moviesStored = JSON.stringify(movies);
this.storage.setItem(this.storageKey, moviesStored).then(
(data) => {
this.renderMovies();
let message = `The movie title ${movie} was added!;
this.clearFieldValues();
this.storageNotication(message);
},

426
(error) => {
let message = `Whoops! Something went wrong. The movie title
${movie} was NOT added`;
this.storageNotication(message);
}
);
}
clearFieldValues()
{
this.lmTitle = "";
}
storageNotication(message) : void
{
let notication = this.toastCtrl.create({
message : message,
duration : 3000
});
notication.present();
}
}
With the amendments in place for the myMovies/src/pages/home/home.html le
we now have the initial stages of our app, based on what we originally developed in
the Data Storage chapter.
Now we can start to introduce the following additional features:
• Amend/Remove saved movies
• Add a rating for the lm
• Add a genre for the lm
• Sliding list component
Case Study #1 - Movies App

Mastering Ionic 2
427
• Animations for revealing/hiding forms used within the app
• Validation routines for all form elds
• Filter movies by genre & rating
• List movies in ascending alphabetical order
Let’s begin upgrading our app by implementing the rating and genre elds to the
add movie form.
In the myMovies/src/pages/home/home.html le make the following amendments
(highlighted in bold):
<form [formGroup]="form" (ngSubmit)="saveMovie()">
<ion-list>
<ion-item margin-bottom>
<ion-label>Title</ion-label>
<ion-input type="text"
formControlName="movieName"
[(ngModel)]="lmTitle">
</ion-input>
</ion-item>
<ion-item margin-bottom>
<ion-label text-left>Rating</ion-label>
<ion-range
formControlName="rating"
min="1"
max="5"
step="1"
snaps="true"
color="secondary"
[(ngModel)]="lmRating">
<ion-label range-left>1</ion-label>
<ion-label range-right>5</ion-label>

428
</ion-range>
</ion-item>
<ion-item margin-bottom>
<ion-label>Genre</ion-label>
<ion-select
formControlName="genre"
[(ngModel)]="lmGenre">
<ion-option value="Action">Action</ion-option>
<ion-option value="Comedy">Comedy</ion-option>
<ion-option value="Documentary">Documentary</ion-option>
<ion-option value="Horror">Horror</ion-option>
<ion-option value="Other">Other</ion-option>
<ion-option value="Romance">Romance</ion-option>
<ion-option value="Thriller">Thriller</ion-option>
<ion-option value="War">War</ion-option>
<ion-option value="All">All genres!</ion-option>
</ion-select>
</ion-item>
<button
ion-button
color="primary"
text-center
block
[disabled]="!form.valid">Save Movie</button>
</ion-list>
</form>
As each of the added form elements implements a particular formControl and model
we’ll need to wire this into the logic for the myMovies/src/pages/home/home.ts le
(amendments highlighted in bold):
Case Study #1 - Movies App

Mastering Ionic 2
429
....
export class HomePage {
...
public lmRating : any;
public lmGenre : any;
constructor( .. )
{
...
this.form = fb.group({
"movieName" : ["", Validators.required],
"genre" : ["", Validators.required],
"rating" : ["", Validators.required]
});
...
}
...
}
Now that the additional form elements and logic are in place we can next turn our
attention towards amending the list that displays our saved movies.
We’ll modify this list to include sliding items that reveal buttons to edit and remove
the selected movie.
Within the myMovies/src/pages/home/home.html le add this functionality by
making the following changes (amendments highlighted in bold):

Mastering Ionic 2
430
<ion-list *ngIf="isData">
<ion-list-header>
Your saved movies
</ion-list-header>
<ion-item-sliding *ngFor="let data of storedData">
<ion-item>
{{ data.movie }}
</ion-item>
<ion-item-options side="right">
<button
ion-button
color="primary"
(click)="amendListing(data)">
<ion-icon name="create"></ion-icon>
Amend
</button>
<button
ion-button
color="secondary"
(click)="removeListing(data)">
<ion-icon name="close"></ion-icon>
Remove
</button>
</ion-item-options>
</ion-item-sliding>
</ion-list>
With the template amended to incorporate a sliding list we now need to add the
button event methods - amendListing and removeListing - to the component
class.
In addition to these we’ll also need to make the following changes to the existing
myMovies/src/pages/home/home.ts class logic (amendments highlighted in bold):

431
Case Study #1 - Movies App
import { Component, ViewChild } from '@angular/core';
import { Content, ... } from 'ionic-angular';
...
export class HomePage {
@ViewChild(Content) content: Content;
...
public isEdited : boolean = false;
public isDeleted : boolean = false;
public incr : number = 0;
...
resetMovies(data)
{
...
this.movies.push(
{
movie : data[k].movie,
genre : data[k].genre,
rating : data[k].rating
});
}
}
saveMovie()
{
let movie : string = this.form.controls["movieName"].value,
genre : string = this.form.controls["genre"].value,
rating : number = this.form.controls["rating"].value,
...
this.incr = 0;
...

432
Mastering Ionic 2
if(i === 0)
{
this.movies.push(
{
movie : movie,
genre : genre,
rating : rating
});
this.storeMovie(this.movies, movie);
}
...
}
scrollToTopOfScreen()
{
this.content.scrollToTop();
}
amendListing(item) : void
{
let editedMovie = item.movie,
editedGenre = item.genre,
editedRating = item.rating;
this.scrollToTopOfScreen();
this.lmTitle = editedMovie;
this.lmGenre = editedGenre;
this.lmRating = editedRating;
this.isEdited = true;
this.incr++;
this.removeListing(item);

433
Case Study #1 - Movies App
}
removeListing(item) : void
{
let i : number = 0,
k;
for(k = 0; k < this.storedData.length; k++)
{
if(this.storedData[k].movie.indexOf(item.movie) !== -1)
{
this.storedData.splice(k, 1);
this.movies.length = 0;
this.movies = this.storedData;
this.removeItem(this.storageKey);
if(this.isEdited)
{
this.isDeleted = false;
}
else
{
this.isDeleted = true;
}
this.storeMovie(this.movies, item.movie);
i++;
}
}
}
removeItem(itemKey)

Mastering Ionic 2
434
{
this.store.removeItem(itemKey)
.then(
(data) => {
},
(error) => {
let message = "An error occurred! The item was NOT removed";
this.storageNotication(message);
}
);
}
storeMovie(movies, movie)
{
...
this.store.setItem(this.storageKey, moviesStored).then(
(data) => {
this.storedData = null;
this.renderMovies();
let message = this.renderNoticationMessage(movie);
this.storageNotication(message);
},
(error) => {
...
}
);
}
renderNoticationMessage(movie) : string
{
var message;

Case Study #1 - Movies App
435
if(this.isDeleted)
{
this.clearFieldValues();
message = "Congratulations! The item was successfully re-
moved";
this.isDeleted = false;
this.incr = 0;
}
else if(this.isEdited)
{
if(this.incr === 0)
{
this.clearFieldValues();
message = `The movie title ${movie} was successfully amended`;
this.isEdited = false;
}
}
else
{
this.clearFieldValues();
message = `The movie title ${movie} was added`;
}
return message;
}
clearFieldValues()
{
this.lmTitle = "";
this.lmRating = "";
this.lmGenre = "";
}

Mastering Ionic 2
436
That’s quite a lot of code we’ve added to and amended in the myMovies/src/pages/
home/home.ts le!
Before we cover this new code in depth we need to make some small adjustments
(highlighted in bold) to the myMovies/src/app/app.module.ts le so we can
successfully build and publish the app to a connected device:
import { NgModule, ErrorHandler } from '@angular/core';
import { IonicApp, IonicModule, IonicErrorHandler } from 'ionic-angular';
import { MyApp } from './app.component';
import { Storage } from '../providers/storage';
import { HomePage } from '../pages/home/home';
@NgModule({
declarations: [
MyApp,
HomePage
],
imports: [
IonicModule.forRoot(MyApp)
],
bootstrap: [IonicApp],
entryComponents: [
MyApp,
HomePage
],
providers: [{provide: ErrorHandler, useClass: IonicErrorHandler}, Storage]
})
export class AppModule {}
If we had additional components for the app (instead of just the HomePage module)
we would need to import those and then add them within the following sections of
the src/app/app.module.ts le:
• declarations
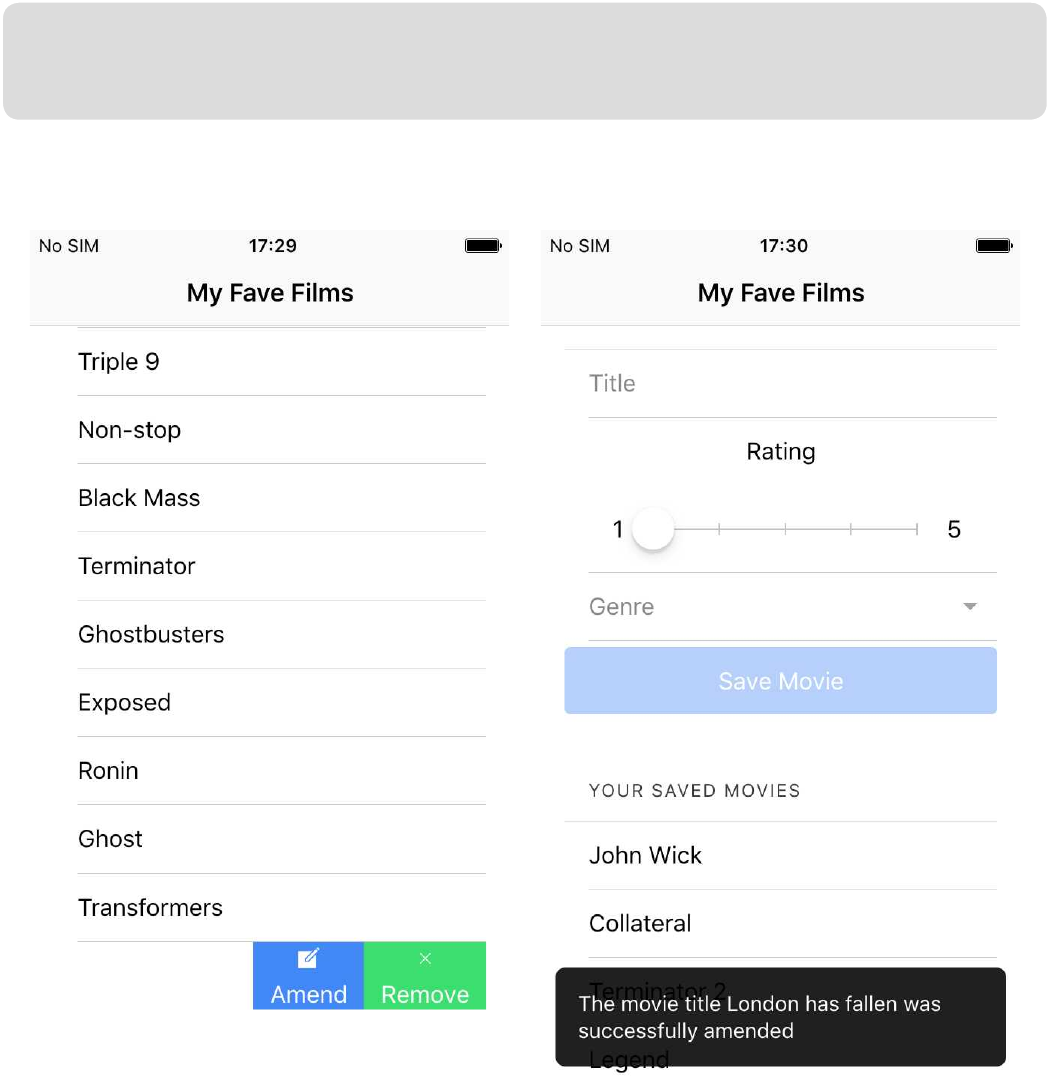
ionic prepare ios && ionic build ios
ionic run ios --device
• entryComponents
Now the necessary code for the myMovies/src/app/app.module.ts le has been
added let’s take a break from coding and actually see the app in action on our
mobile device.
Connect your handheld device to the computer and through the Terminal application
run the following commands:
Once published to and running on your device you should the app functionality
being displayed as shown in the following screen captures:
437
Case Study #1 - Movies App

438
Each saved movie can now be slid back to reveal options to amend or remove that
particular entry.
When a user selects the Amend movie option the movie will be loaded into the form
and, once saved, a notication will be published to the screen informing the user of
the fact.
Similarly if a user selects the Remove Movie option a notication will be published to
the screen informing the user that the movie has been deleted.
So far so good!
One thing does stand out though - movies are displayed in order of their being
added to the list which looks, well, kind of untidy.
Mastering Ionic 2

Case Study #1 - Movies App
439
Before we begin examining our recent code updates let’s sort the saved movies
programmatically so that they are displayed in ascending alphabetical order.
Once again return to the myMovies/src/pages/home/home.ts le and make the
following amendments (highlighted in bold):
...
renderMovies() : void
{
this.store.getItems(this.storageKey)
.then(
(data) => {
let existingData = Object.keys(data).length;
if(existingData !== 0)
{
this.storedData = data;
this.sortMoviesByTitle(this.storedData);
this.isData = true;
}
}
);
}
sortMoviesByTitle(data)
{
data.sort(
function(a, b)
{
var x = a.movie.toLowerCase(),
y = b.movie.toLowerCase();
return x < y ? -1 : x > y ? 1 : 0;

440
}
);
}
resetMovies(data)
{
...
this.sortMoviesByTitle(this.movies);
}
saveMovie()
{
for(k in this.storedData)
{
...
if(i === 0)
{
this.movies.push(
{
...
});
this.sortMoviesByTitle(this.movies);
...
}
else
{
...
}
}
}
Mastering Ionic 2
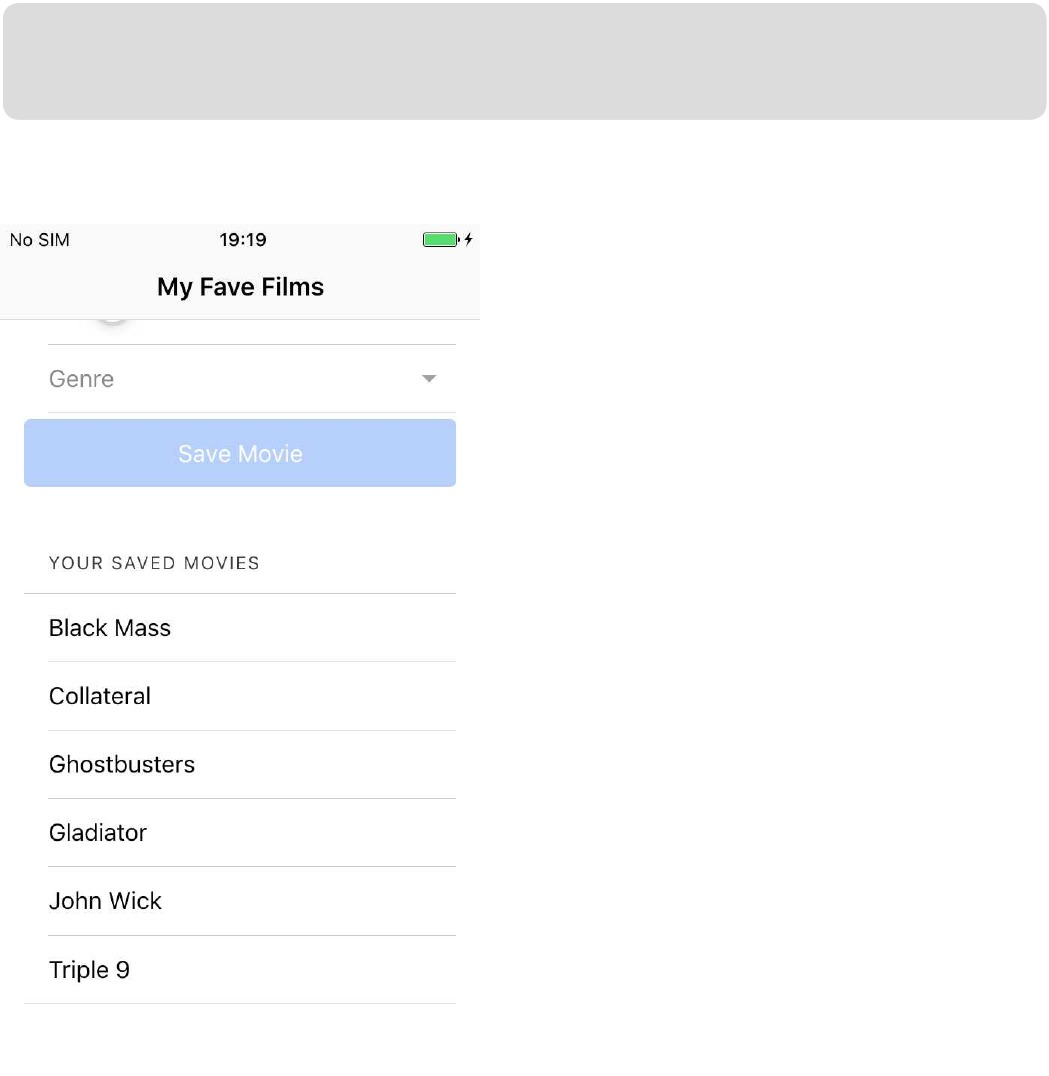
Case Study #1 - Movies App
441
With the additional logic to sort our movies in place now would be a good time to
rebuild and re-run the application on a connected iOS device using the following CLI
commands:
ionic build ios
ionic run ios --device
Once published, and running on your device, any listed movies should be displayed
in ascending alphabetical order as shown in the following screen capture:
Lubbly jubbly as Del boy would say (if you’re a fan of British sitcom Only Fools and
Horses you’ll get the reference - if you’re not then I really can’t help you!)
Now let’s break down our recent code amendments for implementing the ability to
amend/remove movie listings and display those in ascending alphabetical order so

442
we understand what is going on at each step of the way.
At the top of the myMovies/src/pages/home/home.ts le we import the following
additional modules (highlighted in bold):
import { Component, ViewChild } from '@angular/core';
import { Content,
NavController,
Platform,
ToastController } from 'ionic-angular';
import { FormGroup,
FormControl,
Validators,
FormBuilder } from '@angular/forms';
import { Storage } from '../../providers/storage';
The Angular 2 ViewChild module will allow the script to access a different
component class and its methods.
The Ionic 2 Content component provides a scrollable content area for the page
HTML template which can be interacted with through the different methods listed in
the following online documentation.
The HomePage class begins with implementing the ViewChild annotation (which is
used to reference the Content component) then adds three additional public
properties for subsequent use in controlling the amend/remove logic for handling
saved movies within the app:
export class HomePage {
@ViewChild(Content) content: Content;
...
public isEdited : boolean = false;
public isDeleted : boolean = false;
public incr : number = 0;
Mastering Ionic 2

Case Study #1 - Movies App
443
We then modify the renderMovies method to sort the saved movies that are to be
displayed on the page in ascending alphabetical order using the sortMoviesByTitle
method:
renderMovies() : void
{
this.store.getItems(this.storageKey)
.then(
(data) => {
let existingData = Object.keys(data).length;
if(existingData !== 0)
{
this.storedData = data;
this.sortMoviesByTitle(this.storedData);
this.isData = true;
}
});
}
The sortMoviesByTitle method makes use of the native TypeScript array sort
method (passing in a function to alphabetically sort the supplied JSON object of
saved movies in an ascending order):
sortMoviesByTitle(data)
{
data.sort(function(a, b)
{
var x = a.movie.toLowerCase(),
y = b.movie.toLowerCase();
return x < y ? -1 : x > y ? 1 : 0;
});
}

444
Within the saveMovie method we add some additional logic to reset the incr
property to zero (for use in conditionally handling notication back to the user when
amending an existing movie record) and we also implement the sortMoviesByTitle
method to ensure that movies are ordered as required prior to being saved back into
the existing NativeStorage object:
saveMovie()
{
let movie : string = this.form.controls[“movieName”].value,
genre : string = this.form.controls[“genre”].value,
rating : number = this.form.controls[“rating”].value,
i : number = 0,
k;
this.incr = 0;
for(k in this.storedData)
{
if(this.storedData[k].movie === movie)
{
i++;
}
}
if(i === 0)
{
this.movies.push(
{
movie : movie,
genre : genre,
rating : rating
});
this.sortMoviesByTitle(this.movies);
this.storeMovie(this.movies, movie);
}
Mastering Ionic 2

Case Study #1 - Movies App
else
{
let message = `The movie ${movie} has already been stored. Please en-
ter a different movie title.`;
this.storageNotication(message);
}
}
Next we have the scrollToTopOfScreen method which, as the name implies, allows
the class to programmatically scroll the HTML content to the top of the page.
This will be used, when selecting a saved record for amendment, to scroll to the
movie entry form at the top of the page:
scrollToTopOfScreen()
{
this.content.scrollToTop();
}
445
Following this is the amendListing method which is called on the click event for the
Amend button in the HTML template:
amendListing(item) : void
{
let editedMovie = item.movie,
editedGenre = item.genre,
editedRating = item.rating;
this.scrollToTopOfScreen();
this.lmTitle = editedMovie;
this.lmGenre = editedGenre;
this.lmRating = editedRating;
this.isEdited = true;
this.incr++;

446
this.removeListing(item);
}
This assigns the selected movie name, rating and genre to variables which are then
assigned to the associated models used on each form eld. This allows the selected
movie data to be displayed in the HTML form so that it can then be edited as and
where required.
We then set the isEdited ag to true and increment the incr property by 1 so that
we can handle notifying the user later on in the script.
Finally we call the removeListing method to remove the selected movie from the
NativeStorage object.
removeListing(item) : void
{
let i : number = 0,
k;
for(k = 0; k < this.storedData.length; k++)
{
if(this.storedData[k].movie.indexOf(item.movie) !== -1)
{
this.storedData.splice(k, 1);
this.movies.length = 0;
this.movies = this.storedData;
this.removeItem(this.storageKey);
if(this.isEdited)
{
this.isDeleted = false;
}
else
{
Mastering Ionic 2

Case Study #1 - Movies App
447
this.isDeleted = true;
}
this.storeMovie(this.movies, item.movie);
i++;
}
}
}
The removeListing method takes in a single movie object and iterates through the
storedData array object to see if a match can be found with the supplied movie.
If a match is found the movie is removed from the storedData array, the movies
array is reset and then repopulated with the newly amended storedData array
items.
The removeItem method is called to completely remove the NativeStorage object,
we then set the boolean value for the isDeleted property based on whether or not
we are amending the current movie before nally calling the storeMovie method to
recreate the NativeStorage object and store the movies data within this.
removeItem(itemKey)
{
this.store.removeItem(itemKey)
.then(
(data) => {
},
(error) => {
let message = "An error occurred! The item was NOT removed";
this.storageNotication(message);
}
);
}

448
The removeItem method removes the NativeStorage object that stores all the
saved movies and handles how any errors that may occur during this operation are
returned to the user.
storeMovie(movies, movie)
{
let moviesStored = JSON.stringify(movies);
this.store.setItem(this.storageKey, moviesStored).then(
(data) => {
this.storedData = null;
this.renderMovies();
let message = this.renderNoticationMessage(movie);
this.storageNotication(message);
},
(error) => {
let message = `Whoops! Something went wrong. The movie title
${movie} was NOT added`;
this.storageNotication(message);
});
}
The storeMovie method then recreates the NativeStorage object and populates that
with the recently amended movies array object.
Within the returned promise the storedData object is reset before being repopulated
through the renderMovies method which displays the saved movies on the page.
We then return a notication message to the user to inform them of the outcome of
the operation.
The following renderNoticationMessage method determines which message to
return based on whether we are removing, amending or adding a movie to the
NativeStorage object and subsequently clears the HTML form of any entered data:
Mastering Ionic 2

Case Study #1 - Movies App
449
renderNoticationMessage(movie) : string
{
var message;
if(this.isDeleted)
{
this.clearFieldValues();
message = "Congratulations! The item was successfully removed";
this.isDeleted = false;
this.incr = 0;
}
else if(this.isEdited)
{
if(this.incr === 0)
{
this.clearFieldValues();
message = `The movie title ${movie} was successfully amended`;
this.isEdited = false;
}
}
else
{
this.clearFieldValues();
message = `The movie title ${movie} was added`;
}
return message;
}
Finally we reach the last amendment in our code - the clearFieldValues method
where we simply reset the values for the models used on each form eld to empty
strings:

450
clearFieldValues()
{
this.lmTitle = "";
this.lmRating = "";
this.lmGenre = "";
}
A lot of amendments to go through but we got there in the end - all good stuff!
Now we can implement the next stage of upgrading the functionality for the app with
the following features:
• Filter movies by genre
• Filter movies by rating
Open the myMovies/src/pages/home/home.html le and make the following
amendments (highlighted in bold):
<ion-header>
...
</ion-header>
<ion-content padding>
<form
[formGroup]="form"
(ngSubmit)="saveMovie()">
<ion-list>
...
</ion-list>
</form>
Mastering Ionic 2

Case Study #1 - Movies App
451
<ion-item *ngIf="!isData">
...
</ion-item>
<ion-list *ngIf="isData" no-lines>
<ion-list-header>
Filter By
</ion-list-header>
<ion-item side="right">
<ion-label>Genre:</ion-label>
<ion-select
[(ngModel)]="ltered"
(ionChange)="lterMoviesByGenre($event, ltered)">
<ion-option value="Action">Action</ion-option>
<ion-option value="Comedy">Comedy</ion-option>
<ion-option value="Documentary">Documentary</ion-option>
<ion-option value="Horror">Horror</ion-option>
<ion-option value="Other">Other</ion-option>
<ion-option value="Romance">Romance</ion-option>
<ion-option value="Thriller">Thriller</ion-option>
<ion-option value="War">War</ion-option>
<ion-option value="All">Show me all genres!</ion-option>
</ion-select>
</ion-item>
<ion-item>
<p text-center>Or</p>
</ion-item>

452
<ion-item>
<ion-label text-left>Rating:</ion-label>
<ion-range
min="1"
max="5"
step="1"
snaps="true"
[(ngModel)]="rated"
(ionChange)="lterMoviesByRating($event, rated)">
<ion-label range-left>1</ion-label>
<ion-label range-right>5</ion-label>
</ion-range>
</ion-item>
</ion-list>
<ion-list *ngIf="isData">
<ion-list-header>
Your saved movies
</ion-list-header>
...
</ion-list>
</ion-content>
All we’ve done with the above amendment is simply add 2 Ionic UI components:
• An <ion-select> menu and
• An <ion-range> slider
Which will allow the user to lter the display of saved movies based on their choice
of selection.
Mastering Ionic 2

Case Study #1 - Movies App
453
...
import { AlertController, ... } from 'ionic-angular';
...
export class HomePage {
...
public ltered : any;
public rated : any;
constructor(public alertCtrl : AlertController, ...)
{
...
}
renderMovies(isFiltered = false, lterType = null, ltered = null) : void
{
this.store.getItems(this.storageKey)
.then(
(data) => {
let existingData = Object.keys(data).length;
if(isFiltered)
{
let k,
temp = [];
if(data)
{
Now we simply need to amend the component logic to enable this functionality.
Return to the myMovies/src/pages/home/home.ts le and make the following
amendments (highlighted in bold):

454
for(k in data)
{
if(lterType === 'genre')
{
if(data[k].genre === ltered)
{
temp.push({
movie : data[k].movie,
genre : data[k].genre,
rating : data[k].rating
});
}
}
else if(lterType === 'rating')
{
if(data[k].rating === ltered)
{
temp.push({
movie : data[k].movie,
genre : data[k].genre,
rating : data[k].rating
});
}
}
}
this.storedData = temp.slice(0);
this.sortMoviesByTitle(this.storedData);
}
}
else
Mastering Ionic 2

Case Study #1 - Movies App
455
{
this.storedData = data;
this.sortMoviesByTitle(this.storedData);
}
this.resetMovies(this.storedData);
if(existingData !== 0)
{
this.isData = true;
}
else
{
this.isData = false;
}
},
(error) => {
let message = "You don't have any movies to display. Why not
add some?";
this.displayAlert(message);
});
}
displayAlert(message) : void
{
let headsUp = this.alertCtrl.create({
title: 'Heads Up!',
subTitle: message,
buttons: ['Got It!']
});
headsUp.present();
}

456
lterMoviesByGenre(ltered)
{
if(ltered !== 'All')
{
this.renderMovies(true, 'genre', ltered);
}
else
{
this.renderMovies();
}
}
lterMoviesByRating(rated)
{
this.storedData = null;
this.renderMovies(true, 'rating', rated.value);
}
...
clearFieldValues()
{
...
this.rated = 1;
}
Before we delve into each of the above amendments to our class take a few
minutes to rebuild and re-run the application on the handheld device connected to
your computer with the following commands:
Mastering Ionic 2
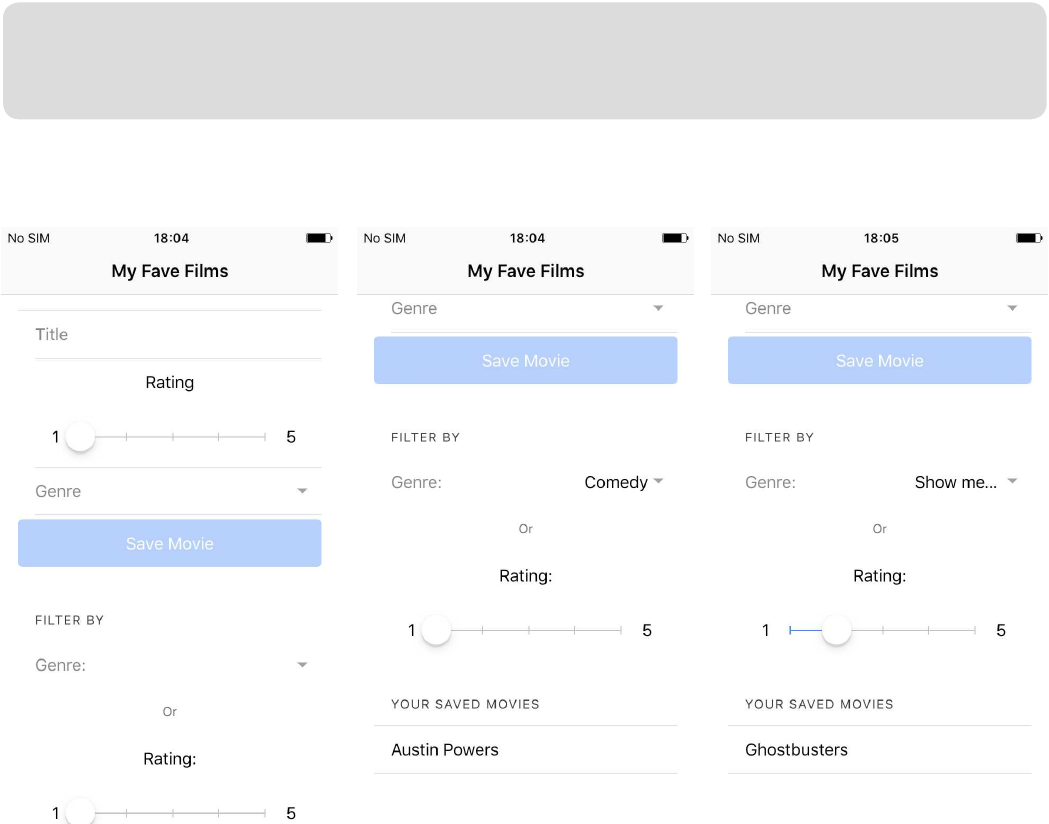
Case Study #1 - Movies App
ionic build ios
ionic run ios --device
457
Once published to and running on your device the following UI enhancements and
functionality should be displayed as shown in the following screen captures:
As these images demonstrate the genre and rating lters are implemented beneath
the movie entry form and, when interacting with these newly added <ion-select> and
<ion-range> UI components, we successfully lter the saved movies based on the
following criteria:
• Display only those with from the Comedy genre
• Display only those we awarded with a rating of 2
So now we can lter our saved movies by genre or rating which is great but there’s
one niggle - our recent amendments leave the UI looking too cluttered and "busy".
Our nal round of amendments will involve improving the app UI and implementing
some Angular 2 animations to help enhance the user experience a little.

458
Before we get to this though let’s take a look at the amendments we made to the
class logic to enable the ltering of our saved movies.
...
import { AlertController, ... } from 'ionic-angular';
...
export class HomePage {
...
public ltered : any;
public rated : any;
constructor(public alertCtrl : AlertController, ...)
{
...
}
We begin with importing the AlertController module (subsequently passing that into
the class constructor and setting that to a property of alertCtrl) which will be used to
generate alert messages in the displayAlert method.
We also set 2 properties - ltered and rated - which will be used in the ngModel
data binding on the <ion-select> and <ion-range> UI components in the Filter By
section on the HTML template. These properties will be used to retrieve selected
data and pass those back as parameters within the lterMoviesByGenre and
lterMoviesByRating methods.
Next we amend the renderMovies method to accommodate any ltering:
renderMovies(isFiltered = false, lterType = null, ltered = null) : void
{
this.store.getItems(this.storageKey)
.then(
(data) => {
Mastering Ionic 2

Case Study #1 - Movies App
459
let existingData = Object.keys(data).length;
if(isFiltered)
{
let k,
temp = [];
if(data)
{
for(k in data)
{
if(lterType === 'genre')
{
if(data[k].genre === ltered)
{
temp.push({
movie : data[k].movie,
genre : data[k].genre,
rating : data[k].rating
});
}
}
else if(lterType === 'rating')
{
if(data[k].rating === ltered)
{
temp.push({
movie : data[k].movie,
genre : data[k].genre,
rating : data[k].rating
});
}

460
}
}
this.storedData = temp.slice(0);
this.sortMoviesByTitle(this.storedData);
}
}
else
{
this.storedData = data;
this.sortMoviesByTitle(this.storedData);
}
this.resetMovies(this.storedData);
if(existingData !== 0)
{
this.isData = true;
}
else
{
this.isData = false;
}
},
(error) => {
let message = "You don’t have any movies to display. Why not
add some?";
this.displayAlert(message);
});
}
The renderMovies method now accepts 3 optional parameters:
• isFiltered
• lterType
Mastering Ionic 2

Case Study #1 - Movies App
461
• ltered
These are used to instruct the script, when the renderMovies method is triggered,
whether or not the user has requested the saved movies to be ltered (isFiltered)
and, if so, with what type of lter (lterType) and the value for that lter (ltered).
The method then uses conditional statements to determine, if the saved movies are
to be ltered, the type of lter to retrieve only those matching movies on otherwise, if
there are no lters, all saved movies are returned for display.
If an error has been encountered with trying to retrieve movies an alert message is
triggered using the displayAlert method:
displayAlert(message) : void
{
let headsUp = this.alertCtrl.create({
title: 'Heads Up!',
subTitle: message,
buttons: ['Got It!']
});
headsUp.present();
}
This simply creates a dialog box with a message passed into it for display to the
user.
The lterMoviesByGenre method is our next addition to the script:
lterMoviesByGenre(ltered)
{
if(ltered !== 'All')
{
this.renderMovies(true, 'genre', ltered);
}

462
else
{
this.renderMovies();
}
}
As the name suggests the lterMoviesByGenre method triggers the display of
saved movies based on the selected genre.
If the user has selected All genres the renderMovies method is called without any
supplied parameters.
This is followed by our next method - lterMoviesByRating:
lterMoviesByRating(rated)
{
this.storedData = null;
this.renderMovies(true, ‘rating’, rated.value);
}
This simply captures the selected rating from the <ion-range> slider passing this
in as the third parameter for the renderMovies method (the rst parameter states
whether this is an amendment or not and the second value the type of lter - rating).
Finally, the remaining amendment is to the clearFieldValues method which simply
resets the rated property value to 1 (this value is then picked up by the ngModel
directive on the <ion-slider> UI component for the lter by section:
clearFieldValues()
{
...
this.rated = 1;
}
Mastering Ionic 2

Case Study #1 - Movies App
463
Now we can turn our attention to implementing the nal round of amendments for
the app - tidying up the UI and adding animations.
Open the myMovies/src/pages/home/home.html le and make the following
amendments (highlighted in bold):
<ion-header>
...
</ion-header>
<ion-content padding>
<div padding-bottom margin-bottom>
<button
ion-button
color="primary"
text-center
block
(click)="toggleForm()">{{ buttonText }}</button>
</div>
<div [@panelHeightTrigger]="expandedState">
<form
[formGroup]="form"
(ngSubmit)="saveMovie()"
*ngIf="expanded">
...
</form>
</div>
<ion-list *ngIf="isData" no-lines>
<div padding-bottom margin-bottom>
<button
ion-button

464
color="secondary"
text-center
block
(click)="toggleFilters()">{{ ltersText }}</button>
</div>
<div [@ltersPanelHeightTrigger]="expandedFiltersState">
<div *ngIf="expandedFilters">
<ion-list-header>
Filter By
</ion-list-header>
<ion-item side="right">
<ion-label>Genre:</ion-label>
<ion-select
[(ngModel)]="ltered"
(ionChange)="lterMoviesByGenre($event, ltered)">
<ion-option value="Action">Action</ion-option>
<ion-option value="Comedy">Comedy</ion-option>
<ion-option value="Documentary">Documentary</ion-option>
<ion-option value="Horror">Horror</ion-option>
<ion-option value="Other">Other</ion-option>
<ion-option value="Romance">Romance</ion-option>
<ion-option value="Thriller">Thriller</ion-option>
<ion-option value="War">War</ion-option>
<ion-option value"All">Show me all genres!</ion-option>
</ion-select>
</ion-item>
<ion-item>
<p text-center>Or</p>
</ion-item>
Mastering Ionic 2

Case Study #1 - Movies App
465
<ion-item>
<ion-label text-left>Rating:</ion-label>
<ion-range
min="1"
max="5"
step="1"
snaps="true"
[(ngModel)]="rated"
(ionChange)="lterMoviesByRating($event, rated)">
<ion-label range-left>1</ion-label>
<ion-label range-right>5</ion-label>
</ion-range>
</ion-item>
</div>
</div>
</ion-list>
...
</ion-content>
For the nal HTML adjustment we need to download this JS polyll (and then add
this le to the following app directory: myMovies/src/assets/js) so that the Web
Animation API used by the underlying Angular 2 framework is able to work on older
and non-supporting platforms - particularly iOS!
In the myMovies/src/index.html le add the following line (highlighted in bold):
<script src="cordova.js"></script>
<script src="assets/js/web-animations.min.js"></script>
<!-- The polylls js is generated during the build process -->
<script src="build/polylls.js"></script>
And that completes the HTML adjustments for enabling animations within the app!

466
Let’s go over these in a little more detail so we understand what’s going on.
Within the myMovies/src/pages/home/home.html page we start by adding a
button to enable the user to show/hide the movie entry form using a function named
toggleForm (which is triggered on a click event attached to the button):
<div padding-bottom margin-bottom>
<button
ion-button
color="primary"
text-center
block
(click)="toggleForm()">{{ buttonText }}</button>
</div>
Next we amend the movie entry form to enable animations to be take place by
adding a property of panelHeightTrigger which will only be red depending on the
value of expandedState.
Additionally an ngIf directive is attached to the form which is assigned a boolean
value of expanded (this will be used within the class logic to determine whether or
not the form is displayed):
<div [@panelHeightTrigger]="expandedState">
<form
[formGroup]="form"
(ngSubmit)="saveMovie()"
*ngIf="expanded">
...
</form>
</div>
Mastering Ionic 2

Case Study #1 - Movies App
467
Following from this we then add another button to the page template which, using
a click event with an attached function named toggleFilters, will enable the user to
show or hide the ltering based UI components on the page template:
<div padding-bottom margin-bottom>
<button
ion-button
color="secondary"
text-center
block
(click)="toggleFilters()">{{ ltersText }}</button>
</div>
Next we add a <div> wrapper to enable animations to be take place on the Ionic UI
components that provide the movie related lters (these components are contained
within this <div>) by adding a property of ltersPanelHeightTrigger which will only
be red depending on the value of expandedFiltersState.
Additionally an ngIf directive, which uses the expandedFilters boolean, is attached
to an internal <div> element to determine whether or not the UI components for
ltering the saved movies are displayed:
<div [@ltersPanelHeightTrigger]="expandedFiltersState">
<div *ngIf="expandedFilters">
...
</div>
</div>
Within this <div> wrapper we have added the following UI components:
• <ion-select>
• <ion-range>
The <ion-select> element offers the user the ability to lter the saved movies by a

468
specic genre and uses the ionChange event to trigger the lterMoviesByGenre
method.
This method captures the event that was red (in this instance the ionChange
event) and the genre selected:
<ion-select
[(ngModel)]="ltered"
(ionChange)="lterMoviesByGenre($event, ltered)">
...
</ion-select>
The <ion-range> element offers the user the ability to lter the saved movies by a
selected rating, using the ionChange event to trigger the lterMoviesByRating
method.
This captures the event that was red and the selected rating value:
<ion-range
min="1"
max="5"
step="1"
snaps="true"
[(ngModel)]="rated"
(ionChange)="lterMoviesByRating($event, rated)">
<ion-label range-left>1</ion-label>
<ion-label range-right>5</ion-label>
</ion-range>
That covers the HTML amendments we needed to make for helping to improve the
application UI as well as implementing the triggers for the animation functionality.
Now we can move onto scripting the logic for these HTML amendments.
Mastering Ionic 2

Case Study #1 - Movies App
469
Within the myMovies/src/pages/home/home.ts le make the nal set of shown
amendments (highlighted in bold):
import {
Component,
trigger,
state,
style,
transition,
animate,
ViewChild } from '@angular/core';
...
@Component({
...
animations: [
trigger('panelHeightTrigger', [
state('expanded', style({ height: '370px', visibility: 'visible' })),
state('collapsed', style({ height: '0px', visibility: 'hidden' })),
transition('collapsed => expanded', animate('1000ms ease-in')),
transition('expanded => collapsed', animate('1000ms 200ms ease-
out’))
]),
trigger('ltersPanelHeightTrigger', [
state('expandedState', style({ height: '300px', visibility: 'visible' })),
state('collapsedState', style({ height: '0px', visibility: 'hidden' })),
transition('collapsedState => expandedState', animate('1000ms
ease-in')),
transition('expandedState => collapsedState', animate('1000ms
200ms ease-out'))
])
]
})
export class HomePage {

470
...
public expanded : boolean = false;
public expandedState : string = "collapsed";
public expandedFilters : boolean = false;
public expandedFiltersState : string = "collapsedState";
public buttonText : string = "Add a new movie";
public ltersText : string = "Display Filters";
...
lterMoviesByGenre(ltered)
{
...
this.toggleFilters();
}
lterMoviesByRating(rated)
{
...
setTimeout(
() => {
this.toggleFilters();
}, 750);
}
saveMovie()
{
let movie : string = this.form.controls["movieName"].value,
genre : string = this.form.controls["genre"].value,
rating : number = this.form.controls["rating"].value,
Mastering Ionic 2

Case Study #1 - Movies App
471
i : number = 0,
k;
this.toggleForm();
...
}
amendListing(item) : void
{
let editedMovie = item.movie,
editedGenre = item.genre,
editedRating = item.rating;
this.toggleForm();
...
}
toggleForm()
{
this.expanded = !this.expanded;
if(this.expanded)
{
this.buttonText = "Nah, just display my movies";
this.expandedState = 'expanded';
}
else
{
this.buttonText = "Add a new movie";
this.expandedState = 'collapsed';
}
}

472
toggleFilters()
{
this.expandedFilters = !this.expandedFilters;
if(this.expandedFilters)
{
this.ltersText = "Hide these lters";
this.expandedFiltersState = 'expandedState';
}
else
{
this.ltersText = "Display Filters";
this.expandedFiltersState = 'collapsedState';
}
}
And that completes our nal set of amendments!
With the above code additions we’ve implemented a lot of animation oriented logic
to enhance the presentation layer for the app.
Before reviewing these amendments take a few minutes to rebuild and re-run the
application on the handheld device connected to your computer) with the following
commands:
ionic build ios
ionic run ios --device
Once published to and running on your device the application should display the
new enhancements to the UI as well as triggering the animation functionality for the
form groups on the page as shown in the following screen captures:
Mastering Ionic 2
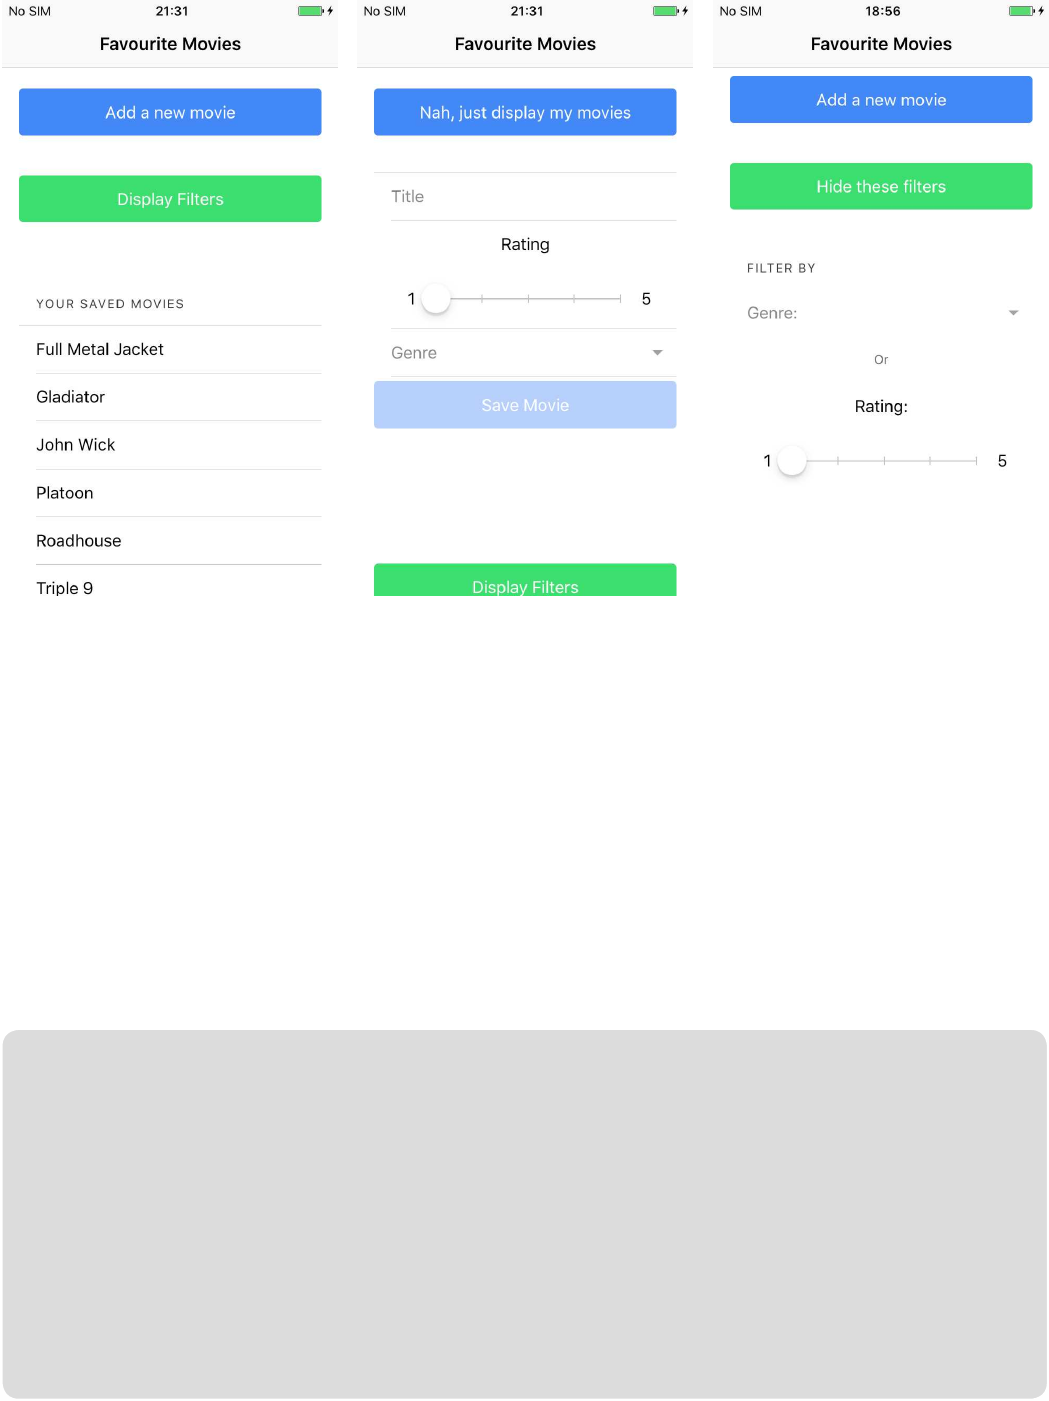
Case Study #1 - Movies App
473
If you’re seeing the above then congratulations!
If you’re not then double check your code against that contained within the pages of
this chapter and, once resolved, come back to this page.
Assuming all is good and well with your application let’s now spend some time going
through the recent additions to the class logic.
We begin by importing animation related modules at the top of the myMovies/src/
pages/home/home.ts le:
import {
Component,
trigger,
state,
style,
transition,
animate,
ViewChild } from '@angular/core';

474
Following from this we then dene 2 sets of animation rules inside an array within
the @Component decorator:
• panelHeightTrigger (animation logic for the movie entry form)
• ltersPanelHeightTrigger (animation logic for the DOM wrapper containing the
<ion-select> and <ion-range> movie lters)
These rules consist of the following:
• trigger (Denes the properties that will be attached to a DOM element on the
page and act, as the name implies, as an animation trigger)
• state (Declares the style properties that will be used when animating to and from)
• transition (Denes the order in which the declared states will be animated, the
duration of that animation and what easing functions may be applied)
All of which is structured like so:
@Component({
...
animations: [
trigger('panelHeightTrigger', [
state('expanded', style({ height: '370px', visibility: 'visible' })),
state('collapsed', style({ height: '0px', visibility: 'hidden' })),
transition('collapsed => expanded', animate('1000ms ease-in')),
transition('expanded => collapsed', animate('1000ms 200ms ease-
out'))
]),
trigger('ltersPanelHeightTrigger', [
state('expandedState', style({ height: '300px', visibility: 'visible' })),
state('collapsedState', style({ height: '0px', visibility: 'hidden' })),
transition('collapsedState => expandedState', animate('1000ms
ease-in')),
transition('expandedState => collapsedState', animate('1000ms
200ms ease-out'))
Mastering Ionic 2

Case Study #1 - Movies App
475
])
]
})
We then, within the body of the HomePage class, add some additional properties for
use with the animation logic:
public expanded : boolean = false;
public expandedState : string = "collapsed";
public expandedFilters : boolean = false;
public expandedFiltersState : string = "collapsedState";
public buttonText : string = "Add a new movie";
public ltersText : string = "Display Filters";
The lterMoviesByGenre method is subsequently amended to include a call to
trigger the toggleFilters method so that the <ion-select> and <ion-range> UI
components are hidden once the user has selected a genre to lter the display of
saved movies:
lterMoviesByGenre(ltered)
{
...
this.toggleFilters();
}
Related to this the lterMoviesByRating method also includes a call to trigger the
toggleFilters method, wrapping that within a setTimeout call to avoid UI conicts
with closing the lters area while also rendering ltered movie results to the screen:
lterMoviesByRating(rated)
{
...
setTimeout(

476
() => {
this.toggleFilters();
}, 750);
}
We then add the toggleForm method to both the saveMovie and amendListing
methods so that the movie entry form is hidden once the user has submitted their
movie to be saved to the NativeStorage object:
saveMovie()
{
let movie : string = this.form.controls["movieName"].value,
genre : string = this.form.controls["genre"].value,
rating : number = this.form.controls["rating"].value,
i : number = 0,
k;
this.toggleForm();
...
}
amendListing(item) : void
{
let editedMovie = item.movie,
editedGenre = item.genre,
editedRating = item.rating;
this.toggleForm();
...
}
Finally, we added the following methods:
Mastering Ionic 2

Case Study #1 - Movies App
477
• toggleForm (Control display of movie entry form)
• toggleFilters (Control display of <ion-select> and <ion-range> lters)
Which use conditional logic to set button texts and the state of the movie entry form
and the <ion-select> and <ion-range> lters:
toggleForm()
{
this.expanded = !this.expanded;
if(this.expanded)
{
this.buttonText = "Nah, just display my movies";
this.expandedState = "expanded";
}
else
{
this.buttonText = "Add a new movie";
this.expandedState = "collapsed";
}
}
toggleFilters()
{
this.expandedFilters = !this.expandedFilters;
if(this.expandedFilters)
{
this.ltersText = "Hide these lters";
this.expandedFiltersState = "expandedState";
}
else
{
this.ltersText = "Display Filters";
this.expandedFiltersState = "collapsedState";
Mastering Ionic 2
478
}
}
Finishing touches
Before we can consider the app completed there’s one nal addition we need to
make - implementing the necessary launch icon and splash screen images for the
iOS and Android directories in the /myMovies/resources directory.
Without these our app will use the default Apache Cordova images which seems a
little lazy after all the work we’ve put in during this case study.
Before proceeding though you’ll need to download the les for this case study from
the following link: http://tinyurl.com/jxc5wcn (if you haven’t done so already).
Having done this copy both the icon.png and splash.png les from the following
locations in the downloaded project les directory:
• myMovies/resources/android
• myMovies/resources/ios
And then paste these into the matching directories in your own myMovies project,
beginning with the iOS launch and splash images:
Followed by those for Android:
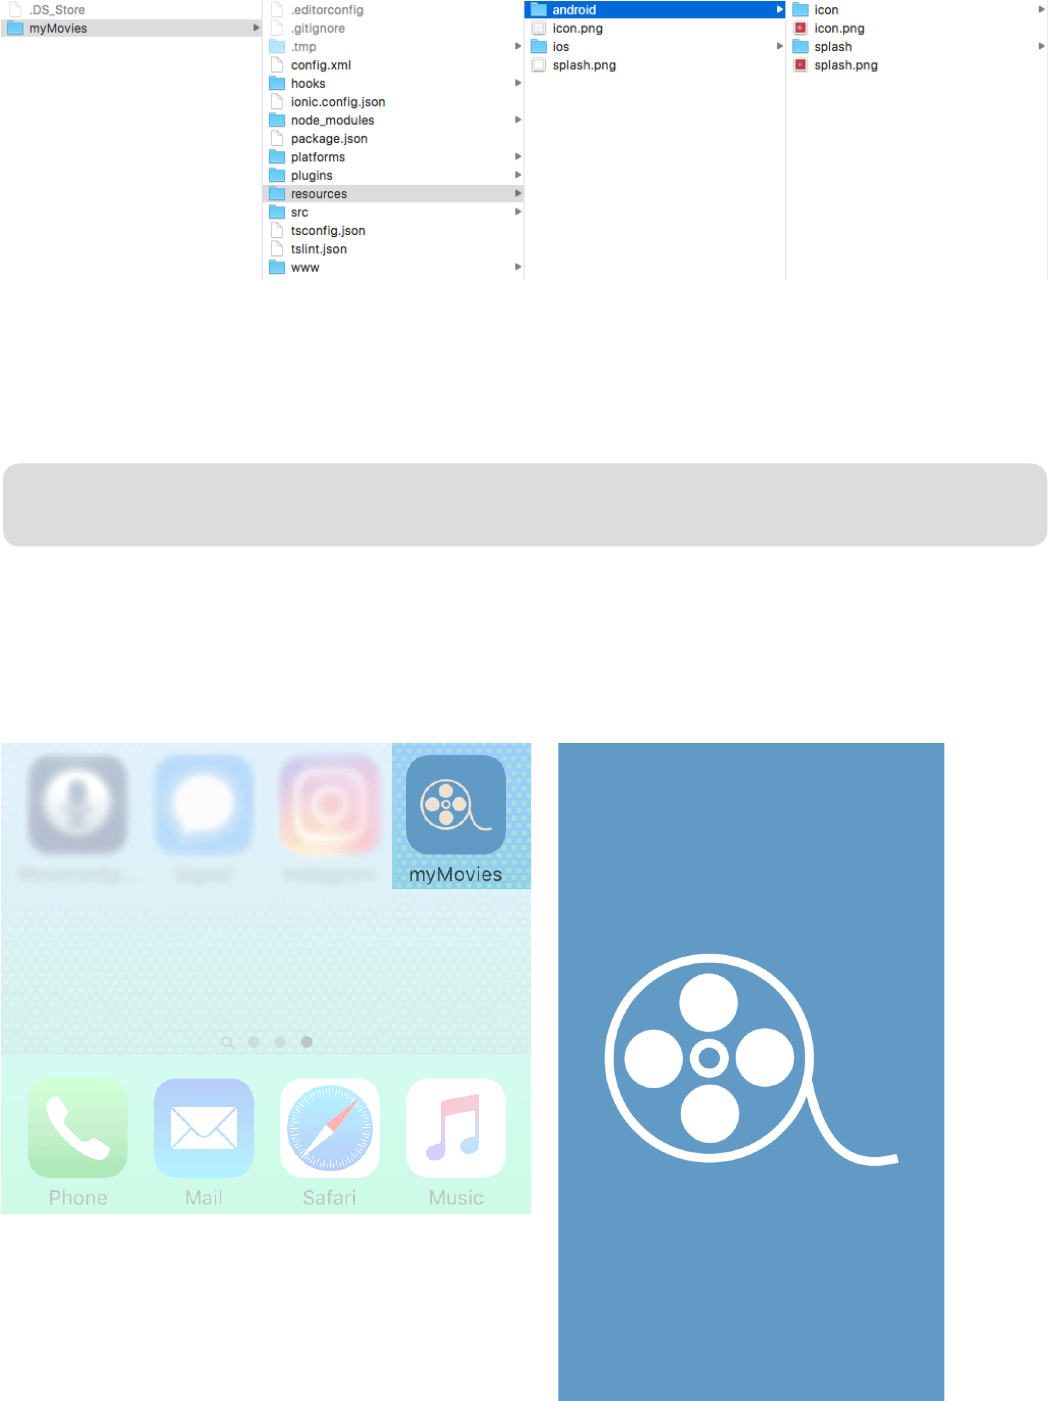
479
Case Study #1 - Movies App
With our respective launch icon and splash screen templates in place for iOS and
Android we can now generate the images to be used for these platforms using the
following Ionic CLI command (as always - ensure you are at the root of the
myMovies project directory before running such commands):
ionic resources
Once the command has nished processing you should see the different launch icon
and splash screen sizes being generated from the supplied template images which,
when our app is published to a mobile device, should give us something like the
following:

And that, as they say, is a wrap!
In the case study we’ve built a single page Ionic 2 app using Native Storage and the
Web Animations API that allows us to:
• Add, amend and remove movie entries
• Implemented Angular 2’s FormBuilder service & form validation logic
• Check for duplicate movie entries (and reject them from being entered)
• Display movies in ascending alphabetical order
• Filter movies by genre and rating
• Display data entry forms and components when and where necessary with just
the right amount of animation (not too much, not too little!)
Feel free to experiment with building on top of what we’ve accomplished here with
adding extra features such as inserting a movie image for each listing, more rened
movie validation logic or maybe even enabling both lters to work together instead
of
independently.
Hopefully you’ve found this case study useful in learning more about working with
Ionic 2 and some of its features (which you can then carry over for use in your own
projects).
In the next case study we’ll look at implementing features including SQLite data
storage, In-App Purchases and further Ionic 2 UI components.
Resources
All project les for this chapter can be found listed in the download links on page
636.
480

Case Study #2
SoopaDoopaGames
App
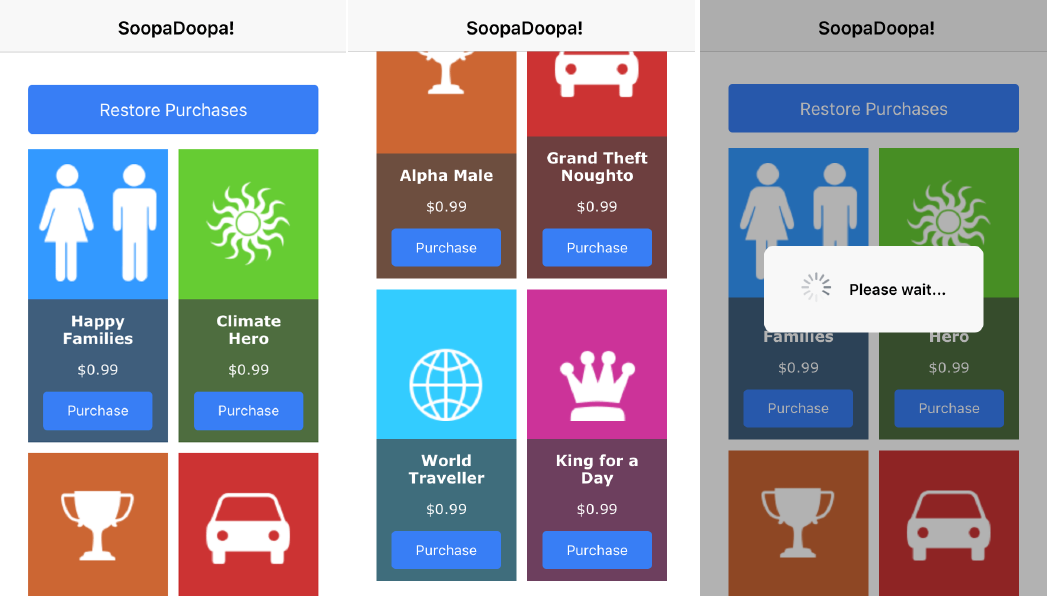
482
Case Study #2 - SoopaDoopaGames
In this case study we’re going to use Ionic 2 to develop a sample application that
allows users to purchase and unlock pre-existing content that would otherwise be
inaccessible (in this context we’ll be unlocking ctional games but the choice of
content could really be anything at all such as downloadable les, video media etc.).
Features and functionality that will be used include:
• The Ionic Grid component
• In-App Purchasing functionality
• Storing data using the Cordova SQLite plugin
And, by the end of this chapter, your app should resemble the following:
The very rst time the app is loaded the following 6 “games” are displayed with
Purchase buttons enabled:
• Happy Families
• Climate Hero
• Alpha Male
• Grand Theft Noughto
• World Traveller
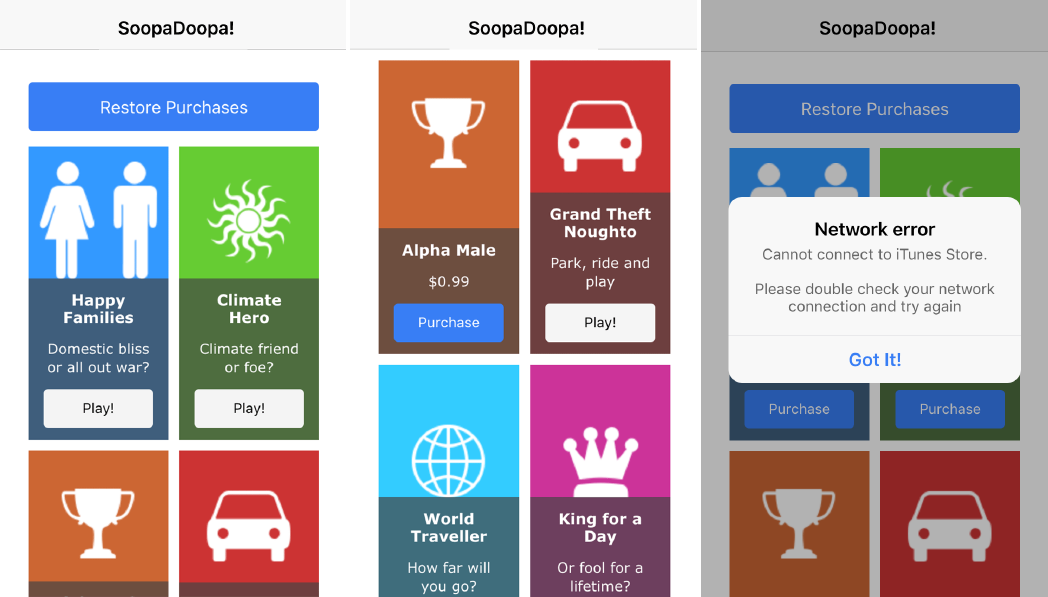
Mastering Ionic 2
483
• King for a Day
Every time the App is loaded a network check is run to determine whether the
purchasable products are able to be veried with the Apple App & Google Play
stores.
When a “game” has been successfully purchased the UI is updated to display a
caption and a Play! button for that game:
As previously mentioned, if, for some reason, when launched the app cannot
connect with the respective online store an alert window is displayed informing the
user of the fact and provides a suggestion for further investigation.
When the user closes this alert window the app then tries to re-initiate the request to
contact the respective app store to verify that the listed “games” are available for
purchase.
Assuming that the user has successfully purchased their selected “game” they
will be able to then access that as shown in the following screen captures for all
“games”:
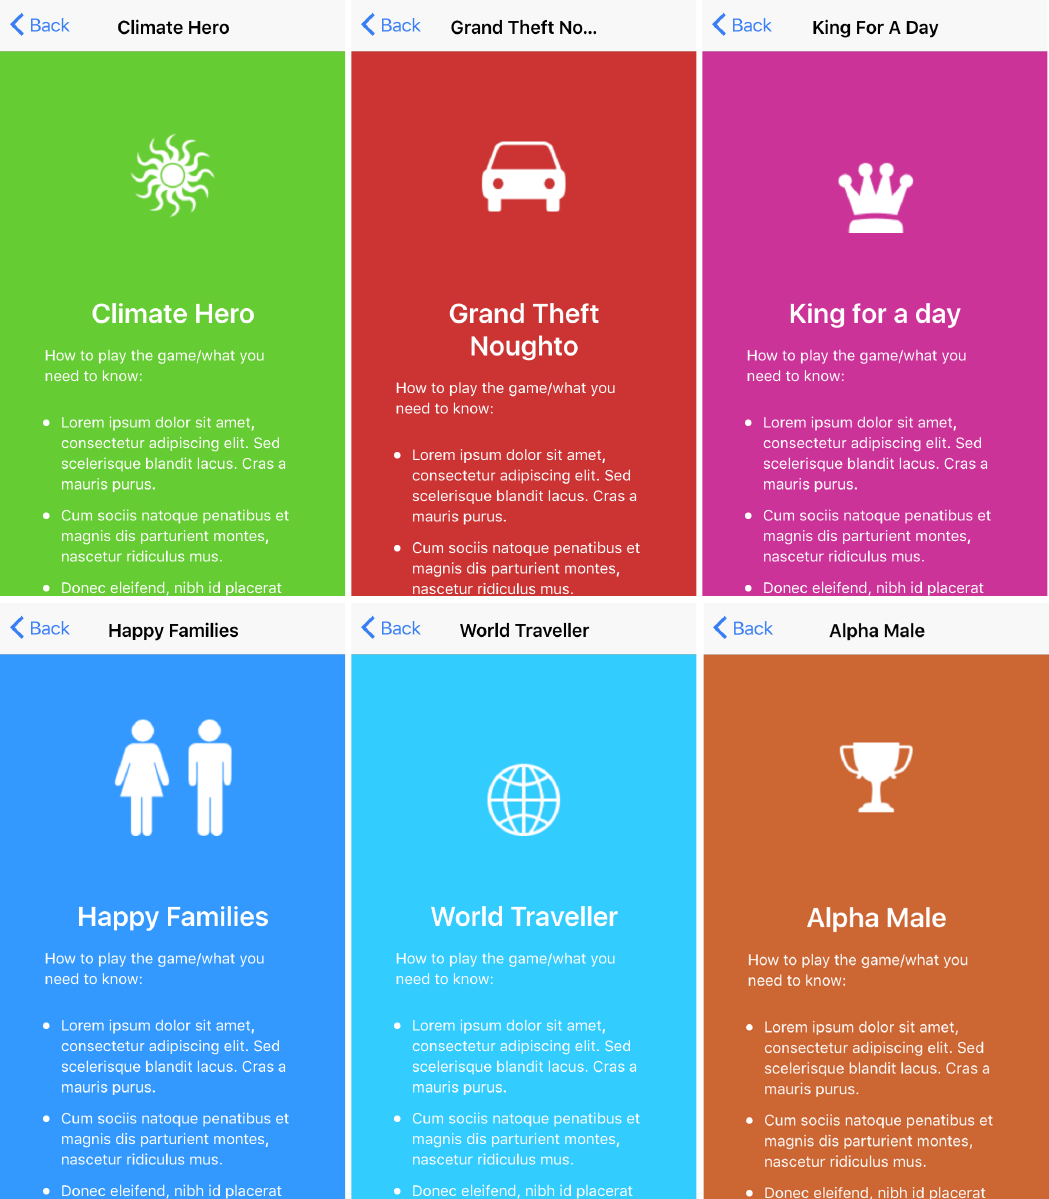
Case Study #2 - SoopaDoopaGames
484
As you can see each “game” is pretty much a variation on the same theme - the only
differences being those of the title, choice of image and page background colour for
each respective “game”.
So that covers what you’ll be developing in this Case Study and should expect to

Mastering Ionic 2
485
see by the end of the chapter.
So, without further ado, let’s make a start on building the app!
At the root of your apps projects directory run the following commands (waiting for
each successive command to successfully complete running of course!) in the Ionic
CLI to generate the new app, install the required plugins and create the necessary
pages:
ionic start SoopaDoopaGames blank --v2
cd SoopaDoopaGames
npm install
ionic plugin add cordova-plugin-inapppurchase
ionic plugin add cordova-sqlite-storage
ionic g provider database
ionic g provider utilities
ionic g page alphaMale
ionic g page climateHero
ionic g page grandTheftNoughto
ionic g page happyFamilies
ionic g page kingForADay
ionic g page worldTraveller
Breaking this down we create a blank Ionic 2 app (don’t forget that --v2 ag!) named
SoopaDoopaGames which, once generated by the CLI, we then change into and
run the npm install command to make all required dependencies and modules
available for the app to subsequently use.
Following on from this we then install the following plugins:
• cordova-plugin-inapppurchase
• cordova-sqlite-storage
Once completed we generate the following 2 services (also referred to as providers/
injectables - depending on who you ask there are many terms used to describe the
same item!):

Case Study #2 - SoopaDoopaGames
486
• Database (provides methods to interact with the underlying SQLite database
through the cordova-sqlite-storage plugin API)
• Utilities (provides helper methods for the app)
Finally we generate the pages (or, more accurately, the web components that will
contain the TypeScript, Sass and HTML for the page) for each “game”:
• alphaMale
• climateHero
• grandTheftNoughto
• happyFamilies
• kingForADay
• worldTraveller
That forms the basic foundation for our app which, over the following pages, we are
going to spend time plugging the necessary logic, styles and UI elements into place
for.
Let’s begin by setting up the SoopaDoopaGames/src/app/app.module.ts le with
the necessary imports and congurations (amendments highlighted in bold):
import { NgModule, ErrorHandler } from '@angular/core';
import { IonicApp, IonicModule, IonicErrorHandler } from 'ionic-angular';
import { MyApp } from './app.component';
import { HomePage } from '../pages/home/home';
import { AlphaMale } from '../pages/alpha-male/alpha-male';
import { ClimateHero } from '../pages/climate-hero/climate-hero';
import { GrandTheftNoughto } from '../pages/grand-theft-noughto/grand-
theft-noughto';
import { HappyFamilies } from '../pages/happy-families/happy-families';
import { KingForADay } from '../pages/king-for-a-day/king-for-a-day';
import { WorldTraveller } from '../pages/world-traveller/world-traveller';
import { Database } from '../providers/database';
import { Utilities } from '../providers/utilities';

Mastering Ionic 2
487
@NgModule({
declarations: [
MyApp,
HomePage,
AlphaMale,
ClimateHero,
GrandTheftNoughto,
HappyFamilies,
KingForADay,
WorldTraveller
],
imports: [
IonicModule.forRoot(MyApp)
],
bootstrap: [IonicApp],
entryComponents: [
MyApp,
HomePage,
AlphaMale,
ClimateHero,
GrandTheftNoughto,
HappyFamilies,
KingForADay,
WorldTraveller
],
providers: [{provide: ErrorHandler, useClass: IonicErrorHandler}, Database,
Utilities]
})
export class AppModule {}
Here we are simply declaring the components and providers that will be imported
and used within the app. This is an important step so be sure to get the paths to the
components/providers correct as well as the spelling of the modules to be imported.

Case Study #2 - SoopaDoopaGames
488
Now we can turn our attention to implementing the logic for the following providers:
• Database
• Utilities
Let’s make a start with scripting the logic for the Utilities provider as this will contain
only a single method.
Open the SoopaDoopaGames/src/providers/utilities.ts le and make the
amendments displayed below (highlighted in bold):
import { Injectable } from '@angular/core';
import { Http } from '@angular/http';
import 'rxjs/add/operator/map';
@Injectable()
export class Utilities {
constructor(public http: Http)
{
console.log('Hello Utilities Provider');
}
prexWithZeros = function(num)
{
var num = num;
if(num < 10)
{
num = '0' + num;
}
return num;
}
}

489
Mastering Ionic 2
The prexWithZeros method simply takes a number, determines if it’s less than 10
and, if so, prepends a zero to the number and then returns that back to the script
where the method will be called.
We’re going to use this method to prepend single date values with zeros where
necessary.
For example:
// The prexWithZeros method transforms this
1-1-2016
// Into this
01-01-2016
This formats our date values so they’re easier to read and understand when saving
(to the SQLite database) the “games” that have been purchased through the In-App
Purchases plugin API (unfortunately there’s no DATE type in SQLite as there is in
MySQL or other database vendors as this format would be perfect for these
converted date values).
That completes all of the logic required for our Utilities provider so now we can turn
our attention towards implementing the necessary methods for the app database
provider.
Open the SoopaDoopaGames/src/providers/database.ts le and make the
amendments displayed below (highlighted in bold):
import { Injectable } from '@angular/core';
import { Http } from '@angular/http';
import {SQLite} from 'ionic-native';
import 'rxjs/add/operator/map';
import { Utilities } from '../providers/utilities';
@Injectable()

490
Case Study #2 - SoopaDoopaGames
export class Database {
public data : any = null;
public storage : any = null;
public dbName : string = "Soopadoopagames.db";
public purchases : any = [];
constructor(
public http : Http,
public UTIL : Utilities
)
{
this.data = null;
}
createDatabase()
{
this.storage = new SQLite();
this.storage.openDatabase({
name : this.dbName,
location : 'default' // the location eld is required
})
.then((data) =>
{
console.log("Opened database");
this.createDatabaseTables();
},
(err) =>
{
console.error('Unable to open database: ', err);
});
}

Mastering Ionic 2
491
createDatabaseTables()
{
this.createPurchasesTable();
}
createPurchasesTable()
{
this.storage.executeSql('CREATE TABLE IF NOT EXISTS appPurchas-
es (id INTEGER PRIMARY KEY AUTOINCREMENT, productID TEXT, is-
Purchased TEXT NOT NULL, date TEXT NOT NULL, timestamp INTEGER
NOT NULL)', {})
.then((data) =>
{
console.log("TABLE CREATED: " + JSON.stringify(data));
},
(error) =>
{
console.log("Error: " + JSON.stringify(error.err));
console.dir(error);
});
}
retrievePurchases()
{
return new Promise(resolve =>
{
this.storage.executeSql("SELECT * FROM appPurchases", {})
.then((data) =>
{
this.purchases = [];
if(data.rows.length > 0)

Case Study #2 - SoopaDoopaGames
492
{
var k;
for(k = 0; k < data.rows.length; k++)
{
this.purchases.push({
productId : data.rows.item(k).productID
});
}
}
resolve(this.purchases);
},
(error) =>
{
console.log("Error: " + JSON.stringify(error));
});
});
}
doesPurchaseExistInTable(productID)
{
this.storage.executeSql("SELECT * FROM appPurchases WHERE
productID = '" + productID + "'", {})
.then((data) =>
{
let isPurchased = 'Y',
currDate = new Date(),
year = currDate.getFullYear(),
month = this.UTIL.prexWithZeros(currDate.getMonth()),
day = this.UTIL.prexWithZeros(currDate.getDay()),
hour = this.UTIL.prexWithZeros(currDate.getHours()),
mins = this.UTIL.prexWithZeros(currDate.getMinutes()),
secs = this.UTIL.prexWithZeros(currDate.getSeconds()),
dateIs = year + '-' + month + '-' + day + ' ' + hour + ':' + mins + ':'

Mastering Ionic 2
493
+ secs,
timestampIs = Math.oor(Date.now()/1000);
if(data.rows.length === 0)
{
this.insertPurchasesToTable(productID, isPurchased, dateIs,
timestampIs);
}
else
{
console.log('Record exists for ' + productID);
}
},
(error) =>
{
console.log("Error determining if purchase exists in appPurchases
table: " + JSON.stringify(error));
});
}
insertPurchasesToTable(productID, isPurchased, date, timestamp)
{
let sql = "INSERT INTO appPurchases(productID, isPurchased, date,
timestamp) VALUES('" + productID + "', '" + isPurchased + "', '" + date +
"', " + timestamp + ")";
this.storage.executeSql(sql, {})
.then((data) =>
{
console.log(`INSERTED RECORD for product ID: ${productID}`);
},
(error) =>
{

Case Study #2 - SoopaDoopaGames
494
There’s quite a bit going on here so let’s break the provider down section by section.
We rstly import the Utilities module so we can subsequently access and use the
prexWithZeros method:
import { Injectable } from '@angular/core';
import { Http } from '@angular/http';
import {SQLite} from 'ionic-native';
import 'rxjs/add/operator/map';
import { Utilities } from '../providers/utilities';
We then dene public properties at the top of the Database class which are used for
various purposes such as dening the name of the database object as well as
storing/managing data throughout the class:
public data : any = null;
public storage : any = null;
public dbName : string = "soopadoopagames.db";
public purchases : any = [];
Next we create the createDatabase method which, as the name implies, is used to
generate the SQLite database - via the SQLite plugin API:
createDatabase()
{
this.storage = new SQLite();
this.storage.openDatabase({
name : this.dbName,
console.log("Error inserting " + productID + ": " + JSON.stringi-
fy(error.err));
});
}
}

Mastering Ionic 2
495
location : 'default' // the location eld is required
})
.then((data) =>
{
console.log("Opened database");
this.createDatabaseTables();
},
(err) =>
{
console.error('Unable to open database: ', err);
});
}
This also executes the createDatabaseTables() method which is simply a wrapper
for executing a single method - createPurchasesTable():
createDatabaseTables()
{
this.createPurchasesTable();
}
The createPurchasesTable() method is used to generate the SQLite database
table for storing a record of each In-App product purchased by the user.
This table will be used by the app to determine whether or not a game has been
purchased.
If a record for that game purchase is found the app UI is updated to display a link to
the game page. If a record isn’t found the app UI simply displays a Purchase button
for that game:
createPurchasesTable()
{
this.storage.executeSql('CREATE TABLE IF NOT EXISTS appPurchases

Case Study #2 - SoopaDoopaGames
496
(id INTEGER PRIMARY KEY AUTOINCREMENT, productID TEXT, isPur-
chased TEXT NOT NULL, date TEXT NOT NULL, timestamp INTEGER
NOT NULL)', {})
.then((data) =>
{
console.log("TABLE CREATED: " + JSON.stringify(data));
},
(error) =>
{
console.log("Error: " + JSON.stringify(error.err));
console.dir(error);
});
}
Here the table elds are structured to store the following data:
• productID (the game product ID I.e. 'com.saintsatplay.happyFamilies')
• isPurchased (stores a value to show whether the product has been purchased)
• date (date of the purchase)
• timestamp (timestamp format for the date of the purchase)
The next database method retrievePurchases is, as the name implies, used to
return all records stored in the appPurchases SQLite table:
retrievePurchases()
{
return new Promise(resolve =>
{
this.storage.executeSql("SELECT * FROM appPurchases", {})
.then((data) =>
{
this.purchases = [];
if(data.rows.length > 0)

Mastering Ionic 2
497
{
var k;
for(k = 0; k < data.rows.length; k++)
{
this.purchases.push({
productId : data.rows.item(k).productID
});
}
}
resolve(this.purchases);
},
(error) =>
{
console.log("Error: " + JSON.stringify(error));
});
});
}
Our next, and nal, method for the Database service - insertPurchasesToTable -
handles adding purchased products to the SQLite table:
insertPurchasesToTable(productID, isPurchased, date, timestamp)
{
let sql = "INSERT INTO appPurchases(productID, isPurchased, date,
timestamp) VALUES('" + productID + "', '" + isPurchased + "', '" + date +
"', " + timestamp + ")";
this.storage.executeSql(sql, {})
.then((data) =>
{
console.log(`INSERTED RECORD for product ID: ${productID}`);
},
(error) =>
{

Case Study #2 - SoopaDoopaGames
498
console.log("Error inserting " + productID + ": " + JSON.stringify(er-
ror.err));
});
}
Sass/Page styles
Now we can turn our attention to dening the styling for the app.
Open the SoopaDoopaGames/src/theme/variables.scss le and add the following
shared variables (highlighted in bold):
// Shared Variables
// --------------------------------------------------
// To customize the look and feel of this app, you can override
// the Sass variables found in Ionic’s source scss les.
// To view all the possible Ionic variables, see:
// http://ionicframework.com/docs/v2/theming/overriding-ionic-variables/
$text-color: #000;
$background-color: #fff;
$happy-families: #3399ff;
$climate-hero: #66cc33;
$alpha-male: #cc6633;
$grand-theft-noughto: #cc3333;
$world-traveller: #33ccff;
$king-for-a-day: #cc3399;
These additional Sass variables are named based on the “game” they will apply to
and are used in both the “game” link panels on the home page and the individual
pages for each “game”.
We’re now going to create a brand new Sass le which we’ll save under the name of
shared.scss within the following directory: SoopaDoopaGames/src/theme.

Mastering Ionic 2
499
This le will contain the following style rules that will be used across the pages for
each “game”:
.page {
img {
display: block;
margin: 50px auto 0 auto;
}
h1 {
margin-top: 50px;
font-size: 1.8em;
font-weight: bold;
color: #fff;
text-align: center;
}
p,
li {
font-size: 1em;
color: #fff;
line-height: 1.4em;
text-align: left;
padding-bottom: 10px;
}
ul {
padding: 0 0 50px 15px;
margin: 0;
}
}
Don’t forget to save this le in the following location: SoopaDoopaGames/src/
theme/shared.scss.

Case Study #2 - SoopaDoopaGames
500
Within the SoopaDoopaGames/src/theme/variables.scss le place an import rule
for this shared Sass le like so (highlighted in bold):
// Ionic Variables and Theming. For more info, please see:
// http://ionicframework.com/docs/v2/theming/
@import "ionic.globals";
@import "shared";
The nal set up for the app styling involves making edits to the following les:
• src/pages/home/home.scss
• src/pages/alpha-male/alpha-male.scss
• src/pages/climate-hero/climate-hero.scss
• src/pages/grand-theft-noughto/grand-theft-noughto.scss
• src/pages/happy-families/happy-families.scss
• src/pages/king-for-a-day/king-for-a-day.scss
• src/pages/world-traveller/world-traveller.scss
We’ll go through each one of these in turn (all amendments highlighted in bold).
home.scss
This will simply declare the styles that are to be used within the Ionic Grid UI
component where each “game” link will be displayed:
page-home {
.box {
position: relative;
height: 270px;
img {
padding: 1em 0 1em 0;
display: block;

Mastering Ionic 2
501
margin: auto;
}
}
.description {
position: absolute;
width: 100%;
bottom: 0;
padding: 1em 1em 0.5em 1em;
background-color: rgba(68, 68, 68, 0.7);
h1 {
font-size: 1em;
font-weight: bold;
font-family: Verdana;
text-align: center;
color: rgba(255, 255, 255, 1);
}
p {
font-size: 0.9em;
font-family: Verdana;
text-align: center;
color: rgba(255, 255, 255, 1);
}
button {
font-size: 0.9em;
}
}
.happy-families {
background-color: $happy-families;

Case Study #2 - SoopaDoopaGames
502
}
.climate-hero {
background-color: $climate-hero;
}
.alpha-male {
background-color: $alpha-male;
}
.grand-theft-noughto {
background-color: $grand-theft-noughto;
}
.world-traveller {
background-color: $world-traveller;
}
.king-for-a-day {
background-color: $king-for-a-day;
}
}
alpha-male.scss
Here we simply dene the background colour for the alpha-male.html page:
page-alpha-male {
.alpha-male {
background-color: $alpha-male;
}
}

Mastering Ionic 2
503
climate-hero.scss
And in the climate-hero.html page we dene the background colour too:
page-climate-hero {
.climate-hero {
background-color: $climate-hero;
}
}
grand-theft-noughto.scss
Similarly we dene the background colour for the grand-theft-noughto.html page:
page-grand-theft-noughto {
.grand-theft-noughto {
background-color: $grand-theft-noughto;
}
}
happy-families.scss
The background colour for the happy-families.html page is dened next:
page-happy-families {
.happy-families {
background-color: $happy-families;
}
}
king-for-a-day.scss
The king-for-a-day.html page background colour is also dened:

Case Study #2 - SoopaDoopaGames
504
page-king-for-a-day {
.king-for-a-day {
background-color: $king-for-a-day;
}
}
world-traveller.scss
Finally the world-traveller.html page background colour is the last to be dened:
page-world-traveller {
.world-traveller {
background-color: $world-traveller;
}
}
And with that nal edit we’ve concluded the coding for all custom style rules that will
be used within the app.
HTML
As we begin coding the HTML for the individual page components we’ll start to see
how these styles are implemented - starting with the SoopaDoopaGames/src/
pages/home/home.html template (amendments highlighted in bold):
<ion-header>
<ion-navbar>
<ion-title>
SooperDooperGames!
</ion-title>
</ion-navbar>
</ion-header>

Mastering Ionic 2
505
<ion-content padding>
<ion-grid>
<ion-row>
<ion-col>
<button
ion-button
text-center
block
color="primary"
(click)="restoreProductListings()">
Restore Purchases
</button>
</ion-col>
</ion-row>
<ion-row>
<ion-col width-50>
<section class="box happy-families">
<img src="assets/images/happy-families.png" alt="Happy fami-
lies">
<div class="description">
<h1>Happy Families</h1>
<div *ngIf="!happyFamilies">
<p>$0.99</p>
<button
ion-button
text-center
block
color="primary"
(click)="purchaseProduct('com.saintsatplay.happyfami-

Case Study #2 - SoopaDoopaGames
506
lies')">
Purchase
</button>
</div>
<div *ngIf="happyFamilies">
<p>Domestic bliss or all out war?</p>
<button
ion-button
text-center
block
color="light"
(click)="playGame('HappyFamilies')">
Play!
</button>
</div>
</div>
</section>
</ion-col>
<ion-col width-50>
<section class="box climate-hero">
<img src="assets/images/climate-hero.png" alt="Climate Hero">
<div class="description">
<h1>Climate Hero</h1>
<div *ngIf="!climateHero">
<p>$0.99</p>
<button
ion-button
text-center
block

Mastering Ionic 2
507
color="primary"
(click)="purchaseProduct('com.saintsatplay.climatehero')">
Purchase
</button>
</div>
<div *ngIf="climateHero">
<p>Climate friend or foe?</p>
<button
ion-button
text-center
block
color="light"
(click)="playGame('ClimateHero')">
Play!
</button>
</div>
</div>
</section>
</ion-col>
</ion-row>
<ion-row>
<ion-col width-50>
<section class="box alpha-male">
<img src="assets/images/alpha-male.png" alt="Alpha Male">
<div class="description">
<h1>Alpha Male</h1>
<div *ngIf="!alphaMale">
<p>$0.99</p>
<button

Case Study #2 - SoopaDoopaGames
508
ion-button
text-center
block
color="primary"
(click)="purchaseProduct('com.saintsatplay.alphamale')">
Purchase
</button>
</div>
<div *ngIf="alphaMale">
<p>Tough enough to cut it at the top?</p>
<button
ion-button
text-center
block
color="light"
(click)="playGame('AlphaMale')">
Play!
</button>
</div>
</div>
</section>
</ion-col>
<ion-col width-50>
<section class="box grand-theft-noughto">
<img src="assets/images/grand-theft-noughto.png" alt="Grand
Theft Noughto">
<div class="description">
<h1>Grand Theft Noughto</h1>
<div *ngIf="!grandTheftNoughto">

Mastering Ionic 2
509
<p>$0.99</p>
<button
ion-button
text-center
block
color="primary"
(click)="purchaseProduct('com.saintsatplay.grandtheft-
noughto')">
Purchase
</button>
</div>
<div *ngIf="grandTheftNoughto">
<p>Park, ride and play</p>
<button
ion-button
text-center
block
color="light"
(click)="playGame('GrandTheftNoughto')">
Play!
</button>
</div>
</div>
</section>
</ion-col>
</ion-row>
<ion-row>
<ion-col width-50>
<section class="box world-traveller">

Case Study #2 - SoopaDoopaGames
510
<img src="assets/images/world-traveller.png" alt="World Travel-
ler">
<div class="description">
<h1>World Traveller</h1>
<div *ngIf="!worldTraveller">
<p>$0.99</p>
<button
ion-button
text-center
block
color="primary"
(click)="purchaseProduct('com.saintsatplay.worldtravel-
ler')">
Purchase
</button>
</div>
<div *ngIf="worldTraveller">
<p>How far will you go?</p>
<button
ion-button
text-center
block
color="light"
(click)="playGame('WorldTraveller')">
Play!
</button>
</div>
</div>
</section>
</ion-col>

Mastering Ionic 2
511
<ion-col width-50>
<section class="box king-for-a-day">
<img src="assets/images/king-for-a-day.png" alt="King for a
day">
<div class="description">
<h1>King for a Day</h1>
<div *ngIf="!kingForADay">
<p>$0.99</p>
<button
ion-button
text-center
block
color="primary"
(click)="purchaseProduct('com.saintsatplay.kingfora-
day')">
Purchase
</button>
</div>
<div *ngIf="kingForADay">
<p>Or fool for a lifetime?</p>
<button
ion-button
text-center
block
color="light"
(click)="playGame('KingForADay')">
Play!
</button>
</div>
</div>

</section>
</ion-col>
</ion-row>
</ion-grid>
</ion-content>
Case Study #2 - SoopaDoopaGames
512
Here we’ve implemented the Ionic Grid component to layout the page UI using a
combination of the <ion-row> and <ion-col> tags.
There’s a lot going on here but the layout essentially follows the same pattern with
each <ion-col> displaying the same HTML tag structure albeit with different “game”
content for each <ion-col>:
<ion-col width-50>
<section class="box king-for-a-day">
<img src="assets/images/king-for-a-day.png" alt="King for a day">
<div class="description">
<h1>King for a Day</h1>
<div *ngIf="!kingForADay">
<p>$0.99</p>
<button
ion-button
text-center
block
color="primary"
(click)="purchaseProduct('com.saintsatplay.kingforaday')">
Purchase
</button>
</div>

Mastering Ionic 2
513
<div *ngIf="kingForADay">
<p>Or fool for a lifetime?</p>
<button
ion-button
text-center
block
color="light"
(click)="playGame('KingForADay')">
Play!
</button>
</div>
</div>
</section>
</ion-col>
As the content for each <ion-col> follows the same structure we implement the same
rules across each column:
• Set the column width to 50% of the grid width
• Assign the CSS class name to the <section> tag that is relevant to the “game“
being displayed (in the above example this is: king-for-a-day)
• Display the price along with a Purchase button for the “game” if the ngIf condition
evaluates to false
• Otherwise display a description and a link to play the “game” if the ngIf condition
evaluates to true
Each column displays the title, image and description specic to each “game” and
where the game has yet to be purchased a Purchase button is displayed with a click
event that calls the purchaseProduct method.
This purchaseProduct method supplies the product ID for the “game” which
matches those stored in the In-App Purchase product listings of each respective App
Store.

Case Study #2 - SoopaDoopaGames
514
If a “game” has been purchased by the user a link to the page where that “game”
resides is displayed in the form of a Play! button.
This Play! button implements a click event which calls the playGame method to
initiate the navigation process.
The value passed into the playGame method is the component class name for the
page that we are navigating to.
At the top of the page, above the rows/columns where the games are displayed,
we’ve implemented a single button component with a click event calling a method of
restoreProductListings:
<button
ion-button
text-center
block
color="primary"
(click)="restoreProductListings()">
Restore Purchases
</button>
The restoreProductListings method allows the user to be able to manually restore
any previous product purchases for the app.
Even though we’ll be implementing the SQLite database functionality to store and
retrieve purchases for the app the Apple App Store guidelines recommend that an
app making use of In-App Purchase functionality must provide the user with the
means to restore their purchases.
If such functionality is not implemented with In-App Purchase based apps then the
app will more than likely be rejected by the App Store moderators.
The restoreProductListings method/feature helps us meet this particular App Store
criteria while also providing a nice UX feature for the end-user.

Mastering Ionic 2
515
That covers all of the necessary HTML for the home page component template.
Now we’ll turn our attention to the individual page HTML templates for each “game”.
The HTML structure and content will essentially be the same across each page,
save for some minor differences with images and names, so there will be a lot of
repetition in the following examples.
Open the SoopaDoopaGames/src/pages/alpha-male/alpha-male.html template
and make the following amendments (highlighted in bold):
<ion-header>
<ion-navbar>
<ion-title>Alpha Male</ion-title>
</ion-navbar>
</ion-header>
<ion-content>
<ion-grid class="page alpha-male">
<ion-row>
<ion-col>
<img src="assets/images/alpha-male.png" alt="Alpha Male">
</ion-col>
</ion-row>
<ion-row>
<ion-col width-10></ion-col>
<ion-col width-80>
<h1>Alpha Male</h1>
<p>How to play the game/what you need to know:</p>
<ul>
<li>Lorem ipsum dolor sit amet, consectetur adipiscing elit.</li>

516
Case Study #2 - SoopaDoopaGames
<li>Curabitur non nisl sit amet arcu tempus imperdiet.</li>
<li>In quis efcitur felis, vel cursus ex.</li>
<li>Donec quis nisl et ex porttitor maximus sed in nisl.</li>
<li>Cras et odio vitae purus aliquam viverra.</li>
<li>In hac habitasse platea dictumst.</li>
</ul>
<button
ion-button
text-center
block
color="light">
Got it - let’s go!
</button>
</ion-col>
<ion-col width-10></ion-col>
</ion-row>
</ion-grid>
</ion-content>
Once again we implement the Ionic Grid component for the page layout, separating
the content area into 3 columns this time and aligning the actual content with the
vertical centre of the screen by assigning a 10% width to the columns on either side.
The main page content consists of the “game” image, name, rules for playing (which
are just lines of lorem ipsum generated at the surprisingly useful lipsum.com
website) and a dummy button to initiate the “game” (yes...it’s only there for show!)
There will be NO class logic for each of these “game” pages as they are simply
template placeholders to demonstrate what we would see after purchasing that
“game” from the app home screen.

517
Mastering Ionic 2
Climate Hero
Now open the SoopaDoopaGames/src/pages/climate-hero/climate-hero.html
template and make the following amendments (highlighted in bold):
<ion-header>
<ion-navbar>
<ion-title>Climate Hero</ion-title>
</ion-navbar>
</ion-header>
<ion-content>
<ion-grid class="page climate-hero">
<ion-row>
<ion-col>
<img src="assets/images/climate-hero.png" alt="Climate
Hero">
</ion-col>
</ion-row>
<ion-row>
<ion-col width-10></ion-col>
<ion-col width-80>
<h1>Climate Hero</h1>
<p>How to play the game/what you need to know:</p>
<ul>
<li>Lorem ipsum dolor sit amet, consectetur adipiscing elit.</li>
<li>Curabitur non nisl sit amet arcu tempus imperdiet.</li>
<li>In quis efcitur felis, vel cursus ex.</li>
<li>Donec quis nisl et ex porttitor maximus sed in nisl.</li>
<li>Cras et odio vitae purus aliquam viverra.</li>
<li>In hac habitasse platea dictumst.</li>
</ul>

Case Study #2 - SoopaDoopaGames
518
<button
ion-button
text-center
block
color="light">
Got it - let’s go!
</button>
</ion-col>
<ion-col width-10></ion-col>
</ion-row>
</ion-grid>
</ion-content>
Once again the template structure and majority of the content is identical save for:
• <ion-title> value of Climate Hero
• <ion-grid> class name of climate-hero
• image source le of climate-hero.png
• <h1> value of Climate Hero.
This pattern is repeated over ALL of the “game” specic pages where the values for
the above are based on the name of the “game” for each page.
Grand Theft Noughto
Now, make similar amendments (highlighted in bold), to the SoopaDoopaGames/
src/pages/grand-theft-noughto/grand-theft-noughto.html template (taking care
to substitute the necessary game values where required):
<ion-header>
<ion-navbar>

Mastering Ionic 2
519
<ion-title>Grand Theft Noughto</ion-title>
</ion-navbar>
</ion-header>
<ion-content>
<ion-grid class="page grand-theft-noughto">
<ion-row>
<ion-col>
<img src="assets/images/grand-theft-noughto.png" alt="Grand
Theft Noughto">
</ion-col>
</ion-row>
<ion-row>
<ion-col width-10></ion-col>
<ion-col width-80>
<h1>Grand Theft Noughto</h1>
<p>How to play the game/what you need to know:</p>
<ul>
<li>Lorem ipsum dolor sit amet, consectetur adipiscing elit.</li>
<li>Curabitur non nisl sit amet arcu tempus imperdiet.</li>
<li>In quis efcitur felis, vel cursus ex.</li>
<li>Donec quis nisl et ex porttitor maximus sed in nisl.</li>
<li>Cras et odio vitae purus aliquam viverra.</li>
<li>In hac habitasse platea dictumst.</li>
</ul>
<button
ion-button
text-center
block
color="light">
Got it - let’s go!
</button>

Case Study #2 - SoopaDoopaGames
520
</ion-col>
<ion-col width-10></ion-col>
</ion-row>
</ion-grid>
</ion-content>
Happy Families
Now make similar amendments (highlighted in bold) for the SoopaDoopaGames/
src/pages/happy-families/happy-families.html template:
<ion-header>
<ion-navbar>
<ion-title>Happy Families</ion-title>
</ion-navbar>
</ion-header>
<ion-content>
<ion-grid class="page happy-families">
<ion-row>
<ion-col>
<img src="assets/images/happy-families.png" alt="Happy Fami-
lies">
</ion-col>
</ion-row>
<ion-row>
<ion-col width-10></ion-col>
<ion-col width-80>
<h1>Happy Families</h1>
<p>How to play the game/what you need to know:</p>

Mastering Ionic 2
521
<ul>
<li>Lorem ipsum dolor sit amet, consectetur adipiscing elit.</li>
<li>Curabitur non nisl sit amet arcu tempus imperdiet.</li>
<li>In quis efcitur felis, vel cursus ex.</li>
<li>Donec quis nisl et ex porttitor maximus sed in nisl.</li>
<li>Cras et odio vitae purus aliquam viverra.</li>
<li>In hac habitasse platea dictumst.</li>
</ul>
<button
ion-button
text-center
block
color="light">
Got it - let’s go!
</button>
</ion-col>
<ion-col width-10></ion-col>
</ion-row>
</ion-grid>
</ion-content>
King for a Day
Make the following amendments (highlighted in bold) for the SoopaDoopaGames/
src/pages/king-for-a-day/king-for-a-day.html template:
<ion-header>
<ion-navbar>
<ion-title>King for a Day</ion-title>
</ion-navbar>

Case Study #2 - SoopaDoopaGames
522
</ion-header>
<ion-content>
<ion-grid class="page king-for-a-day">
<ion-row>
<ion-col>
<img src="assets/images/king-for-a-day.png" alt="King for a
Day">
</ion-col>
</ion-row>
<ion-row>
<ion-col width-10></ion-col>
<ion-col width-80>
<h1>King for a Day</h1>
<p>How to play the game/what you need to know:</p>
<ul>
<li>Lorem ipsum dolor sit amet, consectetur adipiscing elit.</li>
<li>Curabitur non nisl sit amet arcu tempus imperdiet.</li>
<li>In quis efcitur felis, vel cursus ex.</li>
<li>Donec quis nisl et ex porttitor maximus sed in nisl.</li>
<li>Cras et odio vitae purus aliquam viverra.</li>
<li>In hac habitasse platea dictumst.</li>
</ul>
<button
ion-button
text-center
block
color="light">
Got it - let’s go!

Mastering Ionic 2
523
</button>
</ion-col>
<ion-col width-10></ion-col>
</ion-row>
</ion-grid>
</ion-content>
World Traveller
Once you’ve saved this le make the nal set of amendments (highlighted in bold) to
the SoopaDoopaGames/src/pages/world-traveller/world-traveller.html template:
<ion-header>
<ion-navbar>
<ion-title>World Traveller</ion-title>
</ion-navbar>
</ion-header>
<ion-content>
<ion-grid class="page world-traveller">
<ion-row>
<ion-col>
<img src="assets/images/ world-traveller.png" alt="World Travel-
ler">
</ion-col>
</ion-row>
<ion-row>
<ion-col width-10></ion-col>

Case Study #2 - SoopaDoopaGames
524
<ion-col width-80>
<h1>World Traveller</h1>
<p>How to play the game/what you need to know:</p>
<ul>
<li>Lorem ipsum dolor sit amet, consectetur adipiscing elit.</li>
<li>Curabitur non nisl sit amet arcu tempus imperdiet.</li>
<li>In quis efcitur felis, vel cursus ex.</li>
<li>Donec quis nisl et ex porttitor maximus sed in nisl.</li>
<li>Cras et odio vitae purus aliquam viverra.</li>
<li>In hac habitasse platea dictumst.</li>
</ul>
<button
ion-button
text-center
block
color="light">
Got it - let’s go!
</button>
</ion-col>
<ion-col width-10></ion-col>
</ion-row>
</ion-grid>
</ion-content>
There’s denitely a lot of repetition over these page templates but you’ll be glad to
know that’s the last of the HTML amendments for the app!
With the templates, styles and services in place we can now move onto scripting the
logic to tie all of this together.
Open the SoopaDoopaGames/src/pages/home/home.ts le and implement the

Mastering Ionic 2
525
following amendments (highlighted in bold):
import { Component } from '@angular/core';
import { AlertController,
LoadingController,
NavController,
Platform } from 'ionic-angular';
import { InAppPurchase } from 'ionic-native';
import { AlphaMale } from '../../pages/alpha-male/alpha-male';
import { ClimateHero } from '../../pages/climate-hero/climate-hero';
import { GrandTheftNoughto } from '../../pages/grand-theft-noughto/
grand-theft-noughto';
import { HappyFamilies } from '../../pages/happy-families/happy-families';
import { KingForADay } from '../../pages/king-for-a-day/king-for-a-day';
import { WorldTraveller } from '../../pages/world-traveller/world-traveller';
import { Database } from '../../providers/database';
@Component({
selector: 'page-home',
templateUrl: 'home.html'
})
export class HomePage {
public happyFamilies : boolean = false;
public climateHero : boolean = false;
public alphaMale : boolean = false;
public grandTheftNoughto : boolean = false;
public worldTraveller : boolean = false;
public kingForADay : boolean = false;
public goTo;
private loader;
public products = [
'com.saintsatplay.happyfamilies',
'com.saintsatplay.climatehero',

526
Case Study #2 - SoopaDoopaGames
'com.saintsatplay.alphamale',
'com.saintsatplay.grandtheftnoughto',
'com.saintsatplay.worldtraveller',
'com.saintsatplay.kingforaday'
];
constructor( public alertCtrl : AlertController,
public DB : Database,
public loadingCtrl : LoadingController,
public navCtrl : NavController,
public platform : Platform)
{
this.platform.ready().then(() =>
{
DB.createDatabase();
this.initiateProductCheckAndParsing();
});
}
initiateProductCheckAndParsing()
{
this.platform.ready().then(() =>
{
this.displayPreloader();
InAppPurchase
.getProducts(this.products)
.then((products) =>
{

Mastering Ionic 2
527
this.DB.retrievePurchases()
.then((data) =>
{
this.hidePreloader();
this.determineProductsToEnable(data);
})
.catch(function(err)
{
this.hidePreloader();
this.displayAlert('Retrieving Saved purchases', err);
});
})
.catch((err) =>
{
this.hidePreloader();
this.displayNetworkErrorMessage('Network error', err.errorMes-
sage + '.<br><br>Please double check your network connection and try
again');
});
});
}
determineProductsToEnable(data)
{
this.platform.ready().then(() =>
{
let k;
for(k in data)
{
this.DB.doesPurchaseExistInTable(data[k].productId);
if(data[k].productId === "com.saintsatplay.happyfamilies")

Case Study #2 - SoopaDoopaGames
528
{
this.happyFamilies = true;
}
if(data[k].productId === "com.saintsatplay.climatehero")
{
this.climateHero = true;
}
if(data[k].productId === "com.saintsatplay.alphamale")
{
this.alphaMale = true;
}
if(data[k].productId === "com.saintsatplay.grandtheftnoughto")
{
this.grandTheftNoughto = true;
}
if(data[k].productId === "com.saintsatplay.worldtraveller")
{
this.worldTraveller = true;
}
if(data[k].productId === "com.saintsatplay.kingforaday")
{
this.kingForADay = true;
}
}
});
};

Mastering Ionic 2
529
displayPreloader()
{
this.loader = this.loadingCtrl.create({
content: "Please wait..."
});
this.loader.present();
};
hidePreloader()
{
this.loader.dismissAll();
}
playGame(page)
{
switch(page)
{
case "AlphaMale":
this.goTo = AlphaMale;
break;
case "ClimateHero":
this.goTo = ClimateHero;
break;
case "HappyFamilies":
this.goTo = HappyFamilies;
break;
case "GrandTheftNoughto":
this.goTo = GrandTheftNoughto;

Case Study #2 - SoopaDoopaGames
530
break;
case "WorldTraveller":
this.goTo = WorldTraveller;
break;
case "KingForADay":
this.goTo = KingForADay;
break;
}
this.navCtrl.push(this.goTo);
}
purchaseProduct(product)
{
this.platform.ready().then(() =>
{
var productID = product,
purchasedItem = [{"productId" : productID}];
this.displayPreloader();
InAppPurchase
.buy(productID)
.then((data) =>
{
this.hidePreloader();
this.determineProductsToEnable(purchasedItem);
})
.catch((err) =>
{
this.hidePreloader();

Mastering Ionic 2
531
});
});
}
restoreProductListings()
{
this.platform.ready().then(() =>
{
this.displayPreloader();
InAppPurchase
.restorePurchases()
.then((data) =>
{
this.hidePreloader();
this.determineProductsToEnable(data);
})
.catch((err) =>
{
console.log(err);
});
});
}
displayAlert(title, message) : void
{
let headsUp = this.alertCtrl.create({
title: title,
subTitle: message,
buttons: ['Got It!']
});
headsUp.present();

Case Study #2 - SoopaDoopaGames
532
}
displayNetworkErrorMessage(title, message) : void
{
let headsUp = this.alertCtrl.create({
title: title,
subTitle: message,
buttons: [
{
text : 'Got It!',
handler : () =>
{
this.initiateProductCheckAndParsing();
}
}]
});
headsUp.present();
}
}
With these amendments to the src/pages/home/home.ts le we’ve managed to tie
together the following functionality:
• Implemented the ability to performIn-App purchases
• Stored records of all purchased products within SQLite data storage
• Provided UI friendly error handling
• Implemented navigation based on the purchased product
• Offered users the ability to restore purchased products
Thanks to leveraging the installed Cordova plugin API’s, Ionic 2 UI components and
our custom services we’ve managed to script all that functionality in the space of just
one class.

Mastering Ionic 2
533
For roughly 248 lines of code that’s quite an impressive feat!
As in the previous case study let’s spend some time going through the different
sections of the script and familiarising ourselves with exactly what is going at each
stage of the code.
At the top of the script we import additional required modules which consist of:
• The AlertController and LoadingController Ionic 2 UI components
• The excellent InAppPurchase Cordova plugin for handling all the app product
purchase requirements
• The different page components for the app
• Finally the custom Database service
Which completes all the modules that we need to import for the app:
import { Component } from '@angular/core';
import { AlertController,
LoadingController,
NavController,
Platform } from 'ionic-angular';
import { InAppPurchase } from 'ionic-native';
import { AlphaMale } from '../../pages/alpha-male/alpha-male’;
import { ClimateHero } from '../../pages/climate-hero/climate-hero’;
import { GrandTheftNoughto } from '../../pages/grand-theft-noughto/
grand-theft-noughto';
import { HappyFamilies } from '../../pages/happy-families/happy-families';
import { KingForADay } from '../../pages/king-for-a-day/king-for-a-day';
import { WorldTraveller } from '../../pages/world-traveller/world-traveller';
import { Database } from '../../providers/database';
Towards the top of the HomePage class we dene some boolean properties that will
be used to control the initial display of the purchase options for each “game” option
on the home page HTML template, followed by properties to help with subsequent
navigation to other pages, loading of messages and nally an array to store the

Case Study #2 - SoopaDoopaGames
534
product ID’s associated with the App Stores and the “games” available for purchase:
public happyFamilies : boolean = false;
public climateHero : boolean = false;
public alphaMale : boolean = false;
public grandTheftNoughto : boolean = false;
public worldTraveller : boolean = false;
public kingForADay : boolean = false;
public goTo;
private loader;
public products = [
'com.saintsatplay.happyfamilies',
'com.saintsatplay.climatehero',
'com.saintsatplay.alphamale',
'com.saintsatplay.grandtheftnoughto',
'com.saintsatplay.worldtraveller',
'com.saintsatplay.kingforaday'
];
We then pass selected modules as parameters into the class constructor, assigning
each one to a specic public property before triggering both the createDatabase
and initiateProductCheckAndParsing methods within a platform.ready() call so
that the device is ready for all plugin related tasks to be executed:
constructor( public alertCtrl : AlertController,
public DB : Database,
public loadingCtrl : LoadingController,
public navCtrl : NavController,
public platform : Platform)
{
this.platform.ready().then(() =>
{
DB.createDatabase();

Mastering Ionic 2
535
this.initiateProductCheckAndParsing();
});
}
The initiateProductCheckAndParsing() method handles the initial contact with the
App store, using the Cordova InAppPurchase plugin’s getProducts() method, to
determine if the products are available for purchase within the app.
Using a Promise based API the InAppPurchase plugin, where App Store contact
was successful, returns saved purchases via the DB.retrievePurchases() method.
If there are any saved records returned from the SQLite database then the
determineProductsToEnable() method is called which is used to update the HTML
template content to allow the user to play each purchased “game”.
If the initial App Store check was unable to be implemented, for whatever reasons,
the displayNetworkErrorMessage() method is called which handles informing the
user and providing the functionality to re-initiate the App Store check:
initiateProductCheckAndParsing()
{
this.platform.ready().then(() =>
{
this.displayPreloader();
InAppPurchase
.getProducts(this.products)
.then((products) =>
{
this.DB.retrievePurchases()
.then((data) =>
{
this.hidePreloader();

Case Study #2 - SoopaDoopaGames
536
this.determineProductsToEnable(data);
})
.catch(function(err)
{
this.hidePreloader();
this.displayAlert('Retrieving Saved purchases', err);
});
})
.catch((err) =>
{
this.hidePreloader();
this.displayNetworkErrorMessage('Network error', err.errorMes-
sage + '.<br><br>Please double check your network connection and try
again');
});
});
}
The determineProductsToEnable() method simply takes the data object returned
from the earlier call to the initial InAppPurchase.getProducts and then the
DB.retrieveProducts() methods.
This data object is iterated through to determine if any matches are found for the
productId value and, if there are, the boolean properties for controlling the
display of purchase buttons are updated to hide them in the page HTML template
and show the links to each purchased game instead.
A call to the DB.doesPurchaseExistInTable() method is also called to determine
whether a purchased product can be added to the SQLite database table:
determineProductsToEnable(data)
{
this.platform.ready().then(() =>

537
Mastering Ionic 2
{
let k;
for(k in data)
{
this.DB.doesPurchaseExistInTable(data[k].productId);
if(data[k].productId === "com.saintsatplay.happyfamilies")
{
this.happyFamilies = true;
}
if(data[k].productId === "com.saintsatplay.climatehero")
{
this.climateHero = true;
}
if(data[k].productId === "com.saintsatplay.alphamale")
{
this.alphaMale = true;
}
if(data[k].productId === "com.saintsatplay.grandtheftnoughto")
{
this.grandTheftNoughto = true;
}
if(data[k].productId === "com.saintsatplay.worldtraveller")
{
this.worldTraveller = true;
}
if(data[k].productId === "com.saintsatplay.kingforaday")
{
this.kingForADay = true;
}

Case Study #2 - SoopaDoopaGames
538
}
});
};
We then dene methods to handle informing the user that a background task is
taking place (such as communicating with the App Store or retrieving saved records
from the app’s SQLite database).
These implement specic methods provided through the Ionic LoadingController
component API:
displayPreloader()
{
this.loader = this.loadingCtrl.create({
content: "Please wait.."
});
this.loader.present();
};
hidePreloader()
{
this.loader.dismissAll();
}
Following from this we handle the page navigation for the purchased “game” that the
user has selected to play through the playGame() method:
playGame(page)
{
switch(page)
{
case "AlphaMale":

Mastering Ionic 2
539
this.goTo = AlphaMale;
break;
case "ClimateHero":
this.goTo = ClimateHero;
break;
case "HappyFamilies":
this.goTo = HappyFamilies;
break;
case "GrandTheftNoughto":
this.goTo = GrandTheftNoughto;
break;
case "WorldTraveller":
this.goTo = WorldTraveller;
break;
case "KingForADay":
this.goTo = KingForADay;
break;
}
this.navCtrl.push(this.goTo);
}
Purchasing “game” products displayed on the home page HTML template is handled
with the purchaseProduct() method.
This method takes the supplied productId value for the game, attempts to initiate a
purchase request with the App Store and, if successfully completed, subsequently
adds the purchased product to the app’s SQLite database enabling the “game” to be
accessed by the user:

Case Study #2 - SoopaDoopaGames
540
purchaseProduct(product)
{
this.platform.ready().then(() =>
{
var productID = product,
purchasedItem = [{"productId" : productID}];
this.displayPreloader();
InAppPurchase
.buy(productID)
.then((data) =>
{
this.hidePreloader();
this.determineProductsToEnable(purchasedItem);
})
.catch((err) =>
{
this.hidePreloader();
});
});
}
The restoreProductListings method allows the user to retrieve data about all the
products they have purchased for the app from the App Store and, if the network
request was successful, switch those products on in the page template in addition to
determining whether each purchased product needs to be added to the app SQLite
database:
restoreProductListings()
{
this.platform.ready().then(() =>
{

Mastering Ionic 2
541
this.displayPreloader();
InAppPurchase
.restorePurchases()
.then((data) =>
{
this.hidePreloader();
this.determineProductsToEnable(data);
})
.catch((err) =>
{
console.log(err);
});
});
}
The displayAlert() method simply handles informing the user of an error that may
have occurred using the Ionic AlertController Component and methods available
through its API:
displayAlert(title, message) : void
{
let headsUp = this.alertCtrl.create({
title: title,
subTitle: message,
buttons: ['Got It!']
});
headsUp.present();
}
Finally the displayNetworkErrorMessage() method handles error situations where
attempts to connect with and run tasks through the App Store have failed.
The user is informed of the nature of the error and is able to re-initiate the App Store

Case Study #2 - SoopaDoopaGames
542
request through calling the initiateProductCheckAndParsing() method upon
closing the alert window thrown up by the displayNetworkErrorMessage() method:
displayNetworkErrorMessage(title, message) : void
{
let headsUp = this.alertCtrl.create({
title: title,
subTitle: message,
buttons: [
{
text : 'Got It!',
handler : () =>
{
this.initiateProductCheckAndParsing();
}
}]
});
headsUp.present();
}
With the app logic, styling and HTML structure implemented, along with the
necessary congurations for the SoopaDoopaGames/src/app/app.module.ts le,
we are now left with the following 3 tasks for the front-end development of our app:
• Editing the cong.xml le to include the necessary widget ID
• Adding the images to be used on the home page and “game” pages
• Adding the Google Play Billing Key to the www/manifest.json le
The rst 2 tasks we can solve shortly whereas the last task will be dealt with when
setting up the Google Play In-App Products and submitting an APK le.
Adding Images for the App
The necessary images for the app can be added as follows:

Mastering Ionic 2
543
• Create a directory titled images inside the root of the src/assets directory
• Copy all of the images for the download les for this case study from the following
download directory: /SooperDooperGames/src/assets/images/
• Paste these copied images into the following directory of your own soopaDoopa-
Games app: SooperDooperGames/src/assets/images
cong.xml
Open the cong.xml le for your app (located in the root of your project) and edit
the following elds/attributes to your particular requirements:
• widget ID (use reverse domain name notation - I.e. com.saintsatplay.nameOfApp
- this must match the Bundle ID you set for the app when creating the App Store
listing in iTunes Connect - which we’ll do shortly!)
• Name (What your app is called)
• Description (A brief summary of the app; what it does, its purpose etc.)
• Author (Developer/team name, e-mail address and website address)
The above elds/attributes are congured within the cong.xml le as follows
(highlighted in bold):
<?xml version="1.0" encoding="UTF-8" standalone="yes"?>
<widget
id="com.saintsatplay.sooperdoopergames"
version="0.0.1"
xmlns="http://www.w3.org/ns/widgets"
xmlns:cdv="http://cordova.apache.org/ns/1.0">
<name>Soopa Doopa Games</name>
<description>An awesome Ionic/Cordova app.</description>
<author
email="support@saintsatplay.com"
href="http://www.saintsatplay.com/">
Saints at Play Limited
</author>
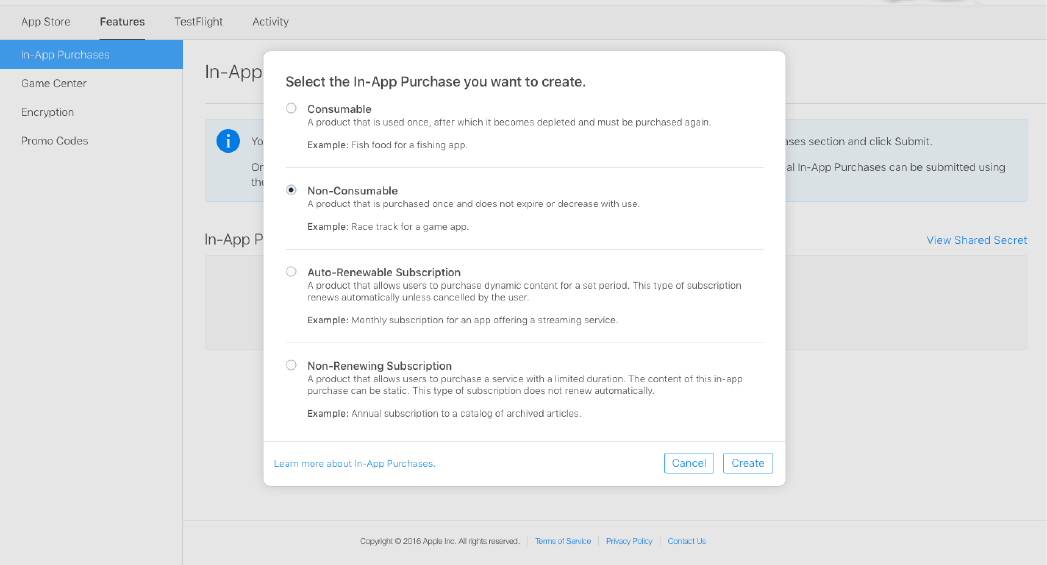
Case Study #2 - SoopaDoopaGames
544
Now that the coding for the app is more or less completed (with the exception of the
In-App Product Billing Key for the www/manifest.json le which we’ll add later on
when setting up the Google Play listing and APK le) we can start conguring the
In-App Purchasable products for the Apple App Store and Google Play Store.
Creating In-App Purchases on the Apple App Store
Log into your iOS developer account on the iTunes Connect portal and create a new
iOS App.
Proceed to the Features screen for the newly created app, from the side menu
select the In-App Purchases link then click on the + icon to add a new In-App
Purchase and select Non-Consumable from the available options in the modal
window that appears:
Choosing Non-Consumable allows us to create a product that the user can only
purchase once from within the app.
Once this option has been selected click the Create button at the bottom right hand
side of the modal window.
Mastering Ionic 2
545
The New In-App Purchase screen will then open presenting the following elds for
data entry/selection:
• Reference Name (Required - Product name which is displayed only in the Sales
& Trends reports on iTunes Connect - maximum of 64 characters)
• Product ID (Required - the alphanumeric string that identies the product such
as com.saintsatplay.happyfamilies or com.saintsatplay.climatehero)
• Availability (Optional - Whether or not the In-App Purchase is available on the
Apple App Store - checked by default)
• Pricing (Required - Choice of applicable price for the product ranging from Free
through to different pricing tiers)
• Display Name (Required - Name of the In-App Purchase which is displayed on
the App Store)
• Description (Optional - Information about the In-App Purchase product that will
be used for review purposes and may, depending on the type of In-App Pur-
chase, be visible to customers on the App Store)
• Screenshot (Required for review by the App Store moderator)
• Review Notes (Additional information about the In-App Purchase product that
may be useful to the App Store moderator I.e. test account details for accessing
the product etc.)
Through this screen you’ll need to create and enter details for In-App Purchases
connected with the following products:
• com.saintsatplay.alphamale
• com.saintsatplay.climatehero
• com.saintsatplay.grandtheftnoughto
• com.saintsatplay.happyfamilies
• com.saintsatplay.kingforaday
• com.saintsatplay.worldtraveller
The following screen capture displays the com.saintsatplay.happyfamilies In-App
Purchase entry:

546
Case Study #2 - SoopaDoopaGames
Once you’ve entered all of the necessary In-App Purchase product entries you’ll see
these displayed on the landing screen for the In-App Purchases section of the newly
created SooperDooperGames app like so:
As you can see the process of setting up In-App Purchases on the Apple App Store
is a little time consuming but relatively straightforward.
547
Mastering Ionic 2
One (possible) last step regarding the Apple set-up for the app...
Unless you’re using a wildcard App ID (which can be generated by Xcode) you’ll
need to create an App ID matching the one that was entered in your cong.xml le
(in the widget ID eld) through the Certicates, Identiers & Proles portal of your
Apple Developer account.
Creating In-app Products on the Google Play Store
Google Play implements In-app Products in a way that they can only be tested
AFTER an APK le has been uploaded for beta/alpha testing (prior to that being
production ready and published for sale on the Play Store).
To understand how this works log in to your Google Play Developer account and
Add a New Application:
In the modal window that appears be sure to:
• Select the default language for your application
• Enter the title for your application (in this example - Soopa Doopa Games)
• Select Prepare Store Listing from the buttons at the bottom of the window
We could Upload an APK le but we rst of all need to add the License Key for the
application to the www/manifest.json le so that we can enable In-app Products to
be able to be purchased through Google Play.
Case Study #2 - SoopaDoopaGames
548
Navigate to the Services & APIs screen, scroll down to the Licensing & In-App
Billing section and select & copy the displayed license key:
Now in your application’s www/manifest.json le enter this license key as the
following key/value pairing (highlighted in bold):
{
"name": "My Ionic App",
"short_name": "My Ionic App",
"start_url": "index.html",
"display": "standalone",
"icons": [{
"src": "icon.png",
"sizes": "512x512",
"type": "image/png"
}],
"play_store_key":"COPIED_KEY_VALUE_IS_PASTED_HERE"
}
With the Play Store license key in place we can now build our android app and then
code sign the APK le ready for upload.
Mastering Ionic 2
549
Using the Ionic CLI run the following build command to generate an unsigned APK
le:
ionic build --release android
Once successfully completed you’ll need to generate a keystore le which, as you’ll
remember from the Code signing for iOS & Android chapter, is used to generate a
digital signature when signing the APK le using the jarsigner tool:
keytool -genkey -v -keystore SoopaDoopaGames-release-key.keystore -alias
SoopaDoopaGames -keyalg RSA -keysize 2048 -validity 10000
Enter a password for the keystore le (store this somewhere safe as, if you lose this,
you won’t be able to run the keystore le in the future!), answer the command line
tool prompts and you should have a generated keystore le within the space of a
minute or so.
Once this is the case you can sign the previously generated APK le by running the
following command:
jarsigner -verbose -sigalg SHA1withRSA -digestalg SHA1 -keystore Soopa-
DoopaGames-release-key.keystore platforms/android/build/outputs/apk/an-
droid-release-unsigned.apk SoopaDoopaGames
Once the APK has been signed we need to run the zipalign tool using the following
command to optimise the APK le:
zipalign -v 4 platforms/android/build/outputs/apk/android-release-unsigned.apk
platforms/android/build/outputs/apk/SoopaDoopaGames.apk
Now that the APK le for the app has been generated, signed and optimised it’s
ready for upload to the Google Play Store.
Returning to your Google Play Developer account go to the APK screen of the
Soopa Doopa Games Application, select the Beta Testing tab and upload the signed
APK le:
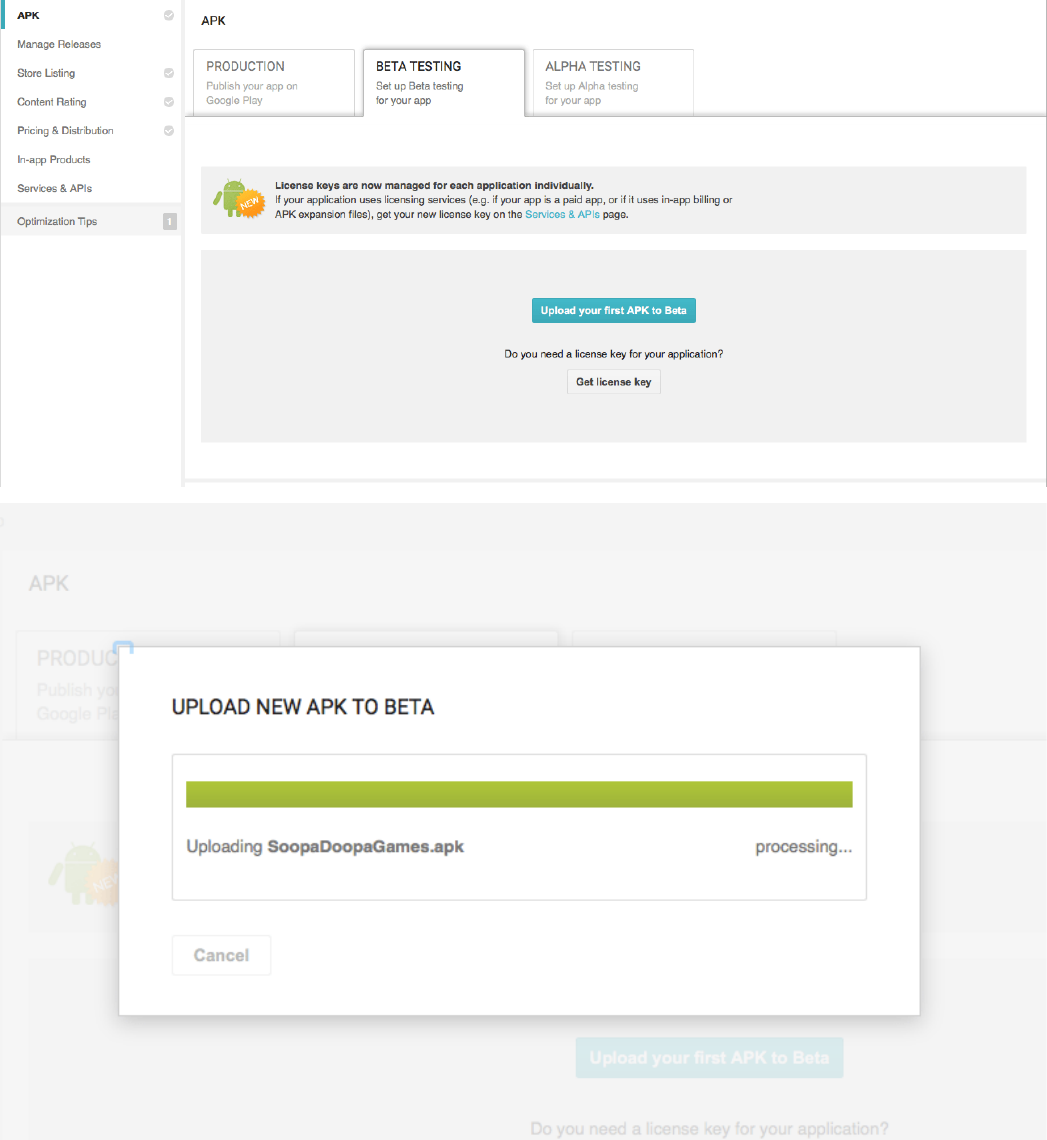
Case Study #2 - SoopaDoopaGames
550
Once the APK le has completed uploading to the Beta Testing tab you can begin
completing the rest of the Soopa Doopa Games application content sections.
We won’t go through all the screen here as we covered those in the Submitting your
Android App to the Google Play Store chapter but we will concentrate on the In-app
Products screen.
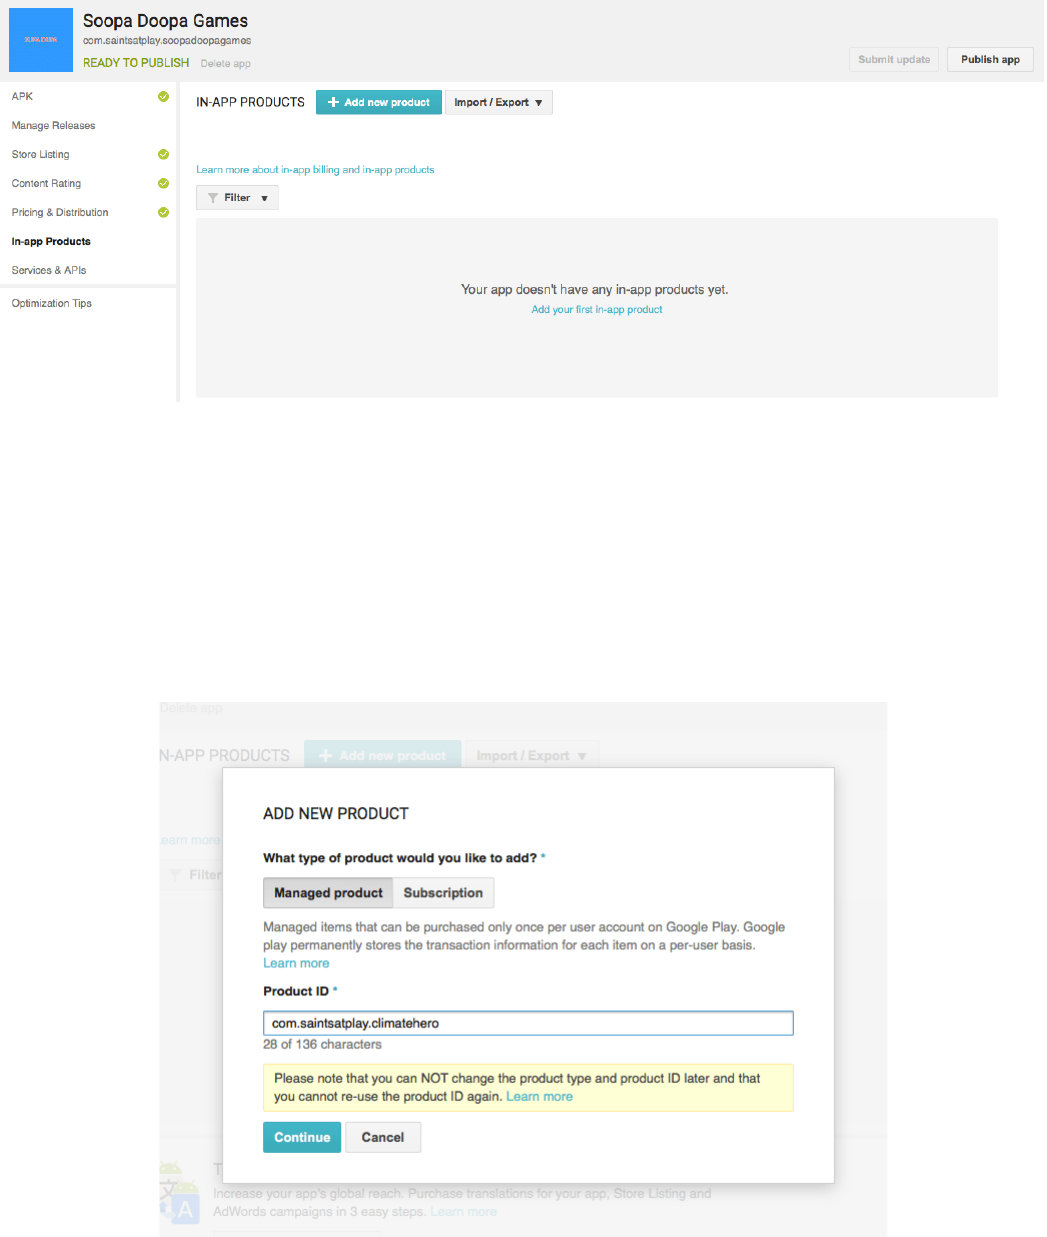
Mastering Ionic 2
551
As we have entered the license key for the app we can start adding our In-app
Products to this section.
Click on the Add new product button:
A modal window will appear offering two product types to select from:
• Managed product (I.e. a consumable or non-consumable product item)
• Subscription (I.e. a recurring billable item such as a monthly magazine)
Select Managed product from the product type options and enter the product ID for
the product you want to create in the Product ID eld:
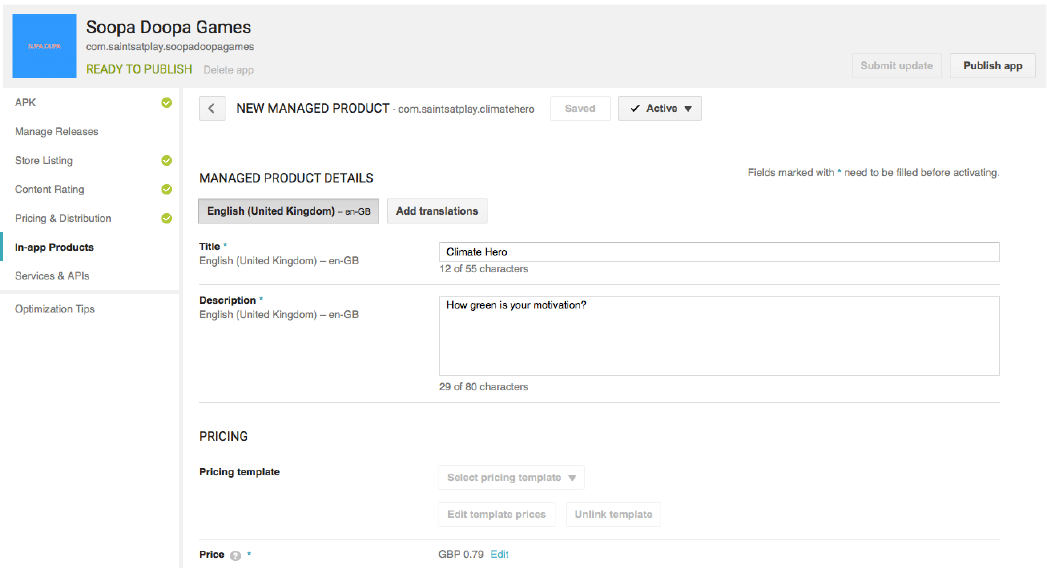
Case Study #2 - SoopaDoopaGames
552
The following product ID’s will need to be individually added as In-app Products for
the Soopa Doopa Games app:
• com.saintsatplay.alphamale
• com.saintsatplay.climatehero
• com.saintsatplay.grandtheftnoughto
• com.saintsatplay.happyfamilies
• com.saintsatplay.kingforaday
• com.saintsatplay.worldtraveller
As we’re creating the com.saintsatplay.climatehero In-app Product we’ll be
prompted to complete entering details for this product after clicking on the Continue
button:
These details, which will be displayed on the customer facing purchase prompt in
the app, include:
• Title
• Description
• Price
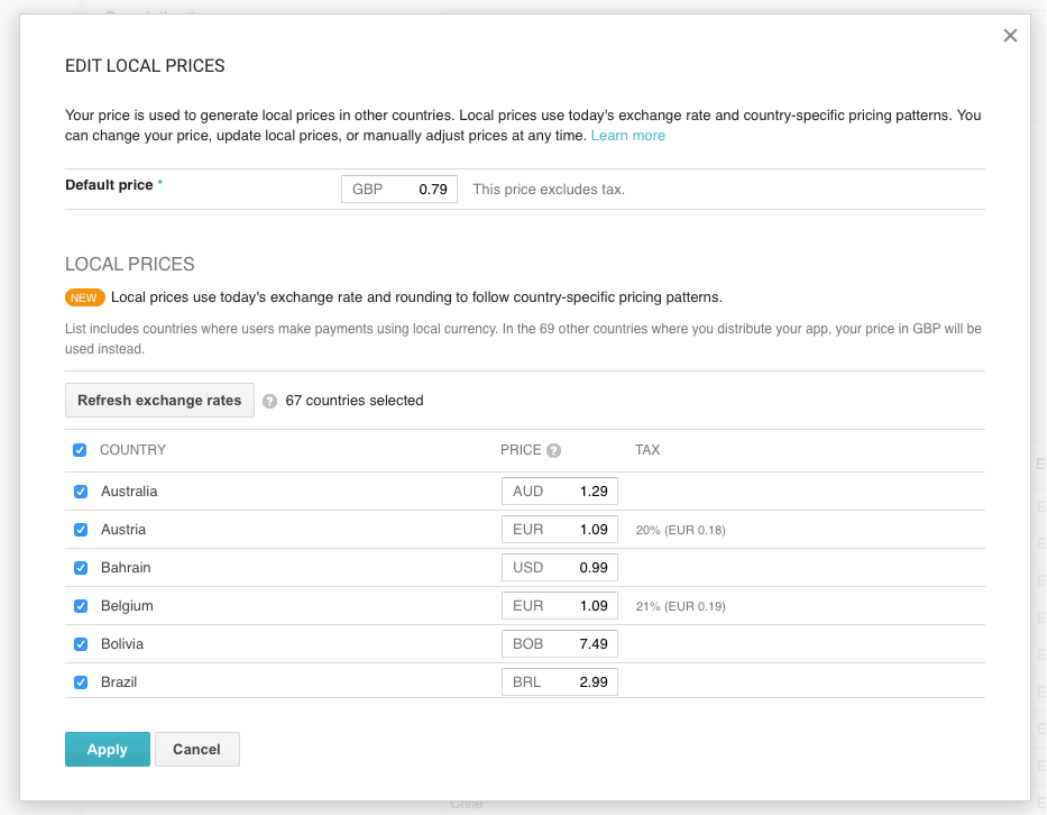
Mastering Ionic 2
553
When determining a price for the In-app Product (if it is not free) you can also select
the countries where the In-app product will be displayed in the local currency for that
country:
Once any fees have been applied you can either save your In-app Product details
using the Save button at the top of the form or choose Active from the drop down
menu next to this button (which will automatically save your In-app Product and
make this publicly available once the app is published to the Google Play store).
After creating the separate In-app Products (whose product ID’s match exactly those
listed at the top of the previous page) you’ll see these displayed on the landing
screen for the In-app Products section like so:
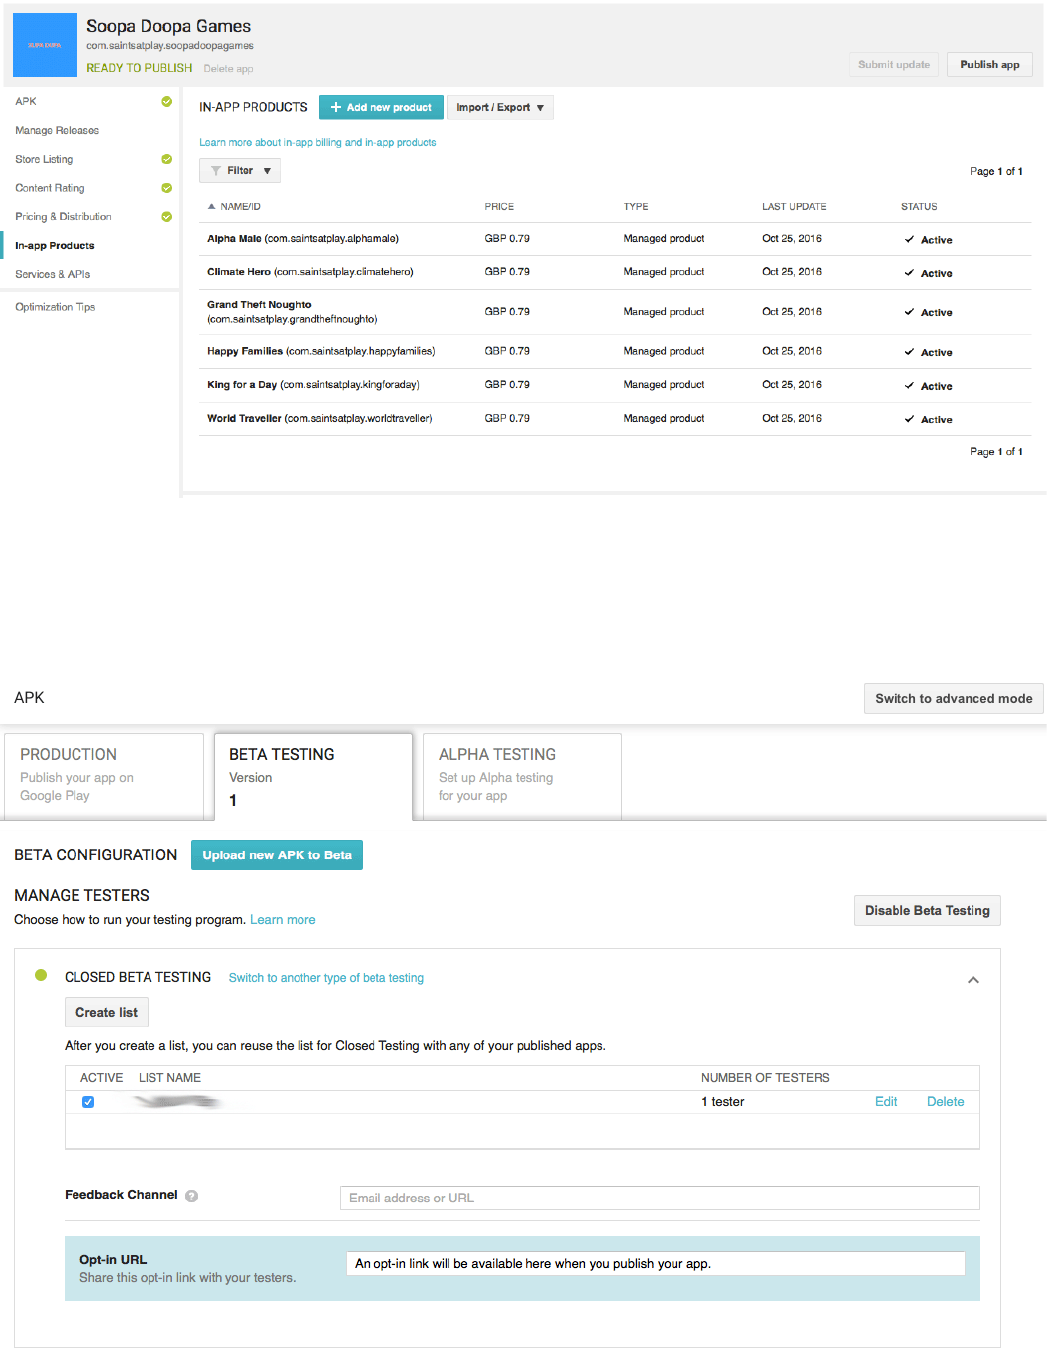
Case Study #2 - SoopaDoopaGames
554
There is one nal step to be taken before we can publish the app and that is to Set
up Closed Beta Testing which allows the app to be installed by selected testers
(we can enter their email addresses on screen) who can then make test purchases
of the activated In-app Products:

Mastering Ionic 2
555
Once published and approved by the Google Play moderators an opt-in URL for
the app will be displayed within the Closed Beta Testing section of the APK screen
which can then be shared with testers.
This opt-in URL contains a “closed” Google Play Store link which testers can visit to
download, install and beta test the app from:
An important point to note here - The tester installing the beta app cannot be the
publisher of the app as the In-app Product functionality won’t allow purchases to be
made for products in the app if this is the case.
If you, as the developer, want to test your beta apps then you’ll need to use a
secondary Google account - NOT the one associated with your Google Play
Developer account (and, if you don’t currently have a second Google account,
creating one is pretty quick and easy to do).
Simply log into that secondary account on your Android device and you should be
good to go with installing beta versions of your app for testing.
Once installed you should be able to test your In-App Product purchases like so:
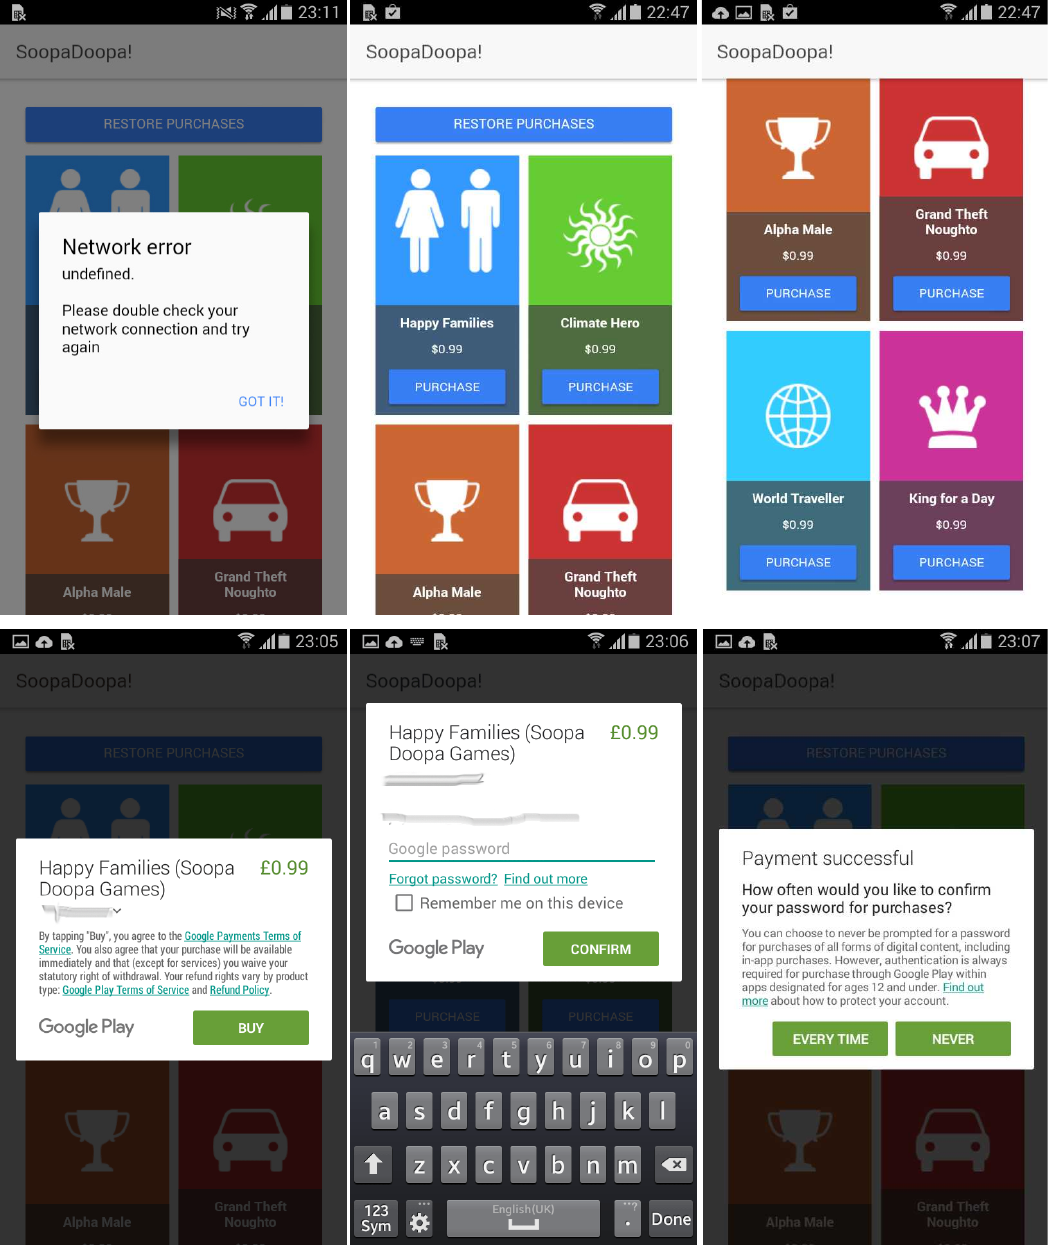
Case Study #2 - SoopaDoopaGames
556
As you can see implementing In-app Purchases (or In-app Products as they are
referred to on Google Play) is a little more involved on the Android platform than
they are on iOS.
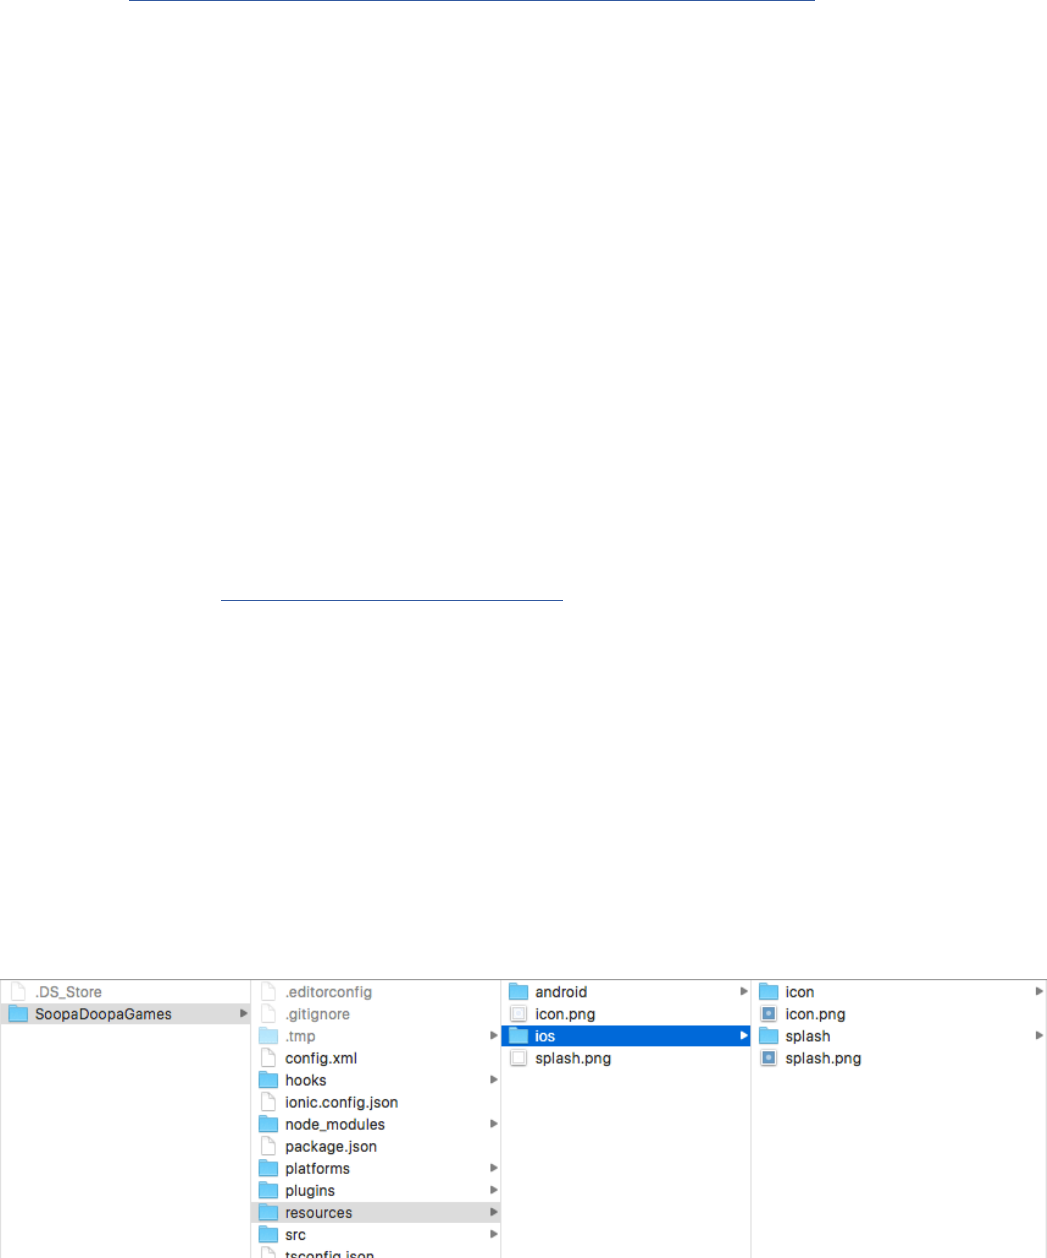
557
There’s quite a few hoops to jump through and, in my personal opinion, it’s not as
intuitive or as user friendly as the iOS experience.
Thanks to Alex Disler’s excellent Cordova In-App Purchase plugin though we can
implement In-App purchases/products across both platforms through a simplied
and easy-to-use API which makes life as a developer so much easier...and that can
never be a bad thing!
Finishing touches
Before we can consider the app completed there’s one nal addition we need to
make - implementing the necessary launch icon and splash screen images for the
iOS and Android directories in the /SoopaDoopaGames/resources directory.
Without these our app will use the default Apache Cordova images which seems a
little lazy after all the work we’ve put in during this case study.
Before proceeding though you’ll need to download the les for this case study from
the following link: http://tinyurl.com/gwnamma (if you haven’t done so already).
Having done this copy both the icon.png and splash.png les from the following
locations in the downloaded project les directory:
• SoopaDoopaGames/resources/android
• SoopaDoopaGames/resources/ios
And then paste these into the matching directories in your own SoopaDoopaGames
project, beginning with the iOS launch and splash images:
Mastering Ionic 2
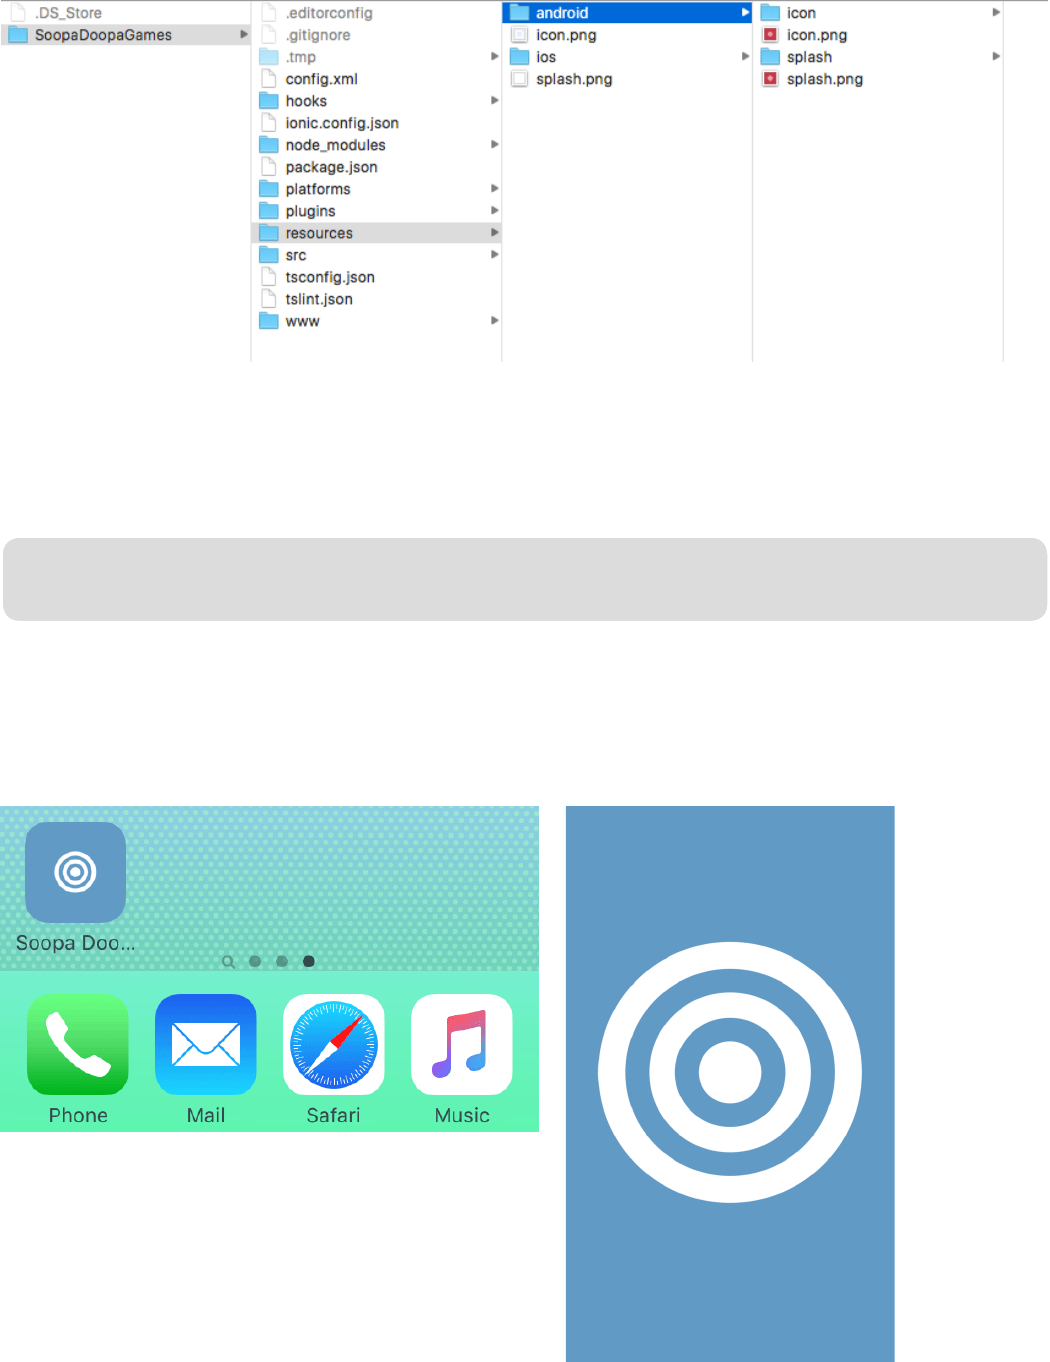
Case Study #2 - SoopaDoopaGames
558
With our respective launch icon and splash screen templates in place for iOS and
Android we can now generate the images to be used for these platforms using the
following Ionic CLI command (as always - ensure you are at the root of the
SoopaDoopaGames project directory before running such commands):
ionic resources
Once the command has nished processing you should see the different launch icon
and splash screen sizes being generated from the supplied template images which,
when our app is published to a mobile device, should give us something like the
following:
Followed by those for Android:
559
Summary
Congratulations on reaching the end of the SoopaDoopaGames Case Study!
Over the course of this chapter you’ve managed to build a product based app for
iOS & Android (while navigating and overcoming certain keys differences between
the platforms) that successfully implements the following features:
• In-App Purchase functionality allowing the user to buy and restore products
• The ability to store purchased products in the app’s SQLite database
• Render page layouts using the Ionic 2 Grid component
In addition to integrating Ionic/Cordova plugins, custom services and page UI
Components you’ve also spent time creating and conguring the necessary In-App
Purchase products on both the Apple App and Google Play Stores.
Through doing this you’ve learnt that the Apple App Store allows you to create your
In-App Purchases and test those BEFORE submitting your app for release while the
Google Play Store requires that your In-App Products are created and only able to
be tested AFTER submitting a pre-production APK le.
I personally prefer Apple’s approach!
Hopefully you can take away new techniques and knowledge from this case study
and develop those further in your own Ionic 2 projects.
Maybe you could further develop the case study itself? What about improving and
extending network detection capabilities so that if the network connection is
suddenly lost the app informs the user of this event and responds accordingly?
Maybe you could look into adding further In-App Purchase products that are, this
time, consumable instead (that is, once depleted they can be repurchased again
and again)? Or maybe even have a go at creating re-billable subscriptions?
Whatever your choices there’s a lot of scope for further development and I’d love
to receive feedback from readers on what they’ve been able to take away and use
from this particular case study.
Mastering Ionic 2

Case Study #3
AppyMapper
App

Case Study #3 - Appy Mapper
562
In our third and nal case study we’re going to develop a Google Maps single page
application, called appyMapper, that allows users to nd Apple store locations
across the United Kingdom, France, Germany, Belgium and the Netherlands.
The app will incorporate the following features and functionality:
• Locate all available Apple store locations within a pre-selected distance from the
user’s current geographic location
• Filter stores by specic countries
• Reload all stores
• Ionic Form components
• Ionic Native GoogleMaps and Cordova SQLite plugins
With these in mind let’s make a start by creating a new project at the root of your
apps directory, installing the required plugins and creating the pipes and services
for the app using the following commands (you will of course know by now to wait
patiently for each listed command to successfully complete executing before running
the next one!):
ionic start appyMapper blank --v2
cd appyMapper
npm install
ionic platform add android
ionic plugin add cordova-plugin-geolocation
ionic plugin add cordova-sqlite-storage
ionic g provider database
ionic g provider les
ionic g provider distances
ionic g pipe sanitiser
We’ll also be installing the Cordova Google Maps plugin that we spent some time
exploring and familiarising ourselves with during the Plugins chapter.
This will require setting up the following additional keys in your Google Developers
Console account:

Mastering Ionic 2
563
• Android API Key
• iOS API Key
If you need to, revisit the Plugins chapter for a step-by-step guide on how this is
achieved but, before you do, let’s quickly open and amend the appyMapper/cong.
xml le to include the following changes (highlighted in bold):
<widget
id="com.saintsatplay.appyMapper"
version="0.0.1"
xmlns="http://www.w3.org/ns/widgets"
xmlns:cdv="http://cordova.apache.org/ns/1.0">
With the App ID now in place feel free to set up the Android & iOS API keys for the
appyMapper project and then come back to this page once completed!
Now that the necessary platform API keys have been created it’s time to proceed
with installing the Cordova GoogleMaps plugin.
In your Terminal, and at the root of the appyMapper project directory, enter the
following command (substituting YOUR_APP_KEY_VALUE_HERE for the recently
generated iOS and Android key values that you will need to copy from your Google
Developers Console account - BUT do make sure you enter the iOS key value for
iOS and the Android key value for Android otherwise the Google maps functionality
won’t work!):
Cordova plugin add https://github.com/phonegap-googlemaps-plugin/cordo-
va-plugin-googlemaps --variable API_KEY_FOR_ANDROID="YOUR_APP_
KEY_VALUE_HERE" --variable API_KEY_FOR_IOS="YOUR_APP_KEY_VAL-
UE_HERE"
Remember, from the Plugins chapter, that the installation process might take a little
while so sit back, relax and get ready to start diving into some coding shortly!
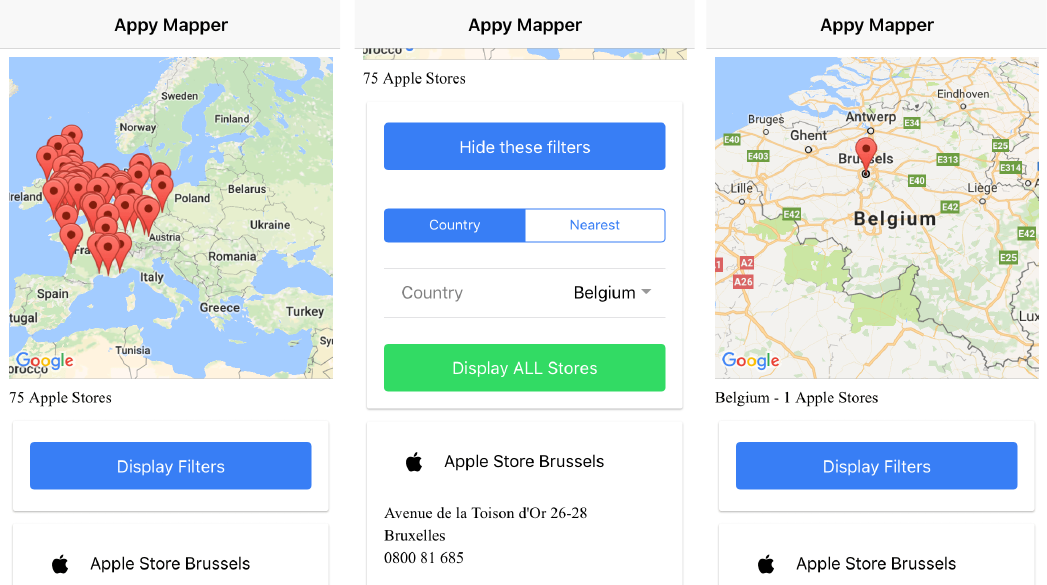
Case Study #3 - Appy Mapper
564
appyMapper
With all the necessary les and plugins in place for the app now would be a good
time to review what we are going to be building in this case study.
The app will consist of a single page with:
• A Google Map displaying all Apple Store locations
• A lters section where the user can display those store locations based solely on
country or those nearest to their current geographical location
• A list of each store, with accompanying address/contact details, will be displayed
underneath the map
By the end of the case study you should be able to see a fully functional app as
shown in the following screen captures:
The rst screen capture demonstrates the initially loaded state of the application
with all of the Apple Store locations displayed for the following countries:
• Belgium
• France
• Germany
Mastering Ionic 2
565
• Netherlands
• United Kingdom
The second screen capture demonstrates the types of lters we’ll be building into
the application allowing us to display Apple Store locations by:
• Country
• Nearest to current location by a specied range
• All store locations
Finally, the third screen capture displays the locations of Apple Stores for the
country selection of Belgium with the Google Map zooming in to t the borders of
that country.
With the preview of what we’ll be building covered let’s make a start on the actual
development!
A good place to start would be with our newly created providers:
• appyMapper/src/providers/les.ts
• appyMapper/src/providers/database.ts
• appyMapper/src/providers/distances.ts
These form the backbone for the logic of the appyMapper application so what better
place to start coding?
les.ts
The appyMapper/src/providers/les.ts le contains the functionality to load the
following JSON les for the app:
• appyMapper/src/assets/data/countries.js
• appyMapper/src/assets/data/locations.js
These will be used to subsequently populate the app’s SQLite database with the

Case Study #3 - Appy Mapper
566
European countries and Apple Store locations that our app will use as data sources.
Within the appyMapper/src/providers/les.ts le make the following amendments
(highlighted in bold):
...
@Injectable()
export class Files {
private countries : any = [];
private locations : any = [];
constructor(public http: Http)
{
}
loadCountries()
{
this.http.get('assets/data/countries.js')
.map(res => res.json())
.subscribe(countries =>
{
for(var k in countries.countries)
{
this.countries.push({
id: countries.countries[k].id,
country: countries.countries[k].country,
lat: countries.countries[k].lat,
lng: countries.countries[k].lng,
zoom: countries.countries[k].zoom,
active: countries.countries[k].active

});
}
});
}
getCountriesFromJSON()
{
return this.countries;
}
loadLocations()
{
this.http.get('assets/data/locations.js')
.map(res => res.json())
.subscribe(locations =>
{
for(var k in locations.locations)
{
this.locations.push({
id: locations.locations[k].id,
country: locations.locations[k].country,
name: locations.locations[k].name,
address: locations.locations[k].address,
lat: locations.locations[k].lat,
lng: locations.locations[k].lng,
zoom: locations.locations[k].zoom,
active: locations.locations[k].active
});
}
});
Mastering Ionic 2
567

}
getLocationsFromJSON()
{
return this.locations;
}
}
Case Study #3 - Appy Mapper
568
This is a fairly simple provider which, through the loadCountries() method, loads
the list of European countries that the appyMapper will use that the different Apple
Store locations belong to.
Once the JSON country data has been loaded this is then stored in a dedicated
countries object which is able to be accessed by other TypeScript classes in the
appyMapper application through the getCountriesFromJSON() method.
Similarly the loadLocations() method is used to load the JSON data for all the
Apple Store locations that are associated with the European countries loaded
through the loadCountries() method.
The locations object which stores all of the loaded JSON data for the Apple Stores is
then able to be accessed through other TypeScript classes in the appyMapper
application through the getLocationsFromJSON() method.
That’s all that needs to be stated about the Files service - it’s pretty simple and fairly
straightforward to understand.
Before we go any further though now would be a good time to actually add the
following les to the app:
• countries.js
• locations.js

Mastering Ionic 2
569
Without those we have no data to work with so they’re kind of important!
Both of these les can be found in the downloadable assets for this case study in
the following directory: /appyMapper/src/assets/data.
You will need to copy both of these les to a directory named data that will need to
be created within the following project location on your machine: appyMapper/src/
assets.
If you’re not too sure about the location simply look at the structure of the completed
appyMapper project available in the downloadable assets directory: Projects Files/
Case Studies/AppyMapper/ and use that as a guide to compare to your own app
structure.
I’m deliberately not listing the contents for those les here as the locations.js JSON
data alone runs to 73 entries - believe me when I say that would be a lot of pages
you’d be copying and pasting from!
Also adding that here would unnecessarily add to the size of this Case Study
chapter and that would detract from the material that we need to cover through
these pages...so get copying those les if you haven’t already done so!
Once those JSON les have been copied to this location you’re good to go!
database.ts
The engine driving the app is, as you’ve probably guessed by now, the SQLite
database which is used to store and retrieve the JSON data originally loaded into
the app using methods contained within the Files service.
The appyMapper/src/providers/database.ts le as you might expect will contain
the functionality to interact with the SQLite database for the app, which will include:
• Creating the appyMapper database
• Creating the tables for storing country and locations JSON data

Case Study #3 - Appy Mapper
570
• Storing the locations and country data
• Retrieving locations and country data
These requirements should be fairly familiar by now with similar functionality that
we’ve covered in both the Plugins chapter and the SoopaDoopaGames case study.
So let’s see what this functionality looks like by implementing the following code to
the appyMapper/src/providers/database.ts script (amendments highlighted in
bold):
import { Injectable } from '@angular/core';
import { Http } from '@angular/http';
import { SQLite } from 'ionic-native';
import 'rxjs/add/operator/map';
import { Files } from '../providers/les';
@Injectable()
export class Database {
public data : any = null;
public storage : any = null;
public dbName : string = "appyMapper.db";
public locations : any = [];
public countries : any = [];
constructor(
public http : Http,
public les : Files
)
{
this.data = null;
}

Mastering Ionic 2
571
createDatabase()
{
this.storage = new SQLite();
this.storage.openDatabase({
name : this.dbName,
location : 'default' // the location eld is required
})
.then((data) =>
{
console.log("Opened database");
this.createDatabaseTables();
},
(err) =>
{
console.error('Unable to open database: ', err);
});
}
createDatabaseTables()
{
this.createCountriesTable();
this.createStorelocationsTable();
}
createCountriesTable()
{
this.storage.executeSql('CREATE TABLE IF NOT EXISTS countries (id
INTEGER PRIMARY KEY AUTOINCREMENT, country TEXT NOT NULL, lat
TEXT NOT NULL, lng TEXT NOT NULL, zoom INTEGER NOT NULL, active
TEXT NOT NULL)', {})
.then((data) =>
{

Case Study #3 - Appy Mapper
572
console.log("countries TABLE CREATED : " + JSON.stringify(data));
},
(error) =>
{
console.log("Error: " + JSON.stringify(error.err));
console.dir(error);
});
}
createStorelocationsTable()
{
this.storage.executeSql('CREATE TABLE IF NOT EXISTS storeLoca-
tions (id INTEGER PRIMARY KEY AUTOINCREMENT, country INTEGER
NOT NULL, name TEXT NOT NULL, address TEXT NOT NULL, lat TEXT
NOT NULL, lng TEXT NOT NULL, zoom INTEGER NOT NULL, active TEXT
NOT NULL)', {})
.then((data) =>
{
console.log("storeLocations TABLE CREATED: " + JSON.stringify(-
data));
},
(error) =>
{
console.log("Error: " + JSON.stringify(error.err));
console.dir(error);
});
}
retrieveStorelocations()
{
return new Promise(resolve =>
{

573
Mastering Ionic 2
this.storage.executeSql("SELECT * FROM storeLocations WHERE
active='Y'", {})
.then((data) =>
{
this.locations = [];
if(data.rows.length > 0)
{
let k;
for(k = 0; k < data.rows.length; k++)
{
this.locations.push({
country : data.rows.item(k).country,
name : data.rows.item(k).name,
address : data.rows.item(k).address,
lat : data.rows.item(k).lat,
lng : data.rows.item(k).lng,
zoom : data.rows.item(k).zoom
});
}
}
else
{
var numLocations = this.les.getLocationsFromJSON(),
isFavourite = "N",
k;
for(k = 0; k < numLocations.length; k++)
{
this.locations.push({
country : numLocations[k].country,
name : numLocations[k].name,
address : numLocations[k].address,
lat : numLocations[k].lat,
lng : numLocations[k].lng,

574
Case Study #3 - Appy Mapper
zoom : numLocations[k].zoom,
active : numLocations[k].active
});
}
this.insertStoreLocationsToTable(numLocations, isFavourite);
}
resolve(this.locations);
},
(error) =>
{
console.log("Error retrieving locations from retrieveStoreLoca-
tions: " + JSON.stringify(error));
});
});
}
insertStoreLocationsToTable(val, isFavourite)
{
var i,
sql = 'INSERT INTO storeLocations(country, name, address, lat,
lng, zoom, active) VALUES';
for(i = 0; i < val.length; i++)
{
sql = sql + '("' + val[i].country + '", "' + val[i].name + '", "' + val[i].ad-
dress + '", "' + val[i].lat + '", "' + val[i].lng + '", ' + val[i].zoom + , "' + val[i].
active + '")';
if(i < (val.length - 1))
{
sql = sql + ',';
}

575
Mastering Ionic 2
}
this.storage.executeSql(sql, {})
.then((data) =>
{
//console.log("storeLocations TABLE INSERTED RECORDS");
},
(error) =>
{
console.log(“ERROR -> “ + JSON.stringify(error.err));
});
}
retrieveCountries()
{
return new Promise(resolve =>
{
this.storage.executeSql("SELECT * FROM countries WHERE ac-
tive='Y'", {})
.then((data) =>
{
this.countries = [];
if(data.rows.length > 0)
{
let k;
for(k = 0; k < data.rows.length; k++)
{
this.countries.push({
id : data.rows.item(k).id,
country : data.rows.item(k).country,
lat : data.rows.item(k).lat,
lng : data.rows.item(k).lng,
zoom : data.rows.item(k).zoom,

576
Case Study #3 - Appy Mapper
active : data.rows.item(k).active
});
}
}
else
{
//console.log("No data found in countries table");
let numCountries = this.les.getCountriesFromJSON(),
k;
for(k = 0; k < numCountries.length; k++)
{
if(numCountries[k].isActive !== "N")
{
this.countries.push({
id : numCountries[k].id,
country : numCountries[k].country,
lat : numCountries[k].lat,
lng : numCountries[k].lng,
zoom : numCountries[k].zoom,
active : numCountries[k].active
});
}
}
this.insertCountriesToTable(numCountries);
}
resolve(this.countries);
},
(error) =>
{
console.log("Error retrieving countries from retrieveCountries: "
+ JSON.stringify(error));
});
});

Mastering Ionic 2
577
}
insertCountriesToTable(val)
{
var i,
sql = 'INSERT INTO countries(country, lat, lng, zoom, active) VAL-
UES';
for(i = 0; i < val.length; i++)
{
sql = sql + '("' + val[i].country + '", "' + val[i].lat + '", "' + val[i].lng +
'", ' + val[i].zoom + ', "' + val[i].active + '")';
if(i < (val.length - 1))
{
sql = sql + ',';
}
}
this.storage.executeSql(sql, {})
.then((data) =>
{
//console.log("countries TABLE INSERTED RECORDS");
},
(error) =>
{
console.log("ERROR: " + JSON.stringify(error.err));
});
}
}

Case Study #3 - Appy Mapper
578
After previous chapters and code examples the Database provider should make
sense but let’s break each section of the above script down in more detail so we
truly understand what their purpose is.
We begin with importing the SQLite plugin from Ionic Native and the Files service
(which will be subsequently used to load the necessary JSON les for the app)
followed by dening some properties to be used by the Database provider and then
initialise a public property named les within the class constructor:
...
import { SQLite } from 'ionic-native';
...
import { Files } from '../providers/les';
@Injectable()
export class Database {
public data : any = null;
public storage : any = null;
public dbName : string = "appyMapper.db";
public locations : any = [];
public countries : any = [];
constructor(
public http : Http,
public les : Files
)
{
this.data = null;
}

579
Mastering Ionic 2
The createDatabase method, which follows after the constructor declaration, is
used, as the name implies, to create the database for the application.
If the database is successfully created the createDatabaseTables method is then
called to set up the necessary tables for subsequently storing the list of European
countries and Apple Store locations:
createDatabase()
{
this.storage = new SQLite();
this.storage.openDatabase({
name : this.dbName,
location : 'default' // the location eld is required
})
.then((data) =>
{
console.log("Opened database");
this.createDatabaseTables();
},
(err) =>
{
console.error('Unable to open database: ', err);
});
}
createDatabaseTables()
{
this.createCountriesTable();
this.createStorelocationsTable();
}
The Database provider then goes on to generate the createCountriesTable and
createStorelocationsTable methods - each of which declare eld denitions that
match up to those of the keys in the respective JSON les that were imported

580
Case Study #3 - Appy Mapper
through the Files service.
Structuring the elds in this way allows for straightforward one-to-one insertion of
data from each JSON le to its respective database table when parsing the les a
little later on in the script:
createCountriesTable()
{
this.storage.executeSql('CREATE TABLE IF NOT EXISTS countries (id
INTEGER PRIMARY KEY AUTOINCREMENT, country TEXT NOT NULL, lat
TEXT NOT NULL, lng TEXT NOT NULL, zoom INTEGER NOT NULL, active
TEXT NOT NULL)' {})
.then((data) =>
{
console.log("countries TABLE CREATED : " + JSON.stringify(data));
},
(error) =>
{
console.log("Error: " + JSON.stringify(error.err));
console.dir(error);
});
}
createStorelocationsTable()
{
this.storage.executeSql('CREATE TABLE IF NOT EXISTS storeLocations
(id INTEGER PRIMARY KEY AUTOINCREMENT, country INTEGER NOT
NULL, name TEXT NOT NULL, address TEXT NOT NULL, lat TEXT NOT
NULL, lng TEXT NOT NULL, zoom INTEGER NOT NULL, active TEXT NOT
NULL)', {})
.then((data) =>
{
console.log("storeLocations TABLE CREATED: " + JSON.stringify(da-

Mastering Ionic 2
581
ta));
},
(error) =>
{
console.log("Error: " + JSON.stringify(error.err));
console.dir(error);
});
}
Now we create the retrieveStoreLocations method to return data for all of the
Apple Store locations that we have imported into the app.
This method determines whether we load the Apple Store locations from the
database or from the JSON object created through the loadLocations method of
the Files service.
If no data is found in the storeLocations table the JSON object is returned instead
with its data also being used to populate the storeLocations table:
retrieveStorelocations()
{
return new Promise(resolve =>
{
this.storage.executeSql("SELECT * FROM storeLocations WHERE
active='Y'", {})
.then((data) =>
{
this.locations = [];
if(data.rows.length > 0)
{
let k;
for(k = 0; k < data.rows.length; k++)
{
this.locations.push({

Case Study #3 - Appy Mapper
582
country : data.rows.item(k).country,
name : data.rows.item(k).name,
address : data.rows.item(k).address,
lat : data.rows.item(k).lat,
lng : data.rows.item(k).lng,
zoom : data.rows.item(k).zoom
});
}
}
else
{
var numLocations = this.les.getLocationsFromJSON(),
isFavourite = "N",
k;
for(k = 0; k < numLocations.length; k++)
{
this.locations.push({
country : numLocations[k].country,
name : numLocations[k].name,
address : numLocations[k].address,
lat : numLocations[k].lat,
lng : numLocations[k].lng,
zoom : numLocations[k].zoom,
active : numLocations[k].active
});
}
this.insertStoreLocationsToTable(numLocations, isFavourite);
}
resolve(this.locations);
},
(error) =>
{

Mastering Ionic 2
583
console.log("Error retrieving locations from retrieveStoreLocations:
" + JSON.stringify(error));
});
});
}
The insertStoreLocationsToTable method follows immediately afterwards and
handles the bulk inserts of all Apple Store locations to the storeLocations table:
insertStoreLocationsToTable(val, isFavourite)
{
var i,
sql = 'INSERT INTO storeLocations(country, name, address, lat,
lng, zoom, active) VALUES';
for(i = 0; i < val.length; i++)
{
sql = sql + '("' + val[i].country + '", "' + val[i].name + '", "' + val[i].ad-
dress + '", "' + val[i].lat + '", "' + val[i].lng + '", ' + val[i].zoom + ', "' + val[i].
active + '")';
if(i < (val.length - 1))
{
sql = sql + ',';
}
}
this.storage.executeSql(sql, {})
.then((data) =>
{
//console.log("storeLocations TABLE INSERTED RECORDS");
},
(error) =>
{

Case Study #3 - Appy Mapper
584
console.log("Error: " + JSON.stringify(error.err));
});
}
Following from this the retrieveCountries method is used to return data for all of the
European countries that we have imported into the app.
Similar to the retrieveStoreLocations method this determines whether we load the
records of countries from the database or from the JSON object created through the
loadCountries method of the Files service.
If no data is found in the countries table the JSON object is returned instead with its
data also being used to populate the countries table:
retrieveCountries()
{
return new Promise(resolve =>
{
this.storage.executeSql("SELECT * FROM countries WHERE ac-
tive='Y'", {})
.then((data) =>
{
this.countries = [];
if(data.rows.length > 0)
{
let k;
for(k = 0; k < data.rows.length; k++)
{
this.countries.push({
id : data.rows.item(k).id,
country : data.rows.item(k).country,
lat : data.rows.item(k).lat,
lng : data.rows.item(k).lng,

Mastering Ionic 2
585
zoom : data.rows.item(k).zoom,
active : data.rows.item(k).active
});
}
}
else
{
//console.log("No data found in countries table");
let numCountries = this.les.getCountriesFromJSON(),
k;
for(k = 0; k < numCountries.length; k++)
{
if(numCountries[k].isActive !== "N")
{
this.countries.push({
id : numCountries[k].id,
country : numCountries[k].country,
lat : numCountries[k].lat,
lng : numCountries[k].lng,
zoom : numCountries[k].zoom,
active : numCountries[k].active
});
}
}
this.insertCountriesToTable(numCountries);
}
resolve(this.countries);
},
(error) =>
{
console.log("Error retrieving countries from retrieveCountries: " +
JSON.stringify(error));

Case Study #3 - Appy Mapper
586
});
});
}
Finally we complete our Database provider with the insertCountriesToTable
method which like the insertStoreLocationsToTable method handles the bulk
inserts of all imported European countries to the countries table:
insertCountriesToTable(val)
{
var i,
sql = 'INSERT INTO countries(country, lat, lng, zoom, active) VAL-
UES';
for(i = 0; i < val.length; i++)
{
sql = sql + '("' + val[i].country + '", "' + val[i].lat + '", "' + val[i].lng + '",
' + val[i].zoom + ', "' + val[i].active + '")';
if(i < (val.length - 1))
{
sql = sql + ',';
}
}
this.storage.executeSql(sql, {})
.then((data) =>
{
//console.log("countries TABLE INSERTED RECORDS");
},
(error) =>
{
console.log("ERROR: " + JSON.stringify(error.err));
});
}

Mastering Ionic 2
587
distances.ts
Our third and nal provider, the appyMapper/src/providers/distances.ts le,
handles the required logic for calculating the nearest Apple Store to a user’s location
- this does assume that the user is one of the following countries OR very close to:
• Belgium
• France
• Germany
• Netherlands
• United Kingdom
If the user happens to be somewhere completely different then the logic will not be
able to nd an Apple Store (or Stores) nearest to their current location due to the
data set being used!
With that said let’s look at the logic used to calculate the nearest store(s) based on
range/location (amendments highlighted in bold):
import { Injectable } from '@angular/core';
import { Http } from '@angular/http';
import 'rxjs/add/operator/map';
@Injectable()
export class Distances {
constructor(public http: Http)
{
}
convertDegreesToRadians(degree)
{
return degree * (Math.PI / 180);

Case Study #3 - Appy Mapper
588
}
calculateDistanceInKilometres(latitudeOne, longitudeOne, latitudeTwo,
longitudeTwo)
{
let radiusOfEarth = 6371, // Radius of the earth in km
degreesLat = this.convertDegreesToRadians(latitudeTwo -
latitudeOne),
degreesLon = this.convertDegreesToRadians(longitudeTwo
- longitudeOne),
calculationOne = Math.sin(degreesLat/2) * Math.sin(degree-
sLat/2),
calculationTwo = Math.cos(this.convertDegreesToRadians(lat-
itudeOne)) * Math.cos(this.convertDegreesToRadians(latitudeTwo)),
calculationThree = Math.sin(degreesLon/2) * Math.sin(de-
greesLon/2),
sumTotal = calculationOne + calculationTwo * calcula-
tionThree,
nalSum = 2 * Math.atan2(Math.sqrt(sumTotal), Math.
sqrt(1-sumTotal)),
actualDistance = radiusOfEarth * nalSum;
return actualDistance;
}
}
Even though there are only 2 methods in the provider this is easily the most complex
logic required for the nearest store to current location functionality.
The rst of these methods - convertDegreesToRadians - is used to convert a
latitude or longitude coordinate value into a radian to be able to be used to help
calculate distances within the calculateDistanceInKilometres method:

589
Mastering Ionic 2
convertDegreesToRadians(degree)
{
return degree * (Math.PI / 180);
}
So why do we need to convert map coordinates to radians instead of being able to
directly use the latitude and longitude values?
It all boils down to the math and the numbers required to be able to calculate the
distances between different coordinate sets.
This online resource explains in further detail.
The second and nal method - calculateDistanceInKilometres - accepts the
following 4 parameters:
• latitudeOne (The user’s current latitude)
• longitudeOne (The user’s current longitude)
• latitudeTwo (A latitude coordinate for an Apple Store location)
• longitudeTwo (A longitude coordinate for an Apple Store location)
These are then used in a quite complicated mathematical formula within the
method - which I’m not even going to try and explain in depth (as, to be honest, I
don’t fully understand every aspect of the logic myself!) - that involves the use of
trigonometric functions to calculate distances between the location coordinates
(which have been converted from degrees into radians) while taking into account the
curvature of the earth (based on the radius of the planet in kilometres).
Once calculated the distance is then returned by the method:
calculateDistanceInKilometres(latitudeOne, longitudeOne, latitudeTwo,
longitudeTwo)
{
let radiusOfEarth = 6371, // Radius of the earth in km

590
Case Study #3 - Appy Mapper
degreesLat = this.convertDegreesToRadians(latitudeTwo - lati-
tudeOne),
degreesLon = this.convertDegreesToRadians(longitudeTwo -
longitudeOne),
calculationOne = Math.sin(degreesLat/2) * Math.sin(degreesLat/2),
calculationTwo = Math.cos(this.convertDegreesToRadians(latitude-
One)) * Math.cos(this.convertDegreesToRadians(latitudeTwo)),
calculationThree = Math.sin(degreesLon/2) * Math.sin(degreesLon/2),
sumTotal = calculationOne + calculationTwo * calculation-
Three,
nalSum = 2 * Math.atan2(Math.sqrt(sumTotal), Math.
sqrt(1-sumTotal)),
actualDistance = radiusOfEarth * nalSum;
return actualDistance;
}
The trigonometry/math for this particular method was derived from something called
the Haversine formula which is covered in great detail through this particular online
resource.
It’s worth reading this online resource just to get a handle on the logic behind the
formula but, unless you’re quite mathematically inclined, don’t expect to nd it the
easiest of material to spend time trying to digest!
That covers the necessary provider logic for our app but before we progress onto
using these in our home page component we need to make them available for use
within the app through the following modications (highlighted in bold) to the
appyMapper/src/app/app.module.ts le:
import { NgModule, ErrorHandler } from '@angular/core';
import { IonicApp, IonicModule, IonicErrorHandler } from 'ionic-angular';
import { MyApp } from './app.component';
import { Database } from '../providers/database';

Mastering Ionic 2
591
import { Distances } from '../providers/distances';
import { Files } from '../providers/les';
import { Sanitiser } from '../pipes/sanitiser';
import { HomePage } from '../pages/home/home';
@NgModule({
declarations: [
MyApp,
HomePage,
Sanitiser
],
imports: [
IonicModule.forRoot(MyApp)
],
bootstrap: [IonicApp],
entryComponents: [
MyApp,
HomePage
],
providers: [{provide: ErrorHandler, useClass: IonicErrorHandler}, Database,
Distances, Files, Sanitiser]
})
export class AppModule {}
The eagle-eyed amongst you may have noticed the addition of a certain pipe in the
above code named Sanitiser.
This will be used to ‘sanitise’ and trust any HTML tags contained within the parsed
locations data that was inserted into the storeLocations table from the locations
JSON le.
Before we go any further open the appyMapper/src/pipes/sanitiser.ts le and
implement the following logic to assist with making the HTML input for the store
locations data ‘trustworthy’ (amendments highlighted in bold):

Case Study #3 - Appy Mapper
592
import { Injectable, Pipe, PipeTransform } from '@angular/core';
import {DomSanitizer, SafeHtml } from '@angular/platform-browser';
@Pipe({
name: 'sanitiser'
})
@Injectable()
export class Sanitiser implements PipeTransform
{
constructor(public _sanitise: DomSanitizer)
{
}
transform(v: string)
{
return this._sanitise.bypassSecurityTrustHtml(v);
}
}
This is a fairly simple and straightforward script that imports and uses Angular 2’s
DomSanitizer and SafeHtml modules to bypass security and trust the string that
contains the HTML value which is supplied in the transform method.
As we are loading and working with locally imported location data that we know can
be trusted use of this pipe won’t cause any security issues or concerns.
If, however, we were working with third-party, remote data that was being imported
into the app (such as a social media feed) it would be wise, in such a context, to
take a much stricter data handling policy.

Mastering Ionic 2
593
After all, it’s better to be safe than sorry for the sake of expediency!
With our pipe now completed, saved and, along with the app providers, added to
the appyMapper/src/app/app.module.ts le we can begin to turn our attention to
scripting and bringing together all of the different application logic within our
appyMapper/src/pages/home/home.ts le (amendments highlighted in bold):
import { Component, ViewChild } from '@angular/core';
import { Content,
NavController,
Platform,
ToastController } from 'ionic-angular';
import { Geolocation,
GoogleMap,
GoogleMapsAnimation,
GoogleMapsEvent,
GoogleMapsLatLng } from 'ionic-native';
import { Database } from '../../providers/database';
import { Distances } from '../../providers/distances';
import { Sanitiser } from '../../pipes/sanitiser';
@Component({
selector: 'page-home',
templateUrl: 'home.html'
})
export class HomePage {
@ViewChild(Content) content: Content;
private coords : any = {};
private europe : any = {};
private map : GoogleMap;
private location : any;
public allStores : any;

Case Study #3 - Appy Mapper
594
public locations : any;
public locationsPresent : any = false;
public countries : any;
public markers : any = [];
public byCountry : any;
public byNearest : any;
public displayFilters : boolean = false;
public ltersText : string = "Display Filters";
public summary : string;
constructor(public navCtrl : NavController,
public platform : Platform,
public DB : Database,
public DIST : Distances,
public toastCtrl : ToastController)
{
this.platform.ready().then(() =>
{
GoogleMap.isAvailable()
.then((isAvailable: boolean)=>
{
if(!isAvailable)
{
console.log('GoogleMap plugin is NOT available');
}
else
{
console.log('GoogleMap plugin is available');
Geolocation.getCurrentPosition().then((resp) =>
{

Mastering Ionic 2
595
this.coords = {
lat : resp.coords.latitude,
lng : resp.coords.longitude
};
this.europe = {
lat : '50.537421',
lng : '15.114438'
};
this.location = new GoogleMapsLatLng(this.europe.lat, this.
europe.lng);
this.map = new GoogleMap('map', {
'backgroundColor': 'white',
'controls' : {
'compass': true,
'indoorPicker': true,
'zoom': true
},
'camera': {
'latLng': this.location,
'tilt': 90,
'zoom': 3,
'bearing': 0
},
'gestures': {
'scroll': true,
'tilt': true,
'rotate': true,
'zoom': true
}
});

Case Study #3 - Appy Mapper
596
this.map.on(GoogleMapsEvent.MAP_READY).subscribe(() =>
{
DB.retrieveStorelocations().then((data) =>
{
this.allStores = data;
this.locations = data;
this.renderLocations(this.map, this.locations, null, null);
this.summary = `${this.locations.length} Apple Stores`;
});
DB.retrieveCountries().then((data) =>
{
this.countries = data;
});
});
})
.catch((error) =>
{
console.dir(error);
});
}
});
});
}
renderLocations(map, locations, lat = null, lng = null, zoom = null)
{
let k;
if(lat !== null && lng !== null && zoom !== null)
{
let LOCATIONS = new GoogleMapsLatLng(lat, lng);

Mastering Ionic 2
597
map.animateCamera({
'target': LOCATIONS,
'tilt': 90,
'zoom': zoom,
'bearing': 0,
'duration': 1500
},
function()
{
console.log("The animation is done");
});
}
if(locations.length !== 0)
{
for(k in locations)
{
let markerOptions = {
‘position’ : new GoogleMapsLatLng( locations[k].lat,
locations[k].lng),
'title' : locations[k].name,
animation : GoogleMapsAnimation.DROP,
'styles' : {
'text-align' : 'right',
'color' : 'grey'
}
};
map.addMarker(markerOptions, this.onMarkerAdded);
};
this.locationsPresent = true;
this.locations = locations;
}
else

Case Study #3 - Appy Mapper
598
{
let message = "No stores were found for your selected search crite-
ria. Please try a different search.";
this.storeNotication(message);
this.locationsPresent = false;
}
}
renderAllStoreLocations()
{
this.scrollToTopOfScreen();
this.removeMapMarkers();
this.locations = this.allStores;
let zoom = 3;
this.renderLocations(this.map,
this.locations,
this.europe.lat, this.europe.lng, zoom);
this.displayLocationFilters();
this.summary = `${this.locations.length} Apple Stores`;
}
renderLocationsByCountry(id)
{
let j,
k,
stores = [],
country,
lat,
lng,
zoom,

num = Number(id);
for(k in this.countries)
{
if(num === this.countries[k].id)
{
country = this.countries[k].country;
lat = this.countries[k].lat;
lng = this.countries[k].lng;
zoom = this.countries[k].zoom;
}
}
for(j in this.allStores)
{
if(num === this.allStores[j].country)
{
stores.push({
id : this.allStores[j].id,
country : this.allStores[j].country,
name : this.allStores[j].name,
address : this.allStores[j].address,
lat : this.allStores[j].lat,
lng : this.allStores[j].lng,
zoom : this.allStores[j].zoom,
isFavourite : this.allStores[j].isFavourite
});
}
}
this.renderLocations(this.map, stores, lat, lng, zoom);
this.summary = `${country} - ${this.locations.length} Apple Stores`;
}
599
Mastering Ionic 2

onMarkerAdded(marker)
{
this.markers.push(marker);
}
removeMapMarkers()
{
this.markers.length = 0;
this.map.clear();
}
lterLocationsByCountry(byCountry)
{
this.removeMapMarkers();
this.scrollToTopOfScreen();
this.renderLocationsByCountry(byCountry);
this.displayLocationFilters();
}
lterLocationsByNearest(byNearest)
{
this.removeMapMarkers();
this.scrollToTopOfScreen();
this.determineNearestLocations(byNearest);
this.displayLocationFilters();
}
determineNearestLocations(range)
{
600
Case Study #3 - Appy Mapper

Mastering Ionic 2
601
let j,
currentGeoLat = this.coords.lat,
currentGeoLng = this.coords.lng,
stores = [],
rangeToSearch = Number(range),
zoom = 4;
for(j in this.allStores)
{
var storeLat = this.allStores[j].lat,
storeLng = this.allStores[j].lng,
distance = this.DIST.calculateDistanceInKilometres(
currentGeoLat,
currentGeoLng,
storeLat,
storeLng);
if(distance <= rangeToSearch)
{
stores.push({
id : this.allStores[j].id,
country : this.allStores[j].country,
name : this.allStores[j].name,
address : this.allStores[j].address,
lat : this.allStores[j].lat,
lng : this.allStores[j].lng,
zoom : this.allStores[j].zoom,
isFavourite : this.allStores[j].isFavourite,
distance : distance
});
}
}

Case Study #3 - Appy Mapper
602
this.renderLocations(this.map,
stores,
currentGeoLat,
currentGeoLng,
zoom);
this.summary = `${stores.length} Apple Stores found within ${range-
ToSearch} Km of your location`;
}
scrollTheScreen()
{
this.content.scrollTo(0, 300, 750);
}
scrollToTopOfScreen()
{
this.content.scrollTo(0, 0, 750);
}
storeNotication(message) : void
{
let notication = this.toastCtrl.create({
message : message,
duration : 3000
});
notication.present();
}
displayLocationFilters()
{

Mastering Ionic 2
603
this.scrollTheScreen();
this.displayFilters = !this.displayFilters;
if(this.displayFilters)
{
this.ltersText = "Hide these lters";
}
else
{
this.ltersText = "Display Filters";
}
}
}
As you can see with the appyMapper/src/pages/home/home.ts script there’s quite
a lot going on! As we did with the providers let’s go over each section in more detail
so we have a complete understanding of what the script is designed to do.
As with all TypeScript classes we begin by importing the necessary modules for our
application logic, in particular, the GoogleMap related modules and our custom
providers and pipes.
We then use the ViewChild annotation, within the HomePage class, to congure
the script to be able to access the Ionic 2 Content component and its methods.
Following from this a range of private and public properties are then dened that will
be used to work with data, Ionic native plugins and Ionic 2 UI components:
import { Component, ViewChild } from '@angular/core';
import { Content,
NavController,
Platform,
ToastController } from 'ionic-angular';
import { Geolocation,

Case Study #3 - Appy Mapper
604
GoogleMap,
GoogleMapsAnimation,
GoogleMapsEvent,
GoogleMapsLatLng } from 'ionic-native';
import { Database } from '../../providers/database';
import { Distances } from '../../providers/distances';
import { Sanitiser } from '../../pipes/sanitiser';
@Component({
selector: 'page-home',
templateUrl: 'home.html'
})
export class HomePage {
@ViewChild(Content) content: Content;
private coords : any = {};
private europe : any = {};
private map : GoogleMap;
private location : any;
public allStores : any;
public locations : any;
public locationsPresent : any = false;
public countries : any;
public markers : any = [];
public byCountry : any;
public byNearest : any;
public displayFilters : boolean = false;
public ltersText : string = "Display Filters";
public summary : string;
We then pass the names of selected modules into the class constructor using these
to initialise properties for our database and distances providers, as well as the Ionic
2 ToastController component.

Mastering Ionic 2
605
Within the constructor we then implement the platform.ready method to ensure that
calls to the GoogleMap plugin methods are able to be executed once the platform
has loaded and is able to be accessed.
The GoogleMap plugin performs a conditional check using the isAvailable method
to determine whether the plugin is able to be accessed or not.
If the GoogleMap plugin is able to be accessed then the user’s current geolocation
position is captured, coordinates for the European continent are dened and
supplied to create a new GoogleMap instance and, once the GoogleMap has been
successfully initialised and is ready for use, the DB.retrieveStorelocations() and
DB.retrieveCountries methods are called to return the required data to power the
app with:
this.platform.ready().then(() =>
{
GoogleMap.isAvailable()
.then((isAvailable: boolean)=>
{
if(!isAvailable)
{
console.log('GoogleMap plugin is NOT available');
}
else
{
console.log('GoogleMap plugin is available');
Geolocation.getCurrentPosition().then((resp) =>
{
this.coords = {
lat : resp.coords.latitude,
lng : resp.coords.longitude
};
this.europe = {

Case Study #3 - Appy Mapper
606
lat : '50.537421',
lng : '15.114438'
};
this.location = new GoogleMapsLatLng(this.europe.lat,
this.europe.lng);
this.map = new GoogleMap('map', {
'backgroundColor': 'white',
'controls' : {
'compass': true,
'indoorPicker': true,
'zoom': true
},
'camera': {
'latLng': this.location,
'tilt': 90,
'zoom': 3,
'bearing': 0
},
'gestures': {
'scroll': true,
'tilt': true,
'rotate': true,
'zoom': true
}
});
this.map.on(GoogleMapsEvent.MAP_READY).subscribe(() =>
{
DB.retrieveStorelocations().then((data) =>
{
this.allStores = data;
this.locations = data;
this.renderLocations(this.map, this.locations, null, null);

Mastering Ionic 2
607
this.summary = `${this.locations.length} Apple Stores`;
});
DB.retrieveCountries().then((data) =>
{
this.countries = data;
});
});
})
.catch((error) =>
{
console.dir(error);
});
}
});
});
The renderLocations method is used to render map markers to the GoogleMap
instance that display the locations for the Apple Stores retrieved from the supplied
data set.
A conditional check is performed within the method to determine whether or not map
latitude, longitude and zoom supplied parameters have been provided.
If they have the GoogleMap instance is positioned to the supplied coordinate values
(which will be the case when the user lters locations by country or nearest stores to
their current geographical location).
If no store locations were supplied to the method the user is informed of the fact
through the storeNotication method and a boolean value of false is set for the
locationsPresent property which is used to hide any previous store listings from
being displayed on the HTML template underneath the GoogleMap instance:

Case Study #3 - Appy Mapper
608
renderLocations(map, locations, lat = null, lng = null, zoom = null)
{
let k;
if(lat !== null && lng !== null && zoom !== null)
{
let LOCATIONS = new GoogleMapsLatLng(lat, lng);
map.animateCamera({
'target': LOCATIONS,
'tilt': 90,
'zoom': zoom,
'bearing': 0,
'duration': 1500
},
function()
{
console.log("The animation is done");
});
}
if(locations.length !== 0)
{
for(k in locations)
{
let markerOptions = {
'position' : new GoogleMapsLatLng( locations[k].lat,
locations[k].lng),
'title' : locations[k].name,
animation : GoogleMapsAnimation.DROP,
'styles' : {
'text-align' : 'right',
'color' : 'grey'
}

Mastering Ionic 2
609
};
map.addMarker(markerOptions, this.onMarkerAdded);
};
this.locationsPresent = true;
this.locations = locations;
}
else
{
let message = "No stores were found for your selected search criteria.
Please try a different search.";
this.storeNotication(message);
this.locationsPresent = false;
}
}
The renderAllStoreLocations method, as the name implies, is used to render all
Apple Store locations from the loaded data set.
This method would only be triggered once a user has pressed the Display ALL
Stores button situated in the location lters section of the HTML template.
Once pressed the method scrolls the page back towards the top of the screen to
ensure the map is displayed to the user, removes all current map markers, calls the
renderLocations method (supplying latitude, longitude and zoom values as method
parameters), hides the display of the location lters and updates the text beneath
the GoogleMap instance on the page:
renderAllStoreLocations()
{
this.scrollToTopOfScreen();
this.removeMapMarkers();
this.locations = this.allStores;
let zoom = 3;

Case Study #3 - Appy Mapper
610
this.renderLocations(this.map,
this.locations,
this.europe.lat, this.europe.lng, zoom);
this.displayLocationFilters();
this.summary = `${this.locations.length} Apple Stores`;
}
Following from this the renderLocationsByCountry method denes the logic for
ltering Apple Store locations based on the supplied country ID value.
As countries matching the supplied ID are found these are pushed into an array
which, upon completion, are passed to the renderLocations method, along with the
necessary country specic latitude, longitude and zoom values, to show only Apple
Store locations for that country on the GoogleMap instance:
renderLocationsByCountry(id)
{
let j,
k,
stores = [],
country,
lat,
lng,
zoom,
num = Number(id);
for(k in this.countries)
{
if(num === this.countries[k].id)
{
country = this.countries[k].country;
lat = this.countries[k].lat;
lng = this.countries[k].lng;
zoom = this.countries[k].zoom;
}

Mastering Ionic 2
611
}
for(j in this.allStores)
{
if(num === this.allStores[j].country)
{
stores.push({
id : this.allStores[j].id,
country : this.allStores[j].country,
name : this.allStores[j].name,
address : this.allStores[j].address,
lat : this.allStores[j].lat,
lng : this.allStores[j].lng,
zoom : this.allStores[j].zoom,
isFavourite : this.allStores[j].isFavourite
});
}
}
this.renderLocations(this.map, stores, lat, lng, zoom);
this.summary = `${country} - ${this.locations.length} Apple Stores`;
}
Methods to handle the addition and removal of map markers are dened shortly
afterwards:
onMarkerAdded(marker)
{
this.markers.push(marker);
}
removeMapMarkers()
{
this.markers.length = 0;

Case Study #3 - Appy Mapper
612
this.map.clear();
}
The lterLocationsByCountry method is dened next which is used to clear the
map of currently displayed Apple Store locations, scrolls the page back to the top of
the screen, passes the supplied country value to the renderLocationsByCountry
method and subsequently handles hiding the display of the locations lters on the
HTML template through the displayLocationFilters method:
lterLocationsByCountry(byCountry)
{
this.removeMapMarkers();
this.scrollToTopOfScreen();
this.renderLocationsByCountry(byCountry);
this.displayLocationFilters();
}
Similarly the lterLocationsByNearest method performs exactly the same function
with one major difference: store locations are ltered by those nearest to the user’s
current geographical location using the determineNearestLocations which accepts
a single parameter - the range in kilometres that the user wants to search within.
lterLocationsByNearest(byNearest)
{
this.removeMapMarkers();
this.scrollToTopOfScreen();
this.determineNearestLocations(byNearest);
this.displayLocationFilters();
}
The determineNearestLocations method handles the logic for ltering through all
of the imported European Apple Store locations to determine, using the Distances
provider’s calculateDistanceInKilometres method, which Apple stores fall within
the range specied by the user based on their supplied geographical location.

Mastering Ionic 2
613
Stores that meet the search criteria are pushed into a stores object which, once all
matching locations have been found, is then supplied as one of the parameters for
the renderLocations method (along with the user’s current geolocation
coordinates), to display those store locations on both the GoogleMap instance and
in the store listings underneath the map:
determineNearestLocations(range)
{
let j,
currentGeoLat = this.coords.lat,
currentGeoLng = this.coords.lng,
stores = [],
rangeToSearch = Number(range),
zoom = 4;
for(j in this.allStores)
{
var storeLat = this.allStores[j].lat,
storeLng = this.allStores[j].lng,
distance = this.DIST.calculateDistanceInKilometres(
currentGeoLat,
currentGeoLng,
storeLat,
storeLng);
if(distance <= rangeToSearch)
{
stores.push({
id : this.allStores[j].id,
country : this.allStores[j].country,
name : this.allStores[j].name,
address : this.allStores[j].address,
lat : this.allStores[j].lat,
lng : this.allStores[j].lng,

Case Study #3 - Appy Mapper
614
zoom : this.allStores[j].zoom,
isFavourite : this.allStores[j].isFavourite,
distance : distance
});
}
}
this.renderLocations(this.map,
stores,
currentGeoLat,
currentGeoLng,
zoom);
this.summary = `${stores.length} Apple Stores found within ${rangeTo-
Search} Km of your location`;
}
Following this methods for scrolling the page to specic positions on the screen are
dened:
scrollTheScreen()
{
this.content.scrollTo(0, 300, 750);
}
scrollToTopOfScreen()
{
this.content.scrollTo(0, 0, 750);
}
Along with the storeNotication method which provides the user with a supplied
message, to be displayed at the bottom of the screen for a maximum of 3 seconds,
using the Ionic 2 ToastController component:

Mastering Ionic 2
615
storeNotication(message) : void
{
let notication = this.toastCtrl.create({
message : message,
duration : 3000
});
notication.present();
}
Finally the displayLocationFilters, as the name suggests, handles the display of
the location lters in the HTML template along with the text for the button handling
the display/non-display of those lters:
displayLocationFilters()
{
this.scrollTheScreen();
this.displayFilters = !this.displayFilters;
if(this.displayFilters)
{
this.ltersText = "Hide these lters";
}
else
{
this.ltersText = "Display Filters";
}
}
So that pretty much concludes the logic driving the app functionality.
Hopefully you get a good idea of how this is used to implement features such as
ltering Apple Store locations by country or those nearest to a user’s current
geolocation coordinates - now let’s take a look at the HTML used in the home page
component’s template.

Case Study #3 - Appy Mapper
616
HTML
Open the appyMapper/src/pages/home/home.html template and make the
following amendments (highlighted in bold):
<ion-header>
<ion-navbar>
<ion-title>
Appy Mapper
</ion-title>
</ion-navbar>
</ion-header>
<ion-content>
<div id="map"></div>
<span class="map-information">{{ summary }}</span>
<ion-card>
<ion-card-header>
<button
ion-button
color="primary"
text-align
block
(click)="displayLocationFilters()">{{ ltersText }}</button>
</ion-card-header>
<div *ngIf="displayFilters" padding>
<ion-segment [(ngModel)]="lters">
<ion-segment-button value="country">
Country
</ion-segment-button>
<ion-segment-button value="byNearest">

Mastering Ionic 2
617
Nearest
</ion-segment-button>
</ion-segment>
<div class="lters" [ngSwitch]="lters">
<ion-list>
<ion-item *ngSwitchCase="'country'">
<ion-label>Country</ion-label>
<ion-select
[(ngModel)]="byCountry"
(ionChange)="lterLocationsByCountry(byCountry)">
<ion-option>Select a country...</ion-option>
<ion-option
*ngFor="let country of countries"
value="{{ country.id }}">{{ country.country }}</ion-option>
</ion-select>
</ion-item>
<ion-item *ngSwitchCase="'byNearest'">
<ion-label>Nearest store to me:</ion-label>
<ion-select
[(ngModel)]="byNearest"
(ionChange)="lterLocationsByNearest(byNearest)">
<ion-option value="50">50 Miles</ion-option>
<ion-option value="100">100 Miles</ion-option>
<ion-option value="250">250 Miles</ion-option>
<ion-option value="500">500 Miles</ion-option>
<ion-option value="1000">1000 Miles</ion-option>
</ion-select>
</ion-item>
</ion-list>
</div>

Case Study #3 - Appy Mapper
618
<button class="reset"
ion-button
color="secondary"
text-align
block
(click)="renderAllStoreLocations()">Display ALL Stores</button>
</div>
</ion-card>
<div *ngIf="locationsPresent">
<ion-card *ngFor="let location of locations">
<ion-card-header>
<ion-item class="heading">
<ion-icon ios="logo-apple"
md="logo-apple"
item-left></ion-icon>
<h2>{{ location.name }}</h2>
</ion-item>
</ion-card-header>
<ion-card-content>
<div
class="location-address"
[innerHTML]="location.address | sanitiser"></div>
</ion-card-content>
</ion-card>
<button
ion-button
color="secondary"
text-align
block
Mastering Ionic 2
619
(click)="scrollToTopOfScreen()">Back to Top</button>
</div>
</ion-content>
That’s a lot of HTML so let’s break this down section-by-section.
Firstly we dene the HTML area for the map and the location summary displayed
underneath the map:
<div id="map"></div>
<span class="map-information">{{ summary }}</span>
We then create the button to operate displaying/hiding the lters for the Apple Store
Locations using the displayLocationFilters click event:
<ion-card-header>
<button
ion-button
color="primary"
text-align
block
(click)="displayLocationFilters()">{{ ltersText }}</button>
</ion-card-header>
The lters, consisting of by European country and by stores nearest to the user’s
current geolocation, are operated through buttons situated within <ion-segment>
components.
Each lter is displayed using an ngSwitch directive which uses the value from the
button within the <ion-segment> to determine what is/isn’t activated on the page.
When a selection is made with either lter the attached ionChange event triggers
a function call which accepts the selected value retrieved from the ngModel for that
particular lter.

Case Study #3 - Appy Mapper
620
The nal lter, used to display All Apple Store locations through the attached click
event calling the renderAllStoreLocations method, is situated underneath all other
lters in its own block level button.
The buttons to operate the lters, along with the lters themselves, are contained
within an ngIf directive whose value determines whether or not they are displayed
on the page:
<div *ngIf="displayFilters" padding>
<ion-segment [(ngModel)]="lters">
<ion-segment-button value="country">
Country
</ion-segment-button>
<ion-segment-button value="byNearest">
Nearest
</ion-segment-button>
</ion-segment>
<div class="lters" [ngSwitch]="lters">
<ion-list>
<ion-item *ngSwitchCase="'country'">
<ion-label>Country</ion-label>
<ion-select
[(ngModel)]="byCountry"
(ionChange)="lterLocationsByCountry(byCountry)">
<ion-option>Select a country...</ion-option>
<ion-option
*ngFor="let country of countries"
value="{{ country.id }}">{{ country.country }}</ion-option>
</ion-select>
</ion-item>
<ion-item *ngSwitchCase="'byNearest'">

Mastering Ionic 2
621
<ion-label>Nearest store to me:</ion-label>
<ion-select
[(ngModel)]="byNearest"
(ionChange)="lterLocationsByNearest(byNearest)">
<ion-option value="50">50 Miles</ion-option>
<ion-option value="100">100 Miles</ion-option>
<ion-option value="250">250 Miles</ion-option>
<ion-option value="500">500 Miles</ion-option>
<ion-option value="1000">1000 Miles</ion-option>
</ion-select>
</ion-item>
</ion-list>
</div>
<button class="reset"
ion-button
color="secondary"
text-align
block
(click)="renderAllStoreLocations()">Display ALL Stores</button>
</div>
Underneath the lters the nal section of the page HTML is used to display a list of
the locations displayed on the GoogleMap instance followed by a block level
button to allow the user to scroll back to the top of the screen by triggering the
attached click event for the scrollToTopOfScreen method.
Notice in the ngFor loop, where the location details are being iterated through and
rendered into <ion-card> components, the use of the sanitiser class appended as
a pipe to the value of the innerHTML property for the location address?
This is where the pipe that we created earlier for sanitising HTML output is nally
used!

Case Study #3 - Appy Mapper
622
<div *ngIf="locationsPresent">
<ion-card *ngFor="let location of locations">
<ion-card-header>
<ion-item class="heading">
<ion-icon ios="logo-apple"
md="logo-apple"
item-left></ion-icon>
<h2>{{ location.name }}</h2>
</ion-item>
</ion-card-header>
<ion-card-content>
<div
class="location-address"
[innerHTML]="location.address | sanitiser"></div>
</ion-card-content>
</ion-card>
<button
ion-button
color="secondary"
text-align
block
(click)="scrollToTopOfScreen()">Back to Top</button>
</div>
All of the locations output being rendered into <ion-card> components is wrapped
within an ngIf directive that relies on the value of the locationsPresent property to
determine whether or not to display the rendered locations.
This conditional directive is useful where a nearest location search has retrieved no
store locations yet the content area still displays those store locations that were
rendered to the page prior to the nearest locations lter being activated:

Mastering Ionic 2
623
CSS
The nal area we need to cover will be the styling for the appyMapper project.
Thankfully this is a relatively small task consisting of a handful of lines added solely
to the appyMapper/src/pages/home/home.scss le (amendments highlighted in
bold):
page-home {
#map {
height: 60%;
width: 95%;
margin: 2.5%;
}
.map-information {
display: block;
font-size: 1.1em;
padding-bottom: 0 0 1.5em 0;
margin: 0 0 0 2.5%;
}
.lters,
.reset {
margin: 25px 0 0 0;
}
.heading {
font-weight: bold;
}
.location-address {
padding: 0 0 1em 0;
line-height: 1.4em;

Case Study #3 - Appy Mapper
624
font-size: 1.1em;
}
}
ion-app.gmapscdv_ .nav-decor,
._gmaps_cdv_,
.nav-decor{
background-color: rgba(0, 0, 0, 0) !important;
}
There’s nothing complicated or involved here, just some straightforward custom
style rules for assisting with rendering certain aspects of the app UI as well as the
addition of a familiar looking style rule from the Plugins chapter which helps
overcome any potential issues with the Google Map not rendering properly.
With the styling now implemented let’s take a few moments to celebrate our hard
work by building, running and nally previewing the completed app!
Connect your handheld device to the computer and using the Ionic CLI run the
following commands (substituting android for iOS if you happen to be developing for
that platform) - you know the drill by now!
ionic prepare ios && ionic build ios
ionic run ios --device
All things being well (and always assuming no mistakes were made with the coding!)
you should be greeted by a fully functioning app allowing you to play with and
explore the different features that it offers as demonstrated in the screen captures
on the following page:
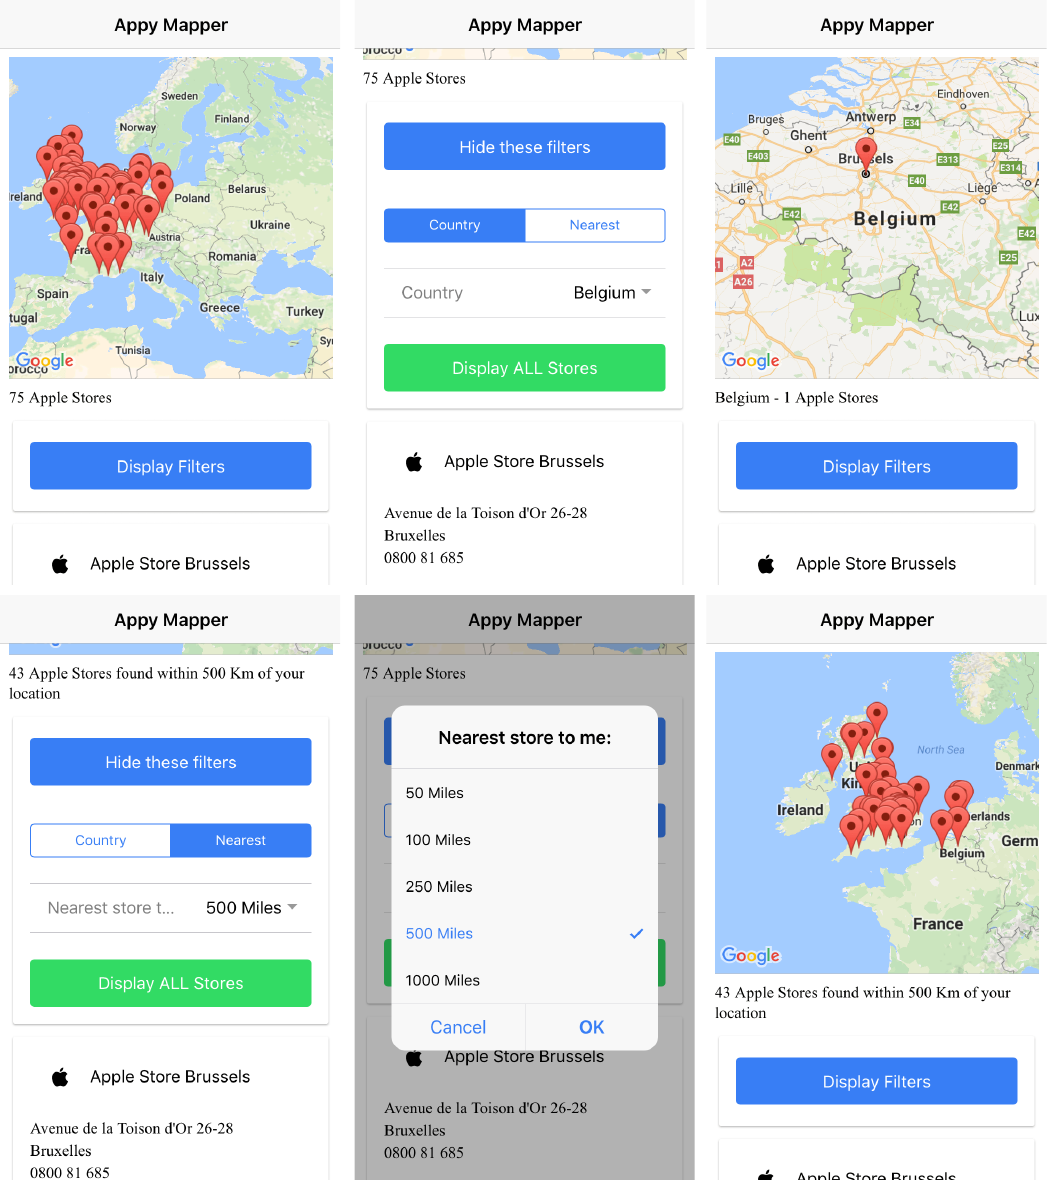
Mastering Ionic 2
625
If you’re able to interact with the app and see the above screens (okay - your results
may differ for the Nearest store to me functionality!) then congratulations!
Now for the last remaining step in completing our third and nal case study.
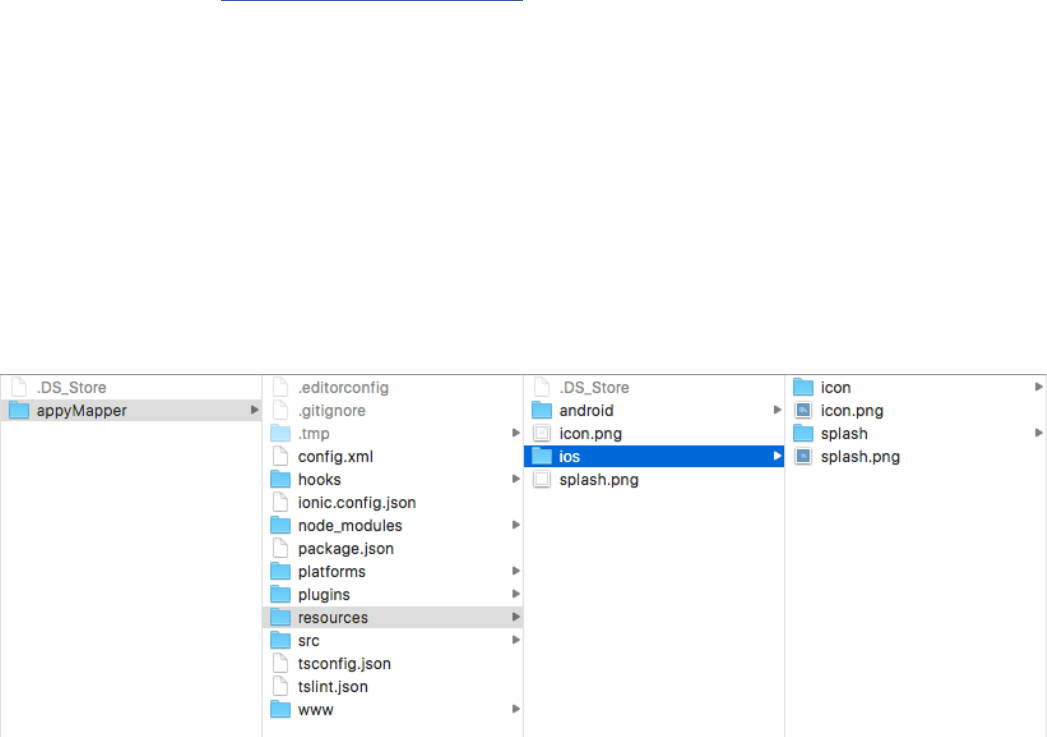
Finishing touches
As in previous case studies there’s one nal addition we need to make before we
can consider the app completed - implementing the necessary launch icon and
splash screen images for the iOS and Android directories located in the following
directory: /appyMapper/resources.
Without these our app will use the default Apache Cordova images which seems a
little lazy after all the work we’ve put in during this case study.
Before proceeding though you’ll need to download the les for this case study from
the following link: http://tinyurl.com/j3yjqbo (if you haven’t done so already).
Having done this copy both the icon.png and splash.png les from the following
locations in the downloaded project les directory:
• appyMapper/resources/android
• appyMapper/resources/ios
And then paste these into the matching directories in your own appyMapper project,
beginning with the iOS launch and splash images:
626
Case Study #3 - Appy Mapper
We then do the same for the android sub-directory:
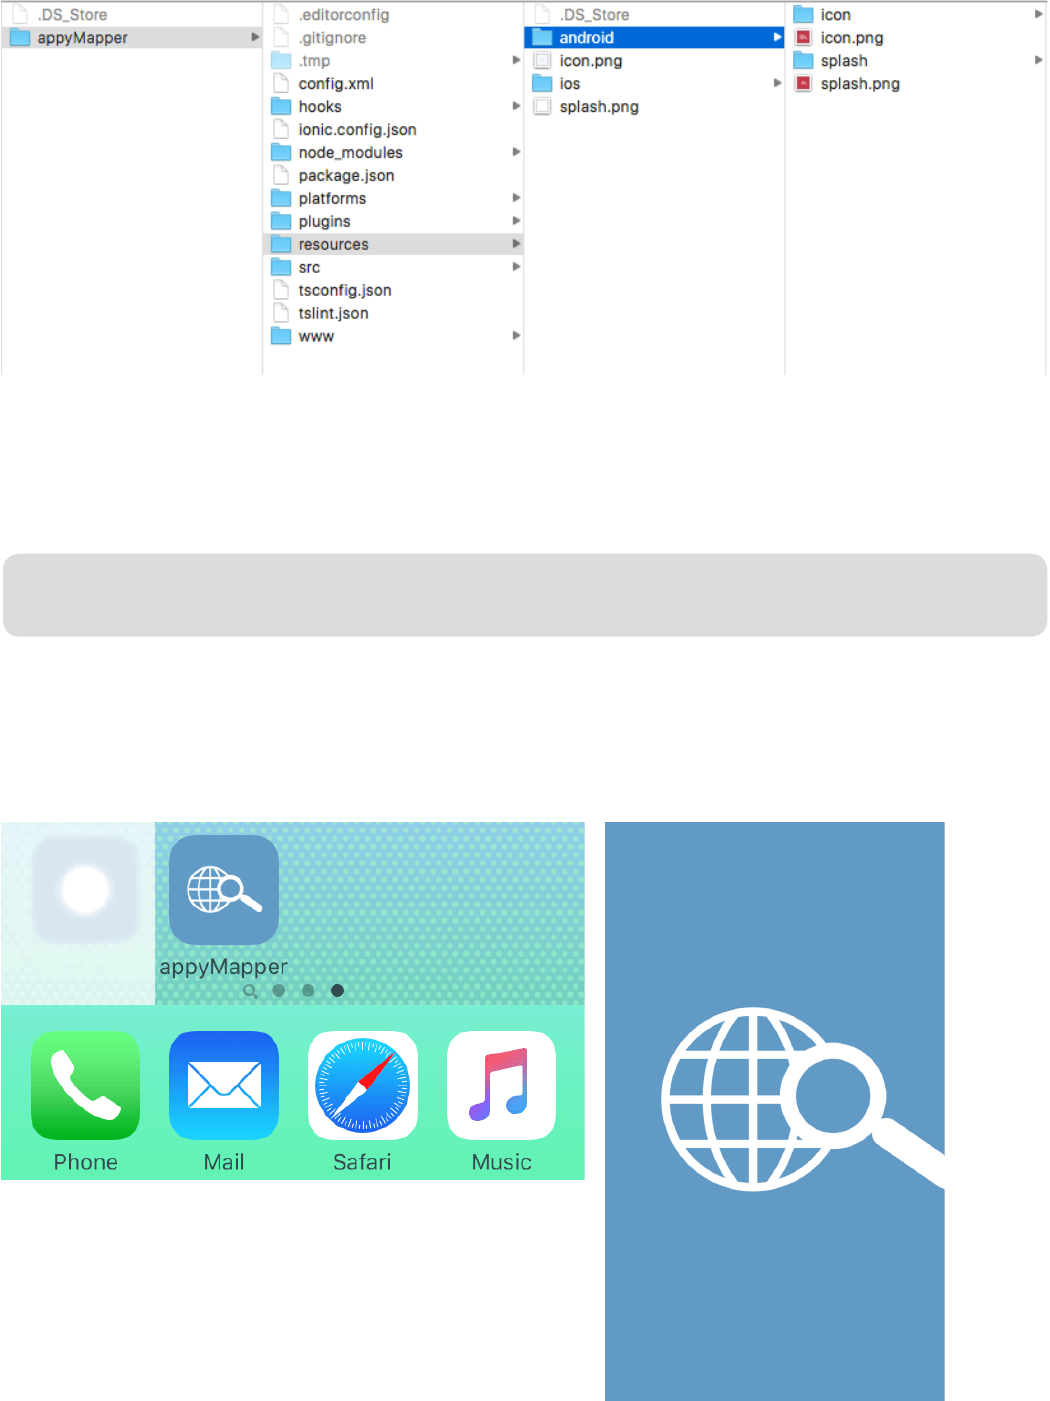
627
Mastering Ionic 2
With our respective launch icon and splash screen templates in place for iOS and
Android we can now generate the images to be used for these platforms using the
following Ionic CLI command (as always - ensure you are at the root of the
appyMapper project directory before running such commands):
ionic resources
Once the command has nished processing you should see the different launch icon
and splash screen sizes being generated from the supplied template images which,
when our app is published to a mobile device, should give us something like the
following:

628
Case Study #3 - Appy Mapper
And, with that, you’ve successfully completed the third and nal case study for this
book!
Give yourself a round of applause for all the time, effort and hard work you’ve put in
to get to this stage.
Not only does this concludes the third and nal case study but also the material for
Mastering Ionic 2.
There’s been a lot to take in and I hope you’ve had fun consolidating your learning
with working on these case studies and nd something useful to take into your own
projects.
Resources
All project les for this chapter can be found listed in the download links on page
636.

In closing...
Once again thanks for making the decision to purchase Mastering Ionic 2.
You’ve covered a lot of topics throughout this book including, but not limited to: core
technologies, classes & decorators, components, templates, theming, plugins,
code signing and submitting your iOS & Android apps to their respective App Stores.
That’s a lot of material to get through and I hope that you’ve managed to learn some
new and useful concepts and techniques along the way that will help inform your
app development going forwards.
Let me know if there’s anything that you felt wasn’t covered in the book and/or could
be improved upon - especially if there are any errors in the spelling and/or code
samples (even the most diligent of eyes don’t always catch a mistake!)
I’d love to know what readers think of the book so please feel free to share your
thoughts, comments, suggestions and any feedback that you may have through the
following e-mail address: support@masteringionic2.com.
Alternatively you can visit masteringionic2.com to sign up to the mailing list for book
updates (which I would strongly encourage you to do just to ensure the book’s
content is kept up to date - please note that I don’t spam or share your details with
others....I promise!) as well as access to blog articles and related Ionic 2 resources.
Happy coding and....I look forward to hearing from you shortly!
629
Mastering Ionic 2

Finding himself drawn to the web design industry
shortly after the dot com bubble collapse James
Grifths has been designing/developing websites for
over 14 years and mobile/tablet apps for 5 years for a
range of clients including Virgin Media, Shelter, Evans
Cycles, EDF Energy, Rated People & the British
Science Association.
His business website: Saints at Play provides a range
of digital products & services as well as sharing
hundreds of freely available articles on web/mobile
development technologies and processes.
When not working on websites/apps, writing e-books
and researching web based technologies James
enjoys spending time reading, studying history, making
sculpture, listening to podcasts and trying to spend as
much time in nature as possible.
Author Bio
630

631
Mastering Ionic 2
Index
@Component 80
@Directive 80
@Injectable 81
@Pipe 81
.editorcong 69
.gitignore 70
A
access modiers 9, 22
Ahead-of-Time compiler 28
AlertController 453, 458
Angular 2 20, 31
Apache Cordova 30
Arrow functions 27, 28
autoincrement 275
B
boolean 37
C
Classes 87, 88
CLI 12
Code signing 366
components 20
cong.xml 69, 355, 356
constructor 90

632
Index
D
Database 269
Data-binding 225
Decorators 76
Debugging 322
DOM 12
E
ECMAScript 13
ES6 13
Event binding 124
export 90
F
Fat arrow 27
lter (array method) 214
G
Grid component 482, 500
H
hooks 70
I
Interpolation braces 128
Ionic Cloud 46, 47, 52, 53
Ionic Creator 46, 47
Ionic Lab 46
Ionic Market 47
Ionic Native 48, 177

633
Mastering Ionic 2
J
JSON 13
Just-in-Time compilation 28
K
Keystore 185
Keytool 185
L
LocalStorage 248
M
map (array method) 212
Modules 37
N
Navigation 24, 25, 100
NavController 25, 26, 27
NativeStorage 250
ngClass 130
ngIf 129
ngFor 126
ngModel 225
ngStyle 129
ngSwitch 128
Node 13, 57
node_modules 71
NPM 54, 57

O
Observables 23, 211
P
package.json 71
permissions 313
Plugins 175
primary key 275
private 39
Promises 22, 210
property binding 130
protected 39
prototype 36
prototypes 34
public 39
Q
Query 274
R
Regular expressions 232
S
Sass 43
SassDoc 348, 349, 350
service-worker.js 73
Splashscreen 357
src 73
string interpolation 41, 42
SQLite 269
sudo 54
Index
634

Mastering Ionic 2
635
T
Theming 158
ToastController 256, 260
tscong.json 74
tslint.json 74
Transpiling 42
Type annotations 37
TypeDoc 346, 347, 348
TypeScript 20, 21, 33 - 42
U
Utilities 488
V
Validators 234, 235
W
www 74
X
Xcode 14, 305, 317, 316, 319
Y
Z
zipalign 389
636
Project download links
Code samples
Project code featured throughout the pages of this book is able to be downloaded, in
the form of zip les, on a chapter by chapter basis, as indicated in the table below:
Animations
http://tinyurl.com/gs5m99e
Data Storage http://tinyurl.com/hatfzvf
Documenting your code http://tinyurl.com/zepjcey
Forms & Data Input http://tinyurl.com/jxo3t8k
Navigation http://tinyurl.com/h3wjv8p
Plugins http://tinyurl.com/jf8bf2y
Preparing Apps for release http://tinyurl.com/jz9pjjq
Templates http://tinyurl.com/j34mueb
Testing & Proling Apps http://tinyurl.com/hpz7j7a
Case Study #1 http://tinyurl.com/jxc5wcn