Max Edelstein GBTD And GBMB Guide
User Manual:
Open the PDF directly: View PDF ![]() .
.
Page Count: 35

This document was last edited by Max Edelstein on 5/31/2018
Hello all, Max here. Vsauce couldn’t make it and you are stuck with me today. Below is a guide
on using Harry Mulders gameboy tile designer (GBTD) and gameboy map builder (GBMB). I
will post the link to the software here and include many pictures with focused areas. This
document will be updated and posted to my github.
I did not make GBTD or GBMB, Harry Mulder created them in delphi programming language.
Link for gameboy tile designer: http://www.devrs.com/gb/hmgd/gbtd.html
Link for gameboy map builder: http://www.devrs.com/gb/hmgd/gbmb.html
To start off I wanted to say that this software (GBTD and GBMB) is pretty old but it gets the job
done. It can be used for various game boy games whether your chosen language is assembler
(asm) for the gameboy or C programming language for the gameboy (gb). It should be noted that
the Harry Mulders programs support all versions of the gameboy from the classic to the color.
When you download the file it will probably be a .zip file or a tape archive file (tar). Unzip these
files and put them in a folder of your choosing. Note many files may end up getting saved here,
so one should probably place it inside an empty folder.
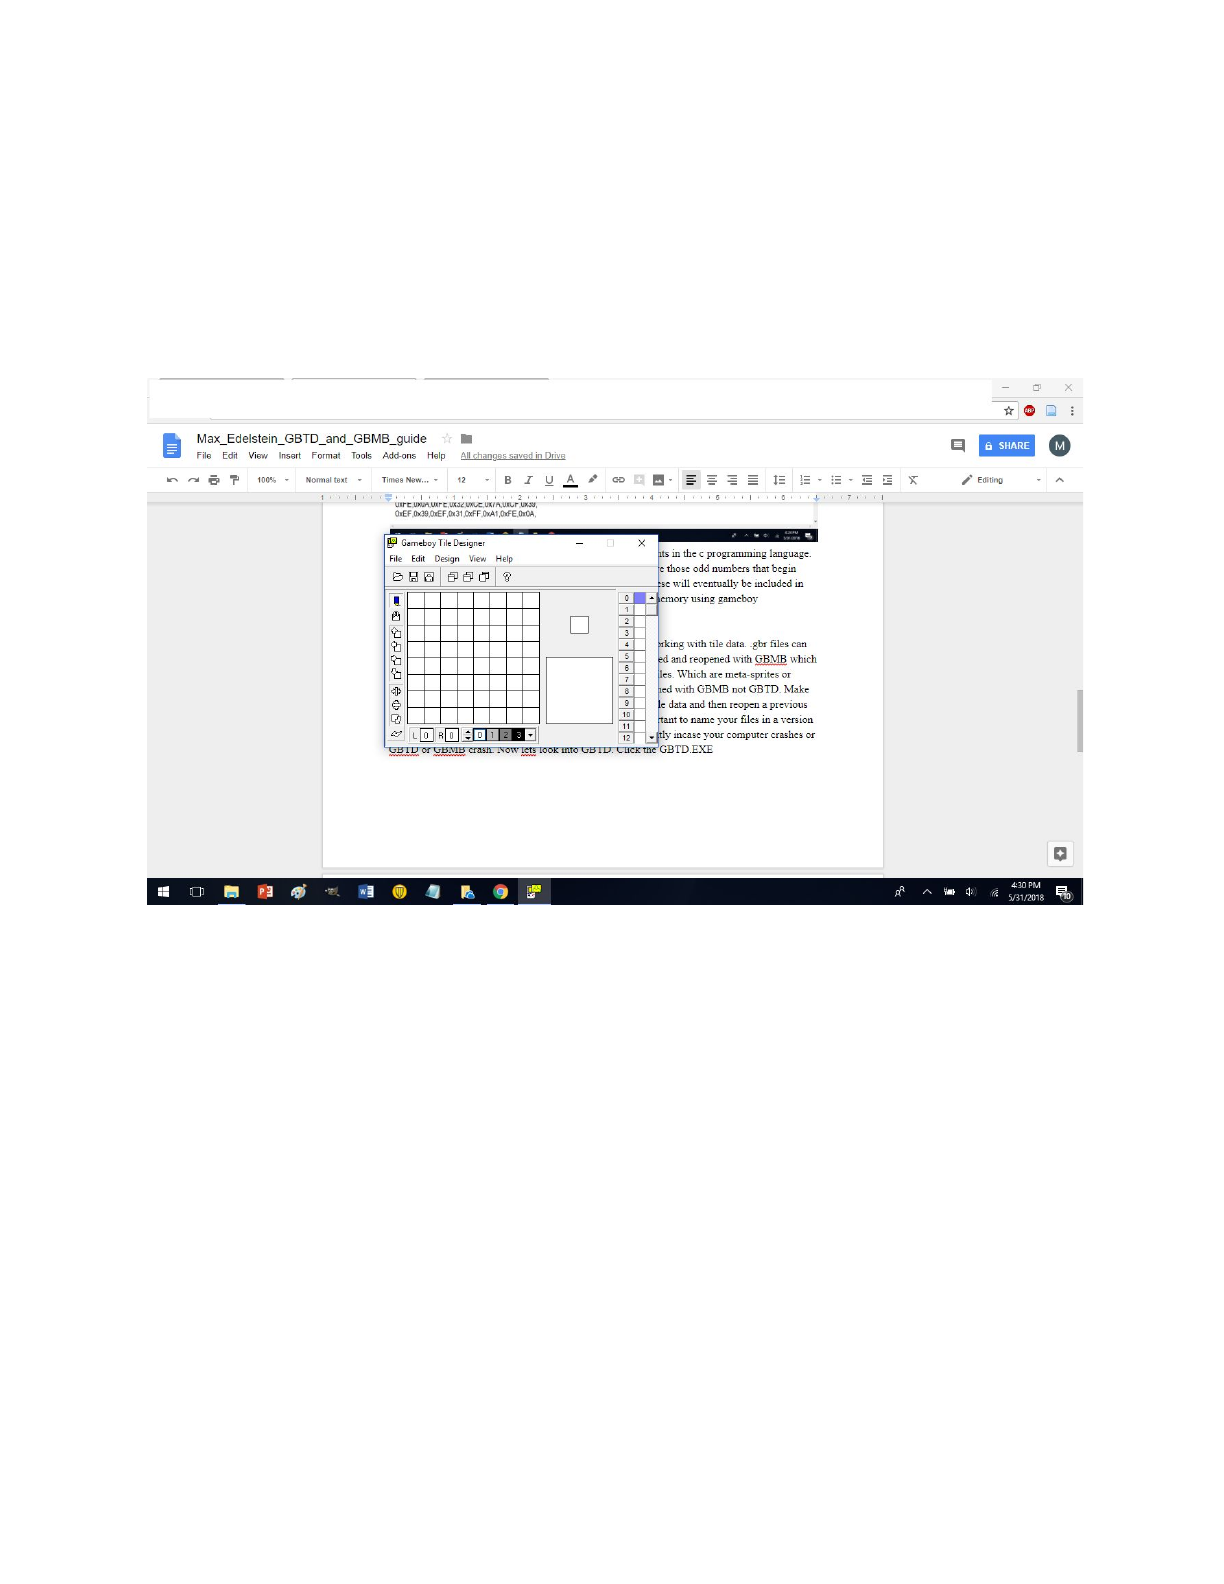
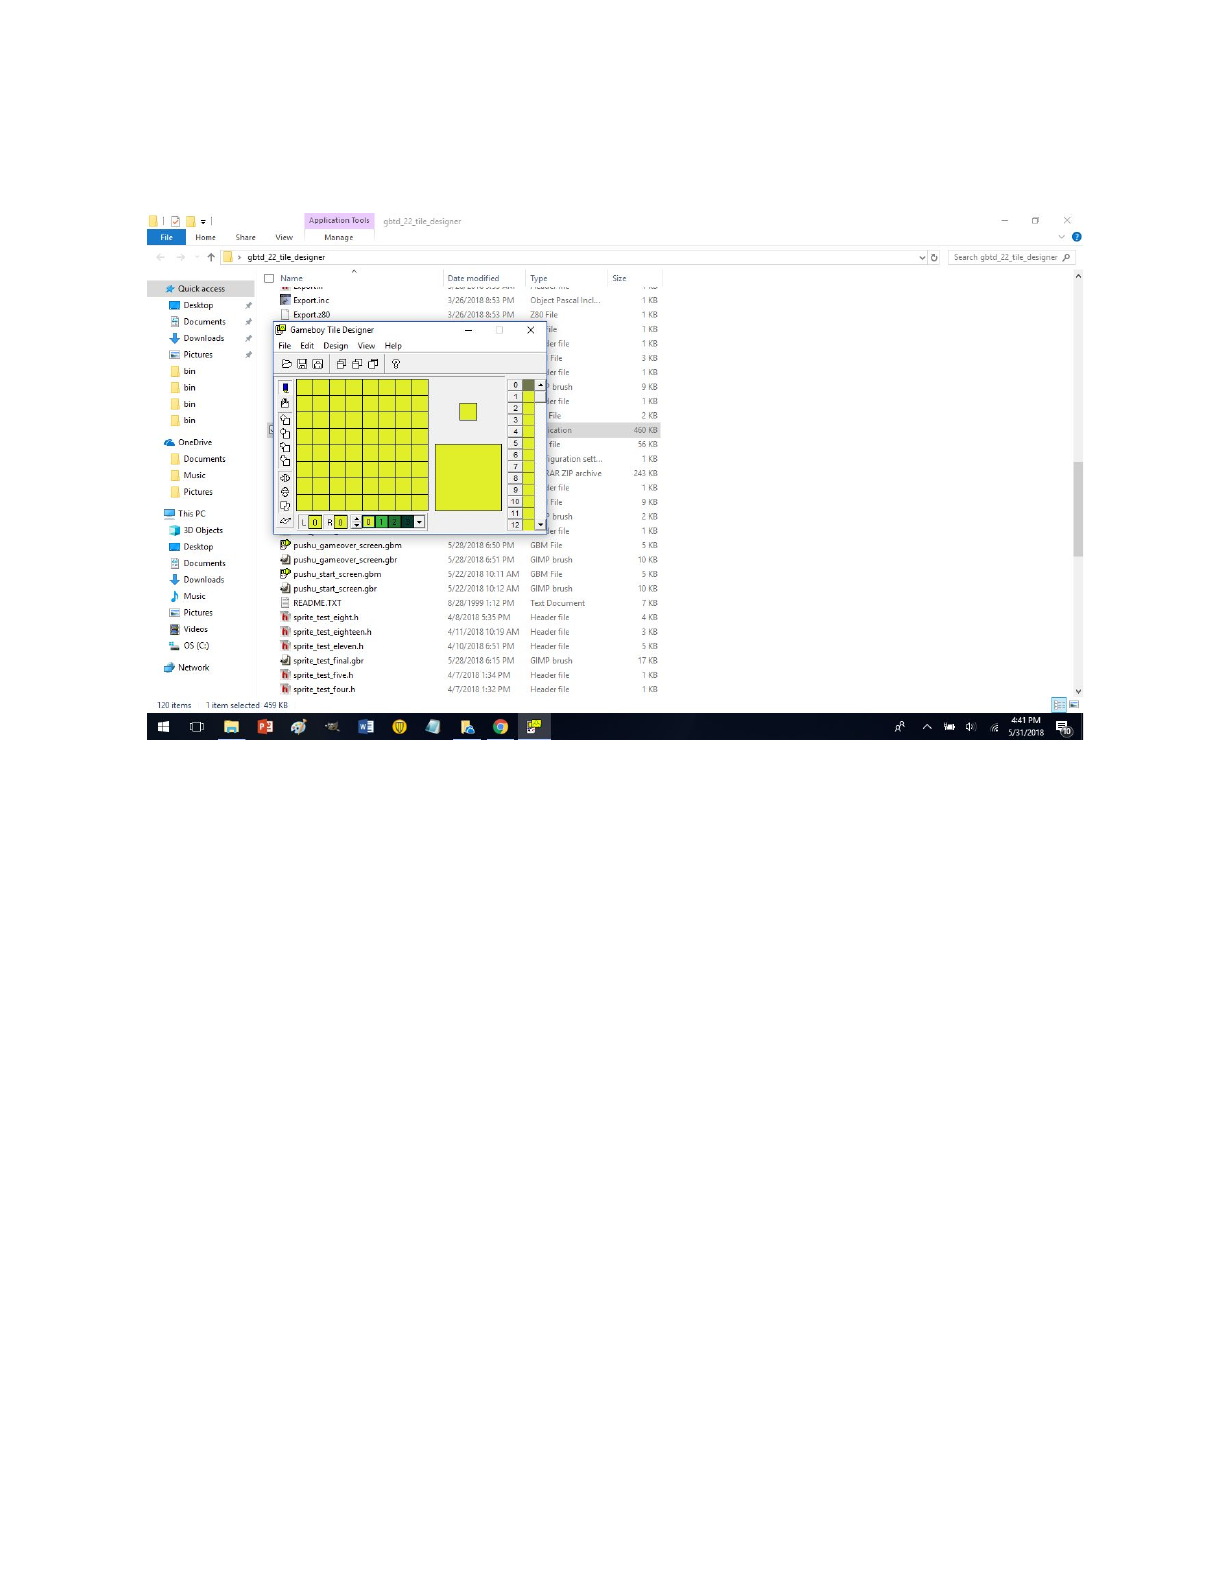
Here is what the GBTD looks like on my computer.
The GBTD EXE is what you want to click on and run. Windows defender usually says
something like it could harm your computer. But don’t worry about that. It should be noted that
all of the help files and links that come with GBTD and GBMB are deprecated and will lead you
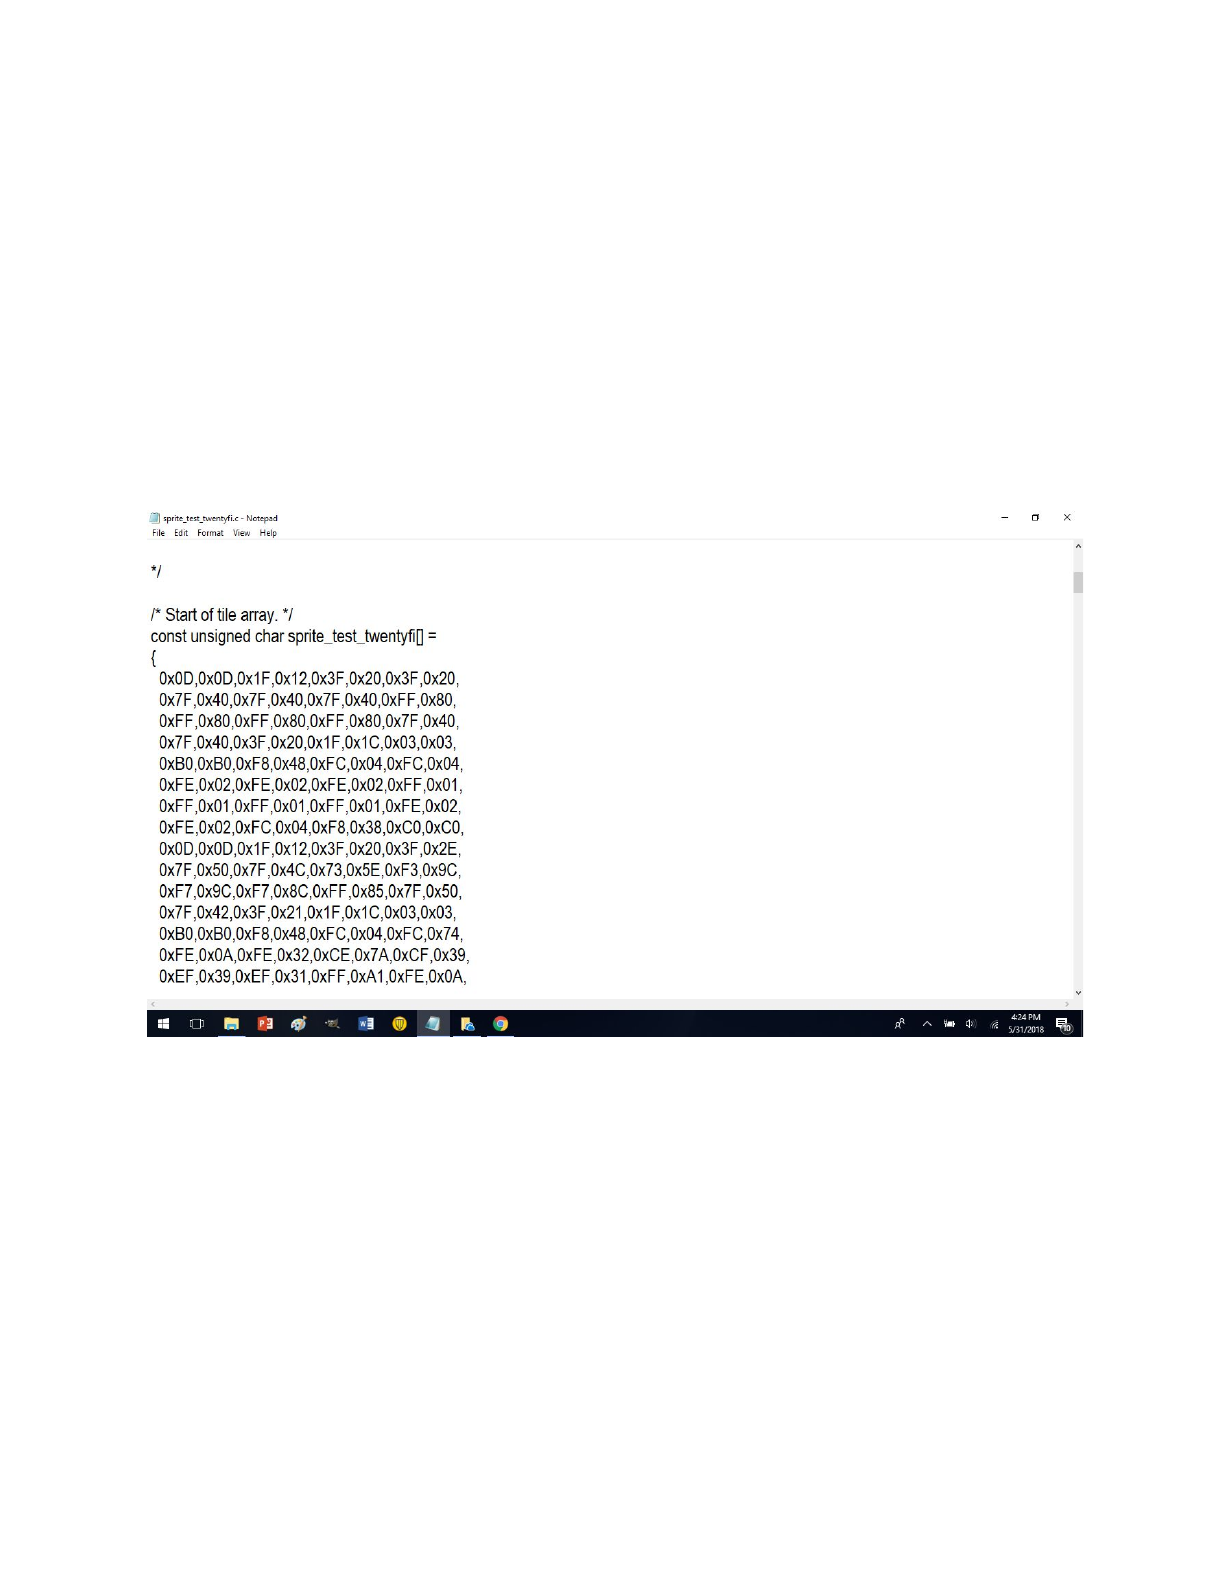
to dead links. Also note in the above image that the stuff you create in GBTD and GBMB are
saved in the same folder as the GBTD executable file is in. The .c (source code) and .h (header
files) files contain the tile and map data (which is always in hexadecimal). Always place the
word const in front of the arrays in the .c files after you generate them. I will mention this when
necessary. Else you will have to wait for a long time for your program to compile and you may
eventually run into an address overflow or an error such as “So Said Evelyn the Modified Dog”.
An example would be const unsigned char tiles_generated_name[] = { etc. Let’s look at an
example shall we.
It should be notes that stuff between the /* and */ are comments in the c programming language.
You could also use // to denote comments. Much of the file are those odd numbers that begin
with 0x. These denote hexadecimal data. Still 0’s and 1’s. These will eventually be included in
your gameboy project and loaded into sprite or background memory using gameboy
development kit (GBDK) functions.
The .gbr files are used to save your progress when you are working with tile data. .gbr files can
be reopened with GBTD. The .gbr files can be used and opened and reopened with GBMB which
is then used to create tile maps which you will save at .gbm files. Which are meta-sprites or
sprites made up of other sprites. .gbm files (gameboy map files) can only be reopened with
GBMB not GBTD. Make sense? Think logically. It is important that if you decide to make
changes to tile data and then reopen a previous .gbm map that certain data can become messed
up. It is important to name your files in a version control scheme so one doesn’t attempt to use
old outdated data. It is also important to make back ups frequently incase your computer crashes
or GBTD or GBMB crash. Now let’s look into GBTD. I am about the become very meta for a
moment. Because the picture is in front of the document that I am typing. Haha. Click the
GBTD.EXE
See the GBTD, it sure is a small screen. And you can’t even maximize the screen. Less to worry
about is what I think. Don’t be intimidated. It has many functions that any old normal program
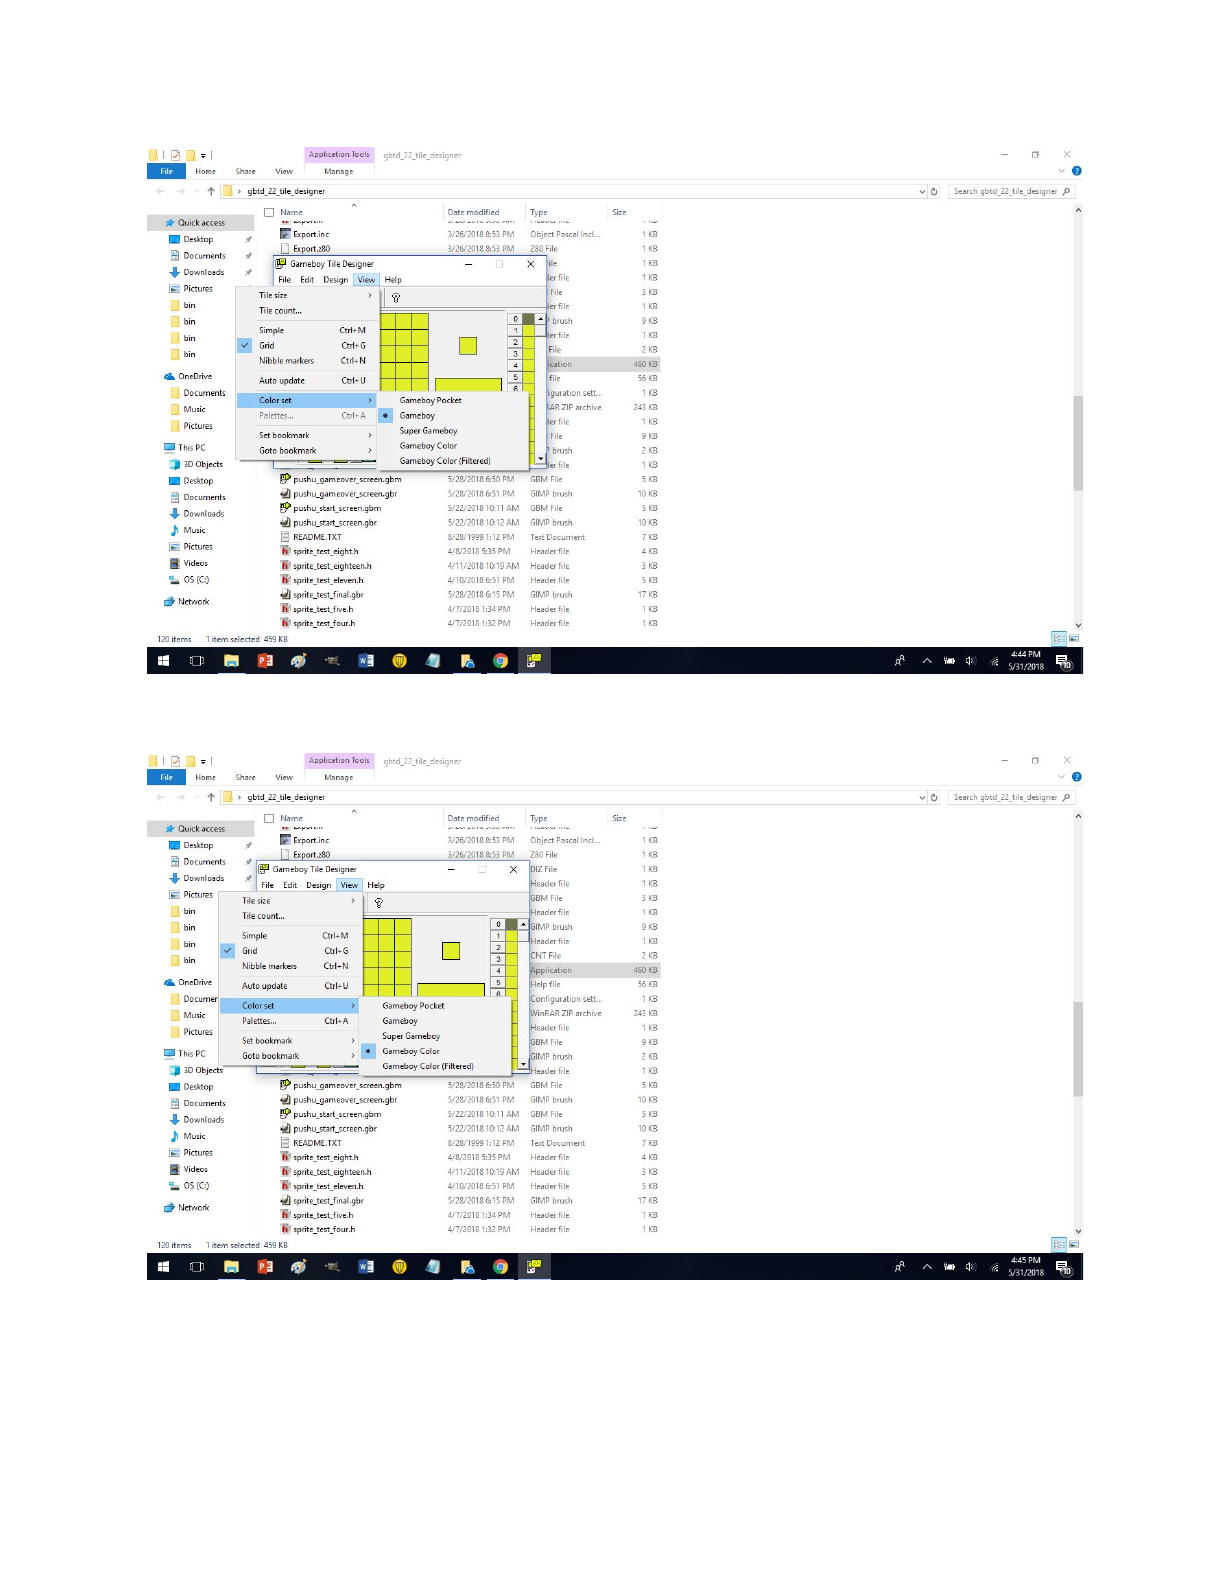
would have. Let’s explore some stuff shall we? First goto view-> Tile size and you will note
some things.
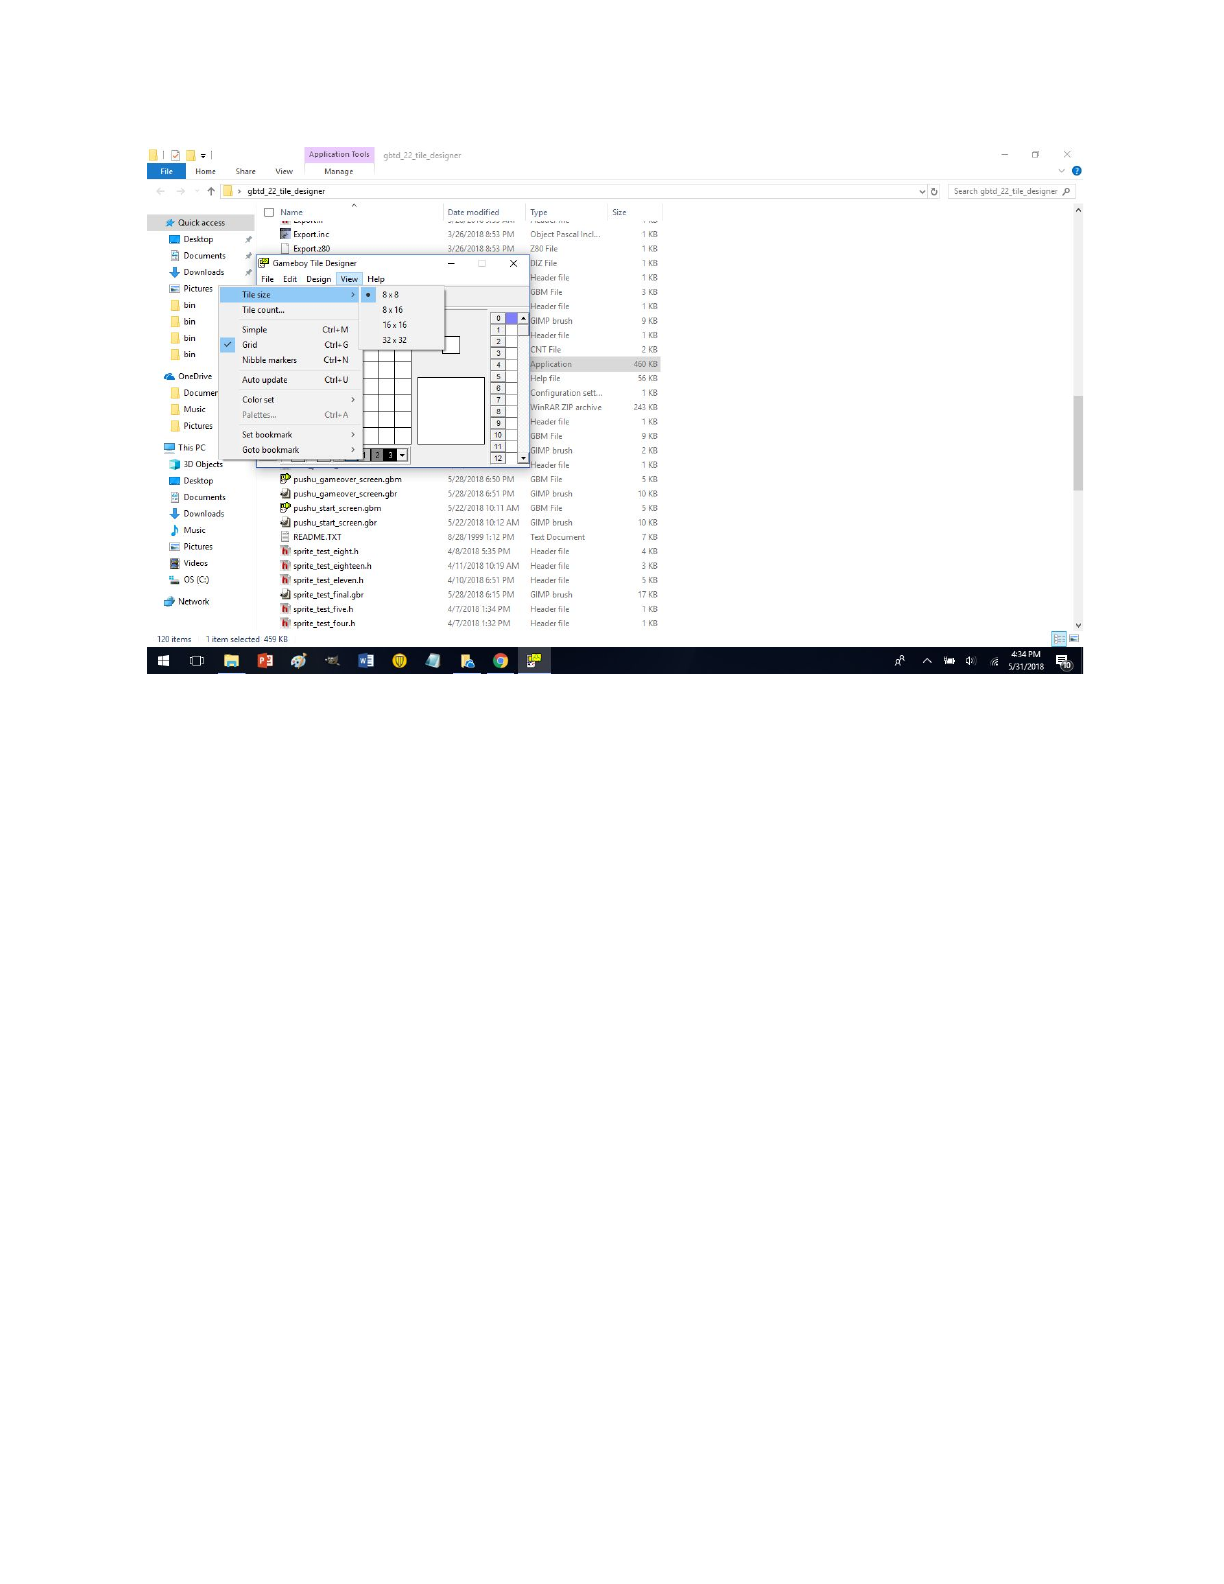
Four options are to choose from. But they won’t cause anything different in the code. It should
be noted that using the GBDK sprites can only be either 8x8 or 8x16. But why have the options
of 16x16 or 32x32. The reason is to see how sprites connect visually in GBTD. Let’s say you
plan to make a meta sprite out of two 8 x 16 tiles. Therefore you could work with them next to
each other and see how they look before you attempt to connect them in code. Also note that we
are currently limited to 56 tiles on the right side. Therefore we could only have 56 8x8 tiles. But
luckily this can be changed for all of the tile size options in GBTD. Goto GBTD view-> click on
tile count and this shows up.
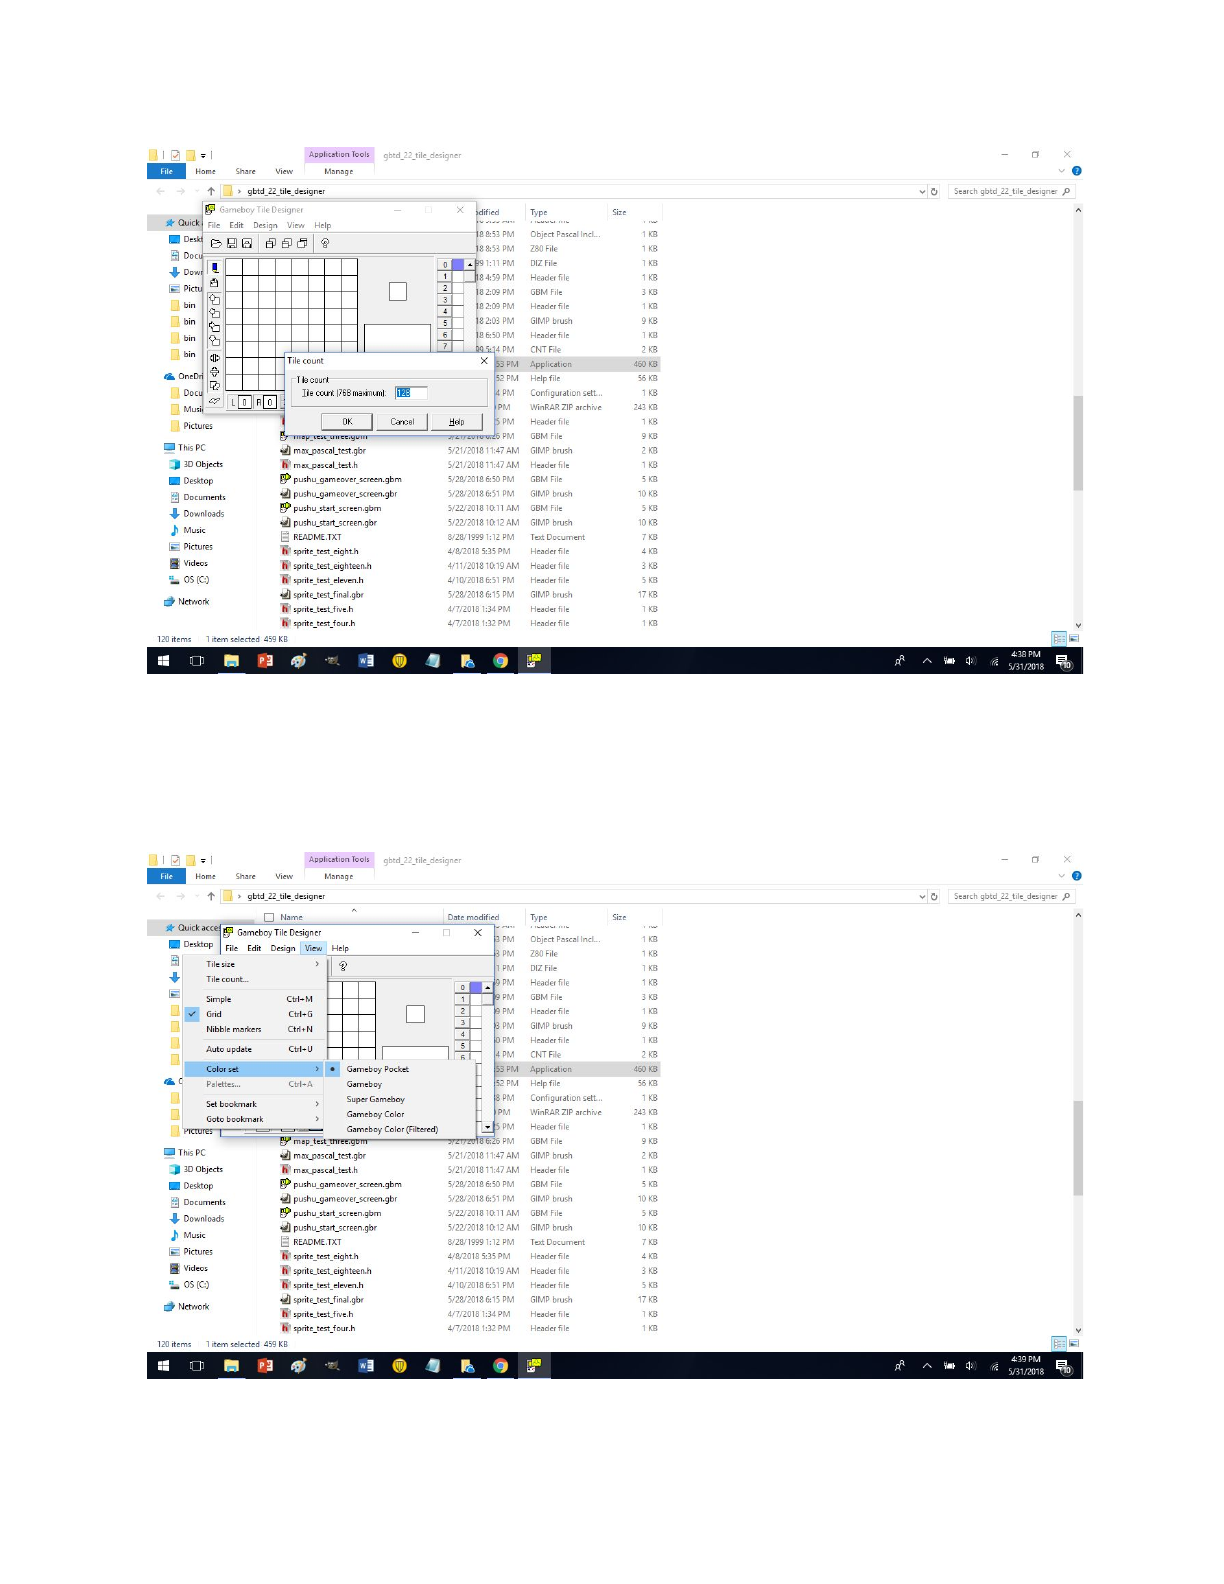
Type a number of tiles you want and you are good to go.
Also not how currently we are working in black and white. Well this won’t work for the
gameboy color or regular gameboy for that matter. Goto view-> color set and choose the device
you plan to work for. Here is a visual.
Let’s choose gameboy color shall we? This also works for the others. And yes the regular
gameboy has four colors.
Now we have some colours. Which are nostalgic to some people I suppose. But I want to change
these colours me boi. Well don’t worry because I will be your guide to the internets. This applies
to the gameboy color only. You can’t change the previous colors of the gameboy because the old
gameboy only had four colours, therefore the word palettes will be greyed out. This is due to the
fact that the old gameboy only had four colours. Let me show you.
See how Palettes is greyed out. The option is not available. Now onto the gameboy color (GBC).
Goto view-> color set -> gameboy color
Observe the visual below closely.
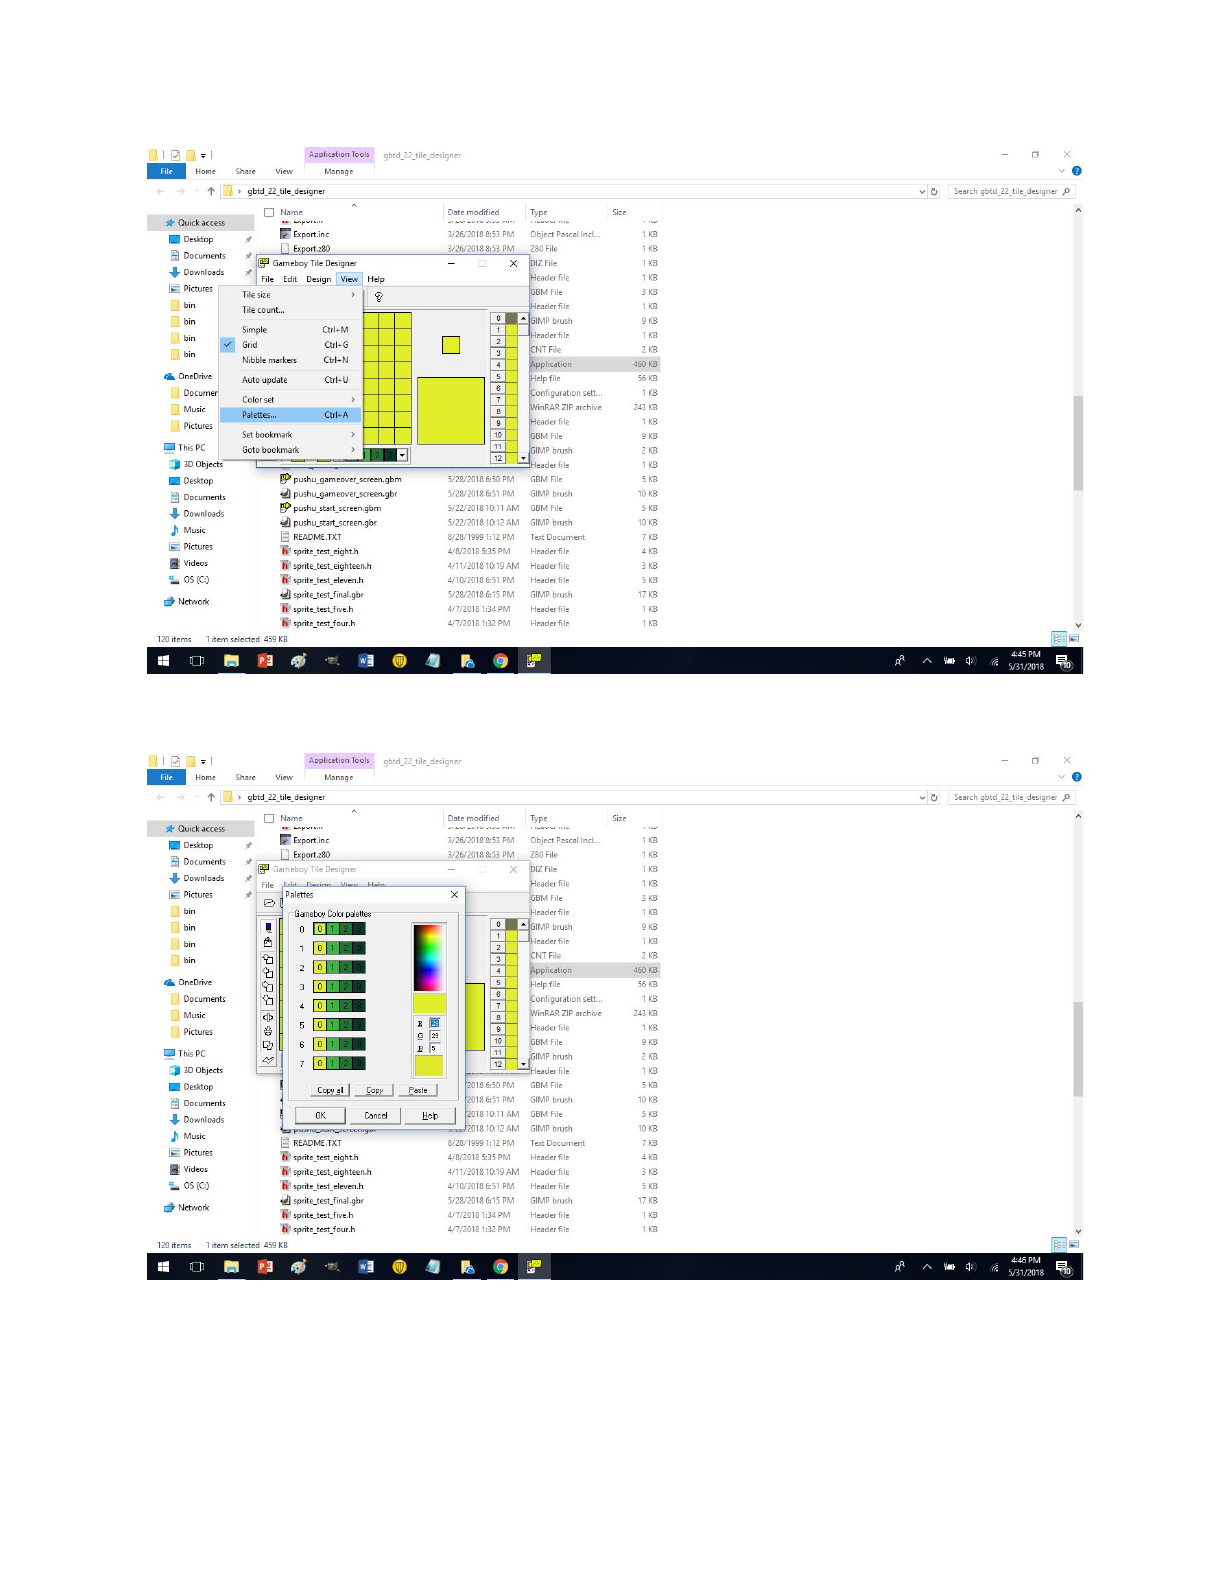
Oh yes, Palettes is now in black and we can click it. But it doesn’t end at that. Now click Palettes
young one.
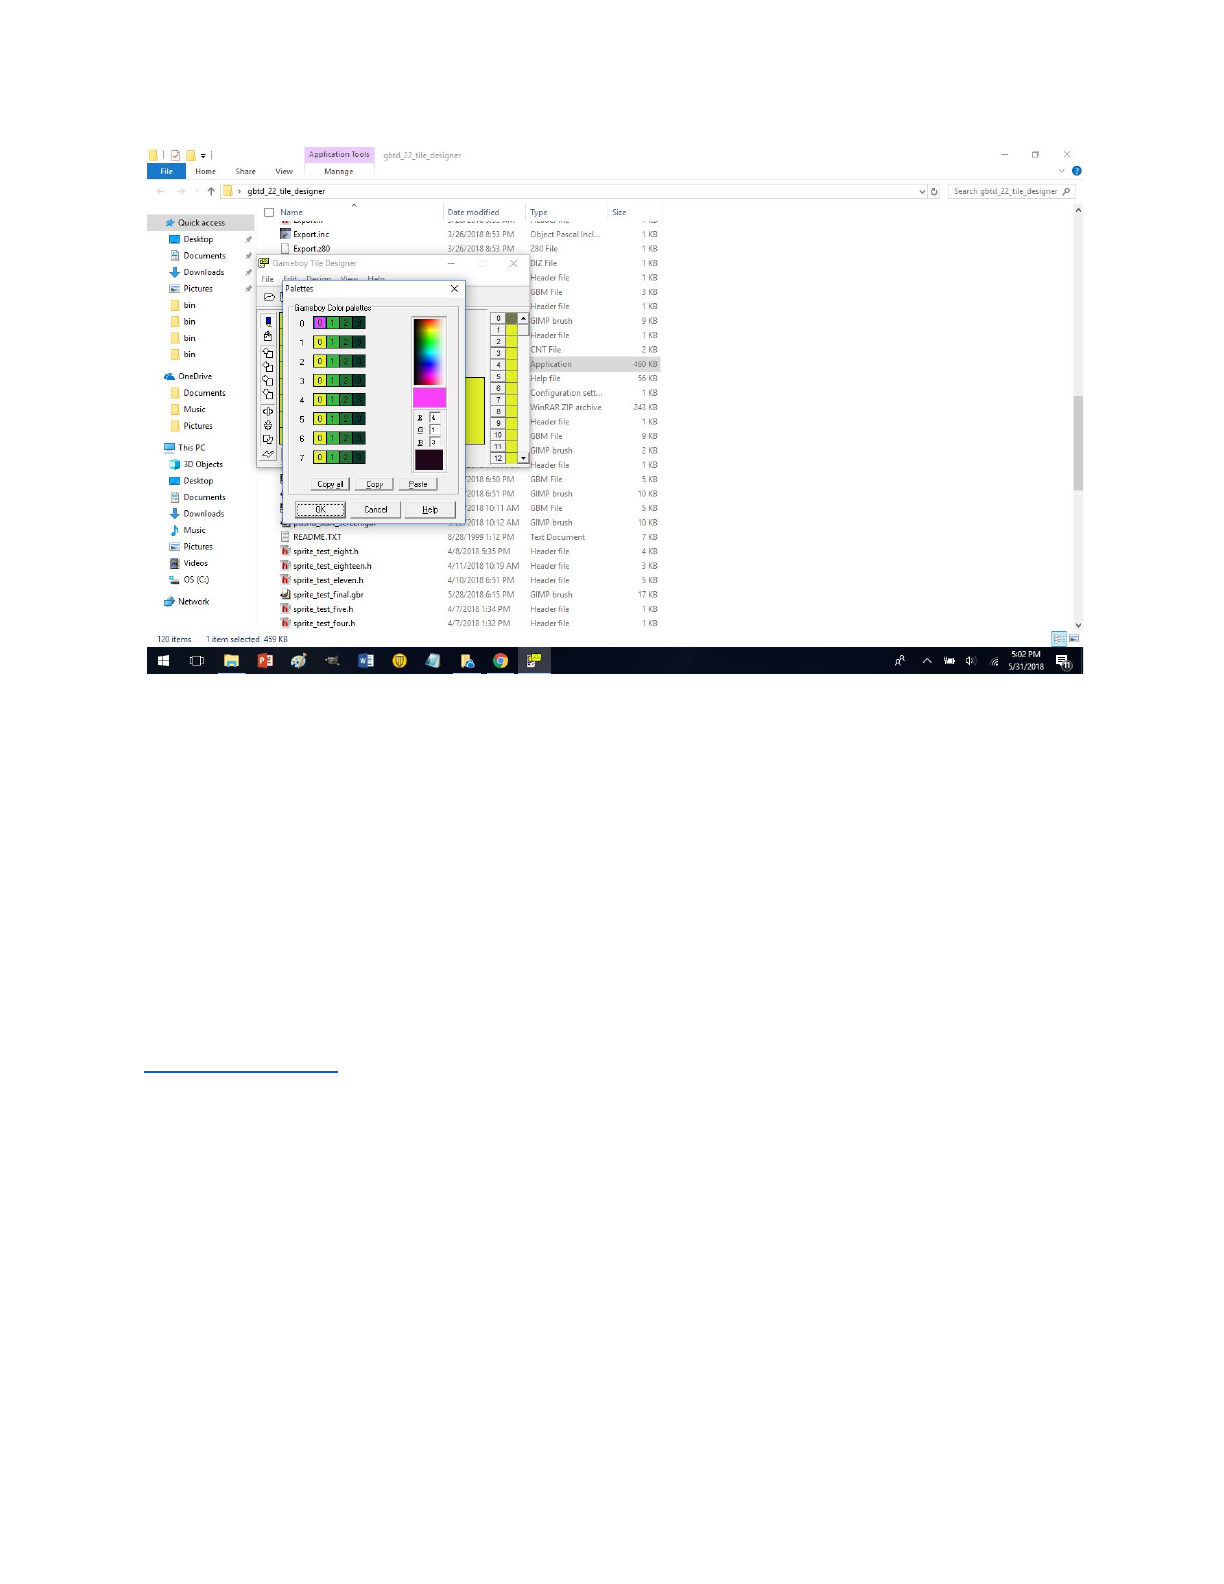
Oh boy what is this? Well this is eight colour palettes. But you should understand how these
colours are different from your normal colors. This had to do with the gameboy colors hardware
palettes. One doesn’t need to go in depth, but one should know that the game boy color has less
colour options compared to a modern day computer. Also note how when it comes to the
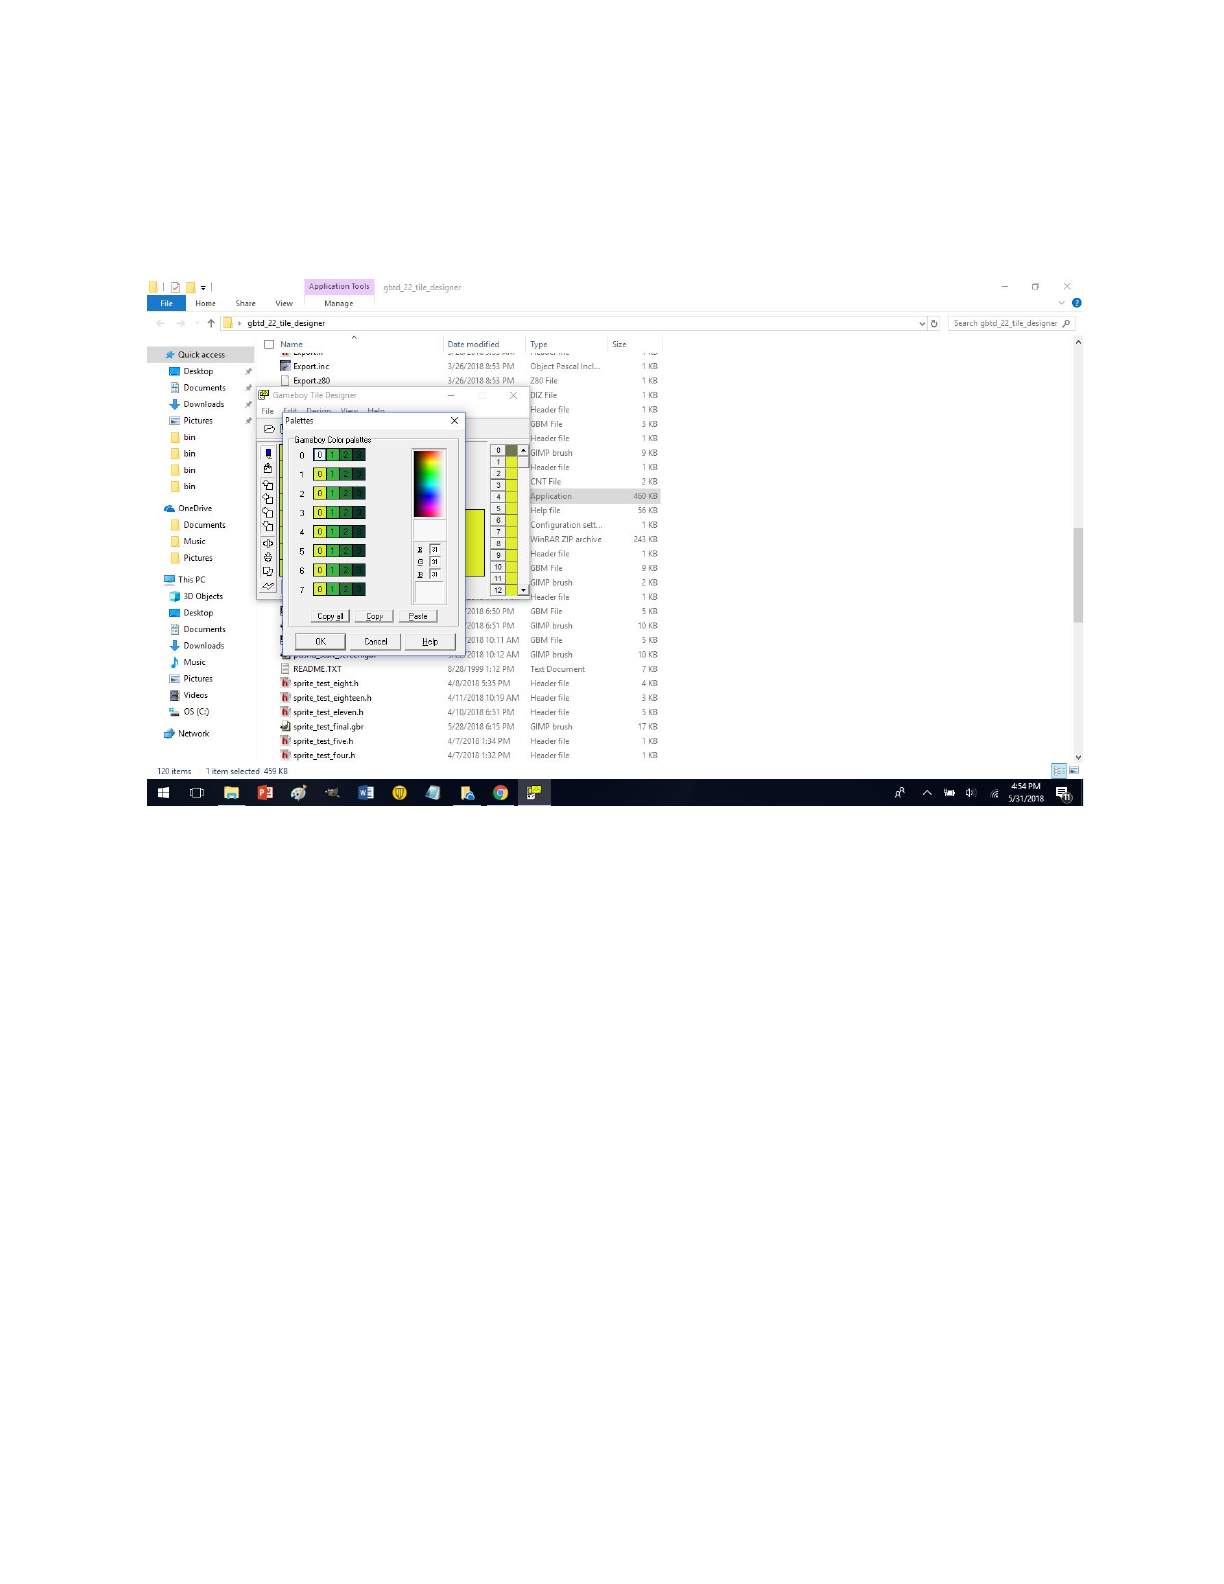
gameboy that the first palette entry 0 will be the transparent colour. Meaning this colour is
designated not to show up on the game screen. This applies to sprites only and not backgrounds.
Backgrounds have more colours. These colours can be changed by either entering a number from
0 to 31 on the right hand side boxes while a box is select.
You really have to make sure that you double clicked that box, else you may end up editing the
numbers of a palette you didn’t mean to. Really make sure to click that box and make sure that it
is really selected. Many times I have made that very mistake and changed colours I did not mean
to. Or you can double click a colour palette box and then use the colour picker to select a colour
from the rainbow bar thing. It reminds me of old microsoft paint. Note how one can only have 8
colour palettes for both sprites and 8 colour palettes for background. Also note how the zero
based numbering system strikes again. Ex- first palette is palette 0 and last palette is palette 7. 8
in all. When you are done selecting colours I recommend to hit the button copy all and open a
blank notepad or document to paste that in and save it. Here is a visual.
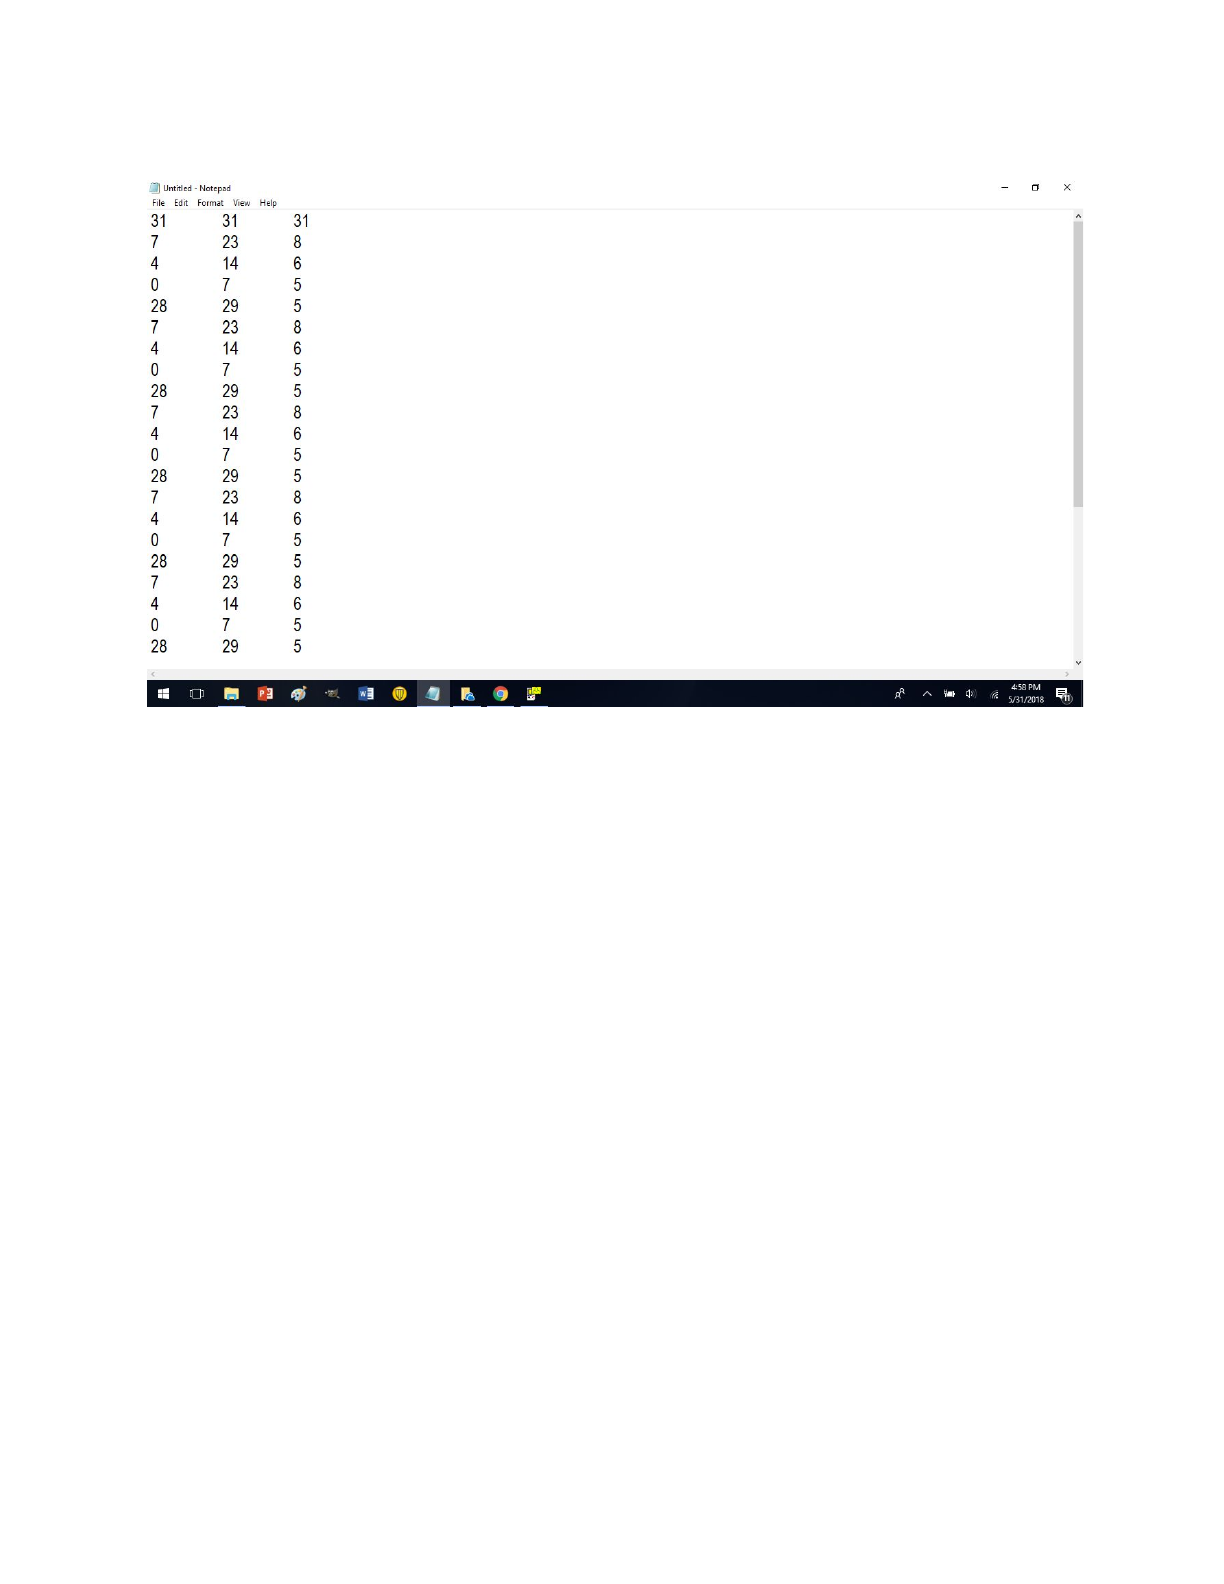
You seeing what I am seeing? A bunch of freaking numbers. How torturous. Well I never said
doing any of this would be easy. Three numbers represent one colour. Take a look back at the
previous image. 31,31,31 is the colour white. Which makes sense because it is all of the colours.
If you look more closely you will see all of the other colours from the 8 palettes here also. These
can be later used for the RGB(#,#,#) function to create colour palettes. One can structure them so
four RGB() with four on a line appear each denoting a single colour. This method can also be
used for backgrounds. I know it seems like a lot of work and it is. But I believe in you. Take a
look at some of the examples on my github to see what I am talking about. I recommend
choosing one colour to always have as the sprite transparent colour and keep that in the first slot
or palette 0. Here is a visual.
Look at the image and see where my cursor points to? Well neither do I, because windows print
screen command makes my cursor invisible. You see that pink colour? What does that tell you
other than that Max doesn’t understand color theory? It tells the artist that this colour is meh and
It will never show up as a sprites colour in my game.
I heard ways exist to have sprites with more than three colours. This has been done by me one
time, but its a waste of sprite data. GBDK can only display 40 sprites on the screen at once. So
either one 8x8 or one 8x16. Basically one sprite overlaps another sprites and you have more than
three colours. But sprite order has to be kept in mind. Because depending on how sprites are
loaded in memory, one sprite you expect to be on top of another may come out the other way
around. This is a good time for you to download the BGB emulator. I will link it here
http://bgb.bircd.org/
Get that emulator because it is a godsend. It will allow you to observe how sprite and
background data and colours are set in memory. I bet Nintendo wished they had BGB back then.
Now it may seem that I am going on a tangent, but it is a necessary one. Download bgb now and
bring up my game “Pushu” which can be found on my github. You can bring up any game
because this is a cookie cutter explanation. Place the .gb on your desktop or the appropriate
directory and double click the game. When in the game which looks like this
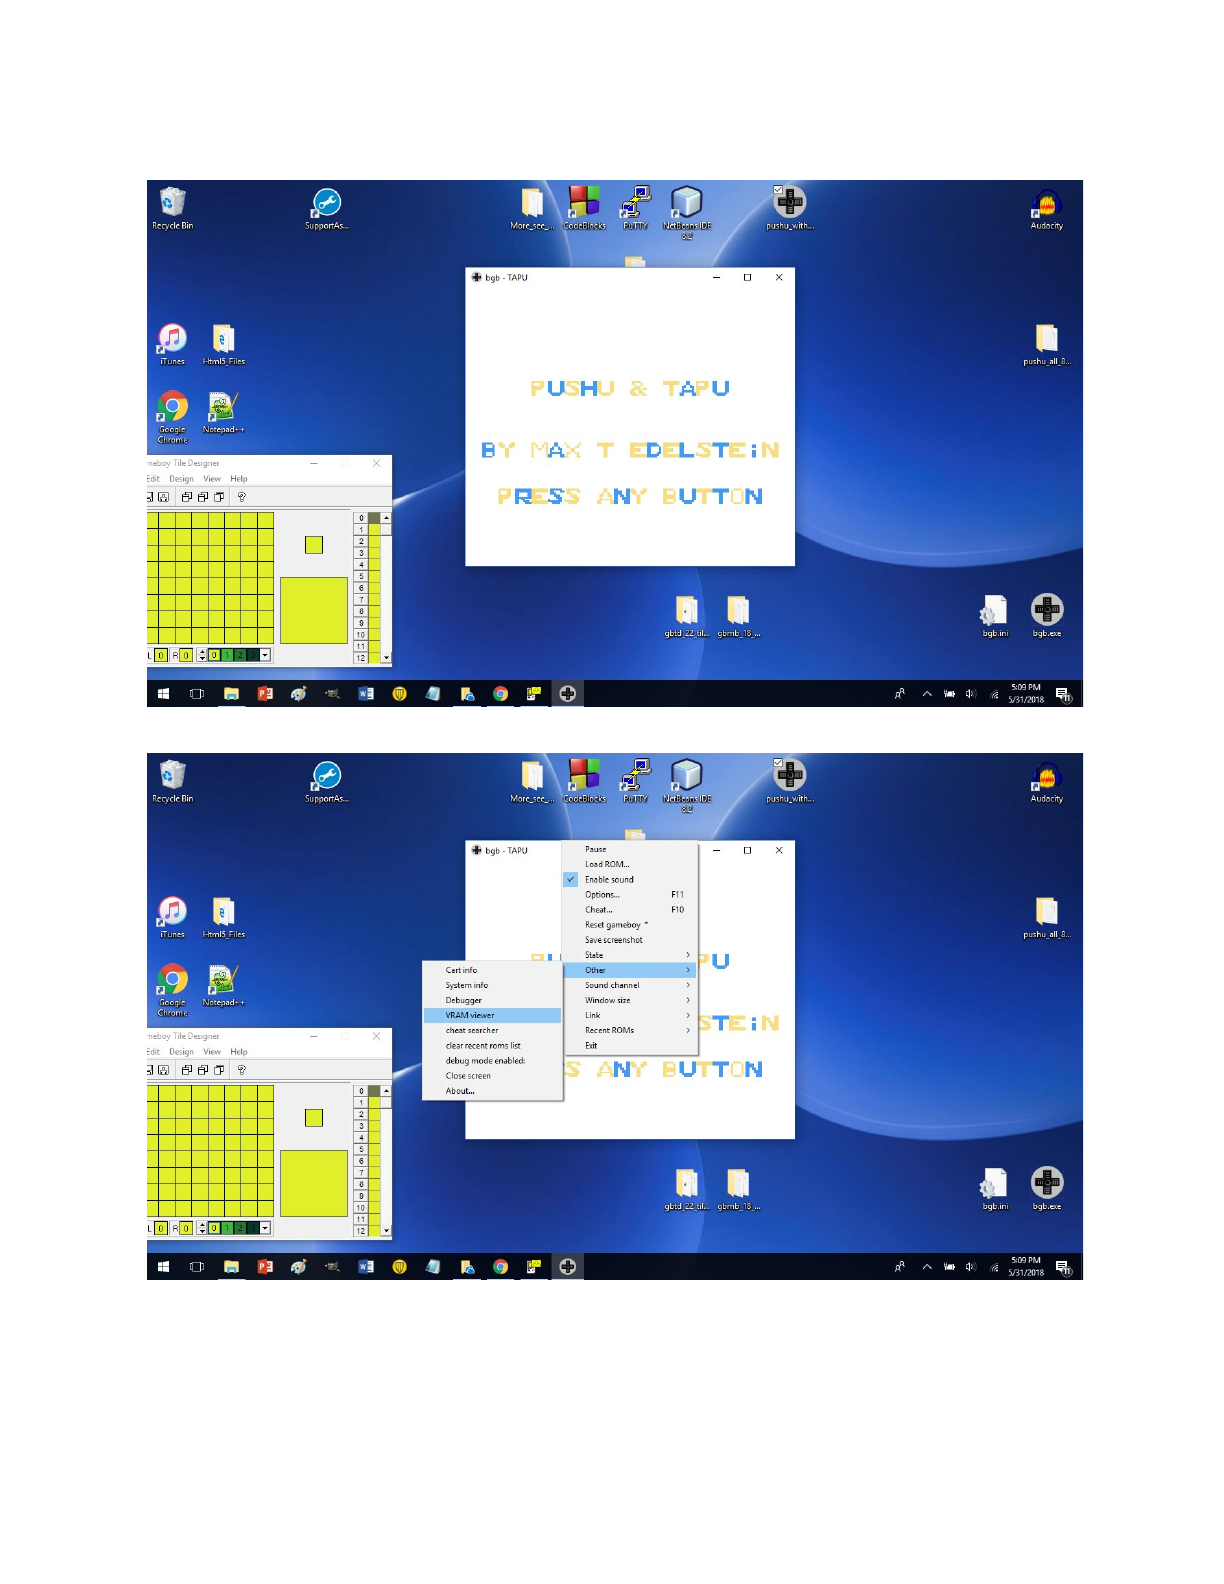
Well you can see my games start screen. But now right click the game screen. Here is a visual.
Goto other -> then VRAM viewer.
Don’t mind that the P is blue in memory and yellow on screen. I wanted this effect. Don’t even
dwell on that! Now click the Palettes tab on the bgb vram viewer
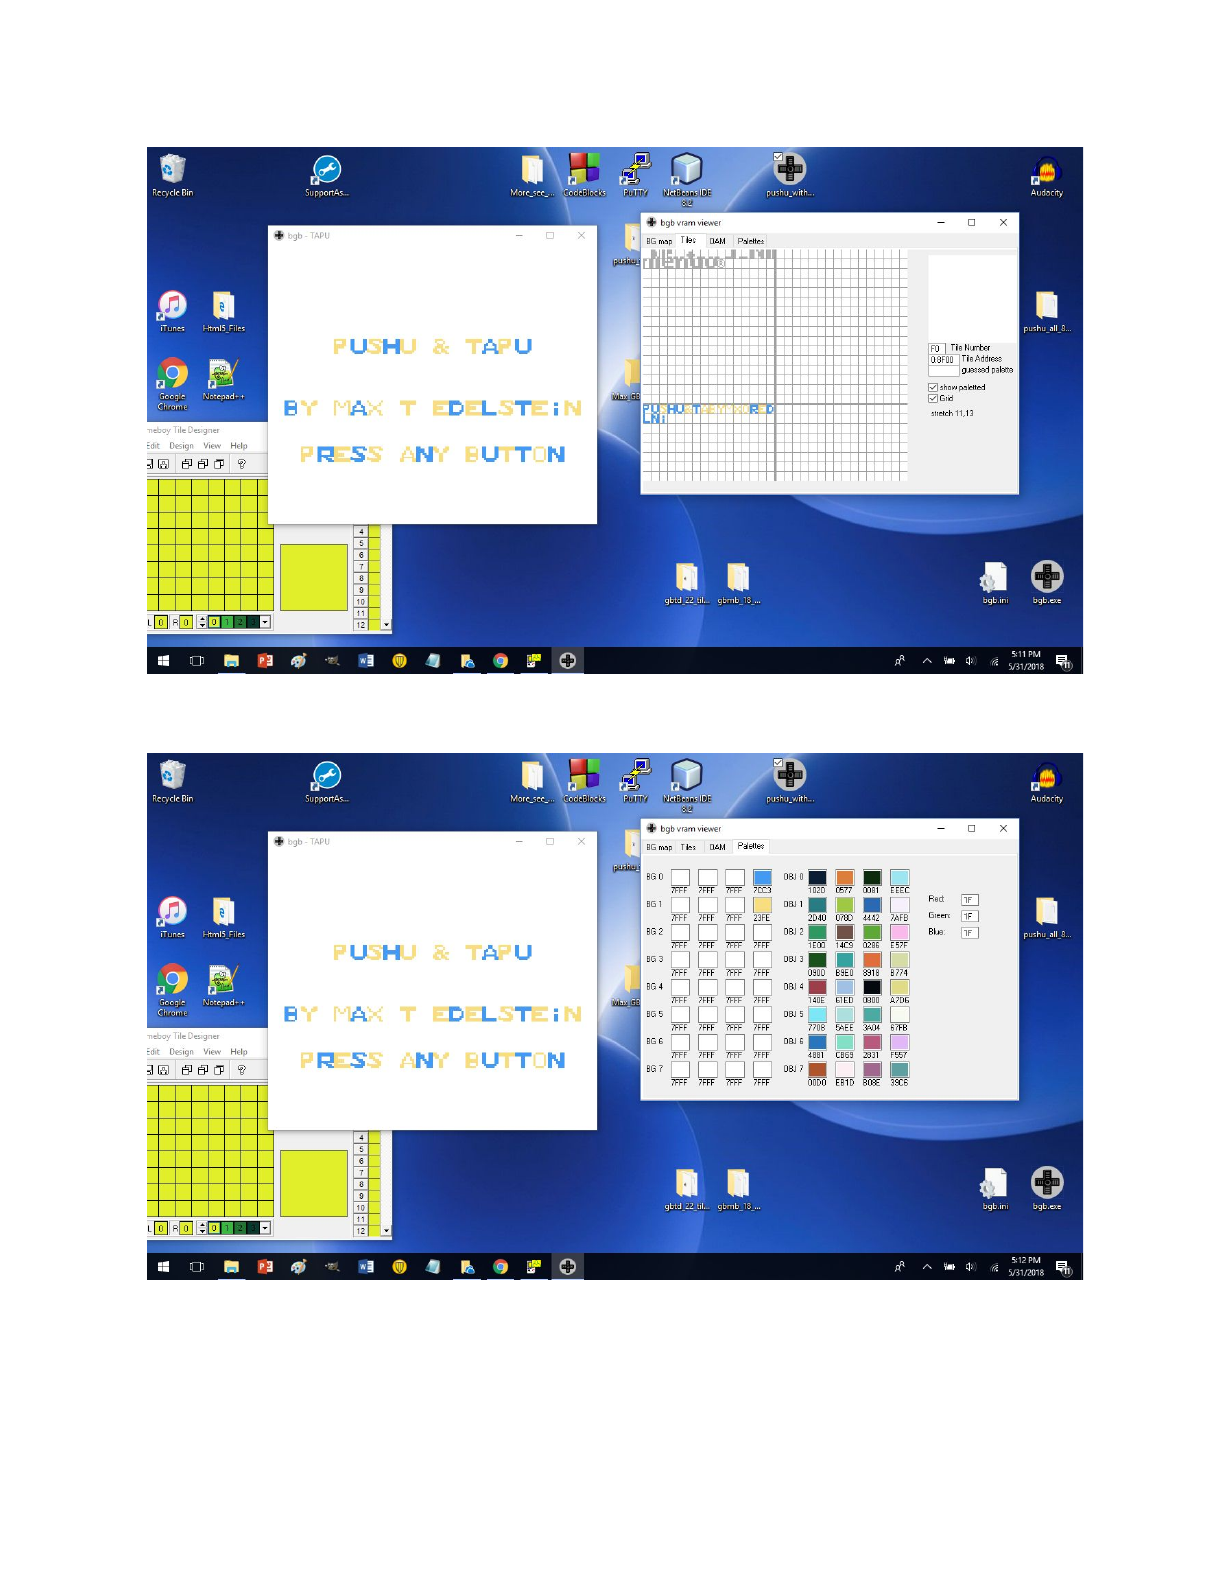
Now We aren’t looking at sprite data here. We are looking at background data. Rather the two
colours that make up by start screen colours. It should be noted here that tiles with colours in
GBTD look different when you actually run them as a .gb file. The blue and yellow colours I
made in GBTD looked like different shades of blue and yellow on the actual game. But this
turned out to be a beautiful side effect. In the above picture look at how no sprite data is set. Well
that data set is default data. Below I am going to draw the letter E. And then show you how to
save it properly at .gbr file so it can be reopened again by GBTD or opened with GBMB. I
picked colours that I will use in GBMB. Remember once again to write these numbers down
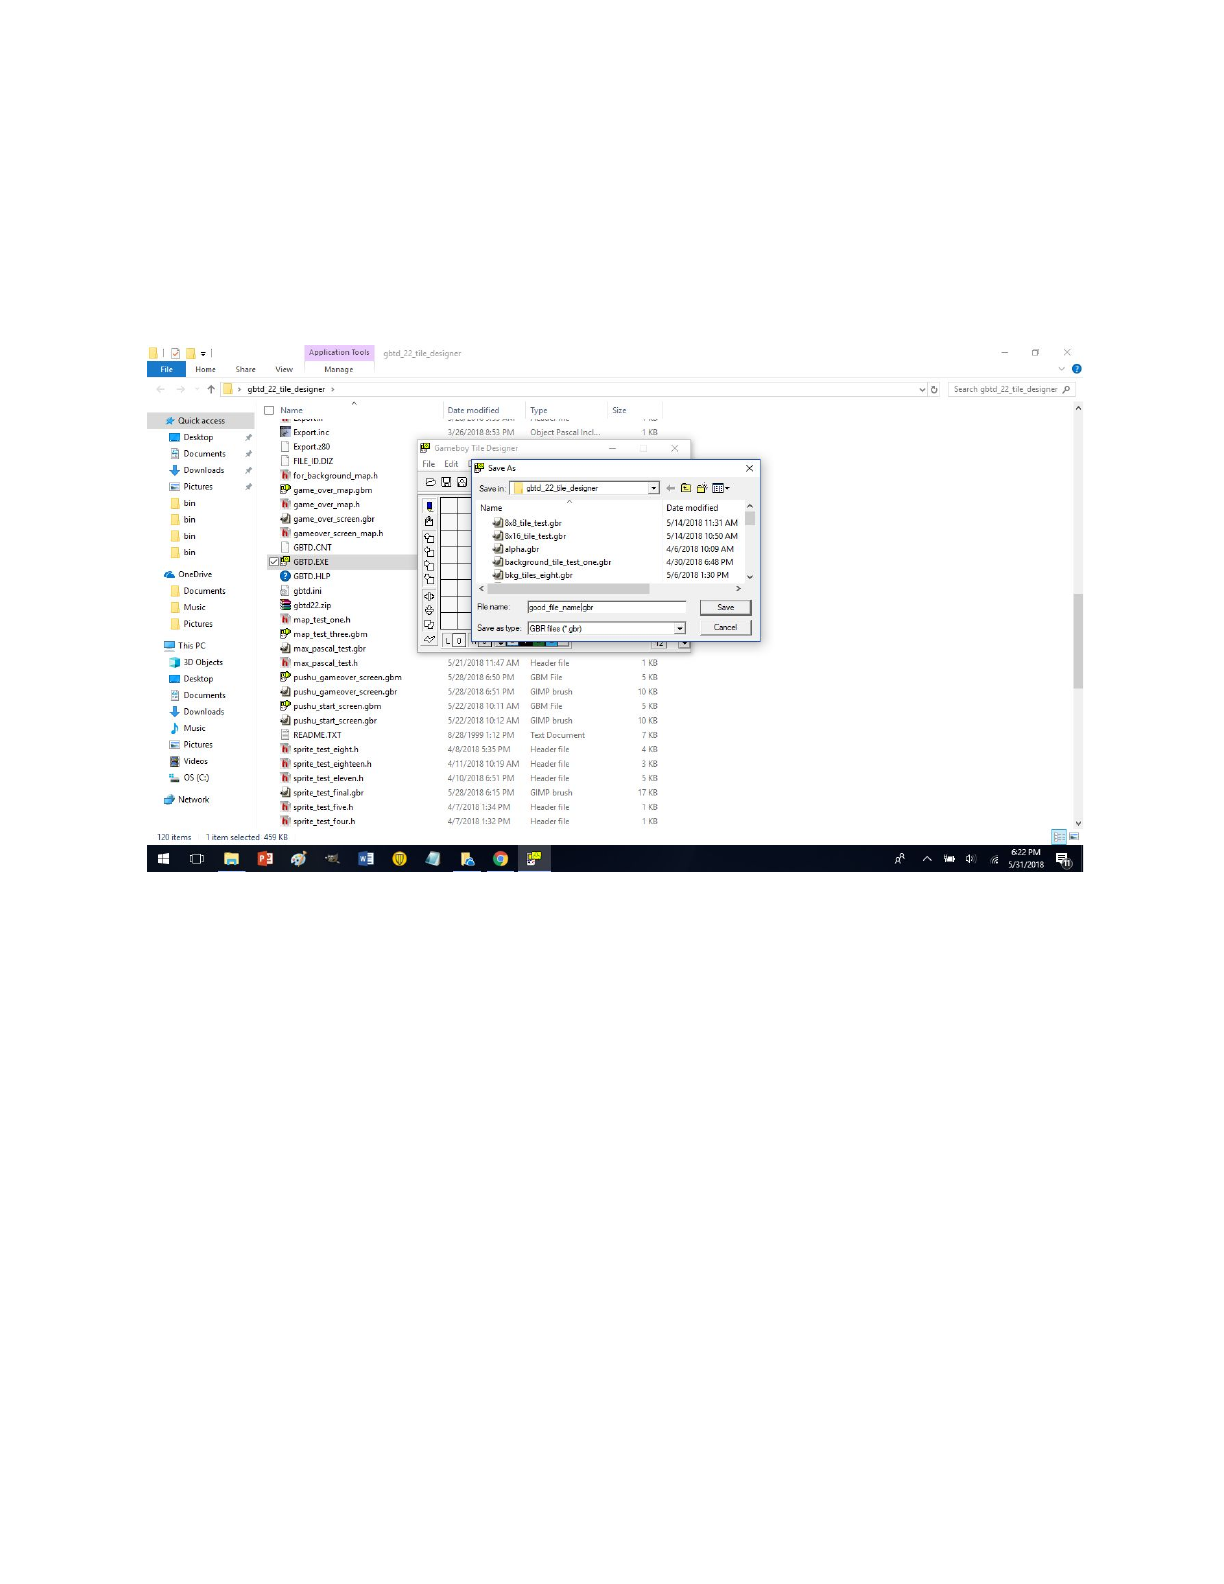
later. Because the programmer will need these to pass the colour properly. Goto file-> save as ->
good_file_name.gbr then click save.
Now I drew a blue letter E.
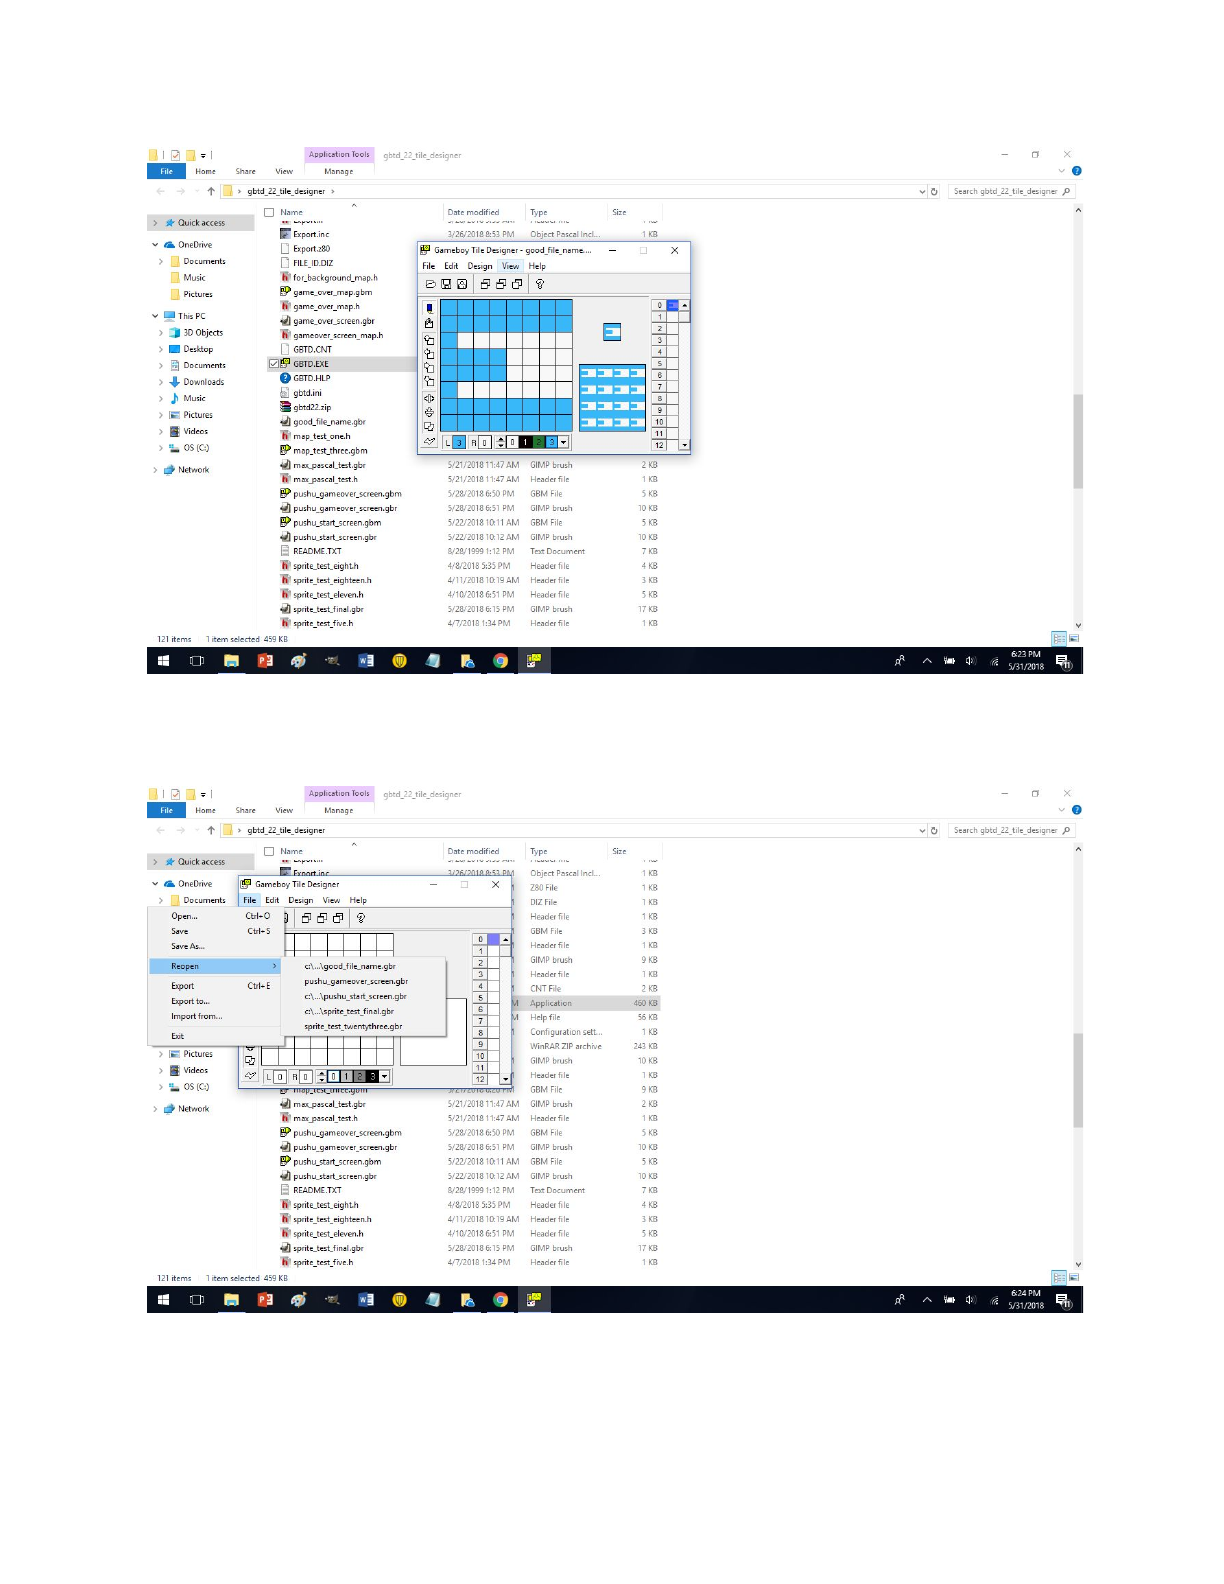
Click save again and this will save the previous made good_file_name.gbr file. Now let’s close
the file.The recently closed file can be found by doing what is in the visual below.
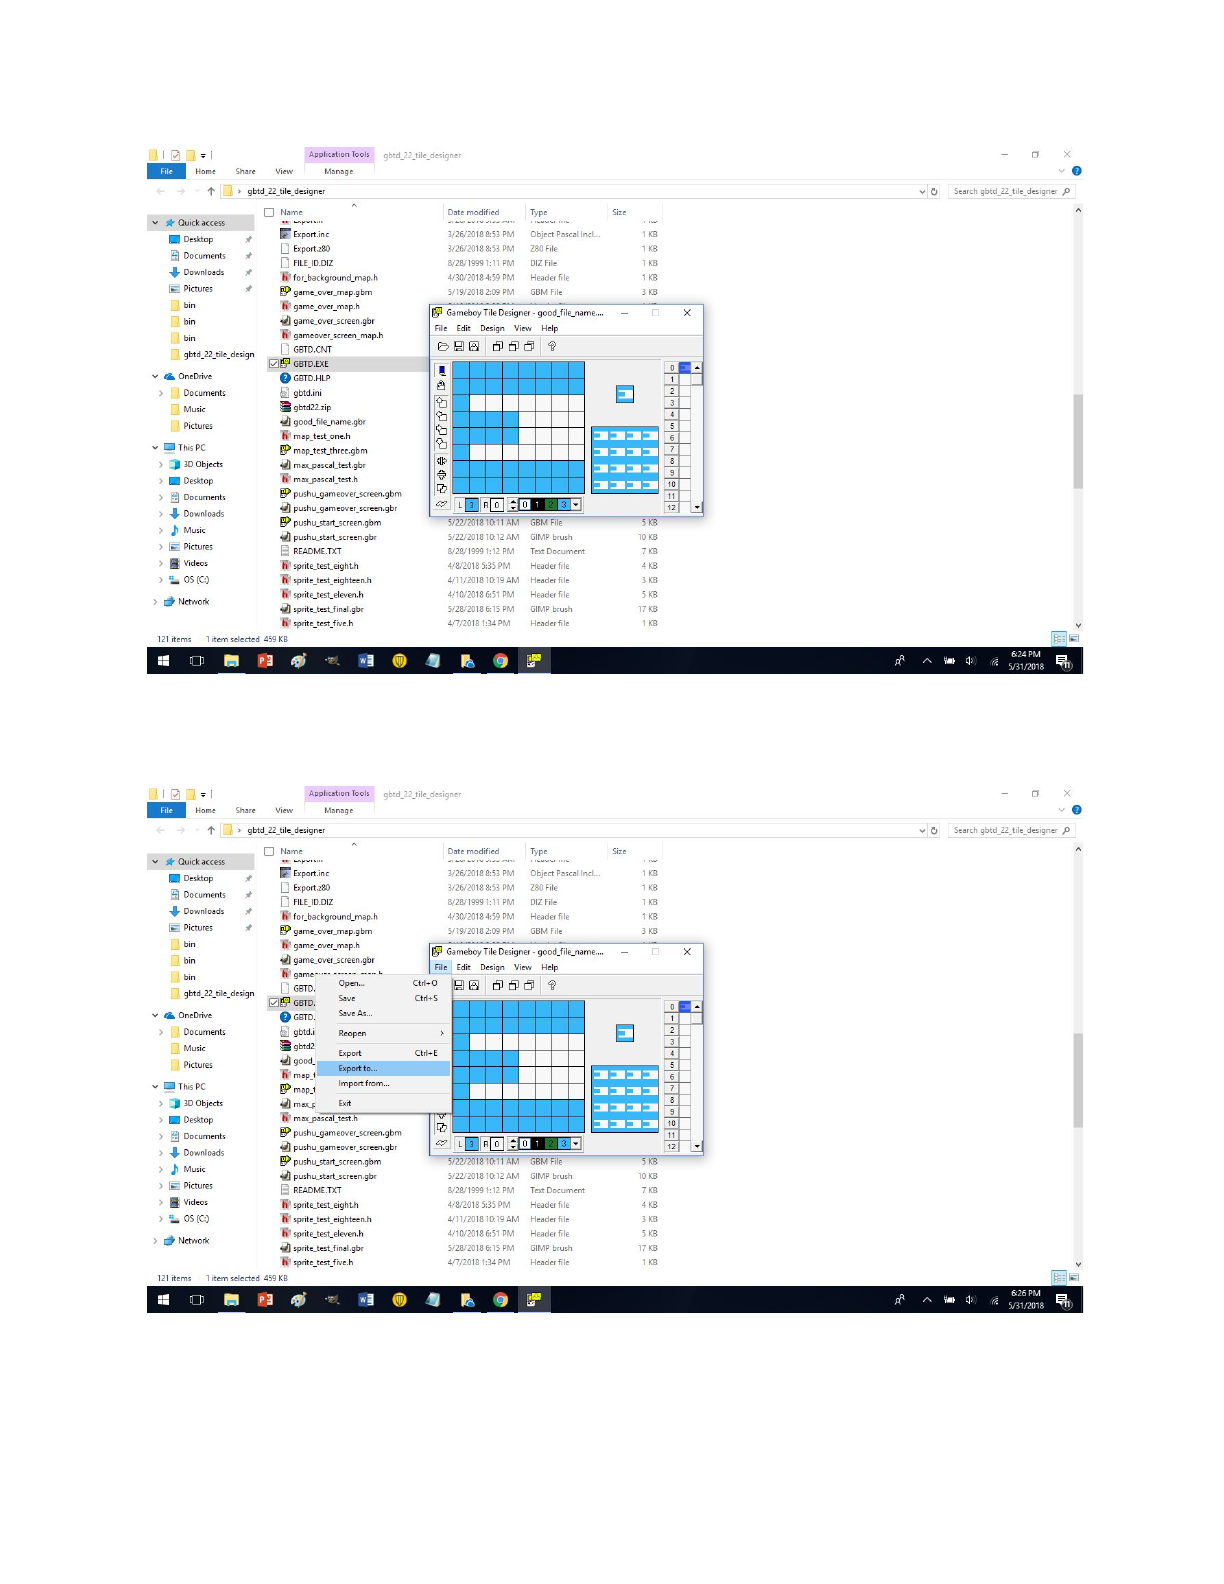
Now we are going to export the tile data. Which is just the blue E tile. Do what is in the below
visual. File -> export to
Now we see a screen with an overwhelming amount of fields.
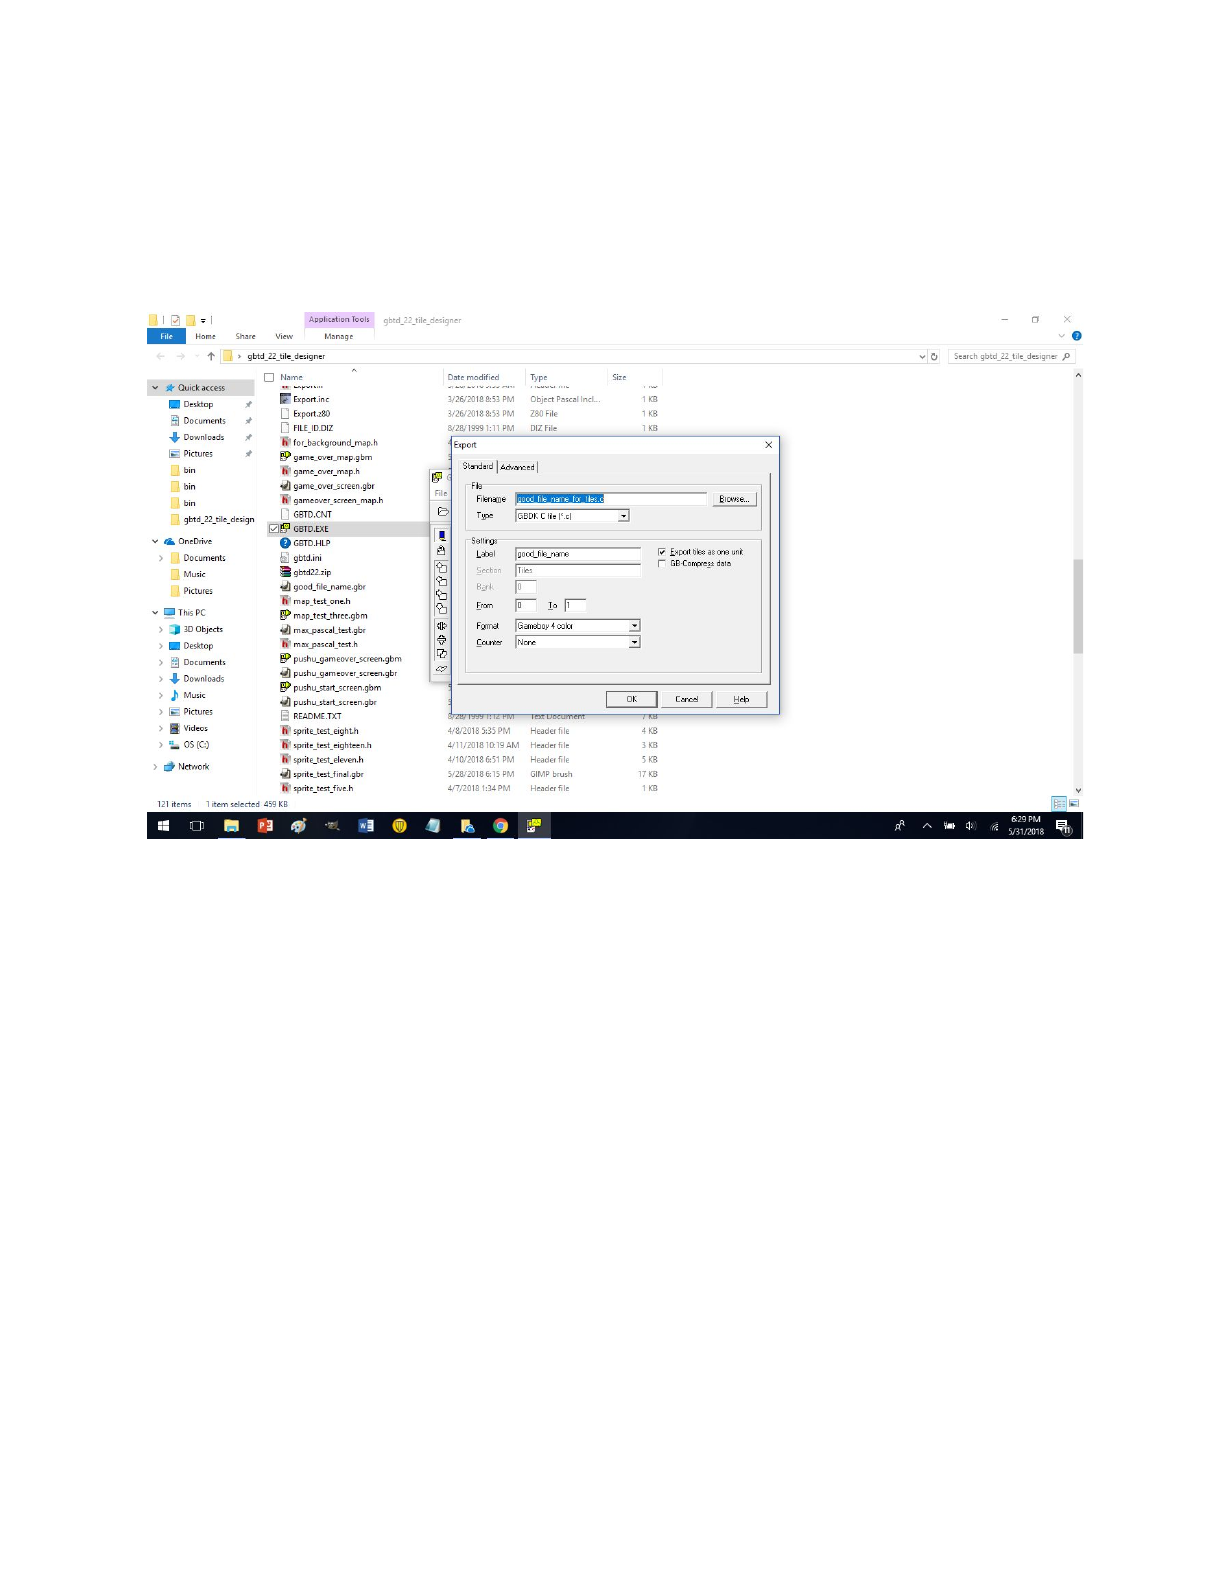
Since I am assuming we are working using the c programming language change the Type field
into a .c file format. These tiles will have to be included in your GBDK area preprocessor in c.
Programmer need to know that. They will be using the include directive with the file name of the
tiles in quotes. Ex- #include “good_file_name.c”
Now back to the exporting. Look at the visual below.
The filename field should have the name of your file and end with a .c because after all this is a c
file. The type is GBDK C file. Now note the label. How self descriptive. This field here will be
the name of the unsigned character data. I will show it to you again in a second. When we export
the file we will have to open this file and place the word const in front of the unsigned char data
array. I will provide a visual soon. Now the field that says “From” is how many tiles we will be
exporting. Here the zero based numbering system strikes again. If you can’t remember how
many tiles you used don’t worry. Just click cancel and go back to the GBTD. The right area of
the GBTD screen a column can be seen.
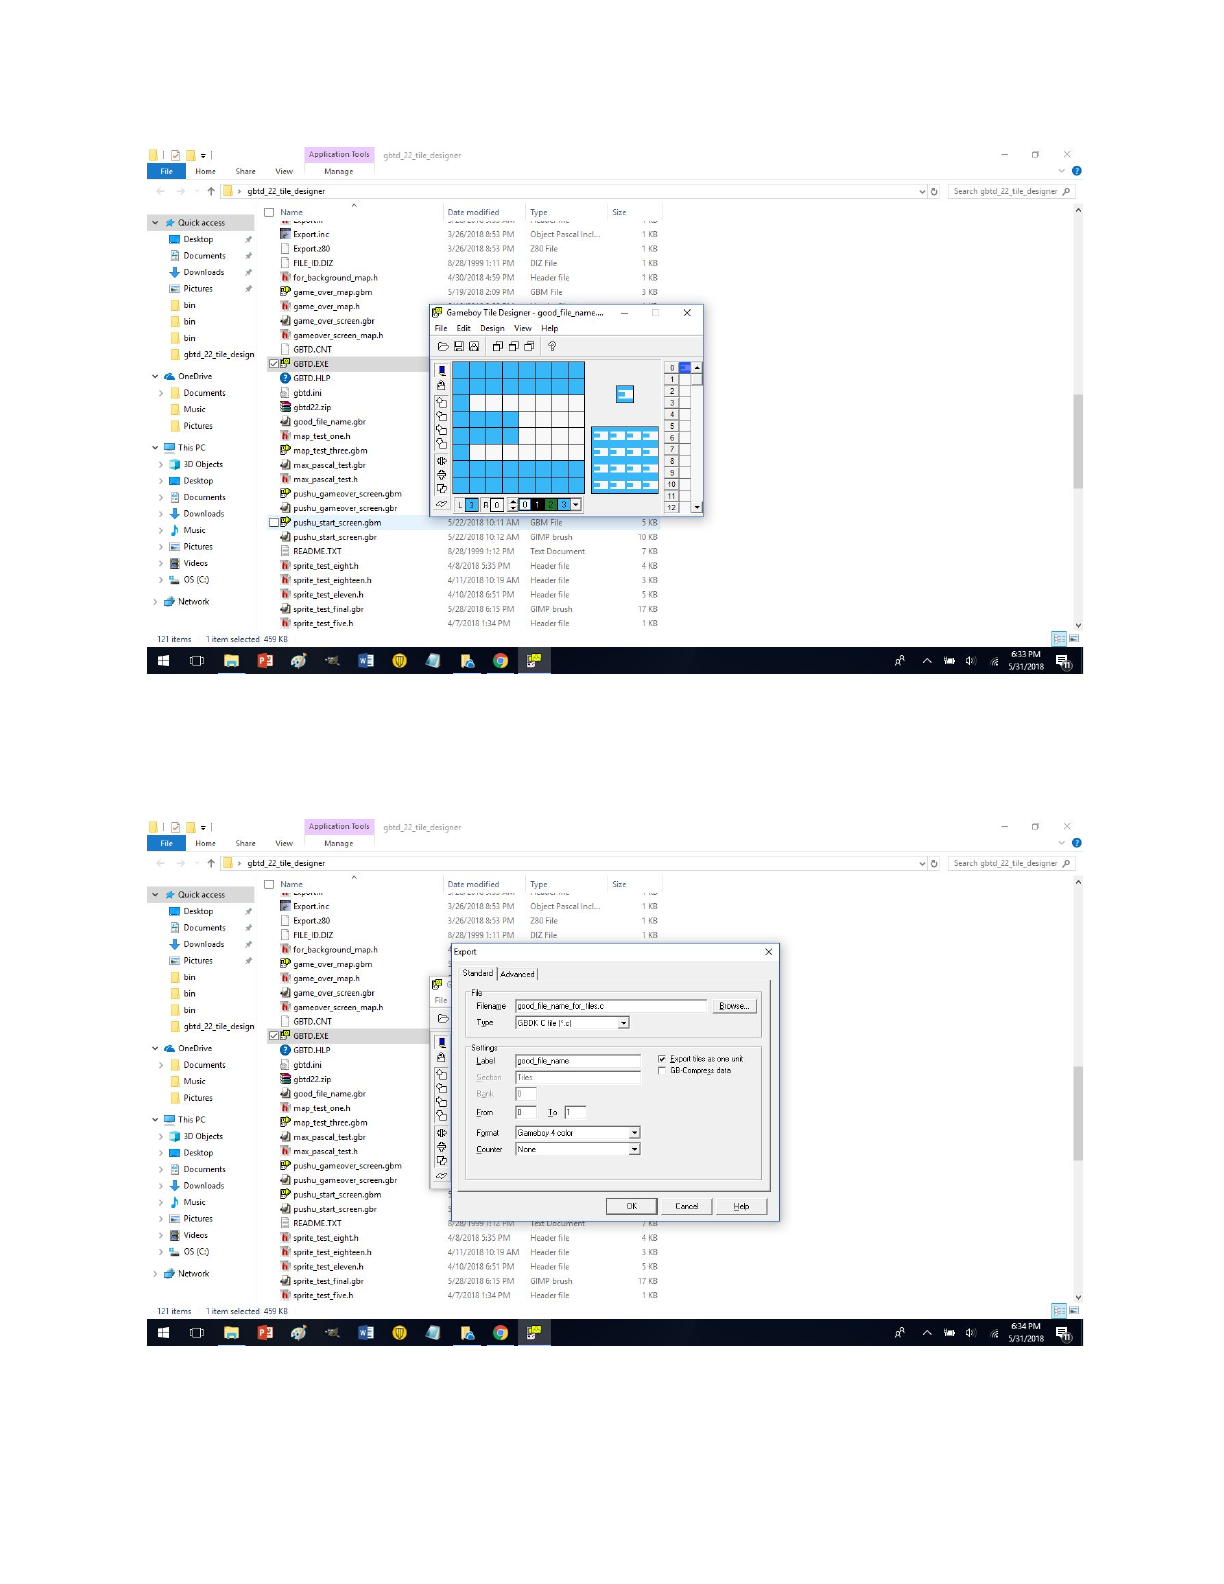
It starts at 0 and goes on from there. Now count how many tiles you used and write it down.
Don’t be afraid to use a notecard or paper. Now back to exporting. I made the field 0 to 1 just to
have an extra blank tile. Note some people recommend to have the first tile or tile 0 to be
completely white, because this tile will tile background tiles that have not been initialized.

Now click ok. And not how it seems nothing has changed. Well not goto the folder where you
stored GBTD.
Note how the .gbr file we saved and the .c file we saved can be found in the same folder. Don’t
move these yet, because gameboy map builder will look for the .gbr file in this same folder.
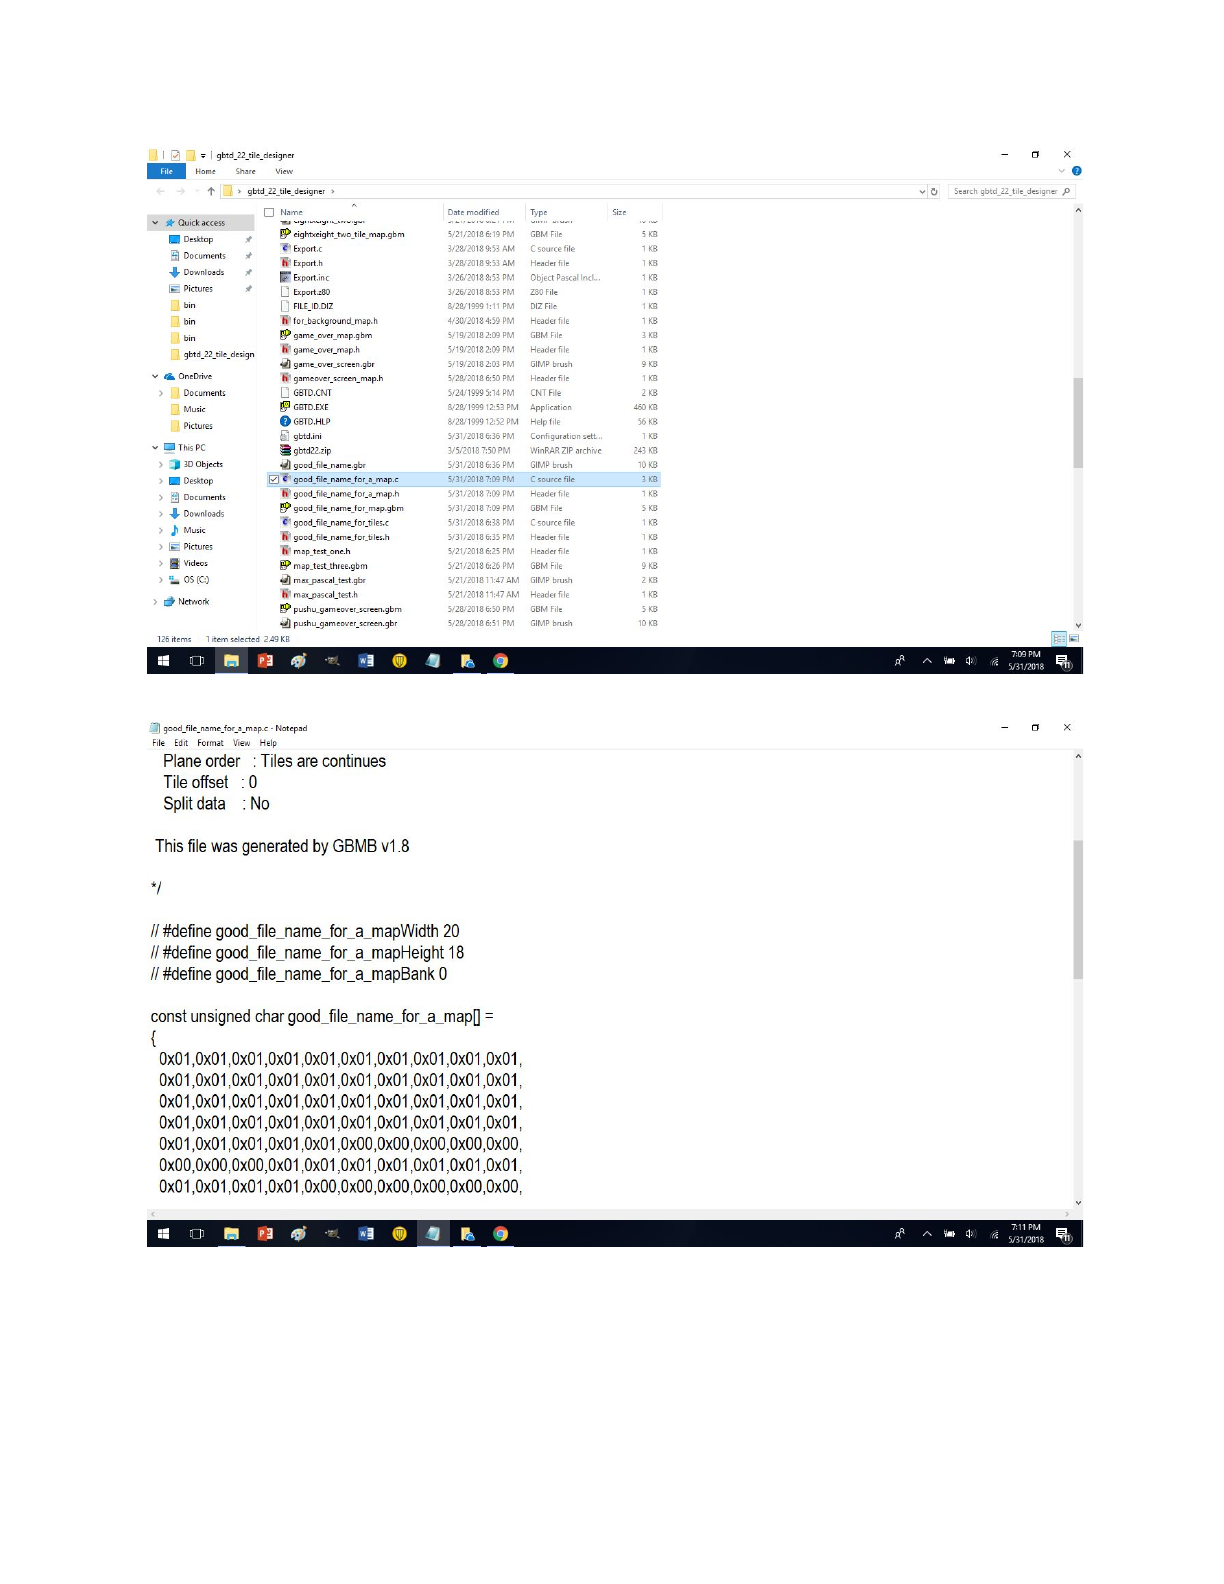
Now let’s open the .c file we created by right clicking the file -> edit
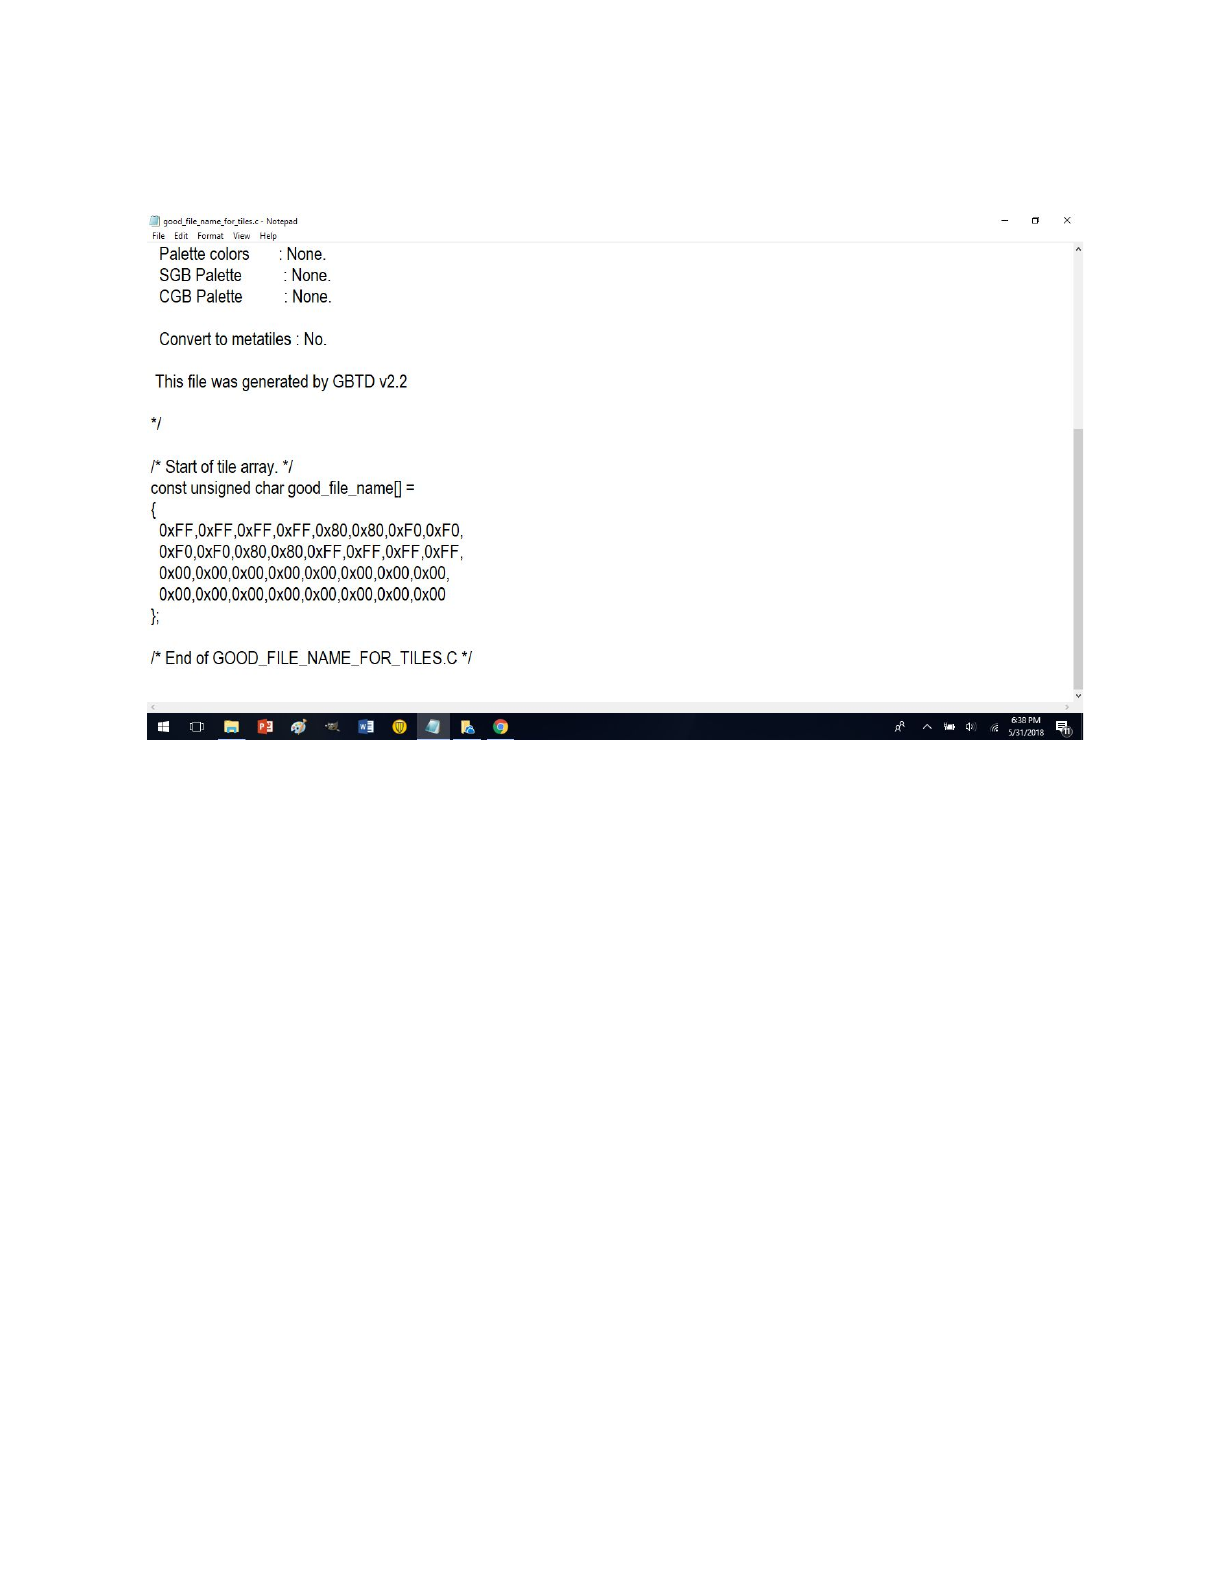
Scroll down to the unsigned char good_file_name[] and place the word const in front of the
unsigned part. Visual below.
After placing the word const in front of unsigned remember to save the file then close the file.
It should be known that I am not a professional when it comes to this software. I had close to no
help besides vague clues and old forum articles that I had read. So I would not be surprised if
people find a more efficient way to do the things that I had shown you.
Now let us open gameboy map builder (GBMB) visual of what is in the zip folder after opened
in another folder.
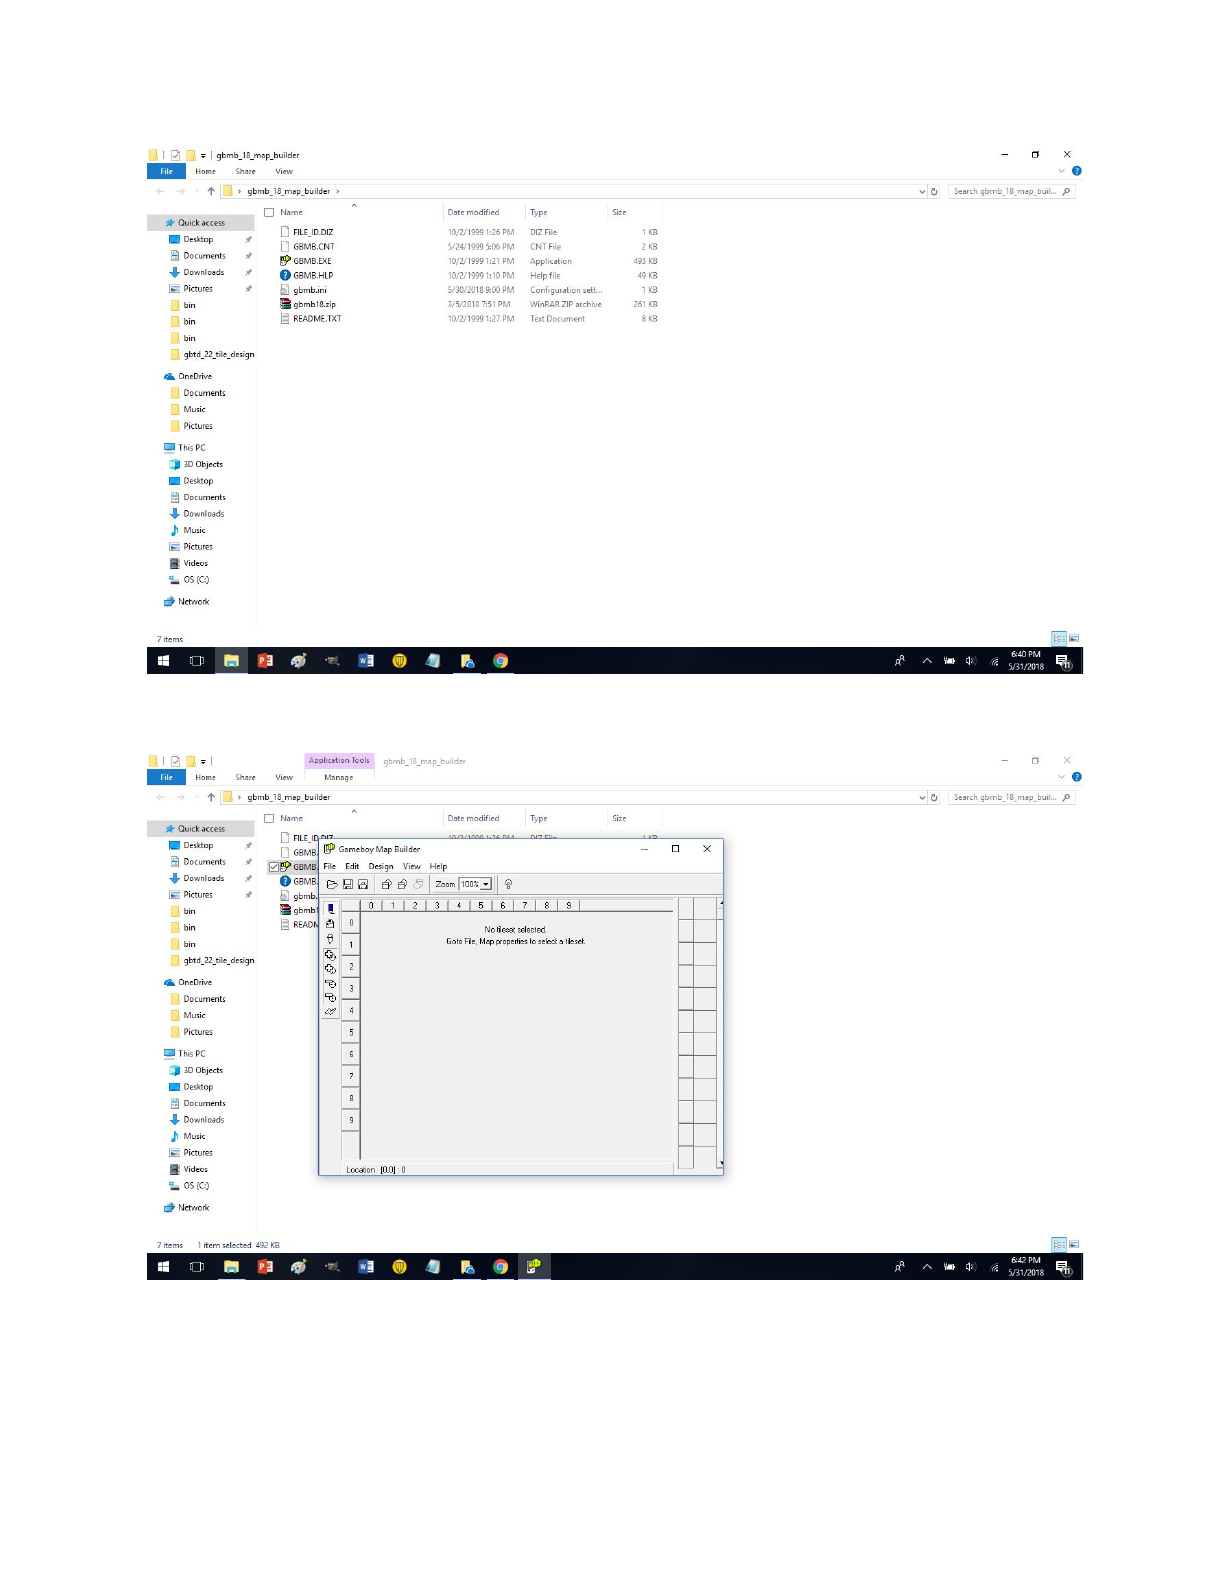
Now click on GBMB.EXE and run it. Possibly windows defender will set off and ask you if you
really want to run it.
Oh well would you look at that. GBMB has a maximize feature. Well even though I complained
before, I am not going to use it :P.
Now if we are going to create a map, I had learned that one does not need to turn on any special
setting. Just goto file -> location properties

And do what is shown in the visual below.
Then click the button add and do
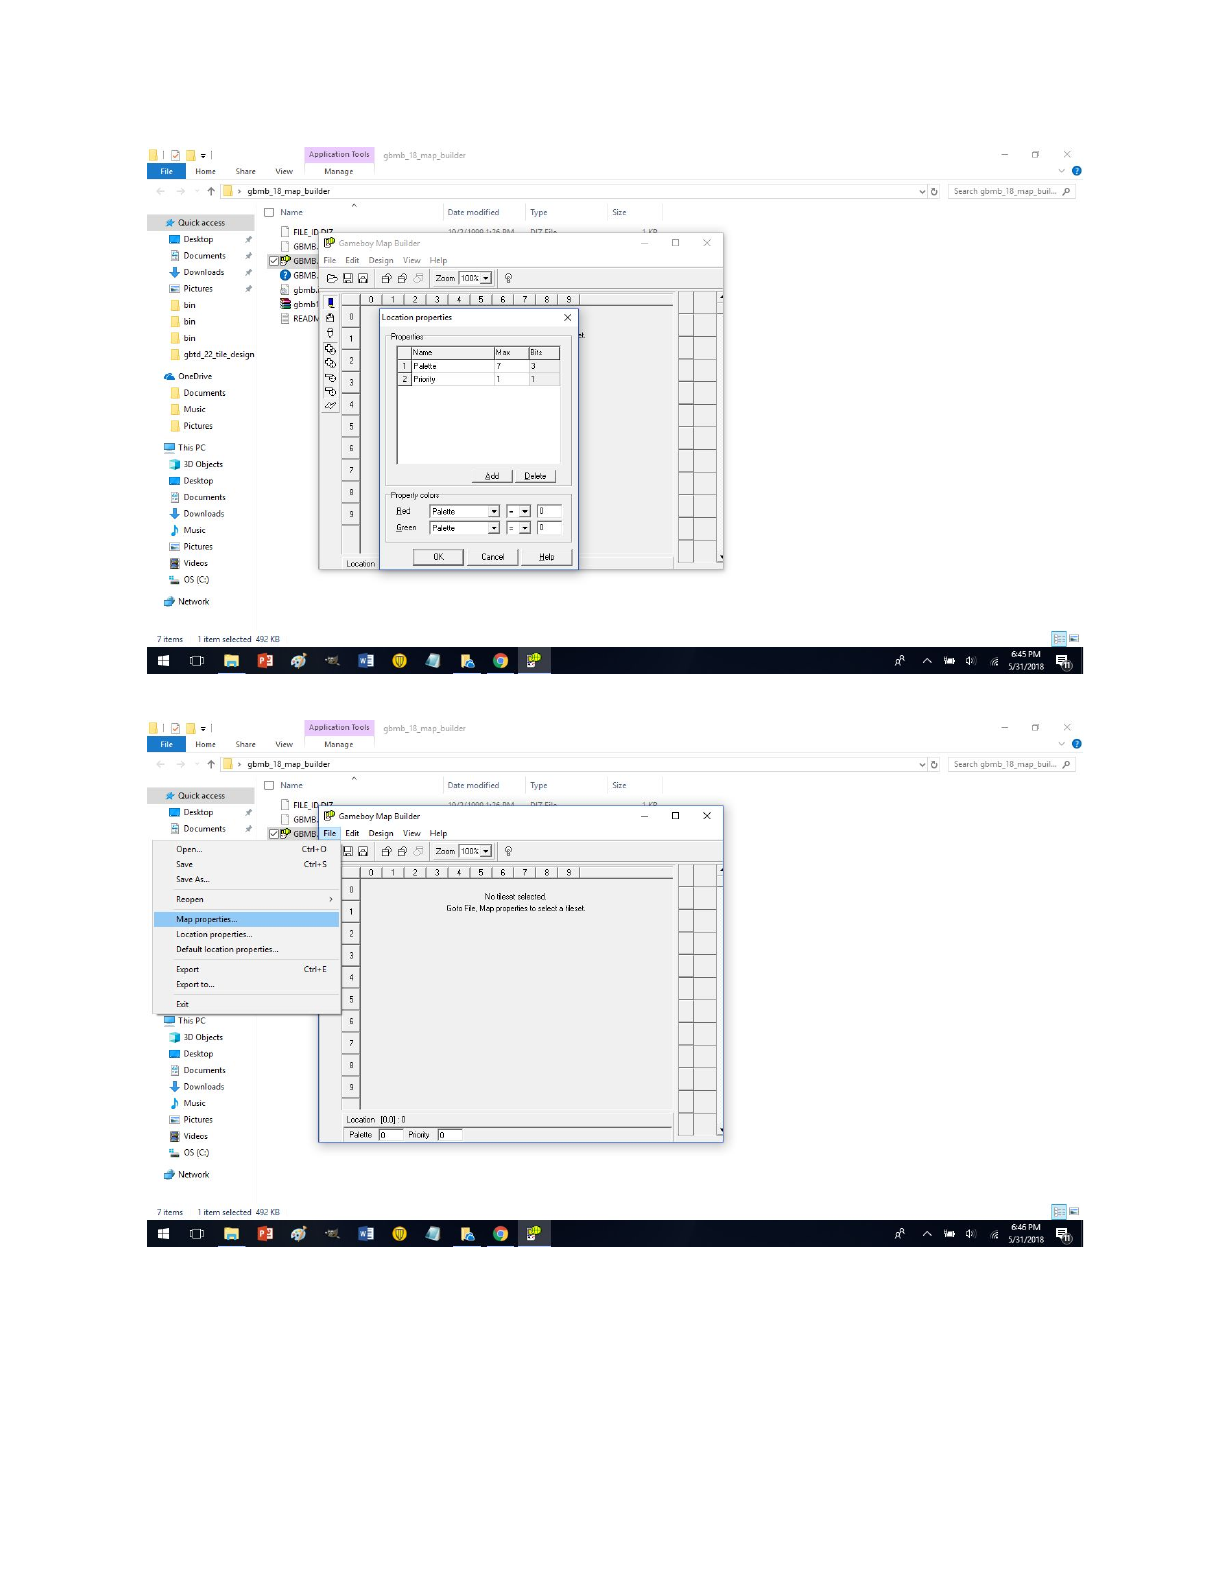
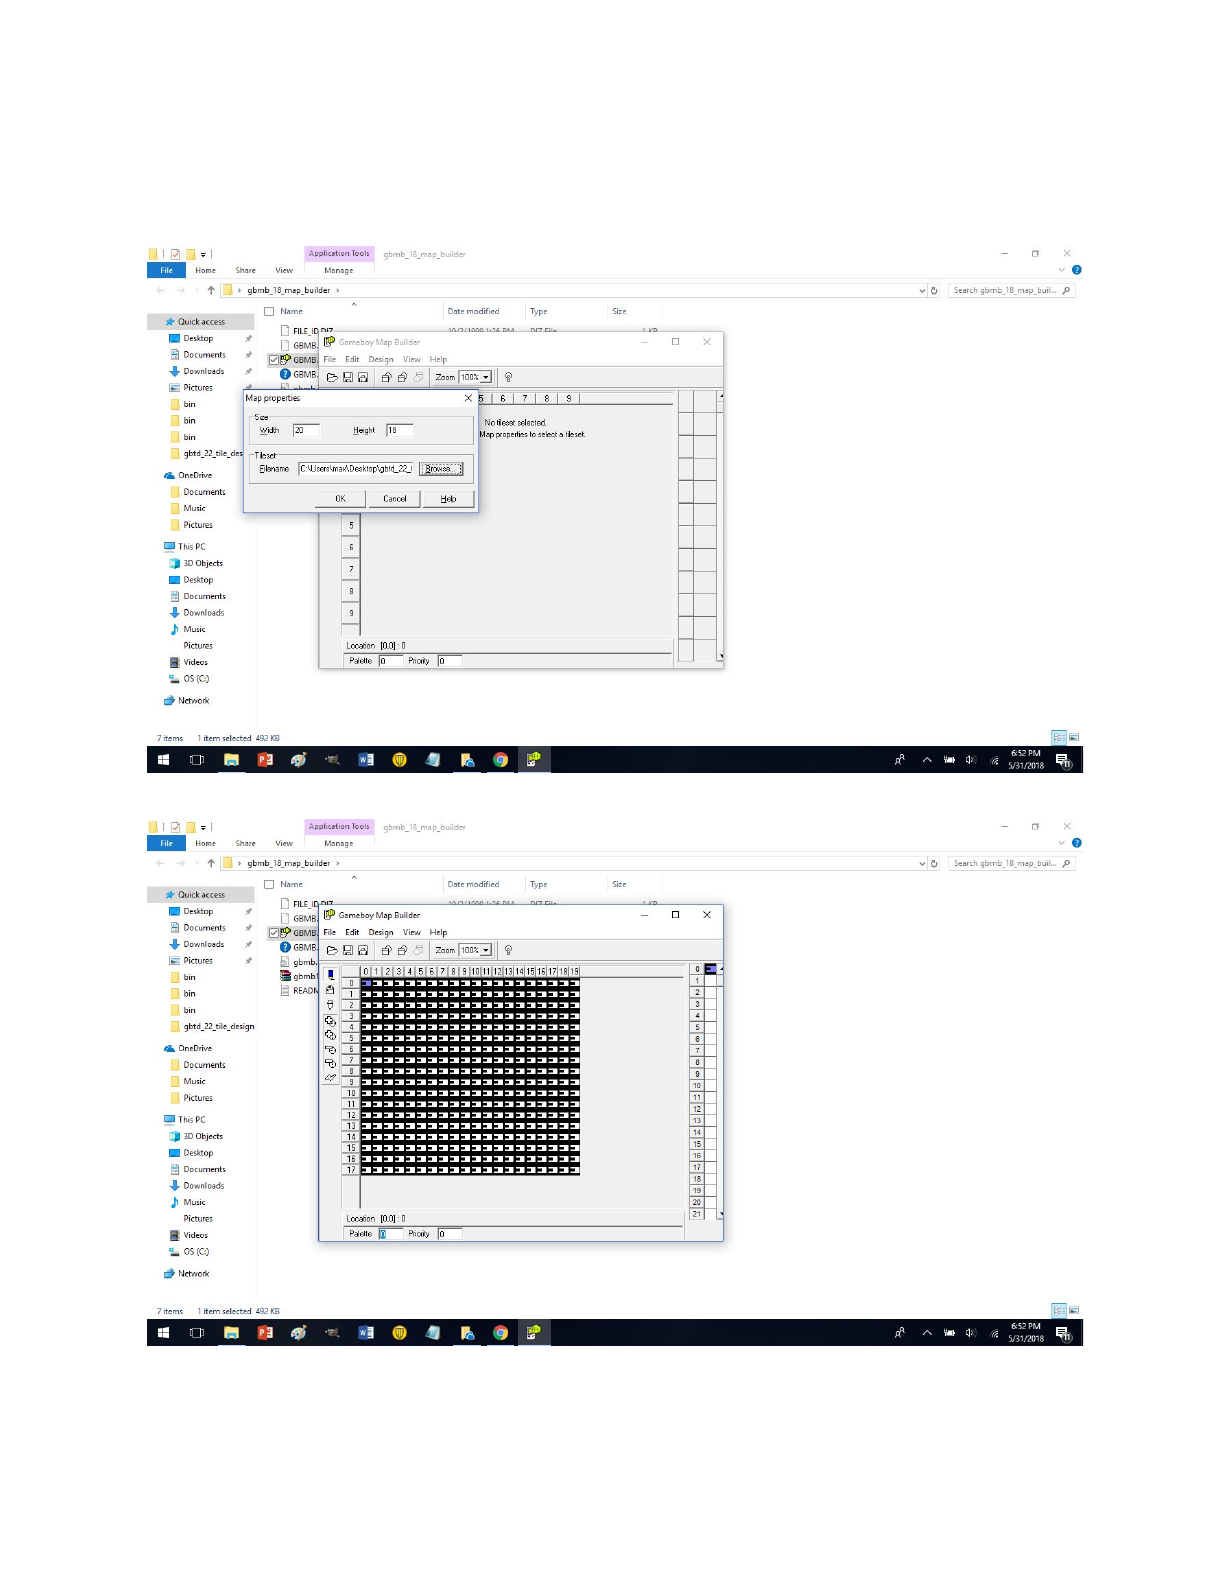
Then click ok and goto file -> map properties
Now note the width and height

Many people create a map the size of Width 20 and Height 18 due to the gameboy screen size
being the same. Or 160 pixels by 144 pixels.
Now you could do that or you could enter a larger size to pass a larger map. One may want a
larger map for things such as scrolling for a larger playing field. Check out the examples on my
github for ways I did this. Usually a function exists for passing the width and height and one
would pass these numbers 20, 18 to the function. Or perhaps they used a 31 by 31 map they
would pass the numbers 31, 31 to the function. Now lets click the button browse in the above
image.
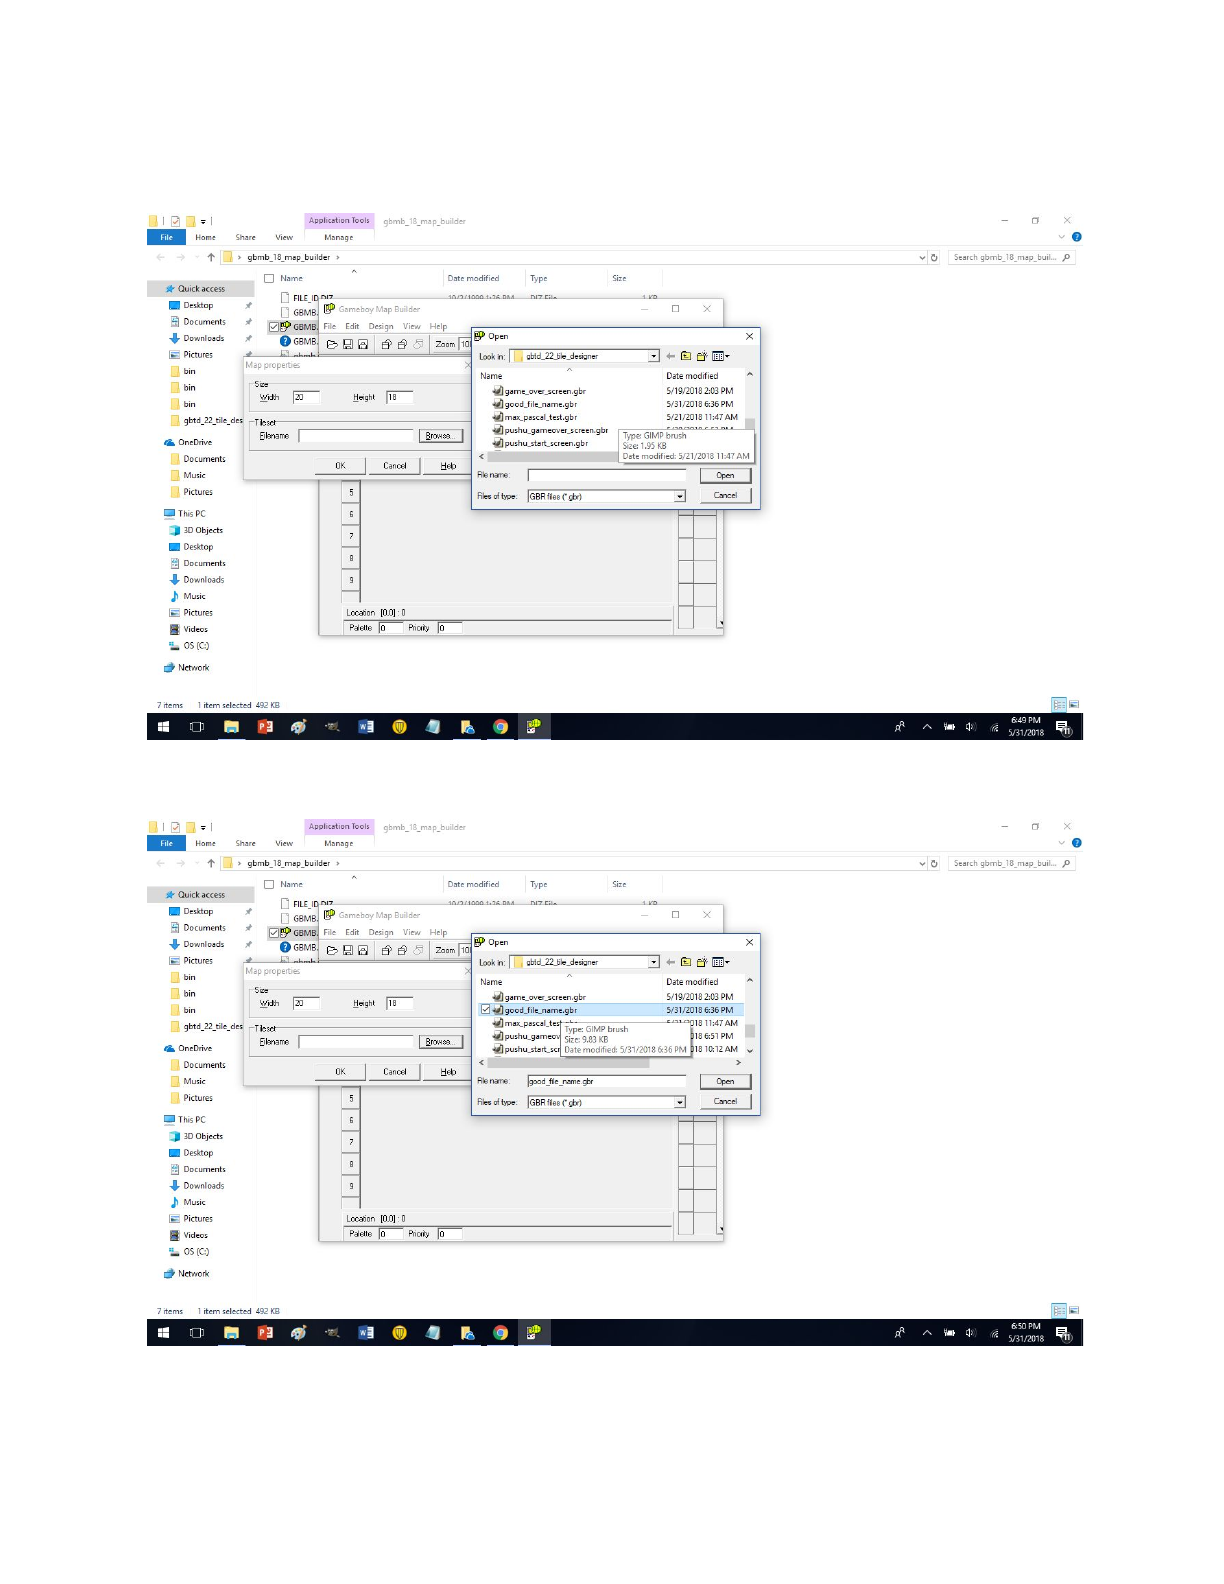
Look what was brought up. The files from the GBTD folder. And do you see how they are all
.gbr files. Now let’s open the file we made previously in GBTD and saved as a gbr.
Well that file name sure is good :D. Did I mention how important it is to have a good file naming
scheme. Perhaps if we haven’t done this then we would have had a more difficult time finding
our file. Now let’s click that open button.
Ahem, now we click ok.
(said in a Mr. Krabs voice) Mother of pearl! (end of talking as Mr. Krabs, or continue thinking I
am talking like him, I am not a cop) What happened? Well remember what I said earlier about
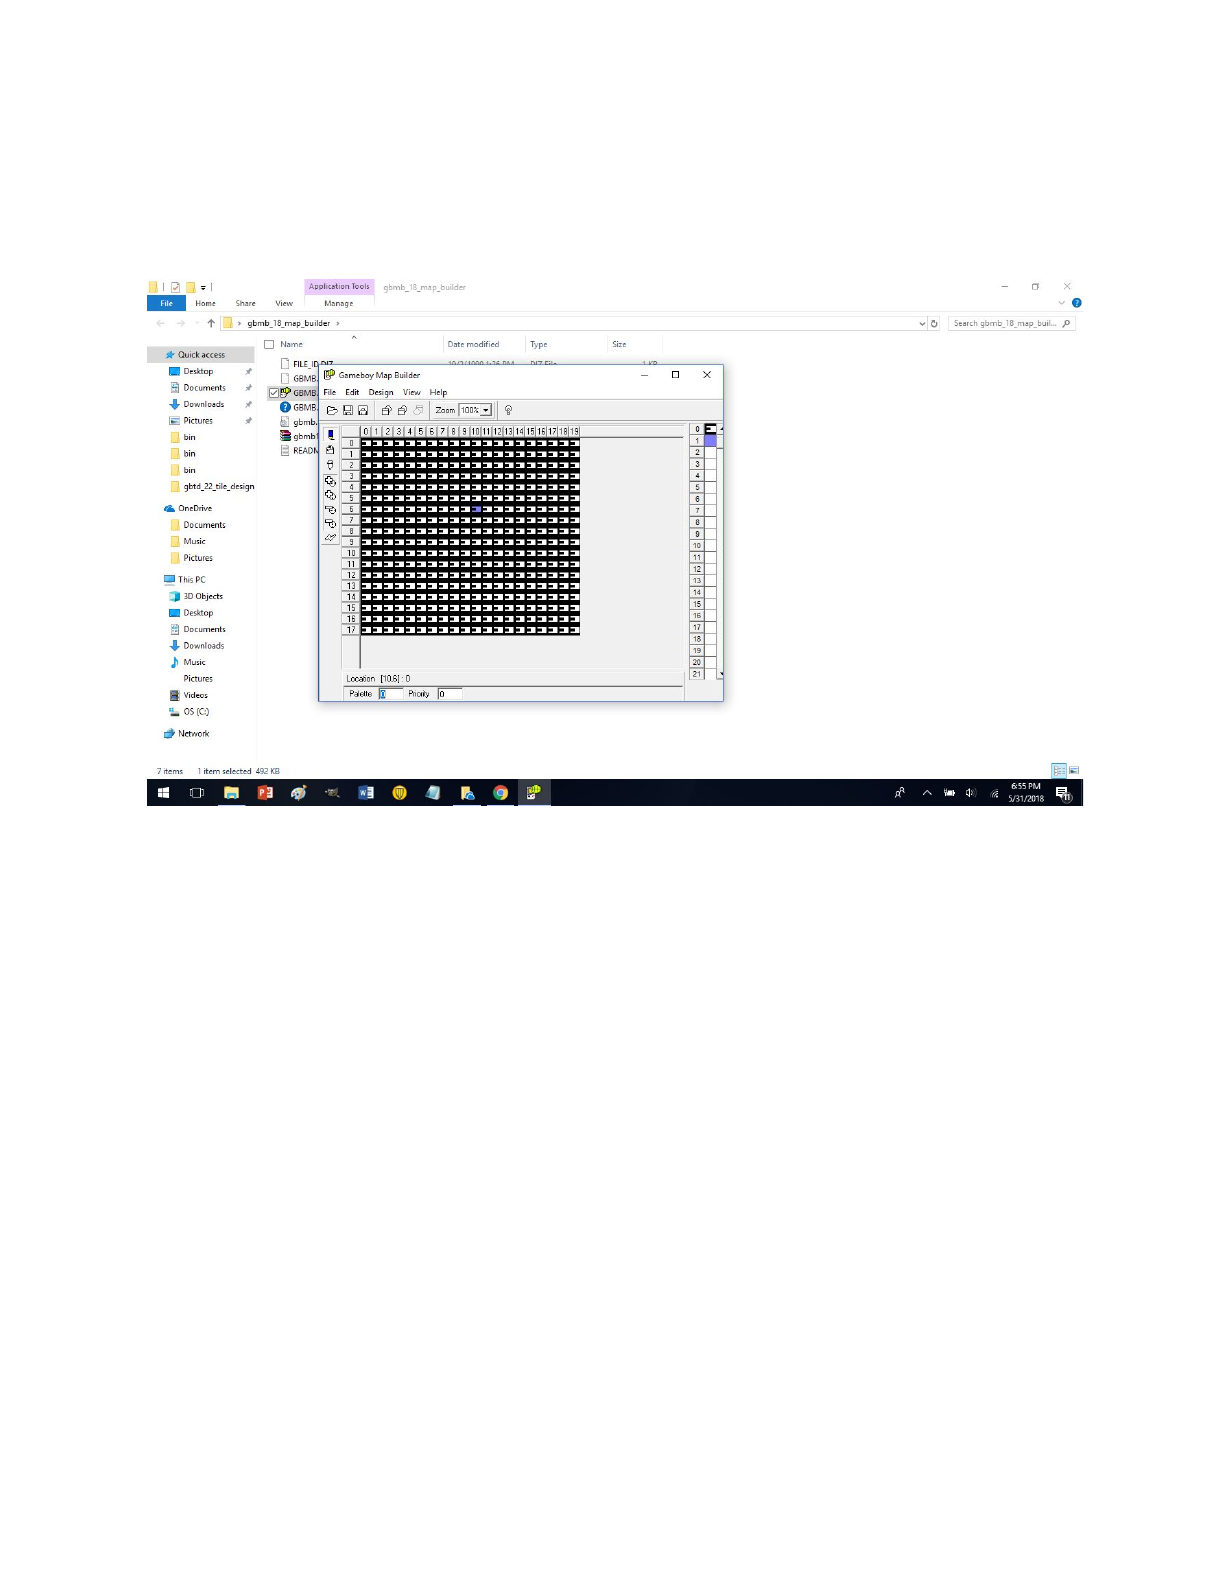
the blue P in my game Pushu? A similar thing happened here. The first tile was tiled over areas
that were not filled. But let’s say we only want a single line of “E’s”. How do we do that? Well
move your cursor to the tile column (the one with the numbers and tiles in them and left click a
tile you want to use. Here is a visual.
Note that the column on the right in blue is the tile we selected. Now lets left click the actual
map. Well did you notice how nothing happened. This is because to actually change a tile you
must use the right click of the mouse button. You can also hold right mouse button down and
drag to alter many tiles at once.
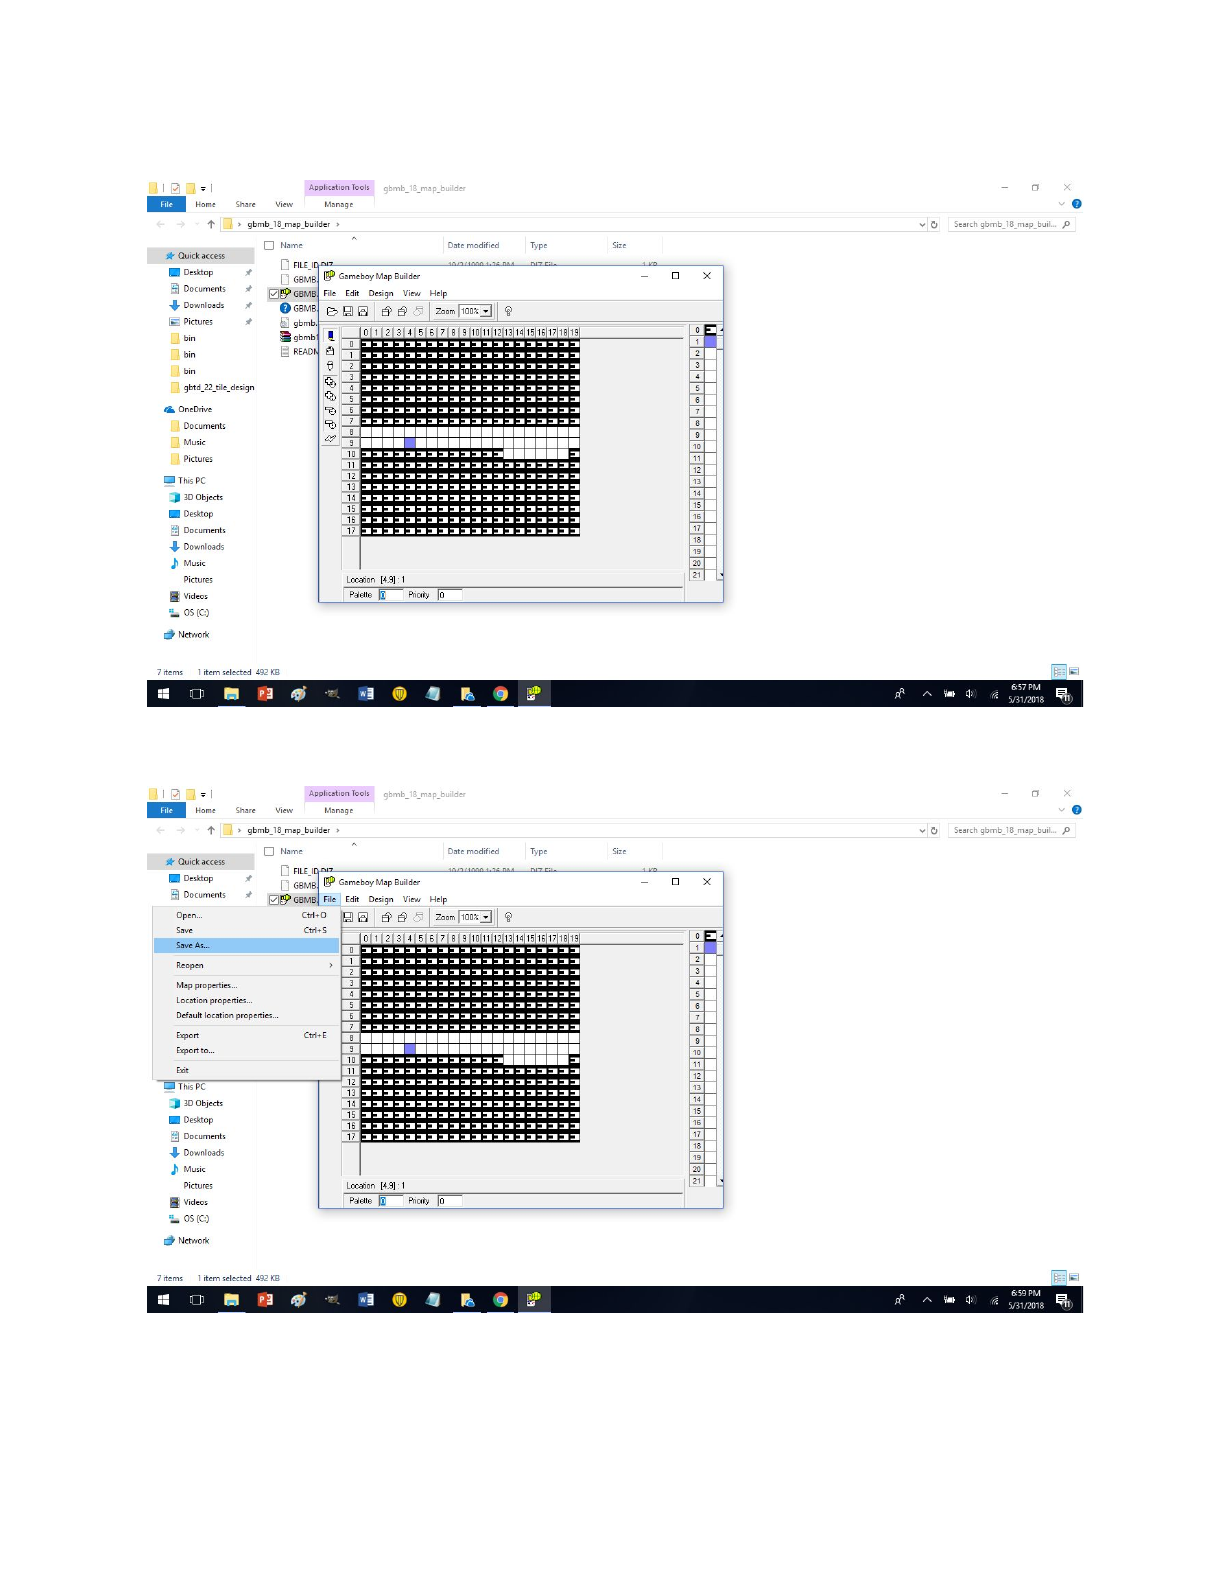
Well I broken one of my golden rules now haven’t I? Boy I sure hope someone gets fired for that
blunder. Oh god that someone is me :P. Well now let’s save real quick. Goto file -> save as
Click save as.
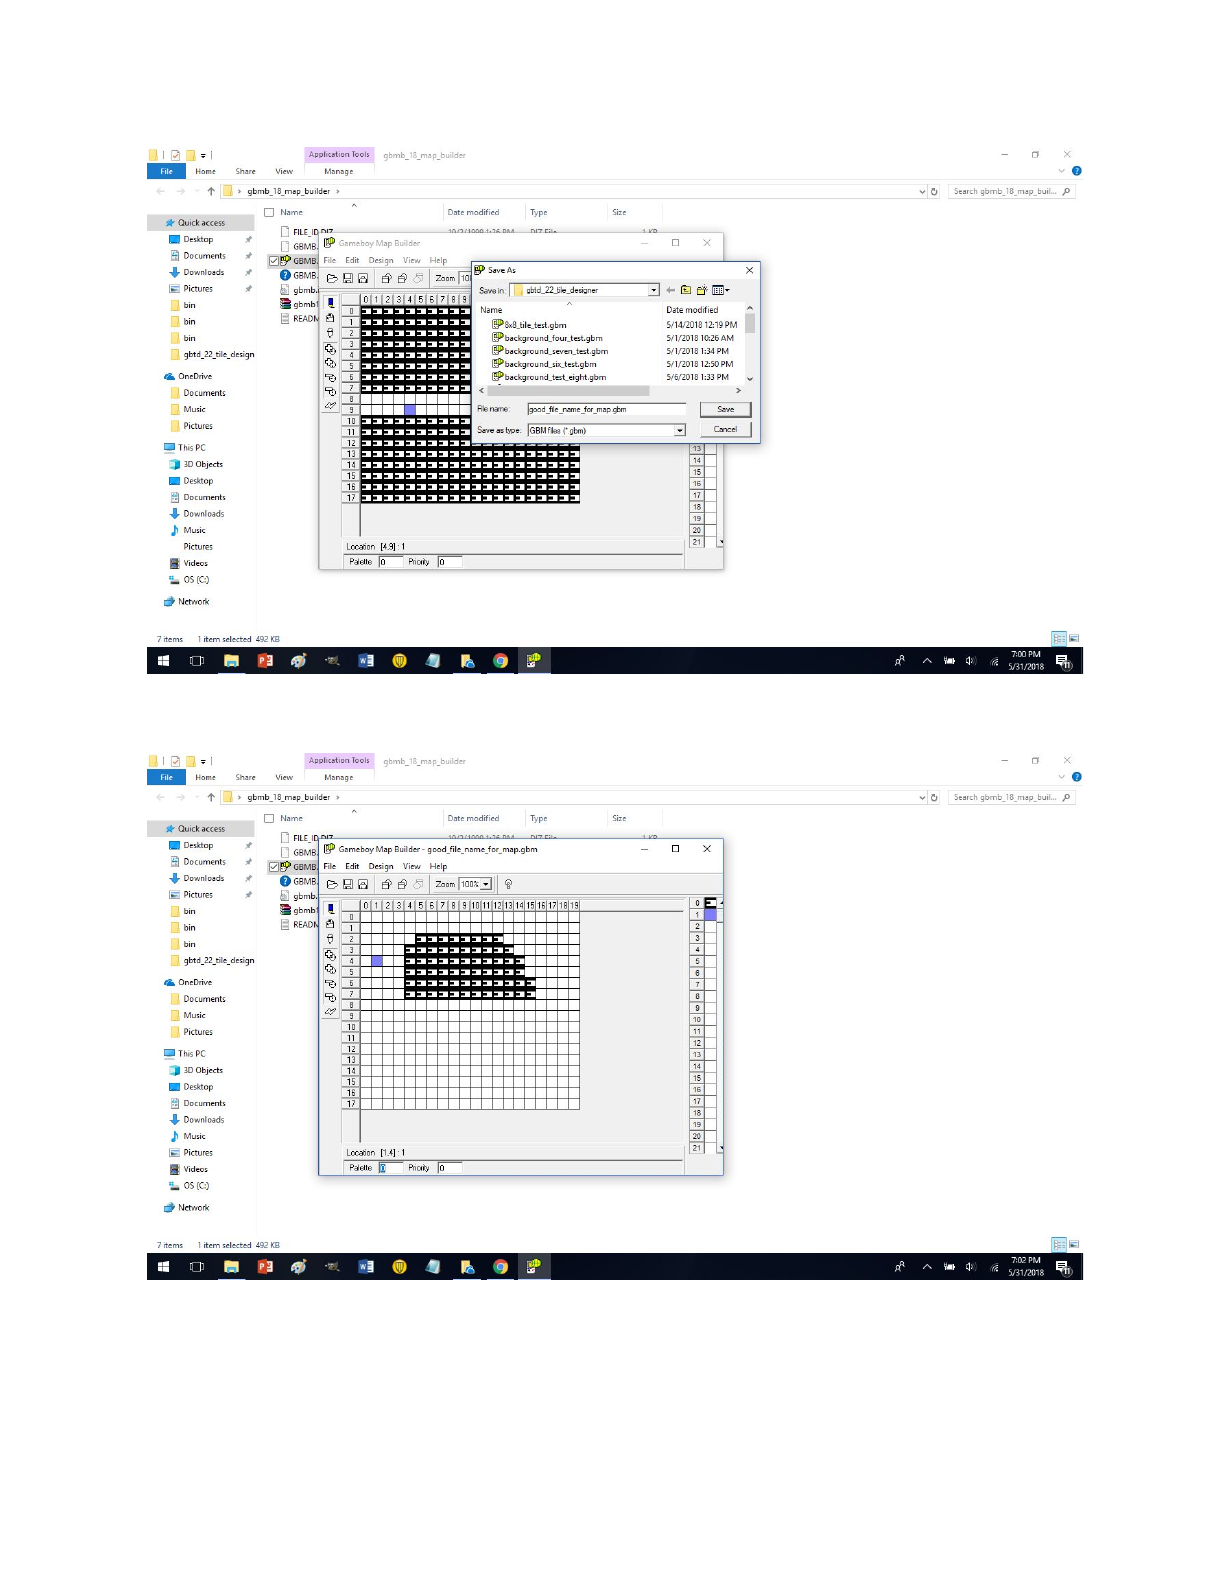
Note the extension is now .gbm and once you save it as a .gbm you can open it with GBMB in
the future. After clicking save lets do a little more editing to the map.
I saved it so now don’t worry. But now look at this.
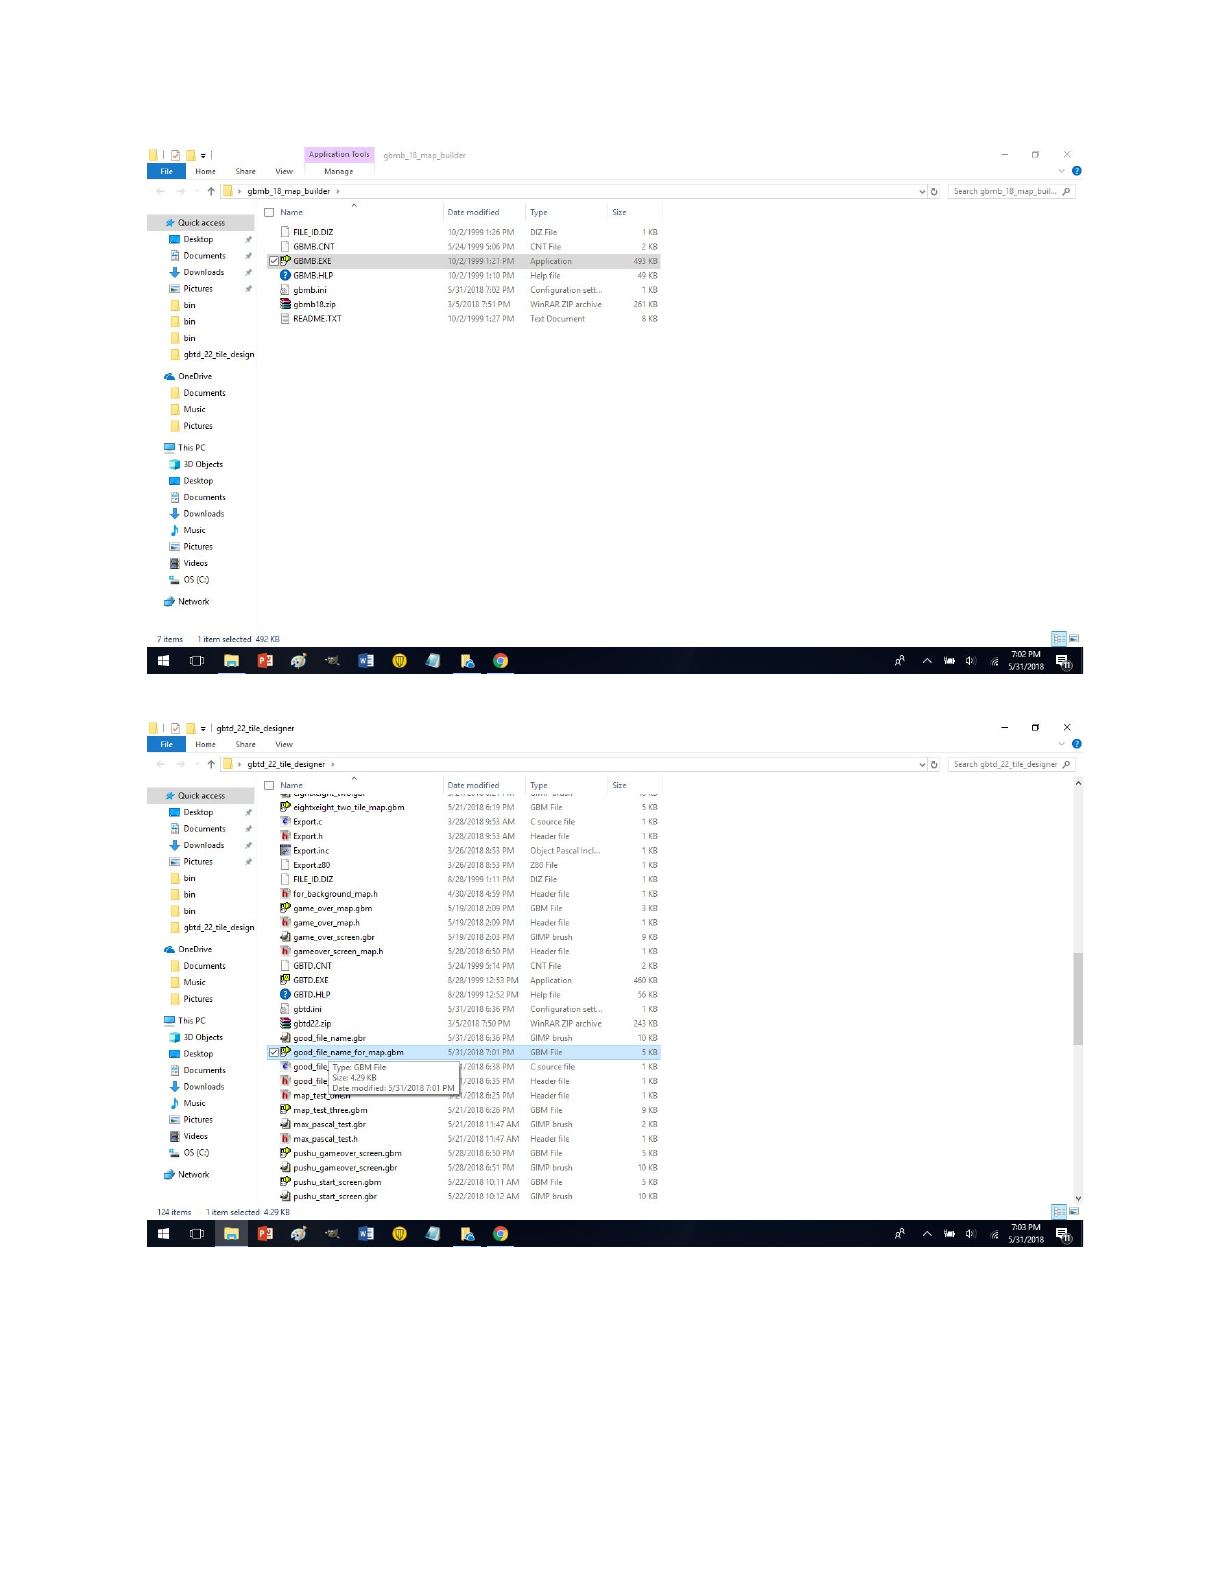
Oh where did our .gbm file that we just created go? Any guesses audience?
Found it, and I only pulled my hair so much that I became bald (personally I think bald is cool).
Now lets double click that file.

Amazing, we can open the map we previously made. Now setting the colors isn’t something you
have to worry about in GBMB. Setting colors is done in the code. Now lets export the map data.
Goto file -> export to
Well doesn’t the screen below look familiar?
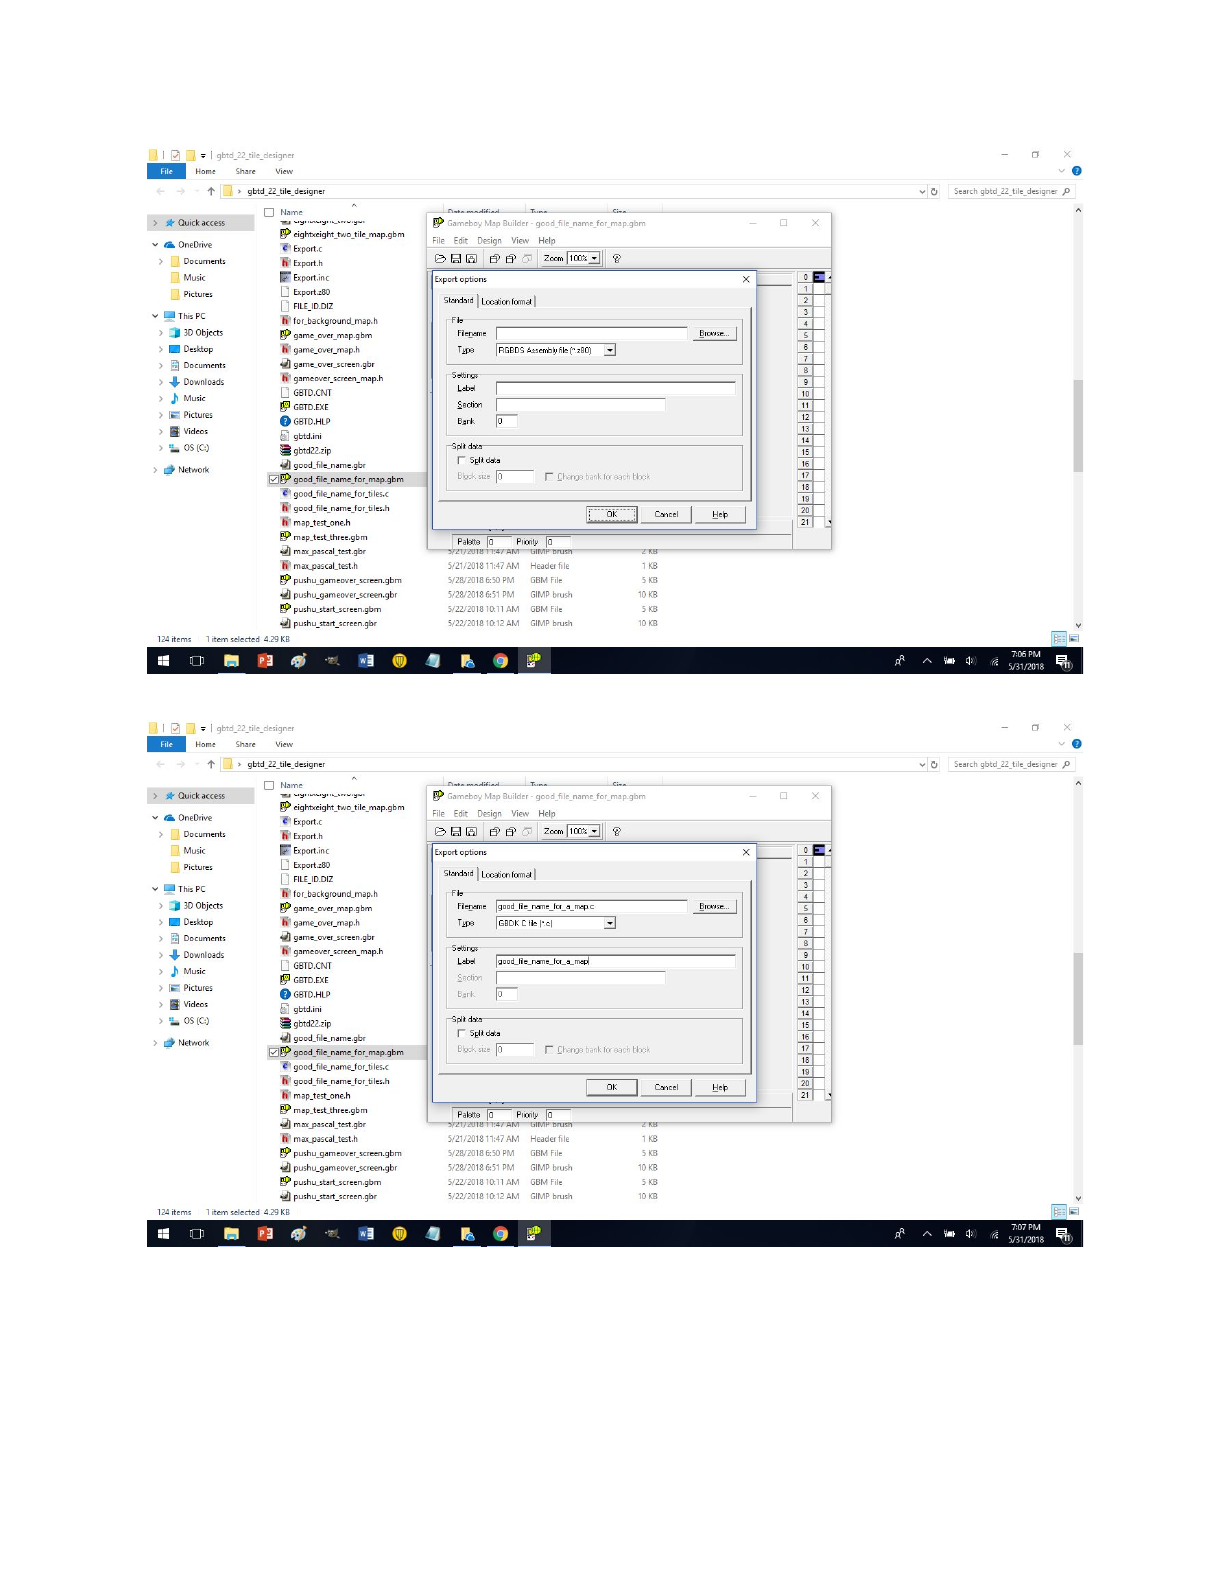
Fill in this stuff.
Click the tab Location format.
Do these setting in Location format
Then click ok. Now at this point you maybe asking “Max why would anyone invent such a thing
that seems like hell?”. Well the answer to that is for the year 2000 this was a great tool and still is
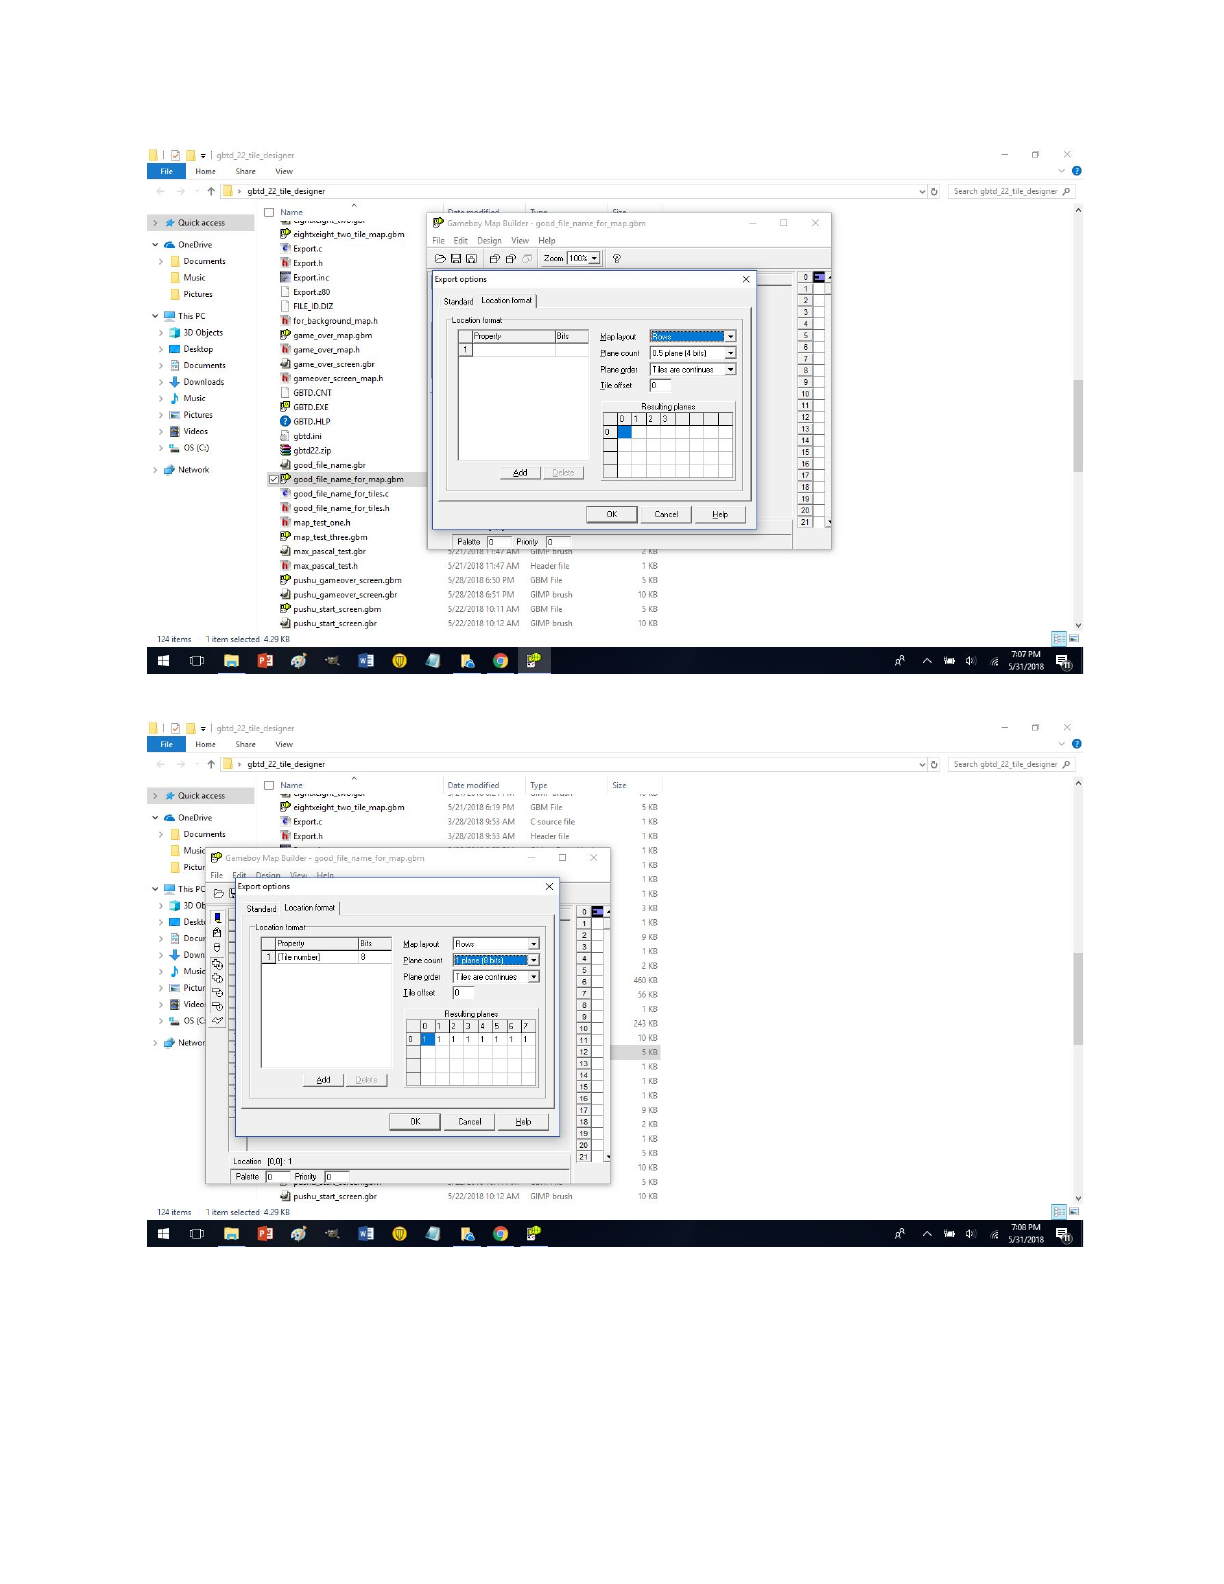
for serving its purpose. Now lets locate that map.c file we made cause we are not done yet.
Locate that file you made and right click it and goto edit and click edit.
Note how I added const in front of the unsigned char good_file_name_for_a_map[] array and I
also commented out the #define stuff. I don’t believe you have to do that. Well unless you are a
programmer your job is complete.

Conclusion
Hello everyone, I made this in my free time to help people learn these tools made by Harry
Mulder. I learned much of this information by myself to create my first small video game Pushu.
I wanted to give this guide to the people and extraterrestrials (who I am assuming are interested
in creating gameboy games) to give back to the community. If anyone wants to edit this for the
better to help others I am glad for you to do so :). I have to work with a higher level game engine
for school now but I will always try to be around. Until next time, hugs and kisses and thanks for
taking my humor if you could call it that…
~Max Taylor Edelstein
