Cubase VST 5.0 – Menu And Dialog Reference
User Manual: MenuReference
Open the PDF directly: View PDF ![]() .
.
Page Count: 149 [warning: Documents this large are best viewed by clicking the View PDF Link!]

- 1 -
Menu and Dialog
Reference
Menu and Dialog
Reference

- 2 -
Documentation by Ernst Nathorst-Böös, Ludvig Carlson, Anders Nordmark, Roger Wiklander
Additional assistance: Cecilia Lilja
Quality Control: Cristina Bachmann, Sabine Pfeifer, Claudia Schomburg
The information in this document is subject to change without notice and does not represent a commit-
ment on the part of Steinberg Soft- und Hardware GmbH. The software described by this document is sub-
ject to a License Agreement and may not be copied to other media except as specifically allowed in the
License Agreement. No part of this publication may be copied, reproduced or otherwise transmitted or re-
corded, for any purpose, without prior written permission by Steinberg Soft- und Hardware GmbH.
All product and company names are ™ or © trademarks of their respective owners. Apple, the Apple logo,
Macintosh, and Power Macintosh are trademarks of Apple Computer, Inc.
© Steinberg Soft- und Hardware GmbH, 2000.
All rights reserved.

- 3 -
1
The Apple Menu

- 4 -
About Cubase...
When Cubase VST is running, the Apple menu contains an item called “About Cu-
base...”. Selecting this brings up a window showing you the version of the program
and a list of the people involved in creating it.
To close the About Cubase window, click anywhere in it.

- 5 -
2
The File Menu
- 6 -
New Song
When you select New Song from the File menu in Cubase VST, the following
happens:
• If you have unsaved changes in the current Song, you are asked whether you want to
save it or not.
• Then, a file creation dialog opens, allowing you to select a folder and specify a name
for your New Song file.
• An empty Song with the specified name is created, together with a subfolder called
“XXX.Audio” (where “XXX” is the name of the new Song).
The new Song is set up according to the Autoload Song, with the new Audio folder
selected as Audio Files Folder. There can only be one Song open at a time.
New Arrangement
Selecting this menu item creates a new Arrange window, called Untitled plus a
number. You can change the name in two ways:
• By double clicking on the current name (in the Arrange window’s title bar).
If you use Mac OS 8.0 or later please note that this only works if the “Collapsing Windows”
feature has been turned off.
• By saving the Arrangement.
The maximum number of open Arrange windows at any time depends on the
amount of memory available, but the upper limit is always sixteen.
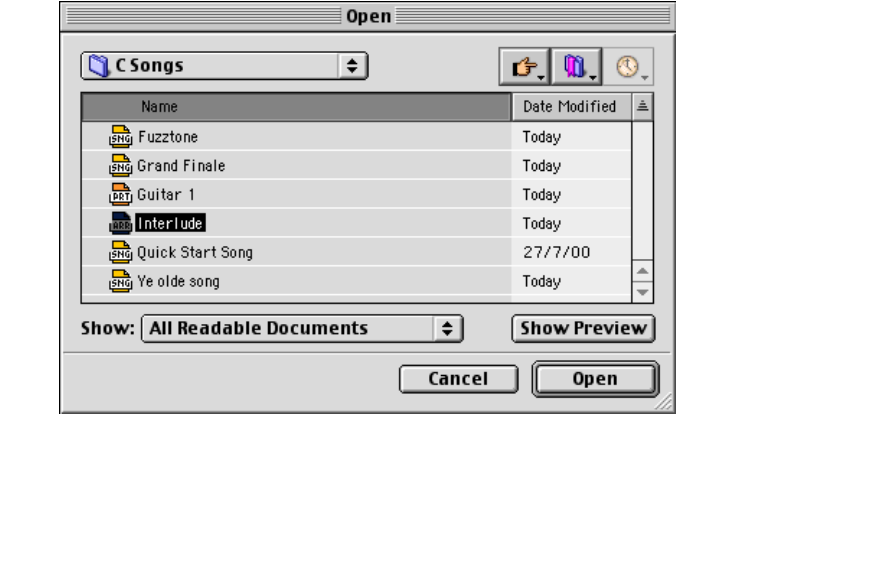
Open...
This dialog is used for opening all types of Cubase files.

- 7 -
Open From Library
This feature allows you to build a menu of documents that you want be able to ac-
cess quickly.
Import – Audio File...
This command lets you import audio files directly into your Arrangement.
If you want to import a stereo file, make sure that the Track is set to stereo in the In-
spector.
1. Move the Left Locator to where you want the audio file to start.
2. Pull down the File menu and select “Import”, then select “Audio File...” from the sub-
menu.
A file dialog opens.
3. Select a file format (AIFF, WAV, SD II, MP3) from the Show pop-up menu.
Files of the selected type(s) are listed in the file dialog box.
4. Use the file dialog box to locate the file and select it.
• You can audition the audio file by using the Play button (click the “Show Preview” but-
ton if the Play button isn’t visible).
When you click the Play button, its label changes to ”Playing” and the selected audio file is
played back. Playback continues until you click on the button again, or select another file.
5. Click “Open”.
The file is imported into the Pool, just as when using the Import Audio File command on the
File menu in the Pool. A segment that plays the whole file is created and placed in an Audio
Part, which in turn is placed on the selected Audio Track, at the position of the Left Locator.
❐
If you import an MP3 file, the program will create a copy of the file and convert this to
AIFF format before importing it (the original MP3 file will not be used in the Cubase
VST Song). The Wave file will be placed in the currently selected Audio Files folder (if
you haven’t yet specified one, you will be asked to do so).
Please be aware that the converted AIFF file will be several times larger than the origi-
nal MP3 file!

- 8 -
Import – ReCycle File...
This command allows you to import files exported from Steinberg ReCycle, a pro-
gram designed for working with sampled loops.
• There are currently three ReCycle file formats supported by Cubase, Rex1 (*.rex), Rex2
(*.rx2) and Recycle (*.rcy).
1. Locate the ReCycle export file you just saved, and select it.
You can audition the file before opening it by clicking on the Play button.
2. Click Open.
The following happens:
• A copy is made of the ReCycle file. This copy is converted to a AIFF file, which is added to the
Pool.
❐
The original ReCycle file should not be deleted or moved, because it will be called upon
if you later want to re-import the corresponding AIFF file into the Arrangement from
the Pool. Cubase “remembers” the location of the original file and will automatically
try to open it when needed.
• A number of Segments are created for the file, each one corresponding to a slice in ReCycle.
• A Part which will play these Segments is automatically created on the active Track, starting at
the Left Locator position.
Now you can play back the ReCycled file in any tempo, as if using a sampler. You can also edit
it in detail, quantize, etc, for example from the Audio editor.
• If you need to re-import the file into the Arrangement, drag the file item from the Pool
to the Arrangement, just as any other file.
A new Part is then created.
Import – MIDI File...
This allows you to import Standard MIDI Files (SMF) of type 0 or type 1.
Import – 24 Song...
This allows you to import songs created in “Steinberg Pro 24”, a program for the
Atari ST platform. More information can be found in the chapter “File Handling” in
the Getting Started book.
Import – Cubase 3.x Grooves...
In earlier versions of Cubase VST, Groove Quantize templates had a specific file for-
mat (whereas in this version, each Groove is a Part file). To import Grooves from an
older version, use this menu item.
- 9 -
Close
This closes the Active window.
If the window is an Arrangement, you get three options:
If the window is an editor, selecting Close “keeps” the changes made (as opposed
to cancelling them).
❐
Note that it isn’t possible to close a Song! If you have finished working on the current
Song, either quit Cubase VST or select “New Song” from the File menu.
Save
This saves any changes made to the Song since you last saved. If the Song hasn't
been saved before, the Save dialog comes up asking you to specify a name and “lo-
cation” for the Song.
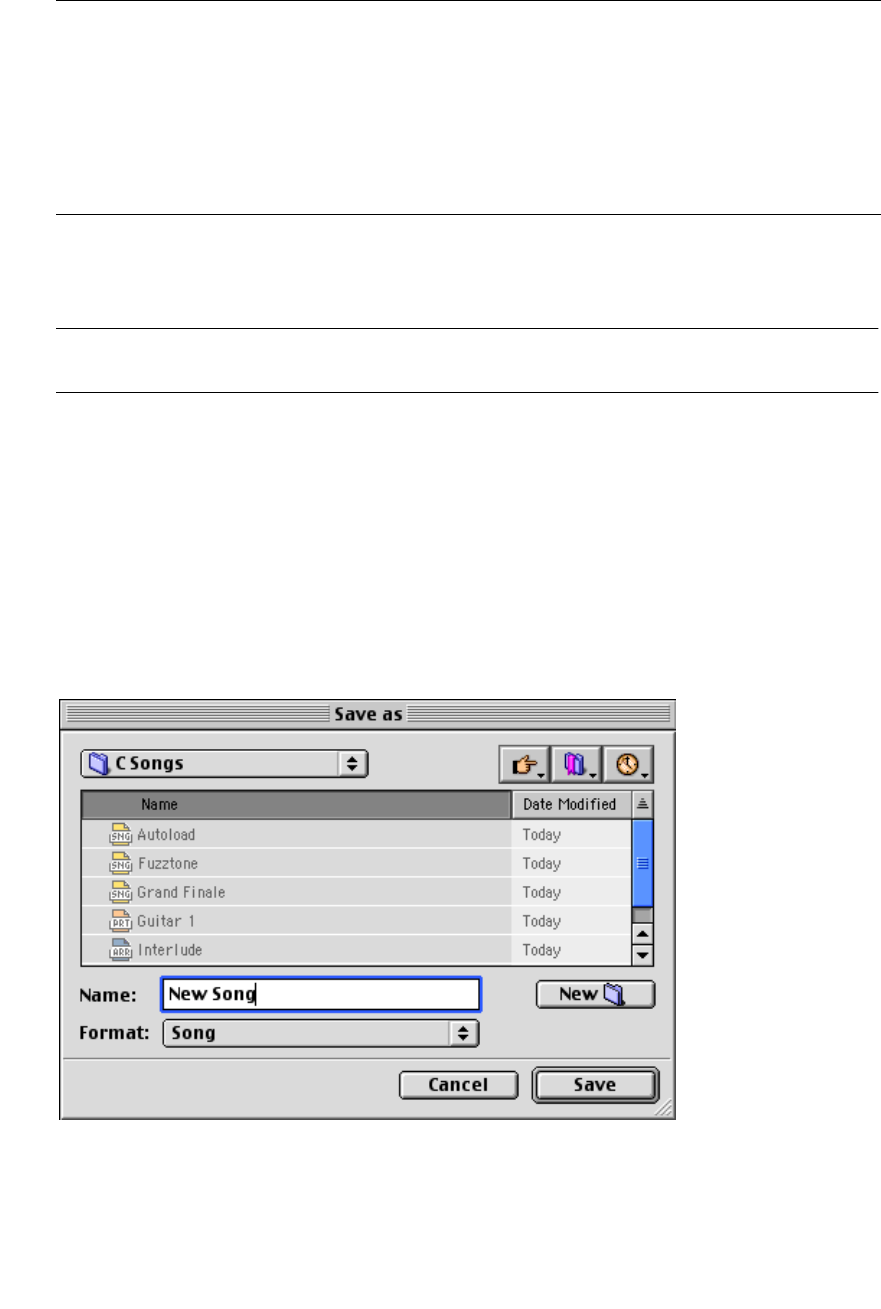
Save As...
This dialog box allows you to Save to disk and specify the type, name and location
for the file.
Option: Description:
Save A file dialog is opened, allowing you to save the Arrangement before it is closed.
Don’t Save The Arrangement is closed and erased from memory.
Set Aside The window is closed, but the Arrangement is still kept in memory and is available
on the Windows menu. The window can be opened again by selecting it from there.
Cancel Aborts the entire operation.
- 10 -
Save Backup
By using the Save Backup feature on the File menu you can save a backup copy of
the current song. This copy is a complete replica of the original song and has the
same name, with an additional number that corresponds to the number of backups
made.
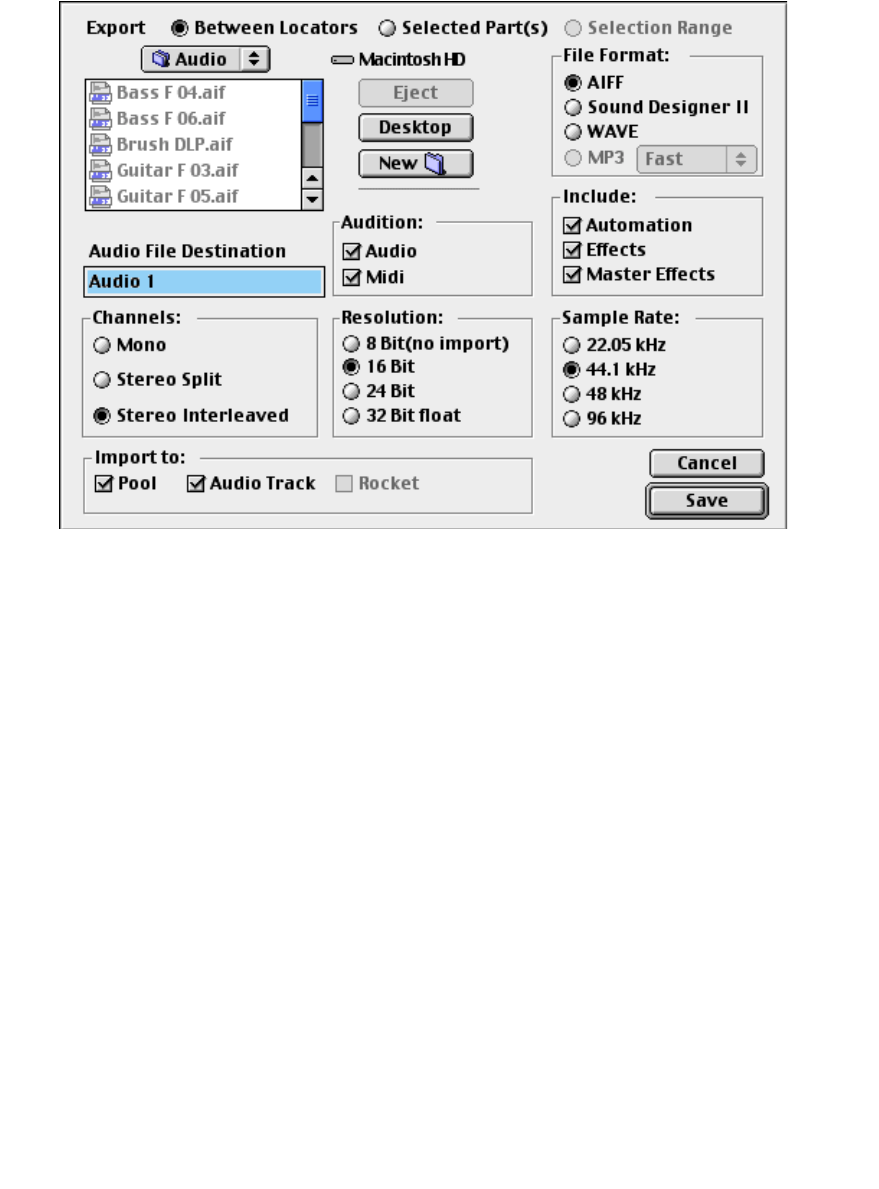
Export – Audio Tracks
This command lets you mix down and export audio in the current Arrangement, to
a separate audio file. Effects, EQ and Mixing Automation can be included in the ex-
ported audio file. There are three different modes for the Export Audio Tracks func-
tion:
• Between Locators
This mode will export all unmuted audio Tracks between the left and right locators and cre-
ate a Mixdown file according to the specified settings in the Export Audio dialog.
• Selected Part(s)
This mode will create a separate file for each selected audio Part in the Arrangement.
• Selection Range
This mode will create a Mixdown file based on the current Selection Range. All unmuted au-
dio within the range will be included in the Mixdown file.

- 11 -
1. Set up the Tracks and Parts according to the Mixdown mode you would like to use:
• For the “Between Locators” mode, set up the left and right locator, to encompass the
area that you want to mix down.
The rule is: All audio you hear on playback will be included in the Mixdown file!
• For the “Selected Parts” mode, select all Parts that you wish to mix down.
You don’t have to make any settings for unselected Parts, even if they are audible on play-
back. They wont be included in the Mixdown file.
• For the “Selection Range” mode, define a range with the Selection Range tool.
2. Set up your Tracks, so that they play back the way you want.
You can use the automation in the Channel Mixer, as well as Effects and Master Effects. If you
are planning not to include any of these features in the exported audio file, you should turn
them off while preparing the Tracks as well, to hear what you get.
3. If you want to include the automation, make sure that the Read button is activated in
the VST Channel Mixer.
4. Pull down the File menu and select “Audio Tracks...” from the Export submenu.
The Export Audio dialog opens.
5. Set the Mixdown mode (Between Locators, Selected Parts or Selection Range) by click-
ing the corresponding radio button.
6. Decide whether you want to include automation and/or effects, by using the “Include”
checkboxes.
You can independently include the automation from the VST Channel Mixer, the Mixer Ef-
fects and the Master Effects. If you are exporting with Dithering activated, you should make
sure that “Include Master Effects” is activated!
7. If you want to automatically import the resulting audio file back into Cubase VST, acti-
vate the “Import to” checkboxes.
If you activate the “Pool” checkbox, the file will appear in the Pool. Activating the “Audio
Track” checkbox as well, will place the file in a new Part on an Audio Track, starting at the Left
Locator.
❐
These options are not available if you select 8 bit Resolution.
8. If you want an audible verification during the mixdown process, activate the “Audition
Audio” checkbox.
This will cause the unmuted audio Tracks to rapidly play back while the mixdown file is cre-
ated.
9. Select a file type.
You can choose between AIFF, Sound Designer II, and WAVE. Which type to choose depends
on which other programs you plan to use the file in.
❐
An MP3 Encoder is available for purchase, adding MPEG Layer 3 files to the available
Export file types. For more information about this, go to www.cubase.net.

- 12 -
10.Select mono or stereo with the “Channels” radio buttons.
You have three choices here:
• You can make a mono file, in which case the left and right channels are mixed (as when using
the mono switch in the Master window).
• You can select Stereo Interleaved, in which case a true stereo file is created.
• Finally, you can select the Stereo Split option, in which case two mono files (one for each ste-
reo side) will be created. The “Import to Pool/Audio Track” options are not available if this op-
tion is selected.
11.Select a Resolution.
The choices are 8, 16, and 24 Bit. Cubase VST/32 is also able to export 32 Bit files.
• 8 Bit audio files are of limited fidelity, but can be useful for multimedia applications such as
QuickTime movies, or situations when you want to keep the file size down.
• 32 Bit files can be imported into some high-end audio editors such as Steinberg WaveLab
3.0.
• If you plan to use the file in a “regular” version of VST (Cubase VST or Cubase VST Score), you
have to select the 16 or 24 Bit option.
❐
When you export to a resolution of 16 Bit or lower, you should consider activating the
Dither function in the Master Mixer. Note that you must activate the “Include Master
Effects” checkbox for the Dithering to be included in the mixdown.
12.Select a sample rate.
You can choose between 22.05, 44.1 and 48 kHz. If you are using the Cubase VST/32 version,
you can also select 96kHz. However, to be able to re-import and play 96kHz files in Cubase
VST/32, your audio hardware and its drivers must support this sample rate.
❐
It is possible to import and/or audition the file no matter which sample rate is selected.
Please note however, that if the selected sample rate is another than the one used by
Cubase VST, the pitch and length of the audio will be incorrect when you play it.
13.Select a folder and a name for the audio file to be created.
If you have selected the “Stereo Split” option in step 10 above, the two files will have the
same name, but with the letter “L” appended for the left channel file and “R” for the right
channel file.
14.Click the Save button.
The audio file is created. If you have activated the “Audition” options, the resulting audio will
be cued (played back rapidly) during the process. If you have activated the “Import to” op-
tions, the file will be imported into the Pool and, if you like, onto an audio Track. You can play
it back to check the results immediately. Just remember to mute the original Tracks, and turn
off any eq and/or effects for the audio channel(s) used by the imported Track, so that you re-
ally hear the true result!

- 13 -
Export – MIDI File
This allows you to save your music (MIDI data only) as a Standard MIDI File (SMF).
Export – Cubase 3.x Arrangement
This allows you to save the active Arrangement in a format compatible with older
versions of Cubase.
Export – Cubase 3.x Song
This allows you to save the entire Song in a format compatible with older versions
of Cubase.
Revert To saved
This command restores the Song to the last saved version. Any changes you made
since you last saved are lost. You can use this command as a way of Undoing many
changes at the same time. Save your Song, experiment, and if you don't like the re-
sults, revert to the last saved version.

- 14 -
Page Setup...
This item opens the standard Mac OS Page Setup dialog, used for deciding about
paper formats etc, before printing. Exactly what options are available depend on
what version of Mac OS you run and what printer you are using.
Cubase VST adds the following options to this dialog:
Print...
Opens the standard Mac OS Print dialog, allowing you to select which pages to
print, how many copies of each etc. Please refer to your Macintosh documentation
for more information.
You can print from the following windows:
• Score Edit.
• List Edit.
Print All...
This is the same as above, except it prints all Layouts in the Song. This command
will be used when you select a Song in the Finder and select Print there. By select-
ing several Song documents and selecting Print from the Finder, you can print an
unlimited number of Songs.
Quit
This simply Quits the program. If you have any unsaved changes you will be asked
whether you want to save them before quitting.
If you do not save your Song, you will also be asked whether you want to delete au-
dio files that have been recorded since you last opened this Song. Normally, you
will want to do this, since if you don’t save the Song, there’s no “context” to play
back the recorded audio files from.
Option: Description:
Measure in This is used to set a unit of measure for the margins.
Margins This is used to adjust the margins manually.
Default Values If you have adjusted the margins, this button allows you to return to the
largest possible printing area for your printer.
Toggle Margins When this is activated, you will have different margins on the left and right
pages, that is inner and outer margins, rather than left and right.

- 15 -
File Quick Selection List
The most recently loaded files appear at the bottom of the File menu (you can set
the number of recent files to show in the Preferences-General-General dialog). Se-
lecting one opens it.

- 16 -
3
The Edit Menu

- 17 -
Undo
You can Undo your last action by selecting this menu item or by pressing [Com-
mand]-[Z] (the default key command for Undo). The menu item also gives you a
clue about what will be undone. For example: If it says “Undo Delete”, the last thing
you did was delete something.
If you wish to “Undo the Undo”, this is possible since after an Undo, this menu com-
mand changes to “Redo”.
Cut
This takes the selected item(s) (Parts, notes or other MIDI Events, etc.) removes
them from the window they were in and puts them in an invisible “storage bin”
called the Clipboard. You can later paste them into the same window or another.
Copy
This takes the selected item(s) and copies them to the Clipboard. You can later
paste them into the same window or another.
Paste
If you have used Cut or Copy to put something on the Clipboard, you can use this
command to put that something back into the active window. You can Paste as
many times as you want from the Clipboard.
You can Paste Events from one MIDI editor into another. You can also Paste Parts
that were Cut or Copied from another Arrange window. You can not Paste Events
into an Arrange window or Parts into an editor (neither of which would make much
sense to do).
Objects pasted into an Arrange window or an editor are always Pasted in at the cur-
rent Song Position.
Delete (Item)
This simply deletes the selected objects. Most often the menu item gives you a clue
of what will be deleted, such as “Delete Parts” if you have selected Parts in the
Arrange Window.

- 18 -
Select
This menu item contains a submenu, allowing you to select different combinations
of Events (in the editors), Parts (in the Arrange window) and other objects. The sub-
menu looks slightly different in the different windows.
These are the menu items:
Select All
This command selects all objects in the window (Parts in the Arrange window,
Events in an editor etc.). The default key command for Select All is [Command]-[A].
Invert
“Inverts” the selection; that is, all previously selected items get de-selected and all
previously de-selected items get selected.
From Song Position
This works like Select All, but only selects objects that begin at the current Song Po-
sition or later.
Overlap (Arrange Window only)
Selects all items that are partly overlapped by another item.
Track Class (Arrange Window only)
Selects all Parts on all Tracks that are set to the same Track Class as the Active Track.
Same Type (Editors only)
Selects all Events of the same Event type as the selected Event.
If Events of several different types are selected, Select Same Type will look at the
Event type of the first selected Event.
Inside Locators
Selects all objects located between the Left and Right Locators.
Outside Locators
Selects all objects
not
located between the Left and Right Locators.
Parts On Track (Arrange Window only)
Selects all Parts on the active Track. This can also be done by pressing [Shift] on the
computer keyboard and double clicking somewhere in the Track in the Part Display.

- 19 -
In Same Folder (Arrange Window only)
If a Folder Track is selected, all Parts within this Folder are selected. If a Part or a
Track in a Folder is selected, all Parts in the same Folder are selected.
Muted Parts (Arrange Window only)
Selects all Muted Parts in the Arrange window.
Muted Notes (MIDI Editors only)
Selects all Muted note events in a MIDI Editor.
Score Layout (Arrange Window only)
This opens yet another submenu, containing the Score Layouts you have defined.
Selecting one of the Score Layouts from the submenu will select all Parts on the
Tracks included in the Score Layout.
Equal Pitch (Editors only)
Contains a submenu with two options:
• In Same Octave:
This will select all Note Events with the same pitch and within the same octave as the se-
lected note.
• In All Octaves:
This will select all Note Events of the same pitch as the selected note, in all octaves. If you for
example have selected a note of the pitch F4, then all F:s, from F-2 to F8, will be selected.
Voice (Score Edit only)
This item opens yet another submenu. If you are working with several Voices in
Score Edit, you can select all notes in one of the Voices by using the submenu.
Active Staff (Score Edit only)
This selects all notes and symbols that belong to the currently active staff.
Same Enharmonic (Score Edit only)
This is an expansion on the Equal Pitch option that only selects notes of the same
pitch
and
with the same enharmonic shift setting (in all octaves).
For example if you select an F# (F sharp) and use this command, all F#s will be se-
lected but not any Gbs (G flats).
Same Verse (Score Edit only)
If you have selected a word (a lyrics object), selecting this menu item will automat-
ically select all other words in the same verse.

- 20 -
Get Info
Score
In Score Edit, different dialog boxes will appear when you select this command, de-
pending on what is selected. The dialogs allow you to change properties of the se-
lected object. A complete list of the objects and what dialog they open can be
found in the Score Layout and Printing document.
MIDI Mixer
In this window, this menu item opens up the Object Definition dialog box (an Ob-
ject has to be selected).
Edit
This menu item brings up different editors, depending on what type of Track Class
you are working with:
List
This menu item opens the List Editor. The List Editor can be used for MIDI Tracks,
Drum Tracks, Mix Tracks and Audio Tracks.
Drum
This menu item opens the Drum Editor. Drum Edit is mainly used for situations
when you want to edit regular MIDI Tracks (as opposed to Drum Tracks) in the
Drum Editor. For Drum Tracks you can use Edit or simply double click.
Score
This menu item is used to open the Score Editor. In Score Edit you can edit MIDI and
Drum Tracks.
Track Class: Editor:
Audio Tracks Audio Edit
MIDI Track Key Edit, List Edit or Score Edit, depending on your Preference settings.
Drum Track Drum Edit.
Chord Track Score Edit.
Mixer Track If the Track is an Automation Mix Track for the VST Channel Mixers or the MIDI
Track Mixer, the Controller Editor is opened. Otherwise, the MIDI Mixer opens.
Style Track Style Track Editor.

- 21 -
Controller
This Editor is for continuous data such as volume, panning, pitch bend or modula-
tion. It can be used on MIDI Tracks, Drum Tracks, Mix Tracks, and Audio Tracks. It
can also be used on Objects in a MIDI Mixer Map.
Graphical MasterTrack and List MasterTrack
These two items open the two MasterTrack (tempo) editors, the Graphical one (which
resembles the Controller Editor) and the List version (which resembles List Edit).
Notepad
This utility allows you to type in text that you want saved with your Arrangement.
You can also Paste in text here that you have Cut or Copied in other applications
(and vice versa), or use Drag and Drop if the application allows dragging of text
blocks, like Simple Text or MS Word for example.
Preferences – General Information
A few options and commands occur repeatedly in the Preferences dialog:
Save with Song
Many of the dialogs in Cubase VST contain a checkbox labeled “Save with Song”. If
this is activated, you have to save the Song to keep the settings you have made in
the dialog. If the checkbox isn’t activated, this means that the settings you make
will automatically be saved in Cubase VST’s Preference file when you Quit.
Use Default
This resets the options to the basic, recommended settings.

- 22 -
Preferences – General
General
Option: Description:
Open last Song on startup When this is activated, the last opened song will automati-
cally be opened when you launch the program.
AutoSave every - [xx] Minutes When this is activated, your Song will automatically be saved
at a time interval you specify. See the chapter “File Handling”
in the Getting Started book for details.
Keep Last [xx] Files on File Menu This allows you to specify how many of the files you have
worked on that will remain on the File menu for quick
selection.
Stop Follow Song after Scrolling This is related to the Follow Song feature. When this is acti-
vated, Follow Song is temporarily disabled as soon as you
scroll the window horizontally.
Update Window during Scrolling When this is activated, the windows are updated continu-
ously while you scroll. You may want to deactivate this on a
slower computer.
Wind / Rewind speed This lets you decide how fast the song position pointer
should move when you wind and rewind. The value ranges
from 1 to 10.

- 23 -
Preroll for Play from Selected If you activate the “Play From Selected Object” function from
the “Key Command Preferences - Transport and Locators” di-
alogue, you can here specify how far ahead of the selected
object playback should start.
Set MIDI Channels with pop-up When this is activated, MIDI Channels will be displayed on a
pop-up rather than as numbers.
Transpose MIDI with Mini Keyboard When this is activated, Transpose Part Parameter changes
will be made with a small keyboard, rather than by number.
Change Volume with Slider When this is activated, Volume Part Parameter changes will
be made with a slider, rather than by numbers.
Change Panorama with Slider When this is activated, Pan Part Parameter changes will be
made with a slider, rather than by numbers.
Knob Mode This lets you decide whether the various knobs and dials
used throughout the program should respond to a circular or
a linear motion with the mouse when manipulated.
Only Show Important Alerts When this is activated, fewer alert messages will appear. Acti-
vate this when you feel confident in using the program and
are less worried about making mistakes.
Mini Tool Box If this Preference item is selected, Toolboxes will appear as a
horizontal strip, with smaller icons. Note that this only ap-
plies if the toolbox is “torn off” the menu bar, or if opened by
Control-clicking.
Use Crosshair Cursor When this is activated, your movements in the Part Display
and in various editors will be tracked by a crosshair cursor.
Display Resolution This allows you to adjust the Display Resolution, that is how
many “ticks” there are to a quarter note. This affects the pre-
cision of editing in all windows. Audio playback takes full ad-
vantage of this resolution. However, please note that MIDI
playback precision is limited by the MROS resolution setting
in the Synchronization dialog.
Move to last Start Position on
Second Stop When this is activated, any time you stop playback and then
click stop a second time, the song position pointer jumps
back to where you previously started playback.
Increase Values with [Control]+click If this option is activated, pressing [Control] and clicking on a
value will increase it, while clicking without a modifier key
will decrease the value. This allows users with two-button
mouses to increase values by clicking on the right button
and decrease values with the left button.
Option: Description:

- 24 -
Arrangement
Option: Description:
Allow Tools on Track List When this is activated, you can use the Pencil and Eraser in
the Track List, to create or delete Tracks. You can also use the
Glue Tube, Logical and Groove tools on whole Tracks this
way.
Tools work on All Selected Parts When this is activated, Tool operations will be applied to all
selected Parts, rather than to just the one you clicked on.
Restrict Inspector to Track Changes When this is activated, you will only be able to make Inspec-
tor changes for an entire Track, instead of individual settings
for each Part.
Keep Part Names in view When this is deactivated, a Part’s name is only shown in the
beginning of the Part. When this is activated, you will always
be able to see the name of the part, in the Part, at the left
side of the Part display. This will then be true even if the Part
starts “outside” the Part Display.
Draw Grid If this option is activated, the Arrange Window will display a
grid that can help make positioning in the window easier.
The grid divides the Part Display into “boxes” sized vertically
according to the Track height and horizontally in multiples
of four bars, depending on the horizontal magnification
(just like the bar numbers in the Ruler).

- 25 -
Editors
Option: Description:
Double click opens This pop-up allows you to specify which editor will open when
you select Edit from the Edit menu with a MIDI Track/Part
selected or when you double click on a MIDI Part.
Note Name Style This allows you to select from four ways of displaying note
names. To check out the various options, open a MIDI Part
containing notes with various pitches in List Edit. Switch be-
tween the options in the Preferences dialog and check how
the Val1 column in List Edit changes.
Show End Position in Info Line When this is activated, the Info Line in the Editors displays the
end position of the events. When this is deactivated, it displays
the events’ lengths.
Tools work on all selected Events When this is activated, Tool operations that you perform in the
editors will be applied to all selected Events.
Goto Menu sets Song Position Normally, the Goto menus in the editors will only change the
view, as if the scrollbars were used. If this option is activated,
using the Goto menus will move the Song Position as well.
- 26 -
Modifiers
This Preference page allows you to specify which key modifiers should be used for
setting the Song position, displaying the Marker menu, and for displaying the Tool-
box and the Score context menus.
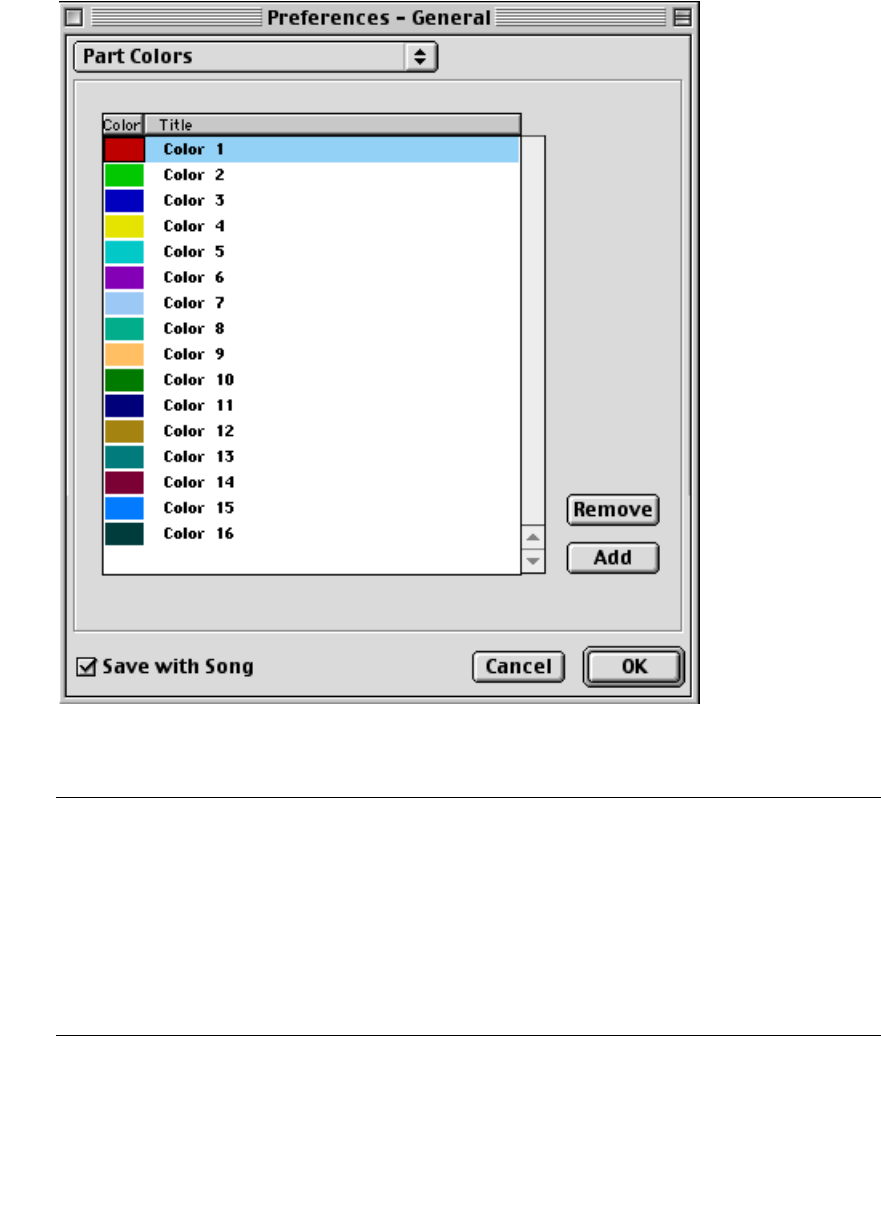
Part Colors
This dialog allows you to create and modify the color options on the Part color pop-
up in the Arrange windows.
Option: Description:
Color This column displays the currently defined colors. Double clicking one brings
up the standard Apple Color Picker dialog where you can change the color.
Title This column displays the name of the currently defined colors. Double click on
the name to change it.
Remove This removes the currently selected color item from the list.
Add This adds a new color item to the list.
- 27 -
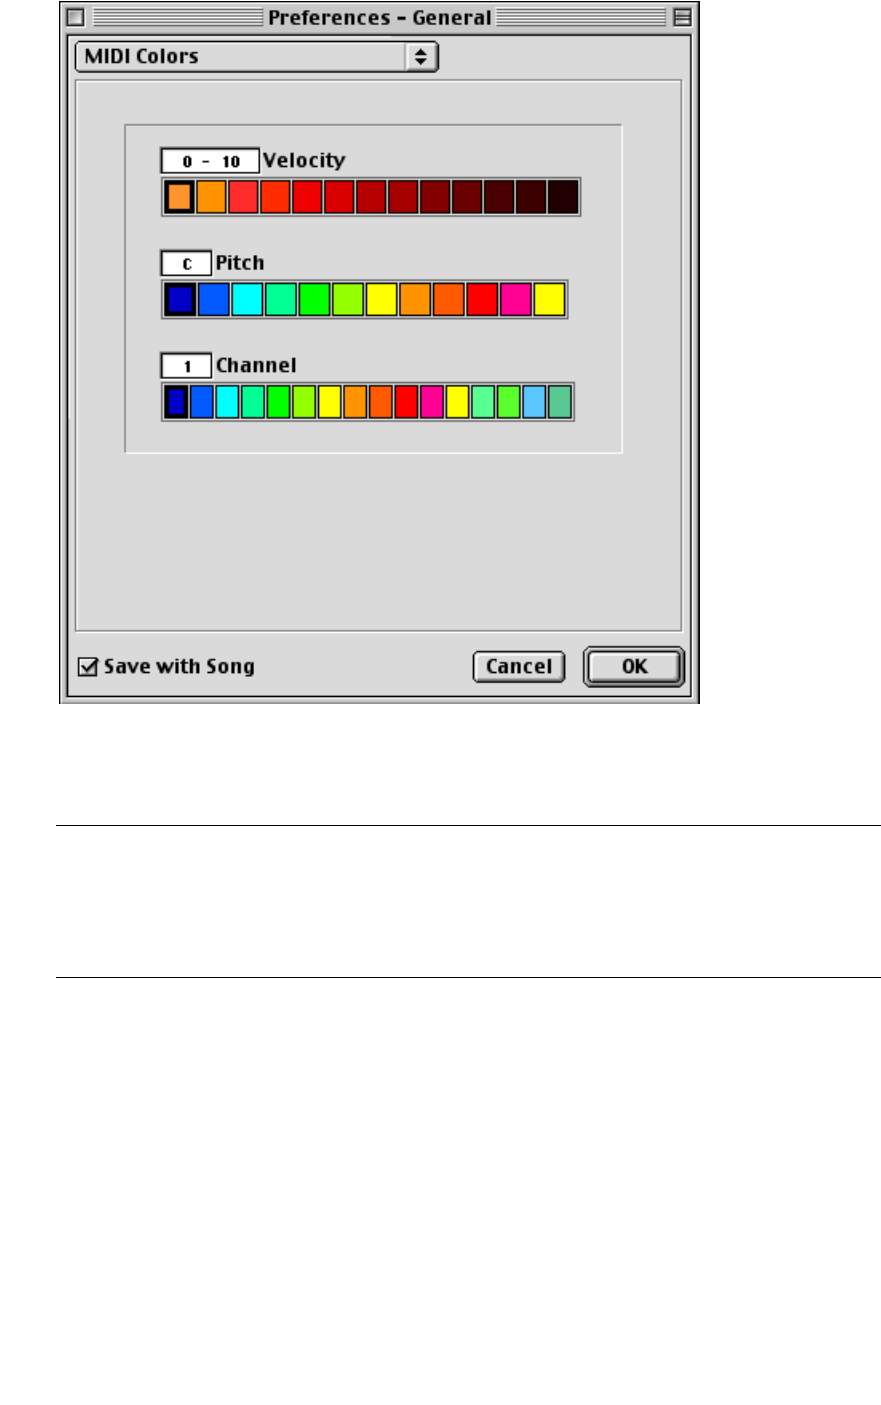
MIDI Colors
This dialog allows you to specify the colors for three of the options on the Color
pop-up in the MIDI editors. To change any color, double click on it and use the stan-
dard Apple Color Picker dialog that appears.
Option: Description:
Velocity This allows you to specify different colors for different velocity ranges.
Pitch This allows you to specify different colors for the different pitches within one octave.
Channel This allows you to specify different colors for different MIDI Channels.
- 28 -
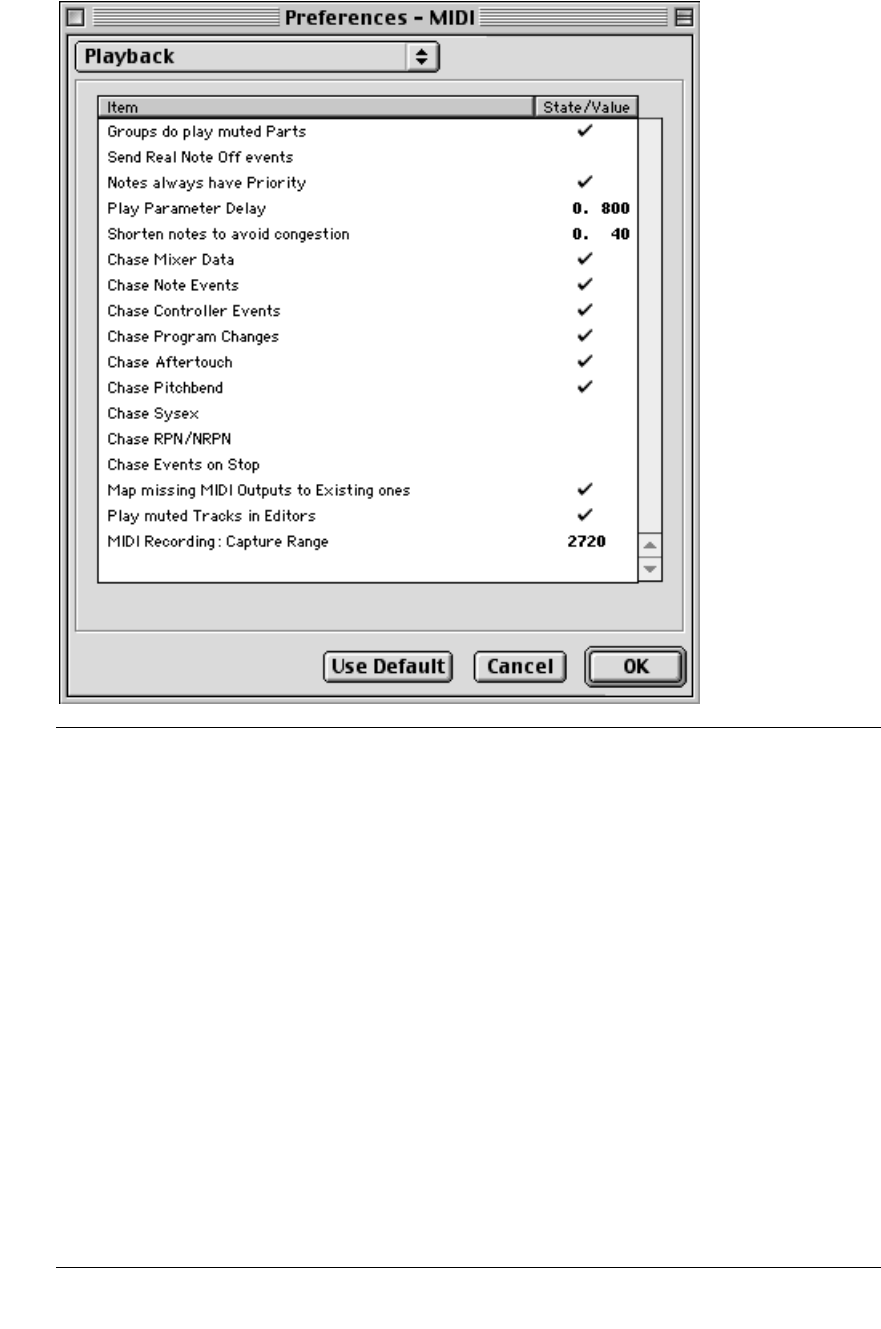
Preferences – MIDI
Playback
Option: Description:
Groups do play muted parts When this is activated, Parts in a Group are played back even if the
Track with the original Parts is muted. When you want to bring
Parts in and out of a Group, by Muting them, deactivate this option.
Send Real Note Off events When this is activated, true Note Off messages are sent out instead
of Note On messages with velocity 0. You might have to activate
this with some very old MIDI equipment.
Notes always have priority When this is activated, Note On messages are always given abso-
lute priority over other messages, during playback. This is to en-
sure tight timing regardless of heavy use of continuous data.
Play Parameter Delay This parameter allows you to set a (pre)delay for the transmission
of play parameters (as set up in the Inspector). Many MIDI units
take some time to react to for example Program Change and Bank
Select. If your unit “chokes” when it receives a Program Change,
try setting this to a negative value.
Shorten notes to avoid
congestion When this is activated, there is always a short period of time be-
tween a Note Off and a Note On with the same MIDI Channel. If
you experience lost notes on your synthesizer when you send it
notes with very short lengths, raise this figure.

- 29 -
Chase [various data types] These options are used together with the Chase Events function
described on page 100.
Chase Events on Stop When this is activated, the program will Chase as soon as you hit
stop. This means for example that:
• A long note that is shut off by Stop, will be retriggered when you
activate playback.
• A damper pedal, which is on and has been switched off when
you stopped, will be set to its previous state.
Map missing MIDI Outputs to
Existing ones This preference is for those situations when you open a Song that
was created with different MIDI interface(s) than you currently have
in your system. This is especially useful under OMS. When it is acti-
vated, the missing output is mapped to the next available output.
Play muted Tracks in Editors When this is activated, a Muted track will still play when opened
in an editor window. When this is deactivated, it will stay muted at
all times.
MIDI Recording: Capture Range This item allows you to specify a range (in ticks). A recorded event
within this range will be moved to the nearest beat, if the event is
played before the beat in a preroll, or at the end of a section when
in Cycle Record.
Option: Description:
- 30 -
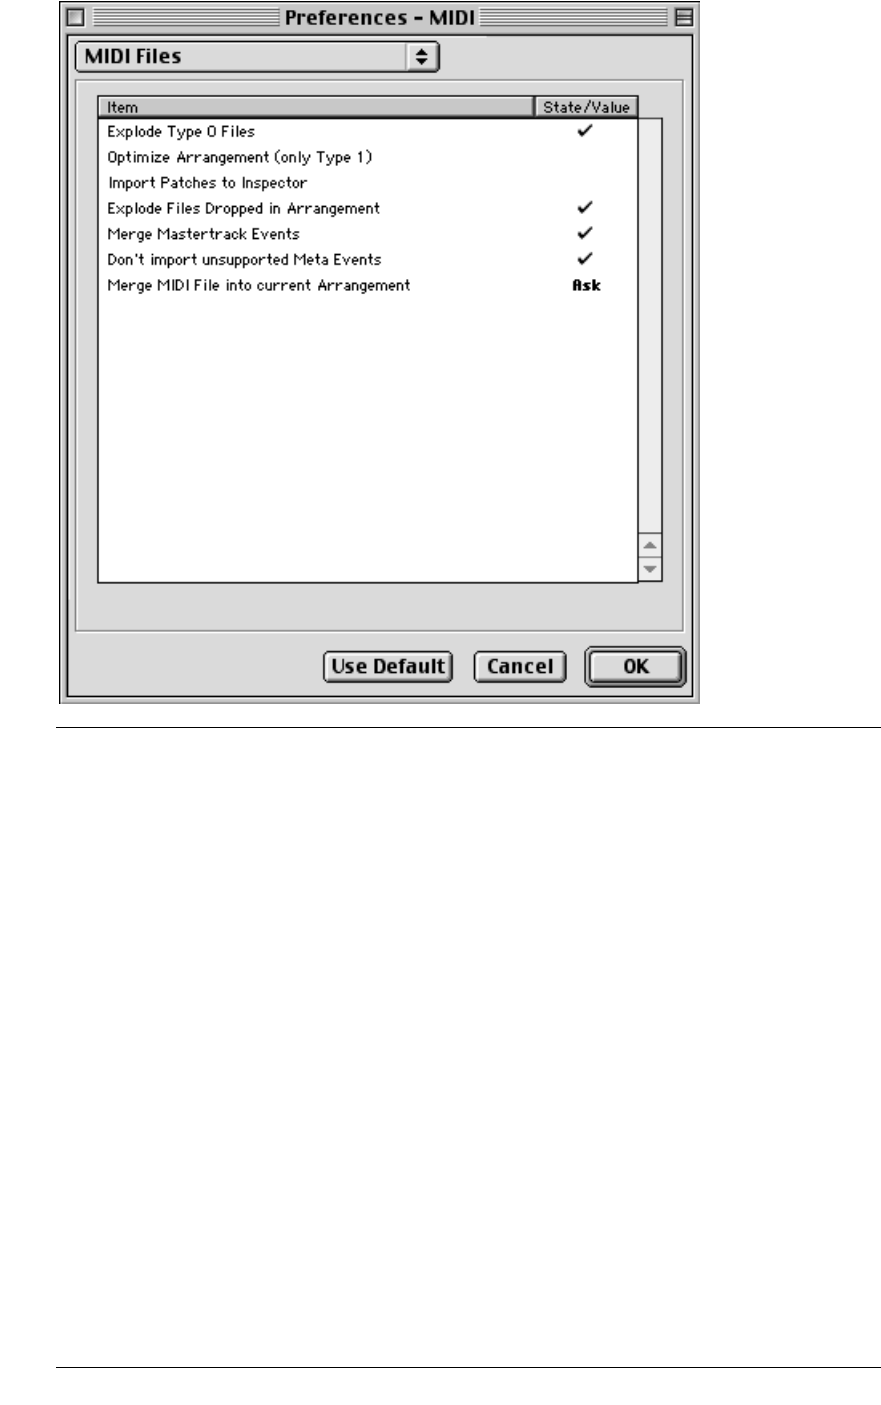
MIDI Files
Option: Description:
Explode Type 0 Files If this is activated, an imported MIDI File of type 0, will be “exploded”
into a number of Tracks, one for each MIDI Channel in the MIDI File.
Optimize Arrangement When this is activated, an Optimize Arrangement operation will auto-
matically be performed on imported Type 1 MIDI Files.
Import Patches to
Inspector When this is activated, Program Change messages at the beginning of
a MIDI File will be converted into Inspector settings when you import
the file.
Explode Files Dropped in
Arrangement This setting determines what will happen when you drag and drop a
MIDI file into an Arrangement. When this is activated, it will be ex-
ploded into a number of Tracks. When this is deactivated, it will appear
on one Track only.
Merge Mastertrack Events When this is activated, Tempo events in an imported MIDI File will be
merged with existing Master Track events in your Arrangement (if they
don’t conflict with existing tempo events). When this is deactivated no
changes will be made to the Master Track.
Don’t import unsupported
Meta Events When this is activated, unknown MIDI events will be discarded when
you import a MIDI File. When deactivated, all events will be imported.
Merge MIDI File into
current Arrangement When you import a MIDI file, this option determines whether the MIDI
file should be merged into the current Arrangement (“Yes”) or not
(“No”). If the option “Ask” is selected, you will be asked each time you
import a MIDI file.
- 31 -
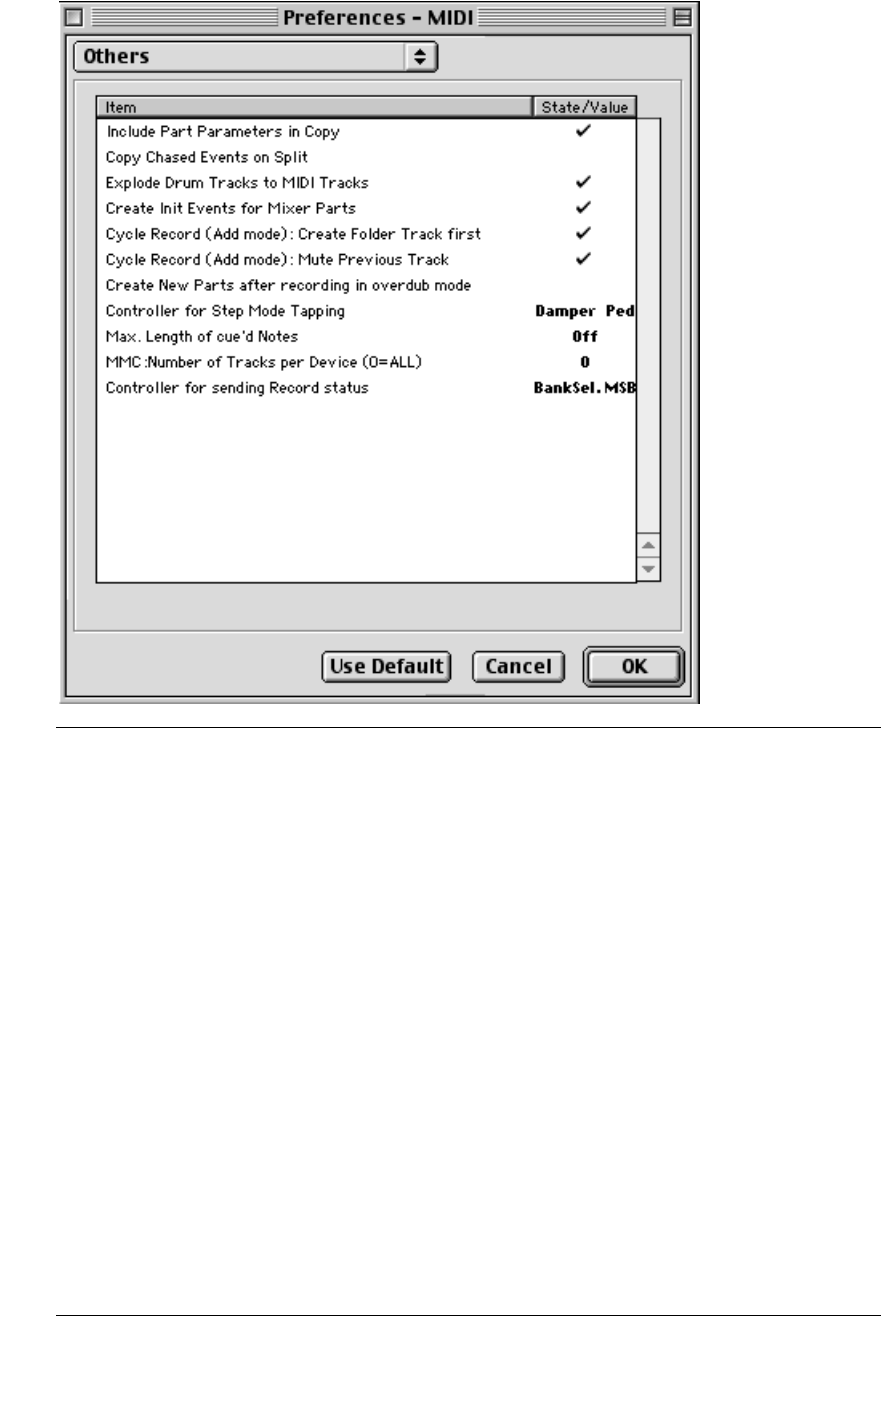
Others
Option: Description:
Include Part Parameters in Copy This determines what happens with Inspector Part Param-
eter settings when you Copy and Paste Parts. When this is
On, Inspector Parameters are copied with the Parts. When
this is Off the copied Part will have initialized settings (all
Off/zero).
Copy Chased Events on Split When this is activated, Events that make up a “snapshot” of
the Part at the split point will be copied to the beginning of
the second part. This includes for example:
• Notes that have been split will be “reinserted” into the be-
ginning of the second Part, playing the remaining duration.
• Mixer events will be inserted to restore any automation
you have inserted.
Explode Drum Tracks to MIDI Tracks When this is activated, and you use the Explode by Chan-
nel function on a Drum Track, the resulting Tracks will be
MIDI Tracks. Otherwise they will be Drum Tracks.
Create Init Events for Mixer Parts When this is activated and you put a Mixer Track in Write
mode, Events will be inserted at the beginning of the Part,
that correspond to the Objects’ current positions.
Cycle Record (Add mode):
Create Folder Track first When this is activated, a Folder Track is automatically cre-
ated and all “takes” are put in this folder.

- 32 -
Cycle Record (Add mode):
Mute Previous Track When this is activated, each time you start a new “take”
the previous Track (“take”) is muted.
Create New Parts after recording in
overdub mode When this is activated, new Parts are always created in
Overdub mode, regardless of whether a Part already ex-
isted at that position. This may lead to overlapping Parts.
Controller for Step Mode Tapping This is used to specify which MIDI Controller should be
used for advancing one step during Step Input.
Max. Length of cued Notes When you select notes in the editors, they will play (if the
Speaker button is activated). This preference allows you
to limit the maximum playback length of such notes, to a
sensible value.
MMC:Number of Tracks per
Device (0=ALL) This controls how MIDI Machine Control Track numbers
are assigned to devices. When set to All, only one ma-
chine is addressed. All other numbers allow you to specify
how many Tape Track channels each separate device
uses. For example, if set to 8, Tape Track channels 1-8 will
address the device with machine ID 0, channels 9-16 will
address the device with Machine ID 1, and so on.
Controller for Sending Record Status This is a special feature for remote control devices with
“visual feedback” (e.g. a LED) indicating that recording is
activated. When recording is activated, Cubase VST will
send a MIDI Controller message (of the type you specified
here) with the value 127. Deactivating recording sends a
message with the value 0.
If you don’t specifically need this, we recommend that
you select “No Ctrl”.
Option: Description:
- 33 -
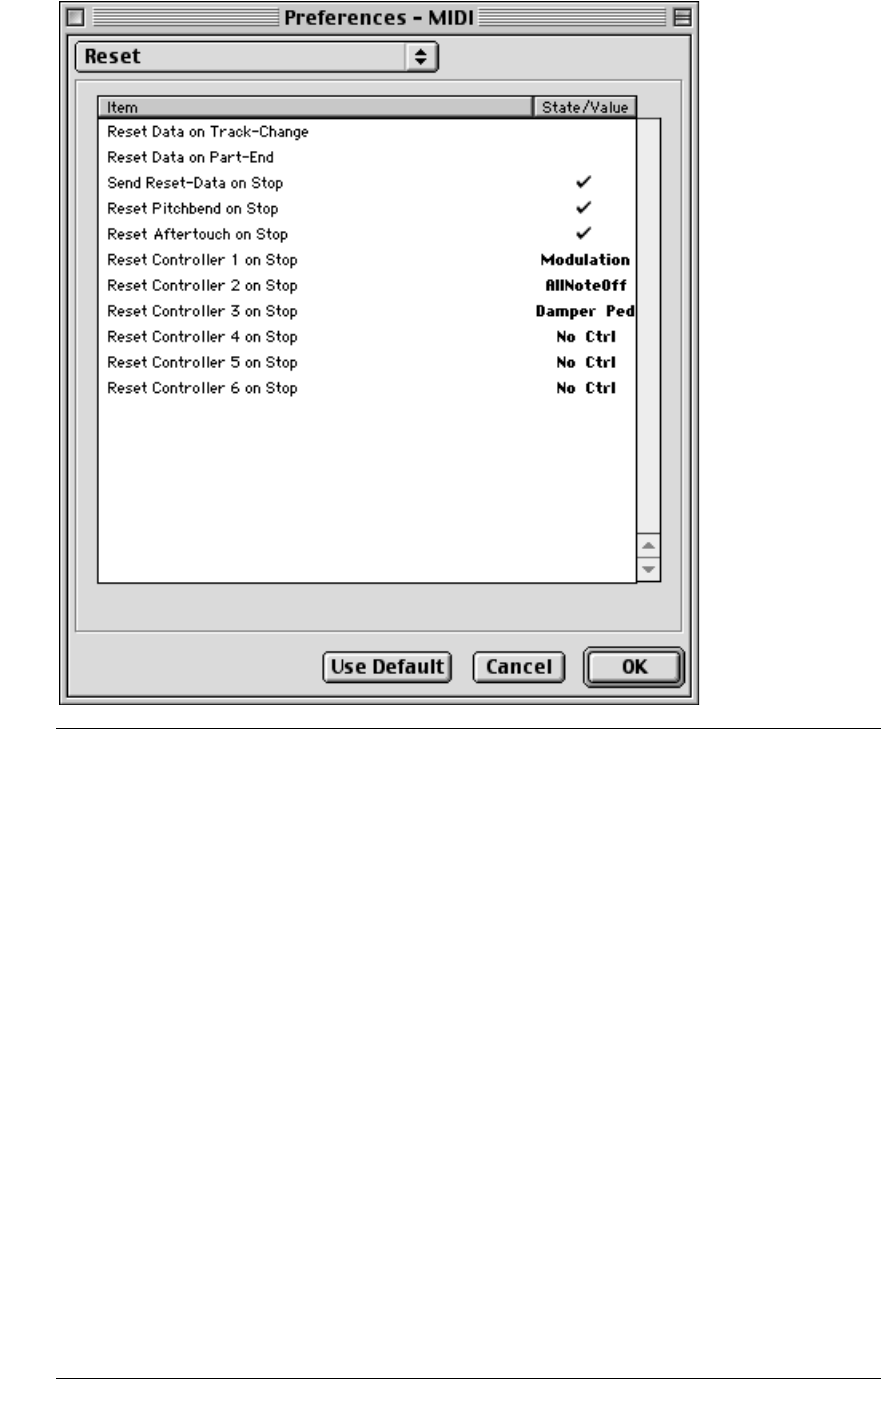
Reset
Option: Description:
Reset Data on
Track-Change When this is activated, the following messages are “reset” for the Track when
you switch to another Track:
• Pitch Bend
• Modulation
• Pressure
Reset Data on
Part-End When this is activated, the following messages are “reset” when a Part ends:
• Pitch Bend
• Modulation
• Sustain Pedal
• Pressure
Send Reset-Data
on Stop When this is activated, the following messages are “reset” each time you stop:
• Pitch Bend
• Modulation
• Pressure
• All Notes Off is sent out
• Reset All Controllers is sent out
Reset Pitch Bend
on Stop When this is activated, Pitch Bend messages are “reset” each time you stop.
Reset Aftertouch
on Stop When this is activated, Aftertouch messages are “reset” each time you stop.
Reset Controller
1-6 on Stop Allows you to select six different controllers that should be reset on stop. To
deactivate, select “No Ctrl”.
- 34 -
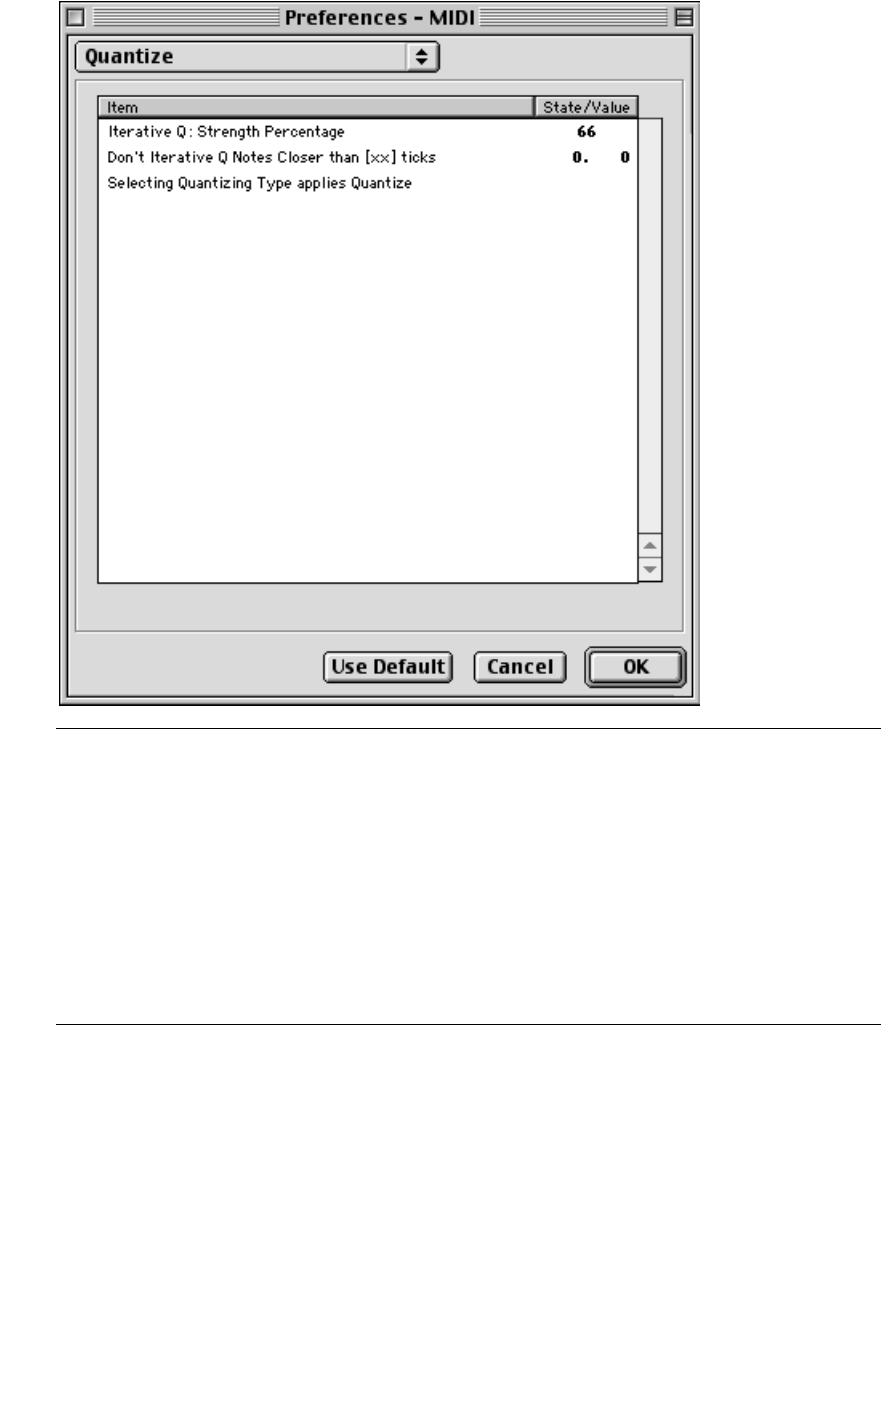
Quantize
Option: Description:
Iterative Q: Strength Percentage This allows you to specify how much notes will be moved when
you use Iterative Q.
50%, for example, means the notes will be moved halfways to
the specified Quantize value.
Don’t Iterative Q Notes Closer
than [xx] ticks This allows you to set things up so that notes that are already
very close to the specified Quantize value will not be moved at
all when you use Iterative Quantization.
Selecting Quantizing Type
applies Quantize This allows you to select whether you want quantizing to be ap-
plied automatically when you select a quantizing type, or not.
- 35 -
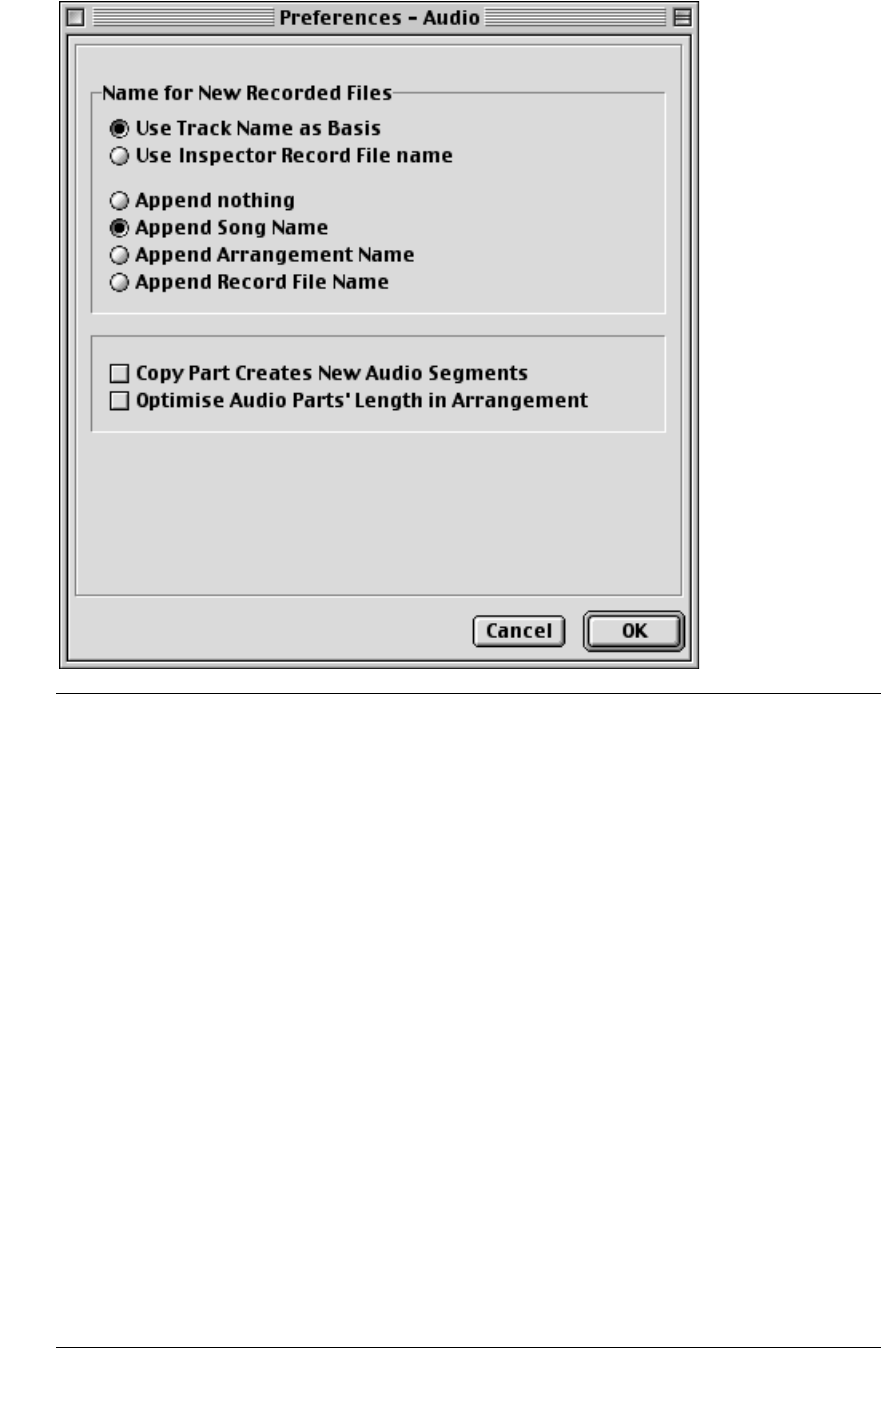
Preferences – Audio
Option: Description:
Name for New Recorded Files –
Use Track Name as Basis When this is selected, newly recorded files will get the name of
the Track.
Name for New Recorded Files –
Use Inspector Record File name When this is selected, newly recorded files will get the name
specified in the “record Info” field in the Inspector.
Name for New Recorded Files –
Append nothing When this is selected, the name of new files will only be based
on Track name or Inspector settings, as described above.
Name for New Recorded Files –
Append Song Name When this is selected, the name of the Song will be appended
to the end of the file name.
Name for New Recorded Files –
Append Arrangement Name When this is selected, the name of the Arrangement will be ap-
pended to the end of the file name.
Name for New Recorded Files –
Append Record File Name When this is selected, the Record File name specified in the In-
spector will be appended to the end of the file name.
Copy Part Creates New Audio
Segments When this is activated, and you copy an audio Part somehow,
new Segments are automatically created. This ensures that ed-
iting one Part does not affect any other. When this is deacti-
vated, copied Parts will share segments. In this case changes
you make to one Part may affect the other.
Optimize Audio Parts’ Length in
Arrangement If the tempo is raised, the segment that a Part plays may “pro-
trude” past the end of the Part. When this option is activated,
Cubase VST will automatically increase the Part length to allow
the complete segment to be played.
- 36 -
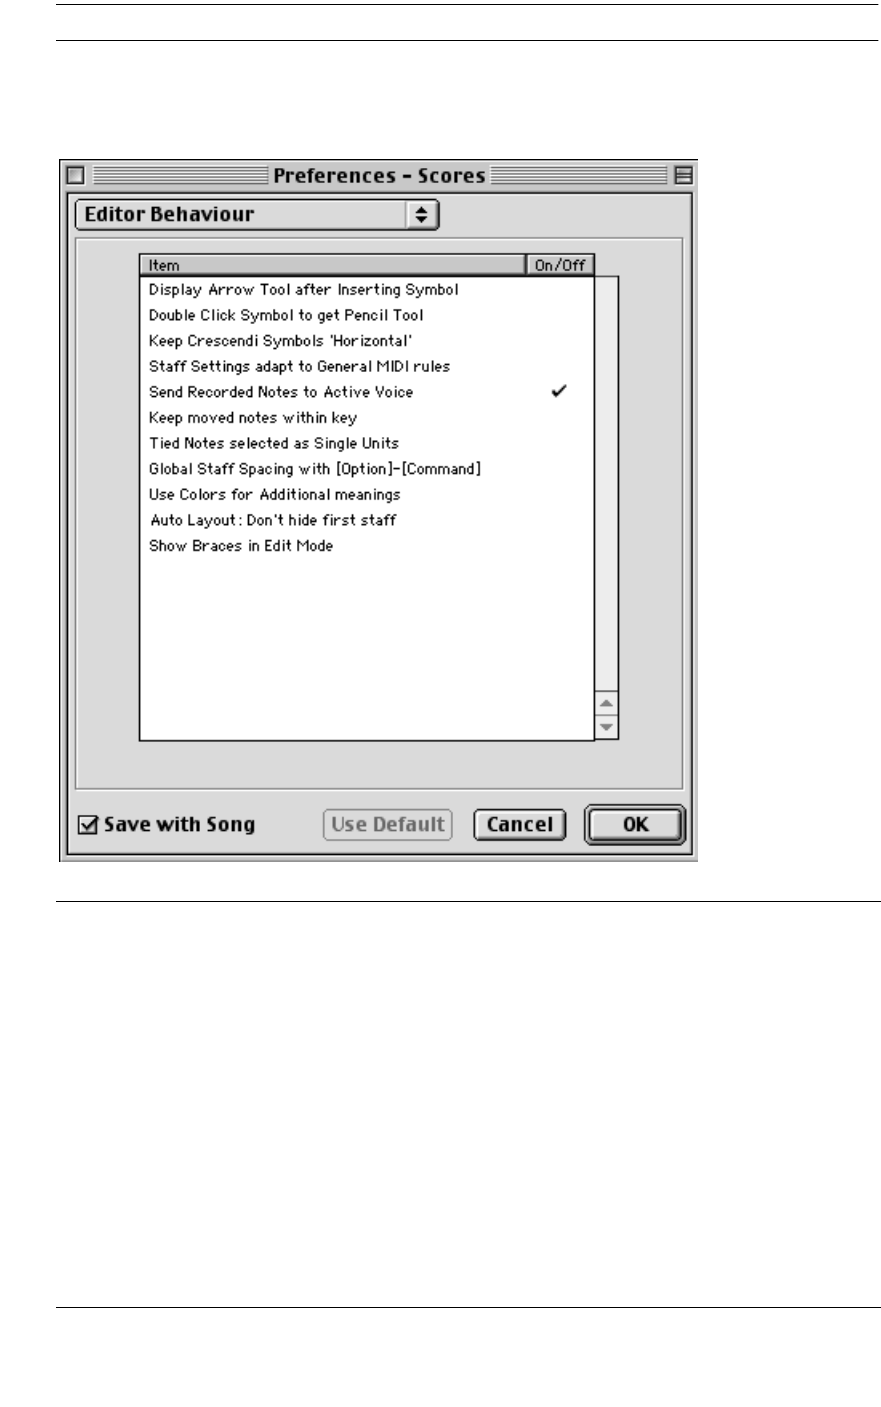
Preferences – Scores
❐
These settings are available in the Score and VST/32 versions only.
Editor Behavior
Option: Description:
Display Arrow Tool after
Inserting Symbol When this is activated, as soon as you add a Symbol, the program
switches back to the Arrow tool. When this is deactivated, the Pencil
tool remains active after inserting a symbol.
Double Click Symbol to get
Pencil Tool When this is activated, you need to double click with the Arrow tool
in a Palette to activate the Pencil tool. When this is deactivated, a
single click is enough to bring out the Pencil.
Keep Crescendi Symbols
‘Horizontal’ When this is activated, crescendo symbols are never “slanted”.
Staff Settings adapt to
General MIDI rules If you have selected Programs by General MIDI name for a Track and
this option is activated, the GM program will be taken into account
when making initial staff settings for that Track. That is, keyboards
will be on split staves and correct clefs, display transpose and drum
mapping will be used, etc.

- 37 -
Send Recorded Notes to
Active Voice When this is activated, recorded notes will be placed in the active
voice. When this is deactivated, recorded notes will just be entered
onto the activate staff.
Keep moved notes within
key When this is activated, and you move notes vertically (to transpose
them), you will be restricted to pitches within the current key.
Tied Notes selected as Single
Units When this is activated, and you click on either note in a tied note
pair, both notes will be selected.
Global Staff Spacing with
[Option]-[Command] When this is activated, [Option]-[Command] spacing of staves is ap-
plied to all staves on all pages. When this is deactivated, it is only ap-
plied to the current page.
Use Colors for Additional
meanings When this is activated, color is used to identify the following non-
standard score elements:
• Right Bound Text.
• Graphic Notes.
• Muted Notes.
• Linked Events (staccato, accents etc.) that have been moved with
the layout tool.
• Slurs that have been moved with the layout tool.
Auto Layout: don’t hide first
staff This option affects the Auto Layout functions “Hide Empty Staves”
and “Optimize All”. When “don’t hide first staff” is activated, staves in
the very first grand staff will not be hidden, even if they are empty.
Show Braces in Edit mode Normally, braces are only shown in Page mode. With this option ac-
tivated they will also be visible in Edit mode.
Option: Description:
- 38 -
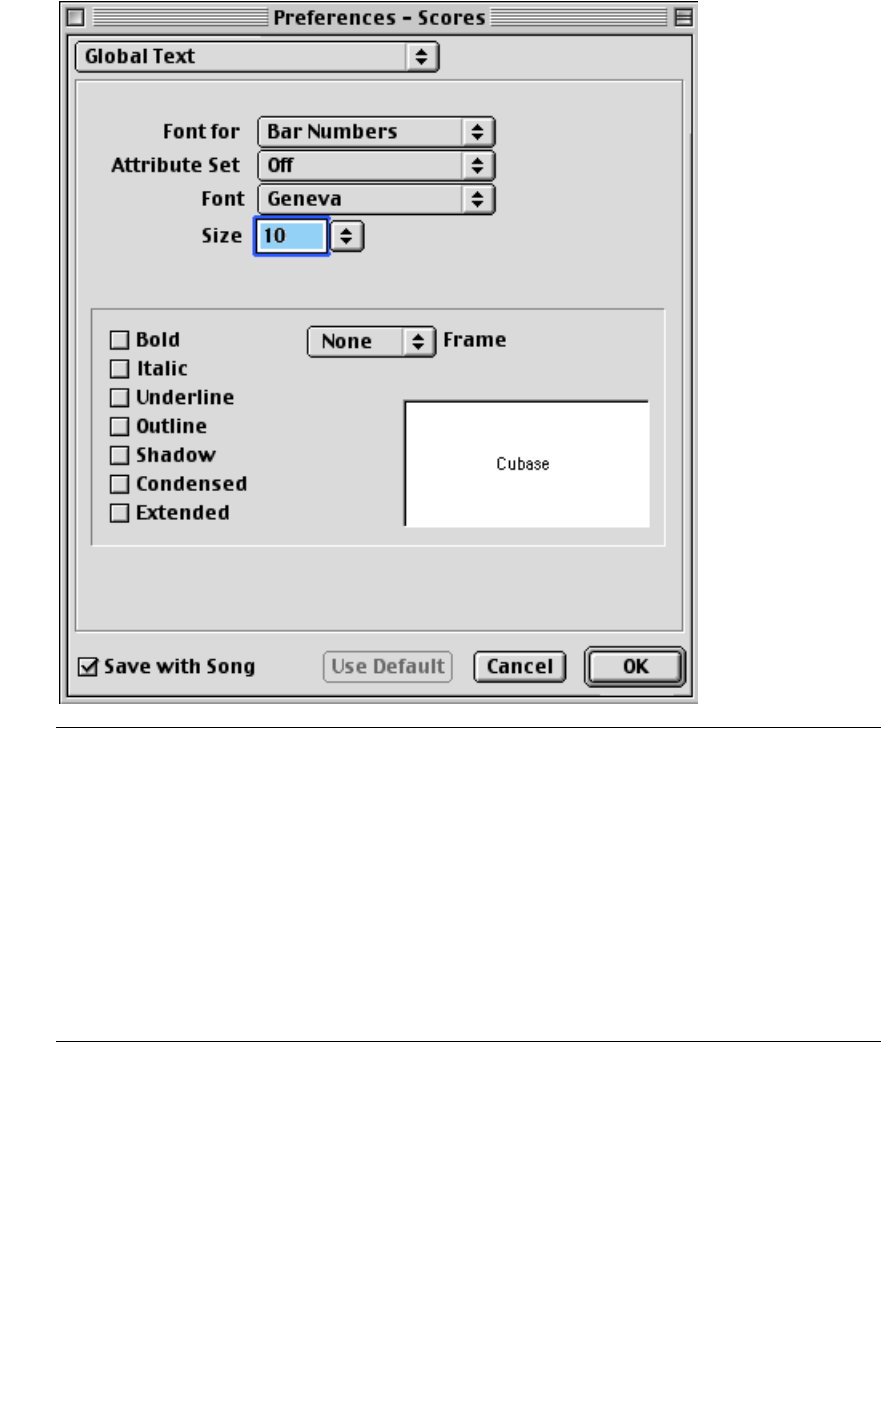
Global Text
Option: Description:
Font for This is the major switch in the dialog, that allows you to specify which score
element to make text appearance settings for.
Attribute Set This allows you to make all text settings by selecting a pre-defined Text
Attribute Set.
Font This allows you to select a font for the specified score element.
Size This allows you to select a point size for the specified score text element.
Text Style Options This allows you to select between various options for the look of the text.
Example text box This shows you what the text will look like.
- 39 -
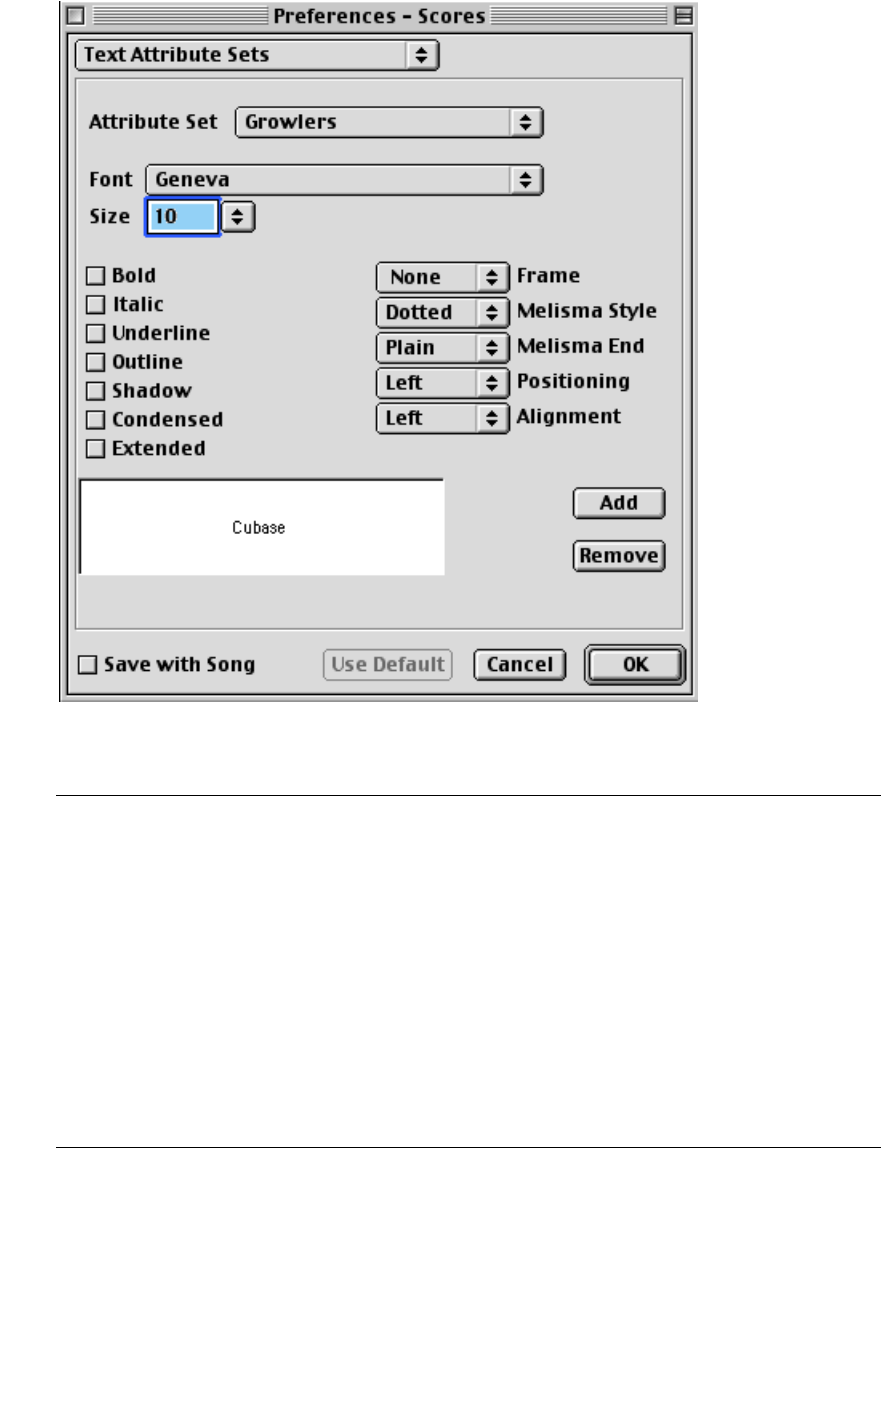
Text Attribute Sets
Text Attribute Sets are pre-defined “text styles” that you can apply to various ele-
ments of the score.
Option: Description:
Attribute Set This allows you to select a Text Attribute Set to change or Apply. You can
also double click here to change the name.
Font This allows you to select a font for the Text Attribute Set.
Size This allows you to select a point size for the Text Attribute Set.
Text Style Options This allows you to select between various options for the Text Attribute Set.
Example text box This shows you what the text will look like.
Add This adds a new Text Attribute Set to the list. You have to specify a name
before you can start setting the options.
Remove This removes the currently selected Text Attribute Set from the list.
- 40 -
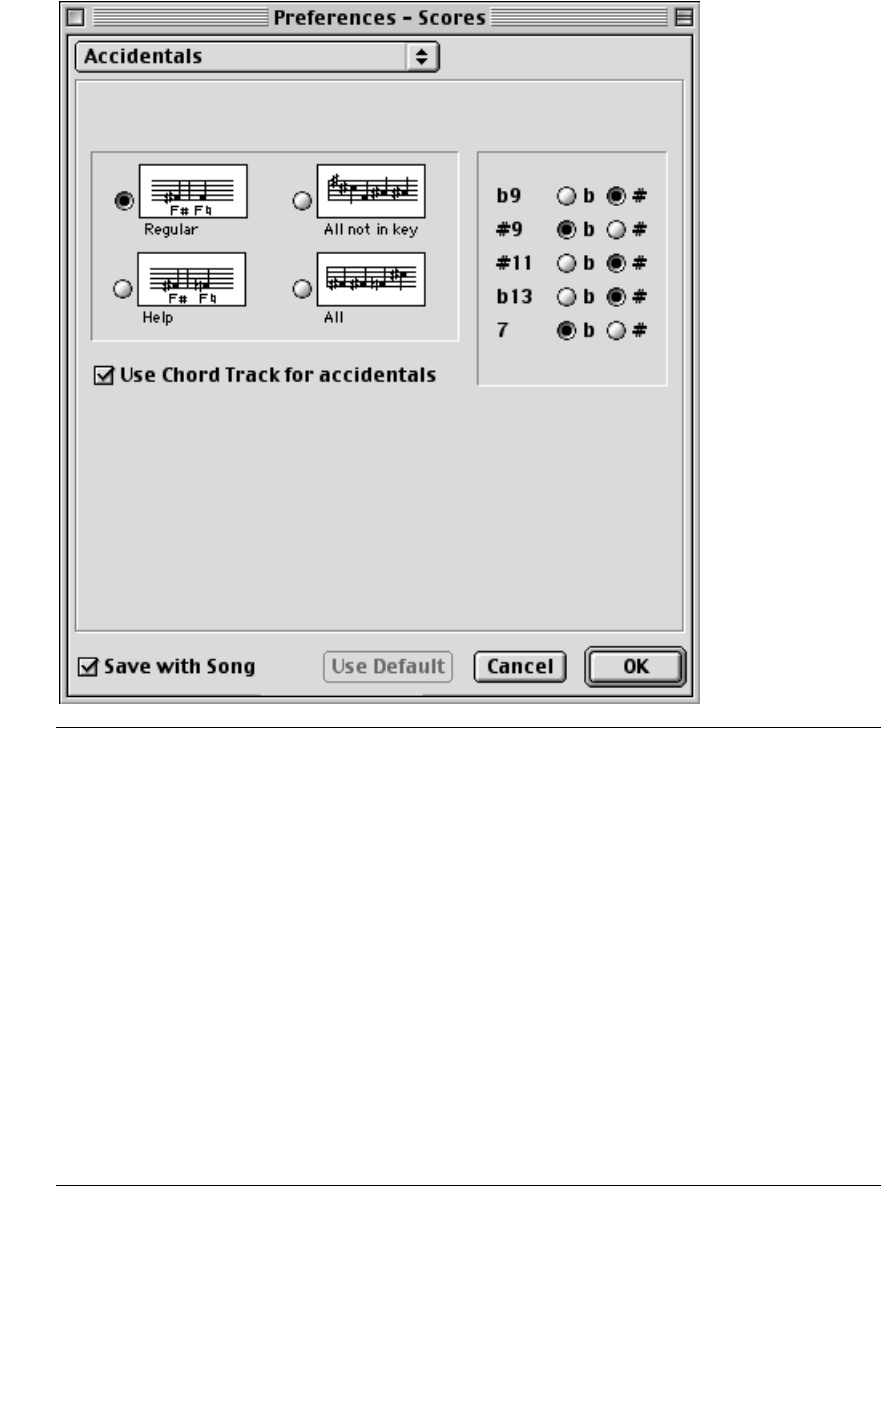
Accidentals
Option: Description:
Regular Notes outside the scale get accidentals. In this mode, accidentals
are not repeated within a measure.
All not in key As Regular, but accidentals get repeated even within the same
measure.
Help As above, but if a note outside the scale is followed by one inside
the scale (in a following measure), this second note will also be
displayed with an accidental.
All Every single note in the score gets an accidental.
Tensions These radio buttons allow you to select how five of the most
common intervals should be displayed, as sharps or flats.
Use Chord Track for accidentals When this button is activated, a Chord Track in the Arrangement
will affect enharmonic shifting. This is an important feature that
can save you hours of manual enharmonic shifting adjustments.
See the Score Layout and Printing document for details.
- 41 -
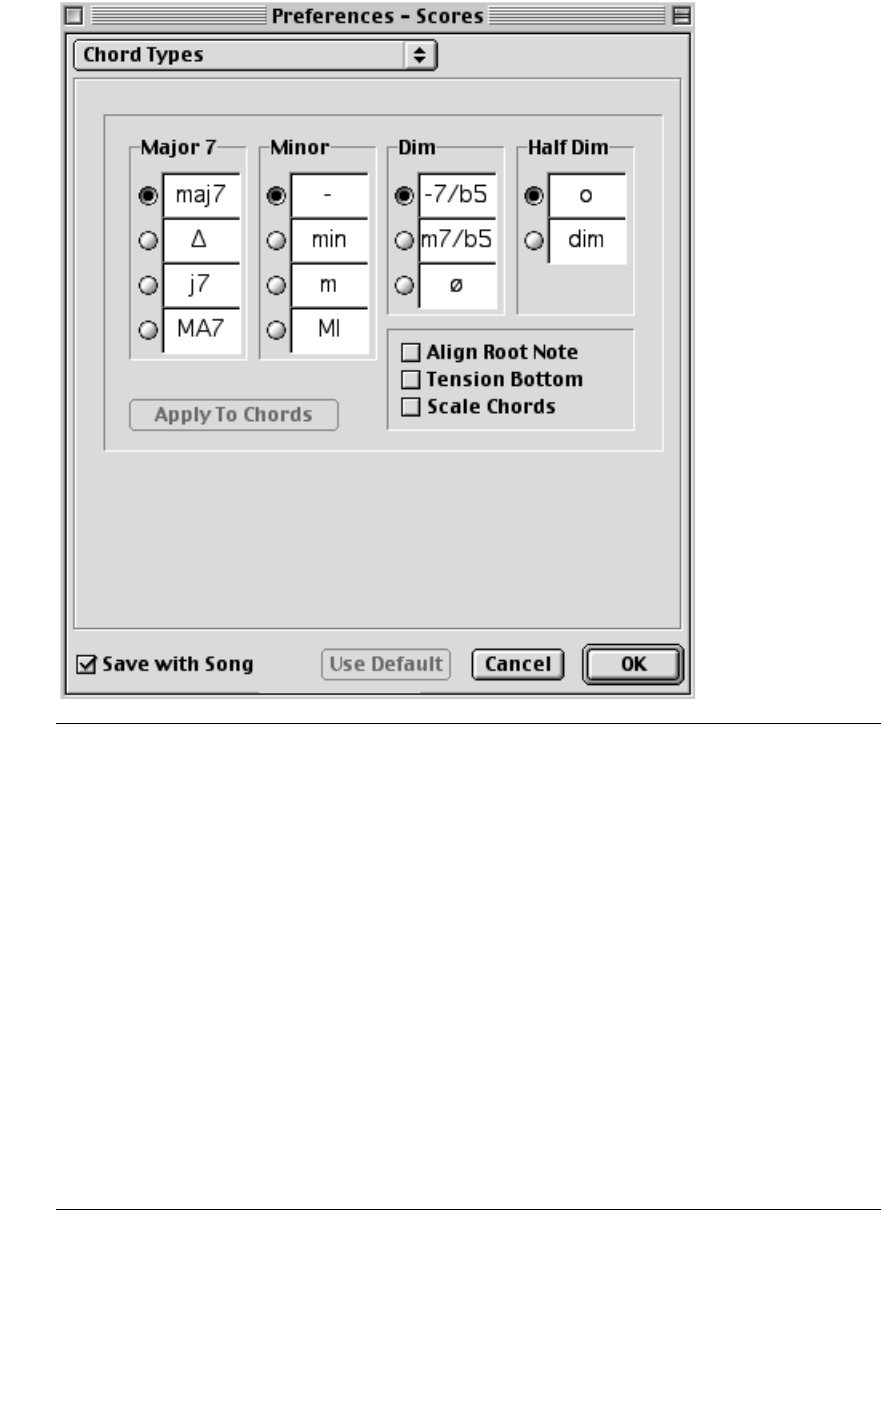
Chord Types
Option: Description:
Major This allows you to select between various ways of displaying major sev-
enth chords.
Minor This allows you to select between various ways of displaying minor
chords.
Half Dim This allows you to select between various ways of displaying half dimin-
ished chords.
Dim This allows you to select between various ways of displaying diminished
chords.
Align Root Note When this is activated, any root note you have specified for a chord, will
be drawn on the same vertical position as the rest of the characters.
Tension Bottom When this is activated, tensions will be drawn on the same vertical posi-
tion as the rest of the characters.
Scale Chords When this is activated, chord size will be scaled with the system size.
Apply To Chords This applies changes you have made, directly, without closing the dialog.
- 42 -
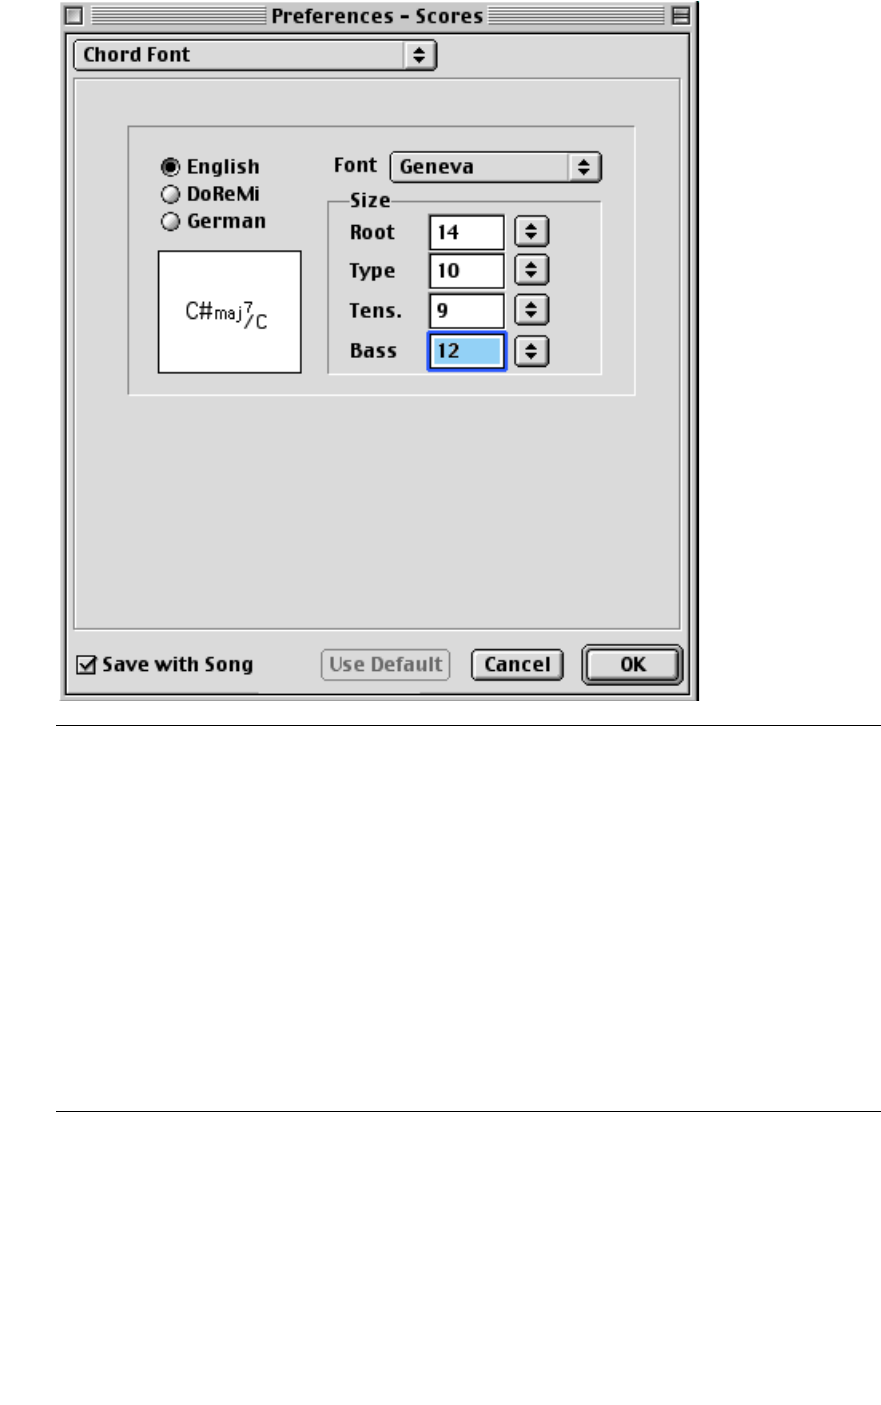
Chord Font
Option: Description:
English/DoReMi/German This allows you to select between three ways of displaying chords.
The example shows you the differences.
Font This allows you to specify a font for all chords.
Size – Root This allows you to specify a point size for the root note in the chord,
for example the “C” in a “Cm” chord.
Size – Type This allows you to specify a point size for the letters indicating the
type of chord, for example the “m” in a “Cm” chord.
Size – Tens. This allows you to specify the point size for the tensions in chord
symbols.
Size – Bass This allows you to specify a point size for the letter indicating the
bass note in a chord, for example the “F” in “G/F”.
- 43 -
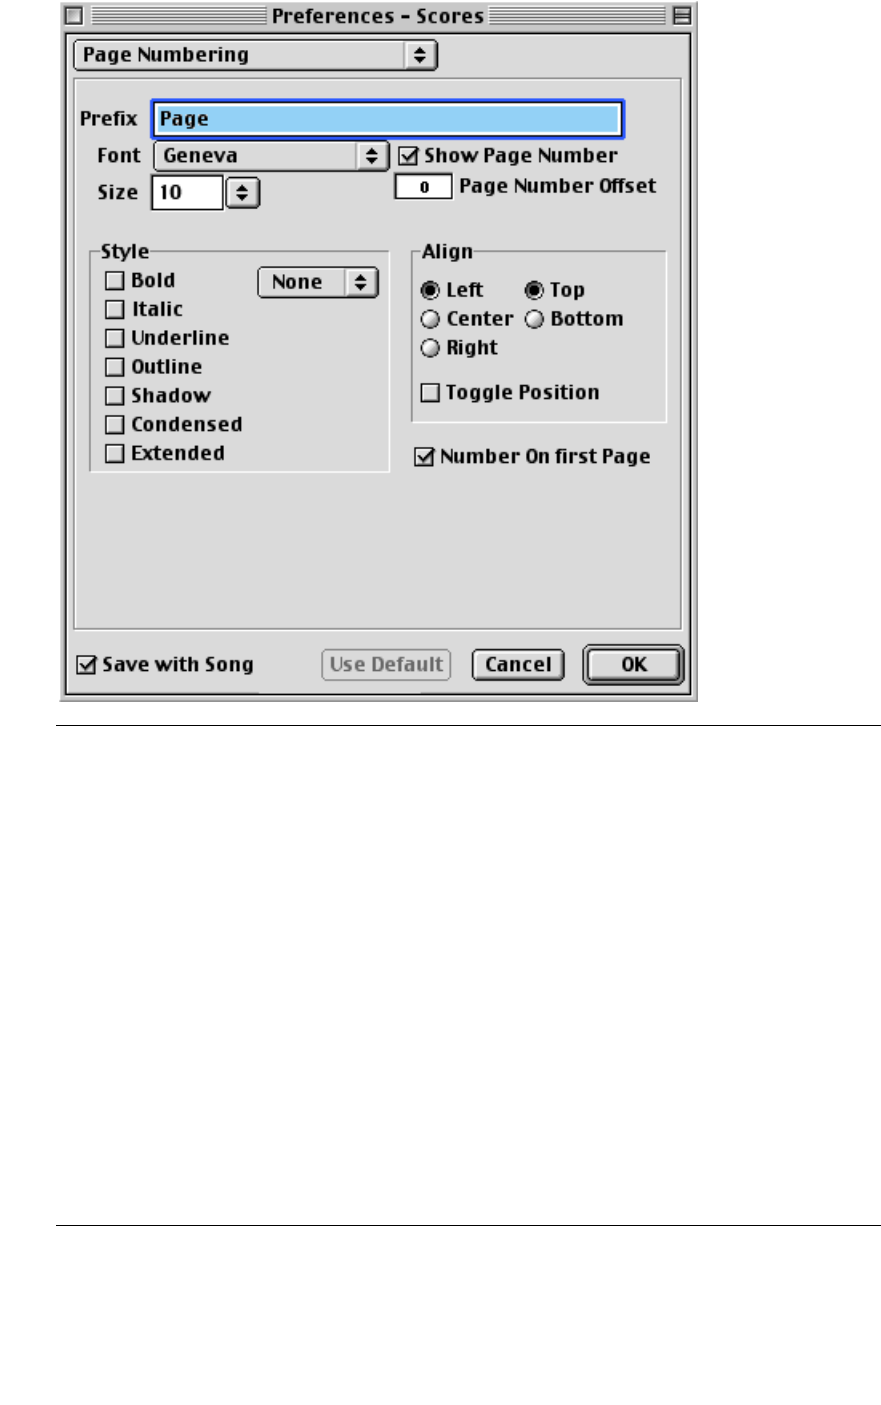
Page Numbering
Option: Description:
Prefix Adds a text before the actual page number.
Font This allows you to select a font for page numbers.
Size This allows you to select a point size for page numbers.
Text Style Options This allows you to select between various options for the look of the
text.
Show Page Number Turns page numbering on/off completely.
Page Number Offset This allows you to add to the page number so that the first pages
doesn’t start on ”1”.
Align Determines where on the page you want the text, vertically (Top/Bot-
tom) and horizontally (Left, Center, Right).
Toggle Position If you have chosen Left or Right for the Preference above, you can also
activate Toggle Position, which makes the page number alternate be-
tween left and right on even/odd pages.
Number On first Page Hides/shows the page number on the first page.

- 44 -
Copyright
Option: Description:
Text This is where you enter your preferred copyright notice text.
Font This allows you to select a font for the specified score element.
Size This allows you to select a point size for the specified score text element.
Text Style Options This allows you to select between various options for the look of the text.
Show Copyright Turns the copyright notice on/off completely.
Align Decides where on the page you want the text, vertically (Top/Bottom) and
horizontally (Left, Center, Right).
Toggle Position If you have chosen Left or Right for the Preference above, you can also acti-
vate Toggle Position, which makes the copyright notice alternate between
left and right on even/odd pages.
- 45 -
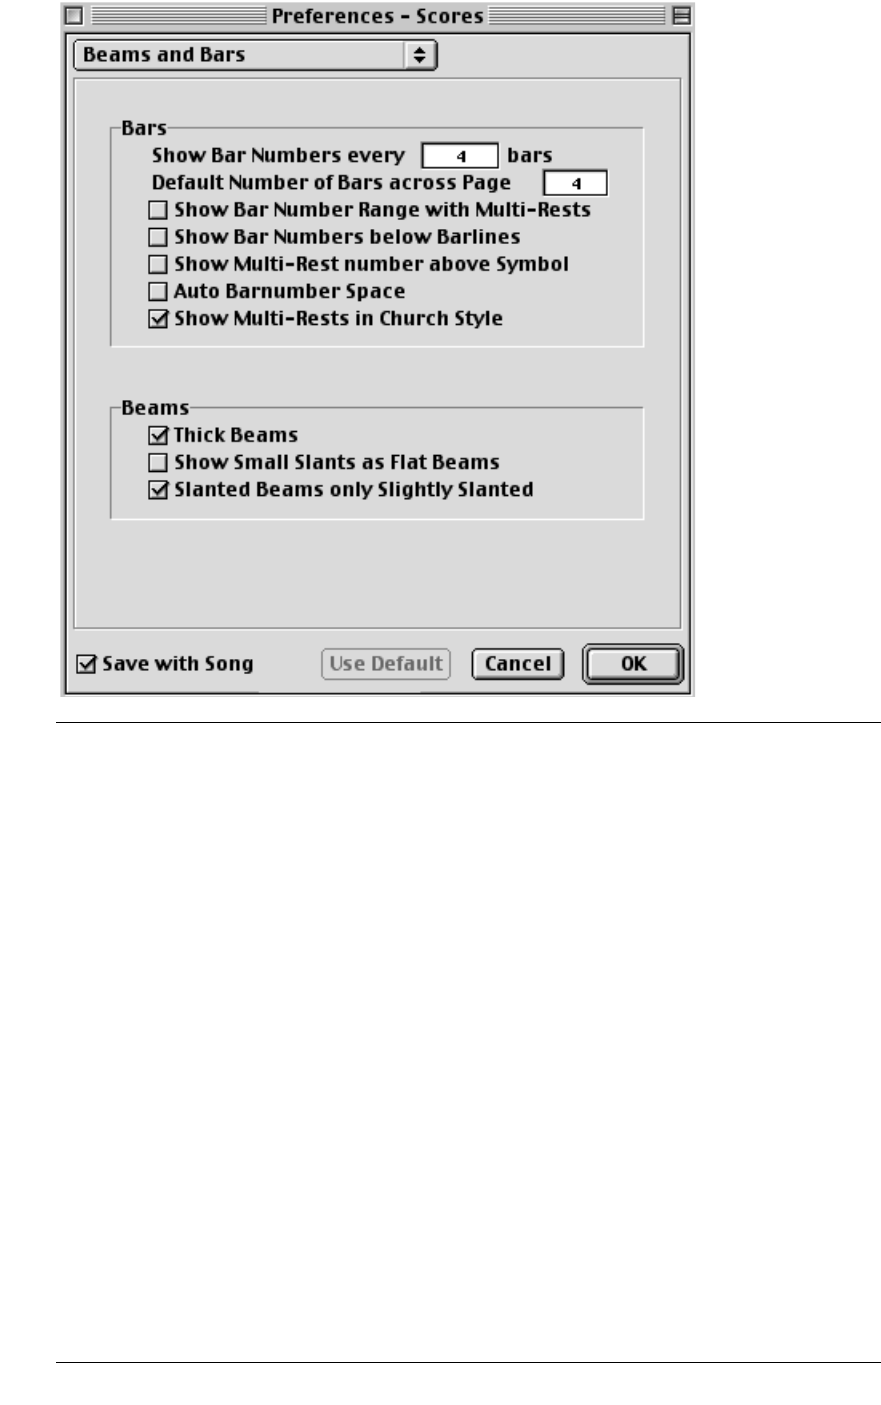
Beams and Bars
Option: Description:
Show Bar Numbers every
[x] bars This allows you to set how often bar numbers should appear above
the bars. The first option is called “First”, which means only the first
bar on each staff is numbered. The second option is called “Off” which
means no bar numbers at all.
Default Number of Bars
across Page [xx] This is used in three cases:
• In Edit mode to set how many bars should be across the page.
• In Page mode to decide how many bars there should be across the
page in a new layout.
• The maximum number of bars per staff when using the Auto Layout
functions.
Show Bar Number Range
with Multi-Rests When this is activated, and a multi rest appears in the score, the bar
number will be displayed as a range, for example like this: “3-17”.
Show Bar Numbers below
Barlines When this is activated, bar numbers will be displayed below the staff
rather than above the staff.
Show Multi-Rest number
above Symbol Determines whether the multiple rest numbers go above the symbol
or below.
Auto Barnumber Space Determines whether the vertical position of the Bar numbers should
be adjusted automatically depending on the contents of the mea-
sures, or not.
Show Multi-Rests in
Church Style Selects between two types of multiple rests, “horizontal” and “vertical”.

- 46 -
Thick Beams Makes beams thicker than otherwise.
Show Small Slants as Flat
Beams Makes beams straight that would otherwise be slightly slanted. In
other words, this raises the “tolerance” for when the program decides
to make a beam flat.
Slanted Beams only Slightly
Slanted Makes the beam slant small although there might be a large vertical
distance between the first and last note in the beam group.
Option: Description:
- 47 -
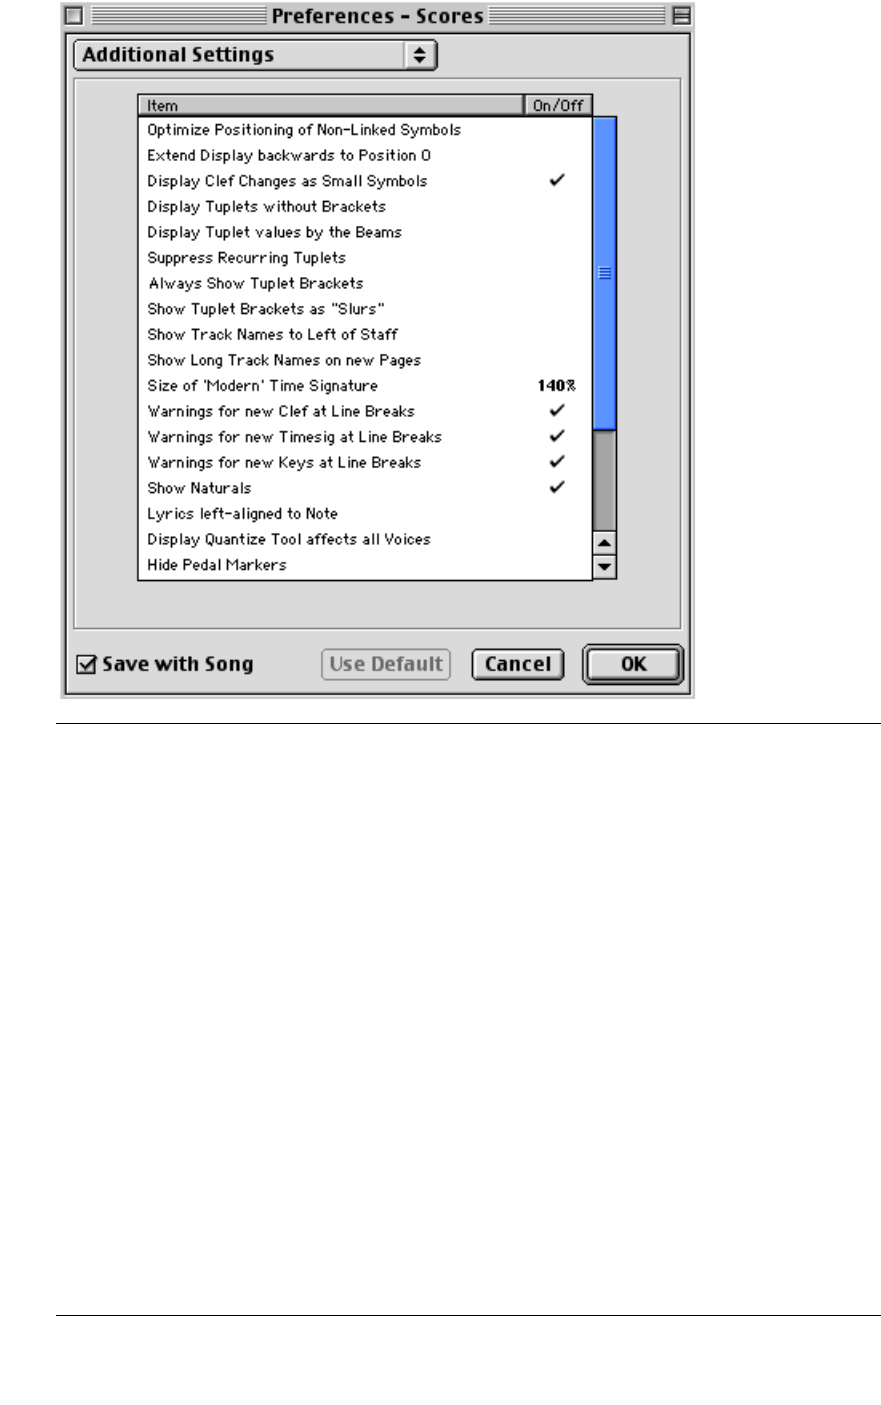
Additional Settings
Option: Description:
Optimize Positioning of Non-
Linked Symbols When this is activated, an enhanced algorithm will be used for po-
sitioning symbols that are not linked to notes. When this is deacti-
vated, the program will work like it did in version 3.x.
Extend Display backwards to
Position 0 Determines whether the relative Part position should be used or
not. If this flag is activated, the first bar in the Score will be bar 1
even if the Part doesn‘t start at 1.1.0.
Display Clef Changes as Small
Symbols Determines whether the inserted clefs (clef changes) should be as
big as the one at the beginning of the staff or smaller.
Display Tuplets without
Brackets Determines whether there should be brackets embracing tuplet
groups or not.
Display Tuplet values by the
Beams Used to decide if the tuplet indication should go above the notes
or below.
Suppress Recurring Tuplets This is for situations where several tuplets (including triplets) oc-
cur after each other. When this is activated, only the first group
will have a number indication. When this is deactivated, all groups
will have this indication.
Always Show Tuplet Brackets When this is activated, the tuplet number indication will appear
on a line that spans the tuplet group. When this is deactivated,
there will be no such line.

- 48 -
Show Tuplet Brackets as
“Slurs” When this is activated, tuplet brackets will have the same shape as
slurs, as opposed to “angle brackets”.
Show Track Names to Left
of Staff When this is activated, Track names are shown to the left of the
staff, rather than just above the staff.
Show Long Track Names on
new Pages When this is activated, the “Long” Track Name is displayed for the
first staff of every page. When it is deactivated, the “Long” Track
Name is displayed for the first staff on the first page only.
Size of ‘Modern’ Time
Signature This is used to adjust the size of Modern Time Signatures. Such Time
Signatures are displayed above the staff, rather than on the staff.
Warnings for new Clef/
TimeSig/Keys at Line Breaks When these options are activated, a change of clef, key signature
or time signature that would normally only appear at the begin-
ning of the next line (because it was inserted at just that bar num-
ber) will instead appear at the end of a line and at the beginning
of the next.
Show Naturals When this is On, and a change to another key occurs, naturals will
be inserted to “nullify” any sharps and flats that relate to the previ-
ous key signature.
Lyrics left-aligned to Note When this is activated, lyrics will be left justified to the notes in-
stead of center justified.
Display Quantize Tool affects
all Voices When this is activated, the Display Quantize Tool will always affect
all voices on the staff.
Hide Pedal Markers Normally, MIDI sustain pedal messages that you have recorded
are shown as pedal markers in the score. This option allows you to
turn this feature off.
Hide Program Changes Normally, MIDI Program Changes messages that you have re-
corded are shown in the score. This option allows you to turn this
feature off.
Grand Staff Barlines in old
Choral Style When this is activated, bar lines in grand staves never cross the ac-
tual staves.
Display Double Barlines on
Time Signature Change If this is activated, each Time Signature change will be preceded
by a double bar line.
Automatic Accents follow
Display Lengths When this is activated, automatic accent and tenuto symbols will
be added to the score. If the recorded length of a note is much
shorter than the displayed length, it will get a staccato symbol. If it
is near full length or longer, it will get a tenuto symbol.
Accents above Stems When this is activated, accent note symbols are displayed at the
stem side of notes instead of by the note head.
Accents above Staves When this is activated, accent note symbols are displayed above
the staff, regardless of the stem direction of the notes. This setting
overrides the “Accents above Stems” option.
Option: Description:
- 49 -
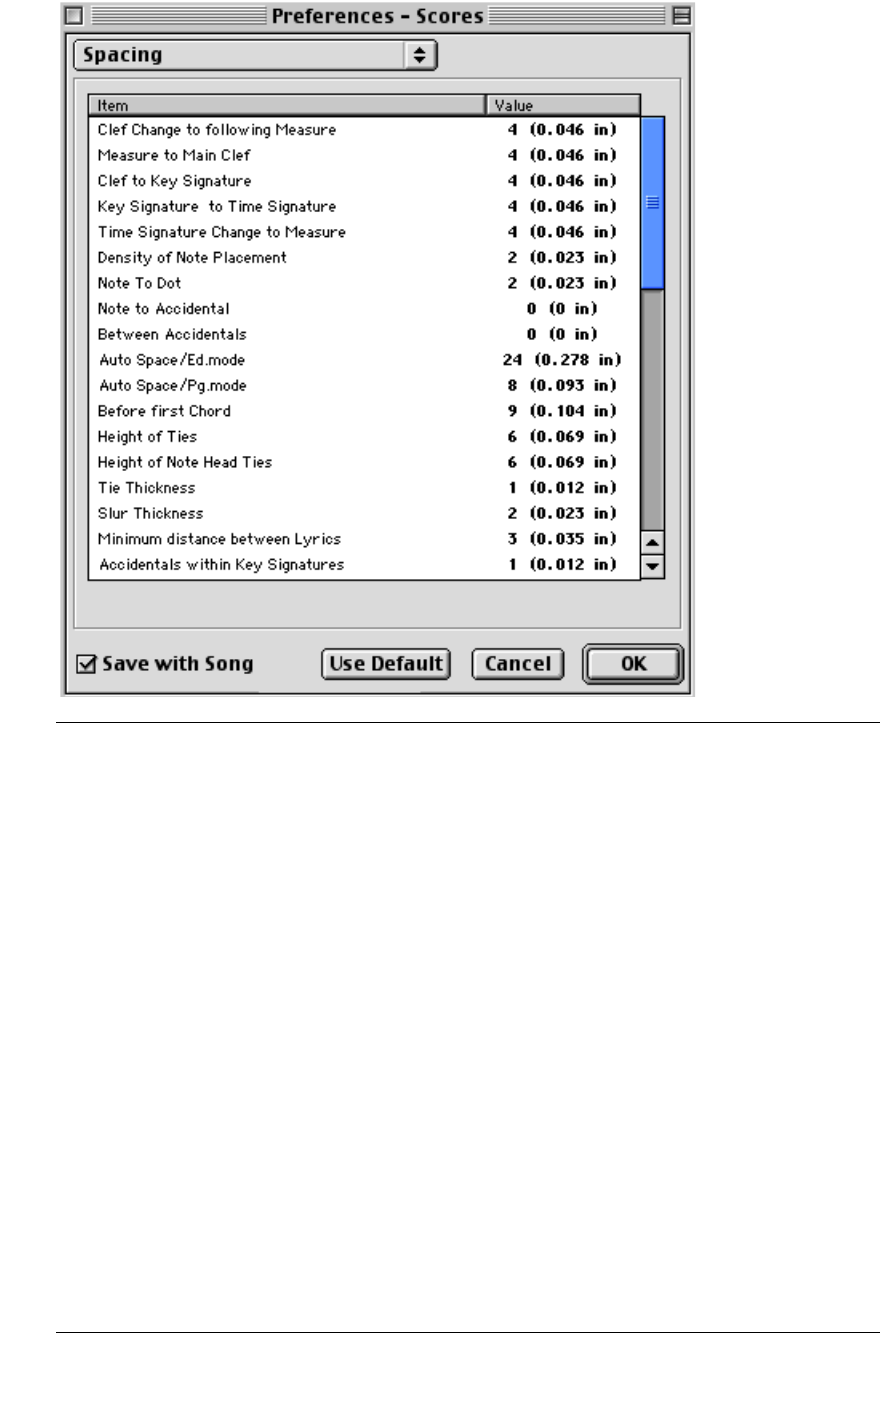
Spacing
Option: Description:
Clef Change to following Measure The distance between a Clef inserted at the beginning of a
measure, and the bar line that comes after it.
Measure to Main Clef The distance between the beginning of a staff to the first
clef on the line.
Clef to Key Signature The distance between the Clef and Key Signature symbols
at the beginning of a staff.
Key Signature to Time Signature The distance between the Key Signature and Time Signa-
ture symbols at the beginning of a staff.
Time Signature Change to Measure The distance between an inserted Time Signature symbol
and the bar line coming after it.
Density of Note Placement This is the minimum distance between chords/notes in a
bar. Raising this value makes the measures wider.
Note to Dot The distance between notes and their dots (for dotted
notes).
Note to Accidental The distance between notes and their accidentals.
Between Accidentals The vertical distance between accidentals in a chord.
Auto Space/Ed.mode By raising this value, you will get less bars across the page
in Edit mode. By lowering it you will get more.

- 50 -
Auto Space/Pg.mode The same as above, but this value is only used by the Auto
Layout function, in Page Mode.
Before first Chord The distance between the bar line and the first note in
each measure.
Height of Ties This adjusts the height of ties.
Height of Note Head Ties The height of a Bow up/Bow down symbol.
Tie Thickness This adjusts the thickness of all ties (automatic and “man-
ual”).
Slur Thickness This adjusts the thickness of all slurs.
Minimum distance between Lyrics This adjusts the minimum spacing between lyric syllables.
Accidentals within Key Signatures This adjusts the spacing between each accidental symbol
in the group of accidentals displayed at the beginning of
each staff.
First Bar Number - Horizontal Offset This allows you to move the first bar number on the staves
horizontally.
First Bar Number - Vertical Offset This allows you to move the first bar number on the staves
vertically.
Other Bar Numbers - Horizontal Offset This allows you to move the bar numbers for all bars but
the first on each staff, horizontally.
Other Bar Numbers - Vertical Offset This allows you to move the bar numbers for all bars but
the first on each staff, vertically.
Behind Grace Notes This allows you to adjust the spacing between grace notes
belonging to the same note and also their spacing to the
note they belong to.
Staff Separator - Horizontal Offset Increasing this value allows you to indent staff separators
from the left margin.
Staff Separator - Vertical Offset Adjusting this value allows you to move all staff separators
vertically.
Track Name - Horizontal Offset The horizontal distance between the Track name and the
beginning of the staff.
Track Name - Vertical Offset The vertical distance between the Track name and the
staff.
Minimum Distance between Staves This is used to adjust the spacing between systems in two
cases:
1. In Edit mode.
2. In Page mode after using Auto Layout.
The larger the value, the wider the spacing.
Short Track Name - Horizontal Offset This is used to adjust the horizontal distance between
staves and their Short Track Names.
Short Track Name - Vertical Offset This is used to adjust the vertical distance between staves
and their Short Track Names.
Slur's Start & End Distance from Note
Head This is used to adjust how far the end points of slurs should
be from the note heads it belongs to.
Slur's Middle Distance from Note Head This allows you to adjust the vertical position of the middle
of slurs, which effectively controls their appearance.
Option: Description:

- 51 -
Multi Rest Height This adjusts the widths of Multi Rest symbols.
Multi Rest Width This adjusts the heights of Multi Rest symbols.
Add to Auto Layout Distance This number adds to the distance between staves that will
be added when you use any of the Auto Layout functions.
The higher the number, the larger the distance between
staves.
“Spread Page” Bottom Distance This adds to the white space that will appear on the bot-
tom of a page when using the Auto Layout functions.
Default Line Width This specifies the thickness of all lines that don’t have a
specific width adjustment.
Line Width [for option] This allows you to “trim” the line widths for various ele-
ments in the score.
Option: Description:
- 52 -
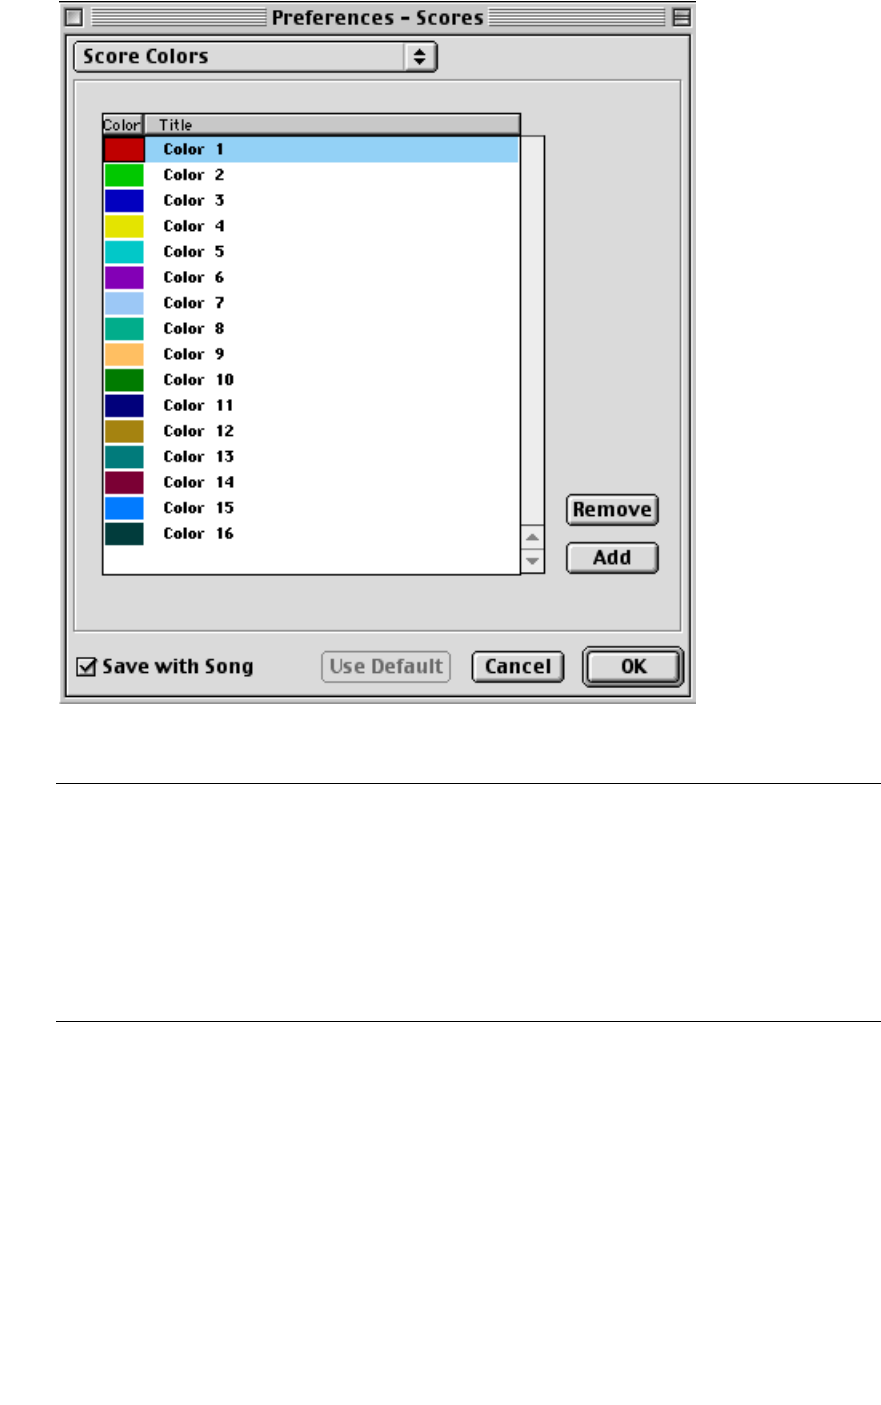
Score Colors
This dialog allows you to create and modify the color options on the Color pop-up
in Score Edit.
Option: Description:
Color This column displays the currently defined colors. Double clicking one brings
up the standard apple Color Picker dialog where you can change the color.
Title This column displays the name of the currently defined colors. Double click
on the name to change it.
Remove This removes the currently selected color item from the list.
Add This adds a new color item to the list.
- 53 -
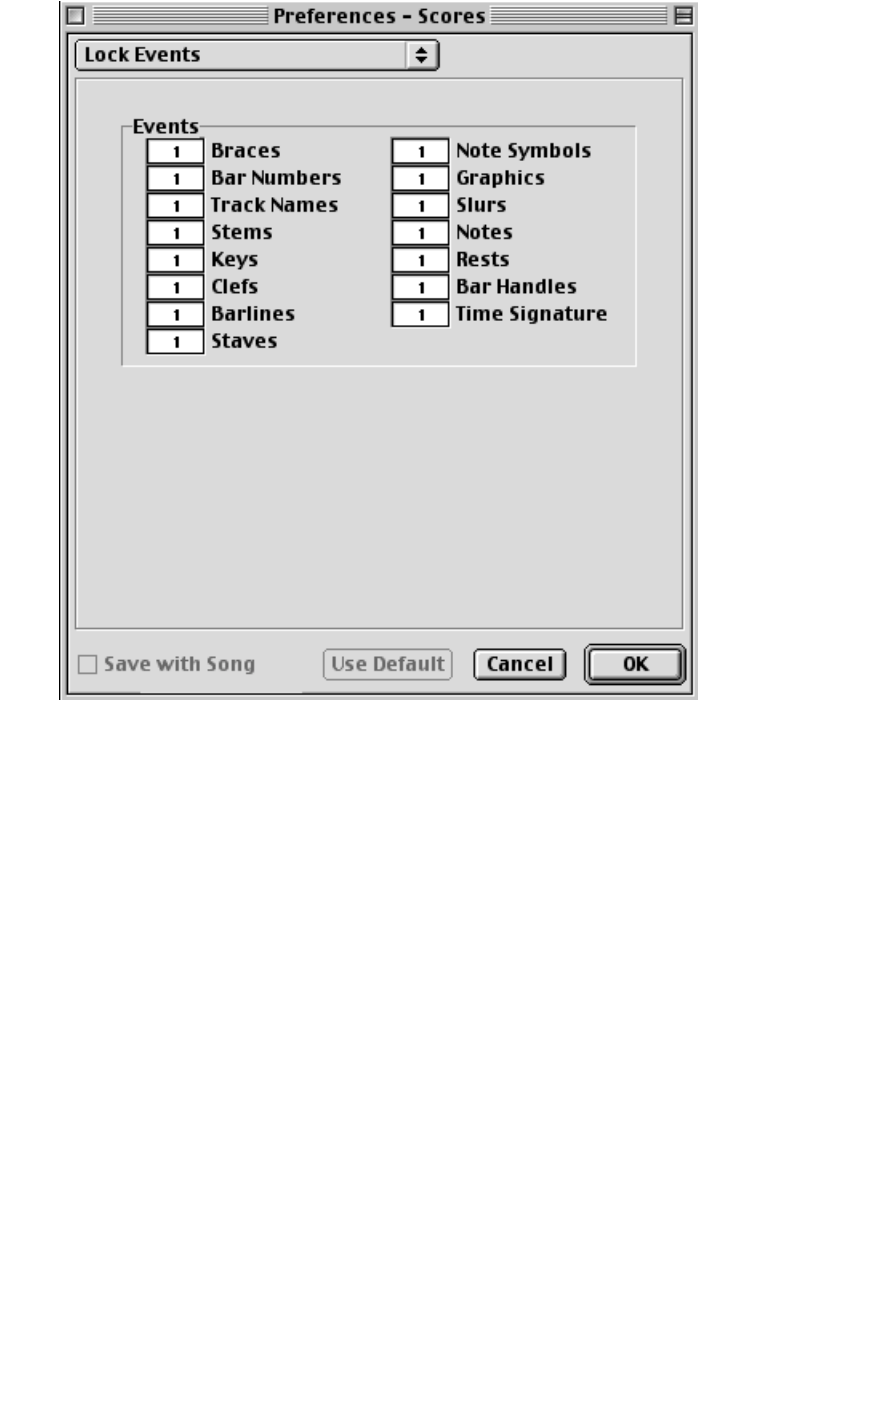
Lock Events
This allows to specify which “lock layer” various elements in the score should be-
long to. You can then choose to “lock” one or two layers, so that the elements in
this “lock layer” can’t accidentally be moved.
- 54 -
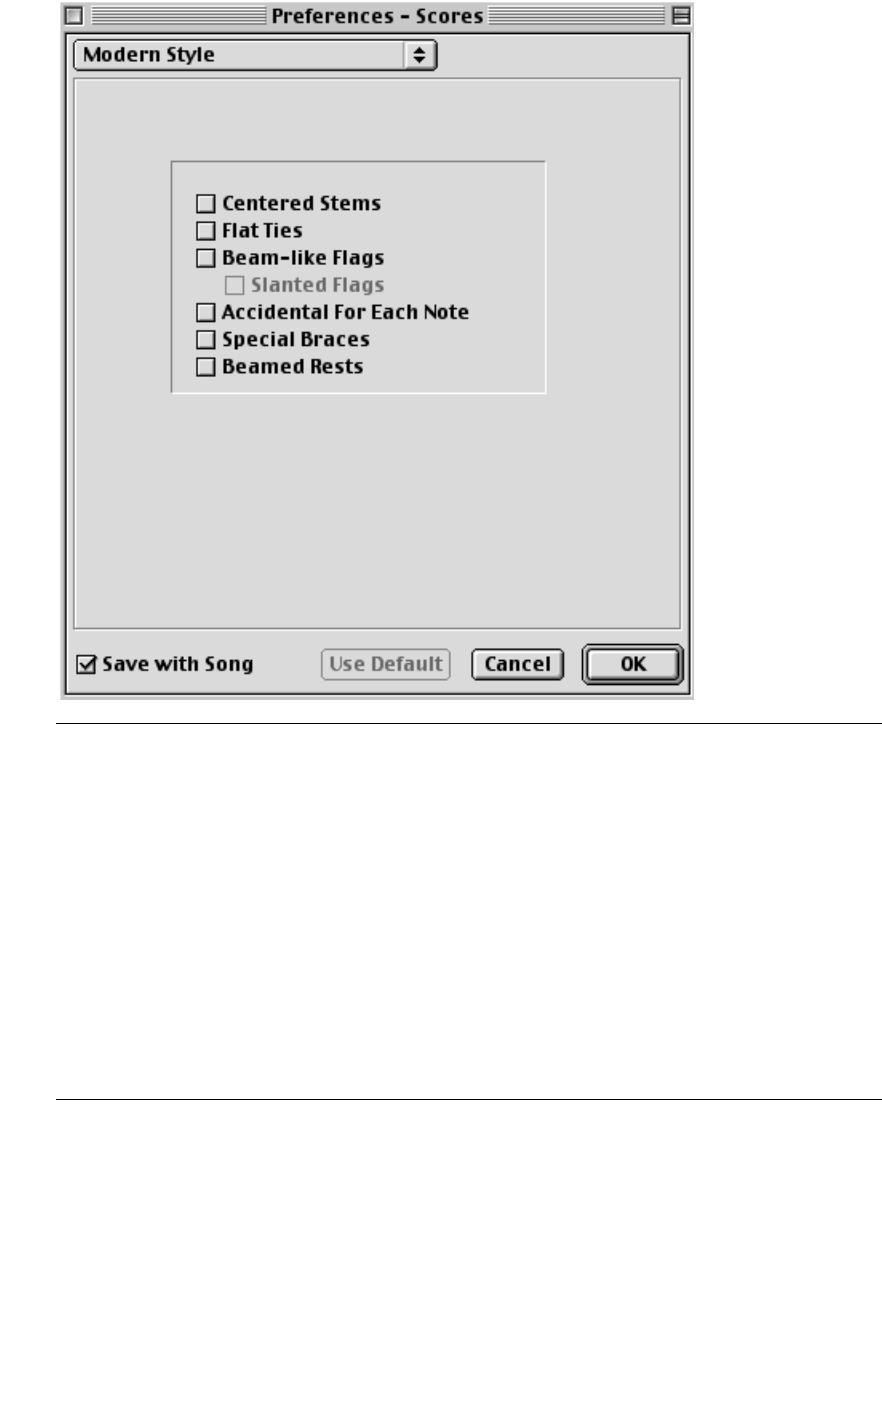
Modern Style
Option: Description:
Centered Stems When this is activated, the note heads will appear in the center of the
stems.
Flat Ties When this is activated, ties will be flat.
Beam-like Flags When this is activated, note flags will be vertical lines, rather than nor-
mal “wavy” flags.
Slanted Flags If the option above is activated, you can use this setting to make the
flags slant downwards.
Accidental For Each Note When this is activated, both notes in a tied pair will get an accidental.
Special Braces When this is activated, simpler types of braces are used.
Beamed Rests When this is activated, rests will be beamed just as notes.
- 55 -
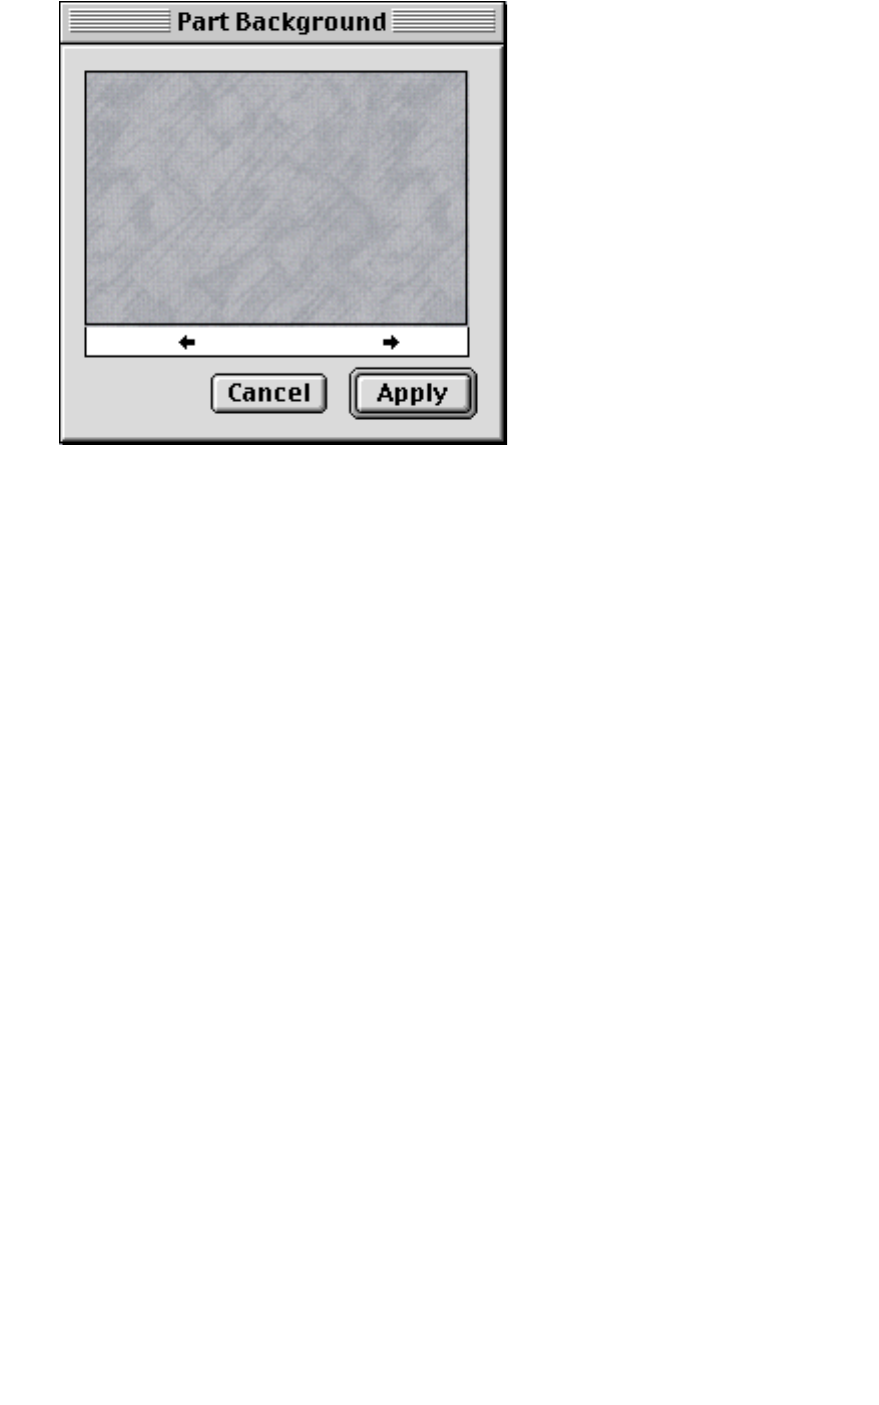
Preferences – Part Background
This menu command is used in the Arrange window.
It allows you to select a background “bitmap” (picture) that will then be used in the
Part Display in the Arrange window.

- 56 -
Preferences – Key Commands
This menu command allows you to define Key Commands, Toolbar buttons and
MIDI Control for most Cubase commands.
In the dialog you will find all main menu items and a large number of other func-
tions, all arranged on different “pages” depending on which menu/window they be-
long to. You can also see which Key Commands are currently assigned by default.
To add a Key Command, proceed as follows:
1. Use the pop-up at the top of the window to select the preferred page.
2. Click in the “Key” column for the item or function to which you wish to assign a Key
Command, or alternatively, select the item and use the “Set Key” button.
A window appears prompting you to press a Key. You can choose between any single key or
a combination of one or several Modifier keys (Command,Option, Ctrl, Shift) plus any key.
If the Key Command you enter is already assigned, you will get a prompt asking if
you want to replace the currently assigned command or cancel the operation.

- 57 -
4
The Structure Menu

- 58 -
Create Track
This Command creates a new empty Track.
The new Track will have the following properties:
The same Track Class as the Active Track’s.
• If you start with an empty Track List, the new Track will be a MIDI Track.
• If the active Track is a Style Track, the new Track will be a MIDI Track (since there can only be
one Style Track in an Arrangement).
• If the selected Track is a Folder Track, the new Track will be a MIDI Track inside the folder.
• The same MIDI Channel as the active Track’s, plus one.
So, if the active Track is a Drum Track with MIDI Channel 3, the new Track will be a Drum
Track with MIDI Channel 4.
• The name “Track X” where X is the total number of Tracks including the new one.
To create a Track you can also double click in an empty part of the Track list. The de-
fault key command for creating a new Track is [Command]-[T].
Move Track to Folder
This command is used for moving Tracks into Folder Tracks. Folder Tracks are de-
scribed in detail in the chapter with the same name in the Getting into the Details
document. Below follows a summary.
1. Select the Folder Track that you want to move the Track into.
2. Select one or more parts on the Track(s) you want to move.
3. Select “Move Track to Folder” from the Structure menu.

- 59 -
Explode By Channel
This command is described in detail in the chapter “The Arrangement - More on
what you can do with Parts and Tracks” in the Getting into the Details document.
Below follows a summary:
With MIDI Parts
This command takes a MIDI Part containing Events on several MIDI Channels and
splits it up into several new Parts on new Tracks - one Track per MIDI channel.
You could have such a Part with various MIDI Channels if you for example have re-
corded a synth with a split keyboard or a guitar synthesizer, or if you have recorded
material from another sequencer. This is related to setting a Track to MIDI Channel
“Any”.
With Audio Parts
Works as with MIDI Parts, but the Audio Parts are split up on one Track per Audio
Channel.
With Drum Parts
If you use this command on Drum Tracks/Parts, they are not split up per MIDI Chan-
nel, instead they are split up per Sound in the Drum Edit Drum Map. After the oper-
ation you will get one track for the bass drum, one for the snare, etc.
Performing the “Explosion”
1. Select the Track to be “exploded”.
2. Set up the Left and Right Locator for the range of the Track you want to “explode”.
3. Select Explode By Channel from the Structure menu.
New Parts are created. If possible, they are put on existing Tracks (if Tracks set to the
right Channels already exist). Otherwise new Tracks are created automatically. Each
Track is automatically set to the correct Channel.

- 60 -
Merge Tracks
This command is described in detail in the chapter “The Arrangement - More on
what you can do with Parts and Tracks” in the Getting into the Details document.
Below follows a summary:
This command allows you to merge all Parts on some or all MIDI, Audio or Drum
Tracks to one composite Part. To make use of all the information stored in that cre-
ated Part you will probably set the resulting track to Channel “Any”.
1. Set up the Left and Right Locator for the range you want to merge.
2. Mute the Tracks you don't want included in the merge.
3. Select the Track where you want the merged Part to appear.
Make sure to select the same type of Track as the Tracks you want to merge (i.e. an Audio
Track when merging Audio Tracks, etc.).
4. Select Merge Tracks from the Structure menu.
A new Part is created.
• Any Real Time Parameter settings in the source Parts are made permanent in the destination
Part (see “Freeze Play Parameters” for details).
• Output settings are lost.
• Drum Tracks are merged according to their O-Note setting.
• If you set the destination Track to MIDI Channel Any, it will still play back on all the correct
MIDI Channels.
• Likewise, when merging Audio Parts you need to set the resulting merge Part to Audio Chan-
nel Any, to make it play back on all the correct Audio Channels.
- 61 -
Create Part
This creates a new empty Part on the active Track, beginning at the Left Locator
and ending at the Right Locator.
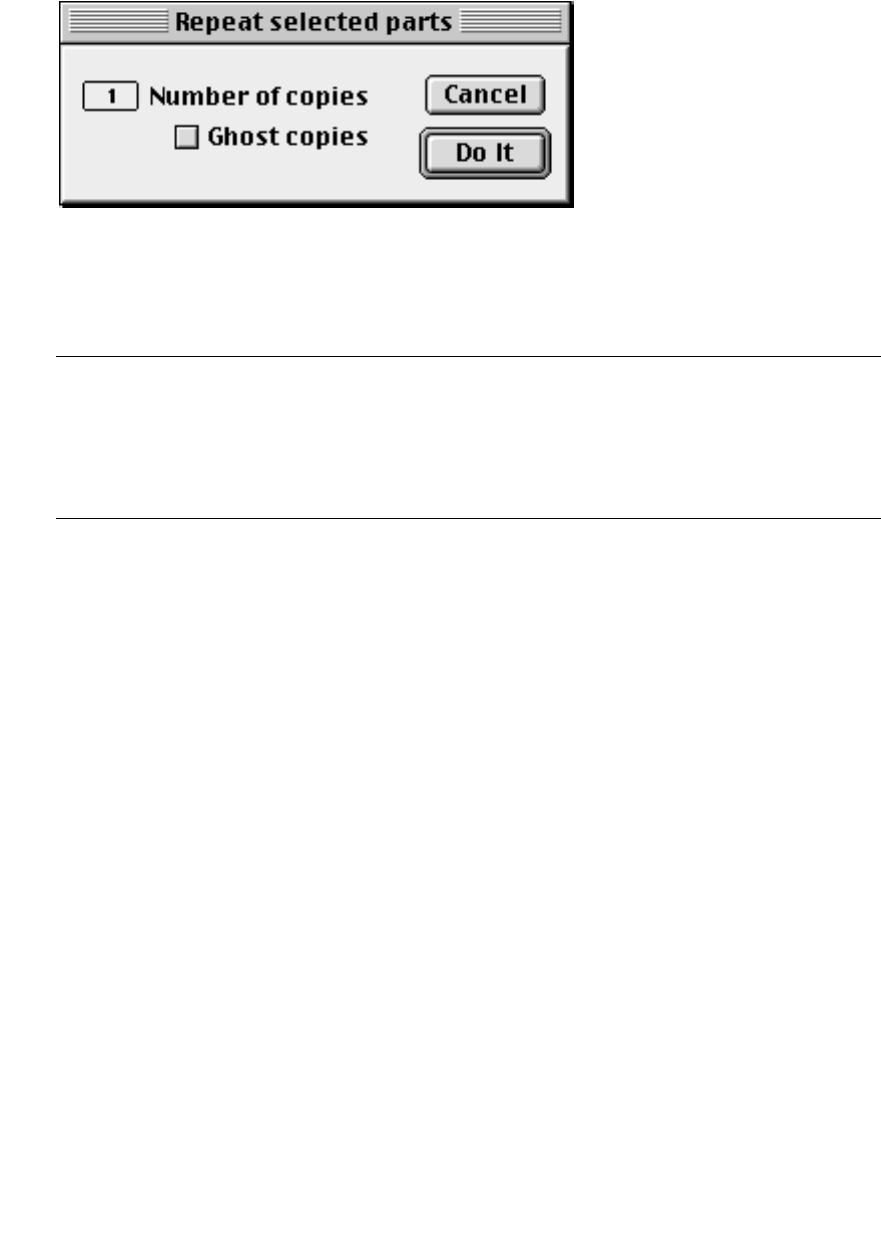
Repeat Parts...
This function repeats the selected Parts and lines up the copies after the original(s).
The selected Parts are treated as one “block”, and the relative spacing of the repeat
is determined by the length of the entire “block” (the beginning of the first Part and
the end of the last). There are two dialog options:
Trim Events to Part
This command makes sure all Events in a Part end where the Part ends and no later.
It is possible to record and enter Events which “stick out” outside the Part, for
example after using the Scissors or Pen Tools, and this isn't always desired.
To remedy this situation, select the Parts and use Trim Events to Part.
Option: Description:
Number of copies Use this Field to decide how many copies you want of the Part(s).
Ghost copies When this is activated, the copies will be “Ghost copies” of the copied
Parts. That is, when you change anything in the original(s), the Ghosts are
changed accordingly.

- 62 -
Cut at Locators
This command cuts out a piece of the “virtual tape“, across all Tracks.
• The piece that is removed is the section between the Locators.
• The Parts to the right of the Right Locator will be moved left, filling out the gap.
• Any Parts that have a section inside the Locators, are shortened.
• Muted Tracks are not affected.
For more info, see the chapter “The Arrangement - More on what you can do with
Parts and Tracks” in the Getting into the Details document.
Insert at Locators
This command inserts a piece of “blank tape” into your Arrangement:
• The length of the piece will be the number of bars between the Left and Right Locator. To for
example insert four bars after bar three, set the Left Locator to 3.1.0 and the Right Locator to
7.1.0.
• All music after the Left Locator is “pushed” to a later position.
• Parts that start before the Left Locator and end after it, will be lengthened by the selected
amount of bars.
• There will be no Events in the lengthened sections.
• Muted Tracks are not affected. But, the Master Track is affected just like any other Track.
For more info, see the chapter “The Arrangement - More on what you can do with
Parts and Tracks” in the Getting into the Details document.
Split at Locators
This command Splits Parts on all Tracks at the Left and Right Locator positions, just
as if you had done it with the Scissors Tool.
• If you only want to make one split, set the Left and Right Locators to the same value.
• Muted Tracks are not affected.
For more info, see the chapter “The Arrangement - More on what you can do with
Parts and Tracks” in the Getting into the Details document.
Split at Markers
This command Splits Parts on all Tracks at the Marker Part start and end positions.
• Muted Tracks are not affected.
For more info, see the chapter “The Marker Track” in the Getting Started book.

- 63 -
Insert/Remove Bar(s)...
This command allows you to insert and remove a range of empty bars. Muted
Tracks are not affected.
There are five dialog options:
Copy Locator Range
Copy Locator Range copies a piece of your Arrangement, on all Tracks.
1. Set the Left and Right Locators to encompass the section you want to Copy.
2. Mute the Tracks you don’t want to copy.
3. Set the Song Position to the position where you want the copy to appear.
4. Select Copy Locator Range.
Cubase VST now makes up one Part on each unmuted Track that contains the mu-
sic between the Locators, and Pastes this in at the Song Position.
Muted Tracks are not affected.
Option: Description:
Start Position Use this field to specify at which position the bars should be inserted, or
from where bars should be removed.
Time Signature When using the Insert option, this allows you to specify a Time Signature
for the inserted bars.
Number of bars This allows you to specify how many bars to insert or remove.
Insert Click this button to insert bars.
Remove Click this button to remove bars.
- 64 -
Show/Hide Groups
This command brings up/hides the Group List, from which you can drag Group
Parts into the Arrange window.
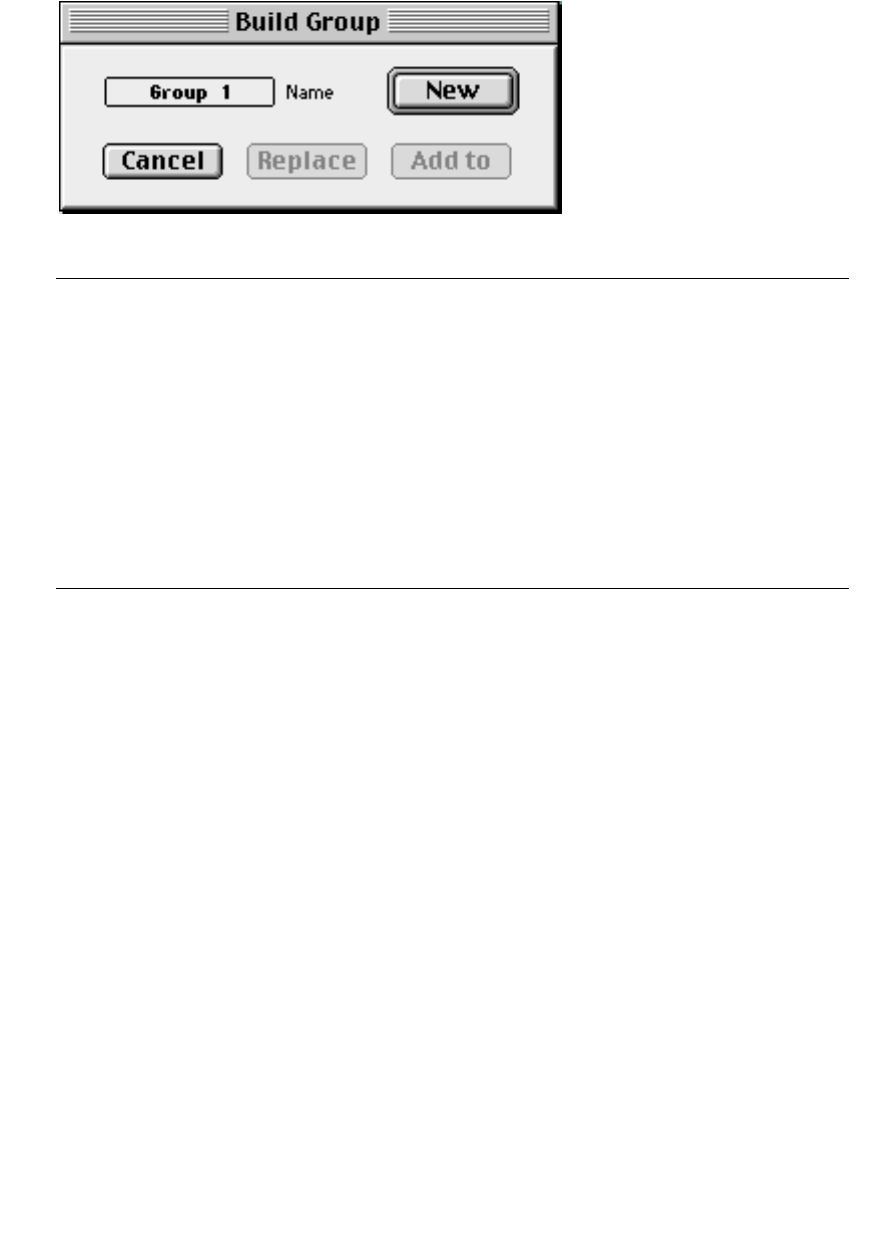
Build Group...
This dialog is used to manage the contents in Groups. The options are:
Unpack Group
This takes a Group Part apart into its original components. An example: you have
repeated a verse several times, by turning it into a Group and repeating this via
Group Parts on a Group Track. Now you find that you want to make some small ad-
justments to the first verse only.
1. Select the Group Part on the Group Track.
2. Select Unpack Group.
• If the Group was created in this Arrange window, Ghost Parts appear on existing Tracks.
• If the Group was created in another Arrangement, real Parts are created on existing Tracks, or
if needed, new Tracks are created.
Option: Description:
Name In this box you can enter the name of the Group.
New If you want a completely new Group, select a number of Parts in the Arrange
window, open this dialog and click this button.
Replace If you want to replace the contents of a Group, proceed as follows: Select a
number of Parts to make up the Group. In the Group list, select the Group to
be replaced, open this dialog and click the Replace button.
Add to If you want to add Parts to a Group, proceed as follows: Select a number of
Parts to add to the Group. In the Group list, select the Group to add the Parts
to, open this dialog and click the Add To button.
- 65 -
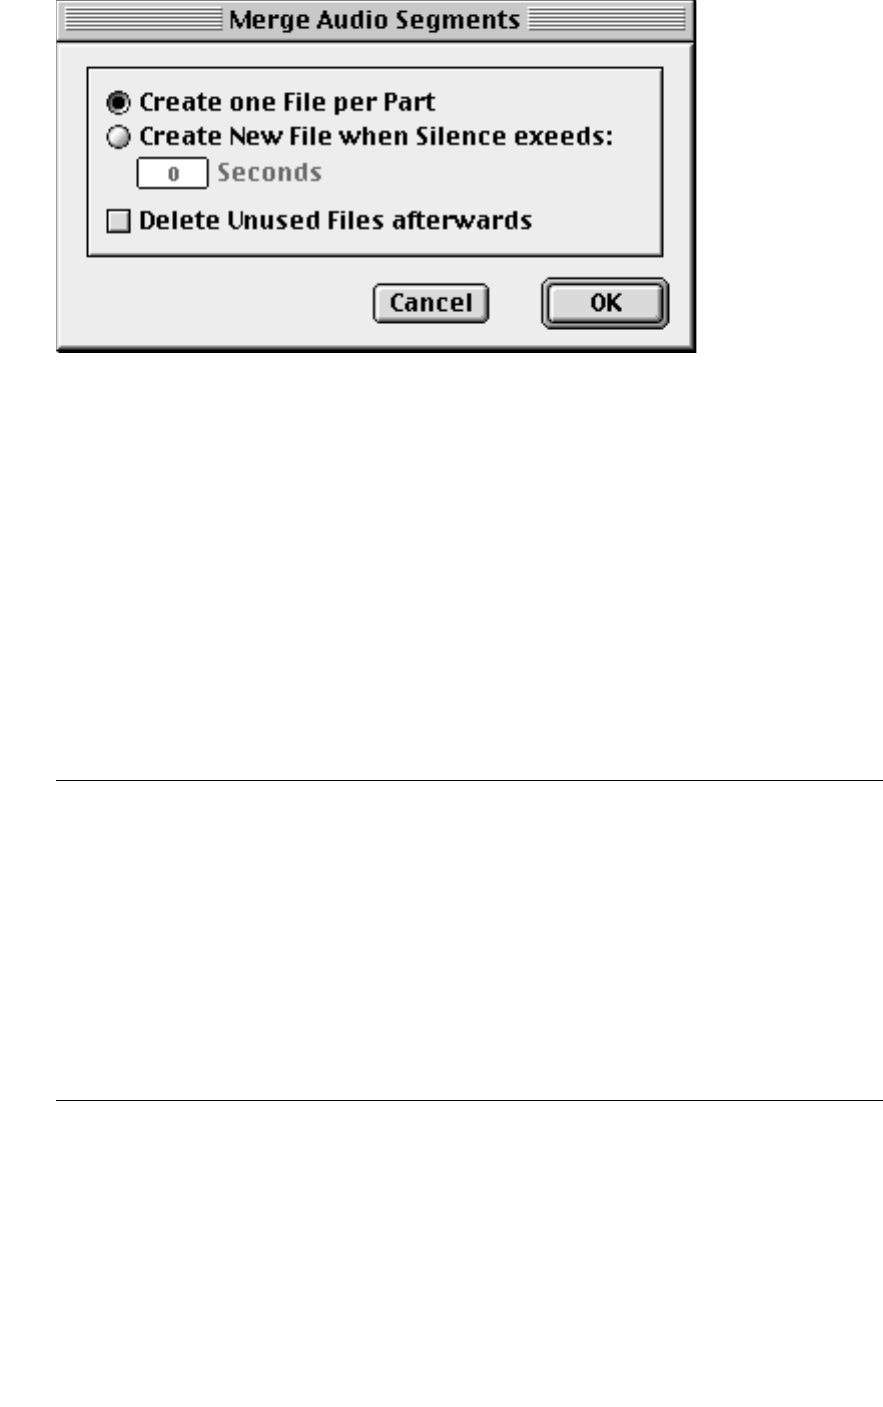
Merge Audio Segments...
This function allows you to create a continuous Audio Segment from several Parts
on the same Track. It also allows you to exclude any Parts containing silence ex-
ceeding a specified number of seconds.
Proceed as follows:
1. Select the Audio Parts you want to Merge.
2. Select the Join Tool and click on the first Part.
A single Part containing all the separate Audio Segments is created.
3. Select “Merge Audio Segments” from the Structure menu.
A dialog box opens.
4. Set up the parameters as desired.
The options are:
5. Select the desired option and click OK.
A warning that this operation can’t be undone appears.
6. Click OK again.
Setting Description
Create one File per Part All segments in a Part will be merged into one new audio file.
Create New File when
Silence exceeds... As above, but if the Part contains silence (empty space) exceeding a speci-
fied length, more than one audio file will be created. This is useful for sav-
ing disk space if the Part contains a lot of empty space between segments.
Delete Unused Files
afterwards If this checkbox is activated, Cubase VST will perform a “Delete Unused
Files” operation after merging the segments (see the Audio Pool chapter
in the Getting into the Details document).
Note that this will permanently delete all unused audio files from your
hard disk, not just files originally played by the merged segments!
Proceed with caution!

- 66 -
Merge Overlapping Parts
For MIDI and Audio Parts, this feature simply cuts the overlapped section from the
first Part and merges it into the second Part. Just as with regular Merge, the results
depend on the Record Mode:
• Overdub Mode gives a regular merge, that is the contents of the second Part are kept,
together with the inserted Events from the first Part.
• Replace Mode will make the inserted Events replace the old Events in the destination
Part.
• Merge Overlapping Parts cannot be undone.
Optimize Arrangement
In certain cases, you may end up with long Parts having sections containing no
Events. For example, you may have recorded a MIDI Part to a Song in real time,
playing in certain places and not playing in other places, but recording it as a con-
tinuous take. The resulting Part will have “empty” sections, containing no Events.
The Optimize Arrangement operation will automatically cut and resize Parts so that
all empty sections are removed, thereby “tidying up” the Arrangement.
1. Select the Track or Part(s) you want to Optimize.
If you want to Optimize the complete Arrangement, select all Parts.
2. Select “Optimize Arrangement” from the Structure menu.
A warning that the operation can’t be undone appears.
3. Click “Continue”.
Now all sections of Parts containing a Bar (or more) without Events will have been cut out
and removed.
❐
When you use Optimize Arrangement, the Snap setting does not affect where the Parts
are split. The resulting Parts will always start and end on whole bar positions.

- 67 -
5
The Functions Menu

- 68 -
Quantize
This menu command applies the previously selected Quantizing type to specified
Parts/Events.
Quantizing Type – Over Quantize
This type of Quantizing moves the notes to the closest Quantize value, without
changing their lengths. It also tries to detect chords, and keeps them together
when quantizing.
Quantizing Type – Note On
This type of Quantizing moves the Note On start position to the closest Quantize
value.
Quantizing Type – Iterative
This type of Quantizing moves the notes a certain amount towards the closest
Quantize value, if they are not very close to it already.
How much the notes are moved, and what is considered “already close to the
Quantize value”, is set in the Preferences – MIDI – Quantize dialog.
Quantizing Type – Analytic
This type of Quantize should be used on complex input, such as parts with mixed
straight notes and triplets and glissandos. The Quantize value is used, but not rigor-
ously, more to give the program an “impression” of how you want it.
Quantizing Type – Groove Templates
This type of quantizing is not meant for correcting errors, but for creating rhythmic
feels. This is done by comparing your recorded music with a “Groove” (a pattern
with a certain feel) and moving the appropriate notes so that their timing matches
that of the Groove.
The lower half of the Quantizing Type menu is divided into two sections, both re-
lated to Grooves:
• The last selected Groove Template.
• All the Groove Templates found by the program on start-up.
The submenu structure on the Groove list corresponds to the folder structure in the selected
Groove folder on your hard disk.
- 69 -
Undo Quantize
Quantizing is not permanent (unless you use Freeze Quantize). You can at any time
(even after Saving) use Undo Quantize to get the original recording back.
Freeze Quantize
This makes the Quantization permanent. After using this command it is no longer
possible to Undo Quantize.
It is important to understand that all Quantize operations (except Iterative Quan-
tize) use the original, un-quantized music to determine how notes should be
moved. If you want to Quantize in several steps, you have to Freeze Quantize be-
tween each step for the operations to have the desired effect.
Groove Control
This dialog is used for setting up and creating Groove templates. For a full descrip-
tion please refer to the chapter “More about Quantizing and Grooves” in the “Get-
ting in to the Details” online documentation.
- 70 -
Logical Editor
In brief, the Logical Editor should be used when you want to apply more of a
“search and replace” function on MIDI data. The Logical Editor dialog allows you to
find certain MIDI Events, based on criteria that you set up.
Once those Events are found, they could be deleted, changed in one way or an-
other, or moved to another Track for example. The Logical editor offers many pow-
erful and complex features, which may take a little time to master. Please refer to
the chapter “Logical Edit” in the Getting into the Details document for a full de-
scription of this function.
- 71 -
Logical - Edit List...
This menu item brings up a window that allows you to rename Logical Presets and
define a folder from where Logical Presets are read and stored. See the chapter
“Logical Edit” in the Getting into the Details document for details.
Logical - Presets
This hierarchical menu contains all your Logical Presets. Selecting an item applies it
to the selected Parts/Events.
Below follows a list of Presets as per the folders created when you install the pro-
gram. You can open Logical Edit and change any of them should you wish.
Delete Notes
This simply deletes all notes, but leaves all other types of Events.
Delete Short Notes
This deletes all notes with a length shorter than 15 ticks (20 milliseconds at 120
BPM). This is for guitar and wind synthesizers which often send unwanted short
notes.
Double Speed
This recalculates the positions of all Events to mimic a tempo change. Use this on
one Part at a time, or the results will be confusing, since the beginning of the Part
isn't moved.

- 72 -
Fade Out Velocity
This takes all the notes and creates a ramp of velocity for them starting at velocity
100, ending at 0. This is a ”poor man’s fade out” (it doesn't work very well on long
notes; if that is a problem, use MIDI Volume instead).
Fix Velocity 100
This sets all notes to velocity 100.
Half Speed
Same as Double Speed, but half the tempo.
If you do not want to lose Events, you have to resize the Part to at least double
length before you try it.
Push Back -4
This moves all the Events (not just notes) 4 ticks (5 milliseconds at 120 BPM) earlier
in the Arrangement. Use this repeatedly if you need more.
Push Forward +4
Same as above, but puts the Events four ticks later in the Arrangement.
Random Notes
This makes all the notes get a random pitch within a two octave range and a ran-
dom velocity between 90 and 127.
Random Velocity
This leaves the pitch of all notes, but gives them a random velocity value between
90 and 110.
Del Aftertouch
Deletes all Aftertouch events.
Del Velocity < 30, 35, 40 and 45
Deletes all notes with a velocity value lower than the title specifies.
Delete Program Change
Deletes all Program Change events.
El.BD->ak.BD
Transposes all notes with the pitch (key) specified for the “Electronic Bass Drum” to
the key specified for the “Acoustic Bass Drum” (in General MIDI).
Extract Bassdrum/HH
Extracts the specified drum (as specified in General MIDI) and puts it on its own
Track.

- 73 -
Fix Notes on A5
This changes all notes to the pitch A5.
High Notes To Chan 1
This moves all notes above the pitch E5 to MIDI Channel 1. For this to have any ef-
fect you must set the Track to MIDI Channel “Any”.
Low Notes To Chan 2
This moves all notes below the pitch E5 to MIDI Channel 2. For this to have any ef-
fect you must set the Track to MIDI Channel “Any”.
Transpose +12
This transposes all notes one octave up.
Transpose -12
This transposes all notes one octave down.
Freeze Play Parameters
This transforms Playback Parameter settings that you have made in the Inspector
into permanent changes in the Part. This means that some MIDI messages in the
Parts are altered and new ones may be inserted. The functions applies to the fol-
lowing:
After the operation, the Inspector settings that are affected are also reset to default
values.
Setting: Action:
Bank Bank Select messages are inserted into the Part(s).
Program Program Change messages are inserted into the Part(s).
Volume Volume messages are inserted into the Part(s).
Transpose The Pitch of the notes is changed.
Velocity The velocity of the notes is altered.
Delay The Events are moved.
Length The notes' lengths are altered.
Compression The velocity of the notes is altered.
Pan Pan messages are inserted into the Part(s).
Extended parameters The only parameters from the extended Inspector that are converted
into real data are the Dynamic and Random parameters. Multi Out is
not affected.
- 74 -
Convert to Groove
This command takes the selected Part and converts it into a Groove template.
This Groove template is stored as a file, with the same name as the Part used for
conversion. It is stored in the folder specified by the Set Path function in the Groove
Control window. This means it immediately appears on the Groove Quantize menu,
where it can immediately be used.
For more info see the chapter “More about Quantizing and Grooves” in the Getting
into the Details document.
Convert to IPS Phrase...
This command takes the notes in the selected Part and copies them to a Phrase for
use in the Interactive Phrase Synthesizer.
Creating a New Phrase
1. Select a Part.
2. Select Convert to IPS Phrase from the Functions menu.
3. In the dialog, select an empty “slot” from the pop-up.
4. Click on the OK button.
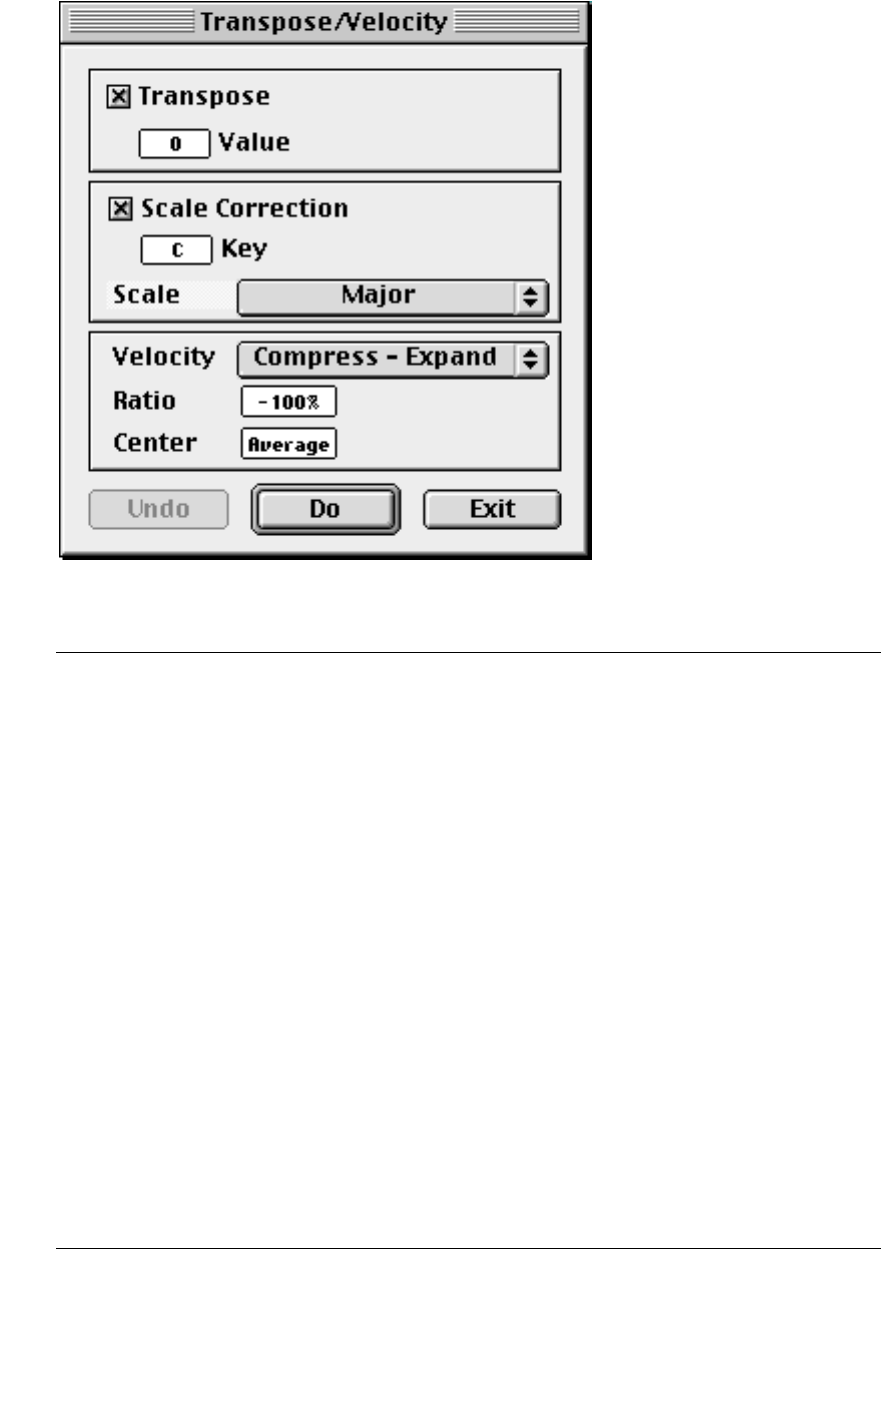
- 75 -
MIDI Functions - Transpose/Velocity...
This dialog box allows you to transpose notes, map notes to certain scales and to
process velocity in various ways. Here is a rundown of the options:
Option: Description:
Transpose When this is activated, the notes will be transposed the set number of semi-
tones (see below) if you click the Do button.
Value When the Transpose function is activated (see above), this is used to set the
number of semitones the notes should get transposed if you click the Do button.
Scale Correction When this is activated, the notes will be shifted to the closest pitch in the se-
lected Scale and Key if you click the Do button.
Key When Scale Correction is activated, this is used to set a Key signature for the
scale applied in the field below.
Scale When Scale Correction is activated, this pop-up allows you to specify a Scale to
correct the notes to. When you then Transpose, the notes will be shifted to the
closest pitch within that scale.
Velocity This pop-up is used to decide for some type of Velocity processing. See the ta-
ble below.
Undo Clicking this button undoes what you just did with the Do button.
Do This button performs the actual processing. You can try out different types of
processing and Undo the ones you don't like, without closing the dialog in be-
tween.
Exit This closes the dialog.
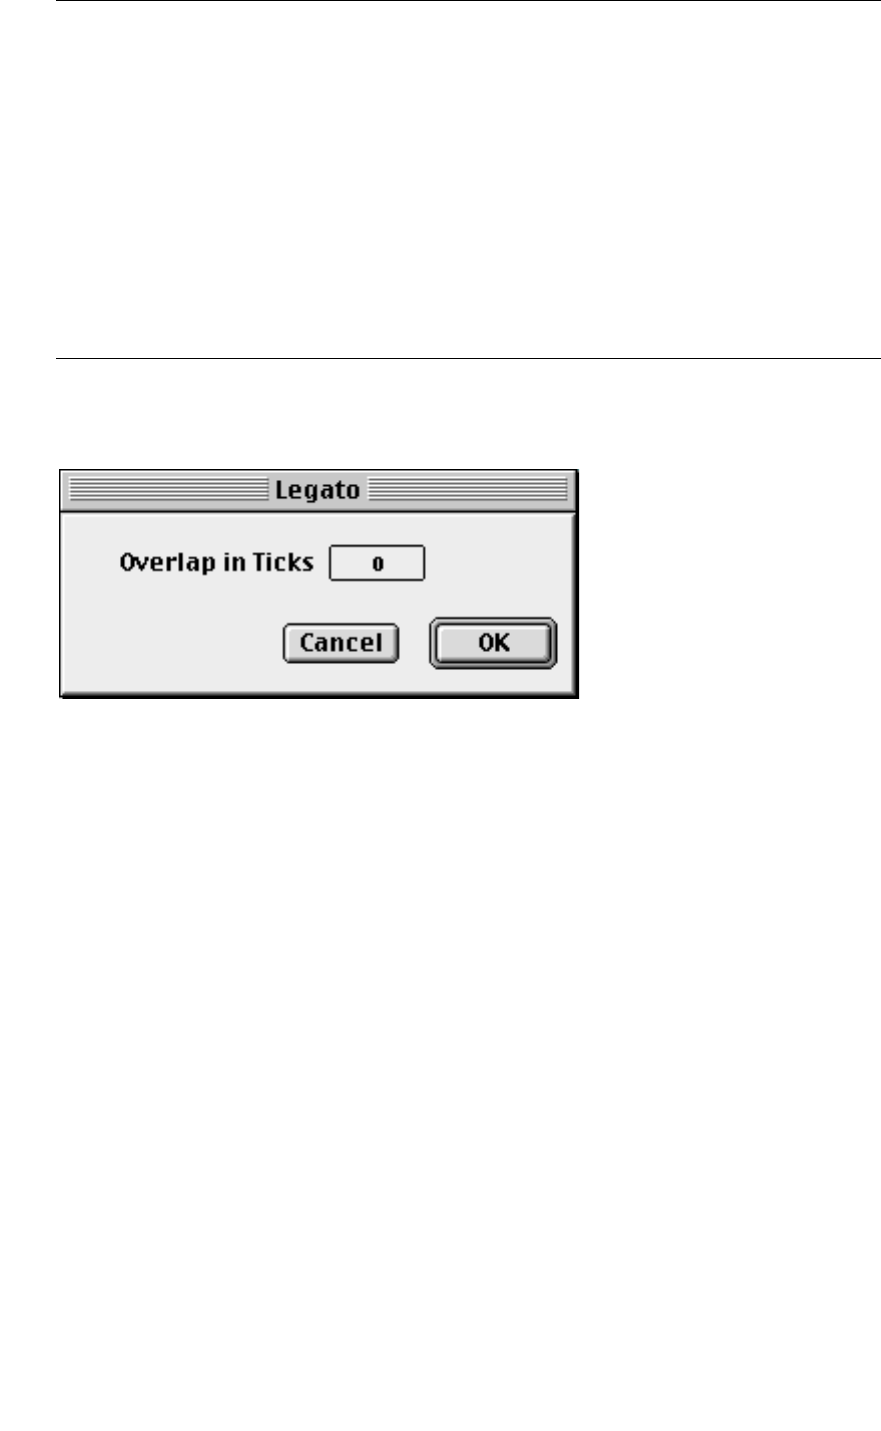
- 76 -
Velocity Options
MIDI Functions – Note Length – Legato
This function is used to control Legato playing. It brings up a dialog box allowing
you to specify a legato Overlap setting (in ticks).
• If Overlap is set to positive numbers, all notes that you apply the function to, will be length-
ened so that they always overlap, by at least that amount of ticks. If they already overlap
more, they are not affected. The last note will be lengthened to the end of the Part.
• If Overlap is set to negative numbers, the notes will be shortened so that there is always a
gap between the notes. This gap will be at least the number of ticks specified. If the gap is al-
ready larger, the notes are not affected.
MIDI Functions – Note Length – Length Size
This command Quantizes the Length of notes without moving their start points. In
other words, the length of all notes is changed to the closest Quantize value, but
the start positions are left intact.
MIDI Functions – Note Length – Fixed Length
This sets all notes to the same length, without moving their start points. The notes
get the length of the Quantize value.
Option: Description:
None No Velocity processing at all.
Compress - Expand This takes two settings, Ratio and Center, see below. On expansion (Ratios
above 100%) velocity values lower than Center are lowered, and those
higher than Center are raised. On Compression (Ratios below 100%), the
opposite applies, velocities below Center are raised and velocities above
are lowered.
Add - Subtract This simply adds a fixed number (Value - see below) to the existing velocity
values. The Value can be positive or negative.
Limit This lets you make sure that no velocity values fall outside a given range
(Lower and Upper values, see below). If they do, when you apply this func-
tion, they will be raised/lowered to exactly the Lower/Upper values.

- 77 -
MIDI Functions – Note Length – Del. Overlaps (mono)
This function allows you to make sure that no two notes of the same pitch overlap
(that is, that one starts before the other ends). Overlapping notes of the same pitch
can confuse some MIDI instruments (a new Note On is transmitted before the Note
Off is transmitted). This command can then be used to automatically rectify the
problem.
MIDI Functions – Note Length – Del. Overlaps (poly)
This function shortens notes when required, so that no note begins before another
ends. This happens regardless of which pitch the notes have.
MIDI – Note Length – Damper Pedal To Note Lengths
This function scans for Sustain pedal On/Off events, lengthens the affected notes to
match the Sustain pedal Off position, and then removes the Sustain Controller on/
off events.
MIDI Functions – Delete Doubles
This command erases all double notes. Such doubles most often occur when you
record in Cycle mode and record over more than one lap. Double notes can be hard
to hear, but sometimes sound like short delays, flanger effects, or even just as one
loud note.
MIDI Functions – Delete Cont. Data
This command erases all Continuous data, or more specifically, the following:
• Controllers
• Pitch Bend
• Channel Pressure
• Poly Pressure
MIDI Functions – Reduce Cont. Data
This function “thins out” continuous data such as Controllers, Pitch Bend, Channel
Pressure and Poly Pressure The problem with too much data recorded has to do
with MIDI's limitations. Only so much data can be sent down a MIDI cable at one
time. Overloading MIDI as such is sometimes known as “MIDI Choke”, and mani-
fests itself as delayed or stuck notes, MIDI error messages on the receiving units dis-
play, etc. In this case, Reduce Continuous Data might do the trick.

- 78 -
MIDI Functions – Restrict Polyphony
This function makes sure that a Part does not use up more synthesizer notes than
specified (by selecting a number from the menu). This is useful when you have an
instrument with limited polyphony and want to make sure all notes in the Part will
be played. The effect is achieved by shortening notes as required, so that they end
before the next note starts.
Audio Functions – Launch External Wave Editor...
This allows you to edit an audio segment in another program, some sort of wave or
audio editor that you have installed on your hard disk.
The first time you select this menu item, a file dialog will appear, allowing you to lo-
cate the wave editor application on your hard disk. Your selection will automati-
cally be “remembered” by the program.
• Should you want to change to another application, hold down [Command] when you
select the menu item.
This brings up the file dialog again.
Audio Functions – General Instructions
A number of processing functions specifically for audio are included in the pro-
gram. These can be applied in a number of ways:
• On one or more selected Parts in the Arrange window.
This will process all files in the Part(s) by equal amounts.
• On one or more selected Events in the Audio Editor.
This will process those segments of the audio files that the Events play back.
• On one or more files or segments in the Pool.
• A selection, segment or file in the Wave editor.
❐
Note that the audio processing makes permanent alterations to the audio file(s)! If you
process a segment or Event, be aware that all segments playing this section of the file
will be affected by the processing.
You should also remember that a segment or an Event is most often only a smaller
section of a complete audio file. If you perform audio processing to this section,
you may not be able to use the audio file in other Songs, etc. Be sure to make back-
ups of your audio files if required.
Applying the Processing
1. Select the audio you want to process.
2. Select the desired function.
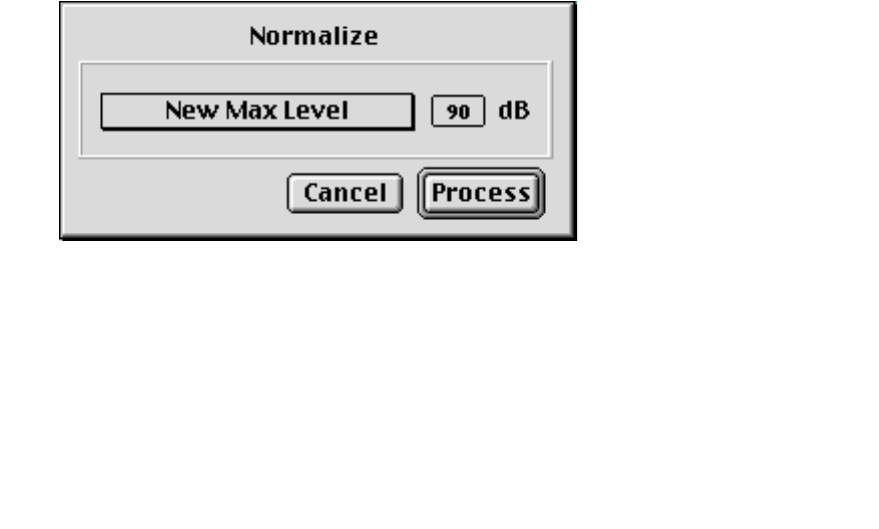
- 79 -
Audio Functions – Reverse
This turns a recording backwards, just as when you turn a tape on a reel-to-reel
recorder backwards.
Audio Functions – Silence
This replaces the audio with absolute silence.
Audio Functions – Fade in
This creates a linear fade in.
Audio Functions – Fade Out
This creates a linear fade out.
Audio Functions – Quieten
This lowers the amplitude of the recording to about half the level.
Audio Functions – Invert
This can be used with for example a stereo recording where one channel has acci-
dentally been recorded out of phase with the other. You could say it turns the
waveform ”upside down”.
Audio Functions
– Normalize
This function allows you to adjust the volume of the audio, by specifying the de-
sired maximum level in the recording. The program then scans the audio to find
the current maximum level, compares that with the desired maximum level, and
raises (or lowers) the level of the whole recording accordingly.
Typically, this can be used for increasing the level of a recording that was made at
too low a level.
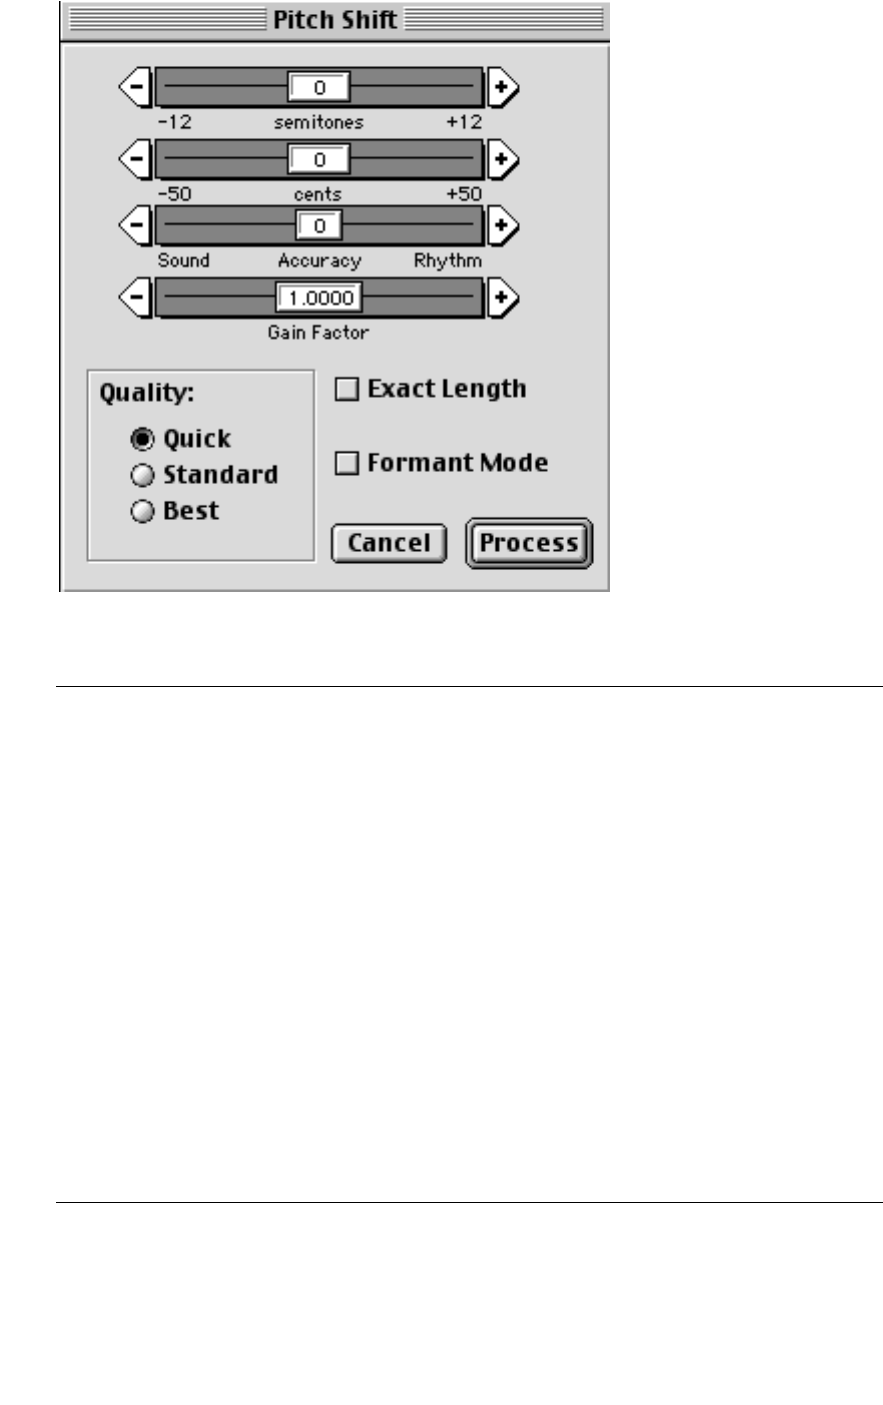
- 80 -
Audio Functions
– Pitchshift
This command changes the pitch of a recording without affecting its length. The
parameters are as follows:
Parameter Description
Formant Mode If you are pitch shifting vocal material, or other recordings with prominent reso-
nant character, you should activate this option for best results.
Exact Length If this is activated, the processed file will have the exact same sample length as the
original. If it is deactivated the resulting file length may differ by a few milliseconds.
If you don’t need this length accuracy, you should leave this option deactivated,
for a slightly improved audio quality.
Gain This parameter allows you to lower the volume of the pitch shifted material.
This can sometimes be necessary, as the pitch shift process may raise the volume,
introducing clipping in the processed file.
Accuracy Set this parameter according to whether the rhythmic feel of the audio material
has a high priority or not.
If you set this to a low value (drag the slider to the left), the timing and rhythmic
feel will be preserved as accurately as possible. If you set it to a high value, the
tonal quality gets priority, allowing slight changes in timing.
Quality Allows you to select one of three Quality modes for the processing: Fast, Standard
and Best. As indicated by the names, the higher the Quality, the slower the pro-
cessing. For most uses, the Standard mode is probably sufficient.
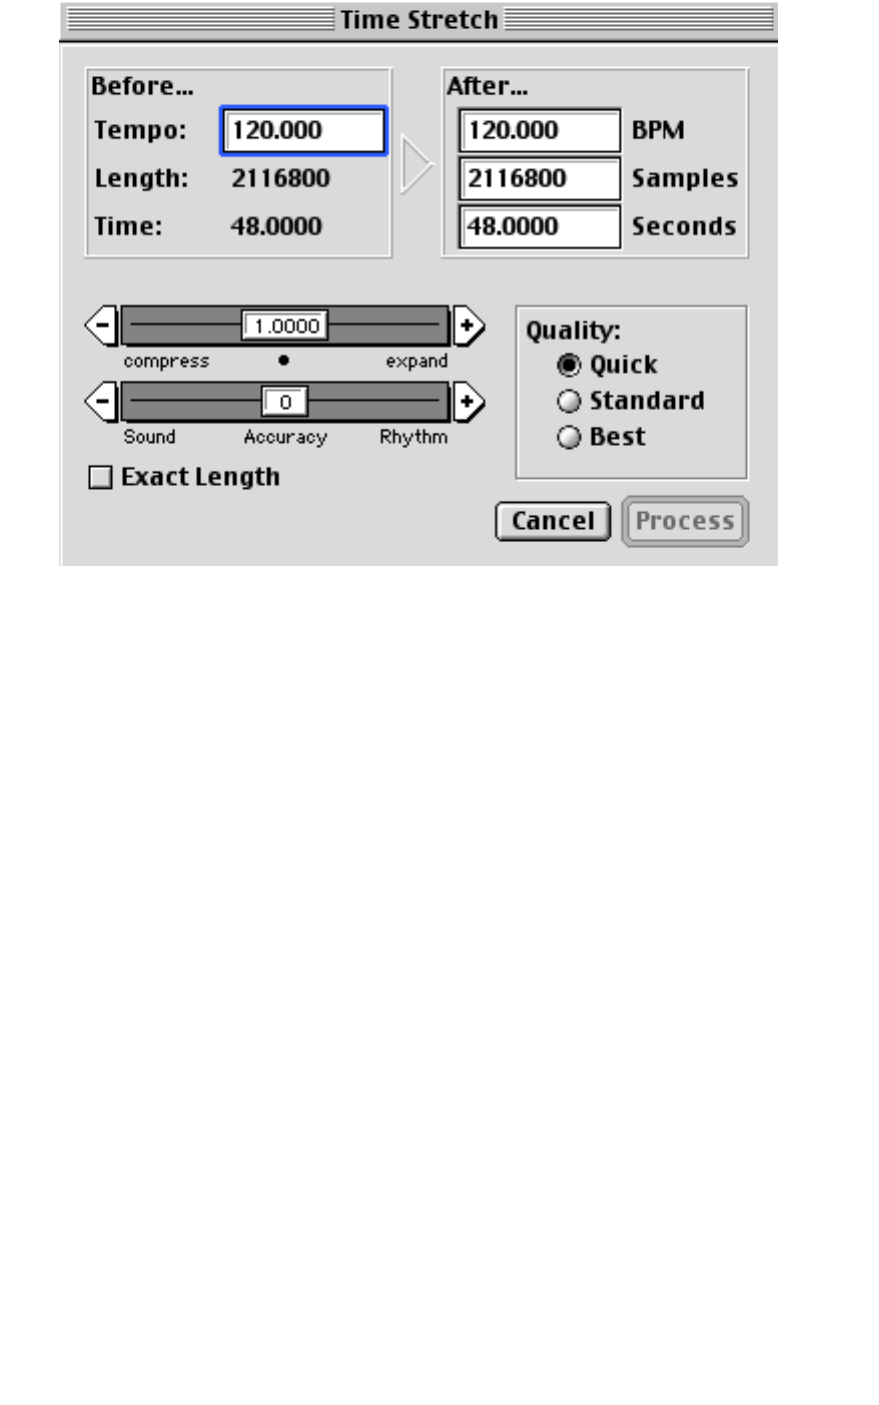
- 81 -
Audio Functions
– Timestretch
This command changes the length of a recording without affecting its pitch.
There are several ways to specify the amount of Time Stretch.
• By defining a new tempo (in beats per minute) in the BPM “After...” field.
For this to make sense, you also need to tell the program the original tempo in the BPM “Be-
fore...” field. This method is useful if you have e.g. a drumloop of known tempo and want it to
fit the current Song tempo, etc.
• By defining a new length in the Samples “After...” field.
The length of the currently selected item is displayed in the “Before...” field (in samples).
• By defining a new length in the Time “After...” field.
The original sample length is displayed in the “Before...” field (in seconds).
• By specifying a stretch factor using the Factor slider.
Note that regardless of which method you use, the other fields will automatically be ad-
justed when you make settings. This makes it easy to see the resulting stretch factor when
converting to a new tempo, etc.

- 82 -
The remaining Time Stretch parameters are:
Parameter Description
Exact Length If this is activated, the processed file will have the exact same sample length as the
original. If it is deactivated the resulting file length may differ by a few milliseconds.
If you don’t need this length accuracy, you should leave this option deactivated,
for a slightly improved audio quality.
Accuracy Set this parameter according to whether the rhythmic feel of the audio material
has a high priority or not.
If you set this to a low value (drag the slider to the left), the timing and rhythmic
feel will be preserved as accurately as possible. If you set it to a high value, the
tonal quality gets priority, allowing slight changes in timing.
Quality Allows you to select one of three Quality modes for the processing: Fast, Standard
and Best. As indicated by the names, the higher the Quality, the slower the pro-
cessing. For most uses, the Standard mode is probably sufficient.
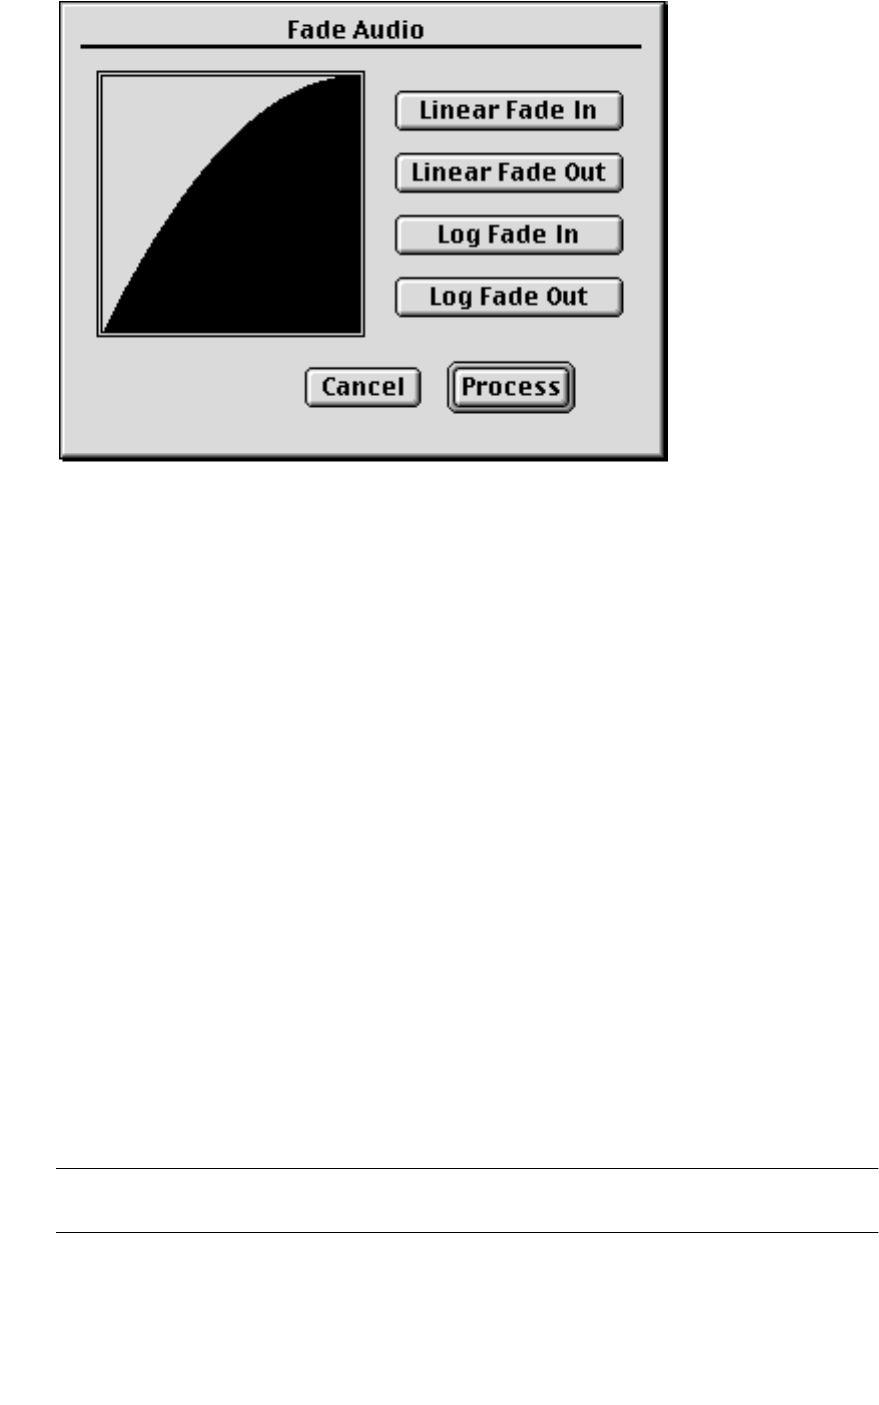
- 83 -
Audio Functions
– Fade Dialog
This allows you to fade a recording with a curve that you specify yourself.
The Fade Dialog can be seen as an extension of the regular Fade In/Out functions
on the Audio Functions submenu. You can choose between Linear Fade in/out (the
same as in the other Fade functions) or Log Fade in/out (which produces a logari-
thimic, slightly “rounded” Fade curve). It is also possible to “draw” fade curves with
the mouse directly in the window!
• Note that the fade you set up in the dialog affects the full length of each audio selec-
tion!
If you want to make a quick fade in at the beginning of a long Audio Event, you should split
the Event with the Scissors tool at where you want the fade to end, and then only perform
the Fade operation on the short first Event.
• If several Parts/Audio Events are selected, the Fade dialog will remain open, allowing
you to specify a fade for each selected Part/Event.
Audio Functions – Remove DC Offset
This function will remove any DC offset in the audio selection. A DC offset is when
there is too large a DC (direct current) component in the signal, sometimes visible
as the signal not being visually centered around the “zero level axis”. DC offsets do
not affect what you actually hear, but they affect zero crossing detection and cer-
tain processing, and it is recommended that you remove them.
❐
It is recommended that this function is applied to complete audio files, since the DC
offset (if any) is normally present throughout the entire recording.

- 84 -
6
The Panels Menu
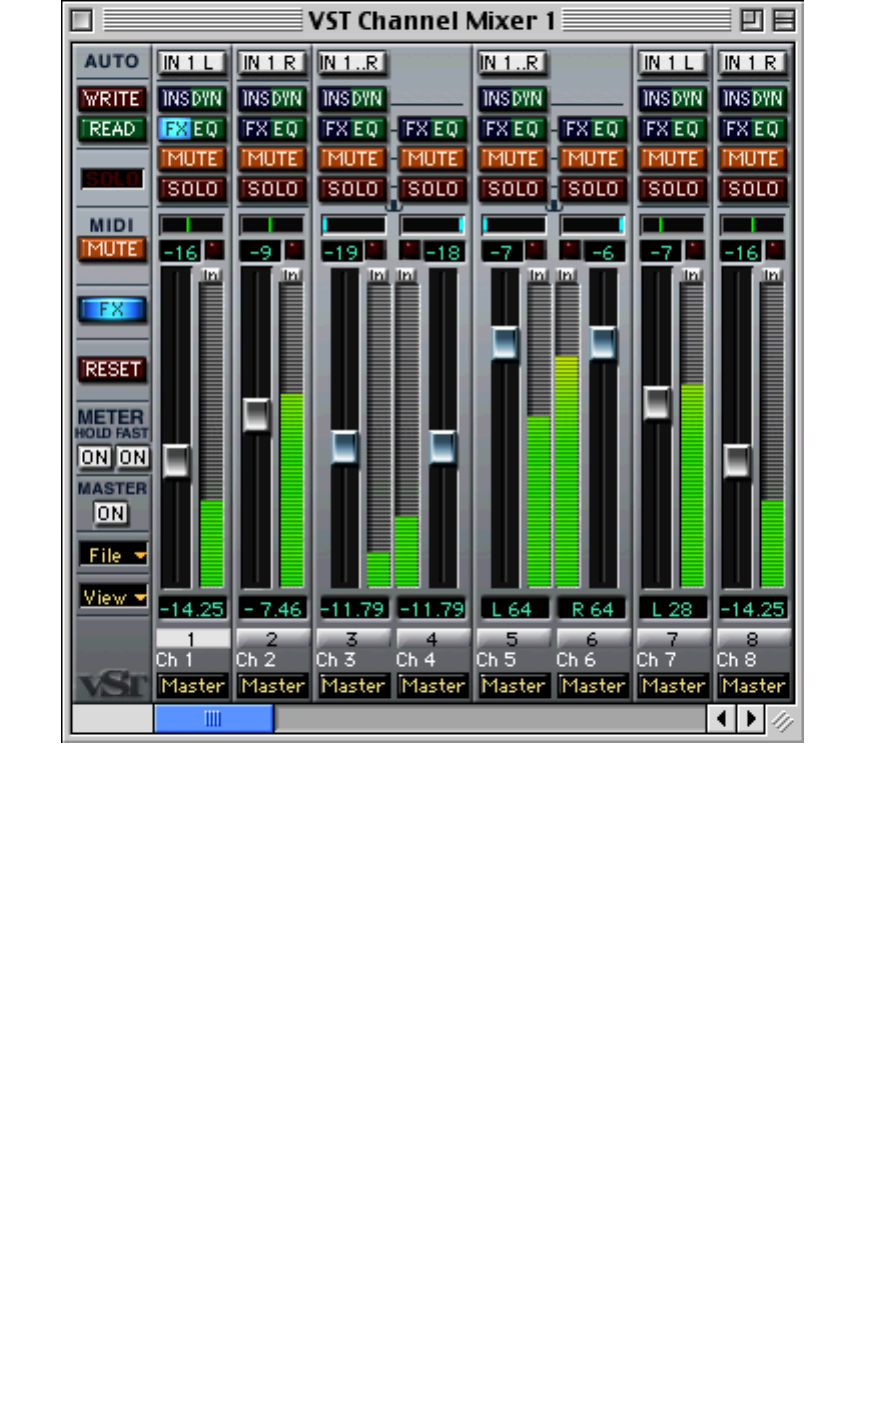
- 85 -
VST Channel Mixer 1
This menu item opens up the VST Channel Mixer 1 window where you can adjust
levels and panning and set up EQ and effects for your Audio, Group, VST Instru-
ment and ReWire channels. By using the Mixer Views functions you can tailor the
Channel Mixer 1 to show any combination of channels and channel types.
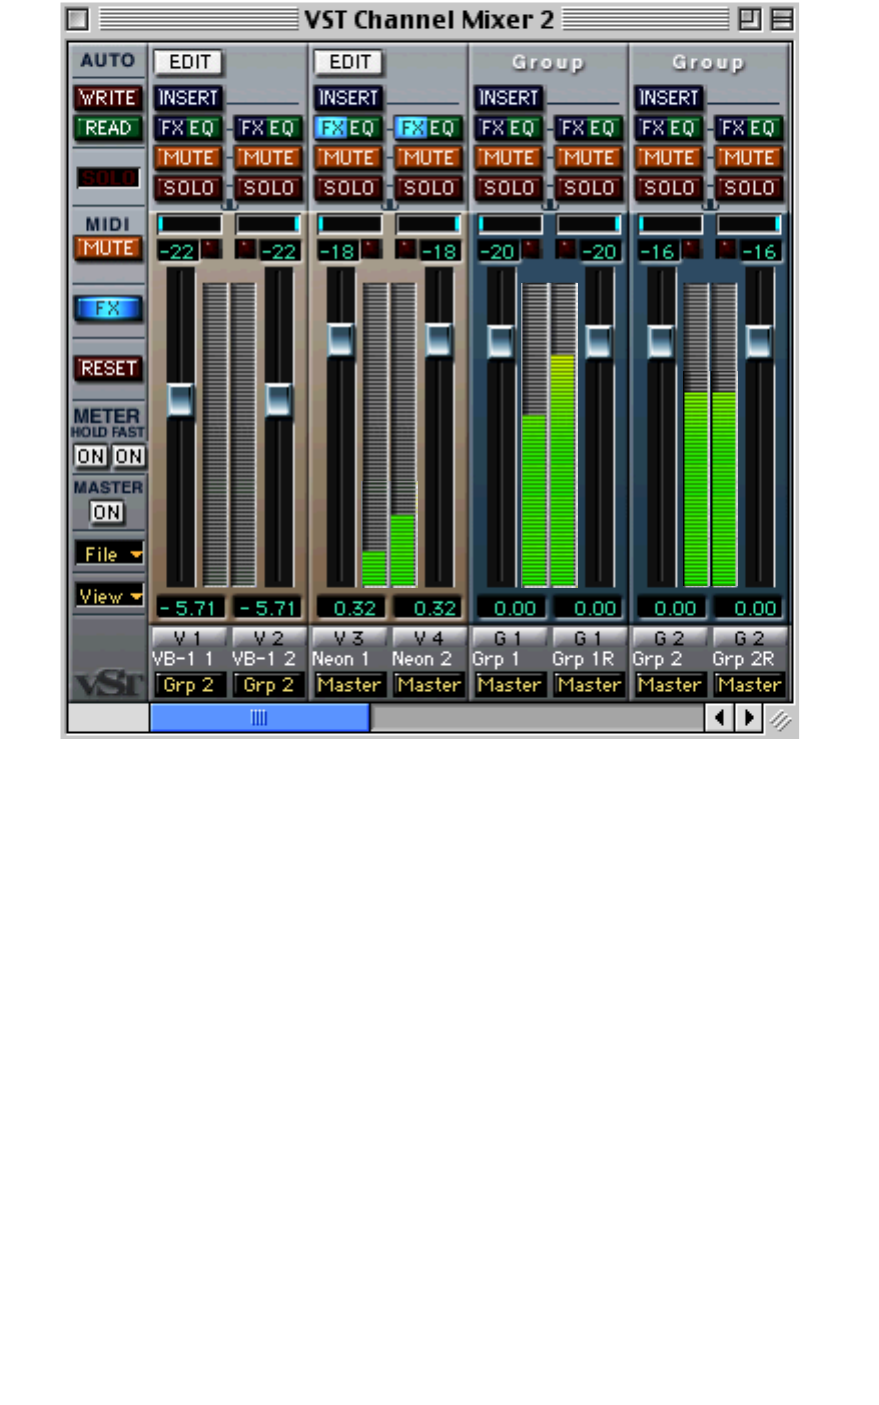
- 86 -
VST Channel Mixer 2
This menu item opens up the VST Channel Mixer 2. This is, just like the VST Channel
Mixer 1, completely customizeable to show any combination of channels or chan-
nel types. It is not a separate VST Mixer, it is simply a second Mixer window, allow-
ing you to set up two Mixer windows to your liking.
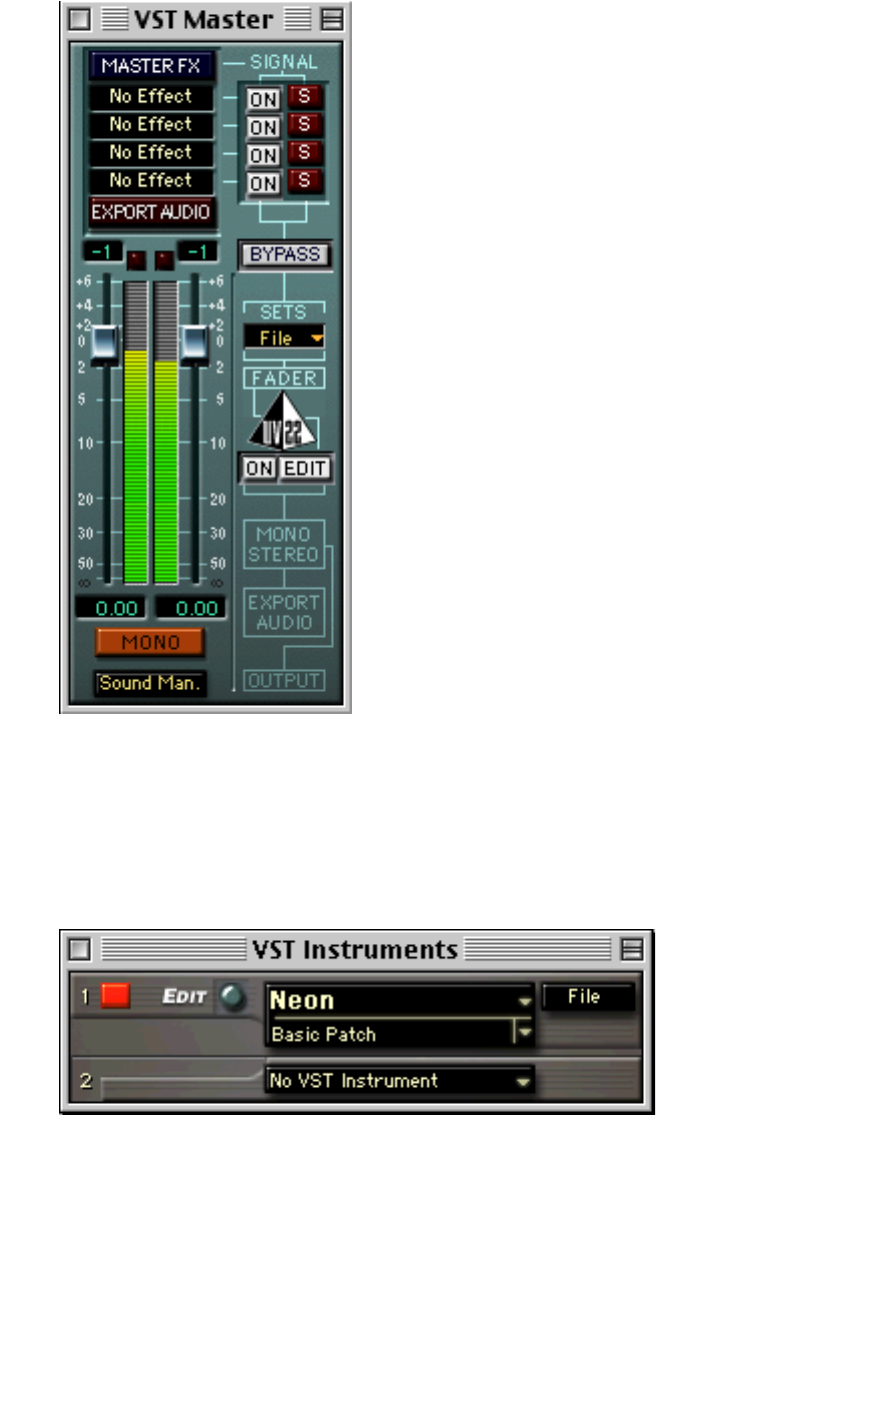
- 87 -
VST Master Mixer
This menu item open up the Master Mixer window which contains the Master fad-
ers and possibly sections for output buses (if your audio card and ASIO driver sup-
ports more than two channels).
VST Instruments
This menu item opens the VST Instruments window. This is where you load, acti-
vate and manage VST Instruments (MIDI controlled software synthesizers, drum
machines or other sound sources). Clicking the Edit button brings up the control
panel for the corresponding VST Instrument.
- 88 -
VST Inputs
This menu item opens up the VST Inputs window which allows you to activate and
rename audio inputs in your audio hardware.
VST TrueTape (Cubase VST/32 only)
TrueTape is a unique Steinberg technology that emulates the behavior of a profes-
sional analog tape recorder. While digital audio recording has a number of benefits,
some may perceive digital sound to be somewhat “sterile” and “cold” compared to
high quality analog recordings. The TrueTape feature remedies this problem by
recreating the sound of analog tape saturation at the recording stage.
• To activate TrueTape, select “TrueTape 32 Bit” from the Record Mode pop-up menu in
the Arrange window or Audio System Setup dialog.
Note that recording in this mode creates 32 bit audio files.
• Selecting “VST TrueTape” from the Panels menu brings up the TrueTape window, in
which you make settings for the effect.
Use the Drive control to adjust the amount of tape saturation effect to your liking, or select
one of the Drive presets from the pop-up menu.
For details, see the “Getting into the Details” documentation.
- 89 -
VST Send Effects
This menu item opens up the VST Send Effects window where you can select up to
eight Send effects to use and make settings for. See the chapter “Mixing” in the
Getting Started book and “Mixing Audio and using Effects” in the Getting into the
Details document.
VST Master Effects
This menu item opens up the VST Master Effects window where you can select up
to four Master effects to use and make settings for them. See the chapter “Mixing”
in the Getting Started book and “Mixing Audio and using Effects” in the Getting
into the Details document.
- 90 -
Audio Pool
The Audio Pool is where you manage your audio segments and files. The Audio
Pool lists all the audio files in the Song. Please note that this means it shows the files
for all Arrange windows that belong to the Song.
Each file is represented by a line in bold text, preceded by a triangle. For each file
there are a number of settings and information, plus a waveform image on the
right side. The files in the Audio Pool each represent an audio file on one of your
hard disks that is (or has been) used in the Song.
Files are never used directly in the Song. Instead it is the “segments” that are played
back from the Tracks. For each file you have one or more segments. Segments are
specifications for a section of a file.
Segments are mainly created when you record audio and when you edit in the Au-
dio editor.
ReWire
This menu item brings up a window that allows you to set up ReWire input chan-
nels. This window is only of any relevance to users of ReWire compatible programs
(such as ReBirth RB338).
VST Performance
This menu item opens up the Performance window which allows you to monitor
the “load” on the CPU (computer processor) and hard disk.
- 91 -
MIDI Track Mixer
This menu item opens up the MIDI Track Mixer window where you can adjust lev-
els, panning and other parameters for your MIDI devices.
- 92 -
MIDI Echo/Pitch Shifter
This menu item brings up a window for realtime processing of MIDI data, which al-
lows you to create echo and harmonization effects. It is described in the separate
document “The MIDI Echo/Pitch Shifter”.
Interactive Phrase Synthesizer
IPS (Interactive Phrase Synthesizer) is a type of synthesizer, not for audio data, but
rather for musical (MIDI) data. It allows you to input a phrase (a recording in Cu-
base) and remodel it using various modules. A full explanation of the IPS can be
found in the separate document “Interactive Phrase Synthesizer”.
- 93 -
Arpeggiator
This menu item brings up a window for realtime arpeggiation effects. It is described
in the separate document “The Arpeggiator”.
- 94 -
Key Caps Play
This little utility allows you to transmit MIDI data by pressing keys on your com-
puter keyboard and by clicking on the “keys” on the screen. The graphics indicate
what pitch each key “plays”.
• When “Computer Keyboard plays Notes” is deactivated, you can only click on the screen keys
to transmit MIDI. The computer keyboard is used for keyboard shortcuts as usual.
• When “Computer Keyboard plays Notes” is activated, you can also press the corresponding
keys on the computer keyboard to transmit MIDI. However, keys that are not indicated in the
dialog as representing pitches, are still used for keyboard shortcuts. Furthermore, as soon as
you close the dialog, the computer keyboard is only used for keyboard shortcuts.
• When “No Screen Redraw” is activated, the graphics in the dialog do not indicate which
notes you “play”. However, in this mode, the response is faster.
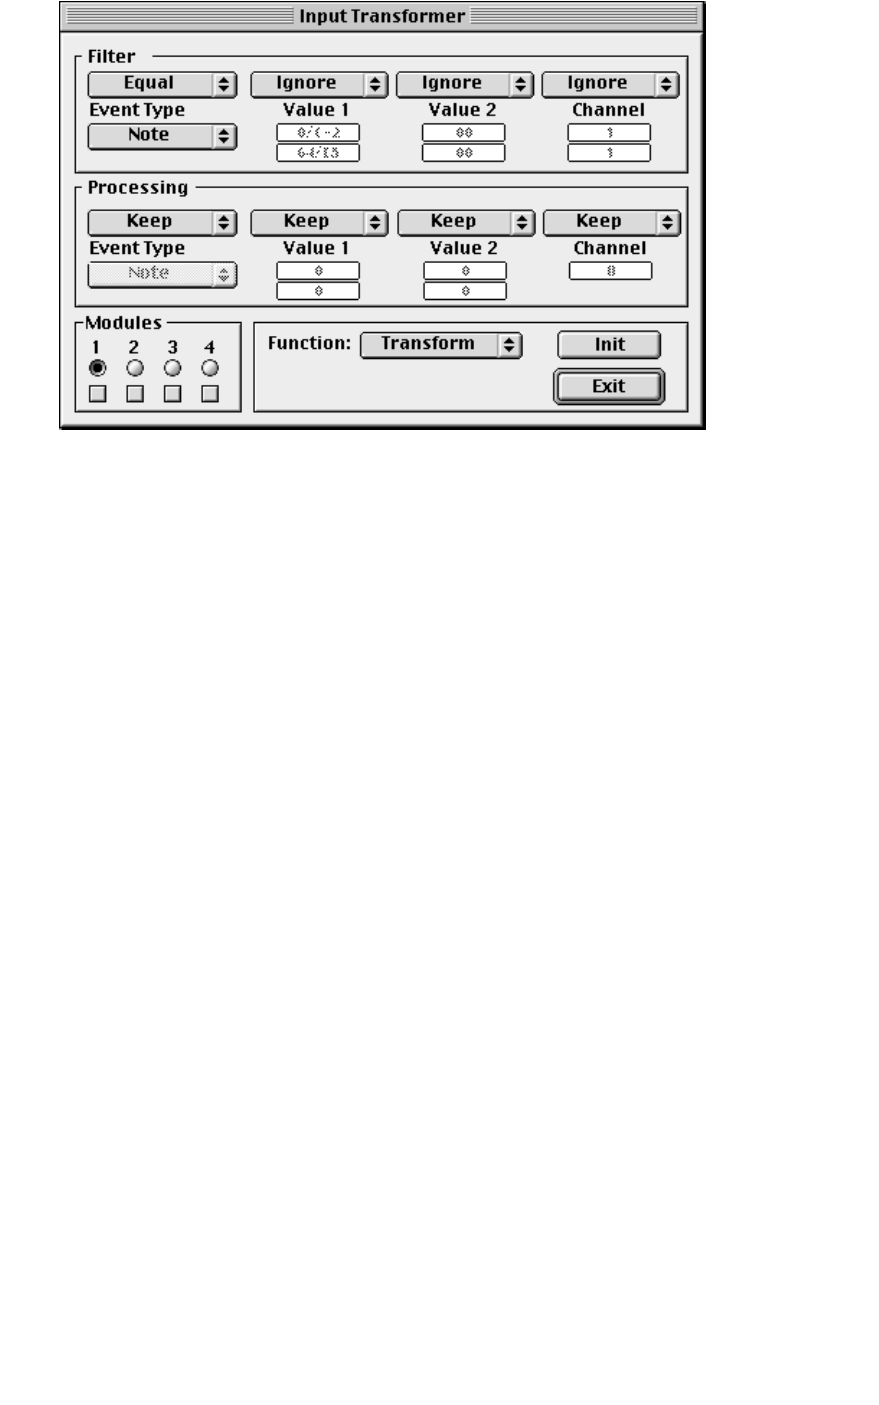
- 95 -
MIDI Input Transformer...
This dialog box is used to selectively filter out or transform (change) incoming MIDI
data, before it gets recorded. To use the Input Transformer you should be reason-
ably acquainted with Logical Edit, since the two are very similar.
Here are some of the things the Input Transformer allows you to do:
• Use four different filters/transforms at the same time.
• Make up split keyboard combinations for recording left and right hands separately.
• Turn a Controller like a foot pedal into MIDI notes (for playing bass drum the right way).
• Filter out one specific type of MIDI data on one MIDI channel only.
• Turn Aftertouch into any Controller (and vice versa).
• Inverse velocity or pitch.
• etc...
And again: four of these things can be done at the same time. For details, see the
chapter “ Filtering and Mapping MIDI Data” in the Getting into the Details docu-
mentation.
Rocket Network
These menu items refer to the Rocket Power feature, for collaborating with other
users over the Cubase Network. This is described in the separate RocketPower doc-
ument.

- 96 -
7
The Options Menu

- 97 -
Follow Song
When this is activated, the Arrange window and the editors scroll automatically
with the Song during playback, when you record, fast forward etc.
Part Appearance
This allows you to tailor the appearance of the Parts in the Arrange window. You
can choose between three options:
Using the “Use Track Settings” option
To specify appearance on a Track by Track basis, proceed as follows:
1. Make sure “Use Track Settings” is activated on the Part Appearance menu, as de-
scribed above.
2. Press the mouse button with the pointer over one of the Track columns, in the Track
list.
3. Make sure the Appearance option is activated (ticked).
4. Arrange the Track columns so that you can see the “N-E” (Names–Events) column in the
Track List.
5. In the “N-E” column, hold down the [Option]-key and click on the left side to turn dis-
play of names on/off and click on the right side to turn display of events on/off.
Option: Description:
Show Names Parts have their names displayed inside them. Show Names and
Show events can be activated at the same time.
Show Events Parts have a representation of the recorded data displayed in them.
The lower half of the menu allows you to select which types of
Events you want displayed in the Parts. Show Names and Show
events can be activated at the same time.
Use Track Settings When this is selected you can specify for each Track how you want
your Parts displayed, as described below.

- 98 -
Multirecord
This menu item is used to turn on Multi Recording, so that you can record on sev-
eral Tracks at the same time. It is also used to choose one of four types of Multi Re-
cording: Merge, Channel Split, Input Split or Layer (see below).
When Multi Recording is activated, a new Track column appears, labelled “R”. This is
used to set a track to “Record Ready”, and in some cases for selecting different op-
tions from a pop-up. It all depends on the Track mode selected:
Mode: Details:
Merge This is the preferred mode for audio only recording or for recording audio and
one MIDI Track.
Channel Split This splits the incoming MIDI messages according to their MIDI Channel. Use
this when you have several MIDI instruments connected, each sending on a dif-
ferent MIDI Channel. Four Tracks can be set to Record Ready, at the same time.
The recording column pop-up lists the MIDI Channels the Track records on (each
Track records on four MIDI Channels).
Input Split This splits the incoming MIDI messages according to their MIDI Input. Use this
when you have several MIDI instruments, each connected to a different MIDI In-
put. Four Tracks can be set to Record Ready at the same time. The recording col-
umn pop-up is labelled 1 to 4, corresponding to your first four MIDI Inputs.
Layer In this mode, the same data is recorded on all activated Tracks. This allows you
to layer sounds when recording, by setting the Tracks to different MIDI Channels
and/or Outputs.

- 99 -
Record Tempo/Mutes
Tempo Recording
This allows you to record tempo changes into the Master Track.
1. Just to make sure you don't accidentally replace any important MIDI recordings, select
an empty Track.
2. Activate Record Tempo/Mutes.
3. Activate recording.
4. During recording, change the Tempo directly on the Transport bar or by using the
computer keyboard or MIDI Input.
For Tempo change via MIDI input, a Remote Key has to be assigned in the Preferences dialog.
5. Stop Recording.
6. Activate Master on the Transport Bar.
7. Start playback.
The program now plays back with the recorded tempo.
Mute Recording
You can either record a single Mute in the Track List, or a preprogrammed Mute on
several Tracks. You can even record a click on the Solo button.
1. Select a MIDI Track for recording. Pick a Track not used for any other purposes!
2. Activate Record Tempo/Mutes.
3. Activate recording.
4. During recording, click in the Mute column, recall sets of Mutes or click the Solo button.
5. Stop Recording.
You need to be a bit careful with Mute recordings. It is possible to do things like muting the
Track that plays back the mutes, etc. which could lead to confusion. See the online documen-
tation for details.
Play in Background
When this is activated Cubase will keep hold of MIDI and audio playback, even when
another program is active. This allows it to continue playing even when you switch
over to another program. However, this means that other programs may not be able
to use the MIDI interface or audio card. If this is required, deactivate this option. OMS
users should note that OMS has its own switch called ‘Run MIDI in background’ that
keeps hold of MIDI ports as long as any OMS application is still running.
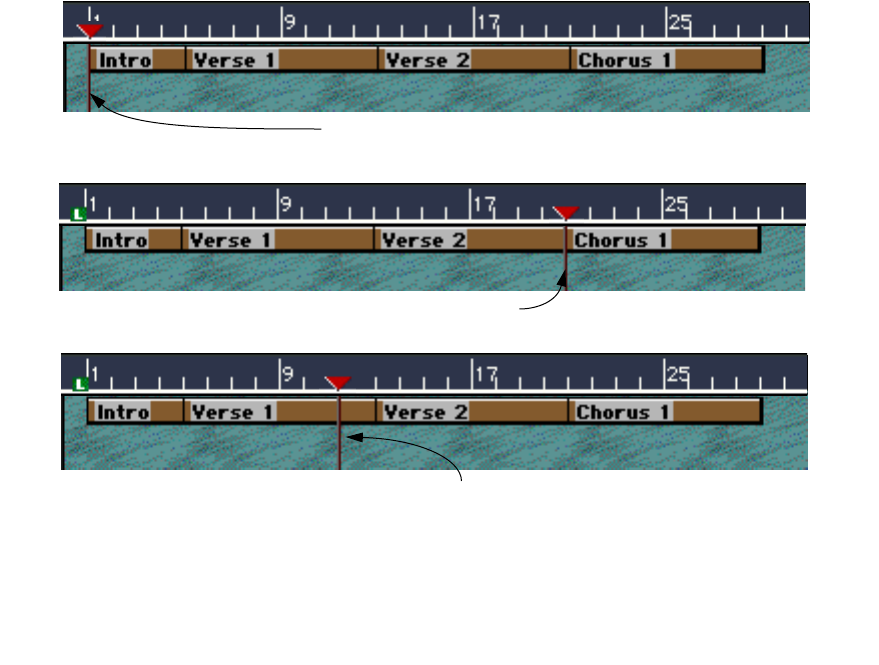
- 100 -
Ears Only
When this is activated, the entire screen goes black, to allow you to concentrate on
listening to your music rather than both hearing and “seeing” it. To return to nor-
mal display, just press the mouse button.
Chase Events
When this function is turned on, Cubase transmits a number of MIDI messages to
your synthesizers each time you move to a new position in your Song. It does this
so that all MIDI units should be set up correctly with regard to Program Change,
Controller messages (such as MIDI Volume) etc.
Theory
The theory behind Chase has to do with the way MIDI handles Continuous Control-
lers and other messages. Let us explain this by an example:
Let’s say you have an Arrangement with a Track that has a Program Change com-
mand inserted at the beginning. This command makes a synth switch to a piano
sound.
In the beginning of the first chorus you have another Program Change command
which makes the same synth switch to a string sound.
You now play back the song. It begins with the piano sound and then switches to
the string sound. In the middle of the chorus you stop and rewind to some point
between the beginning and the second Program Change. The synth will now still
play the string sound although you wanted it to be piano!
Chase Events solves this problem! If you have Chase Events turned on when you
rewind, Cubase tracks the music back to the beginning and finds the first Program
Change. It then sends this out, so that the synth is set to the right Program.
At this point the “String” Program change is sent out.
At this point the “Piano” Program change is sent out.
When you rewind to this position, the instrument is still set to “String”.

- 101 -
Summary
In other words, when Chase Events is activated, and you move to a new position,
Cubase tracks all changes that have occurred since 1.1.0. It then sends out the last
value for a number of parameters (as described below).
Setting Up Chase
1. Activate Chase Events on the Options menu.
2. Select Preferences–MIDI–Playback from the Edit menu.
3. Activate the desired Chase options in the list.
Inside a Part (played back from the Arrange window), Controllers, Pitch Bend, Pro-
gram Change, Note Ons, Mute Events and Mixer Events are always chased (if Chase
is activated). Therefore, if you want to make sure that all Events are always chased,
make up one long Part for each Track (by gluing Parts together).
MIDI Message: Description:
Mixer Data All Mixer Events are chased.
Note Events Chases Note On messages, which means that notes that should be sounding
at this position are turned on when you hit Play.
Controller events Chases Continuous Controllers (see below). When a Part is set to “Any”, only
Controllers below Controller number 36 are chased.
Program Changes When the Parts on the Track are set to MIDI Channel 1 to 16, Program Changes
are chased throughout the whole Arrangement, regardless of how many Parts
are on the Tracks. If the Part is set to “Any”, Program Changes are only chased
within the Part.
Aftertouch Chases Channel Aftertouch messages.
Pitchbend Chases Pitch Bend messages.
Sysex All System Exclusive Events in the current Part are sent out.
RPN/NRPN Registered and Non-registered Parameters (a special type of Controller) are
chased (this chasing can be time consuming).
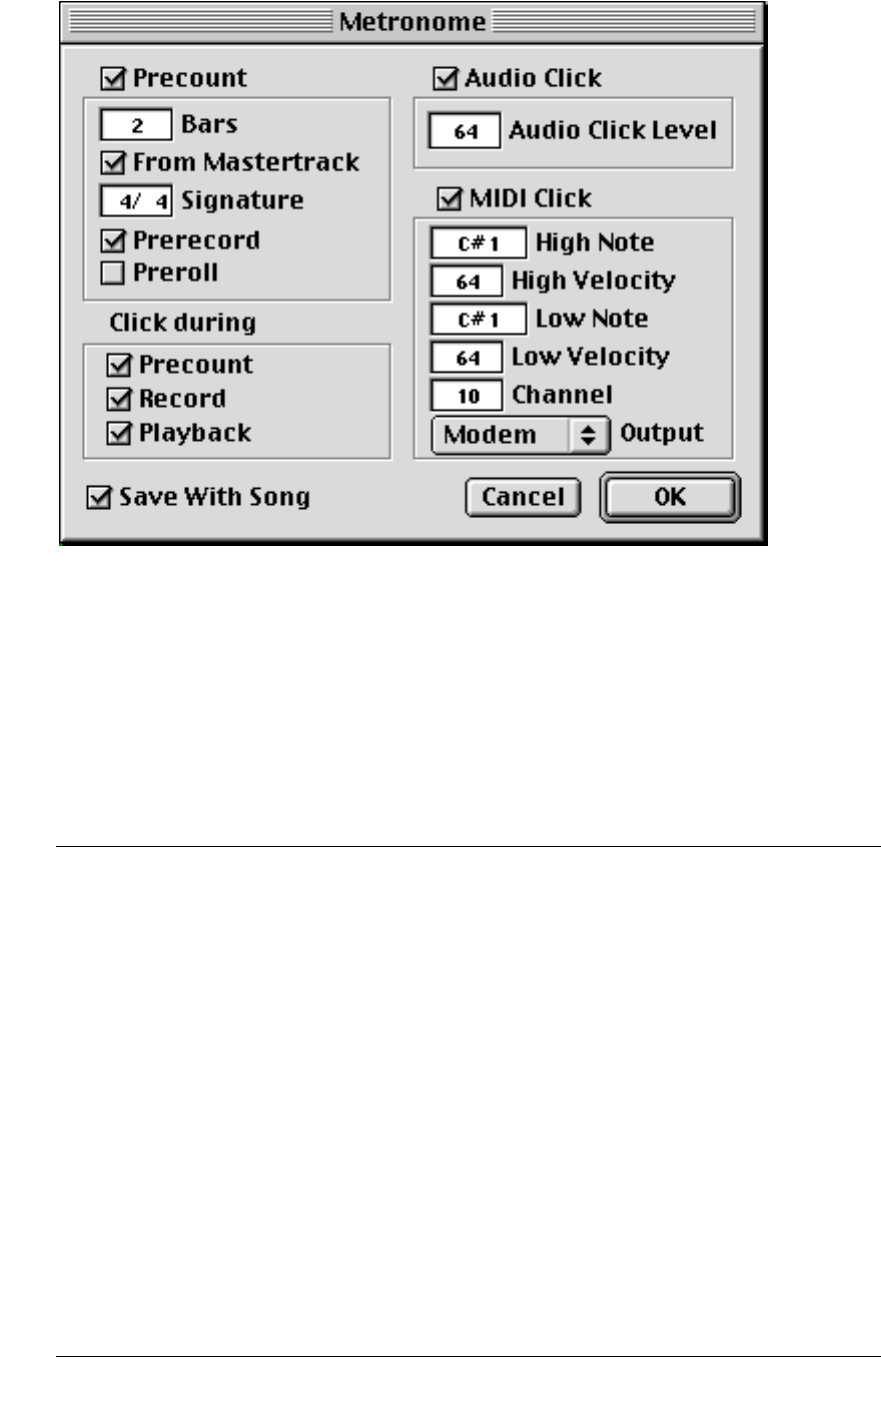
- 102 -
Metronome...
The Metronome dialog is used for three things:
• To set up how the program should behave when you activate recording (Precount, Pre-
record and Preroll).
• To set up the Audio Click metronome (that uses the computer's sound).
• To set up the MIDI Click metronome (that plays a click on one of your MIDI instru-
ments).
Here are the options:
Option: Description:
Precount When this is activated, there will be a precount (count-in) before recording
commences.
Bars Use this to set the length of the Precount (in Bars).
From Mastertrack When this is activated, the Precount will be in the time signature set in the
Master Track.
Signature If “From Master Track” is not activated, you can use these fields to set a Time
Signature for the Precount.
Prerecord If this is activated, Cubase will record even during the Precount (but not be-
fore the start of the Arrangement).
Preroll When this is activated, Cubase starts playback from a position one or more
bars back when you activate recording, instead of providing a “silent” Pre-
count.
Click During These three options allow you to set when the Click should be heard, during
the Precount, during Recording and/or during Playback.
Audio Click When this is activated, the Metronome will be heard as an audio “beep”.

- 103 -
Synchronization
Synchronization is when you make two pieces of equipment agree on time or tempo.
You can establish synchronization between Cubase VST and a number of other types
of devices, including tape recorders and video decks, but also other MIDI devices that
“play back”, such as other sequencers, drum machines, “workstation sequencers” etc.
Cubase VST can be sync “master” or “slave” (or both). When synchronizing Cubase
VST to other equipment (i.e. Cubase VST as “slave”), you need to activate sync as
such by clicking on the Sync button on the Transport bar. When the Sync button is
activated, Cubase VST will automatically start when it receives a proper synchroni-
zation signal.
Audio Click Level This is used to set the volume of the audio beep.
MIDI Click When this is activated, the Metronome will play back via MIDI.
High Note The MIDI note number for the downbeat clicks.
High Velocity The velocity value for the downbeats.
Low Note The MIDI note number for all other Metronome clicks.
Low Velocity The velocity value for all other Metronome clicks.
Channel The MIDI Channel for all Metronome clicks.
Output Use this to select a MIDI Output for the MIDI Metronome.
Save With Song Use this option to set whether the settings should be saved in the Cubase VST
Preference file or with the Song.
Option: Description:

- 104 -
Briefly, the items and functions in the dialog have the following functionality (for
procedures and details, please refer to the manual):
Section Item Description
Sync Sources Timecode Base This determines which kind of timecode synchronization should
be used when synchronizing Cubase VST to external equipment.
When the “Intern” setting is selected, the program will not re-
ceive timecode.
Sync Sources From Input If you are synchronizing Cubase VST to incoming MIDI timecode,
this is where you select the MIDI input to which the time code is
coming in.
Sync Sources Output If you are using MIDI Machine Control (Timecode Base is set to
“MMC”), this is where you specify the MIDI Output to which the
external recorder is connected.
Sync Sources Frame Rate When synchronizing Cubase VST to external equipment, this is
where you specify what frame rate to expect from the incoming
time code.
Sync Sources Tempo Base This allows you to synchronize Cubase VST to incoming MIDI
Clock. When the “Intern” setting is selected, the program will not
receive MIDI Clock.
Sync Sources From Input If you are synchronizing Cubase VST to incoming MIDI Clock, this
is where you select the MIDI input to which the MIDI clock signal
is coming in.
Sync Out MIDI Timecode Used for selecting a MIDI Output to which Cubase VST should
send MIDI Timecode (when using Cubase VST as sync master).
Sync Out MIDI Clock Used for selecting a MIDI Output to which Cubase VST should
send MIDI Clock (when using Cubase VST as sync master).
Offsets Song Start When synchronizing to external equipment, use this parameter to
specify which frame on the external device that should corre-
spond to the beginning of the Song (position 1.1.0 in Cubase VST).
Offsets Time Display The Time Position display on the Transport bar usually starts at
“zero”, even if the incoming time code is something else. But if you
want Song Position 1.1.1.0 to correspond to some certain Time
position on the Transport bar, set this parameter to that position.
Offsets Bar Display Allows you to set the number of the first bar in the Song. This al-
lows you to record before position 1.1.1.0, which is otherwise im-
possible.
N/A Write Timecode This function can only be used if you are using a time code de-
vice, which can be instructed by Cubase VST to start writing
timecode.
Sync Options Lock Time Using this field you can set how many frames of “correct” time
code Cubase VST should receive before attempting “lock” (syn-
chronize) to incoming time code. If you have a tape recorder
with a very short start-up time, you could try lowering this num-
ber to make lock-up even faster than it already is. If you have
Chase Events turned on, and many Events to chase, you could try
raising this number.

- 105 -
Sync Options Dropout Time On a tape with time code (SMPTE) dropouts may occur. If a drop-
out is very long, Cubase VST may (temporarily) stop. In the Drop-
out Time field you can set how long a drop-out (in frames)
should be tolerated until Cubase VST decides that the tape isn't
good enough to synchronize to. If you have a very stable time
code source, you may lower this number to make Cubase VST
stop more swiftly after the tape recorder has been stopped.
Sync Options Detect Frame
Change If this option is ticked, Cubase VST will automatically detect
frame rate changes in incoming time code and reset the Frame
rate setting to the new value.
The “normal” setting for this parameter is “Off”.
MROS
Resolution PPQ This allows you to set the MIDI playback resolution of the pro-
gram.
Cubase VST normally gives MIDI playback first priority. This
means that whatever the workload of the computer, MIDI data is
sent out when – and as – it should. However, when a lot of MIDI
data is handled and an unusual amount of real-time processing
is going on, the program might not feel as smooth to use as it
normally does.
For example, if you feel the graphics aren't updated as quickly as
you like, you could try lowering the resolution to 384 (or less)
ticks per quarter note.
On the other hand, if you need extremely high playback resolu-
tion, you should use the highest possible playback setting, 1920
ticks per quarter note.
No matter what this setting is, audio is always recorded and
played back at 15360 PPQs. Editing conforms to the display reso-
lution, set in the Preferences-General-General dialog.
Section Item Description
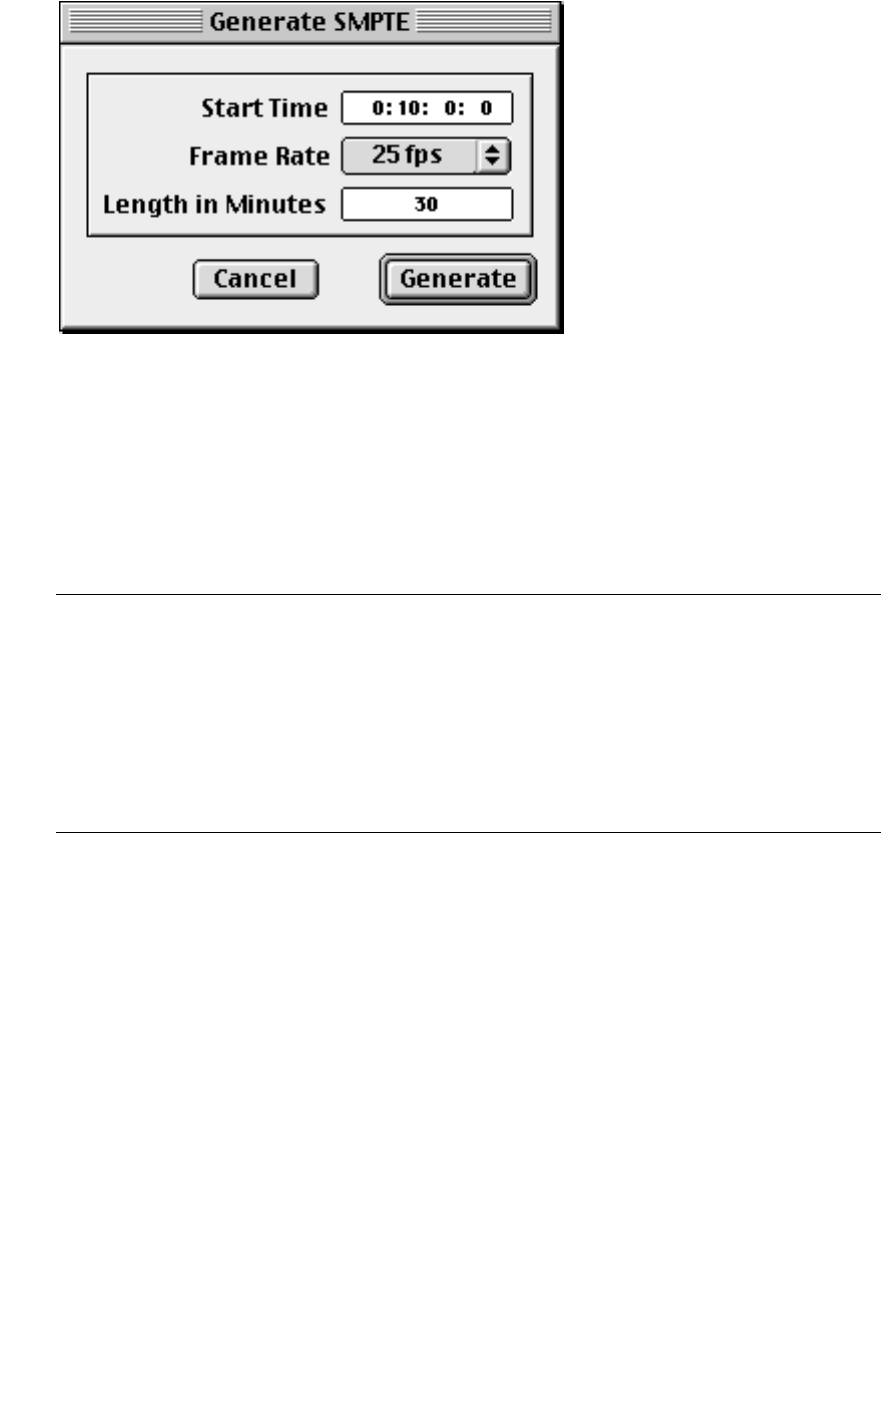
- 106 -
Generate SMPTE...
This function creates an audio file on your hard disk that contains SMPTE code. You
can then play back or record this file onto a track of for example a multi track tape re-
corder. Cubase can then be synchronized to that tape recorder (provided you have
the right synchronization equipment). The idea behind this is that the time code
generated by this function is clocked by the audio hardware you are using. That
means that this time code is in perfect ”sync” with the audio hardware. Using this
time code rather than one generated by an external device will enhance synchroni-
zation stability between the external device and the audio recordings in Cubase.
Option: Description:
Start Time Use this to enter the first frame in the time code generated.
A common figure is 1: 0: 0: 0: (one hour).
Frame Rate Use this to select a Frame Rate. See the chapter “Synchronization” in the Get-
ting into the Details document.
Length in minutes Use this to set the length of the generated time code file.
Generate Click this button to actually generate the file.
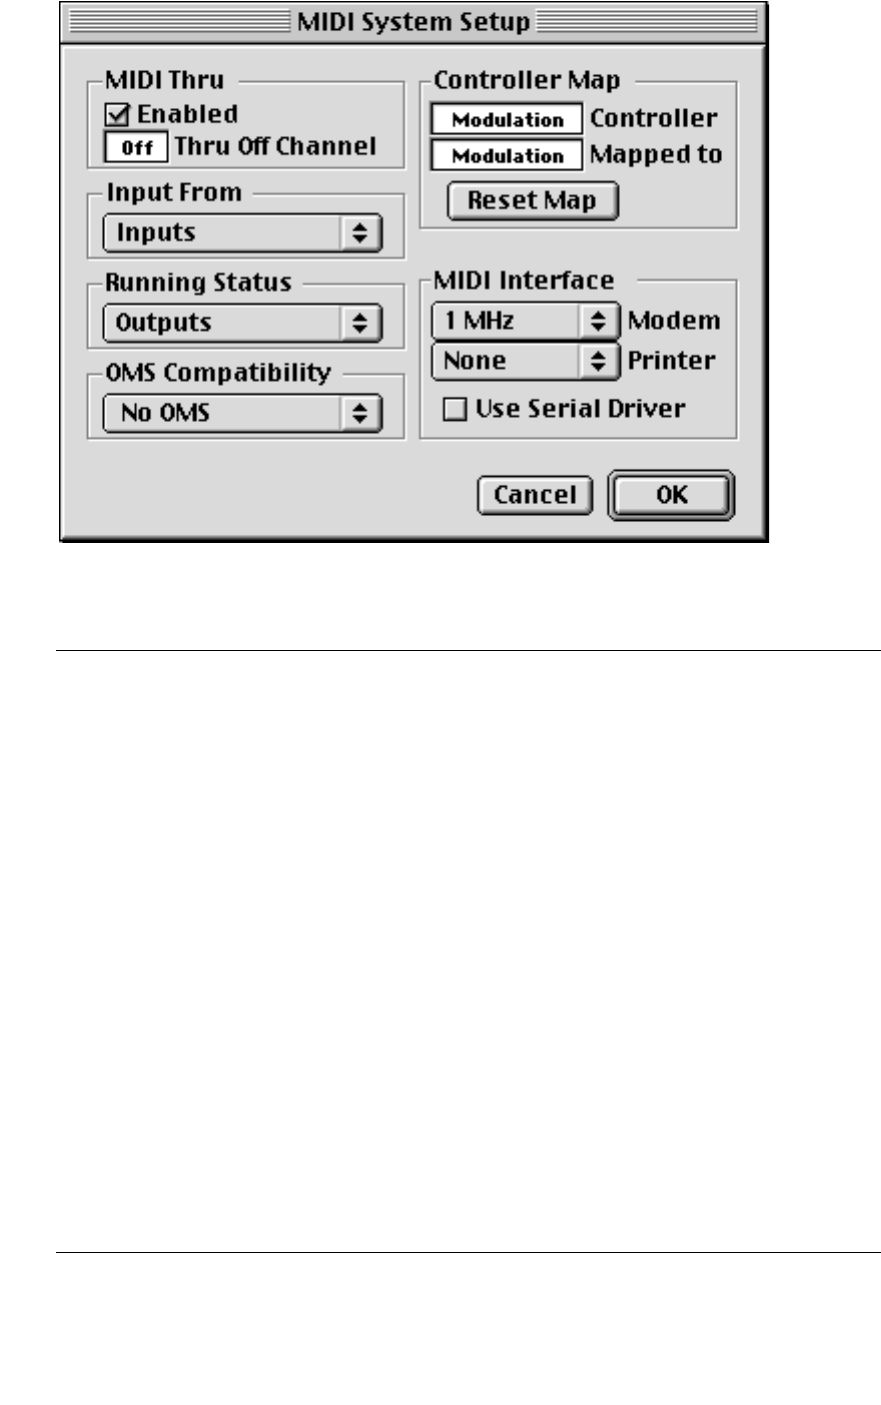
- 107 -
MIDI Setup – System…
This dialog allows you to make basic MIDI settings, activate MIDI Interfaces etc.
Here is a rundown of the options:
Option: Description:
MIDI Thru – Enabled When this is activated, signals coming in via MIDI will automatically be
“echoed” to the Track's MIDI Out. This is necessary if you for example want to
record yourself playing one synthesizer keyboard but are using a connected
sound module as sound source.
If possible this setting should always be activated, and your keyboard set to
Local Off. See the Getting Started book for more details.
MIDI Thru – Thru Off
Channel If MIDI Thru (above) is activated this setting still prevents certain MIDI Chan-
nels from being “echoed”. This should only be used with older keyboards
which do not have a Local Off setting. See the Getting Started book for more
details.
Controller Map -
Controller Cubase can convert any type of Controller into any other, in realtime and
while the messages are being recorded. This field allows you to select which
Controller to convert.
Controller Map -
Mapped to When you have selected a Controller to convert, using the field above this
one, use this field to specify which Controller to convert into.
Reset Map This resets the Controller mapping settings (see above), so that no Controller
conversion takes place.
Input From This allows you to make any combination of MIDI Inputs active for recording.
Exactly what options appear here of course depends on what MIDI Interfaces
you have installed, and whether you use OMS or not.

- 108 -
Running Status This allows you to turn Running Status on/off for each MIDI Output in your
system. If you are using “standard” MIDI interfaces, you should have Running
Status activated for all Outputs, unless you run into problems with MIDI
communication (should normally only happen with some very old MIDI
equipment). If you do, try turning this option off for the offending outputs.
If you are using a Multi Port MIDI Interfaces, you should turn Running Status
off!
OMS Compatibility This is where you specify whether the program should use OMS (Open Music
System) for MIDI communication or not. OMS is described in detail in the
separate OMS document.
MIDI Interface -
Modem This setting informs the program about what type of MIDI interface (if any) is
connected to the Modem port on the computer (only relevant if you’re not
using OMS). The most common MIDI interface combinations are as follows:
1 MHz: Standard MIDI interface connected to one Port.
1 MTP: MIDI Time Piece or Studio 4 connected to one Port.
2 MTP: 2 MIDI Time Pieces or Studio 4s connected to one Port.
2 MTP: 1 Studio 5 connected to one Port.
MIDI Interface -
Printer This pop-up is used to inform the program about what type of MIDI interface
(if any) is connected to the Printer port on the computer (see MIDI Interface -
Modem above for a description of the most common alternatives).
MIDI Interface -
Serial Driver Serial Driver is a modern DMA transfer technology built into most Macintosh
computers. This switch should be active if at all possible. Only if you get
hanging MIDI notes should you turn it off. This switch is of no relevance if
you are using OMS.
Option: Description:
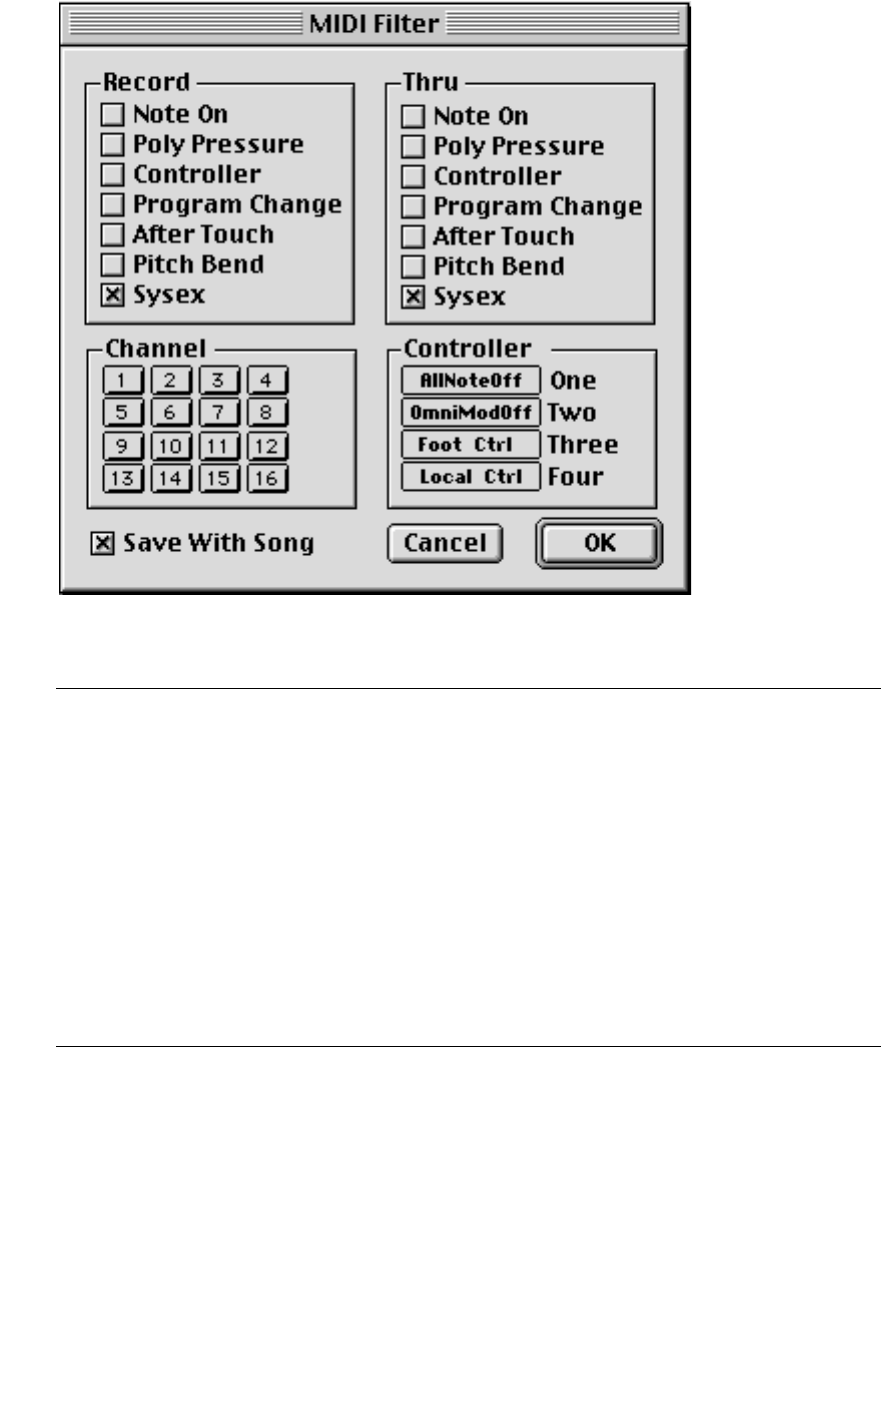
- 109 -
MIDI Setup – Filtering…
This dialog is used to prevent certain MIDI messages from being recorded and
“thruput”.
Option: Description:
Record Activating any of these options prevents that type of MIDI message from being re-
corded. It will, however, be thruput, and if already recorded, it will play back normally.
Thru Activating any of these options prevents that type of MIDI message from being
thruput. It will, however, be recorded and played back normally.
Channel By activating any of the options, MIDI messages on that MIDI Channel will neither
be recorded, nor thruput. Already recorded messages will, however, be played back
normally.
Controller Setting any of these four fields to a certain MIDI Controller (as opposed to “No Ctrl”),
prevents Controller messages of that type from being recorded or thruput. Already
recorded messages will, however, be played back normally. Since there are four
fields you can filter out any four Controllers of your choice.
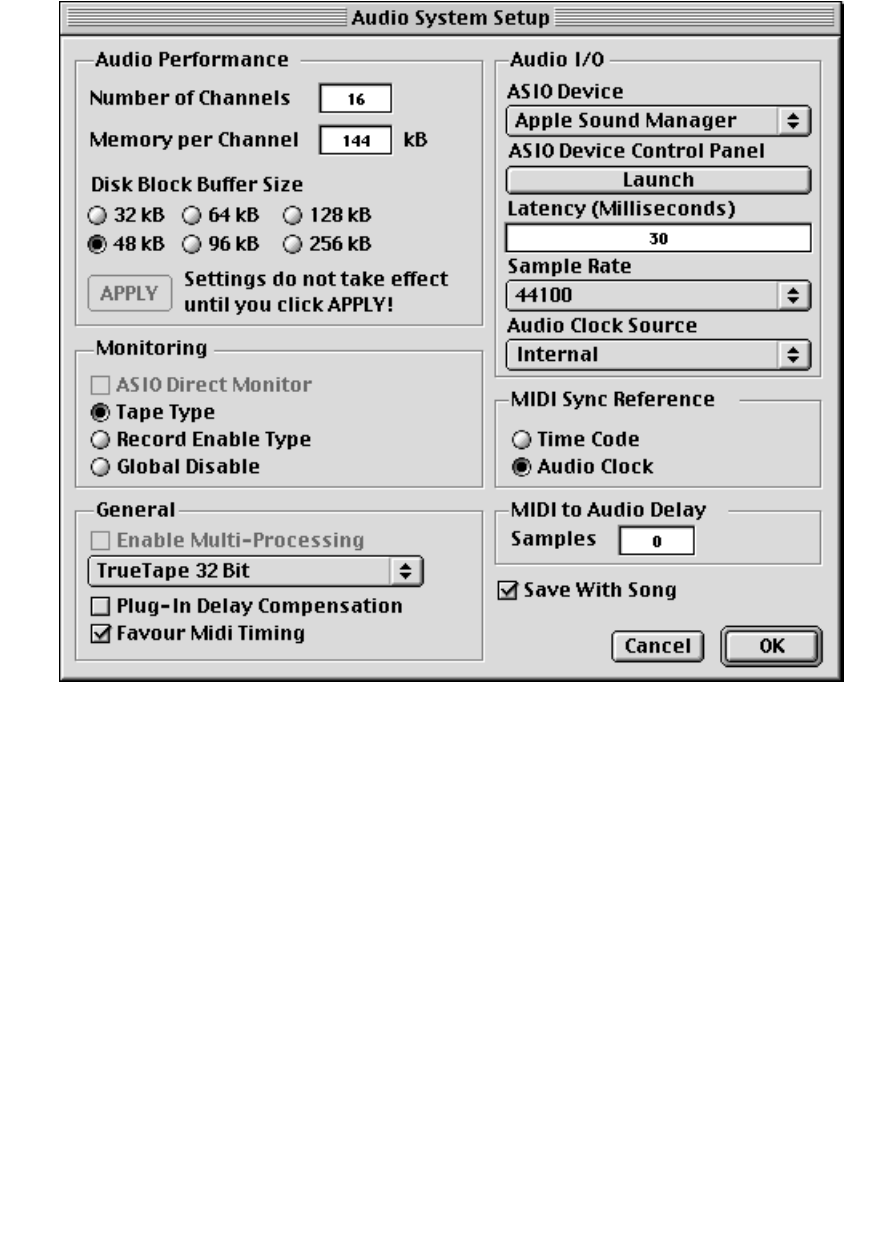
- 110 -
MIDI Setup – OMS
These options are only available if you have OMS installed and activated. This is de-
scribed in detail in the separate OMS document
Audio Setup – System...
This dialog is used for setting up various options related to how your computer
plays back audio. On the following pages, each section of the dialog is described.

- 111 -
Audio Performance section
• Number of Channels.
Sets the number of audio channels you would like to have access to (4 - 72, or 4 - 128 in VST/32).
• Memory per Channel.
Sets the amount of internal memory assigned to each audio channel. This value multiplied
by the Number of Channels has a direct relation to the amount of RAM assigned to the pro-
gram in the Finder. The higher the value the lesser the risk of playback problems. On the
other hand, raising this will probably lower the number of channels you can use at the same
time, since the total amount of RAM in the computer is always limited.
• Disk Block Buffer Size.
Governs the buffer size used in Cubase VST when reading and writing data from/to the hard
disk. The larger value, the smoother and faster performance.
However, each Buffer Size value has a corresponding minimum Memory per Channel setting.
For example, if the Disk Block Buffer Size is 64 kB, the Memory per Channel cannot be lower
than 192 kB.
As you can see, there is a quite involved relation between these three parameters.
To ensure the best HD/audio performance, you would raise the Disk Block Buffer
Size, but this automatically increases the Memory per Channel which in turn limits
the possible Number of Channels. This means you will have to experiment with dif-
ferent settings to find the performance/memory/channel balance best suited for
your system.
The Apply button
Clicking the Apply button applies the settings you have made. If you get a warning
reading “Not enough memory for the Audio Engine”, you either have to decrease
the number of audio channels or decrease the Memory per Channel figure.
Try these settings first!
• Generally, start with Disk Block Buffer Size set to 64 kB and Memory per Channel set to
256 kB.
• If you find that the audio and hard disk performance is poor (playback stutters, system
momentarily slows down), try raising the Disk Block Buffer Size to 96 kB.
The Memory per Channel setting is automatically increased to 288 kB.
• If you need more channels, try lowering Disk Block Buffer Size to 48 kB.
• If you have plenty of free RAM, another option would be to quit the program, increase
its memory assignment in the Finder and re-launch it.
Generally, the more RAM you make available for the program, the better the performance.
❐
All of the above assumes your hard disk is fast enough to handle the number of channels
specified.

- 112 -
Audio I/O
ASIO Device
Here you select the ASIO driver you want to use. The options depend on which
drivers are available for your audio card:
• If you are using the Mac’s built-in audio hardware, you should select the “Apple Sound
Manager” ASIO driver.
• If you are using additional audio hardware, for which there is a dedicated ASIO driver,
you should always use that driver.
By “dedicated ASIO driver” we mean an ASIO driver specifically written for your audio hard-
ware model.
ASIO Device Control Panel “Launch” button
If the driver supports it, this button brings up a window with settings specific to the
audio card.
Latency indication
The Latency is the delay between when audio is “sent” from the program and when
you actually hear it. The latency in an audio system depends on the audio hardware
and its drivers. As described in the Getting Started book, latency may be a problem
if you monitor through Cubase VST, when you are playing VST Instruments “live”
from a MIDI keyboard or when you mix your audio (in situations where high time
precision is required). However, the recorded audio will not be affected, since VST
takes the latency into account, and adjusts the timing of the recorded audio ac-
cordingly.
The Latency indication in the Audio System Setup dialog shows you the latency
with your current ASIO driver and settings. Depending on the ASIO driver, you may
be able to reduce the latency by adjusting the number and size of the audio buffers
in the ASIO Control Panel. Also, you should be aware that “dedicated” ASIO drivers
(written specifically for the audio hardware) often give lower latency values than
the Apple Sound Manager driver.
❐
Audio playback and recording timing will not be affected by latency, since VST takes the
latency into account, and adjusts the timing accordingly. Similarly, if you play back MIDI
Parts routed to VST Instruments, the playback precision is sample accurate, regardless
of the latency.
Sample Rate
This setting determines the audio quality of your recordings. The higher the value,
the better the quality, but when you raise the value, each recording also uses up
more disk space and computer processing power.
You should not change the Sample Rate setting if you already have files in the Pool
(which you will have if you have made any audio recordings at all in this Song).

- 113 -
Audio Clock Source
If the card and its driver supports it, this pop-up allows you to select an external
source to which the audio playback can synchronize its sample rate. See the docu-
mentation that came with the card for details.
Monitoring
This section contains several options for how Cubase VST should handle monitor-
ing (listening to the signal you are recording). Note that you could also monitor “ex-
ternally”, e.g. through an external mixer (see the Getting Started book).
ASIO Direct Monitoring
When the option ASIO Direct Monitoring is activated, monitoring is handled by the
actual audio hardware, that is, the monitored signal does not pass through Cubase
VST. Instead, the ASIO driver for the audio hardware is instructed to send the audio
from the monitored input directly back to a specified output, thus providing moni-
toring with very low latency.
❐
If this feature isn’t supported by your audio hardware or its ASIO driver, the option will
be greyed out in the Audio System Setup dialog.
• The monitored sound is sent to the output specified for the audio channel on the VST
Channel Mixer’s Output pop-up menu.
Not all ASIO drivers may support this feature. Also, some ASIO drivers may not allow Direct
Monitored audio and playback audio to be sent to the same Output, in which case you need
to designate a separate output for monitoring.
• You can control the volume and pan of the monitored sound using the channel fader
and pan control in the VST Channel Mixer.
Again, not all ASIO drivers may support this feature.
• ASIO Direct Monitoring follows the same rules as the internal VST monitoring.
See below.
• VST effects or EQ will not affect the Direct Monitored sound.
Monitoring Modes
The three checkboxes determine how and when Cubase VST should activate and
deactivate monitoring. Note that these apply both to “regular” monitoring through
Cubase VST and to ASIO Direct Monitoring:
Mode Description
Tape Type Monitoring will automatically be activated for a Record Enabled Track in Stop and
Record Mode. During playback monitoring is deactivated, allowing you to hear
the recorded audio.
Record Enable
Type Monitoring will automatically be activated when you Record Enable a Track.
Global Disable Monitoring is disabled, regardless of the Record Enable status. This is the mode to
select if you are monitoring externally or directly via the audio hardware (without
ASIO Direct Monitoring).

- 114 -
MIDI Sync Reference
This determines what clock source MIDI playback will use.
• If Time Code is selected, the MIDI playback will always be in time with any external time code
coming in. However, there is a risk that MIDI playback will not be in perfect sync with the au-
dio. This happens because the audio card is not aware of fluctuations in the incoming time
code and therefore can not adjust to them.
• Audio Clock is the preferred option when you are not using any external synchronization. If
Audio Clock is selected, MIDI and audio playback will always be in perfect sync. However,
there’s a risk they will both drift in relation to incoming time code.
MIDI to Audio Delay
If you experience that MIDI playback lags behind the audio, this could be because
the MIDI response in your MIDI instrument is slightly slow. If this is the case, use this
parameter to compensate.
Enable Multi-Processing
If you have a computer with multiple processors, activating this option will allow
Cubase VST to take advantage of this. See the “Getting into the Details” document.
Record Mode pop-up
This pop-up menu is a mirror of the Record Mode pop-up menu in the Arrange win-
dow. Use this to select a resolution (16 bit or 24 bit) for your recordings. If you are
using Cubase VST/32 you can also select 32 bit and TrueTape 32 bit.
This is described in detail in the “Getting into the Details” document.
Favour MIDI Timing
When this is activated, the MIDI processing gets somewhat higher priority than the
audio processing, for optimum MIDI timing. As long as the “CPU Over” indicator in
the Audio Performance window doesn’t light up, leave this option activated.
❐
If you are using OMS, you should always activate Favour MIDI Timing.
Plug-in Delay Compensation
Some effect plug-ins may have a certain delay, which will be noticeable especially
when you use them as Insert effects. If you experience delayed audio playback from
Tracks with Insert effects, you should activate Plug-In Delay Compensation in the
Audio System Setup dialog. When this option is activated, the playback timing of
the delayed Tracks is adjusted to compensate for the delay in the plug-ins.
❐
You may also need to activate this option when you are using the Channel Settings VST
Dynamics panel. Even though these are not accessed as Insert Effects, technically they
are just that, and may cause an audible delay.
- 115 -
Audio Setup – Audio Files Folder...
This command is for specifying where on your hard disk your recorded audio files
should be placed.
Audio Setup – Use Waveforms
When this is deactivated, no waveforms will be calculated for audio recordings you
make. This will speed up the recording process, since you don’t have to wait for the
waveform overviews to be created.
When you later reactivate this menu item, the program will create waveforms for
recent audio files.
You can also manually update the waveform overview for a file, in the Audio Pool.
Audio Setup – Snap To Zero
If you are familiar with audio editing from other digital systems you will know that
splicing two audio files together might create a “click” just at the split point. This is
because the two signals happen to have a different amplitude (level) at this point
which creates a transient (a sudden and dramatic change in signal level).
One way to avoid this is to always make all edits at “zero crossings”.
An analog waveform is a voltage rising and falling around a center axis. This center
axis is considered “zero” voltage. As indicated in the picture, a zero crossing is when
the signal passes through this center axis.
To automatically make all edits happen at the closest zero crossing, activate Snap
To Zero on the Audio Setup submenu on the Options menu. When Snap To Zero is
activated, the following operations always occur at the closest zero crossing:
• Changing Start and End Insets.
• Splitting Event in the Audio editor.
• Splitting Parts in the Arrangement (the Events in the Parts are split at zero crossings).
• Using Snip Loop (in the Audio editor).
• Using Banish Silence (in the Audio editor or from the Pool).
Zero crossings

- 116 -
Audio Setup – Confirm Record
When this is activated, you will be asked at the end of each audio recording whether
you want to keep the file or not. The idea behind this is that hard disk space is nor-
mally precious, and this safety measure allows you to stay confident that no extra
hard disk space is wasted for recordings that you make but not actually use in the
Song.
Audio Setup – Disable Audio
This feature allows you to deactivate the audio engine. It disables audio playback, re-
cording and sync, although it is still possible to perform “silent” editing of audio, for
example in the Audio Editor. You may want to use this feature if you are working with
MIDI only and don’t want to waste computer processor power on the audio engine.
❐
You can also disable audio on start-up, by pressing the [Shift] button when you launch
Cubase VST.
Remote Setup
This dialog is used to select a Remote device type, and to specify the MIDI input and
output ports the Remote device is connected to.
Option: Description:
File name This allows you to specify a name for the file, before confirming.
Skip All If you have made a multi channel recording, pressing this button skips them all.
Skip This skips only the file currently displayed in the File Name field.
Confirm This confirms that you want to keep this particular file.
- 117 -
Movie Setup – Setup...
This menu item opens up a dialog that allows you to load and set up QuickTime
movies for playback in sync with Cubase VST. It is described in the chapter “Movies”
in the Getting Started book.
Movie Setup – Movie Tracks...
This menu item opens up a utility that allows you perform editing on QuickTime
movies, such as inserting and extracting audio tracks. It is described in detail in the
chapter “Quicktime Movie capabilities” in the Getting into the Details document.
Reset Devices
This command performs all the functions of a “Send Reset-Data on Stop” (as speci-
fied in the Preferences dialog), plus it resets all connected MIDI devices such as
MIDI interface and synchronization devices, etc.

- 118 -
8
The Score Menu

- 119 -
About the Score Menu
This menu is only available in Cubase VST Score and Cubase VST/32. Furthermore,
you can only access it from within the Score editor.
Edit/Page Mode
This command switches Score Edit between Page and Edit mode. The menu shows
the mode you will be switching to when you select this item.
• Edit mode is the mode of choice when you only plan to edit MIDI data. In this mode as much
as possible of music on the Track(s) is shown in the window.
• Page mode shows your score as it will appear on a page when you print it out. This is the
mode of choice for preparing scores for printout.
Layout Layer Only
When this is activated, Score Edit only displays symbols that are in the ”Layout
Layer”, that is symbols that can be found in the Layout Symbols Palette.
Layout Settings
This dialog is used for two things:
• For making a number of settings only applied in the Score Editor’s Page Mode.
• For handling Layouts.

- 120 -
The Layout section.
This is the section to the left in the dialog. It contains the following settings and
functions:
The Page Mode settings.
These are found in the upper right corner of the dialog:
Item Description
Arrangement pop-up Allows you to select one of the Arrangements in the Song (by default,
the current Arrangement is selected). The Layouts available in that Ar-
rangement are listed in the Layout list below.
Layout list Lists the Layout in the currently selected Arrangement. The Layout used
by the currently edited Track combination is indicated by a bullet. Cur-
rently unused Layouts are displayed in italics.
You can select another Layout in this list and apply it to the current
Track combinations with the Get Layout and Get Form Only functions.
Double clicking a Layout in the list allows you to rename it.
Track List This list shows which Tracks are displayed in the selected Layout (indi-
cated by bullets). Furthermore it allows you to specify properties for the
Tracks in the Layout:
- drag in the leftmost columns to create Braces or Brackets, spanning
some or all of the Tracks.
- Use the columns to the right to determine whether a Track should be
displayed with a Modern Time signature (see below), whether the Staff
Name should be shown and whether the Track should display Global
Symbols (inserted using the Global symbol palette).
Load Allows you to load a saved layout from disk.
Save Allows you to save the selected layout to disk, for use in other Songs.
Clean Up Clicking this button will delete all Layouts that no longer have a Track
combination to be assigned to.
This does not delete Layouts that have a Track combination but are cur-
rently not used!
Remove Allows you to delete the selected Layout. It is not possible to delete the
Layout you are currently using (the one indicated by a bullet in the list).
Duplicate Creates a duplicate of the selected Layout in the list.
Get Layout Applies all properties of the selected Layout to the score.
Get Form only Applies only some properties of the selected Layout to the score.
Item Description
Spacing pop-up Adjusts the spacing of notes within a measure. This can be set to Regular
(recommended for melody lines and syncopated material), Optimize
(recommended for chord parts and non-syncopated parts) or Equal
(spacing is always proportional to note value).
Multi Rests Set this to the highest number of empty bars allowed in a row. If for ex-
ample you set this to 2, any occurrences of 3 or more empty bars in a row
will be replaced by a multi rest symbol.
You can make settings for the appearance of Multi Rests in the Prefer-
ences-Score-Beams and Bars dialog, and select a font for the Multi Rests
number in the Preferences-Score-Global Text dialog.

- 121 -
Staff Name settings
These are found in the lower right corner of the dialog:
Size Changes the size of all staves in this Layout. This setting is part of the
Layout.
Real Book When this is activated, Time Signature and Clef symbols are not set out
at the beginning of each staff, only on the first staff on each page.
Staff Separators When this is activated, separator symbols are inserted at the beginning
of every Grand Staff.
Modern Timesignatures When this is activated, Time Signatures are shown above the staves
rather than in them. You can set the size of the Modern Time Signature in
the Preferences–Scores–Additional Settings dialog. Also note that when
Modern Time Signature is selected, you can use the “Sign” column in the
Track list to specify for which Tracks time signatures should be displayed.
Item Description
Staff Names Activate this if you want staff names to be shown.
From Track Activate this if you want the actual names of the Tracks in the Arrangement to be
used as staff names in the score.
Long/Short If you want to specify custom staff names for the score, deactivate “From Track”
and use the Long and Short fields to specify the desired staff names. Normally the
“Long” name is shown for the first system only, and the “Short” name is used for
all following systems. If the “Show Long Staff Names on new Pages” is activated in
the Preferences–Scores–Additional Settings dialog, the Long name will be dis-
played for the first system on every page.
Item Description
- 122 -
Staff Settings...
This is where you set up how the Score Editor should display (interpret) the MIDI
notes, to make the score as legible as possible.The dialog contains the following
items:
Staff Mode
Option: Description:
Single This is the mode to use when the Track is for example a simple lead or bass line.
Split This mode allows you to set up a piano staff with a fixed split point. All notes be-
low the split will appear on the lower staff and vice versa.
Polyphonic This is the most advanced option which allows you to set up polyphonic voicing
on a single or split (piano) staff.
Splitpoint When Split is selected from the Staff Mode pop-up, this field is used to set the ac-
tual split point.
Edit button When Polyphonic is selected from the Staff Mode pop-up, this allows you to
open the Polyphonic Voicing dialog.

- 123 -
Display Quantize
By setting the values you "inform" the program about how you want the note val-
ues interpreted. These settings only affects how notes are displayed, not how they
play back.
Interpret Flags
Key/Clef
Staff Presets
The items on this menu are the Staff Presets that have been created in the Staff
Settings. Selecting one applies it to the activate staff. Staff Presets is also available
as a Score menu item.
Option: Description:
Notes Set this according to the “smallest note position” you want to be shown in the
score.
For example, if you have notes on odd sixteenth note positions, the Note Display
Quantize value should be set to sixteenth notes.
Rests Set the Rest Display Quantize value according to the smallest note value (length)
you want to be displayed for a single note, positioned on a beat.
Auto Quantize Tick this if your music contains mixed straight notes and triplets.
Dev If you have Auto Quantize activated, turning on "Dev." (Deviation) might help the
program recognise imprecisely played notes.
Adapt If this is activated, and the program finds a triplet, it "guesses" there is a higher
probability that there are more triplets "surrounding it". Turn this on if not all trip-
lets are found by the program.
Option: Description:
Clean Lengths When this is activated, slightly short notes will be displayed as longer, to avoid
unwanted rests.
No Overlap If one note starts before another has ended (they overlap) the score will be less
legible (unless you use Polyphonic voicing). Turning on No Overlap "cuts off" one
note where the next starts.
Syncopation When this is off, the program adds ties to long notes extending over beats. When
it is on, it doesn't.
Shuffle When this is on, the program displays groups of for example a quarter note trip-
let, followed by an eighth note triplet as two regular eighth notes.
Option: Description:
Clef Scroll Bar Use this to select a clef for the staff.
Key Scroll Bar Use this to select a key for the staff.
Auto Clef When this is activated, the program will automatically select a bass or treble clef,
depending on the pitches of the notes.
Lower Staff If you have a split or Polyphonic system with two staves, this allows you to decide
which you are making key and clef settings for, the lower staff (activated) or the
upper (deactivated).
- 124 -
Staff Presets
This menu item is used to select and apply Staff Presets to the score. Staff Presets
are “macros” (predefined settings) for the Staff Settings dialog.
The items on this menu are the Staff Presets that have been created in the Staff
Settings. Selecting one applies it to the activate staff.
Staff Functions – Grace Note
This converts the selected notes into grace notes.
Staff Functions – Find Grace Note...
The menu item opens up a dialog that allows you to automatically locate notes
very close to another note, and convert these to grace notes.
- 125 -
Staff Functions – Build N-Tuplet...
This dialog is used to create N-Tuplets.
Staff Functions – Move to Voice
This item brings up a submenu allowing you to select one of the Polyphonic Voices
in the score. This is used to move notes from one Voice to another.
Staff Functions – Move to Staff
❐
This function is only available in Page Mode.
This allows you to move one or more notes under a beam to another staff, to create
cross staff beaming.
1. Make sure all the notes that should be under the same beam are grouped together (un-
der one beam), and that they all have the desired pitch.
2. Select the notes to be moved.
3. Select Move to Staff. From the submenu that appears, select the Staff or Track the
note(s) should be moved to.
4. If needed, adjust beam appearance.
Option: Description:
Type This is used to specify the type of tuplet. “7let”, for example, means a septuplet.
Over This is used to specify the final length of the tuplet, as a note value.
Text This allows you to specify a text above the tuplet, for example “7” for a septuplet.
Change Length If this is activated, the program will change the length of the notes to exactly the
note value the tuplet indicates. If this is not activated, the length of the notes is
not changed in any way.
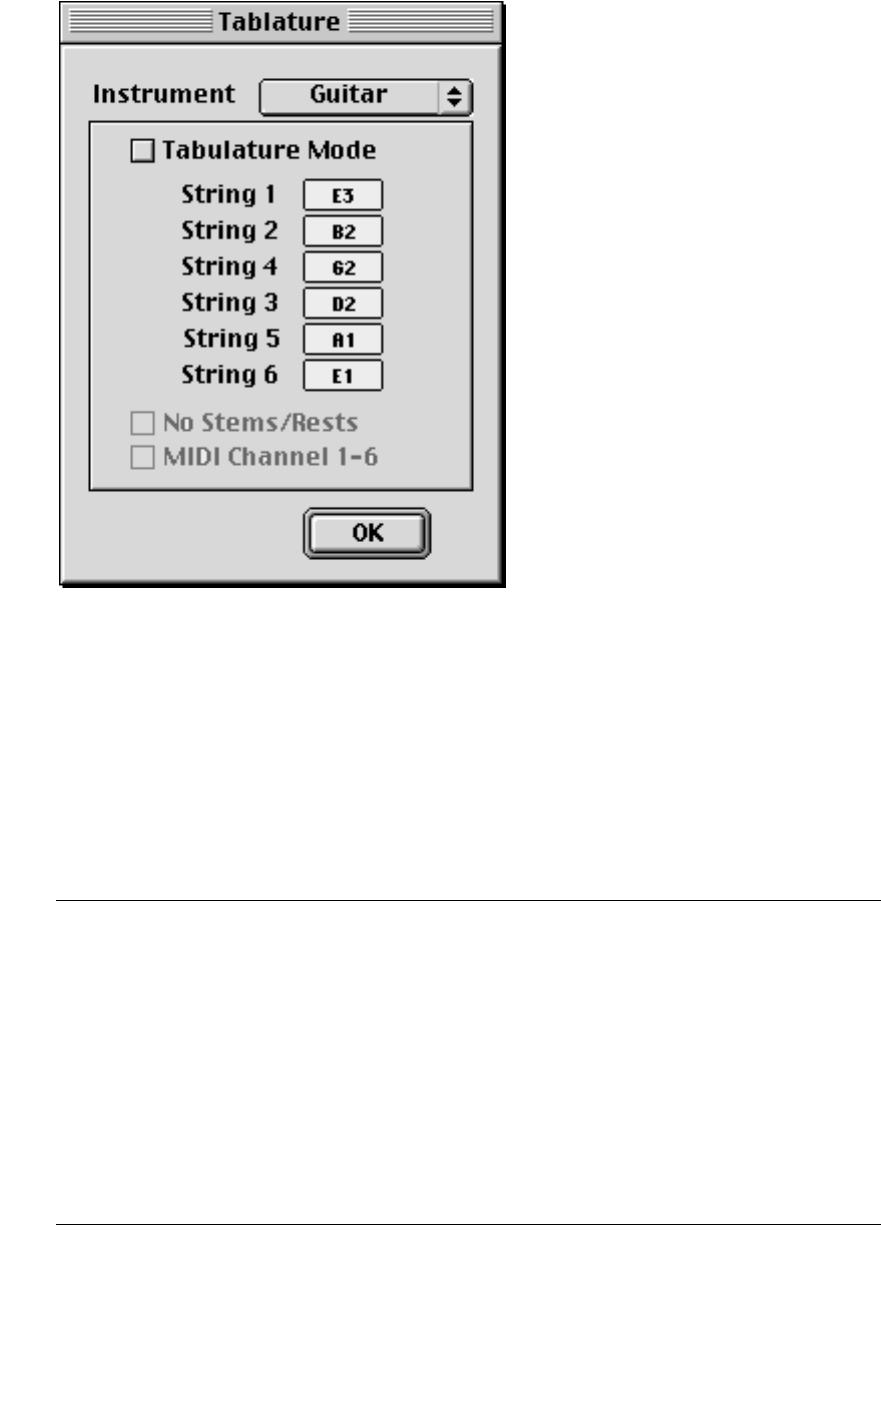
- 126 -
Staff Functions – Tablature...
This dialog is used for converting a regular score to tablature.
1. If you only want to display a section of the Track as Tablature, use the “To” menu to
specify which.
2. Make sure the notes in the specified section are actually within the range of the desired
fretted instrument.
3. Select Tablature from the Staff Functions menu.
4. Fill out the dialog box and click OK.
Option: Description:
Instrument This pop-up is used to select one of the pre-defined instruments.
Tablature Mode This is used to actually activate the Tablature mode for the staff.
String 1 to 6 These are used to adjust the open tuning of each string, if you are scoring for
an instrument tuned in a non-standard way.
No Stems/Rests Activating this creates notes without stems and hides all rests.
MIDI Channel 1-6 If this is activated, the program will look at the original MIDI Channel values
for each string and use this information to decide on which “string” each note
should be placed. This is mainly intended for parts recorded with a MIDI Gui-
tar controller.
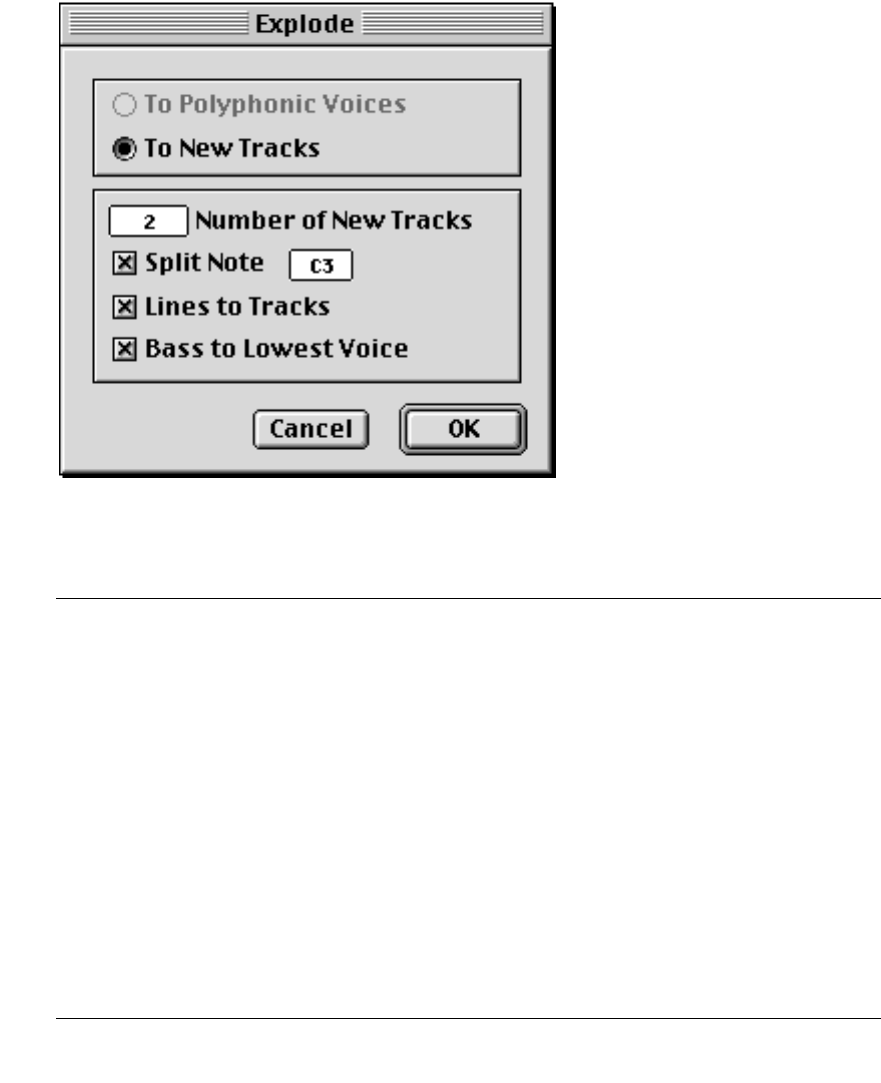
- 127 -
Staff Functions – Move to String
This hierarchical menu item allows you to move Tablature notes from one “string”
to another. For example, a note that was on the 2nd fret on the 1st string in a guitar
tablature might be moved to the 7th fret on the second, without affecting its pitch.
1. Select the note(s) to be moved.
2. Select “Move to String” from the Staff Functions menu.
3. Select one of the options on the menu.
Staff Functions – Explode...
This dialog is used to turn one Track (staff) into either a number of new polyphonic
voices or to new Tracks (for example to create individual Tracks from a polyphonic
vocal score). Here are the options:
Option: Description:
To Polyphonic Voices/
To New Tracks If you select Polyphonic Voices, this dialog performs the same function as
the Polyphonic Voices dialog. If you select New Tracks, the “extracted”
notes are put into new Tracks.
Number of New Tracks This allows you to specify the number of new Tracks to be created. Gener-
ally, this should be set to number of “lines” in the score.
Split Note If you want notes above a certain note (the split note) to be moved to a
separate Track, activate this option and set up a split note. By for example
setting “Number of New Tracks” to 2, you can extract the left and right
hand in a piano recording to one Track each.
Lines to Track When this is activated, the program tries to put each line in the score on
one Track each.
Bass to Lowest Voice If this is activated, the program automatically finds the lowest notes
throughout the Part and puts them on their own Track.

- 128 -
Staff Functions – Extract Voices
This function converts a staff with polyphonic voices to a number of Tracks, each
containing the notes from one voice. The Tracks are named after the original Track,
but with an indication of the voice number appended.
Staff Functions – Merge All Staves
This function creates a new composite Track, containing all notes and other ele-
ments from the currently edited Tracks.
Symbol Palettes – Palettes
This menu is used for bringing out and hiding the various Score Symbol palettes.
Palettes with a tick mark in the menu are displayed on screen.
Clef etc.
This symbol palette is used to insert key-, clef- and time signature changes into the
score.
Note Symbols
This symbol palette is used to insert note symbols, that is, symbols that each are
directly tied to a certain note, like accents, staccato etc.
Dynamics
This symbol palette is used to add crescendo and decrescendo symbols, slurs and
ties. It also allows you to add dynamic symbols.
Line/Trill
This allows you to add various lines, trills, arpeggios, octave indications and other
symbols.
Note that the arpeggios, hand indications and strum symbols are all note depen-
dent - that is, they must appear in front of a note or chord.
Graphic
This symbol palette is used to add notes and rests as “graphic” symbols which do
not play back via MIDI.
Other
This allows you to add various type of text (lyrics and “regular”), guitar symbols,
chord symbols, tempo indications, repeats etc.

- 129 -
Layout
❐
This palette is only available in Page Mode.
All the symbols in this palette are for the Layout layer.
Global Symbols
The symbols in the “Global” palette belong to the Layout layer. When you are edit-
ing a layout containing several Tracks, you can have inserted Global Symbols auto-
matically copied to any combination of Tracks in the layout. You decide which
Tracks should display Global Symbols by ticking their “Glob” column in the Layout
Settings dialog.
• Any editing you perform to Global Symbols is automatically duplicated in the other Tracks.
• You can turn on and off the display of Global Symbols for different Tracks at any time.
• Global Symbols can be copied between layouts, by using the “Get Form Only” or “Get Lay-
out” functions in the Layout Settings dialog.
Words
This allows you to add words or phrases to your score. To specify such a word or
phrase, double click on a position in the palette and fill out the dialog box that
appears.
Custom
This allows you to create your own collection of frequently used symbols from
other palettes.
• To add a symbol to this palette hold down [Option] and click on the symbol in the pal-
ette it normally resides in.
• To remove a symbol from this palette, hold down [Option] and click on it in this palette.
Pictures
This allows you to create your own symbols, by copying and pasting images from
painting and drawing programs. It is recommended to use “object” based images
rather than “bitmap” images, because the former print better. For details see the
chapter “Working with Symbols” in the Score Layout and Printing document.
Symbol Palettes – Close All
This menu item closes all Symbol Palette windows currently open on the screen.
Symbol Palettes – Arrange Palettes
This menu item arranges the positions of all symbol palettes and the Toolbox, on
screen. For details see the chapter “Working with Symbols” in the Score Layout and
Printing document.

- 130 -
Move Events to
This allows you to move events between Tracks.
1. Select one or more events.
2. Select the Track to move them to, from this menu.
If you hold down [Option], the Events are copied instead of moved.
To determine which Tracks are displayed on the menu, proceed as follows:
1. Select the Edit item, from this menu.
2. In the Track List that appears, activate/deactivate Tracks as desired, by clicking on
them.
The currently edited Tracks are always available on the menu, as is the “All Staves” option
(used for copying Events to all edited staves).

- 131 -
Text Font, Size and Style
These menu items are for determining the look of text you add to your score.
• To specify the look of text before you add it, set up these menus before adding the
text.
• To change the look of text you have already added, select the text and make the set-
tings.
For details about adding and editing text, see the chapter in the Score Layout and
Printing document.
Font
The menu lists all fonts installed in your computer. For more information on fonts,
see your Macintosh manual.
Size
This allows you to specify a point size for the text.
Style
The options on this menu allow you to further tailor the look of the text. The first
half of the menu lists the standard Macintosh text style options. The lower half lists
options specific to Cubase VST. Many of these relate to the “text line” function, the
black handle to the right of the text that allows you to “pull out” an extending line:
Text Attribute Set
This menu item allows you to apply pre-defined text styles to format various text
items. The Edit item brings up a dialog that allows you to create and manage such
Text Attribute Sets.
Option: Description:
Box This encloses the text in a square box.
Oval This encloses the text in an oval.
Solid Line, End Line
Down/Up/Arrow These determine the shape of the end of the “melisma line”. This line ap-
pears at the right edge of a text block and can be dragged to the desired
length in the score. It is used for indicating how long a syllable should be ex-
tended when singing, the duration of a articulation advice, etc.
Right Edge Position When this is activated, the right side of a text block (rather than the left side)
is used for calculating its position. This has an effect in situations where that
text block is moved automatically (as a result of an Auto Layout function,
when you move bar lines manually, etc.). If, for example, the text block ap-
pears just in front of a note (to the left of it), it will appear in a more sensible
position after the adjustment, if this option is activated.
Align Middle/Align
Right This allows you to specify whether multi-line text should be left justified (no
option activated), center justified (Align Middle) or right justified (Align Right).
- 132 -
Text Functions – Replace Text Font
This function will find text in a certain font, size and style and replace the text set-
tings for it, to change the appearance. Specify the text format to search for to the
left in the dialog, and the text format to apply (use for replacement) to the right.
• If you want the “Search For” section of this dialog automatically set up with the setting
of a certain font, size, etc, that you have in a text block on screen, select that text be-
fore opening the dialog.
Text Functions – Find and Replace
This menu item allows you to find and replace all text in the Score that contains a
certain phrase, by a single command:
Option: Description:
Find Here you type in the text to look for.
Replace Here you type in the text to replace the found text with.
Ignore Case When this is activated, the text will be found regardless of whether it has been
typed with the same case (choice of small and CAPITAL letters).
Entire word When this is activated, a phrase will only be found if it constitutes an entire phrase.
For example, if you search for “cat”, then the word “cat” will be found, but not the
word “catalog”.
- 133 -
Text Functions – Lyrics from Clipboard
This is used to convert text from some word processing or text editing program
into lyrics in Cubase VST.
1. Type the text in the word processing program.
Separate syllables by spaces, tabs or hyphens.
2. Copy the text in the word processing program.
3. Switch over to Cubase VST.
4. Select the note where the first syllable should appear.
5. Select Lyrics from Clipboard.
Text Functions – Text to Clipboard
This menu item copies text you have selected to the Macintosh Clipboard, so that it
can be pasted in into another program.
Text Functions – Fill with Clipboard Lyrics...
This menu command automatically enters notes and corresponding lyrics, from
text that you have copied to the Macintosh Clipboard. Proceed as follows:
1. Copy some text (possibly including lines that are separated by carriage returns) to the
clipboard.
Separate syllables by spaces, tabs or hyphens.
2. Set the Snap and Quantize values to determine note length and spacing.
3. Set the Song position to where you want the notes to start appearing.
4. Select this command and fill out the dialog.
The “Bar Step...” option is only of interest if your text is separated into lines. It determines the
minimum distance between lines in the text. If you for example set this to 4, there will always
be at least four bars between the beginning of each text line.
5. Click OK.
Notes appear with one word of lyrics underneath each.
For details see the chapter “Working with Text” in the Score Layout and Printing
document.
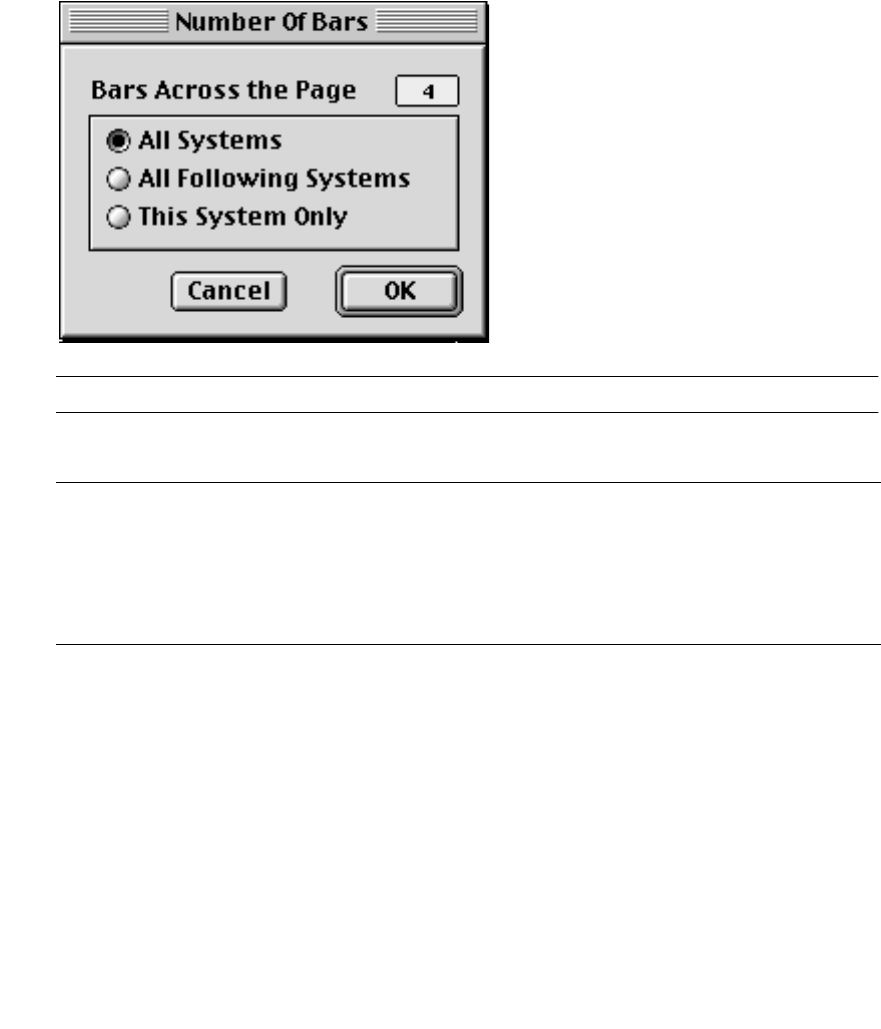
- 134 -
Text Functions - Text Settings
This menu item opens a dialog in which you can make settings for text. The options
are exactly the same as the ones available on the Text Font, Size and Style submenus.
Text Functions - Move To Verse
This function allows you to assign the selected lyrics to a verse (1-6). Different verses
are indicated by different colors in the score, but will print in black and white as
usual. You can select all lyrics in one verse only, by selecting a lyrics text block from
that verse and selecting “Same Verse” from the Select submenu on the Edit menu.
Format – Number of Bars...
❐
This function is only available in Page Mode.
This dialog is used to adjust the number of bars across the page.
Format – Insert Bar
This inserts one bar at the Song position.
Format – Remove Bar
This removes one bar at the Song position.
Option: Description:
Bars Across the page This is where you specify the number of bars across the Page.
System options These radio buttons are used to direct the “Bars across the Page” setting
to all systems, the active staff/system and all following systems or the
active staff/system only.
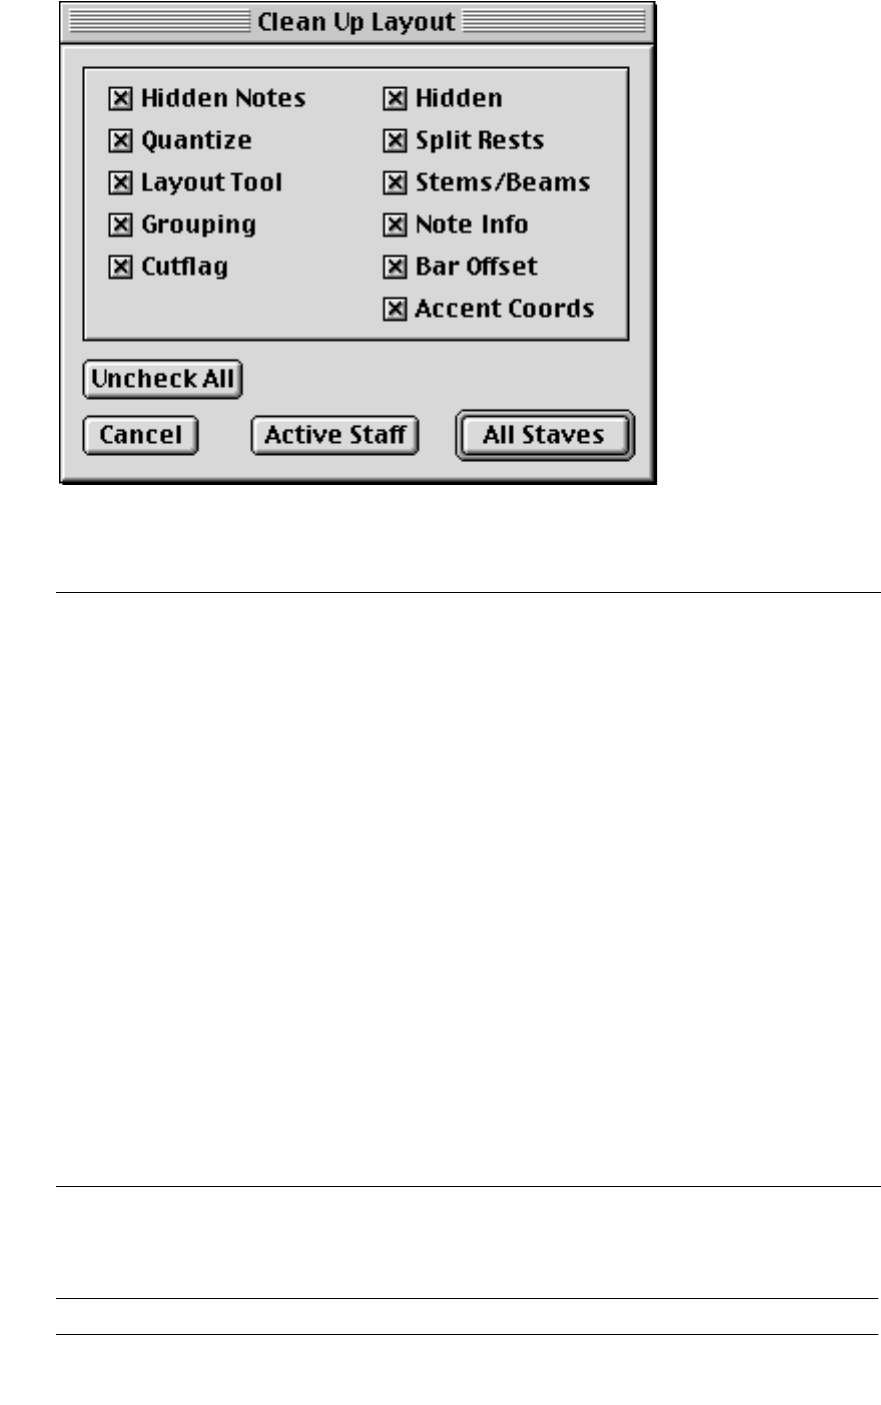
- 135 -
Format – Clean Up Layout...
This dialog allows you to delete invisible layout elements, which in effect restores
that part of the score to default settings. Open the dialog and activate the properties
you want restored, and click the “Active Staff” or the “All Staves” button (see below).
Format – Move to Next/Previous Page
❐
This function is only available in Page Mode.
Option: Description:
Hidden Notes This reveals any notes you might have hidden.
Quantize This removes any Display Quantize “exceptions” you might have added.
Layout Tool This undoes any adjustments you might have made with the Layout Tool.
Grouping This undoes/reveals any beam grouping you might have made.
Cutflag This removes any cutflag events you might have inserted.
Hidden This reveals all hidden elements.
Split Rests This restores/reveals any split multiple rests.
Stems/Beams This undoes/reveals any stem or beam adjustments you might have made.
Note Info This restores any Note Info changes you might have made to default settings.
Bar Offset This cancels all Bar Offset settings you might have made.
Accent Coords This restores Accent coordinates to their default positions.
Uncheck All This deactivates all options in the dialog.
Active Staff This closes the dialog and performs the “clean-up” (Clean Up Layout) on the
active staff only.
All Staves This closes the dialog and performs the “clean-up” on all staves.

- 136 -
This allows you to control page breaks:
1. Click on the first Grand Staff that should appear on the next/previous page so that it is
selected.
2. Select Move to Next/Previous Page from the menu.
Format – Copy To All Grand Staves
This copies the braces and broken bar line settings of the current grand staff to all
grand staves.
❐
This function is only available in Page Mode.
Format – Marker Track To Form
This function inserts rehearsal symbols and double bar lines at the position where
Marker Parts start. If you for example have three Marker Parts starting at bar 1, 17
and 33, you will get three rehearsal symbols at those positions, labelled “A”, “B” and
“C” respectively.
❐
This function is only available in Page Mode.
Format – Show/Hide Marker Track
If you select “Show Marker Track”, the name of Marker Parts will be displayed, at
their start position. This is independent of whether the Marker Track is visible in the
Arrange window or not.

- 137 -
Format – Align Elements
This menu option allows you to graphically align symbols on the screen.
1. Select the object that has the “correct” position.
2. With [Shift] pressed, select the objects you want aligned with the object you selected
in step 1.
3. Select one of the options from the “Align Elements” menu:
• The “Dynamics” option is a special function for aligning dynamic symbols only.
Format – Score Notes to MIDI
This function takes the Display Quantize and other “graphic” formatting you might
have done to your score and applies it to the MIDI data. In other words, after using
this function, notes will have “perfect” lengths and positions, just as they are dis-
played in the score. Proceed as follows:
1. For safety, create a copy of the Track, in the Arrange window.
2. Open the Track in Score Edit.
3. Make sure the notes you want to affect are not hidden.
4. If you want only a part of the score converted, use the To menu to specify this section.
5. Select “Score Notes To MIDI”.
The notes get “converted”.
Format - Spacer and Hidden to Layout
This function moves all selected “Spacer” and “Hidden” Events (taking the “To” pop-
up menu into account) from the note layer to the Layout layer. This is convenient if
you need custom spacing of score events in the full score but not in the extracted
parts, or vice versa.
Option: Description:
Left Sides The left sides of the objects will be aligned.
Right Sides The right sides of the objects will be aligned.
Top Edges The top of the objects will be aligned.
Bottom Edges The bottom of the objects will be aligned.
Horizontal Center The objects will be aligned horizontally.
Vertical Center The objects will be aligned vertically.

- 138 -
Auto Layout
❐
These functions are only available in Page Mode.
This makes the program “walk through” the score and make adjustments to mea-
sure widths, staff distances etc, automatically.
Before using Auto Layout you should adjust the “Default Number of Bars across
Page” value in the Preferences–Scores–Beams and Bars dialog to give the program
a hint on how many measures you want across the page in a “normal” part of the
score.
Proceed as follows:
1. If you want the command to only affect one system, select any staff in that system.
2. Select one of the options from the Auto Layout menu:
Option: Description:
Move Bars Only affects the measure widths in the currently selected staff (one line only).
Move All Bars Same as above, but affects all measures from the selected staff and onwards.
Move Staves Affects vertical staff distance, starting with the selected staff.
Hide Empty Staves This hides all empty staves. Note that polyphonic/split staves are in this case
treated as one entity, if the clef in the upper system differs from that in the
lower system. That is, a piano staff is considered “empty” only if there are no
notes on either staff.
Bars & Staves A combination of Move All Bars and Move Staves, plus automatic calculation
of the number of bars across the page. However, the “Default Bars Across the
Page” setting always constitutes the maximum number of measures across
the page.
Spread Page This corrects the vertical layout of the staves on the current page, so that they
“fit onto the page”. In other words, this removes white space at the bottom of
the page.
Spread All Pages Same as above, but for all pages, starting with the current.
Optimize All All of the above in one fell swoop. This procedure might take some time but
usually yields great results.

- 139 -
Global Settings – MIDI Meaning...
This dialog is used to set up how note symbols added to the score should affect
MIDI playback
1. Add the desired symbols to the score (accents, staccato, tenuto etc.).
2. Open the MIDI Meaning dialog.
3. Activate MIDI meaning by ticking the “Active” checkbox.
4. Set up how the different symbols should affect length and velocity.
See below.
5. Close the dialog.
6. Play back the piece to check the settings.
Option: Description:
Symbol column This is used to set which effect the symbol should have on MIDI playback.
Velocity column Velocity can be left unaffected (Off), you can raise the notes' current veloci-
ties (values above 100%) or lower it (values below 100%).
Length column Length can be left unaffected (Off), you can lengthen the notes (values
above 100%) or shorten them (values below 100%).
Active This is used to turn the MIDI Meaning function on and off altogether.
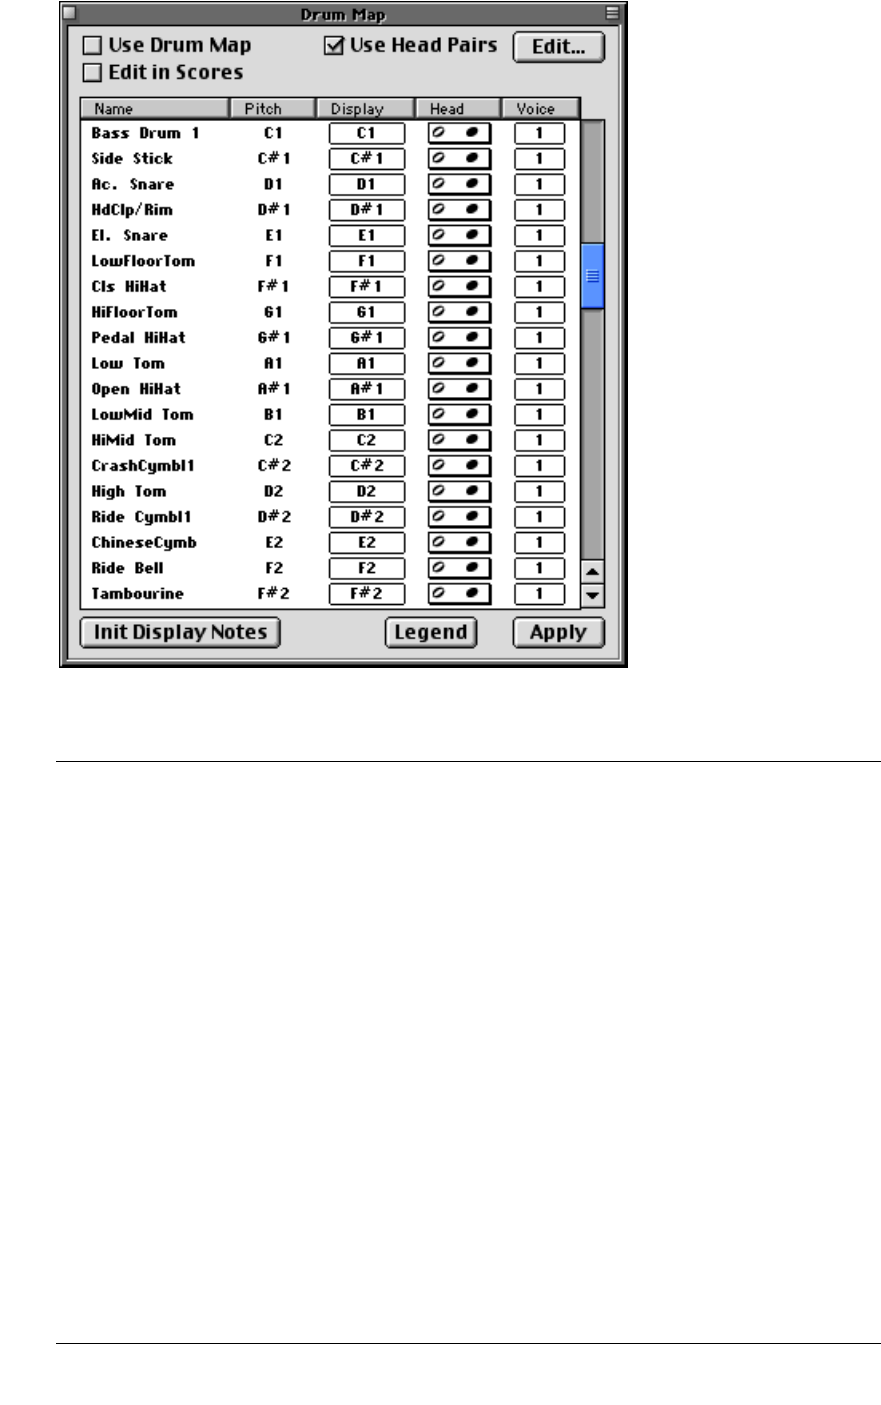
- 140 -
Global Settings – Drum Map...
This dialog is used to set up the scoring drum map which “regulates” the appear-
ance of drum notes.
Option: Description:
Use Drum Map When this is activated the Drum Map is used for the active Staff.
Use Head Pairs When this is activated, you have two heads for each drum note. The left head
will appear if the note is a half note or longer. The right will appear if the note is
shorter than a half note.
Edit in Scores When this is activated, you can edit the actual Drum map settings in the score.
That is, transposing a note will only affect the display pitch of the drum sound,
double clicking a note allows you to specify a note head style for that drum
sound, etc.
Note that you must leave the dialog open for this to work - closing the dialog au-
tomatically turns this option off, allowing you to edit the notes in normal fashion.
Edit This button opens a dialog which allows you to edit Drum head pairs.
Name This is the Drum Sound name, which can be edited.
Pitch For Drum Tracks this is the In-Note in the Drum Map that plays this sound. For
MIDI Tracks, this is the pitch of the MIDI note in the Track.
Display The vertical position for this Pitch in the score. For example you can make all
notes with pitch F3 appear as if they had the pitch A4.
Head This field contains a pop-up which allows you to select one of a number of note
heads for this pitch.
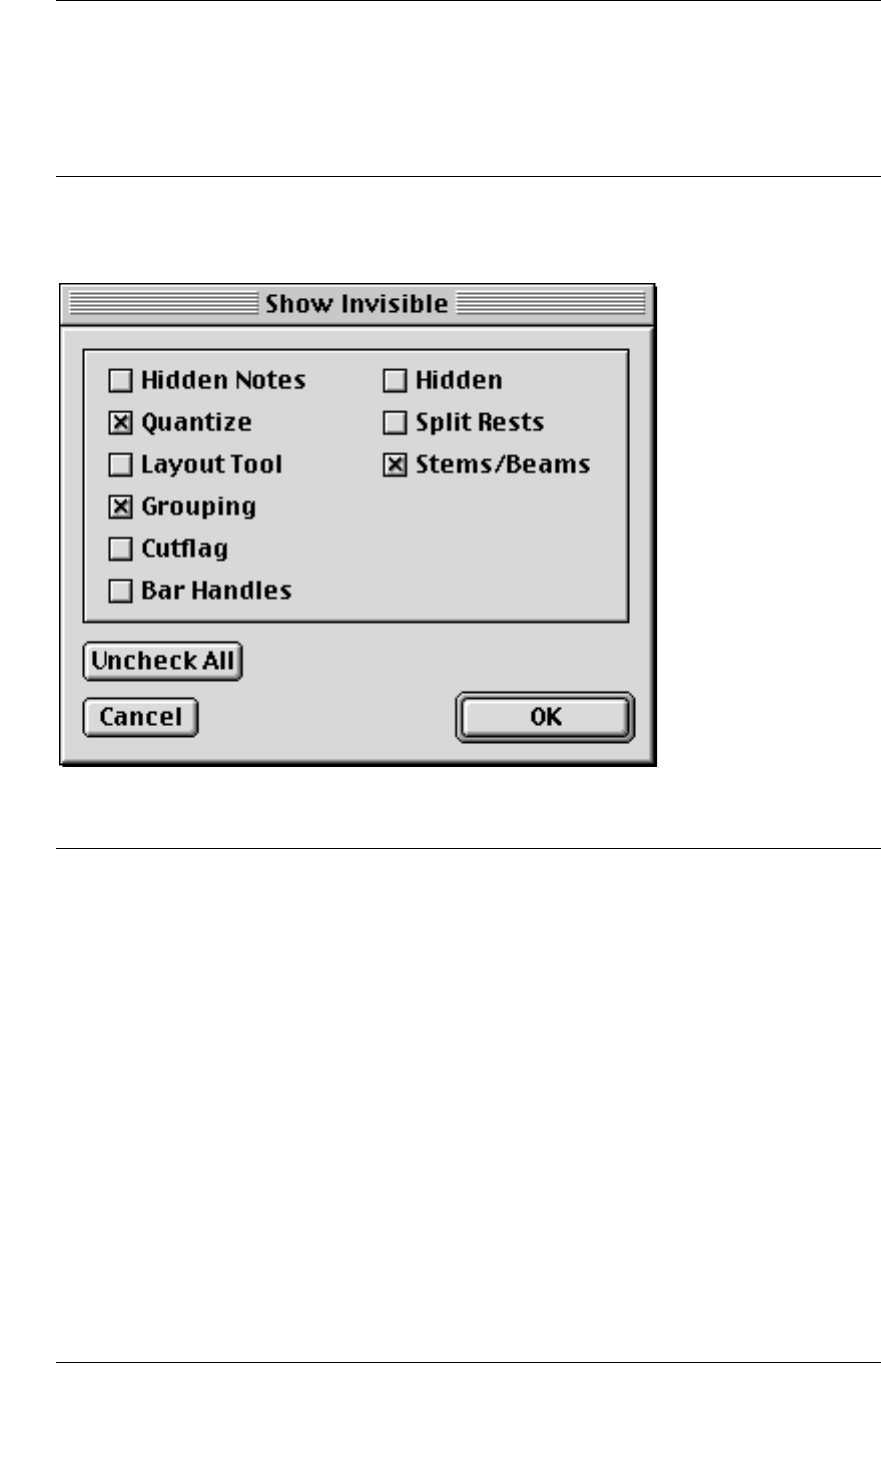
- 141 -
Global Settings – Show Invisible...
This menu item opens up a dialog that is used to make layout adjustments appear
as text in the score so that you know where such adjustments have been made.
You can also hide and display “invisible” items using the Show Invisible Filter Bar in
the Score window.
Voice This allows you to make all notes with a certain pitch appear in a certain poly-
phonic voice.
Init Display Notes This resets the Display note values to default settings.
Legend This adds the name of each drum sound above each note that plays it.
Option: Description:
Hidden Notes This reveals any notes you might have hidden.
Quantize This displays markers in the score where you have made Display Quantize “ex-
ceptions”.
Layout Tool This displays markers in the score where you have made adjustments with the
Layout Tool.
Grouping This displays markers in the score where you have made beam groupings.
Cutflag This displays markers in the score where you have inserted Cutflag Events.
Bar Handles This reveals the bar handles.
Hidden This displays markers in the score for each hidden element (notes excepted).
Split Rests This displays markers in the score wherever you have split multiple rests.
Stems/Beams This displays markers in the score where you have made any stem or beam ad-
justments.
Uncheck All This deactivates all options in the dialog. When all options are deactivated, the
button changes name to “Check All”.
Option: Description:
- 142 -
Global Settings – Edit Guitar Lib...
This dialog allows you to add combined fret and chord symbols to the score. It also
allows you to create such symbols for later use. For details see the chapter “Work-
ing with Symbols” in the Score Layout and Printing document.
Option: Description:
Use for Make Chords When this is activated, and you use the Make Chords function, this guitar
symbol will be added to the score when the corresponding chord is found.
Small Display This is a convenience function for the dialog itself that allows you to see
the fret symbols in a small or large format.
Save with Song This determines whether the setting is saved with the Song or in the Cu-
base VST Preference file.
Guitar symbol This is used to define the chord. By clicking on the frets you add strings to
the cord. You can click at the top of the symbol to define whether a string
should be played with open tuning or not at all. You can also click to the
left of the frets to define a position on the fretboard (roman numbers).
Chord symbol This column automatically displays the chord you have specified on the
frets.
New This creates a new chord symbol in the list.
Remove This removes the selected symbol from the list.
Load This allows you to Load ready-made symbol files from disk.
Save This allows you to save your chords to disk.

- 143 -
Global Settings – Show/Hide Coordinates
This menu item hides/shows the Coordinate window which helps you position
symbols and other elements on the page, by indicating their exact coordinates.
❐
This function is only available in Page Mode.
Export – Export Score
❐
This function is only available in Page Mode.
This menu item opens a file dialog allowing you to export a page as a picture file,
for import into a drawing or DTP program.
• You can choose to export one page, all pages or just the selection area (see below).
• You can choose between three picture formats:
• EPSF – Encapsulated PostScript™ File. An advanced and precise object oriented image for-
mat used by most Layout (DTP) programs.
• Illustrator 88 – More or less the same as EPSF, but with better compatibility with the Adobe Il-
lustrator™ program.
• PICT – A Bitmap (rasterized) file. If you select this format, you must also specify a resolution.
The higher the value, the better the quality, but also the larger the file.
Export – Select Range
❐
This function is only available in Page Mode.
This menu item is used to select which part of the current page to export as a
graphic file (see Export Score above).
When you select this menu item the pointer turns into a cross. Use this to drag a
rectangle that covers the part of the page you want to export.
Force Update
This “forces” the program to redraw the entire screen. Use this in case the screen
isn't redrawn properly (as a result of the computer's calculation of the page's ap-
pearance).
Display Tracks
This menu item lists all Tracks in the Arrange window. Selecting a Track adds/re-
moves it to/from the Score Editor.
Display Layout
This menu item lists all Layouts defined in the “Page Mode Settings” dialog. Select-
ing one opens that Layout and its corresponding Track combination in Score Edit.

- 144 -
9
The Windows Menu

- 145 -
Transport Bar - Hide/Show
This allows you to switch between hiding and showing the entire Transport Bar.
You can use the computer keyboard to activate the functions on the Transport Bar,
even though it is hidden.
Transport Bar - Display Modes
The remaining options on the Tranport Bar submenu are for selecting a display
mode for the Transport Bar. You can also step between the display modes by click-
ing the zoom box on the Tranport Bar.
Hide/Show Toolbar
This allows you to switch between hiding and showing the Toolbar, the strip with
buttons for activating often used functions in Cubase VST.
Hide/Show Big Time
This hides/shows a big version of the position display. You can switch between
time code and meter representation by clicking in the window.
Tile/Tile Editors
These commands resize and rearrange windows on the screen.
• Tile arranges windows in rows and columns, regardless of whether they are Editors or
Arrangements.
• Tile Editors is the same as Tile Windows, but only acts on Editor windows.
• Stack makes windows partially overlap.
- 146 -
Window Sets – New Window Set...
This dialog allows you to create a new Window Set.
Window Sets – Edit...
This dialog is used for changing the names of Windows sets (double click on the
name) or for deleting Window Sets (select a set in the list and click Remove).
Option: Description:
Name line Here you enter the desired name for the Window Set.
All Windows This stores the “state” (open/closed, position etc.) of all windows, including
settings for each one.
Top Window Only This stores the state of the currently active window only.
Include Settings If this is activated, the settings for the currently active window are included.

- 147 -
Window Sets – Window Set List
The remaining part of the Window Set submenu contains a list of all currently de-
fined Window Sets. Selecting one recalls it.
Arrangements
This submenu contains a list of all Arrangements in the Song, including Arrange-
ments that have been closed with the Set Aside option. Selecting one opens the
window (if it is set aside) and makes it active.
Movies
This submenu contains a list of all QuickTime movies that have been added using
the Add Movie function in the Movie Setup dialog. Selecting one makes the win-
dow active (brings it to the front). See the chapter “Quicktime Movie capabilities” in
the Getting into the Details document.
Other
This submenu contains a list of all windows that are open and that are not Arrange-
ments or QuickTime movies. Selecting one makes the window active (brings it to
the front).

- 148 -
10
The Help Menu

- 149 -
Standard Macintosh Items
At the top of this menu you may find standard items, put there the by the Macin-
tosh operating system. These are not used in Cubase VST.
Steinberg Web Items
The remaining items on the menu allow you to visit Steinberg sites on the Internet,
where you can get support, update information and communicate with other Cu-
base VST users. Note that you need a working Internet connection for this to work.
