AgentPortal Mitel 6140 Install & User Guide
User Manual: Mitel 6140 Install & User Guide
Open the PDF directly: View PDF ![]() .
.
Page Count: 72
- Introduction
- System requirements
- Agent Portal Server
- Agent Portal Client
- Agent procedures for Agent Portal Client
- Appendix A: Agent Portal Control programmer reference
- Glossary
INSTALLATION AND USER GUIDE
Introduction 1
Introduction
About 6140 Agent Portal
Mitel Networks™ 6140 Agent Portal allows an agent to receive call information via a number of different
applications that can be configured to ‘pop’ or display automatically on any desktop. Agent Portal consists
of two components; the Agent Portal Server and a Client. The Client is either the default Client, that is
shipped with the product, or a toolkit that can be used to develop a customized application. Agent Portal
uses MiTAI software to receive call events sent from the PBX to the Agent Portal Server which then
transmits them to the Client via TCP/IP. (See Figure 6-1)
Figure 6-1 Agent Portal architecture
Agent Portal Server
The Agent Portal Server performs the following tasks:
• starts and stops Agent Portal sessions, monitors devices and logs agents in and out of sessions
• receives data from the PBX via MiTAI
• for each call, collects details and sends this data to the agent
• receives login requests from the Client
In addition, the Agent Portal Server can be integrated with a custom Interactive Voice Response (IVR)
system to allow data to be transmitted from the IVR to the Agent Portal Server which then transmits it to
the Client.
The method used to physically connect the Agent Portal Server to the PBX depends on the PBX model
you are using. For more information on the server hardware requirements, refer to “Agent Portal Server
requirements” on page 5.
2 Introduction
Client
The client receives call records from the Agent Portal Server, via winsock. The client uses a
programmable component, Agent Portal Control, to communicate between the Agent Portal Server and
the client. The client interface to Agent Portal Control is either Agent Portal Client, the default interface
shipped with the product, or Agent Portal Control, a toolkit that can be used to develop a customized
application. For more information on the Agent Portal Control and the default interface, refer to:
• “Agent Portal Client” on page 2
• “Agent Portal Control” on page 2
Agent Portal Client
The Agent Portal Client is the default client interface that is shipped with Agent Portal. The Agent Portal
Client is programmed to integrate and exchange data with the following applications:
• text editor (Call Pad)
• Microsoft Outlook
• any application that supports Active Server Page (ASP) scripts
• any application that can receive call details as command-line arguments
• DDE
Agent Portal Control
The Agent Portal Control is a toolkit that can be used to develop an application to handle the
communication between the Agent Portal Server and the Client applications. It is a programmable OLE
Custom control (OCX) program that allows agent applications to interact with the Agent Portal Server.
For more information on the fundamentals of the Agent Portal Control components, refer to “Appendix A:
Agent Portal Control programmer reference” on page 55.
Mitel PBX
Agent Portal receives call events from one of the following Mitel PBXs:
• SX-200
• SX-2000
• 3300 ICP
Introduction 3
What this guide contains
This guide is intended to be used to install, configure and administer the Agent Portal system. This guide
is not intended to be used by call center agents. For your convenience the pdf file, Agent Procedure.book,
has been included on the CD and can be distributed to Agents. This file contains only those procedures
used by call center agents.
This guide is organized into the following sections:
• “System requirements” on page 5, details the hardware and software requirements for Agent Portal.
• “Agent Portal Server” on page 9, describes how to install and configure the Agent Portal Server. It also
includes some administration procedures.
• “Agent Portal Client” on page 27, describes how to install and configure the Agent Portal Client.
• “Agent procedures for Agent Portal Client” on page 47, provides agent procedures as well as some
basic troubleshooting tips.
• “Appendix A: Agent Portal Control programmer reference” on page 55
• “Glossary” on page 69, contains a list of terms used in this guide.
4 Introduction
System requirements 5
System requirements
If you are using the default Agent Portal Client and running only Agent Portal software, the following
recommended requirements apply. These requirements may change if you are using a customized Client
or running additional call center applications. For more information, refer to:
• “Agent Portal Server requirements” on page 5
• “Agent Portal Client workstation requirements” on page 6
• “PBX requirements” on page 6
NOTE: Refer to “Connection limitations” on page 7, for information on Agent Portal limitations.
Agent Portal Server requirements
Before installing the Agent Portal Server, verify that you have satisfied the following recommended
server hardware and software requirements.
Minimum hardware requirements
For optimum performance, the server should be equipped with the following minimum hardware:
• Intel Pentium II 550 MHz CPU
• 256 MB RAM (minimum)
• 200 MB of free space
• CD-ROM drive
• 3.5 inch floppy disk drive
• PS2 or USB mouse and keyboard
• Network Interface Card (NIC)
• Parallel port on server for security access module (SAM)
• Internal MODEM card (optional)
• Appropriate PBX connectivity:
• SX-200 requires TALK TO CX card
• SX-2000 requires the appropriate connectivity kit - AFC or Application Service Unit (ApSU)
• 3300 ICP via TCP/IP
Minimum software requirements
The following third-party software is required for use with the server:
• Windows 2000 Professional or Windows 2000 Server with Windows 2000 Service Pack 3
• MODEM card driver, if card is installed
• Microsoft Networking (TCP/IP)
• Adobe Acrobat Reader (found on the Mitel Networks 6140 Agent Portal Installation CD)
• Driver software for PBX link interface cards:
• SX-200 requires MiTAI runtime version 8.0.11
• SX-2000 requires MiTAI runtime version 8.0.11
• 3300 ICP requires MiTAI runtime version 11.0.1 or higher
6 System requirements
Agent Portal Client workstation requirements
Before installing the Agent Portal Client, verify that you have satisfied the following recommended client
workstation hardware and software requirements.
Minimum hardware requirements
For optimum performance, each customer-supplied client workstation should be equipped with the
following hardware:
• Intel Pentium 200 MHz CPU
• 64 MB RAM
• 150 MB free disk space
• SVGA graphics supporting a resolution of at least 800 x 600 pixels (optimum resolution is 1024 x 768)
• Network Interface Card (NIC)
• PS2 or USB mouse and keyboard
Minimum software requirements
Call information is delivered to a set of third party applications including Microsoft Outlook. Access is
required to any third party applications that you have specified during the setup procedures.
In addition, the following software is required for use with the Client:
• Internet Explorer version 5.5 with Service Pack 2
• Microsoft Outlook 2000
• TCP/IP protocol enabled
• Adobe Acrobat Reader
PBX requirements
The following resources are required for use with the Mitel PBX:
• Appropriate PBX software:
• SX-200 requires LW18
• SX-2000 requires LW 31 (T stream)
• 3300 ICP requires 3.3 (will support MiTAI 11.0)
• Appropriate MiTAI software
• SX-200 and SX-2000 with AFC requires version 8.0.11
• 3300 ICP and SX-200 with ApSU requires 11.0.1
• Appropriate licensing
• All PBXs must be licensed to use MiTAI
• Verify that you have enough monitors to monitor your agents plus device extensions and trunks
• Class of Service (CoS) options enabled in the SX2000 and 3300 ICP:
• HCI/CTI/TAPI Call Control must be set to Yes
• HCI/CTI/TAPI Monitor Allowed must be set to Yes
System requirements 7
Connection limitations
The Agent Portal Server component is intended for use on Windows 2000.
• Use Windows 2000 Server if:
• 10 or more 6140 clients will be connected to the 6140 Server.
• MiTAI Server is used (PBX connected by TalkTo, or AFC card)
• Use Windows 2000 Professional if:
• Less than ten 6140 clients will be connected to the 6140 Server
• MiTAI Remote is used (3300, or SX-2000 connected by APSU)
8 System requirements
Agent Portal Server 9
Agent Portal Server
Before you can begin using Agent Portal, you must install and configure the Agent Portal Server software
using the following procedures, in the order listed.
• “Installing the security access module” on page 9
• “Installing 6140 Agent Portal Server software” on page 10
• “Accessing the Agent Portal Server” on page 17
• “Configuring the Agent Portal Server” on page 19
Once the software is configured, you can start using it. For more information, refer to “Using the 6140
Agent Portal Server” on page 23.
NOTE:MATAI must be installed and running before you install Agent Portal.
Installing the security access module
The security access module (SAM) provides the Agent Portal with a System Identifier (ID) code. This ID
code, in combination with a password, allows you to enable the licenses that you have purchased. The
SAM must be installed or Agent Portal will not function.
Attach the SAM to the server’s parallel port using the following procedure:
1. Insert the SAM into the server’s parallel port. (See Figure 4-1)
2. Tighten the screws on either side of the SAM.
Figure 4-1 Installation of SAM
10 Agent Portal Server
Installing 6140 Agent Portal Server software
Before installing Agent Portal Server, verify that you have satisfied the recommended hardware and
software requirements. For more information, refer to “System requirements” on page 5. Use the
following procedure to install Agent Portal Server.
1. Verify that MATAI is installed and running before you install Agent Portal.
2. Insert the Mitel Networks™ 6140 Agent Portal CD into the drive.
The Agent Portal Installation screen is displayed. (See Figure 4-2)
Figure 4-2 Agent Portal Installation screen
3. Select the Install Agent Portal Server option.
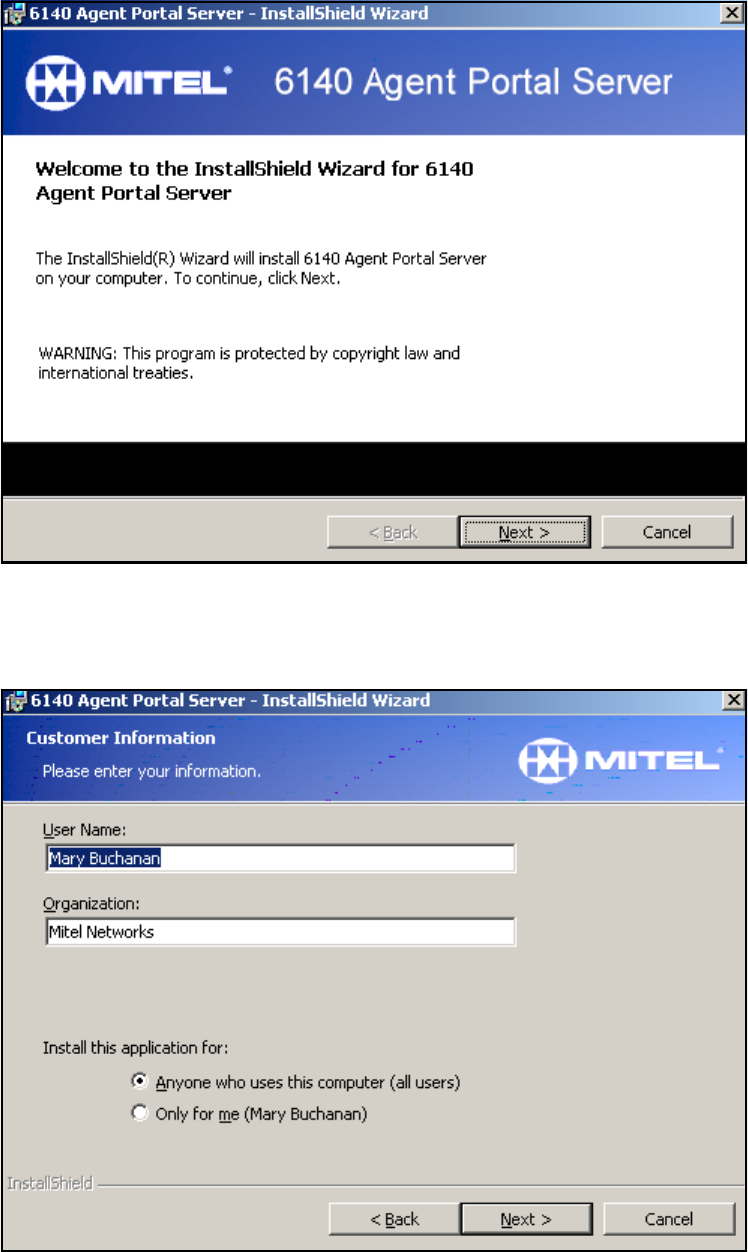
The Install Wizard is displayed. (See Figure 4-3)
12 Agent Portal Server
5. Enter your name and organization.
6. In the ‘Install this application for’ field, select the appropriate option.
7. Select Next.
The Setup Type window is displayed. (See Figure 4-5)
Figure 4-5 Setup Type window
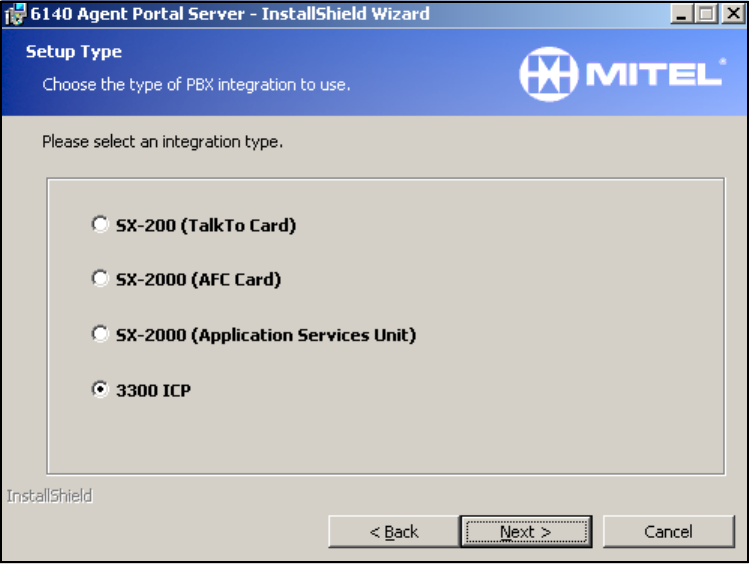
8. Select the PBX type to which the Agent Portal Server will integrate.
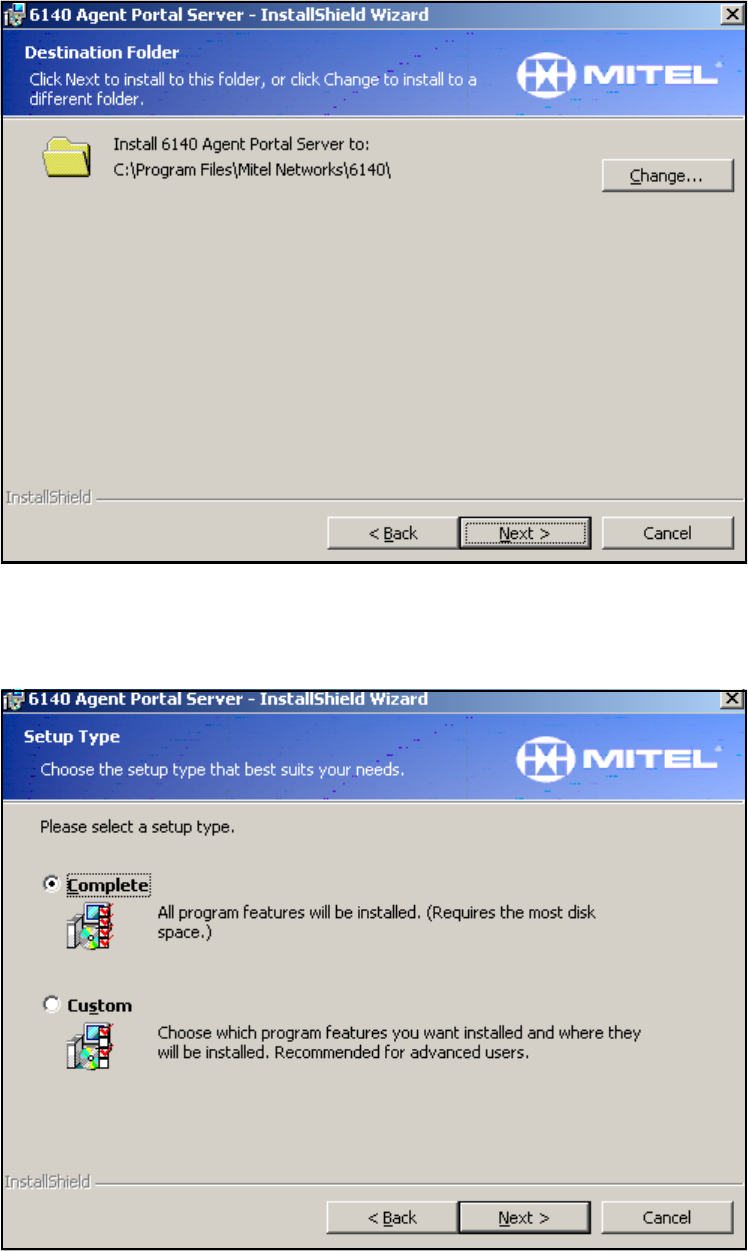
The Destination folder window is displayed. (See Figure 4-6)
14 Agent Portal Server
10. Select one of the following setup types:
• Complete. For more information, refer to “Complete Installation of Server Software” on page 14.
• Custom. For more information, refer to “Custom Installation of Server Software” on page 15.
Complete Installation of Server Software
A Complete installation installs the Server software as well as the MITAI support files. Use the following
procedure to perform a complete installation.
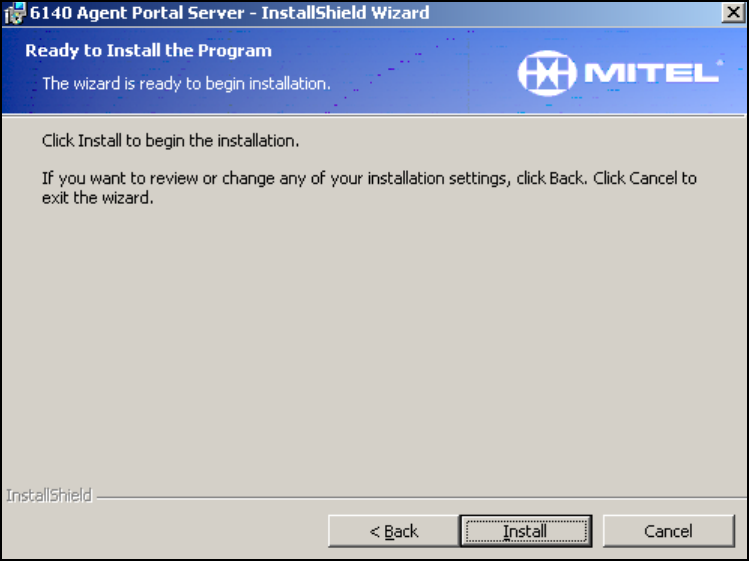
1. Select Complete.
2. Select Next.
The ‘Ready to Install the Program’ window is displayed.
Figure 4-8 Ready to Install window
3. Click Install.
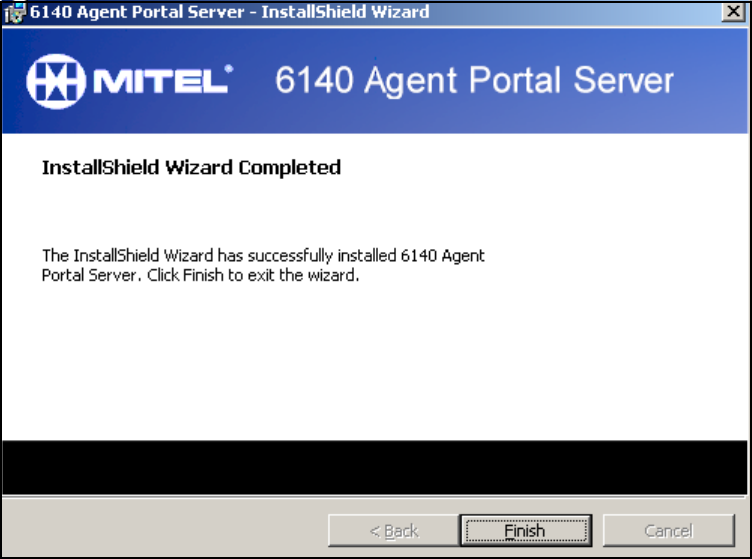
The software is installed and the Install Complete window is displayed. (See Figure 4-9)
Agent Portal Server 15
Figure 4-9 Install complete window
4. Click Finish.
A dialog box is displayed indicating that you must restart your system.
5. Restart your system for the changes to take effect.
Custom Installation of Server Software
A custom installation allows you to select which program features to install. You have a choice of
installing the server software and the MITAI software.
1. Select Custom.
2. Select Next.
The Custom Setup window is displayed. (See Figure 4-10)

16 Agent Portal Server
Figure 4-10 Custom setup window
3. Verify the storage requirements of each feature by selecting the feature. The storage requirements
are displayed in the right pane.
4. Select the down arrow beside the feature you wish to install.
A set of install options is displayed. (See Figure 4-11)
Figure 4-11 Installation options
5. For each feature, select the appropriate install option.
6. If necessary, change the storage location of the feature by selecting the feature and selecting
Change.
The ‘Change Current Destination’ folder window is displayed.
7. Browse to the appropriate location and click OK to confirm the folder name where you wish to store
the feature.
8. Select Next.
The ‘Ready to Install the Program’ window is displayed.
9. Select Install.
The ‘InstallShield Wizard Complete’ window is displayed.
10. Select Finish.
The features you selected are installed on your workstation. A dialog box is displayed indicating that
you must restart your system.
11. Restart your system for the configuration changes to take place.
Agent Portal Server 17
Accessing the Agent Portal Server
When you restart your system, the Agent Portal software is automatically started and the icon is
minimized in your system tray. If you exit from the Agent Portal server interface, the software must be
restarted.
Use the following procedure to access the Agent Portal Server interface:
1. From the Start menu, select Program Files/Mitel Networks/6140/Server.
The server icon is minimized in your system tray. (See Figure 4-12)
Figure 4-12 Agent Portal Server icon minimized
2. When the icon is blue, double click on the icon in the system tray, to display the interface.
There is a delay while the server initializes the connection to the Mitel PBX; the red icon turns blue
once the connection is established.
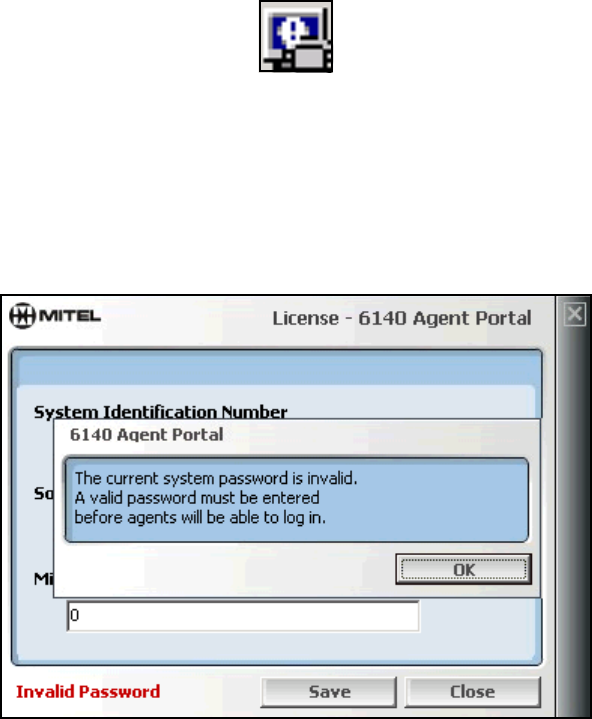
If this is the first time you have accessed Agent Portal after installing it, the Invalid password window
is displayed. (See Figure 4-13)
If this is not the first time you have accessed Agent Portal, go to step 8.
Figure 4-13 Invalid password window
3. Click OK to accept this message.
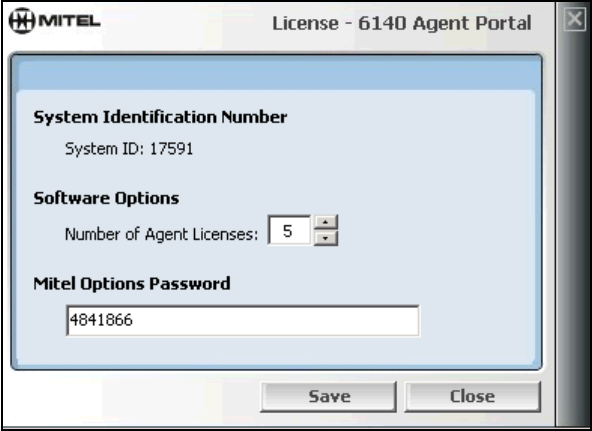
In the License window, the System Identification number is updated automatically from the security
access module (SAM) that is plugged into the parallel port of the Agent Portal Server.
4. Enter the number of agent licenses you have purchased, using the arrow keys or by typing it.
5. Enter the Mitel-supplied password in the Mitel Options Password field.
6. Select Save.
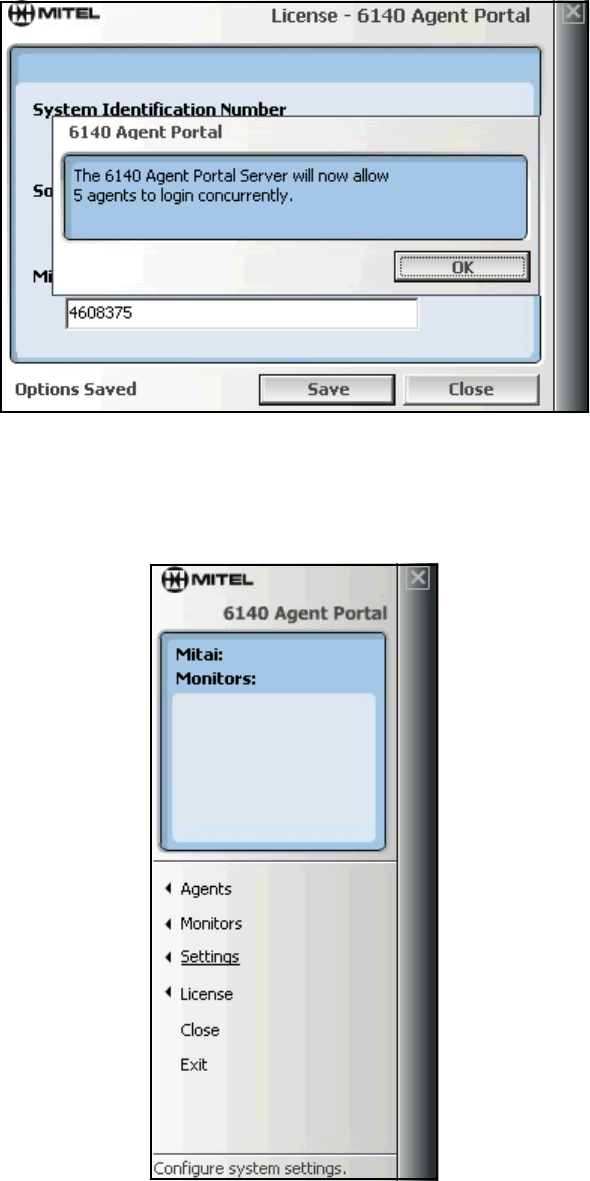
An acceptance message is displayed. (See Figure 4-14)
18 Agent Portal Server
Figure 4-14 License acceptance message
7. Select OK. As soon as this connection is established, the interface is displayed.
8. You may select Close or click the Windows Close button to minimize the interface. The system
continues running and the agent connections are not affected. (See Figure 4-15)
Figure 4-15 Agent Portal Server interface
Caution: Do not select Exit. If you select Exit, the Agent Portal system is shut down and
agents are disconnected from their connections.
Agent Portal Server 19
Configuring the Agent Portal Server
You use the Agent Portal Server to monitor devices, enable event logging to files and log agents out of the
system. You configure the set up for these functions using the Agents, Monitors and Settings options in
the Agent Portal Server interface. This configuration information is stored in the APS.ini file.
Configure the Agent Portal Server using the following procedures:
• “Configuring PBX type” on page 19
• “Configuring connection details” on page 19
• “Enabling system logging” on page 19
• “Enabling monitoring for a device” on page 21
Configuring PBX type
Agent Portal receives calls from a Mitel Networks™ SX-2000, 3300 ICP or SX-200. The system default
PBX type is SX-2000/3300. You must identify which Mitel PBX your system uses. Use the following
procedure to specify your PBX:
1. From the Agent Portal Server interface, select Settings.
The Settings window is displayed. (See Figure 4-16)
2. In the PBX Type pane, select SX-2000/3300 ICP or SX-200.
3. Select Save.
Configuring connection details
Some default connection settings have been pre-configured on your system. However, it may be necessary
to re-configure these settings for your particular system.
Use the following procedure to your connection details:
1. From the Agent Portal Server interface, select Settings.
The Settings window is displayed. (See Figure 4-16)
2. In the ‘Winsock Local Port’ field, enter the local port number on the Agent Portal Server.
This is the port to which the Agent Portal Client connects. The default setting for this port is 50000.
3. In the ‘MiTAI Reconnect Interval’ field, enter the number of seconds.
This is the time interval between when the MiTAI connection to the PBX is broken and when the
system attempts to reconnect. The default re-connection interval is 30 seconds.
4. Select Save.
Enabling system logging
System logging is set to disabled when you install Agent Portal. You can enable logging for the Agent
Portal Server and client as well as logging for the MiTAI component on the server. Use the following
procedure to specify the logging required for your system:
1. From the Agent Portal Server interface, select Settings.
The Settings window is displayed. (See Figure 4-16)
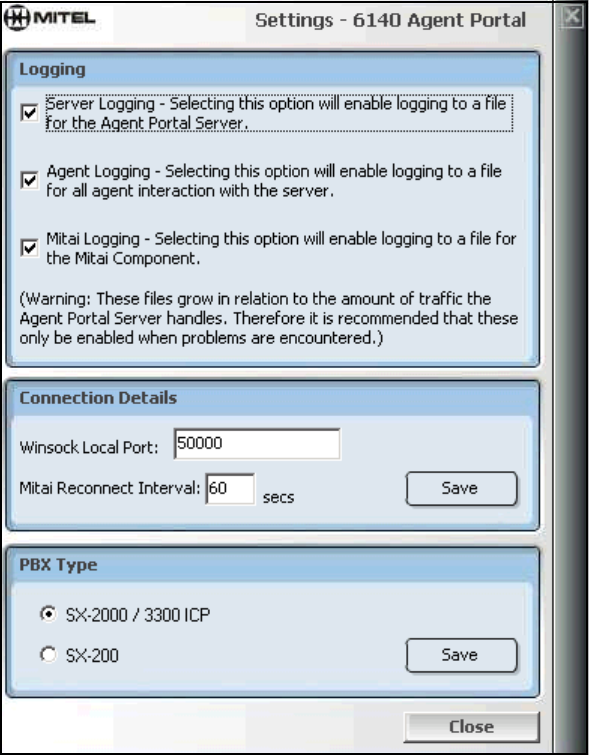
20 Agent Portal Server
Figure 4-16 Settings window
2. Select the type of logging you wish to enable by selecting one of the following options:
• Server Logging: logs all the Agent Portal Server actions. These log files are stored in
c:/Program Files/Mitel Networks/6140/Server/Logs/Server.
• Agent Logging: logs all the interaction between the Agent Portal Client and Server. These log
files are stored in c:/Program Files/Mitel Networks/6140/Server/Logs/Agent.
• Mitai Logging: logs all MiTAI server actions. These log files are stored in c:/Program Files/Mitel
Networks/6140/Server/Logs/MiTAI.
When you select one of these options, the logging is immediately enabled.
NOTE: When the logging option is on, large amounts of information is collected. To reduce unnecessary
storage on your hard drive, set the logging option to ‘off’ unless you require the logs for system debugging
purposes.
Agent Portal Server 21
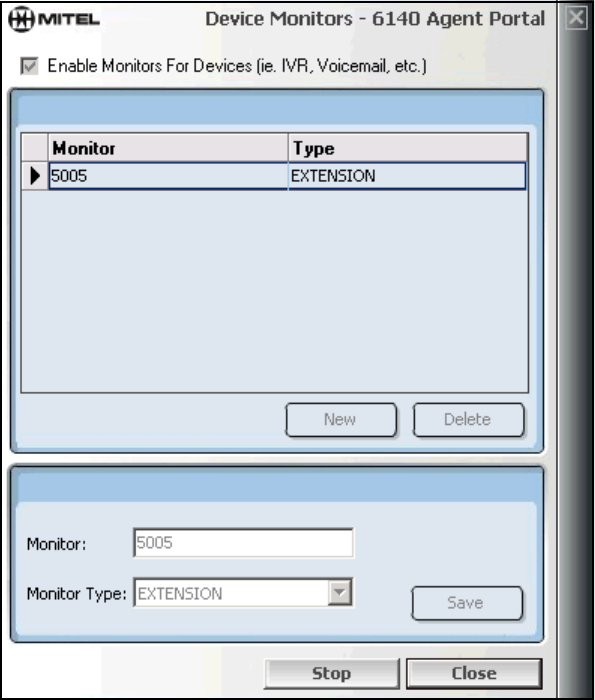
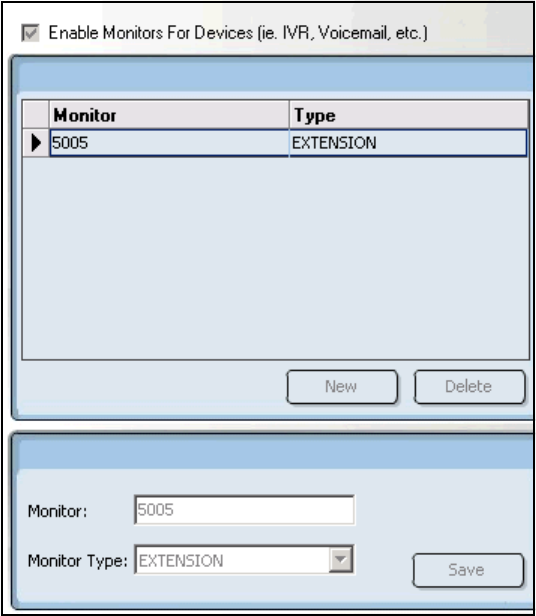
Enabling monitoring for a device
The Device Monitors window displays the extensions or trunks that route external calls through the device
types such as IVRs or Voice Mail. You also use this window to start and stop the monitoring of extensions
and trunks. Use the following procedure to initially configure monitoring for devices or to specify an
additional device for monitoring:
1. In the Agent Portal Server interface, select Monitors.
The Device Monitors window is displayed. (See Figure 4-17)
Figure 4-17 Device Monitors window
2. Verify that the option, ‘Enable Monitors for Devices’, is enabled.
• If the calls do not go through a device (for example a voicemail or IVR system), the option must
be unchecked.This disables all the fields in the Device Monitors window and you are finished.
• If the calls do go through a device, the option must be checked. Continue to step 3.
3. Stop monitoring if necessary:
• If you have previously configured monitoring, select Stop to stop the monitoring of all devices.
• If you have not previously configured monitoring, continue to step 4.
4. Select the action you wish to perform:
• If you wish to edit an existing monitor, select the monitor.
• If you wish to add a monitor, select New in the upper pane.
The fields in the lower pane are enabled. If you selected New, the Monitor field is cleared.
5. In the ‘Monitor’ field, enter the extension or trunk number that you wish to monitor.
6. In the ‘Monitor Type’ field, select the appropriate type.
22 Agent Portal Server
• Select Trunk if the device uses trunks.
• Select Extension if the device uses extensions.
You can have a combination of Monitor Types displayed in this window.
7. Select Save.
8. Repeat steps 3 through 7 for each device you wish to monitor.
9. Select Start to restart device monitoring for the system.
All the devices listed in this window are currently being monitored.
Agent Portal Server 23
Using the 6140 Agent Portal Server
You use the Agent Portal Server to perform the following procedures:
• “Rebooting the Agent Portal system” on page 23
• “Updating license information” on page 24
• “Managing logged-in agents” on page 24
Rebooting the Agent Portal system
If it is necessary to reboot the system, use the following procedure:
1. Notify agents that the Agent Portal system is shutting down.
2. In the Agent Portal Server interface, select Exit.
Agents are disconnected from the Agent Portal system but are not disconnected from their calls. An
error message is displayed in the Agent Portal Server interface. (See Figure 4-18)
Figure 4-18 Error message
3. When you have completed your required maintenance, start the Agent Portal Server from the Start
menu by selecting Programs/Mitel Networks/6140/Agent Portal Server.
There is a delay while the server initializes the connection to the Mitel PBX. As soon as this
connection is established, the interface is displayed and the system is running.
4. Notify the agents that the system is running and they must now login to Agent Portal system
When you restart the system, the agents are not automatically logged in to the client.
24 Agent Portal Server
Updating license information
The current Agent Portal Client licenses were enabled the first time you started your system. The License
window allows you to enable any additional licenses that you have purchased. If you have increased the
number of licenses for Agent Portal, use the following procedure to update the license information.
1. From the Agent Portal Server interface, select License.
The License window is displayed. (See Figure 4-19) The System Identification number is displayed
automatically.
2. In the field, ‘Number of Agent Licenses’, use the arrow keys to select your total number of licenses.
3. In the field, ‘Mitel Options Password’, enter the password that was provided with your new licenses.
4. Select Save.
The new licenses are enabled.
Figure 4-19 License window
Managing logged-in agents
The Agents option in the Agent Portal Server interface allows you to view the agents that are currently
logged in to the system.
1. In the Agent Portal Server interface, select Agents.
The Agents window displays connection information for agents. (See Figure 4-20)
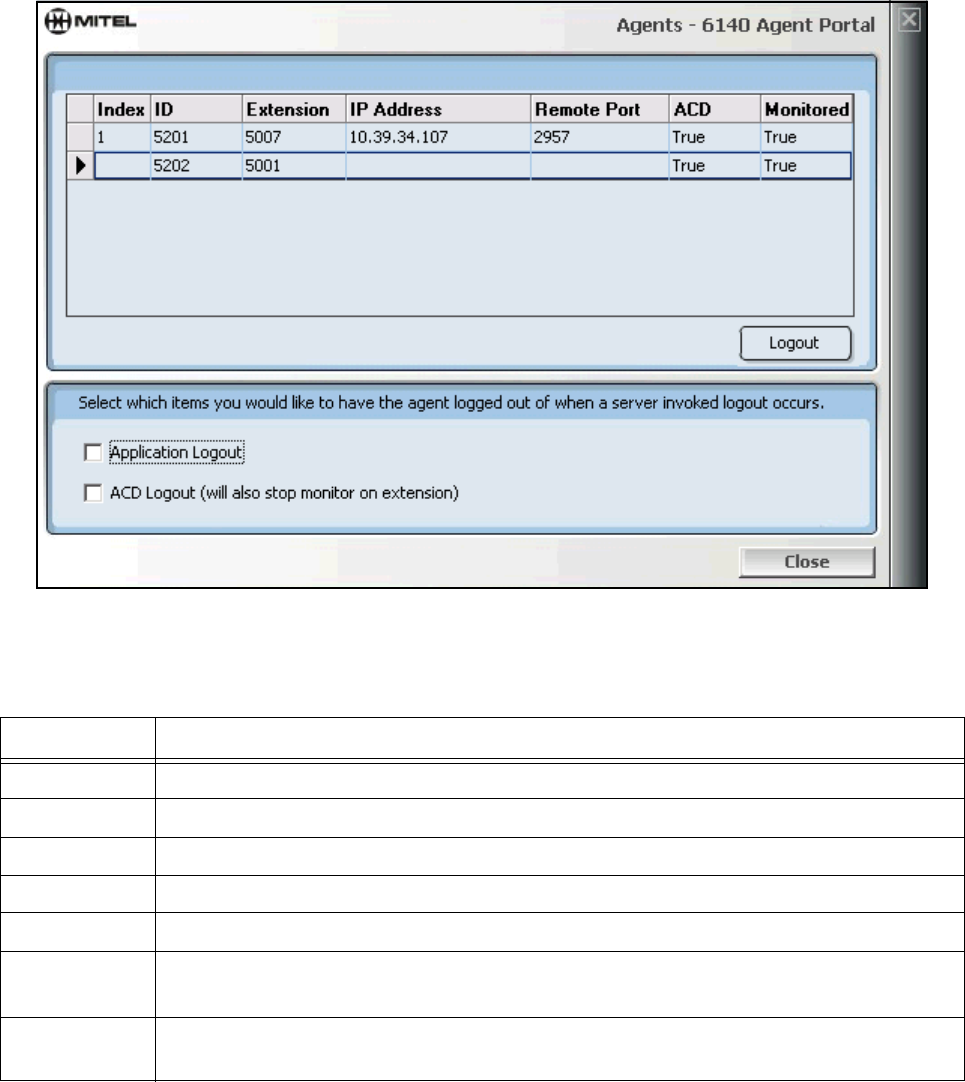
Agent Portal Server 25
Figure 4-20 Agents window
In this screen example, the first entry identifies an agent logging in through the Agent Portal Client
interface. The second entry identifies an agent that has logged into ACD through their telephone set, but
not through the Agent Portal Client interface.
2. Select the actions in the bottom pane by clicking in the appropriate box:
• If you wish to log the agent out of the Agent Portal system but allow them to remain logged into
the Automatic Call Distribution (ACD), select Application Logout only.
• If you wish to log the agent out of the system and log them out of the ACD, select both
Application Logout and ACD Logout.
Note: If you select ACD Logout and not Application Logout, the agent will be logged out of the ACD
but the Agent Portal client remains connected.
Field Definition
Index a unique number assigned by the system to each agent connection
ID the agent’s ID number
Extension the agent’s telephone number
IP address the ip address of the agent’s workstation
Remote Port the remote client’s winsock port
Phone identifies if the agent’s phone is connected. A value of true indicates a good
connection. A value of false indicates a problem with the connection.
Monitor identifies if the connection is being monitored. A value of true indicates a good
connection. A value of false indicates a problem with the connection.
26 Agent Portal Server
3. Select the agent you wish to logout.
4. Select Logout.
The display associated with that agent is erased from the Agents window.
5. Select Close to close this window.
When you select Exit in the Agent Portal Server interface, your selections will apply to all agents.

Agent Portal Client 27
Agent Portal Client
Before you can begin using Agent Portal, you must install and configure the Agent Portal client software
using the following procedures, in the order listed.
• “Installing 6140 Agent Portal Client software” on page 27
• “Accessing Agent Portal Client” on page 32
• “Configuring Agent Portal Client” on page 32
Once the software is configured, the agents can start using it. For more information on procedures for
using Agent Portal Client, refer to “Agent procedures for Agent Portal Client” on page 47.
Installing 6140 Agent Portal Client software
1. Verify that MATAI is installed and running before you install Agent Portal.
2. Insert the Mitel Networks™ 6140 Agent Portal CD into the drive.
The Agent Portal Installation screen is displayed. (See Figure 4-1)
Figure 4-1 Agent Portal Installation screen
3. Select the Install Agent Portal Client option.
The Install Shield Wizard is launched. (See Figure 4-2)
28 Agent Portal Client
Figure 4-2 Install Shield Wizard
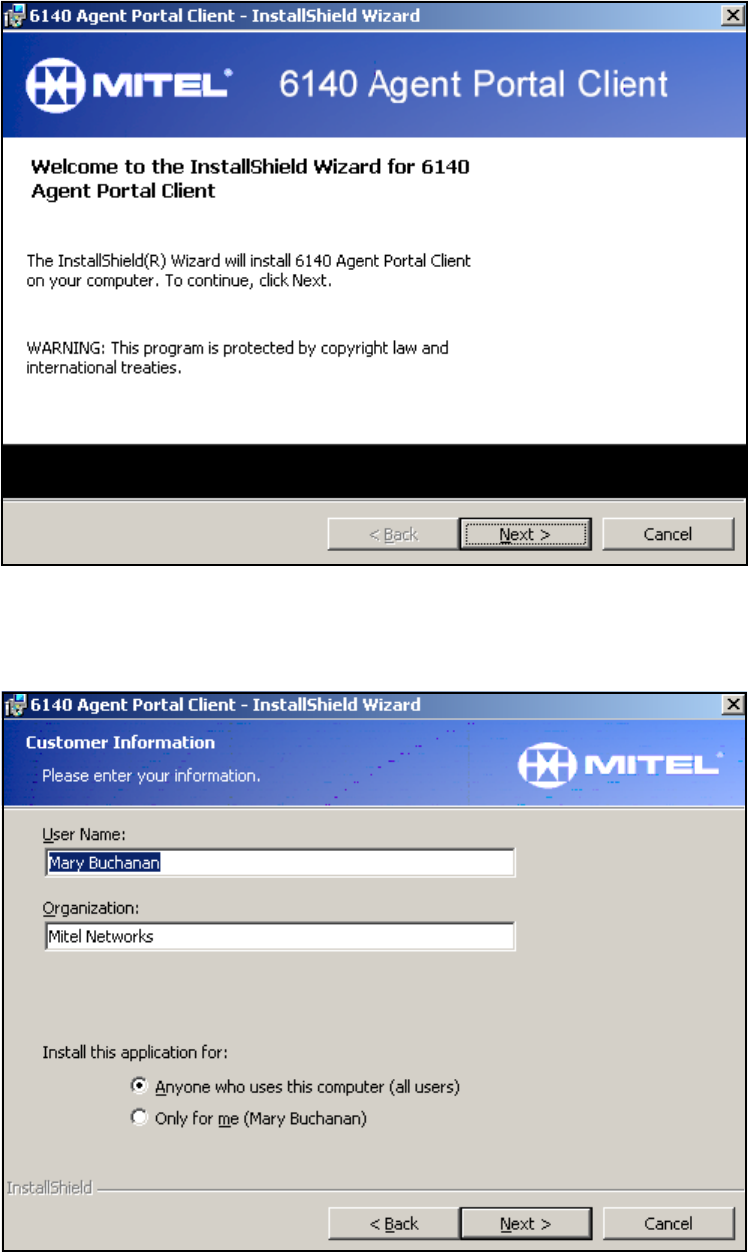
4. Select Next.
The Customer Information window is displayed. (See Figure 4-3)
Figure 4-3 Customer Information window
Agent Portal Client 29
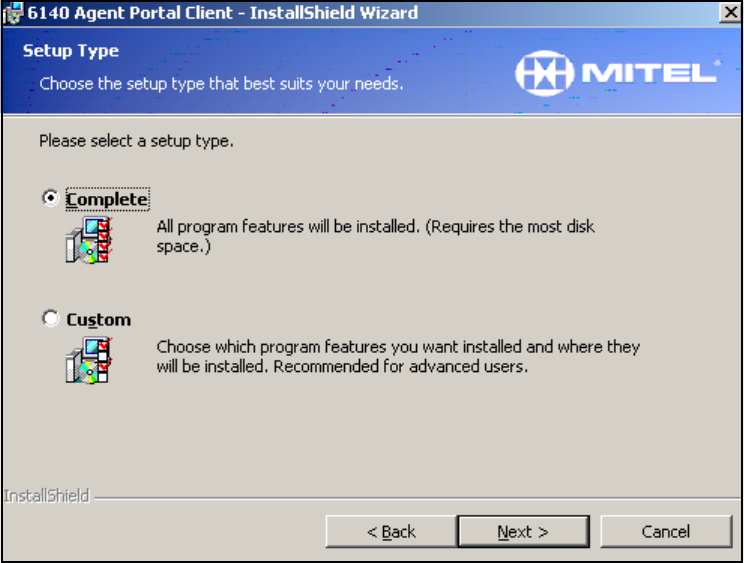
5. Enter your name and organization.
6. In the ‘Install this application for’ field, select the appropriate option.
7. Select Next.
The Setup Type window is displayed. (See Figure 4-4)
Figure 4-4 Setup Type window
8. Select one of the following setup types:
• Complete. For more information, refer to “Complete installation of client software” on page 29.
• Custom. For more information, refer to “Custom installation of client software” on page 30.
Complete installation of client software
A Complete installation installs the Client software as well as the application demonstrations. Use the
following procedure to perform a complete installation.
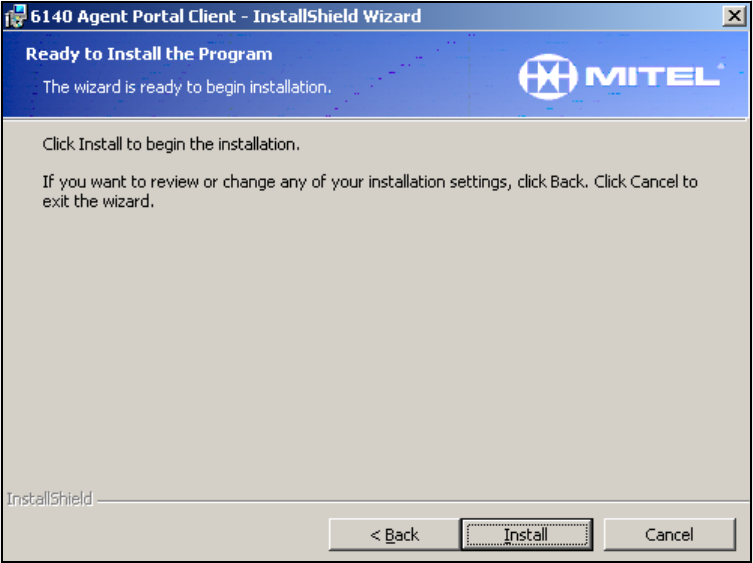
1. Select Complete.
2. Select Next.
The Ready to Install the Program window is displayed. (See Figure 4-5)
30 Agent Portal Client
Figure 4-5 Ready to Install the Program window
3. Select Install.
The InstallShield Wizard Complete window is displayed.
4. Select Finish.
The Agent Portal Client and Server software is installed on your workstation.
Custom installation of client software
A Custom installation allows you to select which program features to install as well as the location in
which to install these features. It is recommended that you perform a Custom installation if you wish to
use the Agent Portal Control OCX to create a customized application.
Use the following procedure to perform a custom installation.
1. Select Custom.
2. Select Next.
The Custom Setup window is displayed. (See Figure 4-6)

Agent Portal Client 31
Figure 4-6 Custom Setup window
3. Click on the plus signs (+) beside each feature.
The displays all the subfeatures for each feature.
Figure 4-7 Subfeature install display
4. Verify the storage requirements of each feature by selecting the feature.
The storage requirements are displayed in the right pane.
5. Select the down arrow beside the feature and subfeatures you wish to install.
A set of install options is displayed. (See Figure 4-8)
Figure 4-8 Install options display
32 Agent Portal Client
6. For each feature, select the appropriate install option.
You must install the Agent Portal Outlook Connector if you wish use the Microsoft Outlook Journal
and Contact window popups.
An icon, indicating your selection, is displayed beside the feature.
7. If necessary change the storage location of the feature by selecting the feature and selecting Change.
The Change Current Destination Folder window is displayed.
8. Browse to the appropriate location and click OK to confirm the folder name where you wish to store
the feature.
9. Select Next.
The Ready to Install the Program window is displayed. (See Figure 4-5)
10. Select Install.
The InstallShield Wizard Complete window is displayed.
11. Select Finish.
The features you selected are installed on your workstation.
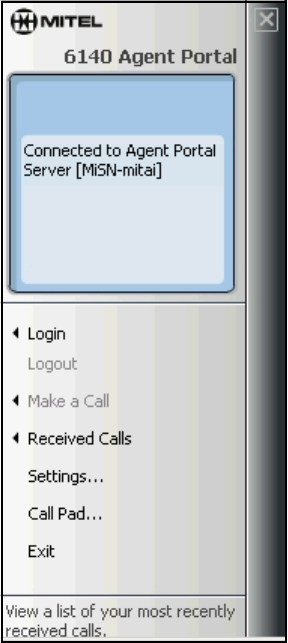
Accessing Agent Portal Client
Use the following procedure to log in to the Agent Portal Client interface:
1. From the Programs menu, select Mitel Networks, 6140/Agent Portal Client.
The Agent Portal icon is minimized on your desktop. The icon is red before you log in to the system.
2. Select the Agent Portal icon.
The Agent Portal Client interface is displayed.
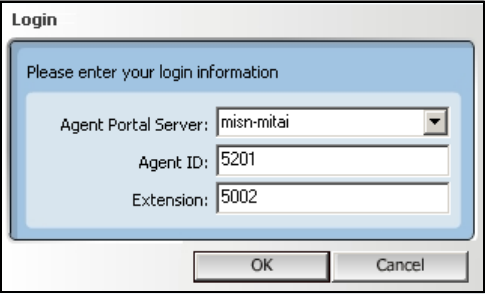
3. Select the ‘Login’ option.
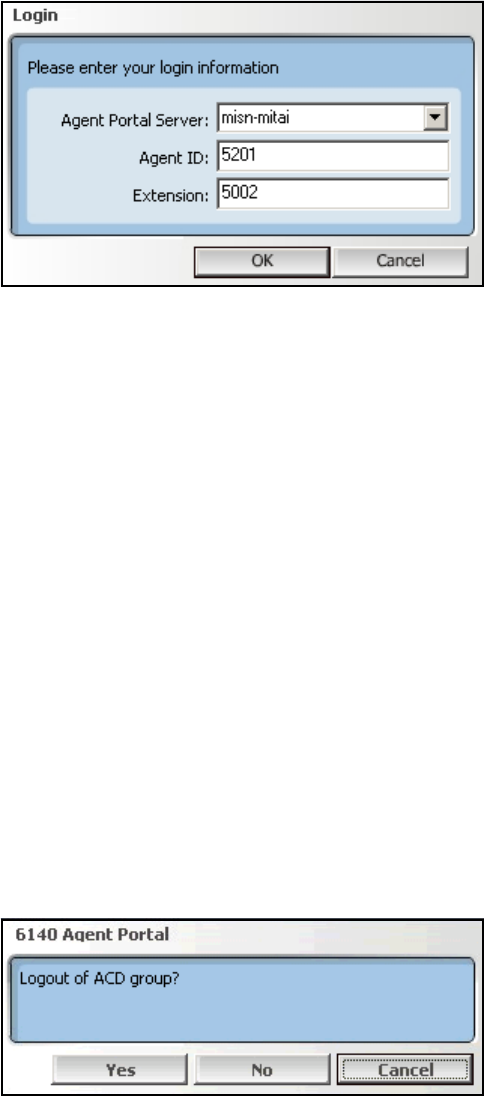
The Login window is displayed. (See Figure 4-9)
Figure 4-9 Login window
4. In the Login window, enter the ip address or server name in the ‘Agent Portal Server’ field.
5. Enter your agent ID and your extension number.
6. Select OK.
7. The Status window displays the message ‘Login Successful’.
Configuring Agent Portal Client
Call information can be delivered to an agent via a number of different applications using the default
client interface, Agent Portal Client. These applications can be configured to ‘pop’ or display
automatically on any desktop. Using Agent Portal Client, you have the option of launching one of the
following when a call is received:
Agent Portal Client 33
• Agent Portal Call Pad: a customized text editor
• Microsoft Outlook
• any application that supports Active Server Page (ASP) scripts
• any application that can receive call details as command-line arguments
• DDE
The Settings window allows you to specify how and where call information is delivered to an agent. This
configuration must be performed on each agent’s workstation. A set of demonstrations that illustrate the
use of these ‘pops’ are included with Agent Portal. For information on these demonstrations, refer to
“Application demonstrations” on page 42.
In addition to the above ‘pops’ included in the default Agent Portal client, you may wish to use the
programmable Agent Portal Control OCX to create a custom application that launches third party
applications. Agent Portal includes a demonstration of a custom application that launches a third party
application that supports COM/OLE automation. For more information, refer to “OLE/COM
demonstration” on page 45.
Configuring launch application
Use the following procedure to configure one or more applications to launch when the agent receives a
call:
1. In the Agent Portal Client interface, select Settings.
The Settings window is displayed. (See Figure 4-10).
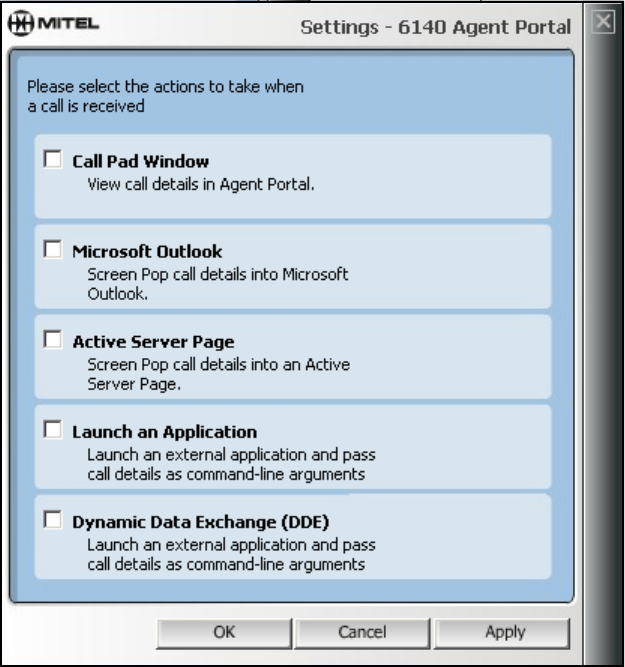
34 Agent Portal Client
Figure 4-10 Settings window
2. Click in the selection boxes to select one or more applications to launch when a call is received.
An Options button is displayed for that application.
3. For each application, select the Options button.
An Options window is displayed.
4. Enter the required information for each Options window. For more information on how to complete the
fields in each option window, refer to
• “Configuring launch of Call Pad” on page 35
• “Configuring launch of Microsoft Outlook windows” on page 36
• “Configuring launch of Active Server Page applications” on page 39
• “Configuring launch of applications that receive command line arguments” on page 40
• “Configuring launch of applications capable of Dynamic Data Exchange” on page 41
5. Select OK to save your settings and close this window.
Agent Portal Client 35
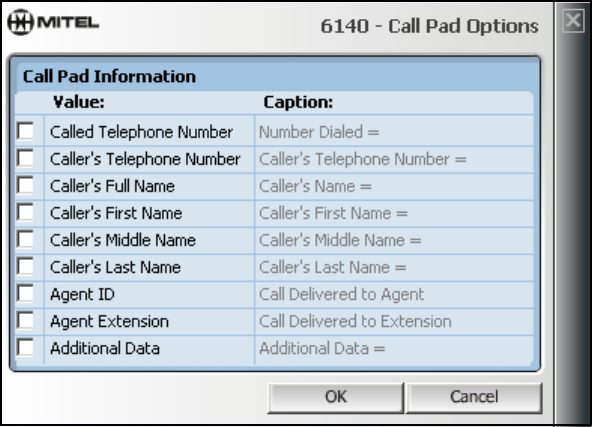
Configuring launch of Call Pad
Call Pad is a simple text editor which displays information that has been programmed into the default
Agent Portal Client software. Use the following procedure to determine what information is displayed in
the call record sent to the agent:
1. In the Call Pad Options window (See Figure 4-11), select the appropriate values to display by clicking
in the option boxes.
Figure 4-11 Call Pad Options window
The caption text is enabled for text additions or changes. This text is displayed on the agent’s screen
with the call record information.
2. Add or edit a caption using one of the following steps:
• enter new text
• select the existing text and enter new text
3. If you wish to allow the agent to enter additional data in the Call Pad text editor, select the ‘Additional
Data’ option.
If there is an Agent Portal Server and IVR integration, the data passed from the IVR to the server and
then delivered to the client, is displayed under Additional Data.
4. Click OK.
36 Agent Portal Client
Configuring launch of Microsoft Outlook windows
In the Settings window, the Microsoft Outlook option allows you to display Microsoft Outlook’s Contact
window and populate it’s Journal Entry windows. For more information, refer to the following
procedures:
• “Configuring Contact window launch” on page 36
• “Configuring Journal window launch” on page 37
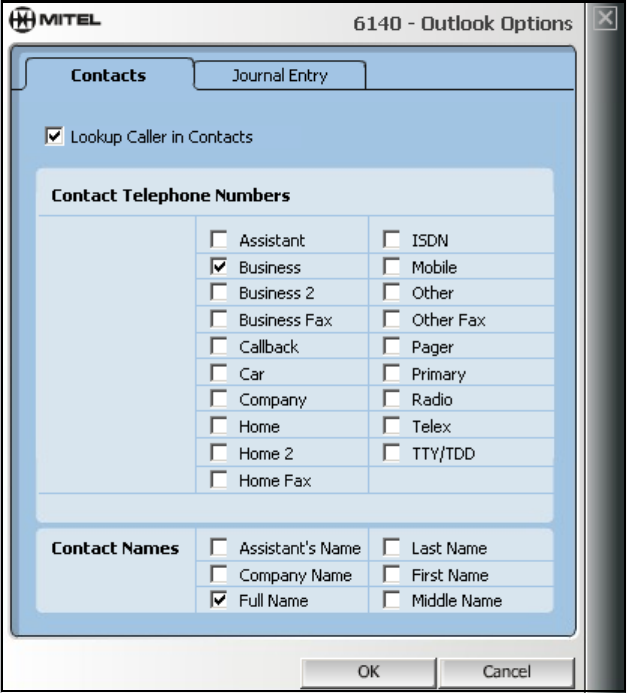
Configuring Contact window launch
1. In the Outlook Options window, select the Contacts tab.
The Contacts window is displayed. (See Figure 4-12)
Figure 4-12 Microsoft Outlook Contacts Options window
2. If you wish the system to search your Microsoft Outlook Contacts list for a match, select the ‘Lookup
Caller in Contacts’ option.
• If the system finds a match, the Contact window is displayed with the appropriate fields
completed.
• If the system does not find a match, no window is displayed.
3. In the Contact Telephone Numbers section, select the appropriate telephone numbers to perform the
search based on the caller’s ANI.
These are the numbers that the system will search for in your Microsoft Outlook Contacts list.
Agent Portal Client 37
4. In the Contact Names section, select the appropriate names.
These are the names that the system will search for in your Microsoft Outlook Contacts list.
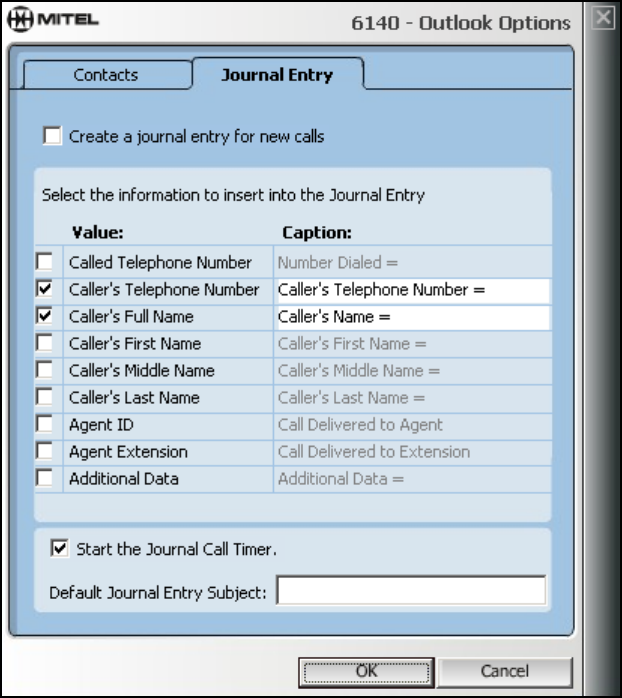
Configuring Journal window launch
1. Select the Journal tab.
The Journal window is displayed. (See Figure 4-13)
Figure 4-13 Microsoft Outlook Journal Entry Options window
2. If you wish to create a journal entry each time you receive a call, select the option, Create a journal
entry for new calls.
Based on your selection in the Contacts window, the system displays the following upon receipt of a
call:
• If you de-selected ‘Lookup Caller in Contacts’, the system displays a journal entry for the call
but it is not applied to a contact.
• If you selected ‘Lookup Caller in Contacts’ and the system finds a match, both the Contact
window and the Journal window are displayed with the appropriate fields completed and the
journal entry is applied to the contact.
• If you selected ‘Lookup Caller in Contacts’ and the system does not find a match, the system
displays journal entry for the call but it is not applied to a contact.
3. In the section titled ‘Select the information to insert into the Journal Entry’, select the appropriate
information to enter by clicking in the option boxes.
38 Agent Portal Client
The caption text is enabled for text additions or changes. This text is displayed in the Journal Entry for
each call.
4. Add or edit a Caption using one of the following steps:
• enter new text
• select the existing text and enter new text
5. If you wish to time the call, select the option ‘Start the Journal Call Timer’.
The timer starts when the Journal Entry window is opened and stops when the window is closed or if
you select the Pause button.
6. If you wish to distinguish journal entries for incoming calls from your other journal entries, enter an
appropriate subject name in the option, ‘Default Journal Entry Subject’.
7. Click OK.
Agent Portal Client 39
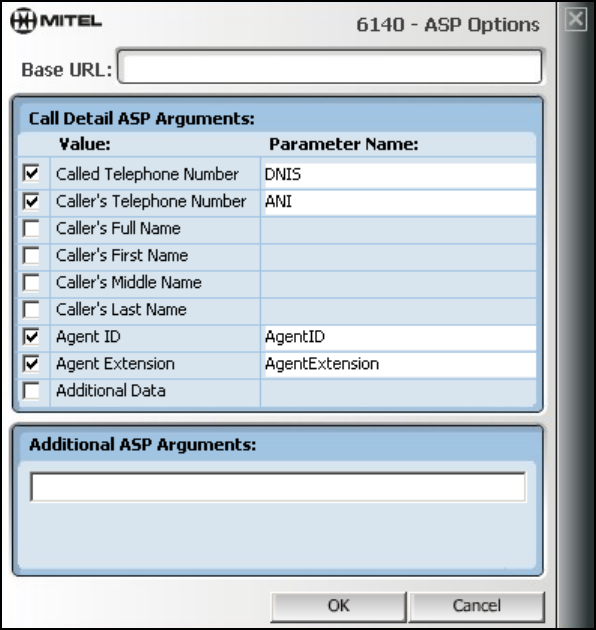
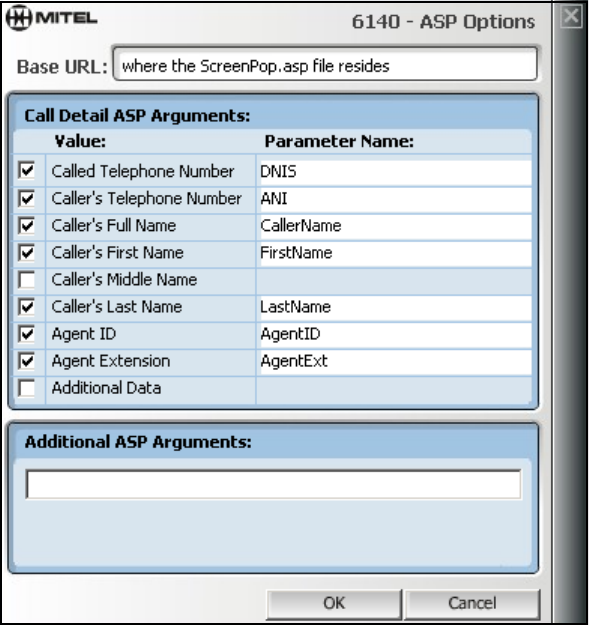
Configuring launch of Active Server Page applications
In the Settings window, the Active Server Page (ASP) option allows you to place data record information
into any application that supports ASP. Use the following procedure to configure this option:
1. In the ASP Options window enter a path in the ‘Base URL’ field. (See Figure 4-14)
This is the path to the ASP that you wish to launch.
Figure 4-14 Active Server Page Options window
2. Select the appropriate values to display by clicking the option boxes.
The parameter name text is enabled for text additions or changes. Information is passed to the ASP
via the parameter names that you enter in these fields.
3. Add or edit a parameter name using one of the following steps:
• enter new text
• select the existing text and enter new text
4. If there are additional static arguments that you wish to send to the ASP, enter them in the ‘Additional
ASP Arguments’ field.
5. Click OK.
A demonstration of the Active Server Page functionality is provided with Agent Portal. For more
information, refer to “Active Server Page demonstration” on page 43.
40 Agent Portal Client
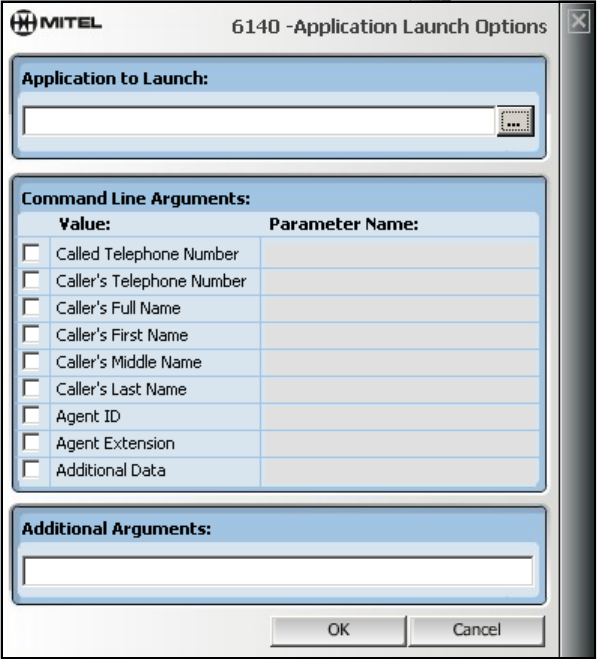
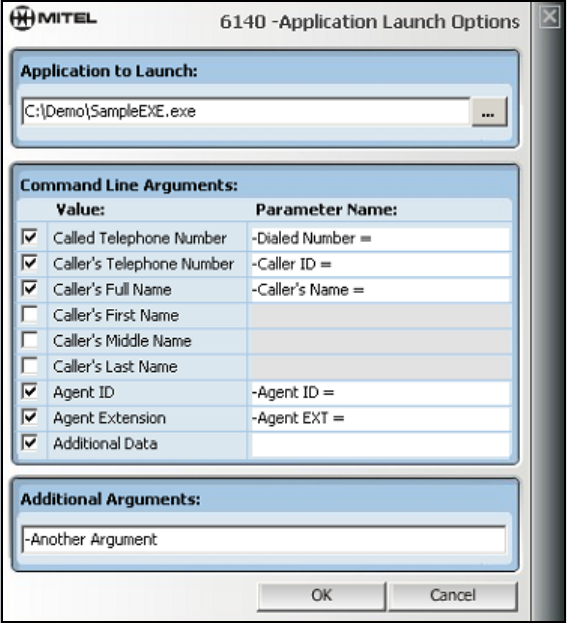
Configuring launch of applications that receive command
line arguments
In the Settings window, the Application Launch option allows you to configure the launch of any
application that can receive call details as command-line arguments. Use the following procedure to
configure this option:
1. In the Application Launch Options window, enter a path in the ‘Application to Launch’ field. (See
Figure 4-15)
This is the path to the application that will be launched.
Figure 4-15 Application Launch Options window
2. If necessary, click the button opposite the ‘Application to Launch’ field to browse to the application.
3. Select the appropriate values to be passed to the application as arguments.
The parameter name field is enabled for the name of the argument that the application is expecting.
Information is passed to the application via the parameter names that you enter in these fields.
4. Add or edit a parameter name using one of the following steps:
• enter new text
• select the existing text and enter new text
5. If there are additional static arguments that you wish to send to the application, enter them in the
‘Additional ASP Arguments’ field.
6. Click OK.
A demonstration of this functionality is provided with Agent Portal. For more information, refer to
“Command Line demonstration” on page 44.
Agent Portal Client 41
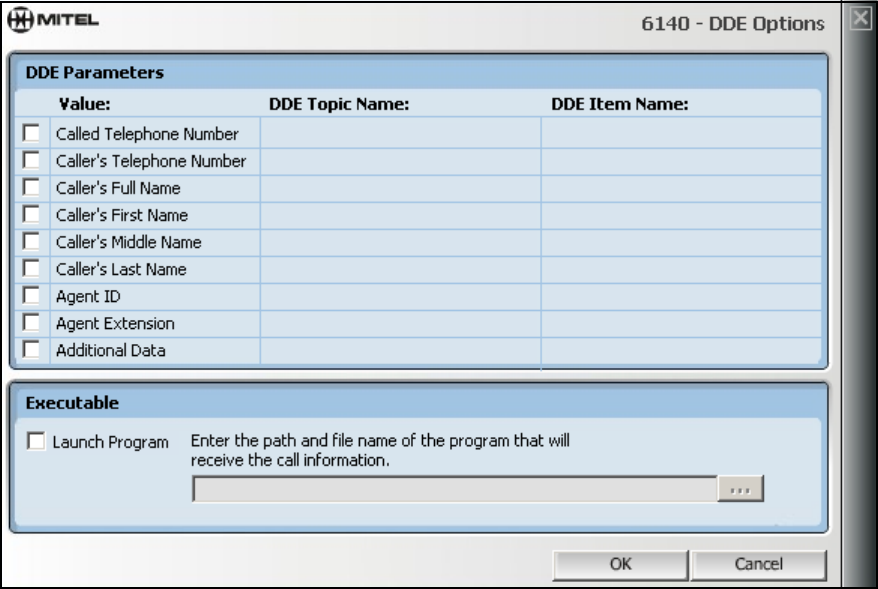
Configuring launch of applications capable of Dynamic
Data Exchange
In the Settings window, the Dynamic Data Exchange (DDE) option provides information via command-
line arguments to any application that uses DDE. Use the following procedure to configure this option:
1. In the DDE Options window, select the appropriate value to display. (See Figure 4-16)
Figure 4-16 DDE Options window
When you select a value, the DDE topic name and item name fields are enabled.
2. Enter the correct value for the DDE topic name and item name.
3. Select the ‘Launch Program’ option.
4. In the ‘Executable’ field, enter the path to the program that will receive the call information.
If necessary, you can click the button opposite this field to browse to the application.
5. Click OK.
A demonstration of this functionality is provided with Agent Portal. For more information, refer to
“Command Line demonstration” on page 44.
42 Agent Portal Client
Application demonstrations
There are four demonstrations included with Agent Portal. To view any of these demonstrations, launch it
using one of the following procedures:
• “Dynamic Data Exchange demonstration” on page 42
• “Active Server Page demonstration” on page 43
• “Command Line demonstration” on page 44
• “OLE/COM demonstration” on page 45
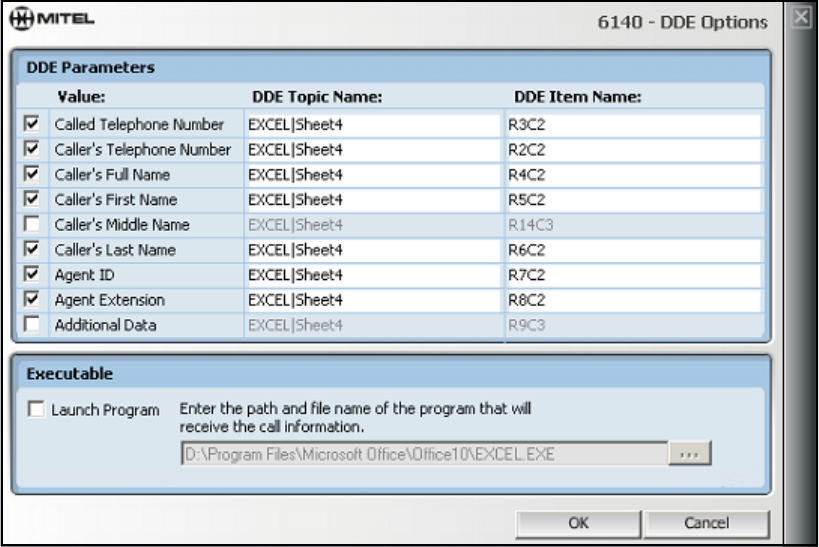
Dynamic Data Exchange demonstration
This demonstration is an example of how Agent Portal can be used to send data to a third party application
that supports Dynamic Data Exchange (DDE). Use the following procedure to launch the demonstration:
1. In the Agent Portal Client interface, select Settings.
2. Select the option, Dynamic Data Exchange (DDE).
3. Select the Options button for this application.
4. Configure the DDE options. (See Figure 4-17).
Figure 4-17 DDE Options configuration for demonstration
5. On the Mitel Networks™ 6140 Agent Portal CD, navigate to /Client/Samples/Excel DDE.
6. Select the Excel DDE folder and copy it onto the workstation where you will run your demonstration.
7. In the DDE folder, open the file called DDE Call Log.xls.
This open the demonstration file in Excel.
8. In the Agent Portal Client interface, select Login.
9. In the Login window, enter your log-in information and select OK.
10. Place a call to an agent’s extension, ACD path or AgentID.
An Excel spreadsheet is displayed with the call information displayed in the appropriate fields.
Agent Portal Client 43
Active Server Page demonstration
This demonstration is an example of how the Agent Portal can be used to send data to a third party
application that supports ASP. Use the following procedure to launch the demonstration:
1. On a workstation running a web server, create a physical directory called Screen Pop.
2. On the same workstation, create a virtual directory called Screen Pop and map it to the physical
directory.
3. On the Mitel Networks™ 6140 Agent Portal CD, navigate to /Client/Samples/ASP.
4. Select the ASP folder and copy it onto the workstation where you will run your demonstration.
5. Copy the files, ScreenPop.ASP and AgentPortal.JPG, to the physical directory you created in step 1.
6. In the Agent Portal Client interface, select Settings.
7. Select the option, Active Server Page.
8. Select the Options button for this application.
9. Configure the ASP options. (See Figure 4-18).
Figure 4-18 Active Server Page configuration for demonstration
10. In the Agent Portal Client interface, select Login.
11. In the Login window, enter your log-in information and select OK.
12. Call an agent’s extension, ACD path or AgentID.
An Internet Explorer window displays the Mitel 6140 Agent Portal ASP demonstration page.
44 Agent Portal Client
Command Line demonstration
This demonstration is an example of how Agent Portal can be used to send data to a third party application
that supports command line arguments. Use the following procedure to launch the demonstration:
1. On the Mitel Networks™ 6140 Agent Portal CD, navigate to /Client/Samples/COM.
2. Select the COM folder and copy it onto the workstation where you will run your demonstration.
3. Copy the SampleEXE.exe file to a location on your workstation.
4. In the Agent Portal Client interface, select Settings.
5. Select the option, ‘Launch an Application’.
6. Select the Options button.
7. Configure the ASP options. (See Figure 4-19).
Figure 4-19 Command Line Argument Configuration for demonstration
8. In the Agent Portal Client interface, select Login.
9. In the Login window, enter your log-in information and select OK.
10. Call an agent’s extension/path or AgentID.
A text box displays the information that has been transferred.
Agent Portal Client 45
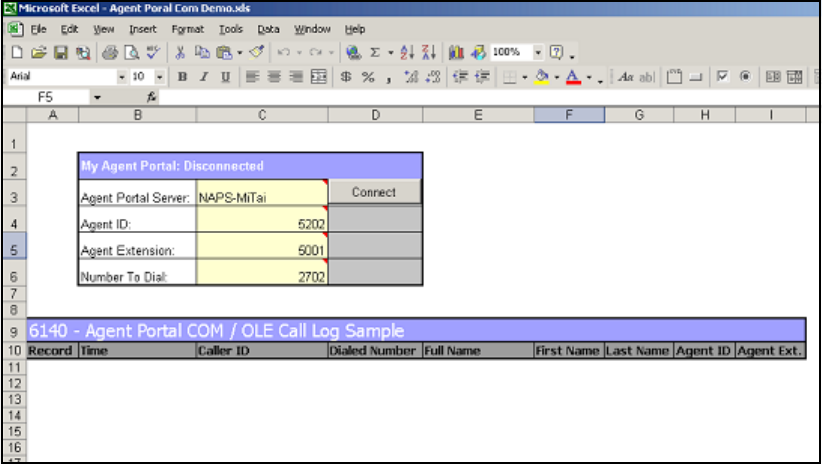
OLE/COM demonstration
This demonstration is an example of a Agent Portal integration to a third party application. This
functionality allows the integration of any third party application that supports COM/OLE Automation.
For this example code was written, using the Agent Portal tools, to create a stand-alone client in Excel.
Use the following procedure to launch the demonstration:
1. Log off and exit the Agent Portal Client.
The Agent Portal Client must be stopped before proceeding with this demonstration.
2. On the Mitel Networks™ 6140 Agent Portal CD, navigate to /Client/Samples/Com OLE.
3. Select the COM-OLE folder and copy it onto the workstation where you will run your demonstration.
4. In the COM-OLE folder, open the Agent Portal Com Demo.xls file.
The demonstration file opens in Excel. (See Figure 4-20)
5. Enter the following information in the Excel window:
• Agent Portal Server name or ip address
• Agent ID
• Agent extension
• Number to dial
Figure 4-20 COM/OLE configuration for demonstration
6. Select Connect.
The Login button is enabled.
7. Select Login.
The Dial In button is enabled.
8. Enter a number in the ‘Number to Dial’ field.
9. Call the agent’s extension, path or Agent ID.
10. Select Dial.
The first Excel row in the ‘Call Log Sample’ section is populated with the call information.
To view the code for this demonstration, verify that Excel is running, press Alt F11 and open the file,
Sheet1MyAgent.
46 Agent Portal Client
Agent procedures for Agent Portal Client 47
Agent procedures for Agent Portal Client
After the Agent Portal Server and Client are configured, the Agents can log in and begin using the Agent
Portal Client. Agents use the Agent Portal Client to perform the following procedures:
• “Logging in to Agent Portal Client” on page 47
• “Logging out of Agent Portal Client” on page 48
• “Exiting Agent Portal Client” on page 48
• “Making a call” on page 49
• “Displaying and returning received calls” on page 49
• “Stop monitoring a device” on page 50
• “Using other applications displayed on your screen” on page 51
• “Troubleshooting” on page 54
Logging in to Agent Portal Client
Use the following procedure to log in to the Agent Portal Client interface:
1. From the Programs menu, select Mitel Networks, 6140 Agent Portal Client.
The Agent Portal icon is displayed in the system tray. The icon is red before you log in to the system.
2. Select the Agent Portal icon.
The Agent Portal Client interface is displayed. (See Figure 5-1)
Figure 5-1 Agent Portal Client interface
48 Agent procedures for Agent Portal Client
3. Select the Login option.
The Login window is displayed. (See Figure 5-2)
Figure 5-2 Login window
4. In the Login window, enter your Agent Portal Server name or ip address.
5. Enter your agent ID and your extension number.
If you do not enter your agent ID, calls can only be sent to your extension number.
6. Select OK.
7. The Status window displays the message ‘Login Successful’.
Logging out of Agent Portal Client
If you wish to log out of the Agent Portal Server but leave the Agent Portal application running, use the
following procedure:
1. In the Agent Portal interface, select Logout.
The Status window displays the message ’Logout Successful’.
Exiting Agent Portal Client
If you wish to log out of the Agent Portal Server and close the Agent Portal application, use the following
procedure:
1. In the Agent Portal Client interface, select Exit.
One of the following occurs:
• The Agent Portal Client interface is closed.
• A message is displayed asking if you wish to logout of ACD group. (See Figure 5-3)
Figure 5-3 Exit window
This window indicates that you have not logged out of the Agent Portal Client.
2. If this window is displayed, select a button:
• If you wish to log off Agent Portal Client and log out of the ACD, select Yes.
Agent procedures for Agent Portal Client 49
• If you wish to log off Agent Portal Client and remain logged into the ACD, select No.
The Agent Portal Client is shut down.
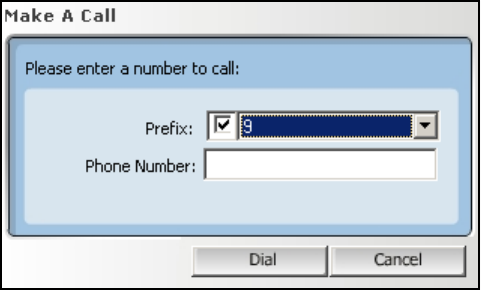
Making a call
You can use a telephone set to make a call or you can use the Make a Call option on your 6140 Agent
Portal Client interface. Use the following procedure to make a call using the Agent Portal Client:
1. In the Agent Portal Client interface, select the Make a Call option.
The Make a Call window is displayed. (See Figure 5-4)
Figure 5-4 Make a Call window
2. Enter the telephone number you wish to dial.
If it is necessary to dial a prefix, select the Prefix option and select a number from the drop-down list.
3. Select Dial.
The dialed number is displayed in the interface display window.
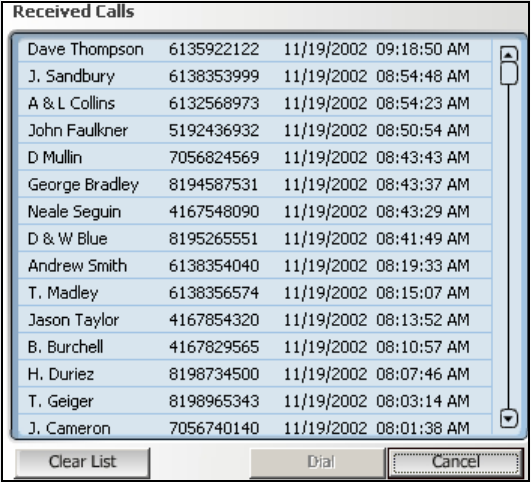
Displaying and returning received calls
The Received Calls options allows you to display a list of all the calls you have received as well as to
return any of these calls. Information for up to 20 received calls is saved. If more than 20 calls are
received, the system begins deleting the oldest calls first. Use the following procedure:
1. In the Agent Portal Client interface, select the Received Calls option.
The call number is displayed with the person, date and time of the call. (See Figure 5-5)
2. If you wish to call one of the listed numbers, select the number and then select Dial.
The ‘Make a Call’ window is displayed with the selected number entered in the ‘Phone Number’ field.
3. Select Dial.
Received calls continue to be stored and displayed on this window until you clear the list. To clear all the
entries in this list, select Clear List.
50 Agent procedures for Agent Portal Client
Figure 5-5 Received calls window
Stop monitoring a device
Use the following procedure to stop the monitoring for a device:
1. In the Agent Portal Server interface, select Monitors.
The Device Monitors window is displayed. (See Figure 5-6)
Agent procedures for Agent Portal Client 51
Figure 5-6 Device Monitors window
2. Select Stop.
Monitoring is stopped for all devices. The status window indicates that the monitors are stopped. At
this point, you can delete any device from the Device Monitoring window.
3. In the upper pane, select the device you wish to stop monitoring.
4. Select Delete.
5. Select Start.
All the devices listed in this window are currently being monitored.
Using other applications displayed on your screen
Your Agent Portal Client interface may have been configured to launch third party applications which
display caller information. For more information on using some of these applications in Agent Portal,
refer to
• “Using Call Pad” on page 51
• “Using Contact window in Microsoft Outlook” on page 52
• “Using Journal Entry window in Microsoft Outlook” on page 53
Using Call Pad
If the Call Pad window is displayed on your workstation, use the following procedure to update the
existing information:
1. Enter additional information in this window.
2. Select Save from the File menu.
52 Agent procedures for Agent Portal Client
3. Close the window, using the Windows Close button.
A message is displayed which asks you if you want to save the changes.
4. Select OK.
5. Browse to the folder where you wish to save this file.
6. Select Save.
Using Contact window in Microsoft Outlook
If the Contact window is displayed on your workstation, use the following procedure to update the
existing information or to return the call:
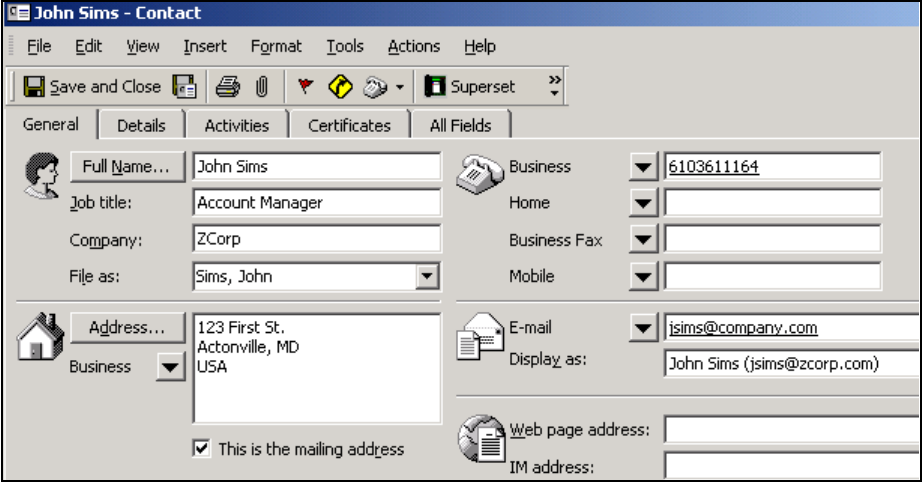
1. Using standard Microsoft Outlook procedures, update the information in this Contact window. (See
Figure 5-7)
Figure 5-7 Contact window in Microsoft Outlook
2. If you wish to return the call, click the Superset button in the tools bar.
A window is displayed which lists all the telephone numbers in your caller’s Contact window.
3. Select the number you wish to dial.
4. Select Dial.

Agent procedures for Agent Portal Client 53
Using Journal Entry window in Microsoft Outlook
If the Journal Entry window is displayed on your workstation, use the following procedure to view caller
information and to time your call.
1. Using standard Microsoft Outlook procedures, update the information in this Journal Entry window.
Figure 5-8 Journal Entry window in Microsoft Outlook
2. To start the timer, select ‘Start Timer’.
If you wish to pause the timer, select ‘Pause Timer’. The timer is stopped when you exit this window.
3. Add additional information to this journal by entering text below the last line.
4. Save this journal entry by selecting Save from the File menu.

54 Agent procedures for Agent Portal Client
Troubleshooting
The following table includes a set of possible error messages, their meaning and the actions you can take
to resolve the problem.
Table 5-1:
Error message Meaning Actions
Server Invoked Logout • Connection to MiTAI was
lost
• Administrator logged you out
of Agent Portal
When advised by administrator,
log back in to Agent Portal
Client using the procedures in
“Logging in to Agent Portal Client”
on page 47.
Agent ‘x’ at extension ‘y’
cannot be monitored
Extension cannot be monitored Contact administration to verify
that the extension is a type that
can be monitored.
Agent ‘x’ at extension ‘y’
cannot be monitored
[invalid device]
Extension cannot be monitored Contact administration to verify
that the extension is a type that
can be monitored.
Login of Agent ‘x’ at
extension ‘y’ could not be
confirmed
Agent ID may currently be in
use
Verify that the Agent ID you
have entered is valid
Login of Agent at extension
‘y’ could not be confirmed
(similar to previous error
messages)
Agent ID was not entered in
Login window
• If you do not need the Agent
Portal ACD, disregard message
• If you wish to use Agent Portal
ACD, enter your Agent ID.
Error connecting to Agent
Portal Server [server_name]
Cannot connect to the server
identified in your Login
window because:
• incorrect entry of server
• server is not running
• Verify correct entry of server
name in Login window
• Contact administrator to
determine if server is running
Unable to make a call to
‘extension #’ [Invalid
device specified]
An invalid number was
entered in the ‘Make a Call’
window
Verify that you have entered the
correct number

Appendix A: Agent Portal Control programmer reference 55
Appendix A:
Agent Portal Control programmer reference
The Agent Portal Control is a programmable OLE Custom control (OCX) component file that can be
referenced by any object-oriented programming application. This appendix contains the property, method
and event information required to program the Agent Portal Control.
Properties
The following Properties are used in the Agent Portal Control:
• Extension
• AgentID
• ConnectionState
• ServerAddress
• ServerPort
Table 6-1: Extension Property definition
Extension
Use Returns or sets the extension number of the telephone that the agent is using
Syntax Object.Extension = string
Arguments Object - the instance of the Agent Portal Control
string - the extension number of the telephone
Remarks Extension can be set at run time or design time. This sets the telephone extension
that is used when invoking the MakeCall, Login and Logout methods. Extension
can also be set as an argument to the Login method.
Table 6-2: AgentID Property definition
AgentID
Use Returns or sets the Automatic Call Distribution (ACD) Agent ID that the agent is
using
Syntax Object.AgentID = string
Arguments Object - the instance of the Agent Portal Control
string - the ACD Agent ID of the user
Remarks AgentID can be set at run time or design time. This is the AgentID that is used
when invoking the Login and Logout methods. AgentID can also be set as an
argument to the Login method.

56 Appendix A: Agent Portal Control programmer reference
Table 6-3: ConnectionState Property definition
ConnectionState
Use Returns the state of the connection to the Agent Portal Server, expressed
as an enumerated type
This a read only property and is unavailable at design time.
Syntax Object.ConnectionState
Data type Integer
Settings eCLOSED 0 Closed. This is the default
eOPEN 1 Open
eLISTENING 2 Listening
eCONNECTIONPENDING 3 Connection pending
eRESOLVINGHOST 4 Resolving server name
eHOSTRESOLVED 5 Server name is resolved
eCONNECTING 6 Connecting to the server
eCONNECTED 7 Connected to the server
eCLOSING 8 Server is closing connection
eError 9 Error
Table 6-4: ServerAddress Property definition
ServerAddress
Use Returns or sets the address of the remote Agent Portal Server machine to
which the Agent Portal Control should connect.
Syntax Object.ServerAddress = string
Arguments Object - the instance of the Agent Portal Control
string - the hostname or ip address of the Agent Portal Server.
Remarks ServerAddress can be set at run time or design time. ServerAddress can also
be set as an argument to the Connect method.

Appendix A: Agent Portal Control programmer reference 57
Table 6-5: ServerPort Property definition
ServerPort
Use Returns or sets the remote port number, to connect to, on the Agent Portal
Server
Syntax Object.ServerPort = Long
Arguments Object - the instance of the Agent Portal Control
Long - The port number, to connect to, on the Agent Portal Server
Remarks ServerPort can be set at run time or design time. ServerPort can also be set
as an argument to the Connect method. The default ServerPort is 50,000.

58 Appendix A: Agent Portal Control programmer reference
Methods
The following Methods are used in the Agent Portal Control:
• Connect
• Disconnect
• Login
• Logout
• MakeCall
Table 6-6: Connect Method definition
Connect
Use Connects the agent application to the Agent Portal Server.
Also refer to ConnectionStatus event.
Syntax Object.Connect (Server, Port)
Arguments Object - the declared instance of the Agent Portal Control
Server - the host name or ip address of the Agent Portal Server
Port - the predefined port or socket that is known to be listening for new
requests on the Agent Portal Server.
Return Value Value of 1 indicates a successful request
Any value other than 1 indicates a failures. For more information on error
codes and their reason, refer to “Server return values” on page 65.
Table 6-7: Disconnect Method definition
Disconnect
Use Disconnects the agent application to the Agent Portal Server.
Also refer to ConnectionStatus event.
Syntax Object.Disconnect
Arguments Object - the declared instance of the Agent Portal Control
Return Value Value of 1 indicates a successful request
Any value other than 1 indicates a failures. For more information on error
codes and their reason, refer to “Server return values” on page 65.

Appendix A: Agent Portal Control programmer reference 59
Table 6-8: Login Method definition
Login
Use Logs an agent in to both the Agent Portal Server and the ACD group on the
PBX.
Also refer to LoginStatus event.
Syntax Object.Login (AgentID, Extension)
Arguments Object - the declared instance of the Agent Portal Control
AgentID - the assigned agent ID number the agent uses to login to the PBX
Extension - the extension number of the telephone the agent uses
Return Value Value of 1 indicates a successful request
Any value other than 1 indicates a failures. For more information on error
codes and their reason, refer to “Server return values” on page 65.
Remarks The agent must use the application to login to the ACD group. If the agent
does not use the application to login, the Agent Portal Server cannot
associate the correct call event to the agent’s ip address.
Table 6-9: Logout Method definition
Logout
Use Logs an agent out of both the Agent Portal Server and the ACD group on the
PBX.
Also refer to LogoutStatus event.
Syntax Object.Logout (AgentID, Extension)
Arguments Object - the declared instance of the Agent Portal Control
AgentID - the assigned agent ID number the agent is currently using
Extension - the extension number of the telephone the agent is currently
using
Return Value Value of 1 indicates a successful request
Any value other than 1 indicates a failures. For more information on error
codes and their reason, refer to “Server return values” on page 65.

60 Appendix A: Agent Portal Control programmer reference
Table 6-10: MakeCall Method definition
MakeCall
Use Dials the agent’s telephone.
Also refer to DialStatus event.
Syntax Object.MakeCall (Destination)
Arguments Object - the declared instance of the Agent Portal Control
Destination - The dialable number to be dialed from the agent’s telephone
Return Value Value of 1 indicates a successful request
Any value other than 1 indicates a failures. For more information on error
codes and their reason, refer to “Server return values” on page 65.

Appendix A: Agent Portal Control programmer reference 61
Events
The following Events are used in the Agent Portal Control:
• CallInfoReceived
• ConnectionStatus
• DialStatus
• LoginStatus
• LogoutStatus
Table 6-11: CallInfoReceived Event definition
CallInfoReceived
Use Occurs when a call is received at an agent’s telephone
Syntax Object_CallInfoReceived (ANI as String, DNIS as String, CallerFirstName
as String, CallerMiddleName as String, CallerLastName as String, Data as
String, AgentID as String, Extension as String)
Arguments Object - the declared instance of the Agent Portal control
ANI - the Automatic Number Identification of the caller (the calling line
ID)
DNIS - the original DNIS (dialed digits) sent to the PBX by the Telco
CallerFirstName - the caller’s first name if present
CallerMiddleName - the caller’s middle name if present
CallerLastName - the caller’s last name if present
Data - any additional data to be associated with the call
AgentID - the ID of the Agent that the call is for
Extension - The extension of the telephone intended to receive the call

62 Appendix A: Agent Portal Control programmer reference
Table 6-12: Connection Status Event definition
Connection Status
Use Occurs when the state of the Winsock connection to the Agent Portal
Server changes
Syntax Object_ConnectionStatus (Status as AgentPortalObject.ConnectionState)
Arguments Object - the declared instance of the Agent Portal Control
Status - the current status of the Winsock connection to the Agent Portal
Server
Settings for
AgentPortalObject.Co
nnectionState
eCLOSED 0 Closed. This is the default
eOPEN 1 Open
eLISTENING 2 Listening
eCONNECTIONPENDING 3 Connection pending
eRESOLVINGHOST 4 Resolving server name
eHOSTRESOLVED 5 Server name is resolved
eCONNECTING 6 Connecting to the server
eCONNECTED 7 Connected to the server
eCLOSING 8 Server is closing connection
eError 9 Error
Table 6-13:
LicenseExceeded
Use Occurs if the purchased number of concurrent Agent Connections has
been exceeded.
Syntax Object_LicenseExceeded( )
Arguments Object - the declared instance of the Agent Portal Control

Appendix A: Agent Portal Control programmer reference 63
Table 6-14: LoginStatus Event definition
LoginStatus
Use Occurs after a request to login an agent was processed by the server
Syntax Object_LoginStatus (Status as AgentPortalObject.Result, AgentID as
String, Extension as String, Reason as String)
Arguments Object - the declared instance of the Agent Portal Control
Status - value is ‘true’ if the server was able to login the agent, value is
‘false’ if server was unable to login the agent
AgentID - the agent ID of the agent that the request was made for
Extension - the extension of the agent that the request was made for
Reason - if server was unable to login the agent, a reason is given
Table 6-15: LogoutStatus Event definition
LogoutStatus
Use Occurs after a request to logout an agent was processed by the server
Syntax Object_LogoutStatus (Status as AgentPortalObject.Result, AgentID as
String, Extension as String, Reason as String)
Arguments Object - the declared instance of the Agent Portal Control
Status - value is ‘true’ if the server was able to logout the agent, value is
‘false’ if server was unable to logout the agent
AgentID - the agent ID of the agent that the request was made for
Extension - the extension of the agent that the request was made for
Reason - if server was unable to logout the agent, a reason is given

64 Appendix A: Agent Portal Control programmer reference
Table 6-16: MakeCallStatus Event definition
MakeCallStatus
Use Occurs after a request to dial an agent’s telephone was processed by the
server
Syntax Object_MakeCallStatus (Status as Boolean, Destination as String, Reason
as String)
Arguments Object - the declared instance of the Agent Portal Control
Status - value is ‘true’ if the server was able to dial the requested telephone;
value is ‘false’ if server was unable to dial the requested telephone
Destination - the telephone number the server was asked to dial
Reason - if server was unable to dial the requested telephone, a reason is
given
Table 6-17: ServerUnavailable Event definition
ServerUnavailable
Use Occurs if communication to the Agent Portal Server could not be
established
Syntax Object_Server Unavailable ( )
Arguments Object - The declared instance of the AgentPortal control

Appendix A: Agent Portal Control programmer reference 65
Server return values
The following table lists the return values which indicate the status of requests sent to the Agent Portal
Server.
The following table lists the return values which indicate an error was encountered between the Agent
Portal Server and the PBX.
Table 6-18: Return values for status of requests
Val ue R ea so n
1 The request was successful
2 An error was encountered in the Agent Portal Server application
3 The requested agent could not be logged in
4 A monitor could not be set on the extension specified
5 An unknown error has occurred
Table 6-19: Return values for errors between Agent Portal Server and PBX
Val ue R ea so n
1001 Command failed
1103 Communication with the PBX could not be initialized
1104 Server unavailable
1105 Communication error
1205 Memory error
1206 Warning: No event
1207 A required attribute is missing
1209 Attribute not supported
1211 Unknown attribute
1213 Data lost
1215 Unspecified error
1217 Congestion communicating with the PBX
1219 Privilege violation
1221 Invalid device specified
1223 Invalid Call ID specified

66 Appendix A: Agent Portal Control programmer reference
1225 Invalid PBX handle
1227 Invalid Monitor handle
1229 The called device is invalid
1231 Unable to originate the call
1233 No call to clear
1235 No active call
1237 No held call
1239 No call to hold
1241 No call to answer
1243 No call to complete
1245 The requested feature could not be invoked
1247 No call to divert
1249 The requested feature is invalid for the device
1251 Too many monitors are set
1253 The feature is already set
1255 The feature is not set
1261 The PBX is already open
1265 The Mitai environment is absent
1267 A split is not possible
1269 Unknown service
1273 The PBX is not open
1275 An unknown event occurred
1277 A callback is already present
1278 A callback is not present
1279 Invalid attribute value
1281 Send callback message failed
1283 The device is already monitored
Table 6-19: Return values for errors between Agent Portal Server and PBX
Value Reason

Appendix A: Agent Portal Control programmer reference 67
1285 Cannot establish a monitor
1287 The requested device is not monitorable
1289 Cannot get enough shared memory
1291 Invalid directory number
1292 The directory number is too long
1295 The attribute is duplicated
1294 Invalid ACD path
1296 Invalid ACD group
1297 Invalid truck type
1299 The command was rejected
1350 LAN failure
1351 LAN timeout
1352 Broken socket detected
1353 Invalid LAN message
1354 Service full
1360 Cannot connect to the service
1361 LAN parser failed
1362 LAN encoder failed
1401 Internal event error
1403 Too many blocking commands
1404 PBX already initialized
1405 Cannot create mutex
1406 Mutex abandoned
1407 A Directory Number is required
1408 Mutex problem detected
Table 6-19: Return values for errors between Agent Portal Server and PBX
Val ue R ea so n
68 Appendix A: Agent Portal Control programmer reference
Glossary 69
Glossary
Active X Active X is the name Microsoft has given to a set of strategic object-oriented
programming technologies and tools.
ANI Automatic Number Identification (ANI) is a service that provides the telephone
number of a received call. The service provider determines the method of
providing this information.
ASP Active Server Pages (ASP) is a Microsoft specification that uses ActiveX
scripting to dynamically create web pages with a .ASP extension.
COM Component Object Model (COM) is a software architecture that allows
applications to be built from binary software components.
DDE Dynamic Data Exchange (DDE) allows information to be shared or
communicated between programs. For example, when you share information
between a Excel spreadsheet and a Word document, if you make a change in the
Excel spreadsheet, that value also changes in your Word document.
Applications that use DDE include Microsoft's Excel, Word, Lotus 1-2-3,
AmiPro, Quattro Pro, and Visual Basic.
DNIS Dialed Number Identification Service (DNIS) is a service that provides the dialed
telephone number to the receipient of the call. DNIS is a common feature of 800
and 900 lines. For example, if you have multiple 800 or 900 numbers to the same
destination, DNIS identifies the number that was called.
IVR Interactive Voice Response (IVR) is a software application that accepts a
combination of voice telephone input and touch-tone keypad selection. The IVR
provides appropriate responses in the form of voice, fax, callback, email and
other media.
OLE Object Linking and Embedding (OLE) is a Microsoft standard that allows you
to create objects in one application and link them in a second application.
OCX OLE Custom Control (OCX) is an independent program module that can be
accessed by other programs running in Microsoft Windows. The OCX is a
dynamic link library (DLL) module or subprogram that can be used by other
applications.
MiTAI Mitel Telephony Applications Interface (MiTAI) is an Applications Protocol
Interface (API) that allows third-party-developed CTI applications to interface
with the Mitel Network's call control
SAM Security Access Module (SAM) is a device that attaches to a PC's parallel port to
control access to a particular application.
70 Glossary
