Mixxx User Manual
User Manual:
Open the PDF directly: View PDF ![]() .
.
Page Count: 115 [warning: Documents this large are best viewed by clicking the View PDF Link!]
- Introduction to Mixxx
- Getting Started
- An Overview of the Mixxx Interface
- The Mixxx Library
- Overview of the Library features
- Tracks - View and edit your whole collection
- Loading Tracks
- Finding Tracks (Search)
- Previewing Tracks
- Edit metadata of audio files
- Auto DJ - Automate your mix
- Playlists - Arranging tracks in a set order
- Crates - Organizing tracks into collections
- Computer - Loading tracks from anywhere on your computer
- Recordings
- History - Keep track of your sessions
- Analyze - Prepare your tracks
- iTunes, Traktor, Rhythmbox, Banshee - Using external libraries
- Removing tracks from the library
- Compatible file formats
- Music from audio CDs
- DJ Hardware
- Example Setups
- Controlling Mixxx
- Vinyl Control
- Using Microphones
- Live Broadcasting - Start your own Internet radio
- Effects
- DJing With Mixxx
- Preferences
- Advanced Topics
- Contributing to the Project
- Appendix
- Glossary of Terms

Mixxx User Manual
Release 2.1.0
The Mixxx Development Team
Apr 15, 2018

Contents
1 Introduction to Mixxx 1
1.1 How Mixxx Works ............................................ 1
2 Getting Started 3
2.1 Opening Mixxx .............................................. 3
2.2 Importing your audio files ........................................ 3
2.3 Analyze your library ........................................... 4
2.4 Configuring sound input and output ................................... 4
3 An Overview of the Mixxx Interface 7
3.1 The Deck Sections ............................................ 8
3.2 The Mixer Section ............................................ 17
3.3 The Sampler Section ........................................... 20
3.4 The Effects Section ............................................ 22
3.5 The Microphone Section ......................................... 22
3.6 Preview Deck Section .......................................... 22
4 The Mixxx Library 24
4.1 Overview of the Library features ..................................... 24
4.2 Tracks - View and edit your whole collection .............................. 25
4.3 Loading Tracks .............................................. 28
4.4 Finding Tracks (Search) ......................................... 29
4.5 Previewing Tracks ............................................ 30
4.6 Edit metadata of audio files ....................................... 30
4.7 Auto DJ - Automate your mix ...................................... 33
4.8 Playlists - Arranging tracks in a set order ................................ 33
4.9 Crates - Organizing tracks into collections ................................ 34
4.10 Computer - Loading tracks from anywhere on your computer ..................... 35
4.11 Recordings ................................................ 36
4.12 History - Keep track of your sessions .................................. 36
4.13 Analyze - Prepare your tracks ...................................... 36
4.14 iTunes, Traktor, Rhythmbox, Banshee - Using external libraries .................... 36
4.15 Removing tracks from the library .................................... 37
4.16 Compatible file formats ......................................... 37
4.17 Music from audio CDs .......................................... 38
5 DJ Hardware 39
i

5.1 Controllers ................................................ 39
5.2 Audio Interfaces ............................................. 40
5.3 Mixers .................................................. 41
5.4 Turntables ................................................ 42
5.5 CDJs ................................................... 42
5.6 Microphones ............................................... 42
6 Example Setups 43
6.1 Computer Only .............................................. 43
6.2 Laptop and Splitter Cable ........................................ 44
6.3 Laptop and External USB Audio Interface ............................... 45
6.4 Laptop and MIDI or HID Controller ................................... 46
6.5 Laptop, External Hardware Mixer and Vinyl Control .......................... 47
7 Controlling Mixxx 49
7.1 Using a Mouse and Touchpad ...................................... 49
7.2 Using a Keyboard ............................................ 50
7.3 Using MIDI/HID Controllers ...................................... 50
7.4 Using Timecode Vinyl Records and CDs ................................ 52
8 Vinyl Control 53
8.1 How does it work? ............................................ 53
8.2 What do I need to use it? ......................................... 53
8.3 Configuring Input and Output devices .................................. 56
8.4 Configuring Vinyl Control ........................................ 56
8.5 Enabling Vinyl Control .......................................... 58
8.6 Single Deck Control ........................................... 59
8.7 End-Of-Record Mode .......................................... 59
8.8 Control Track ............................................... 60
8.9 Troubleshooting ............................................. 60
9 Using Microphones 62
9.1 Software Monitoring ........................................... 62
9.2 Direct Monitoring ............................................ 63
9.3 Hardware Mixers ............................................. 65
9.4 DJ Controllers With Microphone Inputs ................................. 66
10 Live Broadcasting - Start your own Internet radio 68
10.1 Streaming Servers ............................................ 68
10.2 Configuring Mixxx ............................................ 68
10.3 Live Broadcasting Preferences ...................................... 69
10.4 Troubleshooting ............................................. 71
10.5 Activate MP3 streaming support ..................................... 71
11 Effects 74
11.1 Effect Units ................................................ 74
11.2 Effect Parameters & Metaknobs ..................................... 75
11.3 Effects In Headphones .......................................... 76
12 DJing With Mixxx 77
12.1 Setting Your Levels Properly (Gain Staging) .............................. 77
12.2 Beatmatching and Mixing ........................................ 78
12.3 Master Sync ............................................... 79
12.4 Harmonic Mixing ............................................ 79
12.5 Recording Your Mix ........................................... 79
ii

12.6 Using Auto DJ For Automatic Mixing .................................. 80
13 Preferences 84
13.1 Sound Hardware ............................................. 84
13.2 Library .................................................. 87
13.3 Beat Detection .............................................. 88
13.4 Key Detection .............................................. 89
13.5 Equalizers ................................................ 90
14 Advanced Topics 92
14.1 Adding support for your MIDI/HID Controller ............................. 92
14.2 Making a Custom Keyboard Mapping .................................. 94
14.3 Additional Effects via external Mixer Mode ............................... 94
14.4 Deleting Your Library .......................................... 96
15 Contributing to the Project 97
15.1 As a non-developer ............................................ 97
15.2 As a software developer ......................................... 97
16 Appendix 99
16.1 Additional Resources ........................................... 99
16.2 Keyboard mapping table ......................................... 99
16.3 Application shortcuts ........................................... 101
16.4 Command line options .......................................... 102
16.5 Developer tools .............................................. 103
16.6 Version History .............................................. 104
17 Glossary of Terms 106
iii

CHAPTER 1
Introduction to Mixxx
Mixxx enables you to perform live DJ mixes with your digital music collection. It helps you rock the party with DJ
controllers, vinyl turntables, or even just your keyboard. It is developed by an international team of volunteers who
want to bring the joy of DJing to everyone. The project is non-profit, open-source and community driven. Together,
we aim to build the best DJ software ever created. We hope you will join us!
1.1 How Mixxx Works
Mixxx is different from typical music player applications because it plays multiple audio files at the same time and
has many features to manipulate the playback of the audio files. This lets you creatively mix different tracks together
on the fly.
You can use Mixxx to preview the next track in headphones before the audience hears it, also known as headphone
cueing. This helps you choose a track that is appropriate for the present moment and that will mix well into the
currently playing track(s). To use headphone cueing, you need at least 2 separate audio outputs, typically provided
by a USB audio interface (also known as a “sound card”, although most of them are not shaped like cards anymore).
Mixxx can be used in two different ways for headphone cueing:
Internal Mixing
Mixxx plays multiple audio files on the computer at the same time, mixes them together, and sends the
mixed signal to one audio interface output. A separate signal is sent to another audio interface output
for headphone cueing. Often a DJ controller is used with internal mixing to provide easier control over
Mixxx than a mouse and keyboard.
External Mixing
In this kind of setup, Mixxx plays multiple audio files on the computer at the same time and sends each
track to a separate audio interface output. The audio interface’s outputs are plugged into an external hard-
ware mixer. The hardware mixer performs the actual mixing of the audio signals. On the hardware mixer,
there are separate outputs for the mixed signal to play to the audience and for the DJ to use headphone
cueing. External mixing is typically used with turntables and special vinyl records to manipulate digital
music files as if the music was on the vinyl records.
1
Mixxx User Manual, Release 2.1.0
Fig. 1: Using Mixxx together with a DJ controller for internal mixing. The DJ controller has an integrated audio
interface that provides two separate stereo outputs.
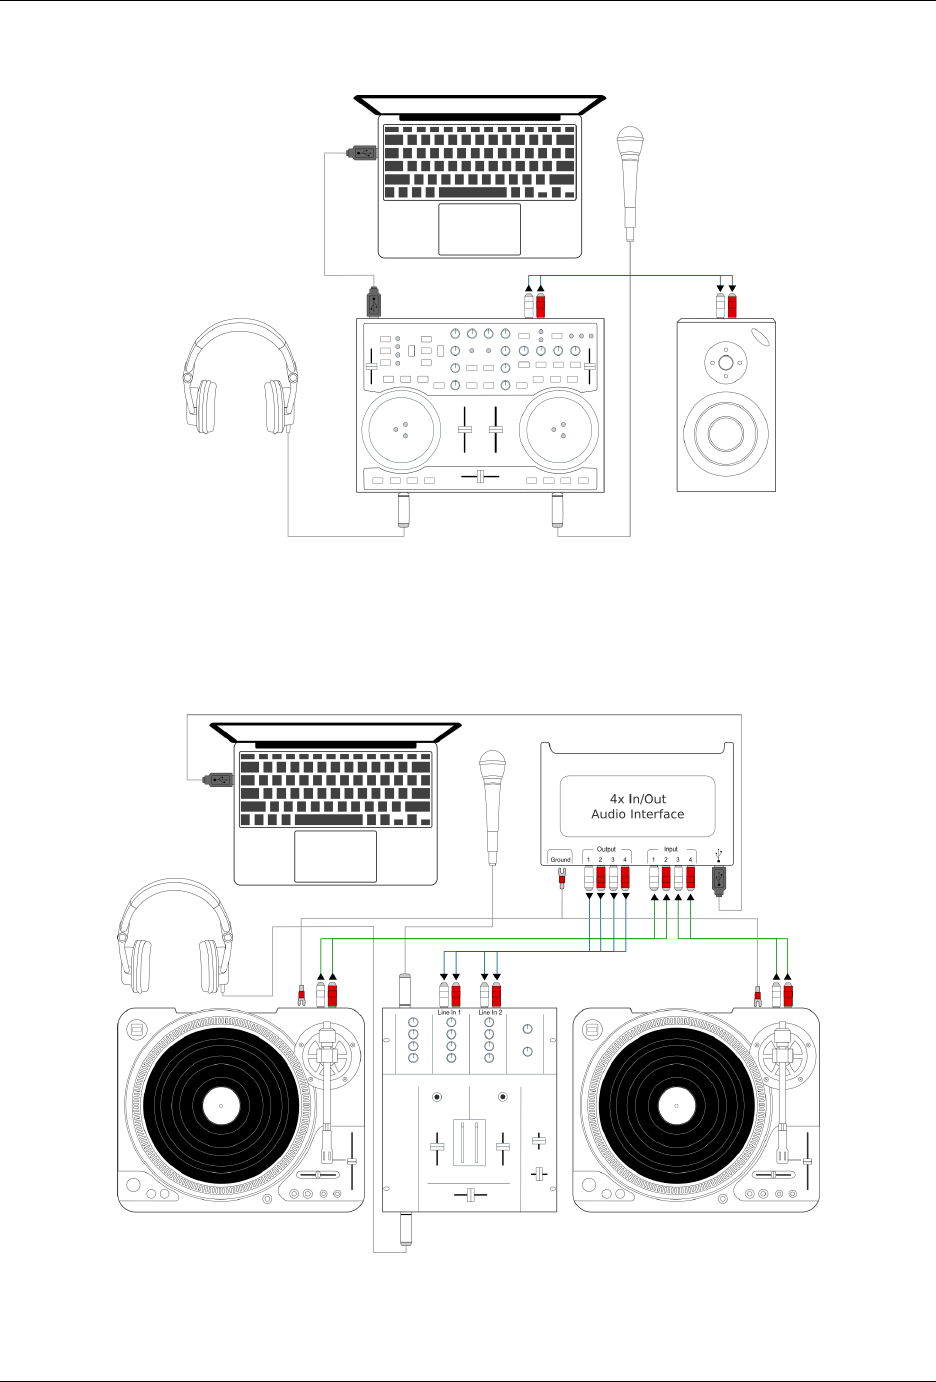
Fig. 2: Using Mixxx together with a USB audio interface, external mixer, and timecode vinyl for external mixing
1.1. How Mixxx Works 2
CHAPTER 2
Getting Started
2.1 Opening Mixxx
Once you’ve installed Mixxx, start by opening Mixxx and importing your music to the Mixxx library.
Windows Double-click the Mixxx icon on the Desktop. Alternatively, browse your Windows start menu and click the
Mixxx icon, or perform a search for Mixxx.exe.
Mac OSX Double-click the Mixxx icon in the Applications folder. Alternatively, drag the Mixxx icon to the
dock and double-click it there or search for mixxx in Spotlight.
GNU/Linux Click the Mixxx icon in the applications menu or launcher of your desktop environment or perform a
search for mixxx. Alternatively type mixxx into the terminal, then hit Return. If your audio interface is
not accessible from Mixxx because it is used by other applications via PulseAudio, you may close and restart
Mixxx using pasuspender mixxx. See Command line options for an overview of Mixxx’s command line
options.
2.2 Importing your audio files
The first time you run Mixxx, you are asked to select a directory where your music is stored. By default, the dialog
points to a location where music files are typically held, but you can select any location on your computer.
Click Select Folder and Mixxx will scan your music library. Depending on the size of your library this could take some
time. All the supported music files Mixxx detects will be listed in the Tracks - View and edit your whole collection.
If you want to refresh your library (for example because you added or moved files), you can do this with Library →
Rescan Library in the menu. If you want to rescan at every launch, select Preferences →Library →Rescan on startup.
3
Mixxx User Manual, Release 2.1.0
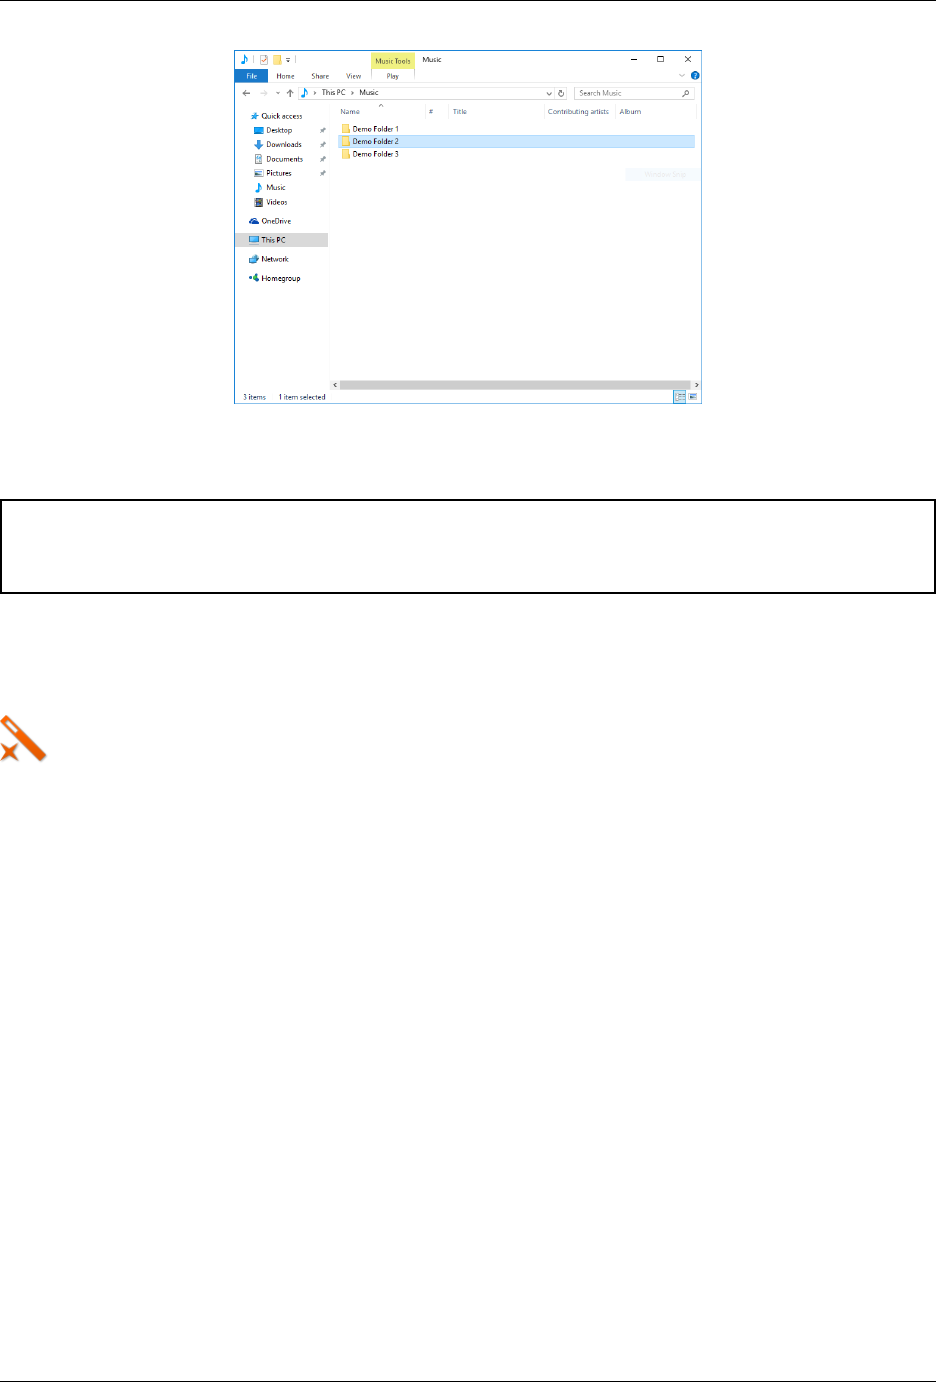
Fig. 1: Mixxx running on Windows 10 - Choose music library directory dialog
Warning: On Windows 7 and 8 the import dialog points to your Windows “Music“ Library, a special-purpose
virtual folder. You can not use these virtual folders. Select a regular folder instead, usually “My Music“, like
pictured above.
2.3 Analyze your library
Mixxx automatically analyzes tracks the first time you load them in a deck, nevertheless it is recommended that
you analyze them before playing live to ensure the beatgrids are correct. Furthermore, track analysis takes considerable
CPU power and might cause skips in the audio — things you surely don’t need while performing.
Once you have imported your music library, press OK on the Preferences window. Go to the Analyze view on the left
side panel of the library. This allows you to run beatgrid,key, and ReplayGain detection on tracks in advance. While
analyzing, the progress in percentage and total queue length are shown.
See also:
For more information, go to Beat Detection.
2.4 Configuring sound input and output
Before you can start using Mixxx, you need to configure Mixxx to use your sound hardware in Preferences →Sound
Hardware. You do not need to configure all inputs and outputs.
The DJ Hardware chapter explains different types of DJ hardware and how to set them up with the the input and
output options. For Mixxx to perform the best it can on your system, configure the other Sound Hardware preferences
in addition to the inputs and outputs.
2.4.1 Output Options
Internal mixing:
2.3. Analyze your library 4
Mixxx User Manual, Release 2.1.0
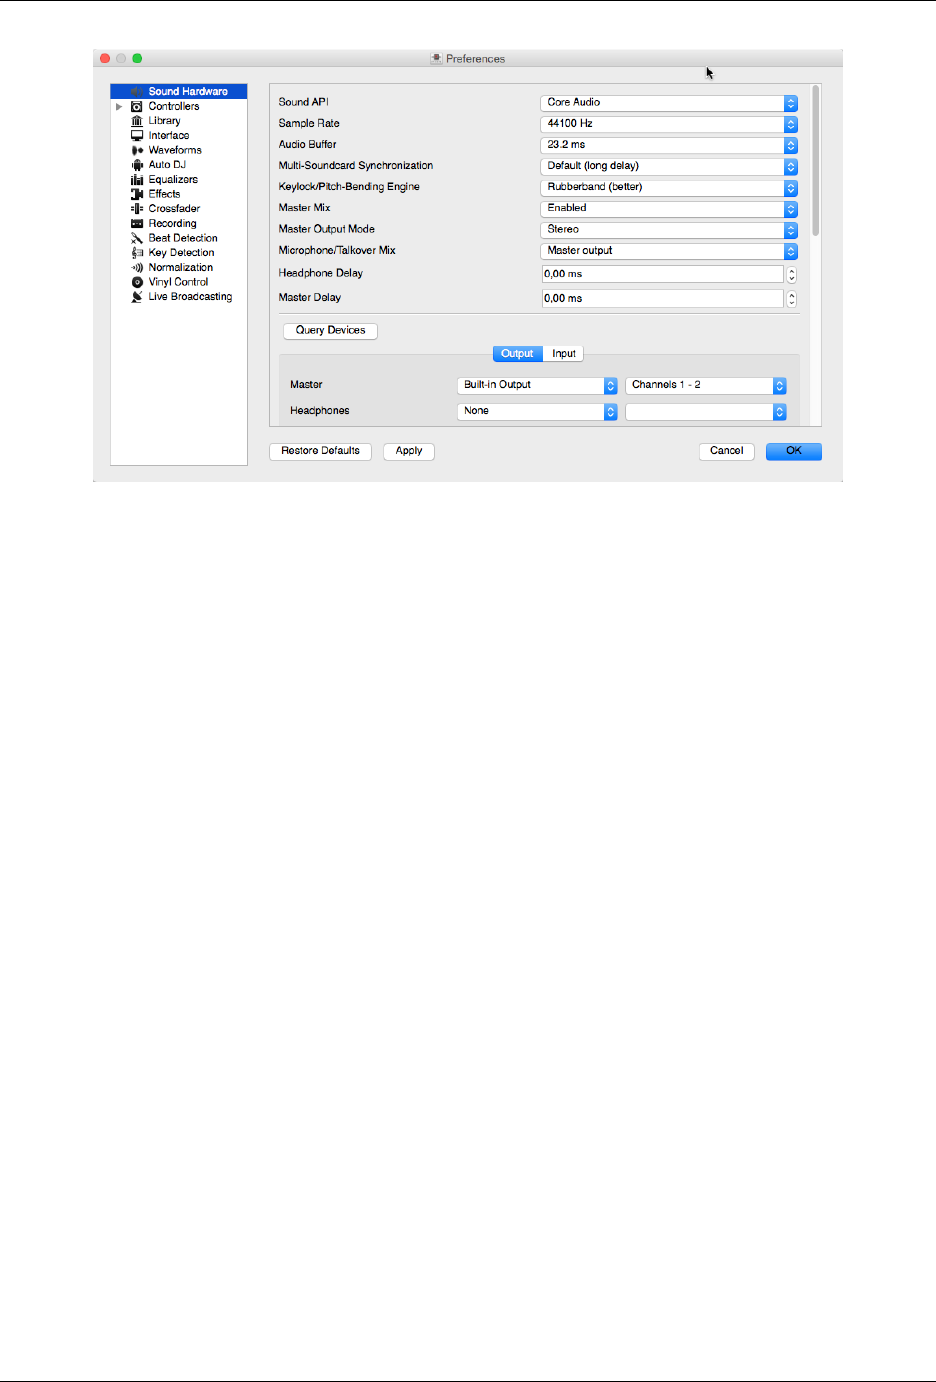
Fig. 2: Mixxx Sound Hardware Preferences
Use these outputs if you are not using an external hardware mixer. If you are using a controller with a built-in audio
interface, use these outputs.
•Master: all decks, samplers, microphones, and auxiliary inputs mixed together. This output is sent to the
speakers for the audience.
•Headphones: all decks, samplers, microphones, and auxiliary inputs assigned to pre-fader listening
•Booth: same as Master output, but has a separate gain control
External mixing:
•Decks 1-4: the individual unmixed decks to send to an external mixer
•Bus Left/Center/Right: all decks, samplers, and auxiliary inputs assigned to each side of Mixxx’s crossfader
2.4.2 Input Options
Internal mixing:
Use these inputs if you are not using an external hardware mixer. If you are using a controller with a built in audio
interface, use these inputs.
•Microphone 1-4: live microphone or musical instrument inputs
•Auxiliary 1-4: other sound sources
External mixing:
•Record/Broadcast: When this is configured, Mixxx will record and broadcast from this audio interface input
instead of the internal master mix. If you have a microphone plugged into the mixer, do not configure the
Microphone 1-4 inputs.
Either internal or external mixing:
•Vinyl Control 1-4: timecode input from turntables or CDJs for manipulating decks 1-4
2.4. Configuring sound input and output 5

CHAPTER 3
An Overview of the Mixxx Interface
Welcome to the Mixxx interface. This is where the magic happens. You are going to want to get very familiar with
this interface because it is the main way to use Mixxx. In this chapter, we present the default interface of Mixxx and
describe its elements, knobs and faders.
Fig. 1: The Mixxx interface - Latenight skin
This is the Latenight skin. It is the default skin supplied with Mixxx. There are a variety of others skins included with
Mixxx. You should explore them all to figure out which one you prefer. This section will focus on Latenight only.
7
Mixxx User Manual, Release 2.1.0
3.1 The Deck Sections
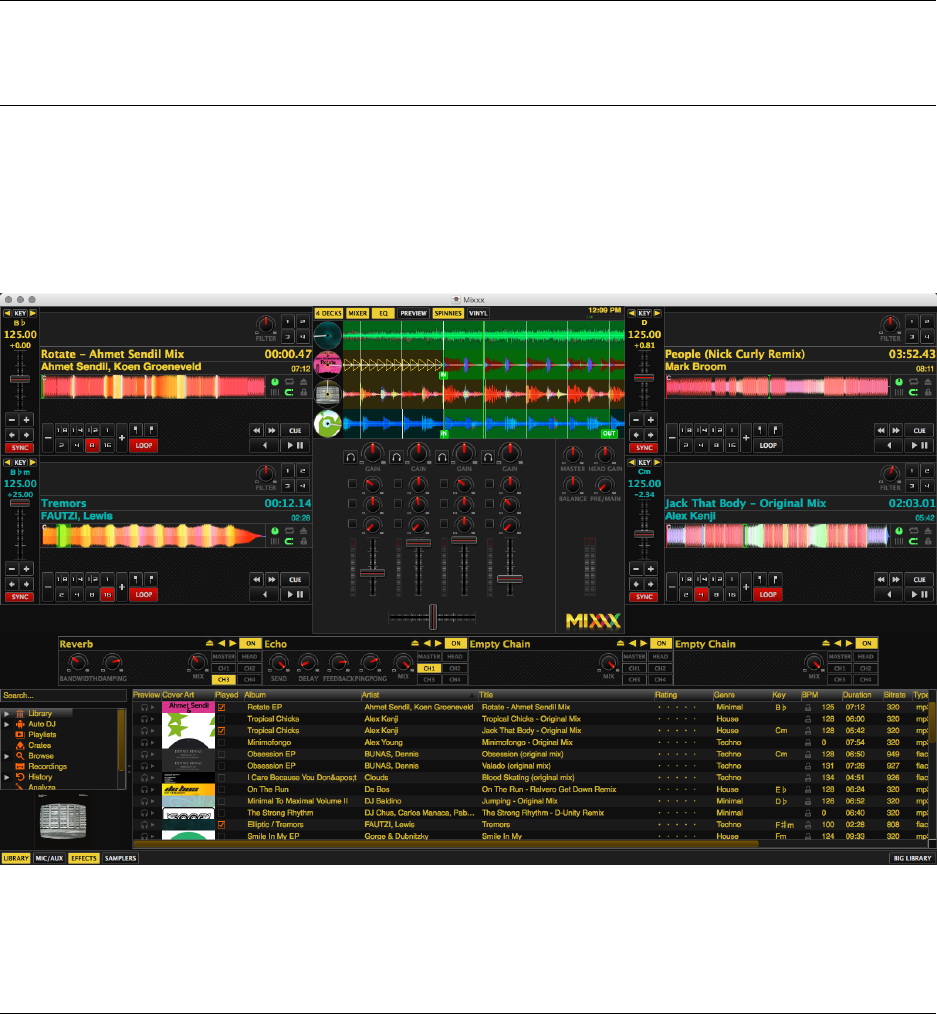
Fig. 2: A deck with a track loaded
The deck section allows you to control everything relating to a virtual turntable deck. We are going to break this down
into sections.
3.1.1 Track Information Display
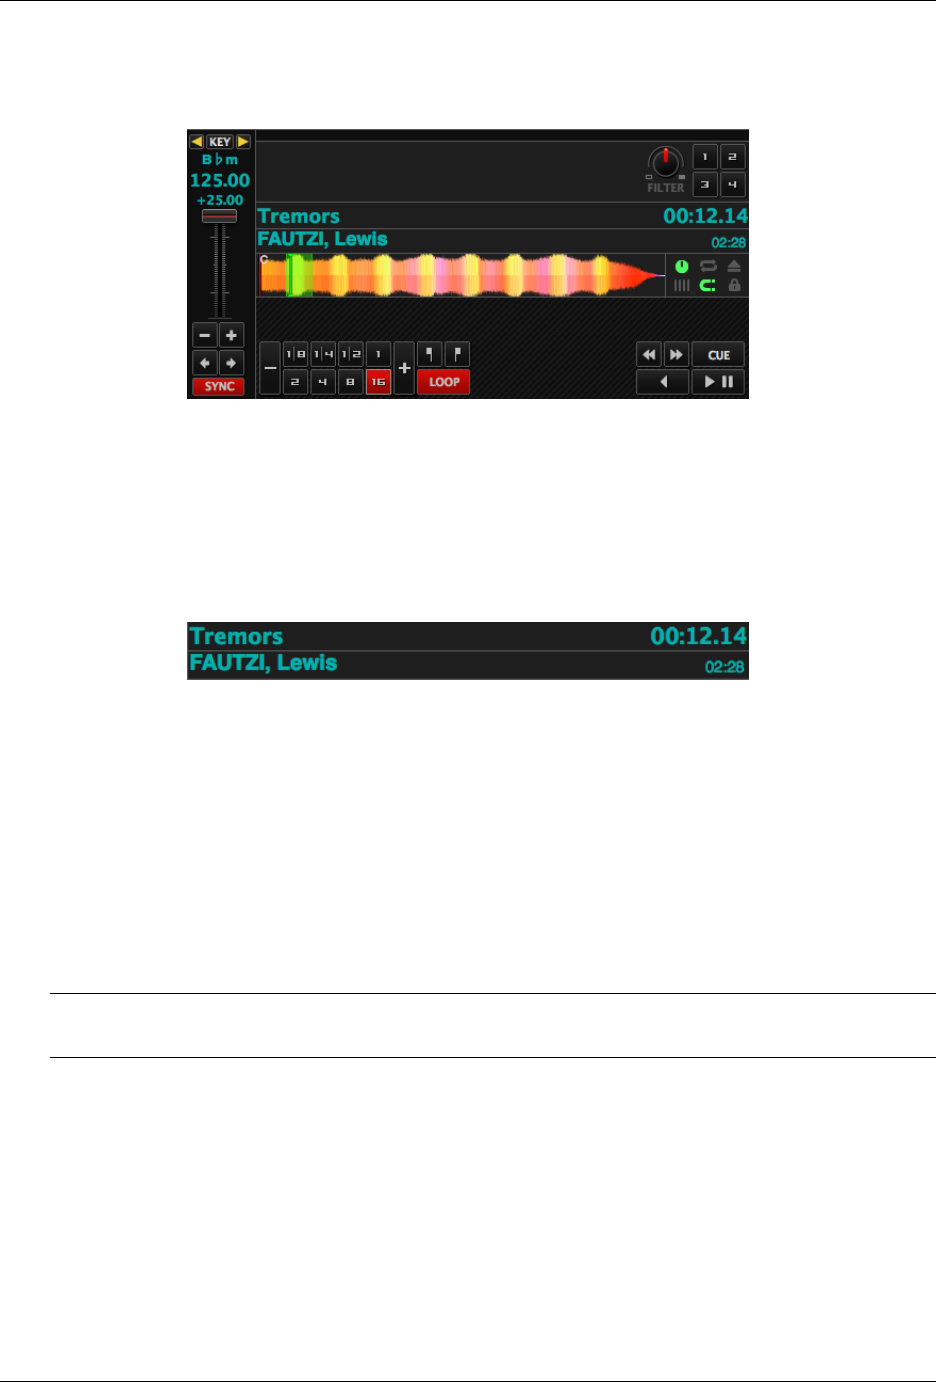
Fig. 3: The track information section of the deck
Track Title The title of the track that was loaded into a deck is displayed on top. This is the same as the title
listed under the Title column heading in the Mixxx library. This information is initially loaded from the track’s
metadata. If the metadata is missing, the title and artist are guessed from the filename.
Track Artist The artist of the track is listed below. It is the same as listed under the Artist column heading in the
Mixxx library.
BPM (Tempo) The number at the top right is the effective BPM of the track. This is the detected BPM of the track,
adjusted for the playback rate of the track. For example, if the track is normally 100 BPM, and it is playing at
+5%, then the effective BPM will read 105 BPM.
Hint: You can use a keyboard shortcut and tap with the beat to set the BPM to the speed you are tapping, go to
Using a Keyboard for more information.
Time Elapsed/Remaining/Both
New in version 2.1.0: Option to show elapsed and remaining time simultaneously
By default it displays the total elapsed time in the track up to the millisecond. Clicking on the display
switches to the Time Remaining view, which indicates how much time is left before the track reaches the
end. Clicking the display again, both the elapsed and remaining time are shown simultaneously in the
format elapsed time / remaining time. You can change the default in Preferences →Interface →Track
Time Display.
3.1. The Deck Sections 8
Mixxx User Manual, Release 2.1.0
3.1.2 Waveform Displays
The waveform section of a deck allows you to visualize the audio changes that occur throughout the track, you can
basically “see” your music.
By default the waveform displays are aligned parallel to each other in order to make beatmatching easier, as it is
possible to beatmatch visually by aligning the beats that appear in each waveform.
Fig. 4: Mixxx default skin (Latenight) - Parallel waveforms
Depending on the skin Mixxx displays either parallel waveforms (default) or separate waveforms. Select your pre-
ferred appearance in Preferences →Interface →Skin.
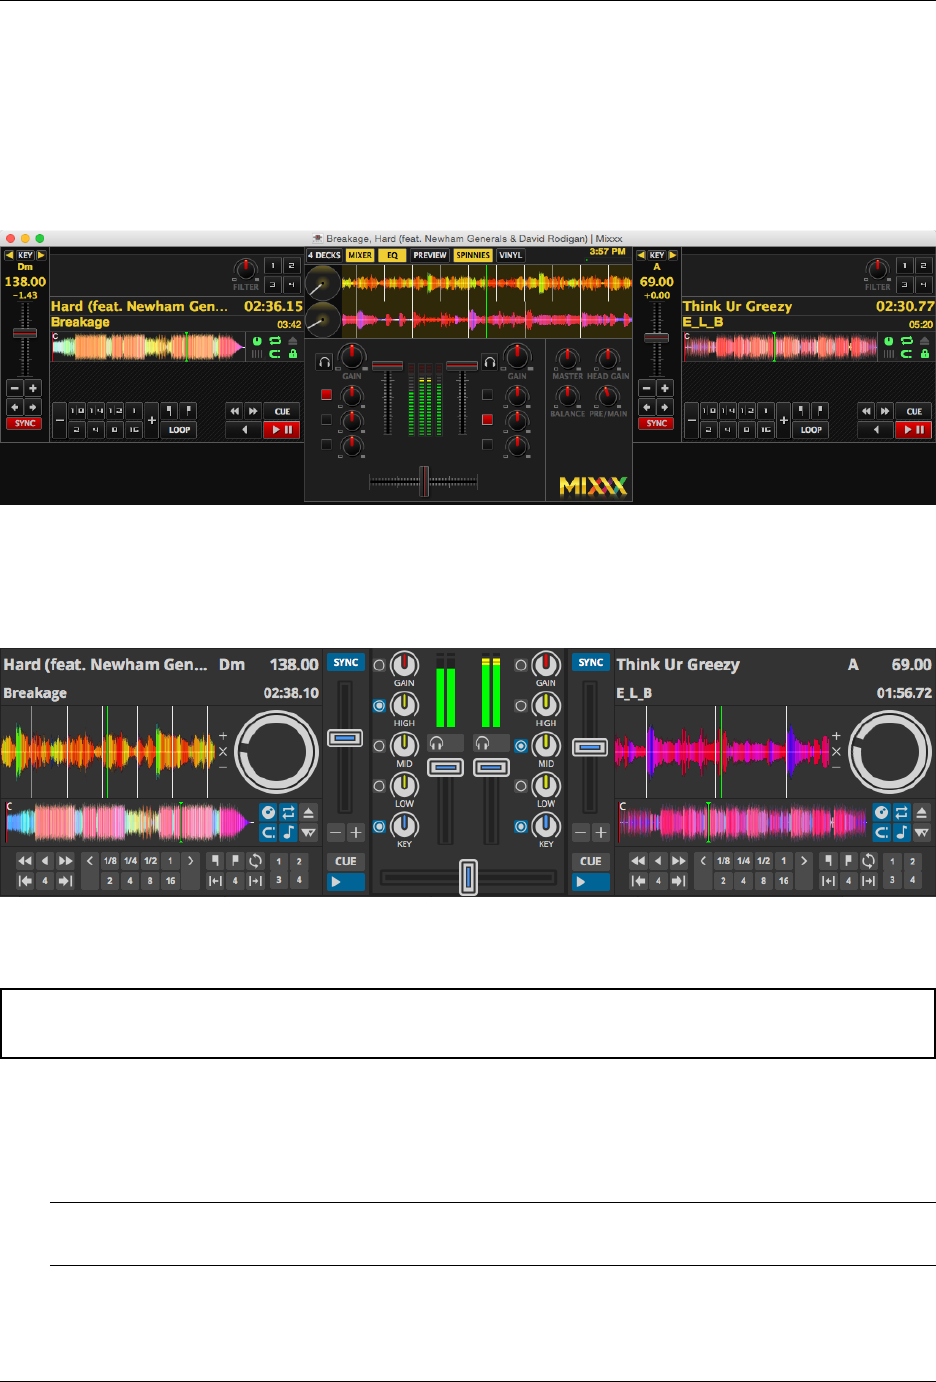
Fig. 5: Mixxx alternative skin (Deere) - Separate waveforms
Warning: If you have a slower computer and notice performance issues with Mixxx, try lowering the frame rate
or changing the waveform type in Preferences →Interface →Waveforms.
Waveform summary The big waveform summary shows the waveform envelope of the track near the current play-
back position and is updated in real time. The mouse can be used on the waveform to pause, scratch, spin-back
or throw the tracks. Right-clicking on the waveforms allows you to drag with the mouse to make temporary
pitch adjustments.
Hint: You can select from different types of displays for the waveform, which differ primarily in the level of
detail shown in the waveform, in Preferences →Interface →Waveforms →Summary type.
Waveform overview
New in version 2.1.0: Darken played part of track in decks and samplers
3.1. The Deck Sections 9

Mixxx User Manual, Release 2.1.0
The smaller, zoomed-out version of the waveform shows the various markers within the track as well as
the waveform envelope of the entire track. This is useful because they allow DJs to see breakdowns far in
advance. As visual aid, the part of the track that has already been played is darkened.
Clicking somewhere on the waveform allows you to jump to an arbitrary position in the track. Like with
the Waveform summary, you can select from different types of displays for the overview in Preferences
→Interface →Waveforms →Overview type.
Vinyl Widget The line on the vinyl widget rotates if the track moves. It is similar to the position marker found on
scratch records. Use the mouse on the vinyl widget to pause, scratch, spin-back or throw tracks - just like a
real record. When performing Loop rolls or right-clicking on the vinyl during playback, a “ghost” marker hints
where the playback will continue. The Vinyl Widget is hidden by default and can be enabled in the Deck Options
Button Grid.
If Vinyl control is enabled, it can optionally display the time-coded vinyl signal quality. Activate the option in
Preferences →Vinyl Control →Show Signal Quality in Skin.
Waveform Zoom Using the mouse-wheel everywhere in the waveform summary will zoom the waveform in or out.
You can choose whether to synchronize the zoom level between the decks in Preferences →Interface →Wave-
forms.
Waveform Marker While mixing, various additional markers can appear on the waveforms:
•Position marker: The static vertical line in the center of the waveform summary indicates the playback point
of the deck. The waveform overview includes a vertical line to show the current position within the track.
•Beat marker: The regular white lines on the waveform summary indicate the locations of beats in the audio,
also called the beatgrid.
•Cue marker: Indicates the position of the cue point.
•Hotcue marker: Indicate the position and number of a hotcue point if set.
•Loop-in/Out marker: Indicate the beginning and the end of a loop.
•Loop overlay: Is drawn between the Loop-in/Out markers and changes color depending on whether a loop is
activated or not.
•Track ending notification: If the waveform overview flashes red, only 30 seconds are left before the track
reaches the end.
3.1.3 Deck Options Button Grid
Fig. 6: The Options Button Grid of the deck
The six buttons at the bottom right below the waveform allow you to configure the deck. Starting from the top-left and
moving clockwise the buttons are as follows:
Show/Hide Vinyl Widget Toggles the visibility of the Vinyl Widget in the Waveform Displays.
Repeat Mode Toggle If enabled, the repeat mode will jump back to the beginning and continue playing when the
track finishes.
Eject Track Button Clicking this button ejects the track from the deck. Alternatively you can use a keyboard shortcut,
go to the chapter Using a Keyboard for more information.
3.1. The Deck Sections 10

Mixxx User Manual, Release 2.1.0
Beat-grid Adjust Button Clicking this button adjusts the track beat-grid so that the current position is marked as a
beat. This is useful if Mixxx was able to accurately detect the track’s BPM but failed to align the beat markers
on the beats. For more information, go to the chapter Beat Detection.
Quantize Mode Toggle If enabled, all cues, hotcues, loops, and beatloops will be automatically quantized so that
they begin on a beat.
Keylock Toggle Keylock locks the track’s pitch so that adjustments to its tempo via the rate slider do not affect its
pitch. This is useful if you would like to speed up or slow down a track and avoid the “chipmunk” effect that
speeding up vocals has.
3.1.4 Playback/Cue Controls
Fig. 7: The playback and cueing controls of the deck
Play/Pause Button Clicking the Play/Pause button starts and pauses the playback.
See also:
The actual behavior of the Play/Pause button depends on the selected Cue mode.
Hint: To return to the beginning of the track, right-click on the deck’s Fast-Rewind Button.
Cue Button If the button is pressed while the track is playing, the play position jumps to the Cue point on the track
and the track is paused. Once the track is paused at the Cue point, you can preview it by holding the Cue Button.
If you have not moved the Cue point yet, the default point is at the track’s beginning.
See also:
The actual behavior of the Cue button depends on the selected Cue mode.
Setting Cue points
Every track has a Cue point, by default on its beginning. Unlike with Hotcues, you can’t delete, but only move Cue
points.
The Cue point is moved according to the selected Cue mode, as explained below.
Auto Cue
Mixxx automatically seeks to the saved Cue point on track load. If none exists, seeks to the beginning of the track.
Uncheck Preferences →Interface →Auto Cue →Jump to main cue point on track load to always seek to the beginning
of the track.
3.1. The Deck Sections 11

Mixxx User Manual, Release 2.1.0
Using Cue Modes
Mixxx supports various Cue modes that adapt to fit other devices in your setup, or your personal preferences. The
actual behavior of the Play, Pause, and Cue buttons depends on the selected Cue mode. To change the Cue mode, go
to Preferences →Interface →Cue mode.
Mixxx mode (default)
•While paused at Cue point (Cue button lit):
–Holding down the Cue button plays the track from the Cue point, as long as the button is pressed. After
releasing the Cue button, the track jumps back to Cue point and pauses again. Continue playback by
pressing the Play/Pause button before releasing the Cue button.
•While paused not at Cue point (Cue button flashing):
–Tapping the Cue button stores the current position as new Cue point.
•While playing:
–Tapping the Cue button causes the track to instantly jump to the location of the Cue point where it pauses
the playback.
–Tapping the Play/Pause button pauses the track at the current position.
Mixxx mode (no blinking)
Is the same as the default Mixxx mode, but with no blinking indicators.
Pioneer mode
• It is basically the same as Mixxx mode but the buttons are more flashy like a Pioneer CDJ player.
• The Play/Pause button flashes once per second when a track is paused.
• The Cue button flashes twice a second when the next push will move the Cue point.
Denon mode
•While paused at Cue point (Cue button lit):
–Holding down the Cue button plays the track from the Cue point, as long as the button is pressed. After
releasing the Cue button, the track jumps back to Cue point and pauses again. Continue playback by
pressing the Play/Pause button before releasing the Cue button.
–Tapping the Play/Pause button starts the track at the current position.
•While paused not at Cue point (Play button flashing):
–Tapping the Cue button moves the track back to Cue point.
–Tab the Play/Pause button to start playing. The Cue point moves to the position where the track was started.
•While playing:
–Tapping the Cue button causes the track to instantly jump to the location of the cue point where it pauses
the playback.
–Tapping the Play/Pause button pauses the track at the current position.
Numark mode
• It is basically the same as Denon mode but without a flashing Play/Pause button.
• This mode is useful if you want to implement a custom skin with 3-button decks, featuring a Cue button, a
dedicated Pause button, and a Play/Stutter button.
CUP (Cue + Play) mode
3.1. The Deck Sections 12
Mixxx User Manual, Release 2.1.0
•While paused at Cue point (Cue button lit):
–Continue playback by releasing the Cue button.
•While paused not at Cue point (Cue button flashing):
–Tapping the Cue button stores the current position as new Cue point. Continue playback by releasing the
Cue button.
•While playing:
–Tapping the Cue button causes the track to instantly jump to the location of the Cue point where it pauses
the playback. Continue playback by releasing the Cue button.
–Tapping the Play/Pause button pauses the track at the current position.
Hint: Use the Hotcue Controls to place more reference points on a track.
See also:
You can also use keyboard shortcuts for Cueing. Go to Using a Keyboard for more information.
3.1.5 Transport Controls
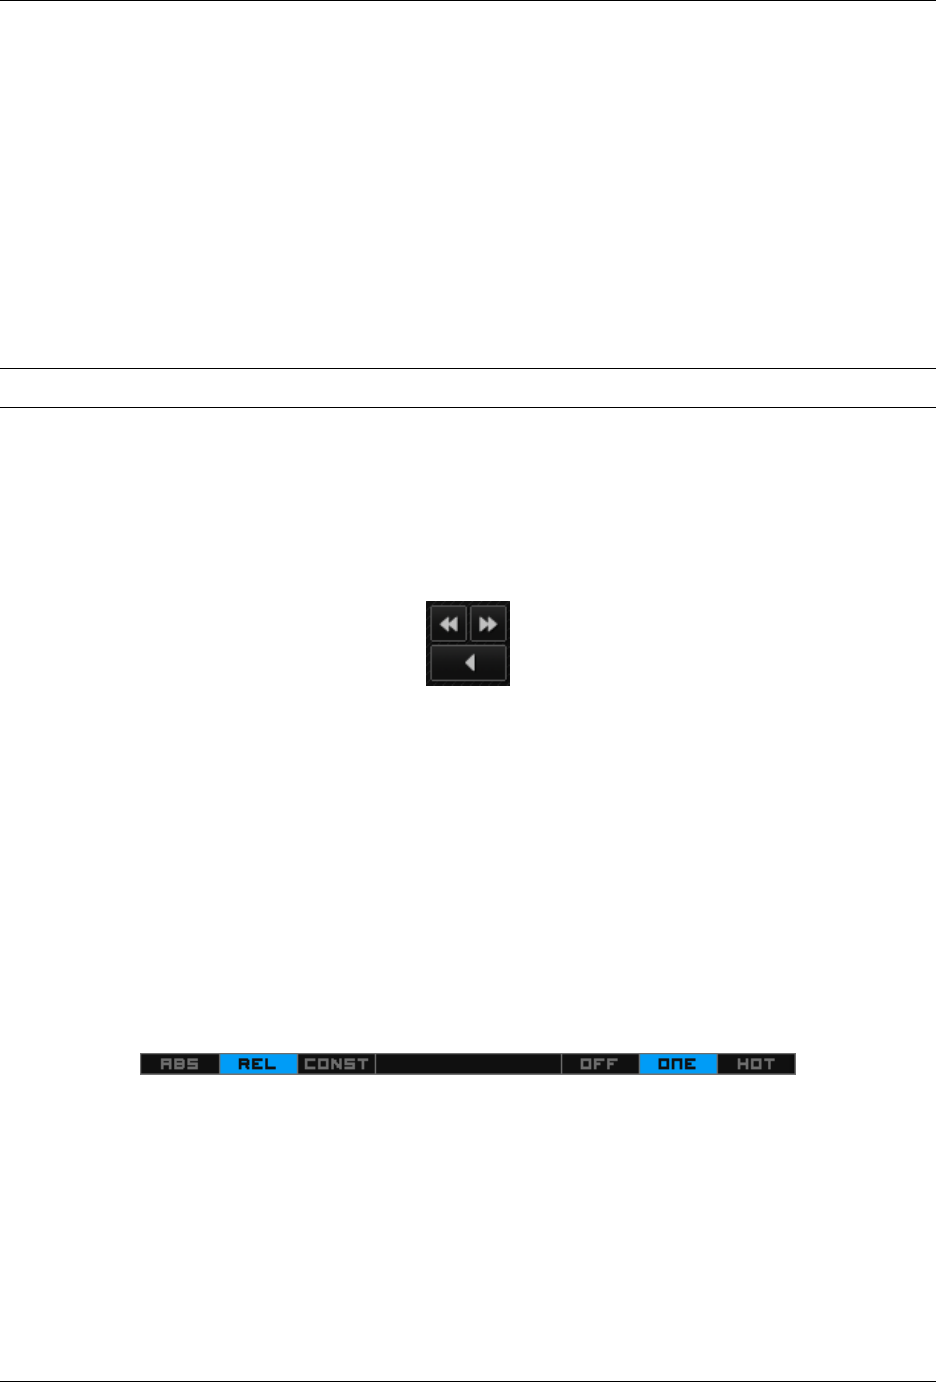
Fig. 8: The transport controls of the deck
Fast-Rewind button As long as the button is pressed, the track will play in reverse with increased speed. Right-
clicking on the button will seek the play position to the beginning of the track.
Fast-Forward button As long as the button is pressed, the track will play with increased speed. Right-clicking on
the button will seek the play position to the end of the track.
Reverse button As the name suggests, this button plays a track backwards. Right-clicking on the button puts a
track into reverse while being held, resumes the track and disables Slip mode when released. Useful to censor
expletives on the fly, or simply as part of your mix.
3.1.6 Vinyl Control Mode and Cueing controls
Fig. 9: The Vinyl Control Mode and Cueing controls of a deck
The control above the waveforms relate to the vinyl control feature in Mixxx and is hidden in the default Mixxx user
interface. Click the VINYL section expansion button in the mixer section, or use the specific Application shortcuts to
show or hide the section.
Abs/Rel/Const button
•Absolute mode: The track position equals needle position and speed.
•Relative mode: The track speed equals needle speed regardless of needle position.
3.1. The Deck Sections 13
Mixxx User Manual, Release 2.1.0
•Constant mode: The track speed equals last known-steady speed regardless of needle input.
Off/One/Hot button
This button determines how cue points are treated in vinyl control relative mode:
•Off: Cue points are ignored.
•One Cue: If the needle is dropped after the cue point, the track will seek to that cue point.
•Hot Cue: The track will seek to nearest previous hotcue point.
See also:
For more information on how to use Vinyl control in your setup, go to the chapter Vinyl Control.
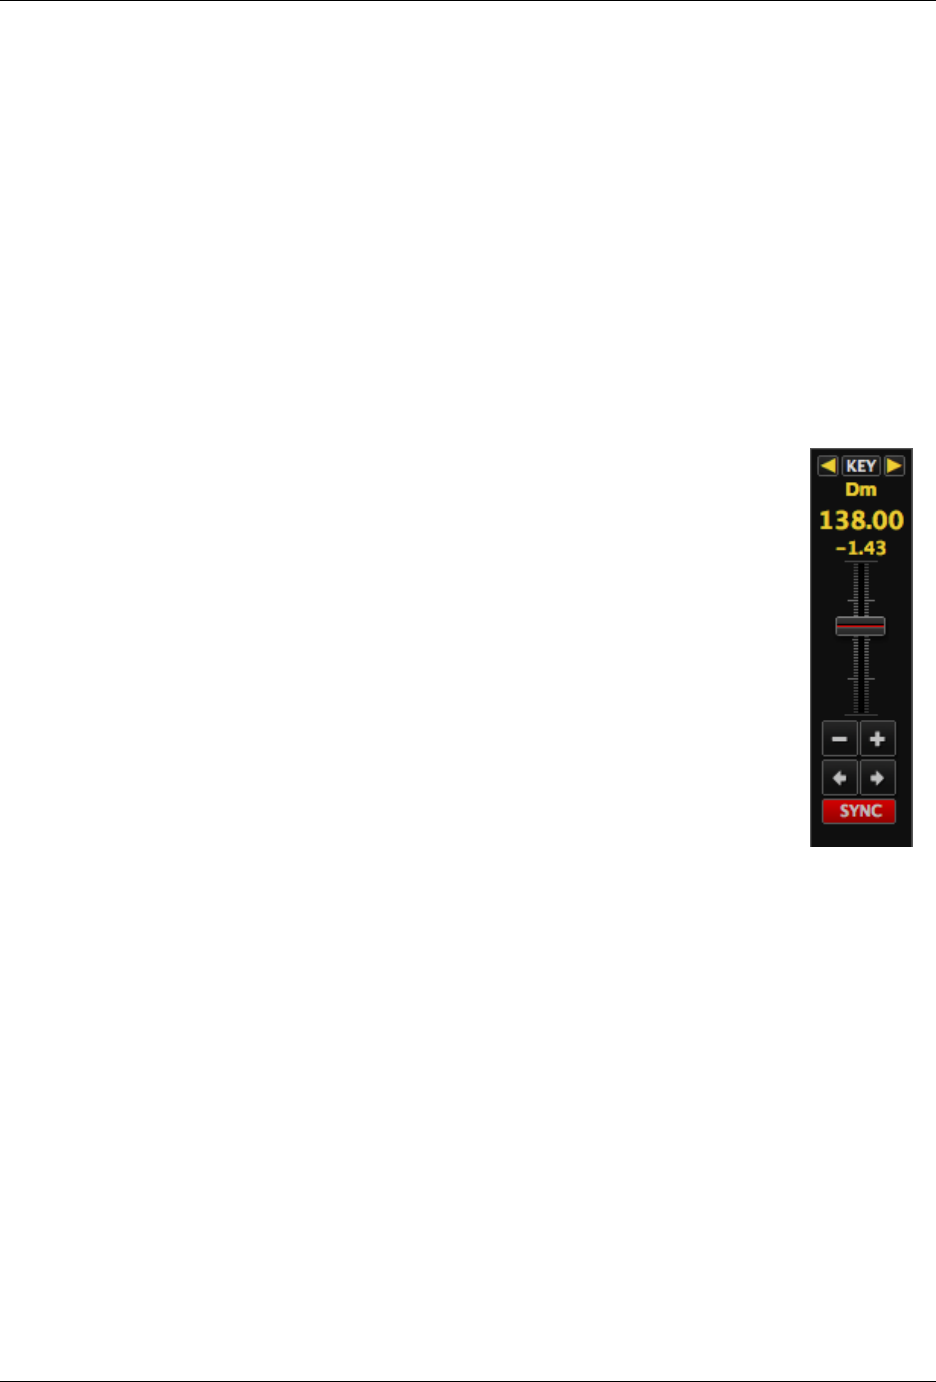
3.1.7 Sync and Rate Controls
Fig. 10: Rate con-
trols
The rate controls allow you to change the rate at which tracks are played. This is very useful
for beatmatching two tracks together in a mix. You can control rate changes also from your
computer’s keyboard, see the chapter Using a Keyboard for more information.
SYNC button
•Left-Click: Changes the rate of the track so that the BPM and phase of the track matches
the other deck.
•Right-Click: Only changes the rate of the track to match the other deck but does not adjust
the phase.
Decks and samplers now pick which sync target to sync to on the fly. Decks can’t sync to
samplers and samplers can only sync to decks. The sync target for samplers is:
• The first deck (in numerical order) that is playing a track with a detected beatgrid, and has
a rate different than zero.
• The first deck (in numerical order) that has a track loaded with a detected beatgrid, no
matter if it is playing or stopped.
So basically, if you sync a sampler and both deck 1 and deck 2 are playing a track with a beatgrid
then deck 1 will win since numerically it is first. The sync targets for decks are chosen with the
new master sync feature, see Master Sync for more information.
Pitch/Rate slider The slider allows you to change the speed of the song, by default up to 10%
from the tracks original tempos. The speed will increase as you move the slider up, oppo-
site to the behavior found on DJ turntables and CDJ. Right-clicking on the slider will reset
the tempo to its original value.
Pitch Rate Display The percent that the track’s rate is sped up or slowed down is noted here. Is
the Pitch/Rate slider positioned at the center, the pitch rate display is at +0.0%, which indicates no change.
Pitch/Rate buttons The plus and minus buttons increase or decrease the tempo in steps at which
a song is played, same as pulling the pitch slider slightly. By right-clicking the buttons you
get even finer adjustments.
Temporary Pitch/Rate buttons (Nudge) Pushing the left and right arrow buttons is like nudg-
ing the metal edge of a turntable, or the outer edge of a CD player. It will give the track
a push or pull forwards or backwards. If the buttons are released the previous tempo is
restored. The buttons can act as either a fixed pitch bend or a ramping pitch bend.
See also:
3.1. The Deck Sections 14
Mixxx User Manual, Release 2.1.0
To customize the amount by which the buttons alter the pitch of the track, the slider range as well as the direction, go
to Preferences →Interface →Adjustment buttons →Permanent / Temporary.
Hint: If the tempo of a track changes, you’ll notice that the tone changes based on the pitch used (e.g. playing at
faster pitch gives a chipmunk sound). You can enable the Keylock feature to maintain a constant tone.
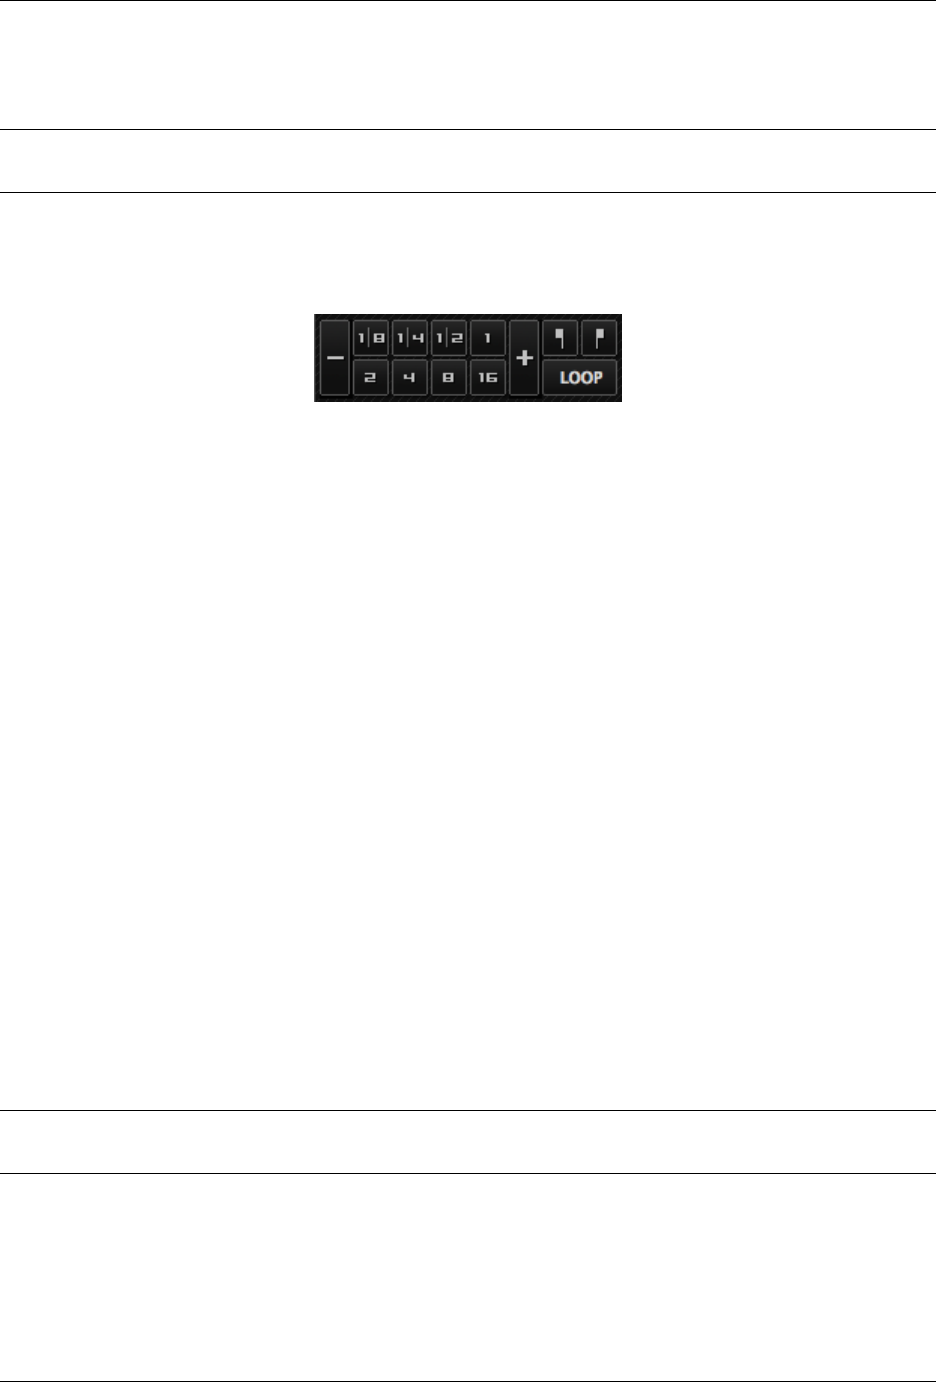
3.1.8 Loop Controls
Fig. 11: The beatloop and looping controls of the deck
In this section of the Mixxx interface you can control (beat-)loops and set the loop points of a track.
Beatlooping Buttons
•Instant loop: The numbered buttons represents a different bar length. Clicking on any of that buttons will set
a loop of the defined number of beats from the beat immediately following the current playback position. If a
loop is set, a loop overlay will be drawn on the waveforms.
•Loop roll: Right-click on any of the numbered loop buttons to temporarily setup a rolling loop over the defined
number of beats. Playback will resume where the track would have been if it had not entered the loop.
•Double loop: Clicking on the plus button will double the current loop’s length up to 64 bars. The length of the
loop overlay in the waveform will increase accordingly.
•Halve loop: Clicking on the minus button will halve the current loop’s length down to 1/32 bars. The length of
the loop overlay in the waveform will decrease accordingly.
Loop Buttons
•Loop-In: This button allow you to manually set the start point of a loop. A loop-in marker is placed on the
waveform indicating the position. If clicked when a loop was already set, it moves the start point of a loop to a
new position.
•Loop-Out: This button allow you to manually set the end point of a loop. A loop-out marker is placed on the
waveform indicating the position. If clicked when a loop was already set, it moves the end point of a loop to a
new position.
•Loop: Also dubbed Reloop, this button toggles whether the loop is active or not. This works for manually
placed loops as well as automatic loops set by the beatlooping buttons. Depending on the current status of the
loop, the loop overlay on the waveforms changes color.
Hint: If you are playing inside a loop and want to move the end point beyond its current position in the track, click
on the Loop button first and when the play position reaches the desired position, click on the Loop-Out button.
See also:
If the Quantize mode is enabled, the loops will automatically snap to the nearest beat. This is disabled by default, click
on the Quantize Mode Toggle to enable it.
3.1. The Deck Sections 15
Mixxx User Manual, Release 2.1.0
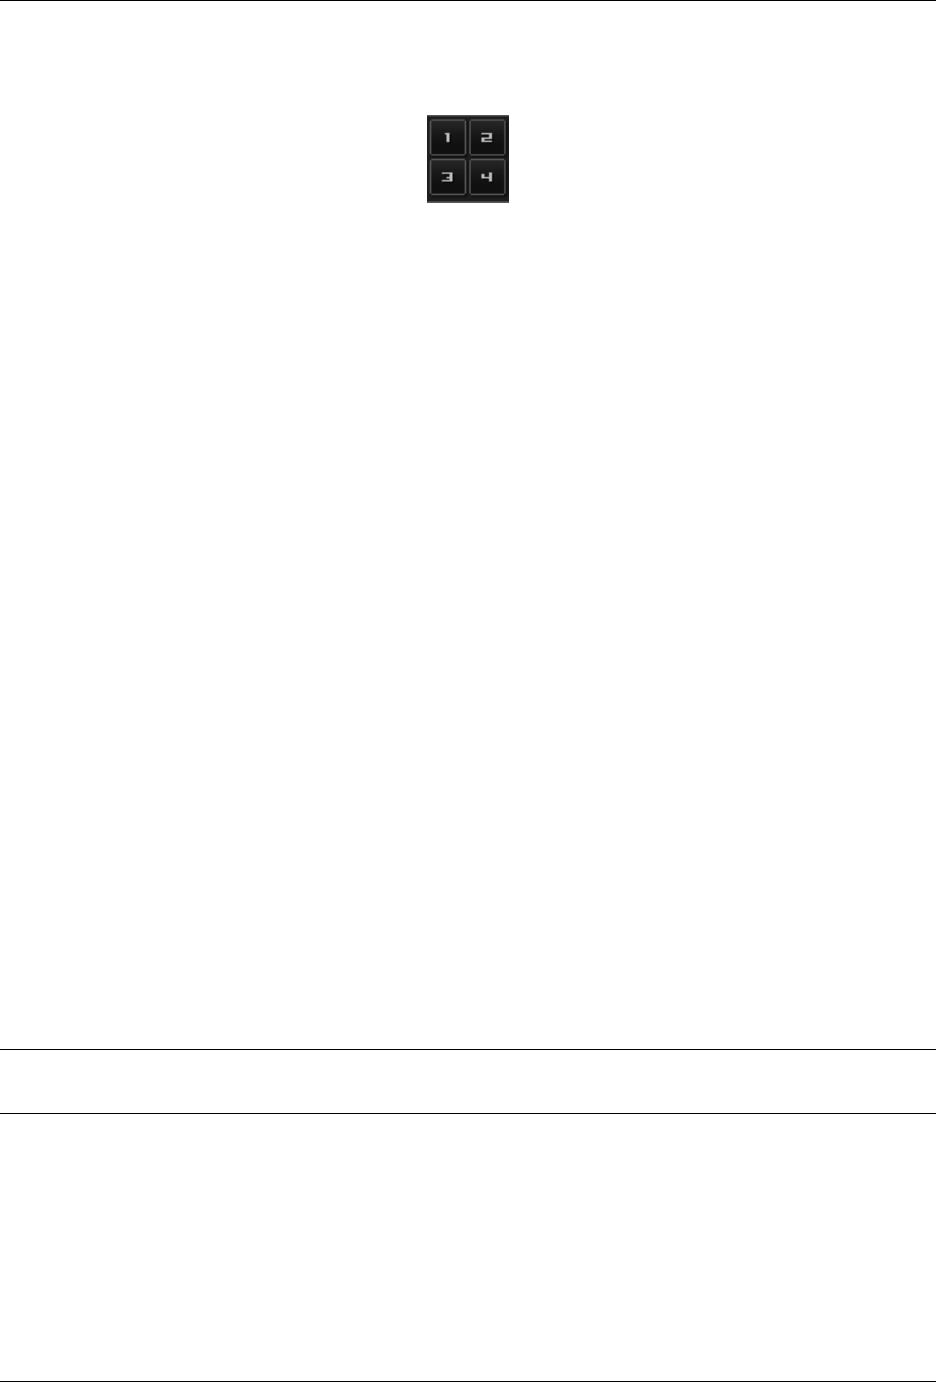
3.1.9 Hotcue Controls
Fig. 12: The hotcue controls of the deck
To jump in between different parts of a track, you can use these numbered buttons. You can also use keyboard
shortcuts, go to Using a Keyboard for more information.
Setting Hotcues
Clicking on a numbered button will set a hotcue at the current play position on the track. A marker with the corre-
sponding number will appear in the waveform and the button will light up to indicate that the hotcue is set.
Playing Hotcues
•While playing: Tap a hotcue button to cause the track to instantly jump to the location of the hotcue and continue
playing. If you are playing inside a loop and tap a hotcue whose position is outside of the loop, then the track
still instantly jumps to the hotcue but the loop will be deactivated.
•While stopped: Tap a hotcue button to cause the track to instantly jump to the location of the hotcue and start
playing as long as the button is pressed. Press the Play keyboard shortcut while the hotcue button is pressed to
continue playback, then release the hotcue button.
Hotcue labels
New in version 2.1.0.
You can add custom names to hotcues. Right-clicking on a selected track in the track list reveals the context menu.
Choose Properties →Cuepoints →Label and add a label for the hotcue. Press Enter , then click OK to save.
The hotcue indicator on the waveform changes to the format #:label.
Deleting Hotcues
To delete a hotcue, right-click on the numbered button. The marker in the waveform will be deleted as well.
Note: Mixxx supports up to 36 hotcues per deck. By default, only some of them are visible in the user interface. You
can customize your keyboard or controller mappings to use all of them.
See also:
Just as with the loops (see above), if the quantize mode is enabled, the hotcues will automatically snap to the nearest
beat. This is disabled by default, click on the Quantize Mode Toggle to enable it.
3.2. The Mixer Section 16
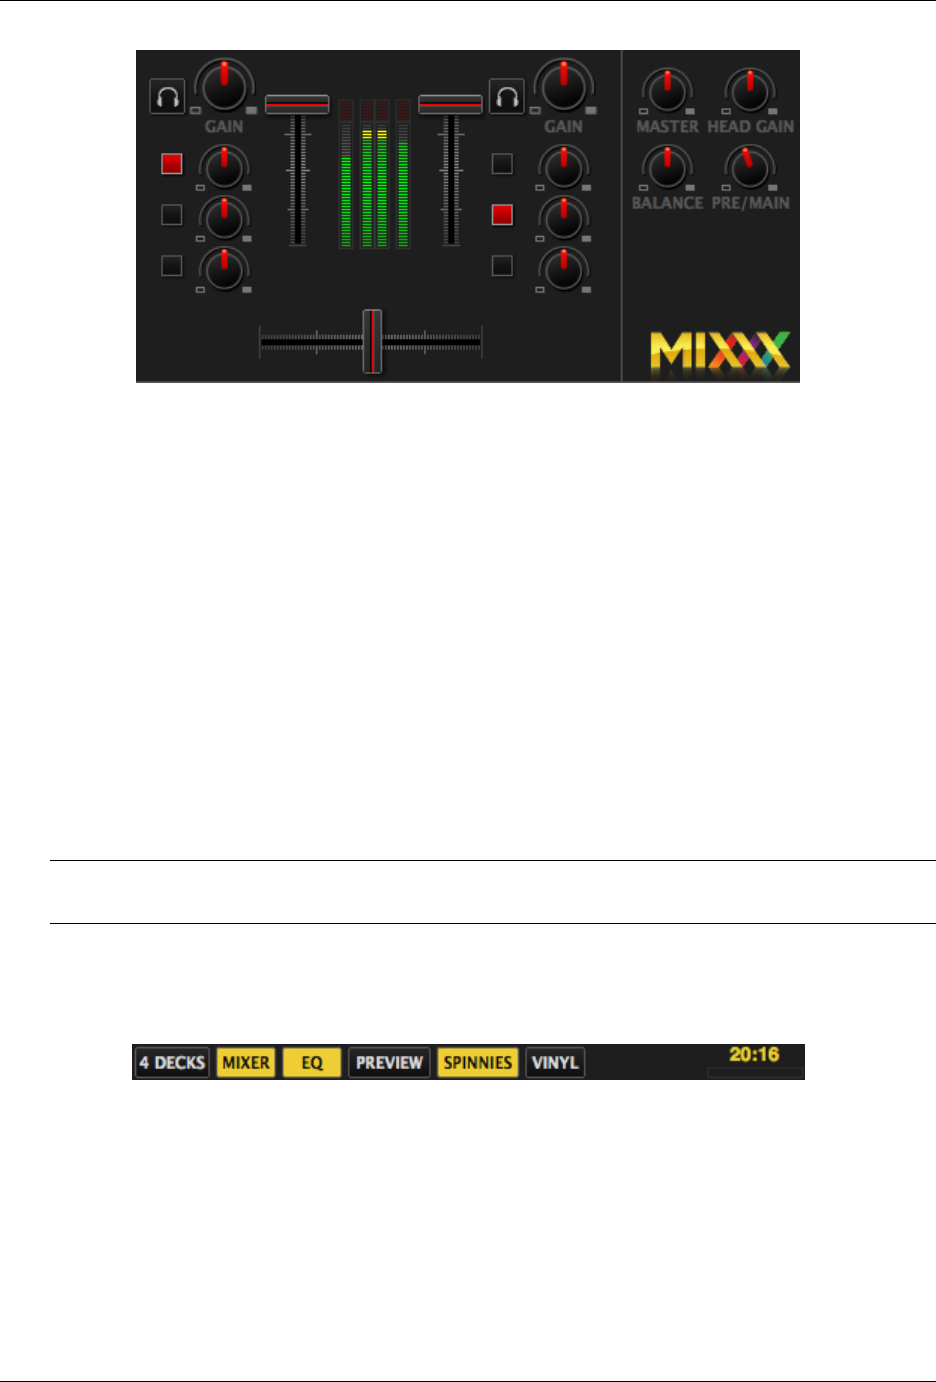
Mixxx User Manual, Release 2.1.0
Fig. 13: The mixer section
3.2 The Mixer Section
The mixer section of the Mixxx user interface allows you to control how the different decks and samplers are mixed
together.
3.2.1 Channel Faders and Level Meters
Level meters In the center of the mixer section are 4 level meters. The two outer-most level meters are for each deck,
while the 2 inner-most level meters are the left and right level meters for the master output. These should stay at
the top of the green region, with the loudest parts of the music (transients) briefly going into the yellow region.
They should never be in the red region. Refer to Setting your levels properly (gain staging) for more details.
Line faders The two large faders on either side of the level meters are the deck volume faders, also known as Channel-
or Line-faders. Adjusting these controls the volume of each deck.
Hint: Some DJ’s prefer to use the line faders over the crossfader for fading between tracks. Try it, you may
like it.
3.2.2 Section Expansion Buttons
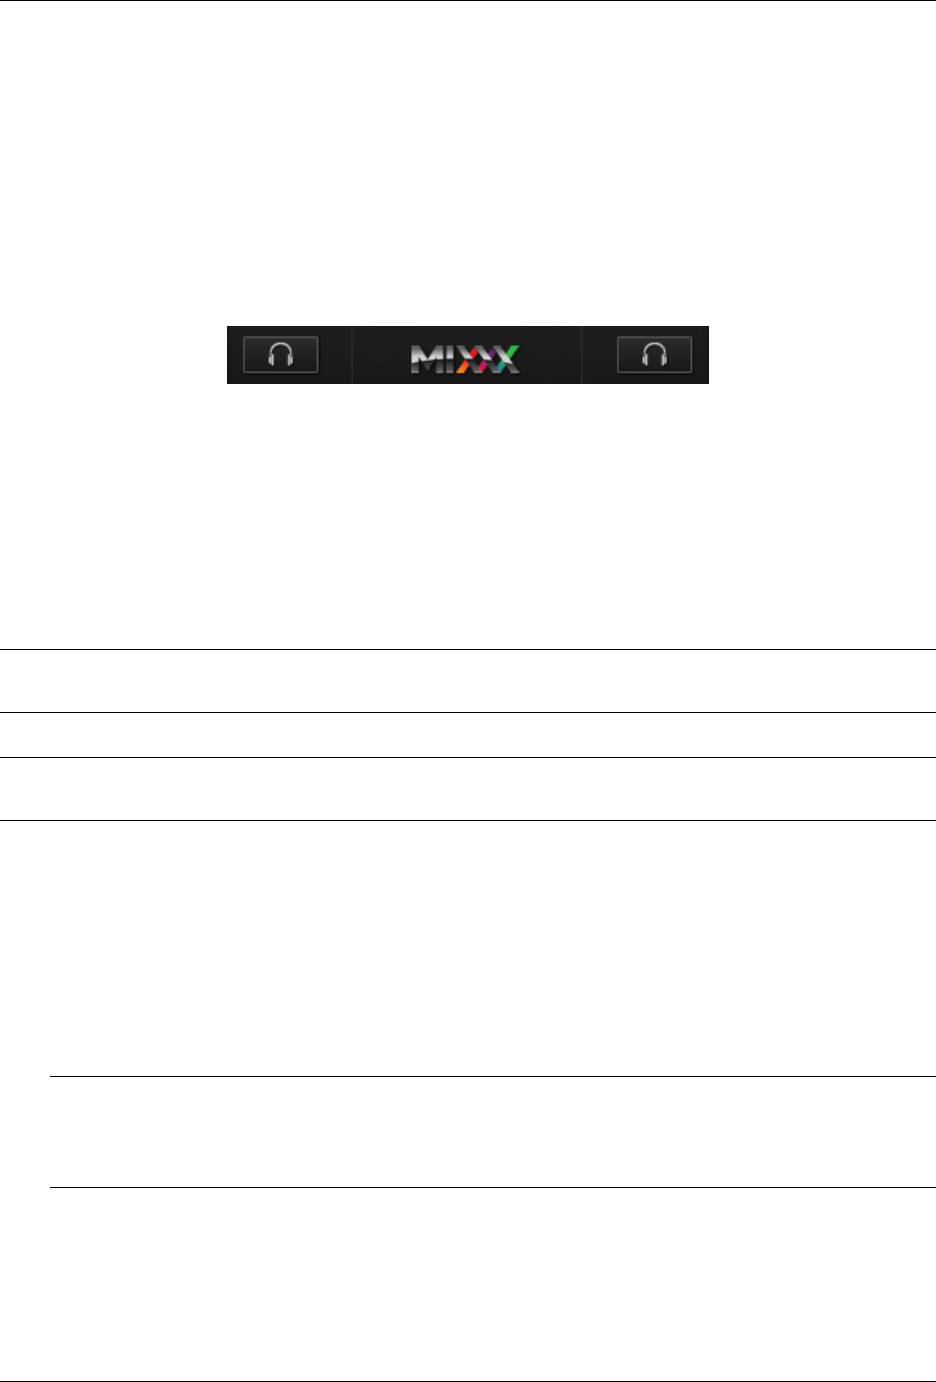
Fig. 14: The section expansion buttons on top
On top, and on the button of the user interface are the section expansion buttons.
If you click on either MIC,SAMPLER, or VINYL then you will enable control sections for interacting with:
•The Microphone Section
•The Sampler Section
•Vinyl Control Mode and Cueing controls
You can also use the specific Application shortcuts.
3.2. The Mixer Section 17
Mixxx User Manual, Release 2.1.0
3.2.3 Headphone and Master Mix Controls
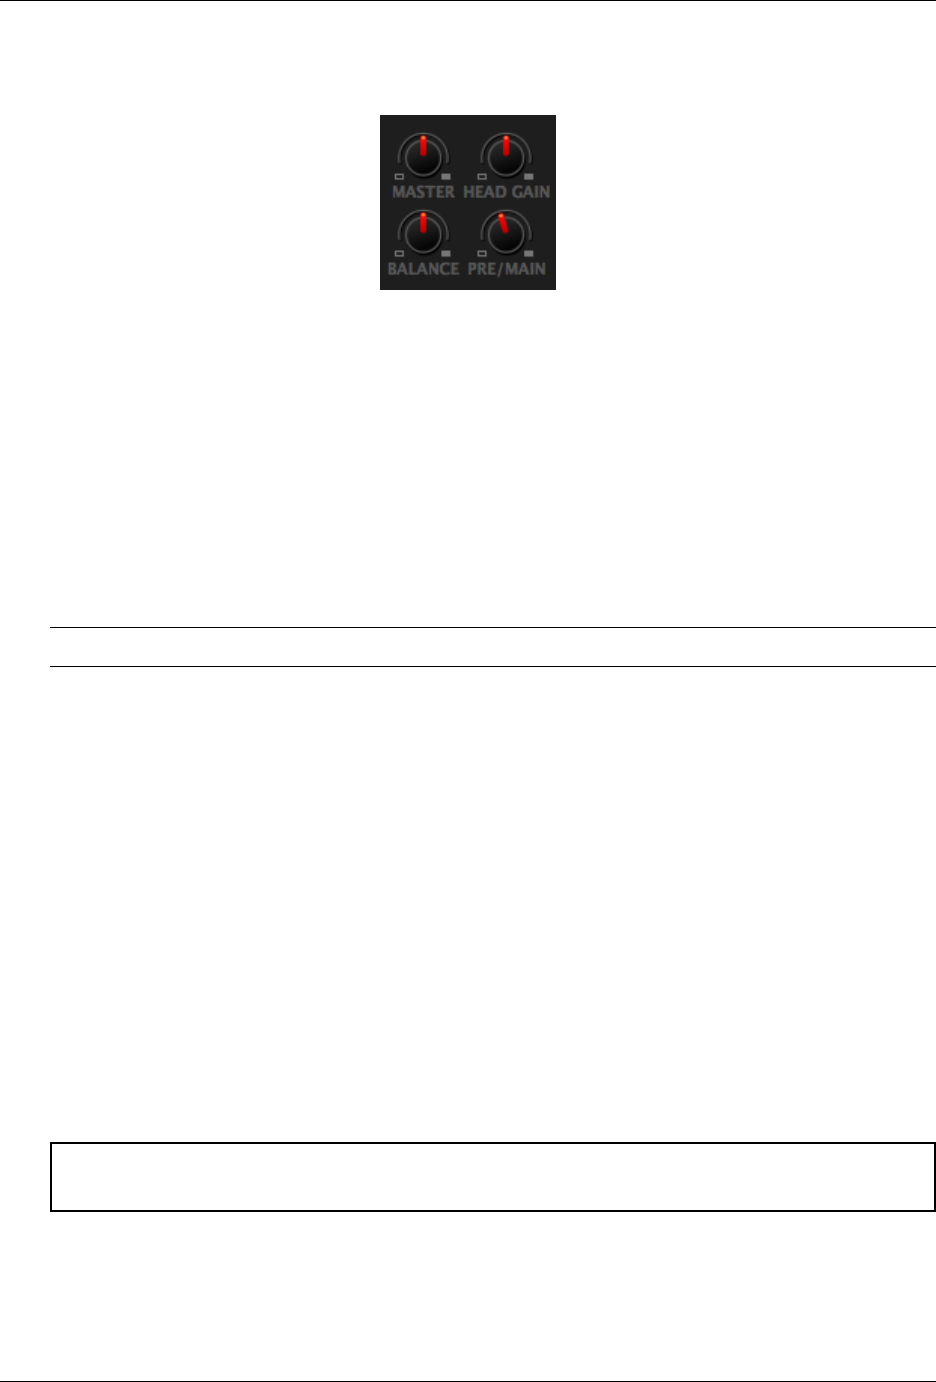
Fig. 16: The headphone and master mix knobs
Pre/Main Knob Allows you to control how much of the master output you hear in the Headphones output. It works
like a crossfader between the stereo Master and stereo PFL signal. If the knob is set to the left, you only hear
the PFL signal, which is the usual position for prelistening tracks.
This can be used to practice DJing with only one stereo output and a set of either speakers or headphones.
Additionally, this can be used to mix in headphones when you cannot hear the speakers connected to the Master
output and there are no booth monitor speakers. Some DJs prefer to use this knob to mix in headphones all the
time, but many find it to be a difficult way to play. If there is only one set of speakers and no booth monitors, you
can avoid the need to mix in headphones by setting up the speakers behind you so both you and your audience
can hear them.
Note: Don’t forget to activate the PFL button on the deck you want to listen to in your headphones.
Head-Split Button If activated, two mono signals are sent to the headphone output instead of one stereo signal. The
master signal plays in the right channel, while the cueing signal plays in the left channel. You can still adjust
the Pre/Main Knob to control the mix of the master and cue signals in the left channel.
Balance Knob This knob allows you to adjust the balance (left/right orientation) of the master output.
Master Knob The Master Gain Knob controls the gain applied to the Master output signal that Mixxx sends to your
sound card, Internet broadcasting servers, and recorded mixes. Generally, this knob should not be adjusted. To
change the output volume, a gain control should be adjusted as close to the speakers as possible for the best
signal-to-noise ratio throughout your signal chain. Ideally, the volume would only be adjusted by adjusting the
gain on the power amplifier. On active speakers, including computer speakers, studio monitors, and PA systems
that do not require a separate amplifier, this means adjusting the gain on the speakers (which may be labeled
“Volume”).
As a DJ, you may not have access to the power amplifier. In that case, adjust the volume by adjusting the gain on
the equipment closest to the power amplifier that you have access to. Typically, this is a DJ mixer. If you are not
going through a mixer, adjust the gain of your sound card. If your sound card does not have any controls on it
(for example, for sound cards built into computers), adjust the sound card settings with your OS mixer program.
The Master Gain Knob in Mixxx should be a last resort for adjusting volume.
Warning: In no case should any part of the signal chain be clipping, indicated by a level meter going
into its red region or an LED labeled “clipping” turning on.
See also:
For an explanation of why you should set your gains this way, see Setting your levels properly (gain staging).
3.2. The Mixer Section 18
Mixxx User Manual, Release 2.1.0
Head Gain Knob This knob controls the gain applied to the headphone output signal that Mixxx sends to your sound
card. Generally, this knob should not be adjusted. To adjust the volume in your headphones, adjust your sound
card’s gain on the headphone output. Most external sound cards have a gain knob specifically for the headphone
jack. If you use an onboard sound card for your headphones, adjust the gain control in your OS mixer program.
If your sound card only has one gain knob that controls both the main output and the headphone output, then
adjust the Head Gain knob in Mixxx to control the volume of your headphones without affecting your main
output.
3.2.4 PFL/Headphone Button
Fig. 17: The headphone buttons of both decks in the mixer
The headphone button is also known as the pre-fader listen or PFL button and allows you to use headphone cueing.
That is, it allows you to hear the track you will play next in your headphones before your audience hears it. This helps
you plan when to start the next track and manipulate it to make it blend better with the currently playing track (for
example, by synchronizing the beats, setting a loop, or using EQs). Pressing the PFL button plays the track on the
headphone output at full volume regardless of the position of the crossfader or the deck’s line fader. To play a track
in your headphones but not have the audience hear it, press the PFL button and move the crossfader all the way to the
opposite side of the deck or turn the deck’s volume fader all the way down.
Note: Headphone cueing is only available if you have configured a Headphone Output in Preferences →Sound
Hardware.
Note: If you use an external hardware mixer, plug your headphones into that rather than your sound card. Use the
headphone buttons on the mixer rather than the buttons in Mixxx.
3.2.5 Equalizers and Gain Knobs
Gain Knob The gain knob allows you to adjust the gain applied to the deck. Use this to compensate for the differences
in recording levels between tracks. In general, you should adjust this knob so that the track’s level meter stays
around the top of the green region with the loudest parts of the track (the transients) briefly going into the yellow
region. Do NOT turn the Gain Knob up so much that the level meter is in the red region. At this point the
track is clipping, which sounds bad and could damage equipment.
Note: By default, Mixxx automatically applies an additional ReplayGain so tracks have approximately equal
loudness at unity gain. Your tracks must be analyzed to take advantage of this feature. When an unanalyzed
track is loaded, Mixxx calculates its ReplayGain value, but will not apply a newly calculated ReplayGain value
to a track after it has already started playing (to avoid a sudden change in the gain of a playing track).
See also:
For an explanation of why you should set your gains this way, see Setting your levels properly (gain staging).
EQ Knobs The low, mid, and high EQ knobs allow you to change the filters of the audio. This allows you to selec-
tively reduce or boost certain frequency ranges of the audio.
3.2. The Mixer Section 19

Mixxx User Manual, Release 2.1.0
Warning: Be careful not to raise the EQs so much that the signal clips, indicated by a level meter being in
the red region. See Setting your levels properly (gain staging) for a more detailed explanation.
Kill Switches The small boxes next to each EQ knob are called kills. Hold these buttons to fully remove that frequency
range. Short click on the buttons for latching. When in Latch mode, click again to restore the frequency range.
If the Kill switches do not work as expected, check the high/low shelf EQ settings in the preferences.
Fig. 18: EQ Con-
trols
See also:
You can customize the EQ settings in Preferences →Equalizer.
3.2.6 Crossfader
Fig. 19: The crossfader section of the mixer
The crossfader determines the actual volume of each deck when moving the slider from left to
right. If both decks are playing and the crossfader is in its default center position, then you will
hear both decks. Right-clicking on the crossfader will reset the slider to its default position.
You can reverse the configuration of the crossfader, so that the right deck is on the left end of the
crossfader and vice versa. This is also known as Hamster Style. To adjust the crossfader to your
style of mixing, go to Preferences →Crossfader.
Hint: Using the AutoDJ feature in Mixxx, you can automate the crossfade between the decks.
3.3 The Sampler Section
Fig. 20: A sample deck
Samplers are miniature decks. They allow you to play short samples and jingles but also addi-
tional tracks in your mix. They come with a small overview waveform and a limited number of
controls. All controls work just like on the regular decks, see The Deck Sections.
The Sampler section can be hidden in the Mixxx user interface. Click the SAMPLER button, or
use the specific Application shortcuts to show or hide the section.
3.3. The Sampler Section 20

Mixxx User Manual, Release 2.1.0
3.3.1 Waveform Display
Waveform overview The waveform shows the various markers within the track as well as the waveform envelope of
the entire track. Clicking somewhere on the waveform allows you to jump to an arbitrary position in the track.
Waveform Marker While mixing, some additional markers can appear on the waveforms:
•Position marker: A vertical line indicates the playback point of the sample deck.
•Hotcue marker: Indicate the position and number of a hotcue point if set.
3.3.2 Track Information Display
Track Artist/Title The artist and title of the track that was loaded into a sampler deck is displayed here.
BPM (Tempo) The number at the top right is the effective BPM of the track. Tap the BPM to set the BPM to the
speed you are tapping.
3.3.3 Deck Options Button Grid
The buttons grid next to the waveform overview allow you to configure the sampler deck. Starting from the top-left
and moving counterclockwise the buttons are as follows:
Repeat Mode Toggle If enabled, the repeat mode will jump back to the beginning and continue playing when the
track finishes.
Eject Track Button Clicking this button ejects the track from the deck.
Mix Orientation Toggle This control determines the sampler input’s mix orientation.
Keylock Toggle Keylock locks the track’s pitch so that adjustments to its tempo via the rate slider do not affect its
pitch.
3.3.4 Sample Deck Controls
Play/Pause button Clicking the button always starts playback from the cue point. If playback is already enabled the
play position will jump back to the cue point. Right-clicking on the button will stop playback and seek the play
position to the beginning of the sample.
Sync Button Syncs the Sampler deck to a regular deck, as described in Sync and Rate Controls.
•Left-Click: Changes the rate of the track so that the BPM and phase of the track matches the sync target.
•Right-Click: Only changes the rate of the track to match the sync target but does not adjust the phase.
Hotcue Controls To jump in between different parts of a sample, you can use these numbered hotcue buttons.
PFL/Headphone Button If active, the pre-fader listen or PFL button allows you to listen to the track in your head-
phones.
Gain Knob Allows you to adjust the gain applied to the track.
Level Meter Shows the level of the signal and can be adjusted with the Gain knob.
Pitch/Rate slider The slider allows you to change the speed of the sample. Right-clicking on the slider will reset the
tempo to its original value.
3.3. The Sampler Section 21
Mixxx User Manual, Release 2.1.0
3.4 The Effects Section
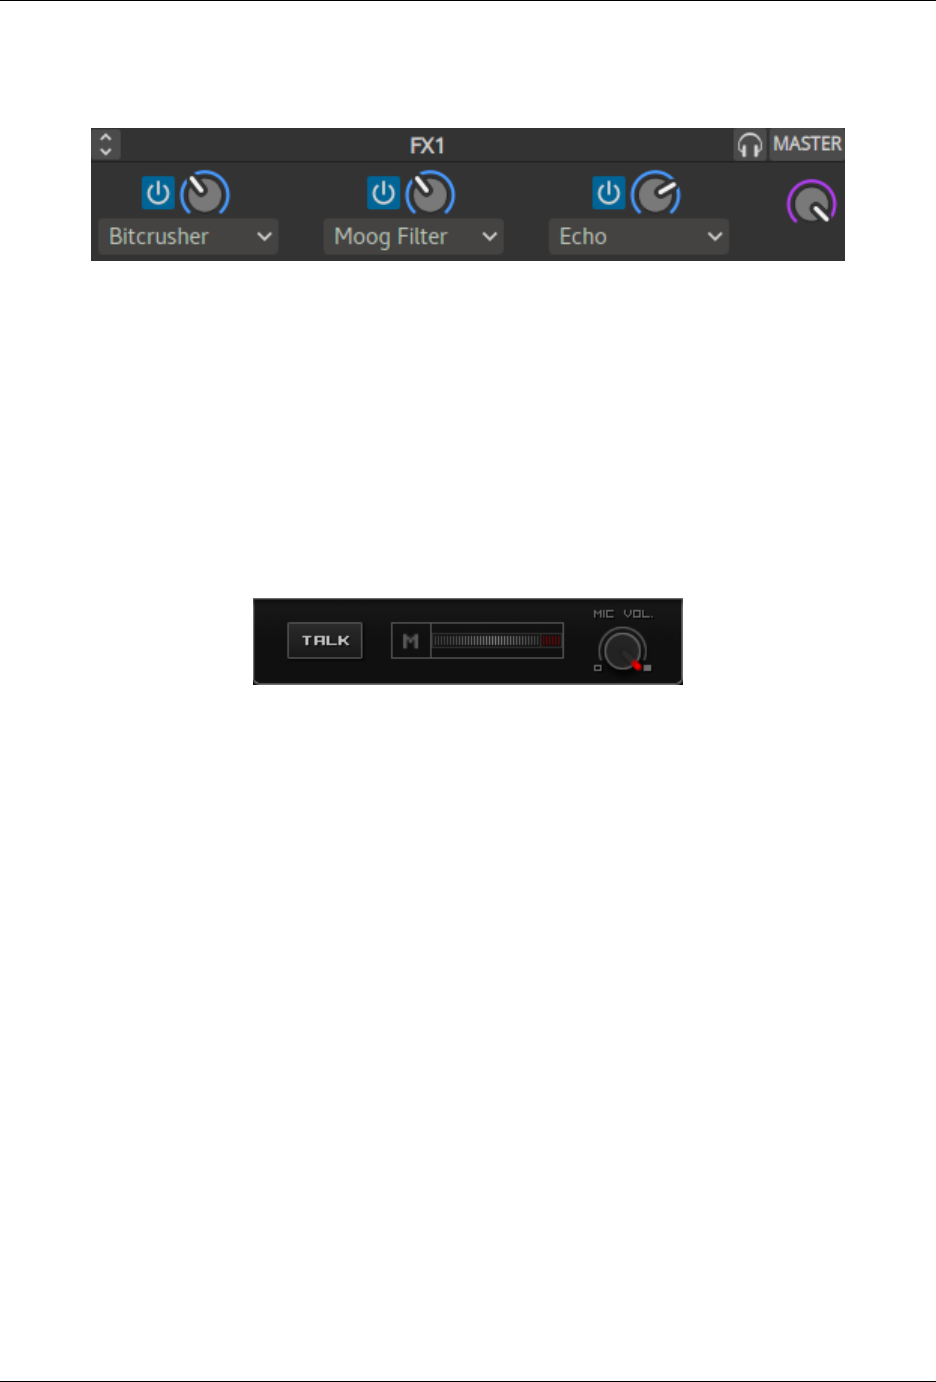
Fig. 21: An effect unit
Mixxx comes with some built in sound effects that can be chained together in effect units. Effect units can be freely
assigned to different decks as well as other inputs. The buttons for routing decks to effect units are in the The Deck
Sections.
See also:
The Effects chapter has a more detailed explanation of the effects system.
3.5 The Microphone Section
Fig. 22: The Microphone section
The microphone section is hidden in the default Mixxx user interface. Click the MIC button in the mixer section, or
use the specific Application shortcuts to show or hide the section.
See also:
The Using Microphones chapter has detailed instructions for setting up microphones with various hardware.
3.5.1 Microphone Controls
Talk Button Hold this button and talk to mix the microphone input into the Mixxx master output. Short click on the
button for latching. This is handy for talking for an extended period, for example when streaming a radio show.
When in Latch mode, click again to mute the microphone input.
Mix Orientation Toggle This control determines the microphone input’s mix orientation. Either to the left side of
crossfader, to the right side or to the center (default). Clicking cycles through all the options.
Microphone Volume Meter This displays the microphone volume input signal strength.
Microphone Gain Knob Use this knob to adjust the gain of the microphone output. Try to keep the volume at a
reasonable level to avoid signal clipping.
3.6 Preview Deck Section
The Preview Deck is a special deck that allows you to pre-listen to tracks in the headphones before using them in your
mix. Pre-listening a track does not change the tracks’s Played state as well as the play counter and is not logged in the
3.4. The Effects Section 22

Mixxx User Manual, Release 2.1.0
Fig. 23: The Preview Deck with a track loaded
History. Press CTRL +4(Windows/Linux) or CMD +4(Mac) to display the Preview Deck.
The features in detail:
•Track Artist/Title: The artist and title of the track is displayed here. This is the same listed under the Track and
Title column in the Mixxx library. This information is initially loaded from the track’s metadata.
•Eject Track button: Clicking this button ejects the track from the deck.
•Play/Pause button: Clicking the button starts and pauses the playback. Right-clicking on the button will stop
playback and seek the play position to the beginning of the tracks.
•Waveform overview: Shows the various markers (Cues, Hotcues) within the track as well as the waveform
envelope of the entire track. Clicking somewhere on the waveform allows you to jump to an arbitrary position
in the track.
•Gain slider: Move the slider to adjust the gain of the track.
•Volume Meter: Shows the current volume of the track. If it’s too loud and distorted, a peak indicator flashes
red.
See also:
For more information, go to the chapter Previewing Tracks.
3.6. Preview Deck Section 23
CHAPTER 4
The Mixxx Library
4.1 Overview of the Library features
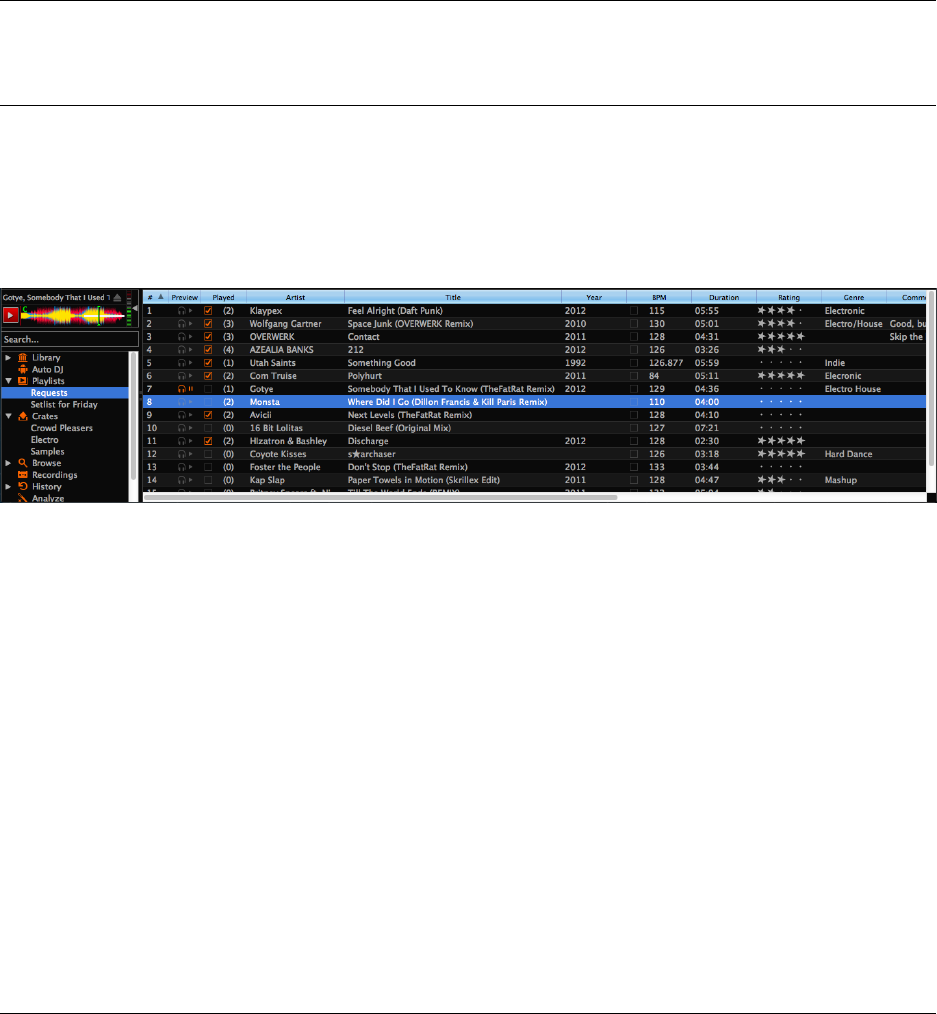
Fig. 1: The Mixxx Library
The library manages all of your music files. This is where you can find the tracks you want to play and load them into
adeck or sampler; see Loading Tracks. Mixxx imports your music library automatically when it is run for the first
time, see Changing music directories for more information.
The sidebar on the left contains different collections of music. The track list view on the right displays the tracks in
those collections.
Sidebar:
•Search: Search for tracks in your Mixxx library.
•Tracks: View and edit your whole collection.
•Auto DJ: Automatically load and crossfade tracks for unattended mixing.
•Playlists: Arrange tracks in a set order.
•Crates: Organize tracks in (unordered) collections.
•Computer: Navigate, view, and load tracks from folders on your hard disk and connected devices.
24

Mixxx User Manual, Release 2.1.0
•Recordings: Record your mix and view previous recordings.
•History: Browse lists of tracks played in past mixing sessions.
•Analyze: Generate Mixxx-specific data for tracks before a gig.
•External Libraries: Access your existing iTunes, Traktor, Rhythmbox, and Banshee libraries.
Track List:
•Sort: Display and sort track collections by different criteria.
•Load: Drag tracks you want to play to the waveform display.
•Edit: Rate tracks and edit track properties.
4.2 Tracks - View and edit your whole collection
A sortable list of all the tracks in your music library.
Customizing the view Move columns by clicking a column header and dragging it to another position. Right-click
on a column header to show or hide individual columns. Adjust the column width to fit the contents of the rows
by double-clicking on the separator between two column headers.
Sorting Tracks Tracks are automatically sorted by the active column. Click on the active column header to reverse
the sort order. Click on another column header to change the active column.
•Multi-Column sorting
You can sort multiple columns by clicking up to three column headers you wish to sort your tracks by. This
makes searching for tracks in a large list more efficient. Clicking twice on a column header will reverse
the sort order.
Example:
1. Click on the BPM column header -> list is sorted by BPM
2. Click on the Year column header -> list is sorted by year. If year is equal, it is still sorted by the last
criteria, e.g. BPM.
3. Click on the Genre column header -> list is sorted by genre. If genre is equal, it is still sorted by year.
If genre and year is equal, then it is sorted by BPM.
•Random sorting
New in version 2.1.0.
Click on the Preview column header to randomly sort tracks.
•Sort keys by circle of fifths
New in version 2.1.0.
Click on the Key column header. The order starts with Cat the top, then its relative minor (a), then adds 1
sharp (G), then G’s relative minor (e), and so adding sharps/removing flats around the circle of fifths. For
Lancelot notation, it starts with G#m at the top, which is 1A in that notation, and proceeds alphanumerically
(minor keys appear before their relative major keys in this case).
Rating tracks Make sure the Rating column is not hidden. Rate tracks by hovering over the rating field and clicking
the stars.
Track Inline editing Mixxx reads metadata from the tracks to fill the columns of the library. Double-click on a field,
edit the data, and hit Enter when you are done. Go to the chapter edit metadata for detailed information.
4.2. Tracks - View and edit your whole collection 25

Mixxx User Manual, Release 2.1.0
Loading tracks To load a track into a deck, you can either drag it to the waveform display or use the context menu.
Go to the chapter Loading Tracks for detailed information.
Importing tracks Mixxx imports your music library automatically when it is run for the first time. Go to the chapter
Changing music directories for detailed information.
Previewing Tracks To pre-listen to tracks in your headphones without loading them to a regular deck, click the
icon in the Preview column. Go to the chapter Previewing Tracks for detailed information.
Cover/Album Art
Mixxx can display cover art it finds for a track in the library. It will search for available cover art in the
following places in order and will use the first one it finds:
1. The first image saved in the track’s ID3v2/Vorbis tags
2. An image file in the track folder (if there is only one image file there.)
3. %track-file-base%.jpg in the track directory for %track-file-base%.mp3
4. %album%.jpg
5. cover.jpg
6. front.jpg
7. album.jpg
8. folder.jpg
Mixxx supports the following image types: jpg, jpeg, png, gif, bmp
Rescan Library If you want to manually refresh your library without exiting (for example because you added or
moved files) you can do this with Library →Rescan Library in the menu at the top of the application window.
You can prompt an automatic rescan when Mixxx is started under Preferences →Library →Rescan on startup.
4.2.1 Track list context menu
Right-clicking on selected tracks in the track list reveals the context menu:
New in version 2.1.0:
Add options to replace AutoDJ queue, clear waveforms
•• Use checkbox menu in Crates selection
• Add BPM conversions 133,33% and 150%
• Re-organize context menu
•Add to Auto DJ: Adds the content of the selection to either the bottom or top of the Auto DJ playlist for
automatic mixing. The replace option deletes the Auto DJ queue first, and then fills it with the selected tracks.
•Load to: Loads a selected file to one of the available Decks,Samplers or to the Previewdeck. Alternatively
simply drag it to the Waveform Displays. The number of available decks and samplers might differ, depending
on the selected skin. Note that you can’t load multiple files at once.
•Add to Playlist: Add selected tracks to an existing playlist, or drag the selection to a playlist crate in the sidebar.
Choose Create new playlist to put them into a new playlist.
•Crates: The checkbox shows in which existing crates the selection is in. Changing the crates selection does
not collapse the menu, which allows much easier categorization of tracks without going through the menu from
scratch. Choose Create new Crate to put them into a new crate.
•Metadata:
4.2. Tracks - View and edit your whole collection 26

Mixxx User Manual, Release 2.1.0
– Import from File Tags: If the track’s metadata changes, (e.g. if you used iTunes to edit it,) this
option lets you save the new values for the selected tracks to the Mixxx library. See edit metadata.
– Import from MusicBrainz: Look up metadata online by searching the MusicBrainz database and
apply the search results to your tracks. See edit metadata.
– Export to File Tags: Saves metadata to files. Mixxx may wait to modify files until they are not
loaded to any decks or samplers. If you do not see changed metadata in other programs immediately,
eject the track from all decks and samplers or shutdown Mixxx.
– Cover Art:
*Choose New Cover: Select an image from the file browser as the cover.
*Clear Cover: Delete any cover information saved for this track.
*Reload from track/folder: Reload the cover from the tracks’ ID3v2 tags or a picture in the track
folder if the tags do not supply any.
•Clear:
– BPM and Beatgrid: Removes the BPM and beatgrid data from the selected tracks in the Mixxx
library. After doing this, we recommend analyzing the tracks again.
– Play Count: Marks selected tracks as not played in the current session and sets their play counter to
zero. The icon in the Played column changes.
– Hotcues: Clears all saved hotcues and hotcue labels.
– ReplayGain: Clears all saved ReplayGain values.
– Waveform: Clears the saved waveform data from the selected tracks. This is useful if a file is over-
written by another file of the same name, or was edited externally (e.g. in a waveform editor). To
clear the waveform cache for all tracks in the library, select Preferences →Waveforms →Clear
cached Waveforms .
– All: Clears all of the data above from the Mixxx library database at once.
•Change BPM:
–Allows to change the BPM to 50%, 66%, 75%, 133,33%, 150%, or 200% of the BPM set by Mixxx when
analyzing the tracks. If many of the detected BPM values are incorrect, you might want to adjust the BPM
Range in the Analyzer Settings and re-run the analysis.
– Lock/Unlock BPM: Locks/Unlocks the BPM of selected tracks so you can’t edit them in the track prop-
erties. The icon next to the track’s BPM in the library row is a toggle. Clicking it will set the status to
“locked”, and the icon changes to .
•Hide from Library: Temporarily hides selected tracks from the track list. Hidden tracks are listed in the Hidden
Tracks menu item which is explained below.
•Open in File Browser: Brings up the selected files in your file manager.
•Properties: Similar to inline editing explained above, the properties dialog allows you to view and edit metadata
such as title, artist, album, and view the full file name and path. Note that you can not edit multiple files at once.
Note: Most of the context menu items are available in file lists of other views like Auto DJ, Playlists, and Crates as
well.
4.2. Tracks - View and edit your whole collection 27

Mixxx User Manual, Release 2.1.0
4.2.2 Missing Tracks
The Missing Tracks view is accessible by expanding the Library tree item in the sidebar. Any tracks that were previ-
ously loaded into your library but were later not found on your drive will appear here. Mixxx does not automatically
delete records of missing tracks so that extra metadata Mixxx might have (such as hot cues and beat grids) will not be
lost in case the file is replaced.
The features in detail:
•Select All button: Selects all tracks in the current view.
•Purge button: Purges the selected tracks from the Mixxx library, but does not remove them from your computer.
This will delete all metadata Mixxx has for a track.
4.2.3 Hidden Tracks
The Hidden Tracks view is accessible by expanding the Library tree item in the sidebar. Any tracks that were pre-
viously loaded into your library but were later set to be hidden from the library will appear here. Use the Hide from
Library context menu item in the tracks view to temporarily hide selected tracks.
The features in detail:
•Select All button: Selects all tracks in the current view.
•Purge Button: Purges the selected tracks from the Mixxx library, but does not remove them from your computer.
This will delete all metadata Mixxx has for a track.
•Unhide Button: Removes the selected tracks from the Hidden Tracks view and makes them available in the
regular track lists again. The tracks will re-appear in every playlist or crate they were in before being hidden.
See also:
To learn how to permanently remove tracks from the Mixxx library using the Hidden Tracks view, see permanently
remove tracks.
4.3 Loading Tracks
Tracks can be loaded into a deck in several ways:
• Right-click the library track table: Right-clicking on a track in the table will present the options Load in Deck
1and Load in Deck 2, among others. Making either selection will load a track into a deck.
• By Using a Keyboard to load the selected track in the library track table.
• Drag-and-drop from library track table: Dragging-and-dropping a track from the track table onto a waveform
display will load the track into that deck.
• Drag-and-drop from deck to deck: Once you’ve loaded a track to deck, sampler, or preview deck, click on the
track title and drag it to another deck or sampler.
• Drag-and-drop from external file browser: Dragging-and-dropping a track from an external file browser directly
onto a waveform display in Mixxx will load that track. This function also works with some other applications.
For example, on macOS, dragging-and-dropping a track from iTunes onto one of Mixxx’s waveform displays
will load it into that deck.
4.3. Loading Tracks 28
Mixxx User Manual, Release 2.1.0
4.4 Finding Tracks (Search)
The search function filters the currently displayed list (e.g. a playlist, a crate, or even the whole library) for tracks that
match your search query.
• Activate the search input field by clicking in it or pressing CTRL +F(Windows/Linux) or CMD +F(Mac).
• Type your search term(s). Mixxx filters the tracks as you type and shows only those matching the search term(s).
Search terms can include an artist’s name, a song title, BPM, etc.
• To clear the search string hit ESC or click the clear button right next to the input field.
• Hit TAB to cycle between the search and the list of results in the library. Use the ARROW UP and ARROW DOWN
keys to scroll in the list of results.
Note: If the search input field has focus, the Mixxx keyboard shortcuts are disabled, see Using a Keyboard.
4.4.1 Using search operators
Search operators allow you to form more complex search queries. They allow you to limit certain search terms to
particular properties of your tracks.
Mixxx supports the following filters:
•Text filtering: album_artist, album, artist, comment, composer, crate, genre, grouping, location, title
•Numeric filtering: bitrate, bpm, played, rating, track, year
•Special filtering: key, duration, added, dateadded, datetime_added, date_added
–Supports fuzzy matching of key searches. The following example list tracks with harmonically compatible
keys to C# minor.
~key:c#m
You can combine operators but there’s no way to do an “OR” search right now. The following example list
all tracks by “Danger” over 3 minutes long that are rated 4 or 5.
artist:Danger duration:>3m rating:>=4
–Negative search filters. Use the -prefix as negation operator. The following example would find “hip-hop“
from any year but 1990.
genre:hip-hop -year:1990
4.4. Finding Tracks (Search) 29
Mixxx User Manual, Release 2.1.0
Examples for text filtering Examples for numeric filtering Examples for duration filtering
artist: “com truise” bpm:140 duration:2m10
album:Danger bpm: >140 duration:<2:10
genre: Trance year: <2010 duration:>1m35s
title: foo bpm: >=140 duration:>62
composer: foo rating: <=4
comment: foo bpm: 140-150
genre:hip-hop -genre:gangsta played: >10
Note it doesn’t matter if you have space
between the colon and the argument or
not. Quotes must be used for multi-
word text arguments.
Note that you can put a space after
the colon but currently there must
be no space between the operator
and the number.
Note that you can put a space after
the colon but currently there must
be no space between the operator
and the number.
4.5 Previewing Tracks
To pre-listen to a track, activate the Preview column in a library view. Clicking the icon in the library’s Preview
column loads the selected track into a special Preview Deck that will only output sound in the headphones channel.
Click the icon to stop the playback.
Alternatively, select a track from the track list of the Mixxx library, drag the track to the waveform view of the Preview
Deck and click the Play button next to the waveform.
To display the Preview deck, press CTRL +4(Windows/Linux) or CMD +4(Mac).
Hint: Click on the Preview column header to randomly sort tracks.
4.6 Edit metadata of audio files
New in version 2.1: Option to write audio tags back into files
Mixxx reads relevant metadata from the tracks and displays them in the library columns. You are free to edit most
metadata, and Mixxx offers a number of different ways to do so. Note that some information can not be edited, such
as bitrate, size, length, type, filename, and location.
Note: Mixxx does not support editing the metadata of many tracks at a time (bulk editing).
Warning: Mixxx wont touch your audio files by default. Changes to a track’s metadata will be saved to the Mixxx
library, but not to the track itself.
If you wish to write modified track metadata from the library into file tags, check the box in Preferences →Library
→Track Metadata Synchronisation.
4.6.1 Manual Edit
Track Inline editing: Double-click on a field in the library. If the field is editable, it will become an editable text
box. Enter a value and hit Enter when you are done.
4.5. Previewing Tracks 30
Mixxx User Manual, Release 2.1.0
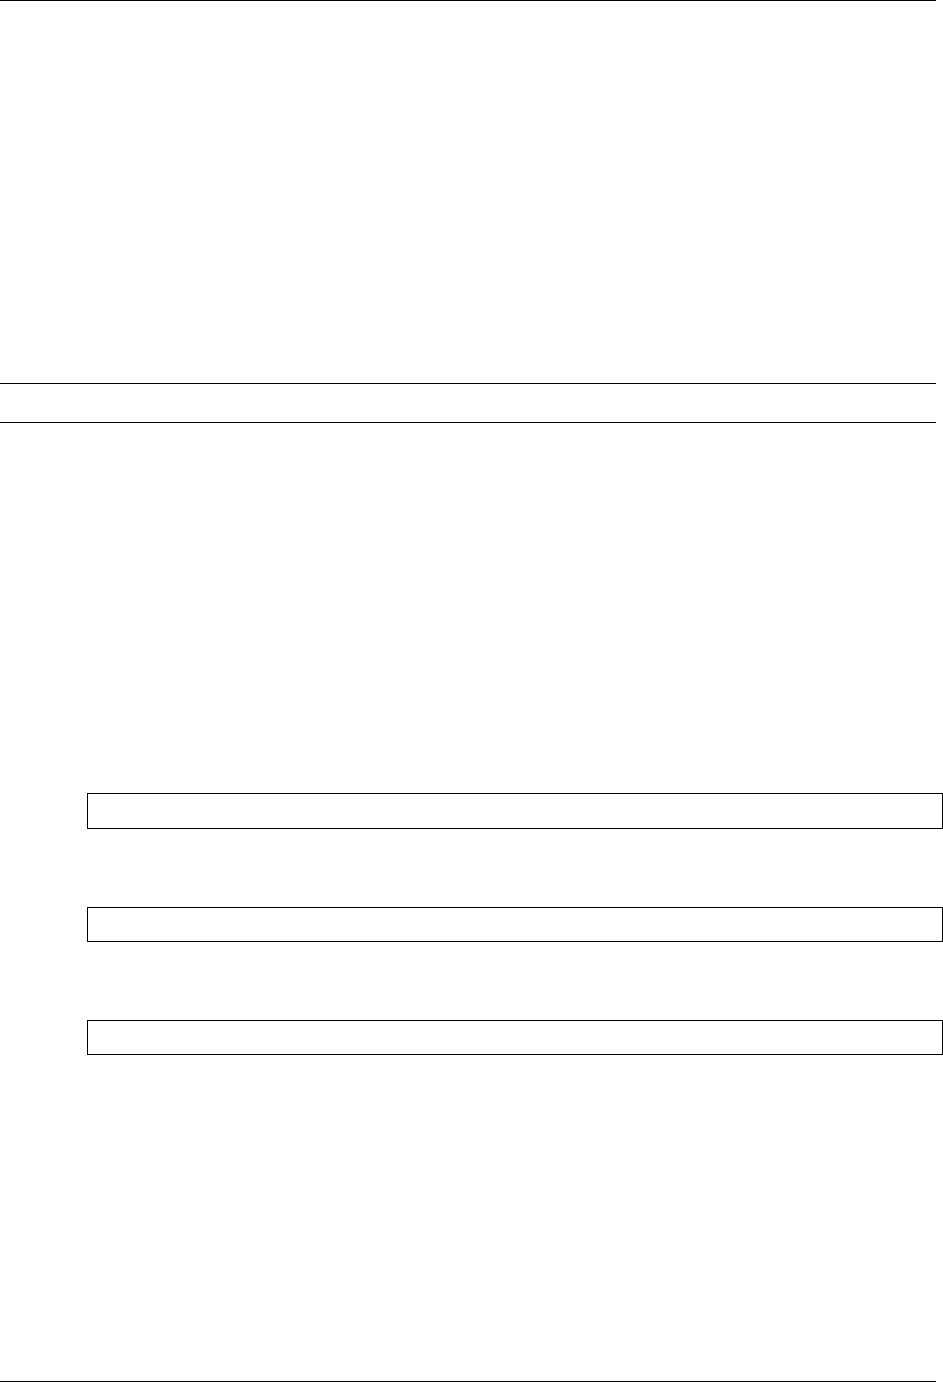
Fig. 2: Mixxx library - Inline editing
Properties editor: Click on a single track in the library and select Properties to open the editor. Add or change
values in the editable fields, and save your changes as explained below.
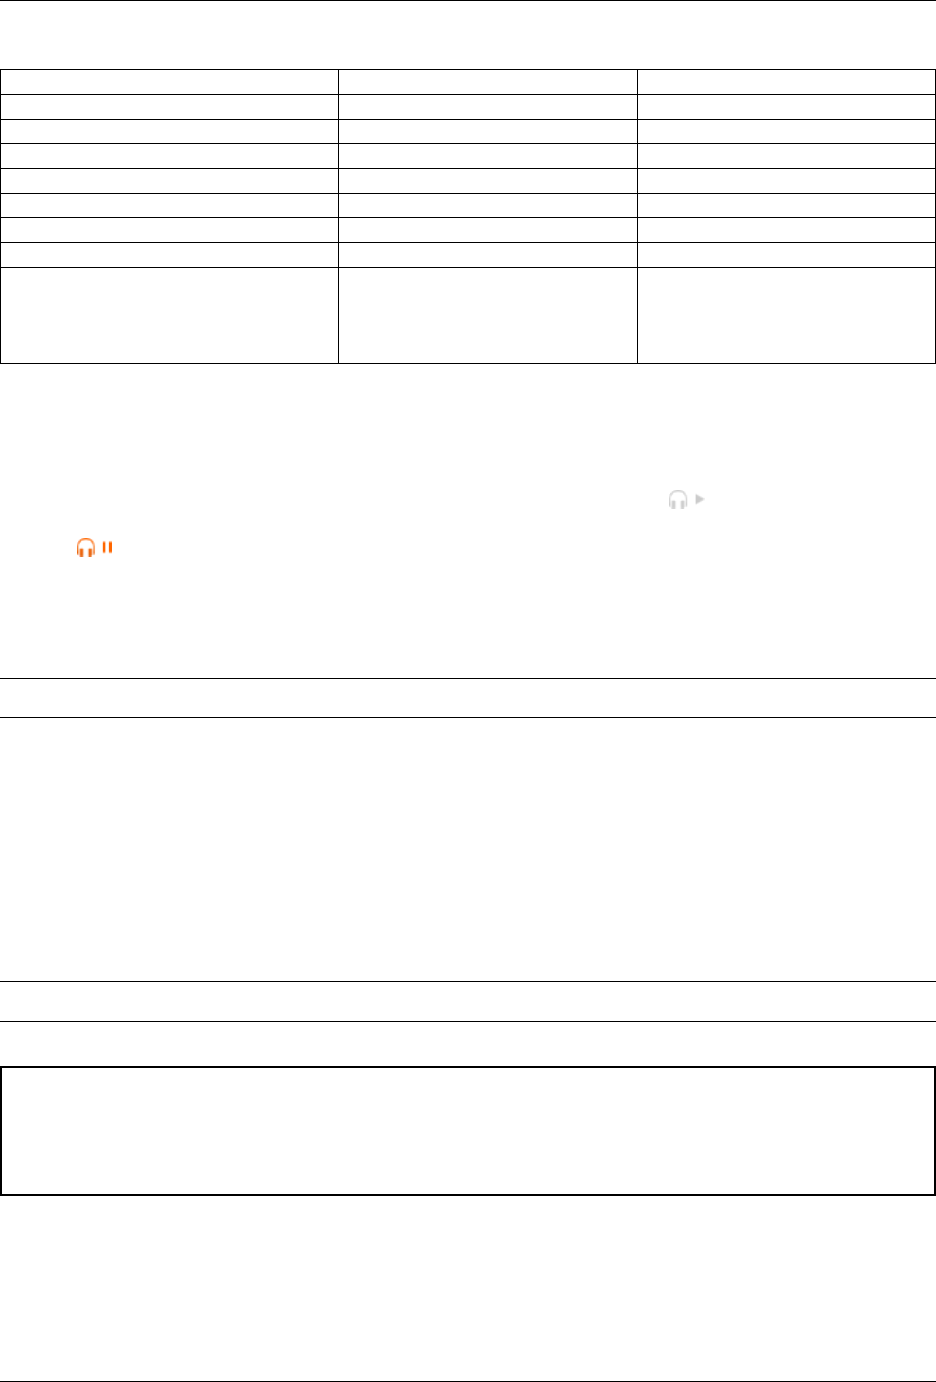
Fig. 3: Mixxx library - Properties editor
•OK: Accept the changes and close the editor.
•Apply: Accept the changes and leave the editor open.
•Cancel: Discard the changes and close the editor.
•Previous/Next: Load the previous or next track in the current library view.
•Import Metadata from File: Prompts Mixxx to re-read the metadata of the selected track (such as when
you have modified it externally with another application.)
•Import Metadata from MusicBrainz: Look up metadata on-line by searching the MusicBrainz database.
See below.
4.6.2 Using the MusicBrainz online database
Musicbrainz is an open-source music encyclopedia that collects music metadata and makes it available to the public.
4.6. Edit metadata of audio files 31
Mixxx User Manual, Release 2.1.0
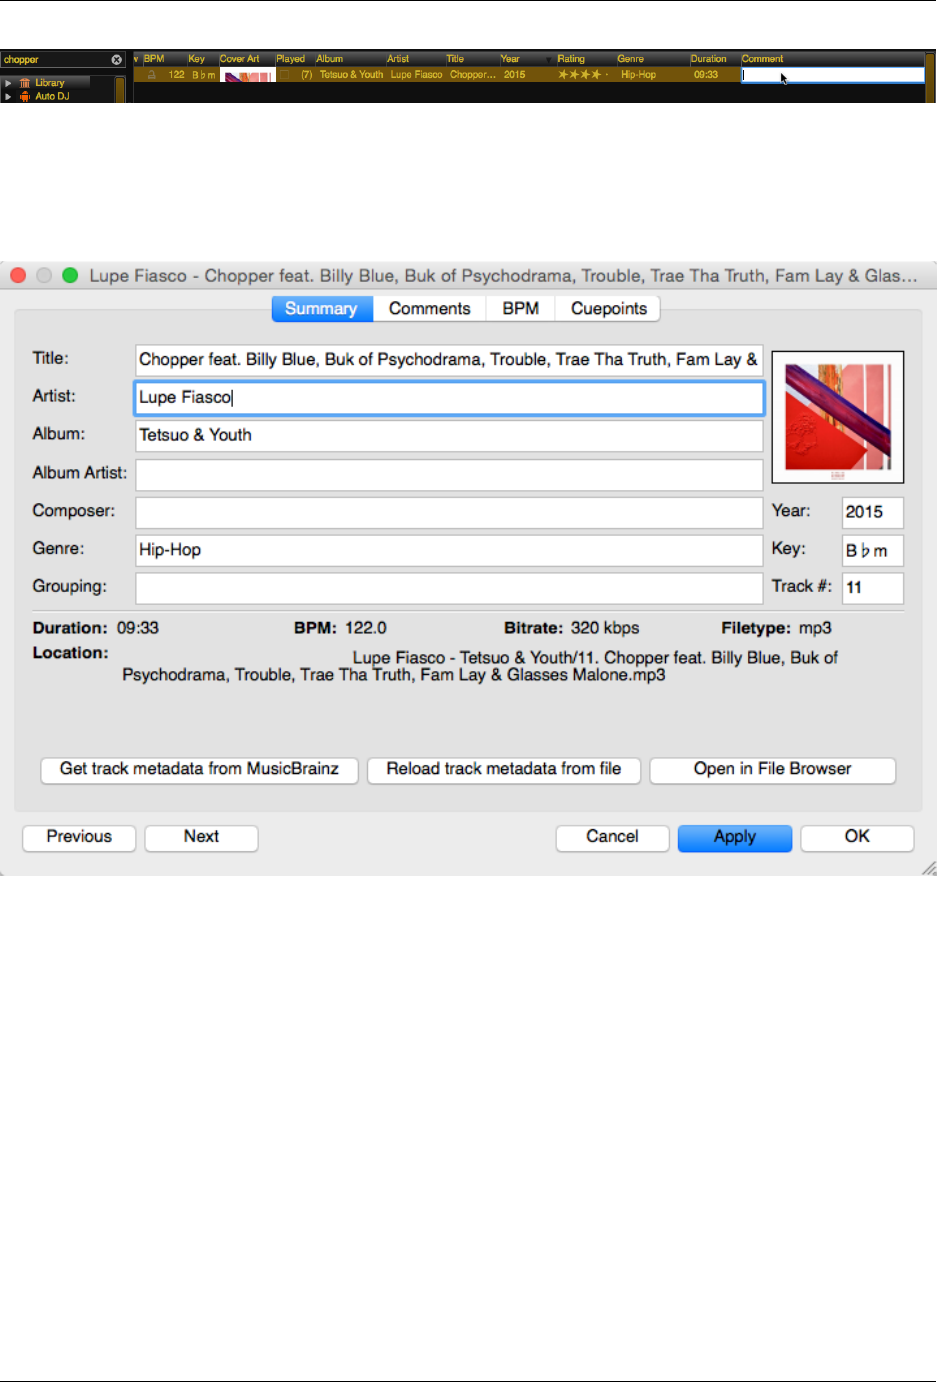
Fig. 4: Mixxx library - MusicBrainz Wizard
The MusicBrainz wizard in Mixxx allows searching the MusicBrainz database and applying the results to your tracks.
Click on a single track in the library and select Get Metadata from MusicBrainz. Mixxx fetches track data from the
MusicBrainz database and displays the search results.
Select the best match from the search results by clicking on it in the list.
•Apply: Apply the selected MusicBrainz metadata to the track.
•Close: Close the wizard.
•Previous/Next: Load the previous or next track in the current library view and perform a MusicBrainz lookup
on it as well.
Fetching track metadata from MusicBrainz can fail:
• if Mixxx is unable to find the specified track in the MusicBrainz database,
• if Mixxx cannot reach the MusicBrainz servers (if they are down,)
• or if you are not connected to the Internet.
Hint: The MusicBrainz service has been designed for identifying full audio files. If a track is less than 2 minutes
long, identifying the file will likely fail. Identifying a layered mix-track or mash-up may produce false positives in the
result list.
4.6.3 Using third-party software
If you have modified file metadata in third-party software, select Library →Rescan Library in the menu on top of the
application window. This prompts Mixxx to re-read the metadata from all tracks in the library.
Popular software to edit metadata of audio files include:
•Mp3tag (Windows)
•Kid3 (Mac, Windows, Linux)
•Picard (Mac, Windows, Linux)
4.6. Edit metadata of audio files 32

Mixxx User Manual, Release 2.1.0
4.7 Auto DJ - Automate your mix
The Auto DJ queue is a special playlist that contains extra controls for automatic mixing. This is useful when
taking a break from live mixing or for using Mixxx as media player.
The Auto DJ features in detail:
New in version 2.1: Selection Info label
•Shuffle button: Randomizes the order of tracks in the Auto DJ playlist.
•Add Random button: Adds a random track from track sources (crates) to the Auto DJ queue. If no track
sources are configured, the track is added from the library instead.
•Skip track button: Skips the next track in the Auto DJ playlist.
•Fade now button: Triggers the transition to the next track.
•Transition time spin-box: Determines the duration of the transition. A negative value will add a pause between
tracks.
•Selection Info label: Displays the duration and number of selected tracks. Press Ctrl + A to get the total
duration of the AutoDJ queue.
•Enable Auto DJ button: Toggles the Auto DJ mode on or off.
The Skip track,Add Random and Fade now buttons are only accessible if the Auto DJ mode is enabled. The Search
field in the upper left corner is disabled in Auto DJ. By default, Auto DJ removes tracks after playing them but if you
want it to play the same tracks over and over again, you can activate the Auto DJ Requeue option in Preferences →
Auto DJ →Re-queue tracks after playback.
Auto DJ Crates
It is possible to add random tracks to the bottom of the Auto DJ playlist. The tracks are chosen from a set of crates
that you have set as a source for Auto DJ, or from the standard library. Mixxx will normally try to select tracks that
haven’t yet been played. You can set a minimum number of tracks that are always available for selection no matter
when they were last played in Preferences →Auto DJ →Minimum available tracks in Track Source.
See also:
For more information, go to the chapter Using Auto DJ For Automatic Mixing.
4.8 Playlists - Arranging tracks in a set order
Playlists are ordered lists of tracks that allow you to plan your DJ sets. Some DJs construct playlists before they
perform live; others prefer to build them on-the-fly.
Playlists are not directly loadable into decks as Mixxx is primarily intended for live, attended performance use. How-
ever, you can right-click a playlist to queue it to Auto DJ, so in a sense you can “play” it.
•Create a playlist: Right-click on the Playlists sidebar item and select Create New Playlist. Name the playlist
and click OK. The total number of tracks and total duration are displayed next to the name.
•Import playlists: Right-click on the Playlists sidebar item and select Import Playlist. Select one or more
playlists and click OK. Mixxx creates an import of these existing external playlists as new Mixxx playlists.
4.7. Auto DJ - Automate your mix 33
Mixxx User Manual, Release 2.1.0
•Add Tracks: Add tracks to a previously created playlist by dragging-and-dropping a selection of tracks from
the library or playlists onto the name of a playlist in the sidebar. Alternatively, use the right-click context menu
in the library’s track list.
Hint: If you have a track selected in the library, all of the visible playlist and crates that it is in are shown in
bold.
Right-click on an existing playlist name to access the different features in the context menu:
•Add to Auto DJ: Adds the content of the playlist to the Auto DJ queue for automatic mixing.
•Rename: To rename a playlist, just enter a new playlist name and click OK.
•Duplicate: Sometimes you want to build a playlist based on an existing one. Select the playlist you would like
to duplicate, choose Duplicate Playlist, name the new playlist and click OK.
•Remove: Removes an unlocked playlist. Tracks that were in the playlist remain in the library for later use.
•Lock: This icon indicates a locked playlist. If a playlist is locked, you cannot add tracks, rename or delete
the playlist. Choose Unlock from the context menu to unlock the playlist.
•Analyze entire playlist: Forces the analysis of the tracks in the playlist in the Analyze view.
•Import playlist: Import tracks from external playlists in various file formats to the selected playlist. For more
information, go to iTunes, Traktor, Rhythmbox, Banshee - Using external libraries.
•Export playlist: Export a playlist to various file formats such as m3u,m3u8,pls,txt, or csv. This allows
you to use the data in other applications.
•Export Track files: This copies all of the tracks in a playlist into a folder such as an external USB stick. Only
files are copied, not Mixxx-specific metadata like waveforms or cover art that is not embedded in the file.
4.9 Crates - Organizing tracks into collections
Crates are unordered collections of tracks, just like DJ cases holding your favorite records.
•Create a crate: Right-click on the Crates sidebar item and select Create New Crate. Name the crate and click
OK. The total number of tracks and total duration are displayed next to the name.
•Import crates: Right-click on the Crates sidebar item and select Import Crate. Select one or more playlists and
click OK. Mixxx creates an import of these existing external playlists as new Mixxx crates.
•Add Tracks: Add tracks to a previously created crate by dragging-and-dropping a selection of tracks from the
library or playlists onto the name of a crate in the sidebar. Alternatively use the context menu in the library’s
track list.
Right-click on an existing crate’s name to access the different features in the context menu:
•Rename: To rename a crate, enter the new crate name and click OK.
•Duplicate: Just like playlists you can duplicate an existing crate. Select the crate you would like to duplicate,
choose Duplicate Crate, name the new crate and click OK.
•Remove: Removes an unlocked crate. Tracks in the crate are still available in the library for later use.
•Lock: This icon indicates a locked crate. If a crate is locked, you cannot add tracks, rename or delete the
crate. Choose Unlock from the context menu to unlock the crate.
4.9. Crates - Organizing tracks into collections 34

Mixxx User Manual, Release 2.1.0
•Auto DJ Track Source: Use this crate as a source for random tracks in Auto DJ, see Auto DJ crates .
•Analyze entire crate: Forces the analysis of the crate in the Analyze view.
•Import crate: Import tracks from external playlists in various file formats to the selected crate.
•Export crate: Export a crate to various file formats, such as m3u,m3u8,pls,txt, or csv. This allows you
to use the data in other applications.
•Export Track files: This copies all of the tracks in a crate into a folder such as an external USB stick. Only
files are copied, not Mixxx-specific metadata like waveforms or cover art that is not embedded in the file.
4.9.1 Crates vs. Playlists
Crates are unordered collections of tracks. Unlike playlists, they cannot contain duplicate entries and do not support
arranging tracks within them.
Often DJs group tracks by genre, keep lists of favorite tracks, and/or prepare lists of tracks they want to play at a
particular party. In these cases they rarely care about the order since they will choose it at the party based on the dance
floor and mood. They certainly don’t want duplicates in these lists. Crates serve these purposes. You can think of
them like labels in GMail or Web 2.0 tags for your music.
If however you want to plan out a specific set and practice the transitions, you will want an ordered list of tracks.
Playlists serve this purpose.
4.10 Computer - Loading tracks from anywhere on your computer
This mode works like a file manager and allows you to load tracks from anywhere on your computer and
connected devices, that are not necessarily already in your Mixxx library.
Click the Computer sidebar item to navigate the computer and find your music. Depending on your operating system,
your music will usually be found in the “My Music” or “Music” folder. Drag the files you want to import to the
Tracks icon or directly to the Waveform Displays.
Note: Currently you can only drag files (not folders) to the Mixxx library.
Right-click on a folder and choose Add to Library to add the folder as an additional music directory. Mixxx will watch
this directory and its subdirectories for new tracks.
See also:
For more informations, go to Changing music directories.
4.10.1 Quick Links - Bookmark your favorite folders
Using the Quick Links sub-menu you can bookmark folders for direct access. Click the Browse sidebar item and
navigate to the folder you would like to bookmark. Right-click and choose Add to Quick Links. The folder is now
pinned below the Quick Links. To un-pin that folder, right-click and choose Remove from Quick Links.
4.10. Computer - Loading tracks from anywhere on your computer 35
Mixxx User Manual, Release 2.1.0
4.11 Recordings
In this section of the library you can start and stop recording your session as well as view previous recordings
and the dates they were made.
See also:
For more information, go to Recording Your Mix.
4.12 History - Keep track of your sessions
The history section automatically keeps a list of tracks you play in your DJ sets. This is handy for remembering
what worked in your DJ sets, posting set-lists, or reporting your plays to licensing organizations. Every time you start
Mixxx, a new history section is created. If you don’t play any tracks during the session, it will be discarded.
This icon indicates the current session.
Click on the History icon in the sidebar to switch to the History view, then right-click on a session’s name/date to
access the different features:
•Add to Auto DJ: Adds the content of the session to the Auto DJ queue for automatic mixing.
•Rename: Rename a session. The default is the calendar date (YYYY-MM-DD).
•Remove: Remove a previous (unlocked) session. (You cannot remove the current session.)
•Lock: Protect a previous session against accidental merge or deletion. An icon indicates a locked session.
•Create new history playlist: Split off the current history session and add a new session without having to restart
Mixxx. The current history must contain at least one track for this option to be available.
•Join with previous: Append the selected history session to the end of the previous one.
•Export playlist: Export a session in various file formats. This allows you to use the data in other applications.
4.13 Analyze - Prepare your tracks
This section allows you to analyze your tracks in advance of loading them into a deck. Analyzing tracks requires
considerable CPU power and may cause skips in the audio while performing, so it helps to have your tracks analyzed
before you play. See Analyze your library for details.
4.14 iTunes, Traktor, Rhythmbox, Banshee - Using external libraries
Supported libraries:
•iTunes (Windows, macOS)
•Traktor (Windows, macOS),
4.11. Recordings 36

Mixxx User Manual, Release 2.1.0
•Rhythmbox (GNU/Linux)
•Banshee (Windows, macOS, GNU/Linux)
The external library views allow you to use music libraries you have created in these third-party applications. You
can access music as well as playlists. If available, Mixxx automatically loads the external libraries from their default
locations on your hard drive.
Note: Playing a track from an external library will add it to your Mixxx library.
Right-click on the iTunes icon in the Library tree and select Choose Library to load the iTunes Music Library.
xml from a different location. Select Use Default Library to reset.
• Right-click on a iTunes/Traktor/Rhythmbox/Banshee playlist and choose Import Playlist to import it into a new
Mixxx playlist.
• If you have an iTunes configuration file (*.xml) from a Windows or Mac partition mounted in Linux, you can
load it and use your iTunes tracks and playlists as well.
See also:
External libraries can be disabled under Preferences →Library.
4.15 Removing tracks from the library
Removing tracks from the Mixxx library will not physically delete them from your drive. However it does delete extra
metadata Mixxx might have (such as hotcues and the beatgrids), and removes links to playlists or crates.
1. Click the Library item in the sidebar.
2. Find and select the tracks you want to remove, perform a right-click on them and select Hide from Library from
the context menu.
3. Expand the Library item in the sidebar and click on the Hidden tracks sub-item. All tracks that were set to be
hidden from the library will appear here.
4. Select the tracks you want to remove, or use the Select All button.
5. To confirm you want to permanently remove these tracks from the library, click Purge.
Hint: If you later decide to add some of the deleted tracks back, import them to the Mixxx library again, see Changing
music directories.
4.16 Compatible file formats
Mixxx supports a variety of audio file formats:
4.15. Removing tracks from the library 37
Mixxx User Manual, Release 2.1.0
Lossless Lossy
FLAC (flac) MP3 (mp3)
Wave (wav) Ogg Vorbis (ogg)
Aiff (aiff, aif) AAC (aac, m4a, mp4)
Opus (opus)
Lossless formats preserve every detail of the original recording and are recommended for the best sound quality. The
FLAC format compresses the files to take less space on your computer without sacrificing audio quality. WAV and
AIFF files are uncompressed and take up much more space.
Lossy formats take up less storage space on your computer than lossless formats at the expense of reducing sound
quality. Assuming an average track length of about 4 minutes, a 1 TB hard drive or solid state drive can store about
42000 FLAC files or about 115000 MP3 files at 320 kbps.
There is no benefit to converting lossy file to lossless formats. The detail lost when making the lossy file cannot be
recovered.
AAC (M4A) is supported on Windows Vista and macOS 10.8 onwards. The Platform Update Supplement is required
for Windows Vista.
On Linux, AAC playback is disabled by default due to licensing restrictions. To enable the playback of AAC files, build
Mixxx from source with m4a/AAC files support.
Warning: DRM protected files, such as m4p files purchased in the iTunes Store in 2009 or earlier, are not
supported.
Warning: ALAC files use the same container MP4 container format and file extensions (m4a, mp4) as AAC files,
but Mixxx cannot play ALAC files. It is recommended to convert ALAC files to FLAC for use in Mixxx. This will
not reduce the sound quality of the files.
4.17 Music from audio CDs
Mixxx can not play music directly from audio CDs. Use a CD ripping program to copy the audio from the CD to
files on your computer. It is recommended to save the ripped files in the FLAC format. Many different programs are
available to rip CDs, but not every program is capable of saving them to FLAC.
4.17. Music from audio CDs 38

CHAPTER 5
DJ Hardware
Although Mixxx can be used with just a laptop or desktop computer, fully taking advantage of Mixxx’s features
requires specialized DJ hardware. Depending on your budget and application area, your setup and requirements may
vary. This chapter provides general background information about various types of DJ hardware.
See also:
The Mixxx DJ Hardware Guide lists specific devices with information about their prices, features, and compatibility
with Mixxx.
5.1 Controllers
DJ controllers are devices with knobs, faders, buttons, and jog wheels to control DJ software such as Mixxx. Con-
trollers allow quick access to different controls while providing tactile and visual feedback indicating the state of each
control, such as the position of a knob or whether a switch is on or off. This allows you to focus on manipulating
the music without needing to look at your computer screen all the time. Controllers also allow using two hands to
manipulate two different controls at the same time, which is required for many mixing techniques.
DJ controllers typically do not do any actual audio processing. Instead, they send signals (typically MIDI or HID over
a USB cable) to the computer to instruct DJ software how to manipulate the audio. Many DJ controllers include an
audio interface with 2 separate stereo outputs built into the device. This allows the DJ to transport and setup only one
piece of hardware in addition to a laptop. Some devices can be used as both a controller and hardware mixer.
Mixxx can work with any MIDI or HID controller as long as there is a mapping file to tell Mixxx how to understand
the controller’s signals. Mixxx comes bundled with a number of MIDI and HID mapping presets, which are listed
in the Mixxx DJ Hardware Guide on the wiki. For controllers that Mixxx does not yet support, you can search the
forum to see if anyone has started a mapping. You can also start one yourself using the information in the Controller
Mapping Documentation on the wiki.
See also:
Using MIDI/HID Controllers describes how to configure Mixxx to use controllers.
39

Mixxx User Manual, Release 2.1.0
5.2 Audio Interfaces
An audio interface (also known as a “sound card”, although few of them are shaped like cards anymore) is a device
that allows a computer to send output to and receive input from audio equipment. Whether using internal or external
mixing, it is recommended to use a single audio interface with at least 4 independent output channels (2 separate stereo
pairs).
The headphone jack on most laptops is not a second audio output. Rather, plugging headphones into the jack simply
redirects the laptop’s single stereo output from its speakers to your headphones. A splitter cable can be used to separate
the stereo output of a headphone jack into two separate mono outputs for headphone cueing, but it is recommended
to use a sound card with at least four mono outputs (for two stereo pairs). Such sound cards tend to be higher quality
than those built into laptops and allow your mix to be enjoyed in stereo by your audience.
Unlike some proprietary DJ systems, Mixxx can use any audio interface and any MIDI or HID controller that your
OS has drivers to use. If your controller has an integrated audio interface, you may choose to use a different audio
interface for higher quality audio. Mixxx can also use multiple audio interfaces simultaneously.
5.2.1 Audio Interface Considerations
This section provides background information to help you choose an audio interface to use with Mixxx.
Bit Depth and Sample Rate
Most music is published with a bit depth of 16 bits at a sample rate of 44.1 kHz because this is all that is needed to
store all the detail of music in digital form.
Bit depth determines the possible dynamic range of the signal. 16 bits is more than enough for playing back music.
While 24 bits is helpful for recording, it is useless for playback.
Half the sample rate determines the maximum frequency that can be represented by the signal. Humans generally
can’t hear frequencies above 20 kHz, so a sampling rate of 44.1 kHz, representing a maximum frequency of 22.05
kHz, is fine for playback. Higher sample rates like 88.2 kHz and 96 kHz can be helpful to reduce aliasing distortion
when recording, but have no benefit for playback and make your computer work harder.
For a more thorough and technical explanation of why 16 bits at 44.1 kHz is all that is needed for playback, read
24/192 Music Downloads Are Very Silly Indeed.
Specifications
When considering specifications, higher dynamic range, higher signal-to-noise ratio (SNR), higher maximum output
level, lower THD+N (Total Harmonic Distortion + Noise; look for a more negative dB value or smaller percentage),
and lower crosstalk (more negative dB value) are better. Cheap audio interfaces tend to not have these specifications
published.
Connector and Cable Types
If you are unfamiliar with professional audio equipment, read Digital DJ Tips’ Essential Guide to Audio Cables for
DJs to understand the different kinds of connectors on audio interfaces. It is better to use an audio interface with
balanced outputs, especially if you will run long cables directly into an amplifier or active speakers without going
through a hardware mixer. Balanced signals reject interference and are less susceptible to ground loop hum issues
(which can be a problem when plugging unbalanced gear into separate power sources).
5.2. Audio Interfaces 40

Mixxx User Manual, Release 2.1.0
However, most venues have DJs plug into hardware DJ mixers, which typically only have RCA inputs (RCA cables
cannot be balanced). Most home/computer speakers and amplifiers have RCA and/or 1/8” TRS stereo inputs. Most
live sound mixers have balanced 1/4” TRS mono inputs. If you need to interconnect balanced and unbalanced gear,
refer to this guide from Presonus and this guide from Rane.
Number of Channels
Audio interfaces sometimes have multiple connectors for a single channel, resulting in more connectors than channels.
So, not every connector can send or receive and independent signal. For example, some audio interfaces made for
DJing have 4 output channels with 4 mono output connectors and 1 stereo headphone connector. This does not mean
that the audio interface can send out 6 different signals at the same time; rather, the signal on 2 of the mono outputs
and the stereo headphone output would be the same. Also, many controllers have separate master and booth outputs
with independent volume controls, but they both play the same signal.
Vinyl Control and Phono Preamplifiers
Turntables output low voltage (phono level) signals that need to be amplified to line level before most audio equipment
can work with them. So, if you want to use Vinyl Control, sometimes referred to as a Digital Vinyl System (DVS), it is
best to have phono preamplifiers (one for each deck) somewhere between your turntable and sound card to boost the
turntable’s phono level signal to line level. Mixxx can amplify phono level signals in software, but it is better to do it
in hardware. The phono preamp can be in the turntable, in the audio interface, or a stand alone device. Most audio
interfaces do not have phono preamps; these are generally found on audio interfaces specifically made for controlling
DJ software with timecode vinyl. Mixers with audio interfaces have phono preamps on their deck inputs, but not
necessarily on every deck input. Many higher-end all-in-one controllers also include audio interfaces with phono
preamps.
5.3 Mixers
Mixers are devices that combine audio signals. DJ mixers are different from live and studio mixers because they have
multiple stereo channels with phono preamplifiers for connecting Turntables. It is conventional to use a DJ mixer with
Vinyl Control, but vinyl control can be used without a hardware mixer.
Using Mixxx with a DJ mixer requires an audio interface with at least 4 mono outputs (2 stereo pairs) to send Mixxx’s
decks to the mixer’s stereo channels. Some DJ mixers have a USB audio interface built into them. This lets Mixxx
send unmixed audio files directly to the mixer without needing a separate stand-alone audio interface.
Often DJs who use DJ software with internal mixing send their master output to a hardware mixer. This can be helpful
to send the mixed signal to both a main speaker output for the audience and booth speakers for the DJ with separate
gain controls for each output. It also facilitates smooth transitions between DJs.
However, using an external mixer with internal mixing is not necessary and reduces the sound quality. Each piece
of equipment an audio signal passes through reduces the sound quality, so avoiding unnecessary equipment in the
signal path can provide better sound quality. Many DJ controllers provide separate master and booth outputs with
independent volume controls. Alternatively, a sound card with at least 6 output channels can be used with Mixxx’s
Booth output.
Many people confuse “analog mixers” and “hardware mixers”, but these are are not the same. Many hardware mixers
process audio digitally with specialized signal processors as opposed to a general purpose CPU like those in laptop
and desktop computers.
See also:
Recording And Broadcasting With An External Hardware Mixer
5.3. Mixers 41

Mixxx User Manual, Release 2.1.0
5.4 Turntables
Turntables are mechanical devices that play music recordings cut into vinyl phonograph records. Before software like
Mixxx was available, the art of DJing originated with turntables and DJ mixers. Special vinyl records can be used with
turntables to control the playback of digital files in Mixxx as if the digital file was pressed onto the vinyl record.
See also:
Vinyl Control
5.5 CDJs
CDJs are devices that play digital audio files and have controls from manipulating the playback of the audio. Originally
CDJs played audio CDs, but new devices typically use USB storage drives or SD cards. Some CDJs can be plugged
into a computer with a USB cable to function as a controller for Mixxx.
5.6 Microphones
Microphones convert changes in sound pressure in air to changes in voltage (an analog audio signal). Mixxx can work
with any microphone that can be plugged into your audio interface.
See also:
Using Microphones
5.4. Turntables 42

CHAPTER 6
Example Setups
This chapter presents some example hardware setups with instructions for how to configure Mixxx to work with them.
See also:
•DJ Hardware: background information about different types of equipment.
•Configuring sound input and output: details about each available input and output option.
•Using Microphones: details for configuring Mixxx to work with microphones.
•DJ Hardware Guide lists specific devices with information about their prices, features, and compatibility with
Mixxx.
6.1 Computer Only
The built-in audio interface on most computers comes with a single stereo line-out and a microphone input. This can
be set up with Mixxx in two ways:
6.1.1 Practicing Mixing / Broadcasting
This setup can be used with a single audio output for speakers or headphones to practice DJing without investing in
any equipment other than a computer and a set of speakers or headphones. With this configuration, use the Pre/Main
Knob to switch back and forth between the Master mix and PFL signal. This setup cannot be used to play for a live
audience because the Master mix is not sent to an audio interface output. However, it can be used by radio DJs who
only need to send the Master mix to a broadcast audience.
1. Open Preferences →Sound Hardware
2. Select the Output tab
3. From the Headphones drop-down menu, select your built-in audio interface, then Channels 1-2. Although this
is labeled Headphones, you can also plug speakers into the output jack of your computer.
4. Depending on your audio interface, you can specify a microphone
43
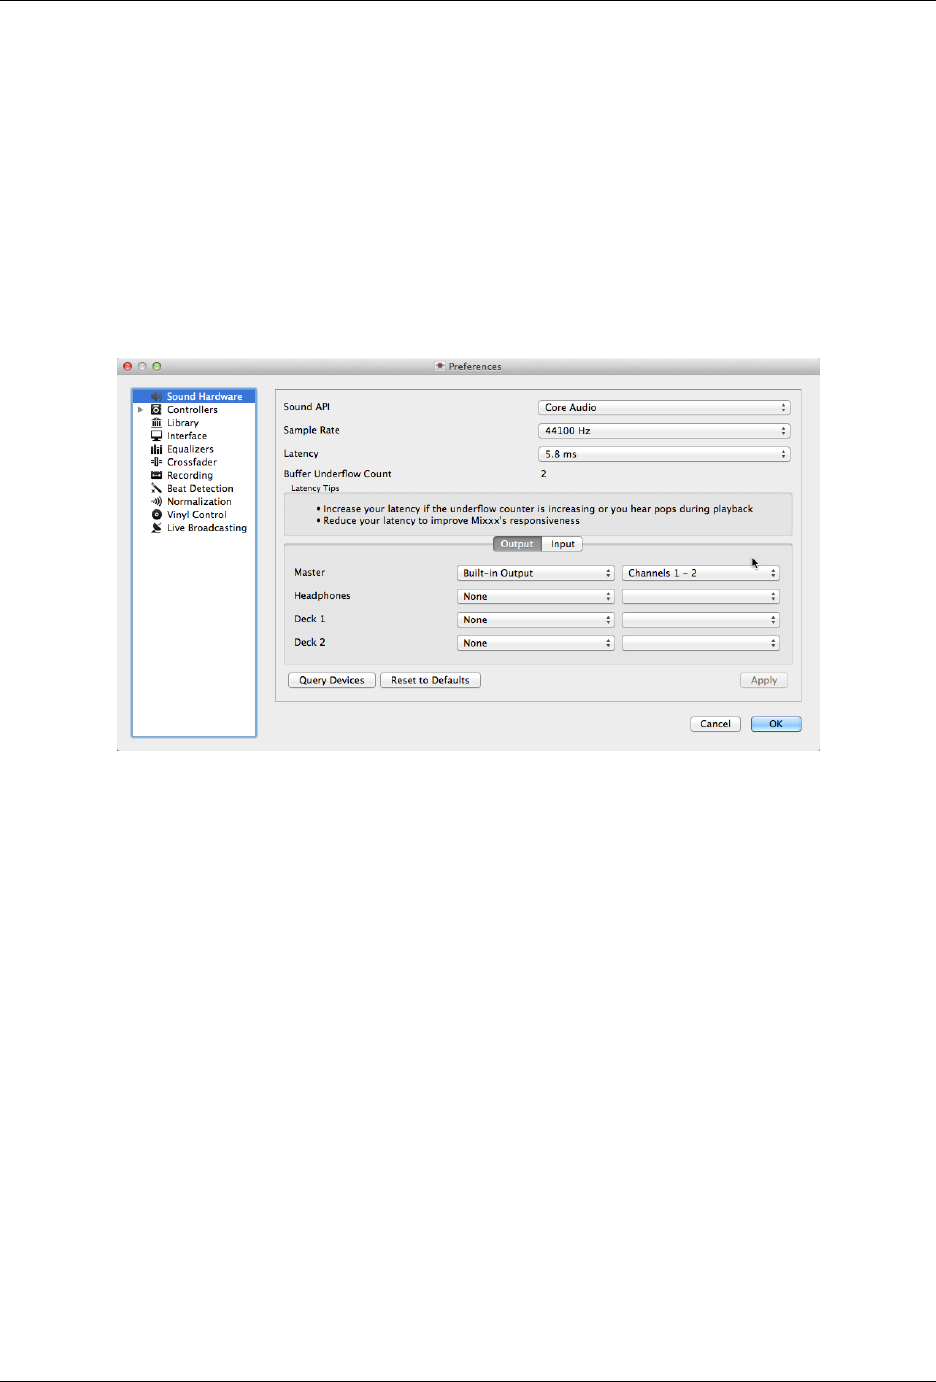
Mixxx User Manual, Release 2.1.0
(a) Use your built-in microphone or connect a microphone to your computer
(b) Check that your microphone is detected by your OS
(c) Open the Input tab
(d) From the Microphone drop-down menu, select the input your microphone is connected to
5. Click Apply to save the changes.
6.1.2 Playing for an Audience
This setup allows for playing to an audience without headphone cueing.
Fig. 1: Using Mixxx with your built-in sound card
1. Open Preferences →Sound Hardware
2. Select the Output tab
3. From the Master drop-down menu, select your built-in audio interface, then Channels 1-2
4. Depending on your audio interface, you can specify a microphone
(a) Use your built-in microphone or connect a microphone to your computer
(b) Check that your microphone is detected by your OS
(c) Open the Input tab
(d) From the Microphone drop-down menu, select the input your microphone is connected to
5. Click Apply to save the changes.
6.2 Laptop and Splitter Cable
The cheapest way to DJ and cue with headphones uses a stereo-to-mono DJ splitter cable (also known as a “Y cable”)
plugged into the headphone jack of a laptop or other computer. This cable divides the stereo output from a single jack
into two separate mono singals.
6.2. Laptop and Splitter Cable 44
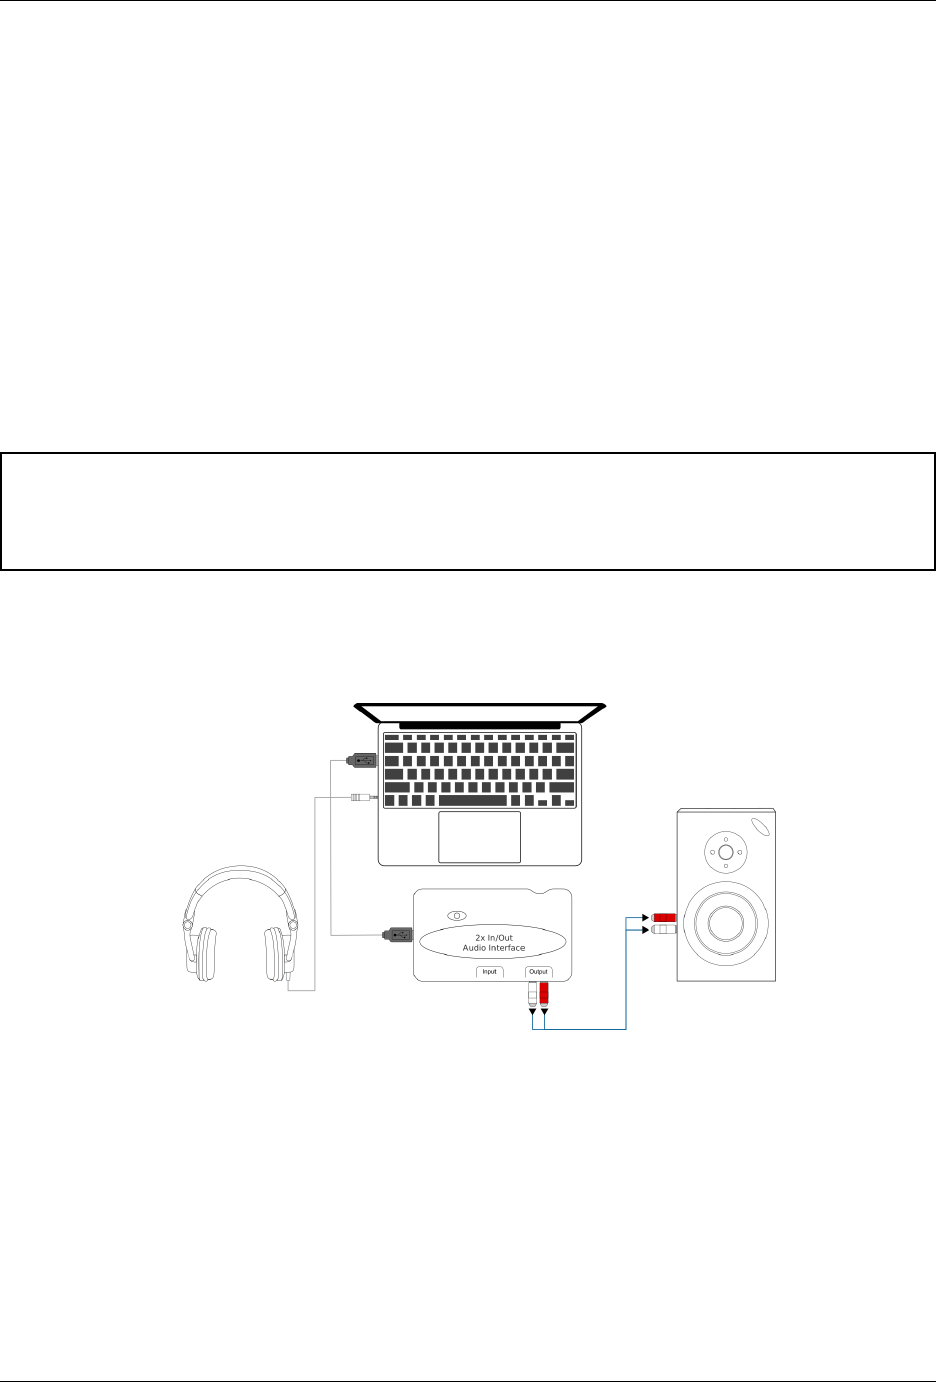
Mixxx User Manual, Release 2.1.0
This setup allows you to start DJing without having to invest in expensive equipment. However, because the signals
are in mono, you and your audience will not be able to enjoy music producers’ positioning of sound in space (although
many club PA systems are wired in mono anyway). Furthermore, audio interfaces built into computers are usually low
quality and often pick up interface from other components of the computer.
Using a built-in audio interface and a stereo-to-mono splitter
1. Open Preferences →Sound Hardware
2. Select the Output tab
3. Check that your headphones are plugged into the side of the cable with a headphones symbol and that the
speakers are plugged into the side of the cable with a speaker symbol.
4. From the Master drop-down menu, select your built-in audio interface, then Channel 1
5. From the Headphones drop-down menu, select your built-in audio interface, then Channel 2
6. Click Apply to save the changes.
Warning: Most splitter cables, particularly those marketed as headphone splitter cables, output the same stereo
signal to two headphone jacks and will not work for this DJ setup. Also, if you use a generic stereo-to-mono
splitter adapter, you may only be able to hear out of one side of your speakers and headphones. DJ splitter cables
allow you to hear the same mono signal on both sides of your headphones and speakers.
6.3 Laptop and External USB Audio Interface
Fig. 2: Using Mixxx together with an external audio interface
Using two audio interfaces (built-in + external)
1. Open Preferences →Sound Hardware
2. Select the Output tab
3. From the Master drop-down menu, select the external audio interface, then Channels 1-2
4. From the Headphones drop-down menu, select the built-in audio interface, then Channels 1-2
Using an external multi-channel audio interface
1. Open Preferences →Sound Hardware
6.3. Laptop and External USB Audio Interface 45
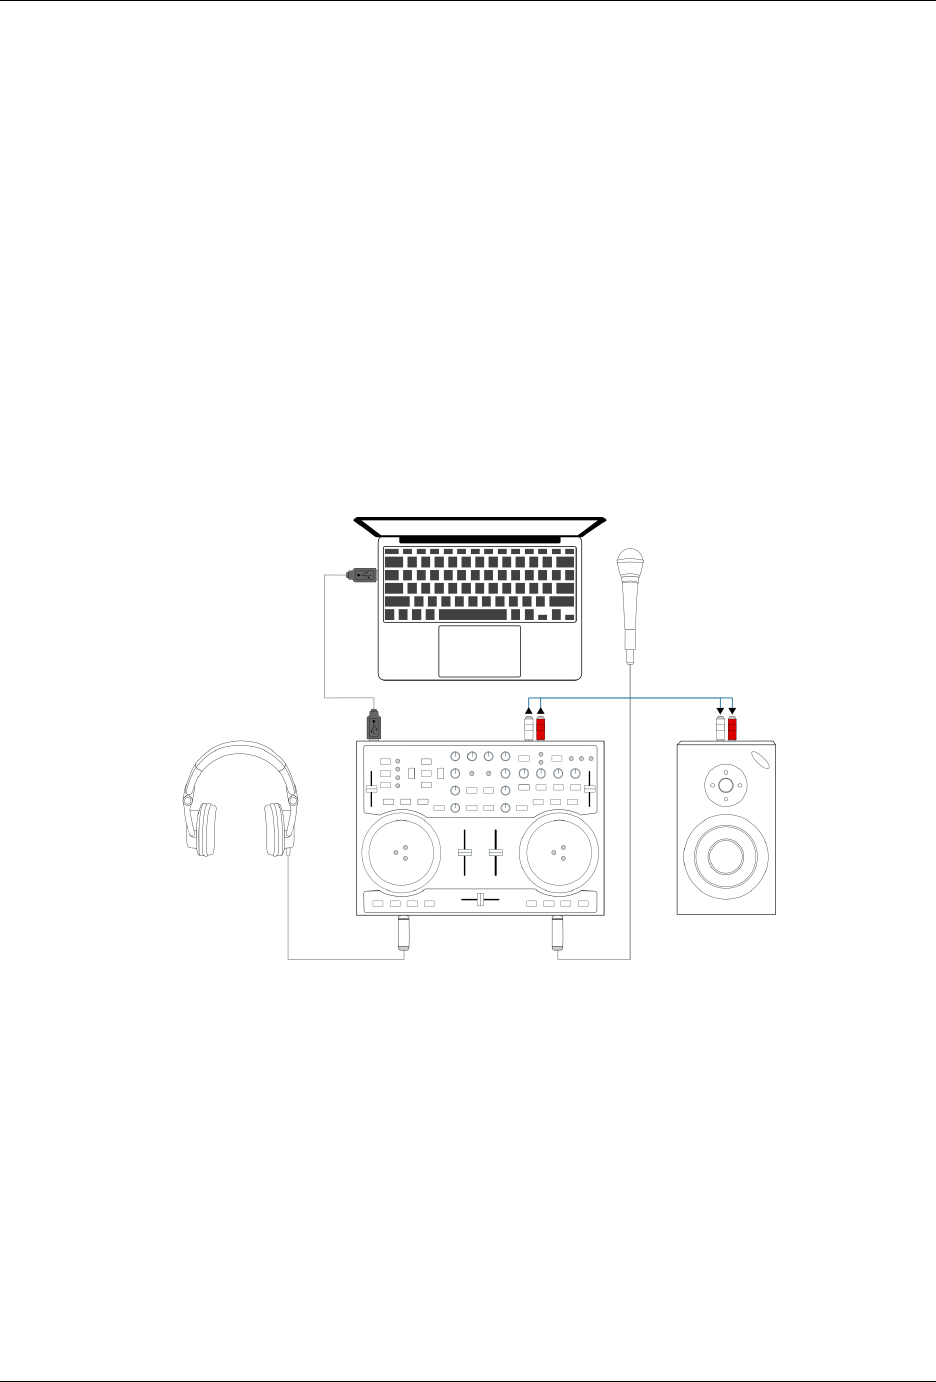
Mixxx User Manual, Release 2.1.0
2. Select the Output tab
3. From the Master drop-down menu, select the external audio interface, then Channels 1-2
4. From the Headphones drop-down menu, select the external audio interface, then Channels 3-4
5. Click Apply to save the changes.
6.4 Laptop and MIDI or HID Controller
See also:
The Controllers section of the DJ Hardware chapter has background information about controllers.
6.4.1 Controllers with an integrated audio interface
Many DJ controllers include an integrated multi-channel audio interface. A setup with this kind of controller may look
like the diagram below:
Fig. 3: Using Mixxx together with a DJ controller and integrated audio interface
Using a controller with an integrated multi-channel audio interface
1. Open Preferences →Sound Hardware
2. Select the Output tab
3. From the Master drop-down menu, select your controller’s audio interface, then Channels 1-2
4. From the Headphones drop-down menu, select your controller’s audio interface, then Channels 3-4
5. Click Apply to save the changes.
6.4. Laptop and MIDI or HID Controller 46
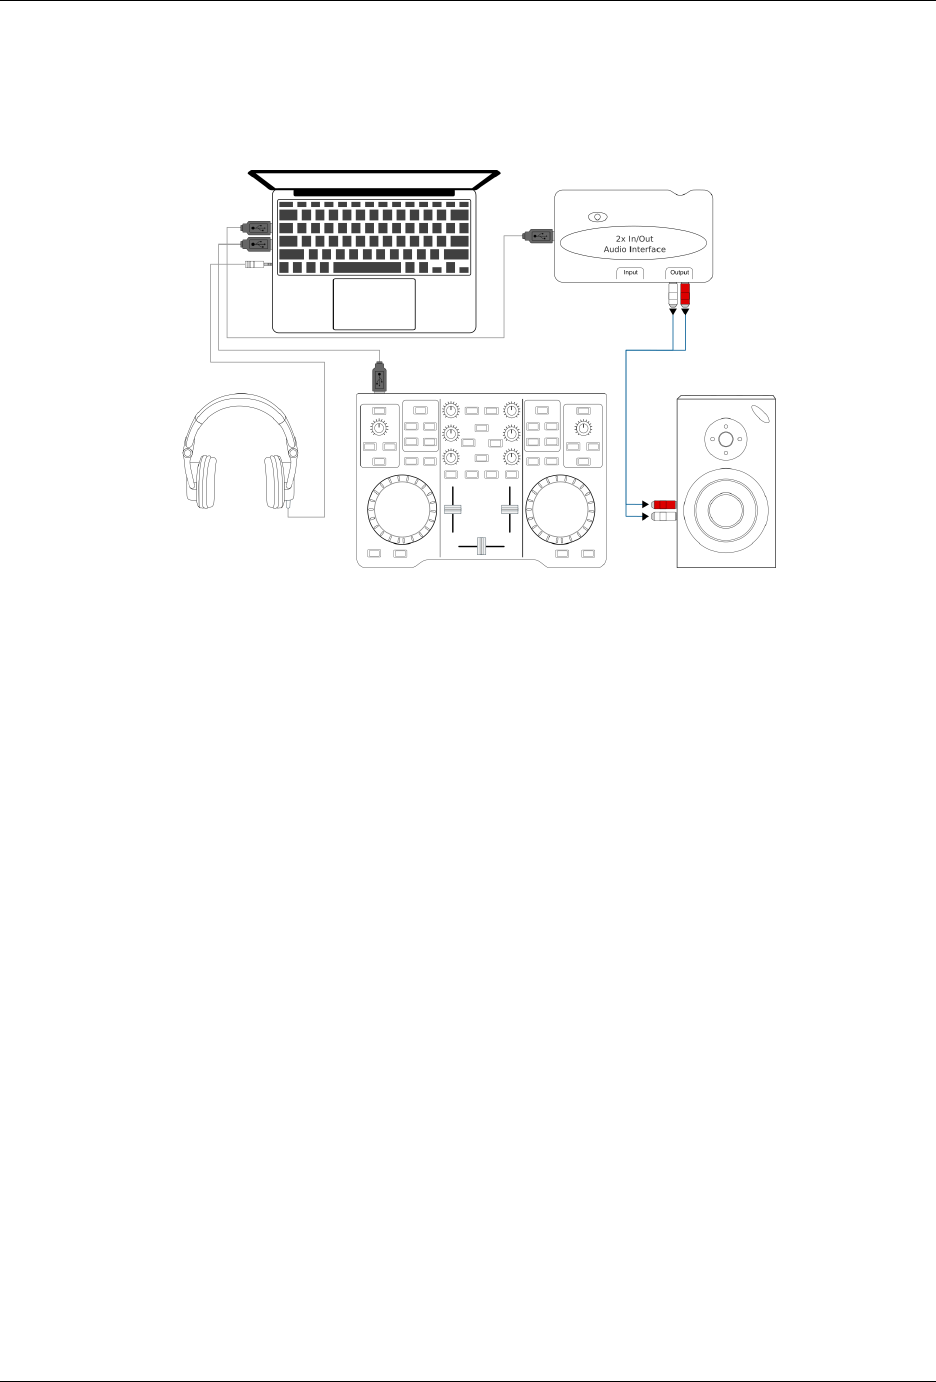
Mixxx User Manual, Release 2.1.0
6.4.2 Controllers without an integrated audio interface
Controllers without an integrated audio interface can be used together with a USB audio interface as depicted in the
diagram below:
Fig. 4: Using Mixxx together with a DJ controller and external audio interface
Using a controller without an integrated audio interface
1. Open Preferences →Sound Hardware
2. Select the Output tab
3. From the Master drop-down menu, select the external audio interface, then Channels 1-2
4. From the Headphones drop-down menu, select the built-in audio interface, then Channels 1-2
5. Click Apply to save the changes.
6.5 Laptop, External Hardware Mixer and Vinyl Control
This setup allows DJs to use the techniques of DJing with vinyl record turntables combined with the portability and
flexibility of a laptop computer. Instead of carrying crates of records or CDs, DJs can carry their entire music collection
on their laptop. In addition to a laptop and headphones, this setup requires an audio interface with at least two pairs of
stereo inputs and outputs as well as a pair of timecode records.
See also:
Go to the chapter Vinyl Control for detailed information.
6.5. Laptop, External Hardware Mixer and Vinyl Control 47
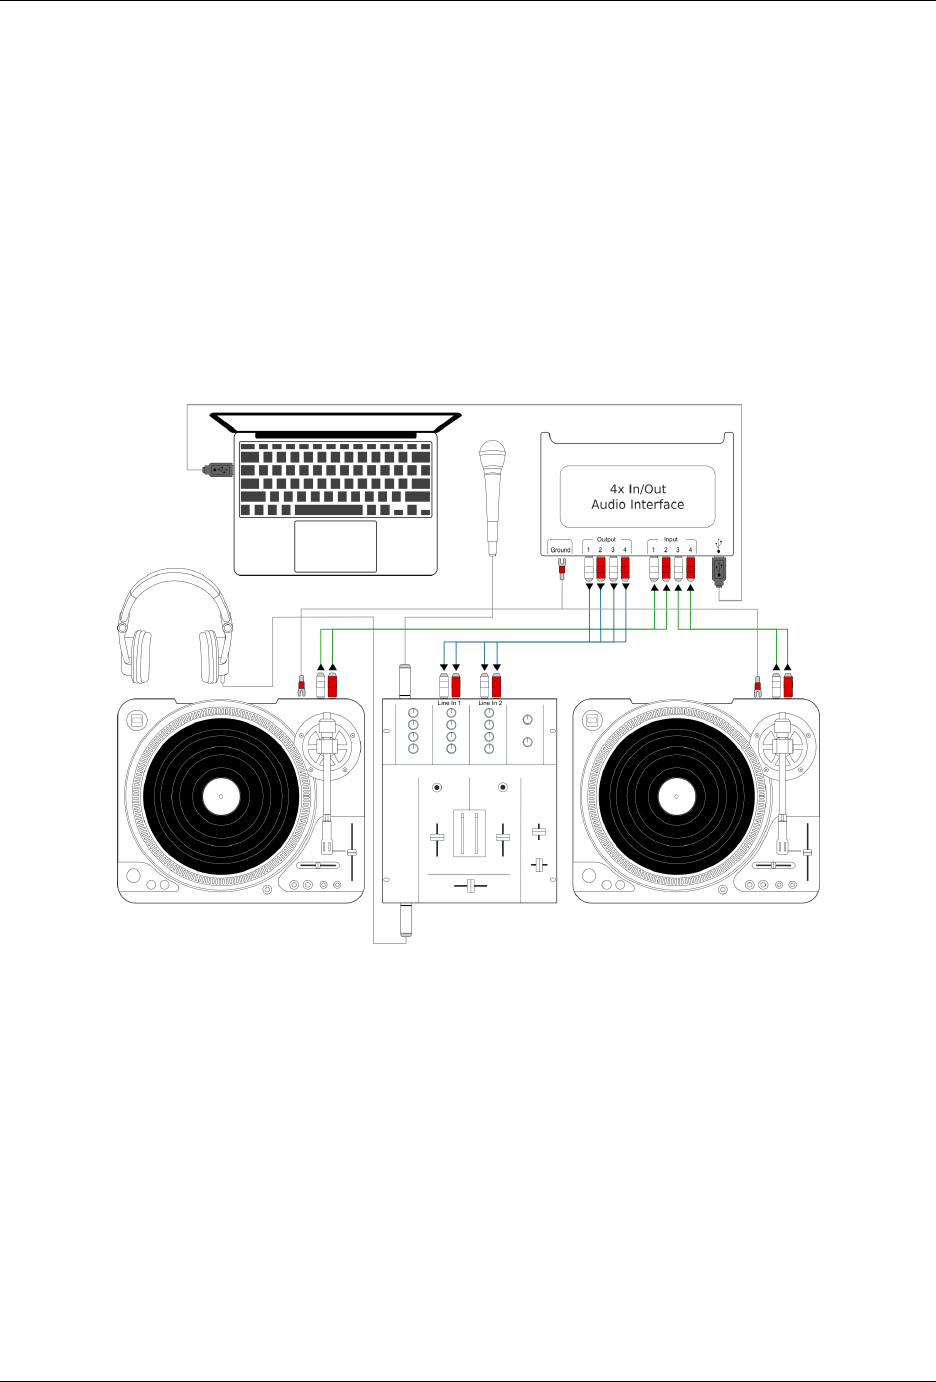
Mixxx User Manual, Release 2.1.0
Fig. 5: Using Mixxx together with turntables and external mixer
6.5. Laptop, External Hardware Mixer and Vinyl Control 48
CHAPTER 7
Controlling Mixxx
Mixxx can be controlled with a keyboard, a mouse, MIDI/HID controllers, time-code records/CDs, or a combination
of these. The choice usually depends on your budget or style of DJing.
7.1 Using a Mouse and Touchpad
Use your mouse to interact with the controls in the Mixxx User Interface on your computer screen. You can perform
actions by pointing and clicking with your mouse.
•Single Left Click: Performing a left mouse click on buttons triggers the default action for that control. Moreover
if you click on a value in the track list of the Mixxx library, you can change the value. For example the year of
a track.
•Single Right Click: On most buttons, performing a right click triggers a different action than a left click. You
can return any knob or fader to its default value by right-clicking that control.
•Mouse Drag: Click on a knob or fader, hold the left mouse button and move your cursor to change the value of
the control. Use mouse drag to drop tracks from the file list to the decks, crates, playlists, etc.
•Mouse Wheel: Just like Mouse Drag, you can change knob and fader values by placing the cursor over the
control and moving the mouse wheel.
Hint: If you hover with the mouse over a control (e.g the crossfader) in the Mixxx user interface, the tooltip lists the
left- and right-click action respectively.
Hint: On a Macbook or a computer with a touchpad that lacks mouse buttons, a two-finger click gesture is often
treated as a right click.
See also:
Using the Mouse drag/wheel on the waveforms you can adjust zoom and playback rate of the tracks. For more
information, go to Waveform Displays.
49
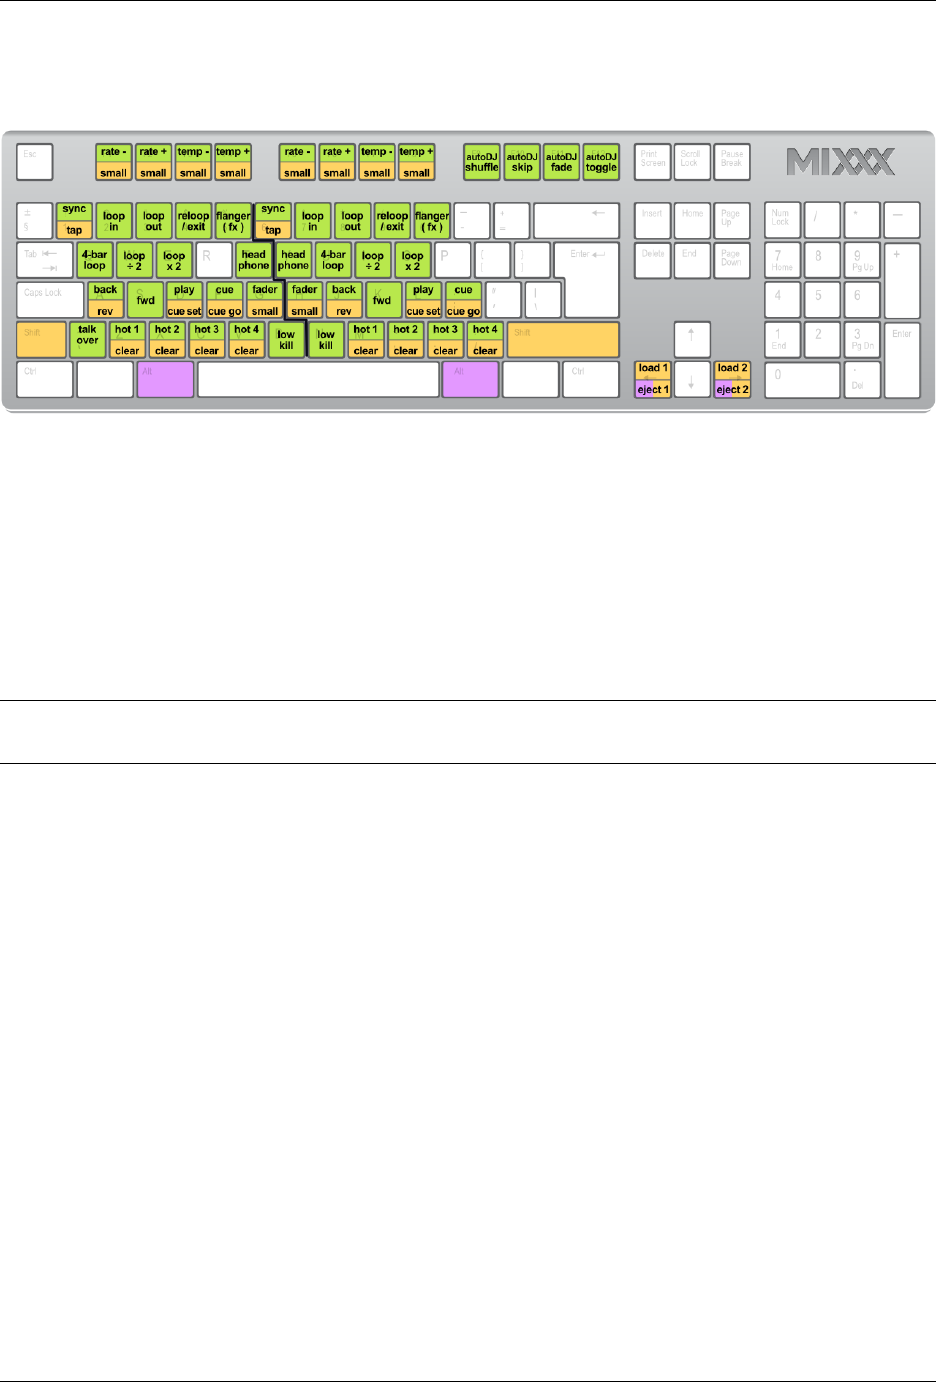
Mixxx User Manual, Release 2.1.0
7.2 Using a Keyboard
Fig. 1: Mixxx Keyboard shortcuts (for en-us keyboard layout)
Download the image
Controlling Mixxx with a keyboard is handy. Unlike mouse control, the keyboard allows you to manage things
simultaneously. For example, you can start playing a track on deck 1 whilst stopping deck 2 at the same time.
The default mapping for English keyboards is depicted in the figure above. It is divided into a left-hand side for deck
1 and right-hand side for deck 2. Please note that you can also access the functions through Mixxx’s interface.
For some user groups, like those using controllers or vinyl control, it might be useful to enable/disable the keyboard
mappings at runtime. You can do so by clicking Options →Enable Keyboard Shortcuts.
Hint: If you hover with the mouse over a control (e.g. the crossfader) in the Mixxx user interface, the tooltip lists the
keyboard shortcuts of the control among a description of the control.
See also:
For a list of default shortcuts, go to Keyboard mapping table.
7.2.1 Customizing the keyboard mapping
Mixxx allows you to customize the keyboard control. For more information, go to:
•Making a Custom Keyboard Mapping
7.3 Using MIDI/HID Controllers
Mixxx supports MIDI and HID controllers which are external hardware devices used to control audio applications.
Many DJs prefer the hands-on feel of a controller with Mixxx because it can feel similar to using a real mixer and
turntables or CDJ.
7.3.1 Loading a controller preset
Without loading the correct preset, your controller does not work with Mixxx.
1. Connect your controller(s) to your computer
7.2. Using a Keyboard 50
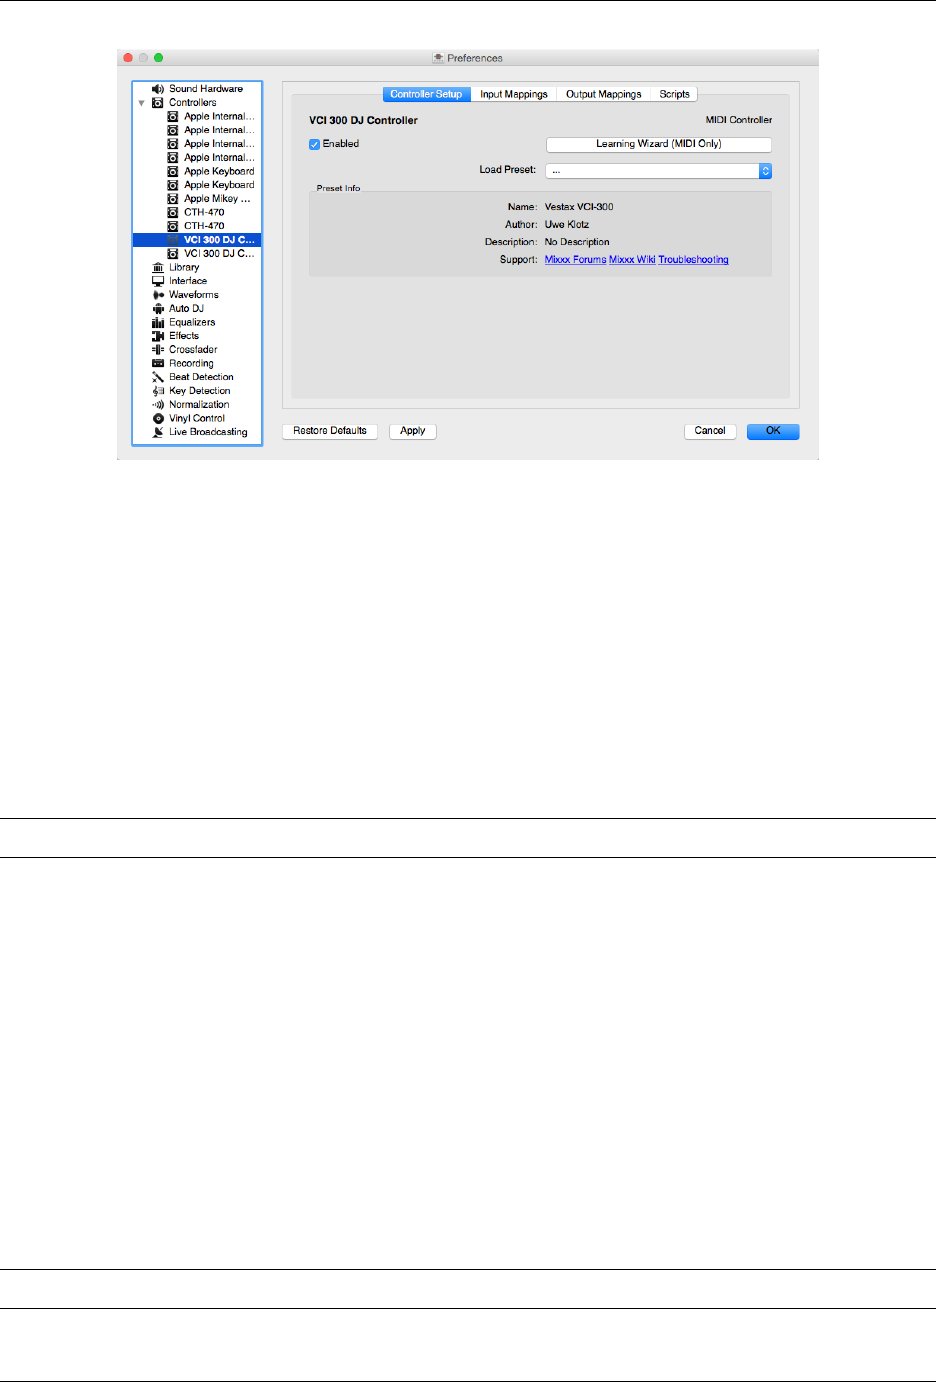
Mixxx User Manual, Release 2.1.0
Fig. 2: Mixxx Preferences - Loading a controller preset
2. Start Mixxx
3. Go to Preferences →Controllers
4. Select your device from the list of available devices on the left, and the right pane will change
5. Activate the Enabled checkbox
6. Select the mapping for your controller from the Load Preset drop-down menu
7. Click Apply and Mixxx can now be controlled by your controller(s).
8. Repeat step 4-7 for any of the controllers you want to use
Hint: If you do not find a connected device in the list, make sure to install any necessary drivers for that device.
7.3.2 Supported controllers
Mixxx can use any MIDI/HID controller that is recognized by your OS (some may require drivers), as long as there is
a MIDI/HID mapping file to tell Mixxx how to understand it. Mixxx comes bundled with a number of mappings for
various devices. There are two levels of controller mappings:
•Mixxx Certified Mappings: These mappings are verified by the Mixxx Development Team.
•Community Supported Mappings: These mappings are provided and have been verified as working by the
Mixxx community, but the Mixxx Development Team is unable to verify their quality because we don’t have
the devices ourselves. They might have bugs or rough edges.
If you run into issues with any of these mappings, please file a bug report on our Bug Tracker or tell us about it on
our mailing list, forums, or IRC channel. Device support varies for each supported OS, so make sure to consult the
documentation of the device.
Hint: Additional mappings are available in the Controller presets forum.
7.3. Using MIDI/HID Controllers 51

Mixxx User Manual, Release 2.1.0
See also:
Before purchasing a controller to use with Mixxx, consult our Hardware Compatibility wiki page. It contains the most
up-to-date information about which controllers work with Mixxx and the details of each.
7.3.3 Installing a preset from the forum
To use a controller mapping that did not come bundled with Mixxx, place the controller mapping in your User Presets
folder. This is the folder called “controllers” inside your User Preferences folder. To open your User Presets folder,
go to Preferences →Controllers and click the Open User Preset Folder button. Alternatively, navigate to the folder in
your OS file browser:
• GNU/Linux: /home/<username>/.mixxx/controllers
• macOS: /Users/<username>/Library/Application Support/Mixxx/controllers
• Windows Vista and newer: C:\Users\<username>\AppData\Mixxx\controllers
• Windows XP: C:\Documents and Settings\<username>\AppData\controllers
On Windows, the AppData folder is hidden, so if you have not already, you will need to set Windows Explorer to
show hidden files and folders (how to do this varies with each version of Windows).
If the mapping was posted as a .zip file, first extract the .zip file by right clicking on it in your file browser and
selecting the option for extracting an archive or compressed folder. Copy the .xml file into your User Preset folder.
If there is a .js file, also copy that to your User Preset folder. Restart Mixxx and load the preset.
7.3.4 Map your own your controller
There is no mapping available for your controller or you want to change an existing mapping? You can map your
controller by using the Controller Wizard or take full control with the MIDI Scripting support in Mixxx.
See also:
Go to Adding support for your MIDI/HID Controller for detailed information.
7.4 Using Timecode Vinyl Records and CDs
Vinyl control allows a user to manipulate the playback of a track in Mixxx using a turntable or CDJ as an interface.
In effect, it simulates the sound and feel of having your digital music collection on vinyl. Many DJs prefer the tactile
feel of vinyl, and vinyl control allows that feel to be preserved while retaining the benefits of using digital audio.
See also:
Go to Vinyl Control for detailed information.
7.4. Using Timecode Vinyl Records and CDs 52

CHAPTER 8
Vinyl Control
Vinyl control allows a user to manipulate the playback of a track in Mixxx using a real turntable as a controller. In
effect, it simulates the sound and feel of having your digital music collection on vinyl. Many DJs prefer the tactile feel
of vinyl, and vinyl control allows that feel to be preserved while retaining the benefits of using digital audio.
8.1 How does it work?
Vinyl control uses special timecode records or CD’s which are placed on real turntables or CDJ. The audio output of
the turntables is plugged into a audio interface connected to a computer on which Mixxx is running. When a record
is played on one of the attached turntables, Mixxx reads the timecode from the record and uses the information to
manipulate whatever track is loaded.
8.2 What do I need to use it?
It is possible to use Mixxx’s vinyl control with a variety of setups. Unlike some proprietary DJ software, Mixxx can
use several types of timecode media and any audio interface that your operating system has drivers to use. Optionally,
any MIDI/HID controller can be used together with timecode control. The basic setups for timecode control are:
Setup 1: Vinyl DJ
2-4 timecode vinyls, 2-4 turntables with phono pre-amplifiers (or line-level output), and 2-4 stereo sound
inputs.
Your audio interface inputs must match the turntable outputs. Turntables output very quiet phono-level
outputs that must be amplified for Mixxx to use. You should either find a audio interface that has phono
pre-amplifiers built in (one for each deck), use standalone phono pre-amplifiers, or use turntables with
built in phono pre-amplifiers.
You can try skipping the phono pre-amps if you use the software pre-amp in Mixxx on the Vinyl Control
preferences pane. This may not work for everyone. Line-level signals are preferred and recommended.
53
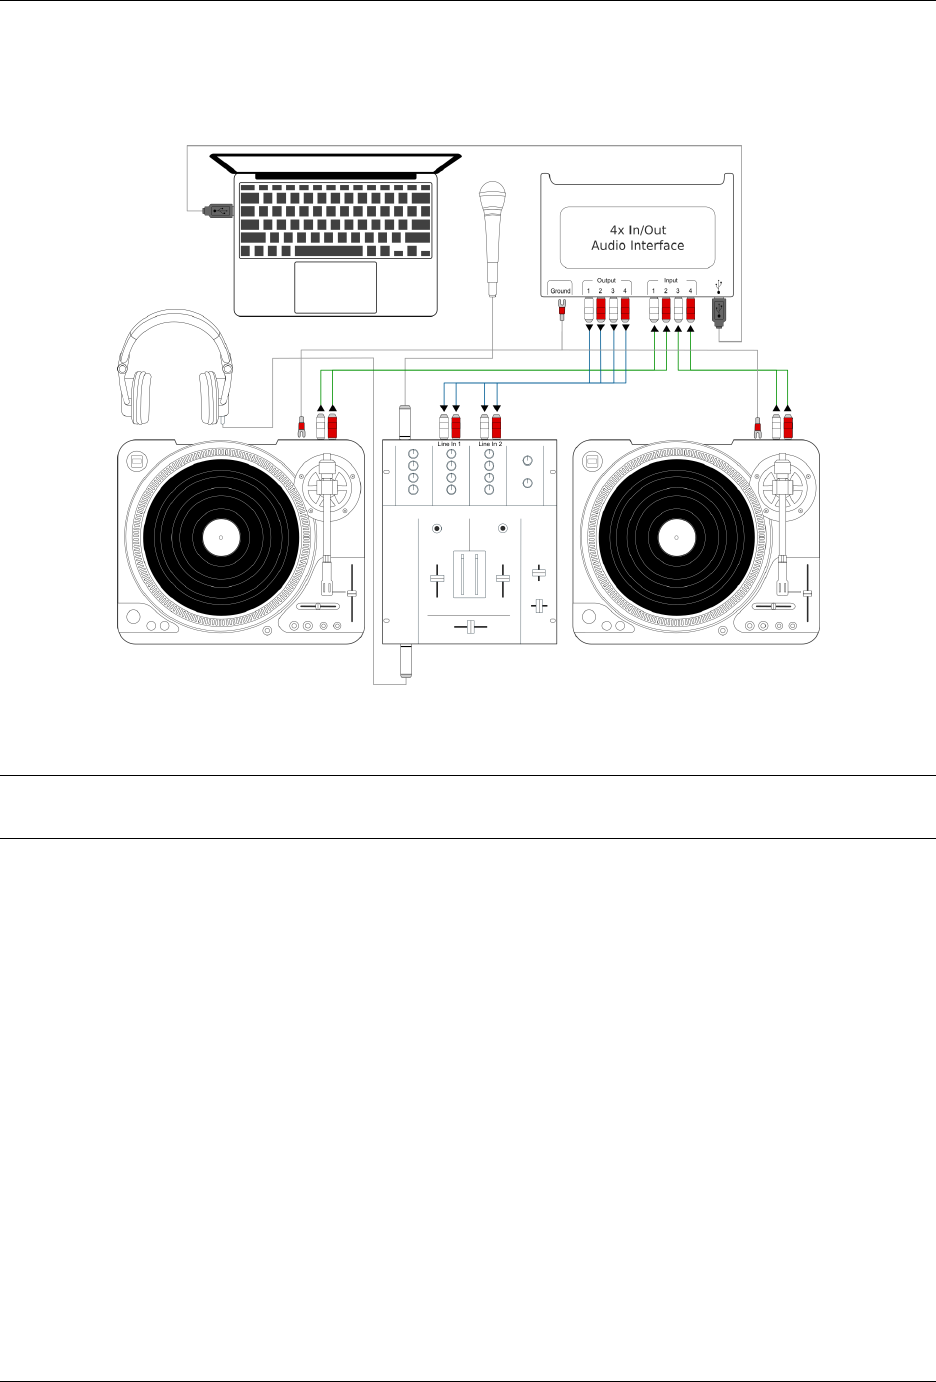
Mixxx User Manual, Release 2.1.0
For turntables a typical setup is depicted in the figure below. First, connect the RCA cables from the
turntables to the inputs on your audio interface. Second, connect the outputs of your audio interface to the
inputs on your mixer.
Fig. 1: Using Mixxx together with turntables and external mixer
Note: Many modern turntables have a Line/Phono select switch. If yours does, make sure it matches the input or
switch setting on your sound card.
Setup 2: CDJ
2-4 timecode CDs, 2-4 CD decks, and 2-4 stereo sound inputs.
Setting up CDJs for use with timecode CDs is similar to setting up turntables. The figure below outlines a
typical configuration. First, connect the RCA cables of the CDJs to inputs of your audio interface. Second,
connect the inputs of your mixer to the outputs of your audio interface. Make sure the input mode of your
audio interface is set to Line.
Sound inputs
• It is recommended to use a DJ audio interface that has multiple stereo line inputs on it.
• Alternatively you can use multiple audio interfaces, each with a single stereo line in, but this is strongly discour-
aged.
Mixxx supports vinyl control input through a single audio interface with at least 4-channels of input (two stereo line-in
jacks), or through multiple separate audio interfaces which each have 2-channels of input (a single stereo line-in jack).
Vinyl control requires the use of stereo line-in jacks - Mono or microphone inputs will not work.
It is strongly recommended to use a audio interface that comes with native low latency drivers such as ASIO (Windows)
or CoreAudio (Mac). Linux users depend on the quality of the corresponding open source driver.
8.2. What do I need to use it? 54
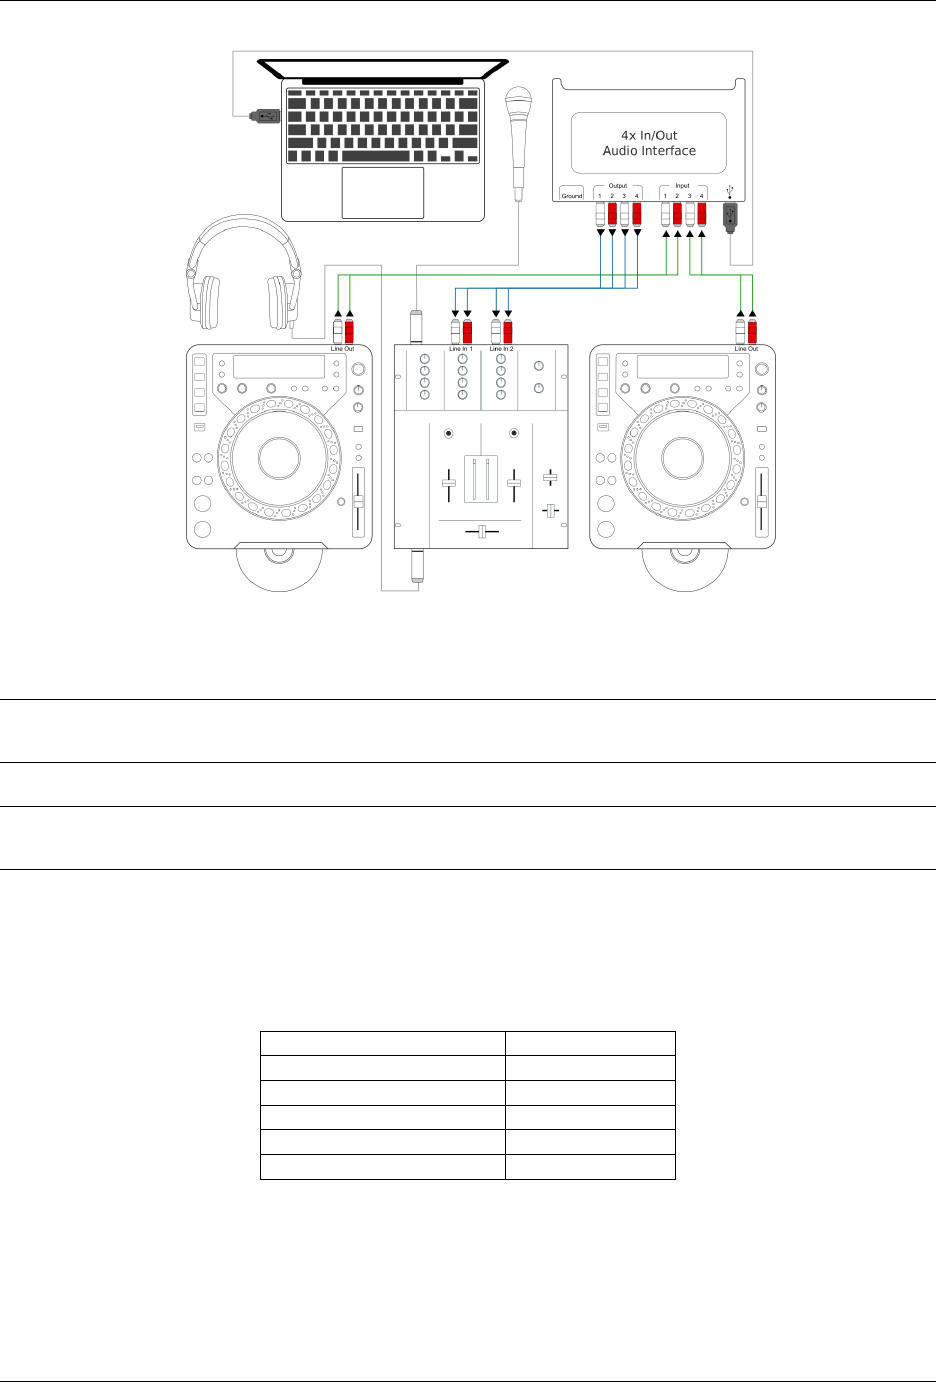
Mixxx User Manual, Release 2.1.0
Fig. 2: Using Mixxx together with CDJs and external mixer
Note: For best scratch performance with vinyl control, we recommend using a system capable of latencies of 10ms.
With higher latencies the scratch sound will start to become distorted.
Note: An external hardware mixer is not required for using timecode control. You can use a MIDI or HID controller
to mix in software instead.
8.2.1 Supported Timecode media
You can use any of the timecode media supported by Mixxx:
Type Responsiveness
Serato CV02 Vinyl Very high
Serato CV02 CD Very high
Traktor Scratch MK1 Vinyl Very high
Traktor Scratch MK2 Vinyl Not supported
MixVibes DVS V2 Vinyl Very high
At the present time, Serato records are recommended if you are looking to buy vinyl. If you want to use CDs, you can
download a free copy for personal use from Serato.
8.2. What do I need to use it? 55
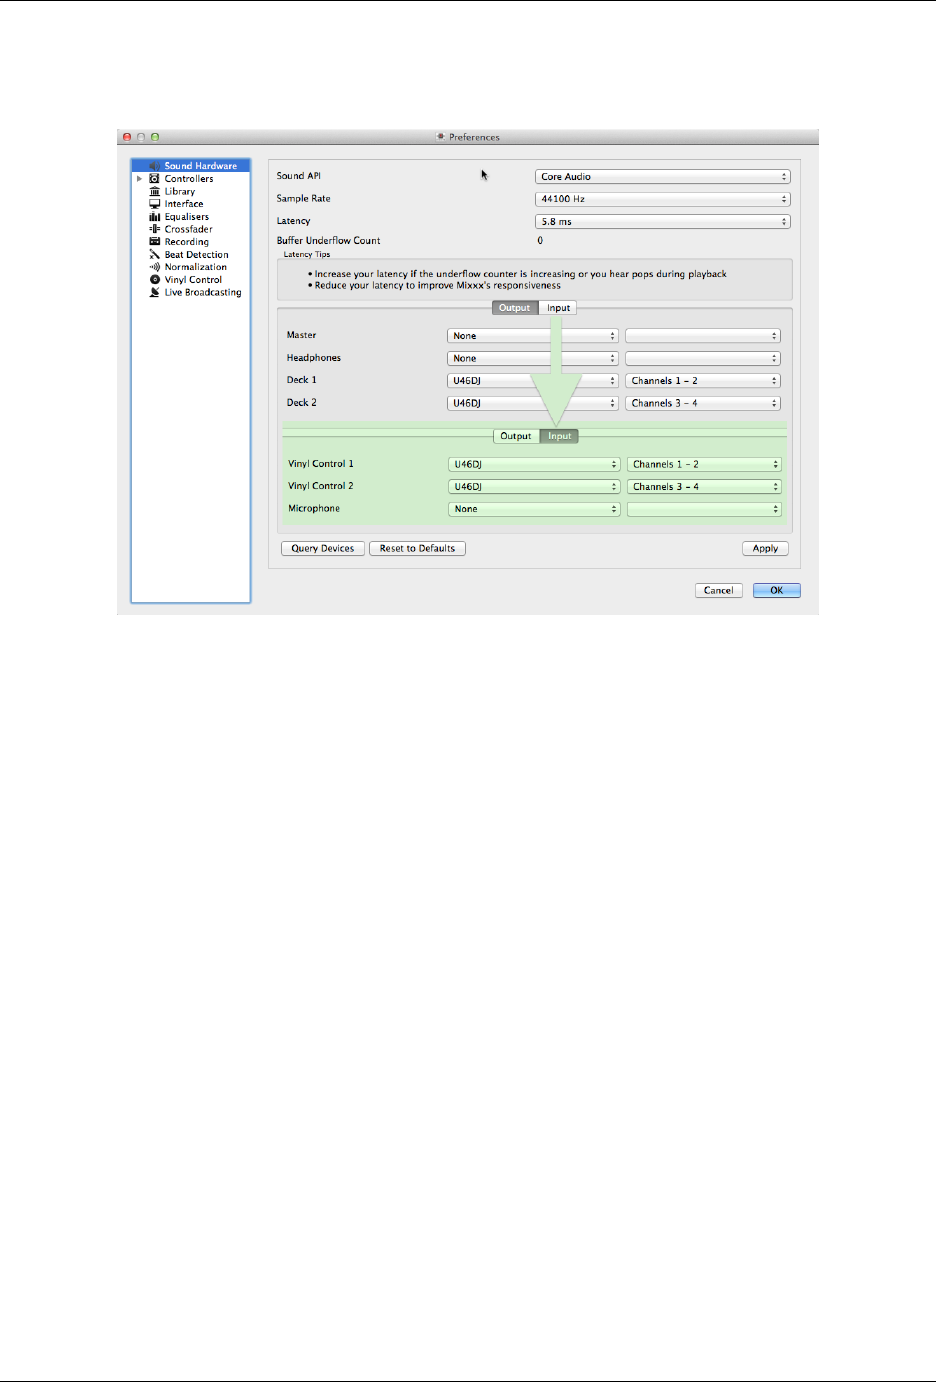
Mixxx User Manual, Release 2.1.0
8.3 Configuring Input and Output devices
Fig. 3: Mixxx preferences - Setting up Input and Output devices for Vinyl Control
Mixxx can be controlled by up to 4 decks with either timecoded vinyl or timecoded CDs.
1. Open Preferences →Sound Hardware
2. Select the Input tab
3. From the Vinyl Control 1 -Vinyl Control 4 drop-down menus, select the audio interface(s) which your decks are
plugged into.
4. In the channel selection drop-down menu, select the channel pairs corresponding to the plug on your audio
interface that your deck(s) are plugged into, typically Channels 1-2 and Channels 3-4 etc.
5. Click Apply to save the changes.
6. Select the Output tab
7. Specify Deck 1 -Deck 4 to route Mixxx’s output directly to the external mixer
8. Click Apply to save the changes.
8.4 Configuring Vinyl Control
You can configure vinyl control in Preferences →Vinyl Control.
8.4.1 Turntable Input Signal Boost
Many turntables provide unamplified “phono level” output which must be boosted to a “line level” signal. Normally,
a mixer or audio interface provides this amplification, but if you’re plugging a turntable’s phono output directly into a
audio interface that doesn’t support phono input, Mixxx can do the amplification. The Turntable Input Signal Boost
8.3. Configuring Input and Output devices 56
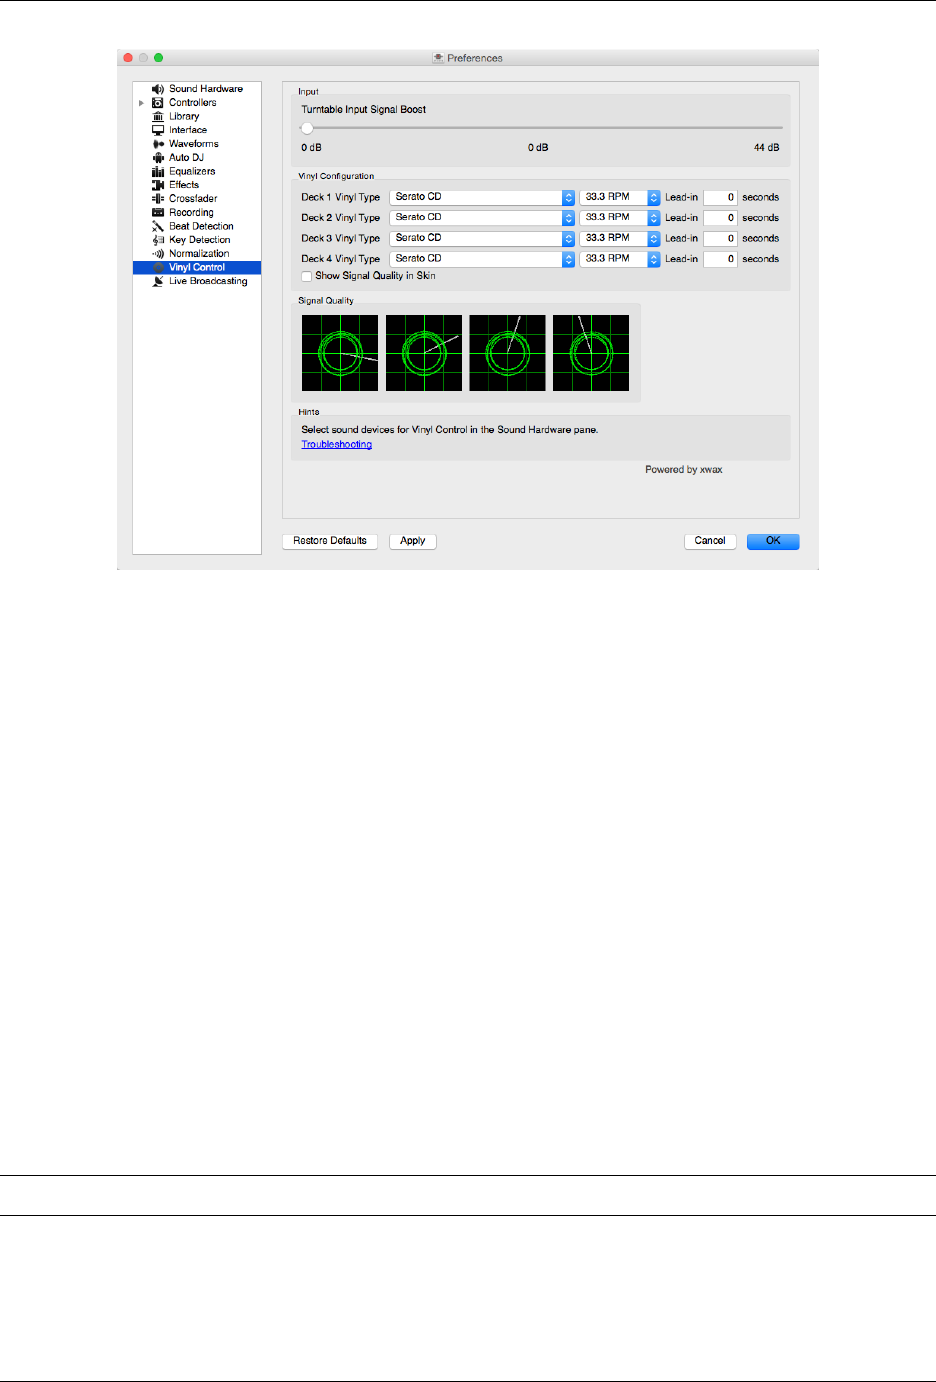
Mixxx User Manual, Release 2.1.0
Fig. 4: Mixxx preferences - Setting up vinyl control
slider allows you to adjust the level of preamplification applied to your decks’ signal. However, it is always preferable
to use a proper phono preamplifier if you have one.
8.4.2 Vinyl Configuration
•Vinyl Type: Several types of timecoded media can be used to control Mixxx. Configure the drop-down menus
to match what type of timecoded media you are using on your decks.
•Deck Vinyl Tempo: Change this if you prefer to scratch with your turntable or CDJ set at 45 RPM, default is
33 RPM.
•Lead-in Time: Allows you to set a dead-zone at the start of your vinyl or CD, where the time code will be
ignored. This is useful in situations where the time code begins very close to the edge of a vinyl which can
make back-cueing over the first beat in a track tricky to do without your turntable’s needle falling off the vinyl.
Setting a lead-in time of 20 seconds or more helps alleviate this by giving you more room on the vinyl to cue
with. It’s also useful when you’ve worn the grooves at the edge of a control record to the point that it no longer
works reliably: you simply set the lead-in so that the start of the tracks begin in good groove area. You can keep
doing this until you run out of groove area, thereby decreasing your record replacement frequency.
•Show Signal Quality in Skins: If enabled, a circular representation of the incoming timecode signal is displayed
in real-time on the Vinyl Widget in the Mixxx Interface.
Hint: Although not recommended, you can use different kinds of timecode media per deck.
8.4.3 Control Mode
Mixxx has three control modes regardless of which control records you use.
8.4. Configuring Vinyl Control 57

Mixxx User Manual, Release 2.1.0
•Absolute Mode: Provides Mixxx with both pitch and position information from the timecode, and allows you
to seek by needle dropping on your vinyl or seeking on your CDJ.
•Relative Mode: Takes the position to be relative to your deck’s starting point, and only controls the pitch in
Mixxx. It is not possible to seek using your deck in relative mode, with one exception. If you drop the needle
in the Lead-in Time area (see Vinyl Configuration), Mixxx will seek back to the beginning of the track. Once
a track is playing in Relative Mode, Mixxx will not allow you to select Absolute mode. Otherwise, the track
would suddenly jump to a new position. Make sure the record is stopped and then you’re free to select Absolute
mode.
•Constant Mode: This special mode is usually only activated when Mixxx needs to keep playing a track even if
the vinyl control signal isn’t present. Constant mode is automatically enabled when the needle reaches the end
of a vinyl control record.
8.4.4 Cueing Modes
Mixxx has two optional cueing modes for vinyl control which only apply to Relative Mode. These modes are useful
for quickly seeking to specific positions in a track without touching the laptop. Turntablists often need to find a break
or a vocal sample, and cueing modes make these easy to find.
•Cue: In this mode, when you drop the needle on the record after the Cue point, Mixxx will seek to that cue
point.
•Hot Cue: When the needle is dropped Mixxx will seek to the nearest hotcue point, working backwards. So
if you have a hotcue at the one-minute mark, and another at the two-minute mark, you can drop the needle
anywhere between one and two minutes and Mixxx will seek to the one-minute hotcue.
Hint: You can change the Control and Cueing Modes directly in the Mixxx user interface while mixing, go to Vinyl
Control Mode and Cueing controls. Alternatively, use the Application shortcuts.
8.4.5 Signal Quality
A successful vinyl control setup hinges on good signal quality. Many factors can affect signal quality, but the most
important one is ensuring the volume level of your timecode signal is moderate. A signal that is too loud or too quiet
will cause adverse performance, often characterized by a loss of position data causing absolute mode to behave like
relative mode.
Mixxx represents the quality of the timecode signal as a circular graphic coming from the vinyl control audio itself.
The graphs correspond to your active input devices Deck 1 -Deck 4 .
If your vinyl signal is working, you should see a round, green circle drawn with two lines. This vinyl “doughnut”
should be as circular as possible, and the lines should be clear with a minimum amount of fuzz.
Hint: You can display the signal quality in the Mixxx user interface while mixing, see Configuring Input and Output
devices .
8.5 Enabling Vinyl Control
For each deck, select Options →Vinyl Control →Enable Vinyl Control, or use the Application shortcuts.
8.5. Enabling Vinyl Control 58
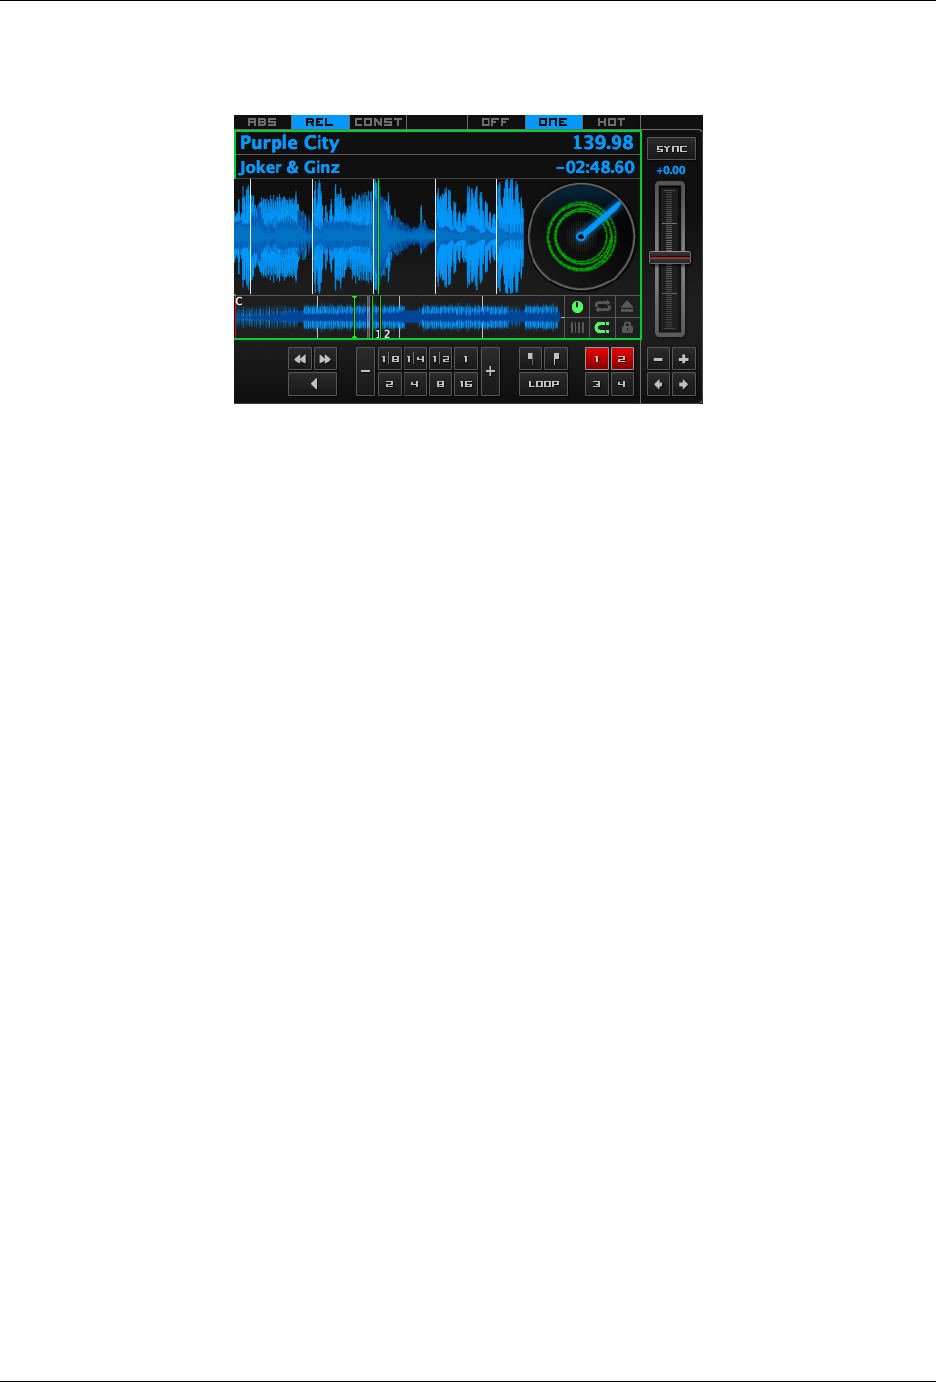
Mixxx User Manual, Release 2.1.0
8.5.1 Vinyl Control Status Display
Fig. 5: The vinyl control status, and signal quality display of the deck
A rectangle provides visual feedback with regards to vinyl control status of a deck.
•Off: Vinyl control disabled on the deck.
•Green: Vinyl control is enabled on the deck.
•Yellow: The needle has reached End-Of-Record.
8.6 Single Deck Control
If you only have one turntable, you can still use Mixxx to play your sets. In the Preferences →Sound Hardware →
Input tab, use the same audio input for both Vinyl Control decks.
When mixing, you’ll have one track playing automatically while the other is controlled by the turntable. Start by
enabling vinyl control on the first deck, and start mixing. When you’re ready to cue up the next record, just disable
vinyl control on the first deck and enable it on the second deck. Playback will continue on the first deck without
interruption. Cue up the second track and mix it in. When you’re ready to cue the first deck again, just toggle the
second deck off and the first deck on again.
Use the Application shortcuts to swap focus from one deck to the other. Alternatively, select Vinyl →Single Deck
mode in the Controller Wizard, to assign the control to a key on your controller.
8.7 End-Of-Record Mode
Sometimes the track you are playing is longer than the timecode area on your record. If the needle reaches the end of
the vinyl timecode, Mixxx will enter a special End-Of-Record Mode. When this happens, the vinyl indicator (usually
a green rectangle) will blink yellow as a warning. At the same time, Mixxx will automatically enable Constant Mode
and will ignore the turntable’s pitch. At this point the track will simply continue playing until the end. When you load
a new track, End-Of-Record Mode will be automatically disabled and Constant Mode turned off.
When you’re in End-Of-Record Mode and you want to still use the turntable for pitch control, simply lift the needle
and place it anywhere in the main timecode area. It’s OK, the track won’t stop playing. As soon as Mixxx detects that
the needle has settled, it will automatically switch to Relative Mode.
8.6. Single Deck Control 59

Mixxx User Manual, Release 2.1.0
8.8 Control Track
Some vinyl control records have a special portion of grooves near the center of the record for selecting and loading
tracks in the user interface. You can see these grooves because there is a gap between the main timecode area and the
inner circle. Some control records have not been tested with Mixxx, and their control areas are not supported. Serato
CV02 Vinyl and Traktor Vinyl MK1 are known to work. Serato CV02 CDs are known not to work.
Just drop the needle in the control area and let the record play forward or backward. The highlighted row in the library
should move up or down. Simply lift the needle and drop it anywhere in the main timecode area to load the track.
8.9 Troubleshooting
Configuration
To complete your setup you must configure Mixxx properly. Make sure you have:
• specified Deck 1 -Deck 4 in Preferences →Sound Hardware to route Mixxx’s output directly to the external
mixer
• specified Vinyl Control 1 -Vinyl Control 4 under Preferences →Sound Hardware →Input
• selected the correct control type under Preferences →Vinyl Control →Vinyl type in the preferences. See the list
of Supported Timecode media
• enabled vinyl control via the menu under Options -> Vinyl Control →Enable Vinyl Control.
Signal Quality
The graph is displayed in Preferences →Vinyl Control, see Signal Quality.
8.8. Control Track 60
Mixxx User Manual, Release 2.1.0
Sig-
nal
Meaning Troubleshooting
Vinyl control input channels not correctly set up.
Vinyl control will not work.
Open Preferences/ Sound Hardware and set up the
devices you want to use, see Configuring Input and
Output devices
Vinyl control input channels set up correctly. Wait-
ing for timecode input signal.
Start your turntable or CDJ with the selected time-
code vinyl or CD.
Nearly perfect green doughnut about about half the
width of the graph. Rotating radar sweeps in the
direction your record on the turntable is spinning.
Everything is OK, nothing to do. Go spin some
beats.
Incorrect choice of vinyl control source. Doughnut
looks good but has a solid red color.
Select the correct vinyl type in the preferences. E.g.
maybe you selected side B of the Serato Vinyl but
your record is on side A.
Input signal is bad. As the vinyl signal gets worse,
you’ll see the color of the doughnut change from
green over orange to red.
Check the wiring / grounding on your turntable /
CDJ. You timecode record / CD might be worn out
or the needle on your turntable is dirty.
Wrong direction. The green doughnut looks good
but the radar sweeps in the opposite direction of the
record on your turntable / CDJ.
You probably have a wiring problem. Try reversing
the left and right inputs on your turntable. You may
also have to rewire the headshell.
Input signal is no timecode signal. Mixxx receives
a normal audio signal while it expects a timecode
signal.
Start your turntable or CDJ with the selected time-
code vinyl or CD. You may want to check if the in-
puts devices are set up correctly in the preferences.
Left or right channel is missing. Mixxx receives
only a mono signal but needs a stereo timecode sig-
nal to operate.
Check the wiring on your turntable / CDJ and also
the headshell and needle on your turntable.
Timecode signal too loud. Mixxx receives a signal
which has too much amplification.
Lower the amplification, either on your external
mixer, audio interface, or with the Turntable Input
Signal Boost.
Timecode signal too quiet. Mixxx receives a signal
which has not enough amplification.
Boost the amplification, either on your external
Mixer, audio interface, or with the Turntable Input
Signal Boost.
8.9. Troubleshooting 61
CHAPTER 9
Using Microphones
Mixxx can work with any microphone that can be plugged into your audio interface. There are three ways to use
microphones with Mixxx, each with their own pros and cons:
•Software Monitoring: Cheapest and simplest to set up, but you cannot hear yourself without a disorienting delay,
referred to as “latency”.
•Direct Monitoring: Recommended for most users. This is the cheapest to set up with good sound quality and
without the latency of software monitoring.
•Hardware Mixers: Most expensive option to set up with high sound quality. This does not have the latency of
software monitoring.
Warning: USB microphones are not recommended. These devices have their own audio interface built in and can
only be used with software monitoring. Some USB microphones have headphone jacks for direct monitoring, but
the music from Mixxx cannot be heard in this headphone jack. Also, they can be difficult to configure at the same
time as a different audio interface for music output.
See also:
The Mixxx DJ Hardware Guide lists specific audio interfaces with information about their prices, features, and suit-
ability for use with microphones.
9.1 Software Monitoring
Software monitoring can be used with the built-in microphone on a laptop or with a headset plugged into the built-in
audio interface on a computer. However, there is a delay between the time you make sound into the microphone and
hear it in the Master output. Due to the nature of digital audio, it takes time for input from the audio interface to be
available for Mixxx to process, time for Mixxx to process the audio, and more time to send the audio back out the
audio interface. This time is referred to as “latency”.
Mixxx can be configured to run at low latencies by choosing a smaller Audio Buffer, but there is no way to completely
eliminate latency. Although latency is measured in milliseconds, even a few milliseconds of latency can be disorienting
62

Mixxx User Manual, Release 2.1.0
and distracting to hear, whether you are using the microphone for spoken announcements, vocals, or playing a musical
instrument.
To use software monitoring:
1. Open Preferences →Sound Hardware.
2. Select the Input tab.
3. For Microphone 1, select the audio interface that your microphone is plugged into.
4. Click the Apply button.
5. Click the OK button.
6. Click the Mics button in the main Mixxx window to show the microphone controls.
7. Click the Talk button when you are using the microphone.
Hint: If you would prefer to not hear the microphone input, you can set the Microphone Monitor Mode option to
Direct monitor (recording and broadcasting only). This will still mix the microphone input with your recorded and
broadcasted mixes, but it will not mix the microphone with the Master output. Don’t forget to press the Talk button
when using the microphone if you use this option.
9.2 Direct Monitoring
An audio interface with direct monitoring and a Loopback Input is the recommended way to use microphones with
Mixxx for most users. Except for audio interfaces built into computers, most audio interfaces with microphone inputs
support direct monitoring. However, not all audio interfaces that support direct monitoring also have a loopback input.
Direct monitoring routes the audio from the audio interface’s inputs directly its outputs. This avoids the latency of
sending it into the computer and back out with Software Monitoring. At the same time, the audio interface sends the
input into the computer so Mixxx can record and broadcast it.
9.2.1 Loopback Input
Some audio interfaces that support Direct Monitoring have a loopback input feature. They add Mixxx’s output to the
microphone signal before sending it to the computer. This makes it easier to set up Mixxx with direct monitoring than
configuring Latency Compensation.
To configure Mixxx with a loopback input:
1. Open Preferences →Sound Hardware.
2. Click the Input tab.
3. Select the audio interface for the Record/Broadcast input. Do not configure anything for the Microphone 1-4
inputs.
4. Click the Apply button.
5. Click the OK button.
6. Activate direct monitoring and loopback on your audio interface.
7. Adjust the microphone volume with the input gain knob on your audio interface.
The microphone controls in Mixxx will not affect your microphones because they are mixed by the audio interface
and not sent directly to Mixxx.
9.2. Direct Monitoring 63
Mixxx User Manual, Release 2.1.0
9.2.2 Latency Compensation
When using Direct Monitoring, you will hear the microphone mixed with the music from Mixxx without any noticable
latency. However, it still takes time for Mixxx to receive the microphone signal and process it. Without compensating
for this latency or using a Loopback Input, the microphone inputs will be out of time relative to the music in your
recorded and broadcasted mixes.
Mixxx can compensate for this timing misalignment, but it is complicated to set up. If you do not want to record your
microphone into your mix or broadcast, you can activate direct monitoring on your audio interface without configuring
latency compensation.
Measuring Round Trip Latency
To configure Mixxx to compensate for input latency while using direct monitoring, first you must measure the round
trip latency of your setup. The round trip latency is different from the size of the Audio Buffer configured in Mixxx.
It is the amount of time it takes for audio to make a complete trip from your audio interface’s input, through your
computer, and back out the audio interface.
Mixxx cannot calculate the round trip latency because it depends on details of your audio interface’s hardware, your
operating system, your audio interface’s driver, and other factors in your computer’s hardware. The round trip latency
can only be found by measuring it. To do this, use a physical cable to connect the audio interface’s output to its input.
Then, use a third party program to measure the round trip latency. These programs are recommended on each OS:
•GNU/Linux:jack_iodelay
•Windows:RTL Utility
•macOS:Audacity
You must use the same sample rate and audio buffer size in the measurement program as you do in Mixxx for the
measurement to be accurate. If you decide to change the sample rate or buffer size you use with Mixxx, you will need
to remeasure your round trip latency to have your microphone inputs aligned in your recorded and broadcasted mixes.
Warning: Make sure direct monitoring is not activated on your audio interface while you are measuring the
round trip latency or you will not get an accurate measurement.
Configuring Latency Compensation
1. Before opening Mixxx, measure the round trip latency.
2. Open Mixxx.
3. Open Preferences →Sound Hardware.
4. Click the Input tab.
5. Select the audio interface input(s) for the Microphone 1-4 inputs. Select a single mono channel for each Micro-
phone input unless you are using stereo microphones.
6. For the Microphone Monitor Mode option, select Direct monitor (recording and broadcasting only).
7. Enter the measured round trip latency in millseceonds for the Microphone Latency Compensation option.
8. Click the Apply button.
9. Click the OK button.
10. Activate direct monitoring on your audio interface.
9.2. Direct Monitoring 64

Mixxx User Manual, Release 2.1.0
11. Click the Mics button in the main Mixxx window to show the microphone controls.
12. Click the Talk button when you are using the microphone.
13. Adjust the microphone volume with the input gain knob on your audio interface. Do not adjust the microphone
gain in Mixxx. If you do, the relative volume of the mics and music will be different in your recorded and
broadcasted mixes compared to what you hear out of your audio interface.
Mixxx will not record or broadcast your microphone if the Talk button is not active. However, you will still hear the
microphone in your main output because the microphone is mixed by your audio interface, not Mixxx. You may leave
the Talk button on to ensure you do not forget it, but this will record and broadcast background noise when you are not
actively using the microphone. If your microphone has an on/off switch on it, you may leave the Talk button enabled
in Mixxx and use the switch on the microphone to avoid adding background noise to your mix. Alternatively, you can
adjust the input gain on your audio interface throughout your mix.
9.2.3 Activating Direct Monitoring And Loopback On The Audio Interface
General tips for activating direct monitoring and loopback are described below. However, every audio interface is
different, so refer to the audio interface manual from the manufacturer for more details.
On stand-alone audio interfaces, there is often a knob on the device that controls direct monitoring. This knob cross-
fades the audio interface’s output between the signal from the computer and the directly monitored inputs. If your
audio interface has a knob like this, set the knob to the center. Alternatively, some audio interfaces have a switch to
toggle direct monitoring instead of a knob.
To hear mono microphone inputs on both sides of the stereo output with direct monitoring, you typically need to toggle
a switch on the device.
If the audio interface supports Loopback Input, that may be activated by a switch on the device.
Audio interfaces with lots of inputs and outputs often have a control panel program provided by the manufacturer that
is installed automatically with the driver. This may be used instead of knobs and switches on the hardware to control
direct monitoring, loopback, stereo/mono switches, and other audio interface features. On GNU/Linux, you might be
able to access these controls with alsamixer.
Refer to the section below for details about DJ Controllers With Microphone Inputs.
9.3 Hardware Mixers
Mixxx can be used with a microphone plugged into an external hardware mixer. This does not have the problem with
latency that happens with Software Monitoring. However, it is generally recommeded to use an audio interface that
supports Direct Monitoring and a Loopback Input instead of an external mixer. If you are using Vinyl Control and a
microphone, you may need an external mixer.
Mixxx can send each deck to separate stereo channels on an external mixer by using the Deck 1-4 outputs. This
requires an audio interface with at least 4 output channels (2 stereo pairs). Audio interfaces built into computers only
have one stereo output and they do not have high sound quality. Thus, another audio interface is recommended. Audio
interfaces with at least 4 output channels typically have microphone inputs and support Direct Monitoring, so there is
no need for the external mixer.
However, audio interfaces with phono preamplifiers for Vinyl Control do not have microphone inputs. If you want to
use vinyl control with a microphone, it is recommended to plug the microphone into a DJ mixer.
9.3. Hardware Mixers 65

Mixxx User Manual, Release 2.1.0
Warning: Some mixers that are not designed for DJing have a built-in USB audio interface. However, the
audio interfaces in these mixers typically send only 2 channels (one stereo pair) to the mixer, so they are not
recommended.
9.3.1 Recording And Broadcasting With An External Hardware Mixer
To record or broadcast with an external hardware mixer, the output of the mixer needs to be connected to the input of
an audio interface. Most DJ mixers have an extra output for this which may be labeled “record”, “session”, “auxiliary”,
or “booth”. Some audio interfaces for vinyl control have enough input channels to receive the output of the mixer and
timecode from two turntables. If yours does not, you may use the input of the audio interface built into your computer,
but these do not have high sound quality.
Alternatively, some DJ mixers have a built-in USB audio interface. These have inputs with phono preamplifiers for
vinyl control and usually can send the record output back to the computer without a separate audio interface. Many
(but not all) of these mixers are digital mixers, so they can send signals back and forth to Mixxx without converting
them to analog. This results in higher sound quality for your recorded and broadcasted mixes compared to using a
separate audio interface with an external mixer.
To configure Mixxx for using a hardware mixer for recording and/or broadcasting:
1. Open Preferences →Sound Hardware.
2. In the Output tab, select the audio interface for the Deck 1-2 outputs (and Deck 3-4 outputs if your audio interface
and mixer support 4 decks).
3. Click the Input tab.
4. For the Record/Broadcast input, select the audio interface connected to the mixer’s output. For mixers with a
built-in USB audio interface, refer to the mixer manufacturer’s manual to find which channels of the mixer’s
audio interface send the record output.
5. If you are using vinyl control, select the audio interface connected to the turntables for the Vinyl Control 1-4
inputs.
6. Click the Apply button.
7. Click the OK button.
Do not configure anything for the Microphone 1-4 inputs when using an external mixer. The microphone controls in
Mixxx will not affect your microphones because the microphone is mixed by the external mixer.
DJ mixers typically do not supply phantom power required for condenser microphones. Stand-alone audio interfaces
typically do supply phantom power.
9.4 DJ Controllers With Microphone Inputs
DJ controllers with microphone inputs typically mix the microphone input with the master output without sending it
to the computer. This does not have the problem with latency that happens with Software Monitoring. However, many
cheap DJ controllers do not digitize the signal to make it available to the computer. Refer to the controller’s page on
the Mixxx wiki or the manual from the controller manufacturer for details about your particular controller.
If the controller does not digitize the microphone input, you cannot use Mixxx’s microphone input to record or broad-
cast with the microphone using Mixxx’s Microphone 1-4 inputs. It is still possible to record and broadcast the micro-
phone by connecting the booth output of the controller to an audio interface input and configuring this for Mixxx’s
Record/Broadcast input. If the controller does not have a booth output, a Y splitter cable can be used on each side of
the stereo main output to connect the main output to both the speakers and to another audio interface’s input.
9.4. DJ Controllers With Microphone Inputs 66

Mixxx User Manual, Release 2.1.0
DJ controllers typically do not supply phantom power required for condenser microphones. Stand-alone audio inter-
faces typically do supply phantom power.
9.4. DJ Controllers With Microphone Inputs 67

CHAPTER 10
Live Broadcasting - Start your own Internet radio
Live Broadcasting in Mixxx allow you to stream your mix over the Internet to listeners around the world.
See also:
The Using Microphones chapter has detailed instructions for including input from microphones in your broadcasted
mixes.
10.1 Streaming Servers
Remote streaming server Mixxx allows you to feed your audio stream directly to Shoutcast and Icecast streaming
servers. Depending on the number of listeners, streaming audio requires a significant amount of bandwidth.
Streaming servers provide the required bandwidth and broadcast the stream to your listeners. A popular free
streaming service is Caster.fm. A review of several free and paid stream hosts is available at broadcasting-
world.net.
Fig. 1: Mixxx as client-side streaming source broadcasting to an remote streaming server
Local streaming server For experienced users, it may be interesting to set up your own local streaming server. This
turns your personal computer into a radio station and listeners connect directly to your server. Mixxx as a
streaming source does not need to run on the same computer as your streaming server. However, professional
stations often run the streaming source on the same computer as the streaming server for stability and reliability
reasons. Keep in mind that if want to stream audio to a significant number of listeners, you’ll need enough
bandwidth. Read the Shoutcast documentation or Icecast documentation for server setup instructions.
Fig. 2: Mixxx as client-side streaming source broadcasting to an local streaming server
10.2 Configuring Mixxx
Start by supplying Mixxx with all information needed to establish a connection to the streaming server:
68
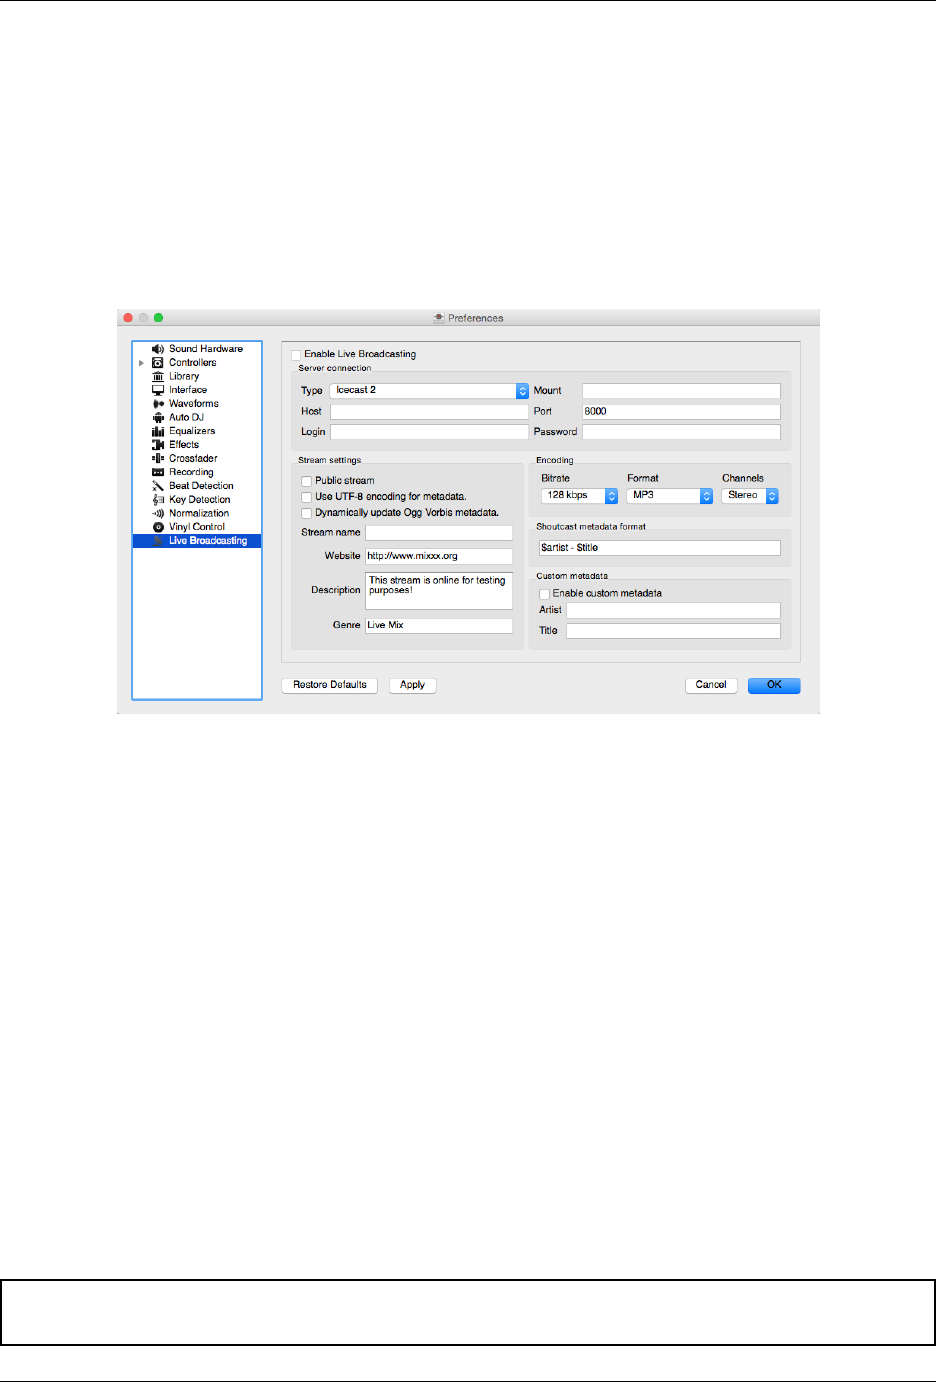
Mixxx User Manual, Release 2.1.0
• Open Preferences →Live Broadcasting.
• Insert the settings following the descriptions in the Live Broadcasting Preferences
• Click OK
• Go to Options →Enable Live Broadcasting or use the Application shortcuts to start broadcasting.
10.3 Live Broadcasting Preferences
Fig. 3: Mixxx preferences - Setting up live broadcasting
Server Connection
•Type: Select the type of streaming server you want to connect with. Shoutcast 1,Icecast 1, and Icecast 2 servers
are supported.
Mixxx works with Shoutcast 2 using the Shoutcast 1 protocol if you provide a stream name in Preferences →
Live Broadcasting →Stream Settings. If you don’t provide a stream name, Shoutcast 2 rejects the connection
(where Shoutcast 1 would accept this case).
•Host: You can enter the host as either a host name or an IP address.
•Login: As provided by your streaming server provider. Without this, you will not connect successfully to the
server. The default login for Icecast is source while the default login for Shoutcast is admin.
•Mount: A mount point is a unique name identifying a particular stream. For Shoutcast it is not necessary to
specify a mount point. The setting must not be blank if you are using Icecast. Try the default /mount or
/live. If you haven’t been given a specific mount point you can usually make one up. It always begins with a
/(slash) followed by a text without any special characters in it.
•Port: As provided by your streaming server provider. Most servers use the default port 8000.
•Password: As provided by your streaming server provider, unless you run your own radio server. It is required
to establish the connection to the server and to start the broadcast.
Warning: Do not enter a URL as the host! http://example.com:8000 does not work. Use example.
com in the Host field and 8000 in the Port field instead.
10.3. Live Broadcasting Preferences 69

Mixxx User Manual, Release 2.1.0
Stream Setting
•Public stream: If enabled, this option adds your radio station to the Shoutcast/Icecast directory.
•Enable UTF-8 metadata: If enabled, this option fixes broken accented and foreign language symbols in meta-
data, assuming the streaming provider has configured the server to support UTF-8 metadata.
•Dynamically update Ogg Vorbis metadata: Due to flaws in some streaming clients, updating Ogg Vorbis
metadata dynamically can cause listener glitches and disconnections. Check this box to update the metadata
anyway. Some players that listeners can use have bugs that can cause audio glitches or disconnections when the
Ogg Vorbis metadata is updated dynamically. If this is not a problem, you can enable this checkbox.
•Stream name: So, what’s the name of your show?
•Website: The website you would like your listeners to visit.
•Description: Enter your DJ name and a short tagline.
•Genre: List the main genres you play. This attracts search hits on stream directories. Genre must not be blank.
Encoding
•Bitrate: Selecting a bitrate of 128 or 160 kbps is common and provides sufficient quality to your listeners.
Higher bitrates will use a larger chunk in your Internet connection bandwidth to stream and for your listeners to
receive the stream.
•Format: Mixxx supports streaming to Icecast servers either in MP3 or Ogg Vorbis format, streaming to Shout-
cast servers is supported in MP3 format.
Shoutcast metadata format
This allows to set custom metatdata formats for the Shoutcast title field. Previously only artist -
title was allowed. For example if you were broadcasting as part of a station, you could add the
station’s name or the presenter’s name in the title: MyStation | $artist - $title. Or if you
were doing a live mix with several artists, you could have: Live mix by MyName - currently
playing: $artist. Or even if you wanted a very unusual format: Hey, I like $artist,
here is $title by $artist.
The changes do not affect the case for the combination of OGG/Icecast2.
Custom metadata
By default, Mixxx broadcasts artist and title information of the files that you play to your listeners. You
can disable this feature and use your own custom metadata.
•Enable custom metadata: Toggles custom metadata on and off.
•Artist: Insert your custom artist metadata here, your DJ name for example.
•Title: Insert your custom title metadata here.
Note: Due to licensing restrictions, MP3 streaming is not enabled by default. For information on how to enable MP3
streaming, go to the chapter Activate MP3 streaming support.
10.3.1 Icecast vs. Shoutcast
Both essentially serve the same purpose. An Icecast server can stream either MP3 or Ogg Vorbis. However, although
Ogg is more efficient and effective (you get higher-fidelity sound than MP3 at lower data rates) not all players can
play Ogg streams. As a result MP3 is probably a safe choice unless you know your listeners can hear an Ogg stream
successfully.
10.3. Live Broadcasting Preferences 70

Mixxx User Manual, Release 2.1.0
10.3.2 Broadcast directories
Generally your streaming server host adds your radio station to the Shoutcast/Icecast directory, if you enable the Public
Stream option in Preferences →Live Broadcasting →Stream Settings.
•Shoutcast radio directory:www.shoutcast.com
•Icecast radio directory:dir.xiph.org
Often streaming hosts will run their own directories. Check your host’s FAQ to find out. If you want to promote your
streaming radio station even more, register at services like streamfinder.com. An overview of different internet radio
directories is available at shoutcheap.com
10.4 Troubleshooting
• If you have trouble connecting to your streaming server, check the configuration in the Live Broadcasting Pref-
erences.
• You may need the LAME libraries to stream in MP3. See Activate MP3 streaming support.
• You may have selected the Ogg Vorbis format that is unsupported by Shoutcast servers.
• You may need to check your firewall settings. Both Icecast and Shoutcast use two ports. If you are streaming
on a port (for example, port 8000) then you need to open up the next port (port 8001) as well.
• You may need to configure port forwarding if you are behind a router or your router will block requests to your
streaming port (for example, port 8000)
10.5 Activate MP3 streaming support
Due to licensing restrictions, MP3 streaming is not enabled by default. In order to enable MP3 streaming you must
install the LAME MP3 codec yourself. The following section explains how you can do that.
Hint: If you have activated MP3 streaming support, you’ll be also able to record your mixes in MP3 format. Go to
the chapter Recording Your Mix for more information.
10.5.1 Activate MP3 streaming support on Windows
To activate MP3 streaming on Windows, follow these steps:
1. Download LAME 3.98.4 binaries from http://www.rarewares.org/mp3-lame-libraries.php.
Hint: The download page includes 32-bit and 64-bit versions. Make sure the version you download matches
the version of Mixxx that you use, not the version of Windows. If you are on 64bit Windows but are using 32bit
Mixxx, you need the 32bit (“x86”) version of the LAME binaries.
2. Unpack the downloaded archive. You need a utility for manipulating archives like the free 7zip.
3. Copy libmp3lame.dll to the location you have installed Mixxx, probably C:\Program
Files\Mixxx\.
10.4. Troubleshooting 71
Mixxx User Manual, Release 2.1.0
4. Only if you are running Mixxx 1.11 or earlier, you must also rename libmp3lame.dll to lame_enc.dll
in the folder where you have installed Mixxx. Select Help →About to find out your version of Mixxx.
5. Restart Mixxx
Windows Troubleshooting
• Double check that the version of LAME you use (“x86” = 32-bit vs. “x64” = 64-bit) matches the version of
Mixxx you use.
• If you are running Mixxx 1.11 or earlier, did you rename the libmp3lame.dll to lame_enc.dll?
• Make sure you put the correct LAME *.dll file in the same folder that contains the installation of Mixxx you
are using.
Warning: Some websites like Audacity provide lame binaries too. Do not use these versions or Mixxx will show
an error when activating live broadcasting and your stream will fail.
10.5.2 Activate MP3 streaming support on macOS
Method A: Download
To activate MP3 streaming on macOS, follow these steps:
1. Download LAME 3.98.4 Intel (macOS 10.8+ 64-bit)
2. Double-click on the downloaded zip file to unpack the file and you’ll get an installer package file
3. Double-click on the installer package file and follow the step-by-step instructions in the installer
4. Restart Mixxx
Method B: Package manager
Another easy way to activate MP3 streaming is to use Homebrew or MacPorts, which are package managers like apt
on Debian/Ubuntu Linux. They provide a convenient way to install many Open Source packages. Once Homebrew or
Macports is installed, adding MP3 support to Mixxx is rather simple.
Homebrew:
1. Open a terminal and type the following commands:
brew install lame
2. Restart Mixxx
Macports:
1. Open a terminal and type the following commands:
sudo port install lame
2. Restart Mixxx
10.5. Activate MP3 streaming support 72

Mixxx User Manual, Release 2.1.0
10.5.3 Activate MP3 streaming support on Linux
On Ubuntu and GNU/Linux-based operating systems MP3 streams can be activated by installing the package
libmp3lame. Dependent on your Linux distribution the package might be slightly named different such as lame.
1. Open a terminal and type the following commands:
sudo apt-get install libmp3lame0
2. Restart Mixxx
10.5. Activate MP3 streaming support 73
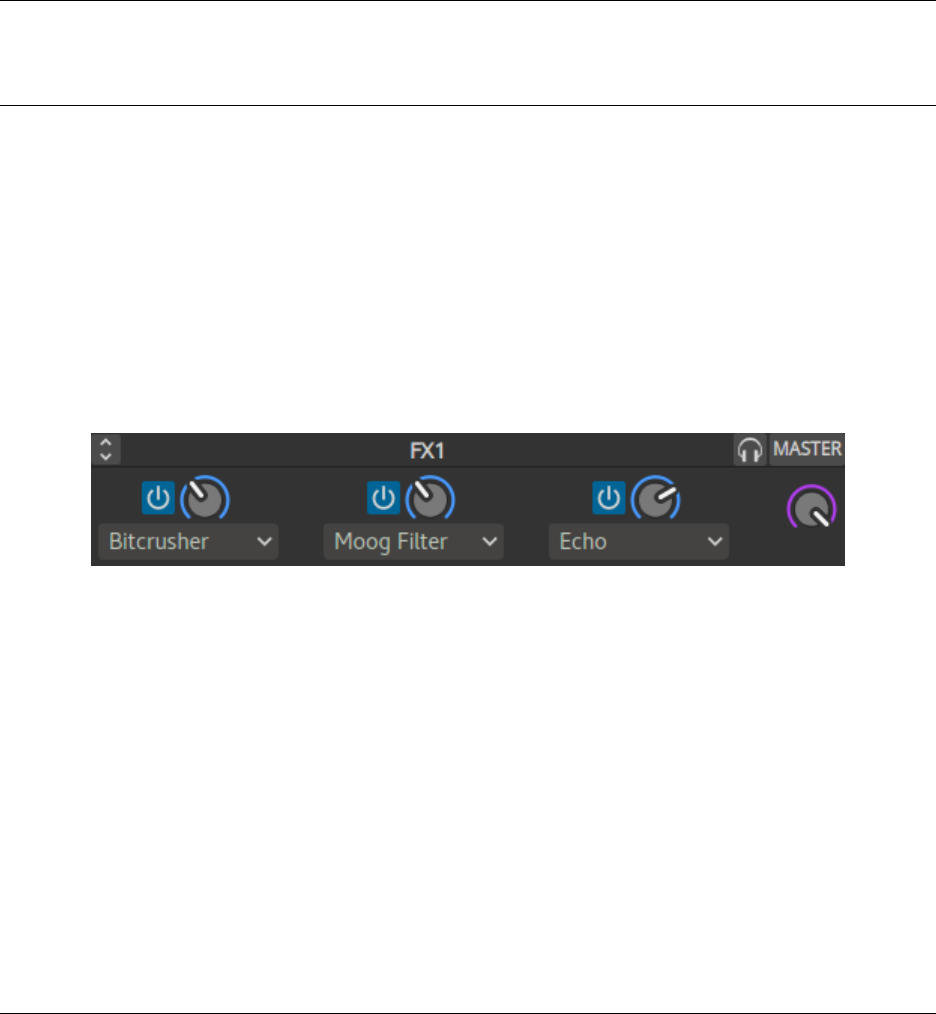
CHAPTER 11
Effects
Mixxx has a powerful sound effects system. Understanding how it works can open you up to a wide variety of mixing
techniques.
11.1 Effect Units
Mixxx has 4 effect units. By default, only 2 of them are shown. The other 2 effect units can be shown by toggling the
setting in the skin settings menu.
Fig. 1: An effect unit
Each effect unit can load up to 3 effects in a chain. These effects are processed one after the other in series. You will
hear different sounds depending on the order of effects within the chain. Each effect in the chain has its own button to
toggle it on and off.
Effect units can process sound from:
• decks
• microphones
• auxiliary inputs
• the master mix
• the PFL (headphone) mix
• left/middle/right crossfader buses
74
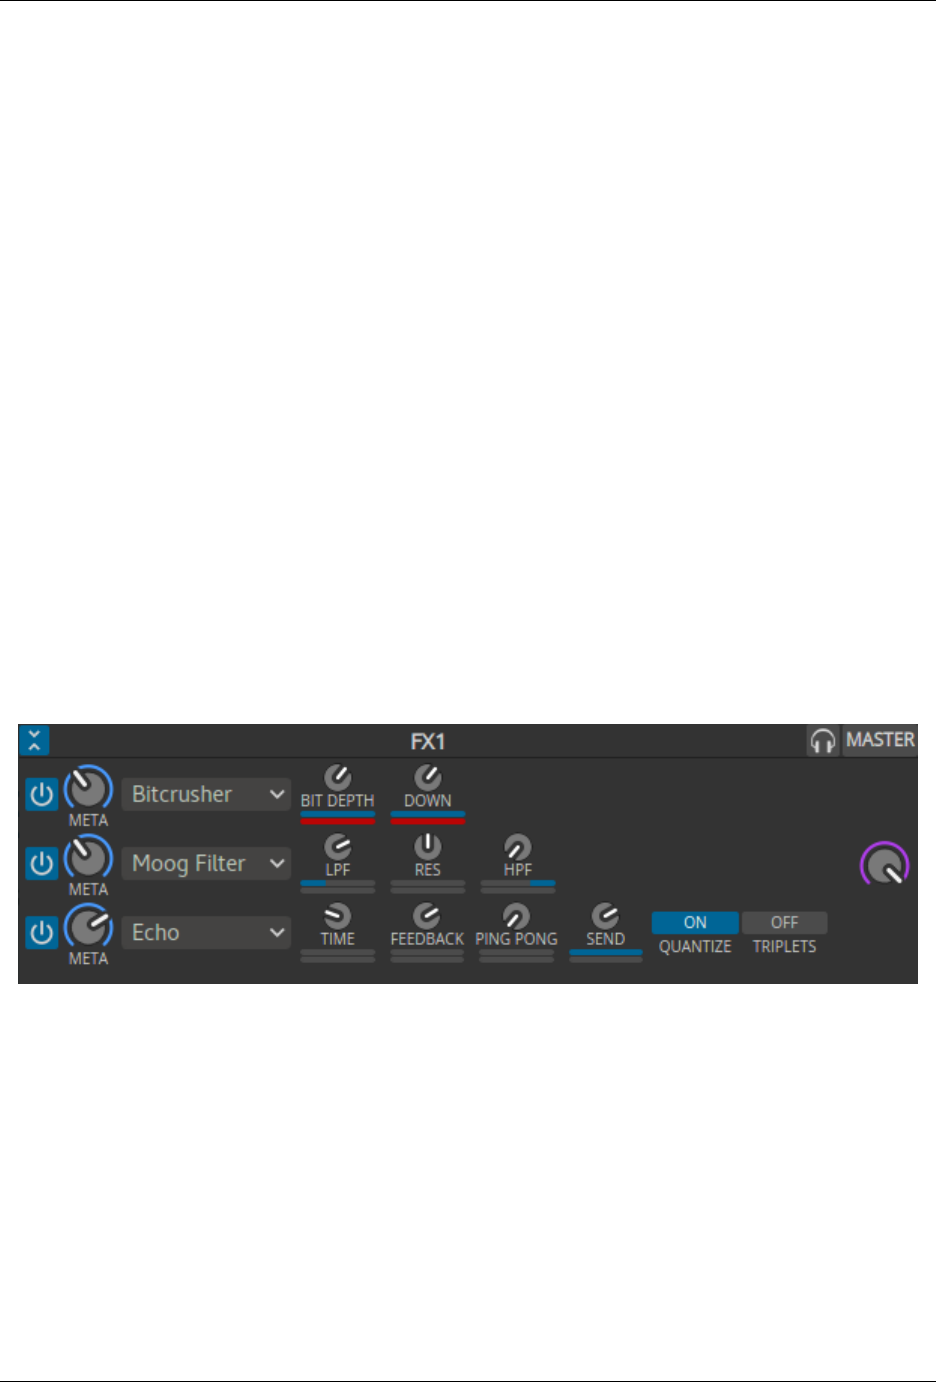
Mixxx User Manual, Release 2.1.0
The buttons to route effect units to decks, microphones, and auxiliary inputs are located in the deck, microphone, and
auxiliary sections of the skin. The buttons for routing other inputs to effect units are in different locations depending
on the skin.
If a channel is assigned to multiple effect units, those effect units are chained together. This allows you to chain more
than 3 effects at a time.
The mix knob adjusts the mix between the dry signal (input to the unit) and the wet signal (output of the last effect in
the unit). It changes the level of all 3 effects in the unit together. When the knob is fully left, no sound will be heard
from the effect unit. When the knob is fully right, only the output of the effect unit will be heard without any of the
dry input signal.
Effects are processed after the deck faders and crossfader. This allows effects like Echo and Reverb to continue
outputting sound after their input has been cut off by lowering the fader. Unlike other DJ software and hardware,
effects can also be heard in headphones even though they are processed after the faders for the master output. Refer to
the Effects In Headphones section below for details.
Note that equalizer and filter effects create a phase shift. If the mix knob is anywhere in the middle between dry and
wet and any of these effects are enabled in the unit, there will be comb filtering which is probably not desired. For
more background information, read Equalizers and Phase Shift.
11.2 Effect Parameters & Metaknobs
Every effect within an Effect Unit has its own set of parameters. By default, these are hidden. Instead, there is a single
knob called a “metaknob” for each effect which is linked to the different parameters. The metaknob allows you to
easily control the effects in a unit without having to manipulate every parameter individually.
If you want more detailed control of effects, press the expansion button on the effect unit to reveal the effect parameters:
Fig. 2: An effect unit with parameters showing
You can customize how the metaknob is linked to the parameters by clicking the buttons below the parameter knobs.
The button under the parameter name controls the metaknob link mode:
• Inactive: parameter not linked
• Active: parameter moves with metaknob
• Left side active: parameter moves with left half of metaknob turn
• Right side active: parameter moves with right half of metaknob turn
• Left and right side active: parameter moves across range with half of metaknob turn and back with the other half
The button below the metaknob link button inverts the parameter’s relationship to the metaknob.
11.2. Effect Parameters & Metaknobs 75

Mixxx User Manual, Release 2.1.0
For information about specific effects and their parameters, hover your mouse over them to show the tooltip. If you do
not see tooltips, check that you have them enabled for the skin in Preferences →Interface.
Effects (except for Reverb) that have a length of time as a parameter are synchronized to the tempo of decks.
11.3 Effects In Headphones
To preview how a track will sound with effects before you mix in the track, simply assign the deck to an effect unit
and enable the headphone button for the deck. Note that this will increase CPU compared to assigning an effect unit
to a deck without the headphone button enabled. This is because effects are processed in parallel for the headphone
output (prefader) and master output (postfader).
Effects can also be previewed in headphones on decks that are playing to the audience, but this requires a few more
steps:
1. Disable the effect unit for the deck
2. Enable the headphone button for the deck
3. Enable the headphone button for the effect unit
4. Enable effects and adjust their metaknobs and parameters for how you want the effects to sound.
5. When you are ready to mix in the effect, turn the mix knob fully left (dry)
6. Enable the effect unit for the deck
7. Turn the mix knob right so the effects are heard in the master output
8. Disable the headphone button for the effect unit so you do not forget to turn it off later
11.3. Effects In Headphones 76
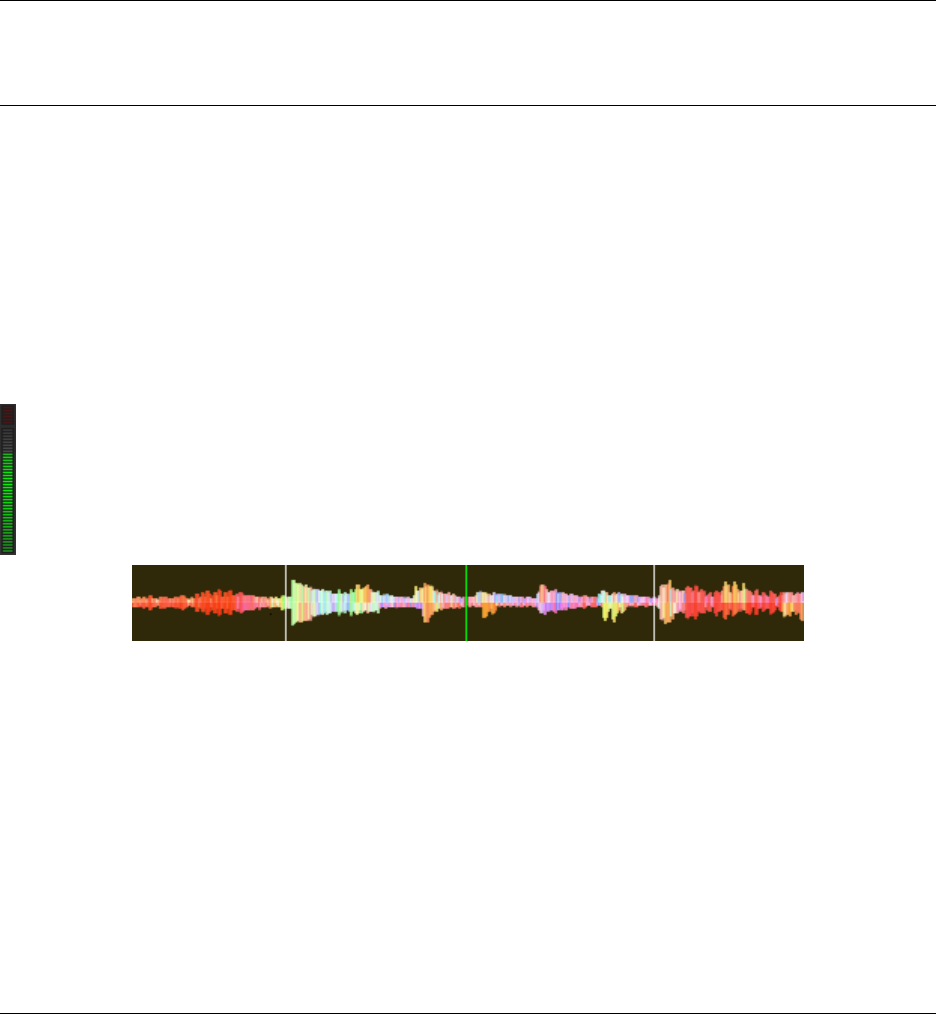
CHAPTER 12
DJing With Mixxx
Mixxx was designed to be easy to learn for both novice and experienced DJs.
This part of the manual provides you with directions for using Mixxx’s features to create your own mixes.
12.1 Setting Your Levels Properly (Gain Staging)
Setting your levels properly, also known as gain staging, is essential for getting the best sound quality out of the
equipment you are using. At every link in your signal chain, from Mixxx’s channel gains to the power amplifier,
the level should be well above the noise floor, but lower than the maximum level before the signal clips. The level
meters should mostly be around the top of their green region. The level meter pictured to the left shows where
Mixxx’s level meters should average at the loudest parts of tracks. The average level should not be in the yellow
region. Use the yellow region to leave headroom, or available level above the average before the signal clips. The
loudest parts of the music (the transients) should briefly go into the yellow region.
Fig. 1: A waveform at a good level. Note that the example waveforms in this section were made by adjusting the visual
gain of the waveform display in Mixxx to illustrate the concepts. Adjusting the visual gain of the waveform display
does not change the level of the audio.
If a level meter is in its red region, the signal is clipping and the gain should be turned down. Some equipment
doesn’t have a level meter and only has an LED that turns on when the signal clips. Clipping means that the peaks
of the waveform are flattened because the equipment has reached the maximum level that it can amplify the signal to.
This distorts sound in an unpleasant way and can damage equipment by driving it with more power than it is designed
to handle. Increasing the gain past the point where clipping begins (further into the red on a meter) will distort the
signal more. If you want to make the sound louder when every part of the signal chain is at its maximum without
clipping, use more speakers or use speakers that are more sensitive and convert electrical energy into acoustic energy
more efficiently.
77
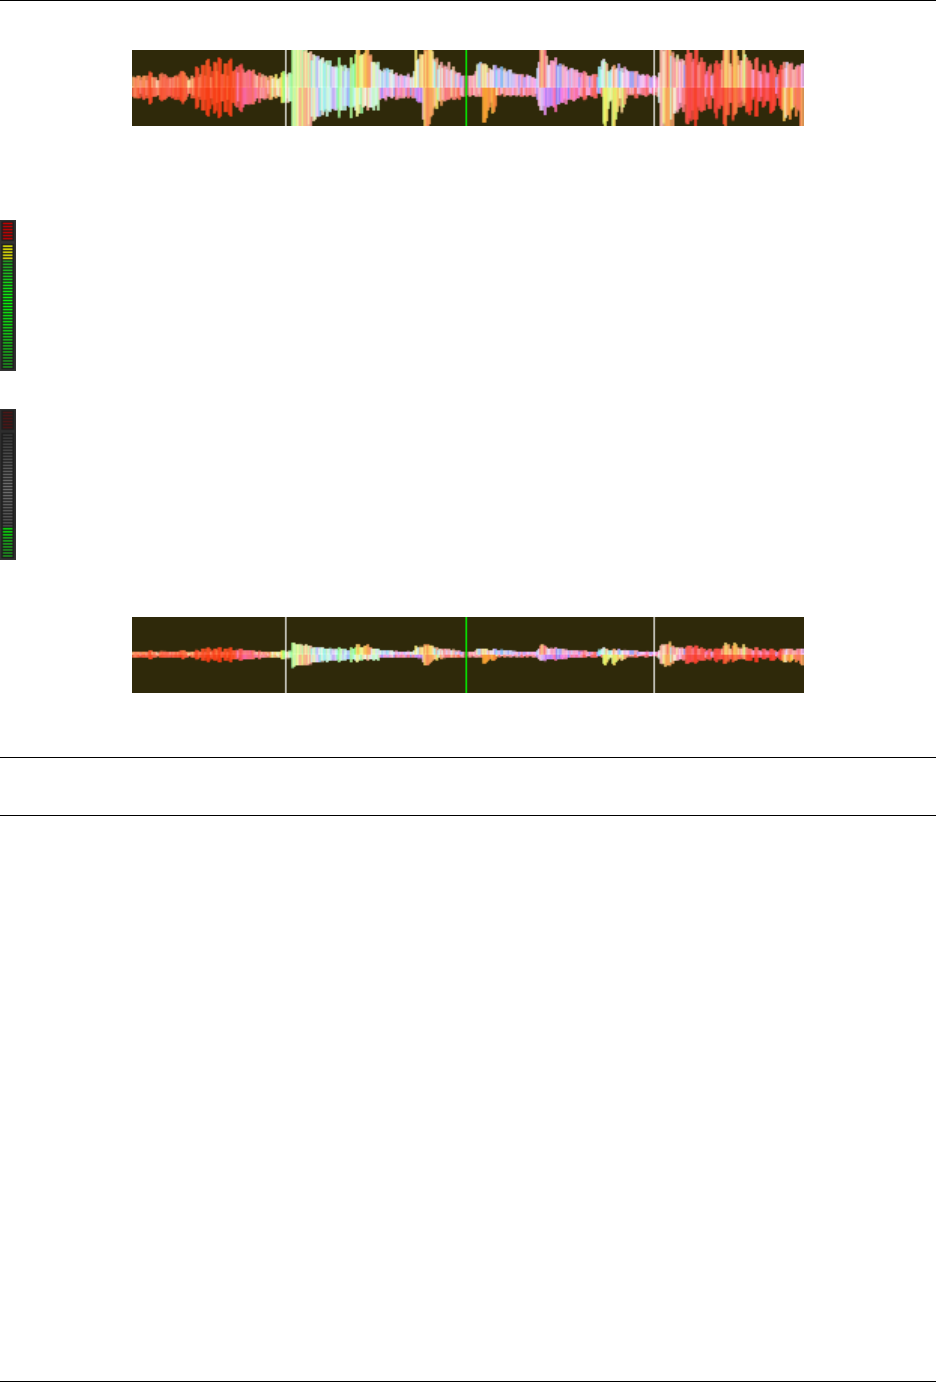
Mixxx User Manual, Release 2.1.0
Fig. 2: A clipping waveform
On the other hand, the signal should not be too low. This is because every audio device generates a little noise at a
level referred to as its noise floor. Additionally, analog signals pick up noise as they travel along wires. The signal
measured by the meter on the left is relatively close to the noise floor. When a device is turned up, the noise floor
does not go up; only the signal does. However, every time the signal is amplified by the gain of another piece of
equipment, both the noise and the signal from previous devices in the signal chain are amplified. For example, if
your sound card is turned down and you turn the gain up on your mixer to compensate, the signal-to-noise ratio
(SNR) of the sound card output will be low and the mixer’s gain will amplify the signal and the noise from the
sound card, plus the noise picked up along the wire. The end result will have more noise than if the output of the
sound card was turned up before the signal reached the mixer and the mixer’s gain did not have to be turned up.
Fig. 3: A waveform that is too close to the noise floor
Note: To adjust the output volume of a sound system while maintaining a high signal-to-noise ratio, the gain should be adjusted
as close to the speakers as possible. Refer to the Gain Knob section for details.
12.2 Beatmatching and Mixing
Beatmatching is the process of adjusting the playback rate of a track so that it matches the tempo of another track.
Beatmatching also involves adjusting the phase of the beats in a track so that they are aligned with the beats in the
other track. Matching the tempo and aligning the beats are the two things a DJ must do to beatmatch.
Mixxx can match the tempo and align the beats for you but this requires an accurately detected BPM value and a
correct beat grid for both tracks. To enable this feature, tap the SYNC button. To beatmatch manually, the tempo of
the two tracks must be synchronized by adjusting the playback rate sliders. You can adjust the phase of the beats by
right-clicking and dragging on either waveform display to temporarily speed up or slow down one of the tracks until
the beats are aligned. The temporary pitch bend buttons can also be used to momentarily adjust the playback rate,
allowing you to “shuffle” the beats in a track forwards or backwards, so they can be aligned with another track. See
the chapter Sync and Rate Controls.
Two tracks are beatmatched once their tempos are matched and their beats are aligned. A “perfect” beatmatch is nearly
impossible - there will always be a tiny difference in the playback rates. A keen DJ will keep his or her ears open and
listen for the beats drifting out of alignment. This has a distinct “double bass kick” sound which is often preceded by
the kick weakening in intensity as the two kicks drift out of phase. When this happens, the beats can be realigned by
simply tapping one of the temporary pitch bend buttons a few times in the appropriate direction.
12.2. Beatmatching and Mixing 78
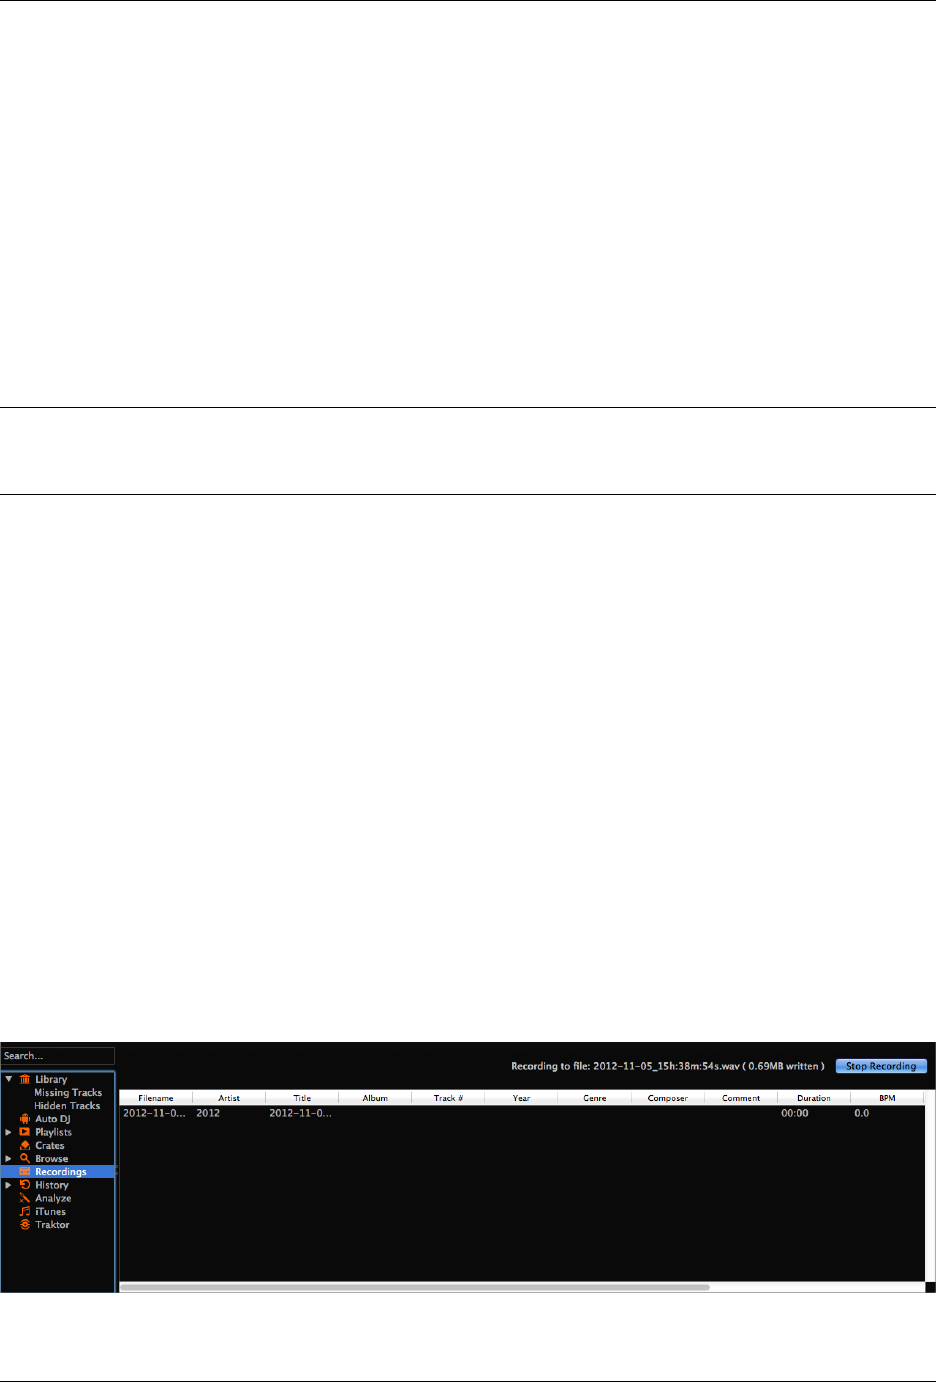
Mixxx User Manual, Release 2.1.0
12.3 Master Sync
Master Sync is an intelligent assistant that allows you to leave the beatmatching to Mixxx so you can focus on track
selection, effects manipulation, looping, 4 deck mixing, and other advanced DJing techniques.
To activate Master Sync on a deck, push and hold (or click and hold) the SYNC button. You’ll know Master Sync is
on because the sync button will remain lit. Changing the rate of any deck that has Sync lit will change the rates of all
other decks that also have the Sync button lit. There is no need to set specific decks to be a master or followers. You
can play, stop, eject, load, and queue any track with master sync and it won’t interrupt the playback of the other decks.
However, changing the rate of a stopped deck will change the rate of playing decks.
Master Sync will also notice if one of your tracks is double the BPM of another track and match them correctly. So
if you want to mix a 140 BPM drum & bass track with a 70 bpm dubstep track, Master Sync will make sure they are
lined up properly.
Hint: Usually, Master Sync will only make sure the rate sliders are set correctly. If you also want to make sure your
beats are perfectly in sync, turn on the QUANTIZE button. When activated, Quantize will ensure that the beats are
perfectly lined up as well.
12.4 Harmonic Mixing
Harmonic mixing is a technique to mix songs with matching melodies and harmonies. To learn more about harmonic
mixing you might want to check out the mixshare archive.
Mixxx has two features to help you with harmonic mixing. The first is a key lock. When it is active changing the speed
of a track won’t affect the key. To enable key lock, click the key lock button in the Deck Options Button Grid. The
second is that Mixxx can automatically detect the key of a track and will display it in the library and the decks. The
notation which is used to display a key can be changed in Key Detection Preferences.
12.5 Recording Your Mix
With the integrated recording feature you can record your mix as an audio file and listen to it later, distribute it as a
Podcast or burn it to CD.
By default, Mixxx records the Master output. Alternatively, Mixxx can record the output of an external mixer if
you have an audio interface configured for the Record/Broadcast input in Preferences →Sound Hardware. Refer to
Recording And Broadcasting With An External Hardware Mixer for details.
Fig. 4: Mixxx library - Recordings view
12.3. Master Sync 79

Mixxx User Manual, Release 2.1.0
Mixxx can record your mix in various audio formats and quality settings. You can split your recordings, generate cue
files, choose a custom recording directory and even set your own metadata. By default, Mixxx saves your recordings
as lossless wav files to a Mixxx/Recordings sub-folder in the Mixxx music directory. Before you start recording,
we recommend that you adjust the settings in Preferences →Recording.
If you click on the Recordings icon in the sidebar of the Mixxx library, the track table to the right displays the content
of your recordings directory. New recordings are automatically saved to this directory as well as CUE files if you
choose to create them in the preferences.
Hint: Recording your mixes and listening to them later to critique yourself is a great tool for improving your DJing
skills. Sending your mixes to other DJs for feedback can also be helpful.
12.5.1 Record your mix to disk
New in version 2.1: Added recording widget to toggle a recording session.
Click on the recording icon on top of the application window to start, and stop the recording session. The duration of
the running recording is displayed next to the icon.
Note: The recording widget might not be available in some skins.
Alternatively:
• Click on the Recordings icon in the sidebar to switch to the Recordings view
• Click the Start Recording button or click Options →Record Mix in the menu on top of the Mixxx application
window.
• The display above the track table shows how much data has already been recorded, as well as the duration of
the recording.
• Perform your mix
• Click the Stop Recording button to stop the recording when the mix has finished.
Hint: You can instantly play your recording as a track in Mixxx. Simply drag-and-drop the track to a deck.
12.6 Using Auto DJ For Automatic Mixing
Auto DJ allows you to automatically load tracks from the Auto DJ playlist when the current track is nearly finished,
and crossfade into it. See Auto DJ - Automate your mix.
12.6.1 Loading tracks into Auto DJ
To play tracks automatically, they must first be loaded into the Auto DJ playlist. The Auto DJ playlist is empty by
default.
There are several ways to load tracks into the Auto DJ playlist:
• Select single or multiple tracks from the library, a regular playlist or crate and drag them to the Auto DJ icon on
the left.
12.6. Using Auto DJ For Automatic Mixing 80
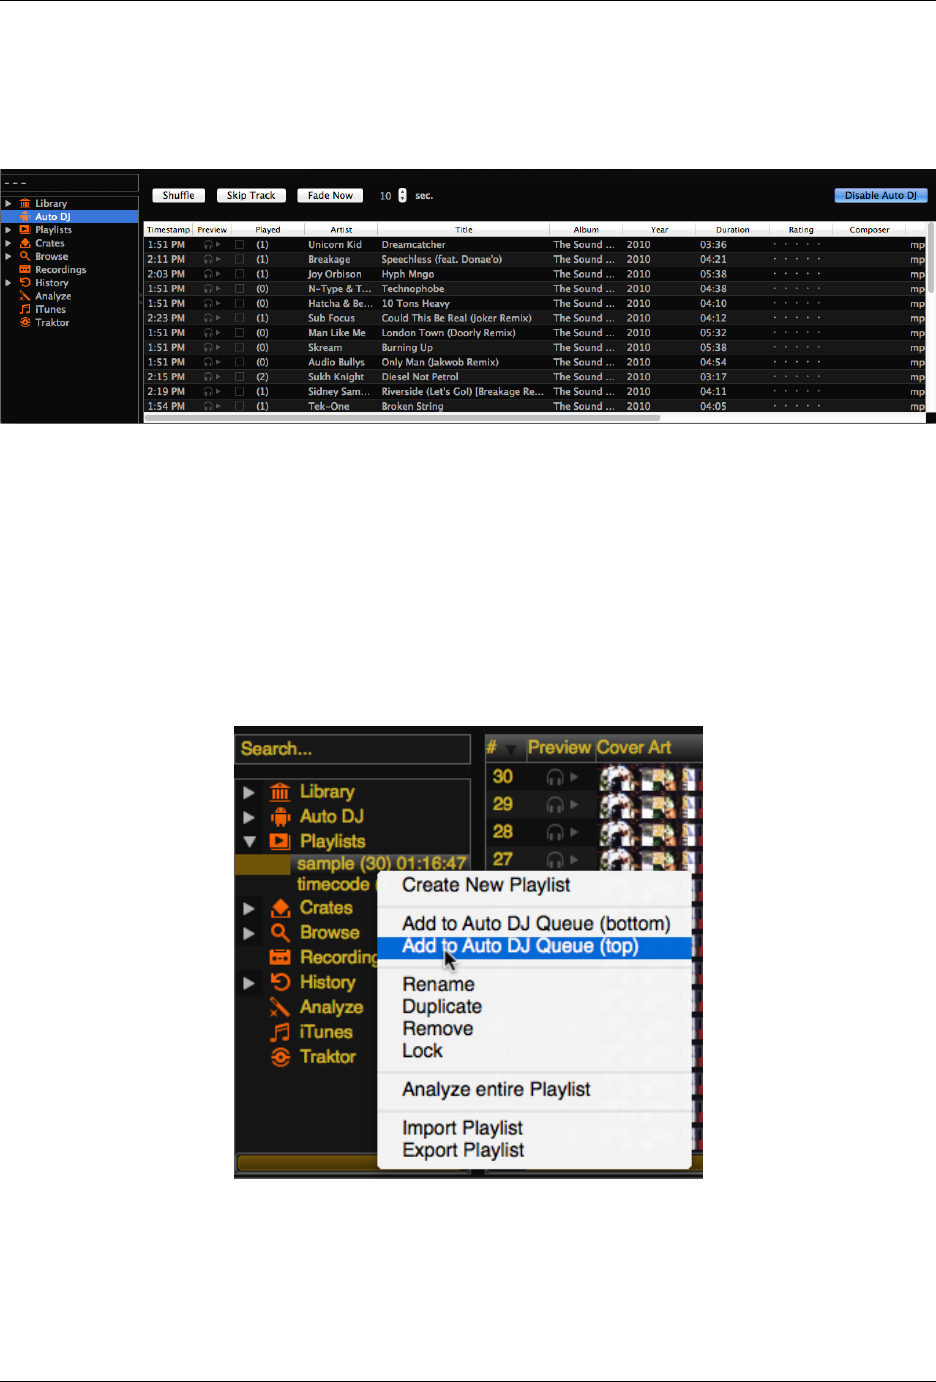
Mixxx User Manual, Release 2.1.0
Fig. 5: Mixxx library - Auto DJ view
Fig. 6: Mixxx library - Adding a playlist to Auto DJ
12.6. Using Auto DJ For Automatic Mixing 81

Mixxx User Manual, Release 2.1.0
• Select a regular playlist or crate, right-click with the mouse and select Add to Auto DJ from the mouse menu.
This adds all tracks to Auto DJ.
• While in the Auto DJ view of the library, drag tracks from external file managers to the Auto DJ icon in the
sidebar or to the Auto DJ track table on the right.
12.6.2 Using Auto DJ crates
Instead of inserting the contents of the crates directly into the Auto DJ playlist, Auto DJ crates are associated crates
that become a source of random track selections.
•Add a crate to the Auto DJ track sources: Expand the Auto DJ item in the sidebar, and right-click on the
Crates sub-item. Select one of the existing crates from the list. This makes the content of the crate available for
random selection into the Auto DJ queue for automatic mixing. The name of the crate is now listed as sub-item
below.
If you do not have any crates available for selection in the list, go and create a crate first and add some tracks,
see Crates - Organizing tracks into collections.
•Manually add tracks from track sources to Auto DJ: Click the Auto DJ item in the sidebar and switch to
the Auto DJ view of the library. Click the Add random button to add one track at the time from Auto DJ track
sources to the bottom of the Auto DJ playlist.
Note: If you did not set any crates as an Auto DJ track source, clicking the Add Random button will add a
randomly selected track from the whole library instead.
•Automatically add tracks from track sources to Auto DJ: Mixxx can randomly add tracks to the Auto DJ
playlist from track sources as soon as a specified minimum number of tracks remain. Select Preferences →Auto
DJ →Enable random track addition to queue →On. Set Minimum allowed tracks before addition to change
the minimum number of tracks after which random tracks may be added.
Note: If you did not set any crates as an Auto DJ track source, tracks are selected from the whole library
instead.
•Remove a crate from the Auto DJ track sources: Expand the Auto DJ item in the sidebar, and right-click on
one of the crates listed below the Crates sub-item. Select Remove Crate as Track Source to remove the crate
from the Auto DJ track sources.
12.6.3 Playing tracks in Auto DJ
Now that you have loaded tracks into the Auto DJ playlist, you can activate Auto DJ as follows:
• Click on the Auto DJ icon in the sidebar to switch to the Auto DJ view of the library.
• Click the Enable Auto DJ button.
• The first tracks from your list are loaded into the decks and the playback starts.
• Mixxx will continue to automatically mix until the Auto DJ playlist is empty.
• Click the Disable Auto DJ button to stop the automatic mixing
12.6. Using Auto DJ For Automatic Mixing 82

Mixxx User Manual, Release 2.1.0
Hint: You can add a track to the end of the Auto DJ playlist once it is played instead of removing it. Set Preferences
→Auto DJ →Re-queue tracks after playback →On.
12.6. Using Auto DJ For Automatic Mixing 83

CHAPTER 13
Preferences
Mixxx has many options to customize in Options →Preferences.
13.1 Sound Hardware
Fig. 1: Mixxx Sound Hardware Preferences
To achieve the best performance with Mixxx it is essential to configure your audio buffer,sample rate, and audio API.
These three factors largely determine Mixxx’s responsiveness and reliability. The optimal settings will vary based on
your computer and hardware quality.
For information about the different input and output options, refer to Configuring sound input and output. The DJ
Hardware chapter explains different types of DJ hardware and how to set them up with the the input and output
84

Mixxx User Manual, Release 2.1.0
options. If you are using a microphone, refer to the Using Microphones chapter.
13.1.1 Audio Buffer
The audio buffer is the amount of audio in milliseconds that Mixxx processes at a time. This is a major factor that
determines the latency between changing controls in Mixxx such as moving the crossfader or pressing the play button
and hearing the audio change. For example, with an audio buffer of 23 ms, it will take approximately 23 milliseconds
for Mixxx to stop the audio after you toggle the play button. The actual latency will be longer depending on a variety
of factors.
The audio buffer setting determines how quickly your Operating System expects Mixxx to react. A smaller audio
buffer means Mixxx will be more responsive, but requires a faster CPU and quality audio interface. Setting your audio
buffer too small may be too much for your computer and audio interface to handle. In this situation, Mixxx playback
will be choppy and very clearly distorted as your system will not be able to keep up with how frequently Mixxx is
trying to processing audio. It is recommended to set your audio buffer as small as your system can handle reliably
without glitches. Experiment with different audio buffer sizes to find what works for your system.
An audio buffer between 23-64 ms is acceptable if you are using Mixxx with a keyboard/mouse or a controller. An
audio buffer below 10 ms is recommended when vinyl control is used because Mixxx will feel unresponsive otherwise.
The Adjusting Audio Latency page on the Mixxx Wiki has tips for different operating systems that may help you use
a smaller audio buffer reliably.
Warning: Your system may glitch only occasionally if you have your audio buffer set a little too low. This will
happen at unpredictable times and you may not notice if you are only doing brief tests of each audio buffer size.
When you think you have found a good buffer size for your system, play with Mixxx for at least a half hour before
performing to ensure no glitches happen.
13.1.2 Sample Rate
The sample rate setting in Mixxx controls how many samples (chunks of audio) per second are produced by Mixxx.
This determines the maximum frequency in Mixxx’s signal, which is half the sample rate. Humans can only hear up
to 20 kHz, so there is generally no need to use more than a 44.1 kHz (44100 Hz) sample rate for playback. Most music
is published with a 44100 Hz sample rate, and playing music in a different sample rate than the audio file slightly
reduces sound quality.
Warning: A sample rate of 96 kHz gives your computer less than half the time to as to do the same processing.
Increasing the sample rate will increase CPU usage and likely raise the minimum audio buffer size you can use
reliably.
13.1.3 Sound API
The Sound API that Mixxx uses is the method by which Mixxx talks to your Operating System in order to deliver
audio to your audio interface. Your choice of Sound API can drastically affect Mixxx’s performance on your computer.
Therefore it is important to take care to choose the best Sound API available to you.
Windows
The following Sound APIs are available on Windows:
13.1. Sound Hardware 85

Mixxx User Manual, Release 2.1.0
•ASIO: Good
•WDM-KS: Good
•WASAPI: Acceptable
•DirectSound: Poor
•MME: Poor
It is best to use the ASIO Sound API that bypassses the sound processing of the Windows kernel. Using ASIO requires
a driver for your audio interface from the manufacturer. Check the manufacturer’s website to see if a driver download
is available. Soundcards designed for musicians almost always have an ASIO driver available, but audio interfaces
built into computers and very cheap audio interfaces typically do not have an ASIO driver. If there is no ASIO driver
available for your audio interface, use the WDM-KS API. There is generally no advantage to using ASIO4ALL, a
wrapper around the WDM-KS API.
GNU/Linux
The following Sound APIs are available on GNU/Linux:
•ALSA: Good
•JACK: Good
•OSS: Acceptable
ALSA is the simplest sound API to configure. Using ALSA will prevent any other programs from using the audio
interface(s) that Mixxx is using.
JACK allows you to route audio between JACK-compatible applications in flexible ways and output sound from
multiple programs at the same time. However, JACK can be complicated to set up. Unless you will be connecting
Mixxx to other JACK-compatible applications, JACK offers no advantages over ALSA. To use JACK, start the JACK
daemon before running Mixxx. Otherwise JACK will not appear as a Sound API in the preferences.
Most modern GNU/Linux distributions use PulseAudio by default. When launched from a GUI menu entry or icon,
Mixxx suspends PulseAudio while it is running so that Mixxx can use ALSA directly. Like JACK, PulseAudio allows
multiple programs to access one audio interface, but PulseAudio and JACK have opposite design goals. PulseAudio is
designed to make ordinary computer usage such as watching videos online and listening to music easy whereas JACK
is designed for demanding low latency audio programs like Mixxx. It can be difficult to setup JACK and PulseAudio
to work well together. So, unless you already use JACK, it is easiest to let Mixxx suspend PulseAudio and use ALSA.
If the PulseAudio plugin for alsalibs is installed on GNU/Linux, you can choose the virtual device pulse. This
allows Mixxx to share the default system audio interface with other media players. This only works if you start Mixxx
without pasuspender, which you can do by running mixxx from a console rather than clicking the launcher icon in
a menu or on your desktop. Since the sound stream is routed from ALSA to Pulse and back to ALSA, this adds an
additional latency of ~2 x the selected audio buffer size.
OSS is an Sound API that predates ALSA. Few modern audio interfaces have OSS drivers.
macOS
CoreAudio is the only Sound API on macOS.
13.1.4 Other Sound Hardware options
•Multi-Soundcard Synchronization: Mixxx is able to use two or more audio interfaces at a time, each with
its own clock. When multiple audio interfaces are in use, the Mixxx engine is driven by the Master audio
13.1. Sound Hardware 86

Mixxx User Manual, Release 2.1.0
interface. Here you can select the synchronization used for the other audio interfaces to avoid buffer overflows
or underflows.
•Keylock/Pitch-Bending Engine: This allows you to select the engine used for independent tempo and pitch
changes (e.g. keylock). Use Soundtouch on lower power machines (such as netbooks) or if you experience
buffer underflows while using keylock.
•Master Mix: You may disable the master mix to reduce Mixxx’s CPU usage if you do not use the Master output,
recording or live broadcasting.
•Master Output Mode: In Mono mode, the left and right channel are combined into a mono signal which is
passed to both channels of your master audio interface. This is useful for setups where the audience cannot hear
your mix in stereo because of speaker placement or playing in a space with lots of reverberation.
•Buffer Underflow Count: Underflows (data is not available when needed) indicate that some of the subsystems
in Mixxx can’t keep up with real-time deadlines imposed by the current audio buffer size. This is useful to
tune the latency settings. If the counter increases, then increase your audio buffer size, decrease the sample rate
setting or change the sound API setting if available.
13.2 Library
13.2.1 Changing music directories
You can manually add, relink, and remove Mixxx music directories in Preferences →Library.
Add a new music directory Mixxx handles multiple music library folders. Click Add to browse to a directory where
your music is stored. Mixxx will watch this directory and its subdirectories for new tracks.
If you add a directory that is already in your library, or you are currently rescanning your library, the operation
is canceled.
Directories can also be added from the Computer sidebar item inside the library.
Relink a existing music directory If an existing music directory is moved, Mixxx doesn’t know where to find the
audio files in it. Click Relink to select the music directory in its new location. This will re-establish the links to
the audio files in the Mixxx library.
Remove a music directory Click Remove, and Mixxx will no longer watch a directory and its subdirectories for new
tracks, and asks what would you like to do with the tracks from these directories.
• Select Hide Tracks to hide all tracks from this directory and subdirectories.
• Select Delete Track Metadata to delete all metadata for these tracks from Mixxx permanently
• Select Leave Tracks Unchanged to leave the tracks unchanged in your library.
Hiding tracks saves their metadata in case you re-add them in the future.
Metadata means all track details (artist, title, playcount, etc.) as well as beatgrids, hotcues, and loops. This
choice only affects the Mixxx library. No files on disk will be changed or deleted.
Hint: When changing music directories, you might want to run a library rescan afterwards. Select Library →Rescan
Library in the menu.
13.2. Library 87
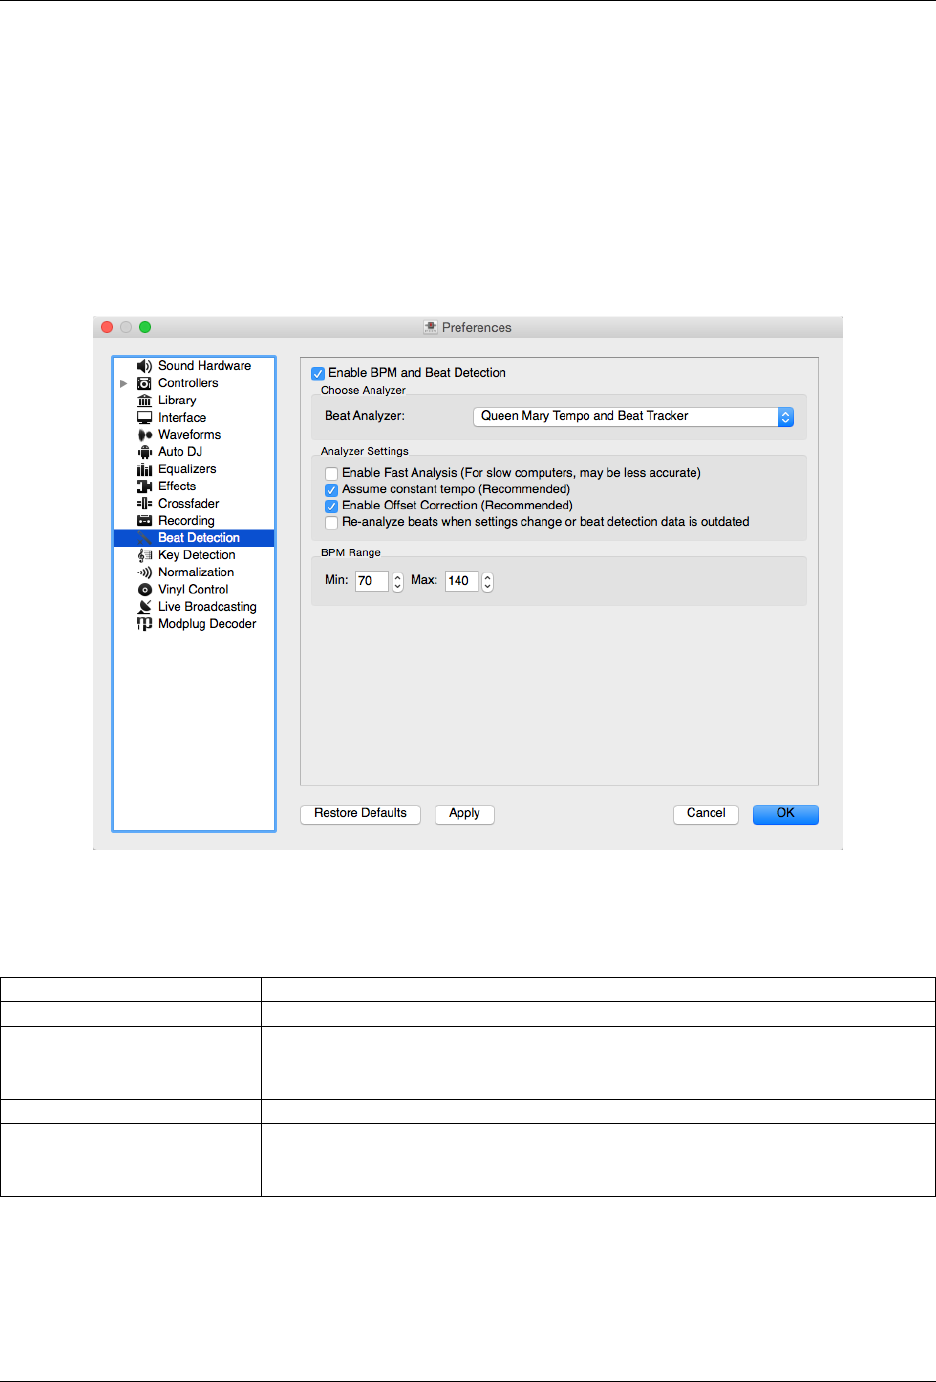
Mixxx User Manual, Release 2.1.0
13.3 Beat Detection
Mixxx uses an ultra-precise BPM and beat detector. Manual adjustments are redundant in many cases because Mixxx
knows where the beats are.
BPM and beat detection is a complex operation. Depending on your computer and the track’s bitrate and duration this
may take some time. By default Mixxx analyzes the complete track. To accelerate beat detection on slower computers,
a “Fast Analysis” option is available. If enabled, the BPM is computed by analyzing the first minute of the track. In
most cases this does not affect the beat detection negatively because most of today’s dance music is written in a 4/4
signature with a fixed tempo.
Fig. 2: Mixxx preferences - BPM settings
The table below summarizes the beat detection settings:
Option Description
Enable Fast Analysis If enabled, BPM will be detected by only using the first minute of audio.
Assume constant tempo If enabled, Mixxx assumes that the distances between the beats are constant. If
disabled, the raw beat grid obtained by the analyzer is presented. The latter is
appropriate for tracks with variable tempo.
Enable Offset Correction Prevents beat markers from being placed incorrectly.
Re-analyze beats when set-
tings change or beat detection
data is outdated
If enabled, Mixxx over-writes old beat grids from prior versions. Moreover, it will
re-analyze the BPM if your beat detection preferences change or BPM data from
3rd party programs are present.
13.3.1 Correcting Beat Grids
There may be situations where BPM and beat detection do not result in a proper beat grid.
13.3. Beat Detection 88

Mixxx User Manual, Release 2.1.0
Typically, the detected BPM is correct but the analyzer has failed to detect the location of the first beat. Consequently,
the beat markers are shifted, i.e. the beat markers are a fixed distance from the true beat. To adjust the beat grid, cue
the track before a real beat and click the Beat-grid Adjust button in the Deck Options Button Grid.
If the detected BPM is not accurate, the corresponding beat grid will also be inaccurate. A deviation of 0.02 BPM
units from the correct BPM will cause beatgrid alignment issues on long tracks (e.g. a club mix). If this happens, your
beatgrid may look aligned for the few minutes but you will notice a slight drift as the song goes on. Finding the correct
BPM is easy in many cases - just follow the note below.
Note: If the detected BPM value is not sufficiently accurate but very close to an integer value, try to set the BPM
value manually to the integer.
13.4 Key Detection
Mixxx comes with a high precision musical key detector to help you make smooth mixes by ensuring that your tracks
are musically compatible.
13.4.1 Analyzer Settings
Key detection is a complex operation. Depending on your computer and the track’s bitrate and duration this may take
some time. By default Mixxx analyzes the complete track. To accelerate key detection on slower computers, a “Fast
Analysis” option is available. If enabled, the key is computed by analyzing the first minute of the track.
Fig. 3: Mixxx preferences - Key settings
The table below summarizes the Key detection settings:
13.4. Key Detection 89
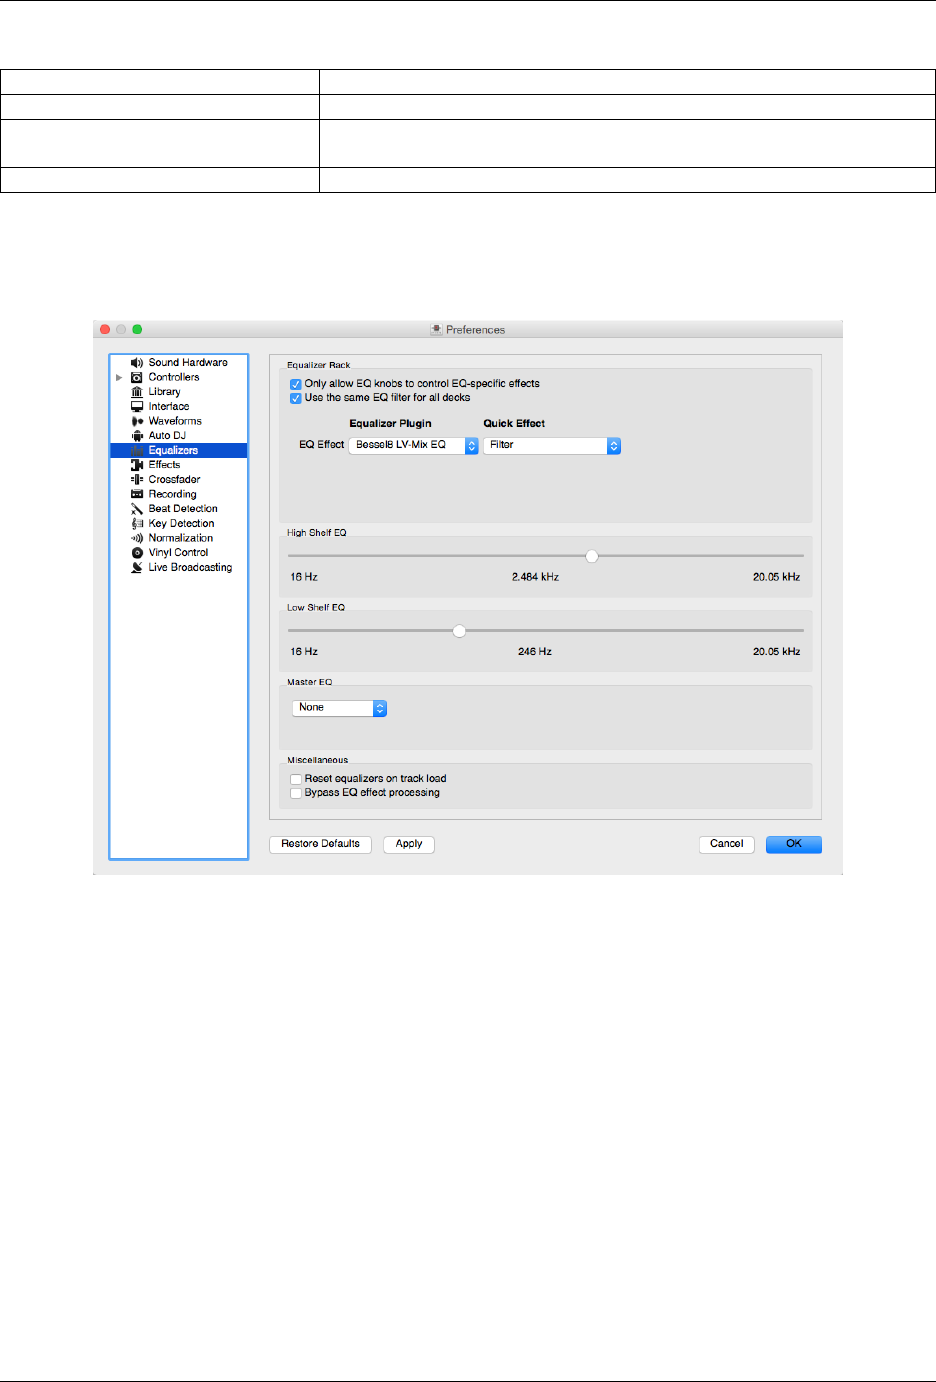
Mixxx User Manual, Release 2.1.0
Option Description
Enable Fast Analysis If enabled, the key will be detected by using only the first minute of audio.
Re-analyze key when settings change
or Key detection data is outdated
If enabled, Mixxx will re-analyse tracks if you select a different key detec-
tion plugin or the key was generated by a program other than Mixxx.
Key Notation Change the way keys are displayed in the library.
13.5 Equalizers
Fig. 4: Equalizer Preferences
Preferences →Equalizer allows you to setup the equalizers.
•Equalizer Rack: The Equalizer Rack is a special effect rack that is connected to the deck’s equalizer and filter
controls.
In this section you can select the equalizers and quick effects that are used with the decks.
•Equalizer Plugin: Here you can select the effect that is used as the mixing EQ in each deck. By default only
built-in equalizers are displayed. Unchecking Only allow EQ knobs to control EQ specific effects allows you to
select any other effect.
•Quick Effect: Here you can select the effect that is controlled by the dedicated filter knob in each deck. By
default only built-in filter effects are selected for all decks, but that can be changed as above.
•High/Low Shelf EQ: This slider sets the crossover frequencies of the mixing EQ. It controls which frequency
range is affected by the low, mid, and high channel EQ knobs. By default the low knob controls the bass and
sub bass range up to 246 Hz. The mid knob controls the mid range up to 2.5 kHz. The remaining treble range is
controlled by the high knob.
•Master EQ: This section allows you to setup an EQ that affects the master output.
13.5. Equalizers 90
Mixxx User Manual, Release 2.1.0
13.5.1 Mixing Equalizers
Mixxx offers three types of mixing equalizers with a full kill option. These equalizers are “isolators”, adapted from
analog crossover networks. Each EQ is combination of a high shelf filter, a band pass filter, and a low shelf filter. Each
EQ type has a unique sound, so try them out to find out which one you prefer.
The Bessel EQs with Lipshitz and Vanderkooy Mix (LV-Mix) do not alter the sound or take any processing time when
their knobs are in the center position. They activate once you adjust an EQ knob.
The Linkwitz-Riley EQ on the other hand always applies a minimum, natural sounding phase shift to the sound. Their
processing time does not change when you adjust the EQ knobs.
The following table compares some technical parameters:
Type cut roll-off phase shift bit perfect CPU usage
Bessel4 LV-Mix soft -24 db/Oct linear yes low
Bessel8 LV-Mix medium -48 db/Oct linear yes medium
Linkwitz-Riley sharp -48 db/Oct minimum no high
• cut: the frequency response (curve form) at the cross over frequency.
• roll-off: The steepness of the EQ bands.
• linear phase: No phase distortion, all frequencies are processed with the same group delay.
• minimum phase: A natural phase distortion, the group delay changes by the frequency.
• bit perfect: Whether the EQ leaves the original samples untouched when the EQ is at unity.
• CPU usage: Processing time needed to calculate the EQ output.
13.5. Equalizers 91

CHAPTER 14
Advanced Topics
14.1 Adding support for your MIDI/HID Controller
With several dozens of DJ controllers supported out-of-the-box, Mixxx gives you comprehensive hardware control for
your DJ mixes, see Using MIDI/HID Controllers.
Support for additional devices can be added to Mixxx by creating a new preset file. This file tells Mixxx how to
translate, or map, MIDI/HID messages from a controller into commands that Mixxx understands.
You can download and share custom controller presets in the Mixxx User customizations forums.
14.1.1 Controller Wizard
By far, the easiest way to create a new MIDI preset is by using the Controller Wizard.
1. Connect your controller(s) to your computer
2. Start Mixxx
3. Go to Preferences →Controllers
4. Select your device from the list of available devices on the left, and the right pane will change
5. Activate the Enabled checkbox
6. Click on Learning Wizard to open the selection dialog
7. Click any control in the Mixxx GUI
8. Alternatively, click the Choose Control button and choose one from the selection list
9. Push Learn and then move a control or push a button on your controller to map it. You can also move a control
without pushing the Learn button if you are learning many controls.
10. If you are learning a button, just push it once. If you are learning a knob or a slider, try to move it throughout its
range.
92
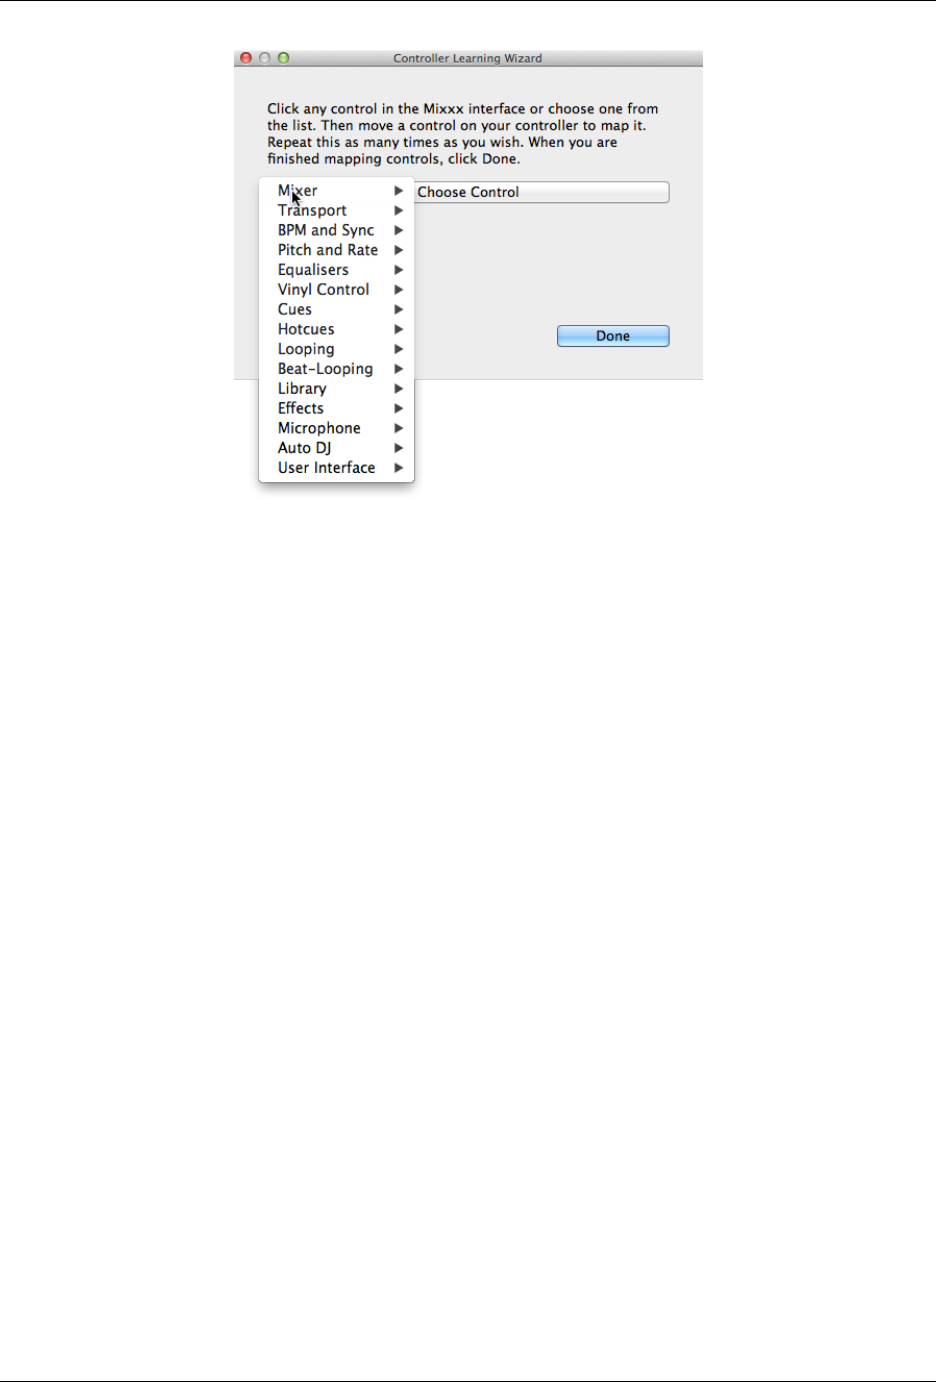
Mixxx User Manual, Release 2.1.0
Fig. 1: Mixxx Controller Wizard - Mapping a control
11. After Mixxx detects the control, you may click Learn Another or you can click on another button in the Mixxx
GUI to learn another control.
12. When you are finished mapping controls, click Done
There are also some advanced options in the Midi Wizard you may need to use:
• Soft Takeover: Use this option for knobs or sliders to avoid sudden jumps in when the knob in the GUI doesn’t
match the physical knob. If you select this option, you won’t be able to perform super-fast motions as easily.
(Recommended off)
• Invert: Use this option for controls that you want to work backwards from how they were detected.
• Switch Mode: Use this option on controllers that have controls that act like switches and emit one value on the
first press, and a different value on the next press. (Think an actual hardware toggle switch, or a button that
lights up on the first press and turns off on the second press).
• Jog Wheel / Select Knob: Use this for knobs that don’t have a beginning or an end, but spin continuously.
The Controller wizard saves the new preset to the following file paths:
• Linux: /home/<username>/.mixxx/controllers
• macOS: /Users/<username>/Library/ApplicationSupport/Mixxx/controllers
• Windows: %LOCALAPPDATA%\Mixxx\controllers
You can then modify the XML file it creates (or any of the ones that ship with Mixxx) if you’d like to fine-tune it or add
more presets. For more information, go to https://mixxx.org/wiki/doku.php/midi_controller_mapping_file_format.
The Controller Wizard works only for MIDI devices. Currently you can’t map modifier (shift) keys and platter rota-
tions. Use MIDI Scripting instead.
14.1.2 MIDI Scripting
In order to support the advanced features of many MIDI/HID controllers, Mixxx offers what we call MIDI Scripting.
14.1. Adding support for your MIDI/HID Controller 93

Mixxx User Manual, Release 2.1.0
It enables MIDI controls to be mapped to QtScript (aka Javascript/EMCAScript) functions stored in function library
files, freeing Mixxx from a one-to-one MIDI mapping ideology. These user-created functions can then do anything
desired with the MIDI event such as have a single controller button simultaneously affect two or more Mixxx properties
(“controls”), adjust incoming control values to work better with Mixxx (scratching), display a complex LED sequence,
or even send messages to text displays on the controller.
For more information, go to https://mixxx.org/wiki/doku.php/midi_scripting and https://mixxx.org/wiki/doku.php/
hid_mapping_format.
14.2 Making a Custom Keyboard Mapping
The default keyboard mappings are defined in a text file which can be found at the following location:
• Linux: /usr/local/share/mixxx/keyboard/en_US.kbd.cfg
• macOS: /Applications/Mixxx.app/Contents/Resources/keyboard/en_US.kbd.cfg
• Windows: <Mixxx installation directory>\keyboard\en_US.kbd.cfg
Depending on your system’s language settings, Mixxx might use a different file as default, e.g. de_DE.kbd.cfg
for German or es_ES.kbd.cfg for Spanish.
It is not recommended that you modify the system-wide keyboard mapping file because all your changes may be lost
if you uninstall or upgrade Mixxx. Instead, copy the default mapping file to the following location:
• Linux: ~/.mixxx/Custom.kbd.cfg
• macOS: ~/Library/ApplicationSupport/Mixxx/Custom.kbd.cfg
• Windows: %LOCALAPPDATA%\Mixxx\Custom.kbd.cfg
Then edit this file and save the changes. On the next startup, Mixxx will check if Custom.kbd.cfg is present and
load that file instead of the default mapping file. This has the advantage that you can always revert back to the default
mapping by deleting Custom.kbd.cfg.
For a list of controls that can be used in a keyboard mapping, see https://mixxx.org/wiki/doku.php/mixxxcontrols.
You can download and share custom keyboard mappings in the Mixxx User customizations forums.
14.3 Additional Effects via external Mixer Mode
Mixxx comes with a set of native effects. Additionally, using the external mixer mode you can route each deck directly
to 3rd party effect hosts.
The following examples are only intended to encourage experimentation, they are not definitive guidance.
14.3.1 Effects via AU Lab on macOS
On macOS there is a simple and free way to give Mixxx access to the collection of AU/VST/MAS plugins that are
installed on your system.
• Install the free Soundflower, a system extension for inter-application audio routing.
• Download AU Lab.app standalone from Apple (you will need an free Apple Developer Login though), go to the
Downloads for Developers page and search for “AU Lab” to get it.
In Mixxx
14.2. Making a Custom Keyboard Mapping 94
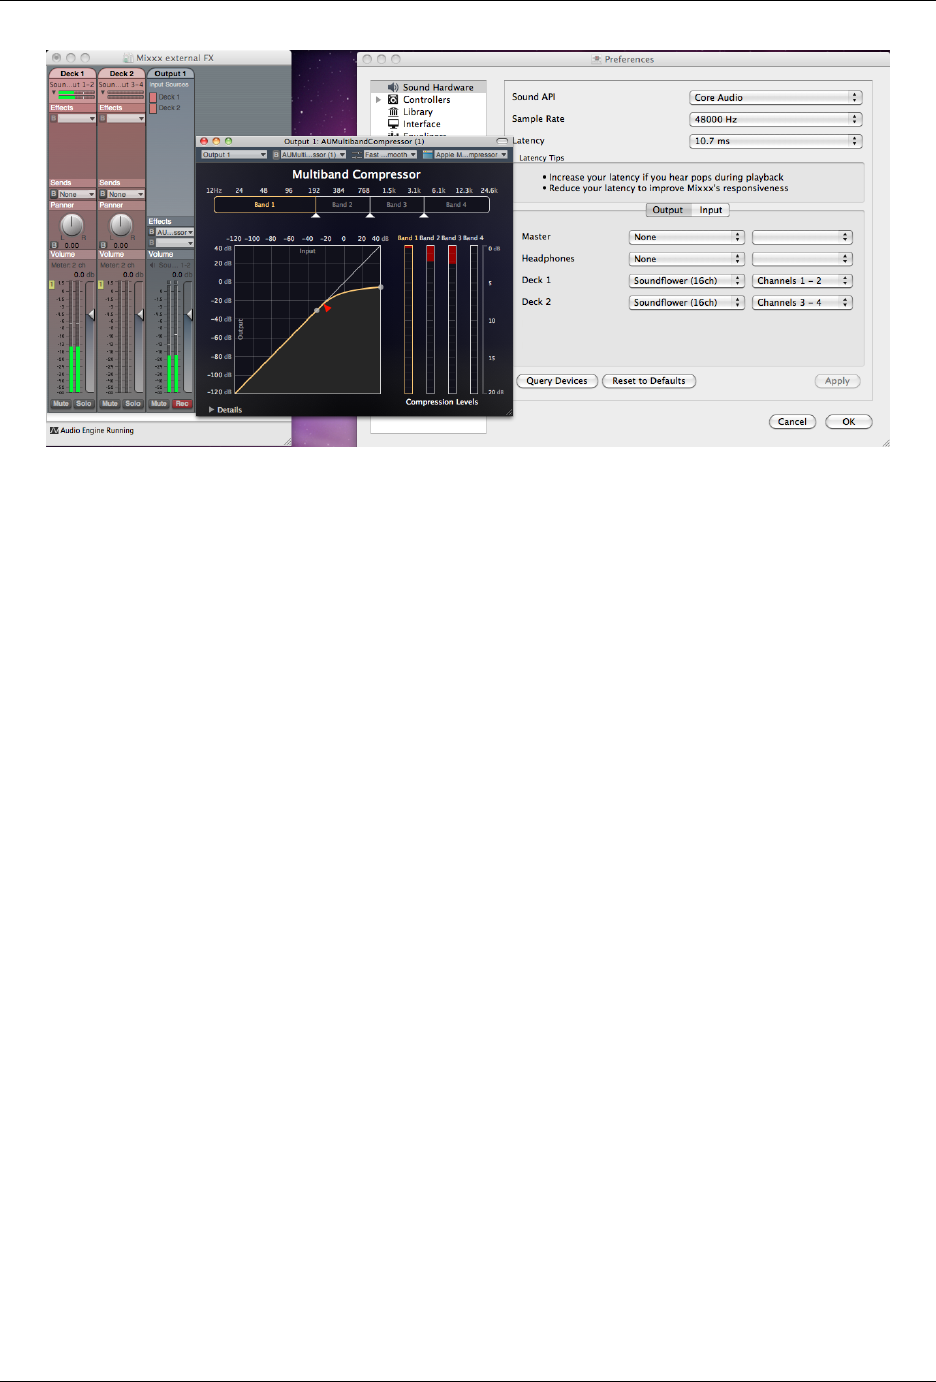
Mixxx User Manual, Release 2.1.0
Fig. 2: The Au Lab routing for external effects on macOS
• Go to Preferences →Sound Hardware→Output
• Select for Deck 1 the Soundflower 16 device with Channel 1-2
• Select for Deck 2 the Soundflower 16 device with Channel 3-4
• Click the Apply button
In AU Lab
• Click on the +button to create a new configuration
• Add 2 stereo input tracks in the Audio Input Tab
• Add 2 stereo output tracks in the Audio Output Tab
• Click OK
• Change the audio input device to Soundflower 16
• Change the audio output device for example to Built-in Output
• Click Create document
• In the Output 1 channel, select an effect from the drop-down menu, for example Apple > AUCompressor
The effect should now react if you play a track in Mixxx.
14.3.2 Effects via JACK Rack on GNU/Linux
Use Jack to route each deck directly through JACK Rack effect racks, or for more control you can use Ardour (or
another DAW) using sends for effects. This gives Mixxx access to the extensive collection of LADSPA plugins.
Make sure the correct multichannel audio interface has been selected in Jack (Jack settings visible bottom left). Note
that Mixxx possibly labels its Jack ports as “Portaudio”.
14.3. Additional Effects via external Mixer Mode 95
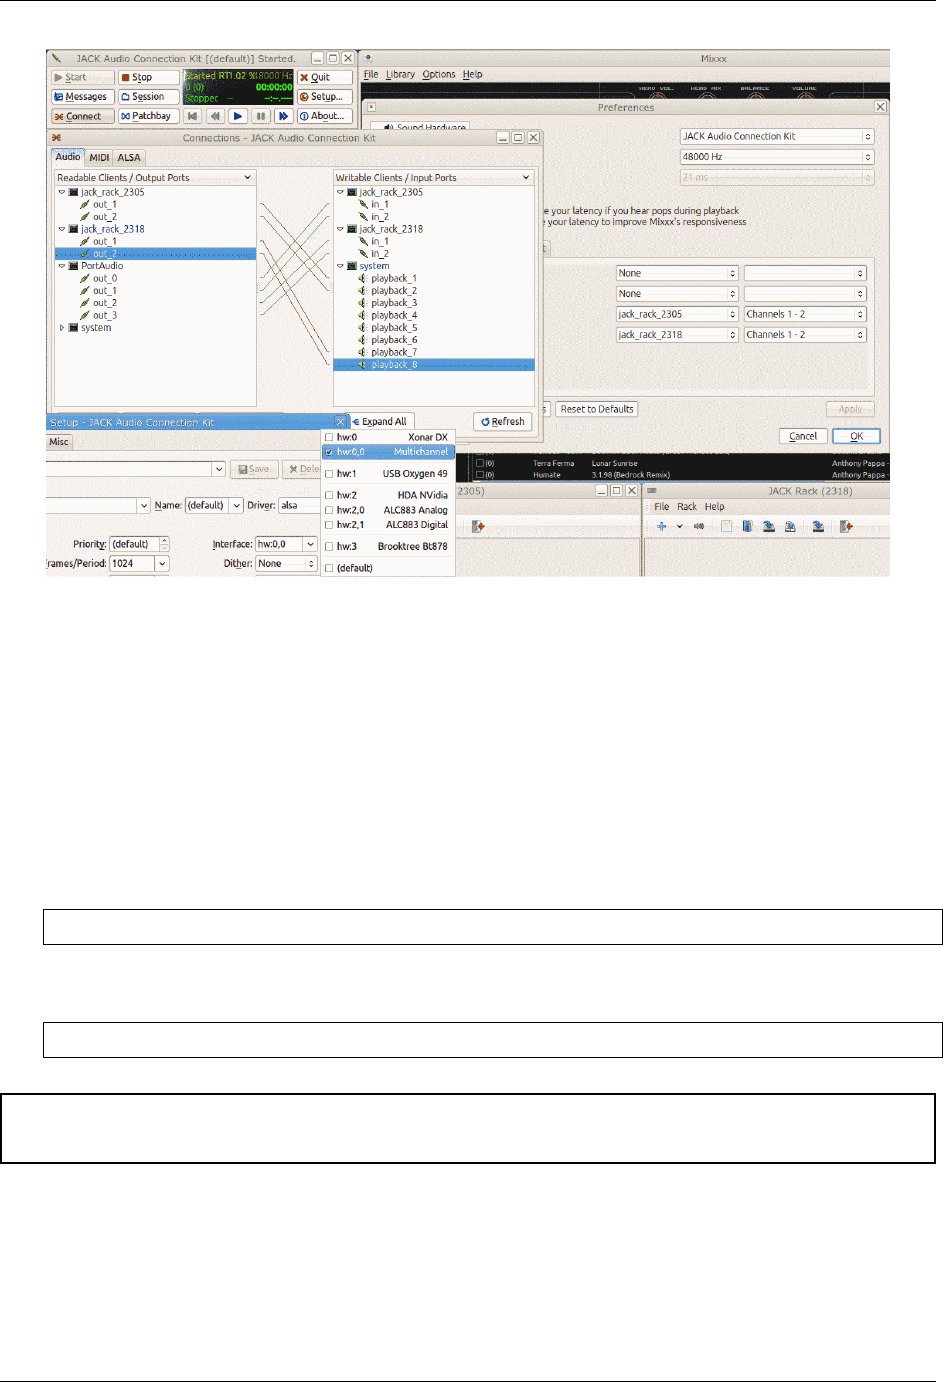
Mixxx User Manual, Release 2.1.0
Fig. 3: The Jack routing for external effects on GNU/Linux
14.4 Deleting Your Library
The library file is stored in the following places depending on your operating system:
Windows The Mixxx library is stored in the %USERPROFILE%\Local Settings\Application
Data\Mixxx\ folder. To delete your library on Windows, delete the mixxxdb.sqlite file in this
folder.
macOS The Mixxx library is stored in the Library/Application Support/Mixxx folder in your home
directory. To delete your library on macOS type the following command into a terminal:
rm ~/Library/Application\ Support/Mixxx/mixxxdb.sqlite
GNU/Linux The Mixxx library is stored in the .mixxx folder in your home directory. To delete your library on
GNU/Linux type the following command into a terminal:
rm ~/.mixxx/mixxxdb.sqlite
Warning: Deleting your library will lose all of your metadata. This includes saved hotcues, loops, comments,
ratings, and other library related metadata. Only delete your library if you are fine with losing these.
14.4. Deleting Your Library 96

CHAPTER 15
Contributing to the Project
Mixxx is a community-driven project involving many DJs worldwide. Without the contributions from these DJs,
Mixxx would not exist, and we’re constantly looking for more contributors.
We want to make it as easy as possible for people to get involved in Mixxx development. First off, to be clear you
don’t have to be a programmer to contribute.
15.1 As a non-developer
•Donate to Mixxx using Paypal to help support and enhance development.
•Make skins
•Make MIDI mappings for your controller
•Report bugs
• Update our Wiki to make sure the information on it is up to date.
• Translate Mixxx using Transifex
• Answer questions on the Troubleshooting Forum and the Launchpad Answers page
• Help promote Mixxx: If you’ve got a blog, write an article about Mixxx. Blog about our new releases when
they come out. Any exposure on the web and in print helps our project grow, and is much appreciated.
• Send us some photos of you using Mixxx at a gig!
15.2 As a software developer
• You don’t have to know C++. There are developers who got into Mixxx development while learning C++ along
the way.
• Join our mailing list: mixxx-devel
97

Mixxx User Manual, Release 2.1.0
• Join our Zulip chat.
• Tell us your ideas! Email us, talk on Zulip, file wishlist bugs, or post on the forums.
• Register an account on our development platform Github and fork our code. See Using Git for Mixxx Develop-
ment
• Join the Mixxx Development Team on Launchpad.
• Get familiar with the code. Pick a bug off of the Easy Bug List
• Get help fixing the bug on Zulip, talk to us about the best way to do it.
Contributing to Mixxx in 3 Easy Steps:
1. Pick a bug off of the Easy Bug List
2. Talk to us on Zulip for help on how to fix it.
3. Fix it! Done! Your name will now be on the Mixxx contributor list.
15.2. As a software developer 98

CHAPTER 16
Appendix
16.1 Additional Resources
Got questions? Need more information? Want to contribute? There are a variety of other resources where you can
find out more:
•Mixxx Website: For general information and updates, as well as the latest news on Mixxx, go to: https://mixxx.
org
•Mixxx Wiki: For up-to-date information about supported DJ hardware, documentation on making controller
mappings, and other tips and tricks, go to: https://mixxx.org/wiki/
•Mixxx Community Forums: To search for answers, post your question or answer other DJ’s questions, go to:
https://mixxx.org/forums
•Mixxx Zulip Chat: Hang out with Mixxx developers and users on our Zulip chat. Stand-alone apps for Zulip
can be configured to use the server mixxx.zulipchat.com.
•Mixxx Source Code: To download the source code for Mixxx, go to: https://github.com/mixxxdj/mixxx
•Mixxx Bug Tracker: To report a bug or request a feature, go to: https://bugs.launchpad.net/mixxx
•Mixxx Translations: To translate Mixxx and promote your mother tongue, go to: https://www.transifex.com/
mixxx-dj-software/public/ . Please read the Translation FAQ first.
•Social Media: Follow us on Twitter ,Facebook , and Google+ .
16.2 Keyboard mapping table
Shortcuts let you work more efficiently. This table lists the default keyboard shortcuts for accessing Mixxx with an
English keyboard layout. Depending on your language settings the defaults may be different.
99

Mixxx User Manual, Release 2.1.0
Function Deck 1 Deck 2 Master
Mixer
Crossfade Left G
Crossfade Right H
Small Crossfade Left Shift + G
Small Crossfade Right Shift + H
Activate/Disable Effects Unit 5 0
Headphone Cue (Pre-fader listen) T Y
Bass Kill B N
Playback
Load selected track to deck Shift + left Shift + right
Unload track from deck Alt + Shift + left Alt + Shift + right
Playback D L
Seek Backwards A J
Reverse Playback Shift + A Shift + J
Seek Forwards S K
Tempo Adjust Down F1 F5
Tempo Adjust Up F2 F6
Small Tempo Adjust Down Shift + F1 Shift + F5
Small Tempo Adjust Up Shift + F2 Shift + F6
Temporary Tempo Adjust Down F3 F7
Temporary Tempo Adjust Up F4 F8
Small Temporary Tempo Adjust Down Shift + F3 Shift + F7
Small Temporary Tempo Adjust Up Shift + F4 Shift + F8
Tempo (BPM) Sync 1 6
BPM Tap Tempo Adjust Shift + ! Shift + ^
Cue and Loop
Set Cuepoint Shift + D Shift + L
Cue F ;
Cue Go-to-and-stop Shift + F Shift + :
Activate 4 Beat Loop Q U
Halve Beat Loop Size W I
Double Beat Loop Size E O
Set Loop In Point 2 7
Set Loop Out Point (Activates Loop) 3 8
Toggle Loop On/Off 4 9
Set Hot cue 1 Z M
Set Hot cue 2 X ,
Set Hot cue 3 C .
Set Hot cue 4 V /
Clear Hot cue 1 Shift + Z Shift + M
Clear Hot cue 2 Shift + X Shift + <
Clear Hot cue 3 Shift + C Shift + >
Clear Hot cue 4 Shift + V Shift + ?
Microphone
Microphone Talkover ‘
Auto DJ
Shuffle Auto DJ playlist Shift + F9
Skip next track in Auto DJ Shift + F10
Fade to next track in Auto DJ Shift + F11
Toggle Auto DJ on/Off Shift + F12
Continued on next page
16.2. Keyboard mapping table 100
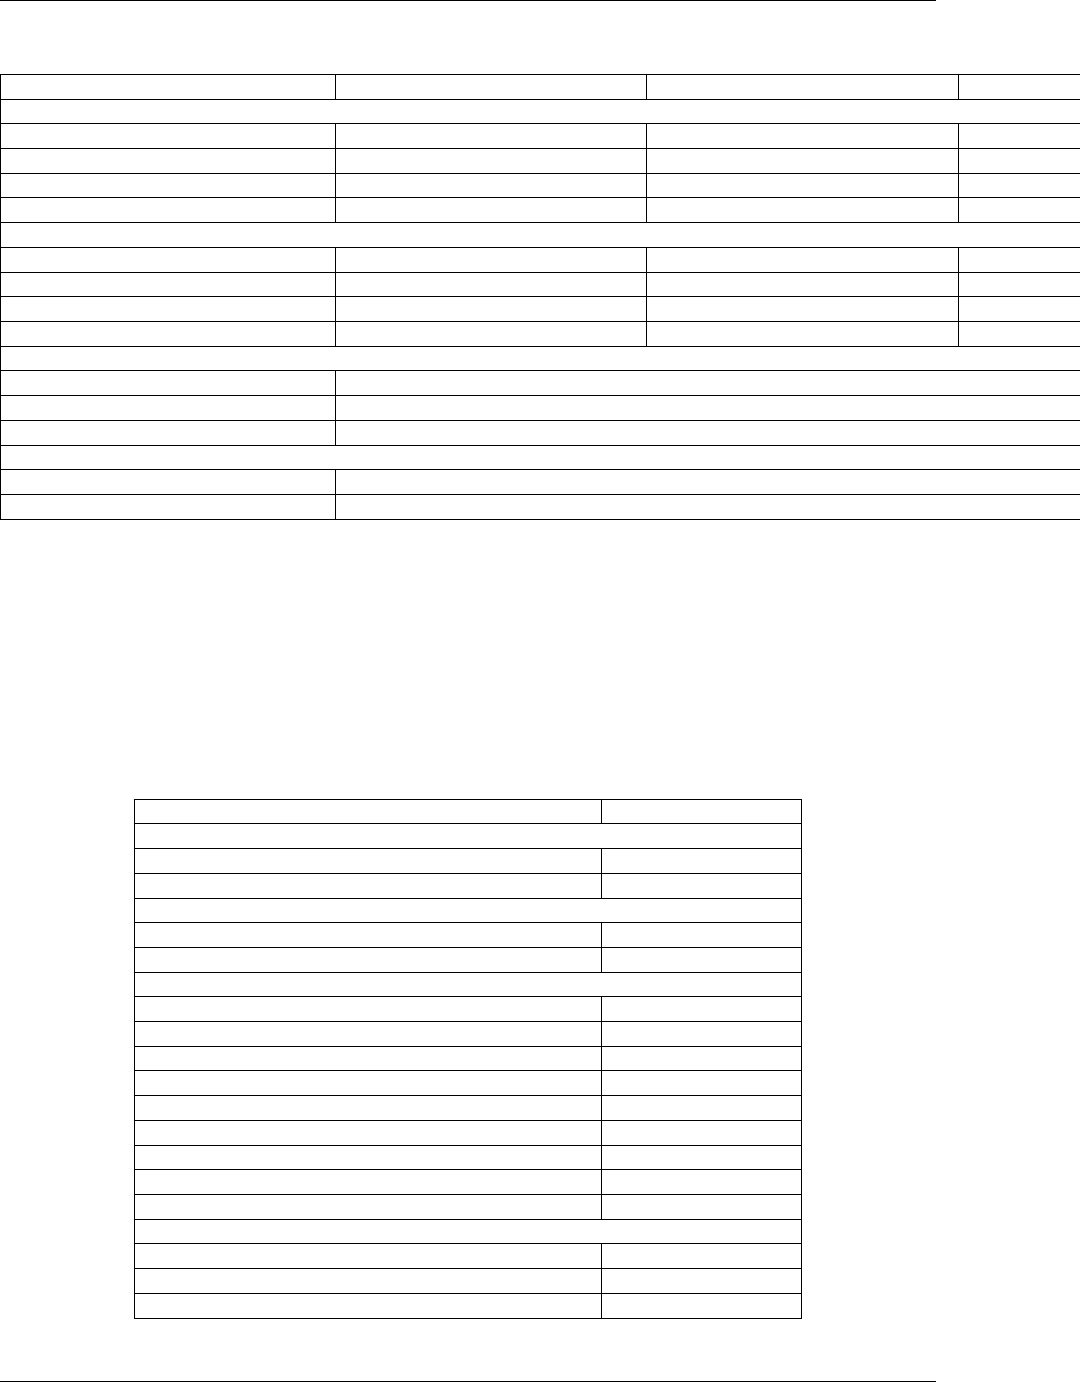
Mixxx User Manual, Release 2.1.0
Table 1 – continued from previous page
Function Deck 1 Deck 2 Master
Preview Deck
Load Selected Track And Play Alt + Return
Start/Stop Return
Seek Backwards Alt + Left
Seek Forwards Alt + Right
Vinyl Control
Passthrough Ctrl + J Ctrl + K
Vinylcontrol Mode Ctrl + Shift + Y Ctrl + Shift + U
Vinylcontrol Cueing Ctrl + Alt+ Y Ctrl + Alt + U
Single Deck Toggle / Swap Decks Ctrl + T Ctrl + T
Search bar
Focus Ctrl + F
Clear input Ctrl + Back
Exit search and leave focus ESC
Library
Select all files in current list Ctrl + A
Select group of files in current list Click first item, hold Shift key, click last item
See also:
Mixxx allows you to customize the keyboard shortcuts. For more information, and to download a keyboard mapping
image, go to Using a Keyboard.
16.3 Application shortcuts
Use these shortcuts to access features available in the menu on top of the application window.
Function Key
File menu
Load Track to Deck 1 Ctrl + O
Load Track to Deck 2 Ctrl + Shift + O
Library menu
Add new Playlist Ctrl + N
Add new Crate Ctrl + Shift + N
View menu
Show Samplers Ctrl + 1
Show Microphone Section Ctrl + 2
Show Vinyl Control Section Ctrl + 3
Show Preview Deck Ctrl + 4
Show Effect Rack Ctrl + 5
Show Cover Art Ctrl + 6
Maximize Library Space
Full Screen (Windows & Linux) F11
Full Screen (macOS) Shift + Command + F
Options menu
Enable Vinyl Control 1 Ctrl + T
Enable Vinyl Control 2 Ctrl + Y
Enable Vinyl Control 3 Ctrl + U
Continued on next page
16.3. Application shortcuts 101
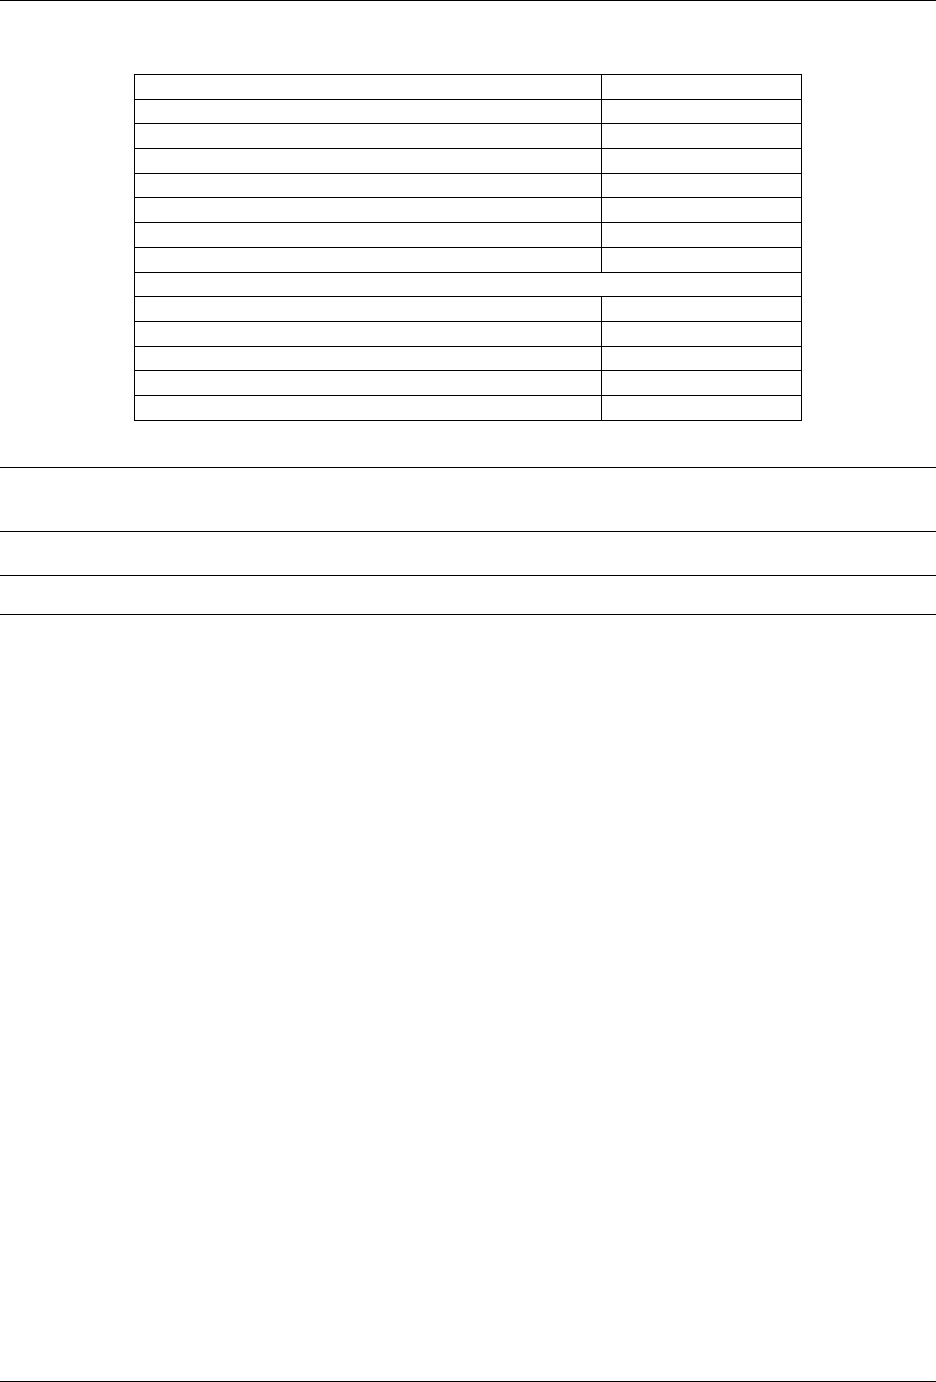
Mixxx User Manual, Release 2.1.0
Table 2 – continued from previous page
Function Key
Enable Vinyl Control 4 Ctrl + I
Enable Live Broadcasting Ctrl + L
Record Mix Ctrl + R
Enable Keyboard Shortcuts Ctrl + ‘
Open Preferences (Windows & Linux) Ctrl + P
Open Preferences (macOS) Ctrl + ,
Exit Mixxx Ctrl + Q
Developer menu
Reload skin Ctrl + Shift + R
Developer Tools Ctrl + Shift + T
Stats: Base Bucket Ctrl + Shift + B
Stats: Experiment Bucket Ctrl + Shift + E
Debugger Enabled Ctrl + Shift + D
Hint: The Ctrl key on Windows & Linux is equivalent to the Command key on macOS. The Alt key on Windows
& Linux is equivalent to the Option key on macOS. Application shortcuts are not customizable.
Note: The Developer menu is available if Mixxx is started using the Command line options.
16.4 Command line options
Mixxx is designed to be as user-friendly as possible. As such, its command line options are only useful for development
or debugging, as they make these tasks easier. Command line options are case-sensitive.
New in version 2.1.0: --debugAssertBreak option --logLevel option --logFlushLevel option
Changed in version 2.1.0: --controllerDebug option also prints outgoing MIDI messages
16.4. Command line options 102

Mixxx User Manual, Release 2.1.0
Option Description
[FILE] Load the specified music file(s) at start-up. Each file
you specify will be loaded into the next virtual deck.
For a list of supported file types, go to Changing music
directories
–resourcePath PATH Top-level directory where Mixxx should look for its re-
source files such as MIDI mappings, overriding the de-
fault installation location.
–pluginPath PATH Top-level directory where Mixxx should look for sound
source plugins in addition to default locations.
–settingsPath PATH Top-level directory where Mixxx should look for user
settings files such as the library database and prefer-
ences configuration file.
–controllerDebug Causes Mixxx to display/log all controller data it sends
and receives, and script functions it loads.
–developer Enables developer-mode. Includes extra log info, stats
on performance, a Developer tools menu, extra devel-
oper skins, and provides useful information for skin
writers in widget tooltips and logs .
–safeMode Disables risky things at start up. This should help trou-
bleshoot crashes at startup or if Mixxx won’t boot.
••••• Automatically loads empty waveforms
• Disables spinning vinyl widgets
• Disables synchronization polling
• Doesn’t open controllers by default
–locale LOCALE Use a custom locale for loading translations (e.g fr)
-f, –fullScreen Starts Mixxx in full-screen mode
–logLevel LEVEL Sets the verbosity of command line logging
•critical - Critical/Fatal only
•warning - Above + Warnings
•info - Above + Informational messages
•debug - Above + Debug/Developer messages
•trace - Above + Profiling messages
–logFlushLevel LEVEL Sets the the logging level at which the log buffer is
flushed to mixxx.log. LEVEL is one of the values
defined at --logLevel above.
–debugAssertBreak Breaks (SIGINT) Mixxx, if a DEBUG_ASSERT eval-
uates to false. Under a debugger you can con-
tinue afterwards. This will also avoid to switch the
MIXXX_DEBUG_ASSERTIONS_FATAL flag which
leads to a time consuming full rebuild. Now the
MIXXX_DEBUG_ASSERTIONS_FATAL is only re-
spected if --debugAssertBreak is not passed.
-h, –help Display this help message and exit
16.5 Developer tools
To start Mixxx in Developer mode from a custom resource directory with MIDI and HID logging enabled, type the
following line into the terminal and hit return:
16.5. Developer tools 103

Mixxx User Manual, Release 2.1.0
./mixxx --controllerDebug --developer --resourcePath res
16.5.1 Experiment modes for rapid development and testing
• Adds a static Experiment class with a tri-state mode flag that indicates whether the experiment mode is OFF,
BASE, or EXPERIMENT.
• Adds Developer →Stats:Experiment Bucket and Developer →Stats:Base Bucket. Each one toggles between
OFF and BASE/EXPERIMENT so you can choose exactly what time spans you would like to collect in your
base and experiment buckets.
• Updates StatsManager to segment collected stats into a base and experiment bucket. This allows you to quickly
measure the difference a code change has on relevant counters / timers within the same execution of Mixxx.
This is useful for quickly enabling and disabling a code change without a re-compile/re-run cycle to get an anecdotal
sense of how it “feels” as well as a quantified sense of how it differs in terms of stats Mixxx collects.
All stats collected via the usual Counter/Timer/ScopedTimer/etc. tools are segmented into a BASE STATS and EX-
PERIMENT STATS section printed to the log on exit.
16.6 Version History
v2.1.0 (2018-04-15)
• Graphical interface scales for high resolution screens
• Overhauled Deere and LateNight skins
• New Tango skin
• Resizable waveforms
• Effects are synchronized to the tempo
• Effects are processed post-fader and post-crossfader and can be previewed in headphones
• One metaknob per effect with customizable parameter control for intuitive use of effect chains
• Nine new effects: Autopan, Biquad Equalizer, Biquad Full Kill Equalizer, Loudness Contour, Metronome,
Parametric Equalizer, Phaser, Stereo Balance, Tremolo
• Loaded effects and their parameters are saved and restored when Mixxx restarts
• More transparent sounding equalizers (Biquad Equalizer and Biquad Full Kill Equalizer)
• Improved scratching sounds with jog wheels, vinyl control, and dragging waveforms with the mouse
• Simplified looping and beatjump controls
• Configurable rows of 8 samplers with up to 8 rows available for a total of 64 samplers
• Files loaded to samplers are reloaded when Mixxx restarts
• Improved volume normalization algorithm (EBU-R 128)
• Filter library table by crates
• Sort musical keys in library table by circle of fifths
• Write metadata tags back to audio files
• New JavaScript library for controller mapping
16.6. Version History 104

Mixxx User Manual, Release 2.1.0
• Configure multiple Internet broadcasting stations and use multiple stations at the same time
• Broadcast and record microphones with direct monitoring and latency compensation
• Broadcast and record from an external mixer
• Booth output with independent gain knob for using sound cards with 6 output channels without an external
mixer
• Prevent screensaver from starting while Mixxx is running
• CUP (Cue And Play) cue button mode
• Time remaining and time elapsed now take into account the tempo fader
• Clicking cover art now shows it full size in a separate window
For a full list of new features and bugfixes, go to: https://launchpad.net/mixxx/2.1.
v2.0.0 (2015-12-31)
• 4 Decks with Master Sync
• New Effects Framework with 4 Effect Units and 5 Built-in Effects: * Flanger, Bit Crusher, Reverb, Echo, Filter
* More to come!
• Configurable, Resizeable User Interface with 3 Brand New Skins
• Cover Art Display
• Music Key Detection and Shifting
• Vinyl Audio Pass-Through
• 4 Microphone inputs and 4 Auxiliary inputs
• MIDI Mapping GUI and Improved Learning Wizard
• MusicBrainz metadata fetching
• RGB Musical Waveforms
• Hundreds of Bug Fixes and Improvements
• New Pitch-Independent Algorithm for Better-Sounding Key-lock
For a full list of new features and bugfixes, go to: https://launchpad.net/mixxx/2.0.
See also:
For an overview of previous versions, take a look at the timeline.
16.6. Version History 105

CHAPTER 17
Glossary of Terms
AAC Advanced Audio Coding (AAC) is a patented audio compression algorithm which uses a form of lossy data
compression. Designed to be the successor to MP3, AAC generally achieves better sound quality at similar bit
rates. While the .aac extension is sometimes used for AAC-encoded files, they are typically saved with an .m4a
file extension.
AcoustID An acoustic fingerprint system built entirely on open-source technology. It aims to create a free database
of user-submitted audio fingerprints with mapping to the MusicBrainz metadata database and provide a web
service for audio file identification using this database. For more information, see‘<https://acoustid.org/>‘_.
AIFF Short for Audio Interchange File Format. High-quality digital audio file format, similar to .wav files. Contains
CD-quality audio stored in a non-compressed, lossless format. AIFF files generally end with a .aiff or .aif
extension.
ALAC Apple Lossless Audio Codec (ALAC) is a lossless audio file format used by iTunes and other Apple products.
ALAC files use the same MP4 container format as AAC and use the same file extensions (m4a, mp4). Mixxx
and many other programs are not compatible with ALAC. It is recommended to convert ALAC files to FLAC
for use in Mixxx.
API An Application Program Interface (API) is a specification and set of rules for how software programs interact
with each other. In Mixxx, an example of this is the Sound API that Mixxx uses to communicate with the
Operating System to make use of the soundcards connected to the computer.
audio interface
audio interfaces An audio interface is a device that facilitates the input and output of audio signals to and from a
computer, typically connected by USB. Almost all computers come with a basic audio interface built in, but a
higher quality audio interface with at least 4 output channels is recommended for Mixxx.
balance A balance control on a mixer allows you to adjust the balance between the left and right channel. The
balance refers to the relative volume of the corresponding channel in a stereo audio signal.
bar In musical notation, a bar (or measure) is a segment of time defined by a given number of beats. Typically, a
piece consists of several bars of the same length.
beatgrid A series of markers that point to the location of beats within the track. Beatgrids are used for advanced
mixing functions such as track sync, precise effects synchronization, looping and accurate BPM representation.
106

Mixxx User Manual, Release 2.1.0
beatmatching A mixing technique used to establish a similar tempo with two or more tracks, making them sound
like just one track.
binaries Files that contain compiled computer code, which was compiled from source code. Source code, which
is usually a bunch of text files, is processed with a program called a compiler. The compiler then generates a
binary, which is something like an an .exe or a .dll file. By using binaries you are relieved of the task of having
to compile the code by yourself.
bitrate Describe the quality of an audio or video file. For audio data the bitrate is commonly measured in Kbps. For
example, an MP3 audio file that is compressed at 192 Kbps will have a greater dynamic range and may sound
slightly more clear than the same audio file compressed at 128 Kbps.
BPM Beats per minute (BPM) is used as a measure of tempo in music. If you tap your foot to music you are following
the “beat”. If you count how many taps you do in a minute you have calculated the BPM.
bug report Every software has bugs. When you come across a bug in this software, you should submit a report about
it to the developers. They can use this to identify, replicate and fix the issue.
CDJ CDJ is a term originally used to describe a line of CD players from Pioneer Electronics. Today CDJ generally
refers to DJ CD players that work like a record player. They allow analog control of music using CDs, usually
using a touch sensitive emulated vinyl control surface.
codec Short for compressor/decompressor, a codec is any technology for compressing and decompressing audio and
video data. Some popular codecs for computer audio include MP3 and Ogg Vorbis.
controller An external hardware device that generates and transmits signals to a computer, usually via USB, to
control software with physical controls other than a mouse and keyboard. Controllers have many uses for music
such as controlling DJ programs like Mixxx. They typically send MIDI signals but some controllers use HID
signals. Many DJs prefer to control DJ software using physical knobs, faders, and wheels on controllers instead
of using a computer keyboard and mouse.
crossfader The crossfader is a slider that determines how much each deck of audio contributes to the master output.
cue A Cue or Cue point is a reference point in the track usually placed on the position the DJ wants the track to start
at by default. This is useful to instantly jump to that point without seeking through the track.
cue sheet A cue sheet (or CUE file, CUE sheet, etc.) is a formatted plain text file which is used to provide index
information for a large audio file. For example, it can be used to tell software extra details about the layout of a
CD to burn.
cueing Headphone cueing, or just cueing, is listening to the next track you would like to mix in in your headphones.
The audience will not hear what you are cueing in your headphones. Being able to cue is a crucial aspect to
DJing.
db Short for decibels. A Decibel is a logarithmic measurement of sound level. Whispering is around 25 dB while
unbearable sound such as a jet engine is around 160 db. Rule of thumb: A volume increase of 10 dB is perceived
as twice as loud.
deck A deck is like a virtual vinyl turntable. You can load a track into it and play the track, just like you would put a
record on turntable and play it.
direct monitoring A feature of many soundcards that allows microphones and other input signals to be heard through
the soundcard outputs with no perceivable latency. With direct monitoring, the audio interface mixes the input
signal in hardware with the output signal from Mixxx. This bypasses the latency of sending the signal into the
computer for Mixxx to process and sending it back out to the soundcard.
DRM Digital Rights Management (DRM) technologies attempt to control what you can and can’t do with the media
and hardware you’ve purchased. Typically, a DRM system either encrypts the data so that it can only be accessed
in a way authorized by copyright holders or marks content with a digital watermark or similar method so that
the content can not be freely distributed. For information about how you can get involved in activism against
DRM, see Defective by Design.
107

Mixxx User Manual, Release 2.1.0
EQ
Equalizer An equalizer allows the sound in specified frequency bands to be amplified or reduced, in order to adjust
the quality and character of the sound.
A simple graphic equalizer consists of multiple controls for boosting or cutting bands or frequencies of sound.
A parametric equalizer controls more parameters of the sound than a graphic equalizer. It can control three
aspects of each frequency: level (boost or cut), the center or primary frequency, and the bandwidth or range of
each frequency.
fast-forward To cause something to advance at quicker than normal speed. In terms of audio software that means if
you press the fast-forward button the audio will play with increased speed as long as the button is pressed. This
is useful to seek through a track.
fast-rewind The opposite of fast-forward. If you press the fast-rewind button the audio will play in reverse with
increased speed as long as the button is pressed.
file manager A computer program that organizes data files into groups and shows you where they are when you need
to find them again. Popular file managers for the operating systems Mixxx supports are Explorer on Windows,
Finder on macOS and Nautilus on GNU/Linux.
FLAC Free Lossless Audio Compression (FLAC), a patent-free audio compression similar to MP3 but lossless (i.e.
there is no loss in audio quality when used). FLAC files generally end with a .flac extension.
flanger A flanger is an effect that mixes the input signal with a delayed copy of itself which leads to interferences in
the signal and creates a comb-filter effect. By routing the output of the effect back into the input (feedback), the
effect is enhanced.
GUI Short for “Graphical User Interface” and is pronounced “gooey”. It refers to a user interface based on graphics
(icons, pictures and menus) instead of text. In Mixxx, it uses a mouse, keyboard, or MIDI /HID controllers as
input devices.
head/mix button The head/mix button is used to control how much you mix the master output into your headphone
output. This can be very useful when cueing a track, because you can test out how it sounds when mixed with
the main mix in your headphones, before letting the audience hear the track.
headphone button The headphone button is used to indicate whether or not you are pre-listening to a deck or sampler
in your headphones.
headphone output The headphone output is what you hear in your headphones.
HID Short for for Human Interface Device, a part of the USB specification. It specifies a device class (a type
of computer hardware) for human interface devices such as keyboards, mice, game controllers, and some DJ
controllers.
hotcue Similar to the main cue point, a hotcue is a reference point in the track. DJs usually place hotcues at distinctive
positions within a track such as drops, breaks or kicks and snares. Mixxx supports up to 36 hotcues.
HSV HSV stands for hue, saturation, and value, and is also often called HSB (B for brightness). The HSV Color
Model represents color in a way more suited to the human perception of color. For example, the relationships
“stronger than”, “darker than”, and “the opposite of” are easily expressed in HSV. In contrast, the representation
of the hardware-oriented RGB model is close to what most monitors show.
icecast Icecast is free and open-source software that allows digital audio content to be broadcast to and from media
player software, enabling the creation of Internet radio stations. Unlike Shoutcast, the software provides the
ability to stream in free file formats like Ogg Vorbis and run your own directory server.
IRC Internet Relay Chat (IRC) is an online chat network. The Mixxx IRC channel was on the FreeNode IRC Network
in the #mixxx channel. The channel was replaced in 2018 by the Mixxx Zulip Chat.
kbps Short for kilobits per second. Here used to measure the quality of audio data. See bitrate
108

Mixxx User Manual, Release 2.1.0
key Short for “musical key” (i.e. C major).
key lock
keylock With key lock enabled, the tempo of the track will change but the pitch remains consistent. When unlocked,
the pitch slider will speed up (or slow down) the track and the pitch will increase (or decrease) along with it.
kill switch A button to turn on and off individual frequency ranges within a channel, i.e. treble, mid and bass. Useful
for effects where the DJ drops a track out for a period or creates room for a transition.
LAME LAME is a free software codec used to encode/compress audio into the lossy MP3 file format.
latency Latency refers to a short period of delay (usually measured in milliseconds) between when an audio signal
enters and when it emerges from a system. Being able to lower the latency as much as possible makes a huge
difference in responsiveness.
level meter The level meter is used to show the average levels of audio signals. The level should average around the
top of the green region, with the loudest parts of the music (the transients) briefly going into the yellow region.
If the level meter is in the red, the signal is clipping and the gain should be turned down.
lossless Used when describing audio compression algorithms, a lossless algorithm is one which results in no loss in
audio quality when used.
lossy Used when describing audio compression algorithms, a lossy algorithm is one which results in a loss in audio
quality when used.
macOS macOS (originally named “Mac OS X” until 2012 and then “OS X” until 2016) is the current Mac operating
system that officially succeeded the classic Mac OS in 2001.
master output The master output is the main audio output. It is what your audience hears.
master sync Master sync mode persistently adjusts a track’s tempo and phase (if quantization is enabled) in order to
stay in sync with other decks that are in master sync mode.
metadata In general, any piece of information about a music file that Mixxx uses (e.g. title, artist, album, hotcue
locations, loops, etc.). Various file metadata formats allow information such as the title, artist, album, and track
number to be stored in the audio file itself, see https://en.wikipedia.org/wiki/ID3 . Mixxx stores additional
metadata about music files in its database, like beatgrid, waveform data, hotcues, playlists, crates, number of
plays, etc.
MIDI Short for for Musical Instrument Digital Interface. A digital communications language and hardware specifi-
cation enabling compatible electronic instruments, sequencers, computers, etc., to communicate with each other
in a network. Most DJ controllers use MIDI to communicate with computers.
MP3 A patented audio compression algorithm which uses a form of lossy data compression. It is de-facto standard
of digital audio compression for music. MP3 files generally end with a .mp3 extension.
MusicBrainz A open-source music encyclopedia that collects music metadata and makes it available to the public.
For more information, see https://musicbrainz.org/.
Ogg Vorbis A patent-free audio compression algorithm which uses a form of lossy data compression. It is designed
to provide for efficient streaming and manipulation of high quality digital audio. Ogg Vorbis files generally end
with a .ogg or .oga extension.
open-source Generically, open-source refers to a program for which the source code is available to the public for use
and/or modification from its original design free of charge. Open source code is typically created as a collabo-
rative effort in which programmers improve upon the code and share the changes within the community. Open
source sprouted in the technological community as a response to proprietary software owned by corporations.
For more information, see Wikipedia.
OpenGL An operating system feature used to draw hardware-accelerated graphics. Mixxx uses OpenGL to draw the
waveform displays and spinning vinyl widgets.
109

Mixxx User Manual, Release 2.1.0
operating system Your operating system (OS) is the computing environment on your computer. For example, Win-
dows, macOS, or GNU/Linux are the three operating systems that Mixxx supports.
Opus Opus is a totally open, royalty-free, highly versatile lossy audio codec. The .opus filename extension is recom-
mended.
PFL PFL or “pre-fader listen” is the headphone signal that is not affected by the deck volume faders. This allows for
pre-listening tracks in headphones by lowering the volume fader so the deck plays only to headphones but not
to the audience. See also: headphone button.
phase The phase of a track is its position relative to another track. If two tracks are sync’d to the same tempo and
in-phase then they should be playing so that their beats are aligned.
pitch bend A technique used by DJs that temporarily bends the rate of a track up or down, usually while a button
is held. This technique is usually used to make micro-adjustments to the synchronization of tracks while beat-
matching. Before digital DJing, this was accomplished by dragging one’s finger alongside the turntable to slow
it down or by twisting the record spindle to speed it up.
podcast A podcast is a feed of audio or video files made available for free or for purchase over the Internet. Podcast
clients such as iTunes allow listeners to subscribe to the feed and automatically download content to their
portable audio players as it becomes available.
quantization Quantization is the process of aligning notes and other events like loops or cuepoints so that they start
or finish exactly on beats or fractions of beats.
ramping pitch bend Basically identical to the regular pitch bend with the difference that the pitch changes gradually,
instead of all at once. Often uses for temporary pitch changes. It simulates the effect of touching a turntable to
temporarily slow down or speed up a record.
rate The speed at which a track is played back, usually expressed in terms of a percentage of the speed relative to the
tracks normal rate. Often while mixing, DJs adjust the rates of tracks so that they can play at the same tempo as
other tracks. This allows DJs to beatmix, and is an essential part of DJing.
ReplayGain ReplayGain normalizes audio data in a non-destructive way, so the tracks in your music library don’t
all play at different volumes. Audio files are scanned by a psychoacoustic algorithm to determine the loudness
of the audio data. ReplayGain information is stored as metadata in a digital audio file in order for the sound to
be correctly played at the right level of loudness.
reverse Reverse plays a track backwards.
RGB The RGB color model is an additive color model in which red, green, and blue light are added together in
various ways to reproduce a broad array of colors. The name of the model comes from the initials of the three
additive primary colors, red, green, and blue.
shoutcast Shoutcast is proprietary software that allows digital audio content to be broadcast to and from media player
software, enabling the creation of Internet radio stations.
soundcard
soundcards Another name for an audio interface, although few audio interfaces are shaped like cards anymore.
sync Sync allows you to automatically adjust a track’s tempo and phase to be in sync with another deck that is
playing.
tempo The speed of a track measured in bpm.
timecode Used here in conjunction with vinyl control. A special audio signal on a control vinyl or control CD (time-
code media) that a computer can listen to in order to determine speed, direction and position of the playback.
track A track is another word for a song.
110

Mixxx User Manual, Release 2.1.0
url Uniform Resource Locator. The address that defines the route to a file on an Internet server. URLs are typed into
a Web browser to access Web pages and files, and URLs are embedded within the pages themselves as hypertext
links. One example of a URL is https://mixxx.org .
vinyl control A method of controlling DJ applications which simulates the traditional DJing paradigm of two turnta-
bles. Using special timecode media, the DJ application analyzes the timecode signal and simulates the sound
and feel of having your music collection on vinyl.
volume A term that refers to the degree of sound intensity or audibility; loudness. Volume is determined by people’s
perception and does not directly correspond to any physical property of sound.
WAV Standard digital audio file format used for storing waveform data; allows audio recordings to be saved with
different sampling rates and bitrates; often saved in a 44.1 KHz, 16-bit, stereo format, which is the standard
format used for CD audio. Wave files are not compressed, and are therefore lossless. Wave files generally end
with a .wav extension.
waveform overview The waveform overview shows the waveform envelope of the entire track, and is useful because
they allow DJs to see breakdowns far in advance.
waveform summary The waveform summary shows the waveform envelope of the track near the current playback
position.
Zulip Zulip is a powerful, open source group chat application that combines the immediacy of real-time chat with the
productivity benefits of threaded conversations. The Mixxx Zulip Chat at can be found at https://mixxx.
zulipchat.com .
111
