Mongo DB Admin Guide
User Manual:
Open the PDF directly: View PDF ![]() .
.
Page Count: 220 [warning: Documents this large are best viewed by clicking the View PDF Link!]

MongoDB Administrator Training

MongoDB Administrator Training
Release 3.4
MongoDB, Inc.
Nov 15, 2017
Contents
1Introduction 4
1.1 Warm Up ................................................. 4
1.2 MongoDB - The Company ....................................... 5
1.3 MongoDB Overview ........................................... 5
1.4 MongoDB Stores Documents ..................................... 8
1.5 MongoDB Data Types ......................................... 11
1.6 Lab: Installing and Configuring MongoDB .............................. 14
2Storage 18
2.1 Introduction to Storage Engines .................................... 18
3CRUD 24
3.1 Creating and Deleting Documents .................................. 24
3.2 Reading Documents .......................................... 29
3.3 Query Operators ............................................ 36
3.4 Lab: Finding Documents ........................................ 40
3.5 Updating Documents .......................................... 40
3.6 Lab: Updating Documents ....................................... 49
4Indexes 50
4.1 Index Fundamentals .......................................... 50
4.2 Lab: Basic Indexes ........................................... 56
4.3 Compound Indexes ........................................... 57
4.4 Lab: Optimizing an Index ........................................ 62
4.5 Multikey Indexes ............................................. 63
4.6 Hashed Indexes ............................................. 67
4.7 Geospatial Indexes ........................................... 68
4.8 Using Compass with Indexes ..................................... 75
4.9 TTL Indexes ............................................... 79
4.10 Text Indexes ............................................... 81
4.11 Partial Indexes .............................................. 83
4.12 Lab: Finding and Addressing Slow Operations ........................... 86
4.13 Lab: Using explain() ........................................ 87
5ReplicaSets 88
5.1 Introduction to Replica Sets ...................................... 88
5.2 Elections in Replica Sets ........................................ 91
5.3 Replica Set Roles and Configuration ................................. 96
5.4 The Oplog: Statement Based Replication .............................. 97
1

5.5 Lab: Working with the Oplog ...................................... 99
5.6 Write Concern ..............................................101
5.7 Read Concern ..............................................106
5.8 Read Preference ............................................113
5.9 Lab: Setting up a Replica Set .....................................114
6Sharding 118
6.1 Introduction to Sharding ........................................118
6.2 Balancing Shards ............................................125
6.3 Shard Zones ...............................................127
6.4 Lab: Setting Up a Sharded Cluster ..................................129
7ReportingToolsandDiagnostics 136
7.1 Performance Troubleshooting .....................................136
8BackupandRecovery 144
8.1 Backup and Recovery .........................................144
9Aggregation 149
9.1 Intro to Aggregation ...........................................149
10 Views 157
10.1 Views Tutorial ..............................................157
10.2 Lab: Vertical Views ...........................................159
10.3 Lab: Horizontal Views .........................................160
10.4 Lab: Reshaped Views .........................................161
11 Security 162
11.1 Security Introduction ..........................................162
11.2 Authorization ...............................................165
11.3 Lab: Administration Users .......................................171
11.4 Lab: Create User-Defined Role (Optional) ..............................172
11.5 Authentication ..............................................174
11.6 Lab: Secure mongod ..........................................175
11.7 Auditing ..................................................176
11.8 Encryption ................................................178
11.9 Log Redaction ..............................................180
11.10Lab: Secured Replica Set - KeyFile (Optional) ...........................181
11.11Lab: LDAP Authentication & Authorization (Optional) ........................184
11.12Lab: Security Workshop ........................................186
12 MongoDB Atlas, Cloud & Ops Manager Fundamentals 195
12.1 MongoDB Cloud & Ops Manager ...................................195
12.2 Automation ................................................197
12.3 Lab: Cluster Automation ........................................200
12.4 Monitoring ................................................201
12.5 Lab: Create an Alert ..........................................203
12.6 Backups .................................................203
13 MongoDB Cloud & Ops Manager Under the Hood 206
13.1 API ....................................................206
13.2 Lab: Cloud Manager API ........................................207
13.3 Architecture (Ops Manager) ......................................208
13.4 Security (Ops Manager) ........................................210
13.5 Lab: Install Ops Manager .......................................211
2

14 Introduction to MongoDB BI Connector 214
14.1 MongoDB Connector for BI ......................................214
3

1 Introduction
Warm Up (page 4) Activities to get the class started
MongoDB - The Company (page 5) About MongoDB, the company
MongoDB Overview (page 5) MongoDB philosophy and features
MongoDB Stores Documents (page 8) The structure of data in MongoDB
MongoDB Data Types (page 11) An overview of BSON data types in MongoDB
Lab: Installing and Configuring MongoDB (page 14) Install MongoDB and experiment with a few operations.
1.1 Warm Up
Introductions
• Who am I?
•MyroleatMongoDB
•Mybackgroundandpriorexperience
Getting to Know You
• Who are you?
• What role do you play in your organization?
• What is your background?
•DoyouhavepriorexperiencewithMongoDB?
MongoDB Experience
• Who has never used MongoDB?
• Who has some experience?
• Who has worked with production MongoDB deployments?
• Who is more of a developer?
• Who is more of an operations person?
4

Logistics
1.2 MongoDB - The Company
10gen
•MongoDBwasinitiallycreatedin2008aspartofahostedapplication stack.
•Thecompanywasoriginallycalled10gen.
•Aspartoftheiroverarchingplantocreatethe10genplatform, the company built a database.
•Suddenlyeverybodysaid:“Ilikethat!Givemethatdatabase!”
Origin of MongoDB
•10genbecameadatabasecompany.
•In2013,thecompanyrebrandedasMongoDB,Inc.
•Thefoundershaveotherstartupstotheircredit:DoubleClick, ShopWiki, Gilt.
•Themotivationforthedatabasecamefromobservingthefollowing pattern with application development.
–The user base grows.
–The associated body of data grows.
–Eventually the application outgrows the database.
–Meeting performance requirements becomes difficult.
1.3 MongoDB Overview
Learning Objectives
Upon completing this module students should understand:
•MongoDBvs.relationaldatabasesandkey/valuestores
•Verticalvs.horizontalscaling
•TheroleofMongoDBinthedevelopmentstack
•ThestructureofdocumentsinMongoDB
•Arrayfields
•Embeddeddocuments
•FundamentalsofBSON
5

MongoDB is a Document Database
Documents are associative arrays like:
•Pythondictionaries
•Rubyhashes
•PHParrays
•JSONobjects
An Example MongoDB Document
AMongoDBdocumentexpressedusingJSONsyntax.
{
"_id" :"/apple-reports-second-quarter-revenue",
"headline" :"Apple Reported Second Quarter Revenue Today",
"date" :ISODate("2015-03-24T22:35:21.908Z"),
"author" :{
"name" :"Bob Walker",
"title" :"Lead Business Editor"
},
"copy" :"Apple beat Wall St expectations by reporting ...",
"tags" :[
"AAPL","Earnings","Cupertino"
],
"comments" :[
{"name" :"Frank","comment" :"Great Story" },
{"name" :"Wendy","comment" :"When can I buy an Apple Watch?" }
]
}
Vertical Scaling
CPU
RAM
I/O
CPU
RAM
I/O
6
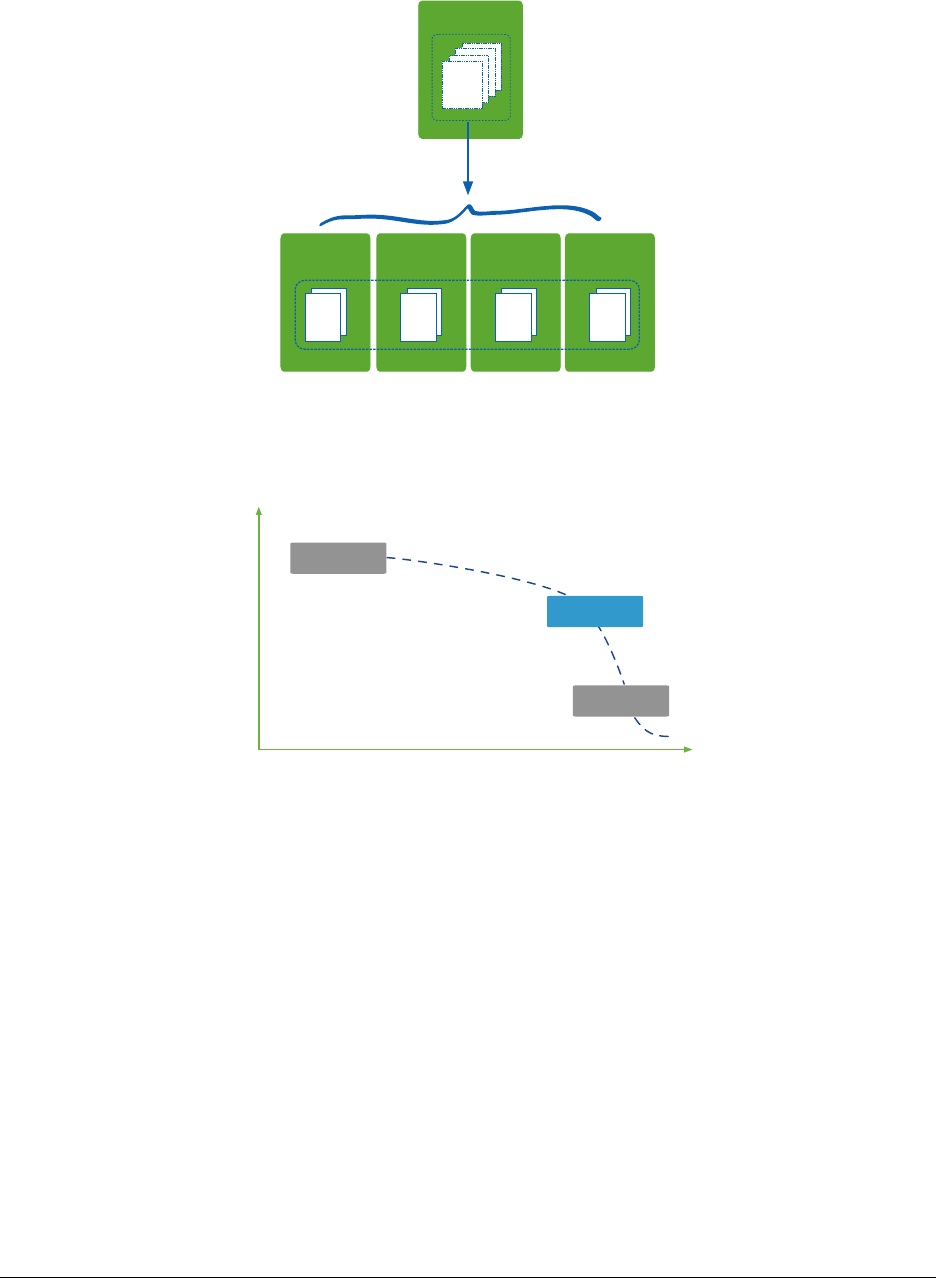
Scaling with MongoDB
1TB
Collection1
Shard A
256 GB
Shard B
256 GB
Shard C
256 GB
Shard D
256 GB
Collection1
Database Landscape
Depth of Functionality
Scalability & Performance
RDBMS
Memcached
MongoDB
7
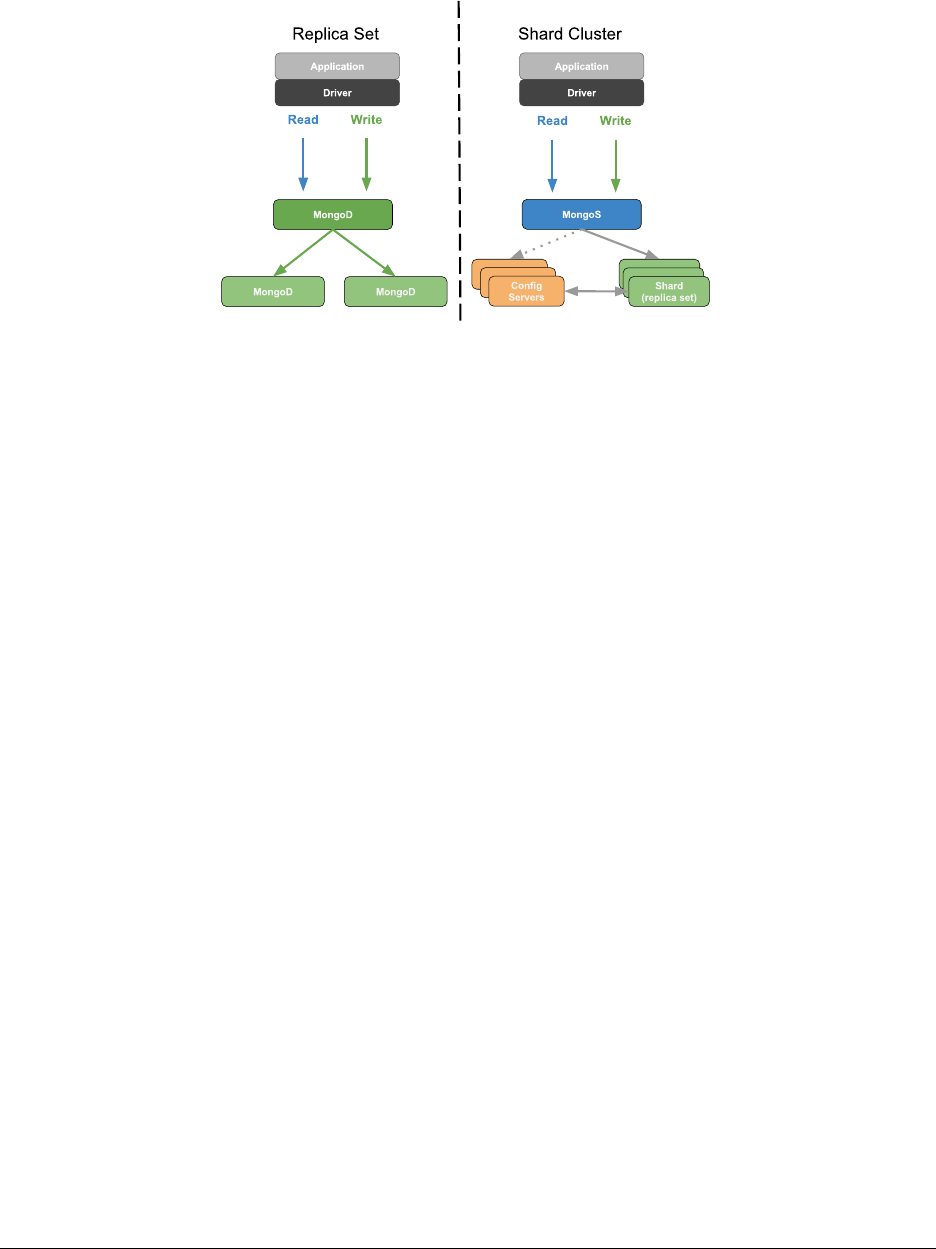
MongoDB Deployment Models
1.4 MongoDB Stores Documents
Learning Objectives
Upon completing this module, students should understand:
•JSON
•BSONbasics
•Thatdocumentsareorganizedintocollections
8

JSON
•JavaScriptObjectNotation
•Objectsareassociativearrays.
•Theyarecomposedofkey-valuepairs.
ASimpleJSONObject
{
"firstname" :"Thomas",
"lastname" :"Smith",
"age" :29
}
JSON Keys and Values
•Keysmustbestrings.
•Valuesmaybeanyofthefollowing:
–string (e.g., “Thomas”)
–number (e.g., 29, 3.7)
–true / false
–null
–array (e.g., [88.5, 91.3, 67.1])
–object
•Moredetailat
json.org1.
Example Field Values
{
"headline" :"Apple Reported Second Quarter Revenue Today",
"date" :ISODate("2015-03-24T22:35:21.908Z"),
"views" :1234,
"author" :{
"name" :"Bob Walker",
"title" :"Lead Business Editor"
},
"tags" :[
"AAPL",
23,
{"name" :"city","value" :"Cupertino" },
{"name" :"stockPrice","value":NumberDecimal("143.51")},
["Electronics","Computers" ]
]
}
1http://json.org/
9

BSON
•MongoDBstoresdataasBinaryJSON(BSON).
•MongoDBdriverssendandreceivedatainthisformat.
•TheymapBSONtonativedatastructures.
•BSONprovidessupportforallJSONdatatypesandseveralothers.
•BSONwasdesignedtobelightweight,traversableandefficient.
•Seebsonspec.org2.
BSON Hello World
// JSON
{"hello" :"world" }
// BSON
x16 x0 x0 x0 // document size
x2 // type 2=string
hellox0 // name of the field, null terminated
x6 x0 x0 x0 // size of the string value
worldx0 // string value, null terminated
x0 // end of document
AMoreComplexBSONExample
// JSON
{"BSON" :["awesome",5.05,1986 ]}
// BSON
x31 x0 x0 x0 // document size
x4 // type=4, array
BSONx0 // name of first element
x26 x0 x0 x0 // size of the array, in bytes
x2 // type=2, string
x30 x0 // element name ’0’
x8 x0 x0 x0 // size of value for array element 0
awesomex0 // string value for element 0
x1 // type=1, double
x31 x0 // element name ’1’
x33 x33 x33 x33 x33 x33 x14 x40 // double value for array element 1
x10 // type=16, int32
x32 x0 // element name ’2’
xc2 x7 x0 x0 // int32 value for array element 2
x0
x0
2http://bsonspec.org/#/specification
10

Documents, Collections, and Databases
•Documentsarestoredincollections.
•Collectionsarecontainedinadatabase.
•Example:
–Database: products
–Collections: books, movies, music
•Eachdatabase-collectioncombinationdefinesanamespace.
–products.books
–products.movies
–products.music
The _id Field
•Alldocumentsmusthavean_id field.
•Ifno_id is specified when a document is inserted, MongoDB will add the _id field as an ObjectId.
•MostdriverswillactuallycreatetheObjectIdifno_id is specified.
•Somerestrictions:
–The _id is immutable.
–Can not be an array
–The _id field must be unique to a collection
*acts as Primary key for replication.
1.5 MongoDB Data Types
Learning Objectives
By the end of this module, students should understand:
• What data types MongoDB supports
•SpecialconsiderationforsomeBSONtypes
11

What is BSON?
BSON is a binary serialization of JSON, used to store documents and make remote procedure calls in MongoDB. For
more in-depth coverage of BSON, specifically refer to bsonspec.org3
Note: All official MongoDB drivers map BSON to native types and data structures
BSON types
MongoDB supports a wide range of BSON types. Each data type hasacorrespondingnumberandstringaliasthatcan
be used with the $type operator to query documents by BSON type.
Double 1“double”
String 2“string”
Object 3“object”
Array 4“array”
Binary data 5“binData”
ObjectId 7“objectId”
Boolean 8“bool”
Date 9“date”
Null 10 “null”
BSON types continued
Regular Expression 11 “regex”
JavaScript 13 “javascript”
JavaScript (w/ scope) 15 “javascriptWithScope”
32-bit integer 16 “int”
Timestamp 17 “timestamp”
64-bit integer 18 “long”
Decimal128 19 “decimal”
Min key -1 “minKey”
Max key 127 “maxKey”
3http://bsonspec.org/
12

ObjectId
Date MAC address PID Counter
12 byte Hex String
ObjectId:
>ObjectId()
ObjectId("58dc309ce3f39998099d6275")
Timestamps
BSON has a special timestamp type for internal MongoDB use and is not associated with the regular Date type.
Date
BSON Date is a 64-bit integer that represents the number of milliseconds since the Unix epoch (Jan 1, 1970). This
results in a representable date range of about 290 million years into the past and future.
•OfficialBSONspecreferstotheBSONDatetypeasUTCdatetime
•Signeddatatype.Negativevaluesrepresentdatesbefore1970.
var today =ISODate() // using the ISODate constructor
Decimal
In MongoDB 3.4, support was added for 128-bit decimals.
•Thedecimal BSON type uses the decimal128 decimal-based floating-point numbering format.
•Thissupports34significantdigitsandanexponentrangeof-6143 to +6144.
•Intendedforapplicationsthathandlemonetaryandscientific data that requires exact precision.
How to use Decimal
For specific information about how your preferred driver supports decimal128, click here4.
In the Mongo shell, we use the NumberDecimal() constructor.
•Canbecreatedwithastringargumentoradouble
•StoredinthedatabaseasNumberDecimal(“999.4999”)
>NumberDecimal("999.4999")
NumberDecimal("999.4999")
>NumberDecimal(999.4999)
NumberDecimal("999.4999")
4https://docs.mongodb.com/ecosystem/drivers/
13

Decimal Considerations
•Ifupgradinganexistingdatabasetousedecimal128,itisrecommendedanewfieldbeaddedtoreflectthenew
type. The old field may be deleted after verifying consistency
•Ifanyfieldscontaindecimal128 data, they will not be compatible with previous versions of MongoDB. There
is no support for downgrading datafiles containing decimals
•decimal types are not strictly equal to their double representations, so use the NumberDecimal constructor in
queries.
1.6 Lab: Installing and Configuring MongoDB
Learning Objectives
Upon completing this exercise students should understand:
•HowMongoDBisdistributed
•HowtoinstallMongoDB
•ConfigurationstepsforsettingupasimpleMongoDBdeployment
•HowtorunMongoDB
•HowtoruntheMongoshell
Production Releases
64-bit production releases of MongoDB are available for the following platforms.
•Windows
•OSX
•Linux
Installing MongoDB
•Visithttps://docs.mongodb.com/manual/installation/.
•PleaseinstalltheEnterpriseversionofMongoDB.
•Clickontheappropriatelink,suchas“InstallonWindows”or “Install on OS X” and follow the instructions.
•Versions:
–Even-numbered builds are production releases, e.g., 2.4.x,2.6.x.
–Odd-numbers indicate development releases, e.g., 2.5.x, 2.7.x.
14

Linux Setup
PATH=$PATH:<path to mongodb>/bin
sudo mkdir -p /data/db
sudo chmod -R 744 /data/db
sudo chown -R `whoami`/data/db
Install on Windows
•Downloadandrunthe.msiWindowsinstallerfrommongodb.org/downloads.
•Bydefault,binarieswillbeplacedinthefollowingdirectory.
C:\Program Files\MongoDB\Server\<VERSION>\bin
•ItishelpfultoaddthelocationoftheMongoDBbinariestoyour path.
•Todothis,from“SystemProperties”select“Advanced”then“EnvironmentVariables”
Create a Data Directory on Windows
•EnsurethereisadirectoryforyourMongoDBdatafiles.
•Thedefaultlocationis\data\db.
•Createadatadirectorywithacommandsuchasthefollowing.
md \data\db
Launch a mongod
Explore the mongod command.
<path to mongodb>/bin/mongod --help
Launch a mongod with the MMAPv1 storage engine:
<path to mongodb>/bin/mongod --storageEngine mmapv1
Alternatively, launch with the WiredTiger storage engine (default).
<path to mongodb>/bin/mongod
Specify an alternate path for data files using the --dbpath option. (Make sure the directory already exists.) E.g.,
<path to mongodb>/bin/mongod --dbpath /test/mongodb/data/wt
15

The MMAPv1 Data Directory
ls /data/db
•Themongod.lockfile
–This prevents multiple mongods from using the same data directory simultaneously.
–Each MongoDB database directory has one .lock.
–The lock file contains the process id of the mongod that is usingthedirectory.
•Datafiles
–The names of the files correspond to available databases.
–Asingledatabasemayhavemultiplefiles.
The WiredTiger Data Directory
ls /data/db
•Themongod.lockfile
–Used in the same way as MMAPv1.
•Datafiles
–Each collection and index stored in its own file.
–Will fail to start if MMAPv1 files found
Import Exercise Data
unzip usb_drive.zip
cd usb_drive
mongoimport -d sample -c tweets twitter.json
mongoimport -d sample -c zips zips.json
mongoimport -d sample -c grades grades.json
cd dump
mongorestore -d sample city
mongorestore -d sample digg
Note: If there is an error importing data directly from a USB drive, please copy the sampledata.zip file to your local
computer first.
16

Launch a Mongo Shell
Open another command shell. Then type the following to start the Mongo shell.
mongo
Display available commands.
help
Explore Databases
Display available databases.
show dbs
To use a particular database we can type the following.
use <database_name>
db
Exploring Collections
show collections
db.<COLLECTION>.help()
db.<COLLECTION>.find()
Admin Commands
•Therearealsoanumberofadmincommandsatourdisposal.
•Thefollowingwillshutdownthemongodweareconnectedtothrough the Mongo shell.
•YoucanalsojustkillwithCtrl-Cintheshellwindowfromwhich you launched the mongod.
db.adminCommand({shutdown : 1})
•Confirmthatthemongodprocesshasindeedstopped.
•Onceyouhave,pleaserestartit.
17
2 Storage
Introduction to Storage Engines (page 18) MongoDB storage engines
2.1 Introduction to Storage Engines
Learning Objectives
Upon completing this module, students should be familiar with:
•AvailablestorageenginesinMongoDB
•MongoDBjournalingmechanics
•ThedefaultstorageengineforMongoDB
•Commonstorageengineparameters
•ThestorageengineAPI
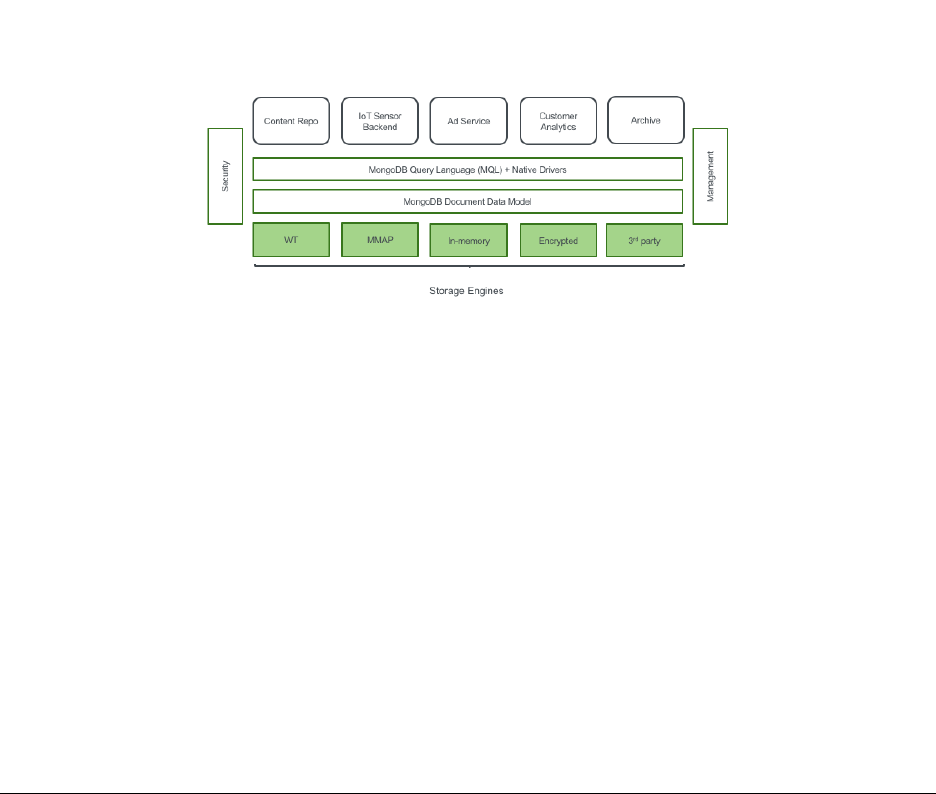
What is a Database Storage Engine?
How Storage Engines Affect Performance
• Writing and reading documents
•Concurrency
•Compressionalgorithms
•Indexformatandimplementation
•On-diskformat
18

Storage Engine Journaling
•Keeptrackofallchangesmadetodatafiles
•Stagewritessequentiallybeforetheycanbecommittedtothe data files
•Crashrecovery,writesfromjournalcanbereplayedtodatafiles in the event of a failure
MongoDB Storage Engines
As of MongoDB 3.4, three storage engine options are available:
•WiredTiger(default)
–with the option of on-disk/at rest encryption (Enterprise only)
•MMAPv1
•In-memorystorage(Enterpriseonly)
Specifying a MongoDB Storage Engine
Use the --storageEngine parameter to specify which storage engine MongoDB should use. E.g.,
mongod --storageEngine mmapv1
Specifying a Location to Store Data Files
•Usethedbpath parameter
mongod --dbpath /data/db
•Otherfilesarealsostoredhere.E.g.,
–mongod.lock file
–journal
•SeetheMongoDBdocsforacompletelistof
storage options5.
5http://docs.mongodb.org/manual/reference/program/mongod/#storage-options
19

MMAPv1 Storage Engine
•MMAPv1isMongoDB’soriginalstorageenginewasthedefaultuptoMongoDB3.0.
•specifytheuseoftheMMAPv1storageengineasfollows:
mongod --storageEngine mmapv1
•MMAPv1isbasedonmemory-mappedfiles,whichmapdatafilesondiskintovirtualmemory.
•AsofMongoDB3.0,MMAPv1supportscollection-levelconcurrency.
MMAPv1 Workloads
MMAPv1 excels at workloads where documents do not outgrow their original record size:
•High-volumeinserts
•Read-onlyworkloads
•In-placeupdates
Power of 2 Sizes Allocation Strategy
•MongoDB3.0usesallocationasthedefaultrecordallocation strategy for MMAPv1.
•Withthisstrategy,recordsincludethedocumentplusextraspace,orpadding.
•Eachrecordhasasizeinbytesthatisapowerof2(e.g.32,64,128,...2MB).
•Fordocumentslargerthan2MB,allocationisroundeduptothe nearest multiple of 2MB.
•ThisstrategyenablesMongoDBtoefficientlyreusefreedrecords to reduce fragmentation.
•Inaddition,theaddedpaddinggivesadocumentroomtogrowwithout requiring a move.
–Saves the cost of moving a document
–Results in fewer updates to indexes
Compression in MongoDB
•Compressioncansignificantlyreducetheamountofdiskspace / memory required.
•ThetradeoffisthatcompressionrequiresmoreCPU.
•MMAPv1doesnotsupportcompression.
•WiredTigerdoes.
20

WiredTiger Storage Engine
•TheWiredTigerstorageengineexcelsatallworkloads,especially write-heavy and update-heavy workloads.
•NotablefeaturesoftheWiredTigerstorageenginethatdonot exist in the MMAPv1 storage engine include:
–Compression
–Document-level concurrency
•DefaultstorageenginesinceMongoDB3.2.
•Forolderversions,specifytheuseoftheWiredTigerstorage engine as follows.
mongod --storageEngine wiredTiger
WiredTiger Compression Options
•snappy (default): less CPU usage than zlib,lessreductionindatasize
•zlib:greaterCPUusagethansnappy,greaterreductionindatasize
•nocompression
Configuring Compression in WiredTiger
Use the wiredTigerCollectionBlockCompressor parameter. E.g.,
mongod --storageEngine wiredTiger
--wiredTigerCollectionBlockCompressor zlib
Configuring Memory Usage in WiredTiger
Use the wiredTigerCacheSize parameter to designate the amount of RAM for the cache used by the WT storage
engine.
•Bydefault,thisvalueissettothemaximumof:
–50% of physical RAM minus 1GB or 256 MB (for MongoDB 3.4+)
–60% of physical RAM minus 1GB or 1GB (for MongoDB 3.2)
•Additionally,MongoDBusesmemoryforconnections,aggregations, sorts, ...
•TherestofthememoryisusedbytheFileSystemCache,whichis also needed by WT for optimal performance.
21

Journaling in MMAPv1 vs. WiredTiger
•MMAPv1useswrite-aheadjournalingtoensureconsistencyand durability between fsyncs.
•WiredTigerusesawrite-aheadlogincombinationwithcheckpoints to ensure durability.
•Regardlessofstorageengine,alwaysusejournalinginproduction.
MMMAPv1 Journaling Mechanics
•Journalfilesin<DATA-DIR>/journalareappendonly
•1GBperjournalfile
•OnceMongoDBappliesallwriteoperationsfromajournalfiletothedatabasedatafiles,itdeletesthejournal
file (or re-uses it)
•Usuallyonlyafewjournalfilesinthe<DATA-DIR>/journaldirectory
MMAPv1 Journaling Mechanics (Continued)
•Dataisflushedfromthesharedviewtodatafilesevery60seconds (configurable)
•Theoperatingsystemmayforceaflushatahigherfrequencythan 60 seconds if the system is low on free
memory
•Onceajournalfilecontainsonlyflushedwrites,itisnolonger needed for recovery and can be deleted or re-used
WiredTiger Journaling Mechanics
•WiredTigerwillcommitacheckpointtodiskevery60secondsorwhenthereare2gigabytesofdatatowrite.
•Betweenandduringcheckpointsthedatafilesarealwaysvalid.
•TheWiredTigerjournalpersistsalldatamodificationsbetween checkpoints.
•IfMongoDBexitsbetweencheckpoints,itusesthejournaltoreplayalldatamodifiedsincethelastcheckpoint.
•Bydefault,WiredTigerjournaliscompressedusingsnappy.
Storage Engine API
MongoDB 3.0 introduced a storage engine API:
•Abstractedstorageenginefunctionalityinthecodebase
•EasierforMongoDBtodevelopfuturestorageengines
•EasierforthirdpartiestodeveloptheirownMongoDBstorage engines
22

Conclusion
•MongoDB3.0introducespluggablestorageengines.
•Currentoptionsinclude:
–MMAPv1 (default)
–WiredTiger
•WiredTigerintroducesthefollowingtoMongoDB:
–Compression
–Document-level concurrency
23

3CRUD
Creating and Deleting Documents (page 24) Inserting documents into collections, deleting documents,anddrop-
ping collections
Reading Documents (page 29) The find() command, query documents, dot notation, and cursors
Query Operators (page 36) MongoDB query operators including: comparison, logical, element, and array operators
Lab: Finding Documents (page 40) Exercises for querying documents in MongoDB
Updating Documents (page 40) Using update methods and associated operators to mutate existing documents
Lab: Updating Documents (page 49) Exercises for updating documents in MongoDB
3.1 Creating and Deleting Documents
Learning Objectives
Upon completing this module students should understand:
•HowtoinsertdocumentsintoMongoDBcollections.
•_id fields:
•Howtodeletedocumentsfromacollection
•Howtoremoveacollectionfromadatabase
•HowtoremoveadatabasefromaMongoDBdeployment
Creating New Documents
•CreatedocumentsusinginsertOne() and insertMany().
•Forexample:
// Specify the collection name
db.<COLLECTION>.insertOne( { "name" :"Mongo" })
// For example
db.people.insertOne( { "name" :"Mongo" })
24

Example: Inserting a Document
Experiment with the following commands.
use sample
db.movies.insertOne( { "title" :"Jaws" })
db.movies.find()
Implicit _id Assignment
•Wedidnotspecifyan_id in the document we inserted.
•Ifyoudonotassignone,MongoDBwillcreateoneautomatically.
•ThevaluewillbeoftypeObjectId.
Example: Assigning _ids
Experiment with the following commands.
db.movies.insertOne( { "_id" :"Jaws","year" :1975 })
db.movies.find()
Inserts will fail if...
•Thereisalreadyadocumentinthecollectionwiththat_id.
•Youtrytoassignanarraytothe_id.
•Theargumentisnotawell-formeddocument.
Example: Inserts will fail if...
// fails because _id can’t have an array value
db.movies.insertOne( { "_id" :["Star Wars",
"The Empire Strikes Back",
"Return of the Jedi" ]})
// succeeds
db.movies.insertOne( { "_id" :"Star Wars" })
// fails because of duplicate id
db.movies.insertOne( { "_id" :"Star Wars" })
// malformed document
db.movies.insertOne( { "Star Wars" })
25

insertMany()
•Youmaybulkinsertusinganarrayofdocuments.
•UseinsertMany() instead of insertOne()
Ordered insertMany()
•FororderedinsertsMongoDBwillstopprocessinginsertsupon encountering an error.
•Meaningthatonlyinsertsoccurringbeforeanerrorwillcomplete.
•Thedefaultsettingfordb.<COLLECTION>.insertMany is an ordered insert.
•Seethenextexerciseforanexample.
Example: Ordered insertMany()
Experiment with the following operation.
db.movies.insertMany( [ { "_id" :"Batman","year" :1989 },
{"_id" :"Home Alone","year" :1990 },
{"_id" :"Ghostbusters","year" :1984 },
{"_id" :"Ghostbusters","year" :1984 }])
db.movies.find()
Unordered insertMany()
•Pass{ordered: false}to insertMany() to perform unordered inserts.
•Ifanygiveninsertfails,MongoDBwillstillattemptallofthe others.
•Theinsertsmaybeexecutedinadifferentorderthanyouspecified.
•Thenextexerciseisverysimilartothepreviousone.
•However,weareusing{ordered: false}.
•Oneinsertwillfail,butalltherestwillsucceed.
Example: Unordered insertMany()
Experiment with the following insert.
db.movies.insertMany( [ { "_id" :"Jaws","year" :1975 },
{"_id" :"Titanic","year" :1997 },
{"_id" :"The Lion King","year" :1994 }],
{ ordered :false })
db.movies.find()
26

The Shell is a JavaScript Interpreter
•SometimesitisconvenienttocreatetestdatausingalittleJavaScript.
•Themongoshellisafully-functionalJavaScriptinterpreter. You may:
–Define functions
–Use loops
–Assign variables
–Perform inserts
Exercise: Creating Data in the Shell
Experiment with the following commands.
for (i=1;i<=10000;i++){
db.stuff.insert( { "a" :i})
}
db.stuff.find()
Deleting Documents
You may delete documents f r o m a M o n g o D B d e p l oyment i n s everalways.
•UsedeleteOne() and deleteMany() to delete documents matching a specific set of conditions.
•Dropanentirecollection.
•Dropadatabase.
Using deleteOne()
•DeleteadocumentfromacollectionusingdeleteOne()
•Thiscommandhasonerequiredparameter,aquerydocument.
•Thefirstdocumentinthecollectionmatchingthequerydocument will be deleted.
27

Using deleteMany()
•DeletemultipledocumentsfromacollectionusingdeleteMany().
•Thiscommandhasonerequiredparameter,aquerydocument.
•Alldocumentsinthecollectionmatchingthequerydocumentwillbedeleted.
•Passanemptydocumenttodeletealldocuments.
Example: Deleting Documents
Experiment with removing documents. Do a find() after each deleteMany() command below.
for (i=1;i<=20;i++) { db.testcol.insertOne( { _id :i, a :i})}
db.testcol.deleteMany( { a :1}) // Delete the first document
// $lt is a query operator that enables us to select documents that
// are less than some value. More on operators soon.
db.testcol.deleteMany( { a :{$lt:5}}) // Remove three more
db.testcol.deleteOne( { a :{$lt:10 }}) // Remove one more
db.testcol.deleteMany() // Error: requires a query document.
db.testcol.deleteMany( { } ) // All documents removed
Dropping a Collection
•Youcandropanentirecollectionwithdb.<COLLECTION>.drop()
•Thecollectionandalldocumentswillbedeleted.
•Itwillalsoremoveanymetadataassociatedwiththatcollection.
•Indexesareonetypeofmetadataremoved.
•All collection and indexes files are removed and space allocated reclaimed.
–Wired Tiger only!
•Moreonmetadatalater.
28

Example: Dropping a Collection
db.colToBeDropped.insertOne( { a :1})
show collections // Shows the colToBeDropped collection
db.colToBeDropped.drop()
show collections // collection is gone
Dropping a Database
•Youcandropanentiredatabasewithdb.dropDatabase()
•Thisdropsthedatabaseonwhichthemethodiscalled.
•Italsodeletestheassociateddatafilesfromdisk,freeingdisk space.
•Bewarethatinthemongoshell,thisdoesnotchangedatabasecontext.
Example: Dropping a Database
use tempDB
db.testcol1.insertOne( { a :1})
db.testcol2.insertOne( { a :1})
show dbs // Here they are
show collections // Shows the two collections
db.dropDatabase()
show collections // No collections
show dbs // The db is gone
use sample // take us back to the sample db
3.2 Reading Documents
Learning Objectives
Upon completing this module students should understand:
•Thequery-by-exampleparadigmofMongoDB
•Howtoqueryonarrayelements
•Howtoqueryembeddeddocumentsusingdotnotation
•Howthemongoshellanddriversusecursors
•Projections
•Cursormethods:.count(),.sort(),.skip(),.limit()
29

The find() Method
•ThisisthefundamentalmethodbywhichwereaddatafromMongoDB.
•Wehavealreadyuseditinitsbasicform.
•find() returns a cursor that enables us to iterate through all documents matching a query.
•Wewilldiscusscursorslater.
Query by Example
•ToqueryMongoDB,specifyadocumentcontainingthekey/value pairs you want to match
•Youneedonlyspecifyvaluesforfieldsyoucareabout.
•Otherfieldswillnotbeusedtoexcludedocuments.
•Theresultsetwillincludealldocumentsinacollectionthat match.
Example: Querying by Example
Experiment with the following sequence of commands.
db.movies.drop()
db.movies.insertMany( [
{"title" :"Jaws","year" :1975,"imdb_rating" :8.1 },
{"title" :"Batman","year" :1989,"imdb_rating" :7.6 }
])
db.movies.find()
db.movies.find( { "year" :1975 })
// Multiple Batman movies from different years, find the correct one
db.movies.find( { "year" :1989,"title" :"Batman" })
Querying Arrays
•InMongoDByoumayqueryarrayfields.
•Specifyasinglevalueyouexpecttofindinthatarrayindesired documents.
•Alternatively,youmayspecifyanentirearrayinthequerydocument.
•Aswewillseelater,therearealsoseveraloperatorsthatenhance our ability to query array fields.
30

Example: Querying Arrays
db.movies.drop()
db.movies.insertMany(
[{ "title" :"Batman","category" :["action","adventure" ]},
{"title" :"Godzilla","category" :["action","adventure","sci-fi" ]},
{"title" :"Home Alone","category" :["family","comedy" ]}
])
// Match documents where "category" contains the value specified
db.movies.find( { "category" :"action" })
// Match documents where "category" equals the value specified
db.movies.find( { "category" :["action","sci-fi" ]}) // no documents
// only the second document
db.movies.find( { "category" :["action","adventure","sci-fi" ]})
Querying with Dot Notation
•Dotnotationisusedtoqueryonfieldsinembeddeddocuments.
•Thesyntaxis:
"field1.field2" :value
•Putquotesaroundthefieldnamewhenusingdotnotation.
Example: Querying with Dot Notation
db.movies.insertMany(
[{
"title" :"Avatar",
"box_office" :{"gross" :760,
"budget" :237,
"opening_weekend" :77
}
},
{
"title" :"E.T.",
"box_office" :{"gross" :349,
"budget" :10.5,
"opening_weekend" :14
}
}
])
db.movies.find( { "box_office" :{"gross" :760 }})// no values
// dot notation
db.movies.find( { "box_office.gross" :760 }) // expected value
31

Example: Arrays and Dot Notation
db.movies.insertMany( [
{"title" :"E.T.",
"filming_locations" :
[{"city" :"Culver City","state" :"CA","country" :"USA" },
{"city" :"Los Angeles","state" :"CA","country" :"USA" },
{"city" :"Cresecent City","state" :"CA","country" :"USA" }
]},
{"title":"Star Wars",
"filming_locations" :
[{"city" :"Ajim","state" :"Jerba","country" :"Tunisia" },
{"city" :"Yuma","state" :"AZ","country" :"USA" }
]}])
db.movies.find( { "filming_locations.country" :"USA" })// two documents
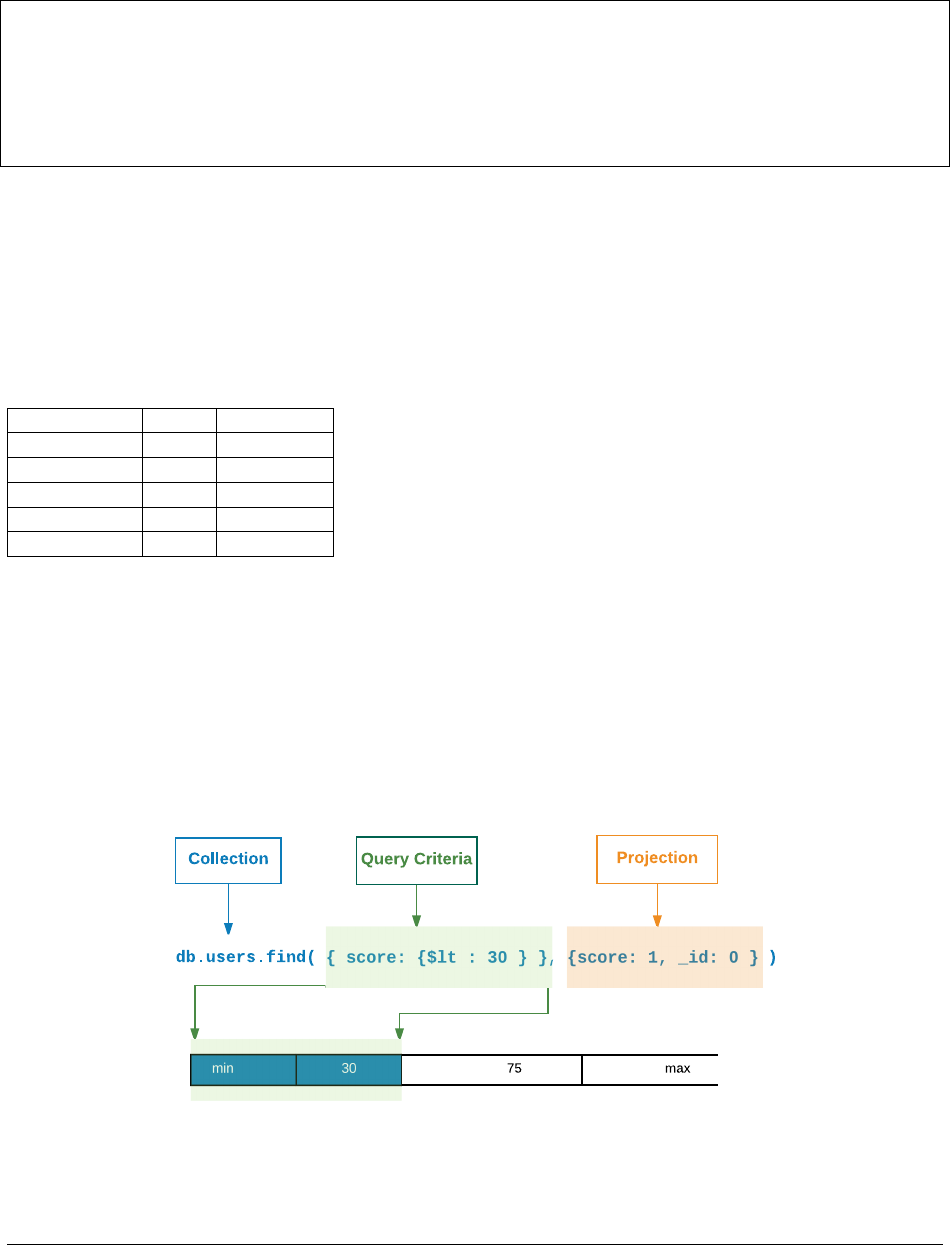
Projections
•Youmaychoosetohaveonlycertainfieldsappearinresultdocuments.
•Thisiscalledprojection.
•Youspecifyaprojectionbypassingasecondparametertofind().
Projection: Example (Setup)
db.movies.insertOne(
{
"title" :"Forrest Gump",
"category" :["drama","romance" ],
"imdb_rating" :8.8,
"filming_locations" :[
{"city" :"Savannah","state" :"GA","country" :"USA" },
{"city" :"Monument Valley","state" :"UT","country" :"USA" },
{"city" :"Los Anegeles","state" :"CA","country" :"USA" }
],
"box_office" :{
"gross" :557,
"opening_weekend" :24,
"budget" :55
}
})
32

Projection: Example
db.movies.findOne( { "title" :"Forrest Gump" },
{"title" :1,"imdb_rating" :1})
{
"_id" :ObjectId("5515942d31117f52a5122353"),
"title" :"Forrest Gump",
"imdb_rating" :8.8
}
Projection Documents
•IncludefieldswithfieldName: 1.
–Any field not named will be excluded
–except _id, which must be explicitly excluded.
•ExcludefieldswithfieldName: 0.
–Any field not named will be included.
Example: Projections
for (i=1;i<=20;i++){
db.movies.insertOne(
{"_id" :i, "title" :i,
"imdb_rating" :i, "box_office" :i})
}
db.movies.find()
// no "box_office"
db.movies.find( { "_id" :3}, { "title" :1,"imdb_rating" :1})
// no "imdb_rating"
db.movies.find( { "_id" :{ $gte :10 }},{"imdb_rating" :0})
// just "title"
db.movies.find( { "_id" :4}, { "_id" :0,"title" :1})
// just "imdb_rating", "box_office"
db.movies.find( { "_id" :5}, { _id :0,"title" :0})
// Can’t mix inclusion/exclusion except _id
db.movies.find( { "_id" :6}, { "title" :1,"imdb_rating" :0})
Cursors
• When you use find(),MongoDBreturnsacursor.
•Acursorisapointertotheresultset
•Youcangetiteratethroughdocumentsintheresultusingnext().
•Bydefault,themongoshellwilliteratethrough20documents at a time.
33

Example: Introducing Cursors
db.testcol.drop()
for (i=1;i<=10000;i++){
db.testcol.insertOne( { a :Math.floor( Math.random() *100 +1),
b:Math.floor( Math.random() *100 +1)})
}
db.testcol.find()
it
it
Example: Cursor Objects in the Mongo Shell
// Assigns the cursor returned by find() to a variable x
var x=db.testcol.find()
// Displays the first document in the result set.
x.next()
// True because there are more documents in the result set.
x.hasNext()
// Assigns the next document in the result set to the variable y.
y=x.next()
// Return value is the value of the a field of this document.
y.a
// Displaying a cursor prints the next 20 documents in the result set.
x
Cursor Methods
•count():Returnsthenumberofdocumentsintheresultset.
•limit():Limitstheresultsettothenumberofdocumentsspecified.
•skip():Skipsthenumberofdocumentsspecified.
Example: Using count()
db.testcol.drop()
for (i=1;i<=100;i++) { db.testcol.insertOne( { a :i})}
// all 100
db.testcol.count()
// just 41 docs
db.testcol.count( { a :{$lt:42 }})
// Another way of writing the same query
db.testcol.find( { a :{$lt:42 } } ).count( )
34

Example: Using sort()
db.testcol.drop()
for (i=1;i<=20;i++){
db.testcol.insertOne( { a :Math.floor( Math.random() *10 +1),
b:Math.floor( Math.random() *10 +1)})
}
db.testcol.find()
// sort descending; use 1 for ascending
db.testcol.find().sort( { a :-1})
// sort by b, then a
db.testcol.find().sort( { b :1,a:1})
// $natural order is just the order on disk.
db.testcol.find().sort( { $natural :1})
The skip() Method
•Skipsthespecifiednumberofdocumentsintheresultset.
•Thereturnedcursorwillbeginatthefirstdocumentbeyondthe number specified.
•Regardlessoftheorderinwhichyouspecifyskip() and sort() on a cursor, sort() happens first.
The limit() Method
•Limitsthenumberofdocumentsinaresultsettothefirstk.
•Specifykas the argument to limit()
•Regardlessoftheorderinwhichyouspecifylimit(),skip(),andsort() on a cursor, sort() happens
first.
•Helpsreduceresourcesconsumedbyqueries.
The distinct() Method
•Returnsallvaluesforafieldfoundinacollection.
•Onlyworksononefieldatatime.
•Inputisastring(notadocument)
35

Example: Using distinct()
db.movie_reviews.drop()
db.movie_reviews.insertMany( [
{"title" :"Jaws","rating" :5},
{"title" :"Home Alone","rating" :1},
{"title" :"Jaws","rating" :7},
{"title" :"Jaws","rating" :4},
{"title" :"Jaws","rating" :8}])
db.movie_reviews.distinct( "title" )
3.3 Query Operators
Learning Objectives
Upon completing this module students should understand the following types of MongoDB query operators:
•Comparisonoperators
•Logicaloperators
•Elementqueryoperators
•Operatorsonarrays
Comparison Query Operators
•$lt:Existsandislessthan
•$lte:Existsandislessthanorequalto
•$gt:Existsandisgreaterthan
•$gte:Existsandisgreaterthanorequalto
•$ne:Doesnotexistordoesbutisnotequalto
•$in:Existsandisinaset
•$nin:Doesnotexistorisnotinaset
Example (Setup)
// insert sample data
db.movies.insertMany( [
{
"title" :"Batman",
"category" :["action","adventure" ],
"imdb_rating" :7.6,
"budget" :35
},
{
"title" :"Godzilla",
"category" :["action",
"adventure","sci-fi" ],
"imdb_rating" :6.6
},
36

{
"title" :"Home Alone",
"category" :["family","comedy" ],
"imdb_rating" :7.4
}
])
Example: Comparison Operators
db.movies.find()
db.movies.find( { "imdb_rating" :{ $gte :7}})
db.movies.find( { "category" :{$ne:"family" }})
db.movies.find( { "title" :{$in:["Batman","Godzilla" ]}})
db.movies.find( { "title" :{ $nin :["Batman","Godzilla" ]}})
Logical Query Operators
•$or:Matcheitheroftwoormorevalues
•$not:Usedwithotheroperators
•$nor:Matchneitheroftwoormorevalues
•$and:Matchbothoftwoormorevalues
–This is the default behavior for queries specifying more thanonecondition.
–Use $and if you need to include the same operator more than once in a query.
Example: Logical Operators
db.movies.find( { $or :[
{"category" :"sci-fi" }, { "imdb_rating" :{ $gte :7}}
]})
// more complex $or, really good sci-fi movie or medicore family movie
db.movies.find( { $or :[
{"category" :"sci-fi","imdb_rating" :{ $gte :8}},
{"category" :"family","imdb_rating" :{ $gte :7}}
]})
// find bad movies
db.movies.find( { "imdb_rating" :{ $not :{$gt:7}}})
37

Example: Logical Operators
// find movies within an imdb_rating range
db.movies.find( { "imdb_rating" :{$gt:5, $lte :7}}) // and is implicit
// queries can be nested, why are there no results?
db.movies.find( { $and :[
{$or:[
{"category" :"sci-fi","imdb_rating" :{ $gte :8}},
{"category" :"family","imdb_rating" :{ $gte :7}}
]},
{$or:[
{"category" :"action","imdb_rating" :{ $gte :6}}
]}
]})
Element Query Operators
•$exists:Selectdocumentsbasedontheexistenceofaparticularfield.
•$type:Selectdocumentsbasedontheirtype.
•See
BSON types6for reference on types.
Example: Element Operators
db.movies.find( { "budget" :{ $exists :true }})
// type 1 is Double
db.movies.find( { "budget" :{ $type :1}})
// type 3 is Object (embedded document)
db.movies.find( { "budget" :{ $type :3}})
Array Query Operators
•$all:Arrayfieldmustcontainallvalueslisted.
•$size:Arraymusthaveaparticularsize.E.g.,$size : 2 means 2 elements in the array
•$elemMatch:Allconditionsmustbematchedbyatleastoneelementinthearray
6http://docs.mongodb.org/manual/reference/bson-types
38

Example: Array Operators
db.movies.find( { "category" :{ $all :["sci-fi","action" ]}})
db.movies.find( { "category" :{ $size :3}})
Example: $elemMatch
db.movies.insertOne( {
"title" :"Raiders of the Lost Ark",
"filming_locations" :[
{"city" :"Los Angeles","state" :"CA","country" :"USA" },
{"city" :"Rome","state" :"Lazio","country" :"Italy" },
{"city" :"Florence","state" :"SC","country" :"USA" }
]})
// This query is incorrect, it won’t return what we want
db.movies.find( {
"filming_locations.city" :"Florence",
"filming_locations.country" :"Italy"
})
// $elemMatch is needed, now there are no results, this is expected
db.movies.find( {
"filming_locations" :{
$elemMatch :{
"city" :"Florence",
"country" :"Italy"
}}})
39

3.4 Lab: Finding Documents
Exercise: student_id < 65
In the sample database, how many documents in the grades collection have a student_id less than 65?
Exercise: Inspection Result “Fail” & “Pass”
In the sample database, how many documents in the inspectionscollectionhaveresult “Pass” or “Fail”?
Exercise: View Count > 1000
In the stories collection, write a query to find all stories where the view count is greater than 1000.
Exercise: Most comments
Find the news article that has the most comments in the storiescollection
Exercise: Television or Videos
Find all digg stories where the topic name is “Television” or the media type is “videos”. Skip the first 5 results and
limit the result set to 10.
Exercise: News or Images
Query for all digg stories whose media type is either “news” or“images”andwherethetopicnameis“Comedy”.(For
extra practice, construct two queries using different sets of operators to do this.)
3.5 Updating Documents
Learning Objectives
Upon completing this module students should understand
•ThereplaceOne() method
•TheupdateOne() method
•TheupdateMany() method
•Therequiredparametersforthesemethods
•Fieldupdateoperators
•Arrayupdateoperators
•Theconceptofanupsertandusecases.
•ThefindOneAndReplace() and findOneAndUpdate() methods
40

The replaceOne() Method
•Takesonedocumentandreplacesitwithanother
–But leaves the _id unchanged
•Takestwoparameters:
–Amatchingdocument
–Areplacementdocument
•Thisis,insomesense,thesimplestformofupdate
First Parameter to replaceOne()
•RequiredparametersforreplaceOne()
–The query parameter:
*Use the same syntax as with find()
*Only the first document found is replaced
•replaceOne() cannot delete a document
Second Parameter to replaceOne()
•Thesecondparameteristhereplacementparameter:
–The document to replace the original document
•The_idmuststaythesame
•Youmustreplacetheentiredocument
–You cannot modify just one field
–Except for the _id
Example: replaceOne()
db.movies.insertOne( { title:"Batman" })
db.movies.find()
db.movies.replaceOne( { title :"Batman" }, { imdb_rating :7.7 })
db.movies.find()
db.movies.replaceOne( { imdb_rating:7.7 },
{ title
:"Batman", imdb_rating:7.7 })
db.movies.find()
db.movies.replaceOne( { }, { title:"Batman" })
db.movies.find() // back in original state
db.movies.replaceOne( { }, { _id :ObjectId() } )
41

The updateOne() Method
•MutateonedocumentinMongoDBusingupdateOne()
–Affects only the _first_ document found
•Twoparameters:
–Aquerydocument
*same syntax as with find()
–Change document
*Operators specify the fields and changes
$set and $unset
•UsetospecifyfieldstoupdateforUpdateOne()
•Ifthefieldalreadyexists,using$set will change its value
–If not, $set will create it, set to the new value
•Onlyspecifiedfieldswillchange
•Alternatively,removeafieldusing$unset
Example (Setup)
db.movies.insertMany( [
{
"title" :"Batman",
"category" :["action","adventure" ],
"imdb_rating" :7.6,
"budget" :35
},
{
"title" :"Godzilla",
"category" :["action",
"adventure","sci-fi" ],
"imdb_rating" :6.6
},
{
"title" :"Home Alone",
"category" :["family","comedy" ],
"imdb_rating" :7.4
}
])
42

Example: $set and $unset
db.movies.updateOne( { "title" :"Batman" },
{ $set :{"imdb_rating" :7.7 }})
db.movies.updateOne( { "title" :"Godzilla" },
{ $set :{"budget" :1}})
db.movies.updateOne( { "title" :"Home Alone" },
{ $set :{"budget" :15,
"imdb_rating" :5.5 }})
db.movies.updateOne( { "title" :"Home Alone" },
{ $unset :{"budget" :1}})
db.movies.find()
Update Operators
•$inc:Incrementafield’svaluebythespecifiedamount.
•$mul:Multiplyafield’svaluebythespecifiedamount.
•$rename:Renameafield.
•$set:Updateoneormorefields(alreadydiscussed).
•$unset Delete a field (already discussed).
•$min:Updatesthefieldvaluetoaspecifiedvalueifthespecifiedvalue is less than the current value of the
field
•$max:Updatesthefieldvaluetoaspecifiedvalueifthespecifiedvalue is greater than the current value of
the field
•$currentDate:Setthevalueofafieldtothecurrentdateortimestamp.
Example: Update Operators
db.movies.updateOne( { title:"Batman" }, { $inc:{"imdb_rating" :2}})
db.movies.updateOne( { title:"Home Alone" }, { $inc:{"budget" :5}})
db.movies.updateOne( { title:"Batman" }, { $mul:{"imdb_rating" :4}})
db.movies.updateOne( { title:"Batman" },
{ $rename
:{ budget:"estimated_budget" }})
db.movies.updateOne( { title:"Home Alone" }, { $min:{ budget:5}})
db.movies.updateOne( { title:"Home Alone" },
{ $currentDate :{ last_updated:{ $type:"timestamp" }}})
// increment movie rating by 1
db.movie_mentions.updateOne( { title:"Batman" },
{ $inc
:{"imdb_rating" :1}})
43

The updateMany() Method
•TakesthesameargumentsasupdateOne
•Updatesalldocumentsthatmatch
–updateOne stops after the first match
–updateMany continues until it has matched all
Warning: Without an appropriate index, you may scan every document in the collection.
Example: updateMany()
// let’s start tracking the number of sequals for each movie
db.movies.updateOne( { }, { $set :{"sequels" :0}})
db.movies.find()
// we need updateMany to change all documents
db.movies.updateMany( { }, { $set :{"sequels" :0}})
db.movies.find()
Array Element Updates by Index
•Youcanusedotnotationtospecifyanarrayindex
•Youwillupdateonlythatelement
–Other elements will not be affected
Example: Update Array Elements by Index
// add a sample document to track mentions per hour
db.movie_mentions.insertOne(
{"title" :"E.T.",
"day" :ISODate("2015-03-27T00:00:00.000Z"),
"mentions_per_hour" :[0,0,0,0,0,0,0,
0,0,0,0,0,0,0,0,0,0,0,0,0,0,0,
0,0]
})
// update all mentions for the fifth hour of the day
db.movie_mentions.updateOne(
{"title" :"E.T." },
{"$set" :{"mentions_per_hour.5" :2300 }})
44

Array Operators
•$push:Appendsanelementtotheendofthearray.
•$pushAll:Appendsmultipleelementstotheendofthearray.
•$pop:Removesoneelementfromtheendofthearray.
•$pull:Removesallelementsinthearraythatmatchaspecifiedvalue.
•$pullAll:Removesallelementsinthearraythatmatchanyofthespecified values.
•$addToSet:Appendsanelementtothearrayifnotalreadypresent.
Example: Array Operators
db.movies.updateOne(
{"title" :"Batman" },
{ $push :{"category" :"superhero" }})
db.movies.updateOne(
{"title" :"Batman" },
{ $pushAll :{"category" :["villain","comic-based" ]}})
db.movies.updateOne(
{"title" :"Batman" },
{ $pop :{"category" :1}})
db.movies.updateOne(
{"title" :"Batman" },
{ $pull :{"category" :"action" }})
db.movies.updateOne(
{"title" :"Batman" },
{ $pullAll :{"category" :["villain","comic-based" ]}})
The Positional $Operator
•$7is a positional operator that specifies an element in an array to update.
•Itactsasaplaceholderforthefirstelementthatmatchesthequerydocument.
•$replaces the element in the specified position with the value given.
•Example:
db.<COLLECTION>.updateOne(
{<array>:value ... },
{<update operator>:{"<array>.$" :value } }
)
7http://docs.mongodb.org/manual/reference/operator/update/postional
45

Example: The Positional $Operator
// the "action" category needs to be changed to "action-adventure"
db.movies.updateMany( { "category":"action",},
{ $set
:{"category.$" :"action-adventure" }})
Upserts
•Ifnodocumentmatchesawritequery:
–By default, nothing happens
–With upsert: true,insertsonenewdocument
*$setOnInsert will add fields only in the insert scenario
•WorksforupdateOne(),updateMany(),replaceOne()
•Syntax:
db.<COLLECTION>.updateOne( <query document>,
<update document>,
{ upsert
:true })
Upsert Mechanics
•Willupdateifdocumentsmatchingthequeryexist
•Willinsertifnodocumentsmatch
–Creates a new document using equality conditions in the querydocument
–Adds an _id if the query did not specify one
–Performs the write on the new document
•updateMany() will only create one document
–If none match, of course
Example: Upserts
db.movies.updateOne( { "title" :"Jaws" },
{ $inc
:{"budget" :5}},
{ upsert
:true })
db.movies.updateMany( { "title" :"Jaws II" },
{ $inc
:{"budget" :5}},
{ upsert
:true })
db.movies.replaceOne( { "title" :"E.T.","category" :["scifi" ]},
{"title" :"E.T.","category" :["scifi" ], "budget" :1},
{ upsert
:true })
46

save()
•Thedb.<COLLECTION>.save() method is syntactic sugar
–Similar to replaceOne(),queryingthe_id field
–Upsert if _id is not in the collection
•Syntax:
db.<COLLECTION>.save( <document>)
Example: save()
•Ifthedocumentintheargumentdoesnotcontainan_id field, then the save() method acts like
insertOne() method
–An ObjectId will be assigned to the _id field.
•Ifthedocumentintheargumentcontainsan_id field: then the save() method is equivalent to a replaceOne
with the query argument on _id and the upsert option set to true
// insert
db.movies.save( { "title" :"Beverly Hills Cops","imdb_rating" :7.3 })
// update with { upsert: true }
db.movies.save( { "_id" :1234,"title" :"Spider Man","imdb_rating" :7.3 })
Be careful with save()
Careful not to modify stale data when using save().Example:
db.movies.drop()
db.movies.insertOne( { "title" :"Jaws","imdb_rating" :7.3 })
db.movies.find( { "title" :"Jaws" })
// store the complete document in the application
doc =db.movies.findOne( { "title" :"Jaws" })
db.movies.updateOne( { "title" :"Jaws" }, { $inc:{"imdb_rating" :2}})
db.movies.find()
doc.imdb_rating =7.4
db.movies.save(doc) // just lost our incrementing of "imdb_rating"
db.movies.find()
47

findOneAndUpdate() and findOneAndReplace()
•Update(orreplace)onedocumentandreturnit
–By default, the document is returned pre-write
•Canreturnthestatebeforeoraftertheupdate
•Makesareadplusawriteatomic
•Canbeusedwithupserttoinsertadocument
findOneAndUpdate() and findOneAndReplace() Options
•Thefollowingareoptionalfieldsfortheoptionsdocument
•projection: <document> -selectthefieldstosee
•sort: <document> -sorttoselectthefirstdocument
•maxTimeoutMS: <number> -howlongtowait
–Returns an error, kills operation if exceeded
•upsert: <boolean> if true, performs an upsert
Example: findOneAndUpdate()
db.worker_queue.findOneAndUpdate(
{ state :"unprocessed" },
{ $set
:{"worker_id" :123,"state" :"processing" }},
{ upsert
:true })
findOneAndDelete()
•Notanupdateoperation,butfitsinwithfindOneAnd ...
•Returnsthedocumentanddeletesit.
•Example:
db.foo.drop();
db.foo.insertMany( [ { a :1}, { a :2}, { a :3}]);
db.foo.find(); // shows the documents.
db.foo.findOneAndDelete( { a :{ $lte :3}});
db.foo.find();
48

3.6 Lab: Updating Documents
Exercise: Pass Inspections
In the sample.inspections collection, let’s imagine that we want to do a little data cleaning.
We’ve decided to eliminate the “Completed” inspection result and use only “No Violation Issued” for such inspection
cases.
Please update all inspections accordingly.
Exercise: Set fine value
For all inspections that failed, set a fine value of 100.
Exercise: Increase fine in ROSEDALE
•Updateallinspectionsdoneinthecityof“ROSEDALE”.
•Forfailedinspections,raisethe“fine”valueby150.
Exercise: Give a pass to “MongoDB”
•TodayMongoDBgotavisitfromtheinspectors.
•Wepassed,ofcourse.
•Sogoaheadandupdate“MongoDB”andsettheresult to “AWESOME” and give a corresponding certificate.
•Theinspectormaynothaveuploadedthebasicdetailsfor“MongoDB”, so ensure the update takes place even if
“MongoDB” isn’t in the collection
•MongoDB’sinformationis
business name:MongoDB
id:10407-2017-ENFO
address:
city:New York, zip:10036, street:43, number:229
Exercise: Updating Array Elements
Insert a document representing product metrics for a backpack:
db.product_metrics.insertOne(
{ name
:"backpack",
purchasesPast7Days:[0,0,0,0,0,0,0]})
Each 0 within the “purchasesPast7Days” field corresponds to adayoftheweek. ThefirstelementisMonday,the
second element is Tuesday, etc.).
Write an update statement to increment the number of backpackssoldonFridayby200.
49
4 Indexes
Index Fundamentals (page 50) An introduction to MongoDB indexes
Lab: Basic Indexes (page 56) Ashortexerciseonthebasicofindexusage
Compound Indexes (page 57) Indexes on two or more fields
Lab: Optimizing an Index (page 62) Lab on optimizing a compound index
Multikey Indexes (page 63) Indexes on array fields
Hashed Indexes (page 67) Hashed indexes
Geospatial Indexes (page 68) Geospatial indexes: both those on legacy coordinate pairs and those supporting queries
that calculate geometries on an earth-like sphere.
Using Compass with Indexes (page 75) Using Compass to create a geospatial index
TTL Indexes (page 79) Time-To-Live indexes
Text Inde xes (page 81) Free text indexes on string fields
Partial Indexes (page 83) Partial indexes in MongoDB
Lab: Finding and Addressing Slow Operations (page 86) Lab on finding and addressing slow queries
Lab: Using explain() (page 87) Lab on using the explain operation to review execution stats
4.1 Index Fundamentals
Learning Objectives
Upon completing this module students should understand:
•Theimpactofindexingonreadperformance
•Theimpactofindexingonwriteperformance
•Howtochooseeffectiveindexes
•Theutilityofspecificindexesforparticularquerypatterns
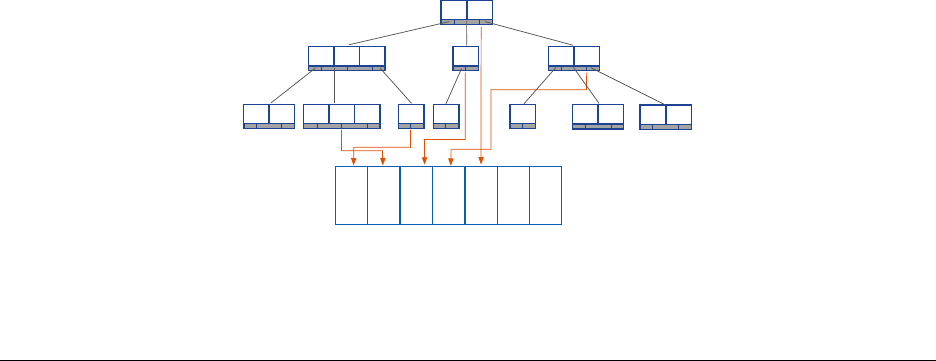
Why Indexes?
{
x:8.5,
...
}
{
x:5,
...
}
{
x:17,
...
}
{
x:35,
...
}
... ...
{
x:25,
...
}
9 25
17 27 35
8.5 16 26 28 33 39 55
1 2 4 5 6
3 7 8
Index on x
50

Types of Indexes
•Single-fieldindexes
•Compoundindexes
•Multikeyindexes
•Geospatialindexes
•Textindexes
Exercise: Using explain()
Let’s explore what MongoDB does for the following query by using explain().
We are projecting only user.name so that the results are easy to read.
db.tweets.find( { "user.followers_count" :1000 },
{"_id" :0,"user.name":1})
db.tweets.find( { "user.followers_count" :1000 } ).explain()
Results of explain()
With the default explain() verbosity, you will see results similar to the following:
{
"queryPlanner" :{
"plannerVersion" :1,
"namespace" :"twitter.tweets",
"indexFilterSet" :false,
"parsedQuery" :{
"user.followers_count" :{
"$eq" :1000
}
},
Results of explain() -Continued
"winningPlan" :{
"stage" :"COLLSCAN",
"filter" :{
"user.followers_count" :{
"$eq" :1000
}
},
"direction" :"forward"
},
"rejectedPlans" :[]
},
...
}
51

explain() Verbosity Can Be Adjusted
•default: determines the winning query plan but does not execute query
•executionStats: executes query and gathers statistics
•allPlansExecution: runs all candidate plans to completion and gathers statistics
explain("executionStats")
>db.tweets.find( { "user.followers_count" :1000 })
.explain("executionStats")
Now we have query statistics:
..
"executionStats" :{
"executionSuccess" :true,
"nReturned" :8,
"executionTimeMillis" :107,
"totalKeysExamined" :0,
"totalDocsExamined" :51428,
"executionStages" :{
"stage" :"COLLSCAN",
"filter" :{
"user.followers_count" :{
"$eq" :1000
}
},
explain("executionStats") -Continued
"nReturned" :8,
"executionTimeMillisEstimate" :100,
"works" :51430,
"advanced" :8,
"needTime" :51421,
"needFetch" :0,
"saveState" :401,
"restoreState" :401,
"isEOF" :1,
"invalidates" :0,
"direction" :"forward",
"docsExamined" :51428
}
...
}
52

explain("executionStats") Output
•nReturned :numberofdocumentsreturenedbythequery
•totalDocsExamined :numberofdocumentstouchedduringthequery
•totalKeysExamined :numberofindexkeysscanned
•AtotalKeysExamined or totalDocsExamined value much higher than nReturned indicates we
need a better index
•Based.explain() output, this query would benefit from a better index
Other Operations
In addition to find(),weoftenwanttouseexplain() to understand how other operations will be handled.
•aggregate()
•count()
•group()
•update()
•remove()
•findAndModify()
•insert()
db.<COLLECTION>.explain()
db.<COLLECTION>.explain() returns an ExplainableCollection.
>var explainable =db.tweets.explain()
>explainable.find( { "user.followers_count" :1000 })
equivalent to
>db.tweets.explain().find( { "user.followers_count" :1000 })
also equivalent to
>db.tweets.find( { "user.followers_count" :1000 } ).explain()
53

Using explain() for Write Operations
Simulate the number of writes that would have occurred and determine the index(es) used:
>db.tweets.explain("executionStats").remove( { "user.followers_count" :1000 })
>db.tweets.explain("executionStats").update( { "user.followers_count" :1000 },
{ $set :{"large_following" :true } }, { multi:true })
Single-Field Indexes
•Single-fieldindexesarebasedonasinglefieldofthedocuments in a collection.
•Thefieldmaybeatop-levelfield.
•Youmayalsocreateanindexonfieldsinembeddeddocuments.
Creating an Index
The following creates a single-field index on user.followers_count.
db.tweets.createIndex( { "user.followers_count" :1})
db.tweets.find( { "user.followers_count" :1000 } ).explain()
explain() indicated there will be a substantial performance improvement in handling this type of query.
Listing Indexes
List indexes for a collection:
db.tweets.getIndexes()
List index keys:
db.tweets.getIndexKeys()
Indexes and Read/Write Performance
•Indexesimprovereadperformanceforqueriesthataresupported by the index.
•InsertswillbeslowerwhenthereareindexesthatMongoDBmust also update.
•ThespeedofupdatesmaybeimprovedbecauseMongoDBwillnotneedtodoacollectionscantofindtarget
documents.
•Anindexismodifiedanytimeadocument:
–Is inserted (applies to all indexes)
–Is deleted (applies to all indexes)
–Is updated in such a way that its indexed field changes
54

Index Limitations
•Youcanhaveupto64indexespercollection.
•YoushouldNEVERbeanywhereclosetothatupperbound.
• Write performance will degrade to unusable at somewhere between 20-30.
Use Indexes with Care
•Everyqueryshoulduseanindex.
•Everyindexshouldbeusedbyaquery.
•Anywritethattouchesanindexedfieldwillupdateeveryindex that touches that field.
•IndexesrequireRAM.
•Bemindfulaboutthechoiceofkey.
Additional Index Options
•Sparse
•Unique
•Background
Sparse Indexes in MongoDB
•Sparseindexesonlycontainentriesfordocumentsthathavetheindexedfield.
db.<COLLECTION>.createIndex(
{ field_name :1},
{ sparse :true })
Defining Unique Indexes
•Enforceauniqueconstraintontheindex
–On a per-collection basis
•Can’tinsertdocumentswithaduplicatevalueforthefield
–Or update to a duplicate value
•Noduplicatevaluesmayexistpriortodefiningtheindex
db.<COLLECTION>.createIndex(
{ field_name :1},
{ unique :true })
55

Building Indexes in the Background
•Buildingindexesinforegroundisablockingoperation.
•Backgroundindexcreationisnon-blocking,however,takeslongertobuild.
•Initiallylarger,orlesscompact,thananindexbuiltintheforeground.
db.<COLLECTION>.createIndex(
{ field_name :1},
{ background :true })
4.2 Lab: Basic Indexes
Exercise: Creating a Basic Index
•Beginbyimportingtheroutescollectionfromtheusbdriveinto a running mongod process
•Youshouldimport66985
# if no mongod running
mkdir -p data/db
mongod --port 30000 --dbpath data/db --logpath data/mongod.log --append --fork
# end if no mongod running
mongoimport --drop -d airlines -c routes routes.json
Executing a Query
•Withthedocumentsinserted,performthefollowingtwoqueries, finding all routes for Delta
db.routes.find({"airline.id":2009})
db.routes.find({"airline.id":2009}).explain("executionStats")
Creating an Index
•Createanindexontheroutes collection
•Theindexshouldbeonthe"airline.id" key, in descending order
•Rerunthequerywithexplain
•Verifythatthenewlycreatedindexsupportsthequery
56

4.3 Compound Indexes
Learning Objectives
Upon completing this module students should understand:
• What a compound index is.
•Howcompoundindexesarecreated.
•Theimportanceofconsideringfieldorderwhencreatingcompound indexes.
•Howtoefficientlyhandlequeriesinvolvingsomecombination of equality matches, ranges, and sorting.
•Somelimitationsoncompoundindexes.
Introduction to Compound Indexes
•Itiscommontocreateindexesbasedonmorethanonefield.
•Thesearecalledcompound indexes.
•Youmayuseupto31fieldsinacompoundindex.
•Youmaynotusehashedindexfields.
The Order of Fields Matters
Specifically we want to consider how the index will be used for:
•Equalitytests,e.g.,
db.movies.find( { "budget" :7,"imdb_rating" :8})
•Rangequeries,e.g.,
db.movies.find( { "budget" :10,"imdb_rating" :{$lt:9}})
•Sorting,e.g.,
db.movies.find( { "budget" :10,"imdb_rating" :6}
).sort( { "imdb_rating" :-1})
57

Designing Compound Indexes
•Let’slookatsomeguidingprinciplesforbuildingcompoundindexes.
•Thesewillgenerallyproduceagoodifnotoptimalindex.
•Youcanoptimizeafteralittleexperimentation.
•Wewillexplorethisinthecontextofarunningexample.
Example: A Simple Message Board
Requirements:
•Findallmessagesinaspecifiedtimestamprange.
•Selectforwhetherthemessagesareanonymousornot.
•Sortbyratingfromhighesttolowest.
Load the Data
a=[{"timestamp" :1,"username" :"anonymous","rating" :3},
{"timestamp" :2,"username" :"anonymous","rating" :5},
{"timestamp" :3,"username" :"sam","rating" :1},
{"timestamp" :4,"username" :"anonymous","rating" :2},
{"timestamp" :5,"username" :"martha","rating" :5}]
db.messages.insertMany(a)
Start with a Simple Index
Start by building an index on { timestamp : 1 }
db.messages.createIndex( { timestamp :1}, { name :"myindex" })
Now let’s query for messages with timestamp in the range 2 through 4 inclusive.
db.messages.find( { timestamp :{ $gte :2, $lte :4} } ).explain("executionStats")
Analysis:
•Explainplanshowsgoodperformance,i.e.totalKeysExamined =n.
•However,thisdoesnotsatisfyourquery.
•Needtoqueryagainwith{username: "anonymous"} as part of the query.
58

Query Adding username
Let’s add the user field to our query.
db.messages.find( { timestamp :{ $gte :2, $lte :4},
username :"anonymous" } ).explain("executionStats")
totalKeysExamined >n.
Include username in Our Index
db.messages.dropIndex( "myindex" );
db.messages.createIndex( { timestamp :1, username :1},
{ name :"myindex" })
db.messages.find( { timestamp :{ $gte :2, $lte :4},
username :"anonymous" } ).explain("executionStats")
totalKeysExamined is still > n. Why?
totalKeysExamined >n
timestamp username
1“anonymous”
2“anonymous”
3“sam”
4“anonymous”
5“martha”
ADifferentCompoundIndex
Drop the index and build a new one with user.
db.messages.dropIndex( "myindex" );
db.messages.createIndex( { username :1, timestamp :1},
{ name :"myindex" })
db.messages.find( { timestamp :{ $gte :2, $lte :4},
username :"anonymous" } ).explain("executionStats")
totalKeysExamined is 2. nis 2.
59

totalKeysExamined == n
username timestamp
“anonymous” 1
“anonymous” 2
“anonymous” 4
“sam” 2
“martha” 5
Let Selectivity Drive Field Order
•Orderfieldsinacompoundindexfrommostselectivetoleastselective.
•Usually,thismeansequalityfieldsbeforerangefields.
• When dealing with multiple equality values, start with the most selective.
•Ifacommonrangequeryismoreselectiveinstead(rare),specify the range component first.
Adding in the Sort
Finally, let’s add the sort and run the query
db.messages.find( {
timestamp :{ $gte :2, $lte :4},
username :"anonymous"
} ).sort( { rating :-1} ).explain("executionStats");
•NotethatthewinningPlan includes a SORT stage
•ThismeansthatMongoDBhadtoperformasortinmemory
•Inmemorysortsoncandegradeperformancesignificantly
–Especially if used frequently
–In-memory sorts that use > 32 MB will abort
In-Memory Sorts
Let’s modify the index again to allow the database to sort for us.
db.messages.dropIndex( "myindex" );
db.messages.createIndex( { username :1, timestamp :1, rating :1},
{ name :"myindex" });
db.messages.find( {
timestamp :{ $gte :2, $lte :4},
username :"anonymous"
} ).sort( { rating :-1} ).explain("executionStats");
•Theexplainplanremainsunchanged,becausethesortfieldcomes after the range fields.
•Theindexdoesnotstoreentriesinorderbyrating.
•Notethatthisrequiresustoconsideratradeoff.
60
Avoiding an In-Memory Sort
Rebuild the index as follows.
db.messages.dropIndex( "myindex" );
db.messages.createIndex( { username :1, rating :1, timestamp :1},
{ name :"myindex" });
db.messages.find( {
timestamp :{ $gte :2, $lte :4},
username :"anonymous"
} ).sort( { rating :-1} ).explain("executionStats");
•Wenolongerhaveanin-memorysort,butneedtoexaminemorekeys.
•totalKeysExamined is 3 and and nis 2.
•Thisisthebestwecandointhissituationandthisisfine.
•However,iftotalKeysExamined is much larger than n,thismightnotbethebestindex.
No need for stage : SORT
username rating timestamp
“anonymous” 2 4
“anonymous” 3 1
“anonymous” 5 2
“sam” 1 2
“martha” 5 5
General Rules of Thumb
•Equalitybeforerange
•Equalitybeforesorting
•Sortingbeforerange
Covered Queries
• When a query and projection include only the indexed fields, MongoDB will return results directly from the
index.
•Thereisnoneedtoscananydocumentsorbringdocumentsintomemory.
61

•Thesecoveredqueriescanbeveryefficient.
Exercise: Covered Queries
db.testcol.drop()
for (i=1;i<=20;i++){
db.testcol.insertOne({ "_id" :i, "title" :i, "name" :i,
"rating" :i, "budget" :i})
};
db.testcol.createIndex( { "title" :1,"name" :1,"rating" :1})
// Not covered because _id is present.
db.testcol.find( { "title" :3},
{"title" :1,"name" :1,"rating" :1}
).explain("executionStats")
// Not covered because other fields may exist in matching docs.
db.testcol.find( { "title" :3},
{"_id" :0,"budget" :0} ).explain("executionStats")
// Covered query!
db.testcol.find( { "title" :3},
{"_id" :0,"title" :1,"name" :1,"rating" :1}
).explain("executionStats")
4.4 Lab: Optimizing an Index
Exercise: What Index Do We Need?
Run the the following Javascript file from the handouts.
mongo --shell localhost/performance performance.js
In the shell that launches execute the following method
performance.init()
The method above will build a sample data set in the “sensor_readings” collection. What index is needed for this
query?
db.sensor_readings.find( { tstamp:{ $gte:ISODate("2012-08-01"),
$lte:ISODate("2012-09-01")},
active:true } ).limit(3)
62

Exercise: Avoiding an In-Memory Sort
What index is needed for the following query to avoid an in-memory sort?
db.sensor_readings.find( { active:true } ).sort( { tstamp :-1})
Exercise: Avoiding an In-Memory Sort, 2
What index is needed for the following query to avoid an in-memory sort?
db.sensor_readings.find(
{x:{$in:[100,200,300,400]}}
).sort( { tstamp :-1})
4.5 Multikey Indexes
Learning Objectives
Upon completing this module, students should understand:
• What a multikey index is
• When MongoDB will use a multikey index to satisfy a query
•Howmultikeyindexeswork
•Howmultikeyindexeshandlesorting
•Somelimitationsonmultikeyindexes
Introduction to Multikey Indexes
•Amultikeyindexisanindexonanarray.
•Anindexentryiscreatedoneachvaluefoundinthearray.
•Multikeyindexescansupportprimitives,documents,orsub-arrays.
•Thereisnothingspecialthatyouneedtodotocreateamultikey index.
•YoucreatethemusingcreateIndex() just as you would with an ordinary single-field index.
•Ifthereisanarrayasavalueforanindexedfield,theindexwill be multikey on that field.
63

Example: Array of Numbers
db.race_results.drop()
db.race_results.createIndex( { "lap_times" :1})
a=[{"lap_times" :[3,5,2,8]},
{"lap_times" :[1,6,4,2]},
{"lap_times" :[6,3,3,8]}]
db.race_results.insertMany( a )
// Used the index
db.race_results.find( { lap_times :1} ).explain()
// One document found.
// Index not used, because it is naive to position.
db.race_results.find( { "lap_times.2" :3} ).explain()
Exercise: Array of Documents, Part 1
Create a collection and add an index on the comments.rating field:
db.blog.drop()
b=[{"comments" :[
{"name" :"Bob","rating" :1},
{"name" :"Frank","rating" :5.3 },
{"name" :"Susan","rating" :3}]},
{"comments" :[
{ name :"Megan","rating" :1}]},
{"comments" :[
{"name" :"Luke","rating" :1.4 },
{"name" :"Matt","rating" :5},
{"name" :"Sue","rating" :7}]}]
db.blog.insertMany(b)
db.blog.createIndex( { "comments" :1})
// vs
db.blog.createIndex( { "comments.rating" :1})
// for this query
db.blog.find( { "comments.rating" :5})
Exercise: Array of Documents, Part 2
For each of the three queries below:
•Howmanydocumentswillbereturned?
• Will it use our multi-key index? Why or why not?
•Ifaquerywillnotusetheindex,whichindexwillituse?
db.blog.find( { "comments" :{"name" :"Bob","rating" :1}})
db.blog.find( { "comments" :{"rating" :1}})
db.blog.find( { "comments.rating" :1})
64

Exercise: Array of Arrays, Part 1
Add some documents and create an index simulating a player in agamemovingonanX,Ygrid.
db.player.drop()
db.player.createIndex( { "last_moves" :1})
c=[{"last_moves" :[[1,2], [ 2,3], [ 3,4]]},
{"last_moves" :[[3,4], [ 4,5]]},
{"last_moves" :[[4,5], [ 5,6]]},
{"last_moves" :[[3,4]]},
{"last_moves" :[[4,5]]}]
db.player.insertMany(c)
db.player.find()
Exercise: Array of Arrays, Part 2
For each of the queries below:
•Howmanydocumentswillbereturned?
• Does the query use the multi-key index? Why or why not?
•Ifthequerydoesnotusetheindex,whatisanindexitcoulduse?
db.player.find( { "last_moves" :[3,4]})
db.player.find( { "last_moves" :3})
db.player.find( { "last_moves.1" :[4,5]})
db.player.find( { "last_moves.2" :[2,3]})
How Multikey Indexes Work
•Eacharrayelementisgivenoneentryintheindex.
•Soanarraywith17elementswillhave17entries–oneforeachelement.
•Multikeyindexescantakeupmuchmorespacethanstandardindexes.
Multikey Indexes and Sorting
•Ifyousortusingamultikeyindex:
–Adocumentwillappearatthefirstpositionwhereavaluewouldplacethedocument.
–It will not appear multiple times.
•Thisappliestoarrayvaluesgenerally.
•Itisnotaspecificpropertyofmultikeyindexes.
65

Exercise: Multikey Indexes and Sorting
db.testcol.drop()
a=[{x:[1,11 ]},{x:[2,10 ]},{x:[3]},
{x:[4]},{x:[5]}]
db.testcol.insert(a)
db.testcol.createIndex( { x :1})
// x : [ 1, 11 ] array comes first. It contains the lowest value.
db.testcol.find().sort( { x :1})
// x : [ 1, 11 ] array still comes first. Contains the highest value.
db.testcol.find().sort( { x :-1})
Limitations on Multikey Indexes
•Youcannotcreateacompoundindexusingmorethanonearray-valued field.
•Thisisbecauseofthecombinatorics.
•Foracompoundindexontwoarray-valuedfieldsyouwouldendup with N * M entries for one document.
•Youcannothaveahashedmultikeyindex.
•Youcannothaveashardkeyuseamultikeyindex.
•Wediscussshardkeysinanothermodule.
•Theindexonthe_id field cannot become a multikey index.
Example: Multikey Indexes on Multiple Fields
db.testcol.drop()
db.testcol.createIndex( { x :1,y:1})
// no problems yet
db.testcol.insertOne( { _id :1,x:1,y:1})
// still OK
db.testcol.insertOne( { _id :2,x:[1,2], y :1})
// still OK
db.testcol.insertOne( { _id :3,x:1,y:[1,2]})
// Won’t work
db.testcol.insertOne( { _id :4,x:[1,2], y :[1,2]})
66

4.6 Hashed Indexes
Learning Objectives
Upon completing this module, students should understand:
• What a hashed index is
• When to use a hashed index
What is a Hashed Index?
•Hashedindexesarebasedonfieldvalueslikeanyotherindex.
•Thedifferenceisthatthevaluesarehashedanditisthehashed value that is indexed.
•Thehashingfunctioncollapsessub-documentsandcomputesthehashfortheentirevalue.
•MongoDBcanusethehashedindextosupportequalityqueries.
•Hashedindexesdonotsupportmulti-keyindexes,i.e.indexes on array fields.
•Hashedindexesdonotsupportrangequeries.
Why Hashed Indexes?
•InMongoDB,theprimaryuseforhashedindexesistosupportsharding a collection using a hashed shard key.
•Insomecases,thefieldwewouldliketousetosharddatawouldmakeitdifficulttoscaleusingsharding.
•Usingahashedshardkeytoshardacollectionensuresanevendistributionofdataandovercomesthisproblem.
•See
Shard a Collection Using a Hashed Shard Key8for more details.
•Wediscussshardingindetailinanothermodule.
Limitations
•Youmaynotcreatecompoundindexesthathavehashedindexfields.
•Youmaynotspecifyauniqueconstraintonahashedindex.
•Youcancreatebothahashedindexandanon-hashedindexonthe same field.
8http://docs.mongodb.org/manual/tutorial/shard-collection-with-a-hashed-shard-key/
67

Floating Point Numbers
•MongoDBhashedindexestruncatefloatingpointnumbersto64-bit integers before hashing.
•Donotuseahashedindexforfloatingpointnumbersthatcannot be reliably converted to 64-bit integers.
•MongoDBhashedindexesdonotsupportfloatingpointvalueslarger than 253.
Creating a Hashed Index
Create a hashed index using an operation that resembles the following. This operation creates a hashed index for the
active collection on the afield.
db.active.createIndex( { a:"hashed" })
4.7 Geospatial Indexes
Learning Objectives
Upon completing this module, students should understand:
•Usecasesofgeospatialindexes
•Thetwotypesofgeospatialindexes
•Howtocreate2dgeospatialindexes
•Howtoqueryfordocumentsinaregion
•Howtocreate2dsphereindexes
•TypesofGeoJSONobjects
•Howtoqueryusing2dsphereindexes
Introduction to Geospatial Indexes
We can use geospatial indexes to quickly determine geometricrelationships:
•Allpointswithinacertainradiusofanotherpoint
• Whether or not points fall within a polygon
• Whether or not two polygons intersect
68

Easiest to Start with 2 Dimensions
•Initially,itiseasiesttothinkaboutgeospatialindexesin two dimensions.
•OnetypeofgeospatialindexinMongoDBisaflat2dindex.
•Withageospatialindexwecan,forexample,searchfornearby items.
•Thisisthetypeofservicethatmanyphoneappsprovidewhen,say,searchingforanearbycafe.
•WemighthaveaquerylocationidentifiedbyanXina2dcoordinate system.
Location Field
•Ageospatialindexisbasedonalocationfieldwithindocuments in a collection.
•Thestructureoflocationvaluesdependsonthetypeofgeospatial index.
•Wewillgointomoredetailonthisinafewminutes.
•WecanidentifyotherdocumentsinthiscollectionwithXsinour2dcoordinatesystem.
Find Nearby Documents
•Ageospatialindexenablesustoefficientlyqueryacollection based on geometric relationships between docu-
ments and the query.
•Forexample,wecanquicklylocatealldocumentswithinacertain radius of our query location.
•Inthisexample,we’veillustrateda$near query in a 2d geospatial index.
Flat vs. Spherical Indexes
There are two types of geospatial indexes:
•Flat,madewitha2d index
•Two-dimensionalspherical,madewiththe2dsphere index
–Takes into account the curvature of the earth
–Joins any two points using a geodesic or “great circle arc”
–Deviates from flat geometry as you get further from the equator, and as your points get further apart
69

Flat Geospatial Index
•ThisisaCartesiantreatmentofcoordinatepairs.
•E.g.,theindexwouldnotreflectthefactthattheshortestpath from Canada to Siberia is over the North Pole (if
units are degrees).
•2dindexescanbeusedtodescribeanyflatsurface.
•Recommendedif:
–You have l egacy c o o r d i n a t e p a i r s ( M o n g o D B 2 . 2 o r e a r l i e r ) .
–You do not plan to use GeoJSON objects such as LineStr i n g s o r Polygons.
–You are not going to use points fa r e n o u g h N o r t h or South to wo r ry about the Earth’s curvature.
Spherical Geospatial Index
•SphericalindexesmodelthecurvatureoftheEarth
•IfyouwanttoplottheshortestpathfromtheKlondiketoSiberia, this will know to go over the North Pole.
•SphericalindexesuseGeoJSONobjects(Points,LineString, and Polygons)
•CoordinatepairsareconvertedintoGeoJSONPoints.
Creating a 2d Index
Creating a 2d index:
db.<COLLECTION>.createIndex(
{ field_name :"2d",<optional additional field>:<value>},
{<optional options document>})
Possible options key-value pairs:
•min : <lower bound>
•max : <upper bound>
•bits : <bits of precision for geohash>
Exercise: Creating a 2d Index
Create a 2d index on the collection testcol with:
•Aminvalueof-20
•Amaxvalueof20
•10bitsofprecision
•Thefieldindexedshouldbexy.
70

Inserting Documents with a 2d Index
There are two accepted formats:
•Legacycoordinatepairs
•Documentwiththefollowingfieldsspecified:
–lng (longitude)
–lat (latitude)
Exercise: Inserting Documents with 2d Fields
•Insert2documentsintothe‘twoD’collection.
•Assign2dcoordinatevaluestothexy field of each document.
•Longitudevaluesshouldbe-3and3respectively.
•Latitudevaluesshouldbe0and0.4respectively.
Querying Documents Using a 2d Index
•Use$near to retrieve documents close to a given point.
•Use$geoWithin to find documents with a shape contained entirely within the query shape.
•Usethefollowingoperatorstospecifyaqueryshape:
–$box
–$polygon
–$center (circle)
Example: Find Based on 2d Coords
Write a query to find all documents in the testcol collection that have an xy field value that falls entirely within the
circle with center at [ -2.5, -0.5 ] and a radius of 3.
db.testcol.find( { xy :{ $geoWithin :{ $center :[[-2.5,-0.5 ], 3]}}}
71

Creating a 2dsphere Index
You can index o n e o r m o r e 2 d s p h e r e fi e l d s i n a n i n d ex.
db.<COLLECTION>.createIndex( { <location field>:"2dsphere" })
The GeoJSON Specification
•TheGeoJSONformatencodeslocationdataontheearth.
•Thespecisathttp://geojson.org/geojson-spec.html
•ThisspecisincorporatedinMongoDB2dsphereindexes.
•ItincludesPoint,LineString,Polygon,andcombinationsof these.
GeoJSON Considerations
•Thecoordinatesofpointsaregivenindegrees(longitudethen latitude).
•TheLineStringthatjoinstwopointswillalwaysbeageodesic.
•Shortlines(aroundafewhundredkilometersorless)willgoaboutwhereyouwouldexpectthemto.
•PolygonsaremadeofaclosedsetofLineStrings.
Simple Types of 2dsphere Objects
Point:Asinglepointontheglobe
{<field_name>:{ type :"Point",
coordinates :[<longitude>,<latitude>]}}
LineString:AgeodesiclinethatisdefinedbyitstwoendPoints
{<field_name>:{ type :"LineString",
coordinates :[[<longitude 1>,<latitude 1>],
[<longitude 2>,<latitude 2>],
...,
[<longitude n>,<latitude n>]]}}
72

Polygons
Simple Polygon:
{<field_name>:{ type :"Polygon",
coordinates :[[[<Point1 coordinate pair>],
[<Point2 coordinate pair>],
...
[<Point1 coordinate pair again>]]
}}
Polygon with One Hole:
{<field_name>:{ type :"Polygon",
coordinates :[[<Points that define outer polygon>],
[<Points that define inner polygon>]]
}}
Other Types of 2dsphere Objects
•MultiPoint:OneormorePointsinonedocument
•MultiLine:OneormoreLineStringsinonedocument
•MultiPolygon:OneormorePolygonsinonedocument
•GeometryCollection:OneormoreGeoJSONobjectsinonedocument
Exercise: Inserting GeoJSON Objects (1)
Create a coordinate pair for each the following airports. Create one variable per airport.
•LaGuardia(NewYork):40.7772°N,73.8726°W
•JFK(NewYork):40.6397°N,73.7789°W
•Newark(NewYork):40.6925°N,74.1686°W
•Heathrow(London):52.4775°N,0.4614°W
•Gatwick(London):51.1481°N,0.1903°W
•Stansted(London):51.8850°N,0.2350°E
•Luton(London):51.9000°N,0.4333°W
73

Exercise: Inserting GeoJSON Objects (2)
•Nowlet’smakearraysofthese.
•PutalltheNewYorkareaairportsintoanarraycallednyPorts.
•PutalltheLondonareaairportsintoanarraycalledlondonPorts.
•Createathirdarrayforflightnumbers:“AA4453”,“VA3333”,“UA2440”.
Exercise: Inserting GeoJSON Objects (3)
•CreatedocumentsforeverypossibleNewYorktoLondonflight.
•IncludeaflightNumber field for each flight.
Exercise: Creating a 2dsphere Index
•Createtwoindexesonthecollectionflights.
•Makethefirstacompoundindexonthefields:
–origin
–destination
–flightNumber
•Specify2dsphereindexesonbothorigin and destination.
•Specifyasimpleindexonname.
•Makethesecondindexjusta2dsphereindexondestination.
Querying 2dsphere Objects
$geoNear:Findsallpoints,ordersthembydistancefromaposition.
{<field name>:{ $near :{ $geometry :{
type :"Point",
coordinates :[ lng, lat ] },
$maxDistance :<meters>}}}}
$near:Justlike$geoNear,exceptinveryedgecases;checkthedocs.
$geoWithin:Onlyreturnsdocumentswithalocationcompletelycontained within the query.
$geoIntersects:Returnsdocumentswiththeirindexedfieldintersectinganypartoftheshapeinthequery.
74

4.8 Using Compass with Indexes
Learning Objectives
Upon completing this module, students should understand:
•HowtoviewindexusagewithCompass
•HowtocreateindexeswithCompass
Introduction
•CompassprovidesauserfriendlyinterfaceforinteractingwithMongoDB
•IfyouareunfamiliarwithCompass,clickbelowforahighlevel overview
/modules/compass
Execute a GeoJSON query with Compass
•Importthetrips.json dataset into a database called citibike and a collection called trips
•ExecuteageoSpatialqueryfindingalltripsthat
–Begin within a 1.2 mile radius (1.93 kilometers) of the middleofCentralPark:
*[-73.97062540054321,40.776398033956916]
–End within a 0.25 mile radius (.40 kilometers) of Madison Square Park:
*[-73.9879247077942, 40.742201076382784]
Execute Query (cont)
•Importingthedata
mongoimport --drop -d citibike -c trips trips.json
•InCompass,executingthequery
{
"start station location":{"$geoWithin":{"$centerSphere":[
[-73.97062540054321, 40.776398033956916 ],0.000302786 ]}},
"end station location":{"$geoWithin":{"$centerSphere":[
[-73.9879247077942, 40.742201076382784 ],0.00006308 ]}}
}
75
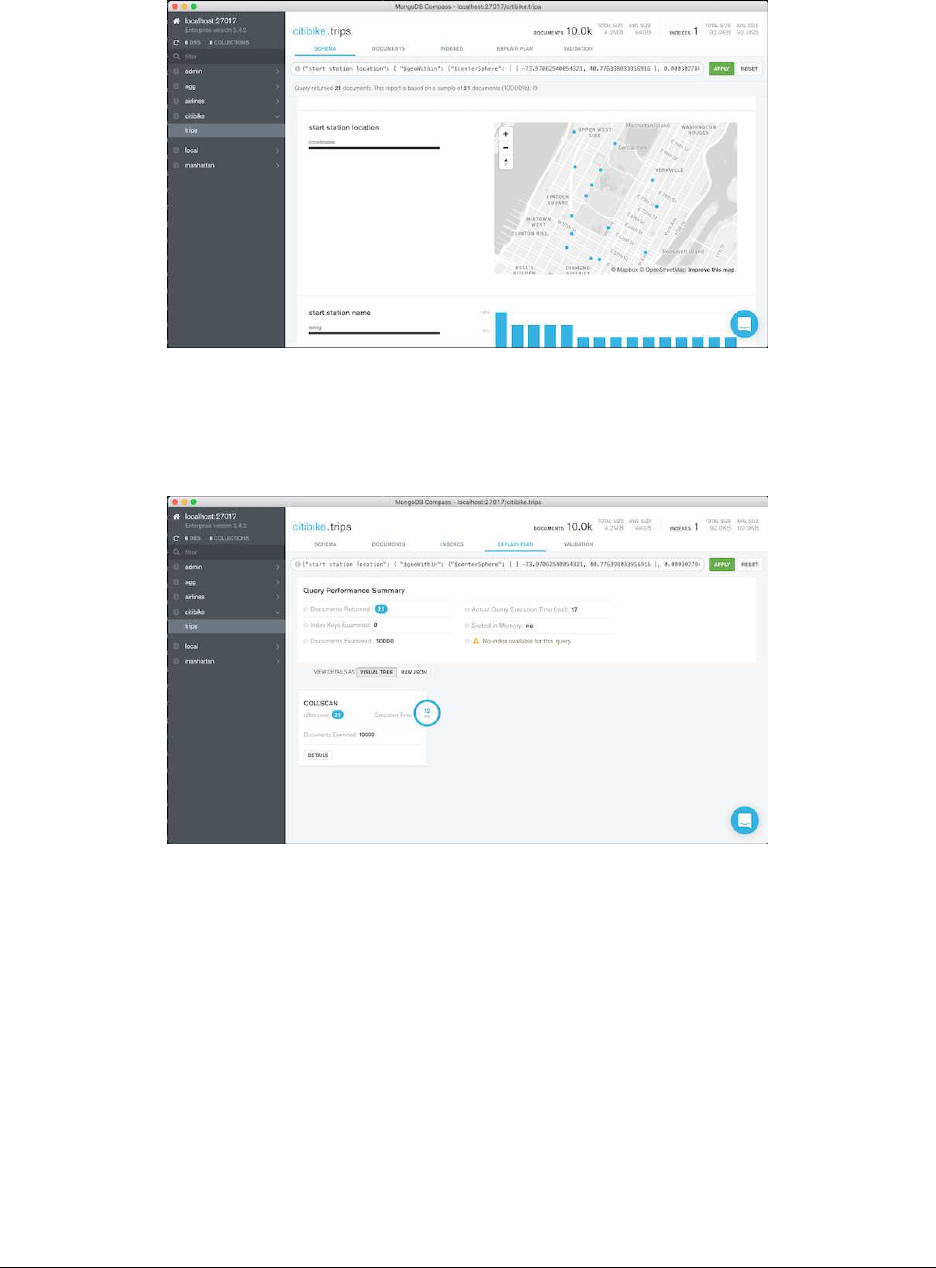
GeoJSON Query Example
GeoJSON Query Explain Plan
GeoJSON Query Explain Detail
76

Query Explain (cont)
•Ourexplainvisualizeristellinguskeydetails
–Documents returned, index keys examined, documents examined
–Query execution time, sorting information, and if an index was available
–Avisualizationofthequeryplan
Creating an Index Using Compass
•NavigatetotheIndexestab
•Createanewindexnamedgeospatial_start_end
•Selectthe“startstationlocation”fieldandchoose2dsphere
•Addanotherfield
•Selectthe“end station location field and choose 2dsphere
•Click“Create”
The Index Tab
77
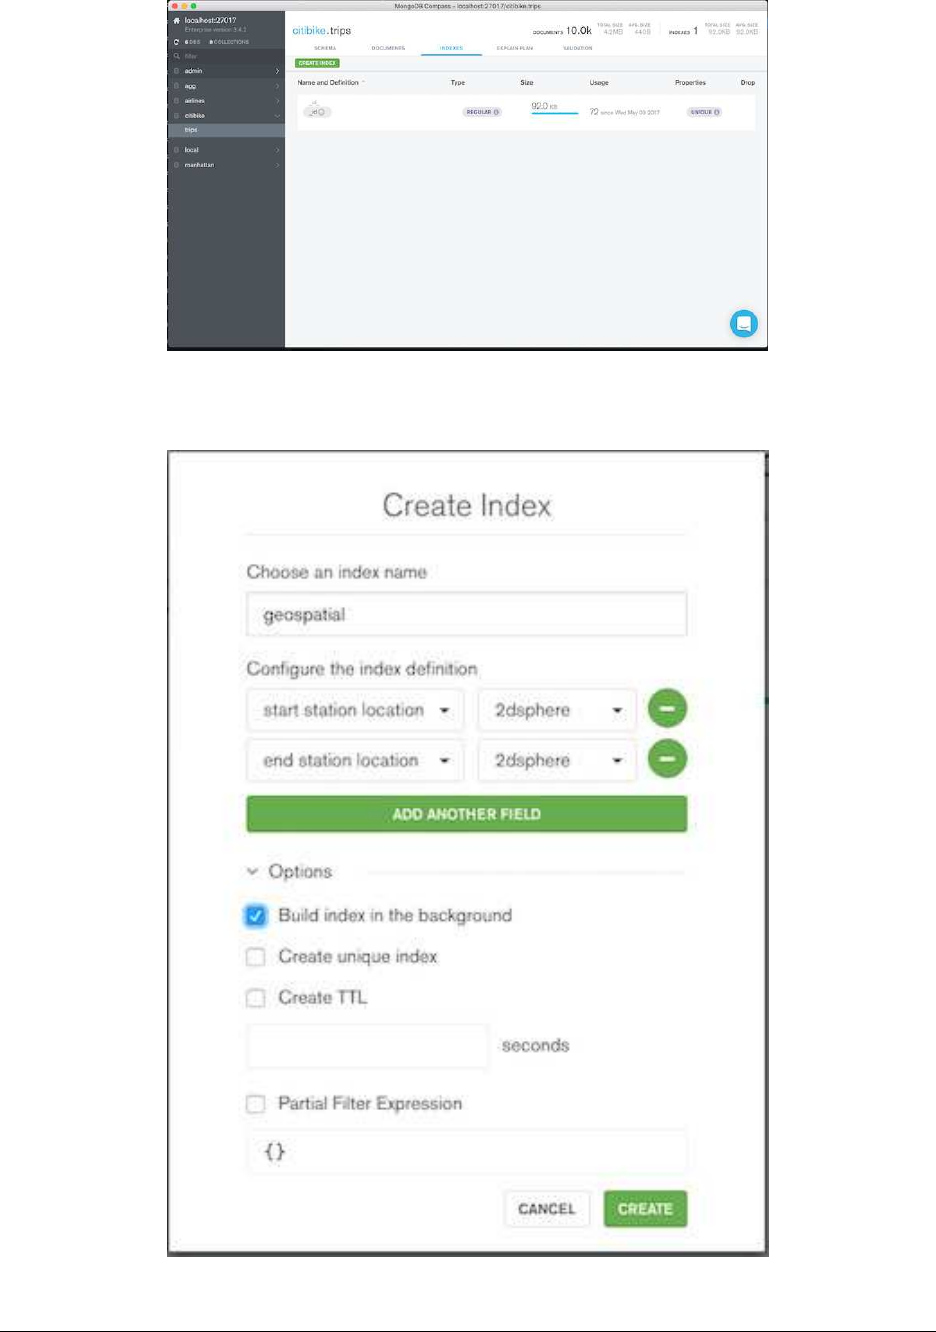
Creating an Index Example
78
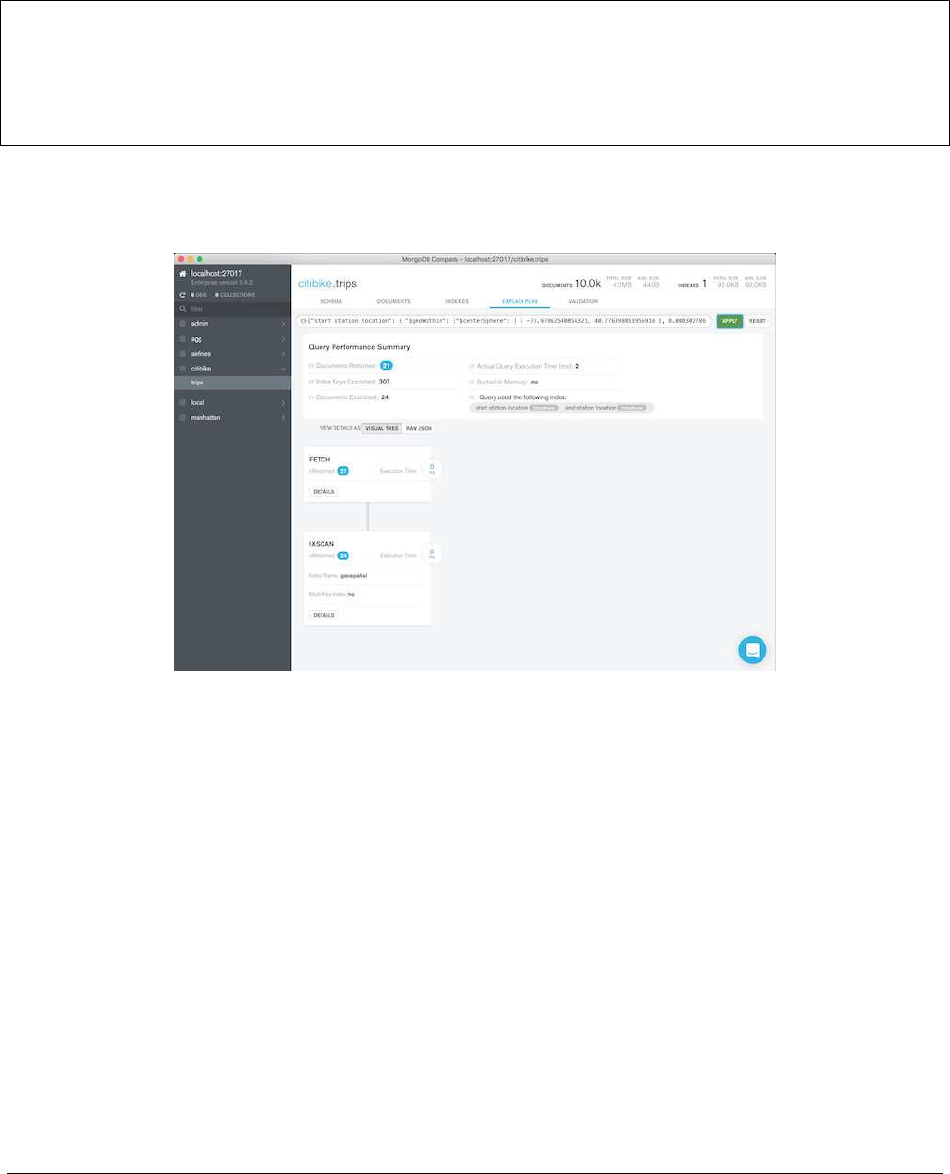
Verifying the Index
•NavigatetotheSchema tab
•Resetthequerybar,andthenre-runourgeoquery
•NavigatetotheExplain tab
{
"start station location":{"$geoWithin":{"$centerSphere":[
[-73.97062540054321, 40.776398033956916 ],0.000302786 ]}},
"end station location":{"$geoWithin":{"$centerSphere":[
[-73.9879247077942, 40.742201076382784 ],0.00006308 ]}}
}
Index Performance
4.9 TTL Indexes
Learning Objectives
Upon completing this module students should understand:
•HowtocreateaTTLindex
• When a TTL indexed document will get deleted
•LimitationsofTTLindexes
79

TTL Index Basics
•TTLisshortfor“TimeToLive”.
•TTLindexesmustbebasedonafieldoftypeDate (including ISODate)orTimestamp.
•AnydocumentwithaDate value older than expireAfterSeconds in the targeted field of the index, will
get deleted at some point.
Creating a TTL Index
Create with:
db.<COLLECTION>.createIndex( { field_name :1},
{ expireAfterSeconds :some_number } )
Exercise: Creating a TTL Index
Let’s create a TTL index on the ttl collection that will delete documents older than 30 seconds. Write a script that
will insert documents at a rate of one per second.
db.sessions.drop()
db.sessions.createIndex( { "last_user_action" :1},
{"expireAfterSeconds" :30 })
i=0
while (true){
i+= 1;
db.sessions.insertOne( { "last_user_action" :ISODate(), "b" :i});
sleep(1000); // Sleep for 1 second
}
Exercise: Check the Collection
Then, leaving that window open, open up a new terminal and connect to the database with the mongo shell. This will
allow us to verify the TTL behavior.
// look at the output and wait. After a ramp-up of up to a minute or so,
// count() will be reset to 30 once/minute.
while (true){
print(db.sessions.count());
sleep(100);
}
80

4.10 Text Indexes
Learning Objectives
Upon completing this module, students should understand:
•Thepurposeofatextindex
•Howtocreatetextindexes
•Howtosearchusingtextindexes
•Howtoranksearchresultsbyrelevancescore
What is a Text Index?
•Atextindexisbasedonthetokens(words,etc.)usedinstring fields.
•MongoDBsupportstextsearchforanumberoflanguages.
•Textindexesdroplanguage-specificstopwords(e.g.inEnglish “the”, “an”, “a”, “and”, etc.).
•Textindexesusesimple,language-specificsuffixstemming(e.g., “running” to “run”).
Creating a Text Index
You create a tex t i n d ex a little bit diff e r e n t l y t h a n y o u c r e a te a standard index.
db.<COLLECTION>.createIndex( { <field name>:"text" })
Exercise: Creating a Text Index
Create a text index on the “dialog” field of the montyPython collection.
db.montyPython.createIndex( { dialog :"text" })
Creating a Text Index with Weighted Fields
•Thedefaultweightis1foreachindexedfield.
•Theweightisrelativetootherweightsinatextindex.
db.<COLLECTION>.createIndex(
{"title" :"text","keywords":"text","author" :"text" },
{"weights" :{
"title" :10,
"keywords" :5
}})
•Termmatchin“title”fieldhas10times(i.e.10:1)theimpactasatermmatchinthe“author”field.
81

Text Indexes are Similar to Multikey Indexes
•Continuingourexample,youcantreatthedialog field as a multikey index.
•Amultikeyindexwitheachofthewordsindialog as values.
•Youcanquerythefieldusingthe$text operator.
Exercise: Inserting Texts
Let’s add some documents to our montyPython collection.
db.montyPython.insertMany( [
{_id:1,
dialog :"What is the air-speed velocity of an unladen swallow?" },
{_id:2,
dialog :"What do you mean? An African or a European swallow?" },
{_id:3,
dialog :"Huh? I... I don’t know that." },
{_id:45,
dialog :"You’re using coconuts!" },
{_id:55,
dialog :"What? A swallow carrying a coconut?" }])
Querying a Text Index
Next, let’s query the collection. The syntax is:
db.<COLLECTION>.find( { $text :{ $search :"query terms go here" }})
Exercise: Querying a Text Index
Using the text index, find all documents in the montyPython collection with the word “swallow” in it.
// Returns 3 documents.
db.montyPython.find( { $text :{ $search :"swallow" }})
Exercise: Querying Using Two Words
•FindalldocumentsinthemontyPythoncollectionwitheither the word ‘coconut’ or ‘swallow’.
•BydefaultMongoDBORsquerytermstogether.
•E.g.,ifyouqueryontwowords,resultsincludedocumentsusing either word.
// Finds 4 documents, 3 of which contain only one of the two words.
db.montyPython.find( { $text :{ $search :"coconut swallow" }})
82

Search for a Phrase
•Tomatchanexactphrase,includesearchtermsinquotes(escaped).
•Thefollowingqueryselectsdocumentscontainingthephrase “European swallow”:
db.montyPython.find( { $text:{ $search:"\"European swallow\"" }})
Text Search Score
•Thesearchalgorithmassignsarelevancescoretoeachsearch result.
•Thescoreisgeneratedbyavectorrankingalgorithm.
•Thedocumentscanbesortedbythatscore.
db.<COLLECTION>.find(
{ $text :{ $search :"swallow coconut"}},
{ textScore
:{$meta :"textScore" }}
).sort(
{ textScore
:{ $meta:"textScore" }}
))
4.11 Partial Indexes
Learning Objectives
Upon completing this module, students should be able to:
•Outlinehowpartialindexeswork
•Distinguishpartialindexesfromsparseindexes
•Listanddescribetheusecasesforpartialindexes
•Createandusepartialindexes
What are Partial Indexes?
•Indexeswithkeysonlyforthedocumentsinacollectionthatmatchafilterexpression.
•Relativetostandardindexes,benefitsinclude:
–Lower storage requirements
*On disk
*In memory
–Reduced performance costs for index maintenance as writes occur
83

Creating Partial Indexes
•Createapartialindexby:
–Calling db.collection.createIndex()
–Passing the partialFilterExpression option
•YoucanspecifyapartialFilterExpression on any MongoDB index type.
•Filterdoesnotneedtobeonindexedfields,butitcanbe.
Example: Creating Partial Indexes
•Considerthefollowingschema:
{"_id" :7,"integer" :7,"importance" :"high" }
•Createapartialindexonthe“integer”field
•Createitonlywhere“importance”is“high”
Example: Creating Partial Indexes (Continued)
db.integers.createIndex(
{ integer :1},
{ partialFilterExpression :{ importance :"high" },
name :"high_importance_integers" })
Filter Conditions
•AsthevalueforpartialFilterExpression,specifyadocumentthatdefinesthefilter.
•Thefollowingtypesofexpressionsaresupported.
•Usetheseincombinationsthatareappropriateforyourusecase.
•Yourfiltermaystipulateconditionsonmultiplefields.
–equality expressions
–$exists:trueexpression
–$gt,$gte,$lt,$lte expressions
–$type expressions
–$and operator at the top-level only
84

Partial Indexes vs. Sparse Indexes
•Bothsparseindexesandpartialindexesincludeonlyasubset of documents in a collection.
•Sparseindexesreferenceonlydocumentsforwhichatleastone of the indexed fields exist.
•Partialindexesprovidearicherwayofspecifyingwhatdocuments to index than does sparse indexes.
db.integers.createIndex(
{ importance :1},
{ partialFilterExpression :{ importance :{ $exists :true }}}
)// similar to a sparse index
Quiz
Which documents in a collection will be referenced by a partialindexonthatcollection?
Identifying Partial Indexes
>db.integers.getIndexes()
[
...,
{
"v" :1,
"key" :{
"integer" :1
},
"name" :"high_importance_integers",
"ns" :"test.integers",
"partialFilterExpression" :{
"importance" :"high"
}
},
...
]
Partial Indexes Considerations
•Notusedwhen:
–The indexed field is not in the query
–Aquerygoesoutsideofthefilterrange,evenifnodocumentsare out of range
•Youcan.explain() queries to check index usage
85

Quiz
Consider the following partial index. Note the partialFilterExpression in particular:
{
"v" :1,
"key" :{
"score" :1,
"student_id" :1
},
"name" :"score_1_student_id_1",
"ns" :"test.scores",
"partialFilterExpression" :{
"score" :{
"$gte" :0.65
},
"subject_name" :"history"
}
}
Quiz (Continued)
Which of the following documents are indexed?
{"_id" :1,"student_id" :2,"score" :0.84,"subject_name" :"history" }
{"_id" :2,"student_id" :3,"score" :0.57,"subject_name" :"history" }
{"_id" :3,"student_id" :4,"score" :0.56,"subject_name" :"physics" }
{"_id" :4,"student_id" :4,"score" :0.75,"subject_name" :"physics" }
{"_id" :5,"student_id" :3,"score" :0.89,"subject_name" :"history" }
4.12 Lab: Finding and Addressing Slow Operations
Set Up
•Inthisexerciselet’sbringupamongo shell with the following instructions
mongo --shell localhost/performance performance.js
In the shell that launches execute the following method
performance.init()
86
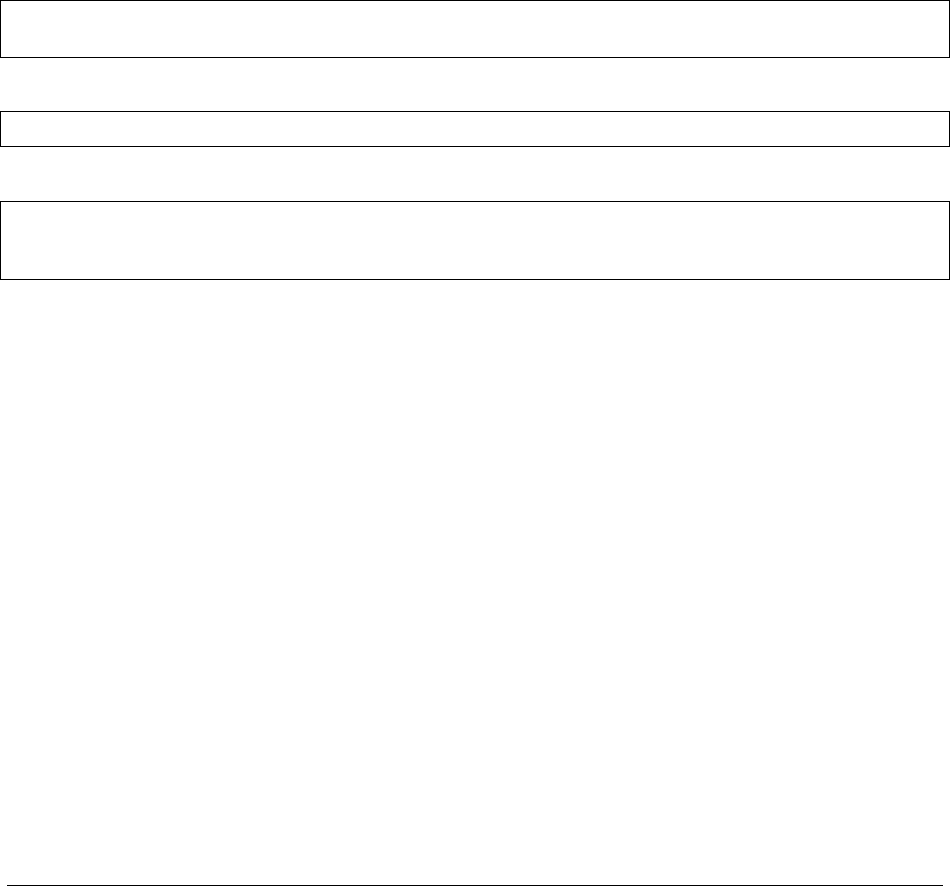
Exercise: Determine Indexes Needed
•Inamongoshellrunperformance.b().Thiswillruninaninfiniteloopprintingsomeoutputasitruns
various statements against the server.
•Nowimaginewehavedetectedaperformanceproblemandsuspect there is a slow operation running.
•Findtheslowoperationandterminateit.Everyslowoperation is assumed to run for 100ms or more.
•Inordertodothis,openasecondwindow(ortab)andrunasecond instance of the mongo shell.
• What indexes can we introduce to make the slow queries more efficient? Disregard the index created in the
previous exercises.
4.13 Lab: Using explain()
Exercise: explain(“executionStats”)
Drop all indexes from previous exercises:
mongo performance
>db.sensor_readings.dropIndexes()
Create an index for the “active” field:
db.sensor_readings.createIndex({ "active" :1})
How many index entries and documents are examined for the following query? How many results are returned?
db.sensor_readings.find(
{"active":false,"_id":{ $gte:99, $lte:1000 }}
).explain("executionStats")
87

5 Replica Sets
Introduction to Replica Sets (page 88) An introduction to replication and replica sets
Elections in Replica Sets (page 91) The process of electing a new primary (automated failover) inreplicasets
Replica Set Roles and Configuration (page 96) Configuring replica set members for common use cases
The Oplog: Statement Based Replication (page 97) The process of replicating data from one node of a replica set to
another
Lab: Working with the Oplog (page 99) Abrieflabthatillustrateshowtheoplogworks
Write Concern (page 101) Balancing performance and durability of writes
Read Concern (page 106) Settings to minimize/prevent stale and dirty reads
Read Preference (page 113) Configuring clients to read from specific members of a replica set
Lab: Setting up a Replica Set (page 114) Launching members, configuring, and initiating a replica set
5.1 Introduction to Replica Sets
Learning Objectives
Upon completing this module, students should understand:
•Strikingtherightbalancebetweencostandredundancy
•Themanyscenariosreplicationaddressesandwhy
•Howtoavoiddowntimeanddatalossusingreplication
Use Cases for Replication
•HighAvailability
•DisasterRecovery
•FunctionalSegregation
High Availability (HA)
•Datastillavailablefollowing:
–Equipment failure (e.g. server, network switch)
–Datacenter failure
•Thisisachievedthroughautomaticfailover.
88

Disaster Recovery (DR)
•Wecanduplicatedataacross:
–Multiple database servers
–Storage backends
–Datacenters
•Canrestoredatafromanothernodefollowing:
–Hardware failure
–Service interruption
Functional Segregation
There are opportunities to exploit the topology of a replica set:
•Basedonphysicallocation(e.g.rackordatacenterlocation)
•Foranalytics,reporting,datadiscovery,systemtasks,etc.
•Forbackups
Large Replica Sets
Functional segregation can be further exploited by using large replica sets.
•50nodereplicasetlimitwithamaximumof7votingmembers
•Usefulfordeploymentswithalargenumberofdatacentersoroffices
•Readonlyworkloadscanpositionsecondariesindatacenters around the world (closer to application servers)
Replication is Not Designed for Scaling
•Canbeusedforscalingreads,butgenerallynotrecommended.
•Drawbacksinclude:
–Eventual consistency
–Not scaling writes
–Potential system overload when secondaries are unavailable
•Considershardingforscalingreadsandwrites.
89
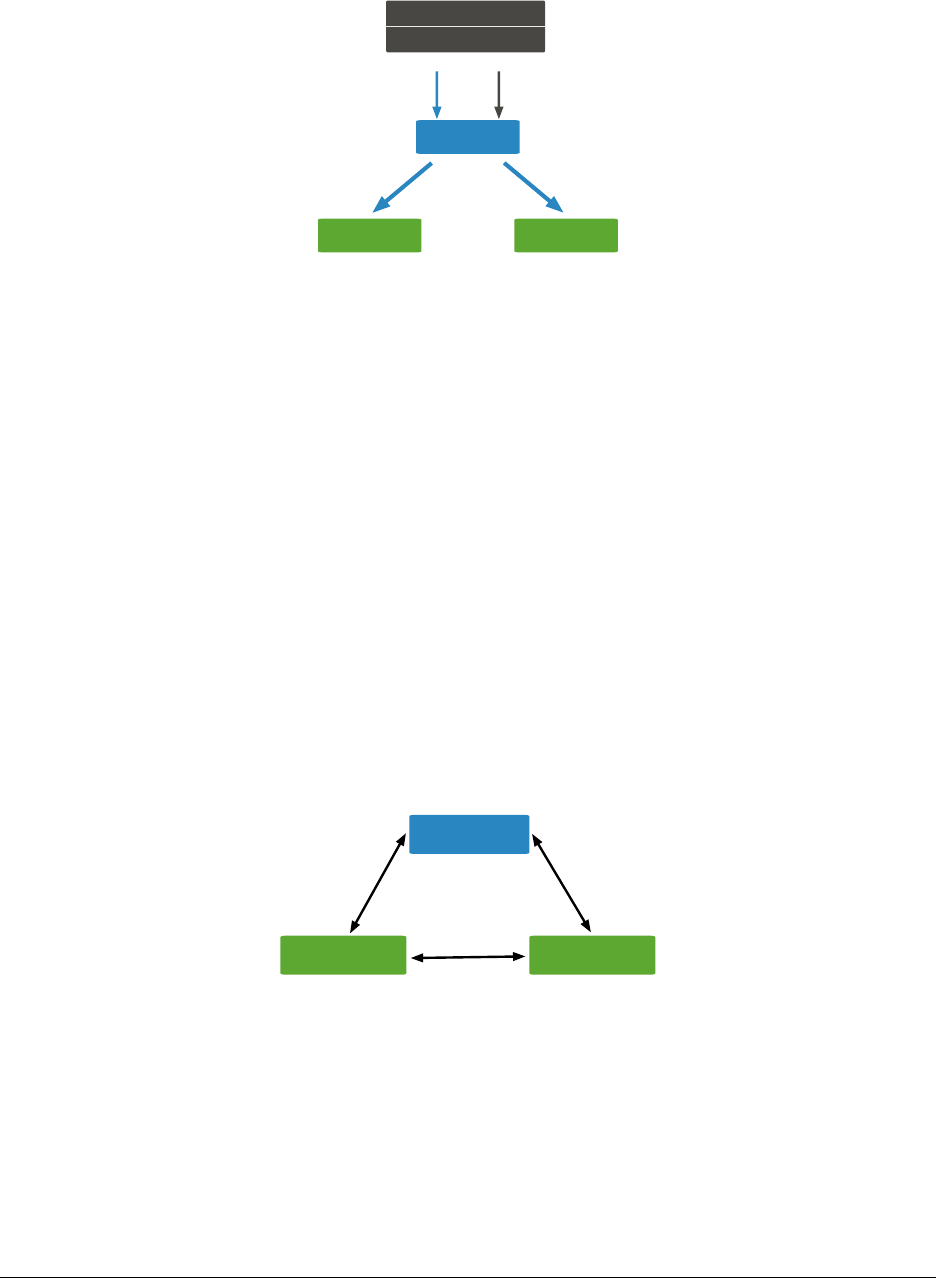
Replica Sets
Primary
Client Application
Driver
Writes
Reads
Replication
Primary
Replication
Secondary Secondary
Primary Server
•Clientssendwritestotheprimaryonly.
•MongoDB,Inc. maintainsclientdriversinmanyprogramminglanguageslikeJava,C#,Javascript,Python,
Ruby, and PHP.
•MongoDBdriversarereplicasetaware.
Secondaries
•Asecondaryreplicatesoperationsfromanothernodeinthereplica set.
•Secondariesusuallyreplicatefromtheprimary.
•Secondariesmayalsoreplicatefromothersecondaries.This is called replication chaining.
•Asecondarymaybecomeprimaryasaresultofafailoverscenario.
Heartbeats
Primary
Secondary Secondary
Heartbeat
Heartbeat
Heartbeat
90
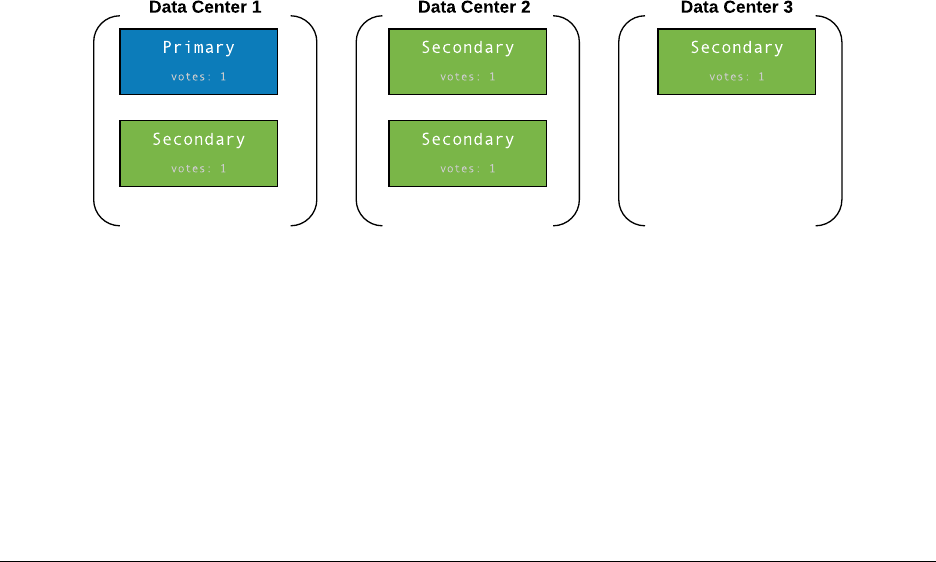
The Oplog
•Theoperationslog,oroplog,isaspecialcappedcollectionthatisthebasisforreplication.
•Theoplogmaintainsoneentryforeachdocumentaffectedbyevery write operation.
•Secondariescopyoperationsfromtheoplogoftheirsyncsource.
Initial Sync
•Occurswhenanewserverisaddedtoareplicaset,orweerasethe underlying data of an existing server (–dbpath)
•Allexistingcollectionsexceptthelocal collection are copied
•AsofMongoDB>=3.4,allindexesarebuiltwhiledataiscopied
•AsofMongoDB>=3.4,initialsyncismoreresilienttointermittent network failure/degradation
5.2 Elections in Replica Sets
Learning Objectives
Upon completing this module students should understand:
•Thatelectionsenableautomatedfailoverinreplicasets
•Howvotesaredistributedtomembers
• What prompts an election
•Howanewprimaryisselected
Members and Votes
91
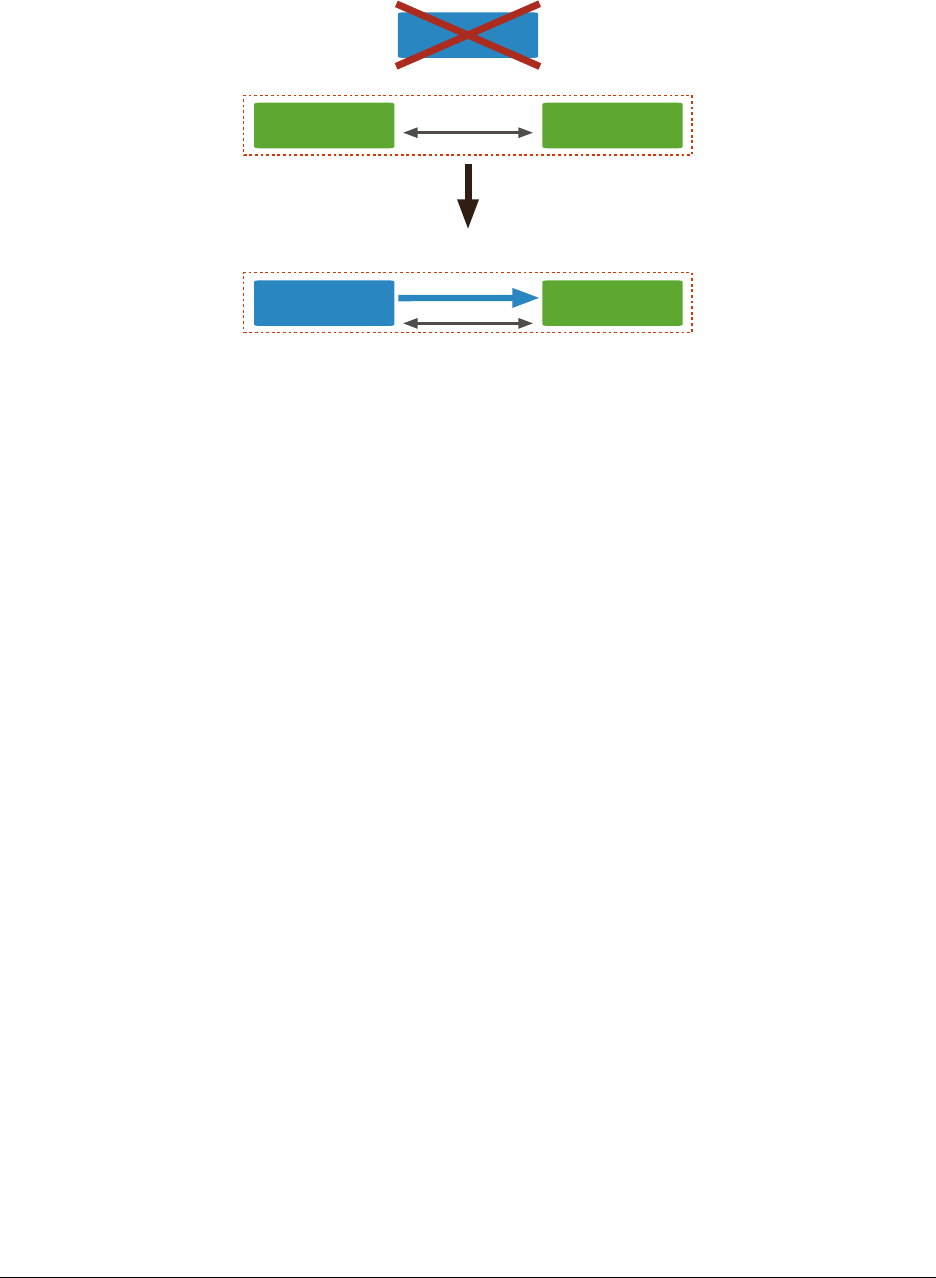
Calling Elections
Heartbeat
Election for New Primary
Replication
New Primary Elected
Secondary Secondary
Secondary
Primary
Primary
Heartbeat
Selecting a New Primary
•Dependsonwhichreplicationprotocolversionisinuse
•PV0
–Priority
–Optime
–Connections
•PV1
–Optime
–Connections
Priority
•PV0factorspriorityintovoting.
•Thehigheritspriority,themorelikelyamemberistobecomeprimary.
•Thedefaultis1.
•Serverswithapriorityof0willneverbecomeprimary.
•Priorityvaluesarefloatingpointnumbers0-1000inclusive.
92

Optime
•Optime:Operationtime,whichisthetimestampofthelastoperation the member applied from the oplog.
•Tobeelectedprimary,amembermusthavethemostrecentoptime.
•Onlyoptimesofvisiblemembersarecompared.
Connections
•Mustbeabletoconnecttoamajorityofthemembersinthereplica set.
•Majorityreferstothetotalnumberofvotes.
•Notthetotalnumberofmembers.
When will a primary step down?
•AfterreceivingthereplSetStepDown or rs.stepDown() command.
•Ifasecondaryiseligibleforelectionandhasahigherpriority.
•Ifitcannotcontactamajorityofthemembersofthereplicaset.
replSetStepDown Behavior
•Primarywillattempttoterminatelongrunningoperationsbefore stepping down.
•Primarywillwaitforelectablesecondarytocatchupbeforesteppingdown.
•“secondaryCatchUpPeriodSecs”canbespecifiedtolimittheamountoftimetheprimarywillwaitforasec-
ondary to catch up before the primary steps down.
Exercise: Elections in Failover Scenarios
•Wehavelearnedaboutelectingaprimaryinreplicasets.
•Let’slookatsomescenariosinwhichfailovermightbenecessary.
Scenario A: 3 Data Nodes in 1 DC
Which secondary will become the new primary?
93
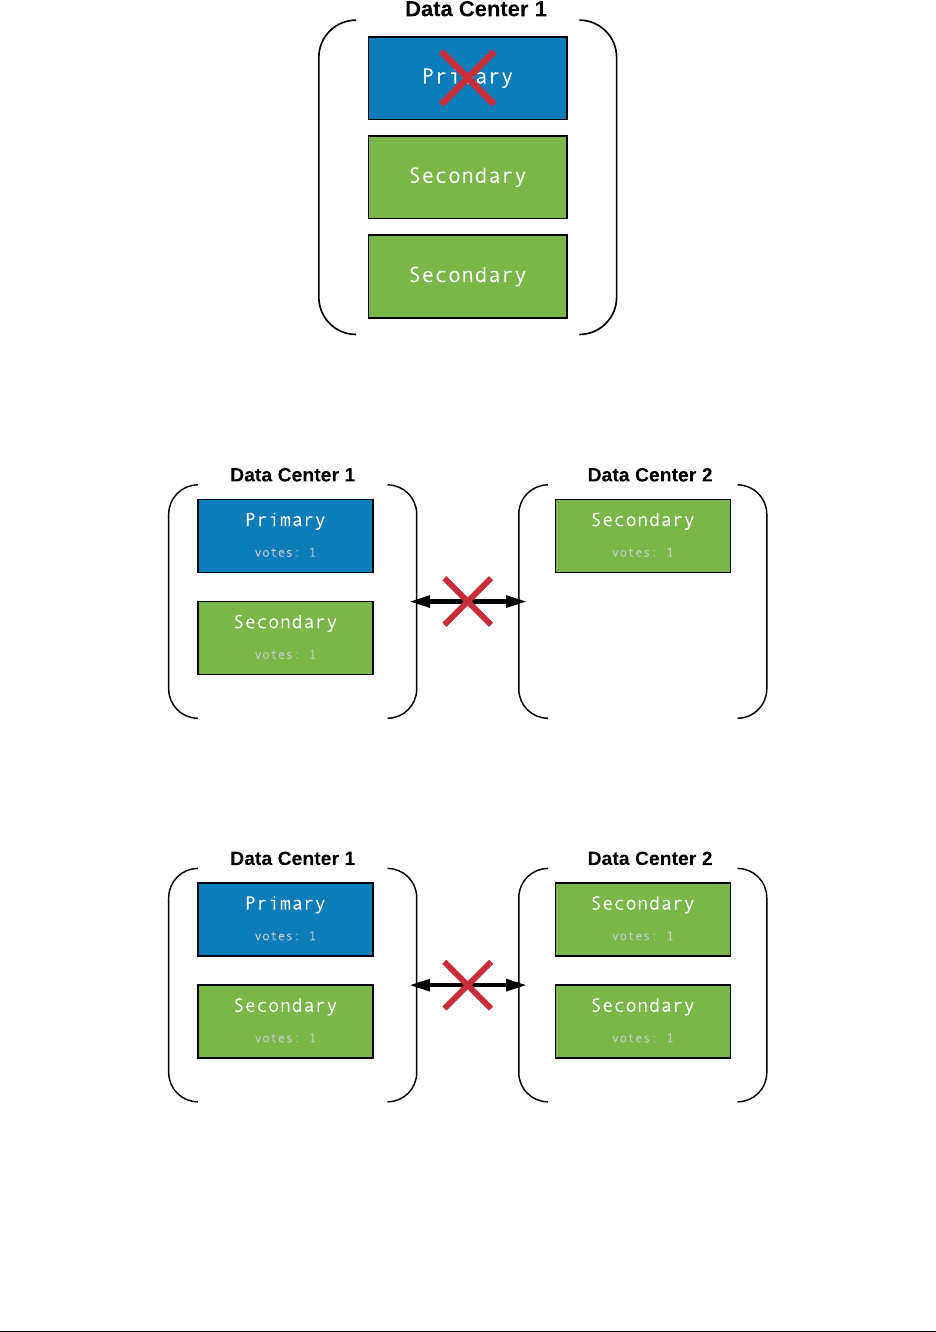
Scenario B: 3 Data Nodes in 2 DCs
Which member will become primary following this type of network partition?
Scenario C: 4 Data Nodes in 2 DCs
What happens following this network partition?
94
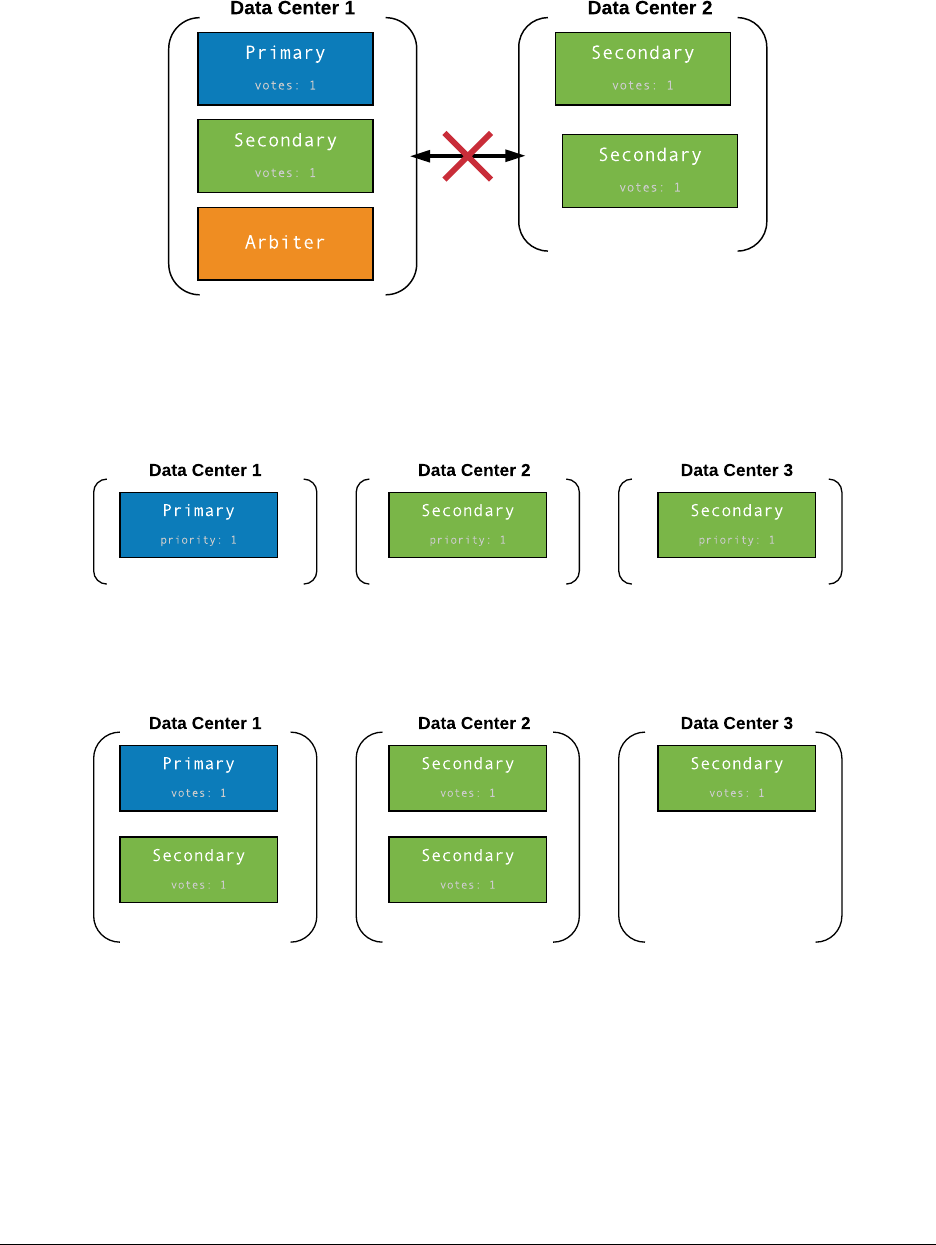
Scenario D: 5 Nodes in 2 DCs
The following is similar to Scenario C, but with the addition of an arbiter in Data Center 1. What happens here?
Scenario E: 3 Data Nodes in 3 DCs
• What happens here if any one of the nodes/DCs fail?
• What about recovery time?
Scenario F: 5 Data Nodes in 3 DCs
What happens here if any one of the nodes/DCs fail? What about recovery time?
95

5.3 Replica Set Roles and Configuration
Learning Objectives
Upon completing this module students should understand:
•Theuseofprioritytopreferencecertainmembersordatacenters as primaries.
•Hiddenmembers.
•Theuseofhiddensecondariesfordataanalyticsandotherpurposes (when secondary reads are used).
•TheuseofslaveDelaytoprotectagainstoperatorerror.
Example: A Five-Member Replica Set Configuration
•Forthisexampleapplication,therearetwodatacenters.
•Wenamethehostsaccordingly:dc1-1,dc1-2,dc2-1,etc.
–This is just a clarifying convention for this example.
–MongoDB does not care about host names except to establish connections.
•Thenodesinthisreplicasethaveavarietyofrolesinthisapplication.
Configuration
conf ={// 5 data-bearing nodes
_id:"mySet",
members:[
{_id:0, host :"dc1-1.example.net:27017", priority :5},
{_id:1, host :"dc1-2.example.net:27017", priority :5},
{_id:2, host :"dc2-1.example.net:27017" },
{_id:3, host :"dc1-3.example.net:27017", hidden :true },
{_id:4, host :"dc2-2.example.net:27017", hidden :true,
slaveDelay:7200 }
]
}
Principal Data Center
{_id:0, host :"dc1-1.example.net", priority :5},
{_id:1, host :"dc1-2.example.net", priority :5},
96

Data Center 2
{_id:2, host :"dc2-1.example.net:27017" },
What about dc1-3 and dc2-2?
// Both are hidden.
// Clients will not distribute reads to hidden members.
// We use hidden members for dedicated tasks.
{_id:3, host :"dc1-3.example.net:27017", hidden :true },
{_id:4, host :"dc2-2.example.net:27017", hidden :true,
slaveDelay:7200 }
What about dc2-2?
{_id:4, host :"dc2-2.example.net:27017", hidden :true,
slaveDelay :7200 }
5.4 The Oplog: Statement Based Replication
Learning Objectives
Upon completing this module students should understand:
•Binaryvs.statement-basedreplication.
•Howtheoplogisusedtosupportreplication.
•HowoperationsinMongoDBaretranslatedintooperationswritten to the oplog.
• Why oplog operations are idempotent.
•Thattheoplogisacappedcollectionandtheimplicationsthis holds for syncing members.
Binary Replication
•MongoDBreplicationisstatementbased.
•Contrastthatwithbinaryreplication.
•Withbinaryreplicationwewouldkeeptrackof:
–The data files
–The offsets
–How many bytes were written for each change
•Inshort,wewouldkeeptrackofactualbytesandveryspecificlocations.
•Wewouldsimplyreplicatethesechangesacrosssecondaries.
97

Tradeoffs
•Thegoodthingisthatfiguringoutwheretowrite,etc.isveryefficient.
•Butwemusthaveabyte-for-bytematchofourdatafilesontheprimary and secondaries.
•Theproblemisthatthiscouplesourreplicasetmembersinways that are inflexible.
•Binaryreplicationmayalsoreplicatediskcorruption.
Statement-Based Replication
•Statement-basedreplicationfacilitatesgreaterindependence among members of a replica set.
•MongoDBstoresastatementforeveryoperationinacappedcollection called the oplog.
•Secondariesdonotsimplyapplyexactlytheoperationthatwas issued on the primary.
Example
Suppose the following command is issued and it deletes 100 documents:
db.foo.deleteMany({ age :30 })
This will be represented in the oplog with records such as the following:
{"ts" :Timestamp(1407159845,5), "h" :NumberLong("-704612487691926908"),
"v" :2,"op" :"d","ns" :"bar.foo","b" :true,"o" :{"_id" :65 }}
{"ts" :Timestamp(1407159845,1), "h" :NumberLong("6014126345225019794"),
"v" :2,"op" :"d","ns" :"bar.foo","b" :true,"o" :{"_id" :333 }}
{"ts" :Timestamp(1407159845,4), "h" :NumberLong("8178791764238465439"),
"v" :2,"op" :"d","ns" :"bar.foo","b" :true,"o" :{"_id" :447 }}
{"ts" :Timestamp(1407159845,3), "h" :NumberLong("-1707391001705528381"),
"v" :2,"op" :"d","ns" :"bar.foo","b" :true,"o" :{"_id" :1033 }}
{"ts" :Timestamp(1407159845,2), "h" :NumberLong("-6814297392442406598"),
"v" :2,"op" :"d","ns" :"bar.foo","b" :true,"o" :{"_id" :9971 }}
Replication Based on the Oplog
•Onestatementperdocumentaffectedbyeachwrite:insert,update, or delete.
•Providesalevelofabstractionthatenablesindependenceamong the members of a replica set:
–With regard to MongoDB version.
–In terms of how data is stored on disk.
–Freedom to do maintenance without the need to bring the entiresetdown.
98

Operations in the Oplog are Idempotent
•Eachoperationintheoplogisidempotent.
• Whether applied once or multiple times it produces the same result.
•Necessaryifyouwanttobeabletocopydatawhilesimultaneously accepting writes.
The Oplog Window
•Oplogsarecappedcollections.
•Cappedcollectionsarefixed-size.
•Theyguaranteepreservationofinsertionorder.
•Theysupporthigh-throughputoperations.
•Likecircularbuffers,onceacollectionfillsitsallocatedspace:
–It makes room for new documents.
–By overwriting the oldest documents in the collection.
Sizing the Oplog
•Theoplogshouldbesizedtoaccountforlatencyamongmembers.
•Thedefaultsizeoplogisusuallysufficient.
•Butyouwanttomakesurethatyouroplogislargeenough:
–So that the oplog window is large enough to support replication
–To give you a large enough history for any diagnostics you might wish to run.
5.5 Lab: Working with the Oplog
Create a Replica Set
Let’s take a look at a concrete example. Launch mongo shell as follows.
mkdir -p /data/db
mongo --nodb
Create a replica set by running the following command in the mongo shell.
replicaSet =new ReplSetTest( { nodes :3})
99

ReplSetTest
•ReplSetTestisusefulforexperimentingwithreplicasetsas a means of hands-on learning.
•Itshouldneverbeusedinproduction.Never.
•Thecommandabovewillcreateareplicasetwiththreemembers.
•Itdoesnotstartthemongods,however.
•Youwillneedtoissueadditionalcommandstodothat.
Start the Replica Set
Start the mongod processes for this replica set.
replicaSet.startSet()
Issue the following command to configure replication for these mongods. You will need to issue this while output is
flying by in the shell.
replicaSet.initiate()
Status Check
•Youshouldnowhavethreemongodsrunningonports20000,20001, and 20002.
•Youwillseelogstatementsfromallthreeprintinginthecurrent shell.
•Tocompletetherestoftheexercise,openanewshell.
Connect to the Primary
Open a new shell, connecting to the primary.
mongo --port 20000
Create some Inventory Data
Use the store database:
use store
Add the following inventory:
inventory =[{_id:1, inStock:10 }, { _id:2, inStock:20 },
{_id
:3, inStock:30 }, { _id:4, inStock:40 },
{_id
:5, inStock:50 }, { _id:6, inStock:60 }]
db.products.insert(inventory)
100

Perform an Update
Issue the following update. We might issue this update after apurchaseofthreeitems.
db.products.update({ _id:{$in:[2,5]}},
{ $inc
:{ inStock :-1}},
{ multi
:true })
View the Oplog
The oplog is a capped collection in the local database of each replica set member:
use local
db.oplog.rs.find()
{"ts" :Timestamp(1406944987,1), "h" :NumberLong(0), "v" :2,"op" :"n",
"ns" :"","o" :{"msg" :"initiating set" }}
...
{"ts" :Timestamp(1406945076,1), "h" :NumberLong("-9144645443320713428"),
"v" :2,"op" :"u","ns" :"store.products","o2" :{"_id" :2},
"o" :{"$set" :{"inStock" :19 }}}
{"ts" :Timestamp(1406945076,2), "h" :NumberLong("-7873096834441143322"),
"v" :2,"op" :"u","ns" :"store.products","o2" :{"_id" :5},
"o" :{"$set" :{"inStock" :49 }}}
5.6 Write Concern
Learning Objectives
Upon completing this module students should understand:
•HowandwhenrollbackoccursinMongoDB.
•Thetradeoffsbetweendurabilityandperformance.
• Write concern as a means of ensuring durability in MongoDB.
•Thedifferentlevelsofwriteconcern.
•Relationbetweenvotingmemberandwriteconcern
What happens to the write?
•Awriteissenttoaprimary.
•Theprimaryacknowledgesthewritetotheclient.
•Theprimarythenbecomesunavailablebeforeasecondarycanreplicatethewrite
101

Answer to ‘What happens to the write?’
•Anothermembermightbeelectedprimary.
•Itwillnothavethelastwritethatoccurredbeforetheprevious primary became unavailable.
• When the previous primary becomes available again:
–It will note it has writes that were not replicated.
–It will put these writes into a rollback file.
–Ahumanwillneedtodeterminewhattodowiththisdata.
•ThisisdefaultbehaviorinMongoDBandcanbecontrolledusing write concern.
Balancing Durability with Performance
•Thepreviousscenarioisaspecificinstanceofacommondistributed systems problem.
•Forsomeapplicationsitmightbeacceptableforwritestoberolledback.
•Otherapplicationsmayhavevaryingrequirementswithregard to durability.
•Tunablewriteconcern:
–Make critical operations persist to an entire MongoDB deployment.
–Specify replication to fewer nodes for less important operations.
Defining Write Concern
•MongoDBacknowledgesitswrites
• Write concern determines when that acknowledgment occurs
–How many servers
–Whether on disk or not
•Clientsmaydefinethewriteconcernperwriteoperation,ifnecessary.
•Standardizeonspecificlevelsofwriteconcernsfordifferent classes of writes.
•Inthediscussionthatfollowswewilllookatincreasinglystrict levels of write concern.
•Onlyvotingmembersparticipateinwriteconcerncount.
102
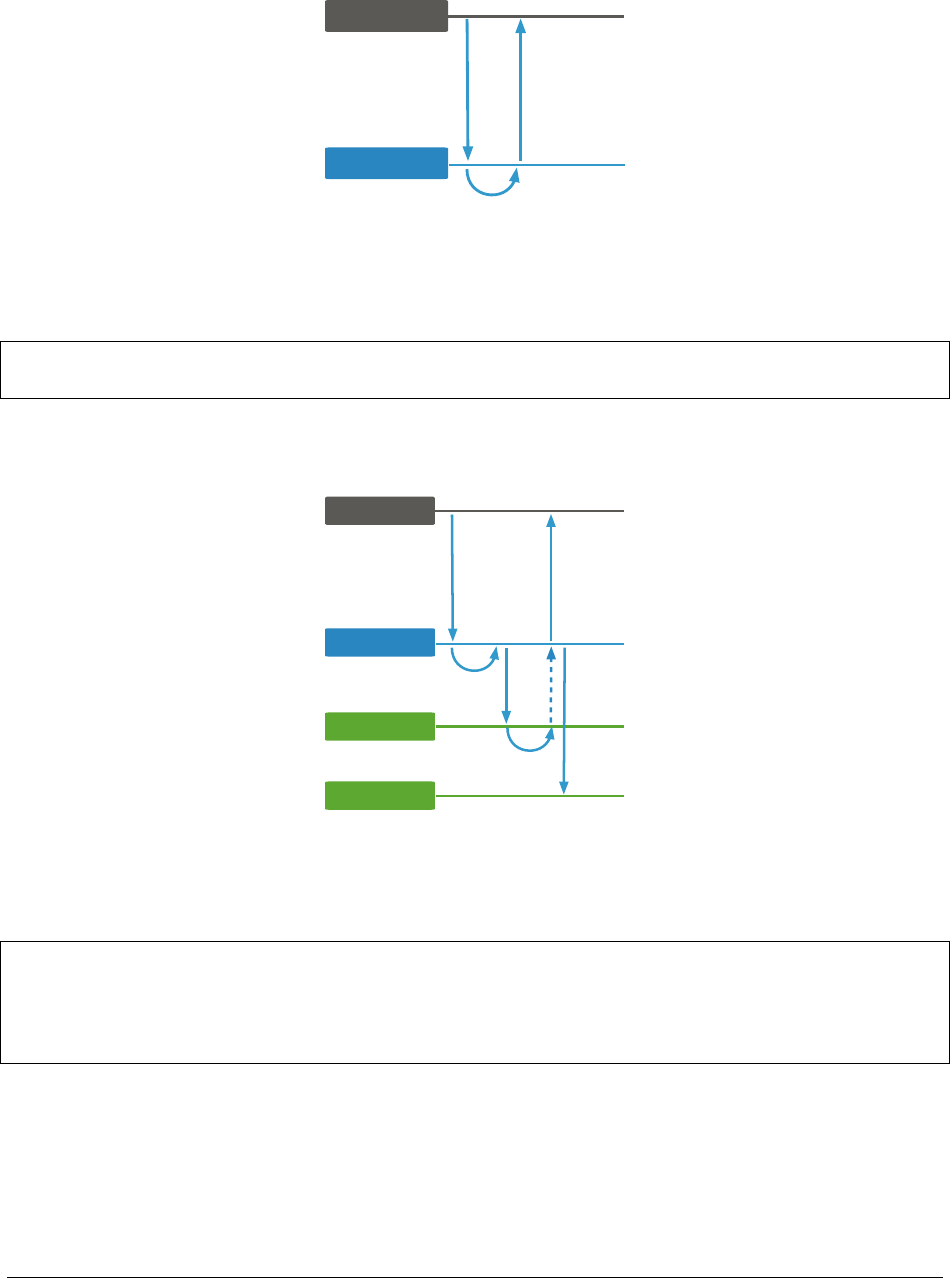
Write Concern: {w: 1}
Driver
Primary
Write
mongod
Response
Apply
writeConcern:
{ w: 1 }
Example: {w: 1}
db.edges.insertOne( { from :"tom185",to:"mary_p" },
{ writeConcern :{w:1}})
Write Concern: {w: 2}
Driver
Primary
Write
Primary
Secondary
Apply
Replicate
Secondary
Replicate
writeConcern:
{ w: 2 }
Response
Apply
Example: {w: 2}
db.customer.updateOne( { user :"mary_p" },
{ $push :{ shoppingCart:
{_id:335443, name :"Brew-a-cup",
price :45.79 }}},
{ writeConcern :{w:2}})
103

Other Remarks regarding Write Concerns
•wcan use any integer for write concern.
•Acknowledgmentguaranteesthewritehaspropagatedtothespecified number of voting members.
–E.g., {w: 3},{w: 4},etc.
•j: trueensures the writes are in the journal (which is written to disk) before being acknowledged
–PV0: on the primary need to write to the journal
–PV1: all nodes contributing to the majority write the journaltodiskbeforeacknowledgewriteConcern-
MajorityJournalDefault9
•w: majorityimplies j: truein PV1
Write Concern: {w: "majority"}
• Ensures the primary completed the write (in RAM).
–By default, also on disk
•Ensureswriteoperationshavepropagatedtoamajorityofthe voting members.
•Avoidshardcodingassumptionsaboutthesizeofyourreplica set into your application.
•Usingmajoritytradesoffperformancefordurability.
•Itissuitableforcriticalwritesandtoavoidrollbacks.
Example: {w: "majority"}
db.products.updateOne({ _id :335443 },
{ $inc :{ inStock :-1}},
{ writeConcern :{w:"majority" }})
Quiz: Which write concern?
Suppose you have a replica set with 7 data nodes, all voting members in the replica set. Your application has critical
inserts for which you do not want rollbacks to happen. Secondaries may be taken down from to time for maintenance,
leaving you with a potential 4 server replica set. Which write concern is best suited for these critical inserts?
•{w:1}
•{w:2}
•{w:3}
•{w:4}
•{w:“majority”}
9http://docs.mongodb.org/manual/reference/replica-configuration/#rsconf.writeConcernMajorityJournalDefault
104

Further Reading
See Write Concern Reference10 for more details on write concern configurations, including setting timeouts and iden-
tifying specific replica set members that must acknowledge writes (i.e. tag sets11).
10 http://docs.mongodb.org/manual/reference/write-concern
11 http://docs.mongodb.org/manual/tutorial/configure-replica-set-tag-sets/#replica-set-configuration-tag-sets
105

5.7 Read Concern
Learning Objectives
Upon completing this module, students will be able to:
•Definereadconcern
• Distinguish stale from dirty reads
•Describehowreadconcernpreventsdirtyreads
•UnderstandhowtousereadconcerninMongoDB
•Understandthedifferencesbetweenreplicationprotocolversion 0 and 1
Read Concerns
•Local:Default
•Majority:AddedinMongoDB3.2,requiresWiredTigerandelectionProtocol Version 1 (PV1)
•Linearizable:AddedinMongoDB3.4,workswithMMAPorWiredTiger
Local
•Defaultreadconcern
•Willreturndatafromtheprimary.
•Doesnotwaitforthewritetobereplicatedtoothermembersof the replica set.
Majority
•AvailableonlywithWiredTigerandPV1.
•Readsmajorityacknowledgedwritesfromasnapshot.
–server will need additional memory to keep additional snapshot in memory
–need to start mongod with –enableMajorityReadConcern
•Undercertaincircumstances(highvolume,flakynetwork),can result in stale reads.
106
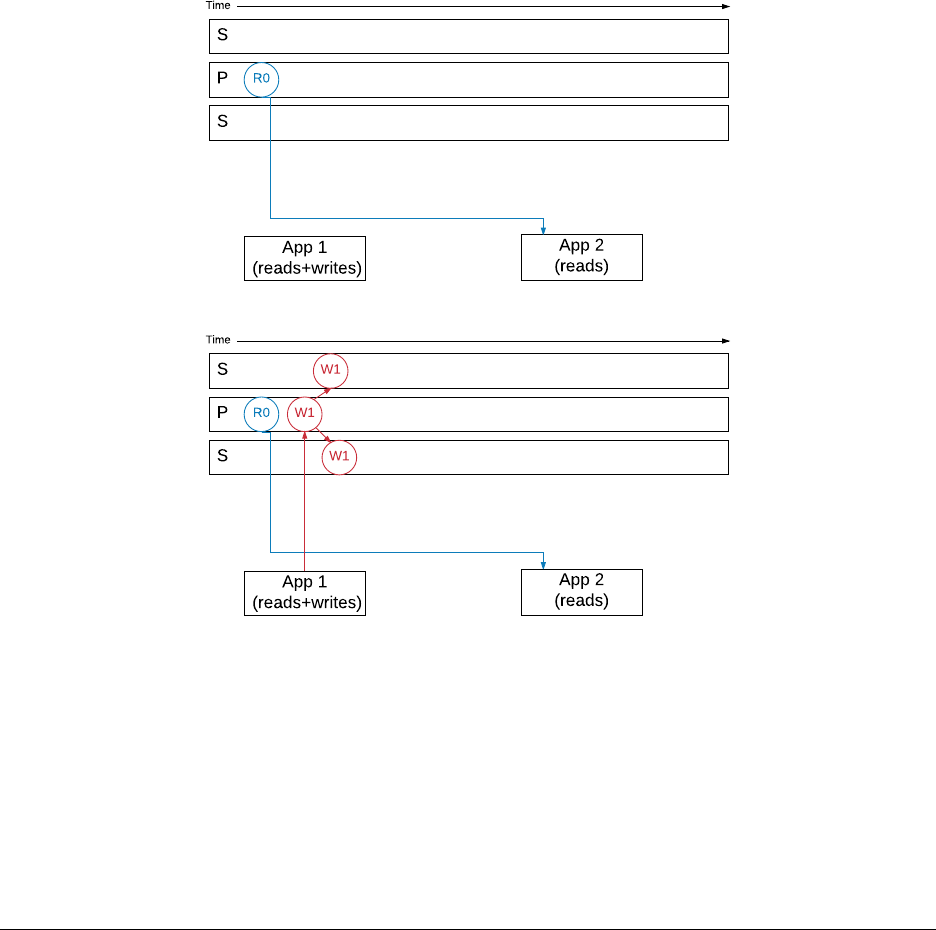
Linearizable
•AvailablewithMongoDBversions>=3.4
•Willreadlatestdataacknowledgedwithw: majority,orblockuntilreplicasetacknowledgesawritein
progress with w: majority
•Canresultinvery slow queries.
–Always use maxTimeMS with linearizable
•Onlyguaranteedtobealinearizablereadwhenthequeryfetches a single document
Example: Read Concern Level Majority
App1 is doing writes to a document with w:“majority”
App2 is reading the same document with read concern level: “majority”
A new version of the document (W1) is written by App1,andthewriteispropagatedtothesecondaries
The write,alsoneedstobejournaled (J1) on each secondary
107

Once the write is journaled on a majority of nodes, App1 will get a confirmation of the commit on a majority (C1) of
nodes.
If App2 reads the document with a read concern level majority at any time before C1,itwillgetthevalueR0
However after the committed state (C1), it will get the new value for the document (R1)
108
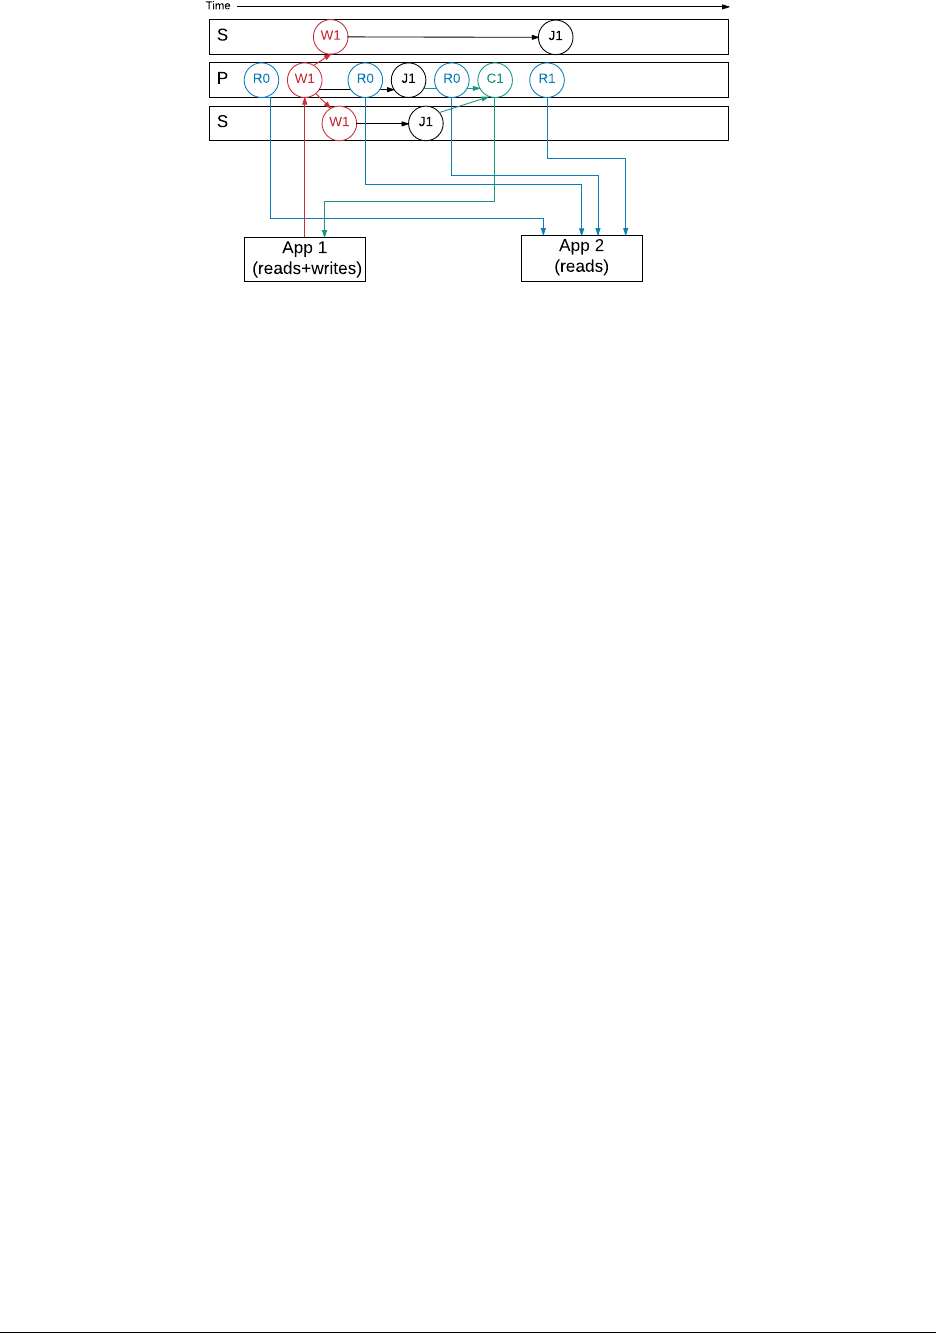
Background: Stale Reads
•Readsthatdonotreflectthemostrecentwritesarestale
•Thesecanoccurwhenreadingfromsecondaries
•Systemswithstalereadsare“eventuallyconsistent”
•Readingfromtheprimaryminimizesoddsofstalereads
–They can still occur in rare cases
Stale Reads on a Primary
•Inunusualcircumstances,twomembersmaysimultaneouslybelieve that they are the primary
–One can acknowledge {w: "majority"}writes
*This is the true primary
–The other was a primary
*But a new one has been elected
•Inthisstate,theotherprimarywillservestalereads
Background: Dirty Reads
•Dirtyreadsarenotstalereads
•Dirtyreadsoccurwhenyouseeaviewofthedata
–... but that view may not persist
–... even in the history (i.e., oplog)
•Occurwhendataisreadthathasnotbeencommittedtoamajority of the replica set
–Because that data could get rolled back
109

Dirty Reads and Write Concern
• Write concern alone can not prevent dirty reads
–Data on the primary may be vulnerable to rollback
–The exception being linearizable reads on a primary with writeConcernMajorityJournalDefault
set to true.
•Readconcernwasimplementedtoallowdeveloperstheoptionofpreventingdirtyreads
Quiz
What is the difference between a dirty read and a stale read?
Read Concern and Read Preference
•Readpreferencedeterminestheserveryoureadfrom
–Primary, secondary, etc.
•Readconcerndeterminestheviewofthedatayousee,anddoesnotupdateitsdatathemomentwritesare
received
Read Concern and Read Preference: Secondary
•Theprimaryhasthemostcurrentviewofthedata
–Secondaries learn which writes are committed from the primary
•Dataonsecondariesmightbebehindtheprimary
–But never ahead of the primary
Using Read Concern
•Touselevel: majority read concern, you must:
–Use WiredTiger on all members
–Launch all mongods in the set with
*--enableMajorityReadConcern
–Specify the read concern level to the driver
•Youshould:
–Use write concern {w: "majority"}
–Otherwise, an application may not see its own writes
110

Example: Using Read Concern
•First,launchareplicaset
–Use --enableMajorityReadConcern
•Ascriptisintheshell_scripts directory of the USB drive.
./launch_replset_for_majority_read_concern.sh
Example: Using Read Concern (Continued)
#!/usr/bin/env bash
echo ’db.testCollection.drop();’ | mongo --port 27017 readConcernTest; wait
echo ’db.testCollection.insertOne({message: "probably on a secondary." } );’ |
mongo --port 27017 readConcernTest; wait
echo ’db.fsyncLock()’ | mongo --port 27018;wait
echo ’db.fsyncLock()’ | mongo --port 27019;wait
echo ’db.testCollection.insertOne( { message : "Only on primary." } );’ |
mongo --port 27017 readConcernTest; wait
echo ’db.testCollection.find().readConcern("majority");’ |
mongo --port 27017 readConcernTest; wait
echo ’db.testCollection.find(); // read concern "local"’ |
mongo --port 27017 readConcernTest; wait
echo ’db.fsyncUnlock()’ | mongo --port 27018;wait
echo ’db.fsyncUnlock()’ | mongo --port 27019;wait
echo ’db.testCollection.drop();’ | mongo --port 27017 readConcernTest
Quiz
What must you do in order to make the database return documents that have been replicated to a majority of the replica
set members?
Replication Protocol Version 0
•Betterdataconsistencywhenusingarbitersandw: 1 writes
•Doesnotsupportmajority read concern
•30secondbufferbetweenelections
•Supportsvetoesbasedonpriority
–Should have fewer elections, and fewer w: 1 rollbacks.
111

Replication Protocol Version 1
•Version1isthedefaultinMongoDB>=3.2.
•Withversion1,secondariesnowwritetodiskbeforeacknowledging writes.
•{w: "majority"}now implies {j: true}
–Can be disabled by setting writeConcernMajorityJournalDefault to false for versions >= 3.4
•SetthereplicationprotocolversionusingtheprotocolVersion parameter in your replica set configuration.
Replication Protocol Version 1 (continued)
•AlsoaddselectionTimeoutMillis as an option
–For secondaries: How long to wait before calling for an election
–For primaries: How long to wait before stepping down
*After losing contact with the majority
*This applies to the primary only
•Requiredforreadconcernlevel“majority”
Quiz
What are the advantages of replication protocol 1?
Further Reading
See Read Concern Reference12 for more details on read concerns.
12 http://docs.mongodb.org/manual/reference/read-concern
112

5.8 Read Preference
What is Read Preference?
•Readpreferenceallowsyoutospecifythenodesinareplicaset to read from.
•Clientsonlyreadfromtheprimarybydefault.
•Therearesomesituationsinwhichaclientmaywanttoreadfrom:
–Any secondary
–Aspecificsecondary
–Aspecifictypeofsecondary
•Onlyreadfromasecondaryifyoucantoleratepossiblystaledata,asnotallwritesmighthavereplicated.
Use Cases
•Runningsystemsoperationswithoutaffectingthefront-end application.
•Providinglocalreadsforgeographicallydistributedapplications.
•Maintainingavailabilityduringafailover.
Not for Scaling
•Ingeneral,donot read from secondaries to provide extra capacity for reads.
•Sharding13 increases read and write capacity by distributing operations across a group of machines.
•Shardingisabetterstrategyforaddingcapacity.
Read Preference Modes
MongoDB drivers support the following read preferences. Note that hidden nodes will never be read from when
connected via the replica set.
•primary:Default.Alloperationsreadfromtheprimary.
•primaryPreferred:Readfromtheprimarybutifitisunavailable,readfromsecondary members.
•secondary:Alloperationsreadfromthesecondarymembersofthereplica set.
•secondaryPreferred:Readfromsecondarymembersbutifnosecondariesareavailable, read from the primary.
•nearest:Readfrommemberofthereplicasetwiththeleastnetworklatency, regardless of the member’s type.
13 http://docs.mongodb.org/manual/sharding
113

Tag Sets
•Thereisalsotheoptiontousedtagsets.
•Youmaytagnodessuchthatqueriesthatcontainthetagwillbe routed to one of the servers with that tag.
•Thiscanbeusefulforrunningreports,sayforaparticulardata center or nodes with different hardware (e.g.
hard disks vs SSDs).
For example, in the mongo shell:
conf =rs.conf()
conf.members[0].tags ={dc:"east",use:"production" }
conf.members[1].tags ={dc:"east",use:"reporting" }
conf.members[2].tags ={use:"production" }
rs.reconfig(conf)
5.9 Lab: Setting up a Replica Set
Overview
•Inthisexercisewewillsetupa3datanodereplicasetonasingle machine.
•Inproduction,eachnodeshouldberunonadedicatedhost:
–To avoid any potential resource contention
–To provide isolation against server failure
Create Data Directories
Since we will be running all nodes on a single machine, make sure each has its own data directory.
On Linux or Mac OS, run the following in the terminal to create the 3 directories ~/data/rs1,~/data/rs2,and
~/data/rs3:
mkdir -p ~/data/rs{1,2,3}
On Windows, run the following command instead in Command Prompt or PowerShell:
md c:\data\rs1 c:\data\rs2 c:\data\rs3
114

Launch Each Member
Now start 3 instances of mongod in the foreground so that it is easier to observe and shutdown.
On Linux or Mac OS, run each of the following commands in its own terminal window:
mongod --replSet myReplSet --dbpath ~/data/rs1 --port 27017 --oplogSize 200
mongod --replSet myReplSet --dbpath ~/data/rs2 --port 27018 --oplogSize 200
mongod --replSet myReplSet --dbpath ~/data/rs3 --port 27019 --oplogSize 200
On Windows, run each of the following commands in its own Command Prompt or PowerShell window:
mongod --replSet myReplSet --dbpath c:\data\rs1 --port 27017 --oplogSize 200
mongod --replSet myReplSet --dbpath c:\data\rs2 --port 27018 --oplogSize 200
mongod --replSet myReplSet --dbpath c:\data\rs3 --port 27019 --oplogSize 200
Status
•Atthispoint,wehave3mongod instances running.
•TheywerealllaunchedwiththesamereplSet parameter of “myReplSet”.
•Despitethis,themembersarenotawareofeachotheryet.
•Thisisfinefornow.
Connect to a MongoDB Instance
•ConnecttotheoneoftheMongoDBinstanceswiththemongoshell.
•Todosorunthefollowingcommandintheterminal,CommandPrompt, or PowerShell:
mongo // connect to the default port 27017
Configure the Replica Set
rs.initiate()
// wait a few seconds
rs.add (’<HOSTNAME>:27018’)
rs.addArb(’<HOSTNAME>:27019’)
// Keep running rs.status() until there’s a primary and 2 secondaries
rs.status()
115

Problems That May Occur When Initializing the Replica Set
•bindIpparameterisincorrectlyset
•Replicasetconfigurationmayneedtobeexplicitlyspecifiedtouseadifferenthostname:
>conf ={
_id:"<REPLICA-SET-NAME>",
members:[
{_id:0, host :"<HOSTNAME>:27017"},
{_id:1, host :"<HOSTNAME>:27018"},
{_id:2, host :"<HOSTNAME>:27019",
"arbiterOnly" :true},
]
}
>rs.initiate(conf)
Write to the Primary
While still connected to the primary (port 27017) with mongo shell, insert a simple test document:
db.testcol.insert({ a:1})
db.testcol.count()
exit // Or Ctrl-d
Read from a Secondary
Connect to one of the secondaries. E.g.:
mongo --port 27018
Read from the secondary
rs.slaveOk()
db.testcol.find()
Review the Oplog
use local
db.oplog.rs.find()
116

Changing Replica Set Configuration
To change the replica set configuration, first connect to the primary via mongo shell:
mongo --port <PRIMARY_PORT> # e.g. 27017
Let’s raise the priority of one of the secondaries. Assuming it is the 2nd node (e.g. on port 27018):
cfg =rs.conf()
cfg["members"][1]["priority"]=10
rs.reconfig(cfg)
Verifying Configuration Change
You will see errors l i ke the following, w h i c h a r e expected:
2014-10-07T17:01:34.610+0100 DBClientCursor::init call() failed
2014-10-07T17:01:34.613+0100 trying reconnect to 127.0.0.1:27017 (127.0.0.1)failed
2014-10-07T17:01:34.617+0100 reconnect 127.0.0.1:27017 (127.0.0.1)ok
reconnected to server after rs command (which is normal)
Verify th a t t h e r e p l i c a s e t c o nfigurat i o n i s n ow a s exp e c t e d :
rs.conf()
The secondary will now become a primary. Check by running:
rs.status()
Further Reading
•Replica Configuration14
•Replica States15
14 http://docs.mongodb.org/manual/reference/replica-configuration/
15 http://docs.mongodb.org/manual/reference/replica-states/
117

6 Sharding
Introduction to Sharding (page 118) An introduction to sharding
Balancing Shards (page 125) Chunks, the balancer, and their role in a sharded cluster
Shard Zones (page 127) How zone-based sharding works
Lab: Setting Up a Sharded Cluster (page 129) Deploying a sharded cluster
6.1 Introduction to Sharding
Learning Objectives
Upon completing this module, students should understand:
• What problems sharding solves
• When sharding is appropriate
•Theimportanceoftheshardkeyandhowtochooseagoodone
• Why sharding increases the need for redundancy
Contrast with Replication
•Inanearliermodule,wediscussedReplication.
•Thisshouldneverbeconfusedwithsharding.
•Replicationisabouthighavailabilityanddurability.
–Taking your data and constantly copying it
–Being ready to have another machine step in to field requests.
Sharding is Concerned with Scale
• What happens when a system is unable to handle the applicationload?
•Itistimetoconsiderscaling.
•Thereare2typesofscalingwewanttoconsider:
–Vertica l s c a l i n g
–Horizontal scaling
118
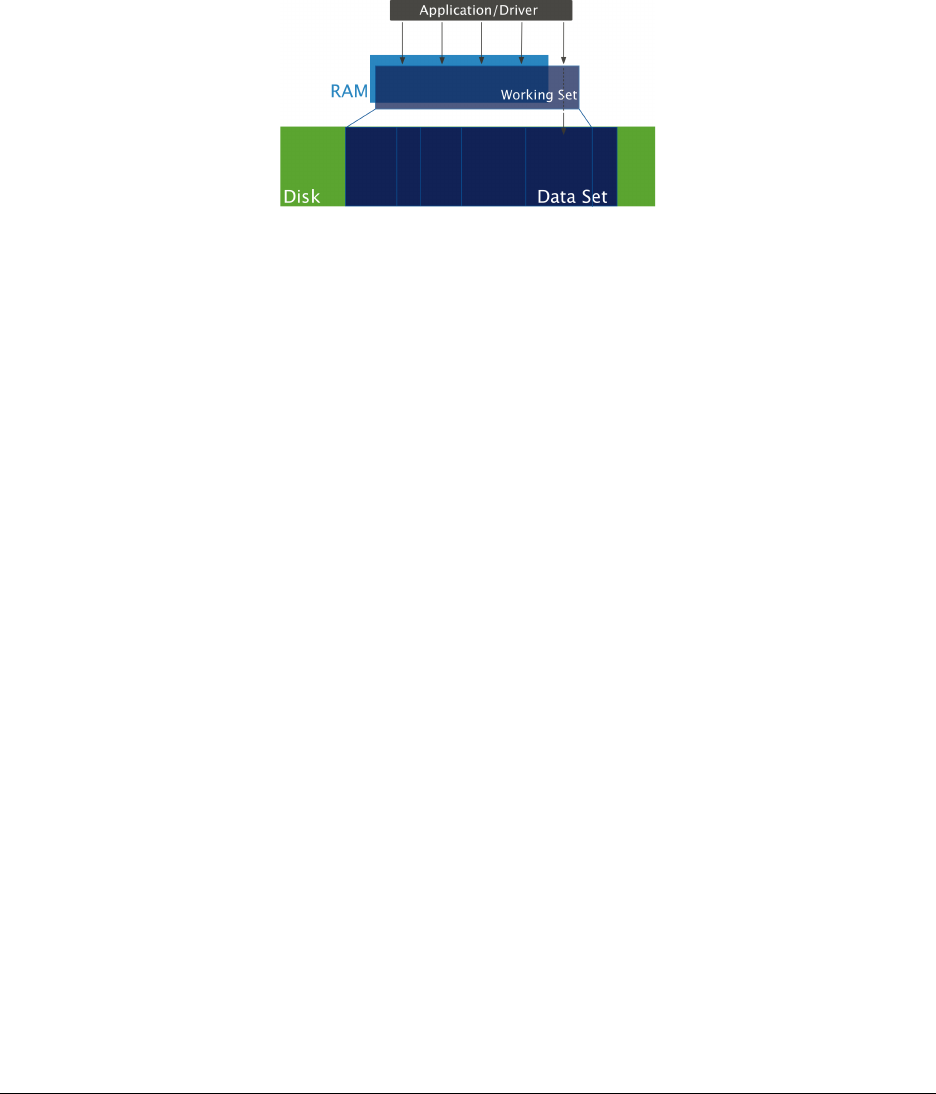
Vertical Scaling
•AddingmoreRAM,fasterdisks,etc.
• When is this the solution?
•First,consideraconceptcalledtheworking set.
The Working Set
Limitations of Vertical Scaling
•ThereisalimittohowmuchRAMonemachinecansupport.
•ThereareotherbottleneckssuchasI/O,diskaccessandnetwork.
•Costmaylimitourabilitytoscaleup.
•Theremayberequirementstohavealargeworkingsetthatnosingle machine could possible support.
•Thisiswhenitistimetoscalehorizontally.
Sharding Overview
•MongoDBenablesyoutoscalehorizontallythroughsharding.
•Shardingisaboutaddingmorecapacitytoyoursystem.
•MongoDB’sshardingsolutionisdesignedtoperformwelloncommodity hardware.
•Thedetailsofshardingareabstractedawayfromapplications.
•Queriesareperformedthesamewayasifsendingoperationsto a single server.
•Connectionsworkthesamebydefault.
119
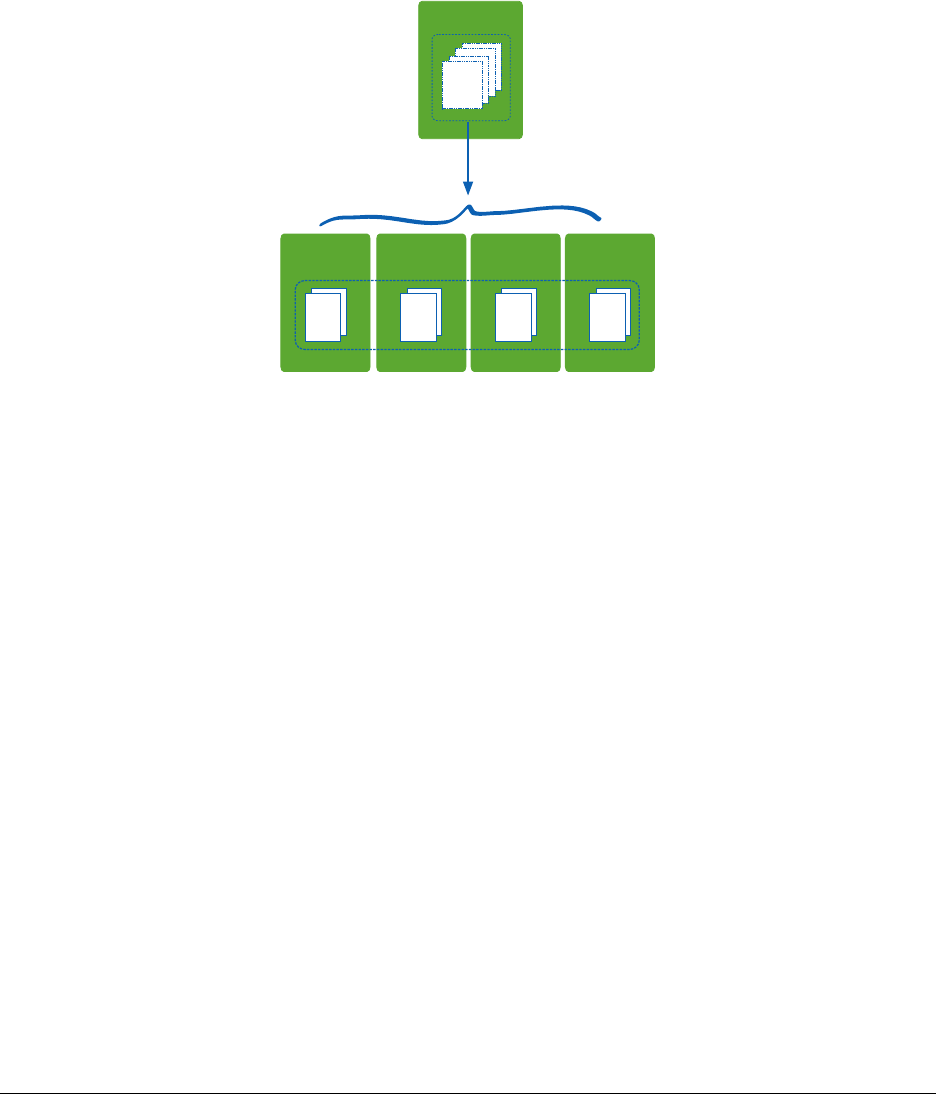
When to Shard
•Ifyouhavemoredatathanonemachinecanholdonitsdrives
•Ifyourapplicationiswriteheavyandyouareexperiencingtoo much latency.
•Ifyourworkingsetoutgrowsthememoryyoucanallocatetoasingle machine.
Dividing Up Your Dataset
1TB
Collection1
Shard A
256 GB
Shard B
256 GB
Shard C
256 GB
Shard D
256 GB
Collection1
Sharding Concepts
To understanding how sharding works in MongoDB, we need to understand:
•ShardKeys
•Chunks
Shard Key
•Youmustdefineashardkeyforashardedcollection.
•Basedononeormorefields(likeanindex)
•Shardkeydefinesaspaceofvalues
•Thinkofthekeyspacelikepointsonaline
•Akeyrangeisasegmentofthatline
120

Shard Key Ranges
•Acollectionispartitionedbasedonshardkeyranges.
•Theshardkeydetermineswheredocumentsarelocatedinthecluster.
•Itisusedtorouteoperationstotheappropriateshard.
•Forreadsandwrites.
•Onceacollectionissharded,youcannotchangeashardkey.
•Youcannotupdate the value of the shard key for a document
Targeted Query Using Shard Key
Shard A Shard B Shard C
Collection (shard key a)
mongos
Driver
Read
Results
a: "z1"
{ a: "z1" }
Chunks
•MongoDBpartitionsdataintochunks based on shard key ranges.
•Thisisbookkeepingmetadata.
•MongoDBattemptstokeeptheamountofdatabalancedacrossshards.
•Thisisachievedbymigratingchunksfromoneshardtoanother as needed.
•Thereisnothinginadocumentthatindicatesitschunk.
•Thedocumentdoesnotneedtobeupdatedifitsassignedchunkchanges.
121
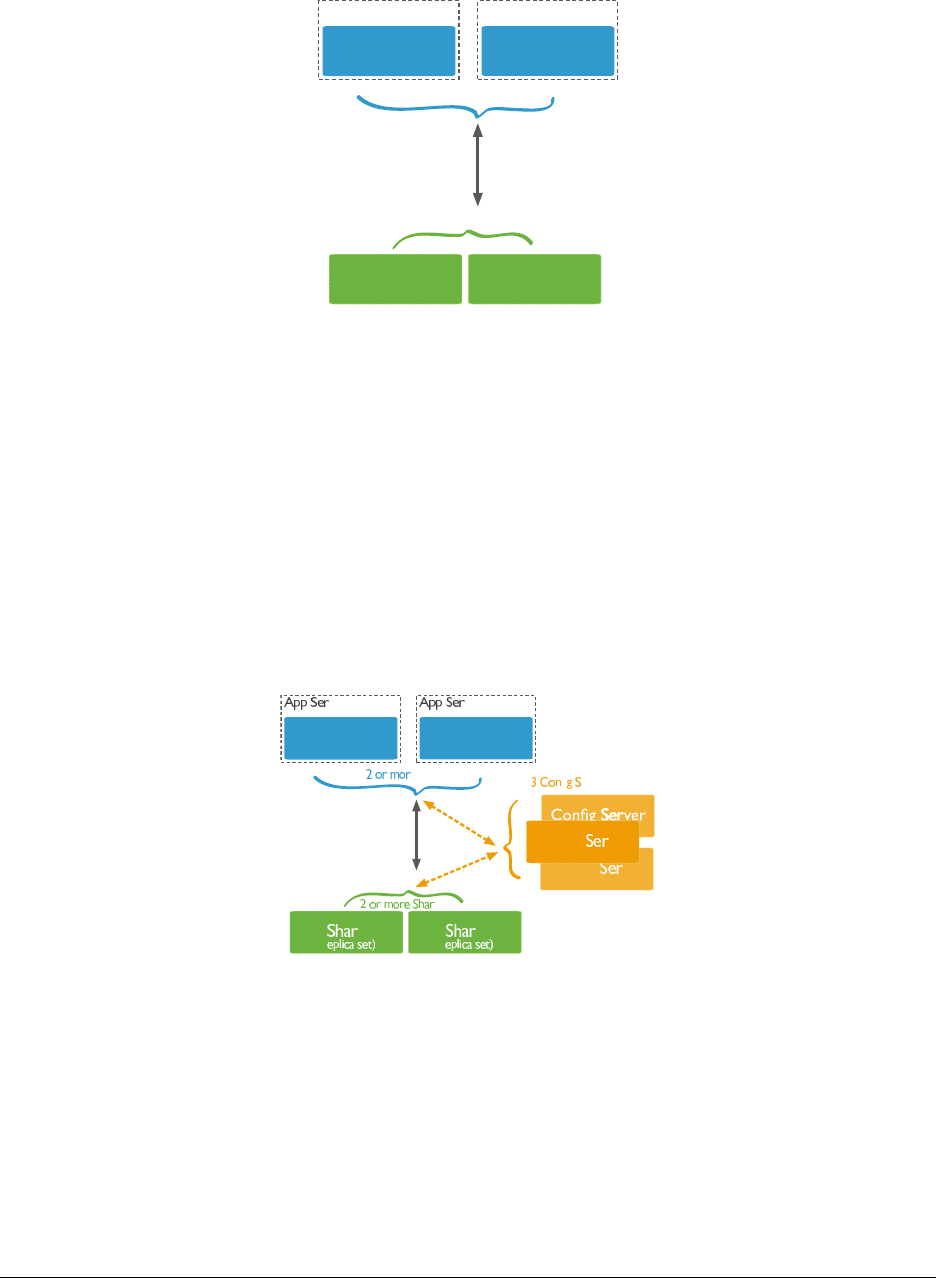
Sharded Cluster Architecture
Router
(mongos)
Shard Shard
2 or more Shards
Router
(mongos)
2 or more Routers
App Server App Server
(replica set) (replica set)
Mongos
•Amongosisresponsibleforacceptingrequestsandreturning results to an application driver.
•Inashardedcluster,nearlyalloperationsgothroughamongos.
•Ashardedclustercanhaveasmanymongosroutersasrequired.
•Itistypicalforeachapplicationservertohaveonemongos.
•Alwaysusemorethanonemongostoavoidasinglepointoffailure.
Config Servers
Config ver
Config ver
Config ver
Router
(mongos)
d d
ds
fi ervers
Router
(mongos)
e Routers
ver ver
(r (r
122

Config Server Hardware Requirements
•Qualitynetworkinterfaces
•Asmallamountofdiskspace(typicallyafewGB)
•AsmallamountofRAM(typicallyafewGB)
•Thelargertheshardedcluster,thegreatertheconfigserverhardwarerequirements.
Possible Imbalance?
•Dependingonhowyouconfiguresharding,datacanbecomeunbalanced on your sharded cluster.
–Some shards might receive more inserts than others.
–Some shards might have documents that grow more than those in other shards.
•Thismayresultintoomuchloadonasingleshard.
–Reads and writes
–Disk activity
•Thiswoulddefeatthepurposeofsharding.
Balancing Shards
•IfachunkgrowstoolargeMongoDBwillsplititintotwochunks.
•TheMongoDBbalancerkeepschunksdistributedacrossshards in equal numbers.
•However,abalancedshardedclusterdependsonagoodshardkey.
With a Good Shard Key
You might easily see t h a t :
•Readshitonly1or2shardsperquery.
• Writes are distributed across all servers.
•Yourdiskusageisevenlydistributedacrossshards.
•Thingsstaythiswayasyouscale.
123

With a Bad Shard Key
You might see that:
•Yourreadshiteveryshard.
•Yourwritesareconcentratedononeshard.
•Mostofyourdataisonjustafewshards.
•Addingmoreshardstotheclusterwillnothelp.
Choosing a Shard Key
Generally, you want a shard key:
•Thathashighcardinality
•Thatisusedinthemajorityofreadqueries
•Forwhichthevaluesreadandwriteoperationsusearerandomly distributed
•Forwhichthemajorityofreadsareroutedtoaparticularserver
More Specifically
•Yourshardkeyshouldbeconsistentwithyourquerypatterns.
•Ifreadsusuallyfindonlyonedocument,youonlyneedgoodcardinality.
•Ifreadsretrievemanydocuments:
–Your shard key supports l o c a l i t y
–Matching documents will reside on the same shard
Cardinality
•Agoodshardkeywillhavehighcardinality.
•Arelativelysmallnumberofdocumentsshouldhavethesameshard key.
•Otherwiseoperationsbecomeisolatedtothesameserver.
•Becausedocumentswiththesameshardkeyresideonthesameshard.
•Addingmoreserverswillnothelp.
•Hashingwillnothelp.
124

Non-Monotonic
•Agoodshardkeywillgeneratenewvaluesnon-monotonically.
•Datetimes,counters,andObjectIdsmakebadshardkeys.
•Monotonicshardkeyscauseallinsertstohappenonthesameshard.
•Hashingwillsolvethisproblem.
•However,doingrangequerieswithahashedshardkeywillperform a scatter-gather query across the cluster.
Shards Should be Replica Sets
•Asthenumberofshardsincreases,thenumberofserversinyour deployment increases.
•Thisincreasestheprobabilitythatoneserverwillfailonany given day.
•Withredundancybuiltintoeachshardyoucanmitigatethisrisk.
6.2 Balancing Shards
Learning Objectives
Upon completing this module students should understand:
•Chunksandthebalancer
•Thestatusofchunksinanewlyshardedcollection
•Howchunksplitsautomaticallyoccur
•Advantagesofpre-splittingchunks
•Howthebalancerworks
Chunks and the Balancer
•Chunksaregroupsofdocuments.
•Theshardkeydetermineswhichchunkadocumentwillbecontained in.
•Chunkscanbesplitwhentheygrowtoolarge.
•Thebalancerdecideswherechunksgo.
•Ithandlesmigrationsofchunksfromoneservertoanother.
125
Chunks in a Newly Sharded Collection
•Therangeofachunkisdefinedbytheshardkeyvaluesofthedocuments the chunk contains.
• When a collection is sharded it starts with just one chunk.
•Thefirstchunkforacollectionwillhavetherange:
{ $minKey :1} to { $maxKey :1}
•Allshardkeyvaluesfromthesmallestpossibletothelargest fall in this chunk’s range.
Chunk Splits
d A
32.1 MB
32.1 MB
64.2 MB
Split
Split
Pre-Splitting Chunks
•Youmaypre-splitdatabeforeloadingdataintoashardedcluster.
• Pre-splitting is useful if:
–You plan to do a larg e d a t a i m p o r t e a r l y o n
–You ex p e c t a h e av y i n i t ial serve r l o a d a n d want t o ens u r e w r i tes are distributed
Start of a Balancing Round
•Abalancingroundisinitiatedbythebalancerprocessontheprimaryconfigserver.
•Thishappenswhenthedifferenceinthenumberofchunksbetween two shards becomes to large.
•Specifically,thedifferencebetweentheshardwiththemostchunksandtheshardwiththefewest.
•Abalancingroundstartswhentheimbalancereaches:
–2whentheclusterhas<20chunks
–4whentheclusterhas20-79chunks
–8whentheclusterhas80+chunks
126

Balancing is Resource Intensive
•Chunkmigrationrequirescopyingallthedatainthechunkfrom one shard to another.
•Eachindividualshardcanbeinvolvedinonemigrationatatime. Parallel migrations can occur for each shard
migration pair (source + destination).
•Theamountofpossibleparallelchunkmigrationsfornshards is n/2 rounded down.
•MongoDBcreatessplitsonlyafteraninsertoperation.
•Forthesereasons,itispossibletodefineabalancingwindowtoensurethebalancerwillonlyrunduringsched-
uled times.
Chunk Migration Steps
1. The balancer process sends the moveChunk command to the source shard.
2. The source shard continues to process reads/writes for that chunk during the migration.
3. The destination shard requests documents in the chunk and begins receiving copies.
4. After receiving all documents, the destination shard receives any changes to the chunk.
5. Then the destination shard tells the config db that it has thechunk.
6. The destination shard will now handle all reads/writes.
7. The source shard deletes its copy of the chunk.
Concluding a Balancing Round
•Eachchunkwillmove:
–From the shard with the most chunks
–To the shard with the fewest
•Abalancingroundendswhenallshardsdifferbyatmostonechunk.
6.3 Shard Zones
Learning Objectives
Upon completing this module students should understand:
•Thepurposeforshardzones
•Advantagesofusingshardzones
•Potentialdrawbacksofshardzones
127

Zones - Overview
•Shardzonesallowyouto“tie”datatooneormoreshards.
•Ashardzonedescribesarangeofshardkeyvalues.
•Ifachunkisintheshardtagrange,itwillliveonashardwiththattag.
•Shardtagrangescannotoverlap.Inthecasewetrytodefineoverlapping ranges an error will occur during
creation.
Example: DateTime
•Documentsolderthanoneyearneedtobekept,butarerarelyused.
•YousetapartoftheshardkeyastheISODateofdocumentcreation.
•AddshardstotheLTSzone.
•Theseshardscanbeoncheaper,slowermachines.
•Investinhigh-performanceserversformorefrequentlyaccessed data.
Example: Location
•Youarerequiredtokeepcertaindatainitshomecountry.
•Youincludethecountryintheshardtag.
•Maintaindatacenterswithineachcountrythathousetheappropriate shards.
•Meetsthecountryrequirementbutallowsallserverstobepart of the same system.
•Asdocumentsageandpassintoanewzonerange,thebalancerwill migrate them automatically.
Example: Premium Tier
•Youhavecustomerswhowanttopayfora“premium”tier.
•Theshardkeypermitsyoutodistinguishonecustomer’sdocuments from all others.
•Tagthedocumentrangesforeachcustomersothattheirdocuments will be located on shards of the appropriate
tier (zone).
•Shardstaggedaspremiumtierrunonhighperformanceservers.
•Othershardsrunoncommodityhardware.
•See
Manage Shard Zone16
16 http://docs.mongodb.org/manual/tutorial/manage-shard-zone/
128

Zones - Caveats
•Becausetaggedchunkswillonlybeoncertainservers,ifyoutagmorethanthoseserverscanhandle,you’ll
have a problem.
–You’r e not onl y worrying about your overall serve r l o a d , y o u ’re worrying about server load for each of
your tags.
•Yourchunkswillevenlydistributethemselvesacrosstheavailable zones. You cannot control things more fine
grained than your tags.
6.4 Lab: Setting Up a Sharded Cluster
Learning Objectives
Upon completing this module students should understand:
•Howtosetupashardedclusterincluding:
–Replica sets as shards
–Config Servers
–Mongos processes
•Howtoenableshardingforadatabase
•Howtoshardacollection
•Howtodeterminewheredatawillgo
Our Sharded Cluster
•Inthisexercise,wewillsetupaclusterwith3shards.
•Eachshardwillbeareplicasetwith3members(includingonearbiter).
•Wewillinsertsomedataandseewhereitgoes.
Sharded Cluster Configuration
•Threeshards:
1. A replica set on ports 27107, 27108, 27109
2. A replica set on ports 27117, 27118, 27119
3. A replica set on ports 27127, 27128, 27129
•Threeconfigserversonports27217,27218,27219
•Twomongosserversatports27017and27018
129

Build Our Data Directories
On Linux or MacOS, run the following in the terminal to create the data directories we’ll need.
mkdir -p ~/data/cluster/config/{c0,c1,c2}
mkdir -p ~/data/cluster/shard0/{m0,m1,arb}
mkdir -p ~/data/cluster/shard1/{m0,m1,arb}
mkdir -p ~/data/cluster/shard2/{m0,m1,arb}
mkdir -p ~/data/cluster/{s0,s1}
On Windows, run the following commands instead:
md c:\data\cluster\config\c0 c:\data\cluster\config\c1 c:\data\cluster\config\c2
md c:\data\cluster\shard0\m0 c:\data\cluster\shard0\m1 c:\data\cluster\shard0\arb
md c:\data\cluster\shard1\m0 c:\data\cluster\shard1\m1 c:\data\cluster\shard1\arb
md c:\data\cluster\shard2\m0 c:\data\cluster\shard2\m1 c:\data\cluster\shard2\arb
md c:\data\cluster\s0 c:\data\cluster\s1
Initiate a Replica Set (Linux/MacOS)
mongod --replSet shard0 --dbpath ~/data/cluster/shard0/m0 \
--logpath ~/data/cluster/shard0/m0/mongod.log \
--fork --port 27107 --shardsvr
mongod --replSet shard0 --dbpath ~/data/cluster/shard0/m1 \
--logpath ~/data/cluster/shard0/m1/mongod.log \
--fork --port 27108 --shardsvr
mongod --replSet shard0 --dbpath ~/data/cluster/shard0/arb \
--logpath ~/data/cluster/shard0/arb/mongod.log \
--fork --port 27109 --shardsvr
mongo --port 27107 --eval "\
rs.initiate(); sleep(3000);\
rs.add(’$HOSTNAME:27108’);\
rs.addArb(’$HOSTNAME:27109’)"
Initiate a Replica Set (Windows)
mongod --replSet shard0 --dbpath c:\data\cluster\shard0\m0\
--logpath c:\data\cluster\shard0\m0\mongod.log \
--port 27107 --oplogSize 10 --shardsvr
mongod --replSet shard0 --dbpath c:\data\cluster\shard0\m1\
--logpath c:\data\cluster\shard0\m1\mongod.log \
--port 27108 --oplogSize 10 --shardsvr
mongod --replSet shard0 --dbpath c:\data\cluster\shard0\arb \
--logpath c:\data\cluster\shard0\arb\mongod.log \
--port 27109 --oplogSize 10 --shardsvr
mongo --port 27107 --eval "\
rs.initiate(); sleep(3000);\
rs.add (’<HOSTNAME>:27108’);\
rs.addArb(’<HOSTNAME>:27109’)"
130

Spin Up a Second Replica Set (Linux/MacOS)
mongod --replSet shard1 --dbpath ~/data/cluster/shard1/m0 \
--logpath ~/data/cluster/shard1/m0/mongod.log \
--fork --port 27117 --shardsvr
mongod --replSet shard1 --dbpath ~/data/cluster/shard1/m1 \
--logpath ~/data/cluster/shard1/m1/mongod.log \
--fork --port 27118 --shardsvr
mongod --replSet shard1 --dbpath ~/data/cluster/shard1/arb \
--logpath ~/data/cluster/shard1/arb/mongod.log \
--fork --port 27119 --shardsvr
mongo --port 27117 --eval "\
rs.initiate(); sleep(3000);\
rs.add (’$HOSTNAME:27118’);\
rs.addArb(’$HOSTNAME:27119’)"
Spin Up a Second Replica Set (Windows)
mongod --replSet shard1 --dbpath c:\data\cluster\shard1\m0\
--logpath c:\data\cluster\shard1\m0\mongod.log \
--port 27117 --oplogSize 10 --shardsvr
mongod --replSet shard1 --dbpath c:\data\cluster\shard1\m1\
--logpath c:\data\cluster\shard1\m1\mongod.log \
--port 27118 --oplogSize 10 --shardsvr
mongod --replSet shard1 --dbpath c:\data\cluster\shard1\arb \
--logpath c:\data\cluster\shard1\arb\mongod.log \
--port 27119 --oplogSize 10 --shardsvr
mongo --port 27117 --eval "\
rs.initiate(); sleep(3000);\
rs.add (’<HOSTNAME>:27118’);\
rs.addArb(’<HOSTNAME>:27119’)"
AThirdReplicaSet(Linux/MacOS)
mongod --replSet shard2 --dbpath ~/data/cluster/shard2/m0 \
--logpath ~/data/cluster/shard2/m0/mongod.log \
--fork --port 27127 --shardsvr
mongod --replSet shard2 --dbpath ~/data/cluster/shard2/m1 \
--logpath ~/data/cluster/shard2/m1/mongod.log \
--fork --port 27128 --shardsvr
mongod --replSet shard2 --dbpath ~/data/cluster/shard2/arb \
--logpath ~/data/cluster/shard2/arb/mongod.log \
--fork --port 27129 --shardsvr
mongo --port 27127 --eval "\
rs.initiate(); sleep(3000);\
131

rs.add (’$HOSTNAME:27128’);\
rs.addArb(’$HOSTNAME:27129’)"
A Third Replica Set (Windows)
mongod --replSet shard2 --dbpath c:\data\cluster\shard2\m0\
--logpath c:\data\cluster\shard2\m0\mongod.log \
--port 27127 --oplogSize 10 --shardsvr
mongod --replSet shard2 --dbpath c:\data\cluster\shard2\m1\
--logpath c:\data\cluster\shard2\m1\mongod.log \
--port 27128 --oplogSize 10 --shardsvr
mongod --replSet shard2 --dbpath c:\data\cluster\shard2\arb \
--logpath c:\data\cluster\shard2\arb\mongod.log \
--port 27129 --oplogSize 10 --shardsvr
mongo --port 27127 --eval "\
rs.initiate(); sleep(3000);\
rs.add (’<HOSTNAME>:27128’);\
rs.addArb(’<HOSTNAME>:27129’)"
Status Check
•Nowwehavethreereplicasetsrunning.
•Wehaveoneforeachshard.
•Theydonotknowabouteachotheryet.
•Tomakethemashardedclusterwewill:
–Build our config databases
–Launch our mongos processes
–Add each shard to the cluster
•Tobenefitfromthisconfigurationwealsoneedto:
–Enable sharding for a database
–Shard at least one collection within that database
132

Launch Config Servers (Linux/MacOS)
mongod
--dbpath ~/data/cluster/config/c0 \
--replSet csrs \
--logpath ~/data/cluster/config/c0/mongod.log \
--fork --port 27217 --configsvr
mongod
--dbpath ~/data/cluster/config/c1 \
--replSet csrs \
--logpath ~/data/cluster/config/c1/mongod.log \
--fork --port 27218 --configsvr
mongod
--dbpath ~/data/cluster/config/c2 \
--replSet csrs \
--logpath ~/data/cluster/config/c2/mongod.log \
--fork --port 27219 --configsvr
mongo --port 27217 --eval "\
rs.initiate(); sleep(3000);\
rs.add (’<HOSTNAME>:27218’);\
rs.add (’<HOSTNAME>:27219’)"
Launch Config Servers (Windows)
mongod --dbpath c:\data\cluster\config\c0\
--replSet csrs \
--logpath c:\data\cluster\config\c0\mongod.log \
--port 27217 --configsvr
mongod --dbpath c:\data\cluster\config\c1\
--replSet csrs \
--logpath c:\data\cluster\config\c1\mongod.log \
--port 27218 --configsvr
mongod --dbpath c:\data\cluster\config\c2\
--replSet csrs \
--logpath c:\data\cluster\config\c2\mongod.log \
--port 27219 --configsvr
mongo --port 27217 --eval "\
rs.initiate(); sleep(3000);\
rs.add (’<HOSTNAME>:27218’);\
rs.add (’<HOSTNAME>:27219’)"
133

Launch the Mongos Processes (Linux/MacOS)
Now our mongos’s. We need to tell them about our config servers.
mongos --logpath ~/data/cluster/s0/mongos.log --fork --port 27017 \
--configdb "csrs/$HOSTNAME:27217,$HOSTNAME:27218,$HOSTNAME:27219"
mongos --logpath ~/data/cluster/s1/mongos.log --fork --port 27018 \
--configdb "csrs/$HOSTNAME:27217,$HOSTNAME:27218,$HOSTNAME:27219"
Launch the Mongos Processes (Windows)
Now our mongos’s. We need to tell them about our config servers.
configseedlist="csrs/$HOSTNAME:27217,$HOSTNAME:27218,$HOSTNAME:27219"
mongos --logpath c:\data\cluster\s0\mongos.log --port 27017 \
--configdb $configseedlist
mongos --logpath c:\data\cluster\s1\mongos.log --port 27018 \
--configdb csrs/localhost:27217,localhost:27218,localhost:27219
Add All Shards
echo "sh.addShard( ’shard0/$HOSTNAME:27107’ ); \
sh.addShard( ’shard1/$HOSTNAME:27117’ ); \
sh.addShard( ’shard2/$HOSTNAME:27127’ ); sh.status()" | mongo
Note: Instead of doing this through a bash (or other) shell command,youmayprefertolaunchamongoshelland
issue each command individually.
Enable Sharding and Shard a Collection
Enable sharding for the test database, shard a collection, and insert some documents.
mongo --port 27017
sh.enableSharding("test")
sh.shardCollection("test.testcol",{a:1,b:1})
for (i=0;i<1000;i++){
docArr =[];
for (j=0;j<1000;j++){
docArr.push(
{
a:i, b :j,
c:"Filler String 0000000000000000000000000000000000000000000000000"
})
};
db.testcol.insert(docArr)
};
134

Observe What Happens
Connect to either mongos using a mongo shell and frequently issue:
sh.status()
135

7 Reporting Tools and Diagnostics
Performance Troubleshooting (page 136) An introduction to reporting and diagnostic tools for MongoDB
7.1 Performance Troubleshooting
Learning Objectives
Upon completing this module students should understand basic performance troubleshooting techniques and tools
including:
•mongostat
•mongotop
•db.setProfilingLevel()
•db.currentOp()
•db.<COLLECTION>.stats()
•db.serverStatus()
mongostat and mongotop
•mongostat samples a server every second.
–See current ops, pagefaults, network traffic, etc.
–Does not give a view into historic performance; use Ops Manager for that.
•mongotop looks at the time spent on reads/writes in each collection.
Exercise: mongostat (setup)
In one window, perform the following commands.
db.testcol.drop()
for (i=1;i<=10000;i++){
arr =[];
for (j=1;j<=1000;j++){
doc ={_id:(1000 *(i-1)+j), a:i, b:j, c:(1000 *(i-1)+j) };
arr.push(doc)
};
db.testcol.insertMany(arr);
var x=db.testcol.find( { b :255 });
x.next();
var x=db.testcol.find( { _id :1000 *(i-1)+255 });
x.next();
var x="asdf";
db.testcol.updateOne( { a :i, b :255 }, { $set :{d:x.pad(1000)}});
print(i)
}
136

Exercise: mongostat (run)
•Inanotherwindow/tab,runmongostat.
•Youwillsee:
–Inserts
–Queries
–Updates
Exercise: mongostat (create index)
•Inathirdwindow,createanindexwhenyouseethingsslowingdown:
db.testcol.createIndex( { a :1,b:1})
•Lookatmongostat.
•Noticethatthingsaregoingsignificantlyfaster.
•Then,let’sdropthatandbuildanotherindex.
db.testcol.dropIndexes()
db.testcol.createIndex( { b :1,a:1})
Exercise: mongotop
Perform the following then, in another window, run mongotop.
db.testcol.drop()
for (i=1;i<=10000;i++){
arr =[];
for (j=1;j<=1000;j++){
doc ={_id:(1000*(i-1)+j), a:i, b:j, c:(1000*(i-1)+j)};
arr.push(doc)
};
db.testcol.insertMany(arr);
var x=db.testcol.find( {b:255} ); x.next();
var x=db.testcol.find( {_id:1000*(i-1)+255} ); x.next();
var x="asdf";
db.testcol.updateOne( {a:i, b:255}, {$set:{d:x.pad(1000)}});
print(i)
}
137

db.currentOp()
•currentOpisatoolthataskswhatthedbisdoingatthemoment.
•currentOpisusefulforfindinglong-runningprocesses.
•Fieldsofinterest:
–microsecs_running
–op
–query
–lock
–waitingForLock
Exercise: db.currentOp()
Do the following then, connect with a separate shell, and repeatedly run db.currentOp().
db.testcol.drop()
for (i=1;i<=10000;i++){
arr =[];
for (j=1;j<=1000;j++){
doc ={_id:(1000*(i-1)+j), a:i, b:j, c:(1000*(i-1)+j)};
arr.push(doc)
};
db.testcol.insertMany(arr);
var x=db.testcol.find( {b:255} ); x.next();
var x=db.testcol.find( {_id:1000*(i-1)+255 }); x.next();
var x="asdf";
db.testcol.updateOne( {a:i, b:255}, {$set:{d:x.pad(1000)}});
print(i)
}
db.<COLLECTION>.stats()
•Usedtoviewthecurrentstatsforacollection.
•Everythingisinbytes;usethemultiplierparametertoviewinKB,MB,etc
•Youcanalsousedb.stats() to do this at scope of the entire database
138

Exercise: Using Collection Stats
Look at the output of the following:
db.testcol.drop()
db.testcol.insertOne( { a :1})
db.testcol.stats()
var x="asdf"
db.testcol2.insertOne( { a :x.pad(10000000)})
db.testcol2.stats()
db.stats()
The Profiler
•Offbydefault.
•Toreset,db.setProfilingLevel(0)
•Atsetting1,itcaptures“slow”queries.
•Youmaydefinewhat“slow”is.
•Defaultis100ms:db.setProfilingLevel(1)
•E.g.,tocapture20ms:db.setProfilingLevel(1, 20)
The Profiler (continued)
•Iftheprofilerlevelis2,itcapturesallqueries.
–This will severely impact performance.
–Turns all reads into writes.
•Alwaysturntheprofileroffwhendone(setlevelto0)
•Createsdb.system.profile collection
Exercise: Exploring the Profiler
Perform the following, then look in your db.system.profile.
db.setProfilingLevel(0)
db.testcol.drop()
db.system.profile.drop()
db.setProfilingLevel(2)
db.testcol.insertOne( { a :1})
db.testcol.find()
var x="asdf"
db.testcol.insertOne( { a :x.pad(10000000)}) // ~10 MB
db.setProfilingLevel(0)
db.system.profile.find().pretty()
139

db.serverStatus()
•Takesasnapshotofserverstatus.
•Bytakingdiffs,youcanseesystemtrends.
•MostofthedatathatOpsManager,CloudManagerandAtlasgetisfromthiscommand.
Exercise: Using db.serverStatus()
•Openuptwowindows.Inthefirst,type:
db.testcol.drop()
var x="asdf"
for (i=0;i<=10000000;i++){
db.testcol.insertOne( { a :x.pad(100000)})
}
•Inthesecondwindow,typeperiodically:
var x=db.serverStatus(); x.metrics.document
Analyzing Profiler Data
•Enabletheprofileratdefaultsettings.
•Runfor5seconds.
•Slowoperationsarecaptured.
•Theissueisthereisnotaproperindexonthemessagefield.
•Youwillseehowfastdocumentsaregettinginserted.
•Itwillbeslowb/cthedocumentsarebig.
Performance Improvement Techniques
•Appropriatewriteconcerns
•Bulkoperations
•Goodschemadesign
•GoodShardKeychoice
•Goodindexes
140

Performance Tips: Write Concern
•Increasingthewriteconcernincreasesdatasafety.
•Thiswillhaveanimpactonperformance,however.
•Thisisespeciallytruewhentherearenetworkissues.
•Youwillwanttobalancebusinessneedsagainstspeed.
Bulk Operations
•Usingbulkoperations(includinginsertMany and updateMany )canimproveperformance,especially
when using write concern greater than 1.
•Theseenabletheservertoamortizeacknowledgement.
•CanbedonewithbothinsertMany and updateMany .
Exercise: Comparing insertMany with mongostat
Let’s spin up a 3-member replica set:
mkdir -p /data/replset/{1,2,3}
mongod --logpath /data/replset/1/mongod.log \
--dbpath /data/replset/1 --replSet mySet --port 27017 --fork
mongod --logpath /data/replset/2/mongod.log \
--dbpath /data/replset/2 --replSet mySet --port 27018 --fork
mongod --logpath /data/replset/3/mongod.log \
--dbpath /data/replset/3 --replSet mySet --port 27019 --fork
echo "conf = {_id: ’mySet’, members: [{_id: 0, host: ’localhost:27017’}, \
{_id: 1, host: ’localhost:27018’}, {_id: 2, host: ’localhost:27019’}]}; \
rs.initiate(conf)" | mongo
mongostat,insertOne with {w: 1}
Perform the following, with writeConcern : 1 and insertOne():
db.testcol.drop()
for (i=1;i<=10000;i++){
for (j=1;j<=1000;j++){
db.testcol.insertOne( { _id :(1000 *(i-1)+j),
a:i, b :j, c :(1000 *(i-1)+j) },
{ writeConcern :{w:1}});
};
print(i);
}
Run mongostat and see how fast that happens.
141

Multiple insertOne swith{w: 3}
Increase the write concern to 3 (safer but slower):
db.testcol.drop()
for (i=1;i<=10000;i++){
for (j=1;j<=1000;j++){
db.testcol.insertOne(
{_id
:(1000 *(i-1)+j), a:i, b:j, c:(1000 *(i-1)+j)},
{ writeConcern
:{w:3}}
);
};
print(i);
}
Again, run mongostat.
mongostat,insertMany with {w: 3}
•Finally,let’suseinsertMany to our advantage:
•NotethatwriteConcern is still {w: 3}
db.testcol.drop()
for (i=1;i<=10000;i++){
arr =[]
for (j=1;j<=1000;j++){
arr.push(
{_id
:(1000 *(i-1)+j), a:i, b:j, c:(1000 *(i-1)+j) }
);
};
db.testcol.insertMany( arr, { writeConcern :{w:3}});
print(i);
}
142

Schema Design
•Thestructureofdocumentsaffectsperformance.
•Optimizeforyourapplication’sread/writepatterns.
•Wewantasfewrequeststothedatabaseaspossibletoperformagivenapplicationtask.
See the data modeling section for more information.
Shard Key Considerations
•Chooseashardkeythatdistributesloadacrossyourcluster.
•Createashardkeysuchthatonlyasmallnumberofdocumentswill have the same value.
•Createashardkeythathasahighdegreeofrandomness.
•Yourshardkeyshouldenableamongostotargetasingleshardforagivenquery.
Indexes and Performance
•Readsandwritesthatdon’tuseanindexwillcrippleperformance.
•Incompoundindexes,ordermatters:
–Sort on a field that comes before any range used in the index.
–You can’t s k i p fi e l d s ; t h ey must be used in order.
–Revisit the indexing section for more detail.
143

8 Backup and Recovery
Backup and Recovery (page 144) An overview of backup options for MongoDB
8.1 Backup and Recovery
Disasters Do Happen
144

Human Disasters
Terminology: RPO vs. RTO
•Recovery Point Objective (RPO):Howmuchdatacanyouaffordtolose?
•Recovery Time Objective (RTO):Howlongcanyouaffordtobeoff-line?
Terminology: DR vs. HA
•Disaster Recovery (DR)
•High Availability (HA)
•Distinctbusinessrequirements
•Technicalsolutionsmayconverge
Quiz
• Q: What’s the hardest thing about backups?
•A:Restoringthem!
•Regularly test that restoration works!
145

Backup Options
•DocumentLevel
–Logical
–mongodump,mongorestore
•Filesystemlevel
–Physical
–Copy files
–Vo l u m e / d i s k s n a p s h o t s
Document Level: mongodump
•DumpscollectiontoBSONfiles
•Mirrorsyourstructure
•Canberunliveorinofflinemode
•Doesnotincludeindexes(rebuiltduringrestore)
•--dbpath for direct file access
•--oplog to record oplog while backing up
•--query/filter selective dump
mongodump
$ mongodump --help
Export MongoDB data to BSON files.
options:
--help produce help message
-v [ --verbose ] be more verbose (include multiple times for
more verbosity e.g. -vvvvv)
--version print the program’s version and exit
-h [ --host ] arg mongo host to connect to ( /s1,s2 for
--port arg server port. Can also use --host hostname
-u [ --username ] arg username
-p [ --password ] arg password
--dbpath arg directly access mongod database files in path
-d [ --db ] arg database to use
-c [ --collection ] arg collection to use (some commands)
-o [ --out ] arg (=dump)output directory or "-" for stdout
-q [ --query ] arg json query
--oplog Use oplog for point-in-time snapshotting
146

File System Level
•Must use journaling!
•Copy/data/db files
•Orsnapshotvolume(e.g.,LVM,SAN,EBS)
•Seriously, always use journaling!
Ensure Consistency
Flush RAM to disk and stop accepting writes:
•db.fsyncLock()
•Copy/Snapshot
•db.fsyncUnlock()
File System Backups: Pros and Cons
•Entiredatabase
•Backupfileswillbelarge
•Fastestwaytocreateabackup
•Fastestwaytorestoreabackup
Document Level: mongorestore
•mongorestore
•--oplogReplay replay oplog to point-in-time
File System Restores
•Alldatabasefiles
•Selecteddatabasesorcollections
•ReplayOplog
147

Backup Sharded Cluster
1. Stop Balancer (and wait) or no balancing window
2. Stop one config server (data R/O)
3. Backup Data (shards, config)
4. Restart config server
5. Resume Balancer
Restore Sharded Cluster
1. Dissimilar # shards to restore to
2. Different shard keys?
3. Selective restores
4. Consolidate shards
5. Changing addresses of config/shards
Tips and Tricks
•mongodump/mongorestore
–--oplog[Replay]
–--objcheck/--repair
–--dbpath
–--query/--filter
•bsondump
–inspect data at console
•LVMsnapshottime/spacetradeoff
–Multi-EBS (RAID) backup
–clean up snapshots
148

9 Aggregation
Intro to Aggregation (page 149) An introduction to the the aggregation framework, pipeline concept, and select
stages
9.1 Intro to Aggregation
Learning Objectives
Upon completing this module students should understand:
•Theconceptoftheaggregationpipeline
•Keystagesoftheaggregationpipeline
• What aggregation expressions and variables are
•Thefundamentalsofusingaggregationfordataanalysis
Aggregation Basics
•UsetheaggregationframeworktotransformandanalyzedatainMongoDBcollections.
•ForthosewhoareusedtoSQL,aggregationcomprehendsthefunctionality of several SQL clauses like
GROUP_BY,JOIN,AS,andseveralotheroperationsthatallowustocomputedatasets.
•Theaggregationframeworkisbasedontheconceptofapipeline.
The Aggregation Pipeline
•AnaggregationpipelineinanalogoustoaUNIXpipeline.
•Eachstageofthepipeline:
–Receives a set of documents as input.
–Performs an operation on those documents.
–Produces a set of documents for use by the following stage.
•Apipelinehasthefollowingsyntax:
pipeline =[$stage1, $stage2, ...$stageN]
db.<COLLECTION>.aggregate( pipeline, { options } )
149

Aggregation Stages
•Therearemanyaggregationstages.
•Inthisintroductorylesson,we’llcover:
–$match:Similartofind()
–$project:Shapedocuments
–$sort:Likethecursormethodofthesamename
–$group:Usedtoaggregatefieldvaluesfrommultipledocuments
–$limit:Usedtolimittheamountofdocumentsreturned
–$lookup:ReplicatesanSQLleftouter-join
Aggregation Expressions and Variables
•Usedtorefertodatawithinanaggregationstage
•Expressions
–Use field path to access fields in input documents, e.g. "$field"
•Variables
–Can be both user-defined and system variables
–Can hold any type of BSON data
–Accessed like expressions, but with two $, e.g. "$$<variable>"
–For more information about variables in aggregation expressions, click here17
The Match Stage
•The$match operator works like the query phase of find()
•Documentsinthepipelinethatmatchthequerydocumentwillbepassedtosubsequentstages.
•$match is often the first operator used in an aggregation stage.
•Likeotheraggregationoperators,$match can occur multiple times in a single pipeline.
17 https://docs.mongodb.com/manual/reference/aggregation-variables/
150

The Project Stage
•$projectallowsyoutoshapethedocumentsintowhatyouneedforthenextstage.
–The simplest form of shaping is using $project to select only the fields you are interested in.
–$project can also create new fields from other fields in the input document.
*E.g.,youcanpullavalueoutofanembeddeddocumentandputitatthe top level.
*E.g.,youcancreatearatiofromthevaluesoftwofieldsaspassalong as a single field.
•$projectproduces1outputdocumentforeveryinputdocument it sees.
ATwitterDataset
•Let’slookatsomeexamplesthatillustratetheMongoDBaggregation framework.
•Theseexamplesoperateonacollectionoftweets.
–As with any dataset of this type, it’s a snapshot in time.
–It may not reflect the structure of Twitter feeds as they look today.
Tweets Data Model
{
"text" :"Something interesting ...",
"entities" :{
"user_mentions" :[
{
"screen_name" :"somebody_else",
...
}
],
"urls" :[],
"hashtags" :[]
},
"user" :{
"friends_count" :544,
"screen_name" :"somebody",
"followers_count" :100,
...
}
}
151

Analyzing Tweets
•Imaginethetypesofanalysesonemightwanttodoontweets.
•It’scommontoanalyzethebehaviorofusersandthenetworksinvolved.
•Ourexampleswillfocusonthistypeofanalysis
Friends and Followers
•Let’slookagainattwostageswetouchedonearlier:
–$match
–$project
•Inourdataset:
–friends are those a user follows.
–followers are others that follow a user.
•Usingtheseoperatorswewillwriteanaggregationpipelinethatwill:
–Ignore anyone with no friends and no followers.
–Calculate who has the highest followers to friends ratio.
Exercise: Friends and Followers
db.tweets.aggregate( [
{ $match
:{"user.friends_count":{$gt:0},
"user.followers_count":{$gt:0}}},
{ $project
:{ ratio:{$divide:["$user.followers_count",
"$user.friends_count"]},
screen_name :"$user.screen_name"}},
{ $sort
:{ ratio:-1}},
{ $limit
:1}])
Exercise: $match and $project
•ThereisonedocumentperTwitteruser
•Oftheusersinthe“Brasilia”timezonewhohavetweeted100times or more, who has the largest number of
followers?
•Timezoneisfoundinthe“time_zone”fieldoftheuserobjectin each tweet.
•Thenumberoftweetsforeachuserisfoundinthe“statuses_count” field.
•Aresultdocumentshouldlooksomethinglikethefollowing:
{_id :ObjectId(’52fd2490bac3fa1975477702’),
followers :2597,
screen_name:’marbles’,
tweets :12334
}
152

The Group Stage
•Forthosecomingfromtherelationalworld,$group is similar to the SQL GROUP BY statement.
•$groupoperationsrequirethatwespecifywhichfieldtogroup on.
•Documentswiththesameidentifierwillbeaggregatedtogether.
•With$group,weaggregatevaluesusing
accumulators18.
Tweet Source
•Thetweetsinourtwittercollectionhaveafieldcalledsource.
•Thisfielddescribestheapplicationthatwasusedtocreatethe tweet.
•Let’swriteanaggregationpipelinethatidentifiestheapplications most frequently used to publish tweets.
Exercise: Tweet Source
db.tweets.aggregate( [
{"$group" :{"_id" :"$source",
"count" :{"$sum" :1}}},
{"$sort" :{"count" :-1}}
])
Group Aggregation Accumulators
Accumulators available in the group stage:
•$sum
•$avg
•$first
•$last
•$max
•$min
•$push
•$addToSet
18 http://docs.mongodb.org/manual/meta/aggregation-quick-reference/#accumulators
153

Rank Users by Number of Tweets
•Onecommontaskistorankusersbasedonsomemetric.
•Let’slookatwhotweetsthemost.
•Earlierwedidthesamethingfortweetsource.
–Group together all tweets by a user for every user in our collection
–Count the tweets for each user
–Sort in decreasing order
•Let’saddthelistoftweetstotheoutputdocuments.
•Needtouseanaccumulatorthatworkswitharrays.
•Canuseeither$addToSetor$push.
Exercise: Adding List of Tweets
For each user, aggregate all their tweets into a single array.
db.tweets.aggregate( [
{"$group" :{"_id" :"$user.screen_name",
"tweet_texts" :{"$push" :"$text" },
"count" :{"$sum" :1}}},
{"$sort" :{"count" :-1}},
{"$limit" :3}
])
The Sort Stage
•Usesthe$sortoperator
•Workslikethesort() cursor method
•1tosortascending;-1tosortdescending
•E.g,db.testcol.aggregate([{$sort:{b:1,a:-1}}])
The Skip Stage
•Usesthe$skipoperator
•Worksliketheskip() cursor method.
•Valueisanintegerspecifyingthenumberofdocumentstoskip.
•E.g,thefollowingwillpassallbutthefirst3documentstothe next stage in the pipeline.
–db.testcol.aggregate( [ { $skip : 3 }, ... ] )
154

The Limit Stage
•Usedtolimitthenumberofdocumentspassedtothenextaggregation stage.
•Workslikethelimit() cursor method.
•Valueisaninteger.
•E.g.,thefollowingwillonlypass3documentstothestagethat comes next in the pipeline.
–db.testcol.aggregate( [ { $limit: 3 }, ... ] )
The Lookup Stage
•Pullsdocumentsfromasecondcollectionintothepipeline
–The second collection must be in the same database
–The second collection cannot be sharded
•Documentsbasedonamatchingfieldineachcollection
•Previously,youcouldgetthisbehaviorwithtwoseparatequeries
The Lookup Stage (continued)
•Documentsbasedonamatchingfieldineachcollection
•Previously,youcouldgetthisbehaviorwithtwoseparatequeries
–One to the collection that contains reference values
–The other to the collection containing the documents referenced
Example: Using $lookup
•Importthecompaniesdatasetintoacollectioncalledcompanies
•Createaseparatecollectionfor$lookup
// BEGIN EXAMPLES LOOKUP INSERT
db.commentOnCategory.insertMany( [
{ category_id
:"consulting",
comment:"Consulting - giving advices" },
{ category_id
:"consulting",
comment:"Consulting - providing human resources" },
{ category_id
:"enterprise",
comment:"Enterprise - constructing starships" },
{ category_id
:"finance",
comment:"Finance - making money" },
{ category_id
:"hardware",
155

Example: Using $lookup (Continued)
comment:"Hardware - from a hammer to a laptop" },
{ category_id
:"software",
comment:"Software - everything else that is missing in order to have a solution
!→"},
{ category_id
:null,
comment:"Null - have not decided yet was the business is about" },
{ category_id
:null,
comment:"Null - can’t really disclose what we do" },
{ category_id
:null,
comment:"Null - is not in business anymore" }
])
// END EXAMPLES LOOKUP INSERT
// BEGIN EXAMPLES LOOKUP AGGREGATION
db.companies.aggregate( [
{ $match
:{ number_of_employees:{ $gte:200000 }}},
{ $sort :{ number_of_employees:-1}},
156

10 Views
Views Tutorial (page 157) Creating and Deleting views
Lab: Vertical Views (page 159) Creating a vertical view lab
Lab: Horizontal Views (page 160) Creating a horizontal view lab
Lab: Reshaped Views (page 161) Creating a reshaped view lab
10.1 Views Tutorial
Learning Objectives
Upon completing this module students should understand:
• What a view is
• What views are useful for
•Howtocreateanddropaview
•Internalmechanismsofaview
What a View is
•Anon-materializedcollectioncreatedfromoneormoreother collections.
•ForthosewhoareusedtoSQL,MongoDBviewsareequivalent.
•Canbethoughtofasapredefinedaggregationthatcanbequeried.
What Views are useful for
•Viewsprovideanexcellentmechanismfordataabstraction.
•Viewsprovideanexcellentmeanstoprotectdata
–Sensitive data from a collection can be projected out of the view
–Views are read only
–Combined with role based authorization allows to select information by roles
157

How to create and drop a view
•Creatingaviewisastraightforwardprocess.
–We must give our view a <name>, which will be the name we can access it by
–We must specify a <source> collection
–We must define an aggregation <pipeline> to fill our new view with data
–Optionally, we may also specify a <collation>
Example - Creating a view
# db.createView(<name>, <source>, <pipeline>, <collation>)
db.createView("contact_info","patients",[
{$project:{
_id: 0,
first_name: 1,
last_name: 1,
gender: 1,
email: 1,
phone: 1
}
}
])
# views are shown along with other collections
show collections
# views metadata is stored in the system.views collection
db.system.views.find()
Dropping Views
•Viewscanbedroppedlikeanyothercollection
db.contact_info.drop()
Internal mechanisms of a view
Views can be thought of as a predefined aggregation. As such:
•Viewsdonotcontainanydatanortakediskspacebythemselves
•Viewswillbenefitgreatlyfromindexesonthesourcecollection in their $match stage
•Viewsareconsideredshardediftheirunderlyingcollection is sharded.
•Viewsareimmutable,andcannotberenamed
•Aviewwillnotberemovediftheunderlyingcollectionisremoved
158

10.2 Lab: Vertical Views
Exercise: Vertical View Creation
It is useful to create vertical views to give us a lens into a subset of our overall data.
•Startbyimportingthenecessarydataifyouhavenotalready.
tar xvzf views_dataset.tar.gz
# for version >= 3.4
mongoimport -d companies -c complaints --drop views_dataset.json
To help you verify your work, there are 404816 entries in this dataset.
Exercise : Vertical View Creation Instructions
Once you’ve verified the data import was successful:
•CreateaviewthatonlyshowscomplaintsinNewYork
•Ensuretheviewshowsthemostrecentlysubmittedcomplaints by default
Exercise : Vertical View Creation Instructions Result
The resulting data should look like:
db.companyComplaintsInNY.findOne()
{
"complaint_id" :1416985,
"product" :"Debt collection",
"sub-product" :"",
"issue" :"Cont’d attempts collect debt not owed",
"sub-issue" :"Debt is not mine",
"state" :"NY",
"zip_code" :11360,
"submitted_via" :"Web",
"date_received" :ISODate("2015-06-11T04:00:00Z"),
"date_sent_to_company" :ISODate("2015-06-11T04:00:00Z"),
"company" :"Transworld Systems Inc.",
"company_response" :"In progress",
"timely_response" :"Yes",
"consumer_disputed" :""
}
159

Exercise: Vertical View Creation Validation Instructions
Verify t h e v i ew i s f u n c t ioning c o r r e c t l y.
•Insertthedocumentonthefollowingslide
•Queryyournewlycreatedview
•Thenewlyinserteddocumentshouldbethefirstintheresultset
Exercise: Vertical View Creation Validation Instructions Cont’d
db.complaints.insert({
"complaint_id" :987654,
"product" :"Food and Beverage",
"sub-product" :"Coffee",
"issue" :"Coffee is too hot",
"sub-issue" :"",
"state" :"NY",
"zip_code" :11360,
"submitted_via" :"Web",
"date_received" :new Date(),
"date_sent_to_company" :"pending",
"company" :"CoffeeMerks",
"company_response" :"",
"timely_response" :"",
"consumer_disputed" :""
})
10.3 Lab: Horizontal Views
Exercise: Horizontal View Creation
Horizontal views allow us to provide a selective set of fields of the underlying collection of documents for efficiency
and role-based filtering of data.
•Let’sgoaheadandcreateahorizontalviewofourdataset.
•Startbyimportingthenecessarydataifyouhavenotalready.
mongoimport -d companies -c complaints --drop views_dataset.json
To help you verify your work, there are 404816 entries in this dataset.
160

Exercise : Horizontal View Creation Instructions
Once you’ve verified the data import was successful, create a view that only shows the the following fields:
•product
•company
•state
Exercise : Horizontal View Creation Instructions Result
The resulting data should look like:
db.productComplaints.findOne()
{
"product" :"Debt collection",
"state" :"FL",
"company" :"Enhanced Recovery Company, LLC"
}
10.4 Lab: Reshaped Views
Exercise: Reshaped View
We can create a reshaped view of a collection to enable more intuitive data queries and make it easier for applications
to perform analytics.
It is also possible to create a view from a view.
•Usetheaggregationframeworktocreateareshapedviewofour dataset.
•Itisnecessarytohavecompleted
Lab: Horizontal Views (page 160)
Exercise : Reshaped View Specification
Create a view that can be queried by company name that shows theamountofcomplaintsbystate.Theresultingdata
should look like:
db.companyComplaintsByState.find({"company":"ROCKY MOUNTAIN MORTGAGE COMPANY"})
{
"company" :"ROCKY MOUNTAIN MORTGAGE COMPANY",
"states" :[
{
"state" :"TX",
"count" :4
}
]
}
161

11 Security
Security Introduction (page 162) AhighleveloverviewofsecurityinMongoDB
Authorization (page 165) Authorization in MongoDB
Lab: Administration Users (page 171) Lab on creating admin users
Lab: Create User-Defined Role (Optional) (page 172) Lab on creating custom user roles
Authentication (page 174) Authentication in MongoDB
Lab: Secure mongod (page 175) Lab on standing up a mongod with authorization enabled
Auditing (page 176) Auditing in MongoDB
Encryption (page 178) Encryption at rest in MongoDB
Log Redaction (page 180) Enabling log redaction in MongoDB
Lab: Secured Replica Set - KeyFile (Optional) (page 181) Using keyfiles to secure a replica set
Lab: LDAP Authentication & Authorization (Optional) (page 184) Authentication & authorization with LDAP
Lab: Security Workshop (page 186) Securing a full deployment
11.1 Security Introduction
Learning Objectives
Upon completing this module students should understand:
•Thehigh-leveloverviewofsecurityinMongoDB
•SecurityoptionsforMongoDB
–Authentication
–Authorization
–Transport Encryption
–Enterprise only features
162
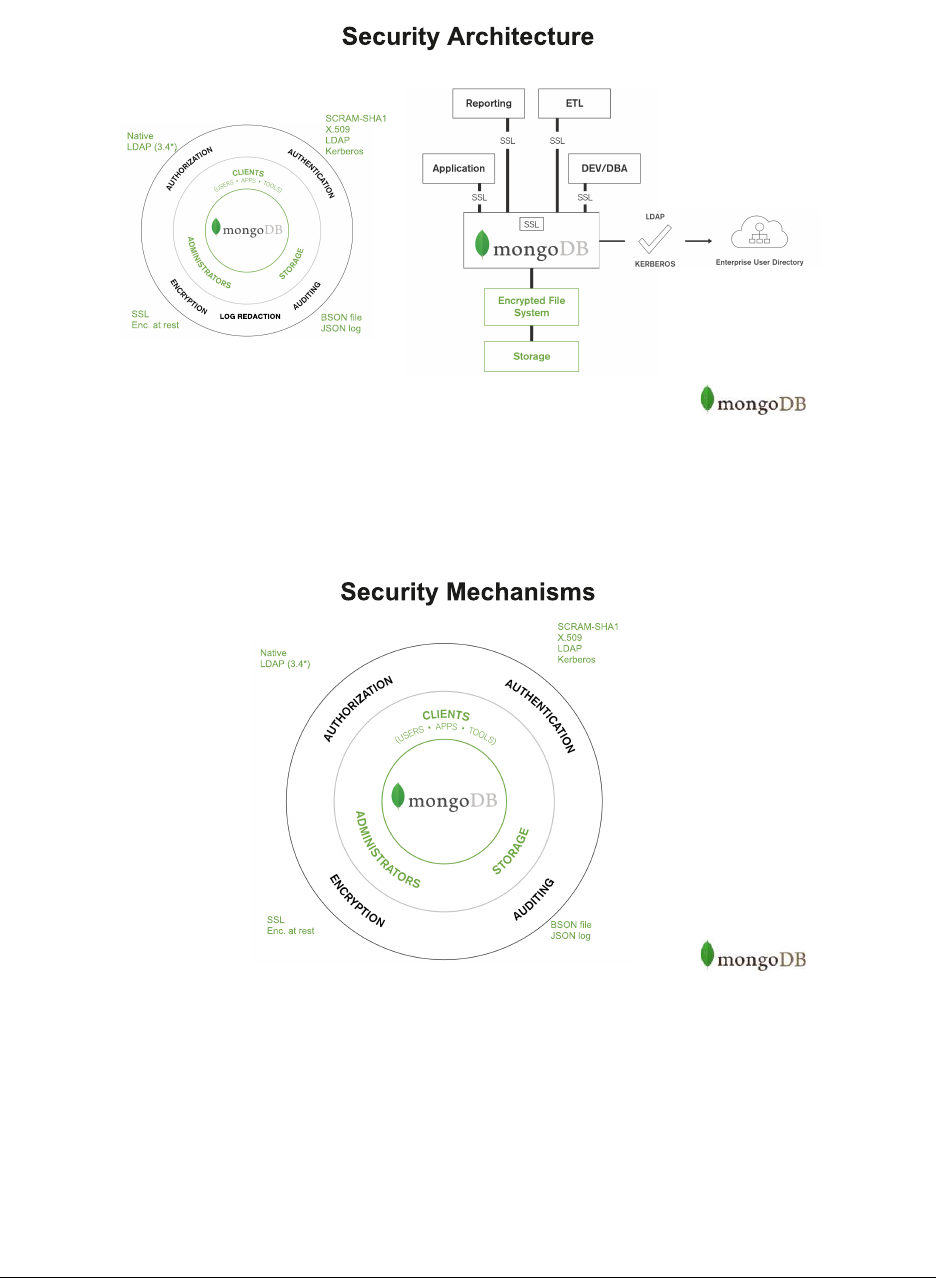
AHighLevelOverview
Security Mechanisms
163

Authentication Options
•Community
–Challenge/response authentication using SCRAM-SHA-1 (username & password)
–X.509 Authentication (using X.509 Certificates)
• Enterprise
–Kerberos
–LDAP
Authorization via MongoDB
•Predefinedroles
•Customroles
•LDAPauthorization(MongoDBEnterprise)
–Query LDAP server for groups to which a user belongs.
–Distinguished names (DN) are mapped to roles on the admin database.
–Requires external authentication (x.509, LDAP, or Kerberos).
Transport Encryption
•TLS/SSL
–May use certificates signed by a certificate authority or self-signed.
•FIPS(MongoDBEnterprise)
Network Exposure Options
•bindIp limits the ip addresses the server listens on.
•Usinganon-standardportcanprovidealayerofobscurity.
•MongoDBshouldstillberunonlyinatrustedenvironment.
164
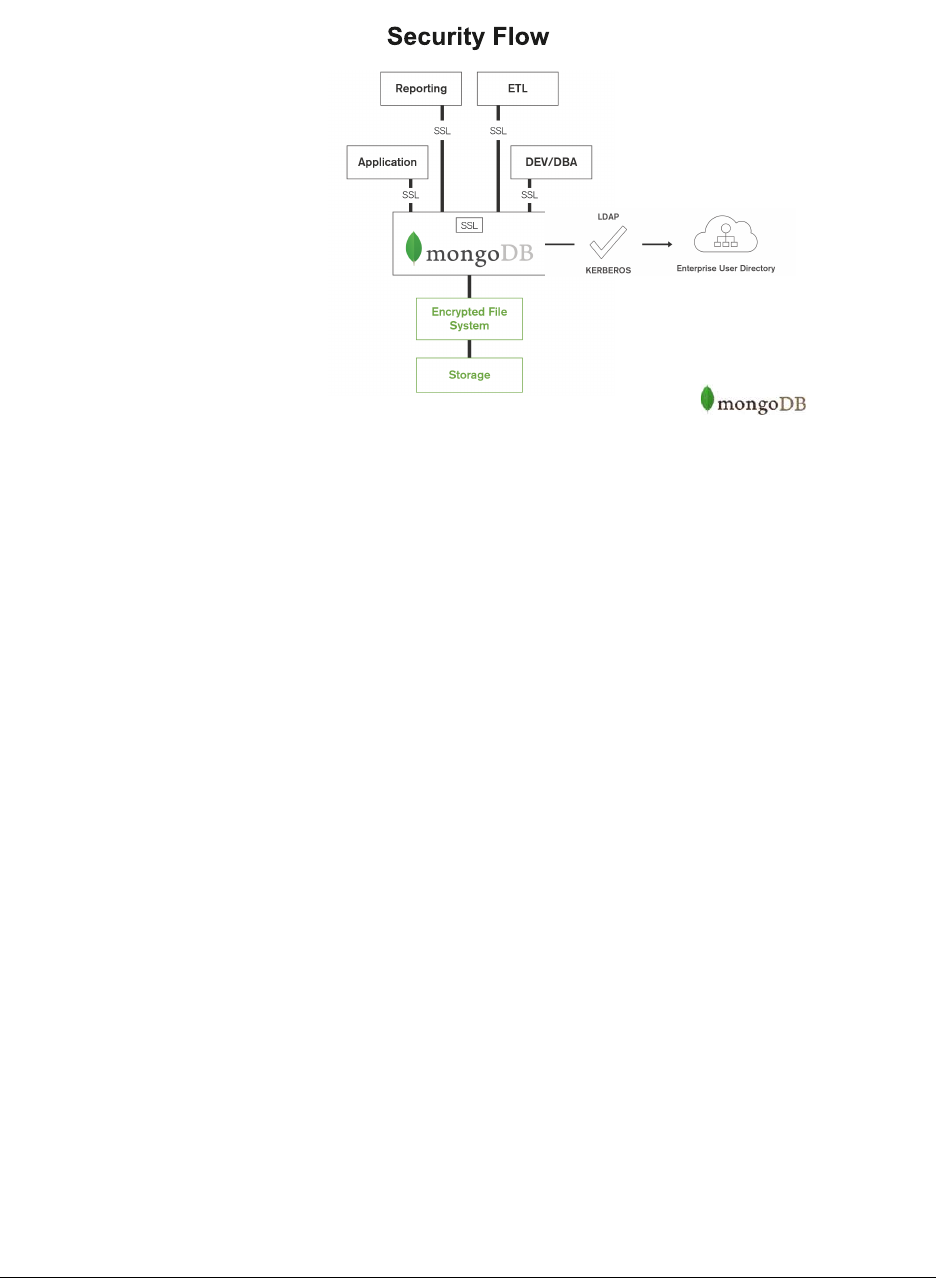
Security Flow
11.2 Authorization
Learning Objectives
Upon completing this module, students should be able to:
•OutlineMongoDB’sauthorizationmodel
•Listauthorizationresources
•Describeactionsuserscantakeinrelationtoresources
•Createroles
•Createprivileges
•OutlineMongoDBbuilt-inroles
•Grantrolestousers
•ExplainLDAPauthorization
165

Authorization vs Authentication
Authorization and Authentication are generally confused and misinterpreted concepts:
•Authorizationdefinestherulesbywhichuserscaninteractwith a given system:
–Which operations can they perform
–Over which resources
•Authenticationisthemechanismbywhichusersidentifyandaregrantedaccesstoasystem:
–Validat i o n o f c r e d e n t i a l s and iden t i t i e s
–Controls access to the system and operational interfaces
Authorization Basics
•MongoDBenforcesarole-basedauthorizationmodel.
•Auserisgrantedrolesthatdeterminetheuser’saccesstodatabase resources and operations.
The model determines:
• Which roles are granted to users
• Which privileges are associated with roles
• Which actions can be performed over different resources
What is a resource?
•Databases?
•Collections?
•Documents?
• Users?
•Nodes?
•Shard?
•ReplicaSet?
166
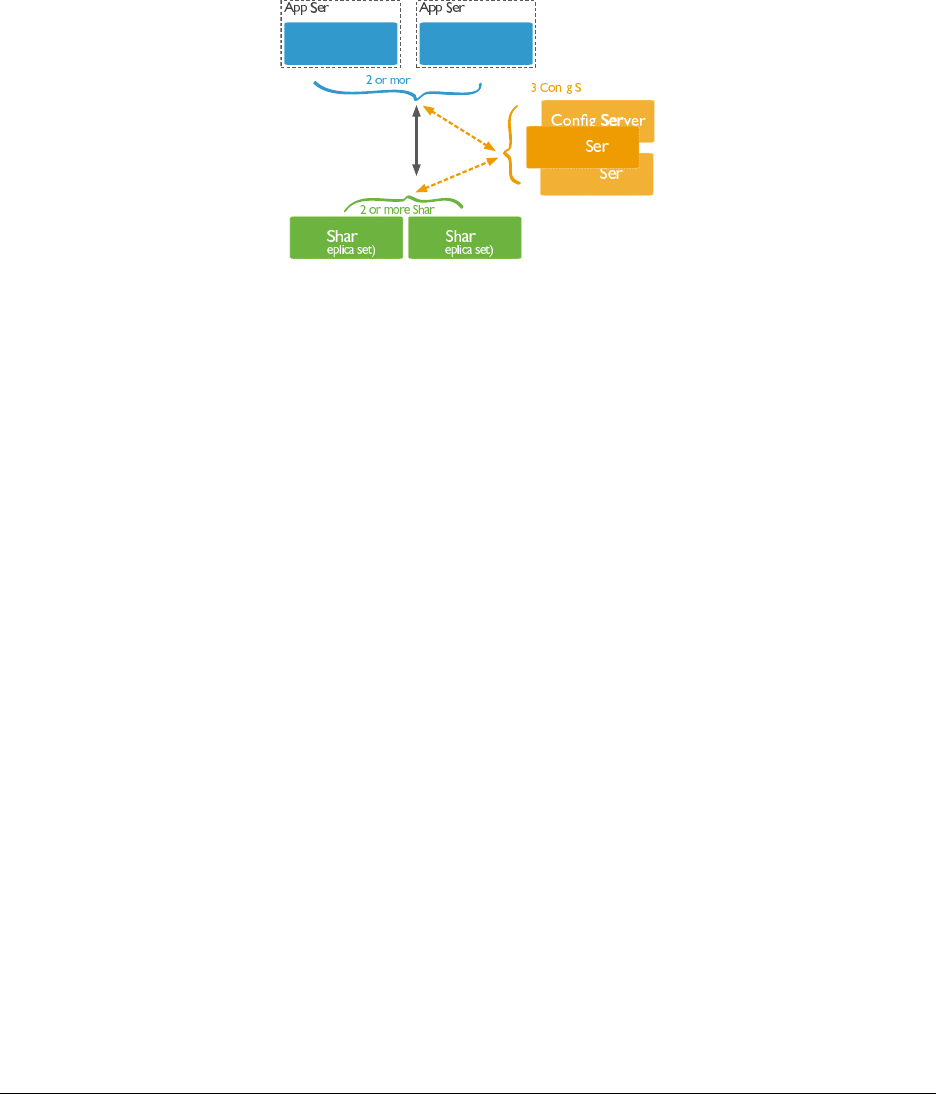
Authorization Resources
•Databases
•Collections
•Cluster
Cluster Resources
Config ver
Config ver
Config ver
Router
(mongos)
d d
ds
fi ervers
Router
(mongos)
e Routers
ver ver
(r (r
Types of Actions
Given a resource, we can consider the available actions:
•Queryandwriteactions
•Databasemanagementactions
•Deploymentmanagementactions
•Replicationactions
•Shardingactions
•Serveradministrationactions
•Diagnosticactions
•Internalactions
167

Specific Actions of Each Type
Query / Write Database Mgmt Deployment Mgmt
find enableProfiler planCacheRead
insert createIndex storageDetails
remove createCollection authSchemaUpgrade
update changeOwnPassword killop
... ...
See the complete list of actions19 in the MongoDB documentation.
Authorization Privileges
Aprivilegedefinesapairingbetweenaresourceasasetofpermitted actions.
Resource:
{"db":"yourdb","collection":"mycollection"}
Action: find
Privilege:
{
resource:{"db":"yourdb","collection":"mycollection"},
actions:["find"]
}
Authorization Roles
MongoDB grants access to data through a role-based authorization system:
•Built-inroles:pre-cannedrolesthatcoverthemostcommonsetsofprivilegesusersmayrequire
•User-definedroles:ifthereisaspecificsetofprivilegesnot covered by the existing built-in roles you are able
to create your own roles
Built-in Roles
Database Admin Cluster Admin All Databases
dbAdmin clusterAdmin readAnyDatabase
dbOwner clusterManager readWriteAnyDatabase
userAdmin clusterMonitor userAdminAnyDatabase
hostManager dbAdminAnyDatabase
Database User Backup & Restore
read backup
readWrite restore
Superuser Internal
root __system
19 https://docs.mongodb.com/manual/reference/privilege-actions/
168

Built-in Roles
To grant roles while creating an user:
use admin
db.createUser(
{
user:"myUser",
pwd:"$up3r$3cr7",
roles:[
{role:"readAnyDatabase",db:"admin"},
{role:"dbOwner",db:"superdb"},
{role:"readWrite",db:"yourdb"}
]
}
)
Built-in Roles
To grant roles to existing user:
use admin
db.grantRolesToUser(
"reportsUser",
[
{ role
:"read",db:"accounts" }
]
)
User-defined Roles
•Ifnosuitablebuilt-inroleexists,wecancancreatearole.
•Define:
–Role name
–Set of privileges
–List of inherit roles (optional)
use admin
db.createRole({
role:"insertAndFindOnlyMyDB",
privileges:[
{resource:{db:"myDB", collection:"" }, actions:["insert","find"]}
],
roles:[]})
169

Role Privileges
To check the privileges of any particular role we can get that information using the getRole method:
db.getRole("insertAndFindOnlyMyDB", {showPrivileges:true})
LDAP Authorization
As of MongoDB 3.4, MongoDB supports authorization with LDAP.
How it works:
1. User authenticates via an external mechanism
$ mongo --username alice \
--password secret \
--authenticationMechanism PLAIN \
--authenticationDatabase ’$external’
LDAP Authorization (cont’d)
2. Username is tranformed into LDAP query
[
{
match:"(.+)@ENGINEERING",
substitution:"cn={0},ou=engineering,dc=example,dc=com"
}, {
match:"(.+)@DBA",
substitution:"cn={0},ou=dba,dc=example,dc=com"
}
]
LDAP Authorization (cont’d)
3. MongoDB queries the LDAP server
•Asingleentity’sattributesaretreatedastheuser’sroles
•Multipleentitiy’sdistinguishednamesaretreatedastheuser’s roles
170

Mongoldap
mongoldap can be used to test configurations between MongoDB and an LDAP server
$ mongoldap -f mongod.conf \
--user "uid=alice,ou=Users,dc=example,dc=com" \
--password secret
11.3 Lab: Administration Users
Premise
Security roles often span different levels:
•Superuserroles
•DBAroles
•Systemadministrationroles
•Useradministrationroles
•Applicationroles
In this lab we will look at several types of administration roles.
User Administration user
•Generally,incomplexsystems,weneedsomeonetoadminister users.
•Thisroleshouldbedifferentfromaroot level user for a few reasons.
•root level users should be used has last resort user
•Administrationofusersisgenerallyrelatedwithsecurityofficers
Create User Admin user
Create a user that will administer other users:
db.createUser(
{
user:"securityofficer",
pwd:"doughnuts",
customData:{ notes:["admin","the person that adds other persons"]},
roles:[
{ role
:"userAdminAnyDatabase",db:"admin" }
]
})
171

Create DBA user
DBAs are generally concerned with maintenance operations inthedatabase.
db.createUser(
{
user:"dba",
pwd:"i+love+indexes",
customData:{ notes:["admin","the person that admins databases"]},
roles:[
{ role
:"dbAdmin",db:"X" }
]
})
If we want to make sure this DBA can administer all databases ofthesystem,whichrole(s)shouldhehave? Seethe
MongoDB documentation20.
Create a Cluster Admin user
Cluster administration is generally an operational role that differs from DBA in the sense that is more focussed on the
deployment and cluster node management.
For a team managing a cluster, what roles enable individuals to do the following?
•Addandremovereplicanodes
•Manageshards
•Dobackups
•Cannotreaddatafromanyapplicationdatabase
11.4 Lab: Create User-Defined Role (Optional)
Premise
•MongoDBprovidesasetofbuilt-inroles.
•Pleaseconsiderthosebeforegeneratinganotherroleonyour system.
•Sometimesitisnecessarytocreaterolesmatchspecifictheneeds of a system.
•Forthatwecanrelyonuser-definedrolesthatsystemadministrators can create.
•ThisfunctionshouldbecarriedbyuserAdmin level administration users.
20 https://docs.mongodb.com/manual/reference/built-in-roles/
172

Define Privileges
•Rolesaresetsofprivilegesthatauserisgranted.
•Createarolewiththefollowingprivileges:
–User can read user details from database brands
–Can list all collections of database brands
–Can update all collections on database brands
–Can write to the collection automotive in database brands
Create the JSON array that describes the requested set of privileges.
Create Role
•Giventheprivilegeswejustdefined,wenowneedtocreatethis role specific to database brands.
•Thenameofthisroleshouldbecarlover
• What command do we need to issue?
Grant Role: Part 1
We now want to grant this role to the user named ilikecars on the database brands.
use brands;
db.createUser(
{
user:"ilikecars",
pwd:"ferrari",
customData:{notes:["application user"]},
roles:[
{role:"carlover",db:"brands"}
]
})
Grant Role: Part 2
•Wenowwanttograntgreaterresponsibilitytoourrecentlycreated ilikecars!
•Let’sgrantthedbOwner role to the ilikecars user.
173

Revoke Role
•Let’sassumethattherolecarlover is no longer valid for user ilikecars.
•Howdowerevokethisrole?
11.5 Authentication
Learning Objectives
Upon completing this module, you should understand:
•Authenticationmechanisms
•Externalauthentication
•Nativeauthentication
•Internalnodeauthentication
•Configurationofauthenticationmechanisms
Authentication
•Authenticationisconcernedwith:
–Validat i n g i d e n t i t i e s
–Managing certificates / credentials
–Allowing accounts to connect and perform authorized operations
•MongoDBprovidesnativeauthenticationandsupportsX509certificates, LDAP, and Kerberos as well.
Authentication Mechanisms
MongoDB supports a number of authentication mechanisms:
•SCRAM-SHA-1(default>=3.0)
• MONGODB-CR (legacy)
•X509Certificates
•LDAP(MongoDBEnterprise)
•Kerberos(MongoDBEnterprise)
174
Internal Authentication
For internal authentication purposes (mechanism used by replica sets and sharded clusters) MongoDB relies on:
•Keyfiles
–Shared password file used by replica set members
–Hexadecimal value of 6 to 1024 chars length
•X509Certificates
Simple Authentication Configuration
To get started we just need to make sure we are launching our mongod instances with the --auth parameter.
mongod --dbpath /data/db --auth
For any connections to be established to this mongod instance, the system will require a username and password.
mongo --authenticationDatabase admin -u user -p
!→
!→
!→MongoDB shell version: 3.2.5
Enter password:
11.6 Lab: Secure mongod
Premise
It is time for us to get started setting up our first MongoDB instance with authentication enabled!
Launch mongod
Let’s start by launching a mongod instance:
mkdir /data/secure_instance_dbpath
mongod --dbpath /data/secure_instance_dbpath --port 28000
At this point there is nothing special about this setup. It is just an ordinary mongod instance ready to receive connec-
tions.
175

Root level user
Create a root level user:
mongo --port 28000 admin // Puts you in the _admin_ database
use admin
db.createUser( {
user:"maestro",
pwd:"maestro+rules",
customData:{ information_field:"information value" },
roles:[ {role:"root",db:"admin" }]
})
Enable Authentication
Launch mongod with auth enabled
mongo admin --port 28000 --eval ’db.shutdownServer()’
mongod --port 28000 --dbpath /data/secure_instance_dbpath --auth
Connect using the recently created maestro user.
mongo --port 28000 admin -u maestro -p
11.7 Auditing
Learning Objectives
Upon completing this module, you should be able to:
•OutlinetheauditingcapabilitiesofMongoDB
•Enableauditing
•Summarizeauditingconfigurationoptions
Auditing
•MongoDBEnterpriseincludesanauditingcapabilityformongod and mongos instances.
•Theauditingfacilityallowsadministratorsanduserstotrack system activity
•Importantfordeploymentswithmultipleusersandapplications.
176

Audit Events
Once enabled, the auditing system can record the following operations:
•Schema
•Replicasetandshardedcluster
•Authenticationandauthorization
•CRUDoperations(DML,offbydefault)
Auditing Configuration
The following are command-line parameters to mongod/mongos used to configure auditing.
Enable auditing with --auditDestination.
•--auditDestination:wheretowritetheauditlog
–syslog
–console
–file
•--auditPath:auditlogpathincasewedefine“file”asthedestination
Auditing Configuration (cont’d)
•--auditFormat:theoutputformatoftheemittedeventmessages
–BSON
–JSON
•--auditFilter:anexpressionthatwillfilterthetypesofeventsthesystemrecords
By default we only audit DDL operations but we can also enable DML (requires auditAuthorizationSuccess set to
true)
Auditing Message
The audit facility will launch a message every time an auditable event occurs:
{
atype: <String>,
ts : { "$date": <timestamp> },
local: { ip: <String>, port: <int> },
remote: { ip: <String>, port: <int> },
users : [ { user: <String>, db: <String> }, ... ],
roles: [ { role: <String>, db: <String> }, ... ],
param: <document>,
result: <int>
}
177

Auditing Configuration
If we want to configure our audit system to generate a JSON file we would need express the following command:
mongod --auditDestination file --auditPath /some/dir/audit.log --auditFormat JSON
If we want to capture events from a particular user myUser:
mongod --auditDestination syslog --auditFilter ’{"users.user": "myUser"}’
To enable DML we need to set a specific parameter:
mongod --auditDestination console --setParameter auditAuthorizationSuccess=true
11.8 Encryption
Learning Objectives
Upon completing this module, students should understand:
•TheencryptioncapabilitiesofMongoDB
•Networkencryption
•Nativeencryption
•Thirdpartyintegrations
Encryption
MongoDB offers two levels of encryption
•Transportlayer
•Encryptionatrest(MongoDBEnterprise>=3.2)
Network Encryption
•MongoDBenablesTLS/SSLfortransportlayerencryptionoftraffic between nodes in a cluster.
•Threedifferentnetworkarchitectureoptionsareavailable:
–Encryption of application traffic connections
–Full encryption of all connections
–Mixed encryption between nodes
178

Native Encryption
MongoDB Enterprise comes with a encrypted storage engine.
•NativeencryptionsupportedbyWiredTiger
•Encryptsdataatrest
–AES256-CBC: 256-bit Advanced Encryption Standard in CipherBlockChainingmode(default)
*symmetric key (same key to encrypt and decrypt)
–AES256-GCM: 256-bit Advanced Encryption Standard in Galois/Counter Mode
–FIPS is also available
•Enablesintegrationwithkeymanagementtools
Encryption and Replication
•Encryptionisnotpartofreplication:
–Data is not natively encrypted on the wire
*Requires transport encryption to ensure secured transmission
–Encryption keys are not replicated
*Each node should have their own individual keys
Third Party Integration
•KeyManagementInteroperabilityProtocol(KMIP)
–Integrates with Vormetric Data Security Manager (DSM) and SafeNet KeySecure
•StorageEncryption
–Linux Unified Key Setup (LUKS)
–IBM Guardium Data Encryption
–Vo r m e t r i c D a t a S e c u r i t y P l a t f o r m
*Also enables Application Level Encryption on per-field or per-document
–Bitlocker Drive Encryption
179

11.9 Log Redaction
Learning Objectives
Upon completing this module students should understand:
• What log redaction is
•Howtoenableanddisablelogredaction
What is log redaction?
•Logredaction,whenenabled,preventsthefollowing
–Details about specific queries from showing in the log when verbose mode is enabled
–Details about specific queries that trigger a profiling event (a slow query, for example)
Enabling Log Redaction
•Thereareseveralwaystoenablelogredaction
–In the configuration file via redactClientLogData: true under security
–Passing the command line argument --redactClientLogData when starting a mongod or mongos
–Connecting to a mongod or mongos and running
db.adminCommand({
setParameter:1, redactClientLogData:true
})
Exercise: Enable Log Redaction Setup
For this exercise we’re going to start a mongod process with verbose logging enabled and then enable log redaction
•Startamongod with verbose logging enabled
mkdir -p data/db
mongod -v --dbpath data/db --logpath data/mongod.log --logappend --port 31000 --fork
•Inanotherterminal,tailthemongod.log to view realtime logging events
tail -f data/mongod.log
180

Exercise: Enable Log Redaction (cont)
•Connecttoyourmongod process from the shell.
•Useadatabasecalledrd and insert a document, observing the output in mongod.log with tail.
mongo --port 31000
use rd
db.foo.insertOne({name:"bob", medicalCondition:"SENSITIVE, should not be logged"})
•Inthelogoutput,youshouldseesomethingsimilartothefollowing:
2017-04-28T09:39:41.629-0700 I COMMAND [conn1]command rd.foo appName: "MongoDB Shell
!→"command: insert {
insert: "foo", documents: [{_id: ObjectId(’5903704d2482ced24904c8a6’),
name: "bob", medicalCondition: "SENSITIVE, should not be logged"
}],
...
Exercise: Enable Log Redaction (cont)
•Fromthemongoshell,enablelogredaction
•Insertanotherdocument
mongo --port 31000
use rd
db.foo.insertOne({name:"mary", medicalCondition:"SENSITIVE, should not be logged"})
•Verifythatthedocumentisbeingredactedinthelog
2017-04-28T12:23:07.111-0700 I COMMAND [conn1]command rd.foo appName: "MongoDB Shell
!→"command: insert {
insert: "###", documents: [{_id: "###", name: "###", medicalCondition: "###" }],
...
11.10 Lab: Secured Replica Set - KeyFile (Optional)
Premise
Security and Replication are two aspects that are often neglected during the Development phase to favor usability and
faster development.
These are also important aspects to take in consideration foryourProductionenvironments,sinceyouprobablydon’t
want to have your production environment Unsecured and without High Availability!
This lab is to get fully acquainted with all necessary steps tocreateasecuredreplicasetusingthekeyfile for cluster
authentication mode
181
Setup Secured Replica Set
AfewstepsarerequiredtofullysetupasecuredReplicaSet:
1. Instantiate one mongod node with no auth enabled
2. Create a root level user
3. Create a clusterAdmin user
4. Generate a keyfile for internal node authentication
5. Re-instantiate a mongod with auth enabled, keyfile defined and replSet name
6. Add Replica Set nodes
We will also be basing our setup using MongoDB configuration files21
Instantiate mongod
This is a rather simple operation that requires just a simple instruction:
$pwd
/data
$ mkdir -p /data/secure_replset/
{1,2,3};cd secure_replset/1
Then go to this yaml file22 and copy it into your clipboard
$ pbpaste > mongod.conf; cat mongod.conf
Instantiate mongod (cont’d)
systemLog:
destination: file
path: "/data/secure_replset/1/mongod.log"
logAppend: true
storage:
dbPath: "/data/secure_replset/1"
wiredTiger:
engineConfig:
cacheSizeGB: 1
net:
port: 28001
processManagement:
fork: true
# setParameter:
#enableLocalhostAuthBypass:false
# security:
#keyFile:/data/secure_replset/1/mongodb-keyfile
21 https://docs.mongodb.org/manual/reference/configuration-options/
22 https://github.com/thatnerd/work-public/blob/master/mongodb_trainings/secure_replset_config.yaml
182

Instantiate mongod (cont’d)
After defining the basic configuration we just need to call mongod passing the configuration file.
mongod -f mongod.conf
Create root user
We start by creating our typical root user:
$ mongo admin --port 28001
>use admin
>db.createUser(
{
user:"maestro",
pwd:"maestro+rules",
roles:[
{ role
:"root",db:"admin" }
]
})
Create clusterAdmin user
We then need to create a clusterAdmin user to enable management of our replica set.
$ mongo admin --port 28001
>db.createUser(
{
user:"pivot",
pwd:"i+like+nodes",
roles:[
{ role
:"clusterAdmin",db:"admin" }
]
})
Generate a keyfile
For internal Replica Set authentication we need to use a keyfile.
openssl rand -base64 741 > /data/secure_replset/1/mongodb-keyfile
chmod 600 /data/secure_replset/1/mongodb-keyfile
183

Add keyfile to the configuration file
Now that we have the keyfile generated it’s time to add that information to our configuration file. Just un-comment the
last few lines.
systemLog:
destination: file
path: "/data/secure_replset/1/mongod.log"
logAppend: true
storage:
dbPath: "/data/secure_replset/1"
net:
port: 28001
processManagement:
fork: true
setParameter:
enableLocalhostAuthBypass: false
security:
keyFile: /data/secure_replset/1/mongodb-keyfile
Configuring Replica Set
•Nowit’stimetoconfigureourReplicaSet
•ThedesiredsetupforthisReplicaSetshouldbenamed“VAULT”
•Itshouldconsistof3databearingnodes
11.11 Lab: LDAP Authentication & Authorization (Optional)
Premise
•Authenticationandauthorizationwithanexternalservice(likeLDAP)isanimportantfunctionalityforlarge
organizations that rely on centralized user management tools.
•Thislabisdesignedtogetyoufamiliarwiththeproceduretorunamongod with authentication and authoriza-
tion enabled with an external LDAP service.
Test Connection to LDAP
•AnLDAPserverisupandrunningforyoutoconnectto.
•Server Info:
–ServerAddress:192.168.19.100:8389
–User:uid=alice,ou=Users,dc=mongodb,dc=com
–Password:secret
184

Test Connection to LDAP (cont’d)
•Yourgoalistofillinthefollowingconfigurationfileandgetmongoldap to successfully talk to the LDAP
server with the following command:
$ mongoldap --config mongod.conf --user alice --password secret
...
security:
authorization: "enabled"
ldap:
servers: "XXXXXXXXXXXXXX:8389"
authz:
queryTemplate: "XXXXXXXXXXXXXXXXXXXXXXXXXXXXXXXXXXXXXXXXXXXXXXX"
userToDNMapping: ’[{match: "XXXX", substitution:
!→"XXXXXXXXXXXXXXXXXXXXXXXXXXXXXXXXX"}]’
transportSecurity: "none"
bind:
method: "simple"
setParameter:
authenticationMechanisms: PLAIN
Authentication with LDAP
•Onceyou’vesuccessfullyconnectedtoLDAPwithmongoldap you should be able to use the same config file
with mongod.
$ mongod --config mongod.conf
•Fromhereyoushouldbeabletoauthenticatewithalice and secret.
$ mongo --username alice \
--password secret \
--authenticationMechanism PLAIN \
--authenticationDatabase ’$external’
Authorization with LDAP
•Aftersuccessfullyauthenticating with LDAP, you’ll need to take advantage of the localhost exception to enable
authorization with LDAP.
•Createarolethatallowsanyonewhoisapartofthecn=admins,ou=Users,dc=mongodb,dc=com LDAP group
to be able to manage users (e.g., inheriting userAdminAnyDatabase).
•Toconfirmthatyou’vesuccessfullysetupauthorizationthefollowingcommandshouldexecutewithouterrorif
you’re authenticated as alice since she’s apart of the group.
> use admin
> db.getRoles
()
185

11.12 Lab: Security Workshop
Learning Objectives
Upon completing this workshop, attendees will be able to:
•SecureapplicationcommunicationwithMongoDB
•UnderstandallsecurityauthenticationandauthorizationoptionsofMongoDB
•EncryptMongoDBdataatrestusingencryptedstorageengine
•Enableauditingandunderstandtheperformanceimplications
•FeelcomfortabledeployingandsecurelyconfiguringMongoDB
Introduction
In this workshop, attendees will install and configure a secure replica set on servers running in AWS.
•WearegoingtosecurethebackendcommunicationsusingTLS/SSL
•Enableauthorizationonthebackendside
•Encryptthestoragelayer
•Makesurethatthereareno“leaks” of information
List of exercises
• 1: Accessing your AWS instances
•2:StartingMongoDBandconfiguringthereplicaset
•3:LaunchtheClientApplication
•4:Setuplocalaccounts
•5:EnableSSLbetweenthenodes
•6:EnableSSLConnectionfromthemongoshellandfromtheApplication
•7:EncryptStorageLayer
•8:Avoidanylogleaks
•9:EnableAuditing
186

Exercise: Accessing your instances from Windows
•DownloadandinstallPuttyfromhttp://www.putty.org/
•StartPuttywith:All Programs > PuTTY > PuTTY
•InSession:
–In the Host Name box, enter centos@<publicIP>
–Under Connection type,selectSSH
•InConnection/SSH/Auth,
–Browse to the AdvancedAdministrator.ppk file
•ClickOpen
•Detailedinfoat:
Connect to AWS with Putty23
Exercise: Accessing your instances from Linux or Mac
•Getyour.pemfileandclosethepermissionsonit
chmod 600 AdvancedAdministrator.pem
•Enablethekeychainandssh into node1,propagatingyourcredentials
ssh-add -K AdvancedAdministrator.pem
ssh -i AdvancedAdministrator.pem -A centos@54.235.1.1
•SSHintonode2 from node1
ssh -A node2
Solution: Accessing your instances
In our machines we will have access to all nodes in the deployment:
cat /etc/hosts
A/share/downloads folder with all necessary software downloaded
ls /share/downloads
ls /etc/ssl/mongodb
23 http://docs.aws.amazon.com/AWSEC2/latest/UserGuide/putty.html
187

Important Notes
•onlyusesudo when needed, otherwise you can run in permission issues
–use ‘sudo service ...’ to start mongod
•replicasetshouldbenamedSECURED
•mustuseConfig Files to start the mongod processes, not command line options
–use /etc/mongod.conf
–careful with the spacing in the YAML file
Exercise 2: Starting MongoDB and configuring the replica set
•/share/downloads/mongodb_packages contains MongoDB 3.2 and 3.4
•Installationinstructionsareat:
–https://docs.mongodb.com/manual/tutorial/install-mongodb-enterprise-on-red-hat/
•Configurethe3nodesasareplicasetnamedSECURED
•Usenode1,node2 and node3 for your host names
•YouMUST use a config file24
Solution 2: Installing MongoDB
• Installation
cd /data/downloads/mongodb_packages
sudo yum install -y mongodb-enterprise-3.4.9-1.el7.x86_64.rpm
sudo vi /etc/mongod.conf
sudo service mongod start
sudo service mongod status
# if errors OR mongod not running ...
cat /var/log/mongdb/mongod.log
Solution 2: Config File (cont)
•Configurethe3nodesasareplicasetnamedSECURED,changebindIp to the 10.0.0.X address, plus 127.0.0.1
•Use/mongod-data/appdb for your dbpath
•Allotherdefaultsarefinefornow
storage:
dbPath: /mongod-data/appdb/
...
replication:
replSetName: SECURED
net:
bindIp: 10.0.0.101,127.0.0.1
24 https://docs.mongodb.com/manual/reference/configuration-options/
188

Solution 2: Replica Set Config (cont)
cfg ={
_id: "SECURED",
version: 1,
members: [
{_id: 0, host: "node1:27017"},
{_id: 1, host: "node2:27017"},
{_id: 2, host: "node3:27017"}
]
}
rs.initiate(cfg)
rs.status()
Solution 2: Verification (cont)
Let’s try to connect to our running MongoDB cluster:
mongo --host node1
If you want to be sure to connect to the Primary, instead, use:
mongo --host SECURED/node1,node2,node3
Finally, verify that the replica set is healthy
rs.status()
Exercise 3: Launch the Client Application
It’s time to connect our client application. Install the application on node4
cd ~
tar xzvf /share/downloads/apps/security_lab.tgz
cd mongo-messenger
npm install
npm start
... webpack: bundle is now VALID.
•Ifyougetanerror running npm install,thereisworkaroundonthenextpage
•Connecttothepublicipofyournode4 instance, port 8080
http://NODE4-public-IP:8080
189

Fixing node/npm issue with SSL (Sept 2017 bug)
npm: relocation error: npm: symbol SSL_set_cert_cb, version libssl.so.10 not defined
!→in file libssl.so.10 with link time reference
Update the OpenSSL lib
sudo yum update -y openssl
OR install a newer NPM version:
curl https://raw.githubusercontent.com/creationix/nvm/v0.13.1/install.sh | bash
source ~/.bash_profile
nvm install v8.6.0
OR use Yarn
sudo wget https://dl.yarnpkg.com/rpm/yarn.repo -O /etc/yum.repos.d/yarn.repo
sudo yum install yarn
How is the client application connecting to the database?
•Theconnectionstringusedbytheapplicationisinmessage.js and looks like this:
const url ="mongodb://node1:27017,node2:27017,node3:27017/
security-lab?replicaSet=SECURED"
•confirmthatthetooliswritingtothedatabasebyrunningthefollowinginamongoshell:
use security-lab
db.messages.find({from:"your_username"}).pretty()
•Thiswillwork,fornow...
WARNING: Spying your deployment!
Throughout the lab, the instructor will be spying on your deployment!
This checking is done by running a few scripts on your machinesthatwillverifywhetherornotyouhavecompletely
secured your deployment.
We will come back to this later on.
190

Authorization and Authentication
Discussion on the following questions:
•differencebetweenauthorizationandauthentication?
•whichauthenticationmechanismtouse?
•whichauthorizationsupportwillyouuse?
Exercise 4: Set up local accounts
It is time to start securing the system.
To do this, you will have to decide:
•Setofusersrequiredtooperatethissystem
•Somereferences:
–MongoDB authentication25
–role-based access control26
SSL certificates
25 https://docs.mongodb.com/manual/core/authentication/
26 https://docs.mongodb.com/manual/core/authorization/
191

Exercise 5: Enable SSL between the nodes
•Werestricted“bindIp”toalocalnetworkinterface,however if this was an outside address, it would not be good
enough
•Let’sensurewelimittheconnectionstoalistofnodeswecontrol
–Let’s use SSL certificates
–As a reminder, they are in /etc/ssl/mongodb/
Exercise 6: Enable SSL connection from the mongo shell and from the Application
•Youwillneedtocombinethemongomessenger.key and mongomessenger.pem files together to
quickly test connection in the mongo shell.
•AfteryouhavetestedSSLfromthemongoshell,updatetheclient’s connection info to connect over SSL27.
•Usemongomessenger.key,mongomessenger.pem,andmessenger-CA.pem for your client con-
nection.
# Concatenate the PEM and KEY files. ’cut’ will add the missing end of line chars
cut -b 1- /etc/ssl/mongodb/mongomessenger.
*> ~/client.pem
mongo --ssl --sslCAFile /etc/ssl/mongodb/messenger-CA.pem \
--sslPEMKeyFile ~/client.pem --host SECURED/node1,node2,node3
AnoteaboutX509certificateswithclusterAuthMode: x509
•Certificatesmust differ from the root CA certificate in the subject area by at least one of the following:
•“O”:Organization
•“OU”:OrganizationalUnit
•“DC”:DomainComponent
•IftheclientpresentsacertificatethatmatchestheCAcertificate in these 3 fields, the client will be given root
access,circumventinganyrole-basedaccesscontrol.
Gaining root access
openssl x509 -noout -subject -in /etc/ssl/mongodb/ca.pem
openssl x509 -noout -subject -in /etc/ssl/mongodb/node1.pem
# "O", "OU" (and no "DC") in the subject lines are the same!
# now, gain root even if a user is created
mongo --ssl --sslCAFile /etc/ssl/mongodb/messenger-CA.pem --sslPEMKeyFile \
/etc/ssl/mongodb/node1.pem --authenticationMechanism MONGODB-X509 \
--authenticationDatabase=’$external’ --host SECURED/node1,node2,node3
# using correctly created certs
openssl x509 -noout -subject -in ~/client.pem
# will fail
mongo --ssl --sslCAFile /etc/ssl/mongodb/messenger-CA.pem --sslPEMKeyFile \
~/client.pem --authenticationMechanism MONGODB-X509 \
--authenticationDatabase=’$external’ --host SECURED/node1,node2,node3
# will connect
27 http://mongodb.github.io/node-mongodb-native/2.2/tutorials/connect/ssl/
192

mongo --ssl --sslCAFile /etc/ssl/mongodb/messenger-CA.pem \
--sslPEMKeyFile ~/client.pem --host SECURED/node1,node2,node3
# will not be authorized until auth’d with user
show dbs
Exercise 7: Encrypt Storage Layer
To fully secure our MongoDB deployment we need to consider theactualMongoDBinstancefiles.
Your instructor has s o m e s c r i p t s t h a t w i l l e n a b l e h i m t o h ave apeekintotheyourcollectionandindexesdatafiles.
Don’t let them do so!!!
Exercise 8: Avoid any log leaks
Logs are an important asset of your system.
Allow us to understand any potential issue with our cluster ordeployment. Buttheycanalsoleak some confidential
information!
Make sure that you do not have any data leaks into your logs.
This should be done without downtime
Auditing
At this point we have a secured MongoDB deployment hardened against outside attacks, and used Role-Based Access
Control to limit the access of users.
•Thefinalstepistoenableauditing,givingusaclearrecordof who performed an auditable action.
Exercise 9: Enable Auditing
•Enableauditingforalloperations,toincludeCRUDoperations, for the security-lab database
•OutputthelogfileinJSONformat
•Outputthelogfileto/mongod-data/audit/SECURED
•Therearemany
filter options28
28 https://docs.mongodb.com/manual/tutorial/configure-audit-filters/
193

Putting it together
storage:
dbPath: /mongod-data/appdb/
...
net:
ssl:
mode: requireSSL
PEMKeyFile: /etc/ssl/mongodb/node1.pem
CAFile: /etc/ssl/mongodb/ca.pem
security:
clusterAuthMode: x509
enableEncryption : true
encryptionKeyFile : /etc/ssl/mongodb/mongodb-keyfile
redactClientLogData: true
Putting it together (cont)
auditLog:
destination: file
format: JSON
path: /mongod-data/audit/SECURED/audit.json
filter: ’{ roles: { role: "readWrite", db: "security-lab" } }’
setParameter: { auditAuthorizationSuccess:true }
Summary
What we did:
•Enabledbasicauthorization
•UsedSSLcertificatesforthecluster
•UsedX509certificatetoauthenticatetheclient
•Encryptedthedatabaseatrest
•Redactedthemongod logs
•Configuredauditingforaspecificuser
194

12 MongoDB Atlas, Cloud & Ops Manager Fundamentals
MongoDB Cloud & Ops Manager (page 195) Learn about what Cloud & Ops Manager offers
Automation (page 197) Cloud & Ops Manager Automation
Lab: Cluster Automation (page 200) Set up a cluster with Cloud Manager Automation
Monitoring (page 201) Monitor a cluster with Cloud Manager
Lab: Create an Alert (page 203) Create an alert on Cloud Manager
Backups (page 203) Use Cloud Manager to create and administer backups
12.1 MongoDB Cloud & Ops Manager
Learning Objectives
Upon completing this module students should understand:
•FeaturesofCloud&OpsManager
•Availabledeploymentoptions
•ThecomponentsofCloud&OpsManager
Cloud and Ops Manager
All services for managing a MongoDB cluster or group of clusters:
•Monitoring
•Automation
•Backups
Deployment Options
•CloudManager:Hosted,
https://www.mongodb.com/cloud
•OpsManager:On-premises
195
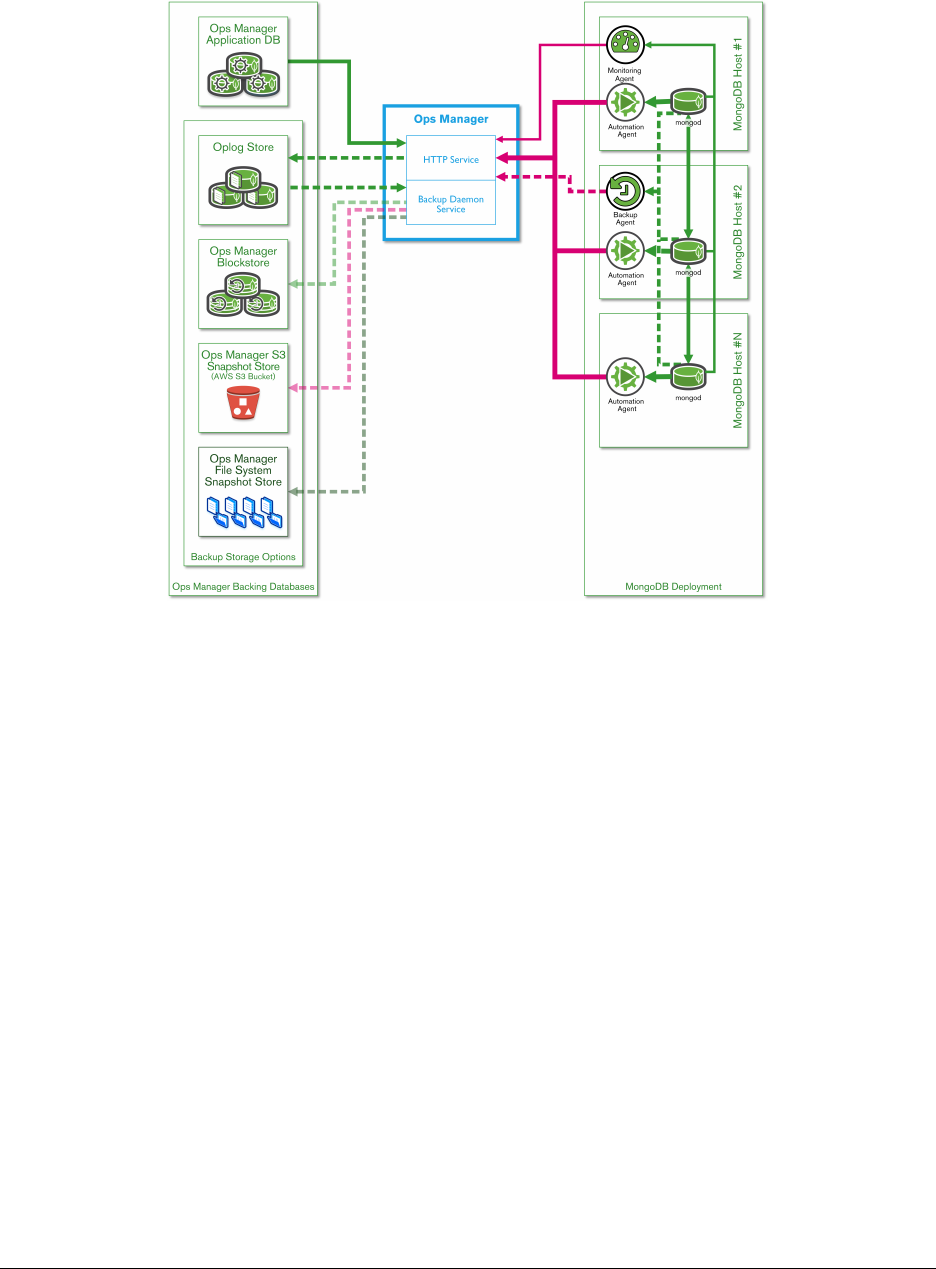
Architecture
Cloud Manager
•ManageMongoDBinstancesanywherewithaconnectiontoCloud Manager
• Option to provision servers via AWS integration
Ops Manager
On-premises, with additional features for:
• Alerting (SNMP)
•Deploymentconfiguration(e.g.backupredundancyacrossinternal data centers)
•GlobalcontrolofmultipleMongoDBclusters
196

Cloud & Ops Manager Use Cases
•Managea1000nodecluster(monitoring,backups,automation)
• Manage a personal project (3 node replica set on AWS, using Cloud Manager)
•Manage40deployments(witheachdeploymenthavingdifferent requirements)
Creating a Cloud Manager Account
Free account at https://www.mongodb.com/cloud
12.2 Automation
Learning Objectives
Upon completing this module students should understand:
•UsecasesforCloud/OpsManagerAutomation
•TheCloud/OpsManagerAutomationinternalworkflow
What is Automation?
Fully managed MongoDB deployment on your own servers:
•Automatedprovisioning
•Dynamicallyaddcapacity(e.g.addmoreshardsorreplicaset nodes)
•Upgrades
•Admintasks(e.g.changethesizeoftheoplog)
How Does Automation Work?
•Automationagentisinstalledoneachserverincluster
•Administratorcreatesagoalenvironment/topologyforsystem (through Cloud / Ops Manager interface)
•AutomationagentsperiodicallycheckwithCloud/OpsManager to get new environment/topology instructions
•Agentscreateandfollowaplanforimplementingtheinstructions
•Minuteslater,clusterdesigniscomplete,clusterisingoal state
197

Automation Agents
Sample Use Case
Administrator wants to create a 100-shard sharded cluster, with each shard comprised of a 3 node replica set:
•Administratorinstallsautomationagenton300servers
•Clusterenvironment/topologyiscreatedinCloud/OpsManager, then deployed to agents
•Agentsexecuteinstructionsuntil100-shardclusteriscomplete (usually several minutes)
Upgrades Using Automation
•Upgradeswithoutautomationcanbeamanuallyintensiveprocess (e.g. 300 servers)
•Alotofedgecaseswhenscripting(e.g.1shardhasproblems,oronereplicasetisamixedversion)
•OneclickupgradewithCloud/OpsManagerAutomationfortheentirecluster
198

Automation: Behind the Scenes
•AgentspingCloud/OpsManagerfornewinstructions
•AgentscomparetheirlocalconfigurationfilewiththelatestversionfromCloud/OpsManager
•ConfigurationfileinJSON
•AllcommunicationsoverSSL
{
"groupId":"55120365d3e4b0cac8d8a52a737",
"state":"PUBLISHED",
"version":4,
"cluster":{...
Configuration File
When version number of configuration file on Cloud / Ops Manager is greater than local version, agent begins making
aplantoimplementchanges:
"replicaSets":[
{
"_id":"shard_0",
"members":[
{
"_id":0,
"host":"DemoCluster_shard_0_0",
"priority":1,
"votes":1,
"slaveDelay":0,
"hidden":false,
"arbiterOnly":false
},
...
199

Automation Goal State
Automation agent is considered to be in goal state after all cluster changes (related to the individual agent) have been
implemented.
Demo
•TheinstructorwilldemonstrateusingAutomationtosetupasmallclusterlocally.
•Referencedocumentation:
•The Automation Agent29
•The Automation API30
•Configuring the Automation Agent31
12.3 Lab: Cluster Automation
Learning Objectives
Upon completing this exercise students should understand:
•Howtodeploy,dynamicallyresize,andupgradeaclusterwith Automation
Exercise #1
Create a cluster using Cloud Manager automation with the following topology:
•3shards
•Eachshardisa3nodereplicaset(2databearingnodes,1arbiter)
•Version2.6.8ofMongoDB
•To conserve s pace, set “s mal lfiles ” = tru e and “oplog Siz e” = 10
29 https://docs.cloud.mongodb.com/tutorial/nav/automation-agent/
30 https://docs.cloud.mongodb.com/api/
31 https://docs.cloud.mongodb.com/reference/automation-agent/
200

Exercise #2
Modify the cluster topology from Exercise #1 to the following:
•4shards(addoneshard)
•Version3.0.1ofMongoDB(upgradefrom2.6.8->3.0.1)
12.4 Monitoring
Learning Objectives
Upon completing this module students should understand:
•Cloud/OpsManagermonitoringfundamentals
•HowtosetupalertsinCloud/OpsManager
Monitoring in Cloud / Ops Manager
•Identifyclusterperformanceissues
•Identifyindividualnodesinclusterwithperformanceissues
•Visualizeperformancethroughgraphsandoverlays
•Configureandsetalerts
Monitoring Use Cases
•Alertonperformanceissues,tocatchthembeforetheyturninto an outage
•Diagnoseperformanceproblems
•Historicalperformanceanalysis
•Monitorclusterhealth
•Capacityplanningandscalingrequirements
Monitoring Agent
•Requestsmetricsfromeachhostinthecluster
•SendsthosemetricstoCloud/OpsManagerserver
•Mustbeabletocontacteveryhostinthecluster(agentcanlive in a private network)
•MusthaveaccesstocontactCloud/OpsManagerwebsitewithmetrics from hosts
201

Agent Configuration
•CanuseHTTPproxy
•Cangatherhardwarestatisticsviamunin-node
•Agentcanoptionallygatherdatabasestatistics,andrecord slow queries (sampled)
Agent Security
•SSLcertificateforSSLclusters
•LDAP/Kerberossupported
•Agentmusthave“clusterMonitor”roleoneachhost
Monitoring Demo
Visit https://www.mongodb.com/cloud
Navigating Cloud Manager Charts
•Addchartstoviewbyclickingthenameofthechartatthebottom of the host’s page
•“i”iconnexttoeachcharttitlecanbeclickedtolearnwhatthe chart means
•Holdingdowntheleftmousebuttonanddraggingontopofthechart will let you zoom in
Metrics
•Minute-levelmetricsfor48hours
•Hourlymetricsforabout3months
•Dailymetricsforthelifeofthecluster
Alerts
•Everychartcanbealertedon
•Changestothestateoftheclustercantriggeralerts(e.g.afailover)
•Alertscanbesenttoemail,SMS,HipChat,orPagerDuty
202

12.5 Lab: Create an Alert
Learning Objectives
Upon completing this exercise students should understand:
•HowtocreateanalertinCloudManager
Exercise #1
Create an alert through Cloud Manager for any node within yourclusterthatisdown.
After the alert has been created, stop a node within your cluster to verify the alert.
12.6 Backups
Learning Objectives
Upon completing this module students should understand:
•HowCloud/OpsManagerBackupswork
•AdvantagestoCloud/OpsManagerBackups
Methods for Backing Up MongoDB
•mongodump
•Filesystembackups
•Cloud/OpsManagerBackups
Comparing MongoDB Backup Methods
Considerations Mongodump File System Cloud Backup Ops Manager
Initial Complexity Medium High Low High
Replica Set PIT Yes ** Yes ** Yes Yes
Sharded Snapshot No Yes ** Yes Yes
Restore Time Slow Fast Medium Medium
**Requires advanced scripting
203
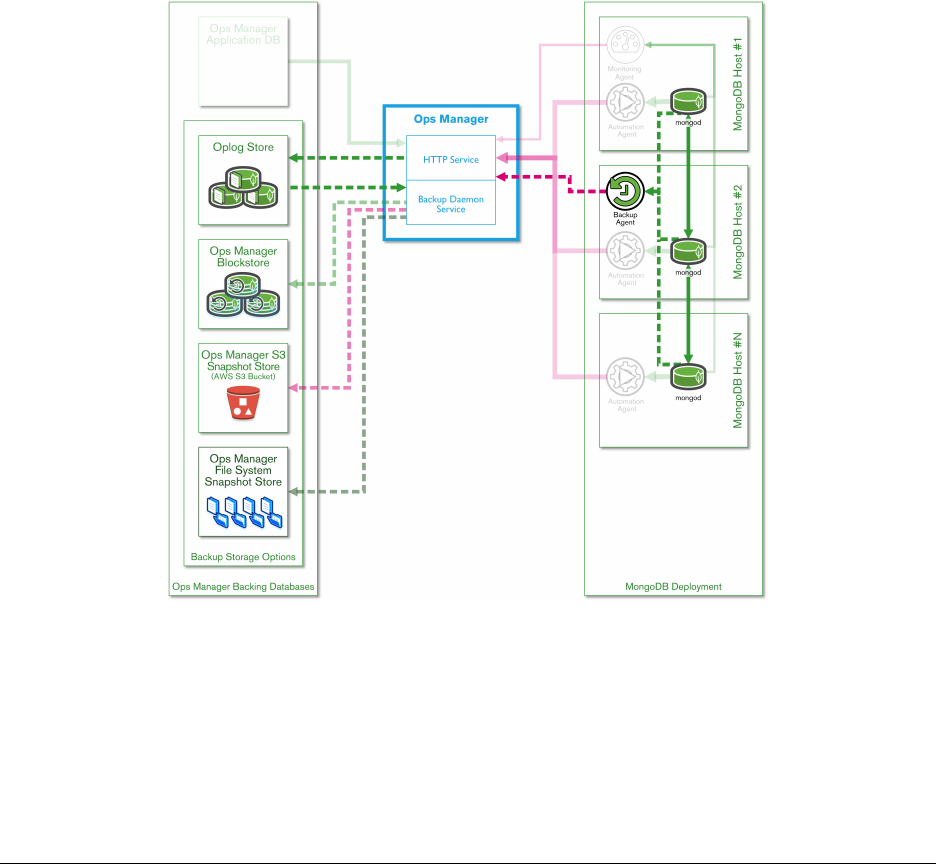
Cloud / Ops Manager Backups
•Basedoffoplogs(evenfortheconfigservers)
•Point-in-timerecoveryforreplicasets,snapshotsforsharded clusters
•Oplogonconfigserverforshardedclusterbackup
•Abilitytoexcludecollections,databases(suchaslogs)
•Retentionrulescanbedefined
Restoring from Cloud / Ops Manager
•Specifywhichbackuptorestore
•SCPpushorHTTPSpull(onetimeuselink)fordatafiles
Architecture
204

Snapshotting
•LocalcopyofeveryreplicasetstoredbyCloud/OpsManager
•Oplog entries applied on top of local copy
•Localcopyisusedforsnapshotting
•Verylittleimpacttothecluster(equivalenttoaddinganother secondary)
Backup Agent
•Backupagent(canbemanagedbyAutomationagent)
•BackupagentsendsoplogentriestoCloud/OpsManagerservice to be apply on local copy
205

13 MongoDB Cloud & Ops Manager Under the Hood
API (page 206) Using the Cloud & Ops Manager API
Lab: Cloud Manager API (page 207) Cloud & Ops Manager API exercise
Architecture (Ops Manager) (page 208) Ops Manager
Security (Ops Manager) (page 210) Ops Manager Security
Lab: Install Ops Manager (page 211) Install Ops Manager
13.1 API
Learning Objectives
Upon completing this module students should understand:
•OverviewoftheCloud/OpsManagerAPI
•SampleusecasesfortheCloud/OpsManagerAPI
What is the Cloud / Ops Manager API?
Allows users to programmatically:
•Accessmonitoringdata
•Backupfunctionality(requestbackups,changesnapshotschedules, etc.)
•Automationclusterconfiguration(modify,view)
API Documentation
https://docs.mms.mongodb.com/core/api/ <https://docs.mms.mongodb.com/core/api/>
Sample API Uses Cases
•IngestCloud/OpsManagermonitoringdata
•Programmaticallyrestoreenvironments
•Configurationmanagement
206

Ingest Monitoring Data
The monitoring API can be used to ingest monitoring data into another system, such as Nagios, HP OpenView, or your
own internal dashboard.
Programatically Restore Environments
Use the backup API to programmatically restore an integration or testing environment based on the last production
snapshot.
Configuration Management
Use the automation API to integrate with existing configuration management tools (such as Chef or Puppet) to auto-
mate creating and maintaining environments.
13.2 Lab: Cloud Manager API
Learning Objectives
Upon completing this exercise students should understand:
•HaveabasicunderstandingofworkingwiththeCloudManagerAPI(orOpsManagerifthestudentchooses)
Using the Cloud Manager API
If Ops Manager is installed, it may be used in place of Cloud Manager for this exercise.
Exercise #1
Navigate the Cloud Manager interface to perform the following:
•GenerateanAPIkey
•AddyourpersonalmachinetotheAPIwhitelist
Exercise #2
Modify and run the following curl command to return alerts foryourCloudManagergroup:
curl -u"username:apiKey" --digest -i
"https://mms.mongodb.com/api/public/v1.0/groups/<GROUP-ID>/alerts"
207

Exercise #3
How would you find metrics for a given host within your Cloud Manager account? Create an outline for the API calls
needed.
13.3 Architecture (Ops Manager)
Learning Objectives
Upon completing this module students should understand:
•OpsManageroverview
•OpsManagercomponents
•ConsiderationsforsizinganOpsManagerenvironment
MongoDB Ops Manager
•On-premisesversionofCloudManager
•Everythingstayswithinprivatenetwork
Components
•Applicationserver(s):webinterface
•OpsManagerapplicationdatabase:monitoringmetrics,automation configuration, etc.
•Backupinfrastructure:clusterbackupsandrestores
Architecture
Application Server
•15GBRAM,50GBofdiskspacearerequired
• Equivalent to a m3.xlarge AWS instance
208
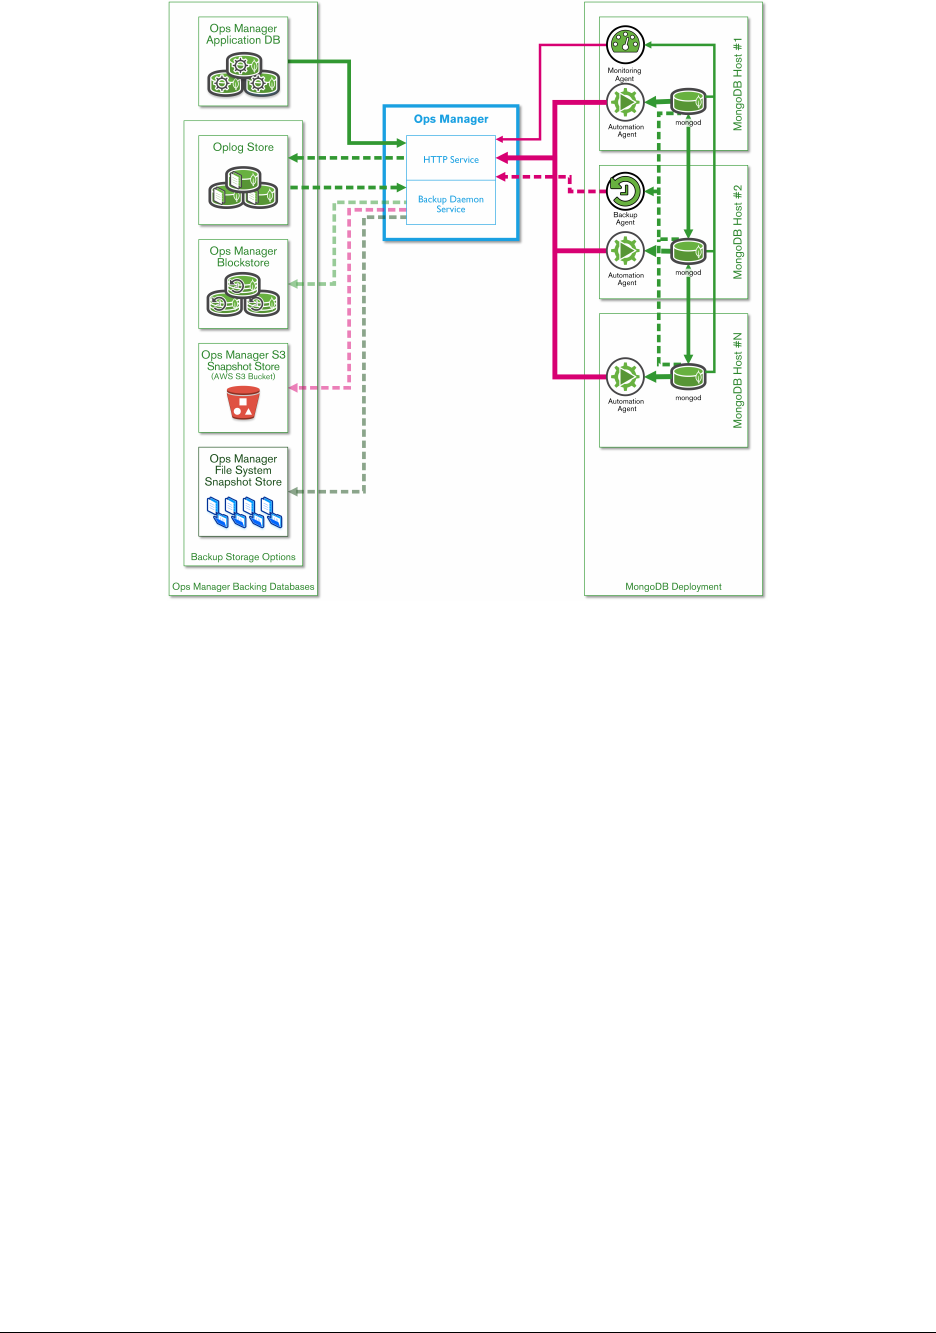
Application Database
•Allmonitoringmetrics,automationconfigurations,etc.stored here
•Replicaset,however,astandaloneMongoDBnodecanalsobeused
Backup Infrastructure
•Backupdatabase(blockstore,oplog,sync)
•Backupdaemonprocess(managesapplyingoplogentries,creating snapshots, etc.)
Backup Database
•3sections:-blockstoreforblocks-oplog-syncforinitialsyncslices
•Replicaset,astandaloneMongoDBnodecanalsobeused
•Mustbesizedcarefully
•Allsnapshotsarestoredhere
•Blocklevelde-duping,thesameblockisn’tstoredtwice(significantly reduces database size for deployment
with low/moderate writes)
209

Backup Daemon Process
•The“workhorse”ofthebackupinfrastructure
•Createsalocalcopyofthedatabaseitisbackingup(references “HEAD” database)
•Requires2-3Xdataspace(ofthedatabaseitisbackingup)
•Canrunmultipledaemons,pointingtomultiplebackupdatabases (for large clusters)
13.4 Security (Ops Manager)
Learning Objectives
Upon completing this module students should understand:
•OpsManagersecurityoverview
•SecurityandauthenticationoptionsforOpsManager
Ops Manager User Authentication
•Two-Factorauthenticationcanbeenabled(usesGoogleAuthenticator)
•LDAPauthenticationoption
Authentication for the Backing Ops Manager Databases
Ops Manager application database and backup database:
• MongoDB-CR (SCRAM-SHA1)
•LDAP
•Kerberos
Authenticating Between an Ops Manager Agent and Cluster
•LDAP
•MongoDB-CR
•Kerberos(Linuxonly)
210

Encrypting Communications
•AllcommunicationscanbeencryptedoverSSL.
Ops Manager Groups
•Userscanbelongtomanydifferentgroups
•Usershavedifferentlevelsofaccesspergroup
User Roles By Group
•ReadOnly
•UserAdmin
•MonitoringAdmin
•BackupAdmin
•AutomationAdmin
•Owner
Global User Roles
•GlobalReadOnly
•GlobalUserAdmin
•GlobalMonitoringAdmin
•GlobalBackupAdmin
•GlobalAutomationAdmin
•GlobalOwner
13.5 Lab: Install Ops Manager
Learning Objectives
Upon completing this exercise students should understand:
•ThecomponentsneededforOpsManager
•HowtosuccessfullyinstallOpsMananger
211

Install Ops Manager
ALinuxmachinewithatleast15GBofRAMisrequired
Install Ops Manager
We will follow an outline of the installation instructions here:
https://docs.opsmanager.mongodb.com/current/tutorial/install-basic-deployment/
Exercise #1
Prepare your environment for running all Ops Manager components: Monitoring, Automation, and Backups
•Setupa3nodereplicasetfortheOpsManagerapplicationdatabase (2 data bearing nodes, 1 arbiter)
•Setupa3nodereplicasetforOpsManagerbackups(2databearing nodes, 1 arbiter)
•Verifybothreplicasetshavebeeninstalledandconfiguredcorrectly
Exercise #2
Install the Ops Manager application
•OpsManagerapplicationrequiresalicenseforcommercialuse
•DownloadtheOpsmanagerapplication(aftercompletingform): http://www.mongodb.com/download
•Installationinstructions(fromabove):docs.opsmanager.mongodb.com
•VerifyOpsManagerisrunningsuccessfully
Exercise #3
Install the Ops Manager Backup Daemon
•TheOpsManagerbackupdaemonisrequiredforusingOpsManager for backups
•Downloadandinstallthebackupdaemon(usingthelinkfromthe past exercise)
•Verifytheinstallationwassuccessfulbylookingatthelogs in: <install_dir>/logs
212

Exercise #4
Verify t h e O p s M a n a g e r i n s talla t i o n was s u c c e s s f u l :
https://docs.opsmanager.mongodb.com/current/tutorial/test-new-deployment/
Exercise #5
Use Ops Manager to backup a test cluster:
•Createa1nodereplicasetviaOpsManagerautomation
•Addsampledatatothereplicaset:
>for (var i=0;i<10000;i++) { db.blog.insert( { "name" :i})}
WriteResult({ "nInserted" :1})
>db.blog.count()
10000
•UseOpsManagertobackupthetestcluster
•PerformarestoreviaOpsManagerofthetestcluster
213

14 Introduction to MongoDB BI Connector
MongoDB Connector for BI (page 214) An introduction to MongoDB Connector for BI
14.1 MongoDB Connector for BI
Learning Objectives
Upon completing this module students should understand:
•ThedifferenttoolsincludedintheMongoDBBIConnectorpackage
•ThedifferentconfigurationfilesrequiredbytheBIConnector
•ThesupportedSQLstatementsversion
•Howtolaunchmongosqld
•RunSQLstatementsinaMongoDBserverinstance
MongoDB BI Connector: Introduction
MongoDB Connector for BI enables the execution of SQL statements in a MongoDB server.
It’s a native connector implementation that enables Business Intelligence tools to read data from a MongoDB server.
How it works
The MongoDB Connector for BI executes in the following mode:
•GeneratesaDocument-RelationalDefinitionLanguage(DRDL) file that defines a map between a given collec-
tion shape to a relational schema
•Oncethedrdl file is generate, BI tools are able to request the correspondant relational sql and express queries
•AfterreceivingandprocessingaSQLstatement,providesback results in tabular format, native to BI Tools.
•TheBIconnectoralsofunctionsasapass-throughauthentication proxy.
214

BI Connector Package
BI Connector is a composite of the connector daemon and a schema definition utility.
•mongosqld :Runsasaserverdaemon and responds to incoming SQL queries
•mongodrdl:Utilitythatgeneratesdrdl files from the databases and colletions in MongoDB
The mongodrdl
mongodrdl generates a Document-Relation Definition Language file.
•Thedrdl file is a mapping between a given collection(s) shape and it’s corresponding relational schema
schema:
- db: <database name>
tables:
- table: <SQL table name>
collection: <MongoDB collection name>
pipeline:
- <optional pipeline elements>
columns:
- Name: <MongoDB field name>
MongoType: <MongoDB field type>
SqlName: <mapped SQL column name>
SqlType: <mapped SQL column type>
mongodrdl Example
To generate a drdl file we need to connect mongodrdl to a MongoDB instance:
mongodrdl -d training -c zips --host localhost:27017
cat zips.drdl
schema:
- db: training
tables:
- table: zips
collection: zips
pipeline: []
columns:
- Name: _id
MongoType: bson.ObjectId
SqlName: _id
SqlType: varchar
...
215
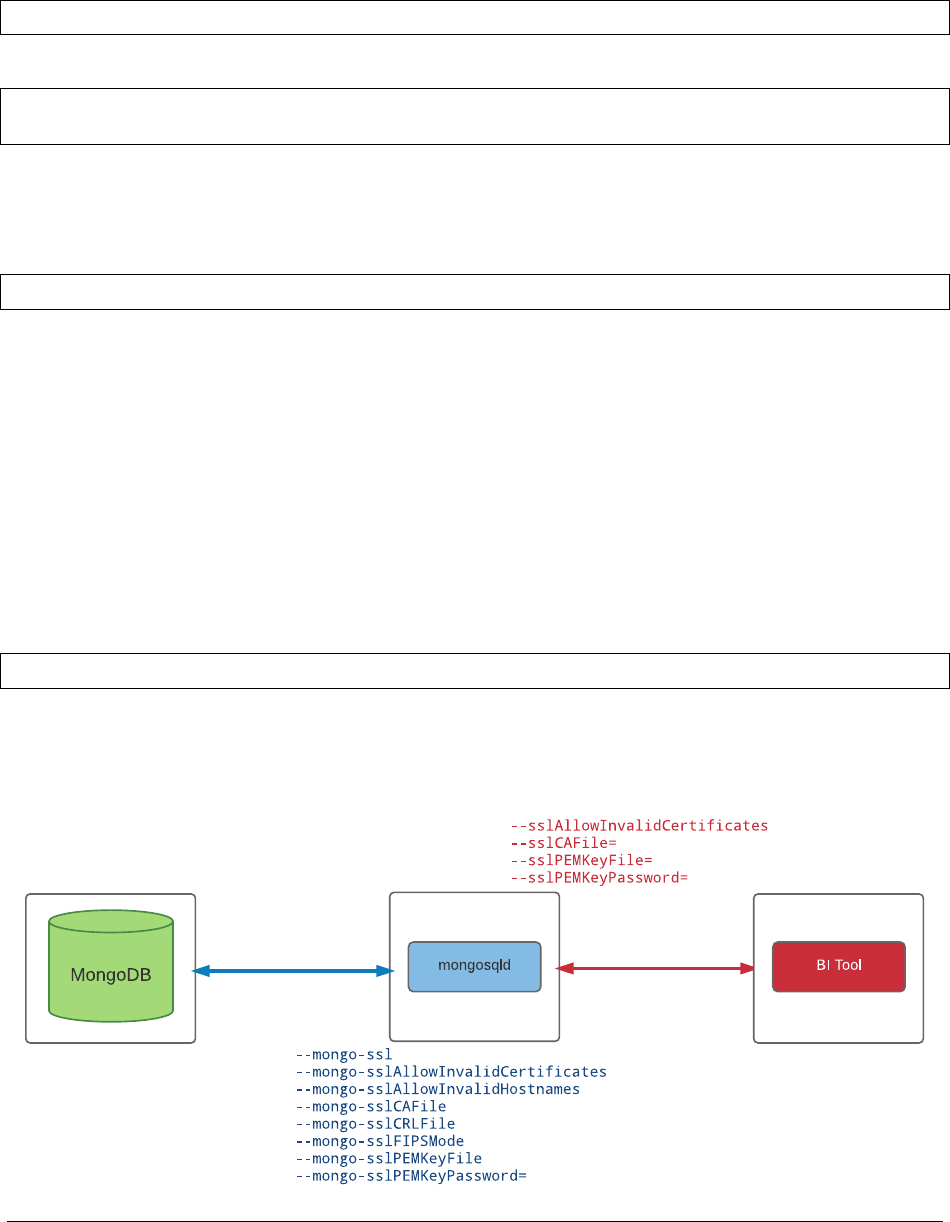
Custom Filtering
mongodrdl allows you to define a --customFilter field in case we need to express MongoDB native queries
from within our SQL query expression.
mongodrdl -c zips -d training -o zips.drdl --customFilterField "mongoqueryfield"
For example, executing a geospatial query:
SELECT *FROM zips
WHERE mongoqueryfield ="{’loc’: {’$geoNear’: [30, 48, 100]}}"
mongosqld Daemon
mongosqld runs as a server daemon and responds to incoming SQL queries.
mongosqld --mongo-uri mongodb://localhost:27017 --schema zips.drdl
•Bydefaultmongosqld will be listening for incoming requests on 127.0.0.1:3307
mongosqld Authentication & Authorization
The BI Connector offers integration for three different authentication mechanisms:
• SCRAM-SHA-1
• MONGODB-CR
•PLAIN(LDAP Authentication)
And external LDAP Authorization:
•requiresdefiningthesource attribute in the user name string
grace?mechanism=PLAIN&source=$external
mongosqld Encryption
BI Connector supports network encrytpion on all segments of the connection.
216

SQL Compatibalility
•BIConnectorversion2.0iscompatiblewith
SQL-99 SELECT32 statements
•UsesMySQLwireprotocol
mysql --protocol tcp --port 3307
•ThismeanswecanuseaSQLclientlikemysql to query data on MongoDB
use training;
SELECT *FROM zips;
32 https://docs.mongodb.com/bi-connector/master/supported-operations/
217

Find out more
mongodb.com | mongodb.org
university.mongodb.com
Having trouble?
File a JIRA ticket:
jira.mongodb.org
Follow us on twitter
@MongoDBInc
@MongoDB
