Morserino 32 Manual
User Manual:
Open the PDF directly: View PDF ![]() .
.
Page Count: 27
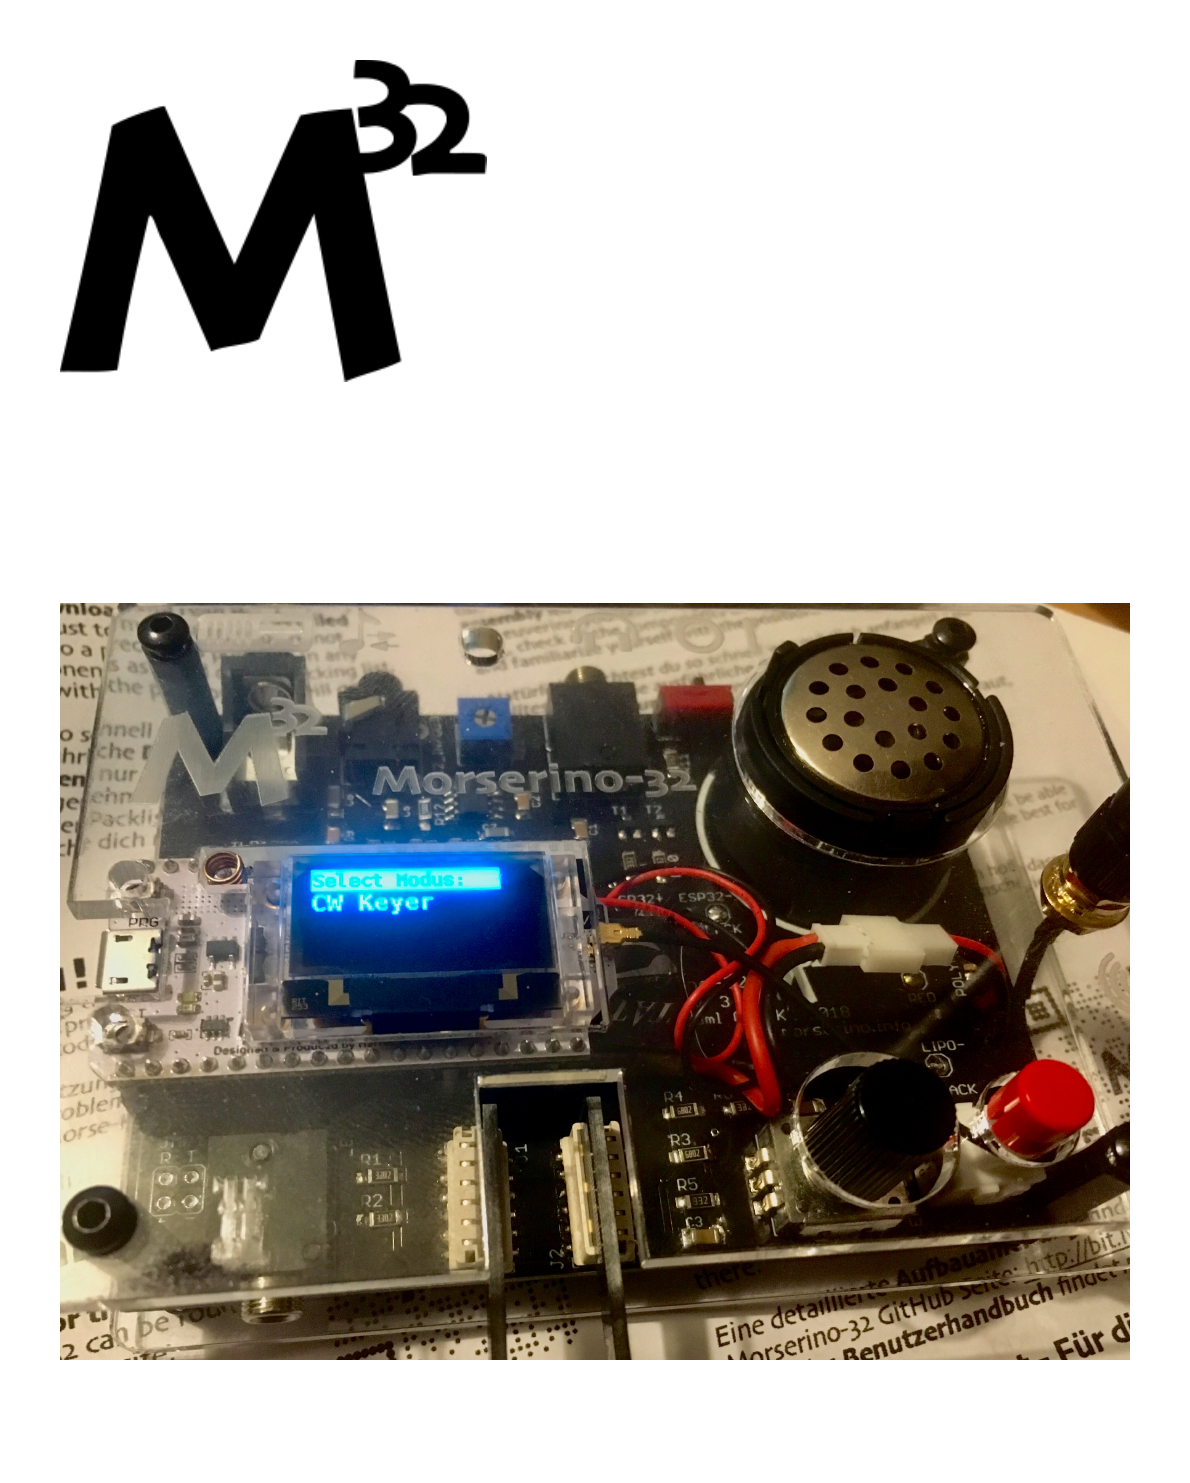
Morserino-32 User Manual
A multi-functional Morse Code Device, perfect for Learning and Training
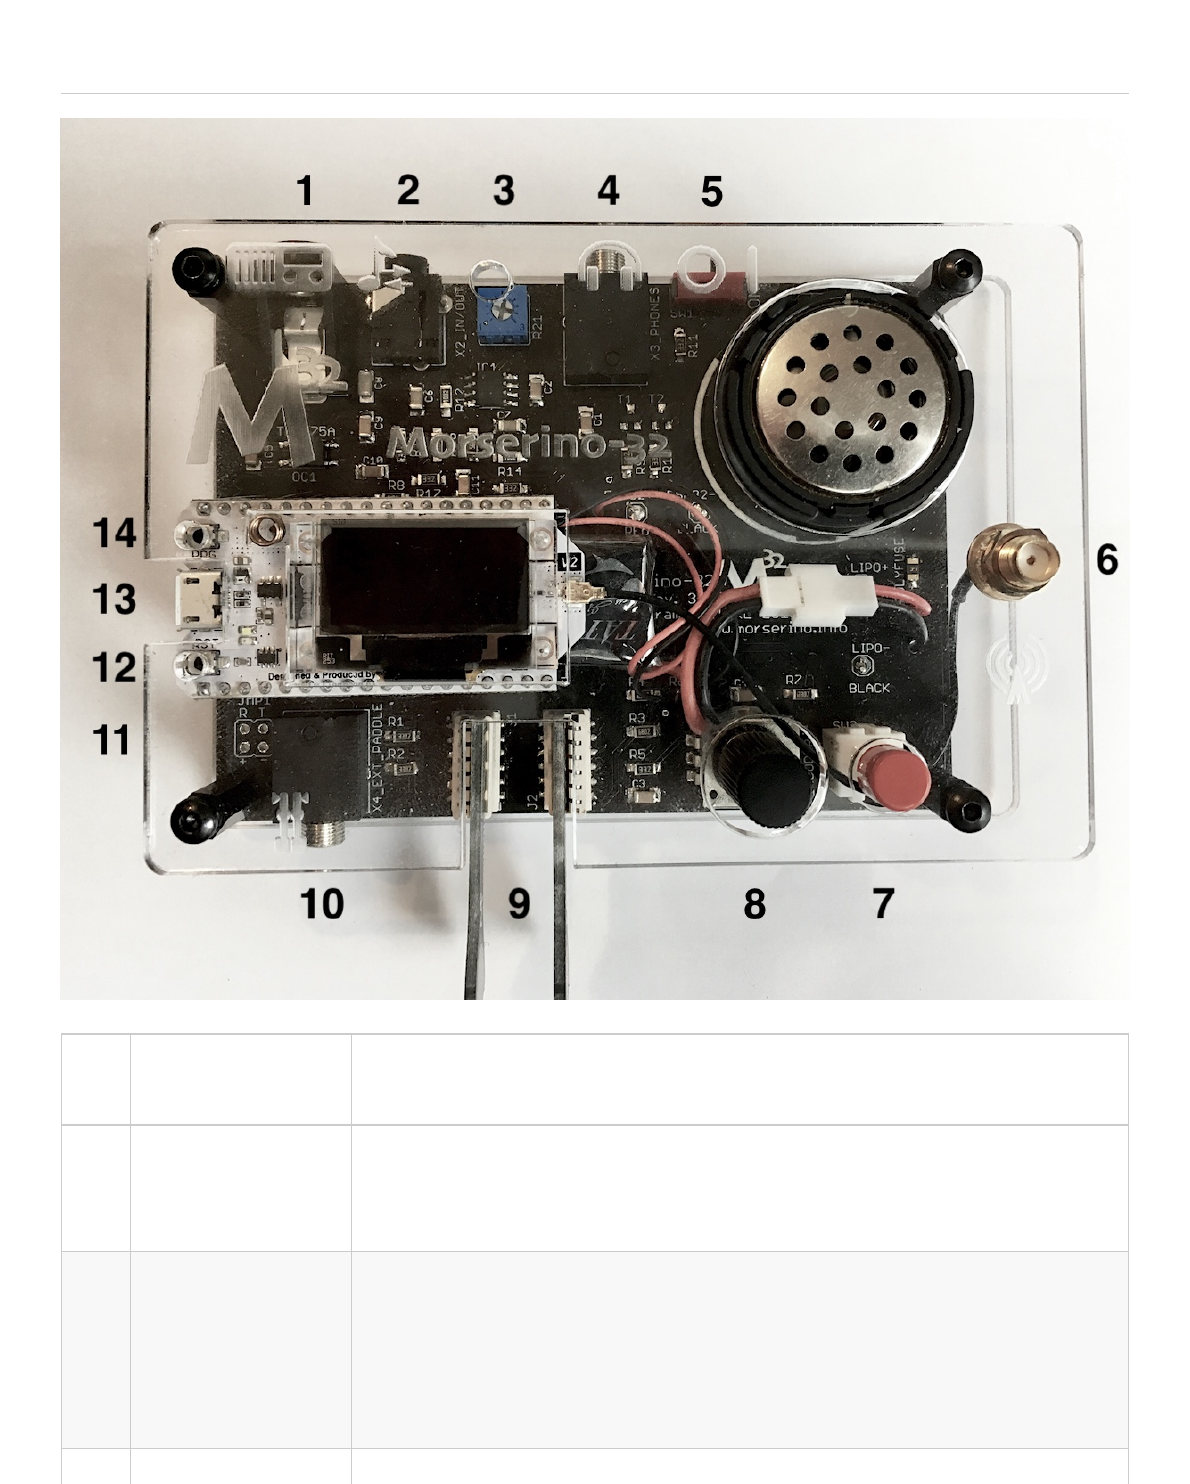
#Connector /
Control Usage
1
3.5mm Phone
Jack (2 poles): to
TX
Connect this to your transmitter or transceiver if you would like to key
them with this device.
2
3.5mm Phone
Jack (4 poles):
Audio In / Line
Out
Audio input for the CW decoder; connect the audio output of a receiver
for decoding CW signals. Audio output (pretty close to a pure sine wave)
that is not influenced by setting the loudspeaker volume. The
assignments to the jack are as follows: Tip and 1st ring - audio in; 2nd
ring: ground; sleeve: audio out.
Connectors and Controls

3 Audio Input level Adjust audio input level with the help of this potentiometer; there is a
special function to help with level adjustment, see section "Start Menu"
(towards the end of the section).
4
3.5 mm Phone
Jack (3 poles):
Headphones
Connect your headphones (any stereo headphones with standard phone
jacks from mobile phones should work) here to listen through
headphones and switch off the speaker. You cannot attach a loudspeaker
directly to this jack without providing some interface (headphone out
needs a DC connection to ground through 50 - 300 Ohms.)
5 Power Switch
Connect / disconnect the LiPo battery from the device. For frequent use
of the Morserino-32 you can leave the battery connected. If you will not
use the device for several days, disconnect the battery as otherwise it will
be slowly discharged.
6
SMA female
Antenna
Connector
Connect a 430 MHz antenna for LoRa operation. Do not transmit LoRa
without an antenna!
7
RED
(Power/Vol/Scroll)
Button
When the device is shut off (but with the battery connected, i.e. in deep
sleep), this wakes up and restarts your device. When the device is up and
running, a short press of this button swaps the rotary encoder between
adjusting the keyer speed and volume control. A long press of the button
allows you to scroll the display with the rotary encoder, pressing the
button again changes the function back to speed control. While in the
menu, a long press starts the mode to adjust audio input level, and a
quick triple click brings up the Wifi functions. See below for further details.
8BLACK Rotary
Encoder
Used to make your selection within menus, to adjust speed, volume, or
scroll the display, and to set various parameters and options. Can be
rotated and is also a push-button switch.
9Connectors for
touch paddles
These PCB connectors accept the capacitive touch paddles. if you are
only using an external paddle (or for transport), you may remove the
touch paddles.
10
3.5 mm Phone
Jack (3 poles):
External Paddle
Use this to connect either an external (mechanical) paddle (tip is left
paddle, ring is right paddle, sleeve is ground), or a straight key (tip is the
key). With a straight key you can use the CW decoder to monitor the
quality of you fist!
11 Serial Interface
You can connect a cable (directly or through a 4-pole pinhead connector)
to an external serial device, e.g. a GPS receiver module (this is currently
not supported by software, but not very difficult to do). The 4 poles are T
(Transmit), R (Receive), + and - (3.3V power from the Heltec module).

12 Reset Button Through a small hole you can reach the Reset button of the Heltec
module (rarely needed).
13 USB
Use a normal 5V USB Charger to power the device and charge its LiPo
Battery. The microcontroller firmware can also be reprogrammed through
USB (although you can update the Morserino-32 firmware also through a
WiFi connection).
14 PRG Button Through a small hole you can reach the Programming Button of the
Heltec module (normally not needed).

If you want to use the devie with USB power, just plug a USB cabel in from virtually any USB charger (it
consumes a max of 200 mA, so any 5V charger will do).
If you run it from battery power, slide the sliding switch to the ON position.
When the device is off but with the battery connected (sliding power switch is on), it is in deep sleep in
reality: almost all functions of the microcontroller are turned off, and power consumption is minimal (less
than 5% of normal operation).
To turn the device on from deep sleep, just press the RED (Power/Vol/Scroll) button momentarily. You will
see a start screen for a couple of seconds. The only interesting bit of the start screen is at its very bottom:
you will see an indication of how much battery power is still left. If this goes way towards empty, you should
connect your device to a USB power source. (The battery will be drained even if you never turn the device
on - although this is rather minimal in its deep sleep status, a full battery will be empty after a couple of
days. Therrefore, if you intend not to use the Morserino for a longer period of time, disconnect the battery
from the device using the slider switch at the back...)
If the battery voltage is dangerously low when you attempt to turn it on, an empty battery symbol will show
on the scren and the device will refuse to boot up. if you see this symbol, you should begin charging your
battery as soon as possible.
To disconnect the device from the battery (turning it off, unless you are USB powered), slide the sliding
switch to the OFF position.
To put the device into deep sleep, you have two options:
In the main menu, select the option "Go To Sleep"
Do nothing. After 5 minutes of screen inactivity (7.5 minutes when in a transceiver mode) the device
will power itself off and go into deep sleep.
To charge the battery, connect it with a USB cable to a reliable USB 5V power source, like your computer,
or a USB charger like your phone charger.
Make sure the hardware switch of the device is ON while charging - if you disconnect the battery
through the switch, the battery cannot be charged. When charging, the orange LED on the ESP32
module is lit brightly. When the battery is disconnected, this LED will not be lit brightly, but rather be blinking
nervously or half lit.
Once the battery has been fully charged, the orange LED will not be lit anymore.
You can of course always use the device when it is powered by USB, if the battery is charging or not.
Powering On and Off / Charging the Battery

To prevent deep discharging of the LiPo battery, always turn the Morserino-32 off via the main slide
switch. Do not leave it in 'sleep mode' for long periods of time (up to a day or maybe two is ok, if it was
well charged; a fully charged 600 mAh battery will be discharged to the level of about 3.2 V within 3 to 4
days during deep sleep).
The Heltec module has electronics on board for charging the battery, and it it prevents overcharging quite
well. But it has no prevention of deep discharge! Deep discharge leads to diminished battery capacity
and eventually early death of the battery!
Selections of the various modes, and setting all sorts of parameters is being done using the rotary encoder
and its BLACK button. Rotating the encoder leads you through the options or values, clicking the button
once selects an option or a value, or brings you to the next level of the menu (there are up to three levels in
the menu), and a long press exits the current state and promotes you a level up.
A double click of the BLACK knob brings you to the parameter setting menu. If you do this from the menu,
all parameters can be changed. If done from within a modus, only the parameters that are relevant for the
current modus are being shown and can be changed.
A long press brings you back to the menu from any of the modi, and within the menu promotes you a level
up.
The additional RED (Power/Vol/Scroll) Button allows you to quickly toggle between speed control and
volume control with a single click.
A long click changes the display and encoder into scroll mode (the display has a buffer of 15 lines, and
normally only the bottom three lines can be seen; in scroll mode you can scroll back to the previous lines;
while you are in scroll mode, a scroll bar is shown at the far right side of the display, indicating roughly
where you are within the 15 lines of text buffer). Clicking again in scroll mode changes the screen into its
normal operating mode and brings the encoder back to speed control.
While you are selecting a menu (e.g. immediately after power-on), the RED button has some extra
functionalities - see the section Start Menu for further details:
A long press of the RED button starts a function to adjust the audio input level (and possible the output
level on a device you connected to the Morserino-32's line-out port).
A triple click of the RED button brings up the menu for the WiFi functions. WiFi is not always on, as it used
only for two specific purposes:
To upload a text file for the Morse code player
Using the Rotary Encoder, its BLACK Button, and the RED
Power/Vol/Scroll Button

To update the firmware of the Morserino-32 to the latest and greatest version. This is similar to the file
upload, but instead you point it to the compiled binary file containing the firmware (you can get the
firmware through the Morserino-32 github repository).
A third function allows you to tell the Morserino the SSID and password four your WiFi network (which
needs to be done before you can connect your Morserino-32 to your WiFi network).
All WiFi functions end with the Morserino32 re-booting after these functions have been performed.
The display is divided into two main sections: on top is the status line, that gives important information
according to the current state of the device, and below is an area of three scrolling lines where the
generated Morse code characters are shown in clear text. All characerts from Morse code are shown in
lower case, for better readability; Pro signs are shown as letters in brackets, like <ka> or <sk> . In
addition, when in Echo Trainer modus (see below), the result of your attempt to enter the correct Morse
code is shown as ERR or OK (together with some audible signals).
Although only three lines of scrolling text are shown, there is internally a buffer of 15 lines -- after a long
press of the RED (Vol/Scroll) button you can use the encoder to scroll back and make the previous lines
visible again. This also works while you are in any of the modi and screen output is being generated -
nothing is lost and the display reverts to its normal behaviour once you leave the scroll mode.
While you are presented a menu (either the start menu, or a menu to select preferences), the status line
tells you what to do (Select Modus or Set Preferences:).
When in Keyer Modus, CW Generator Modus or Echo Trainer Modus, the status line shows the following,
from left to right:
A T or an X, meaning the device uses the Touch paddles or EXternal paddles (selectable by entering
the preferences menu).
A,B or U, indicating the automatic keyer mode: Iambic A, Iambic B, or Ultimatic (for details on these
modi see below).
The currently set speed in words per minute. In CW Keyer modus as nnWpM, in CW Generator or
Echo Trainer modus as (nn)nnWpM. The value in brackets shows the effective speed, which differs
when inter-word spacing or inter-character spacing are set to other values than those defined by the
norm (length of 3 dits for inter-character spacing, and length of 7 dits for inter-word spacing). See the
notes below regarding the parameters you can set in CW Generator modus.
When in a transceiver modus, you also see two values for speed - the one in brackets is the speed of
the signal received, the other one the speed of your keyer.
The Display
The Status Line

When the digits indicating the speed are shown as bold, turning the rotary encoder will change the
speed. When they are shown in normal characters, turning the rotary encoder changes the volume.
A horizontal "progress" bar that extends from left to right indicates the volume of the side tone
generated by the device (full length of the bar means top volume). This normally shows a white frame
around the black progress bar (an extension of the rest of the status line); if this is reversed (white
progress bar within black surroundings - and the WpM digits are not bold), turning the rotary encoder
will change the volume.
On the very right hand end of the status line there will be an indicator (showing concentric half-circles)
symbolizing radio transmission whenever the LoRA modus is active (if the Morserino-32 is in LoRa
Transceiver mode, or you have set a parameter to transmit LoRa while in one of the CW generator
modi).
The Start Menu gives you a selection of the modi you can use; it is a multi-level menu (up to three levels
deep). The top level is always displayed on the top line, the second level on the 2nd line and the third level
on the 3rd line underneath the status line. The current selection in the current menu level is displayed in
bold. When you are in top or second level, and there exists a sub-menu a level down, you will see two dots
(..) on the line below the current entry.
Here are the various selections you can choose from the Start Menu (more detailed information can be
found further down):
1. CW Keyer. This is an automatic keyer that supports Iambic A, Iambic B, and Ultimatic mode.
2. CW Generator. This either generates randomized characters and words for CW training purposes, or
plays the contents of a text file in Morse code. You can set a number of options by choosing
appropriate parameters (see the section on Parameters below). An interesting option for training
purposes is the word double option, which plays any word (or group of charcaters, all signs etc) twice.
You can choose between the following at level 2:
Random: Generates groups of random characters. The length of the groups as well as the choice
of characters can be selected in the parameters, by double clicking the black rotary knob (see the
description of parameters for details).
CW Abbrevs: Random abbreviations that are very common in CW transmissions (through a
parameter setting you can choose the maximum length of the abbreviations you want to train).
English Words: Random words from a list of the 200 most common words in the English
language (again you can set a maximum length through a parameter).
Call Signs: Generates random strings that have the structure and appearance of amateur radio
call signs (these are not real call signs, and there will be some generated that could not exits in
the real world, as either the prefix is not in use or a country's administration would not hand out
certain suffixes). The maximum length can be selected through a parameter.
Start Menu

Mixed: Selects randomly from the previous possibilities (random character groups, abbreviations,
English words and call signs).
File Player: Plays the content of file in Morse code, that has been uploaded to the Morserino-32.
Currently it can hold just one file, as soon as you upload a new one, the old one weill be
overwritten. Upload works through WiFi from your PC (or Mac or tablet or smartphone or
whatever). This modus remembers where you stopped, and will continue there the next time you
restart the File Player. Once the end of the file is reached, it will commence at the beginning
again. The file should contain ASCII characters only (upper or lower case does not matter) -
characters that cannot be represented in Morse code are just ignored. Pro signs can be in the file,
they need to be written as 2 character represenations with either [] oder <>, e.g. <sk> or
[ka] . The following pro signs are recognized:
<ar> : will be shown on display as +
<bt> : will be shown on display as =
<as>
<ka>
<kn>
<sk>
<ve>
There is a new parameter for file player: „Randomize File“. If set to „On“ (default is „Off“), the
device will skip n words after each word sent (n = random number between 0 and 255); as file
reads wrap around at end-of-file, you will see all the words in the file eventually (but it could take a
while). If your file is for example an alphabetical word list, words generated will still be in
alphabetical order during one pass of the file; so to get more unpredictable results, it will be best
to start with a random list of words. What can this be used for? You could for example take a list
of call signs and upload this file to the Morserino-32 (Google for supercheckpartial to get files with
calls that actually have been active in HF contests). Now File Player lets you train these call signs
in a random fashion.
You can start and stop the CW generator by quickly pressing a paddle, or by pushing the BLACK knob.
3. Echo Trainer. Here the Morserino-32 generates a word (which is a basically a series of characters,
with the possibilities as in the CW generator), and then waits for you to repeat these characters using
the paddle. If you wait too long, or if you response is not identical to what has been generated, an error
is indicated (on display and acoustically), and the prompt word is being repeated. If you keyed the
correct characters, this is also indicated acoustically and on screen, and you are prompted for the next
word.
The sub-menus are the same as for the CW Generator: Random, CW Abbrevs, English Words, Call
Signs, Mixed and File Player.
Again, like with the CW Generator, you can set a huge range of parameters to fine tune the generation
of things.

You can start the Echo Trainer by pressing a paddle or pushing the BLACK knob, and stop it again by
pressing the BLACK knob.
4. Koch Trainer. This contains a complete set of functionalities to learn Morse code according to the
Koch method, learning and training one character after the other. This is a three level menu, structured
as follows:
Select Lesson: Select a "Koch lesson" between 1 and 50 (you will learn 50 characters in total
through the Koch method). The number of the lesson and the character associated with that
lesson will be displayed in the menu.
Learn New Chr: Selecting this the new character will be introduced - you will hear the sound, and
see the sequence of dots and dashes quickly on the screen, as well as the character displayed on
the screen. This will be repeated until you stop by pressing the BLACK knob. After each
occurence you have the opportunity to repeat with the paddles what you have heard, and the
device will let you know if this was correct or not.
CW Generator: This generates randomized characters and words for CW training purposes,
using only the characters you have learned so far (as determined by the Koch lesson that had
been selected). You can choose between the following at level 3:
Random: Generates groups of random characters. The length of the groups can be selected
in the parameters, by double clicking the black rotary knob (see the description of
parameters for details).
CW Abbrevs: Random abbreviations that are very common in CW transmissions (but only
using the letters you have learned so far - so you should start doing this once you have
reached lesson 2 or 3, and even then the number of abbreviations generated will be very
limited, of course); through a parameter setting you can choose the maximum length of the
abbreviations you want to train).
English Words: Random words from a list of the 200 most common words in the English
language (again you can set a maximum length through a parameter, and only words
containing letters already learnt will be shown).
Mixed: Selects randomly from the previous possibilities (random character groups,
abbreviations, and English words).
Echo Trainer: Here the device generates a word, and then waits for you to repeat these
characters using the paddle. If you wait too long, or if you response is not identical to what has
been generated, an error is indicated (on display and acoustically), and the prompt word is being
repeated. If you keyed the correct characters, this is also indicated acoustically and on screen,
and you are prompted for the next word.
The sub-menus are the same as for the CW Generator in Koch mode: Random, CW Abbrevs,
English Words and Mixed.
5. Transceiver. Here you have two items in the corresponding sub-menu:

LoRa Trx: This is a Morse code transceiver, using LoRa in the 70cm ISM band. In addition to the
functionality of the CW keyer, this sends out whatever you key through the LoRa transceiver
(using a special data format that encodes the dots and dashes you keyed, regardless if these are
legal Morse code characters or not), and it listens on the band when you are not keying; therefore
you can really have an interactive conversation in Morse code betweem tow or more Morserino-
32 devices! Please be aware that characters are being transmitted word by word, therefore there
is a little delay on the receiving end - QSK is therefore not possible. It encourages you to use
proper hand-over procedures!
iCW/Ext Trx: In this (still somewhat experimental) modus a transceiver connected to the
Morserino-32 is being keyed, or you can use the line-out audio to either key for example an FM
transceiver, or use CW over the Internet (iCW - this uses Mumble as an audio exchange protocol).
Any CW signals coming in as audio through the audio in port are being decoded and displayed on
the screen.
6. CW Decoder. In this modus, Morse code characters are being decoded and shown on the screen. The
Morse code can either be entered via a Morse key ("straight key" - connected to the jack where you
would normally connect an external paddle; you can also use one of the touch paddles to manually key
the decoder). Using the decode in this way, you can control and improve your keying with a straight
key, by checking, if the decode decodes correctly what you tried to send.
You can also decode a tone input (at the audio input port) taken for example from a receiver. The tone
should be at around 700 Hz. Optionally there is a pretty sharp filter (implemented in software) that
detects just tones in a very narrow range around 700 Hz, and disregards all others. This is being used
by selecting the Parameter "Narrow" (see the section on Morserino-32 parameters).
7. Go to Sleep. This shuts off the device (or to be more precise, it puts the device into "deep sleep", so
that it draws very little current, and the battery should survive for a few days). To bring the device "back
to life", just press the RED Power/Vol/Scroll button. If you plan to not use your Morserino-32 for
several days, you should disconnect the battery using the sliding switch on the back, to avoid deep
discharge of the LiPo battery.
You can also reach some other functions while you are positioned within the Start Menu - not through a
menu selection, but through either a long press on the RED button, or double clicking the RED button:
Long press of the RED button: This starts a function to adjust the audio input level: make sure a tone
signal is on input, and a bar graph will indicate the voltage of the input signal. Adjust it with the blue
trimmer potentiometer, so that the left and right ends of the solid bar are within the two outer
rectangles. At the same time, a sinus signal is output on line-out, and the transceiver output is
shortened (keying a transmitter, should you have it connected to one).
A simple test or demo for the audio-in adjustment is to connect line-out with audio in, feeding the
output sine wave into the audio input. You can see the solid bar graph changing when you turn the
potentiometer, leaving just a tiny solid bar in the middle and exposing the two rectangles on both ends
of the graph at one end of the potentiomenter range (essentially you are just measuring the noise on

the operation amplifiers input), and with the solid bar graph extending beyond the rectangles on both
ends on the other end of the potentiometer sweep. Now you can set the potentiometer so that the solid
bar is almost touching the outer bounds of the rectangles. This is the optimal setting for the audio in
level. Obviously you have to perform this for the audio source you are planning to use, e.g. for your
radio receiver.
Triple click of the RED button: This brings up the menu for the WiFi functions (see further down for a
more detailed description). WiFi is not always on, as it used only for two specific purposes:
To upload a text file for the Morse code player (currently only one text file can be uploaded,
uploading a new file overwrites any file that has been uploaded previously). In this mode the
Morserino-32 connects to your local WiFi network and starts a simple web server.
To update the firmware of the Morserino-32 to the latest and greatest version. This is similar to
the file upload, but instead you point it to the compiled binary file containing the firmware (you can
get the firmware through the Morserino-32 github repository).
WiFi configuration: A third function allows you to tell the Morserino the SSID and password four
your WiFi network (otherwise it would not be able to connect to your network). For this the
Morserino-32 starts as an access point, providing its own network (with SSID "morserino"). You
need to connect your computer to that network (no password is required) and point a browser to
m32.local. A simple form will appear that allows you to enter the SSID and the password for you
WiFi network.
All WiFi functions end with the Morserino32 re-booting after these functions have been performed.
When you use one of these modi, the top line (status line) gives the following information (from left to right):
E or T: The paddle that is currently in use, either an External (mechanical) paddle, or the built-in Touch
paddle.
A or B or U: The automatic keyer mode, either Iambic A (Curtis A) mode, Iambic B (Curtis B mode) or
Ultimatic mode.
The speed in wpm (words per minute).
The audio volume, indicated by a graphical bar.
If you set the option to transmit with LoRa (see the parameter section), a small symbol for radio
waves is displayed on the right end of the status line.
A single click with the encoder button toggles the mode of the encoder between setting the keyer speed and
setting the audio volume. Keyer speed is in words per minute (the reference word is the word PARIS, which
also means that 1 wpm equals 5 characters per minute.
Using the Modi "CW Keyer", "CW Generator" and "Echo Trainer"

Other parameters can be set by double click of the encoder button, which provides you with a menu of
parameters (see the section on Parameters).
Some specifics for each of these modi:
In CW Keyer modus, you just use the built-in capacitive touch paddles or the external paddles to
generate morse code.
In CW Generator modus, the device will generate random groups of morse characters for you to
decode. Once you selected this mode, you can start and stop the generation of morse code by
pressing the paddle (you can press just one side or squeeze both).
When it starts the first time after selection from the top menu, it will first alert you by generating
"vvv<ka> " ( ..._ ..._ ..._ _._._ ) in Morse code, before it actually begins generating the
random groups.
In Echo Trainer modus, the device will generate a group of characters (in other words, a word) and
then wait for you to key in the same word. If you wait too long, or if the response is not correct, the
word will be repeated, until you get it right.
In this modus, it will not be shown on the display, what the generated prompt word is -- only your
response is shown.
Like in CW Trainer modus, you start the generation by pressing a paddle, and then the sequence
"vvv<ka> " will be generated as an alert before the echo training starts. You cannot stop or interrupt
this modus by pressing the paddle -- after all, you use the paddle to generate your responses! So the
only way to stop this modus is a ckick of the BLACK encoder button.
For Echo Trainer modi there is a special parameter that should help you to train for maximum speed,
called Adaptv. Speed (adaptive speed; see the section on Parameters). Whenever your response was
correct, the speed will be increased by 1 word per minute; whenever you make a mistake, it will
decrease by 1. Thus you will eventually always train at your limit, which certainly is the best way to
push your limits...
The German psychologist Koch developed a method for learning Morse code (in the 1930s), by which each
lesson adds an additional character. The order is neither alphabetical, nor sorted by the length of the Morse
codes, but follows a certin rhythmical pattern, so that the individual characters are learned as rhythm, and
not as a succession of dits and dahs.
In order to prevent counting dits and dahs, or thinking of and reconstructing what you heard, the speed
should be sufficiently high (min. 18 wpm), pauses between characters and words should not be lengthened
enormously (and it is always better to just lengthen the pauses between words, and keep the inter-
character spaces to more or less the normal space). With our device you can set interword space
Koch Method

independently from intercharacter space, so you can find a setting that perfectly fits your needs.
The order of the characters learned has not been strictly defined by Koch, and therefore different learning
courses use slightly different orders. Here we use the same order of characters as defined by the
"SuperMorse" software package (see http://www.qsl.net/kb5wck/super.html), which is also used by the "CW
Schule Graz". The order is as follows:
Lesson 1: m
Lesson 2: k
Lesson 3: r
Lesson 4: s
Lesson 5: u
Lesson 6: a
Lesson 7: p
Lesson 8: t
Lesson 9: l
Lesson 10: o
Lesson 11: w
Lesson 12: i
Lesson 13: . (dot)
Lesson 14: n
Lesson 15: j
Lesson 16: e
Lesson 17: f
Lesson 18: 0 (zero)
Lesson 19: y
Lesson 20: v
Lesson 21: , (comma)
Lesson 22: g
Lesson 23: 5
Lesson 24: /
Lesson 25: q
Lesson 26: 9
Lesson 27: z
Lesson 28: h
Lesson 29: 3
Lesson 30: 8
Lesson 31: b
Lesson 32: ?
Lesson 33: 4
Lesson 34: 2
Lesson 35: 7

Lesson 36: c
Lesson 37: 1
Lesson 38: d
Lesson 39: 6
Lesson 40: x
Lesson 41: - (minus)
Lesson 42: =
Lesson 43: SK (Pro Sign)
Lesson 44: KA (Pro Sign)
Lesson 45: AR (Pro Sign, equals +)
Lesson 46: AS (Pro Sign)
Lesson 47: KN (Pro Sign)
Lesson 48: VE (Pro Sign)
Lesson 49: @
Lesson 50: : (Colon)
Should you want to use the Koch method for learning Morse code, you will find everything you need in
the Menu item "Koch Trainer". It has a submenu to enter the lesson you want to add, one to practice just
this one new letter (using the echo trainer modus, so you are encouraged to repeat what you hear), and the
modi "CW Generator" and "Echo Trainer", each of the last two with the submenus for "Random" (groups of
random characters out of the so far encountered characters), "CW Abbrevs" (the abbreviations usually used
in CW QSOs), "English words" (the most common English words) and "Mixed" (random groups,
abbreviations and words mixed randomly). Of course, only the already learned characters will be used -
which means, that while you are still struggling with your first characters, the number of abbreviations and
words will be quite limited).
Basically, this uses the same interface as the CW Keyer. But as soon as you receive something, the status
line also shows the speed of the sending station in addition to your own speed - you see something like
18r20sWpM, which indicates you are receiving a station with a speed of 18 Wpm, and you are sending at
20 WpM. In addition, the volume bar on the right of the status line changes its function: instead of indicating
the current volume level, it gives you an indication of the signal strength - a crude form of an S-Meter, if you
like. the full bar indicates an RSSI level of roughly -20dB, and the bar begins to show at a level of roughly
-150dB.
Pressing the RED Pwr/Vol/Scroll Button still enables you to set the audio level.
Morse characters received by the transceiver are shown in bold in the (scrollable) text area on the display,
while everything you are sending is shown in regular characters.
Another feature is worth mentioning here: The frequency of the tone you are hearing when you are
receiving the other station is adjusted through the "Pitch" parameter, as in the other modi. The pitch of the
Using the Modus "LoRa Trx"

tone when you are sending can be the same, or a half tone higher or lower then the receiving tone - this is
being set through the Tone Shift parameter, in the same way as in Echo Trainer modus.
One other thing you might want to know: the LoRa CW Transceiver does not work like a CW transceiver on
shortwave, where an unmodulated carrier is being keyed, and the delay between sender and receiver is just
defined by the delay in the path of the electromagnetic waves carrying the signals. LoRa uses a spread
spectrum technology to send data packets - in a way a bit similar to WiFi that you use on your phone or PC.
Therefore all you are keying in is being encoded into data first - esentially the speed and all the dots,
dashes and pauses between characters. As soon as the pause is long enough to be recognized as a pause
between words (as a blank space, as it were), the whole data packet assembled so far is being transmitted
and in due course being played back at the indicated speed by the receiving Morserino-32.
When morse code is packed into a LoRa data packet, dots, dashes and pasues are encoded; it is not so
that the clear text would be sent as ASCII cgaracters. Therefore it is possible to send "illegal" morse code
characters, or characters that might only be used in certain languages. They will be transmitted correctly
(but shown on the display as non-decodable)-
Sending the code word by word means there is a significant delay between sender and receiver, and the
delay depends to a large degree on the length of the words being sent, and on the speed that is being
used. As most words in a typical CW conversation are rather short (7 characters or more already
constitutes a very long word), this is nothing to worry about (unless you are sitting both in the same room
using no headphones - then it will be really confusing). But try sending really long words, say 10 or more
character long, at really low speed (5 WpM), and you will see what I am talking about!
The status line is slightly different from the other modi. First of all, the rotary encoder is always in the
volume setting mode - speed is determined from the decoded Morse code and cannot be set manually.
Pressing the encoder button will end the decoder modus and bring you back to the Start Menu.
On the left of the status display at the top, you will see a black rectangle whenever the key is pressed (or a
750 Hz tone detected - this replaces the indicators for external paddles and for the keyer mode.
The current speed as detected by the decoder is displayed as WpM on the status line. Whenever you leave
the decoder, this speed setting is preserved - so when you switch over to the CW Keyer, it will be set to the
last speed value detected with the decoder. I am not sure if this is a bug or a feature ;-)
This modus does not have many parameters (see the next section); maybe the most important is the ability
to switch the filter bandwidth of the audio decoder between narrow (ca 150 Hz) and wide (ca 600 Hz).
You always reach the parameters menu by double clicking the BLACK rotary encoder button. This
Using the Modus "Morse Decoder"
Parameters

provides you with a menu of parameters (you will see a ">" character in front the of the current parameter,
and the line underneath shows the current value). Use the encoder to lead you through the available
parameters. If you want to leave the parameter setting menu, just press the encoder button a bit longer, and
you will be back in the operational modus from which you called the parameter setting menu (or back in the
menu, if you entered a double click from the menu).
When you have reached the parameter you want to change, click once. Now the ">" character will be at the
bottom line in front of the parameter value, indicating that rotating the encoder will change this value. Once
you are satisfied with the value, click once to return to the selection of parameters, or press the button a
bit longer to leave the parameter menu.
Obviously the parameters that can be set vary depending on the modus you are in: When you double click
while in a particular modus, you will only get to those parameters that are relevant for the current modus.
Did you double click from the Start Menu, you will be presented the complete range of parameters.
Bold values are standard or recommended ones. When called from the Start Menu, all parameters will be
availabe for change. See further down for the parameters available in the various modi.
Parameter
Name Description Values
Encoder
Click
Turning the encoder may generate a short tone burst, or be
silent Off / On
Tone Pitch
Hz The frequency of the side tone, in Hz
A series of tones
between 233 and
932 Hz,
corresponding to the
musical notes of the
B flat major scale
from b flat to b'' flat
(2 octaves)
Paddle Allows selection of external paddles, or the built-in touch
paddles
Touch Paddle / Ext.
Paddle
Paddle
Polarity Defines which paddle is for dits, and which for dahs _. dah-dit /
._ di-dah
Latency
Defines, how long after generating the current element (dot or
dash) the paddles will be „deaf“. If it is 0, you have to release
the paddle while the last element is still „on“. If set to 7, the
paddles will only react to a paddle press after 7/8 of a dot
A value between 0
and 7, meaning 0/8
to 7/8 of a dot length
List of All Morserino-32 Parameters

length. (default is 4, i.e. half
a dot length).
Keyer
Mode Sets the Iambic Mode (A or B), or Ultimatic; see below Curtis A / Curtis B /
Ultimatic
CurtisB
DahT% Timing in Curtis B mode for dahs; see below 0 -- 100, in steps of
5 [35 - 55]
CurtisB
DitT% Timing in Curtis B mode for dits; see below 0 -- 100, in steps of
5 [55 - 100]
AutoChar
Spce Minimum spacing between characters Off / min. 2 / 3 / 4
dots
Tone Shift
The pitch of the tone, when you are transmitting in LoRa CW
Trx modus, can either be the same as the one you get from
the receiver, or can be a half tone lower or a half tone higher.
No Tone Shift / Up
1/2 Tone / Down 1/2
Tone
Interword
Spc
The time (in lengths of a dit) that is inserted between words
(see below 6 -- 45 [7] see below
Interchar
Spc
The time (in lengths of a dit) that is inserted between
characters (see below) 3 -- 15 [3]
Random
Groups
For the output of groups of random characters, determine
which character subsets should be included
Alpha / Numerals /
Interpunct. / Pro
Signs / Alpha + Num
/ Num+Interp. /
Interp+ProSn /
Alpha+Num+Int /
Num+Int+ProS / All
Chars
Length
Rnd Gr
Here you select how many characters there should be in
each group; traditionally this is 5.
Fixed lengths 1 -- 6,
and 2 to 3 -- 2 to 6
(length chosen
randomly within
these limits) [5]
Length
Calls Select the maximum length of generated call signs Unlimited / max. 3 --
max. 6
Length
Abbrev
Select the maximum length of the randomly generated
common CW abbreviations and Q groups
Unlimited / max. 2 --
max. 6

Length
Words
Select the maximum length of the randomly generated
common English words
Unlimited / max. 2 --
max. 6
Trainer
Disp Select, how the trainer should display what it generates Display off / Char by
Char / Word by word
Each Word
2x
In the CW Trainer modus, each "word" (characters between
spaces) will be output twice, as a help to learn to copy by ear. Off / On
Randomize
File
If set to „On“, file player will skip n words after each word sent
(n = random number between 0 and 255) Off / On
Echo
Repeats
Here you decide, how often a word is repeated when the
response is either too late or erroneous, before a new word is
being generated. If the value is 0, then the next word will
always be a new one, regardless if you responded correctly
or not.
0 -- 6 / Forever
Confrm.
Tone
Here you define if an audible confirmation tone should be
sounded in Echo Trainer modus. If you turn it off, the device
just repeats the prompt when the response was wrong, or
sends a new prompt. The visual indication of "OK" or "ERR"
will still be visible when the tone is turned off.
On / Off
Key ext TX Here you determine, if a connected Transmitter will be keyed
when you use the device
Never / CW Keyer
only / Keyer&Trainer
Send via
LoRa
If set to ON, whatever the CW generator generates will also
transmitted via LoRa - so you can have one device
generating something, and several others receiving the same
sequence (using the LoRa Trx modus). Be aware that you
must have an antenna connected when you transmit via
LoRa, otherwise the LoRa transceiver will eventually be
destroyed!
LoRa Tx ON / LoRa
Tx OFF
Bandwidth
Defines the bandwidth the CW decoder is using (this is
implemented in software using a so called Goertzel filter).
(Wide = ca. 600 Hz, Narrow = ca. 150 Hz; center frquency =
ca 700 Hz)
Wide / Narrow
Adaptv.
Speed
If this is set to ON, the speed will be increased by 1 WpM
whenever you gave a correct response, and will be
decreased by 1 whenever you made a mistake.
ON / OFF
Parameters in CW Keyer modus

Parameters
Encoder Click Tone Pitch Hz Paddle
Latency Keyer Mode CurtisB DahT%
Note:
Latency defines, how long after generating the current element (dot or dash) the paddles will be „deaf“.
This used to be 0, with the effect, that especially at higher speeds you would generate more dots than
intended, as you had to release the paddle while the last dot was still „on“. Now you can set this to a value
between 0 and 7, meaning 0/8 to 7/8 of a dot length (default is 4, i.e. half a dot length). If you still tend to
generate unwanted dits, increase this value.
Iambic Modes: When you press both paddles of a iambic keyer, dahs and dits will be generated
alternatively, while both paddles are being pressed, starting with the one you have hit first. The difference
between modes A and B is the behavior when both paddles are released when the current element is being
generated: in Mode A the keyer stops after the current element, in Mode B the keyer will add another
element opposite to the one during which you released the paddles.
In other words, in Curtis B mode the opposite paddle is checked while the current element (dit or dah) is
being output, and if a paddle is pressed during that time, another opposite element is added to the current
one. In Mode A this is not the case. As mode B is a bit tricky to use, this was later changed, so that only
after a certain percentage of the duration of the element the paddles are being checked. This is the
percentage you can set here with the parameters "CurtisB DahT%" and "CurtisB DitT%".
If you set them to 0, the lowest value, the Mode is identical with the original Curtis B Mode; the later
developed "enhanced" Curtis B mode uses a percentage of roughly 35%-40%. If you set the percentage to
100, the highest value, the behavior is the same as in Curtis A mode.
This parameter allows you to set any behavior between Curtis A and original Curtis B modes on a
continuous scale, and you can set the percentage for dits and dahs separately (this makes sense, as the
timing for dits is just a third of that for dahs, and so you might find that you want a higher percentage for dits
to feel comfortable).
Ultimatic Mode: In Ultimatic Mode, when you keep both paddles pressed, a dit or a dah is generated,
depending on which paddle you hit first, and afterwards the opposite element is being generated
continuously. This of advantage for characters like j, b, 1, 2, 6, 7.
NB: Iambic modes and Ultimatic mode can only be used with the built-in touch paddle or an external dual-
lever paddle; the selection of these modes is irrelevant when you use an external single-lever paddle.
Parameters in CW Generator modus

Parameters
Encoder Click Tone Pitch Hz Paddle Interword Spc
Interchar Spc Random Groups Length Rnd Gr Length Calls
Length Abbrev Length Words Trainer Disp Each Word 2x
Key ext TX Send via LoRa
Notes:
Intercharacter Space. This describes how much space is inserted between characters. The "norm" is 3 a
space which has the length of three dits. To make it easier to copy code that is being sent at high speeds,
and as a good method to learn Morse code, this space can be extended. The code should be sent at rather
high speeds ( > 18 wpm) , to make it impossible to "count" dits and dahs, so that you rather learn the
"rhythm" of each character. In general, it is better to rather increase the space between words, and not so
much the space between characters; therefore it is recommended to set this value between 3 and max. 6.
See below.
Interword Space. Normally this is defined as the length of 7 dits. When in CW Keyer modus, we determine
a new word after a pause 6 dits long, to avoid that text runs too much into each other on the display. In CW
Trainer modus, you can set the interword space to values between 6 and 45 (which is more than 6 times
the normal space) to make it easier to copy code in your head at high speeds. In analogy to Farnsworth
spacing, this is also being called Wordsworth spacing. This is an even better way to learn copying high
speed code word by word in your head. Of course you can combine both interword and intercharacter
spacing methods.
As character spacing can be set independently, this would mean that you can set character spacing higher
than interword spacing, which would be rather confusing. In order to avoid this confusion, interword space
will always be at least 4 dit lengths longer than the character spacing, even if a smaller interword space has
been set.
The ARRL and some Morse code training programs use something they call "Farnsworth Spacing": here
the spaces between characters and between words are lengthened proportionately by a certain factor. You
can emulate Farnsworth Spacing by incrementing both inter-character and inter-word space, e.g. setting
inter-character space to 6 and inter-word space to 14, thus effectively doubling all spaces between
characters and words. if you do this at a character speed of 20 WpM, the resulting effective speed will be
14 WpM. This will be shown on the status line as (14)20WpM.

Parameters
Encoder Click Tone Pitch Hz Paddle Interword Spc
Interchar Spc Trainer Disp Randomize File Each Word 2x
Send via LoRa
Parameters
Encoder Click Tone Pitch Hz Paddle Paddle Polarity
Latency
Keyer Mode CurtisB DahT% CurtisB DitT% AutoChar Spce
Tone Shift Interword Spc Interchar Spc Random Groups
Length Rnd Gr Length Calls Length Abbrev Length Words
Echo Repeats Confrm. Tone
Parameters
Encoder Click Tone Pitch Hz Paddle Paddle Polarity
Latency
Keyer Mode CurtisB DahT% CurtisB DitT% AutoChar Spce
Tone Shift Interword Spc Interchar Spc Randomize File
Parameters in CW Generator - File Player modus
Parameters in Echo Trainer modus
Parameters in Echo Trainer - File Player modus
Parameters in Koch Trainer - CW Generator modus

Parameters
Encoder Click Tone Pitch Hz Paddle Interword Spc
Interchar Spc Length Rnd Gr Length Abbrev Length Words
Trainer Disp Each Word 2x ey ext TX Send via LoRa
Parameters
Encoder Click Tone Pitch Hz Paddle Paddle Polarity
Latency
Keyer Mode CurtisB DahT% CurtisB DitT% AutoChar Spce
Tone Shift Interword Spc Interchar Spc Length Rnd Gr
Length Abbrev Length Words Echo Repeats Confrm. Tone
Parameters
Encoder Click Tone Pitch Hz Paddle Paddle Polarity
Latency
Keyer Mode CurtisB DahT% CurtisB DitT% AutoChar Spce
Tone Shift
Parameters
Encoder Click Tone Pitch Hz Paddle Paddle Polarity
Latency
Keyer Mode CurtisB DahT% CurtisB DitT% AutoChar Spce
Tone Shift Bandwidth
Parameters
Encoder Click Tone Pitch Hz Bandwidth
Parameters in Koch Trainer - Echo Trainer modus
Parameters in Transceiver - LoRa Trx modus
Parameters in Transceiver - Ext / iCW Trx modus
Parameters in CW Decoder modus

You can use the WiFi feature of the Heltec ESP32 Wifi LoRa Module used in the Morserino-32 for two
functions of the device:
Uploading a text file to the Morserino-32 that can then be played in CW Generator Modus oder Echo
Trainer modus.
Uploading the binary file of a new firmware version.
For both of these functionalities the file to be uploaded (be it a text file or the compiled binary file for the
software update) must be on your computer (even a tablet or smartphone will work, as you only need basic
webbrowser functionality on that device), and your Morserino must be connected to the same WiFi network
as your computer.
In order to connect your Morserino-32 to your local WiFi network, you usually need to know the SSID (the
"name") of the network, and the password to connect to it. And you must enter these two items into your
Morserino-32. As it does not have a keyboard for convenient entry of this information, we use another way
of doing it, and for this end another WiFi function has been implemented: network configuration, which is
the first you have to use before you can use the other functions.
While your Morserino-32 is displaying the Start menu, click the RED button three times quickly, in order to
get into the WiFi Menu. The top entry is "WiFi Config", select it to proceed.
The device will start WiFi as an access point, thus creating its own WiFi Network (with the SSID
"Morserino"). If you check the available networks with your computer or smartphone, you will find it easily;
please switch your computer to use this network (you will not need a password to connect).
Once you are connected, enter "m32.local" into your browser on your computer. If your computer or
smartphone does not support mDNS (Android, for example, is not supporting it), you have to enter the IP
address 192.168.4.1 into the browser instead of m32.local. You will then see a little form with just 2 empty
fields in your browser: SSID and password. Enter the name of your local WiFi network, and the
correspondig password, and click on the "Submit" button. Your Morserino-32 will store these network
credentials and then restart itself (so the network "Morserino" will disappear).
NB: You cannot use a WiFi network with a "captive portal", as they are often used on public networks.
These networks require that a browser is available on the device that wants so connect to the network, and
the Morserino-32 does not have a browser...
Once you configured your Morserino-32 with your local WiFi crendentials, you are ready to uplaode a text
Wifi Functions
Network Configuration
Uploading a Text File

file to use for your Morse code training. Currently only one file can reside on the Morserino-32, This means,
whenever you upload a new file, the old one will be overwritten.
The file that you upload should be a plain ASCII text file without any formatting (no Word files, pdf
documents etc.). German characters (ÄÖÜäöüß) encoded as UTF-8 are allowed and will be converted to
ae, oe, ue and ss. The file can contain uppercase and lowercase letters, and all the characters that are part
of the Koch method set (50 characters in total). Any other characters will just be disregarded when the file is
played in Morse code. The file that you upload can be pretty large - you have more than 1 MB space
available for it (enough to store a copy of Mark Twain's "The Adventures of Huckleberry Finn").
In order to upload the file, press the RED button quickly three times, and select "File Upload" from the
menu. After a few seconds (it needs to connect to your Wifi network first) Morserino-32 will indicate that it is
waiting for uplaod. You point the browser of your computer to "m32.local" (or the IP address shown on the
display).
First you will see a Login screen. Use "m32" as User ID and "upload" as password. On the next screen in
your browser you will find a file selection dialog - select the file you want to upload (its name or extension
doesn't matter) and click the button labelled "Begin". Once the upload is completed (it will not take long) the
Morserino-32 will restart itself, and you can now use the uploaded file in CW Generator or Echo Trainer
modus.
If for any reason you need to abort the process, you have to restart the device either by completely
disconnecting it from power (battery off and USB disconnect), or pressing the Reset button with the help of
a tiny screwdriver or a ball point pen (the rest button can be reached through the hole under the USB
connector).
Updating the firmware of the Morserino-32 through WiFi is the easist way to update your firmware. While
traditionally you need a software development environment on your computer (in our case the Arduino IDE
plus the necessary files for supoort of the Heltec module), and use that first to compile the software, making
sure you have all necessary libraries also installed, and then load the softare to the microcontroller using
USB, all you need now is a computer with a browser and a WiFi network.
Updating the firmware is very similar to uploading a text file. You first need to get the binary file from the
Morserino-32 repository on GitHub (https://github.com/oe1wkl/Morserino-32 - look for a directory under
"Software" called "Binaries". Get the latest version and download it to your computer. The file name looks
like this:
morse_3_vx.y.ino.wifi_lora_32.bin with x.y being the version number.
Now get the WiFi menu again by clicking quickly three times on the RED button, and select the enry
"Update Firmw.". Similar to file upload, you point your browser to "m32.local" (or the shown IP address),
and you will eventually see a Login screen. This time you use the user name "m32" and the password
Updating the Morserino-32 Firmware

"update".
Again you will see a file selection screen next, you select your binary file and click the button labelled
"Begin". This time the uplaod will take longer - it can take a few minutes, so be patient. The file is big, needs
to be uploaded and written to the Morserino-32 and needs to be verified to make sure it is an executable
file. Finally, the device will restart itself and you should notice the new version number on the display during
start-up.
