Microsoft NCTSN CDS Reference Manual Version 2.0 Revised 20042018 BLACKBERRY ID SWD 1590032 0505111339 001 Vers2.0
User Manual: BLACKBERRY ID SWD-1590032-0505111339-001
Open the PDF directly: View PDF ![]() .
.
Page Count: 56

1
Version 2.0 Revised 20041018
1
NCTSN Core Data Set
NCTSN Core Data Set
Reference Manual
Reference Manual

2
Version 2.0 Revised 20041018
2
Table of Contents
22Enroll a client
21Log-out
15Help!
14NCTSN-InForm Home page
11Passwords
10Screen layout
9Access and Log-in
8Browser basics
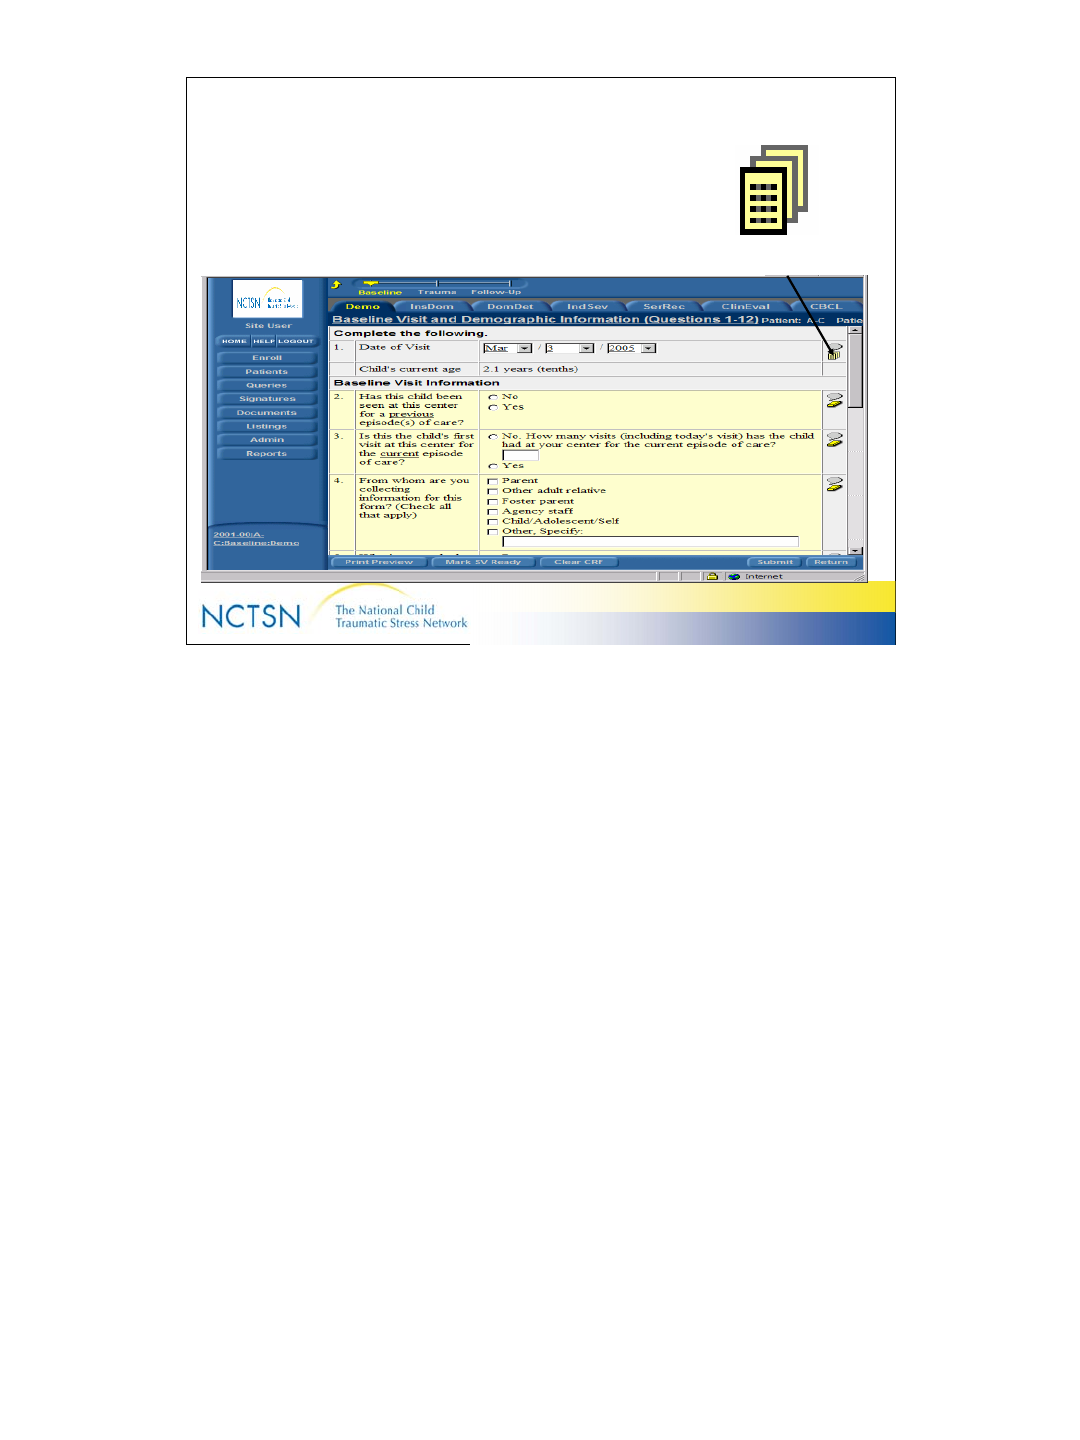
7Security features
6System requirements
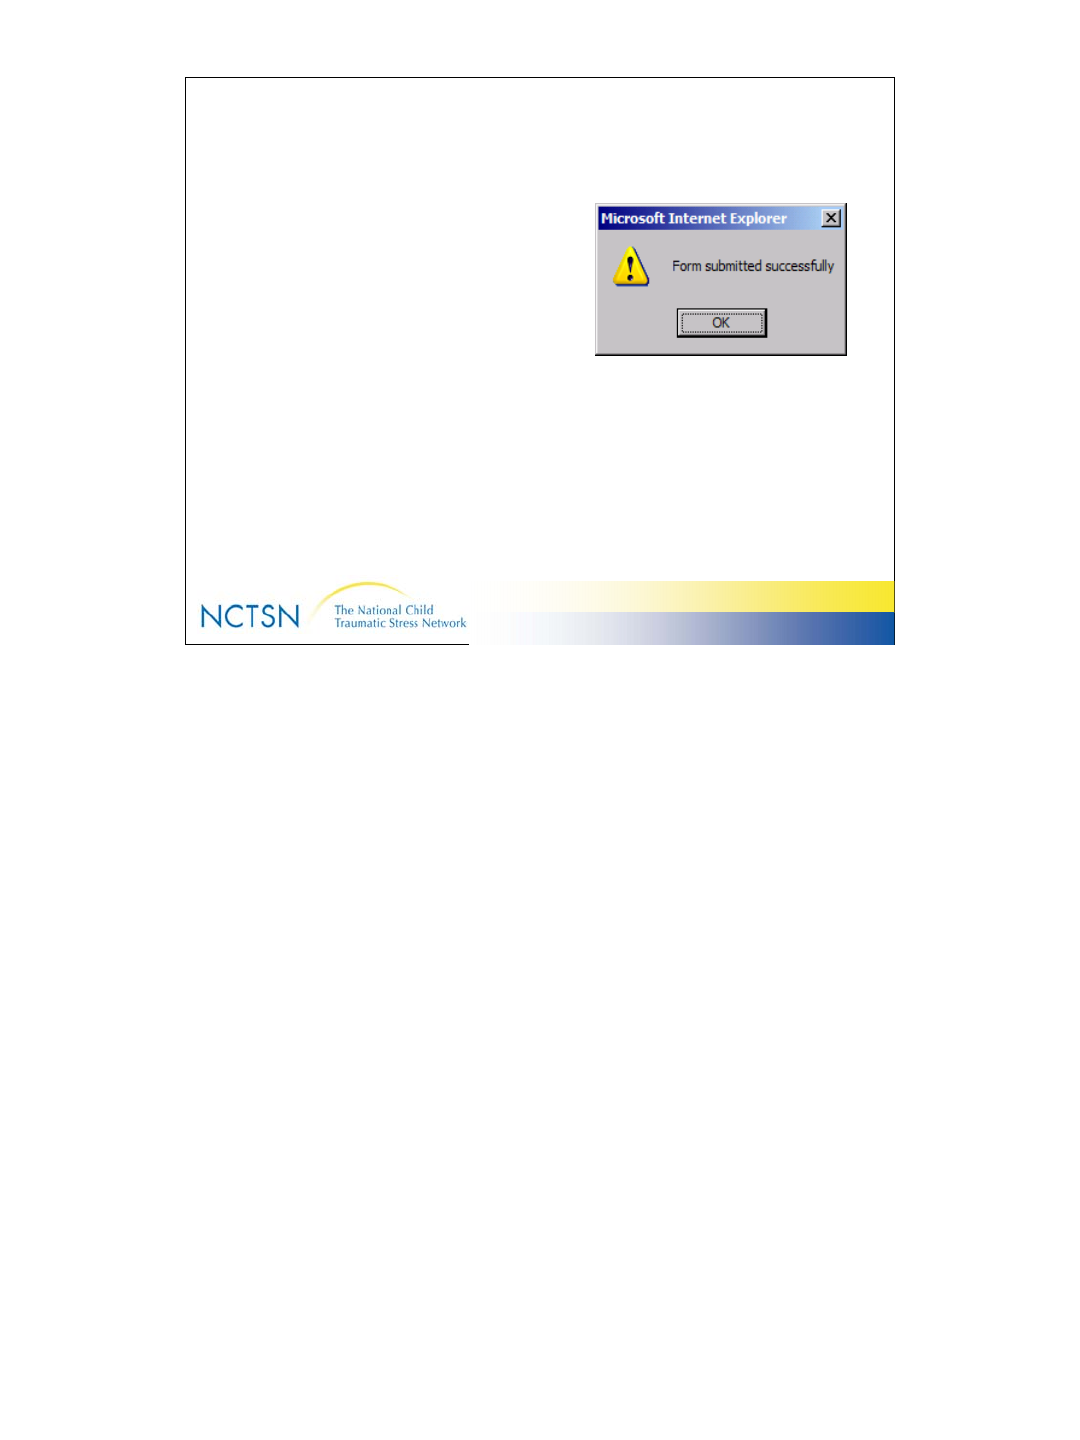
5System overview
4Glossary
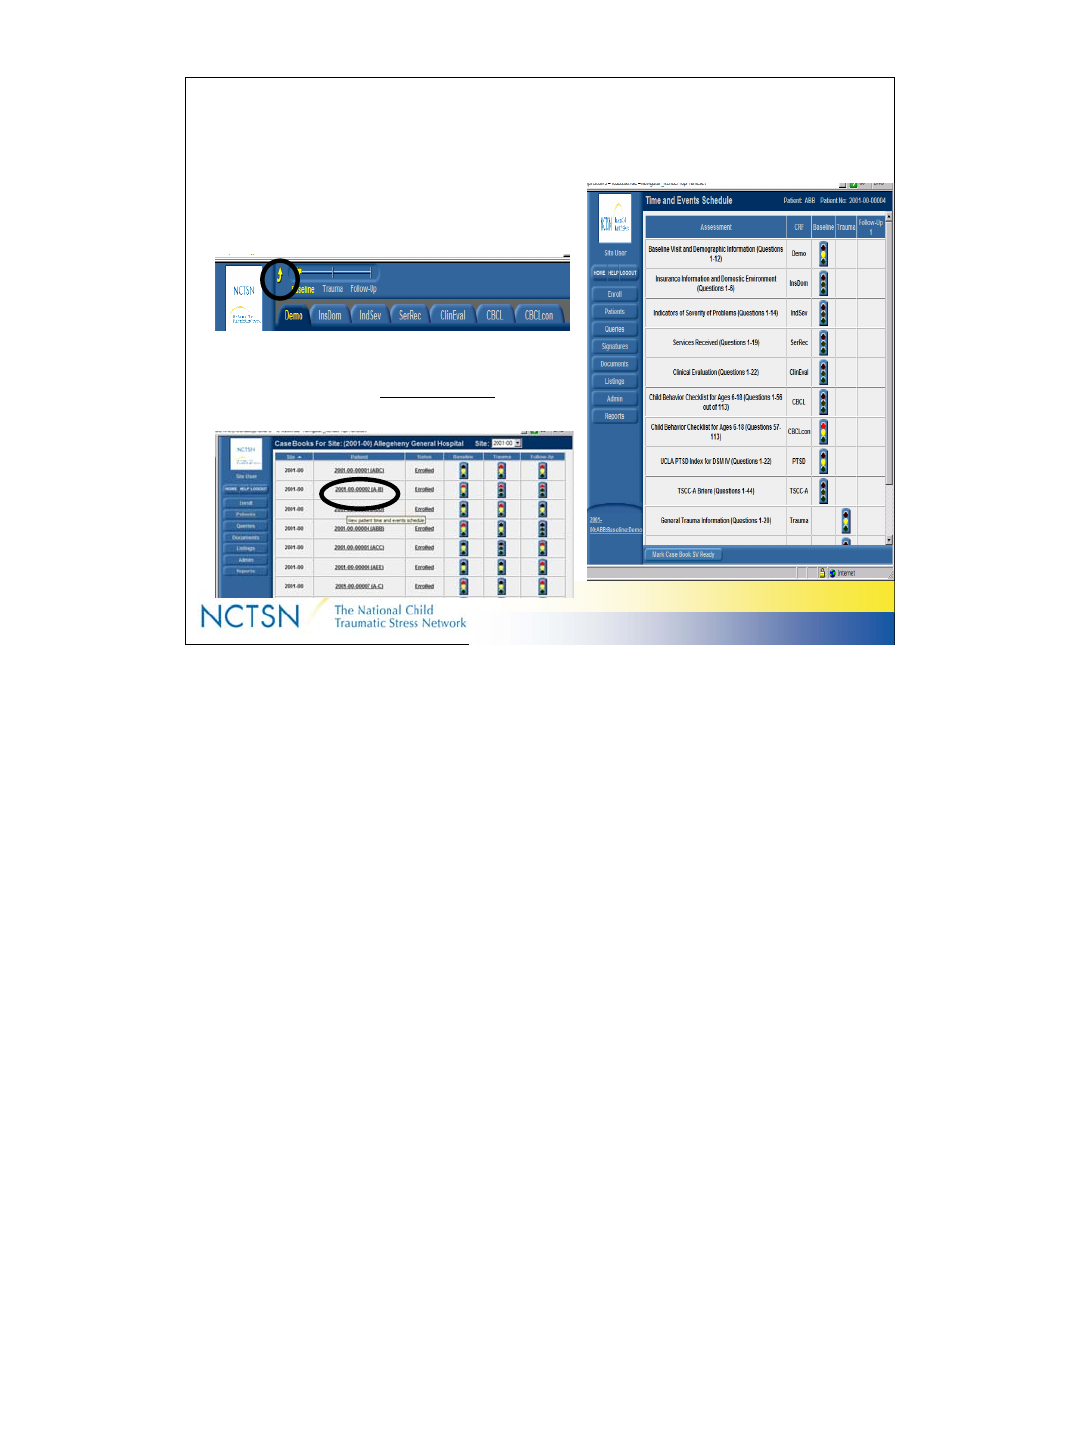
Page NumberTopic

3
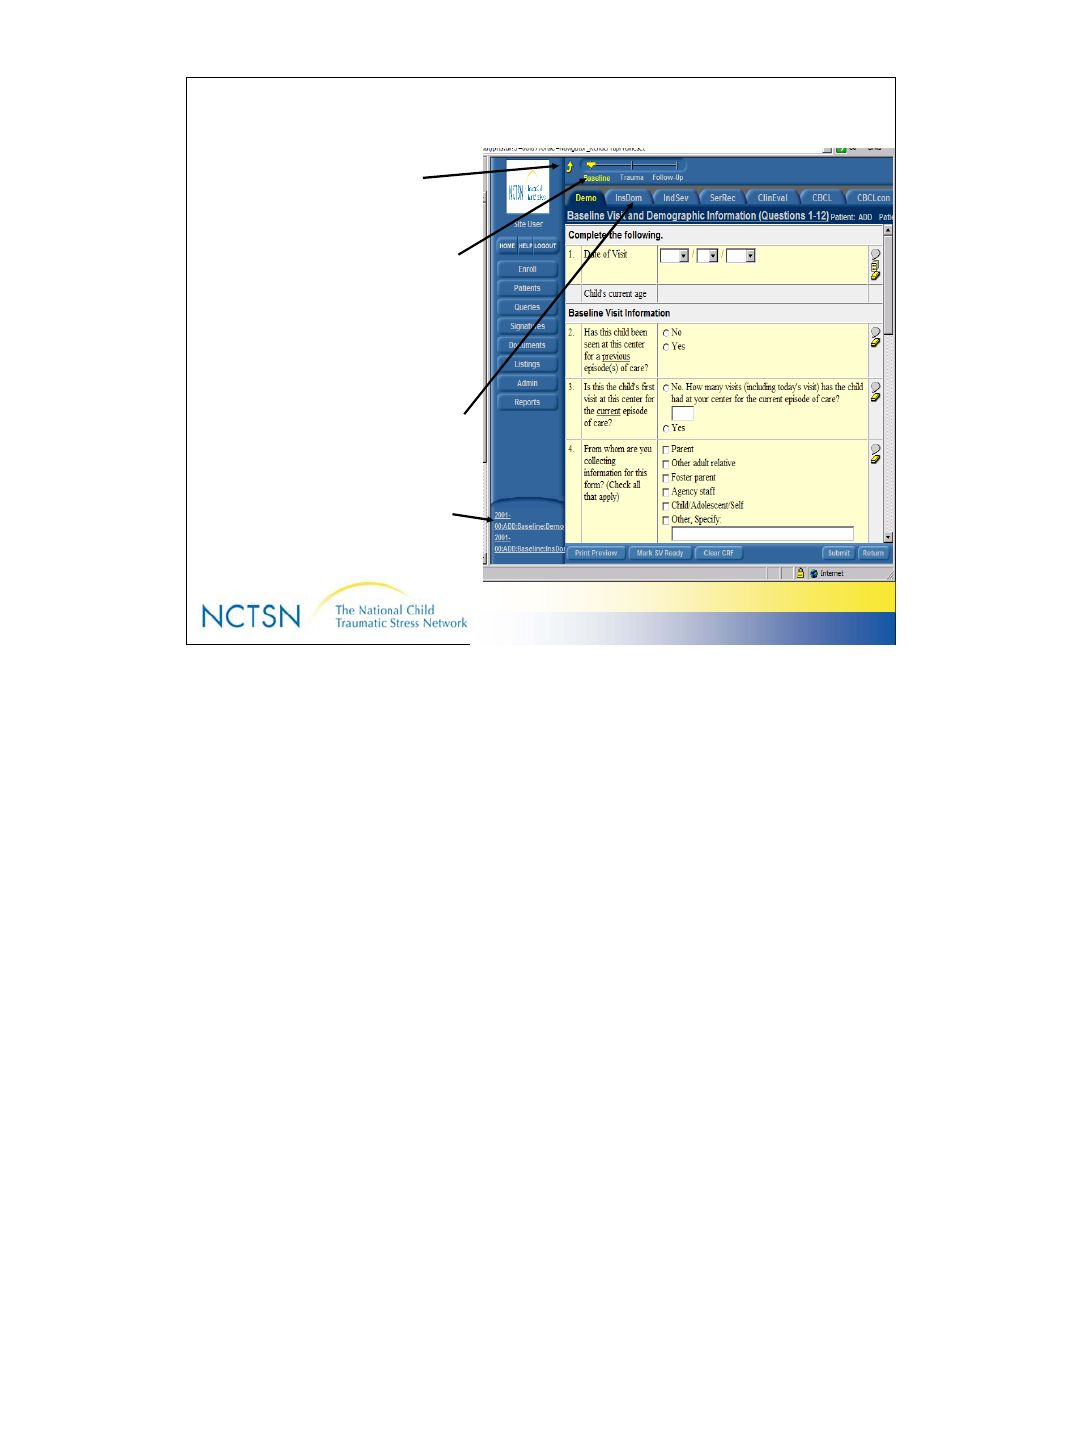
Version 2.0 Revised 20041018
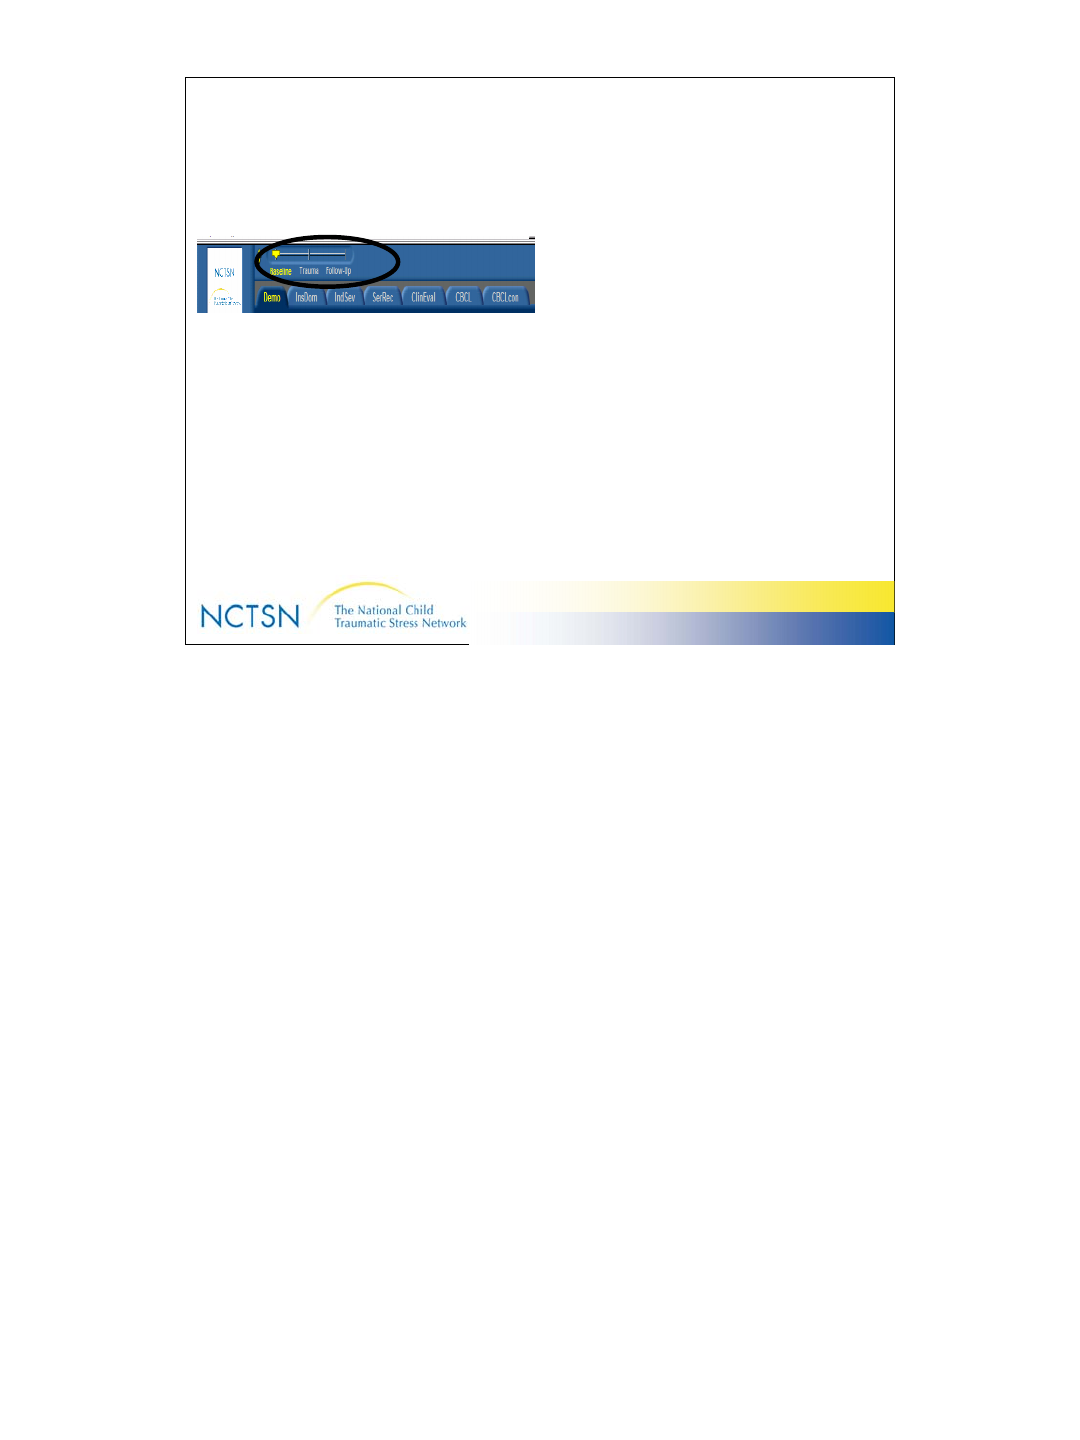
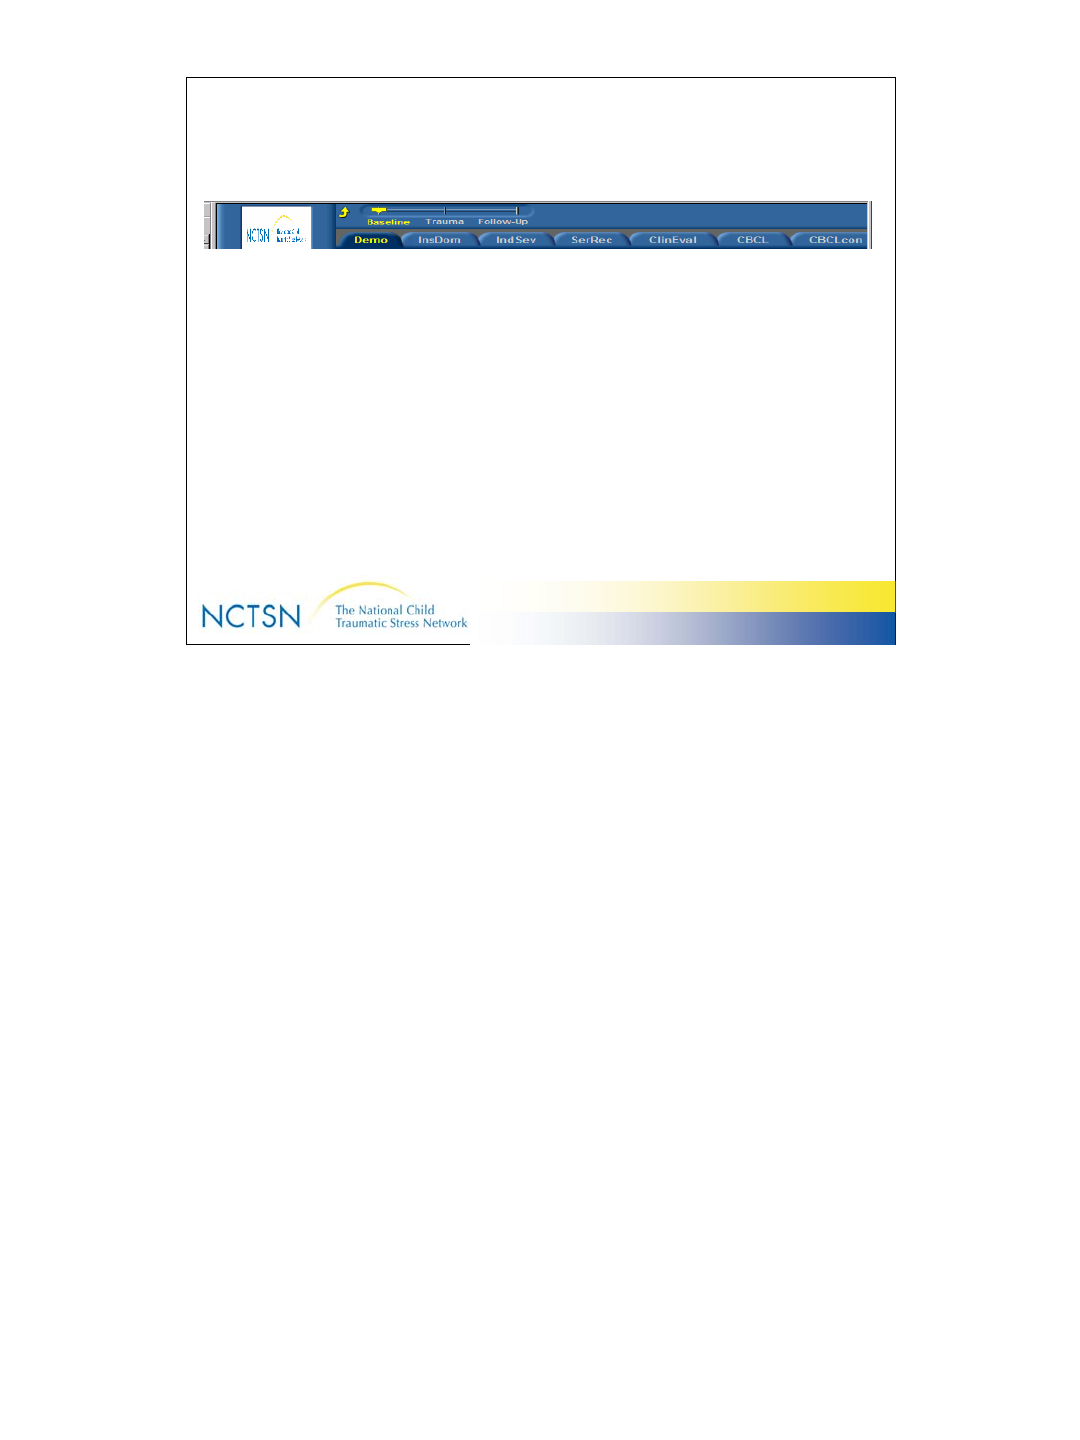
3
Table of Contents
52
55
56
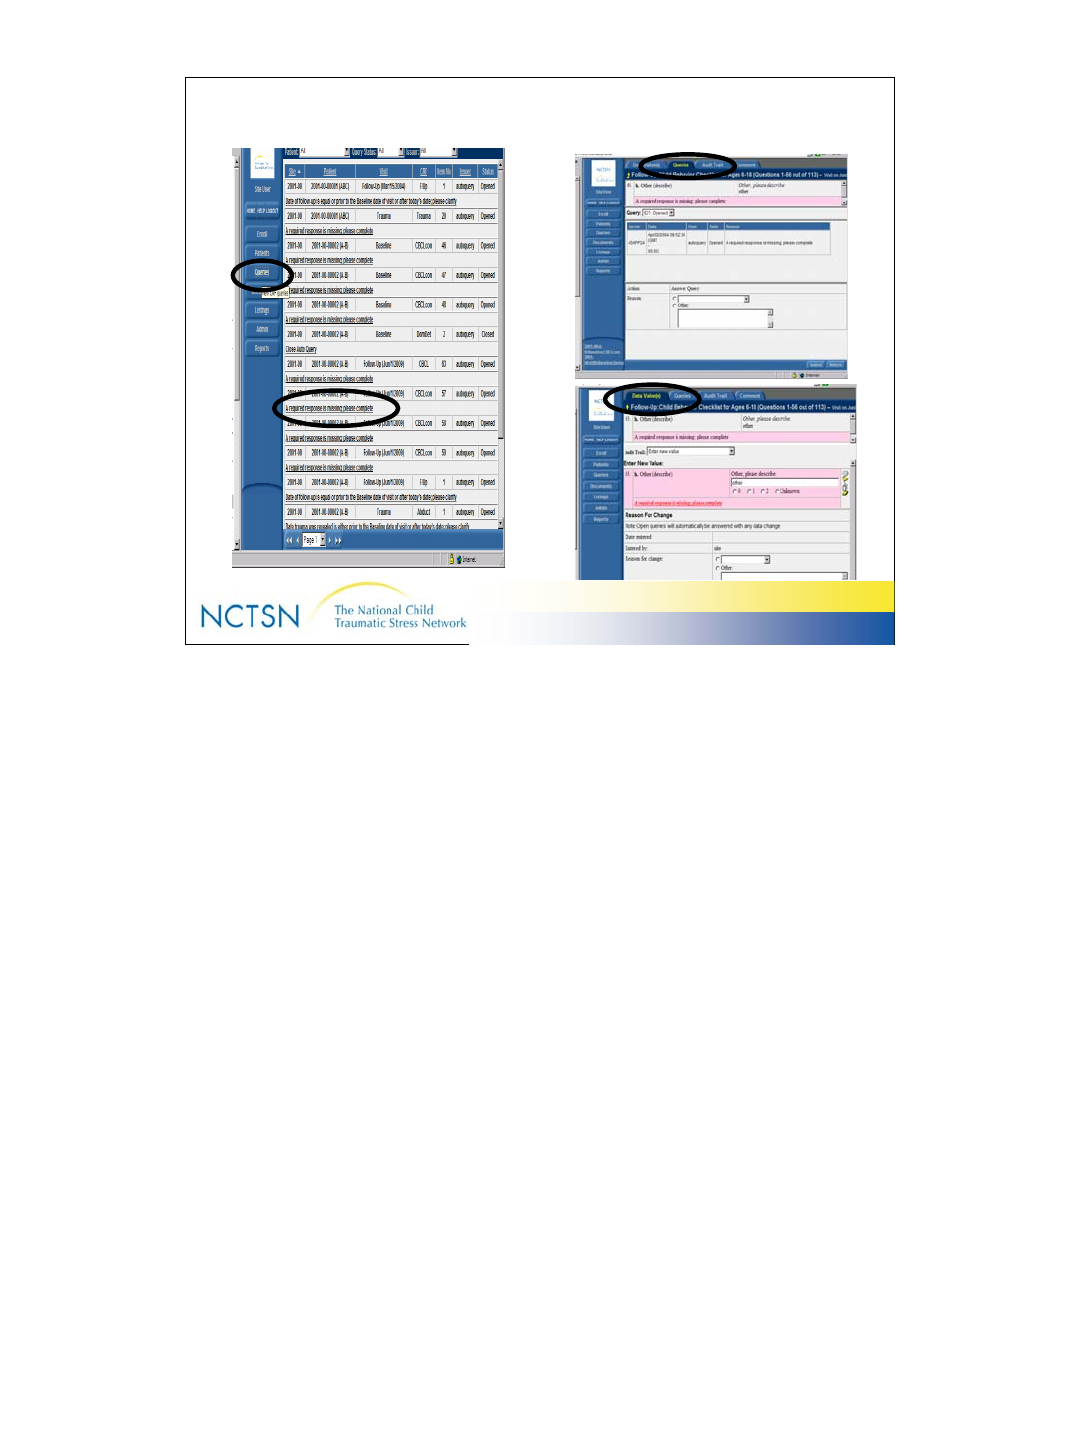
Printing
New User Accounts
New Center Sub-Center Accounts
51Reports
50Exports (Listings)
49Admin
48New follow-up visit form
44Comments
42Audit Trail
36Queries
28Navigate through InForm
24Enter, edit & save data
Page NumberTopic

4
Version 2.0 Revised 20041018
4
Glossary of InForm Terminology
Return
Go back to the previous screen
Submit
Save data in the database
Patient
Client/child who is or will be enrolled in
the Core Data Set
Listings
Files of client data for review & interim
analysis
Reports
Client level summaries of standard
assessment scores
Case Report/Record Form (CRF)
Paper version of a data collection form
eCRF
Electronic data collection form/screen
Case Book/Case Record Book
(CRB)
Complete set of all data collection
forms or screens
Enroll
Create a case book for a client/patient

5
Version 2.0 Revised 20041018
5
Overview: What is InForm?
–Web-based Electronic Data Capture (EDC) tool
selected by the NCTSN to use for the Core Data Set
–Enables NCTSN Centers to enter client data into an
electronic Case Record Form
–Data are automatically stored and maintained in a
database via the Internet
6
Version 2.0 Revised 20041018
6
System Requirements
•Pentium II processor
•Display 1024 x 768
resolution
•64 MB memory
•6GB hard drive
•MS Windows 98 or later
•High Speed Internet
connection
•Microsoft Internet Explorer
version 5.5 or higher
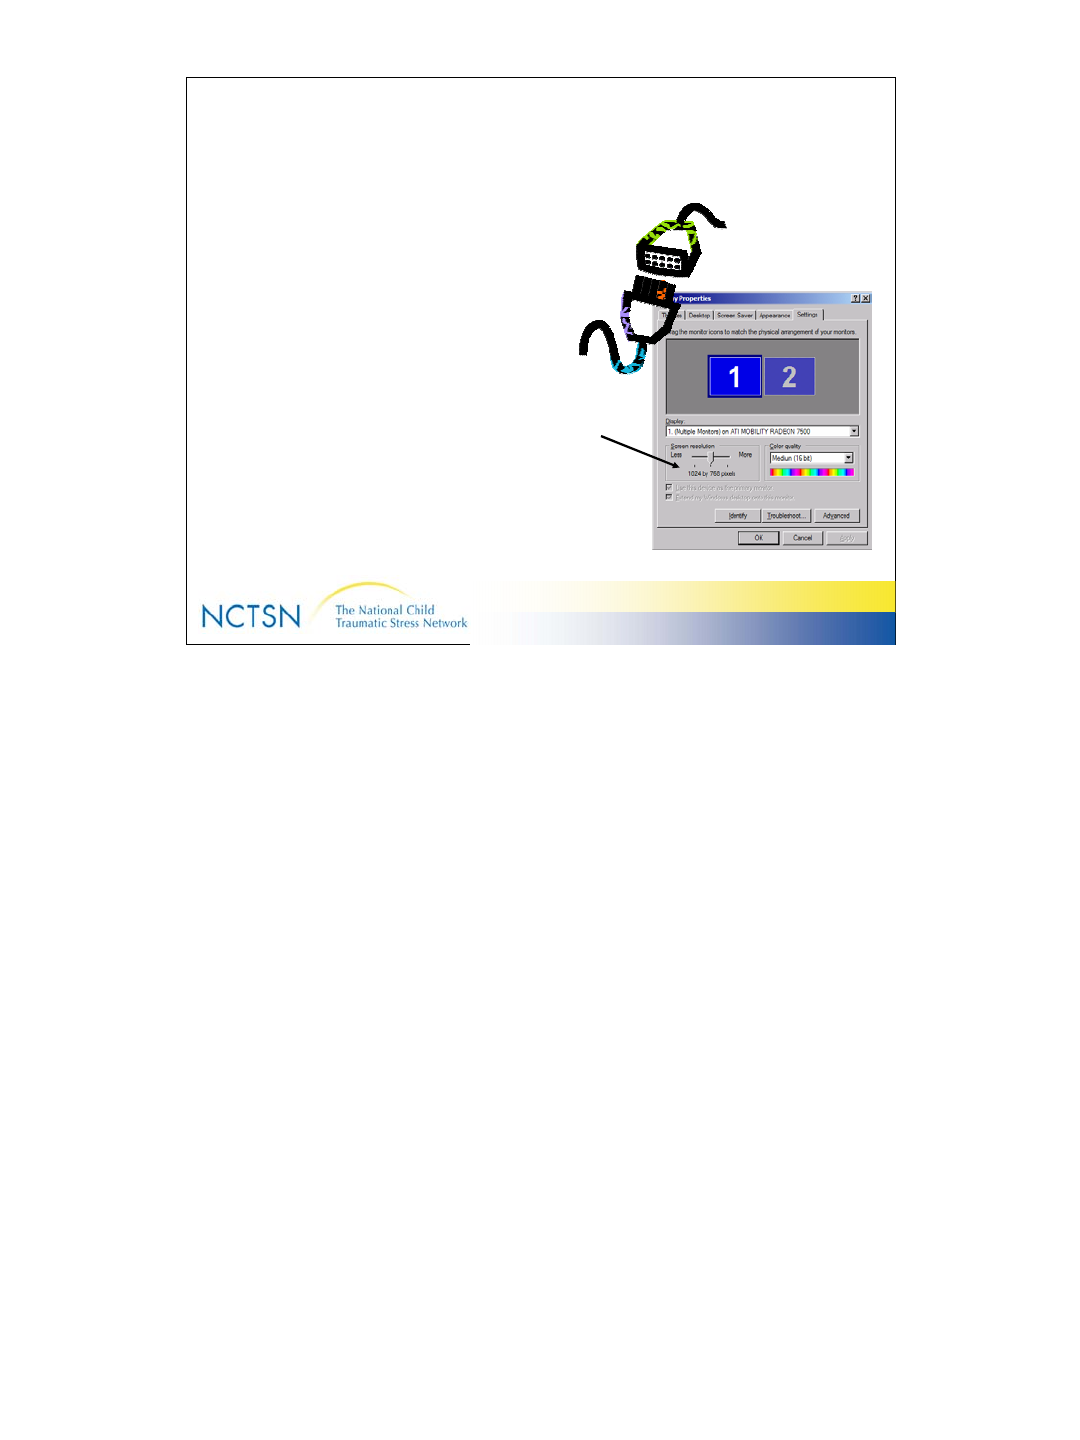
Set your monitor to 1024x768 resolution to assure that you’re seeing the
entire InForm data entry screen.
To check the resolution on your monitor:
Click the Start button in the bottom left corner
Click Control Panel
Click Settings
Click Display
Make sure you see 1024 x 768.
If you’re still having trouble, check your web browser font size. Make sure
it’s set to “smallest”.
On your Browser Toolbar:
Select “View”
Select “Text Size”
Select “Smallest”. This is especially important if you want to view NCTSN
patient level reports.

7
Version 2.0 Revised 20041018
7
Security Features
•Password (PW) Protected: Each user has a unique
ID and PW. This combination acts as an electronic
signature.
•InForm requires re-identification of User after 5
minutes of inactivity
•InForm requires re-identification of User after 120
minutes of continuous activity
•128 bit encryption like the banks use
8
Version 2.0 Revised 20041018
8
Browser Basics
•Recommended Internet Browser:
– Microsoft Internet Explorer, Version 5.5 SP 2 or higher
•The InForm web application:
–Is a Mouse-driven application
–Is a One-Click system (use the left button on your mouse)
– Supports only the PRINT button of the Internet Browser
–Do not use the BACK or FORWARD button on the Browser toolbar
–Do not use “keyboard” shortcuts (ctrl + C, etc)
–4ways to know the system is “thinking” vs “not responding”:
• Hourglass
• Spinning globe icon in top right corner
• Status bar with Java script near the bottom of the screen
• Progress bar changes from gray to blue as the forms load
9
Version 2.0 Revised 20041018
9
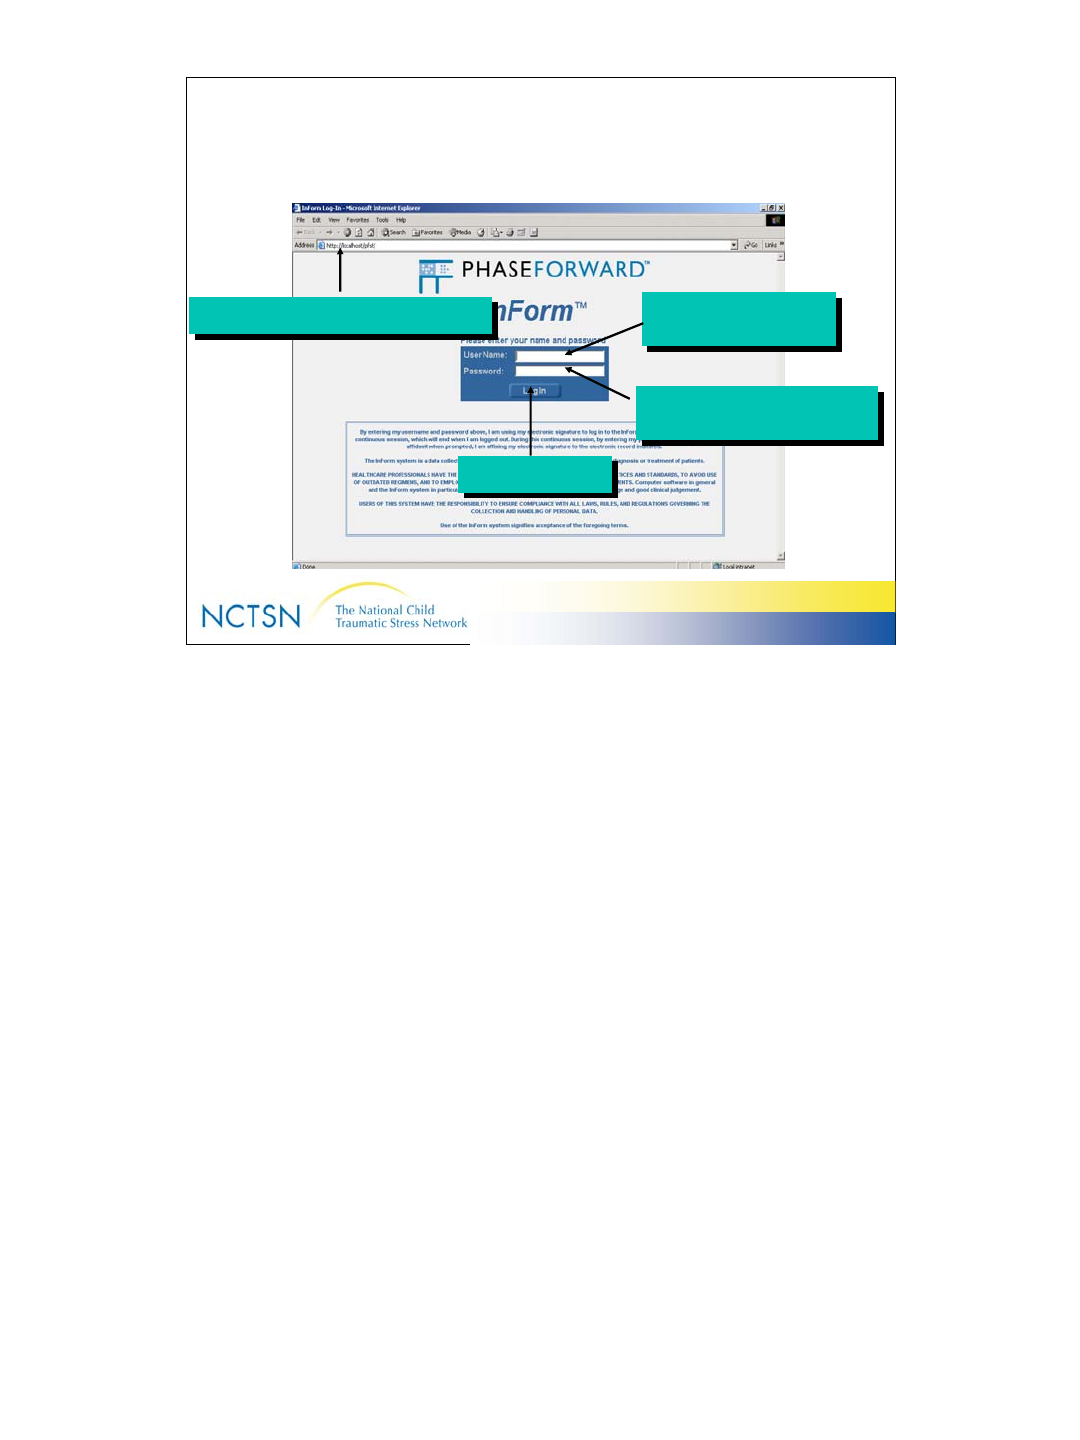
Access & Log-in
4. Click “Log In”
4. Click “Log In”
1. Type the Web Address/URL
1. Type the Web Address/URL 2. Type User Name
(Case-Sensitive)
2. Type User Name
(Case-Sensitive)
3. Type default Password
(Case-Sensitive)
3. Type default Password
(Case-Sensitive)
4. Click Log In
4. Click Log In
Training System can be found at https://www.webcrf.net/trainnctsn/.
Use the Training ID and Password assigned by the Data Center.
You’ll be notified of the URL for the “Production” website and will receive an ID and Password for that
system after you’ve completed the training exercises.
10
Version 2.0 Revised 20041018
10
InForm Screen Layout
Navigation
Pane Content Pane
Content-Specific Pane
11
Version 2.0 Revised 20041018
11
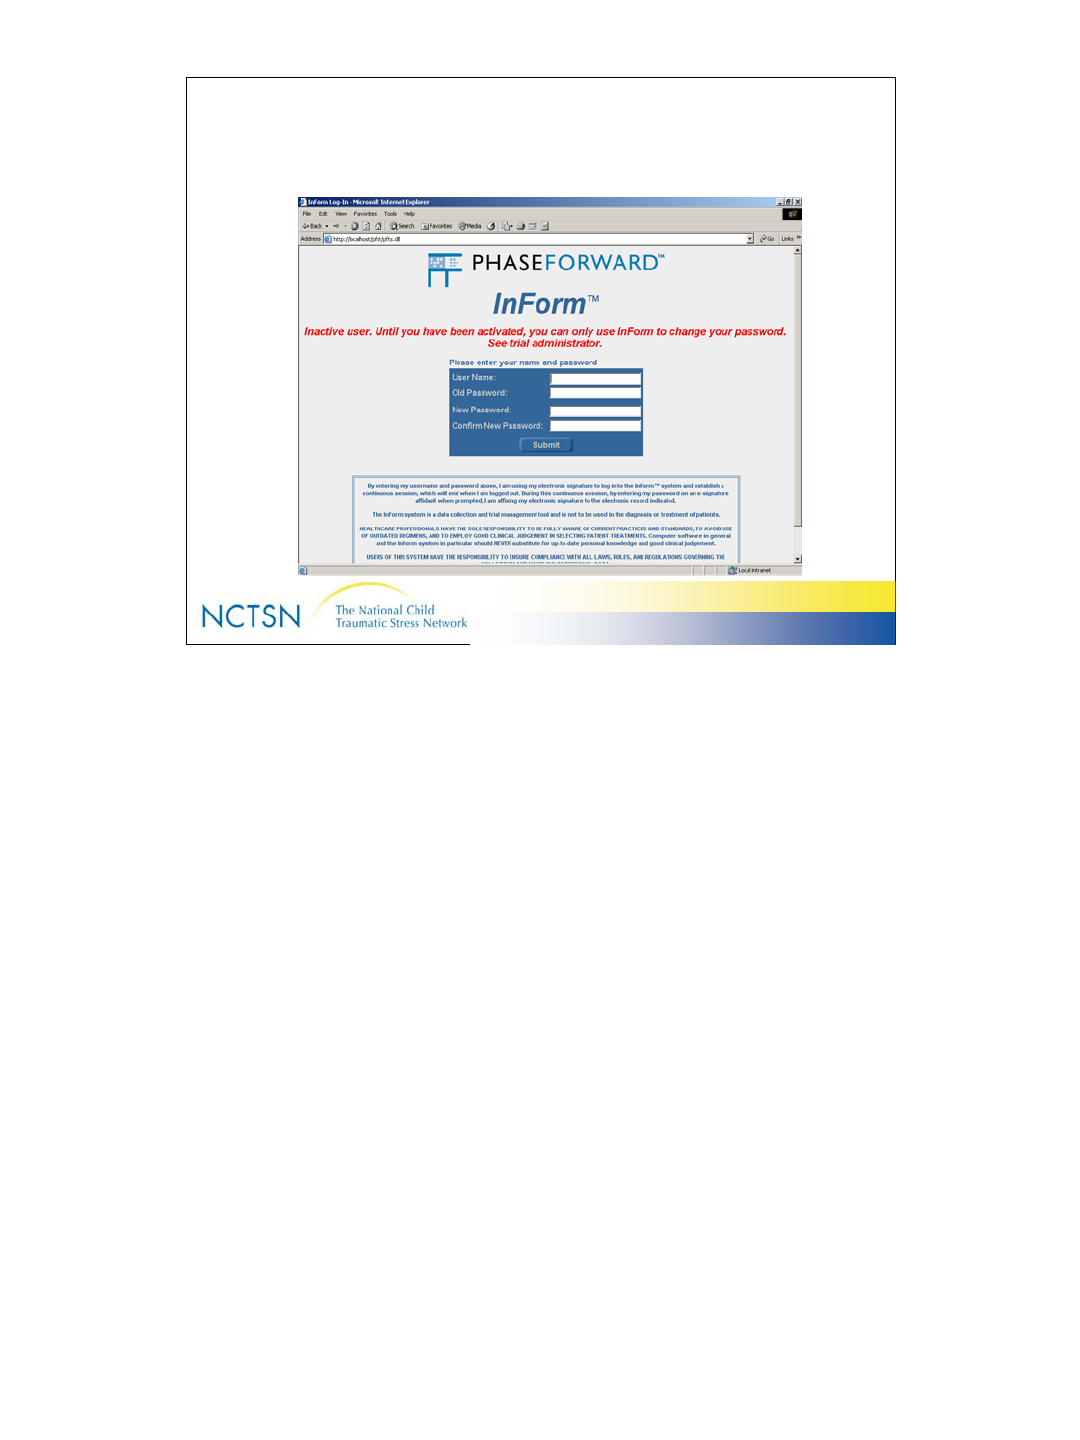
Passwords
• User Name and Password are required to use InForm.
• The User ID and Password ensure that only authorized personnel gain access to the NCTSN
Core Data Set.
• They also allow InForm to track activity during data entry or amendments
• You’ll be assigned a user name and an initial password
• You’ll be asked to change your password the first time you use it to log in. Change it by using this
process:
1. Enter your User Id
2. Enter the old password
3. Create and enter a new password (Do NOT use the Caps Lock button)
4. Confirm the new password
5. Click “submit”
• The password should meet the following criteria:
1. Use a combination of letters (upper and lower case) and numbers (8-32 characters)
2. Passwords are case sensitive. Do NOT use caps lock
3. Easy for you to remember but difficult for someone else to guess
4. Do not write down or share your password (Fraud)
• As a security feature, you’ll be asked to change your password every 120 days. The system
will prompt you to do so at the appropriate time.
• After 3 unsuccessful log-in attempts, your account will be inactivated. Call 919-668-8182 or email
NCTSN@dcri.duke.edu & ask for it to be re-activated.
• Passwords can only be used once. You may not reuse the same password.
12
Version 2.0 Revised 20041018
12
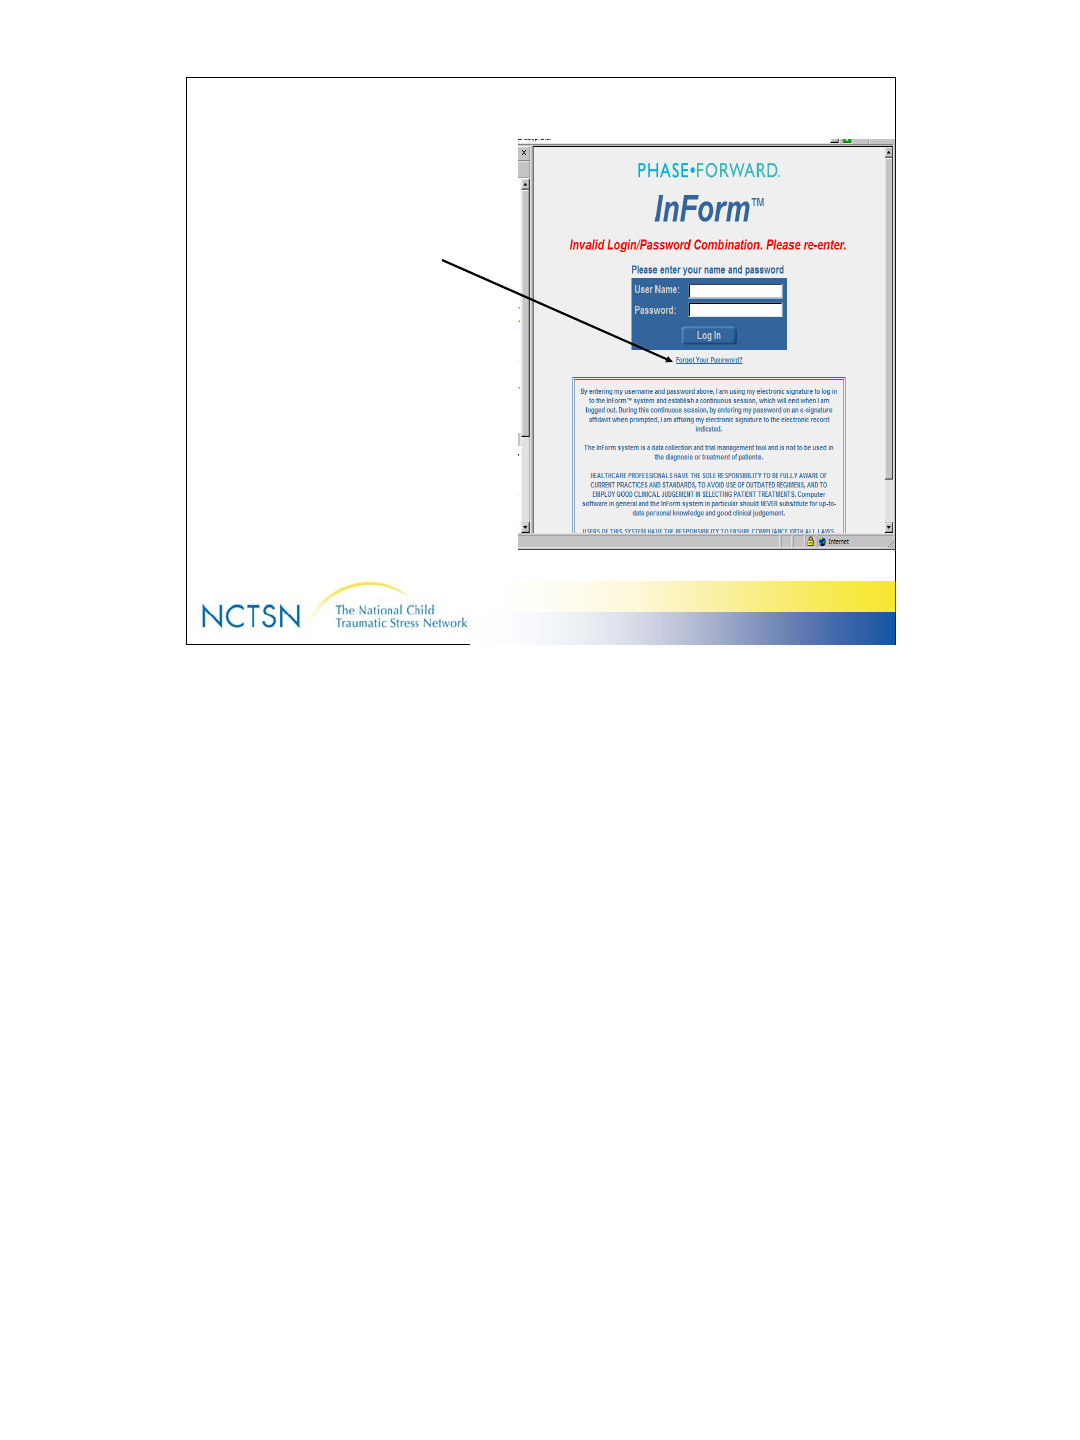
Forgotten Passwords
• InForm has a built in
mechanism that you can use
to get a new password if you
forget the old one.
• After the First Failed Log-in
Attempt, the Forgot Password
feature will display on your
Log-in Screen.
• This feature works ONLY if
you’ve entered a “trigger”
question during the Password
change process.
•Click the “Forgot Your Password” hyperlink.
•Read the Trigger Question that displays & type in your answer.
•Click the “Get New Password” button
InForm (nobody@webcrf.net) will send you an email with a system generated password.
Use it to log in and reset your password to something you can remember easily, but that will
be hard for someone else to guess. Remember, Passwords are case specific. Don’t use
caps lock.
The email reads like this:
**** PLEASE DO NOT REPLY TO THIS MESSAGE ****
Dear XXXXXXXX,
This email confirms that your temporary password is the following:
Temporary Password: KOWoH8Ry
Please note this password is case sensitive and must be entered exactly as
it appears above.
Use this password the next time you login. After logging in, you will be
prompted to change your password.
For further inquires, please contact trial administrator.
**** PLEASE DO NOT REPLY TO THIS MESSAGE ****
13
Version 2.0 Revised 20041018
13
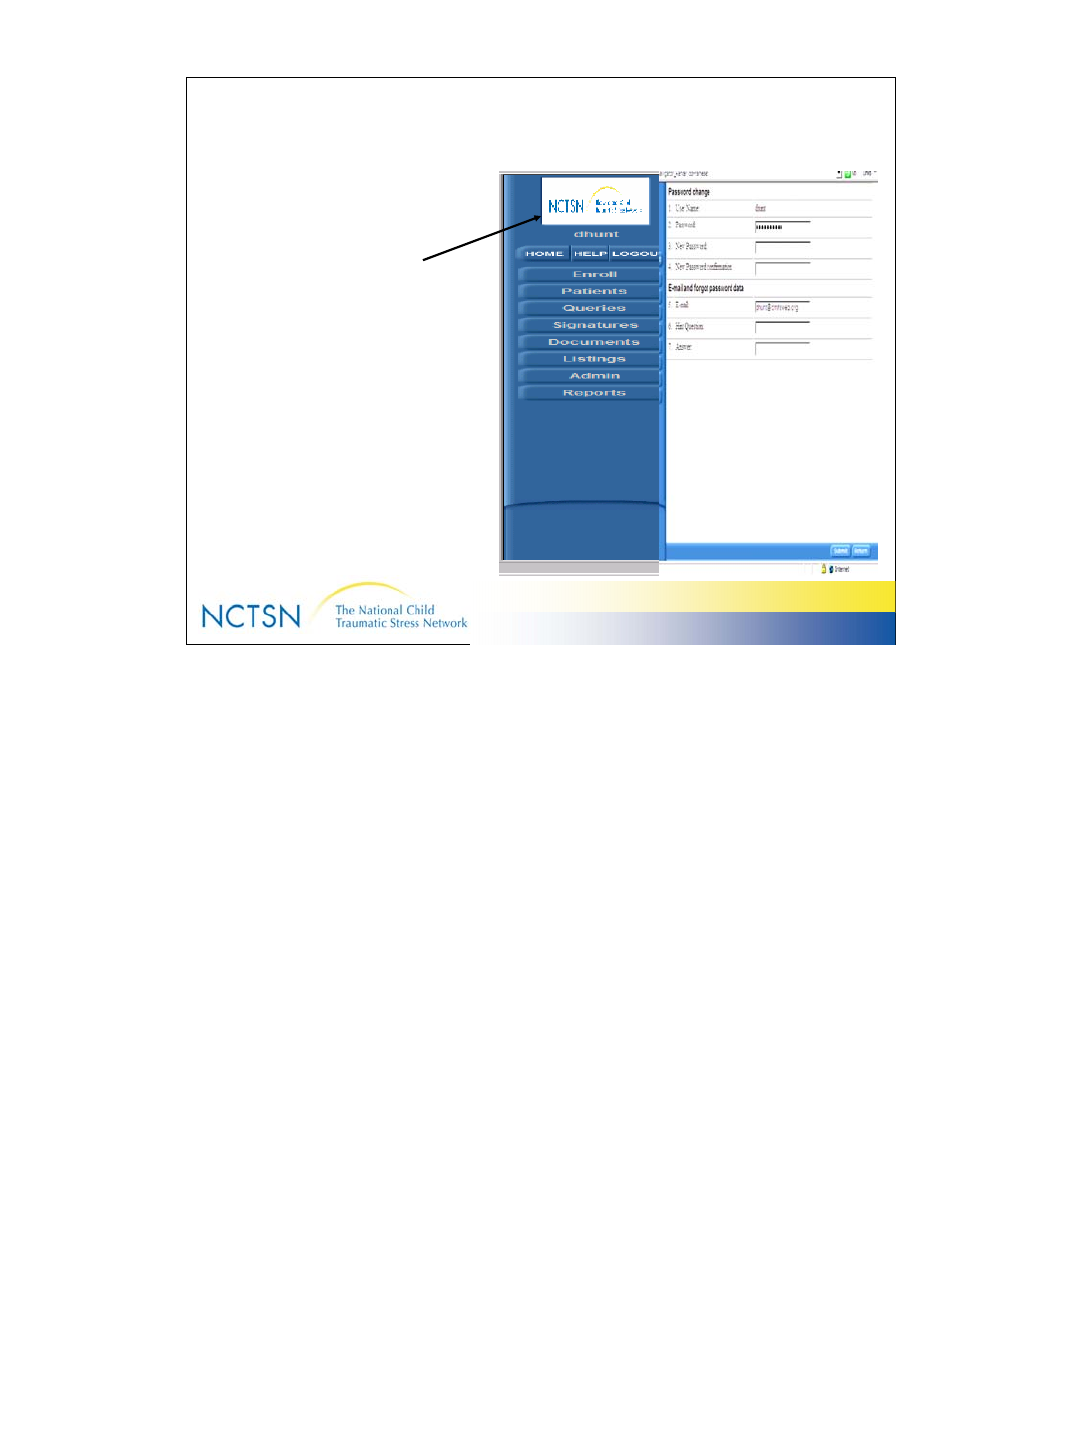
“At Will” Password Change
Use the NCTSN Logo on the
Home Page to change your
password if necessary.
1. Click the NCTSN logo
2. Enter your old password
3. Enter your new password
4. Enter your new password
again to “confirm” it
5. Enter a “Trigger” question that
will help you recall your
password in the event that
you forget it.
6. Enter the answer to your
question
14
Version 2.0 Revised 20041018
14
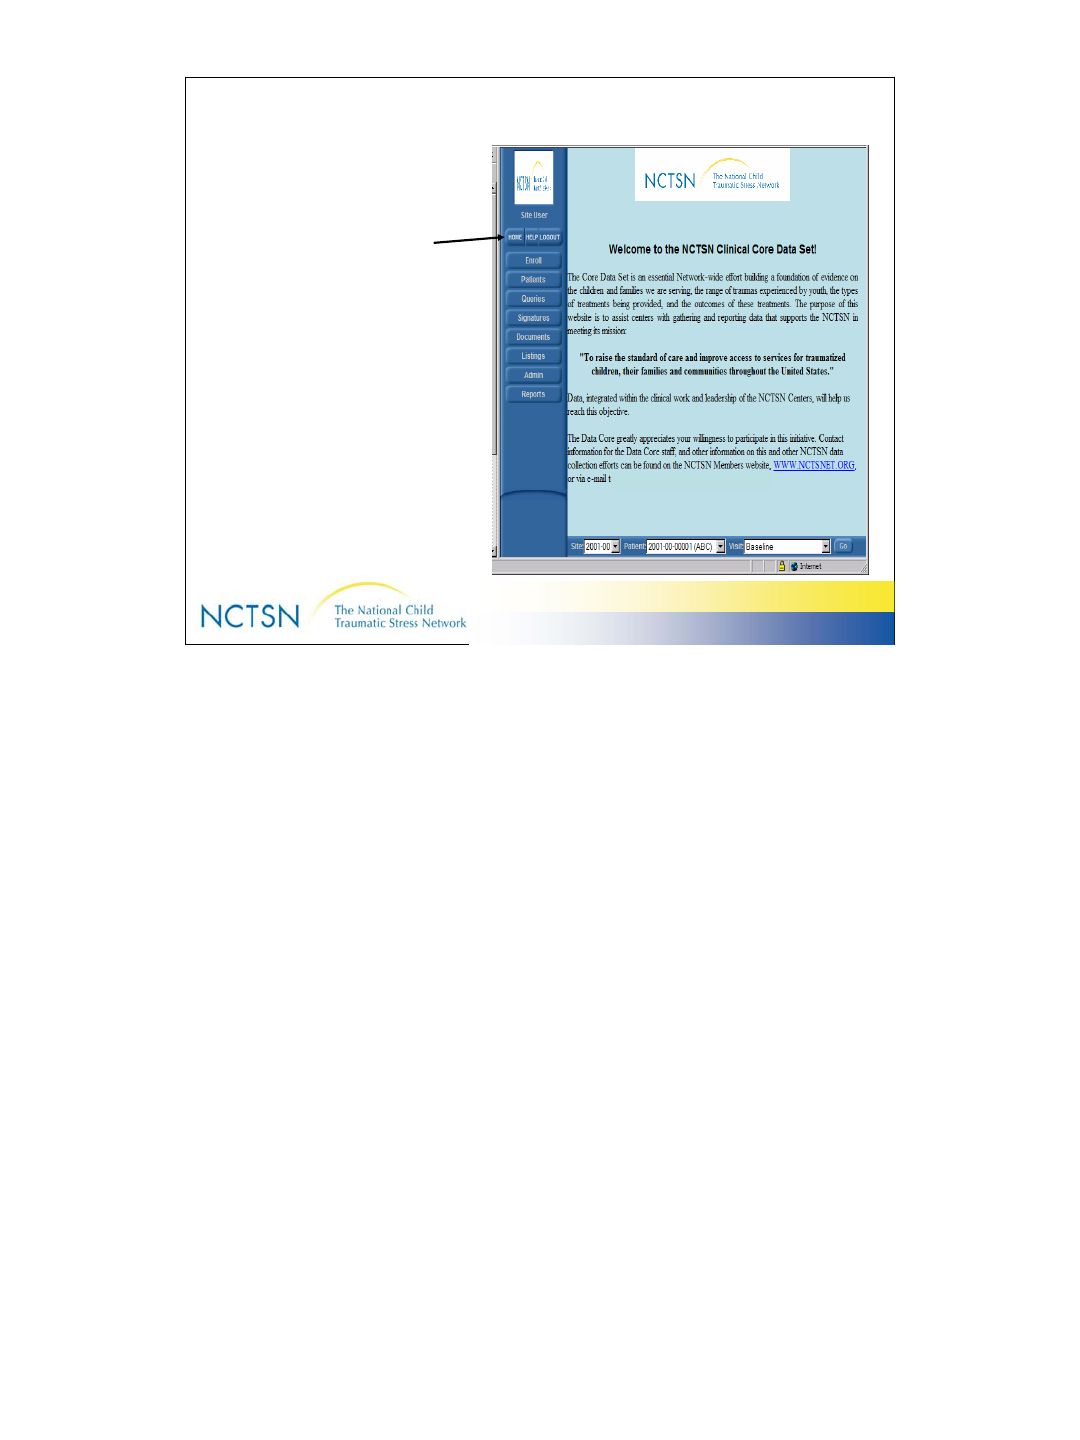
NCTSN Home Page
The HOME button takes you
to the NCTSN Core Data Set
Homepage
NCTSN@DCRI.DUKE.EDU
15
Version 2.0 Revised 20041018
15
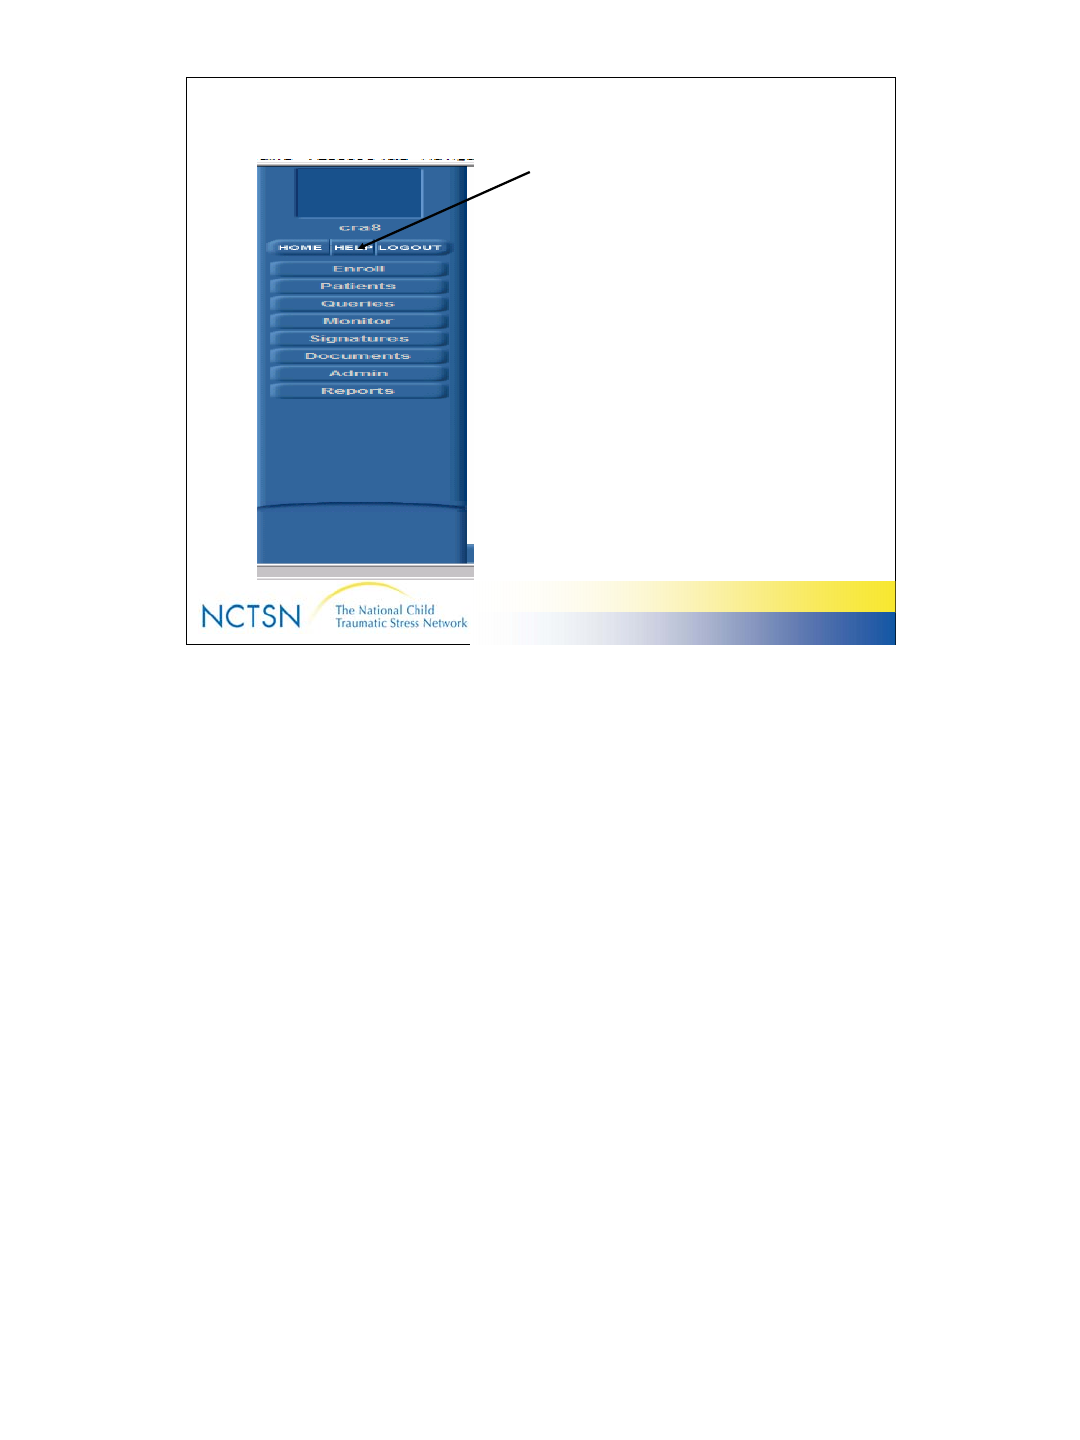
HELP!
If you have questions regarding the
InForm system, use InForm’s HELP
functionality to find your answers.
HELP button on the Navigation pane:
•Content view: Like the table of contents of a book; broad subject areas
(i.e. Chapter on “Meat” in a cookbook)
•Index view: Like the index of a book; more specific areas (i.e. Recipe for
Santa Fe Chicken)
Hover help: Hold your mouse button over an icon & note the descriptive
message that displays briefly
eHelp: Underlined text will often take you to a page with additional
information about that item
16
Version 2.0 Revised 20041018
16
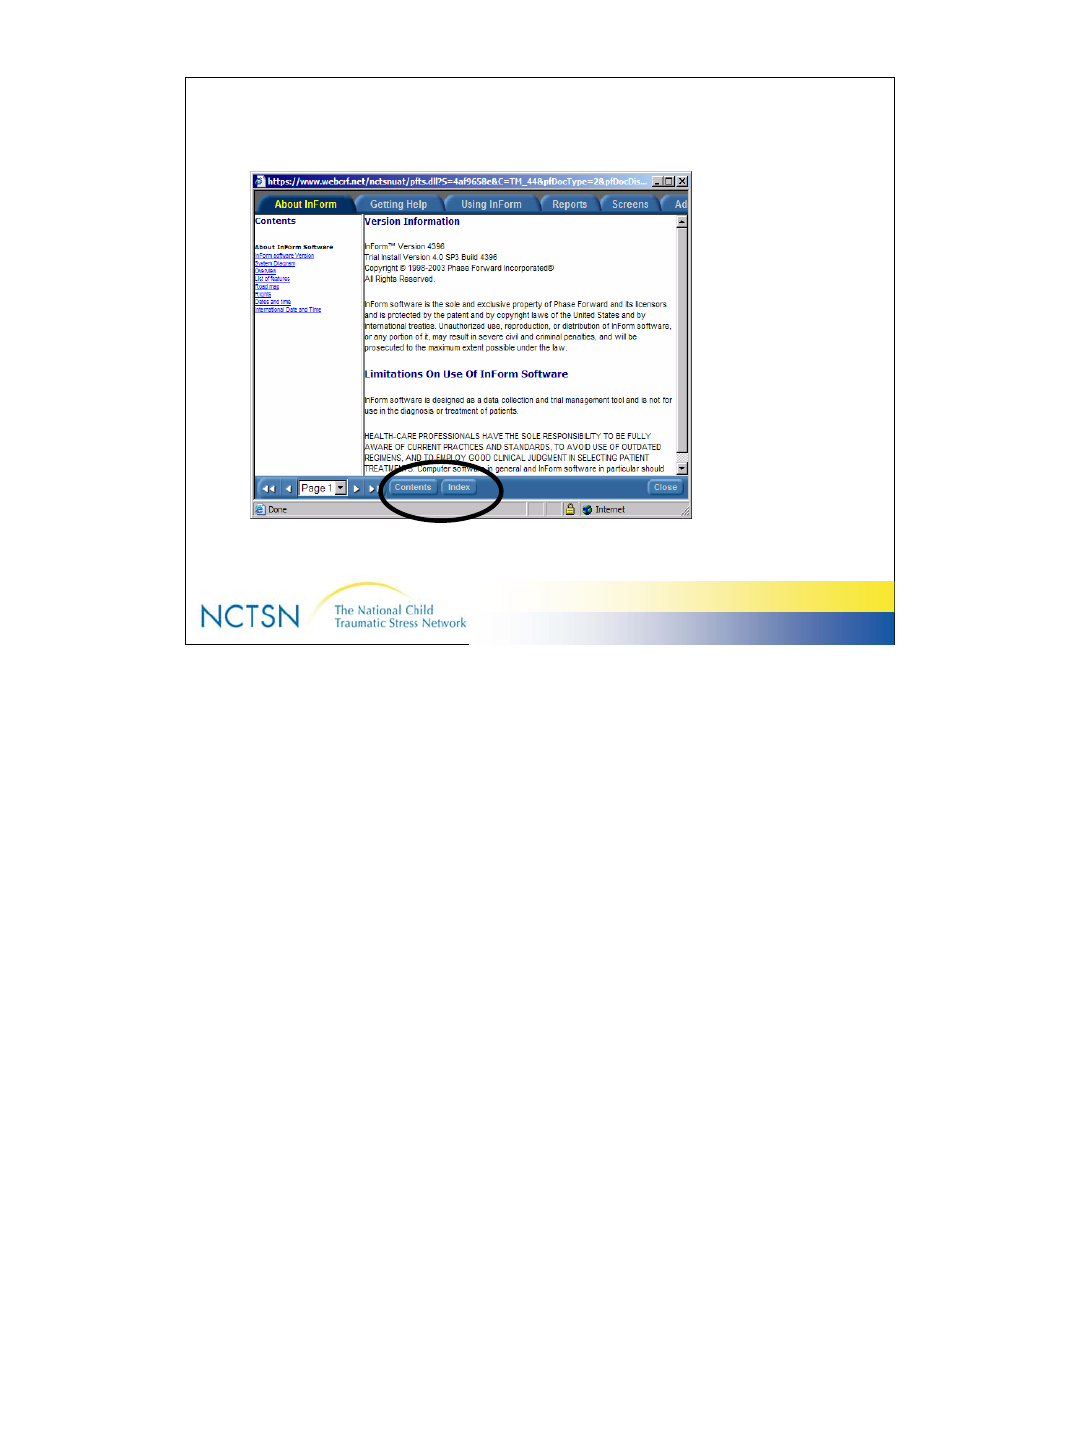
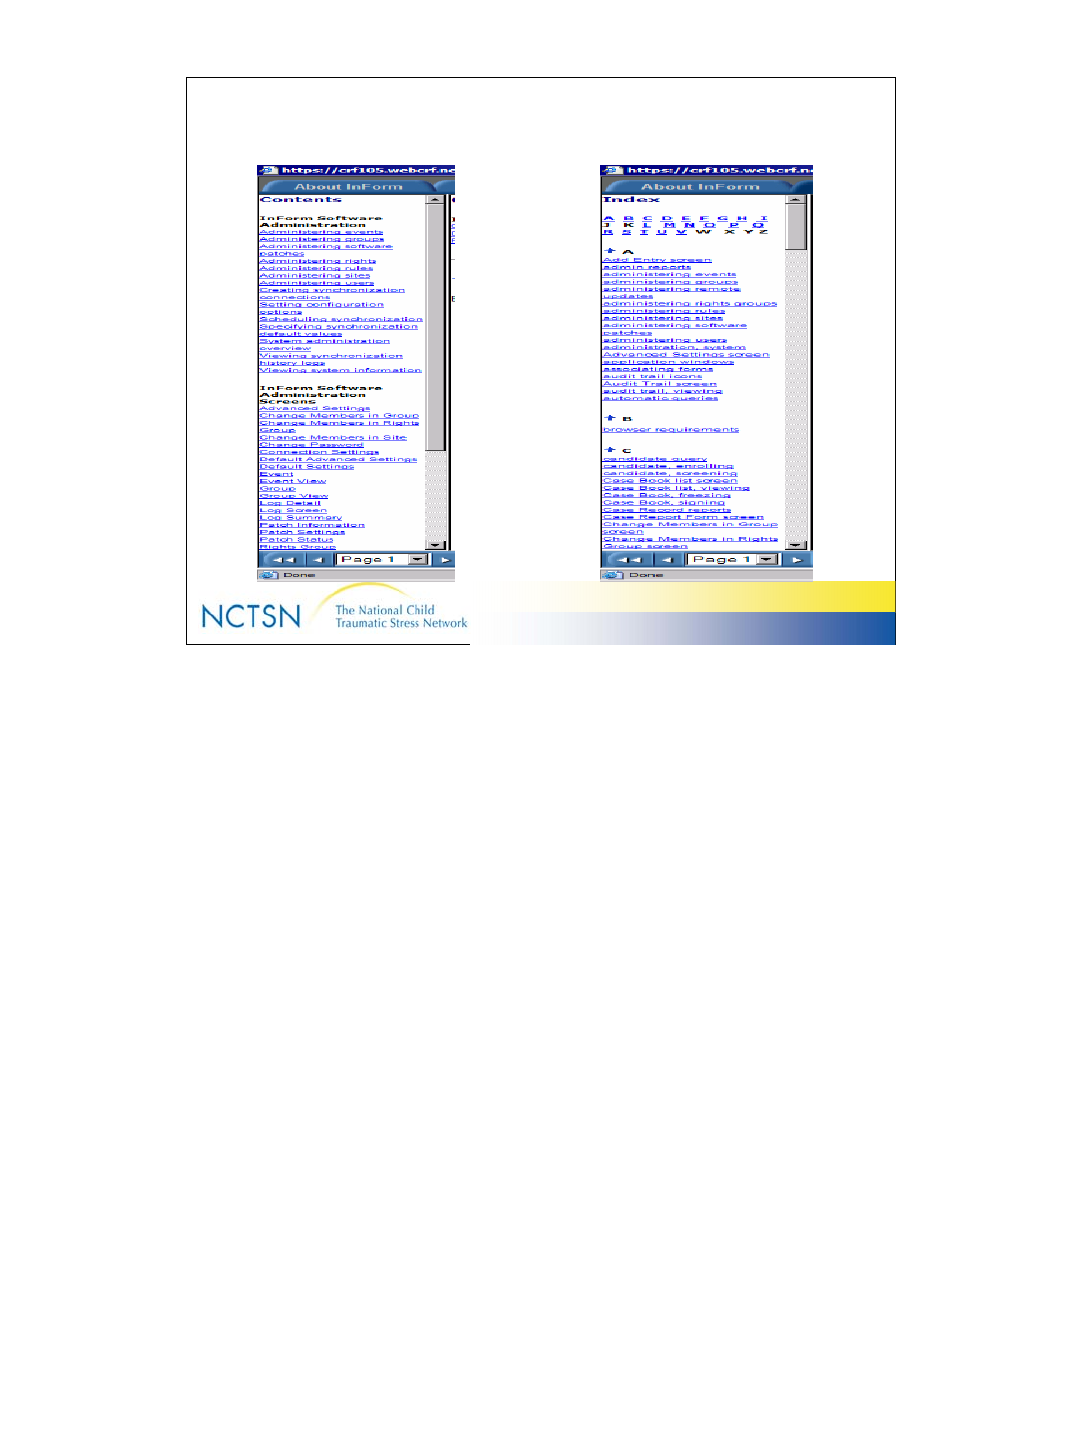
HELP!
Find topics using the “Table of Contents” view or the
“Index” view.
17
Version 2.0 Revised 20041018
17
HELP
Table of Contents View Index View
18
Version 2.0 Revised 20041018
18
Hover Help
Position your mouse over any button, icon, or underlined text. A message
describing it displays for a short time then disappears.
The examples on this slide display when you hover over a Traffic Light,
underlined patient ID # or the ‘Reports’ button. There are many other
locations where “Hover help” is available.
19
Version 2.0 Revised 20041018
19
eHelp
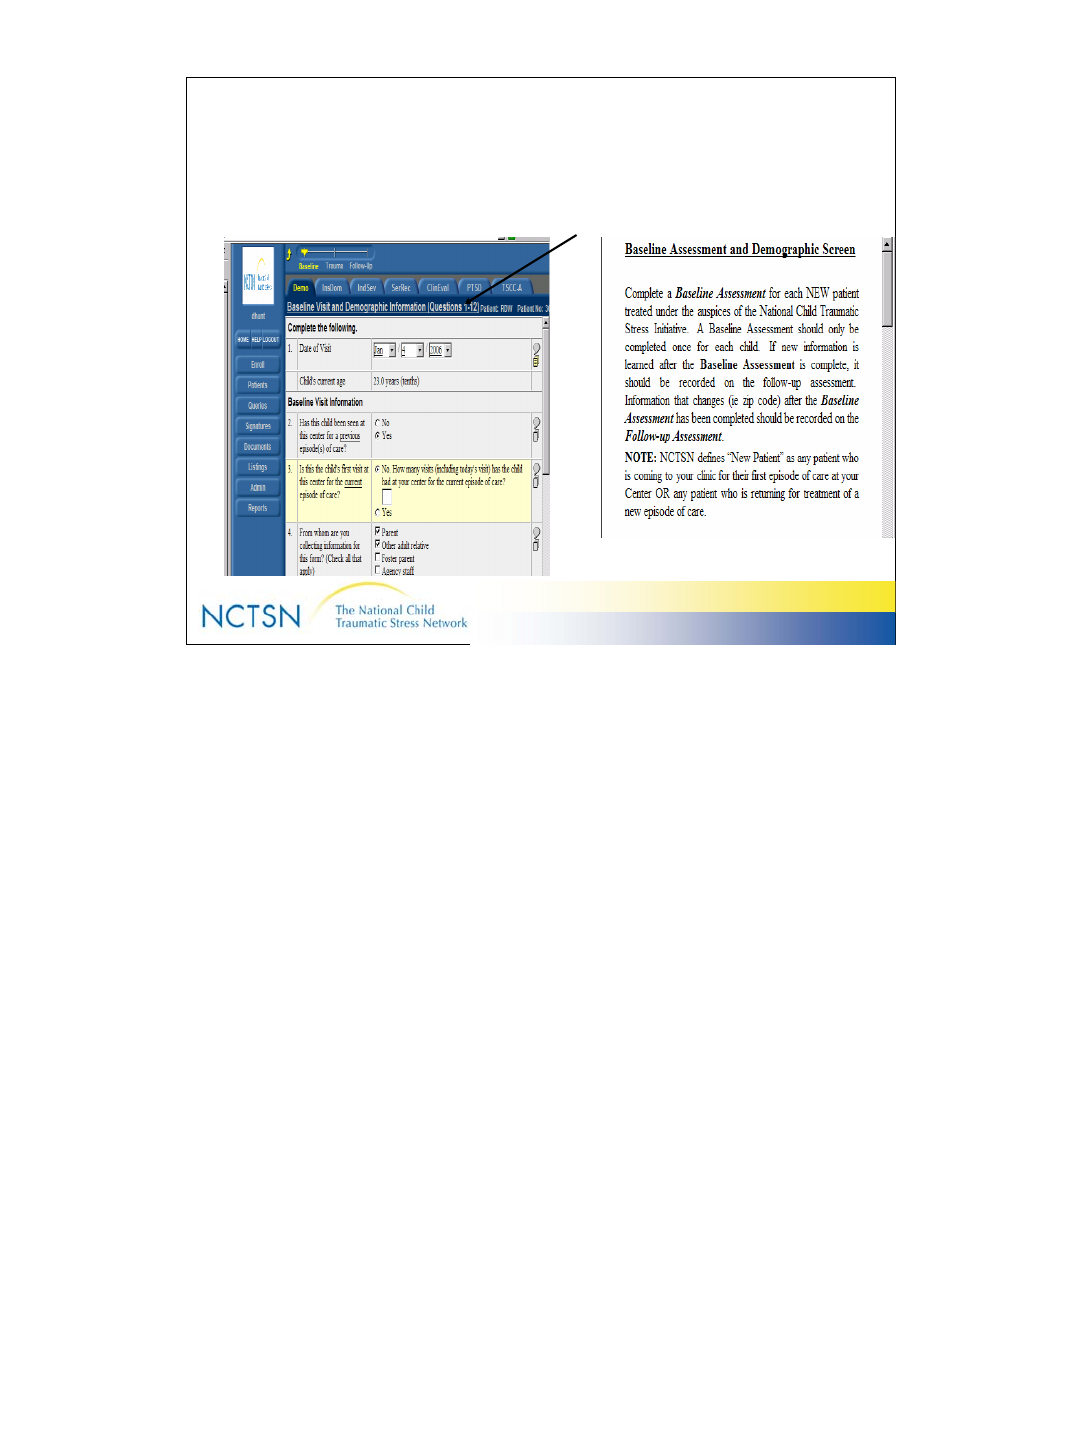
Underlined text often take you somewhere else in the system.
Click this one to go to information about the Baseline Visit and Demographics
screen.
20
Version 2.0 Revised 20041018
20
HELP with NCTSN-specifics
21
Version 2.0 Revised 20041018
21
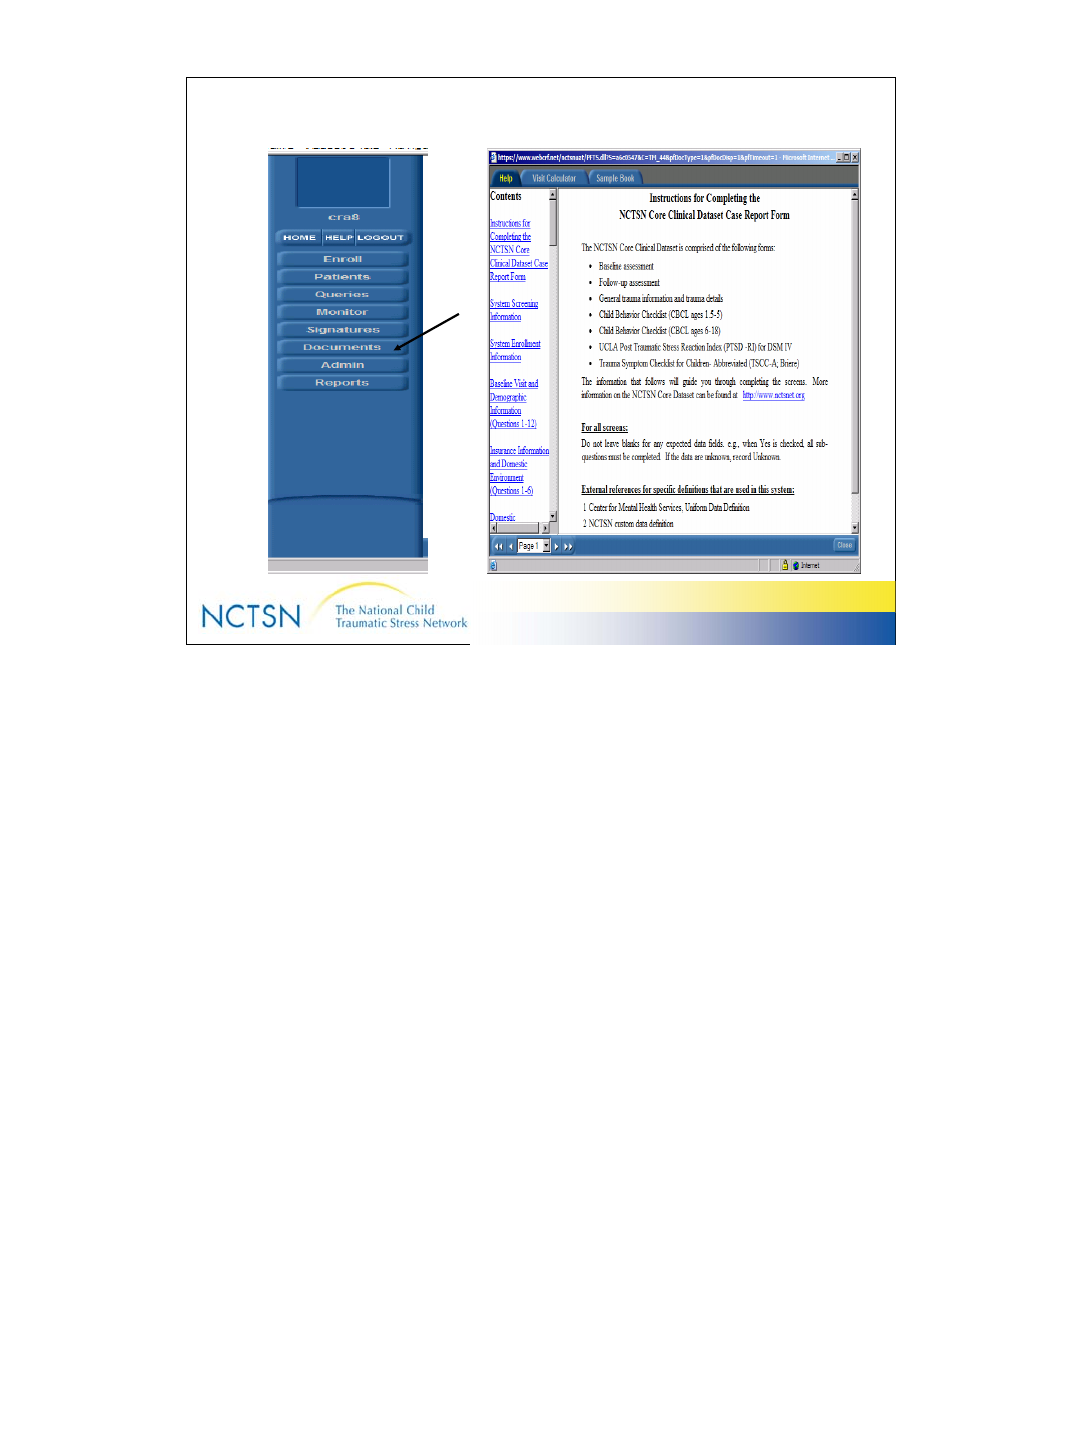
LogOut
Use the Log-out button to tell
InForm that you’ve finished
using the system.
–NOTE: Closing your
Internet Browser
window does NOT log
you out of InForm.
22
Version 2.0 Revised 20041018
22
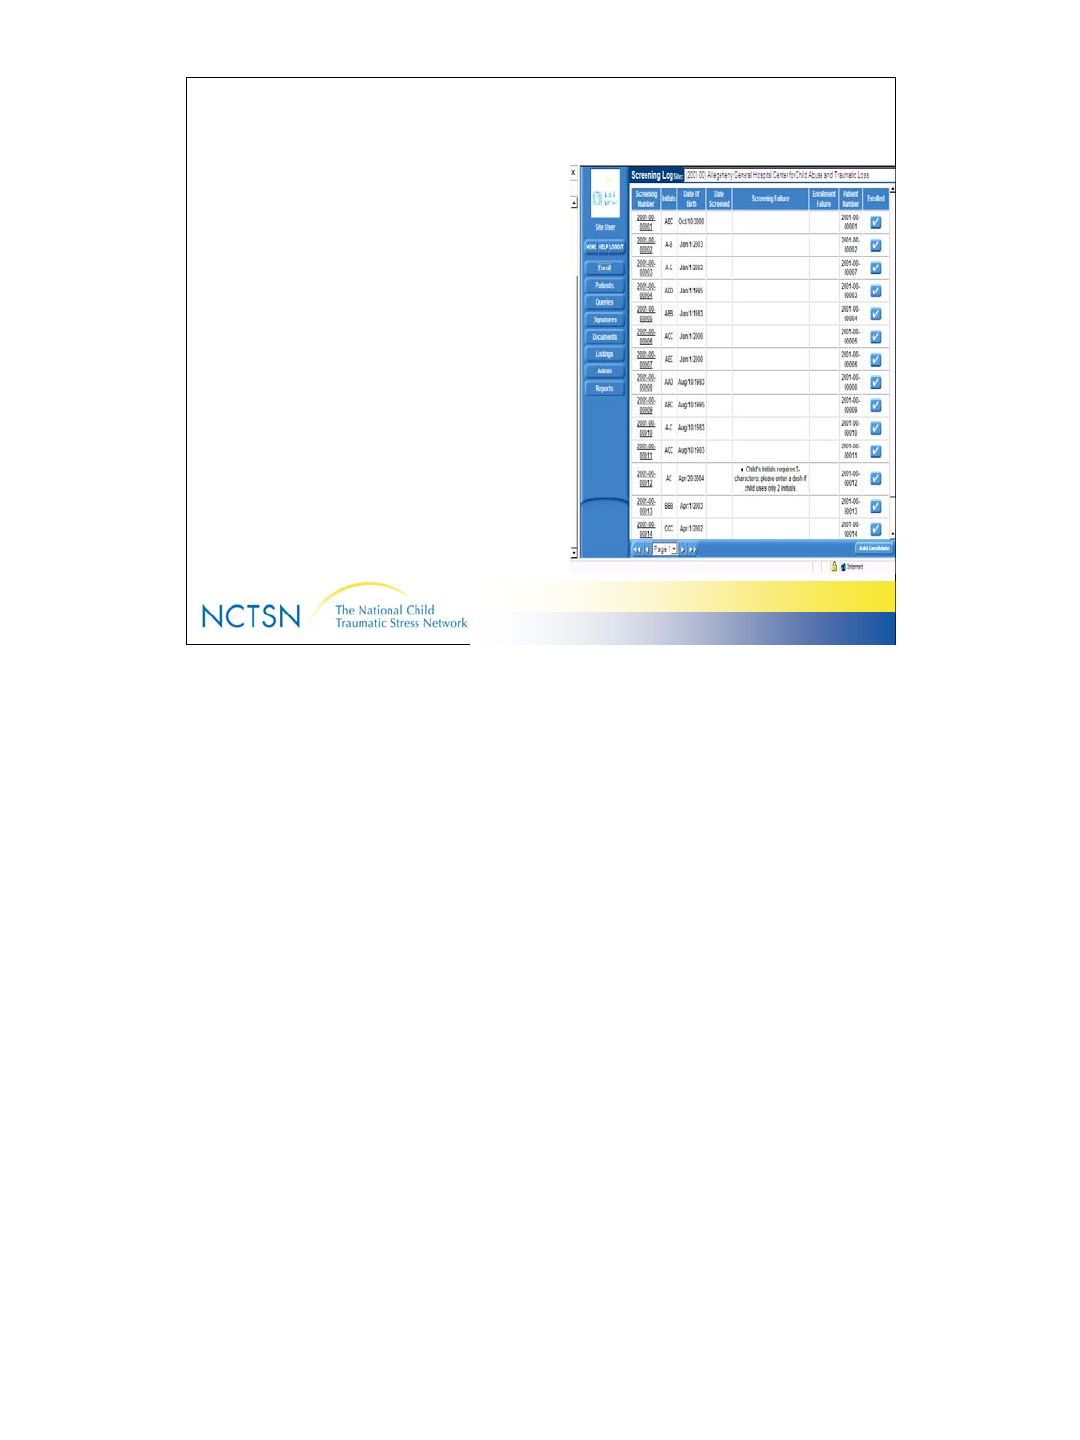
Enroll a New Client
Screening and enrolling is the process
InForm uses to create an electronic
Case Book for the clients who will
participate in the Core Data Set.
Follow these steps:
Click Enroll on the Navigation pane
Click Add Candidate in the bottom right corner of the screen
Enter the client’s initials, date of birth & gender
Click Submit
Find your client in the list & click the Enroll button on the far right
Select the checkbox asking if you want to Enroll this client and click Submit.
Click Enroll on the bottom of the screen if you want to proceed.
Note: The Patient Number is your Center ID + Subcenter id (if applicable, or
00) + sequential number generated by the InForm beginning with 00001.
The screening number is created first as a placeholder until the Enrollment
process is complete.
Note: To see the enrollment information for your client from other screens in
the system, follow these steps:
1. Click the “Enroll” button in the Navigation pane & see the “Screening
Log”
2. Click the underlined Screening Number for your patient
23
Version 2.0 Revised 20041018
23
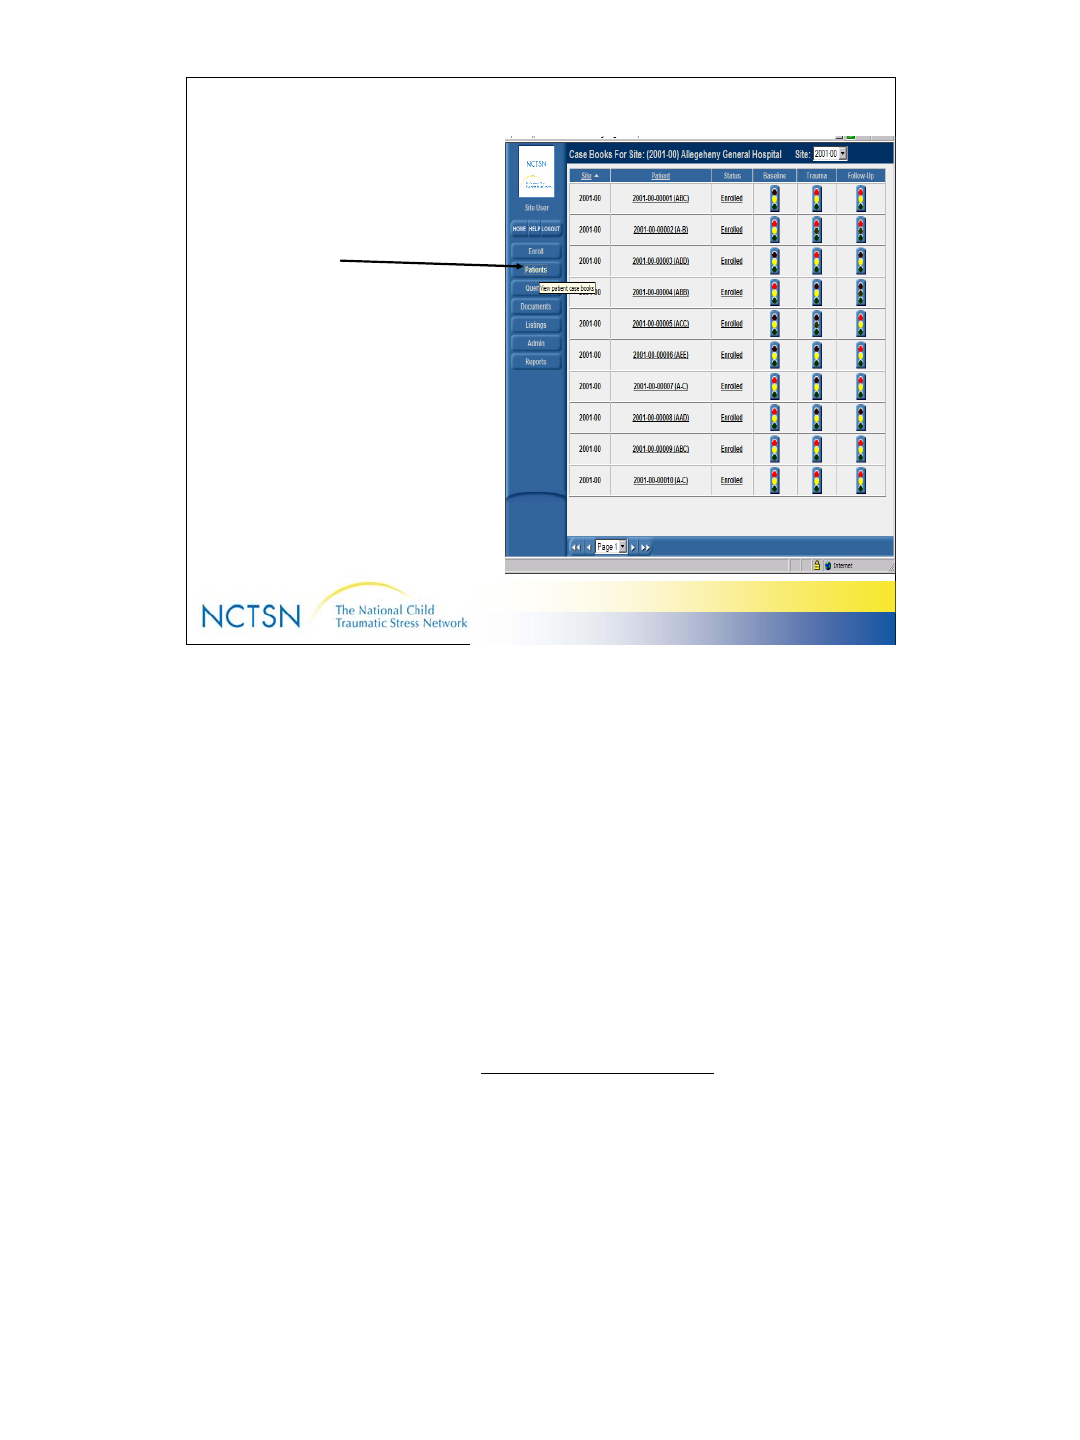
Patients = Clients
Click the ‘PATIENTS’ in the navigation
pane to see the list of all clients from
your Center who are enrolled in the
Core Data Set.
Note: You can see the following at a glance:
•List of Clients/children who are enrolled from your Center
•The Visits for which they have data entered (Baseline, Trauma, Follow-up)
•The status of their data (Traffic lights)
If you are responsible for clients at multiple Centers, select the Site of choice
or “All” from the dropdown box in the top right corner of your screen to see
more clients.
Note:
A click on the patient number (ie 2001-00-00004 (ABB) ) takes you to the
Time and Events schedule where you see complete list of forms for that
patient
A click on a traffic light takes you directly to the data entry screens for that
Visit
24
Version 2.0 Revised 20041018
24
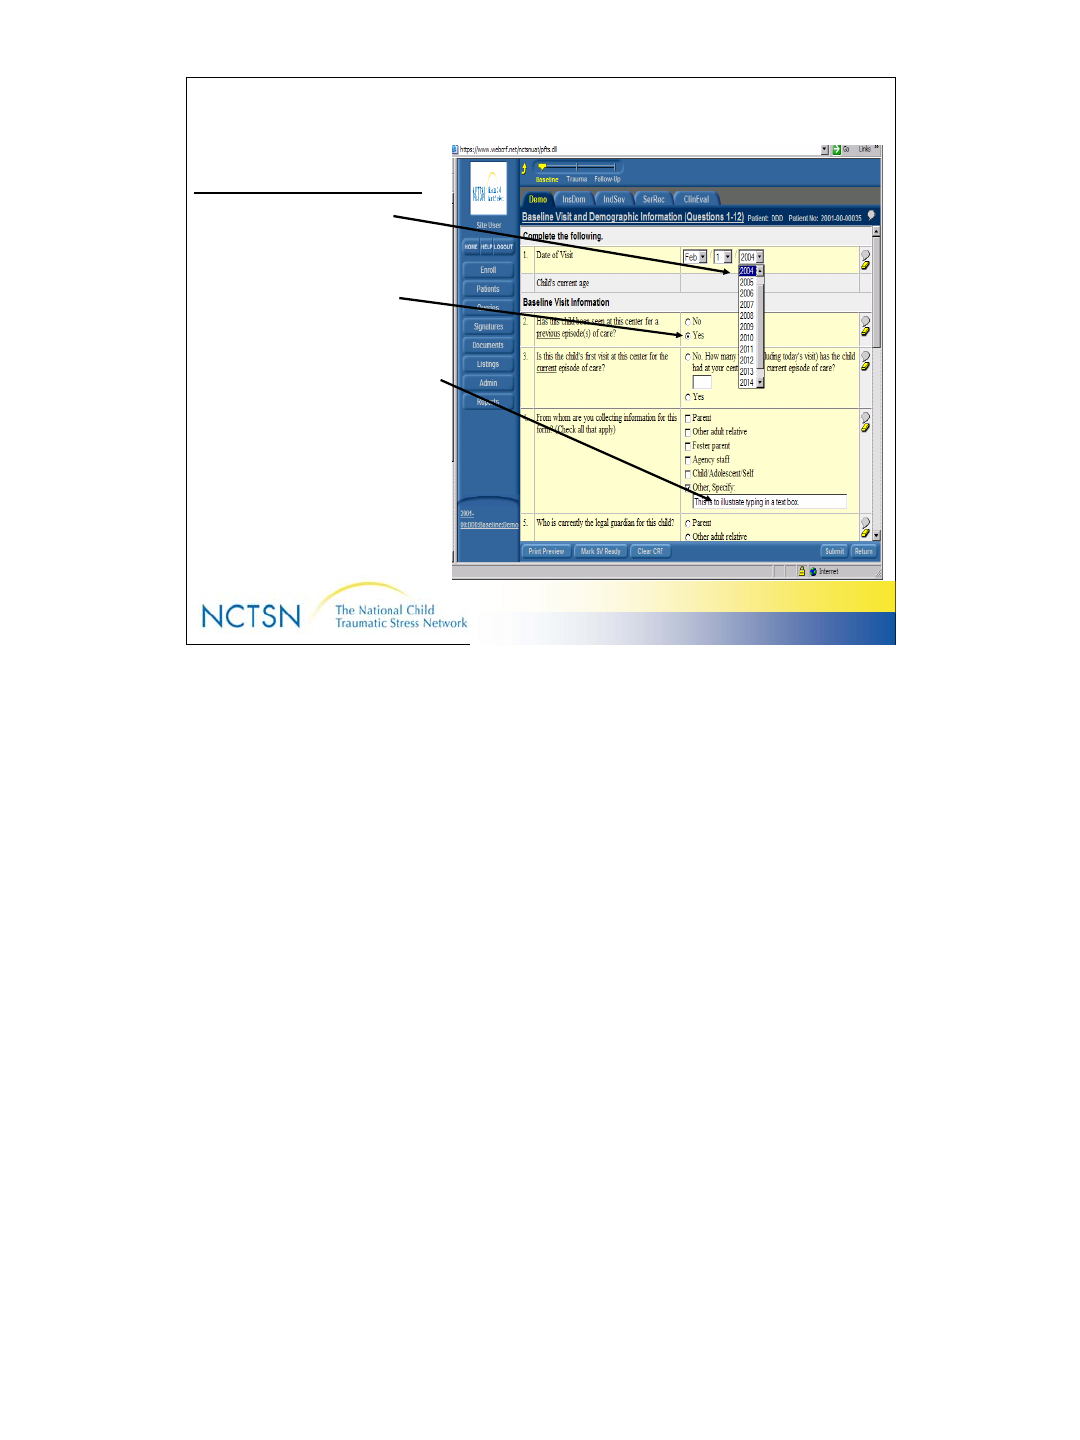
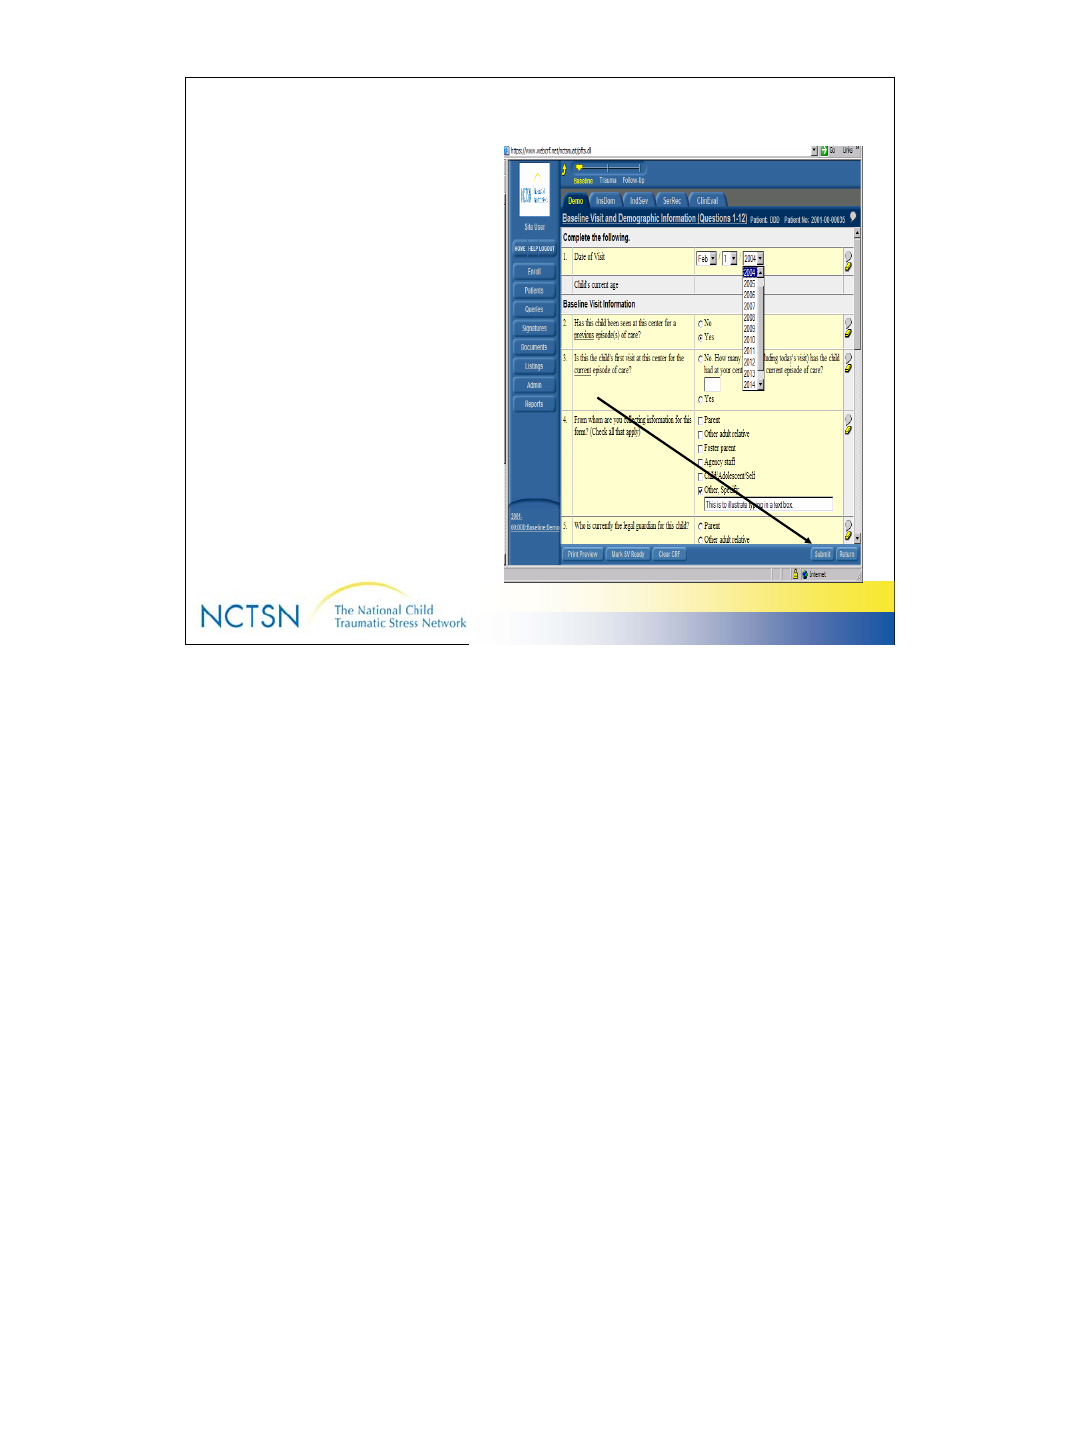
Enter Data
3 ways to Enter data
1. Select from Drop Down
Box
2. Click on a Radio Button
3. Type into a Text Field
25
Version 2.0 Revised 20041018
25
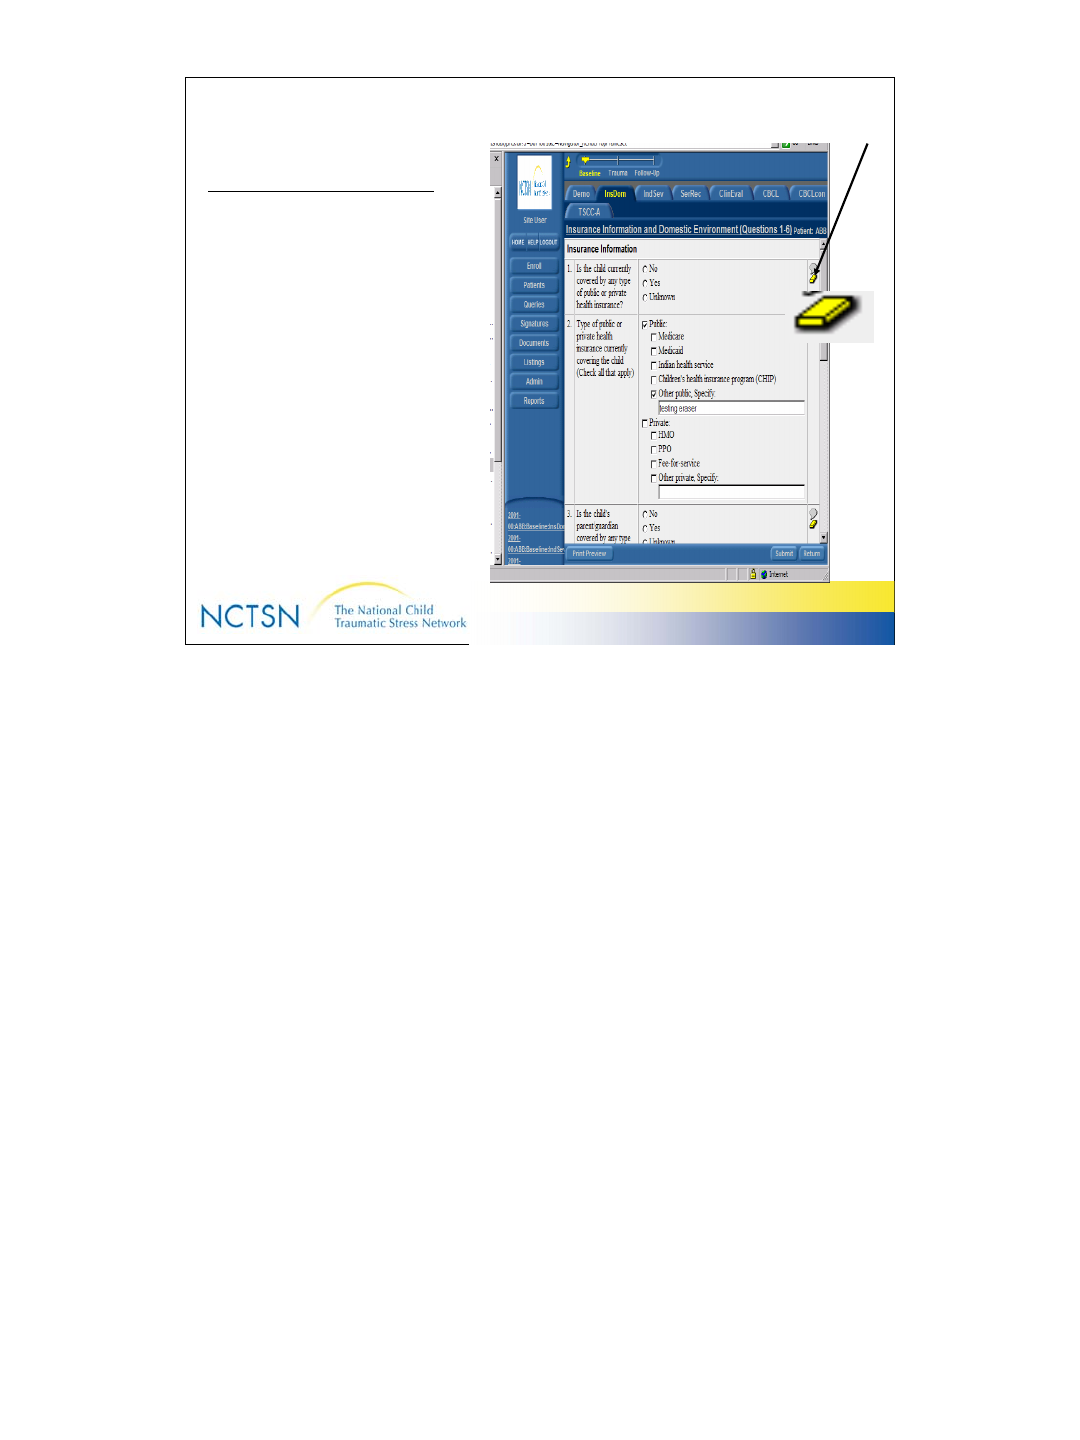
Edit = Change
3 ways to CHANGE data
1. Click the data field and
backspace over the current
entry
2. Highlight the incorrect
entry and use the Delete
key on your keyboard
3. Click the Eraser Icon
(looks like a Bar of Gold or
Bar of Butter)
26
Version 2.0 Revised 20041018
26
Submit = Save
• The Submit button is the
method used for sending
data to the InForm
database.
• Packets of information are
encrypted and sent across
the Internet to the InForm
server
27
Version 2.0 Revised 20041018
27
Submit = Save
• Microsoft sends a
confirmation message that
lets you know the data
reached the database
successfully
• Click OK to continue

28
Version 2.0 Revised 20041018
28
Navigate through InForm
PATIENTS button
Click to see a list of all clients
enrolled from your Center
Patient Number
Click to see the Time and Events
Schedule (all forms for that client)
Traffic Lights
Click to go to a specific set of forms
Arrows beside the Page Number
Click to display additional clients
who have been enrolled by your
Center.
29
Version 2.0 Revised 20041018
29
Navigate through InForm
Yellow Arrow Up
Click to see the Time and Events
Schedule
Visit Ruler Bar
Click to go quickly to each set of forms
(Baseline, Trauma & Follow up)
Tabs
Click to move on to a new form (screen)
List of most recently used records
Click to see recently used forms for a client
30
Version 2.0 Revised 20041018
30
Time and Events Schedule
A “Tree-top” view of all forms (eCRF’s) for a particular patient
From the data entry screen, click the
“Yellow Arrow Up’ to display it.
From the list of patients, click the
patient’s number (ie “1001-00-00002”)
to display it.
The “Yellow Arrow Up” is located beside the Visit Ruler Bar in the top right corner of
the eCRF’s (data entry screens).
Click a traffic light to go to a specific eCRF
31
Version 2.0 Revised 20041018
31
Visit Ruler Bar
Takes you quickly to sets of forms/screens
Baseline: Collected near the beginning of treatment.
• Demographics
• Insurance & Domestic Environment
• Indicators of Severity
• Services Received
• Clinical Evaluation
• Standard assessments (PTSD,
TSCC-A, CBCL)
Trauma: Completed at baseline & updated during
treatment as new information is learned.
• General Trauma Information
• Trauma Details
Follow-Up: Completed during and at the completion of
treatment
• Follow-up visit information
• Treatment by NCTSN Center
• Standard assessments (PTSD,
TSCC-A, CBCL)
Instructions about completing each set of forms are found by clicking the
“Documents” button on the navigation pane. See slide #20.
Click a traffic light to go to a specific eCRF
32
Version 2.0 Revised 20041018
32
Tabs
Take you quickly to a new form (screen)
Tab names are abbreviated names of the forms. Each tab corresponds to a
particular section of the Core Data Set.
These tabs are examples of those found in the Baseline Visit:
Demo = Demographic information
InsDom = Insurance & domestic environment
IndSev = Indicators of severity
SerRec = Services received
ClinEval = Clinical evaluation
CBCL = Child Behavior Checklist
Refer to the Time and Events Schedule in InForm to see a complete list of
Form names and abbreviations found on the Tabs.
To reach the Time and Events Schedule from a Data entry screen:
Click the “Yellow Arrow Up” located at top of the screen beside the Visit
Ruler Bar located near the top of your screen.
To reach the Time and Events Schedule if you’re not on a data entry
screen:
Click Patients
Click the underlined patient number
To reach a data entry screen from the Time and Events Schedule:
Click a traffic light by the intended form under the intended visit (Baseline,
Trauma, or Follow-up)
33
Version 2.0 Revised 20041018
33
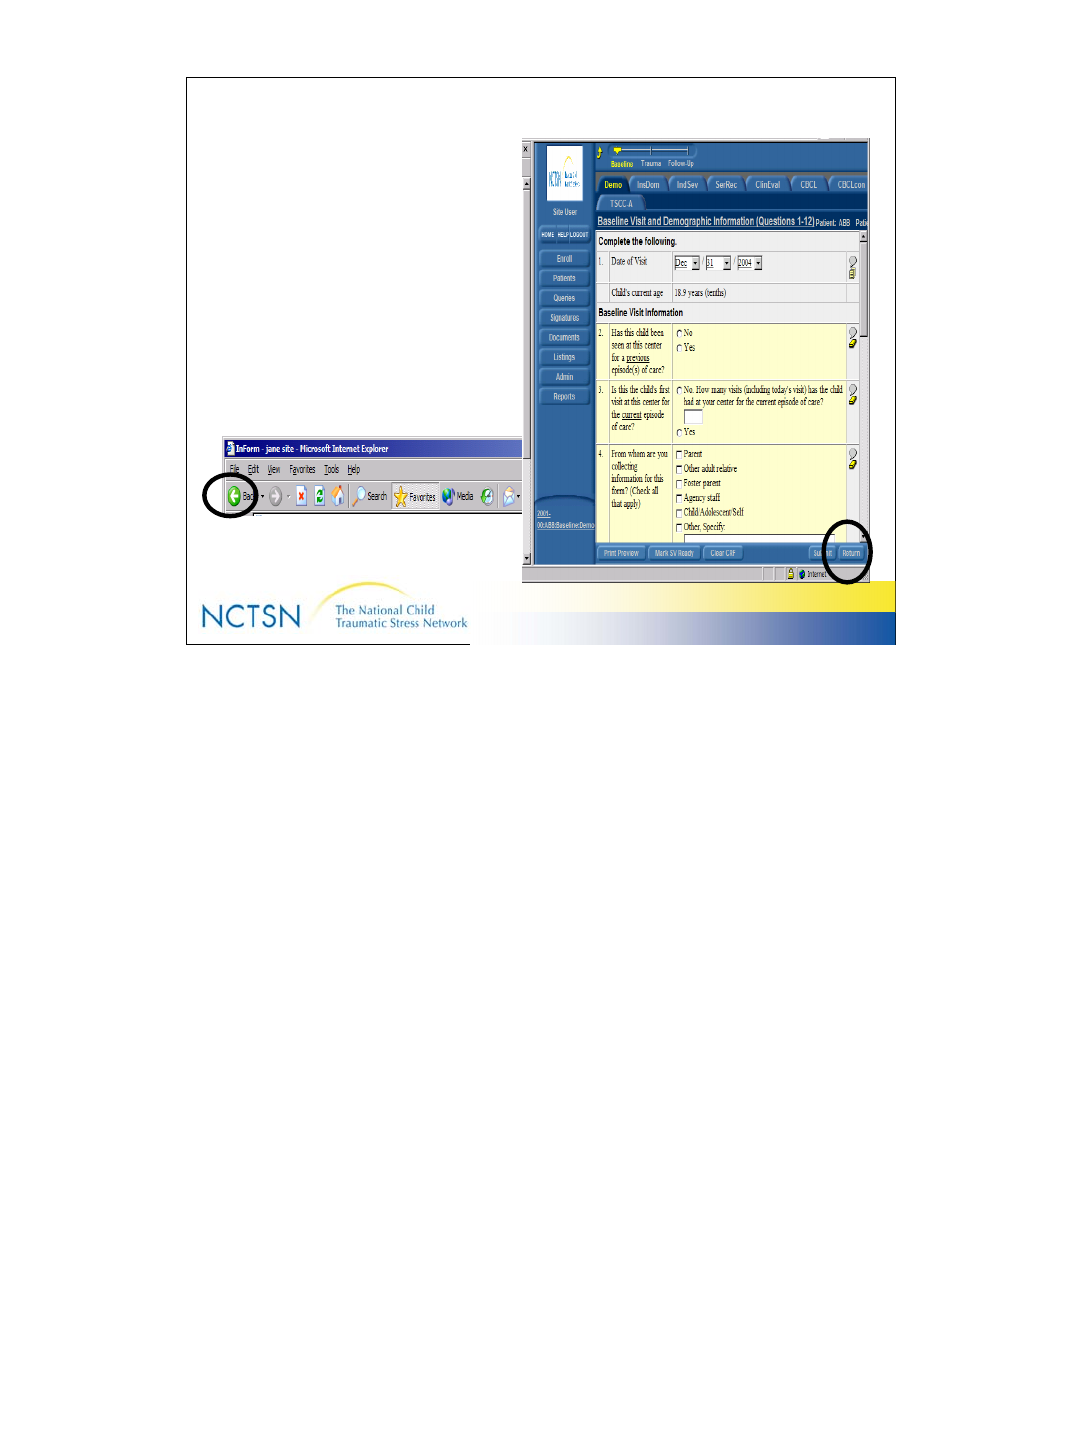
Return = Back
RETURN takes you back to
the screen you were using just
prior to the current screen.
• It’s the same as the “Back”
button/green arrow on your
Browser toolbar.
Use the Return button in InForm; do not use the Back button on your
Browser toolbar.
34
Version 2.0 Revised 20041018
34
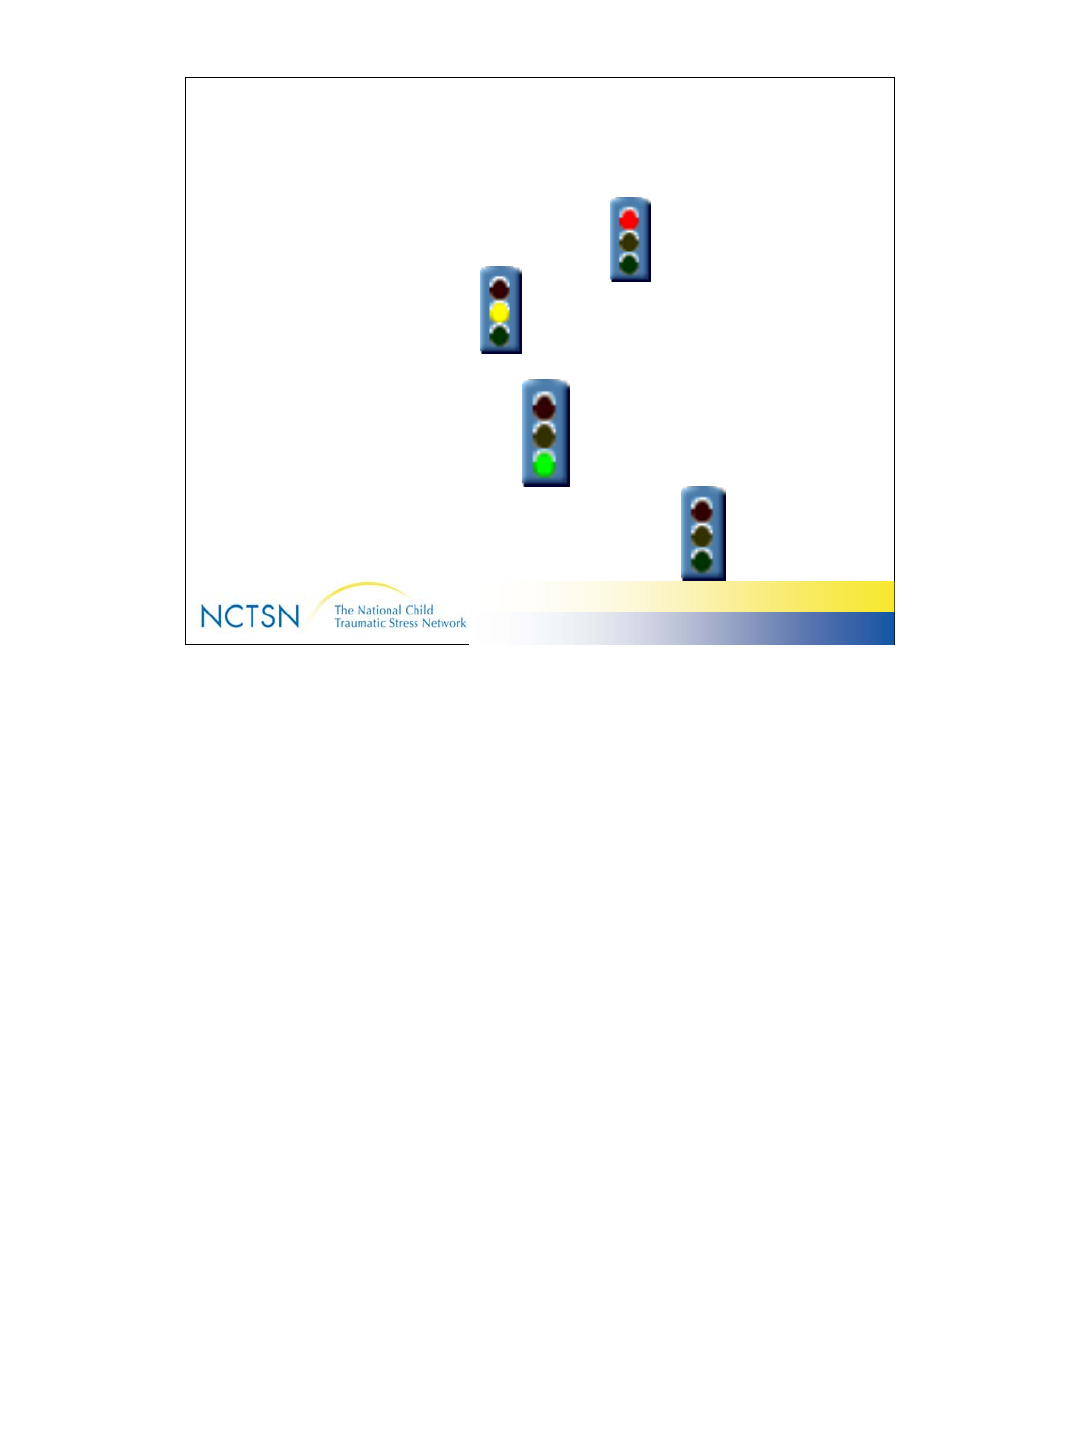
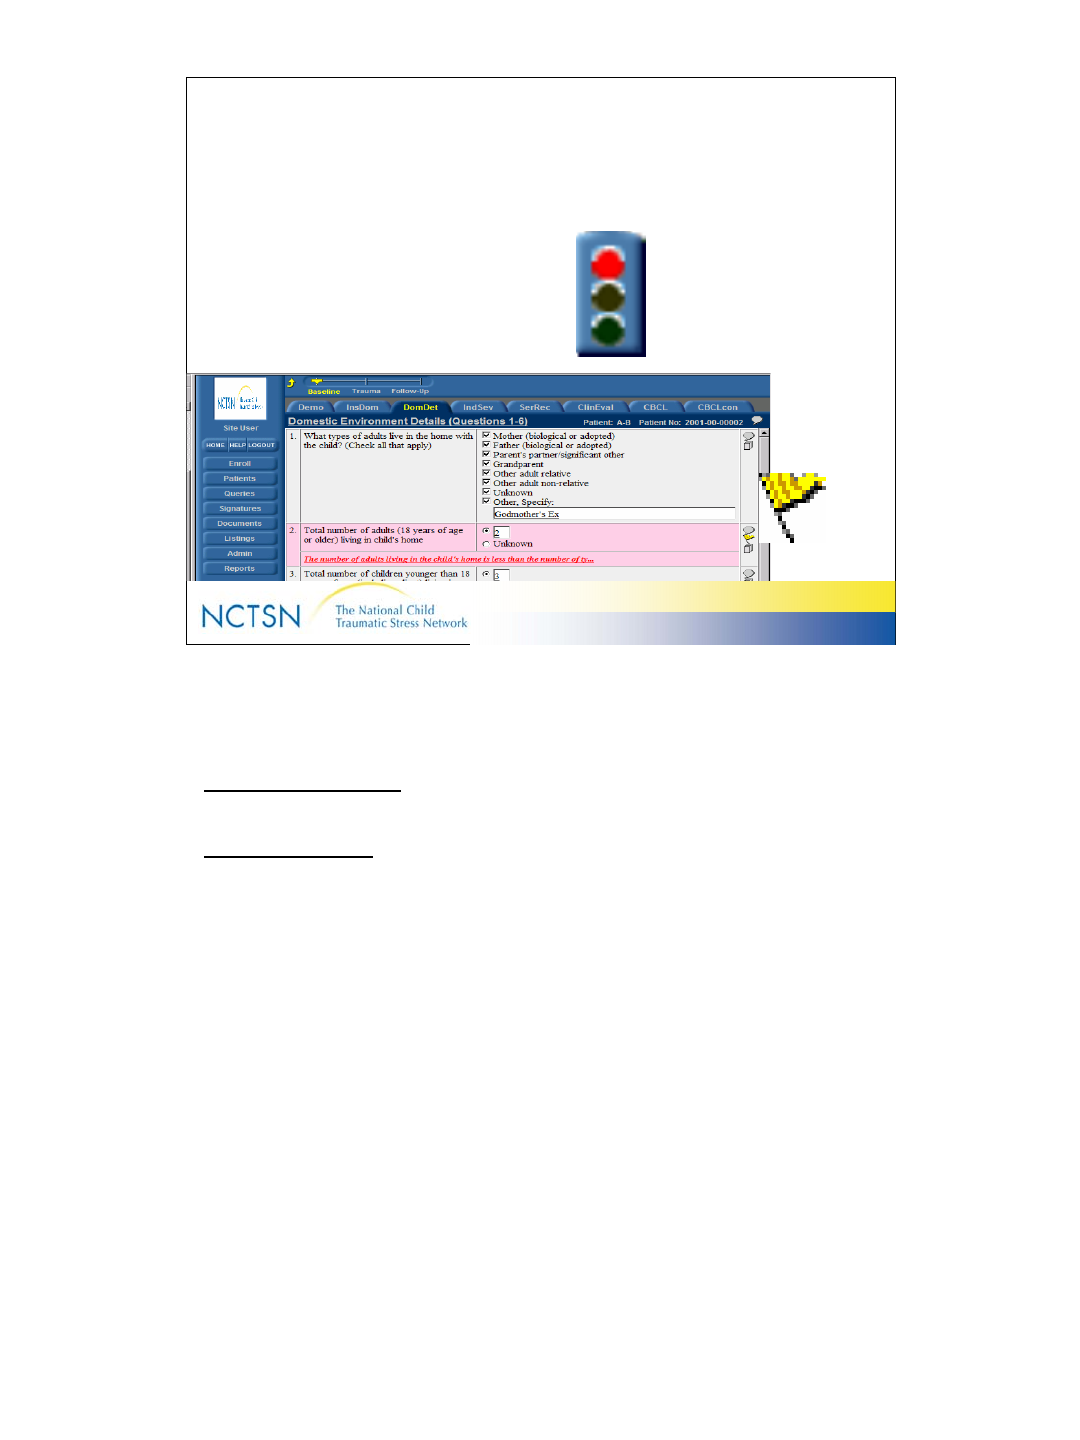
Traffic Lights
Traffic lights tell you the status of the data
–Red light = Query/Question about the data
–Yellow light = Missing data
–Green light = Form is Complete.
–Black light = No data has been entered on that form.
35
Version 2.0 Revised 20041018
35
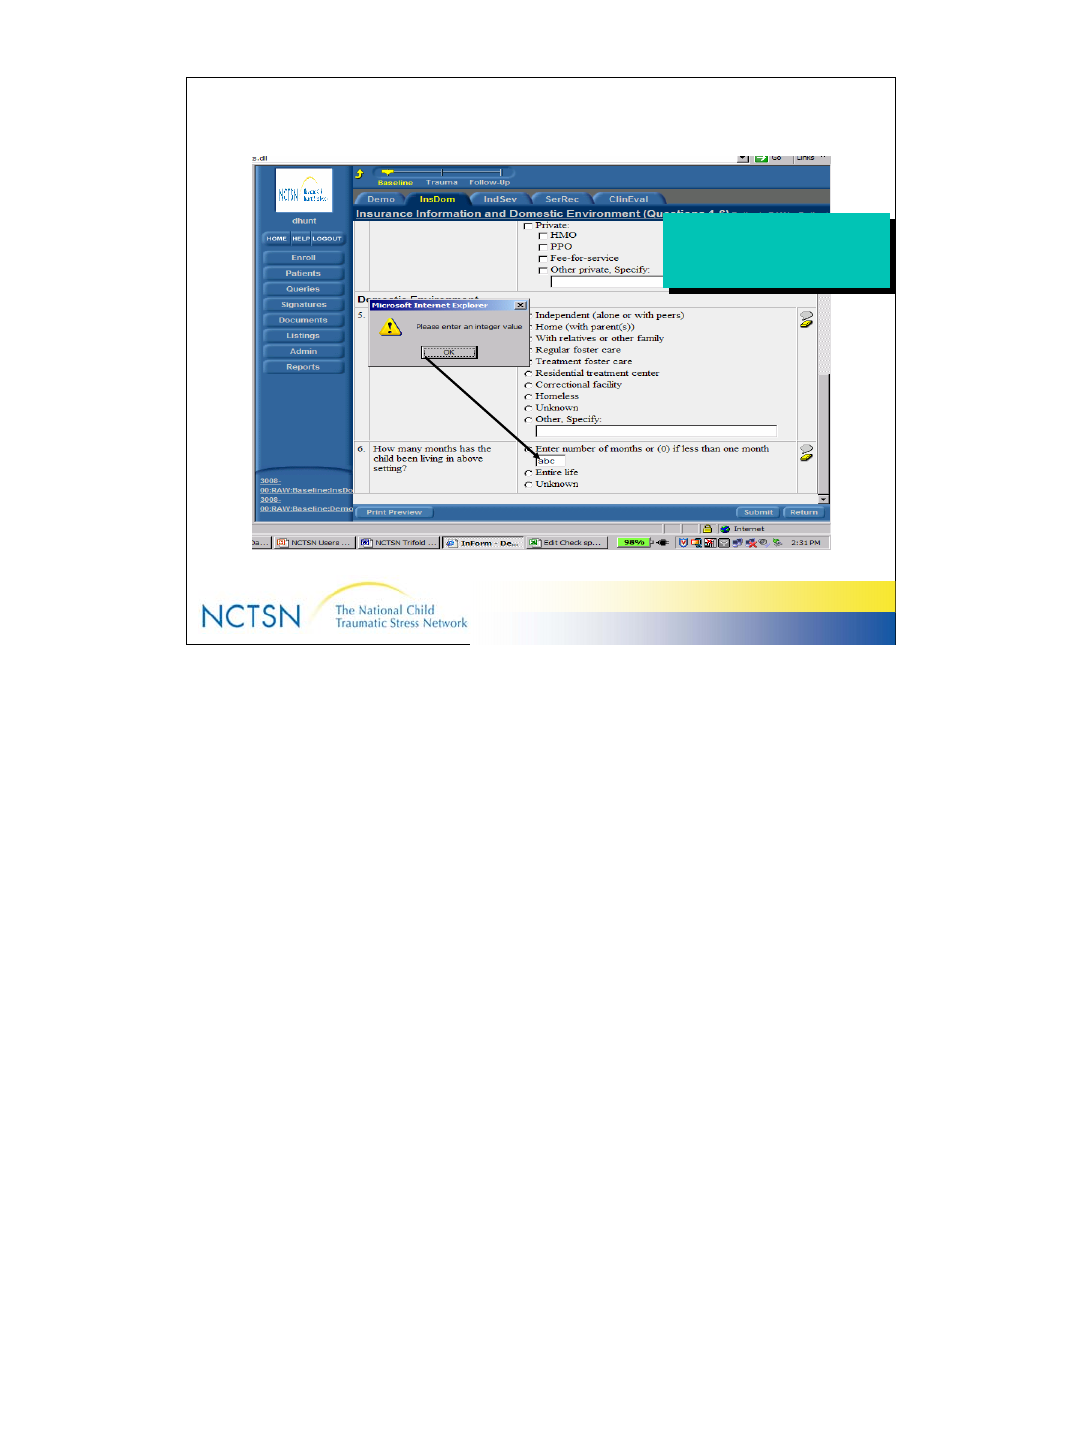
Data Validation
Users are alerted
immediately to data
format discrepancies
Users are alerted
immediately to data
format discrepancies
•Prevents data submission until data are corrected
•Ensures data format is correct
Numbers vs. Characters
Decimal requirements
Valid Ranges
36
Version 2.0 Revised 20041018
36
Queries
3 ways to know you have a query:
– Red traffic lights
– Red data fields
– Yellow flag
Queries are “Questions about the data”.
Two types of Queries
Automatic Queries - generated when you submit data that lies outside
the parameters set for that data item.
Manual Queries - created by Data center and issued for Centers to
review
37
Version 2.0 Revised 20041018
37
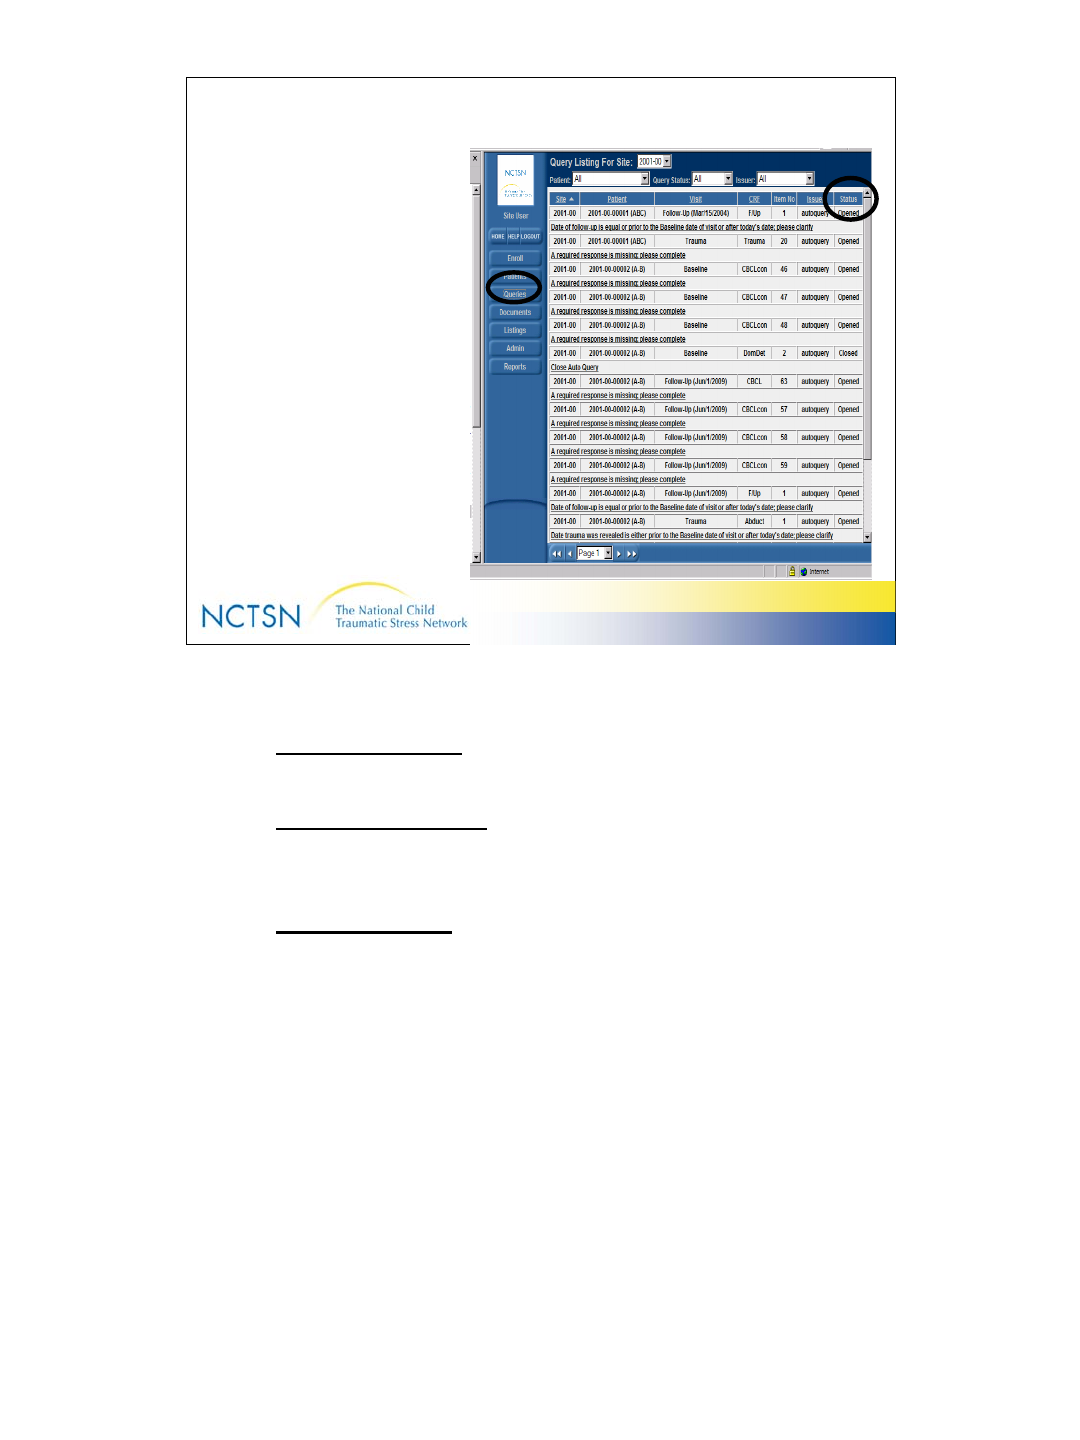
Status of Queries
3 possible states of queries:
– Opened
–Answered
– Closed
Click the “Queries” button on
the Navigation pane to
see a list of queries for
your Center. There may
be more than one query
for each patient.
Status is found in the far
right column.
Queries have the following states:
Opened Queries
Active queries awaiting a response by Center personnel
Answered Queries
Queries which have been responded to by Center personnel
and are awaiting review by the NCTSN Data Center
Closed Queries
Queries which have been resolved and closed by InForm or
the NCTSN Data Center
Use the dropdown boxes at the top of the list to sort the queries. You may
sort by one variable at a time.
Sort by:
Center ID (if you have access to data at more than one Center)
Status of queries (open, answered, closed)
Person who issued (created) the query

38
Version 2.0 Revised 20041018
38
Answering Queries
There are 2 possible responses:
Option 1
• The data was entered incorrectly & must be changed
Option 2
• The data was entered correctly, InForm just doesn’t
recognize it as a valid answer for that question.
39
Version 2.0 Revised 20041018
39
Answering Queries
Autoquery fires: “Number of children living
in child’s home is fewer than number of
Types of adults living with the child. Please
clarify.”
Clinician enters 3 for “Number of adults living in child’s
home” but indicates that 4 types of adults live with the child.
OPTION 1 OPTION 2
Clinician reviews chart and
corrects value to 4 in and
indicates Reason for Change:
“Transcription error”
Clinician reviews chart and
confirms entry is correct;
indicates “Original Value is
Correct”. The data “Is what
it is”.
InForm recognizes new value is
within range. Status changes to
Query Status = Closed
InForm recognizes the query is
answered, but value does not
satisfy query. Status changes to:
Query Status = Answered
40
Version 2.0 Revised 20041018
40
Answering Queries
1
2
3
4
5, 6
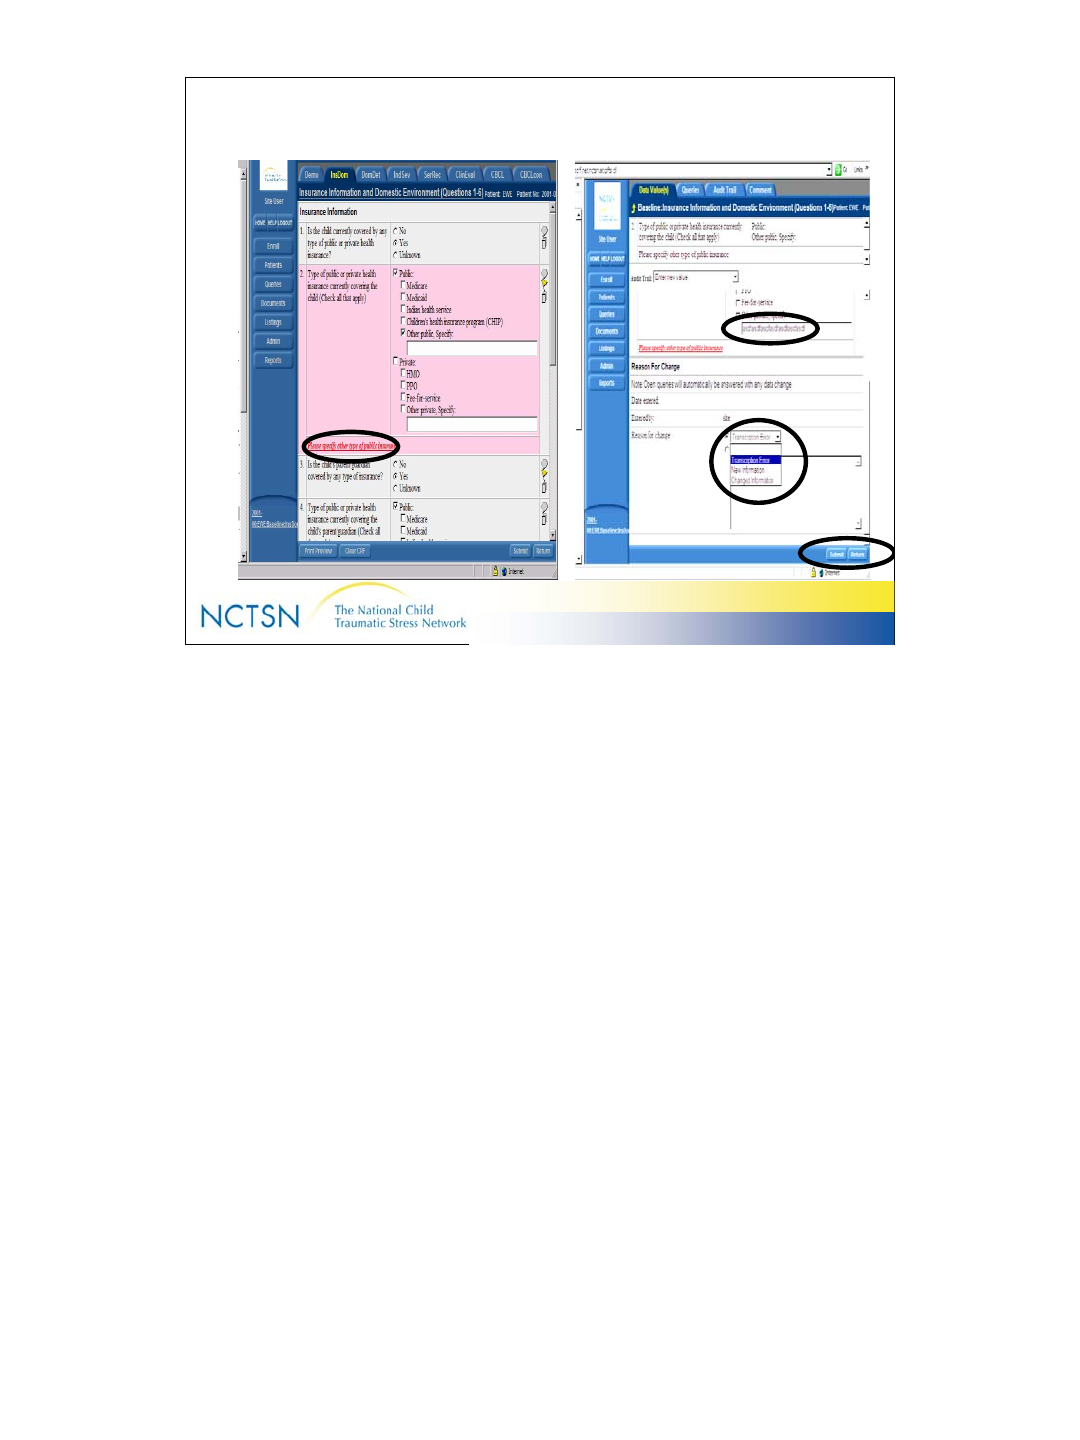
To answer a query from the Data Entry Screen:
1. Read the red underlined message that tells you why the query fired.
2. Hover your cursor over the field where data needs to be changed and click once.
InForm will take you to the Data Values Tab where the data can be changed.
3. Click the field a second time to correct the entry.
4. Scroll down and enter a reason for the change. InForm requires a reason for
every change. You can select from the drop down list or enter your own in the
“other” field located below the drop down box.
5. Click Submit.
6. Click Return to return to the data entry screen.
41
Version 2.0 Revised 20041018
41
Answering Queries
1
2
4
3
To answer queries from the List of Queries:
1. Click the Queries button on the Navigation pane.
2. Select the intended patient and query from the list. Note, all queries for all
patients from your Center are on this list. There may be more than one query for
the intended patient. Scroll through the list to find the intended query.
3. Click the underlined description of the query message. This takes you to a
Query Tab; Do not make any changes on this screen. Click the “Data Values”
tab located to the right of the Query Tab.
4. Enter the correct data & provide a reason for change.
5. Click Submit, found on the bottom right corner of screen.
6. Click Return to return to the data entry screen. The Return button is on the
bottom right corner of screen
42
Version 2.0 Revised 20041018
42
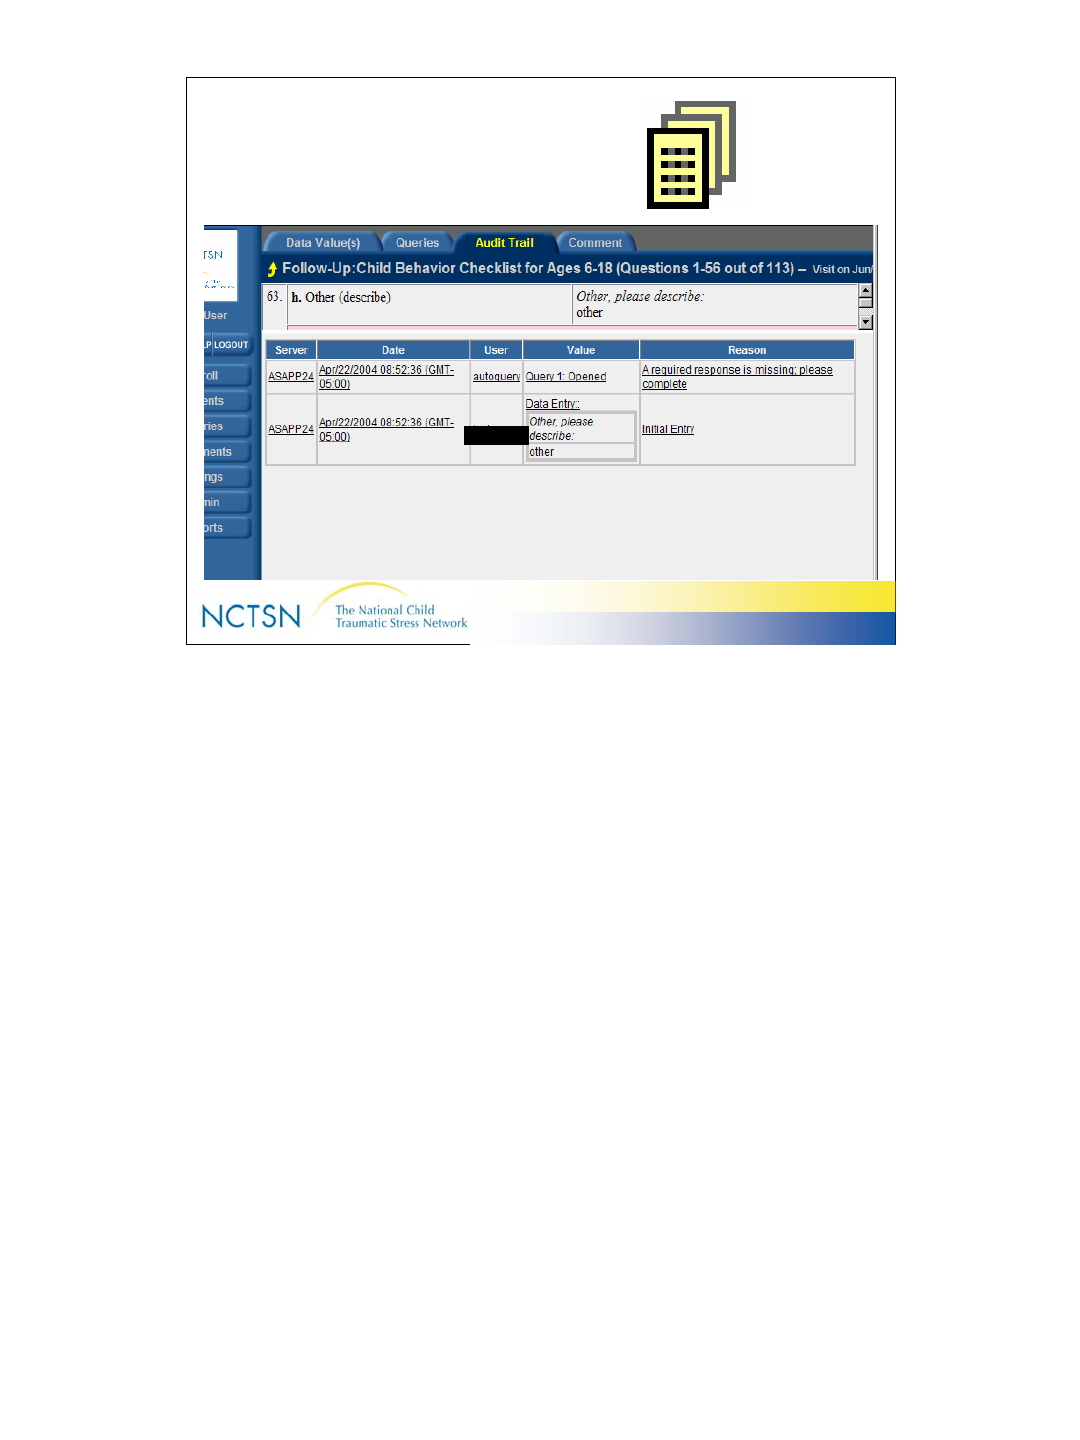
Audit Trail
Documents all activities with the data
– Creating
– Deleting
– Modifying Item Has Been
Changed -- Click to
View Audit Trail
The Audit Trail is updated each time “Submit” is clicked. It tells you “Who
did it” and “what they did”!
User ID, Date, Time and type of activity (create, delete, modify) are
recorded.
Remember, “Once entered, always there…”!
Audits contain the following information:
Full Date, Time, User and Reason for Change
Full Chronological Recording with no Obscured Records
Audit trail is Read-Only Access – it cannot be modified.
43
Version 2.0 Revised 20041018
43
Audit Trail
SiteUser
The audit trail icon displays on the far right side of each item/question after
changes have been made. Click it to see details about the changes made
to the item.
Note: You can move easily from the audit trail to the Data Values tab to
make additional changes to the item if necessary.
44
Version 2.0 Revised 20041018
44
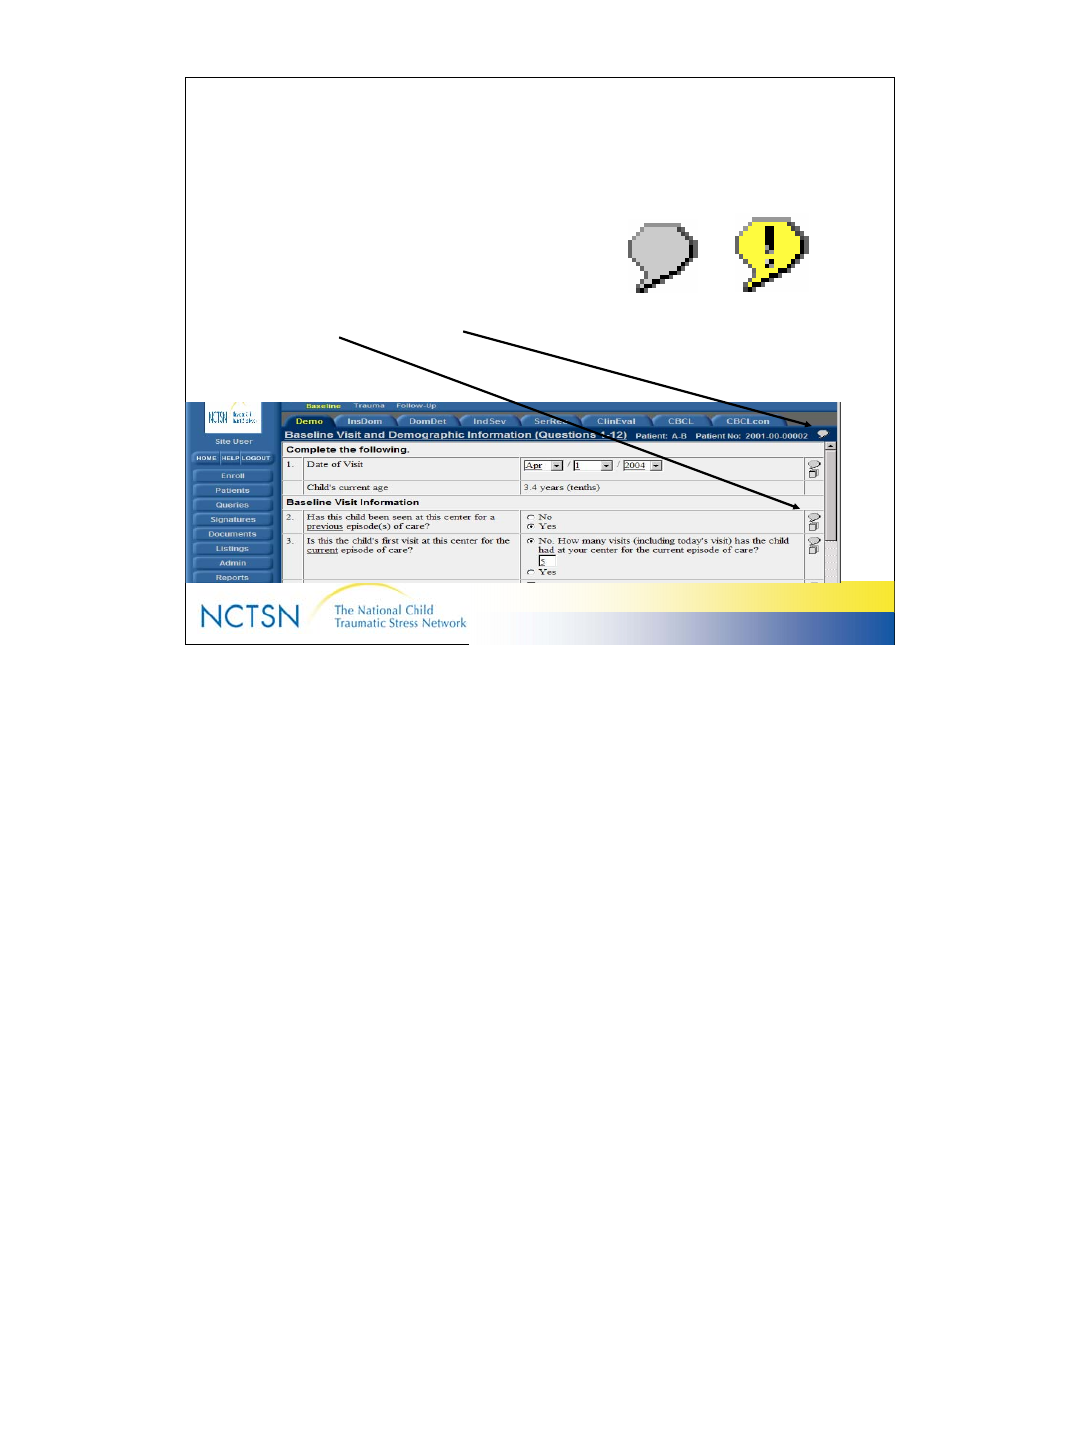
Comments
• Comments can be entered on
a ITEM or on an FORM
No Comment Exists -
- Click to Enter a
Comment
Comment Exists
-- Click to Update
Or View Existing
Comment
Comments are like “electronic post-it notes”
To enter a Form Level Comment,
Click on the Comment Icon in the top right corner of each screen.
To enter an Item Level Comment,
Click on the Comment Icon located on the far right side of the line item.
45
Version 2.0 Revised 20041018
45
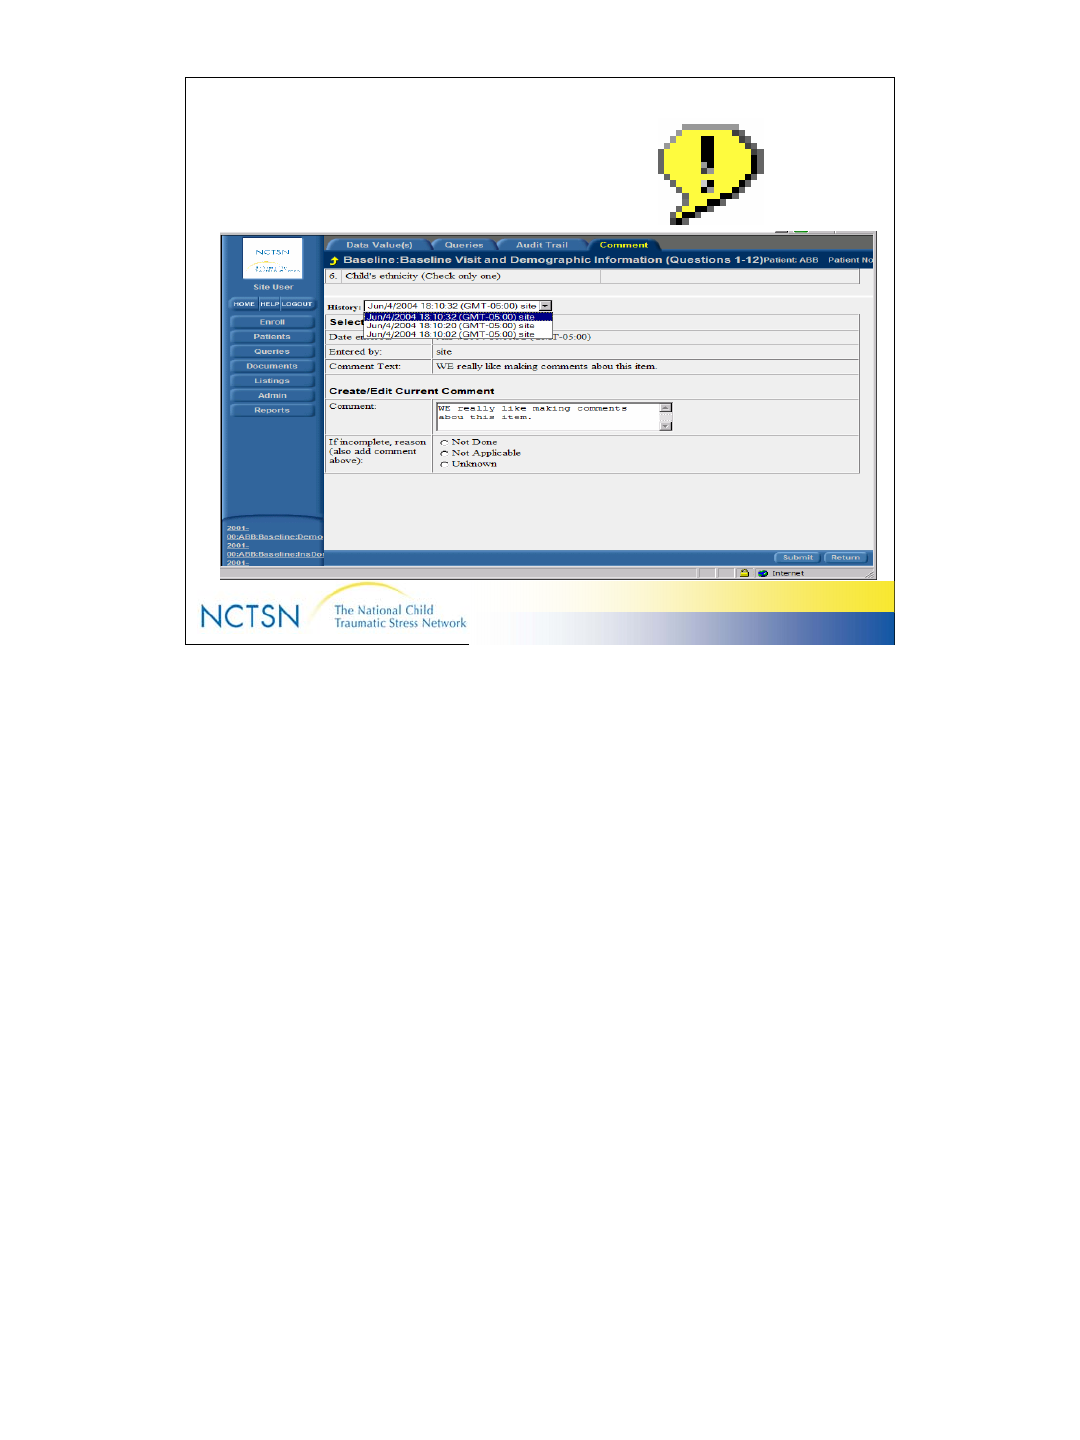
Comments
This is an example of Comments & the comment history. Multiple comments can be
made. To review the comment history, select from the drop down list.
Note you can move easily to the Audit tab and Data Values tab to see the history
of changes or to edit the data.
46
Version 2.0 Revised 20041018
46
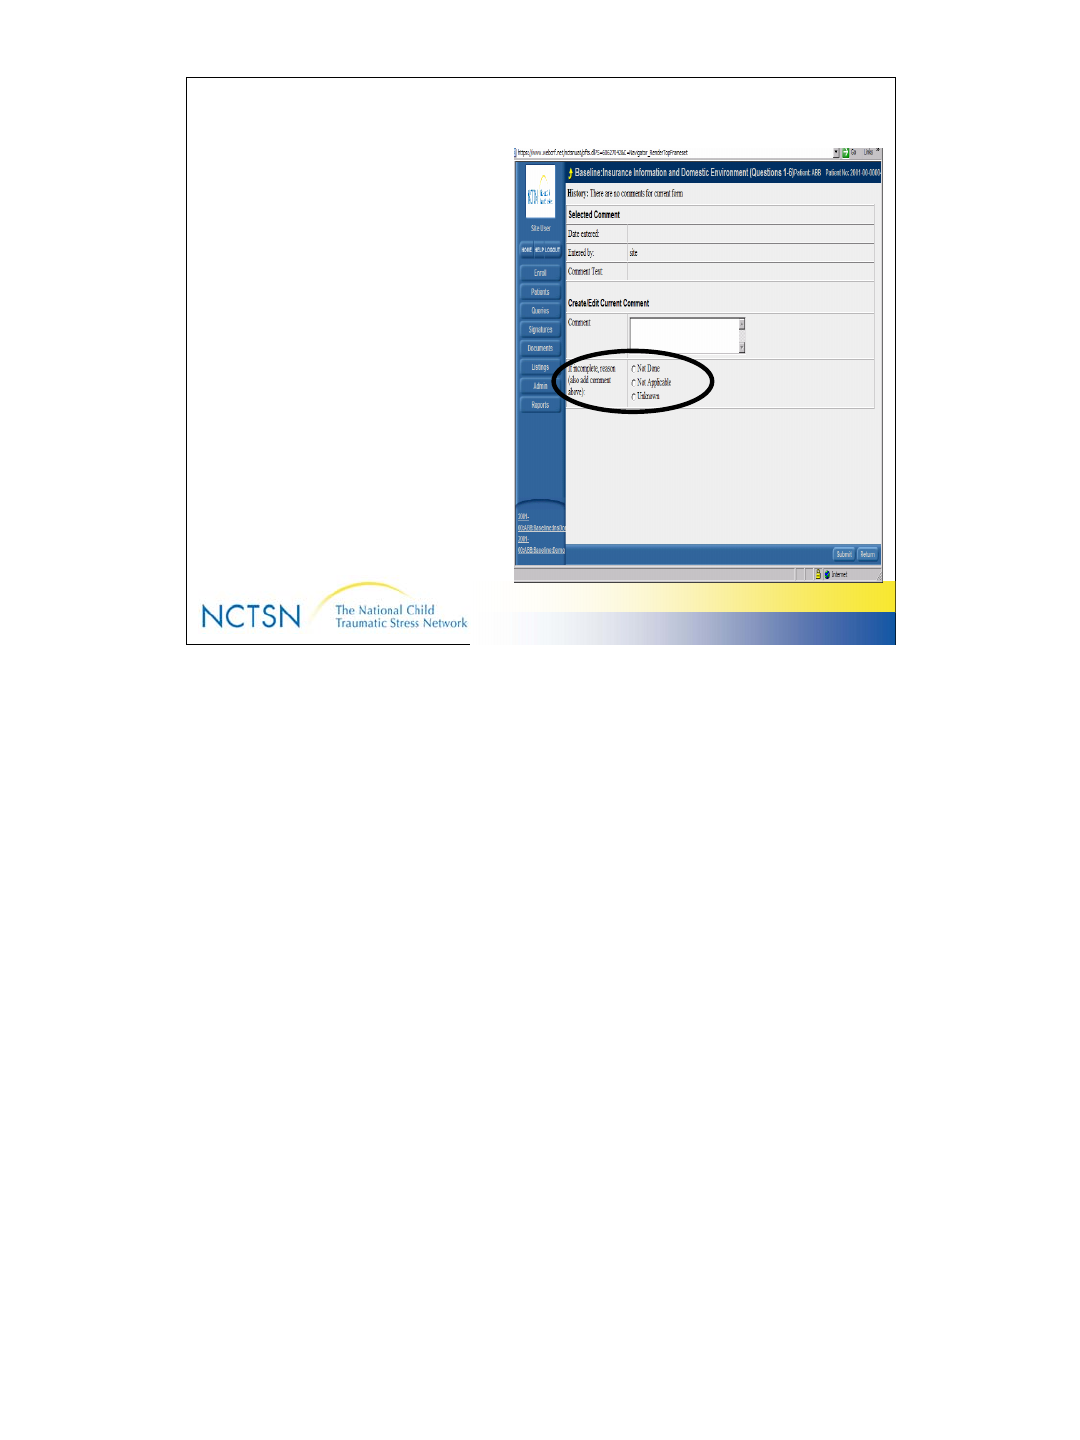
Not Done, Not Applicable, Unknown
These fields are found on the
Form Comment screen or the
Item Comment screen when
NO data has been entered
Use “Not Done” if you are
unable to get the data for that
screen and do NOT plan to (or
cannot) get that data at another
visit.
47
Version 2.0 Revised 20041018
47
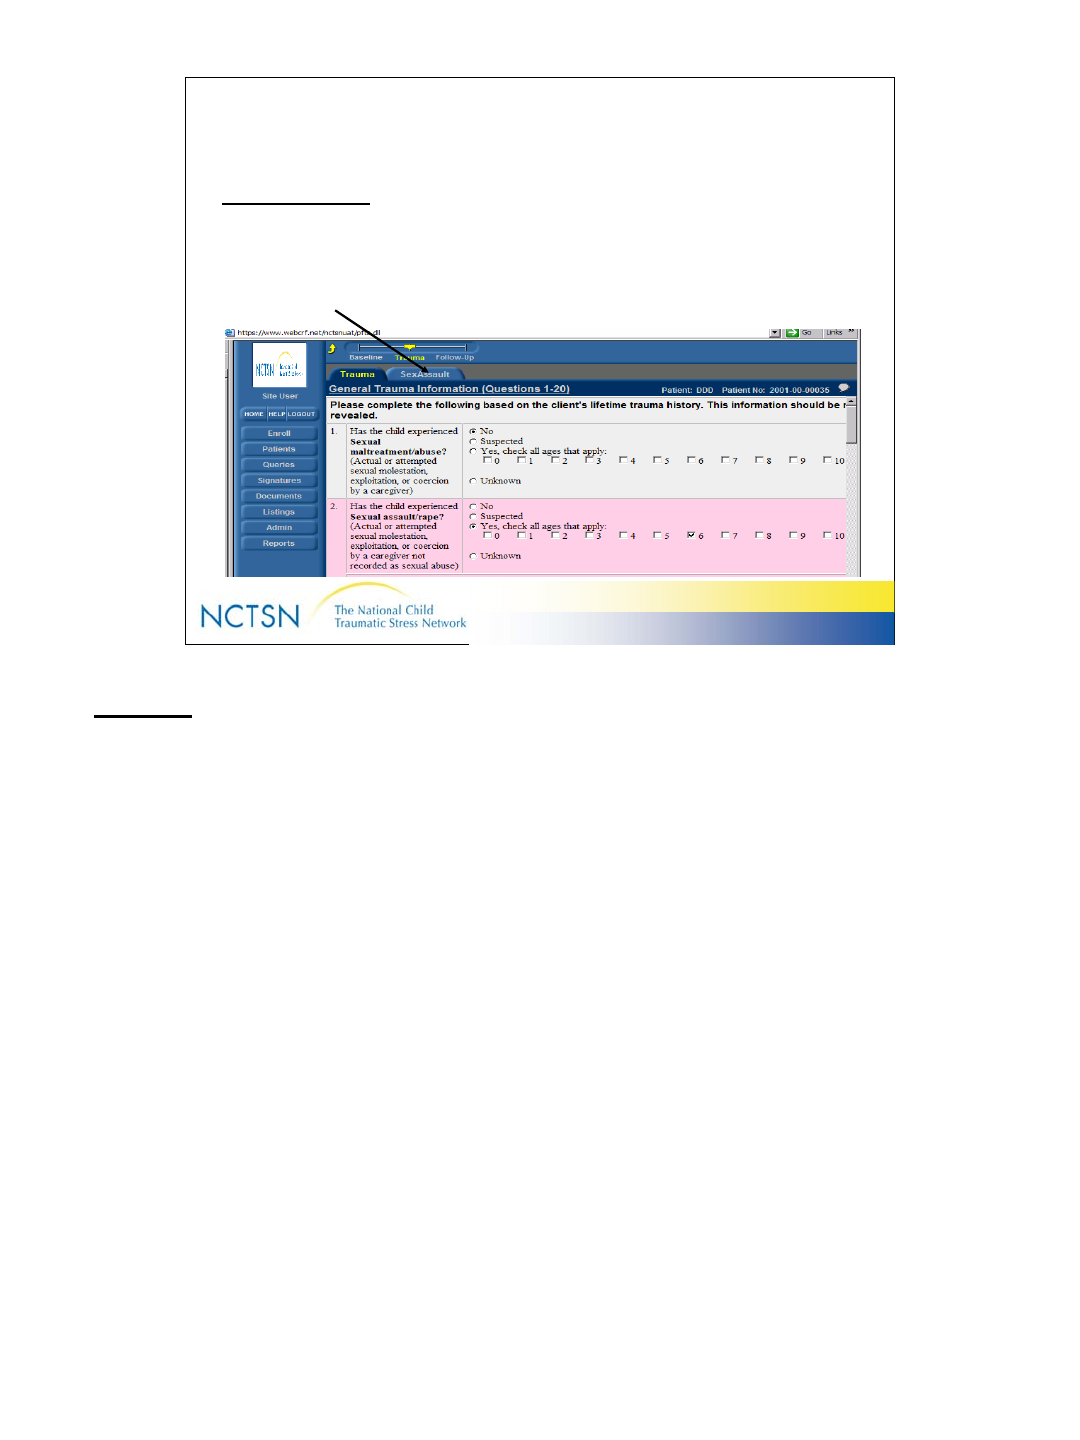
Dynamic Forms
Dynamic Forms
– Are created upon data submission; Triggered by answers to certain
questions
Example: On the General Trauma Information form, if you answer “YES” to “Has
child experienced Sexual Assault/maltreatment?” & click Submit, the Trauma Detail
form for Sexual Assault/Maltreatment is created. The “SexAssault” tab is now
behind the “Trauma” tab.
Another example: Inform creates a CBCL, PTSD &/or TSCC-A based on the age
of your client. Age is calculated using the Date of Birth entered on the Enrollment
screen and the Date of Visit on the Baseline or Follow-up Assessment form. The
standard assessments forms display only when the client meets the age criteria
established for the assessment.
CBCL 1.5-5 YOA
CBCL 6-18 YOA
PTSD & TSCC-A 7-18 YOA
48
Version 2.0 Revised 20041018
48
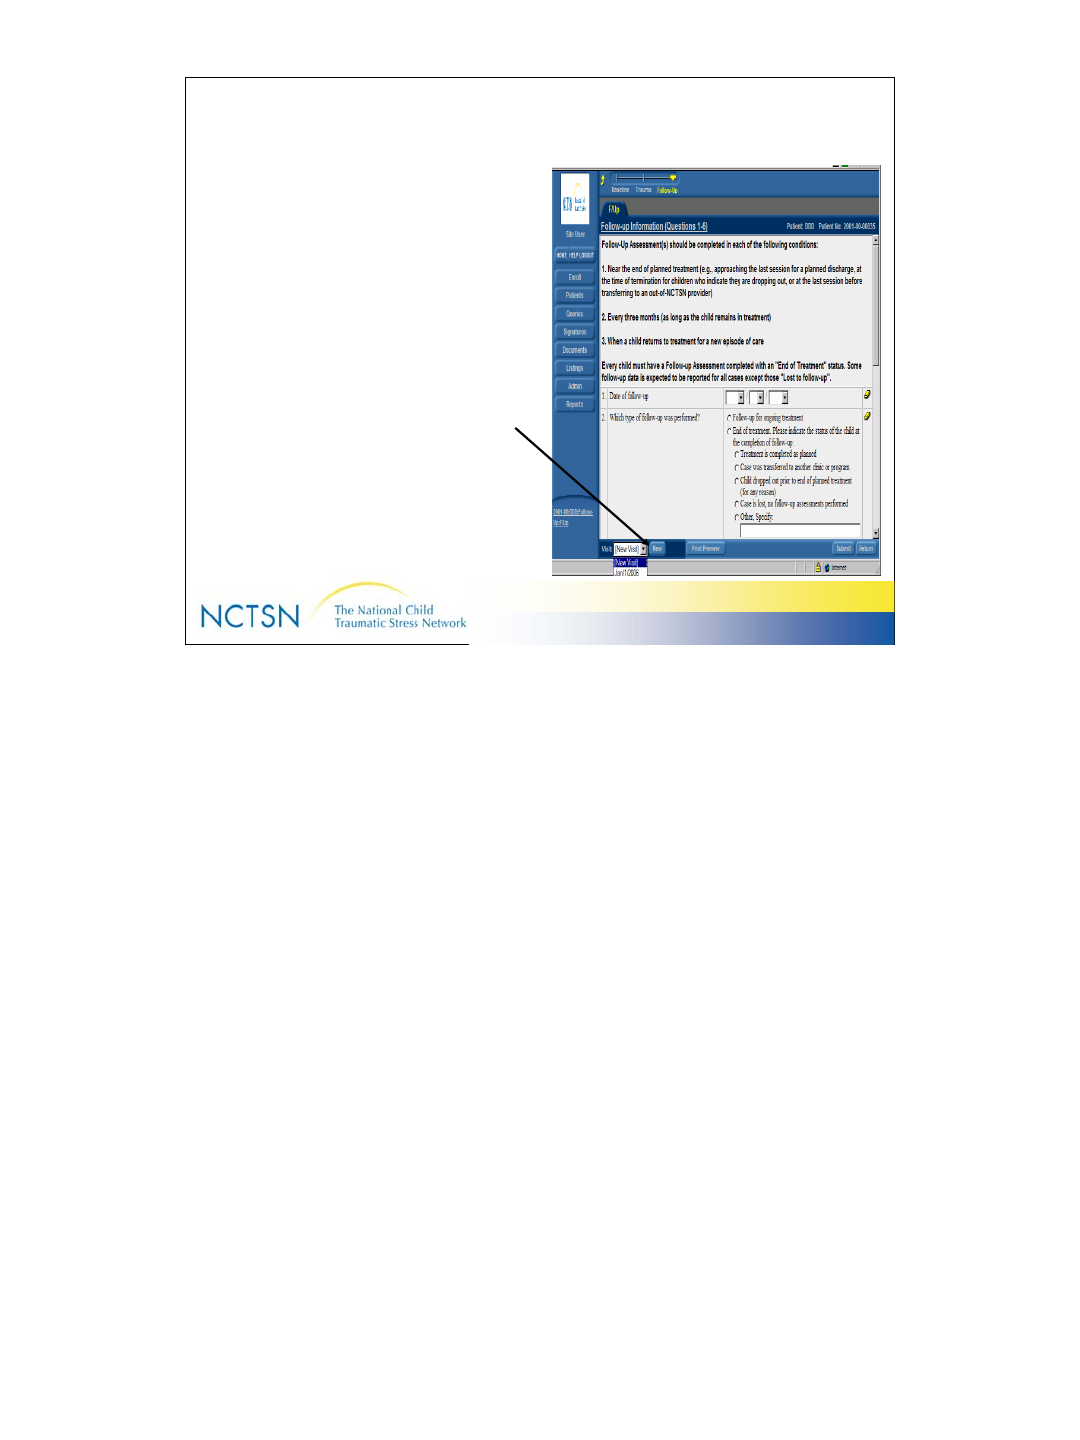
Create a New Follow-up Visit Form
• Select “New” in the bottom left
corner of the Follow-up Visit
form
• Enter the follow-up visit date
and other data.
• Click “Submit”.
• Select visits from the drop-
down box to see list of follow-
up visits.
Note: Additional pages/screens for the Follow up assessment are created when the
data on the initial form has been submitted.

49
Version 2.0 Revised 20041018
49
Admin
• ADMIN button provides
information about the version
of InForm you are using
This is an informational screen. It’s View Only.
50
Version 2.0 Revised 20041018
50
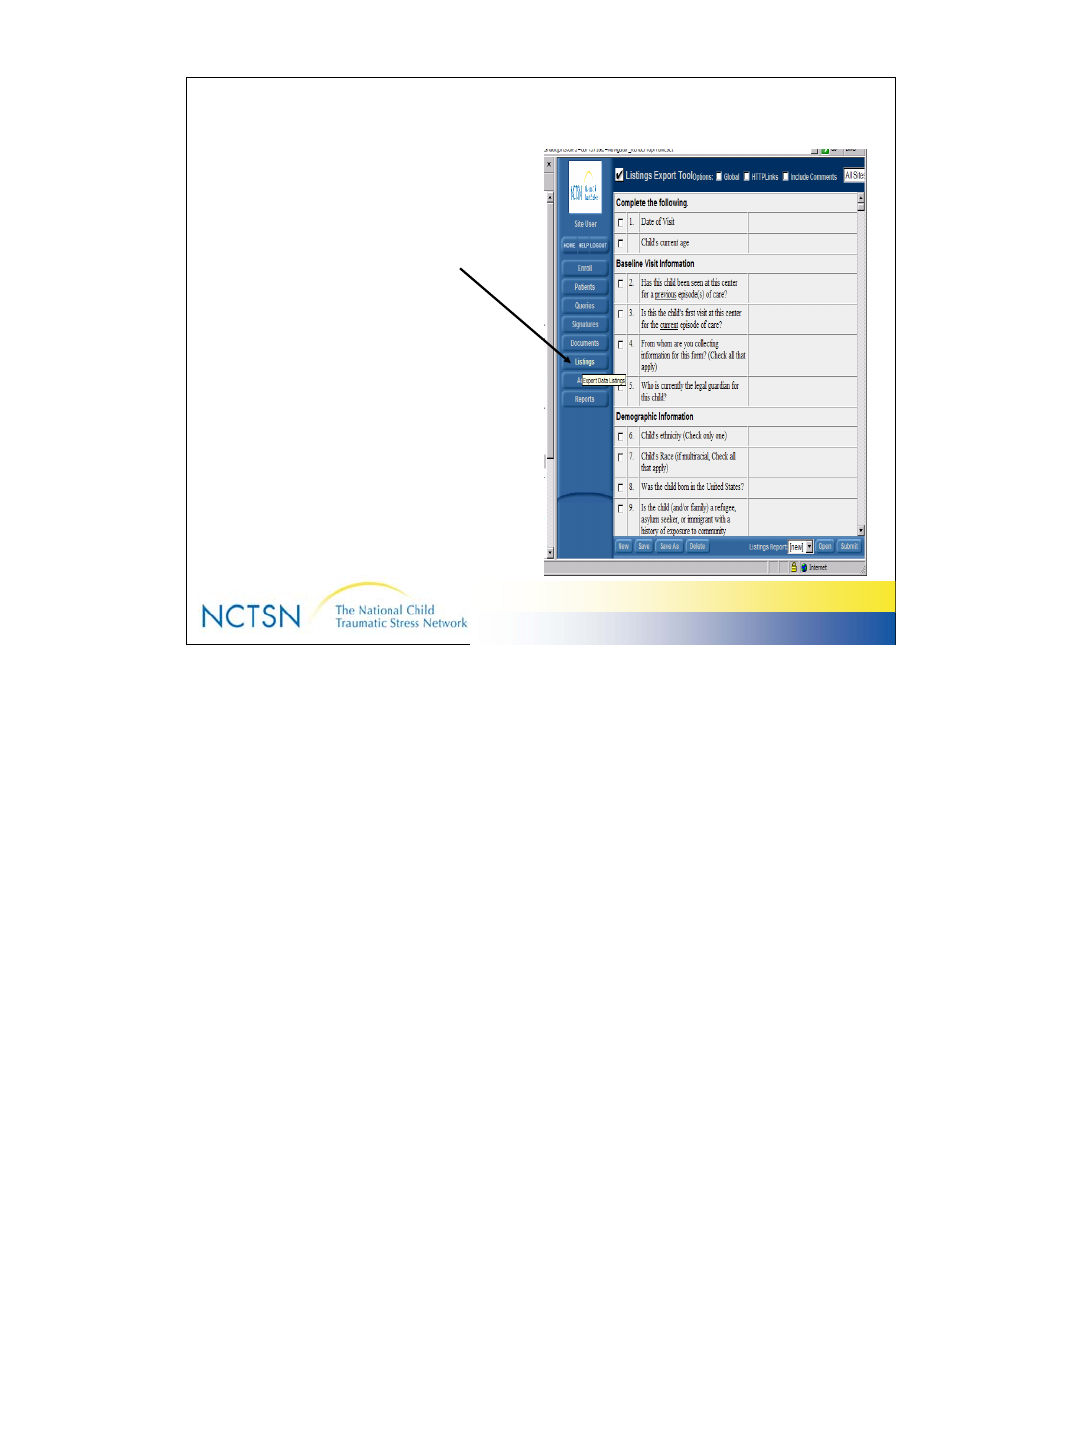
Export Data to Excel (Listings)
• The Listings function outputs
data from the InForm to an
Excel spreadsheet
• Listings provide access to
selected data for:
– Review purposes
– Interim analysis
• Users can define items to
output and recall the Listing
(by name) for future use
• Output can be saved locally
to an .xls file or .csv file
1. Click the Listings button on the navigation pane
2. Click the checkbox beside each item you’d like to export
3. Select a Visit (All Visits, Baseline, Trauma, or Follow-up)
4. Click Submit
6. Click Download
7. Click Open if you’d like to look at the file
8. Save the file to your PC if desired.
If you’d like to create a Listing that can be used repeatedly,
Complete steps 1-3 above
Click “Save” in the bottom left corner & give your Listing a short name.
InForm will create a list of Listings that display in the dropdown box
beside Listing Report on the bottom right side fo the screen.
Click Submit
Click Download
Click Open if you’d like to see your file OR click Save and identify a location
if you’d like to save the data from your Listing to your PC.
51
Version 2.0 Revised 20041018
51
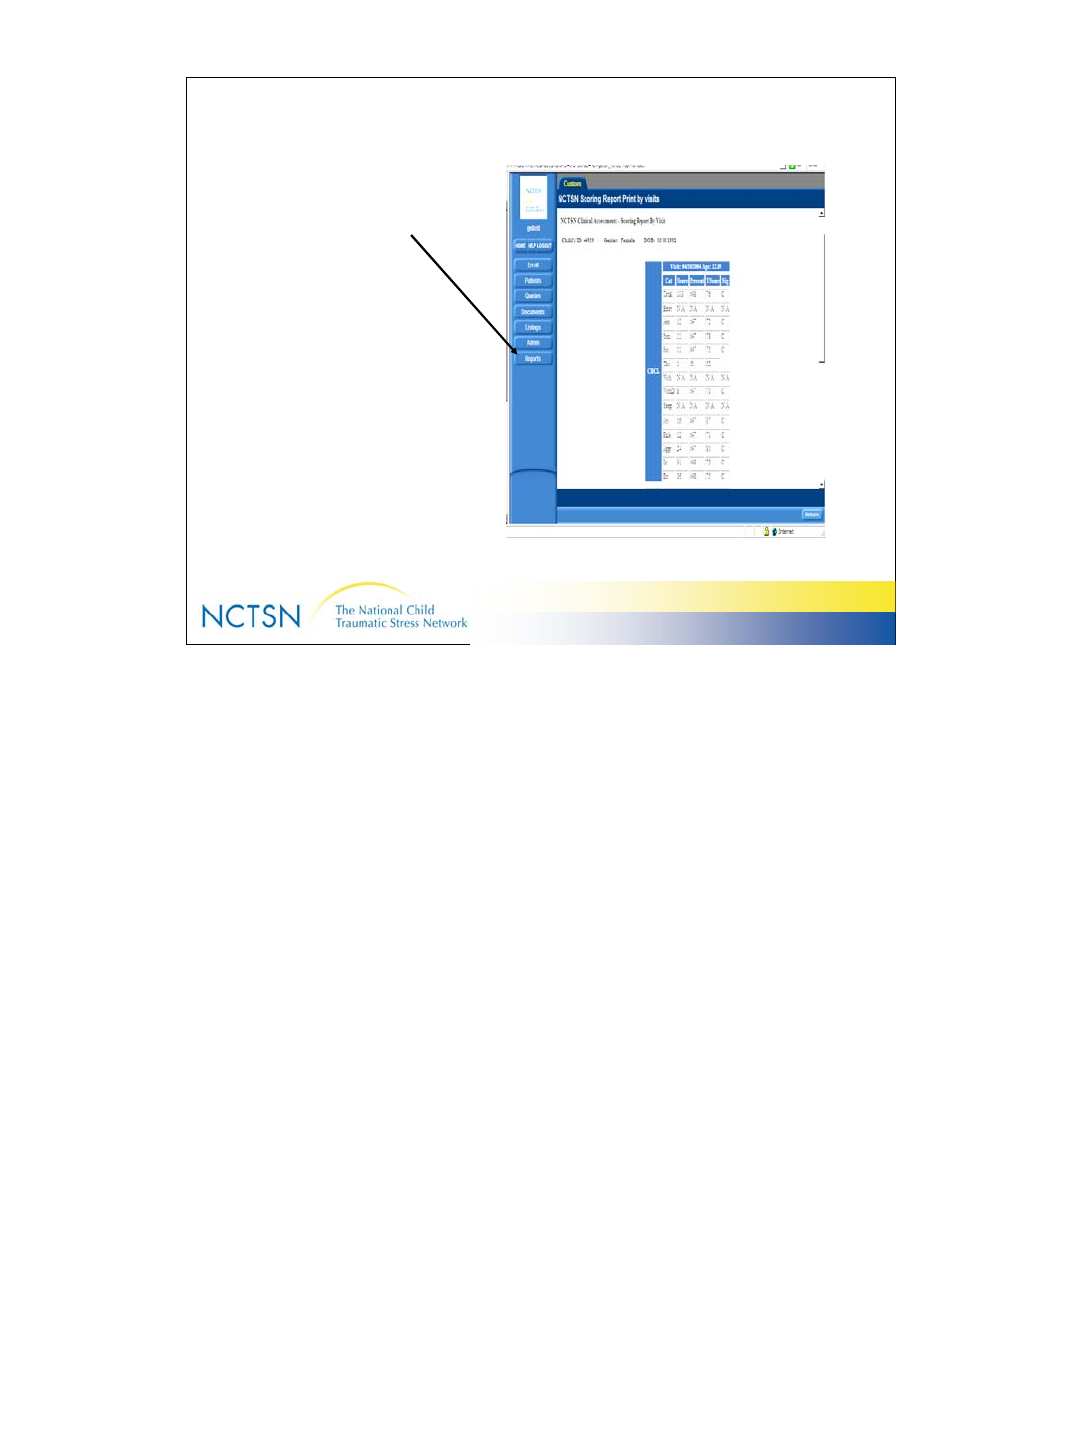
NCTSN Reports
• Custom reports available
– Scores for the standard
assessments
•CBCL
• TSCC-A (Briere)
•PTSD
1. Click REPORTS in the Navigation Pane
2. Select the intended report
•NCTSN Scoring Report View Only
•NCTSN Scoring Report Print by Visit
3. Enter complete patient ID number (Center ID – Subcenter ID – Patient number)
4. Select VISITS (required only for Print by Visit)
5. Click SUBMIT
Note: Scores are generated only when a designated percentage of questions have been
answered.
If you’re having trouble seeing the entire screen (or the entire report on a screen), set your monitor to
1024x768 resolution to assure that you’re seeing the entire InForm data entry screen.
To check the resolution on your monitor:
Click the Start button in the bottom left corner
Click Control Panel
Click Settings
Click Display
Make sure you see 1024 x 768.
If you’re still having trouble, check your web browser font size. Make sure it’s set to “smallest”.
On your Browser Toolbar:
Select “View”
Select “Text Size”
Select “Smallest”. This is especially important if you want to view NCTSN patient level reports.
52
Version 2.0 Revised 20041018
52
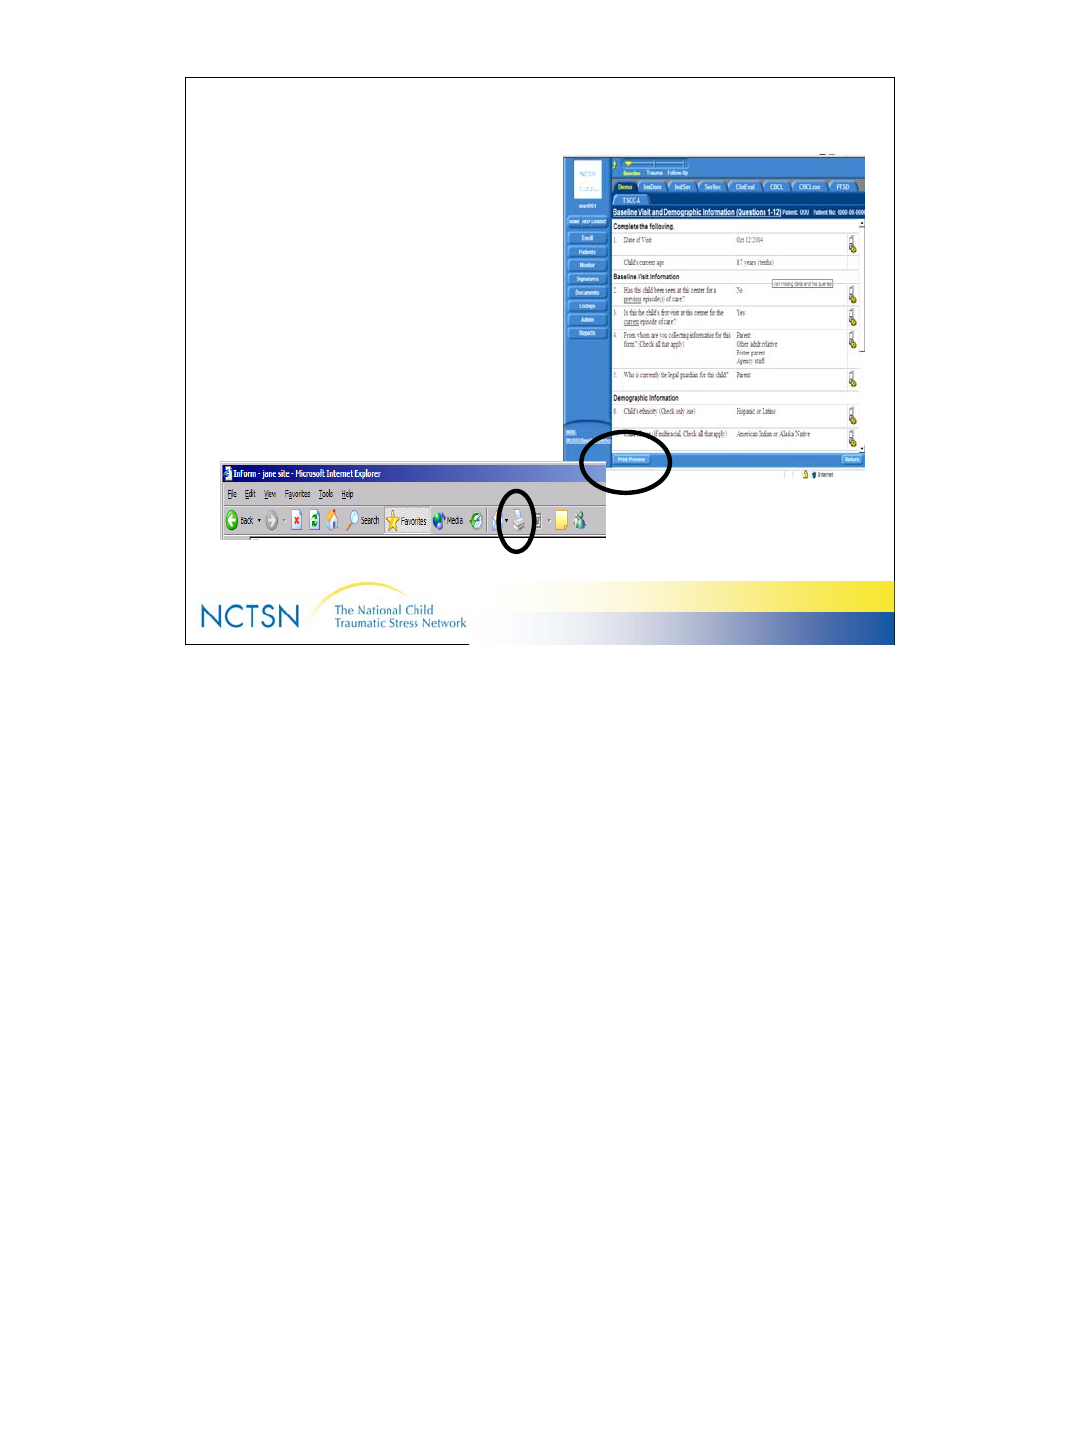
Printing from InForm
•eCRF’s and Reports may be
printed
– Click the “Print Preview”
button
– Then click the Printer icon
on your Browser Toolbar
53
Version 2.0 Revised 20041018
53
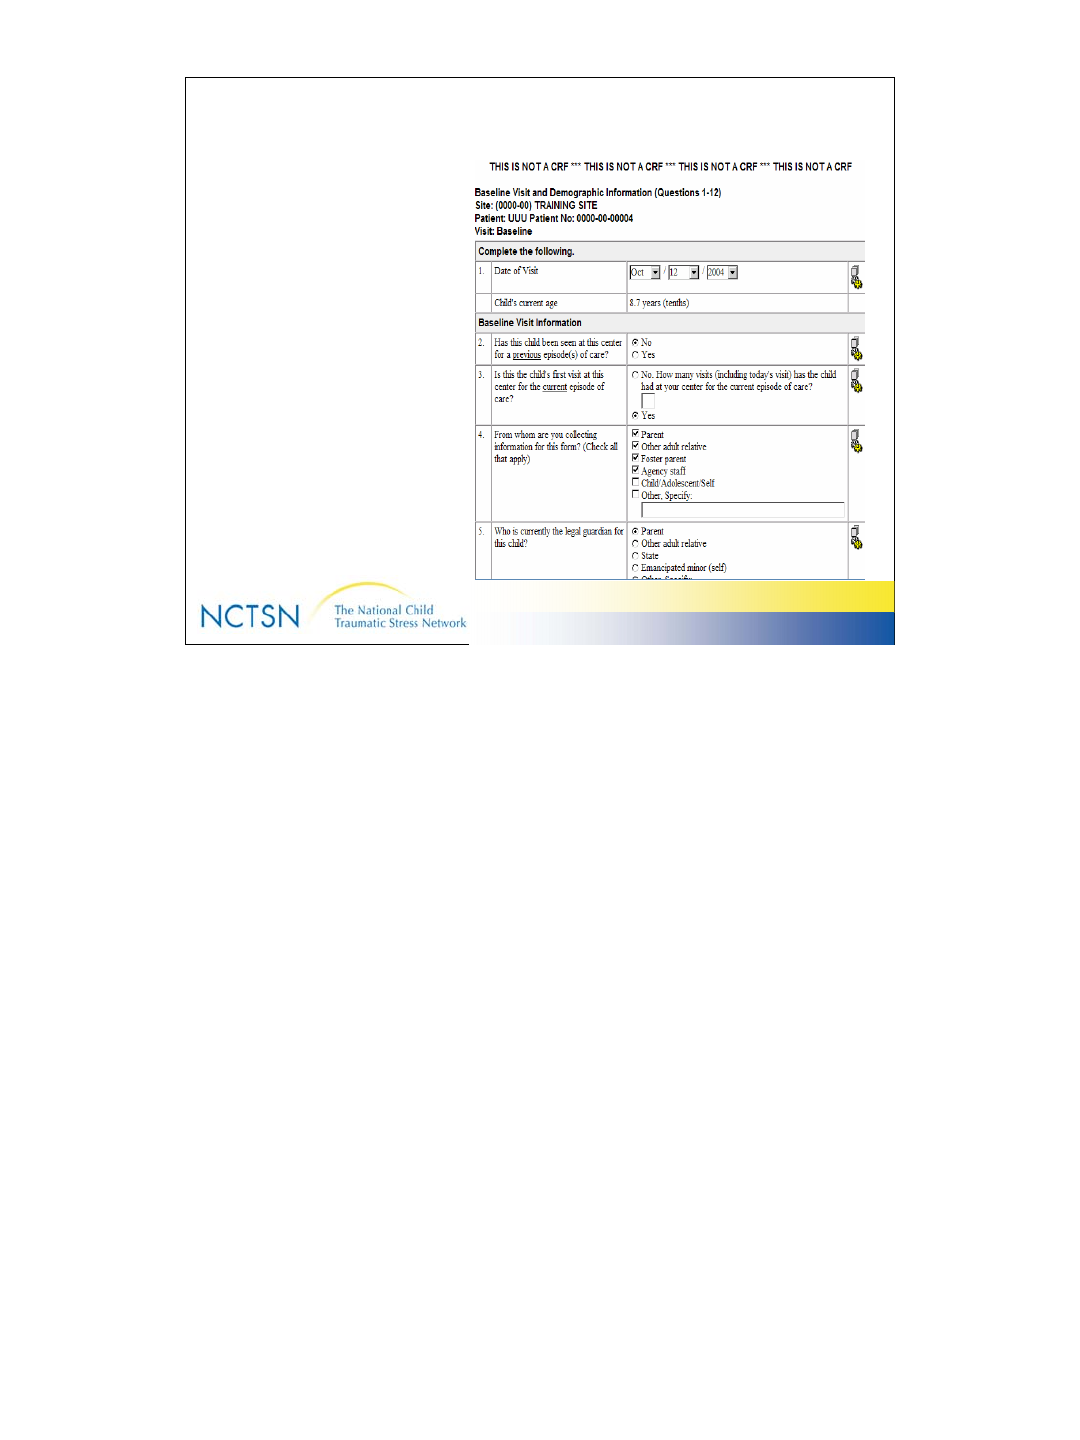
More on Printing
• An example of the output
from “Print Preview”
54
Version 2.0 Revised 20041018
54
More on Printing
Page Setup (under the “File”
menu on your Browser Toolbar)
may need to be adjusted for
optimal printing.
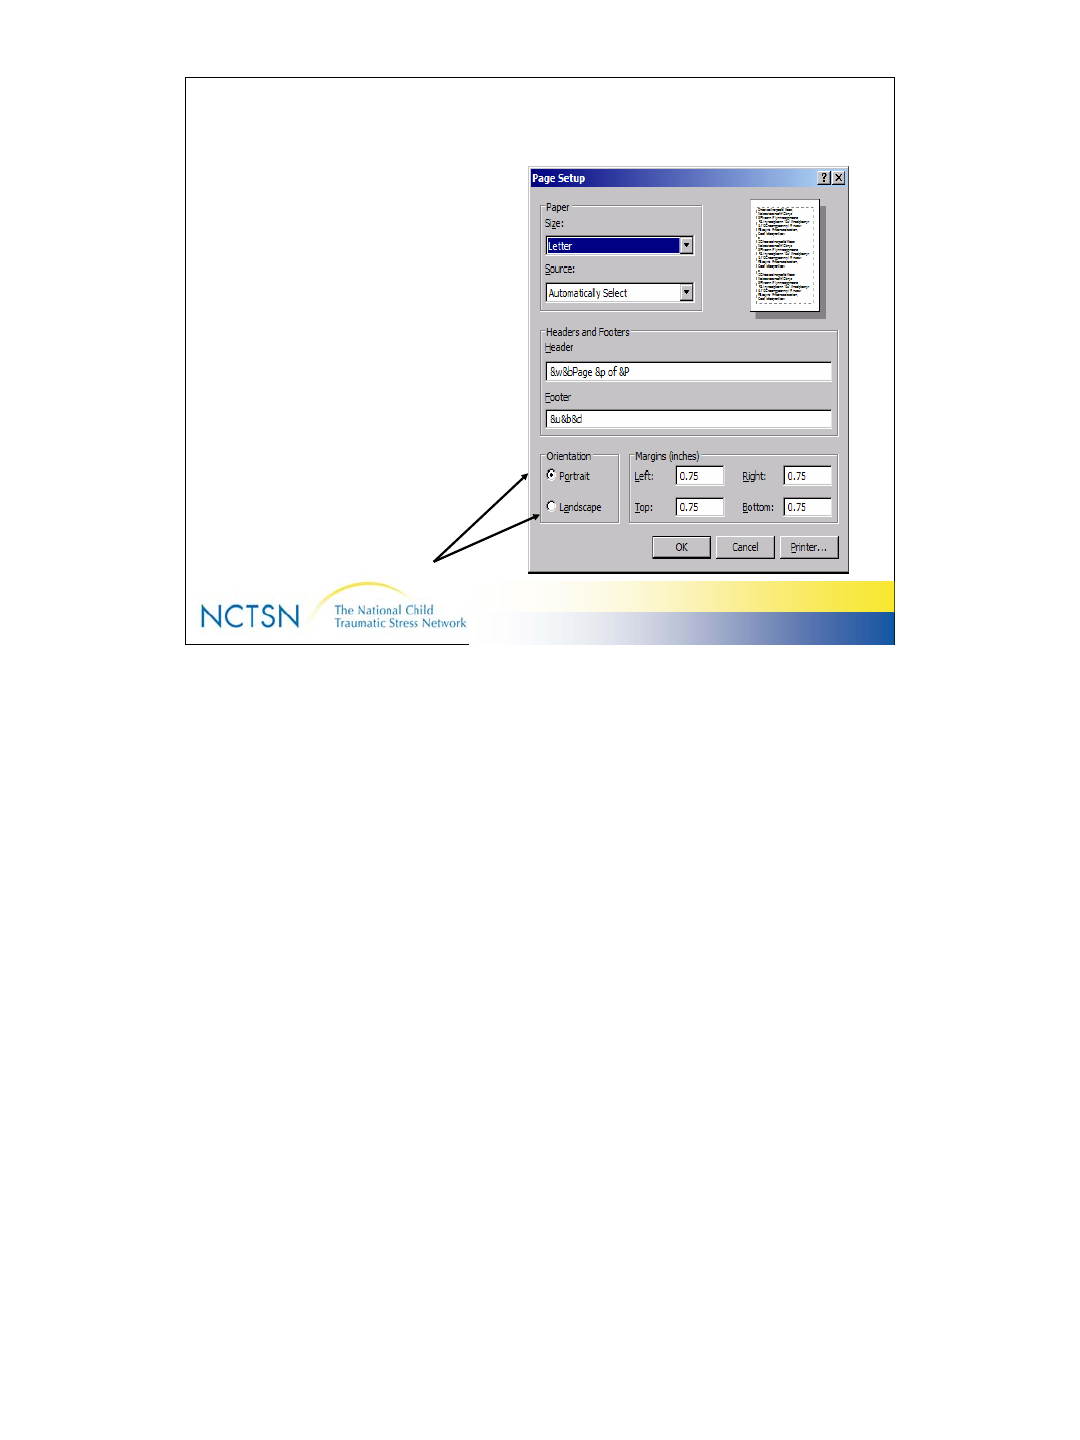
• Use Landscape orientation for
Reports and the General Trauma
Information eCRF.
• Use Portrait orientation for other
eCRF’s
55
Version 2.0 Revised 20041018
55
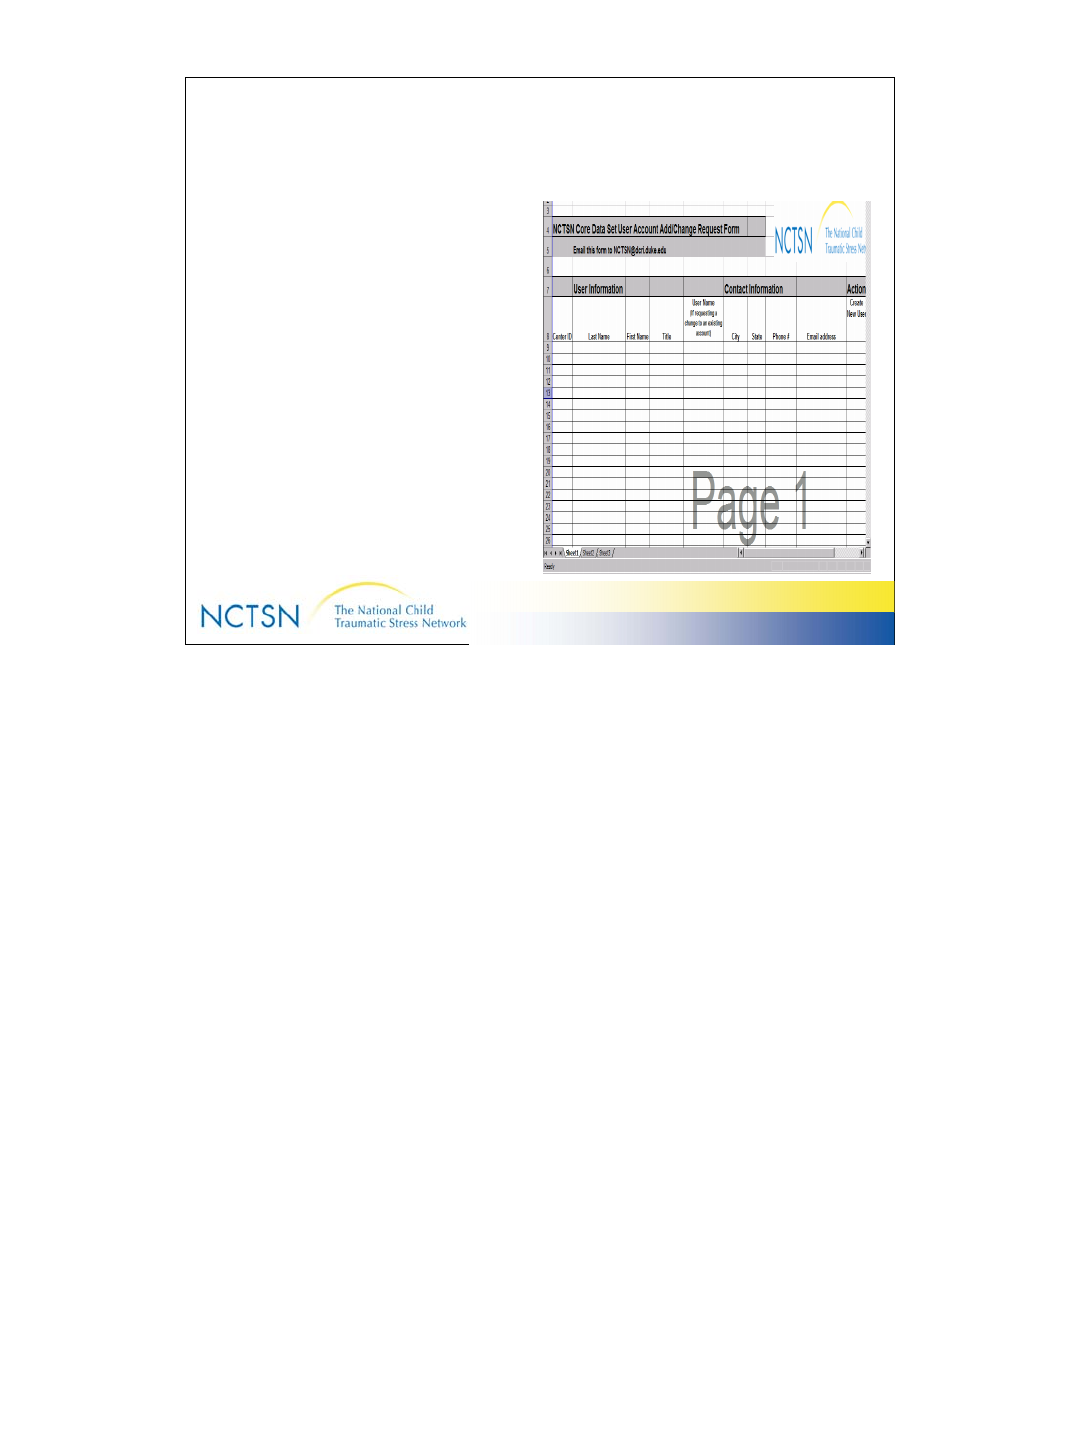
Request a New User Account
• Complete the information
requested on the NCTSN User
Account Add/Change Form.
•Email to: NCTSN@dcri.duke.edu
This form is found in your packet of training materials & on the CD.
56
Version 2.0 Revised 20041018
56
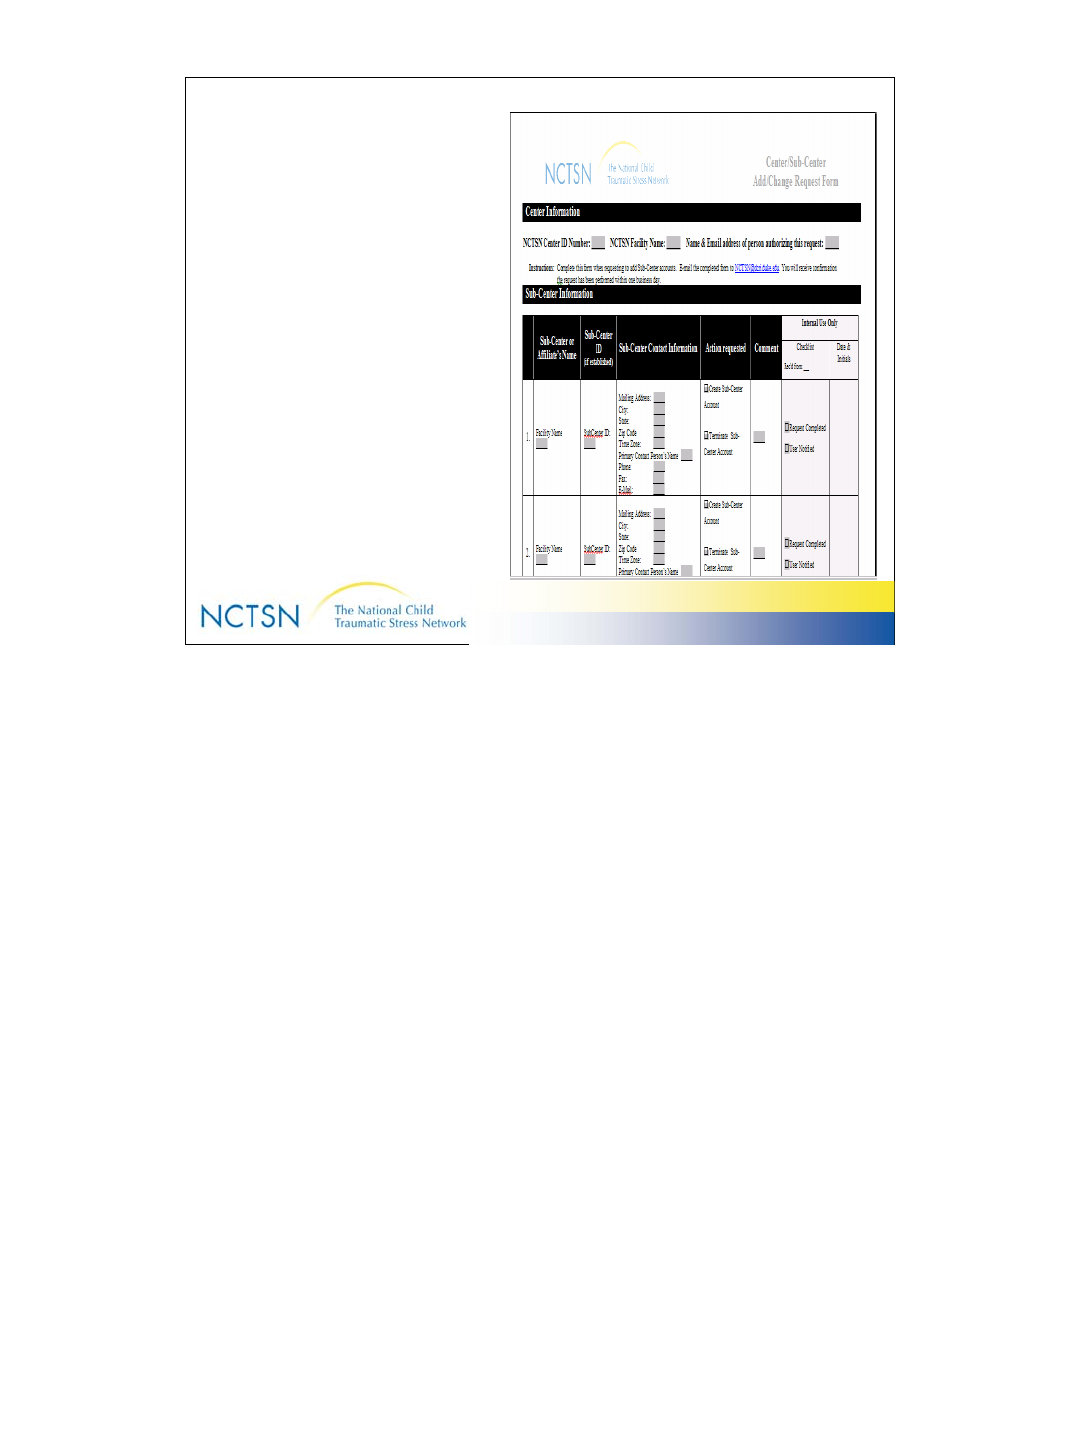
Request a new Center Account
Complete the information requested
on the NCTSN Center_Sub-Center
Add Change Request Form.
• Use the Comment field to
indicate which user accounts
should have access (Read/Write
or View only) to data at the
requested Sub-Center
•Email to: NCTSN@dcri.duke.edu
This form is found in your packet of training materials & on the CD.
