NEAX2400 IPX System Operations And Maintenance Manual (IPX U Type) PDF NEC Op Maint Type
IPX System Op and Maint (IPX-U Type)(2430710w) IPX System Op and Maint (IPX-U Type)(2430710w)
NEC IPX System Op and Maint IPX U Type NEC_IPX_System_Op_and_Maint_IPX_U_Type www.TelecomUserGuides.com Access User Guides, Manuals and Brochures
User Manual: PDF T E X T F I L E S
Open the PDF directly: View PDF ![]() .
.
Page Count: 724 [warning: Documents this large are best viewed by clicking the View PDF Link!]
- Table of Contents
- List of Figures
- List of Tables
- CHAPTER 1 Introduction
- CHAPTER 2 System Maintenance Outline
- 1. General
- 2. Basic Knowledge
- 3. How to Read Precautions, Diagnostic, and Fault Repair Information
- 4. Reporting Fault to NEC
- CHAPTER 3 System Messages
- CHAPTER 4 Unit/Circuit Card Replacement Procedure
- 1. LPM Accommodating Unit/Circuit Card Replacement Procedure
- 2. TSWM Accommodating Circuit Card Replacement Procedure
- 3. PIM Accommodating Circuit Card Replacement Procedure
- 4. ISWM Accommodating Circuit Card Replacement Procedure
- 5. Fan Unit Replacement
- 6. CPR Cooling FAN Replacement
- 7. Fuse Replacement
- CHAPTER 5 Fault Repair Procedures
- 1. Line Fault
- 2. Trunk Fault
- 3. ATTCON/DESKCON Fault
- 4. Unit Fault
- 5. Speech Path (TSW) System Fault (LN)
- 6. SPEECH PATH SYSTEM FAULT (WHOLE SYSTEM/ISW)
- 7. Control System Fault
- 8. Alarm Indication Fault
- 9. Power Supply Fault
- 10. Fan Unit Fault
- 11. Tone Fault
- 12. System Down Fault
- 13. Common Channel Interoffice Signaling (CCIS) Line Fault
- 14. Integrated Service Digital Network (ISDN) Line Fault
- 15. Hard Time Clock Fault
- CHAPTER 6 System Operations
- 1. Alarm Indications
- 2. Collection of System Messages
- 3. Indication of Lockout Stations
- 4. Line Load Control
- 5. IOC Line Monitor
- 6. Line Management
- 7. Station Message Detail Recording System (SMDR)
- 7.1 Transmission Data to SMDR Equipment
- 7.2 IPX Format (Text Format of Centralized Billing - Fusion)
- 7.3 ICS Format
- 7.4 Details on Transmission Data
- 7.4.1 Calling Party Information/Called Party Information
- 7.4.2 Call Start/Call End Time Information
- 7.4.3 Called Number
- 7.4.4 Account Code/Authorization Code
- 7.4.5 Route Advance Information
- 7.4.6 Condition B Information
- 7.4.7 Call Metering Information
- 7.4.8 Office Code of Calling (Called) Party and Billing Process Office
- 7.4.9 Text Format of SMDR - TCP/IP Interface
- 8. Traffic Management
- 9. Office Data Management
- 10. Test Operations of Various Kinds
- 11. ROUTINE DIAGNOSIS
- 12. System Control Procedures
- 12.1 Changeover/Make-Busy/Make-Busy Cancel of Equipment
- 12.2 Initialization
- 12.2.1 General
- 12.2.2 System Initialization by Turning ON the Power Supply
- 12.2.3 System Initialization by Key Operations on TOPU
- 12.2.4 System Initialization by Keys on CPU Front Panel
- 12.2.5 System Initialization by SINZ/SINZ1 Command
- 12.2.6 Peripheral Equipment Initialization (Line/Trunk Initialization)
- 12.3 How to Turn ON/OFF Whole System
- 12.4 How to Turn OFF Whole System
- 12.5 System Start-Up
- CHAPTER 7 Routine Maintenance Procedure
- CHAPTER 8 Maintenance Commands
- ALLC
- ALMG
- ATRF
- ATRFN
- BOSD
- CADSD
- CATK
- CBCN
- CCSE
- CDBU
- CMOD
- CMODI
- CMWL
- CMWL_T
- CPRS
- CSCL
- CSTN
- DCBD
- DCEN
- DCON
- DFTD
- DISS
- DLEN
- DLSL
- DLSS
- DLSS_T
- DLTEL
- DNTEL
- DPKG
- DPSW
- DSTN
- DTELN
- DTF101
- DTF102
- DTF103
- DTF104
- DTF105
- DTF201
- DTF301
- DTF302
- DTF303
- DTF501
- DTF601
- DTF602
- DTF101N
- DTF102N
- DTF103N
- DTF104N
- DTF105N
- DTF201N
- DTF301N
- DTF302N
- DTF303N
- DTF501N
- DTF601N
- DTF602N
- FLINST
- HDD_FDD
- HDD_MAT
- HDD_MAT_N
- HDFP
- MBCT
- MBLE
- MBPM
- MBRT
- MBSM
- MBST
- MBST_T
- MBTC
- MBTK
- MEM_HDD
- MEM_HDD_N
- MFCH
- PMBU
- RALM
- RALMN
- RLST
- RLST_T
- SINZ
- SINZI
- SPTS
- SRTS
- XHFD

OCTOBER, 2000
NEC America, Inc.
NDA-24307
Issue 1
STOCK #200789
System Operations and Maintenance Manual
(IPX-U Type)
®

LIABILITY DISCLAIMER
NEC America, Inc. reserves the right to change the specifications, functions, or
features, at any time, without notice.
NEC America, Inc. has prepared this document for use by its employees and
customers. The information contained herein is the property of NEC America,
Inc. and shall not be reproduced without prior written approval from NEC
America, Inc.
NEAX and Dterm are registered trademarks of NEC Corporation.
Copyright 1999, 2000
NEC America, Inc.
Printed in the U.S.A.

ISSUE 1 ISSUE 2 ISSUE 3 ISSUE 4
DATE OCTOBER, 2000 DATE DATE DATE
ISSUE 5 ISSUE 6 ISSUE 7 ISSUE 8
DATE DATE DATE DATE
NEAX2400 IPX
System Operations and Maintenance Manual (IPX-U Type)
Revision Sheet 1/10
NDA-24307
PAGE No. ISSUE No.
12345678
i 1
ii 1
iii 1
iv 1
v 1
vi 1
vii 1
viii 1
ix 1
x 1
xi 1
xii 1
xiii 1
xiv 1
xv 1
xvi 1
1 1
2 1
3 1
4 1
5 1
6 1
7 1
8 1
9 1
10 1
11 1
12 1
13 1
14 1
15 1
16 1
17 1
18 1
19 1
20 1
21 1
22 1
23 1
24 1
25 1
26 1
27 1
28 1
29 1
30 1
31 1
32 1
33 1
34 1
35 1
36 1
37 1
38 1
39 1
40 1
41 1
42 1
43 1
44 1
45 1
46 1
47 1
48 1
49 1
50 1
51 1
52 1
53 1
54 1
55 1
56 1
57 1
58 1
59 1
60 1
PAGE N o. ISSUE No.
12345678

ISSUE 1 ISSUE 2 ISSUE 3 ISSUE 4
DATE OCTOBER, 2000 DATE DATE DATE
ISSUE 5 ISSUE 6 ISSUE 7 ISSUE 8
DATE DATE DATE DATE
NEAX2400 IPX
System Operations and Maintenance Manual (IPX-U Type)
Revision Sheet 2/10
NDA-24307
61 1
62 1
63 1
64 1
65 1
66 1
67 1
68 1
69 1
70 1
71 1
72 1
73 1
74 1
75 1
76 1
77 1
78 1
79 1
80 1
81 1
82 1
83 1
84 1
85 1
86 1
87 1
88 1
89 1
90 1
91 1
92 1
93 1
94 1
95 1
96 1
97 1
98 1
PAGE No. ISSUE No.
12345678
99 1
100 1
101 1
102 1
103 1
104 1
105 1
106 1
107 1
108 1
109 1
110 1
111 1
112 1
113 1
114 1
115 1
116 1
117 1
118 1
119 1
120 1
121 1
122 1
123 1
124 1
125 1
126 1
127 1
128 1
129 1
130 1
131 1
132 1
133 1
134 1
135 1
136 1
PAGE No. ISSUE No.
12345678

ISSUE 1 ISSUE 2 ISSUE 3 ISSUE 4
DATE OCTOBER, 2000 DATE DATE DATE
ISSUE 5 ISSUE 6 ISSUE 7 ISSUE 8
DATE DATE DATE DATE
NEAX2400 IPX
System Operations and Maintenance Manual (IPX-U Type)
Revision Sheet 3/10
NDA-24307
137 1
138 1
139 1
140 1
141 1
142 1
143 1
144 1
145 1
146 1
147 1
148 1
149 1
150 1
151 1
152 1
153 1
154 1
155 1
156 1
157 1
158 1
159 1
160 1
161 1
162 1
163 1
164 1
165 1
166 1
167 1
168 1
169 1
170 1
171 1
172 1
173 1
174 1
PAGE No. ISSUE No.
12345678
175 1
176 1
177 1
178 1
179 1
180 1
181 1
182 1
183 1
184 1
185 1
186 1
187 1
188 1
189 1
190 1
191 1
192 1
193 1
194 1
195 1
196 1
197 1
198 1
199 1
200 1
201 1
202 1
203 1
204 1
205 1
206 1
207 1
208 1
209 1
210 1
211 1
212 1
PAGE No. ISSUE No.
12345678

ISSUE 1 ISSUE 2 ISSUE 3 ISSUE 4
DATE OCTOBER, 2000 DATE DATE DATE
ISSUE 5 ISSUE 6 ISSUE 7 ISSUE 8
DATE DATE DATE DATE
NEAX2400 IPX
System Operations and Maintenance Manual (IPX-U Type)
Revision Sheet 4/10
NDA-24307
213 1
214 1
215 1
216 1
217 1
218 1
219 1
220 1
221 1
222 1
223 1
224 1
225 1
226 1
227 1
228 1
229 1
230 1
231 1
232 1
233 1
234 1
235 1
236 1
237 1
238 1
239 1
240 1
241 1
242 1
243 1
244 1
245 1
246 1
247 1
248 1
249 1
250 1
PAGE No. ISSUE No.
12345678
251 1
252 1
253 1
254 1
255 1
256 1
257 1
258 1
259 1
260 1
261 1
262 1
263 1
264 1
265 1
266 1
267 1
268 1
269 1
270 1
271 1
272 1
273 1
274 1
275 1
276 1
277 1
278 1
279 1
280 1
281 1
282 1
283 1
284 1
285 1
286 1
287 1
288 1
PAGE No. ISSUE No.
12345678

ISSUE 1 ISSUE 2 ISSUE 3 ISSUE 4
DATE OCTOBER, 2000 DATE DATE DATE
ISSUE 5 ISSUE 6 ISSUE 7 ISSUE 8
DATE DATE DATE DATE
NEAX2400 IPX
System Operations and Maintenance Manual (IPX-U Type)
Revision Sheet 5/10
NDA-24307
289 1
290 1
291 1
292 1
293 1
294 1
295 1
296 1
297 1
298 1
299 1
300 1
301 1
302 1
303 1
304 1
305 1
306 1
307 1
308 1
309 1
310 1
311 1
312 1
313 1
314 1
315 1
316 1
317 1
318 1
319 1
320 1
321 1
322 1
323 1
324 1
325 1
326 1
PAGE No. ISSUE No.
12345678
327 1
328 1
329 1
330 1
331 1
332 1
333 1
334 1
335 1
336 1
337 1
338 1
339 1
340 1
341 1
342 1
343 1
344 1
345 1
346 1
347 1
348 1
349 1
350 1
351 1
352 1
353 1
354 1
355 1
356 1
357 1
358 1
359 1
360 1
361 1
362 1
363 1
364 1
PAGE No. ISSUE No.
12345678

ISSUE 1 ISSUE 2 ISSUE 3 ISSUE 4
DATE OCTOBER, 2000 DATE DATE DATE
ISSUE 5 ISSUE 6 ISSUE 7 ISSUE 8
DATE DATE DATE DATE
NEAX2400 IPX
System Operations and Maintenance Manual (IPX-U Type)
Revision Sheet 6/10
NDA-24307
365 1
366 1
367 1
368 1
369 1
370 1
371 1
372 1
373 1
374 1
375 1
376 1
377 1
378 1
379 1
380 1
381 1
382 1
383 1
384 1
385 1
386 1
387 1
388 1
389 1
390 1
391 1
392 1
393 1
394 1
395 1
396 1
397 1
398 1
399 1
400 1
401 1
402 1
PAGE No. ISSUE No.
12345678
403 1
404 1
405 1
406 1
407 1
408 1
409 1
410 1
411 1
412 1
413 1
414 1
415 1
416 1
417 1
418 1
419 1
420 1
421 1
422 1
423 1
424 1
425 1
426 1
427 1
428 1
429 1
430 1
431 1
432 1
433 1
434 1
435 1
436 1
437 1
438 1
439 1
440 1
PAGE No. ISSUE No.
12345678

ISSUE 1 ISSUE 2 ISSUE 3 ISSUE 4
DATE OCTOBER, 2000 DATE DATE DATE
ISSUE 5 ISSUE 6 ISSUE 7 ISSUE 8
DATE DATE DATE DATE
NEAX2400 IPX
System Operations and Maintenance Manual (IPX-U Type)
Revision Sheet 7/10
NDA-24307
441 1
442 1
443 1
444 1
445 1
446 1
447 1
448 1
449 1
450 1
451 1
452 1
453 1
454 1
455 1
456 1
457 1
458 1
459 1
460 1
461 1
462 1
463 1
464 1
465 1
466 1
467 1
468 1
469 1
470 1
471 1
472 1
473 1
474 1
475 1
476 1
477 1
478 1
PAGE No. ISSUE No.
12345678
479 1
480 1
481 1
482 1
483 1
484 1
485 1
486 1
487 1
488 1
489 1
490 1
491 1
492 1
493 1
494 1
495 1
496 1
497 1
498 1
499 1
500 1
501 1
502 1
503 1
504 1
505 1
506 1
507 1
508 1
509 1
510 1
511 1
512 1
513 1
514 1
515 1
516 1
PAGE No. ISSUE No.
12345678

ISSUE 1 ISSUE 2 ISSUE 3 ISSUE 4
DATE OCTOBER, 2000 DATE DATE DATE
ISSUE 5 ISSUE 6 ISSUE 7 ISSUE 8
DATE DATE DATE DATE
NEAX2400 IPX
System Operations and Maintenance Manual (IPX-U Type)
Revision Sheet 8/10
NDA-24307
517 1
518 1
519 1
520 1
521 1
522 1
523 1
524 1
525 1
526 1
527 1
528 1
529 1
530 1
531 1
532 1
533 1
534 1
535 1
536 1
537 1
538 1
539 1
540 1
541 1
542 1
543 1
544 1
545 1
546 1
547 1
548 1
549 1
550 1
551 1
552 1
553 1
554 1
PAGE No. ISSUE No.
12345678
555 1
556 1
557 1
558 1
559 1
560 1
561 1
562 1
563 1
564 1
565 1
566 1
567 1
568 1
569 1
570 1
571 1
572 1
573 1
574 1
575 1
576 1
577 1
578 1
579 1
580 1
581 1
582 1
583 1
584 1
585 1
586 1
587 1
588 1
589 1
590 1
591 1
592 1
PAGE No. ISSUE No.
12345678

ISSUE 1 ISSUE 2 ISSUE 3 ISSUE 4
DATE OCTOBER, 2000 DATE DATE DATE
ISSUE 5 ISSUE 6 ISSUE 7 ISSUE 8
DATE DATE DATE DATE
NEAX2400 IPX
System Operations and Maintenance Manual (IPX-U Type)
Revision Sheet 9/10
NDA-24307
593 1
594 1
595 1
596 1
597 1
598 1
599 1
600 1
601 1
602 1
603 1
604 1
605 1
606 1
607 1
608 1
609 1
610 1
611 1
612 1
613 1
614 1
615 1
616 1
617 1
618 1
619 1
620 1
621 1
622 1
623 1
624 1
625 1
626 1
627 1
628 1
629 1
630 1
PAGE No. ISSUE No.
12345678
631 1
632 1
633 1
634 1
635 1
636 1
637 1
638 1
639 1
640 1
641 1
642 1
643 1
644 1
645 1
646 1
647 1
648 1
649 1
650 1
651 1
652 1
653 1
654 1
655 1
656 1
657 1
658 1
659 1
660 1
661 1
662 1
663 1
664 1
665 1
666 1
667 1
668 1
PAGE No. ISSUE No.
12345678

ISSUE 1 ISSUE 2 ISSUE 3 ISSUE 4
DATE OCTOBER, 2000 DATE DATE DATE
ISSUE 5 ISSUE 6 ISSUE 7 ISSUE 8
DATE DATE DATE DATE
NEAX2400 IPX
System Operations and Maintenance Manual (IPX-U Type)
Revision Sheet 10/10
NDA-24307
669 1
670 1
671 1
672 1
673 1
674 1
675 1
676 1
677 1
678 1
679 1
680 1
681 1
682 1
683 1
684 1
685 1
686 1
687 1
688 1
689 1
690 1
691 1
692 1
693 1
694 1
695 1
696 1
PAGE No. ISSUE No.
12345678 PAG E No. ISSUE No.
12345678

NDA-24307 TABLE OF CONTENTS
Page i
Issue 1
NDA-24307
ISSUE 1
OCTOBER, 2000
NEAX2400 IPX
System Operations and Maintenance Manual
(IPX-U Type)
TABLE OF CONTENTS
Page
LIST OF FIGURES . . . . . . . . . . . . . . . . . . . . . . . . . . . . . . . . . . . . . . . . . . . . . . . . . . . . . . . . . . . . . . . . . . . . . . . xi
LIST OF TABLES . . . . . . . . . . . . . . . . . . . . . . . . . . . . . . . . . . . . . . . . . . . . . . . . . . . . . . . . . . . . . . . . . . . . . . . . xv
CHAPTER 1 INTRODUCTION . . . . . . . . . . . . . . . . . . . . . . . . . . . . . . . . . . . . . . . . . . . . . . . . . . . . . . . . . . . 1
1. GENERAL . . . . . . . . . . . . . . . . . . . . . . . . . . . . . . . . . . . . . . . . . . . . . . . . . . . . . . . . . . . . . . . . . . . . . . 1
2. HOW TO FOLLOW THE MANUAL . . . . . . . . . . . . . . . . . . . . . . . . . . . . . . . . . . . . . . . . . . . . . . . . . . . 1
CHAPTER 2 SYSTEM MAINTENANCE OUTLINE . . . . . . . . . . . . . . . . . . . . . . . . . . . . . . . . . . . . . . . . . . . 3
1. GENERAL . . . . . . . . . . . . . . . . . . . . . . . . . . . . . . . . . . . . . . . . . . . . . . . . . . . . . . . . . . . . . . . . . . . . . . 3
1.1 Purpose . . . . . . . . . . . . . . . . . . . . . . . . . . . . . . . . . . . . . . . . . . . . . . . . . . . . . . . . . . . . . . . . . . . 3
1.2 Administrative Management Procedures . . . . . . . . . . . . . . . . . . . . . . . . . . . . . . . . . . . . . . . . . . 3
1.3 How to Follow This Manual . . . . . . . . . . . . . . . . . . . . . . . . . . . . . . . . . . . . . . . . . . . . . . . . . . . . 4
2. BASIC KNOWLEDGE . . . . . . . . . . . . . . . . . . . . . . . . . . . . . . . . . . . . . . . . . . . . . . . . . . . . . . . . . . . . . 4
2.1 System Configuration. . . . . . . . . . . . . . . . . . . . . . . . . . . . . . . . . . . . . . . . . . . . . . . . . . . . . . . . . 5
2.1.1 Configuration of the System . . . . . . . . . . . . . . . . . . . . . . . . . . . . . . . . . . . . . . . . . . . . . 6
2.2 Line Equipment Numbers (LENS) . . . . . . . . . . . . . . . . . . . . . . . . . . . . . . . . . . . . . . . . . . . . . . . 16
2.2.1 Module Group . . . . . . . . . . . . . . . . . . . . . . . . . . . . . . . . . . . . . . . . . . . . . . . . . . . . . . . . 16
2.2.2 Unit . . . . . . . . . . . . . . . . . . . . . . . . . . . . . . . . . . . . . . . . . . . . . . . . . . . . . . . . . . . . . . . . 17
2.2.3 Group . . . . . . . . . . . . . . . . . . . . . . . . . . . . . . . . . . . . . . . . . . . . . . . . . . . . . . . . . . . . . . 18
2.2.4 Level . . . . . . . . . . . . . . . . . . . . . . . . . . . . . . . . . . . . . . . . . . . . . . . . . . . . . . . . . . . . . . . 19
2.3 Local Partition (LP) Number. . . . . . . . . . . . . . . . . . . . . . . . . . . . . . . . . . . . . . . . . . . . . . . . . . . . 20
2.4 Assignment of Network Control Node (NCN). . . . . . . . . . . . . . . . . . . . . . . . . . . . . . . . . . . . . . . 21
2.5 System Messages . . . . . . . . . . . . . . . . . . . . . . . . . . . . . . . . . . . . . . . . . . . . . . . . . . . . . . . . . . . 25
2.6 Fault Detecting Function . . . . . . . . . . . . . . . . . . . . . . . . . . . . . . . . . . . . . . . . . . . . . . . . . . . . . . 26
2.7 Range of Faults Specification. . . . . . . . . . . . . . . . . . . . . . . . . . . . . . . . . . . . . . . . . . . . . . . . . . . 31
2.8 Explanation of Terms . . . . . . . . . . . . . . . . . . . . . . . . . . . . . . . . . . . . . . . . . . . . . . . . . . . . . . . . . 39
3. HOW TO READ PRECAUTIONS, DIAGNOSTIC, AND FAULT REPAIR INFORMATION . . . . . . . . . 41
3.1 Precaution about Diagnostic Procedure/Fault Repair Procedure. . . . . . . . . . . . . . . . . . . . . . . . 41
3.2 How to Follow Diagnostic Procedure/Fault Repair Procedure . . . . . . . . . . . . . . . . . . . . . . . . . . 45
4. REPORTING FAULT TO NEC. . . . . . . . . . . . . . . . . . . . . . . . . . . . . . . . . . . . . . . . . . . . . . . . . . . . . . . 48
4.1 Fault Reporting Method . . . . . . . . . . . . . . . . . . . . . . . . . . . . . . . . . . . . . . . . . . . . . . . . . . . . . . . 48
4.2 Forwarding Faulty Circuit Card Method . . . . . . . . . . . . . . . . . . . . . . . . . . . . . . . . . . . . . . . . . . . 50
CHAPTER 3 SYSTEM MESSAGES . . . . . . . . . . . . . . . . . . . . . . . . . . . . . . . . . . . . . . . . . . . . . . . . . . . . . . 51
0-C Reset Interrupt . . . . . . . . . . . . . . . . . . . . . . . . . . . . . . . . . . . . . . . . . . . . . . . . . . . . . . . . . . . . . 56
0-D CPU Clock Down . . . . . . . . . . . . . . . . . . . . . . . . . . . . . . . . . . . . . . . . . . . . . . . . . . . . . . . . . . . 58
0-E C-Level Infinite Loop . . . . . . . . . . . . . . . . . . . . . . . . . . . . . . . . . . . . . . . . . . . . . . . . . . . . . . . . 59
0-F Memory Failure . . . . . . . . . . . . . . . . . . . . . . . . . . . . . . . . . . . . . . . . . . . . . . . . . . . . . . . . . . . . 61

TABLE OF CONTENTS NDA-24307
Page ii
Issue 1
TABLE OF CONTENTS (CONTINUED)
Page
0-G B-Level Infinite Loop (Permanent) . . . . . . . . . . . . . . . . . . . . . . . . . . . . . . . . . . . . . . . . . . . . . . 63
0-H B-Level Infinite Loop (Temporary) . . . . . . . . . . . . . . . . . . . . . . . . . . . . . . . . . . . . . . . . . . . . . . 64
0-I Mate CPU Failure. . . . . . . . . . . . . . . . . . . . . . . . . . . . . . . . . . . . . . . . . . . . . . . . . . . . . . . . . . . 65
0-J Abnormal Interrupt . . . . . . . . . . . . . . . . . . . . . . . . . . . . . . . . . . . . . . . . . . . . . . . . . . . . . . . . . . 66
1-A Both TSW Failure (Permanent) . . . . . . . . . . . . . . . . . . . . . . . . . . . . . . . . . . . . . . . . . . . . . . . . 67
1-B TSW Failure (Permanent) . . . . . . . . . . . . . . . . . . . . . . . . . . . . . . . . . . . . . . . . . . . . . . . . . . . . 68
1-C Both TSW Write Failure . . . . . . . . . . . . . . . . . . . . . . . . . . . . . . . . . . . . . . . . . . . . . . . . . . . . . . 69
1-D TSW Write Failure . . . . . . . . . . . . . . . . . . . . . . . . . . . . . . . . . . . . . . . . . . . . . . . . . . . . . . . . . . 70
1-E Both TSW Clock Failure. . . . . . . . . . . . . . . . . . . . . . . . . . . . . . . . . . . . . . . . . . . . . . . . . . . . . . 71
1-F TSW Clock Failure . . . . . . . . . . . . . . . . . . . . . . . . . . . . . . . . . . . . . . . . . . . . . . . . . . . . . . . . . . 72
1-G Both HSW Failure . . . . . . . . . . . . . . . . . . . . . . . . . . . . . . . . . . . . . . . . . . . . . . . . . . . . . . . . . . 73
1-H HSW Failure. . . . . . . . . . . . . . . . . . . . . . . . . . . . . . . . . . . . . . . . . . . . . . . . . . . . . . . . . . . . . . . 74
1-I Both HSW Write Failure. . . . . . . . . . . . . . . . . . . . . . . . . . . . . . . . . . . . . . . . . . . . . . . . . . . . . . 75
1-J HSW Write Failure . . . . . . . . . . . . . . . . . . . . . . . . . . . . . . . . . . . . . . . . . . . . . . . . . . . . . . . . . . 76
1-K Both HSW CLK Failure . . . . . . . . . . . . . . . . . . . . . . . . . . . . . . . . . . . . . . . . . . . . . . . . . . . . . . 77
1-L HSW CLK Failure. . . . . . . . . . . . . . . . . . . . . . . . . . . . . . . . . . . . . . . . . . . . . . . . . . . . . . . . . . . 79
1-O Both PLO Failure . . . . . . . . . . . . . . . . . . . . . . . . . . . . . . . . . . . . . . . . . . . . . . . . . . . . . . . . . . . 81
1-P PLO Failure . . . . . . . . . . . . . . . . . . . . . . . . . . . . . . . . . . . . . . . . . . . . . . . . . . . . . . . . . . . . . . . 83
1-S Module Group Down Failure . . . . . . . . . . . . . . . . . . . . . . . . . . . . . . . . . . . . . . . . . . . . . . . . . . 85
1-T TSW ACT Change Report . . . . . . . . . . . . . . . . . . . . . . . . . . . . . . . . . . . . . . . . . . . . . . . . . . . . 86
1-U DLKC Data Transfer Failure (Permanent) . . . . . . . . . . . . . . . . . . . . . . . . . . . . . . . . . . . . . . . . 88
1-V DLKC Data Transfer Failure (Temporary) . . . . . . . . . . . . . . . . . . . . . . . . . . . . . . . . . . . . . . . . 89
1-W PLO Restore . . . . . . . . . . . . . . . . . . . . . . . . . . . . . . . . . . . . . . . . . . . . . . . . . . . . . . . . . . . . . . 90
1-X LN → ISW CLK/FH Failure . . . . . . . . . . . . . . . . . . . . . . . . . . . . . . . . . . . . . . . . . . . . . . . . . . . 91
1-Y LN → ISW CLK/FH Failure (Both) . . . . . . . . . . . . . . . . . . . . . . . . . . . . . . . . . . . . . . . . . . . . . . 93
1-Z LN → ISW CLK/FH Release . . . . . . . . . . . . . . . . . . . . . . . . . . . . . . . . . . . . . . . . . . . . . . . . . . 95
3-B C-Level Infinite Loop (Permanent) . . . . . . . . . . . . . . . . . . . . . . . . . . . . . . . . . . . . . . . . . . . . . . 97
3-C C-Level Infinite Loop (Temporary) . . . . . . . . . . . . . . . . . . . . . . . . . . . . . . . . . . . . . . . . . . . . . . 98
3-D Lock-Up Failure (Permanent). . . . . . . . . . . . . . . . . . . . . . . . . . . . . . . . . . . . . . . . . . . . . . . . . . 99
3-E Lock-Up Failure (Temporary). . . . . . . . . . . . . . . . . . . . . . . . . . . . . . . . . . . . . . . . . . . . . . . . . . 100
3-F -48V Over Current . . . . . . . . . . . . . . . . . . . . . . . . . . . . . . . . . . . . . . . . . . . . . . . . . . . . . . . . . . 101
3-G Ground Failure . . . . . . . . . . . . . . . . . . . . . . . . . . . . . . . . . . . . . . . . . . . . . . . . . . . . . . . . . . . . . 102
3-H Digital Line Warning. . . . . . . . . . . . . . . . . . . . . . . . . . . . . . . . . . . . . . . . . . . . . . . . . . . . . . . . . 103
3-I Digital Line Failure . . . . . . . . . . . . . . . . . . . . . . . . . . . . . . . . . . . . . . . . . . . . . . . . . . . . . . . . . . 104
3-J Digital Line Restore . . . . . . . . . . . . . . . . . . . . . . . . . . . . . . . . . . . . . . . . . . . . . . . . . . . . . . . . . 105
4-C Both TSW Ready Failure . . . . . . . . . . . . . . . . . . . . . . . . . . . . . . . . . . . . . . . . . . . . . . . . . . . . . 106
4-D TSW Ready Failure . . . . . . . . . . . . . . . . . . . . . . . . . . . . . . . . . . . . . . . . . . . . . . . . . . . . . . . . . 107
4-E Both HSW Ready Failure. . . . . . . . . . . . . . . . . . . . . . . . . . . . . . . . . . . . . . . . . . . . . . . . . . . . . 108
4-F HSW Ready Failure . . . . . . . . . . . . . . . . . . . . . . . . . . . . . . . . . . . . . . . . . . . . . . . . . . . . . . . . . 109
4-Q DLKC Ready Failure . . . . . . . . . . . . . . . . . . . . . . . . . . . . . . . . . . . . . . . . . . . . . . . . . . . . . . . . 110
4-S MUX Ready Failure . . . . . . . . . . . . . . . . . . . . . . . . . . . . . . . . . . . . . . . . . . . . . . . . . . . . . . . . . 111
4-T Both MUX Ready Failure . . . . . . . . . . . . . . . . . . . . . . . . . . . . . . . . . . . . . . . . . . . . . . . . . . . . . 112
4-U PCI Card Failure . . . . . . . . . . . . . . . . . . . . . . . . . . . . . . . . . . . . . . . . . . . . . . . . . . . . . . . . . . . 113
4-V PCI Card Failure Recovered . . . . . . . . . . . . . . . . . . . . . . . . . . . . . . . . . . . . . . . . . . . . . . . . . . 114
6-A System Failure . . . . . . . . . . . . . . . . . . . . . . . . . . . . . . . . . . . . . . . . . . . . . . . . . . . . . . . . . . . . . 115
6-B RGU and Howler Failure . . . . . . . . . . . . . . . . . . . . . . . . . . . . . . . . . . . . . . . . . . . . . . . . . . . . . 116
6-C Line Load Control Start . . . . . . . . . . . . . . . . . . . . . . . . . . . . . . . . . . . . . . . . . . . . . . . . . . . . . . 117
6-D Line Load Control Stop . . . . . . . . . . . . . . . . . . . . . . . . . . . . . . . . . . . . . . . . . . . . . . . . . . . . . . 118
6-H Bad Call Notification. . . . . . . . . . . . . . . . . . . . . . . . . . . . . . . . . . . . . . . . . . . . . . . . . . . . . . . . . 119

NDA-24307 TABLE OF CONTENTS
Page iii
Issue 1
TABLE OF CONTENTS (CONTINUED)
Page
6-I STA-Test Connection Data . . . . . . . . . . . . . . . . . . . . . . . . . . . . . . . . . . . . . . . . . . . . . . . . . . . 124
6-J Emergency Call . . . . . . . . . . . . . . . . . . . . . . . . . . . . . . . . . . . . . . . . . . . . . . . . . . . . . . . . . . . . 127
6-L Emergency Control Start . . . . . . . . . . . . . . . . . . . . . . . . . . . . . . . . . . . . . . . . . . . . . . . . . . . . . 128
6-M Emergency Control Stop . . . . . . . . . . . . . . . . . . . . . . . . . . . . . . . . . . . . . . . . . . . . . . . . . . . . . 129
6-N Abnormal Call Duration Data . . . . . . . . . . . . . . . . . . . . . . . . . . . . . . . . . . . . . . . . . . . . . . . . . . 130
6-O SMDR Output Buffer Overflow Alarm. . . . . . . . . . . . . . . . . . . . . . . . . . . . . . . . . . . . . . . . . . . . 133
6-P SMDR Output Buffer Overflow Release. . . . . . . . . . . . . . . . . . . . . . . . . . . . . . . . . . . . . . . . . . 136
7-A System Initialize With Data Load . . . . . . . . . . . . . . . . . . . . . . . . . . . . . . . . . . . . . . . . . . . . . . . 137
7-B System Initialize . . . . . . . . . . . . . . . . . . . . . . . . . . . . . . . . . . . . . . . . . . . . . . . . . . . . . . . . . . . . 139
7-C CPU MBR Key Turn ON. . . . . . . . . . . . . . . . . . . . . . . . . . . . . . . . . . . . . . . . . . . . . . . . . . . . . . 140
7-D CPU MBR Key Turn OFF. . . . . . . . . . . . . . . . . . . . . . . . . . . . . . . . . . . . . . . . . . . . . . . . . . . . . 141
7-E TSW MBR Key Turn ON . . . . . . . . . . . . . . . . . . . . . . . . . . . . . . . . . . . . . . . . . . . . . . . . . . . . . 142
7-F TSW MBR Key Turn OFF . . . . . . . . . . . . . . . . . . . . . . . . . . . . . . . . . . . . . . . . . . . . . . . . . . . . 143
7-I ALMC MB Key Turn ON. . . . . . . . . . . . . . . . . . . . . . . . . . . . . . . . . . . . . . . . . . . . . . . . . . . . . . 144
7-J ALMC MB Key Turn OFF. . . . . . . . . . . . . . . . . . . . . . . . . . . . . . . . . . . . . . . . . . . . . . . . . . . . . 145
7-K PM MB Key Turn ON . . . . . . . . . . . . . . . . . . . . . . . . . . . . . . . . . . . . . . . . . . . . . . . . . . . . . . . . 146
7-L PM MB Key Turn OFF . . . . . . . . . . . . . . . . . . . . . . . . . . . . . . . . . . . . . . . . . . . . . . . . . . . . . . . 147
7-M NCU MB Key Turn ON. . . . . . . . . . . . . . . . . . . . . . . . . . . . . . . . . . . . . . . . . . . . . . . . . . . . . . . 148
7-N NCU MB Key Turn OFF . . . . . . . . . . . . . . . . . . . . . . . . . . . . . . . . . . . . . . . . . . . . . . . . . . . . . . 149
7-O Cyclic Diagnosis Normal . . . . . . . . . . . . . . . . . . . . . . . . . . . . . . . . . . . . . . . . . . . . . . . . . . . . . 150
7-P Cyclic Diagnosis Information (Error Detected). . . . . . . . . . . . . . . . . . . . . . . . . . . . . . . . . . . . . 160
7-U PLO MB Key Turn ON . . . . . . . . . . . . . . . . . . . . . . . . . . . . . . . . . . . . . . . . . . . . . . . . . . . . . . . 180
7-V PLO MB Key Turn OFF . . . . . . . . . . . . . . . . . . . . . . . . . . . . . . . . . . . . . . . . . . . . . . . . . . . . . . 181
13-A CCH Clock Failure . . . . . . . . . . . . . . . . . . . . . . . . . . . . . . . . . . . . . . . . . . . . . . . . . . . . . . . . . . 183
13-B CCH C-Level Infinite Loop Failure (Permanent) . . . . . . . . . . . . . . . . . . . . . . . . . . . . . . . . . . . 184
13-C CCH C-Level Infinite Loop Failure (Temporary). . . . . . . . . . . . . . . . . . . . . . . . . . . . . . . . . . . . 185
13-D CCH Lock-Up Failure (Permanent) . . . . . . . . . . . . . . . . . . . . . . . . . . . . . . . . . . . . . . . . . . . . . 186
13-E CCH Lock-Up Failure (Temporary) . . . . . . . . . . . . . . . . . . . . . . . . . . . . . . . . . . . . . . . . . . . . . 187
13-F CCH B-Level Infinite Loop Failure (Permanent). . . . . . . . . . . . . . . . . . . . . . . . . . . . . . . . . . . . 188
13-G CCH B-Level Infinite Loop Failure (Temporary). . . . . . . . . . . . . . . . . . . . . . . . . . . . . . . . . . . . 189
13-H CCS Link Failure (Permanent). . . . . . . . . . . . . . . . . . . . . . . . . . . . . . . . . . . . . . . . . . . . . . . . . 190
13-I CCS Link Failure (Temporary) . . . . . . . . . . . . . . . . . . . . . . . . . . . . . . . . . . . . . . . . . . . . . . . . . 192
13-J Restoration From CCS Link Failure . . . . . . . . . . . . . . . . . . . . . . . . . . . . . . . . . . . . . . . . . . . . . 194
13-K CCH Reset Interrupt Failure. . . . . . . . . . . . . . . . . . . . . . . . . . . . . . . . . . . . . . . . . . . . . . . . . . . 195
13-N Digital Line Warning. . . . . . . . . . . . . . . . . . . . . . . . . . . . . . . . . . . . . . . . . . . . . . . . . . . . . . . . . 196
13-O Digital Line Failure . . . . . . . . . . . . . . . . . . . . . . . . . . . . . . . . . . . . . . . . . . . . . . . . . . . . . . . . . . 197
13-P Digital Line Restore . . . . . . . . . . . . . . . . . . . . . . . . . . . . . . . . . . . . . . . . . . . . . . . . . . . . . . . . . 198
13-Q DAU Battery Operation . . . . . . . . . . . . . . . . . . . . . . . . . . . . . . . . . . . . . . . . . . . . . . . . . . . . . . 199
13-R DAU Line Operation . . . . . . . . . . . . . . . . . . . . . . . . . . . . . . . . . . . . . . . . . . . . . . . . . . . . . . . . . 200
13-Z Power Failure. . . . . . . . . . . . . . . . . . . . . . . . . . . . . . . . . . . . . . . . . . . . . . . . . . . . . . . . . . . . . . 201
15-A VPS Failure (Temporary) . . . . . . . . . . . . . . . . . . . . . . . . . . . . . . . . . . . . . . . . . . . . . . . . . . . . . 202
15-B VPS Failure (Permanent) . . . . . . . . . . . . . . . . . . . . . . . . . . . . . . . . . . . . . . . . . . . . . . . . . . . . . 203
15-C VPS Restore . . . . . . . . . . . . . . . . . . . . . . . . . . . . . . . . . . . . . . . . . . . . . . . . . . . . . . . . . . . . . . 204
16-A Inside Trunk All Busy . . . . . . . . . . . . . . . . . . . . . . . . . . . . . . . . . . . . . . . . . . . . . . . . . . . . . . . . 205
16-B Virtual Tie Line Set Report. . . . . . . . . . . . . . . . . . . . . . . . . . . . . . . . . . . . . . . . . . . . . . . . . . . . 207
16-C Virtual Tie Line Cancel Report. . . . . . . . . . . . . . . . . . . . . . . . . . . . . . . . . . . . . . . . . . . . . . . . . 208
16-E Virtual Tie Line Set Time Out. . . . . . . . . . . . . . . . . . . . . . . . . . . . . . . . . . . . . . . . . . . . . . . . . . 209
16-F Sender Start Time Out . . . . . . . . . . . . . . . . . . . . . . . . . . . . . . . . . . . . . . . . . . . . . . . . . . . . . . . 212
16-K I/O Port Line OFF. . . . . . . . . . . . . . . . . . . . . . . . . . . . . . . . . . . . . . . . . . . . . . . . . . . . . . . . . . . 219

TABLE OF CONTENTS NDA-24307
Page iv
Issue 1
TABLE OF CONTENTS (CONTINUED)
Page
16-L I/O Port Line Restore . . . . . . . . . . . . . . . . . . . . . . . . . . . . . . . . . . . . . . . . . . . . . . . . . . . . . . . . 220
16-M Hard Clock Failure . . . . . . . . . . . . . . . . . . . . . . . . . . . . . . . . . . . . . . . . . . . . . . . . . . . . . . . . . . 221
16-N Hard Clock Restore . . . . . . . . . . . . . . . . . . . . . . . . . . . . . . . . . . . . . . . . . . . . . . . . . . . . . . . . . 222
16-T IOC Failure (Temporary) . . . . . . . . . . . . . . . . . . . . . . . . . . . . . . . . . . . . . . . . . . . . . . . . . . . . . 223
16-U IOC Failure (Permanent) . . . . . . . . . . . . . . . . . . . . . . . . . . . . . . . . . . . . . . . . . . . . . . . . . . . . . 224
16-X Station Exchanged Report . . . . . . . . . . . . . . . . . . . . . . . . . . . . . . . . . . . . . . . . . . . . . . . . . . . . 225
17-A CCH MBR Key Turn ON . . . . . . . . . . . . . . . . . . . . . . . . . . . . . . . . . . . . . . . . . . . . . . . . . . . . . 228
17-B CCH MBR Key Turn OFF. . . . . . . . . . . . . . . . . . . . . . . . . . . . . . . . . . . . . . . . . . . . . . . . . . . . . 229
17-C CCH MB Key Turn ON. . . . . . . . . . . . . . . . . . . . . . . . . . . . . . . . . . . . . . . . . . . . . . . . . . . . . . . 230
17-D CCH MB Key Turn OFF . . . . . . . . . . . . . . . . . . . . . . . . . . . . . . . . . . . . . . . . . . . . . . . . . . . . . . 231
17-H Day/Night Change Information. . . . . . . . . . . . . . . . . . . . . . . . . . . . . . . . . . . . . . . . . . . . . . . . . 232
17-O IOC MB Key Turn ON . . . . . . . . . . . . . . . . . . . . . . . . . . . . . . . . . . . . . . . . . . . . . . . . . . . . . . . 234
17-P IOC MB Key Turn OFF. . . . . . . . . . . . . . . . . . . . . . . . . . . . . . . . . . . . . . . . . . . . . . . . . . . . . . . 235
17-Q IOC MBR Key Turn ON . . . . . . . . . . . . . . . . . . . . . . . . . . . . . . . . . . . . . . . . . . . . . . . . . . . . . . 236
17-R IOC MBR Key Turn OFF . . . . . . . . . . . . . . . . . . . . . . . . . . . . . . . . . . . . . . . . . . . . . . . . . . . . . 237
17-Y GATE-HSW MBR Key ON . . . . . . . . . . . . . . . . . . . . . . . . . . . . . . . . . . . . . . . . . . . . . . . . . . . . 238
17-Z GATE-HSW MBR Key OFF . . . . . . . . . . . . . . . . . . . . . . . . . . . . . . . . . . . . . . . . . . . . . . . . . . . 239
23-P Dch Back-Up Automatic Change Start/End . . . . . . . . . . . . . . . . . . . . . . . . . . . . . . . . . . . . . . . 240
23-Q Dch Back-Up Manual Change Start/End . . . . . . . . . . . . . . . . . . . . . . . . . . . . . . . . . . . . . . . . . 242
23-Y MUX Clock Failure . . . . . . . . . . . . . . . . . . . . . . . . . . . . . . . . . . . . . . . . . . . . . . . . . . . . . . . . . . 244
23-Z Both MUX Clock Failure. . . . . . . . . . . . . . . . . . . . . . . . . . . . . . . . . . . . . . . . . . . . . . . . . . . . . . 245
26-N MAT Log. . . . . . . . . . . . . . . . . . . . . . . . . . . . . . . . . . . . . . . . . . . . . . . . . . . . . . . . . . . . . . . . . . 246
26-R Call Trace. . . . . . . . . . . . . . . . . . . . . . . . . . . . . . . . . . . . . . . . . . . . . . . . . . . . . . . . . . . . . . . . . 247
26-V LAN Interface Error Report . . . . . . . . . . . . . . . . . . . . . . . . . . . . . . . . . . . . . . . . . . . . . . . . . . . 251
26-W LAN Interface Release Report . . . . . . . . . . . . . . . . . . . . . . . . . . . . . . . . . . . . . . . . . . . . . . . . . 255
27-E DLMX MBR Key Turn ON . . . . . . . . . . . . . . . . . . . . . . . . . . . . . . . . . . . . . . . . . . . . . . . . . . . . 257
27-F DLMX MBR Key Turn OFF . . . . . . . . . . . . . . . . . . . . . . . . . . . . . . . . . . . . . . . . . . . . . . . . . . . 258
27-G DLMX ACT Change Report . . . . . . . . . . . . . . . . . . . . . . . . . . . . . . . . . . . . . . . . . . . . . . . . . . . 259
33-A MUX Clock Restore . . . . . . . . . . . . . . . . . . . . . . . . . . . . . . . . . . . . . . . . . . . . . . . . . . . . . . . . . 260
33-B SDT Alarm Warning . . . . . . . . . . . . . . . . . . . . . . . . . . . . . . . . . . . . . . . . . . . . . . . . . . . . . . . . . 261
33-C SDT Alarm Trouble . . . . . . . . . . . . . . . . . . . . . . . . . . . . . . . . . . . . . . . . . . . . . . . . . . . . . . . . . 263
33-D SDT Alarm Restore . . . . . . . . . . . . . . . . . . . . . . . . . . . . . . . . . . . . . . . . . . . . . . . . . . . . . . . . . 266
33-E SDT Interface Change Notify . . . . . . . . . . . . . . . . . . . . . . . . . . . . . . . . . . . . . . . . . . . . . . . . . . 267
CHAPTER 4 UNIT/CIRCUIT CARD REPLACEMENT PROCEDURE . . . . . . . . . . . . . . . . . . . . . . . . . . . . . 269
1. LPM ACCOMMODATING UNIT/CIRCUIT CARD REPLACEMENT PROCEDURE . . . . . . . . . . . . . . 269
1.1 Precautions . . . . . . . . . . . . . . . . . . . . . . . . . . . . . . . . . . . . . . . . . . . . . . . . . . . . . . . . . . . . . . . . 269
1.2 Circuit Card Mounting Face Layout . . . . . . . . . . . . . . . . . . . . . . . . . . . . . . . . . . . . . . . . . . . . . . 269
1.3 Operating Procedures . . . . . . . . . . . . . . . . . . . . . . . . . . . . . . . . . . . . . . . . . . . . . . . . . . . . . . . . 271
1.3.1 CPR Replacement Procedure. . . . . . . . . . . . . . . . . . . . . . . . . . . . . . . . . . . . . . . . . . . . 272
1.3.2 EMA Card Replacement Procedure . . . . . . . . . . . . . . . . . . . . . . . . . . . . . . . . . . . . . . . 285
1.3.3 IOC Card Replacement Procedure . . . . . . . . . . . . . . . . . . . . . . . . . . . . . . . . . . . . . . . . 287
1.3.4 Power Supply Unit Replacement Procedure. . . . . . . . . . . . . . . . . . . . . . . . . . . . . . . . . 289
1.3.5 MISC Card Replacement Procedure. . . . . . . . . . . . . . . . . . . . . . . . . . . . . . . . . . . . . . . 291
1.3.6 MMC Card Replacement Procedure . . . . . . . . . . . . . . . . . . . . . . . . . . . . . . . . . . . . . . . 292
2. TSWM ACCOMMODATING CIRCUIT CARD REPLACEMENT PROCEDURE . . . . . . . . . . . . . . . . . 294
2.1 Precautions . . . . . . . . . . . . . . . . . . . . . . . . . . . . . . . . . . . . . . . . . . . . . . . . . . . . . . . . . . . . . . . . 294
2.2 Circuit Card Mounting Face Layout . . . . . . . . . . . . . . . . . . . . . . . . . . . . . . . . . . . . . . . . . . . . . . 294
2.3 Operating Procedures . . . . . . . . . . . . . . . . . . . . . . . . . . . . . . . . . . . . . . . . . . . . . . . . . . . . . . . . 295

NDA-24307 TABLE OF CONTENTS
Page v
Issue 1
TABLE OF CONTENTS (CONTINUED)
Page
2.3.1 GT Card Replacement Procedure. . . . . . . . . . . . . . . . . . . . . . . . . . . . . . . . . . . . . . . . . 296
2.3.2 TSW Card Replacement Procedure . . . . . . . . . . . . . . . . . . . . . . . . . . . . . . . . . . . . . . . 300
2.3.3 DLKC Card Replacement Procedure . . . . . . . . . . . . . . . . . . . . . . . . . . . . . . . . . . . . . . 306
2.3.4 PLO Card Replacement Procedure. . . . . . . . . . . . . . . . . . . . . . . . . . . . . . . . . . . . . . . . 308
2.3.5 CLK Card Replacement Procedure. . . . . . . . . . . . . . . . . . . . . . . . . . . . . . . . . . . . . . . . 310
2.3.6 PWR SW Card Replacement Procedure. . . . . . . . . . . . . . . . . . . . . . . . . . . . . . . . . . . . 312
2.3.7 MISC Card Replacement Procedure. . . . . . . . . . . . . . . . . . . . . . . . . . . . . . . . . . . . . . . 313
3. PIM ACCOMMODATING CIRCUIT CARD REPLACEMENT PROCEDURE . . . . . . . . . . . . . . . . . . . 314
3.1 Precaution . . . . . . . . . . . . . . . . . . . . . . . . . . . . . . . . . . . . . . . . . . . . . . . . . . . . . . . . . . . . . . . . . 314
3.2 Circuit Card Mounting Face Layout . . . . . . . . . . . . . . . . . . . . . . . . . . . . . . . . . . . . . . . . . . . . . . 314
3.3 Operating Procedures . . . . . . . . . . . . . . . . . . . . . . . . . . . . . . . . . . . . . . . . . . . . . . . . . . . . . . . . 315
3.3.1 LC/TRK Circuit Card Replacement Procedure . . . . . . . . . . . . . . . . . . . . . . . . . . . . . . . 316
3.3.2 MUX Card Replacement Procedure . . . . . . . . . . . . . . . . . . . . . . . . . . . . . . . . . . . . . . . 317
3.3.3 PWR Card Replacement Procedure . . . . . . . . . . . . . . . . . . . . . . . . . . . . . . . . . . . . . . . 320
3.3.4 HUB Circuit Card Replacement Procedure. . . . . . . . . . . . . . . . . . . . . . . . . . . . . . . . . . 322
3.3.5 SDT Card Replacement Procedure. . . . . . . . . . . . . . . . . . . . . . . . . . . . . . . . . . . . . . . . 324
3.3.6 DLMX Card Replacement Procedure . . . . . . . . . . . . . . . . . . . . . . . . . . . . . . . . . . . . . . 329
4. ISWM ACCOMMODATING CIRCUIT CARD REPLACEMENT PROCEDURE. . . . . . . . . . . . . . . . . . 331
4.1 Precautions . . . . . . . . . . . . . . . . . . . . . . . . . . . . . . . . . . . . . . . . . . . . . . . . . . . . . . . . . . . . . . . . 331
4.2 Circuit Card Mounting Face Layout . . . . . . . . . . . . . . . . . . . . . . . . . . . . . . . . . . . . . . . . . . . . . . 331
4.3 Operating Procedures . . . . . . . . . . . . . . . . . . . . . . . . . . . . . . . . . . . . . . . . . . . . . . . . . . . . . . . . 332
4.3.1 IOGT Card Replacement Procedure . . . . . . . . . . . . . . . . . . . . . . . . . . . . . . . . . . . . . . . 333
4.3.2 TSW Card Replacement Procedure . . . . . . . . . . . . . . . . . . . . . . . . . . . . . . . . . . . . . . . 337
4.3.3 HSW Card Replacement Procedure . . . . . . . . . . . . . . . . . . . . . . . . . . . . . . . . . . . . . . . 340
4.3.4 PLO Card Replacement Procedure. . . . . . . . . . . . . . . . . . . . . . . . . . . . . . . . . . . . . . . . 343
4.3.5 PWR SW Card Replacement Procedure. . . . . . . . . . . . . . . . . . . . . . . . . . . . . . . . . . . . 345
5. FAN UNIT REPLACEMENT. . . . . . . . . . . . . . . . . . . . . . . . . . . . . . . . . . . . . . . . . . . . . . . . . . . . . . . . . 346
6. CPR COOLING FAN REPLACEMENT . . . . . . . . . . . . . . . . . . . . . . . . . . . . . . . . . . . . . . . . . . . . . . . . 351
7. FUSE REPLACEMENT . . . . . . . . . . . . . . . . . . . . . . . . . . . . . . . . . . . . . . . . . . . . . . . . . . . . . . . . . . . . 354
CHAPTER 5 FAULT REPAIR PROCEDURES . . . . . . . . . . . . . . . . . . . . . . . . . . . . . . . . . . . . . . . . . . . . . . 359
1. LINE FAULT. . . . . . . . . . . . . . . . . . . . . . . . . . . . . . . . . . . . . . . . . . . . . . . . . . . . . . . . . . . . . . . . . . . . . 362
1.1 Check Point . . . . . . . . . . . . . . . . . . . . . . . . . . . . . . . . . . . . . . . . . . . . . . . . . . . . . . . . . . . . . . . . 363
1.2 Line Control . . . . . . . . . . . . . . . . . . . . . . . . . . . . . . . . . . . . . . . . . . . . . . . . . . . . . . . . . . . . . . . . 363
1.3 Line Fault - When Dial Tone (DT) Cannot Be Heard . . . . . . . . . . . . . . . . . . . . . . . . . . . . . . . . . 365
1.4 Line Fault - When Dialing Results in a Wrong Connection . . . . . . . . . . . . . . . . . . . . . . . . . . . . 367
1.5 Line Fault - When Bell Does Not Ring . . . . . . . . . . . . . . . . . . . . . . . . . . . . . . . . . . . . . . . . . . . . 368
1.6 When Call Cannot Be Answered and Speech Cannot Be Made . . . . . . . . . . . . . . . . . . . . . . . . 369
1.7 Dterm Fault. . . . . . . . . . . . . . . . . . . . . . . . . . . . . . . . . . . . . . . . . . . . . . . . . . . . . . . . . . . . . . . . . . 370
2. TRUNK FAULT . . . . . . . . . . . . . . . . . . . . . . . . . . . . . . . . . . . . . . . . . . . . . . . . . . . . . . . . . . . . . . . . . . 372
2.1 Check Point . . . . . . . . . . . . . . . . . . . . . . . . . . . . . . . . . . . . . . . . . . . . . . . . . . . . . . . . . . . . . . . . 372
2.2 Trunk Control . . . . . . . . . . . . . . . . . . . . . . . . . . . . . . . . . . . . . . . . . . . . . . . . . . . . . . . . . . . . . . . 375
2.3 Trunk (ORT, SND, CFT) Fault . . . . . . . . . . . . . . . . . . . . . . . . . . . . . . . . . . . . . . . . . . . . . . . . . . 376
2.4 Trunk (COT, TLT, DTI) Fault . . . . . . . . . . . . . . . . . . . . . . . . . . . . . . . . . . . . . . . . . . . . . . . . . . . 377
3. ATTCON/DESKCON FAULT . . . . . . . . . . . . . . . . . . . . . . . . . . . . . . . . . . . . . . . . . . . . . . . . . . . . . . . . 381
3.1 Check Point . . . . . . . . . . . . . . . . . . . . . . . . . . . . . . . . . . . . . . . . . . . . . . . . . . . . . . . . . . . . . . . . 381
3.2 ATTCON/DESKCON Control . . . . . . . . . . . . . . . . . . . . . . . . . . . . . . . . . . . . . . . . . . . . . . . . . . . 381

TABLE OF CONTENTS NDA-24307
Page vi
Issue 1
TABLE OF CONTENTS (CONTINUED)
Page
3.3 ATTCON/DESKCON Fault. . . . . . . . . . . . . . . . . . . . . . . . . . . . . . . . . . . . . . . . . . . . . . . . . . . . . 383
4. UNIT FAULT . . . . . . . . . . . . . . . . . . . . . . . . . . . . . . . . . . . . . . . . . . . . . . . . . . . . . . . . . . . . . . . . . . . . 385
4.1 Check Point . . . . . . . . . . . . . . . . . . . . . . . . . . . . . . . . . . . . . . . . . . . . . . . . . . . . . . . . . . . . . . . . 386
4.2 Unit Fault - Fault Related to Speech . . . . . . . . . . . . . . . . . . . . . . . . . . . . . . . . . . . . . . . . . . . . . 388
4.3 Unit Fault - When Dial Tone (DT) Cannot Be Heard . . . . . . . . . . . . . . . . . . . . . . . . . . . . . . . . . 392
4.4 Unit Fault - ACT-Side MUX Card Is Faulty and System Has Changed Over . . . . . . . . . . . . . . . 396
5. SPEECH PATH (TSW) SYSTEM FAULT (LN) . . . . . . . . . . . . . . . . . . . . . . . . . . . . . . . . . . . . . . . . . . 398
5.1 Check Point . . . . . . . . . . . . . . . . . . . . . . . . . . . . . . . . . . . . . . . . . . . . . . . . . . . . . . . . . . . . . . . . 398
5.2 Speech Path System Fault - Fault Related to Speech. . . . . . . . . . . . . . . . . . . . . . . . . . . . . . . . 401
5.3 Speech Path System Fault - When Dial Tone (DT) Cannot Be Heard. . . . . . . . . . . . . . . . . . . . 405
5.4 Speech Path System Fault (LN) - STBY Side Has Become Faulty . . . . . . . . . . . . . . . . . . . . . . 406
6. SPEECH PATH SYSTEM FAULT (WHOLE SYSTEM/ISW) . . . . . . . . . . . . . . . . . . . . . . . . . . . . . . . . 408
6.1 Check Point . . . . . . . . . . . . . . . . . . . . . . . . . . . . . . . . . . . . . . . . . . . . . . . . . . . . . . . . . . . . . . . . 408
6.2 Speech Path System Fault (Whole System/ISW) - Fault Related to Speech. . . . . . . . . . . . . . . 409
6.3 Speech Path System Fault (Whole System/ISW) - ACT side becomes Faulty Intermittently . . 410
6.4 Speech Path System Fault (Whole System/ISW) - STBY side becomes Faulty Intermittently . 411
6.5 PLO Fault . . . . . . . . . . . . . . . . . . . . . . . . . . . . . . . . . . . . . . . . . . . . . . . . . . . . . . . . . . . . . . . . . . 412
7. CONTROL SYSTEM FAULT . . . . . . . . . . . . . . . . . . . . . . . . . . . . . . . . . . . . . . . . . . . . . . . . . . . . . . . . 413
7.1 Check Point . . . . . . . . . . . . . . . . . . . . . . . . . . . . . . . . . . . . . . . . . . . . . . . . . . . . . . . . . . . . . . . . 413
7.2 Control System Fault - Fault Occurs Intermittently. . . . . . . . . . . . . . . . . . . . . . . . . . . . . . . . . . . 414
7.3 Control System Fault - STBY Side is Faulty. . . . . . . . . . . . . . . . . . . . . . . . . . . . . . . . . . . . . . . . 416
8. ALARM INDICATION FAULT. . . . . . . . . . . . . . . . . . . . . . . . . . . . . . . . . . . . . . . . . . . . . . . . . . . . . . . . 417
8.1 Check Point . . . . . . . . . . . . . . . . . . . . . . . . . . . . . . . . . . . . . . . . . . . . . . . . . . . . . . . . . . . . . . . . 417
8.2 Fault of Alarm Indicating Panel . . . . . . . . . . . . . . . . . . . . . . . . . . . . . . . . . . . . . . . . . . . . . . . . . 417
8.3 Fault That Cannot Be Detected . . . . . . . . . . . . . . . . . . . . . . . . . . . . . . . . . . . . . . . . . . . . . . . . . 423
9. POWER SUPPLY FAULT . . . . . . . . . . . . . . . . . . . . . . . . . . . . . . . . . . . . . . . . . . . . . . . . . . . . . . . . . . 424
9.1 Check Point . . . . . . . . . . . . . . . . . . . . . . . . . . . . . . . . . . . . . . . . . . . . . . . . . . . . . . . . . . . . . . . . 424
9.2 Fuse Blown Fault . . . . . . . . . . . . . . . . . . . . . . . . . . . . . . . . . . . . . . . . . . . . . . . . . . . . . . . . . . . . 430
9.3 Circuit Breaker OFF Fault in PWR Supply . . . . . . . . . . . . . . . . . . . . . . . . . . . . . . . . . . . . . . . . . 431
9.4 Fault of Alarm Lamps on PWR Supply. . . . . . . . . . . . . . . . . . . . . . . . . . . . . . . . . . . . . . . . . . . . 432
10. FAN UNIT FAULT . . . . . . . . . . . . . . . . . . . . . . . . . . . . . . . . . . . . . . . . . . . . . . . . . . . . . . . . . . . . . . . . 433
10.1 Check Point . . . . . . . . . . . . . . . . . . . . . . . . . . . . . . . . . . . . . . . . . . . . . . . . . . . . . . . . . . . . . . . . 433
10.2 Fan Unit Fault. . . . . . . . . . . . . . . . . . . . . . . . . . . . . . . . . . . . . . . . . . . . . . . . . . . . . . . . . . . . . . . 434
11. TONE FAULT. . . . . . . . . . . . . . . . . . . . . . . . . . . . . . . . . . . . . . . . . . . . . . . . . . . . . . . . . . . . . . . . . . . . 436
11.1 Check Point . . . . . . . . . . . . . . . . . . . . . . . . . . . . . . . . . . . . . . . . . . . . . . . . . . . . . . . . . . . . . . . . 436
11.2 Tone Fault . . . . . . . . . . . . . . . . . . . . . . . . . . . . . . . . . . . . . . . . . . . . . . . . . . . . . . . . . . . . . . . . . 437
12. SYSTEM DOWN FAULT . . . . . . . . . . . . . . . . . . . . . . . . . . . . . . . . . . . . . . . . . . . . . . . . . . . . . . . . . . . 439
12.1 When Cause for Fault Cannot Be Identified. . . . . . . . . . . . . . . . . . . . . . . . . . . . . . . . . . . . . . . . 440
12.2 When Faulty Circuit Cards Can Be Assumed From System Message . . . . . . . . . . . . . . . . . . . 443
13. COMMON CHANNEL INTEROFFICE SIGNALING (CCIS) LINE FAULT . . . . . . . . . . . . . . . . . . . . . . 444
13.1 Check Point . . . . . . . . . . . . . . . . . . . . . . . . . . . . . . . . . . . . . . . . . . . . . . . . . . . . . . . . . . . . . . . . 444
13.2 CCIS Line Control . . . . . . . . . . . . . . . . . . . . . . . . . . . . . . . . . . . . . . . . . . . . . . . . . . . . . . . . . . . 444
13.3 Specific CCH/CCT Card Is Faulty . . . . . . . . . . . . . . . . . . . . . . . . . . . . . . . . . . . . . . . . . . . . . . . 445
13.4 Fault of CCH, DTI and Related Flat Cable. . . . . . . . . . . . . . . . . . . . . . . . . . . . . . . . . . . . . . . . . 446
14. INTEGRATED SERVICE DIGITAL NETWORK (ISDN) LINE FAULT . . . . . . . . . . . . . . . . . . . . . . . . . 447
14.1 Check Point . . . . . . . . . . . . . . . . . . . . . . . . . . . . . . . . . . . . . . . . . . . . . . . . . . . . . . . . . . . . . . . . 447

NDA-24307 TABLE OF CONTENTS
Page vii
Issue 1
TABLE OF CONTENTS (CONTINUED)
Page
14.2 ISDN Line Control . . . . . . . . . . . . . . . . . . . . . . . . . . . . . . . . . . . . . . . . . . . . . . . . . . . . . . . . . . . 447
14.3 Specific DCH/PRT Card Is Faulty . . . . . . . . . . . . . . . . . . . . . . . . . . . . . . . . . . . . . . . . . . . . . . . 448
14.4 Fault of DCH, DTI and Related Flat Cable. . . . . . . . . . . . . . . . . . . . . . . . . . . . . . . . . . . . . . . . . 449
15. HARD TIME CLOCK FAULT . . . . . . . . . . . . . . . . . . . . . . . . . . . . . . . . . . . . . . . . . . . . . . . . . . . . . . . . 450
CHAPTER 6 SYSTEM OPERATIONS . . . . . . . . . . . . . . . . . . . . . . . . . . . . . . . . . . . . . . . . . . . . . . . . . . . . . 451
1. ALARM INDICATIONS . . . . . . . . . . . . . . . . . . . . . . . . . . . . . . . . . . . . . . . . . . . . . . . . . . . . . . . . . . . . 452
1.1 Kinds of Alarm Indications . . . . . . . . . . . . . . . . . . . . . . . . . . . . . . . . . . . . . . . . . . . . . . . . . . . . . 452
1.2 How to Stop Alarm Indications . . . . . . . . . . . . . . . . . . . . . . . . . . . . . . . . . . . . . . . . . . . . . . . . . . 452
1.3 Alarm Indications on TOPU . . . . . . . . . . . . . . . . . . . . . . . . . . . . . . . . . . . . . . . . . . . . . . . . . . . . 453
1.4 Variable Alarm Indication . . . . . . . . . . . . . . . . . . . . . . . . . . . . . . . . . . . . . . . . . . . . . . . . . . . . . . 454
2. COLLECTION OF SYSTEM MESSAGES . . . . . . . . . . . . . . . . . . . . . . . . . . . . . . . . . . . . . . . . . . . . . . 455
2.1 Automatic Printout to System Message Dedicated Printer. . . . . . . . . . . . . . . . . . . . . . . . . . . . . 455
2.2 Display on MAT . . . . . . . . . . . . . . . . . . . . . . . . . . . . . . . . . . . . . . . . . . . . . . . . . . . . . . . . . . . . . 455
3. INDICATION OF LOCKOUT STATIONS. . . . . . . . . . . . . . . . . . . . . . . . . . . . . . . . . . . . . . . . . . . . . . . 456
3.1 Indicating Method. . . . . . . . . . . . . . . . . . . . . . . . . . . . . . . . . . . . . . . . . . . . . . . . . . . . . . . . . . . . 456
3.2 Recovery Procedure. . . . . . . . . . . . . . . . . . . . . . . . . . . . . . . . . . . . . . . . . . . . . . . . . . . . . . . . . . 456
4. LINE LOAD CONTROL . . . . . . . . . . . . . . . . . . . . . . . . . . . . . . . . . . . . . . . . . . . . . . . . . . . . . . . . . . . . 458
4.1 Operating Procedure . . . . . . . . . . . . . . . . . . . . . . . . . . . . . . . . . . . . . . . . . . . . . . . . . . . . . . . . . 458
5. IOC LINE MONITOR . . . . . . . . . . . . . . . . . . . . . . . . . . . . . . . . . . . . . . . . . . . . . . . . . . . . . . . . . . . . . . 462
6. LINE MANAGEMENT . . . . . . . . . . . . . . . . . . . . . . . . . . . . . . . . . . . . . . . . . . . . . . . . . . . . . . . . . . . . . 463
6.1 Make-Busy/Make-Busy Cancel of Station and Data Terminal . . . . . . . . . . . . . . . . . . . . . . . . . . 463
6.2 Class Change and Number Change of Station and Data Terminal . . . . . . . . . . . . . . . . . . . . . . 464
6.3 Make-Busy/Make-Busy Cancel of C.O. Line/Tie Line . . . . . . . . . . . . . . . . . . . . . . . . . . . . . . . . 464
6.4 Line Management Commands . . . . . . . . . . . . . . . . . . . . . . . . . . . . . . . . . . . . . . . . . . . . . . . . . . 465
7. STATION MESSAGE DETAIL RECORDING SYSTEM (SMDR) . . . . . . . . . . . . . . . . . . . . . . . . . . . . 466
7.1 Transmission Data to SMDR Equipment . . . . . . . . . . . . . . . . . . . . . . . . . . . . . . . . . . . . . . . . . . 466
7.2 IPX Format (Text Format of Centralized Billing - Fusion). . . . . . . . . . . . . . . . . . . . . . . . . . . . . . 468
7.3 ICS Format. . . . . . . . . . . . . . . . . . . . . . . . . . . . . . . . . . . . . . . . . . . . . . . . . . . . . . . . . . . . . . . . . 476
7.4 Details on Transmission Data . . . . . . . . . . . . . . . . . . . . . . . . . . . . . . . . . . . . . . . . . . . . . . . . . . 479
7.4.1 Calling Party Information/Called Party Information . . . . . . . . . . . . . . . . . . . . . . . . . . . . 479
7.4.2 Call Start/Call End Time Information. . . . . . . . . . . . . . . . . . . . . . . . . . . . . . . . . . . . . . . 480
7.4.3 Called Number . . . . . . . . . . . . . . . . . . . . . . . . . . . . . . . . . . . . . . . . . . . . . . . . . . . . . . . 481
7.4.4 Account Code/Authorization Code . . . . . . . . . . . . . . . . . . . . . . . . . . . . . . . . . . . . . . . . 482
7.4.5 Route Advance Information. . . . . . . . . . . . . . . . . . . . . . . . . . . . . . . . . . . . . . . . . . . . . . 483
7.4.6 Condition B Information. . . . . . . . . . . . . . . . . . . . . . . . . . . . . . . . . . . . . . . . . . . . . . . . . 483
7.4.7 Call Metering Information . . . . . . . . . . . . . . . . . . . . . . . . . . . . . . . . . . . . . . . . . . . . . . . 484
7.4.8 Office Code of Calling (Called) Party and Billing Process Office . . . . . . . . . . . . . . . . . 484
7.4.9 Text Format of SMDR - TCP/IP Interface . . . . . . . . . . . . . . . . . . . . . . . . . . . . . . . . . . . 485
8. TRAFFIC MANAGEMENT . . . . . . . . . . . . . . . . . . . . . . . . . . . . . . . . . . . . . . . . . . . . . . . . . . . . . . . . . . 488
8.1 The Kind of Traffic Measurement. . . . . . . . . . . . . . . . . . . . . . . . . . . . . . . . . . . . . . . . . . . . . . . . 488
8.2 Operating Procedure . . . . . . . . . . . . . . . . . . . . . . . . . . . . . . . . . . . . . . . . . . . . . . . . . . . . . . . . . 490
8.2.1 Procedure for Set-up and Start . . . . . . . . . . . . . . . . . . . . . . . . . . . . . . . . . . . . . . . . . . . 490
8.2.2 Data Output - Details on DTFD/DTFDN Command . . . . . . . . . . . . . . . . . . . . . . . . . . . 492
8.2.3 Service Conditions (when performing Traffic Measurement via TCP/IP) . . . . . . . . . . . 495

TABLE OF CONTENTS NDA-24307
Page viii
Issue 1
TABLE OF CONTENTS (CONTINUED)
Page
9. OFFICE DATA MANAGEMENT. . . . . . . . . . . . . . . . . . . . . . . . . . . . . . . . . . . . . . . . . . . . . . . . . . . . . . 496
9.1 Office Data Stored Locations . . . . . . . . . . . . . . . . . . . . . . . . . . . . . . . . . . . . . . . . . . . . . . . . . . . 496
9.2 Office Data Preservation . . . . . . . . . . . . . . . . . . . . . . . . . . . . . . . . . . . . . . . . . . . . . . . . . . . . . . 496
9.3 Office Data Management Procedure . . . . . . . . . . . . . . . . . . . . . . . . . . . . . . . . . . . . . . . . . . . . . 497
9.4 Call Forwarding Data/Individual Speed Calling Data Management . . . . . . . . . . . . . . . . . . . . . . 500
9.5 One-Touch Speed Call Memory Data Management . . . . . . . . . . . . . . . . . . . . . . . . . . . . . . . . . 500
9.6 Commands for Data Management . . . . . . . . . . . . . . . . . . . . . . . . . . . . . . . . . . . . . . . . . . . . . . . 500
10. TEST OPERATIONS OF VARIOUS KINDS . . . . . . . . . . . . . . . . . . . . . . . . . . . . . . . . . . . . . . . . . . . . 501
10.1 Designated Connection Test (Station) . . . . . . . . . . . . . . . . . . . . . . . . . . . . . . . . . . . . . . . . . . . . 502
10.2 Designated Connection Test (DESKCON/ATTCON). . . . . . . . . . . . . . . . . . . . . . . . . . . . . . . . . 512
10.3 Bad Call Notification. . . . . . . . . . . . . . . . . . . . . . . . . . . . . . . . . . . . . . . . . . . . . . . . . . . . . . . . . . 514
11. ROUTINE DIAGNOSIS . . . . . . . . . . . . . . . . . . . . . . . . . . . . . . . . . . . . . . . . . . . . . . . . . . . . . . . . . . . . 515
11.1 Related System Data . . . . . . . . . . . . . . . . . . . . . . . . . . . . . . . . . . . . . . . . . . . . . . . . . . . . . . . . . 515
11.2 Routine Diagnosis Result. . . . . . . . . . . . . . . . . . . . . . . . . . . . . . . . . . . . . . . . . . . . . . . . . . . . . . 517
12. SYSTEM CONTROL PROCEDURES . . . . . . . . . . . . . . . . . . . . . . . . . . . . . . . . . . . . . . . . . . . . . . . . . 518
12.1 Changeover/Make-Busy/Make-Busy Cancel of Equipment . . . . . . . . . . . . . . . . . . . . . . . . . . . . 518
12.1.1 General . . . . . . . . . . . . . . . . . . . . . . . . . . . . . . . . . . . . . . . . . . . . . . . . . . . . . . . . . . . . . 518
12.1.2 How to Control CPU Block . . . . . . . . . . . . . . . . . . . . . . . . . . . . . . . . . . . . . . . . . . . . . . 528
12.1.3 Manual System Changeover of CPU . . . . . . . . . . . . . . . . . . . . . . . . . . . . . . . . . . . . . . 530
12.1.4 Forced Changeover of CPU . . . . . . . . . . . . . . . . . . . . . . . . . . . . . . . . . . . . . . . . . . . . . 534
12.1.5 How to Control Switching Block . . . . . . . . . . . . . . . . . . . . . . . . . . . . . . . . . . . . . . . . . . 535
12.1.6 Manual System Changeover of Speech Path System . . . . . . . . . . . . . . . . . . . . . . . . . 537
12.1.7 Manual System Changeover of PLO. . . . . . . . . . . . . . . . . . . . . . . . . . . . . . . . . . . . . . . 541
12.2 Initialization. . . . . . . . . . . . . . . . . . . . . . . . . . . . . . . . . . . . . . . . . . . . . . . . . . . . . . . . . . . . . . . . . 543
12.2.1 General . . . . . . . . . . . . . . . . . . . . . . . . . . . . . . . . . . . . . . . . . . . . . . . . . . . . . . . . . . . . . 543
12.2.2 System Initialization by Turning ON the Power Supply. . . . . . . . . . . . . . . . . . . . . . . . . 544
12.2.3 System Initialization by Key Operations on TOPU . . . . . . . . . . . . . . . . . . . . . . . . . . . . 546
12.2.4 System Initialization by Keys on CPU Front Panel . . . . . . . . . . . . . . . . . . . . . . . . . . . . 554
12.2.5 System Initialization by SINZ/SINZ1 Command . . . . . . . . . . . . . . . . . . . . . . . . . . . . . . 555
12.2.6 Peripheral Equipment Initialization (Line/Trunk Initialization) . . . . . . . . . . . . . . . . . . . . 556
12.3 How to Turn ON/OFF Whole System . . . . . . . . . . . . . . . . . . . . . . . . . . . . . . . . . . . . . . . . . . . . . 557
12.3.1 How to Turn ON a LN . . . . . . . . . . . . . . . . . . . . . . . . . . . . . . . . . . . . . . . . . . . . . . . . . . 558
12.3.2 How to Turn ON the ISW. . . . . . . . . . . . . . . . . . . . . . . . . . . . . . . . . . . . . . . . . . . . . . . . 559
12.4 How to Turn OFF Whole System . . . . . . . . . . . . . . . . . . . . . . . . . . . . . . . . . . . . . . . . . . . . . . . . 560
12.4.1 How to Turn OFF a LN . . . . . . . . . . . . . . . . . . . . . . . . . . . . . . . . . . . . . . . . . . . . . . . . . 560
12.5 System Start-Up . . . . . . . . . . . . . . . . . . . . . . . . . . . . . . . . . . . . . . . . . . . . . . . . . . . . . . . . . . . . . 562
12.5.1 System Start-Up Procedures. . . . . . . . . . . . . . . . . . . . . . . . . . . . . . . . . . . . . . . . . . . . . 562
CHAPTER 7 ROUTINE MAINTENANCE PROCEDURE . . . . . . . . . . . . . . . . . . . . . . . . . . . . . . . . . . . . . . . 567
1. GENERAL . . . . . . . . . . . . . . . . . . . . . . . . . . . . . . . . . . . . . . . . . . . . . . . . . . . . . . . . . . . . . . . . . . . . . . 567
1.1 Flow of Procedures . . . . . . . . . . . . . . . . . . . . . . . . . . . . . . . . . . . . . . . . . . . . . . . . . . . . . . . . . . 567
1.2 Required Test Equipment and Tools . . . . . . . . . . . . . . . . . . . . . . . . . . . . . . . . . . . . . . . . . . . . . 568
2. ROUTINE MAINTENANCE PROCEDURES . . . . . . . . . . . . . . . . . . . . . . . . . . . . . . . . . . . . . . . . . . . . 569
3. ROUTINE MAINTENANCE PROCEDURES-DETAILED EXPLANATIONS . . . . . . . . . . . . . . . . . . . . 570
3.1 Check of Ambient Conditions in Switch Room. . . . . . . . . . . . . . . . . . . . . . . . . . . . . . . . . . . . . . 571
3.2 Alarm Check. . . . . . . . . . . . . . . . . . . . . . . . . . . . . . . . . . . . . . . . . . . . . . . . . . . . . . . . . . . . . . . . 572
3.3 MAT/Printer Check. . . . . . . . . . . . . . . . . . . . . . . . . . . . . . . . . . . . . . . . . . . . . . . . . . . . . . . . . . . 573

NDA-24307 TABLE OF CONTENTS
Page ix
Issue 1
TABLE OF CONTENTS (CONTINUED)
Page
3.4 Collection of System Messages . . . . . . . . . . . . . . . . . . . . . . . . . . . . . . . . . . . . . . . . . . . . . . . . . 574
3.5 Display of Locked-out Station. . . . . . . . . . . . . . . . . . . . . . . . . . . . . . . . . . . . . . . . . . . . . . . . . . . 575
3.6 Fan Unit Check. . . . . . . . . . . . . . . . . . . . . . . . . . . . . . . . . . . . . . . . . . . . . . . . . . . . . . . . . . . . . . 576
3.7 Alarm Tests . . . . . . . . . . . . . . . . . . . . . . . . . . . . . . . . . . . . . . . . . . . . . . . . . . . . . . . . . . . . . . . . 577
3.8 Main Power System Check . . . . . . . . . . . . . . . . . . . . . . . . . . . . . . . . . . . . . . . . . . . . . . . . . . . . 578
3.9 Trunk RGU Check . . . . . . . . . . . . . . . . . . . . . . . . . . . . . . . . . . . . . . . . . . . . . . . . . . . . . . . . . . . 579
3.10 ATTCON/DESKCON Check. . . . . . . . . . . . . . . . . . . . . . . . . . . . . . . . . . . . . . . . . . . . . . . . . . . . 580
3.11 System Check . . . . . . . . . . . . . . . . . . . . . . . . . . . . . . . . . . . . . . . . . . . . . . . . . . . . . . . . . . . . . . 582
4. ROUTINE MAINTENANCE CHECK LISTS . . . . . . . . . . . . . . . . . . . . . . . . . . . . . . . . . . . . . . . . . . . . . 583
CHAPTER 8 MAINTENANCE COMMANDS . . . . . . . . . . . . . . . . . . . . . . . . . . . . . . . . . . . . . . . . . . . . . . . . 593
ALLC Assignment of Line Load Control . . . . . . . . . . . . . . . . . . . . . . . . . . . . . . . . . . . . . . . . . . . 596
ALMG Assignment of Alarm Grade Data . . . . . . . . . . . . . . . . . . . . . . . . . . . . . . . . . . . . . . . . . . . 597
ATRF Assignment of Traffic Measurement Order . . . . . . . . . . . . . . . . . . . . . . . . . . . . . . . . . . . . 598
ATRFN Assignment of Traffic Measurement Order for Fusion Network. . . . . . . . . . . . . . . . . . . . . 600
BOSD Back Up One-Touch Speed Call Memory Data. . . . . . . . . . . . . . . . . . . . . . . . . . . . . . . . . 602
CADSD Continuous Assignment of Station Data . . . . . . . . . . . . . . . . . . . . . . . . . . . . . . . . . . . . . . 603
CATK Continuous Assignment of Trunk Data . . . . . . . . . . . . . . . . . . . . . . . . . . . . . . . . . . . . . . . 606
CBCN Control of Broadcasting for NDM. . . . . . . . . . . . . . . . . . . . . . . . . . . . . . . . . . . . . . . . . . . . 613
CCSE Change of Common Signaling Channel Equipment . . . . . . . . . . . . . . . . . . . . . . . . . . . . . 614
CDBU Change of Dch Backup . . . . . . . . . . . . . . . . . . . . . . . . . . . . . . . . . . . . . . . . . . . . . . . . . . . 615
CMOD Change of System Mode . . . . . . . . . . . . . . . . . . . . . . . . . . . . . . . . . . . . . . . . . . . . . . . . . . 616
CMODI Change of System Mode for ISW . . . . . . . . . . . . . . . . . . . . . . . . . . . . . . . . . . . . . . . . . . . 617
CMWL Control Message Waiting Lamp . . . . . . . . . . . . . . . . . . . . . . . . . . . . . . . . . . . . . . . . . . . . 618
CMWL_T Control Message Waiting Lamps - Telephone Number. . . . . . . . . . . . . . . . . . . . . . . . . . . 619
CPRS Controlled Alternate PRSCs . . . . . . . . . . . . . . . . . . . . . . . . . . . . . . . . . . . . . . . . . . . . . . . 620
CSCL Continuous Change of Station Class. . . . . . . . . . . . . . . . . . . . . . . . . . . . . . . . . . . . . . . . . 621
CSTN Continuous Change of Station Number. . . . . . . . . . . . . . . . . . . . . . . . . . . . . . . . . . . . . . . 622
DCBD Display of Call Block Entry Data . . . . . . . . . . . . . . . . . . . . . . . . . . . . . . . . . . . . . . . . . . . . 623
DCEN Display of Connection Trunk LENS Data for LDM. . . . . . . . . . . . . . . . . . . . . . . . . . . . . . . 625
DCON Display of Connection Status . . . . . . . . . . . . . . . . . . . . . . . . . . . . . . . . . . . . . . . . . . . . . . 626
DFTD Display of System Message Details . . . . . . . . . . . . . . . . . . . . . . . . . . . . . . . . . . . . . . . . . 627
DISS Display of Program Issue . . . . . . . . . . . . . . . . . . . . . . . . . . . . . . . . . . . . . . . . . . . . . . . . . 628
DLEN Display of LENS Data . . . . . . . . . . . . . . . . . . . . . . . . . . . . . . . . . . . . . . . . . . . . . . . . . . . .629
DLSL Display of Lock Out Station - LENS. . . . . . . . . . . . . . . . . . . . . . . . . . . . . . . . . . . . . . . . . . 631
DLSS Display of Lockout Station - Number. . . . . . . . . . . . . . . . . . . . . . . . . . . . . . . . . . . . . . . . . 632
DLSS_T Display of Lock Out Station - Number- Telephone Number . . . . . . . . . . . . . . . . . . . . . . . 633
DLTEL Display of Telephone Number from LENS for LDM. . . . . . . . . . . . . . . . . . . . . . . . . . . . . . 634
DNTEL Display of Telephone Number from LENS for NDM . . . . . . . . . . . . . . . . . . . . . . . . . . . . . 635
DPKG Display of Setting Port Package . . . . . . . . . . . . . . . . . . . . . . . . . . . . . . . . . . . . . . . . . . . . 636
DPSW Display Package Switch Status . . . . . . . . . . . . . . . . . . . . . . . . . . . . . . . . . . . . . . . . . . . . . 637
DSTN Display of Station Data . . . . . . . . . . . . . . . . . . . . . . . . . . . . . . . . . . . . . . . . . . . . . . . . . . .639
DTELN Display of Telephone Number Data for NDM . . . . . . . . . . . . . . . . . . . . . . . . . . . . . . . . . . 640
DTF101 Display of Terminal Traffic Data . . . . . . . . . . . . . . . . . . . . . . . . . . . . . . . . . . . . . . . . . . . . 641
DTF102 Display of Route Traffic Data. . . . . . . . . . . . . . . . . . . . . . . . . . . . . . . . . . . . . . . . . . . . . . .642
DTF103 Display of Station Peg Count Data . . . . . . . . . . . . . . . . . . . . . . . . . . . . . . . . . . . . . . . . . . 643
DTF104 Display of Attendant Peg Count Data . . . . . . . . . . . . . . . . . . . . . . . . . . . . . . . . . . . . . . . . 644
DTF105 Display of Route Peg Count Data . . . . . . . . . . . . . . . . . . . . . . . . . . . . . . . . . . . . . . . . . . . 645
DTF201 Display of Service Peg Count Data . . . . . . . . . . . . . . . . . . . . . . . . . . . . . . . . . . . . . . . . . . 646

TABLE OF CONTENTS NDA-24307
Page x
Issue 1
TABLE OF CONTENTS (CONTINUED)
Page
DTF301 Display of UCD Route Peg Count Data. . . . . . . . . . . . . . . . . . . . . . . . . . . . . . . . . . . . . . . 647
DTF302 Display of UCD Group Peg Count Data. . . . . . . . . . . . . . . . . . . . . . . . . . . . . . . . . . . . . . . 648
DTF303 Display of Station Peg Count Data . . . . . . . . . . . . . . . . . . . . . . . . . . . . . . . . . . . . . . . . . . 649
DTF501 Display of Attendant Answering Peg Count Data . . . . . . . . . . . . . . . . . . . . . . . . . . . . . . . 650
DTF601 Display of Connection Route Peg Count Data . . . . . . . . . . . . . . . . . . . . . . . . . . . . . . . . . 651
DTF602 Display of Connection Route Traffic Data . . . . . . . . . . . . . . . . . . . . . . . . . . . . . . . . . . . . . 652
DTF101N Display of Terminal Traffic Data for Fusion Network. . . . . . . . . . . . . . . . . . . . . . . . . . . . . 653
DTF102N Display of Route Traffic Data for Fusion Network . . . . . . . . . . . . . . . . . . . . . . . . . . . . . . . 654
DTF103N Display of Station Peg Count Data for Fusion Network. . . . . . . . . . . . . . . . . . . . . . . . . . . 655
DTF104N Display of Attendant Peg Count Data for Fusion Network. . . . . . . . . . . . . . . . . . . . . . . . . 656
DTF105N Display of Route Peg Count Data for Fusion Network. . . . . . . . . . . . . . . . . . . . . . . . . . . . 657
DTF201N Display of Service Peg Count Data for Fusion Network . . . . . . . . . . . . . . . . . . . . . . . . . . 658
DTF301N Display of UCD Route Peg Count Data for Fusion Network . . . . . . . . . . . . . . . . . . . . . . . 659
DTF302N Display of UCD Group Peg Count Data for Fusion Network . . . . . . . . . . . . . . . . . . . . . . . 660
DTF303N Display of Station Peg Count Data for Fusion Network. . . . . . . . . . . . . . . . . . . . . . . . . . . 661
DTF501N Display of Attendant Answering Peg Count Data for Fusion Network. . . . . . . . . . . . . . . . 662
DTF601N Display of Connection Route Peg Count Data for Fusion Network . . . . . . . . . . . . . . . . . . 663
DTF602N Display of Connection Route Traffic Data for Fusion Network . . . . . . . . . . . . . . . . . . . . . 664
FLINST File Install . . . . . . . . . . . . . . . . . . . . . . . . . . . . . . . . . . . . . . . . . . . . . . . . . . . . . . . . . . . . . 665
HDD_FDD Data Control Between HDD and FDD . . . . . . . . . . . . . . . . . . . . . . . . . . . . . . . . . . . . . . . . 666
HDD_MAT Data Control Between HDD and MAT. . . . . . . . . . . . . . . . . . . . . . . . . . . . . . . . . . . . . . . . 667
HDD_MAT_N Data Control Between HDD and MAT for NDM. . . . . . . . . . . . . . . . . . . . . . . . . . . . . . . . . 668
HDFP HDD Format of PBX . . . . . . . . . . . . . . . . . . . . . . . . . . . . . . . . . . . . . . . . . . . . . . . . . . . . . 669
MBCT Make Busy of Connection Trunk for LDM . . . . . . . . . . . . . . . . . . . . . . . . . . . . . . . . . . . . . 670
MBLE Make Busy of LENS . . . . . . . . . . . . . . . . . . . . . . . . . . . . . . . . . . . . . . . . . . . . . . . . . . . . . 671
MBPM Make Busy of Port Microprocessor . . . . . . . . . . . . . . . . . . . . . . . . . . . . . . . . . . . . . . . . . . 672
MBRT Make Busy of Route . . . . . . . . . . . . . . . . . . . . . . . . . . . . . . . . . . . . . . . . . . . . . . . . . . . . .673
MBSM Make Busy of System Message Printout. . . . . . . . . . . . . . . . . . . . . . . . . . . . . . . . . . . . . . 674
MBST Make Busy of Station. . . . . . . . . . . . . . . . . . . . . . . . . . . . . . . . . . . . . . . . . . . . . . . . . . . . .675
MBST_T Make Busy of Station - Telephone Number. . . . . . . . . . . . . . . . . . . . . . . . . . . . . . . . . . . . 676
MBTC Make Busy of Trunk-Continuous . . . . . . . . . . . . . . . . . . . . . . . . . . . . . . . . . . . . . . . . . . . . 677
MBTK Make Busy of Trunk. . . . . . . . . . . . . . . . . . . . . . . . . . . . . . . . . . . . . . . . . . . . . . . . . . . . . .678
MEM_HDD Data Control Between Memory and HDD . . . . . . . . . . . . . . . . . . . . . . . . . . . . . . . . . . . . . 679
MEM_HDD_N Data Control Between Memory and HDD for NDM . . . . . . . . . . . . . . . . . . . . . . . . . . . . . . 680
MFCH Make Busy of FCCH . . . . . . . . . . . . . . . . . . . . . . . . . . . . . . . . . . . . . . . . . . . . . . . . . . . . . 681
PMBU Port Microprocessor Back Up . . . . . . . . . . . . . . . . . . . . . . . . . . . . . . . . . . . . . . . . . . . . . . 682
RALM Release Alarm . . . . . . . . . . . . . . . . . . . . . . . . . . . . . . . . . . . . . . . . . . . . . . . . . . . . . . . . . . 683
RALMN Release Alarm for NDM. . . . . . . . . . . . . . . . . . . . . . . . . . . . . . . . . . . . . . . . . . . . . . . . . . . 684
RLST Release Station/Trunk . . . . . . . . . . . . . . . . . . . . . . . . . . . . . . . . . . . . . . . . . . . . . . . . . . . .685
RLST_T Release Station/Trunk - Telephone Number . . . . . . . . . . . . . . . . . . . . . . . . . . . . . . . . . . . 686
SINZ System Initialization. . . . . . . . . . . . . . . . . . . . . . . . . . . . . . . . . . . . . . . . . . . . . . . . . . . . . . 688
SINZI System Initialization for ISW . . . . . . . . . . . . . . . . . . . . . . . . . . . . . . . . . . . . . . . . . . . . . . .689
SPTS Scanning of Port Status. . . . . . . . . . . . . . . . . . . . . . . . . . . . . . . . . . . . . . . . . . . . . . . . . . .690
SRTS Scanning of Route Status . . . . . . . . . . . . . . . . . . . . . . . . . . . . . . . . . . . . . . . . . . . . . . . . . 694
XHFD X-RAY HD or FDD Diagnosis . . . . . . . . . . . . . . . . . . . . . . . . . . . . . . . . . . . . . . . . . . . . . . 695

NDA-24307 LIST OF FIGURES
Page xi
Issue 1
LIST OF FIGURES
Figure Title Page
Figure 2-1 Flow of Administrative Management Procedures. . . . . . . . . . . . . . . . . . . . . . . . . . . . . . . . . . . 3
Figure 2-2 NEAX2400 IPX IPX-U . . . . . . . . . . . . . . . . . . . . . . . . . . . . . . . . . . . . . . . . . . . . . . . . . . . . . . . 5
Figure 2-3 System Configuration. . . . . . . . . . . . . . . . . . . . . . . . . . . . . . . . . . . . . . . . . . . . . . . . . . . . . . . . 6
Figure 2-4 Details on Inter-node PCM Cable Connections . . . . . . . . . . . . . . . . . . . . . . . . . . . . . . . . . . . . 7
Figure 2-5 Details on Ethernet Cable Connections (Establishment of Fusion Link) (1/2) . . . . . . . . . . . . . 8
Figure 2-6 Details on Ethernet Cable Connections (Using MAT via Ethernet) . . . . . . . . . . . . . . . . . . . . . 10
Figure 2-7 Face Layout of ISW . . . . . . . . . . . . . . . . . . . . . . . . . . . . . . . . . . . . . . . . . . . . . . . . . . . . . . . . . 11
Figure 2-8 Face Layout of IMG0 (Local Node) . . . . . . . . . . . . . . . . . . . . . . . . . . . . . . . . . . . . . . . . . . . . . 12
Figure 2-9 Face Layout of IMG1 (Local Node) . . . . . . . . . . . . . . . . . . . . . . . . . . . . . . . . . . . . . . . . . . . . . 13
Figure 2-10 Face Layout of IMG2 (Local Node) . . . . . . . . . . . . . . . . . . . . . . . . . . . . . . . . . . . . . . . . . . . . . 14
Figure 2-11 Face Layout of IMG3 (Local Node) . . . . . . . . . . . . . . . . . . . . . . . . . . . . . . . . . . . . . . . . . . . . . 15
Figure 2-12 LENS Format . . . . . . . . . . . . . . . . . . . . . . . . . . . . . . . . . . . . . . . . . . . . . . . . . . . . . . . . . . . . . . 16
Figure 2-13 Module Group Allocations (LN0/1/2/3). . . . . . . . . . . . . . . . . . . . . . . . . . . . . . . . . . . . . . . . . . . 16
Figure 2-14 Unit Number Allocations (LN0/1/2/3) . . . . . . . . . . . . . . . . . . . . . . . . . . . . . . . . . . . . . . . . . . . . 17
Figure 2-15 Group Number Allocations (LN0/1/2/3) . . . . . . . . . . . . . . . . . . . . . . . . . . . . . . . . . . . . . . . . . . 18
Figure 2-16 Level Number Allocations (LN0/1/2/3) . . . . . . . . . . . . . . . . . . . . . . . . . . . . . . . . . . . . . . . . . . . 19
Figure 2-17 LP Number Allocations (LN0/1/2/3) . . . . . . . . . . . . . . . . . . . . . . . . . . . . . . . . . . . . . . . . . . . . . 20
Figure 2-18 Example of NCN Assignment (1/3) . . . . . . . . . . . . . . . . . . . . . . . . . . . . . . . . . . . . . . . . . . . . . 22
Figure 2-19 System Message Example. . . . . . . . . . . . . . . . . . . . . . . . . . . . . . . . . . . . . . . . . . . . . . . . . . . . 25
Figure 2-20 Fault Detection General Diagram (via Alarm Lamps on TOPU) . . . . . . . . . . . . . . . . . . . . . . . 27
Figure 2-21 Fault Detection Block Diagram (via Display of System Messages) . . . . . . . . . . . . . . . . . . . . . 28
Figure 2-22 Fault Detection Block Diagram. . . . . . . . . . . . . . . . . . . . . . . . . . . . . . . . . . . . . . . . . . . . . . . . . 29
Figure 2-23 General System Block Diagram (1/2). . . . . . . . . . . . . . . . . . . . . . . . . . . . . . . . . . . . . . . . . . . . 32
Figure 2-24 CPU Controlling Block Diagram (ISW). . . . . . . . . . . . . . . . . . . . . . . . . . . . . . . . . . . . . . . . . . . 34
Figure 2-25 CPU Controlling Block Diagram (LN). . . . . . . . . . . . . . . . . . . . . . . . . . . . . . . . . . . . . . . . . . . . 35
Figure 2-26 Speech Path Block Diagram (1/2) . . . . . . . . . . . . . . . . . . . . . . . . . . . . . . . . . . . . . . . . . . . . . . 36
Figure 2-27 Speech Path Range of Fault . . . . . . . . . . . . . . . . . . . . . . . . . . . . . . . . . . . . . . . . . . . . . . . . . . 38
Figure 2-28 3M® Model 8012 Portable Field Service Kit. . . . . . . . . . . . . . . . . . . . . . . . . . . . . . . . . . . . . . . 41
Figure 2-29 How to Hold a Circuit Card. . . . . . . . . . . . . . . . . . . . . . . . . . . . . . . . . . . . . . . . . . . . . . . . . . . . 42
Figure 2-30 How to Set the ROM in IC Socket . . . . . . . . . . . . . . . . . . . . . . . . . . . . . . . . . . . . . . . . . . . . . . 42
Figure 2-31 How to Clean the Connector Portion . . . . . . . . . . . . . . . . . . . . . . . . . . . . . . . . . . . . . . . . . . . . 43
Figure 2-32 How to Clean Gold-Plated Terminal. . . . . . . . . . . . . . . . . . . . . . . . . . . . . . . . . . . . . . . . . . . . . 43
Figure 2-33 Diagnostic Work Items and Symbols Example . . . . . . . . . . . . . . . . . . . . . . . . . . . . . . . . . . . . 46
Figure 2-34 Recovery Procedure Example . . . . . . . . . . . . . . . . . . . . . . . . . . . . . . . . . . . . . . . . . . . . . . . . . 47
Figure 2-35 Circuit Card Version Number, Program Name, and Program Package Version Number . . . . 49
Figure 4-1 Circuit Card Mounting Face Layout of LPM . . . . . . . . . . . . . . . . . . . . . . . . . . . . . . . . . . . . . . . 270
Figure 4-2 CPR Face Layout. . . . . . . . . . . . . . . . . . . . . . . . . . . . . . . . . . . . . . . . . . . . . . . . . . . . . . . . . . . 272
Figure 4-3 How to Replace the CPU . . . . . . . . . . . . . . . . . . . . . . . . . . . . . . . . . . . . . . . . . . . . . . . . . . . . . 273
Figure 4-4 Removal of Front Panel and Top Cover From CPR. . . . . . . . . . . . . . . . . . . . . . . . . . . . . . . . . 279
Figure 4-5 Insertion of ISAGT and LANI Cards. . . . . . . . . . . . . . . . . . . . . . . . . . . . . . . . . . . . . . . . . . . . . 280
Figure 4-6 Reattachment of CPR Top Cover and Front Panel . . . . . . . . . . . . . . . . . . . . . . . . . . . . . . . . . 281
Figure 4-7 Accommodation of New CPR Into LPM . . . . . . . . . . . . . . . . . . . . . . . . . . . . . . . . . . . . . . . . . . 282
Figure 4-8 Insertion of New HFD Into CPR . . . . . . . . . . . . . . . . . . . . . . . . . . . . . . . . . . . . . . . . . . . . . . . . 283
Figure 4-9 Switch Setting on the CPU Front Panel . . . . . . . . . . . . . . . . . . . . . . . . . . . . . . . . . . . . . . . . . . 284
Figure 4-10 Circuit Card Mounting Face Layout of TSWM . . . . . . . . . . . . . . . . . . . . . . . . . . . . . . . . . . . . . 294
Figure 4-11 System Block Diagram (Connections Between GT and CPU). . . . . . . . . . . . . . . . . . . . . . . . . 296
Figure 4-12 System Block Diagram (TSW and Other Speech Path Echelons). . . . . . . . . . . . . . . . . . . . . . 301
Figure 4-13 LEDs and Switches for TSW Changeover . . . . . . . . . . . . . . . . . . . . . . . . . . . . . . . . . . . . . . . . 303
Figure 4-14 Circuit Card Mounting Face Layout of PIM . . . . . . . . . . . . . . . . . . . . . . . . . . . . . . . . . . . . . . . 314

LIST OF FIGURES NDA-24307
Page xii
Issue 1
LIST OF FIGURES (CONTINUED)
Figure Title Page
Figure 4-15 Circuit Card Mounting Face Layout of ISWM. . . . . . . . . . . . . . . . . . . . . . . . . . . . . . . . . . . . . . 331
Figure 4-16 System Block Diagram (IOGT and Other Speech Path Echelons) . . . . . . . . . . . . . . . . . . . . . 333
Figure 4-17 FANU Locations. . . . . . . . . . . . . . . . . . . . . . . . . . . . . . . . . . . . . . . . . . . . . . . . . . . . . . . . . . . . 346
Figure 4-18 Preparation for FANU Replacement (Fans on TOPU). . . . . . . . . . . . . . . . . . . . . . . . . . . . . . . 347
Figure 4-19 How to Replace FANU (Fans on TOPU) . . . . . . . . . . . . . . . . . . . . . . . . . . . . . . . . . . . . . . . . . 348
Figure 4-20 Preparation for FANU Replacement (Fans in Fan Box). . . . . . . . . . . . . . . . . . . . . . . . . . . . . . 349
Figure 4-21 How to Replace FANU (Fans in Fan Box) . . . . . . . . . . . . . . . . . . . . . . . . . . . . . . . . . . . . . . . . 350
Figure 4-22 CPR Face Layout. . . . . . . . . . . . . . . . . . . . . . . . . . . . . . . . . . . . . . . . . . . . . . . . . . . . . . . . . . . 351
Figure 4-23 Extraction of CPR from LPM . . . . . . . . . . . . . . . . . . . . . . . . . . . . . . . . . . . . . . . . . . . . . . . . . . 352
Figure 4-24 Rear View of CPR . . . . . . . . . . . . . . . . . . . . . . . . . . . . . . . . . . . . . . . . . . . . . . . . . . . . . . . . . . 352
Figure 4-25 How to Remove the Cooling Fan . . . . . . . . . . . . . . . . . . . . . . . . . . . . . . . . . . . . . . . . . . . . . . . 353
Figure 4-26 Kind of Fuse . . . . . . . . . . . . . . . . . . . . . . . . . . . . . . . . . . . . . . . . . . . . . . . . . . . . . . . . . . . . . . . 354
Figure 4-27 Fuse After Blown Fault. . . . . . . . . . . . . . . . . . . . . . . . . . . . . . . . . . . . . . . . . . . . . . . . . . . . . . . 354
Figure 4-28 Fuse Locations in LPM/PIM/FANU/BASEU . . . . . . . . . . . . . . . . . . . . . . . . . . . . . . . . . . . . . . . 355
Figure 4-29 Fuse Location on PWR SW Card (TSWM/ISWM) . . . . . . . . . . . . . . . . . . . . . . . . . . . . . . . . . . 356
Figure 4-30 RGU Fuse Blown Fault Flowchart . . . . . . . . . . . . . . . . . . . . . . . . . . . . . . . . . . . . . . . . . . . . . . 357
Figure 4-31 DC -48V Fuse Blown Fault Flowchart . . . . . . . . . . . . . . . . . . . . . . . . . . . . . . . . . . . . . . . . . . . 358
Figure 5-1 Controlling LC/ELC Circuit Cards and Speech Path . . . . . . . . . . . . . . . . . . . . . . . . . . . . . . . . 364
Figure 5-2 Controlling Trunk Circuit Cards and Speech Path . . . . . . . . . . . . . . . . . . . . . . . . . . . . . . . . . . 375
Figure 5-3 ATT Connector Cabling and Connector Leads Accommodation. . . . . . . . . . . . . . . . . . . . . . . 382
Figure 5-4 Range of Units (LN0/1/2/3) . . . . . . . . . . . . . . . . . . . . . . . . . . . . . . . . . . . . . . . . . . . . . . . . . . . 385
Figure 5-5 Unit Control Block Diagram (Dual Configuration). . . . . . . . . . . . . . . . . . . . . . . . . . . . . . . . . . . 386
Figure 5-6 Unit Control Block Diagram (Single Configuration) . . . . . . . . . . . . . . . . . . . . . . . . . . . . . . . . . 387
Figure 5-7 MUX Card Locations (LN0/1/2/3). . . . . . . . . . . . . . . . . . . . . . . . . . . . . . . . . . . . . . . . . . . . . . . 387
Figure 5-8 Speech Path Block Diagram (1/2) . . . . . . . . . . . . . . . . . . . . . . . . . . . . . . . . . . . . . . . . . . . . . . 399
Figure 5-9 System Messages Related to Speech Path System Fault (Whole System/ISW) . . . . . . . . . . 408
Figure 5-10 Cable Routing for Alarm Indications. . . . . . . . . . . . . . . . . . . . . . . . . . . . . . . . . . . . . . . . . . . . . 418
Figure 5-11 Cabling Related to Alarm Indicating Panel. . . . . . . . . . . . . . . . . . . . . . . . . . . . . . . . . . . . . . . . 419
Figure 5-12 Distribution/Collection of Key/Alarm Information within the System. . . . . . . . . . . . . . . . . . . . . 420
Figure 5-13 Alarm Bus Cable Connections Diagram (1/2) . . . . . . . . . . . . . . . . . . . . . . . . . . . . . . . . . . . . . 421
Figure 5-14 Block Diagram of Power Supply System (ISW) . . . . . . . . . . . . . . . . . . . . . . . . . . . . . . . . . . . . 424
Figure 5-15 Block Diagram of Power Supply System (IMG0) . . . . . . . . . . . . . . . . . . . . . . . . . . . . . . . . . . . 425
Figure 5-16 Block Diagram of Power Supply System (IMG1/IMG2) . . . . . . . . . . . . . . . . . . . . . . . . . . . . . . 426
Figure 5-17 Block Diagram of Power Supply System (IMG3) . . . . . . . . . . . . . . . . . . . . . . . . . . . . . . . . . . . 427
Figure 5-18 Power Supply to PIM . . . . . . . . . . . . . . . . . . . . . . . . . . . . . . . . . . . . . . . . . . . . . . . . . . . . . . . . 428
Figure 5-19 Power Supply to LPM (LN/ISW). . . . . . . . . . . . . . . . . . . . . . . . . . . . . . . . . . . . . . . . . . . . . . . . 428
Figure 5-20 Power Supply to TSWM/ISWM . . . . . . . . . . . . . . . . . . . . . . . . . . . . . . . . . . . . . . . . . . . . . . . . 429
Figure 5-21 Circuit Diagram of Fan Unit and Thermal Unit. . . . . . . . . . . . . . . . . . . . . . . . . . . . . . . . . . . . . 435
Figure 5-22 Dial Tone Connection. . . . . . . . . . . . . . . . . . . . . . . . . . . . . . . . . . . . . . . . . . . . . . . . . . . . . . . . 436
Figure 5-23 External Hold Tone Supply Block Diagram . . . . . . . . . . . . . . . . . . . . . . . . . . . . . . . . . . . . . . . 438
Figure 5-24 System Down Fault Repair Sequence . . . . . . . . . . . . . . . . . . . . . . . . . . . . . . . . . . . . . . . . . . . 439
Figure 5-25 Controlling CCIS Line. . . . . . . . . . . . . . . . . . . . . . . . . . . . . . . . . . . . . . . . . . . . . . . . . . . . . . . . 444
Figure 5-26 Controlling ISDN Line. . . . . . . . . . . . . . . . . . . . . . . . . . . . . . . . . . . . . . . . . . . . . . . . . . . . . . . . 447
Figure 6-1 System Status Monitor. . . . . . . . . . . . . . . . . . . . . . . . . . . . . . . . . . . . . . . . . . . . . . . . . . . . . . . 451
Figure 6-2 Alarm Indications . . . . . . . . . . . . . . . . . . . . . . . . . . . . . . . . . . . . . . . . . . . . . . . . . . . . . . . . . . . 452
Figure 6-3 Alarm Indications on TOPU . . . . . . . . . . . . . . . . . . . . . . . . . . . . . . . . . . . . . . . . . . . . . . . . . . . 453
Figure 6-4 Automatic Printout to System Message Dedicated Printer Operating Procedure . . . . . . . . . . 455
Figure 6-5 Recovery Procedure From Lockout Station (1/2). . . . . . . . . . . . . . . . . . . . . . . . . . . . . . . . . . . 456
Figure 6-6 Line Load Control Operations on ATTCON—Setting. . . . . . . . . . . . . . . . . . . . . . . . . . . . . . . . 458

NDA-24307 LIST OF FIGURES
Page xiii
Issue 1
LIST OF FIGURES (CONTINUED)
Figure Title Page
Figure 6-7 Line Load Control Operations on ATTCON—Cancelling. . . . . . . . . . . . . . . . . . . . . . . . . . . . . 459
Figure 6-8 Line Control Indication (ATTCON) . . . . . . . . . . . . . . . . . . . . . . . . . . . . . . . . . . . . . . . . . . . . . . 459
Figure 6-9 Line Load Control Key Operations on DESKON—Setting. . . . . . . . . . . . . . . . . . . . . . . . . . . . 460
Figure 6-10 Line Load Control Key Operations on DESKON—Cancelling . . . . . . . . . . . . . . . . . . . . . . . . . 460
Figure 6-11 Line Load Control Indication (DESKCON) . . . . . . . . . . . . . . . . . . . . . . . . . . . . . . . . . . . . . . . . 461
Figure 6-12 Class Change and Number Change of Station and Data Terminal Procedure . . . . . . . . . . . . 464
Figure 6-13 Make-Busy/Make-Busy Cancel of C.O. Line/Tie Line Procedure . . . . . . . . . . . . . . . . . . . . . . 464
Figure 6-14 Message Format for Outgoing Call - IPX Format. . . . . . . . . . . . . . . . . . . . . . . . . . . . . . . . . . . 470
Figure 6-15 Message Format for Incoming Call - IPX Format. . . . . . . . . . . . . . . . . . . . . . . . . . . . . . . . . . . 471
Figure 6-16 Message Format for Station-to-Station Call - IPX Format . . . . . . . . . . . . . . . . . . . . . . . . . . . . 472
Figure 6-17 Message Format for Incoming Call - ICS Format. . . . . . . . . . . . . . . . . . . . . . . . . . . . . . . . . . . 476
Figure 6-18 Message Format for Outgoing Call - ICS Format. . . . . . . . . . . . . . . . . . . . . . . . . . . . . . . . . . . 477
Figure 6-19 Message Format for Station-to-Station Call - ICS Format . . . . . . . . . . . . . . . . . . . . . . . . . . . . 478
Figure 6-20 SMDR—TCP/IP Interface Billing Output Devices . . . . . . . . . . . . . . . . . . . . . . . . . . . . . . . . . . 485
Figure 6-21 IPX “MAT Menu” Display Image (Example) . . . . . . . . . . . . . . . . . . . . . . . . . . . . . . . . . . . . . . . 491
Figure 6-22 DTFD Command Display Image (Example). . . . . . . . . . . . . . . . . . . . . . . . . . . . . . . . . . . . . . . 493
Figure 6-23 “Listup Report” Window when “View Database” Is Selected (Example) . . . . . . . . . . . . . . . . . 494
Figure 6-24 “Export” Dialog for Traffic Report Text File Saving . . . . . . . . . . . . . . . . . . . . . . . . . . . . . . . . . 494
Figure 6-25 Office Data Change Procedure . . . . . . . . . . . . . . . . . . . . . . . . . . . . . . . . . . . . . . . . . . . . . . . . 497
Figure 6-26 Node-Level Commands for Data Management . . . . . . . . . . . . . . . . . . . . . . . . . . . . . . . . . . . . 498
Figure 6-27 Network-level Commands for Data Management . . . . . . . . . . . . . . . . . . . . . . . . . . . . . . . . . . 499
Figure 6-28 Test Operation Method Examples . . . . . . . . . . . . . . . . . . . . . . . . . . . . . . . . . . . . . . . . . . . . . . 501
Figure 6-29 Register Test Procedure/Connection Diagram . . . . . . . . . . . . . . . . . . . . . . . . . . . . . . . . . . . . 503
Figure 6-30 Sender Test Procedure/Connection Diagram . . . . . . . . . . . . . . . . . . . . . . . . . . . . . . . . . . . . . 504
Figure 6-31 3-Party Conference Test Procedure . . . . . . . . . . . . . . . . . . . . . . . . . . . . . . . . . . . . . . . . . . . . 505
Figure 6-32 3-Party Conference Test Connection Diagram . . . . . . . . . . . . . . . . . . . . . . . . . . . . . . . . . . . . 506
Figure 6-33 Tone Test Procedure/Connection Diagram . . . . . . . . . . . . . . . . . . . . . . . . . . . . . . . . . . . . . . . 507
Figure 6-34 Interrupt Ringing (IR) Test Procedure/Connection Diagram . . . . . . . . . . . . . . . . . . . . . . . . . . 509
Figure 6-35 Trunk Test Procedure . . . . . . . . . . . . . . . . . . . . . . . . . . . . . . . . . . . . . . . . . . . . . . . . . . . . . . . 510
Figure 6-36 Trunk Test Connection Diagram . . . . . . . . . . . . . . . . . . . . . . . . . . . . . . . . . . . . . . . . . . . . . . . 511
Figure 6-37 System Block Diagram for ISW Switching Network . . . . . . . . . . . . . . . . . . . . . . . . . . . . . . . . . 519
Figure 6-38 System Block Diagram for LN Switching Network (1/2). . . . . . . . . . . . . . . . . . . . . . . . . . . . . . 520
Figure 6-39 How to Check the LEDs and SW Keys for System Changeover (ISW) . . . . . . . . . . . . . . . . . . 522
Figure 6-40 How to Check the LEDs and SW Keys for System Changeover (IMG0) . . . . . . . . . . . . . . . . . 523
Figure 6-41 How to Check the LEDs and SW Keys for System Changeover (IMG1) . . . . . . . . . . . . . . . . . 524
Figure 6-42 How to Check LEDs and SW Keys for System Changeover (IMG2) . . . . . . . . . . . . . . . . . . . . 525
Figure 6-43 How to Check LEDs and SW Keys for System Changeover (IMG3) . . . . . . . . . . . . . . . . . . . . 526
Figure 6-44 How to Check STATUS LEDs . . . . . . . . . . . . . . . . . . . . . . . . . . . . . . . . . . . . . . . . . . . . . . . . . 527
Figure 6-45 System Block Diagram in LN (Switching Network Between CPU and GT) . . . . . . . . . . . . . . . 529
Figure 6-46 CPU in ACT/STBY Mode (ISW). . . . . . . . . . . . . . . . . . . . . . . . . . . . . . . . . . . . . . . . . . . . . . . . 530
Figure 6-47 CPU Changeover via MBR Key (ISW). . . . . . . . . . . . . . . . . . . . . . . . . . . . . . . . . . . . . . . . . . . 531
Figure 6-48 LED Indications Before and After CPU Changeover (ISW) . . . . . . . . . . . . . . . . . . . . . . . . . . . 531
Figure 6-49 CPU in ACT/STBY Mode (LN) . . . . . . . . . . . . . . . . . . . . . . . . . . . . . . . . . . . . . . . . . . . . . . . . . 532
Figure 6-50 GT in ACT / STBY Mode (LN) . . . . . . . . . . . . . . . . . . . . . . . . . . . . . . . . . . . . . . . . . . . . . . . . . 532
Figure 6-51 CPU Changeover via MBR Key (LN). . . . . . . . . . . . . . . . . . . . . . . . . . . . . . . . . . . . . . . . . . . . 533
Figure 6-52 LED Indications Before and After CPU Changeover (LN) . . . . . . . . . . . . . . . . . . . . . . . . . . . . 533
Figure 6-53 Forced CPU Changeover. . . . . . . . . . . . . . . . . . . . . . . . . . . . . . . . . . . . . . . . . . . . . . . . . . . . . 534
Figure 6-54 System Block Diagram (Switching Network for Speech Path System) . . . . . . . . . . . . . . . . . . 537
Figure 6-55 IOGT/TSW/HSW/DLKC/MUX in ACT Mode . . . . . . . . . . . . . . . . . . . . . . . . . . . . . . . . . . . . . . 538

LIST OF FIGURES NDA-24307
Page xiv
Issue 1
LIST OF FIGURES (CONTINUED)
Figure Title Page
Figure 6-56 IOGT/TSW/HSW/DLKC/MUX in STBY Mode . . . . . . . . . . . . . . . . . . . . . . . . . . . . . . . . . . . . . 538
Figure 6-57 Speech Path System Changeover via Active IOGT MBR Key. . . . . . . . . . . . . . . . . . . . . . . . . 539
Figure 6-58 LED Indications Before and After Speech Path System Changeover . . . . . . . . . . . . . . . . . . . 540
Figure 6-59 PLO/CLK in ACT/STBY Mode . . . . . . . . . . . . . . . . . . . . . . . . . . . . . . . . . . . . . . . . . . . . . . . . . 541
Figure 6-60 PLO Changeover via MB Key . . . . . . . . . . . . . . . . . . . . . . . . . . . . . . . . . . . . . . . . . . . . . . . . . 542
Figure 6-61 LED Indications Before and After PLO/CLK Changeover . . . . . . . . . . . . . . . . . . . . . . . . . . . . 542
Figure 6-62 System Initialization by Turning ON the Power Supply . . . . . . . . . . . . . . . . . . . . . . . . . . . . . . 544
Figure 6-63 Conceptional Diagram of Initial Program Load . . . . . . . . . . . . . . . . . . . . . . . . . . . . . . . . . . . . 547
Figure 6-64 Keys on the TOPU (ISW). . . . . . . . . . . . . . . . . . . . . . . . . . . . . . . . . . . . . . . . . . . . . . . . . . . . . 547
Figure 6-65 Keys on the TOPU (LN) . . . . . . . . . . . . . . . . . . . . . . . . . . . . . . . . . . . . . . . . . . . . . . . . . . . . . . 547
Figure 6-66 Related Keys and LEDs for System Initialization. . . . . . . . . . . . . . . . . . . . . . . . . . . . . . . . . . . 548
Figure 6-67 System Initialization by Keys on CPU Front Panel . . . . . . . . . . . . . . . . . . . . . . . . . . . . . . . . . 554
Figure 6-68 System Initialization by SINZ Command . . . . . . . . . . . . . . . . . . . . . . . . . . . . . . . . . . . . . . . . . 555
Figure 6-69 How to Turn ON a LN. . . . . . . . . . . . . . . . . . . . . . . . . . . . . . . . . . . . . . . . . . . . . . . . . . . . . . . . 558
Figure 6-70 How to Turn ON the ISW . . . . . . . . . . . . . . . . . . . . . . . . . . . . . . . . . . . . . . . . . . . . . . . . . . . . . 559
Figure 6-71 How to Turn OFF a LN. . . . . . . . . . . . . . . . . . . . . . . . . . . . . . . . . . . . . . . . . . . . . . . . . . . . . . . 560
Figure 7-1 Flow of Procedures . . . . . . . . . . . . . . . . . . . . . . . . . . . . . . . . . . . . . . . . . . . . . . . . . . . . . . . . . 568
Figure 7-2 Adjusting Time on ATTCON. . . . . . . . . . . . . . . . . . . . . . . . . . . . . . . . . . . . . . . . . . . . . . . . . . . 580
Figure 7-3 Desk Console. . . . . . . . . . . . . . . . . . . . . . . . . . . . . . . . . . . . . . . . . . . . . . . . . . . . . . . . . . . . . . 581

NDA-24307 LIST OF TABLES
Page xv
Issue 1
LIST OF TABLES
Table Title Page
Table 2-1 How to Follow This Manual Guide . . . . . . . . . . . . . . . . . . . . . . . . . . . . . . . . . . . . . . . . . . . . . 4
Table 2-2 Kinds of Circuit Card Front Restart . . . . . . . . . . . . . . . . . . . . . . . . . . . . . . . . . . . . . . . . . . . . . 40
Table 3-1 List of System Messages . . . . . . . . . . . . . . . . . . . . . . . . . . . . . . . . . . . . . . . . . . . . . . . . . . . . 51
Table 3-2 Error Code . . . . . . . . . . . . . . . . . . . . . . . . . . . . . . . . . . . . . . . . . . . . . . . . . . . . . . . . . . . . . . . . 252
Table 3-3 Error Kind (ERRK) . . . . . . . . . . . . . . . . . . . . . . . . . . . . . . . . . . . . . . . . . . . . . . . . . . . . . . . . . . 254
Table 4-1 LPM Unit/Circuit Cards and Reference Items . . . . . . . . . . . . . . . . . . . . . . . . . . . . . . . . . . . . . 271
Table 4-2 TSWM Circuit Cards and Reference Items . . . . . . . . . . . . . . . . . . . . . . . . . . . . . . . . . . . . . . . 295
Table 4-3 PIM Circuit Cards and Reference Items . . . . . . . . . . . . . . . . . . . . . . . . . . . . . . . . . . . . . . . . .315
Table 4-4 ISW Circuit Cards and Reference Items . . . . . . . . . . . . . . . . . . . . . . . . . . . . . . . . . . . . . . . . .332
Table 5-1 Fault Repair Procedure Quick Reference . . . . . . . . . . . . . . . . . . . . . . . . . . . . . . . . . . . . . . . . 359
Table 5-2 Line Fault Situation . . . . . . . . . . . . . . . . . . . . . . . . . . . . . . . . . . . . . . . . . . . . . . . . . . . . . . . . . 362
Table 5-3 Trunk Fault Situation . . . . . . . . . . . . . . . . . . . . . . . . . . . . . . . . . . . . . . . . . . . . . . . . . . . . . . . . 372
Table 5-4 Timings for Trunks . . . . . . . . . . . . . . . . . . . . . . . . . . . . . . . . . . . . . . . . . . . . . . . . . . . . . . . . . 373
Table 5-5 Timings for Senders . . . . . . . . . . . . . . . . . . . . . . . . . . . . . . . . . . . . . . . . . . . . . . . . . . . . . . . . 374
Table 5-6 Unit Fault Situation . . . . . . . . . . . . . . . . . . . . . . . . . . . . . . . . . . . . . . . . . . . . . . . . . . . . . . . . . 385
Table 5-7 Speech Path (TSW) System Fault Situation (LN) . . . . . . . . . . . . . . . . . . . . . . . . . . . . . . . . . . 398
Table 5-8 Speech Path (TSW) System Fault Situation (LN) . . . . . . . . . . . . . . . . . . . . . . . . . . . . . . . . . . 408
Table 5-9 Control System Fault Situation . . . . . . . . . . . . . . . . . . . . . . . . . . . . . . . . . . . . . . . . . . . . . . . . 413
Table 5-10 Alarm Indication Fault Situation . . . . . . . . . . . . . . . . . . . . . . . . . . . . . . . . . . . . . . . . . . . . . . . 417
Table 5-11 PIN Location of External Alarm . . . . . . . . . . . . . . . . . . . . . . . . . . . . . . . . . . . . . . . . . . . . . . . . 419
Table 5-12 PWR Supply Fault Situation . . . . . . . . . . . . . . . . . . . . . . . . . . . . . . . . . . . . . . . . . . . . . . . . . . 424
Table 5-13 CCIS Line Fault Situation . . . . . . . . . . . . . . . . . . . . . . . . . . . . . . . . . . . . . . . . . . . . . . . . . . . . 444
Table 5-14 ISDN Line Fault Situation . . . . . . . . . . . . . . . . . . . . . . . . . . . . . . . . . . . . . . . . . . . . . . . . . . . . 447
Table 6-1 Description of Alarm Indications on TOPU . . . . . . . . . . . . . . . . . . . . . . . . . . . . . . . . . . . . . . .453
Table 6-2 Message Judgment Criteria . . . . . . . . . . . . . . . . . . . . . . . . . . . . . . . . . . . . . . . . . . . . . . . . . . 462
Table 6-3 ASCII Code . . . . . . . . . . . . . . . . . . . . . . . . . . . . . . . . . . . . . . . . . . . . . . . . . . . . . . . . . . . . . . . 467
Table 6-4 Kind of Data . . . . . . . . . . . . . . . . . . . . . . . . . . . . . . . . . . . . . . . . . . . . . . . . . . . . . . . . . . . . . . 469
Table 6-5 Traffic Measurement Types . . . . . . . . . . . . . . . . . . . . . . . . . . . . . . . . . . . . . . . . . . . . . . . . . . 488
Table 6-6 Designated Connection Test (Station) Operations . . . . . . . . . . . . . . . . . . . . . . . . . . . . . . . . . 502
Table 6-7 Tone Numbers . . . . . . . . . . . . . . . . . . . . . . . . . . . . . . . . . . . . . . . . . . . . . . . . . . . . . . . . . . . . 508
Table 6-8 Changeover of CPU Block . . . . . . . . . . . . . . . . . . . . . . . . . . . . . . . . . . . . . . . . . . . . . . . . . . . 528
Table 6-9 Changeover of Switching Block . . . . . . . . . . . . . . . . . . . . . . . . . . . . . . . . . . . . . . . . . . . . . . . 535
Table 6-10 Lamp Indications on DSP of CPR . . . . . . . . . . . . . . . . . . . . . . . . . . . . . . . . . . . . . . . . . . . . . . 545
Table 6-11 System Initialization Procedure Types . . . . . . . . . . . . . . . . . . . . . . . . . . . . . . . . . . . . . . . . . . 546
Table 6-12 System Initialization Without Loading Procedure . . . . . . . . . . . . . . . . . . . . . . . . . . . . . . . . . . 549
Table 6-13 System Initialization With Office Data Loading Procedure . . . . . . . . . . . . . . . . . . . . . . . . . . . 550
Table 6-14 System Initialization with Program Loading Procedure . . . . . . . . . . . . . . . . . . . . . . . . . . . . . . 551
Table 6-15 System Initialization With Office Data And Program Loading Procedure . . . . . . . . . . . . . . . . 552
Table 6-16 System Initialization by Phase 1 Restart Procedure . . . . . . . . . . . . . . . . . . . . . . . . . . . . . . . . 553
Table 6-17 Line/Trunk Initialization Procedure . . . . . . . . . . . . . . . . . . . . . . . . . . . . . . . . . . . . . . . . . . . . . 556
Table 6-18 How to Turn OFF the ISW Procedure . . . . . . . . . . . . . . . . . . . . . . . . . . . . . . . . . . . . . . . . . . .561
Table 6-19 Start-Up Procedure When Basic and Application Software is Installed . . . . . . . . . . . . . . . . . 563
Table 6-20 Start-Up Procedure When Basic, Application Software and Office Data is Installed . . . . . . . 565
Table 7-1 Test Equipment and Tools . . . . . . . . . . . . . . . . . . . . . . . . . . . . . . . . . . . . . . . . . . . . . . . . . . . 568
Table 7-2 List of Routine Maintenance Procedures . . . . . . . . . . . . . . . . . . . . . . . . . . . . . . . . . . . . . . . .569
Table 7-3 List of Routine Maintenance Procedures . . . . . . . . . . . . . . . . . . . . . . . . . . . . . . . . . . . . . . . .570
Table 8-1 Command List . . . . . . . . . . . . . . . . . . . . . . . . . . . . . . . . . . . . . . . . . . . . . . . . . . . . . . . . . . . . . 593

LIST OF TABLES NDA-24307
Page xvi
Issue 1
This page is for your notes.

NDA-24307 CHAPTER 1
Page 1
Issue 1
CHAPTER 1 INTRODUCTION
1. GENERAL
This manual describes routine system maintenance and fault repair procedures. This chapter explains how to
follow the manual and provides precautions pertaining to maintenance jobs as a whole. Be sure to read this chap-
ter thoroughly before starting the required maintenance job.
2. HOW TO FOLLOW THE MANUAL
If technicians engage in a fault repair with a sufficient amount of knowledge of the system (system
configurations, controlling systems, functions, etc.), the time spent repairing the system is minimized. This
manual provides explanations about the system, while placing emphasis on system configurations, controlling
systems, and functions. If faults of all conceivable cases are to be assumed for the explanations, the explanations
may lack reality and be more difficult to understand. Therefore, this manual provides the explanations on the
basis of the following points:
(1) It is very important to judge whether the fault has occurred in the system or at any of the peripheral
equipment.
(2) In case the system is faulty, explanations will be given about the actions to be taken until you identify the
faulty circuit card/cards.
(3) Explanations will be omitted pertaining to the following faults:
• Fault of peripheral equipment (MAT, telephone sets, etc.)
• Fault due to an error in office data assignment
• Fault due to an error in installation procedure (an error in circuit card switch setting, cross-connection,
etc.)
(4) How to Read This Manual
• When a fault is to be repaired for the first time
See Section 3, How to Read Precautions, Diagnostic,
and Fault Repair Information, Chapter 2.
See Section 4, Reporting Fault to NEC,
in Chapter 2.
Go to Chapter 5.
See Section 3, How to Read Precautions, Diagnostic,
and Fault Repair Information, Chapter 2.
Go to Chapter 5.
CHAPTER 1 NDA-24307
Page 2
Issue 1
INTRODUCTION
• When only the contents of a system message needs to be known, or when a fault is to be diagnosed
from a system message
• When the range of faulty conditions has been specified and a faulty circuit card can be assumed
• When investigating the system for the purpose of a fault repair
• When replacing a unit/circuit card with a spare
• When performing routine maintenance
Chapter 5
See Section 4, Reporting Fault to NEC, in Chapter 2.
Chapter 5
See Section 4, Reporting Fault to NEC, in Chapter 2.
Chapter 5
Chapter 4
Chapter 7
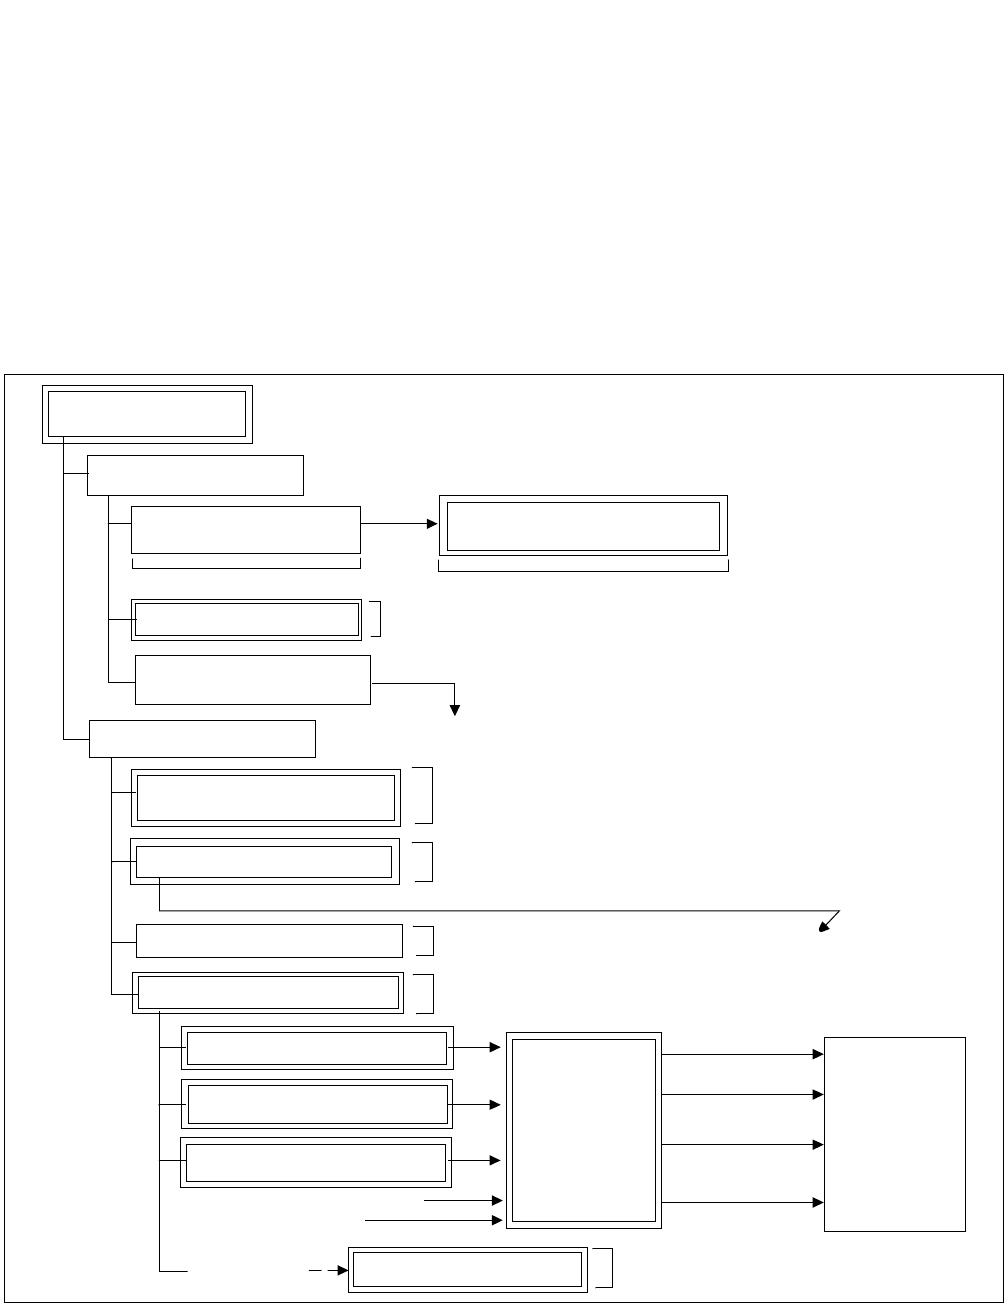
NDA-24307 CHAPTER 2
Page 3
Issue 1
CHAPTER 2 SYSTEM MAINTENANCE OUTLINE
1. GENERAL
1.1 Purpose
This chapter explains the outline of fault diagnosis and duties necessary to maintain the PBX.
1.2 Administrative Management Procedures
Figure 2-1 shows the work flow of the administrative management procedures.
Figure 2-1 Flow of Administrative Management Procedures
Administrative
Management Works
Expansion and Change of
Station Users
Management Works
Diagnosis result, system message displays abnormality
(Abnormal
Congestion)
Line fault
Circuit card fault
Terminal
(Tel., etc.) fault
Fault cause not
able to be localized
Administrative Works
(B) (A)
(A)
(B)
Actions on Claims from
Station Users and/or Operators
Office Data Management and Office
Data Protection
Traffic Management
Station Message Detail
Recording System (SMDR)
Routine Diagnosis
System Status Monitor
Routine Maintenance
Alarm Indications
Collection of System Messages
Indication of Lockout Stations
Line Load Control
Fault Analysis/
Test Operation/
Changeover/
Make-Busy/Circuit
Card Change/
Initialization
See Chapter 6 See Chapter 6
See Chapter 6
See Chapter 6
See Chapter 6
See Chapter 6
See Chapter 6
See Chapter 7
Refer to
Chapter 5

CHAPTER 2 NDA-24307
Page 4
Issue 1
SYSTEM MAINTENANCE OUTLINE
1.3 How to Follow This Manual
Table 2-1 provides a brief description of the contents for each chapter in this manual.
2. BASIC KNOWLEDGE
This section identifies the information necessary for the system operations and maintenance procedures.
2.1 System Configuration
2.2 Line Equipment Numbers (LENS)
2.3 Local Partition (LP) Number
2.4 Assignment of Network Control Node (NCN)
2.5 System Messages
2.6 Fault Detecting Function
2.7 Range of Faults Specification
2.8 Explanation of Terms
Table 2-1 How to Follow This Manual Guide
CHAPTER DESCRIPTION
2See Section 2, Basic Knowledge.
Explains basic knowledge of fault detection and indication, functions and fault range of the system,
etc.
See Section 3, How to Read Precautions, Diagnostic, and Fault Repair Information.
Explains the methods of procedure performance and various symbols used in the description.
See Section 4, Reporting Fault to NEC.
Explains the method of forwarding faulty circuit cards, the method of creating a history record for
future fault repair, and the method of reporting faults to NEC.
3Explains how to read and analyze system messages.
4Explains the method of replacing a unit/circuit card due to a fault.
5Explains repair procedures corresponding to the faults of processors or equipment.
6Explains how to control the system in service management functions and precautions required in the
system control process.
7Explains routine maintenance.
8Explains the commands used in the system administrative management procedure.
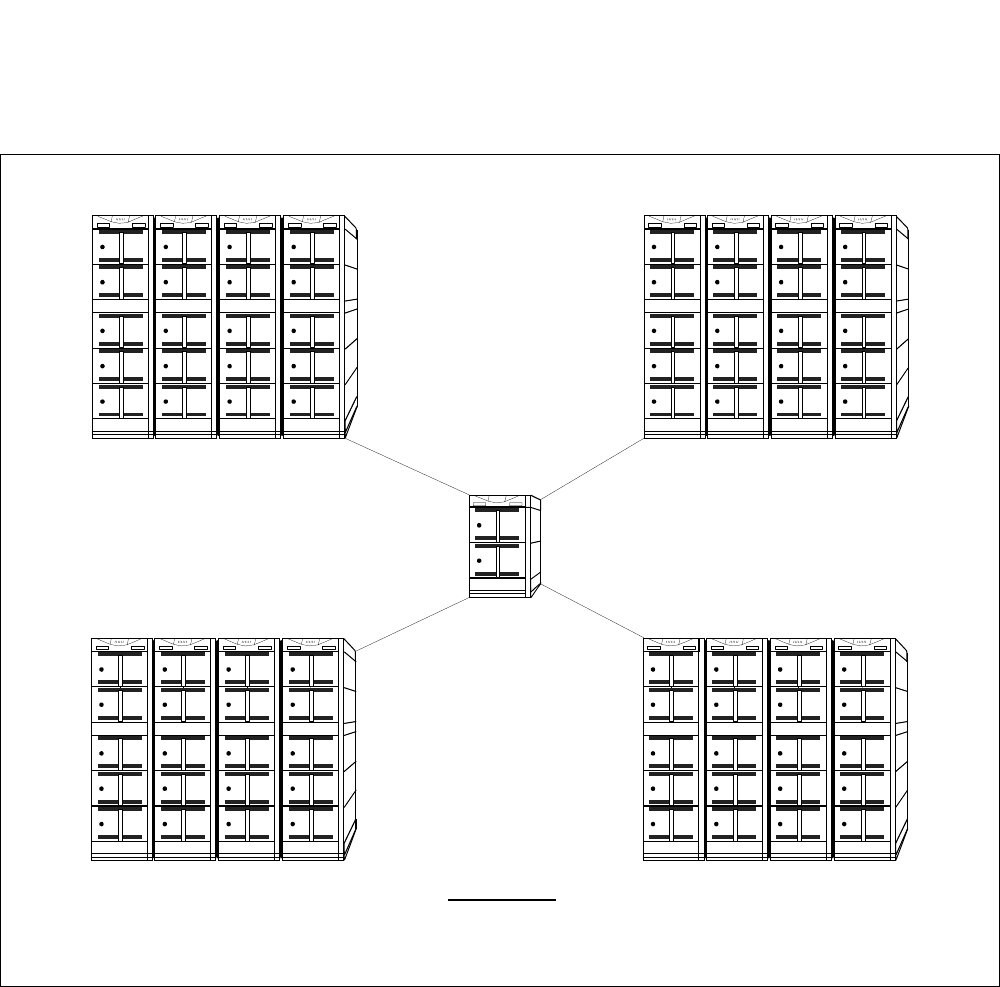
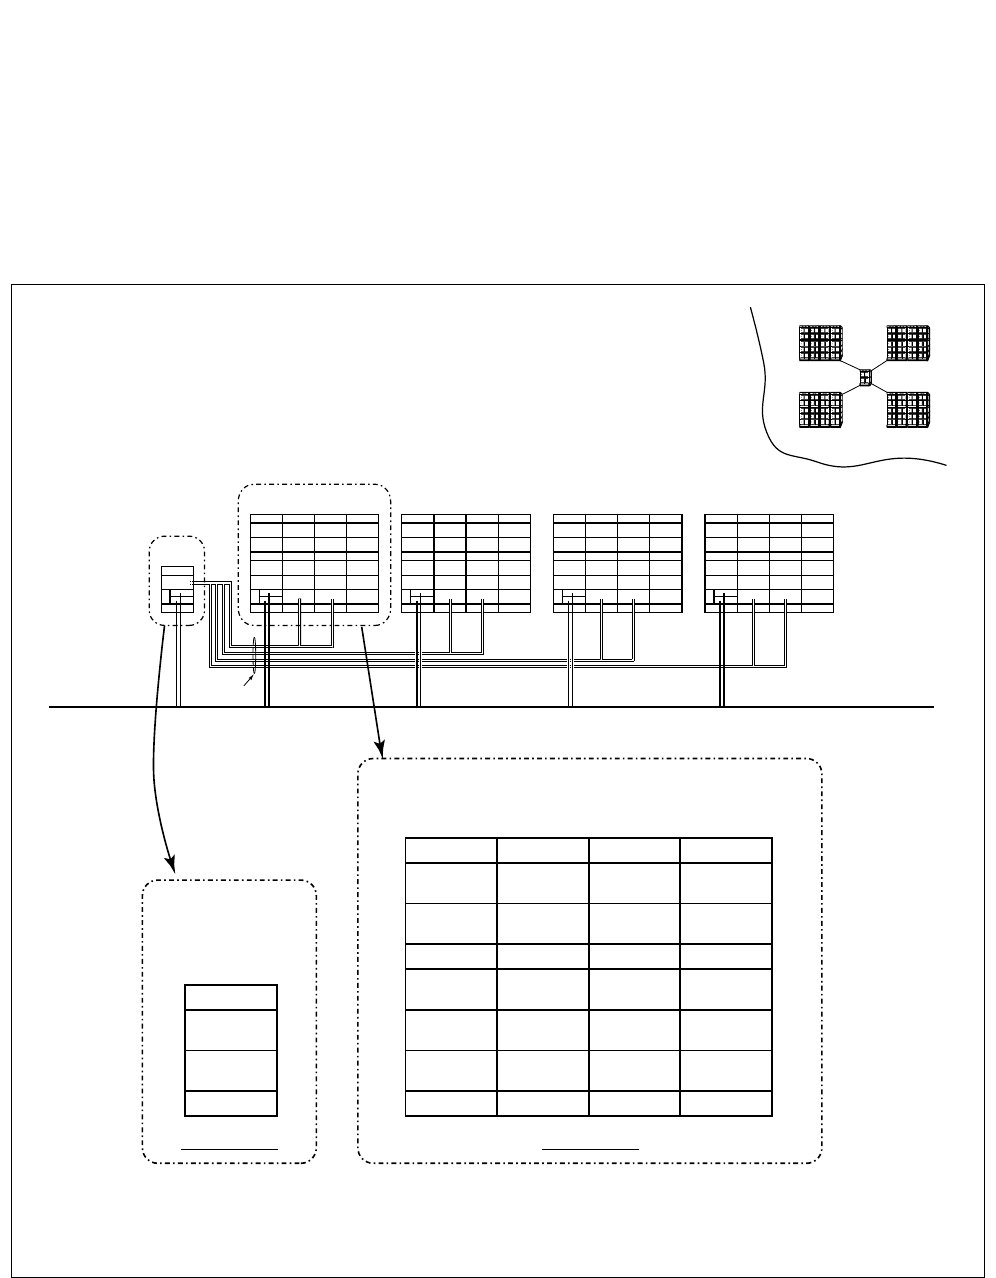
CHAPTER 2 NDA-24307
Page 6
Issue 1
SYSTEM MAINTENANCE OUTLINE
2.1.1 Configuration of the System
The NEAX2400 IPX IPX-U system (referred to in the remainder of this manual as “the system”) is
configured by a single Inter-node Switch (ISW) and a maximum of 4 Local Nodes (LNs). Refer to
figures in this section. The ISW and LNs are connected via the Fusion link, with Ethernet and physical
PCM cables connected to each other. Figure 2-3 provides an overall image of system configuration. A
two-module ISW and maximum four Local nodes compose a single network system via the Fusion
link.
Figure 2-3 System Configuration
......
......
LN0
ISW
LN1
LN3LN2
......
......
......
......
......
......
......
......
......
......
......
......
......
......
......
......
......
......
......
......
......
......
......
......
......
......
......
......
......
......
......
......
LN0/1/2/3
BASEU BASEU BASEU BASEU
LPM TSWM0 TSWM1 DUMMY
PIM1 PIM1 PIM1 PIM1
PIM0 PIM0 PIM0 PIM0
FANU FANU FANU FANU
PIM2 PIM2 PIM2 PIM2
PIM3 PIM3 PIM3 PIM3
TOPU TOPU TOPU TOPU
LN2 LN3
ISW
LN0 LN1
Ether
PCM Cable
ISW
BASEU
LPM
ISWM
TOPU
IMG0 IMG1 IMG2 IMG3
FRONT VIEWFRONT VIEW
ISW:
Inter-node Switch
LN: Local Node
TOPU: Top Unit
LPM: Local Processor Module
TSWM: Time Division Switch Module
ISWM:
Inter-node Switch Module
PIM:
Port Interface Module
FANU:
Fan Unit
BASEU: Base Unit
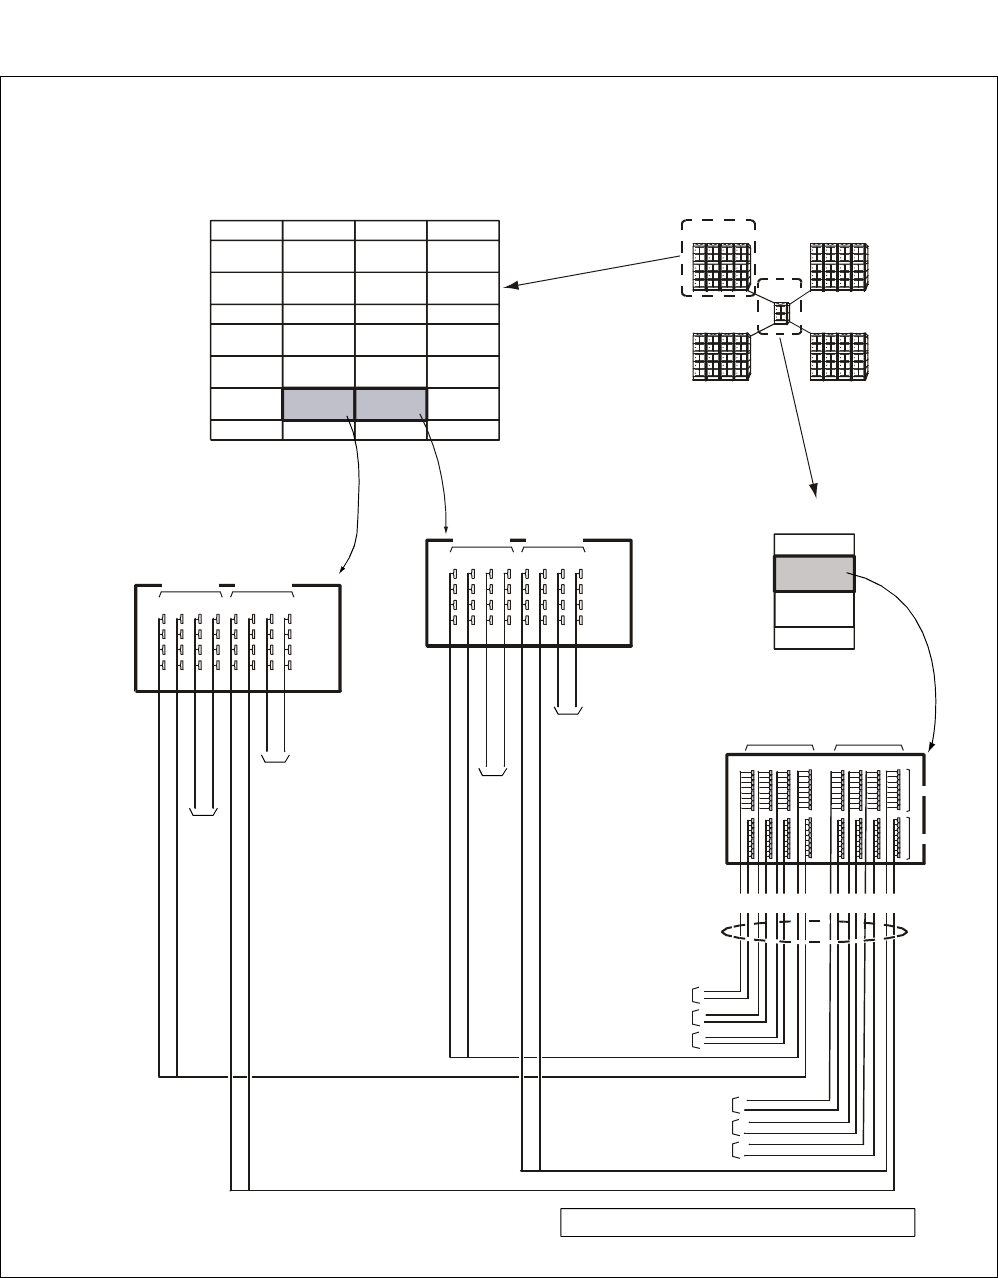
NDA-24307 CHAPTER 2
Page 7
Issue 1
SYSTEM MAINTENANCE OUTLINE
Figure 2-4 Details on Inter-node PCM Cable Connections
Note: For actual cable runnings, refer to the Installation Manual.
ISW
BASEU
LPM
ISWM
TOPU
< ISWM Backplane >
For TSWM1
For TSWM0
(17) (16) (15) (14) (07) (06) (05) (04)
LN0
IMG0 IMG1 IMG2 IMG3
BASEU BASEU BASEU BASEU
LPM TSWM0 TSWM1 DUMMY
PIM1 PIM1 PIM1 PIM1
PIM0 PIM0 PIM0 PIM0
FANU FANU FANU FANU
PIM2 PIM2 PIM2 PIM2
PIM3 PIM3 PIM3 PIM3
TOPU TOPU TOPU TOPU
< TSWM0 Backplane >
(19) (18) (17) (16) (15) (14) (13) (12)
TSW
(No. 1 System) TSW
(No. 0 System)
< TSWM1 Backplane >
(19) (18) (17) (16) (15) (14) (13) (12)
TSW
(No. 1 System) TSW
(No. 0 System)
TSW
(No. 1 System)
To MUX
(IMG0/1)
To LN3
TSW
(No. 0 System)
[ Details on PCM Cable Connections between ISW and LN ]
............
LN0
ISW
LN1
LN3LN2
......
......
......
......
......
......
......
......
................................................
......
......
......
......
......
......
......
......
................................................
To MUX
(IMG2/3)
To MUX
(IMG2/3)
To MUX
(IMG0/1)
To LN2
To LN1
To LN3
To LN2
To LN1
PCM (ISW-LN TSW-CA-n) Cables
IPX-U
LN: Local Node ISW: Inter-node Switch
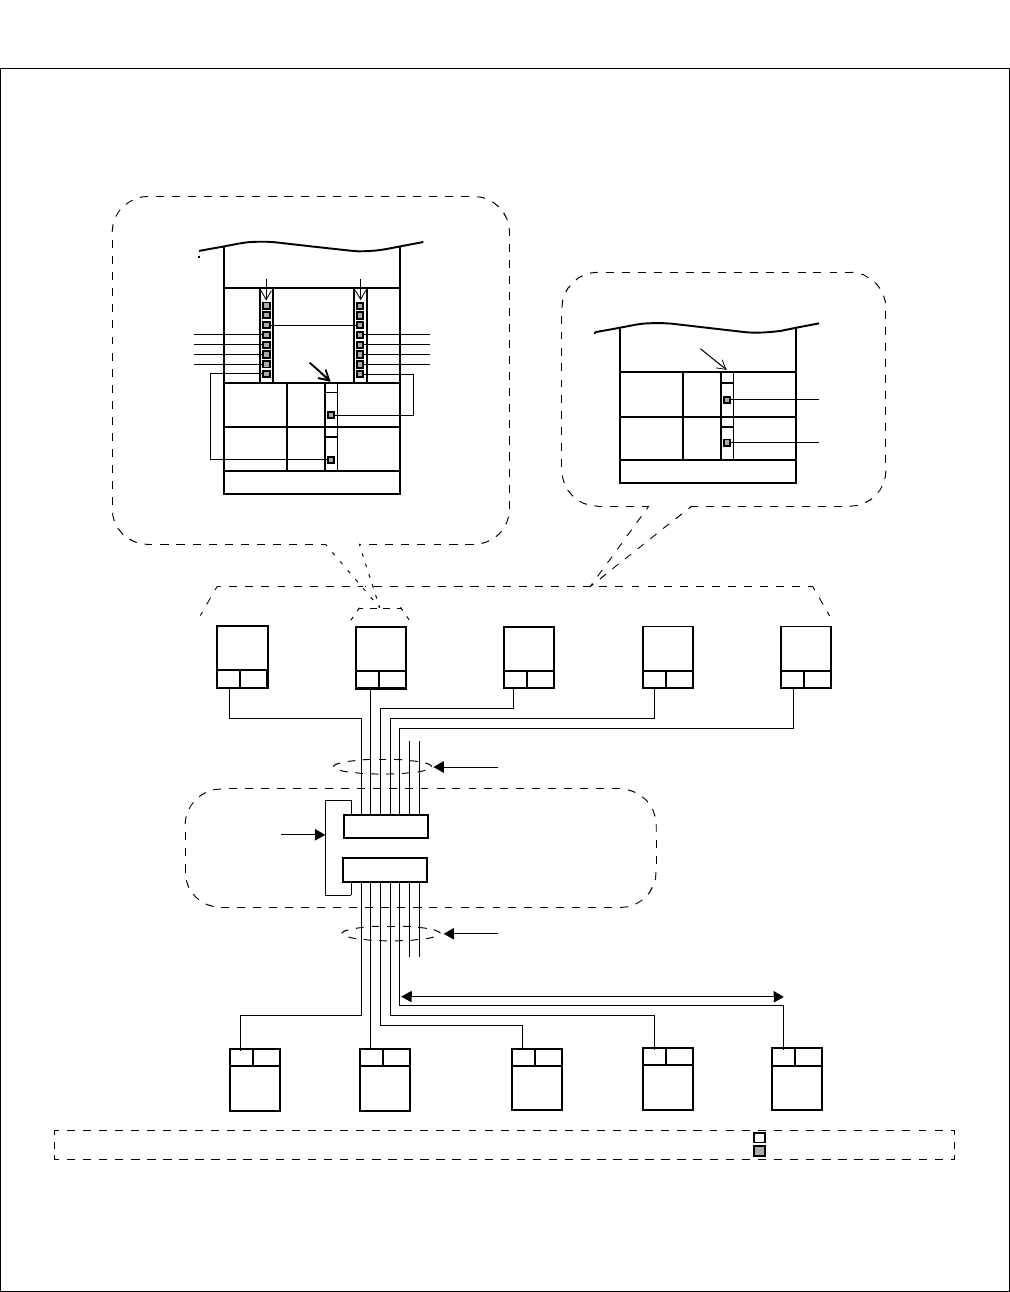
CHAPTER 2 NDA-24307
Page 8
Issue 1
SYSTEM MAINTENANCE OUTLINE
Figure 2-5 Details on Ethernet Cable Connections (Establishment of Fusion Link) (1/2)
ISW
CPU1
HUB1
HUB0
PIM0 of LN0, IMG0
10 BASE-T Cables (Straight)
10 BASE-T Cables (Straight)
10 BASE-T
Cables
(Cross)
CPU1
LPM
PIM0
CPU0
00
00
LANI
HUB0 HUB1
Note Note
IMG0 (LN0)
From ISW
From LN1
From LN2
From LN3
From ISW
From LN1
From LN2
From LN3
LPM
CPU1
CPU0
00
00
LANI
ISW / IMG0 (LN1/2/3)
Max. 328 ft (100m)
Note 2
: 10 BASE-T connector
ISW: Inter-node Switch LN: Local Node LI: LANI (PZ-PC19) HUB: PA-M96
Note 1
Note: HUB card can be mounted in any universal slot of PIM.
L1
LN0
CPU1
L1
LN1
CPU1
L1
LN2
CPU1
L1
LN3
CPU1
L1
LN1
CPU1
L1
LN1
CPU1
L1
LN1
CPU1
L1
LN1
CPU1
L1
LN1
CPU1
L1
To HUB1
in LN0
To HUB1
in LN0
Note 1: The connections, shown in this figure, are only an example. Actual cable runnings may vary, depending on your
system configuration. (Refer to the “Installation Manual” for more details)
Note 2: The mutual 10 BASE-T (Ethernet) connections must be within 328 feet (100m) in their distance. If the distance is
longer [e.g. , Fusion Link is provided also with other distant IPX node(s)], use FCH (PA-FCHA) card as a protocol
converter for the Fusion-link data. For more details, refer to the “Fusion Network System Manual.
[Details on Ether Cable Connections]
ISW and each LN can achieve a Fusion link by physically connecting themselves via the 10 BASE-T cables. This figure
shows an example where the CPR-accommodated LANI cards (internal LANI: PCI slot 00) are mutually connected via
HUB0/HUB1 (PA-M96) cards in PIM0 of LN0, IMG0 (HUB0 for CPU0 of all nodes, HUB1 for CPU1 of all nodes.)
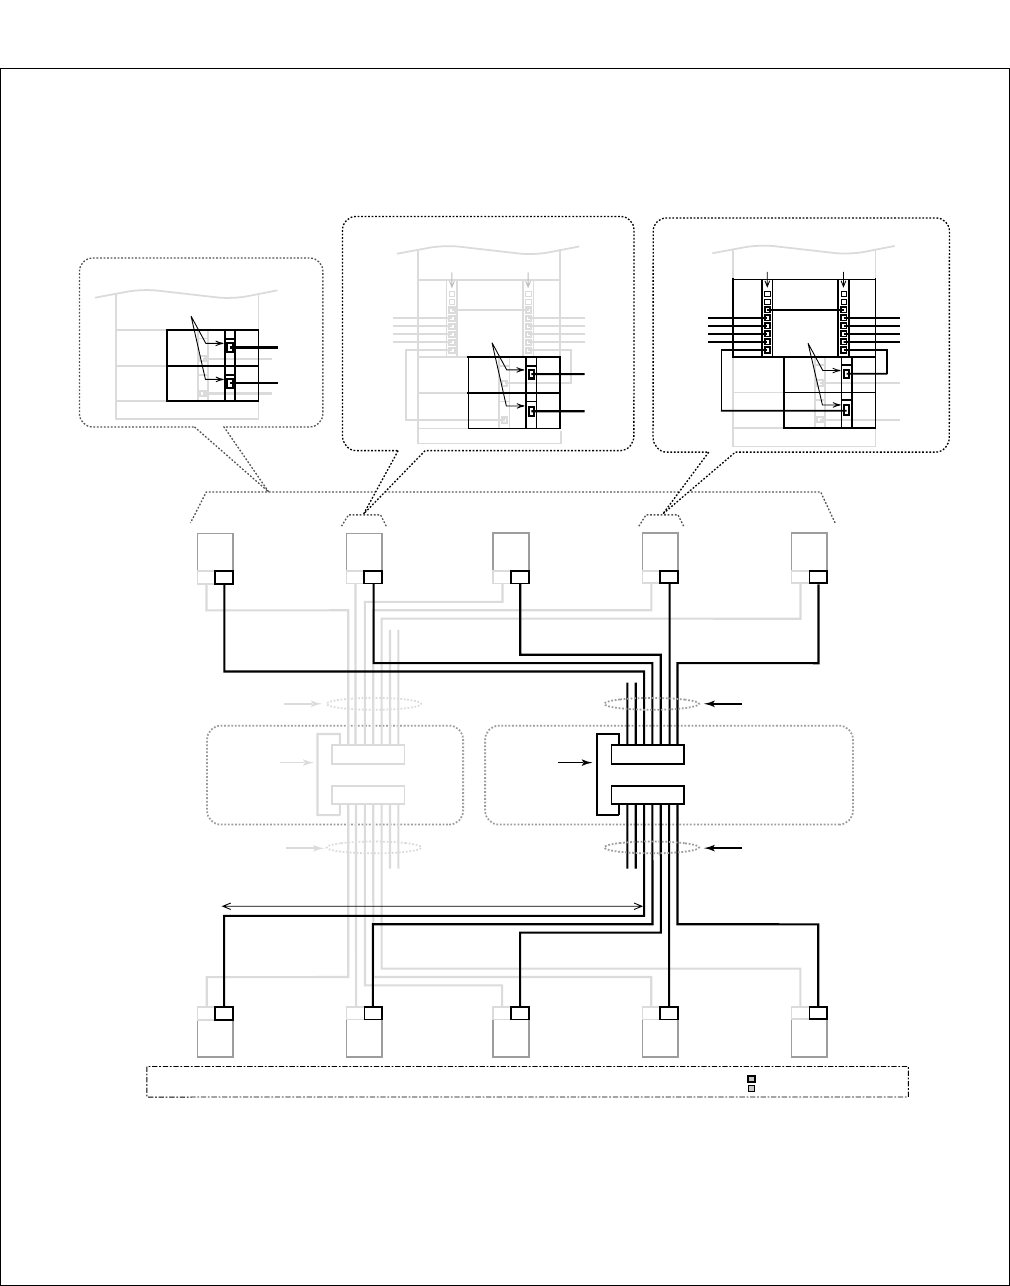
NDA-24307 CHAPTER 2
Page 9
Issue 1
SYSTEM MAINTENANCE OUTLINE
Figure 2-5 Details on Ethernet Cable Connections (Establishment of Fusion Link) (2/2)
[ Details on Ether Cable Connections: When Dual LANIs are used for each CPU ]
When dual LANIs are used for each CPU, the whole second LANIs (external LANI: PCI slot 03) must also be
connected in addition to the first LANIs explained on the previous page. This figure shows an example where the
second LANIs are connected to the additional HUB2/HUB3 (PA-M96) cards in PIM0 of LN2, IMG0 (HUB2 for
CPU0 of all nodes, HUB3 for CPU1 of all nodes).
LI LI
ISW
CPU1
LI LI
LN3
CPU1
LI LI
LN2
CPU1
LI LI
LN1
CPU1
LI LI
LN0
CPU1
LI LI
ISW
CPU0
LI LI
LN3
CPU0
LI LI
LN2
CPU0
LI LI
LN1
CPU0
LI LI
LN0
CPU0
HUB1
HUB0
LN0 PIM0 of LN2, IMG0
10 BASE-T Cables (Straight)
10 BASE-T Cables (Straight)
10 BASE-T
Cables
(Cross)
HUB3
HUB2
10 BASE-T
Cables
(Cross)
10 BASE-T Cables (Straight)
10 BASE-T Cables (Straight)
CPU1
LPM
PIM0
CPU0
00
00
03
03
HUB0 HUB1
IMG0 (LN0)
From ISW
From LN1
From LN2
From LN3
From ISW
To HUB3
in LN2
To HUB2
in LN2
From LN1
From LN2
From LN3
CPU1
LPM
PIM0
CPU0
00
00
03
03
HUB2 HUB3
IMG0 (LN2)
From ISW
From LN0
From LN1
From LN3
From ISW
To HUB1
in LN0
To HUB0
in LN0
From LN0
From LN1
From LN3
LPM
CPU1
CPU0
00
00
ISW / IMG0 (LN1/3)
To HUB0
in LN0
To HUB1
in LN0
03
03 To HUB2
in LN2
To HUB3
in LN2
: 10 BASE-T connector
ISW: Inter-node Switch LN: Local Node LI: LANI (PZ-PC19) HUB: PA-M96
Second LANI Second LANI
Second LANI
Max. 328 ft (100m) Note 2
Note 1
Note 1: The above connections are only an example. Actual cable runnings may vary, depending on your system
configuration (Refer to the “Installation Manual” for more details.)
Note 2: The mutual 10 BASE-T (Ethernet) connections must be within 328 ft (100m) in their distance. If dis-
tance is longer (e.g., Fusion link is provided with other distant IPX node(s), use FCH (PA-FCHA) card
as a protocol converter for the Fusion link data. For more details, refer to the “Fusion Network System
Manual.”
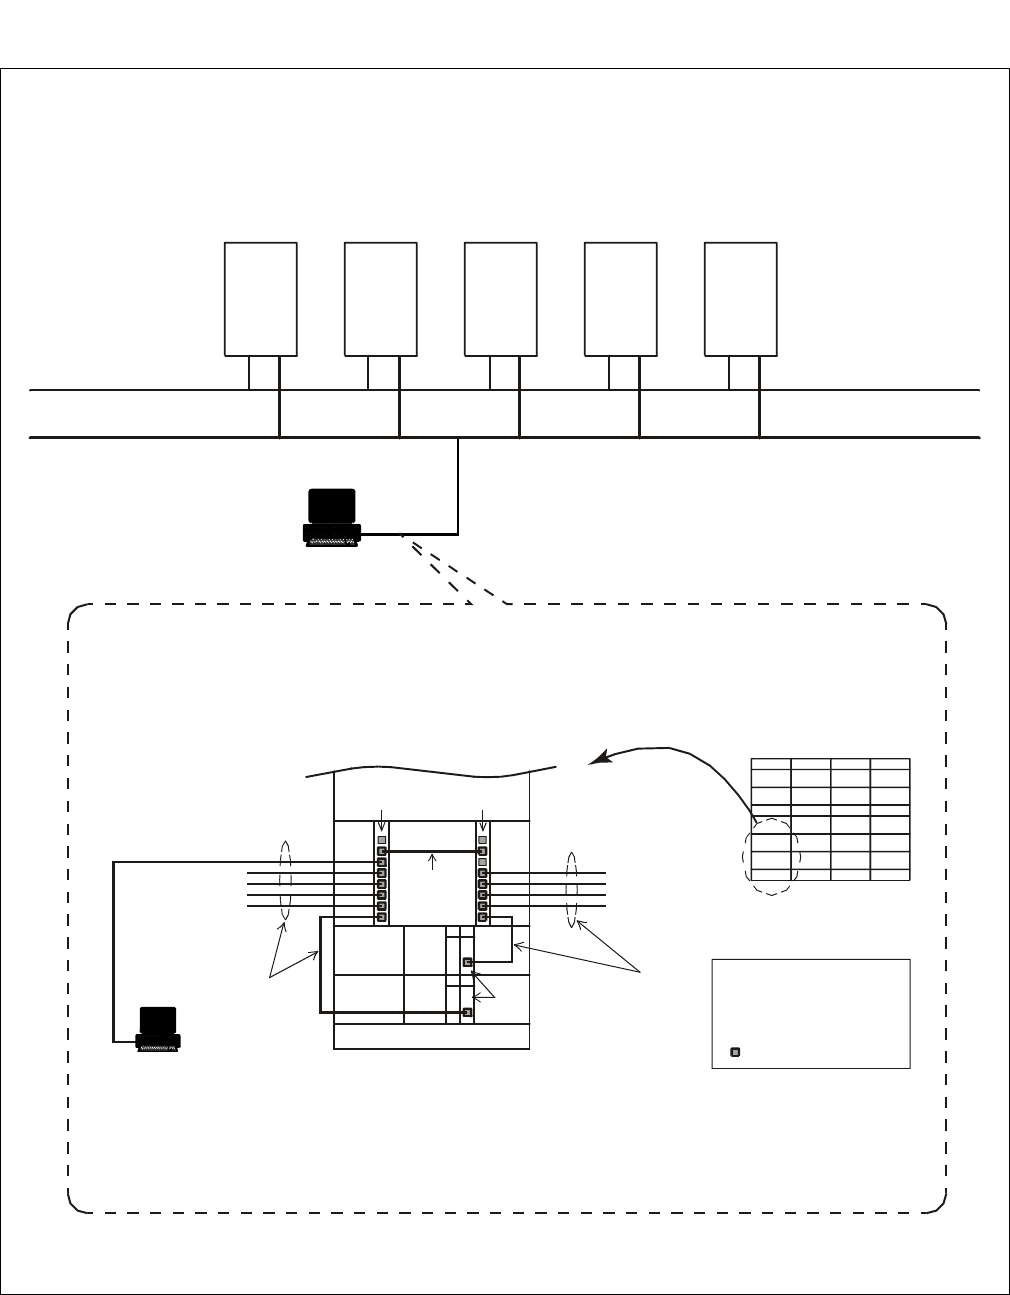
CHAPTER 2 NDA-24307
Page 10
Issue 1
SYSTEM MAINTENANCE OUTLINE
Figure 2-6 Details on Ethernet Cable Connections (Using MAT via Ethernet)
Note: The LANI card for MAT connection is mounted in PCI slot No. 01 of each CPR.
[ Details on Ether Cable Connections: When using MAT via Ethernet ]
CPU1
LPM
PIM0
CPU0
01
01
00
00
HUB
LANI
IMG0 (LN1)
ISW
Fusion Link
Ether for MAT
LN0 LN1 LN2 LN3
LN1
IMG0 IMG1 IMG2 IMG3
MAT
MAT
10 BASE-T Cable
(Straight)
10 BASE-T Cable
(Straight)
10 BASE-T Cable
(Cross)
ISW
LN
LANI
HUB
: Inter-node Switch
: Local Node
: LANI (PZ-PC19)
: PA-M96
: 10 BASE-T connector
Note 1 HUB
Note 1
To LANI0 of ISW
To LANI0 of LN0
To LANI0 of LN2
To LANI0 of LN3
Note 2
To LANI1 of ISW
To LANI1 of LN0
To LANI1 of LN2
To LANI1 of LN3
Note 2
The IPX-U system can use both IOC (PH-IO24) card or each CPR-accommodated LANI (PZ-PC19) card as
an interface for the connection to a MAT. This figure shows an example where a MAT is connected via the
LANI card in PCI slot 01 of each LN/ISW.
This figure is an example where a MAT is connected to LN1 via the 10 BASE-T cables
(Ethernet). As seen from this, the MAT, a single terminal connected to the Ether, can control
the whole system status, thus capable of a single-point entry to each LN and ISW.
Note 1: When connecting the MAT by this way, be sure to use dedicated HUB (PA-M96) card(s).
Note 2: Because ISW has no universal slot for external HUB cards, connect the 10 BASE-T ca-
bles (from the ISW) to a MAT-dedicated HUB in any of the LNs (LN0 - LN3). In this ex-
ample, the cables are ISW) to a MAT-dedicated HUB in any of the LNs (LN0 - LN3). In
this example, the cables are connected to HUB in LN1.
NDA-24307 CHAPTER 2
Page 11
Issue 1
SYSTEM MAINTENANCE OUTLINE
Figure 2-7 Face Layout of ISW
03 04
IOC (PH-IO24)
EMA (PH-PC40)
13 14
01 02
MMC (PH-M22)
00 01 02 03 04 05 06 07 08 10 11 16 17 18 1915
PWR0 (PH-PW14)
HSW00 (PU-SW01)
TSW00 (PU-SW00)
IOGT0 (PH-GT10)
PWR1 (PH-PW14)
HSW01 (PU-SW01)
TSW01 (PU-SW00)
TSW02 (PU-SW00)
TSW03 (PU-SW00)
PLO0
PLO1
00
IOGT1 (PH-GT10)
TSW10 (PU-SW00)
TSW11 (PU-SW00)
TSW12 (PU-SW00)
TSW13 (PU-SW00)
HSW10 (PU-SW01)
HSW11 (PU-SW01)
(PH-CK16-A/17-A)
(PH-CK16-A/17-A)
(RES)
(RES)
ISW
09 12
BASEU
LPM
ISWM
TOPU
Note
LANI(PZ-PC19)
ISAGT(PZ-GT13)
LANI(PZ-PC19)
LANI(PZ-PC19)
LANI(PZ-PC19)
LANI(PZ-PC19) LANI(PZ-PC19)
ISAGT(PZ-GT13)
FDD/HDDPWR DSP
Note: The 2nd IOC card (optional) may be mounted in this slot.
CHAPTER 2 NDA-24307
Page 12
Issue 1
SYSTEM MAINTENANCE OUTLINE
Figure 2-8 Face Layout of IMG0 (Local Node)
Note: The 2nd IOC card (optional) may be mounted in this slot.
00 01 02 03 04 05 06 07 08 09 10 11 12 13 14 15 16 17 18 19 20 21 22 23
00 01 02 03 04 05 06 07 08 09 10 11 12 13 14 15 16 17 18 19 20 21 22 23
00
00
01
01
02
02
03
03
04
04
05 06 07 08 09 10 11 12 13 14 15 16 17 18 19 20 21 22 23
00 01 02 03 04 05 06 07 08 09 10 11 12 13 14 15 16 17 18 19 20 21 22 23
LPM
PIM 0
PIM 1
FANU
PIM 2
PIM 3
TOPU
BASEU
PH-PC40 (EMA)
PH-IO24 (IOC)
PWR1
PWR0
PWR1
PWR0
PWR1
PWR0
PWR0
PWR1
PH-PC36 (MUX) PH-PC36 (MUX)
PH-PC36 (MUX)
PH-PC36 (MUX)
PH-PC36 (MUX)
PH-PC36 (MUX)
PH-PC36 (MUX) PH-PC36 (MUX)
Note
IMG0 (Local Node)
PH-I-M22 (MMC)
NDA-24307 CHAPTER 2
Page 13
Issue 1
SYSTEM MAINTENANCE OUTLINE
Figure 2-9 Face Layout of IMG1 (Local Node)
Note: No circuit card is mounted in Slot 02 of TSWM0.
00
00
01
01
02
02
03
03
04
04
05 06 07 08 09 10 11 12 13 14 15 16 17 18 19 20 21
21
22
05 06 07 08 09 10 11 12 13 14 15 16 17 18 19 20
23
22 23
00 01 02 03 04 05 06 07 08 09 10 11 12 13 14 15 16 17 18 19 20 21 22 23
TSWM0
PIM 0
PIM 1
FANU
PIM 2
PIM 3
TOPU
MISC
MISC
MISC
MISC
DLKC0
DLKC1
GT0
GT1
TSW00
TSW01
TSW02
TSW03
TSW10
TSW11
TSW12
TSW13
PLO0
PLO1
MISC
PWRSW1
PWRSW0
PWR0
PWR1
PWR0
PWR1
PA-PW55-A (PWR0)
PA-PW54-A (PWR1)
PA-PW55-A (PWR0)
PA-PW54-A (PWR1)
PH-PC36 (MUX) PH-PC36 (MUX)
PH-PC36 (MUX)
PH-PC36 (MUX)
PH-PC36 (MUX)
PH-PC36 (MUX)
PH-PC36 (MUX) PH-PC36 (MUX)
IMG1 (Local Node)
00 01 02 03 04 05 06 07 08 09 10 11 12 13 14 15 16 17 18 19 20 21 22 23
00 01 02 03 04 05 06 07 08 09 10 11 12 13 14 15 16 17 18 19 20 21 22 23
PH-PC36 (MUX)
PWR1
PWR0 PWR0
PWR1
PH-PC36 (MUX)
BASEU
CHAPTER 2 NDA-24307
Page 14
Issue 1
SYSTEM MAINTENANCE OUTLINE
Figure 2-10 Face Layout of IMG2 (Local Node)
Note: No circuit card is mounted in Slot 02 of TSWM1.
00
00
01
01
02
02
03
03
04
04
05 06 07 08 09 10 11 12 13 14 15 16 17 18 19 20 21
21
22
05 06 07 08 09 10 11 12 13 14 15 16 17 18 19 20
23
22 23
00 01 02 03 04 05 06 07 08 09 10 11 12 13 14 15 16 17 18 19 20 21 22 23
TSWM1
PIM 0
PIM 1
FANU
PIM 2
PIM 3
TOPU
MISC
MISC
MISC
MISC
GT0
GT1
TSW00
TSW01
TSW02
TSW03
TSW10
TSW11
TSW12
TSW13
PLO0
PLO1
MISC
PWRSW1
PWRSW0
PWR0
PWR1
PWR0
PWR1
PA-PW55-A (PWR0)
PA-PW54-A (PWR1)
PA-PW55-A (PWR0)
PA-PW54-A (PWR1)
PH-PC36 (MUX) PH-PC36 (MUX)
PH-PC36 (MUX)
PH-PC36 (MUX)
PH-PC36 (MUX)
PH-PC36 (MUX)
PH-PC36 (MUX) PH-PC36 (MUX)
IMG2 (Local Node)
00 01 02 03 04 05 06 07 08 09 10 11 12 13 14 15 16 17 18 19 20 21 22 23
00 01 02 03 04 05 06 07 08 09 10 11 12 13 14 15 16 17 18 19 20 21 22 23
PH-PC36 (MUX)
PWR1
PWR0 PWR0
PWR1
PH-PC36 (MUX)
BASEU
NDA-24307 CHAPTER 2
Page 15
Issue 1
SYSTEM MAINTENANCE OUTLINE
Figure 2-11 Face Layout of IMG3 (Local Node)
00 01 02 03 04 05 06 07 08 09 10 11 12 13 14 15 16 17 18 19 20 21 22 23
00 01 02 03 04 05 06 07 08 09 10 11 12 13 14 15 16 17 18 19 20 21 22 23
00 01 02 03 04 05 06 07 08 09 10 11 12 13 14 15 16 17 18 19 20 21 22 23
00 01 02 03 04 05 06 07 08 09 10 11 12 13 14 15 16 17 18 19 20 21
21
22
22
23
DUMMY
PIM 0
PIM 1
FANU
PIM 2
PIM 3
TOPU
BASEU
PWR1
PWR0
PWR1
PWR0
PWR1
PWR0
PWR1
PWR0
PH-PC36 (MUX) PH-PC36 (MUX)
PH-PC36 (MUX)
PH-PC36 (MUX)
PH-PC36 (MUX)
PH-PC36 (MUX)
PH-PC36 (MUX) PH-PC36 (MUX)
IMG3 (Local Node)
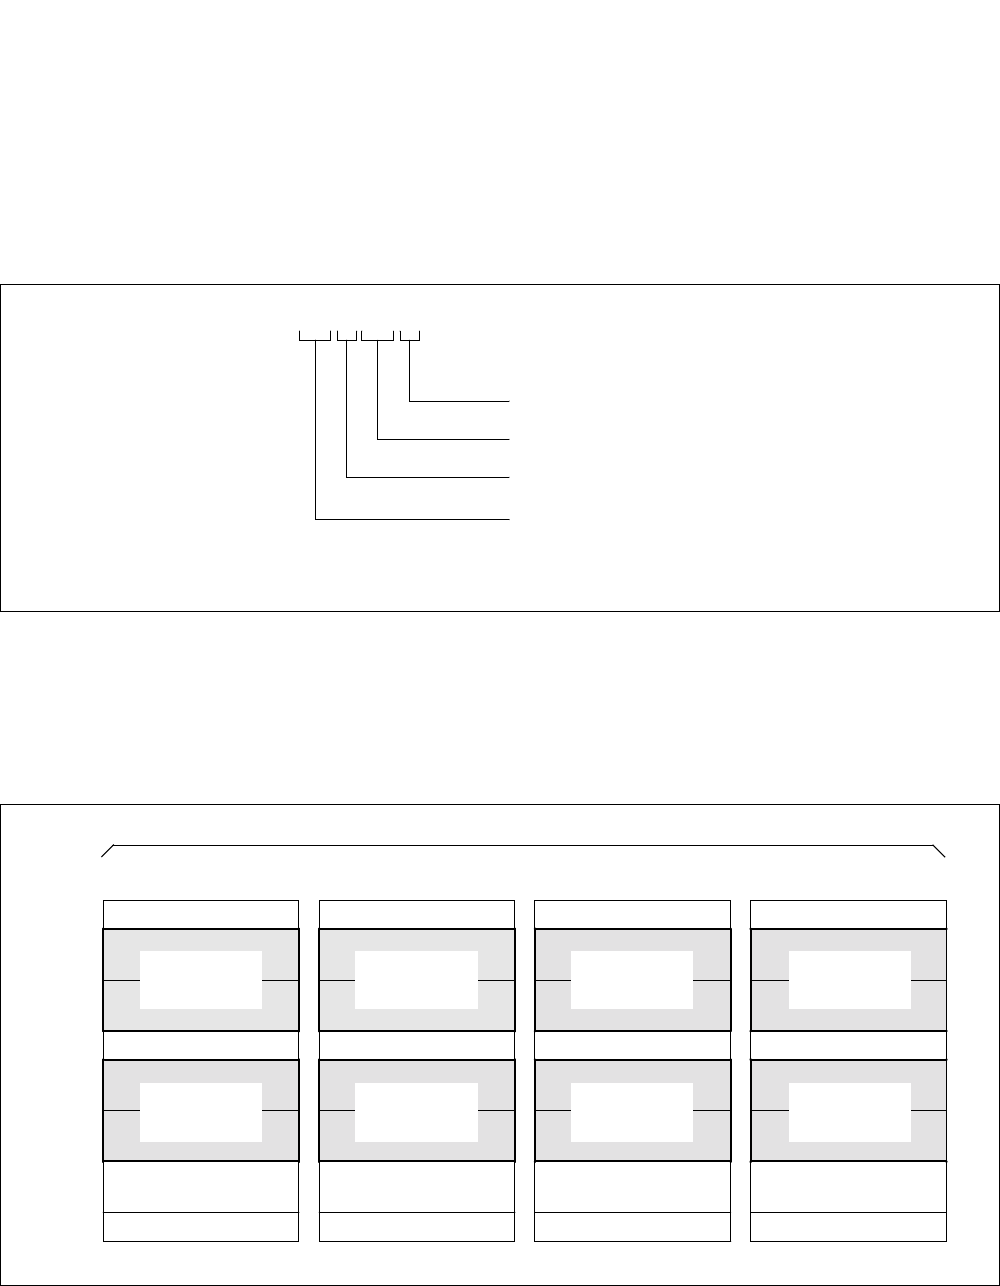
CHAPTER 2 NDA-24307
Page 16
Issue 1
SYSTEM MAINTENANCE OUTLINE
2.2 Line Equipment Numbers (LENS)
The Line Equipment Numbers (LENS) are used to specify the location of a circuit (trunk/port) in any of
the PIM universal slots. Refer to the figures in this section, and confirm the LENS format used in the
system.
As shown in Figure 2-12, the LENs consists of six digits: two digits for MG, one digit for U, two digits
for G, and one digit for Lv.
Figure 2-12 LENS Format
2.2.1 Module Group
Figure 2-13 explains the Module Group (MG). In a fully expanded system, the MG number ranges
from 00 to 07 in each local node.
Figure 2-13 Module Group Allocations (LN0/1/2/3)
LENS = XX X XX X
Lv (Level) : 0 - 7
G (Group) : 00 - 23
U (Unit) : 0 - 3
MG (Module Group) : 00 - 07
Note
Note: In addition to Group No. 00-23, 24-31 can be used as the extended group numbers.
PIM3
PIM2
PIM1
PIM0
FRONT VIEW
TOPU
IMG0
FANU
BASEU
LPM
TOPU
IMG2
FANU
BASEU
TSWM1
TOPU
IMG3
FANU
BASEU
DUMMY
TOPU
IMG1
FANU
BASEU
TSWM0
MG01
MG00
MG05
MG04
MG07
MG06
MG03
MG02
LN0/1/2/3
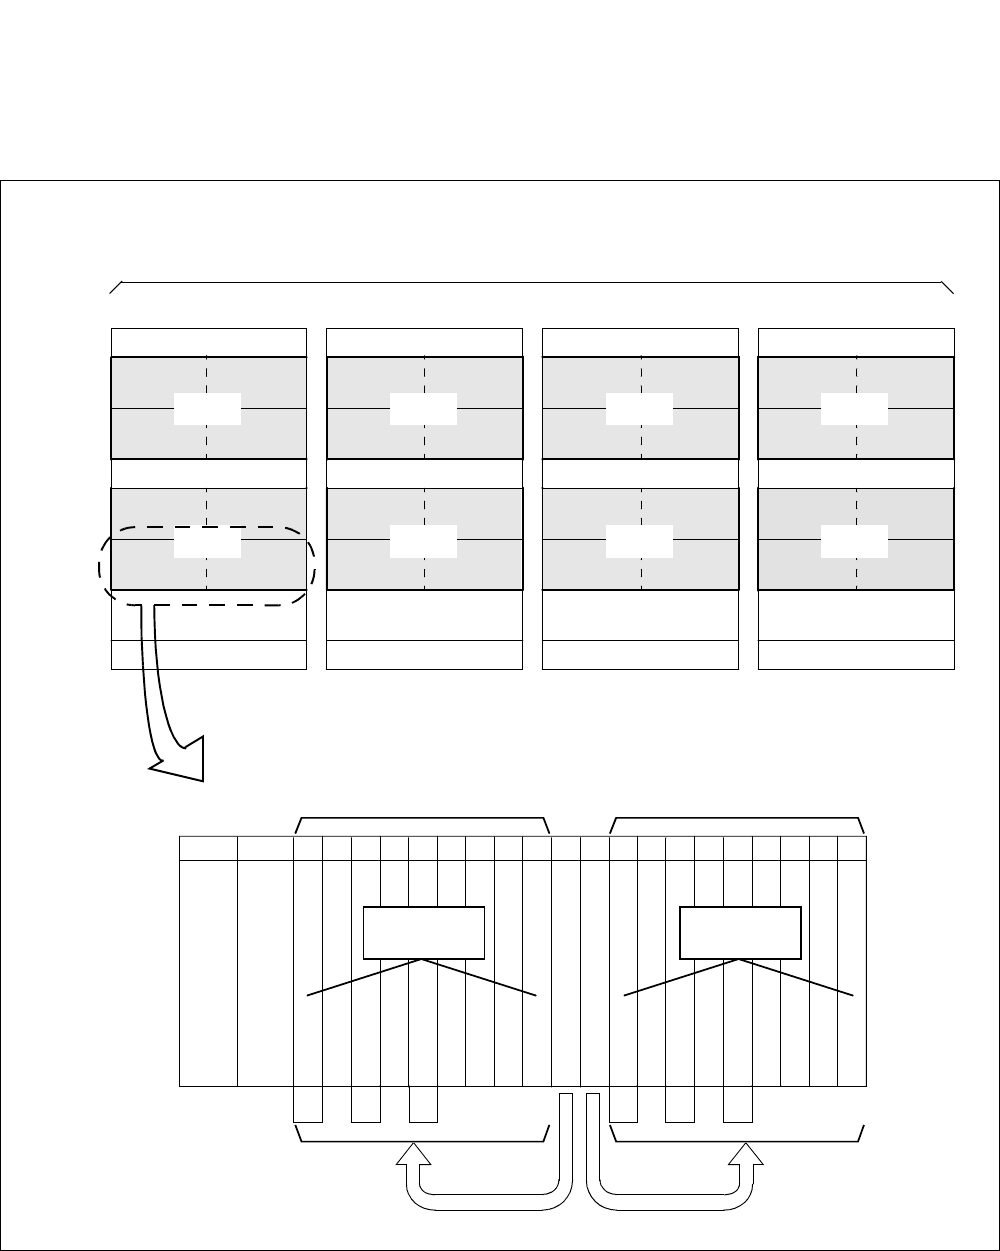
NDA-24307 CHAPTER 2
Page 17
Issue 1
SYSTEM MAINTENANCE OUTLINE
2.2.2 Unit
Details on Unit (U) numbers are shown in Figure 2-14. The numbers range from 0 to 3, and each unit
represents the PIM universal slots, No. 04-12 (U 0/2) or No. 15-23 (U 1/3).
Figure 2-14 Unit Number Allocations (LN0/1/2/3)
FRONT VIEW
TOPU
IMG0
FANU
BASEU
LPM
U2 U3
U0 U1
U2 U3
U0 U1
MG01
MG00
TOPU
IMG2
FANU
BASEU
TSWM1
U2 U3
U0 U1
U2 U3
U0 U1
MG05
MG04
TOPU
IMG3
FANU
BASEU
DUMMY
U2 U3
U0 U1
U2 U3
U0 U1
MG07
MG06
TOPU
IMG1
FANU
BASEU
TSWM0
U2 U3
U0 U1
U2 U3
U0 U1
MG03
MG02
PIM3
PIM2
PIM1
PIM0
00 02 04 05 06 07 08 09 10 11 12 13 14 15 16 17 18 19 20 21 22 23
16 16 16 16 16 16 32 32 32 16 16 16 16 16 16 32 32 32
MUX (PH-PC36) 0
MUX (PH-PC36) 1
PWR
PWR
Unit Number (U = 0/2) Unit Number (U = 1/3)
Control Control
On each Module Group (MG: #00 - 07), a total of four Units (U0 - U3) can be assigned.
16 16 16 16 16 16
Number
of
Time Slots
Slots No.
PIM
(16)(16)
192 TS192 TS
LN0/1/2/3
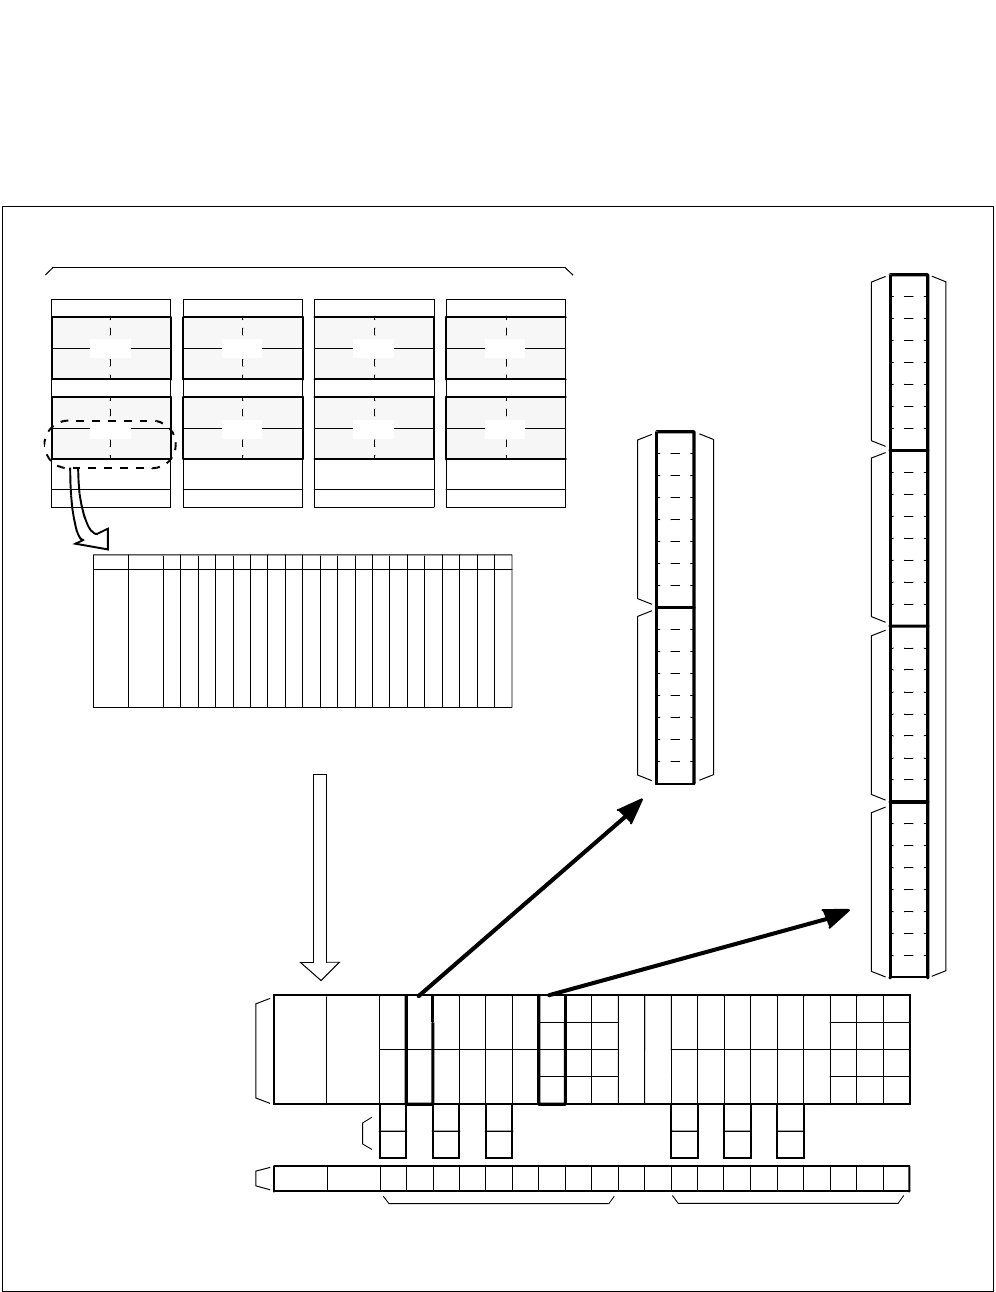
CHAPTER 2 NDA-24307
Page 18
Issue 1
SYSTEM MAINTENANCE OUTLINE
2.2.3 Group
The Group (G) numbers are allocated as shown in Figure 2-15. A total of two Groups are assigned on
each universal slots within the PIM. Slot numbers 10, 11, 12, 21, 22, 23 can contain a total of four
Groups as an exception.
Figure 2-15 Group Number Allocations (LN0/1/2/3)
A total of two or four Groups (G) can be assigned on each PIM universal slot.
G = 15
G = 14
G = 13
G = 12
G = 03
G = 02
16 ports total
32 ports total
Slot No. 05
Slot No. 10
U = 0 / 2 U = 1 / 3
Slot No.
Extended
Group No.
Note
23
22
21
20
01
00
03
02
05
04
07
06
09
08
27 29 31
26 28 30
11
10
15
14
13
12
19
18
17
16
01
00(25)(24)
03
02
05
04
07
06
09
08
11
10
15
14
13
12
19
18
17
16
23
22
21
20
27 29 31
26 28 30
Group No. PIM
04 05 06 07 08 09 10 11 12 13 14 15 16 17 18 19 20 21 22 23 00 02
TOPU
IMG0
FANU
BASEU
LPM
U2
U3
U0
U1
U2
U3
U0
U1
MG01
MG00
TOPU
IMG2
FANU
BASEU
TSWM1
U2
U3
U0
U1
U2
U3
U0
U1
MG05
MG04
TOPU
IMG3
FANU
BASEU
DUMMY
U2
U3
U0
U1
U2
U3
U0
U1
MG07
MG06
TOPU
IMG1
FANU
BASEU
TSWM0
U2
U3
U0
U1
U2
U3
U0
U1
MG03
MG02
PIM3
PIM2
PIM1
PIM0
00 02 04 05 06 07 08 09 10 11 12 13 14 15 16 17 18 19 20 21 22 23
MUX (PH-PC36) 1
MUX (PH-PC36) 0
PWR
PWR
PIM
FRONT VIEW
Note: In addition to Group No. 00 - 23, the system can use No. 24 - 31 as theoretically valid numbers.
Refer to the Fusion Network System Manual for information on Extended Group No. 26 - 31.
LN0/1/2/3
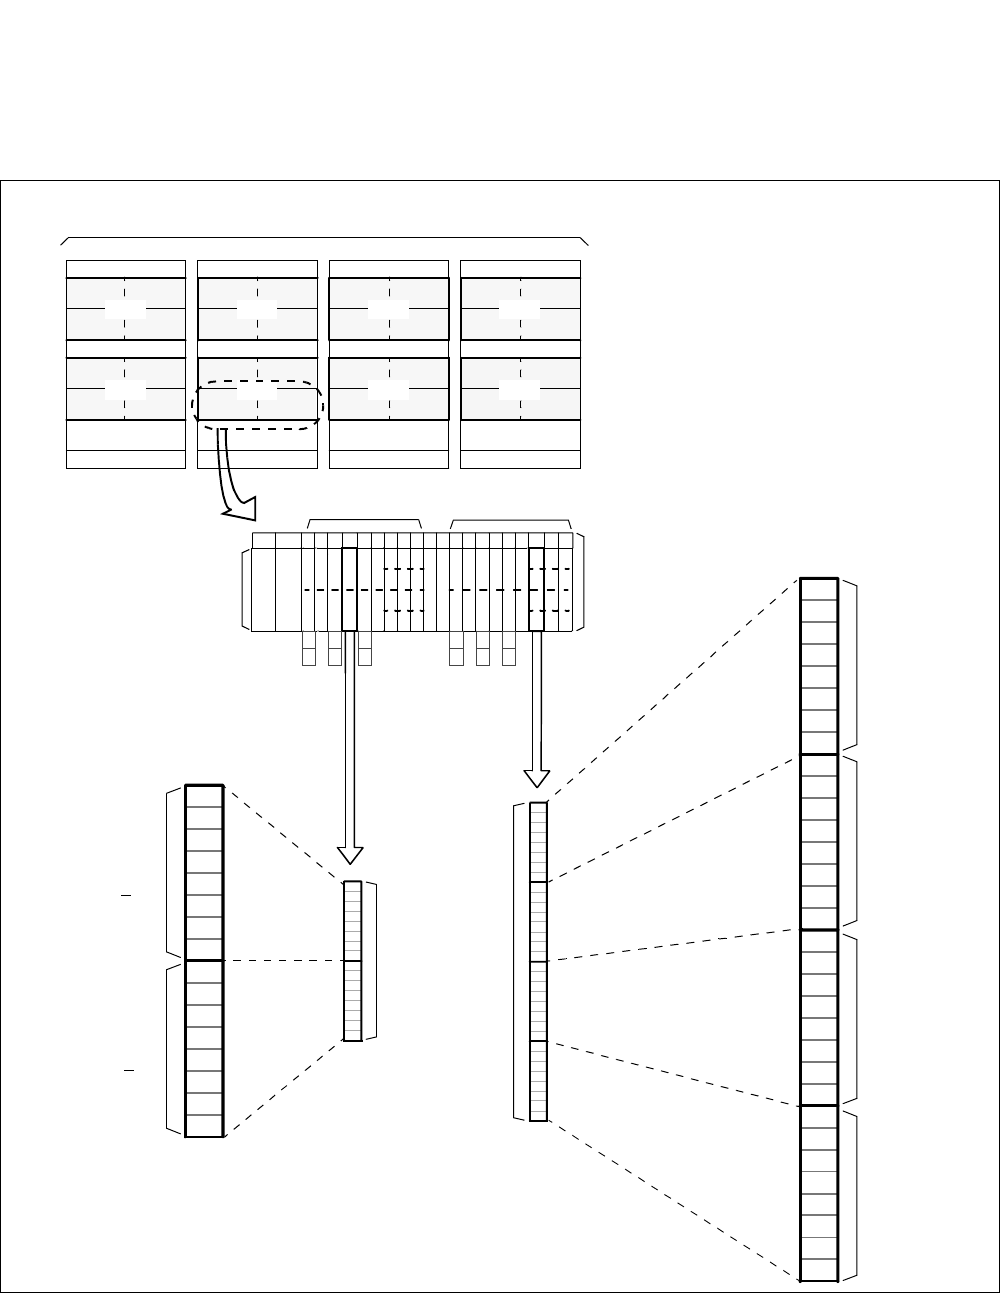
NDA-24307 CHAPTER 2
Page 19
Issue 1
SYSTEM MAINTENANCE OUTLINE
2.2.4 Level
Figure 2-16 explains the Level (Lv) numbers. There are a total of eight Levels (Lv0 - Lv7) on every
Group number, which ranges from 00 to 31.
Figure 2-16 Level Number Allocations (LN0/1/2/3)
A total of eight Levels (Lv0 - Lv7) can be assigned on each Group.
Group
Level (Lv)
TOPU
IMG0
FANU
BASEU
LPM
U2
U3
U0
U1
U2
U3
U0
U1
MG01
MG00
TOPU
IMG2
FANU
BASEU
DUMMY
U2
U3
U0
U1
U2
U3
U0
U1
MG05
MG04
TOPU
IMG3
FANU
BASEU
DUMMY
U2
U3
U0
U1
U2
U3
U0
U1
MG07
MG06
TOPU
IMG1
FANU
BASEU
TSWM0
U2
U3
U0
U1
U2
U3
U0
U1
MG03
MG02
PIM3
PIM2
PIM1
PIM0
Group
Level (Lv)
00 02 04 05 06 07 08 09 10 11 12 13 14
U = 0 / 2 U = 1 / 3
Group No.
01
00
03
02
05
04
07
06
09
08
11
10
15
14
13
12
19
18
17
16
23
22
21
20
01
00
03
02
05
04
07
06
09
08
11
10
15
14
13
12
19
18
17
16
23
22
21
20
PIM
(24) (25)
27
26
29
28
31
30
27
26
29
28
31
30
16-port Slot
32-port Slot
7
6
5
4
3
2
1
0
7
6
5
4
3
2
1
0
(G = Even No., < 10)
Group
(G = Odd No., < 11)
7
6
5
4
3
2
1
0
7
6
5
4
3
2
1
0
7
6
5
4
3
2
1
0
7
6
5
4
3
2
1
0
(G = 15/19/23)
Group
(G = 14/18/22)
Group
(G = 13/17/21)
Group
(G = 12/16/20)
FRONT VIEW
15 16 17 18 19 20 21 22 23
LN0/1/2/3

CHAPTER 2 NDA-24307
Page 20
Issue 1
SYSTEM MAINTENANCE OUTLINE
2.3 Local Partition (LP) Number
The Local Partition (LP) number refers to a logical local processor number, theoretically assigned for each
IMG that consists of four (or less) Port Interface Modules (PIM). Though the local processor does not
actually exist in any of the IMGs, except for IMG0, the system can apply the two-digit LP number to each
IMG (see Figure 2-17) on its data memory program. The LP numbers are used primarily in the following
cases:
•Display of system messages
•Assignment of line load control data (ALLC command)
•Backup for Call Forwarding/Speed Calling data (MEM_HDD command), etc.
Figure 2-17 LP Number Allocations (LN0/1/2/3)
FRONT VIEW
PIM3
PIM2
PIM1
PIM0
PIM3
PIM2
PIM1
PIM0
PIM3
PIM2
PIM1
PIM0
PIM3
PIM2
PIM1
PIM0
TOPU
IMG0
FANU
BASEU
LPM
TOPU
IMG2
FANU
BASEU
TSWM1
TOPU
IMG3
FANU
BASEU
DUMMY
TOPU
IMG1
FANU
BASEU
TSWM0
LP No. = 00 LP No. = 02 LP No. = 04 LP No. = 06
The Local Partition No. (two digits, even number) is assigned on each IMG.
LN0/1/2/3

NDA-24307 CHAPTER 2
Page 21
Issue 1
SYSTEM MAINTENANCE OUTLINE
2.4 Assignment of Network Control Node (NCN)
The IPX-U system can be in service by dialing a Telephone Number assigned for each station at a Network
Control Node (NCN). Because these network-level data (NDM data) can be assigned via the MAT
dedicated to the NCN only, designate any of the following nodes as this network data manager (NCN):
•One of the Local Nodes (LN), excepting for the ISW, within the IPX-U system
•One of the belonging Fusion nodes outside the IPX-U system
For more details, refer to Figure 2-18.
Note 1: Within the IPX-U system, the NCN can be designated only from the Local Nodes (LN0-LN3). The ISW
cannot be assigned as the NCN.
Note 2: On a Fusion network, assign only one NCN. Multiple nodes cannot be assigned as the NCN.
Because the Fusion link can be established either independently within the system (IPX-U) or jointly with
other outside IPX series, the assignment of NCN can differ, depending on the network configuration.

CHAPTER 2 NDA-24307
Page 22
Issue 1
SYSTEM MAINTENANCE OUTLINE
Pattern 1 When the system has a Fusion link independently of other systems
If the system has a Fusion link only within the system (i.e. no Fusion link is established with other IPX
series), an NCN must be assigned from any of the existing Local Nodes, excepting the ISW. In this
example, LN0 is assigned as the NCN.
Figure 2-18 Example of NCN Assignment (1/3)
Note 1: The network-level data (NDM data) can be assigned only at the NCN. However, other node-level
data (LDM data) must also be assigned at each node (including ISW), depending on the
requirements. For more details, refer to the “Installation Manual (IPX-U Type)” or the “Fusion
Network System Manual.”
Note 2: When the system is operated, the function to be performed by the ISW is only to provide the PCM
time slot switching between the Local Nodes. However, an FPC (Fusion Point Code) must be as-
signed also for the ISW together with other Local nodes, by using the ASYDL command.
......
......
LN0
ISW
LN1
LN3
LN2
......
......
......
......
......
......
......
......
......
......
......
......
......
......
......
......
......
......
......
......
......
......
......
......
......
......
......
......
......
......
......
......
......
......
......
......
......
......
......
......
< IPX-U >
(FPC=15)
(FPC=16)
(FPC=17)
(FPC=19)
(FPC=18)
Note 2
LDM
NDM
DM
Network Data Memory
-System Data
ASYDN, AFMU, ALRTN....
-Number Planning Data
ANPDN, ASPAN....
-Station Numbering
ALGNN, ALGSN....
......
Assignment of NDM Data
via Centralized MAT
NDM
NDM
NDM
NDM
Note 1
Network Control Node
NDM Data Copy
Station B
TELN: 42005
Station D
TELN: 45007
Station C
TELN: 43002
Station A
TELN: 41000
ISW : Inter-node Switch
LN : Local Node
NCN: Network Control Node
DM : Data Memory
LDM: Local Data Memory
NDM: Network Data Memory
FPC : Fusion Point Code
TELN: Telephone Number
MAT : Maintenance Administration Terminal
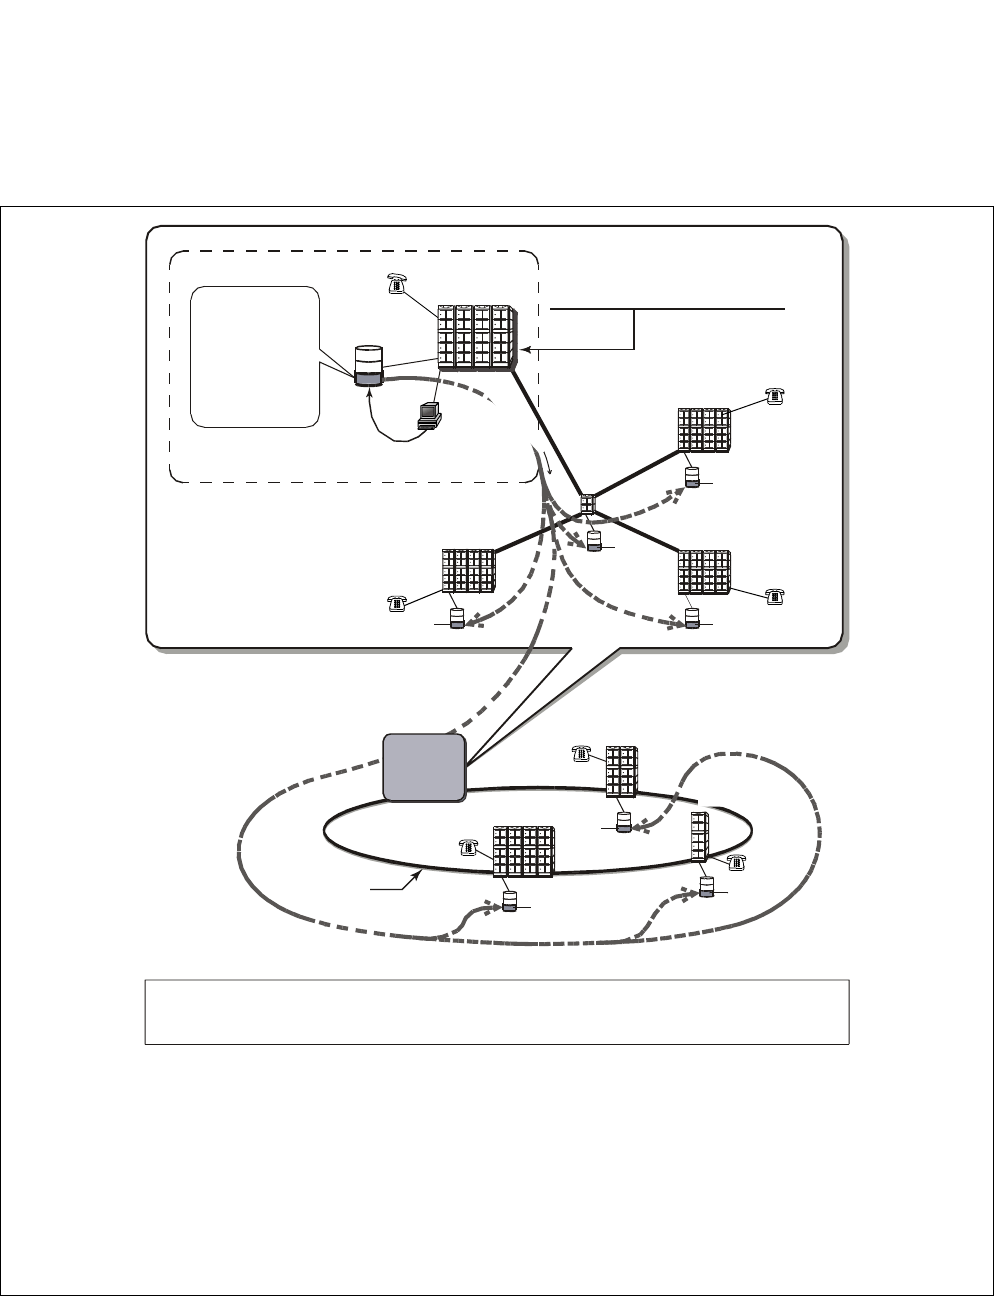
NDA-24307 CHAPTER 2
Page 23
Issue 1
SYSTEM MAINTENANCE OUTLINE
Pattern 2 When the system has a Fusion link with other IPX series and an NCN exists within the system
If the system has a Fusion link also with other IPX series (i.e. the Fusion nodes exist also outside the
system), an NCN can be assigned from either Local Nodes outside the system or the Local Nodes
inside the system. In this example, LN0 of the IPX-U system is designated as the NCN.
Figure 2-18 Example of NCN Assignment (2/3)
Note 1: The network-level data (NDM data) can be assigned only at the NCN. However, other node-
level data (LDM data) must also be assigned at each node (including ISW), depending on the
requirements. For more details, refer to the “Installation Manual (IPX-U Type)” or the
“Fusion Network System Manual.”
Note 2: When the system is operated, the function to be performed by the ISW is only to provide PCM
time slot switching between the Local Nodes. However, an FPC (Fusion Point Code) must be
assigned also for the ISW together with other Local nodes, by using the ASYDL command.
NDM
ISW : Inter-node Switch
LN : Local Node
NCN: Network Control Node
DM : Data Memory
LDM: Local Data Memory
NDM: Network Data Memory
FPC : Fusion Point Code
TELN: Telephone Number
MAT : Maintenance Administration Terminal
......
......
LN0
ISW
LN1
LN3
LN2
................................................
......
......
......
......
......
......
......
...... ......
......
......
......
......
......
......
......
......
......
......
......
......
......
......
......
(FPC=15)
(FPC=16)
(FPC=17)
(FPC=19)
(FPC=18)
LN-C
(FPC=3)
LN-A
(FPC=1)
Note 2
LDM
NDM
DM
Assignment of NDM Data
via Centralized MAT
NDM
NDM
NDM
NDM
NDM
Note 1
Network Control Node
NDM Data Copy
Station B
TELN: 42005
Station D
TELN: 45007
Station E
TELN: 47001
Station G
TELN: 49012
Station C
TELN: 43002
Station A
TELN: 41000
......
......
......
......
......
......
......
......
................................................
........................
............
IPX-U
System
Station F
TELN: 48003
NDM
LN-B
(FPC=2)
Fusion Link
Network Data Memory
-System Data
ASYDN, AFMU, ALRTN....
-Number Planning Data
ANPDN, ASPAN....
-Station Numbering
ALGNN, ALGSN....
......
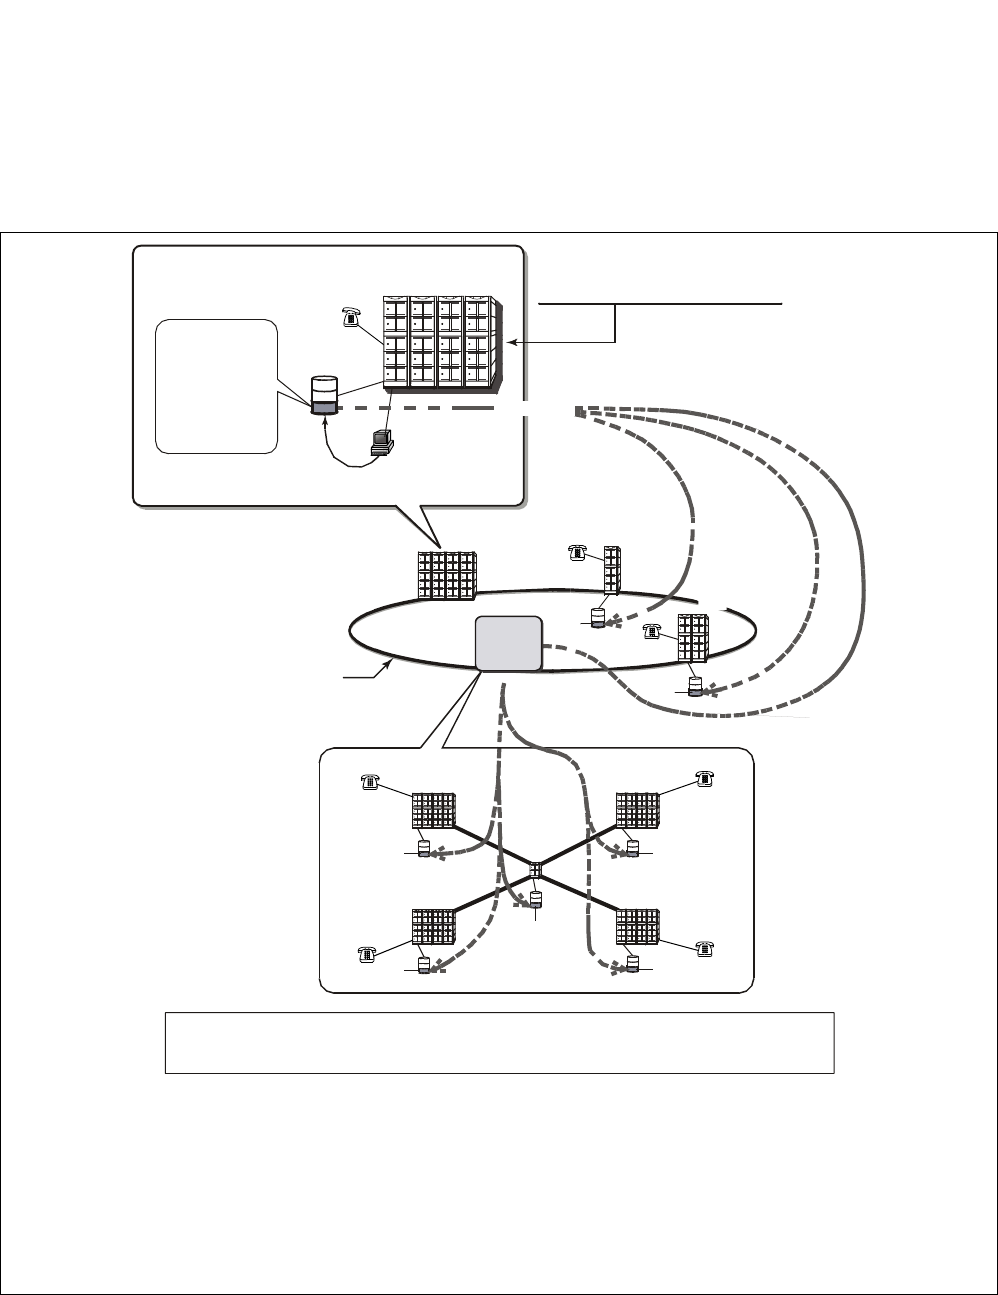
CHAPTER 2 NDA-24307
Page 24
Issue 1
SYSTEM MAINTENANCE OUTLINE
Pattern 3 When the system has a Fusion link with other IPX series and an NCN exists outside the system
If the system has a Fusion link also with other IPX series (i.e. the Fusion nodes exist also outside the
system), an NCN can be assigned from either Local Nodes outside the system or the Local Nodes
inside the system. In this example, LN-A (NEAX2400IPX series, 4-IMG type) outside the system is
designated as the NCN.
Figure 2-18 Example of NCN Assignment (3/3)
Note 1: The network-level data (NDM data) can be assigned only at the NCN. However, other node-level
data (LDM data) must also be assigned at each node (including ISW), depending on the
requirements. For more details, refer to the “Installation Manual (IPX-U Type)” or the “Fusion
Network System Manual.”
Note 2: When the system is operated, the function to be performed by the ISW is only to provide the PCM
time slot switching between the Local Nodes. However, a FPC (Fusion Point Code) must be
assigned also for the ISW together with other Local nodes, by using the ASYDL command.
ISW : Inter-node Switch
LN : Local Node
NCN: Network Control Node
DM : Data Memory
LDM: Local Data Memory
NDM: Network Data Memory
FPC : Fusion Point Code
TELN: Telephone Number
MAT : Maintenance Administration Terminal
Station G
TELN: 49012
NDM
......
......
......
......
...................................... ... ..... ..
NDM
............
S ta tion F
TELN: 48003
LN-B
(FPC=2)
LN-C
(FPC=3)
Fusion Link
......
......
......
......
......
......
......
......
......
......
.... ..
.... ..
......
......
......
......
LN-A
(FPC=1)
LDM
NDM
DM
Assignment of NDM Data
via Centralized MAT
Note 1
Station E
TELN: 47001
Network Control Node
Station B
TELN: 42005
Station A
TELN: 41000
............
ISW
LN1
LN3
LN2
......
......
......
......
......
......
......
......
...................................... ... ..... ..
(FPC=15)
(FPC=17)
(FPC=19)
(FPC=18)
Note 2
NDM
NDM
NDM
NDM
LN0
...................................... ... ..... ..
(FPC=16)
NDM
Station D
TELN: 45007
TELN: 43002
Station C
...................................... ... ..... ..
IPX-U
System
NDM Data Copy
Network Data Memory
-System Data
ASYDN, AFMU, ALRTN....
-Number Planning Data
ANPDN, ASPAN....
-Station Numbering
ALGNN, ALGSN....
......
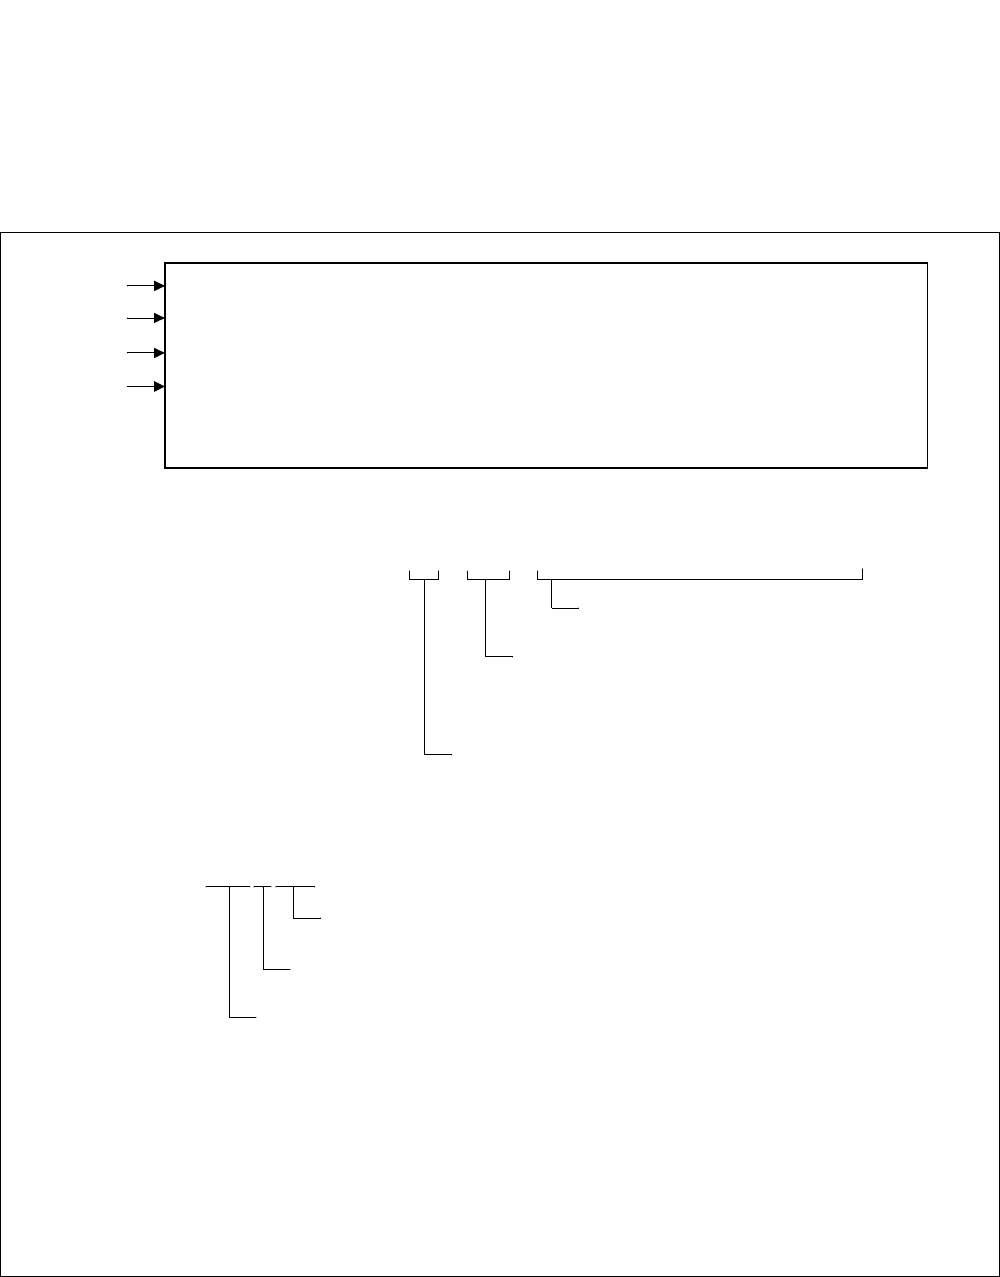
NDA-24307 CHAPTER 2
Page 25
Issue 1
SYSTEM MAINTENANCE OUTLINE
2.5 System Messages
System messages display during routine diagnosis, system operation status controlling, and fault
occurrence. Figure 2-19 shows an example of a system message.
Refer to Chapter 3 for details on each message.
Figure 2-19 System Message Example
(1) SYSTEM MESSAGE 3-E SUP LOCK UP FAILURE (TEMPORARY)
(2) NEC TOKYO
(3) LP00-0-ACT
(4)
4:0000 0000 0000 0000 5:0000 0000 0000 0000 6:0000 0000 0000 0000
1:1102 0000 0000 0000 2:0000 0000 0000 0000 3:0000 0000 0000 0000
7:0000 0000 0000 0000 8:0000 0000 0000 0000 9:0000 0000 0000 0000
Meaning:
(1) : SYSTEM MESSAGE 3-E SUP LOCK-UP FAILURE (TEMPORARY)
Meaning of the message
System Message Level
(Indicated by Alarm Lamp) Note 2
System Message Number
(2) : Office Name, Date and Time
(3) : LP00-0-ACT
ACT/STBY indication for dual systems
Faulty processor/Related processor
No.0/No.1 system indication for dual systems
(4) : Message detail data (notation by hexadecimal numbers)
Note 1: The data here indicates the Office Name, uniquely assigned to each node and ISW. This
can be set by using the ASYD (SYS1, Index 96-115) or AOFC command.
Note 2: There are four kinds of alarm information to be indicated by alarm lamps: MN, MJ, SUP,
and NON indications.
JUL 24 09:35
Note 1

CHAPTER 2 NDA-24307
Page 26
Issue 1
SYSTEM MAINTENANCE OUTLINE
2.6 Fault Detecting Function
The system finds a fault by its fault detecting circuit and the fault detecting program. Once a fault occurs,
the system initiates a remedial action such as system changeover, make-busy setting, or restart processing
by the automatic diagnosis function. This action reduces the influence of the fault so that system servicing
may be minimized. The result of the process taken and the fault situation are indicated for equipment con-
cerned.
Among the faults, those related to speech path (noise, one-way speech, speech inability, etc.) are not
detectable. Since these fault reports are to be obtained from a station or operator, periodic trunk tests must
be performed without failure to detect the faults related to speech path.
Figure 2-20 and Figure 2-21 shows an outline of fault detection, and Figure 2-23 shows a block diagram
of fault detection.
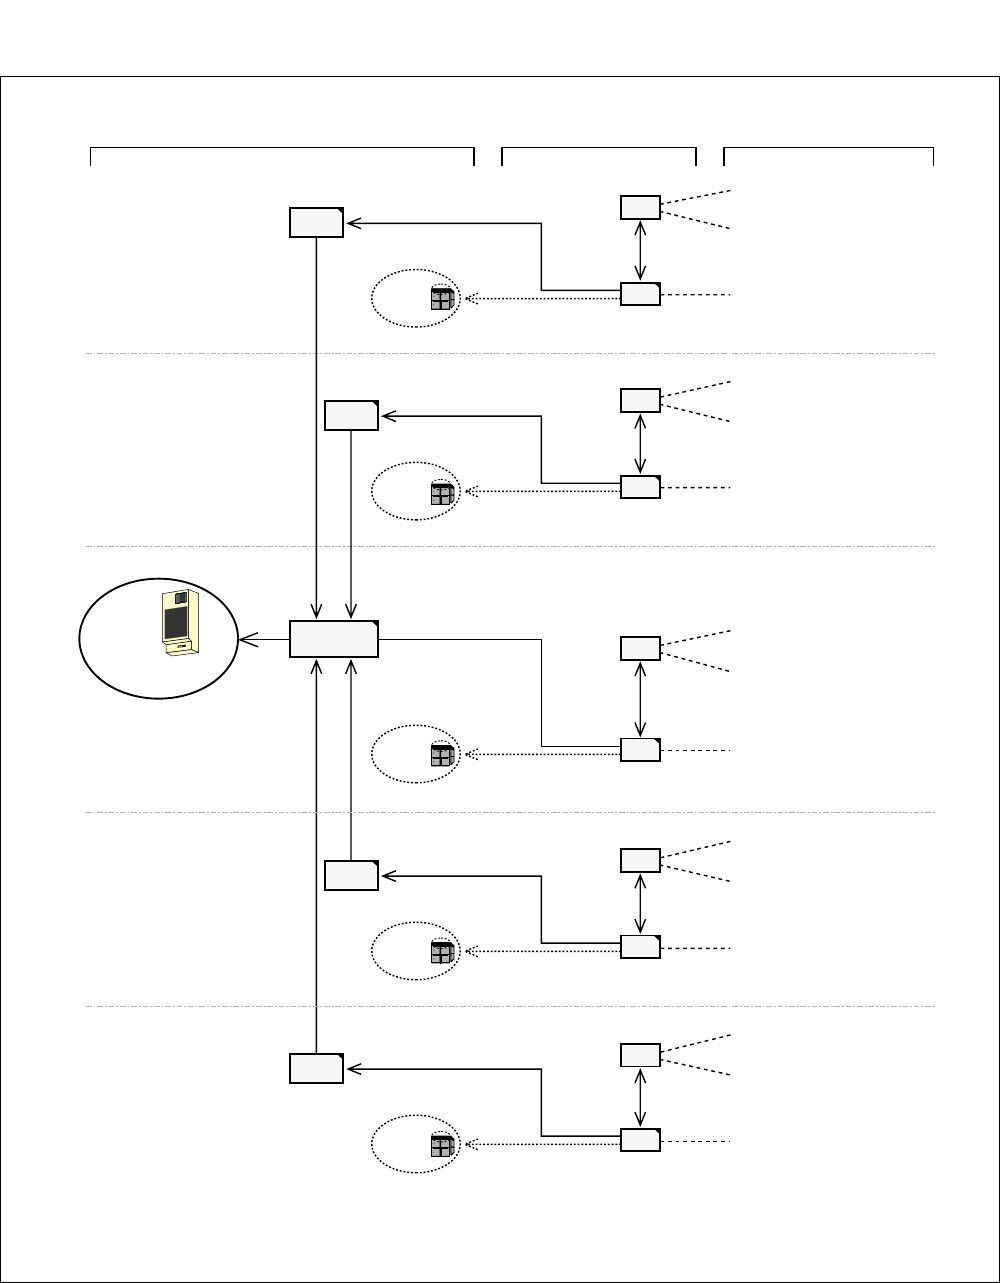
NDA-24307 CHAPTER 2
Page 27
Issue 1
SYSTEM MAINTENANCE OUTLINE
Figure 2-20 Fault Detection General Diagram (via Alarm Lamps on TOPU)
Indication of Fault Occurrence Information Collection
and Diagnosis Example of Faults
CPU
Fault of line/trunk card
TSW write failure,
Fault of clocks, etc.
Abnormal temperature,
power supply failure,
fuse blowing, etc., within
the equipment frame
CPU
Fault of line/trunk card
TSW write failure,
Fault of clocks, etc.
Abnormal temperature,
power supply failure,
fuse blowing, etc., within
the equipment frame
CPU
Fault of line/trunk card
TSW write failure,
Fault of clocks, etc.
Abnormal temperature,
power supply failure,
fuse blowing, etc., within
the equipment frame
CPU
Fault of line/trunk card
TSW write failure,
Fault of clocks, etc.
Abnormal temperature,
power supply failure,
fuse blowing, etc., within
the equipment frame
CPU
Fault of line/trunk card
TSW write failure,
Fault of clocks, etc.
Abnormal temperature,
power supply failure,
fuse blowing, etc., within
the equipment frame
MMC
Indication of
Alarm Lamps
on TOPU
MMC
Indication of
Alarm Lamps
on TOPU
MMC
Indication of
Alarm Lamps
on TOPU
MMC
Indication of
Alarm Lamps
on TOPU
Indication
of Audible
and Visual Alarm
Indicating Panel
LN0
LN1
ISW
LN2
LN3
MMC
EMA
EMA
EMA
EMA
Note: Alarm Indicating Panel indicates the fault information on both ISW and other Local Nodes (fault notification on a system
basis). Meanwhile, alarm lamps on the TOPU for ISW and Local Nodes (indicated in dotted lines above) provide the fault
indication only related to the belonging node. For more details, refer to CHAPTER 6.
Indication of
Alarm Lamps
on TOPU EMA
MJ
NEC
ON OFF
BELL
......
......
......
......
......
......
......
......
......
......
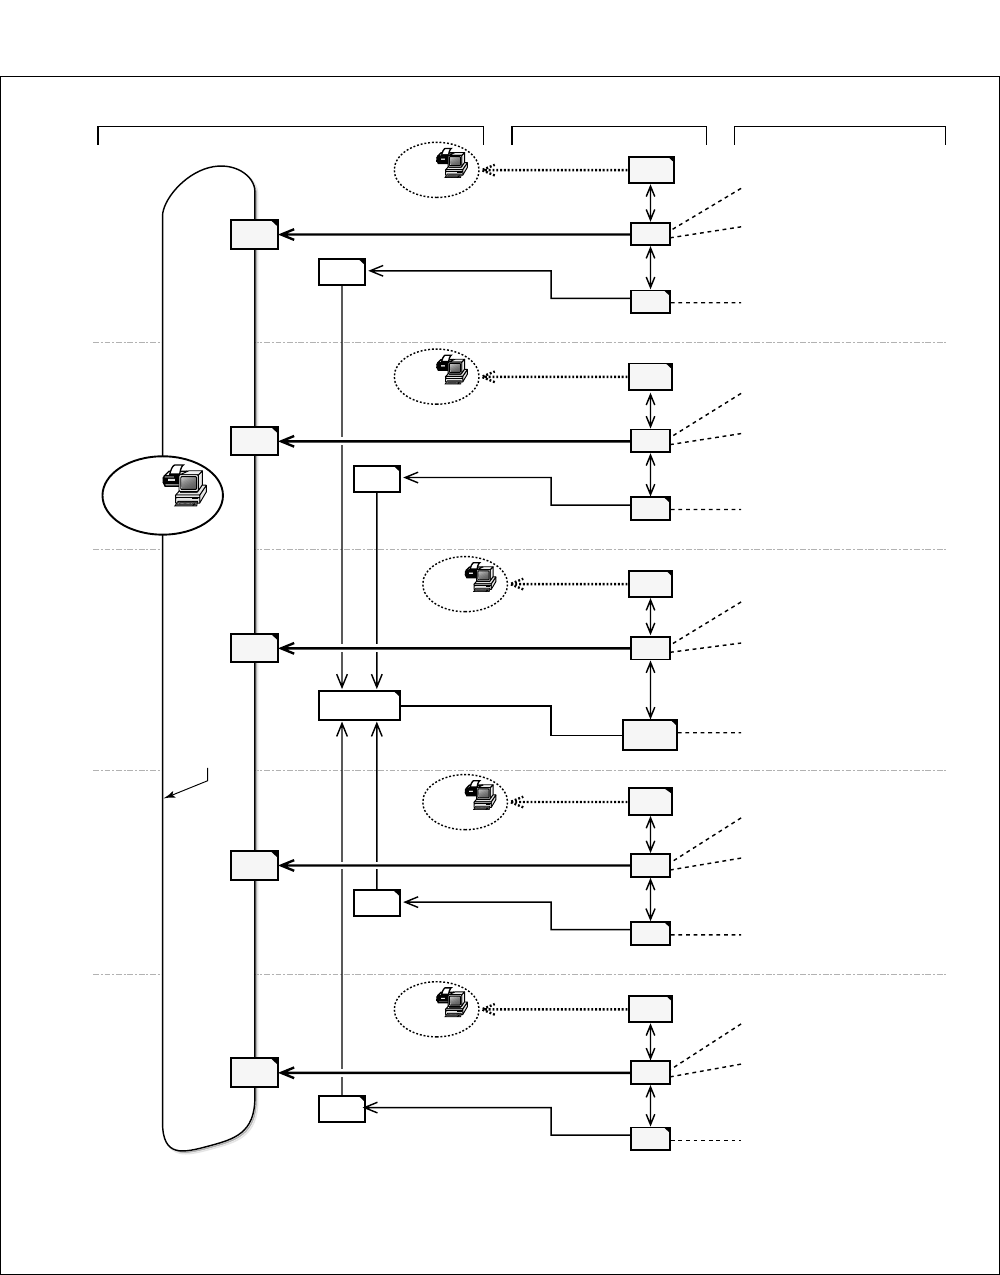
CHAPTER 2 NDA-24307
Page 28
Issue 1
SYSTEM MAINTENANCE OUTLINE
Figure 2-21 Fault Detection Block Diagram (via Display of System Messages)
Indication of Fault Occurrence Information Collection
and Diagnosis Example of Faults
CPU
Fault of line/trunk card
TSW write failure,
Fault of clocks, etc.
Abnormal temperature,
power supply failure,
fuse blowing, etc., within
the equipment frame
CPU
Fault of line/trunk card
TSW write failure,
Fault of clocks, etc.
Abnormal temperature,
power supply failure,
fuse blowing, etc., within
the equipment frame
CPU
Fault of line/trunk card
TSW write failure,
Fault of clocks, etc.
Abnormal temperature,
power supply failure,
fuse blowing, etc., within
the equipment frame
CPU
Fault of line/trunk card
TSW write failure,
Fault of clocks, etc.
Abnormal temperature,
power supply failure,
fuse blowing, etc., within
the equipment frame
CPU
Fault of line/trunk card
TSW write failure,
Fault of clocks, etc.
Abnormal temperature,
power supply failure,
fuse blowing, etc., within
the equipment frame
MMC
MMC
MMC
MMC
LN0
LN1
ISW
LN2
LN3
MMC
EMA
IOC
IOC
IOC
IOC
IOC
EMA
EMA
EMA
EMA
Note: In addition to the connection to a port of IOC (PH-IO24) circuit card, a MAT can be connected also to the
Ethernet via LAN Interfaces (PZ-PC19: PCI Slot 01 of each CPR).
...-:;..+..*
...-:;..+..*
...-:;..+..*
...-:;..+..*
Display of
System Messages
LANI
...-:;..+..*
...-:;..+..*
...-:;..+..*
...-:;..+..*
Display of
System Messages
...-:;..+..*
...-:;..+..*
...-:;..+..*
...-:;..+..*
Display of
System Messages
...-:;..+..*
...-:;..+..*
...-:;..+..*
...-:;..+..*
Display of
System Messages
...-:;..+..*
...-:;..+..*
...-:;..+..*
...-:;..+..*
Display of
System Messages
...-:;..+..*
...-:;..+..*
...-:;..+..*
...-:;..+..*
Display of
System Messages
LANI
LANI
LANI
LANI
Ether
- Symbols -
EMA: PH-PC40 MMC: PH-M22 LANI: PZ-PC19 IOC: PH-IO24
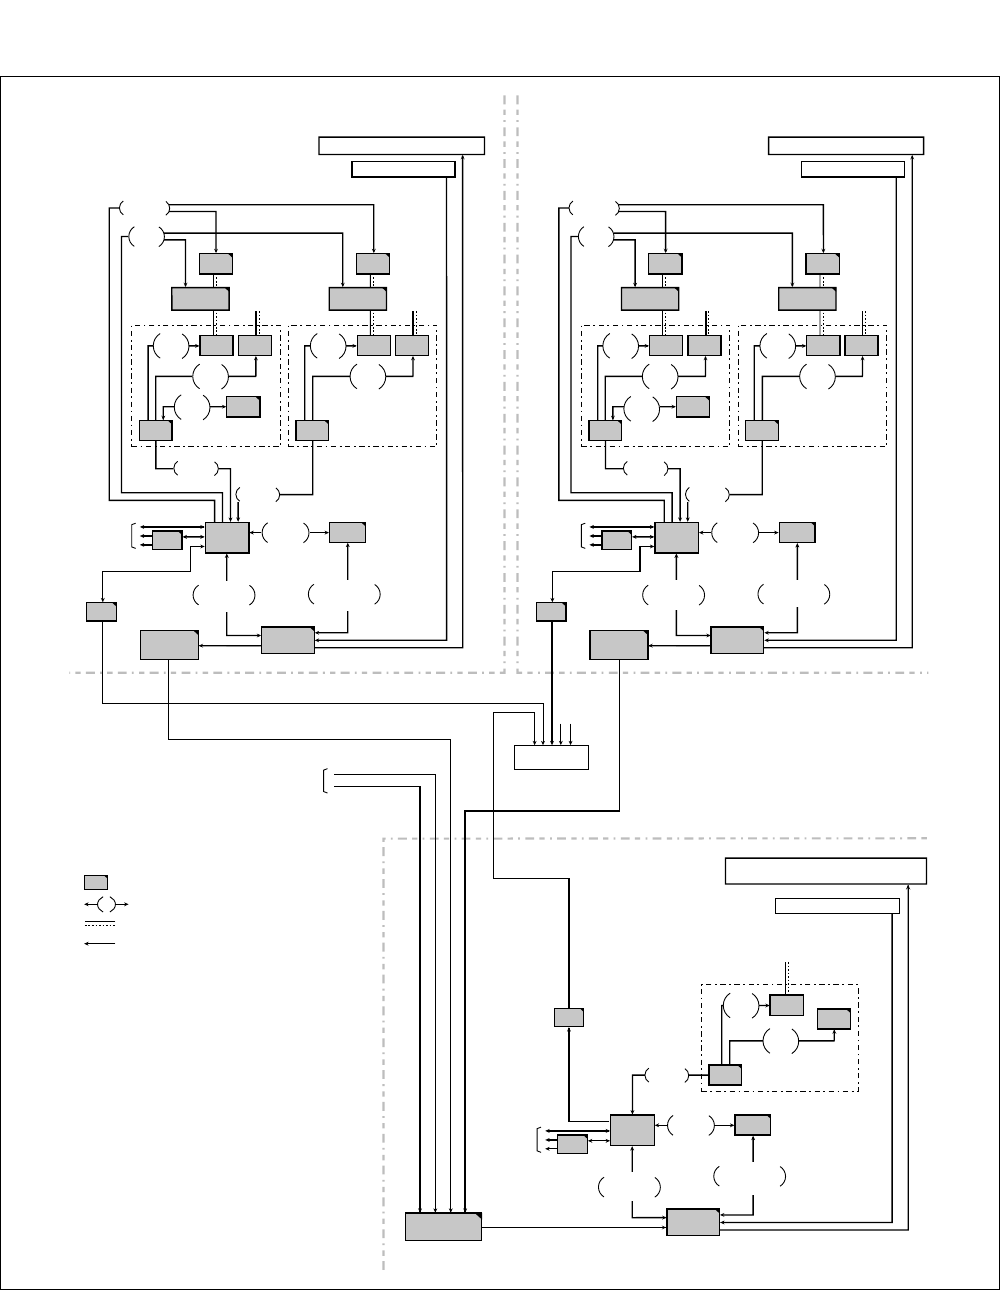
NDA-24307 CHAPTER 2
Page 29
Issue 1
SYSTEM MAINTENANCE OUTLINE
Figure 2-22 Fault Detection Block Diagram
PWR
PWR
GT
DLKC
GT
PWR
GTGT
DLKC
To/From TSW
of each LN
MJ, MN fault
Power, Fuse blown fault
Temperature, CPU fault
Speech Path System fault (SPE)
RGU, Howler fault
PFT fault
CPU Clock fault
Note:
CPU
EMA
MMC
To MAT,
Printer, etc.
Alarm Lamps on the TOPU
Thermal Reed Relay
RDY
Clock
etc.
Howler
Ringing
Circuit
Fault
Information
Note
PWR Supply
Failure,
Fuse Blown
Firmware
Fault
C-level
monitor
C-level
monitor
TSW/
INT
LC/TRK
MUX
TSWM1
TSW/
INT TSW/
INT TSW/
INT
LC/TRK
MUX
TSWM0
RDY
Clock
Write
etc. RDY
Clock
Write
etc.
RDY
Clock
Write
etc.
RDY
Clock
Write
etc.
RDY
Clock
Write
etc.
IOC
LANI
To TSW
of ISWM To TSW
of ISWM
CPU
EMA
MMC
To MAT,
Printer, etc.
Alarm Lamps on the TOPU
Thermal Reed Relay
Howler
Ringing
Circuit
Fault
Information
Note
PWR Supply
Failure,
Fuse Blown
C-level
monitor
TSW/
INT
IOGT
HSW
ISWM
RDY
Clock
Write
etc.
RDY
Clock
Write
etc.
IOC
From
other existing
Local Nodes
From
other
nodes
LANI
< LN >
< ISW >
< LN >
To MAT
on the Ethernet
: Circuit Card
: Main faults to be detected
: Speech path
: Flow of fault information
CPU
EMA
MMC
TSW
INT
MUX
HSW
DLKC
PWR
LANI
IOC
GT
IOGT
LC/TRK
MAT
LN
TSWM
ISW
ISWM
:Central Processing Unit
:Emergency Alarm Controller
:Man Machine Controller
:Time Division Switch
:Speech Path Control Interface
:Multiplexer
:Highway Switch
:Data Link Controller
:Power Supply
:Local Area Network Interface
:I/O Controller
:Gate
:Input/Output Gate
:Line/Trunk
:Maintenance Administration Terminal
:Local Node
:Time Division Switch Module
:Inter-node Switch
:Inter-node Switch Module
- Symbols -

CHAPTER 2 NDA-24307
Page 30
Issue 1
SYSTEM MAINTENANCE OUTLINE
(a) Main Faults
Faults that may occur in the system can be generally categorized into Processor System Fault, Speech
Path System Fault, Line/Trunk Fault, etc.
•Processor System Fault
The CPU alarm detecting circuit continuously monitors whether the CPU is working normally. If
a fault is detected, the CPU calls up the diagnostic program, which identifies the cause of the fault
and determines whether the fault is temporary or permanent. When the fault affects system
operations, Active/Standby status of the CPU is changed over (provided that the system has dual
configuration).
•Bus System Fault
The CPU transfers line/trunk card control information to the associated peripheral circuits via IO
Bus. When a parity error is detected in the transfer data or when the required information cannot
be transferred from a circuit card, the CPU identifies the cause of the fault, changes over the CPU
so that system operation is not affected, and executes restart processing.
•Speech Path Fault
The CPU monitors the operating status of the TSW card, the occurrence of errors in writing data
to the switch memory, and the basic clocks supplied to the speech path. Upon detecting a fault, the
CPU identifies the cause of the fault, determines whether the fault is temporary or permanent, and
executes required processing such as changeover of the TSW card.
•Others
The alarm detecting circuit on the EMA card continuously monitors the occurrence of faults in the
PWR supply cards, such as abnormal temperatures within the equipment frame, and lights the
alarm lamp on the TOPU when a fault is detected.
(b) Lamp Indications on the TOPU
When a fault occurs, the corresponding lamp on the TOPU indicates the location of the fault. For the
meaning of each lamp indication, refer to Chapter 6.

NDA-24307 CHAPTER 2
Page 31
Issue 1
SYSTEM MAINTENANCE OUTLINE
2.7 Range of Faults Specification
(1) Upon receiving a fault report from a station user or an operator, the technician can assume a faulty card
exists if the range to be affected by the fault can be determined. For the detailed procedure, refer to
Chapter 5. Use the following actions to check the MDF:
(a) Check the LENS of the reporter (Station or ATTCON/DESKCON).
(b) Check other circuits of the circuit card in which the reporter (station line or ATTCON/DESKCON)
is located.
(c) Check the other groups (other circuit cards mounted in the same module) in the module in which the
reporter is located.
(d) Check lines in each of the other modules on the basis of plural lines.
(2) If the fault cannot be detected by the system (a fault related to the speech path such as noise during speech,
one-way speech, speech inability), the range of (a) through (d) (itemized above) should be limited.
(3) When a major fault is detected in the dual systems, the CPU or TSW system automatically changes over
if the fault range is (c) and (d). In this case, the whole module involved is placed into make-busy status
even if the fault is partial, and the station lines currently operating normally become faulty status.
Diagnose the fault from the content of the system message displayed and repair the fault as required.
(4) When limiting the range of faults, consider the system circuitry that consists of the control (see Figure 2-
24 and Figure 2-25, where CPU 0 is active) and speech path systems (see Figure 2-26).
(5) As seen from the block diagrams in Figure 2-24 through Figure 2-27, if a fault occurs within the common
portions to be controlled, all other associated portions are affected by that fault occurrence. If the range
of faults is outside PIM fault, CPU/TSW system changeover is executed (only when the fault is detectable
by the system).
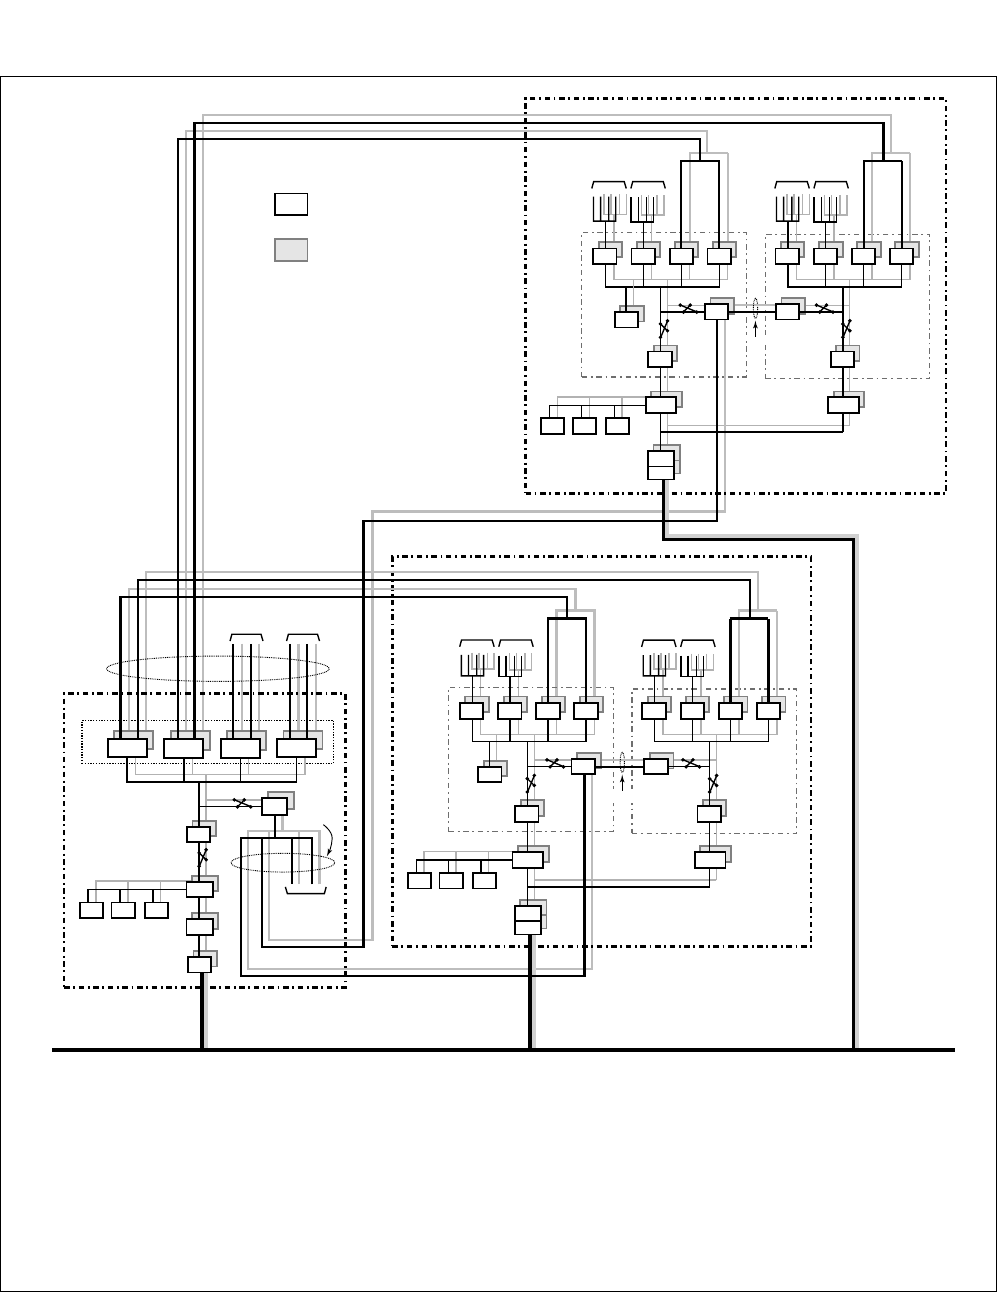
CHAPTER 2 NDA-24307
Page 32
Issue 1
SYSTEM MAINTENANCE OUTLINE
Figure 2-23 General System Block Diagram (1/2)
HSW
TSWM0 TSWM1
TSWM0 TSWM1
< ISW (Inter-node Switch) >
ISAGT: PZ-GT13 LANI: PZ-PC19 IOGT: PH-GT10 TSW: PU-SW00
HSW: PU-SW01 PLO: PH-CK16/17-A EMA: PH-PC40 IOC: PH-IO24
< LN (Local Node) >
ISAGT-A: PZ-GT13 ISAGT-B: PZ-GT20 LANI: PZ-PC19 GT: PH-GT09 TSW: PH-SW12 MUX: PH-PC36
DLKC: PH-PC20 PLO: PH-CK16-A CLK: PH-CK18 EMA: PH-PC40 IOC: PH-IO24
MISC
IOC EMA
PLO
MISC
IOC EMA
MISC
IOC EMA
PLO
GT
ISAGT-B
TSW00 TSW01 TSW02 TSW03
TSW00 TSW01 TSW02 TSW03
TSW00 TSW01 TSW02 TSW03
IOGT
ISAGT
CPU
LANI
GT
ISAGT-A
CPU
LANI
Fusion Link
ISW
LN0
LN1
To PLO of
LN2/3
DLKC
GT
ISAGT-A
GT
ISAGT-B
CPU
LANI
TSW00 TSW01 TSW02 TSW03
DLKC
PLO CLK
To MUX
(IMG0) To MUX
(IMG1)
To MUX
(IMG0) To MUX
(IMG1) To MUX
(IMG2) To MUX
(IMG3)
To MUX
(IMG2) To MUX
(IMG3)
CLK
Note 1
Note 3
Note 4
Note 4
Circuit Card
(No. 0 System)
Circuit Card
(No. 1 System)
Note 1
HSW00, 01 for No. 0 System /
HSW10, 11 for No. 1 System
Note 2
ISW-LN TSW CA-n Cables
Note 3
ISW-LN PLO CA-n Cables
Note 4
PLO-CLK CA-n Cables
:
:
TSW00 TSW01 TSW02 TSW03
Note 2
To TSW
of LN2 To TSW
of LN3
Note: For details on each equipment’s switching network, see Chapter 6, System Control
Procedures.
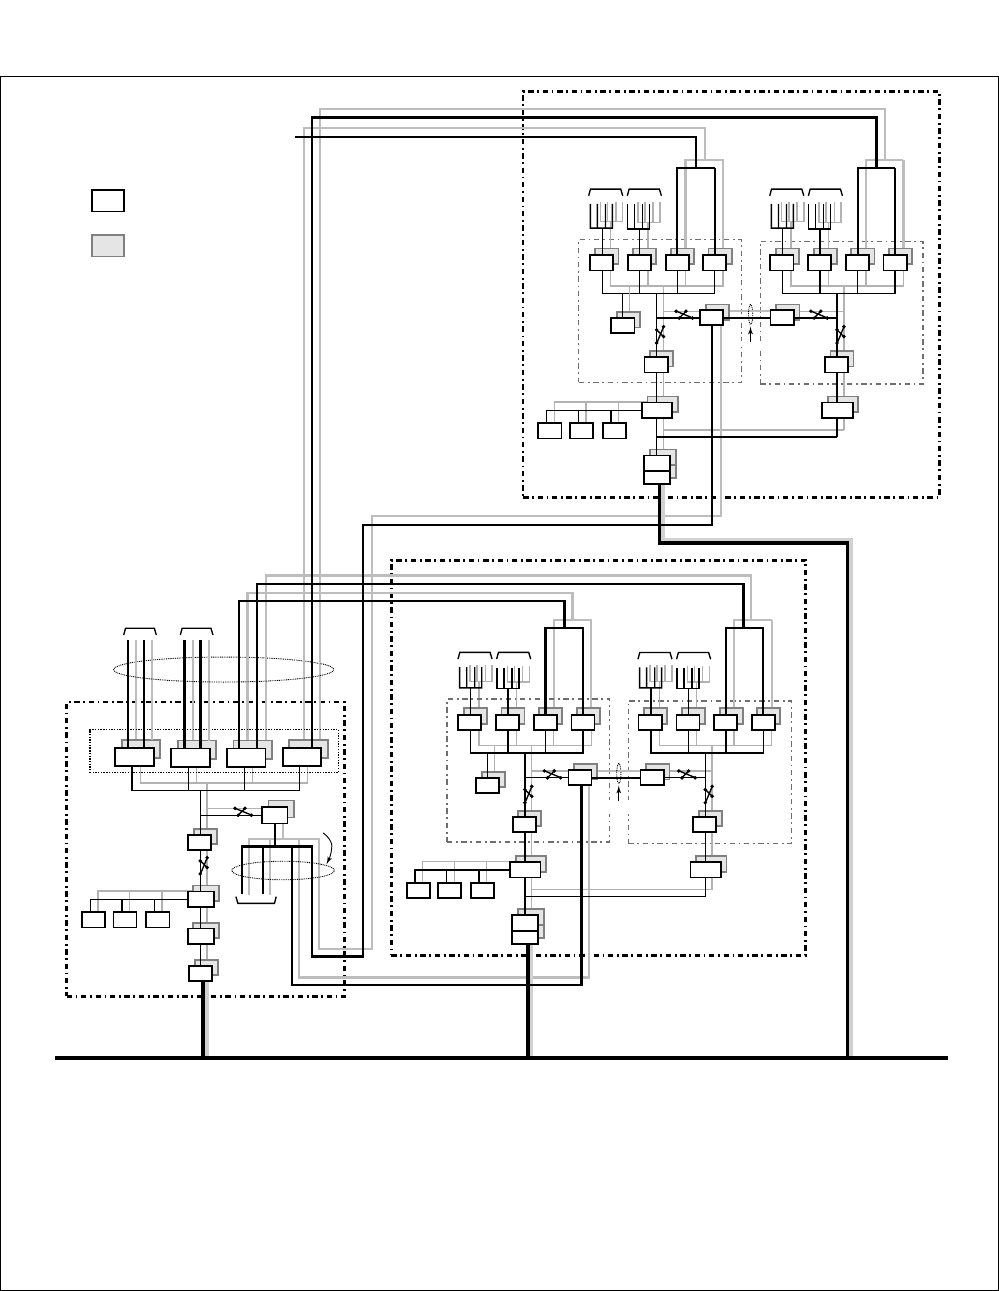
NDA-24307 CHAPTER 2
Page 33
Issue 1
SYSTEM MAINTENANCE OUTLINE
Figure 2-23 General Block Diagram of the Whole System (2/2)
TSWM0 TSWM1
TSWM0 TSWM1
MISC
IOC EMA
HSW
PLO
MISC
IOC EMA
MISC
IOC EMA
PLO
GT
ISAGT-B
TSW00 TSW01 TSW02 TSW03
TSW00 TSW01 TSW02 TSW03
TSW00 TSW01 TSW02 TSW03
TSW00 TSW01 TSW02 TSW03
IOGT
ISAGT
CPU
LANI
GT
ISAGT-A
CPU
LANI
Fusion Link
ISW
LN2
LN3
To TSW
of LN0 To TSW
of LN1
To PLO of
LN0/1
DLKC
GT
ISAGT-A
GT
ISAGT-B
CPU
LANI
TSW00 TSW01 TSW02 TSW03
DLKC
PLO CLK
To MUX
(IMG0) To MUX
(IMG1)
To MUX
(IMG0) To MUX
(IMG1) To MUX
(IMG2) To MUX
(IMG3)
To MUX
(IMG2) To MUX
(IMG3)
CLK
Note 2
Note 1
Note 3
Note 4
Note 4
Circuit Card
(No. 0 System)
Circuit Card
(No. 1 System)
Note 1
HSW00, 01 for No. 0 System /
HSW10, 11 for No. 1 System
Note 2
ISW-LN TSW CA-n Cables
Note 3
ISW-LN PLO CA-n Cables
Note 4
PLO-CLK CA-n Cables
:
:
< ISW (Inter-node Switch) >
ISAGT: PZ-GT13 LANI: PZ-PC19 IOGT: PH-GT10 TSW: PU-SW00
HSW: PU-SW01 PLO: PH-CK16/17-A EMA: PH-PC40 IOC: PH-IO24
< LN (Local Node) >
ISAGT-A: PZ-GT13 ISAGT-B: PZ-GT20 LANI: PZ-PC19 GT: PH-GT09 TSW: PH-SW12 MUX: PH-PC36
DLKC: PH-PC20 PLO: PH-CK16-A CLK: PH-CK18 EMA: PH-PC40 IOC: PH-IO24
Note: For details on each equipment’s switching network, see Chapter 6, System Control Procedures.
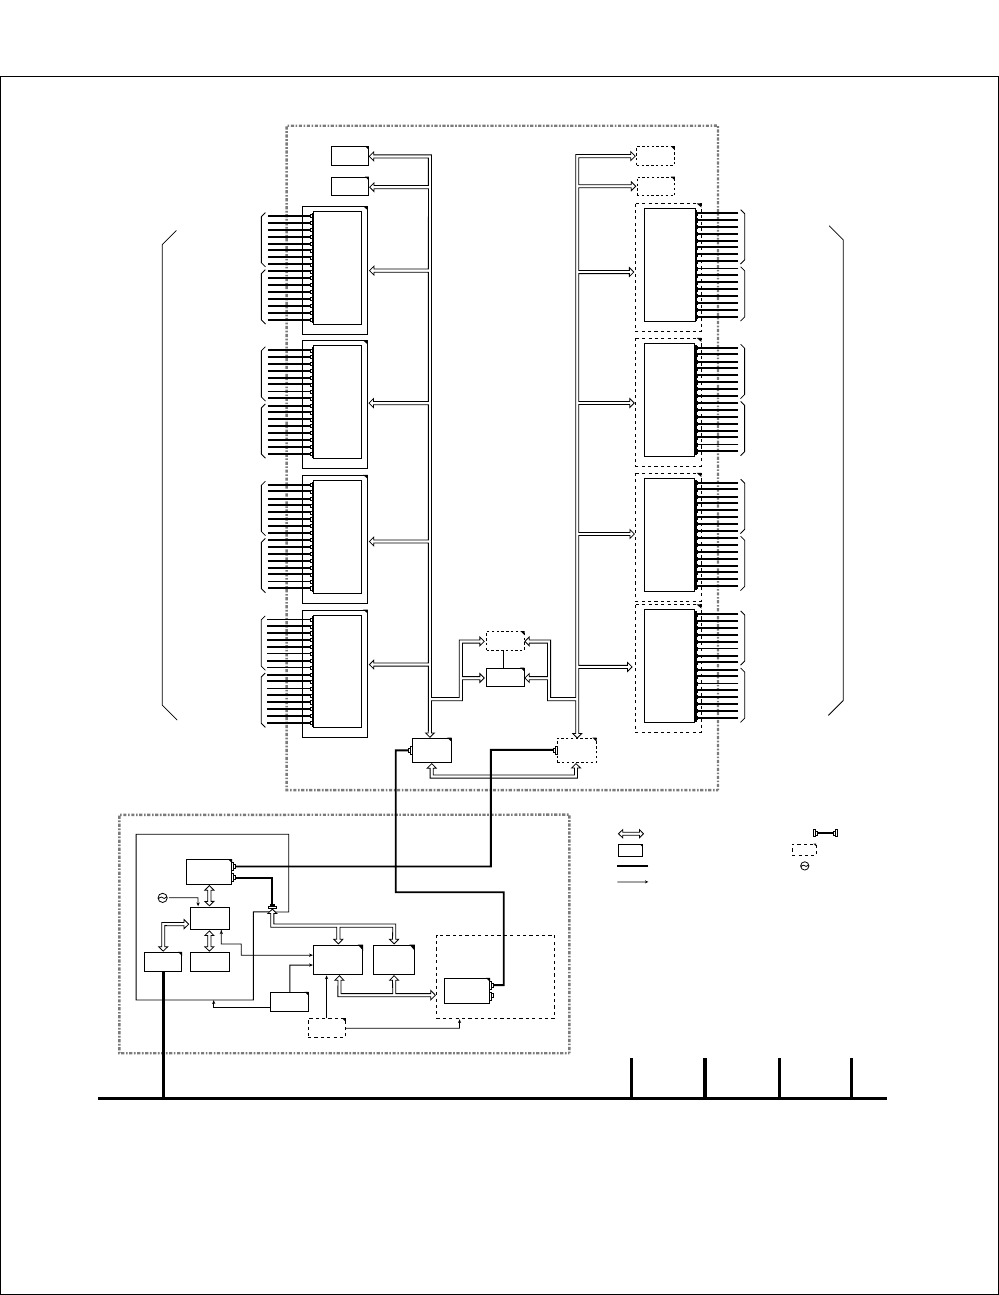
CHAPTER 2 NDA-24307
Page 34
Issue 1
SYSTEM MAINTENANCE OUTLINE
Figure 2-24 CPU Controlling Block Diagram (ISW)
LPM of ISW
EMA IOC /
MISC
ISAGT 0
LANI
PWR
PWR
CPU 0
MEMORY
PCI BUS
ISA BUS
CPU board
CPR
CPU clock
CPR
(ST-BY)
Reset Signal
(ST-BY)
MISC BUS
MISC BUS
T
M
IOGT 1IOGT 0
IOP1 IOP0
ISAGT 1
CPU board
T
M
Fusion Link
PLO 0
PLO 1
MISC BUS
MISC BUS
To TSWM1 of LN3
To TSWM0 of LN3
To TSWM1 of LN2
To TSWM0 of LN2
To TSWM1 of LN1
To TSWM0 of LN1
000
001
002
003
004
005
006
007
008
009
00A
00B
00C
00D
00E
00F
TSW
TSW
TSW
TSW
TSW/
INT
TSW
TSW
TSW
TSW
TSW
TSW
TSW
TSW
TSW
TSW
TSW
TSW
TSW 00
010
011
012
013
014
015
016
017
018
019
01A
01B
01C
01D
01E
01F
TSW
TSW
TSW
TSW
TSW/
INT
TSW
TSW
TSW
TSW
TSW
TSW
TSW
TSW
TSW
TSW
TSW
TSW
TSW 01
020
021
022
023
024
025
026
027
028
029
02A
02B
02C
02D
02E
02F
TSW
TSW
TSW
TSW
TSW/
INT
TSW
TSW
TSW
TSW
TSW
TSW
TSW
TSW
TSW
TSW
TSW
TSW
TSW 02
030
031
032
033
034
035
036
037
038
039
03A
03B
03C
03D
03E
03F
TSW
TSW
TSW
TSW
TSW/
INT
TSW
TSW
TSW
TSW
TSW
TSW
TSW
TSW
TSW
TSW
TSW
TSW
TSW 03
110
111
112
113
114
115
116
117
118
119
11A
11B
11C
11D
11E
11F
TSW
TSW
TSW
TSW
TSW/
INT
TSW
TSW
TSW
TSW
TSW
TSW
TSW
TSW
TSW
TSW
TSW
TSW
TSW 11
120
121
122
123
124
125
126
127
128
129
12A
12B
12C
12D
12E
12F
TSW
TSW
TSW
TSW
TSW/
INT
TSW
TSW
TSW
TSW
TSW
TSW
TSW
TSW
TSW
TSW
TSW
TSW
TSW 12
130
131
132
133
134
135
136
137
138
139
13A
13B
13C
13D
13E
13F
TSW
TSW
TSW
TSW
TSW/
INT
TSW
TSW
TSW
TSW
TSW
TSW
TSW
TSW
TSW
TSW
TSW
TSW
TSW 13
HSW 00
HSW 11HSW 01
HSW 10
To TSWM1 of LN3
To TSWM0 of LN3
To TSWM1 of LN2
To TSWM0 of LN2
To TSWM1 of LN1
To TSWM0 of LN1
To TSWM1 of LN0
To TSWM0 of LN0
To TSWM1 of LN0
To TSWM0 of LN0
Note 2
This figure shows a block diagram of the CPU controlling block in ISW, where CPU 0 is active.
To LPM
of LN0 To LPM
of LN1 To LPM
of LN2 To LPM
of LN3
- Symbols -
: Controlling Routes of CPU : Cable
: Circuit card (active) : Circuit card (ST-BY)
: External Cable : Clock Oscillator
: Signal
EMA: PH-PC40
LANI: PZ-PC19
IOC: PH-IO24 MUX: PH-PC36
ISAGT: PZ-GT13
IOGT: PH-GT10
TSW: PH-SW00
PLO: PH-CK16-A/17-A
CLK: PH-CK18
TSW I/O BUS
ISWM
TSW I/O BUS
Note 2
Note 3
HSW: PH-SW01
Note 1 Note 1
100
101
102
103
104
105
106
107
108
109
10A
10B
10C
10D
10E
10F
TSW
TSW
TSW
TSW
TSW/
INT
TSW
TSW
TSW
TSW
TSW
TSW
TSW
TSW
TSW
TSW
TSW
TSW
TSW 10
Note 1: The two HSW cards here provide the space division switching for a maximum of 16 PCM
highways from/to the TSW (PU-SW00) cards in ISWM. For more details, refer to NEAX2400 IPX
IPX-U “Circuit Card Manual”.
Note 2: See details in Figure 2-26, Speech Path Block Diagram.
Note 3: Multiple connection is provided on the backboard side between the PLOs here. For more details,
refer to the “Circuit Card Manual”.
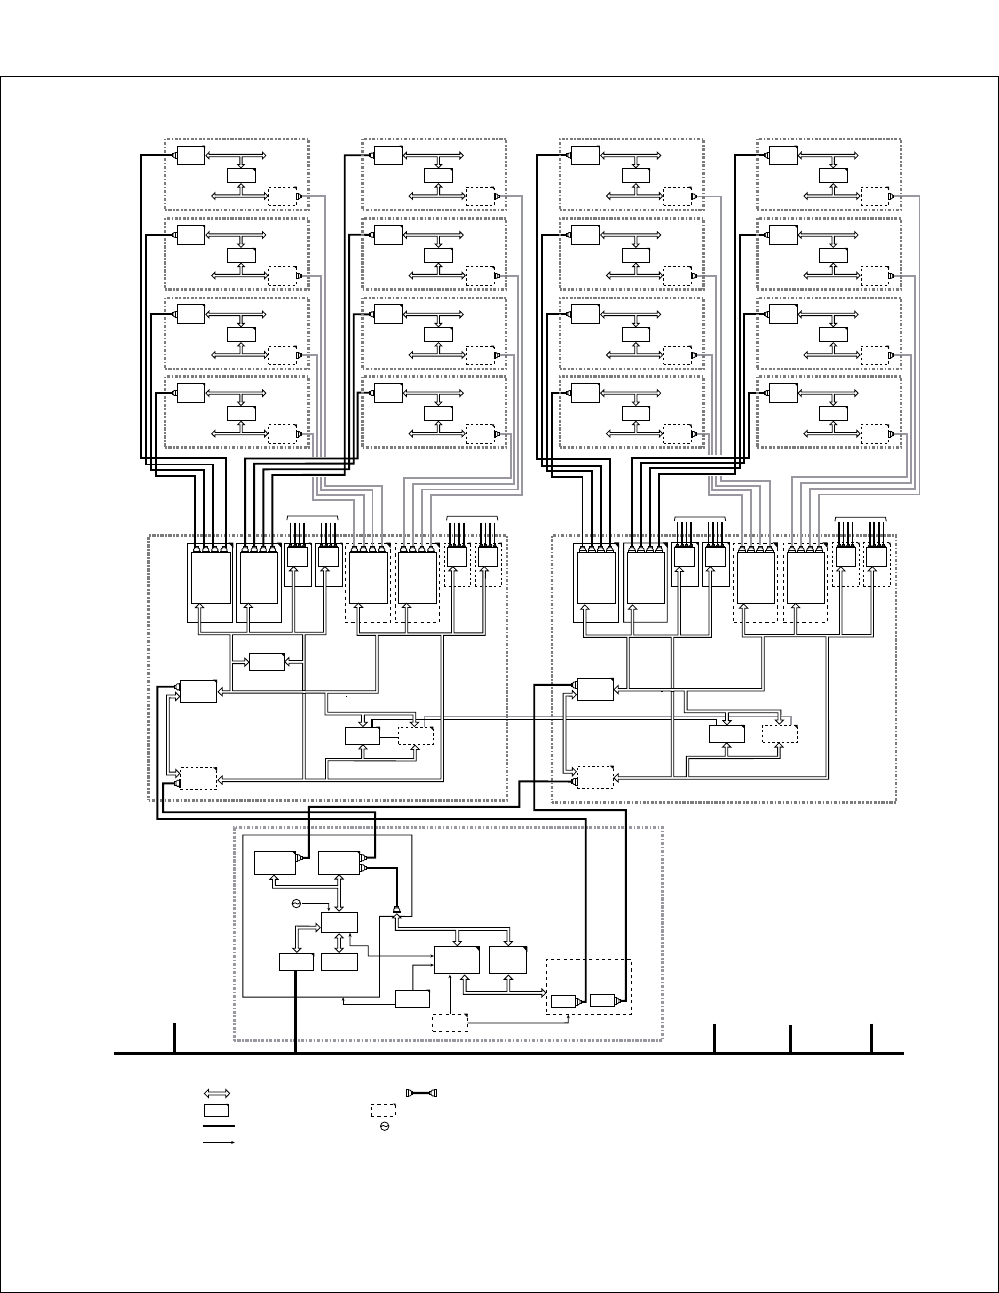
NDA-24307 CHAPTER 2
Page 35
Issue 1
SYSTEM MAINTENANCE OUTLINE
Figure 2-25 CPU Controlling Block Diagram (LN)
EMA IOC /
MISC
LANI
PWR
PWR
CPU 0
MEMORY
PCI BUS
ISA BUS
CPU board
CPR
CPU clock
Reset Signal
(ST-BY)
MISC BUS
MISC BUS
TSWM 1 of LN0
TSW 00 TSW 01 TSW 11TSW 10
CLK 0 CLK 1
GT 1
GT 0
IOP1
IOP0
TSW/INT TSW/INT TSW/INTTSW/INT
M
U
X
M
U
X
M
U
X
M
U
X
M
U
X
M
U
X
M
U
X
M
U
X
M
U
X
M
U
X
M
U
X
M
U
X
M
U
X
M
U
X
M
U
X
M
U
X
TSW
02
TSW/
INT
TSW
03
TSW/
INT
TSW
13
TSW/
INT
TSW
12
TSW/
INT
TSW I/O
MISC BUS
MISC BUS
BUS TSW I/O BUS
ISAGT-0A
T
M
ISAGT-0B
CPR
(ST-BY)
ISAGT-A
TSWM 0 of LN0
TSW 00 TSW 01 TSW 11TSW 10
PLO 0 PLO 1
GT 1
GT 0
IOP1
IOP0
TSW/INT TSW/INT TSW/INTTSW/INT
M
U
X
M
U
X
M
U
X
M
U
X
M
U
X
M
U
X
M
U
X
M
U
X
M
U
X
M
U
X
M
U
X
M
U
X
M
U
X
M
U
X
M
U
X
M
U
X
TSW
02
TSW/
INT
TSW
03
To ISWM
TSW/
INT
TSW
13
TSW/
INT
TSW
12
TSW/
INT
TSW I/O BUS
MISC BUS
MISC BUS
MISC BUS
TSW I/O BUS
LC/TRK
MUX
MUX PM BUS
PM BUS
LC/TRK
MUX
MUX PM BUS
PM BUS
LC/TRK
MUX
MUX PM BUS
PM BUS
LC/TRK
MUX
MUX PM BUS
PM BUS
IMG 0
PIM 3
PIM 2
PIM 1
PIM 0
ISAGT-B
LPM of LN0
Fusion Link
To LPM of ISW
This figure shows a block diagram of the CPU controlling block in LN0, where CPU 0 is active.
- Symbols -
: Controlling Routes of CPU : Cable
: Circuit card (active) : Circuit card (ST-BY)
: External Cable : Clock Oscillator
: Signal
DLKC
0/1
LC/TRK
MUX
MUX PM BUS
PM BUS
LC/TRK
MUX
MUX PM BUS
PM BUS
LC/TRK
MUX
MUX PM BUS
PM BUS
LC/TRK
MUX
MUX PM BUS
PM BUS
IMG 3
PIM 3
PIM 2
PIM 1
PIM 0
LC/TRK
MUX
MUX PM BUS
PM BUS
LC/TRK
MUX
MUX PM BUS
PM BUS
LC/TRK
MUX
MUX PM BUS
PM BUS
LC/TRK
MUX
MUX PM BUS
PM BUS
IMG 2
PIM 3
PIM 2
PIM 1
PIM 0
LC/TRK
MUX
MUX PM BUS
PM BUS
LC/TRK
MUX
MUX PM BUS
PM BUS
LC/TRK
MUX
MUX PM BUS
PM BUS
LC/TRK
MUX
MUX PM BUS
PM BUS
IMG 1
PIM 3
PIM 2
PIM 1
PIM 0
EMA: PH-PC40
LANI: PZ-PC19
IOC: PH-IO24
DLKC: PH-PC20
MUX: PH-PC36
ISAGT-A: PZ-GT13
ISAGT-B: PZ-GT20
GT: PH-GT09
TSW: PH-SW12
PLO: PH-CK16-A/17-A
CLK: PH-CK18
Note 1
Note 2
To ISWM Note 1 To ISWM Note 1 To ISWM Note 1
To LPM
of LN1 To LPM
of LN2 To LPM
of LN3
Note 1: See details in Figure 2-26, Speech Path Block Diagram.
Note 2: Multiple connection is provided on the backboard side between the PLOs here. For more
details, refer to the “Circuit Card Manual.”
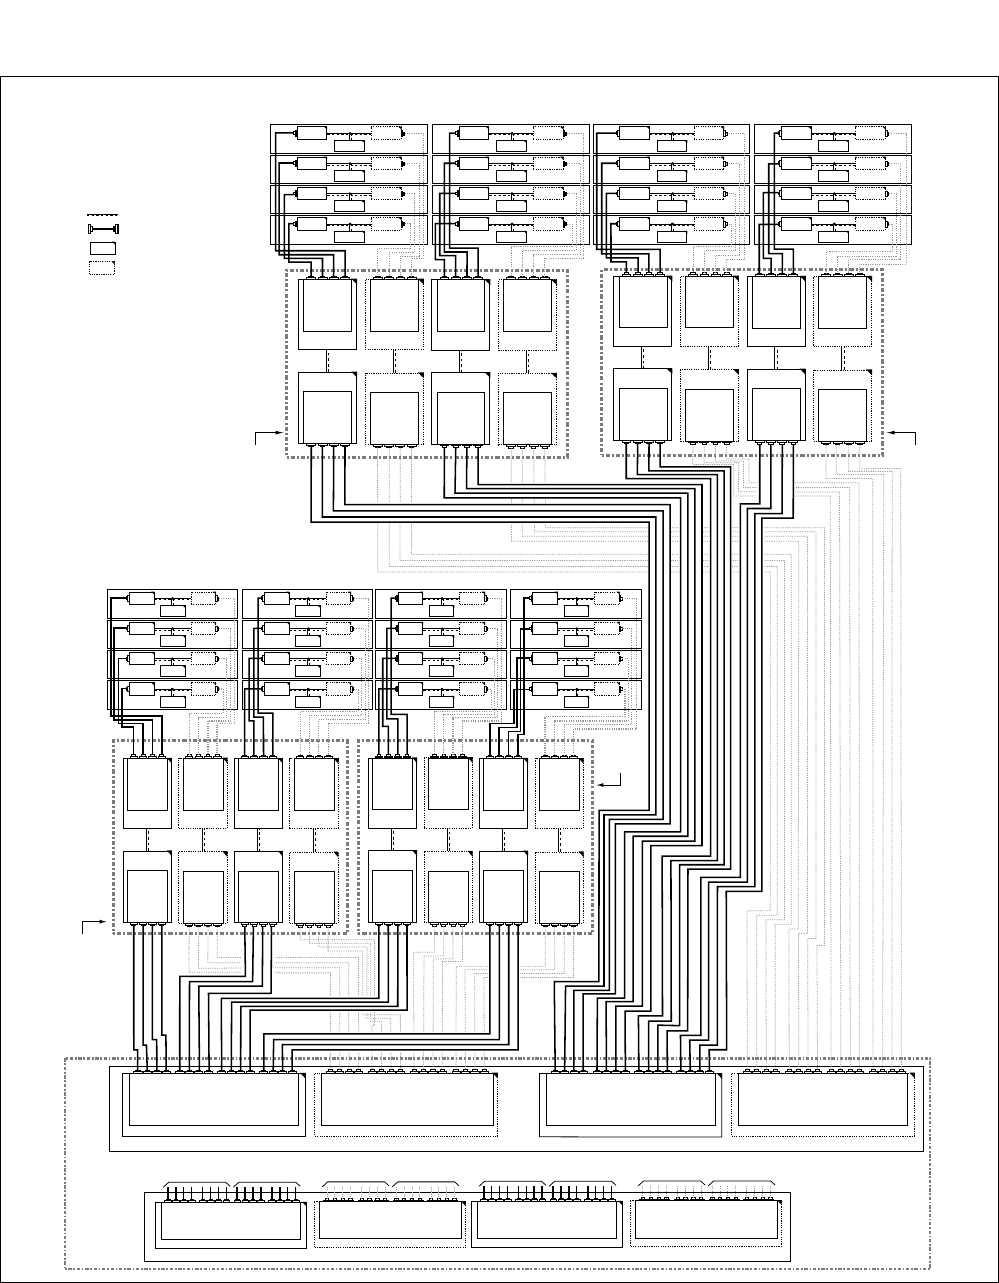
CHAPTER 2 NDA-24307
Page 36
Issue 1
SYSTEM MAINTENANCE OUTLINE
Figure 2-26 Speech Path Block Diagram (1/2)
ISWM
MUX MUX
LC/TRK
PIM0
IMG0 of LN0
PIM1
MUX MUX
LC/TRK
PIM2
MUX MUX
LC/TRK
PIM3
MUX MUX
LC/TRK
MUX MUX
LC/TRK
PIM0
IMG1 of LN0
PIM1
MUX MUX
LC/TRK
PIM2
MUX MUX
LC/TRK
PIM3
MUX MUX
LC/TRK
MUX MUX
LC/TRK
PIM0
IMG2 of LN0
PIM1
MUX MUX
LC/TRK
PIM2
MUX MUX
LC/TRK
PIM3
MUX MUX
LC/TRK
MUX MUX
LC/TRK
PIM0
IMG3 of LN0
PIM1
MUX MUX
LC/TRK
PIM2
MUX MUX
LC/TRK
PIM3
MUX MUX
LC/TRK
- Symbols -
: Cable
: Circuit card (ACT)
: Circuit card (ST-BY)
: Speech Path
TSW (in TSWM0/1) : PH-SW12
TSW (in ISWM) : PU-SW00
HSW: PU-SW01
MUX: PH-PC36
T
S
W
TSW/INT TSW 00
T
S
W
000 001 002 003 004 005 006 007 008 009 00A 00B 00C00D 00E 00F
T
S
W
T
S
W
T
S
W
T
S
W
T
S
W
T
S
W
T
S
W
T
S
W
T
S
W
T
S
W
T
S
W
T
S
W
T
S
W
T
S
W
T
S
W
TSW/INT TSW 10
T
S
W
100 101 102 103 104 105 106 107 108 109 10A 10B 10C 10D 10E 10F
T
S
W
T
S
W
T
S
W
T
S
W
T
S
W
T
S
W
T
S
W
T
S
W
T
S
W
T
S
W
T
S
W
T
S
W
T
S
W
T
S
W
HSW
T
S
W
TSW/INT TSW 01
T
S
W
010 011 012 013 014 015 016 017 018 019 01A 01B 01C 01D 01E 01F
T
S
W
T
S
W
T
S
W
T
S
W
T
S
W
T
S
W
T
S
W
T
S
W
T
S
W
T
S
W
T
S
W
T
S
W
T
S
W
T
S
W
T
S
W
TSW/INT TSW 11
T
S
W
110 111 112 113 114 115 116 117 118 119 11A 11B 11C 11D 11E 11F
T
S
W
T
S
W
T
S
W
T
S
W
T
S
W
T
S
W
T
S
W
T
S
W
T
S
W
T
S
W
T
S
W
T
S
W
T
S
W
T
S
W
TSW/INT TSW/INT TSW/INT
00800900A
00B 00C00D00E00F
TSWM 0
( LN0)
M
U
X
TSW 00
M
U
X
M
U
X
M
U
X
TSW02
M
U
X
M
U
X
M
U
X
M
U
X
TSW/INT
M
U
X
M
U
X
M
U
X
M
U
X
TSW 10
M
U
X
M
U
X
M
U
X
M
U
X
TSW 12
M
U
X
TSW 01
M
U
X
M
U
X
M
U
X
TSW03
M
U
X
M
U
X
M
U
X
M
U
X
M
U
X
M
U
X
M
U
X
M
U
X
TSW 11
M
U
X
M
U
X
M
U
X
M
U
X
TSW 13
TSW/INT TSW/INT TSW/INT TSW/INT
000001002003 004005006007 104105106107
100101102103
10810910A10B 10C10D10E10F
TSWM 1
( LN0)
M
U
X
TSW 00
M
U
X
M
U
X
M
U
X
TSW02
M
U
X
M
U
X
M
U
X
M
U
X
M
U
X
M
U
X
M
U
X
M
U
X
TSW 10
M
U
X
M
U
X
M
U
X
M
U
X
TSW 12
M
U
X
TSW 01
M
U
X
M
U
X
M
U
X
TSW03
M
U
X
M
U
X
M
U
X
M
U
X
M
U
X
M
U
X
M
U
X
M
U
X
TSW 11
M
U
X
M
U
X
M
U
X
M
U
X
TSW 13
TSW/INT TSW/INT TSW/INT TSW/INT
TSW/INT TSW/INT TSW/INT TSW/INT
000001002003 004005006007 104105106107
100101102103
00800900A
00B 00C00D00E00F
10810910A10B 10C10D10E10F
MUX MUX
LC/TRK
PIM0
IMG0 of LN1
PIM1
MUX MUX
LC/TRK
PIM2
MUX MUX
LC/TRK
PIM3
MUX MUX
LC/TRK
MUX MUX
LC/TRK
PIM0
IMG1 of LN1
PIM1
MUX MUX
LC/TRK
PIM2
MUX MUX
LC/TRK
PIM3
MUX MUX
LC/TRK
MUX MUX
LC/TRK
PIM0
IMG2 of LN1
PIM1
MUX MUX
LC/TRK
PIM2
MUX MUX
LC/TRK
PIM3
MUX MUX
LC/TRK
MUX MUX
LC/TRK
PIM0
IMG3 of LN1
PIM1
MUX MUX
LC/TRK
PIM2
MUX MUX
LC/TRK
PIM3
MUX MUX
LC/TRK
TSWM 0
( LN1)
M
U
X
TSW 00
M
U
X
M
U
X
M
U
X
TSW02
M
U
X
M
U
X
M
U
X
M
U
X
TSW/INT
M
U
X
M
U
X
M
U
X
M
U
X
TSW 10
M
U
X
M
U
X
M
U
X
M
U
X
TSW 12
M
U
X
TSW 01
M
U
X
M
U
X
M
U
X
TSW03
M
U
X
M
U
X
M
U
X
M
U
X
M
U
X
M
U
X
M
U
X
M
U
X
TSW 11
M
U
X
M
U
X
M
U
X
M
U
X
TSW 13
TSW/INT TSW/INT TSW/INT
TSW/INT TSW/INT TSW/INT TSW/INT
000001002003 004005006007
00800900A00B 00C00D00E00F
104105106107
100101102103
10810910A10B 10C10D10E10F
TSWM 1
( LN1)
M
U
X
TSW 00
M
U
X
M
U
X
M
U
X
TSW02
M
U
X
M
U
X
M
U
X
M
U
X
M
U
X
M
U
X
M
U
X
M
U
X
TSW 10
M
U
X
M
U
X
M
U
X
M
U
X
TSW 12
M
U
X
TSW 01
M
U
X
M
U
X
M
U
X
TSW03
M
U
X
M
U
X
M
U
X
M
U
X
M
U
X
M
U
X
M
U
X
M
U
X
TSW 11
M
U
X
M
U
X
M
U
X
M
U
X
TSW 13
TSW/INT TSW/INT TSW/INT TSW/INT
TSW/INT TSW/INT TSW/INT TSW/INT
000001002003 004005006007 104105106107
100101102103
00800900A00B 00C00D00E00F
10810910A10B 10C10D10E10F
HSW
T
S
W
TSW/INT TSW 02
T
S
W
020021022023 024025026027 02802902A02B 02C02D02E02F
T
S
W
T
S
W
T
S
W
T
S
W
T
S
W
T
S
W
T
S
W
T
S
W
T
S
W
T
S
W
T
S
W
T
S
W
T
S
W
T
S
W
T
S
W
TSW/INT TSW 12
T
S
W
120121122123 124125126127 12812912A12B 12C12D12E12F
T
S
W
T
S
W
T
S
W
T
S
W
T
S
W
T
S
W
T
S
W
T
S
W
T
S
W
T
S
W
T
S
W
T
S
W
T
S
W
T
S
W
T
S
W
TSW/INT
TSW 03
T
S
W
030031032033 034035036037 03803903A03B 03C03D03E03F
T
S
W
T
S
W
T
S
W
T
S
W
T
S
W
T
S
W
T
S
W
T
S
W
T
S
W
T
S
W
T
S
W
T
S
W
T
S
W
T
S
W
T
S
W
TSW/INT TSW 13
T
S
W
130131132133 134135136137 13813913A13B 13C13D13E13F
T
S
W
T
S
W
T
S
W
T
S
W
T
S
W
T
S
W
T
S
W
T
S
W
T
S
W
T
S
W
T
S
W
T
S
W
T
S
W
T
S
W
To TSWM0
of LN2 To TSWM1
of LN2 To TSWM0
of LN3 To TSWM1
of LN3
To TSWM0
of LN2 To TSWM1
of LN2 To TSWM0
of LN3 To TSWM1
of LN3
This figure shows a block diagram of speech path.

NDA-24307 CHAPTER 2
Page 37
Issue 1
SYSTEM MAINTENANCE OUTLINE
Figure 2-26 Speech Path Block Diagram (2/2)
ISWM
MUX MUX
LC/TRK
PIM0
IMG0 of LN2
PIM1
MUX MUX
LC/TRK
PIM2
MUX MUX
LC/TRK
PIM3
MUX MUX
LC/TRK
MUX MUX
LC/TRK
PIM0
IMG1 of LN2
PIM1
MUX MUX
LC/TRK
PIM2
MUX MUX
LC/TRK
PIM3
MUX MUX
LC/TRK
MUX MUX
LC/TRK
PIM0
IMG2 of LN2
PIM1
MUX MUX
LC/TRK
PIM2
MUX MUX
LC/TRK
PIM3
MUX MUX
LC/TRK
MUX MUX
LC/TRK
PIM0
IMG3 of LN2
PIM1
MUX MUX
LC/TRK
PIM2
MUX MUX
LC/TRK
PIM3
MUX MUX
LC/TRK
- Symbols -
: Cable
: Circuit card (ACT)
: Circuit card (ST-BY)
: Speech Path
TSW (in TSWM0/1) : PH-SW12
TSW (in ISWM) : PU-SW00
HSW: PU-SW01
MUX: PH-PC36
T
S
W
TSW/INT TSW 02
T
S
W
020
021
022
023024
025
026
027028029
02A
02B02C
02D
02E
02F
T
S
W
T
S
W
T
S
W
T
S
W
T
S
W
T
S
W
T
S
W
T
S
WT
S
W
T
S
W
T
S
W
T
S
W
T
S
W
T
S
W
T
S
W
TSW/INT TSW 12
T
S
W
120121
122
123124125
126
127128
129
12A
12B12C
12D
12E
12F
T
S
W
T
S
W
T
S
W
T
S
W
T
S
W
T
S
W
T
S
W
T
S
WT
S
W
T
S
W
T
S
W
T
S
W
T
S
W
T
S
W
HSW
T
S
W
TSW/INT TSW 03
T
S
W
030031
032
033034
035036
037038
039
03A
03B
03C
03D
03E
03F
T
S
W
T
S
W
T
S
W
T
S
W
T
S
W
T
S
W
T
S
W
T
S
WT
S
W
T
S
W
T
S
W
T
S
W
T
S
W
T
S
W
T
S
W
TSW/INT TSW 13
T
S
W
130131
132133134
135
136
137138
139
13A
13B
13C
13D
13E
13F
T
S
W
T
S
W
T
S
W
T
S
W
T
S
W
T
S
W
T
S
W
T
S
WT
S
W
T
S
W
T
S
W
T
S
W
T
S
W
T
S
W
TSW/INT TSW/INT TSW/INT
00800900A
00B 00C00D00E00F
TSWM 0
( LN2)
M
U
X
TSW 00
M
U
X
M
U
X
M
U
X
TSW02
M
U
X
M
U
X
M
U
X
M
U
X
TSW/INT
M
U
X
M
U
X
M
U
X
M
U
X
TSW 10
M
U
X
M
U
X
M
U
X
M
U
X
TSW 12
M
U
X
TSW 01
M
U
X
M
U
X
M
U
X
TSW03
M
U
X
M
U
X
M
U
X
M
U
X
M
U
X
M
U
X
M
U
X
M
U
X
TSW 11
M
U
X
M
U
X
M
U
X
M
U
X
TSW 13
TSW/INT TSW/INT TSW/INT TSW/INT
000001002003 004005006007 104105106107
100101102103
10810910A10B 10C10D10E10F
TSWM 1
( LN2)
M
U
X
TSW 00
M
U
X
M
U
X
M
U
X
TSW02
M
U
X
M
U
X
M
U
X
M
U
X
M
U
X
M
U
X
M
U
X
M
U
X
TSW 10
M
U
X
M
U
X
M
U
X
M
U
X
TSW 12
M
U
X
TSW 01
M
U
X
M
U
X
M
U
X
TSW03
M
U
X
M
U
X
M
U
X
M
U
X
M
U
X
M
U
X
M
U
X
M
U
X
TSW 11
M
U
X
M
U
X
M
U
X
M
U
X
TSW 13
TSW/INT TSW/INT TSW/INT TSW/INT
TSW/INT TSW/INT TSW/INT TSW/INT
000001002003 004005006007 104105106107
100101102103
00800900A
00B 00C00D00E00F
10810910A10B 10C10D10E10F
MUX MUX
LC/TRK
PIM0
IMG0 of LN3
PIM1
MUX MUX
LC/TRK
PIM2
MUX MUX
LC/TRK
PIM3
MUX MUX
LC/TRK
MUX MUX
LC/TRK
PIM0
IMG1 of LN3
PIM1
MUX MUX
LC/TRK
PIM2
MUX MUX
LC/TRK
PIM3
MUX MUX
LC/TRK
MUX MUX
LC/TRK
PIM0
IMG2 of LN3
PIM1
MUX MUX
LC/TRK
PIM2
MUX MUX
LC/TRK
PIM3
MUX MUX
LC/TRK
MUX MUX
LC/TRK
PIM0
IMG3 of LN3
PIM1
MUX MUX
LC/TRK
PIM2
MUX MUX
LC/TRK
PIM3
MUX MUX
LC/TRK
TSWM 0
( LN3)
M
U
X
TSW 00
M
U
X
M
U
X
M
U
X
TSW02
M
U
X
M
U
X
M
U
X
M
U
X
TSW/INT
M
U
X
M
U
X
M
U
X
M
U
X
TSW 10
M
U
X
M
U
X
M
U
X
M
U
X
TSW 12
M
U
X
TSW 01
M
U
X
M
U
X
M
U
X
TSW03
M
U
X
M
U
X
M
U
X
M
U
X
M
U
X
M
U
X
M
U
X
M
U
X
TSW 11
M
U
X
M
U
X
M
U
X
M
U
X
TSW 13
TSW/INT TSW/INT TSW/INT
TSW/INT TSW/INT TSW/INT TSW/INT
000001002003 004005006007
00800900A00B 00C00D00E00F
104105106107
100101102103
10810910A10B 10C10D10E10F
TSWM 1
( LN3)
M
U
X
TSW 00
M
U
X
M
U
X
M
U
X
TSW02
M
U
X
M
U
X
M
U
X
M
U
X
M
U
X
M
U
X
M
U
X
M
U
X
TSW 10
M
U
X
M
U
X
M
U
X
M
U
X
TSW 12
M
U
X
TSW 01
M
U
X
M
U
X
M
U
X
TSW03
M
U
X
M
U
X
M
U
X
M
U
X
M
U
X
M
U
X
M
U
X
M
U
X
TSW 11
M
U
X
M
U
X
M
U
X
M
U
X
TSW 13
TSW/INT TSW/INT TSW/INT TSW/INT
TSW/INT TSW/INT TSW/INT TSW/INT
000001002003 004005006007 104105106107
100101102103
00800900A00B 00C00D00E00F
10810910A10B 10C10D10E10F
HSW
T
S
W
TSW/INT
TSW 00
T
S
W
000001002003 004005006007 00800900A00B 00C00D00E00F
T
S
W
T
S
W
T
S
W
T
S
W
T
S
W
T
S
W
T
S
W
T
S
W
T
S
W
T
S
W
T
S
W
T
S
W
T
S
W
T
S
W
T
S
W
TSW/INT
TSW 10
T
S
W
100101102103 104105106107 10810910A10B 10C10D10E10F
T
S
W
T
S
W
T
S
W
T
S
W
T
S
W
T
S
W
T
S
W
T
S
W
T
S
W
T
S
W
T
S
W
T
S
W
T
S
W
T
S
W
T
S
W
TSW/INT
TSW 01
T
S
W
010011012013 014015016017 01801901A01B 01C01D01E01F
T
S
W
T
S
W
T
S
W
T
S
W
T
S
W
T
S
W
T
S
W
T
S
W
T
S
W
T
S
W
T
S
W
T
S
W
T
S
W
T
S
W
T
S
W
TSW/INT
TSW 11
T
S
W
110111112113 114115116117 11811911A11B 11C11D11E11F
T
S
W
T
S
W
T
S
W
T
S
W
T
S
W
T
S
W
T
S
W
T
S
W
T
S
W
T
S
W
T
S
W
T
S
W
T
S
W
T
S
W
To TSWM0
of LN0 To TSWM1
of LN0 To TSWM0
of LN1 To TSWM1
of LN1
To TSWM0
of LN0 To TSWM1
of LN0 To TSWM0
of LN1 To TSWM1
of LN1
This figure shows a block diagram of speech path.
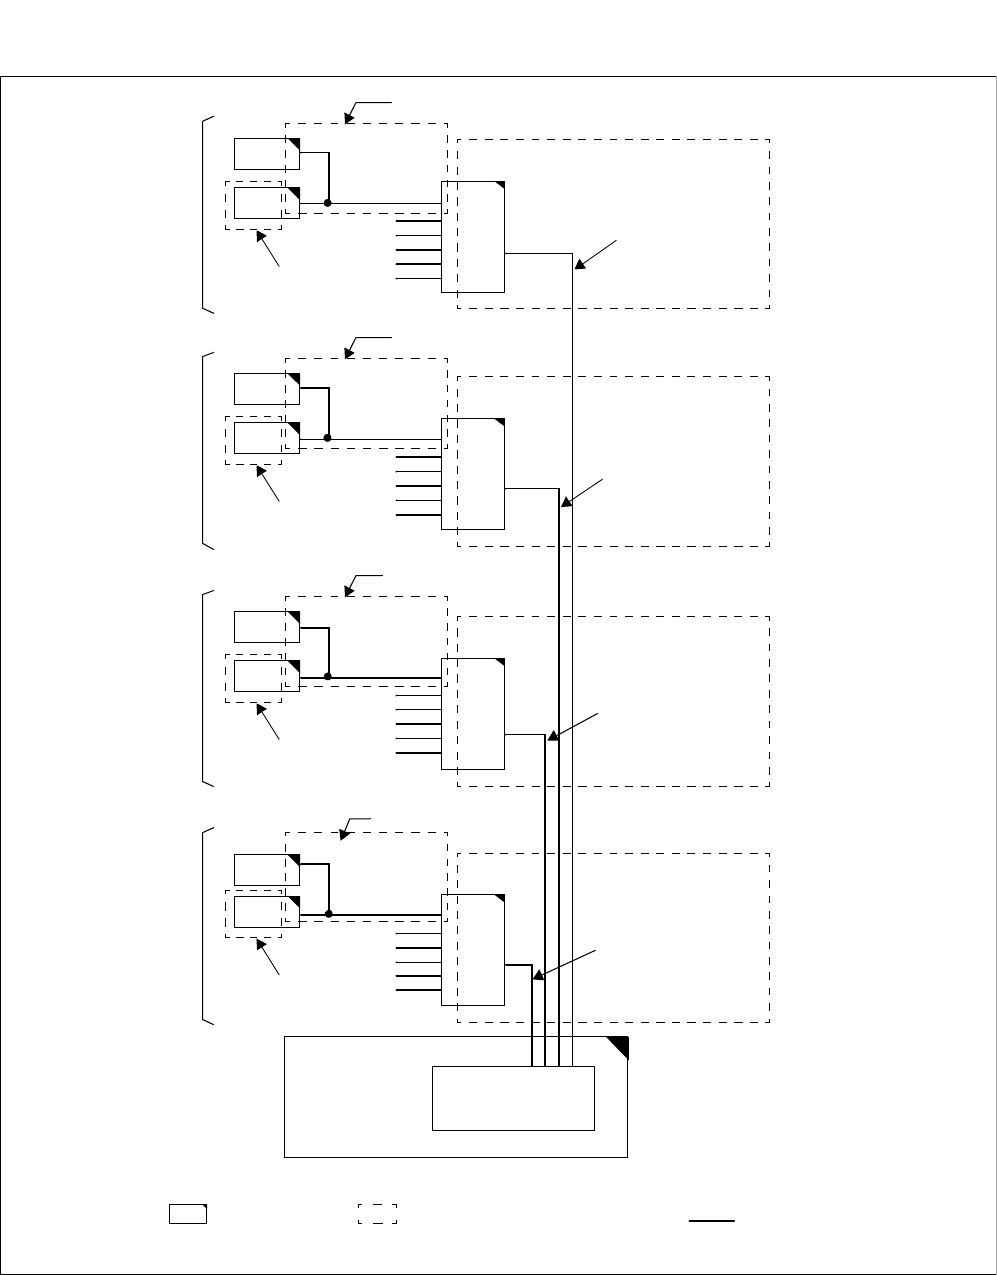
CHAPTER 2 NDA-24307
Page 38
Issue 1
SYSTEM MAINTENANCE OUTLINE
Figure 2-27 Speech Path Range of Fault
MUX
A fault within this range
affects this module.
32ch
A fault within this range
affects the circuit card.
A fault within this range affects two slots.
PIM 3
A fault within this range
affects this module.
32ch
A fault within this range
affects the circuit card.
A fault within this range
affects two slots.
PIM 3
A fault within this range
affects this module.
32ch
A fault within this range
affects the circuit card.
A fault within this range
affects two slots.
PIM 3
A fault within this range
affects this module.
32ch
A fault within this range
affects the circuit card.
A fault within this range
affects two slots.
PIM 3
TSW
TSW/INT
512ch
512ch
512ch
512ch
LC/TRK
LC/TRK
MUX
MUX
MUX
LC/TRK
LC/TRK
LC/TRK
LC/TRK
LC/TRK
LC/TRK
: Circuit Card : Possible fault range to be affected : Speech Path
Symbols

NDA-24307 CHAPTER 2
Page 39
Issue 1
SYSTEM MAINTENANCE OUTLINE
2.8 Explanation of Terms
•C-Level Infinite Loop
The program repeatedly executes specific routines due to a fault of the main memory, data destruction,
etc. The program is not able to be processed normally. This faulty condition is referred to as Program
Infinite Loop. C-Level infinite loop is a state where a clock-level program, which runs under clock
interrupt disable state, is in an infinite loop status.
•B-Level Infinite Loop
This is a state where a program infinite loop has occurred during a connection processing and the
connection for the next call is not able to be processed.
•PM (Port Microprocessor)
Each line/trunk card mounted in the PIM is equipped with a processor called Port Microprocessor
(PM), which continuously supervises the lines/trunks.
•Ready Error
For acknowledging the connection between the CPU and a circuit card, an interface signal called
Ready Signal is used. When the CPU has accessed a specific circuit card and the normality of the
connection is acknowledged, the Ready Signal is returned to the CPU within 6 µs. If the Ready signal
is not returned to the CPU within 6 µs after access, the situation is referred to as Ready Error.
•Parity Error
For confirming the normality of data transfer between the CPU and the circuit card under the control
of the CPU, parity check is made. When an error is detected in a parity check, it is referred to as Parity
Error. Parity check means to confirm the normality of data by adding an error detecting parity bit to
a set of data to be transferred.
When a set of data is transferred, a parity bit is added to the data so that the data has an even-number
of “1” bits (it is referred to as Even Parity). When there is an odd-number of “1” bits in the received
one set of data, it is detected as an error.
•Monitor Restart
Monitor restart processing suspends current processings in progress without applying any hardware
controlling, allowing the system to restart its operations from the monitor program.
The system abandons only the processings of the calls being handled by the program, and maintains
all the connections that have already been established.
•Circuit Card Front Initializing Restart
The whole system is forcibly initialized. However, the initialization varies with the setting of the
SENSE switch on the DSP of CPU (see Table 2-2).

CHAPTER 2 NDA-24307
Page 40
Issue 1
SYSTEM MAINTENANCE OUTLINE
•PM (Line/Trunk Card) Make-Busy Restart
In this processing, the faulty PM (Line/Trunk Card) is isolated from the system and, at the same time,
the calls associated with that faulty PM (Line/Trunk Card) are released. No calls related to the faulty
PM (Line/Trunk Card) are processed and the system normally runs without the faulty PM (Line/Trunk
Card).
•Data Copy Restart
In a system of dual CPU configuration, the RAM memory (including the data memory) is copied from
the ACT side CPU into the STBY side CPU, and ACT/STBY is changed over and monitor restart is
executed.
In the case of this restart processing, only the ACT side CPU and the STBY side CPU are changed
over without any effect on the current connections. However, no call processings are executed while
the restart processing is in progress (from copying until the end of the changeover).
Table 2-2 Kinds of Circuit Card Front Restart
SENSE (0~F) KIND OF RESTART REMARKS
1 DM Clear Restart
2 DM Load Restart When the system is in operation
5 OAI Memory Clear Restart
C OFF-line Restart
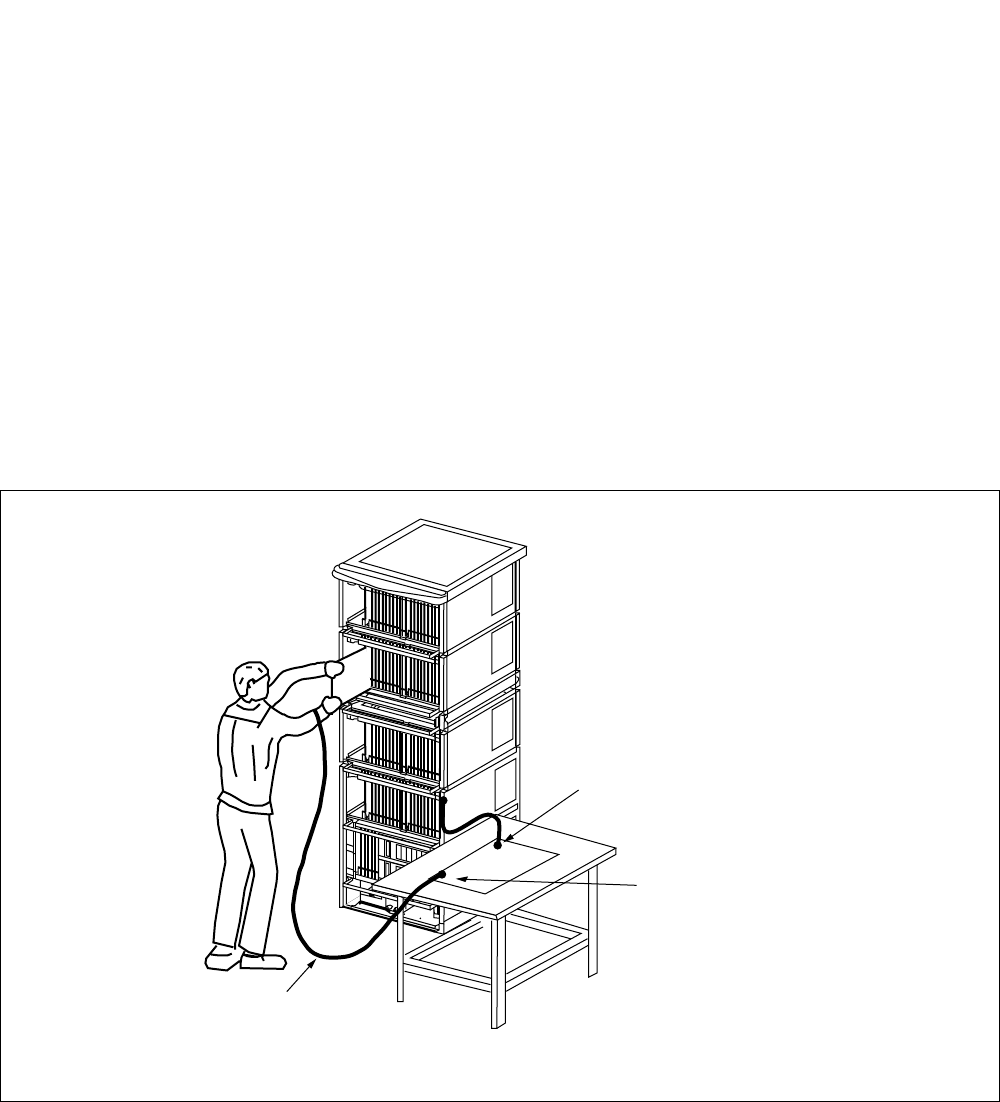
NDA-24307 CHAPTER 2
Page 41
Issue 1
SYSTEM MAINTENANCE OUTLINE
3. HOW TO READ PRECAUTIONS, DIAGNOSTIC, AND FAULT REPAIR INFORMATION
3.1 Precaution about Diagnostic Procedure/Fault Repair Procedure
When performing diagnostic procedures/fault repair procedures, be aware of the following actions:
(1) When replacing a circuit card with a spare, handle the circuit card using the Field Service Kit.
(a) To protect the circuit card from static electricity, wear a wrist strap before handling the circuit card.
(b) Before extracting the circuit card from its mounting slot, set its MB switch to the UP side (ON).
(2) When holding a circuit card by hand, wear gloves and be careful not to touch mounted parts, gold-
plated terminal, etc., on the circuit card.
The 3M Model 8012 Portable Field Service Kit, shown in Figure 2-28, is recommended as an effective
countermeasure against static electricity.
Figure 2-28 3M® Model 8012 Portable Field Service Kit
Wrist Strap
Place the Circuit
Card on a
conductive sheet.
Connect ground wire to the Earth
terminal of the Module Group.
Note: 3M is a registered trademark of Minnesota Mining and Manufacturing, Inc.
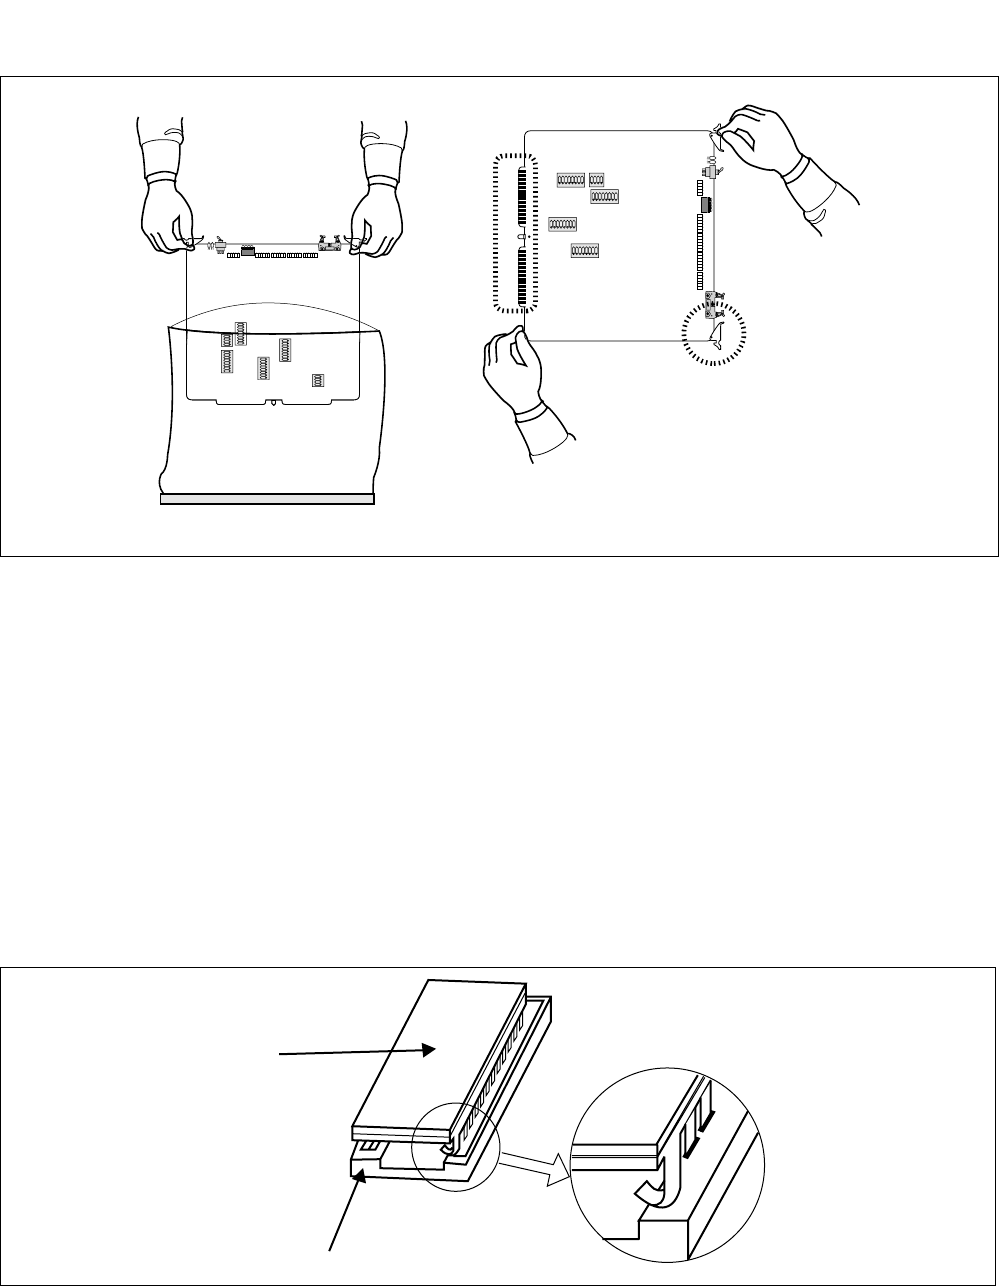
CHAPTER 2 NDA-24307
Page 42
Issue 1
SYSTEM MAINTENANCE OUTLINE
Figure 2-29 How to Hold a Circuit Card
(3) When a circuit card appears to be faulty, check the following items before replacing it with a spare:
(a) Poor connector contact at the circuit card may be responsible for the fault. Repeat insertion and
extraction of the circuit card a few times. Clean the connector portion, and recheck for proper
operation.
(b) Check the lead wires of vertically-mounted parts (resistors, capacitors, etc.) to ensure they have not
shorted each other or broken.
(c) Check the back side of the circuit card to see if there is any short-circuited soldered portion, or
modified cross connection wires erroneously left unconnected.
(d) Check the ROMs to ensure proper seating in the IC socket. Figure 2-30 shows a leg that is bent and
not set in the socket.
Figure 2-30 How to Set the ROM in IC Socket
1234
OFF
12345678
OFF
12345678
OFF
12345678
OFF
12345678
OFF
1234
OFF
1234
OFF
12345678
OFF
12345678
OFF
12345678
OFF
12345678
OFF
Card Puller Tab
Circuit Card
Circuit Card
Plastic Bag
Gold Plated Terminal
Note
Note: Do not touch the Gold Plated Terminal with bare hands.
A pin is bent, not
inserted in the socket.
ROM
SOCKET
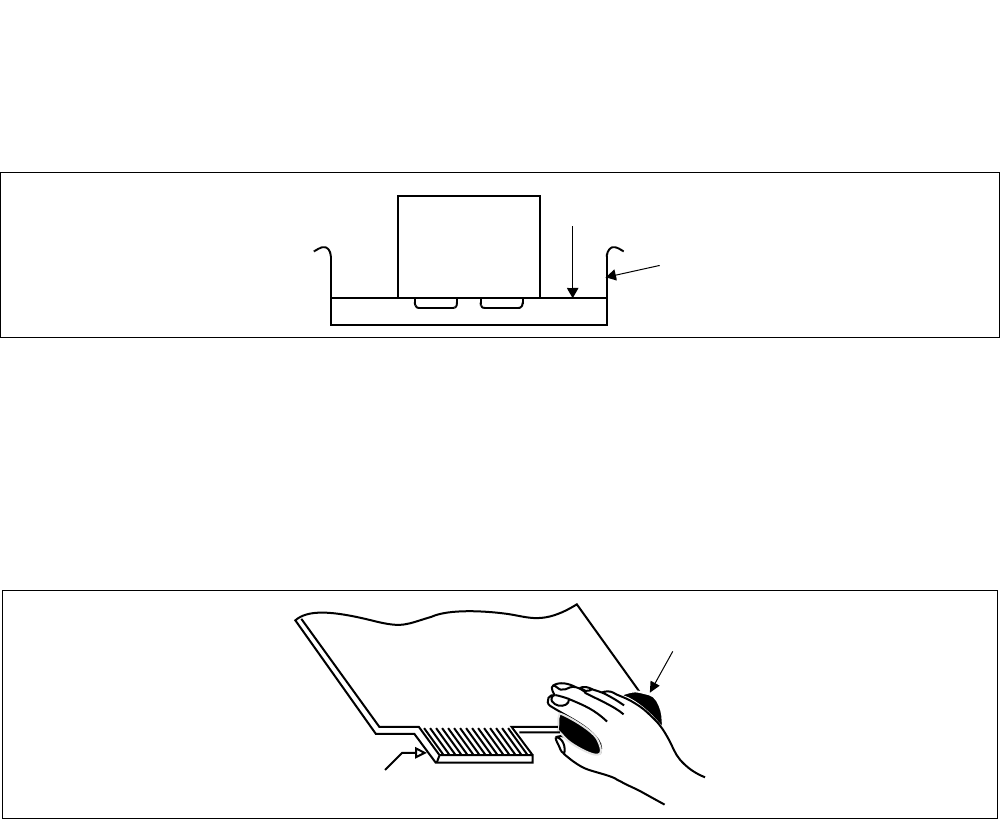
NDA-24307 CHAPTER 2
Page 43
Issue 1
SYSTEM MAINTENANCE OUTLINE
(4) How to clean the connector portion (gold-plated terminal):
(a) Dip the gold-plated terminal portion in the cleaning fluid for 3 to 5 seconds (only PA-XX type circuit
card), as shown in Figure 2-31.
Figure 2-31 How to Clean the Connector Portion
Note 1: Some of the parts are subject to damage if they come in contact with the cleansing liquid. Be careful
to allow only the connector portion (gold-plated terminal) to contact the cleaning liquid.
Note 2: Be sure to use fresh cleaning fluid (FREON or isopropyl alcohol).
(b) Using a soft cotton cloth, wipe both sides of the connector portion (gold-plated terminal) clean (only
PA-XX type circuit card), as shown in Figure 2-32.
Figure 2-32 How to Clean Gold-Plated Terminal
Note 1: Use cloth (gauze, etc.) to clean.
Note 2: After wiping, be careful not to leave lint on the surface of the circuit card.
(5) When a check on the flat cable or LT cable is directed in the tree, check the following items:
(a) Make a visual check to see if the connector is properly connected.
(b) Poor connector contact may be responsible for the fault. Repeat connection and disconnection a few
times, and check again to see if the connector is properly connected.
(c) Perform continuity test on the flat cable.
(6) When replacing the circuit card is directed in the tree, replace the circuit card with a spare as per Chapter 4.
(7) When multiple circuit cards appear to be faulty, before replacing them with spares, remount them (one at
a time) into their slots, to determine which cards should be replaced.
Circuit
Card
Cleaning
Fluid
Container
gauze
Gold-plated terminal

CHAPTER 2 NDA-24307
Page 44
Issue 1
SYSTEM MAINTENANCE OUTLINE
The following is an example where the fault was recovered after the replacement of circuit cards:
(8) When a fault recovery is completed, use the RALM/RALMN command to clear all the alarm indications
and registered system messages. If required, restore temporary cross connections and transient data for
testing to the original ones.
Set the 1st circuit card back into its mounting slot
If the fault recurs: Replace the circuit card.
Set the 2nd circuit card back into its mounting slot
If the fault recurs: Replace the circuit card.
Set the 3rd circuit card back into its mounting slot
If the fault recurs: Replace the circuit card.
If a circuit card is found to be faulty, send the faulty circuit card for repair.
The fault may be a temporary one, or due to poor contact of the circuit card. Observe the
situation for a while.
START
END

NDA-24307 CHAPTER 2
Page 45
Issue 1
SYSTEM MAINTENANCE OUTLINE
3.2 How to Follow Diagnostic Procedure/Fault Repair Procedure
(a) Diagnostic Work
A fault diagnostic procedure by system message is explained in the “TREE” format on an individual
system message basis.
•Proceed with judgment as to whether the fault status coincides with the indicated status, following
the sequence beginning from START.
•How to proceed with the diagnosis work is explained in Figure 2-33.
STEP 1 Determine whether the fault coincides with the fault status (1) in Figure 2-33.
STEP 2 If the fault status does coincide, the fault is indicated by (2). Repair the fault by referring to the
relevant section in Chapter 5. Otherwise, proceed to (3).
STEP 3 Perform the work indicated by (3). The result of the work (3) is broken down as indicated by
(4).
STEP 4 Determine whether the result of work (3) coincides with the status indicated by (5). If so, the
fault(s) is/are indicated either by (6) or by (7). If not, proceed to the next Step.
STEP 5 Perform the work indicated by (8), and if the result of the work is the same as the status
indicated, the fault is indicated by (9). If the fault repair work indicated by (9) affects another
normal line, recheck the work as indicated by (10).
(b) Fault Repair Procedure
A fault repair procedure is explained by means of “TREE” format in Chapter 5. The following
explains how to follow the “TREE” format and proceed with designated work. See Figure 2-34.
•Begin from START and proceed with the necessary repair work following the sequence.
•When a faulty circuit card (or circuit cards) is suspected, replace the faulty circuit card with a spare
in accordance with the work procedure pertaining to that specific circuit card.
STEP 1 Replace the circuit card indicated by (A) with a spare and check it. Perform the detailed work
as per (B). If the fault status is beyond repair, proceed to the next step.
STEP 2 If the range of the fault or the system configuration is as indicated by (C), perform a check as
indicated by (D). If the fault status is beyond repair, proceed to the next step.
STEP 3 Replace the circuit card indicated by (E) with a spare and check it. The detailed procedure
indicated by (G) varies with the system configuration indicated by (F).
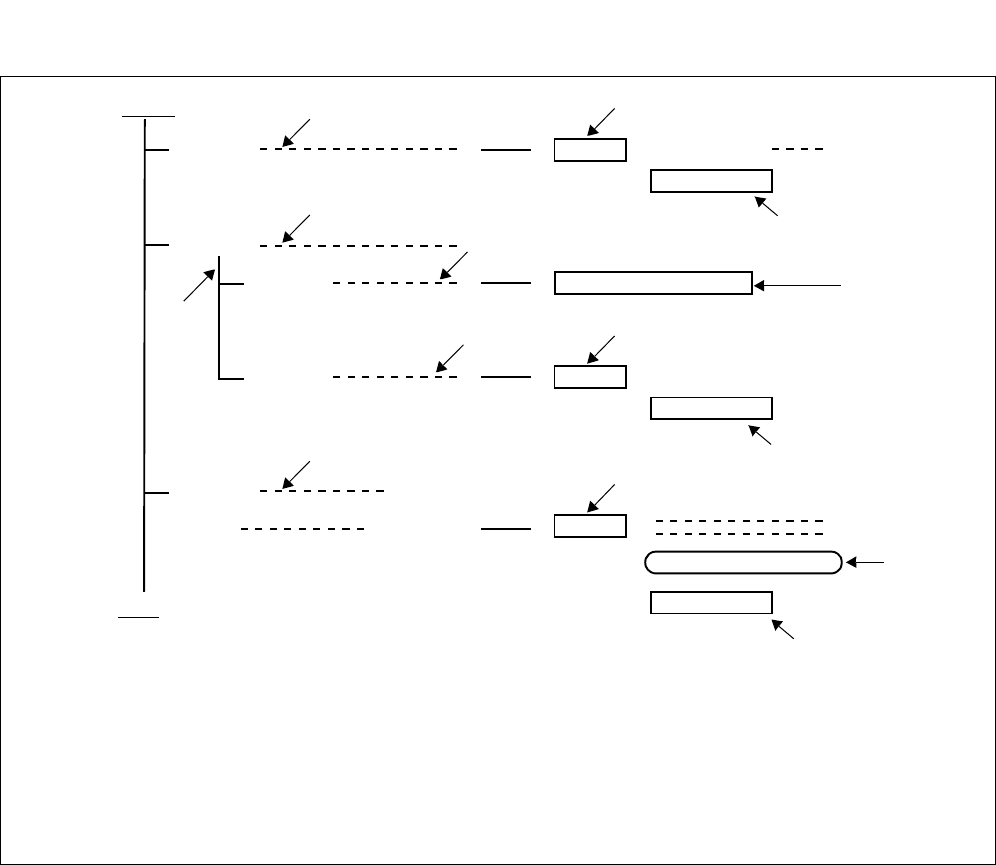
CHAPTER 2 NDA-24307
Page 46
Issue 1
SYSTEM MAINTENANCE OUTLINE
Figure 2-33 Diagnostic Work Items and Symbols Example
FAULT SUPERVISION
START
END
When FAULT
Section No.
(1)
: It is the fault of
Perform
(3)
(4)
When
(5)
(2)
When FAULT
Section No.
: It is the fault of
(7)
When
(8)
with
performed FAULT
Section No.
:
(9)
CHECK OF WORK
(6)
(10)
(11)
(Chapter 5)
(Chapter 5)
(Chapter 5)
(11)
(5)
Note: (1): Judgment of fault status
(2),(6),(7),(9): When the fault status coincides with the indication, the cause of the fault is indicated.
(11): When repairing the fault, refer to the relevant section in Chapter 5.
(3): Operating items for diagnosis
(4): Branching of the result of the operation
(5): Judgment of the status of the result of the operation
(8): When operating method is unknown, refer to Chapter 6.
(11)
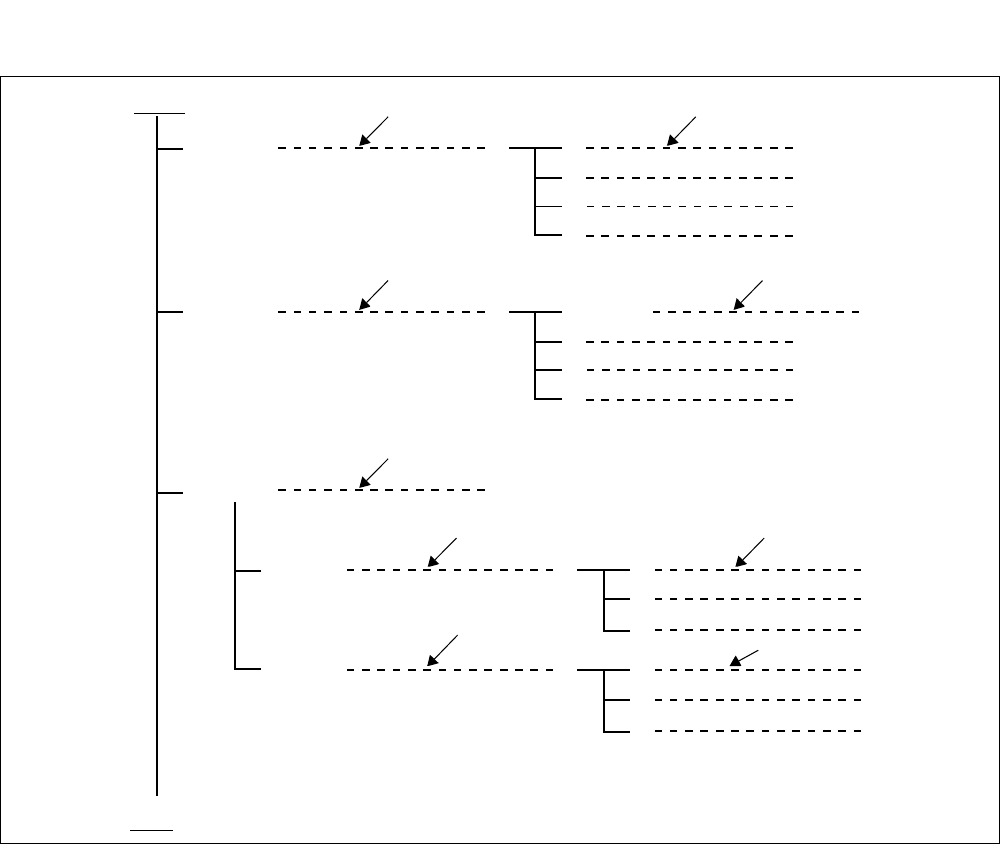
NDA-24307 CHAPTER 2
Page 47
Issue 1
SYSTEM MAINTENANCE OUTLINE
Figure 2-34 Recovery Procedure Example
START
END
Check
(A) (B)
When
(C) (D)
When
(F) (G)
Check
Check
(E)
When
(G)
(F)

CHAPTER 2 NDA-24307
Page 48
Issue 1
SYSTEM MAINTENANCE OUTLINE
4. REPORTING FAULT TO NEC
When the cause of a fault is uncertain, make note of the situation involved and report it to NEC. When
forwarding faulty circuit cards to NEC, exercise caution to protect from static electricity.
4.1 Fault Reporting Method
The following three items must be included in the report without fail:
(1) Faulty situation (reports should be similar to “dial tone is not heard only on individual lines,” “incoming
C.O. line calls are not able to be terminated only to a specific ATTCON/DESKCON,” etc.)
•Faulty phenomena
On lifting the handset, dial tone is not heard but side tone is heard, etc.
•History of fault
When did the fault occur? What kind of repair procedure has been executed? Does the fault still exist
or not exist? etc.
•Range of fault
Range of fault should be reported: Single line?, Specific trunk?, Specific circuit card?, Specific PIM?,
Whole system?, etc.
(2) Circuit Card Version Number, Program Name, and Program Package Version Number of the circuit card.
Figure 2-35 shows an example of PA-16LCBE circuit card.
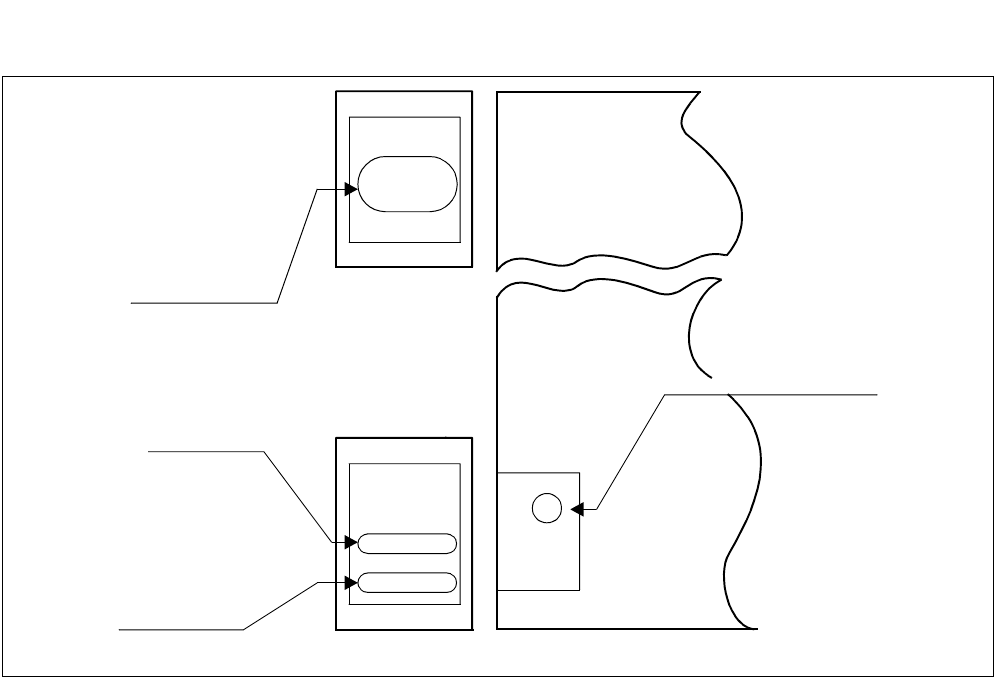
NDA-24307 CHAPTER 2
Page 49
Issue 1
SYSTEM MAINTENANCE OUTLINE
Figure 2-35 Circuit Card Version Number, Program Name, and Program Package Version Number
PA-
16LCBE
SPA-
16LCBE
SP 785
A 6A
Front
Program Package
Version Number
Program Name
Circuit Card Name
9A 91-03
TR 5448
Right View of Circuit Card
Circuit Card Version Number

CHAPTER 2 NDA-24307
Page 50
Issue 1
SYSTEM MAINTENANCE OUTLINE
4.2 Forwarding Faulty Circuit Card Method
Send the faulty circuit card to the NEC agent to whom a request is made for a replacement card. Adhere
to the following procedure for sending the faulty circuit card:
(1) Insert connector covers onto the circuit card terminals.
(2) Put the circuit card into a static electricity protective bag.
(3) Pack the circuit card with air cap, etc.
(4) Set the circuit card into the cardboard box for that specific circuit card.
(5) If multiple circuit cards are to be sent, set each circuit card in a separate cardboard box and stuff the box
with shock absorbing material.
Note: When sending a faulty circuit card, put it in a static guard bag. To prevent damage, NEVER place the
circuit card in a vinyl bag or ship it without a protective bag.

NDA-24307 CHAPTER 3
Page 51
Issue 1
CHAPTER 3 SYSTEM MESSAGES
This chapter explains how to read and analyze system messages displayed during routine diagnosis, system op-
eration status controlling, and occurrence of a fault within the system. Table 3-1 provides a list of system mes-
sages.
Table 3-1 List of System Messages
MESSAGE NO. SYSTEM MESSAGE PAGE
0-C Reset Interrupt 56
0-D CPU Clock Down 58
0-E C-Level Infinite Loop 59
0-F Memory Failure 61
0-G B-Level Infinite Loop (Permanent) 63
0-H B-Level Infinite Loop (Temporary) 64
0-I Mate CPU Failure 65
0-J Abnormal Interrupt 66
1-A Both TSW Failure (Permanent) 67
1-B TSW Failure (Permanent) 68
1-C Both TSW Write Failure 69
1-D TSW Write Failure 70
1-E Both TSW Clock Failure 71
1-F TSW Clock Failure 72
1-G Both HSW Failure 73
1-H HSW Failure 74
1-I Both HSW Write Failure 75
1-J HSW Write Failure 76
1-K Both HSW CLK Failure 77
1-L HSW CLK Failure 79
1-O Both PLO Failure 81
1-P PLO Failure 83
1-S Module Group Down Failure 85
1-T TSW ACT Change Report 86
1-U DLKC Data Transfer Failure (Permanent) 88
1-V DLKC Data Transfer Failure (Temporary) 89
1-W PLO Restore 90
1-X LN Æ ISW CLK/FH Failure 91

CHAPTER 3 NDA-24307
Page 52
Issue 1
SYSTEM MESSAGES
1-Y LN Æ ISW CLK/FH Failure (Both) 93
1-Z LN Æ ISW CLK/FH Release 95
2-T AP-INT Data Transfer Failure (Permanent) Note 1 -
2-U AP-INT Data Transfer Failure (Temporary) Note 1 -
2-V IP Data Transfer Failure (Permanent) Note 1 -
2-W IP Data Transfer Failure (Temporary) Note 1 -
3-B C-Level Infinite Loop (Permanent) 97
3-C C-Level Infinite Loop (Temporary) 98
3-D Lock-Up Failure (Permanent) 99
3-E Lock-Up Failure (Temporary) 100
3-F -48V Over Current 101
3-G Ground Failure 102
3-H Digital Line Warning 103
3-I Digital Line Failure 104
3-J Digital Line Restore 105
4-C Both TSW Ready Failure 106
4-D TSW Ready Failure 107
4-E Both HSW Ready Failure 108
4-F HSW Ready Failure 109
4-Q DLKC Ready Failure 110
4-R IO Ready Failure for UAP Note 1 -
4-S MUX Ready Failure 111
4-T Both MUX Ready Failure 112
4-U PCI Card Failure 113
4-V PCI Card Failure Recovered 114
6-A System Failure 115
6-B RGU and Howler Failure 116
6-C Line Load Control Start 117
6-D Line Load Control Stop 118
6-H Bad Call Notification 119
6-I STA-Test Connection Data 124
6-J Emergency Call 127
6-L Emergency Control Start 128
Table 3-1 List of System Messages (Continued)
MESSAGE NO. SYSTEM MESSAGE PAGE

NDA-24307 CHAPTER 3
Page 53
Issue 1
SYSTEM MESSAGES
6-M Emergency Control Stop 129
6-N Abnormal Call Duration Data 130
6-O SMDR Output Buffer Overflow Alarm 133
6-P SMDR Output Buffer Overflow Release 136
7-A System Initialize With Data Load 137
7-B System Initialize 139
7-C CPU MBR Key Turn ON 140
7-D CPU MBR Key Turn OFF 141
7-E TSW MBR Key Turn ON 142
7-F TSW MBR Key Turn OFF 143
7-I ALMC MB Key Turn ON 144
7-J ALMC MB Key Turn OFF 145
7-K PM MB Key Turn ON 146
7-L PM MB Key Turn OFF 147
7-M NCU MB Key Turn ON 148
7-N NCU MB Key Turn OFF 149
7-O Cyclic Diagnosis Normal 150
7-P Cyclic Diagnosis Information (Error Detected) 160
7-U PLO MB Key Turn ON 180
7-V PLO MB Key Turn OFF 181
13-A CCH Clock Failure 183
13-B CCH C-Level Infinite Loop Failure (Permanent) 184
13-C CCH C-Level Infinite Loop Failure (Temporary) 185
13-D CCH Lock-Up Failure (Permanent) 186
13-E CCH Lock-Up Failure (Temporary) 187
13-F CCH B-Level Infinite Loop Failure (Permanent) 188
13-G CCH B-Level Infinite Loop Failure (Temporary) 189
13-H CCS Link Failure (Permanent) 190
13-I CCS Link Failure (Temporary) 192
13-J Restoration From CCS Link Failure 194
13-K CCH Reset Interrupt Failure 195
13-N Digital Line Warning 196
13-O Digital Line Failure 197
Table 3-1 List of System Messages (Continued)
MESSAGE NO. SYSTEM MESSAGE PAGE

CHAPTER 3 NDA-24307
Page 54
Issue 1
SYSTEM MESSAGES
13-P Digital Line Restore 198
13-Q DAU Battery Operation 199
13-R DAU Line Operation 200
13-Z Power Failure 201
15-A VPS Failure (Temporary) 202
15-B VPS Failure (Permanent) 203
15-C VPS Restore 204
16-A Inside Trunk All Busy 205
16-B Virtual Tie Line Set Report 207
16-C Virtual Tie Line Cancel Report 208
16-E Virtual Tie Line Set Time Out 209
16-F Sender Start Time Out 212
16-K I/O Port Line OFF 219
16-L I/O Port Line Restore 220
16-M Hard Clock Failure 221
16-N Hard Clock Restore 222
16-T IOC Failure (Temporary) 223
16-U IOC Failure (Permanent) 224
16-X Station Exchanged Report 225
17-A CCH MBR Key Turn ON 228
17-B CCH MBR Key Turn OFF 229
17-C CCH MB Key Turn ON 230
17-D CCH MB Key Turn OFF 231
17-H Day/Night Change Information 232
17-O IOC MB Key Turn ON 234
17-P IOC MB Key Turn OFF 235
17-Q IOC MBR Key Turn ON 236
17-R IOC MBR Key Turn OFF 237
17-Y GATE-HSW MBR Key ON 238
17-Z GATE-HSW MBR Key OFF 239
23-J ATM Interface Warning Note 2 -
23-K ATM Interface Failure Note 2 -
23-L ATM Interface Recovered Note 2 -
Table 3-1 List of System Messages (Continued)
MESSAGE NO. SYSTEM MESSAGE PAGE

NDA-24307 CHAPTER 3
Page 55
Issue 1
SYSTEM MESSAGES
Note 1: Refer to “Fusion Network System Manual.”
Note 2: Refer to the manual related to ATM.
Note 3: Refer to “Wireless System Manual.”
Note 4: Refer to the manual related to OAI.
23-P Dch Back-Up Automatic Change Start/End 240
23-Q Dch Back-Up Manual Change Start/End 242
23-R ATM Interface Change Report Note 2 -
23-S FCCH Failure Note 1 -
23-T FCCH Failure Recovered Note 1 -
23-U FCCH Status Notice Note 1 -
23-W FCCH Advancing Start Note 1 -
23-X FCCH Advancing End Note 1 -
23-Y MUX Clock Failure 244
23-Z Both MUX Clock Failure 245
25-J ZT Operation Start Note 3 -
25-K ZT Set Up NG Note 3 -
25-L ZT Fault Note 3 -
25-M ZT Fault Recovery Note 3 -
25-N ZT Carrier Fault Note 3 -
26-N MAT Log 246
26-R Call Trace 247
26-V LAN Interface Error Report 251
26-W LAN Interface Release Report 255
27-C ATM Interface Port MB Key ON Note 2 -
27-D ATM Interface Port MB Key OFF Note 2 -
27-E DLMX MBR Key Turn ON 257
27-F DLMX MBR Key Turn OFF 258
27-G DLMX ACT Change Report 259
33-A MUX Clock Restore 260
33-B SDT Alarm Warning 261
33-C SDT Alarm Trouble 263
33-D SDT Alarm Restore 266
33-E SDT Interface Change Notify 267
Table 3-1 List of System Messages (Continued)
MESSAGE NO. SYSTEM MESSAGE PAGE
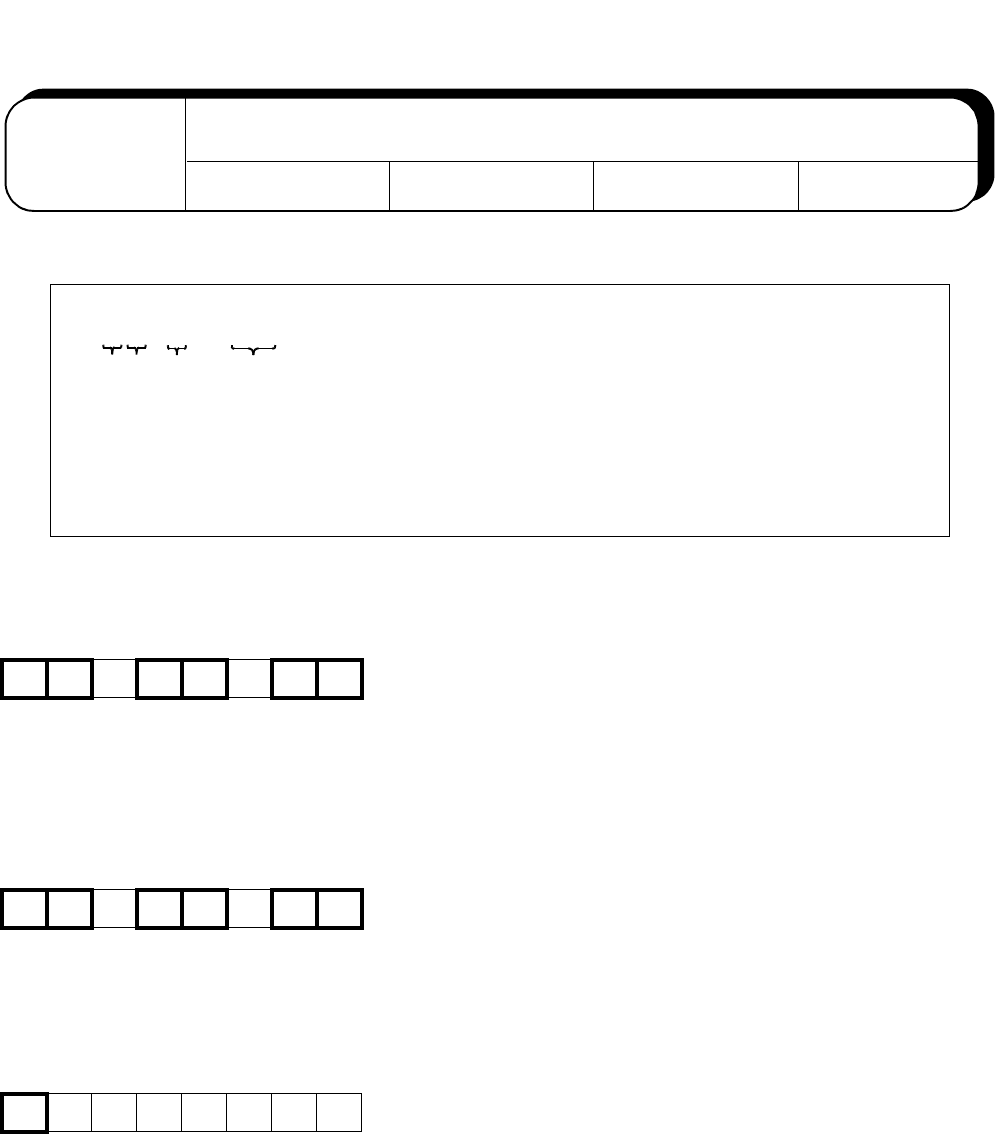
CHAPTER 3 NDA-24307
Page 56
Issue 1
SYSTEM MESSAGES
This message displays when the processor is reset due to a failure in the system.
➀ Self-CPU Restart Information
➁ Mate-CPU Restart Information (FF
H: not mounted)
➂ Related-call Release Result
See Chapter 5 for repair procedure.
1: XXXX XX00 XXXX 0000 2: 0000 0000 0000 0000 3: 0000 0000 0000 0000
➀ ➁ ➂ ➃
4: 0000 0000 0000 0000 5: 0000 0000 0000 0000 6: 0000 0000 0000 0000
7: 0000 0000 0000 0000 8: 0000 0000 0000 0000 9: 0000 0000 0000 0000
b7 b6 b4 b3 b1 b0
b7 b6 b4 b3 b1 b0
b7
Default Alarm:
MN
0-C Reset Interrupt
Default Grade:
3Grade Modified: Lamp Modified:
b0: 0/1 = -/Monitor Restart
b1: 0/1 = -Phase 1 Restart Note 1
b3: 0/1 = -/Initialization
b4: 0/1 = -/Data Copy Restart executed (for Dual-CPU system only)
b6: 0/1 = Program Load not executed/executed
b7: 0/1 = ACT/STBY (active system indication after restart)
b0: 0/1 = -/Monitor Restart
b1: 0/1 = -Phase 1 Restart Note 1
b3: 0/1 = -/Initialization
b4: 0/1 = -/Data Copy Restart executed (for Dual-CPU system only)
b6: 0/1 = Program Load not executed/executed
b7: 0/1 = ACT/STBY (active system indication after restart)
b7: 0/1 = Call Release Processing after restart
→
“Normal End”/
“Abnormal End”

NDA-24307 CHAPTER 3
Page 57
Issue 1
SYSTEM MESSAGES
➃Data Load Result after restart
processing
Note 1: Phase 1 Restart is executed when initializing the system without disrupting the following two-way
connections that have already been established:
•Basic two-way connections (STN-STN, STN-TRK, TRK-TRK)
•Fixed connections
•Two-way connections established on a Fusion link
For more details, see Chapter 6, Section 12.
Note 2: The number sharing data load also affects the data load of Dual Station Calling Over-FCCS.
b7 b6 b5 b4 b3 b2 b1 b0
b11 b9 b8
b0: 0/1 = Office Data Load
→
“Normal End”/“Abnormal End”
b1: 0/1 = Call Fowarding Data Load
→
“Normal End”/“Abnormal End”
b2: 0/1 = Individual Speed Calling data load
→
“Normal End”/“Abnormal
End”
b3: 0/1 = RCF Data Load
→
“Normal End”/“Abnormal End”
b4: 0/1 = Name Display Data Load
→
“Normal End”/“Abnormal End”
b5: 0/1 = Network DM Load
→
“Normal End”/“Abnormal End”
b6: 0/1 = Local DM Load
→
“Normal End”/“Abnormal End”
b7: 0/1 = DM Load/Non Load
b8: 0/1 = User Assign Soft Key data load
→
“Normal End”/“Abnormal
End”
b9: 0/1 = Number Sharing data load is “Normal End”/“Abnormal End”
Note 2
b11: 0/1 = Call Block data load is “Normal End”/“Abnormal End”

CHAPTER 3 NDA-24307
Page 58
Issue 1
SYSTEM MESSAGES
This message displays when a fault has occurred to the clock oscillator in the CPU.
➀ Self-CPU Restart Information
➁ Mate-CPU Restart Information (FF
H: not mounted)
➂ Related Call Information
See Chapter 5 for repair procedure.
1: XXXX XX00 0000 0000 2: 0000 0000 0000 0000 3: 0000 0000 0000 0000
➀ ➁➂
4: 0000 0000 0000 0000 5: 0000 0000 0000 0000 6: 0000 0000 0000 0000
7: 0000 0000 0000 0000 8: 0000 0000 0000 0000 9: 0000 0000 0000 0000
b7 b5 b4 b3 b0
b7 b5 b4 b3 b0
b7
Default Alarm:
MN
0-D CPU Clock Down
Default Grade:
3Grade Modified: Lamp Modified:
b0: 0/1=-/Monitor Restart
b3: 0/1=-/Initialization
b4: 0/1=-/Data Copy restart (for Dual-CPU system only)
b5: 0/1=-/MB control
b7: 0/1=ACT/STBY (active system indication after restart)
b0: 0/1=-/Monitor Restart
b3: 0/1=-/Initialization
b4: 0/1=-/Data Copy restart (for Dual-CPU system only)
b5: 0/1=-/MB control
b7: 0/1=ACT/STBY (active system indication after restart)
b7: 0/1=Released/Not released
NDA-24307 CHAPTER 3
Page 59
Issue 1
SYSTEM MESSAGES
C-level infinite loop is a state where a clock-level program, running under clock interrupt disable state, is in
an infinite loop. This message displays when the counter value to check the normality of the processing has
become abnormal.
➀ Self-CPU Restart Information after
clock fault occurrence
➁ Mate-CPU Restart Information
➂ NMI Factor
See Chapter 5 for repair procedure.
0-E C-level Infinite Loop
1: XXXX XXXX XXXX XXXX 2: XXXX XXXX XXXX XXXX 3: XXXX XXXX XXXX XXXX
➀ ➁➂ ➃➄
➅➆ ➇
4: XXXX XXXX XXXX XXXX 5: XXXX XXXX XXXX XXXX 6: XXXX XXXX XXXX XXXX
➇
7: XXXX XXXX XXXX XXXX 8: XX00 0000 0000 0000 9: 0000 0000 0000 0000
➇
b7 b5 b4 b3 b0
b7 b5 b4 b3 b0
b6 b5 b4 b3 b2 b1 b0
Default Alarm:
SUP
0-E C-Level Infinite Loop
Default Grade:
2Grade Modified: Lamp Modified:
b0: 0/1 = -/Monitor Restart
b3: 0/1 = -/Initialization
b4: 0/1 = -/Data Copy Restart (for Dual-CPU system only)
b5: 0/1 = -/MB control
b7: 0/1 = ACT/STBY (active system indication after restart)
b0: 0/1 = -/Monitor Restart
b3: 0/1 = -/Initialization
b4: 0/1 = -/Data Copy Restart (for Dual-CPU system only)
b5: 0/1 = -/MB control
b7: 0/1 = ACT/STBY (active system indication after restart)
b0: 0/1 = -/Reset by Power On
b1: 0/1 = -/Watchdog Timer timeout
b2: 0/1 = ISAGT is mounted/ISGAT is not mounted
b3: 0/1 = -/OSC clock interrupt on ISGAT
b4: 0/1 = -/IO parity Alarm
b5: 0/1 = -/IO ready Alarm
b6: 0/1 = -/External NMI

CHAPTER 3 NDA-24307
Page 60
Issue 1
SYSTEM MESSAGES
➃ System Controlling Port B
➄ CPU Alarm
➅ CPU Changeover Factors
➆ System ALM
➇ Data to be Analyzed by NEC
Engineers
b7 b6 b5 b4 b3 b2 b1 b0
b7 b6 b5 b4 b3 b2 b1 b0
b7 b6 b5 b4 b3 b2 b1 b0
b7 b6 b5 b4 b3 b2 b1 b0
b7 b6 b5 b4 b3 b2 b1 b0
b0: 0/1 = Timer 2 Gate ON/OFF
b1: 0/1 = Speaker Gate ON/OFF
b2: 0/1 = Parity Check Enable/MASK
b3: 0/1 = Channel Check Enable/MASK
b4: 0/1 = -/RAM Refresh Pulse Output State
b5: 0/1 = -/Timer 2 Output State
b6: 0/1 = -/Channel Check Error Detected
b7: 0/1 = -/Parity Error Detected
b0: 0/1 = -/ACT-side Processor CLK Alarm
b1: 0/1 = -/ACT-side Processor COP Alarm
b2: 0/1 = -/ACT-side Processor MEM Alarm
b3: 0/1 = -/ACT-side Processor Emergency Timer Overflow
b4: 0/1 = -/STBY-side Processor CLK Alarm
b5: 0/1 = -/STBY-side Processor COP Alarm
b6: 0/1 = -/STBY-side Processor MEM Alarm
b7: 0/1 = -/STBY-side Processor Emergency Timer Overflow
b0: 0/1 = -/CLK Alarm
b1: 0/1 = -/Emergency Timer Overflow
b2: 0/1 = -/SOFT EMA
b3: 0/1 = -/SOFT changeover
b4: 0/1 = -/Emergency Counter Overflow
b5: 0/1 = STBY/ACT
b6: 0/1 = Dual/Single
b7: 0/1 = CPU 0/CPU 1
b0: 0/1 = -/Main Power Alarm
b1: 0/1 = -/Power Alarm
b2: 0/1 = -/FUSE Alarm
b3: 0/1 = -/TEMP MJ Alarm
b4: 0/1 = -/TEMP MN Alarm
b5: 0/1 = -/Parity Alarm
b6: 0/1 = Card is not mounted/mounted
b7: 0/1 = -/EMA CLK Alarm
NDA-24307 CHAPTER 3
Page 61
Issue 1
SYSTEM MESSAGES
This message displays when a CPU memory read/write error occurs.
➀Information on Self-CPU Restart
after detection of a clock fault
➁ Mate-CPU Restart Information
➂ NMI Factor
See Chapter 5 for repair procedure.
0-F Memory Failure
1: XXXX XXXX XXXX XXXX 2: XXXX XXXX XXXX XXXX 3: XXXX XXXX XXXX XXXX
➀ ➁➂ ➃ ➄ ➅ ➆➇
4: XXXX XXXX XXXX XXXX 5: XXXX XXXX XXXX XXXX 6: XXXX XXXX XXXX XXXX
➇
7: XXXX XXXX XXXX XXXX 8: XX00 0000 0000 0000 9: 0000 0000 0000 0000
➇
b7 b5 b4 b3 b0
b7 b5 b4 b3 b0
b6 b5 b4 b3 b2 b1 b0
Default Alarm:
SUP
0-F Memory Failure
Default Grade:
3Grade Modified: Lamp Modified:
b0: 0/1 = -/Monitor Restart
b3: 0/1 = -/Initialization
b4: 0/1 = -/Data Copy Restart (for Dual-CPU system only)
b5: 0/1 = -/MB control
b7: 0/1 = ACT/STBY (active system indication after restart)
b0: 0/1 = -/Monitor Restart
b3: 0/1 = -/Initialization
b4: 0/1 = -/Data Copy Restart (for Dual-CPU system only)
b5: 0/1 = -/MB control
b7: 0/1 = ACT/STBY (active system indication after restart)
b0: 0/1 = -/Reset by Power On
b1: 0/1 = -/Watchdog Timer timeout
b2: 0/1 = ISGAT is mounted/ISGAT is not mounted
b3: 0/1 = -/OSC clock interrupt on ISGAT
b4: 0/1 = -/IO parity Alarm
b5: 0/1 = -/IO ready Alarm
b6: 0/1 = -/External NMI

CHAPTER 3 NDA-24307
Page 62
Issue 1
SYSTEM MESSAGES
➃ System Controlling Port B
➄ CPU Alarm
➅ CPU Changeover Factors
➆ System ALM
➇ Data to be Analyzed by NEC
Engineers
b7 b6 b5 b4 b3 b2 b1 b0
b7 b6 b5 b4 b3 b2 b1 b0
b7 b6 b5 b4 b3 b2 b1 b0
b7 b6 b5 b4 b3 b2 b1 b0
b7 b6 b5 b4 b3 b2 b1 b0
b0: 0/1 = Timer 2 Gate ON/OFF
b1: 0/1 = Speaker Gate ON/OFF
b2: 0/1 = Parity Check Enable/MASK
b3: 0/1 = Channel Check Enable/MASK
b4: 0/1 = -/RAM Refresh Pulse Output State
b5: 0/1 = -/Timer 2 Output State
b6: 0/1 = -/Channel Check Error Detected
b7: 0/1 = -/Parity Error Detected
b0: 0/1 = -/ACT-side Processor CLK Alarm
b1: 0/1 = -/ACT-side Processor COP Alarm
b2: 0/1 = -/ACT-side Processor MEM Alarm
b3: 0/1 = -/ACT-side Processor Emergency Timer Overflow
b4: 0/1 = -/STBY-side Processor CLK Alarm
b5: 0/1 = -/STBY-side Processor COP Alarm
b6: 0/1 = -/STBY-side Processor MEM Alarm
b7: 0/1 = -/STBY-side Processor Emergency Timer Overflow
b0: 0/1 = -/CLK Alarm
b1: 0/1 = -/Emergency Timer Overflow
b2: 0/1 = -/SOFT EMA
b3: 0/1 = -/SOFT changeover
b4: 0/1 = -/Emergency Counter Overflow
b5: 0/1 = STBY/ACT
b6: 0/1 = Dual/Single
b7: 0/1 = CPU 0/CPU 1
b0: 0/1 = -/Main Power Alarm
b1: 0/1 = -/Power Alarm
b2: 0/1 = -/FUSE Alarm
b3: 0/1 = -/TEMP MJ Alarm
b4: 0/1 = -/TEMP MN Alarm
b5: 0/1 = -/Parity Alarm
b6: 0/1 = Card is not mounted/mounted
b7: 0/1 = -/EMA CLK Alarm
NDA-24307 CHAPTER 3
Page 63
Issue 1
SYSTEM MESSAGES
This message displays when a B-level infinite loop failure occurs.
➀Information on Self-CPU Restart
after detection of a clock fault
➁ Mate-CPU Restart Information
➂ B-level Infinite Loop
➃ Data to be Analyzed by NEC Engineers
See Chapter 5 for repair procedure.
0-F Memory Failure
1: XXXX XXXX XXXX XXXX 2: XXXX XXXX XXXX XXXX 3: XXXX XXXX XXXX XXXX
➀ ➁➂ ➃
4: XXXX XXXX XXXX XXXX 5: XXXX XXXX XXXX XXXX 6: XXXX XXXX XXXX XXXX
➃
7: XXXX XXXX XXXX XXXX 8: XX00 0000 0000 0000 9: 0000 0000 0000 0000
➃
b7 b5 b4 b3 b0
b7 b5 b4 b3 b0
b1 b0
b7 b6 b5 b4 b3 b2 b1 b0
Default Alarm:
MN
0-G B-Level Infinite Loop (Permanent)
Default Grade:
2Grade Modified: Lamp Modified:
b0: 0/1 = -/Monitor Restart
b3: 0/1 = -/Initialization
b4: 0/1 = -/Data Copy restart (for Dual-CPU system only)
b5: 0/1 = -/MB control
b7: 0/1 = ACT/STBY (active system indication after restart)
b0: 0/1 = -/Monitor Restart
b3: 0/1 = -/Initialization
b4: 0/1 = -/Data Copy Restart (for Dual-CPU system only)
b5: 0/1 = -/MB control
b7: 0/1 = ACT/STBY (active system indication after restart)
b0: 0/1 = -/B-level Infinite Loop
b1: 0/1 = -/Task Timer Timeout

CHAPTER 3 NDA-24307
Page 64
Issue 1
SYSTEM MESSAGES
This message displays when, in the CPU program processing, the counter value to check the normality of the
processing has become abnormal.
➀ Self-CPU Restart Information
➁ Mate-CPU Restart Information
(FF H: not mounted)
➂
➃ Data analyzed by NEC Engineers
See Chapter 5 for repair procedure.
1: XXXX XXXX XXXX XXXX 2: XXXX XXXX XXXX XXXX 3: XXXX XXXX XXXX XXXX
➀ ➁ ➂ ➃ ➃ ➃
4: XXXX XXXX XXXX XXXX 5: XXXX XXXX XXXX XXXX 6: XXXX XXXX XXXX XXXX
➃➃➃
7: XXXX XXXX XXXX XXXX 8: XX00 0000 0000 0000 9: 0000 0000 0000 0000
➃➃
b7 b5 b4 b3 b0
b7 b5 b4 b3 b0
b1 b0
Default Alarm:
SUP
0-H B-Level Infinite Loop (Temporary)
Default Grade:
1Grade Modified: Lamp Modified:
b0: 0/1 = -/Monitor Restart
b3: 0/1 = -/Initialization
b4: 0/1 = -/Data Copy restart (for Dual-CPU system only)
b5: 0/1 = -/MB control
b7: 0/1 = ACT/STBY (active system indication after restart)
b0: 0/1 = -/Monitor Restart
b3: 0/1 = -/Initialization
b4: 0/1 = -/Data Copy restart (for Dual-CPU system only)
b5: 0/1 = -/MB control
b7: 0/1 = ACT/STBY (active system indication after restart)
b0: 0/1 = -/B-level Infinite Loop
b1: 0/1 = -/Task Timer Timeout
NDA-24307 CHAPTER 3
Page 65
Issue 1
SYSTEM MESSAGES
This message displays when a fault, such as the Clock down or C-level infinite loop error, has occurred.
➀ STBY-side CPU Fault Information
See Chapter 5 for repair procedure.
1: XX00 0000 0000 0000 2: 0000 0000 0000 0000 3: 0000 0000 0000 0000
➀
4: 0000 0000 0000 0000 5: 0000 0000 0000 0000 6: 0000 0000 0000 0000
7: 0000 0000 0000 0000 8: 0000 0000 0000 0000 9: 0000 0000 0000 0000
b3 b2 b1 b0
Default Alarm:
SUP
0-I Mate CPU Failure
Default Grade:
3Grade Modified: Lamp Modified:
b0: 0/1 = -/CPU clock down
b1: 0/1 = -/C-level infinite loop
b2: 0/1 = -/Memory error, Parity alarm
b3: 0/1 = -/Emergency Timer Overflow
CHAPTER 3 NDA-24307
Page 66
Issue 1
SYSTEM MESSAGES
This message displays when the CPU detects abnormal interruption.
➀ Self-CPU Restart Information
➁ Mate-CPU Restart Information
(FF H: not mounted)
➂
➃ Data analyzed by NEC Engineers
See Chapter 5 for repair procedure.
1: XXXX XXXX XXXX XXXX 2: XXXX XXXX XXXX XXXX 3: XXXX XXXX XXXX XXXX
➀ ➁ ➂ ➃ ➃ ➃ ➃
4: XXXX XXXX XXXX XXXX 5: XXXX XXXX XXXX XXXX 6: XXXX XXXX XXXX XXXX
➃➃➃
7: XXXX XXXX XXXX XXXX 8: XX00 0000 0000 0000 9: 0000 0000 0000 0000
➃➃
b7 b5 b4 b3 b0
b7 b5 b4 b3 b0
b1 b0
Default Alarm:
SUP
0-J Abnormal Interrupt
Default Grade:
2Grade Modified: Lamp Modified:
b0: 0/1 = -/Monitor Restart
b3: 0/1 = -/Initialization
b4: 0/1 = -/Data Copy restart (for Dual-CPU system only)
b5: 0/1 = -/MB control
b7: 0/1 = ACT/STBY (active system indication after restart)
b0: 0/1 = -/Monitor Restart
b3: 0/1 = -/Initialization
b4: 0/1 = -/Data Copy restart (for Dual-CPU system only)
b5: 0/1 = -/MB control
b7: 0/1 = ACT/STBY (active system indication after restart)
b0: 0/1 = -/Abnormal Interruption (Hardware)
b3: 0/1 = -/Program Exception

NDA-24307 CHAPTER 3
Page 67
Issue 1
SYSTEM MESSAGES
This message displays when link information cannot be written into the switch memory of the TSW in both
systems.
➀TSW system in which a fault is
detected
➁ Status at the time of fault detection
➂ Data analyzed by NEC Engineers
See Chapter 5 for repair procedure.
1: XXXX XXXX XXXX XXXX 2: 0000 0000 0000 0000 3: 0000 0000 0000 0000
➀ ➁ ➂
4: 0000 0000 0000 0000 5: 0000 0000 0000 0000 6: 0000 0000 0000 0000
7: 0000 0000 0000 0000 8: 0000 0000 0000 0000 9: 0000 0000 0000 0000
b0
b6 b0
Default Alarm:
MN
1-A Both TSW Failure (Permanent)
Default Grade:
3Grade Modified: Lamp Modified:
b0: 0/1 = TSW No. 0/TSW No. 1
b0: 0/1 = TSW No. 0 system/TSW No. 1 system
b6: Speech Path in ACT status
0/1 = No. 0 system/No. 1 system

CHAPTER 3 NDA-24307
Page 68
Issue 1
SYSTEM MESSAGES
This message displays when link information cannot be written into the switch memory of the TSW card in
one of the dual systems.
➀TSW system in which a fault is
detected
➁ Status at the time of fault detection
➂ Data analyzed by NEC Engineers
See Chapter 5 for repair procedure.
1: XXXX XXXX XXXX XXXX 2: 0000 0000 0000 0000 3: 0000 0000 0000 0000
➀ ➁ ➂
4: 0000 0000 0000 0000 5: 0000 0000 0000 0000 6: 0000 0000 0000 0000
7: 0000 0000 0000 0000 8: 0000 0000 0000 0000 9: 0000 0000 0000 0000
b0
b6 b0
Default Alarm:
MN
1-B TSW Failure (Permanent)
Default Grade:
3Grade Modified: Lamp Modified:
b0: 0/1 = TSW No. 0/TSW No. 1
b0: 0/1 = TSW No. 0/TSW No. 1
b6: 0/1 = Speech Path in ACT status
No. 0 system/No. 1 system

NDA-24307 CHAPTER 3
Page 69
Issue 1
SYSTEM MESSAGES
This message displays when the link information cannot be written into the switch memory of the TSW in both
systems.
➀TSW system in which a fault is
detected
➁
➂ Data analyzed by NEC Engineers
See Chapter 5 for repair procedure.
1: XXXX XXXX XXXX XXXX 2: 0000 0000 0000 0000 3: 0000 0000 0000 0000
➀ ➁ ➂
4: 0000 0000 0000 0000 5: 0000 0000 0000 0000 6: 0000 0000 0000 0000
7: 0000 0000 0000 0000 8: 0000 0000 0000 0000 9: 0000 0000 0000 0000
b0
b6 b0
Default Alarm:
MN
1-C Both TSW Write Failure
Default Grade:
2Grade Modified: Lamp Modified:
b0: 0/1 = TSW No. 0/TSW No. 1
b0: 0/1 = TSW No. 0/TSW No. 1
b6: 0/1 = Speech Path in ACT status
No. 0 system/No. 1 system

CHAPTER 3 NDA-24307
Page 70
Issue 1
SYSTEM MESSAGES
This message displays when the link information cannot be written into the switch memory of the TSW card
in one of the dual systems.
➀TSW system in which a fault is
detected
➁ Status at the time of fault detection
➂ Data analyzed by NEC Engineers
See Chapter 5 for repair procedure.
1: XXXX XXXX XXXX XXXX 2: 0000 0000 0000 0000 3: 0000 0000 0000 0000
➀ ➁ ➂
4: 0000 0000 0000 0000 5: 0000 0000 0000 0000 6: 0000 0000 0000 0000
7: 0000 0000 0000 0000 8: 0000 0000 0000 0000 9: 0000 0000 0000 0000
b0
b6 b0
Default Alarm:
MN
1-D TSW Write Failure
Default Grade:
2Grade Modified: Lamp Modified:
b0: 0/1 = TSW No. 0/TSW No. 1
b0: 0/1 = TSW No. 0/TSW No. 1
b6: 0/1 = Speech Path ACT status
TSW No. 0 system is ACT/TSW No. 1 system is ACT
NDA-24307 CHAPTER 3
Page 71
Issue 1
SYSTEM MESSAGES
This message displays when the system detects a clock failure, such as TSW internal clock down or Frame
Head down, in both systems.
➀TSW card in which a fault is
detected
➁ Clock status of No. 0 TSW
➂ Clock status of No. 1 TSW
Note: Refer to the meaning of ➁.
See Chapter 5 for repair procedure.
1: XXXX XX00 0000 0000 2: 0000 0000 0000 0000 3: 0000 0000 0000 0000
➀ ➁ ➂
4: 0000 0000 0000 0000 5: 0000 0000 0000 0000 6: 0000 0000 0000 0000
7: 0000 0000 0000 0000 8: 0000 0000 0000 0000 9: 0000 0000 0000 0000
b1 b0
b7 b6 b2
Default Alarm:
MN
1-E Both TSW Clock Failure
Default Grade:
3Grade Modified: Lamp Modified:
b0: 0/1 = -/Clock failure of No. 0 TSW
b1: 0/1 = -/Clock failure of No. 1 TSW
b2: 0/1 = -/DTG output down
b6: 0/1 = -/External 32 ch Clock (PLO) No. 0 System down
b7: 0/1 = -/External 32 ch Clock (PLO) No. 1 System down

CHAPTER 3 NDA-24307
Page 72
Issue 1
SYSTEM MESSAGES
This message displays when the system detects a clock failure, such as TSW internal clock down or Frame
Head down in one of the dual systems.
➀TSW card in which a fault is
detected
➁ Clock status of No. 0 TSW
➂ Clock status of No. 1 TSW
Note: Refer to the meaning of ➁.
See Chapter 5 for repair procedure.
1: XXXX XX00 0000 0000 2: 0000 0000 0000 0000 3: 0000 0000 0000 0000
➀ ➁ ➂
4: 0000 0000 0000 0000 5: 0000 0000 0000 0000 6: 0000 0000 0000 0000
7: 0000 0000 0000 0000 8: 0000 0000 0000 0000 9: 0000 0000 0000 0000
b1 b0
b7 b6 b2
Default Alarm:
MN
1-F TSW Clock Failure
Default Grade:
3Grade Modified: Lamp Modified:
b0: 0/1 = -/Clock failure of No. 0 TSW
b1: 0/1 = -/Clock failure of No. 1 TSW
b2: 0/1 = -/DTG output down
b6: 0/1 = -/External 32 ch Clock (PLO) No. 0 System down
b7: 0/1 = -/External 32 ch Clock (PLO) No. 1 System down

NDA-24307 CHAPTER 3
Page 73
Issue 1
SYSTEM MESSAGES
This message displays when the system detects any failure at the HSW in both systems.
➀ HSW detected as faulty
➁ System status at the time of fault
detection
➂ Wire Address
➃ Write Data
➄ Read Data
See Chapter 5 for repair procedure.
1: XXXX XXXX XXXX XX00 2: 0000 0000 0000 0000 3: 0000 0000 0000 0000
➀ ➁ ➂ ➃➄
4: 0000 0000 0000 0000 5: 0000 0000 0000 0000 6: 0000 0000 0000 0000
7: 0000 0000 0000 0000 8: 0000 0000 0000 0000 9: 0000 0000 0000 0000
b0
b7 b6 b4 b3 b2 b0
Default Alarm:
MN
1-G Both HSW Failure
Default Grade:
3Grade Modified: Lamp Modified:
b0: 0/1 = No. 0 system / No. 1 system
b0: HSW No. (0-1)
b2-b3: Kind of TSW
10 = Second Switching
b4: HSW No. (0-1)
b6: Speech Path in ACT state
0/1 = No. 0 system/No. 1 system
b7: Base clock in ACT state
Data analyzed by NEC Engineers.

CHAPTER 3 NDA-24307
Page 74
Issue 1
SYSTEM MESSAGES
This message displays when the system detects any failure at the HSW in one of the dual systems.
➀ HSW detected as faulty
➁ System status at the time of fault
detection
➂ Wire Address
➃ Write Data
➄ Read Data
See Chapter 5 for repair procedure.
1: XXXX XXXX XXXX XX00 2: 0000 0000 0000 0000 3: 0000 0000 0000 0000
➀ ➁ ➂ ➃➄
4: 0000 0000 0000 0000 5: 0000 0000 0000 0000 6: 0000 0000 0000 0000
7: 0000 0000 0000 0000 8: 0000 0000 0000 0000 9: 0000 0000 0000 0000
b0
b7 b6 b4 b3 b2 b0
Default Alarm:
MN
1-H HSW Failure
Default Grade: Grade Modified: Lamp Modified:
b0: 0/1 = No. 0 system / No. 1 system
b0: HSW No. (0-1)
b2-b3: Kind of TSW
10 = Second Switching
b4: HSW No. (0-1)
b6: Speech Path in ACT state
0/1 = No. 0 system/No. 1 system
b7: Base clock in ACT state
Data analyzed by NEC Engineers.
NDA-24307 CHAPTER 3
Page 75
Issue 1
SYSTEM MESSAGES
This message displays when the link information cannot be written into the switch memory of the HSW card
in both systems.
➀ HSW detected as faulty
➁ System status at the time of fault
detection
➂ Wire Address
➃ Write Data
➄ Read Data
See Chapter 5 for repair procedure.
1: XXXX XXXX XXXX XX00 2: 0000 0000 0000 0000 3: 0000 0000 0000 0000
➀ ➁ ➂ ➃➄
4: 0000 0000 0000 0000 5: 0000 0000 0000 0000 6: 0000 0000 0000 0000
7: 0000 0000 0000 0000 8: 0000 0000 0000 0000 9: 0000 0000 0000 0000
b0
b7 b6 b4 b3 b2 b0
Default Alarm:
MN
1-I Both HSW Write Failure
Default Grade:
2Grade Modified: Lamp Modified:
b0: 0/1 = No. 0 system / No. 1 system
b0: HSW No. (0-1)
b2-b3: Kind of TSW
10 = Second Switching
b4: HSW No. (0-1)
b6: Speech Path in ACT state
0/1 = No. 0 system/No. 1 system
b7: Base clock in ACT state
Data analyzed by NEC Engineers.

CHAPTER 3 NDA-24307
Page 76
Issue 1
SYSTEM MESSAGES
This message displays when the link information cannot be written into the switch memory of the HSW card
in one of the dual systems.
➀ HSW detected as faulty
➁ System status at the time of fault
detection
➂ Wire Address
➃ Write Data
➄ Read Data
See Chapter 5 for repair procedure.
1: XXXX XXXX XXXX XX00 2: 0000 0000 0000 0000 3: 0000 0000 0000 0000
➀ ➁ ➂ ➃➄
4: 0000 0000 0000 0000 5: 0000 0000 0000 0000 6: 0000 0000 0000 0000
7: 0000 0000 0000 0000 8: 0000 0000 0000 0000 9: 0000 0000 0000 0000
b0
b7 b6 b4 b3 b2 b0
Default Alarm:
MN
1-J HSW Write Failure
Default Grade:
2Grade Modified: Lamp Modified:
b0: 0/1 = No. 0 system / No. 1 system
b0: HSW No. (0-1)
b2-b3: Kind of TSW
10 = Second Switching
b4: HSW No. (0-1)
b6: Speech Path in ACT state
0/1 = No. 0 system/No. 1 system
b7: Base clock in ACT state
Data analyzed by NEC Engineers.
NDA-24307 CHAPTER 3
Page 77
Issue 1
SYSTEM MESSAGES
This message displays when the system detects a clock failure such as HSW internal clock down or Frame
Head down in both systems.
➀ HSW detected as faulty
➁ Details on failure
➂ Clock status of No. 0 HSW
1: XXXX XXXX XXXX 0000 2: 0000 0000 0000 0000 3: 0000 0000 0000 0000
➀ ➁ ➂ ➃ ➄ ➅
4: 0000 0000 0000 0000 5: 0000 0000 0000 0000 6: 0000 0000 0000 0000
7: 0000 0000 0000 0000 8: 0000 0000 0000 0000 9: 0000 0000 0000 0000
b0
b4 b0
b3 b1 b0
Default Alarm:
MN
1-K Both HSW CLK Failure
Default Grade:
3Grade Modified: Lamp Modified:
b0: 0/1 = No. 0 system / No. 1 system
b0: 0/1 = -/Clock failure in HSW
b4: HSW No. (0-1)
b0: 0/1 = -/HSW card internal clock down
b1: 0/1 = -/External 32 ch Clock (PLO) down
b3: 0/1 = -/Frame Head Return down

NDA-24307 CHAPTER 3
Page 79
Issue 1
SYSTEM MESSAGES
This message displays when the system detects a clock failure such as HSW internal clock down or Frame
Head down in both systems.
➀ HSW detected as faulty
➁ Details on failure
➂ Clock status of No. 0 HSW
1: XXXX XXXX XXXX 0000 2: 0000 0000 0000 0000 3: 0000 0000 0000 0000
➀ ➁ ➂ ➃ ➄ ➅
4: 0000 0000 0000 0000 5: 0000 0000 0000 0000 6: 0000 0000 0000 0000
7: 0000 0000 0000 0000 8: 0000 0000 0000 0000 9: 0000 0000 0000 0000
b0
b4 b0
b3 b1 b0
Default Alarm:
MN
1-L HSW CLK Failure
Default Grade:
3Grade Modified: Lamp Modified:
b0: 0/1 = No. 0 system / No. 1 system
b0: 0/1 = -/Clock failure in HSW
b4: HSW No. (0-1)
b0: 0/1 = -/HSW card internal clock down
b1: 0/1 = -/External 32 ch Clock (PLO) down
b3: 0/1 = -/Frame Head Return down

NDA-24307 CHAPTER 3
Page 81
Issue 1
SYSTEM MESSAGES
This message displays when the system detects a fault, such as input clock all down or output clock down in
the PLO/CLK cards (both systems).
➀ Detected PLO number
Note 1: For CLK in TSWM1 (used in LN only).
Note 2: For PLO in TSWM0 (used in LN only).
➁ Valid Information bit for Scan
Data 1
➂ Valid Information bit for Scan
Data 2
See Chapter 4 for the Circuit Card Replacement Procedure.
1: XXXX XXXX XX00 0000 2: 0000 0000 0000 0000 3: 0000 0000 0000 0000
➀ ➁ ➂ ➃ ➄
4: 0000 0000 0000 0000 5: 0000 0000 0000 0000 6: 0000 0000 0000 0000
7: 0000 0000 0000 0000 8: 0000 0000 0000 0000 9: 0000 0000 0000 0000
b7 b6 b0
b7 b6 b5 b4 b3 b2 b1 b0
b7 b6 b5 b4 b3 b2 b1 b0
Default Alarm:
MJ
1-O Both PLO Failure
Default Grade:
3Grade Modified: Lamp Modified:
b0: 0/1 = No. 0 PLO/No. 1 PLO
b6: 0/1 = -/CLK card failure Note 1
b7: 0/1 = -/PLO card failure Note 2
b0-b7: The bit position corresponding to the detected information in Scan
Data 1 ( ) is flagged “1”.
➃
b0-b7: The bit position corresponding to the detected information in Scan
Data 2 ( ) is flagged “1”.
➄
CHAPTER 3 NDA-24307
Page 82
Issue 1
SYSTEM MESSAGES
➃ Scan Data 1: Current Status of the
PLO card
➄ Scan Data 2: Current status of the
PLO card
Note 1: The clock status includes that of PH-CK18 (CLK) card.
Note 2: This information includes the failure detected in PH-CK18 (CLK) card.
b7 b6 b5 b4 b3 b2 b1 b0
b4 b1 b0
b0: Clock status at the time of detection Note 1
0/1 = STBY/ACT
b1: Circuit Card status at the time of detection
0/1 = PLO synchronizing/PLO self running or drifting
b2: 0/1 = -/Input clock down
b3, b4:Route of Input clock
b5: 0/1 = -/PLO input all down
b6: 0/1 = -/PLO output down Note 2
b7: 0/1 = -/Drifting
b3 b4 DCS Input Route Route of Input Clock
00 0 0
01 1 1
10 - 2
11 - 3
b0: 0/1 = -/5msec Burst Clock down
b1: 0/1 = -/Frame Synchronization from SYNC card is down
b4: 0/1 = -/Internal OSC clock down
NDA-24307 CHAPTER 3
Page 83
Issue 1
SYSTEM MESSAGES
This message displays when the system detects all the failures concerned with input clock down or output clock
down in the PLO/CLK card (one of dual system).
➀ Details on detected PLO
Note 1: For CLK in TSWM1 (used in LN only).
Note 2: For PLO in TSWM0 (used in LN only).
➁ Valid Information bit for Scan
Data 1
➂ Valid Information bit for Scan
Data 2
See Chapter 4 for the Circuit Card Replacement Procedure.
1: XXXX XXXX XX00 0000 2: 0000 0000 0000 0000 3: 0000 0000 0000 0000
➀ ➁ ➂ ➃ ➄
4: 0000 0000 0000 0000 5: 0000 0000 0000 0000 6: 0000 0000 0000 0000
7: 0000 0000 0000 0000 8: 0000 0000 0000 0000 9: 0000 0000 0000 0000
b0
b7 b6 b5 b4 b3 b2 b1 b0
b7 b6 b5 b4 b3 b2 b1 b0
Default Alarm:
MN
1-P PLO Failure
Default Grade:
3Grade Modified: Lamp Modified:
b0: 0/1 = No. 0 PLO/No. 1 PLO
b6: 0/1 = -/CLK card failure Note 1
b7: 0/1 = -/PLO card failure Note 2
b0-b7: The bit position corresponding to the detected information in Scan
Data 1 ( ) is flagged “1”.
➃
b0-b7: The bit position corresponding to the detected information in Scan
Data 2 ( ) is flagged “1”.
➄
CHAPTER 3 NDA-24307
Page 84
Issue 1
SYSTEM MESSAGES
➃ Scan Data 1: Status of the PLO card
➄ Scan Data 2: Current status of the
PLO card
Note 1: The clock status includes that of PH-CK18 (CLK) card.
Note 2: This information includes the failure detected in PH-CK18 (CLK) card.
b7 b6 b5 b4 b3 b2 b1 b0
b4 b1 b0
b0: Clock status at the time of detection Note 1
0/1 = STBY/ACT
b1: Circuit card status at the time of detection
0/1 = PLO synchronizing/PLO self running or drifting
b2: 0/1 = -/Input clock down
b3, b4:Route of Input clock
b5: 0/1 = -/PLO input all down
b6: 0/1 = -/PLO output down Note 2
b7: 0/1 = -/Drifting
b3 b4 DCS Input Route Route of Input Clock
00 0 0
01 1 1
10 - 2
11 - 3
b0: 0/1 = -/5msec clock down
b1: 0/1 = -/Frame signal from SYNC card is down
b4: 0/1 = -/Internal OSC clock down
NDA-24307 CHAPTER 3
Page 85
Issue 1
SYSTEM MESSAGES
This message displays when a fault of the speech path system has occurred in a specific Module Group. The
specific Module Group is placed into make-busy state.
➀ MG number of fault detection
➁ The kind of failure
➂ Speech Path/Clock System
See Chapter 4 for the Circuit Card Replacement Procedure.
1: XXXX XX00 0000 0000 2: 0000 0000 0000 0000 3: 0000 0000 0000 0000
➀ ➁ ➂
4: 0000 0000 0000 0000 5: 0000 0000 0000 0000 6: 0000 0000 0000 0000
7: 0000 0000 0000 0000 8: 0000 0000 0000 0000 9: 0000 0000 0000 0000
b0
b7 b6 b5 b4 b3 b2 b1 b0
b1 b0
Default Alarm:
MJ
1-S Module Group Down Failure
Default Grade:
3Grade Modified: Lamp Modified:
b0: 0/1 = Even-numbered MG/Odd-numbered MG
b0-b7: 00H/01H = -/ACT-side TSW fault
b0: ACT side speech path
0/1 = No. 0 system/No. 1 system
b1: ACT side clock
0/1 = No. 0 system/No. 1 system
CHAPTER 3 NDA-24307
Page 86
Issue 1
SYSTEM MESSAGES
This message displays when the changeover of the TSW system is executed.
➀ACT side Speech Path (TSW) after
changeover
➁ Reason for changeover
1: XXXX 0000 XXXX XXXX 2: 0000 0000 0000 0000 3: 0000 0000 XXXX XXXX
➀ ➁ ➂ ➃ ➄ ➅
4: 0000 0000 0000 0000 5: 0000 0000 0000 0000 6: 0000 0000 0000 0000
7: 0000 0000 0000 0000 8: 0000 0000 0000 0000 9: 0000 0000 0000 0000
b0
b7 b6 b5 b4 b3 b2 b1 b0
Default Alarm:
NON
1-T TSW ACT Change Report
Default Grade:
2Grade Modified: Lamp Modified:
19 21 22
b0: 0/1 = No. 0 system/No. 1 system
b7-b4 b3-b0 CARD CONTENTS
01TSWI/O Alarm
2 32 ch Clock down, FH down
3 24 ch Clock down, FH down
6 TSW SW Memory write failure
9 I/O Alarm release
10 32 ch Clock down recovered, FH down
recovered
11 24 ch Clock down recovered, FH down
recovered
13 TSW MBR key OFF
15 TSW ACT/STBY changeover by the
CMODI command
6 1 MUX MUX circuit card Ready failure
2 MUX circuit card Clock failure
20
NDA-24307 CHAPTER 3
Page 87
Issue 1
SYSTEM MESSAGES
➂~➅ Status of ACT side TSW card
~ Status of STBY side TSW
card
b7 b6 b5 b4 b3 b2 b1 b0
b7 b6 b5 b4 b3 b2 b1 b0
b0-b3, b4-b7: The status of TSW card in each MG (00~07)
0000 = Normal
0001 = Abnormal (Impossible to make links)
➂MG00 MG01
➃MG02 MG03
➄MG04 MG05
➅MG06 MG07
b7-b4 b3-b0
b0-b3, b4-b7: The status of TSW card in each MG (00~07)
0000 = Normal
0001 = Abnormal (Impossible to make links)
MG00 MG01
MG02 MG03
MG04 MG05
MG06 MG07
b7-b4 b3-b0
19
20
21
22
19 22

CHAPTER 3 NDA-24307
Page 88
Issue 1
SYSTEM MESSAGES
This message displays when DLKC data transfer failure (temporary), shown in message [1-V], occurs more
than 16 times an hour. At this time, the faulty DLKC card is shut and its switching network automatically
changes over.
➀ System status of faulty DLKC card
➁ Error Code
➂ Details on Switching Network
1: XXXX XX00 0000 0000 2: 0000 0000 0000 0000 3: 0000 0000 0000 0000
➀ ➁ ➂
4: 0000 0000 0000 0000 5: 0000 0000 0000 0000 6: 0000 0000 0000 0000
7: 0000 0000 0000 0000 8: 0000 0000 0000 0000 9: 0000 0000 0000 0000
b0
b7 b6 b5 b4 b3 b2 b1 b0
b1 b0
Default Alarm:
MN
1-U DLKC Data Transfer Failure (Permanent)
Default Grade:
3Grade Modified: Lamp Modified:
b0: 0/1 = No. 0 system / No. 1 system
01H: Firmware fault
02H: Data transfer time out to DLKC
03H: No answer time out (at DLKC)
04H: Data parity error
b0: Status of Speech Path System (including DLKC)
0/1 = No. 0 system is ACT/No. 1 system is ACT
b1: Status of basic clock
0/1 = No. 0 system is ACT/No. 1 system is ACT
NDA-24307 CHAPTER 3
Page 89
Issue 1
SYSTEM MESSAGES
This message displays when a data sending error or no answer error occurs at the time of data transfer from
CPU to DLKC card.
➀ System status of faulty DLKC card
➁ Error Code
➂ Details on Switching Network
Note: This data displays when the STBY DLKC card is detected as faulty.
1: XXXX XX00 0000 0000 2: 0000 0000 0000 0000 3: 0000 0000 0000 0000
➀ ➁ ➂
4: 0000 0000 0000 0000 5: 0000 0000 0000 0000 6: 0000 0000 0000 0000
7: 0000 0000 0000 0000 8: 0000 0000 0000 0000 9: 0000 0000 0000 0000
b0
b7 b6 b5 b4 b3 b2 b1 b0
b7 b1 b0
Default Alarm:
SUP
1-V DLKC Data Transfer Failure (Temporary)
Default Grade:
1Grade Modified: Lamp Modified:
b0: 0/1 = No. 0 system / No. 1 system
01H: Firmware fault
02H: Data transfer time out to DLKC
03H: No answer time out (at DLKC)
04H: Data parity error
b0: Status of Speech Path System (including DLKC)
0/1 = No. 0 system is ACT/No. 1 system is ACT
b1: Status of basic clock
0/1 = No. 0 system is ACT/No. 1 system is ACT
b7: Information on Reset of STBY DLKC Note
0/1 = - /STBY DLKC card was reset
CHAPTER 3 NDA-24307
Page 90
Issue 1
SYSTEM MESSAGES
This message displays when a PLO/CLK-related failure, such as internal clock down is restored.
➀ Restoration of PLO fault
➁ Current status of PLO card
➂ Current status of the PLO card
Note 1: The status includes that of PH-CK18 (CLK) card.
Note 2: This information includes the failure detected in PH-CK18 (CLK) card.
1: XXXX XX00 0000 0000 2: 0000 0000 0000 0000 3: 0000 0000 0000 0000
➀ ➁ ➂
4: 0000 0000 0000 0000 5: 0000 0000 0000 0000 6: 0000 0000 0000 0000
7: 0000 0000 0000 0000 8: 0000 0000 0000 0000 9: 0000 0000 0000 0000
b0
b7 b6 b5 b4 b3 b2 b1 b0
b4 b1 b0
Default Alarm:
NON
1-W PLO Restore
Default Grade:
3Grade Modified: Lamp Modified:
b0: 0/1 = PLO No. 0 system/PLO No. 1 system
b0: 0/1 = Clock is in STBY side/ACT side Note 1
b1: 0/1 = PLO synchronizing/PLO self running or drifting
b2: 0/1 = -/Input clock down
b3, b4:Route of input clock (see the table below)
b5: 0/1 = -/PLO input all down
b6: 0/1 = -/PLO output down Note 2
b7: 0/1 = -/Drifting
b4 b3 Connected With Primary
Oscillator (M-OSC) Connected With
External Clock
0 0 No. 0 M-OSC Route 0
0 1 No. 1 M-OSC Route 1
10 –Route 2
11 –Route 3
b0: 0/1 = -/5msec clock down
b1: 0/1 = -/Frame Synchronization from SYNC card is down
b4: 0/1 = -/Internal OSC clock down
NDA-24307 CHAPTER 3
Page 91
Issue 1
SYSTEM MESSAGES
This message (for the ISW only) displays when a TSW card (one of the dual systems) of ISW fails to receive
the CLK/FH signals, sent from the LN side.
➀ TSW detected as faulty
➁,➂ Details on the fault (TSW No. 0
side)
➁
➂
Note 1: This data is displayed when b0 of ➀ is set as “1.”
Note 2: For more information on each lamp, refer to the “Circuit Card Manual.”
1: XX00 XXXX XXXX 0000 2: 0000 0000 0000 0000 3: 0000 0000 0000 0000
➀ ➁ ➂ ➃ ➄
4: 0000 0000 0000 0000 5: 0000 0000 0000 0000 6: 0000 0000 0000 0000
7: 0000 0000 0000 0000 8: 0000 0000 0000 0000 9: 0000 0000 0000 0000
b1 b0
b7 b6 b5 b4 b3 b2 b1 b0
b7 b6 b5 b4 b3 b2 b1 b0
LN13 LN12 LN11 LN10 LN03 LN02 LN01 LN00
b7 b6 b5 b4 b3 b2 b1 b0
LN33 LN32 LN31 LN30 LN23 LN22 LN21 L200
Default Alarm:
NON
1-X LN →
→→
→ ISW CLK/FH Failure
Default Grade:
0Grade Modified: Lamp Modified:
b0: 0/1 = -/No. 0 system
b1: 0/1 = -/No. 1 system
The bits here correspond to “LN00” through “LN33” lamps, apiece, on a
TSW (PU-SW00) card of No. 0 system. If “1” is set, the corresponding PCM
traffic has encountered a CLK/FH failure.
0: -
1: LN
→
ISW CLK/FH Failure

CHAPTER 3 NDA-24307
Page 92
Issue 1
SYSTEM MESSAGES
➃,➄ Details on the fault (TSW 1
side)
➃
➄
Note 1: This data is displayed when b1 of ➀ is set as “1.”
Note 2: For more information on each lamp, refer to the “Circuit Card Manual.”
b7 b6 b5 b4 b3 b2 b1 b0
b7 b6 b5 b4 b3 b2 b1 b0
LN13 LN12 LN11 LN10 LN03 LN02 LN01 LN00
b7 b6 b5 b4 b3 b2 b1 b0
LN33 LN32 LN31 LN30 LN23 LN22 LN21 L200
The bits here correspond to “LN00” through “LN33” lamps, apiece, on a
TSW (PU-SW00) card of No. 1 system. If “1” is set, the corresponding PCM
traffic, once detected as faulty, has recovered.
0: -
1: LN
→
ISW CLK/FH Failure
NDA-24307 CHAPTER 3
Page 93
Issue 1
SYSTEM MESSAGES
This message (for the ISW only) displays when a TSW card (both systems) of ISW fails to receive the CLK/
FH signals, sent from the LN side.
➀ TSW detected as faulty
Note: Both b0 and b1 are displayed as “1.”
➁,➂ Details on the fault (TSW No. 0
side)
➁
➂
1: XX00 XXXX XXXX 0000 2: 0000 0000 0000 0000 3: 0000 0000 0000 0000
➀ ➁ ➂ ➃ ➄
4: 0000 0000 0000 0000 5: 0000 0000 0000 0000 6: 0000 0000 0000 0000
7: 0000 0000 0000 0000 8: 0000 0000 0000 0000 9: 0000 0000 0000 0000
b1 b0
b7 b6 b5 b4 b3 b2 b1 b0
b7 b6 b5 b4 b3 b2 b1 b0
LN13 LN12 LN11 LN10 LN03 LN02 LN01 LN00
b7 b6 b5 b4 b3 b2 b1 b0
LN33 LN32 LN31 LN30 LN23 LN22 LN21 L200
Default Alarm:
NON
1-Y LN →
→→
→ ISW CLK/FH Failure (Both)
Default Grade:
0Grade Modified: Lamp Modified:
b0: 0/1 = -/No. 0 system
b1: 0/1 = -/No. 1 system
The bits here correspond to “LN00” through “LN33” lamps, apiece, on a
TSW (PU-SW00) card of No. 0 system. If “1” is set, the corresponding PCM
traffic has encountered a CLK/FH failure.
0: -
1: LN
→
ISW CLK/FH Failure

CHAPTER 3 NDA-24307
Page 94
Issue 1
SYSTEM MESSAGES
➃,➄ Details on the fault (TSW No. 1
side)
➃
➄
Note 1: For more information on each lamp, refer to the “Circuit Card Manual.”
b7 b6 b5 b4 b3 b2 b1 b0
b7 b6 b5 b4 b3 b2 b1 b0
LN13 LN12 LN11 LN10 LN03 LN02 LN01 LN00
b7 b6 b5 b4 b3 b2 b1 b0
LN33 LN32 LN31 LN30 LN23 LN22 LN21 L200
The bits here correspond to “LN00” through “LN33” lamps, apiece, on a
TSW (PU-SW00) card of No. 1 system. If “1” is set, the corresponding PCM
traffic has encountered a CLK/FH failure.
0: -
1: LN
→
ISW CLK/FH Failure

NDA-24307 CHAPTER 3
Page 95
Issue 1
SYSTEM MESSAGES
This message (for the ISW only) displays when LN
→
ISW CLK/FH failure has recovered and issues the [1-
X, 1-Y] system messages.
➀ TSW detected as fault recovery
Note: When fault recovery is detected in both No. 0/No. 1 system, “1” is set in b0 and b1 simultaneously.
➁,➂ Details on the recovered traffic
(TSW No. 0 side)
➁
➂
Note 1: This data is displayed when b0 of ➀ is set as “1.”
Note 2: For more information on each lamp, refer to the “Circuit Card Manual.”
1: XX00 XXXX XXXX 0000 2: 0000 0000 0000 0000 3: 0000 0000 0000 0000
➀ ➁ ➂ ➃ ➄
4: 0000 0000 0000 0000 5: 0000 0000 0000 0000 6: 0000 0000 0000 0000
7: 0000 0000 0000 0000 8: 0000 0000 0000 0000 9: 0000 0000 0000 0000
b1 b0
b7 b6 b5 b4 b3 b2 b1 b0
b7 b6 b5 b4 b3 b2 b1 b0
LN13 LN12 LN11 LN10 LN03 LN02 LN01 LN00
b7 b6 b5 b4 b3 b2 b1 b0
LN33 LN32 LN31 LN30 LN23 LN22 LN21 L200
Default Alarm:
NON
1-Z LN
→
→→
→
ISW CLK/FH Release
Default Grade:
0Grade Modified: Lamp Modified:
b0: 0/1 = -/No. 0 system
b1: 0/1 = -/No. 1 system
The bits here correspond to “LN00” through “LN33” lamps, apiece, on a
TSW (PU-SW00) card of No. 0 system. If “1” is set, the corresponding PCM
traffic, once detected as faulty, has recovered.
0: -
1: Recovery of LN
→
ISW CLK/FH Failure

CHAPTER 3 NDA-24307
Page 96
Issue 1
SYSTEM MESSAGES
➃,➄ Details on the recovered traffic
(TSW No. 1 side)
➃
➄
Note 1: This data is displayed when b1 of ➁ is set as “1.”
Note 2: For more information on each lamp, refer to the “Circuit Card Manual.”
b7 b6 b5 b4 b3 b2 b1 b0
b7 b6 b5 b4 b3 b2 b1 b0
LN13 LN12 LN11 LN10 LN03 LN02 LN01 LN00
b7 b6 b5 b4 b3 b2 b1 b0
LN33 LN32 LN31 LN30 LN23 LN22 LN21 L200
The bits here correspond to “LN00” through “LN33” lamps, apiece, on a
TSW (PU-SW00) card of No. 1 system. If “1” is set, the corresponding PCM
traffic, once detected as faulty, has recovered.
0: -
1: LN
→
ISW CLK/FH Failure
NDA-24307 CHAPTER 3
Page 97
Issue 1
SYSTEM MESSAGES
This message displays when a C-level program abnormal state is detected as permanent. When the Port
Microprocessor (PM) on an LC/TRK card detects the abnormal state, the PM places the card into make-busy
status. If the failure occurs more than 15 times an hour, the system judges the failure as permanent, and issues
the [3-B] system message.
➀Faulty Circuit Card Mounting
Location
1: XX00 0000 0000 0000 2: 0000 0000 0000 0000 3: 0000 0000 0000 0000
➀
4: 0000 0000 0000 0000 5: 0000 0000 0000 0000 6: 0000 0000 0000 0000
7: 0000 0000 0000 0000 8: 0000 0000 0000 0000 9: 0000 0000 0000 0000
b7 b6 b5 b4 b3 b2 b1 b0
Default Alarm:
MN
3-B C-Level Infinite Loop (Permanent)
Default Grade:
3Grade Modified: Lamp Modified:
b0-b4: Group
b5-b6: Unit (0-3)
b7: Module Group
0/1 = Even-numbered MG/Odd-numbered MG
CHAPTER 3 NDA-24307
Page 98
Issue 1
SYSTEM MESSAGES
This message displays when C-level program is detected as abnormal by the Port Microprocessor (PM)
mounted on an LC/TRK card. If the failure occurs less than 15 times/hour, and a B-monitor/Initial restart
executes as the result, the failure is judged as temporary and this message is created.
➀Faulty Circuit Card Mounting
Location
➁ PM Restart Type
Note: B-monitor Restart: Ports whose link have already been established remain connected. Ports processing
a call-origination may be released.
Initial Restart: All ports on the circuit card are forcibly released to be placed in idle state.
1: XX0X 0000 0000 0000 2: 0000 0000 0000 0000 3: 0000 0000 0000 0000
➀ ➁
4: 0000 0000 0000 0000 5: 0000 0000 0000 0000 6: 0000 0000 0000 0000
7: 0000 0000 0000 0000 8: 0000 0000 0000 0000 9: 0000 0000 0000 0000
b7 b6 b5 b4 b3 b2 b1 b0
b0
Default Alarm:
SUP
3-C C-Level Infinite Loop (Temporary)
Default Grade:
1Grade Modified: Lamp Modified:
b0-b4: Group
b5-b6: Unit (0-3)
b7: Module Group
0/1 = Even-numbered MG/Odd-numbered MG
b0: 0/1 = B-monitor/Initial Restart Note
NDA-24307 CHAPTER 3
Page 99
Issue 1
SYSTEM MESSAGES
At the periodic interval, the CPU sends diagnosis data to the Port Microprocessor (PM) on LC/TRK cards in
order to monitor the PM. If the CPU cannot receive the return data within a predetermined period of time, the
system displays this data. When the failure is detected more than 15 times per hour, the failure is judged as
permanent.
➀ Faulty Circuit Card Location
See Chapter 5 for repair procedure.
1: XX00 0000 0000 0000 2: 0000 0000 0000 0000 3: 0000 0000 0000 0000
➀
4: 0000 0000 0000 0000 5: 0000 0000 0000 0000 6: 0000 0000 0000 0000
7: 0000 0000 0000 0000 8: 0000 0000 0000 0000 9: 0000 0000 0000 0000
b7 b6 b5 b4 b3 b2 b1 b0
Default Alarm:
MN
3-D Lock-Up Failure (Permanent)
Default Grade:
3Grade Modified: Lamp Modified:
b0-b4: Group
b5-b6: Unit (0-3)
b7: Module Group
0/1 = Even-numbered MG/Odd-numbered MG
CHAPTER 3 NDA-24307
Page 100
Issue 1
SYSTEM MESSAGES
At the periodic interval, the CPU sends diagnosis data to the Port Microprocessor (PM) on LC/TRK cards in
order to monitor the PM. If the CPU cannot receive the return data within a predetermined period of time, the
system displays this data. When the failure is detected less than 15 times per hour, the failure is judged as
temporary.
➀ Faulty Circuit Card Location
➁ PM Restart Type
1: XXXX 0000 0000 0000 2: 0000 0000 0000 0000 3: 0000 0000 0000 0000
➀ ➁
4: 0000 0000 0000 0000 5: 0000 0000 0000 0000 6: 0000 0000 0000 0000
7: 0000 0000 0000 0000 8: 0000 0000 0000 0000 9: 0000 0000 0000 0000
b7 b6 b5 b4 b3 b2 b1 b0
b0
Default Alarm:
SUP
3-E Lock-Up Failure (Temporary)
Default Grade:
1Grade Modified: Lamp Modified:
b0-b4: Group
b5-b6: Unit (0-3)
b7: Module Group
0/1 = Even-numbered MG/Odd-numbered MG
b0: 0/1 = B-monitor/Initial Restart

NDA-24307 CHAPTER 3
Page 101
Issue 1
SYSTEM MESSAGES
This message displays when over current of the operating power (DC-48V) is supplied from the ATI/ELC
circuit card to the Attendant Console/Dterm. When this fault occurs, the related circuit card is placed into make-
busy state and stops supplying power.
➀ Faulty PM Location
1: XX00 0000 0000 0000 2: 0000 0000 0000 0000 3: 0000 0000 0000 0000
➀
4: 0000 0000 0000 0000 5: 0000 0000 0000 0000 6: 0000 0000 0000 0000
7: 0000 0000 0000 0000 8: 0000 0000 0000 0000 9: 0000 0000 0000 0000
b7 b6 b5 b4 b3 b2 b1 b0
Default Alarm:
SUP
3-F -48V Over Current
Default Grade:
3Grade Modified: Lamp Modified:
b0-b4: Group
b5, b6:Unit
b7: Module Group
0/1 = Even-numbered MG/Odd-numbered MG

CHAPTER 3 NDA-24307
Page 102
Issue 1
SYSTEM MESSAGES
This message displays when a wire of the line between the LC circuit card and the telephone set is short-
circuited with ground.
➀ Faulty Circuit Card Location
➁ Faulty Circuit Card Location
Note: This message displays when using the specific LC card providing the above function.
1: XXXX 0000 0000 0000 2: 0000 0000 0000 0000 3: 0000 0000 0000 0000
➀ ➁
4: 0000 0000 0000 0000 5: 0000 0000 0000 0000 6: 0000 0000 0000 0000
7: 0000 0000 0000 0000 8: 0000 0000 0000 0000 9: 0000 0000 0000 0000
b7 b6 b5 b4 b3 b2 b1 b0
b7 b6 b5 b4 b3 b2 b1 b0
Default Alarm:
SUP
3-G Ground Failure
Default Grade:
1Grade Modified: Lamp Modified:
b0-b2: Circuit No. (0-7)
b3-b7: Circuit card No. (0-31)
b0, b1:Unit No. (0-3)
b2-b7: MG No.
NDA-24307 CHAPTER 3
Page 103
Issue 1
SYSTEM MESSAGES
This message displays when the DTI card detects abnormal state of a digital line but this failure has influence
on the Speech path. When the status is getting worse, they system will issue [3-I] Digital Line Failure.
➀ Faulty PM (LENS) Location
➁ Kind of Fault
➂Fault Detection Time Slot No.
(This data is valid only when the
kind of fault is 08H)
1: XXXX XX00 0000 0000 2: 0000 0000 0000 0000 3: 0000 0000 0000 0000
➀ ➁ ➂
4: 0000 0000 0000 0000 5: 0000 0000 0000 0000 6: 0000 0000 0000 0000
7: 0000 0000 0000 0000 8: 0000 0000 0000 0000 9: 0000 0000 0000 0000
b7 b6 b5 b4 b3 b2 b1 b0
b7 b6 b5 b4 b3 b2 b1 b0
b4 b3 b2 b1 b0
Default Alarm:
SUP
3-H Digital Line Warning
Default Grade:
2Grade Modified: Lamp Modified:
b0-b4: Group
b5, b6:Unit (0-3)
b7: 0/1 = Even numbered MG/Odd numbered MG
01H = Frame alignment loss occurs three times a day
02H = Bit error rate is over 10-6
03H = Slip occurs twice a day
04H = Multiframe alignment loss occurs three times a day
08H = Fault detection on the CCIS Bch
b0-b4: Time Slot No. in which the Digital line failure is detected
(1-16, 17-31)
CHAPTER 3 NDA-24307
Page 104
Issue 1
SYSTEM MESSAGES
This message displays after [3-H] Digital Line Warning lasts in the DTI card over the particular time. This
failure may cause a speech path fault to the DTI card.
➀ Faulty PM Location
➁ Kind of fault
➂Faulty Circuit Card Location (This
data is valid when ➁ is 0FH)
➃ Faulty Circuit Card Location (This
data is valid when ➁ is 0FH)
1: XXXX 0000 XXXX XXXX 2: XXXX XXXX XXXX XXXX 3: XXXX XXXX XXXX XXXX
➀ ➁ ➂ ➃ ➂ ➃ ➂ ➃ ➂ ➃ ➂ ➃ ➂ ➃ ➂ ➃ ➂ ➃ ➂ ➃ ➂ ➃
4: XXXX XXXX 0000 0000 5: 0000 0000 0000 0000 6: 0000 0000 0000 0000
➂ ➃ ➂ ➃
7: 0000 0000 0000 0000 8: 0000 0000 0000 0000 9: 0000 0000 0000 0000
b7 b6 b5 b4 b3 b2 b1 b0
b7 b6 b5 b4 b3 b2 b1 b0
b7 b6 b5 b4 b3
b7 b6 b5 b4 b3 b2 b1 b0
Default Alarm:
SUP
3-I Digital Line Failure
Default Grade:
3Grade Modified: Lamp Modified:
b0-b4: Group
b5, b6:Unit
b7: Module Group
0/1 = Even-numbered MG/Odd-numbered MG
01H = Frame alignment loss occurs 100 times a day
03H = Slip occurs 50 times a day
04H = Multiframe alignment loss occurs 110 times a day
06H = Frame alignment loss lasts for 2 to 3 sec.
07H = Bit error rate is over 10-4
09H = Warning signal (AIS) from the opposite office has been received for 1
sec. continuously.
0BH = Multiframe alignment loss lasts for 2 to 3 sec.
0FH = Digital Line is not restored
b3-b7: Group No.
b0, b1:Unit No. (0-3)
b2-b7: MG No.

NDA-24307 CHAPTER 3
Page 105
Issue 1
SYSTEM MESSAGES
This message displays when a digital line fault is restored.
➀ Faulty Line Location
1: XX00 0000 0000 0000 2: 0000 0000 0000 0000 3: 0000 0000 0000 0000
➀
4: 0000 0000 0000 0000 5: 0000 0000 0000 0000 6: 0000 0000 0000 0000
7: 0000 0000 0000 0000 8: 0000 0000 0000 0000 9: 0000 0000 0000 0000
b7 b6 b5 b4 b3 b2 b1 b0
Default Alarm:
ON
3-J Digital Line Restore
Default Grade:
0Grade Modified: Lamp Modified:
b0-b4: Group No.
b5, b6:Unit No. (0-3)
b7: Module Group
0/1 = Even-numbered MG/odd-numbered MG
CHAPTER 3 NDA-24307
Page 106
Issue 1
SYSTEM MESSAGES
This message displays when a Ready Failure occurs in both systems as a result of the TSW card having a failure
or the card is not mounted properly.
➀Faulty TSW Information
See Chapter 5 for repair procedure.
1: XX00 0000 0000 0000 2: 0000 0000 0000 0000 3: 0000 0000 0000 0000
➀
4: 0000 0000 0000 0000 5: 0000 0000 0000 0000 6: 0000 0000 0000 0000
7: 0000 0000 0000 0000 8: 0000 0000 0000 0000 9: 0000 0000 0000 0000
b7 b1 b0
Default Alarm:
MN
4-C Both TSW Ready Failure
Default Grade:
3Grade Modified: Lamp Modified:
b0: 0/1 = TSW No. 0 system/TSW No. 1 system
Note: When Ready Failure occurs in both systems, the [4-C]
message is separately issued twice: “0” displays in one
message, and “1” in the other message.
b1: Details on faulty TSW card
0 = TSW card (LN) connection to MUX or TSW card within ISWM
Note 1
1 = TSW card (LN) connected to TSW of ISWM Note 2
b7: Fault-detected circuit card
0 = PH-SW12 (LN) or PU-SW00 (ISW)
1 = PH-GT09 (LN only)
Note 1
TSWM0
[ISW]
[LN0]
TSW00 TSW01 TSW02 TSW03
Note 2
To MUX
(IMG0) To M UX
(IMG1)
Note 1
TSWM1
TSW00 TSW01 TSW02 TSW03
Note 2
To M UX
(IMG2) To MUX
(IMG3)
ISWM
TSW00 TSW01 TSW02 TSW03
To LN1 To LN2 To LN3
Note 1
Note 1: If a fault occurs in any of the TSW cards, “0” is set in bit 1 of ➀.
Note 2: If a fault occurs in any of the TSW cards, “1” is set in bit 1 of ➀.
NDA-24307 CHAPTER 3
Page 107
Issue 1
SYSTEM MESSAGES
This message displays when a TSW Ready Failure occurs in one of the dual systems because the TSW card
fails or the card is not mounted properly.
➀Faulty TSW Information
See Chapter 5 for repair procedure.
1: XX00 0000 0000 0000 2: 0000 0000 0000 0000 3: 0000 0000 0000 0000
➀
4: 0000 0000 0000 0000 5: 0000 0000 0000 0000 6: 0000 0000 0000 0000
7: 0000 0000 0000 0000 8: 0000 0000 0000 0000 9: 0000 0000 0000 0000
b7 b1 b0
Default Alarm:
MN
4-D TSW Ready Failure
Default Grade:
3Grade Modified: Lamp Modified:
b0: 0/1 = TSW No. 0 system/TSW No. 1 system
b1: Details on faulty TSW card
0 = TSW card (LN) connection to MUX or TSW card within ISWM
Note 1
1 = TSW card (LN) connected to TSW of ISWM Note 2
b7: Fault-detected circuit card
0 = PH-SW12 (LN) or PU-SW00 (ISW)
1 = PH-GT09 (LN only)
Note 1
TSWM0
[ISW]
[LN0]
TSW00 TSW01 TSW02 TSW03
Note 2
To MUX
(IMG0) To M UX
(IMG1)
Note 1
TSWM1
TSW00 TSW01 TSW02 TSW03
Note 2
To M UX
(IMG2) To MUX
(IMG3)
ISWM
TSW00 TSW01 TSW02 TSW03
To LN1 To LN2 To LN3
Note 1
Note 1: If a fault occurs in any of the TSW cards, “0” is set in bit 1 of ➀.
Note 2: If a fault occurs in any of the TSW cards, “1” is set in bit 1 of ➀.
CHAPTER 3 NDA-24307
Page 108
Issue 1
SYSTEM MESSAGES
This message displays when I/O Ready Failure occurs in both HSW systems.
➀ HSW Fault Detected
Note: When I/O ready failure ocurs simultaneously in both HSW systems, the [4-E] message is separately
issued twice: “0” is displayed in one message and “1” in the other message.
➁ Details on HSW No.
See Chapter 5 for repair procedure.
1: XXXX 0000 0000 0000 2: 0000 0000 0000 0000 3: 0000 0000 0000 0000
➀ ➁
4: 0000 0000 0000 0000 5: 0000 0000 0000 0000 6: 0000 0000 0000 0000
7: 0000 0000 0000 0000 8: 0000 0000 0000 0000 9: 0000 0000 0000 0000
b0
b4 b0
Default Alarm:
MN
4-E Both HSW Ready Failure
Default Grade:
3Grade Modified: Lamp Modified:
b0: 0/1 = No. 0 system/No. 1 system Note
b0: 0/1 = -/Ready Fault in HSW
b4: HSW No. (0-1)
NDA-24307 CHAPTER 3
Page 109
Issue 1
SYSTEM MESSAGES
This message displays when I/O Ready Failure occurs in both HSW systems.
➀ HSW Fault Detected
➁ Details on HSW No.
See Chapter 5 for repair procedure.
1: XXXX 0000 0000 0000 2: 0000 0000 0000 0000 3: 0000 0000 0000 0000
➀ ➁
4: 0000 0000 0000 0000 5: 0000 0000 0000 0000 6: 0000 0000 0000 0000
7: 0000 0000 0000 0000 8: 0000 0000 0000 0000 9: 0000 0000 0000 0000
b0
b4 b0
Default Alarm:
MN
4-F HSW Ready Failure
Default Grade:
3Grade Modified: Lamp Modified:
b0: 0/1 = No. 0 system/No. 1 system
b0: 0/1 = -/Ready Fault in HSW
b4: HSW No. (0-1)
CHAPTER 3 NDA-24307
Page 110
Issue 1
SYSTEM MESSAGES
This message displays when I/O Ready Failure occurs on a DLKC card.
➀Details on faulty DLKC card
1: XX00 0000 0000 0000 2: 0000 0000 0000 0000 3: 0000 0000 0000 0000
➀
4: 0000 0000 0000 0000 5: 0000 0000 0000 0000 6: 0000 0000 0000 0000
7: 0000 0000 0000 0000 8: 0000 0000 0000 0000 9: 0000 0000 0000 0000
b7 b0
Default Alarm:
MN
4-Q DLKC Ready Failure
Default Grade:
3Grade Modified: Lamp Modified:
b0: 0/1 = No. 0 system/No. 1 system
b7: 0/1 = ACT/STBY
NDA-24307 CHAPTER 3
Page 111
Issue 1
SYSTEM MESSAGES
This message displays when the MUX (PH-PC36) card has a Ready Failure in one of the dual systems. When
the card is not ready for service function because of the failure or because the card is not mounted properly,
the system creates this message.
➀Unit and MG number for the faulty
MUX card
➁Faulty MUX card information
See Chapter 5 for repair procedure.
1: XXXX 0000 0000 0000 2: 0000 0000 0000 0000 3: 0000 0000 0000 0000
➀ ➁
4: 0000 0000 0000 0000 5: 0000 0000 0000 0000 6: 0000 0000 0000 0000
7: 0000 0000 0000 0000 8: 0000 0000 0000 0000 9: 0000 0000 0000 0000
b7 b6 b5 b4 b3 b2 b1 b0
b2 b1 b0
Default Alarm:
MN
4-S MUX Ready Failure
Default Grade:
3Grade Modified: Lamp Modified:
b0: 0/1 = -/Even-numbered MG, Unit 0
b1: 0/1 = -/Even-numbered MG, Unit 1
b2: 0/1 = -/Even-numbered MG, Unit 2
b3: 0/1 = -/Even-numbered MG, Unit 3
b4: 0/1 = -/Odd-numbered MG, Unit 0
b5: 0/1 = -/Odd-numbered MG, Unit 1
b6: 0/1 = -/Odd-numbered MG, Unit 2
b7: 0/1 = -/Odd-numbered MG, Unit 3
b0: MG
0/1 = Even number/Odd number
b1: 0/1 = No. 0 system/No. 1 system
b2: ACT or STBY status
0/1 = ACT/STBY
CHAPTER 3 NDA-24307
Page 112
Issue 1
SYSTEM MESSAGES
This message displays when the MUX (PH-PC36) card has a Ready Failure in both of the dual systems. When
the card is not ready for service function because of the failure or because the card is not mounted properly,
the system creates this system message.
➀Unit and MG number for the MUX
card
➁Faulty MUX card information
Note 1: Though this message indicates the Ready Failure in both systems, the information displayed here only
relates to the ACT-side MUX status. (Two messages are not displayed separately.)
Note 2: Fixed as “0 (=ACT).” See Note 1.
See Chapter 5 for repair procedure.
1: XXXX 0000 0000 0000 2: 0000 0000 0000 0000 3: 0000 0000 0000 0000
➀ ➁
4: 0000 0000 0000 0000 5: 0000 0000 0000 0000 6: 0000 0000 0000 0000
7: 0000 0000 0000 0000 8: 0000 0000 0000 0000 9: 0000 0000 0000 0000
b7 b6 b5 b4 b3 b2 b1 b0
b2 b1 b0
Default Alarm:
MN
4-T Both MUX Ready Failure
Default Grade:
3Grade Modified: Lamp Modified:
b0: 0/1 = -/Even-numbered MG, Unit 0
b1: 0/1 = -/Even-numbered MG, Unit 1
b2: 0/1 = -/Even-numbered MG, Unit 2
b3: 0/1 = -/Even-numbered MG, Unit 3
b4: 0/1 = -/Odd-numbered MG, Unit 0
b5: 0/1 = -/Odd-numbered MG, Unit 1
b6: 0/1 = -/Odd-numbered MG, Unit 2
b7: 0/1 = -/Odd-numbered MG, Unit 3
b0: MG
0/1 = Even number/Odd number
b1: 0/1 = No. 0 system/No. 1 system Note 1
b2: ACT or STBY status Note 2
0/1 = ACT/STBY
NDA-24307 CHAPTER 3
Page 113
Issue 1
SYSTEM MESSAGES
This message displays when a PCI card failure occurs.
➀ Fault detection on PCI card
➁ Error status on PCI slot 0
➂ Error status on PCI slot 1
➃ Not used
➄ Error status on PCI slot 3
Note 1: Physical Connection Error
•Ethernet cable is disconnected.
•Ethernet cable has short-circuited.
•Ethernet straight/cross cable selection error
Note 2: Hardware Fault
•Transmitter failure
•Controller lock-up
1: 0X0X 0X0X 0X00 0000 2: 0000 0000 0000 0000 3: 0000 0000 0000 0000
➀ ➁ ➂ ➃ ➄
4: 0000 0000 0000 0000 5: 0000 0000 0000 0000 6: 0000 0000 0000 0000
7: 0000 0000 0000 0000 8: 0000 0000 0000 0000 9: 0000 0000 0000 0000
b3 b2 b1 b0
b1 b0
b1 b0
b1 b0
Default Alarm:
MN
4-U PCI Card Failure
Default Grade:
3Grade Modified: Lamp Modified:
b0: 0/1 = -/Error detection on PCI slot 0 (LANI-A)
b1: 0/1 = -/Error detection on PCI slot 1
b2: 0/1 = -/Error detection on PCI slot 2 (Not used)
b3: 0/1 = -/Error detection on PCI slot 3 (LANI-B)
b0: 0/1 = -/Physical connection error Note 1
b1: 0/1 = -/Hardware Fault Note 2
b0: 0/1 = -/Physical connection error Note 1
b1: 0/1 = -/Hardware Fault Note 2
b0: 0/1 = -/Physical connection error Note 1
b1: 0/1 = -/Hardware Fault Note 2
CHAPTER 3 NDA-24307
Page 114
Issue 1
SYSTEM MESSAGES
This message displays when the PCI card, which was detected as faulty, is recovered.
➀ Detection of PCI restoration
➁Details on error restoration
(PCI slot 0)
➂Details on error restoration
(PCI slot 1)
➃Not used
➄Details on error restoration (PCI
slot 3)
Note: Physical Connection Error
•Ethernet cable is disconnected.
•Ethernet cable has short-circuited.
•Ethernet straight/cross cable selection error
1: 0X0X 0X0X 0X00 0000 2: 0000 0000 0000 0000 3: 0000 0000 0000 0000
➀ ➁ ➂ ➃ ➄
4: 0000 0000 0000 0000 5: 0000 0000 0000 0000 6: 0000 0000 0000 0000
7: 0000 0000 0000 0000 8: 0000 0000 0000 0000 9: 0000 0000 0000 0000
b3 b2 b1 b0
b0
b0
b0
Default Alarm:
MN
4-V PCI Card Failure Recovered
Default Grade:
3Grade Modified: Lamp Modified:
b0: 0/1 = -/Error restoration on PCI slot 0 (LANI-A)
b1: 0/1 = -/Error restoration on PCI slot 1
b2: 0/1 = -/Error restoration on PCI slot 2 (Not used)
b3: 0/1 = -/Error restoration on PCI slot 3 (LANI-B)
b0: 0/1 = -/Physical connection error restoration Note
b0: 0/1 = -/Physical connection error restoration Note
b0: 0/1 = -/Physical connection error restoration Note
NDA-24307 CHAPTER 3
Page 115
Issue 1
SYSTEM MESSAGES
This message displays when any of the following faults are detected:
•Power failure
•Fuse blowing
•In-Frame abnormal temperature
➀ Probable cause for the failure
➁The frame in which a fault is
detected
➂ Factor of the failure
See Chapter 5 for repair procedure.
1: XX00 XXXX 0000 0000 2: 0000 0000 0000 0000 3: 0000 0000 0000 0000
➀ ➁ ➂
4: 0000 0000 0000 0000 5: 0000 0000 0000 0000 6: 0000 0000 0000 0000
7: 0000 0000 0000 0000 8: 0000 0000 0000 0000 9: 0000 0000 0000 0000
b4 b3 b2 b1 b0
b7 b6 b5 b4 b3 b2 b1 b0
b4 b3 b2 b1 b0
Default Alarm:
NON
6-A System Failure
Default Grade:
3Grade Modified:
(FIXED) NON Lamp Modified:
(FIXED) 3
b0: Input power (-48V) down or failure
b1: PWR Supply Fault
b2: PWR Supply Fuse Alarm
b3: Abnormal temperature MJ (70ºC (158ºF))
b4: Abnormal temperature MN (60ºC (140ºF))
b0-b3: Frame No. (0-3)
b4, b5:Frame Group No. (0 only)
b6, b7:Kind of frame
00 = IMG
b0: 0/1 = -/OBP Alarm 0 side
b1: 0/1 = -/OBP Alarm 1 side
b2: 0/1 = -/OBP Alarm MISC side
b3: 0/1 = -/Power Alarm 0 side
b4: 0/1 = -/Power Alarm 1 side
CHAPTER 3 NDA-24307
Page 116
Issue 1
SYSTEM MESSAGES
This message displays when a fault in either the ringer or howler tone occurs in the PWR card.
➀Unit and MG number of fault
detection
➁ Kind of the fault
1: XXXX 0000 0000 0000 2: 0000 0000 0000 0000 3: 0000 0000 0000 0000
➀ ➁
4: 0000 0000 0000 0000 5: 0000 0000 0000 0000 6: 0000 0000 0000 0000
7: 0000 0000 0000 0000 8: 0000 0000 0000 0000 9: 0000 0000 0000 0000
b2 b1 b0
b1 b0
Default Alarm:
MN
6-B RGU and Howler Failure
Default Grade:
3Grade Modified: Lamp Modified:
b0, b1:Unit No. (0-3)
b2: 0/1 = Even-numbered MG/Odd-numbered MG
b0: 0/1 = -/RGU (Ringing Unit) Fault
b1: 0/1 = -/Howler Fault

NDA-24307 CHAPTER 3
Page 117
Issue 1
SYSTEM MESSAGES
This message displays when the CPU usage (occupancy) rate exceeds the value assigned to ASYD, SYS1,
INDEX56, and the call origination from the pre-selected group of stations is restricted (i.e. Line Load Control
is set). This system message is always indicated as 0.
1: 0000 0000 0000 0000 2: 0000 0000 0000 0000 3: 0000 0000 0000 0000
4: 0000 0000 0000 0000 5: 0000 0000 0000 0000 6: 0000 0000 0000 0000
7: 0000 0000 0000 0000 8: 0000 0000 0000 0000 9: 0000 0000 0000 0000
Default Alarm:
NON
6-C Line Load Control Start
Default Grade:
3Grade Modified: Lamp Modified:

CHAPTER 3 NDA-24307
Page 118
Issue 1
SYSTEM MESSAGES
This message displays when the CPU usage (occupancy) rate becomes lower than the value assigned to ASYD,
SYS1, INDEX57, and Line Load Control is cancelled. This system message is always indicated as 0.
1: 0000 0000 0000 0000 2: 0000 0000 0000 0000 3: 0000 0000 0000 0000
4: 0000 0000 0000 0000 5: 0000 0000 0000 0000 6: 0000 0000 0000 0000
7: 0000 0000 0000 0000 8: 0000 0000 0000 0000 9: 0000 0000 0000 0000
Default Alarm:
NON
6-D Line Load Control Stop
Default Grade:
2Grade Modified: Lamp Modified:
NDA-24307 CHAPTER 3
Page 119
Issue 1
SYSTEM MESSAGES
This message displays to indicate the result of Bad Call Notification.
➀ Bad Call Notification
1: XXXX XXXX XXXX XXXX 2: XXXX XXXX XXXX XXXX 3: 0000 0000 0000 0000
➀ ➁ ➂ ➃ ➄ ➅ ➆ ➇ ➈ ➉ 11 12
4: 0000 0000 0000 0000 5: 0000 0000 0000 0000 6: 0000 0000 0000 0000
7: 0000 0000 0000 0000 8: 0000 0000 0000 0000 9: 0000 0000 0000 0000
b7 b6 b5 b4 b3 b2 b1 b0
Default Alarm:
SUP
6-H Bad Call Notification
Default Grade:
2Grade Modified: Lamp Modified:
b0-b3: Station number digit with the fault. (This data is always indicated as
“0” when Type of connection is 2 (ACD Trunk).)
b4-b7: Type of connection
0 = Station connection
1 = Trunk connection
2 = ACD Trunk connection

CHAPTER 3 NDA-24307
Page 120
Issue 1
SYSTEM MESSAGES
When type of connection is intra-Station connection
➁ ~ ➃ Station number (see table)
➄ Called station number
➅ ~ ➇ Called station number
(See table)
➈ Time Slot Number of Link 1 Note 1
➉ Not used
Time Slot Number of Link 2 Note 1
Not used
Note 1: Station at which the operation was performed as shown in the figure below.
b7 b6 b5 b4 b3 b2 b1 b0
b3 b2 b1 b0
b7 b6 b5 b4 b3 b2 b1 b0
b4-b7 b0-b3
➁DC0 DC1
➂DC2 DC3
➃DC4 DC5
b0-b3: Number of digits for the called station number
b4-b7 b0-b3
➅DC0 DC1
➆DC2 DC3
➇DC4 DC5
11
12
CALLED SIDE (TRUNK)
LINK 1
LINK 2
NDA-24307 CHAPTER 3
Page 121
Issue 1
SYSTEM MESSAGES
When type of connection is Trunk connection
➁ ~ ➃ Station number (See table)
➄ Remote Route No.
➅ Remote Route No.
➆ Called trunk No.
➇ Not used
➈ Time Slot Number of Link 1 Note 1
➉ Not used
Time Slot Number of Link 2 Note 1
Not used
Note 1: Station at which the operation was performed as shown below.
b7 b6 b5 b4 b3 b2 b1 b0
b7 b6 b5 b4 b3 b2 b1 b0
b3 b2 b1 b0
b7 b6 b5 b4 b3 b2 b1 b0
b4-b7 b0-b3
➁DC0 DC1
➂DC2 DC3
➃DC4 DC5
b0-b5: Route No. (1-63)
b6: OP
0/1 = Data in OPRT ( ➅ ) is invalid/valid
b7: AC
0/1 = Internal trunk/External trunk
b0-b3: OPRT Route No. (Over 64)
b0-b7: Trunk No.
11
12
CALLED SIDE (TRUNK)
LINK 1
LINK 2
CHAPTER 3 NDA-24307
Page 122
Issue 1
SYSTEM MESSAGES
When type of connection is ACD Trunk connection
➁ ACD Trouble Kind
Note 1: When“➁ (ACD Trouble Kind)” is 01 Hex:
➂ ~ ➅ Information on Calling Party
➆ ➇ Not Used
➈ ➉ Information on Calling Party
Refer to
Information on Held Party or 3rd Station/Trunk in 3-Party Connection
Refer to
Note 2: When“➁ (ACD Trouble Kind)” is 14 Hex:
➂ Issue of ACDP (First digit of decimal place)
➃ Issue of ACDP (Second digit of decimal place)
Note 3: When“➁ (ACD Trouble Kind)” is 21 Hex:
➂ ~ ➅ Information on Calling Party
Refer to ➂ ~ ➅ of Note 1
➆ ➇ Not used
➈ ➉ Information on Unknown Pilot No.
Refer to ➂ ~ ➅, (a) Station of Note 1
b7 b6 b5 b4 b3 b2 b1 b0
b0-b7: ACD trouble kind
01H=ACD trunk trouble key Note 1
14H=ACD reset start Note 2
15H=Insufficient ACD memory
16H=Insufficient ACD call record
17H=Excessive business station on ACD calls
18H=Excessive calls queued
21H=Unknown Pilot No. called Note 3
24H=Illegal execution of ACD timeout procedure Note 4
30H=ACD pointer error detection and recovery Note 5
33H=ACDP reset completion Note 6
34H=Call recovery failure on unknown Pilot No. Note 7
37H=ACD Traffic (incoming) Capacity Over
99H=Illegal ACD processing-trace stored Note 4
(b) Trunk
Route No.+Trunk No.
Example: RT125,TKl0
01 25 00 l0
➂ ➃ ➄➅
b4-b7 b0-b3
➂DC0
➃DC1 DC2
➄DC0
➅DC1 DC2
Route No.
Trunk No.
(a) Station
My Line No.
b4-b7 b0-b3
➂DC0 DC1
➃DC2 DC3
➄DC4 DC5
➅
11 12

NDA-24307 CHAPTER 3
Page 123
Issue 1
SYSTEM MESSAGES
Note 4: When“➁ (ACD Trouble Kind)” is 24 or 99 Hex:
➂ ~ ➅ Not used
➆, ➇ Error Counter
Note 5: When“➁ (ACD Trouble Kind)” is 30 Hex:
➂ ~ ➅ Pointer Address
➆Not used
➇Error Kind
Note 6: When“➁ (ACD Trouble Kind)” is 33 Hex:
➂ ACDP Data Memory
00 = Used
01 = Not used
➃ACDP System Capacity
02 = 50 Agent Positions
04 = 200 Agent Positions
07 = 500 Agent Positions
12 = 900 Agent Positions
15 = 2,000 Agent Positions
Note: If other data is output, the ACD system may not be working correctly. In this case, be sure to install the
ACD application again by using the MSVIP command.
Note 7: When“➁ (ACD Trouble Kind)” is 34 Hex:
➂ ~ ➅ Information on Unknown Pilot No.
Refer to ➂ ~ ➅, (a) Station of Note 1
Note
CHAPTER 3 NDA-24307
Page 124
Issue 1
SYSTEM MESSAGES
This message displays to indicate the result of a designated connection test (Individual Trunk Access) from a
station.
➀Test Item (b0-b3 is valid only for
Outgoing trunk test)
1: XXXX XXXX XXXX XXXX 2: XXXX 00XX XXXX XXXX 3: XXXX XXXX XXXX XX00
➀ ➁ ➂ ➃ ➄ ➅ ➆ ➇ ➈ ➉ 11 12 12 12 12 12
4: 0000 0000 0000 0000 5: 0000 0000 0000 0000 6: 0000 0000 0000 0000
7: 0000 0000 0000 0000 8: 0000 0000 0000 0000 9: 0000 0000 0000 0000
b7 b6 b5 b4 b3 b2 b1 b0
Default Alarm:
NON
6-I STA-Test Connection Data
Default Grade:
3Grade Modified: Lamp Modified:
b0-b2: Kind of Signal
2 = Second Dial Tone
6 = Sender (Delay Dial Start)
7 = Sender (Wink Start)
b3: 0/1 = Data is not valid/valid
b4-b7: Test item
1 = Outgoing Trunk Test
2 = ORT/IRT Test
3 = Sender Test
4 = Digital Conference
5 = Tone Test
6 = Ringing Signal test
0 = Test NG
12
NDA-24307 CHAPTER 3
Page 125
Issue 1
SYSTEM MESSAGES
➁
➂ ~ ➄ Station number of testing
station (see table)
➅ Tenant No.
b7 b6 b5 b4 b3 b2 b1 b0
b7 b3 b2 b1 b0
b0-b3: Number of digits of testing station No.
b4-b7: Error Numbers (see table below)
Error Numbers and Their Meanings
ERROR NO. MEANING
0---
1 Testing station is restricted from activating the
service.
2 Route Number Error of the designated trunk
3 Trunk Number Error of the designated trunk
4 Trunk busy
5 Sender busy
6 SMDR failure
7 Call origination restriction
8Register busy
9 Trunk Number Error - when the trunk has been
designated by SHF.
A Trunk busy - when the trunk has been designated
by SHF.
B Inter-digit timer expiration
C Register or sender is defective with respect to DP,
DP/PB
D Register of sender is faulty with respect to PB
ETone fault
F Test Processing Error
b4-b7 b0-b3
➂DC0 DC1
➃DC2 DC3
➄DC4 DC5
b0-b3: Tenant No. (1-15)
b7: OP
0/1 = Data in OPTN ( ➆ ) is invalid/valid

CHAPTER 3 NDA-24307
Page 126
Issue 1
SYSTEM MESSAGES
➆ Tenant No.
➇ Tested Route No.
Note: When Logical Routes are assigned, Logical Route Numbers are displayed here.
➈ OPRT data
Note: When Logical Routes are assigned, Logical Route Numbers are displayed here.
➉ (This data is not for Ringing Signal Test)
Digit of Dialed Number (for test)
Dialed Number (for test)
(a) Dialed Number sent by the test Trunk/Sender
b3 b2 b1 b0
b7 b6 b5 b4 b3 b2 b1 b0
b7 b6 b5 b4 b3 b2 b1 b0
b7 b4 b3 b2 b1 b0
b7 b6 b5 b4 b3 b2 b1 b0
b4-b7 b0-b3 b4-b7 b0-b3
DC0 DC1 DC12 DC13
DC2 DC3 DC14 DC15
DC4 DC5 DC16 DC17
DC6 DC7 DC18 DC19
DC8 DC9 DC20 DC21
DC10 DC11
b0-b3: Tenant No. (Over 15)
b0-b5: Route No. (1-63) Note
b6: OP
0/1 = Data in OPRT ( ➈ ) is invalid/valid
b7: AC
0/1 = Internal trunk/External trunk
b0-b7: Route No. ( 64) Note
>
b0-b7: Trunk No. for Outgoing trunk test, ORT/IRT Test, Sender
Test and Digital Conference test
Tone Slot No. for Tone Test
0 = DT 1 = SPDT
2 = RBT 3 = CRBT, CWT
4 = BT 5 = RBT
6 = SST, WT 7 = SDT
8 = TRG 9 = SDTT
10 = CWRBT 14 = MSC
b7 b6 b5 b4 b3 b2 b1 b0
b0-b4: Dialed number digit sent by the test Trunk/Sender
or
Dialed number digit received by the test Register
11
12
b) Dialed Number received by the test Register
b4-b7 b0-b3
DC0 DC1
DC2 DC3
DC4 DC5
DC6 DC7
DC8 DC9
DC10 DC11
NDA-24307 CHAPTER 3
Page 127
Issue 1
SYSTEM MESSAGES
This message displays when a call terminates to the Emergency Telephone.
➀ ~ ➅ Called Station (Emergency
Telephone) No. (ASCII Code)
➆ ~ Calling Station No. (ASCII
Code)
1: XXXX XXXX XXXX XXXX 2: XXXX XXXX 0000 0000 3: 0000 0000 0000 0000
➀ ➁ ➂ ➃ ➄ ➅ ➆ ➇ ➈ ➉
4: 0000 0000 0000 0000 5: 0000 0000 0000 0000 6: 0000 0000 0000 0000
7: 0000 0000 0000 0000 8: 0000 0000 0000 0000 9: 0000 0000 0000 0000
b7 b6 b5 b4 b3 b2 b1 b0
b7 b6 b5 b4 b3 b2 b1 b0
Default Alarm:
SUP
6-J Emergency Call
Default Grade:
3Grade Modified: Lamp Modified:
➀DC0 (1st digit)
➁DC1 (2nd digit)
➂DC2 (3rd digit)
➃DC3 (4th digit)
➄DC4 (5th digit)
➅DC5 (6th digit)
➆DC0 (1st digit)
➇DC1 (2nd digit)
➈DC2 (3rd digit)
➉DC3 (4th digit)
DC4 (5th digit)
DC5 (6th digit)
11
12
12
1211
CHAPTER 3 NDA-24307
Page 128
Issue 1
SYSTEM MESSAGES
This message displays when the LCR-Attendant Manual Override is set at the Attendant/Desk Console.
➀ Route Selection Time Pattern No.
assigned at Attendant/Desk
Console
Note: Route Selection Time Pattern 0-7 corresponds to TDPTN No. 0-7 in the AOPR command.
1: XX00 0000 0000 0000 2: 0000 0000 0000 0000 3: 0000 0000 0000 0000
➀
4: 0000 0000 0000 0000 5: 0000 0000 0000 0000 6: 0000 0000 0000 0000
7: 0000 0000 0000 0000 8: 0000 0000 0000 0000 9: 0000 0000 0000 0000
b2 b1 b0
Default Alarm:
NON
6-L Emergency Control Start
Default Grade:
3Grade Modified: Lamp Modified:
b0-b2: Pattern No. (1-7)

NDA-24307 CHAPTER 3
Page 129
Issue 1
SYSTEM MESSAGES
This message displays when the LCR-Attendant Manual Override is cancelled at the Attendant/Desk Console.
➀ Suspension of Emergency Control
Note: Route Selection Patterns 0-7 corresponds to TDPTN No. 0-7 in the AOPR command.
1: XX00 0000 0000 0000 2: 0000 0000 0000 0000 3: 0000 0000 0000 0000
➀
4: 0000 0000 0000 0000 5: 0000 0000 0000 0000 6: 0000 0000 0000 0000
7: 0000 0000 0000 0000 8: 0000 0000 0000 0000 9: 0000 0000 0000 0000
b0
Default Alarm:
NON
6-M Emergency Control Stop
Default Grade:
3Grade Modified: Lamp Modified:
b0: Fixed 0.
0 = Outgoing call restriction is released by Attendant/Desk Console

CHAPTER 3 NDA-24307
Page 130
Issue 1
SYSTEM MESSAGES
This message displays when the system detects abnormal duration in the line connection between the calling
and called party. When the calling and called party establish a line connection and continue the hook-up for an
extremely short or long period of time (predetermined by the ASYD command (SYS1, INDEX45, 46)), this
message is created.
➀ Calling party information
➁ Tenant No. of Calling/Called party (Hex.)
➂ Calling party Information
When calling party is Station
Calling station No. (See table)
1: XXXX XXXX XXXX XX00 2: XXXX XXXX XXXX XXXX 3: XXXX XXXX XXXX XX00
➀ ➁ ➁ ➂ ➂ ➂ ➂ ➃ ➄ ➄ ➄ ➄ ➄ ➄ ➄ ➄ ➄ ➄ ➄ ➄ ➄ ➄
4: 0000 0000 0000 0000 5: 0000 0000 0000 0000 6: 0000 0000 0000 0000
7: 0000 0000 0000 0000 8: 0000 0000 0000 0000 9: 0000 0000 0000 0000
b7 b3 b2 b1 b0
b7 b6 b5 b4 b3 b2 b1 b0
Default Alarm:
NON
6-N Abnormal Call Duration Data
Default Grade:
0Grade Modified: Lamp Modified:
b0-b3: Type of Calling party
0 = Station
1 = Attendant console
2 = Trunk
b7: 0/1 = Short/Long Time
b4-b7 b0-b3
DC0 DC1
DC2 DC3
DC4 DC5

NDA-24307 CHAPTER 3
Page 131
Issue 1
SYSTEM MESSAGES
When calling party is ATTCON/DESKCON
Attendant/Desk console No. (See
table.)
When calling party is Trunk
Route No. and Trunk No. (See table.)
Note:
Route No. (a)
Route No. (b)
➃ Called party information
b7 b6 b5 b4 b3 b2 b1 b0
b7 b6 b5 b4 b3 b2 b1 b0
b3 b2 b1 b0
b3 b2 b1 b0
b4- b7 b0-b3
DC0 DC1
b0-b7
(a) Route No. (Hex) Note
(b) Route No. (Hex) Note
(c) Trunk No. (Hex)
(d) Trunk No. (Hex)
b0-b5: Route No. (1-63)
b6: OP
0/1 = Data in OPRT is invalid/valid
b7: AC
0/1 = Internal trunk/External trunk
b0-b3: OPRT
Route No. (Over 64)
b0-b3: 00 = Station-to-Station call
01 = Outgoing call to outside
02 = Incoming call from outside

CHAPTER 3 NDA-24307
Page 132
Issue 1
SYSTEM MESSAGES
➄ Called Party Information
Station to Station Call
OG Call to outside IC Call from outside
b4-b7 b0-b3
(a)
Tenant No.
Tenant No.
DC0 DC1
DC2 DC3
DC4 DC5
(a) Type of called party
00 = Station
b7 b6 b5 b4 b3 b2 b1 b0
b0-b7
Route No. (Hex)
Route No. (Hex)
Trunk No. (Hex)
Trunk No. (Hex)
b4-b7 b0-b3
Route No. (Hex)
Route No. (Hex)
Trunk No. (Hex)
Trunk No. (Hex)
DC0 DC1
DC2 DC3
DC4 DC5
DC6 DC7
DC8 DC9
DC10 DC11
DC12 DC13
DC14 DC15
DC16 DC17
DC18 DC19
NDA-24307 CHAPTER 3
Page 133
Issue 1
SYSTEM MESSAGES
This message displays when the SMDR output buffer usage rate has exceeded the value assigned to ASYD,
SYS1, INDEX249.
➀ Detail Information
(a) FS = 0, FE = 0/1
➁
1: XXXX XXXX 0000 0000 2: 0000 0000 0000 0000 3: 0000 0000 0000 0000
➀ ➁ ➂ ➃
4: 0000 0000 0000 0000 5: 0000 0000 0000 0000 6: 0000 0000 0000 0000
7: 0000 0000 0000 0000 8: 0000 0000 0000 0000 9: 0000 0000 0000 0000
b7 b6 b5 b4 b3 b2 b1 b0
b0
Default Alarm:
SUP
6-O SMDR Output Buffer Overflow Alarm
Default Grade:
1Grade Modified: Lamp Modified:
b0-b3: FS
b4-b7: FE
This system message varies depending on the data at ➀.
FS FE MEANING
(a) 0 0 SMDR output buffer usage rate exceeds the value
assigned by ASYD, SYS1, INDEX249.
(a) 0 1 After SMDR output buffer usage rate exceeds the
value assigned by ASYD, SYS1, INDEX249,
usage rate lowered less than the value assigned by
INDEX250.
(b) 1 0 -
(c) 2 0 Data output is impossible due to SMDR apparatus
failure.
b0: 0/1 = Data assigned by the ASYD, SYS1, INDEX249, 250 is valid/
invalid

CHAPTER 3 NDA-24307
Page 134
Issue 1
SYSTEM MESSAGES
➂ Buffer Usage Rate Assigned by
ASYD, SYS1, INDEX249
➃ Buffer Usage Rate Assigned by
ASYD, SYS1, INDEX250
(b) FS = 1, FE = 0
➁
➂ Overflow Rate
➃ Overflow Rate
b7 b6 b5 b4 b3 b2 b1 b0
b7 b6 b5 b4 b3 b2 b1 b0
b1 b0
b0
b7 b6 b5 b4
b0-b3: Units
b4-b7: Tens
b0-b3: Units
b4-b7: Tens
b0, b1:Fault Grade by ALMG command
00 = NON CONT 01 = SUP
10 = MN 11 = MJ
b0: 0/1 = -/100% Overflow
b4-b7: 1-9 = 10%-90% Overflow

NDA-24307 CHAPTER 3
Page 135
Issue 1
SYSTEM MESSAGES
(c) FS = 2, FE = 0
➁ SMDR Group No.
➂ Port No.
➃ Not used
(d) FS = 3, FE = 0
➁
b3 b2 b1 b0
b7 b6 b5 b4 b3 b2 b1 b0
b3 b2 b1 b0
b0-b3: SMDR Group No. to which failure occurred
b0-b7: Port No. allocated for SMDR Group to which failure occurred (0-7)
b0-b3: SMDR Group No. to which failure occurred

CHAPTER 3 NDA-24307
Page 136
Issue 1
SYSTEM MESSAGES
This message displays when the SMDR output buffer usage rate has been lowered to less than the value
assigned in the ASYD, SYS1, INDEX250 after the rate exceeds the value assigned by INDEX249.
➀ Detail Information
1: XX00 0000 0000 0000 2: 0000 0000 0000 0000 3: 0000 0000 0000 0000
➀
4: 0000 0000 0000 0000 5: 0000 0000 0000 0000 6: 0000 0000 0000 0000
7: 0000 0000 0000 0000 8: 0000 0000 0000 0000 9: 0000 0000 0000 0000
b7 b6 b5 b4 b3 b2 b1 b0
Default Alarm:
NON
6-P SMDR Output Buffer Overflow Release
Default Grade:
0Grade Modified: Lamp Modified:
b0-b7: 00H = After SMDR output buffer usage rate exceeds the value
assigned by ASYD, SYS1, INDEX249, the rate lowered less than
the value assigned by INDEX250.
NDA-24307 CHAPTER 3
Page 137
Issue 1
SYSTEM MESSAGES
This message displays after the office data is loaded and system initialization has executed.
➀
➁ Load Status
1: XXXX XX00 0000 0000 2: 0000 0000 0000 0000 3: 0000 0000 0000 0000
➀ ➁
4: 0000 0000 0000 0000 5: 0000 0000 0000 0000 6: 0000 0000 0000 0000
7: 0000 0000 0000 0000 8: 0000 0000 0000 0000 9: 0000 0000 0000 0000
b4 b3 b2 b1 b0
b7 b6 b5 b4 b3 b2 b1 b0
b11 b9 b8
Default Alarm:
NON
7-A System Initialize With Data Load
Default Grade:
3Grade Modified: Lamp Modified:
b0: 0/1 = IPL/PWR ON
b1: 0/1 = Load Key OFF/ON
b2: 0/1 = IPL KEY/MAT INITIAL
b3: 0/1 = Program load is executed/-
b4: 0/1 = -/Phase1 Restart Note 1
b0: Office Data Load Status
0/1 = Load OK/NG
b1: Call Forwarding Data Load Status
0/1 = Load OK/NG
b2: Individual Speed Calling Data Load Status
0/1 = Load OK/NG
b3: RCF Data Load Status
0/1 = Load OK/NG
b4: Name Display Data Load Status
0/1 = Load OK/NG
b5: Network DM Load Status
0/1 = Load OK/NG
b6: Local DM Load Status
0/1 = Load OK/NG
b7: 0/1 = DM Load/Non Load
b8: User assign Soft Key Data Load Status
0/1 = Load OK/NG
b9: Number Sharing Data Load Status
0/1 = Load OK/NG Note 2
b11: Call Block Data Load Status
0/1 = Load OK/NG

CHAPTER 3 NDA-24307
Page 138
Issue 1
SYSTEM MESSAGES
Note 1: Phase 1 Restart is executed when initializing the system without disrupting the following two-way
connections that have already been established:
•Basic two-way connections (STN-STN, STN-TRK, TRK-TRK)
•Fixed connections
•Two-way connections established on a Fusion link
Note 2: The Number Sharing data load also affects the data load of Dual Station Calling Over-FCCS .
For more details, see Chapter 6, Section 12.
NDA-24307 CHAPTER 3
Page 139
Issue 1
SYSTEM MESSAGES
This message displays when system initialization is activated.
➀
➁ Details on Intialization Note 2
➂ FPC No. Note 2
Note 1: Phase 1 Restart is executed when initializing the system without disrupting the following two-way
connections that have already been established:
•Basic two-way connections (STN-STN, STN-TRK, TRK-TRK)
•Fixed connections
•Two-way connections established on a Fusion link
Note 2: When the whole system is initialized via key information from the ISW, this message is output in each
LN/ISW. However, the data ➁ and ➂ are displayed at the ISW only.
For more details, see Chapter 6, Section 12.
1: XX00 XX00 0000 0000 2: 0000 0000 0000 0000 3: 0000 0000 0000 0000
➀ ➁ ➂
4: 0000 0000 0000 0000 5: 0000 0000 0000 0000 6: 0000 0000 0000 0000
7: 0000 0000 0000 0000 8: 0000 0000 0000 0000 9: 0000 0000 0000 0000
b4 b3 b2
b1 b0
b7 b6 b5 b4 b3 b2 b1 b0
Default Alarm:
NON
7-B System Initialize
Default Grade:
3Grade Modified: Lamp Modified:
b2: 0/1 = IPL KEY/MAT INITIAL
b3: 0/1 = Program Load/Non Load
b4: 0/1 = -/Phase1 Restart Note 1
b0: 0/1 = -/ISW
→
LN Remote Initialization Request
b1: 0/1 = -/ISW
→
LN Data Sending Error
b0-b7: FPC No. of LN where initialization request sent
CHAPTER 3 NDA-24307
Page 140
Issue 1
SYSTEM MESSAGES
This message displays when the MBR switch on the CPU Front Panel has been turned ON at the time of CPU
changeover or speech path changeover.
➀ Self-CPU Restart Information
➁ Mate-CPU Restart Information
1: XXXX 0000 0000 0000 2: 0000 0000 0000 0000 3: 0000 0000 0000 0000
➀ ➁
4: 0000 0000 0000 0000 5: 0000 0000 0000 0000 6: 0000 0000 0000 0000
7: 0000 0000 0000 0000 8: 0000 0000 0000 0000 9: 0000 0000 0000 0000
b7 b5 b4 b3 b0
b7 b5 b4 b3 b0
Default Alarm:
NON
7-C CPU MBR Key Turn ON
Default Grade:
3Grade Modified: Lamp Modified:
b0: 0/1 = -/Monitor Restart
b3: 0/1 = -/Initialization
b4: 0/1 = -/Data Copy Restart (for Dual-CPU system only)
b5: 0/1 = -/MB control
b7: 0/1 = ACT/STBY (active system indication after restart)
b0: 0/1 = -/Monitor Restart
b3: 0/1 = -/Initialization
b4: 0/1 = -/Data Copy Restart (for Dual-CPU system only)
b5: 0/1 = -/MB control
b7: 0/1 = ACT/STBY (active system indication after restart)

NDA-24307 CHAPTER 3
Page 141
Issue 1
SYSTEM MESSAGES
This message displays when the MBR switch on the CPU Front Panel has been turned OFF at the time of CPU
changeover or speech path changeover.
➀ Self-CPU Restart Information
➁ Mate-CPU Restart Information
1: XXXX 0000 0000 0000 2: 0000 0000 0000 0000 3: 0000 0000 0000 0000
➀ ➁
4: 0000 0000 0000 0000 5: 0000 0000 0000 0000 6: 0000 0000 0000 0000
7: 0000 0000 0000 0000 8: 0000 0000 0000 0000 9: 0000 0000 0000 0000
b7 b5 b4 b3 b0
b7 b5 b4 b3 b0
Default Alarm:
NON
7-D CPU MBR Key Turn OFF
Default Grade:
3Grade Modified: Lamp Modified:
b0: 0/1 = -/Monitor Restart
b3: 0/1 = -/Initialization
b4: 0/1 = -/Data Copy Restart (for Dual-CPU system only)
b5: 0/1 = -/MB control
b7: 0/1 = ACT/STBY (active system indication after restart)
b0: 0/1 = -/Monitor Restart
b3: 0/1 = -/Initialization
b4: 0/1 = -/Data Copy Restart (for Dual-CPU system only)
b5: 0/1 = -/MB control
b7: 0/1 = ACT/STBY (active system indication after restart)

CHAPTER 3 NDA-24307
Page 142
Issue 1
SYSTEM MESSAGES
This message displays when the MBR switch on the TSW card has been turned ON at CPU changeover or
speech path changeover.
➀ System Status of TSW Card
1: XX00 0000 0000 0000 2: 0000 0000 0000 0000 3: 0000 0000 0000 0000
➀
4: 0000 0000 0000 0000 5: 0000 0000 0000 0000 6: 0000 0000 0000 0000
7: 0000 0000 0000 0000 8: 0000 0000 0000 0000 9: 0000 0000 0000 0000
b7 b0
Default Alarm:
NON
7-E TSW MBR Key Turn ON
Default Grade:
3Grade Modified: Lamp Modified:
b0: 0/1 = No. 0 system/No. 1 system
b7: Kind of PKG
0/1 = SW12/GT09

NDA-24307 CHAPTER 3
Page 143
Issue 1
SYSTEM MESSAGES
This message displays when the MBR switch on the TSW card has been turned OFF at CPU changeover or
speech path changeover.
➀ System Status of TSW Card
1: XX00 0000 0000 0000 2: 0000 0000 0000 0000 3: 0000 0000 0000 0000
➀
4: 0000 0000 0000 0000 5: 0000 0000 0000 0000 6: 0000 0000 0000 0000
7: 0000 0000 0000 0000 8: 0000 0000 0000 0000 9: 0000 0000 0000 0000
b7 b0
Default Alarm:
NON
7-F TSW MBR Key Turn OFF
Default Grade:
3Grade Modified: Lamp Modified:
b0: 0/1 = No. 0 system/No. 1 system
b7: Kind of PKG
0/1 = SW12/GT09

CHAPTER 3 NDA-24307
Page 144
Issue 1
SYSTEM MESSAGES
This message displays when the MB switch on the EMA card has been turned ON when extracting or inserting
a circuit card or at PM initialization. This message displays with the [7-J]: ALMC MB Key Turn OFF message.
➀ Frame No. and its Kind
1: XX00 0000 0000 0000 2: 0000 0000 0000 0000 3: 0000 0000 0000 0000
➀
4: 0000 0000 0000 0000 5: 0000 0000 0000 0000 6: 0000 0000 0000 0000
7: 0000 0000 0000 0000 8: 0000 0000 0000 0000 9: 0000 0000 0000 0000
b7 b6 b5 b4 b3 b2 b1 b0
Default Alarm:
SUP
7-I ALMC MB Key Turn ON
Default Grade:
3Grade Modified: Lamp Modified:
b0-b3: Frame No. (0 only)
b4-b5: Frame Group No. (0 only)
b6-b7: Kind of Frame
00=IMG

NDA-24307 CHAPTER 3
Page 145
Issue 1
SYSTEM MESSAGES
This message displays when the MB switch on the EMA card has been turned OFF when extracting or inserting
a circuit card or at PM initialization.
➀ Frame No. and its Kind
1: XX00 0000 0000 0000 2: 0000 0000 0000 0000 3: 0000 0000 0000 0000
➀
4: 0000 0000 0000 0000 5: 0000 0000 0000 0000 6: 0000 0000 0000 0000
7: 0000 0000 0000 0000 8: 0000 0000 0000 0000 9: 0000 0000 0000 0000
b7 b6 b5 b4 b3 b2 b1 b0
Default Alarm:
NON
7-J ALMC MB Key Turn OFF
Default Grade:
3Grade Modified: Lamp Modified:
b0-b3: Frame No. (0 only)
b4-b5: Frame Group No. (0 only)
b6-b7: Kind of Frame
00=IMG

CHAPTER 3 NDA-24307
Page 146
Issue 1
SYSTEM MESSAGES
This message displays when the MB switch on the line/trunk card has been turned ON when extracting or
inserting a circuit card or at PM initialization.
➀ Faulty Line/Trunk Card Location
1: XX00 0000 0000 0000 2: 0000 0000 0000 0000 3: 0000 0000 0000 0000
➀
4: 0000 0000 0000 0000 5: 0000 0000 0000 0000 6: 0000 0000 0000 0000
7: 0000 0000 0000 0000 8: 0000 0000 0000 0000 9: 0000 0000 0000 0000
b7 b6 b5 b4 b3 b2 b1 b0
Default Alarm:
NON
7-K PM MB Key Turn ON
Default Grade:
3Grade Modified: Lamp Modified:
b0-b4: Group No.
b5, b6:Unit No. (0-3)
b7: MG No.
0/1 = Even-numbered MG/Odd-numbered MG

NDA-24307 CHAPTER 3
Page 147
Issue 1
SYSTEM MESSAGES
This message displays when the MB switch on the line/trunk card has been turned OFF when extracting or
inserting a circuit card or at PM initialization.
➀ Faulty Line/Trunk Card Location
1: XX00 0000 0000 0000 2: 0000 0000 0000 0000 3: 0000 0000 0000 0000
➀
4: 0000 0000 0000 0000 5: 0000 0000 0000 0000 6: 0000 0000 0000 0000
7: 0000 0000 0000 0000 8: 0000 0000 0000 0000 9: 0000 0000 0000 0000
b7 b6 b5 b4 b3 b2 b1 b0
Default Alarm:
NON
7-L PM MB Key Turn OFF
Default Grade:
3Grade Modified: Lamp Modified:
b0-b4: Group No.
b5, b6:Unit No. (0-3)
b7: MG No.
0/1 = Even-numbered MG/Odd-numbered MG
CHAPTER 3 NDA-24307
Page 148
Issue 1
SYSTEM MESSAGES
This message displays when the MB switch on the PFT card has been turned ON when extracting or inserting
a circuit card or at PM initialization.
➀ Faulty PFT Card No.
➁ Faulty PFT Card Location
1: XXXX 0000 0000 0000 2: 0000 0000 0000 0000 3: 0000 0000 0000 0000
➀ ➁
4: 0000 0000 0000 0000 5: 0000 0000 0000 0000 6: 0000 0000 0000 0000
7: 0000 0000 0000 0000 8: 0000 0000 0000 0000 9: 0000 0000 0000 0000
b2 b1 b0
b7 b6 b5 b4 b3 b2 b1 b0
Default Alarm:
NON
7-M NCU MB Key Turn ON
Default Grade:
3Grade Modified: Lamp Modified:
b0-b2: Circuit card No. (0-7)
b0-b4: Group No.
b5, b6:Unit No. (0-3)
b7: 0/1 = Even-numbered MG/Odd-numbered MG

NDA-24307 CHAPTER 3
Page 149
Issue 1
SYSTEM MESSAGES
This message displays when the MB switch on the PFT card has been turned OFF when extracting or inserting
a circuit card, or at PM initialization.
➀ Faulty PFT Card No.
➁ Faulty PFT Card Location
1: XXXX 0000 0000 0000 2: 0000 0000 0000 0000 3: 0000 0000 0000 0000
➀ ➁
4: 0000 0000 0000 0000 5: 0000 0000 0000 0000 6: 0000 0000 0000 0000
7: 0000 0000 0000 0000 8: 0000 0000 0000 0000 9: 0000 0000 0000 0000
b2 b1 b0
b7 b6 b5 b4 b3 b2 b1 b0
Default Alarm:
NON
7-N NCU MB Key Turn OFF
Default Grade:
3Grade Modified: Lamp Modified:
b0-b2: Circuit card No. (0-7)
b0-b4: Group No.
b5, b6:Unit No. (0-3)
b7: 0/1 = Even-numbered MG/Odd-numbered MG

CHAPTER 3 NDA-24307
Page 150
Issue 1
SYSTEM MESSAGES
In a specific time cycle, the system allows a routine diagnosis in its hardware and software to determine if they
are operating properly. This message indicates that the system has been checked by the routine diagnosis
program and the result of the diagnosis is normal.
➀ Performed Diagnosis Item
Note: The data in this area will be diverse, according to the diagnosis specified in ➀. For details on each
item data, see the following pages.
1: XXXX XXXX XXXX XXXX 2: 0000 0000 0000 0000 3: 0000 0000 0000 0000
Note
➀
4: 0000 0000 0000 0000 5: 0000 0000 0000 0000 6: 0000 0000 0000 0000
7: 0000 0000 0000 0000 8: 0000 0000 0000 0000 9: 0000 0000 0000 0000
b7 b6 b5 b4 b3 b2 b1 b0
Default Alarm:
NON
7-O Cyclic Diagnosis Normal
Default Grade:
3Grade Modified: Lamp Modified:
[00H] Routine Diagnosis Start
[10H] Program Memory Verification Normal End
[20H] Data Memory Verification Normal End
[30H] TSW ACT/STBY Changeover Normal End
[40H] CPU ACT/STBY Changeover Normal End
[50H] No Trunk Ineffective Hold
[70H] Call Forwarding Memory Clear Normal End
[A0H] Periodic Back-up Normal End
[C0H] Detection of Remaining Link Normal End

NDA-24307 CHAPTER 3
Page 151
Issue 1
SYSTEM MESSAGES
[00H] Routine Diagnosis Start
➀ Performed Diagnosis Item
➁ Diagnosis Menu (SYS1, Index 89)
➂ Diagnosis Menu (SYS1, Index 90)
➃ Call Forward Memory Clear Item
(SYS1, Index 232)
➄ Periodic Back-up Item
(SYS1, Index 304)
1: 00XX 0X0X XX00 0000 2: 0000 0000 0000 0000 3: 0000 0000 0000 0000
➀ ➁ ➂ ➃ ➄
4: 0000 0000 0000 0000 5: 0000 0000 0000 0000 6: 0000 0000 0000 0000
7: 0000 0000 0000 0000 8: 0000 0000 0000 0000 9: 0000 0000 0000 0000
b7 b6 b5 b4 b3 b2 b1 b0
b3 b1
b2 b1 b0
b5 b4 b3 b2 b1 b0
[00H] Routine Diagnosis Start (LN)
[01H] Routine Diagnosis Start (ISW)
b0: 0/1=-/Program Memory Verification
b1: 0/1=-/Data Memory Verification
b2: 0/1=-/TSW ACT/STBY Changeover
b3: 0/1=-/CPU ACT/STBY Changeover
b4: 0/1=-/Trunk Ineffective Hold Check
b5: 0/1=-/Trunk Ineffective Hold Detection
b6: 0/1=-/Call Forwarding Memory Clear
b7: 0/1=-/IP ACT/STBY Changeover
b1: 0/1 = -/Periodic Back-up
b3: 0/1 = -/Residual Link Detection
b0: 0/1 = -/Call Forward All Clear
b1: 0/1 = -/Call Forward Busy Clear
b2: 0/1 = -/Call Forward No Answer Clear
b0: 0/1 = -/Individual Speed Calling Data Save
b1: 0/1 = -/Call Forwarding Data Save
b2: 0/1 = -/PCS Data Save
b3: 0/1 = -/Name Display Data Save
b4: 0/1 = -/User Assign Soft Key Data Save
b5: 0/1 = -/Number Sharing Data Save

CHAPTER 3 NDA-24307
Page 152
Issue 1
SYSTEM MESSAGES
[10H] Program Memory Verification Normal End
➀ Performed Diagnosis Item
➁ Information on HD
➂ Verification of Drive Number
1: 10XX XX00 0000 0000 2: 0000 0000 0000 0000 3: 0000 0000 0000 0000
➀ ➁ ➂
4: 0000 0000 0000 0000 5: 0000 0000 0000 0000 6: 0000 0000 0000 0000
7: 0000 0000 0000 0000 8: 0000 0000 0000 0000 9: 0000 0000 0000 0000
b1 b0
b3 b2 b1 b0
[10H] Program Memory Verification Normal End
b0: 0/1 = -/HFD 0 is normal
b1: 0/1 = -/HFD 1 is normal
b0: 0/1 = -/Drive Number 0
b1: 0/1 = -/Drive Number 1
b2: 0/1 = -/Drive Number 2
b3: 0/1 = -/Drive Number 3

NDA-24307 CHAPTER 3
Page 153
Issue 1
SYSTEM MESSAGES
[20H] Data Memory Verification Normal End
➀ Performed Diagnosis Item
➁ Verification of HD
➂ Verification of Data Memory
1: 20XX XX00 0000 0000 2: 0000 0000 0000 0000 3: 0000 0000 0000 0000
➀ ➁ ➂
4: 0000 0000 0000 0000 5: 0000 0000 0000 0000 6: 0000 0000 0000 0000
7: 0000 0000 0000 0000 8: 0000 0000 0000 0000 9: 0000 0000 0000 0000
b1 b0
b2 b1 b0
[20H] Data Memory Verification Normal End
b0: 0/1 = -/HFD 0 is normal
b1: 0/1 = -/HFD 1 is normal
b0: 0/1 = -/Data Memory
b1: 0/1 = -/Local Data Memory
b2: 0/1 = -/Network Data Memory

CHAPTER 3 NDA-24307
Page 154
Issue 1
SYSTEM MESSAGES
[30H] TSW ACT/STBY Changeover Normal End
➀ Performed Diagnosis Item
➁ Active TSW system after the
changeover
1: 30XX 0000 0000 0000 2: 0000 0000 0000 0000 3: 0000 0000 0000 0000
➀ ➁
4: 0000 0000 0000 0000 5: 0000 0000 0000 0000 6: 0000 0000 0000 0000
7: 0000 0000 0000 0000 8: 0000 0000 0000 0000 9: 0000 0000 0000 0000
b0
[30H] TSW ACT/STBY Changeover Normal End
b0: 0/1 = TSW No. 0 is ACT/TSW No. 1 is ACT

NDA-24307 CHAPTER 3
Page 155
Issue 1
SYSTEM MESSAGES
[40H] CPU ACT/STBY Changeover Normal End
➀ Performed Diagnosis Item
➁ Active status information after
changeover
1: 40XX 0000 0000 0000 2: 0000 0000 0000 0000 3: 0000 0000 0000 0000
➀ ➁
4: 0000 0000 0000 0000 5: 0000 0000 0000 0000 6: 0000 0000 0000 0000
7: 0000 0000 0000 0000 8: 0000 0000 0000 0000 9: 0000 0000 0000 0000
b1 b0
[40H] CPU ACT/STBY Changeover Normal End
b0: CPU
0/1 = No. 0 is ACT/No. 1 is ACT
b1: TSW
0/1 = No. 0 is ACT/No. 1 is ACT

CHAPTER 3 NDA-24307
Page 156
Issue 1
SYSTEM MESSAGES
[50H] No Trunk Ineffective Hold
➀ Performed Diagnosis Item
➁ MG and Unit of No.
1: 50XX 0000 0000 0000 2: 0000 0000 0000 0000 3: 0000 0000 0000 0000
➀ ➁
4: 0000 0000 0000 0000 5: 0000 0000 0000 0000 6: 0000 0000 0000 0000
7: 0000 0000 0000 0000 8: 0000 0000 0000 0000 9: 0000 0000 0000 0000
b7 b6 b5 b4 b3 b2 b1 b0
[50H] No Trunk Ineffective Hold
b0: Unit 0, Even-numbered MG
1 = No Trunk Ineffective Hold
b1: Unit 1, Even-numbered MG
1 = No Trunk Ineffective Hold
b2: Unit 2, Even-numbered MG
1 = No Trunk Ineffective Hold
b3: Unit 3, Even-numbered MG
1 = No Trunk Ineffective Hold
b4: Unit 0, Odd-numbered MG
1 = No Trunk Ineffective Hold
b5: Unit 1, Odd-numbered MG
1 = No Trunk Ineffective Hold
b6: Unit 2, Odd-numbered MG
1 = No Trunk Ineffective Hold
b7: Unit 3, Odd-numbered MG
1 = No Trunk Ineffective Hold

NDA-24307 CHAPTER 3
Page 157
Issue 1
SYSTEM MESSAGES
[70H] Call Forwarding Memory Clear Normal End
➀ Performed Diagnosis Item
1: 7000 0000 0000 0000 2: 0000 0000 0000 0000 3: 0000 0000 0000 0000
➀
4: 0000 0000 0000 0000 5: 0000 0000 0000 0000 6: 0000 0000 0000 0000
7: 0000 0000 0000 0000 8: 0000 0000 0000 0000 9: 0000 0000 0000 0000
[70H] Call Forwarding Memory Clear Normal End
CHAPTER 3 NDA-24307
Page 158
Issue 1
SYSTEM MESSAGES
[A0H] Periodic Back-up Normal
➀ Performed Diagnosis Item
➁ Information on Periodic Backup
Normal End
➂ Backup Data to No. 0 system
➃Backup Data to No. 1 system
Note: The Number Sharing data load also affects the data load of Dual Station Calling Over-FCCS.
1: A0XX XX00 0000 XX00 2: 0000 0000 0000 0000 3: 0000 0000 0000 0000
➀ ➁ ➂ ➃
4: 0000 0000 0000 0000 5: 0000 0000 0000 0000 6: 0000 0000 0000 0000
7: 0000 0000 0000 0000 8: 0000 0000 0000 0000 9: 0000 0000 0000 0000
b1 b0
b6 b5 b4 b3 b2 b1 b0
b6 b5 b4 b3 b2 b1 b0
[A0H] Periodic Back-up Normal
b0: 0/1 = HFD 0 Normal end/Abnormal end
b1: 0/1 = HFD 1 Normal end/Abnormal end
b0: 0/1 = -/Individual Speed Calling Data
b1: 0/1 = -/Call Forwarding Data
b2: 0/1 = -/RCF
b3: 0/1 = -/Name Display Data
b4: 0/1 = -/User Assign Soft Key Data
b5: 0/1 = -/Number Sharing Data Note
b6: 0/1 = -/Call Block Data
b0: 0/1 = -/Individual Speed Calling Data
b1: 0/1 = -/Call Forwarding Data
b2: 0/1 = -/RCF
b3: 0/1 = -/Name Display Data
b4: 0/1 = -/User Assign Soft Key Data
b5: 0/1 = -/Number Sharing Data Note
b6: 0/1 = -/Call Block Data

NDA-24307 CHAPTER 3
Page 159
Issue 1
SYSTEM MESSAGES
[C0H] Detection of Remaining Link Normal End
➀ Performed Diagnosis Item
1: C000 0000 0000 0000 2: 0000 0000 0000 0000 3: 0000 0000 0000 0000
➀
4: 0000 0000 0000 0000 5: 0000 0000 0000 0000 6: 0000 0000 0000 0000
7: 0000 0000 0000 0000 8: 0000 0000 0000 0000 9: 0000 0000 0000 0000
b7 b6 b5 b4 b3 b2 b1 b0
[C0H] Detection of Remaining Link Normal End

CHAPTER 3 NDA-24307
Page 160
Issue 1
SYSTEM MESSAGES
In a specific time cycle, the system allows a routine diagnosis in its hardware and software to determine if they
are operating properly. This message indicates that the system has been checked by the routine diagnosis
program and the result of the diagnosis is not normal.
➀ Detected Error Item
Note 1: This data is output at the ISW.
Note 2: This data is collected and output at the ISW.
Note 3: The data in this area will be diverse, according to the diagnosis specified in ➀. For details on each
item data, see the following pages.
1: XXXX XXXX XXXX XXXX 2: 0000 0000 0000 0000 3: 0000 0000 0000 0000
Note 3
➀
4: 0000 0000 0000 0000 5: 0000 0000 0000 0000 6: 0000 0000 0000 0000
7: 0000 0000 0000 0000 8: 0000 0000 0000 0000 9: 0000 0000 0000 0000
b7 b6 b5 b4 b3 b2 b1 b0
Default Alarm:
NON
7-P Cyclic Diagnosis Information (Error Detected)
Default Grade:
3Grade Modified: Lamp Modified:
[10H] Program Memory Verification Discrepancy
[11H] Program Memory Verification Impossible (HFD Fault)
[12H] Program Memory Verification Impossible (Fault at CPU side)
[20H] Data Memory Verification Discrepancy
[21H] Data Memory Verification Impossible (HFD Fault)
[31H] TSW ACT/STBY Changeover Failure (ISW)
[32H] TSW ACT/STBY Changeover Failure (LN)
[41H] CPU ACT/STBY Changeover Failure
[42H] CPU ACT/STBY Changeover Failure (DM or PM Verification
NG)
[43H] CPU ACT/STBY Changeover Failure (PCI Fault)
[44H] CPU ACT/STBY Changeover Failure (Changeover NG or CPU
RAM Copy NG)
[50H] Trunk Ineffective Hold Detected
[51H] Trunk Ineffective Hold Detected and Released
[52H] Trunk Ineffective Hold Detected Impossible
[70H] Call Forwarding Memory Clear NG
[A0H] Periodic Backup Abnormal End
[C0H] Detection of Remaining Link Abnormal End
NDA-24307 CHAPTER 3
Page 161
Issue 1
SYSTEM MESSAGES
[10H] Program Memory Verification Discrepancy
➀ Detected Error Item
➁ Faulty HFD number
➂ Verification of Drive Number
➃ Data analyzed by NEC Engineers
1: 1000 XXXX XXXX XXXX 2: XXXX 0000 0000 0000 3: 0000 0000 0000 0000
➀ ➁ ➂ ➃
4: 0000 0000 0000 0000 5: 0000 0000 0000 0000 6: 0000 0000 0000 0000
7: 0000 0000 0000 0000 8: 0000 0000 0000 0000 9: 0000 0000 0000 0000
b1 b0
b3 b2 b1 b0
[10H] Program Memory Verification Discrepancy
b0: 0/1 = -/HFD 0
b1: 0/1 = -/HFD 1
b0: 0/1 = -/Drive Number 0
b1: 0/1 = -/Drive Number 1
b2: 0/1 = -/Drive Number 2
b3: 0/1 = -/Drive Number 3
CHAPTER 3 NDA-24307
Page 162
Issue 1
SYSTEM MESSAGES
[11H] Program Memory Verification Impossible (HFD Fault)
➀ Detected Error Item
➁ HFD No. (verification suspended)
➂ Error Type
➃ Data analyzed by NEC Engineers
➄ Error Drive Note
Note: This data is available when ➂ is 00 Hex.
1: 11XX XXXX XXXX 0000 2: 0000 0000 0000 0000 3: 0000 0000 0000 0000
➀ ➁ ➂
➃➄
4: 0000 0000 0000 0000 5: 0000 0000 0000 0000 6: 0000 0000 0000 0000
7: 0000 0000 0000 0000 8: 0000 0000 0000 0000 9: 0000 0000 0000 0000
b1 b0
b7 b6 b5 b4 b3 b2 b1 b0
b3 b2 b1 b0
[11H] Program Memory Verification Impossible (HFD Fault)
b0: 0/1 = -/HFD 0
b1: 0/1 = -/HFD 1
00H: HD Processing NG
01H: HD Not Connected
02H: HD Busy
03H: HD Fault (Fault processing/No equipment, etc.)
04H: Transfer NG
05H: Response Timeout
b0: 0/1 = -/Drive Number 0
b1: 0/1 = -/Drive Number 1
b2: 0/1 = -/Drive Number 2
b3: 0/1 = -/Drive Number 3

NDA-24307 CHAPTER 3
Page 163
Issue 1
SYSTEM MESSAGES
[12H] Program Memory Verification Impossible (Fault at CPU side)
➀ Detected Error Item
➁ Cause for suspended verification
1: 12XX 0000 0000 0000 2: 0000 0000 0000 0000 3: 0000 0000 0000 0000
➀ ➁
4: 0000 0000 0000 0000 5: 0000 0000 0000 0000 6: 0000 0000 0000 0000
7: 0000 0000 0000 0000 8: 0000 0000 0000 0000 9: 0000 0000 0000 0000
b1 b0
[12H] Program Memory Verification Impossible (Fault at CPU side)
01H: CPU-to-CPU communication failure
02H: Check sum file copy failure
CHAPTER 3 NDA-24307
Page 164
Issue 1
SYSTEM MESSAGES
[20H] Data Memory Verification Discrepancy
➀ Detected Error Item
➁ Faulty HFD
➂ Diagnosed Data Memory
➃ Data analyzed by NEC Engineers
1: 20XX XX00 XXXX XXXX 2: XXXX XXXX XXXX XXXX 3: XXXX XXXX XXXX XXXX
➀ ➁ ➂ ➃
4: XXXX XXXX 0000 0000 5: 0000 0000 0000 0000 6: 0000 0000 0000 0000
7: 0000 0000 0000 0000 8: 0000 0000 0000 0000 9: 0000 0000 0000 0000
b1 b0
b2 b1 b0
[20H] Data Memory Verification Discrepancy
b0: 0/1 = -/HFD 0
b1: 0/1 = -/HFD 1
b0: 0/1 = -/Data Memory (DM)
b1: 0/1 = -/Local Data Memory (LDM)
b2: 0/1 = -/Network Data Memory (NDM)
NDA-24307 CHAPTER 3
Page 165
Issue 1
SYSTEM MESSAGES
[21H] Data Memory Verification Impossible (HFD Fault)
➀ Detected Error Item
➁ Faulty HFD
➂ Diagnosed Data Memory
➃ Error Type
➄ Signal Code
➅ Data analyzed by NEC Engineers
➆ Error Drive
Note: When ➃ (Error Type) is 00H, ➄ Signal Code, ➅ and ➆ Error Drive are valid.
DM LDM NDM
1: 21XX XX00 XXXX XXXX 2: XXXX XXXX XXXX XXXX 3: 0000 0000 0000 0000
➀ ➁ ➂ ➃ ➄ ➅ ➆ ➃ ➄ ➅ ➆ ➃ ➄ ➅ ➆
4: 0000 0000 0000 0000 5: 0000 0000 0000 0000 6: 0000 0000 0000 0000
7: 0000 0000 0000 0000 8: 0000 0000 0000 0000 9: 0000 0000 0000 0000
b1 b0
b2 b1 b0
b7 b6 b5 b4 b3 b2 b1 b0
b7 b6 b5 b4 b3 b2 b1 b0
b3 b2 b1 b0
[21H] Data Memory Verification Impossible (HFD Fault)
b0: 0/1 = -/HFD 0
b1: 0/1 = -/HFD 1
b0: 0/1 = -/Data Memory (DM)
b1: 0/1 = -/Local Data Memory (LDM)
b2: 0/1 = -/Network Data Memory (NDM)
00H: HD Processing NG
01H: HD Connection NG
02H: HD Busy
03H: HD Fault (Fault processing/No equipment etc.)
04H: Transfer NG
05H: Response Timeout
51H: Data Transfer starts
53H: File Transfer starts
55H: Data Load
b0: 0/1 = -/Drive Number 0
b1: 0/1 = -/Drive Number 1
b2: 0/1 = -/Drive Number 2
b3: 0/1 = -/Drive Number 3
CHAPTER 3 NDA-24307
Page 166
Issue 1
SYSTEM MESSAGES
[31H] TSW ACT/STBY Changeover Failure (ISW)
Note: This data is output at the ISW
➀ Detected Error Item
➁ Active TSW No.
➂ FPC No. of ISW
➃ Number of MUX cards (ACT side)
Note
➄ Number of MUX cards (STBY
side) Note
Note: This data is displayed when MUX failure occurs in LN side.
1: 31XX XX00 XXXX 0000 2: 0000 0000 0000 0000 3: 0000 0000 0000 0000
➀ ➁ ➂ ➃ ➄
4: 0000 0000 0000 0000 5: 0000 0000 0000 0000 6: 0000 0000 0000 0000
7: 0000 0000 0000 0000 8: 0000 0000 0000 0000 9: 0000 0000 0000 0000
b0
b7 b6 b5 b4 b3 b2 b1 b0
b7 b6 b5 b4 b3 b2 b1 b0
b7 b6 b5 b4 b3 b2 b1 b0
[31H] TSW ACT/STBY Changeover Failure (ISW)
b0: 0/1=TSW No. 0 is ACT/No. 1 is ACT
b0-b7: Total number of MUX cards mounted in all LNs
b0-b7: Total number of MUX cards mounted in all LNs
NDA-24307 CHAPTER 3
Page 167
Issue 1
SYSTEM MESSAGES
[32H] TSW ACT/STBY Changeover Failure (LN)
Note: This data is collected and output at the ISW.
➀ Detected Error Item
➁ Active TSW No.
➂ FPC No. of LN
➃,➄, ➅, ➆ MUX card (ACT side)
linkage condition
1: 32XX XX00 XXXX XXXX 2: XXXX XXXX 0000 0000 3: 0000 0000 0000 0000
➀ ➁ ➂ ➃ ➄ ➅ ➆ ➇ ➈ ➉
4: 0000 0000 0000 0000 5: 0000 0000 0000 0000 6: 0000 0000 0000 0000
7: 0000 0000 0000 0000 8: 0000 0000 0000 0000 9: 0000 0000 0000 0000
b0
b7 b6 b5 b4 b3 b2 b1 b0
b7 b6 b5 b4 b3 b2 b1 b0
11
[32H] TSW ACT/STBY Changeover Failure (LN)
b0: 0/1 = TSW No. 0 is ACT/No. 1 is ACT
As shown in the table below, each bit represents the Unit number allocated
for each MUX card position. When “1” is set, the corresponding MUX card
(status: ACT) has a functional failure.
MG1 MG0
Unit 3 Unit 2 Unit 1 Unit 0 Unit 3 Unit 2 Unit 1 Unit 0
MG3 MG2
Unit 3 Unit 2 Unit 1 Unit 0 Unit 3 Unit 2 Unit 1 Unit 0
MG5 MG4
Unit 3 Unit 2 Unit 1 Unit 0 Unit 3 Unit 2 Unit 1 Unit 0
MG7 MG6
Unit 3 Unit 2 Unit 1 Unit 0 Unit 3 Unit 2 Unit 1 Unit 0
0: -
1: MUX connection error
(functional fault/not mounted)
➃
➄
➅
➆
CHAPTER 3 NDA-24307
Page 168
Issue 1
SYSTEM MESSAGES
➇, ➈, ➉, MUX card (STBY side)
linkage condition
b7 b6 b5 b4 b3 b2 b1 b0
As shown in the table below, each bit represents the Unit number allocated
for each MUX card position. When “1” is set, the corresponding MUX card
(status: ACT) has a functional failure.
11
MG1 MG0
Unit 3 Unit 2 Unit 1 Unit 0 Unit 3 Unit 2 Unit 1 Unit 0
MG3 MG2
Unit 3 Unit 2 Unit 1 Unit 0 Unit 3 Unit 2 Unit 1 Unit 0
MG5 MG4
Unit 3 Unit 2 Unit 1 Unit 0 Unit 3 Unit 2 Unit 1 Unit 0
MG7 MG6
Unit 3 Unit 2 Unit 1 Unit 0 Unit 3 Unit 2 Unit 1 Unit 0
0: -
1: MUX connection error
(functional fault/not mounted)
➇
➈
➉
11

NDA-24307 CHAPTER 3
Page 169
Issue 1
SYSTEM MESSAGES
[41H] CPU ACT/STBY Changeover Failure
➀ Detected Error Item
➁ ACT Status Information
1: 41XX 0000 0000 0000 2: 0000 0000 0000 0000 3: 0000 0000 0000 0000
➀ ➁
4: 0000 0000 0000 0000 5: 0000 0000 0000 0000 6: 0000 0000 0000 0000
7: 0000 0000 0000 0000 8: 0000 0000 0000 0000 9: 0000 0000 0000 0000
b1 b0
[41H] CPU ACT/STBY Changeover Failure
b0: CPU
0/1 = No. 0 is ACT/ No. 1 is ACT
b1: TSW
0/1 = No. 0 is ACT/ No. 1 is ACT

CHAPTER 3 NDA-24307
Page 170
Issue 1
SYSTEM MESSAGES
[42H] CPU ACT/STBY Changeover Failure (DM Verification NG or PM Verification NG)
➀ Detected Error Item
➁ ACT Status Information
1: 42XX 0000 0000 0000 2: 0000 0000 0000 0000 3: 0000 0000 0000 0000
➀ ➁
4: 0000 0000 0000 0000 5: 0000 0000 0000 0000 6: 0000 0000 0000 0000
7: 0000 0000 0000 0000 8: 0000 0000 0000 0000 9: 0000 0000 0000 0000
b1 b0
[42H] CPU ACT/STBY Changeover Failure (DM or PM Verification NG)
b0: CPU
0/1 = No. 0 is ACT/No. 1 is ACT
b1: TSW
0/1 = No. 0 is ACT/No. 1 is ACT

NDA-24307 CHAPTER 3
Page 171
Issue 1
SYSTEM MESSAGES
[43H] CPU ACT/STBY Changeover Failure (PCI Fault)
➀ Detected Error Item
➁ ACT Status Information
1: 43XX 0000 0000 0000 2: 0000 0000 0000 0000 3: 0000 0000 0000 0000
➀ ➁
4: 0000 0000 0000 0000 5: 0000 0000 0000 0000 6: 0000 0000 0000 0000
7: 0000 0000 0000 0000 8: 0000 0000 0000 0000 9: 0000 0000 0000 0000
b1 b0
[43H] CPU ACT/STBY Changeover Failure (PCI Fault)
b0: CPU
0/1 = No. 0 is ACT/No. 1 is ACT
b1: TSW
0/1 = No. 0 is ACT/No. 1 is ACT

CHAPTER 3 NDA-24307
Page 172
Issue 1
SYSTEM MESSAGES
[44H] CPU ACT/STBY Changeover Failure (Changeover NG or CPU RAM Copy NG)
➀ Detected Error Item
➁ ACT Status Information
1: 44XX 0000 0000 0000 2: 0000 0000 0000 0000 3: 0000 0000 0000 0000
➀ ➁
4: 0000 0000 0000 0000 5: 0000 0000 0000 0000 6: 0000 0000 0000 0000
7: 0000 0000 0000 0000 8: 0000 0000 0000 0000 9: 0000 0000 0000 0000
b1 b0
[44H] CPU ACT/STBY Changeover Failure
Changeover NG or CPU RAM Copy NG)
b0: CPU
0/1 = No. 0 is ACT/No. 1 is ACT
b1: TSW
0/1 = No. 0 is ACT/No. 1 is ACT

NDA-24307 CHAPTER 3
Page 173
Issue 1
SYSTEM MESSAGES
[50H] Trunk Ineffective Hold Detected
➀ Detected Error Item
➁ LENS of Trunk Ineffective Hold
(MG, U)
➂ LENS of Ineffective Hold Trunk (G, LV)
1: 50XX 00XX XXXX XXXX 2: XXXX XXXX XXXX XXXX 3: XXXX XXXX XXXX XXXX
➀ ➁ ➂ ➂ ➂
4: XXXX XXXX XXXX XXXX 5: XXXX XX00 0000 0000 6: 0000 0000 0000 0000
➂➂
7: 0000 0000 0000 0000 8: 0000 0000 0000 0000 9: 0000 0000 0000 0000
b2 b1 b0
Group No.
1: 500X 00XX XXXX XXXX 2: XXXX XXXX XXXX XXXX 3: XXXX XXXX XXXX XXXX
Group
Number 0➀ ➁ ➂ ➃ ➄ ➅ ➆ ➇ ➈ ➉ 11 12 13 14 15 16 17 18 19 20
4: XXXX XXXX XXXX XXXX 5: XXXX XX00 0000 0000 6: 0000 0000 0000 0000
25 26
21 22 23 24 27 28 29 30 31
7: 0000 0000 0000 0000 8: 000 0000 0000 0000 9: 0000 0000 0000 0000
<Level>
Level
b7 b6 b5 b4 b3 b2 b1 b0
G0
G1
G2
G3
G30
G31
[50H] Trunk Ineffective Hold Detected
b1 b0
0 0 = Unit 0
0 1 = Unit 1
1 0 = Unit 2
1 1 = Unit 3
b2: 0/1 = Even No./Odd No. Module
0/1 = -/Ineffectively held

CHAPTER 3 NDA-24307
Page 174
Issue 1
SYSTEM MESSAGES
[51H] Trunk Ineffective Hold Detected and Released
➀ Detected Error Item
➁ LENS of Trunk Ineffective Hold
Detected and Released (MG, U)
➂ LENS of Ineffective Hold Trunk (G, LV)
1: 51XX 00XX XXXX XXXX 2: XXXX XXXX XXXX XXXX 3: XXXX XXXX XXXX XXXX
➀ ➁ ➂ ➂ ➂
4: XXXX XXXX XXXX XXXX 5: XXXX XX00 0000 0000 6: 0000 0000 0000 0000
➂➂
7: 0000 0000 0000 0000 8: 0000 0000 0000 0000 9: 0000 0000 0000 0000
b2 b1 b0
Group No.
1: 500X 00XX XXXX XXXX 2: XXXX XXXX XXXX XXXX 3: XXXX XXXX XXXX XXXX
Group
Number ➀ ➀ ➁ ➂ ➃ ➄ ➅ ➆ ➇ ➈ ➉ 11 12 13 14 15 16 17 18 19 20
4: XXXX XXXX XXXX XXXX 5: XXXX XX00 0000 0000 6: 0000 0000 0000 0000
25 26
21 22 23 24 27 28 29 30 31
7: 0000 0000 0000 0000 8: 000 0000 0000 0000 9: 0000 0000 0000 0000
<Level>
Level
b7 b6 b5 b4 b3 b2 b1 b0
G0
G1
G2
G3
G30
G31
[51H] Trunk Ineffective Hold Detected and Released
b1 b0
00 = Unit 0
01 = Unit 1
10 = Unit 2
11 = Unit 3
b2: 0/1 = Even No./Odd No. Module
0/1 = -/Ineffectively held

NDA-24307 CHAPTER 3
Page 175
Issue 1
SYSTEM MESSAGES
[52H] Trunk Ineffective Hold Detected Impossible
➀ Detected Error Item
➁ Cause for the Suspended Detection
1: 5200 XX00 0000 0000 2: 0000 0000 0000 0000 3: 0000 0000 0000 0000
➀ ➁
4: 0000 0000 0000 0000 5: 0000 0000 0000 0000 6: 0000 0000 0000 0000
7: 0000 0000 0000 0000 8: 0000 0000 0000 0000 9: 0000 0000 0000 0000
b1 b0
[52H] Trunk Ineffective Hold Detected Impossible
b1 b0
0 1 = The CPU to detect is abnormal
1 0 = Data transfer error
1 1 = No Answer error

CHAPTER 3 NDA-24307
Page 176
Issue 1
SYSTEM MESSAGES
[70H] Call Forwarding Memory Clear NG
➀ Detected Error Item
➁ Cause for which the Transfer
Memory has been stopped
1: 7000 0X00 0000 0000 2: 0000 0000 0000 0000 3: 0000 0000 0000 0000
➀ ➁
4: 0000 0000 0000 0000 5: 0000 0000 0000 0000 6: 0000 0000 0000 0000
7: 0000 0000 0000 0000 8: 0000 0000 0000 0000 9: 0000 0000 0000 0000
b1 b0
[70H] Call Forwarding Memory Clear NG
b1 b0
0 1 = CPU is abnormal
1 0 = Data Transfer error
NDA-24307 CHAPTER 3
Page 177
Issue 1
SYSTEM MESSAGES
[A0H] Periodic Backup Abnormal End
➀ Error detection by Routine
Diagnosis
➁ Periodic Backup Abnormal End
Information
➂ Backup Data to No. 0 system
➃ Error Code of No. 0 system HD
Note: The Number Sharing data load also affects the data load of Dual Station Calling Over-FCCS.
1: A0XX XX00 XXXX XX00 2: XXXX XXXX XXXX XX00 3: 0000 0000 0000 0000
➀ ➁ ➂ ➃ ➄ ➅ ➆ ➇ ➈ ➉
4: 0000 0000 0000 0000 5: 0000 0000 0000 0000 6: 0000 0000 0000 0000
7: 0000 0000 0000 0000 8: 0000 0000 0000 0000 9: 0000 0000 0000 0000
b1 b0
b6 b5 b4 b3 b2 b1 b0
b7 b6 b5 b4 b3 b2 b1 b0
[A0H] Periodic Backup Abnormal End
b0: 0/1 = HFD 0 Normal end/Abnormal end
b1: 0/1 = HFD 1 Normal end/Abnormal end
b0: 0/1 = -/Individual Speed Calling Data
b1: 0/1 = -/Call Forwarding Data
b2: 0/1 = -/RCF
b3: 0/1 = -/Name Display Data
b4: 0/1 = -/User Assign Soft Key Data
b5: 0/1 = -/Number Sharing Data Note
b6: 0/1 = -/Call Block Data
21H:
40H~47H:
53H:
57H:
59H~5BH:
80H~84H:
A0H:
A2H~A6H:
BDH:
C0H: Failed installation
01H: HD being used by another program
02H: HD not equipped
Parameter
HD Fault

CHAPTER 3 NDA-24307
Page 178
Issue 1
SYSTEM MESSAGES
➄ Error Status of No. 0 System HD
➅ Backup Data to No. 1 System
➆ Error Code of No. 1 System HD
➇ Error Status of No. 1 System HD
➈ [Data analyzed by NEC Engineers]
➉ [Data analyzed by NEC Engineers]
b7 b3 b2 b1 b0
b7 b6 b5 b4 b3 b2 b1 b0
b7 b6 b5 b4 b3 b2 b1 b0
b7 b3 b2 b1 b0
Error occurs;
b0: 0/1 = -/At the time data transfer started
b1: 0/1 = -/At the time data saved
b2: 0/1 = -/At the time data transfer ended
b3: 0/1 = -/At the time file transfer started
Refer to No. ➂
Refer to No.➃
Refer to No.➄
NDA-24307 CHAPTER 3
Page 179
Issue 1
SYSTEM MESSAGES
[C0H] Detection of Remaining Link Abnormal End
➀ Performed Diagnosis Item
➁ Error Data
1: C000 XX00 0000 0000 2: 0000 0000 0000 0000 3: 0000 0000 0000 0000
➀ ➁
4: 0000 0000 0000 0000 5: 0000 0000 0000 0000 6: 0000 0000 0000 0000
7: 0000 0000 0000 0000 8: 0000 0000 0000 0000 9: 0000 0000 0000 0000
b7 b6 b5 b4 b3 b2 b1 b0
b1 b0
[C0H] Detection of Remaining Link Abnormal End
b1 b0
0 1 = CPU is not normal
1 0 = Data transfer error
1 1 = No Answer error

CHAPTER 3 NDA-24307
Page 180
Issue 1
SYSTEM MESSAGES
This message displays when the MB switch on the PLO/CLK card is turned ON when extracting or inserting
a circuit card.
➀ Switched PLO system
1: XX00 0000 0000 0000 2: 0000 0000 0000 0000 3: 0000 0000 0000 0000
➀
4: 0000 0000 0000 0000 5: 0000 0000 0000 0000 6: 0000 0000 0000 0000
7: 0000 0000 0000 0000 8: 0000 0000 0000 0000 9: 0000 0000 0000 0000
b0
Default Alarm:
NON
7-U PLO MB Key Turn ON
Default Grade:
3Grade Modified: Lamp Modified:
b0: 0/1 = PLO No. 0 system/PLO No. 1 system
NDA-24307 CHAPTER 3
Page 181
Issue 1
SYSTEM MESSAGES
This message displays when the MB switch on the PLO/CLK card has been turned off when extracting or
inserting a circuit card.
➀ Switched PLO System
➁ Status of the PLO card at the time
of the fault detection (Scan Data 1)
Note: This information includes the failure detected in PH-CK18 (CLK) card.
1: XXXX XX00 0000 0000 2: 0000 0000 0000 0000 3: 0000 0000 0000 0000
➀ ➁ ➂
4: 0000 0000 0000 0000 5: 0000 0000 0000 0000 6: 0000 0000 0000 0000
7: 0000 0000 0000 0000 8: 0000 0000 0000 0000 9: 0000 0000 0000 0000
b0
b7 b6 b5 b4 b3 b2 b1 b0
Default Alarm:
NON
7-V PLO MB Key Turn OFF
Default Grade:
3Grade Modified: Lamp Modified:
b0: 0/1 = PLO No. 0 system/PLO No. 1 system
b0: 0/1 = Clock STBY/ACT
b1: 0/1 = PLO Synchronizing/PLO self-running or drifting
b2: 0/1 = -/Input clock down
b3, b4:Route of Input clock (see table)
b5: 0/1 = -/PLO input all down
b6: 0/1 = -/PLO output down Note
b7: 0/1 = -/Drifting
b4 b3 Connected With Primary
Oscillator (M-OSC) Connected With
External Clock
0 0 No. 0 M-OSC Route 0
0 1 No. 1 M-OSC Route 1
10 - Route 2
11 - Route 3

CHAPTER 3 NDA-24307
Page 182
Issue 1
SYSTEM MESSAGES
➂ Status of the PLO card at the time
of the failure detection (Scan Data
2)
b4 b1 b0
b0: 0/1 = -/n × 5msec clock down
b1: 0/1 = -/Frame Synchronization down from SYNC card
b4: 0/1 = -/Internal OSC clock down

NDA-24307 CHAPTER 3
Page 183
Issue 1
SYSTEM MESSAGES
This message displays when a clock down failure occurs in the CCH/DCH circuit card. When this message is
indicated, the related CCH/DCH card is placed into make-busy status.
➀ Location of faulty CCH/DCH card
1: XX00 0000 0000 0000 2: 0000 0000 0000 0000 3: 0000 0000 0000 0000
➀
4: 0000 0000 0000 0000 5: 0000 0000 0000 0000 6: 0000 0000 0000 0000
7: 0000 0000 0000 0000 8: 0000 0000 0000 0000 9: 0000 0000 0000 0000
b7 b6 b5 b4 b3 b2 b1 b0
Default Alarm:
SUP
13-A CCH Clock Failure
Default Grade:
3Grade Modified: Lamp Modified:
b0-b4: Group No.
b5, b6:Unit No. (0-3)
b7: 0/1 = Even-numbered MG/Odd-numbered MG

CHAPTER 3 NDA-24307
Page 184
Issue 1
SYSTEM MESSAGES
This message displays when C-level infinite loop of the Port Microprocessor (PM) in the CCH/DCH circuit
card has occurred.
➀ Location of faulty CCH/DCH card
1: XX00 0000 0000 0000 2: 0000 0000 0000 0000 3: 0000 0000 0000 0000
➀
4: 0000 0000 0000 0000 5: 0000 0000 0000 0000 6: 0000 0000 0000 0000
7: 0000 0000 0000 0000 8: 0000 0000 0000 0000 9: 0000 0000 0000 0000
b7 b6 b5 b4 b3 b2 b1 b0
Default Alarm:
SUP
13-B CCH C-Level Infinite Loop Failure (Permanent)
Default Grade:
3Grade Modified: Lamp Modified:
b0-b4: Group No.
b5, b6:Unit No. (0-3)
b7: 0/1 = Even-numbered MG/Odd-numbered MG

NDA-24307 CHAPTER 3
Page 185
Issue 1
SYSTEM MESSAGES
This message displays when C-level infinite loop of the Port Microprocessor (PM) in the CCH/DCH circuit
card has occurred.
➀ Location of faulty CCH/DCH card
1: XX00 0000 0000 0000 2: 0000 0000 0000 0000 3: 0000 0000 0000 0000
➀
4: 0000 0000 0000 0000 5: 0000 0000 0000 0000 6: 0000 0000 0000 0000
7: 0000 0000 0000 0000 8: 0000 0000 0000 0000 9: 0000 0000 0000 0000
b7 b6 b5 b4 b3 b2 b1 b0
Default Alarm:
SUP
13-C CCH C-Level Infinite Loop Failure (Temporary)
Default Grade:
1Grade Modified: Lamp Modified:
b0-b4: Group No.
b5, b6:Unit No. (0-3)
b7: 0/1 = Even-numbered MG/Odd-numbered MG

CHAPTER 3 NDA-24307
Page 186
Issue 1
SYSTEM MESSAGES
This message displays when a Port Microprocessor (PM) of the CCH/DCH card did not send an answer to the
CPU.
➀ Location of faulty CCH/DCH card
1: XX00 0000 0000 0000 2: 0000 0000 0000 0000 3: 0000 0000 0000 0000
➀
4: 0000 0000 0000 0000 5: 0000 0000 0000 0000 6: 0000 0000 0000 0000
7: 0000 0000 0000 0000 8: 0000 0000 0000 0000 9: 0000 0000 0000 0000
b7 b6 b5 b4 b3 b2 b1 b0
Default Alarm:
SUP
13-D CCH Lock-Up Failure (Permanent)
Default Grade:
3Grade Modified: Lamp Modified:
b0-b4: Group No.
b5, b6:Unit No. (0-3)
b7: 0/1 = Even-numbered MG/Odd-numbered MG

NDA-24307 CHAPTER 3
Page 187
Issue 1
SYSTEM MESSAGES
This message displays when a Port Microprocessor (PM) of the CCH/DCH card did not send an answer to the
CPU.
➀ Location of faulty CCH/DCH card
1: XX00 0000 0000 0000 2: 0000 0000 0000 0000 3: 0000 0000 0000 0000
➀
4: 0000 0000 0000 0000 5: 0000 0000 0000 0000 6: 0000 0000 0000 0000
7: 0000 0000 0000 0000 8: 0000 0000 0000 0000 9: 0000 0000 0000 0000
b7 b6 b5 b4 b3 b2 b1 b0
Default Alarm:
SUP
13-E CCH Lock-Up Failure (Temporary)
Default Grade:
1Grade Modified: Lamp Modified:
b0-b4: Group No.
b5, b6:Unit No. (0-3)
b7: 0/1 = Even-numbered MG/Odd-numbered MG

CHAPTER 3 NDA-24307
Page 188
Issue 1
SYSTEM MESSAGES
This message displays when B-level infinite loop of the Port Microprocessor (PM) in the CCH/DCH circuit
card has occurred.
➀ Location of faulty CCH/DCH card
1: XX00 0000 0000 0000 2: 0000 0000 0000 0000 3: 0000 0000 0000 0000
➀
4: 0000 0000 0000 0000 5: 0000 0000 0000 0000 6: 0000 0000 0000 0000
7: 0000 0000 0000 0000 8: 0000 0000 0000 0000 9: 0000 0000 0000 0000
b7 b6 b5 b4 b3 b2 b1 b0
Default Alarm:
SUP
13-F CCH B-Level Infinite Loop Failure (Permanent)
Default Grade:
3Grade Modified: Lamp Modified:
b0-b4: Group No.
b5, b6:Unit No. (0-3)
b7: 0/1 = Even-numbered MG/Odd-numbered MG

NDA-24307 CHAPTER 3
Page 189
Issue 1
SYSTEM MESSAGES
This message displays when B-level infinite loop of the Port Microprocessor (PM) in the CCH/DCH circuit
card has occurred.
➀ Location of faulty CCH/DCH card
1: XX00 0000 0000 0000 2: 0000 0000 0000 0000 3: 0000 0000 0000 0000
➀
4: 0000 0000 0000 0000 5: 0000 0000 0000 0000 6: 0000 0000 0000 0000
7: 0000 0000 0000 0000 8: 0000 0000 0000 0000 9: 0000 0000 0000 0000
b7 b6 b5 b4 b3 b2 b1 b0
Default Alarm:
SUP
13-G CCH B-Level Infinite Loop Failure (Temporary)
Default Grade:
1Grade Modified: Lamp Modified:
b0-b4: Group No.
b5, b6:Unit No. (0-3)
b7: 0/1 = Even-numbered MG/Odd-numbered MG
CHAPTER 3 NDA-24307
Page 190
Issue 1
SYSTEM MESSAGES
This message displays when a failure has occurred numerous times to a common channel signaling link and
the link has been placed into make-busy state.
➀ Location of Faulty CCH/DCH Card
➁ Data to be Analyzed by NEC
Engineers
1: XXXX XX00 0000 0000 2: 0000 0000 0000 0000 3: 0000 0000 0000 0000
➀ ➁ ➂
4: 0000 0000 0000 0000 5: 0000 0000 0000 0000 6: 0000 0000 0000 0000
7: 0000 0000 0000 0000 8: 0000 0000 0000 0000 9: 0000 0000 0000 0000
b7 b6 b5 b4 b3 b2 b1 b0
b7 b6 b5 b4 b3 b2 b1 b0
Default Alarm:
SUP
13-H CCS Link Failure (Permanent)
Default Grade:
1Grade Modified: Lamp Modified:
b0-b4: Group No.
b5, b6:Unit No. (0-3)
b7: 0/1 = Even-numbered MG/Odd-numbered MG
NDA-24307 CHAPTER 3
Page 191
Issue 1
SYSTEM MESSAGES
➂ Probable cause for the failure
b3 b2 b1 b0
b0-b3: See Table:
FLT ID CCITT
ERROR FACTOR
00 A S (F = 1) frame is received.
01 B DM (F = 1) response is received.
02 C UA (F = 1) response is received.
03 D UA (F = 0) response is received.
04 E DM (F = 0) response is received.
05 F SABME command is received.
06 G N200 Timeout (Link is set)
07 H N200 Timeout (Link is
disconnected)
08 I N200 Timeout (Link failure is
restored to normal)
09 J N (R) frame error is received.
0A K FRMR frame is received (Link is
re-setup).
0B L Undefined frame is received.
0C M -
0D N Improper long frame is received.
0E O I frame with I field which exceeds
N201 is received.
0F - -
10 - Layer 1 down (for ILC)
40 - FRMR frame is received. (Link is
not re-setup)
CHAPTER 3 NDA-24307
Page 192
Issue 1
SYSTEM MESSAGES
This message displays when a failure has occurred numerous times to a common channel signaling link and
the link has been placed into make-busy state. When this fault lasts over three minutes, the system message
changes to [13-H] CCS Link Failure (Permanent).
➀ Location of faulty CCH/DCH card
➁ Data to be Analyzed by NEC Engineers
1: XXXX XX00 0000 0000 2: 0000 0000 0000 0000 3: 0000 0000 0000 0000
➀ ➁ ➂
4: 0000 0000 0000 0000 5: 0000 0000 0000 0000 6: 0000 0000 0000 0000
7: 0000 0000 0000 0000 8: 0000 0000 0000 0000 9: 0000 0000 0000 0000
b7 b6 b5 b4 b3 b2 b1 b0
b7 b6 b5 b4 b3 b2 b1 b0
Default Alarm:
NON
13-I CCS Link Failure (Temporary)
Default Grade:
1Grade Modified: Lamp Modified:
b0-b4: Group No.
b5, b6:Unit No. (0-3)
b7: 0/1 = Even-numbered MG/Odd-numbered MG
NDA-24307 CHAPTER 3
Page 193
Issue 1
SYSTEM MESSAGES
➂ Probable cause for the failure
b3 b2 b1 b0
b0-b3: See Table.
FLT ID CCITT
ERROR FACTOR
00 A S (F = 1) frame is received.
01 B DM (F = 1) response is received.
02 C UA (F = 1) response is received.
03 D UA (F = 0) response is received.
04 E DM (F = 0) response is received.
05 F SABME command is received.
06 G N200 Timeout (Link is set)
07 H N200 Timeout (Link is disconnected)
08 I N200 Timeout (Link failure is restored
to normal)
09 J N (R) frame error is received.
0A K FRMR frame is received (Link is
re-setup).
0B L Undefined frame is received.
0C M -
0D N Improper long frame is received.
0E O I frame with I field which exceeds
N201 is received.
0F - -
10 - Layer 1 down (for ILC)
40 - FRMR frame is received. (Link is not
re-setup)

CHAPTER 3 NDA-24307
Page 194
Issue 1
SYSTEM MESSAGES
This message displays when the faults pertaining to CCIS/ISDN Link are restored to normal.
➀ Location of faulty CCH/DCH card
➁ Data to be Analyzed by NEC Engineers
1: XXXX 0000 0000 0000 2: 0000 0000 0000 0000 3: 0000 0000 0000 0000
➀ ➁
4: 0000 0000 0000 0000 5: 0000 0000 0000 0000 6: 0000 0000 0000 0000
7: 0000 0000 0000 0000 8: 0000 0000 0000 0000 9: 0000 0000 0000 0000
b7 b6 b5 b4 b3 b2 b1 b0
b7 b6 b5 b4 b3 b2 b1 b0
Default Alarm:
NON
13-J Restoration From CCS Link Failure
Default Grade:
3Grade Modified: Lamp Modified:
b0-b4: Group No.
b5, b6:Unit No. (0-3)
b7: 0/1 = Even-numbered MG/Odd-numbered MG

NDA-24307 CHAPTER 3
Page 195
Issue 1
SYSTEM MESSAGES
This message displays when a fault occurred to the Port Microprocessor (PM) within the CCH/DCH circuit
card and the restart processing is executed.
➀ Location of faulty CCH/DCH card
1: XX00 0000 0000 0000 2: 0000 0000 0000 0000 3: 0000 0000 0000 0000
➀
4: 0000 0000 0000 0000 5: 0000 0000 0000 0000 6: 0000 0000 0000 0000
7: 0000 0000 0000 0000 8: 0000 0000 0000 0000 9: 0000 0000 0000 0000
b7 b6 b5 b4 b3 b2 b1 b0
Default Alarm:
SUP
13-K CCH Reset Interrupt Failure
Default Grade:
3Grade Modified: Lamp Modified:
b0-b4: Group No.
b5, b6:Unit No. (0-3)
b7: 0/1 = Even-numbered MG/Odd-numbered MG
CHAPTER 3 NDA-24307
Page 196
Issue 1
SYSTEM MESSAGES
This message displays when a digital line failure occurs on the DAI circuit card.
➀ DAI Card Mounting Location
➁ Kind of Fault
1: XXXX 0000 0000 0000 2: 0000 0000 0000 0000 3: 0000 0000 0000 0000
➀ ➁
4: 0000 0000 0000 0000 5: 0000 0000 0000 0000 6: 0000 0000 0000 0000
7: 0000 0000 0000 0000 8: 0000 0000 0000 0000 9: 0000 0000 0000 0000
b7 b6 b5 b4 b3 b2 b1 b0
b4 b3 b2 b1 b0
Default Alarm:
SUP
13-N Digital Line Warning
Default Grade:
1Grade Modified: Lamp Modified:
b0-b4: Group No.
b5, b6:Unit No. (0-3)
b7: MG No.
0/1 = Even-numbered MG/Odd-numbered MG
b0-b4: Kind of Fault (HEX)
00 = -
01 = Frame alignment loss PCM down
02 = Bit error rate is over 10-6
03 = Slip is detected
04 = -
05 = Dch down
06 = Multi-frame alignment loss
07 = -
10 = -
11 = Frame alignment loss PCM down (frequently)
12 = Bit error rate is over 10-4
13 = Slip is detected (frequently)
14 = Opposite office alarm is detected
15 = -
16 = Multi-frame alignment loss (frequently)
17 = Frame alignment loss PCM down (continuously)
18 = Multi-frame alignment loss (continuously)

NDA-24307 CHAPTER 3
Page 197
Issue 1
SYSTEM MESSAGES
This message displays when a digital line failure occurs in succession on the DAI circuit card.
➀ DAI Card Mounting Location
➁ Kind of Fault
1: XXXX 0000 0000 0000 2: 0000 0000 0000 0000 3: 0000 0000 0000 0000
➀ ➁
4: 0000 0000 0000 0000 5: 0000 0000 0000 0000 6: 0000 0000 0000 0000
7: 0000 0000 0000 0000 8: 0000 0000 0000 0000 9: 0000 0000 0000 0000
b7 b6 b5 b4 b3 b2 b1 b0
b4 b3 b2 b1 b0
Default Alarm:
SUP
13-O Digital Line Failure
Default Grade:
2Grade Modified: Lamp Modified:
b0-b4: Group No.
b5, b6:Unit No. (0-3)
b7: MG No.
0/1 = Even-numbered MG/Odd-numbered MG
b0-b4: Kind of Fault (HEX)
00 = -
01 = Frame alignment loss PCM down
02 = Bit error rate is over 10-4
03 = Slip is detected
04 = Opposite office alarm (AIS) is detected
05 = -
06 = Multi-frame alignment loss
07 = Frame alignment loss PCM down (continuously)
08 = Multi-frame alignment loss (continuously)

CHAPTER 3 NDA-24307
Page 198
Issue 1
SYSTEM MESSAGES
This message displays when a digital line failure is restored to normal.
➀ DAI Card Mounting Location
➁ Kind of Fault
1: XXXX 0000 0000 0000 2: 0000 0000 0000 0000 3: 0000 0000 0000 0000
➀ ➁
4: 0000 0000 0000 0000 5: 0000 0000 0000 0000 6: 0000 0000 0000 0000
7: 0000 0000 0000 0000 8: 0000 0000 0000 0000 9: 0000 0000 0000 0000
b7 b6 b5 b4 b3 b2 b1 b0
b4 b3 b2 b1 b0
Default Alarm:
NON
13-P Digital Line Restore
Default Grade:
0Grade Modified: Lamp Modified:
b0-b4: Group No.
b5, b6:Unit No. (0-3)
b7: MG No.
0/1 = Even-numbered MG/Odd-numbered MG
b0-b4: Kind of Fault (HEX)
00 = -
01 = Frame alignment loss PCM down
02 = Bit error rate is over 10-4
03 = -
04 = Opposite office alarm (AIS) is detected
05 = Dch restores to normal
06 = Multi-frame alignment loss

NDA-24307 CHAPTER 3
Page 199
Issue 1
SYSTEM MESSAGES
This message displays when the battery is operated in the due to the Digital Access Unit (DAU) power down.
➀ DAI Card Mounting Location
1: XX00 0000 0000 0000 2: 0000 0000 0000 0000 3: 0000 0000 0000 0000
➀
4: 0000 0000 0000 0000 5: 0000 0000 0000 0000 6: 0000 0000 0000 0000
7: 0000 0000 0000 0000 8: 0000 0000 0000 0000 9: 0000 0000 0000 0000
b7 b6 b5 b4 b3 b2 b1 b0
Default Alarm:
SUP
13-Q DAU Battery Operation
Default Grade:
1Grade Modified: Lamp Modified:
b0-b4: Group No.
b5, b6:Unit No. (0-3)
b7: MG No.
0/1 = Even-numbered MG/Odd-numbered MG
CHAPTER 3 NDA-24307
Page 200
Issue 1
SYSTEM MESSAGES
This message displays when the main power of the Digital Access Unit (DAU) system is restored to normal,
ending the temporary power acceptance from the battery observed in the message [13-Q] DAU
Battery Operation.”
➀ DAI Card Mounting Location
1: XX00 0000 0000 0000 2: 0000 0000 0000 0000 3: 0000 0000 0000 0000
➀
4: 0000 0000 0000 0000 5: 0000 0000 0000 0000 6: 0000 0000 0000 0000
7: 0000 0000 0000 0000 8: 0000 0000 0000 0000 9: 0000 0000 0000 0000
b7 b6 b5 b4 b3 b2 b1 b0
Default Alarm:
NON
13-R DAU Line Operation
Default Grade:
0Grade Modified: Lamp Modified:
b0-b4: Group No.
b5, b6:Unit No. (0-3)
b7: 0/1 = Even-numbered MG/Odd-numbered MG
NDA-24307 CHAPTER 3
Page 201
Issue 1
SYSTEM MESSAGES
This message displays when a PWR circuit card failure is detected.
➀ Power Circuit Card Location
➁ Fault Information
➂ Power Card Classification
See Chapter 4 for the Circuit Card Replacement Procedure.
1: XXXX XX00 0000 0000 2: 0000 0000 0000 0000 3: 0000 0000 0000 0000
➀ ➁ ➂
4: 0000 0000 0000 0000 5: 0000 0000 0000 0000 6: 0000 0000 0000 0000
7: 0000 0000 0000 0000 8: 0000 0000 0000 0000 9: 0000 0000 0000 0000
b2 b1 b0
b4 b3 b2 b1
b0
Default Alarm:
NON
13-Z Power Failure
Default Grade:
3Grade Modified: Lamp Modified:
b0, b1:Unit No. (0-3)
b2: MG No.
0/1 = Even-numbered MG/Odd-numbered MG
b1: 0/1 = -/-5V Power Failure
b2: 0/1 = -/+12V Power Failure
b3: 0/1 = -/+5V Power Failure
b4: 0/1 = -/-48V Power Failure
b0: 0/1 = Group 24 (0 side) / Group 25 (1 side)

CHAPTER 3 NDA-24307
Page 202
Issue 1
SYSTEM MESSAGES
This message displays when a VPS failure is detected.
➀ Probable cause for the failure
➁ LENS of VPS
➂ LENS of VPS
See Chapter 4 for the Circuit Card Replacement Procedure.
1: XXXX XX00 0000 0000 2: 0000 0000 0000 0000 3: 0000 0000 0000 0000
➀ ➁ ➂
4: 0000 0000 0000 0000 5: 0000 0000 0000 0000 6: 0000 0000 0000 0000
7: 0000 0000 0000 0000 8: 0000 0000 0000 0000 9: 0000 0000 0000 0000
b7 b6 b5 b4 b3 b2 b1 b0
b7 b6 b5 b4 b3 b2 b1 b0
b7 b6 b5 b4 b3 b2 b1 b0
Default Alarm:
SUP
15-A VPS Failure (Temporary)
Default Grade:
1Grade Modified: Lamp Modified:
b0-b7: 0 = -
1 = Sector error
FF = Other than above
b0-b2: Level
b3-b7: Group
b0, b1:Unit
b2-b7: Module Group
NDA-24307 CHAPTER 3
Page 203
Issue 1
SYSTEM MESSAGES
This message displays when a VPS failure is detected.
➀ Probable cause for the failure
➁ LENS of VPS
➂ LENS of VPS
1: XXXX XX00 0000 0000 2: 0000 0000 0000 0000 3: 0000 0000 0000 0000
➀ ➁ ➂
4: 0000 0000 0000 0000 5: 0000 0000 0000 0000 6: 0000 0000 0000 0000
7: 0000 0000 0000 0000 8: 0000 0000 0000 0000 9: 0000 0000 0000 0000
b7 b6 b5 b4 b3 b2 b1 b0
b7 b6 b5 b4 b3 b2 b1 b0
b7 b6 b5 b4 b3 b2 b1 b0
Default Alarm:
MN
15-B VPS Failure (Permanent)
Default Grade:
2Grade Modified: Lamp Modified:
b0-b7: 0 = -
01H = Sector error
FF = Other than above
b0-b2: Level
b3-b7: Group
b0, b1:Unit
b2-b7: Module Group
CHAPTER 3 NDA-24307
Page 204
Issue 1
SYSTEM MESSAGES
This message displays when a VPS failure, observed in the message [15-B], is restored to normal.
➀ LENS of VPS
➁ LENS of VPS
1: XXXX 0000 0000 0000 2: 0000 0000 0000 0000 3: 0000 0000 0000 0000
➀ ➁
4: 0000 0000 0000 0000 5: 0000 0000 0000 0000 6: 0000 0000 0000 0000
7: 0000 0000 0000 0000 8: 0000 0000 0000 0000 9: 0000 0000 0000 0000
b7 b6 b5 b4 b3 b2 b1 b0
b7 b6 b5 b4 b3 b2 b1 b0
Default Alarm:
NON
15-C VPS Restore
Default Grade:
2Grade Modified: Lamp Modified:
b0-b2: Level
b3-b7: Group
b0, b1:Unit
b2-b7: Module Group

NDA-24307 CHAPTER 3
Page 205
Issue 1
SYSTEM MESSAGES
This message displays when Intra-Office Trunks (ATI, RST, etc.) have all become busy.
➀ Details on Trunk name and its
Route number
1: XX00 0000 0000 0000 2: 0000 0000 0000 0000 3: 0000 0000 0000 0000
➀
4: 0000 0000 0000 0000 5: 0000 0000 0000 0000 6: 0000 0000 0000 0000
7: 0000 0000 0000 0000 8: 0000 0000 0000 0000 9: 0000 0000 0000 0000
b7 b6 b5 b4 b3 b2 b1 b0
Default Alarm:
SUP
16-A Inside Trunk All Busy
Default Grade:
3Grade Modified: Lamp Modified:
See table on the following page

CHAPTER 3 NDA-24307
Page 206
Issue 1
SYSTEM MESSAGES
ROUTE
NO. DATA
(HEX.) TRUNK NAME ROUTE
NO. DATA
(HEX.) TRUNK NAME
901 01 Attendant Console 917 11 MFC Sender
902 02 Originating Register Trunk 918 12 Not used
903 03 Incoming Register Trunk 919 13 MODEM
904 04 MF Receiver 920 14 MODEM
905 05 Sender Trunk DP/PB 921 15 MODEM
906 06 PB Receiver for Automated
Attendant Service 922 16 MODEM
907 07 AMP 923 17 MODEM
908 08 Not used 924 18 MODEM
909 09 Three-Way Conference Trunk 925 19 MODEM
910 0A Not used 926 1A MODEM
911 0B Not used 927 1B Not used
912 0C Originating Register Trunk for
ATTCON/DESKCON 928 1C Not used
913 0D Three-Way Conference Trunk for
ATTCON/DESKCON 929 1D Data Signaling Trunk-Option
914 0E Not used 930 1E Rate Adaptation Conversion Trunk
915 0F Night ATTCON/DESKCON 931 1F Not used
916 10 MFC Register
NDA-24307 CHAPTER 3
Page 207
Issue 1
SYSTEM MESSAGES
This message displays when Virtual Tie Line setup has completed.
➀ Counter
➁ Virtual Tie Line Call Header
Location
➂ Virtual Tie Line Call Header
Location
1: XXXX XX00 0000 0000 2: 0000 0000 0000 0000 3: 0000 0000 0000 0000
➀ ➁ ➂
4: 0000 0000 0000 0000 5: 0000 0000 0000 0000 6: 0000 0000 0000 0000
7: 0000 0000 0000 0000 8: 0000 0000 0000 0000 9: 0000 0000 0000 0000
b7 b6 b5 b4 b3 b2 b1 b0
b2 b1 b0
b7 b6 b5 b4 b3 b2 b1 b0
Default Alarm:
NON
16-B Virtual Tie Line Set Report
Default Grade:
3Grade Modified: Lamp Modified:
b0: 00=-
01=Re-setup
b0,b1: Unit No.
b2: Module Group No.
b0-b2: Level
b3-b7: Group No.
CHAPTER 3 NDA-24307
Page 208
Issue 1
SYSTEM MESSAGES
This message displays when Virtual Tie Line Cancel has completed.
➀ Counter
➁ Virtual Tie Line Call Header
Location
➂ Virtual Tie Line Call Header
Location
1: XXXX XX00 0000 0000 2: 0000 0000 0000 0000 3: 0000 0000 0000 0000
➀ ➁ ➂
4: 0000 0000 0000 0000 5: 0000 0000 0000 0000 6: 0000 0000 0000 0000
7: 0000 0000 0000 0000 8: 0000 0000 0000 0000 9: 0000 0000 0000 0000
b0
b2 b1 b0
b7 b6 b5 b4 b3 b2 b1 b0
Default Alarm:
NON
16-C Virtual Tie Line Cancel Report
Default Grade:
3Grade Modified: Lamp Modified:
b0: 0/1=-/Re-setup
b0,b1: Unit No.
b2: Module Group No.
b0-b2: Level
b3-b7: Group No.
NDA-24307 CHAPTER 3
Page 209
Issue 1
SYSTEM MESSAGES
This message displays when Virtual Tie Line Setup has failed due to a fault in the network of the terminating
office concerned.
➀ Virtual Tie Line Call Header
Location
➁ Virtual Tie Line Call Header
Location
1: 00XX XX8X XXXX 0000 2: 0000 0000 0000 0000 3: 0000 0000 0000 0000
➀➁ ➂ ➃ ➄
4: 0000 0000 0000 0000 5: 0000 0000 0000 0000 6: 0000 0000 0000 0000
7: 0000 0000 0000 0000 8: 0000 0000 0000 0000 9: 0000 0000 0000 0000
b2 b1 b0
b7 b6 b5 b4 b3 b2 b1 b0
Default Alarm:
NON
16-E Virtual Tie Line Set Time Out
Default Grade:
1Grade Modified: Lamp Modified:
b0,b1: Unit No.
b2: Module Group No.
b0-b2: Level
b3-b7: Group No.
CHAPTER 3 NDA-24307
Page 210
Issue 1
SYSTEM MESSAGES
➂ Virtual Tie Line Call Header
Location
➃ Fault Cause
b7 b6 b5 b4 b3 b2 b1 b0
b6 b5 b4 b3 b2 b1 b0
CLASS REASON
KIND
VALUE DATA REASON KIND
Reason Kind
Class Value
XX
8765 4321(bit)
-000 xxxx
-001
Normal Event Class
000
000
000
000
000
001
001
001
001
001
001
001
001
001
001
001
001
0001
0010
0011
0110
0111
0000
0001
0010
0011
0101
0110
1010
1011
1100
1101
1110
1111
1
2
3
6
7
16
17
18
19
21
22
26
27
28
29
30
31
Dead Number
No route to the designated transit network
No route to the opposite Party
Use of channel not allowed
Call terminated to a setup channel
Normal disconnection
Called user busy
No response from called user
Called party being rung/no answer
Communication denied
Opposite party’s terminal number changed
Disconnection and release of the user not selected
Opposite party’s terminal out of order
Invalid number format (Incomplete Number)
Facility denied
Answer to status inquiry
Other normal class
b0-b3: Call Source
b4-b7: “8” is always indicated.
DATA CALL SOURCE
0User
1 Private network to which the user is directly connected.
(Self side)
2 National network to which the user is directly connected.
(Self side)
3 Tie-Line Network
4 National network to which the opposite party is directly
connected. (Opposite party’s side)
5 Private network to which the opposite party is directly
connected. (Opposite party’s side)
7 International Network
A Network from Interworking
Other Spare
b0-b3: Reason Kind
b4-b6: Class
0=No Answer
Other than 0=Refer to the following table

NDA-24307 CHAPTER 3
Page 211
Issue 1
SYSTEM MESSAGES
010 xxxx
Classes not allowed use of resources
010
010
010
010
010
010
010
0010
0110
1001
1010
1011
1100
1111
34
38
41
42
43
44
47
No usable channel/line
Network failure
Temporary failure
Switching system congested
Access information discarded
Use of requested line/channel not allowed
Class not allowed use of other resources
Reason Kind
Class Value
XX
8765 4321(bit)
011 xxxx
Classes not allowed use of services
011
011
011
011
011
0001
0010
1001
1010
1111
49
50
57
58
63
Use of QOS not allowed
Requested facility not contracted
Bearer capability not allowed
Bearer capability not allowed at present
Class not allowed to use other services or options
100 xxxx
Classes not provided with services
100
100
100
100
100
0001
0010
0101
0110
1111
65
66
69
70
79
Unprovided bearer capability designated
Unprovided channel kind designated
Unprovided facility requested
Restricted digital information bearer capability
Class unprovided with other services or options
101 xxxx
Invalid message class
001
101
101
101
101
101
101
101
101
0001
0010
0011
0100
0101
0110
1000
1011
1111
81
82
83
84
85
86
88
91
95
Invalid call number used
Invalid channel number used
Designated transit call ID number unused
Transit call ID number being used
No transit call
Designated transit call disconnected and released
Terminal attributes unmatch
Invalid transit network selected
Other invalid message class
110 xxxx
Procedure error (ex: unrecognized
message) class
110
110
110
110
110
110
110
110
0000
0001
0010
0011
0100
0101
0110
1111
96
97
98
99
100
101
102
111
Mandatory information elements inadequate
Message kind undefined or unprovided
Call status and message unmatching or message
kind undefined
Information element undefined
Content of information element invalid
Call status and message unmatching
Recovery due to timer over
Class of other procedure errors
111 xxxx
Interworking class 111 111 127 Other interworking class
Others Reserved
CLASS REASON
KIND
VALUE DATA REASON KIND
CHAPTER 3 NDA-24307
Page 212
Issue 1
SYSTEM MESSAGES
This message indicates that an outgoing call (by connection acknowledge system) has not received an
acknowledgment signal from the opposite office. As a result, the attempted outgoing call is routed to Reorder
Tone (ROT) connection.
In Case of Station OG/ATT OG/ATT Tandem Connection
➀ Type of connection and station
number digits
➁ ~ ➃ Calling station number
(See table)
1: XXXX XXXX XX0X XX0X 2: XXXX XXXX XXXX XXXX 3: XXXX XXXX XXXX XXXX
12
➀ ➁ ➂ ➃ ➄ ➅ ➆ ➇ ➈ ➉ 11 12
4: 0000 0000 0000 0000 5: 0000 0000 0000 0000 6: 0000 0000 0000 0000
7: 0000 0000 0000 0000 8: 0000 0000 0000 0000 9: 0000 0000 0000 0000
b7 b6 b2 b1 b0
b7 b6 b5 b4 b3 b2 b1 b0
Default Alarm:
NON
16-F Sender Start Time Out
Default Grade:
0Grade Modified: Lamp Modified:
b0-b2: Digits of station number (origination)
b6-b7:
0 0 = Station OG connection
0 1 = ATT OG connection
1 1 = ATT Tandem connection
b4-b7 b0-b3
➁DC0 DC1
➂DC2 DC3
➃DC4 DC5

NDA-24307 CHAPTER 3
Page 213
Issue 1
SYSTEM MESSAGES
➄ Tenant No. of calling station (Hex.)
➅ OPTN data
Note: This data displays when the Tenant No. of the calling station is larger than 15, and bit7 of ➄ displays
as “1” (otherwise, “0” displays at any time). While the four-bit data of ➄ is self-sufficient in verifying
the Tenant No. “1-15,” this OPTN data provides a supportive role to cover the larger Tenant No.
ranging from 16 to 255. Use the following method to analyze the data:
➆ OG route number (Hex.)
b7 b6 b2 b1 b0
b3 b2 b1 b0
Tenant No. of Calling Station (1-15) =0000 Tenant No.
OPTN data (0: fixed) bit 0 - bit 3 of ➄
Tenant No. of Calling Station (16-255) = OPTN data Tenant No.
OPTN data (variable) bit 0 - bit 3 of ➄
b7 b6 b5 b4 b3 b2 b1 b0
b7: OP data (0/1)
When OPTN data of ➅ is valid, “1” displays.
b0-b3: Tenant No. of calling station
• bit7=0 →Tenant No. ≤ 15 Refer to the OPTN
• bit7=1 →15 < Tenant No.≤ 255 data of ➅
b0-b3: OPTN data Note
b7: AC data
0/1=Internal trunk/External trunk
b6: OP data (0/1)
When OPRT data of ➇ is valid, “1” displays,
b0-b5: OG route number
• bit 6=0 → Route No. ≤ 64 Refer to the OPTN
• bit 6=1 →63 < Route No. data of ➇

CHAPTER 3 NDA-24307
Page 214
Issue 1
SYSTEM MESSAGES
➇ OPRT data
Note: This data displays when the OG Route No. is larger than 63, and bit6 of ➆ displays as “1” (otherwise,
“0” displays at any time). While the six-bit data of ➆ is self-sufficient in verifying the Route No. “1-
63,” this OPRT data provides a supportive role to cover the Route No., which is larger than 63. Use the
following method to analyze the data:
➈ Trunk No. of OG trunk
➉ Trunk No. of the sender
11 Number of digits dialed by the
caller
b3 b2 b1 b0
OG Route No. (1-63) =0000 OG Route No.
OPTN data (0:fixed) bit0 - bit5 of ➆
OG Route No. (64 or larger) = OPTN data OG Route No.
OPTN data (variable) bit0 - bit5 of ➆
b7 b6 b5 b4 b3 b2 b1 b0
b7 b6 b5 b4 b3 b2 b1 b0
b4 b3 b2 b1 b0
b0-b3: OPRT data Note
b0-b7: Trunk No. of OG trunk
b0-b7: Trunk No. of the sender
b0-b4: Number of digits dialed by the caller
NDA-24307 CHAPTER 3
Page 215
Issue 1
SYSTEM MESSAGES
12 Number dialed by the caller (See
table)
In Case of Tandem Connection
➀ Type of connection
➁ IC route number (Hex.)
b7 b6 b5 b4 b3 b2 b1 b0
b7 b6
b7 b6 b5 b4 b3 b2 b1 b0
b4-b7 b0-b3
DC0 DC1
DC2 DC3
DC4 DC5
DC6 DC7
DC8 DC9
DC10 DC11
DC12 DC13
DC14 DC15
DC16 DC17
DC18 DC19
DC20 DC21
b7 b6
1 0 = Tandem connection
b7: AC data
0/1=Internal trunk/External trunk
b6: OP data (0/1)
When OPRT data of ➂ is valid, “1” displays.
b0-b5: IC route number
• bit 6=0 →Route No. ≤ 64 Refer to the OPTN
• bit 6=1 →< 63 Route No. data of ➂

CHAPTER 3 NDA-24307
Page 216
Issue 1
SYSTEM MESSAGES
➂ OPRT data
Note: This data displays when the IC Route No. is larger than 63, and bit6 of ➁ displays as “1” (otherwise,
“1” displays at any time). While the six-bit data of ➁ is self-sufficient in verifying the Route No. “1-
63,” this OPRT data provides a supportive role to cover the Route No., which is larger than 63. Use the
following method to analyze the data:
➃ ~ ➄ Trunk No. of IC trunk
➅ Not used
➆ OG route number (Hex.)
b3 b2 b1 b0
IC Route No. (1-63) =0000 IC Route No.
OPRT data (0:fixed) bit0 - bit5 of ➁
IC Route No. (64 or larger) = OPRT data IC Route No.
OPRT data (variable) bit0 - bit5 of ➁
b7 b6 b5 b4 b3 b2 b1 b0
b7 b6 b5 b4 b3 b2 b1 b0
b0-b3: OPRT data Note
b0-b7: Trunk No. of IC trunk
b7: AC data
0/1=Internal trunk/External trunk
b6: OP data (0/1)
When OPRT data of ➇ is valid, “1” displays,
b0-b5: OG route number
• bit 6=0 →Route No. ≤ 64 Refer to the OPTN
• bit 6=1 →< 63 Route No. data of ➇

NDA-24307 CHAPTER 3
Page 217
Issue 1
SYSTEM MESSAGES
➇ OPRT data
Note: This data displays when the OG Route No. is larger than 63, and bit6 of ➆ displays as “1” (otherwise,
“0” is displays at any time). While the six bit data of ➆ is self-sufficient in verifying the Route No. “1-
63,” this OPRT data provides a supportive role to cover the Route No., which is larger than 63. Use the
following method to analyze the data:
➈ Trunk No. of OG trunk
➉ Trunk No. of the sender
11 Number of digits dialed by the
caller
b3 b2 b1 b0
OG Route No. (1-63) =0000 OG Route No.
OPRT data (0: fixed) bit 0 - bit 5 of ➆
OG Route No. (64 or larger) = OPRT data OG Route No.
OPRT data (variable) bit 0 - bit 5 of ➆
b7 b6 b5 b4 b3 b2 b1 b0
b7 b6 b5 b4 b3 b2 b1 b0
b4 b3 b2 b1 b0
b0-b3: OPRT data Note
b0-b7: Trunk No. of OG trunk
b0-b7: Trunk No. of the sender
b0-b4: Number of digits dialed by the caller

CHAPTER 3 NDA-24307
Page 218
Issue 1
SYSTEM MESSAGES
12 Number dialed by the caller (See
table)
b7 b6 b5 b4 b3 b2 b1 b0 b4-b7 b0-b3
DC0 DC1
DC2 DC3
DC4 DC5
DC6 DC7
DC8 DC9
DC10 DC11
DC12 DC13
DC14 DC15
DC16 DC17
DC18 DC19
DC20 DC21

NDA-24307 CHAPTER 3
Page 219
Issue 1
SYSTEM MESSAGES
This message displays when the DR signal of the RS-232C, connected to the port designated by the system
data, remains OFF for 30 consecutive seconds while the system is in service (immediately after startup in the
case of system start-up).
➀ Faulty Port No.
1: XX00 0000 0000 0000 2: 0000 0000 0000 0000 3: 0000 0000 0000 0000
➀
4: 0000 0000 0000 0000 5: 0000 0000 0000 0000 6: 0000 0000 0000 0000
7: 0000 0000 0000 0000 8: 0000 0000 0000 0000 9: 0000 0000 0000 0000
b7 b6 b5 b4 b3 b2 b1 b0
Default Alarm:
NON
16-K I/O Port Line OFF
Default Grade:
1Grade Modified: Lamp Modified:
0/1 = -/Link Down
b0: Port 0 b4: Port 4
b1: Port 1 b5: Port 5
b2: Port 2 b6: Port 6
b3: Port 3 b7: Port 7
IOC0 IOC1

CHAPTER 3 NDA-24307
Page 220
Issue 1
SYSTEM MESSAGES
This message displays when [16-K] I/O Port Line Down Failure is restored to normal.
➀ Faulty Port No.
1: XX00 0000 0000 0000 2: 0000 0000 0000 0000 3: 0000 0000 0000 0000
➀
4: 0000 0000 0000 0000 5: 0000 0000 0000 0000 6: 0000 0000 0000 0000
7: 0000 0000 0000 0000 8: 0000 0000 0000 0000 9: 0000 0000 0000 0000
b7 b6 b5 b4 b3 b2 b1 b0
Default Alarm:
NON
16-L I/O Port Line Restore
Default Grade:
1Grade Modified: Lamp Modified:
0/1 = -/Link Down
b0: Port 0 b4: Port 4
b1: Port 1 b5: Port 5
b2: Port 2 b6: Port 6
b3: Port 3 b7: Port 7
IOC0 IOC1

NDA-24307 CHAPTER 3
Page 221
Issue 1
SYSTEM MESSAGES
This message displays when the timer circuit on the EMA card becomes faulty and stops functioning and 64-
Hz clock alarm is output.
➀ Message Detail Data
This system message is always indicated as 0000.
1: 0000 0000 0000 0000 2: 0000 0000 0000 0000 3: 0000 0000 0000 0000
➀
4: 0000 0000 0000 0000 5: 0000 0000 0000 0000 6: 0000 0000 0000 0000
7: 0000 0000 0000 0000 8: 0000 0000 0000 0000 9: 0000 0000 0000 0000
Default Alarm:
SUP
16-M Hard Clock Failure
Default Grade:
3Grade Modified: Lamp Modified:

CHAPTER 3 NDA-24307
Page 222
Issue 1
SYSTEM MESSAGES
This message displays when [16-M] Hard Clock Failure is restored to normal.
➀ Message Detail Data
This system message is always indicated as 0000.
1: 0000 0000 0000 0000 2: 0000 0000 0000 0000 3: 0000 0000 0000 0000
➀
4: 0000 0000 0000 0000 5: 0000 0000 0000 0000 6: 0000 0000 0000 0000
7: 0000 0000 0000 0000 8: 0000 0000 0000 0000 9: 0000 0000 0000 0000
Default Alarm:
NON
16-N Hard Clock Restore
Default Grade:
3Grade Modified: Lamp Modified:
NDA-24307 CHAPTER 3
Page 223
Issue 1
SYSTEM MESSAGES
This message displays when the IOC card fails.
➀ IOC circuit card No.
➁ Cause for the fault
1: XXXX 0000 0000 0000 2: 0000 0000 0000 0000 3: 0000 0000 0000 0000
➀ ➁
4: 0000 0000 0000 0000 5: 0000 0000 0000 0000 6: 0000 0000 0000 0000
7: 0000 0000 0000 0000 8: 0000 0000 0000 0000 9: 0000 0000 0000 0000
b0
b4 b3 b2 b1 b0
Default Alarm:
SUP
16-T IOC Failure (Temporary)
Default Grade:
1Grade Modified: Lamp Modified:
b0: 0/1 = No. 0/No. 1
b0: 0/1 = -/COP Alarm
b1: 0/1 = -/CLK Alarm
b2: 0/1 = -/MEM bus CLK Alarm
b3: 0/1 = -/Abnormal Interruption
b4: 0/1 = -/Infinite Loop Detected
CHAPTER 3 NDA-24307
Page 224
Issue 1
SYSTEM MESSAGES
This message displays when the IOC card failure, observed in the message [16-T], is detected more than eight
times a day.
➀ IOC circuit card No.
➁ Cause for the fault
See Chapter 4 for the Circuit Card Replacement Procedure.
1: XXXX 0000 0000 0000 2: 0000 0000 0000 0000 3: 0000 0000 0000 0000
➀ ➁
4: 0000 0000 0000 0000 5: 0000 0000 0000 0000 6: 0000 0000 0000 0000
7: 0000 0000 0000 0000 8: 0000 0000 0000 0000 9: 0000 0000 0000 0000
b0
b4 b3 b2 b1 b0
Default Alarm:
SUP
16-U IOC Failure (Permanent)
Default Grade:
2Grade Modified: Lamp Modified:
b0: 0/1 = No. 0/No. 1
b0: 0/1 = -/COP Alarm
b1: 0/1 = -/CLK Alarm
b2: 0/1 = -/MEM bus CLK Alarm
b3: 0/1 = -/Abnormal Interruption
b4: 0/1 = -/Infinite Loop
NDA-24307 CHAPTER 3
Page 225
Issue 1
SYSTEM MESSAGES
This message displays when the user uses Follow Phone (SWAP) service.
➀ Error code
1: XXXX XXXX XXXX XX00 2: XXXX XXXX XXXX 00XX 3: XXXX 0000 0000 0000
➀ ➁ ➂ ➃ ➄ ➅ ➆ ➇ ➈ ➉ 11 12 13 14 14
4: 0000 0000 0000 0000 5: 0000 0000 0000 0000 6: 0000 0000 0000 0000
7: 0000 0000 0000 0000 8: 0000 0000 0000 0000 9: 0000 0000 0000 0000
b7 b6 b5 b4 b3 b2 b1 b0
ERROR
CODE (HEX) FAILURE ERROR
CODE (HEX) FAILURE
00 Normal End 16 Called station is busy
01 MG unmatch 17 MW has been set to Calling or Called
station
02 Called party is not the station 18 Call Back/OG queuing has been set to
Calling or Called station
03 TEC of Calling or Called station is abnor-
mal 19 Call Forwarding - All Calls has been set to
Calling or Called station
04 TEC unmatch 20 Call Forwarding - Busy Line has been set to
Calling or Called station
05 Hunting group unmatch 21 Call Forwarding - Don’t Answer has been
set to Calling or Called station
06 Call Pick Up group unmatch 22-31 -
07 Calling or Called station is Night station 32 Under processing of Data Memory Back
Up
08 Call Pick Up Expand group unmatch 33 •Collision of swap service
•Under swapping of One Touch Memory
•Memory overflow (Max. 4 stations)
Default Alarm:
NON
16-X Station Exchanged Report
Default Grade:
0Grade Modified: Lamp Modified:
b0-b7: See table
CHAPTER 3 NDA-24307
Page 226
Issue 1
SYSTEM MESSAGES
➁ Tenant No. of the calling station
➂ Accommodated location of the
calling station after Follow Phone
service
➃ Accommodated location of the
calling station after Follow Phone
service
09 - 34 Data Memory read error
10 Calling or Called Dterm has Data Line 35 Data Memory swap failure
11 Calling or Called Dterm has OAI function
key 36 OAI Terminal Information swap failure
(CM Data)
12 Calling or Called station is Agent/
Supervisor (ACD) 37 OAI Terminal Information swap failure
(LP Data)
13-15 - 38 SST Time out
b7 b6 b5 b4 b3 b2 b1 b0
b7 b6 b5 b4 b3 b2 b1 b0
b7 b6 b5 b4 b3 b2 b1 b0
ERROR
CODE (HEX) FAILURE ERROR
CODE (HEX) FAILURE
b0-b3: Tenant No. (1-15)
b0-b7: Tenant No. (over 15)
b0-b2: Level
b3-b7: Group (0-22)
b0, b1:Unit No. (0-3)
b2-b7: MG No.
NDA-24307 CHAPTER 3
Page 227
Issue 1
SYSTEM MESSAGES
➄ ~ ➆ Station No. of the calling
station
➇ Tenant No. of the called station
➈ Accommodated location of the
called station
➉ Accommodated location of the
called station
11 ~ 13 Station No. of the called
station
14 Data Analyzed by NEC Engineers
b7 b6 b5 b4 b3 b2 b1 b0
b7 b6 b5 b4 b3 b2 b1 b0
b7 b6 b5 b4 b3 b2 b1 b0
b7 b6 b5 b4 b3 b2 b1 b0
b7 b6 b5 b4 b3 b2 b1 b0
b4-b7 b0-b3
➄DC0 DC1
➅DC2 DC3
➆DC4 DC5
b0-b3: Tenant No. (1-15)
b0-b7: Tenant No. (over 15)
b0-b2: Level
b3-b7: Group
b0, b1:Unit No. (0-3)
b2-b7: MG No.
b4-b7 b0-b3
11 DC0 DC1
12 DC2 DC3
13 DC4 DC5

CHAPTER 3 NDA-24307
Page 228
Issue 1
SYSTEM MESSAGES
This message displays when the MBR switch on the CCH/DCH card has turned ON.
➀ CCH/DCH Card Mounting
Location
➁ CKT No.
1: XXXX 0000 0000 0000 2: 0000 0000 0000 0000 3: 0000 0000 0000 0000
➀ ➁
4: 0000 0000 0000 0000 5: 0000 0000 0000 0000 6: 0000 0000 0000 0000
7: 0000 0000 0000 0000 8: 0000 0000 0000 0000 9: 0000 0000 0000 0000
b7 b6 b5 b4 b3 b2 b1 b0
b1 b0
Default Alarm:
NON
17-A CCH MBR Key Turn ON
Default Grade:
3Grade Modified: Lamp Modified:
b0-b4: Group No.
b5, b6:Unit No. (0-3)
b7: MG No.
0/1 = Even-numbered MG/Odd-numbered MG
b0, b1:CKT No. (0-3)
NDA-24307 CHAPTER 3
Page 229
Issue 1
SYSTEM MESSAGES
This message displays when the MBR switch on the CCH/DCH card has turned OFF.
➀ CCH/DCH Card Mounting
Location
➁ CKT No.
1: XXXX 0000 0000 0000 2: 0000 0000 0000 0000 3: 0000 0000 0000 0000
➀ ➁
4: 0000 0000 0000 0000 5: 0000 0000 0000 0000 6: 0000 0000 0000 0000
7: 0000 0000 0000 0000 8: 0000 0000 0000 0000 9: 0000 0000 0000 0000
b7 b6 b5 b4 b3 b2 b1 b0
b1 b0
Default Alarm:
NON
17-B CCH MBR Key Turn OFF
Default Grade:
3Grade Modified: Lamp Modified:
b0-b4: Group No.
b5, b6:Unit No. (0-3)
b7: MG No.
0/1 = Even-numbered MG/Odd-numbered MG
b0, b1:CKT No. (0-3)

CHAPTER 3 NDA-24307
Page 230
Issue 1
SYSTEM MESSAGES
This message displays when the MB switch on the CCH/DCH card has turned ON when extracting or inserting
a circuit card or at PM initialization, etc.
➀ CCH/DCH Card Mounting
Location
1: XX00 0000 0000 0000 2: 0000 0000 0000 0000 3: 0000 0000 0000 0000
➀
4: 0000 0000 0000 0000 5: 0000 0000 0000 0000 6: 0000 0000 0000 0000
7: 0000 0000 0000 0000 8: 0000 0000 0000 0000 9: 0000 0000 0000 0000
b7 b6 b5 b4 b3 b2 b1 b0
Default Alarm:
NON
17-C CCH MB Key Turn ON
Default Grade:
3Grade Modified: Lamp Modified:
b0-b4: Group No.
b5, b6:Unit No. (0-3)
b7: MG No.
0/1 = Even-numbered MG/Odd-numbered MG

NDA-24307 CHAPTER 3
Page 231
Issue 1
SYSTEM MESSAGES
This message displays when the MB switch on the CCH/DCH card has turned OFF when extracting or
inserting a circuit card or at PM initialization, etc.
➀ CCH/DCH Card Mounting
Location
1: XX00 0000 0000 0000 2: 0000 0000 0000 0000 3: 0000 0000 0000 0000
➀
4: 0000 0000 0000 0000 5: 0000 0000 0000 0000 6: 0000 0000 0000 0000
7: 0000 0000 0000 0000 8: 0000 0000 0000 0000 9: 0000 0000 0000 0000
b7 b6 b5 b4 b3 b2 b1 b0
Default Alarm:
NON
17-D CCH MB Key Turn OFF
Default Grade:
3Grade Modified: Lamp Modified:
b0-b4: Group No.
b5, b6:Unit No. (0-3)
b7: MG No.
0/1 = Even-numbered MG/Odd-numbered MG
CHAPTER 3 NDA-24307
Page 232
Issue 1
SYSTEM MESSAGES
This message displays when the NIGHT switch on the ATTCON/DESKCON has been operated or when the
DAY/NIGHT change has been executed by the external switch operation.
➀ Tenant No.
➁ Changing Method
1: XXXX XXXX 0000 0000 2: 0000 0000 0000 0000 3: 0000 0000 0000 0000
➀ ➁ ➂ ➃
4: 0000 0000 0000 0000 5: 0000 0000 0000 0000 6: 0000 0000 0000 0000
7: 0000 0000 0000 0000 8: 0000 0000 0000 0000 9: 0000 0000 0000 0000
b7 b6 b5 b4 b3 b2 b1 b0
b7 b6 b5 b4 b3 b2 b1 b0
Default Alarm:
NON
17-H Day/Night Change Information
Default Grade:
0Grade Modified: Lamp Modified:
b0-b3: Tenant No. (1-15)
b4-b7: Tenant No. (over 15)
b0-b7: 1=Night Key on the ATTCON/DESKCON
2=External Key

NDA-24307 CHAPTER 3
Page 233
Issue 1
SYSTEM MESSAGES
➂ Day/Night Mode Specification
➃ External Switch Status
b7 b6 b5 b4 b3 b2 b1 b0
b7 b6 b5 b4 b3 b2 b1 b0
b0-b3: Mode after changing (Refer to table below)
b4-b7: Mode before changing (Refer to table below)
Note: This data is programmed as initial data.
b0 b1 b2 b3 MEANING
b4 b5 b6 b7
0000Day Mode
0 0 0 1 Night Mode 1
0 0 1 0 Night Mode 2 (available only for Japan)
0011Night Mode 3 (DIT-Night Connection Fixed)
Note
b0-b7: 01=Not used
02=Day/Night Change
03=Not used

CHAPTER 3 NDA-24307
Page 234
Issue 1
SYSTEM MESSAGES
This message displays when the MB switch on the IOC card has turned ON when extracting or inserting a
circuit card.
➀ Circuit Card No.
1: XX00 0000 0000 0000 2: 0000 0000 0000 0000 3: 0000 0000 0000 0000
➀
4: 0000 0000 0000 0000 5: 0000 0000 0000 0000 6: 0000 0000 0000 0000
7: 0000 0000 0000 0000 8: 0000 0000 0000 0000 9: 0000 0000 0000 0000
b0
Default Alarm:
NON
17-O IOC MB Key Turn ON
Default Grade:
3Grade Modified: Lamp Modified:
b0: 0/1 = IOC 0/IOC 1
NDA-24307 CHAPTER 3
Page 235
Issue 1
SYSTEM MESSAGES
This message displays when the MB switch on the IOC card has turned OFF.
➀ Circuit Card No.
1: XX00 0000 0000 0000 2: 0000 0000 0000 0000 3: 0000 0000 0000 0000
➀
4: 0000 0000 0000 0000 5: 0000 0000 0000 0000 6: 0000 0000 0000 0000
7: 0000 0000 0000 0000 8: 0000 0000 0000 0000 9: 0000 0000 0000 0000
b0
Default Alarm:
NON
17-P IOC MB Key Turn OFF
Default Grade:
3Grade Modified: Lamp Modified:
b0: 0/1 = IOC 0/IOC 1

CHAPTER 3 NDA-24307
Page 236
Issue 1
SYSTEM MESSAGES
This message displays when the MBR switch on the IOC card has turned ON at the time of CPU changeover
or speech path changeover.
➀ Circuit Card No.
1: XX00 0000 0000 0000 2: 0000 0000 0000 0000 3: 0000 0000 0000 0000
➀
4: 0000 0000 0000 0000 5: 0000 0000 0000 0000 6: 0000 0000 0000 0000
7: 0000 0000 0000 0000 8: 0000 0000 0000 0000 9: 0000 0000 0000 0000
b0
Default Alarm:
NON
17-Q IOC MBR Key Turn ON
Default Grade:
3Grade Modified: Lamp Modified:
b0: 0/1 = IOC 0/IOC 1

NDA-24307 CHAPTER 3
Page 237
Issue 1
SYSTEM MESSAGES
This message displays when the MBR switch on the IOC card has turned OFF at the time of CPU changeover
or speech path changeover.
➀ Circuit Card No.
1: XX00 0000 0000 0000 2: 0000 0000 0000 0000 3: 0000 0000 0000 0000
➀
4: 0000 0000 0000 0000 5: 0000 0000 0000 0000 6: 0000 0000 0000 0000
7: 0000 0000 0000 0000 8: 0000 0000 0000 0000 9: 0000 0000 0000 0000
b0
Default Alarm:
NON
17-R IOC MBR Key Turn OFF
Default Grade:
3Grade Modified: Lamp Modified:
b0: 0/1 = IOC 0/IOC 1

CHAPTER 3 NDA-24307
Page 238
Issue 1
SYSTEM MESSAGES
This message displays when the MBR switch on the IOGT (PH-GT10) card in ISW is turned ON.
➀ IOGT card system status
➁ IOGT card system status after key
operation
Note 1: If the MBR key on the active IOGT card is flipped, the ACT/STBY of Speech Path Systems within the
whole system is totally changed over. For more details, refer to Chapter 6, Chapter 12.
Note 2: “1” is always displayed in the bit data.
1: XXXX XX00 0000 0000 2: 0000 0000 0000 0000 3: 0000 0000 0000 0000
➀ ➁
4: 0000 0000 0000 0000 5: 0000 0000 0000 0000 6: 0000 0000 0000 0000
7: 0000 0000 0000 0000 8: 0000 0000 0000 0000 9: 0000 0000 0000 0000
b0
b7
Default Alarm:
NON
17-Y GATE-HSW MBR Key ON
Default Grade:
3Grade Modified: Lamp Modified:
b0: 0/1 = No. 0 system/No. 1 system
b7: 0/1 = Normal/MB Note 1
NDA-24307 CHAPTER 3
Page 239
Issue 1
SYSTEM MESSAGES
This message displays when the MBR switch on the IOGT (PH-GT10) card in ISW is turned OFF.
➀ IOGT card system status
➁ IOGT card system status after key
operation
Note: If failure occurs on the HSW card side, the IOGT card is placed in Make-Busy state and “1” is
displayed in the bit. Otherwise, “0” is displayed.
1: XXXX XX00 0000 0000 2: 0000 0000 0000 0000 3: 0000 0000 0000 0000
➀ ➁
4: 0000 0000 0000 0000 5: 0000 0000 0000 0000 6: 0000 0000 0000 0000
7: 0000 0000 0000 0000 8: 0000 0000 0000 0000 9: 0000 0000 0000 0000
b0
b7
Default Alarm:
NON
17-Z GATE-HSW MBR Key OFF
Default Grade:
3Grade Modified: Lamp Modified:
b0: 0/1 = No. 0 system/No. 1 system
b7: 0/1 = Normal/MB Note
CHAPTER 3 NDA-24307
Page 240
Issue 1
SYSTEM MESSAGES
This message displays when the Primary Dch fails, Dch Back-Up function is operated automatically.
➀ Condition of the Dch
➁ Location of the Dch (Primary)
➂ Location of the Dch (Back-up)
1: XXXX XXXX XXXX 0000 2: 0000 0000 0000 0000 3: 0000 0000 0000 0000
➀ ➁ ➂ ➃ ➄ ➅
4: 0000 0000 0000 0000 5: 0000 0000 0000 0000 6: 0000 0000 0000 0000
7: 0000 0000 0000 0000 8: 0000 0000 0000 0000 9: 0000 0000 0000 0000
b7 b6 b5 b4 b3 b2 b1 b0
b7 b6 b5 b4 b3 b2 b1 b0
b7 b6 b5 b4 b3 b2 b1 b0
Default Alarm:
NON
23-P Dch Back-Up Automatic Change Start/End
Default Grade:
1Grade Modified: Lamp Modified:
b0-b7: 1 = Back-up Start
2 = Back-up End
3 = Back-up Failed
b0-b4: Group No.
b5, b6:Unit No. (0-3)
b7: 0/1 = Even-numbered MG/Odd-numbered MG
b0-b4: Group No.
b5, b6:Unit No. (0-3)
b7: 0/1 = Even-numbered MG/Odd-numbered MG

NDA-24307 CHAPTER 3
Page 241
Issue 1
SYSTEM MESSAGES
➃ Changeover Information
➄ Status of the Primary/Back-up Dch
➅ EVENT No.
b3 b2 b1 b0
b5 b4 b3 b2 b1 b0
b7 b6 b5 b4 b3 b2 b1 b0
b0, b1:00 = Change from Primary Dch to Dch for Back-up
01 = Change from Dch for Back-up to Primary Dch
10 = Place Primary Dch to ACT status
11 = Place Dch for Back-up to ACT status
b2, b3:00 = Change signal is received
01 = Change signal is sent
b0-b2: Status of Primary Dch
0 = In service (ACT status)
1 = STBY
2 = Out of Service
3 = Make Busy
4 = Changing the status from STBY to In Service
5 = Manual Changeover out of service
b3-b5: Status of Primary Dch
0 = In service (ACT status)
1 = STBY
2 = Out of Service
3 = Make Busy
4 = Changing the status from STBY to In Service
5 = Manual Changeover out of service
b0-b7: EVENT No.

CHAPTER 3 NDA-24307
Page 242
Issue 1
SYSTEM MESSAGES
This message displays when the Primary Dch fails, and the Dch Back-Up function is operated manually.
➀ Condition of the Dch
➁ Location of the Dch (Primary)
➂ Location of the Dch (Back-up)
1: XXXX XXXX XXXX 0000 2: 0000 0000 0000 0000 3: 0000 0000 0000 0000
➀ ➁ ➂ ➃ ➄ ➅
4: 0000 0000 0000 0000 5: 0000 0000 0000 0000 6: 0000 0000 0000 0000
7: 0000 0000 0000 0000 8: 0000 0000 0000 0000 9: 0000 0000 0000 0000
b7 b6 b5 b4 b3 b2 b1 b0
b7 b6 b5 b4 b3 b2 b1 b0
b7 b6 b5 b4 b3 b2 b1 b0
Default Alarm:
NON
23-Q Dch Back-Up Manual Change Start/End
Default Grade:
3Grade Modified: Lamp Modified:
b0-b7: 1 = Back-up Start
2 = Back-up End
3 = Back-up Failed
b0-b4: Group No.
b5, b6:Unit No. (0-3)
b7: 0/1 = Even-numbered MG/Odd-numbered MG
b0-b4: Group No.
b5, b6:Unit No. (0-3)
b7: 0/1 = Even-numbered MG/Odd-numbered MG

NDA-24307 CHAPTER 3
Page 243
Issue 1
SYSTEM MESSAGES
➃ Detailed information on changing
Dch
➄ Status of the Primary/Back-up Dch
➅ EVENT No.
b3 b2 b1 b0
b5 b4 b3 b2 b1 b0
b7 b6 b5 b4 b3 b2 b1 b0
b0, b1:00 = Change from Primary Dch to Dch for Back-up
01 = Change from the Dch for Back-up to Primary Dch
10 = Primary Dch Changeover to ACT status
11 = Back-up Dch Changeover to ACT status
b2, b3:The way of changing
00 = Changed by the MAT
01 = Changed by the MB switch of the circuit card
02 = Changed by placing Dch to Make-Busy
03 = Unknown
b0-b2: Status of Primary Dch
0 = In service (ACT status)
1 = STBY
2 = Out of Service
3 = Make Busy
4 = Changing the status from STBY to In Service
5 = Manual Changeover out of service
b3-b5: Status of Back-up Dch
0 = In service (ACT status)
1 = STBY
2 = Out of Service
3 = Make Busy
4 = Changing the status from STBY to In Service
5 = Manual Changeover out of service
b0-b7: EVENT No.
CHAPTER 3 NDA-24307
Page 244
Issue 1
SYSTEM MESSAGES
This message displays when the MUX (PH-PC36) card has a clock failure in one of the dual systems.
➀ MUX Card Location and System
Status
➁ Scan Data
See Chapter 5 for repair procedure.
1: XXXX 0000 0000 0000 2: 0000 0000 0000 0000 3: 0000 0000 0000 0000
➀ ➁
4: 0000 0000 0000 0000 5: 0000 0000 0000 0000 6: 0000 0000 0000 0000
7: 0000 0000 0000 0000 8: 0000 0000 0000 0000 9: 0000 0000 0000 0000
b4 b3 b2 b1 b0
b3 b2 b1
Default Alarm:
MN
23-Y MUX Clock Failure
Default Grade:
3Grade Modified: Lamp Modified:
b0-b1: Unit number
b2: MG number
b3: 0/1 = MUX No. 0 system/MUX No. 1 system
b4: 0/1 = ACT/STBY
Scan Data:Clock alarm information on the faulty MUX card
b1: 0/1 = -/FH failure for 2M PCM Highway
b2: 0/1 = -/CLK failure for 2M PCM Highway
b3: 0/1 = -/4M CLK failure for PM
NDA-24307 CHAPTER 3
Page 245
Issue 1
SYSTEM MESSAGES
This message displays when the MUX (PH-PC36) card has a clock failure in both of the dual systems.
➀ MUX Card Location
➁ Scan Data 1
➂ Scan Data 2
See Chapter 4 for the Circuit Card Replacement Procedure.
1: XXXX XX00 0000 0000 2: 0000 0000 0000 0000 3: 0000 0000 0000 0000
➀ ➁ ➂
4: 0000 0000 0000 0000 5: 0000 0000 0000 0000 6: 0000 0000 0000 0000
7: 0000 0000 0000 0000 8: 0000 0000 0000 0000 9: 0000 0000 0000 0000
b2 b1 b0
b3 b2 b1
b3 b2 b1
Default Alarm:
MN
23-Z Both MUX Clock Failure
Default Grade:
3Grade Modified: Lamp Modified:
b0-b1: Unit No.
b2: MG No.
Scan Data 1:Details on clock alarm information (ACT side)
b1: 0/1 = -/FH failure for 2M PCM Highway
b2: 0/1 = -/CLK failure for 2M PCM Highway
b3: 0/1 = -/4M CLK failure for PM
Scan Data 2:Details on clock alarm information (STBY side)
b1: 0/1 = -/FH failure for 2M PCM Highway
b2: 0/1 = -/CLK failure for 2M PCM Highway
b3: 0/1 = -/4M CLK failure for PM
CHAPTER 3 NDA-24307
Page 246
Issue 1
SYSTEM MESSAGES
This message displays when the MAT is log-in or log-out.
➀ I/O Port No. and MAT Status
➁ Command Name
➂ User Name
1: XX00 XXXX XXXX XXXX 2: XXXX XXXX XXXX XXXX 3: XXXX XXXX XXXX XXXX
➀ ➁ ➁ ➁ ➁ ➁ ➁ ➂ ➂ ➂ ➂ ➂ ➂ ➂ ➂ ➂ ➂ ➂ ➂ ➂ ➂ ➂ ➂
4: 0000 0000 0000 0000 5: 0000 0000 0000 0000 6: 0000 0000 0000 0000
7: 0000 0000 0000 0000 8: 0000 0000 0000 0000 9: 0000 0000 0000 0000
b7 b6 b5 b4 b2 b1 b0
b7 b6 b5 b4 b3 b2 b1 b0
b7 b6 b5 b4 b3 b2 b1 b0
Default Alarm:
NON
26-N MAT Log
Default Grade:
0Grade Modified: Lamp Modified:
b0-b2: I/O Port No.
000 = Port 0 001 = Port 1
010 = Port 2 011 = Port 3
100 = Port 4 101 = Port 5
110 = Port 6 111 = Port 7
b4-b7: 0000 = Login
0001 = Logout
0010 = Command is startup
0011 = Command exit
b0-b7: Command name
b0-b7: MAT user name
NDA-24307 CHAPTER 3
Page 247
Issue 1
SYSTEM MESSAGES
This massage is issued when a call, originated via a station/trunk, is judged as malicious, and then, the details
on the call is traced with the called party pressing an access code or the “Call Trace” key.
[When a call is originated from a station]
•Information on Called Party (Informer)
Fusion Point Code (FPC) (Hex.)
Note
Tenant No. (Hex.)
Note
Physical Station No. (Hex.)
Note
User Group No. (UGN) (Hex.)
Note
Telephone No. (Hex.)
Note
1: XXXX XXXX XXXX XXXX 2: XXXX XXXX XXXX XXXX 3: XXXX XXXX XXXX XXXX
➀➁➂ ➃➄➅➆➇➈
4: XXXX XXXX XXXX XXXX 5: XXXX XX00 0000 0000 6: 0000 0000 0000 0000
➉
7: 0000 0000 0000 0000 8: 0000 0000 0000 0000 9: 0000 0000 0000 0000
b7 b6 b5 b4 b3 b2 b1 b0
b7 b6 b5 b4 b3 b2 b1 b0
b7 b6 b5 b4 b3 b2 b1 b0
b7 b6 b5 b4 b3 b2 b1 b0
b7 b6 b5 b4 b3 b2 b1 b0
Default Alarm:
NON
26-R Call Trace
Default Grade:
2Grade Modified: Lamp Modified:
11
b4 - b7 b0 - b3
dc0 dc1
dc2 dc3
1
1
2
b4 - b7 b0 - b3
dc0 dc1
dc2 dc3
2
3
b4 - b7 b0 - b3
dc0 dc1
dc2 dc3
dc4 dc5
3
4
b4 - b7 b0 - b3
dc0 dc1
dc2 dc3
4
5
b4 - b7 b0 - b3 b4 - b7 b0 - b3
dc0 dc1 dc8 dc9
dc2 dc3 dc10 dc11
dc4 dc5 dc12 dc13
dc6 dc7 dc14 dc15
5
CHAPTER 3 NDA-24307
Page 248
Issue 1
SYSTEM MESSAGES
•Information on Malicious call
Kind of Call (Hex.)
Note 10H=Call from a station
Fusion Point Code (FPC) (Hex.)
Note
Tenant No. (Hex.)
Note
Physical Station No. (Hex.)
Note
User Group No. (UGN) (Hex.)
Note
Telephone No. (Hex.)
Note
Note: Each No./code is output in hexadecimal. Detailed meanings are as follows:
Output Data (Hex.) Actual Meaning
1~9 →1~9
A→0
B→*
C→#
0→blank
b7 b6 b5 b4 b3 b2 b1 b0
b7 b6 b5 b4 b3 b2 b1 b0
b7 b6 b5 b4 b3 b2 b1 b0
b7 b6 b5 b4 b3 b2 b1 b0
b7 b6 b5 b4 b3 b2 b1 b0
b7 b6 b5 b4 b3 b2 b1 b0
6
7
b4 - b7 b0 - b3
dc0 dc1
dc2 dc3
7
8
b4 - b7 b0 - b3
dc0 dc1
dc2 dc3
8
9
b4 - b7 b0 - b3
dc0 dc1
dc2 dc3
dc4 dc5
9
10
b4 - b7 b0 - b3
dc0 dc1
dc2 dc3
10
11
b4 - b7 b0 - b3 b4 - b7 b0 - b3
dc0 dc1 dc8 dc9
dc2 dc3 dc10 dc11
dc4 dc5 dc12 dc13
dc6 dc7 dc14 dc15
11
NDA-24307 CHAPTER 3
Page 249
Issue 1
SYSTEM MESSAGES
When a call is originated from a trunk
•Information on Called Party (Informer)
Fusion Point Code (FPC) (Hex.)
Note
Tenant No. (Hex.)
Note
Physical Station No. (Hex.)
Note
User Group No. (UGN) (Hex.)
Note
Telephone No. (Hex.)
Note
1: XXXX XXXX XXXX XXXX 2: XXXX XXXX XXXX XXXX 3: XXXX XXXX XXXX XXXX
➀➁➂ ➃➄➅
4: XXXX XXXX XXXX XXXX 5: XXXX 0000 0000 0000 6: 0000 0000 0000 0000
➆
7: 0000 0000 0000 0000 8: 0000 0000 0000 0000 9: 0000 0000 0000 0000
b7 b6 b5 b4 b3 b2 b1 b0
b7 b6 b5 b4 b3 b2 b1 b0
b7 b6 b5 b4 b3 b2 b1 b0
b7 b6 b5 b4 b3 b2 b1 b0
b7 b6 b5 b4 b3 b2 b1 b0
1
b4 - b7 b0 - b3
dc0 dc1
dc2 dc3
1
2
b4 - b7 b0 - b3
dc0 dc1
dc2 dc3
2
3
b4 - b7 b0 - b3
dc0 dc1
dc2 dc3
dc4 dc5
3
4
b4 - b7 b0 - b3
dc0 dc1
dc2 dc3
4
5
b4 - b7 b0 - b3
dc0 dc1
dc2 dc3
dc4 dc5
dc6 dc7
dc8 dc9
dc10 dc11
dc12 dc13
dc14 dc15
5
CHAPTER 3 NDA-24307
Page 250
Issue 1
SYSTEM MESSAGES
•Information on Malicious Call
Kind of Call (Hex.)
Note 20H=Call from a trunk
Calling No. of Trunk Call (Caller ID) (Hex.)
Note, Note 1
Note: Each No./code is output in hexadecimal. Detailed meanings
are as follows:
Output Data (Hex.) Actual Meaning
1~9 →1~9
A→0
B→*
C→#
0→blank
Note 1: If the number of the trunk call (Caller-ID) cannot be identified, the
data here is output as “0”.
b7 b6 b5 b4 b3 b2 b1 b0
b7 b6 b5 b4 b3 b2 b1 b0
6
7
b4 - b7 b0 - b3
dc0 dc1
dc2 dc3
dc4 dc5
dc6 dc7
dc8 dc9
dc10 dc11
dc12 dc13
dc14 dc15
dc16 dc17
dc18 dc19
dc20 dc21
dc22 dc23
dc24 dc25
dc26 dc27
dc28 dc29
dc30 dc31
7
NDA-24307 CHAPTER 3
Page 251
Issue 1
SYSTEM MESSAGES
This message is issued when the connection error related to external LAN Interface equipment occurs in the
system.
~ IP Address for external equipment in which error has been detected. (Hex.)
, Port No. (Client Port No.) (Hex.)
Socket No. (Used Socket No.) (Hex.)
Error Code (TCP/IP Error Code) (Hex.) See Table 3-2.
TCP/IP Part Application Part
1: XXXX XXXX XXXX XXXX 2: XXXX XXXX XXXX XXXX 3: XXXX XXXX XXXX XXXX
➀ ➁ ➂ ➃ ➄ ➅ ➆ ➇ ➈ ➉
4: 0000 0000 0000 0000 5: 0000 0000 0000 0000 6: 0000 0000 0000 0000
7: 0000 0000 0000 0000 8: 0000 0000 0000 0000 9: 0000 0000 0000 0000
b7 b6 b5 b4 b3 b2 b1 b0
b7 b6 b5 b4 b3 b2 b1 b0
b7 b6 b5 b4 b3 b2 b1 b0
b7 b6 b5 b4 b3 b2 b1 b0
Default Alarm:
SUP
26-V LAN Interface Error Report
Default Grade: Grade Modified: Lamp Modified:
11 12 13 14 15 16 17 18 19 20 21 22 23 24
14
56
7
8

CHAPTER 3 NDA-24307
Page 252
Issue 1
SYSTEM MESSAGES
Table 3-2 Error Code
Output Data
(Hex.) Definition Output Data
(Hex.) Definition
BSD SOCKET ERROR 58 Address family not supported
10 User parameter error PROTOCOL FAMILY
11 Host not reachable 59 Address already in use
12 Timeout 60 Can’t assign requested address
14 Protocol error 61 Network is down
15 No buffer space 62 Network is unreachable
16 Connection block invalid 63 Network dropped connection
17 Invalid pointer argument RESET
18 Operation would block 65 Connection reset by peer
19 Message too long 67 Socket is already connected
20 Protocol not available 68 Socket is not connected
50 Destination address required 69 Can’t send after socket shutdown
52 Protocol wrong type for socket 72 Connection refused
54 Protocol not supported 73 Host is down
55 Socket type not supported 76 Operation already in progress
56 Operation not supported on socket 77 Operation now in progress
57 Protocol family not supported

NDA-24307 CHAPTER 3
Page 253
Issue 1
SYSTEM MESSAGES
Application Type
[When =03 (SMDR) / 04 (MCI) ]
Device Number of Error-detected client PC
Kind of Error
Details on Detected Error
~ Not used
b7 b6 b5 b4 b3 b2 b1 b0
b7 b6 b5 b4 b3 b2 b1 b0
b7 b6 b5 b4 b3 b2 b1 b0
b7 b6 b5 b4 b3 b2 b1 b0
9
b0-b7 : (Hex)
01=SUPER SERVER
02=MAT
03=SMDR
04=MCI
05=OAI
06=PMS
07=MIS
9
10
b0-b7: (Hex)
Device Number of error-detected Client PC.
If the Machine Number is not determined, “FF”
is output.
b0-b7: (Hex)
01=SEND Execution Error
02=RECEIVE Execution Error
03=SEND Execution Count Over
04=RECEIVE Execution Count Over
05=System Data is not assigned
06=Time Over
07=Parity Error
08=Connection Error
09=Connection Port Capacity Over
0A=Detection of B-level Infinite Loop
0B~FF=Not used
11
12
-When 01/02 is output at
b0-b7: Cause of error (Hex)
-When 05 is output at
b0-b7: 01=Data (Data Output via LAN) not
assigned
02=Device No. not assigned
-When 07 is output at
b0-b7: 00H=No Parity is set
01H=Odd Parity is set
02H=Even Parity is set
-When 08 is output at
b0-b7: Cause of error (Hex)
11
11
11
11
13 24

CHAPTER 3 NDA-24307
Page 254
Issue 1
SYSTEM MESSAGES
When =05 (OAI) / 07 (MIS)
Faulty Logical Port No. (Hex)
Error Kind (ERRK)
Not used
b7 b6 b5 b4 b3 b2 b1 b0
b7 b6 b5 b4 b3 b2 b1 b0
Table 3-3 Error Kind (ERRK)
Output Data Error Situation Required Check
01H
SEND Execution Error
TCP/IP connection is down because the text is not transmit-
ted continuously.
[1] Check the TCP/IP Transmission
capacity on the UAP side is proper or
not.
[2] Check the operation status on the
UAP side is normal.
02H
RECEIVE Execution Error
Incorrect text format is received.
[1] Check the software operation on the
MIS or Host side.
[2] Check the LAN cable connection
status.
03H
TCP/IP Connection Error
TCP/IP connection is released due to the TCP port discon-
nection order from the MIS or Host.
Re-start the MIS or HOST computer.
04H
Connection Error (B-level Infinite Loop, etc.)
TCP port is released due to the detection of abnormal state in
the MIS or HOST operation.
Re-check the operation status of MIS or
Host.
05H
TCP/IP Port Capacity Over
TCP/IP connection cannot be established due to the connec-
tion port capacity over.
The number of allowed ports for applica-
tion use via TCP/IP must be 16 or less. Ad-
just the used application number not to
exceed “16” in total.
9
10
11
b0-b7 : Error Kind (Hex)
Refer to Table 3-3:
12 ~ 24
NDA-24307 CHAPTER 3
Page 255
Issue 1
SYSTEM MESSAGES
This message is issued when the LAN Interface Connection Failure, detected in Message [26-V], recovers.
This message is displayed when the LAN Interface Connection Failure is restored, and then the first data is
normally sent/received by the recovered application equipment.
~ IP Address for external equipment in which error has been detected. (Hex.)
, Port No. (Client Port No.) (Hex.)
Socket No. (Used Socket No.) (Hex.)
Error Code (TCP/IP Error Code) (Hex.) See Table 3-2.
TCP/IP Part Application Part
1: XXXX XXXX XXXX XXXX 2: XXXX XXXX XXXX XXXX 3: XXXX XXXX XXXX XXXX
➀ ➁ ➂ ➃ ➄ ➅ ➆ ➇ ➈ ➉
4: 0000 0000 0000 0000 5: 0000 0000 0000 0000 6: 0000 0000 0000 0000
7: 0000 0000 0000 0000 8: 0000 0000 0000 0000 9: 0000 0000 0000 0000
b7 b6 b5 b4 b3 b2 b1 b0
b7 b6 b5 b4 b3 b2 b1 b0
b7 b6 b5 b4 b3 b2 b1 b0
b7 b6 b5 b4 b3 b2 b1 b0
Default Alarm:
NON
26-W LAN Interface Release Report
Default Grade: Grade Modified: Lamp Modified:
11 12 13 14 15 16 17 18 19 20 21 22 23 24
14
56
7
8

CHAPTER 3 NDA-24307
Page 256
Issue 1
SYSTEM MESSAGES
Application Type
When =03 (SMDR) / 04 (MCI)
Device Number of recovered client PC
Recovery Information
b7 b6 b5 b4 b3 b2 b1 b0
b7 b6 b5 b4 b3 b2 b1 b0
b7 b6 b5 b4 b3 b2 b1 b0
9
b0-b7 : (Hex)
01=SUPER SERVER
02=MAT
03=SMDR
04=MCI
05=OAI
06=PMS
07=MIS
9
10
b0-b7: (Hex)
Device Number of recovered Client PC
for external LAN Interface.
b0-b7: (Hex)
01=Recovered
02~FF=Not defined
11

NDA-24307 CHAPTER 3
Page 257
Issue 1
SYSTEM MESSAGES
This message is issued when the MBR switch on the DLMX card has been turned ON at the time of DLMX
ACT/ST-BY changeover, etc.
➀ Location of the DLMX card
➁ System status of DLMX card
1: XXXX 0000 0000 0000 2: 0000 0000 0000 0000 3: 0000 0000 0000 0000
➀ ➁
4: 0000 0000 0000 0000 5: 0000 0000 0000 0000 6: 0000 0000 0000 0000
7: 0000 0000 0000 0000 8: 0000 0000 0000 0000 9: 0000 0000 0000 0000
b7 b6 b5 b4 b3 b2 b1 b0
b7 b1 b0
Default Alarm:
NON
27-E DLMX MBR Key Turn ON
Default Grade:
3Grade Modified: Lamp Modified:
b0-b4: Group No.
b5, b6: Unit No. (0-3)
b7: MG No.
0/1 = Even-numbered MG/Odd-numbered MG
b0: 0/1 = System #0/#1
b1: 0/1 = ACT/SY-BY
CHAPTER 3 NDA-24307
Page 258
Issue 1
SYSTEM MESSAGES
This message is issued when the MBR switch on the DLMX card has been turned OFF at the time of DLMX
ACT/ST-BY changeover, etc.
➀ Location of the DLMX card
➁ System status of DLMX card
1: XXXX 0000 0000 0000 2: 0000 0000 0000 0000 3: 0000 0000 0000 0000
➀ ➁
4: 0000 0000 0000 0000 5: 0000 0000 0000 0000 6: 0000 0000 0000 0000
7: 0000 0000 0000 0000 8: 0000 0000 0000 0000 9: 0000 0000 0000 0000
b7 b6 b5 b4 b3 b2 b1 b0
b7 b1 b0
Default Alarm:
NON
27-F DLMX MBR Key Turn OFF
Default Grade:
3Grade Modified: Lamp Modified:
b0-b4: Group No.
b5, b6: Unit No. (0-3)
b7: MG No.
0/1 = Even-numbered MG/Odd-numbered MG
b0: 0/1 = System #0/#1
b1: 0/1 = ACT/SY-BY
NDA-24307 CHAPTER 3
Page 259
Issue 1
SYSTEM MESSAGES
This message is issued when a DLMX card is placed to ACT state due to a mode changeover.
➀ Reason for changeover
1: XXXX 0000 0000 0000 2: 0000 0000 0000 0000 3: 0000 0000 0000 0000
➀
4: 0000 0000 0000 0000 5: 0000 0000 0000 0000 6: 0000 0000 0000 0000
7: 0000 0000 0000 0000 8: 0000 0000 0000 0000 9: 0000 0000 0000 0000
b7 b2 b1 b0
Default Alarm:
NON
27-G DLMX ACT Change Report
Default Grade:
3Grade Modified: Lamp Modified:
b2 b1 b0
0 0 0 = MBR key operation
0 0 1 = Circuit Card Make Busy
0 1 0 = Detection of fault (on the DLMX card)
CHAPTER 3 NDA-24307
Page 260
Issue 1
SYSTEM MESSAGES
This message displays when the MUX (PH-PC36) card, whose clock function was detected as faulty, is
recovered.
➀ MUX Card Location and System
Status
➁ RLS Data
1: XXXX 0000 0000 0000 2: 0000 0000 0000 0000 3: 0000 0000 0000 0000
➀ ➁
4: 0000 0000 0000 0000 5: 0000 0000 0000 0000 6: 0000 0000 0000 0000
7: 0000 0000 0000 0000 8: 0000 0000 0000 0000 9: 0000 0000 0000 0000
b4 b3 b2 b1 b0
b3 b2 b1
Default Alarm:
NON
33-A MUX Clock Restore
Default Grade:
3Grade Modified: Lamp Modified:
b0-b1: Unit number
b2: MG number
b3: 0/1 = MUX No. 0 system / MUX No. 1 system
b4: 0/1 = ACT/STBY
RLS Data:Clock alarm information on the recovered MUX card
b1: 0/1 = -/FH failure for 2M PCM Highway
b2: 0/1 = -/CLK failure for 2M PCM Highway
b3: 0/1 = -/4M CLK failure for PM
NDA-24307 CHAPTER 3
Page 261
Issue 1
SYSTEM MESSAGES
This message displays when an abnormal state is detected temporarily on the SDT (PA-SDTA/B) card.
➀ MG (Module Group)
➁ Details on alarm
Note: Alarm-detected HW is specified in
➂
(next page).
1: X0XX 00XX XXXX XX00 2: 0000 0000 0000 0000 3: 0000 0000 0000 0000
➀ ➁ ➂
4: 0000 0000 0000 0000 5: 0000 0000 0000 0000 6: 0000 0000 0000 0000
7: 0000 0000 0000 0000 8: 0000 0000 0000 0000 9: 0000 0000 0000 0000
b7 b0
b7 b4 b3 b2 b1 b0
Default Alarm:
SUP
33-B SDT Alarm Warning
Default Grade:
2Grade Modified: Lamp Modified:
b7: 0/1 = Even-number MG/Odd-number MG
b4, b3 b2-b0
0 0 0 0 0
0 0 0 0 1 Hardware Failure
0 0 0 1 0 Optical Line Failure
0 0 0 1 1 Onboard Power Alarm
0 1 0 0 0
0 1 0 0 1 PCM Loss
0 1 0 1 0 Frame Alignment Loss
0 1 0 1 1 Receiving Section Failure
0 1 1 0 0 Mistake Rate Degradation
0 1 1 0 1 Sending Section Failure
0 1 1 1 0 Mistake Detection
1 0 0 0 0
1 0 0 0 1 Receiving Path Failure
1 0 0 1 0 Pointer Failure
1 0 0 1 1 Sending Path Failure
1 0 1 0 0 Receiving Path Error
1 0 1 0 1 Sending Path Error
b7: SDT Card Status
0/1=No. 0 System/No.1 System
SDT Card
Trouble
52M Interface
Alarm
VC-11 Path
Trouble
Note

CHAPTER 3 NDA-24307
Page 262
Issue 1
SYSTEM MESSAGES
➂ Alarm-detected HW
Note: This data displays only when b4 is “1” and b3 is “0” in data
➁
.
Repair Procedure
Basically, fault repair work is not required by the display of this message. However, if the message is created
frequently, it is recommended that the repair work be performed as shown in the message [33-C] SDT Alarm
Trouble.
b7 b6 b5 b4 b3 b2 b1 b0
The data here specifies the HW, on which any of the VC-11 Path
Trouble was detected in data ➁ (see Note). Refer to the table below:
b7 b6 b5 b4 b3 b2 b1 b0
- - - - 28 27 26 25
24 23 22 21 20 19 18 17
16 15 14 13 12 11 10 9
87654321
0/1=-/VC-11 Path Trouble
NDA-24307 CHAPTER 3
Page 263
Issue 1
SYSTEM MESSAGES
This message displays when a grave failure occurs on the SDT (PA-SDTA/B) card. If this is issued, remember
the ACT/STBY change of the SDT card may be followed, as a result of fault detection in the optical fiber line
(see [33-E] message).
➀ MG (Module Group)
➁ Details on alarm
Note: Fault repair procedure on each alarm is shown on the next page.
1: XXXX 0000 0000 0000 2: 0000 0000 0000 0000 3: 0000 0000 0000 0000
➀ ➁
4: 0000 0000 0000 0000 5: 0000 0000 0000 0000 6: 0000 0000 0000 0000
7: 0000 0000 0000 0000 8: 0000 0000 0000 0000 9: 0000 0000 0000 0000
b7 b0
b7 b4 b3 b2 b1 b0
Default Alarm:
MN
33-C SDT Alarm Trouble
Default Grade:
3Grade Modified: Lamp Modified:
b7: 0/1 = Even-number MG/Odd-number MG
b4, b3 b2-b0
0 0 0 0 0
0 0 0 0 1 Hardware Failure
0 0 0 1 0 Optical Line Failure
0 0 0 1 1 Onboard Power Alarm
0 0 1 0 0 Abnormal MB Key Operation
0 1 0 0 0
0 1 0 0 1 PCM Loss
0 1 0 1 0 Frame Alignment Loss
0 1 0 1 1 Receiving Section Failure
0 1 1 0 0 Mistake Rate Degradation
0 1 1 0 1 Sending Section Failure
0 1 1 1 0 Mistake Detection
1 0 0 0 0
1 0 0 0 1 Receiving Path Failure
1 0 0 1 0 Pointer Failure
1 0 0 1 1 Sending Path Failure
1 0 1 0 0 Receiving Path Error
1 0 1 0 1 Sending Path Error
b7: SDT Card Status
0/1=No. 0 System/No.1 System
SDT Card
Trouble
52M Interface
Alarm
VC-11 Path
Trouble
Note

CHAPTER 3 NDA-24307
Page 264
Issue 1
SYSTEM MESSAGES
Repair Procedure
Depending on the fault status shown in data ➁, perform necessary repair work:
(1) Hardware Failure/Onboard Power Alarm
SDT (PA-SDTA/B) card is faulty. Replace the card with a spare by referring to Chapter 4, Section 3.3.3,
SDT Card Replacement Procedure.
(2) Optical Line Failure
Diagnosis: In addition to this alarm, is the “PCM Loss” alarm also indicated?
YES →Optical line side is faulty.
Verify that the SDT card in the distant node is not placed into make-busy state. Also, perform the
light level check of the optical fiber cables.
NO →SDT card is faulty.
Replace the SDT card with a spare by referring to Chapter 4, Section 3.3.3, SDT Card
Replacement Procedure.
(3) Abnormal MB Key Operation
This alarm is indicated when the MB key on the PA-SDTA card is turned ON, even though the MBR key
has been on the OFF side. Place the MBR key UP (=ON) and then turn ON the MB key.
(4) PCM Loss
Abnormal state is detected on the optical line side. Verify that the SDT card in the distant node is not
placed into make-busy state. Also, perform the light level check of the optical fiber cables.
(5) 52M Interface Alarm
- Frame Alignment Loss
- Receiving Section Failure
- Mistake Rate Degradation
- Sending Section Failure
- Mistake Detection
Clock synchronization with the distant node might be lost, or a trouble might occur on the optical line
side. Check the PLO cards first in both self-node and distant node. When no fault is found, proceed with
the light level check of the optical fiber cables.

NDA-24307 CHAPTER 3
Page 265
Issue 1
SYSTEM MESSAGES
(6) Receiving Path Failure/Receiving Path Error
Abnormal state is detected in the process of multiplexing the “Receive” signals. To restore this, perform
the following:
STEP 1 Initialization of SDT card (distant node)
Initialize the SDT card in the distant node, and observe the situation. If the fault is not restored,
proceed with STEP 2.
STEP 2 Initialization of SDT card (self-node)
Initialize the SDT card in the self-node, and observe the situation. If the fault is not restored,
proceed with STEP 3.
STEP 3 Replacement of SDT card
It cannot be confirmed which node side (self-node or distant node) is faulty. By referring to
Chapter 4, Section 3.3.5, SDT Card Replacement Procedure, first replace the SDT card only in
one of the nodes. When the fault does not recover, then also replace the SDT card in other side
of the nodes.
(7) Pointer Failure/Sending Path Failure/Sending Path Error
Abnormal state is detected in the process of multiplexing the “Send” signals. To restore this, perform the
following:
STEP 1 Initialization of SDT card
Initialize the SDT card in the self-node, and observe the situation. If the fault is not restored,
proceed with STEP 2.
STEP 2 Replacement of SDT card
By referring to Chapter 4, Section 3.3.5, SDT Card Replacement Procedure, replace the SDT
card in the self-node with a spare.
CHAPTER 3 NDA-24307
Page 266
Issue 1
SYSTEM MESSAGES
This message displays when the SDT (PA-SDTA/B) card or optical fiber line, which was once detected as
faulty, recovers.
➀ MG (Module Group)
➁ Details on the fault
1: X0XX 0000 0000 0000 2: 0000 0000 0000 0000 3: 0000 0000 0000 0000
➀ ➁
4: 0000 0000 0000 0000 5: 0000 0000 0000 0000 6: 0000 0000 0000 0000
7: 0000 0000 0000 0000 8: 0000 0000 0000 0000 9: 0000 0000 0000 0000
b7 b0
b7 b4 b3 b2 b1 b0
Default Alarm:
NON
33-D SDT Alarm Restore
Default Grade:
1Grade Modified: Lamp Modified:
b7: 0/1 = Even-number MG/Odd-number MG
b4, b3 b2-b0
0 0 0 0 0
0 0 0 0 1 Hardware Failure
0 0 0 1 0 Optical Line Failure
0 0 0 1 1 Onboard Power Alarm
0 0 1 0 0 Abnormal MB Key Operation
0 1 0 0 0
0 1 0 0 1 PCM Loss
0 1 0 1 0 Frame Alignment Loss
0 1 0 1 1 Receiving Section Failure
0 1 1 0 0 Mistake Rate Degradation
0 1 1 0 1 Sending Section Failure
0 1 1 1 0 Mistake Detection
1 0 0 0 0
1 0 0 0 1 Receiving Path Failure
1 0 0 1 0 Pointer Failure
1 0 0 1 1 Sending Path Failure
1 0 1 0 0 Receiving Path Error
1 0 1 0 1 Sending Path Error
b7: SDT Card Status
0/1=No. 0 System/No.1 System
SDT Card
Trouble
52M Interface
Alarm
VC-11 Path
Trouble
NDA-24307 CHAPTER 3
Page 267
Issue 1
SYSTEM MESSAGES
This message displays when the ACT/STBY of the SDT (PA-SDTA) card is changed over as a result of fault
detection in the optical fiber line. When the ACT/STBY change cannot be performed, this message also
indicates the cause for the changeover execution failure.
➀ MG (Module Group)
➁ Detailed information
➂ Cause for changeover execution failure
Repair Procedure
Once this message displays, be sure to check other messages, such as [33-C] SDT Alarm Trouble, and review
the cause for the changeover. If any fault is implicated, repair the whole fault(s) according to the situation.
1: X0XX XX00 0000 0000 2: 0000 0000 0000 0000 3: 0000 0000 0000 0000
➀ ➁ ➂
4: 0000 0000 0000 0000 5: 0000 0000 0000 0000 6: 0000 0000 0000 0000
7: 0000 0000 0000 0000 8: 0000 0000 0000 0000 9: 0000 0000 0000 0000
b7 b0
b7 b6 b5 b4 b3 b2 b1 b0
b7 b6 b5 b4 b3 b2 b1 b0
Default Alarm:
NON
33-E SDT Interface Change Notify
Default Grade:
2Grade Modified: Lamp Modified:
b7: 0/1 = Even-number MG/Odd-number MG
b0: Active SDT after Changeover
0/1=No.0 System/No.1 System
b1: Operating Status of SDT
0/1=In service/Out of service
b2, b3: Result of Changeover
0/1=Success/Failure
b7-b4 Cause for Changeover
0001 SDT had a serious failure
0010 MB key on SDT card was turned ON
0H: (Changeover Success)
1H: Optical interface isn’t dual
2H: Optical interface has a serious failure in each No.0/No.1 system

CHAPTER 3 NDA-24307
Page 268
Issue 1
This page is for your notes.

NDA-24307 CHAPTER 4
Page 269
Issue 1
CHAPTER 4 UNIT/CIRCUIT CARD REPLACEMENT PROCEDURE
1. LPM ACCOMMODATING UNIT/CIRCUIT CARD REPLACEMENT PROCEDURE
This section explains how to replace unit/circuit cards mounted in the LPM (ISW/IMG 0).
1.1 Precautions
•Use this procedure to replace a faulty unit/circuit card with a spare or to check a spare card.
•There are functional switches (having set the default switch) on some of the circuit cards to be replaced.
As for switch setting on the circuit cards, confirm the circuit card mounting face layout for the LPM.
When a circuit card with a default switch setting is replaced with a spare card, always make the switch
setting on the new circuit card the same as on the replaced card. Otherwise, electronic components on
the circuit card may be destroyed, or the circuit card itself may fail to function normally.
•When handling a circuit card, always use the field service kit for countermeasures against static
electricity. Touching a circuit card without using the field service kit may destroy the card due to static
electricity on the human body.
1.2 Circuit Card Mounting Face Layout
Figure 4-1 shows the face layout of circuit cards mounted in the LPM.
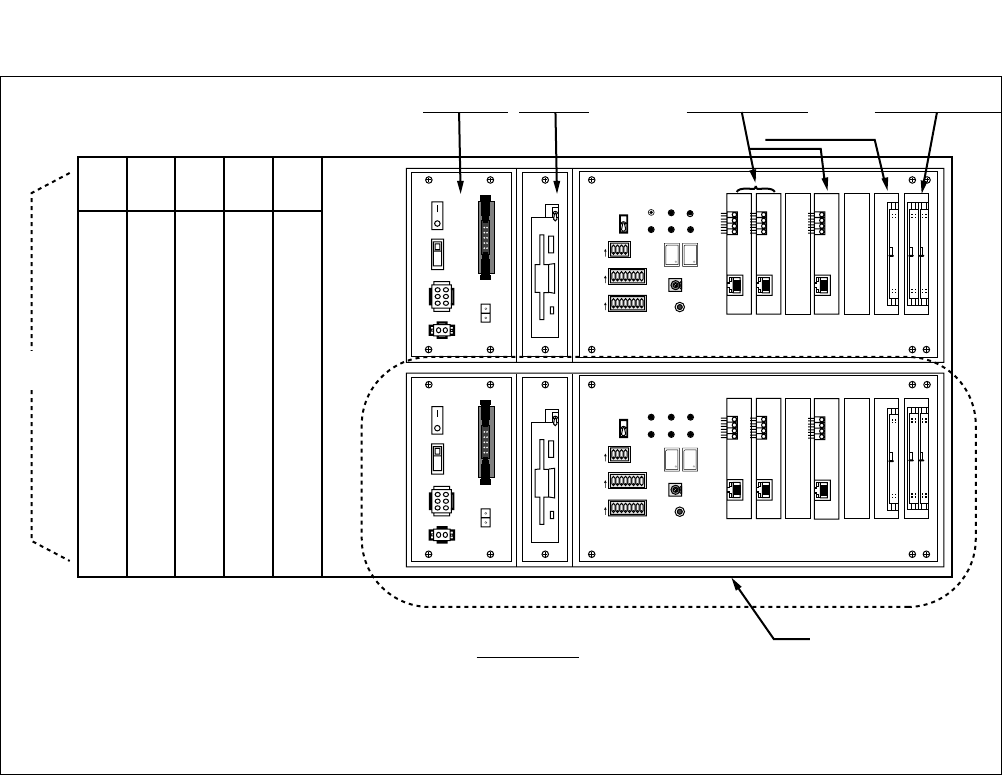
CHAPTER 4 NDA-24307
Page 270
Issue 1
UNIT/CIRCUIT CARD REPLACEMENT PROCEDURE
Figure 4-1 Circuit Card Mounting Face Layout of LPM
12345678
OFF
12345678
OFF
1234
OFF
MBR
FDD
ON
OFF
PALM
ON
OFF
OUT PWR
IN PWR
5A
HDD
SW MB
SYSTEM SELECT0
SENSE
SYSTEM SELECT1
SYSTEM SELECT2 CPURST
SLOT No. 0 1 2 3 4 5 6
STATUS
IMG1 IMG2 IMG3
CPUOPEWDT IMG0
ON
ON
ON
4
C
0
2
6
A
E
12345678
OFF
12345678
OFF
1234
OFF
MBR
FDD
ON
OFF
ON
OFF
OUT PWR
IN PWR
5A
HDD
SW MB
SYSTEM SELECT0
SENSE
SYSTEM SELECT1
SYSTEM SELECT2 CPURST
SLOT No. 0 1 2 3 4 5 6
STATUS
IMG1 IMG2 IMG3
CPUOPEWDT IMG0
ON
ON
ON
4
C
0
2
6
A
E
00 01 02 03 04
MMC (PH-M22)
MISC/IOC
IOC(PH-IO24)
EMA(PH-PC40)
MISC
LPM
FRONT VIEW CPR
PZ-PW92 LANI(PZ-PC19)
ISAGT (PZ-GT20)
Note 1
Note 2
ISAGT(PZ-GT13)PZ-IO27
PALM
Note 1: This card (PZ-GT20) is mounted in the CPR of LN(s) only.
Note 2: In place of PZ-IO27, the CPR may be equipped with PZ-IO28, which does not have the MB key.

NDA-24307 CHAPTER 4
Page 271
Issue 1
UNIT/CIRCUIT CARD REPLACEMENT PROCEDURE
1.3 Operating Procedures
The following paragraphs provide operating procedures to replace unit/circuit cards of the LPM. Perform
the operations that correspond to each reference item specified in Table 4-1.
Table 4-1 LPM Unit/Circuit Cards and Reference Items
UNIT/CIRCUIT CARD REFERENCE ITEM REMARKS
CPR Section 1.3.1, CPR Replacement Procedure CPU, ISAGT,
LANI, HFD
EMA Card Section 1.3.2, EMA Card Replacement Procedure
IOC Card Section 1.3.3, IOC Card Replacement Procedure
PWR Unit Section 1.3.4, Power Supply Unit Replacement Procedure
MISC Card Section 1.3.5, MISC Card Replacement Procedure
Improper key operations may result in a system down. Operate the key using extreme care.
During replacement of a circuit card, the system issues system messages and activates the related
alarm. Reset the indicated alarm after completing the replacement procedure.
If the indicated alarm is cleared via the RALM/RALMN command, the system also clears the
contents of the system message. Before using the RALM/RALMN command, print the messages
using the DFTD command.
Use the ALM RST button on the TOPU only to reset the alarm lamps.
WARNING
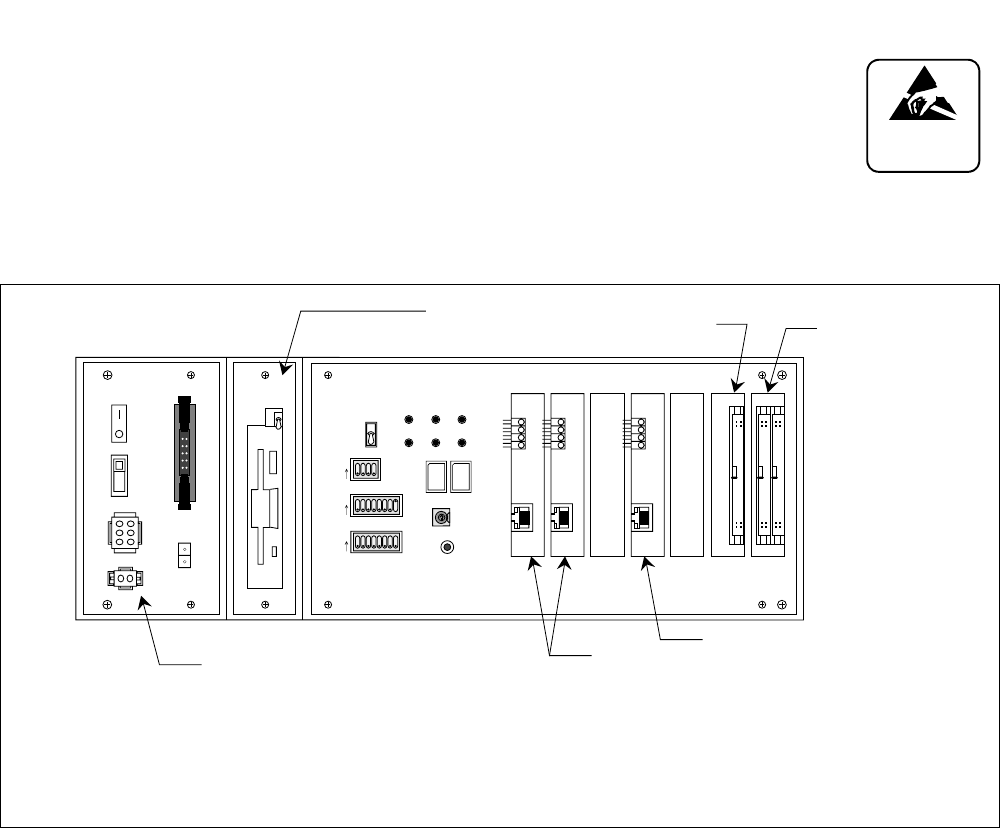
CHAPTER 4 NDA-24307
Page 272
Issue 1
UNIT/CIRCUIT CARD REPLACEMENT PROCEDURE
1.3.1 CPR Replacement Procedure
This section explains how to replace the Control Processor Rack (CPR). The CPR
is mounted in IMG 0 of LN and ISW. Before starting the procedures, make a backup
copy of the main data, such as office data, Call Forwarding (CF) data and Speed
Calling (SPD) data, on to the hard disk of the HFD. Figure 4-2 shows the front view
of the CPR. Operate the related keys and connectors to replace the CPU with a new one. Using a
Phillips screwdriver, remove the four screws and extract the CPR with care, as shown in Figure 4-3.
Figure 4-2 CPR Face Layout
ATTENTION
Contents
Static Sensitive
Handling
Precautions Required
12345678
OFF
12345678
OFF
1234
OFF
MBR
FDD
ON
OFF
ON
OFF
OUT PWR
PALM
IN PWR
5A
HDD
SW MB
SYSTEM SELECT0
SENSE
SYSTEM SELECT1
SYSTEM SELECT2 CPURST
SLOT No.
M
012345 6
STATUS
IMG1 IMG2 IMG3
CPUOPEWDT IMG0
ON
ON
ON
4
C
0
2
6
A
E
PZ-IO27
Note 3
PZ-PW92 PZ-PC19(LANI) PZ-PC19(LANI)
Note 1
PZ-GT13(ISAGT)
PZ-GT20(ISAGT)
Note 2
T
Note 1: This card (secondary LANI for Fusion Link) is optional.
Note 2: This card is mounted in the CPR of LN only.
Note 3: In place of PZ-IO27, the CPR may be equipped with PZ-IO28, which does not have the MB
key.
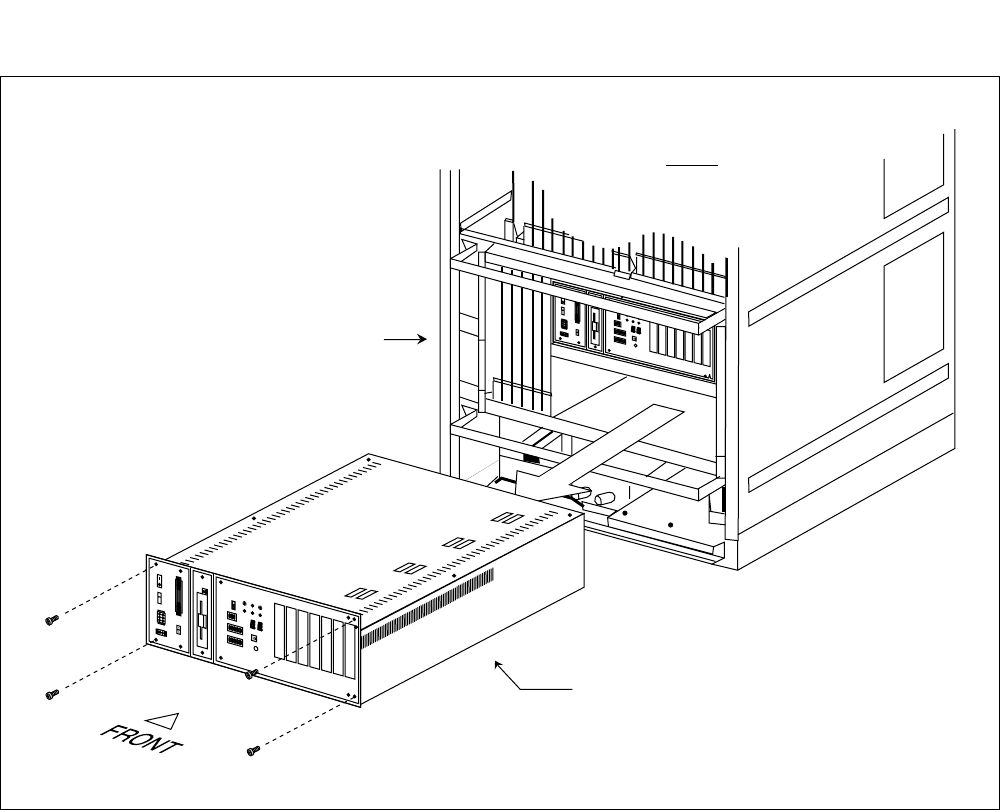
NDA-24307 CHAPTER 4
Page 273
Issue 1
UNIT/CIRCUIT CARD REPLACEMENT PROCEDURE
Figure 4-3 How to Replace the CPU
..........
12345678
12345678
1234
5A
SLOT No. 0 1 2 3 456
2
6
E
..........
12345678
12345678
1234
5A
SLOT No. 0123456
2
6
E
CPR
LPM
IMG 0
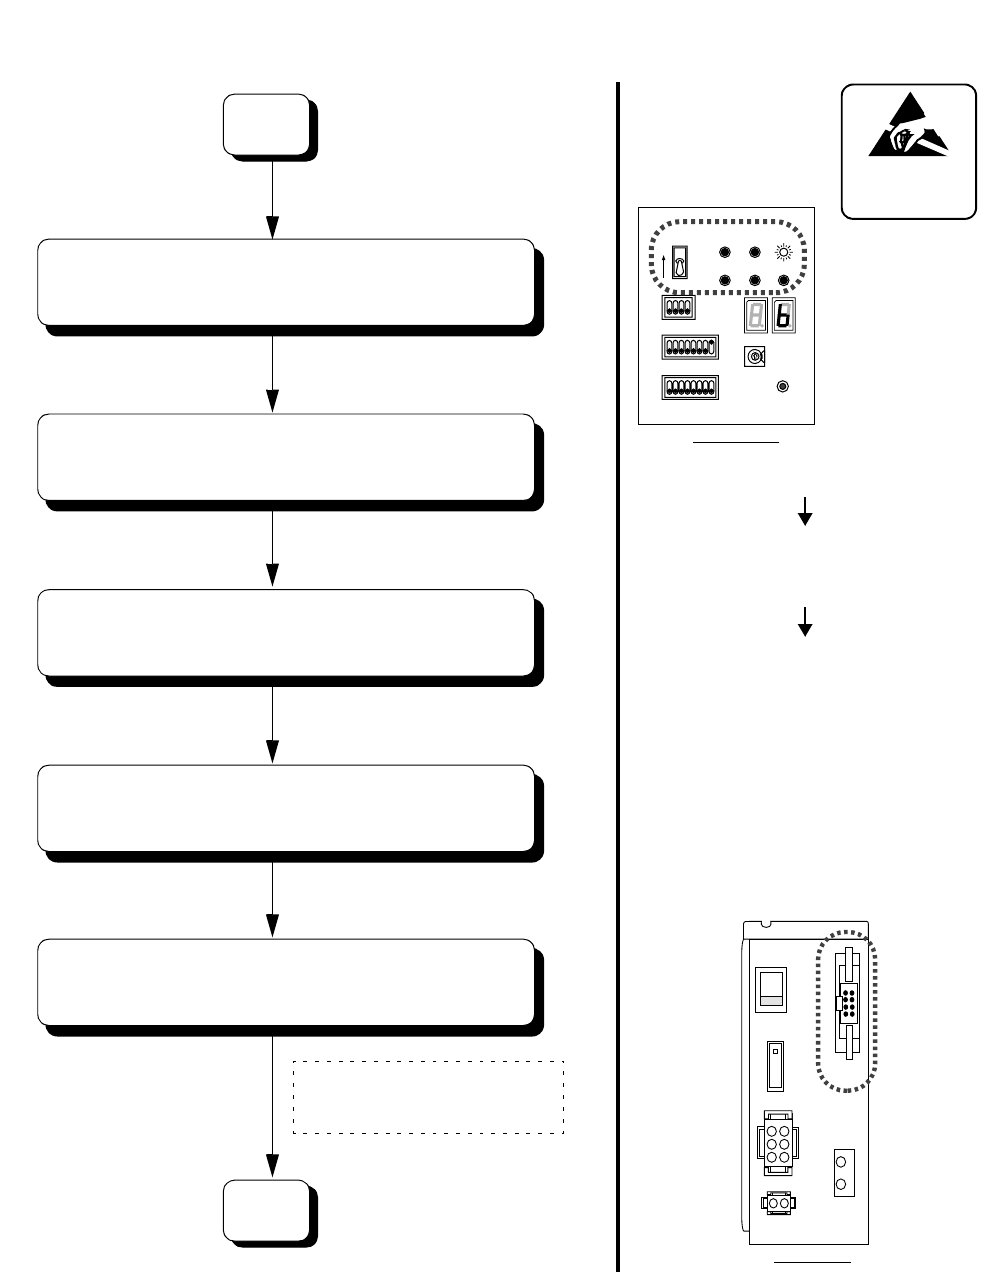
CHAPTER 4 NDA-24307
Page 274
Issue 1
UNIT/CIRCUIT CARD REPLACEMENT PROCEDURE
Replacement Procedure
Note: ACT/STBY of CPR can also be performed by using the CMODI/CMOD command. For details, refer to
Chapter 8, Maintenance Commands.
•System Changeover of the CPU from
ACT to STBY mode.
•IMG0 lamp on the DSP begin to flash
green.
•Check the mate CPU’s lamp indications:
At the ISW
•CPU OPE=Steady green
•IMG0 ~ IMG3=Steady green
at the LN
•CPU OPE=Steady green
•IMG0 ~ IMG3=Flash green
Note: IMG2 - IMG3 lamps may be
OFF depending on the system
configuration
•EMA SUP lamp on the EMA card lights
green.
Cable Name to be disconnected
CPU 0: 10AL-(110) FLT CA
CPU 1: 10AL-(130) FLT CA
START
Make a backup copy of the main data (office data,
CF/SPD data, etc.) onto the hard disk of the HFD.
Turn ON the MBR key on the DSP of the CPU
to be replaced. Then turn OFF the MBR key again.
Confirm the mate CPU's ACT mode.
Turn ON the EMA SUP key on the
EMA (PH-PC40) card.
Disconnect the power alarm cable from
the PALM connector on PZ-PW92.
A
IMG1 IMG2 IMG3
CPUOPEWDT IMG0
12345678
OFF
12345678
OFF
1234
OFF
MBR
FRONT VIEW
DSP
ON
4
C
0
2
6
A
E
ATTENTION
Contents
Static Sensitive
Handling
Precautions Required
PWR (PZ-PW92)
FRONT VIEW
SW
ON
OFF
PALM
-48V
ON
ALM
OUTPWR
INPWR
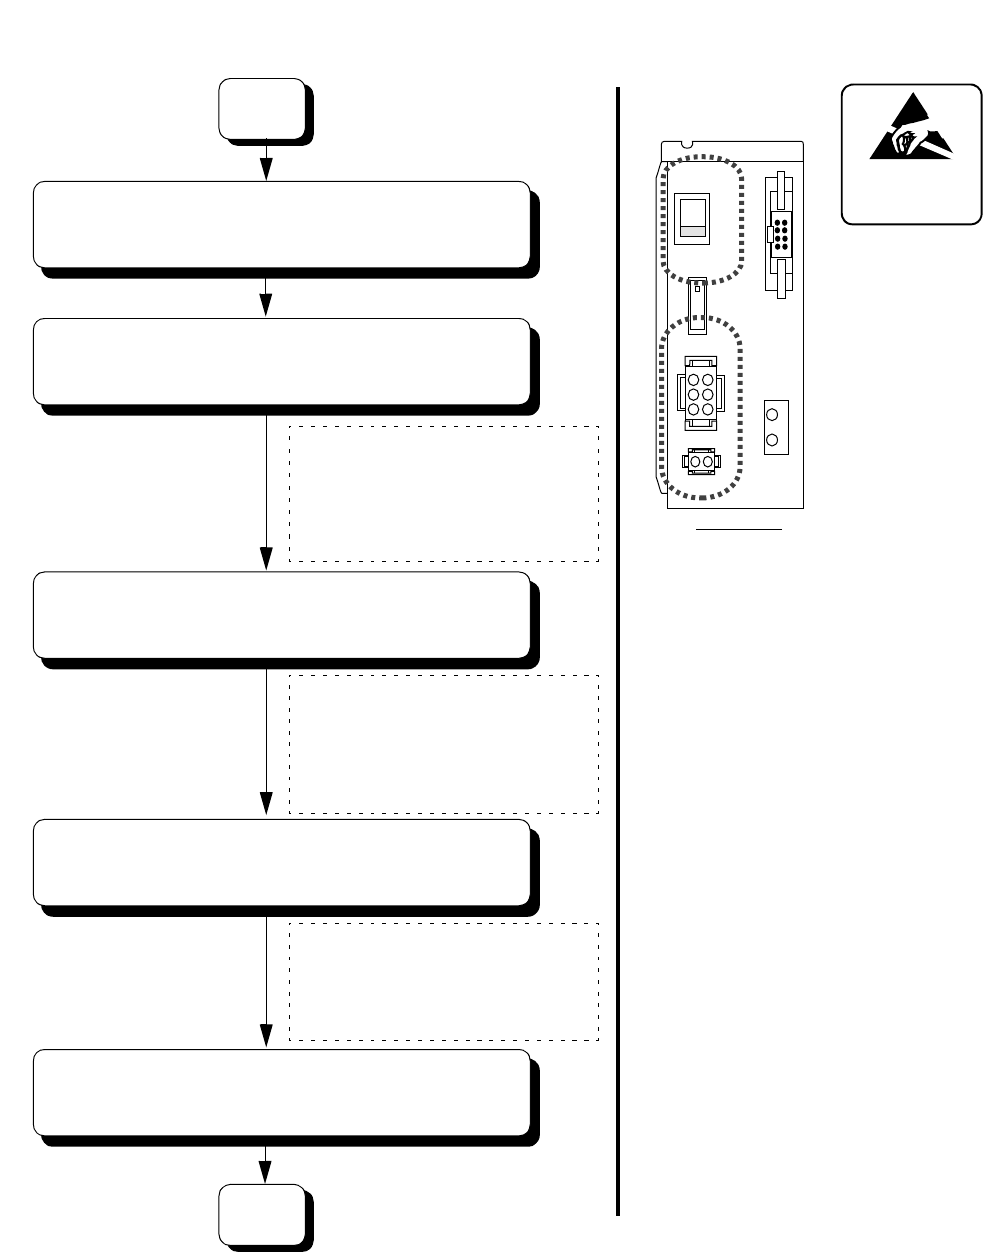
NDA-24307 CHAPTER 4
Page 275
Issue 1
UNIT/CIRCUIT CARD REPLACEMENT PROCEDURE
ATTENTION
Contents
Static Sensitive
Handling
Precautions Required
•Refer to Figure 4-2 for
CPR face layout.
•Refer to Figure 4-2 for
CPR face layout.
•Refer to Figure 4-3 to
replace the CPU.
Cables to be disconnected
Ether cable: UTP CTG5 ST CA-n
Note:
The kind of Ethernet cable may vary,
Disconnect power cables from the OUTPWR
connector and INPWR connector on PZ-PW92.
Disconnect Ethernet cables from the front
connectors on the PZ-PC19 (LANI).
Remove the four screws fastened onto the CPR.
(Keep the removed screws.)
B
A
Turn OFF the SW key on PZ-PW92.
Disconnect bus cables from the front connectors
on the PZ-GT13/PZ-GT20 (ISAGT).
Cables to be disconnected from front
EXGT BUS CA-A for CN-M connector
depending on its connecting
conditions.
Cable to be disconnected from OUTPWR
CPU 0: 6P-(4P-3P) PWR CA-A
CPU 1: 6P-(4P-3P) PWR CA-B
Cable to be disconnected from INPWR
CPU 0: 4P-2P PWR CA-A
CPU 1: 4P-2P PWR CA-B
PWR (PZ-PW92)
FRONT VIEW
SW
ON
OFF
PALM
-48V
ON
ALM
OUTPWR
INPWR
connector of PZ-GT13
34PH 50AL CA-A for CN-T connector
34PH 50AL CA-B (in LN only)
Cables to be disconnected from front
connector of PZ-GT20
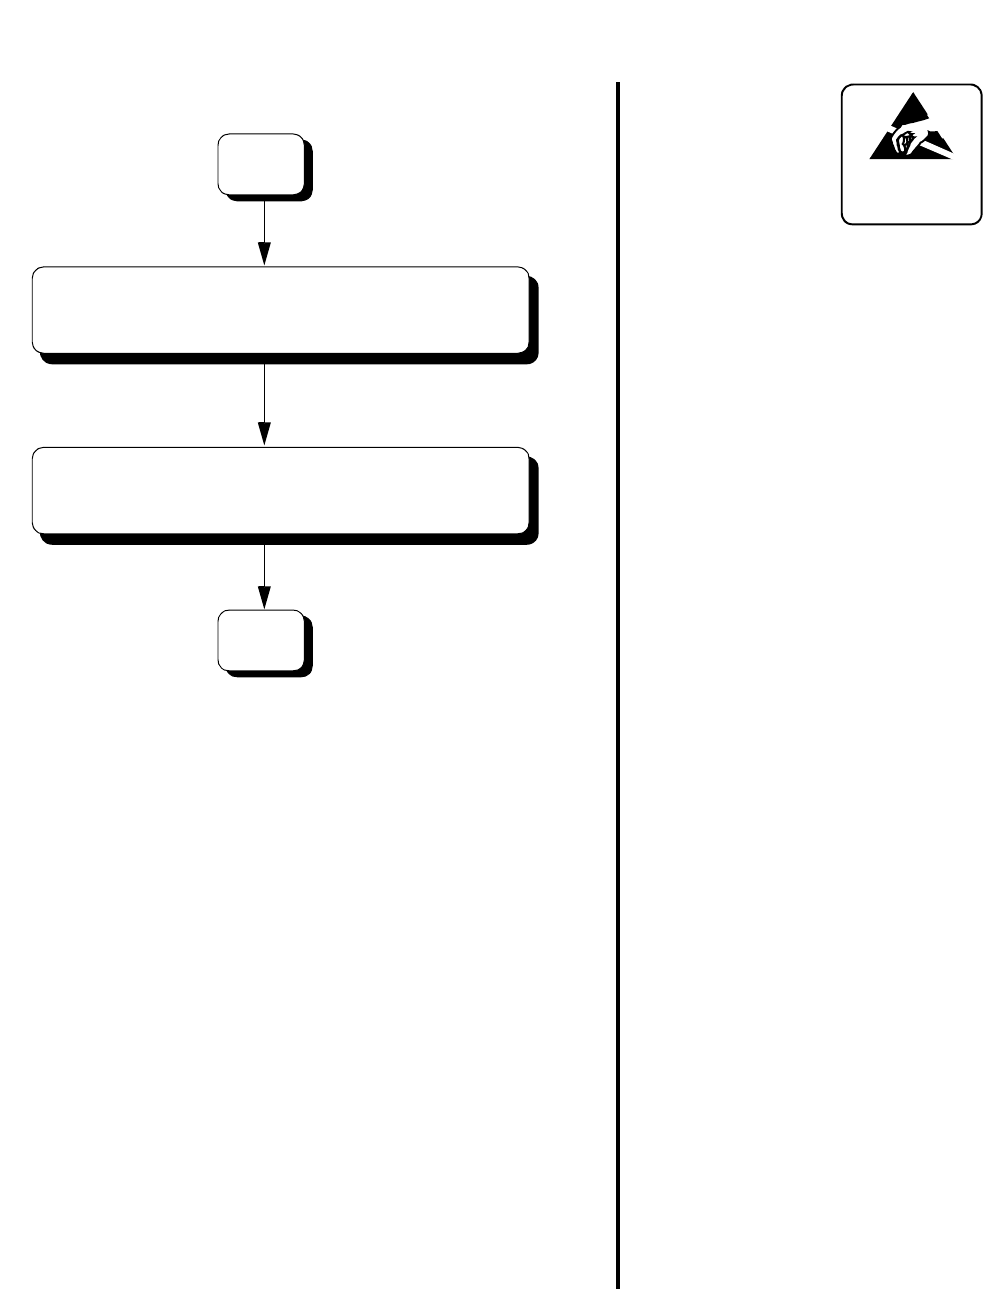
CHAPTER 4 NDA-24307
Page 276
Issue 1
UNIT/CIRCUIT CARD REPLACEMENT PROCEDURE
ATTENTION
Contents
Static Sensitive
Handling
Precautions Required
•Refer to Figure 4-3 to replace
the CPU.
•Refer to Circuit Card Installation
Into New CPR procedure in this
section.
C
B
Extract the CPR from the LPM.
Mount the ISAGT (PZ-GT13/PZ-GT20) and
LANI (PZ-PC19) cards onto the new CPR.
Then, insert the new CPR into the LPM.
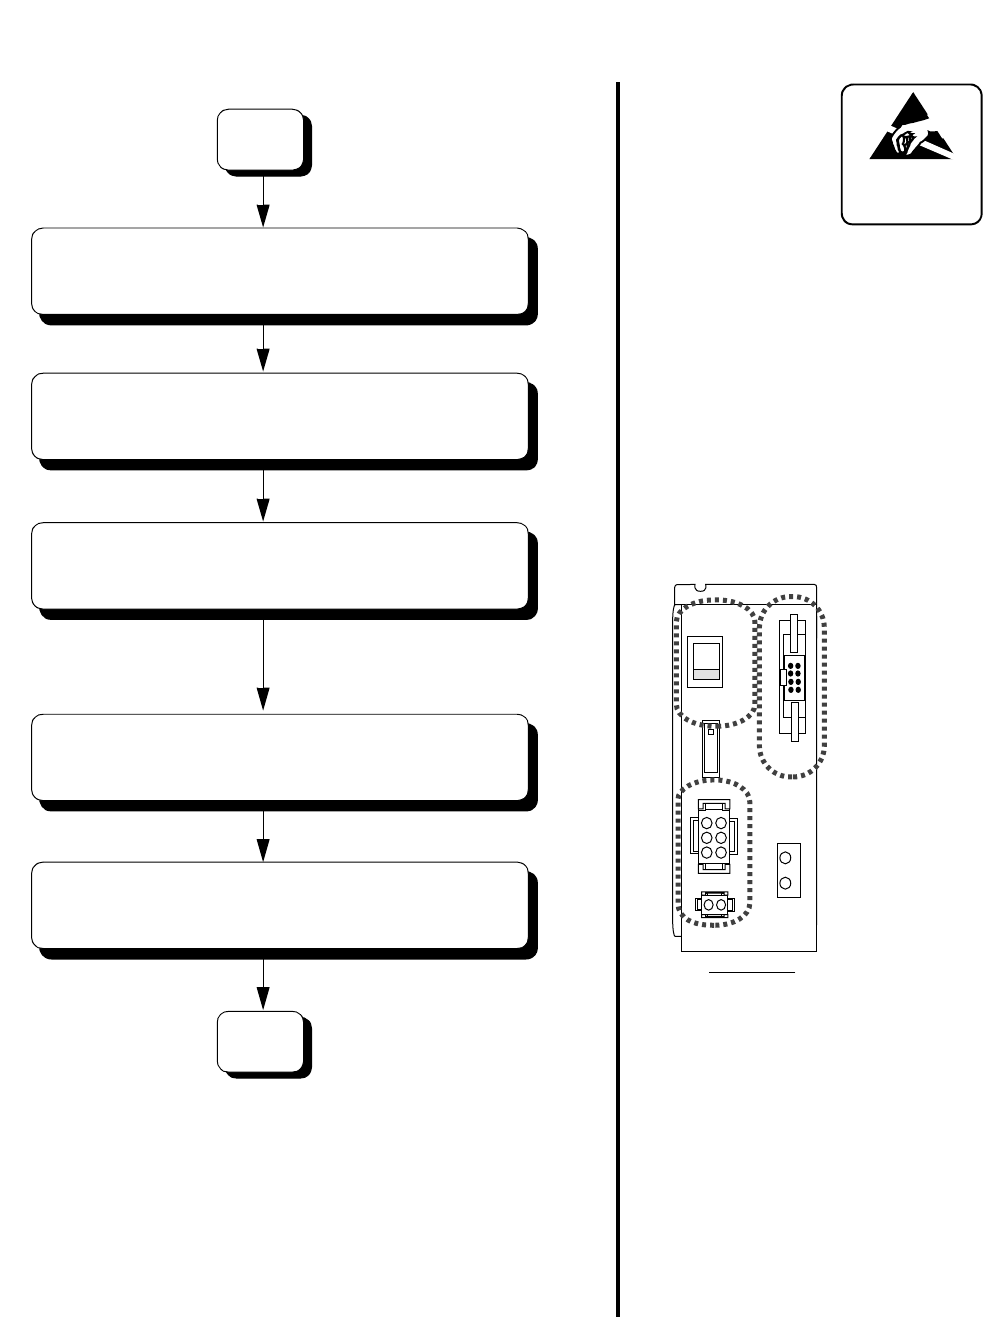
NDA-24307 CHAPTER 4
Page 277
Issue 1
UNIT/CIRCUIT CARD REPLACEMENT PROCEDURE
ATTENTION
Contents
Static Sensitive
Handling
Precautions Required
Note:
Do not connect the cable for the
Connect the disconnected bus cables to the
front connectors on the PZ-GT13/PZ-GT20.
Turn ON the SW key on PZ-PW92.
Connect the disconnected power alarm cable
to the PALM connector on PZ-PW92.
D
C
Connect the disconnected Ethernet cables
Connect the disconnected power cables to
the OUTPWR and INPWR connectors.
PALM connector yet.
to the connectors on the PZ-PC19.
PWR (PZ-PW92)
FRONT VIEW
SW
ON
OFF
PALM
-48V
ON
OUTPWR
INPWR ALM
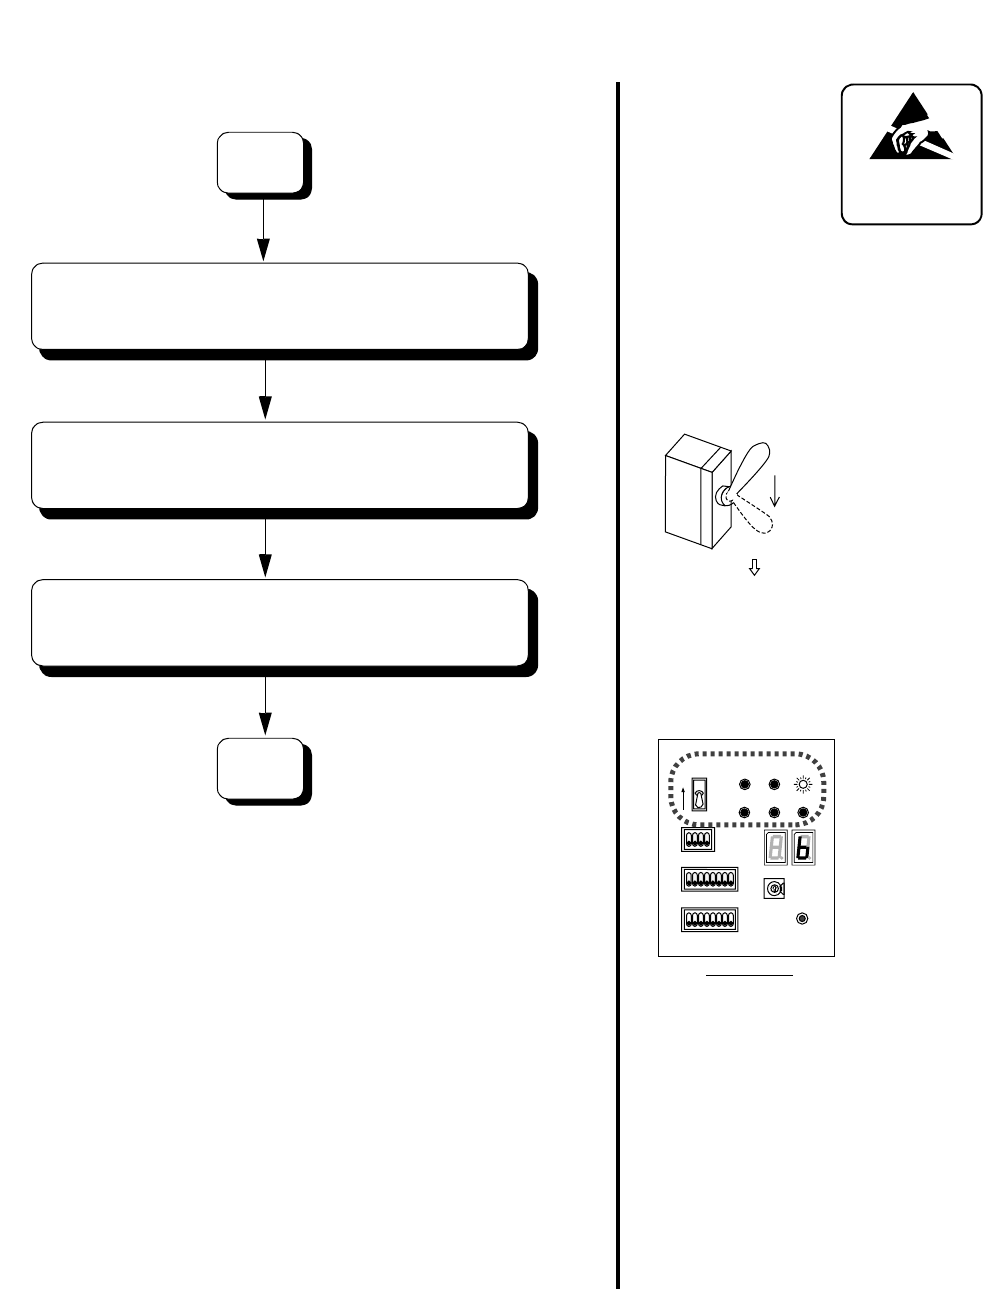
CHAPTER 4 NDA-24307
Page 278
Issue 1
UNIT/CIRCUIT CARD REPLACEMENT PROCEDURE
ATTENTION
Contents
Static Sensitive
Handling
Precautions Required
•EMA SUP lamp on the
EMA card goes OFF.
•IMG0 lamp on the DSP
flashes green.
Flip the MBR key on the DSP of the new
CPR from ON to OFF.
END
D
Turn OFF the EMA-SUP key on the EMA
(PH-PC40) card.
Confirm that IPL has completed successfully.
Initial Program Load (IPL)
starts automatically.
MBR(DSP)
IMG1 IMG2 IMG3
CPUOPEWDT IMG0
12345678
OFF
12345678
OFF
1234
OFF
MBR
FRONT VIEW
DSP
ON
4
C
0
2
6
A
E
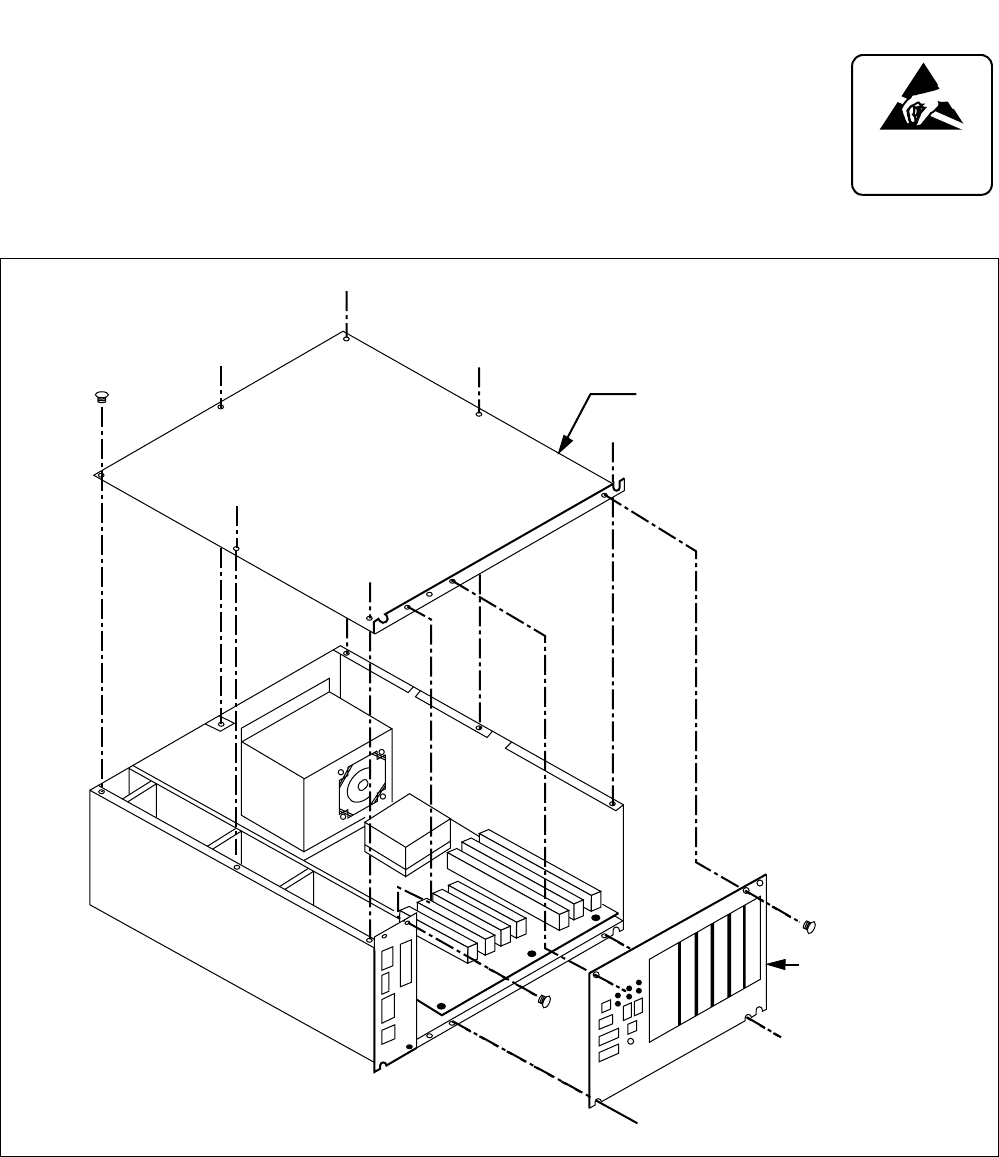
NDA-24307 CHAPTER 4
Page 279
Issue 1
UNIT/CIRCUIT CARD REPLACEMENT PROCEDURE
Circuit Card Installation Into New CPR
This procedure shows how to install the new CPR into the LPM.
(1) Detach the front panel of the new CPR by using the Phillips screwdriver to remove
the four screws, as shown in Figure 4-4. Then, lift the top cover by removing the
eight screws.
Figure 4-4 Removal of Front Panel and Top Cover From CPR
ATTENTION
Contents
Static Sensitive
Handling
Precautions Required
Top Cover
CPR
Front Panel
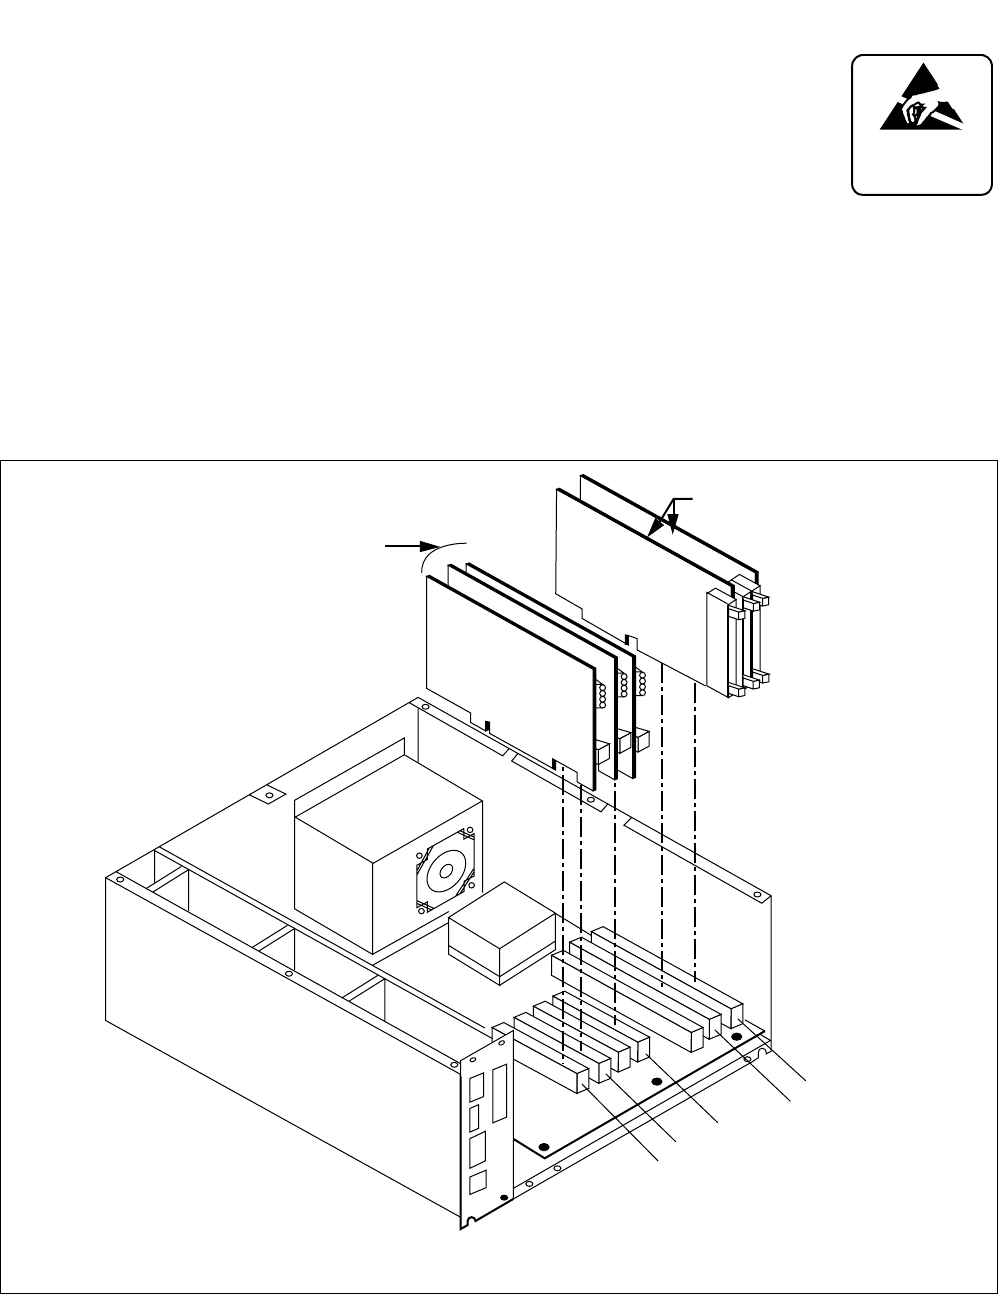
CHAPTER 4 NDA-24307
Page 280
Issue 1
UNIT/CIRCUIT CARD REPLACEMENT PROCEDURE
(2) Insert the ISAGT (PZ-GT13/PZ-GT20) and LANI (PZ-PC19) cards into the
following slots of the new CPR (refer to Figure 4-5):
ISAGT (PZ-GT13) →Slot 6 (ISA)
ISAGT (PZ-GT20) →Slot 5 (ISA) (When LN has more than two IMGs) Note
LANI (PZ-PC19) →Slot 0 (PCI) (For Fusion Link)
LANI (PZ-PC19) →Slot 1 (PCI) (When connecting MAT via 10-BASE T and PCI buses)
LANI (PZ-PC19) →Slot 3 (PCI) (When LANI for Fusion Link is in dual configuration)
Figure 4-5 shows how to insert the ISAGT and LANI cards into the PCI slots 5 and 6, 0 and 1 and 3 of the
CPR, respectively.
Note: This card is mounted in LN only.
Figure 4-5 Insertion of ISAGT and LANI Cards
ATTENTION
Contents
Static Sensitive
Handling
Precautions Required
CPR
Slot 6 (ISA)
ISAGT
LANI
Slot 5 (ISA)
Slot 3 (PCI)
Slot 1 (PCI)
Slot 0 (PCI)
Note: Actual installation of the LANI card may differ, depending on your system configuration.
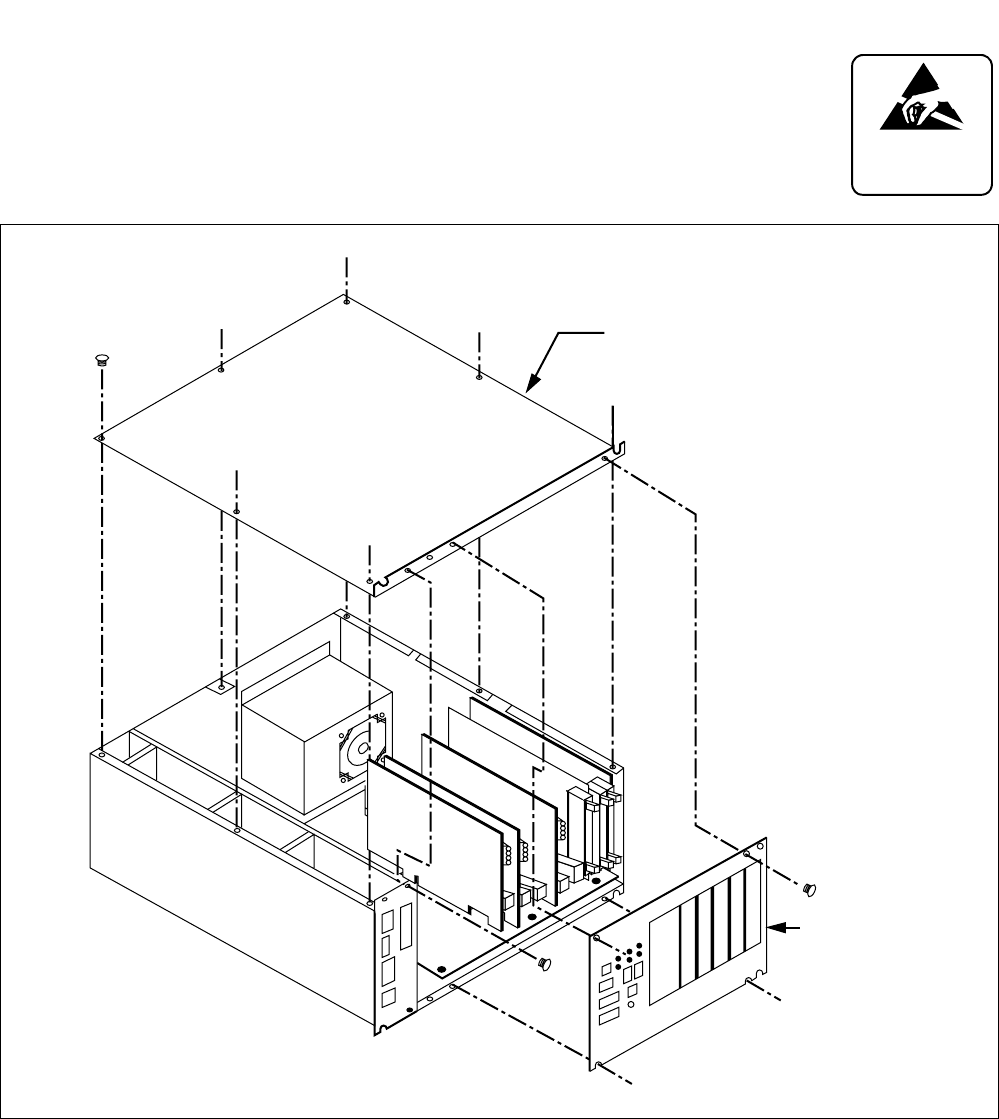
NDA-24307 CHAPTER 4
Page 281
Issue 1
UNIT/CIRCUIT CARD REPLACEMENT PROCEDURE
(3) Reattach the top cover by fastening the removed eight screws. Then, reattach the
front panel by fastening the removed four screws. Refer to Figure 4-6).
Figure 4-6 Reattachment of CPR Top Cover and Front Panel
ATTENTION
Contents
Static Sensitive
Handling
Precautions Required
Top Cover
CPR
Front Panel
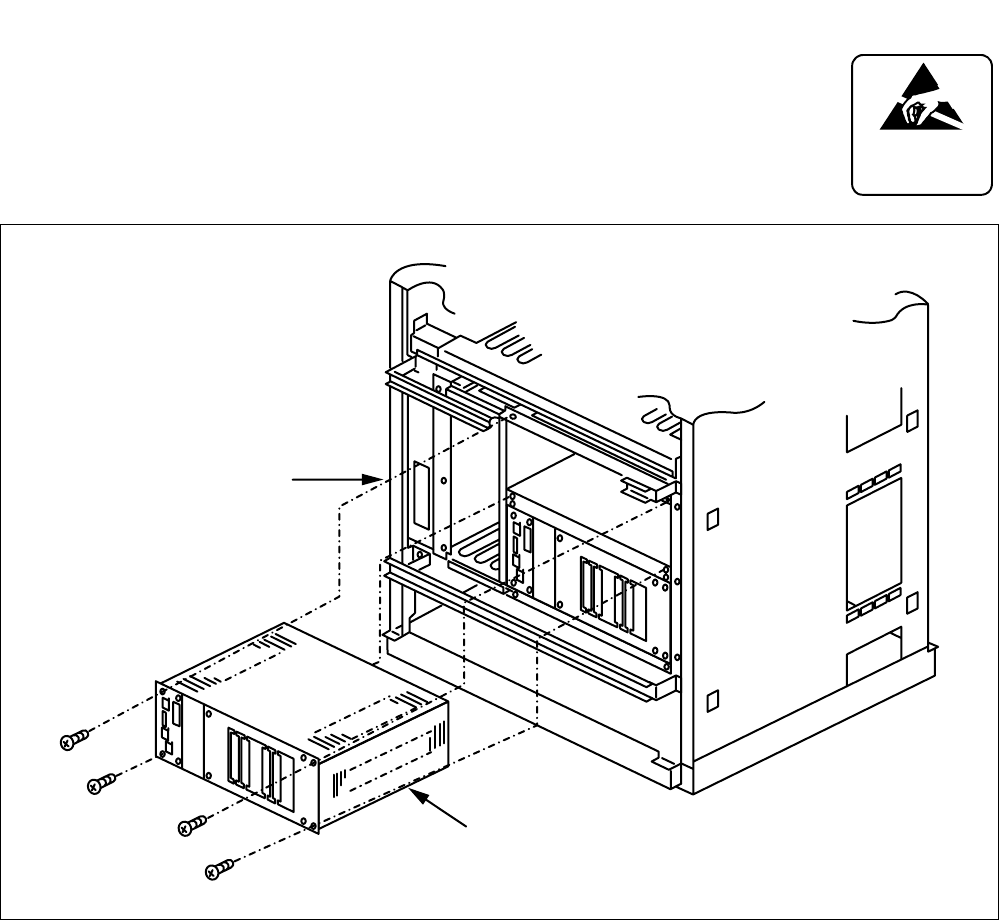
CHAPTER 4 NDA-24307
Page 282
Issue 1
UNIT/CIRCUIT CARD REPLACEMENT PROCEDURE
(4) After turning ON the MBR key on the DSP of the new CPR, insert the new CPR into
the LPM as shown in Figure 4-7. Then, fasten the retained four screws.
Figure 4-7 Accommodation of New CPR Into LPM
ATTENTION
Contents
Static Sensitive
Handling
Precautions Required
CPR
LPM
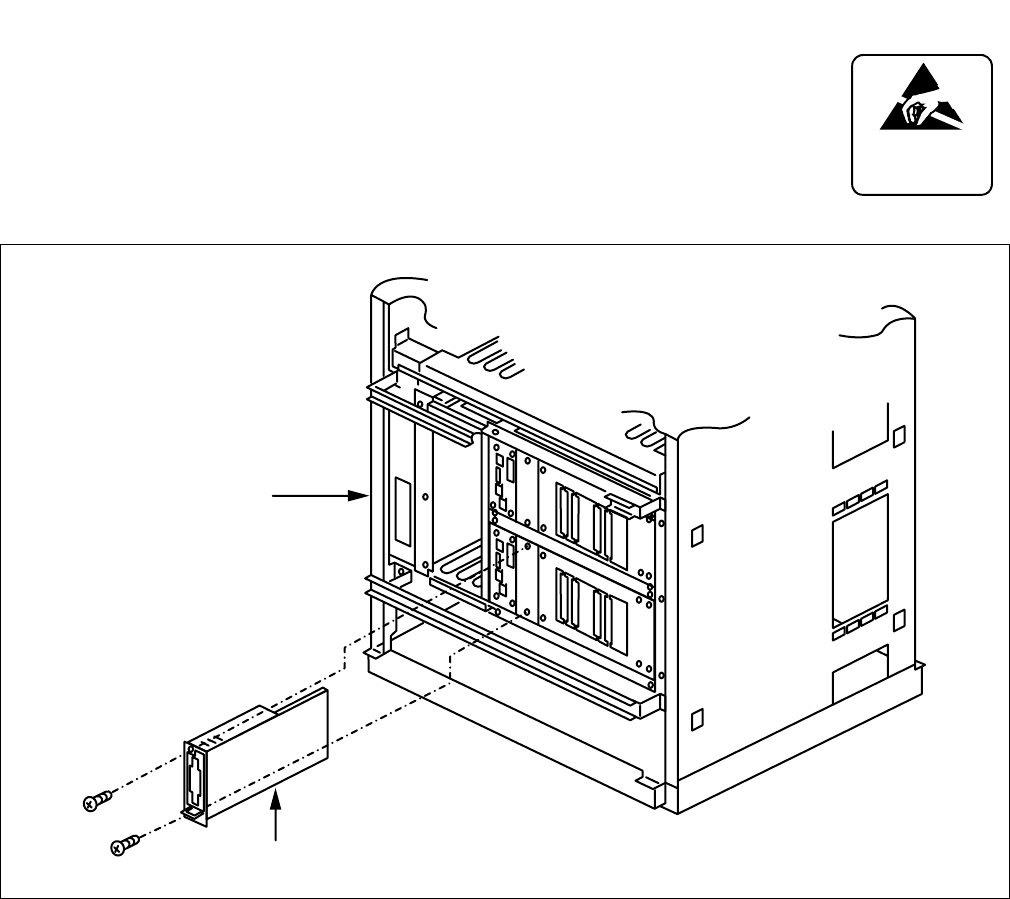
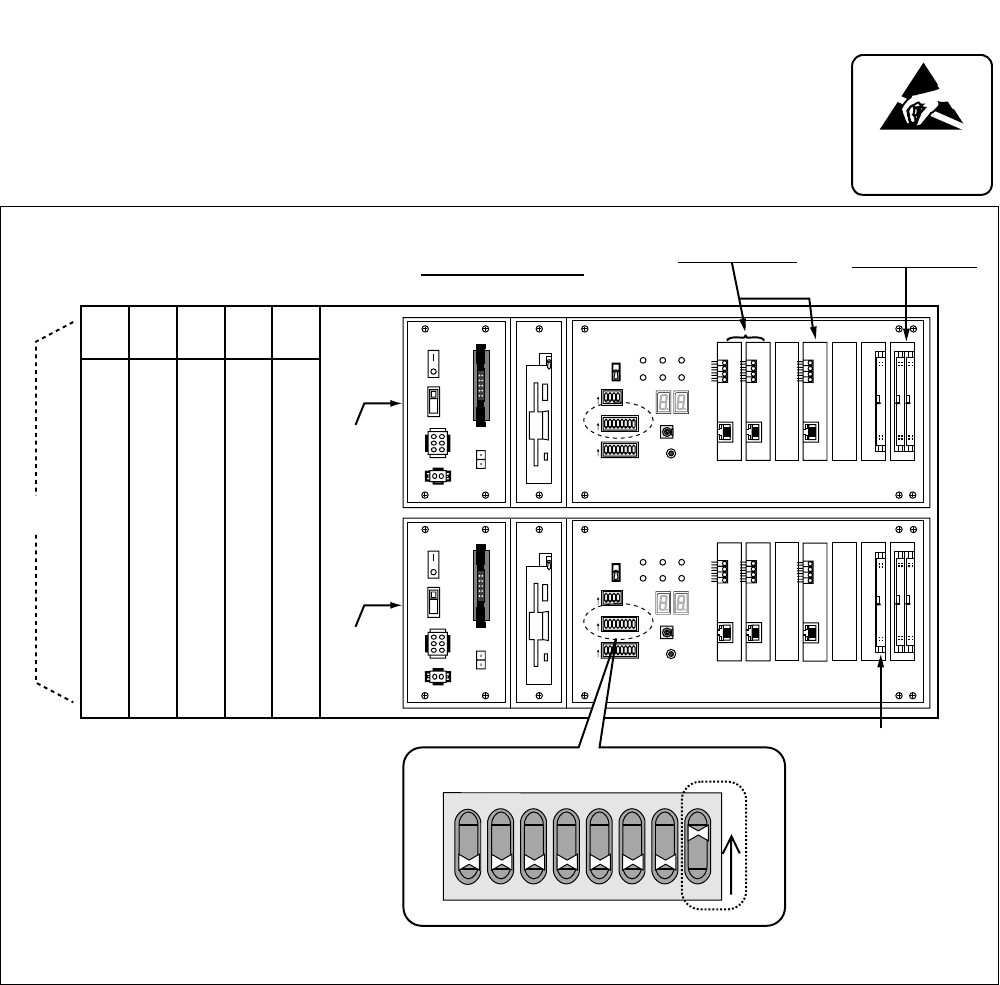
CHAPTER 4 NDA-24307
Page 284
Issue 1
UNIT/CIRCUIT CARD REPLACEMENT PROCEDURE
(6) Make sure Switch 8 of SYSTEM SELECT 1 (DIP Switch) on each CPU Front Panel
is set to ON. (Do this for all LNs and ISW: Refer to Figure 4-9.)
Figure 4-9 Switch Setting on the CPU Front Panel
ATTENTION
Contents
Static Sensitive
Handling
Precautions Required
12345678
OFF
1234
OFF
MBR
FDD
ON
OFF
PALM
ON
OFF
OUT PWR
IN PWR
5A
HDD
SW MB
SYSTEM SELECT0
SENSE
SYSTEM SELECT2 CPURST
SLOT No. 0 1 2 3 4 5 6
STATUS
IMG1 IMG2 IMG3
CPUOPEWDT IMG0
ON
ON
SYSTEM SELECT1
12345678
OFF
ON
4
C
0
2
6
A
E
12345678
OFF
12345678
OFF
1234
OFF
MBR
FDD
ON
OFF
ON
OFF
OUT PWR
IN PWR
5A
HDD
SW MB
SYSTEM SELECT0
SENSE
SYSTEM SELECT1
SYSTEM SELECT2 CPURST
SLOT No. 0 1 2 3 4 5 6
STATUS
IMG1 IMG2 IMG3
CPUOPEWDT IMG0
ON
ON
ON
4
C
0
2
6
A
E
00 01 02 03 04
MMC (PH-M22)
MISC/IOC
IOC(PH-IO24)
EMA(PH-PC49)
MISC
LPM
CPR1
LANI(PZ-PC19) ISAGT(PZ-GT13)
ISAGT(PZ-GT20)
Note
PALM
CPR0
FRONT VIEW
Note: PZ-GT20 card is mounted in LN only.
SYSTEM SELECT1
12345678
OFF
ON
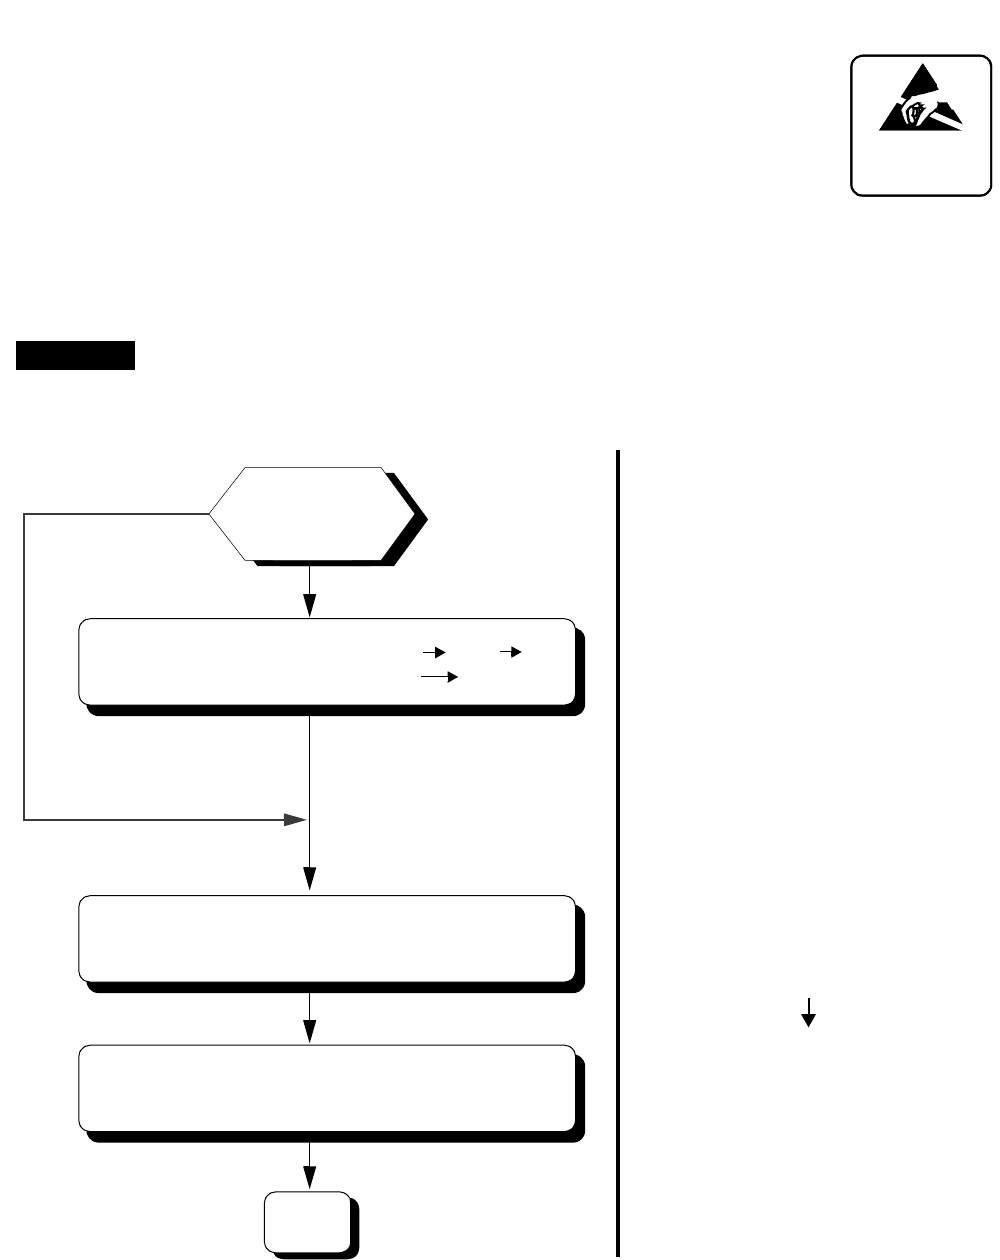
NDA-24307 CHAPTER 4
Page 285
Issue 1
UNIT/CIRCUIT CARD REPLACEMENT PROCEDURE
1.3.2 EMA Card Replacement Procedure
The EMA (PH-PC40) card is mounted in slot No. 04 of the LPM. The main
functions of the card are as follows:
•Designation of ACT/STBY status of the CPU and forced changeover of the
system
•Shutoff of the system’s power supply and detection of rising temperature within the system
•Control of the NCU (PA-M53) card
Replacement Procedure
ATTENTION
Contents
Static Sensitive
Handling
Precautions Required
ATTENTION
Contents
Static Sensitive
Handling
Precautions Required
Before replacing the EMA card, check the CPU 0’s ACT mode. Attempting to replace the card
when the CPU 1 is active will result in the system being initialized.
WARNING
•Check the CPU OPE lamp of DSP 1.
When the lamp is steady-green,
perform the system changeover.
•OPE/MB Lamp on the EMA card
lights red from green.
•When NCU (PA-M53) cards are
mounted, Power Failure Transfer
(PFT) is activated.
Turn ON the MB key on the EMA (PH-PC40) card.
A
Flip the MBR key on the DSP 1 (ON
(System Changeover of CPU 1: ACT STBY)
Extract the EMA card from the LPM.
CPU 1 is Active?
YES
NO
OFF ON
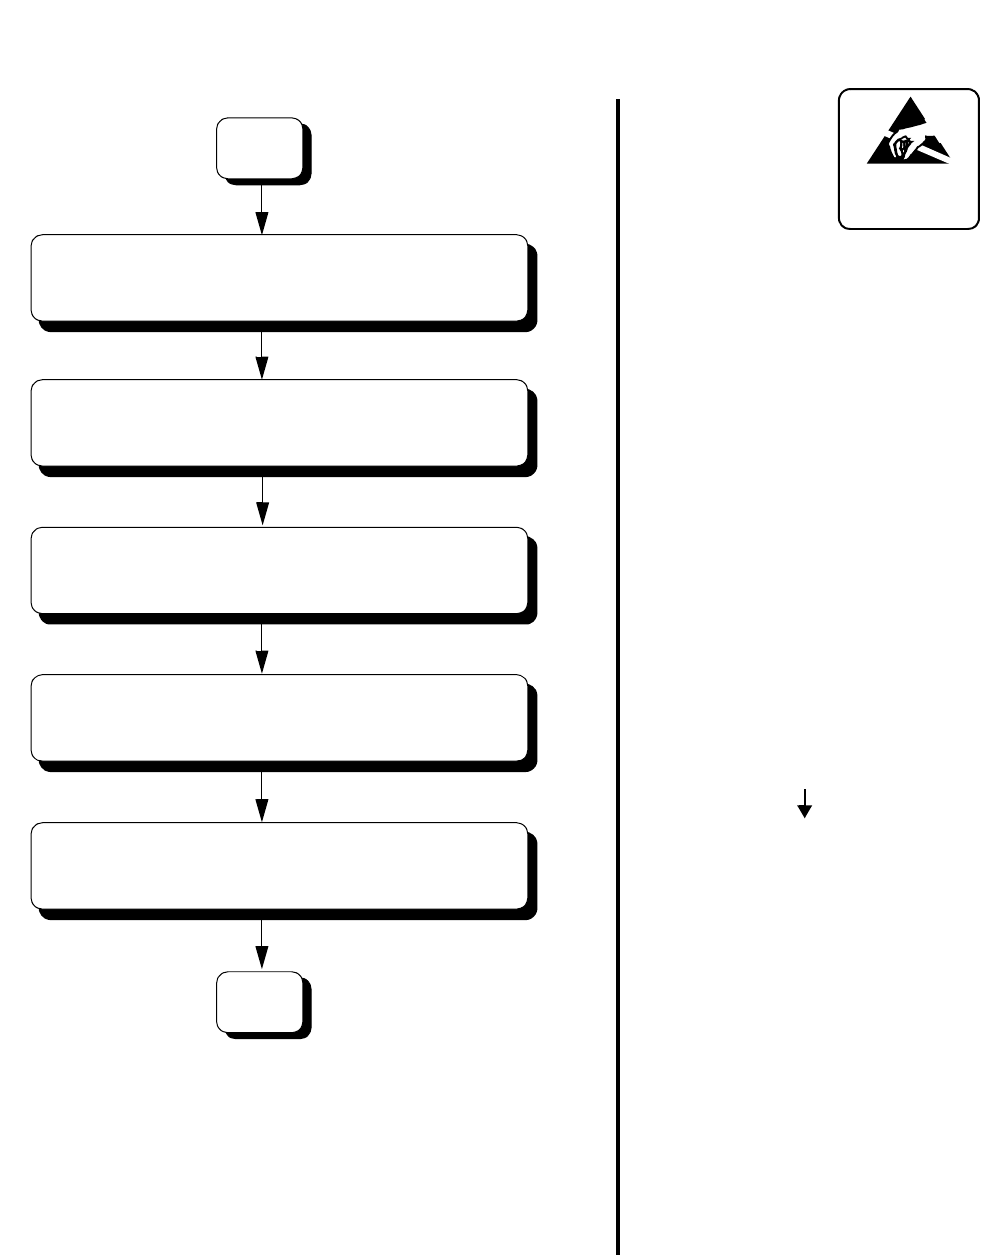
CHAPTER 4 NDA-24307
Page 286
Issue 1
UNIT/CIRCUIT CARD REPLACEMENT PROCEDURE
ATTENTION
Contents
Static Sensitive
Handling
Precautions Required
•OPE/MB Lamp on the EMA card
lights steady-green.
•The PFT service is cancelled:
resumption of normal operation.
Turn ON the MB and EMA SUP keys on the
new card.
Turn OFF the MB and EMA SUP keys on the card.
Assign the time data by using the ATIM/ATIMN
END
A
Set the keys on the new card by referring to the
Insert the new card into the LPM.
card being replaced.
command.
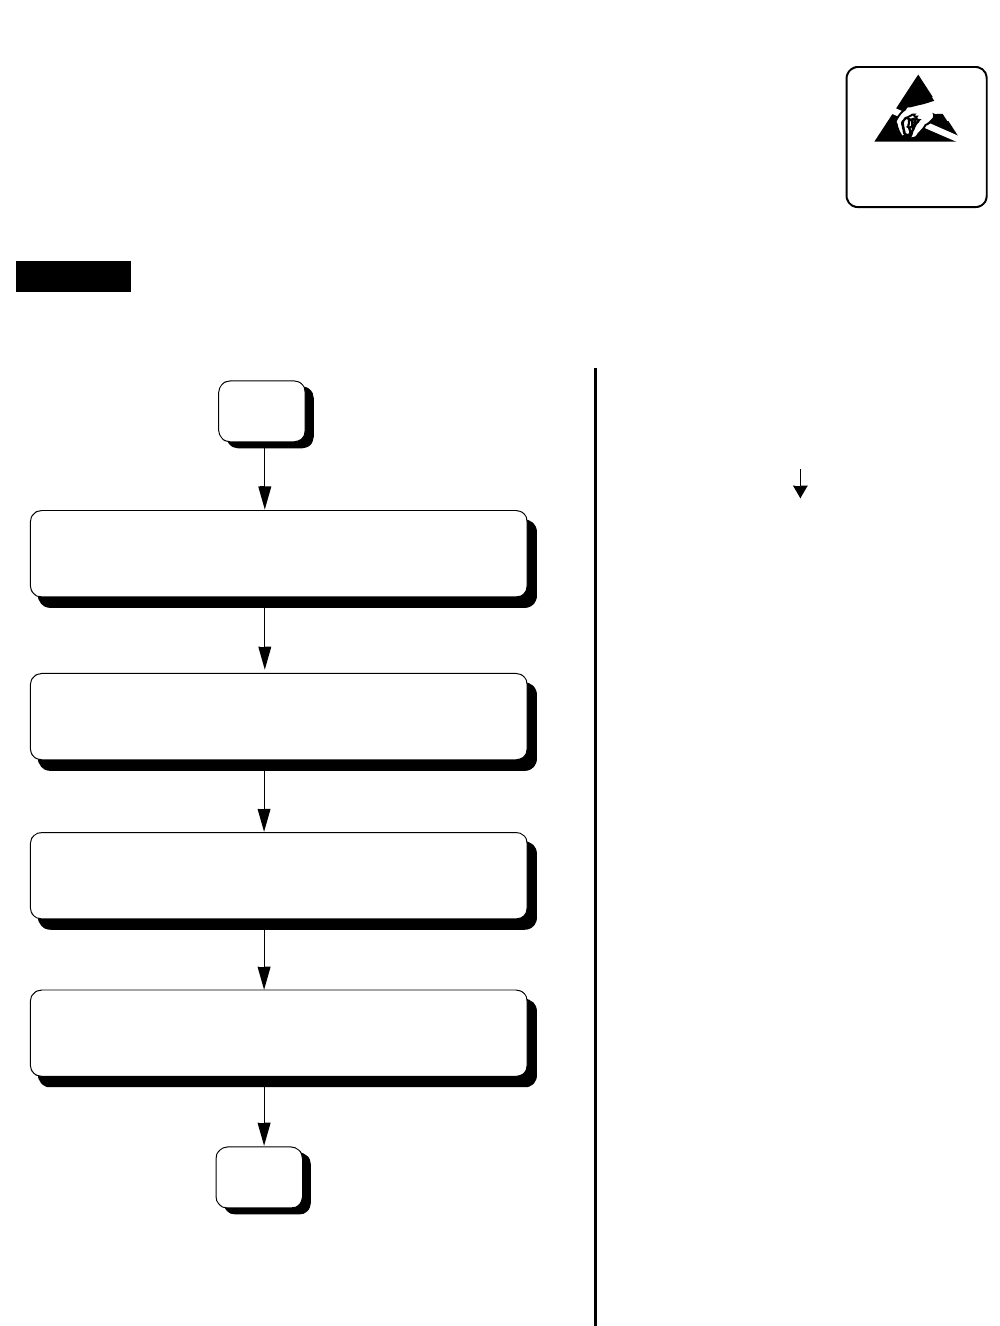
NDA-24307 CHAPTER 4
Page 287
Issue 1
UNIT/CIRCUIT CARD REPLACEMENT PROCEDURE
1.3.3 IOC Card Replacement Procedure
The IOC (PH-IO24) card is mounted in slot No. 02 and/or 03 of the LPM. The
card’s main function is to provide a serial interface between the system and its
external equipment, such as the Maintenance Administration Terminal (MAT),
Station Message Detail Recording System (SMDR), Message Center Interface
(MCI), Property Management System (PMS), etc.
ATTENTION
Contents
Static Sensitive
Handling
Precautions Required
•OPE lamp on the IOC card first
flashes and then lights red.
•All I/O ports are closed and the
equipment, such as MAT and SMDR,
loses connections.
Note: The text data (such as bill-
ing information), registered
before this step, will be
safely transmitted later.
However, the data, recorded
after this step, will not be
sent out, and instead is
stored in the buffer.
•OPE lamp on the IOC card goes OFF.
Extract the card from the LPM.
A
Turn ON the MB key on the card.
Turn ON the MBR key on the IOC (PH-IO24)
card to be replaced.
Set the keys on the new card, referring to the
card to be replaced.
START
The equipment connected to the I/O ports of each card (MAT, SMDR, etc.) cannot be used while
replacing the IOC card.
ATTENTION
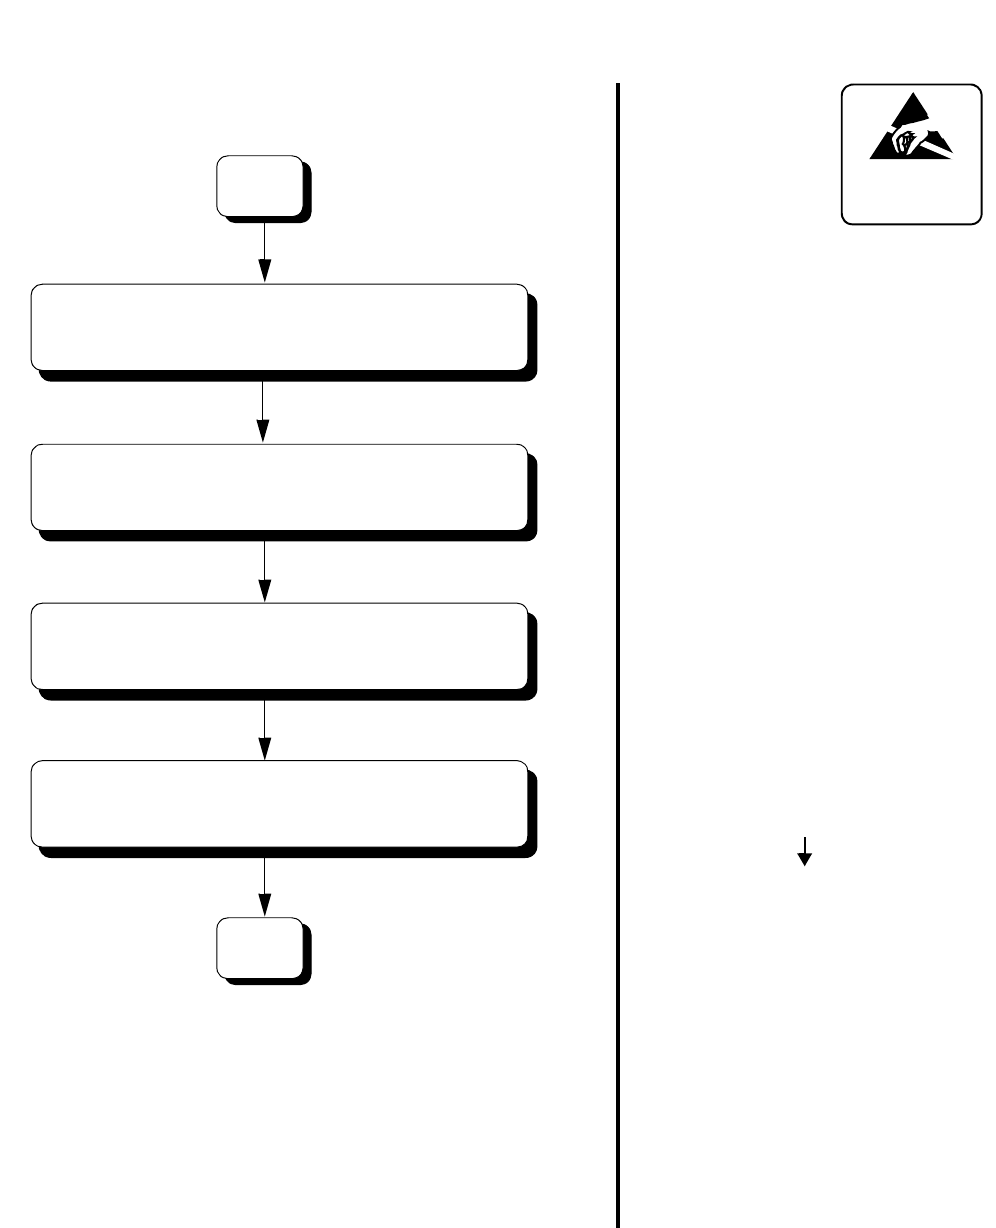
CHAPTER 4 NDA-24307
Page 288
Issue 1
UNIT/CIRCUIT CARD REPLACEMENT PROCEDURE
ATTENTION
Contents
Static Sensitive
Handling
Precautions Required
•OPE lamp on the IOC card lights
red.
•Release of I/O ports: new IOC card
is initialized, and I/O port channels
reopens.
•OPE lamp lights green.
Turn OFF the MB key on the card.
END
Insert the new card into the LPM.
Turn ON the MB and MBR keys on the
new card.
Turn OFF the MBR key on the card.
A
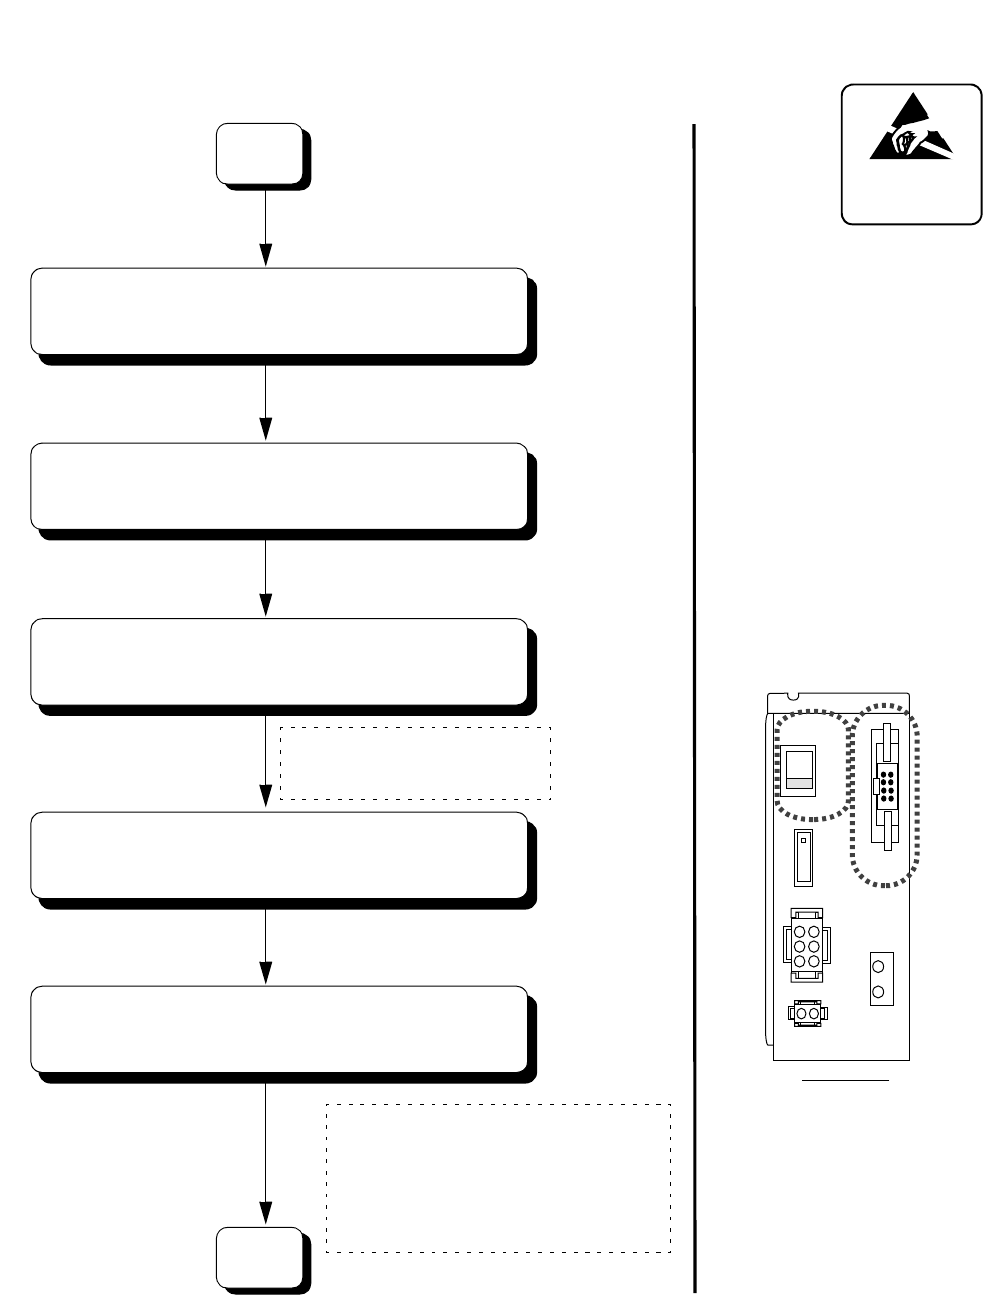
NDA-24307 CHAPTER 4
Page 289
Issue 1
UNIT/CIRCUIT CARD REPLACEMENT PROCEDURE
1.3.4 Power Supply Unit Replacement Procedure
ATTENTION
Contents
Static Sensitive
Handling
Precautions Required
•CPU System
Changeover
Refer to Section 12,
Chapter 6.
Cable to be disconnected from OUTPWR
CPU 0: 6P-(4P-3P) PWR CA-A
CPU 1: 6P-(4P-3P) PWR CA-B
START
Set the mode of the PWR UNIT (PZ-PW92)
to be replaced into STBY mode.
On the EMA (PH-PC40) card, set EMA SUP
switch UP.
Turn OFF the SW key on the PWR UNIT.
Disconnect the power cables from the OUTPWR
connector and INPWR connector on the PZ-PW92.
A
Disconnect the power alarm cable from the
PALM connector on the PZ-PW92.
Cable Name to be disconnected
CPU 0: 10AL-(110) FLT CA
CPU 1: 10AL-(130) FLT CA
Cable to be disconnected from INPWR
CPU 0: 4P-2P PWR CA-A
CPU 1: 4P-2P PWR CA-B
PWR (PZ-PW92)
FRONT VIEW
SW
ON
OFF
PALM
-48V
ON
ALM
OUTPWR
INPWR
CHAPTER 4 NDA-24307
Page 290
Issue 1
UNIT/CIRCUIT CARD REPLACEMENT PROCEDURE
ATTENTION
Contents
Static Sensitive
Handling
Precautions Required
END
Insert the new PWR UNIT into the CPR.
Unscrew the PWR UNIT from the CPR.
Turn ON the SW key on the PWR UNIT.
A
On the EMA card, set EMA SUP switch DOWN.
Reattach power alarm cable to the PALM
connector on the PZ-PW92.
Reattach power cables to OUTPWR
and INPWR connectors on the PZ-PW92.
NDA-24307 CHAPTER 4
Page 291
Issue 1
UNIT/CIRCUIT CARD REPLACEMENT PROCEDURE
1.3.5 MISC Card Replacement Procedure
ATTENTION
Contents
Static Sensitive
Handling
Precautions Required
•Keep MB switch UP.
END
Extract the MISC card from its mounting slot.
On the MISC card, set MB switch UP.
On the MISC card, set MB switch DOWN.
START
Insert the new circuit card into the same
mounting slot.
CHAPTER 4 NDA-24307
Page 292
Issue 1
UNIT/CIRCUIT CARD REPLACEMENT PROCEDURE
1.3.6 MMC Card Replacement Procedure
The MMC (PH-M22) card is mounted in slot No. 00 of the LPM. The card’s main
functions are:
•To collect key setting information on the TOPU of each LN/ISW. Note
•To collect alarm information on LN or the entire system (in case of MMC in
ISW), thereby activating MJ/MN LED on the TOPU display.
Note: If the key setting affects the entire system (i.e. the SYSTEM side is selected by the INITIAL SELECT key
on the ISW TOPU). The information is broadcast to the MMC of ISW including the MMC of all existing
LNs.
Replacement Procedure
ATTENTION
Contents
Static Sensitive
Handling
Precautions Required
•OPE lamp on the MMC goes off.
A
Disconnect the cable from the KEY connector
Set the MB key to UP on the MMC (PH-M22)
START
card the be replaced.
on the MMC card.
Cable to be disconnected
10AL-(400) FLT CA
Disconnect the whole cable(s) from the CNx
connector(s) on the MMC card.
Cable to be disconnected
MT24 MISC CA-n
Extract the MMC card from the LPM.
Note: The connector and cable
names vary depending on
it’s connecting conditions.
NDA-24307 CHAPTER 4
Page 293
Issue 1
UNIT/CIRCUIT CARD REPLACEMENT PROCEDURE
ATTENTION
Contents
Static Sensitive
Handling
Precautions Required
END
Insert the MMC card into the LPM.
Set the MB key on the MMC card UP.
A
Set the MB key on the MMC card DOWN.
Connect the disconnected cable to the KEY
connector on the MMC card.
Connect the disconnected cable(s) to the
CNx connector(s) on the MMC card.
•OPE lamp on the MMC card goes
OFF.
•OPE lamp on the MMC card lights a
steady green.

CHAPTER 4 NDA-24307
Page 294
Issue 1
UNIT/CIRCUIT CARD REPLACEMENT PROCEDURE
2. TSWM ACCOMMODATING CIRCUIT CARD REPLACEMENT PROCEDURE
This section explains the procedure for replacing circuit cards mounted in the TSWM (TSWM0 in IMG1,
TSWM1 in IMG2).
2.1 Precautions
•Use this procedure to replace a faulty circuit card with a spare or to check a spare card.
•There are the functional switches (having set the default switch) on some of the circuit cards to be
replaced. As for switch setting on the circuit cards, confirm the circuit card mounting face layout for
the TSWM. When a circuit card with a default switch setting is replaced with a spare card, always
make the switch setting on the new circuit card the same as on the replaced card. Otherwise, electronic
components on the circuit card may be destroyed, or the circuit card itself may fail to function
normally.
•When handling a circuit card, always use the field service kit for countermeasures against static
electricity. Touching a circuit card without using the field service kit may destroy the card due to static
electricity on the human body.
2.2 Circuit Card Mounting Face Layout
Figure 4-10 shows the face layout of the circuit cards mounted in the TSWM. The circuit cards marked
with * are optional.
Figure 4-10 Circuit Card Mounting Face Layout of TSWM
00 01 02 03 04 05 06 07 08 09 10 11 12 13 14 15 16 17 18 19 20 21 22 23
MISC
MISC
MISC
MISC
DLKC0 Note 1
DLKC1 Note 1
GT0
GT1
TSW00
TSW01
TSW02
TSW03
TSW10
TSW11
TSW12
TSW13
PWR SW0
TSWM0/1
Slot No.
PWR SW1
MISC
PLO0/CLK0
Note 2
*
*
*
*
*
PLO1/CLK1 Note 2
PWRSW: PH-PW14 DLKC: PH-PC20 GT: PH-GT09 TSW: PH-SW12 PLO: PH-CK16-A CLK: PH-CK18
FRONT VIEW
Note 1: This card is mounted in TSWM0 only.
Note 2: PLO is mounted in TSWM0, and CLK is mounted in TSWM1.

NDA-24307 CHAPTER 4
Page 295
Issue 1
UNIT/CIRCUIT CARD REPLACEMENT PROCEDURE
2.3 Operating Procedures
The following paragraphs explain the operating procedures to replace unit/circuit cards located in the
TSWM. Perform the operations corresponding to each Reference Item specified in Table 4-2.
Table 4-2 TSWM Circuit Cards and Reference Items
CIRCUIT CARD
FUNCTION NAME REFERENCE ITEM REMARKS
GT Section 2.3.1, GT Card Replacement Procedure
TSW Section 2.3.2, TSW Card Replacement Procedure
DLKC Section 2.3.3, DLKC Card Replacement Procedure
PLO Section 2.3.4, PLO Card Replacement Procedure
CLK Section 2.3.5, CLK Card Replacement Procedure
PWR SW Section 2.3.6, PWR SW Card Replacement Procedure
MISC Section 2.3.7, MISC Card Replacement Procedure
Improper key operations may result in a system down. Operate the key using extreme care.
During replacement of a circuit card, the system issues system messages and activates the related
alarm. Reset the indicated alarm after completing the replacement procedure.
If the indicated alarm is cleared via the RALM/RALMN command, the system also clears the
contents of the system message. Before using the RALM/RALMN command, print the messages
using the DFTD command.
Use the ALM RST button on the TOPU only to reset the alarm lamps.
WARNING
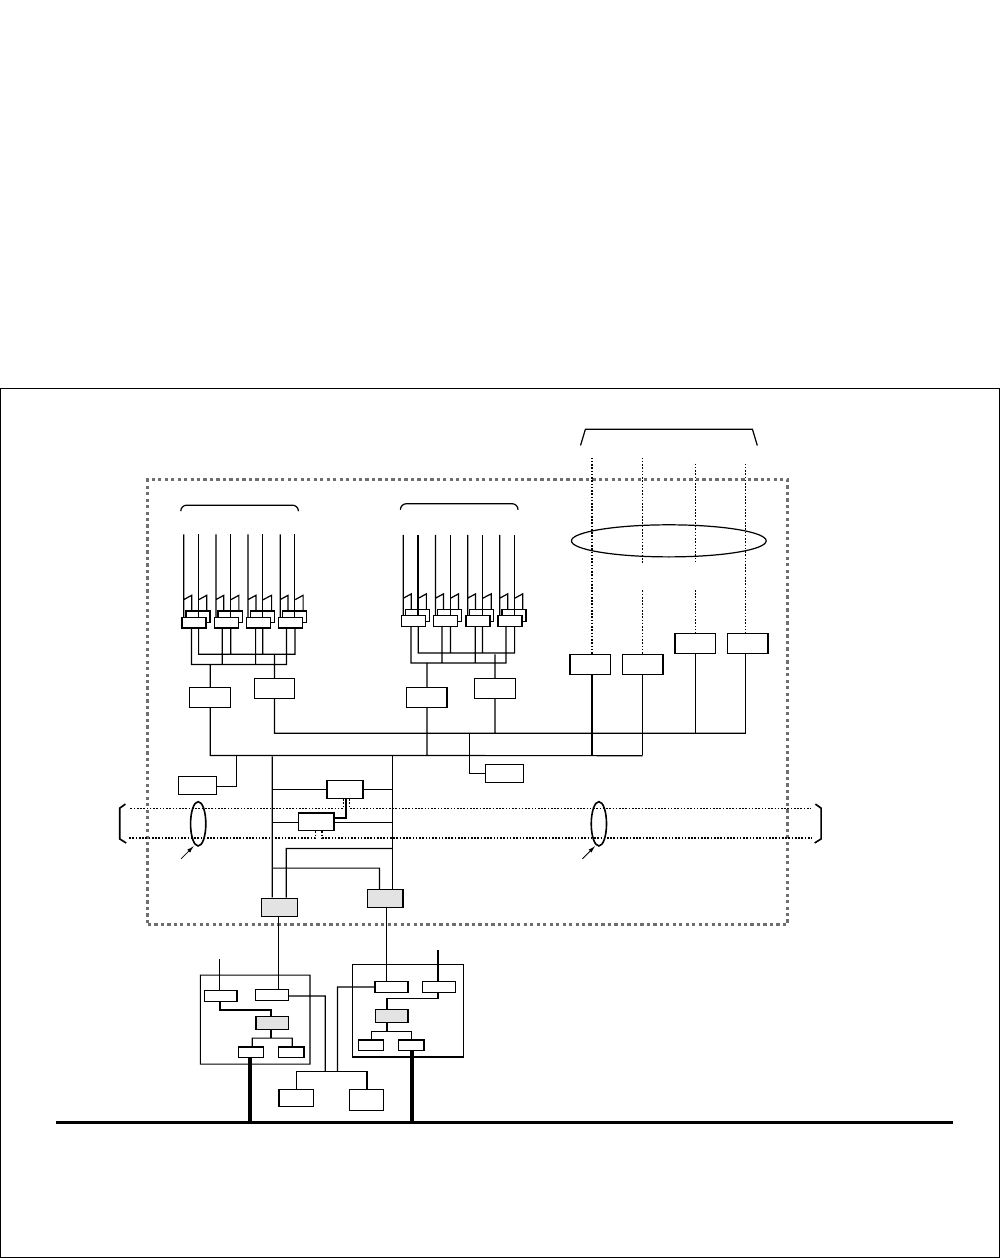
CHAPTER 4 NDA-24307
Page 296
Issue 1
UNIT/CIRCUIT CARD REPLACEMENT PROCEDURE
2.3.1 GT Card Replacement Procedure
The GT (PH-GT09) card is mounted in Slot No. 10 or 11 within the TSWM0 and TSWM1. The card’s
main function is to provide both MISC and I/O Local bus interface between the microprocessor of
CPU and other lower echelons, such as DLKC, TSW and MUX cards. Follow the procedures below to
replace a GT card with a spare.
Note: To replace the GT card, the ACT/STBY status of GT must be changed over first. This must be done by
operating the MBR key (or by using the CMOD/CMOD1 command) on the DSP of active CPR. Figure
4-11 shows a system block diagram centering upon the CPU and its controlling GT. If the ACT/STBY
of GT is to be changed over, the system of CPU must be manually changed over. For more details on the
GT changeover, refer to Section 12, Chapter 6.
Figure 4-11 System Block Diagram (Connections Between GT and CPU)
ISAGT-A: PZ-GT13 ISAGT-B: PZ-GT20 LANI: PZ-PC19 GT: PH-GT09 TSW: PH-SW12
MUX: PH-PC36 DLKC: PH-PC20 PLO: PH-CK16-A EMA: PH-PC40 IOC: PH-IO24 CLK: PH-CK18
LANI LANI
GT 0
TSW 00 TSW 10 TSW 01 TSW 11
GT 1
EMA IOC/
MISC
DLKC 0
DLKC 1
PLO 0
PLO 1
CPR 0
LANILANI CPR 1
MISC BUS
TSW I/O BUS
TSW I/O BUS
Line/Trunk PM
IMG 0
PM BUS
PCM HW
PCM HW
PCM HW
PCM HW
MUXMUXMUXMUX
ISAGT-B
ISAGT-B
To GT0 in TSWM1
Line/Trunk PM
IMG 1
PCM HW
PCM HW
PM BUS
PCM HW
PCM HW
MUXMUXMUXMUX
TSWM0
To GT1 in TSWM1
From PLO
of ISWM To CLK of
TSWM1
ISAGT-A ISAGT-A
TSW 02 TSW 03
TSW 12 TSW 13
External Cables
(ISW-LN TSW CA-n)
External Cables
(ISW-LN PLO CA-n)
External Cables
(PLO-CLK CA-n)
To/From TSW of ISWM
LN0/1/2/3
Fusion Link
CPU 0 CPU 1
Note 1: CLK (PH-CK18) card is mounted in TSWM1 in place of PLO card.
Note 2: DLCK (PH-PC20) card is not mounted in TSWM1.
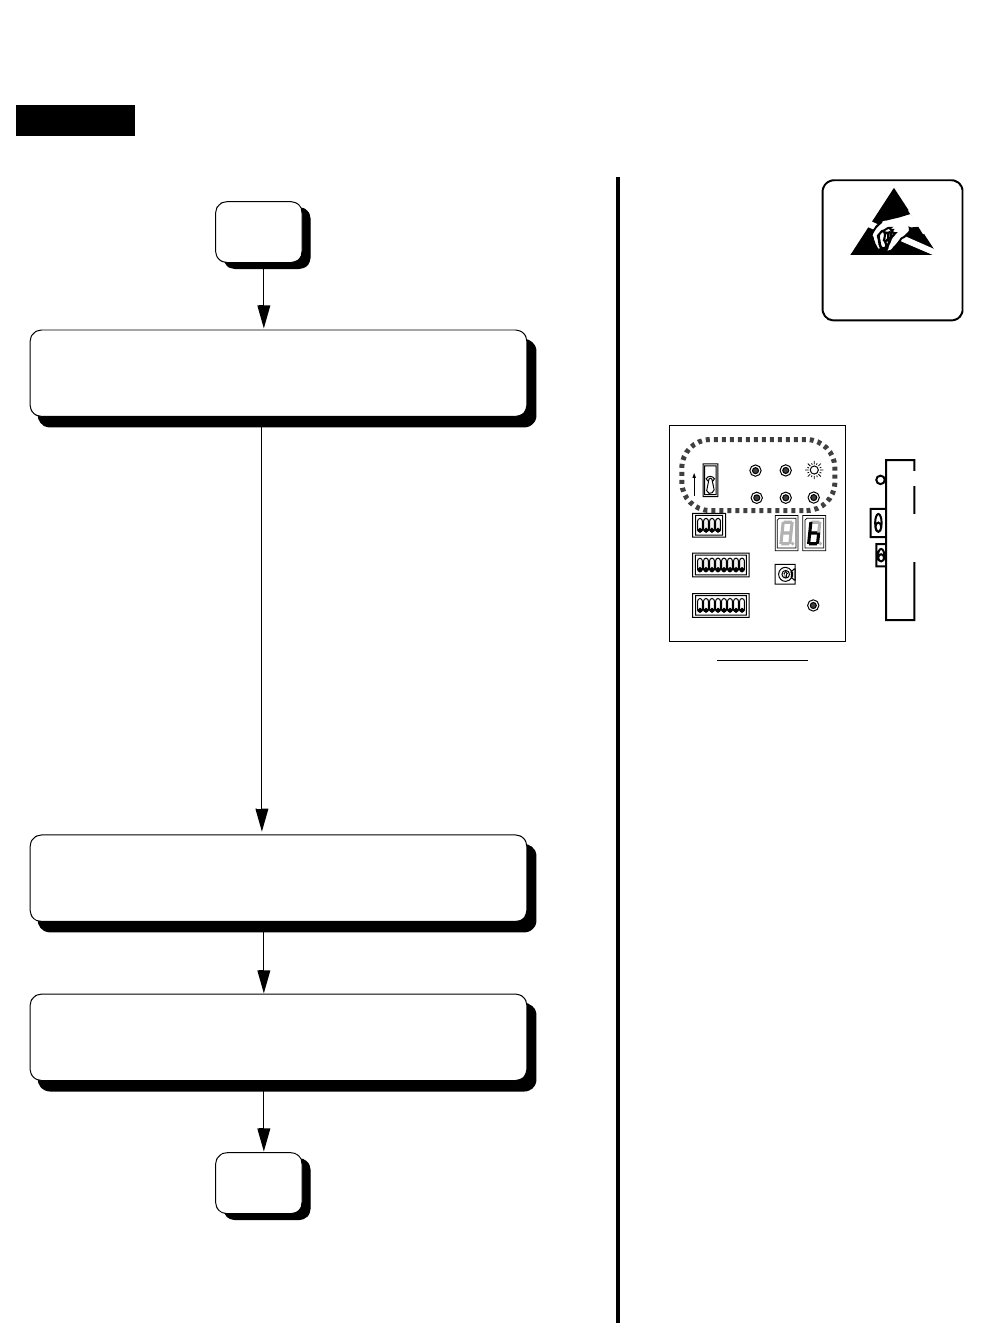
NDA-24307 CHAPTER 4
Page 297
Issue 1
UNIT/CIRCUIT CARD REPLACEMENT PROCEDURE
GT Card Replacement Procedure
Use extreme care when operating the keys on the DSP of CPR and PH-GT09 card.
WARNING
•System Changeover of GT from
ACT to STBY mode.
ATTENTION
Contents
Static Sensitive
Handling
Precautions Required
Check the following lamp indications
on the GT card to be replaced and on
the DSP CPR that controls the GT:
•OPE/MB (GT card) = OFF
•CPU OPE (CPU DSP) = OFF
•IMG0 (CPU DSP) = Flash (green)
•IMG1-3 (CPU DSP) = OFF
Check the following lamp indications
on the mate GT card and the DSP of
the mate CPR:
•OPE/MB (GT card) = Steady-green
•CPU OPE (CPU DSP) = Steady-
green
•IMG0-3 (CPU DSP) = Flash
(green)
Note: Lamp indications of IMG
2-3 vary depending on the
system configuration.
EMA SUP lamp on the EMA card
lights steady-green.
GT (PH-GT09)
OPE/MB
MBR
MB
IMG1 IMG2 IMG3
CPUOPE WDT IMG0
12345678
OFF
12345678
OFF
1234
OFF
MBR
FRONT VIEW
DSP
ON
4
C
0
2
6
A
E
A
Confirm the mate GT's ACT mode.
START
On the EMA (PH-PC40) card, set the
EMA SUP key UP.
On the DSP of active CPR in the LN, turn ON the
MBR key. Turn OFF the MBR key again.
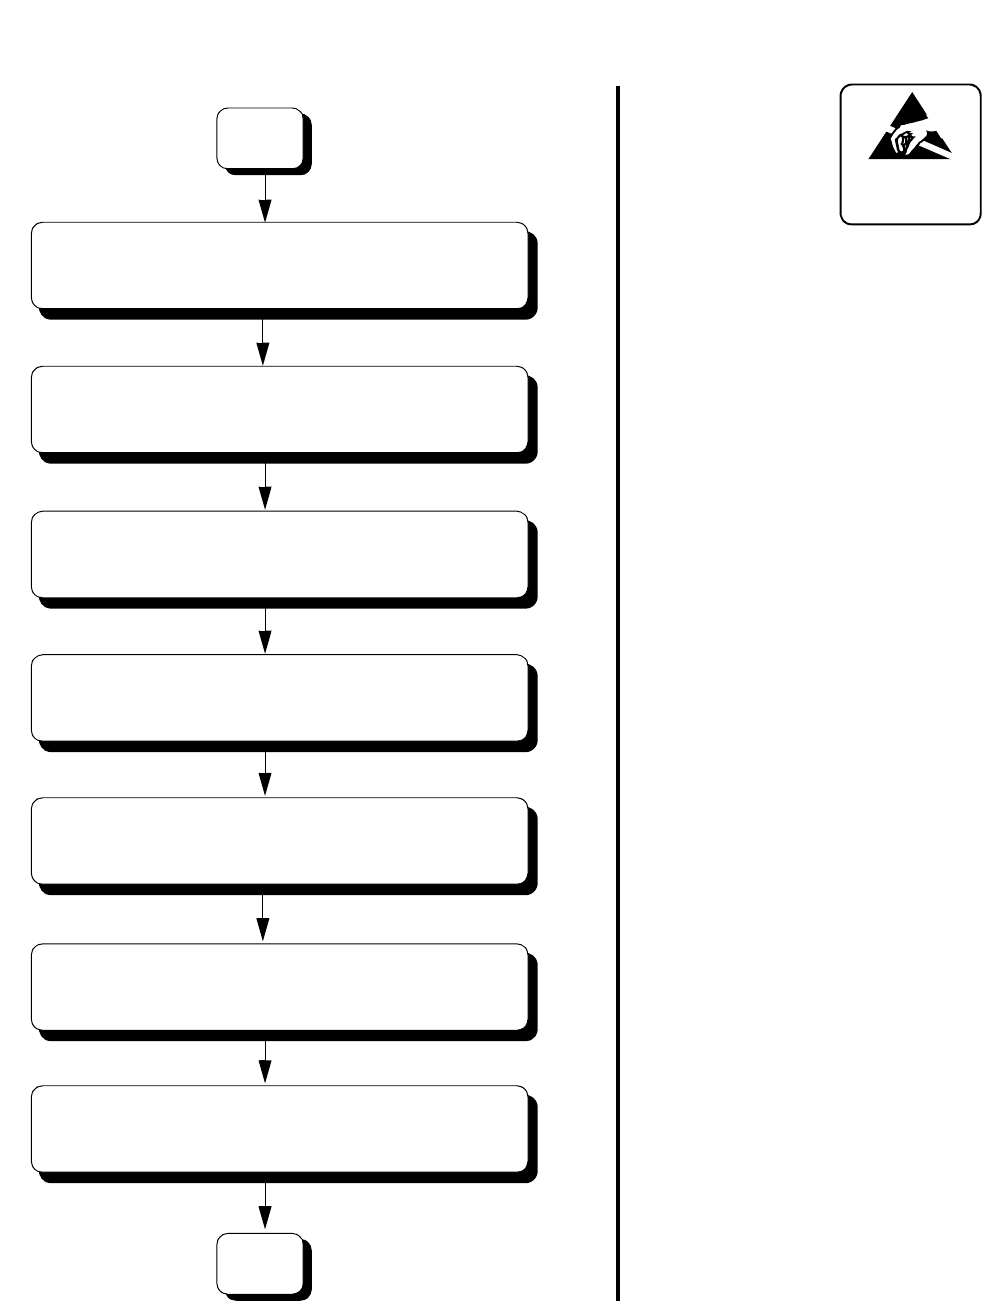
CHAPTER 4 NDA-24307
Page 298
Issue 1
UNIT/CIRCUIT CARD REPLACEMENT PROCEDURE
ATTENTION
Contents
Static Sensitive
Handling
Precautions Required
•OPE/MB lamp on the GT card
remains OFF.
•OPE/MB lamp on the new card is
OFF.
•OPE/MB lamp on the new card
remains OFF.
B
Set the MBR and MB keys on the new card UP.
A
Set the MB key on the new card DOWN.
Insert the new GT card into the TSWM.
Extract the GT card to be replaced
from the TSWM0/1.
Set the MBR Key on the new card DOWN.
On the GT card to be replaced,
set the MB switch UP.
On the GT card to be replaced,
set the MBR switch UP.
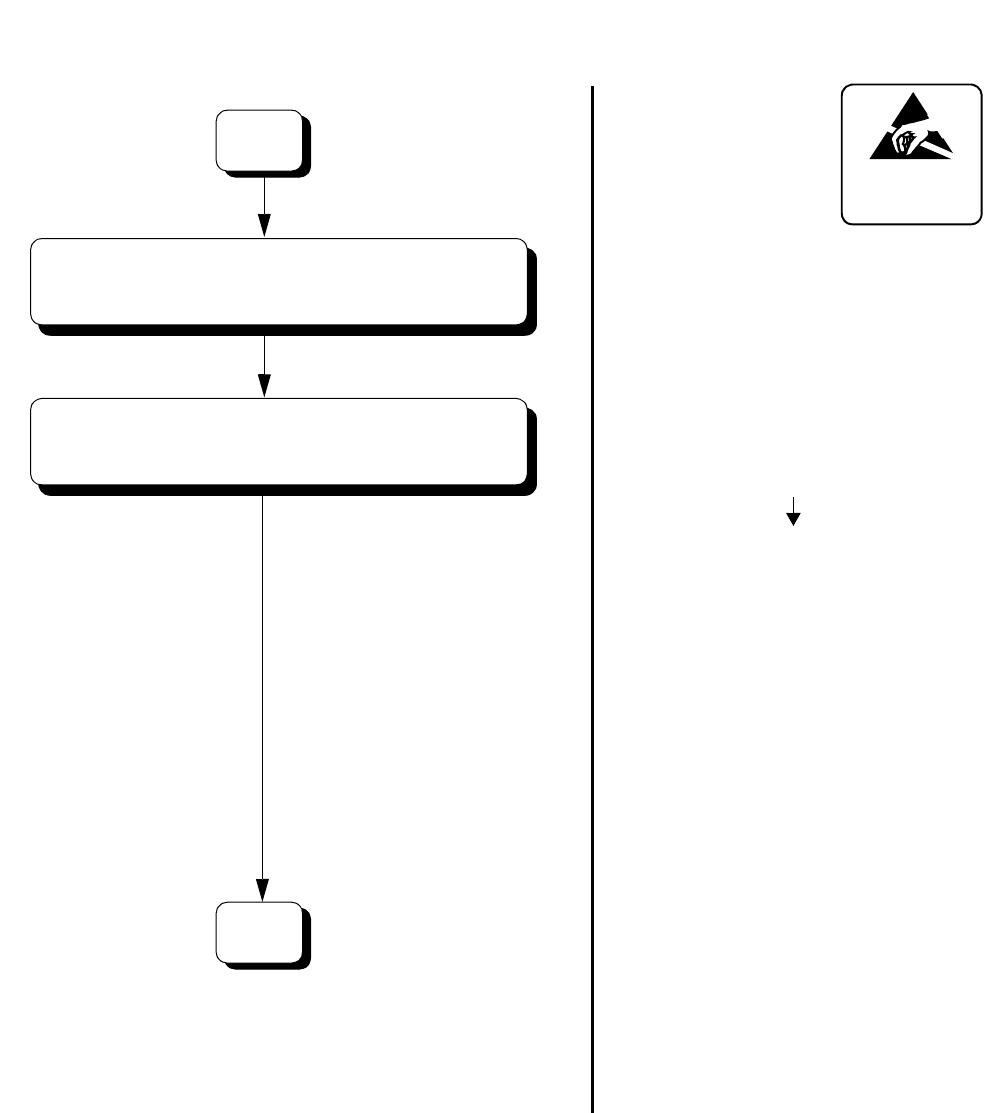
NDA-24307 CHAPTER 4
Page 299
Issue 1
UNIT/CIRCUIT CARD REPLACEMENT PROCEDURE
•EMA SUP lamp on the EMA card goes
OFF.
System Changeover
•Replaced GT: STBY to ACT
•Mate GT: ACT to STBY
Check the following lamp indications on
the new GT card and the DSP of the CPR
which controls the GT.
•OPE/MB (GT card) = Steady-green
•CPU OPE (CPU DSP) = Steady-green
•IMG0 (CPU DSP) = Flash (green)
•IMG1-3 (CPU DSP) = Flash (green)
Note: IMG2-3 lamp indications may
vary depending on the system
configuration.
Check the following lamp indications on
the mate GT card and the DSP of the
mate CPR:
•OPE/MB (GT card) = OFF
•CPU OPE (CPU DSP) = OFF
•IMG0 (CPU DSP) = Flash (green)
•IMG1-3 (CPU DSP) = OFF
ATTENTION
Contents
Static Sensitive
Handling
Precautions Required
END
B
Flip the MBR key on the DSP of CPU which controls
the mate GT. Confirm the new GT functions normally.
On the EMA card, set the EMA SUP switch DOWN.

CHAPTER 4 NDA-24307
Page 300
Issue 1
UNIT/CIRCUIT CARD REPLACEMENT PROCEDURE
2.3.2 TSW Card Replacement Procedure
The TSW (PH-SW12) card is mounted in the Slot Nos. ranging from 12 to 19 within the TSWM0/1.
Equipped with the Time Division Switch (TSW) and Speech Path Controlling Interface (INT), the
card’s main function is to provide the Time Slot (TS) switching for a specific IMG or to provide the
PCM data link with the ISW. If the TSW card is used in a dual configuration, the card’s replacement
procedures are as follows:
Note: To replace a TSW card in dual configuration, the system of the card must be changed over from ACT to
STBY mode. The changeover can be done by flipping the MBR key on the active IOGT (PH-GT10) card
in ISWM or by using the CMODI command. For more details, refer to Section 12, Chapter 6.
Figure 4-12 provides the system block diagram centering upon the speech path between ISW and LN.
If the system of TSW in ISW is changed over, the ACT/STBY of IOGT, HSW (mounted in ISW) and
TSW, DLKC and MUX (mounted in the LN) in the same switching block are also changed over.
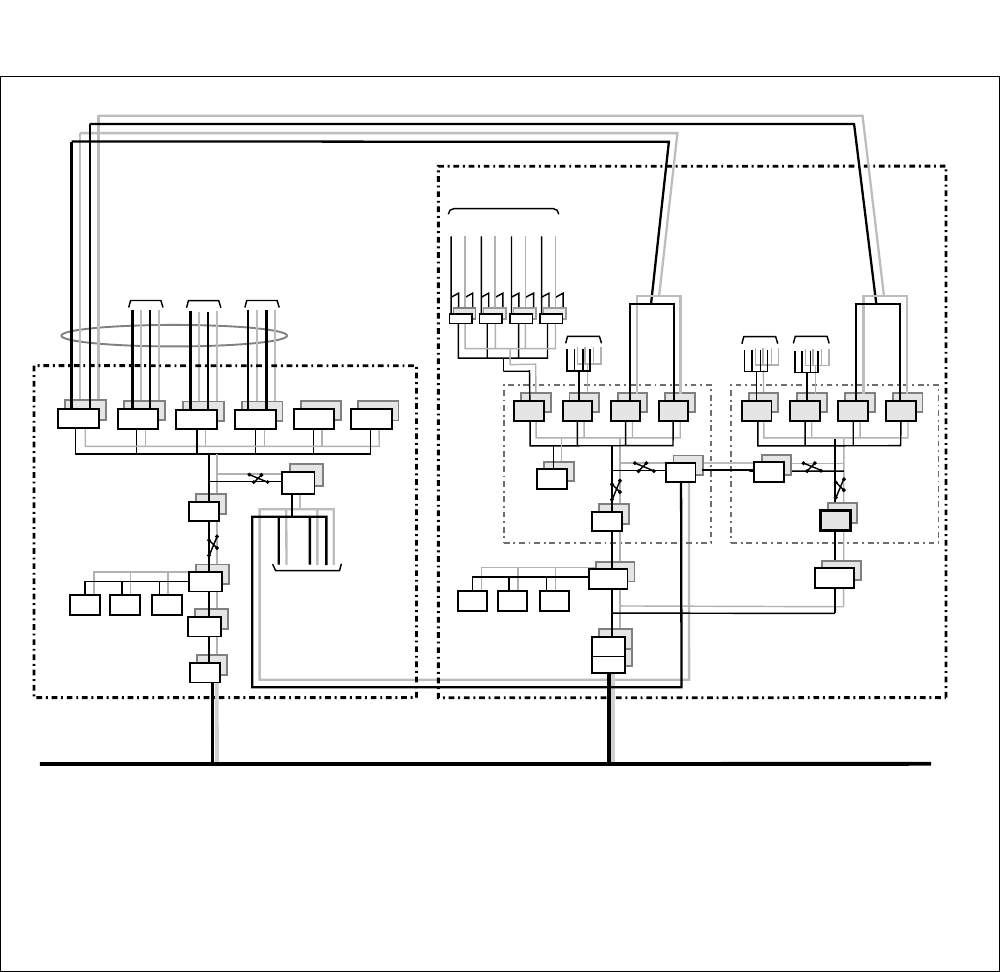
NDA-24307 CHAPTER 4
Page 301
Issue 1
UNIT/CIRCUIT CARD REPLACEMENT PROCEDURE
Figure 4-12 System Block Diagram (TSW and Other Speech Path Echelons)
< ISW (Inter-node Switch) >
ISAGT: PZ-GT13 LANI: PZ-PC19 IOGT: PH-GT10 TSW: PU-SW00
HSW: PU-SW01 PLO: PH-CK16-A/17-A EMA: PH-PC40 IOC: PH-IO24
< LN (Local Node) >
ISAGT-A: PZ-GT13 ISAGT-B: PZ-GT20 LANI: PZ-PC19 GT: PH-GT09 TSW: PH-SW12 MUX: PH-PC36
DLKC: PH-PC20 PLO: PH-CK16-A CLK: PH-CK18 EMA: PH-PC40 IOC: PH-IO24
TSWM0 TSWM1
MISC IOC EMA
PLO
TSW00 TSW01 TSW02 TSW03
GT
ISAGT-A
CPU
LANI
Fusion Link
ISW LN0
To PLO of
LN1 through 3
DLKC
PLO
IOGT
ISAGT
CPU
LANI
To MUX
(IMG1)
To MUX
(IMG2)
To MUX
(IMG3)
CLK
TSW01 TSW02 TSW03 HSW00
To TSW
of LN3
To TSW
of LN1 To TSW
of LN2
To LANI of
LN1 through 3
HSW01
TSW00
Line/Trunk PM
IMG 0
PM BUS
PCM HW
PM BUS
PCM HW
PM BUS
PCM HW
PM BUS
PCM HW
MUX MUX MUX MUX
MISC IOC EMA
TSW00 TSW01 TSW02 TSW03
GT
ISAGT-B
Note : ISW-LN TSW CA-n Cables
Note
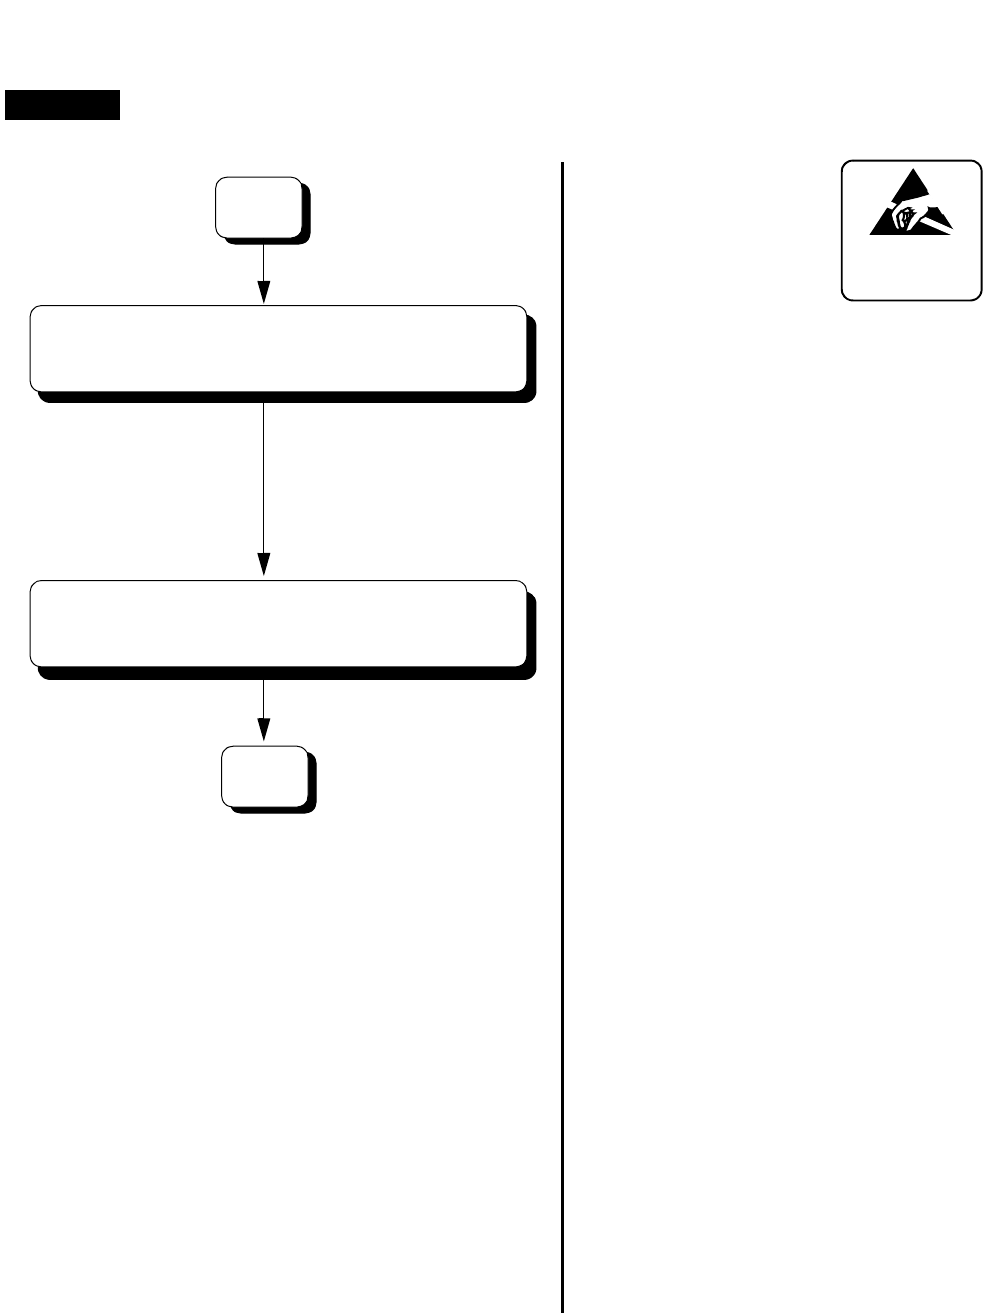
CHAPTER 4 NDA-24307
Page 302
Issue 1
UNIT/CIRCUIT CARD REPLACEMENT PROCEDURE
TSW Card Replacement Procedure
Use extreme care when operating the keys on the circuit card.
WARNING
ATTENTION
Contents
Static Sensitive
Handling
Precautions Required
System Changeover. Check the following
lamp indications on the circuit cards to be
affected and ensure that they are all OFF:
At the ISW:
•TSW ACT (IOGT cards)
•TSW ACT (TSW cards)
•HSW ACT (HSW cards)
At the LN:
•TSW ACT (TSW cards)
•OPE/MB (DLKC card) Note
•MUX ACT (MUX cards)
Note: If the TSW card to be replaced
represents system status 0, all
the circuit cards with 0 status
are totally affected. Check the
whole cited cards' lamp
indications. (See Figure 4-12
and Figure 4-13.)
Check the following lamp indications on
the mate Speech Path block and ensure that
they are all steady-green:
At the ISW:
•TSW ACT (IOGT cards)
•TSW ACT (TSW cards)
•HSW ACT (HSW cards)
At the LN:
•TSW ACT (TSW cards)
•OPE/MB (DLKC card)
•MUX ACT (MUX cards)
A
START
Check the ACT mode of the mate
Speech Path System.
On the active IOGT (PH-GT10) card in ISWM, set
the MBR key UP. Then, return the key DOWN.
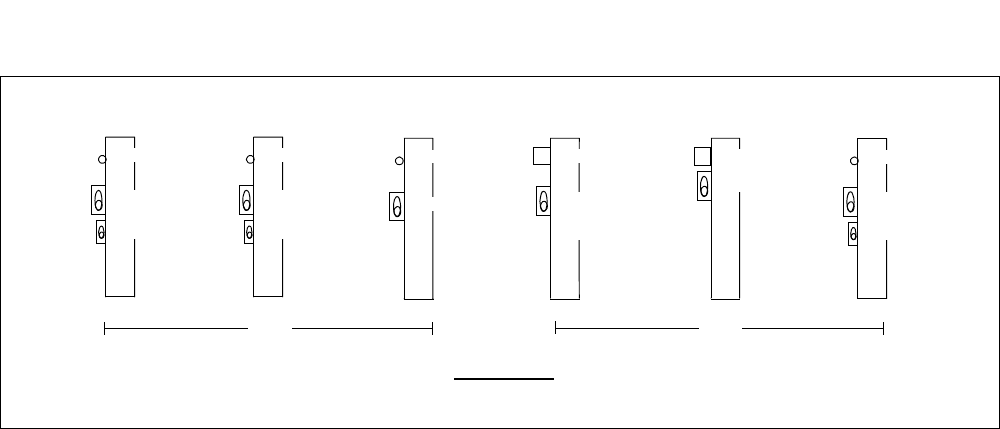
NDA-24307 CHAPTER 4
Page 303
Issue 1
UNIT/CIRCUIT CARD REPLACEMENT PROCEDURE
Figure 4-13 LEDs and Switches for TSW Changeover
MUX (PH-PC36)
MUX ACT
MB
IOGT (PH-GT10)
TSW ACT
MBR
MB
DLKC (PH-PC20)
OPE/MB
MB
HSW (PU-SW01)
HSW ACT
MB
FRONT VIEW
TSW (PH-SW12)
TSW ACT
TSW MBR
MB
TSW (PU-SW00)
TSW ACT
TSW MBR
TSW MB
ISW LN
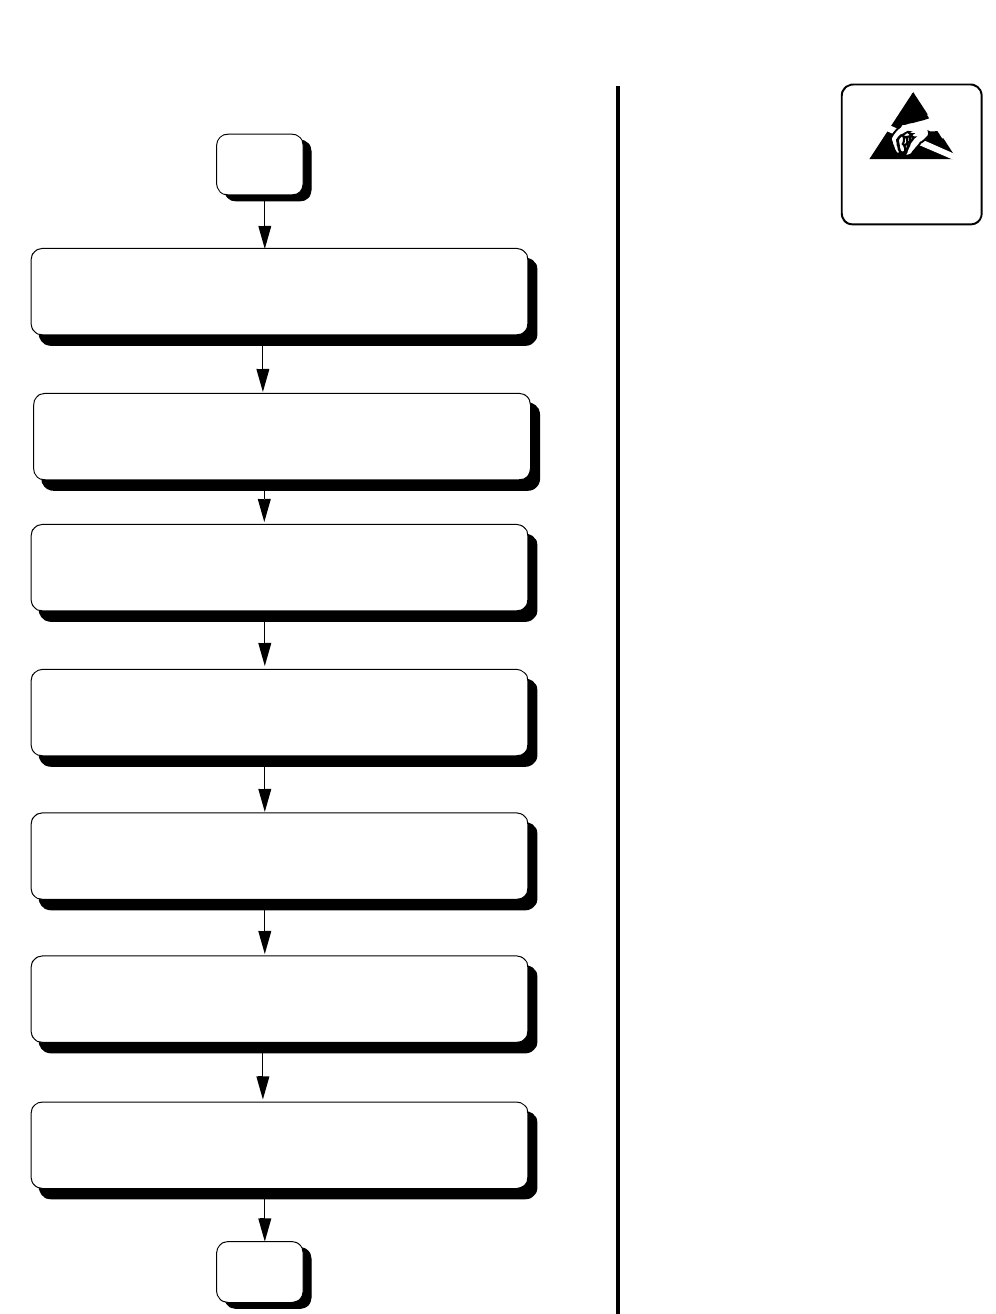
CHAPTER 4 NDA-24307
Page 304
Issue 1
UNIT/CIRCUIT CARD REPLACEMENT PROCEDURE
•TSW ACT lamp on the TSW card
remains OFF.
•TSW ACT lamp on the TSW card
lights red.
•TSW ACT lamp on the new card
lights red.
ATTENTION
Contents
Static Sensitive
Handling
Precautions Required
B
Set TSW MBR and MB keys on the new card UP.
A
Insert the new TSW card into the TSWM.
Set the keys on the new card,
referring to the card replaced.
Extract the TSW card to be replaced
from the TSWM.
On the TSW (PH-SW12) card to be replaced,
set the TSW MBR switch UP.
Confirm M0SY, M1SY, M2SY and M3SY
LEDs on the new card are all lighting green.
On the TSW card to be replaced,
set the MB switch UP.
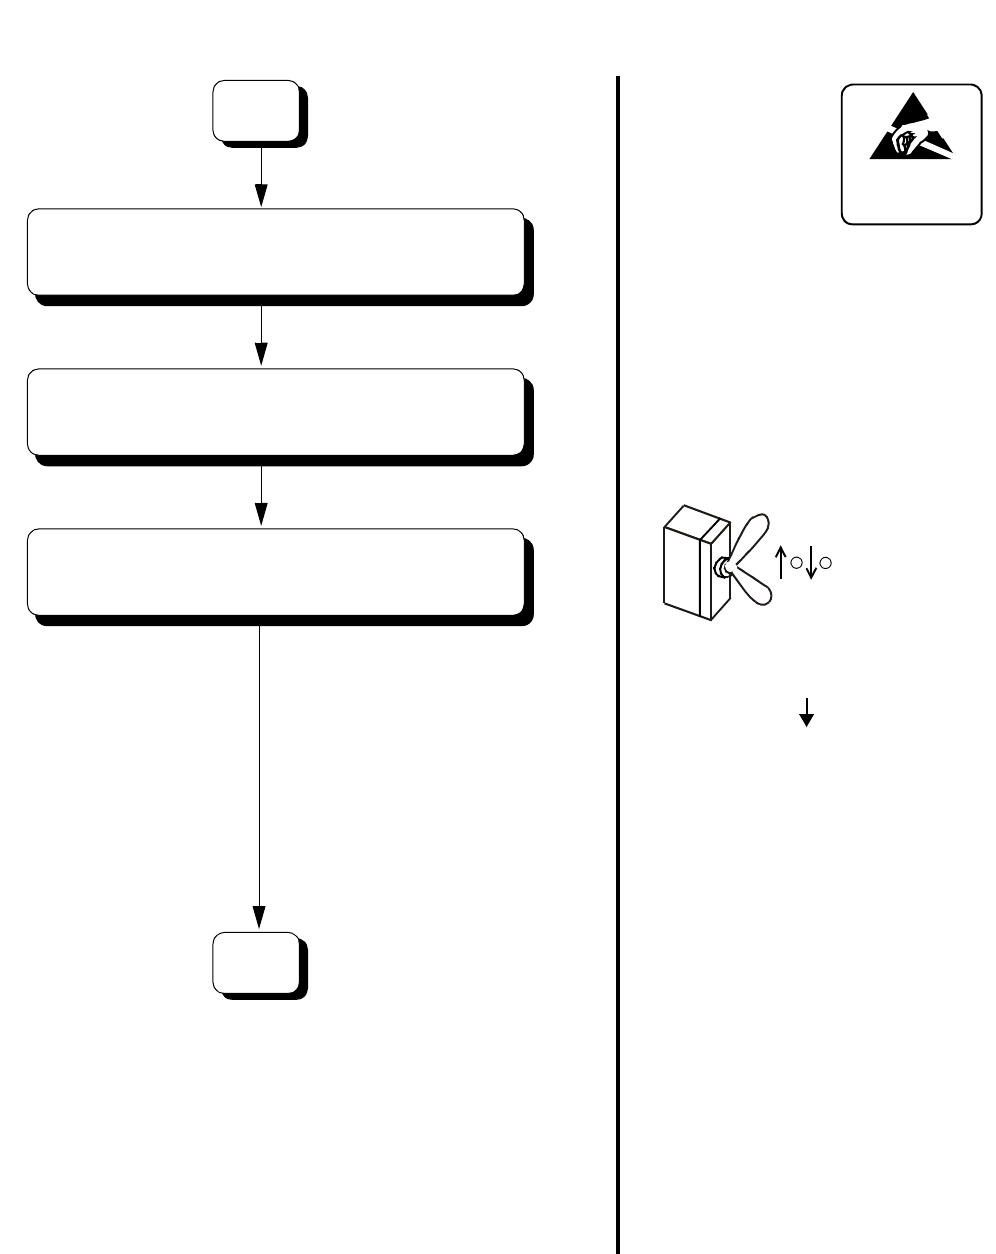
NDA-24307 CHAPTER 4
Page 305
Issue 1
UNIT/CIRCUIT CARD REPLACEMENT PROCEDURE
Note: This procedure assumes the Speech Path mode change is executed totally on a system basis. If the
change is required on a node basis, use the MBR key on that node’s GT (PH-GT09) card or CMODI/
CMOD command. For more details, refer to Section 12, Chapter 6.
ATTENTION
Contents
Static Sensitive
Handling
Precautions Required
•TSW ACT lamp on the new card goes
OFF.
•TSW ACT lamp on the new card
remains OFF.
System Changeover
•Replaced TSW: STBY to ACT
•Mate TSW: ACT to STBY
Check the following lamp indications on the
Speech Path block to which the new TSW card
belongs and ensure that they are all steady-
green:
At the ISW:
•TSW ACT (IOGT cards)
•TSW ACT (TSW cards)
•HSW ACT (HSW cards)
At the LN:
•TSW ACT (TSW cards)
•OPE/MB (DLKC card)
•MUX ACT (MUX cards)
Check the following lamp indications on the
mate Speech Path block and ensure that they
are all OFF:
At the ISW:
•TSW ACT (IOGT cards)
•TSW ACT (TSW cards)
•HSW ACT (HSW cards)
At the LN:
•TSW ACT (TSW cards)
•OPE/MB (DLKC card)
•MUX ACT (MUX cards)
(Refer to Figure 4-12 and Figure 4-13.)
END
B
Set the MB key on the new card DOWN.
Flip the MBR key on the active IOGT card. Confirm
the new TSW card functions normally.
Set the TSW MBR key on the new card DOWN.
MBR (on the active IOGT card of ISW)
12
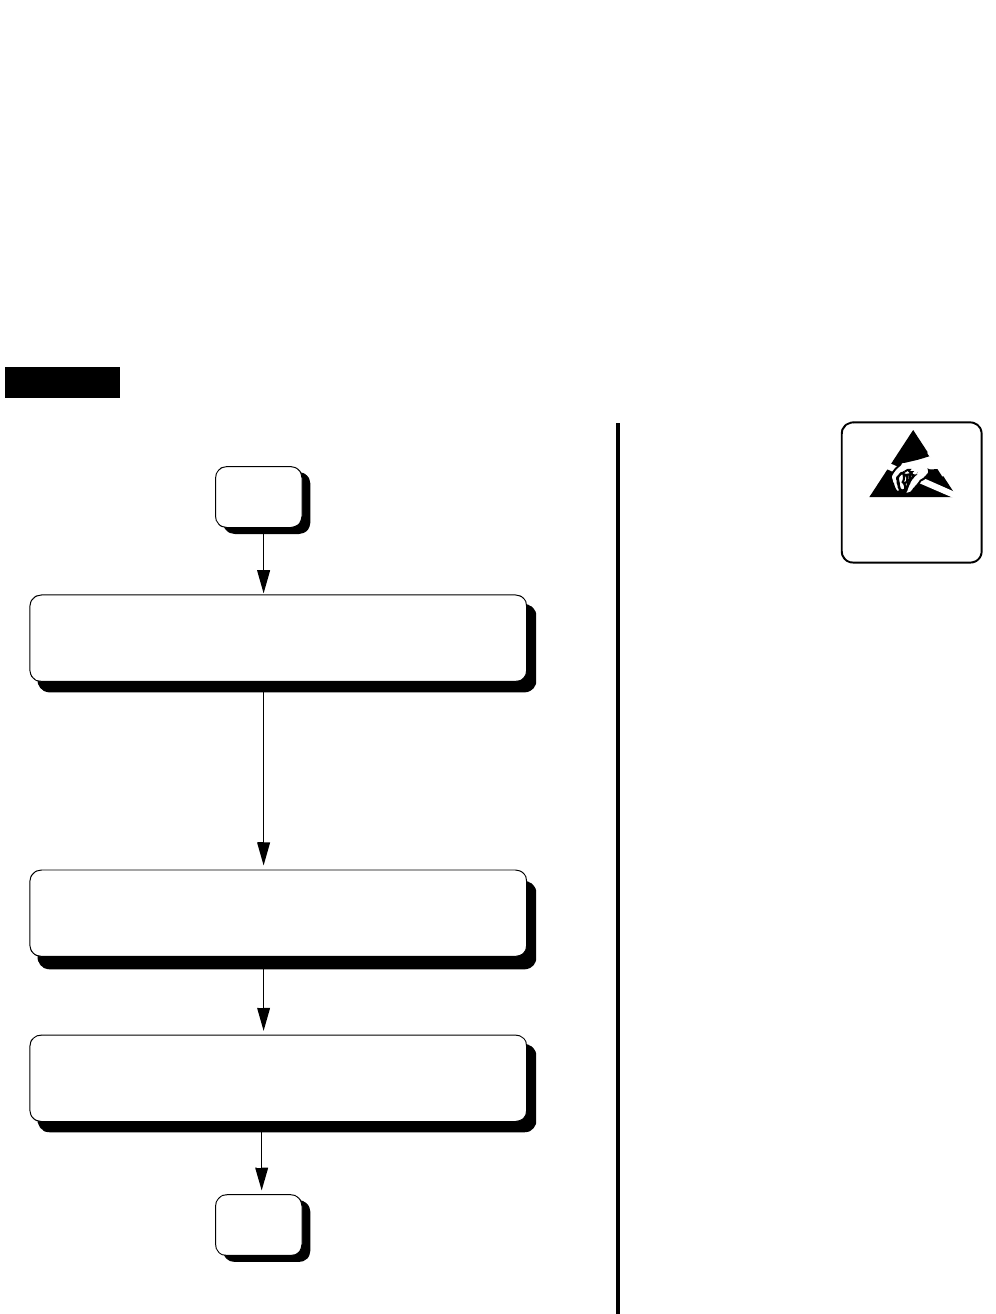
CHAPTER 4 NDA-24307
Page 306
Issue 1
UNIT/CIRCUIT CARD REPLACEMENT PROCEDURE
2.3.3 DLKC Card Replacement Procedure
The DLKC (PH-PC20) card is mounted in Slot No. 08 or 09 within the TSWM0. The card’s main
function is to provide all the Attendant/Desk Consoles with information such as termination/answer/
release (abandoned) of ATT calls or idle/busy status of a station via the link of the TSW system. Use
the following procedures to replace the DLKC card with a spare.
Note: The system changeover of DLKC must be executed by the MBR key operation on the active IOGT (PH-
GT10) card or by using the CMODI command. Before starting this work, confirm the system block
diagram shown in Figure 4-12, or Section 12, Chapter 6.
Replacement Procedure
Use extreme care when operating the keys on the circuit card.
WARNING
ATTENTION
Contents
Static Sensitive
Handling
Precautions Required
System Changeover. Check the following
lamp indications on the circuit cards to be
affected and ensure that they are all OFF:
At the ISW:
•TSW ACT (IOGT cards)
•TSW ACT (TSW cards)
•HSW ACT (HSW cards)
At the LN:
•TSW ACT (TSW cards)
•OPE/MB (DLKC card) Note
•MUX ACT (MUX cards)
Note: If the DLKC card to be replaced
represents system status 0, all
the circuit cards with 0 status
are totally affected. Check the
whole cited cards' lamp
indications. (See Figure 4-12
and Figure 4-13.)
Check the following lamp indications on the
mate Speech Path block and ensure that at
ISW they are all OFF and at LN all are a
steady green:
At the ISW:
•TSW ACT (IOGT cards)
•TSW ACT (TSW cards)
•HSW ACT (HSW cards)
At the LN:
•TSW ACT (TSW cards)
•OPE/MB (DLKC card)
•MUX ACT (MUX cards)
OPE/MB lamp on the DLKC card lights red.
A
START
Check the ACT mode of the mate
Speech Path System.
On the active IOGT (PH-GT10) card in ISWM, set the
MBR key UP. Then, return the key DOWN.
On the DLKC (PH-PC20) card to be
replaced, Set the MB switch UP.
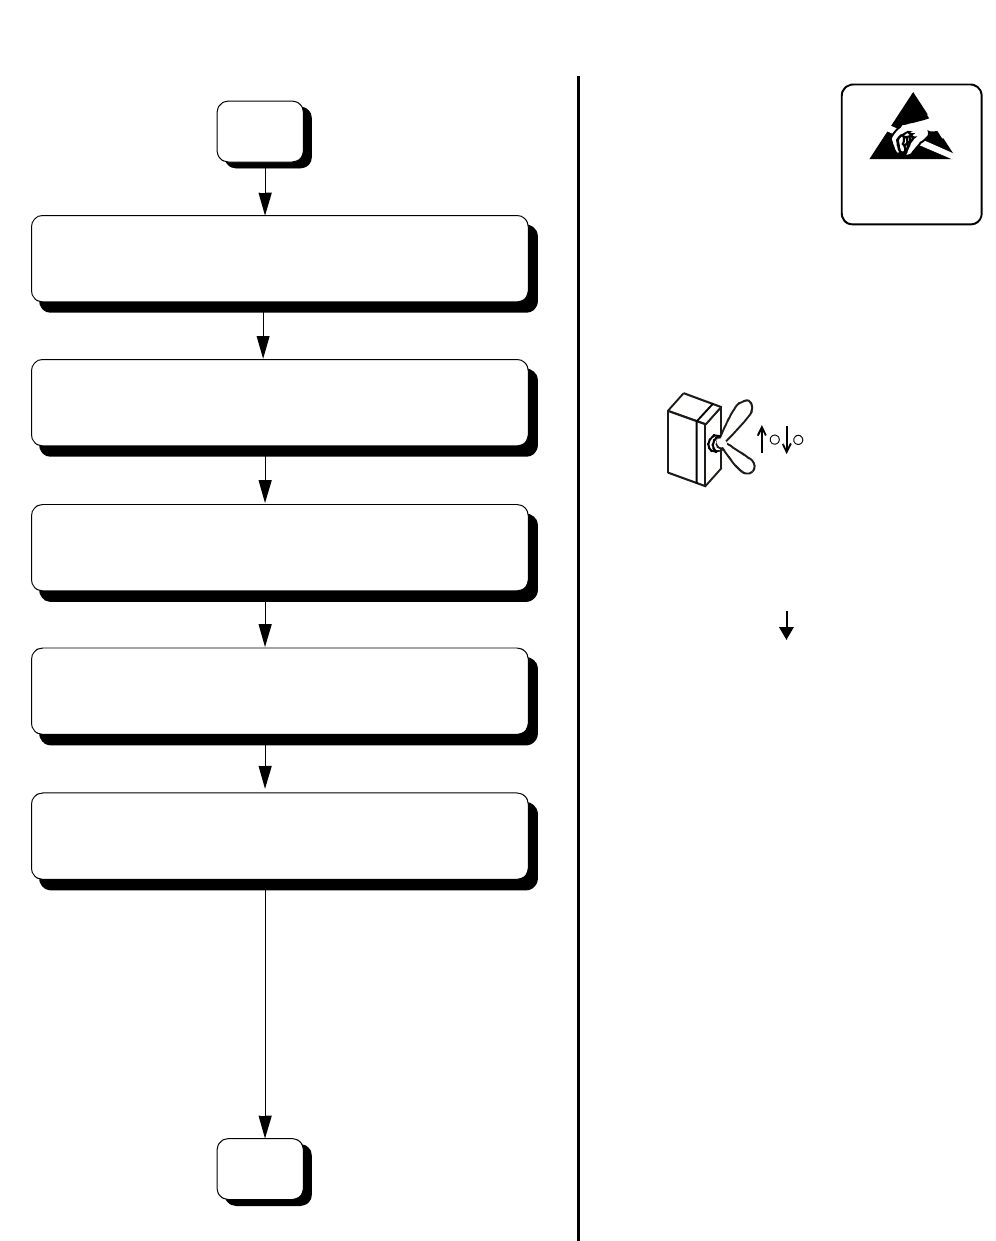
NDA-24307 CHAPTER 4
Page 307
Issue 1
UNIT/CIRCUIT CARD REPLACEMENT PROCEDURE
Note: The changeover of Speech Path system can be performed also by using the CMODI command. For
details, refer to Chapter 8, Maintenance Commands.
ATTENTION
Contents
Static Sensitive
Handling
Precautions Required
•OPE/MB lamp on the new card lights red.
•OPE/MB lamp on the new card goes OFF.
System Changeover
•Replaced DLKC: STBY to ACT
•Mate DLKC: ACT to STBY
Check the following lamp indications on the
Speech Path block to which the new DLKC card
belongs and ensure that they are all steady-green:
At the ISW:
•TSW ACT (IOGT cards)
•TSW ACT (TSW cards)
•HSW ACT (HSW cards)
At the LN:
•TSW ACT (TSW cards)
•OPE/MB (DLKC card)
•MUX ACT (MUX cards)
Check the following lamp indications on the mate
Speech Path block and ensure that they are all
OFF:
At the ISW:
•TSW ACT (IOGT cards)
•TSW ACT (TSW cards)
•HSW ACT (HSW cards)
At the LN:
•TSW ACT (TSW cards)
•OPE/MB (DLKC card)
•MUX ACT (MUX cards)
(Refer to Figure 4-12 and Figure 4-13.)
END
On the new DLKC card, set the MB key DOWN.
A
Extract the DLKC card to be replaced
from the TSWM.
Flip MBR key on the active IOGT card. Confirm the
new DLKC card functions normally.
On the new DLKC card, set the MB switch UP.
Insert the new DLKC card into the TSWM.
MBR (on the active IOGT card of ISW)
12
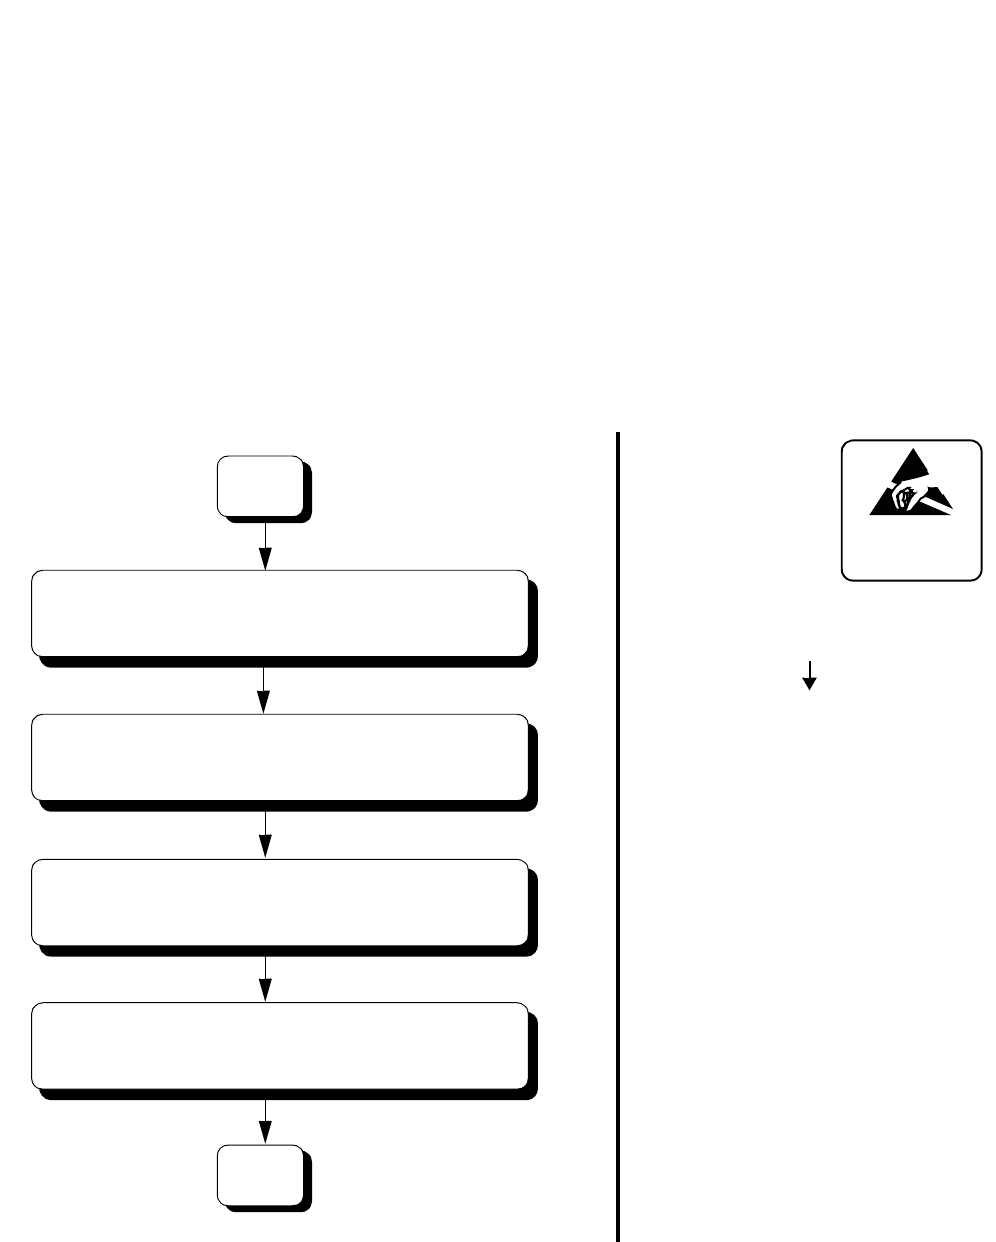
CHAPTER 4 NDA-24307
Page 308
Issue 1
UNIT/CIRCUIT CARD REPLACEMENT PROCEDURE
2.3.4 PLO Card Replacement Procedure
The PLO (PH-CK16-A) card is mounted in Slot No. 21 or 23 within the TSWM0. Used together with
a direct digital interface circuit card, the card’s main function is to set up the clock synchronization on
the network. With this circuit card, the Local Node can be a clock subordinate office of the digital
network. Use the procedures below to replace the PLO card with a spare.
Note: The ACT/STBY of PLO can be changed over via a single MB key operation on the circuit card (ACT
side). Though its circuit is controlled by the GT (PH-GT09) card in TSWM0 via TSW I/O bus, the
switching system of PLO (LN) is not affected by the speech path system changeover, differing from other
echelons such as TSW, MUX, DLKC. Refer to Section 12, Chapter 6. If the system of PLO in TSWM0
is once changeover, the ACT/STBY of CLK in TSWM1 is also changed over.
Replacement Procedure
ATTENTION
Contents
Static Sensitive
Handling
Precautions Required
•PLO system is changed over from
ACT to STBY mode.
•OPE lamp on the PLO and CLK
cards in the same LN goes OFF.
Check the following lamp indications
on the mate PLO and CLK cards in the
same LN.
•OPE = Steady-green
A
START
Extract the PLO card to be replaced
from the TSWM0.
Check the mate PLO's ACT mode.
On the active PLO (PH-CK16-A) card, set the
MB key UP.
Set the keys on the new card according to
the card replaced.
NDA-24307 CHAPTER 4
Page 309
Issue 1
UNIT/CIRCUIT CARD REPLACEMENT PROCEDURE
•OPE lamp on the new card is OFF.
•OPE lamp on the new card remains
OFF.
(Mate PLO = ON [green])
ATTENTION
Contents
Static Sensitive
Handling
Precautions Required
END
A
Insert the new PLO card into the TSWM0.
On the new PLO card, set the MB key UP.
Set the MB key on the new card DOWN.
CHAPTER 4 NDA-24307
Page 310
Issue 1
UNIT/CIRCUIT CARD REPLACEMENT PROCEDURE
2.3.5 CLK Card Replacement Procedure
The CLK (PH-CK18) card is mounted in Slot No. 21 or 23 within the TSWM1. The card’s main
function is to supply basic clock signals to IMG2/3. This card receives clock signs from the PLO
located in TSWM0, thereby distributing the supplied 32,768 MHz CLK, 8 KHz FH (5msec x “n” FH
[for Wireless system]), PLO ACT signals and Hold tone to the TSW located in TSWM1. Use the
procedures below to replace the CLK card with a spare.
Note: The ACT/STBY of CLK(s) can be changed over when the PLO in TSWM0 is changed over (by flipping
the MB key on the active PLO card).
Replacement Procedure
ATTENTION
Contents
Static Sensitive
Handling
Precautions Required
•OPE lamps on the CLK and PLO
cards goes OFF.
•OPE lamps on the mate CLK and
PLO cards are steady green.
A
START
On the CLK (PH-CK18) card to be replaced,
set the MB key UP.
Check the mate CLK's ACT mode.
On the active PLO (PH-CK16-A) card located in
TSWM0, set theMB key UP and then DOWN.
Extract the CLK card to be replaced from the
TSWM1.

NDA-24307 CHAPTER 4
Page 311
Issue 1
UNIT/CIRCUIT CARD REPLACEMENT PROCEDURE
•OPE lamp on the new card is OFF.
•OPE lamp on the new card remains
OFF.
(Mate CLK = ON [green])
ATTENTION
Contents
Static Sensitive
Handling
Precautions Required
END
A
Insert the new CLK card into the TSWM1.
On the new CLK card, set the MB key UP.
Set the MB key on the new card DOWN.

CHAPTER 4 NDA-24307
Page 312
Issue 1
UNIT/CIRCUIT CARD REPLACEMENT PROCEDURE
2.3.6 PWR SW Card Replacement Procedure
The PWR SW (PH-PW14) card is mounted in Slot No. 00 or 01 within the TSWM0/1. The card’s main
function is to supply DC -48V operating power to the same TSWM circuit cards and also DC +5, -5 V
and +12 V output power to the MISC slots. Use the following procedures to replace the card with a
new one.
Replacement Procedure
ATTENTION
Contents
Static Sensitive
Handling
Precautions Required
•P-ON lamp on the PWR SW card
goes OFF.
•ALM lamp on the PWR SW card
lights red.
•P-ON lamp on the new card is OFF.
•ALM lamp on the PWR SW card
lights red.
•P-ON lamp on the new card lights
steady-green.
•ALM lamp on the PWR SW goes
OFF.
END
START
Extract the PWR SW card to be replaced
from the TSWM.
On the new PWR SW card, set the SW key DOWN.
On the PWR SW (PH-PW14) card, set the
SW key DOWN.
Insert the new PWR SW card into the TSWM.
On the new PWR SW card, set the SW key UP.
NDA-24307 CHAPTER 4
Page 313
Issue 1
UNIT/CIRCUIT CARD REPLACEMENT PROCEDURE
2.3.7 MISC Card Replacement Procedure
ATTENTION
Contents
Static Sensitive
Handling
Precautions Required
•Keep MB switch UP.
END
START
Extract the MISC card from its mounting slot.
Insert the new circuit card into the same
mounting slot.
On the MISC card, set MB switch DOWN.
On the MISC card, set MB switch UP.

CHAPTER 4 NDA-24307
Page 314
Issue 1
UNIT/CIRCUIT CARD REPLACEMENT PROCEDURE
3. PIM ACCOMMODATING CIRCUIT CARD REPLACEMENT PROCEDURE
This Section covers the procedures for replacing circuit cards accommodated in the PIM (IMG0/1/2/3).
3.1 Precaution
•This procedure is applied when replacing a faulty circuit card with a spare. It is also able to be applied
when checking a spare card.
•There are functional switches (having set the default switch) on some of the circuit cards to be
replaced. As for switch setting on the circuit cards, confirm the circuit card mounting face layout for
the PIM. When a circuit card which has default switch setting has been replaced with a spare card, be
sure to make switch setting on the new circuit card in the same way as on the replaced card. Otherwise,
electronic components on the circuit card may be destroyed or the circuit card itself may fail to
function normally.
•When handling a circuit card, be sure to use the field service kit as countermeasures against static
electricity. If you touch a circuit card without using the field service kit, electronic components like
an IC on the card may be destroyed by the static electricity electrified on the human body.
3.2 Circuit Card Mounting Face Layout
The face layout of circuit cards mounted in the PIM is shown in Figure 4-14.
Figure 4-14 Circuit Card Mounting Face Layout of PIM
00 01 02 03 04 05 06 07 08 09 10 11 12 13 14 15 16 17 18 19 20 21 22 23
LC/TRK
LC/TRK
LC/TRK
LC/TRK
LC/TRK
LC/TRK
LC/TRK
LC/TRK
LC/TRK
MUX0
MUX1
LC/TRK
LC/TRK
LC/TRK
LC/TRK
LC/TRK
LC/TRK
LC/TRK
LC/TRK
LC/TRK
PWR1
PWR0
PIM
Slot No.
Universal Slots Universal Slots
Note: This Section also covers the procedure to replace the SDT (PA-SDTA/PA-SDTB) card. The card can
be mounted in any of the universal slots (slots 04-12 or 15-23).
Improper key operations may result in a system down. Operate the keys with extreme care.
By replacing a circuit card, the system will issue system messages and activate the related
alarm. Be sure to reset the indicated alarm after the replacement procedure is complete.
If the indicated alarm is cleared via the RALM/RALMN command, the system also clears
the whole contents of the system message. Be sure to print out the messages (by using the
DFTD command) BEFORE using the RALM/RALMN command.
ALM RST button on the TOPU is used to reset the alarm lamps only.
WARNING

NDA-24307 CHAPTER 4
Page 315
Issue 1
UNIT/CIRCUIT CARD REPLACEMENT PROCEDURE
3.3 Operating Procedures
The following sections provide operating procedures to replace circuit cards mounted in the PIM. Perform
the operations corresponding to each Reference Item specified in Table 4-3. The procedures assume that
the system adopts the dual configuration.
Table 4-3 PIM Circuit Cards and Reference Items
CIRCUIT CARD
FUNCTION NAME REFERENCE ITEM REMARKS
LC/TRK Section 3.3.1, LC/TRK Circuit Card Replacement
Procedure
MUX Section 3.3.2, MUX Card Replacement Procedure
PWR Section 3.3.3, PWR Card Replacement Procedure
HUB Section 3.3.4, HUB Circuit Card Replacement
Procedure
SDT Section 3.3.5, SDT Card Replacement Procedure
CHAPTER 4 NDA-24307
Page 316
Issue 1
UNIT/CIRCUIT CARD REPLACEMENT PROCEDURE
3.3.1 LC/TRK Circuit Card Replacement Procedure
ATTENTION
Contents
Static Sensitive
Handling
Precautions Required
•Keep MB switch set at UP.
END
START
Extract the circuit card from its mounting slot.
On the circuit card to be replaced,
set the MB switch UP.
Insert the new card into its mounting slot.
On the new card, set MB switch DOWN.
NDA-24307 CHAPTER 4
Page 317
Issue 1
UNIT/CIRCUIT CARD REPLACEMENT PROCEDURE
3.3.2 MUX Card Replacement Procedure
The MUX (PH-PC36) card is mounted in Slot No. 13 and/or 14 of each Port Interface Module (PIM).
The card’s main function is to provide an interface between the CPR and Port Microprocessor (PM) of
the line/trunk circuit, and also to provide an interface for multiplexing/de-multiplexing of voice Pulse
Code Modulation (PCM) information and digital data information. Use the procedures below to
replace the MUX card with a spare:
Note: Execute the system changeover of MUX by using the MBR key operation on the active IOGT (PH-GT10)
card or by using the CMODI command. Before starting this task, be sure to confirm the system block
diagram shown in Figure 4-12, or Section 12, Chapter 6.
MUX Card Replacement Procedure
Apply extreme care when operating the keys on the circuit cards.
WARNING
ATTENTION
Contents
Static Sensitive
Handling
Precautions Required
System Changeover. Check the following
lamp indications on the circuit cards to be
affected and ensure that they are all OFF:
At the ISW:
•TSW ACT (IOGT cards)
•TSW ACT (TSW cards)
•HSW ACT (HSW cards)
At the LN:
•TSW ACT (TSW cards)
•OPE/MB (DLKC card) Note
•MUX ACT (MUX cards)
Note: If the MUX card to be replaced
represents system status 0, all
the circuit cards with 0 status
are totally affected. Check the
whole cited cards' lamp
indications. (See Figure 4-12
and Figure 4-13.)
Check the following lamp indications on the
mate Speech Path block and ensure that they
are all a steady green:
At the ISW:
•TSW ACT (IOGT cards)
•TSW ACT (TSW cards)
•HSW ACT (HSW cards)
At the LN:
•TSW ACT (TSW cards)
•OPE/MB (DLKC card)
•MUX ACT (MUX cards)
MUX ACT lamp on the MUX card lights
red.
A
START
On the active IOGT (PH-GT10) card in ISWM, set
the MBR key UP. Then, return the key DOWN.
Check the ACT mode of the mate Speech Path
On the MUX (PH-PC36) card to
be replaced, Set the MB switch UP.
System.
CHAPTER 4 NDA-24307
Page 318
Issue 1
UNIT/CIRCUIT CARD REPLACEMENT PROCEDURE
•MUX ACT lamp on the new card
lights red.
ATTENTION
Contents
Static Sensitive
Handling
Precautions Required
B
Insert the new card into the PIM.
A
On the new card, set the MB key UP.
Extract card to be replaced from the mounted PIM.
Disconnect the cable for the MUX front
connector on the card to be replaced.
Connect the disconnected cable to the
MUX front connector on the new card.
Referring to the replaced card, set the keys on
the new card.
NDA-24307 CHAPTER 4
Page 319
Issue 1
UNIT/CIRCUIT CARD REPLACEMENT PROCEDURE
Note: This procedure assumes the Speech Path mode change is executed totally on a system basis. If the
change is required on a node basis, use the MBR key on that node’s GT (PH-GT09) card or CMODI/
CMOD command. For more details, refer to Section 12, Chapter 6.
ATTENTION
Contents
Static Sensitive
Handling
Precautions Required
System Changeover
•Replaced MUX: STBY to ACT
•Mate MUX: ACT to STBY
Check the following lamp indications on the
Speech Path block to which the new MUX
card belongs and ensure that they are all
steady-green:
At the ISW:
•TSW ACT (IOGT cards)
•TSW ACT (TSW cards)
•HSW ACT (HSW cards)
At the LN:
•TSW ACT (TSW cards)
•OPE/MB (DLKC card)
•MUX ACT (MUX cards)
Check the following lamp indications on the
mate Speech Path block and ensure that they
are all OFF:
At the ISW:
•TSW ACT (IOGT cards)
•TSW ACT (TSW cards)
•HSW ACT (HSW cards)
At the LN:
•TSW ACT (TSW cards)
•OPE/MB (DLKC card)
•MUX ACT (MUX cards)
(Refer to Figure 4-12 and Figure 4-13.)
END
B
Flip the MBR key on the active IOGT card. Confirm
the new MUX card functions normally.
On the new MUX card, set the MB key DOWN.
Verify that the SYNC LED on the new card
lights green.
MBR (on the active IOGT card of ISW)
12
CHAPTER 4 NDA-24307
Page 320
Issue 1
UNIT/CIRCUIT CARD REPLACEMENT PROCEDURE
3.3.3 PWR Card Replacement Procedure
The PWR (PA-PW55-A/PA-PW55-B) and DPWR (PA-PW54-A/PA-PW54-B) cards are mounted re-
spectively in Slot No. 1 and Slot No. 3 of each PIM. The card’s main function is to provide operating
power to the circuit cards accommodated in the PIM. The procedures to replace the PWR/DPWR card
are as follows.
Replacement Procedure
•OPE lamp on the card goes OFF.
A
Turn OFF the -48V SW on the card to be replaced.
Turn ON the MB key on the PWR/DPWR card
to be replaced.
Turn OFF the -48V SW on the new card.
Extract the card to be replaced.
Disconnect the power cable from the -48V IN
connector.
ATTENTION
Contents
Static Sensitive
Handling
Precautions Required
NDA-24307 CHAPTER 4
Page 321
Issue 1
UNIT/CIRCUIT CARD REPLACEMENT PROCEDURE
ATTENTION
Contents
Static Sensitive
Handling
Precautions Required
•OPE lamp on the new card is OFF.
•OPE lamp on the new card lights
green.
END
A
Insert the new card into the PIM.
Turn OFF the MB key on the card.
Turn ON the -48V SW on the new card.
Connect the power cable to the -48V IN
connector.
Turn ON the MB key on the new card.
CHAPTER 4 NDA-24307
Page 322
Issue 1
UNIT/CIRCUIT CARD REPLACEMENT PROCEDURE
3.3.4 HUB Circuit Card Replacement Procedure
The HUB (PA-M96) card is mounted in any universal slot of the PIM. This card provides the repeater
function based on ANSI/IEEE820.3.8. This card is also equipped with eight ports for 10 BASE-T cable
connection used for establishing Ethernet Link and/or connecting the MAT.
HUB Card Replacement Procedure
Replacement of a HUB card may result in a temporary shutoff of the Ethernet link. If this is
the case, take appropriate measures, such as CPU mode changeover, arrangement of 10 BASE-
T cable connection, etc, may be necessary.
WARNING
Use extreme care when operating the keys on the circuit cards.
WARNING
•CPU mode change: Refer to
Section 12, Section 6.
A
START
Check the lamp indication of the mate HUB card.
If replacement affects current Ethernet status,
Disconnect the 10 BASE-T cables from the front
connectors of the HUB card to be replaced
ATTENTION
Contents
Static Sensitive
Handling
Precautions Required
On the HUB (PA-M96) card to be replaced,
set the MB key up.
•OPE lamp on the card goes OFF.
ensure CPU mode change or arrangement of
10 BASE-T cable connection.
•OPE lamp on the mate HUB card
lights steady-green.
NDA-24307 CHAPTER 4
Page 323
Issue 1
UNIT/CIRCUIT CARD REPLACEMENT PROCEDURE
ATTENTION
Contents
Static Sensitive
Handling
Precautions Required
•OPE lamp on the new card goes
OFF.
•OPE lamp on the new card lights
green.
END
A
Set the key on the new card, referring to the
Connect the disconnected 10 BASE-T cable(s) to
Insert the new card into the PIM.
Set the MB key on the new card UP.
Extract the HUB card from the universal slot of
the PIM.
card replaced.
the connector(s) on the new card.
Confirm STxx lamp(s) on the new card
Set the MB key on the new DOWN.
is lighting green.
CHAPTER 4 NDA-24307
Page 324
Issue 1
UNIT/CIRCUIT CARD REPLACEMENT PROCEDURE
3.3.5 SDT Card Replacement Procedure
The SDT (PA-SDTA/PA-SDTB) card, mounted in a universal slot of a PIM, is used
to provide a 52M interface for the optical fiber lines. Use the following procedure
to replace the SDT card with a spare.
Optical Fiber Cable Replacement Procedure
ATTENTION
Contents
Static Sensitive
Handling
Precautions Required
ATTENTION
Contents
Static Sensitive
Handling
Precautions Required
While this card is being replaced, the connected optical fiber line cannot be used.
WARNING
•ACT lamp on the PA-SDTA card goes
OFF. (When the card is provided in a
dual configuration, the card becomes
stand-by.)
The following occurs in call processing:
When card is provided in dual
configuration
All calls (including already established
calls plus newly attempted calls) can
normally be handled by the mate card.
When card is in single configuration,
or mate card is faulty in dual
configuration
Though any call attempt is rejected,
already established calls are not
affected. When any connection link
exists, the link is still maintained.
•OPE lamp on the PA-SDTA card lights
red.
The following occur in call processing:
When card is in single configuration,
or mate card is faulty in dual
configuration
Already established calls (while in
speech) lose voice/tone. Any
connection link is severed after a few
seconds.
ATTENTION
Contents
Static Sensitive
Handling
Precautions Required
A
START
On the PA-SDTA card, turn ON Switch 4
of the P-SW key.
On the PA-SDTA card, set the MB key UP (=ON).
NDA-24307 CHAPTER 4
Page 325
Issue 1
UNIT/CIRCUIT CARD REPLACEMENT PROCEDURE
ATTENTION
Contents
Static Sensitive
Handling
Precautions Required
•OPE lamp on the PA-SDTA card
lights steady-green.
END
A
Remove the optical fiber cable from the front
connector on the PA-SDTA card.
Connect the new optical fiber cable to the front
connector on the PA-SDTA card.
On the PA-SDTA card, set the MB key DOWN
(=OFF) and turn OFF Switch 4 of the P-SW key.
CHAPTER 4 NDA-24307
Page 326
Issue 1
UNIT/CIRCUIT CARD REPLACEMENT PROCEDURE
PA-SDTA/PA-SDTB Card Replacement Procedure
ATTENTION
Contents
Static Sensitive
Handling
Precautions Required
•ACT lamp on the PA-SDTA card
goes OFF.
•Though any call attempt is rejected,
already established calls are safely
maintained. When any connection
link exists, the link is maintained.
Note: When the card is in a dual
configuration, perform this
for both system sides, in the
order of STBY
→
ACT.
•OPE lamp on the PA-SDTA card
lights red.
•When already established calls exist,
the connections lose voice/tone.
When any connection link exists, the
link is severed after a few seconds.
Note: When the card is in a dual
configuration, perform this
for both system sides ( ACT
and STBY).
A
START
On the PA-SDTA card, turn ON Switch 4
of the P-SW key.
On the PA-SDTA card, set the MB key UP (=ON).
By using the SPTS command, verify that no calls
are being handled by the SDT card.
NDA-24307 CHAPTER 4
Page 327
Issue 1
UNIT/CIRCUIT CARD REPLACEMENT PROCEDURE
ATTENTION
Contents
Static Sensitive
Handling
Precautions Required
•OPE lamp on the PA-SDTB card
lights red.
•When any connection link exists, the
nailed-down connection between the
FCH (PA-FCHA) and SDT (PA-
SDTB) cards is cut off. Already
established calls, while in speech,
are all disconnected.
•Confirm that the MB key on the new
card is set UP (=ON). If the new card
is PA-SDTA, also confirm that
Switch 4 of the P-SW key is ON.
B
A
Referring to the card removed, perform
the switch settings on the new card.
On the PA-SDTB card, set the MB key UP (=ON).
Remove the flat cables from the front connectors, I/O
and PCM, on both PA-SDTB and PA-SDTA cards.
When replacing the PA-SDTB, also remove MT24
TSW cables from all the front connectors on the card.
Extract both PA-SDTA/PA-SDTB cards,
simultaneously.
CHAPTER 4 NDA-24307
Page 328
Issue 1
UNIT/CIRCUIT CARD REPLACEMENT PROCEDURE
ATTENTION
Contents
Static Sensitive
Handling
Precautions Required
•OPE lamp on the new card lights
red.
•OPE lamp on the new card lights
steady-green.
END
B
On the PA-SDTA card, turn OFF Switch 4 of the
P-SW key.
Insert both PA-SDTA/PA-SDTB cards (including new
card) simultaneously into the same slots of the PIM.
When the new card is PA-SDTB, also connect the MT
24 TSW cables to all the required front connectors.
On the PA-SDTB card, set the MB key DOWN (=OFF).
On the PA-SDTA card, set the MB key DOWN (=OFF).
Connect the disconnected flat cables to the connectors
on the new card and other PA-SDTA/PA-SDTB cards.
Note: When the card is in a dual
configuration, perform this
action for both system sides (
ACT and STBY).
Note: When the card is in a dual
configuration, perform this
action for both system sides, in
the order of STBY → ACT.
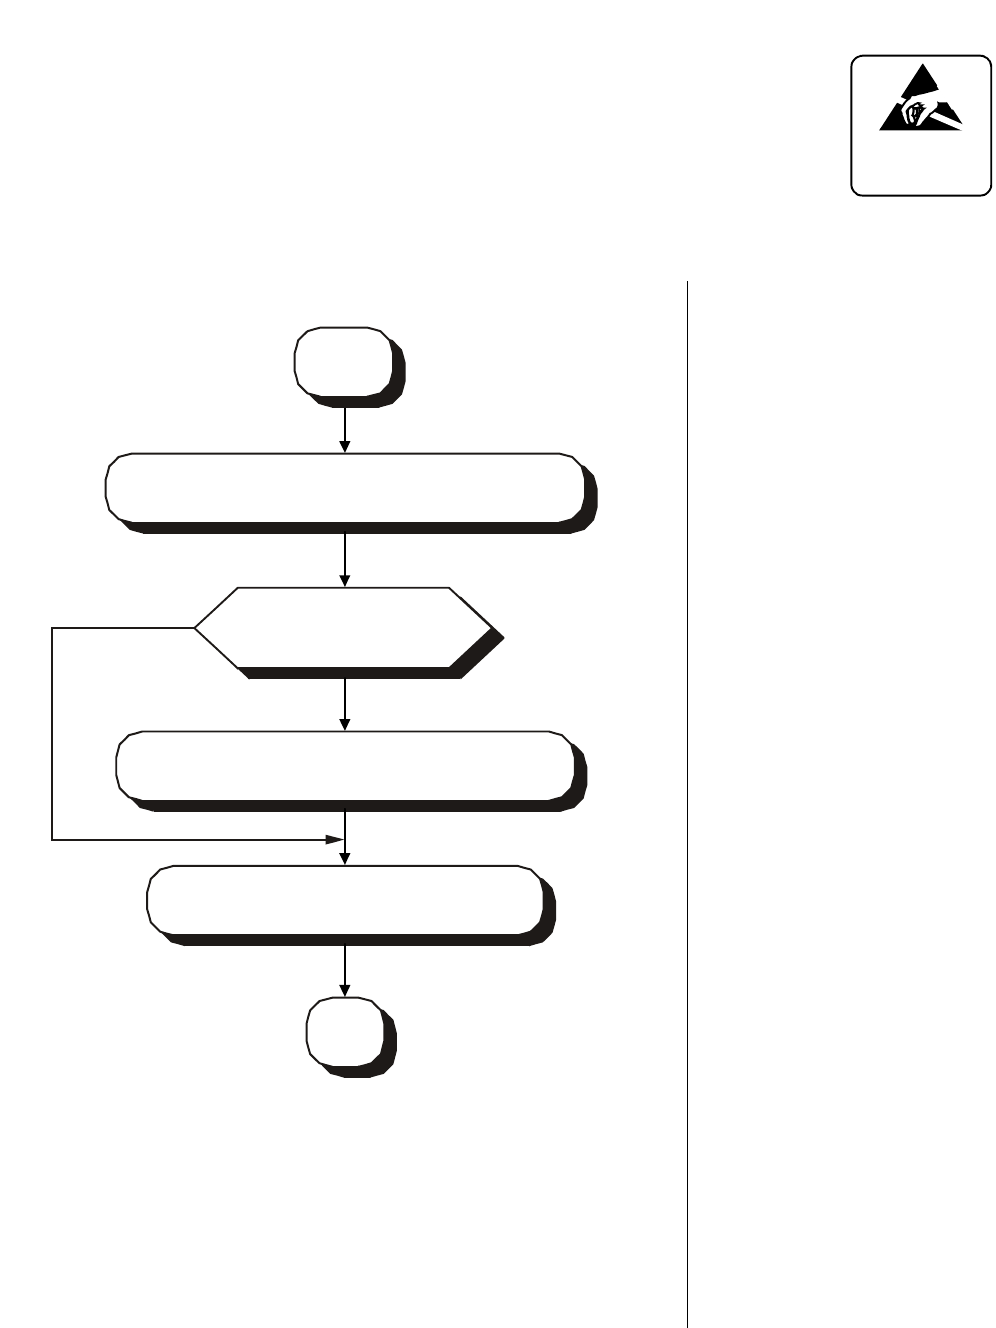
NDA-24307 CHAPTER 4
Page 329
Issue 1
UNIT/CIRCUIT CARD REPLACEMENT PROCEDURE
3.3.6 DLMX Card Replacement Procedure
The DLMX (PA-PC94) card, accommodated in a universal slot of a PIM, is used to
collect the BLF information (associated with Attendant/Desk Console operation)
from DLKC cards of all nodes in the IPX-U system, and to send the collected data
to ATI cards of all nodes. When replacing this card, take the procedure below:
Replacement Procedure
ATTENTION
Contents
Static Sensitive
Handling
Precautions Required
•ACT lamp on the card goes/
remains OFF.
(When the card is formally
active in a dual configuration,
the card is placed to ST-BY
•OPE lamp on the card goes
OFF.
ACT lamp on the mate card
lights steady-green.
Is the DLMX card
in a dual configuration?
On the DLMX (PA-PC94) card to be replaced,
set Element 3 of "MNT" switch DOWN (=ON).
On the DLMX (PA-PC94) card to be
replaced, set the MB key UP.
Check the mate DLMX card's "ACT" mode.
A
YES
NO
START

CHAPTER 4 NDA-24307
Page 330
Issue 1
UNIT/CIRCUIT CARD REPLACEMENT PROCEDURE
A
END
On the new DLMX (PA-PC94) card, set the
switch setting, referring to the card replaced.
On the new DLMX (PA-PC94) card,
set the MB key UP.
Insert the new DLMX (PA-PC94) card into the PIM.
Set the MB key on the new card DOWN.
Extract the DLMX card to be replaced
from the universal slot of the PIM.
ATTENTION
Contents
Static Sensitive
Handling
Precautions Required
•OPE lamp on the card lights
steady-green.

NDA-24307 CHAPTER 4
Page 331
Issue 1
UNIT/CIRCUIT CARD REPLACEMENT PROCEDURE
4. ISWM ACCOMMODATING CIRCUIT CARD REPLACEMENT PROCEDURE
This section explains the procedure for replacing circuit cards mounted in the ISWM.
4.1 Precautions
•Use this procedure to replace a faulty circuit card with a spare or to check a spare card.
•There are the functional switches (having set the default switch) on some of the circuit cards to be
replaced. As for switch setting on the circuit cards, confirm the circuit card mounting face layout for
the PIM. When a circuit card with a default switch setting is replaced with a spare card, always make
the switch setting on the new circuit card the same as on the replaced card. Otherwise, electronic
components on the circuit card may be destroyed, or the circuit card itself may fail to function
normally.
•When handling a circuit card, always use the field service kit for countermeasures against static
electricity. Touching a circuit card without using the field service kit may destroy the card due to static
electricity on the human body.
4.2 Circuit Card Mounting Face Layout
Figure 4-10 shows the face layout of the circuit cards mounted in the TSWM. The circuit cards marked
with * are optional.
Figure 4-15 Circuit Card Mounting Face Layout of ISWM
0 01020304050607080910111213141516171819
TSW00
TWS01
TSW02
TSW03
PLO0
IOGT0
IOGT1
PLO1
TSW10
TSW11
TSW12
TSW13
HSW10
HSW11
HSW00
PWR0
ISWM
Slot No.
PWR1
HSW01
PWRSW: PH-PW14 HSW: PU-SW01 TSW: PU-SW00 PLO: PH-CK16-A17-A IOGT: PH-GT10
FRONT VIEW

CHAPTER 4 NDA-24307
Page 332
Issue 1
UNIT/CIRCUIT CARD REPLACEMENT PROCEDURE
4.3 Operating Procedures
The following section provide operating procedures to replace circuit cards mounted in the ISW. Perform
the operations corresponding to each reference item specified in Table 4-4. The procedures assume that
the system adopts the dual configuration.
Table 4-4 ISW Circuit Cards and Reference Items
CIRCUIT CARD
FUNCTION NAME REFERENCE ITEM REMARKS
IOGT Section 4.3.1, IOGT Card Replacement Procedure
TSW Section 4.3.2, TSW Card Replacement Procedure
HSW Section 4.3.3, HSW Card Replacement Procedure
PLO Section 4.3.4, PLO Card Replacement Procedure
PWR SW Section 4.3.5, PWR SW Card Replacement Procedure
Improper key operations may result in a system down. Operate the key using extreme care.
During replacement of a circuit card, the system issues system messages and activates the related
alarm. Reset the indicated alarm after completing the replacement procedure.
If the indicated alarm is cleared via the RALM/RALMN command, the system also clears the
contents of the system message. Before using the RALM/RALMN command, print the messages
using the DFTD command.
Use the ALM RST button on the TOPU only to reset the alarm lamps.
WARNING
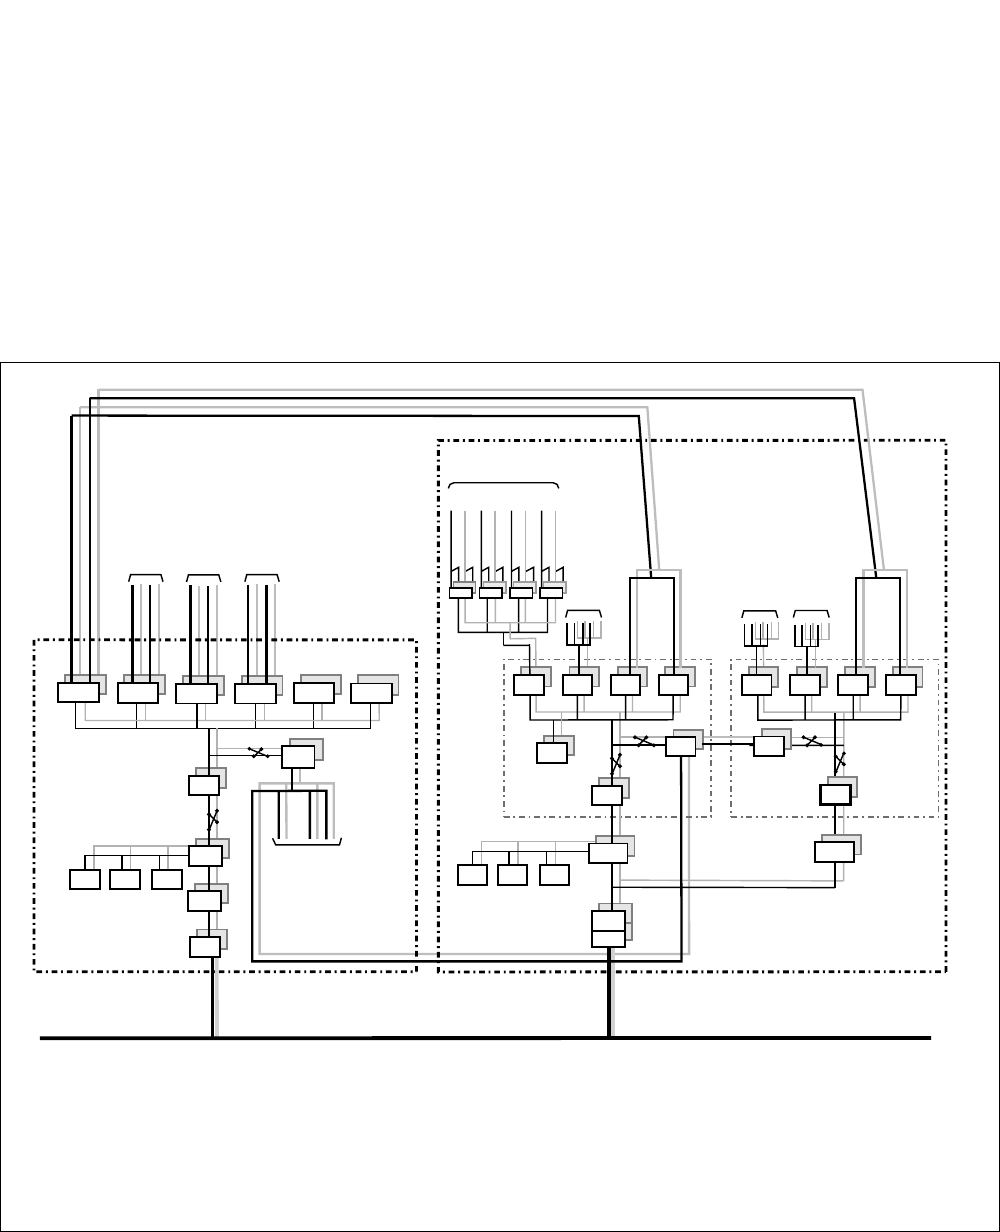
NDA-24307 CHAPTER 4
Page 333
Issue 1
UNIT/CIRCUIT CARD REPLACEMENT PROCEDURE
4.3.1 IOGT Card Replacement Procedure
The IOGT (PH-GT10) card is mounted in Slot No. 10 or 11 within the ISWM. This card provides
MISC/TSW I/O bus interfaces between the CPU and TSW, HSW, PLO cards within the ISWM. Figure
4-16 shows a system block diagram centering upon the CPU and it’s controlling IOGT. If the ACT/
STBY of IOGT is changed over, those of TSW, HSW (in ISW) and TSW, MUX, DLKC (in all LNs)
are also totally changed over. Follow the procedures below to replace an IOGT card with a spare.
Note: To replace the IOGT card, the STBY mode of the card (to be replaced) must be first confirmed. The mode
changeover is available by using the MBR key on the active IOGT card or by using the CMODI
command. See Figure 4-16.
Figure 4-16 System Block Diagram (IOGT and Other Speech Path Echelons)
< ISW (Inter-node Switch) >
ISAGT: PZ-GT13 LANI: PZ-PC19 IOGT: PH-GT10 TSW: PU-SW00
HSW: PU-SW01 PLO: PH-CK16-A/17-A EMA: PH-PC40 IOC: PH-IO24
< LN (Local Node) >
ISAGT-A: PZ-GT13 ISAGT-B: PZ-GT20 LANI: PZ-PC19 GT: PH-GT09 TSW: PH-SW12 MUX: PH-PC36
DLKC: PH-PC20 PLO: PH-CK16-A CLK: PH-CK18 EMA: PH-PC40 IOC: PH-IO24
TSWM0 TSWM1
MISC IOC EMA
PLO
TSW00 TSW01 TSW02 TSW03
GT
ISAGT-A
CPU
LANI
Fusion Link
ISW LN0
To PLO of
LN1 through 3
DLKC
PLO
IOGT
ISAGT
CPU
LANI
To MUX
(IMG1)
To MUX
(IMG2)
To MUX
(IMG3)
CLK
TSW01 TSW02 TSW03 HSW00
To TSW
of LN3
To TSW
of LN1 To TSW
of LN2
To LANI of
LN1 through 3
HSW01
TSW00
Line/Trunk PM
IMG 0
PM BUS
PCM HW
PM BUS
PCM HW
PM BUS
PCM HW
PM BUS
PCM HW
MUX MUX MUX MUX
MISC IOC EMA
TSW00 TSW01 TSW02 TSW03
GT
ISAGT-B
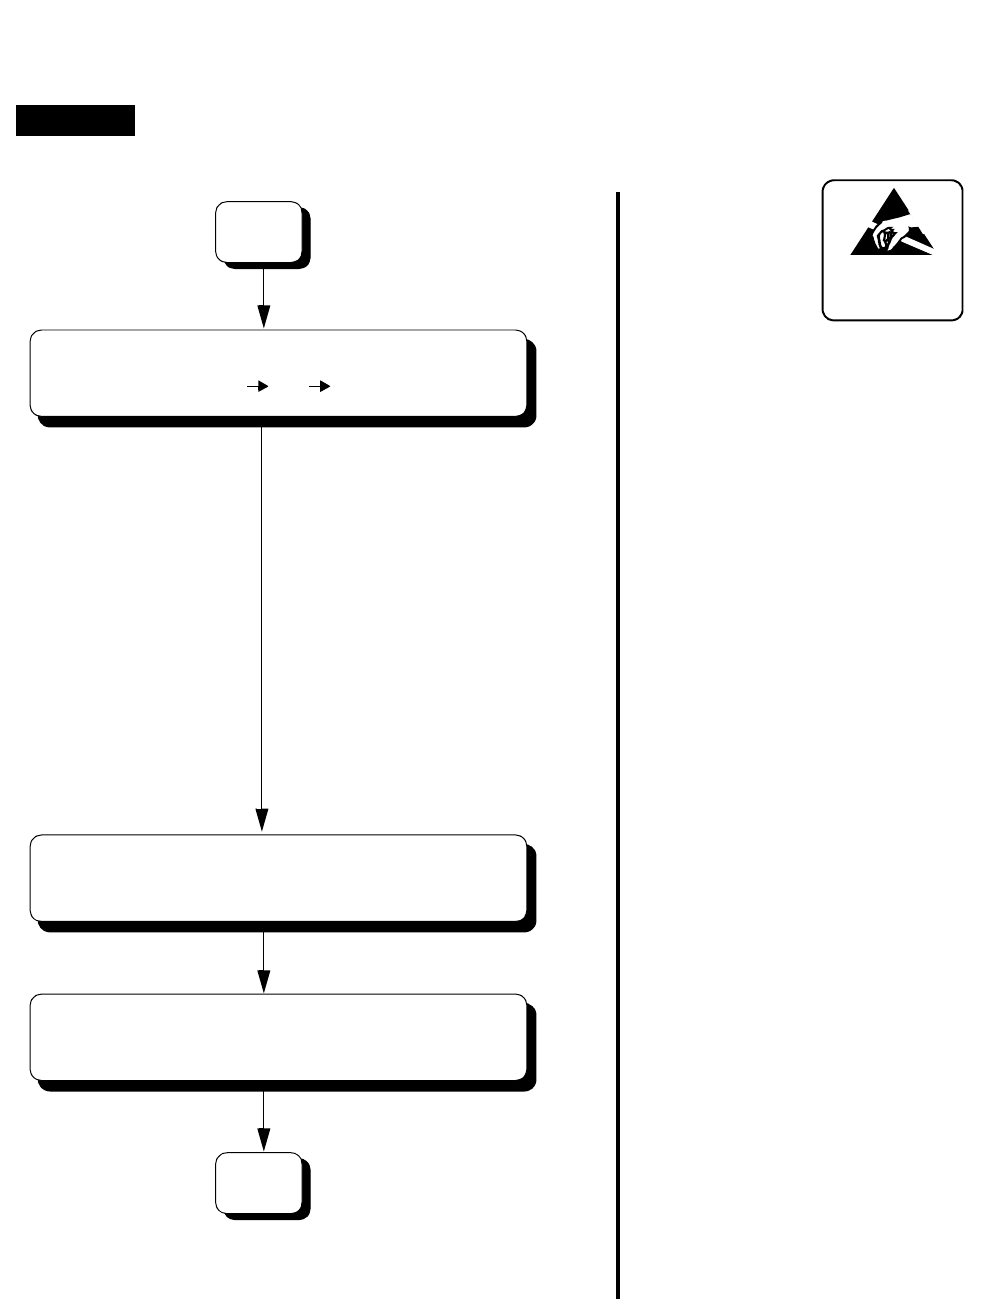
CHAPTER 4 NDA-24307
Page 334
Issue 1
UNIT/CIRCUIT CARD REPLACEMENT PROCEDURE
IOGT Card Replacement Procedure
Use extreme care when operating the keys on the DSP of CPR and PH-GT09 card.
WARNING
ATTENTION
Contents
Static Sensitive
Handling
Precautions Required
System Changeover: Check the following
lamp indications on the IOGT and other
circuit cards in the same Switching block
and ensure they are all OFF:
At the ISW:
•TSW ACT (IOGT cards)
•TSW ACT (TSW cards)
•HSW ACT (HSW cards)
At the LN:
•TSW ACT (TSW cards)
•OPE/MB (DLKC card)
•MUX ACT (MUX cards)
Check the following lamp indications on
the mate IOGT card and other circuit
cards in the same mate block and ensure
they are all a steady green:
At the ISW:
•TSW ACT (IOGT cards)
•TSW ACT (TSW cards)
•HSW ACT (HSW cards)
At the LN:
•TSW ACT (TSW cards)
•OPE/MB (DLKC card)
•MUX ACT (MUX cards)
TSW ACT lamp on the IOGT card
remains OFF.
A
Confirm the mate IOGT's ACT mode.
START
On the IOGT card to be replaced, set the
MBR key UP.
If the card to be replaced is active, flip the MBR
key on the card OFF OFFON
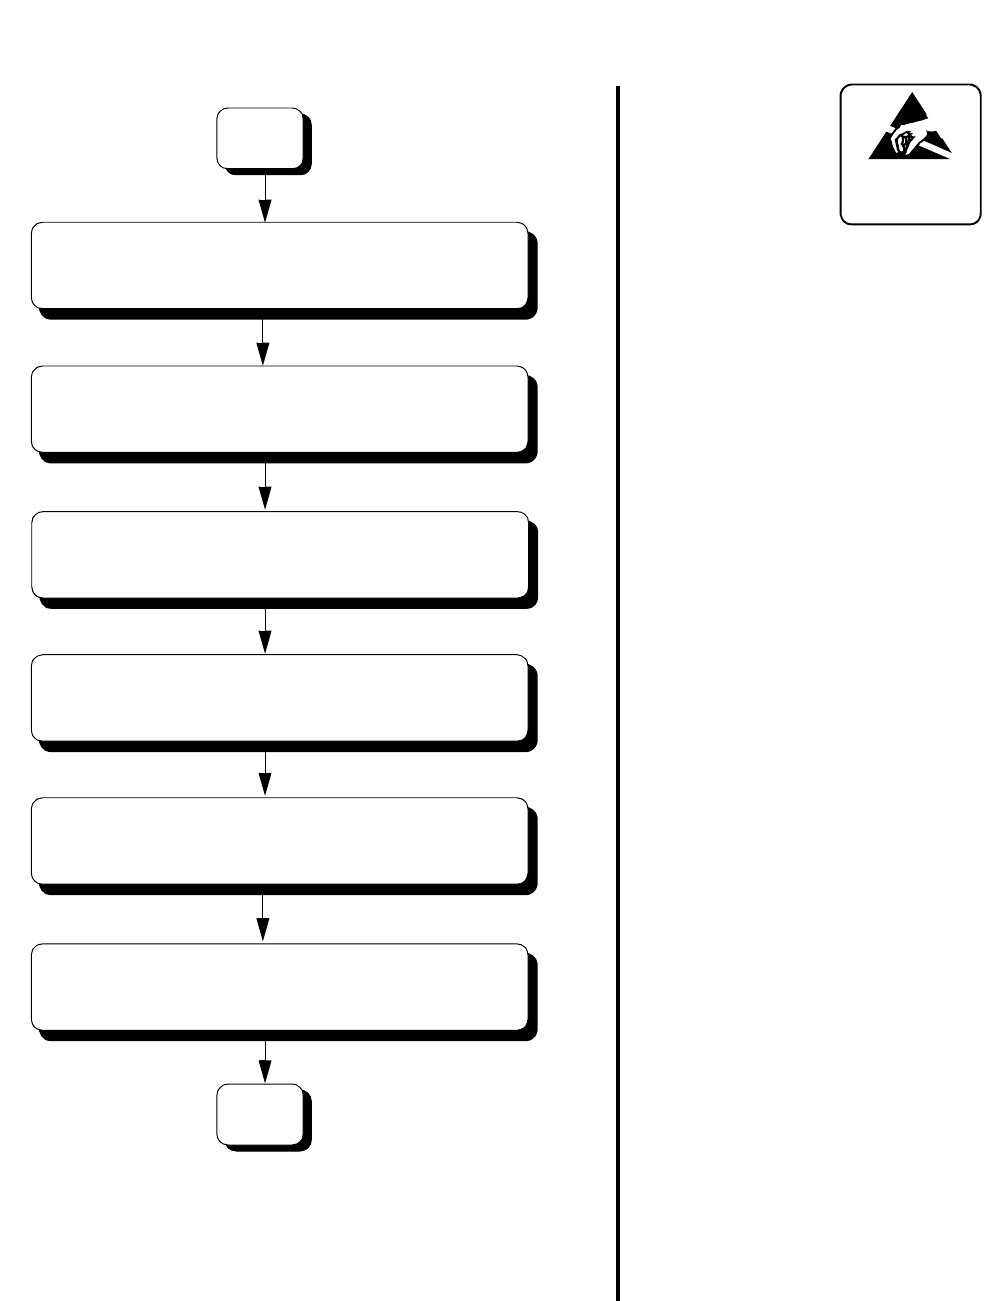
NDA-24307 CHAPTER 4
Page 335
Issue 1
UNIT/CIRCUIT CARD REPLACEMENT PROCEDURE
ATTENTION
Contents
Static Sensitive
Handling
Precautions Required
•TSW ACT lamp on the IOGT card
lights red.
•TSW ACT lamp on the new card
lights red.
•TSW ACT lamp on the IOGT card
goes OFF.
•TSW ACT lamp on the IOGT card
goes OFF.
B
Insert the new card into the ISWM.
A
Set the MBR key on the new card DOWN.
Set the MB key on the new card DOWN.
Extract the IOGT card to be replaced
from the ISWM.
On the new IOGT card, set the MB/MBR key UP,
On the IOGT card to be replaced,
set the MB key UP.
CHAPTER 4 NDA-24307
Page 336
Issue 1
UNIT/CIRCUIT CARD REPLACEMENT PROCEDURE
Note: The system changeover of Speech Path system can be executed also by using the CMODI command. For
details, refer to Chapter 8, Maintenance Commands.
System Changeover: Check the following lamp
indications on the IOGT and other circuit cards
in the same Switching block are all steady
green:
At the ISW:
•TSW ACT (IOGT cards)
•TSW ACT (TSW cards)
•HSW ACT (HSW cards)
At the LN:
•TSW ACT (TSW cards)
•OPE/MB (DLKC card)
•MUX ACT (MUX cards)
Check the following lamp indications on the
mate IOGT card and other circuit cards in the
same mate block are all OFF:
At the ISW:
•TSW ACT (IOGT cards)
•TSW ACT (TSW cards)
•HSW ACT (HSW cards)
At the LN:
•TSW ACT (TSW cards)
•OPE/MB (DLKC card)
•MUX ACT (MUX cards)
ATTENTION
Contents
Static Sensitive
Handling
Precautions Required
END
B
Flip the MBR key on the active IOGT card.
Confirm the new IOGT functions normally.
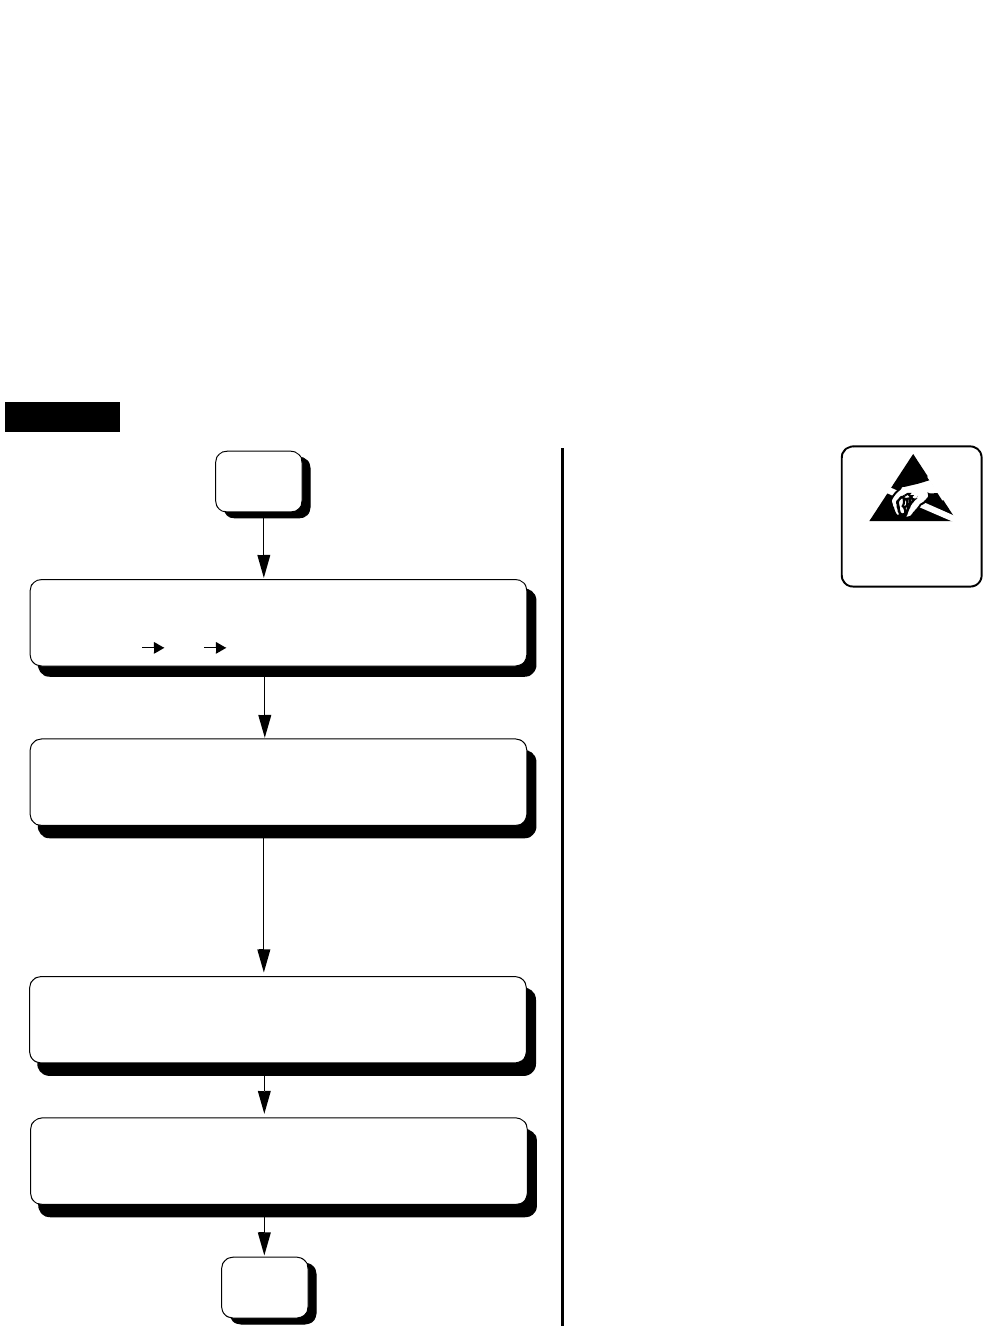
NDA-24307 CHAPTER 4
Page 337
Issue 1
UNIT/CIRCUIT CARD REPLACEMENT PROCEDURE
4.3.2 TSW Card Replacement Procedure
The TSW (PH-SW00) card is mounted in the Slot Nos. ranging from 04 to 07 and Slot Nos. 14 to 17
within the ISWM. Equipped with the Time Division Switch (TSW) and INT function, each circuit card
provides Time Slot (TS) switching for one Local Node (LN). In addition, used together with two PU-
SW01 (HSW) cards in pair, four PU-SW00 (TSW) cards achieve a maximum of 32,768 TS switching
for four LNs.
Note: To replace the TSW card, the STBY mode of the card (to be replaced) must be first confirmed. The mode
changeover is available by using the MBR key on the active IOGT card or by using the CMODI
command. See Figure 4-16.
TSW Card Replacement Procedure
Use extreme care when operating the keys on the circuit card.
WARNING
ATTENTION
Contents
Static Sensitive
Handling
Precautions Required
System Changeover: Check the following lamp
indications on the TSW and other circuit cards in the
same Switching block are all OFF:
At the ISW:
•TSW ACT (IOGT cards)
•TSW ACT (TSW cards)
•HSW ACT (HSW cards)
At the LN:
•TSW ACT (TSW cards)
•OPE/MB (DLKC card)
•MUX ACT (MUX cards)
Check the following lamp indications on the mate
TSW card and other circuit cards in the same mate
block are all a steady green:
At the ISW:
•TSW ACT (IOGT cards)
•TSW ACT (TSW cards)
•HSW ACT (HSW cards)
At the LN:
•TSW ACT (TSW cards)
•OPE/MB (DLKC card)
•MUX ACT (MUX cards)
•TSW ACT lamp on the TSW card remains OFF.
•TSW ACT lamp on the TSW card lights red.
A
START
Check the ACT mode of the mate
Speech Path System.
If the card to be replaced is active, flip the
MBR key on the active IOGT (PH-GT10)
OFFONcard OFF
On the TSW card to be replaced,
set the TSW MBR key UP.
On the TSW card to be replaced,
set the TSW MB key UP.
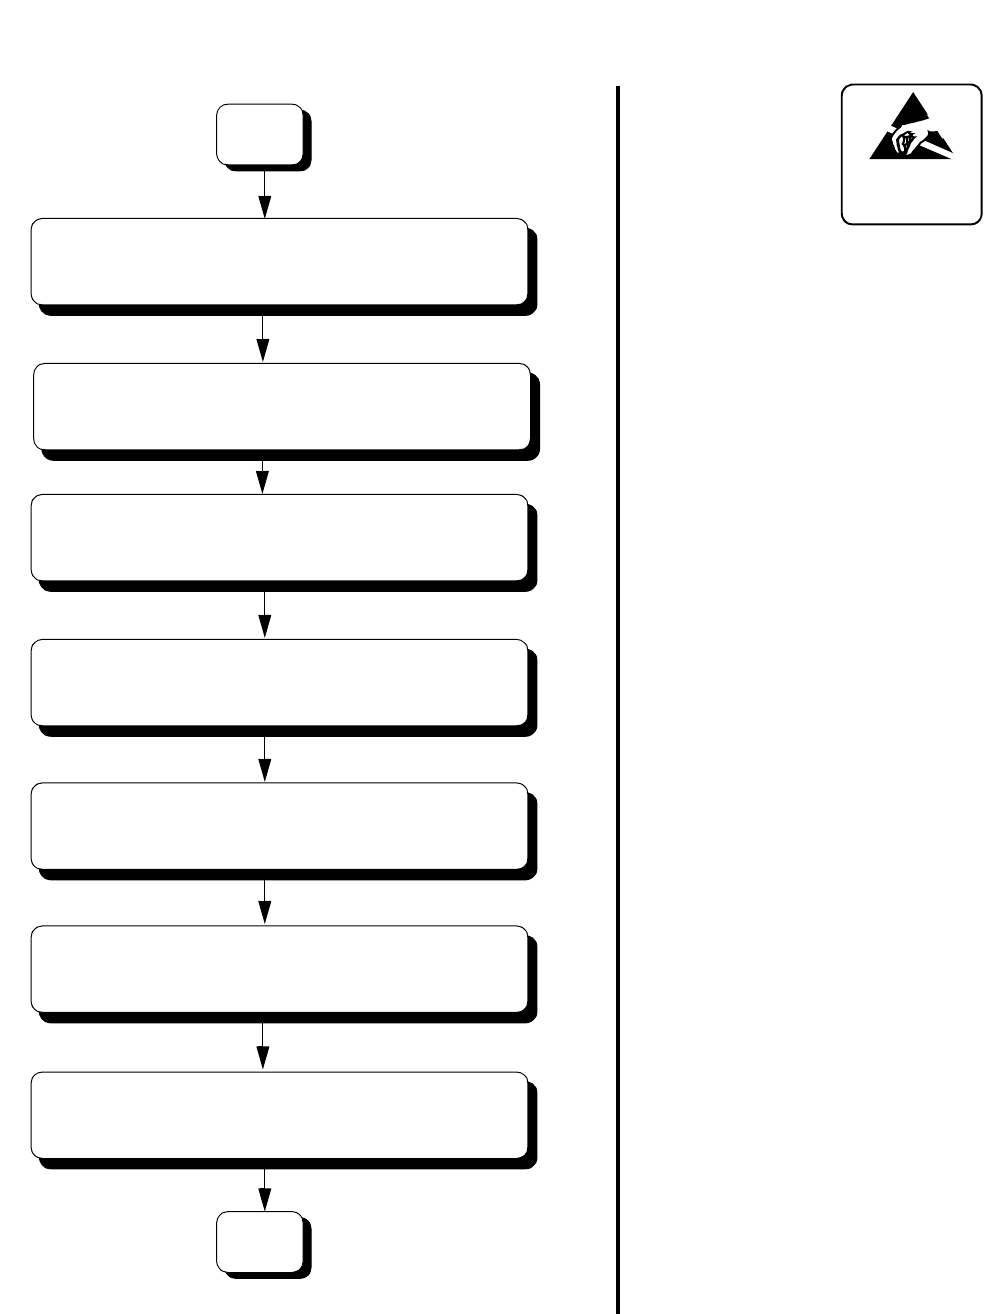
CHAPTER 4 NDA-24307
Page 338
Issue 1
UNIT/CIRCUIT CARD REPLACEMENT PROCEDURE
•TSW ACT lamp on the TSW card
lights red.
•TSW ACT lamp on the TSW card
goes OFF.
•TSW ACT lamp on the TSW card
goes OFF.
ATTENTION
Contents
Static Sensitive
Handling
Precautions Required
B
A
Set the TSW MB key on the new card DOWN.
Insert the new card into the ISWM.
Set the TSW MBR and TSW MB keys on the
new card UP.
Extract the TSW card from the ISWM.
Set the key on the new card, referring to
the card replaced.
Confirm LN00~LN03, LN10~LN13, LN20~23, and
LN30~LN33 LEDs on the new card are lighting green.
Set the TSW MBR key on the new card DOWN.

NDA-24307 CHAPTER 4
Page 339
Issue 1
UNIT/CIRCUIT CARD REPLACEMENT PROCEDURE
Note: The system changeover of Speech Path system can be executed also by using the CMODI command. For
details, refer to Chapter 8, Maintenance Commands.
ATTENTION
Contents
Static Sensitive
Handling
Precautions Required
System Changeover: Check the following
lamp indications on the TSW and other
circuit cards in the same Switching block
are all steady green:
At the ISW:
•TSW ACT (IOGT cards)
•TSW ACT (TSW cards)
•HSW ACT (HSW cards)
At the LN:
•TSW ACT (TSW cards)
•OPE/MB (DLKC card)
•MUX ACT (MUX cards)
Check the following lamp indications on
the mate TSW card and other circuit cards
in the same mate block are all OFF:
At the ISW:
•TSW ACT (IOGT cards)
•TSW ACT (TSW cards)
•HSW ACT (HSW cards)
At the LN:
•TSW ACT (TSW cards)
•OPE/MB (DLKC card)
•MUX ACT (MUX cards)
END
B
Flip the MBR key on the active IOGT card. Confirm
the new card functions normally.
CHAPTER 4 NDA-24307
Page 340
Issue 1
UNIT/CIRCUIT CARD REPLACEMENT PROCEDURE
4.3.3 HSW Card Replacement Procedure
The HSW (PH-SW01) card is mounted in the Slot Nos. 03, 04 and Slot Nos. 18 and 19. The main
functions of this card are as follows:
(a) The swithc omposition is T-T-S-T (T:Time division, S: Space division, T: Time division), and the
space division is composed with this circuit card.
(b) This circuit card collects the 16 highways of PCM data from TSW cards and sends 8 highways to
TSW cards by one card. It is used to perform 16 highways switching by two PU-SW01 cards.
Note: To replace the HSW card, the STBY mode of the card (to be replaced) must be first confirmed. The mode
changeover is available by using the MBR key on the active IOGT card or by using the CMODI com-
mand. See Figure 4-16.
HSW Card Replacement Procedure
Use extreme care when operating the keys on the circuit card.
WARNING
ATTENTION
Contents
Static Sensitive
Handling
Precautions Required
System Changeover: Check the following lamp
indications on the HSW and other circuit cards in the
same Switching block are all OFF:
At the ISW:
•TSW ACT (IOGT cards)
•TSW ACT (TSW cards)
•HSW ACT (HSW cards)
At the LN:
•TSW ACT (TSW cards)
•OPE/MB (DLKC card)
•MUX ACT (MUX cards)
Check the following lamp indications on the mate
HSW card and other circuit cards in the same mate
block are all a steady green:
At the ISW:
•TSW ACT (IOGT cards)
•TSW ACT (TSW cards)
•HSW ACT (HSW cards)
At the LN:
•TSW ACT (TSW cards)
•OPE/MB (DLKC card)
•MUX ACT (MUX cards)
A
START
Check the ACT mode of the mate
Speech Path System.
If the card to be replaced is active, flip the
MBR key on the active IOGT (PH-GT10)
OFFONcard OFF
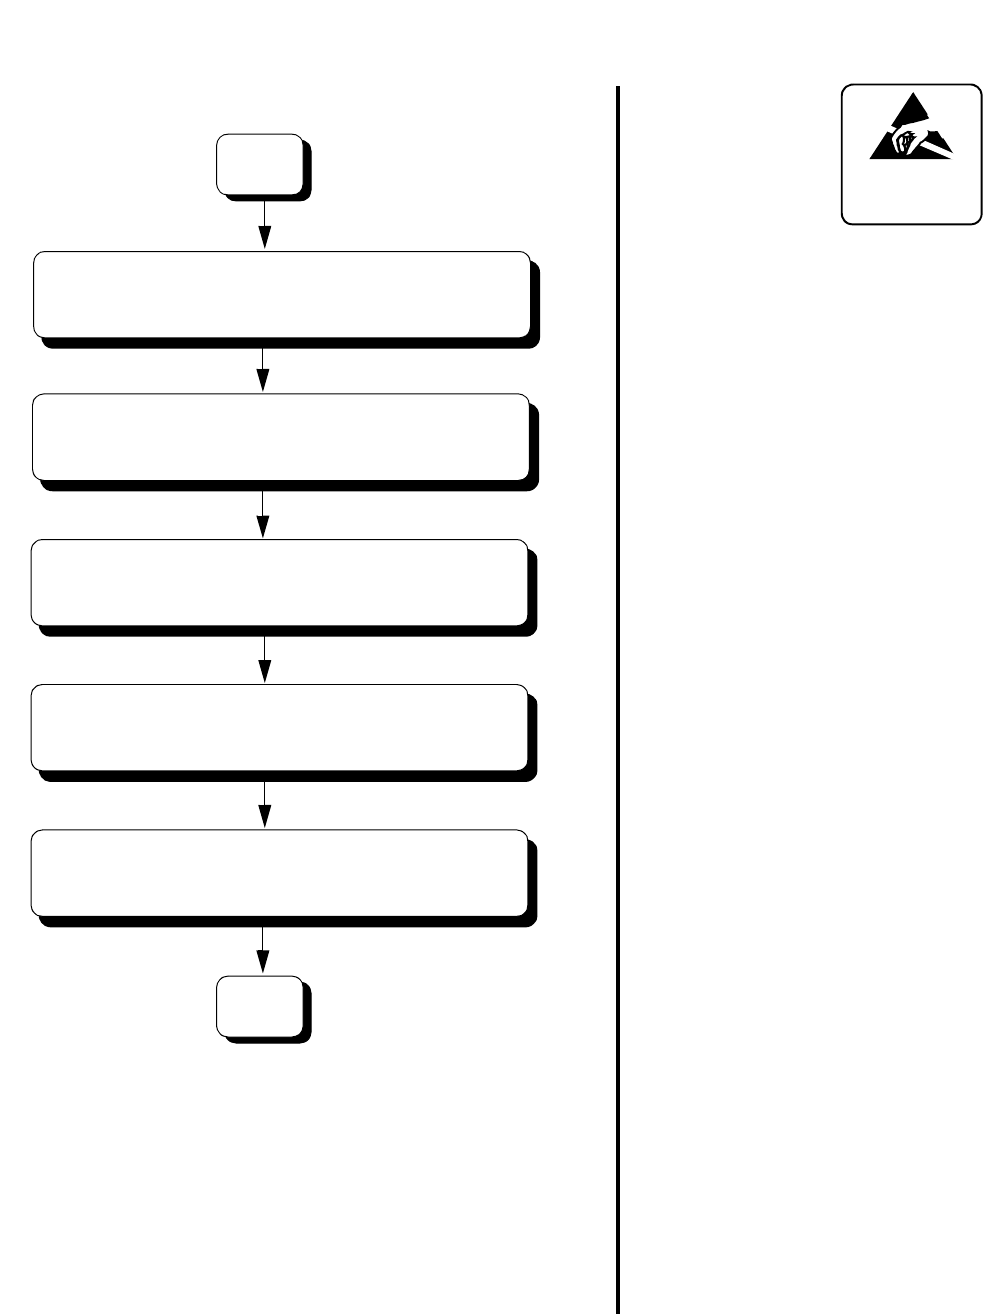
NDA-24307 CHAPTER 4
Page 341
Issue 1
UNIT/CIRCUIT CARD REPLACEMENT PROCEDURE
•HSW ACT lamp on the HSW card
lights red.
•HSW ACT lamp on the HSW card
goes OFF.
•HSW ACT lamp on the HSW card
goes OFF.
ATTENTION
Contents
Static Sensitive
Handling
Precautions Required
B
A
Set the HSW MB keys on the new card DOWN.
Insert the new card into the ISWM.
Set the HSW MB keys on the new card UP.
Extract the HSW card from the ISWM.
On the HSW card to be replaced, set the
MB key UP.
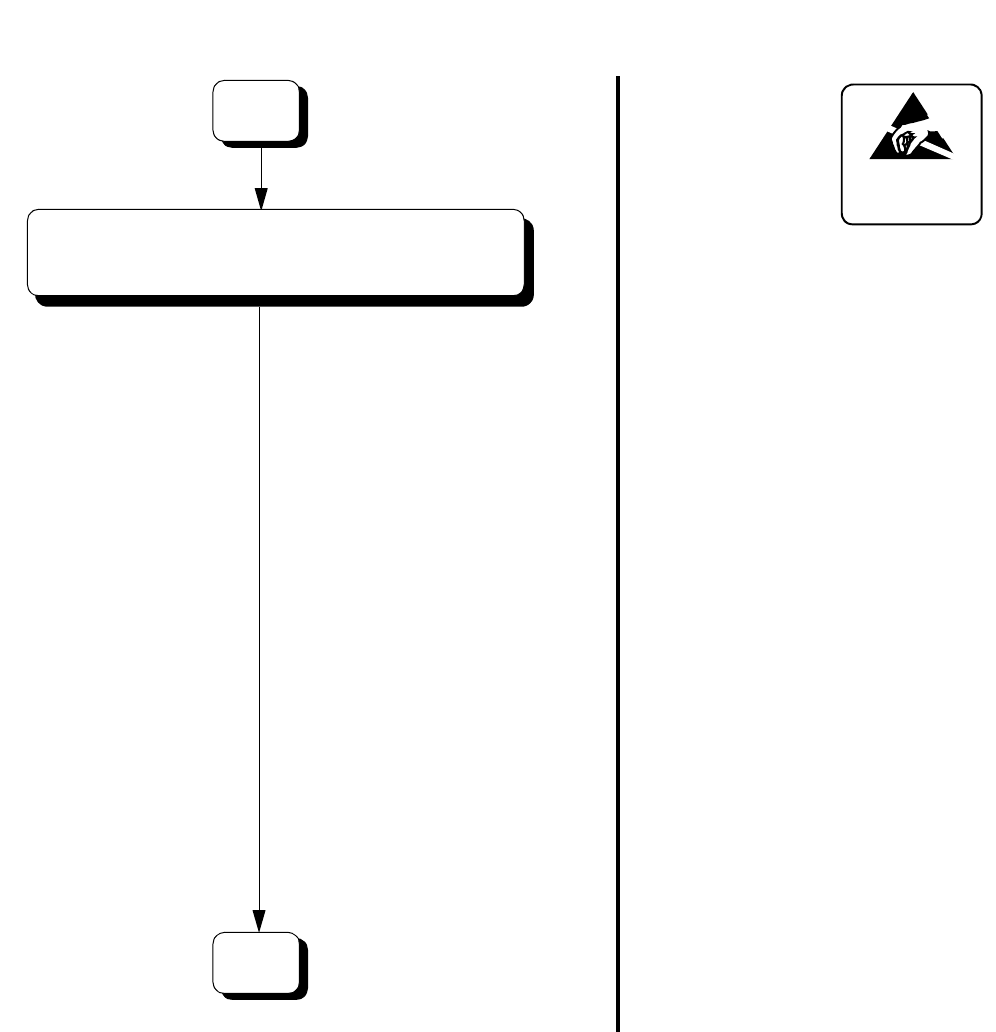
CHAPTER 4 NDA-24307
Page 342
Issue 1
UNIT/CIRCUIT CARD REPLACEMENT PROCEDURE
Note: The system changeover of Speech Path system can be executed also by using the CMODI command. For
details, refer to Chapter 8, Maintenance Commands.
ATTENTION
Contents
Static Sensitive
Handling
Precautions Required
System Changeover: Check the following
lamp indications on the TSW and other
circuit cards in the same Switching block
are all steady green:
At the ISW:
•TSW ACT (IOGT cards)
•TSW ACT (TSW cards)
•HSW ACT (HSW cards)
At the LN:
•TSW ACT (TSW cards)
•OPE/MB (DLKC card)
•MUX ACT (MUX cards)
Check the following lamp indications on
the mate TSW card and other circuit cards
in the same mate block are all OFF:
At the ISW:
•TSW ACT (IOGT cards)
•TSW ACT (TSW cards)
•HSW ACT (HSW cards)
At the LN:
•TSW ACT (TSW cards)
•OPE/MB (DLKC card)
•MUX ACT (MUX cards)
END
B
Flip the MBR key on the active IOGT card in the
same block. Confirm the new card functions normally.

NDA-24307 CHAPTER 4
Page 343
Issue 1
UNIT/CIRCUIT CARD REPLACEMENT PROCEDURE
4.3.4 PLO Card Replacement Procedure
The PLO (PH-CK16-A/17-A) card is located in Slot No. 09 or 13 within the ISWM. Used together
with a different direct digital interface circuit card, the card’s main function is to set up the clock
synchronization on the network. Use the procedures below to replace the PLO card with a spare.
Note: The ACT/STBY of PLO can be changed over via a single MB key operation on the circuit card (ACT
side). Though its circuit is controlled by the IOGT (PH-GT10) card via TSW I/O bus, the switching
system of PLO (ISW) is not affected by the Speech Path system changeover, differing from other
echelons such as IOGT, TSW, and HSW. Refer to Section 12, Chapter 6.
Replacement Procedure
ATTENTION
Contents
Static Sensitive
Handling
Precautions Required
•PLO system is changed over from
ACT to STBY mode.
•OPE lamp on the PLO card goes
OFF.
Check the following lamp indications
on the mate PLO cards:
•OPE = Steady-green
A
START
Extract the PLO card to be replaced
from the ISWM.
Check the mate PLO's ACT mode.
On the active PLO (PH-CK16-A/17-A) card, set the
MB key UP.
Set the keys on the new card according to
the card replaced.

CHAPTER 4 NDA-24307
Page 344
Issue 1
UNIT/CIRCUIT CARD REPLACEMENT PROCEDURE
•OPE lamp on the new card is OFF.
•OPE lamp on the new card remains
OFF.
ATTENTION
Contents
Static Sensitive
Handling
Precautions Required
END
A
Insert the new PLO card into the ISWM.
On the new PLO card, set the MB key UP.
Set the MB key on the new card DOWN.
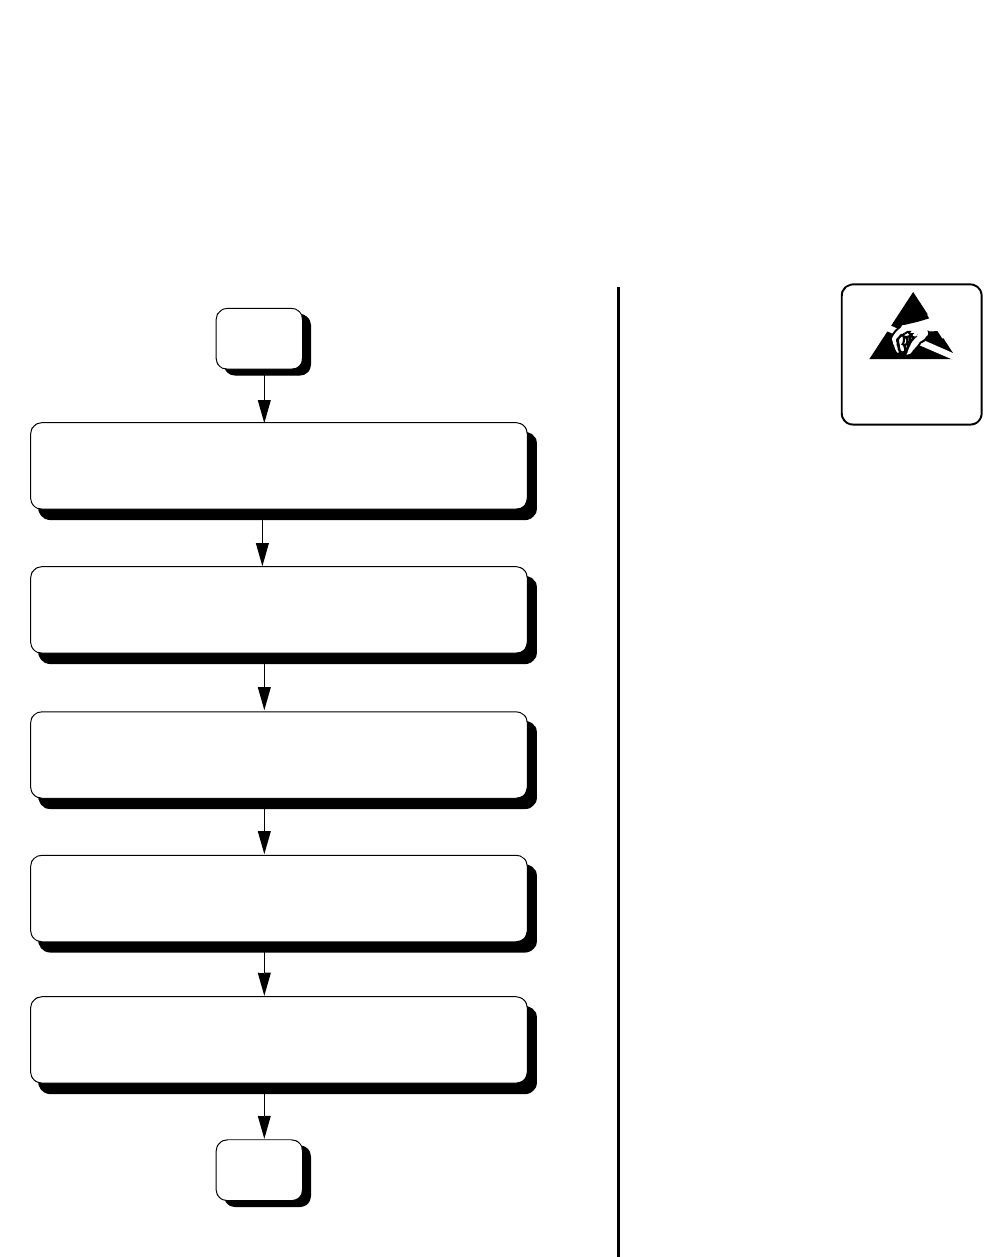
NDA-24307 CHAPTER 4
Page 345
Issue 1
UNIT/CIRCUIT CARD REPLACEMENT PROCEDURE
4.3.5 PWR SW Card Replacement Procedure
The PWR SW (PH-PW14) card is mounted in Slot No. 00 or 01 within the ISWM. The card’s main
function is to supply DC -48V operating power to the same ISWM circuit cards and also DC +5, -5 V
and +12 V output power to the PLO cards. Use the following procedures to replace the card with a new
one.
Replacement Procedure
ATTENTION
Contents
Static Sensitive
Handling
Precautions Required
•P-ON lamp on the PWR SW card
goes OFF.
•ALM lamp on the PWR SW card
lights red.
•P-ON lamp on the new card is OFF.
•ALM lamp on the PWR SW card
lights red.
•P-ON lamp on the new card lights
steady-green.
•ALM lamp on the PWR SW goes
OFF.
END
START
Extract the PWR SW card to be replaced
from the ISWM.
On the new PWR SW card, set the SW key DOWN.
On the PWR SW (PH-PW14) card, set the
SW key DOWN.
Insert the new PWR SW card into the ISWM.
On the new PWR SW card, set the SW key UP.

CHAPTER 4 NDA-24307
Page 346
Issue 1
UNIT/CIRCUIT CARD REPLACEMENT PROCEDURE
5. FAN UNIT REPLACEMENT
This section explains how to replace the Fan Unit (FANU), which is fastened on the TOPU or inside the
dedicated fan box within the system. Because the fan is a vital device to protect the system from heated air, it
is recommended that the fan (a total of three per unit) be replaced at least every two years to guarantee its high
performance.
The mounting location of FANU differs, depending on the module configuration of each cabinet. When the
system consists of a total of three modules or less, the FANU is mounted on the TOPU of the cabinet.
Otherwise, the FANU is housed in the dedicated fan box in the center of the cabinet.
Figure 4-17 FANU Locations
Replacement Procedure: FANU on TOPU
When the FANU is mounted on the TOPU, perform the following replacement procedure. (Refer to Figure 4-
18.):
STEP 1 Using a Phillips screwdriver, remove the four screws. Lift away the top cover.
STEP 2 Turn OFF the PWR SW on the PZ-M369.
STEP 3 Remove the fan fuse (5A) on the PZ-M369.
STEP 4 Remove the fan cables from the fan connector and the connector(s) corresponding to the fan to
be replaced (for example, when replacing fan 0, disconnect the FC0 connector together with
the fan connector).
/ / / / / / / / / / / / / / / / / / / / / / / / / / / / / / / / / / / / / / / / / / / / / / / / / / / / / / / / / / / / / / / /
NEC
NEAX 2400 IMX
TOPU
NEC
NEAX 2400 IMX
TOPU
FAN BOX
located here.
FANU is
When FANU is mounted on TOPU When FANU is mounted in FAN BOX
FRONT VIEW
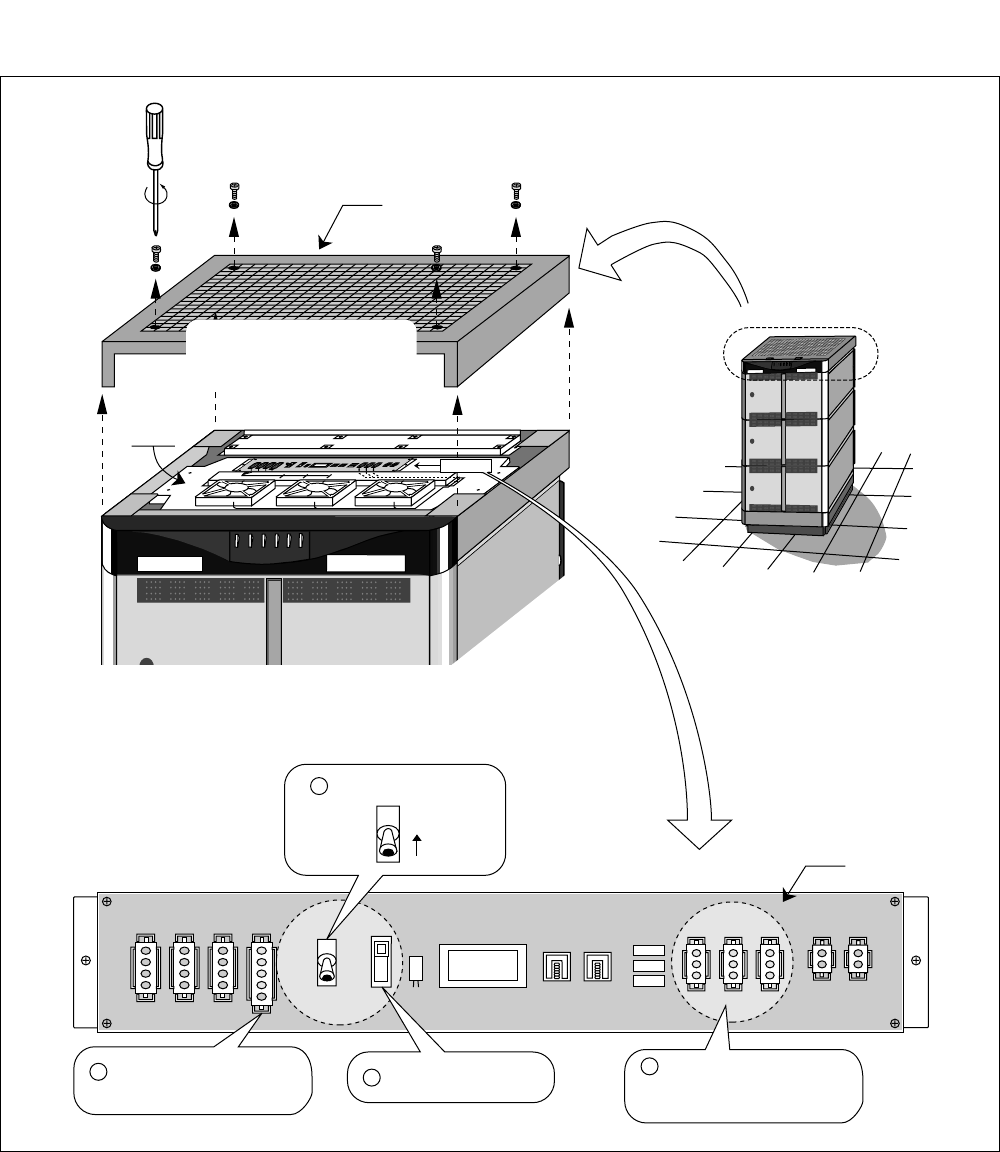
NDA-24307 CHAPTER 4
Page 347
Issue 1
UNIT/CIRCUIT CARD REPLACEMENT PROCEDURE
Figure 4-18 Preparation for FANU Replacement (Fans on TOPU)
STEP 5 Remove the four screws fastening the fan to be replaced. Refer to Figure 4-19.
Note: The removed screws are used in STEP 7 again. Do not dispose of them when unscrewing the fan here.
PBX
NEC
NEAX 2400 IMS
NEAX 2400 IMS
NEC
Top Cover
Unscrew the top cover by using
a Phillips Screwdriver and
remove it from the TOPU.
...
...
.........
.........
.........
.........
.........
.........
.........
..............
.............. ...................
...................
........
........
........
........
.....
.....
.....
.....
.....
.....
FANU
PZ-M369
TH2 FAN TALM1 TALM0
TH1 TH0 FC0 FC1 FC2
PZ-M369
ON
OFF
Auto
FC2 FC1 FC0
OFF
1 Turn PWR SW "OFF"
3 Disconnect the cable(s) and
the connector(s) here used for
the FAN to be replaced.
2 Remove this FAN fuse.
3 Disconnect the FAN cable
from this power connector.
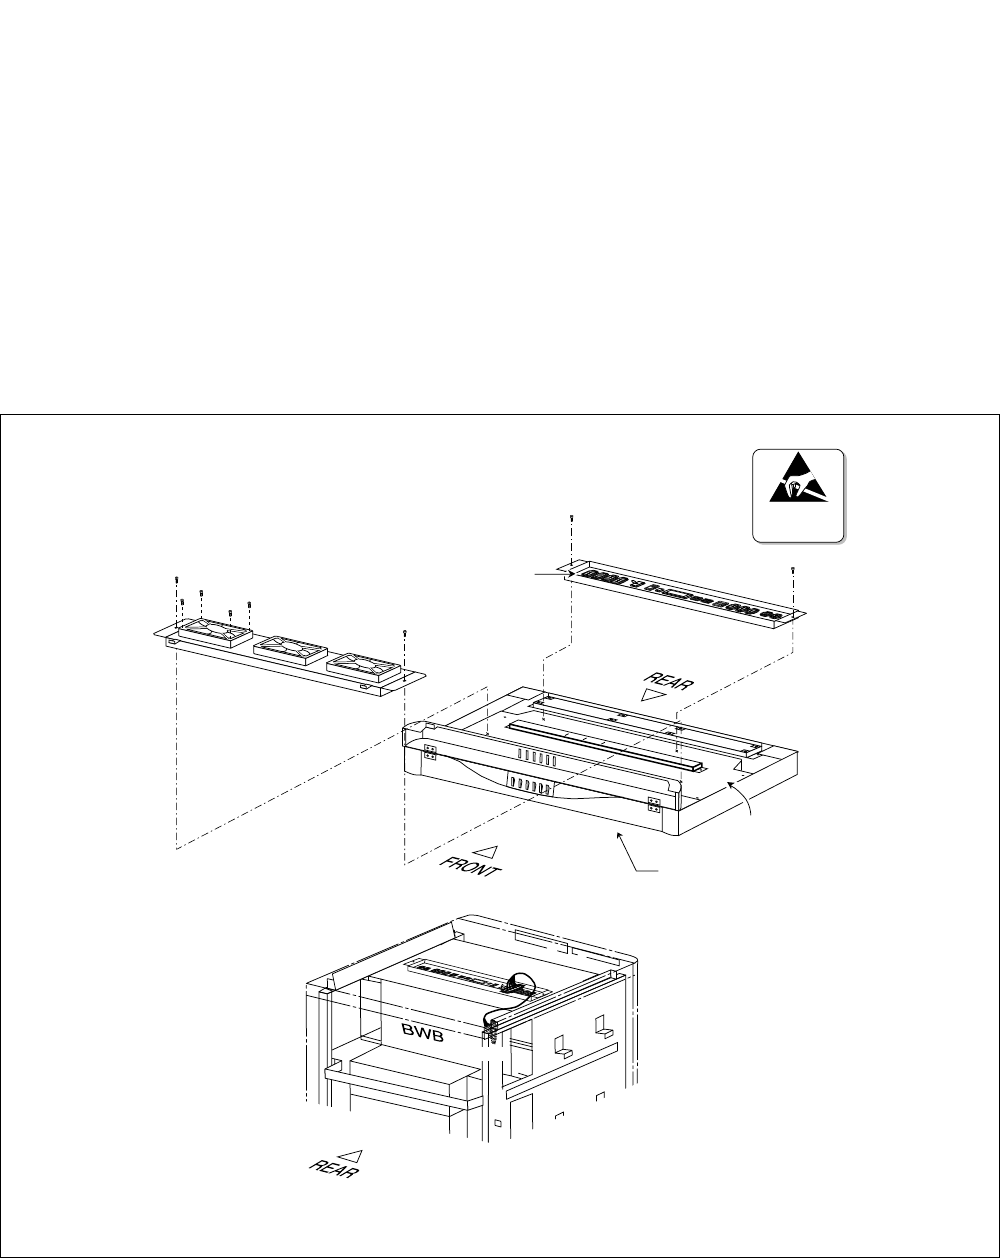
CHAPTER 4 NDA-24307
Page 348
Issue 1
UNIT/CIRCUIT CARD REPLACEMENT PROCEDURE
STEP 6 Remove the unscrewed fan from the FANU.
STEP 7 Fasten the new fan with the removed screws.
STEP 8 Connect the new fan cables to the fan connector and the connector(s) disconnected in STEP 4.
STEP 9 Fix the fan fuse (5A) onto the PZ-M369.
STEP 10 Set the PWR SW on the PZ-M369 to the AUTO position.
Note: The switch setting of the PWR SW can be ON, depending on the location conditions of the system.
STEP 11 Attach the top cover again to the original location.
Figure 4-19 How to Replace FANU (Fans on TOPU)
ATTENTION
Contents
Static Sensitive
Handling
Precautions Required
.
..
.
..
.........
.........
.........
.........
.........
.........
.........
..............
.............. ...................
...................
........
........
........
........
.....
.....
.....
.....
.....
.....
FANU
(FAN)
(FAN)
TOPU
PBX
PZ-M369
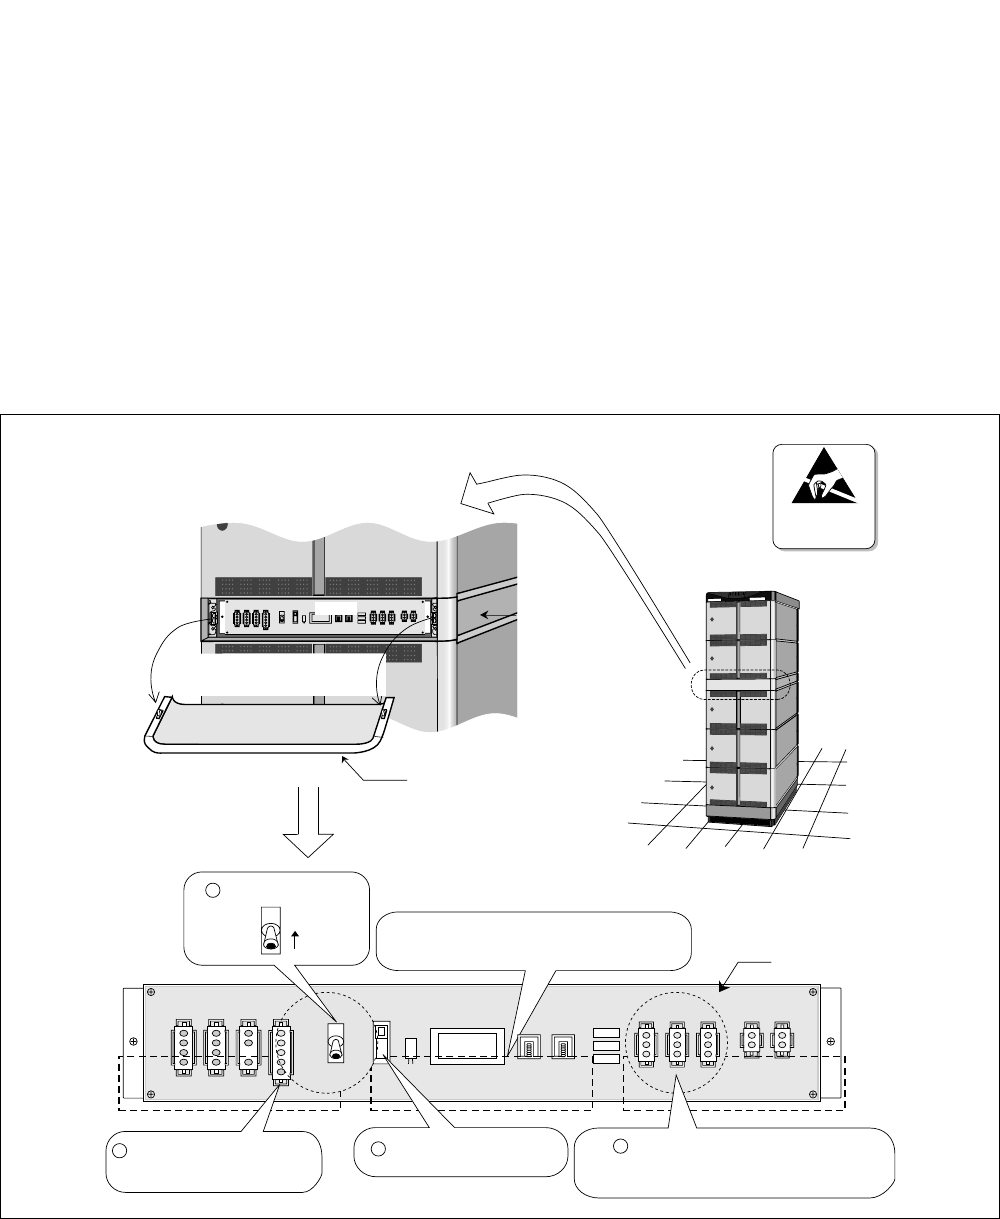
NDA-24307 CHAPTER 4
Page 349
Issue 1
UNIT/CIRCUIT CARD REPLACEMENT PROCEDURE
Replacement Procedure: FANU in Fan Box
When the FANU is mounted in the fan box, perform the following replacement procedures:
STEP 1 Remove the front cover of the fan box. Then, extract the FANU.
STEP 2 Turn OFF the PWR SW on the PZ-M369. (Refer to Figure 4-20.)
STEP 3 Remove the fan fuse (5A) on the PZ-M369.
STEP 4 Remove the fan cables from the fan connector and the connector(s) corresponding to the fan to
be replaced (for example, when replacing Fan 1, disconnect the FC0 connector together with
the fan connector).
Figure 4-20 Preparation for FANU Replacement (Fans in Fan Box)
NEC
NEAX 2400 IMS
PBX
ATTENTION
Contents
Static Sensitive
Handling
Precautions Required
FAN BOX
Front Cover
Remove the Front Cover
and pull out the FANU.
PZ-M369
TH2 FAN TALM1 TALM0
TH1 TH0 FC0 FC1 FC2
These dotted squares indicate the fans.
They reside in the back side of PZ-M369. PZ-M369
ON
OFF
Auto
FC0 FC1 FC2
OFF
1 Turn PWR SW OFF
3 Disconnect the FAN cable(s) and
the connector(s) here used for the
FAN to be replaced.
3 Disconnect the FAN cable
from this connector.
2 Remove this FAN fuse.
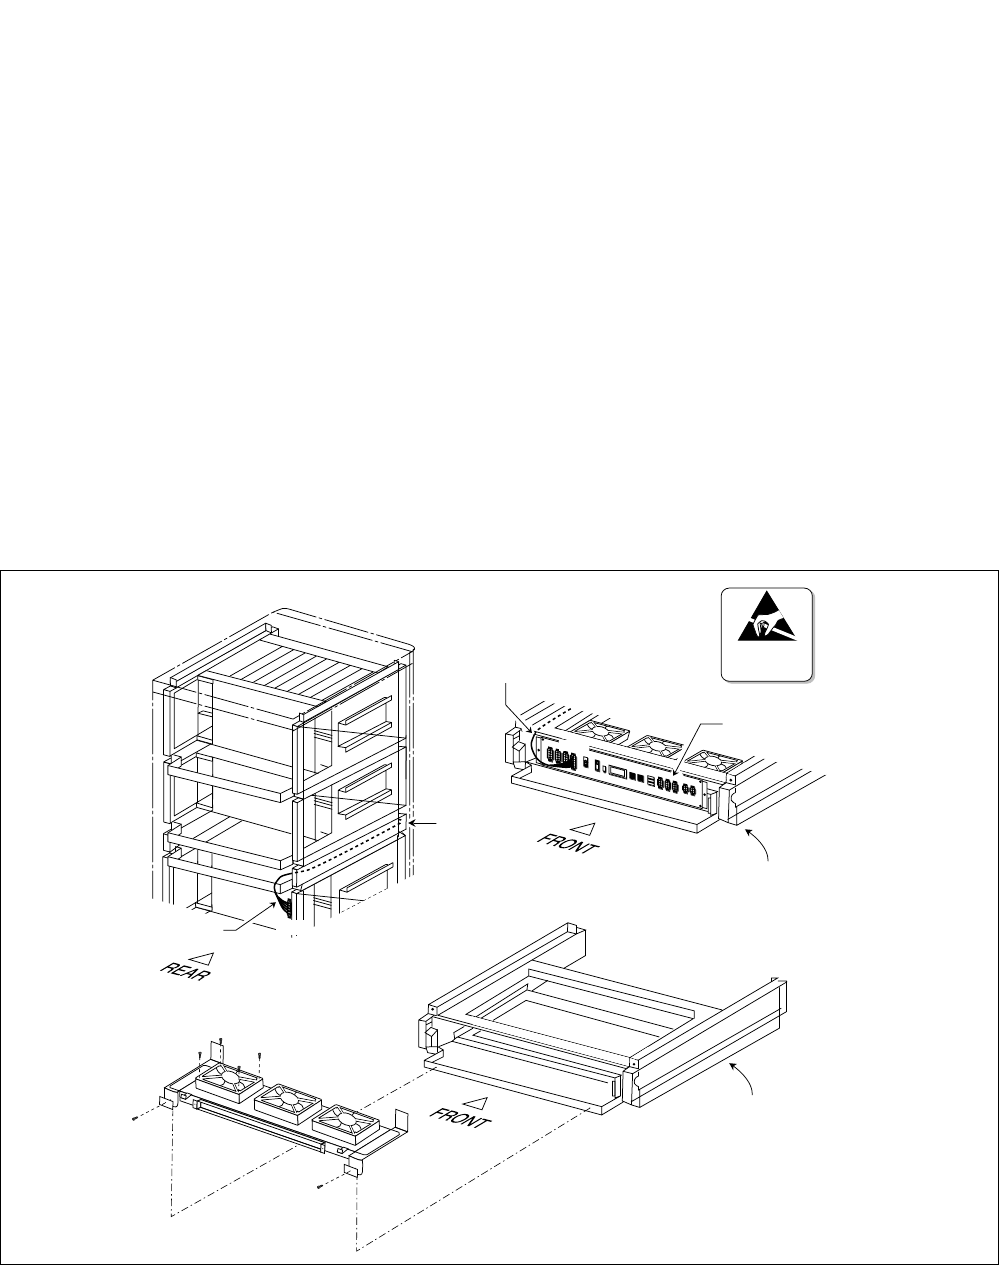
CHAPTER 4 NDA-24307
Page 350
Issue 1
UNIT/CIRCUIT CARD REPLACEMENT PROCEDURE
STEP 5 Take off the four screws fastening the fan to be replaced. (Refer to Figure 4-21.)
Note: The removed screws are used in STEP 7 again. Do not dispose of them when unscrewing the fan here.
STEP 6 Remove the unscrewed fan from the FANU.
STEP 7 Fasten the new fan with the removed screws.
STEP 8 Connect the new fan cables to the fan connector and the connector(s) disconnected in STEP 4.
STEP 9 Fix the fan fuse (5A) again onto the PZ-M369.
STEP 10 Insert the FANU into the fan box and fasten it with the two screws.
STEP 11 Set the PWR SW on the PZ-M369 to the AUTO position.
Note: The switch setting of the PWR SW can be ON, depending on the location conditions of the system.
STEP 12 Attach the front cover to the original location.
Figure 4-21 How to Replace FANU (Fans in Fan Box)
FAN BOX
FAN BOX
(FAN)
FAN power cable
FAN BOX
PBX
FAN power cable
(FAN)
PZ-M369
ATTENTION
Contents
Static Sensitive
Handling
Precautions Required
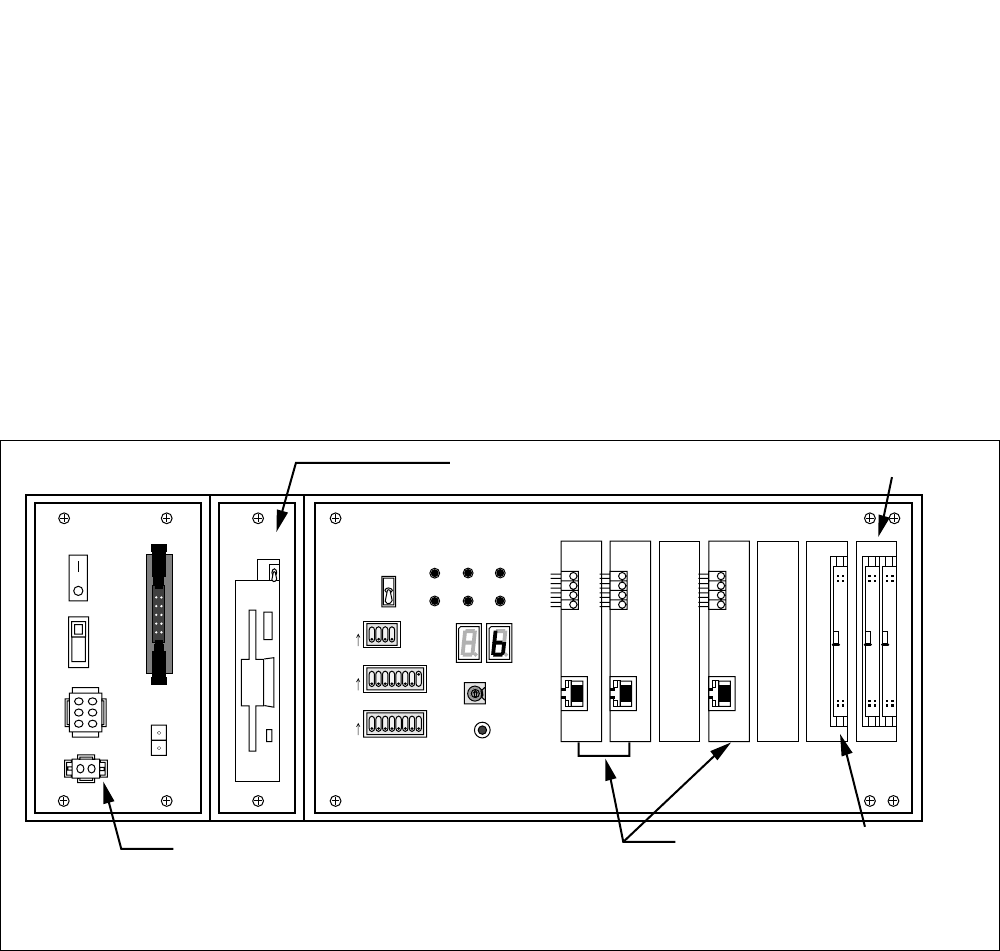
NDA-24307 CHAPTER 4
Page 351
Issue 1
UNIT/CIRCUIT CARD REPLACEMENT PROCEDURE
6. CPR COOLING FAN REPLACEMENT
This section explains how to replace a Cooling Fan in the back side of the CPR. This procedure is necessary
when a fault is detected in the Cooling Fan. Because the fan is a vital device to protect the CPR from heated
air, it is also recommended that the fan be replaced at least every two years, even if a fault is not detected.
STEP 1 Set the CPU, whose rack houses the fan to be replaced, in STBY mode via the MBR key on
the DSP (Refer to Figure 4-22.) Note
Note: For the ACT/STBY changeover of the CPU, see Chapter 6.
STEP 2 Disconnect the power alarm cable from the PALM connector on PZ-PW92.
STEP 3 Turn OFF the PWR SW on the PZ-PW92 (Refer to Figure 4-22.)
Figure 4-22 CPR Face Layout
STEP 4 Disconnect the power, bus, and Ethernet cables from the relevant connectors.
•Power cables from OUTPWR, INPWR connectors on PZ-PW92
•Bus cables from the front connectors on PZ-GT13/PZ-GT20
•Ethernet (UTP CTG5 ST CA-n) cables from the front connectors on the PZ-PC19.
STEP 5 Remove the front bracket, and then take off the four screws fastened onto the CPU. (Refer to
Figure 4-23.)
STEP 6 Extract the CPR from the LPM. (Refer to Figure 4-23.)
12345678
OFF
12345678
OFF
1234
OFF
MBR
FDD
ON
OFF
ON
OFF
OUT PWR
IN PWR
5A
HDD
SW MB
SYSTEM SELECT0
SENSE
SYSTEM SELECT1
SYSTEM SELECT2 CPURST
SLOT No. 0 1 2 3 4 5 6
STATUS
IMG1 IMG2 IMG3
CPUOPE WDT IMG0
ON
ON
ON
4
C
0
2
6
A
E
PZ-IO27
PZ-PW92 PZ-PC19 (LANI) PZ-GT20 (ISAGT)
PZ-GT13 (ISAGT)
PALM
Note 1
Note 2
Note 1: PZ-GT20 is located in LN only.
Note 2: In place of PZ-I027, the CPR may be equipped with PZ-I028 which does not have the MB key.
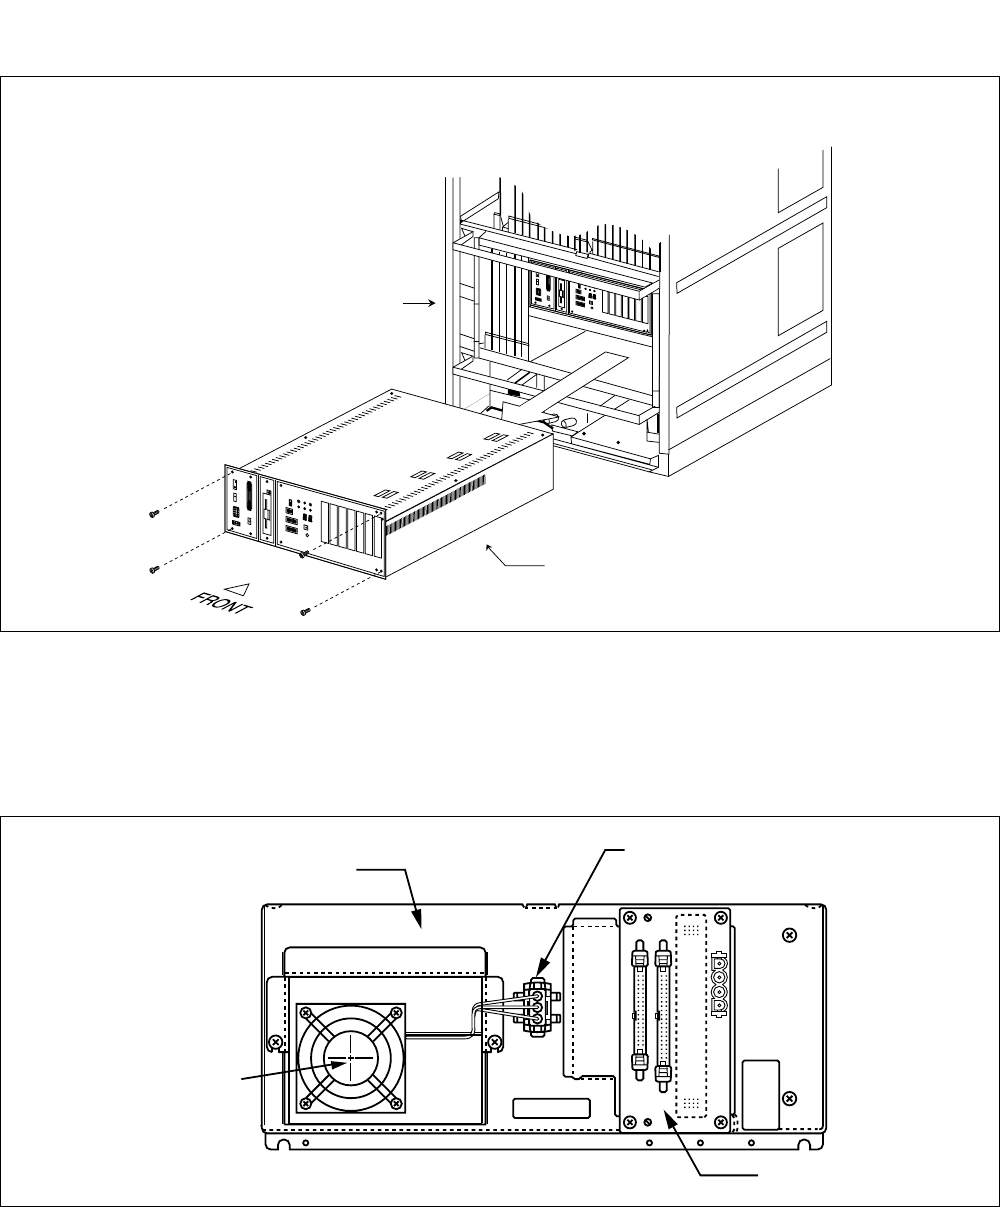
CHAPTER 4 NDA-24307
Page 352
Issue 1
UNIT/CIRCUIT CARD REPLACEMENT PROCEDURE
Figure 4-23 Extraction of CPR from LPM
STEP 7 Disconnect the fan cable from the connector in the backbone of CPR.
Note: The Cooling Fan is located in the backbone of CPR and the cable connector lies in its right side. Refer
to Figure 4-24.
Figure 4-24 Rear View of CPR
STEP 8 Loosen the two screws fastening the box that contains the fan inside. Slightly lift the box and
remove it from the CPR. Refer to Figure 4-24 and Figure 4-25.
..........
12345678
12345678
1234
5A
SLOT No. 0123456
2
6
E
..........
12345678
12345678
1234
5A
SLOT No. 0123456
2
6
E
CPR
LPM
PBX
By using the Phillips screwdriver, remove the four screws. Then, extract the CPR with particular care.
Connector for Cooling FAN Cable
CPR
PZ-M14
Cooling FAN
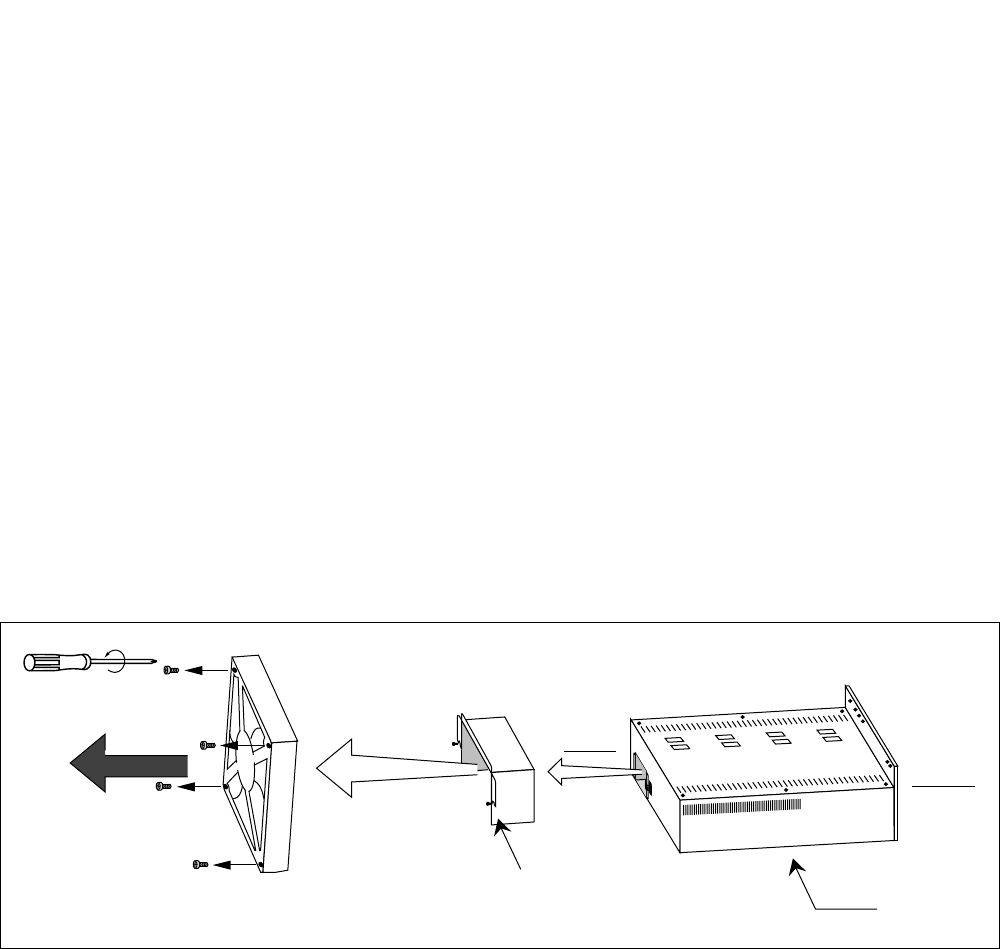
NDA-24307 CHAPTER 4
Page 353
Issue 1
UNIT/CIRCUIT CARD REPLACEMENT PROCEDURE
STEP 9 Take off the four screws and remove the Cooling Fan from the CPR. Refer to Figure 4-25.
STEP 10 Fasten the new Cooling Fan and CPR with the removed screws. Then, connect the fan cable
again. Refer to Figure 4-25.
STEP 11 Connect the fan cable again and insert the CPR back into the LPM. Refer to Figure 4-23 and
Figure 4-24.
STEP 12 Fasten the CPR and LPM with the four screws.
STEP 13 Connect the disconnected power, bus, and Ethernet cables to the relevant connectors.
STEP 14 Turn ON the SW key on the PZ-PW92.
STEP 15 Connect the disconnected power alarm cable to the PALM connector on the PZ-PW92.
STEP 16 Analyze the indicated system message. The message displayed when the PWR SW on the PZ-
PW92 was turned OFF.
STEP 17 Clear the indicated ALM and confirm that the ALM lamp is lit again, indicating that the
Cooling Fan is replaced securely.
Figure 4-25 How to Remove the Cooling Fan
CPR
FRONT
REAR
Loosen, not remove, the screws.
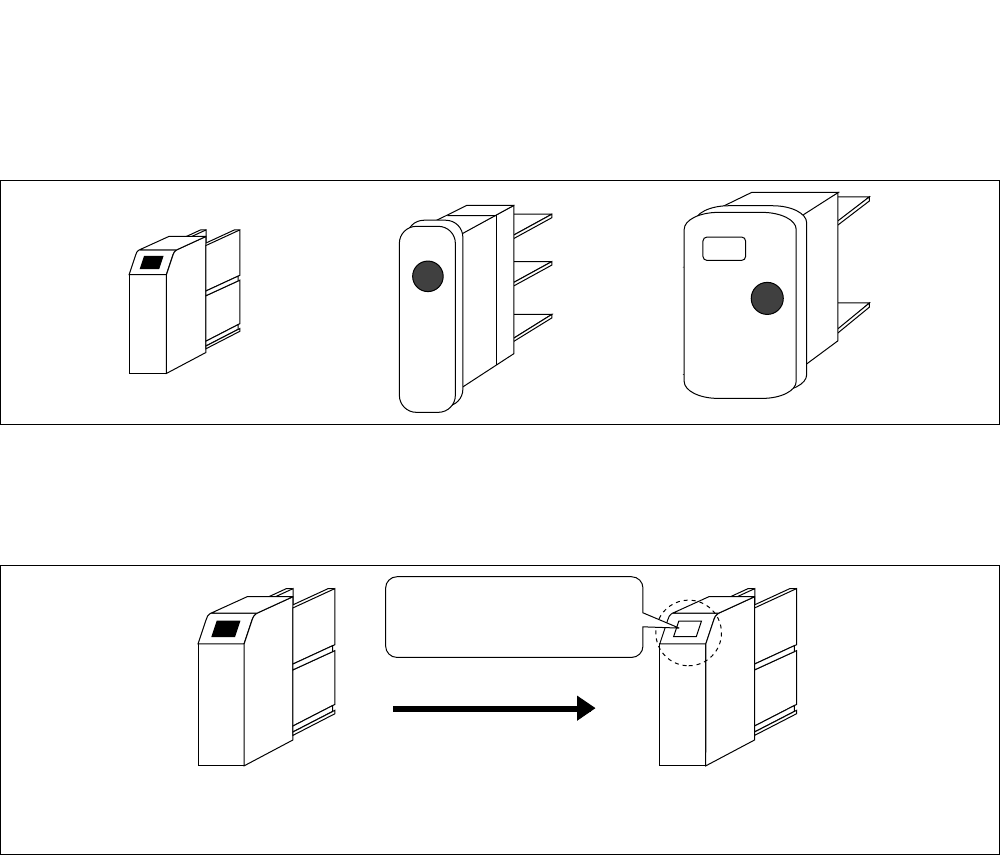
CHAPTER 4 NDA-24307
Page 354
Issue 1
UNIT/CIRCUIT CARD REPLACEMENT PROCEDURE
7. FUSE REPLACEMENT
The system uses the fuses shown in Figure 4-26 as a protection against an overload resulting from a short
circuit.
Figure 4-26 Kind of Fuse
When excessive current is applied to a PWR circuit card, the related fuse is blown. The blown fuse after a fault
can be confirmed as shown in Figure 4-27.
Figure 4-27 Fuse After Blown Fault
The purpose of fuses is to let them blow before the components are damaged. If any fuse gets blown, replace
it immediately with a new one using the following procedure:
(1) Confirm the blown fuse via the system message [6-A] or MJ lamp on the top of IMG 0/ISW.
(2) Replace the fuse with a new one, referring to Figure 4-28 and Figure 4-29.
(3) Determine the cause of the blown fault, referring to Figure 4-30 (case of RGU fuse) or Figure 4-31 (DC-
48V fuse.)
1.5A
12.5V
25A
If a fuse is blown,
this area turns white.
A normal fuse A fuse after blown fault
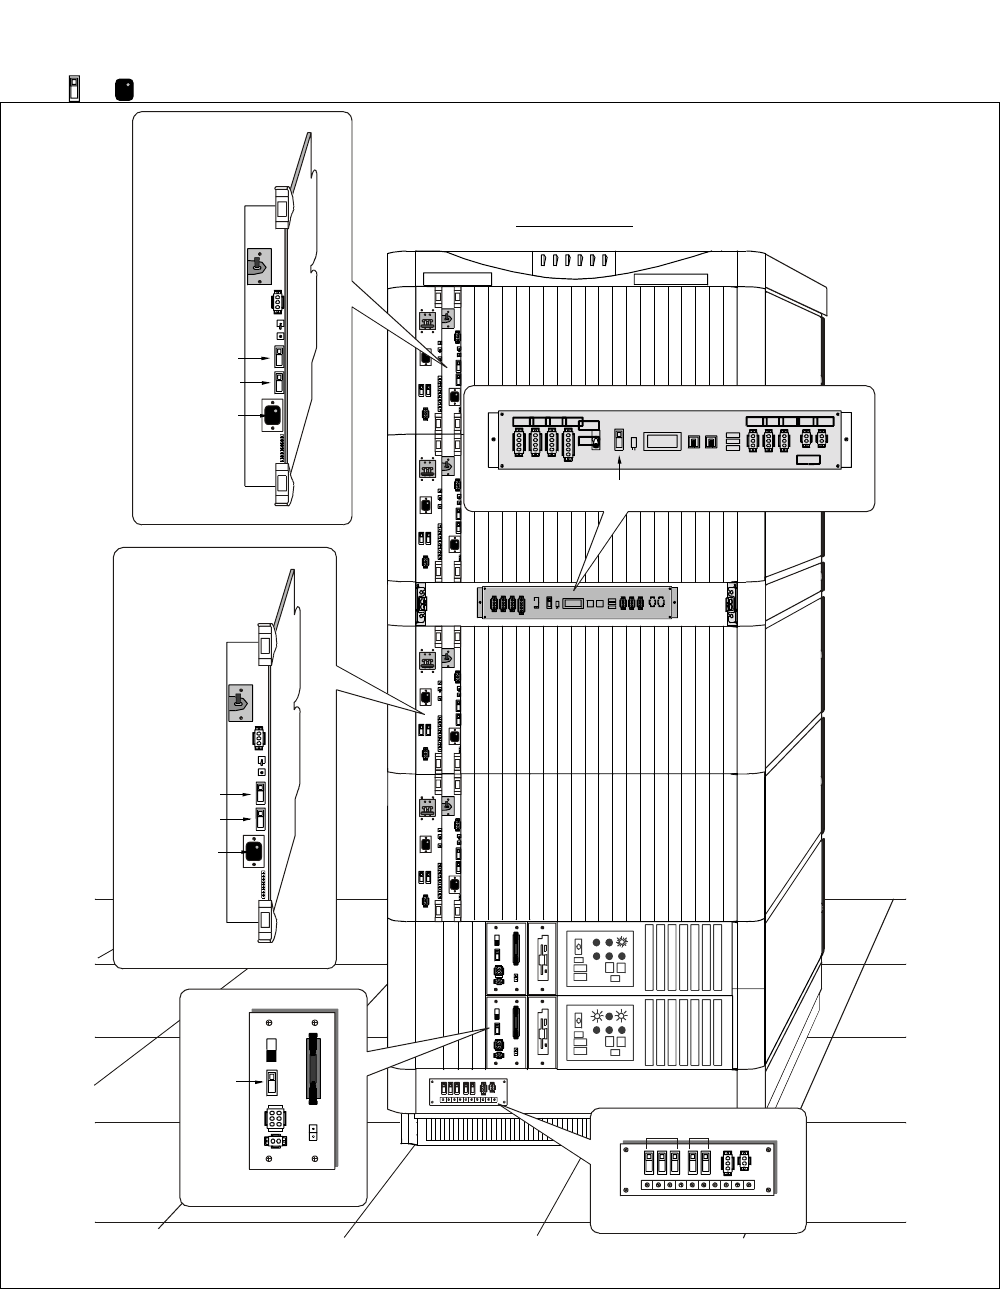
NDA-24307 CHAPTER 4
Page 355
Issue 1
UNIT/CIRCUIT CARD REPLACEMENT PROCEDURE
The following figures show the location of fuses within the system. In the figures, the fuses are indicated
by or .
Figure 4-28 Fuse Locations in LPM/PIM/FANU/BASEU
PIM
LPM
Note
Note
NEC
NEAX 2400 IMS
PZ-M377
3.2A 5.0A
PZ-M369
5.0A
..........
..........
PZ-PW92
5.0A
25A
PA-PW54-A/
PA-PW55-A/
5.0A
0.5A
25A
PBX [Front View]
PA-PW54-B
PA-PW55-B
5.0A
0.5A
25A
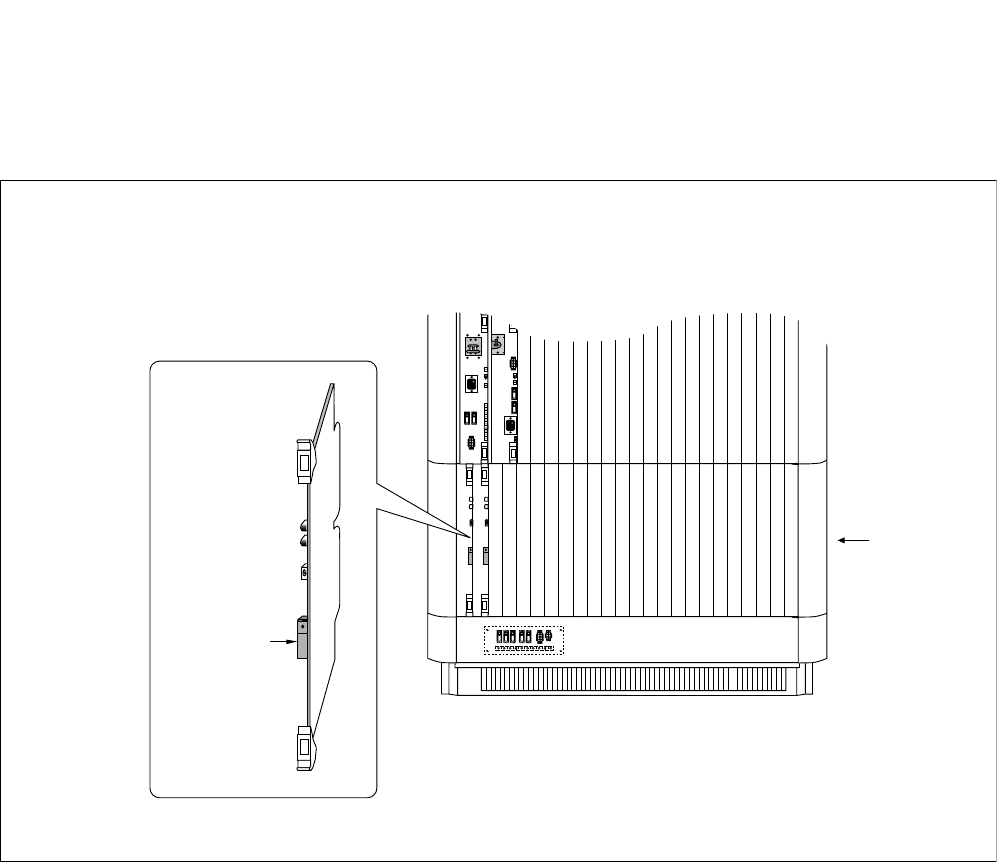
CHAPTER 4 NDA-24307
Page 356
Issue 1
UNIT/CIRCUIT CARD REPLACEMENT PROCEDURE
In the TSWM, the fuse shown in Figure 4-29 is used for the PWR SW (PH-PW14) card, which is housed in
Slot No. 00 and/or 01.
Note: The PH-PW14 card is also used in Slot No. 00 and/or 01 of ISWM.
Figure 4-29 Fuse Location on PWR SW Card (TSWM/ISWM)
PH-PW14
(PWR SW)
FUSE: 15A
TSWM
PBX (IMG1/2)
Front View
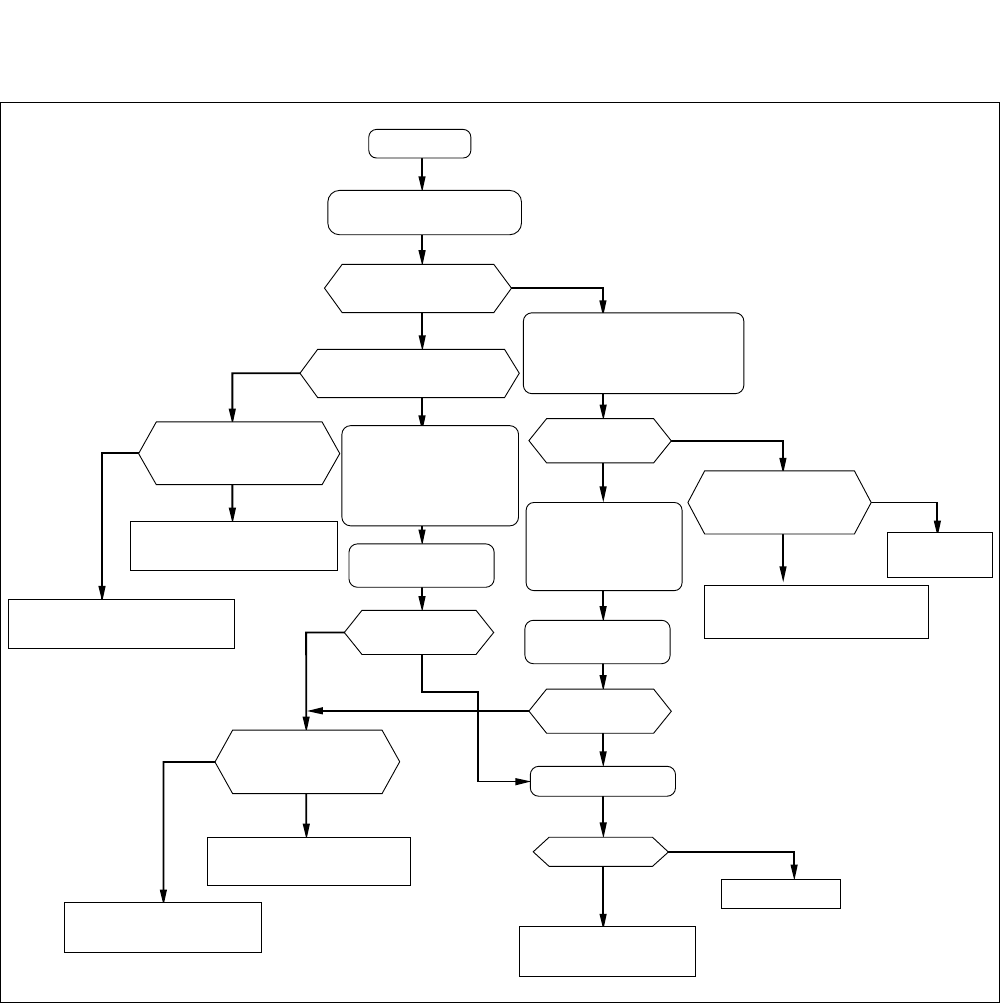
NDA-24307 CHAPTER 4
Page 357
Issue 1
UNIT/CIRCUIT CARD REPLACEMENT PROCEDURE
Perform the procedure in Figure 4-30 to confirm the cause of the RGU fuse blown fault.
Figure 4-30 RGU Fuse Blown Fault Flowchart
Start
Visual check: No pin contacting
or backboard melting?
OPE Lamp (green) of
each LC card remains lit?
Replace the blown fuse with a new
one. The fuse is blown again?
Yes
Yes
Yes
Yes
Yes
No
1. Turn ON (UP) the MB key
on the LC card.
2. Remove the card from the PIM.
3. Replace the fuse with a new one.
Turn ON (UP) the MB
keys on all LC cards,
and remove them from the
PIM. (Only PWR cards are
inside the PIM) Turn ON (UP) the MB
keys on the whole LC cards,
and remove them from the
PIM. (Only PWR cards are
inside the PIM)
The replaced fuse
is blown again?
Perform station-to-station
connections within the PIM.
Is any fuse blown?
Perform station-to-station
connections within the PIM.
Is any fuse blown?
No
No
No
No
No
No
Yes
Yes
No
Fault in LC card that accompanied
the fuse blowing.
Fault of LC card that accompanied
the fuse blowing.
Probable Cause: Not confirmed.
Needs further observation of the fault
There is a short circuit
on the backboard of the PIM.
Fault in LC card that accompanied
the fuse blowing.
Fault of PWR card.
Perform system initialization
after inserting all removed cards.
Fault of LC card
that was removed
Replace the blown fuse
with a new one.
Replace the blown fuse
with a new one.
Replace the PWR card
Yes
Insert the removed cards
one by one (into the PIM).
Is any fuse blown?
The replaced fuse is
blown again?
Fuse is still blown?
No Yes
The replaced fuse
is blown again?
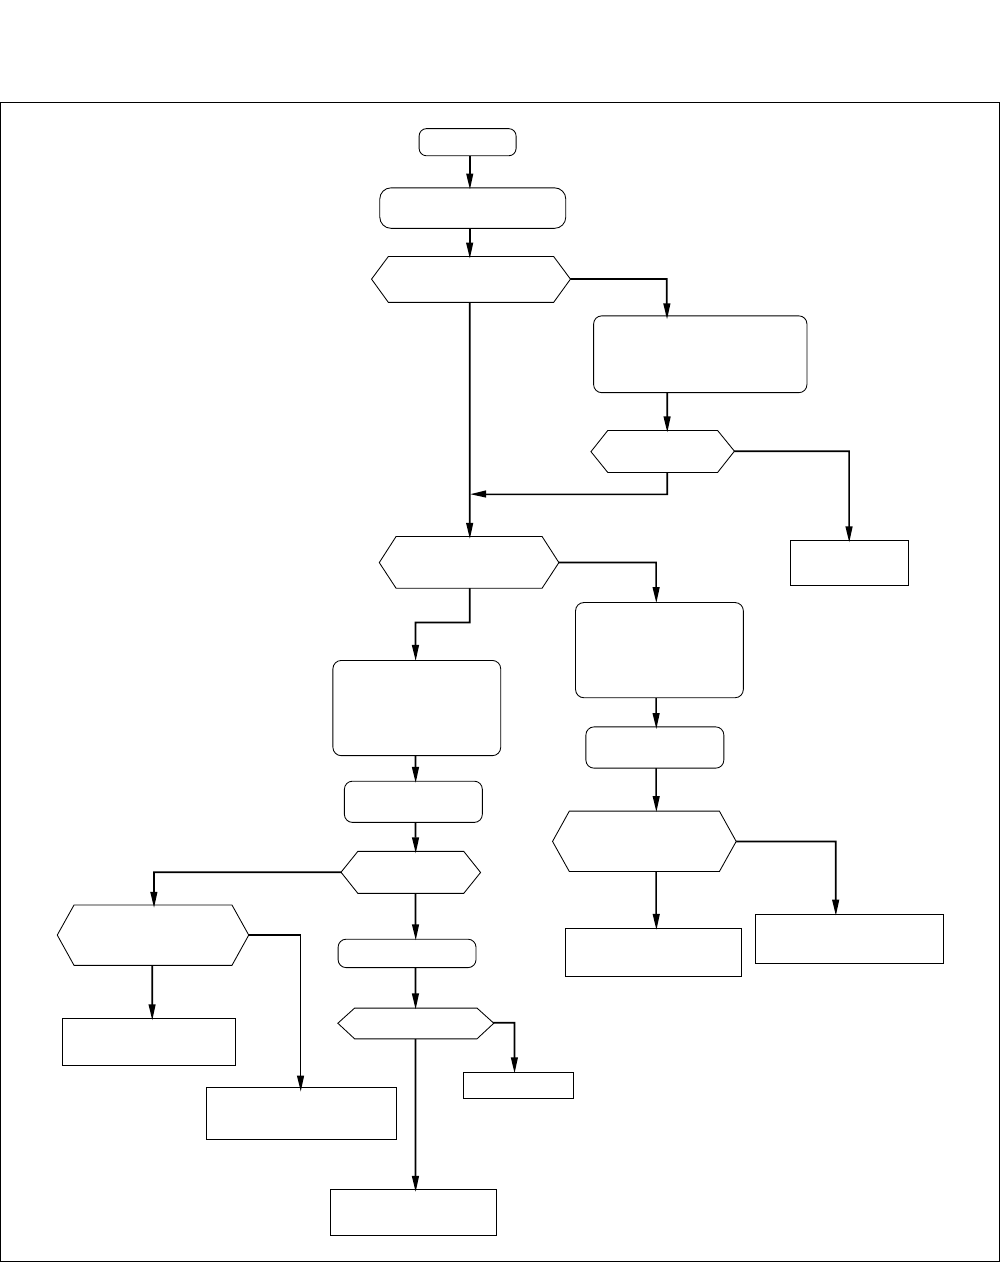
CHAPTER 4 NDA-24307
Page 358
Issue 1
UNIT/CIRCUIT CARD REPLACEMENT PROCEDURE
Perform the procedure in Figure 4-31 to confirm the cause of the DC-48V fuse blown fault.
Figure 4-31 DC -48V Fuse Blown Fault Flowchart
Start
Visual check: No pin contacting
or backboard melting?
OPE Lamps (green) of
LC/TRK/NCU cards remain lit?
Make sure in which module
the fuse has blown
No
1. Turn ON (UP) the MB key
on the circuit card.
2. Remove the card from the PIM.
3. Replace the fuse with a new one.
Turn ON (UP) the MB
keys on the whole circuit
cards, and remove them from
the PIM. (Only PWR cards
are inside the PIM)
Turn ON (UP) the MB
keys on the whole circuit
cards, and remove them from
the PIM. (Only PWR cards
are inside the PIM)
The replaced fuse
is blown again? No
No
No
No
Fault of circuit card that
accompanied the fuse blown.
Perform system initialization
after inserting all removed cards.
Fault of circuit card
that was removed
Replace the blown fuse
with a new one.
Replace the blown fuse
with a new one.
Yes
Yes
Yes
Insert the removed cards
one by one (into the PIM).
Is there any fuse blowing?
The replaced fuse
is blown again?
The fuse is still blown?
There is a short circuit on the
backboard of the PIM.
Fault of PWR card.
Replace the PWR card
Yes
Yes
LPM / TSWM / ISWM / PIM
No
Fault of circuit card that
accompanied the fuse blown.
Perform system initialization
after inserting all removed cards.
Yes
Insert the removed cards
one by one (into the PIM).
Is any fuse blown?

NDA-24307 CHAPTER 5
Page 359
Issue 1
CHAPTER 5 FAULT REPAIR PROCEDURES
This chapter provides information on how to repair the fault(s) within the system. If any of the components or
equipment listed in Table 5-1 has a failure, move on to the repair procedure explained for each faulty condition.
Table 5-1 Fault Repair Procedure Quick Referenc e
FAULTY ITEM FAULTY SITUATION REFERENCE SECTION
Line Fault DP/PB Telephone Dial tone is not heard. Section 1.3, Line Fault - When Dial
Tone (DT) Cannot Be Heard
Dialing results in a wrong
connection. Section 1.4, Line Fault - When
Dialing Results in a Wrong
Connection
Bell does not ring. Section 1.5, Line Fault - When Bell
Does Not Ring
Answer/speech cannot be
made. Section 1.6, When Call Cannot Be
Answered and Speech Cannot Be
Made
Dterm •Dterm cannot be operated.
•Operations are abnormal.
Section 1.7, Dterm Fault
Trunk Fault •No connections can be set up.
•PB/DP signals are erroneously received or set out
from ORT/SND.
•No three-way calling can be made on CFT, or noise
gets in a established connection.
•A connection results in no speech.
•Noise gets in a established connection.
Section 2.3, Trunk (ORT, SND,
CFT) Fault and Section 2.4, Trunk
(COT, TLT, DTI) Fault
ATTCON/DESKCON •No speech can be made.
•No control operations can be made.
Section 3.3, ATTCON/DESKCON
Fault
Unit Fault Faults related to speech. Section 4.2, Unit Fault - Fault
Related to Speech
Dial tone is not heard. Section 4.3, Unit Fault - When Dial
Tone (DT) Cannot Be Heard
The ACT MUX card side has become faulty and system
changeover has been executed. Section 4.4, Unit Fault - ACT-Side
MUX Card Is Faulty and System
Has Changed Over

CHAPTER 5 NDA-24307
Page 360
Issue 1
FAULT REPAIR PROCEDURES
Speech System Fault
(LN) Faults related to speech. Section 5.2, Speech Path System
Fault - Fault Related to Speech
Dial tone is not heard. Section 5.3, Speech Path System
Fault - When Dial Tone (DT)
Cannot Be Heard
STBY side is faulty. Section 5.4, Speech Path System
Fault (LN) - STBY Side Has
Become Faulty
Speech Path System Fault
(Whole System/ISW) Fault related to speech. Section 6.2, Speech Path System
Fault (Whole System/ISW) - Fault
Related to Speech
ACT side becomes faulty intermittently. Section 6.3, Speech Path System
Fault (Whole System/ISW) - ACT
side becomes Faulty Intermittently
STBY side becomes faulty intermittently. Section 6.4, Speech Path System
Fault (Whole System/ISW) - STBY
side becomes Faulty Intermittently
Clock is faulty. Section 6.5, PLO Fault
Control System Fault Fault occurs occasionally at the ACT side. Section 7.2, Control System Fault -
Fault Occurs Intermittently
STBY side is faulty. Section 7.3, Control System Fault -
STBY Side is Faulty
Alarm Indication Fault No fault indication is made on the Alarm Indicator
Panel. Section 8.2, Fault of Alarm
Indicating Panel
Fault is not detected. Section 8.3, Fault That Cannot Be
Detected
Power Supply Fault Fuse for RGU/-48V has blown. Section 9.2, Fuse Blown Fault
The circuit breaker of PWR supply is off. Section 9.3, Circuit Breaker OFF
Fault in PWR Supply
Alarm lamp on the PWR supply is lit. Section 9.4, Fault of Alarm Lamps
on PWR Supply
Fan Unit (FANU) Fault •Fans are not activated even if the temperature has
risen higher than a predetermined degree.
•Fans are not activated even if the FAN START switch
is set to AUTO position.
Section 10.2, Fan Unit Fault
Tone Fault Tone is distorted. Section 11.2, Tone Fault
Table 5-1 Fault Repair Procedure Quick Reference (Continued)
FAULTY ITEM FAULTY SITUATION REFERENCE SECTION

NDA-24307 CHAPTER 5
Page 361
Issue 1
FAULT REPAIR PROCEDURES
System Down Fault Cause for the fault cannot be identified. Section 12.1, When Cause for Fault
Cannot Be Identified
The faulty circuit card can be detected. Section 12.2, When Faulty Circuit
Cards Can Be Assumed From
System Message
CCIS Line Fault •A Specific CCH/CCT card is faulty. When the signal
transmission line is a digital line, transmission/
receiving of control signals cannot be performed.
•When the signal transmission line is an analog line,
transmission/receiving of control signals cannot be
performed.
Section 13.3, Specific CCH/CCT
Card Is Faulty and
Section 13.4, Fault of CCH, DTI
and Related Flat Cable
ISDN Line Fault •A specific DCH/PRT card is faulty.
•When the signal transmission line is a digital line,
transmission/receiving of control signals cannot be
performed.
Section 14.3, Specific DCH/PRT
Card Is Faulty
Section 14.4, Fault of DCH, DTI
and Related Flat Cable
Hard Time Clock Fault EMA card is faulty. Section 15, Hard Time Clock Fault
Table 5-1 Fault Repair Procedure Quick Reference (Continued)
FAULTY ITEM FAULTY SITUATION REFERENCE SECTION

CHAPTER 5 NDA-24307
Page 362
Issue 1
FAULT REPAIR PROCEDURES
1. LINE FAULT
This section explains the fault repair procedure in a case where only one specific station line is in any of the
faulty conditions listed in Table 5-2.
Table 5-2 Line Fault Situation
FAULTY SITUATION REFERENCE SECTION
When Dial Tone cannot be heard Section 1.3, Line Fault - When Dial Tone (DT) Cannot Be Heard
When dialing results in a wrong connection Section 1.4, Line Fault - When Dialing Results in a Wrong
Connection
When the bell does not ring Section 1.5, Line Fault - When Bell Does Not Ring
When call cannot be answered and speech cannot be
made Section 1.6, When Call Cannot Be Answered and Speech
Cannot Be Made
Dterm Fault Section 1.7, Dterm Fault

NDA-24307 CHAPTER 5
Page 363
Issue 1
FAULT REPAIR PROCEDURES
1.1 Check Point
When repairing a line fault, consider the following items:
(1) Check alarm lamps on line circuit cards.
(2) When an outgoing call cannot be originated to a specific line/trunk or when an incoming call cannot be
terminated from a specific line/trunk, check Tenant Restriction Data (assigned via ATNR command) and
Route Restriction Data (assigned via ARSC/ARSCN command).
1.2 Line Control
Each line in a specific Line circuit (LC/ELC) card is controlled by the PM in that line circuit card. The
line circuit cards are controlled from the CPU via the MUX. Figure 5-1 shows the control route of line
circuit cards.
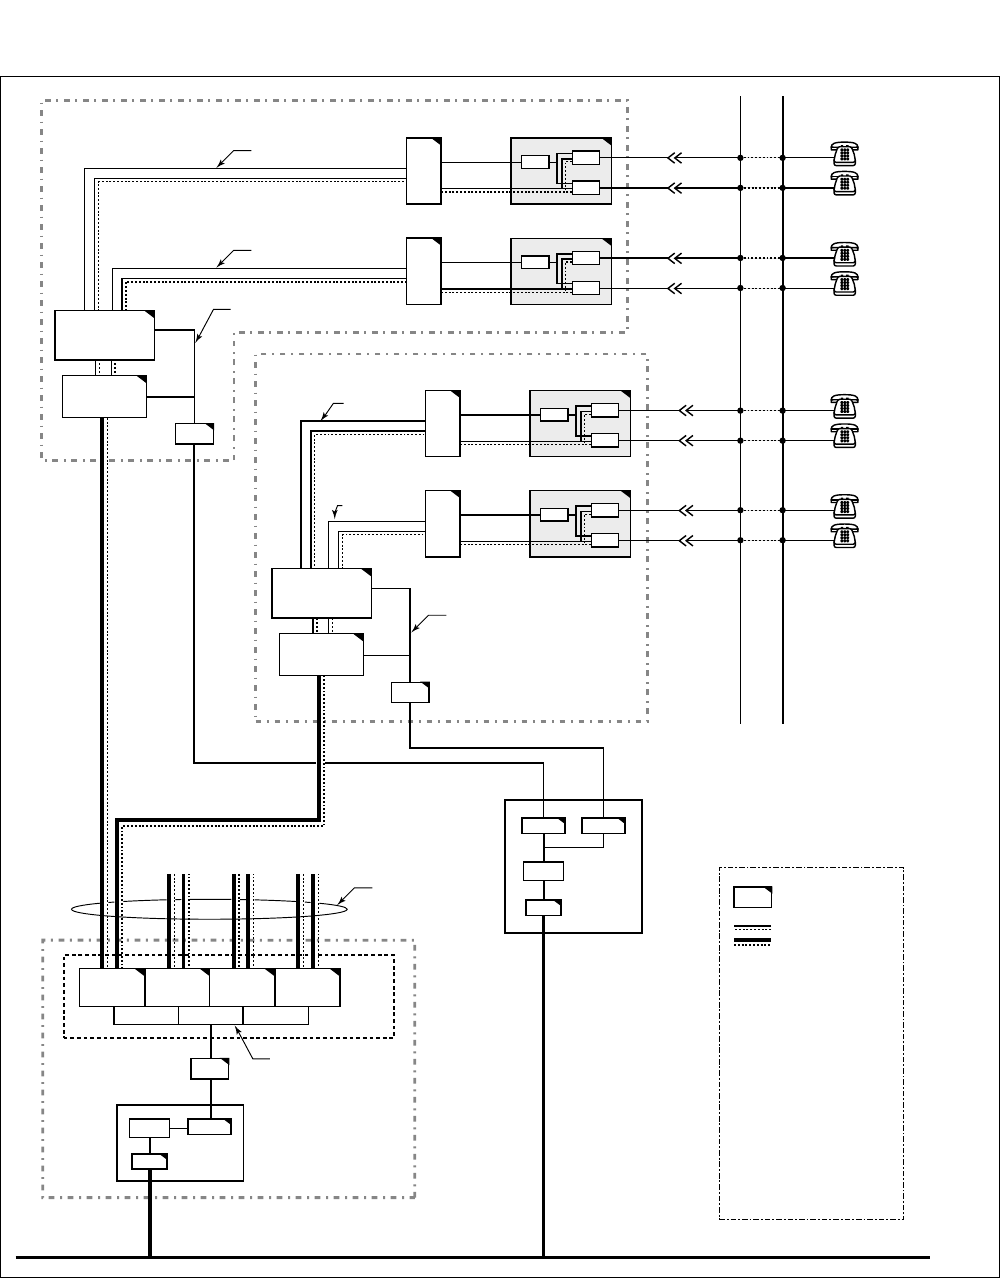
CHAPTER 5 NDA-24307
Page 364
Issue 1
FAULT REPAIR PROCEDURES
Figure 5-1 Controlling LC/ELC Circuit Cards and Speech Path
Control Signal
MDF
Ordinary Telephone/D
LC
PM
LC
Control Signal LT Cable
LT Cable
LC/ELC
LT Cable
LT Cable
LC
Ordinary Telephone/D
LC
PM
Control Signal
LC/ELC
Ordinary Telephone/D
LC
LC
LT Cable
LT Cable
LC/ELC
Ordinary Telephone/D
LC
PM
LC
Control Signal LT Cable
LT Cable
LC/ELC
CPR
(LN0)
LANI
CPU
To LN1 To LN2 To LN3
CPR
ISAGT
LANI
CPU
HSW
ISW
IMG0/1 (LN0)
IMG2/3 (LN0)
PM
MUX
MUX
MUX
MUX
TSW00/TSW01
(TSW10/TSW11)
TSW02/TSW03
(TSW12/TSW13)
TSW02/TSW03
(TSW12/TSW13)
TSW00/TSW01
(TSW10/TSW11)
TSW01(11) TSW02(12) TSW03(13)
IOGT
GT
GT
TSW00(10)
Ether
ISAGT-A ISAGT-B
Control Signal
ISW-LN TSW CA-n
Cables
Control Signal
Control Signal
Control Signal
Control Signal
Control Signal
Control Signal
: Circuit Card
: Speech Path
< LN: Local Node >
TSW
MUX
GT
ISAGT-A
ISAGT-B
LANI
< ISW: Inter-node Switch >
TSW
HSW
IOGT
ISAGT
LANI
: PH-SW12
: PH-PC36
: PH-GT09
: PZ-GT13
: PZ-GT20
: PZ-PC19
: PU-SW00
: PU-SW01
: PH-GT10
: PZ-GT13
: PZ-PC19
term
term
term
term
NDA-24307 CHAPTER 5
Page 365
Issue 1
FAULT REPAIR PROCEDURES
1.3 Line Fault - When Dial Tone (DT) Cannot Be Heard
Note: If a circuit card is replaced because only one line is
faulty, no other lines in that circuit card can be used
until the replacement is complete.
When OPE lamp on the LC circuit card
does not illuminate Confirm MB switch of the LC circuit card is in
ON position (UP).
Use ASDT command to confirm that station
data in the LC circuit card is assigned.
Replace the LC circuit card with a spare.
When BL lamp for each line is flashing or
illuminating on the LC circuit card Confirm MB switch of the LC circuit card is in
ON position (UP side).
Use MBST command to confirm LC circuit
card has not been placed into make-busy state.
Use ASDT command to check the station data
assignment.
Replace the LC circuit card with a spare.
ATTENTION
Contents
Static Sensitive
Handling
Precautions Required
START
A
CHAPTER 5 NDA-24307
Page 366
Issue 1
FAULT REPAIR PROCEDURES
Check the faulty line on the MDF. Isolate the faulty line to the in-house wiring
side and to the system side.
Connect the test telephone to the system side
and check to see if dial tone can be heard.
When Dial Tone (DT) is heard Check the in-house wirings.
Replace the station telephone set with a spare.
When no DT or side tone is
heard Check LT cables.
Replace the LC circuit card with a spare.
When DT is not heard, but side
tone can be heard. Replace the LC circuit card with a spare.
ATTENTION
Contents
Static Sensitive
Handling
Precautions Required
A
END
NDA-24307 CHAPTER 5
Page 367
Issue 1
FAULT REPAIR PROCEDURES
1.4 Line Fault - When Dialing Results in a Wrong Connection
Note: If a circuit card is replaced because only one line is
faulty, no other lines in that circuit card can be used
until the replacement is complete.
When a call addressed to a specific station
has terminated to another station Check to see if Call Forwarding-All Calls data
has been deleted.
Check the faulty line on the MDF. On the MDF, isolate the faulty line to the in-
house wiring side and to the system side.
Connect the test telephone to the system side.
Repeat station-to-station connections and
check to see if the connection is established
normally.
When the dialed station is called The station telephone set is faulty. Replace the
station telephone set with a spare.
When a wrong connection
occurs Replace the LC circuit card with a spare.
ATTENTION
Contents
Static Sensitive
Handling
Precautions Required
START
END
CHAPTER 5 NDA-24307
Page 368
Issue 1
FAULT REPAIR PROCEDURES
1.5 Line Fault - When Bell Does Not Ring
Note: If a circuit card is replaced because only one line is
faulty, no other lines in that circuit card can be used
until the replacement is complete.
Call the faulty station line by Station-to-
Station calling and check to see if the bell
of the telephone rings.
Replace the telephone set and check to see if
its bell rings.
Check the faulty line on the MDF. Isolate the faulty line to the in-house wiring
side and to the system side.
Connect the test telephone to the system side.
Call the faulty line by station-to-station
calling and check to see if the bell rings.
When the bell does not ring Replace the LC circuit card with a spare.
When the bell rings The in-house wiring side is faulty. Confirm
that the A wire is not short-circuiting with
ground.
ATTENTION
Contents
Static Sensitive
Handling
Precautions Required
START
END
NDA-24307 CHAPTER 5
Page 369
Issue 1
FAULT REPAIR PROCEDURES
1.6 When Call Cannot Be Answered and Speech Cannot Be Made
Note: If a circuit card is replaced because only one line is
faulty, no other lines in that circuit card can be used
until the replacement is complete.
Check the faulty line on the MDF. Isolate the faulty line to the in-house wiring
side and to the system side.
Connect the test telephone to the system side.
Call the faulty line by station-to-station
calling.
When speech can be made Replace the telephone set with a spare.
When speech cannot be made Replace the LC circuit card with a spare.
ATTENTION
Contents
Static Sensitive
Handling
Precautions Required
START
END
CHAPTER 5 NDA-24307
Page 370
Issue 1
FAULT REPAIR PROCEDURES
1.7 Dterm Fault
Note 1: If a circuit card is replaced because only one line
is faulty, no other lines in that circuit card can be
used until the replacement is complete.
When OPE lamp on the ELC circuit card
does not illuminate Confirm that MB switch of the ELC circuit
card is in ON position (UP).
Use ASDT command to confirm that station
data in the ELC circuit card is assigned.
Replace the ELC circuit card with a spare.
When BL lamp for each line is flashing or
illuminating on the ELC circuit card Confirm that MB switch of the ELC circuit
card is in ON position (UP).
Use MBST command to confirm that ELC
circuit card has not been placed into make-
busy state.
Use ASDT command to check the station data
assignment.
Replace the ELC circuit card with a spare.
ATTENTION
Contents
Static Sensitive
Handling
Precautions Required
END
START
NDA-24307 CHAPTER 5
Page 371
Issue 1
FAULT REPAIR PROCEDURES
Check the faulty line on the MDF. Isolate the faulty line to the in-house wiring side
and to the system side.
Connect the test Dterm to the system side.
Confirm speech by Station to Station calling.
When no speech can be made Check LT cables.
Replace ELC circuit card with a spare.
When speech can be made Check to see if the modular plug is firmly
connected with the Dterm.
Check the wiring inside the rosette.
Check the in-house wiring for any abnormality.
Replace the Dterm with a spare.
ATTENTION
Contents
Static Sensitive
Handling
Precautions Required
A
END

CHAPTER 5 NDA-24307
Page 372
Issue 1
FAULT REPAIR PROCEDURES
2. TRUNK FAULT
This paragraph explains the fault repair procedure when a fault, shown in Table 5-3, has occurred to a specific
trunk.
2.1 Check Point
When repairing a trunk fault, consider the following items:
(1) Check alarm lamps on trunk circuit cards.
(2) When an outgoing call cannot be originated to a specific trunk or when an incoming call cannot be
terminated from a specific trunk, check Tenant Restriction Data (assigned via ATNR command) and
Route Restriction Data (assigned via ARSC/ARSCN command).
(3) Three-Way Conference Trunk (CFT) is on the MUX (PH-PC36) circuit cards. If a three-way conference
call cannot be established, check the MUX cards.
(4) If the present timing for supervising the trunk/sender status is considered to be responsible for the fault,
change the timing. The specifications for timings that can be changed with respect to trunks and senders
are shown in Table 5-4 and Table 5-5.
Table 5-3 Trunk Fault Situation
TRUNK FAULTY SITUATION REFERENCE SECTION
ORT No connection can be set up.
PB/DP signals are erroneously received or cannot be received. Section 2.3, Trunk (ORT, SND,
CFT) Fault
SND No connections can be set up.
PB/DP signals are erroneously sent out or cannot be sent out.
CFT No connections can be set up.
No three-way calling can be made.
Noise gets in a established connection.
COT
TLT
DTI
No connections can be set up.
A connection results in no speech.
Noise gets in an established connection.
Section 2.4, Trunk (COT, TLT, DTI)
Fault

NDA-24307 CHAPTER 5
Page 373
Issue 1
FAULT REPAIR PROCEDURES
Table 5-4 Timings for Trunks
ITEMS FOR STATUS
SUPERVISION CONDITIONS FOR SUPERVISION TIMING SPECIFICATIONS
1 Detection of Call
Termination •Ring Down System
Detection by ringing signal (20Hz) from
the opposite office.
•Loop System
Detection by loop from the opposite office.
•E&M System
Detection by incoming signal (ground or
–48V) on E (RG2) lead.
Ringing signal of more than four
cycles is detected within 800 ms.
Detection within 16 ms after call
termination.
2 Acknowledge Signal
Sending •Wink Signal
•Delay Start
160 ms (standard)
Timing can be assigned using ARTD/
ARTDN command.
3 Detection of Release at the
time of Incoming
Connection
•E&M System
•Loop System
288 ms (standard)
160 ms (standard)
Timing can be assigned using ARTD/
ARTDN command.
4 Timing for Restricting Call
Origination after Release After release of the user’s trunk or the trunk at
the opposite office has been detected, a new
call origination is restricted.
3070 ms (standard)
Timing can be assigned using ARTD/
ARTDN command.
5 Seizure of Opposite Office •Loop System
Closure of DC loop.
•E&M System
Supply of outgoing call signal (ground or
–48V) onto M (DL) lead.
6 Detection of Acknowledge
Signal •Wink Signal
•Delay Start
Timing is assigned using ARTD/
ARTDN command.
7 Trunk Hold Time Even if answer signal has not reached from the
opposite office, the call is regarded as
answered.
•If DP Signal is 10 sec. (standard)
after dial pulses are sent out
Timing can be assigned using
ARTD/ARTDN command.
•If PB Signal is 30 sec. (standard)
after seizure of the trunk
Timing can be assigned using
ASYD SYS 1 Index 156 (only
when 2nd Dial Tone System).
8 Detection of Release at the
time of Outgoing
Connection
•Loop System
Detection of polarity reversal across tip and
ring.
•E&M System
Detection of Release Signal (ground or
–48V) on E lead.
608 ms (standard)
Timing can be assigned using ARTD/
ARTDN command.

CHAPTER 5 NDA-24307
Page 374
Issue 1
FAULT REPAIR PROCEDURES
Table 5-5 Timings for Senders
ITEMS FOR STATUS
SUPERVISION CONDITIONS FOR SUPERVISION TIMING SPECIFICATIONS
1 Sender Acknowledge Wait
Timer Timing limit for waiting to receive connection
acknowledgement signal from the opposite
office after seizing the opposite office.
4 sec. (standard)
Timing can be assigned using ASYD
SYS 1 Index 130 command.
2 Sender Prepause Timer Time from sender seizure till sending of the
1st digit where connection acknowledgment is
made by interface with the opposite office.
DP: 3 sec. (standard)
PB: 2.5 sec. (standard)
Timing can be assigned using ASYD
SYS 1 Index 131 command.
3 Sender Inter-digit Timer Inter-digit timing for the numbers to be sent
out by the sender. •For DP
10 pps: 860 ms (standard)
20 pps: 460 ms (standard)
Timing can be assigned using
ASYD SYS 1 Index. 132
command.
•For PB
60 ms/120 ms (to be selected by
ONSG of ARTD/ARTDN
command.)
Timing can be changed using
ASYD SYS 1 Index 133
command.
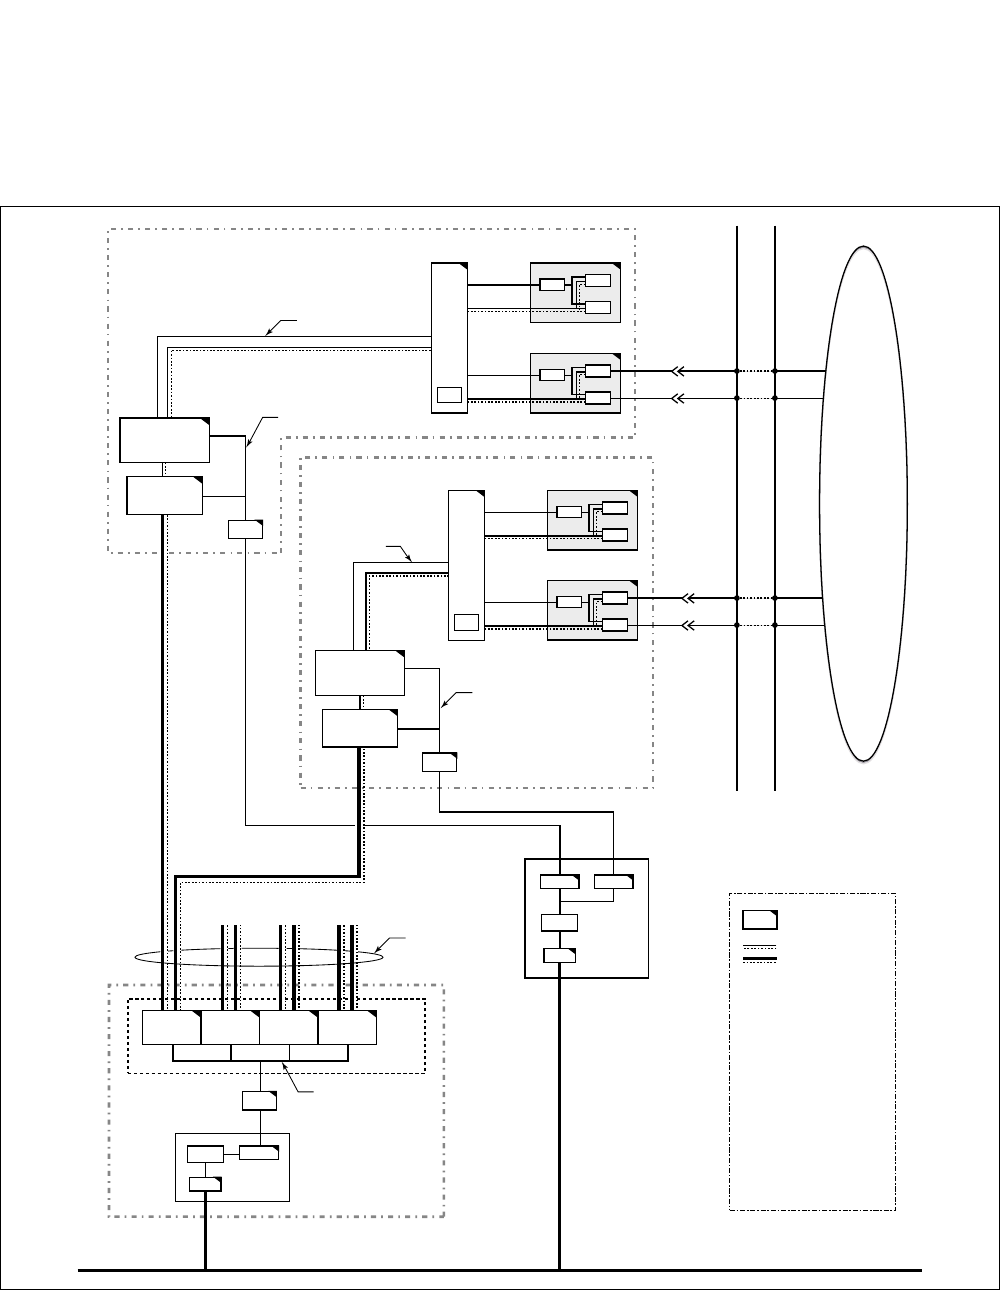
NDA-24307 CHAPTER 5
Page 375
Issue 1
FAULT REPAIR PROCEDURES
2.2 Trunk Control
Trunk circuit cards are controlled from the CPU via the MUX. Each trunk line in a specific trunk circuit
card is controlled by the Port Microprocessor (PM) in a trunk circuit card. Figure 5-2 shows the control
route of the trunk circuit card.
Figure 5-2 Controlling Trunk Circuit Cards and Speech Path
Control Signal
MDF
TRK
PM
TRK
Control Signal
ORT/SND
LT Cable
LT Cable
TRK
TRK
PM
Control Signal
COT/TLT
TRK
TRK
ORT/SND
TRK
PM
TRK
Control Signal LT Cable
LT Cable
COT/TLT
CPR
(LN0)
LANI
CPU
To LN1 To LN2 To LN3
CPR
ISAGT
LANI
CPU
HSW
ISW
IMG0/1 (LN0)
IMG2/3 (LN0)
PM
MUX
MUX
TSW00/TSW01
(TSW10/TSW11)
TSW02/TSW03
(TSW12/TSW13)
TSW02/TSW03
(TSW12/TSW13)
TSW00/TSW01
(TSW10/TSW11)
TSW01(11) TSW02(12) TSW03(13)
IOGT
GT
GT
TSW00(10)
Ether
ISAGT-A ISAGT-B
Control Signal
ISW-LN TSW CA-n
Cables
Control Signal
Control Signal
Control Signal
Control Signal
: Circuit Card
: Speech Path
< LN: Local Node >
TSW
MUX
GT
ISAGT-A
ISAGT-B
LANI
< ISW: Inter-node Switch >
TSW
HSW
IOGT
ISAGT
LANI
: PH-SW12
: PH-PC36
: PH-GT09
: PZ-GT13
: PZ-GT20
: PZ-PC19
: PU-SW00
: PU-SW01
: PH-GT10
: PZ-GT13
: PZ-PC19
Network
CFT
CFT
Note
Note
Note: Eight CFTs are provided on the MUX
(PH-PC36) cards.
CHAPTER 5 NDA-24307
Page 376
Issue 1
FAULT REPAIR PROCEDURES
2.3 Trunk (ORT, SND, CFT) Fault
Note: If a circuit card is replaced because only one line is faulty, no
other lines in that circuit card can be used until the
replacement is complete.
When only one line is faulty Place the faulty line into make-busy state.
For ORT/SND, set MB switch of
each circuit to ON position.
For CFT, place it into make-busy
state using command MBTK.
Replace the circuit card with spare. Set MB switch UP and extract the circuit card
from its mounting slot.
Set MB switch of the new circuit card UP and
insert the circuit card into its mounting slot.
Set MB switch DOWN.
If the line is under make-busy state, cancel it.
ATTENTION
Contents
Static Sensitive
Handling
Precautions Required
START
END
NDA-24307 CHAPTER 5
Page 377
Issue 1
FAULT REPAIR PROCEDURES
2.4 Trunk (COT, TLT, DTI) Fault
Note 1: If a circuit card is replaced because only one line
is faulty, any other lines in that circuit card cannot
be used until the replacement is complete.
Note 2: If the polarities of the external line is reversed, it
is detected in the form of Trunk Ineffective Hold.
When OPE lamp on the trunk circuit card
does not illuminate Confirm that MB switch of the trunk circuit
card is in ON position (UP side).
Use ATRK command to confirm that trunk
data in the trunk circuit card is assigned.
Replace trunk circuit card with a spare.
When BL lamp is flashing or illuminating
on the trunk circuit card Confirm that MB switch of trunk circuit card
is in ON position (UP side).
Use MBTK command to confirm that trunk
circuit card has not been placed into make-
busy state.
Use ATRK command to check trunk data
assignment.
Replace trunk circuit card with a spare.
ATTENTION
Contents
Static Sensitive
Handling
Precautions Required
START
A
CHAPTER 5 NDA-24307
Page 378
Issue 1
FAULT REPAIR PROCEDURES
Check the faulty line on the MDF. If the C.O./Tie Line is in Loop Start system:
Isolate the faulty line to C.O. side and
to the system side.
Connect the test telephone to the C.O.
side.
Note 3: Check can be made
only on temporarily
opened C.O./Tie Lines.
Confirm that Dial Tone (DT) is heard
and the call is connected to the
destination party at the opposite
office.
Note 4: Cross connection
methods are explained
on the following pages.
If C.O./Tie Line is any other type than Loop
Start:
By cross connections on the MDF,
connect the faulty line to a normal
trunk.
By a designated connection from the
ATTCON/DESKCON, seize the
trunk connected with the faulty line.
When the connection is not set up,
the C.O./Tie Line is faulty After the trunk has been seized, check
to see if a call can be originated.
When the connection is set up Replace the Dterm with a spare.
ATTENTION
Contents
Static Sensitive
Handling
Precautions Required
A
END
NDA-24307 CHAPTER 5
Page 379
Issue 1
FAULT REPAIR PROCEDURES
Note: When performing loop-back connection tests on the trunks at the user’s office,
provide cross connection as follows:
(1) For a COT
•Set up a loop-back connection between the C.O. Trunk (COT) to be tested and station line.
•The trunk route must be assigned for Loop Start.
(2) For a TLT (for DID)
•Set up a loop-back connection between the Tie Line Trunk (TLT) to be tested and another TLT.
•If the TLT is a Direct Inward Dialing (DID) Trunk, connect the related leads as shown below:
•If the TLT is a 4-wire E & M System, connect the related leads as shown below:
ATTENTION
Contents
Static Sensitive
Handling
Precautions Required
LC
A
LC
B
LC
C
COT
LC
ATLT
LC
BTLT
TLT RTLT
R
TT
TLT
R R
TT
MM
EE
R R
TT
Receive
Send TLT
Receive
Send
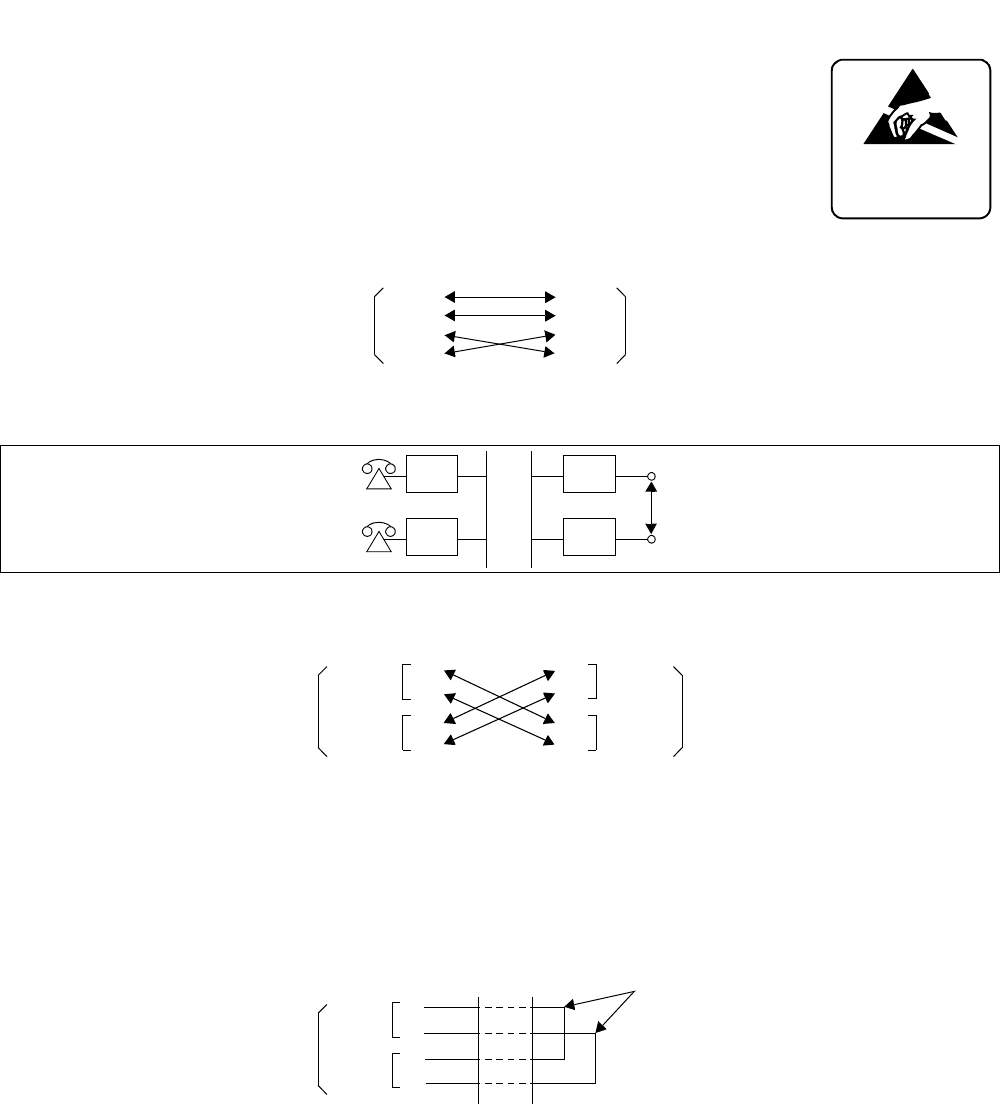
CHAPTER 5 NDA-24307
Page 380
Issue 1
FAULT REPAIR PROCEDURES
•If the TLT is a 2W E & M System, connect the related leads as shown below:
(3) For a DTI
•Set up a loop-back connection between the DTI Trunk to be tested and another DTI Trunk as shown
below:
•When the loop-back test is performed at the time of PCM LOSS, FRM LOSS, or MERM LOSS alarm
lamp (red) illuminates. If the alarm lamp goes out, the DTI circuit card side is normal.
•When only one DTI circuit card is to be checked, make the following connections and confirm that
no alarm lamps illuminates.
ATTENTION
Contents
Static Sensitive
Handling
Precautions Required
TLT RTLT
R
TT
M M
EE
LC
ADTI
LC
BDTI
DTI R R
RR
TT
TT
Receive
Send
DTI
Receive
Send
DTI RB
RA
TB
TA
Receive
Send
Loop-back
Cross Connection

NDA-24307 CHAPTER 5
Page 381
Issue 1
FAULT REPAIR PROCEDURES
3. ATTCON/DESKCON FAULT
This section explains the fault repair procedure when a specific Attendant/Desk Console is in any of the
following faulty conditions.
•No speech can be made.
•No operations can be made.
3.1 Check Point
When repairing an ATTCON/DESKCON fault, consider the following items:
(1) Check the cable connections on the backplane.
(2) When replacing the ATI circuit card for master ATTCON/DESKCON, the system is placed under Night
Mode during replacement procedure.
(3) When replacing the master ATTCON/DESKCON, the system is placed under Night Mode during
replacement procedure.
3.2 ATTCON/DESKCON Control
Each ATTCON/DESKCON is controlled from an ATI (PA-CS33) circuit card. The ATI circuit card is
controlled from the CPU card via the INT on the TSW card. Figure 5-3 shows the control route of the ATI
circuit card.
The ATI (PA-CS33) circuit card is used as an interface card between the PBX and ATTCON/DESKCON.
The card is mounted in slot numbers 12 or 23.
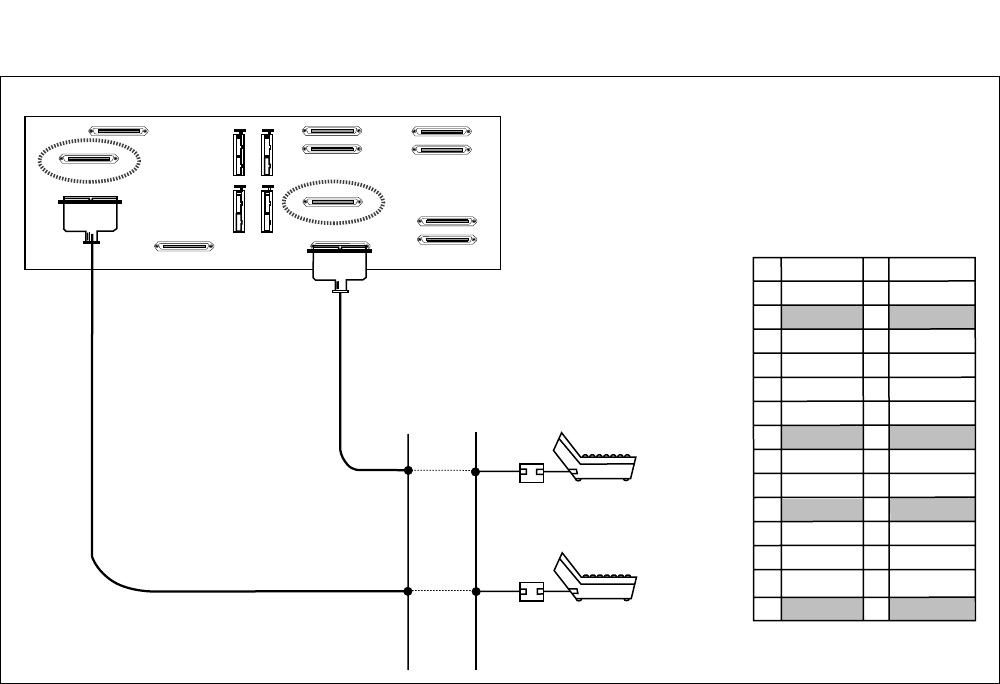
CHAPTER 5 NDA-24307
Page 382
Issue 1
FAULT REPAIR PROCEDURES
Figure 5-3 ATT Connector Cabling and Connector Leads Accommodation
LT5
LT11
PIM backplane
MDF ATTCON/
DESKCON
LT11 is used when PA-CS33 is mounted in slot 23.
LT5 is used when PA-CS33 is mounted in slot 12.
9
10
11
12
13
14
15
16
17
18
19
20
21
22
23
47
34
35
36
37
38
39
40
41
42
43
44
45
46
48
BN4801BN4800
BN4820 BN4821
TAS1B TAS1A
BN4810
BN4830 BN4831
BN4811
TAS0B TAS0A
B2 A2
B3 A3
PA-CS33 Pin Assignment
Installation Cable
Installation Cable
for
ATTCON/
DESKCON 0
for
ATTCON/
DESKCON 1
for
ATTCON/
DESKCON 0
for
ATTCON/
DESKCON 1
0 - 1
0 - 1
Rosette
Rosette
NDA-24307 CHAPTER 5
Page 383
Issue 1
FAULT REPAIR PROCEDURES
3.3 ATTCON/DESKCON Fault
Note: No speech can be made. While replacement of the ATI circuit card for the master ATTCON/DESKCON is in progress,
the system is placed under Night Mode.
On the ATTCON/DESKCON, Lamp Check
(LCHK) key has been pressed but no lamps
have illuminated.
Check the ATT connector cable between the
ATTCON/DESKCON and the PBX.
When OPE lamp of the ATI (PA-CS33)
circuit card does not illuminate Check to see if MB switch of the ATI circuit
card is at ON position (UP side).
Use ATRK command to confirm that the trunk
data in the ATI circuit card are assigned.
Replace the ATI circuit card with a spare.
When BL lamp of the ATI circuit card is
flashing or illuminating Check to see if MB switch of the ATI circuit
card is at ON position (UP side).
Use MBTK command to see if ATI circuit card
is placed into MB state.
Use ATRK command to check ATI data
assignment.
Replace the ATI circuit card with a spare.
When keys cannot be operated Replace the operators headset.
Replace the ATI circuit card with a spare.
ATTENTION
Contents
Static Sensitive
Handling
Precautions Required
START
END
CHAPTER 5 NDA-24307
Page 384
Issue 1
FAULT REPAIR PROCEDURES
Note: No operations can be made.
Replace the ATTCON/DESKCON with a
spare. Set the MB switch of ATI PA-CS33 circuit
card UP.
If the circuit card is equipped with a fuse,
remove the fuse.
Disconnect the CHAMP connector of the
ATTCON/DESKCON and replace the
ATTCON/DESKCON.
If the circuit card is equipped with a fuse,
insert the fuse into its position.
Set the MB switch of the ATI circuit card
DOWN.
Confirm the PA lamp illuminates on the
ATTCON/DESKCON.
ATTENTION
Contents
Static Sensitive
Handling
Precautions Required
START
END

NDA-24307 CHAPTER 5
Page 385
Issue 1
FAULT REPAIR PROCEDURES
4. UNIT FAULT
This section explains the fault repair procedure in a case where any of the faults shown in Table 5-6, has
occurred to all the line/trunk circuit cards mounted in a specific unit. Figure 5-4 shows the range of units.
Figure 5-4 Range of Units (LN0/1/2/3)
Table 5-6 Unit Fault Situation
FAULT SITUATION REFERENCE SECTION
•Noise, one-way speech, no tone.
•Even if dialing has been made, dial tone does not stop. Section 4.2, Unit Fault - Fault Related to Speech
Dial Tone cannot be heard. Section 4.3, Unit Fault - When Dial Tone (DT)
Cannot Be Heard
The MUX card has become faulty and, as a result the CPU has been
changed over. Section 4.4, Unit Fault - ACT-Side MUX Card Is
Faulty and System Has Changed Over
FRONT VIEW
TOPU
IMG0
FANU
BASEU
LPM
MG01
MG00
TOPU
IMG2
FANU
BASEU
TSWM1
Unit 2 Unit 3
Unit 0 Unit 1
MG05
MG04
TOPU
IMG3
FANU
BASEU
DUMMY
Unit 2 Unit 3
Unit 0 Unit 1
MG07
MG06
TOPU
IMG1
FANU
BASEU
TSWM0
MG03
MG02
PIM3
PIM2
PIM1
PIM0
00
MUX (PH-PC36) 0
MUX (PH-PC36) 1
PWR
PWR
Unit No. = 0/2 Unit No. = 1/3
Slot No.
PIM
01 02 03 04 05 06 07 08 09 10 11 12 13 14 15 16 17 18 19 20 21 22 23
Unit 2 Unit 3
Unit 0 Unit 1
Unit 2 Unit 3
Unit 0 Unit 1
Unit 2 Unit 3
Unit 0 Unit 1
Unit 2 Unit 3
Unit 0 Unit 1
Unit 2 Unit 3
Unit 0 Unit 1
Unit 2 Unit 3
Unit 0 Unit 1
LN0/1/2/3
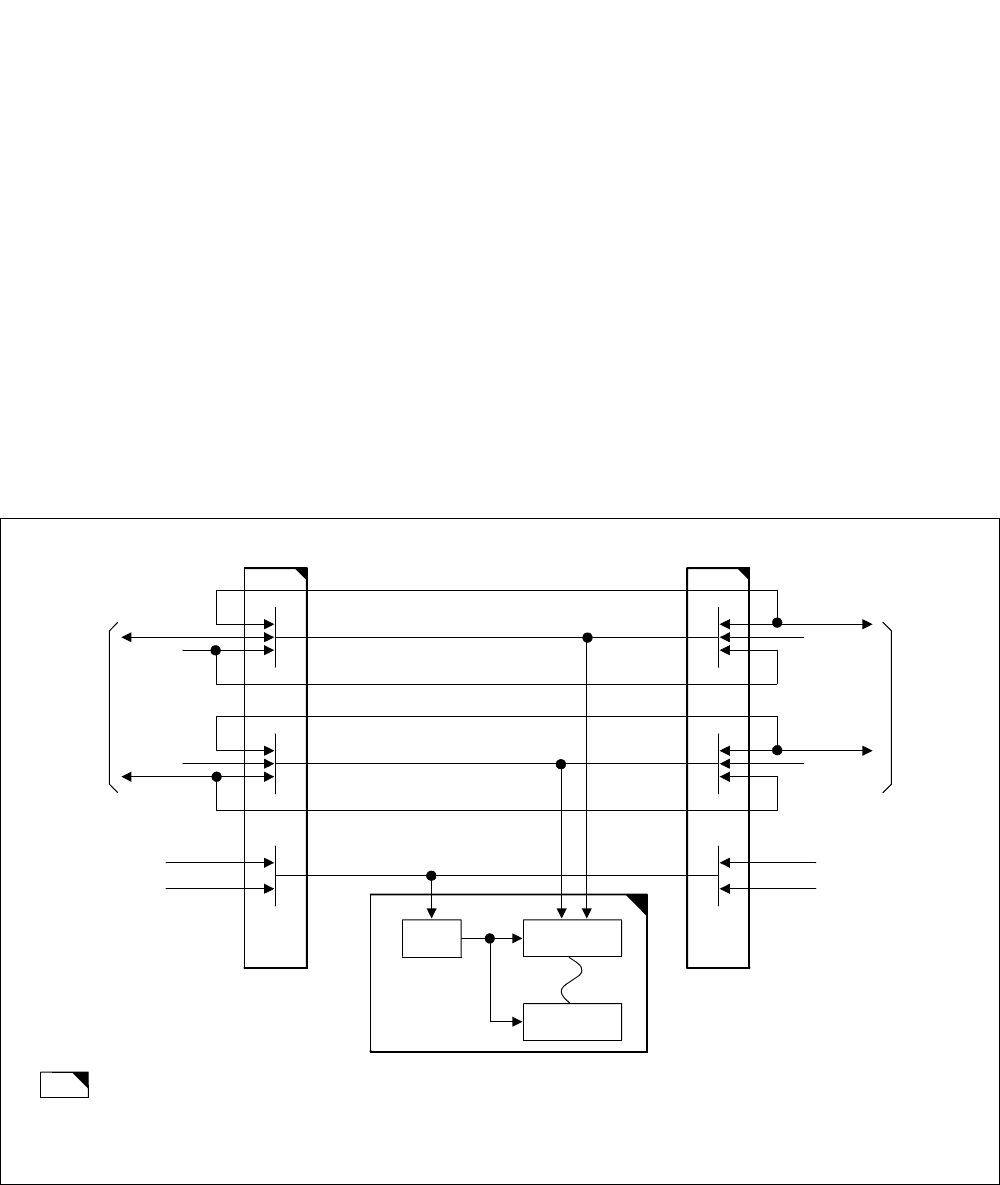
CHAPTER 5 NDA-24307
Page 386
Issue 1
FAULT REPAIR PROCEDURES
4.1 Check Point
When repairing a unit fault, consider the following items:
(1) Speech paths and control paths in the unit are connected to line/trunks via the MUX circuit cards. Be sure
to check the alarm lamps on the MUX circuit cards, and check to see if the front cable between each MUX
circuit card and TSW circuit card is connected correctly. Figure 5-5 and Figure 5-6 show the block
diagram within the unit.
(2) The MUX circuit cards are operating in the ACT/STBY modes under control of the CPU circuit. When
the ACT-side CPU has detected a fault in the ACT-side MUX circuit card, CPU changeover is executed
and the ACT/STBY mode of the Speech Path System is also changed over. When both of the MUX circuit
cards have become faulty, all the lines/trunks in that unit are placed into make-busy state. (If a PFT circuit
card is located in that specific unit, the PFT is activated.) Figure 5-7 shows the location of the MUX cards.
(3) When both units in a specific PIM are faulty, it is possible that the PWR circuit card mounted in that
specific PIM is faulty. In such a case, refer to Section 9, Power Supply Fault.
Figure 5-5 Unit Control Block Diagram (Dual Configuration)
MUX0
Clock
(B)
(A)
Speech
Path
To
TSW/INT
MUX1
LC/TRK
LC/TRK
PM
Line/
Trunk
Circuit Card
Control of
CPU No. 0
ACT/STBY of
CPU No. 0
Clock
(B)
Speech
Path
(A)
To
TSW/INT
Control of
CPU No. 1
ACT/STBY of
CPU No. 1
SYMBOLS
: Circuit Card
: Control on ACT/STBY of Speech Path Systems
: Control on ACT/STBY of Clock Systems
(A)
(B)
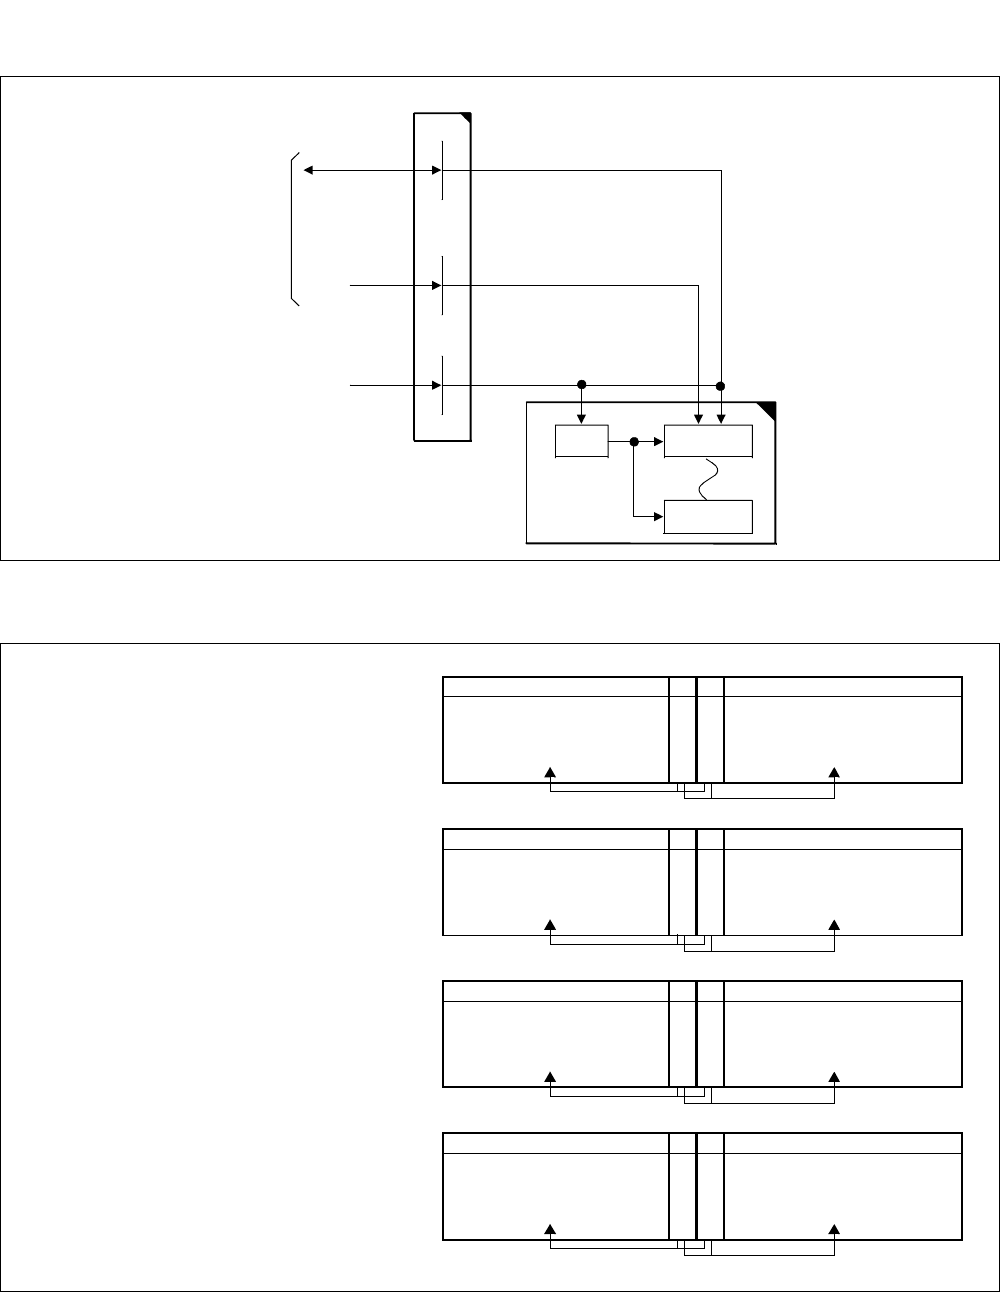
NDA-24307 CHAPTER 5
Page 387
Issue 1
FAULT REPAIR PROCEDURES
Figure 5-6 Unit Control Block Diagram (Single Configuration)
Figure 5-7 MUX Card Locations (LN0/1/2/3)
LC/TRK
LC/TRK
PM
Line/
Trunk
Circuit Card
MUX X
To
TSW/
Clock
Speech
Path
(A)
Control of
CPU
MUX
MUX (PH-PC36) card is mounted
in Slot No. 13 and/or 14 of each
PIM.
MUX 0
MUX 1
UNIT = 2 UNIT = 3
PIM 3
13
IMG0/1/2/3
Front View
14
MUX 0
MUX 1
UNIT = 0 UNIT = 1
PIM 2
13 14
MUX 0
MUX 1
UNIT = 2 UNIT = 3
PIM 1
13 14
MUX 0
MUX 1
UNIT = 0 UNIT = 1
PIM 0
13 14
CHAPTER 5 NDA-24307
Page 388
Issue 1
FAULT REPAIR PROCEDURES
4.2 Unit Fault - Fault Related to Speech
Faulty Situation:
•Noise, one-way speech, no tone, etc. occurs only within a unit.
•Even if dialing has started, dial tone does not stop.
(1) For Dual Configuration
Check by replacing the MUX (PH-PC36)
circuit card.
Replace the MUX circuit card referring to
Section 3.3.2, MUX Card Replacement
Procedure, Chapter 4.
After replacement of the MUX
circuit card, make a station-to-
station call in the faulty unit and
see if speech is normal.
Place the MUX circuit card into ACT mode.
Refer to Section 12, Chapter 6.
Check by replacing the TSW circuit card. Replace the TSW circuit card by referring to
Section 2.3.2, TSW Card Replacement
Procedure, Chapter 4.
After replacement of the TSW
circuit card, make a station-to-
station call in the faulty unit and
see if speech is normal.
Place the TSW circuit card into ACT mode.
Refer to Section 12, Chapter 6.
ATTENTION
Contents
Static Sensitive
Handling
Precautions Required
START
A
NDA-24307 CHAPTER 5
Page 389
Issue 1
FAULT REPAIR PROCEDURES
Check the line/trunk circuit cards mounted
in the unit to see if t ey are faulty.
Perform this check on an individual basis.
Set the MB switch of the line/trunk circuit card
UP and extract it from its mounting slot.
Make a station-to-station call and see if a fault
occurs.
If the fault has stopped occurring,
the circuit card extracted at that
time is faulty. Replace the circuit
card with a spare.
If the fault continues, check the
next circuit card.
ATTENTION
Contents
Static Sensitive
Handling
Precautions Required
A
END
CHAPTER 5 NDA-24307
Page 390
Issue 1
FAULT REPAIR PROCEDURES
(2) For Single Configuration
Check by replacing the MUX (PH-PC36)
circuit card. Replace the MUX circuit card by referring to
Section 3.3.2, MUX Card Replacement
Procedure, Chapter 4.
After replacement of the MUX
circuit card, make a station-to-
station call in the faulty unit and
see if speech is normal.
Check by replacing the TSW circuit card. Replace the TSW circuit card referring to
Section 2.3.2, TSW Card Replacement
Procedure, Chapter 4.
After replacement of the TSW
circuit card, make a station-to-
station call in the faulty unit and
see if speech is normal.
.
ATTENTION
Contents
Static Sensitive
Handling
Precautions Required
START
A
NDA-24307 CHAPTER 5
Page 391
Issue 1
FAULT REPAIR PROCEDURES
Check the line/trunk circuit cards mounted
in the unit to see if they are faulty.
Perform this check on an individual basis.
Set the MB switch of the line/trunk circuit
card UP and extract it from its mounting slot.
Make a station-to-station call and see if a fault
occurs.
If the fault has stopped, the
circuit card extracted at that time
is faulty. Replace the circuit card
with a spare.
If the fault continues, check the
next circuit card.
ATTENTION
Contents
Static Sensitive
Handling
Precautions Required
A
END
CHAPTER 5 NDA-24307
Page 392
Issue 1
FAULT REPAIR PROCEDURES
4.3 Unit Fault - When Dial Tone (DT) Cannot Be Heard
Faulty Situation:
•Dial Tone (DT) cannot be heard except within a unit.
•[4-T] Both MUX Failure / [4-S] MUX Ready Failure
•[23-Y] MUX Clock Failure
Note: For dual system configuration, if a system message indicates that both systems are faulty, first repair
the fault in the indicated system and then proceed to repair the PIM in the other system.
(1) For Dual Configuration
Check to see if the MUX (PH-PC36) circuit
card is making poor contact. Set the faulty MUX circuit card into STBY
mode. Refer to Section 12, Chapter 6.
Set the MB switch of the MUX circuit card UP.
Extract the MUX circuit card from its mounting
slot and clean the contact portion.
If cleaning cannot be done, repeat insertion and
extraction of the circuit card two or three times.
Set the MB switch of the MUX circuit card UP
and insert the circuit card into its mounting slot.
Set the MB switch of the MUX circuit card
DOWN.
Check to see if a station-to-station connection
can be set up within the faulty unit.
Check by replacing the MUX circuit card
with a spare. Place the faulty MUX circuit card into STBY
mode. Refer to Refer to Section 12, Chapter 6.
Replace the MUX circuit card. Refer to Section
3.3.2, MUX Card Replacement Procedure,
Chapter 4.
ATTENTION
Contents
Static Sensitive
Handling
Precautions Required
START
A
B
NDA-24307 CHAPTER 5
Page 393
Issue 1
FAULT REPAIR PROCEDURES
Place the MUX circuit card into ACT mode.
Refer to Section 12, Chapter 6.
Check to see if a station-to-station connection
can be set up to identify the circuit card
responsible for the fault.
Extract all the line/trunk circuit cards from
their mounting slots in the unit. Insert the
cards back into their slots one after another
and see if the dial tone is heard each time.
Extract all the line/trunk circuit cards from their
slots.
Note: Set the MB switch of the line/trunk
circuit card UP and extract.
Confirm the MUX ACT lamp on the MUX
circuit card illuminates.
Set the MB switch of an extracted line/trunk
circuit card UP and insert the circuit cards into
their mounting slots one by one.
Confirm the OPE lamp of the inserted circuit
card illuminates by setting the MB switch
DOWN.
If Dial Tone (DT) is heard, check
the next circuit card.
Make a station-to-station call and see if DT can
be heard.
Note: Perform this check on the rest of the
circuit cards by inserting them into
their slots individually.
If DT is not heard, replace the
circuit card with a spare.
ATTENTION
Contents
Static Sensitive
Handling
Precautions Required
A
END
B
CHAPTER 5 NDA-24307
Page 394
Issue 1
FAULT REPAIR PROCEDURES
(2) For Single Configuration
Check to see if the MUX (PH-PC36)
circuit card is making poor contact. Set the MB switch of the MUX circuit card UP.
Extract the MUX circuit card from its mounting
slot and clean the contact portion.
If cleaning cannot be done, repeat insertion and
extraction of the circuit card two or three times.
Set the MB switch of the MUX circuit card UP
and insert the circuit card into its mounting slot.
Set the MB switch of the MUX circuit card
DOWN.
Check to see if a station-to-station connection
can be set up within the faulty unit.
Check by replacing the MUX circuit card
with a spare. Replace the MUX circuit card referring to Sec-
tion 3.3.2, MUX Card Replacement Procedure,
Chapter 4.
Place the MUX circuit card into ACT mode.
Refer to Section 12, Chapter 6.
Check to see if a station-to-station connection
can be set up to identify a circuit card
responsible for the fault.
ATTENTION
Contents
Static Sensitive
Handling
Precautions Required
START
A
NDA-24307 CHAPTER 5
Page 395
Issue 1
FAULT REPAIR PROCEDURES
Extract all the line/trunk circuit cards from
their mounting slots in the unit. Insert the
cards back into their slots one after
another and see if the dial tone is heard
each time.
Extract all the line/trunk circuit cards from
their slots.
Note: Set the MB switch of the line/trunk
circuit card UP and extract.
Confirm the MUX ACT lamp on the MUX
circuit card illuminates.
Set the MB switch of an extracted Line/Trunk
circuit card UP and insert the circuit cards
into their mounting slots one by one.
Confirm the OPE lamp of the inserted circuit
card illuminates by setting the MB switch
DOWN.
Make a station-to-station call and see if DT is
heard.
Note: Perform this check on the reset of
the circuit cards by inserting them
into their slots individually.
If DT is heard, check the next
circuit card.
If DT is not heard, replace the
circuit card with a spare.
ATTENTION
Contents
Static Sensitive
Handling
Precautions Required
A
END
CHAPTER 5 NDA-24307
Page 396
Issue 1
FAULT REPAIR PROCEDURES
4.4 Unit Fault - ACT-Side MUX Card Is Faulty and System Has Changed Over
Faulty Situation:
•The ACT side has become faulty and the system changeover has executed in the
dual configuration system.
•[4-S] MUX Ready Failure / [4-T] Both MUX Failure
•[23-Y] MUX Clock Failure
Check to see if the MUX (PH-PC36)
circuit card of the STBY side is making
poor contact.
If the connection is set up, set the
faulty system into STBY side.
Refer to Section 12, Chapter 6.
Set the MB switch of the MUX circuit card
UP.
Extract the MUX circuit card from its
mounting slot and clean the contact portion.
If cleaning cannot be done, repeat insertion
and extraction of the circuit card two or three
times.
Set the MB switch of the MUX circuit card
UP and insert the circuit card into its
mounting slot.
Set the MB switch of the MUX circuit card
DOWN.
Set the faulty system to ACT side. Refer to
Section 12, Chapter 6.
Check to see if a station-to-station connection
can be set up within the faulty unit.
ATTENTION
Contents
Static Sensitive
Handling
Precautions Required
START
A
NDA-24307 CHAPTER 5
Page 397
Issue 1
FAULT REPAIR PROCEDURES
Replace the MUX circuit card with a
spare, and check it. Replace the MUX circuit card referring to
Section 3.3.2, MUX Card Replacement
Procedure, Chapter 4.
Place the MUX circuit card into ACT mode.
Refer to Section 12, Chapter 6.
Check to see if a station-to-station connection
can be set up and identify a circuit card
responsible for the fault.
If the connection is set up, set
the faulty system into STBY
side. Refer to Section 12,
Chapter 6.
Perform the above check by extracting each
MUX circuit card individually.
ATTENTION
Contents
Static Sensitive
Handling
Precautions Required
A
END

CHAPTER 5 NDA-24307
Page 398
Issue 1
FAULT REPAIR PROCEDURES
5. SPEECH PATH (TSW) SYSTEM FAULT (LN)
This paragraph explains the fault repair procedure when any of the faults shown in Table 5-7 has occurred in
a LN.
5.1 Check Point
When repairing a speech path fault, consider that when any of the faults shown in Table 5-7 have occurred
in a LN, it is possible that the TSW circuit card is at fault. Always check the alarm lamps on the TSW
circuit card. Refer to Figure 5-8.
Table 5-7 Speech Path (TSW) System Fault Situation (LN)
FAULTY SITUATION REFERENCE SECTION
•Noise, one-way speech, no tone
•Even if dialing has been made, dial tone does not stop.
Section 5.2, Speech Path System Fault - Fault
Related to Speech
Dial tone cannot be heard. Section 5.3, Speech Path System Fault - When Dial
Tone (DT) Cannot Be Heard
A fault occurring in the STBY side TSW is indicated by a system
message or an alarm lamp. Section 5.4, Speech Path System Fault (LN) - STBY
Side Has Become Faulty
NDA-24307 CHAPTER 5
Page 399
Issue 1
FAULT REPAIR PROCEDURES
Figure 5-8 Speech Path Block Diagram (1/2)
ISWM
MUX MUX
LC/TRK
PIM0
IMG0 of LN0
PIM1
MUX MUX
LC/TRK
PIM2
MUX MUX
LC/TRK
PIM3
MUX MUX
LC/TRK
MUX MUX
LC/TRK
PIM0
IMG1 of LN0
PIM1
MUX MUX
LC/TRK
PIM2
MUX MUX
LC/TRK
PIM3
MUX MUX
LC/TRK
MUX MUX
LC/TRK
PIM0
IMG2 of LN0
PIM1
MUX MUX
LC/TRK
PIM2
MUX MUX
LC/TRK
PIM3
MUX MUX
LC/TRK
MUX MUX
LC/TRK
PIM0
IMG3 of LN0
PIM1
MUX MUX
LC/TRK
PIM2
MUX MUX
LC/TRK
PIM3
MUX MUX
LC/TRK
- Symbols -
: Cable
: Circuit card (ACT)
: Circuit card (ST-BY)
: Speech Path
TSW (in TSWM0/1) : PH-SW12
TSW (in ISWM) : PU-SW00
HSW: PU-SW01
MUX: PH-PC36
T
S
W
TSW/INT TSW 00
T
S
W
000 001 002 003 004 005 006 007 008 009 00A 00B 00C00D 00E 00F
T
S
W
T
S
W
T
S
W
T
S
W
T
S
W
T
S
W
T
S
W
T
S
W
T
S
W
T
S
W
T
S
W
T
S
W
T
S
W
T
S
W
T
S
W
TSW/INT TSW 10
T
S
W
100 101 102 103 104 105 106 107 108 109 10A 10B 10C 10D 10E 10F
T
S
W
T
S
W
T
S
W
T
S
W
T
S
W
T
S
W
T
S
W
T
S
W
T
S
W
T
S
W
T
S
W
T
S
W
T
S
W
T
S
W
HSW
T
S
W
TSW/INT TSW 01
T
S
W
010 011 012 013 014 015 016 017 018 019 01A 01B 01C 01D 01E 01F
T
S
W
T
S
W
T
S
W
T
S
W
T
S
W
T
S
W
T
S
W
T
S
W
T
S
W
T
S
W
T
S
W
T
S
W
T
S
W
T
S
W
T
S
W
TSW/INT TSW 11
T
S
W
110 111 112 113 114 115 116 117 118 119 11A 11B 11C 11D 11E 11F
T
S
W
T
S
W
T
S
W
T
S
W
T
S
W
T
S
W
T
S
W
T
S
W
T
S
W
T
S
W
T
S
W
T
S
W
T
S
W
T
S
W
TSW/INT TSW/INT TSW/INT
00800900A
00B 00C00D00E00F
TSWM 0
( LN0)
M
U
X
TSW 00
M
U
X
M
U
X
M
U
X
TSW02
M
U
X
M
U
X
M
U
X
M
U
X
TSW/INT
M
U
X
M
U
X
M
U
X
M
U
X
TSW 10
M
U
X
M
U
X
M
U
X
M
U
X
TSW 12
M
U
X
TSW 01
M
U
X
M
U
X
M
U
X
TSW03
M
U
X
M
U
X
M
U
X
M
U
X
M
U
X
M
U
X
M
U
X
M
U
X
TSW 11
M
U
X
M
U
X
M
U
X
M
U
X
TSW 13
TSW/INT TSW/INT TSW/INT TSW/INT
000001002003 004005006007 104105106107
100101102103
10810910A10B 10C10D10E10F
TSWM 1
( LN0)
M
U
X
TSW 00
M
U
X
M
U
X
M
U
X
TSW02
M
U
X
M
U
X
M
U
X
M
U
X
M
U
X
M
U
X
M
U
X
M
U
X
TSW 10
M
U
X
M
U
X
M
U
X
M
U
X
TSW 12
M
U
X
TSW 01
M
U
X
M
U
X
M
U
X
TSW03
M
U
X
M
U
X
M
U
X
M
U
X
M
U
X
M
U
X
M
U
X
M
U
X
TSW 11
M
U
X
M
U
X
M
U
X
M
U
X
TSW 13
TSW/INT TSW/INT TSW/INT TSW/INT
TSW/INT TSW/INT TSW/INT TSW/INT
000001002003 004005006007 104105106107
100101102103
00800900A
00B 00C00D00E00F
10810910A10B 10C10D10E10F
MUX MUX
LC/TRK
PIM0
IMG0 of LN1
PIM1
MUX MUX
LC/TRK
PIM2
MUX MUX
LC/TRK
PIM3
MUX MUX
LC/TRK
MUX MUX
LC/TRK
PIM0
IMG1 of LN1
PIM1
MUX MUX
LC/TRK
PIM2
MUX MUX
LC/TRK
PIM3
MUX MUX
LC/TRK
MUX MUX
LC/TRK
PIM0
IMG2 of LN1
PIM1
MUX MUX
LC/TRK
PIM2
MUX MUX
LC/TRK
PIM3
MUX MUX
LC/TRK
MUX MUX
LC/TRK
PIM0
IMG3 of LN1
PIM1
MUX MUX
LC/TRK
PIM2
MUX MUX
LC/TRK
PIM3
MUX MUX
LC/TRK
TSWM 0
( LN1)
M
U
X
TSW 00
M
U
X
M
U
X
M
U
X
TSW02
M
U
X
M
U
X
M
U
X
M
U
X
TSW/INT
M
U
X
M
U
X
M
U
X
M
U
X
TSW 10
M
U
X
M
U
X
M
U
X
M
U
X
TSW 12
M
U
X
TSW 01
M
U
X
M
U
X
M
U
X
TSW03
M
U
X
M
U
X
M
U
X
M
U
X
M
U
X
M
U
X
M
U
X
M
U
X
TSW 11
M
U
X
M
U
X
M
U
X
M
U
X
TSW 13
TSW/INT TSW/INT TSW/INT
TSW/INT TSW/INT TSW/INT TSW/INT
000001002003 004005006007
00800900A00B 00C00D00E00F
104105106107
100101102103
10810910A10B 10C10D10E10F
TSWM 1
( LN1)
M
U
X
TSW 00
M
U
X
M
U
X
M
U
X
TSW02
M
U
X
M
U
X
M
U
X
M
U
X
M
U
X
M
U
X
M
U
X
M
U
X
TSW 10
M
U
X
M
U
X
M
U
X
M
U
X
TSW 12
M
U
X
TSW 01
M
U
X
M
U
X
M
U
X
TSW03
M
U
X
M
U
X
M
U
X
M
U
X
M
U
X
M
U
X
M
U
X
M
U
X
TSW 11
M
U
X
M
U
X
M
U
X
M
U
X
TSW 13
TSW/INT TSW/INT TSW/INT TSW/INT
TSW/INT TSW/INT TSW/INT TSW/INT
000001002003 004005006007 104105106107
100101102103
00800900A00B 00C00D00E00F
10810910A10B 10C10D10E10F
HSW
T
S
W
TSW/INT TSW 02
T
S
W
020021022023 024025026027 02802902A02B 02C02D02E02F
T
S
W
T
S
W
T
S
W
T
S
W
T
S
W
T
S
W
T
S
W
T
S
W
T
S
W
T
S
W
T
S
W
T
S
W
T
S
W
T
S
W
T
S
W
TSW/INT TSW 12
T
S
W
120121122123 124125126127 12812912A12B 12C12D12E12F
T
S
W
T
S
W
T
S
W
T
S
W
T
S
W
T
S
W
T
S
W
T
S
W
T
S
W
T
S
W
T
S
W
T
S
W
T
S
W
T
S
W
T
S
W
TSW/INT
TSW 03
T
S
W
030031032033 034035036037 03803903A03B 03C03D03E03F
T
S
W
T
S
W
T
S
W
T
S
W
T
S
W
T
S
W
T
S
W
T
S
W
T
S
W
T
S
W
T
S
W
T
S
W
T
S
W
T
S
W
T
S
W
TSW/INT TSW 13
T
S
W
130131132133 134135136137 13813913A13B 13C13D13E13F
T
S
W
T
S
W
T
S
W
T
S
W
T
S
W
T
S
W
T
S
W
T
S
W
T
S
W
T
S
W
T
S
W
T
S
W
T
S
W
T
S
W
To TSWM0
of LN2 To TSWM1
of LN2 To TSWM0
of LN3 To TSWM1
of LN3
To TSWM0
of LN2 To TSWM1
of LN2 To TSWM0
of LN3 To TSWM1
of LN3
This figure shows a block diagram of speech path.
CHAPTER 5 NDA-24307
Page 400
Issue 1
FAULT REPAIR PROCEDURES
Figure 5-8 Speech Path Block Diagram (2/2)
ISWM
MUX MUX
LC/TRK
PIM0
IMG0 of LN2
PIM1
MUX MUX
LC/TRK
PIM2
MUX MUX
LC/TRK
PIM3
MUX MUX
LC/TRK
MUX MUX
LC/TRK
PIM0
IMG1 of LN2
PIM1
MUX MUX
LC/TRK
PIM2
MUX MUX
LC/TRK
PIM3
MUX MUX
LC/TRK
MUX MUX
LC/TRK
PIM0
IMG2 of LN2
PIM1
MUX MUX
LC/TRK
PIM2
MUX MUX
LC/TRK
PIM3
MUX MUX
LC/TRK
MUX MUX
LC/TRK
PIM0
IMG3 of LN2
PIM1
MUX MUX
LC/TRK
PIM2
MUX MUX
LC/TRK
PIM3
MUX MUX
LC/TRK
- Symbols -
: Cable
: Circuit card (ACT)
: Circuit card (ST-BY)
: Speech Path
TSW (in TSWM0/1) : PH-SW12
TSW (in ISWM) : PU-SW00
HSW: PU-SW01
MUX: PH-PC36
T
S
W
TSW/INT TSW 02
T
S
W
020
021
022
023024
025
026
027028029
02A
02B02C
02D
02E
02F
T
S
W
T
S
W
T
S
W
T
S
W
T
S
W
T
S
W
T
S
W
T
S
WT
S
W
T
S
W
T
S
W
T
S
W
T
S
W
T
S
W
T
S
W
TSW/INT TSW 12
T
S
W
120121
122
123124125
126
127128
129
12A
12B12C
12D
12E
12F
T
S
W
T
S
W
T
S
W
T
S
W
T
S
W
T
S
W
T
S
W
T
S
WT
S
W
T
S
W
T
S
W
T
S
W
T
S
W
T
S
W
HSW
T
S
W
TSW/INT TSW 03
T
S
W
030031
032
033034
035036
037038
039
03A
03B
03C
03D
03E
03F
T
S
W
T
S
W
T
S
W
T
S
W
T
S
W
T
S
W
T
S
W
T
S
WT
S
W
T
S
W
T
S
W
T
S
W
T
S
W
T
S
W
T
S
W
TSW/INT TSW 13
T
S
W
130131
132133134
135
136
137138
139
13A
13B
13C
13D
13E
13F
T
S
W
T
S
W
T
S
W
T
S
W
T
S
W
T
S
W
T
S
W
T
S
WT
S
W
T
S
W
T
S
W
T
S
W
T
S
W
T
S
W
TSW/INT TSW/INT TSW/INT
00800900A
00B 00C00D00E00F
TSWM 0
( LN2)
M
U
X
TSW 00
M
U
X
M
U
X
M
U
X
TSW02
M
U
X
M
U
X
M
U
X
M
U
X
TSW/INT
M
U
X
M
U
X
M
U
X
M
U
X
TSW 10
M
U
X
M
U
X
M
U
X
M
U
X
TSW 12
M
U
X
TSW 01
M
U
X
M
U
X
M
U
X
TSW03
M
U
X
M
U
X
M
U
X
M
U
X
M
U
X
M
U
X
M
U
X
M
U
X
TSW 11
M
U
X
M
U
X
M
U
X
M
U
X
TSW 13
TSW/INT TSW/INT TSW/INT TSW/INT
000001002003 004005006007 104105106107
100101102103
10810910A10B 10C10D10E10F
TSWM 1
( LN2)
M
U
X
TSW 00
M
U
X
M
U
X
M
U
X
TSW02
M
U
X
M
U
X
M
U
X
M
U
X
M
U
X
M
U
X
M
U
X
M
U
X
TSW 10
M
U
X
M
U
X
M
U
X
M
U
X
TSW 12
M
U
X
TSW 01
M
U
X
M
U
X
M
U
X
TSW03
M
U
X
M
U
X
M
U
X
M
U
X
M
U
X
M
U
X
M
U
X
M
U
X
TSW 11
M
U
X
M
U
X
M
U
X
M
U
X
TSW 13
TSW/INT TSW/INT TSW/INT TSW/INT
TSW/INT TSW/INT TSW/INT TSW/INT
000001002003 004005006007 104105106107
100101102103
00800900A
00B 00C00D00E00F
10810910A10B 10C10D10E10F
MUX MUX
LC/TRK
PIM0
IMG0 of LN3
PIM1
MUX MUX
LC/TRK
PIM2
MUX MUX
LC/TRK
PIM3
MUX MUX
LC/TRK
MUX MUX
LC/TRK
PIM0
IMG1 of LN3
PIM1
MUX MUX
LC/TRK
PIM2
MUX MUX
LC/TRK
PIM3
MUX MUX
LC/TRK
MUX MUX
LC/TRK
PIM0
IMG2 of LN3
PIM1
MUX MUX
LC/TRK
PIM2
MUX MUX
LC/TRK
PIM3
MUX MUX
LC/TRK
MUX MUX
LC/TRK
PIM0
IMG3 of LN3
PIM1
MUX MUX
LC/TRK
PIM2
MUX MUX
LC/TRK
PIM3
MUX MUX
LC/TRK
TSWM 0
( LN3)
M
U
X
TSW 00
M
U
X
M
U
X
M
U
X
TSW02
M
U
X
M
U
X
M
U
X
M
U
X
TSW/INT
M
U
X
M
U
X
M
U
X
M
U
X
TSW 10
M
U
X
M
U
X
M
U
X
M
U
X
TSW 12
M
U
X
TSW 01
M
U
X
M
U
X
M
U
X
TSW03
M
U
X
M
U
X
M
U
X
M
U
X
M
U
X
M
U
X
M
U
X
M
U
X
TSW 11
M
U
X
M
U
X
M
U
X
M
U
X
TSW 13
TSW/INT TSW/INT TSW/INT
TSW/INT TSW/INT TSW/INT TSW/INT
000001002003 004005006007
00800900A00B 00C00D00E00F
104105106107
100101102103
10810910A10B 10C10D10E10F
TSWM 1
( LN3)
M
U
X
TSW 00
M
U
X
M
U
X
M
U
X
TSW02
M
U
X
M
U
X
M
U
X
M
U
X
M
U
X
M
U
X
M
U
X
M
U
X
TSW 10
M
U
X
M
U
X
M
U
X
M
U
X
TSW 12
M
U
X
TSW 01
M
U
X
M
U
X
M
U
X
TSW03
M
U
X
M
U
X
M
U
X
M
U
X
M
U
X
M
U
X
M
U
X
M
U
X
TSW 11
M
U
X
M
U
X
M
U
X
M
U
X
TSW 13
TSW/INT TSW/INT TSW/INT TSW/INT
TSW/INT TSW/INT TSW/INT TSW/INT
000001002003 004005006007 104105106107
100101102103
00800900A00B 00C00D00E00F
10810910A10B 10C10D10E10F
HSW
T
S
W
TSW/INT
TSW 00
T
S
W
000001002003 004005006007 00800900A00B 00C00D00E00F
T
S
W
T
S
W
T
S
W
T
S
W
T
S
W
T
S
W
T
S
W
T
S
W
T
S
W
T
S
W
T
S
W
T
S
W
T
S
W
T
S
W
T
S
W
TSW/INT
TSW 10
T
S
W
100101102103 104105106107 10810910A10B10C10D10E10F
T
S
W
T
S
W
T
S
W
T
S
W
T
S
W
T
S
W
T
S
W
T
S
W
T
S
W
T
S
W
T
S
W
T
S
W
T
S
W
T
S
W
T
S
W
TSW/INT
TSW 01
T
S
W
010011012013 014015016017 01801901A01B 01C01D01E01F
T
S
W
T
S
W
T
S
W
T
S
W
T
S
W
T
S
W
T
S
W
T
S
W
T
S
W
T
S
W
T
S
W
T
S
W
T
S
W
T
S
W
T
S
W
TSW/INT
TSW 11
T
S
W
110111112113 114115116117 11811911A11B11C11D11E11F
T
S
W
T
S
W
T
S
W
T
S
W
T
S
W
T
S
W
T
S
W
T
S
W
T
S
W
T
S
W
T
S
W
T
S
W
T
S
W
T
S
W
To TSWM0
of LN0 To TSWM1
of LN0 To TSWM0
of LN1 To TSWM1
of LN1
To TSWM0
of LN0 To TSWM1
of LN0 To TSWM0
of LN1 To TSWM1
of LN1
This figure shows a block diagram of speech path.
NDA-24307 CHAPTER 5
Page 401
Issue 1
FAULT REPAIR PROCEDURES
5.2 Speech Path System Fault - Fault Related to Speech
Faulty Situation:
•Fault related to speech such as noise, one-way speech, no-speed, etc. occurs.
•Even if dialing started, Dial Tone (DT) does not stop.
•[1-C] Both TSW Write Failure
•[1-D] TSW Write Failure
(1) For Dual Configuration
Check to see if fault occurs by replacing
TSW circuit cards one by one. Replace the TSW circuit card referring to
Section 2.3.2, TSW Card Replacement
Procedure, in Chapter 4.
Place the TSW circuit card into ACT mode.
Refer to Section 12, Chapter 6.
Check to see if a station-to-station connection
can be set up and identify a TSW circuit card
responsible for the fault.
Perform the above check by extracting the
TSW circuit cards individually.
Check to see if fault occurs by replacing
MUX circuit cards one by one. Replace the MUX circuit card referring to
Section 3.3.2, MUX Card Replacement
Procedure, Chapter 4.
Place the MUX circuit card into ACT mode.
Refer to Section 12, Chapter 6.
ATTENTION
Contents
Static Sensitive
Handling
Precautions Required
START
AB
CHAPTER 5 NDA-24307
Page 402
Issue 1
FAULT REPAIR PROCEDURES
Check to see if a station-to-station connection
can be set up and identify a circuit card
responsible for the fault.
Perform the above check by extracting the
MUX circuit cards individually.
When the PLO (PH-CK16-A/17-A)/CLK
(PH-CLK18) circuit card is mounted for
digital interface, replace PLO/CLK circuit
card with a spare and check.
Set MB switch of the PLO/CLK circuit card to
UP side.
Confirm OPE lamp on the PLO/CLK circuit
card of the mate system illuminates.
Extract PLO/CLK circuit card from its
mounting slot.
Set MB switch UP and insert the new PLO/
CLK circuit card into its mounting slot.
Set MB switch DOWN.
Set MB switch of the ACT-side PLO/CLK
circuit card UP.
Confirm that the new PLO/CLK circuit card
becomes the ACT side (OPE lamp on the new
card lights green).
Set MB switch of the STBY side PLO/CLK
DOWN.
Confirm that speech can be carried out
normally by a station-to-station call.
Set the faulty speech path system to STBY
side. Refer to Section 12, Chapter 6.
ATTENTION
Contents
Static Sensitive
Handling
Precautions Required
A
END
B

NDA-24307 CHAPTER 5
Page 403
Issue 1
FAULT REPAIR PROCEDURES
(2) For Single Configuration
Check to see if the fault occurs by
replacing TSW circuit cards one by one. Replace the TSW circuit card referring to
Section 2.3.2, TSW Card Replacement
Procedure, Chapter 4.
Check to see if a station-to-station connection
can be set up and identify a TSW circuit card
responsible for the fault.
Perform the above check by extracting the TSW
circuit cards individually.
Check to see if the fault occurs by
replacing MUX circuit cards one by one. Replace the MUX circuit card referring to
Section 3.3.2, MUX Card Replacement
Procedure, Chapter 4.
Initialize the system by pressing the START
button on the TOPU.
Check to see if a station-to-station connection
can be set up and identify a TSW circuit card
responsible for the fault.
Perform the above check by extracting the TSW
circuit cards individually.
ATTENTION
Contents
Static Sensitive
Handling
Precautions Required
START
A
CHAPTER 5 NDA-24307
Page 404
Issue 1
FAULT REPAIR PROCEDURES
When the PLO (PH-CK16-A/17-A)/CLK
(PH-CK18) circuit card is mounted for
digital interface, replace the PLO circuit
card with a spare and check it.
Set MB switch of the PLO/CLK circuit card
to UP side.
Confirm OPE lamp on the PLO/CLK circuit
card goes out.
Extract PLO/CLK circuit card from its
mounting slot.
Set MB switch UP and insert the new PLO/
CLK circuit card into its mounting slot.
Set MB switch DOWN.
Confirm the OPE lamp on the new PLO/CLK
circuit card illuminates.
Confirm that speech can be carried out
normally by a station-to-station call.
ATTENTION
Contents
Static Sensitive
Handling
Precautions Required
A
END
NDA-24307 CHAPTER 5
Page 405
Issue 1
FAULT REPAIR PROCEDURES
5.3 Speech Path System Fault - When Dial Tone (DT) Cannot Be Heard
Faulty Situation:
•Dial Tone (DT) cannot be heard.
•[1-A] Both TSW Failure (Permanent)
•[1-E] Both TSW Clock Failure
•[4-C] Both TSW Ready Failure
•[23-Y] MUX Clock Failure
Note: For dual system configuration, if a system message indicates that both systems are faulty, first repair
the fault in the indicated system and then proceed to repair the PIM in the other system.
Check to see if the TSW circuit card is
making poor contact. Set TSW circuit card into STBY mode. Refer to
Section 12, Chapter 6.
Set TSW MBR switch on the TSW card UP.
Set MB switch of the TSW circuit card UP.
Extract the TSW circuit card from its mounting
slot and clean the contact portion.
If cleaning cannot be done, repeat insertion and
extraction of the circuit card two or three times.
Set TSW MBR and MB switches on the TSW
circuit card UP and insert the circuit card into
its mounting slot.
Set MB switch of the TSW circuit card DOWN.
Set TSW MBR switch DOWN.
Check if a station-to-station connection can be
set up.
Check PCM cables. Check the PCM cables. (See Figure 5-8).
Initialize the system by pressing the START
button on the TOPU and see if a station-to-sta-
tion connection can be set up.
ATTENTION
Contents
Static Sensitive
Handling
Precautions Required
START
END
CHAPTER 5 NDA-24307
Page 406
Issue 1
FAULT REPAIR PROCEDURES
5.4 Speech Path System Fault (LN) - STBY Side Has Become Faulty
Faulty Situation:
•A fault occurred in the STBY side of the dual configuration system.
•[1-B] TSW Failure (Permanent)
•[1-D] TSW Write Failure
•[1-F] TSW Clock Failure
•[4-D] TSW Ready Failure
Check to see if the TSW circuit card
(STBY) is making poor contact. Set the TSW MBR switch of the TSW circuit
card UP.
Set the MB switch of the TSW circuit card UP
and extract the circuit card from its mounting
slot.
Extract the TSW circuit card from its mounting
slot and clean the contact portion.
If cleaning cannot be done, repeat insertion and
extraction of the circuit card two or three times.
Set the TSW MBR and MB switches of the
TSW circuit card UP and insert the circuit card
into its mounting slot.
Set the MB switch of the TSW circuit card
DOWN.
Set the TSW MBR switch DOWN.
Check if a station-to-station connection can be
set up.
Check PCM cables. Check the PCM cables. See Figure 5-8.
Initialize the system by pressing the START
button on the TOPU and see if a station-to-
station connection can be set up.
ATTENTION
Contents
Static Sensitive
Handling
Precautions Required
START
A
NDA-24307 CHAPTER 5
Page 407
Issue 1
FAULT REPAIR PROCEDURES
Faulty Situation:
•Fault related to speech such as noise, one-way speech, no-speed, etc. occurs.
•Even if dialing started, Dial Tone (DT) does not stop.
•[1-C] Both TSW Write Failure
•[1-D] TSW Write Failure
Check to see if fault occurs by extracting
TSW circuit cards one by one.
Replace the TSW circuit card referring to
Section 2.3.2, TSW Card Replacement
Procedure, Chapter 4.
Set the TSW circuit card into ACT mode. Refer
to Section 12, Chapter 6.
Check to see if a station-to-station connection
can be set up to identify a TSW circuit card re-
sponsible for the fault.
Perform the above check by extracting the TSW
circuit cards individually.
Check to see if the fault occurs by
extracting MUX circuit cards one by one. Replace the MUX circuit card referring to
Section 3.3.2, MUX Card Replacement
Procedure, Chapter 4.
Set the MUX circuit card into ACT mode. Refer
to Perform the above check by extracting the
TSW circuit cards individually.
Check to see if a station-to-station connection
can be set up and identify a TSW circuit card
responsible for the fault.
Perform the above check by extracting the
MUX circuit cards individually.
ATTENTION
Contents
Static Sensitive
Handling
Precautions Required
A
END
CHAPTER 5 NDA-24307
Page 408
Issue 1
FAULT REPAIR PROCEDURES
6. SPEECH PATH SYSTEM FAULT (WHOLE SYSTEM/ISW)
This section explains the fault repair procedure when any of the fault shown in Table 5-8 has occurred in a
whole system.
6.1 Check Point
System messages pertaining to whole system fault are shown in Figure 5-9. Check the system messages.
Figure 5-9 System Messages Related to Speech Path System Fault (Whole System/ISW)
Table 5-8 Speech Path (TSW) System Fault Situation (LN)
FAULTY SITUATION REFERENCE SECTION
•Noise, one-way speech, no tone
•Even after dialing a digit, dial tone is still heard.
•Dial tone cannot be heard.
Section 6.2, Speech Path System Fault (Whole
System/ISW) - Fault Related to Speech
•The system message that indicates a fault occurrence to the active
Speech Path System (Whole System /ISW) is intermittently printed
out.
•The alarm lamp on the circuit card of the active Speech Path System
(Whole System /ISW) lights up intermittently.
Section 6.3, Speech Path System Fault (Whole
System/ISW) - ACT side becomes Faulty
Intermittently
•The system message that indicates a fault occurrence to the STBY
Speech Path System (Whole System /ISW) is intermittently printed
out.
•The alarm lamp on the circuit card of the STBY Speech Path
System (Whole System /ISW) lights up intermittently.
Section 6.4, Speech Path System Fault (Whole
System/ISW) - STBY side becomes Faulty
Intermittently
•Clock (CALK, PLOT) is faulty.
CPU TSW
PLO/CLK
HSW
•“1-G” ~ “1-J”HSW Write Failure
•“1-K” ~ “1-L”HSW Clock Failure
•“4-E” ~ “4-F”HSW Ready Failure
•“1-A” ~ “1-D”TSW Write Failure
•“1-E” ~ “1-F”TSW Clock Failure
•“4-C” ~ “4-D”TSW Ready Failure
•“1-O” ~ “1-P”PLO Clock Failure
NDA-24307 CHAPTER 5
Page 409
Issue 1
FAULT REPAIR PROCEDURES
6.2 Speech Path System Fault (Whole System/ISW) - Fault Related to Speech
Replace the TSW card mounted in the
ISWM with a spare. Replace the TSW card by referring to Section
4.3.2, TSW Card Replacement Procedure,
Chapter 4.
Place the TSW circuit card on the ACT mode.
Refer to Section 12, Chapter 6.
After replacement of the TSW card,
make a station to station call and
check and see if a fault occurs.
When a fault occurs in the whole system,
replace the HSW card with a spare. Replace the HSW card by referring to Section
4.3.3, HSW Card Replacement Procedure,
Chapter 4.
Place the HSW card on the ACT mode.
Refer to Section 12, Chapter 6.
After replacement of the HSW card,
make a station to station call, and
check and see if a fault occurs.
ATTENTION
Contents
Static Sensitive
Handling
Precautions Required
START
END

CHAPTER 5 NDA-24307
Page 410
Issue 1
FAULT REPAIR PROCEDURES
6.3 Speech Path System Fault (Whole System/ISW) - ACT side becomes Faulty
Intermittently
Check by replacing related circuit cards of
the ACT mode with a spare. Related circuit cards:
IOGT (Section 4.3.1, Chapter 4)
TSW (Section 4.3.2, Chapter 4)
HSW (Section 4.3.3, Chapter 4)
Set the faulty system on the STBY mode.
Refer to Section 12, Chapter 6.
On the circuit card, set its MB switch UP and
extract the circuit card out of its mounting slot.
Make switch setting on the new circuit card.
On the new circuit card, set its MB switch UP
and insert the circuit card into its mounting slot.
Set MB switch DOWN.
If a fault occurs, set the faulty system on the
STBY mode. Refer to Section 12, Chapter
6.
Set the faulty system on the ACT mode.
Refer to Section 12, Chapter 6.
Check and see if a fault indication is made.
Faulty Situation:
•ACT-side Speech Path System becomes faulty intermittently in ISW/Whole System.
•[1-I] HSW Write Temporary Failure (Both Systems)
•[1-J] HSW Write Temporary Failure (One System)
ATTENTION
Contents
Static Sensitive
Handling
Precautions Required
START
END
NDA-24307 CHAPTER 5
Page 411
Issue 1
FAULT REPAIR PROCEDURES
6.4 Speech Path System Fault (Whole System/ISW) - STBY side becomes Faulty
Intermittently
Check by replacing related circuit cards of
the STBYmode with a spare. Related circuit cards:
IOGT (Section 4.3.1, Chapter 4)
TSW (Section 4.3.2, Chapter 4)
HSW (Section 4.3.3, Chapter 4)
Set the faulty system on the STBY mode.
Refer to Section 12, Chapter 6.
On the circuit card, set its MB switch UP and
extract the circuit card out of its mounting slot.
Make switch setting on the new circuit card.
On the new circuit card, set its MB switch UP
and insert the circuit card into its mounting slot.
Set MB switch DOWN.
If a fault occurs, set the faulty system on the
STBY mode. Refer to Section 12, Chapter
6.
Set the faulty system on the ACT mode.
Refer to Section 12, Chapter 6.
Check and see if a fault indication is made.
Faulty Situation:
•STBY-side Speech Path System becomes faulty intermittently in ISW/Whole System.
•[1-I] HSW Write Temporary Failure (Both Systems) ATTENTION
Contents
Static Sensitive
Handling
Precautions Required
START
END
CHAPTER 5 NDA-24307
Page 412
Issue 1
FAULT REPAIR PROCEDURES
6.5 PLO Fault
Replace the faulty PLO circuit card with a
spare. Set MB switch of the PLO circuit card UP and
extract the circuit card from its mounting slot.
Make necessary switch settings on the new PLO
circuit card.
Set MB switch UP and insert the circuit card
into its mounting slot.
Set MB switch DOWN.
Confirm that no noise generates in a station-
to-station connection. If the system has been operated by the STBY
side, set MB switch on the ACT-side PLO
circuit card UP and execute system changeover.
Refer to Section 12, Chapter 6.
OPE lamp (Green) illuminates on the PLO
circuit card.
Confirm that digital interface connection can
be set up.
Faulty Situation:
•Both PLOs have become faulty, and the system is in operation by clocks from the
HSW.
•One of the two PLOs has become faulty and the other PLO has been set on the ACT
mode.
•[1-O], [1-P] PLO Clock Failure
•[1-K], [1-L] HSW Clock Failure
ATTENTION
Contents
Static Sensitive
Handling
Precautions Required
START
END

NDA-24307 CHAPTER 5
Page 413
Issue 1
FAULT REPAIR PROCEDURES
7. CONTROL SYSTEM FAULT
This section explains the fault repair procedure for the control system listed in Table 5-9.
7.1 Check Point
When repairing the control system, check the status of the following lamps:
LN
•CPR
•GT
•TSW
•MUX
•EMA
ISW
•CPR
•IOGT
•TSW
•HSW
•EMA
Figure 5-1 and Figure 5-2 shows a block diagram of the control system.
Table 5-9 Control System Fault Situation
FAULTY SITUATION REFERENCE SECTION
Fault occurs occasionally at the ACT side. Section 7.2, Control System Fault - Fault Occurs Intermittently
STBY side is faulty. Section 7.3, Control System Fault - STBY Side is Faulty
CHAPTER 5 NDA-24307
Page 414
Issue 1
FAULT REPAIR PROCEDURES
7.2 Control System Fault - Fault Occurs Intermittently
Faulty Situation:
•Fault occurs intermittently at ACT side in the dual configuration system.
•Fault occurs intermittently in the single configuration system.
•[0-C] ~ [0-K] CPU Failure
•[1-C] Both TSW Write Failure
•[1-D] TSW Write Failure
•[3-D], [3-E] Lock-Up Failure (Permanent/Temporary)
(1) For Dual Configuration
Replace ACT-side related circuit card with
a spare, and check. Replace the circuit cards individually referring to the
following sections in Chapter 4:
LN•Section 1.3.1, CPR Replacement Procedure
•Section 1.3.2, EMA Card Replacement
Procedure
•Section 2.3.1, GT Card Replacement Procedure
•Section 2.3.2, TSW Card Replacement
Procedure
•Section 3.3.2, MUX Card Replacement
Procedure
ISW
•Section 1.3.1, CPR Replacement Procedure
•Section 1.3.2, EMA Card Replacement
Procedure
•Section 4.3.1, IOGT Card Replacement
Procedure
•Section 4.3.2, TSW Card Replacement
Procedure
•Section 4.3.3, HSW Card Replacement
Procedure
Place the replaced circuit card into ACT mode
individually by executing CPU or Speech Path System
changeover. Refer to Section 12, Chapter 6.
Check to see if a station-to-station connection can be
set up and identify a circuit card responsible for the
fault.
After all the steps are complete, place the whole circuit
card examined above to the ACT mode. Refer to
Section 12, Chapter 6.
When a fault is not indicated, set the
faulty system to STBY mode. Refer
to Section 12, Chapter 6.
Check to see if a fault is indicated.
ATTENTION
Contents
Static Sensitive
Handling
Precautions Required
START
A
NDA-24307 CHAPTER 5
Page 415
Issue 1
FAULT REPAIR PROCEDURES
(2) For Single Configuration
Replace the related circuit card with a spare,
and check. Replace the circuit cards individually by
referring to the following sections in Chapter 4:
LN•Section 1.3.1, CPR Replacement Procedure
•Section 1.3.2, EMA Card Replacement
Procedure
•Section 2.3.1, GT Card Replacement Procedure
•Section 2.3.2, TSW Card Replacement
Procedure
•Section 3.3.2, MUX Card Replacement
Procedure
ISW
•Section 1.3.1, CPR Replacement Procedure
•Section 1.3.2, EMA Card Replacement
Procedure
•Section 4.3.1, IOGT Card Replacement
Procedure
•Section 4.3.2, TSW Card Replacement
Procedure
•Section 4.3.3, HSW Card Replacement
Procedure
Initialize the system by pressing the START
button on the TOPU and check to see if a
station-to-station connection can be set up and
identify a circuit card responsible for the fault.
ATTENTION
Contents
Static Sensitive
Handling
Precautions Required
A
END
CHAPTER 5 NDA-24307
Page 416
Issue 1
FAULT REPAIR PROCEDURES
7.3 Control System Fault - STBY Side is Faulty
Faulty Situation:
•Fault has occurred in the STBY side of dual configuration system.
•[0-I] STBY CPU Failure
•The ACT side has become faulty, and system changeover has executed.
•[0-C], [0-H], [0-J] Processor Failure (ACT side)
Replace STBY side related circuit cards
with a spare, and check. Replace the circuit cards individually by
referring to the following paragraphs in Chapter
4:
LN•Section 1.3.1, CPR Replacement Procedure
•Section 1.3.2, EMA Card Replacement
Procedure
•Section 2.3.1, GT Card Replacement Procedure
•Section 2.3.2, TSW Card Replacement
Procedure
•Section 3.3.2, MUX Card Replacement
Procedure
ISW
•Section 1.3.1, CPR Replacement Procedure
•Section 1.3.2, EMA Card Replacement
Procedure
•Section 4.3.1, IOGT Card Replacement
Procedure
•Section 4.3.2, TSW Card Replacement
Procedure
•Section 4.3.3, HSW Card Replacement
Procedure
Place the circuit cards into ACT mode by
executing CPU changeover. Refer to Section 12,
Chapter 6.
Check to see if a station-to-station connection
can be set up to identify the circuit card
responsible for the fault.
When a fault is not indicated, set
the faulty systems to STBYmode.
Refer to Section 12, Chapter 6.
ATTENTION
Contents
Static Sensitive
Handling
Precautions Required
START
END
NDA-24307 CHAPTER 5
Page 417
Issue 1
FAULT REPAIR PROCEDURES
8. ALARM INDICATION FAULT
This section explains the fault repair procedure where any of the faults shown in Table 5-10 occur.
8.1 Check Point
When repairing an alarm indication fault, check the alarm cable route shown in Figure 5-10 and Figure 5-
11.
8.2 Fault of Alarm Indicating Panel
Table 5-10 Alarm Indication Fault Situation
FAULTY SITUATION REFERENCE SECTION
A fault is indicated on the TOPU, but it is not indicated on the Alarm Indicating Panel
(External Alarm Indicating Panel). Section 8.2, Fault of Alarm
Indicating Panel
•A system message is indicated, but no alarm indication is made on the TOPU.
•An alarm lamp on the circuit card is lighting, but no alarm indication is made on the MAT
or on the TOPU.
Section 8.3, Fault That
Cannot Be Detected
ATTENTION
Contents
Static Sensitive
Handling
Precautions Required
Confirm lamps and power supply circuit of the Alarm Indicating Panel.
Confirm cross connections on the MDF.
Confirm that the connector of 16 PH EXMISC CA is firmly plugged in the MISC 0A connector on
the backplane of LPM.
START
END
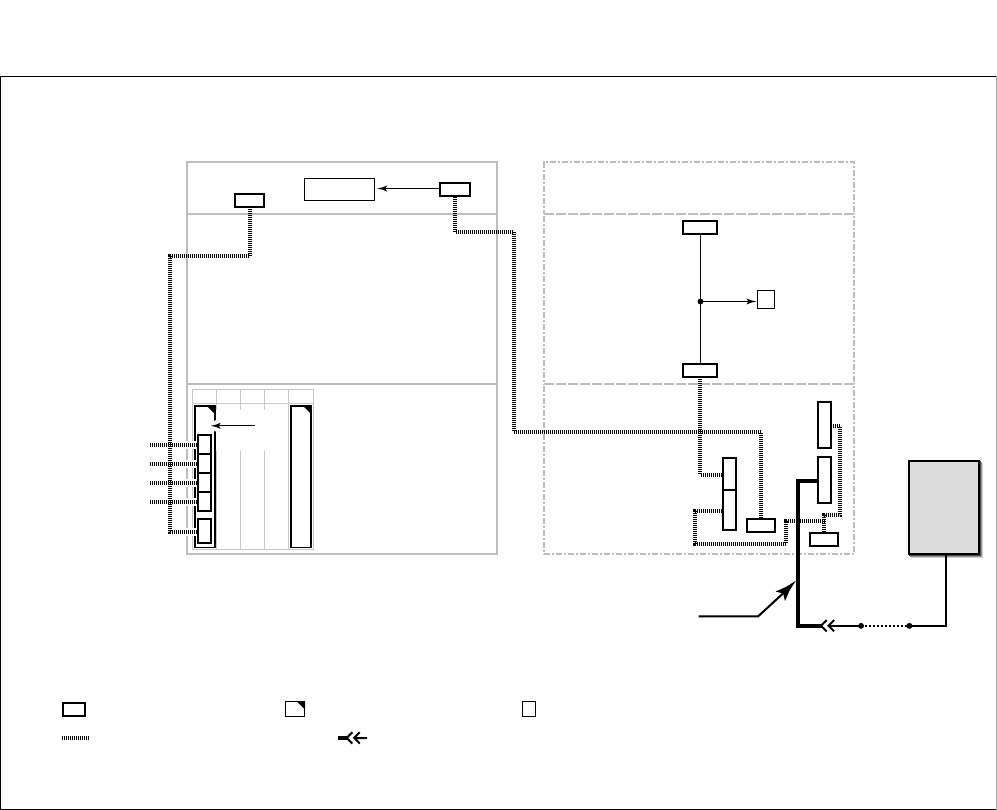
CHAPTER 5 NDA-24307
Page 418
Issue 1
FAULT REPAIR PROCEDURES
Figure 5-10 Cable Routing for Alarm Indications
Alarm
Indicating
Panel
KEY
DSP
DSPL
KEY
ALMA
ALMB
MISC0B MISC0A
EXALM
ALM1
CN3 CN2 CN1 CN0 KEY
(00)(04)
Alarm Lamps
TOPU
ISWM
TOPU
ISWM
LPM LPM
00 04030201
MMC
PH-M22
To CN0 connector of LN0
To CN0 connector of LN1
To CN0 connector of LN2
To CN0 connector of LN3
MDF
68PH EXMISC CA Cable
A
ISW (FRONT VIEW) ISW (REAR VIEW)
: CHAMP connector-ended cable: Internal alarm bus cable
: Connector : Circuit Card A: To alarm information of PWRSW, HSW, TSW, etc.
- Symbols =
EMA (PH-PC40)
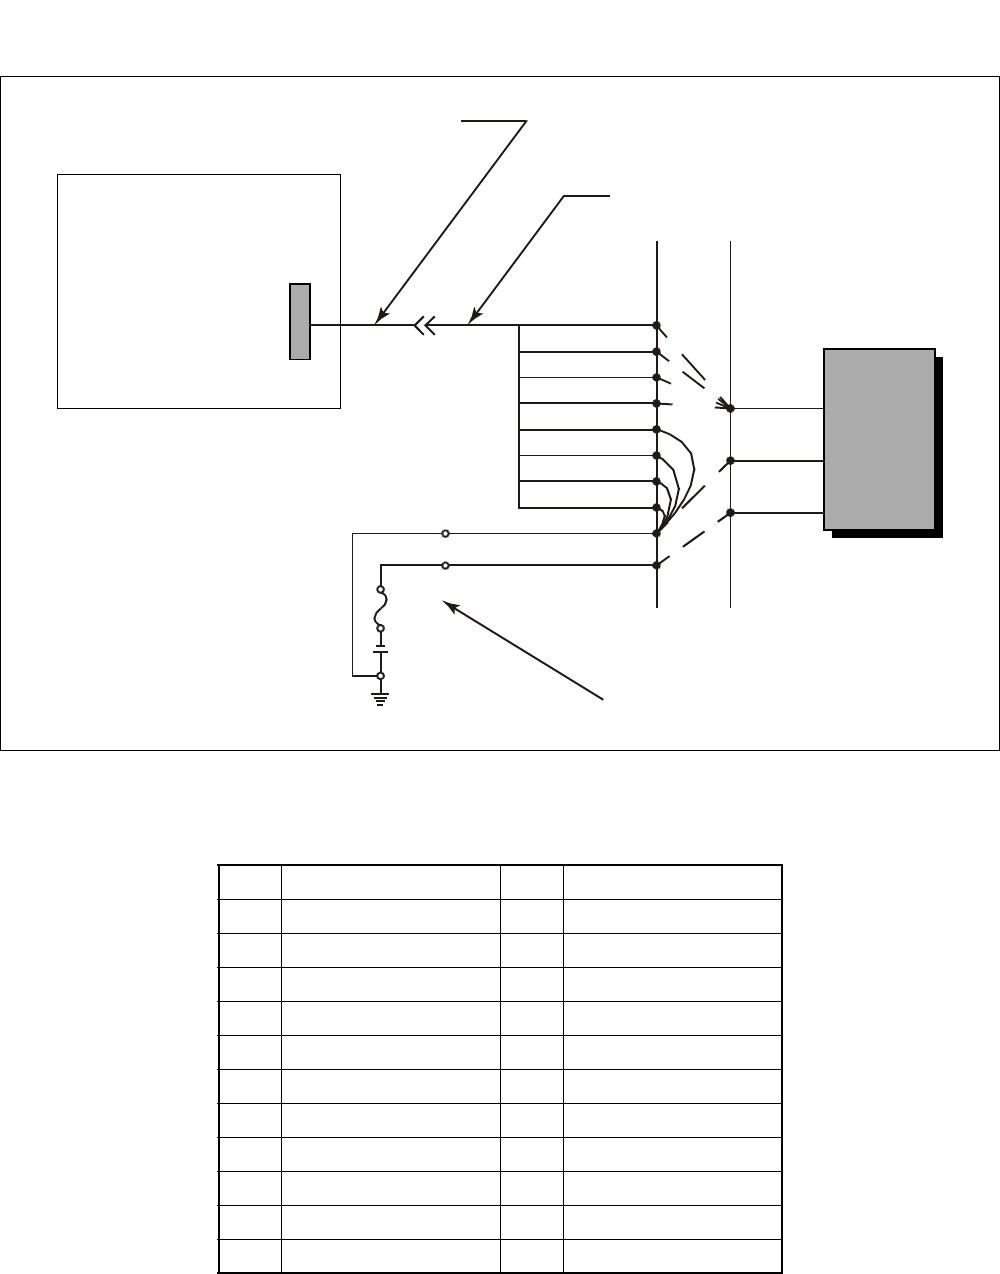
NDA-24307 CHAPTER 5
Page 419
Issue 1
FAULT REPAIR PROCEDURES
Figure 5-11 Cabling Related to Alarm Indicating Panel
Table 5-11 PIN Location of External Alarm
126
2MPALM 27
328
4 EXTAA 29
530
6 BELAA 31
732
8MNAA 33MNBA
9 SUPAA 34 SUPBA
10 MJAA 35 MJBA
11 36
12 37
Alarm
Indicating
Panel
LPM
Backplane
MISC0A
BELAA
MNAA
SUPAA
MJAA
BELBA
MNBA
SUPBA
MJBA
RPT1(G)
RPT0(-48V)
Fuse
-48V
G
MJ / MN / BELL
ISW
CHAMP Connector Cable
MDF
68PH EXMISC CA Cable
Power Receiving Terminal
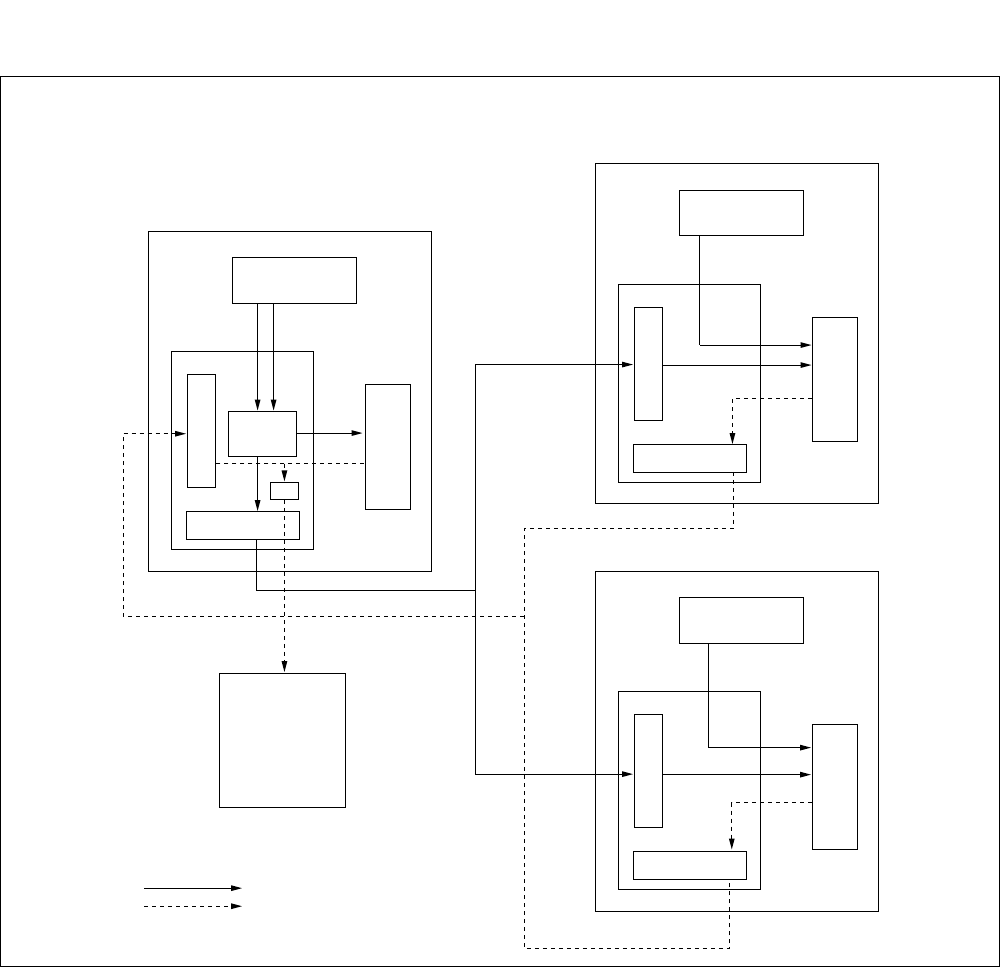
CHAPTER 5 NDA-24307
Page 420
Issue 1
FAULT REPAIR PROCEDURES
Figure 5-12 Distribution/Collection of Key/Alarm Information within the System
PZ-DK222
(TOP KEY)
PH-PC40
PH-M22
EMA
RELAY
RECEIVER
PZ-DK222
(TOP KEY)
PH-PC40
PH-M22
EMA
RELAY
RECEIVER
PZ-DK227
(TOP KEY)
PH-PC40
PH-M22
EMA
SEL
RELAY
RECEIVER
ISEL
ISW
LN
LN
AUDIBLE
AND
VISUAL
ALARM
INDICATING
PANEL
KEY INFORMATION
ALM INFORMATION
This figure shows the flow of alarm and key information between ISW and each LN.
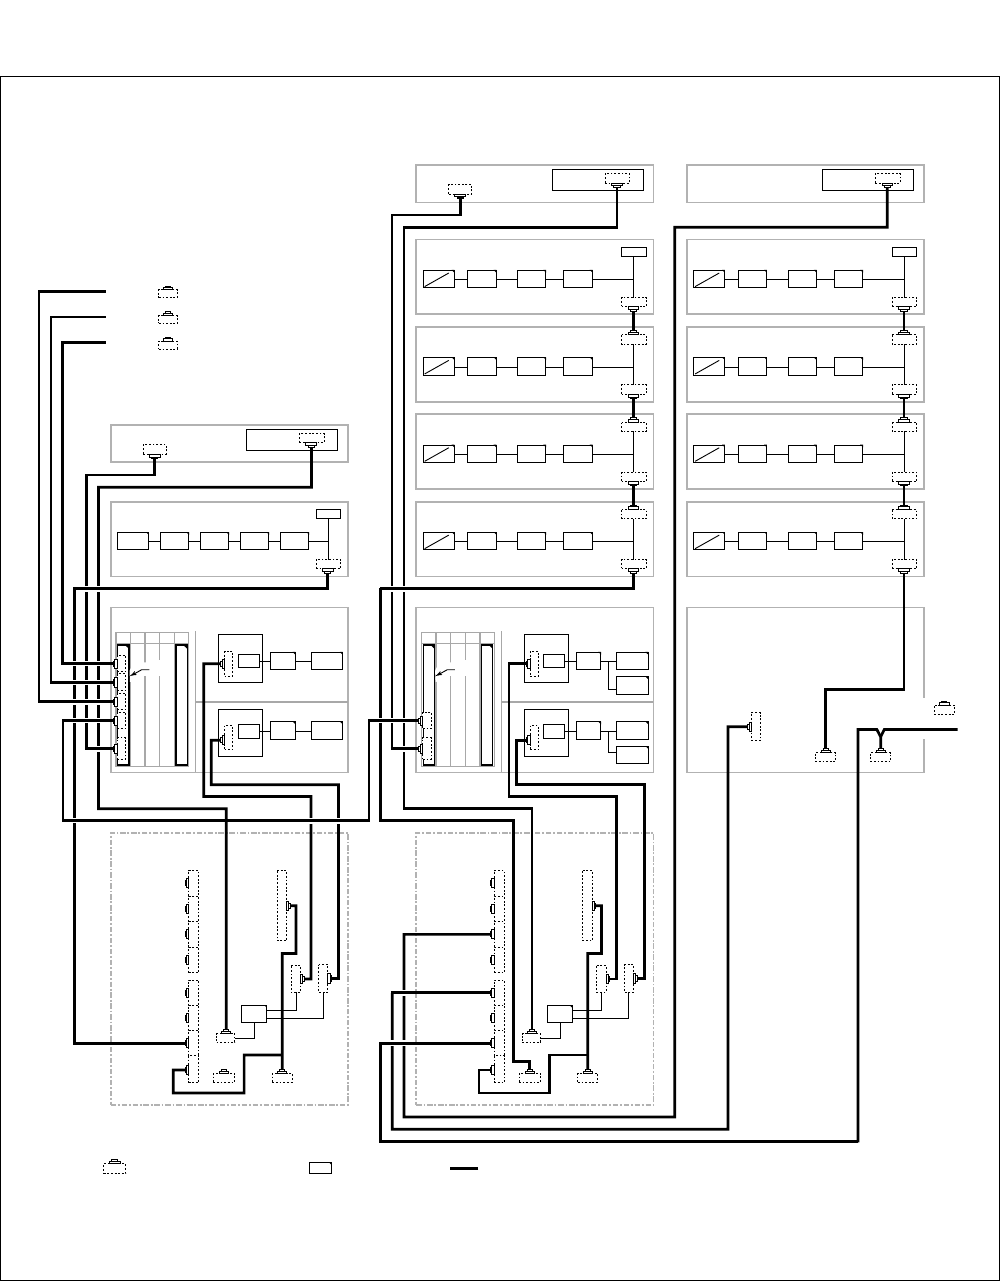
NDA-24307 CHAPTER 5
Page 421
Issue 1
FAULT REPAIR PROCEDURES
Figure 5-13 Alarm Bus Cable Connections Diagram (1/2)
To MMC ( ) of LN3
To MMC ( ) of LN2
To MMC ( ) of LN1
ISWM
HSW0/1 TSW0/1 IOGT0/1 PLO0/1
PWRSW
0/1
ISWM
ALMA
ALMB
DSPL
TOPU PZ-DK227
This figure shows the alarm bus cable connections diagram.
IMG0 (LN0)
MUX 0 LC/TRK MUX 1
PWR
DPWR
PIM 3
ALMA
ALMB
DSPL
KEY
KEY
TOPU
MUX 0 LC/TRK MUX 1
PWR
DPWR
PIM 0
ALMA
ALMB
EMAFH
ALM EMA
CN0
CN0
CN0
MUX 0 LC/TRK MUX 1
PWR
DPWR
PIM 1
ALMA
ALMB
MUX 0 LC/TRK MUX 1
PWR
DPWR
PIM 2
ALMA
ALMB
PZ-DK222
IMG1 (LN0)
MUX 0 LC/TRK MUX 1
PWR
DPWR
PIM 3
ALMA
ALMB
DSPM
TOPU
MUX 0 LC/TRK MUX 1
PWR
DPWR
PIM 0
ALMA
ALMB
TSWM0 (REAR VIEW)
MUX 0 LC/TRK MUX 1
PWR
DPWR
PIM 1
ALMA
ALMB
MUX 0 LC/TRK MUX 1
PWR
DPWR
PIM 2
ALMA
ALMB
PZ-DK222
PALM
PWR1 LANI 1 ISAGT-1A
PWR0 LANI 0 ISAGT-0A
ISAGT-1B
ISAGT-0B
PZ-PW92
PZ-PW92
PALM
00 01 02 03 04
CN0 KEY
MMC
LPM (FRONT VIEW)
PALM
PWR1 LANI 1 ISAGT1
PWR0 LANI 0 ISAGT0
PZ-PW92
PZ-PW92
PALM
00 01 02 03 04
CN3 CN2 CN1 CN0 KEY
MMC
LPM (FRONT VIEW)
LED3 LED2 LED1 ALM3 MUSIC ALM2 ALM1 EXALM
DSP
ALM KEY
PALM1
MISC0B
PALM0
LPM (REAR VIEW)
Slot 00Slot 04
LED3 LED2 LED1 ALM3 MUSIC ALM2 ALM1 EXALM
DSP
ALM KEY
PALM1
MISC0B
PALM0
LPM (REAR VIEW)
Slot 00Slot 04
To
of IMG2
: Alarm-related connector : Circuit Card : External Cable
< ISW: Inter-node Switch >
MMC : PH-M22 EMA: PH-PC40 PWRSW: PH-PW14 HSW: PU-SW01 TSW: PU-SW00 LANI: PZ-PC19
ISAGT: PZ-GT13 IOGT: PH-GT10 PLO: PH-CK16-A/PH-CK17-A
< LN: Local Node >
MMC: PH-M22 EMA: PH-PC40 ISAGT-A: PZ-GT13 ISAGT-B: PZ-GT20 MUX: PH-PC36 LANI: PZ-PC19
EMA EMA
EMA
EMA
EMA
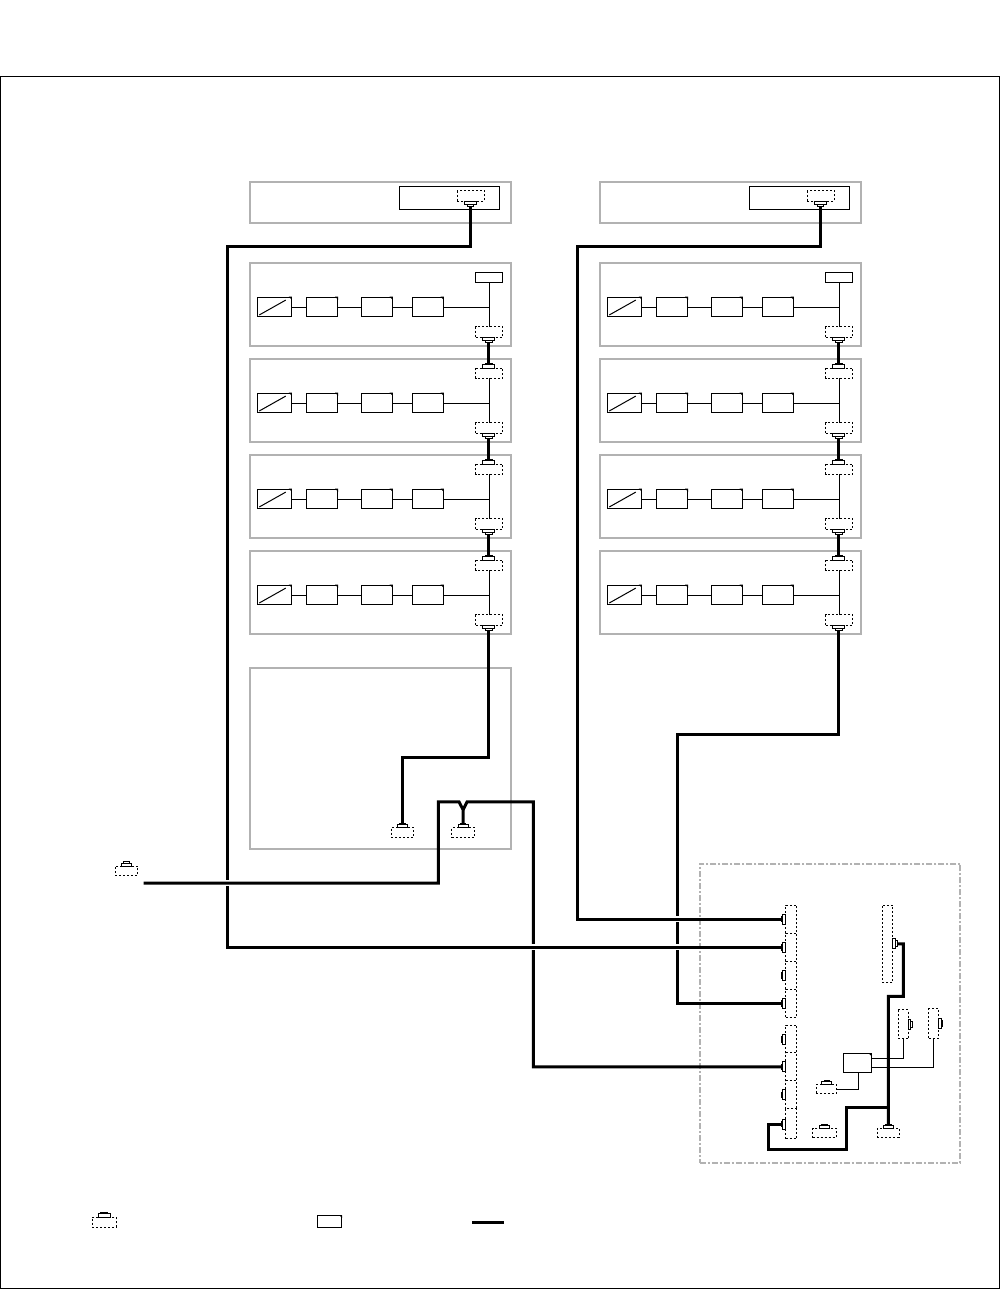
CHAPTER 5 NDA-24307
Page 422
Issue 1
FAULT REPAIR PROCEDURES
Figure 5-13 Alarm Bus Cable Connections Diagram (2/2)
LED3 LED2 LED1 ALM3 MUSIC ALM2 ALM1 EXALM
DSP
ALM KEY
PALM1
MISC0B
PALM0
LPM of LN0 (REAR VIEW)
Slot 00Slot 04
EMA
This figure shows the alarm bus cable connections diagram.
: Alarm-related connector : Circuit Card : External Cable
EMA: PH-PC40 MUX: PH-PC36
IMG2 (LN0)
MUX 0 LC/TRK MUX 1
PWR
DPWR
PIM 3
ALMA
ALMB
DSPM
TOPU
MUX 0 LC/TRK MUX 1
PWR
DPWR
PIM 0
ALMA
ALMB
TSWM1 (REAR VIEW)
MUX 0 LC/TRK MUX 1
PWR
DPWR
PIM 1
ALMA
ALMB
MUX 0 LC/TRK MUX 1
PWR
DPWR
PIM 2
ALMA
ALMB
PZ-DK222
To
of IMG1
IMG3 (LN0)
MUX 0 LC/TRK MUX 1
PWR
DPWR
PIM 3
ALMA
ALMB
DSPM
TOPU
MUX 0 LC/TRK MUX 1
PWR
DPWR
PIM 0
ALMA
ALMB
MUX 0 LC/TRK MUX 1
PWR
DPWR
PIM 1
ALMA
ALMB
MUX 0 LC/TRK MUX 1
PWR
DPWR
PIM 2
ALMA
ALMB
PZ-DK222
ALM EMA
EMA
NDA-24307 CHAPTER 5
Page 423
Issue 1
FAULT REPAIR PROCEDURES
8.3 Fault That Cannot Be Detected
Check the DSP flat cable (See Figure 5-13.).
If the EMA card is removed from the system while the system is in operation under
the control of the CPU 1, the system will reset and stop all call processing. See Section
1.3.2, EMA Card Replacement Procedure, Chapter 4 for detailed instructions.
Replace the EMA circuit card with a spare.
Set the MB switch of the EMA circuit card UP, and extract the circuit card from its
mounting slot.
Make necessary switch settings on the new circuit card, referring to the card extracted.
Set MB switch UP and insert the circuit card into its mounting slot.
Set the MB switch DOWN.
Check to see if a fault is detected.
ATTENTION
Contents
Static Sensitive
Handling
Precautions Required
START
END
WARNING
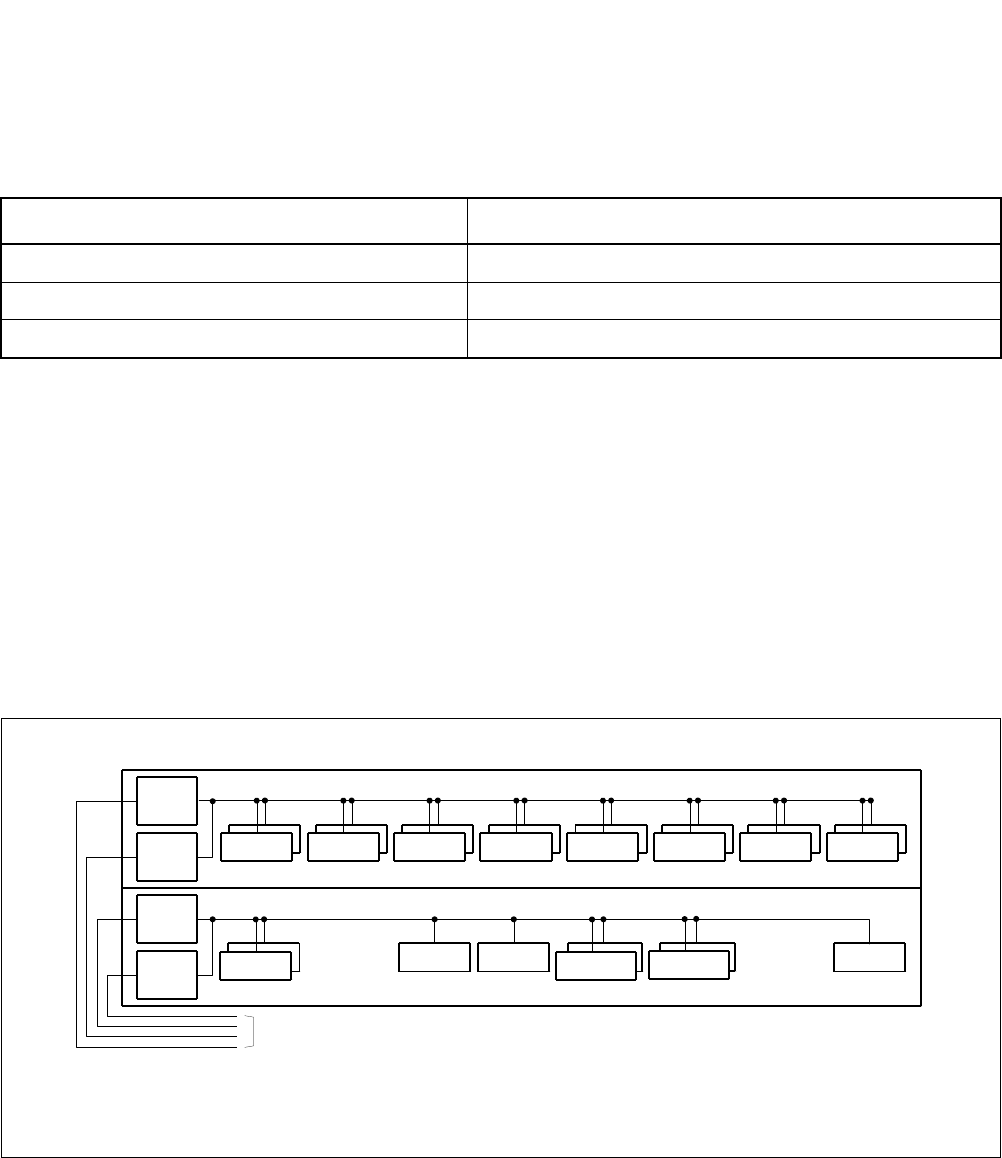
CHAPTER 5 NDA-24307
Page 424
Issue 1
FAULT REPAIR PROCEDURES
9. POWER SUPPLY FAULT
This section explains the fault repair procedure when any of the faults shown in Table 5-12 occur.
9.1 Check Point
When repairing a power supply fault, consider the following items:
(1) Before checking the system, check the rectifier, battery, and power cables.
(2) The PWR circuit card is equipped with the circuits to supply ringing signal and howler tone. When a fault
occurs that causes the bell of the telephone not to ring, or howler tone cannot be heard, etc., check the
alarm lamp on the PWR circuit card.
(3) Figure 5-14 through Figure 5-17 show the block diagrams for the power supply to each module.
Figure 5-14 Block Diagram of Power Supply System (ISW)
Table 5-12 PWR Supply Fault Situation
FAULTY SITUATION REFERENCE SECTION
Fuse Blown Fault Section 9.2, Fuse Blown Fault
Circuit Breaker OFF, Fault in PWR Supply Section 9.3, Circuit Breaker OFF Fault in PWR Supply
Fault of Alarm Lamps on PWR Supply Section 9.4, Fault of Alarm Lamps on PWR Supply
Note: PWR1 is mounted when power supply system is a dual system configuration.
ISWM
PWR
0
PWR
1Note
LPM
PWR
0
PWR
1
MISC
Note
EMA IOC
CPU ISAGT0
ISW
BASEU
LANI0
HSW00 HSW01 TSW00 TSW01 TSW02 TSW03 IOGT0 PLO0
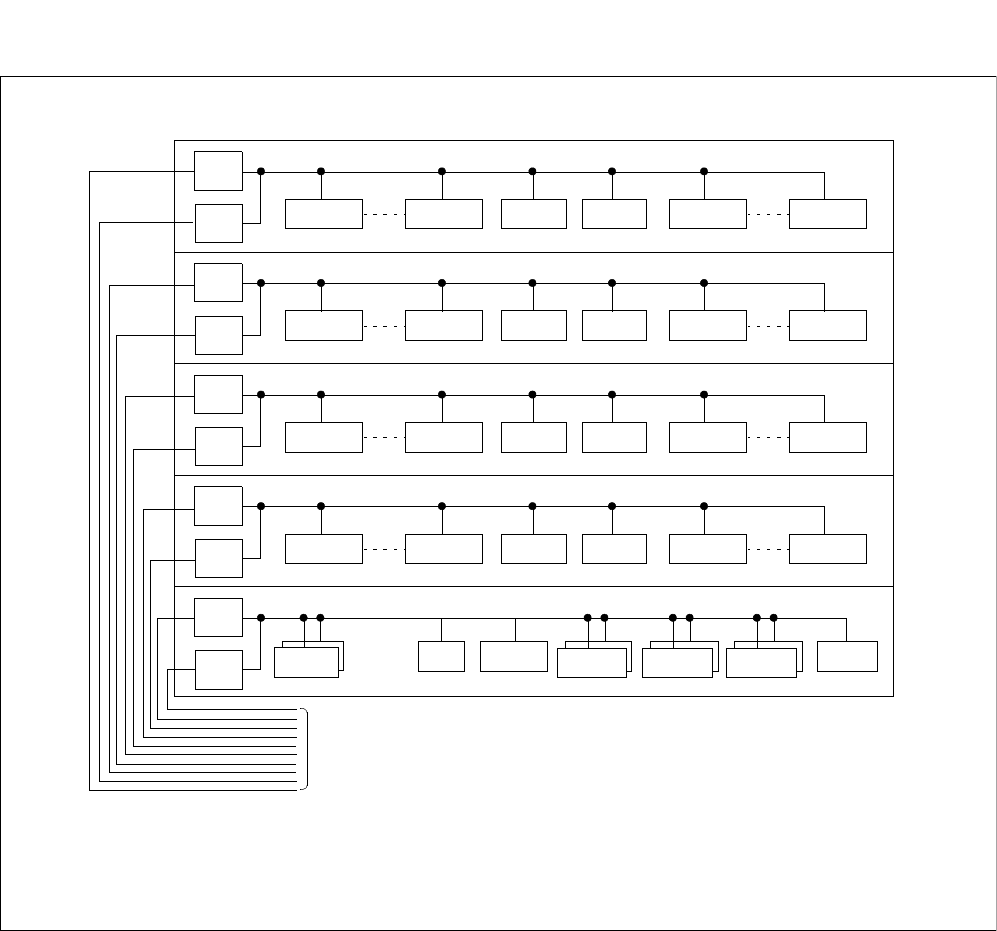
NDA-24307 CHAPTER 5
Page 425
Issue 1
FAULT REPAIR PROCEDURES
Figure 5-15 Block Diagram of Power Supply System (IMG0)
Note: PWR1 is mounted when power supply system is a dual system configuration.
PWR
0
PWR
1LC/TRK LC/TRK MUX0 MUX1 LC/TRK LC/TRK
PIM3
Note
PWR
0
PWR
1LC/TRK LC/TRK MUX0 MUX1 LC/TRK LC/TRK
PIM2
Note
PWR
0
PWR
1LC/TRK LC/TRK MUX0 MUX1 LC/TRK LC/TRK
PIM1
Note
PWR
0
PWR
1LC/TRK LC/TRK MUX0 MUX1 LC/TRK LC/TRK
PIM0
Note
PWR
0
PWR
1
LPM
Note
CPU0 MISC
BASEU
IMG1/2 (LN0/1/2/3)
LANI0
ISAGT-0BISAFT-0A
IOCEMA
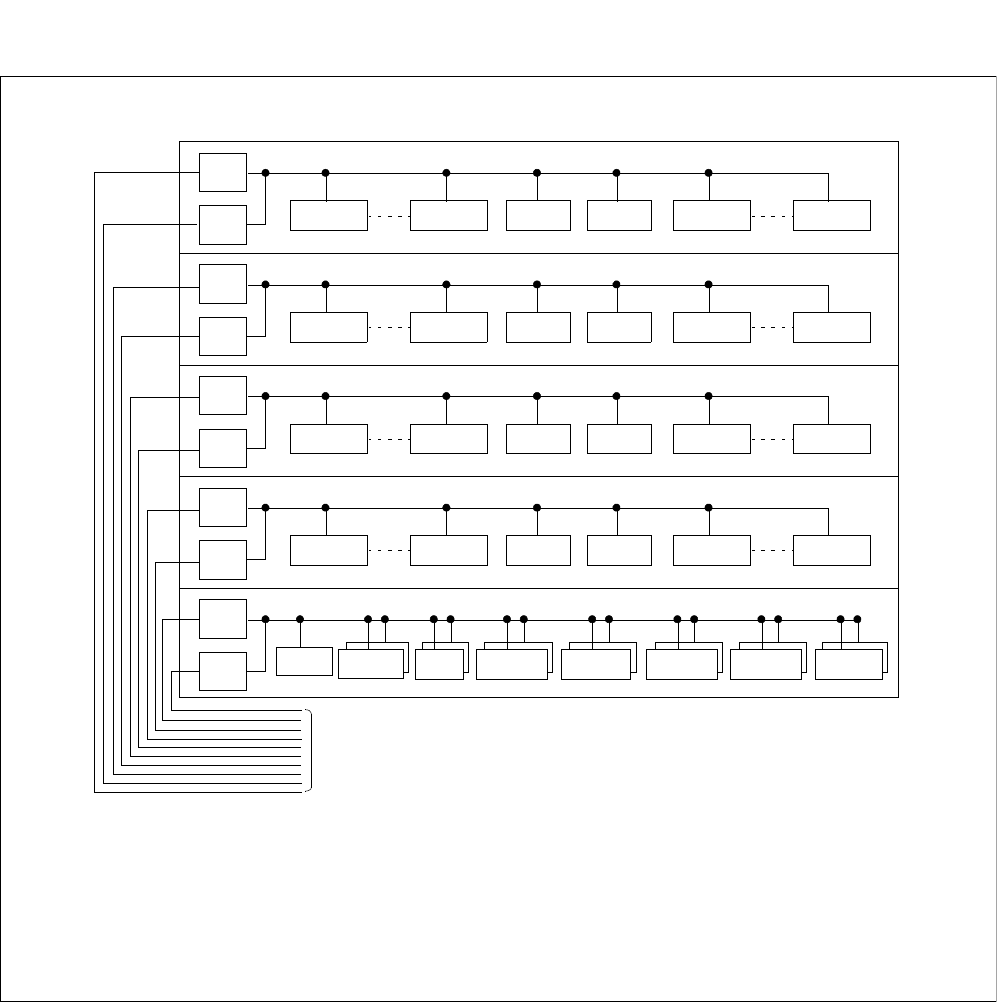
CHAPTER 5 NDA-24307
Page 426
Issue 1
FAULT REPAIR PROCEDURES
Figure 5-16 Block Diagram of Power Supply System (IMG1/IMG2)
PWR
0
PWR
1LC/TRK LC/TRK MUX0 MUX1 LC/TRK LC/TRK
PIM3
Note
PWR
0
PWR
1LC/TRK LC/TRK MUX0 MUX1 LC/TRK LC/TRK
PIM2
Note
PWR
0
PWR
1LC/TRK LC/TRK MUX0 MUX1 LC/TRK LC/TRK
PIM1
Note
PWR
0
PWR
1LC/TRK LC/TRK MUX0 MUX1 LC/TRK LC/TRK
PIM0
Note
PWR
0
PWR
1MISC
LPM
Note DLKC0
PLO0/CLK0
BASEU
IMG1/2 (LN0/1/2/3)
TSW03TSW02TSW01TSW00GT0
Note 1: PWR1 is mounted when power supply system is a dual system configuration.
Note 2: DLKC is not mounted in TSWM1 of IMG2.
Note 3: PLO for IMG1 (TSWM0); CLK for IMG2 (TSWM1)
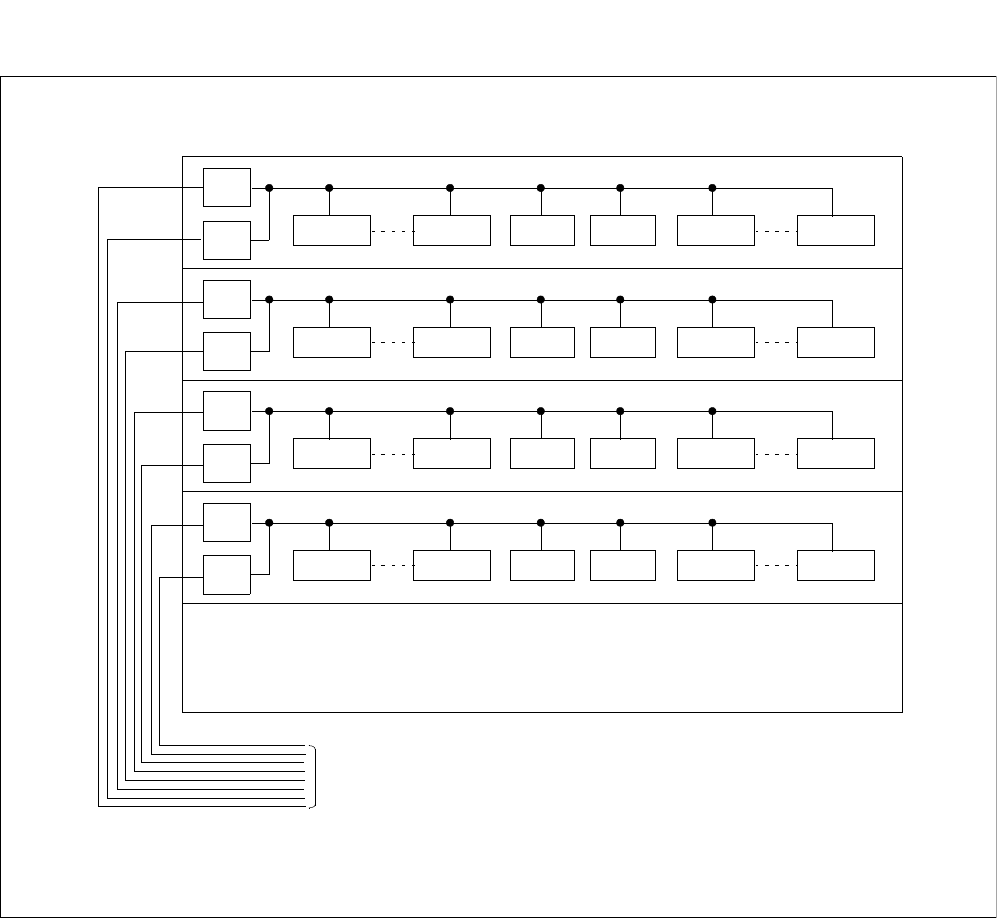
NDA-24307 CHAPTER 5
Page 427
Issue 1
FAULT REPAIR PROCEDURES
Figure 5-17 Block Diagram of Power Supply System (IMG3)
Note: PWR1 is mounted when power supply system is a dual system configuration.
PWR
0
PWR
1LC/TRK LC/TRK MUX0 MUX1 LC/TRK LC/TRK
PIM3
Note
PWR
0
PWR
1LC/TRK LC/TRK MUX0 MUX1 LC/TRK LC/TRK
PIM2
Note
PWR
0
PWR
1LC/TRK LC/TRK MUX0 MUX1 LC/TRK LC/TRK
PIM1
Note
PWR
0
PWR
1LC/TRK LC/TRK MUX0 MUX1 LC/TRK LC/TRK
PIM0
Note
DUMMY
BASEU
IMG3 (LN0/1/2/3)
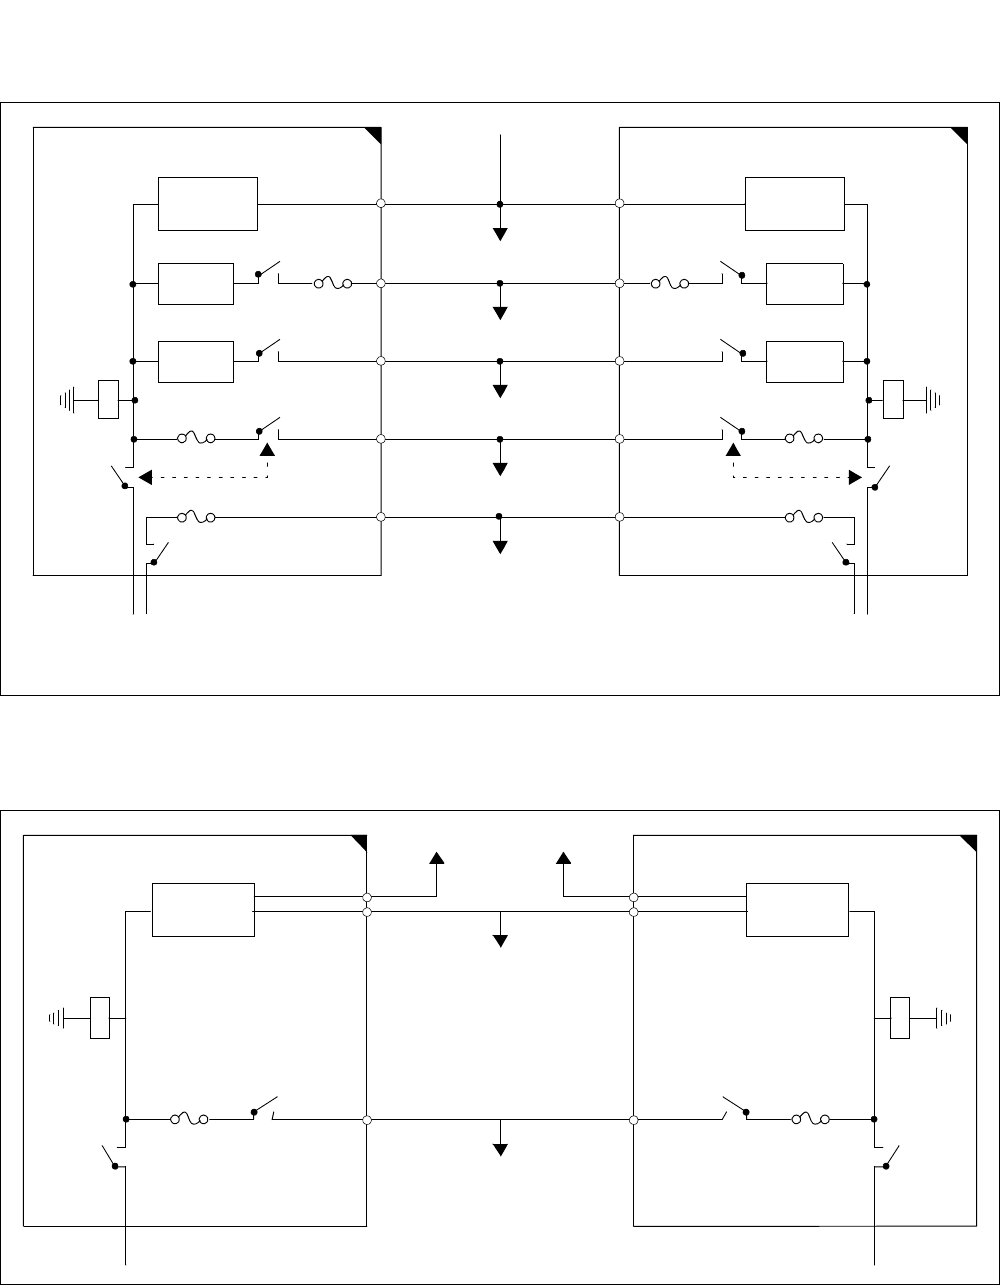
CHAPTER 5 NDA-24307
Page 428
Issue 1
FAULT REPAIR PROCEDURES
(4) Figure 5-18 shows the power supply system for PIM.
Figure 5-18 Power Supply to PIM
(5) Figure 5-19 shows the power supply system for LPM.
Figure 5-19 Power Supply to LPM (LN/ISW)
DC-DC
CONV
RGU
HOW
-48V
NFB
+80V
rel
RGU
REL
PWR0
-48V +80V Note
+5V, +12V, 5V
CR (for LC)
HOW (for LC)
-48V (for LC, TRK)
+80V
+80V -48V
DC-DC
CONV
RGU
HOW
-48 V
NFB
+80 V
rel
REL
PWR1
Note: +80V is for message waiting lamp.
+5V,+12V
(To EMA, MISC, Cards, etc.)
-48V
(To EMA, MISC, Cards, etc.)
PWR1PWR0
DC-DC
CONV
DC-DC
CONV
-48V
+80V
REL
REL
-48V
+80V
(To CPR 0)
-48V
(To CPR 1)
-48V
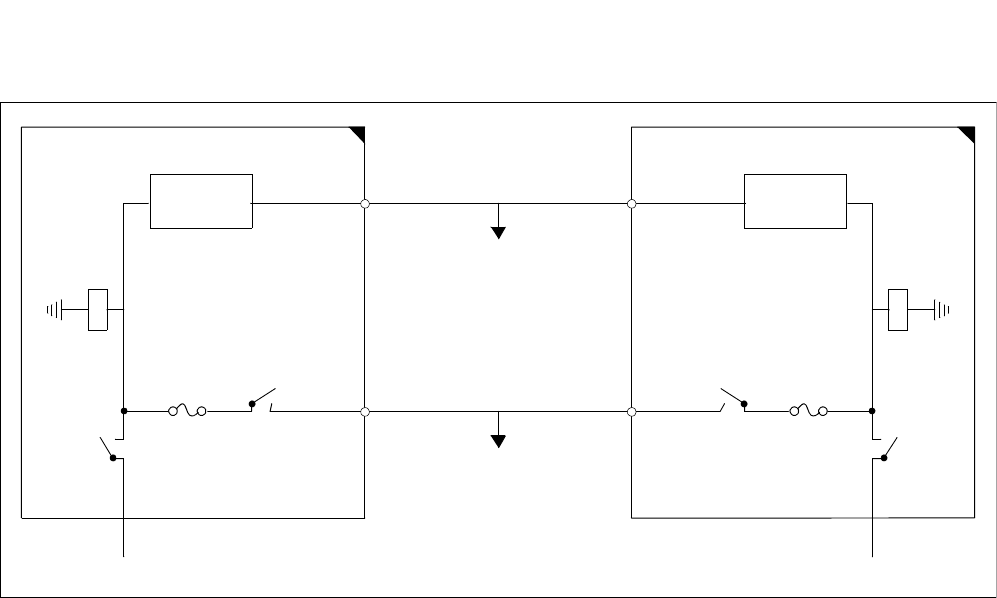
NDA-24307 CHAPTER 5
Page 429
Issue 1
FAULT REPAIR PROCEDURES
(6) Figure 5-20 shows the power supply system for TSWM/ISWM.
Figure 5-20 Power Supply to TSWM/ISWM
+5V, +12V, +5V
(To MISC Cards)
-48V
PWR1PWR0
DC-DC
CONV
DC-DC
CONV
-48V
+80V
REL
REL
-48V
+80V -48V-48V
[TSWM]
To GT, TSW, DLKC, PLO cards
[ISWM]
To IOGT, TSW, HSW, PLO cards

CHAPTER 5 NDA-24307
Page 430
Issue 1
FAULT REPAIR PROCEDURES
9.2 Fuse Blown Fault
Check the backplane of the PIM. Make a visual check on the backplane for pin
contacting, melting or burn, etc.
Extract all the circuit cards from the PIM,
and insert them back into their slots
individually to see if the fuse blows.
Set the MB switch of the PWR supply UP.
Set the circuit breaker of the PWR supply
DOWN.
Extract all the circuit cards from their mounting
slots, except PWR supply.
Replace the fuse with spare.
Set the circuit breaker of the PWR supply UP
side.
Set the MB switch of the PWR supply DOWN.
Insert the circuit cards into their mounting slots
individually, with their MB switch to UP side.
Check to see if the fuse blows when the MB
switch has been set to DOWN.
START
END

NDA-24307 CHAPTER 5
Page 431
Issue 1
FAULT REPAIR PROCEDURES
9.3 Circuit Breaker OFF Fault in PWR Supply
Check the backplane of the PIM. Make a visual check on the backplane for pin
contacting, melting or burning, etc.
Extract all the circuit cards from the PIM,
and make a visual check of the circuit
cards.
Set MB switch of the PWR supply UP.
Set the circuit breaker of the PWR supply
DOWN.
Extract all circuit cards out of their mounting
slots.
Make a visual check of the extracted circuit
cards.
•Check ICs, resistors, and capacitors to see if
any are burned.
START
END

CHAPTER 5 NDA-24307
Page 432
Issue 1
FAULT REPAIR PROCEDURES
9.4 Fault of Alarm Lamps on PWR Supply
Note: Insert each PWR supply with its MB switch to UP side, and then set it back to DOWN side.
Press RESET button of the PWR supply.
Alarm lamp goes out. FAULT SUPERVISION
Alarm lamp illuminates again. Set the MB switch on the PWR supply UP.
Turn circuit breaker OFF.
Set MB switch on all the circuit cards, except
PWR supply.
Extract all circuit cards from their mounting
slots.
Turn circuit breaker ON.
Set the MB switch to DOWN side.
Check to see if the alarm lamp illuminates.
If the alarm lamp illuminates,
replace the PWR supply with a
spare.
If the alarm lamp does not
illuminate, insert the circuit cards
into their mounting slot
individually to see if the alarm
lamp illuminates.
START
END

NDA-24307 CHAPTER 5
Page 433
Issue 1
FAULT REPAIR PROCEDURES
10. FAN UNIT FAULT
This section explains the fault repair procedure where a fan in the Fan Unit (FANU) does not operate.
10.1 Check Point
(1) When repairing a FANU fault, exercise care about the following conditions. The fans (a total of 3) are
activated by operating the PWR SW key located on the PZ-M369. The conditions for starting the fan are
as follows:
•With PWR SW key for the fan set to ON position: Always operating
•With PWR SW key for the fan set to AUTO position: Starts operating if the in-frame
temperature is higher than 40°C (104°F);
stops operating at temperatures lower than
32°C (90°F). See Figure 5-21.
(2) When replacing the FANU with a spare, refer to Section 4, Chapter 4.

CHAPTER 5 NDA-24307
Page 434
Issue 1
FAULT REPAIR PROCEDURES
10.2 Fan Unit Fault
Set the PWR SW key on the PZ-M369 to the ON position.
When the fan spins
Set PWR SW key to AUTO position, and short the thermal relay of the thermal
unit.
If the fan does not
operate Check the connector cable between
the FANU and the thermal unit.
If the fan operates Replace thermal relay with a spare.
Disconnect the fan
connector of the cable for
the thermal unit.
Replace thermal relay with
a spare.
Connect the fan connector.
If the fan does not operate
Check the voltage (DC -48 V) at connectors FC0 through FC2.
If the voltage is less
than -48 V Check the connector cable (fan
connector) between the FANU and
the PIM.
If the voltage is -48 V Replace the fan with a spare. Refer to
Section 4, Chapter 4.
After the fault is corrected, set PWR SW key to the AUTO position. If the fans are to continue operating
constantly, set PWR SW key to the ON position.
START
END

NDA-24307 CHAPTER 5
Page 435
Issue 1
FAULT REPAIR PROCEDURES
Figure 5-21 Circuit Diagram of Fan Unit and Thermal Unit
FAN 0 FAN 1 FAN 2
Power
Filter
Fan Unit
FC0 FC1 FC2
POW
RL
FUSE ALM
-48V
G
FE
FUSE
FAN
1
3
4
2
To PIM/
ON
OFF
AUTO rl
F
FAN START Switch
Thermal Unit
Thermal
Relay
32o C
89o F
Thermal
Relay
40o C
104o F
Thermal
Relay
70o C
158o F
Thermal
Relay
60o C
140o F
RL
rl
GFE FA
LM
FAN
N
P
-48V EMNMJ
rl
To PIM To Display
Section
of TOPU
ISWM
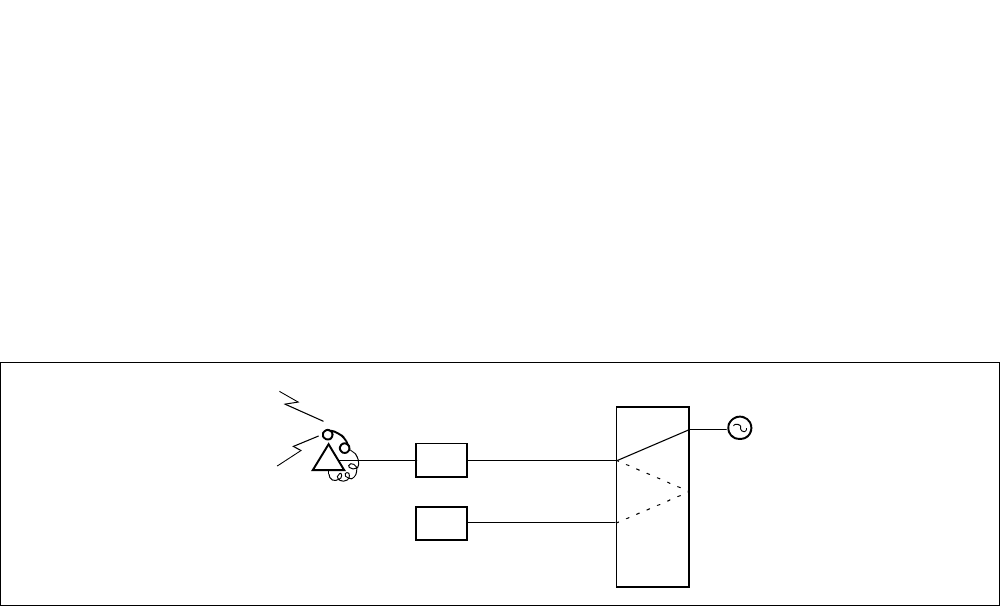
CHAPTER 5 NDA-24307
Page 436
Issue 1
FAULT REPAIR PROCEDURES
11. TONE FAULT
This section explains the fault repair procedure when any of the various tones cannot be heard in the whole
system.
11.1 Check Point
When repairing a tone fault, consider that the tone generator circuit is equipped in the TSW circuit card
and supplies tone. Check the alarm lamps of the TSW circuit card.
Figure 5-22 shows an example of the related trunking for dial tone connection.
Figure 5-22 Dial Tone Connection
TSW DT
LC
Dial
Tone
ORT
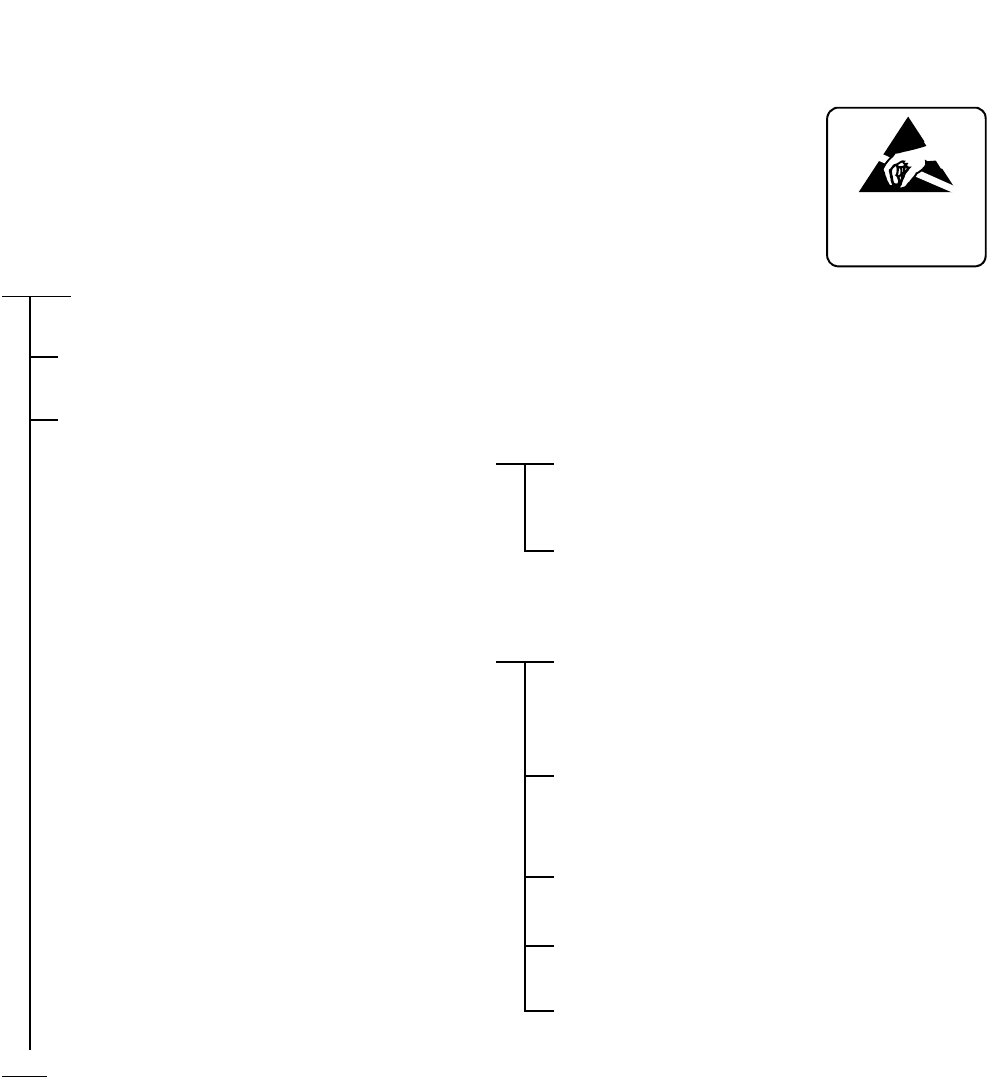
NDA-24307 CHAPTER 5
Page 437
Issue 1
FAULT REPAIR PROCEDURES
11.2 Tone Fault
Replace the TSW circuit card with a spare
and check.
When only Hold Tone is faulty.
If External Hold Tone source is in
use. Check the external equipment which sends out
hold tone.
Check cross connections on the MDF. Figure 5-
23 shows a block diagram of external hold tone
supply (optional).
Replace the PLO circuit card with
a spare. Set the MB switch of the PLO circuit card to
UP side and extract the circuit card from its
mounting slot.
Make necessary switch settings on the new
circuit card, referring to the card extracted.
Set the MB switch of the new circuit card UP
and insert the circuit card into its mounting slot.
Set the MB switch DOWN.
Initialize the system and confirm the tone.
ATTENTION
Contents
Static Sensitive
Handling
Precautions Required
START
END
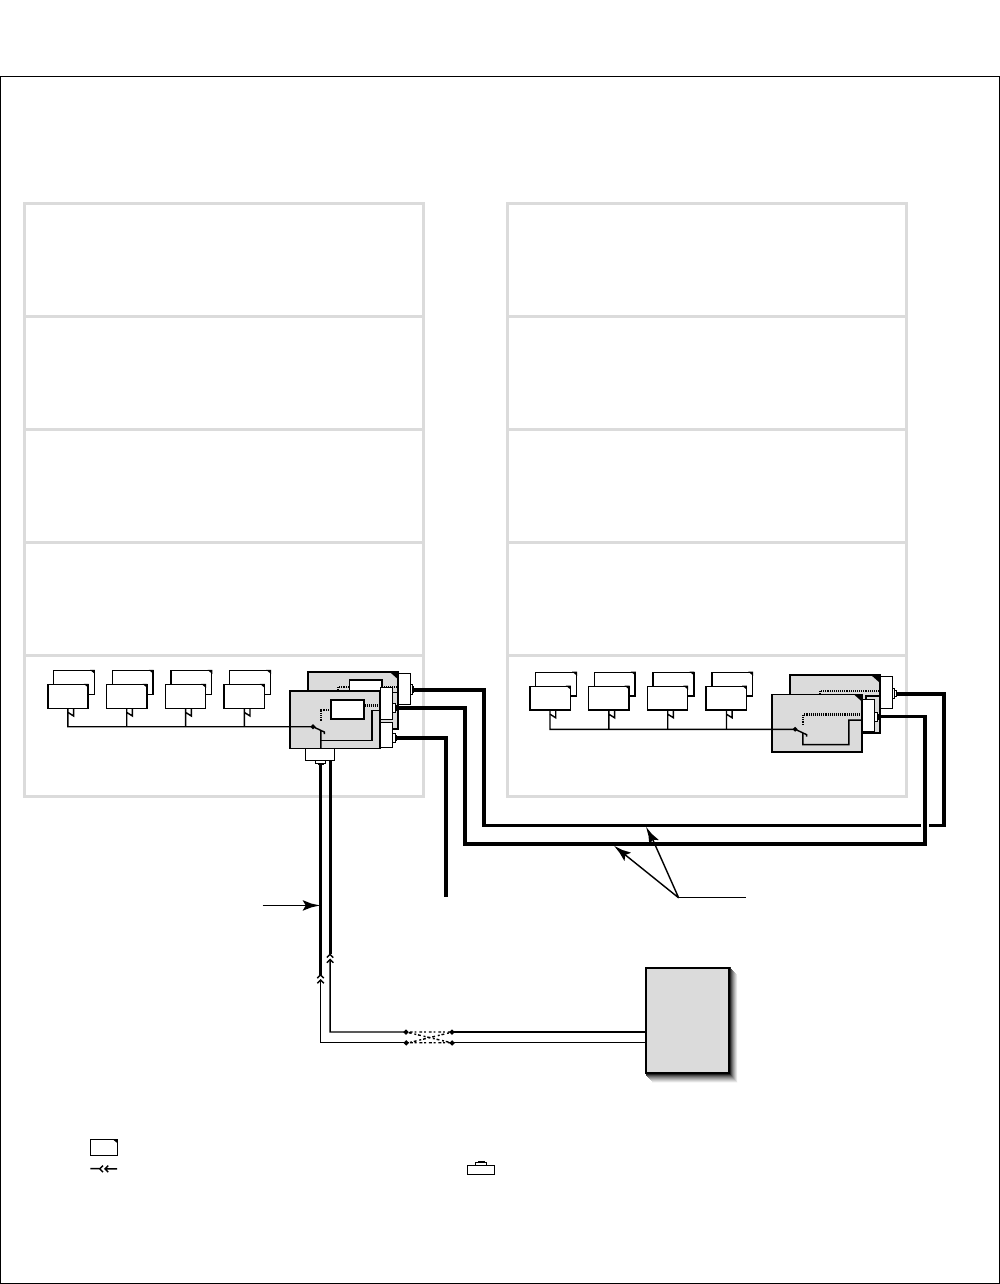
CHAPTER 5 NDA-24307
Page 438
Issue 1
FAULT REPAIR PROCEDURES
Figure 5-23 External Hold Tone Supply Block Diagram
External
Tone
Source
(Option)
To MUSIC
connector
for the EMA
card (IMG0)
MDF Note 2
PLO 1
TSW 00
TSW 10
TSW 03
TSW 13
TSW 02
TSW 12
TSW 01
TSW 11
TSWM0
PIM 0
PIM 2
PIM 3
PIM 1
CLK 0
CLK 1
TSW 00
TSW 10
TSW 03
TSW 13
TSW 02
TSW 12
TSW 01
TSW 11
TSWM1
PIM 0
PIM 2
PIM 3
PIM 1
This figure shows a block diagram of external hold tone supply (optional) in each Local Node (LN0 - LN3). Note 1
- Symbols -
: Circuit Card TSW: PH-SW12 PLO: PH-CK16-A CLK: PH-CK18 EMA: PH-PC40
: CHAMP connector-ended cable
EMAFH
PLOCLK0
EXCLK0
PLOCLK1
PLOCLK1
IMG1 IMG2
: Backplane connectors
ISW-LN PLO CA-A Cable PLO-CLK CA-A Cable
Melody
PLO 0
PLOCLK0
Melody
IC
Note 1: External hold tone is supplied to the PLO of local nodes only (all LN0-LN3 except ISW)
Note 2: Multiple connection is provided on the MDF also between PLO No. 0 and No. 1 systems.
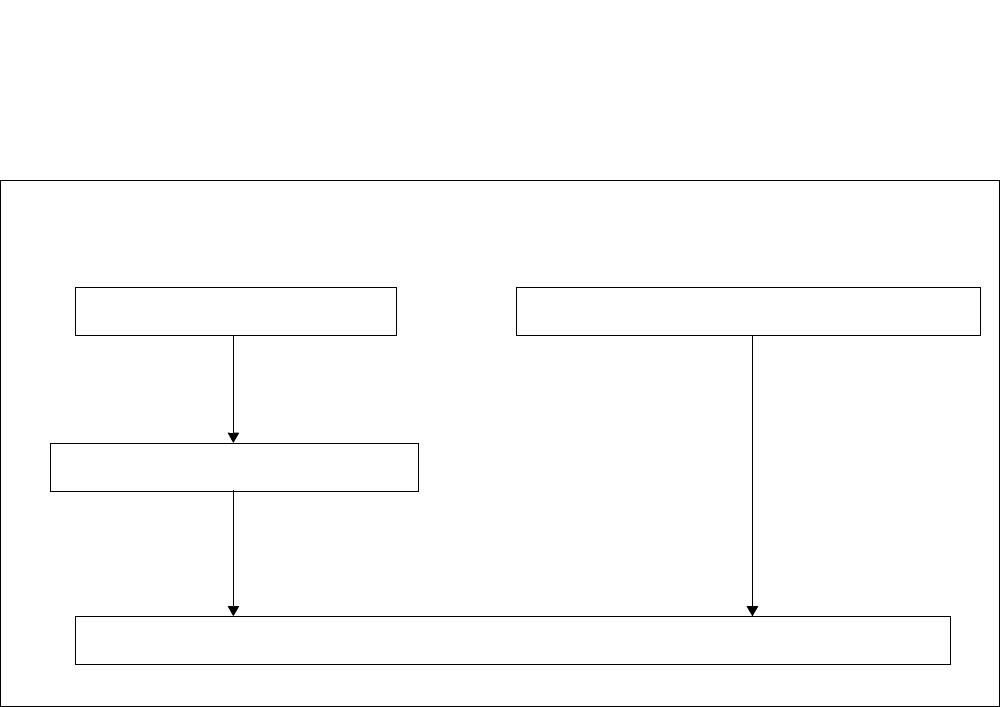
NDA-24307 CHAPTER 5
Page 439
Issue 1
FAULT REPAIR PROCEDURES
12. SYSTEM DOWN FAULT
This section explains the fault repair procedure when both the CPU and TSW systems are faulty. Figure 5-24
shows the sequence of repair for system down fault.
Figure 5-24 System Down Fault Repair Sequence
When cause for the fault cannot be identified:
Section 12.1 When faulty circuit cards can be assumed from
system message: Section 12.2
Check power supply.
Minimize system configuration.
Execute system initialization and see if the mode becomes ON-LINE.
Replace doubtful circuit card with a spare.

CHAPTER 5 NDA-24307
Page 440
Issue 1
FAULT REPAIR PROCEDURES
12.1 When Cause for Fault Cannot Be Identified
Check power supply circuits. Check voltage (DC: -48 V ±5 V) at LOAD side
of the rectifier.
Confirm that NFB (circuit breaker) on all PWR
supplies is at ON position (UP side).
Check to see if there is any PWR supply to
which the alarm lamp illuminates.
System Initialization by loading office data
and program data from the hard disk (Refer
to Section 12, Chapter 6.)
Service connections such as
station-to-station connection
cannot be set up.
See “Check by Minimizing the System
Configuration” on the next page.
Service connections such as
station-to-station connection can
be set up.
The data in the memory has been temporarily
destroyed. Observe the situation for a while.
START
END

NDA-24307 CHAPTER 5
Page 441
Issue 1
FAULT REPAIR PROCEDURES
(1) Check by minimizing the system configuration
Mount only the basic circuit cards in CPU
No. 0 system and initialize. Remove all circuit cards from CPU No. 0
system except the basic circuit cards.
The circuit cards to be mounted are as follows:
•LN
CPU, EMA, GT, TSW, MUX
•ISW
CPU, EMA, IOGT, TSW, HSW
On the CPU Display Panel (DSP), set its SENSE
switch to “1.”
Press Reset (RST) button on the DSP.
CPU OPE lamp should be illuminated on the
DSP.
Initialization cannot be made. Check by replacing the basic circuit cards
individually.
Set MB switch of the circuit card UP and
extract the circuit card from its mounting
slot.
Make necessary switch settings on the new
circuit card.
Set MB switch of the new circuit card UP
and insert the circuit card into its mounting
slot.
Set MB switch DOWN.
On the DSP (CPU), set SENSE switch to “1.”
Press RST button on the DSP.
CPU OPE lamp should illuminate on the DSP.
If CPU OPE lamp of the DSP does not
illuminate, replace next circuit card and check it.
(Repeat the above steps for all basic circuit
cards.)
A

CHAPTER 5 NDA-24307
Page 442
Issue 1
FAULT REPAIR PROCEDURES
Initialize by loading the office data and Pro-
gram Data from hard disk using command
“MEM_HDD.”
Set SYSTEM DATA key on the TOPU to
LOAD position
Using “MEM_HDD,” load the office data and
Program Data from the Hard Disk into the data
memory.
Confirm the SENSE switch is set at “2” on the
DSP (CPU).
Press RST on the DSP.
Confirm OPE lamp illuminates on each basic
circuit card.
Insert removed control circuit cards of CPU
No. 0 and line/trunk circuit cards into their
slots and see if a fault occurs.
Set MB switch of the circuit card UP and insert it
into its mounting slot. (Repeat this for all the cir-
cuit cards.)
Set MB switch DOWN and see if a fault occurs.
Insert control circuit cards of CPU No. 1
system into their mounting slots, and see if
a fault occurs.
Insert the following control circuit cards of CPU
No. 1 system.
•LN
CPU, EMA, GT, TSW, MUX
•ISW
CPU, EMA, IOGT, TSW, HSW
Set MB switch of the circuit card UP and insert
the circuit card into its mounting slot. (Repeat
this for all the circuit cards.)
After the fault repair, mount all the circuit
cards into their mounting slots and execute
system initialization. Refer to Section 12,
Section 6.
Set MB switch DOWN and see if a fault occurs.
Confirm that service connections such as
Station to Station Connection can be set up
between LNs.
A
END

NDA-24307 CHAPTER 5
Page 443
Issue 1
FAULT REPAIR PROCEDURES
12.2 When Faulty Circuit Cards Can Be Assumed From System Message
Faulty Situation:
•When the system is down with message [0-C] ~ [0-J] indicated, faulty circuit cards can be assumed from
the message detail data. Replace circuit cards with spares.
Replace faulty circuit card with a spare. Set MB switch UP and extract the circuit card
from its mounting slot.
Make necessary switch settings on the new
circuit card.
Set the MB switch UP and insert the circuit
card into its mounting slot.
Set the MB switch DOWN.
Confirm that service connections such as
station-to-station connection can be set up.
START
END
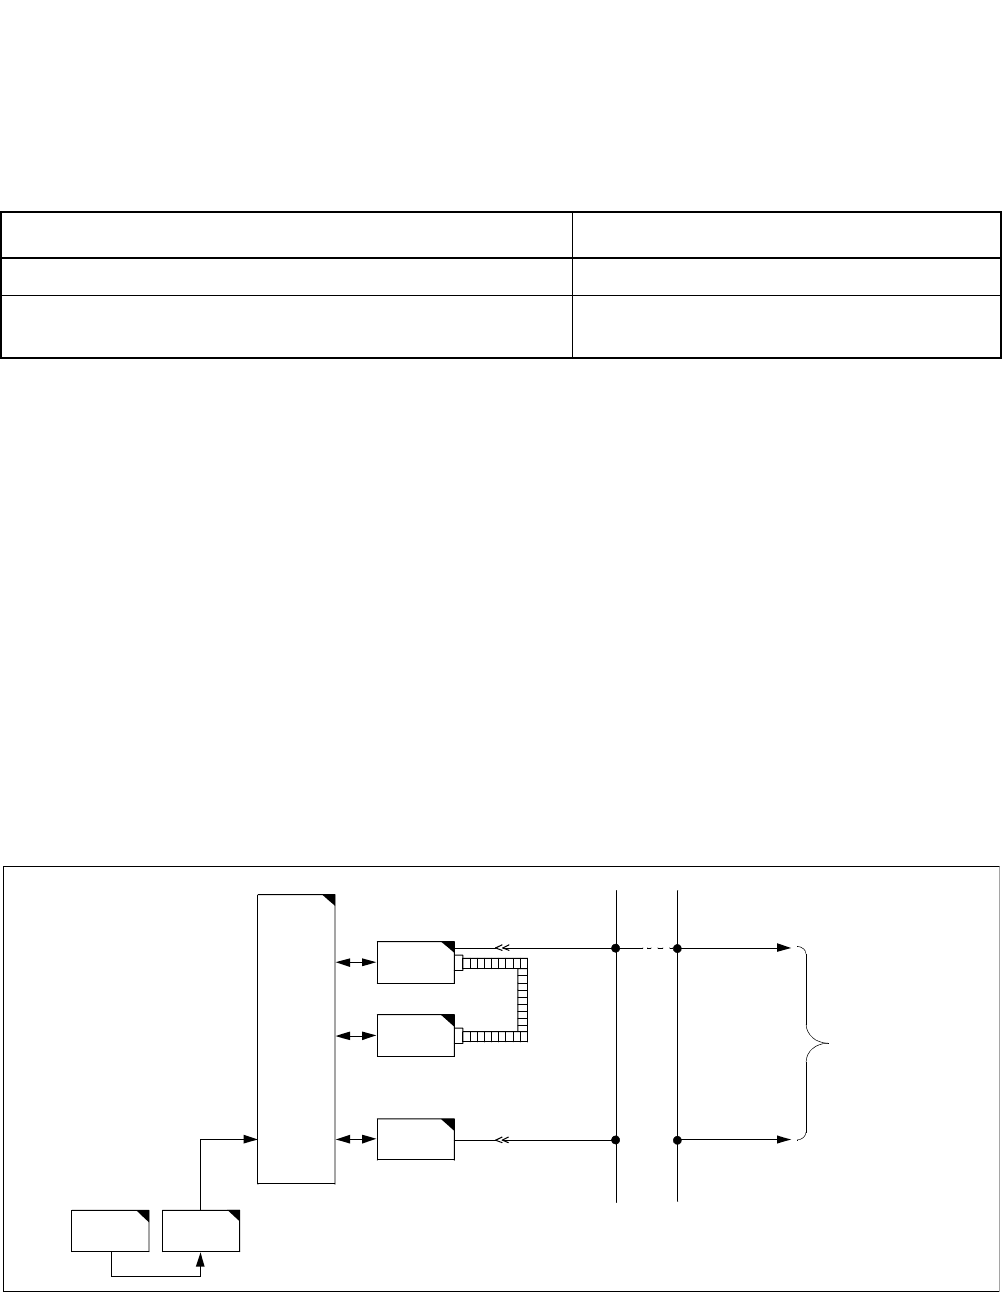
CHAPTER 5 NDA-24307
Page 444
Issue 1
FAULT REPAIR PROCEDURES
13. COMMON CHANNEL INTEROFFICE SIGNALING (CCIS) LINE FAULT
This section explains the fault repair procedure when any of the faults shown in Table 5-13 occur to a specific
CCIS line.
13.1 Check Point
When repairing a CCIS Line fault, consider the following:
(1) Check alarm lamps on the CCH or CCT circuit card.
(2) Refer to Figure 5-25, and check the cable connection.
13.2 CCIS Line Control
The CCH/CCT circuit card controls the signal link (digital) of the interoffice common channel signaling
system and transmitting/receiving call processing information. The signal link controls permit normal
transmission and reception of call processing information.
A break in signal links is detected, then restored to establish signal links. The call processing information
is converted into No. 7 signal format for channel 1 (any channel) of the DTI before being transmitted to a
distant office. Figure 5-25 shows the CCIS line control route.
Figure 5-25 Controlling CCIS Line
Table 5-13 CCIS Line Fault Situation
FAULTY SITUATION REFERENCE SECTION
A specific CCH/CCT card is faulty. Section 13.3, Specific CCH/CCT Card Is Faulty
When the signal transmission line is a digital line, transmitting/
receiving of control signals cannot be performed. Section 13.4, Fault of CCH, DTI and Related Flat
Cable
CPU TSW
MUX
CCH
CCT
DTI
LT Cable
Front
Cable
MDF
To CCIS Line
LT Cable

NDA-24307 CHAPTER 5
Page 445
Issue 1
FAULT REPAIR PROCEDURES
13.3 Specific CCH/CCT Card Is Faulty
Check by replacing CCH/CCT card with
a spare. On CCH/CCT card, set the MBR switch UP.
On CCH/CCT card, set MB switch UP and
extract the card from its mounting slot.
Make switch settings on a new CCH/CCT
card, referring to the card extracted.
On new CCH/CCT card, set MBR and MB
switches UP and insert the card into its
mounting slot.
On new CCH/CCT card, set MB switch
DOWN.
On new CCH/CCT card, set MBR switch
DOWN.
Check whether the fault is still indicated.
START
END

CHAPTER 5 NDA-24307
Page 446
Issue 1
FAULT REPAIR PROCEDURES
13.4 Fault of CCH, DTI and Related Flat Cable
Check connectors and flat cables between
DTI and CCH. On DTI cards, set MB switch UP. On CCH
card, set MBR switch UP.
Check the connector. Check whether the connector is correctly
connected or not. If the connection is found
improper, plug and unplug the connector a few
times.
On DTI cards, set MB switch DOWN. On CCH
card, set MBR switch DOWN.
Check whether the fault is still indicated.
Check the flat cable. On DTI cards, set MB switch UP. On CCH
card, set MBR switch UP.
Test the continuity of the flat cable. If found to
be abnormal, replace the flat cable with a spare.
On DTI cards, set MB switch DOWN. On CCH
card, set MBR switch DOWN.
Check whether the fault is still indicated.
Check by replacing the DTI card with
spare. On DTI card, set MB switch UP and extract the
card from the mounting slot.
On a new DTI card, make the switch setting,
referring to the replaced card.
On new DTI card, set MB switch UP and insert
the card into the mounting slot.
On new DTI card, set MB switch DOWN.
Check whether the fault is still indicated.
START
END
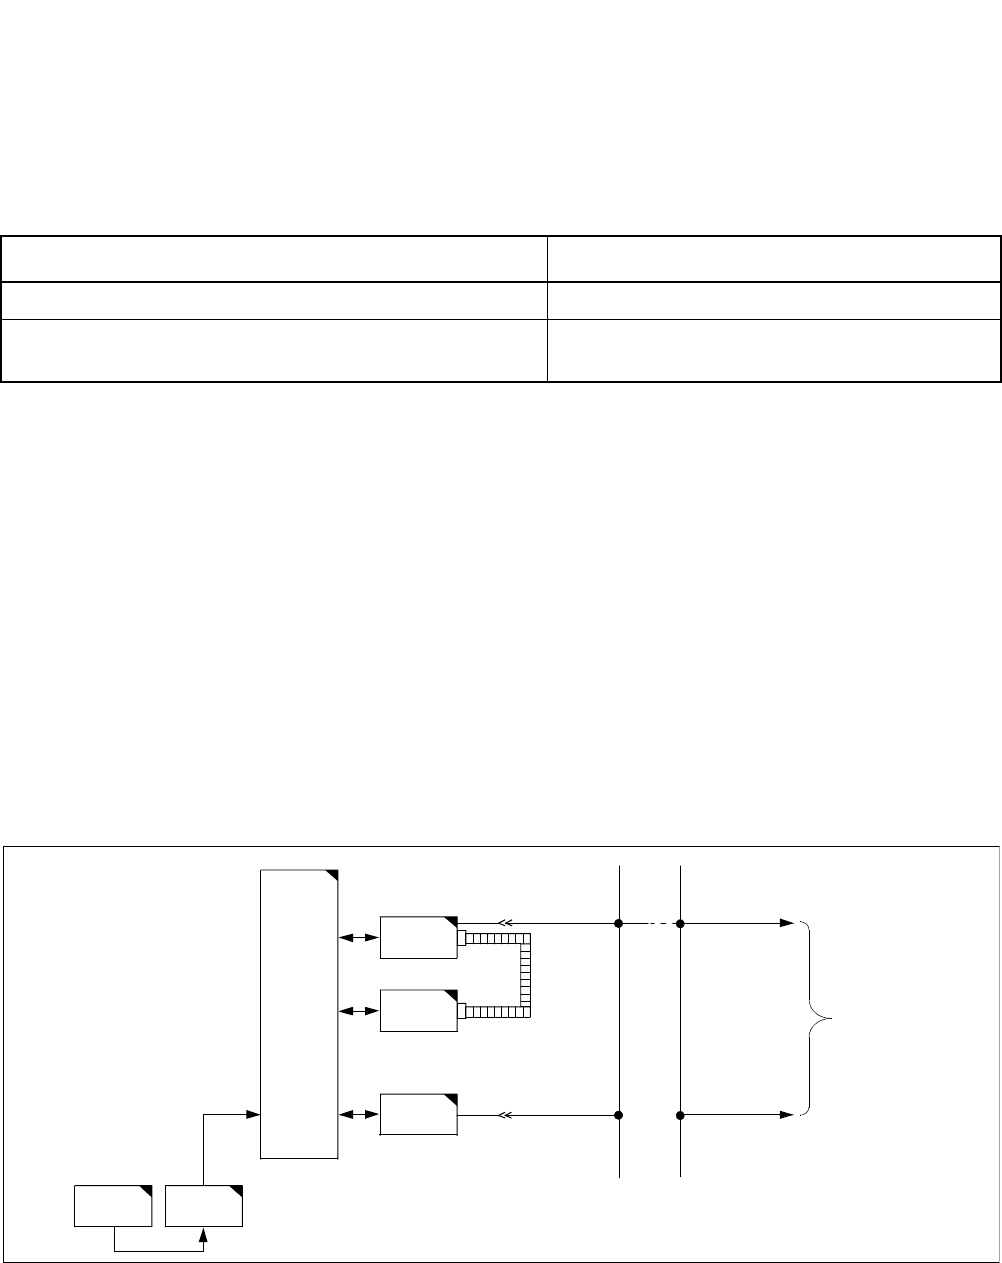
NDA-24307 CHAPTER 5
Page 447
Issue 1
FAULT REPAIR PROCEDURES
14. INTEGRATED SERVICE DIGITAL NETWORK (ISDN) LINE FAULT
This section explains the fault repair procedure when any of the faults shown in Table 5-14 occur to a specific
ISDN.
14.1 Check Point
When repairing an ISDN line fault, consider the following items:
(1) Check alarm lamps on the DCH or PRT circuit card.
(2) Refer to Figure 5-26, and check the cable connection.
14.2 ISDN Line Control
The DCH/PRT circuit card controls the signal link (digital) of the ISDN line and transmits/receives call
processing information.
The signal link controls permit normal transmission and reception of call processing information. Figure
5-26 shows the ISDN line control route.
Figure 5-26 Controlling ISDN Line
Table 5-14 ISDN Line Fault Situation
FAULTY SITUATION REFERENCE SECTION
A specific CCH/CCT card is faulty. Section 14.3, Specific DCH/PRT Card Is Faulty
When the signal transmission line is a digital line, transmitting/
receiving of control signals cannot be performed. Section 14.4, Fault of DCH, DTI and Related Flat
Cable
CPU TSW
MUX
DCH
PRT
DTI
LT Cable
Front
Cable
MDF
To ISDN Line
LT Cable

CHAPTER 5 NDA-24307
Page 448
Issue 1
FAULT REPAIR PROCEDURES
14.3 Specific DCH/PRT Card Is Faulty
Check by replacing the DCH/PRT card with
a spare. On DCH/PRT card, set MBR switch UP.
On DCH/PRT card, set MB switch UP and
extract the card from its mounting slot.
Make switch setting on a new DCH/PRT card,
referring to extracted card.
On new DCH/PRT card, set MBR and MB
switches UP and insert the card into its
mounting slot.
On new DCH/PRT card, set MB switch
DOWN.
On new DCH/PRT card, set MBR switch
DOWN.
Check whether the fault is still indicated.
START
END

NDA-24307 CHAPTER 5
Page 449
Issue 1
FAULT REPAIR PROCEDURES
14.4 Fault of DCH, DTI and Related Flat Cable
Check the connectors and flat cables
between DTI and DCH.
Check the connector. On DTI cards, set MB switch UP. On DCH
card, set MBR switch UP.
Check whether the connector is correctly
connected. If the connection is found improper,
plug and unplug the connector a few times.
On DTI cards, set MB switch DOWN. On DCH
card, set MBR switch DOWN.
Check whether the fault is still indicated.
Check the flat cable. On DTI cards, set MB switch UP. On DCH
card, set MBR switch UP.
Test the continuity of the flat cable. If abnormal,
replace the flat cable with spare.
On DTI cards, set MB switch DOWN. On DCH
card, set MBR switch DOWN.
Check whether the fault is still indicated.
Check by replacing the DTI card with a
spare. On DTI card, set MB switch UP and extract the
card from the mounting slot.
On a new DTI card, make switch setting.
On new DTI card, set MB switch UP and insert
the card into the mounting slot.
On new DTI card, set MB switch DOWN.
Check whether the fault is still indicated.
START
END

CHAPTER 5 NDA-24307
Page 450
Issue 1
FAULT REPAIR PROCEDURES
15. HARD TIME CLOCK FAULT
This section explains the procedure for repairing a hard time clock failure which occurs within the EMA card.
Replace the EMA card.
If the EMA card is removed from the
system while the system is in operation
under the control of the CPU 1, the
system will reset and stop all call
processing. See Section 1.3.2, EMA
Card Replacement Procedure, Chapter
4, for detailed instructions.
Replace the EMA card referring to Section
1.3.2, EMA Card Replacement Procedure,
Chapter 4.
START
END
WARNING

NDA-24307 CHAPTER 6
Page 451
Issue 1
CHAPTER 6 SYSTEM OPERATIONS
To maintain the system in a normal state, maintenance technicians need to monitor the servicing status of the
system. Figure 6-1 shows the flow of the system status monitor.
When trouble occurs in any part of the system or to any phase of system operations, maintenance technicians
are alerted by an alarm indication or by a report from a station user or an operator. When the system becomes
overloaded, maintenance technicians can execute Line Load Control.
Figure 6-1 System Status Monitor
SYSTEM OPERATIONS
1. ALARM INDICATIONS
•Alarm Lamps on Circuit Card
•Alarm Lamps on TOPU
•Alarm Lamps on ATTCON/DESKCON
2. COLLECTION OF SYSTEM MESSAGES
3. INDICATION OF LOCKOUT STATUS
4. LINE LOAD CONTROL
5. IOC LINE MONITOR
6. LINE MANAGEMENT
•Make-Busy/Make-Busy Cancel of Station
•Class/Number Change of Station and Data Terminal
•Make-Busy/Make-Busy Cancel of C.O./Tie Line
7. STATION MESSAGE DETAIL RECORDING SYSTEM (SMDR)
8. TRAFFIC MANAGEMENT
9. OFFICE DATA MANAGEMENT
10. TEST OPERATIONS OF VARIOUS KIND
11. ROUTINE DIAGNOSIS
12. SYSTEM CONTROL PROCEDURES
•Changeover/Make-Busy/Make-Busy Cancel of Equipment
•Initialization
•Power ON/OFF
•System Startup
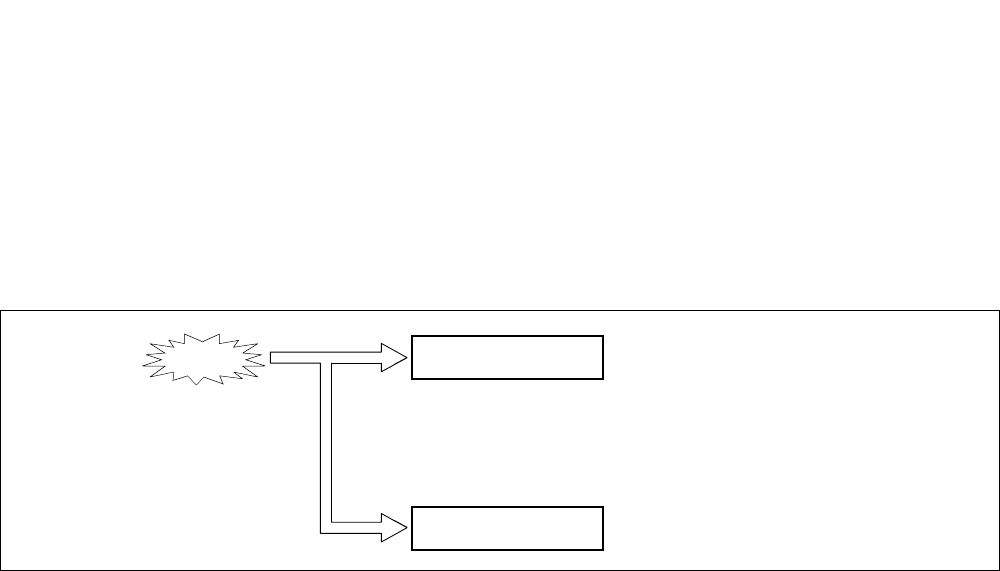
CHAPTER 6 NDA-24307
Page 452
Issue 1
SYSTEM OPERATIONS
1. ALARM INDICATIONS
When trouble occurs in the system, the system activates an appropriate remedial action (system changeover,
make-busy shift of the circuit card, restart processing, etc.) by executing the automatic diagnostic function.
Results of the action taken and the faulty situation are displayed.
1.1 Kinds of Alarm Indications
Figure 6-2 shows the kinds of alarm indications.
Figure 6-2 Alarm Indications
1.2 How to Stop Alarm Indications
To stop the alarm indication, press ALM RST key on the TOPU or use the RALM/RALMN command.
Note: If the RALM/RALMN command is executed, the system messages that show the reason for the failure
will be cleared. Always print the indicated system message before using this command.
ALARM INDICATIONTROUBLE
SYSTEM MESSAGE
•TOPU
•CIRCUIT CARDS
•ATTCON/DESKCON
•MAT
•SYSTEM DEDICATED PRINTER
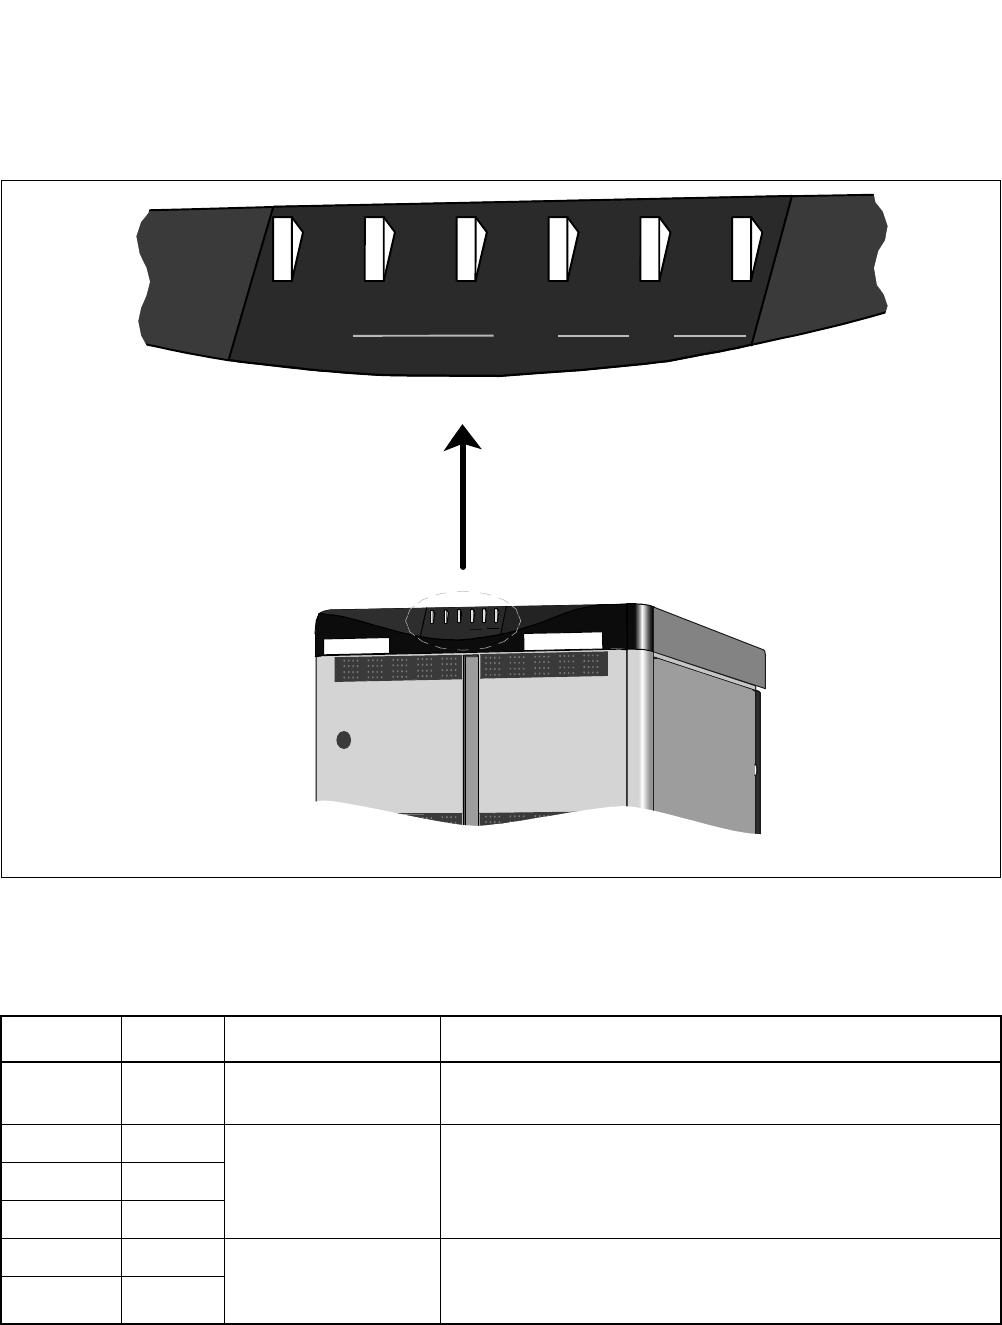
NDA-24307 CHAPTER 6
Page 453
Issue 1
SYSTEM OPERATIONS
1.3 Alarm Indications on TOPU
The system has alarm lamps on the TOPU as shown in Figure 6-3. Table 6-1 lists the meaning of each
lamp.
Figure 6-3 Alarm Indications on TOPU
Table 6-1 Description of Alarm Indications on TOPU
LAMP COLOR FUNCTION CONTENTS
PWR ON Green Power ON Indication Lights when the power is turned ON to the LPM (EMA card
mounted)
ALM MJ Red Alarm urgency level
indicating lamps for each
IMG/ISW
The kind of lamp indications are programmable by variable alarm
indication. Refer to Section 1.4, Variable Alarm Indication.
ALM MN Red
ALM SUP Yellow
SMJ Red Alarm urgency level
indicating lamps for
IMG0 of LN/ISW
LN: Lights when any abnormal state is detected within the node.
ISW: Lights when any abnormal state is detected with ISW.
SMN Red
SMN
PWRSMJ
ON
MJMNSUP
ALM
NEC
NEAX 2400 IPX
PWR
ON
MJ MN SUP
ALM
SYSTEM

CHAPTER 6 NDA-24307
Page 454
Issue 1
SYSTEM OPERATIONS
1.4 Variable Alarm Indication
This feature allows PBX users to make a flexible change of system message output grades which range 0
to 3 and alarm lamp grades which consist of MJ, MN, SUP and NONE. Thus, the PBX users can give a
proper alarm grade to each system message according to their requirements. When assigning no data, the
default alarm grades are automatically adopted.
COMMAND COMMAND FULL NAME
ALMG Assignment of Alarm Grade Data
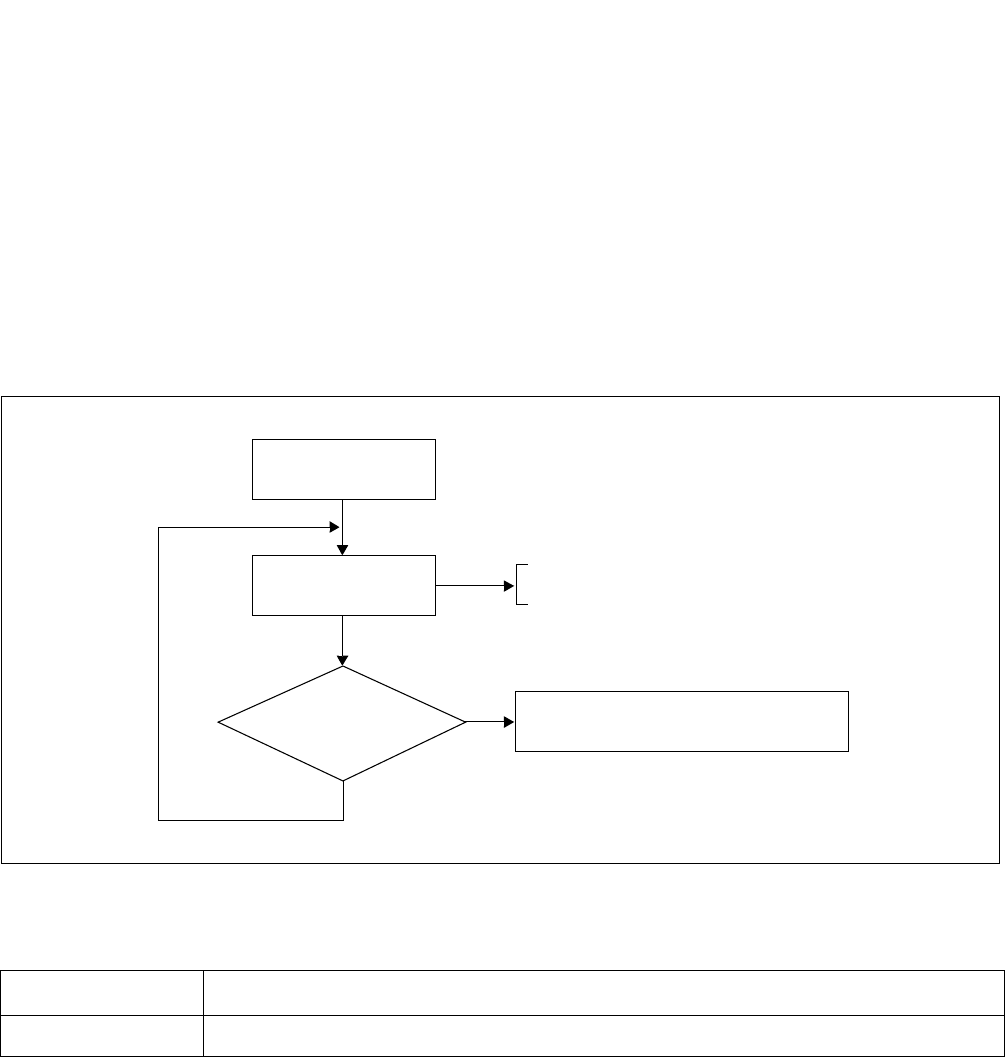
NDA-24307 CHAPTER 6
Page 455
Issue 1
SYSTEM OPERATIONS
2. COLLECTION OF SYSTEM MESSAGES
System messages are collected in the following ways:
•Automatic printout to the system message dedicated printer
•Automatic printout to the MAT printer
•Printout by DFTD command
2.1 Automatic Printout to System Message Dedicated Printer
Figure 6-4 shows the operating procedure.
Figure 6-4 Automatic Printout to System Message Dedicated Printer Operating Procedure
2.2 Display on MAT
Set Scanning to Scanning ON (default) on the Scanning PBX form to collect system messages. If any
message is collected, the information is displayed in the text box on the DFTD command form.
COMMAND COMMAND FULL NAME
MBSM Make Busy of System Message Printout
Power ON to printer.
Automatic
Printout Status
Is printout
stopped
temporarily?
If a message is registered, the contents will
Set printer port to Make-Busy
status using MBSM command.
YES
NO
print out.

CHAPTER 6 NDA-24307
Page 456
Issue 1
SYSTEM OPERATIONS
3. INDICATION OF LOCKOUT STATIONS
When a station is in lockout status (permanent signaling state, shorting across speech wires, etc.), it can quickly
be discovered, preventing the situation from developing into serious trouble.
3.1 Indicating Method
By entering the following commands from the MAT, information pertaining to the lockout station con-
cerned will display.
3.2 Recovery Procedure
Figure 6-5 Recovery Procedure From Lockout Station (1/2)
COMMAND COMMAND FULL NAME
DLSL Display of Lockout Station - LENS
DLSS Display of Lockout Station - Number
Confirm the state of the handset of
the displayed station.
On the MDF, connect the test
telephone to the displayed station
and confirm Dial Tone (DT).
Hear DT?
A
The in-house wiring (from the MDF to
the lockout station) is shorting.
Check the wiring.
Go on-hook and then go off-hook again.
LOCKOUT STATION
SEPARATING
MDF PBX
TEST TEL.
If dial tone is heard, the station is in permanent
signaling status.
YES
NO
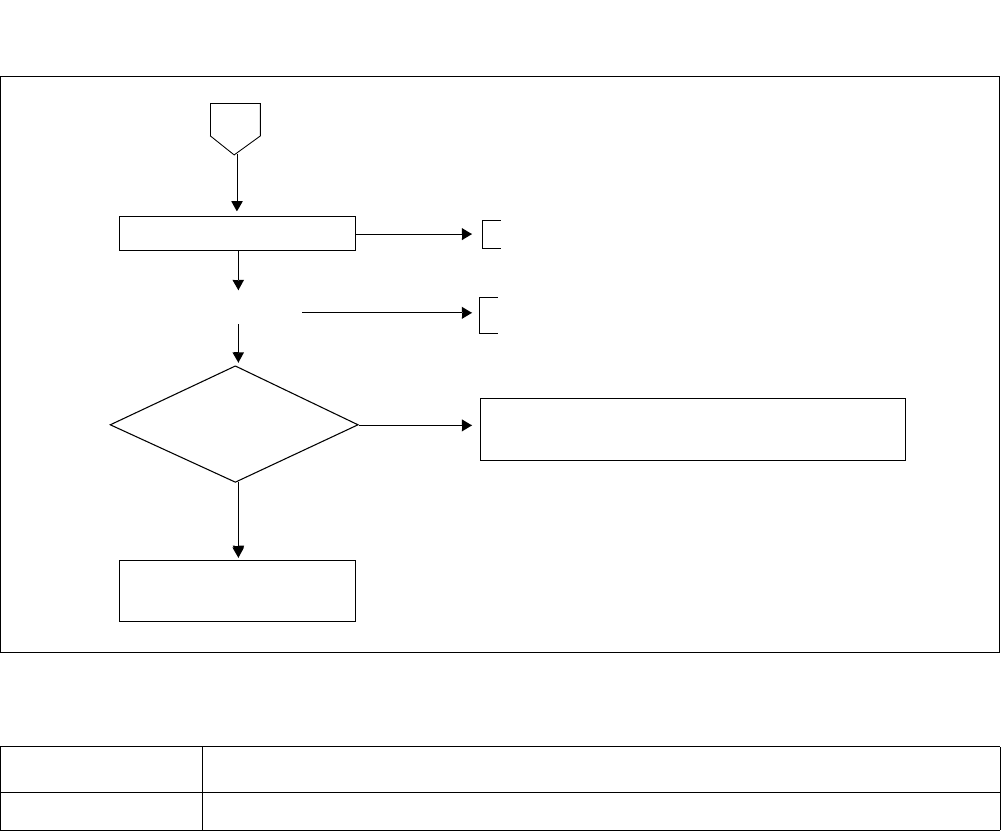
NDA-24307 CHAPTER 6
Page 457
Issue 1
SYSTEM OPERATIONS
Figure 6-5 Recovery Procedure From Lockout Station (2/2)
COMMAND COMMAND FULL NAME
RLST Release Station/Trunk
A
RLST command
(Confirm: DT)
Hear DT?
Replace 16LC card
with a spare.
The circuit may be faulty temporarily.
Observe situation for a while.
Forcibly release the lockout station circuit.
Go off-hook again and confirm DT.
YES
NO
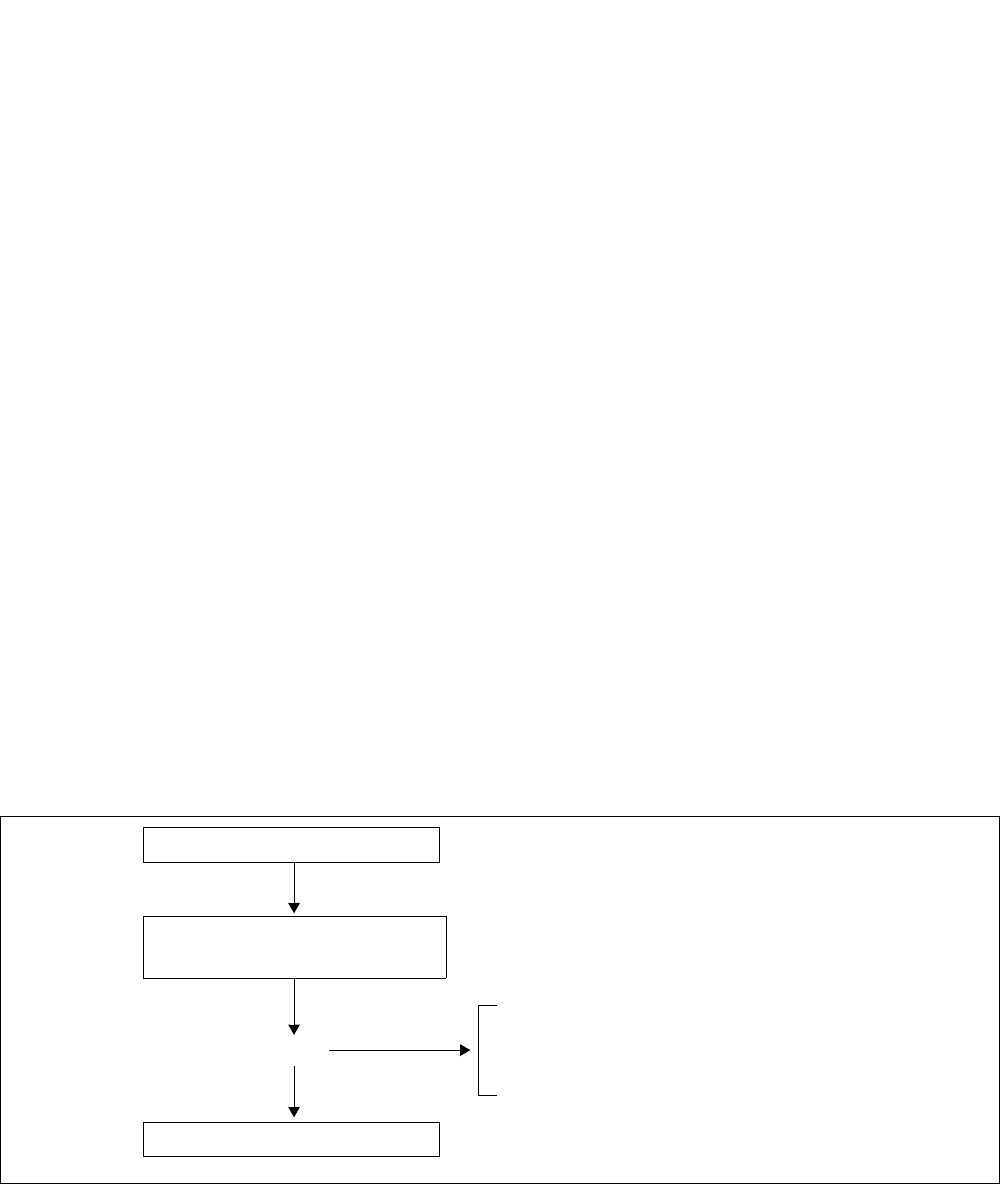
CHAPTER 6 NDA-24307
Page 458
Issue 1
SYSTEM OPERATIONS
4. LINE LOAD CONTROL
In the PBX, Line Load Control can be activated automatically or manually as a countermeasure against
abnormal traffic congestion.
In the case of automatic control, the system automatically monitors an overloaded situation and restricts
outgoing calls from stations and incoming calls from trunks.
In the case of manual control, the operator at an Attendant/Desk Console or the MAT restricts outgoing calls
from stations and incoming calls from trunks.
This section covers the following methods to activate Line Load Control:
•Control by dialing an access code from the ATTCON/DESKCON
•Control by entering command data from the MAT
•System Automatic Monitoring
4.1 Operating Procedure
(1) Key operations on the Attendant Console (ATTCON)
By the operations on the ATTCON, restriction is effected on an outgoing call from a station having SFC
in which the SFI = 16 (Line Load Control) of ASFC command is set as RES=0 (incoming calls to that
station are allowed). For restricting incoming calls from a trunk, system data ASYD, SYS1, INDEX59,
b0=1 should be assigned.
•Setting
Figure 6-6 Line Load Control Operations on ATTCON—Setting
Press LOOP key.
Press CANCEL key.
•Lamp (Figure 6-8) on control
panel lights.
•System message [6-C] displays.
(SST)
Dial the access code for setting
Line Load Control.
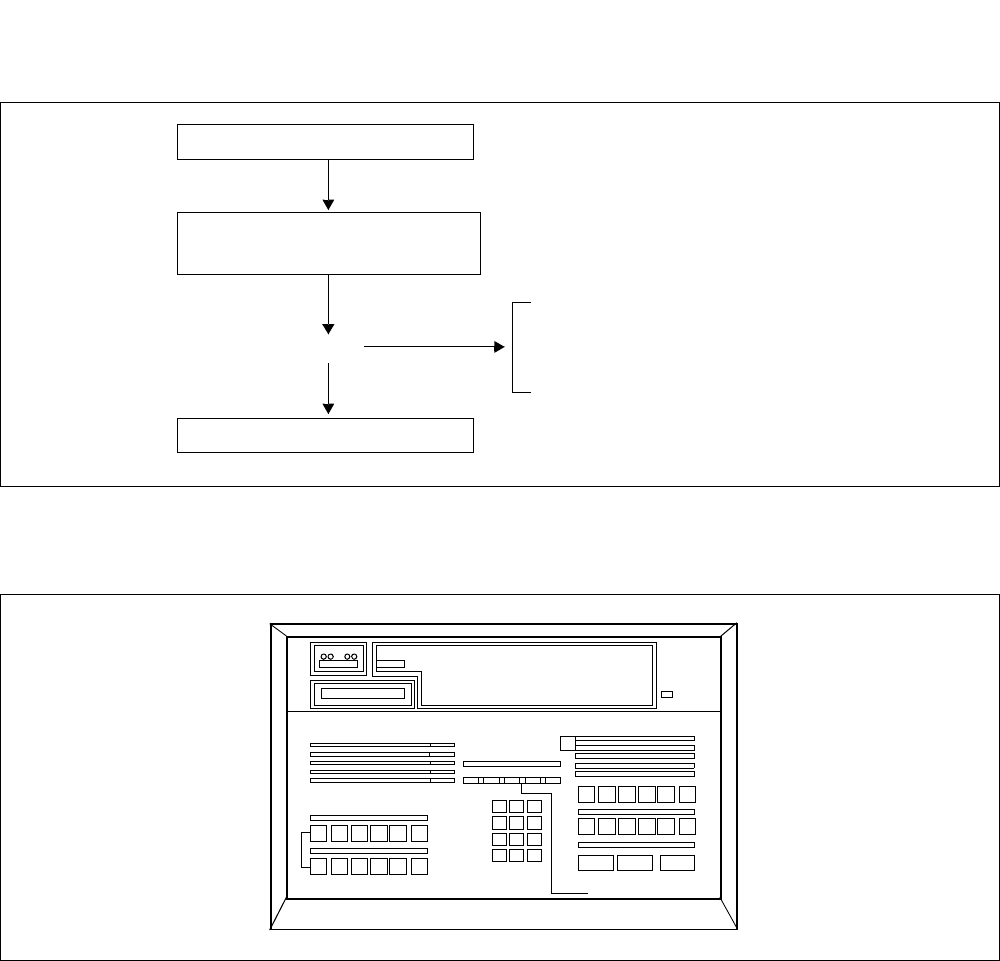
NDA-24307 CHAPTER 6
Page 459
Issue 1
SYSTEM OPERATIONS
•Cancelling
Figure 6-7 Line Load Control Operations on ATTCON—Cancelling
Figure 6-8 Line Control Indication (ATTCON)
Press LOOP key.
Press CANCEL key.
•Lamp (Figure 6-8) on control
panel lights.
•System message [6-D] displays.
(SST)
Dial the access code for cancelling
Line Load Control.
LAMP
NEC
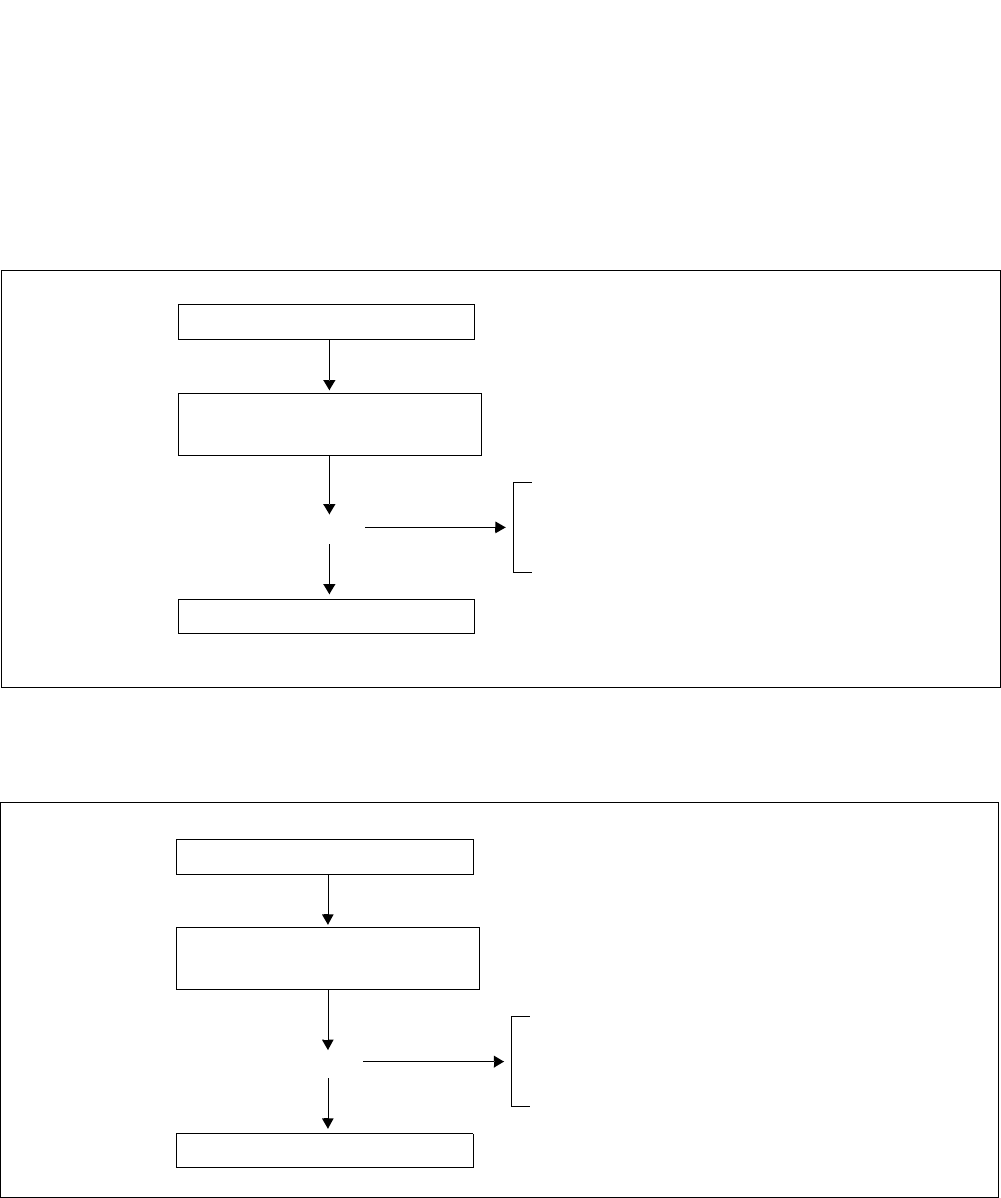
CHAPTER 6 NDA-24307
Page 460
Issue 1
SYSTEM OPERATIONS
(2) Key Operations on the Desk Console (DESKCON)
By the operations on the Desk Console, restriction is applied on an outgoing call from a station having
SFC in which the SFI = 16 (Line Load Control) of ASFC command is set as RES=0 (incoming calls to
that station are allowed). For restricting incoming calls from a trunk, system data ASYD, SYS1,
INDEX59, b0=1 should be assigned.
•Setting
Figure 6-9 Line Load Control Key Operations on DESKON—Setting
•Cancelling
Figure 6-10 Line Load Control Key Operations on DESKON—Cancelling
Press LX (L1-L6) key.
Press CANCEL key.
•LLC displays on DESKCON
(Figure 6-11).
•System message [6-C] displays.
(SST)
Dial the access code for setting
Line Load Control.
Press LX (L1-L6) key.
Press CANCEL key.
•LLC displays on desk console
(Figure 6-11).
•System message [6-D] displays.
(SST)
Dial the access code for cancelling
Line Load Control.
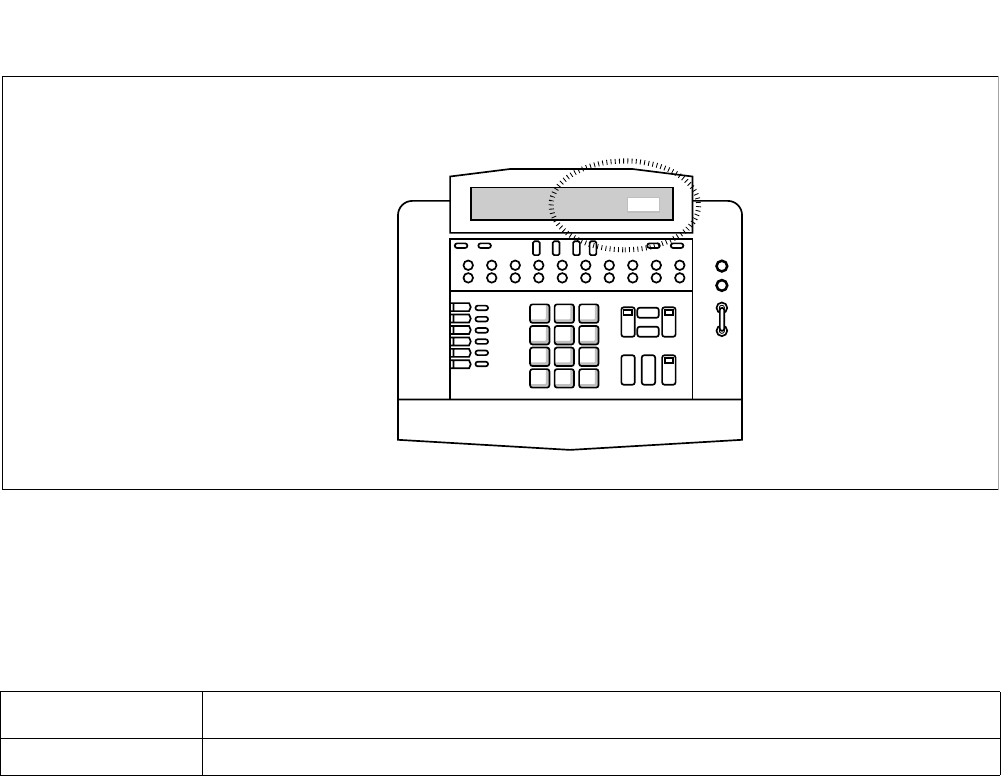
NDA-24307 CHAPTER 6
Page 461
Issue 1
SYSTEM OPERATIONS
Figure 6-11 Line Load Control Indication (DESKCON)
(3) Operations on the MAT
By entering ALLC command from the MAT, Line Load Control executes. The station to be controlled and
the contents of the Line Load Control executed on the MAT are the same as those in Step (1), Key
operations on the Attendant Console (ATTCON).
(4) Automatic Setting
If the usage rate of the CPU exceeds the system data usage rate, Line Load Control is automatically set.
In this case, system message [6-C] displays. The station to be controlled and the contents of the Automatic
Line Load Control are the same as those in Step (1), Key operations on the Attendant Console (ATTCON).
If the usage rate of the CPU drops below the system data usage rate, the Line Load Control is automati-
cally cancelled. In this case, system message [6-D] displays. While the Line Load Control is set, the lamps
on the control panel of the ATTCON/DESKCON remain lit.
COMMAND COMMAND FULL NAME
ALLC Assignment of Line Load Control
1
4
7
*
2
5
8
0
3
6
9
#
Line Load indication
LLC is displayed on a Desk Console, when Line Load Control starts.
LLC
Desk Console
L1
L2
L3
L4
L5
L6

CHAPTER 6 NDA-24307
Page 462
Issue 1
SYSTEM OPERATIONS
5. IOC LINE MONITOR
(1) Functional Outline
This function monitors the IOC port status. As a result of the monitoring by this function, the following
is executed:
•When the connection with a port has been disconnected, it is reported by a message.
•When the connection with a port is set up, it is reported by a message.
•The port status is stored in the memory and updated continuously.
(2) Message Judgment Criteria
Message Judgement Criteria are as described in Table 6-2.
Table 6-2 Message Judgment Criteria
MESSAGE CONTENT
Port Normal System data is assigned, and DR signal is ON.
Port Abnormal System data is assigned, and DR signal is OFF.
Output of Port Disconnected This message is output when Port Abnormal status has lasted for 30 seconds.
This message is immediately output if port abnormal occurs after the IOC card is
initialized.
Output of Port Status Restored This message is output when DR signal is ON for the port about which Output of Port
Disconnected message is output.

NDA-24307 CHAPTER 6
Page 463
Issue 1
SYSTEM OPERATIONS
6. LINE MANAGEMENT
The following explanations apply to line management:
•Make-Busy/Make-Busy Cancel of Station and Data Terminal
•Class Change and Number Change of Station and Data Terminal
•Make-Busy/Make-Busy Cancel of C.O. Line/Tie Line
6.1 Make-Busy/Make-Busy Cancel of Station and Data Terminal
Stations can be put into make-busy state by the following operations:
(1) On each station basis using the MBST command.
•Assign the station number in the STN parameter and choose “1” for the MB box of the MBST com-
mand.
•For the make-busy cancellation, choose “0” for the MB box.
(2) On each circuit basis using the MBLE command.
•Assign LENS number in the LENS parameter and choose “1” for the MB box of the MBLE command.
•For the make-busy cancellation, choose “0” for the MB box.
(3) On each circuit card basis using the MBPM command or operating the MB (toggle) key on the card.
•Assign the required LENS number in the MG, UNIT and Group parameters and choose “3” for the
MB box of the MBPM command.
•For the make-busy cancellation, choose “2” for the MB box.
or
•Set to UP the MB key on the circuit card (= ON).
•For make-busy cancellation, return the MB key down (= OFF).
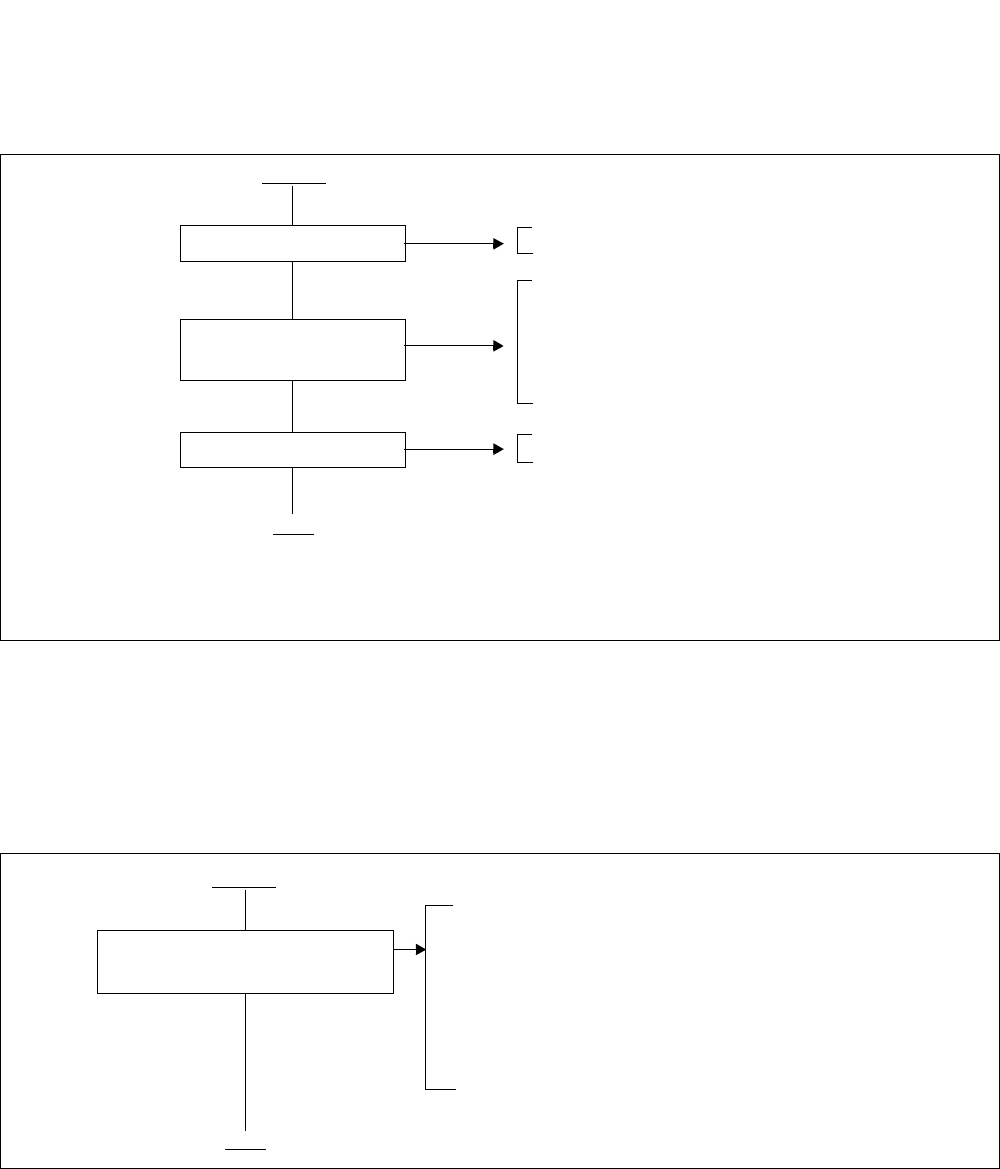
CHAPTER 6 NDA-24307
Page 464
Issue 1
SYSTEM OPERATIONS
6.2 Class Change and Number Change of Station and Data Terminal
Figure 6-12 shows the procedure for class change and number change of station and data terminal.
Figure 6-12 Class Change and Number Change of Station and Data Terminal Procedure
6.3 Make-Busy/Make-Busy Cancel of C.O. Line/Tie Line
Figure 6-13 shows the procedure to make-busy/make-busy cancel of C.O. line/tie line.
Figure 6-13 Make-Busy/Make-Busy Cancel of C.O. Line/Tie Line Procedure
Refer to Section 6.1.
• For changing class, use ASCL command Note 1
•For changing station number, use ASTN command
Note 2
•For changing telephone number, use ALGNN amd
ALGSN comands
Refer to Section 6.1.
START
Line Make-Busy
Class change and number
change
Line Make-Busy Cancel
END
Note 1: For guest station of Hotel System, use AGCL command.
Note 2: For guest station of Hotel System, use AGSN command.
END
• For make-busy/make-busy cancel by line basis, use
MBLE command
• For make-busy/make-busy cancel by route basis, use
MBRT command
• For make-busy/make-busy cancel by each circuit card,
use MBPM commands or MB (toggle) switch setting on
the circuit card
START
Make-Busy/Make-Busy Cancel of
C.O./Tie Line

NDA-24307 CHAPTER 6
Page 465
Issue 1
SYSTEM OPERATIONS
6.4 Line Management Commands
COMMAND COMMAND FULL NAME
AGCL Assignment of Guest Station Class
AGSN Assignment of Alternated Guest Station Number
ASCL Assignment of Station Class Data
ASTN Assignment of Station Number
ALGNN Assignment of Telephone Number Data for NDM
ALGSN Allocation of Telephone Number Data for NDM
MBLE Make Busy of LENS
MBPM Make Busy of Port Microprocessor
MBRT Make Busy of Route
MBST Make Busy of Station
MBTK Make Busy of Trunk
DLEN Display of LENS Data

CHAPTER 6 NDA-24307
Page 466
Issue 1
SYSTEM OPERATIONS
7. STATION MESSAGE DETAIL RECORDING SYSTEM (SMDR)
Billing information can be managed by connecting the PBX system and an external computer (SMDR
equipment).
Note: The SMDR equipment and its software must be provided by the user.
The PBX system provides the SMDR equipment with the following information:
•Calling Party Information
•Called Party Number
•Call Start Time
•Call End Time
•Authorization Code/Account Code
Upon receiving the above information from the PBX system, the SMDR equipment performs editing and
management of the information and outputs the resulting information.
7.1 Transmission Data to SMDR Equipment
(1) Transmission Format
As seen in the figure below, the basic information to be transmitted (Transmission Message) is a block
which begins with Start of Text (STX) and ends with End of Text (ETX). When the call ends, the whole
contents of this information is transmitted to the SMDR equipment.
(2) Transmission Message
One transmission message consists of 128 bytes of data. Each byte represents by ASCII codes the data to
be transmitted (Refer to Table 6-3). The contents of the data to be transmitted vary with the kind of call,
but the first byte is always transmitted by ASCII code K (4B hex.). The second byte to be transmitted is
the data which specifies the kind of call.
Note: In case the Fusion service is involved, the message can consist of more than 128 byte data.
STX: START OF TEXT
ETX: END OF TEST
SA: SYSTEM ADDRESS
UA: UNIT ADDRESS
S
T
X
S
AU
AE
T
X
TRANSMISSION MESSAGE

NDA-24307 CHAPTER 6
Page 467
Issue 1
SYSTEM OPERATIONS
(3) Text Format
Text formats can be selected by system data. For information on data assigment for SMDR, refer to the
“Feature Programming Manual.” Text formats used in the system are as follows:
•IPX format: This format used for both IOC and TCP/IP interface. Refer to Section 7.2
•ICS format: This format used for IOC interface. Refer to Section 7.3.
For detailed information on SMDR TCP/IP interface, refer to Section 7.4.9.
Table 6-3 ASCII Code
CHARACTER
ASCII CODE
REMARKS
HEX. BINARY DIGIT
b7 b6 b5 b4 b3 b2 b1 b0
0 30 00110000
1 31 00110001
2 32 00110010
3 33 00110011
4 34 00110100
5 35 00110101
6 36 00110110
7 37 00110111
8 38 00111000
9 39 00111001
SPACE 20 00100000Special Characters
Code
STX 02 00000010
ETX 03 00000011
SA 30 00110000
UA 21 00101011
* 2A00101010
# 23 00100011
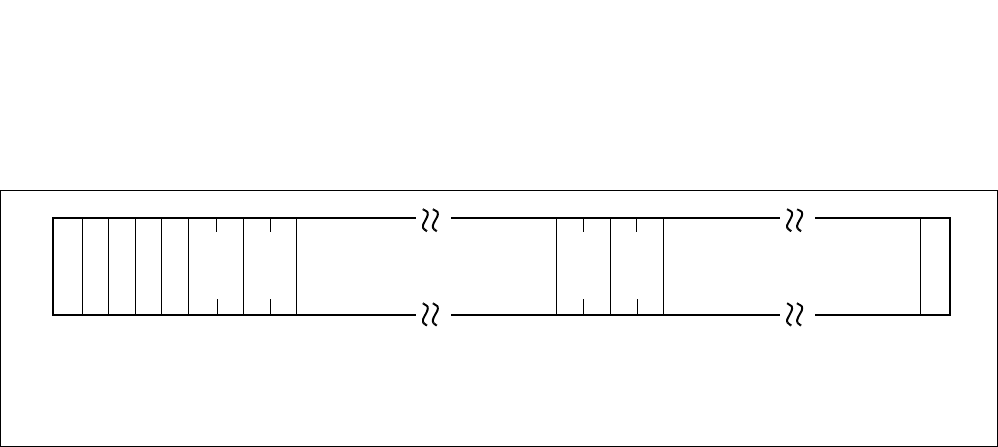
CHAPTER 6 NDA-24307
Page 468
Issue 1
SYSTEM OPERATIONS
7.2 IPX Format (Text Format of Centralized Billing - Fusion)
Below is the IPX format of billing information to be transmitted to the SMDR equipment. Figure 6-14
shows the transmission message of an outgoing call. Figure 6-15 shows the transmission message of an
incoming call. Also, Figure 6-16 shows the transmission message of a station-to-station call.
STX : Start of Text ETX : End of Text
KK : Outgoing KL : Incoming
KM : Extension
S
T
X
E
T
X
Transmission Data
0! K
K
/
L
/
M
Kind
of
Data
Note
Data
Length
Kind
of
Data
Data
Length Transmission Data
Note: For details on the Kind of Data, see Table 6-4.

NDA-24307 CHAPTER 6
Page 469
Issue 1
SYSTEM OPERATIONS
Note: Conditionally Provided: Information is provided when data is effective.
Provided: Information is provided on every call with no exception.
-: Not available.
Table 6-4 Kind of Data
KIND
OF
DATA CONTENTS KK
(OUTGOING) KL
(INCOMING) KM
(STATION)
00 Not Used
01 Outgoing Trunk/Incoming Trunk Information Provided Provided -
02 Calling Party Information (Station Number) Provided - Provided
03 Calling Party Information (Telephone Number) Conditionally
Provided - Conditionally
Provided
04 Called Party Information (Station Number) - Provided Provided
05 Called Party Information (Telephone Number) - Conditionally
Provided Conditionally
Provided
06 Call Start/Call End Time Provided Provided Provided
07 Account Code Conditionally
Provided Conditionally
Provided Conditionally
Provided
08 Condition B Information Provided Provided Provided
09 Alternate Routing Information/Incoming Route Number Provided Provided -
10 Dial Code Provided Conditionally
Provided -
11 Office Code Information (For CCIS) Conditionally
Provided Conditionally
Provided -
12 Authorization Code Conditionally
Provided Conditionally
Provided -
13 Condition C Information + Billing Info/Call Metalling
Info Provided Conditionally
Provided -
14 Condition D Information + Bill Notification Attendant
Console Number Conditionally
Provided --
15 Department Code Conditionally
Provided --
16 Automatic Number Indication Conditionally
Provided Conditionally
Provided -
17 Converted Number Conditionally
Provided --
18-99 Not Used
CHAPTER 6 NDA-24307
Page 470
Issue 1
SYSTEM OPERATIONS
Figure 6-14 Message Format for Outgoing Call - IPX Format
Byte Data
1
10
5
15
25
20
30
40
35
45
55
50
60
65
STX
0
!
K
K
0
1
1
FPC
(3 digits)
Physical
Route No.
Trunk No.
Logical
Route No.
0
2
1
ORIG
Tenant
(3 digits)
STN No.
ATT CON
No.
RT/TK No.
(6 digits)
0
3
02
FPC
(3 digits)
User
Group
Number
Telephone
Number
(Max. 16
digits)
/
Logical
Route No.
(3 digits)
0
6
3
Year
Byte Data
80
75
85
95
90
100
110
105
115
125
120
130
135
Milli-Second
0
7
01
Account
Code
(Max. 16
digits)
0
9
1
FPC1
Outgoing
Tr u n k
Information
Calling
Party
Information
(Station No.)
Note
Calling
Party
Information
(Telephone No.)
Call
Start
Time
Minute
Second
Ye a r
Month
Milli-Second
Day
Hour
Minute
Second
0
8
0
C2
C1
C0
Logical
RT No. 1
Physical
RT No. 1
Call End
Time
Account
Code
Condition B
Information
Note
Alternate
Routing
Information
Note
150
155
165
160
170
180
175
185
195
190
200
205
1
0
03
Dial Code
(Max. 32
digits)
1
2
01
1
1
0
Dial Code
Office Code
Information
Authorization
Code
Byte Data
Office
Code of
Calling
Party
Office Code
of Billing
Process
Office
Authoriza-
tion Code
(Max 16
digits.)
220
225
235
230
240
250
245
255
265
260
270
275
Condition
D Informa-
tion
Automatic
Number
Indication
Note
Department
Code
Billing
Information
/
Call
Metering
1
4
00
D
Bill Notifi-
cation ATT
CON No.
Condition
C Informa-
tion
1
5
0
1
5
0
1
6
03
Depart-
ment Code
ETX
~
~
~
~
~
,
Note: See Reference 1.
*
70
Day
Hour
Month
140
145
Logical
RT No. 2
Physical
RT No. 2
Byte Data
280
285
Automatic
Number
Indication
(Max. 32
digits)
1
7
00
Converted
Number
(Max. 6
digits)
~
FPC2
1
3
0, 0, 0
210
215
C
Con-
verted
Number
NDA-24307 CHAPTER 6
Page 471
Issue 1
SYSTEM OPERATIONS
Figure 6-15 Message Format for Incoming Call - IPX Format
Office Code
of Billing
Process
Office
Byte Data
1
10
5
15
25
20
30
40
35
45
55
50
60
65
STX
0
!
K
L
0
1
1
2
FPC
(3 digits)
Physical
Route No.
Trunk No.
Logical
Route No.
0
4
1
0
ORIG
Tenant
(3 digits)
STN No.
ATT CON
No.
RT/TK No.
(6 digits)
0
5
02
32
FPC
(3 digits)
User Group
Number
(3 digits)
Telephone
Number
(Max. 16
digits)
/
Logical
Route No.
(3 digits)
0
6
3
4
Year
Byte Data
70
80
75
85
95
90
100
110
105
115
125
120
130
Milli-Second
0
7
01
16
Account
Code
(Max. 16
digits)
0
9
1
8
FPC1
Incoming
Tr u n k
Information
Called
Party
Information
(Station No.)
Called
Party
Information
(Telephone No.)
Call
Start
Time
Day
Hour
Minute
Second
Year
Month
Milli-Second
Day
Hour
Minute
Second
0
8
C0
Logical
RT No. 1
Physical
RT No. 1
Call End
Time
Account
Code
Condition B
Information
Note
Incoming
Route
Number Note
140
150
145
155
165
160
170
180
175
185
195
190
200
1
0
03
12
Dial Code
(Max. 32
digits)
1
2
01
16
FPC2
1
1
0
8
Logical
RT No. 2
Physical
RT No. 2
Dial Code
Office Code
Information
Byte Data
Office
Code of
Calling
Party
210
220
215
225
235
230
240
250
245
255
1
3
Automatic
Number
Indication
(Max. 32
digits)
Automatic
Number
IndicationNote
Byte Data
C
Condition C
Information
Note
ETX
Month 135
205
1
6
03
13
Call
Metering
Authoriza-
tion Code
(Max. 16
digits)
Authorization
Code
Note: See Reference 1.
~
~
0
3
C2
C1
~
~
~
*
0
5
CHAPTER 6 NDA-24307
Page 472
Issue 1
SYSTEM OPERATIONS
Figure 6-16 Message Format for Station-to-Station Call - IPX Format
Byte Data
1
10
5
15
25
20
30
40
35
45
55
50
60
65
STX
0
!
K
M
0
2
1
0
FPC
(3 digits)
ORIG
Tenant
(3 digits)
STN No.
ATT CON
No.
(6 digits)
0
5
02
32
FPC
(3 digits)
User Group
Number
(3 digits)
Telephone
Number
(Max. 16
digits)
Byte Data
70
80
75
85
95
90
100
110
105
115
125
120
130
Milli-Second
0
6
Account
Code
(Max. 16
digits)
Calling
Party
Information
(Station No.)
Note
Calling
Party
Information
(Telephone No.)
Call
Start
Time
Day
Hour
Minute
Second
Year
Month
Milli-Second
Day
Hour
Minute
Second
C2
C1
C0
Call End
Time
Account
Code
140
145
0
7
01
16
0
4
1
0
Byte Data
0
8
0
3Condition B
Information
Note
ETX
Month
135
Note: See Reference 1.
0
3
02
32
ORIG
Tenant
(3 digits)
STN No.
ATT CON
No.
(6 digits)
User Group
Number
(3 digits)
Telephone
Number
(Max. 16
digits)
Year
Called
Party
Information
(Station No.)
Note
Called
Party
Information
(Telephone No.)
3
4
~
~
~
NDA-24307 CHAPTER 6
Page 473
Issue 1
SYSTEM OPERATIONS
Reference 1
Data = 02: Calling Party Information (Station Number)
Data = 04: Called Party Information (Station Number)
Data = 08: Condition B Information
02
or
04
10
O
R
I
G
Tenant
(3 digits)
Station No.
ATTC O N N o.
RT / TK No.
(6 digits)
ORIG: Originating Source Identification
ORIG = 0: Information on Station
ORIG = 1: Information on Attendant Console
ORIG = 2: Information on Trunk
08 03 C
2
C0 = 0: Call Origination - Direct
1: Call Origination - via ATTCON
2: Call Origination - Direct (Alternate Routing)
3: Call Origination - via ATTCON (Alternate Routing)
4: Call Origination - Direct (LCR Routing)
5: Call Origination - via ATTCON (LCR Routing)
6: Call Origination - Direct (Called No. - first 6 digits of change code)
7: Call Origination - via ATTCON (Called No. - first 6 digits of change code)
C1 = 0: -
1: Call Origination by OG Queuing
2: Call Origination by dialing with Accounted Code
3: Call Origination by OG Queuing & dialing with Accounted Code
4: Call Origination by Call Forwarding Outside
5: -
6: Call Origination by Call Forwarding Outside & dialing with Accounted Code
C2 = 0: -
1: Call was transferred
2: Billing is continued
3: Call was transferred & billing is continued
4: Call was transferred to last called party
C
1
C
0
CHAPTER 6 NDA-24307
Page 474
Issue 1
SYSTEM OPERATIONS
Data = 09: Alternate Routing Information (KK) / Incoming Route Number (KL)
Data = 13: Condition C Information + Billing Info / Call Metering Info.
09 18 FPC1
(3 digits)
FPC1: FPC actually used
Physical Route No. 1: Physical route actually used
Logical Route No. 1: Logical route actually used
FPC2: FPC first selected
Physical Route No. 2: Physical route first selected
Logical Route No. 2: Logical route first selected
Physical
RT No. 1
Logical
RT No. 1
FPC2
(3 digits)
Physical
RT No. 2
Logical
RT No. 2
13
01
•
05
•
07
C
Billing Info
/
Call Metering
In case of
Billing Information
Charge Data (Basic Charge Unit x 100)
Charge Data (Basic Charge Unit x 101)
Charge Data (Basic Charge Unit x102)
Charge Data (Basic Charge Unit x103)
Charge Data (Basic Charge Unit x104)
Charge Data (Basic Charge Unit x105)
0: No Charge Information
1: Charge Information for 1 cent unit
2: Charge Information for 0.1 cent unit
3: Charge Information for 10 cent unit
4: Charge Information for $1 unit
5: Charge Information for $10 unit
6: Calling Metering (4 digits)
F: Charge Information Error
NDA-24307 CHAPTER 6
Page 475
Issue 1
SYSTEM OPERATIONS
Data = 14: Condition D Information + Bill Notification ATTCON Number
Data = 16: Automatic Number Indication
14
01
•
04
D
Bill
Notification
AT T C O N
Number
D - : Bill Notification (by ATTCON) Not Available
0 : Bill Notification (by ATTCON) Not Applied
1 : Bill Notification (by ATTCON) Available
16
01
33
*
* Information Element Identifier = 0: Unable to Output
1: Display
2: Unable to Notify
3: Out of Service (Out of Area)
4: Public Telephone Origination
Automatic Number Indication (Max. 32 digits)
~
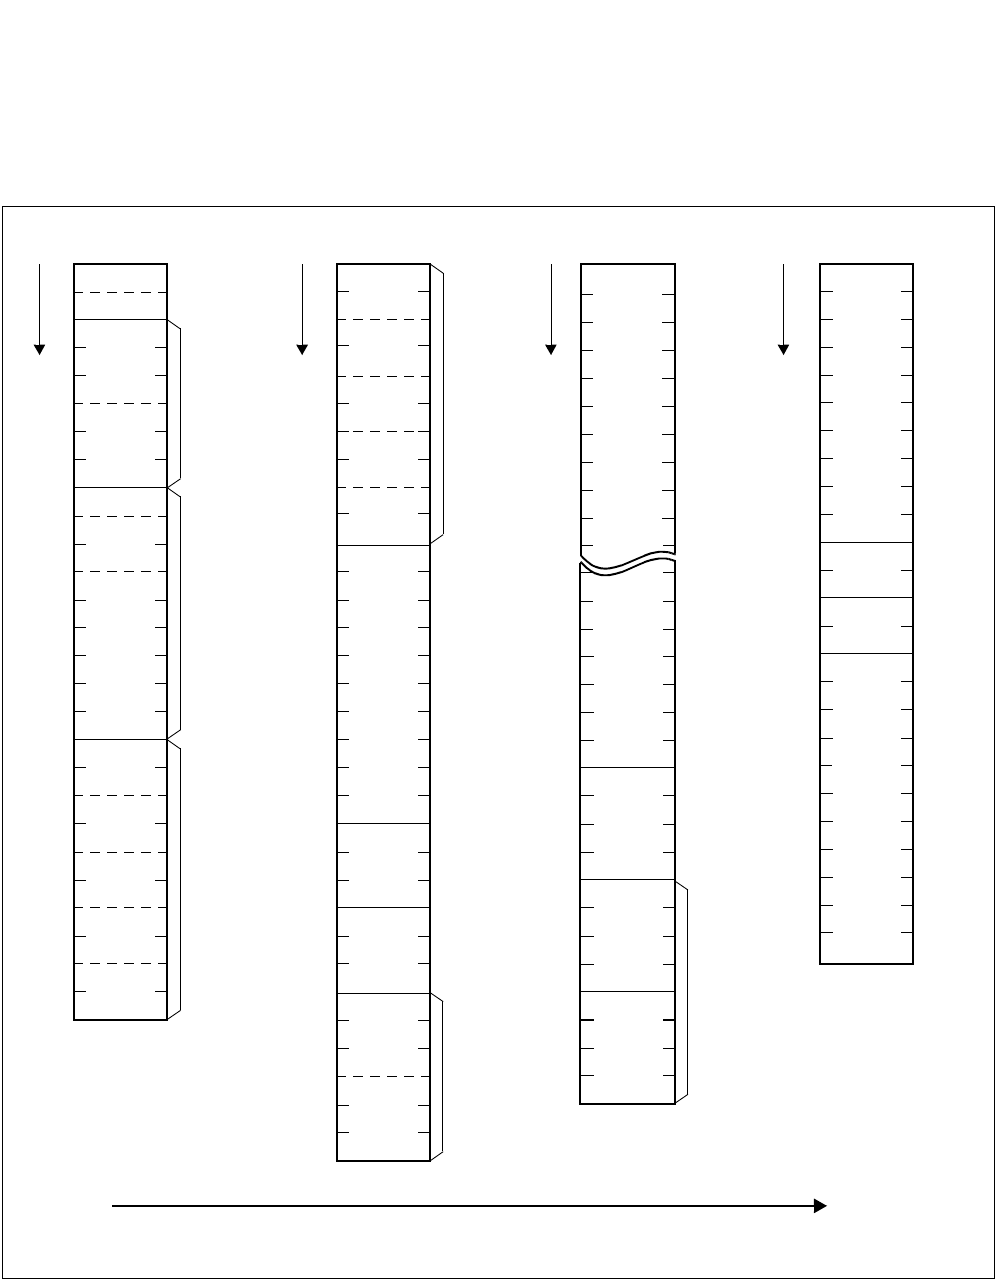
CHAPTER 6 NDA-24307
Page 476
Issue 1
SYSTEM OPERATIONS
7.3 ICS Format
Below is the ICS format to be transmitted to the SMDR equipment. Figure 6-18 shows the Transmission
Message of an outgoing call, and Figure 6-17 shows the Transmission Message of an incoming call. Also,
Figure 6-19 shows the Transmission Message of a station-to-station call.
Figure 6-17 Message Format for Incoming Call - ICS Format
K
BYTE DATA
CALLED
NUMBER
CALL
OFFICE
60
92
96
100
ONLY FOR
NO. 7 CCIS
Note
MONTH
BYTE DATA
00
DAY
HOUR
MINUTE
SECOND
28
30
32
36
38
48
51
54
ROUTE
BYTE DATA
E
ROUTE
NUMBER
TRUNK
NUMBER
ORIG
STATION
OR
ATTEND-
ANT
OR
ROUTE
TRUNK
NUMBER
TENANT
MONTH
DAY
HOUR
MINUTE
SECOND
1
3
6
9
10
12
18
20
22
24
26
CALLED
PARTY
INFORMATION
Note
CALL START
TIME
Note
ROUTE
NUMBER
ACCOUNT
CODE
CONDI-
TION
B
34
CALLED
PARTY
TENANT
57
ADVANCE
INFORMATION
Note
CALL END
TIME
Note
METER-
ING
CODE
OF
CALLED
PARTY
OFFICE
CODE OF
BILLING
PROCESS
OFFICE
BYTE DATA
AUTHORI-
SPACE
YEAR
128
118
(20 Hex.)
YEAR
116
114
ZATION
CODE
104
TERMINAT-
ING
TRUNK
INFORMATION
00
00
Note
Note
Note
Note
Note
Note: See Reference 2.

NDA-24307 CHAPTER 6
Page 477
Issue 1
SYSTEM OPERATIONS
Figure 6-18 Message Format for Outgoing Call - ICS Format
BYTE DATA
CALLED
NUMBER
CALL
OFFICE
60
92
96
100
ONLY FOR
NO. 7 CCIS
Note
MONTH
BYTE DATA
ROUTE
NUMBER
DAY
HOUR
MINUTE
SECOND
28
30
32
36
38
48
51
54
ROUTE
BYTE DATA
K
A
ROUTE
NUMBER
TRUNK
NUMBER
ORIG
STATION
OR
ATTEND-
ANT
OR
ROUTE
TRUNK
NUMBER
TENANT
MONTH
DAY
HOUR
MINUTE
SECOND
1
3
6
9
10
12
18
20
22
24
26
CALLING
PARTY
INFORMATION
Note
CALL START
TIME
Note
2
ROUTE
NUMBER
1
ACCOUNT
CODE
CONDI-
TION
B
34
CALLING
PARTY
TENANT
57
ADVANCE
INFORMATION
Note
CALL END
TIME
Note
METER-
ING
CODE
OF
CALLING
PARTY
OFFICE
CODE OF
BILLING
PROCESS
OFFICE
BYTE DATA
AUTHORI-
SPACE
YEAR
128
118
(20 Hex.)
YEAR
116
114
ZATION
CODE
104
ORIGINATING
TRUNK
INFORMATION
Note
Note
Note
Note
Note
Note: See Reference 2.
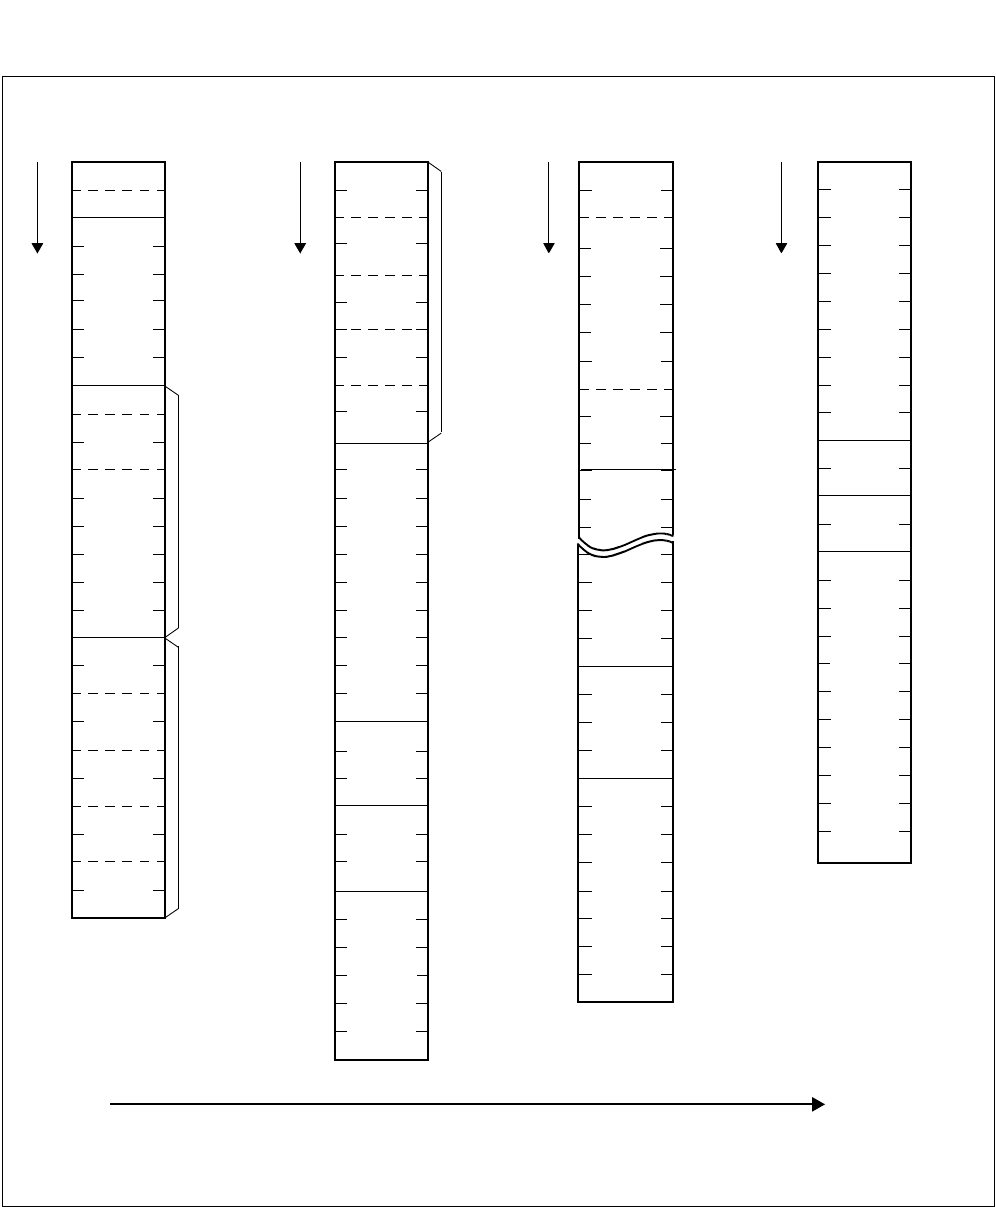
CHAPTER 6 NDA-24307
Page 478
Issue 1
SYSTEM OPERATIONS
Figure 6-19 Message Format for Station-to-Station Call - ICS Format
K
BYTE DATA
60
92
96
MONTH
BYTE DATA
DAY
HOUR
MINUTE
SECOND
28
30
32
36
38
48
51
54
BYTE DATA
B
SPACE
(20 Hex.)
ORIG
STATION
OR
ATTEND-
ANT
TENANT
MONTH
DAY
HOUR
MINUTE
SECOND
1
3
6
9
10
12
18
20
22
24
26
CALLING
PARTY
INFORMATION
CALL START
TIME
ACCOUNT
CODE
CONDI-
TION
B
34
CALLING
PARTY
TENANT
CALL END
TIME CALLED
PARTY
INFORMATION
BYTE DATA
AUTHORI-
SPACE
YEAR
128
118
(20 Hex.)
YEAR
116
114
ZATION
CODE
104
SPACE
(20 Hex.)
TENANT
STATION
OR
ATTEND-
ANT
62
68
71
TENANT
SPACE
(20 Hex.)
SPACE
(20 Hex.)
SPACE
(20 Hex.)
Note
Note
Note
Note
Note
Note
Note: See Reference 2.
Note

NDA-24307 CHAPTER 6
Page 479
Issue 1
SYSTEM OPERATIONS
Reference 2
7.4 Details on Transmission Data
7.4.1 Calling Party Information/Called Party Information
•The 9th byte indicates the type of the calling (or called) party. The 10th through 17th bytes are data
pertaining to this calling (or called) party.
ORIG (Originating Source Identification):
0 = Calling (or called) Party is a station
1 = Calling (or called) Party is an Attendant
2 = Calling (or called) Party is an outside (inside) party
•The contents of 12th through 17th bytes vary with the type of the calling (or called) party.
(1) For a station (ORIG = 0): Data showing Station Number
(2) For an Attendant (ORIG = 1): Data showing Attendant Number
(3) For a trunk (ORIG = 2): Data showing Route Number and Trunk Number
4
0
0
1
SPACE
SPACE
12
13
14
15
16
17
1st DIGIT
2nd DIGIT
3rd DIGIT
4th DIGIT
5th DIGIT
6th DIGIT
EXAMPLEDATA
BYTE
1
0
SPACE
SPACE
SPACE
SPACE
12
13
14
15
16
17
1st DIGIT
2nd DIGIT
3rd DIGIT
4th DIGIT
5th DIGIT
6th DIGIT
EXAMPLEDATA
BYTE
TR No. = 50
12
13
14
15
16
17
Data
Byte
1st DIGIT
2nd DIGIT
3rd DIGIT
1st DIGIT
2nd DIGIT
3rd DIGIT
RT No. = 1
0
0
1
0
5
0
Example
Route
Number
Trunk
Number
CHAPTER 6 NDA-24307
Page 480
Issue 1
SYSTEM OPERATIONS
7.4.2 Call Start/Call End Time Information
•The data which indicates Call Start Time is as follows:
•The data which indicates Call End Time is as follows:
THIS INFORMATION SHOWS THAT THE CALL
BYTE
18
19
20
21
22
23
24
25
26
27
114
115
DATA
MONTH
(01-12)
DAY
(01-31)
HOUR
(00-23)
MINUTE
(00-59)
SECOND
(00-59)
YEAR
(00-99)
EXAMPLE
0
6
0
1
1
3
0
0
0
0
9
8
STARTED AT 1 O’CLOCK P.M. ON JUNE 1st,
1998
YEAR INFORMATION IS SENT OUT ONLY BY
THE LAST TWO DIGITS AS IN ‘98 FOR 1998.
THIS INFORMATION SHOWS THAT THE CALL
BYTE
28
29
30
31
32
33
34
35
36
37
116
117
DATA
MONTH
(01-12)
DAY
(01-31)
HOUR
(00-23)
MINUTE
(00-59)
SECOND
(00-59)
YEAR
(00-99)
EXAMPLE
1
0
2
0
0
9
1
0
3
0
9
8
ENDED AT 9 O’CLOCK 10 MIN. 30 SEC. A.M.
ON OCT. 20, 1998.
YEAR INFORMATION IS SENT OUT ONLY BY
THE LAST TWO DIGITS AS IN ‘98 FOR 1998.
NDA-24307 CHAPTER 6
Page 481
Issue 1
SYSTEM OPERATIONS
7.4.3 Called Number
•The data which indicates the Called Number is as follows:
9-0471-83-0351 HAS BEEN DIALED.
BYTE
60
61
62
63
64
65
66
67
68
69
71
70
90
91
EXAMPLE
0
4
7
1
8
3
0
3
5
1
SPACE
SPACE
SPACE
SPACE
DATA
1st DIGIT
2nd DIGIT
3rd DIGIT
4th DIGIT
5th DIGIT
12th DIGIT
30th DIGIT
32nd DIGIT
9: OG ACCESS CODE
CHAPTER 6 NDA-24307
Page 482
Issue 1
SYSTEM OPERATIONS
7.4.4 Account Code/Authorization Code
•The data which indicates the Account Code is as follows:
•The data which indicates the Authorization Code is as follows:
Note: An Account Code is a numerical code to be dialed (up to 10 digits) by a station user with the
capability to enter a cost accounting.
BYTE
38
39
40
41
42
46
47
ACCOUNT CODE: 1115 HAS BEEN DIALED.
EXAMPLE
1
1
1
5
SPACE
SPACE
SPACE
DATA
1st DIGIT
2nd DIGIT
3rd DIGIT
4th DIGIT
5th DIGIT
9th DIGIT
10th DIGIT
Note: An Authorization Code is a numerical code to be dialed (up to 10 digits) by station users which will
override the station’s class (RSC or SFC) for facilities access restriction.
BYTE
104
105
106
107
108
112
113
AUTHORIZATION CODE: 4001 HAS BEEN DIALED
EXAMPLE
4
0
0
1
SPACE
SPACE
SPACE
DATA
1st DIGIT
2nd DIGIT
3rd DIGIT
4th DIGIT
5th DIGIT
9th DIGIT
10th DIGIT
NDA-24307 CHAPTER 6
Page 483
Issue 1
SYSTEM OPERATIONS
7.4.5 Route Advance Information
When a call has been originated by route advancing, the following data is transmitted.
7.4.6 Condition B Information
The 51st through 53rd bytes are Condition B Information. The Condition B Information indicates the
following data:
BYTE
54
55
56
57
58
THE CALL ORIGINATES
EXAMPLE
0
0
3
0
3
0
59
ROUTE
NUMBER 1
ROUTE
NUMBER 2
VIA NO. 3 ROUTE BECAUSE
NO. 30 ROUTE IS BUSY.
DATA
1st DIGIT
2nd DIGIT
3rd DIGIT
1st DIGIT
2nd DIGIT
3rd DIGIT
ROUTE NUMBER 1: The route which was actually used.
ROUTE NUMBER 2: The route which should have been selected first.
OUTPUT NUMBER
DATA
C2
C1
C0
BYTE
51
52
53
0, 1 or SPACE
0–3 or SPACE
0–5 or SPACE
C2: 0 = Call is not transferred
1 = Call is transferred
C1: 0 = Normal Call
1 = Call originated by OG trunk queuing
2 = Call originated by dialing with Account Code
3 = Call originated by OG trunk queuing and dialing with Account Code
C0: 0 = Regular Call (Direct Dialing from a station)
1 = Regular Call (Call is made through an ATTCON/DESKCON)
2 = Call through route advance (Direct Dialing from a station)
3 = Call through route advance (Call is made through an ATTCON/DESKCON)
4 = Call through Least Cost Routing (Direct Dialing from a station)
5 = Call through Least Cost Routing (Call is made through an ATTCON/DESKCON)
CHAPTER 6 NDA-24307
Page 484
Issue 1
SYSTEM OPERATIONS
7.4.7 Call Metering Information
The value of call metering from the Central Office is transmitted via the data from the 92nd byte to
95th byte.
7.4.8 Office Code of Calling (Called) Party and Billing Process Office
The 96th byte through 99th byte indicates the Office Code of Calling (Called) Party terminated via
CCIS Line.
The 100th byte through 103rd byte indicates the Office Code of the office processing centralized
Billing for CCIS Network.
Note: Office Code includes the CCIS line access code.
BYTE
92
93
94
95
WHEN 5200 METERING PULSES
EXAMPLE
5
2
0
0
ARE RECEIVED FROM C.O.
DATA
1000
100
10
1
OFFICE CODE = 812
BYTE
96
97
98
99
100
101
102
103
DATA
1st DIGIT
2nd DIGIT
3rd DIGIT
4th DIGIT
1st DIGIT
2nd DIGIT
3rd DIGIT
4th DIGIT
EXAMPLE
8
1
2
SPACE
8
1
3
SPACE
OFFICE CODE = 813
OFFICE CODE OF
BILLING PROCESS
OFFICE
OFFICE CODE OF
CALLING (CALLED)
PARTY
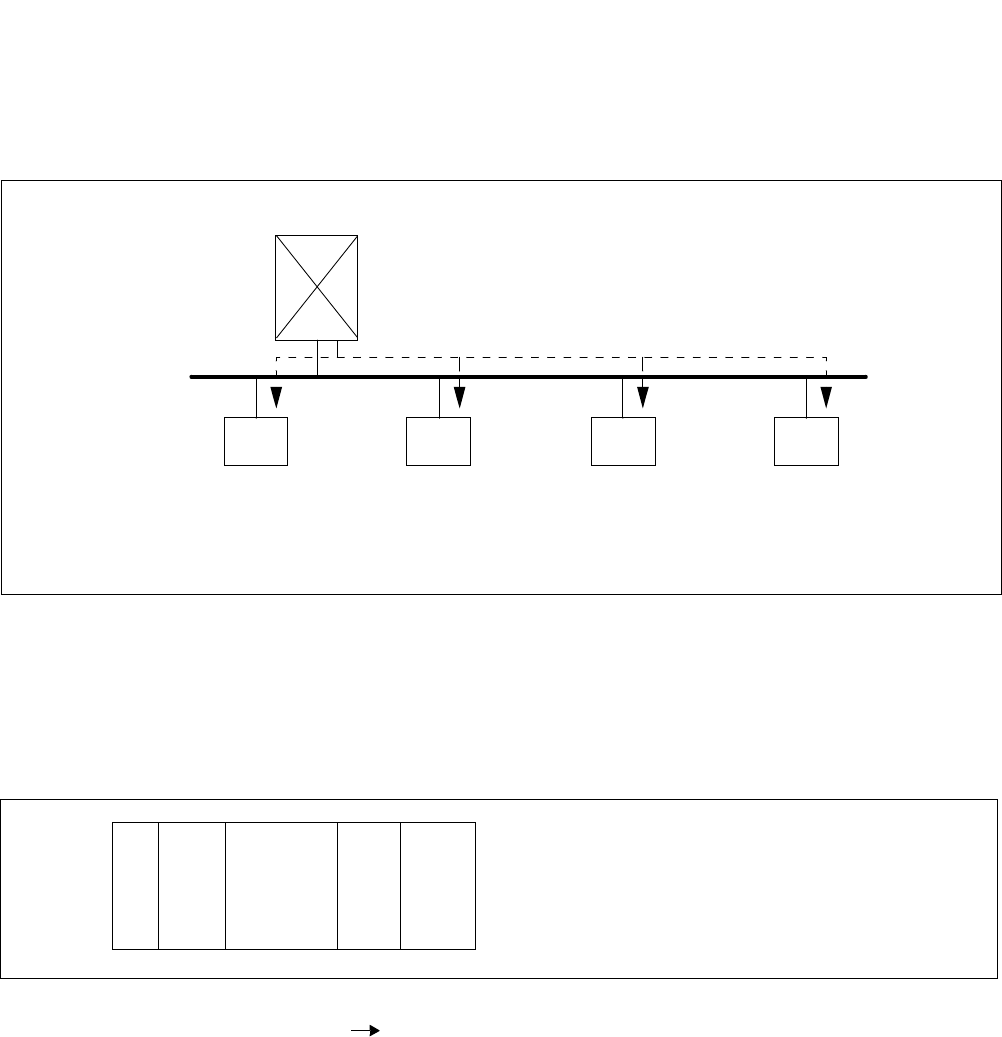
NDA-24307 CHAPTER 6
Page 485
Issue 1
SYSTEM OPERATIONS
7.4.9 Text Format of SMDR - TCP/IP Interface
When using SMDR - TCP/IP interface, billing information is output to the billing output devices
connected by an external LAN in the form of socket interface as shown in Figure 6-20.
Figure 6-20 SMDR—TCP/IP Interface Billing Output Devices
Details on the text format for SMDR - TCP/IP Interface are explained below.
(1) Identifier 1: Data Request Text
A text to be sent by the client when it requests the server to send billing data.
Text sending direction: Client Server
SMDR(A)
(Client)
SMDR(B)
(Client)
SMDR(C)
(Client)
SMDR(D)
(Client)
PBX(Server)
LAN
Billing Information
Note: A maximum of 4 clients can be designated as SMDR equipment for each LN.
Data length
(00002)
Text
identifier
(1)
S
Y
N
Parity
Device
No.
CHAPTER 6 NDA-24307
Page 486
Issue 1
SYSTEM OPERATIONS
(2) Identifier 2: Sending Data Text
A text for sending billing data in response to “(1) Data Request Text” from the client.
Text sending direction: Client Server
The number of billing data records is 64 or less.
(3) Identifier 3: Server Response Text
A text to be sent to the client when there is no billing data to send in response to “(1) Data Request Text”
or as a response to a “(5) Status Monitoring Text.”
Text sending direction: Client Server
(4) Identifier 4: Client Response Text
A response text to be sent to the server by the client which has received the data by a “(2) Sending Data
Text.”
Text sending direction: Client Server
Data length
(XXXXX)
Text
identifier
(2)
S
Y
N
Sequence
No.
Device
No. Billing data
(IPX Format) Parity
Note
Note: Text format of billing data is IPX format only. (Refer to Section 7.2.)
Data length
(00003)
Text
identifier
(3)
S
Y
N
Parity
Device
No. Response
No.
Data length
(00002)
Text
identifier
(4)
S
Y
N
Parity
Device
No. Response
No. ACK/
NAK
NDA-24307 CHAPTER 6
Page 487
Issue 1
SYSTEM OPERATIONS
(5) Identifier 5: Status Monitoring Text
A text for use in monitoring the server status from the client’s viewpoint or the client from the server’s
viewpoint. At the same time, the text is used to notify the server of the client status.
Text sending direction: Client Server
(6) Identifier 6: Connection Disconnect Text
A text to be sent from the client to the server to disconnect the connection. In response to this text, the
server promptly performs processing to disconnect the connection.
Text sending direction: Client Server
Data length
(00005)
Text
identifier
(5)
S
Y
N
Parity
Device
No.
Client
device
information ACK/
NAK
Data length
(00003)
Text
identifier
(6)
S
Y
N
Parity
Device
No. ACK/
NAK

CHAPTER 6 NDA-24307
Page 488
Issue 1
SYSTEM OPERATIONS
8. TRAFFIC MANAGEMENT
To obtain the value of common equipment usage, the system provides traffic measurement feature. It can
improve the system efficiency.
8.1 The Kind of Traffic Measurement
Table 6-5 shows the kinds of traffic measurements.
Table 6-5 Traffic Measurement Type s
TYPE KIND OF
MEASUREMENT DESCRIPTION
1* Terminal Traffic
Measurement Measurement of traffic on a per LENS basis, and measurement of the total traffic on
a PIM basis.
2* Route Traffic
Measurement Measurement of traffic on a per route basis.
3* Station Peg Count Measurement of the number of outgoing connections, intra-office calls, outgoing
C.O. line calls, Tie Line calls, etc. originated by each station.
4* ATTCON Peg Count Measurement of the number of each type of call handled at the ATTCON/
DESKCON.
5* Route Peg Count Measurement of the number of various types of call connections on a per route basis.
6 Service Peg Count Measurement of the number of times the following services are operated:
Call Hold
Call Back
Executive Right of Way
Call Waiting
Call Pickup - Group
Call Pickup - Direct
Call Forwarding - All Calls
Call Forwarding - Busy Line
Call Forwarding - Don’t Answer
Speed Calling - System
Speed Calling - Station
Off-Hook Outgoing Trunk Queuing
Outgoing Trunk Queuing
Consultation Hold - All Call
Call Transfer - All Calls
Three-Way Calling
8 UCD Route Peg Count Measurement of the number of incoming calls, answered calls, and abandoned calls
handled at UCD Groups on a per route basis.
9 UCD Group Peg Count Measurement of the number of incoming calls, answered calls and abandoned calls
on a UCD Group basis.
10 UCD Station Peg Count Measurement of the number of incoming calls, answered calls and abandoned calls
for each station on a UCD Group basis.

NDA-24307 CHAPTER 6
Page 489
Issue 1
SYSTEM OPERATIONS
Note: Asterisk(*) identifies the traffic measurements that can be saved on the HD of the MAT.
15 ATT Answer Peg Count Measurement of the number of answered calls handled by each attendant.
18 Connection Route Peg
Count Measurement of the number of various type of call connection on a connection route
basis.
19 Connection Route Traffic Measurement of traffic on a connection route basis.
Table 6-5 Traffic Measurement Types (Continued)
TYPE KIND OF
MEASUREMENT DESCRIPTION
CHAPTER 6 NDA-24307
Page 490
Issue 1
SYSTEM OPERATIONS
8.2 Operating Procedure
8.2.1 Procedure for Set-up and Start
The procedure to set up and start the traffic measurement is as follows:
(1) By using the ASYD/ASYDN command, assign the necessary system data as follows:
START
When performing traffic measurement on a node basis:
•SYS1, INDEX8 (Number of Tenants)
•SYS1, INDEX9 (Number of Attendant Consoles)
•SYS1, INDEX47, bit 0 (Unit of Traffic Measurement): 0/1 = CCS/Erlang
•SYS1, INDEX47, bit 7 (Traffic Measurement Service): 0/1 = Out/In Service Assign “1.”
When performing traffic measurement on a network basis (via TCP/IP):
•SYS1, INDEX8 (Number of Tenants)
•SYS1, INDEX9 (Number of Attendant Consoles)
•SYS1, INDEX47, bit 0 (Unit of Traffic Measurement): 0/1 = CCS/Erlang
•SYS1, INDEX47, bit 7 (Traffic Measurement Service): 0/1 = Out/In Service Assign “1.”
END
(2) By using the ATRF/ATRFN command, assign the traffic measurement programs as follows:
START
When performing traffic measurement on a node basis:
•Assign traffic measurement “TYPE” (Note 1), “PORT” number to be used, and the output
“INTERVAL” and “Time (HOUR/MINUTE),” etc. For more details, see the ATRF command in
CHAPTER 8.
When performing traffic measurement on a network basis (via TCP/IP):
•Assign traffic measurement “TYPE” (Note 1), “PORT” number to be used, and the output
“INTERVAL” and “Time (HOUR/MINUTE),” etc. For more details, see the ATRFN command
in CHAPTER 8.
END
Note 1: You can select one measurement “TYPE” at a time. If you need two or more measurement “TYPE,”
repeat the same steps, following the entry of this command.
(3) Terminate all the MAT commands.
An image of IPX “MAT Menu” is shown in Figure 6-21. Terminate all MAT commands, and make sure
no commands are currently running via the “Processes” button.
(4) Set the programmed Traffic Measurement in routine operation.
Click the “Scan New Alarms/Traffic” and “Collect New Alarms” buttons on the IPX “MAT Menu”
(confirm the clicked buttons remain in the pressed state). Then, the Traffic Measurement is activated as
programmed.
ASYD
ATRFN
ATRF
ASYDN
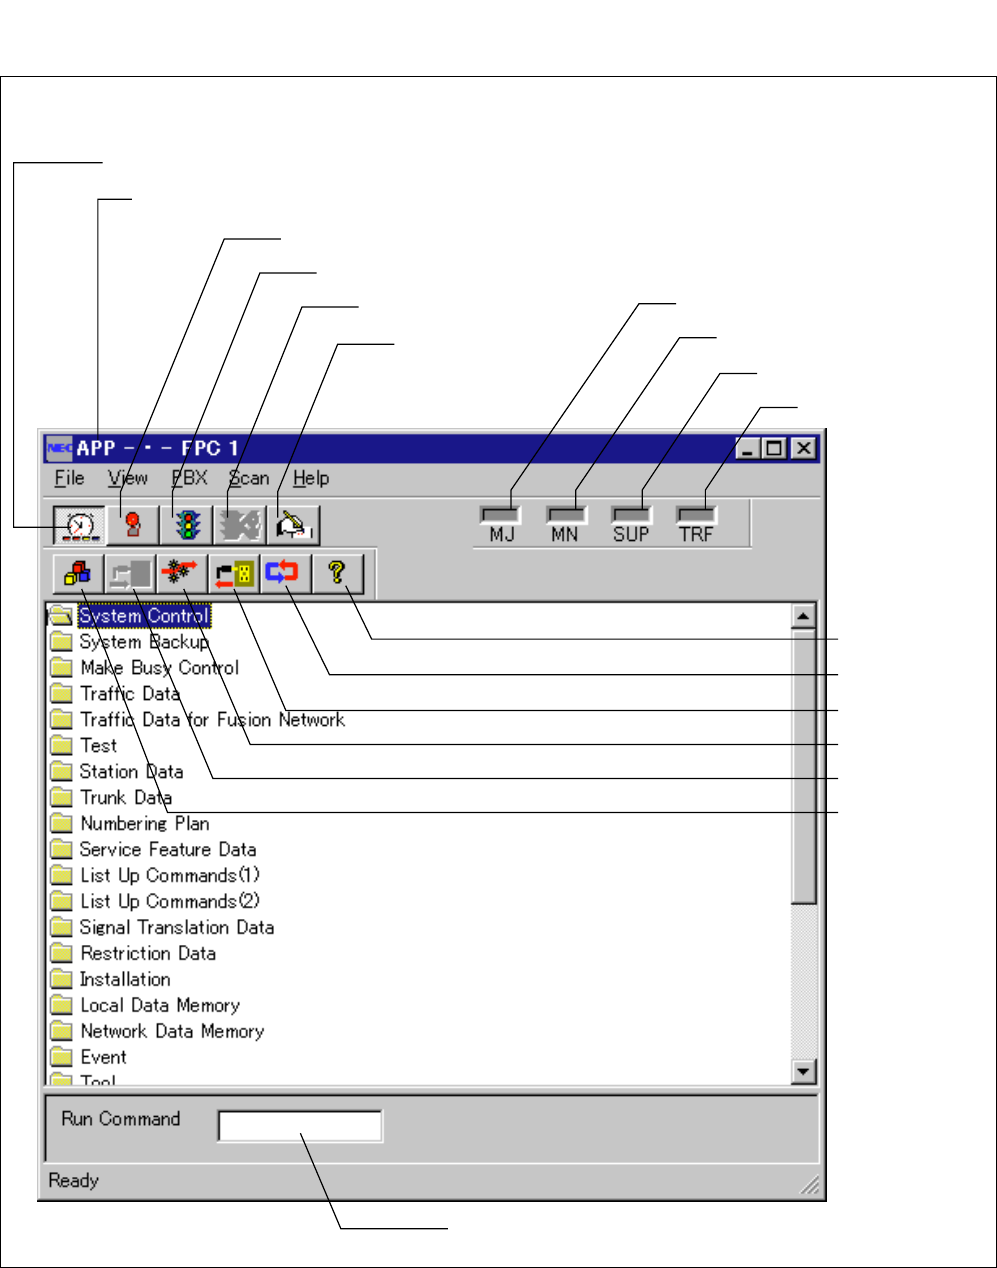
NDA-24307 CHAPTER 6
Page 491
Issue 1
SYSTEM OPERATIONS
Figure 6-21 IPX “MAT Menu” Display Image (Example)
Office Name (assigned by ASYD/AOFC command)
Scan New Alarms/Traffic
Collect New Alarms
Collect New Traffic
Abort Data Collection
View Scanning Log
About
Log Manager
Log out
Configure
Log in
Processes
Major Alarm Indicator
Minor Alarm Indicator
Supervisory Message Indicator
Traffic Data Indicator
Command Name Input Text Box
This Figure shows the IPX “MAT Menu” display image. The display should look similar to the following:

CHAPTER 6 NDA-24307
Page 492
Issue 1
SYSTEM OPERATIONS
8.2.2 Data Output - Details on DTFD/DTFDN Command
To obtain the collected Traffic data, you can use the “DTFxxx” or “DTFxxxN” command as shown below. The
commands can be activated by your direct log-in operation onto the MAT, but in normal cases, the commands
are to be activated automatically at predetermined intervals assigned by the ATRF/ATRFN command.
Also, each command below corresponds to the Traffic Measurement “TYPE” assigned by the ATRF/ATRFN
command.
When performing traffic measurement on a node basis:
When performing traffic measurement on a node network basis :
Note: For information on the command display images, see Figure 6-22, Figure 6-23, and Figure 6-24.
Measurement “TYPE”
(by ATRF Command) Command
Name Full Command Name
1 Terminal Traffic DTF101 Display of Terminal Traffic Data
2 Route Traffic DTF102 Display of Route Traffic Data
3 Station Peg Count DTF103 Display of Station Peg Count Data
4 ATTCON Peg Count DTF104 Display of Attendant Peg Count Data
5 Route Peg Count DTF105 Display of Route Peg Count Data
6 Service Peg Count DTF201 Display of Service Peg Count Data
8 UCD Route Peg Count DTF301 Display of UCD Route Peg Count Data
9 UCD Group Peg Count DTF302 Display of UCD Group Peg Count Data
10 UCD Station Peg Count DTF303 Display of UCD Station Peg Count Data
15 ATT Answer Peg Count DTF501 Display of Attendant Answering Peg Count Data
18 Connection Route Peg Count DTF601 Display of Connection Route Peg Count Data
19 Connection Route Traffic DTF602 Display of Connection Route Traffic Data
Measurement “TYPE”
(by ATRFN Command) Command
Name Full Command Name
1 Terminal Traffic DTF101N Display of Terminal Traffic Data for Fusion Network
2 Route Traffic DTF102N Display of Route Traffic Data for Fusion Network
3 Station Peg Count DTF103N Display of Station Peg Count Data for Fusion Network
4 ATTCON Peg Count DTF104N Display of Attendant Peg Count Data for Fusion Network
5 Route Peg Count DTF105N Display of Route Peg Count Data for Fusion Network
6 Service Peg Count DTF201N Display of Service Peg Count Data for Fusion Network
8 UCD Route Peg Count DTF301N Display of UCD Route Peg Count Data for Fusion Network
9 UCD Group Peg Count DTF302N Display of UCD Group Peg Count Data for Fusion Network
10 UCD Station Peg Count DTF303N Display of UCD Station Peg Count Data for Fusion Network
15 ATT Answer Peg Count DTF501N Display of Attendant Answering Peg Count Data for Fusion Network
18 Connection Route Peg Count DTF601N Display of Connection Route Peg Count Data for Fusion Network
19 Connection Route Traffic DTF602N Display of Connection Route Traffic Data for Fusion Network
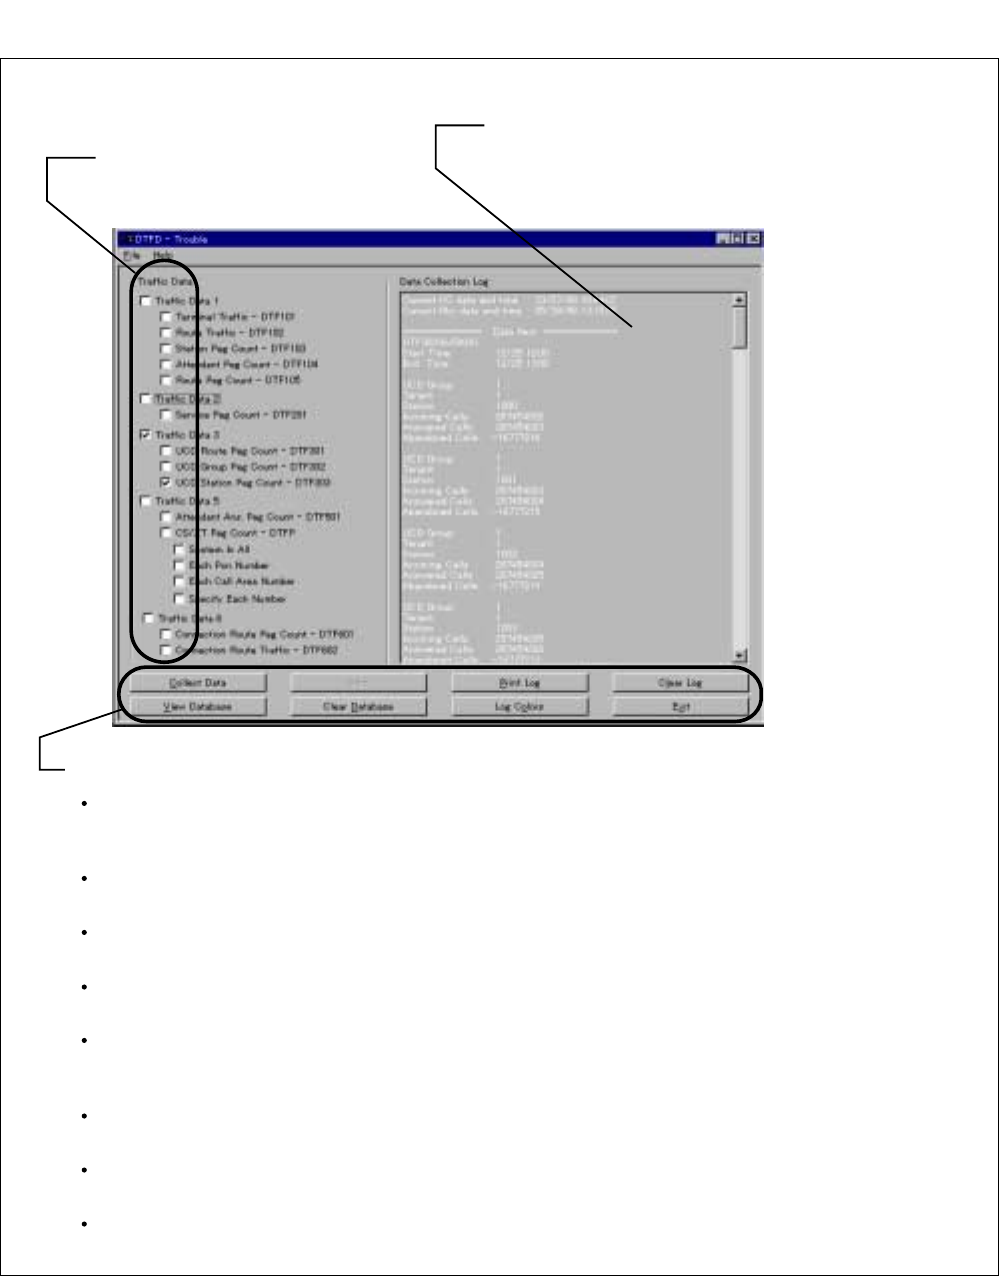
NDA-24307 CHAPTER 6
Page 493
Issue 1
SYSTEM OPERATIONS
Figure 6-22 DTFD Command Display Image (Example)
Traffic Data
Check box to specify the “Traffic Data” TYPE.
Data Collecting Log
This area displays the current Traffic
Measurement data, based on the selected
“Traffic Data” TYPE.
Collect Data
Used to collect the Traffic report with regard to the selected “Traffic Data” TYPE. The result text is shown
in the “Data Collection Log” display area.
Stop
Used to quit the currently performed Traffic Data collection.
Print Log
Used to print out the text data now displayed in the “Data Collection Log” area.
Clear Log
Used to delete (clear) the text data now in the display of the “Data Collection Log” area.
View Database
Used to view the whole data (based on the selected data “Traffic Data” TYPE), so far stored in the database.
More details are shown in Figure 6-11-3.
Clear Database
Used to delete (clear) the whole data (based on the selected “Traffic Data” TYPE), so far stored in the database.
Log Colors
Used to designate/change the text font color of the “Data Collection Log” display area.
Exit
Used to exit this command. (Note that the database contents are not cleared by pressing this button.)
This Figure shows the DTFD command display image (example). The DTFD/DTFDN command should look similar to this.
Tool Buttons
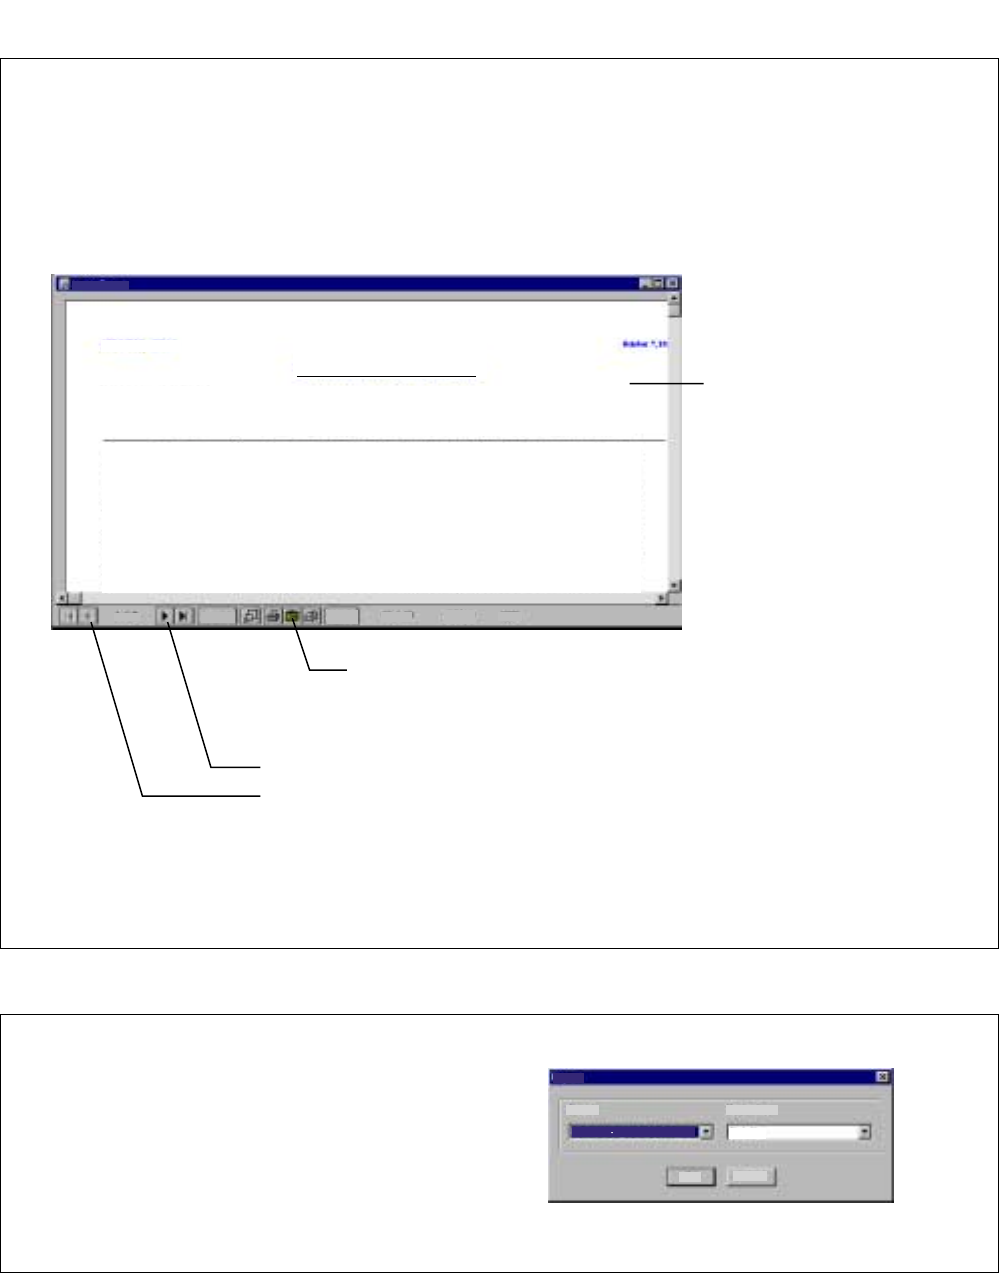
CHAPTER 6 NDA-24307
Page 494
Issue 1
SYSTEM OPERATIONS
Figure 6-23 “Listup Report” Window when “View Database” Is Selected (Example)
Figure 6-24 “Export” Dialog for Traffic Report Text File Saving
This Figure shows a sample image of the “Listup Report” window for the DTFD/DTFDN command. This window appears
by taking the following operations, and is used to obtain a sequence of Traffic data, so far collected and stored in the data-
base. The window is also used to save the Traffic data text (now displayed in the window) onto your desired PC directory.
- To activate this window:
1. Designate a specific “Traffic Data” TYPE out of the DTFD/DTFDN command check boxes (see Figure 6-11-2).
2. Press the “View Database” button on the left-bottom part of the DTFD/DTFDN command (see Figure 6-11-2).
Note
Note: When thiswindow is activated, the initial text to appear is the newest file data, out of a sequence of Traffic reports.
Like this, the newest text (in the database) appears on the first page, and the next new, the next page.
CloseCancel
[ TROUBLE :: DTFA ]
Start Time: 12/25 12:00
End Time: 12/25 13:00
Module Group Unit Group Type Level 0 Level 1 Level 2 Level 3 Level 4 Level 5 Level 6 Level 7
0 0 0 CCS 09252.000 09215.859 09179.718 09143.576 09107.435 09071.294 09035.153 08999.012
0 0 1 CCS 09252.000 09215.859 09179.718 09143.576 09107.435 09071.294 09035.153 08999.012
0 0 2 CCS 09252.000 09215.859 09179.718 09143.576 09107.435 09071.294 09035.153 08999.012
0 0 3 CCS 09252.000 09215.859 09179.718 09143.576 09107.435 09071.294 09035.153 08999.012
0 0 4 CCS 09252.000 09215.859 09179.718 09143.576 09107.435 09071.294 09035.153 08999.012
0 0 5 CCS 09252.000 09215.859 09179.718 09143.576 09107.435 09071.294 09035.153 08999.012
0 0 6 CCS 09252.000 09215.859 09179.718 09143.576 09107.435 09071.294 09035.153 08999.012
0 0 7 CCS 09252.000 09215.859 09179.718 09143.576 09107.435 09071.294 09035.153 08999.012
0 0 8 CCS 09252.000 09215.859 09179.718 09143.576 09107.435 09071.294 09035.153 08999.012
0 0 9 CCS 09252.000 09215.859 09179.718 09143.576 09107.435 09071.294 09035.153 08999.012
0 0 10 CCS 09252.000 09215.859 09179.718 09143.576 09107.435 09071.294 09035.153 08999.012
0 0 11 CCS 09252.000 09215.859 09179.718 09143.576 09107.435 09071.294 09035.153 08999.012
0 0 12 CCS 09252.000 09215.859 09179.718 09143.576 09107.435 09071.294 09035.153 08999.012
0 0 13 CCS 09252.000 09215.859 09179.718 09143.576 09107.435 09071.294 09035.153 08999.012
0 0 14 CCS 09252.000 09215.859 09179.718 09143.576 09107.435 09071.294 09035.153 08999.012
* Terminal Traffic Data (DTF101) *
ABCDE
Listup Report
1 / 2 69 of 69 Total: 69 100%
Save Text File
When saving the currently displayed text page, press this button.
Then, a dialog box, as shown in Figure 6-11-4, appears.
Page (UP)
Page (DOWN)
Any Traffic data, now in the database, can easily be found via these buttons. Select “UP”
or “DOWN”, according to the text display pattern: “the newest the first, the oldest the last.”
Display Area
This area displays the details on
the Traffic report, specified by
the “Page (UP)/Page (DOWN)”
buttons.
Shown here is an example of a
certain first page of “Terminal
Traffic Data (DTF101)”.
The dialog box, as shown below, appears, if the “Save Text File” button is selected on the “Listup Report” window
(see Figure 6-11-3 above). If the file is to be saved:
1. Select “Character-separated values” on the “Format”
list box.
2. Select “Disk file” on the “Destination” list box.
3. Click OK.
After these steps, a new dialog, asking the saved file name and directory, also appears. Then, complete the data saving by
filling out these necessary items.
Format: Destination:
OK Cancel
Disk file
Character separated values
Export

NDA-24307 CHAPTER 6
Page 495
Issue 1
SYSTEM OPERATIONS
8.2.3 Service Conditions (when performing Traffic Measurement via TCP/IP)
(a) The NDM (network-level) data for the traffic measurement order is replaced/updated, at each time
the system is initialized or data change is requested from the ATRFN command.
(b) When the network-level data is once assigned via the ATRFN command, the node-level data for
ATRF command cannot be changed or modified.
(c) When the network-level data is once assigned via the ATRFN command, the already assigned data
by the ATRF command is not cleared, but becomes ineffective.
(d) When a data transfer error occurs, the following are performed in order:
Traffic measurement is suspended momentarily and system message is displayed (notification
of fault)
Traffic measurement, concerning all the remaining data except for the fault-involved one, is re-
sumed
Retry is made repeatedly for the transfer of fault-involved data, until the fault has been eradi-
cated
If the fault hasn’t been eradicated still until the time of next measurement routine, the data is
finally discarded, and next traffic measurement routine starts
(e) When the same Individual ATT Numbers exist on the network, the traffic measurement concerning
the ATTCON/DESKCON cannot be performed correctly.

CHAPTER 6 NDA-24307
Page 496
Issue 1
SYSTEM OPERATIONS
9. OFFICE DATA MANAGEMENT
This section explains how to manage various kinds of data such as Call Forwarding Data, Individual Speed
Calling Data, and Office Data, etc.
9.1 Office Data Stored Locations
The office data is stored in the Memory (MEM) and on the Hard Disk (HD). While the system is in ser-
vice, it operates by the office data stored in the memory. Should the contents of the office data be destroyed
due to trouble, the system restarts its operations by loading the office data from the hard disk into the
memory. The office data of the system in operation is being backed up by the hard disk.
9.2 Office Data Preservation
Since the PBX keeps operating by the assigned office data, be sure to preserve the latest office data. If the
office data is not preserved, all office data must be reassigned if the contents of the data memory have been
destroyed, because of trouble occurrence, etc. The system will remain in a system down state until reas-
signment of the office data is complete.
Practice to verify and confirm the valid office data by routine maintenance is considered an effective
means to prevent loss of the office data and occurrence of trouble due to the office data. For this reason,
be sure to keep the following items near the system at all times so that they may be available when needed.
(1) Office Data Programming Sheets
As the most up-to-date data must be recorded in the sheets, be sure to make entries by pencil.
(2) Floppy Disks for Data Saving
To back up the office data stored on the HD, use floppy disks. The necessary number of Floppy Disks (FD)
is determined by the following factors:
•Mounting capacity of office data depends upon the system data (ASYD-SYS1, Index30, ASYDL-
SYS1, Index 513, 514).
•Each floppy disk can save 1MB of data. After a large-scale office data change, in particular which
includes system data, unpredictable failures might occur. To deal with such failures, prepare an FD
for saving the office data before the changing. In addition, prepare an FD for saving the latest office
data.
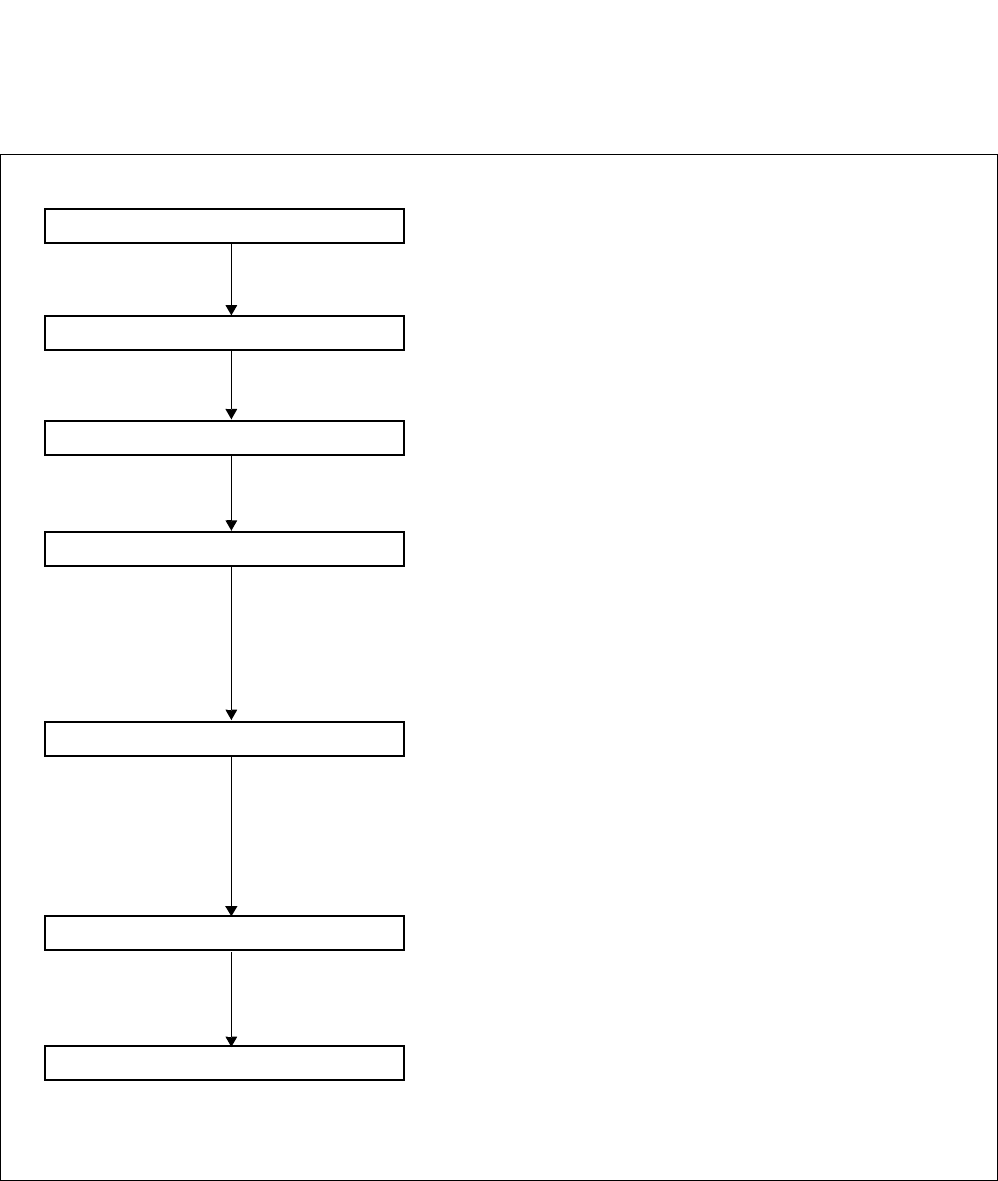
NDA-24307 CHAPTER 6
Page 497
Issue 1
SYSTEM OPERATIONS
9.3 Office Data Management Procedure
The procedure generally taken when changing the office data is shown below.
Figure 6-25 Office Data Change Procedure
HDD_FDD command
System Select : HFD0/HFD1
Direction Select : Verify HDD against MAT
Data Type Select : Data Memory, etc.
MEM_HDD command
Direction Select : Verify HDD against MEM
Data Type Select : Data Memory, etc.
MEM_HDD_N command
Direction Select : Verify HDD against MEM
Data Type Select : Data Memory, etc.
Entry Into Office Data Programming Sheets
MEM_HDD command
Direction Select : Memory to Hard Disk
Data Type Select : Data Memory, etc.
MEM_HDD_N command
Direction Select : Memory to Hard Disk
Data Type Select : Data Memory, etc.
Entry Into Office Data Programming Sheets
Entry Into Office Data Programming Sheets
HDD_FDD command
System Select : HFD0/HFD1
Direction Select : Hard Disk to Floppy Disk
Data Type Select : Data Memory, etc.
CREATION OF DATA CHANGE PLAN
DATA CHANGING
DATA SAVE FROM HDD INTO FD
DATA VERIFICATION
DATA VERIFICATION
DATA SAVE FROM MEM INTO HDD
LISTING OFFICE DATA
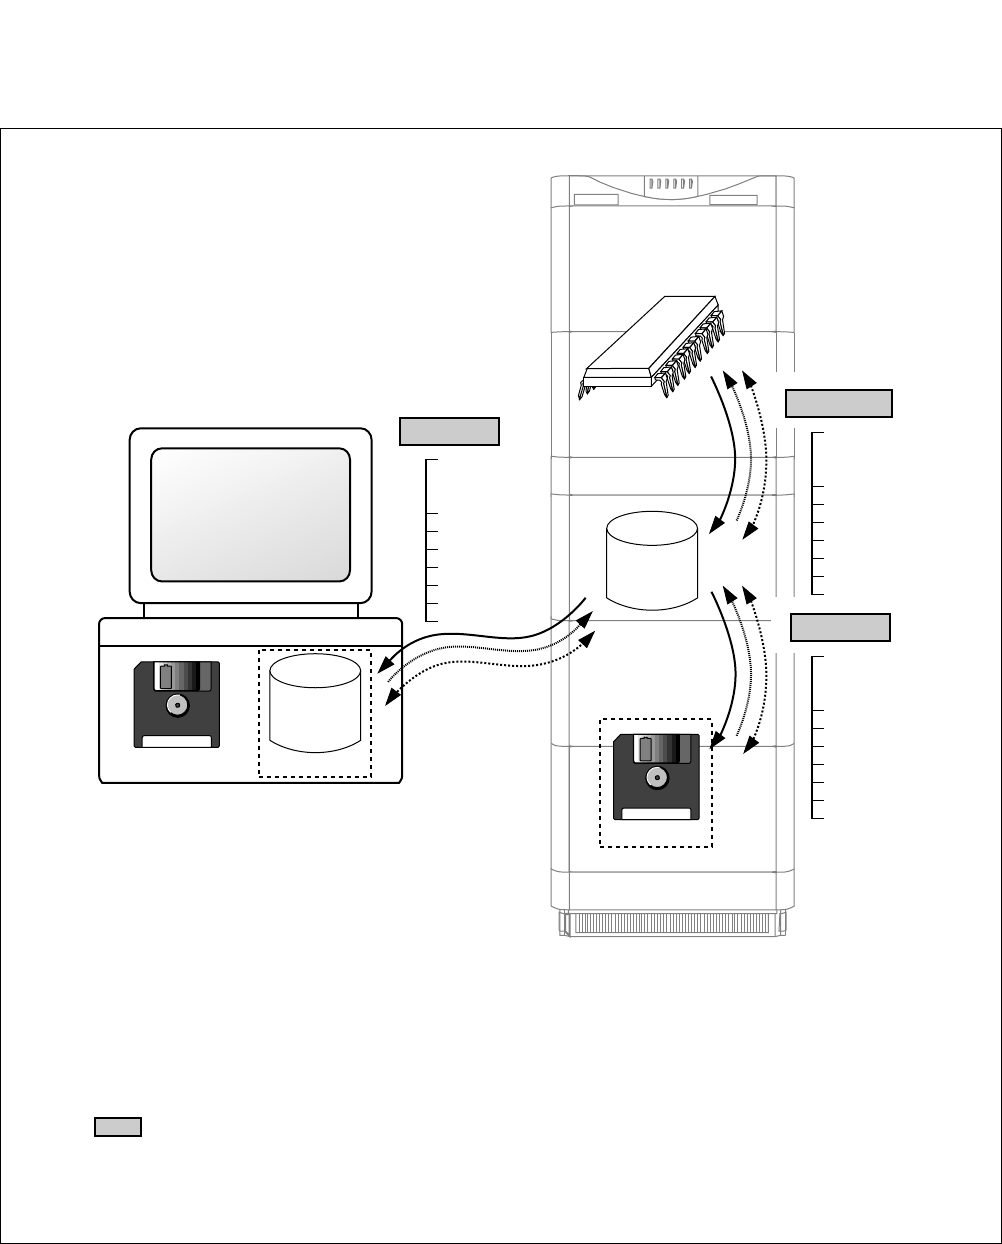
CHAPTER 6 NDA-24307
Page 498
Issue 1
SYSTEM OPERATIONS
Figure 6-26 shows the function of three backup commands: HDD to FDD, HDD to MAT, and MEM to
HDD. These commands are available when logging in to each Local Node.
Figure 6-26 Node-Level Commands for Data Management
NEC
NEAX 2400 IMS
MAT
HDD
HDD
FD
FD
FDD
FDD
HDD_MAT
MEM
IMG0 (LN0/1/2/3)
HDD_FDD
MEM_HDD
DM: Data Memory
NDM: Network Data Memory
LDM: Local Data Memory
ND: Name Display Data
RCF: Wireless Call Forwarding Data
CF: Call Forwarding Data
SPD: Speed Calling-System Data
USK: User Assign Soft Key Data
NS: Number Sharing Data Note
CBK: Call Block Data (for Release 5 or later)
: Command
DM
NDM
LDM
ND
RCF
CF
SPD
USK
NS
CBK
DM
NDM
LDM
ND
RCF
CF
SPD
USK
NS
CBK
DM
NDM
LDM
ND
RCF
CF
SPD
USK
NS
CBK
Note: The Number Sharing data load/back-up also affects the data load/back-up of Dual Station
Calling Over-FCCS.
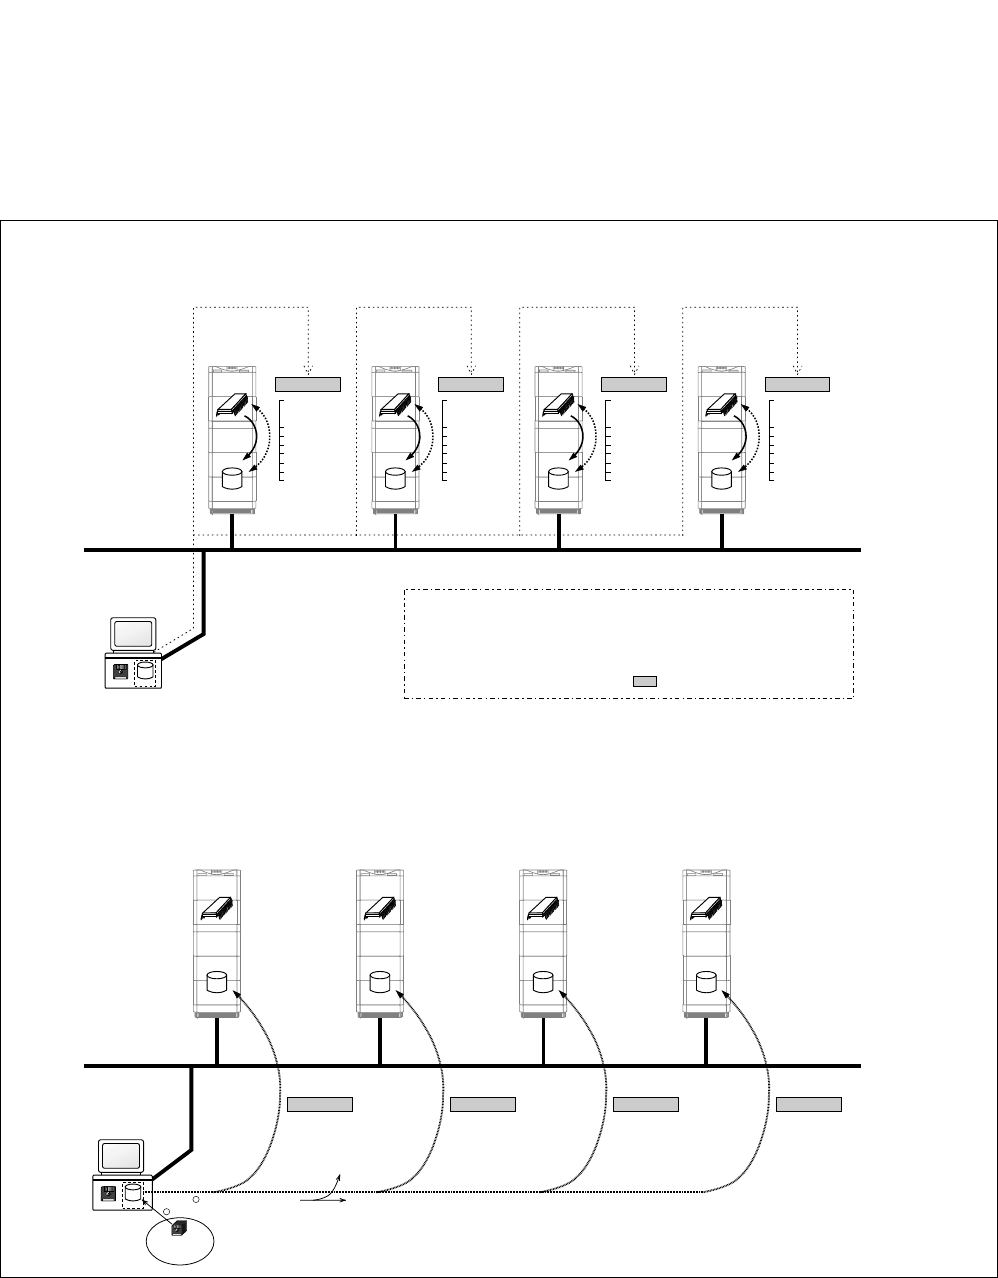
NDA-24307 CHAPTER 6
Page 499
Issue 1
SYSTEM OPERATIONS
In addition to the three backup commands on the previous page, the IPX-U system also can use
“MEM_HDD_N” and “HDD_MAT_N” commands, which are available at the NCN (Network Control
Node) only. Figure 6-27 shows the function of these network-level data management commands.
Note: Service conditions for these commands are shown on the next page.
Figure 6-27 Network-level Commands for Data Management
NEC
NEAX 2400 IMS
HDD
MEM
IMG0
(LN0)
DM
NDM
LDM
ND
RCF
CF
SPD
USK
NS
CBK
DM
NDM
LDM
ND
RCF
CF
SPD
USK
NS
CBK
DM
NDM
LDM
ND
RCF
CF
SPD
USK
NS
CBK
DM
NDM
LDM
ND
RCF
CF
SPD
USK
NS
CBK
MEM_HDD_N
NEC
NEAX 2400 IMS
NEAX 2400 IMS
HDD
MEM
IMG0
(LN1)
MEM_HDD_N
NEC
NEAX 2400 IMS
HDD
MEM
IMG0
(LN2)
MEM_HDD_N
NEC
NEAX 2400 IMS
HDD
MEM
IMG0
(LN3)
MEM_HDD_N
Centralized MAT
(at NCN only)
HDD
FD
FDD
NEC
NEAX 2400 IMS
HDD
MEM
IMG0
(LN0)
HDD_MAT_N HDD_MAT_N HDD_MAT_N HDD_MAT_N
NEC
NEAX 2400 IMS
HDD
MEM
IMG0
(LN1)
NEC
NEAX 2400 IMS
NEAX 2400 IMS
HDD
MEM
IMG0
(LN2)
NEC
NEC
NEAX 2400 IMS
HDD
MEM
IMG0
(LN3)
Centralized MAT
(at NCN only)
HDD
FD
FDD
Control Signal from the MAT Control Signal from the MAT Control Signal from the MAT Control Signal from the MAT
Ether
Ether
< MEM_HDD_N >
This command is used to save/verify a series of Office Data from the Memory of all Local Nodes to the HDD of the same nodes.
< HDD_MAT_N >
This command is used to install (overwrite) the updated Program data, which has been already saved on the HDD of the
centralized MAT, onto the HDD of all Local Nodes.
DM
NDM
LDM
ND
CF
SPD
: Data Memory
: Network Data Memory
: Local Data Memory
: Number Display Data
: Call Forwarding Data
: Speed Calling-System Data
RCF
USK
NS
CBK
: Wireless Call Forwarding Data
: User Assign Soft Key Data
: Number Sharing Data Note
: Call Block Data
(for Release 5 or later)
: Command
Updated
Program Data
Data Install
Data Load (overwriting)
1
2
The Number Sharing data load/back-up also affects the data load/back-up of Dual Station Calling Over-FCCS
(for Release 5 or later).
Note:

CHAPTER 6 NDA-24307
Page 500
Issue 1
SYSTEM OPERATIONS
Service Conditions for MEM_HDD_N Command
This feature is made available by broadcasting the same back-up request signal toward all the nodes. If a failure
occurs in any of the process, the MEM<=>HDD back-ups on a network level cannot be executed any more.
(Retry of signal broadcasting is not made.)
Service Conditions for HDD_MAT_N Command
When an error occurs in the process of data transfer, the updated program data is no more installed onto the
HDD of the node(s) which is/are involved in the fault.
9.4 Call Forwarding Data/Individual Speed Calling Data Management
Call Forwarding Data and Individual Speed Calling Data are changed at any time because these services
are set/cancelled from the station involved. In the PBX, these data are backed up by FD.
Call Forwarding Data: HDD_MAT command
Individual Speed Calling Data: HDD_MAT command
9.5 One-Touch Speed Call Memory Data Management
One-Touch Speed Call Memory data of Dterm is destroyed when ELC circuit card has been replaced with
a spare or its mounting slot has been changed. The data can be backed up onto FD before replacement or
mounting slot change of ELC card.
Backup: BOSD command
9.6 Commands for Data Management
COMMAND COMMAND FULL NAME
BOSD Back Up One-Touch Speed Call Memory Data
HDD_FDD Data Control between HDD and FDD
HDD_MAT Data Control between HDD and MAT
HDD_MAT_N Data Control between HDD and MAT for NDM
MEM_HDD Data Control between Memory and HDD
MEM_HDD_N Data Control between Memory and HDD for NDM
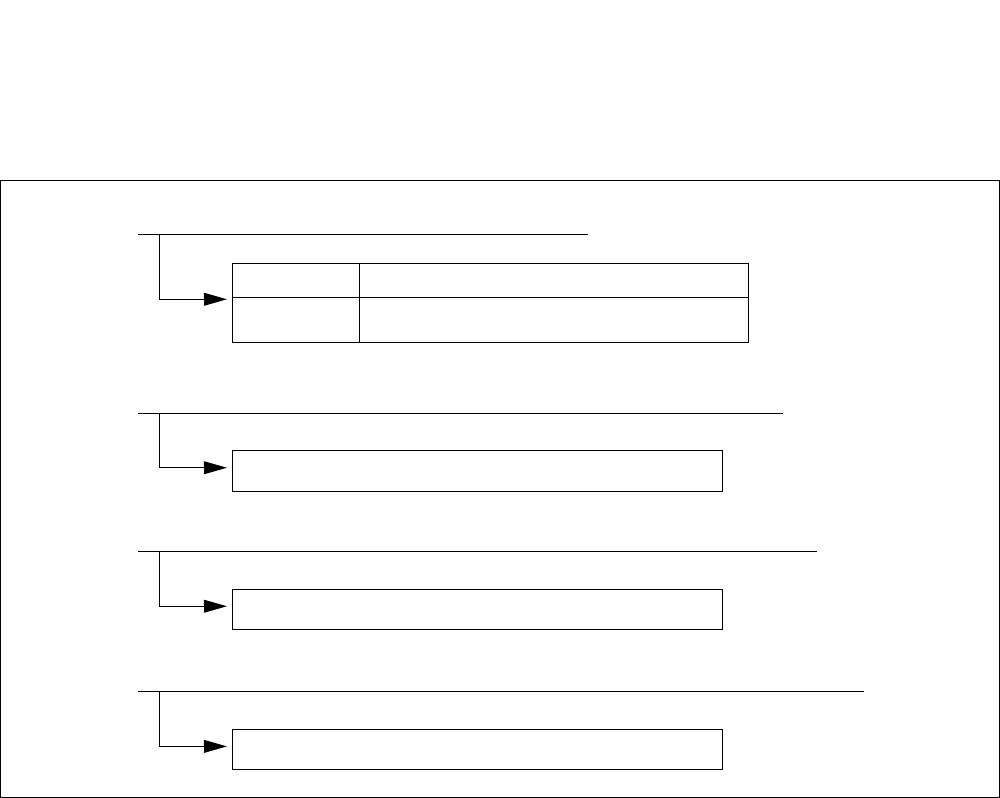
NDA-24307 CHAPTER 6
Page 501
Issue 1
SYSTEM OPERATIONS
10. TEST OPERATIONS OF VARIOUS KINDS
This section explains the methods of test operations (shown in Figure 6-28) to be performed in case a fault
recovery occurs.
Figure 6-28 Test Operation Method Examples
COMMAND COMMAND FULL NAME
DCON Display of Connection Status
Display of connection status of designated station/trunk
Test connection by designating trunks, tones, and ringback tone from test station
10.1 Designated Connection Test (Station)
Test connection by designating trunks (outgoing only) from ATTCON/DESKCON
10.2 Designated Connection Test (ATTCON/DESKCON)
Display of line failure indication when faulty condition occurred while a call is in progress
10.3 Bad Call Notification

CHAPTER 6 NDA-24307
Page 502
Issue 1
SYSTEM OPERATIONS
10.1 Designated Connection Test (Station)
(1) General
The purpose of this test is to confirm the operations related to a trunk or tone that is designated from the
test station. Refer to Table 6-6. The test result displays on the MAT screen as system message [6-I].
(2) Precaution
Designated connection to a trunk—A designated connection to trunk is limited only to an individual line
of either 2nd DT system or sender system.
Table 6-6 Designated Connection Test (Station) Operations
ITEM TEST ITEM CONTENT OF CONFIRMATION REMARKS
1 Register (ORT/IRT) Whether the dialed numbers (1, 2, 3, 4, 5, 6, 7, 8, 9, 0, *, #) can be
received correctly is to be confirmed.
2 Sender Whether the numbers (1, 2, 3, 4, 5, 6, 7, 8, 9, 0, *, #) can all be sent out
is to be confirmed.
3 3-Party Conference
Trunk By connecting the test tone to each port of a 3-Party Conference Trunk,
whether the test tone can be heard is to be confirmed.
4 Tone Various kinds of tone are to be confirmed.
5 Interrupted Ringing
(IR) Interrupt ringing (IR) is to be confirmed.
6 Trunk Connections of trunks are to be confirmed.
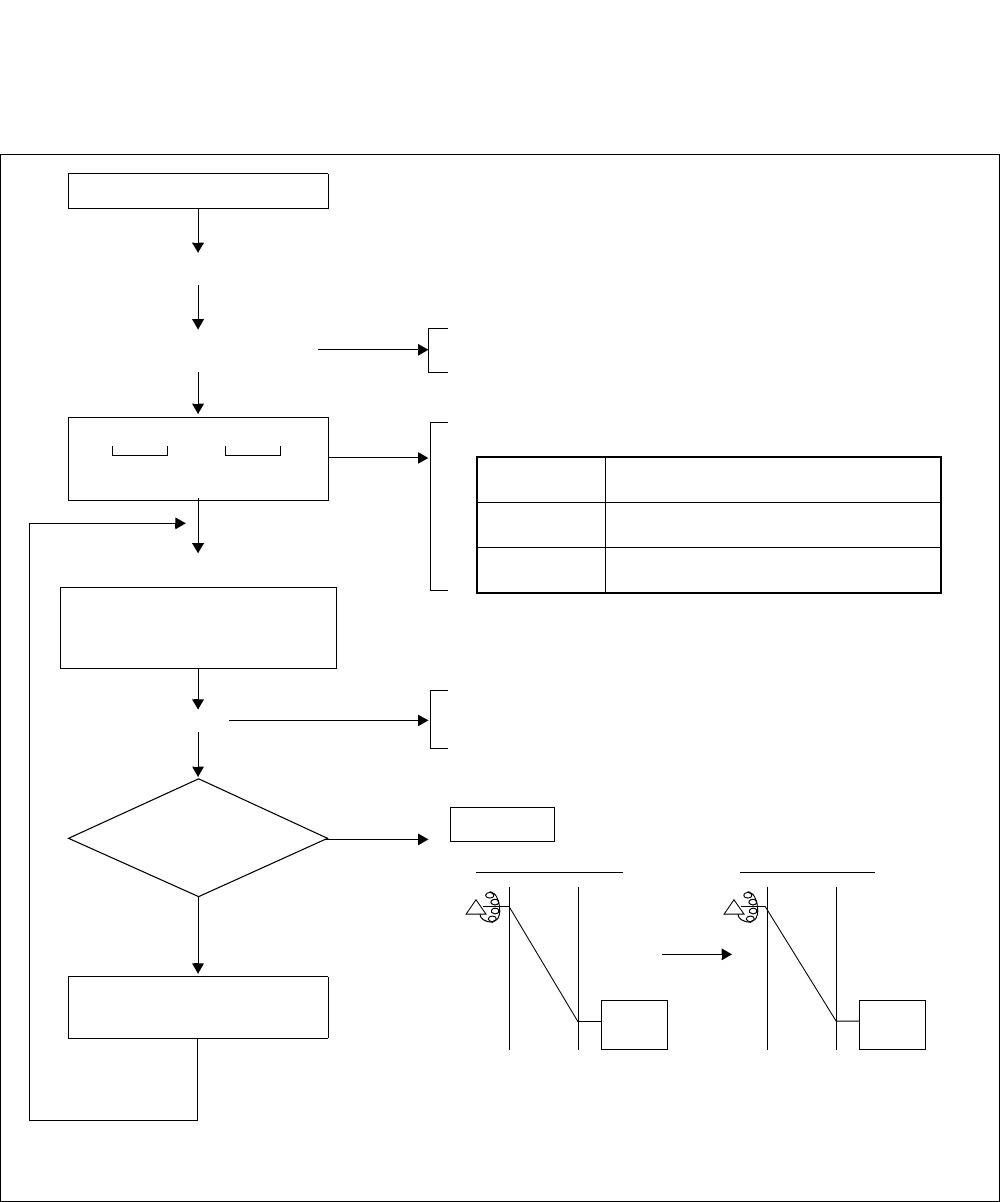
NDA-24307 CHAPTER 6
Page 503
Issue 1
SYSTEM OPERATIONS
(3) Designated Connection Test Procedure
(a) Register Test Procedure
Figure 6-29 Register Test Procedure/Connection Diagram
•Access code is assigned by ASPA command, CI=N,
SRV=SSC, SID=17
•Route numbers to be designated are as follows.:
•If any of the dialed numbers are not received correctly, a
Reorder Tone (ROT) is heard.
RT NUMBER
902
903
TRUNK NAME
Originating Register Trunk
Incoming Register Trunk
Hang Up
TRUNK DESIGNATION TEST IN PROGRESS
REGISTER
UNDER TEST
ORT
Note: If the Trunk Number of the next register is not assigned, the test ends.
Lift handset
(DT)
Dial access code for
designated connection
(DT)
Dial “1,2,3,4,5,6,7,8,9,0” (*, #
in case of PB signal)
consecutively
Is next register to
be tested, too?
(NO)
(YES)
Make switch hook flash
Note
+“9xx”
RT No.
“xxx”
TRK No.
(SST)
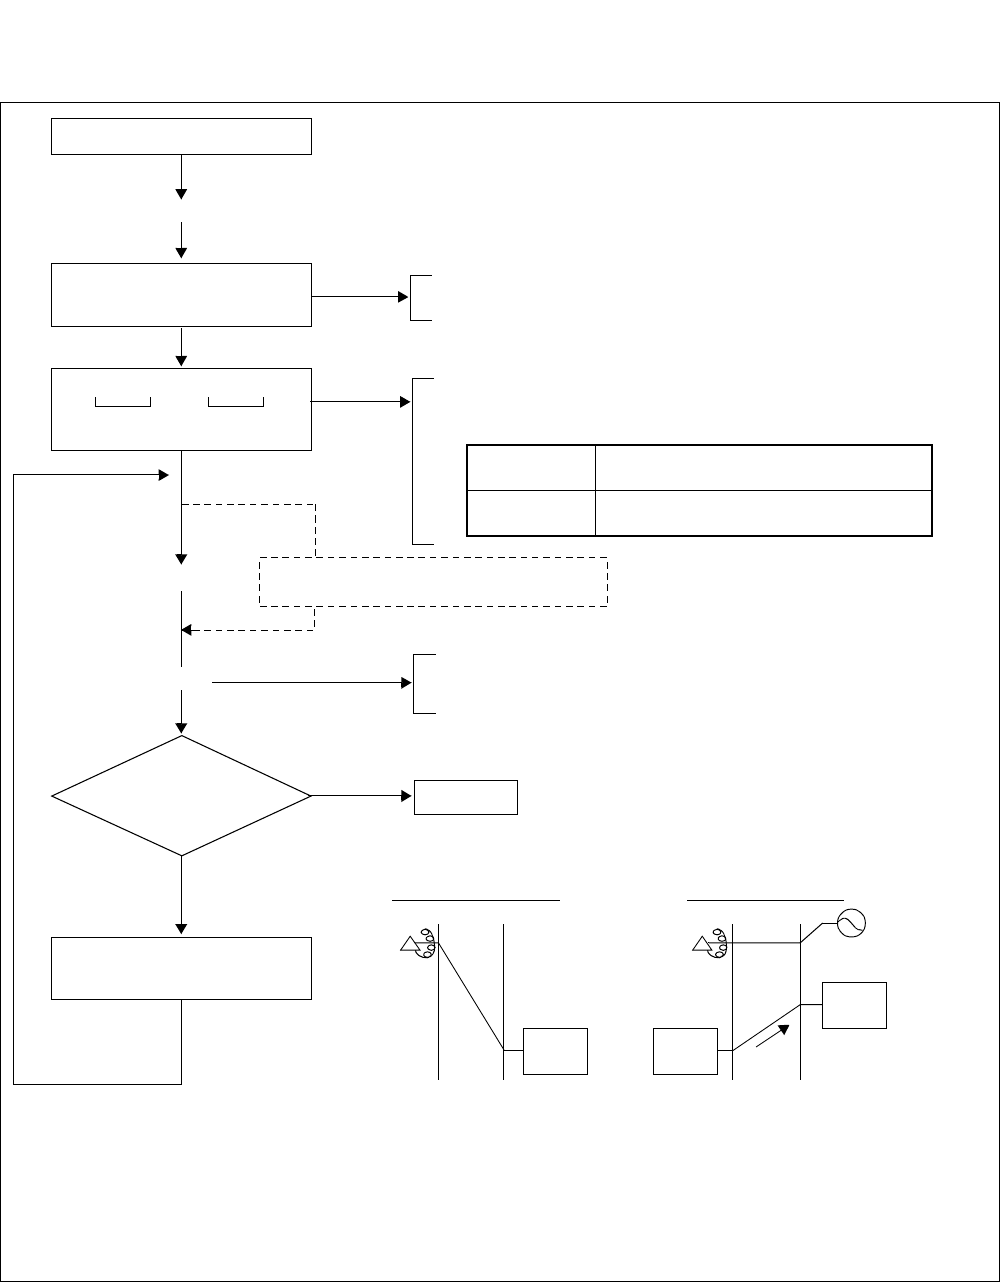
CHAPTER 6 NDA-24307
Page 504
Issue 1
SYSTEM OPERATIONS
(b) Sender Test Procedure
Figure 6-30 Sender Test Procedure/Connection Diagram
•Access code is assigned by ASPA command, CI=N,
SRV=SSC, SID=17
•Route number to be designated is as follows:
•If any of the dialed numbers are received correctly, a Reorder
Tone (ROT) is heard.
RT NUMBER
905
TRUNK NAME
Sender Trunk DP/PB
Note 1: After the sender to be tested is connected to the register, the sender sends out 1 ~ 9, 0 by DP
signals and 1 ~ 9, 0, *, # by PB signals, thus checking to see if the dialed numbers are sent out
correctly.
Note 2: If the trunk number of the next sender is not assigned, the test ends.
+“9xx”
RT No.
“xxx”
TRK No.
Lift handset
Connection test is automatically
Is next
performed Note 1
register to be
tested, too?
Make switch hook flash
Note 2
(DT)
Dial access code for
designated connection
(Music On Hold)
(SST)
TRUNK DESIGNATION
MUSIC ON
HOLD
ORT SND
TEST IN PROGRESS
ORT
DP
OR PB
YES
NO Hang Up
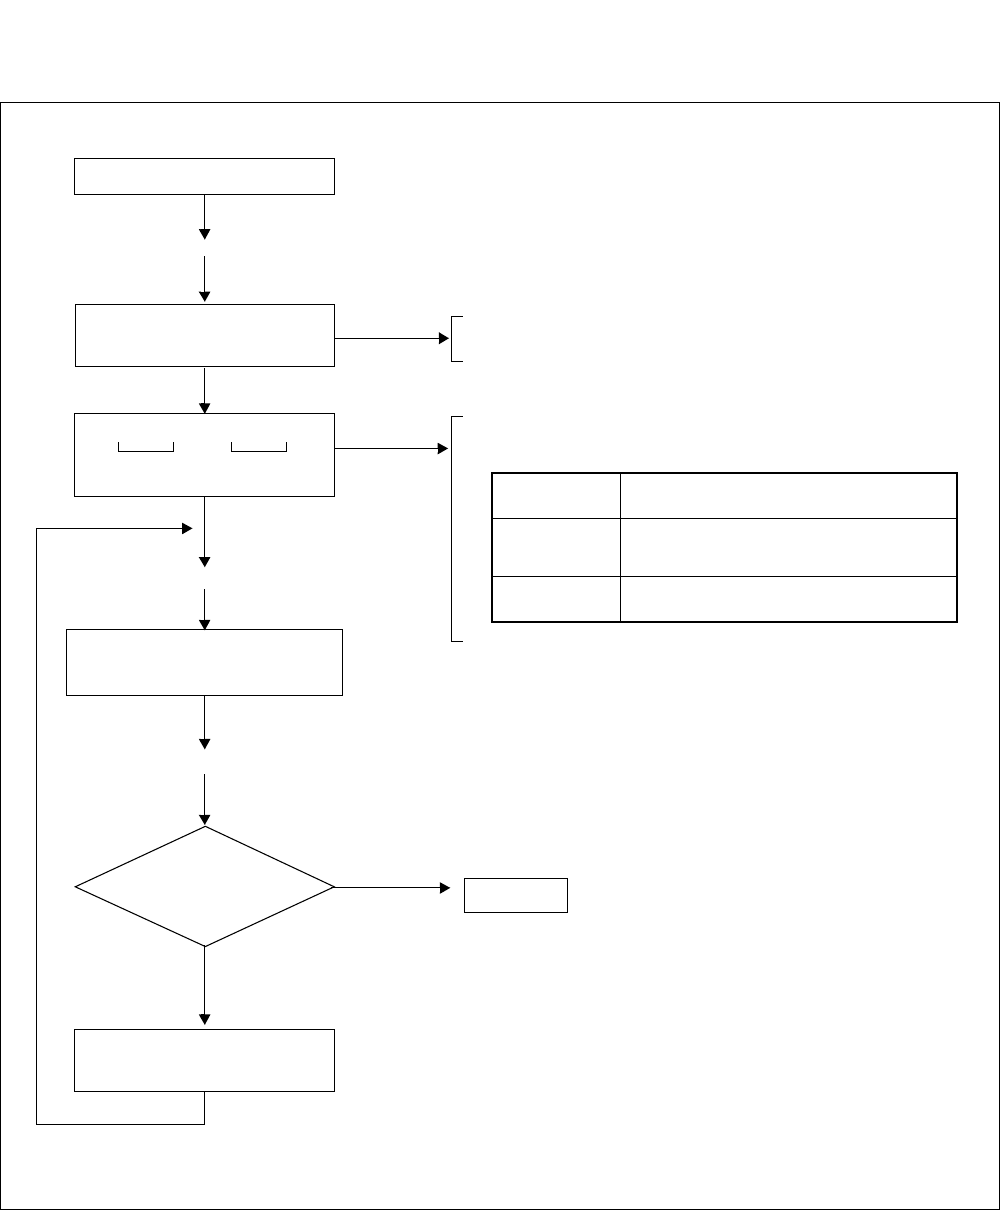
NDA-24307 CHAPTER 6
Page 505
Issue 1
SYSTEM OPERATIONS
(c) 3-Party Conference Trunk Test Procedure
Figure 6-31 3-Party Conference Test Procedure
Note: If the trunk number of the next 3-Party Conference Trunk is not assigned, the test ends.
•Access code is assigned by ASPA command, CI=N,
SRV=SSC, SID=17
• Route numbers to be designated are as follows:
RT NUMBER
909
913
TRUNK NAME
3-party conference trunk
(for station, ATTCON, trunk)
3-party conference trunk
(only for ATTCON)
+“9xx”
RT No.
“xxx”
TRK No.
Lift handset
Is next
register to be
tested, too?
Make switch hook flash
Note
(DT)
Dial access code for
designated connection
(SST)
(SST)
YES
NO Hang Up
As shown in Figure 6-32,
tone sending is repeated.
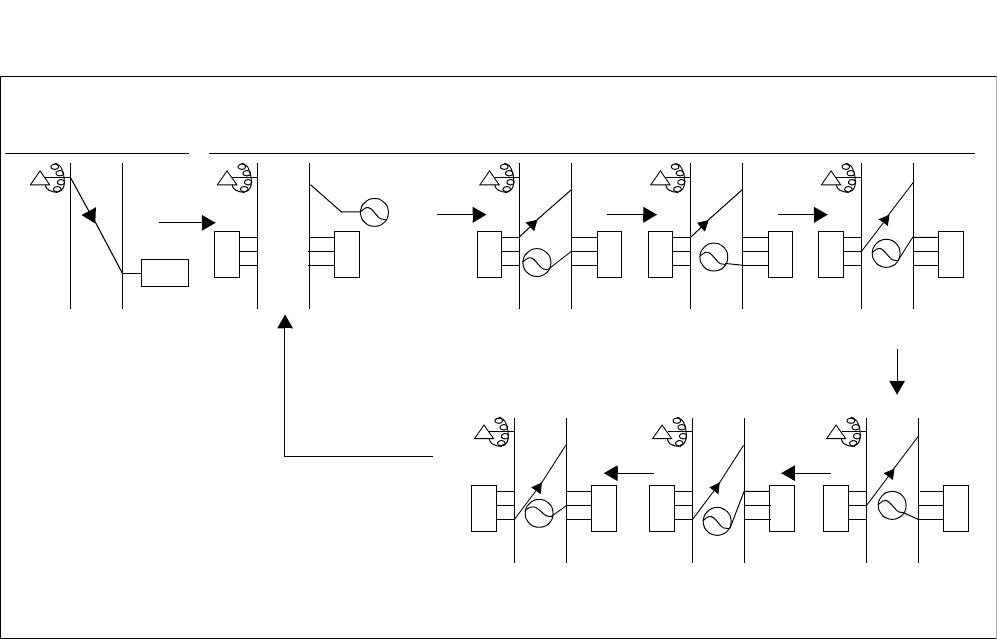
CHAPTER 6 NDA-24307
Page 506
Issue 1
SYSTEM OPERATIONS
Figure 6-32 3-Party Conference Test Connection Diagram
TSTT TSTT TSTT
TSTTTSTTTSTT
ORT
SST
TRUNK DESIGNATION TEST IN PROGRESS
1 SEC. 1 SEC. 1 SEC. 1 SEC.
1 SEC.
1 SEC.
1 SEC.
1 SEC.
(DT) (SST) (DT)
(SST) (DT) (SST)
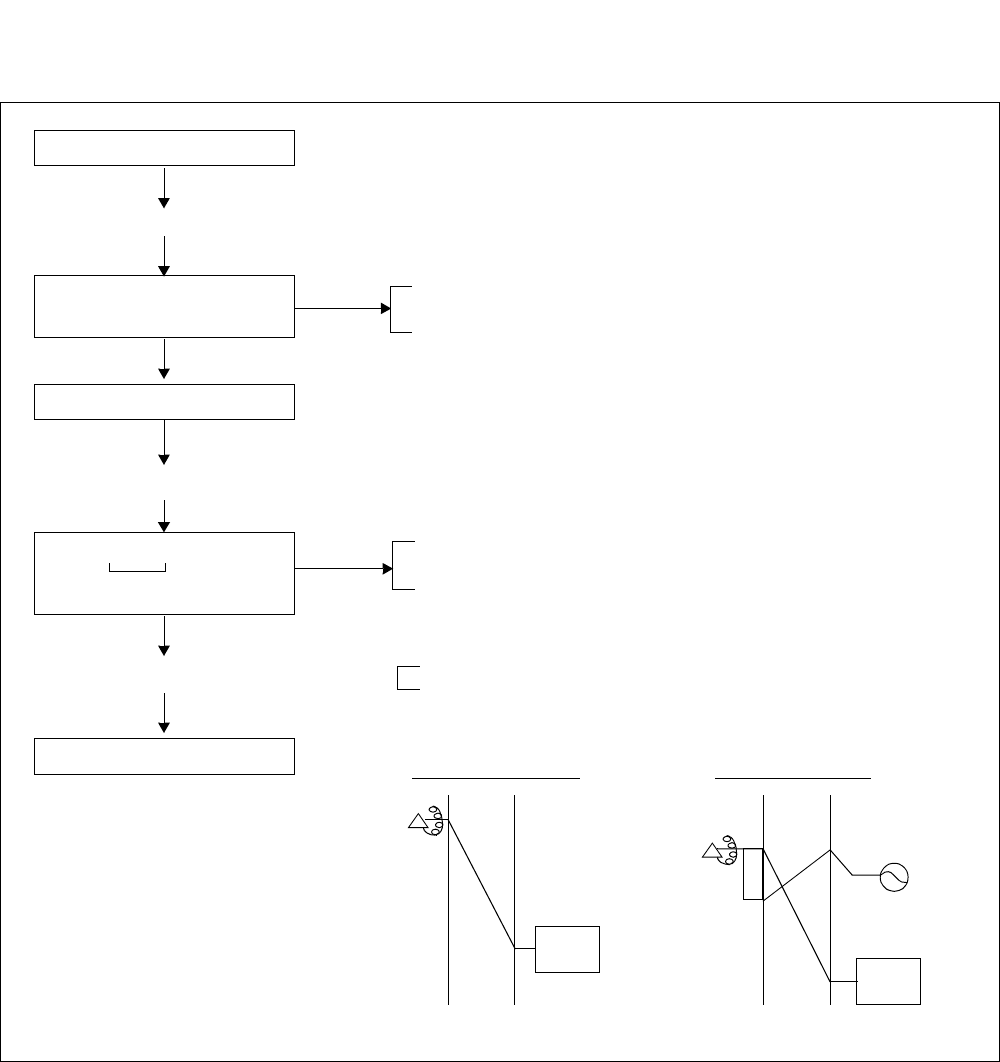
NDA-24307 CHAPTER 6
Page 507
Issue 1
SYSTEM OPERATIONS
(d) Tone Test Procedure
Figure 6-33 Tone Test Procedure/Connection Diagram
•Access code is assigned by ASPA command, CI=N, SRV=SSC,
SID=17
• For Tone No. to be designated, refer to Table 6-7.
•Tone designated by Tone No. is heard.
Lift handset
(Tone)
Dial access code for
designated connection
Dial “x x”
Tone Number
Dial “000”
(DT)
Hang Up
(DT)
TRUNK DESIGNATION TEST IN PROGRESS
ORT
ORT
TONE

CHAPTER 6 NDA-24307
Page 508
Issue 1
SYSTEM OPERATIONS
Table 6-7 Tone Numbers
Tone No. Kind Of Tone Remarks
00 Dial Tone (DT)
01 Special Dial Tone (SPDT)
02 Ring Back Tone (RBT)
03 Continuous Ring Back Tone (CRBT)
04 Busy Tone (BT)
05 Reorder Tone (ROT)
06 Service Set Tone (SST)
07 Second Dial Tone (SDT)
08 No Tone
09 Sender Transmitting Tone (SDTT)
10 Call Waiting Ring Back Tone (CWRBT)
11 No Tone
12 No Tone
13 Test Tone (TSTT)
14 Music On Hold (MSC)
15 No Tone
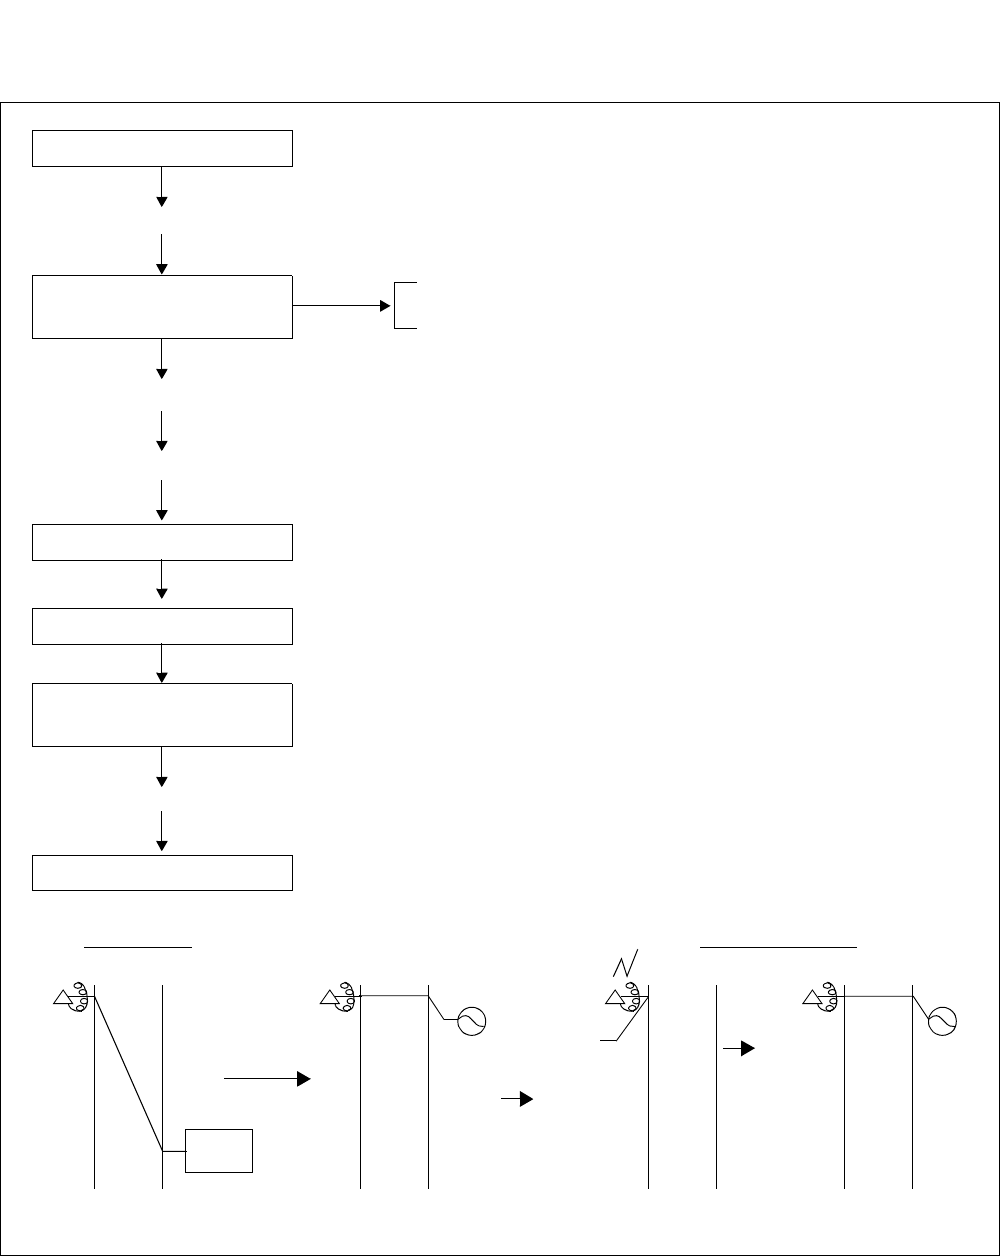
NDA-24307 CHAPTER 6
Page 509
Issue 1
SYSTEM OPERATIONS
(e) Interrupt Ringing (IR) Test Procedure
Figure 6-34 Interrupt Ringing (IR) Test Procedure/Connection Diagram
AAAA
ORT
IR
SST
•Access code is assigned by ASPA command, CI=N, SRV=SSC,
SID=17
Lift handset
Dial access code for
designated connection
(SST)
(DT)
TEST IN PROGRESSDESIGNATION
Dial “999”
Hang Up
Bell Rings
Lift handset and answer
(SST)
Hang Up
HANGUP
SST
ANSWER
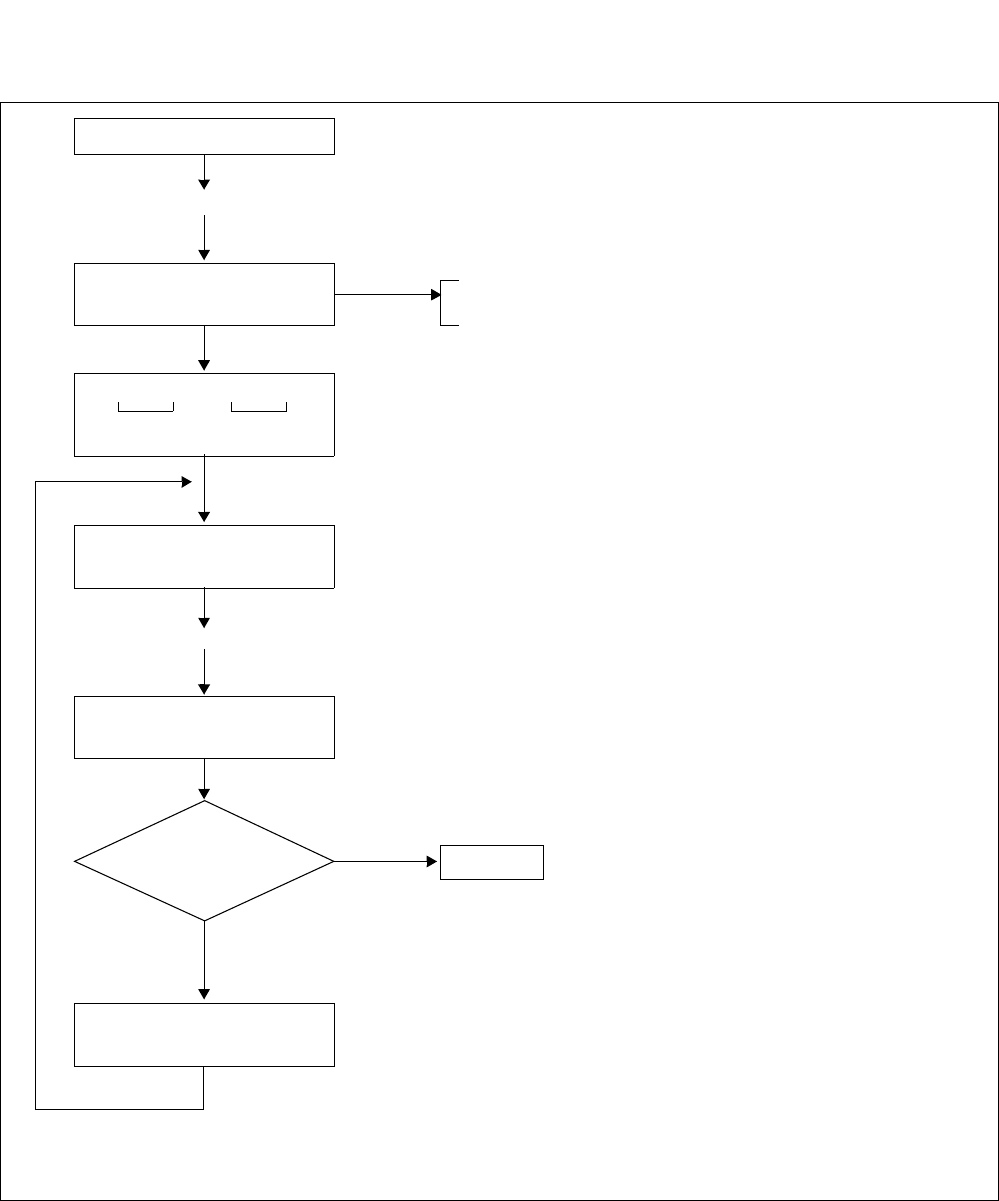
CHAPTER 6 NDA-24307
Page 510
Issue 1
SYSTEM OPERATIONS
(f) Trunk Test Procedure
Figure 6-35 Trunk Test Procedure
Note: If the trunk number of the next trunk is not assigned, the test ends.
• Access code is assigned by ASPA command, CI=N,
SRV=SSC, SID=17
+“9xx”
RT No.
“xxx”
TRK No.
Lift handset
Is next
register to be
tested, too?
Make switch hook flash
Note
(DT)
Dial access code for
designated connection
(RBT)
YES
NO
Dial the called party
number
The called party at the
distant office answers
and talks
Hang Up
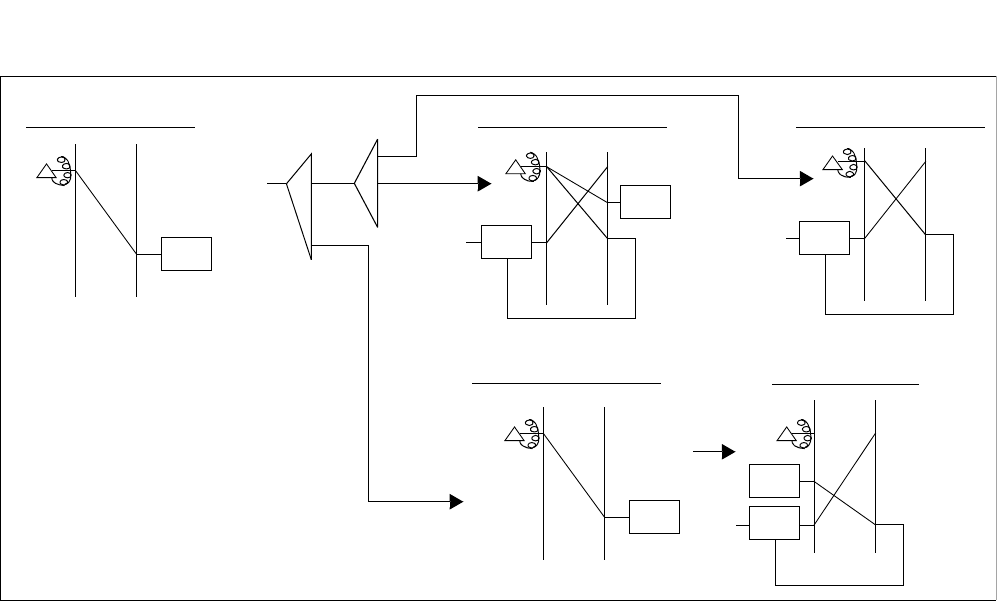
NDA-24307 CHAPTER 6
Page 511
Issue 1
SYSTEM OPERATIONS
Figure 6-36 Trunk Test Connection Diagram
A
ORT
TRUNK DESIGNATION CALLED PARTY DIALING CALLED PARTY DIALING
NUMBER SENDING
CALLED PARTY DIALING
TRK
AA
AAA 2nd DT SYSTEM
CHARGING SERVICE
PROVIDED
SENDER
SYSTEM
SND
TRK
ORT
ORT
TRK
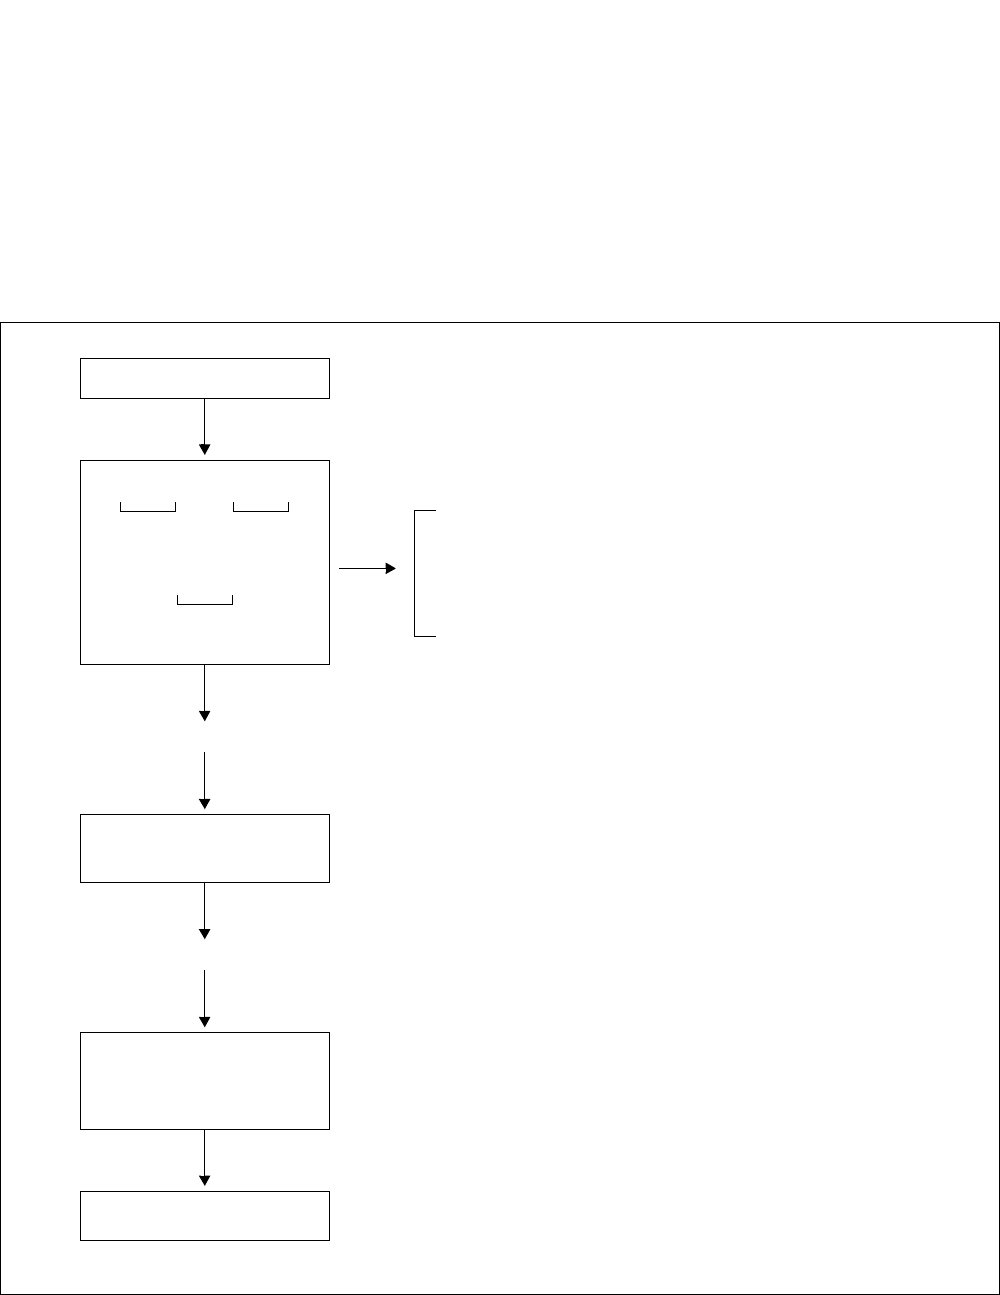
CHAPTER 6 NDA-24307
Page 512
Issue 1
SYSTEM OPERATIONS
10.2 Designated Connection Test (DESKCON/ATTCON)
(1) General
The purpose of this test is to confirm the operations related to a trunk which has been designated from the
DESKCON/ATTCON.
(2) Test Procedure
(a) Trunk seizure with TKSL key
•Whether dialing RT No. + TRK No.
OR
•Dialing C.O. Line NO. is determined per ASYD
command, SYS1. INDEX68. b1.
C.O. Line No. is assigned by ACOC command.
Press TKSL or TRKSL key
(RBT)
+“xxx”
RT No.
“xxx”
TRK No.
or
“xxxx”
C.O. Line NO.
Dial the called party
number
Press CANCEL key
The called party at the
and talks
distant office answers
(DT from Distant Office)
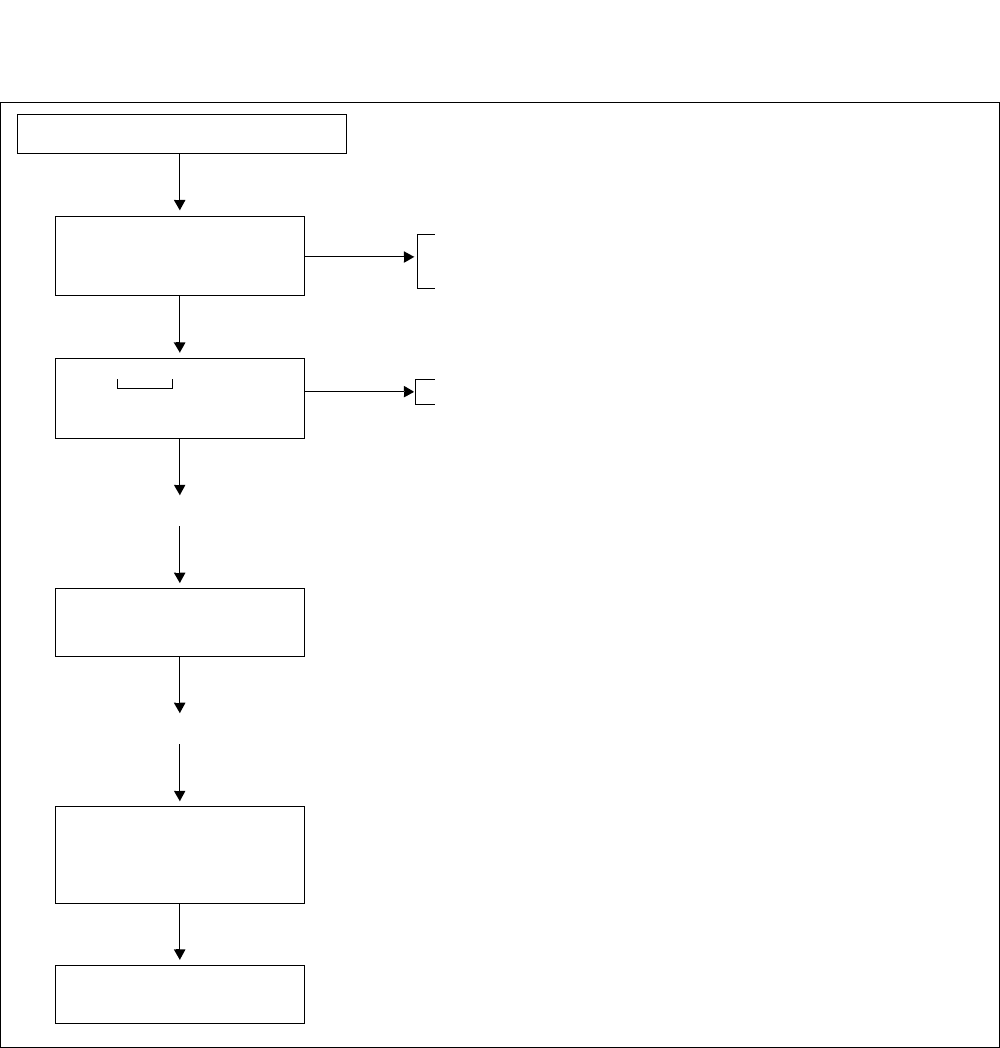
NDA-24307 CHAPTER 6
Page 513
Issue 1
SYSTEM OPERATIONS
(b) Trunk seizure by access code dialing
•Special Code is assigned by ASPA command.
•CI=N, SRV=SSC, SID-17
•C.O. Line No. is assigned by ACOC command.
Press LOOP key or LX (L1-L6) key
(RBT)
Dial “xxxx”
C.O. Line No.
Dial called party number
Press CANCEL key
Called party at the distant
office answers and talks
(DT from distant office)
Dial access code
for designated connection
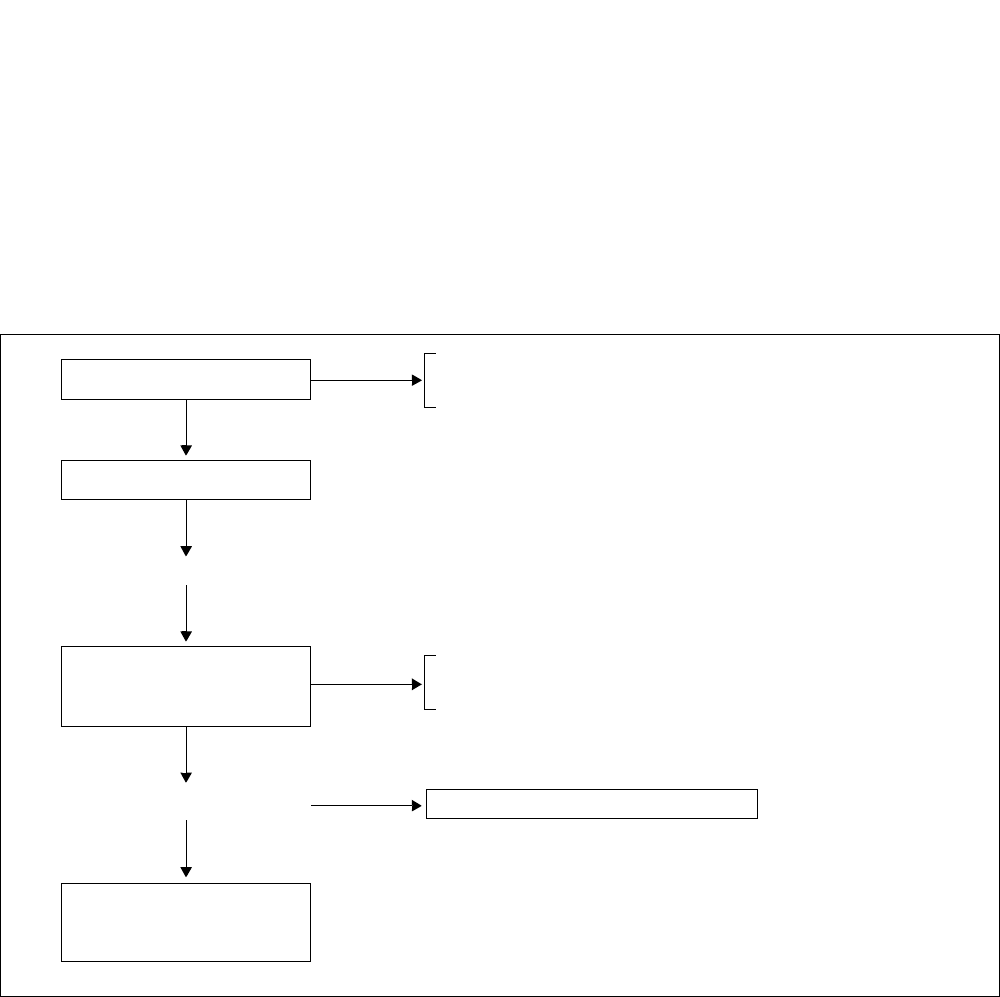
CHAPTER 6 NDA-24307
Page 514
Issue 1
SYSTEM OPERATIONS
10.3 Bad Call Notification
(1) General
When a station user has trouble because of hearing noise during a call, or has other difficulty having a
normal call, the line involved is recorded as a bad call notification.
The record displays on the MAT screen as system message [6-H], which indicates the recording source
(Station Number), Called Station Number or Trunk Number, etc.
(2) Operating Procedure
•SFC of the station user who can perform this operation must
be allowed ASFC, SFI=46
•Access code is assigned by ASPA command, CI=H,
SRV=SSC, SID=46
Switch hook flash
(SST)
Station user returns
to talking state
(SPDT)
Dial access code for
bad call notification
Talking
System message [6-H] displays

NDA-24307 CHAPTER 6
Page 515
Issue 1
SYSTEM OPERATIONS
11. ROUTINE DIAGNOSIS
For confirming its own servicing status, the system automatically executes self diagnosis every day, and
displays the result of the diagnosis on a system message. By this function, possible causes for trouble can be
discovered in an early stage and possible trouble can be prevented from remaining undetected.
11.1 Related System Data
•ASYD, INDEX62 b6, b7 - Routine Diagnosis ACT/STBY Changeover
b7 b6
00 = Every time
0 1 = Once a week (on Sunday)
1 0 = Once a month (on the 1st Sunday of the month)
Note: When Routine Diagnosis is simultaneously executed at all nodes (see SYS1, INDEX87, 88), all nodes
execute ACT/STBY changeover according to the data assigned in ISW.
•ASYD, SYS1, INDEX86,
b0 –When routine diagnosis starts, and the result of the routine diagnosis is normal, the result
displays as system message [7-O].
0/1: Not displayed/To display
b1 –When the result of the routine diagnosis is abnormal, it displays as system message [7-P].
0/1: Not displayed/To display
b3, b2 –Processing at the time when Trunk Ineffective Hold is detected. Note 1
Note 1: Trunk Ineffective Hold is a continuous state other than idle state within a predetermined duration
while routine diagnosis is in progress. Whether it is to be detected/not detected is assigned by ASYD,
SYS1, INDEX89.
Note 2: When Routine Diagnosis is simultaneously executed at all nodes (see SYS1, INDEX87, 88), all nodes
execute ACT/STBY changeover according to the data assigned in ISW.
Bit Except the trunks being held on two-way calls
(station-to-station call, station-to-trunk, trunk-
to-trunk call), the trunks being held at present
are forcibly released
All trunks being held at
present are forcibly
released
LENS of the trunk detected
display as system message
[7-P]
b3 b2
0
0
1
0
1
0
X
—
—
—
—
X
X
X
X

CHAPTER 6 NDA-24307
Page 516
Issue 1
SYSTEM OPERATIONS
•SYS1, INDEX87, 88 - Routine Diagnosis Start Time: Assign Routine Diagnosis Start Time only in
ISW. Regarding LNs, set indexes to FF so that all nodes simultaneously start/stop Routine Diagnosis.
Note
Start time should be such a time at which the traffic of the office is the lowest.
To stop the routine diagnosis, set FF respectively to INDEX87, 88.
Note: If the data other than FF is assigned in a LN, Routing Diagnosis is independently activated in the LN.
•SYS1, INDEX89, 90 — Routine Diagnosis Items: The item corresponding to each bit is to execute
once a day.
Note: When Routine Diagnosis is simultaneously executed at all nodes (see SYS1, INDEX87, 88), all nodes
execute the same Routine Diagnosis Items according to the data assigned in ISW. However, when Call
Forwarding Data Clear/Save is to be executed, the corresponding data (Index 232 b0-b3/INDEX304,
b0, b1, b3-b5) must be assigned on a LN basis
•INDEX89 b0 — Main Memory Check (MM Program Memory)
0/1 = No/Yes
b1 — DM Check (DM = Data Memory)
0/1 = No/Yes
b2 — TSW ACT/STBY Changeover (for Dual Systems)
0/1= No/Yes Note
Note: This data fixed to 0 in LNs.
b3 — CPU ACT/STBY Changeover (for Dual Systems)
0/1= No/Yes
b4 — Trunk Ineffective Hold Check
0/1= No/Yes
b5 — Trunk Ineffective Hold Detection
0/1 = No/Yes
b6 — Call Forwarding Data Clear (See Index 232)
0/1 = No/Yes
•INDEX90 b1 — Backup of Call Forwarding, Individual Speed Data, Name Display Data, User
Assign Soft Key Data and Number Sharing Data to HDD (see Index 304)
0/1 = No/Yes
b3 — Residual Link Detection
0/1 = No/Yes
INDEX 87 0 2 (Hour) 2:00 a.m. is the start time.
INDEX 88 0 0 (Minute)

NDA-24307 CHAPTER 6
Page 517
Issue 1
SYSTEM OPERATIONS
•INDEX232 b0 — Call Forwarding - All Calls Data Clear
0/1 = No/Yes (This data is valid when SYS1, INDEX232, b6=1)
b1 — Call Forwarding - Busy Line Data Clear
0/1 = No/Yes (This data is valid when SYS1, INDEX232, b6=1)
b3 — Call Forwarding - Don’t Answer Data Clear
0/1 = No/Yes (This data is valid when SYS1, INDEX232, b6=1)
•INDEX304 b0 — Individual Speed Calling Data Saving
0/1 = Out/In Service (This data is valid when SYS1, INDEX90, b1=1)
b1 — Call Forwarding Data Saving
0/1 = Out/In Service (This data is valid when SYS1, INDEX90, b1=1)
b3 — Name Display Data Saving
0/1 = Out/In Service (This data is valid when SYS1, INDEX90, b1=1)
b4 — User Assign Soft Key Data Saving
0/1 = Out/In Service (This data is valid when SYS1, INDEX90, b1=1)
b5 — Number Sharing Data Saving
0/1 = Out/In Service (This data is valid when SYS1, INDEX90, b1=1)
11.2 Routine Diagnosis Result
The result of routine diagnosis displays as a system message.
Normally ended: [7-O]
Abnormality detected [7-P] Refer to Chapter 3 for more details.
In case an abnormality is detected, initiate necessary processing explained in Chapter 5.

CHAPTER 6 NDA-24307
Page 518
Issue 1
SYSTEM OPERATIONS
12. SYSTEM CONTROL PROCEDURES
Although the system is remarkably maintenance free, maintenance technicians occasionally may confront a
situation in which they have to manually control the system. This chapter describes system control procedures
focusing on the following four items.
•Changeover/Make-busy/Make-busy Cancel of Equipment
•Initialization
•How to Turn ON/OFF the Whole System
•System Start-up
Note: Changeover of equipment is available for common control equipment, which is provided in a dual
configuration.
12.1 Changeover/Make-Busy/Make-Busy Cancel of Equipment
12.1.1 General
This section explains system operations which are necessary for Changeover/Make-Busy/Make-Busy
Cancel of equipment dividing them into the following two blocks.
•CPU Block
•Switching Block (TSW/HSW/DLKC/MUX, PLO/CLK)
Prior to performing these operations, see Figure 6-37 through Figure 6-44 to obtain general
understanding on the system configuration.

NDA-24307 CHAPTER 6
Page 519
Issue 1
SYSTEM OPERATIONS
This figure shows a system block diagram of ISW, which adopts a dual configuration. As seen in the
figure, ISW has the following terminals for the ACT/STBY changeover of dual system equipment:
CPU: If the ACT/STBY of CPU (ISW) is once changed over, the whole controlling block (including
CPU, ISAGT, LANI in ISW) are also changed over.
IOGT: If the ACT/STBY of IOGT (ISW) is once changed over, the whole switching block within the
system (IOGT, TSW, HSW in ISW and TSW, MUX, DLKC in all LNs) are also changed over.
However, PLO (in both ISW and each LN) is not affected.
PLO: If the ACT/STBY of PLO in ISW is once changed over, only the PLOs in ISW are solely
changed over.
Figure 6-37 System Block Diagram for ISW Switching Network
Note: Even though the ACT/STBY of PLO in ISW is once changed over, the PLO/CLK in each LN are not changed over.
This is because the PLOs in ISW and each LN (TSWM0) have multiple connections, respectively, via the backboard
bus. For more details, refer to the “Circuit Card Manual.”
HSW 01
HSW 00
TSW 03
TSW 02
TSW 01
PLO 1
PLO 0
IOGT 0 IOGT 1
CPR 1
CPR 0 ISAGT
ISAGT: PZ-GT13 LANI : PZ-PC19 IOGT: PH-GT10 TSW : PU-SW00
HSW : PU-SW01 PLO : PH-CK16/17-A EMA : PH-PC40 IOC : PH-IO24
CPU 0
LANI LANI
MISC BUS
LANI LANI
IOC/
MISC
EMA
CPU 1
ISAGT
TSW 00
To TSW of LN3
External Cables
(ISW-LN TSW CA-n)
External Cables
(ISW-LN TSW CA-n)
External Cables
(ISW-LN PLO CA-n)
To PLO1 (TSWM0)
of each LN
To PLO0 (TSWM0)
of each LN
TSW I/O BUS
TSW I/O BUS
Note
To TSW of LN2
To TSW of LN1
To TSW of LN0
To TSW of LN3
To TSW of LN2
To TSW of LN1
To TSW of LN0
HSW 11
HSW 10
TSW 13
TSW 12
TSW11
TSW 10
Fusion Link
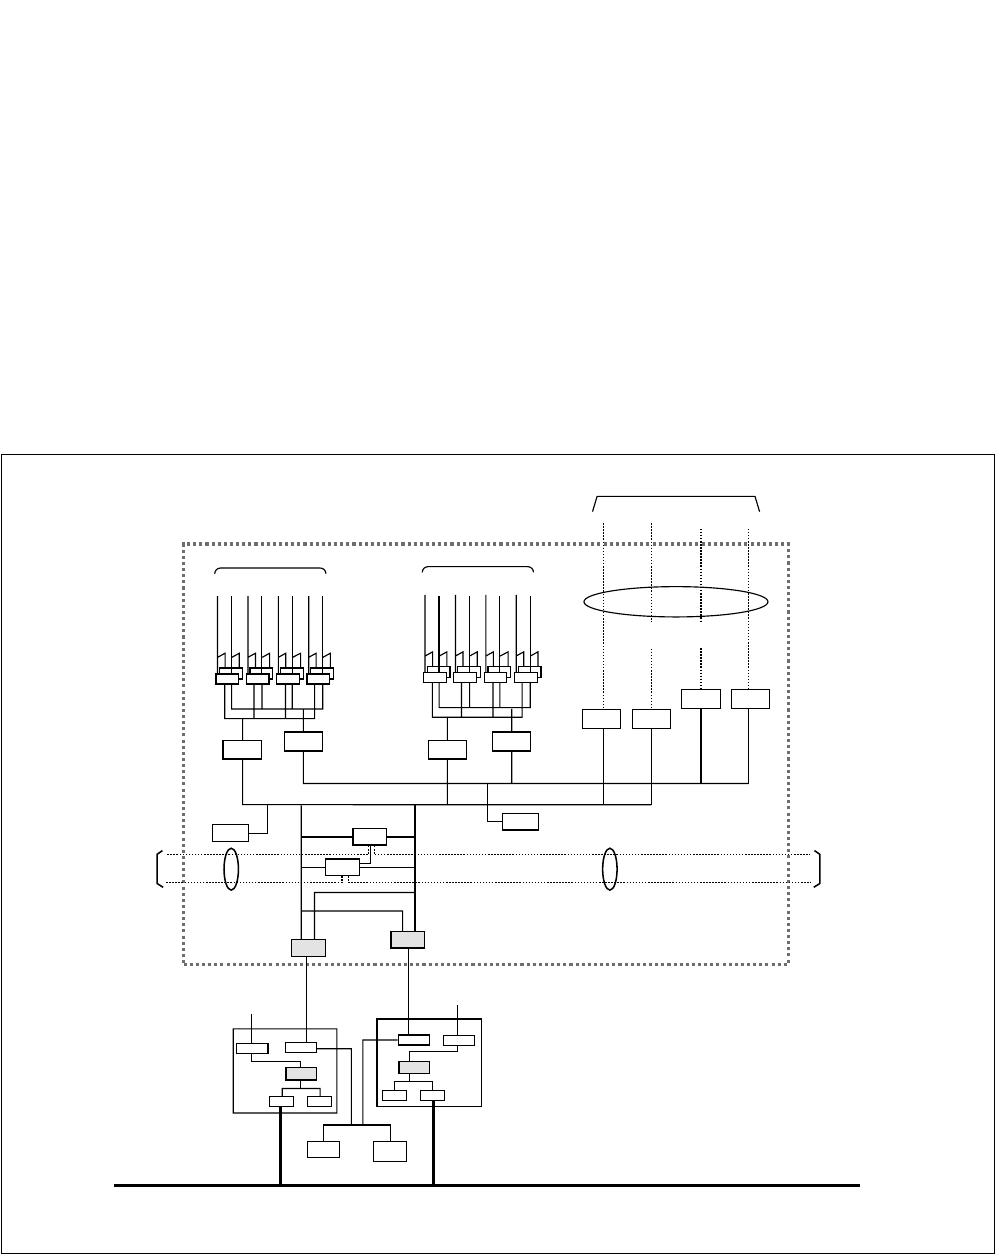
CHAPTER 6 NDA-24307
Page 520
Issue 1
SYSTEM OPERATIONS
This figure shows a system block diagram of LN, which adopts a dual configuration. As seen in the
figure, each LN has following terminals for the ACT/STBY changeover of dual system equipment:
CPU : If the ACT/STBY of CPU is once changed over, the whole controlling block in the
same node (including CPU, ISAGT, LANI) and GT in both TSWM0 and TSWM1
are also changed over.
GT (TSWM0) : If the MBR key is flipped on the active GT (PH-GT09) card in TSWM0, the whole
switching block in IMG0/1 (TSW, MUX, DLKC) and IMG2/3 (TSW, MUX) are to-
tally changed over. However, PLO (in TSWM0) and CLK (in TSWM1) are not af-
fected.
PLO (TSWM0): If the MB key is flipped on the active PLO (PH-CK16-A) card (in TSWM0), the
ACT/STBY of both PLO (in TSWM0) and CLK (in TSWM1) are totally changed
over.
Figure 6-38 System Block Diagram for LN Switching Network (1/2)
Note: See “Note” on the previous page.
ISAGT-A: PZ-GT13 ISAGT-B: PZ-GT20 LANI: PZ-PC19 GT: PH-GT09 TSW: PH-SW12
MUX: PH-PC36 DLKC: PH-PC20 PLO: PH-CK16-A EMA: PH-PC40 IOC: PH-IO24
LANI LANI
GT 0
TSW 00 TSW 10 TSW 01 TSW 11
GT 1
EMA IOC/
MISC
DLKC 0
DLKC 1
PLO 0
PLO 1
CPR 0
LANILANI
CPR 1
MISC BUS
TSW I/O BUS
Note
TSW I/O BUS
Line/Trunk PM
IMG 0
PM BUS
PCM HW
PCM HW
PCM HW
PCM HW
MUXMUXMUXMUX
ISAGT-B
ISAGT-B
To TSWM1
Line/Trunk PM
IMG 1
PCM HW
PCM HW
PM BUS
PCM HW
PCM HW
MUXMUXMUXMUX
TSWM0
To TSWM1
From PLO
of ISWM To CLK of
TSWM1
ISAGT-A ISAGT-A
TSW 02 TSW 03
TSW 12 TSW 13
External Cables
(ISW-LN TSW CA-n)
External Cables
(ISW-LN PLO CA-n)
External Cables
(PLO-CLK CA-n)
To/From TSW of ISWM
LN0/1/2/3
Fusion Link
CPU 0 CPU 1
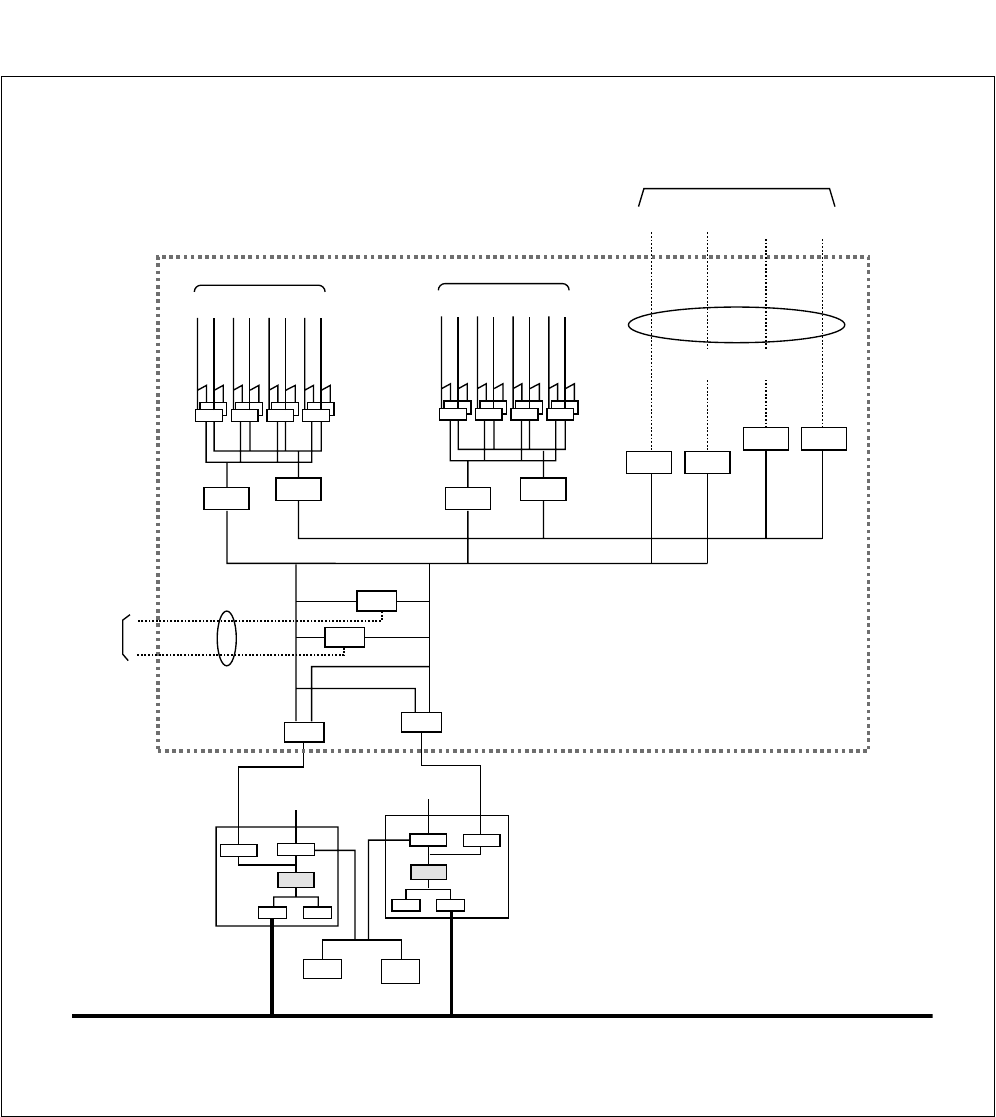
NDA-24307 CHAPTER 6
Page 521
Issue 1
SYSTEM OPERATIONS
Figure 6-38 System Block Diagram for LN Switching Network (2/2)
ISAGT-A: PZ-GT13 ISAGT-B: PZ-GT20 LANI: PZ-PC19 GT: PH-GT09 TSW: PH-SW12
MUX: PH-PC36 CLK: PH-CK18 EMA: PH-PC40 IOC: PH-IO24
LANI LANI
GT 0
TSW 00 TSW 10 TSW 01 TSW 11
GT 1
EMA IOC/
MISC
CLK 0
CLK 1
CPR 0
LANILANI CPR 1
MISC BUS
TSW I/O BUS
TSW I/O BUS
Line/Trunk PM
IMG 2
PCM HW
PCM HW
PCM HW
PCM HW
PM BUS
PCM HW
PCM HW
PCM HW
PCM HW
PM BUS
MUXMUXMUXMUX
ISAGT-B
ISAGT-B
To TSWM0
Line/Trunk PM
IMG 3
MUXMUXMUXMUX
TSWM1
To TSWM0
From PLO
of ISWM
CPU 0
ISAGT-A ISAGT-A
CPU 1
TSW 02 TSW 03
TSW 12 TSW 13
External Cables
(ISW-LN TSW CA-n)
To /From TSW of ISWM
External Cable
(PLO-CLK CA-n)
LN0/1/2/3
Fusion Link
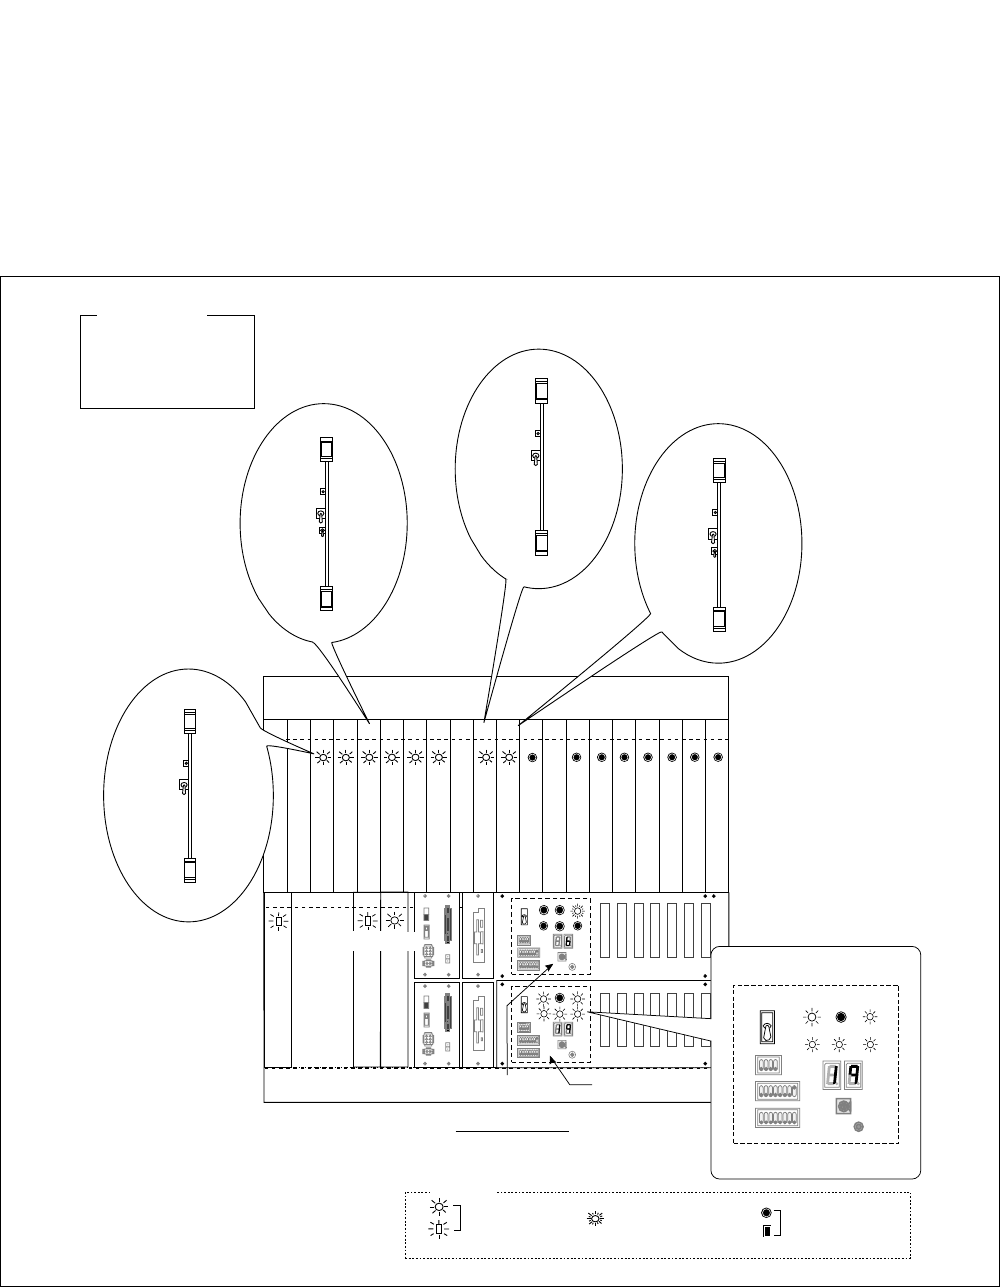
CHAPTER 6 NDA-24307
Page 522
Issue 1
SYSTEM OPERATIONS
To perform the ACT/STBY system changeover, check the lamp indicators shown in Figure 6-39, and
then operate the related key.
Note 1: LED indications cited in Figure 6-39 are only an example. The indicating pattern (ON/Flash/OFF)
can differ, depending on each system setting.
Note 2: STATUS 7-seg. LED provides information on ACT/STBY status of the belonging CPU. For details on
the LED’s checking method, refer Figure 6-44.
Figure 6-39 How to Check the LEDs and SW Keys for System Changeover (ISW)
02 03 04 05 06 07 08 09 10 11 12 13 14 15 16 17 18 19
HSW00 (PU-SW01)
TSW01 (PU-SW00)
TSW02 (PU-SW00)
TSW03 (PU-SW00)
TSW00 (PU-SW00)
TSW10 (PU-SW00)
TSW11 (PU-SW00)
TSW12 (PU-SW00)
TSW13 (PU-SW00)
HSW01 (PU-SW01)
HSW11 (PU-SW01)
HSW10 (PU-SW01)
(PH-CK16-A/17-A)
(PH-CK16-A/17-A)
IOGT0 (PH-GT10)
IOGT1 (PH-GT10)
BASEU
LPM
TOPU
CPU 0 -> ACT
TSW 0 -> ACT
PLO 0 -> ACT
System State
Lamp is ON Lamp is Flashing Lamp is OFF
Legend
::
:
FRONT VIEW
ISW
ISWM
PLO0
PLO1
IOGT
FRONT
MB
MBR
TSW ACT
TSW
FRONT
TSW MB
TSW MBR
TSW ACT
HSW
FRONT
MB
HSW ACT
PLO
FRONT
MB
OPE
03 04
IOC(PH-IO24)
EMA (PH-PC49)
OPE
..........
..........
DSP 0 (PZ-DK224)
DSP 1 (PZ-DK224)
OPE/MB
12345678
OFF
1234
OFF
12345678
OFF
12345678
OFF
1234
OFF
12345678
OFF
4
C
0
2
6
A
E
4
C
0
2
6
A
E
IMG1 IMG2 IMG3
STATUS
Note 2
CPUOPE WDT IMG0
12345678
OFF
1234
OFF
12345678
OFF
MBR
4
C
0
2
6
A
E
PZ-DK224
FRONT
00
MMC(PH-M22)
OPE
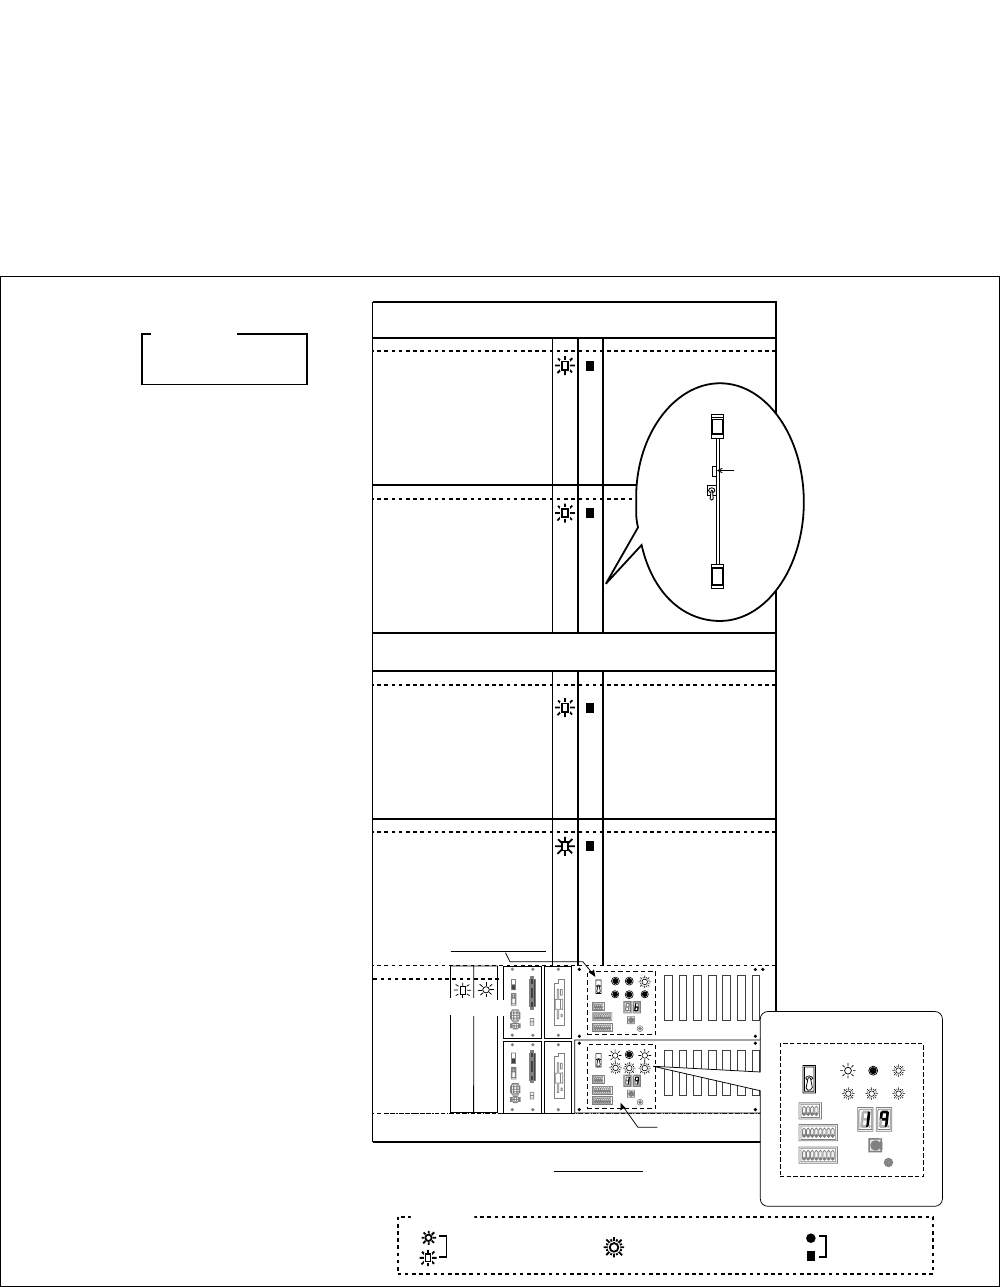
NDA-24307 CHAPTER 6
Page 523
Issue 1
SYSTEM OPERATIONS
To perform the ACT/STBY system changeover, check the lamp indicators shown in Figure 6-40, and
then operate the related key.
Note 1: LED indications cited in Figure 6-40 are only an example. The indicating pattern (ON/Flash/OFF)
can differ, depending on each system setting.
Note 2: STATUS 7-seg. LED provides information on ACT/STBY status of the belonging CPU. For details on
the LED’s checking method, refer Figure 6-44.
Figure 6-40 How to Check the LEDs and SW Keys for System Changeover (IMG0)
13 14
MUX ACT
MUX(PH-PC36)
MUX(PH-PC36)
13 14
MUX ACT
MUX(PH-PC36)
MUX(PH-PC36)
13 14
MUX ACT
MUX(PH-PC36)
MUX(PH-PC36)
MUX ACT
MUX(PH-PC36)
MUX(PH-PC36)
13 14
TOPU
PIM3
PIM2
PIM1
PIM0
LPM
BASEU
FANU
FRONT VIEW
: Lamp is ON : Lamp is OFF: Lamp is Flashing
Legend
CPU 0 -> ACT
TSW 0 -> ACT
System State
IMG0
MUX
FRONT
MUX ACT
MB
03 04
IOC(PH-IO24)
EMA (PH-PC49)
OPE
..........
..........
DSP 0 (PZ-DK224)
DSP 1 (PZ-DK224)
OPE/MB
12345678
OFF
1234
OFF
12345678
OFF
12345678
OFF
1234
OFF
12345678
OFF
4
C
0
2
6
A
E
4
C
0
2
6
A
E
IMG1 IMG2 IMG3
STATUS
Note 2
CPUOPE WDT IMG0
12345678
OFF
1234
OFF
12345678
OFF
MBR
4
C
0
2
6
A
E
PZ-DK224
FRONT
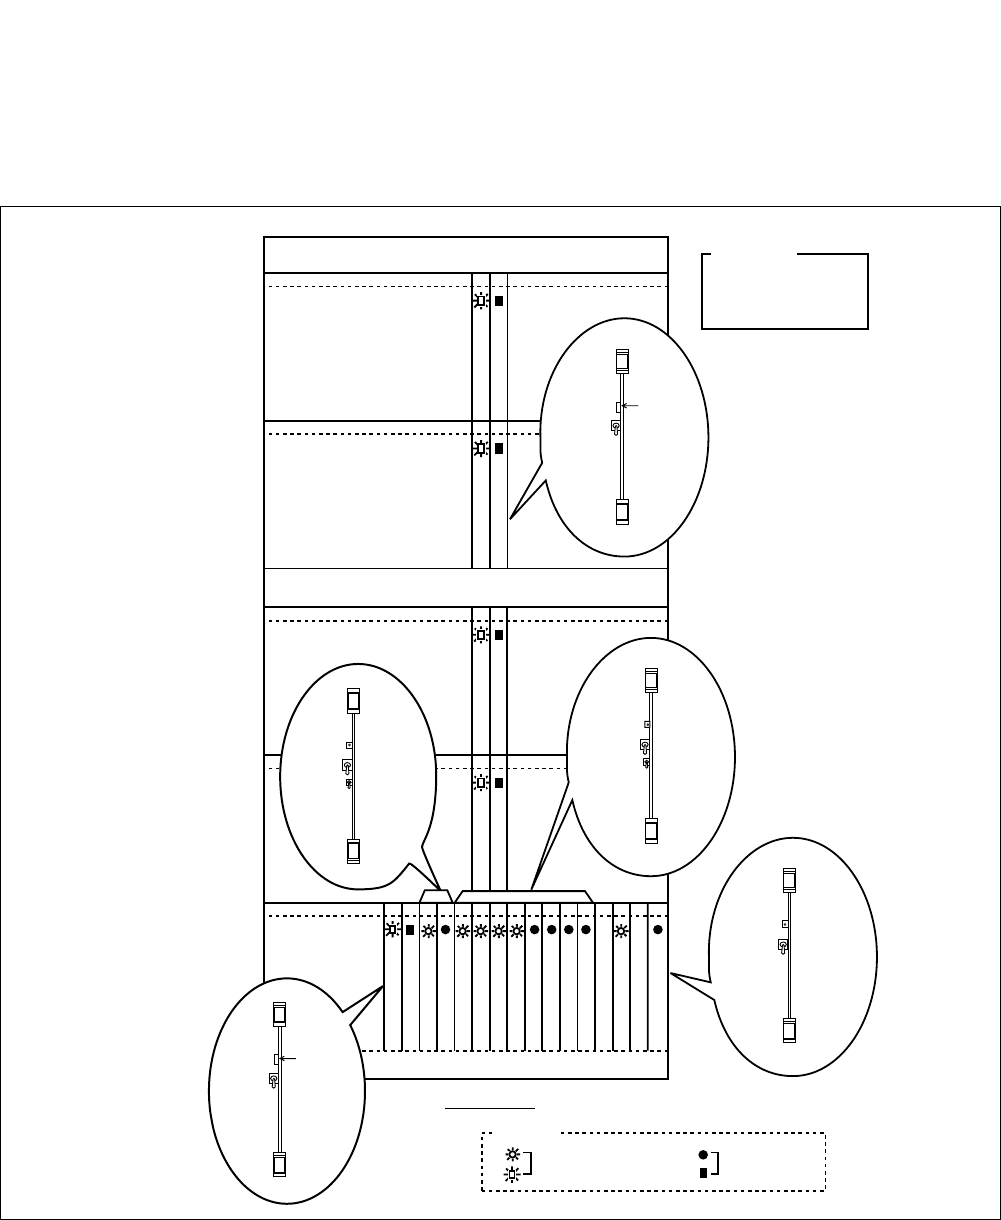
CHAPTER 6 NDA-24307
Page 524
Issue 1
SYSTEM OPERATIONS
To perform ACT/STBY system changeover, check the lamp indicators shown in Figure 6-41, and then
operate the related key.
Note: LED indications cited in Figure 6-41 are only an example. The indicating pattern (ON/Flash/OFF) can
differ, depending on each system setting.
Figure 6-41 How to Check the LEDs and SW Keys for System Changeover (IMG1)
13 14
MUX(PH-PC36)
MUX(PH-PC36)
13 14
MUX(PH-PC36)
MUX(PH-PC36)
13 14
MUX(PH-PC36)
MUX(PH-PC36)
MUX(PH-PC36)
MUX(PH-PC36)
13 14
08 09 10 11 12 13 14 15 16 17 18 19 20 21 22 23
DLKC (PH-PC20)
DLKC (PH-PC20)
GT (PH-GT09)
TSW 00 (PH-SW12)
TSW 01 (PH-SW12)
TSW 02 (PH-SW12)
TSW 03 (PH-SW12)
TSW 10 (PH-SW12)
TSW 11 (PH-SW12)
TSW 12 (PH-SW12)
TSW 13 (PH-SW12)
PLO Note 1
PLO Note 1
(RES)
GT (PH-GT09)
TOPU
PIM3
PIM2
PIM1
PIM0
TSWM
BASEU
FANU
FRONT VIEW
: Lamp is ON : Lamp is OFF
Legend
IMG1
System State
TSW 0 -> ACT
PLO 0 -> ACT
DLKC 0
-> ACT
MUX
FRONT
MUX ACT
MB
DLKC
FRONT
OPE/MB
MB
PLO
FRONT
TSW
FRONT
TSW ACT
MB
TSW MBR
GT
FRONT
OPE/MB
MB
MBR
ACT
MB
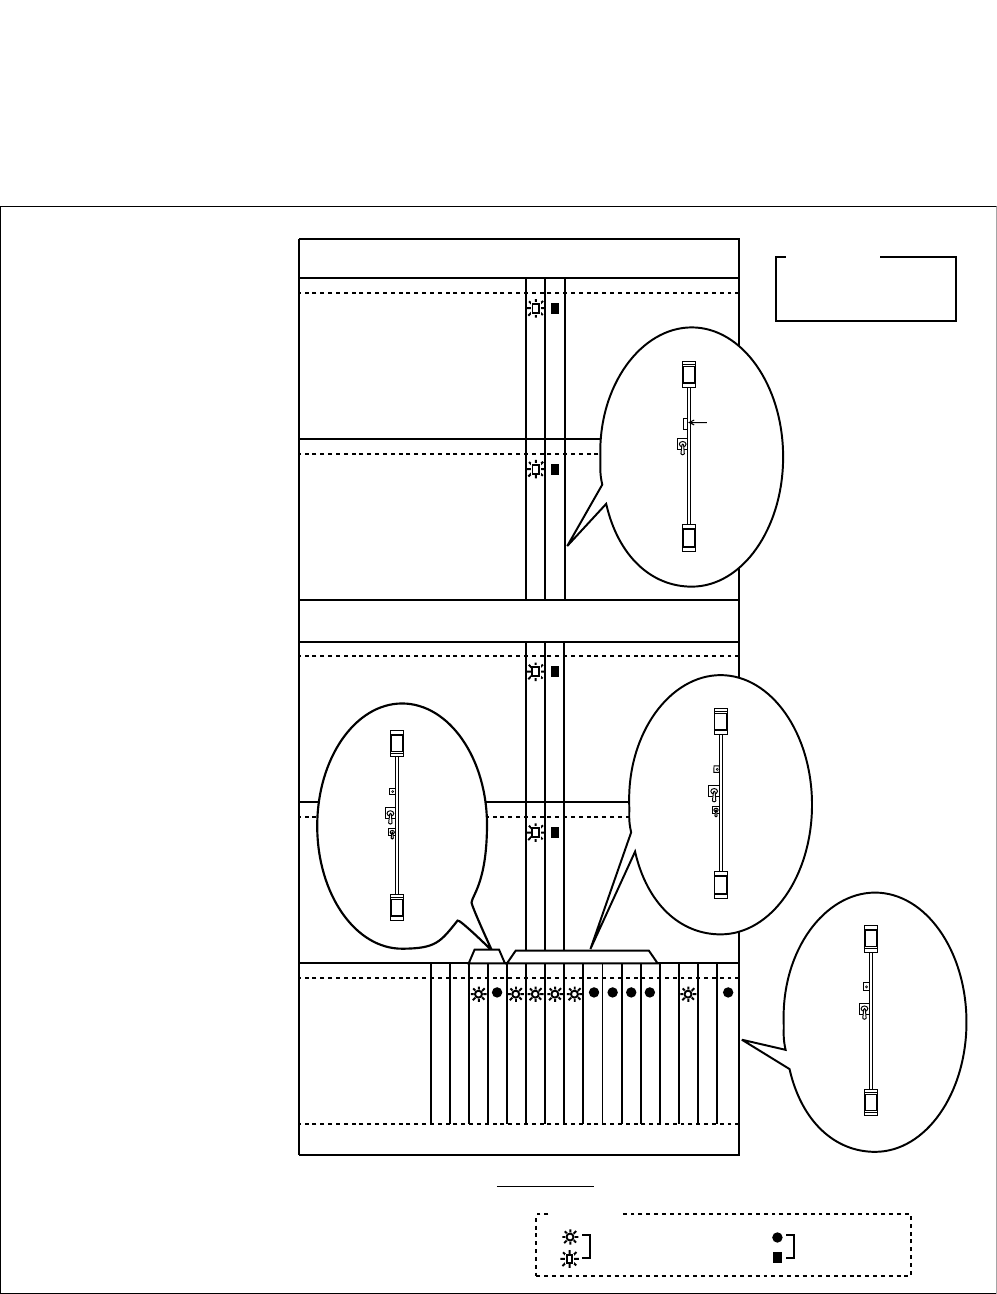
NDA-24307 CHAPTER 6
Page 525
Issue 1
SYSTEM OPERATIONS
To perform the ACT/STBY system changeover, check the lamp indicators shown in Figure 6-42, and
then operate the related key.
Note: LED indications cited in Figure 6-42 are only an example. The indicating pattern (ON/Flash/OFF) can
differ, depending on each system setting.
Figure 6-42 How to Check LEDs and SW Keys for System Changeover (IMG2)
13 14
MUX(PH-PC36)
MUX(PH-PC36)
13 14
MUX(PH-PC36)
MUX(PH-PC36)
13 14
MUX(PH-PC36)
MUX(PH-PC36)
MUX(PH-PC36)
MUX(PH-PC36)
13 14
08 09 10 11 12 13 14 15 16 17 18 19 20 21 22 23
GT (PH-GT09)
TSW 00 (PH-SW12)
TSW 01 (PH-SW12)
TSW 02 (PH-SW12)
TSW 03 (PH-SW12)
TSW 10 (PH-SW12)
TSW 11 (PH-SW12)
TSW 12 (PH-SW12)
TSW 13 (PH-SW12)
CLK (PH-CK18)
CLK (PH-CK18)
(RES)
GT (PH-GT09)
TOPU
PIM3
PIM2
PIM1
PIM0
TSWM1
BASEU
FANU
FRONT VIEW
: Lamp is ON : Lamp is OFF
Legend
IMG2
System State
TSW 0 -> ACT
CLK 0 -> ACT
MUX
FRONT
MUX ACT
MB
CLK
FRONT
TSW
FRONT
TSW ACT
MB
TSW MBR
GT
FRONT
OPE/MB
MB
MBR
OPE
MB

CHAPTER 6 NDA-24307
Page 526
Issue 1
SYSTEM OPERATIONS
To perform the ACT/STBY system changeover, check the lamp indicators shown in Figure 6-43, and
then operate the related key.
Note: LED indications cited in Figure 6-43 are only an example. The indicating pattern (ON/Flash/OFF) can
differ, depending on each system setting.
Figure 6-43 How to Check LEDs and SW Keys for System Changeover (IMG3)
13 14
MUX(PH-PC36)
MUX(PH-PC36)
13 14
MUX(PH-PC36)
MUX(PH-PC36)
13 14
MUX(PH-PC36)
MUX(PH-PC36)
MUX(PH-PC36)
MUX(PH-PC36)
13 14
TOPU
PIM3
PIM2
PIM1
PIM0
DUMMY
BASEU
FANU
FRONT VIEW
: Lamp is ON : Lamp is OFF
Legend
TSW 0 -> ACT
System State
IMG 3
MUX
FRONT
MUX ACT
MB
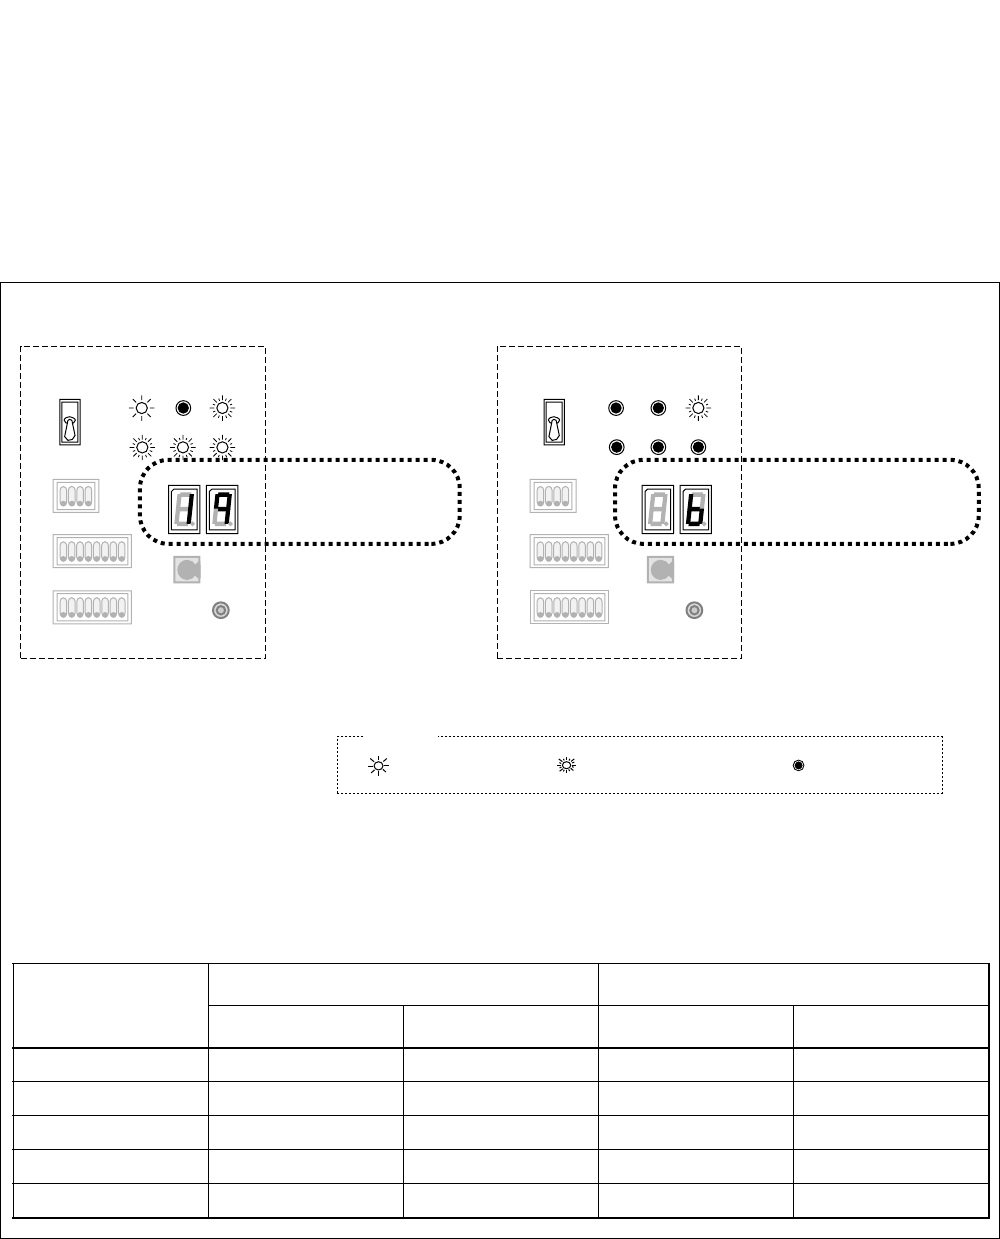
NDA-24307 CHAPTER 6
Page 527
Issue 1
SYSTEM OPERATIONS
•How to check the STATUS 7-seg. LEDs
The ACT/STBY status of CPU can be confirmed by viewing the STATUS 7-seg. LEDs. Visually
check the LED indications and confirm which CPU is active in your system.
When the STATUS LEDs display any of the two-digit numbers (00 - 99), the belonging CPU is
active. If the LEDs display the three letters (S, B and Y) in rotation, the CPU system is in STBY
mode. Note that the numbers (00 - 99), displayed on the active CPU front panel (DSP), conform
to the percentage points showing CPU occupancy rate.
Figure 6-44 How to Check STATUS LEDs
Legend
Lamp is ON
:Lamp is OFF
:
Lamp is Flashing
:
Active
IMG1 IMG2 IMG3
CPUOPE
STATUS
WDT IMG0
12345678
OFF
1234
OFF
12345678
OFF
12345678
OFF
1234
OFF
12345678
OFF
MBR
STATUS
4
C
0
2
6
A
E
4
C
0
2
6
A
E
ST-BY
IMG1 IMG2 IMG3
CPUOPE WDT IMG0
MBR
DSP (Front View) DSP (Front View)
If the CPU is active, the
LEDs here indicate CPU
occupancy rate.
If the CPU is in ST-BY mode,
the left-side LED here goes
OFF and the right side beams
S, b and y in rotation.
Note 1: The figure above shows an example of lamp indications on the DSP mounted in the ISW.
Note 2: In addition to the indication of “STATUS” 7-seg. LEDs, the ACT/ST-BY of the CPU also can be
confirmed via the “CPU OPE” and “IMGn” lamps. Lamp indications on CPR for the fully
expanded system (one ISW and four LNs) are shown below:
LED NAME ISW LN (IMG0)
ACT STBY ACT STBY
CPU OPE Steady-green OFF Steady-green OFF
IMG0 Steady-green Flash green Flash green Flash green
IMG1 Steady-green OFF Flash green OFF
IMG2 Steady-green OFF Flash green OFF
IMG3 Steady-green OFF Flash green OFF

CHAPTER 6 NDA-24307
Page 528
Issue 1
SYSTEM OPERATIONS
12.1.2 How to Control CPU Block
The ACT/STBY of CPU, when it is provided in a dual configuration, can be
switched over by one of the operations shown in Table 6-8. If the system of CPU
in the LN is changed over, the ACT/STBY of GT (in TSWM) also changes over.
See Figure 6-45.
Note 1: While changeover of the CPU is in progress, any call attempt is rejected. Already established calls,
however, will not be affected.
Note 2: When the forced changeover is executed, the entire system is initialized. For this reason, do not use
this operation except in unavoidable circumstances.
Note 3: Except in the case of ISW, the CPU mode change (in LN) affects the ACT/STBY of GT (PH-GT09)
card. See Figure 6-45.
Figure 6-45 shows a system block diagram centering upon the CPU and its controlling GT in a LN.
Though the two sides have a complicated cable connection, the controlling route of CPU 0 directly
goes to GT 0, and that of CPU 1 to GT 1. Therefore, if the system of CPU is changed over, the ACT/
STBY of GT also changes over (for LN only: IOGT is not changed over in the the case of ISW.)
Table 6-8 Changeover of CPU Block
TYPE OPERATIONS REMARKS
Changeover by
CMODI/CMOD
Note 1
Use the CMODI/CMOD command.
See Chapter 8.
CPU OPE lamp
lights steady green
on the DSP of the
CPU, which is
placed into ACT-
mode by this
operation. OPE/MB
lamp of GT
(PH-GT09) card,
which is in the
controlling route,
lights green.
Note 3
Changeover by key
operation Note 1
Turn ON the MBR key on the DSP of the active CPU. After a few seconds,
return the MBR key to the previous position.
See Section 12.1.3, Manual System Changeover of CPU.
Forced Changeover
Note 2 ACT/STBY mode of CPU can be controlled by CPU SEL key operation on the
EMA (PH-PC40) card.
UP- No. 0 system (ACT)
DOWN- No. 1 system (ACT)
Normally, this key must be placed in the center position when the CPU is
provided in a dual configuration.
See Section 12.1.4, Forced Changeover of CPU.
ATTENTION
Contents
Static Sensitive
Handling
Precautions Required
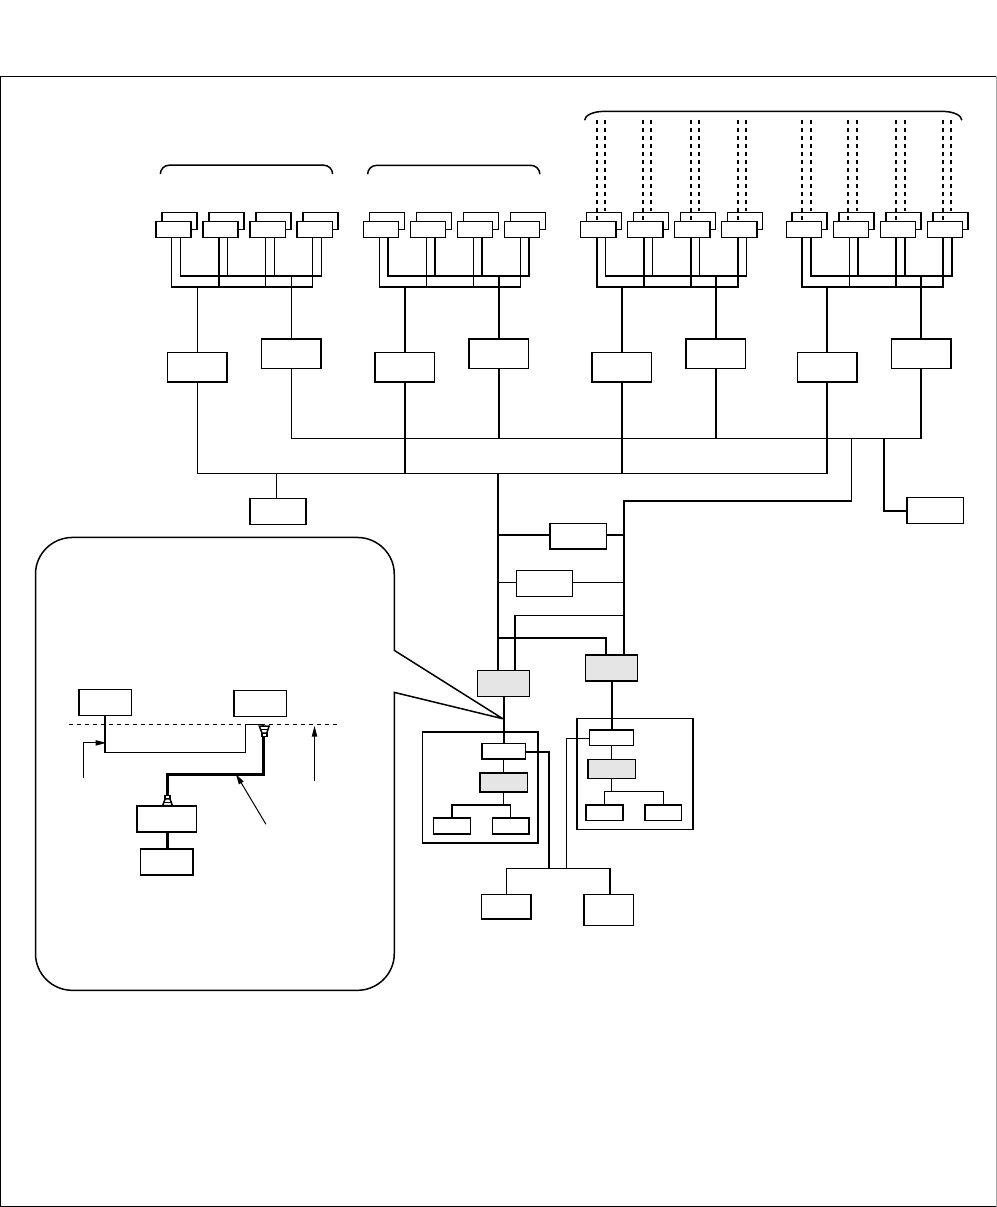
NDA-24307 CHAPTER 6
Page 529
Issue 1
SYSTEM OPERATIONS
Figure 6-45 System Block Diagram in LN (Switching Network Between CPU and GT)
ISAGT: PZ-GT13/PZ-GT20 LANI: PZ-PC19 GT : PH-GT09 TSW: PH-SW12 MUX: PH-PC36
DLKC : PH-PC20 PLO : PH-CK16-A/17-A CLK : PH-CK18 EMA: PH-PC40 IOC : PH-IO24
TSW 00 TSW 10 TSW 01 TSW 11 TSW 02 TSW 12 TSW 03 TSW 13
DLKC 0
IMG 0/2 IMG 1/3
To/From TSW of ISWM
MUXMUXMUX MUX MUXMUX MUXMUXMUXMUX MUXMUX
MUXMUXMUXMUX
TSW I/O BUS
TSW I/O BUS
DLKC 1
LANI LANI
ISAGT
CPU 0
GT 1
EMA IOC/
MISC
CPR 0
LANILANI
ISAGT
CPU 1
CPR 1
MISC BUS
GT 0
PLO 1/
CLK 1
PLO 0/
CLK 0
As shown below, though an external cable is
physically connected between ISAGT 0 and
GT 1, the actual control signal is sent/
received only between ISAGT 0 and GT 0 via
the backboard bus.
GT 1
GT 0
ISAGT0
CPU
IOP0
Backboard
Backboard Bus T
External Cable
Note : As for the ISW, although the cable
connection is the same as above, the
control signal is sent from ISAGT0 to
both IOGT0/1.
Note 3
Note 3
Note 2 Note 2
Note 1: This figure shows the Switching Network diagram only related to the LNs. For the diagram
regarding the ISW. See Figure 6-37.
Note 2: This card is mounted in TSWM0 only.
Note 3: PLO card is mounted in TSWM0 and CLK card is mounted in TSWM1.

CHAPTER 6 NDA-24307
Page 530
Issue 1
SYSTEM OPERATIONS
12.1.3 Manual System Changeover of CPU
To change over the CPU system, the CMODI/CMOD command is normally used. However, if the com-
mand cannot be used for some reason, use the key operations listed below:
Note: For system changeover via the command, see Chapter 8.
Changeover Procedure for CPU of ISW
STEP 1 Determine which CPU is active.
(1) Check the lamp indications on the CPU Display Panel (DSP).
Figure 6-46 CPU in ACT/STBY Mode (ISW)
(2) Check the mate CPU’s STBY mode.
Improper key operations may result in a system down. Operate the related keys, applying
extreme care.
WARNING
Legend
Lamp is ON
:Lamp is OFF
:
Lamp is Flashing
:
Active
IMG1 IMG2
STATUS STATUS
IMG3
CPUOPE WDT IMG0
MBR
STBY
IMG1 IMG2 IMG3
CPUOPE WDT IMG0
MBR
DSP (Front View)
12345678
OFF
1234
OFF
12345678
OFF
12345678
OFF
1234
OFF
12345678
OFF
4
C
0
2
6
A
E
4
C
0
2
6
A
E
The system changeover of CPU can be done only when the mate CPU is in STBY mode. Do
not attempt the changeover if the mate CPU is closed.
WARNING
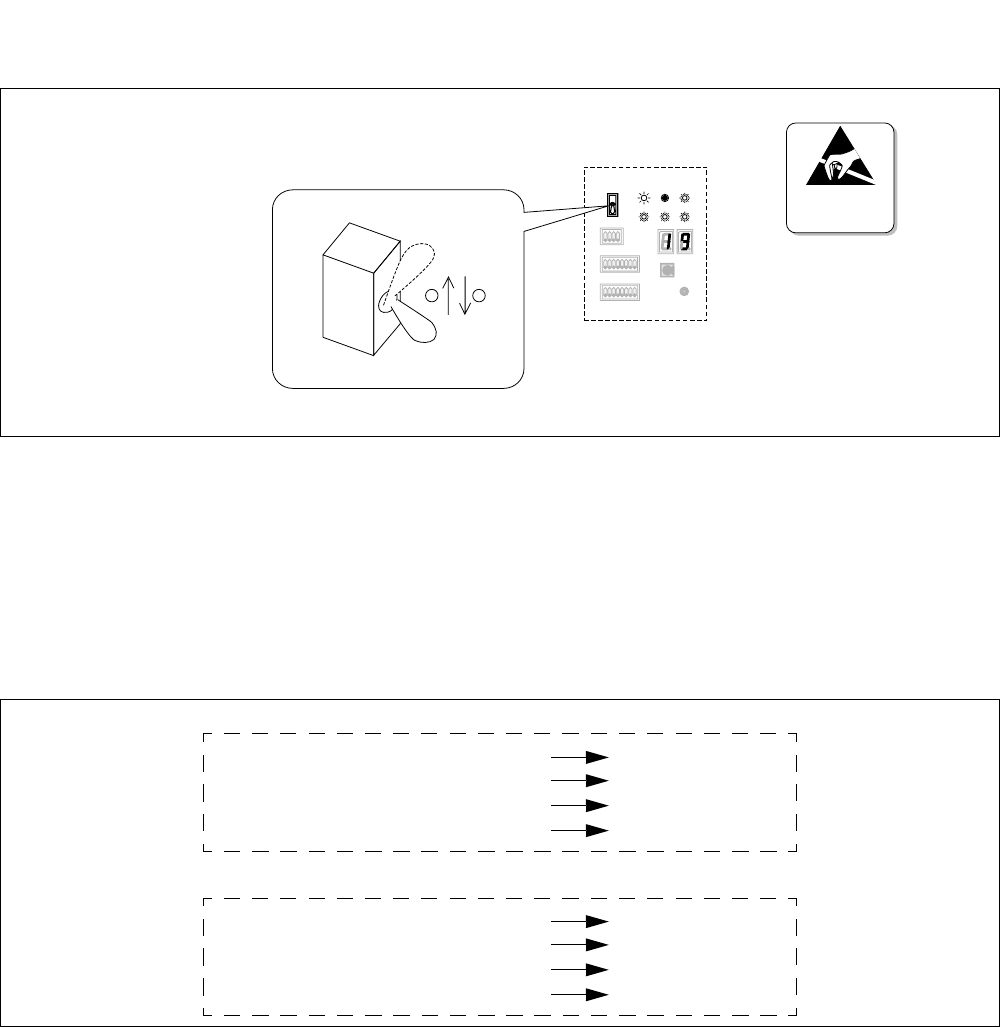
NDA-24307 CHAPTER 6
Page 531
Issue 1
SYSTEM OPERATIONS
STEP 2 Flip the MBR key on the DSP of the active CPU.
Figure 6-47 CPU Changeover via MBR Key (ISW)
Note: If the MBR key remains in the UP position, the CPU stays in its make-busy status. Be sure to return the
key to the DOWN position except in the case of a special purpose.
STEP 3 Confirm the changed lamp indications.
To confirm the CPU changeover, check the lamps on both DSPs. LED indications must change
as shown when the CPU system has been correctly changed over.
Figure 6-48 LED Indications Before and After CPU Changeover (ISW)
STEP 4 Analyze the displayed system messages.
After STEPs 1 through 3 are performed, the system messages [7-C] and [7-D] automatically
display. Confirm that no errors occurred during the CPU changeover process.
Note: When the CPU mode change executes, the MAT (TCP/IP) is once disconnected. Then, log in to the
system again.
After the above steps, set the MBR key as shown below.
The system changeover starts automatically.
12345678
OFF
12345678
OFF
1234
OFF
4
C
0
2
6
A
E
1 2
DSP (Active)
STATUS
ATTENTION
Contents
Static Sensitive
Handling
Precautions Required
CPU Formerly Active After Changeover
CPU Formerly in STBY Mode
CPU OPE
IMG0
IMG1-3
MB/OPE (GT Card)
After Changeover
OFF
Flash (green)
OFF
OFF
: Steady-ON (green)
: Flash (green)
: Flash (green)
: Steady-ON (green)
CPU OPE
IMG0
IMG1-3
MB/OPE (GT Card)
Steady-ON (green)
Steady-ON (green)
Flash (green)
Steady-ON (green)
: OFF
: Flash (green)
: OFF
: OFF
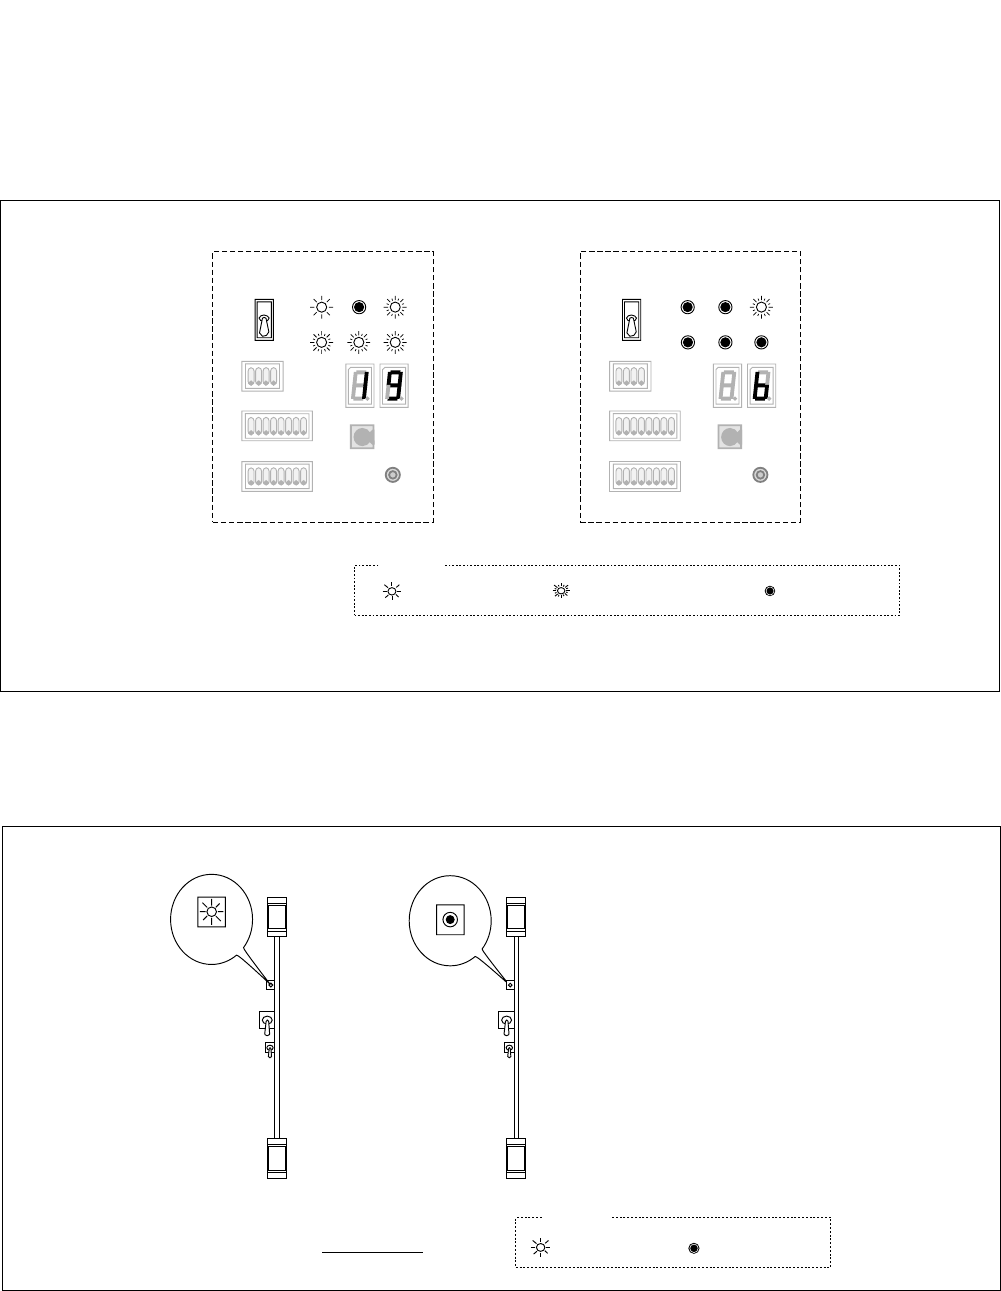
CHAPTER 6 NDA-24307
Page 532
Issue 1
SYSTEM OPERATIONS
Changeover Procedure for CPU of LN
STEP 1 Determine which CPU is active.
(1) Check the lamp indications on the CPU Display Panel (DSP).
Figure 6-49 CPU in ACT/STBY Mode (LN)
The CPU changeover also affects the ACT/ST-BY of GT(s) in the TSWM(0/1). Referring to
Figure 6-50, check the lamp indications on the GT (PH-GT09) card(s).
Figure 6-50 GT in ACT / STBY Mode (LN)
Legend
Lamp is ON
:Lamp is OFF
:
Lamp is Flashing
:
Active
IMG1 IMG2
STATUS STATUS
IMG3
CPUOPE WDT IMG0
MBR
STBY
IMG1 IMG2 IMG3
CPUOPE WDT IMG0
MBR
DSP (Front View)
12345678
OFF
1234
OFF
12345678
OFF
12345678
OFF
1234
OFF
12345678
OFF
4
C
0
2
6
A
E
4
C
0
2
6
A
E
Note: IMG1 through IMG3 lamp indication may differ depending on the system configuration.
MB
MBR
OPE/MB
GT: Active
green
Legend
FRONT VIEW
GT (PH-GT09)
GT: ST-BY
MB
MBR
OPE/MB
Lamp is ON
:Lamp is OFF
:
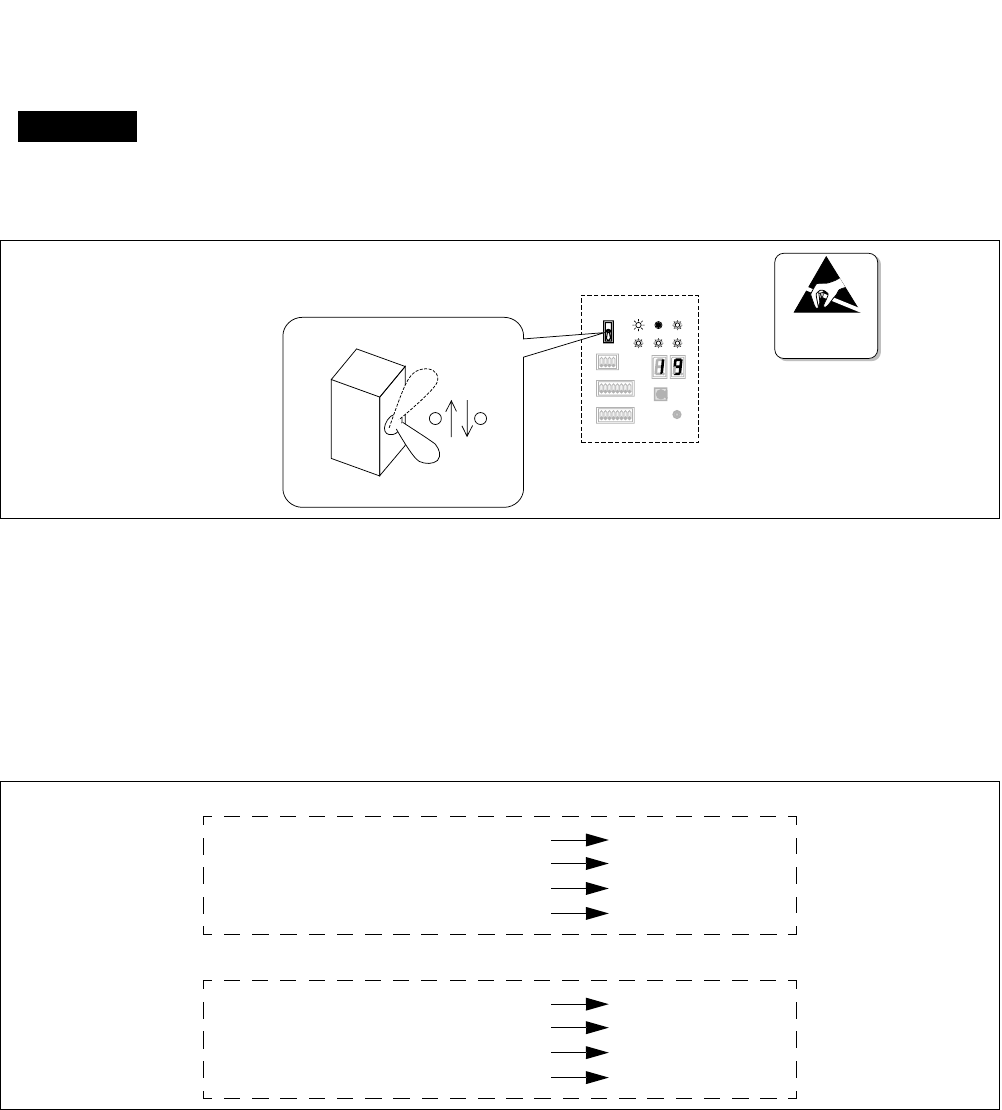
NDA-24307 CHAPTER 6
Page 533
Issue 1
SYSTEM OPERATIONS
(2) Check the mate CPU’s STBY mode. Also check the mate GT’s STBY mode. Refer to
Figure 6-50.
STEP 2 Flip the MBR key on the DSP of the active CPU.
Figure 6-51 CPU Changeover via MBR Key (LN)
Note: If the MBR key remains in the UP position, the CPU stays in its make-busy status. Be sure to return the
key to the DOWN position except in the case of a special purpose.
STEP 3 Confirm the changed lamp indications.
To confirm the CPU changeover, check the lamps on both DSPs. LED indications must change
as shown when the CPU system has been correctly changed over.
Figure 6-52 LED Indications Before and After CPU Changeover (LN)
STEP 4 Analyze the displayed system messages.
After STEPs 1 through 3 are performed, the system messages [7-C] and [7-D] automatically
display. Confirm that no errors occurred during the CPU changeover process.
Note: When the CPU mode change executes, the MAT (TCP/IP) is once disconnected. Then, log in to the
system again.
The system changeover of CPU can be done only when the mate CPU is in STBY mode. Do
not attempt the changeover if the mate CPU is closed.
WARNING
After the above steps, set the MBR key as shown below.
The system changeover starts automatically.
12345678
OFF
12345678
OFF
1234
OFF
4
C
0
2
6
A
E
1 2
DSP (Active)
STATUS
ATTENTION
Contents
Static Sensitive
Handling
Precautions Required
CPU Formerly Active After Changeover
CPU Formerly in STBY Mode
CPU OPE
IMG0
IMG1-3
MB/OPE (GT Card)
After Changeover
OFF
Flash (green)
OFF
OFF
: Steady-ON (green)
: Flash (green)
: Flash (green)
: Steady-ON (green)
CPU OPE
IMG0
IMG1-3
MB/OPE (GT Card)
Steady-ON (green)
Steady-ON (green)
Flash (green)
Steady-ON (green)
: OFF
: Flash (green)
: OFF
: OFF
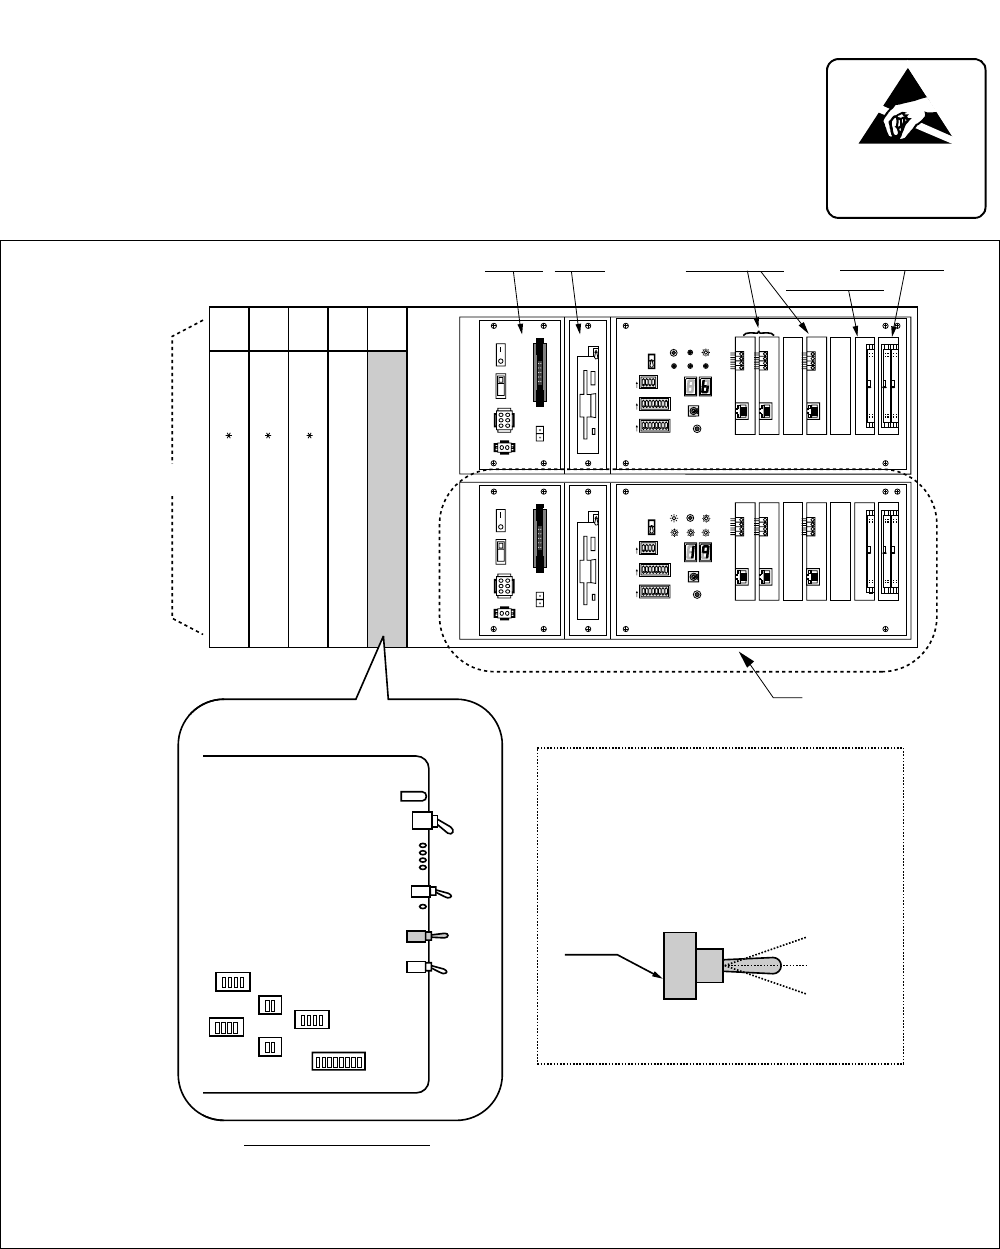
CHAPTER 6 NDA-24307
Page 534
Issue 1
SYSTEM OPERATIONS
12.1.4 Forced Changeover of CPU
Figure 6-53 shows how to perform the forced changeover of CPU by key oper-
ation on the EMA (PH-PC40) card. Because the key operation will cause the en-
tire system to initialize, do not rely on this method except as a last resort. The
LPM is mounted in the LN as as example.
Figure 6-53 Forced CPU Changeover
ATTENTION
Contents
Static Sensitive
Handling
Precautions Required
12345678
OFF
12345678
OFF
1234
OFF
MBR
FDD
ON
OFF
ON
OFF
OUT PWR
IN PWR
5A
HDD
SW MB
SYSTEM SELECT0
SENSE
SYSTEM SELECT1
SYSTEM SELECT2 CPURST
SLOT No. 0 1 2 3 4 5 6
STATUS
IMG1 IMG2 IMG3
CPUOPEWDT IMG0
ON
ON
ON
4
C
0
2
6
A
E
12345678
OFF
12345678
OFF
1234
OFF
MBR
FDD
ON
OFF
ON
OFF
OUT PWR
IN PWR
5A
HDD
SW MB
SYSTEM SELECT0
SENSE
SYSTEM SELECT1
SYSTEM SELECT2 CPURST
SLOT No. 0 1 2 3 4 5 6
STATUS
IMG1 IMG2 IMG3
CPUOPEWDT IMG0
ON
ON
ON
4
C
0
2
6
A
E
00 01 02 03 04
MISC
MISC/IOC
IOC(PH-IO24)
EMA(PH-PC40)
MISC
LPM
CPR
LANI(PZ-PC19) ISAGT(PZ-GT13)
For the forced system changeover, set the CPU-SEL
switch from middle to "Up" or "Down." Note this operation
also leads to system initialization.
1) UP
2) MIDDLE
3) DOWN
For more information, see the "Circuit Card Manual."
: The CPU#1 is placed into the ACT-side.
: Normal setting for dual CPU configuration.
: The CPU#0 is placed into the ACT-side.
(This setting is mandatory for single CPU
system.)
UP
MIDDLE
DOWN
CPU-SEL Key
SW A0
SW92
SW73
SW70
SW62
SW65
OPE/MB
MB
ACT1
CKERR1
ACT0
CKERR0
EMASUP
EMASUP
CPU SEL
NMI SEL
CPU-SEL
EMA(PH-PC40) FACE LAYOUT
ISAGT(PZ-GT20)
PZ-PW92 PZ-IO27
Note 2 Note 1
Note 1: PZ-GT20 card is mounted in the CPR of LN only.
Note 2: In place of PZ-IO27, the CPR may be quipped with PZ-IO28, which does not have the MB key.

NDA-24307 CHAPTER 6
Page 535
Issue 1
SYSTEM OPERATIONS
12.1.5 How to Control Switching Block
The Switching Block denoted here includes the following system equipment:
In LN In ISW
TSW (PH-SW12) IOGT (PH-GT10)
MUX (PH-PC36) TSW (PU-SW00)
DLKC (PH-PC20) HSW (PU-SW01)
PLO (PH-CK16-A) PLO (PH-CK16-A/17-A)
CLK (PH-CK18)
GT (PH-GT09)
Perform the required system changeover by using the CMODI/CMOD command or by operating the
relevant key on the IOGT/PLO card. Refer to Table 6-9.
Note: The changeover of IOGT completely affects the whole system denoted in this section, except for the GT,
PLO, and CLK. If the Speech Path System is changed over, be sure to make a follow-up check to see if
the whole related systems (TSW, HSW, MUX, DLKC) are securely changed over. (The check can be
made by a simple glimpse at the OPE or ACT lamps on each circuit card)
Table 6-9 Changeover of Switching Block
Type Operations Remarks
•Speech Path Changeover by the
CMODI command
Note 1
Use the CMODI command (for the changeover
on both system/node basis by logging in to ISW)
or
Use CMOD (for the changeover only on a node
basis)
See Chapter 8.
All the OPE or ACT lamps on the
Speech Path System, except the
GT, PLO and CLK cards, which
were formerly active, go OFF.
All the OPE or ACT lamps on the
Speech Path System, except the
GT, PLO and CLK cards, which
were formerly STBY, light steady-
green.
•Speech Path System Changeover
by Key Operation on the active
IOGT card
Note 1
On the active IOGT card, turn the MBR key UP.
Note 2
Return the MBR key to the original position
(DOWN) after the TSW ACT lamp goes OFF on
the IOGT card.
See Section 12.1.6, Manual System Changeover
of Speech Path System.
All the OPE or ACT lamps on the
Speech Path system, except GT,
PLO and CLK cards, which were
formerly active, go OFF.
All the OPE or ACT lamps on the
other side Speech Path System,
except the GT, PLO and CLK
cards light steady-green.
ATTENTION
Contents
Static Sensitive
Handling
Precautions Required

CHAPTER 6 NDA-24307
Page 536
Issue 1
SYSTEM OPERATIONS
Note 1: These operations cause a momentary interruption in speech paths. It can be ignored as far as ordinary
telephone calls are concerned. Since interruption might cause bit errors, care should be take when
data communications are involved.
Note 2: When changing over the Speech Path System on a node basis, flip the MBR key on that node’s GT (PH-
GT09) card. Refer to Figure 6-38.
•PLO and CLK Changeover in the
ISW/LN by Key Operation
Note 1
On the active PLO card in ISW/LN, turn the
MBR key UP.
Return the MB key to the original position
(DOWN) after the OPE lamp goes OFF on the
PLO card.
See Section 12.1.7, Manual System Changeover
of PLO/CLK.
The OPE lamp on the PLO/CLK
card, which was formerly active,
goes OFF.
The OPE lamp on the PLO/CLK
card, which was formerly STBY,
goes steady-green.
Table 6-9 Changeover of Switching Block (Continued)
Type Operations Remarks
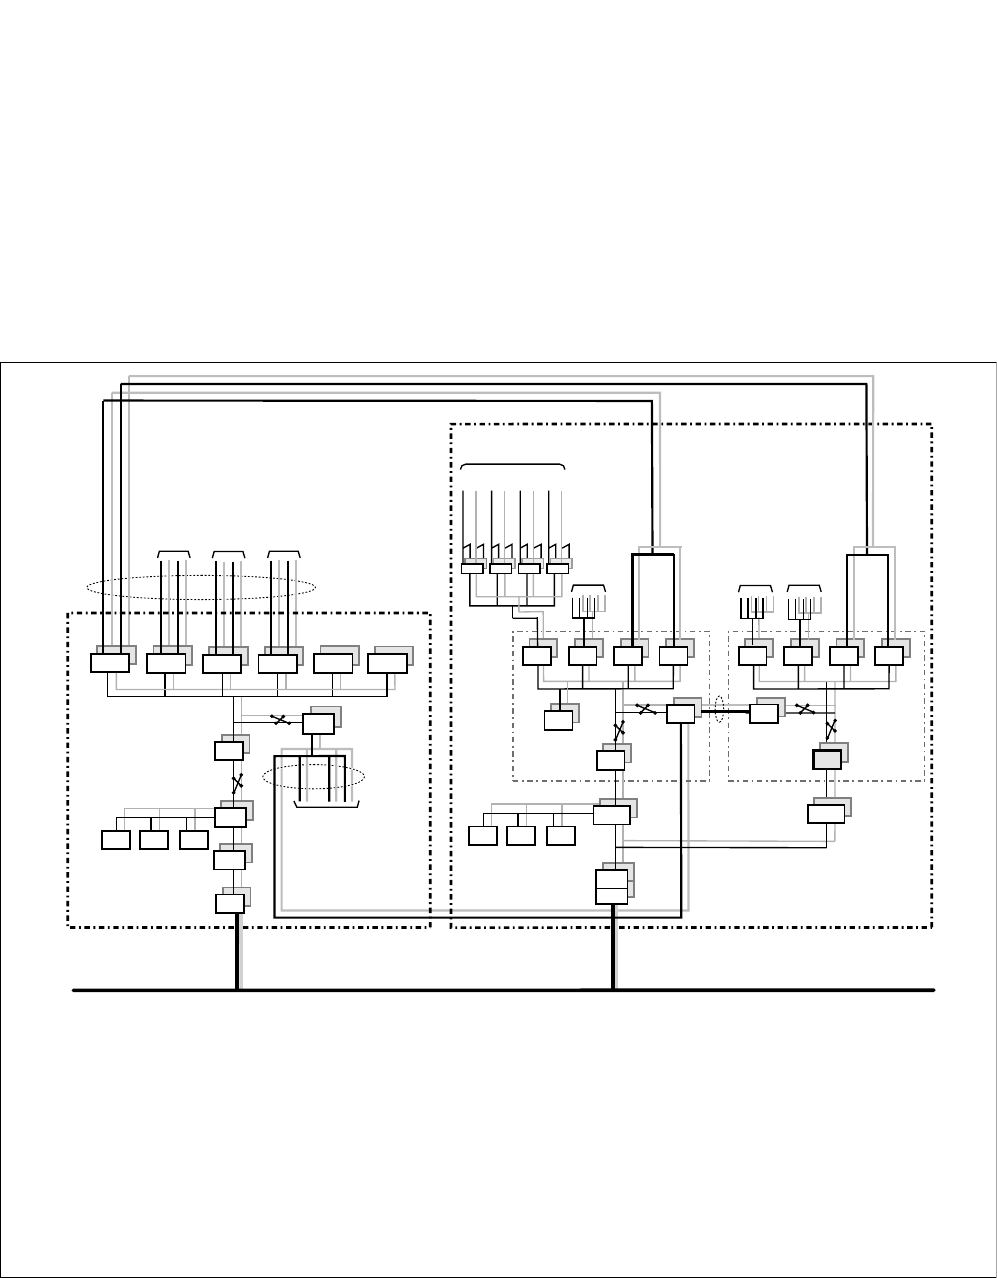
NDA-24307 CHAPTER 6
Page 537
Issue 1
SYSTEM OPERATIONS
12.1.6 Manual System Changeover of Speech Path System
To changeover the ACT/STBY of Speech Path System, the CMODI/CMOD command is normally
used. However, if for some reason the command cannot be used, use the key operations listed below.
Note 1: The command CMOD cannot be used to change over the Speech Path mode on a system basis. This
command is only for the changeover on each node basis.
Note 2: This section gives a detail on how to change the Speech Path mode on a system basis. When the mode
change is necessary on a node basis, flip the MBR key on the GT (PH-GT09) card in that node’s
TSWM0. For more information, refer to Figure 6-38 or the Installation Manual.
Figure 6-54 System Block Diagram (Switching Network for Speech Path System)
< ISW (Inter-node Switch) >
ISAGT: PZ-GT13 LANI: PZ-PC19 IOGT: PH-GT10 TSW: PU-SW00
HSW: PU-SW01 PLO: PH-CK16-A/17-A EMA: PH-PC40 IOC: PH-IO24
< LN (Local Node) >
ISAGT-A: PZ-GT13 ISAGT-B: PZ-GT20 LANI: PZ-PC19 GT: PH-GT09 TSW: PH-SW12 MUX: PH-PC36
DLKC: PH-PC20 PLO: PH-CK16-A CLK: PH-CK18 EMA: PH-PC40 IOC: PH-IO24
TSWM0 TSWM1
MISC IOC EMA
PLO
TSW00 TSW01 TSW02 TSW03
GT
ISAGT-A
CPU
LANI
Fusion Link
ISW LN0
To PLO of
LN1 through 3
DLKC
PLO
IOGT
ISAGT
CPU
LANI
To MUX
(IMG1)
To MUX
(IMG2)
To MUX
(IMG3)
CLK
TSW01 TSW02 TSW03 HSW00
To TSW
of LN3
To TSW
of LN1 To TSW
of LN2
To LANI of
LN1 through 3
HSW01
TSW00
Line/Trunk PM
IMG 0
PM BUS
PCM HW
PM BUS
PCM HW
PM BUS
PCM HW
PM BUS
PCM HW
MUX MUX MUX MUX
MISC IOC EMA
TSW00 TSW01 TSW02 TSW03
GT
ISAGT-B
Note: If the MBR key is once flipped on the active IOGT card, all the Speech Path related systems (TSW,
HSW, DLKC and MUX) in the same switching block are totally changed over. However, the ACT/
STBY of GT (PH-GT09 in LN) and PLO/CLK in both ISW and LNs are not affected.
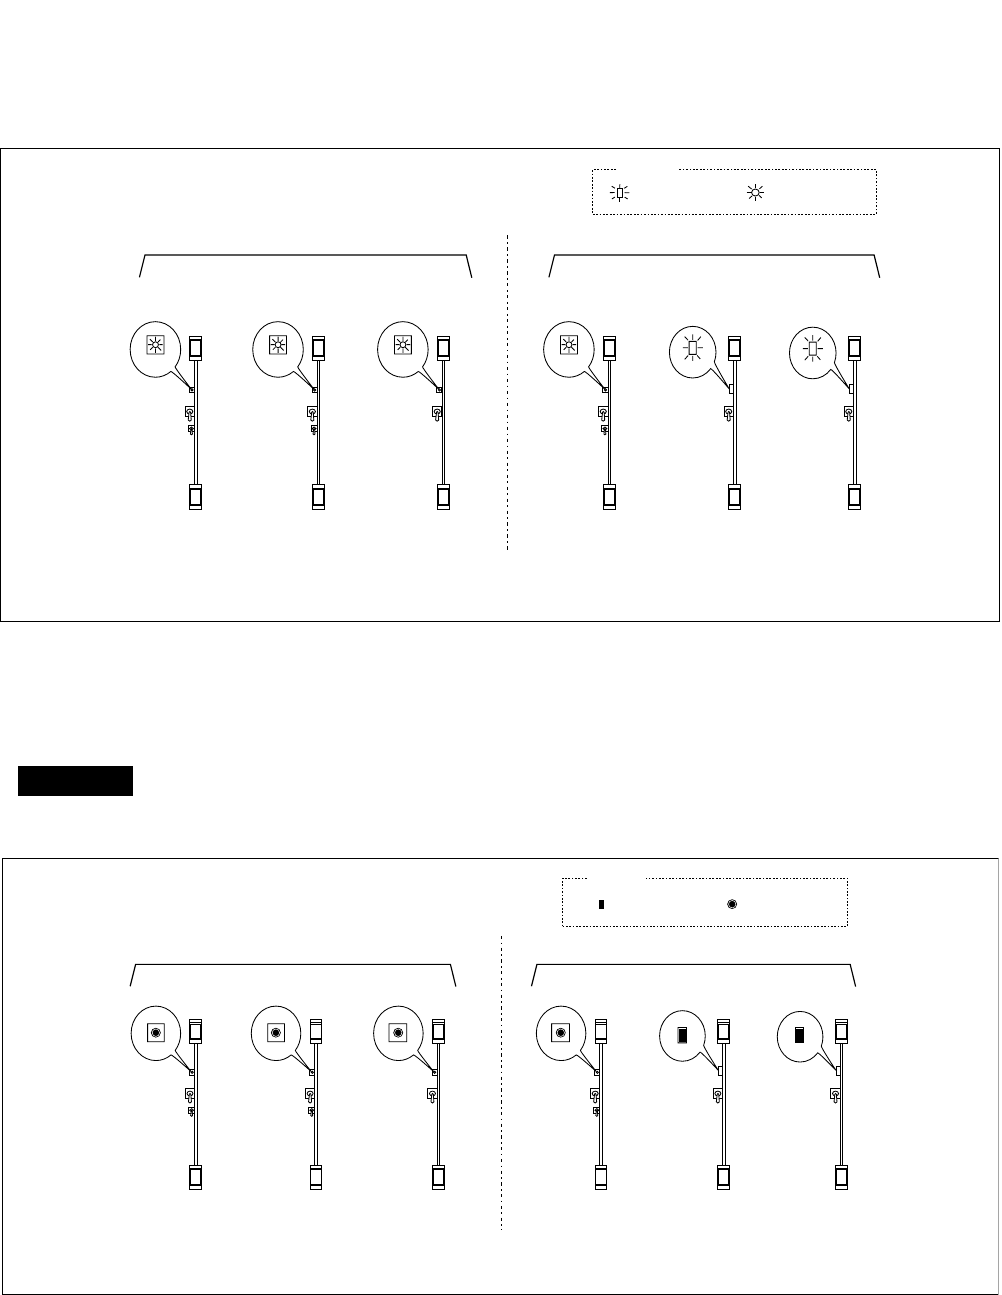
CHAPTER 6 NDA-24307
Page 538
Issue 1
SYSTEM OPERATIONS
STEP 1 Confirm the active Speech Path System.
(1) Check all the lamp indications below, which are in the same switching block.
Figure 6-55 IOGT/TSW/HSW/DLKC/MUX in ACT Mode
(2) Confirm the STBY mode of mate Speech Path System. Check all the lamp indications be-
low, which are in the same switching block.
Figure 6-56 IOGT/TSW/HSW/DLKC/MUX in STBY Mode
TSW: Active
TSW MB
TSW MBR
TSW ACT
green
HSW: Active
MB
HSW ACT
green
IOGT: Active
MB
MBR
TSW ACT
green
MUX: Active
MUX ACT
MB
green
TSW: Active
MB
TSW MBR
TSW ACT
green
DLKC: Active
PU-SW00 PU-SW01 PH-GT10 PH-PC36 PH-SW12 PH-PC20
OPE/MB
MB
green
Circuit Cards in ISW Circuit Cards in LN
Legend
Lamp is ON
:Lamp is ON
:
Note: Be sure to check all the circuit cards in the same Switching Block referring to the lamp indications
above.
The ACT/STBY of Speech Path System can be changed over only when the mate system is
in STBY mode. Do not attempt the changeover if the mate Speech Path System is closed.
WARNING
TSW: ST-BY
TSW MB
TSW MBR
TSW ACT
HSW: ST-BY
MB
HSW ACT
IOGT: ST-BY
MB
MBR
TSW ACT
MUX: ST-BY
MUX ACT
MB
TSW: ST-BY
MB
TSW MBR
TSW ACT
DLKC: ST-BY
OPE/MB
MB
Legend
Lamp is OFF
:Lamp is OFF
:
ISW LN
PU-SW00 PU-SW01 PH-GT10 PH-PC36 PH-SW12 PH-PC20
Note: Be sure to check all the circuit cards in the same Switching Block referring to the lamp indications
above.
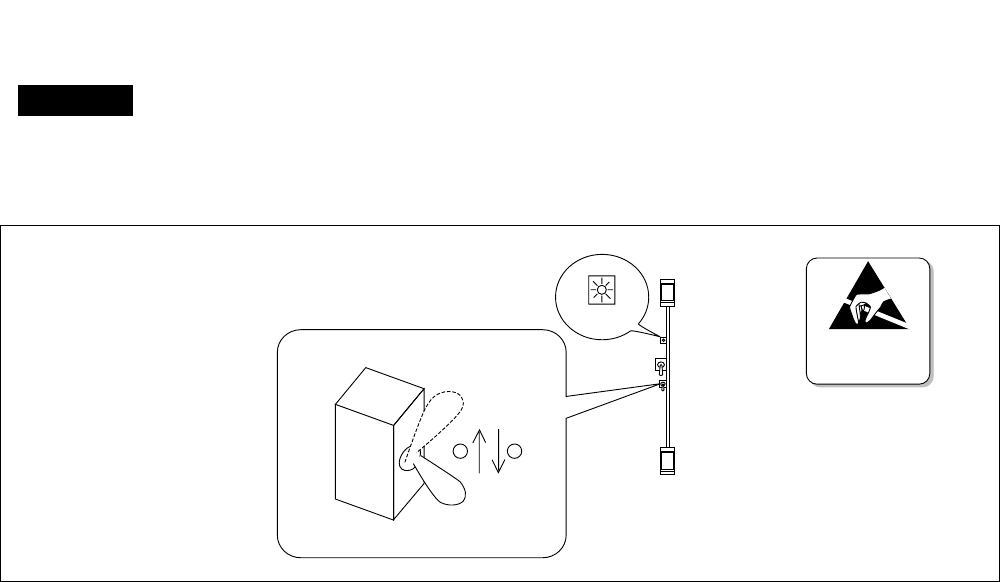
NDA-24307 CHAPTER 6
Page 539
Issue 1
SYSTEM OPERATIONS
STEP 2 Flip the MBR key on the active IOGT card in ISW.
Figure 6-57 Speech Path System Changeover via Active IOGT MBR Key
Note: If the MB key is turned ON (UP), the IOGT card is forcibly placed in a make-busy status. Therefore, do
not operate the MB key by mistake. Also, after the MBR key is flipped, be sure to return the key to the
original position (DOWN).
STEP 3 Confirm the changed lamp indications.
(1) To confirm the imposed Speech Path System changeover, check all the lamps on the cards
shown in Figure 6-58, which are in the relevant switching blocks.
Improper key operations may result in a system down. Operate the related keys, using extreme
care.
WARNING
After the above steps, set the MBR key as shown below.
The system changeover starts automatically.
1 2
IOGT (Active)
ATTENTION
Contents
Static Sensitive
Handling
Precautions Required
MB
MBR
OPE/MB
Steady-green
CHAPTER 6 NDA-24307
Page 540
Issue 1
SYSTEM OPERATIONS
Figure 6-58 LED Indications Before and After Speech Path System Changeover
STEP 4 Analyze the displayed system messages.
After STEPs 1 through 3 are performed, the system messages [7-E], [7-F], and [1-T] will
automatically display. Confirm that no errors occurred during the Speech Path System
changeover process.
Note: When the Speech Path System changeover is executed in each LN independently, the system messages
to be displayed at this time are 7-E, 7-F, and 1-T.
Switching Block Formerly Active After Changeover
TSW ACT (IOGT card): Steady-ON (green) OFF
TSW ACT (TSW card) : Steady-ON (green) OFF
HSW ACT (HSW card): Steady-ON (green) OFF
Switching Block Formerly stby After Changeover
TSW ACT (IOGT card): OFF Steady-ON (green)
TSW ACT (TSW card) : OFF Steady-ON (green)
HSW ACT (HSW card): OFF Steady-ON (green)
LED Indications at the ISW
Switching Block Formerly Active After Changeover
TSW ACT (TSW card) : Steady-ON (green) OFF
MUX ACT (MUX card) : Steady-ON (green) OFF
OPE/MB (DLKC card) : Steady-ON (green) OFF
Switching Block Formerly stby After Changeover
TSW ACT (TSW card) : OFF Steady-ON (green)
MUX ACT (MUX card) : OFF Steady-ON (green)
OPE/MB (DLKC card) : OFF Steady-ON (green)
LED Indications at the LNs
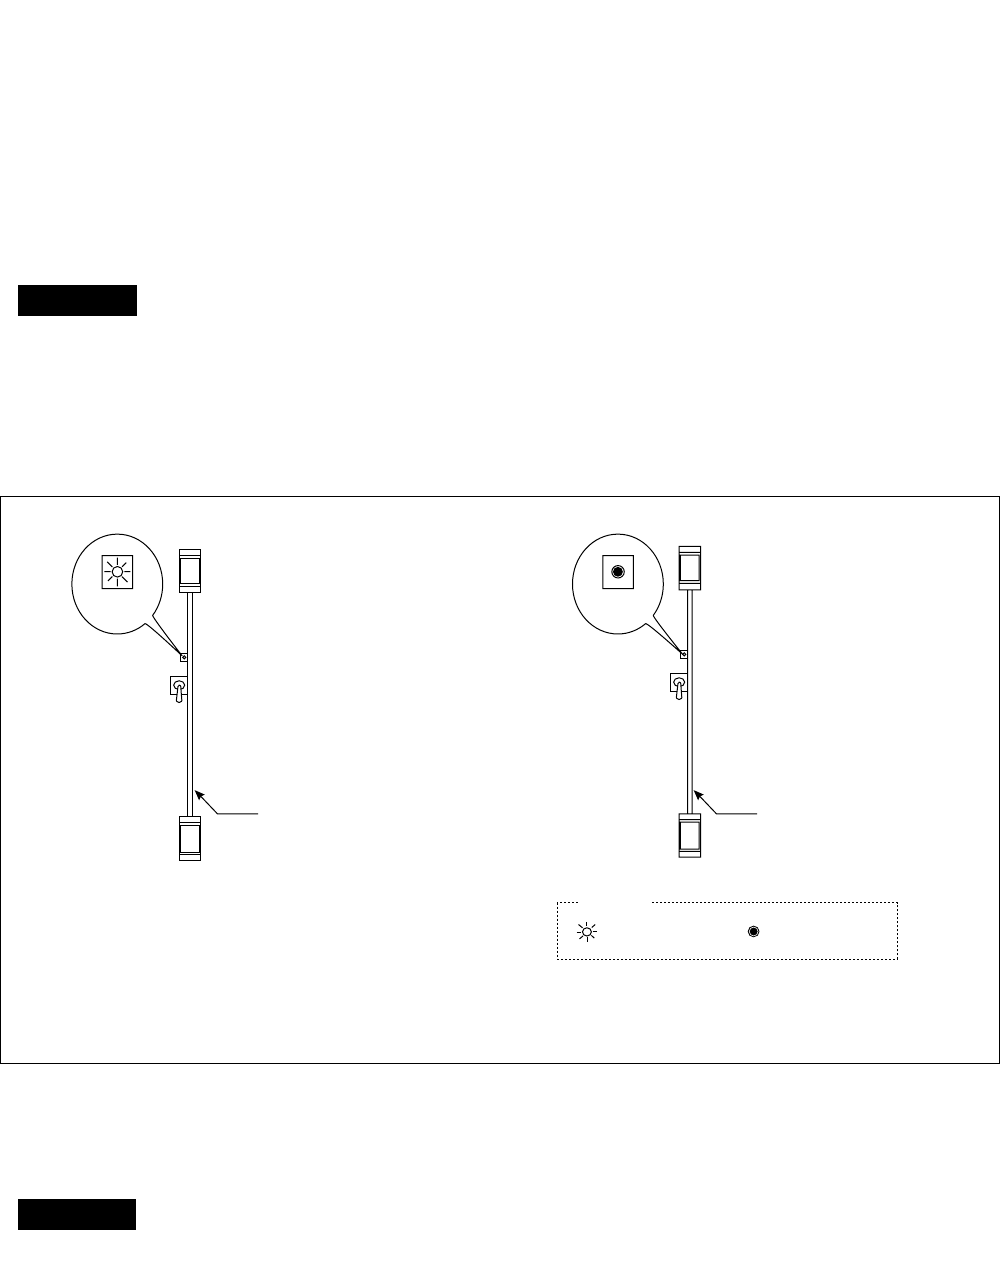
NDA-24307 CHAPTER 6
Page 541
Issue 1
SYSTEM OPERATIONS
12.1.7 Manual System Changeover of PLO
To change over the system of Phase Lock Oscillator (PLO)/Clock (CLK), use the key operations listed
below at a specific LN/ISW.
Note: Though the PLO/CLK belongs to the Switching Block as explained in Section 12.1.5, its ACT/STBY
Switching Network is separate from that of the Speech Path System. Therefore, the changeover of the
PLO/CLK must be independently performed at each LN/ISW.
STEP 1 Confirm the active PLO. When performing the changeover at the LN, also check the active
CLK.
(1) Check the lamp indications.
Figure 6-59 PLO/CLK in ACT/STBY Mode
(2) Check the mate PLO’s STBY mode. When performing the changeover at the LN, check the
mate’s CLK’s STBY mode.
Improper key operations may result in a system down. Operate the related keys, using extreme
care.
WARNING
PH-CK16-A/17-A, PH-CK18 (Front View)
PLO/CLK: Active PLO/CLK: ST-BY
MB
PLO (PH-CK16-A/17-A)
CLK (PH-CK18) PLO (PH-CK16-A/17-A)
CLK (PH-CK18)
green
MB
Legend
Lamp is ON
:Lamp is OFF
:
OPE OPE
Note: ACT/STBY of PLO can be changed over on a node basis, not on a network/system basis. Therefore,
check the PLO/CLK cards only in that specific LN/ISW. Refer to Figure 6-37 and Figure 6-38.
The changeover of PLO/CLK system can be done only when the mate PLO/CLK is in STBY
mode. Do not attempt the changeover if the mate PLO/CLK is closed.
WARNING
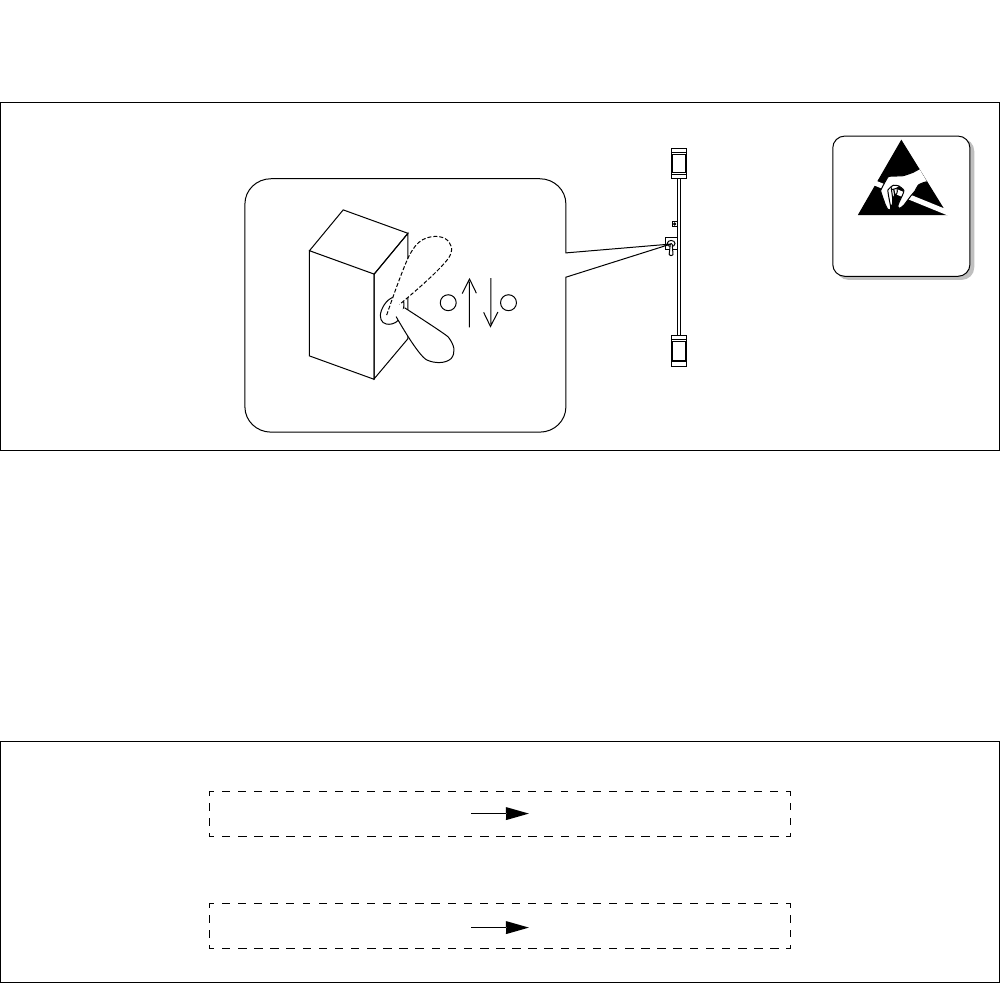
CHAPTER 6 NDA-24307
Page 542
Issue 1
SYSTEM OPERATIONS
STEP 2 Flip the MB key on the PLO card.
Figure 6-60 PLO Changeover via MB Key
Note: If the MB key remains in the UP position, the PLO system also stays in its make-busy status. Be sure to
return the key DOWN except in the case of a special purpose.
STEP 3 Confirm the changed lamp indications.
(1) To affirm the imposed PLO changeover, check the following lamps on both PLO cards. The
LED indications must change as follows when the PLO system has been correctly changed
over. When performing the changeover at the LN, check the CLK’s lamps.
Figure 6-61 LED Indications Before and After PLO/CLK Changeover
STEP 4 Analyze the displayed system messages.
After STEPs 1 through 3 are performed, the system messages [7-U] and [7-V] will
automatically display. Make sure that no errors occurred during the PLO changeover process.
After the above steps, set the MB key as shown below.
Then, the system changeover starts automatically.
1 2
PLO: ActiveMB key
ATTENTION
Contents
Static Sensitive
Handling
Precautions Required
MB
OPE
PLO/CLK Formerly Active After Changeover
PLOCLK Formerly in STBY Mode After Changeover
OPE: Steady-ON (green) OFF
OPE: OFF Steady-ON (green)

NDA-24307 CHAPTER 6
Page 543
Issue 1
SYSTEM OPERATIONS
12.2 Initialization
12.2.1 General
This section explains the initialization types:
System Initialization
•System Initialization by turning ON the Power Supply, Section 12.2.2
•System Initialization by Key Operations on the TOPU, Section 12.2.3
Procedure #1 through Procedure #5
•System Initialization by the keys on the CPU Front Panel, Section 12.2.4
•System Initialization by the SINZ/SINZ1 Command, Section 12.2.5
Peripheral Equipment Initialization (Line/Trunk Initialization), Section 12.2.6
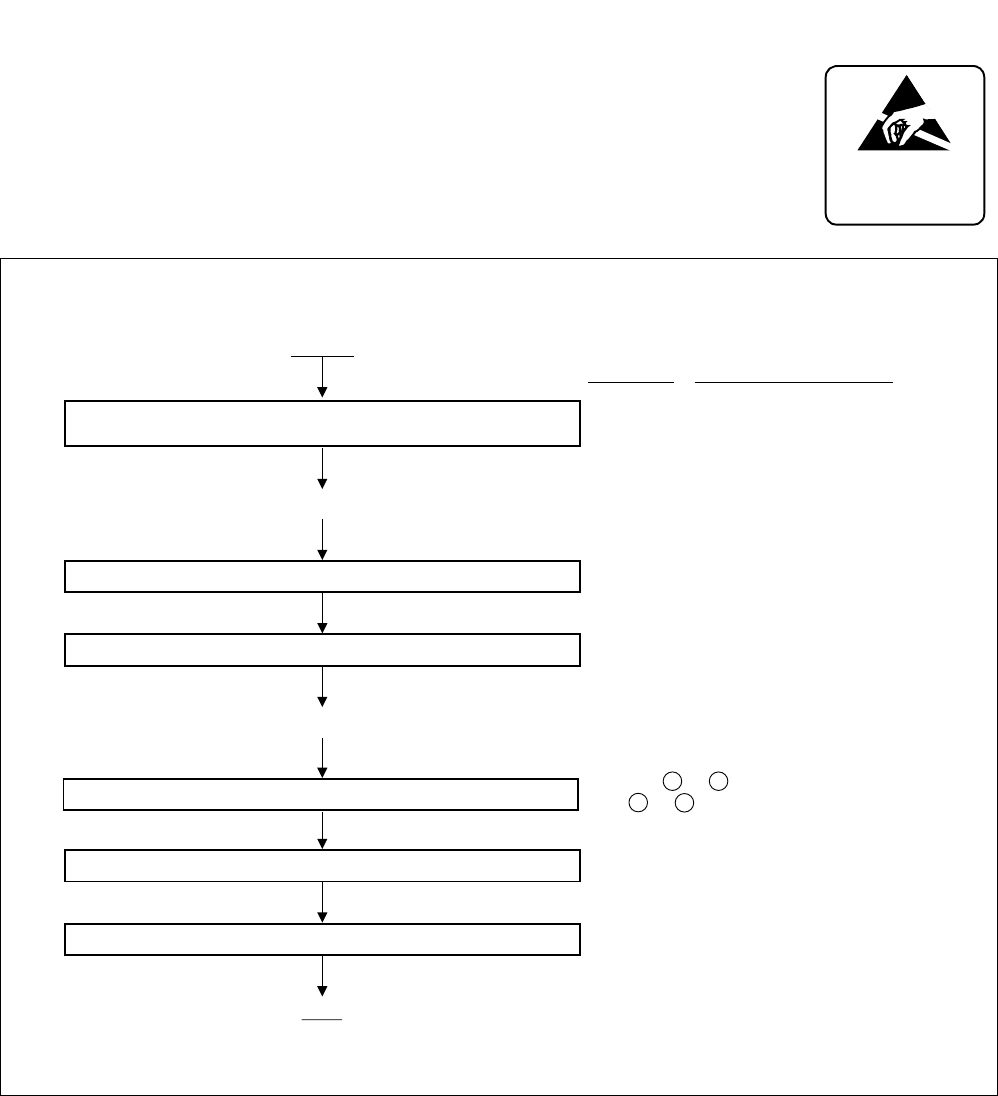
CHAPTER 6 NDA-24307
Page 544
Issue 1
SYSTEM OPERATIONS
12.2.2 System Initialization by Turning ON the Power Supply
This initialization executes when the power supply to a node (ISW/LN) has
stopped. Follow the procedure in Figure 6-62.
Figure 6-62 System Initialization by Turning ON the Power Supply
ATTENTION
Contents
Static Sensitive
Handling
Precautions Required
Confirm all switches in the node are turned “OFF”
on PWR cards.
<The power supply to the node is restored.>
<Execution of Initialization>
START
Confirm input source power to the node is normal.
Turn “ON” the power supply at PWR cards.
Confirm lamp indications on the DSP of CPR.
Clear the alarm by pressing the ALM RST key on the TOPU.
Use the ATIM/ATIMN command to adjust the date and time.
MODULE
LPM:
PIM:
ISWM/TSWM:
Check the INPUT voltage is
normal at the power terminals.
Turn ON the power supply referring to
Section 12.3.
Refer to 1 or 3 of Table 6-10 for DSP 0,
and 2 or 4 of the table for DSP 1.
CIRCUIT CARDS
PWRU 0/PWRU 1 (PZ-PW92)
PWR 0(PA-PW55-A)/
PWR 1(PA-PW54-A)
PWR SW 0/ 1(PH-PW14)
END
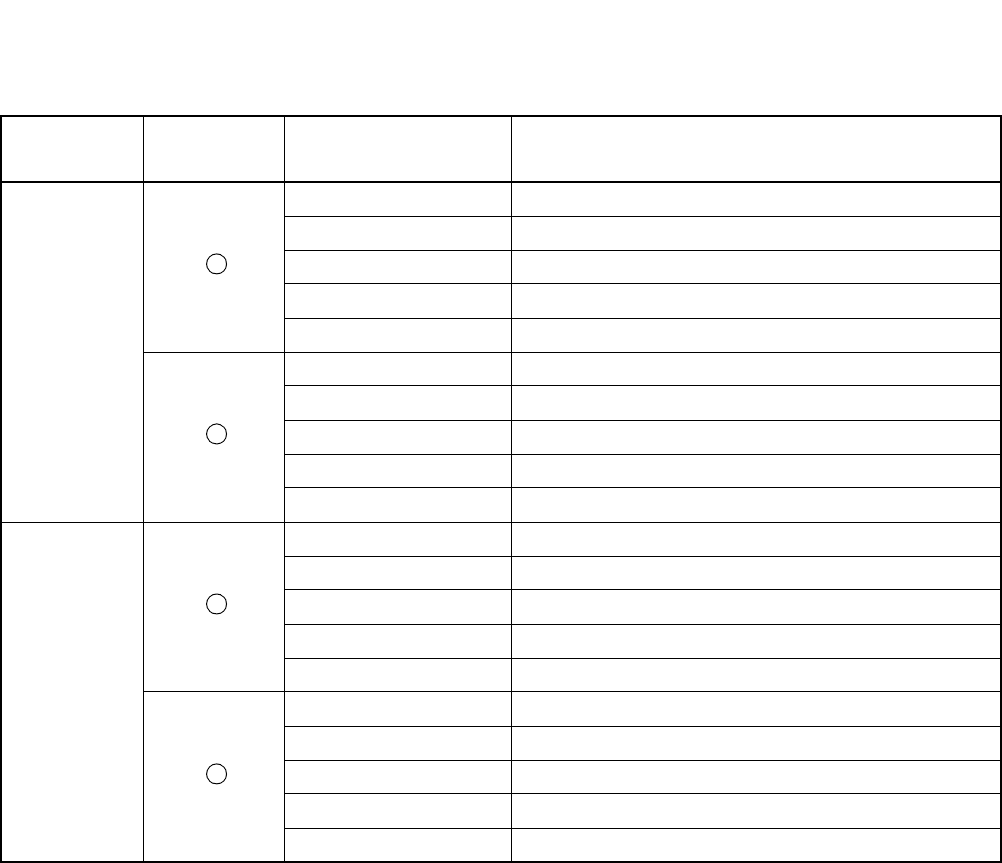
NDA-24307 CHAPTER 6
Page 545
Issue 1
SYSTEM OPERATIONS
Table 6-10 Lamp Indications on DSP of CPR
NODE ACT/
ST-BY LAMP ON DSP STATE
ISW ACT CPU OPE Lights Green
IMG 0 Lights Green
IMG 1 Lights Green
IMG 2 Lights Green (when LN 2 exists)
IMG 3 Lights Green (when LN 3 exists)
STBY CPU OPE OFF
IMG 0 Flashes Green
IMG 1 OFF
IMG 2 OFF
IMG 3 OFF
LN ACT CPU OPE Lights Green
IMG 0 Flashes Green
IMG 1 Flashes Green
IMG 2 Flashes Green (when IMG 2 exists)
IMG 3 Flashes Green (when IMG 3 exists)
STBY CPU OPE OFF
IMG 0 Flashes Green
IMG 1 OFF
IMG 2 OFF
IMG 3 OFF
1
2
3
4

CHAPTER 6 NDA-24307
Page 546
Issue 1
SYSTEM OPERATIONS
12.2.3 System Initialization by Key Operations on TOPU
Table 6-11 shows the system initialization procedure. Figure 6-63 shows the initial program load
conceptional diagram.
Table 6-11 System Initialization Procedure Types
TYPE DESCRIPTION
Procedure 1
(Table 6-12)System Initialization without Loading The whole system or a specific node (ISW/LN) is
initialized. All communications are forcibly released.
System restarts with current Main Memory Files and
Office Data Files that exist on DRAM.
Procedure 2
(Table 6-13)System Initialization with Office Data Loading The whole system or a specific node (ISW/LN) is
initialized. All communications are forcibly released.
System transfers Office Data Files from HDD to DRAM.
System restarts with the transferred Office Data Files and
the current Main Memory Files.
Procedure 3
(Table 6-14)System Initialization with Program Loading The whole system or a specific node (ISW/LN) is
initialized. All communications are forcibly released.
System transfers Main Memory Files from HDD to
DRAM. System restarts with the transferred Main
Memory Files and the current Office Data Files.
Procedure 4
(Table 6-15)System Initialization with Office Data and
Program Loading The whole system or a specific node (ISW/LN) is
initialized. All communications are forcibly released.
System transfers both Main Memory Files and Office
Data Files from HDD to DRAM. System restarts with the
transferred Main Memory Files and the transferred Office
Data Files.
Procedure 5
(Table 6-16)System Initialization by Phase 1 Restart The whole system or a specific node (ISW/LN) is
initialized. All communications, except for the following
two-way connections that have already been established,
are forcibly released:
•Basic two-way connections (STN-STN, STN-TRK,
TRK-TRK)
•Fixed connections
•Two-way connections established on a Fusion Link
Note 1: STN-ATT connection is not included in
the two-way connection list cited
above. These kind of calls are forcibly
released once the initialization
executes.
Note 2: When a calling party hears the Ring
Back Tone, the ORT is additionally
provided, and the call is placed into the
Dial Tone (DT) connection.
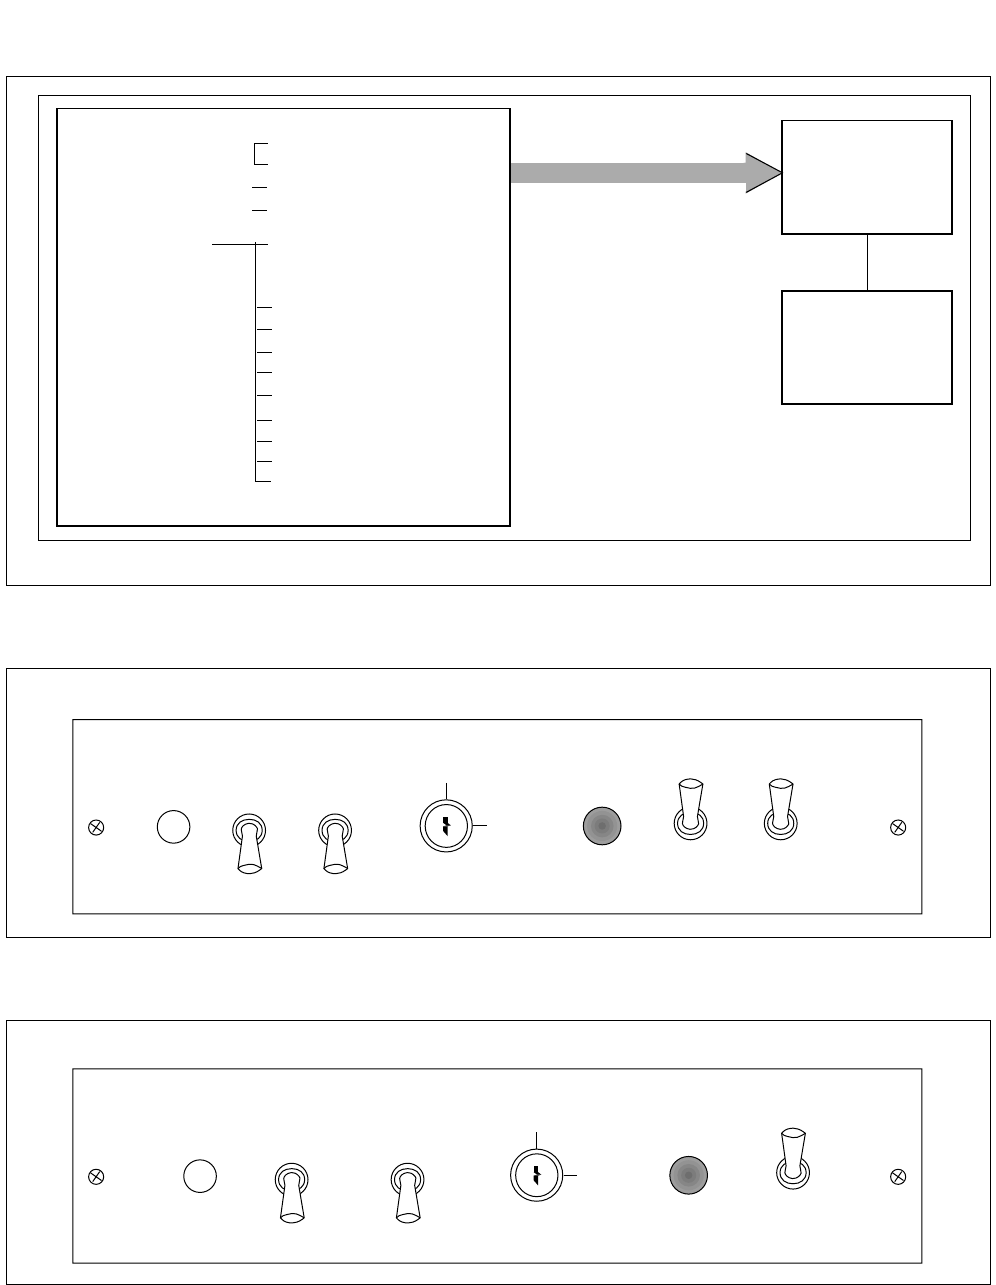
NDA-24307 CHAPTER 6
Page 547
Issue 1
SYSTEM OPERATIONS
Figure 6-63 Conceptional Diagram of Initial Program Load
Figure 6-64 Keys on the TOPU (ISW)
Figure 6-65 Keys on the TOPU (LN)
<DRAM>
<CPU>
<HDD>
Main Memory Files Basic Software (#2~#11)
(=PROGRAM) Standard Service Software
IMAT Software (#1~#2)
TCP/IP Software (#1)
Office Data Files Data Memory (ASYD, AUNT,
(=SYSTEM DATA) ANPD, ASPA,
ASDT, etc.)
Call Forwarding Data
Speed Calling Data
Name Display Data
User Assign Soft Key Data
Number Sharing Data
RCF
NDM
LDM
Call Block Data
PBX
Initial Program Load
ALM
RST ON
OFF
PFT
START
INITIAL
ON
OFF
EFFECT
SYSTEM
SELF
INITIAL
SELECT
LOAD
NON LOAD
PROGRAM
NON LOAD
SYSTEM DATA
LOAD
< PZ-DK227 >
ALM
RST ON
OFF
PFT
START
INITIAL
ON
OFF
EFFECT
LOAD
NON LOAD
PROGRAM
NON LOAD
SYSTEM DATA
LOAD
<PZ-DK222>
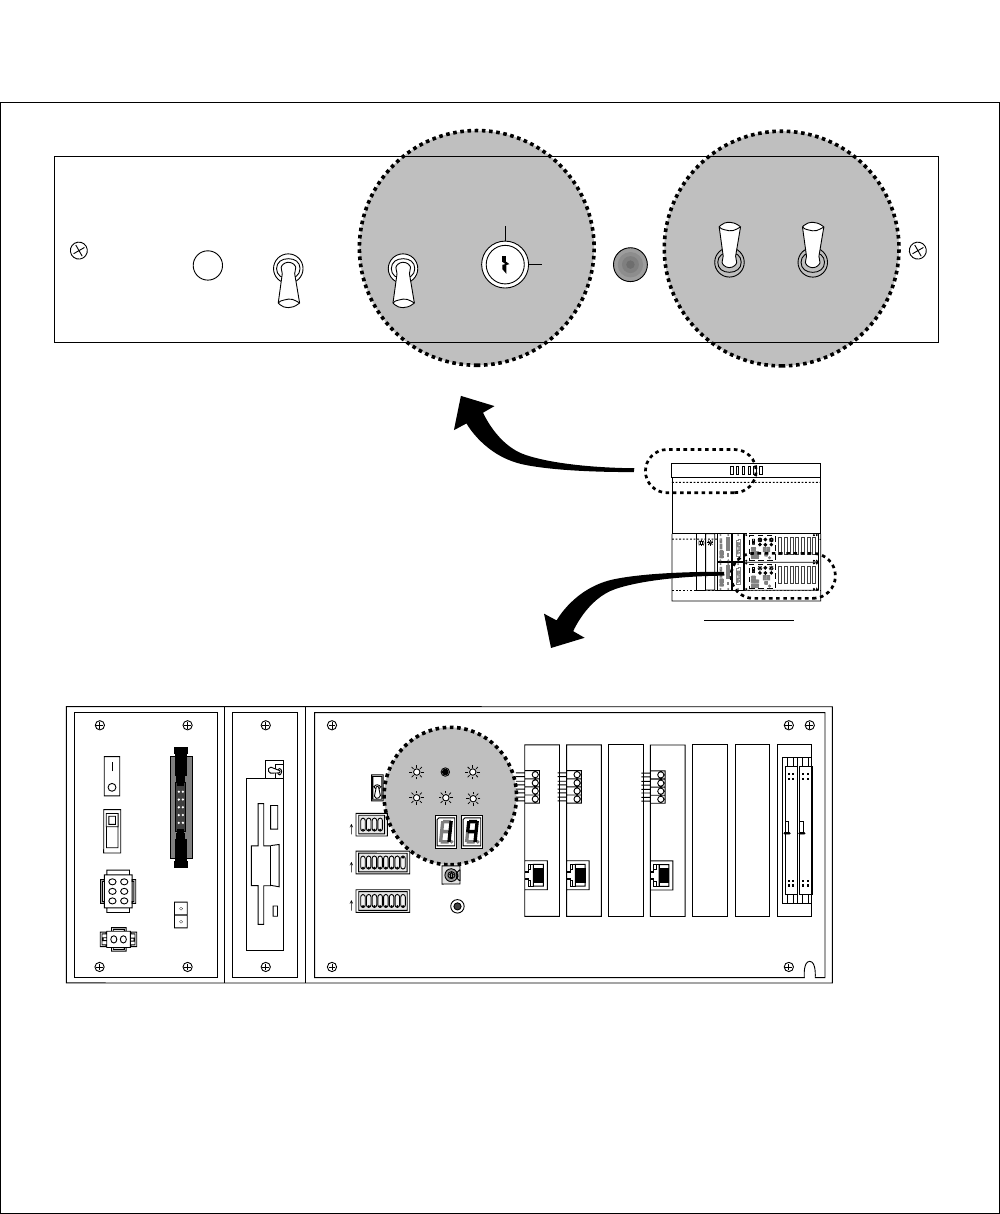
CHAPTER 6 NDA-24307
Page 548
Issue 1
SYSTEM OPERATIONS
To initialize the system, check the lamp indications in Figure 6-66, and operate the keys on the TOPU.
Figure 6-66 Related Keys and LEDs for System Initialization
LOAD
NON LOAD
PROGRM NON LOAD
SYSTEM DATA
LOAD
12345678
OFF
12345678
OFF
1234
OFF
MBR
FDD
ON
OFF
ON
OFF
OUT PWR
IN PWR
5A
HDD
SW MB
SYSTEM SELECT2 CPURST
Note 2
Note 3
SLOT No. 0 1 2 3 4 5 6
ON
ON
ON
ALM
RST ON
OFF
PFT
ON
OFF
START
INITIAL EFFECT
03 04
FRONT VIEW
Ex. ISW
..........
..........
12345678
OFF
1234
OFF
12345678
OFF
4
C
0
2
6
A
E
12345678
OFF
1234
OFF
12345678
OFF
4
C
0
2
6
A
E
4
C
0
2
6
A
E
SENSE
SYSTEM SELECT0
SYSTEM SELECT1
STATUS
IMG1 IMG2 IMG3
CPUOPE WDT IMG0
EX. <PZ-DK227: Face Layout>
<CPR: Face Layout>
SYSTEM
SELF
INITIAL
SELECT
Note 1
To initialize the system, operate the shaded
keys.
To confirm the imposed system initialization,
check the shaded lamp indicators .
Note 1: The Initial Select key exists only on the TOPU of ISW (PZ-DK227). Refer to Figure 6-64
and Figure 6-65.
Note 2: The LED indication cited above is only an example. The actual indicating patterns (ON/
Flash/OFF) may vary, depending on the system configuration.
Note 3: This figure assumes the CPR is equipped with PZ-I027 (HDD/FDD), in place of PZ-IO28.
If PZ-IO28 is used, the MB key is not furnished on the card.

NDA-24307 CHAPTER 6
Page 549
Issue 1
SYSTEM OPERATIONS
Table 6-12 System Initialization Without Loading Procedure
ACTION 7SEG LED/OPE LAMP/KEY
SETTINGS
Note: The TOPU used for intialization varies depending on the type of
initialization.
Initialization of Whole System: TOPU of ISW
Initialization of ISW: TOPU of ISW
Initialization of LN: TOPU of IMG0 (each LN)
START
For lamp indication on DSP,
refer to Table 6-10.
For the face layout of TOPU,
refer to for ISW and for LN.
ISW: Figure 6-64
LN: Figure 6-65
CPU OPE and IMGn lamps on
both DSP go OFF.
STATUS LED (right) on
the CPU is ON.
STATUS LED (right) on
the DSP of CPU is ON.
For lamp indication on DSP,
refer to Table 6-10.
STATUS LED (right) on
the DSP of active CPU is
ON. (ON LINE)
Set the keys on the TOPU as follows.
•PROGRAM KEY →NON LOAD
•SYSTEM DATA KEY →NON LOAD
END
•HD Initial
•System Initialization
•System starts up again.
Turn ON the EFFECT key on the TOPU.
Press the INITIAL START button on the TOPU.
Set the INITIAL SELECT keys as follows.
•Initialization of Whole System→ Set the key to SYSTEM side
•Initialization of ISW → Set the key to SELF side
•Initialization of LN → Skip this step
Confirm the system is operating normally.
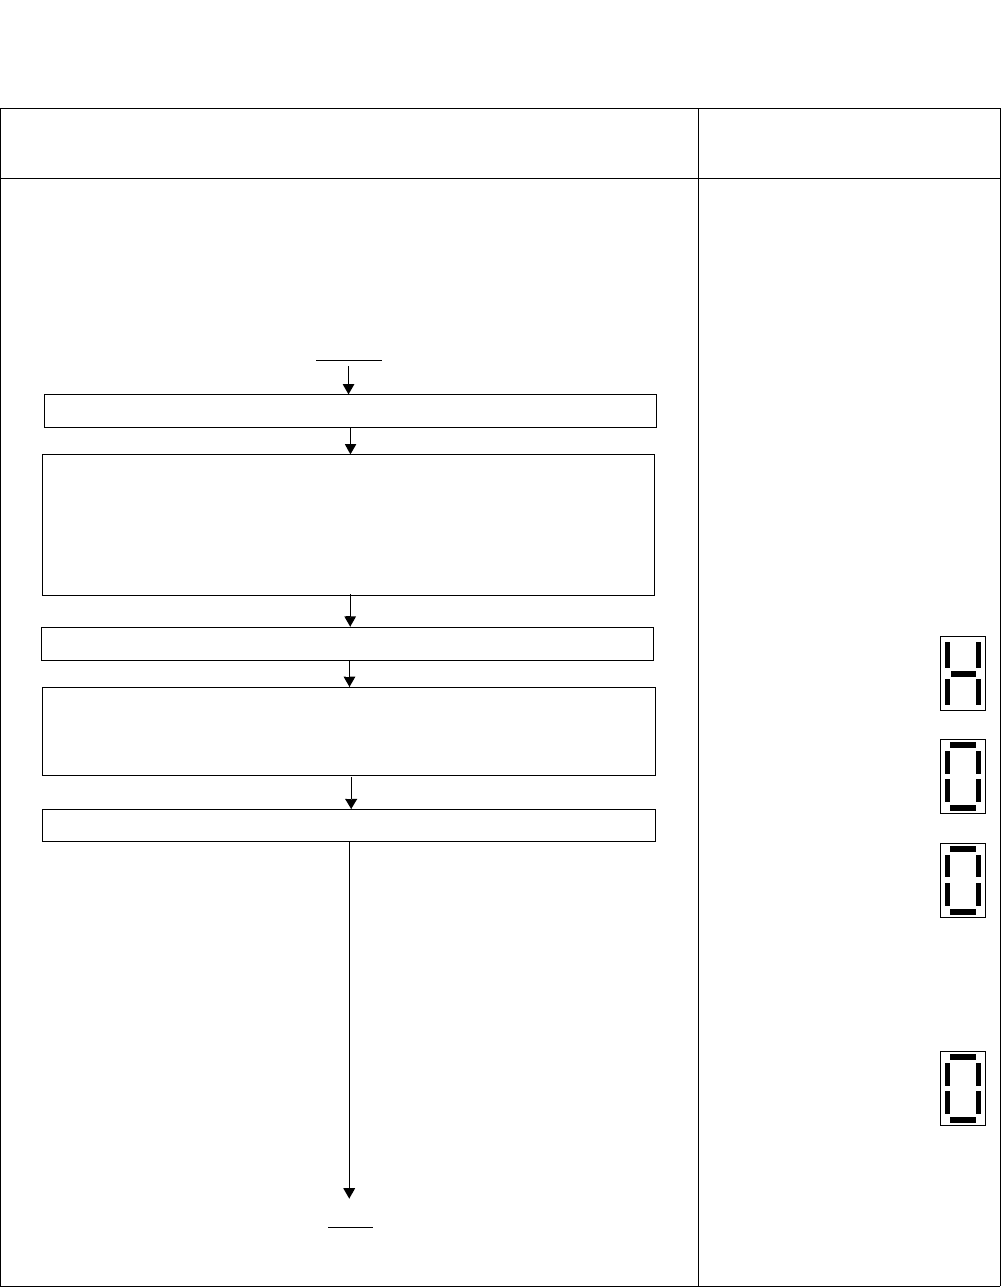
CHAPTER 6 NDA-24307
Page 550
Issue 1
SYSTEM OPERATIONS
Table 6-13 System Initialization With Office Data Loading Procedure
ACTION 7SEG LED/OPE LAMP/KEY
SETTINGS
Note: The TOPU used for intialization varies depending on the type of
initialization.
Initialization of Whole System: TOPU of ISW
Initialization of ISW: TOPU of ISW
Initialization of LN: TOPU of IMG0 (each LN)
START
For lamp indication on DSP,
refer to Table 6-10.
For the face layout of TOPU,
refer to for ISW and for LN.
ISW: Figure 6-64
LN: Figure 6-65
CPU OPE and IMGn lamps on
both DSP go OFF.
STATUS LED (right) on
the CPU is ON.
STATUS LED (right) on
the DSP of CPU is ON.
STATUS LED (right) on
the DSP of active CPU is
ON.
For lamp indication on DSP,
refer to Table 6-10.
STATUS LED (right) on
the DSP of active CPU is
ON. (ON LINE)
Set the keys on the TOPU as follows.
•PROGRAM KEY →NON LOAD
•SYSTEM DATA KEY →NON LOAD
END
•HD Initial
•Office Data LOAD
•System Initialization
•System starts up again.
Turn ON the EFFECT key on the TOPU.
Press the INITIAL START button on the TOPU.
Set the INITIAL SELECT keys as follows.
•Initialization of Whole System→ Set the key to SYSTEM side
•Initialization of ISW → Set the key to SELF side
•Initialization of LN → Skip this step
Confirm the system is operating normally.
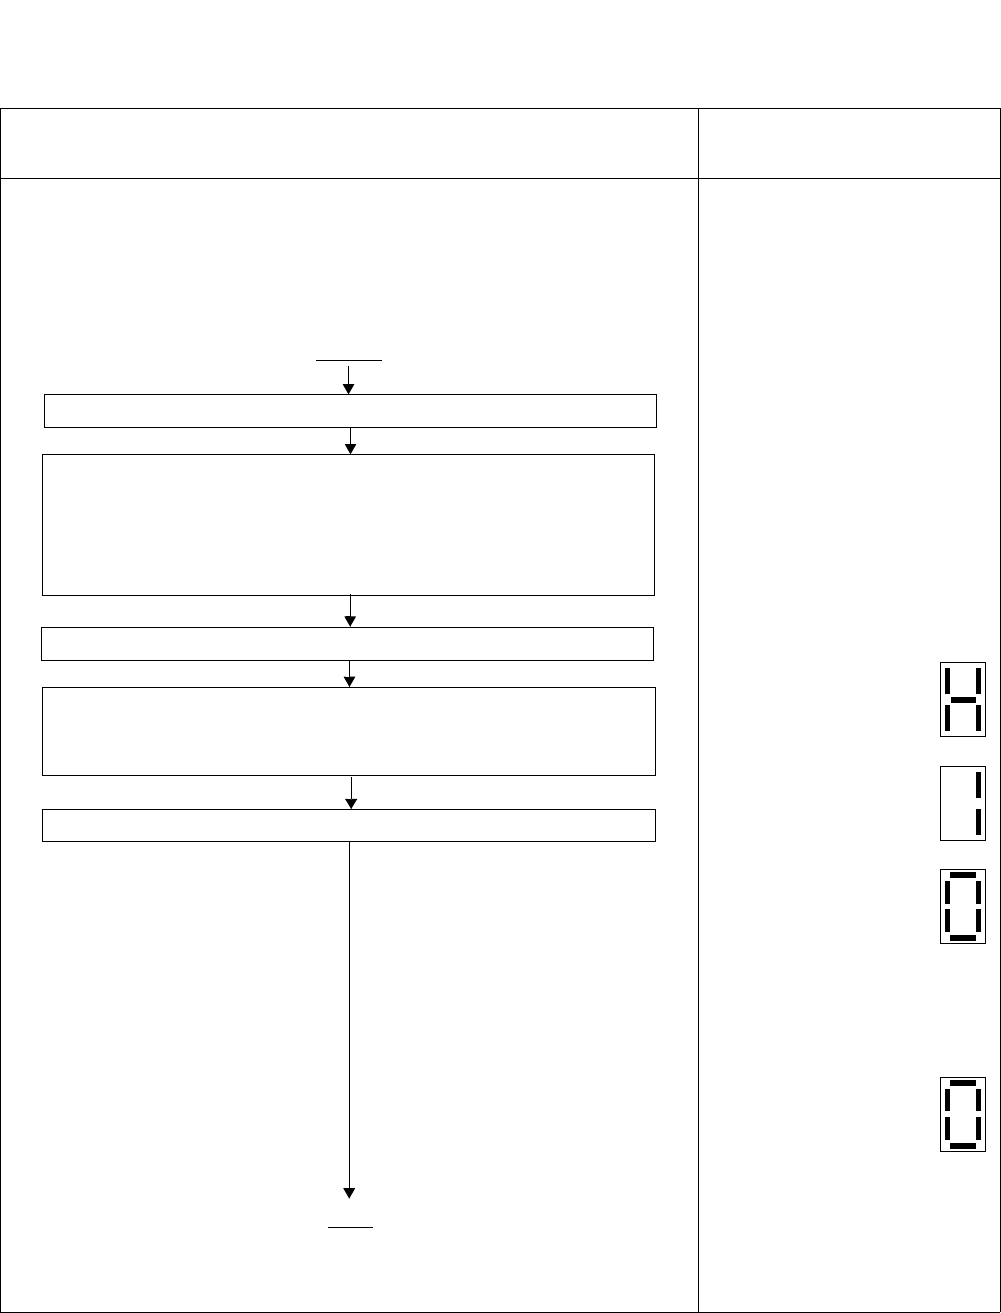
NDA-24307 CHAPTER 6
Page 551
Issue 1
SYSTEM OPERATIONS
Table 6-14 System Initialization with Program Loading Procedure
ACTION 7SEG LED/OPE LAMP/KEY
SETTINGS
Note: The TOPU used for intialization varies depending on the type of
initialization.
Initialization of Whole System: TOPU of ISW
Initialization of ISW: TOPU of ISW
Initialization of LN: TOPU of IMG0 (each LN)
START
For lamp indication on DSP,
refer to Table 6-10.
For the face layout of TOPU,
refer to for ISW and for LN.
ISW: Figure 6-64
LN: Figure 6-65
CPU OPE and IMGn lamps on
both DSP go OFF.
STATUS LED (right) on
the DSP of CPU is ON.
STATUS LED (right) on
the DSP of CPU is ON.
STATUS LED (right) on
the DSP of active CPU
is ON.
For lamp indications on DSP,
refer to Table 6-10.
STATUS LED (right) on
the DSP of active CPU
is ON. (ON LINE)
Set the keys on the TOPU as follows.
•PROGRAM KEY →NON LOAD
•SYSTEM DATA KEY →NON LOAD
END
•HD Initial
•Program LOAD
•System Initialization
•System starts up again.
Turn ON the EFFECT key on the TOPU.
Press the INITIAL START button on the TOPU.
Set the INITIAL SELECT keys as follows.
•Initialization of Whole System→ Set the key to SYSTEM side
•Initialization of ISW → Set the key to SELF side
•Initialization of LN → Skip this step
Confirm the system is operating normally.
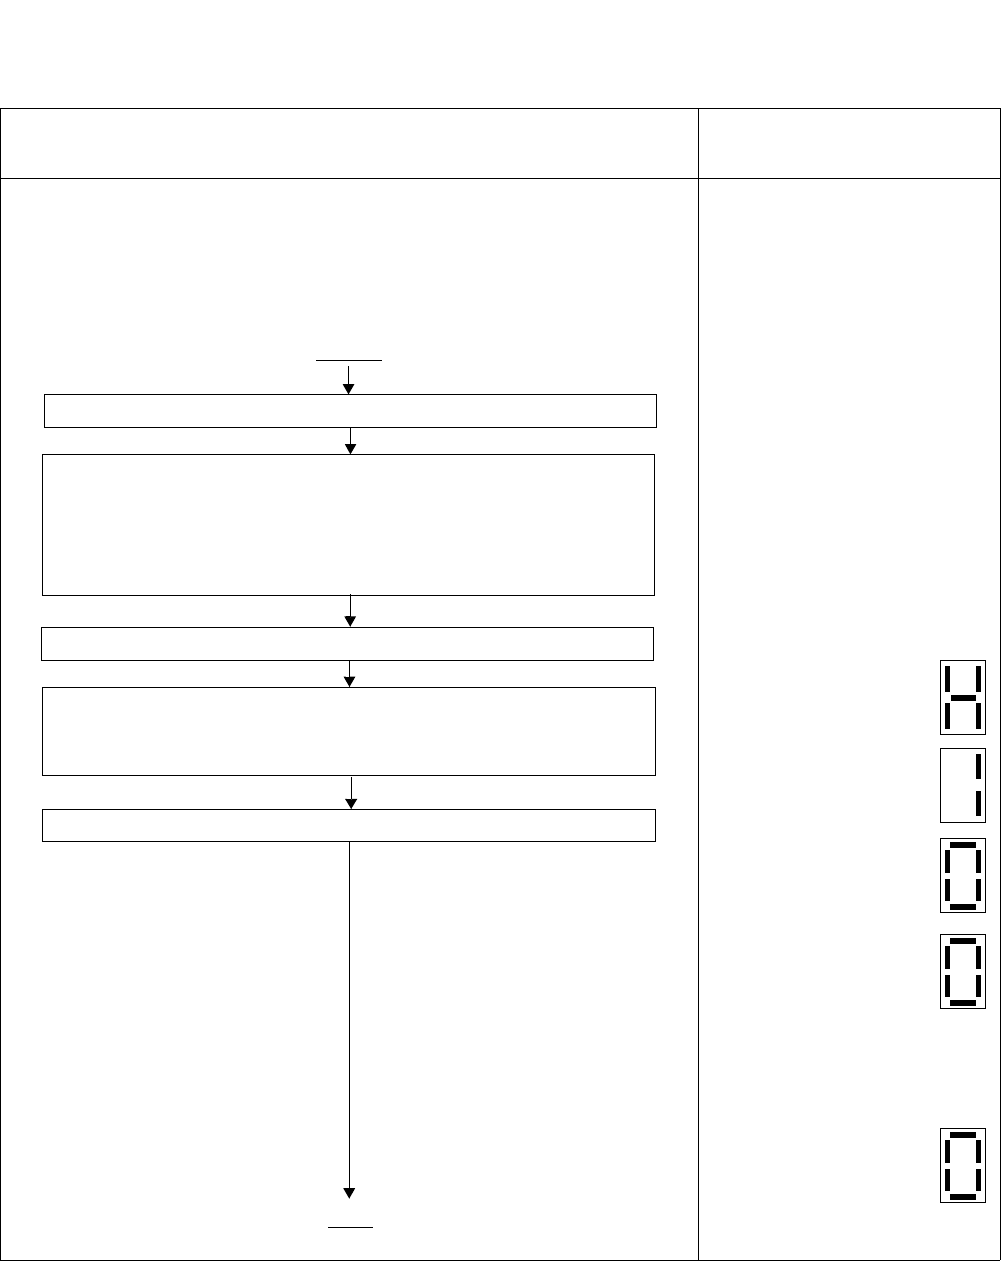
CHAPTER 6 NDA-24307
Page 552
Issue 1
SYSTEM OPERATIONS
Table 6-15 System Initialization With Office Data And Program Loading Procedure
ACTION 7SEG LED/OPE LAMP/KEY
SETTINGS
Note: The TOPU used for intialization varies depending on the type of
initialization.
Initialization of Whole System: TOPU of ISW
Initialization of ISW: TOPU of ISW
Initialization of LN: TOPU of IMG0 (each LN)
START
For lamp indication on DSP,
refer to Table 6-10.
For the face layout of TOPU,
refer to for ISW and for LN.
ISW: Figure 6-64
LN: Figure 6-65
CPU OPE and IMGn lamps on
both DSP go OFF.
STATUS LED (right) on
the DSP of CPU is ON.
STATUS LED (right) on
the DSP of CPU is ON.
STATUS LED (right) on
the DSP of CPU is ON.
STATUS LED (right) on
the DSP of active CPU
is ON.
For lamp indications on DSP,
refer Table 6-10.
STATUS LED (right) on
the DSP of active CPU
is ON. (ON LINE)
Set the keys on the TOPU as follows.
•PROGRAM KEY →NON LOAD
•SYSTEM DATA KEY →NON LOAD
END
•HD Initial
•Program LOAD
•Office Data LOAD
•System Initialization
•System starts up again.
Turn ON the EFFECT key on the TOPU.
Press the INITIAL START button on the TOPU.
Set the INITIAL SELECT keys as follows.
•Initialization of Whole System→ Set the key to SYSTEM side
•Initialization of ISW → Set the key to SELF side
•Initialization of LN → Skip this step
Confirm the system is operating normally.
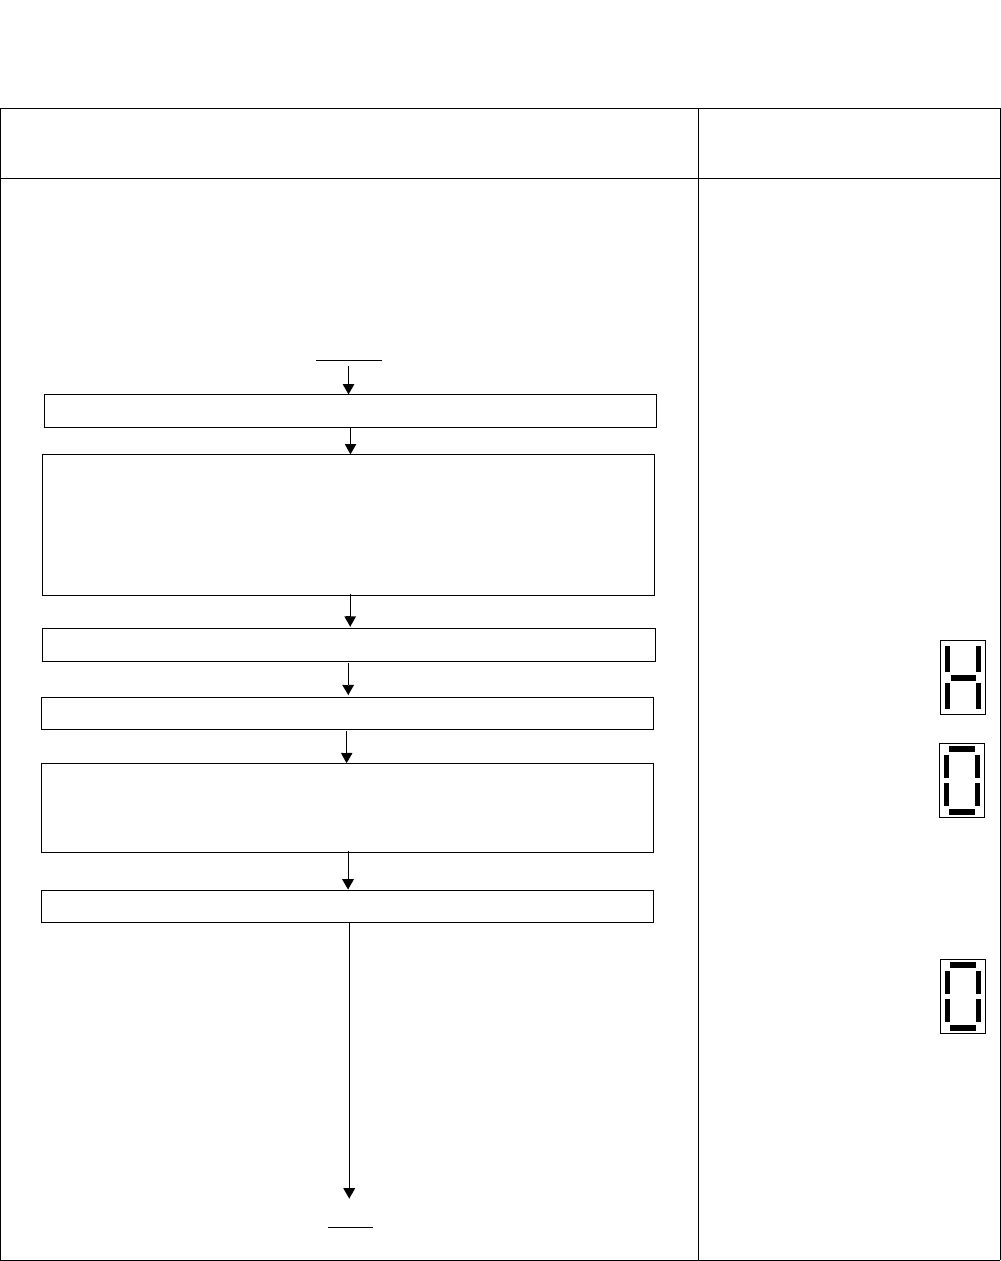
NDA-24307 CHAPTER 6
Page 553
Issue 1
SYSTEM OPERATIONS
Table 6-16 System Initialization by Phase 1 Restart Procedure
ACTION 7SEG LED/OPE LAMP/KEY
SETTINGS
Note: The TOPU used for intialization varies depending on the type of
initialization.
Initialization of Whole System: TOPU of ISW
Initialization of ISW: TOPU of ISW
Initialization of LN: TOPU of IMG0 (each LN)
START
For lamp indication on DSP,
refer to Table 6-10.
For the face layout of TOPU,
refer to for ISW and for LN.
ISW: Figure 6-64
LN: Figure 6-65
CPU OPE and IMGn lamps on
both DSP go OFF.
STATUS LED (right) on
the CPU is ON.
STATUS LED (right) on
the DSP of CPU is ON.
For lamp indications on DSP,
refer to Table 6-10.
STATUS LED (right) on
the DSP of active CPU
is ON. (ON LINE)
Set the keys on the TOPU as follows.
•PROGRAM KEY →NON LOAD
•SYSTEM DATA KEY →NON LOAD
END
•HD Initial
•System Initialization
•System starts up again.
Turn ON the EFFECT key on the TOPU.
Press the INITIAL START button on the TOPU.
Set the INITIAL SELECT keys as follows.
•Initialization of Whole System→ Set the key to SYSTEM side
•Initialization of ISW → Set the key to SELF side
•Initialization of LN → Skip this step
Confirm the system is operating normally.
Set SENSE Switch on the DSP of CPR to 3.
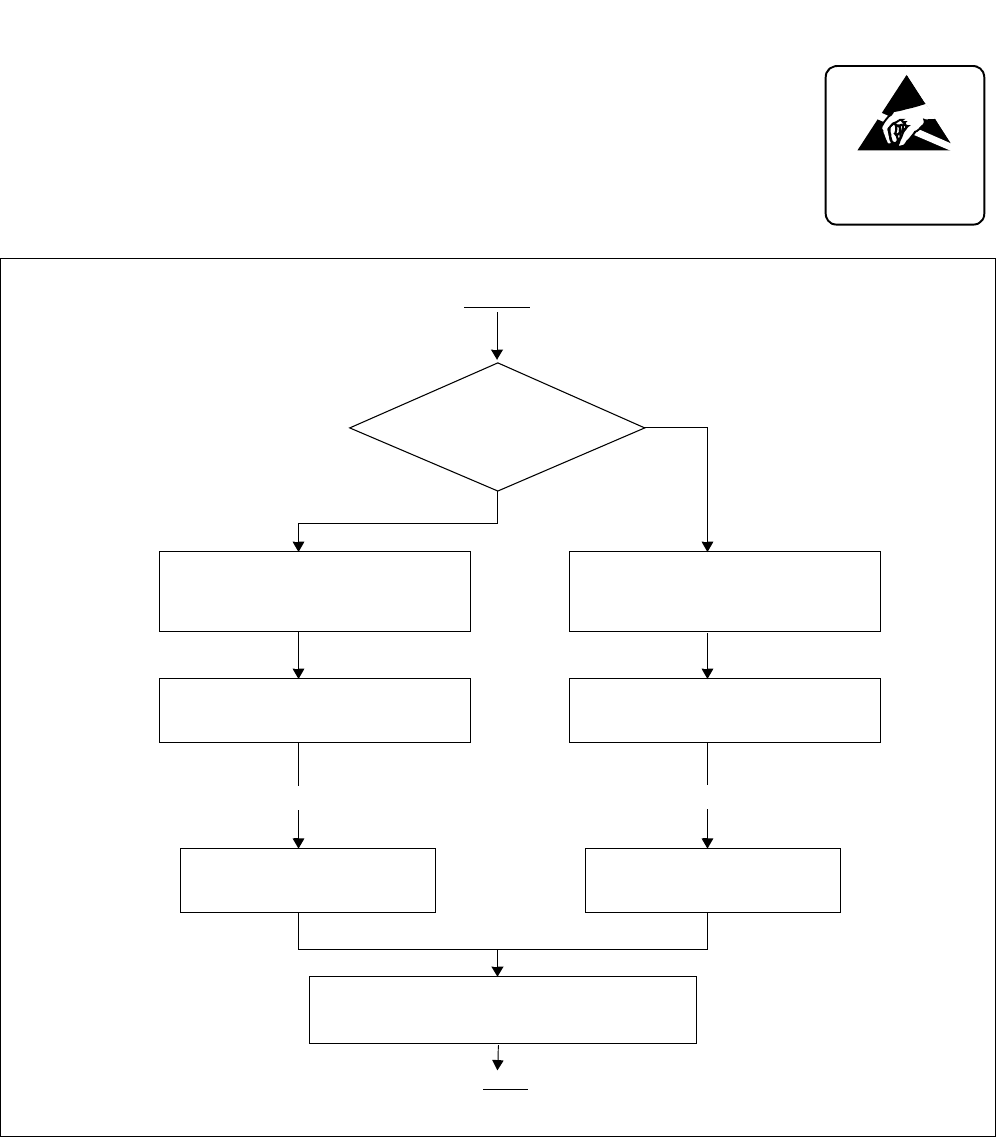
CHAPTER 6 NDA-24307
Page 554
Issue 1
SYSTEM OPERATIONS
12.2.4 System Initialization by Keys on CPU Front Panel
This initialization executes on a node (ISW/LN) basis when the keys on the
TOPU cannot be used. The CPU’s active status must be confirmed before
executing this type of initialization.
Figure 6-67 System Initialization by Keys on CPU Front Panel
ATTENTION
Contents
Static Sensitive
Handling
Precautions Required
Use ATIM/ATIMN command to adjust
date and time.
Confirm ACT 0 lamp
lights green again. Confirm ACT 1 lamp
lights green again.
Press CPU RST key on the
DSP of CPU 0.
Press CPU RST key on the
DSP of CPU 1.
Confirm SENSE switch on the
DSP of CPU 1 is 2 (DM Load
Restart).
Confirm SENSE switch on the
DSP of CPU 0 is 2 (DM Load
Restart).
(ACT0 lights green.) (ACT1 lights green.)
Check ACT0/ACT1
lamps on the EMA
card.
START
(CPU 0 is being initialized.) (CPU 1 is being initialized.)
END
EMA: PH-PC40
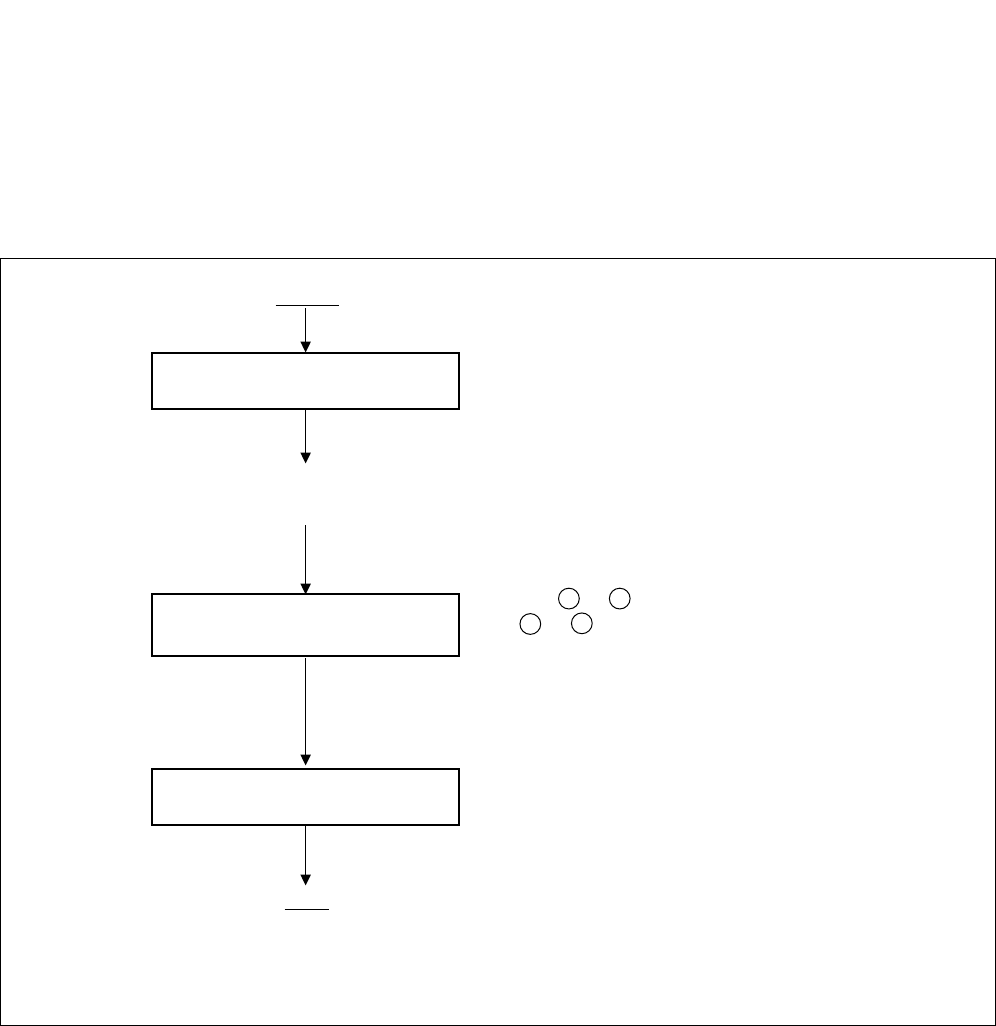
NDA-24307 CHAPTER 6
Page 555
Issue 1
SYSTEM OPERATIONS
12.2.5 System Initialization by SINZ/SINZ1 Command
The entire system can be initialized by execution of the SINZ/SINZ1 command from the MAT, which
is useful for maintenance technicians who have to control the system from a distant location. When
initializing the system on a node (ISW/LN) basis, use SINZ command. When initializing the whole
system, use SINZI command.
Figure 6-68 System Initialization by SINZ Command
START
END
<Execution of Initialization>
For more information about the SINZ/SINZI
command, see CHAPTER 8:
“MAINTENANCE COMMANDS.”
Refer to 1 or 3 of Table 6-9 for DSP#0,
and 2 or 4 of the table for DSP#1.
Use the SINZ/SINZI command
to execute initialization.
Use the ATIM/ATIMN com-
mand to adjust the date and time.
Confirm lamp indications on
the DSP of CPR.
Note: When the system is initialized, the MAT is once disconnected. Then, log in to the
system again.
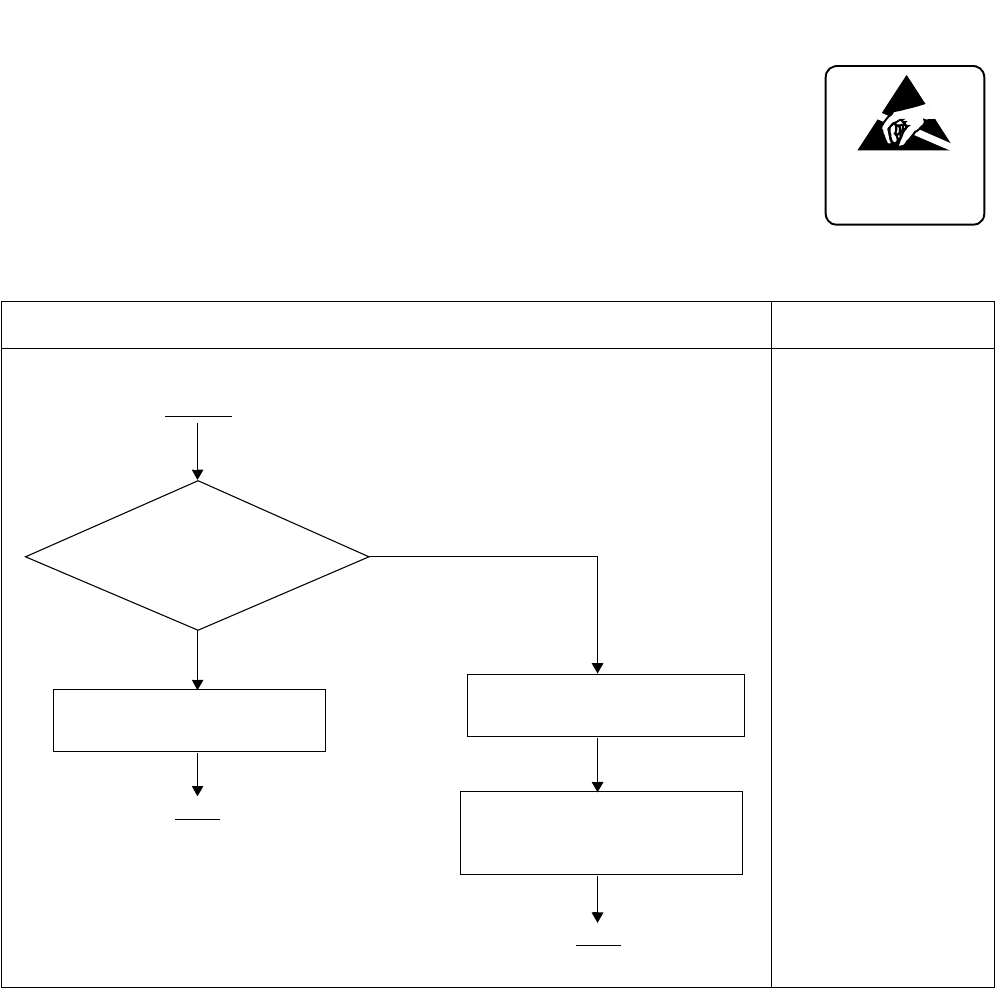
CHAPTER 6 NDA-24307
Page 556
Issue 1
SYSTEM OPERATIONS
12.2.6 Peripheral Equipment Initialization (Line/Trunk Initialization)
Line/trunk initialization can be divided into two types: initialization on an
individual channel basis and initialization on a circuit card basis. Follow the
procedure in Table 6-17.
Table 6-17 Line/Trunk Initialization Procedure
ACTION REMARKS
ATTENTION
Contents
Static Sensitive
Handling
Precautions Required
Return MB switch to the
previous position after the
MB lamp has turned ON.
Turn the MB switch UP on
the circuit card.
Use RLST command.
(Refer to Chapter 8)
START
END
END
Is initialization on
individual channel basis or on
circuit card basis?
Circuit card basis
Individual channel basis
Note: When initializa-
tion executes on a
circuit card basis, all
channels on the cir-
cuit card are placed
into make-busy state.

NDA-24307 CHAPTER 6
Page 557
Issue 1
SYSTEM OPERATIONS
12.3 How to Turn ON/OFF Whole System
A switching system, once put into service, is seldom stopped. However, there may
be a case when a switching system, while in service, must be stopped due to module
expansion work, etc. In preparation for such a case, this Section explains the
procedure for turning ON the power supply.
ATTENTION
Contents
Static Sensitive
Handling
Precautions Required
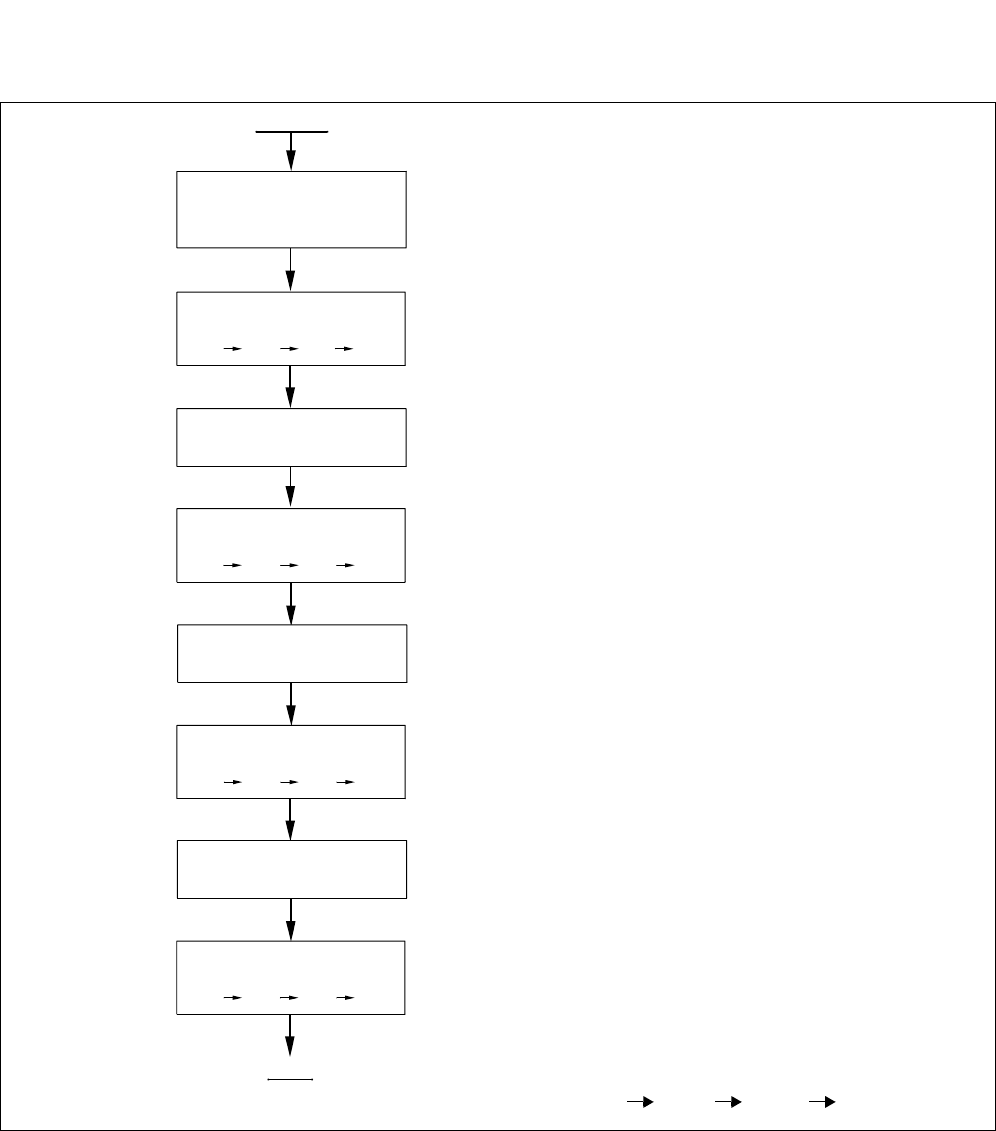
CHAPTER 6 NDA-24307
Page 558
Issue 1
SYSTEM OPERATIONS
12.3.1 How to Turn ON a LN
Figure 6-69 How to Turn ON a LN
START
Make sure the SENSE switch
on the DSP of Active CPU is
set at Ò2Ó (DM Load Restart).
Turn ON the power supply at
PIMs of IM G3.
PIM0 PIM1 PIM2 PIM3
Turn ON the power supply at
TSWM1.
Turn ON the power supply at
PIMs of IM G2.
PIM0 PIM1 PIM2 PIM3
Turn ON the power supply at
PIMs of IM G1.
PIM0 PIM1 PIM2 PIM3
END
Turn ON the -48V SW on the PWR card in PIM0.
Turn ON the -48V SW on the DPWR card in PIM0.
Repeat (1) and (2) for PIM1,2,3 in turn (depending on
the system configuration).
Turn ON the -48V SW on the PH-PW14 (PWR SW#0).
Turn ON the -48V SW on the PH-PW14 (PWR SW#1).
Turn ON the -48V SW on the PWR card in PIM0.
Turn ON the -48V SW on the DPWR card in PIM0.
Repeat (1) and (2) for PIM1,2,3 in turn (depending on
the system configuration).
Turn ON the -48V SW on the PWR card in PIM0.
Turn ON the -48V SW on the DPWR card in PIM0.
Repeat (1) and (2) for PIM1,2,3 in turn (depending on
the system configuration).
(1)
(2)
(3)
(1)
(2)
(3)
(1)
(2)
(3)
(1)
(2)
Turn ON the power supply at
TSWM0.
Turn ON the -48V SW on the PH-PW14 (PWR SW#0).
Turn ON the -48V SW on the PH-PW14 (PWR SW#1).
(1)
(2)
Turn ON the power supply at
PIMs of IMG0.
PIM 0 PIM 1 PIM2 PIM3
Turn ON the -48V SW on the PWR card in PIM0.
Turn ON the -48V SW on the DPWR card in PIM0.
Repeat (1) and (2) for PIM1,2,3 in turn (depending on
the system configuration).
(1)
(2)
(3)
Turn ON the power supply at
LPM.
Turn ON the SW on the PZ-PW92 of CPU#0.
Turn ON the SW on the PZ-PW92 of CPU#1.
(1)
(2)
Note: Start from bigger number IMG stack (i.e. IMG3 IMG2 IMG1 IMG0).
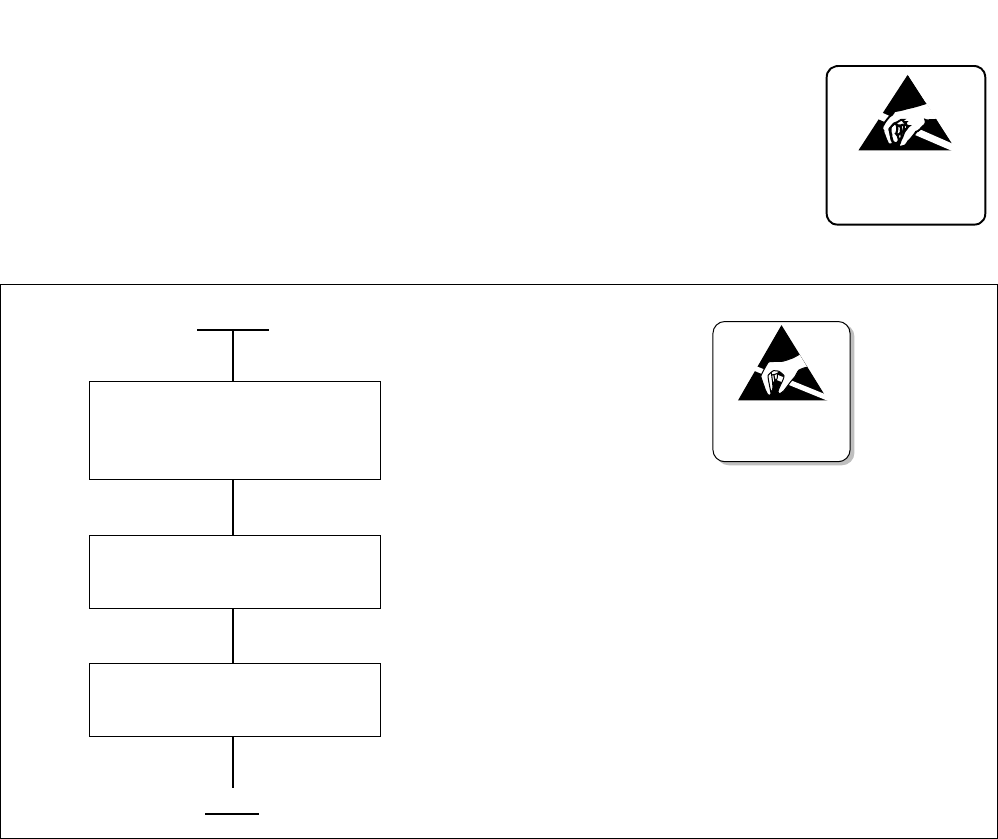
NDA-24307 CHAPTER 6
Page 559
Issue 1
SYSTEM OPERATIONS
12.3.2 How to Turn ON the ISW
Figure 6-70 How to Turn ON the ISW
ATTENTION
Contents
Static Sensitive
Handling
Precautions Required
ATTENTION
Contents
Static Sensitive
Handling
Precautions Required
START
Make sure the SENSE switch
on the DSP of Active CPU is
set at "2"(DM Load Restart).
Turn ON the power supply at
the LPM.
Turn ON the power supply at
the ISWM.
END
Turn ON the SW on the PZ-PW92 of CPU 0.
Turn ON the SW on the PZ-PW92 of CPU 1.
Turn ON the -48V SW on the PH-PW14 (PWR SW 0).
Turn ON the -48V SW on the PH-PW14 (PWR SW 1).
(1)
(2)
(1)
(2)
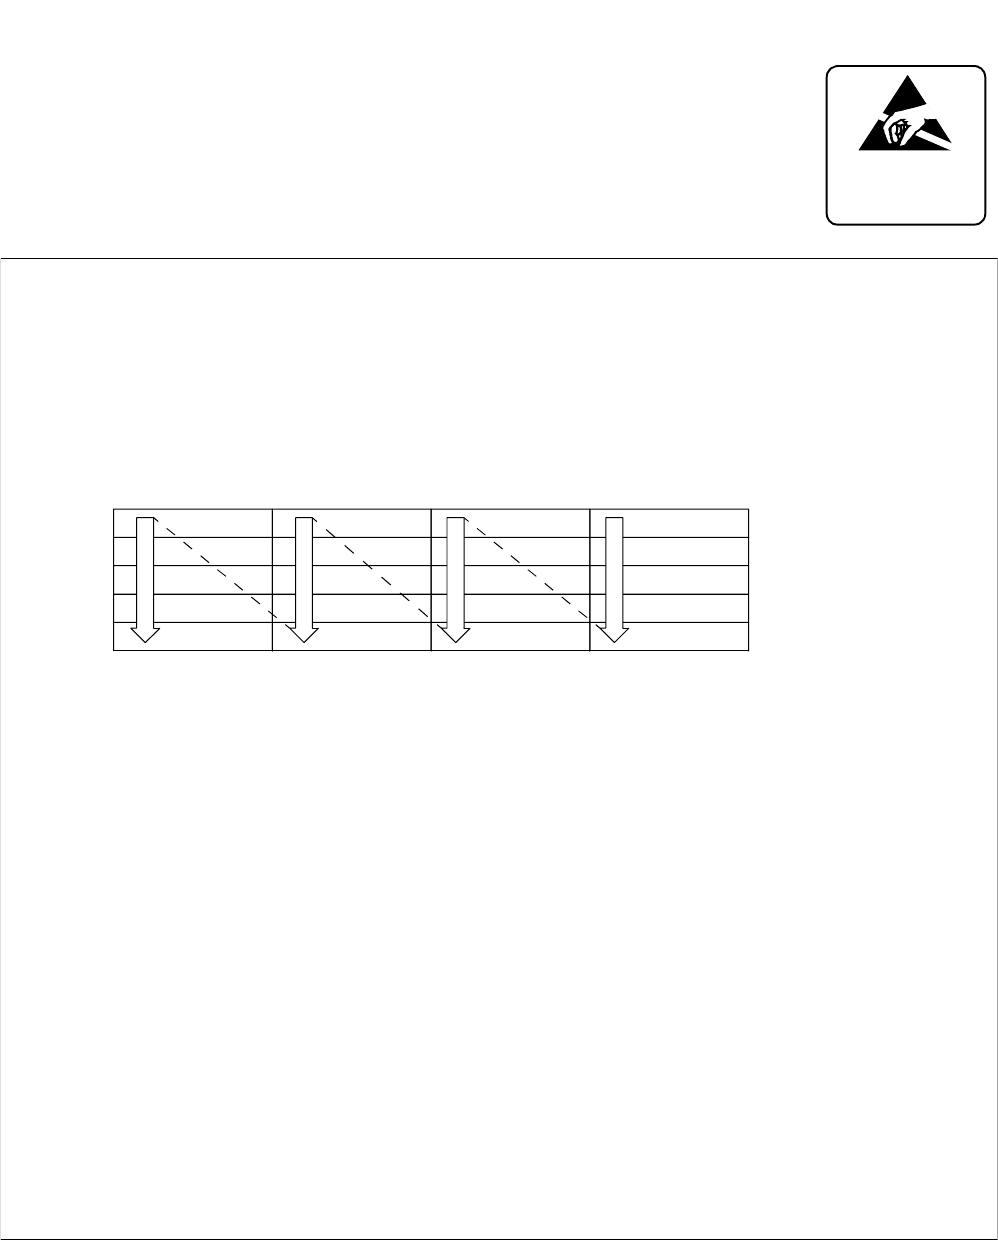
CHAPTER 6 NDA-24307
Page 560
Issue 1
SYSTEM OPERATIONS
12.4 How to Turn OFF Whole System
Be sure to confirm the memory data has been backed up on the HD before turning
OFF the system power. When turning OFF the power supply, follow the procedure
shown below.
12.4.1 How to Turn OFF a LN
Figure 6-71 How to Turn OFF a LN
ATTENTION
Contents
Static Sensitive
Handling
Precautions Required
(1) Turn OFF the -48V SW on the DPWR (first) and PWR (next) cards in PIM3 of IMG3.
(2) Repeat (1) for PIM2, PIM1, PIM0 (IMG3) in turn.
(3) Turn OFF the -48V SW on the DPWR (first) and PWR (next) cards in PIM3 of IMG2.
(4) Repeat (3) for PIM2, PIM1, PIM0 (IMG2) in turn.
(5) Turn OFF the SW on the PH-PW14 (both PWR SW #1 and #0) in TSWM1.
(6) Turn OFF the -48V SW on the DPWR (first) and PWR (next) cards in PIM3 of IMG1.
(7) Repeat (6) for PIM2, PIM1, PIM0 (IMG1) in turn.
(8) Turn OFF the SW on the PH-PW14 (both PWR SW #1 and #0) in TSWM0.
(9) Turn OFF the -48V SW on the DPWR (first) and PWR (next) cards in PIM3 of IMG0.
(10)Repeat (9) for PIM2, PIM1, PIM0 (IMG0) in turn.
(11)Turn OFF the SW on the PZ-PW92 of CPU#1.
(12)Turn OFF the SW on the PZ-PW92 of CPU#0.
As shown in the figure, turn OFF the power supply first in the uppermost
PIM of the IMG stack whose number is bigger.Then, move on to the
bottommost PIM and repeat it for the smaller IMGs.
IMG0 IMG3IMG2IMG1
PIM3
PIM2
PIM1
PIM0
LPM
PIM3
PIM2
PIM1
PIM0
TSWM0
PIM3
PIM2
PIM1
PIM0
TSWM1
PIM3
PIM2
PIM1
PIM0
DUMMY
[Procedure]
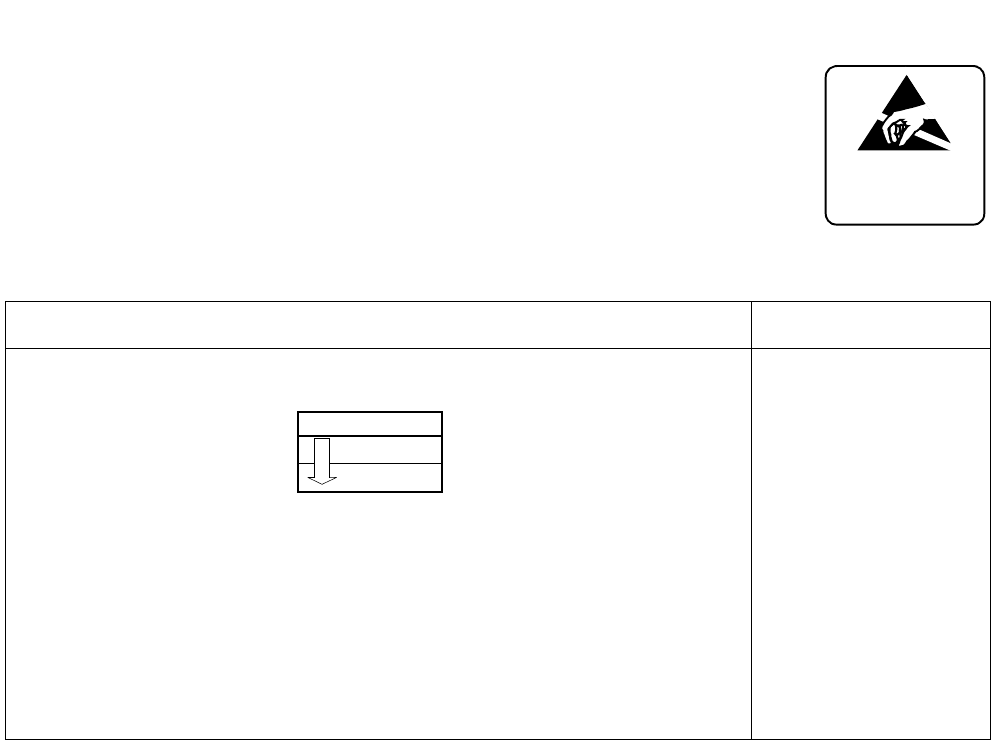
NDA-24307 CHAPTER 6
Page 561
Issue 1
SYSTEM OPERATIONS
Table 6-18 How to Turn OFF the ISW Procedure
ACTION REMARKS
(1) Turn OFF -48V SW on PA-PW14 (both PWR SW 1 and PWR SW 0) in
ISWM.
(2) Turn OFF SW on the PZ-PW92 of CPU 1.
(3) Turn OFF SW on the PZ-PW92 of CPU 0.
ATTENTION
Contents
Static Sensitive
Handling
Precautions Required
ISW
ISWM
LPM

CHAPTER 6 NDA-24307
Page 562
Issue 1
SYSTEM OPERATIONS
12.5 System Start-Up
12.5.1 System Start-Up Procedures
The system start-up procedures consist of the following types.
Procedure 1 (see Table 6-19)
Executes when the Basic Software and Application Software are already installed in the HD. Office
Data is not installed.
Procedure 2 (see Table 6-20)
Executes when the Basic Software, Application Software and Office Data are already installed in the
HD.
Note: For the start-up procedure in case any Basic Software, Application Software and Office Data have not
been installed in the HD, refer to the Installation Manual (IPX-U Type).
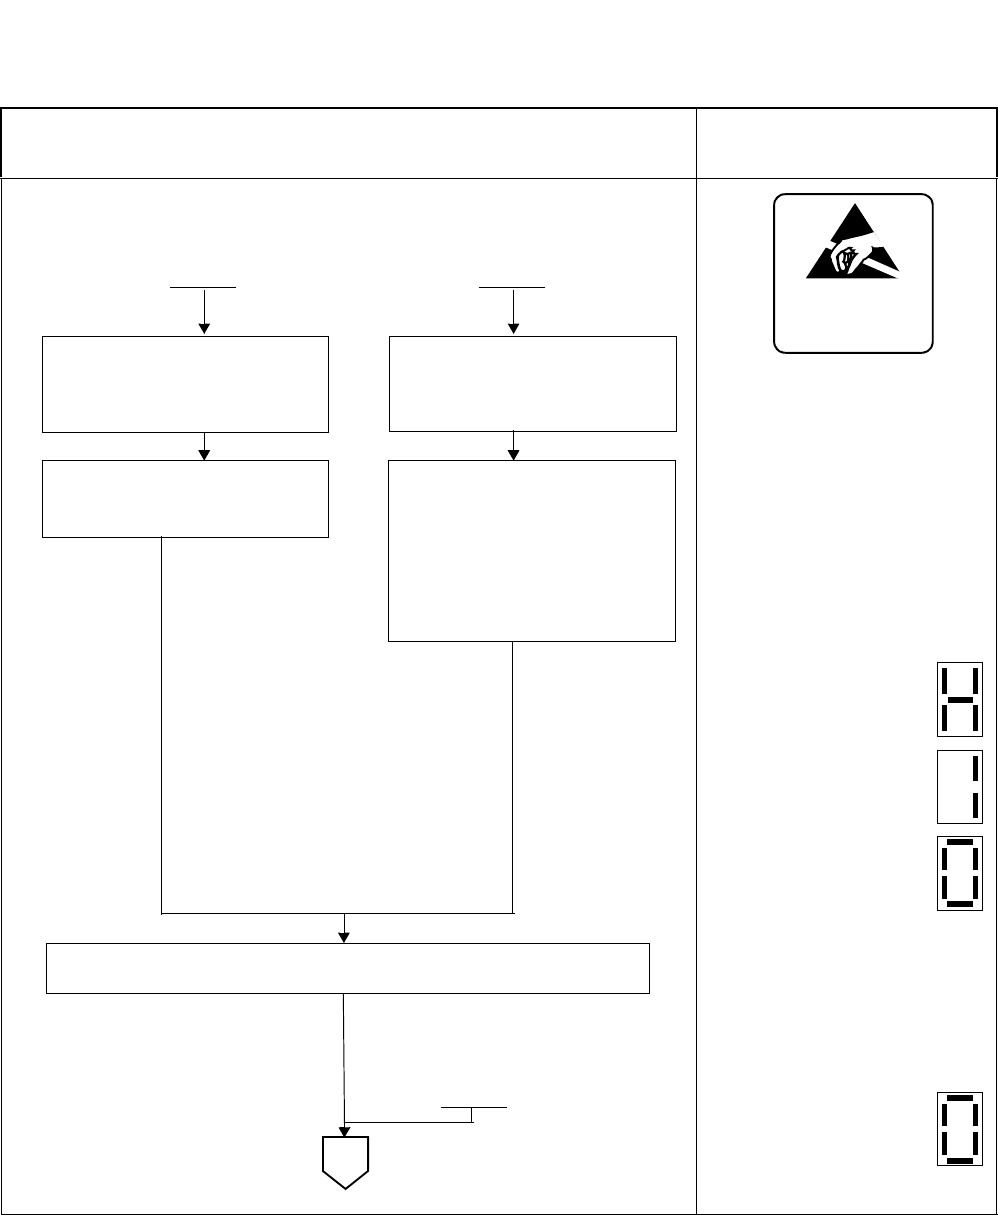
NDA-24307 CHAPTER 6
Page 563
Issue 1
SYSTEM OPERATIONS
Table 6-19 Start-Up Procedure When Basic and Application Software is Installed
ACTION 7SEG LED/OPE LAMP/KEY
SETTINGS
STATUS LED (right) on
the DSP of CPU is ON.
STATUS LED (right) on
the DSP of CPU is ON.
STATUS LED (right) on
the DSP of CPU is ON.
CPU OPE lamp on the
DSP of active CPU
lights steady green. IMG0-3
lamps flash.
For lamp indications, refer to
Table 6-10.
STATUS LED (right) on
the DSP of CPU is ON
(ON LINE).
Press the CPU RST button
on the DSP of active CPU.
or
Turn OFF the SW on the PZ-
PW92 of active CPU and
turn it ON again.
Set the SENSE switch at “1”
(DM Clear Restart) on the DSP
of CPU 0.
Set the SENSE switch at “1”
(DM Clear Restart) on the DSP
of active CPU.
Turn ON the SW on the PZ-
PW92 of CPU 0.
STARTSTART
When Power is OFF and OFF LINE
A
When Power is ON
➀➁
• HD Initialization
• Program Load
• System Initial
The system starts up, clearing the Office Data on the HD.
•The system starts up again
➂when Power is ON and ON
LINE
START
ATTENTION
Contents
Static Sensitive
Handling
Precautions Required

CHAPTER 6 NDA-24307
Page 564
Issue 1
SYSTEM OPERATIONS
Table 6-19 Start-Up Procedure When Basic and Application Software is Installed (Continued)
ACTION 7SEG LED/OPE LAMP/KEY
SETTINGS
Back up your Office Data using the MEM_HDD/MEM_HDD_N
command.
To perform necessary system intialization, refer to Table 6-13,
System Initialization with Office Data Loading.
Set the SENSE switch at “2” (DM Load Restart) on the DSP of
active CPU.
Enter your Office Data.
END
A
If necessary, repeat the above steps for all remaining nodes.
ATTENTION
Contents
Static Sensitive
Handling
Precautions Required
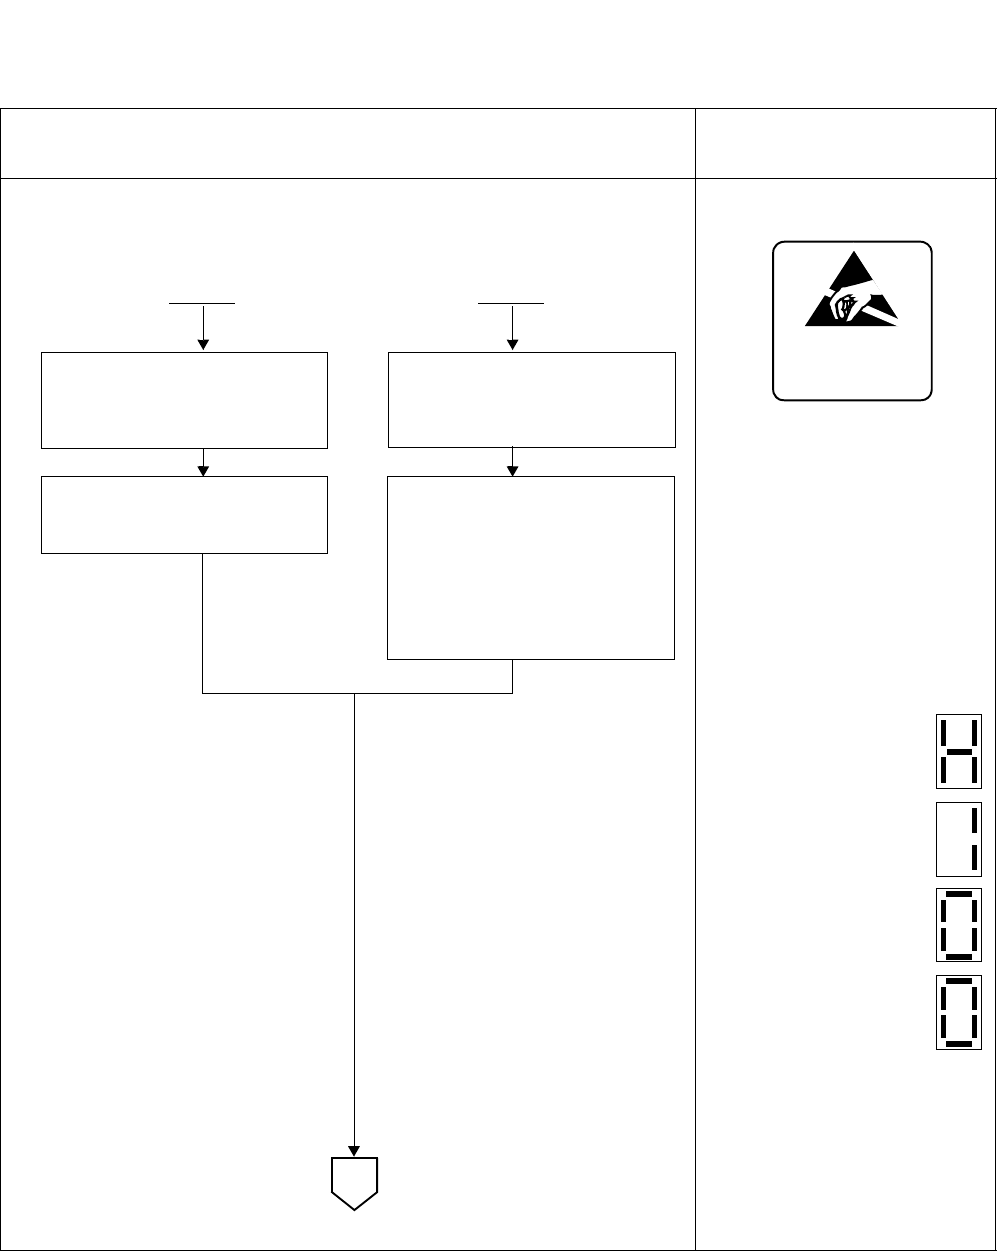
NDA-24307 CHAPTER 6
Page 565
Issue 1
SYSTEM OPERATIONS
Table 6-20 Start-Up Procedure When Basic, Application Software and Office Data is Installed
ACTION 7SEG LED/OPE LAMP/KEY
SETTINGS
STATUS LED (right) on
the DSP of CPU is ON.
STATUS LED (right) on
the DSP of CPU is ON.
STATUS LED (right) on
the DSP of CPU is ON.
STATUS LED (right) on
the DSP of CPU is ON.
Press the CPU RST button
on the DSP of active CPU.
or
Turn OFF the SW on the
PZ-PW92 of active CPU and
turn it ON again.
Set the SENSE switch at “2”
(DM Load Restart) on the DSP
of CPU 0.
Set the SENSE switch at “2”
(DM Load Restart) on the DSP
of active CPU.
• HD Initial
• Program Load
• Office Data Load
• System Initial
Turn ON the SW on the
PZ-PW92 of CPU 0.
STARTSTART
When Power is OFF and OFF LINE
A
When Power is ON
➀➁
ATTENTION
Contents
Static Sensitive
Handling
Precautions Required
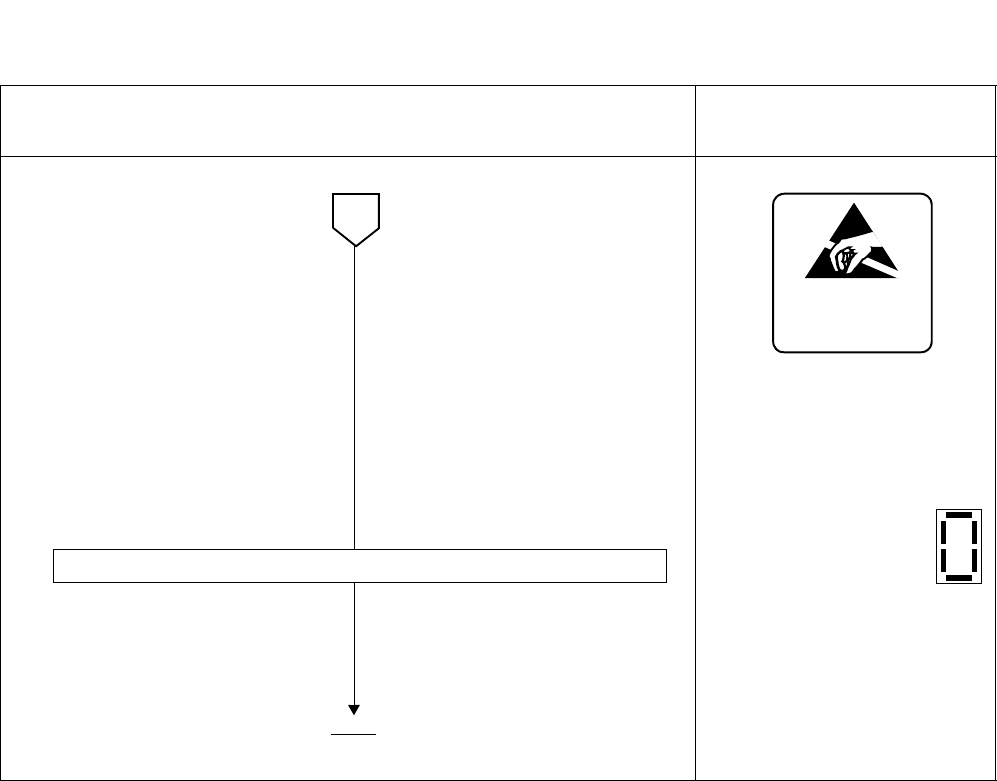
CHAPTER 6 NDA-24307
Page 566
Issue 1
SYSTEM OPERATIONS
For lamp indications, refer to
Table 6-10.
STATUS LED (right) on
the DSP of CPU is ON.
(ON LINE)
Table 6-20 Start-Up Procedure When Basic, Application Software and Office Data is Installed (Continued)
ACTION 7SEG LED/OPE LAMP/KEY
SETTINGS
• The system starts up again.
END
A
If necessary, repeat the previous steps for all remaining nodes.
ATTENTION
Contents
Static Sensitive
Handling
Precautions Required

NDA-24307 CHAPTER 7
Page 567
Issue 1
CHAPTER 7 ROUTINE MAINTENANCE PROCEDURE
1. GENERAL
When a fault has occurred in the system, (for example when a fault has occurred to No. 1 circuit on the 16LC
card), the stations connected to No. 1 circuit become unserviceable. When the 16LC card has been replaced with
a spare to analyze the cause of the fault or to repair the fault, other normal lines also become unserviceable. As
in this example, even when the fault is restricted to a single component, it very often harms the system operations
as a whole.
Even if the system is operating normally, it is necessary to perform a routine check to prevent a fault occurrence
before it is too late to discover any latent cause of a fault.
This chapter categorizes the routine maintenance procedures of the PBX into the following three types, and ex-
plains the minimum required work steps and precautions pertaining to each of the three procedures.
•Daily Maintenance Procedure
•Monthly Maintenance Procedure
•Quarterly Maintenance Procedure
1.1 Flow of Procedures
The scheduling of routine maintenance (daily, monthly, quarterly) will vary with each installation and
organization. Figure 7-1 shows the flow of the routine maintenance procedures.
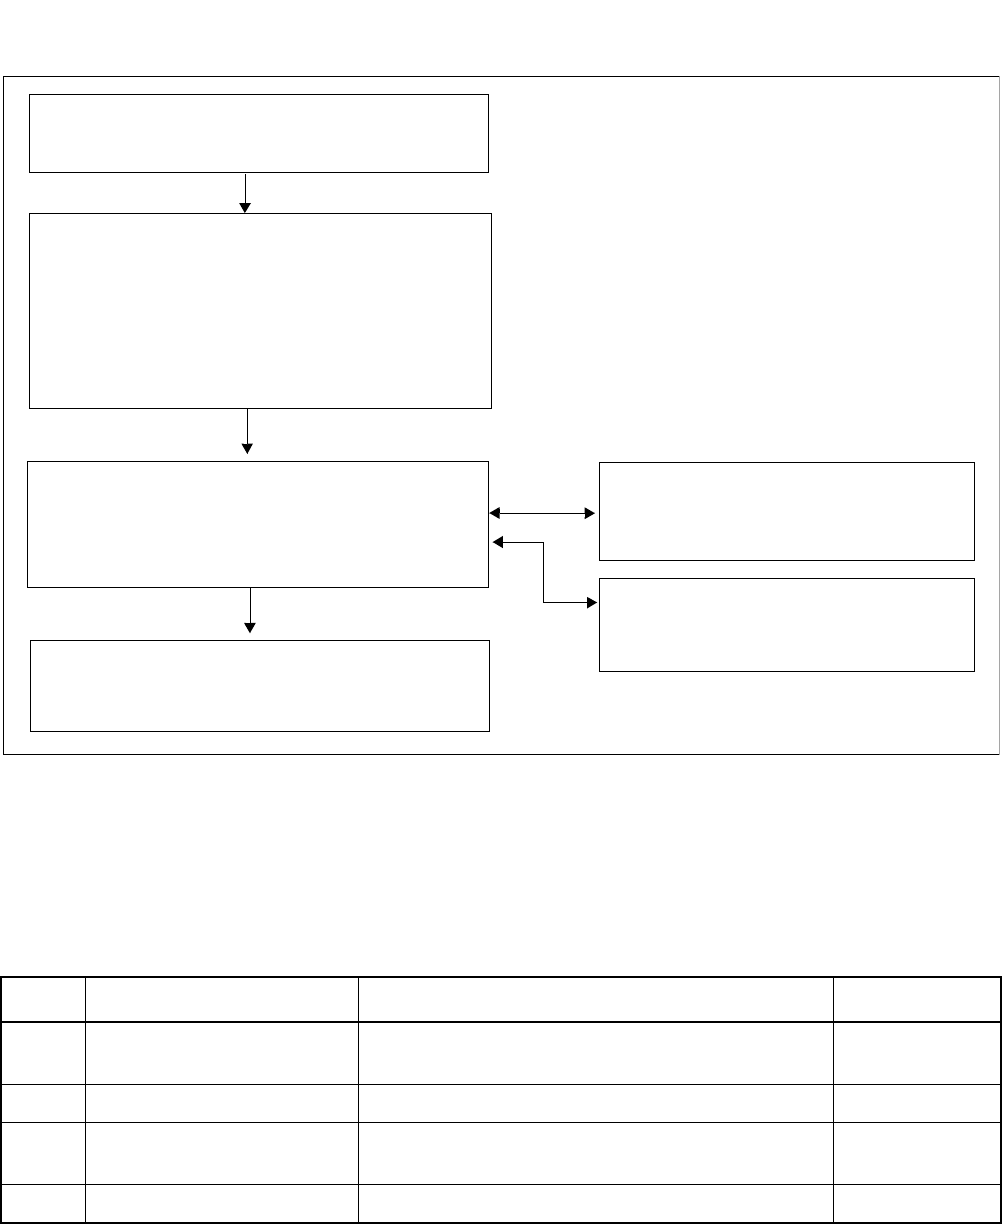
CHAPTER 7 NDA-24307
Page 568
Issue 1
ROUTINE MAINTENANCE PROCEDURE
Figure 7-1 Flow of Procedures
1.2 Required Test Equipment and Tools
Table 7-1 shows the tools and equipment required for test procedures.
Table 7-1 Test Equipment and Tools
NO. TEST EQUIPMENT/TOOLS PURPOSE REMARKS
1 Telephone Set A telephone set is used when performing connection tests
on trunks, etc.
2 Blown Fuse A blown fuse is used when performing alarm tests.
3 VOM Digital Meter VOM digital meter is used when checking output voltages
of the rectifier and the battery.
4 Phillips Screwdriver A screwdriver is used when replacing the fan with a spare.
Section 2.8, Explanation of Terms
in Chapter 2
Chapter 5, Fault Repair Procedures
Chapter 6, System Operations
Chapter 4, Unit/Circuit Card
Replacement Procedure
Section 2, Routine Maintenance Procedures
•Daily Maintenance Procedures
•Monthly Maintenance Procedures
•Quarterly Maintenance Procedures
Note: Perform procedure performance
per each divided section
Section 3, Routine Maintenance Procedures-
Detailed Explanations
•Work performance as per each
divided section
Section 4, Routine Maintenance Check Lists
•Recording of checked items

NDA-24307 CHAPTER 7
Page 569
Issue 1
ROUTINE MAINTENANCE PROCEDURE
2. ROUTINE MAINTENANCE PROCEDURES
This section explains general routine maintenance procedures to be performed on a daily, monthly, and
quarterly basis. Table 7-2 lists each procedure according to the time each procedure is to be performed. Use
the Reference Section to locate the detailed procedure.
Table 7-2 List of Routine Maintenance Procedures
TIME PROCEDURE REFERENCE SECTION REMARKS
Daily Check the temperature and relative humidity in
the switch room. Section 3.1, Check of Ambient
Conditions in Switch Room
Check to see if any of the alarm indicator lamps
on the TOPU are lit. Section 3.2, Alarm Check
Check the operating status of the MAT and the
printer, remaining quantity of paper, etc. Section 3.3, MAT/Printer Check
Check to see if a system message indicating a
fault is displayed. Section 3.4, Collection of
System Messages
Check whether any station is in lockout state. Section 3.5, Display of Locked-
out Station
Check whether the FANU is operating normally. Section 3.6, Fan Unit Check
Monthly Generate an alarm and check whether an indica-
tion appears on the TOPU. Section 3.7, Alarm Tests
Check the conditions of the rectifier and batteries. Section 3.8, Main Power System
Check
Check trunk circuits individually. Also check the
RGU circuit in the PWR Supply of each
Module.
Section 3.9, Trunk RGU Check
Check each operation and lamps of ATTCON/
DESKCON. Section 3.10, ATTCON/
DESKCON Check
Quarterly Check the CPU, TSW, and line/trunk Port
Microprocessors (PMs). Section 3.11, System Check

CHAPTER 7 NDA-24307
Page 570
Issue 1
ROUTINE MAINTENANCE PROCEDURE
3. ROUTINE MAINTENANCE PROCEDURES-DETAILED EXPLANATIONS
This Section provides detailed explanations of the routine maintenance procedures.
Table 7-3 List of Routine Maintenance Procedures
SECTION NO. CONTENTS OF WORK REMARKS
3.1 Check of Ambient Conditions in the Switch Room
3.2 Alarm Check
3.3 MAT/Printer Check
3.4 Collection of System Messages
3.5 Display of Locked-out Station
3.6 FAN Unit Check
3.7 Alarm Tests
3.8 Main Power System Check
3.9 Trunk/RGU Check
3.10 ATTCON/DESKCON Check
3.11 System Check

NDA-24307 CHAPTER 7
Page 571
Issue 1
ROUTINE MAINTENANCE PROCEDURE
3.1 Check of Ambient Conditions in Switch Room
Check the room temperature.
Check the humidity in the room.
If the temperature or the humidity is
outside the allowable range, adjust the air
conditioner.
Check whether the room temperature is within
the range of 5°C (41°F) to 30°C (86°F).
Check whether the relative humidity in the
room is within the 15% to 65% range.
START
END

CHAPTER 7 NDA-24307
Page 572
Issue 1
ROUTINE MAINTENANCE PROCEDURE
3.2 Alarm Check
Check alarm indications on the TOPU.
If an alarm is indicated Check whether the alarm lamp on the power
supply of any module is lit.
Check whether an alarm lamp is lit on any
circuit card(s).
Alarm recovery Refer to Chapter 5, diagnose the alarm and
perform the indicated recovery procedures.
START
END

NDA-24307 CHAPTER 7
Page 573
Issue 1
ROUTINE MAINTENANCE PROCEDURE
3.3 MAT/Printer Check
Check the MAT.
System messages are automatically sent to
the MAT HD for output.
System messages are automatically sent to
the external printer for output.
Turn ON the MAT’s power.
Confirm that the menu appears on the screen.
Leave the MAT power ON continuously (lower
the CRT brightness when not in use).
Confirm that printer power is ON and that the
SEL lamp is lit.
Check the remaining quantity of printer paper.
START
END

CHAPTER 7 NDA-24307
Page 574
Issue 1
ROUTINE MAINTENANCE PROCEDURE
3.4 Collection of System Messages
Cause system messages to be displayed.
When a system message is displayed.
Check the results of routine diagnosis.
When the system is operating normally or
after a fault has been restored
Refer to Chapter 3, System Messages.
If the system message indicates a fault,
diagnose the fault by referring to Chapter 5,
and perform fault recovery.
System message [7-O] indicates that the
system is normal.
System message [7-P] indicates that the system
is abnormal. Perform fault recovery by
referring to Chapter 3 or Chapter 5.
Use the RALM/RALMN command to clear the
alarm indication and registered system
message.
START
END

NDA-24307 CHAPTER 7
Page 575
Issue 1
ROUTINE MAINTENANCE PROCEDURE
3.5 Display of Locked-out Station
Check the displays of relevant commands
to locate any locked-out stations. Check the displays of the following
commands:
• DLSL: Display in the order of LENS.
• DLSS: Display in the order of Station
Numbers
When any station in locked-out
state is displayed Recover the locked-out station(s) referring to
Section 3, Indication of Lockout Stations,
Chapter 6.
START
END

CHAPTER 7 NDA-24307
Page 576
Issue 1
ROUTINE MAINTENANCE PROCEDURE
3.6 Fan Unit Check
When the fan is set for automatic start
When the fan is set for constant operation
When the fan is out of order
Pull the FAN START switch toward the front
and set it to ON (UP) position.
Confirm that the fan has started running.
Pull the FAN START switch toward the front
and set it to AUTO (DOWN) position.
Confirm that the fan is running.
Refer to Section 10, Fan Unit Fault, Chapter 5.
Replace the fan with a spare by referring to
Section 5, Fan Unit Replacement, Chapter 4.
START
END

NDA-24307 CHAPTER 7
Page 577
Issue 1
ROUTINE MAINTENANCE PROCEDURE
3.7 Alarm Tests
An alarm is to be generated which will be displayed at the DESKCON/ATTCON. Be sure to inform
the attendant of the test in advance.
Replace the –48V fuse in the FANU with a blown fuse.
Confirm that an alarm is indicated on the TOPU.
Replace the blown fuse with the original –48V fuse.
Using the RALM/RALMN command, reset all alarm indications.
START
END

CHAPTER 7 NDA-24307
Page 578
Issue 1
ROUTINE MAINTENANCE PROCEDURE
3.8 Main Power System Check
Note: For a longer battery life, observe the following items:
•Place the batteries in a dark, cool place.
•Keep the room temperature within the range of 10°C to 35°C (40°F to 85°F).
•Floating voltage must be kept within the range of the battery specification at all times.
•After discharging, perform equalized charging as per the battery specification.
Check the load voltage (DC –48V ±5 V) of the rectifier.
Check the batteries. Check the forced-charge voltage and floating
voltage.
Check the specific gravity, liquid level and
rated capacity of each battery.
START
END

NDA-24307 CHAPTER 7
Page 579
Issue 1
ROUTINE MAINTENANCE PROCEDURE
3.9 Trunk RGU Check
Check alarm lamps on the line/trunk circuit cards.
Check to see if a system message pertaining to a circuit card has been output.
Check the speech path for each PIM and also check ringing signal.
START
END
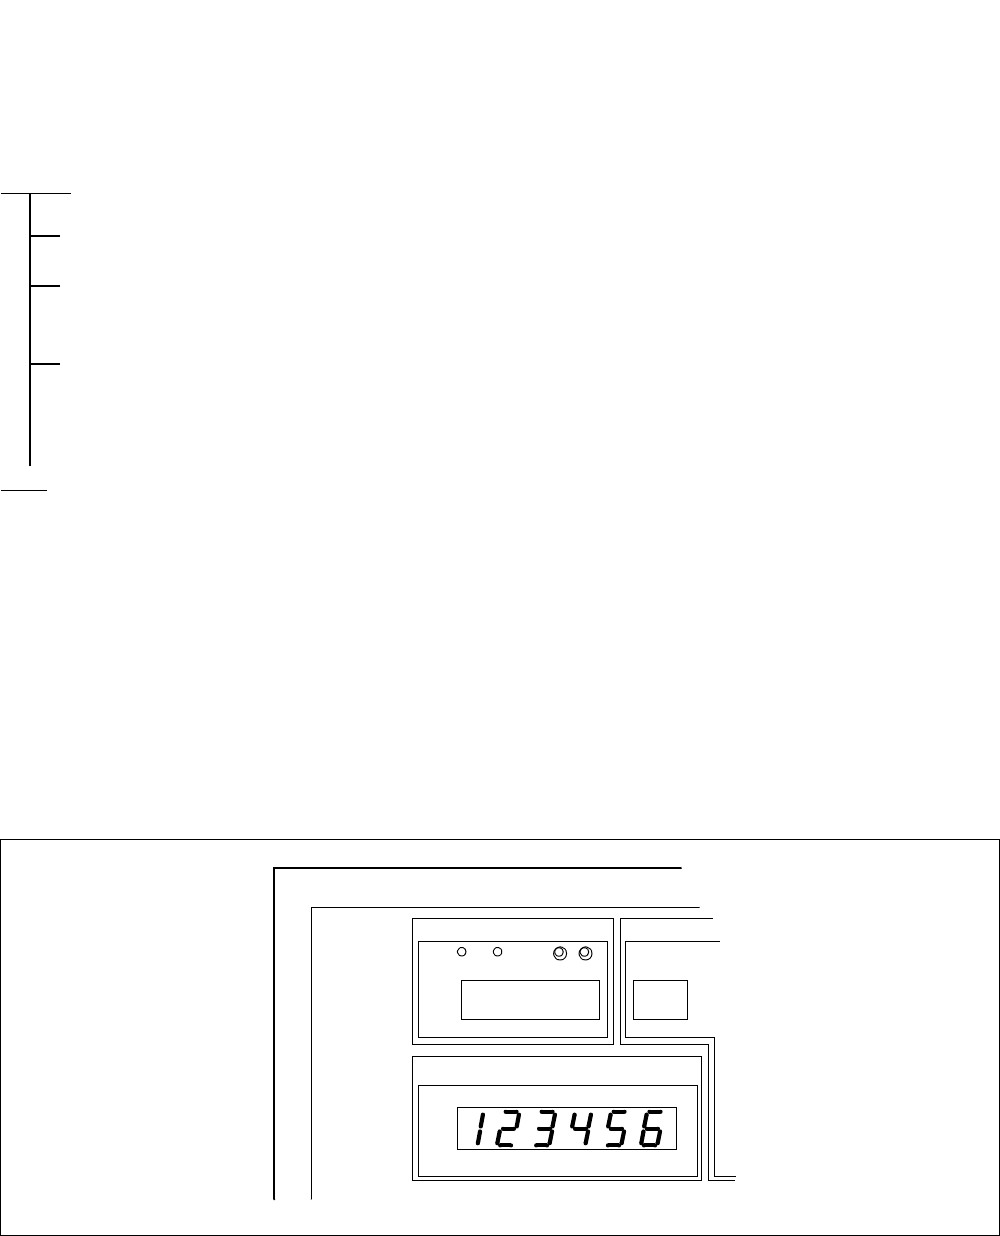
CHAPTER 7 NDA-24307
Page 580
Issue 1
ROUTINE MAINTENANCE PROCEDURE
3.10 ATTCON/DESKCON Check
(1) Attendant Console Check
Note: Adjusting Time Method
•If the Hour (H) button is pushed once, the time will advance one hour. (To push the button, use a thin
object, such as a toothpick.)
•If the H button is held continuously, the time will advance one hour each second.
•If the Minute (M) button is pushed once, the time will advance one minute.
•If the M button is held continuously, the time will advance one minute each second.
Figure 7-2 Adjusting Time on ATTCON
Ask the operator at each ATTCON if the ATTCON is operating normally.
Each operator presses the LCHK button on the ATTCON and confirms that all the lamps on the
control panel light up.
When the ATTCON is equipped with a Time Indicator Section, the operator also checks the displayed
time.
START
END
STATION/TRUNK NUMBER
AM PM
TIME
ADJUST.
H M
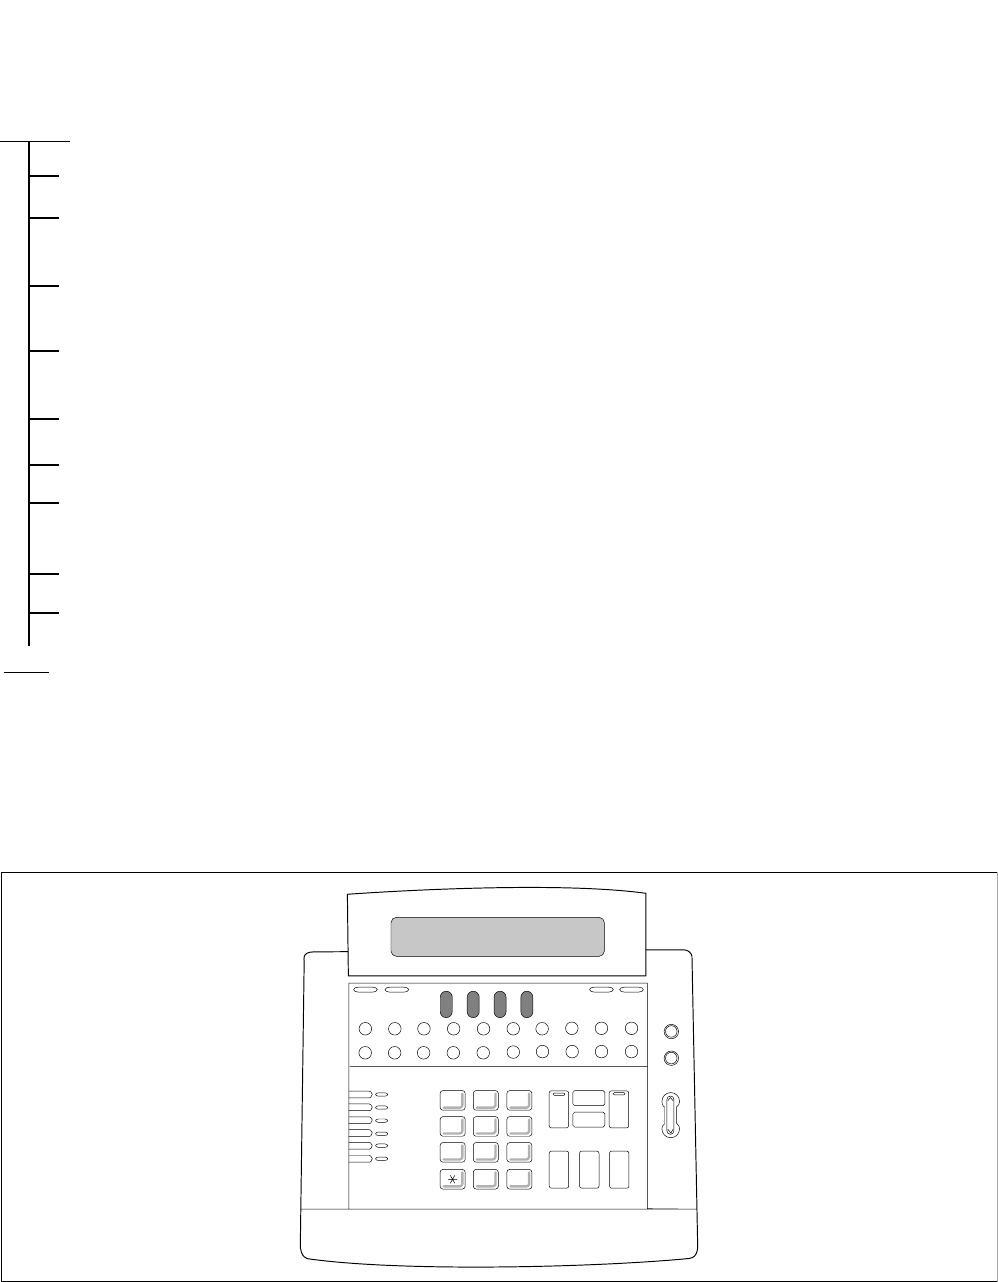
NDA-24307 CHAPTER 7
Page 581
Issue 1
ROUTINE MAINTENANCE PROCEDURE
(2) Desk Console Check
Note 1: The lamp checks can be suspended any time when the * key on the control panel is pressed.
Note 2: The DESKCON obtains time information only from the PBX side. Therefore, adjust the time and date
using the MAT command.
Figure 7-3 Desk Console
Ask the operator at each DESKCON if the DESKCON is operating normally.
On the DESKCON control panel, each operator presses the L3, SRC, and Release keys simultaneously
and confirms that all the lamps on the control panel light red.
Operator presses the # key and confirms that all the lamps on the same transverse line between the
EMG and Mute lamps light green. Refer to the figure below.
Operator presses the # key and confirms that all the green lamps (in the step above) go OFF and the
LCD on the DESKCON displays black.
Operator presses the # key and confirms the black LCD display is cleared and a ringing tone is heard.
Operator presses the # key and confirms the provided ringing tone has suspended.
Operator presses the keys on the DESKCON one by one and confirms that each lamp, corresponding
to the pressed key, emits a light and the name of the key displays on the LCD, respectively.
Operator presses the * button and completes the lamp checks. Note1
Operator checks the displayed time on the right part of LCD. Note 2
START
END
Hold
Release
L6
L5
L4
L3
L2
L1
0
89
6
3
5
2
1
4
7
#
SRC DEST
Talk
Cancel
Answer
BUSYLDN
Alarm Position
Available Position
Busy Night
ATND NANS RECALL PAGETIE
TRKSLEMG Call Park SC SVC Start
REC
MuteBV
3:25 PM WED 1

CHAPTER 7 NDA-24307
Page 582
Issue 1
ROUTINE MAINTENANCE PROCEDURE
3.11 System Check
Check the OPE lamps (green) on all circuit cards.
Check whether a system message pertaining to the CPU/TSW has been output.
Check speech conditions by establishing a station-to-station connection at each PIM.
If the condition is abnormal, determine the nature of the problem (dial tone cannot be heard,
no speech can be established, etc.)
Does the condition occur in No. 0 TSW or in No. 1 TSW?
Does the condition occur in No. 0 CPU or in No. 1 CPU?
Using MEM_HDD/MEM_HDD_N command, check the data memory.
START
END

NDA-24307 CHAPTER 7
Page 583
Issue 1
ROUTINE MAINTENANCE PROCEDURE
4. ROUTINE MAINTENANCE CHECK LISTS
This section provides check lists (Maintenance Procedure Reports) to be used when performing routine
maintenance. The Routine Maintenance Check Lists consists of the following items:
•Maintenance Procedure Report
•C.O. Trunk/Tie Line
•Register/Sender Trunk (RST)
•Digital Conference Function (8 CFT)
•Speech Path for each PIM, and Ringing Generator Unit
•Attendant/Desk Console

CHAPTER 7 NDA-24307
Page 584
Issue 1
ROUTINE MAINTENANCE PROCEDURE
USER NAME SIGNATURE OF
SUPERVISOR WORK TIME
(FROM - )
Name of User (Company) Date: Maintenance
Classification Routine/
Non-routine
Control No. Maintenance
Company
Name of Equipment Room Temperature - °C
°F & humidity % Name of Worker
Reference
Section Item Detail Check Reference
Section Item Detail Check
3.1 Check of Ambient
Conditions in the
Switch Room
Ambient
Temperature
3.9 Trunk RGU Check SND Trunk
Relative humidity DCF Function
3.2 Alarm Check TOPU Tone
3.3 MAT/Printer Check MAT MAT
Printer 3.10 ATTCON Check Ringing Signal
3.4 Collection of
System Messages
Related to Fault 3.11 System Check
Result of Routine
Diagnosis
CPU
3.5 Display of Locked-
out Station
Locked out
Stations
TSW
3.6 Fan Unit Check PM
3.7 Alarm Tests TOPU
3.8 Main Power
System Check
Rectifier
Battery
3.9 Trunk RGU Check C.O. Trunk
Tie Trunk
ORT
IRT
Condition And Cause
Procedure and Parts Used

NDA-24307 CHAPTER 7
Page 585
Issue 1
ROUTINE MAINTENANCE PROCEDURE
C.O. Trunk Tie Line
TEST TYPE TEST ITEM CONNECTION DIAGRAM
C.O. Trunk/Tie Line
Speech Path Test •Set up a speech path test by
seizing a trunk using the
Station or ATTCON/DESKCON
connection test diagrammed to
the right.
•Connection Test-Station
•Connection Test-ATTCON/DESKCON
C.O. Trunk/Tie Line
NAME OF TRUNK ROUTE ACCESS
NUMBER ROUTE
NUMBER TRUNK
NUMBER CHECK REMARKS
LC TRK
C.O./Tie
Line
ATI TRK
C.O./Tie
Line
ATTCON/
DESKCON
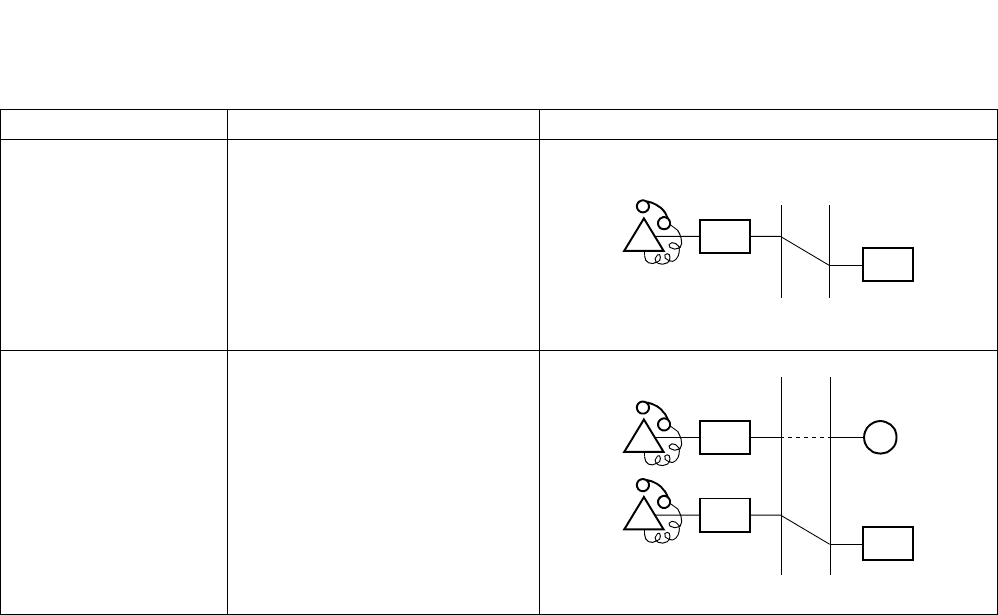
CHAPTER 7 NDA-24307
Page 586
Issue 1
ROUTINE MAINTENANCE PROCEDURE
Register/Sender Trunk (RST)
TEST TYPE TEST ITEM CONNECTION DIAGRAM
ORT Function • Perform the test by specifying
an ORT using the Connection
Test-Station.
• Confirm that [6-I] system
message displays as a result of
the test.
DP/PB
SENDER Function • Perform the test by specifying
an ORT using the Connection
Test-Station.
• Confirm that [6-I] system
message displays as a result of
the test.
LC
ORT
LC ~
SND
ORT

NDA-24307 CHAPTER 7
Page 587
Issue 1
ROUTINE MAINTENANCE PROCEDURE
RST (/)
FUNCTION
TRUNK NO.
ORT SENDER REMARKS
PB RECEIVING DP RECEIVING
RST No.
ORT0 SND0
11
22
33
44
55
66
77
RST No.
00
11
22
33
44
55
66
77
RST No.
00
11
22
33
44
55
66
77
RST No.
00
11
22
33
44
55
66
77
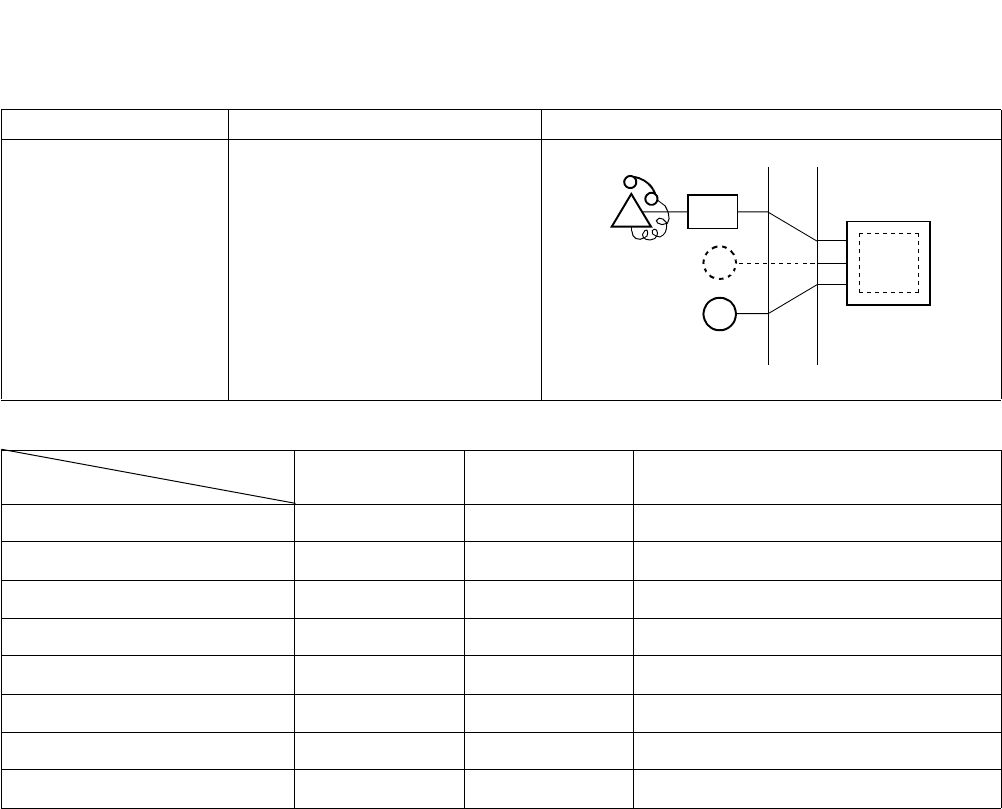
CHAPTER 7 NDA-24307
Page 588
Issue 1
ROUTINE MAINTENANCE PROCEDURE
Digital Conference Function
TEST TYPE TEST ITEM CONNECTION DIAGRAM
Three-way
Conversation • Perform the test by specifying
an 8CFT using the Connection
Test-Station.
• Confirm that [6-I] system
message displays as a result of
the test.
FUNCTION
TRUNK NO. SPEECH RELEASE REMARKS
CFT0
1
2
3
4
5
6
7
LC
~
TSTT
MUX
8CFT
~
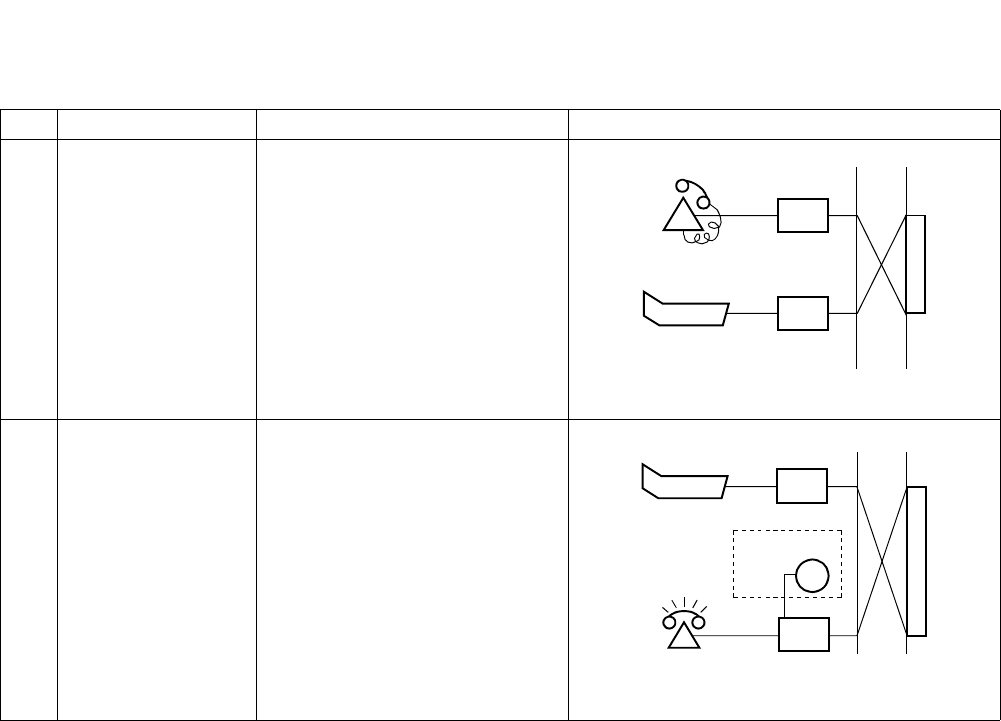
NDA-24307 CHAPTER 7
Page 589
Issue 1
ROUTINE MAINTENANCE PROCEDURE
Speech Path for Each PIM, and Ringing Generator Unit
NO. TEST TYPE TEST ITEM CONNECTION DIAGRAM
1 The ATTCON/
DESKCON is called
from one station in
each PIM.
Normal speech path is confirmed
by calling the attendant from a
station located in each PIM.
2 The operator calls
the station back. After normal speech path has
been confirmed, the attendant
calls the station back. Confirm
that the station rings.
ATI
ATTCON/
LC
DESKCON
ATI
ATTCON/
LC
~
PWR0, 1
RG
(RINGING)
DESKCON

CHAPTER 7 NDA-24307
Page 590
Issue 1
ROUTINE MAINTENANCE PROCEDURE
MOUNTING LOCATION CHECK REMARKS
MODULE NAME UNIT NAME
PIM0
0
1
2
3
PIM1
0
1
2
3
PIM2
0
1
2
3
PIM3
0
1
2
3
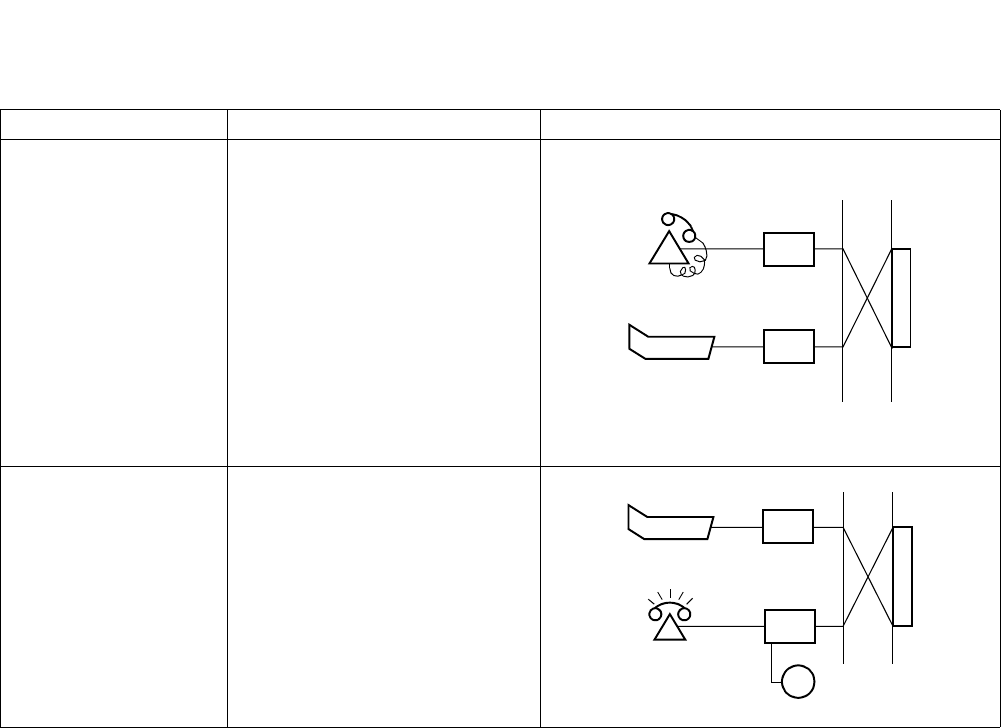
NDA-24307 CHAPTER 7
Page 591
Issue 1
ROUTINE MAINTENANCE PROCEDURE
Attendant/Desk Console (ATTCON/DESKCON)
TEST TYPE TEST ITEM CONNECTION DIAGRAM
Call Termination Test • A station dials the operator
access code and confirm that
the call termination is
indicated at all the ATTCON/
DESKCON.
• A station dials the operator
access code. An attendant
answers and speaks with the
caller. This process is repeated
at all the ATTCON/
DESKCON.
Call Origination Test • The attendant originates a call
to the station by pressing
LOOP keys one after another.
ATI
ATTCON/
LC
DESKCON
ATTCON/
LC
~RG
(RINGING)
ATI
DESKCON

CHAPTER 7 NDA-24307
Page 592
Issue 1
ROUTINE MAINTENANCE PROCEDURE
FUNCTION
ATTCON/
DESKCON NO.
CALL TERMINATION CALL ORIGINATION REMARKS
INCOMING CALL
INDICATION SPEECH RELEASE SPEECH RELEASE
0
1
2
3
4
5
6
7
8
9
10
11
12
13
14
15

NDA-24307 CHAPTER 8
Page 593
Issue 1
CHAPTER 8 MAINTENANCE COMMANDS
This chapter explains various commands used in the system administrative management procedure. Table 8-1
shows a list of maintenance commands.
Table 8-1 Command Lis t
COMMAND COMMAND FULL NAME
ALLC Assignment of Line Load Control
ALMG Assignment of Alarm Grade Data
ATRF Assignment of Traffic Measurement Order
ATRFN Assignment of Traffic Measurement Order for Fusion Network
BOSD Back Up One-Touch Speed Call Memory Data
CADSD Continuous Assignment of Station Data
CATK Continuous Assignment of Trunk Data
CBCN Control of Broadcasting for NDM
CCSE Change of Common Signaling Channel Equipment
CDBU Change of Dch Backup
CMOD Change of System Mode
CMODI Change of System Mode for ISW
CMWL Control Message Waiting Lamp
CMWL_T Control Message Waiting Lamps - Telephone Number
CPRS Controlled Alternate PRSCs
CSCL Continuous Change of Station Class
CSTN Continuous Change of Station Number
DCBD Display of Call Block Entry Data
DCEN Display of Connection Trunk LENS Data for LDM
DCON Display of Connection Status
DFTD Display of System Message Details
DISS Display of Program Issue
DLEN Display of LENS Data
DLSL Display of Lock Out Station - LENS
DLSS Display of Lockout Station - Number
DLSS_T Display of Lock Out Station - Number- Telephone Number

CHAPTER 8 NDA-24307
Page 594
Issue 1
MAINTENANCE COMMANDS
DLTEL Display of Telephone Number from LENS for LDM
DNTEL Display of Telephone Number from LENS for NDM
DPKG Display of Setting Port Package
DPSW Display Package Switch Status
DSTN Display of Station Data
DTELN Display of Telephone Number Data for NDM
DTF101 Display of Terminal Traffic Data
DTF102 Display of Route Traffic Data
DTF103 Display of Station Peg Count Data
DTF104 Display of Attendant Peg Count Data
DTF105 Display of Route Peg Count Data
DTF201 Display of Service Peg Count Data
DTF301 Display of UCD Route Peg Count Data
DTF302 Display of UCD Group Peg Count Data
DTF303 Display of Station Peg Count Data
DTF501 Display of Attendant Answering Peg Count Data
DTF601 Display of Connection Route Peg Count Data
DTF602 Display of Connection Route Traffic Data
DTF101N Display of Terminal Traffic Data for Fusion Network
DTF102N Display of Route Traffic Data for Fusion Network
DTF103N Display of Station Peg Count Data for Fusion Network
DTF104N Display of Attendant Peg Count Data for Fusion Network
DTF105N Display of Route Peg Count Data for Fusion Network
DTF201N Display of Service Peg Count Data for Fusion Network
DTF301N Display of UCD Route Peg Count Data for Fusion Network
DTF302N Display of UCD Group Peg Count Data for Fusion Network
DTF303N Display of Station Peg Count Data for Fusion Network
DTF501N Display of Attendant Answering Peg Count Data for Fusion Network
DTF601N Display of Connection Route Peg Count Data for Fusion Network
DTF602N Display of Connection Route Traffic Data for Fusion Network
Table 8-1 Command List (Continued)
COMMAND COMMAND FULL NAME

NDA-24307 CHAPTER 8
Page 595
Issue 1
MAINTENANCE COMMANDS
FLINST File Install
HDD_FDD Data Control Between HDD and FDD
HDD_MAT Data Control Between HDD and MAT
HDD_MAT_N Data Control Between HDD and MAT for NDM
HDFP HDD Format of PBX
MBCT Make Busy of Connection Trunk for LDM
MBLE Make Busy of LENS
MBPM Make Busy of Port Microprocessor
MBRT Make Busy of Route
MBSM Make Busy of System Message Printout
MBST Make Busy of Station
MBST_T Make Busy of Station - Telephone Number
MBTC Make Busy of Trunk-Continuous
MBTK Make Busy of Trunk
MEM_HDD Data Control Between Memory and HDD
MEM_HDD_N Data Control Between Memory and HDD for NDM
MFCH Make Busy of FCCH
PMBU Port Microprocessor Back Up
RALM Release Alarm
RALMN Release Alarm for NDM
RLST Release Station/Trunk
RLST_T Release Station/Trunk - Telephone Number
SINZ System Initialization
SINZI System Initialization for ISW
SPTS Scanning of Port Status
SRTS Scanning of Route Status
XHFD X-RAY HD or FDD Diagnosis
Table 8-1 Command List (Continued)
COMMAND COMMAND FULL NAME

CHAPTER 8 NDA-24307
Page 596
Issue 1
ALLC: Assignment of Line Load Control
ALLC: Assignment of Line Load Control
1. Functional Outline
This command designates the start and stop of line load control.
2. Parameters
Input Data
ALL/ONE: Operation Mode Selection (1,2)
O/A=Only One LP/All LPs
LP: Local Partition (LP) Number Note
STATUS: Line Load Control Status (0-3)
0=Stop Line Load Control
1=Start Line Load Control
2=Automatic Line Load Control is in effect (display only)
3=Status of all LPs do not match (display only)
Note: This parameter appears when 0 (only one LP) is set in ALL/ONE input data.

NDA-24307 CHAPTER 8
Page 597
Issue 1
ALMG: Assignment of Alarm Grade Data
ALMG: Assignment of Alarm Grade Data
1. Functional Outline
This command makes a flexible change of system message output grades. Thus, the PBX user can give a proper
alarm grade to each system message according to their requirements. When no data is assigned, the default
alarm grades are automatically adopted.
Note: This command cannot change the alarm grade for [6-A] system message.
2. Parameters
Input data
FK: Fault Message Kind (0-7, 10-17, 20-27, 30-37)
FI: Fault Message Index (A-Z)
LMP: Fault Message Lamp Data (0-3)
0=Lamp OFF
1=SUP Lamp ON
2=MN Lamp ON
3=MJ Lamp ON
GRD: Printout Grade (0-3)
TYPE: List-up Type)
1=All Data
2=Changed Data
3=Default Data
SYSM GRD: System Message Output Grade
0=All Messages
1=Not Used
2=MN/MJ Grade Massages
3=MJ Grade Massages

CHAPTER 8 NDA-24307
Page 598
Issue 1
ATRF: Assignment of Traffic Measurement Order
ATRF: Assignment of Traffic Measurement Order
1. Functional Outline
This command is used to assign and delete node-level traffic measurement programs. A request for traffic
measurement is performed on each node basis when a traffic measurement instruction has been assigned by
this command. The collected traffic measurement data can be stored on the HD of the MAT, which can be
designated on the basis of traffic measurement type.
2. Parameters
Input Data
TYPE: Type of Traffic Measurement (1-19)
PORT: Traffic Information Output Terminal Number (0-7: IOC, 8: LAN, 9: NMS)
INTERVAL: Output interval (0, 30-120)
Assign the data (30-120) in 10 minute increments. When assigning 0 (available when any
of TYPE 3-18 is selected), instead specify your desired output time in the OUTPUT
HOUR/MINUTE parameters below.
START HOUR Note
START MINUTE Note
END HOUR Note
END MINUTE Note
OUTPUT HOUR: This data is valid only when “INTERVAL”=0.
OUTPUT MINUTE: This data is valid only when “INTERVAL”=0.
START RT: Start External Route Number (available when TYPE 2/5/8 is selected)
END RT: End External Route Number (available when TYPE 2/5/8 is selected)
DATA MEANING DATA MEANING
1 Terminal Traffic 2 Route Traffic
3 Station Peg Count 4 ATT Peg Count
5 Route Peg Count 6 Service Peg Count
8 UCD Route Peg Count 9 UCD Group Peg Count
10 UCD Station Peg Count 15 ATT Answering Peg Count
18 Connection Route Peg Count 19 Connection Route Traffic

NDA-24307 CHAPTER 8
Page 599
Issue 1
ATRF: Assignment of Traffic Measurement Order
START C_RT: Start Connection Route Number (available when TYPE 18/19 is selected)
END C_RT: End Connection Route Number (available when TYPE 18/19 is selected)
Note: Assign the traffic measurement time period between START HOUR/MINUTE and END HOUR/
MINUTE longer than an hour. Also, if the measurement should be executed throughout a day, assign
the same data in both START HOUR/MINUTE and END HOUR/MINUTE parameter

CHAPTER 8 NDA-24307
Page 600
Issue 1
ATRFN: Assignment of Traffic Measurement Order for Fusion Network
ATRFN: Assignment of Traffic Measurement Order for Fusion Network
1. Functional Outline
This command is used to assign and delete traffic measurement programs available on the Ethernet. A request
for traffic measurement is performed on a network basis when a traffic measurement instruction has been
assigned by this command. The collected traffic measurement data can be stored on the HD of the MAT
(connected to the NCN: Network Control Node), which can be designated on the basis of traffic measurement
type. Note that this command can be used at the NCN only.
2. Parameters
Input Data
TYPE: Type of Traffic Measurement (1-19) Note 1
PORT: Traffic Information Output Terminal Number (0-7: IOC, 8: LAN, 9: NMS)
INTERVAL: Output interval (0, 30-120)
Assign the data (30-120) in 10 minute increments. When assigning 0 (avail-
able when any of TYPE 3-18 is selected), instead specify your desired output
time in the “OUTPUT HOUR/MINUTE” parameters below.
START HOUR Note 2, Note 3
START MINUTE Note 2, Note 3
END HOUR Note 2, Note 3
END MINUTE Note 2, Note 3
OUTPUT HOUR: This data is valid only when “INTERVAL”=0.
OUTPUT MINUTE: This data is valid only when “INTERVAL”=0.
START LGRT: Start Logical Route Number (available when TYPE 2/5/8 is selected)
DATA MEANING DATA MEANING
1 Terminal Traffic 2 Route Traffic
3 Station Peg Count 4 ATT Peg Count
5 Route Peg Count 6 Service Peg Count
8 UCD Route Peg Count 9 UCD Group Peg Count
10 UCD Station Peg Count 15 ATT Answering Peg Count
18 Connection Route Peg Count 19 Connection Route Traffic

NDA-24307 CHAPTER 8
Page 601
Issue 1
ATRFN: Assignment of Traffic Measurement Order for Fusion Network
END LGRT: End Logical Route Number (available when TYPE 2/5/8 is selected)
START C_RT: Start Connection Route Number (available when TYPE 18/19 is selected)
END C_RT: End Connection Route Number (available when TYPE 18/19 is selected)
Note 1: The selected traffic measurement data, except for TYPE 1 (Terminal Traffic), is collected with the
whole network systems as a single unit.
Note 2: When time difference exists between the nodes, confirm that the related time difference data, based on
the UCT (Universal Coordinated Time) standard, has been assigned at each node via the ATDF com-
mand.
Note 3: Assign the traffic measurement time period between START HOUR/MINUTE and END HOUR/
MINUTE longer than an hour. Also, if the measurement should be executed throughout a day, assign
the same data in both START HOUR/MINUTE and END HOUR/MINUTE parameters.
Note 4: If the data for this command is once assigned, the node-level data by the ATRF command is not
cleared, but loses its validity (the network-level data takes precedence).

CHAPTER 8 NDA-24307
Page 602
Issue 1
BOSD: Back Up One-Touch Speed Call Memory Data
BOSD: Back Up One-Touch Speed Call Memory Data
1. Functional Outline
•Save Function
Saves the data residing in the One-Touch Speed Call Memory of ELC card onto a floppy disk.
•Verify Function
Verifies the One-Touch Speed Call Memory data saved on the floppy disk with the data residing in the
One-Touch Speed Call Memory of ELC card.
•Load Function
Loads the One-Touch Speed Call Memory data saved in the floppy disk into the One-Touch Speed Call
Memory of ELC card.
2. Parameters
Input data
Direction Select: PBX Memory to MAT/MAT to PBX Memory / Verify MAT against MEM
Data Type Selection: by Station / by LEN
Begin TN: Note 1
End TN: Note 1
Begin STN: Note 1
End STN: Note 1
Begin LEN: Note 2
End LEN: Note 2
Auto Verify Afterward: Click ON/OFF=Checked/Unchecked
File Name and Path
Note 1: When “by Station” is designated
Note 2: When “by LEN” is designated

NDA-24307 CHAPTER 8
Page 603
Issue 1
CADSD: Continuous Assignment of Station Data
CADSD: Continuous Assignment of Station Data
1. Functional Outline
This command can assign/delete many station data simultaneously which have consecutive numbers.
2. Parameters
Type: Assign/Delete
[When “Assign” is selected in the “Type” selection list box]
Input data
TN(START): Start Tenant Number
TN(END): End Tenant Number
STN(START): Start Station Number [Max. 6 digits] Note 1
STN(END): End Station Number [Max. 6 digits] Note 1
STEP: Station Count-up Step Note 2
If using “*” and “#” → [1-12]
If not using “*” and “#” → [1-10]
LENS(START): First Line Equipment Number [6 digits]
LENS(END): Last Line Equipment Number [6 digits]
GROUP(START): First Group Number [0-31]
GROUP(END): Last Group Number [0-31]
LEVEL(START): First Level Number [0-7]
LEVEL(END): Last Level Number [0-7]
Note 1: In the bottom part of the display, a check box is provided to determine whether to use “*” and “#” as
a part of the Station Number. If necessary, check the box.
Note 2: In the parameter here, specify the size of increment between the consecutive station numbers to be
assigned. See the example below:
Example: [Input data] [Result]
STN(START)=100
STN(END)=200
STEP=10 →Station Number is assigned by 10 increments:
∇ When * and # are not used as part of STN
100 110 120 130 ... 190 200
∇ When * and # are used as part of STN
10* 118 126 134 ... 1** 1#8

CHAPTER 8 NDA-24307
Page 604
Issue 1
CADSD: Continuous Assignment of Station Data
TEC: Telephone Equipment Class [1-31]
1=DP (10pps) 2=PB
3=DP/PB 4=DP (20pps)
5-11=Not used 12=Dterm
13=Data Terminal via Dterm 14=Hot Line
15=CAS Line 16=Data Terminal via Data Module
17=Not used 18=Virtual Line Appearance (for Dterm Multi-Line)
19-22=Not used 23=ISDN Terminal
24-26=Not used 27=8 Conference Equipment
28-31=Not used
RSC: Route Restriction Class [0-15]
SFC: Service Feature Class [0-15]
Buttons
Execute: Click to make the input data valid.
Cancel: Click to cancel the input data.
Exit: Click to exit this command.
Display data (after “Execute” button is pressed)
TN: Tenant Number
STN: Assigned Station Number
LENS: Line Equipment Number
STATUS: Data Entry Result
OK=Data Assignment Is Successful Note
Note: If not OK (i.e. the data entry is not successful), related error message is displayed here.

NDA-24307 CHAPTER 8
Page 605
Issue 1
CADSD: Continuous Assignment of Station Data
[When “Delete” is selected in the “Type” selection list box]
Input data
TN(START): First Tenant Number
TN(END): Last Tenant Number
STN(START): First Station Number [Max. 6 digits]
STN(END): Last Station Number [Max. 6 digits]
STEP: :Station Count-up Step Note 1
If using “*” and “#” → [1-12]
If not using “*” and “#” → [1-10]
Note 1: In the parameter here, specify the size of increment between the consecutive station numbers to be
deleted. See the example below:
Example: [Input data] [Result]
STN(START)=100
STN(END)=200
STEP=10
Buttons
Execute: Click to delete the input data.
Cancel: Click to cancel the deletion.
Exit: Click to exit this command.
Display data
TN: Tenant Number
STN: Station Number
STATUS: Result of Deletion Note 2
Note 2: When the deletion is successful, “OK” is displayed here. Otherwise (i.e. the deletion is rejected), re-
lated error message is displayed.
→Station Number is deleted by 10 increments:
∇ When * and # are not used as part of STN
100 110 120 130 ... 190 200
∇ When * and # are used as part of STN
10* 118 126 134 ... 1** 1#8

CHAPTER 8 NDA-24307
Page 606
Issue 1
CATK: Continuous Assignment of Trunk Data
CATK: Continuous Assignment of Trunk Data
1. Functional Outline
This command can assign/delete many trunk data simultaneously which have consecutive numbers.
2. Parameters
Type/KIND (Note): Assign/Delete
Note: Type
KIND
[When “Assign” is selected in the “Type/KIND” selection list box]
Input data
RT: Route Number
TK (START): First Trunk Number [1-768]
TK (END): Last Trunk Number [1-768]
STEP: Trunk Count-up Step [1-10] Note 1
LENS (START): First Line Equipment Number [6 digits]
LENS (END): Last Line Equipment Number [6 digits]
TN: Tenant Number
RSC: Route Restriction Class [0-15] Note 2
SFC: Service Feature Class [0-15] Note 2
GROUP (START): First Group Number [0-31]
GROUP (END): Last Group Number [0-31]
LEVEL (START): First Level Number [0-7]
LEVEL (END): Last Level Number [0-7]
TYPE: Count-up Type [1-6] Note 3
1 = LEVEL→GROUP→UNIT
2 = LEVEL→UNIT →GROUP
3 = GROUP→UNIT →LEVEL
4 = GROUP→LEVEL→UNIT
5 = UNIT →LEVEL→GROUP
6 = UNIT →GROUP→LEVEL
Note 1: In the parameter here, specify the size of increment between the consecutive trunk numbers to be
assigned. See the example below:
Example: [Input data] [Result]
TN(START)=1
TN(END)=21
STEP=2
Note 2: Data entry for this parameter is necessary when “RT” is “901” or “915.”
Note 3: “TYPE” parameter here determines how to arrange the trunk data. See [Details on Trunk
Arrangement “TYPE”] (later pages) for details.
→Trunk Number is assigned by 2 increments:
1357911...1921

NDA-24307 CHAPTER 8
Page 607
Issue 1
CATK: Continuous Assignment of Trunk Data
Buttons
Execute: Click to make the input data valid.
Cancel: Click to cancel the input data.
Exit: Click to exit this command.
Display data
TK: Assigned Trunk Number
LENS: Line Equipment Number
STATUS: Data Entry Result
OK=Data Assignment Is Successful Note 4
Note 4: If not OK (i.e. the data entry is not successful), related error message is displayed here.

CHAPTER 8 NDA-24307
Page 608
Issue 1
CATK: Continuous Assignment of Trunk Data
[When “Delete” is selected in the “Type/KIND” selection list box]
Input data
RT: Route Number
TK(START): First Trunk Number [1-768]
TK(END): Last Trunk Number [1-768]
STEP: Trunk Count-up Step [1-10] Note 1
Buttons
Execute: Click to delete the input data.
Cancel: Click to cancel the deletion.
Exit: Click to exit this command.
Display data
TK: Trunk Number
STATUS: Result of Deletion
OK=Deletion Success Note 2
Note 1: In the parameter here, specify the size of increment between the consecutive trunk numbers to be de-
leted. See the example below:
Example: [Input data] [Result]
TK(START)=1
TK(END)=21
STEP=2
Note 2: When the deletion is successful, “OK” is displayed here. Otherwise (i.e. the deletion is rejected), re-
lated error message is displayed.
→Trunk Number is deleted by 2 increments:
1357911...1921
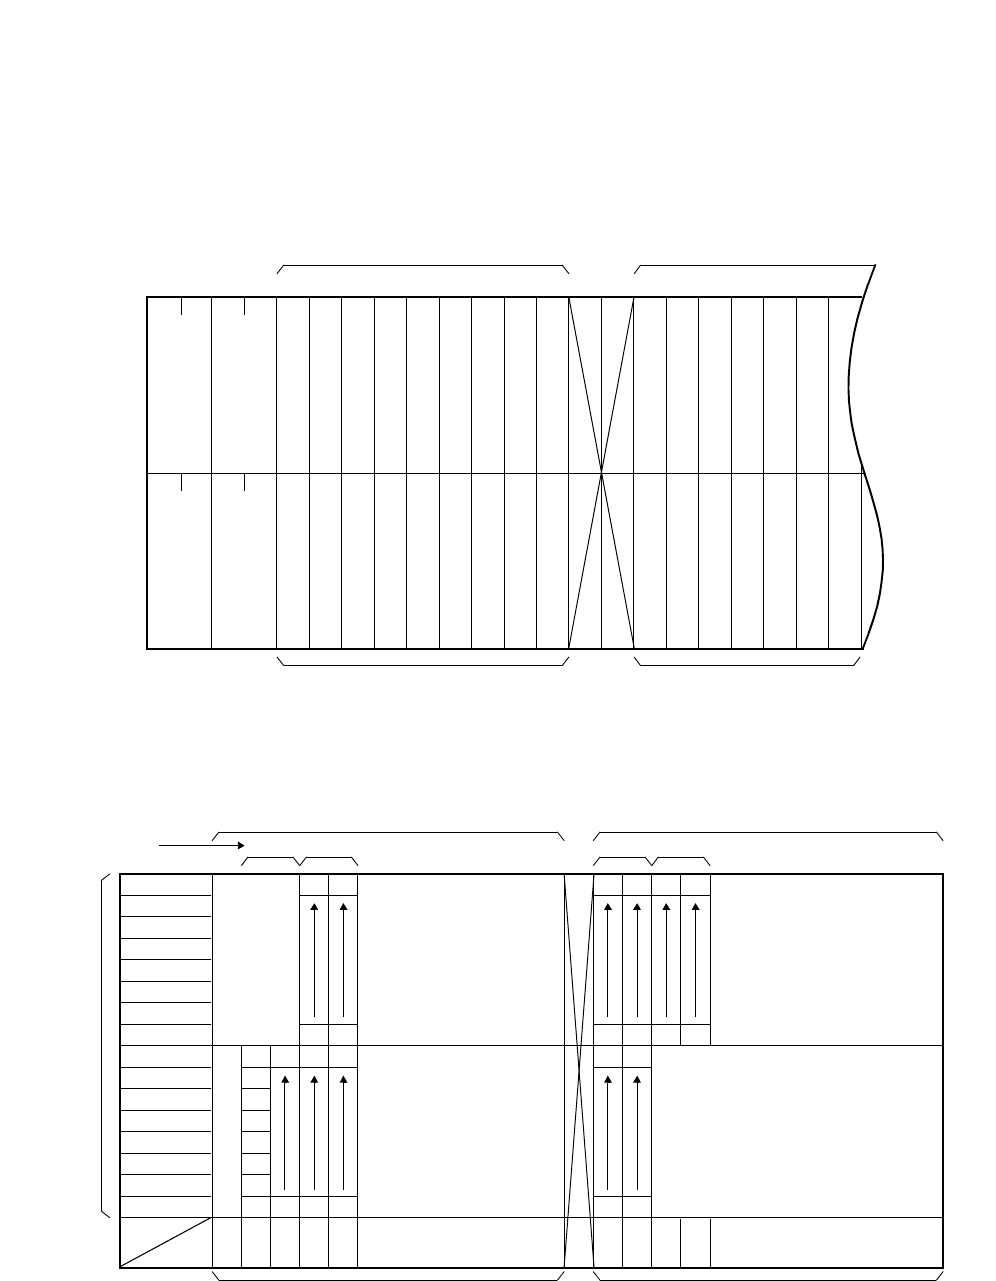
NDA-24307 CHAPTER 8
Page 609
Issue 1
CATK: Continuous Assignment of Trunk Data
[Details on Trunk Arrangement “TYPE”]
When assigning the consecutive trunk data by using the CATK command, you must select the trunk arrange-
ment type (1-6) in the “TYPE” parameter. See the detailed examples below:
The following are the examples when the 16 COT circuit cards are accommodated as shown below.
•TYPE=1 (Level → Group → Unit)
Trunk data is arranged in the following numerical order.
U=2
00
PIM C/E
U=3
05 10 15 20
16
C
O
16
C
O
16
C
O
16
C
O
16
C
O
16
C
O
PIM C/E
U=0 U=1
TTT
TTT
LV7
LV6
LV5
LV4
LV3
LV2
LV1
LV0
LV0
LV1
LV2
LV3
LV4
LV5
LV6
LV7
1
2
3
4
5
6
7
8
02
9
16
03
25
32
05
17
24
04
49
56
57
64
05 06
U=2
U=0
0302
33
40
00
41
48
01
73
80
65
72
1615
U=3
U=1
81
88
89
96
Group No.
Level No.
1MG
Slot No.
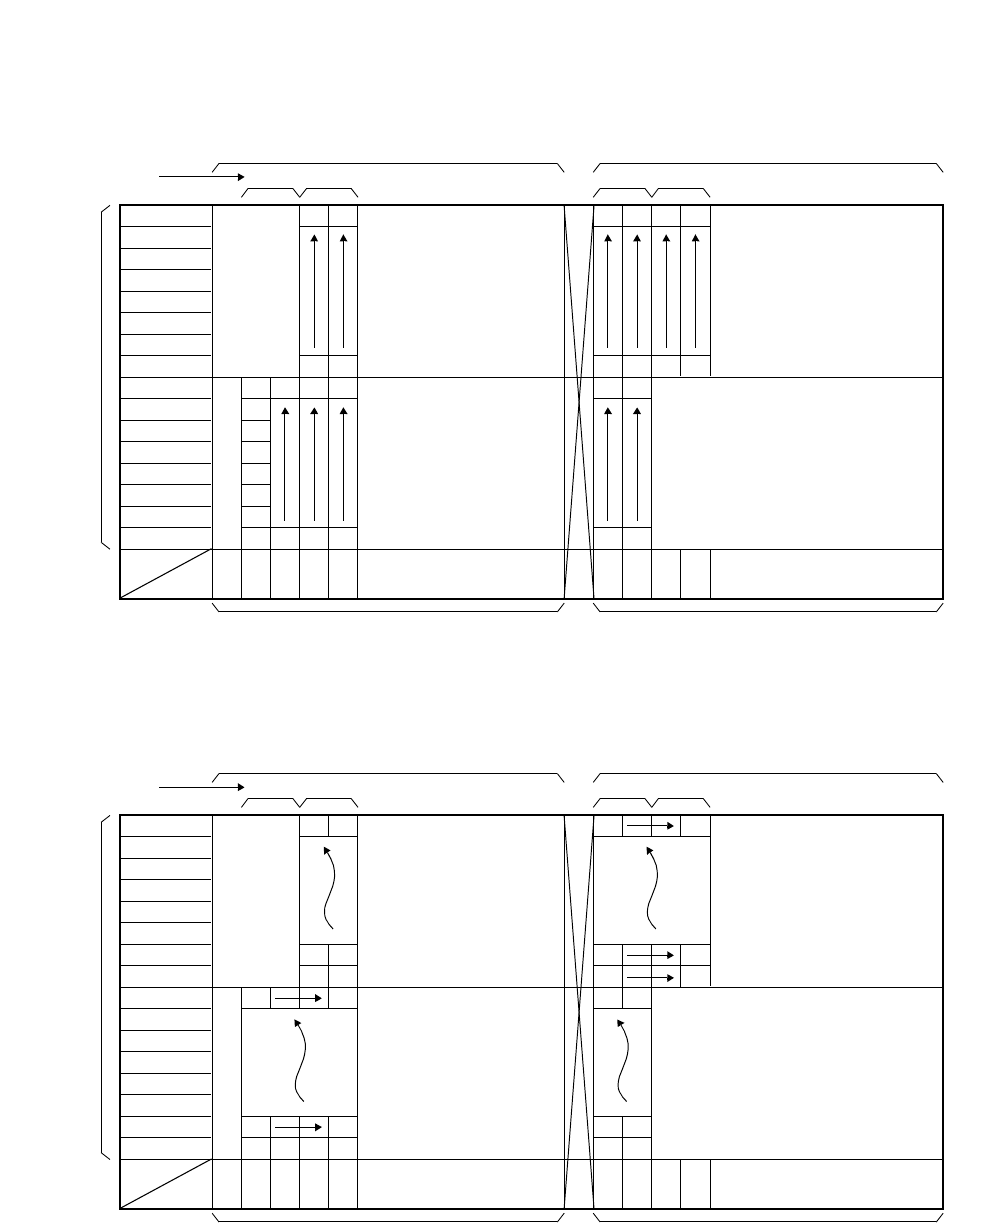
CHAPTER 8 NDA-24307
Page 610
Issue 1
CATK: Continuous Assignment of Trunk Data
•TYPE=2 (Level → Unit → Group)
Trunk data is arranged in the following numerical order.
•TYPE=3 (Group → Level → Unit)
Trunk data is arranged in the following numerical order.
LV7
LV6
LV5
LV4
LV3
LV2
LV1
LV0
LV0
LV1
LV2
LV3
LV4
LV5
LV6
LV7
1
2
3
4
5
6
7
8
02
33
40
03
81
88
05
65
72
04
17
24
49
56
05 06
U=2
U=0
0302
9
16
00
41
48
01
57
64
25
32
1615
U=3
U=1
73
80
89
96
Group No.
Level No.
1MG
Slot No.
LV7
LV6
LV5
LV4
LV3
LV2
LV1
LV0
LV0
LV1
LV2
LV3
LV4
LV5
LV6
LV7
1
5
29
02
4
32
05
49
63
50
64
05 06
U=2
U=0
0302
33
47
00
34
48
01
65
93
1615
U=3
U=1
68
96
Group No.
Level No.
1MG
Slot No.
83536
2
03
3
04
51 52 69 72
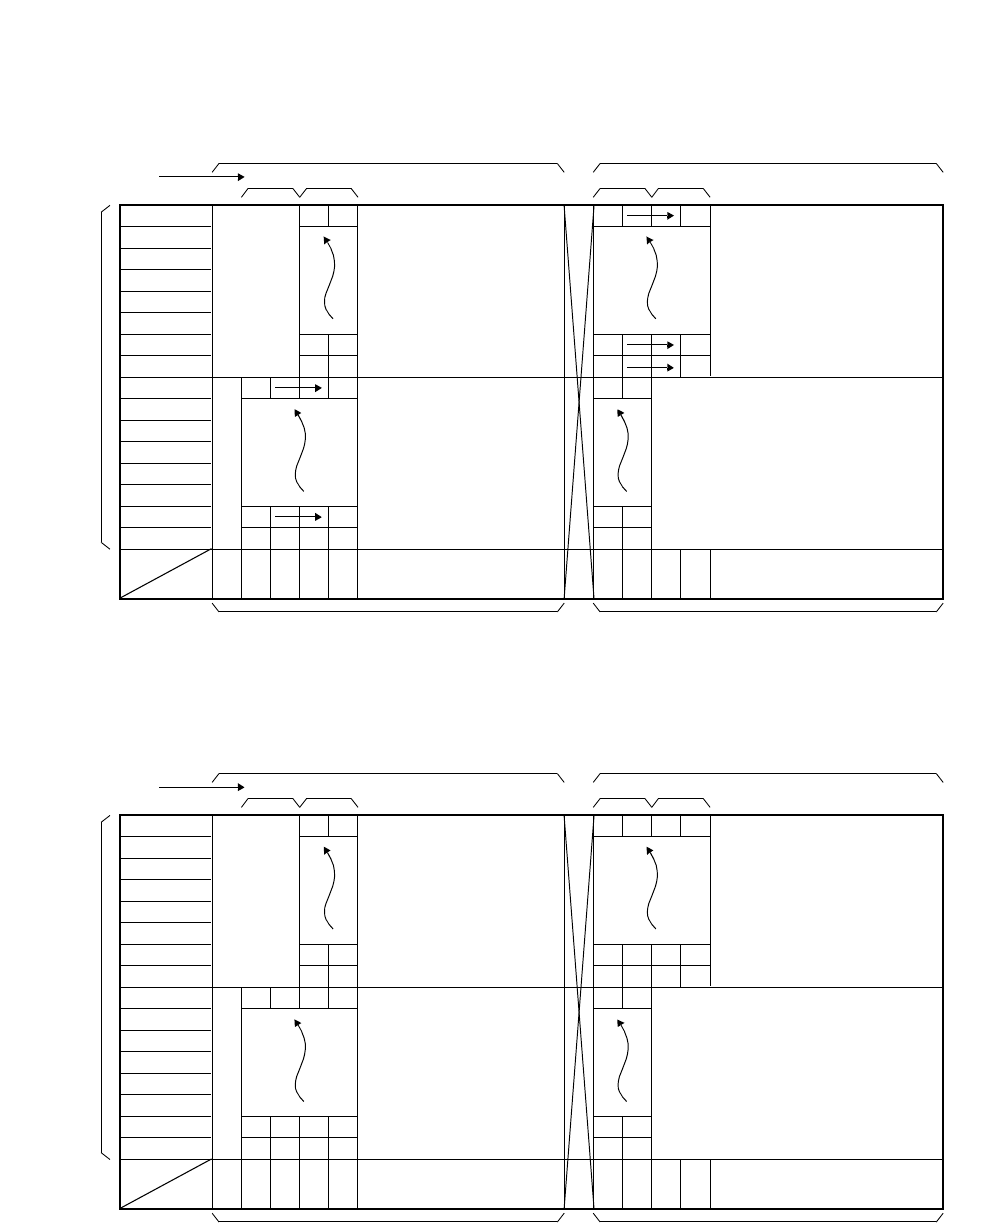
NDA-24307 CHAPTER 8
Page 611
Issue 1
CATK: Continuous Assignment of Trunk Data
•TYPE=4 (Group → Unit → Level)
Trunk data is arranged in the following numerical order.
•TYPE=5 (Unit → Level → Group)
Trunk data is arranged in the following numerical order.
LV7
LV6
LV5
LV4
LV3
LV2
LV1
LV0
LV0
LV1
LV2
LV3
LV4
LV5
LV6
LV7
1
13
85
02
4
88
05
7
91
8
92
05 06
U=2
U=0
0302
5
89
00
6
90
01
9
93
1615
U=3
U=1
12
96
Group No.
Level No.
1MG
Slot No.
16 17 18
2
03
3
04
19 20 21 24
LV7
LV6
LV5
LV4
LV3
LV2
LV1
LV0
LV0
LV1
LV2
LV3
LV4
LV5
LV6
LV7
1
5
29
02
81
95
05
3
31
35
63
05 06
U=2
U=0
0302
2
30
00
34
62
01
4
32
1615
U=3
U=1
82
96
Group No.
Level No.
1MG
Slot No.
83 6 38
33
03
65
04
739 8 84
64 80
40 68
36 66
37 67
61 79
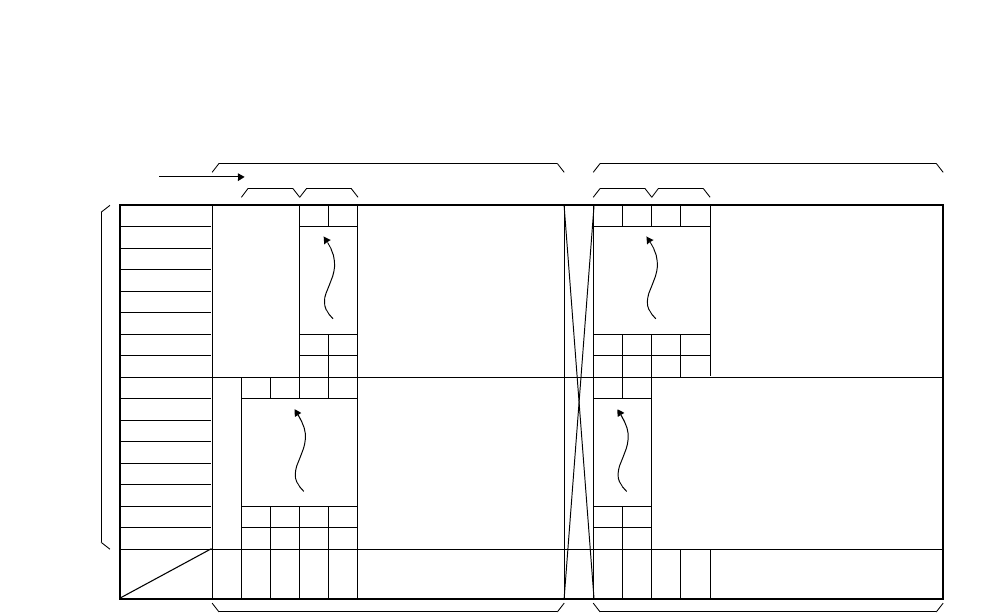
CHAPTER 8 NDA-24307
Page 612
Issue 1
CATK: Continuous Assignment of Trunk Data
•TYPE=6 (Unit → Group → Level)
Trunk data is arranged in the following numerical order.
LV7
LV6
LV5
LV4
LV3
LV2
LV1
LV0
LV0
LV1
LV2
LV3
LV4
LV5
LV6
LV7
1
13
85
02
11
95
05
3
87
7
91
05 06
U=2
U=0
0302
2
86
00
6
90
01
4
89
1615
U=3
U=1
12
96
Group No.
Level No.
1MG
Slot No.
23 14 18
5
03
9
04
15 19 16 24
92 94
20 22
810
17 21
89 93

NDA-24307 CHAPTER 8
Page 613
Issue 1
CBCN: Control of Broadcasting for NDM
CBCN: Control of Broadcasting for NDM
1. Functional Outline
This command specifies the destination of NDM data broadcast from the NCN. This command is available
only at the NCN (Network Control Node).
2. Parameters
Input data
TYPE: ALL (All the Nodes)/ONE (One designated Node)
FPC: FPC of the designated Node Note
Interval: Broadcasting Interval
Note: This parameter appears when one node is selected.

CHAPTER 8 NDA-24307
Page 614
Issue 1
CCSE: Change of Common Signaling Channel Equipment
CCSE: Change of Common Signaling Channel Equipment
1. Functional Outline
This command is used to set/reset the make busy state of CCH circuit card.
2. Parameters
CCH LENS: Line Equipment Number of CCH circuit card [5 digits]
MG=XX, UNIT=X, GROUP=XX
LINK: Link Status [0-2]
0=Link Open
1=Link Close
2=Not Available
MB: Make Busy Information [0-2]
0=Make Idle
1=Make Busy
2=Not Available
Note: This command cannot be used for the ISDN-related circuit card (such as PRT, DCH card).

NDA-24307 CHAPTER 8
Page 615
Issue 1
CDBU: Change of Dch Backup
CDBU: Change of Dch Backup
1. Functional Outline
This command is used to execute the D-channel route changeover, associated with the D-CHANNEL BACK-
UP-PRI feature (for AT&T/NT/N-ISDN2).
2. Parameters
Input data
MG: Module Group Number [00-07] Note
CNT: Number of Dch Backup Route [1-32] Note
Buttons
Get: Click to get information on the Dch Routes.
Change: Click to execute the Dch route changeover.
Stop: Click to cancel the Dch route changeover.
Exit: Click to exit this command.
Display data
RT: External Route Number
STS0: Primary-side DCH Status [ACT/ST-BY/OOS (out of service)]
STS1: Backup-side DCH Status [ACT/ST-BY/OOS (out of service)]
P-LENS: Primary DCH LENS (6 digits)
B-LENS: Backup DCH LENS (6 digits)
CHG-STS: Change Status [Completed/Executing]
Note: Data entry procedure by this command is as follows:
1. Specify the Module Group No. in the “MG” parameter.
2. Click the “Get” button. Then, the related Dch data appears in the display data field.
3. Referring to the display data, enter the “CNT” No. attached to the Dch to be changed over.
4. Click the “Change” button.
→Now, the Dch changeover starts automatically.

CHAPTER 8 NDA-24307
Page 616
Issue 1
CMOD: Change of System Mode
CMOD: Change of System Mode
1. Functional Outline
This command is used to execute ACT/ST-BY change of the processor (CPU) / TSW and display the status of
CPU/CLK/TSW/PLO.
2. Parameters
Input data
TYPE: Type of Process (1,2)
1/2=Change Operating Mode/Make Busy of TSW
DEVICE: Device to be changed (1,2) Note 1
1=CPU Note 2
2=TSW
SW: Type of Switch Note 3
1=TSW(fixed)
SYSTEM: System of Switch (0,1) Note 3
0/1=System 0/System 1
Note 1: This parameter appears only when “TYPE”=1.
Note 2: When the CPU mode change is executed, the MAT (TCP/IP) is once disconnected. Then, log in to the
system again.
Note 3: This parameter appears only when “TYPE”=2.
Display data
Status: CPU 0/1, TSW 0/1, PLO 0/1(0-3)
0=Not Mounted
1=Stand By
2=ACT
3=Make Busy

NDA-24307 CHAPTER 8
Page 617
Issue 1
CMODI: Change of System Mode for ISW
CMODI: Change of System Mode for ISW
1. Functional Outline
This command is used to execute ACT/ST-BY change of the CPU/TSW and display the status of CPU/TSW/
PLO. To use this command, the MAT must be connected to ISW.
2. Parameters
Input data
FPC: FPC of designated Node
Note: When TSW changeover is executed, be sure to assign FPC of ISW.
TYPE SELECT: 1=ACT/ST-BY change of CPU/TSW
2=MB Control of TSW
[When TYPE 1 is selected]
DEVICE: 1=CPU Note
2=TSW
Execution Button: ACT/ST-BY change to be executed
[When TYPE 2 is selected]
SYSTEM: 0/1=TSW No.0 System/TSW No.1 System
Execution Button: MB ON/MB OFF
Note: When the CPU mode change is executed, the MAT (TCP/IP) is once disconnected. Then, log in to the
system again.
Display data
FPC: FPC of each Node
STATUS: Result of ACT/ST-BY change
SYSTEM: No.0 System/No.1 System
CPU: ACT/ST-BY state of CPU No.0/1
TSW: MB ON/MB OFF state of TSW No.0/1
PLO: ACT/ST-BY state of PLO No.0/1

CHAPTER 8 NDA-24307
Page 618
Issue 1
CMWL: Control Message Waiting Lamp
CMWL: Control Message Waiting Lamp
1. Functional Outline
This command indicates ON/OFF status and controls the Message Waiting Lamp ON/OFF (MW Lamp) at the
station. If the station is a Dterm, this command can also control Message Waiting Display on the Dterm.
2. Parameters
Input Data
TYPE: Type of Input (1,2)
1/2=Designation by Station Number/Designation by LEN
TN: Note 1
STN: Maximum 5 digits for Business system, and 6 digits for Hotel system. Note 1
LENS: Note 2
MCI: Message Center MW Status (0,1)
0/1=OFF/ON
ATT: Attendant Console MW Status (0,1) See the parameter MCI.
STA: Station MW Status (0,1) See the parameter MCI.
VMM: Voice Mail Module MW Status (0,1)See the parameter MCI.
Note 1: This parameter appears when TYPE= 1.
Note 2: This parameter appears when TYPE= 2.

NDA-24307 CHAPTER 8
Page 619
Issue 1
CMWL_T: Control Message Waiting Lamps - Telephone Number
CMWL_T: Control Message Waiting Lamps - Telephone Number
1. Functional Outline
This command is used to control/display the Message Waiting Lamp’s ON/OFF status, by using Telephone
Numbers. When the station is a Dterm, this command can also be used to control the Message Waiting Lamp
Display. This command is available at NCN (for Fusion network) only. Note
Note: This command is available for PBX program software.
2. Parameters
Input Data
TYPE: Designation by Telephone Number/Designation by LEN
UGN: User Group Number Note 1
TELN: Telephone Number (max. 16 digits) Note 1
LENS: Line Equipment Number Note 2
MWLAMP: MW Lamp Status OFF/ON
MCI: Message Center MW Status OFF/ON
ATT: Attendant Console MW Status OFF/ON
STA: Station MW Status OFF/ON
VMM: Voice Mail Module MW Status OFF/ON
Note 1: This parameter is valid when “Type = 1” is selected.
Note 2: This parameter is valid when “Type = 2” is selected.
Display Data
FPC: Fusion Point Code (1-253) Note 3
TN: Tenant Number Note 3
STN: Physical Station Number (max. 5 digits for Business/max. 6 digits for Hotel
system) Note 3
Note 3: These parameters are for display only.
Buttons
Get: Click to get information on the MW status.
Set: Click to execute the assigned MW lamp control.
Exit: Click to exit this command.

CHAPTER 8 NDA-24307
Page 620
Issue 1
CPRS: Controlled Alternate PRSCs
CPRS: Controlled Alternate PRSCs
1. Functional Outline
This command is necessary for the Controlled Alternate PRSCs function. It either selects the class used be-
tween two priority restriction classes (Normal or Urgent), or indicates the class used. This command is allowed
only when bit1 of SYS 1, INDEX 59 is “1” (Controlled Alternate PRSCs in service).
2. Parameters
N/U: Priority Restriction Class [N/U]
N=Normal
U=Urgent

NDA-24307 CHAPTER 8
Page 621
Issue 1
CSCL: Continuous Change of Station Class
CSCL: Continuous Change of Station Class
1. Functional Outline
This command can change the station class information (RSC, SFC) continuously by designating the
consecutive range of the station numbers.
2. Parameters
Input data
TN: Tenant Number
STN(START): First Station Number [0-9, #, * (Max. 6 digits)] Note 1
STN(END): Last Station Number [0-9, #, * (Max. 6 digits)] Note 1
TEC(OLD): Telephone Equipment Class before change [1-31] Note 2, Note 3
TEC(NEW): Telephone Equipment Class after change [1-31] Note 2
RSC(OLD): Route Restriction Class before change [0-15] Note 3
RSC(NEW): Route Restriction Class after change [0-15]
SFC(OLD): Service Feature Class before change [0-15] Note 3
SFC(NEW): Service Feature Class after change [0-15]
Note 1: In the bottom part of the display, a check box is provided to determine whether to use “*” and “#” as
a part of the Station Number. If necessary, check the box.
Note 2: Details on TEC (Telephone Equipment Class) are shown below:
1=DP (10pps) 2=PB
3=DP/PB 4=DP (20pps)
5-11=Not used 12=Dterm
13=Data Terminal via Dterm 14=Hot Line
15=CAS Line 16=Data Terminal via Data Module
17=Not used 18=Virtual Line Appearance (for Dterm Multi-Line)
19-22=Not used 23=ISDN Terminal
24-26=Not used 27=8 Conference Equipment
28-31=Not used
Note 3: If you want to change all classes of all specified stations, enter “**” for this parameter.
Buttons
Execute: Click to make the input data valid.
Cancel: Click to cancel the input data.
Exit: Click to exit this command.
Display data
STN: Station Number
STATUS: Data Entry Result
OK=Data Assignment is successful Note
Note: If not OK (i.e. the data entry is not successful), related error message is displayed here.

CHAPTER 8 NDA-24307
Page 622
Issue 1
CSTN: Continuous Change of Station Number
CSTN: Continuous Change of Station Number
1. Functional Outline
This command can change a consecutive range of physical station numbers.
2. Parameters
Input data
TN: Tenant Number
OLD STN(START): First Station Number before change [0-9, #, * (Max. 6 digits)] Note
OLD STN(END): Last Station Number before change [0-9, #, * (Max. 6 digits)] Note
NEW STN(START): First Station Number after change [0-9, #, * (Max. 6 digits)] Note
NEW STN(END): Last Station Number after change [0-9, #, * (Max. 6 digits)] Note
Note: In the bottom part of the display, a check box is provided to determine whether to use “*” and “#” as
a part of the Station Number. If necessary, check the box.
Buttons
Execute: Click to make the input data valid.
Cancel: Click to cancel the input data
Exit: Click to exit this command.
Display data
OLD STN: Station Number before change
NEW STN: Station Number after change
STATUS: Data Entry Result
OK=Data Assignment is successful Note
Note: If not OK (i.e. the data entry is not successful), related error message is displayed here.

NDA-24307 CHAPTER 8
Page 623
Issue 1
DCBD: Display of Call Block Entry Data
DCBD: Display of Call Block Entry Data
1. Functional Outline
This command is used to display the following Call Block data, assigned to a station:
•Number of station/trunk whose call is to be blocked (in the remainder of this page, denoted as “Restriction
Number”)
•Registered “Restriction Numbers” in total
These data can be obtained by entering any of the station’s Telephone Number (TYPE 1), Physical Station
Number (TYPE 2) or LENS (TYPE 3) in the parameters below:
2. Parameters
Input Data
TYPE: Selection of Input Data Type
TYPE 1 (Input Data = UGN, TELN) Note
TYPE 2 (Input Data = FPC, TN, STN) Note
TYPE 3 (Input Data = FPC, LENS) Note
READ (button to view the Display Data)
EXIT (button to exit)
Note: When using this command, first choose the input data type (Type 1 - 3) in the “TYPE” selection list box.
Then the following parameters appear, according to the selected data type.
•When TYPE 1 is selected: UGN (User Group Number)
TELN (Telephone Number [Max.16 digits])
•When TYPE 2 is selected: FPC (Fusion Point Code [1-253])
TN (Tenant Number [Max.3 digits])
STN (Physical Station Number [Max.6 digits])
•When TYPE 3 is selected: FPC (Fusion Point Code [1-253])
LENS (Line Equipment Number)

CHAPTER 8 NDA-24307
Page 624
Issue 1
DCBD: Display of Call Block Entry Data
Display Data
CNT: Registered “Restriction Numbers” in total (1-5)
DC: Each “Restriction Number”
•When Physical Station Number is registered – Max.6 digits
•When Telephone Number is registered – Max.16 digits
•When Trunk Call Number is registered – Max.32 digits

NDA-24307 CHAPTER 8
Page 625
Issue 1
DCEN: Display of Connection Trunk LENS Data for LDM
DCEN: Display of Connection Trunk LENS Data for LDM
1. Functional Outline
This command is used to display the registered connection trunk/route data by designating LENS.
2. Parameters
Input data
C_LENS: Line Equipment Number [6 digits]
Display data
C_RT: Connection Route Number [1-1023]
C_TK: Connection Trunk Number [1-4095]
RT: External Route Number
TK: Trunk Number [1-255]
TN: Tenant Number

CHAPTER 8 NDA-24307
Page 626
Issue 1
DCON: Display of Connection Status
DCON: Display of Connection Status
1. Functional Outline
This command displays the connection status of the station and trunks. If the specified station or trunk is busy,
the connected party is displayed.
2. Parameters
Input data
TYPE: Kind of Connection Status (1-4)
1=Station of Connection Status
2=Trunk of Connection Status
3=LENS of Connection Status
4=Connection Trunk of Connection Status (Fusion Network)
TN: Note 1
STN: Maximum number of digits is 5 for Business system, and 6 for Hotel system. Note 1
RT: Note 2
TK: Note 2
LEN: Note 3
C_RT: Connection Route Number (1-1023) Note 4
C_TK: Connection Trunk Number (1-4095) Note 4
Note 1: This data is valid when Type= 1.
Note 2: This data is valid when Type= 2.
Note 3: This data is valid when Type= 3.
Note 4: This data is valid when Type= 4.

NDA-24307 CHAPTER 8
Page 627
Issue 1
DFTD: Display of System Message Details
DFTD: Display of System Message Details
1. Functional Outline
This command is necessary to print the system messages detected by the Fault Diagnostic programs.
When the fault scanning (Scanning PBX) is effective, the MAT can scan the PBX status by polling every 20
sec, (default setting is Effective.)
If the PBX has faults, this command executes automatically.
2. Parameters
Input data
New/Old
Show Details: YES/NO

CHAPTER 8 NDA-24307
Page 628
Issue 1
DISS: Display of Program Issue
DISS: Display of Program Issue
1. Functional Outline
This command outputs to the printer and displays at the MAT, the program information (version, issue No. and
date) in the main memory, and the program information (SP No.and issue No.) in the port microprocessor
memory mounted in each circuit card in the PBX.
2. Parameters
Input data
Type of Issue: Main Memory/Port Microprocessor
Module Group: Note 1
Unit: Note 1
Display data
Type: Main Memory/Boot ROM/IP/ACDP Note 2
Version: Note 2
Issue: Note 2
Date: Note 2
Group: 00-23 Note 1
SP No.: 4 digits Note 1
Issue: ASCII 2 digits Note 1
Note 1: This data is valid when Port Microprocessor is designated.
Note 2: This data is valid when Main Memory is designated.

NDA-24307 CHAPTER 8
Page 629
Issue 1
DLEN: Display of LENS Data
DLEN: Display of LENS Data
1. Functional Outline
This command displays the data (station data or trunk data) assigned for a designated LEN. For Hotel system,
Room Class and Floor Service Data [Annex (ANX), Ground/Underground (G), Floor (FLR)] displays also.
2. Parameters
Input data
LENS
Display data
TN
STN: Maximum 6 digits
TEC: Telephone Equipment Number (1-31)
RSC: Route Restriction Class (0-15)
SFC: Service Feature Class (0-15)
ROOM CLASS: (0-15)
ANX: Annex (0-3)
G: 0/1=Ground/Underground
FLR: Floor (1-127)
RT: The Internal Route Number
DATA MEANING DATA MEANING
1 DP (10pps) 2 PB
3 DP/PB 4 DP (20 pps)
5-11 Not used 12 Dterm
13 Data Terminal via Dterm 14 Hot Line
15 CAS Line 16 Data Terminal via Data Module
17 Not used 23 ISDN Terminal
18 Virtual Line Appearance (for Dterm
Multi-Line) 19-22 Not used
24-26 Not used 27 Eight Conference Equipment
28-31 Not used

CHAPTER 8 NDA-24307
Page 630
Issue 1
DLEN: Display of LENS Data
TK
C_RT: Connection Route Number (1-1023)
C_TK: Connection Trunk Number (1-4095)
DATA MEANING DATA MEANING
901 Attendant Console 902 Originating Register Trunk
903 Incoming Register Trunk 904 MF Receiver
905 Sender Trunk DP/PB 906 PB Receiver for Automated Attendant Service
907AMP 908Not used
909 Three-Way Conference Trunk 910-912 Not used
913 Three-Way Conference Trunk for ATTCON 914 Not Used
915 Night Attendant Console 916 MFC Register
917 MFC Sender 918 Not used
919-926 Modem 927, 928 Not used
929 Data Signaling Trunk-Option 930 Rate Adapter Conversion Trunk
931-947 Not used

NDA-24307 CHAPTER 8
Page 631
Issue 1
DLSL: Display of Lock Out Station - LENS
DLSL: Display of Lock Out Station - LENS
1. Functional Outline
This command prints the LENS of stations in lockout state.
2. Parameters
Input data
TYPE: Type of Printout (1-3)
1=Printout of all LEN in lockout
2=Printout of locked out LEN in the designated Module Group
3=Printout of locked out LEN in the designated Unit
MG: Note 1, Note 2
UNIT: Note 2
Note 1: The parameter is valid only when Type= 2.
Note 2: The parameter is valid only when Type= 3.
Display data
LENS

CHAPTER 8 NDA-24307
Page 632
Issue 1
DLSS: Display of Lockout Station - Number
DLSS: Display of Lockout Station - Number
1. Functional Outline
This command prints the stations in lockout state by station number.
2. Parameters
Input data
TYPE: Type of Printout (1-3)
1=Printout of all lockout stations
2=Printout of lockout stations by tenant
3=Printout of lockout stations within a specified range of station number.
TN: Note 1, Note 2
START STN: Maximum 6 digits Note 2
END STN: Maximum 6 digits Note 2
Note 1: The parameter is valid only when Type= 2.
Note 2: The parameter is valid only when Type= 3.
Display data
CNT: Count
TN
STN
LENS

NDA-24307 CHAPTER 8
Page 633
Issue 1
DLSS_T: Display of Lock Out Station - Number- Telephone Number
DLSS_T: Display of Lock Out Station - Number- Telephone Number
1. Functional Outline
This command is used to print out stations in lockout state, by using Telephone Numbers. This command is
available at NCN (for Fusion network) only. Note
Note: This command is available for PBX program software.
2. Parameters
Input data
Type: Printout of all lockout stations
Printout of lockout stations by tenant
Printout of lockout stations within a specified range of station number
UGN: User Group Number Note 1, Note 2
Start TELN: First Telephone Number (max. 16 digits) Note 2
End TELN: End Telephone Number (max. 16 digits) Note 2
Note 1: This parameter is valid when “Type = Printout of lockout stations by tenant” is selected.
Note 2: This parameter is valid when “Type = Printout of lockout stations within a specified range of station
number” is selected.
Display data
FPC: Fusion Point Code (1-253)
TN: Tenant Number
Start STN: First Physical Station Number (max. 5 digits for Business/max. 6 digits for Hotel
system)
End STN: End Physical Station Number (max. 5 digits for Business/max. 6 digits for Hotel
system)
CNT: Count
UGN: User Group Number
TELN: Telephone Number (max. 16 digits)
LENS: Line Equipment Number
Buttons
Get: Click to get information on the lockout station
Exit: Click to exit this command.

CHAPTER 8 NDA-24307
Page 634
Issue 1
DLTEL: Display of Telephone Number from LENS for LDM
DLTEL: Display of Telephone Number from LENS for LDM
1. Functional Outline
This command, available at each Local Node (LN), is used to display the Telephone Number or other station
data by designating a specific LEN.
2. Parameters
Input data
LENS: Line Equipment Number [6 digits]
Display data
UGN: User Group Number
TELN: Telephone Number [Max. 16 digits]
TN: Tenant Number
STN: Station Number [Max. 6 digits]
TEC: Telephone Equipment Class [1-31]
RSC: Route Restriction Class [0-15]
SFC: Service Feature Class [0-15]

NDA-24307 CHAPTER 8
Page 635
Issue 1
DNTEL: Display of Telephone Number from LENS for NDM
DNTEL: Display of Telephone Number from LENS for NDM
1. Functional Outline
This command, available at Network Control Node (NCN) only, is used to display the Telephone Number or
other station data by designating a specific FPC and LEN.
2. Parameters
Input data
FPC: Fusion Point Code [1-253]
LENS: Line Equipment Number [6 digits]
Display data
UGN: User Group Number
TELN: Telephone Number [Max. 16 digits]
NID: Network ID Note
TN: Tenant Number
STN: Station Number [Max. 6 digits]
TEC: Telephone Equipment Number [1-31]
RSC: Route Restriction Class [0-15]
SFC: Service Feature Class [0-15]
Note: Network ID (NID) is allocated automatically when the Module Group/Unit data is assigned by the
AFMU command. Refer to the “Fusion Network System Manual” for more information.

CHAPTER 8 NDA-24307
Page 636
Issue 1
DPKG: Display of Setting Port Package
DPKG: Display of Setting Port Package
1. Functional Outline
This command is used to display the circuit card name accommodated in each Group of a specific UNIT.
Note 1: When using this command, make sure that each circuit card related database files have already been
installed to your MAT. (See FLINST command for more information.)
2. Parameters
Input data
MG: Module Group (MG) number [00-07]
UNIT: Unit (U) number [0-3]
Buttons
Get: Click to get information on mounted circuit cards.
Close: Click to exit this command.
Note: When the Input Data above is entered and the “Get” button is pressed, the related circuit card name is
displayed on a Group basis. However, if the name is not found for some reasons, the following mark
may appear in the relevant display field.
•#→Unidentifiable firm ware type.
•## →Data not found in the FMID (database).
•### →Group data not assigned.
•*→Circuit card name not found (for the card is in make-busy state, etc.).

NDA-24307 CHAPTER 8
Page 637
Issue 1
DPSW: Display Package Switch Status
DPSW: Display Package Switch Status
1. Functional Outline
This command is used to display the following information on a Line/Trunk or Control circuit card:
[When MAT is in On-Line Mode (=connected to the system)]
•Current status of each switch
•Explanation of each switch function
[When MAT is in Off-Line Mode (= not connected to the system)]
•Explanation of each switch function
Note 1: When using this command, make sure that each circuit card related database files have already been
installed to your MAT. (See FLINST command for more information.)
2. Parameters
Input data
KIND: Display Kind (selection)
•(MAT=) On-Line Mode
•(MAT=) Off-Line Mode
TYPE: Circuit Card Type (selection)
•Line Trunk Package
•Control Package
PMN: Port Micro Processor Number
PKG NAME: Circuit Card Name
LP/ISW: Local Partition Number [00-06 (Even Number only)] or ISW Number Note
SYSTEM: System Note
0=No.0 System
1=No.1 System
MG: Module Group Number [00-07] Note
UNIT: Unit Number [0-3] Note
ACT/ST-BY: ACT/ST-BY information Note
0=ACT
1=ST-BY
2=Not used
NODE: Node Number [0-3]
CLINE: Collection Line Note
0=Out of Service
1=In Service
No: IOC Card Number [0/1] Note
Note: This parameter may appear when “Control Package” is selected in the “TYPE” parameter.

CHAPTER 8 NDA-24307
Page 638
Issue 1
DPSW: Display Package Switch Status
Buttons
Get: Click to view the display data
Page Up: Click to view the next page data (when next page exists).
Page Down: Click to return to the previous page data.
Exit: Click to exit this command.
Display data
PKG Name: Circuit Card Name
Firm Name/Issue: Firm Name/Issue of the circuit cardEach switch data is also displayed on the dedicated
display page.
Each switch data is also displayed on the dedicated display page.

NDA-24307 CHAPTER 8
Page 639
Issue 1
DSTN: Display of Station Data
DSTN: Display of Station Data
1. Functional Outline
This command is used to display the registered Station Data corresponding to the designated Tenant and Sta-
tion Number. In addition, the information of Hot Line, Dterm Key Layout, Hunting, and Call Pickup, etc., can
also be displayed as the data related to the designated stations.
2. Parameters
Input data
TN: Tenant Number
STN: Station Number [0-9, #, * (Max. 6 digits)]
Buttons
[For display data selection]
SHP: Station Hunting Group-Pilot Note
KYD: Key Data for Dterm Note
CPG: Call Pickup Group Note
CPE: Call Pickup Expand Group Note
PHN: Phantom Station Number Note
SHC: Station Hunting-Circular Note
SHU: Station Hunting-UCD Note
HLS: Hot Line Station Note
Note: When the designated station has any of these data, the corresponding button(s) can be selected. If the
data is necessary, click the button(s).
[For execution order]
Get: Click to view the display data.
Close: Click to exit this command.
Display data (by Parameters)
ETN: Effective Tenant Number
LENS: Line Equipment Number (6 digits)
TEC: Telephone Equipment Class [1-31]
1=DP (10pps) 2=PB
3=DP/PB 4=DP (20pps)
5-11=Not used 12=Dterm
13=Data Terminal via Dterm 14=Hot Line
15=CAS Line 16=Data Terminal via Data Module
17=Not used 18=Virtual Line Appearance (for Dterm Multi-Line)
19-22=Not used 23=ISDN Terminal
24-26=Not used 27=8 Conference Equipment
28-31=Not used
RSC: Route Restriction Class [0-15]
SFC: Service Feature Class [0-15]

CHAPTER 8 NDA-24307
Page 640
Issue 1
DTELN: Display of Telephone Number Data for NDM
DTELN: Display of Telephone Number Data for NDM
1. Functional Outline
This command is used to display the registered station data corresponding to specified User Group Number
(UGN) and Telephone Number (TELN). The following data related to Number Group can be displayed by
clicking the selection button for each data. This command can be used only when logging in to Network
Control Node (NCN).
•ACPGN: Call Pickup Group (NDM)
•ACPEN: Call Pickup Expand Group (NDM)
•ASHUN: Station Hunting Group-UCD (NDM)
•ASHCN: Station Hunting Group-Circular (NDM)
•AHLSN: Hot Line Station (NDM)
•ASHPN: Station Hunting Group-Pilot (NDM)
•AKYD: Key Data for Dterm
2. Parameters
Input Data
UGN: User Group Number
TELN: Telephone Number
Display Data
FPC: Fusion Point Code (1-253)
TN: Tenant Number
STN: Station Number
LENS: Line Equipment Number (6 digits)
MG: Module Group Number
UNIT: Unit Number
G: Group Number
LV: Level Number
TEC: Telephone Class (1-31)
RSC: Route Restriction Class (0-15)
SFC: Service Feature Restriction Class (0-15)
Selection Button
CPGN :Call Pickup Group (NDM)
CPEN :Call Pickup Expand Group (NDM)
SHUN :Station Hunting Group-UCD (NDM)
SHCN :Station Hunting Group-Circular (NDM)
HLSN :Hot Line Station (NDM)
SHPN :Station Hunting Group-Pilot (NDM)
KYD :Key Data for Dterm

NDA-24307 CHAPTER 8
Page 641
Issue 1
DTF101: Display of Terminal Traffic Data
DTF101: Display of Terminal Traffic Data
1. Functional Outline
This command displays the result of traffic measurement data for Type= 1 (Terminal Traffic) assigned by the
ATRF command.
2. Parameters
Traffic Data 1: Terminal Traffic-DTF101
Route Traffic-DTF102
Station Peg Count-DTF103
Attendant Peg Count-DTF104
Route Peg Count-DTF105
Traffic Data 2: Service Peg Count-DTF201
Traffic Data 3: UCD Route Peg Count-DTF301
UCD Group Peg Count-DTF302
UCD Station Peg Count-DTF303
Traffic Data 5: Attendant Answering Peg Count-DTF501
Traffic Data 6: Connection Route Peg Count-DTF601
Connection Route Traffic-DTF602

CHAPTER 8 NDA-24307
Page 642
Issue 1
DTF102: Display of Route Traffic Data
DTF102: Display of Route Traffic Data
1. Functional Outline
This command displays the result of traffic measurement data for Type= 2 (Route Traffic) assigned by the
ATRF command.
2. Parameters
Traffic Data 1: Terminal Traffic-DTF101
Route Traffic-DTF102
Station Peg Count-DTF103
Attendant Peg Count-DTF104
Route Peg Count-DTF105
Traffic Data 2: Service Peg Count-DTF201
Traffic Data 3: UCD Route Peg Count-DTF301
UCD Group Peg Count-DTF302
UCD Station Peg Count-DTF303
Traffic Data 5: Attendant Answering Peg Count-DTF501
Traffic Data 6: Connection Route Peg Count-DTF601
Connection Route Traffic-DTF602

NDA-24307 CHAPTER 8
Page 643
Issue 1
DTF103: Display of Station Peg Count Data
DTF103: Display of Station Peg Count Data
1. Functional Outline
This command displays the result of traffic measurement data for Type= 3 (Station Peg Count) assigned by the
ATRF command.
2. Parameters
Traffic Data 1: Terminal Traffic-DTF101
Route Traffic-DTF102
Station Peg Count-DTF103
Attendant Peg Count-DTF104
Route Peg Count-DTF105
Traffic Data 2: Service Peg Count-DTF201
Traffic Data 3: UCD Route Peg Count-DTF301
UCD Group Peg Count-DTF302
UCD Station Peg Count-DTF303
Traffic Data 5: Attendant Answering Peg Count-DTF501
Traffic Data 6: Connection Route Peg Count-DTF601
Connection Route Traffic-DTF602

CHAPTER 8 NDA-24307
Page 644
Issue 1
DTF104: Display of Attendant Peg Count Data
DTF104: Display of Attendant Peg Count Data
1. Functional Outline
This command displays the result of traffic measurement data for Type= 4 (ATT Peg Count) assigned by the
ATRF command.
2. Parameters
Traffic Data 1: Terminal Traffic-DTF101
Route Traffic-DTF102
Station Peg Count-DTF103
Attendant Peg Count-DTF104
Route Peg Count-DTF105
Traffic Data 2: Service Peg Count-DTF201
Traffic Data 3: UCD Route Peg Count-DTF301
UCD Group Peg Count-DTF302
UCD Station Peg Count-DTF303
Traffic Data 5: Attendant Answering Peg Count-DTF501
Traffic Data 6: Connection Route Peg Count-DTF601
Connection Route Traffic-DTF602

NDA-24307 CHAPTER 8
Page 645
Issue 1
DTF105: Display of Route Peg Count Data
DTF105: Display of Route Peg Count Data
1. Functional Outline
This command displays the result of traffic measurement data for Type= 5 (Route Peg Count) assigned by the
ATRF command.
2. Parameters
Traffic Data 1: Terminal Traffic-DTF101
Route Traffic-DTF102
Station Peg Count-DTF103
Attendant Peg Count-DTF104
Route Peg Count-DTF105
Traffic Data 2: Service Peg Count-DTF201
Traffic Data 3: UCD Route Peg Count-DTF301
UCD Group Peg Count-DTF302
UCD Station Peg Count-DTF303
Traffic Data 5: Attendant Answering Peg Count-DTF501
Traffic Data 6: Connection Route Peg Count-DTF601
Connection Route Traffic-DTF602

CHAPTER 8 NDA-24307
Page 646
Issue 1
DTF201: Display of Service Peg Count Data
DTF201: Display of Service Peg Count Data
1. Functional Outline
This command displays the result of traffic measurement data for Type= 6 (Service Peg Count) assigned by
the ATRF command.
2. Parameters
Traffic Data 1: Terminal Traffic-DTF101
Route Traffic-DTF102
Station Peg Count-DTF103
Attendant Peg Count-DTF104
Route Peg Count-DTF105
Traffic Data 2: Service Peg Count-DTF201
Traffic Data 3: UCD Route Peg Count-DTF301
UCD Group Peg Count-DTF302
UCD Station Peg Count-DTF303
Traffic Data 5: Attendant Answering Peg Count-DTF501
Traffic Data 6: Connection Route Peg Count-DTF601
Connection Route Traffic-DTF602

NDA-24307 CHAPTER 8
Page 647
Issue 1
DTF301: Display of UCD Route Peg Count Data
DTF301: Display of UCD Route Peg Count Data
1. Functional Outline
This command displays the result of traffic measurement data for Type= 8 (UCD Route Peg Count) assigned
by the ATRF command.
2. Parameters
Traffic Data 1: Terminal Traffic-DTF101
Route Traffic-DTF102
Station Peg Count-DTF103
Attendant Peg Count-DTF104
Route Peg Count-DTF105
Traffic Data 2: Service Peg Count-DTF201
Traffic Data 3: UCD Route Peg Count-DTF301
UCD Group Peg Count-DTF302
UCD Station Peg Count-DTF303
Traffic Data 5: Attendant Answering Peg Count-DTF501
Traffic Data 6: Connection Route Peg Count-DTF601
Connection Route Traffic-DTF602

CHAPTER 8 NDA-24307
Page 648
Issue 1
DTF302: Display of UCD Group Peg Count Data
DTF302: Display of UCD Group Peg Count Data
1. Functional Outline
This command displays the result of traffic measurement data for Type= 9 (UCD Group Peg Count) assigned
by the ATRF command.
2. Parameters
Traffic Data 1: Terminal Traffic-DTF101
Route Traffic-DTF102
Station Peg Count-DTF103
Attendant Peg Count-DTF104
Route Peg Count-DTF105
Traffic Data 2: Service Peg Count-DTF201
Traffic Data 3: UCD Route Peg Count-DTF301
UCD Group Peg Count-DTF302
UCD Station Peg Count-DTF303
Traffic Data 5: Attendant Answering Peg Count-DTF501
Traffic Data 6: Connection Route Peg Count-DTF601
Connection Route Traffic-DTF602

NDA-24307 CHAPTER 8
Page 649
Issue 1
DTF303: Display of Station Peg Count Data
DTF303: Display of Station Peg Count Data
1. Functional Outline
This command displays the result of traffic measurement data for Type= 10 (UCD Station Peg Count) assigned
by the ATRF command.
2. Parameters
Traffic Data 1: Terminal Traffic-DTF101
Route Traffic-DTF102
Station Peg Count-DTF103
Attendant Peg Count-DTF104
Route Peg Count-DTF105
Traffic Data 2: Service Peg Count-DTF201
Traffic Data 3: UCD Route Peg Count-DTF301
UCD Group Peg Count-DTF302
UCD Station Peg Count-DTF303
Traffic Data 5: Attendant Answering Peg Count-DTF501
Traffic Data 6: Connection Route Peg Count-DTF601
Connection Route Traffic-DTF602

CHAPTER 8 NDA-24307
Page 650
Issue 1
DTF501: Display of Attendant Answering Peg Count Data
DTF501: Display of Attendant Answering Peg Count Data
1. Functional Outline
This command displays the result of traffic measurement data for Type= 15 (ATT Answering Peg Count)
assigned by the ATRF command.
2. Parameters
Traffic Data 1: Terminal Traffic-DTF101
Route Traffic-DTF102
Station Peg Count-DTF103
Attendant Peg Count-DTF104
Route Peg Count-DTF105
Traffic Data 2: Service Peg Count-DTF201
Traffic Data 3: UCD Route Peg Count-DTF301
UCD Group Peg Count-DTF302
UCD Station Peg Count-DTF303
Traffic Data 5: Attendant Answering Peg Count-DTF501
Traffic Data 6: Connection Route Peg Count-DTF601
Connection Route Traffic-DTF602

NDA-24307 CHAPTER 8
Page 651
Issue 1
DTF601: Display of Connection Route Peg Count Data
DTF601: Display of Connection Route Peg Count Data
1. Functional Outline
This command displays the result of traffic measurement data for Type=18 (Connection Route Peg Count)
assigned by the ATRF command.
2. Parameters
Traffic Data 1: Terminal Traffic-DTF101
Route Traffic-DTF102
Station Peg Count-DTF103
Attendant Peg Count-DTF104
Route Peg Count-DTF105
Traffic Data 2: Service Peg Count-DTF201
Traffic Data 3: UCD Route Peg Count-DTF301
UCD Group Peg Count-DTF302
UCD Station Peg Count-DTF303
Traffic Data 5: Attendant Answering Peg Count-DTF501
Traffic Data 6: Connection Route Peg Count-DTF601
Connection Route Traffic-DTF602

CHAPTER 8 NDA-24307
Page 652
Issue 1
DTF602: Display of Connection Route Traffic Data
DTF602: Display of Connection Route Traffic Data
1. Functional Outline
This command displays the result of traffic measurement data for Type=19 (Connection Route Traffic)
assigned by the ATRF command.
2. Parameters
Traffic Data 1: Terminal Traffic-DTF101
Route Traffic-DTF102
Station Peg Count-DTF103
Attendant Peg Count-DTF104
Route Peg Count-DTF105
Traffic Data 2: Service Peg Count-DTF201
Traffic Data 3: UCD Route Peg Count-DTF301
UCD Group Peg Count-DTF302
UCD Station Peg Count-DTF303
Traffic Data 5: Attendant Answering Peg Count-DTF501
Traffic Data 6: Connection Route Peg Count-DTF601
Connection Route Traffic-DTF602

NDA-24307 CHAPTER 8
Page 653
Issue 1
DTF101N: Display of Terminal Traffic Data for Fusion Network
DTF101N: Display of Terminal Traffic Data for Fusion Network
1. Functional Outline
This command displays the result of traffic measurement data for Type= 1 (Terminal Traffic) assigned by the
ATRFN command.
2. Parameters
Traffic Data 1: Terminal Traffic-DTF101N
Route Traffic-DTF102N
Station Peg Count-DTF103N
Attendant Peg Count-DTF104N
Route Peg Count-DTF105N
Traffic Data 2: Service Peg Count-DTF201N
Traffic Data 3: UCD Route Peg Count-DTF301N
UCD Group Peg Count-DTF302N
UCD Station Peg Count-DTF303N
Traffic Data 5: Attendant Answering Peg Count-DTF501N
Traffic Data 6: Connection Route Peg Count-DTF601N
Connection Route Traffic-DTF602N

CHAPTER 8 NDA-24307
Page 654
Issue 1
DTF102N: Display of Route Traffic Data for Fusion Network
DTF102N: Display of Route Traffic Data for Fusion Network
1. Functional Outline
This command displays the result of traffic measurement data for Type= 2 (Route Traffic) assigned by the
ATRFN command.
2. Parameters
Traffic Data 1: Terminal Traffic-DTF101N
Route Traffic-DTF102N
Station Peg Count-DTF103N
Attendant Peg Count-DTF104N
Route Peg Count-DTF105N
Traffic Data 2: Service Peg Count-DTF201N
Traffic Data 3: UCD Route Peg Count-DTF301N
UCD Group Peg Count-DTF302N
UCD Station Peg Count-DTF303N
Traffic Data 5: Attendant Answering Peg Count-DTF501N
Traffic Data 6: Connection Route Peg Count-DTF601N
Connection Route Traffic-DTF602N

NDA-24307 CHAPTER 8
Page 655
Issue 1
DTF103N: Display of Station Peg Count Data for Fusion Network
DTF103N: Display of Station Peg Count Data for Fusion Network
1. Functional Outline
This command displays the result of traffic measurement data for Type= 3 (Station Peg Count) assigned by the
ATRFN command.
2. Parameters
Traffic Data 1: Terminal Traffic-DTF101N
Route Traffic-DTF102N
Station Peg Count-DTF103N
Attendant Peg Count-DTF104N
Route Peg Count-DTF105N
Traffic Data 2: Service Peg Count-DTF201N
Traffic Data 3: UCD Route Peg Count-DTF301N
UCD Group Peg Count-DTF302N
UCD Station Peg Count-DTF303N
Traffic Data 5: Attendant Answering Peg Count-DTF501N
Traffic Data 6: Connection Route Peg Count-DTF601N
Connection Route Traffic-DTF602N

CHAPTER 8 NDA-24307
Page 656
Issue 1
DTF104N: Display of Attendant Peg Count Data for Fusion Network
DTF104N: Display of Attendant Peg Count Data for Fusion Network
1. Functional Outline
This command displays the result of traffic measurement data for Type= 4 (ATT Peg Count) assigned by the
ATRFN command.
2. Parameters
Traffic Data 1: Terminal Traffic-DTF101N
Route Traffic-DTF102N
Station Peg Count-DTF103N
Attendant Peg Count-DTF104N
Route Peg Count-DTF105N
Traffic Data 2: Service Peg Count-DTF201N
Traffic Data 3: UCD Route Peg Count-DTF301N
UCD Group Peg Count-DTF302N
UCD Station Peg Count-DTF303N
Traffic Data 5: Attendant Answering Peg Count-DTF501N
Traffic Data 6: Connection Route Peg Count-DTF601N
Connection Route Traffic-DTF602N

NDA-24307 CHAPTER 8
Page 657
Issue 1
DTF105N: Display of Route Peg Count Data for Fusion Network
DTF105N: Display of Route Peg Count Data for Fusion Network
1. Functional Outline
This command displays the result of traffic measurement data for Type= 5 (Route Peg Count) assigned by the
ATRFN command.
2. Parameters
Traffic Data 1: Terminal Traffic-DTF101
Route Traffic-DTF102
Station Peg Count-DTF103
Attendant Peg Count-DTF104
Route Peg Count-DTF105
Traffic Data 2: Service Peg Count-DTF201
Traffic Data 3: UCD Route Peg Count-DTF301
UCD Group Peg Count-DTF302
UCD Station Peg Count-DTF303
Traffic Data 5: Attendant Answering Peg Count-DTF501
Traffic Data 6: Connection Route Peg Count-DTF601
Connection Route Traffic-DTF602

CHAPTER 8 NDA-24307
Page 658
Issue 1
DTF201N: Display of Service Peg Count Data for Fusion Network
DTF201N: Display of Service Peg Count Data for Fusion Network
1. Functional Outline
This command displays the result of traffic measurement data for Type= 6 (Service Peg Count) assigned by
the ATRFN command.
2. Parameters
Traffic Data 1: Terminal Traffic-DTF101N
Route Traffic-DTF102N
Station Peg Count-DTF103N
Attendant Peg Count-DTF104N
Route Peg Count-DTF105N
Traffic Data 2: Service Peg Count-DTF201N
Traffic Data 3: UCD Route Peg Count-DTF301N
UCD Group Peg Count-DTF302N
UCD Station Peg Count-DTF303N
Traffic Data 5: Attendant Answering Peg Count-DTF501N
Traffic Data 6: Connection Route Peg Count-DTF601N
Connection Route Traffic-DTF602N

NDA-24307 CHAPTER 8
Page 659
Issue 1
DTF301N: Display of UCD Route Peg Count Data for Fusion Network
DTF301N: Display of UCD Route Peg Count Data for Fusion Network
1. Functional Outline
This command displays the result of traffic measurement data for Type= 8 (UCD Route Peg Count) assigned
by the ATRFN command.
2. Parameters
Traffic Data 1: Terminal Traffic-DTF101N
Route Traffic-DTF102N
Station Peg Count-DTF103N
Attendant Peg Count-DTF104N
Route Peg Count-DTF105N
Traffic Data 2: Service Peg Count-DTF201N
Traffic Data 3: UCD Route Peg Count-DTF301N
UCD Group Peg Count-DTF302N
UCD Station Peg Count-DTF303N
Traffic Data 5: Attendant Answering Peg Count-DTF501N
Traffic Data 6: Connection Route Peg Count-DTF601N
Connection Route Traffic-DTF602N

CHAPTER 8 NDA-24307
Page 660
Issue 1
DTF302N: Display of UCD Group Peg Count Data for Fusion Network
DTF302N: Display of UCD Group Peg Count Data for Fusion Network
1. Functional Outline
This command displays the result of traffic measurement data for Type= 9 (UCD Group Peg Count) assigned
by the ATRFN command.
2. Parameters
Traffic Data 1: Terminal Traffic-DTF101N
Route Traffic-DTF102N
Station Peg Count-DTF103N
Attendant Peg Count-DTF104N
Route Peg Count-DTF105N
Traffic Data 2: Service Peg Count-DTF201N
Traffic Data 3: UCD Route Peg Count-DTF301N
UCD Group Peg Count-DTF302N
UCD Station Peg Count-DTF303N
Traffic Data 5: Attendant Answering Peg Count-DTF501N
Traffic Data 6: Connection Route Peg Count-DTF601N
Connection Route Traffic-DTF602N

NDA-24307 CHAPTER 8
Page 661
Issue 1
DTF303N: Display of Station Peg Count Data for Fusion Network
DTF303N: Display of Station Peg Count Data for Fusion Network
1. Functional Outline
This command displays the result of traffic measurement data for Type= 10 (UCD Station Peg Count) assigned
by the ATRFN command.
2. Parameters
Traffic Data 1: Terminal Traffic-DTF101N
Route Traffic-DTF102N
Station Peg Count-DTF103N
Attendant Peg Count-DTF104N
Route Peg Count-DTF105N
Traffic Data 2: Service Peg Count-DTF201N
Traffic Data 3: UCD Route Peg Count-DTF301N
UCD Group Peg Count-DTF302N
UCD Station Peg Count-DTF303N
Traffic Data 5: Attendant Answering Peg Count-DTF501N
Traffic Data 6: Connection Route Peg Count-DTF601N
Connection Route Traffic-DTF602N

CHAPTER 8 NDA-24307
Page 662
Issue 1
DTF501N: Display of Attendant Answering Peg Count Data for Fusion Network
DTF501N: Display of Attendant Answering Peg Count Data for Fusion Network
1. Functional Outline
This command displays the result of traffic measurement data for Type= 15 (ATT Answering Peg Count)
assigned by the ATRFN command.
2. Parameters
Traffic Data 1: Terminal Traffic-DTF101N
Route Traffic-DTF102N
Station Peg Count-DTF103N
Attendant Peg Count-DTF104N
Route Peg Count-DTF105N
Traffic Data 2: Service Peg Count-DTF201N
Traffic Data 3: UCD Route Peg Count-DTF301N
UCD Group Peg Count-DTF302N
UCD Station Peg Count-DTF303N
Traffic Data 5: Attendant Answering Peg Count-DTF501N
Traffic Data 6: Connection Route Peg Count-DTF601N
Connection Route Traffic-DTF602N

NDA-24307 CHAPTER 8
Page 663
Issue 1
DTF601N: Display of Connection Route Peg Count Data for Fusion Network
DTF601N: Display of Connection Route Peg Count Data for Fusion Network
1. Functional Outline
This command displays the result of traffic measurement data for Type=18 (Connection Route Peg Count)
assigned by the ATRFN command.
2. Parameters
Traffic Data 1: Terminal Traffic-DTF101N
Route Traffic-DTF102N
Station Peg Count-DTF103N
Attendant Peg Count-DTF104N
Route Peg Count-DTF105N
Traffic Data 2: Service Peg Count-DTF201N
Traffic Data 3: UCD Route Peg Count-DTF301N
UCD Group Peg Count-DTF302N
UCD Station Peg Count-DTF303N
Traffic Data 5: Attendant Answering Peg Count-DTF501N
Traffic Data 6: Connection Route Peg Count-DTF601N
Connection Route Traffic-DTF602N

CHAPTER 8 NDA-24307
Page 664
Issue 1
DTF602N: Display of Connection Route Traffic Data for Fusion Network
DTF602N: Display of Connection Route Traffic Data for Fusion Network
1. Functional Outline
This command displays the result of traffic measurement data for Type=19 (Connection Route Traffic)
assigned by the ATRFN command.
2. Parameters
Traffic Data 1: Terminal Traffic-DTF101N
Route Traffic-DTF102N
Station Peg Count-DTF103N
Attendant Peg Count-DTF104N
Route Peg Count-DTF105N
Traffic Data 2: Service Peg Count-DTF201N
Traffic Data 3: UCD Route Peg Count-DTF301N
UCD Group Peg Count-DTF302N
UCD Station Peg Count-DTF303N
Traffic Data 5: Attendant Answering Peg Count-DTF501N
Traffic Data 6: Connection Route Peg Count-DTF601N
Connection Route Traffic-DTF602N

NDA-24307 CHAPTER 8
Page 665
Issue 1
FLINST: File Install
FLINST: File Install
1. Functional Outline
This command is used to install the DPSW-dedicated database files to your MAT. This command is necessary
to provide each circuit card’s various information (such as circuit card name, equipped switch names, etc.)
when your system uses the DPSW/DPKG command.
2. Parameters
Input data
None
Buttons
Copy: Click to start the data file install.
Exit: Click to exit this command.
<Data Install Procedure>
(1) Start up the FLINST command from the Start menu.
(2) Initial Display of the FLINST command appears. Make sure the proper FD drive name is selected in the
“FDD” parameter.
(3) Click the “Copy” button. Then, a message, requiring to insert the first FD into the FDD drive, appears.
(4) Insert the first FD into the FDD of the MAT. Then, click OK.
(5) File copy starts automatically, and the “Copy End” message appears upon completion.
(6) Click OK. Then, another message asks you whether the next FD is to be installed or not.
(7) Click OK.
(8) A message, requiring to insert the second FD into the FDD drive, appears. Insert the second FD into the
FDD, and click OK.
(9) File copy starts automatically, and the “Copy End” message appears upon completion.
(10) Click OK. Then, a message asks you whether the next (fourth) FD is to be installed or not.
(11) Click Cancel.

CHAPTER 8 NDA-24307
Page 666
Issue 1
HDD_FDD: Data Control Between HDD and FDD
HDD_FDD: Data Control Between HDD and FDD
1. Functional Outline
This command is used to install the program data from FDD of PBX to HDD of PBX, and to verify the program
data between FDD of PBX and HDD of PBX.
2. Parameters
Input data
System Select: HFD 0/HFD 1
Direction Select: Floppy Disk to Hard Disk/Verify HDD against FDD/Hard Disk to Floppy Disk
Data Type Selection: Data Memory Note 1
Name Display
Wireless Call Forwarding
Program data Note 2
Call Forwarding
Speed Calling
User Assign Soft Key
Number Sharing Note 3
Call Block
ACD Data Memory
LP Select: This data appears when Call Forwarding, Speed Calling, User Assign Soft Key,
Number Sharing, or Call Block data is designated.
File Name Select
Auto Verify Afterward
Note 1: When “Data Memory” is selected, Local Data Memory (LDM) and Network Data Memory (NDM)
are also saved/verifed simultaneously.
Note 2: “Program data” can be valid when you select “Floppy Disk to Hard Disk” or Verify HDD against
FDD” in the “Direction Select” list box.
Note 3: By saving the Number Sharing data, the data concering “Dual Station Calling Over-FCCS” is also
saved/verifed automatically.

NDA-24307 CHAPTER 8
Page 667
Issue 1
HDD_MAT: Data Control Between HDD and MAT
HDD_MAT: Data Control Between HDD and MAT
1. Functional Outline
This command is used to save the following data from HDD of PBX to MAT.
2. Parameters
Input data
Direction Select: PBX Hard Disk to MAT/MAT to PBX Hard Disk/Verify HDD against MAT
Data Type Selection: Data Memory Note 1
Name display
Wireless Call Forwarding
Program data Note 2
Call Forwarding
Speed Calling
User Assign Soft Key
Number Sharing Note 3
Call Block
ACD Data Memory
LP Select: This data appears only when Call Forwarding, Speed Calling, User Assign Soft
Key, Number Sharing, or Call Block data is designated.
Auto Verify Afterward
Note 1: When “Data Memory” is selected, Local Data Memory (LDM) and Network Data Memory (NDM)
are also saved/verifed simultaneously.
Note 2: “Program data” can be valid when you select “MAT to PBX Hard Disk” in the “Direction Select”
list box.
Note 3: By saving the Number Sharing data, the data concering “Dual Station Calling Over-FCCS” is also
saved/verifed automatically.

CHAPTER 8 NDA-24307
Page 668
Issue 1
HDD_MAT_N: Data Control Between HDD and MAT for NDM
HDD_MAT_N: Data Control Between HDD and MAT for NDM
1. Functional Outline
This command, available at the NCN only, installs (overwrites) the updated Program data from the centralized
MAT onto the HDD of all local nodes. To use this command, first install the updated program data on the HDD
of the MAT and then execute the program installing onto the HDD of each LN.
2. Parameters
Input data
Data Type Selection: Select all the listed program data
Execution Button: Installing of program data is to be executed

NDA-24307 CHAPTER 8
Page 669
Issue 1
HDFP: HDD Format of PBX
HDFP: HDD Format of PBX
1. Functional Outline
This command is used to execute the formatting of the HDD of PBX.
2. Parameters
Input data (Selection by check)
0 System: HDD of No.0 System
1 System: HDD of No.1 System
Buttons
Execute: Click to execute the formatting.
Close: Click to exit this command.

CHAPTER 8 NDA-24307
Page 670
Issue 1
MBCT: Make Busy of Connection Trunk for LDM
MBCT: Make Busy of Connection Trunk for LDM
1. Functional Outline
This command is used to set/reset the make busy state of the connection trunk.
2. Parameters
Input data
C_RT: Connection Route Number [1-1023]
C_TK: Trunk Number [1-4095]
MB: Make Busy Information [0/1]
0=Make Idle
1=Make Busy (Outgoing)

NDA-24307 CHAPTER 8
Page 671
Issue 1
MBLE: Make Busy of LENS
MBLE: Make Busy of LENS
1. Functional Outline
This command assigns the Idle/Busy status of Line Equipment Numbers (LENS).
2. Parameters
Input data
LENS
MB: 0/1=Make Idle/Make Busy

CHAPTER 8 NDA-24307
Page 672
Issue 1
MBPM: Make Busy of Port Microprocessor
MBPM: Make Busy of Port Microprocessor
1. Functional Outline
This command sets or resets the make-busy state of the circuit card that contains the port microprocessor. This
setting and resetting is performed individually for each circuit card. If the location of the circuit card containing
the port microprocessor is specified in this command, the operating state of all circuit cards mounted in the
associated unit is displayed.
2. Parameters
Input data
MG
Unit
Group
MB
Display data
MB: (0-1)
0=Make Idle
1=Make Busy
Note: The Idle/Busy status can be displayed and assigned by the MB parameter.

NDA-24307 CHAPTER 8
Page 673
Issue 1
MBRT: Make Busy of Route
MBRT: Make Busy of Route
1. Functional Outline
This command assigns Idle/Busy status for all the trunks in the route designated.
2. Parameters
Input data
RT: Route Number of the external route/internal route. The Internal Route Number and its
meaning is shown in the table below.
MB: 0/1=Make Idle/Make Busy
DATA MEANING DATA MEANING
901 Attendant/Desk Console 902 Originating Register Trunk
903 Incoming Register Trunk 904 MF Receiver
905 Sender Trunk DP/PB 906 PB Receiver for Automated Attendant Service
907 AMP 908 Not used
909 Three-Way Conference Trunk 910-912 Not used
913 Three-Way Conference Trunk for ATTCON 914 Not used
915 Night Attendant Console 916 MFC Register
917 MFC Sender 918 Not used
919-926 Modem 927, 928 Not used
929 Data Signaling Trunk-Option 930 Rate Adapter Conversion Trunk
931-947 Not used

CHAPTER 8 NDA-24307
Page 674
Issue 1
MBSM: Make Busy of System Message Printout
MBSM: Make Busy of System Message Printout
1. Functional Outline
This command allows or inhibits the system message printer to output system messages.
2. Parameters
Input data
PORT NO.: Port Number of the printer
MB: 0/1=Make Idle/Busy

NDA-24307 CHAPTER 8
Page 675
Issue 1
MBST: Make Busy of Station
MBST: Make Busy of Station
1. Functional Outline
This command assigns the Idle/Busy status of stations.
2. Parameters
Input data
TN
STN: Maximum 5 digits for Business system/maximum 6 digits for Hotel system.
MB: 0/1=Make Idle/Make Busy

CHAPTER 8 NDA-24307
Page 676
Issue 1
MBST_T: Make Busy of Station - Telephone Number
MBST_T: Make Busy of Station - Telephone Number
1. Functional Outline
This command is used to assign the IDLE/BUSY status of stations, by using Telephone Numbers. This com-
mand is available at NCN (for Fusion network) only. Note 1
Note 1: This command is available for PBX program software.
2. Parameters
Input Data
UGN: User Group Number
TELN: Telephone Number (max. 16 digits)
MB: Make Busy/Make Idle
Display Data
FPC: Fusion Point Code (1-253) Note 2
TN: Tenant Number Note 2
STN: Physical Station Number (max. 5 digits for Business system/max. 6 digits for Hotel
system) Note 2
Note 2: This data is for display only.
Buttons
Get: Click to get information on the station
Set: Click to execute the BUSY/IDLE performance.
Exit: Click to exit this command.

NDA-24307 CHAPTER 8
Page 677
Issue 1
MBTC: Make Busy of Trunk-Continuous
MBTC: Make Busy of Trunk-Continuous
1. Functional Description
This command is used to assign the IDLE/BUSY status of trunks. By using this command, plural trunks can
be placed into IDLE/BUSY state simultaneously per a route designated in “RT” parameter.
2. Parameters
RT: Route Number
TK: Trunk Number Note 1
MB: 0=Make Idle
1=Make Busy(Outgoing)
2=Make Busy (Bothway) Note 2
Note 1: Plural trunks can be assigned simultaneously per a route designated in “RT” parameter.
Note 2: 2=Make Busy (Bothway) is not used.

CHAPTER 8 NDA-24307
Page 678
Issue 1
MBTK: Make Busy of Trunk
MBTK: Make Busy of Trunk
1. Functional Outline
This command assigns the Idle/Busy status of trunks.
2. Parameters
RT: Route Number
TK: Trunk Number
MB: 0=Make Idle
1=Make Busy (Outgoing)

NDA-24307 CHAPTER 8
Page 679
Issue 1
MEM_HDD: Data Control Between Memory and HDD
MEM_HDD: Data Control Between Memory and HDD
1. Functional Outline
This command is used to save the following data from MEM of PBX to HDD of PBX, and vice versa.
2. Parameters
Input data
Direction Select: Memory to Hard Disk/Hard Disk to Memory/Verify HDD against MEM
Data Type Selection: Data Memory Note 1
Name Display
Wireless Call Forwarding
Call Forwarding
Speed Calling
User Assign Soft Key
Number Sharing Note 2
Call Block
ACD Data Memory
LP Select: This data is valid when Call Forwarding, Speed Calling, User Assign Soft Key,
Number Sharing or Call Block data is designated.
Auto Verify Afterward
Note 1: When “Data Memory” is selected, Local Data Memory (LDM) and Network Data Memory (NDM)
are also saved/verified simultaneously.
Note 2: By saving the Number Sharing data, the data concerning “Dual Station Calling Over-FCCS is also
saved/verified automatically.

CHAPTER 8 NDA-24307
Page 680
Issue 1
MEM_HDD_N: Data Control Between Memory and HDD for NDM
MEM_HDD_N: Data Control Between Memory and HDD for NDM
1. Functional Outline
This command, available at the NCN only, is used to save/verify a series of Office Data from the Memory of
all Local Nodes to the HDD of the same node.
2. Parameters
Input data
Direction Select: MEM to HDD/Verify HDD against MEM
Data Type Selection: Data Memory Note 1
Name Display
Wireless Call Forwarding
Call Forwarding
Speed Calling
User Assign Soft Key
Number Sharing Note 2
Call Block
ACD Data Memory
LP Select: The parameter is valid when Call Forwarding, Speed Calling, User Assign Soft
Key, Number Sharing, or Call Block data is designated.
Auto Verify Afterward
Note 1: When “Data Memory” is selected, Local Data Memory (LDM) and Network Data Memory (NDM)
are also saved/verified simultaneously.
Note 2: By saving the Number Sharing data, the data concerning “Dual Station Calling Over-FCCS is also
saved/verified automatically.
Display data
Information: FPC of Node in which saving/verifying is executed
Result of the execution
Direction: MEM to HDD/Verify HDD against MEM
Data Type: Selected Data Type

NDA-24307 CHAPTER 8
Page 681
Issue 1
MFCH: Make Busy of FCCH
MFCH: Make Busy of FCCH
1. Functional Outline
This command is used to set or reset the make busy state of the FCH card.
2. Parameters
Input data
FCHN: FCH Number [1-255]
MB: Make Busy Information [0/1]
0=Make Idle
1=Make Busy

CHAPTER 8 NDA-24307
Page 682
Issue 1
PMBU: Port Microprocessor Back Up
PMBU: Port Microprocessor Back Up
1. Functional Outline
This command saves the contents of Port Microprocessor (PM) onto Floppy Disk (FD) or verifies them.
Information of firmware (Program Code) also appears on the screen.
2. Parameters
Input data
Direction Select: Port Microprocessor to MAT/Verify Port Microprocessor/Verify PM with Error
List Auto Verify Afterward can be performed when designating Port
Microprocessor to MAT.
PM Information: Module Group/Unit/Group/Data Size(1-6) See the following data:
1=2 Kbytes
2=4 Kbytes
3=8 Kbytes
4=16Kbytes
5=32Kbytes
6=64Kbytes
Display data
Office
SP Number: Information of firmware (Program Code)
SP Issue: Information of firmware (Program Code)

NDA-24307 CHAPTER 8
Page 683
Issue 1
RALM: Release Alarm
RALM: Release Alarm
1. Functional Outline
This command clears the fault indications.
2. Parameters
Input data
WRT: Y/N=Alarm is released/Not released
RETURN TO MENU?: Y/N=Return to MENU/Start operation again
Display data
Alarms Released

CHAPTER 8 NDA-24307
Page 684
Issue 1
RALMN: Release Alarm for NDM
RALMN: Release Alarm for NDM
1. Functional Outline
This command, available at the NCN only, clears the fault indications of all the nodes by clicking the release
button on the display.
2. Parameters
Display data
FPC: FPC of alarm released nodes
Status: Result of releasing the alarm
OK/NG

NDA-24307 CHAPTER 8
Page 685
Issue 1
RLST: Release Station/Trunk
RLST: Release Station/Trunk
1. Functional Outline
This command releases a station or trunk.
2. Parameters
Input data
TYPE: Type of Select (1-4)
1=Stations
2=Trunk
3=LENS
4=Connection Trunk
TN: Note 1
STN: Maximum 6 digits Note 1
RT: Note 2
TK: Note 2
LENS: Note 3
Connection RT: (1-1023) Note 4
Connection TK: (1-4095) Note 4
Note 1: This parameter is valid only when TYPE= 1.
Note 2: This parameter is valid only when TYPE= 2.
Note 3: This parameter is valid only when TYPE= 3.
Note 4: This parameter is valid only when TYPE= 4.
Display data
STATUS: Status of Station/Trunk(1-4)
1=Idle
2=Busy
3=Lockout
4=Make Busy
FPC: Fusion Point Code (1-253)
INFORMATION: Information of the connected party Note
Note: This parameter appears only when STATUS= 2.

CHAPTER 8 NDA-24307
Page 686
Issue 1
RLST_T: Release Station/Trunk - Telephone Number
RLST_T: Release Station/Trunk - Telephone Number
1. Functional Outline
This command is used to release a station/trunk, by using Telephone Numbers. This command is available at
NCN (for Fusion network) only. Note
Note: This command is available for PBX program software.
2. Parameters
Input Data
TYPE: Telephone Number
Trunk
LENS
Connection Trunk
UGN: User Group Number Note 1
TELN: Telephone Number (max. 16 digits) Note 1
RT: External/Internal Route Number Note 2
TK: Trunk Number Note 2
LENS: Line Equipment Number Note 3
C_RT: Connection Route Number (1-1023) Note 4
C_TK: Connection Trunk Number (1-4095) Note 4
Note 1: This parameter is valid when “Telephone Number” is designated in the “TYPE” selection list box.
Note 2: This parameter is valid when “Trunk” is designated in the “TYPE” selection list box.
Note 3: This parameter is valid when “LENS” is designated in the “TYPE” selection list box.
Note 4: This parameter is valid when “Connection Trunk” is designated in the “TYPE” selection list box.
Display Data
FPC: Fusion Point Code (1-253)
TN: Tenant Number Note 5
STN: Physical Station Number (max. 5 digits for Business/max. 6 digits for Hotel system)
Note 5
STATUS: Status of Station/Trunk (1-5)
1 = Idle
2 = Busy
3 = Lockout
4 = Make Busy
5 = Now Calling
INFORMATION: Information on the connected party Note 6
ERN: Area Number (1-32) Note 7
GRN: Group Number (1-8) Note 7
CSN/ZTN: CS/ZT Number (1-32) Note 7
PCN: PHS Community Number (1-1024) Note 7
Note 5: This data is displayed when “Telephone Number” is designated in the “TYPE” selection list box.
Note 6: This data is displayed when “STATUS” = 2 (Busy).
Note 7: This data is for Wireless system only.

NDA-24307 CHAPTER 8
Page 687
Issue 1
RLST_T: Release Station/Trunk - Telephone Number
Buttons
Get: Click to get information on the station/trunk
Release: Click to execute the station/trunk release.
Exit: Click to exit this command

CHAPTER 8 NDA-24307
Page 688
Issue 1
SINZ: System Initialization
SINZ: System Initialization
1. Functional Outline
This command initializes the PBX from the MAT. At the time of system initialization, this command allows
the programs and the office data to be loaded from a Hard Disk of PBX into the RAM of PBX.
2. Parameters
Input data
TYPE: Kind of Initialization (1-4)
1=System Initialize
2=System Initialize Office Data Load & System Initialize
3=System Initialize Program Load & System Initialize
4=System Initialize Program & Office Data Load & System Initialize
Note: When the system is intialized, the MAT is disconnnected. Then, log in to the system again.

NDA-24307 CHAPTER 8
Page 689
Issue 1
SINZI: System Initialization for ISW
SINZI: System Initialization for ISW
1. Functional Outline
This command is used to initialize ISW and all the LNs in IPX-U system from the MAT. Also, at the time of
system initialization, this command allows the programs and the office data to be loaded from a Hard Disk of
PBX into the RAM of PBX. To use this command, the MAT must be connected to ISW.
2. Parameters
Input data
TYPE SELECT: Kind of Initialization(1-4)
1=Non Load
2=Program Load
3=DM Load
4=Program Load & DM Load
EXECUTION BUTTON : Initialization is to be executed
Display data
FPC: FPC of executed Node
RESPONSE: Result of initialization
OK/NG
Note: When the system is initialized, the MAT is once disconnected. Then, log in to the system again.

CHAPTER 8 NDA-24307
Page 690
Issue 1
SPTS: Scanning of Port Status
SPTS: Scanning of Port Status
1. Functional Outline
This command displays momentarily the working status of Port Microprocessor (PM) on Module Group (MG),
Unit and Group basis.
2. Parameters
Input data
MG
Unit
Group
Interval: The unit for this parameter is second
Display data
PKG TYPE: (0-255)
PKG Status: 1/2=On Line/Make Busy
SP No.: Program information (1-3999)
ISSUE: Firmware Issue (0-4)
LEVEL STATUS
DATA MEANING DATA MEANING DATA MEANING DATA MEANING
0LC 1TRK 2RST 3ATI
4DLC 5Not used 6CFT 7MASTER T
8 SMI 9 MODEM T 10-15 Not used 16 DATA LC
17 DTI 18 HDT 19 GWT 20 DST
21-254 Not used 255 Not assigned

NDA-24307 CHAPTER 8
Page 691
Issue 1
SPTS: Scanning of Port Status
PORT STATUS: when TYPE= “1”
0=circuit card is not mounted or Make Busy
1=More than one port in a group is Idle
2=All port in a group is busy
3=All port in a group is Hard Make Busy or Soft Make Busy
4=
when TYPE= “2”/“3”
0=Not assigned
1=Line Idle
2=Line Busy
3=Make Busy
4=Lockout
PORT DATA
KIND: Type of Port (1,2)
1/2=Station/Trunk
TN: Note 1
STN: Maximum 6 digits Note 1
TEC: Telephone Equipment Number (1-31) Note 1

CHAPTER 8 NDA-24307
Page 692
Issue 1
SPTS: Scanning of Port Status
RT: Note 2
TK: Note 2
TCL: Trunk Class (1-31) Note 2
RT: Route Number
DATA MEANING DATA MEANING
1 DP (10pps) 2 PB
3 DP/PB 4 DP (20pps)
5-11 Not used 12 Dterm
13 Data Terminal via Dterm 14 Hot Line
15 CAS Line 16 Data Terminal via Data Module
17 Not used 18 Virtual Line Appearance (for Dterm
Multi-Line)
19-20 Not used 21 ACD (MIS)
22 Not used 23 ISDN Terminal
24-26 Not used 27 Eight Conference Equipment
28-31 Not used
DATA MEANING DATA MEANING
1DDD Line 2FX
3WATS 4Tie Line
5 CCSA 6 Toll Terminal
7CAS Line 8Paging
9 Code Call Trunk 10 Dictation Trunk
11 Radio Paging Trunk 12-31 Not used

NDA-24307 CHAPTER 8
Page 693
Issue 1
SPTS: Scanning of Port Status
Note 1: The parameter is only for KIND = 1.
Note 2: The parameter is only for KIND= 2.
DATA MEANING DATA MEANING
901 Attendant Console 902 Originating Register Trunk
903 Incoming Register Trunk 904 MF Receiver
905 Sender Trunk DP/PB 906 PB Receiver for Automated Attendant Service
907AMP 908Not used
909 Three-Way Conference Trunk 910-912 Not used
913 Three-Way Conference Trunk for ATTCON 914 Not used
915 Night Attendant 916 MFC Register
917 MFC Sender 918 Not used
919-926 Modem 927, 928 Not used
929 MFC Sender 930 Rate Adapter Conversion Trunk
931 Not used 932-947 Not used

CHAPTER 8 NDA-24307
Page 694
Issue 1
SRTS: Scanning of Route Status
SRTS: Scanning of Route Status
1. Functional Outline
This command displays the designated trunk status (Busy/Idle) at predetermined intervals. A maximum of 15
routes can be scanned.
2. Parameters
Input data
RT: Route Number
Interval Time
Display data
Number of Idle TK
Number of Busy

NDA-24307 CHAPTER 8
Page 695
Issue 1
XHFD: X-RAY HD or FDD Diagnosis
XHFD: X-RAY HD or FDD Diagnosis
1. Functional Outline
This command is used to execute the following diagnoses.
•Hard Disk Diagnosis
By executing read/write check on the files in the hard disk of the PBX, this command diagnoses the hard
disk for its normality.
If an error has been found as a result of the diagnosis, this command displays the information on the faulty
logical drive and the number of faulty sectors on the MAT screen. The information can also be output by
the printer.
•Floppy Disk Diagnosis
By executing cleaning of the floppy disk drive in the PBX, this command diagnoses the floppy disk drive
for its normality.
If the cleaning has not finished normally, a diagnosis error has been found as a result of the diagnosis. The
result message may be displayed on the MAT screen or printed out by the printer.
2. Parameters
Input data
FUNCTION: HD/FDD Designation [1/2]
1=Diagnosis of HD (Hard Disk)
2=Diagnosis of FDD (Floppy Disk Drive)
AREA: Area Designation [0/l] Note
0=All Files
1=Program Files
SYSTEM: System (0/1)
0=No.0 System
1=No.1 System
Note: “AREA” parameter appears only when “1(=HD)” is selected in the “FUNCTION” parameter.
Buttons
Exe: Click to execute the diagnosis.
Close: Click to exist this command.

CHAPTER 8 NDA-24307
Page 696
Issue 1
XHFD: X-RAY HD or FDD Diagnosis
Display data
FAULT DRIVE: Fault Drive Number [0-4]
0=-
1=#0
2=#1
3=#2
4=#3
FAULT SECTOR: Number of Fault Sector [0-65535]
MESSAGE: Result of diagnosis [0-255]
0=Normal End
1=Hard disk read test practice error
2=Floppy disk drive cleaning practice error
3=Common part parameter error (Data length error)
4=FDD cleaning abnormal end (FD not in drive)
5=Individual part parameter error (Function error)
6=Individual part parameter error (Sub function error)
7=Individual part parameter error (Device error)
8=Individual part parameter error (Drive selection error)
9=Individual part parameter error (Data ID error)
10=Individual part parameter error (Processor ID error)
11=Individual part parameter error (File ID error)
12=Individual part parameter error (File name error)
13=Request order error (Health check send error)
14=Request order error (Data send signal error)
15=Internal error (File open error)
16=Internal error (File read error)
17=Internal error (File close error)
18=Internal error (FAT error)
19=Internal error (SCSIC error)
20=Internal error (other)
21=Hard interface abnormal end
22-255=-
