NETSHIELD User Guide.compressed
User Manual: NETSHIELD-User-Guide.compressed
Open the PDF directly: View PDF ![]() .
.
Page Count: 161 [warning: Documents this large are best viewed by clicking the View PDF Link!]
- Table of Contents
- Setup
- System Management
- Network Configuration
- Setting Up Network Access Control
- Determining Ping Response of Nodes on Subnet
- Managing Assets
- Managing Asset Categories
- Importing and Exporting Asset Lists
- Setting Up SmartSwitch Integration
- Asset Detection and Vulnerability Quarantine™
- One-Click ADS Configuration
- Enabling NetBIOS Scans
- Enabling IP Detection via Packet Inspection
- One-Click Packet Sniffing Range Configuration
- NetShield Blocking
- Enabling Manual NetSHIELD Blocking
- Enabling Automatic NetSHIELD Blocking
- Excluding Assets From NetSHIELD Blocking
- Viewing Assets Blocked With NetSHIELD Blocking
- Viewing NetSHIELD Blocking Logs
- Immediately Blocking an Untrusted Asset
- Enabling NetSHIELD UnBlocking Traffic
- Enabling MAC Spoof Alerting
- Enabling MAC Spoof Blocking
- Viewing ADS Configuration Settings
- Preparing Your Network for Asset Detection
- Queuing Trusted Asset Scans
- Disable ADS
- Policy Manager
- Configuring Inventory Alerts
- Configuring Asset Tracker
- Viewing Systems List (Asset List) in Asset Tracker
- Viewing/Modifying/Adding Systems In The Asset Tracker
- Adding User Information
- Adding Software Information
- Adding Peripheral Information
- Associating Users, Software, & Peripherals With Systems
- Associating Users with Systems
- Associating Software with Systems
- Associating Peripherals with Systems
- Removing Assets from SnoopWall NetSHIELD
- malware detection system
- Audits
- Creating and Managing Audits
- Running a One-Click Audit
- Defining A New Audit
- Scheduling Audits
- Scheduling Backups and Audits
- Choosing IP Addresses From List
- Selecting/Grouping IP Addresses to Audit
- Saving the Audit
- Activating & Managing Audits
- Scheduling an Audit to Run
- Deactivating an Audit
- Removing an Audit
- Modifying an Existing Audit’s Definition
- Copying an Audit to Create a Variation
- Removing Systems/IP Addresses from an Audit
- Viewing Lists of CVE Tests by OS and Application
- Managing Known Missing Assets
- Viewing SnoopWall NetSHIELD Schedule
- Generating and Viewing Asset Reports
- Updates
- Command Center
- Reports Guide
- Overview of Report Types and Content
- Understanding SnoopWall NetSHIELD Report Types
- CVE Information in Reports
- Selecting Content Presented in Reports
- Interpreting and Understanding Reports
- Interpreting Complete Vulnerability Reports
- Interpreting Vulnerability Descriptions
- Interpreting Summary Reports
- Remediation of Vulnerabilities in Reports
- Custom Comments
- Finding Automatic Reports for Dynamically Detected Devices
- Removing a Report
- Saving a Report to Disk
- Creating Custom Reports Using Queries
- Generating Management and Executive Reports
- Working with Logs
- Workflow /Remediation Requirements
- Workflow Management System at a Glance
- Workflow Setup/Remediation Steps
- Who Should Learn about Vulnerability Remediation
- Understanding Workflow and User Responsibilities
- IT Staff: Steps For Remediation of Vulnerabilities
- Managing Remediation—Responding to Events as Manager
- Using Workflow in Vulnerability Remediation
- Remediation Scheduling
- The Workflow Ticket Log
- Selecting and Assigning Jobs
- Recognizing a Job Is On Hold
- Viewing Logs of Assigned Jobs
- Viewing Vulnerability Reports
- Using Links in Reports
- Researching CVEs and CANs
- Updating Job Status
- Updating Multiple IDs in a Single Job Ticket
- Tagging a Vulnerability as a False Positive
- Dealing with Escalated Jobs (Managers Only)
- Viewing Escalated Jobs
- Reassigning Jobs (Managers Only)
- Viewing Job Logs of Specific Individuals (Managers Only)
- Confirming False Positives (Managers Only)
- Closing a Job (Managers Only)
- Customer Service
User Guide
NOVEMBER 2017

USER GUIDE
© NETSHIELD Corporation 2017 | https://www.netshieldcorp.com | 1-800-991-3971
TABLE OF CONTENTS
Setup ............................................................................................................................................................ viii
Connect appliance to the network and determine IP address ............................................................. viii
Using a Console Connection .................................................................................................................. x
LOGIN TO NETSHIELD™ IN A WEB BROWSER .................................................................................. xv
Appliance Installation Wizard .............................................................................................................. xvi
License not activated .......................................................................................................................... xxiv
System Management ................................................................................................................................. xxiv
Rebooting NetSHIELD ........................................................................................................................ xxv
Factory Reset ..................................................................................................................................... xxvi
Reset Console Password .................................................................................................................. xxvii
Enable SSH ....................................................................................................................................... xxvii
Setting Up User Accounts ..................................................................................................................... xxvii
Understanding Relationships between User Types .......................................................................... xxvii
Creating or Editing User Accounts ................................................................................................... xxviii
NetSHIELD Access Level ................................................................................................................... xxx
Deleting User Accounts ...................................................................................................................... xxx
Coordinating User Accounts with Asset Tracker User List................................................................. xxx
Setting System Date/Time ..................................................................................................................... xxxi
Background Scans ................................................................................................................................. xxxi
Backup and Restore .............................................................................................................................. xxxii
Backup Now ...................................................................................................................................... xxxiv
Restore .............................................................................................................................................. xxxv
System Statistics ................................................................................................................................. xxxvii
Manage Server Certificate .................................................................................................................. xxxvii
Network Configuration .................................................................................................................................. xl
Multiple Network Interface Card (NIC) Support ....................................................................................... xli
Configuring NICs .................................................................................................................................. xli
Setting Up Network Access Control............................................................................................................. xlii
Initial Asset Discovery .............................................................................................................................. xlii
How SnoopWall NetSHIELD Generates the List of IP Addresses .......................................................... xliii
Adding IP Addresses Manually ............................................................................................................... xliv
System Information Fields ................................................................................................................... xlv
List Categories ..................................................................................................................................... xlvi
Determining Ping Response of Nodes on Subnet ...................................................................................... xlvi
Ping Latency Chart .................................................................................................................................. xlvi

USER GUIDE
© NETSHIELD Corporation 2017 | https://www.netshieldcorp.com | 1-800-991-3971
Pinging Individual Assets ....................................................................................................................... xlvii
IP Categories .......................................................................................................................................... xlvii
Managing Assets ...................................................................................................................................... xlviii
Manage Assets Overview ..................................................................................................................... xlviii
Asset Summary Box .................................................................................................................................... l
Pop-up Menu ............................................................................................................................................... l
Filter Panel ................................................................................................................................................ lii
Deleting IP Addresses ............................................................................................................................... liii
Managing Asset Categories .......................................................................................................................... liii
Importing and Exporting Asset Lists ............................................................................................................ liv
Exporting ................................................................................................................................................... lv
Importing.................................................................................................................................................... lv
Setting Up SmartSwitch Integration .............................................................................................................. lv
Asset Detection and Vulnerability Quarantine™ ......................................................................................... lvi
NetShield Blocking................................................................................................................................. lx
Enabling Manual NetSHIELD Blocking ................................................................................................. lx
Enabling Automatic NetSHIELD Blocking ............................................................................................. lx
Excluding Assets From NetSHIELD Blocking .......................................................................................... lxi
Viewing Assets Blocked With NetSHIELD Blocking ................................................................................ lxi
Viewing NetSHIELD Blocking Logs.......................................................................................................... lxii
Immediately Blocking an Untrusted Asset ............................................................................................... lxii
Enabling NetSHIELD UnBlocking Traffic ................................................................................................ lxiii
Enabling MAC Spoof Alerting .................................................................................................................. lxiv
Enabling MAC Spoof Blocking ................................................................................................................ lxiv
Viewing ADS Configuration Settings ....................................................................................................... lxiv
Preparing Your Network for Asset Detection .......................................................................................... lxv
Queuing Trusted Asset Scans ................................................................................................................ lxvi
Disable ADS ............................................................................................................................................ lxvi
Policy Manager ........................................................................................................................................... lxvi
Configuring Inventory Alerts ...................................................................................................................... lxvii
Configuring Asset Tracker .......................................................................................................................... lxix
Viewing Systems List (Asset List) in Asset Tracker ................................................................................ lxix
Viewing/Modifying/Adding Systems In The Asset Tracker ..................................................................... lxix
Editing/Adding System Information ..................................................................................................... lxx
Viewing Asset Report List .................................................................................................................... lxxi
Adding User Information.......................................................................................................................... lxxi
Adding Software Information .................................................................................................................. lxxii

USER GUIDE
© NETSHIELD Corporation 2017 | https://www.netshieldcorp.com | 1-800-991-3971
Adding Peripheral Information ............................................................................................................... lxxiii
Associating Users, Software, & Peripherals With Systems .................................................................. lxxiv
Associating Users with Systems ............................................................................................................ lxxv
Associating Software with Systems ...................................................................................................... lxxvi
Associating Peripherals with Systems .................................................................................................. lxxvi
Removing Assets from SnoopWall NetSHIELD ................................................................................... lxxvii
malware detection system ...................................................................................................................... lxxviii
overview .............................................................................................................................................. lxxviii
configuration malware detection ......................................................................................................... lxxviii
malware detection system ................................................................................................................... lxxviii
Managing Whitelist For Detected Malware IP Address(es)............................................................... lxxxi
Managing Manual Malware IP Addresses ........................................................................................ lxxxii
Viewing Malware IP Address History ............................................................................................... lxxxii
Viewing Malware Signature Update Schedule ................................................................................ lxxxiii
Audits ...................................................................................................................................................... lxxxiv
Creating and Managing Audits ............................................................................................................ lxxxiv
Running a One-Click Audit .................................................................................................................. lxxxiv
Defining A New Audit .......................................................................................................................... lxxxvi
Assigning an Audit Name ................................................................................................................ lxxxvi
Setting Vulnerability Threshold for Notification............................................................................... lxxxvii
Modifying Who Receives Reports .................................................................................................. lxxxvii
Scheduling Audits .............................................................................................................................. lxxxviii
Scheduling Backups and Audits........................................................................................................ lxxxviii
Setting Audit Frequency and Start Time ....................................................................................... lxxxviii
Choosing IP Addresses From List....................................................................................................... lxxxix
Selecting/Grouping IP Addresses to Audit ............................................................................................... xc
Saving the Audit ....................................................................................................................................... xc
Activating & Managing Audits ................................................................................................................. xci
Scheduling an Audit to Run ..................................................................................................................... xci
Starting an Audit .................................................................................................................................. xcii
Deactivating an Audit .............................................................................................................................. xcii
Removing an Audit ................................................................................................................................. xciii
Modifying an Existing Audit’s Definition ................................................................................................. xciii
Copying an Audit to Create a Variation .................................................................................................. xciii
Removing Systems/IP Addresses from an Audit ................................................................................... xciv
Viewing Lists of CVE Tests by OS and Application ............................................................................... xciv
Managing Known Missing Assets .............................................................................................................. xcv

USER GUIDE
© NETSHIELD Corporation 2017 | https://www.netshieldcorp.com | 1-800-991-3971
Viewing SnoopWall NetSHIELD Schedule ................................................................................................ xcvi
Viewing the Monthly, Weekly, or Yearly Schedule ................................................................................ xcvi
Viewing The Daily Schedule ................................................................................................................. xcvii
Daily Schedule Details ....................................................................................................................... xcvii
Searching the Calendar......................................................................................................................... xcvii
Opening Audit/Scheduling FAQ in the Calendar View ......................................................................... xcviii
National Vulnerability Database ........................................................................................................... xcviii
Managing In Process Audits ................................................................................................................ xcviii
Reviewing Audits .............................................................................................................................. xcviii
Viewing Partial Reports .......................................................................................................................... c
Generating and Viewing Asset Reports ........................................................................................................ ci
Updates ....................................................................................................................................................... civ
Setting Up Automatic Vulnerability Updates ........................................................................................... civ
Retrieving SnoopWall NetSHIELD Service Packs/Version Updates ....................................................... cv
Service Pack Configuration ..................................................................................................................... cvi
Malware threat feed update .................................................................................................................... cvi
License/Subscription updates ................................................................................................................. cvii
Configuring a Proxy for Service Pack and Vulnerability Updates ........................................................... cvii
Command Center ....................................................................................................................................... cviii
Managing Appliances .............................................................................................................................. cix
Adding Managed Appliances .................................................................................................................. cix
Edit Appliance Information .................................................................................................................... cx
Removing Appliances ........................................................................................................................... cx
Adding/Managing Appliance Groups........................................................................................................ cx
Remote Operations ................................................................................................................................. cxii
Command Center Syslog Messages...................................................................................................... cxiii
Configuring the Syslog Server ............................................................................................................... cxv
Clearing Command Center Alerts .......................................................................................................... cxv
Reports Guide ............................................................................................................................................ cxxi
Overview of Report Types and Content ................................................................................................. cxxi
Understanding SnoopWall NetSHIELD Report Types ........................................................................... cxxi
CVE Information in Reports ................................................................................................................... cxxi
Selecting Content Presented in Reports ............................................................................................... cxxii
Interpreting and Understanding Reports .............................................................................................. cxxiv
Interpreting Complete Vulnerability Reports ........................................................................................ cxxiv
Interpreting Vulnerability Descriptions ................................................................................................. cxxvi
Interpreting Summary Reports ............................................................................................................ cxxvii

USER GUIDE
© NETSHIELD Corporation 2017 | https://www.netshieldcorp.com | 1-800-991-3971
Remediation of Vulnerabilities in Reports .......................................................................................... cxxviii
Custom Comments ............................................................................................................................. cxxviii
Adding New Comments .................................................................................................................... cxxix
Editing/Removing Existing Comments .............................................................................................. cxxx
Viewing Comments in Reports .......................................................................................................... cxxx
Finding Automatic Reports for Dynamically Detected Devices............................................................ cxxxi
Removing a Report .............................................................................................................................. cxxxi
Saving a Report to Disk....................................................................................................................... cxxxii
Creating Custom Reports Using Queries ............................................................................................ cxxxii
Querying Reports Database ............................................................................................................ cxxxii
Printing Query Results .................................................................................................................... cxxxiv
Generating Management and Executive Reports.................................................................................. cxxxiv
Requirements for Executive/Management Reports ........................................................................... cxxxiv
Generating Management Reports ...................................................................................................... cxxxiv
Understanding Content of Management Reports ............................................................................... cxxxv
Generating Executive Reports .......................................................................................................... cxxxvii
Understanding Content of Executive Reports .................................................................................. cxxxviii
Working with Logs .................................................................................................................................. cxxxix
Viewing Network Events Log .................................................................................................................. cxl
Viewing System Events Log .................................................................................................................... cxl
Log Reporting Wizard.............................................................................................................................. cxli
Filtering ............................................................................................................................................... cxlii
Generating PDFs ............................................................................................................................... cxliii
Saving Reports .................................................................................................................................. cxliv
Opening Reports ................................................................................................................................. cxlv
Sorting................................................................................................................................................. cxlv
Summary............................................................................................................................................ cxlvi
Workflow /Remediation Requirements .................................................................................................... cxlvii
Workflow Management System at a Glance ........................................................................................ cxlvii
Progression of Job Status ............................................................................................................... cxlviii
Remediation of Vulnerabilities ......................................................................................................... cxlviii
Flagging False Positives .................................................................................................................. cxlviii
Workflow Setup/Remediation Steps.................................................................................................... cxlviii
Who Should Learn about Vulnerability Remediation ............................................................................ cxlix
Understanding Workflow and User Responsibilities ............................................................................. cxlix
Progression of Job Status ................................................................................................................. cxlix
IT Staff: Steps For Remediation of Vulnerabilities ................................................................................ cxlix

USER GUIDE
© NETSHIELD Corporation 2017 | https://www.netshieldcorp.com | 1-800-991-3971
Managing Remediation—Initial Setup ................................................................................................... cl
Managing Remediation—Responding to Events as Manager .................................................................. cl
Using Workflow in Vulnerability Remediation .......................................................................................... cli
Remediation Scheduling .......................................................................................................................... cli
How SnoopWall NetSHIELD Calculates/Sets Due Dates .................................................................... clii
The Workflow Ticket Log ......................................................................................................................... cliii
Selecting and Assigning Jobs ................................................................................................................. cliii
Recognizing a Job Is On Hold ................................................................................................................. clv
Viewing Logs of Assigned Jobs .............................................................................................................. clv
Viewing Vulnerability Reports ................................................................................................................. clvi
Using Links in Reports ............................................................................................................................ clvi
Researching CVEs and CANs ............................................................................................................... clvii
Updating Job Status ............................................................................................................................... clvii
Updating Multiple IDs in a Single Job Ticket ......................................................................................... clviii
Tagging a Vulnerability as a False Positive .......................................................................................... clviii
Dealing with Escalated Jobs (Managers Only) ....................................................................................... clix
Viewing Escalated Jobs .......................................................................................................................... clix
Reassigning Jobs (Managers Only) ........................................................................................................ clix
Viewing Job Logs of Specific Individuals (Managers Only) .................................................................... clxi
Confirming False Positives (Managers Only) .......................................................................................... clxi
Closing a Job (Managers Only) .............................................................................................................. clxii
Customer Service ...................................................................................................................................... 166
................................................................................................................................................................... 166


USER GUIDE
© NETSHIELD Corporation 2017 | https://www.netshieldcorp.com | 1-800-991-3971
SETUP
Connect appliance to the network and determine IP address
1. Plug power cord into the power jack in the rear of the NetSHIELD appliance, and into
a 3-prong grounded outlet.
2. Connect your local area network cable to the eth0 port on the NetSHIELD appliance.
Network cable must be Type RJ -45, category 5 cable or higher.
3. Connect a monitor to the VGA port on the NetSHIELD™ appliance.
4. Connect a keyboard to the USB ports.
5. Boot the appliance by pushing the red Start button on the left side of the front panel.
6. The green Power light will come on. The yellow Disk Activity indicator will also flash.
7. The front panel lights (from right to left) are:
• Power
• Hard Drive Activity
• Network Activity 1
• Network Activity 2
• System Overheat
8. The appliance will run through its startup, displaying its progress on the monitor. When
it is finished, a screen like the following will appear.
USER GUIDE
© NETSHIELD Corporation 2017 | https://www.netshieldcorp.com | 1-800-991-3971
9. Make a note of the DHCP assigned IP address () you are given.
The final number (443) is the port number.
Before you configure NetSHIELD™ software, open port 443 on your Firewall Server. This port
must remain open while NetSHIELD™ is operating so that you can receive service packs,
code updates, and updates to vulnerability tests from SnoopWall.
Using a
Console Connection
To manually configure your appliance using a console connection do the following:
1. The default console password is changeme. No characters will be displayed when
entering the password.
2. The following screen appears:
The following functions can be performed from this screen:
NOTE: If you do not open the port on the Firewall, you cannot receive
automatic vulnerability signature updates, malware updates, or SnoopWall
NetSHIELD™ Service Packs.

USER GUIDE
© NETSHIELD Corporation 2017 | https://www.netshieldcorp.com | 1-800-991-3971
• <1> Network Configuration – Configure network settings for Eth0. A web browser is
used to configure additional interfaces.
• <2> Allowed Access Control - Modify the list of IP addresses that are allowed to
access the user interface via a web browser.
• <3> Disable ADS – Disable the Asset Detection engine on the NetSHIELD™.
• <4> Disable NetSHIELD™ NAC Blocking - Disable NetSHIELD™ Blocking and stop
blocking any assets currently being blocked.
• <5> Reset Network Interfaces - Configuration for all interfaces except ETH0 will be cleared
and the appliance will be rebooted.
• <6> Change Console Password - You will be asked to provide the current password and
confirm the new password. Please remember your password for future use.
• <7> Reset MainAccount Password – Reset MainAccount password to changeme.
• <8> Reboot - Restart the appliance.
• <9> Shutdown - Power down the appliance.
• <10> Factory settings - Return to factory preset settings.
• <11> Enable SSH Login – Enables the ability to login via SSH
• <12> Reset License - Reinstall the NetSHIELD™ license
• <13> Generate SSH Key – Create a one-tine key to allow SSH login.
• <14> Open Support Channel – Open the SSH connection for remote support.
• <15> Close Support Channel – Close the SSH connection for remote support.
• <16> Recreate Certificate – Recreate the self-signed certificate of the NetSHIELD™.
• <17> Logout
USER GUIDE
© NETSHIELD Corporation 2017 | https://www.netshieldcorp.com | 1-800-991-3971
LOGIN TO NETSHIELD™ IN A WEB BROWSER
To log in
1. Open a secure browser window using https://<IP address of appliance>
For example;
If the appliance has an IP address 192.168.254.159
2. If you changed the default port (443) in the installation process, add a colon followed by
the new port number.
For example;
If using port number 10000, Enter the URL as 10000.
If you see a Security Alert or other message from your system, Click Continue to
proceed with the login.
3. The login screen appears:
1. Login the NetSHIELD™ appliance with the default credentials.
• Username: MainAccount
• Password: changeme
4. Click the Login button.
First time setup
Appliance Installation Wizard
The Appliance Installation Wizard will automatically launch. It consists of 8 tabs designed to
get you up and running as quickly as possible. Note that the new tabs do not appear until the
most recently presented tab is completed.
The 1st tab is the End Users License Agreement.

USER GUIDE
© NETSHIELD Corporation 2017 | https://www.netshieldcorp.com | 1-800-991-3971
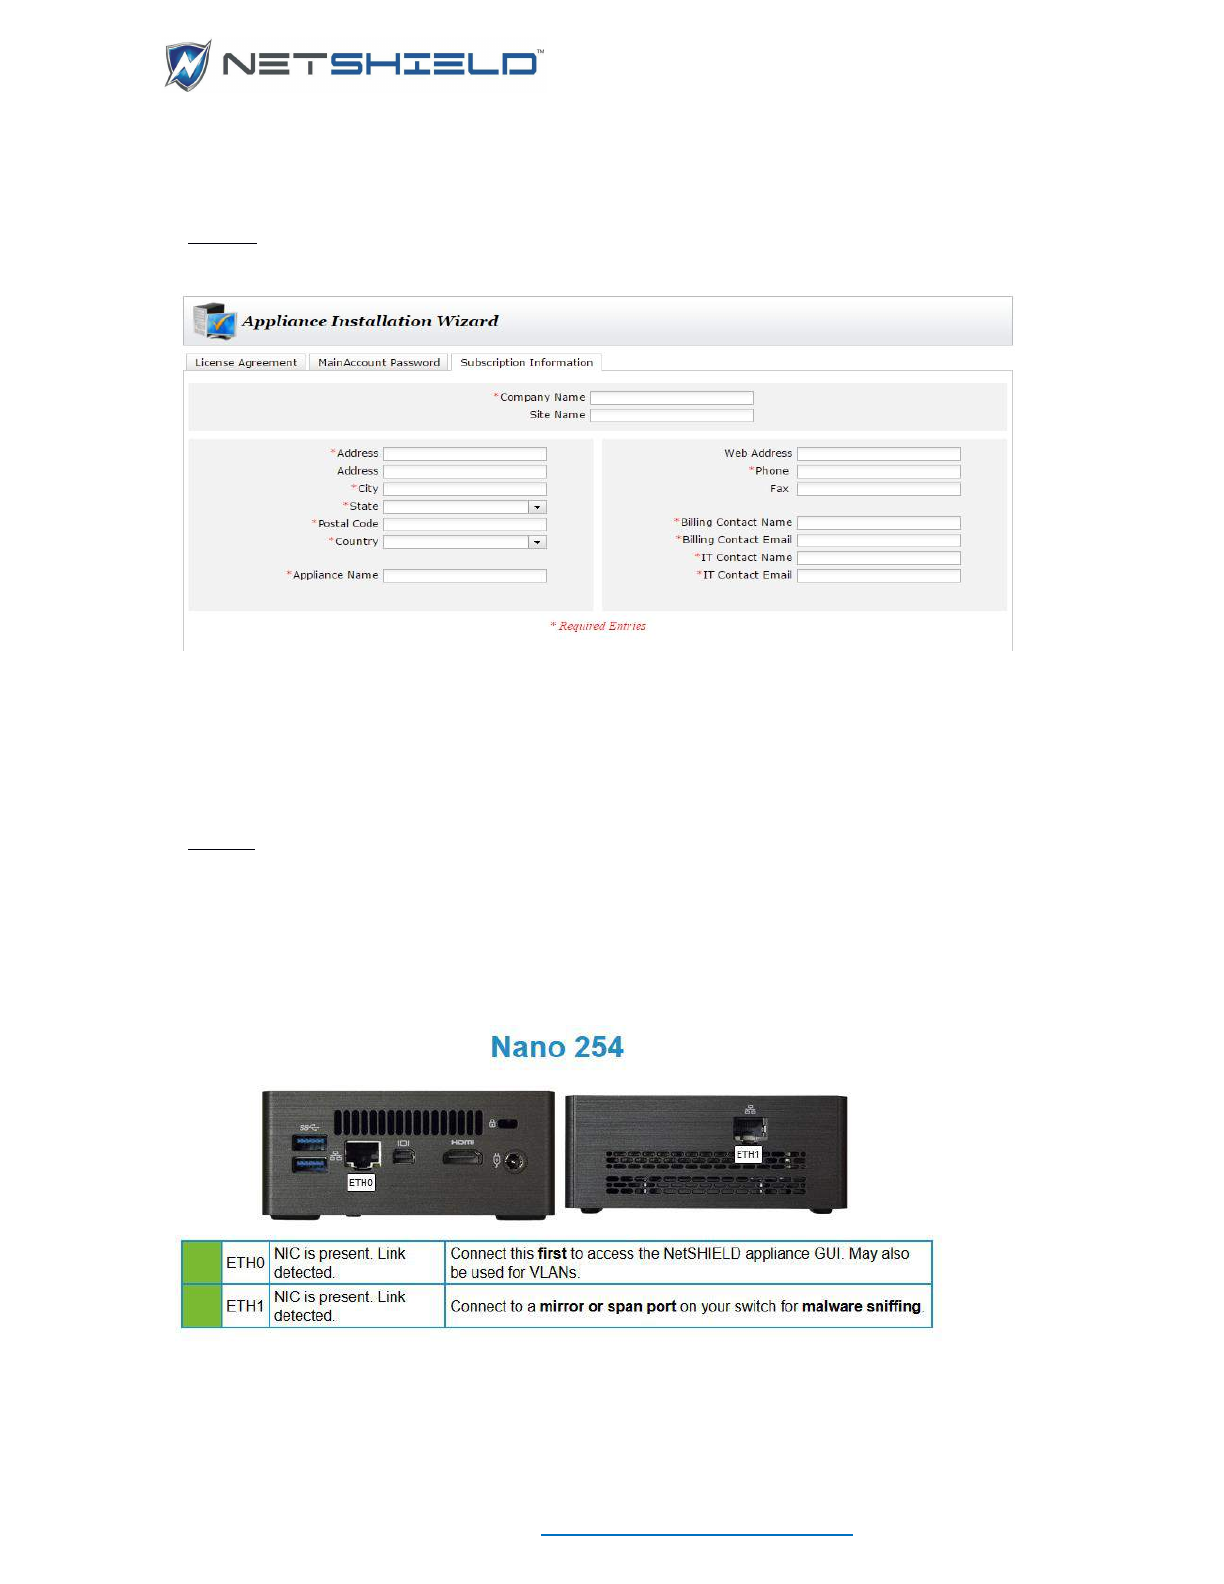
The 3rd tab is the Subscription Information tab.
1. Fill in all of the required information, indicated by (*).
2. Click the Save button.
The 4th tab is the Ethernet Port Configuration.
1. A picture of the possible Ethernet connections is displayed based on the appliance type.
See the example below.

USER GUIDE
© NETSHIELD Corporation 2017 | https://www.netshieldcorp.com | 1-800-991-3971
The 5th tab is the Network Configuration tab.
1. Make changes as necessary to the Network Configuration Data.
2. Click on Save.
3. Click the Next buttons to go to the next screen.
If you have changed the IP Address for Eth0 or SSL port, the appliance server will be restarted.
The Appliance Installation Wizard will attempt to reload itself. You can need to login again, or
prompt the browser to try the reload again. You will also need to confirm the certificate again.
The 6th tab is Notification Information.

USER GUIDE
© NETSHIELD Corporation 2017 | https://www.netshieldcorp.com | 1-800-991-3971
1. Fill in the Required Information as indicated by the red (*).
2. Click the Verify Mail Settings.
3. If the configuration is correct, a message box will appear, and the email address
specified in the System Admin Email entry will receive a test message.
4. Click Save.
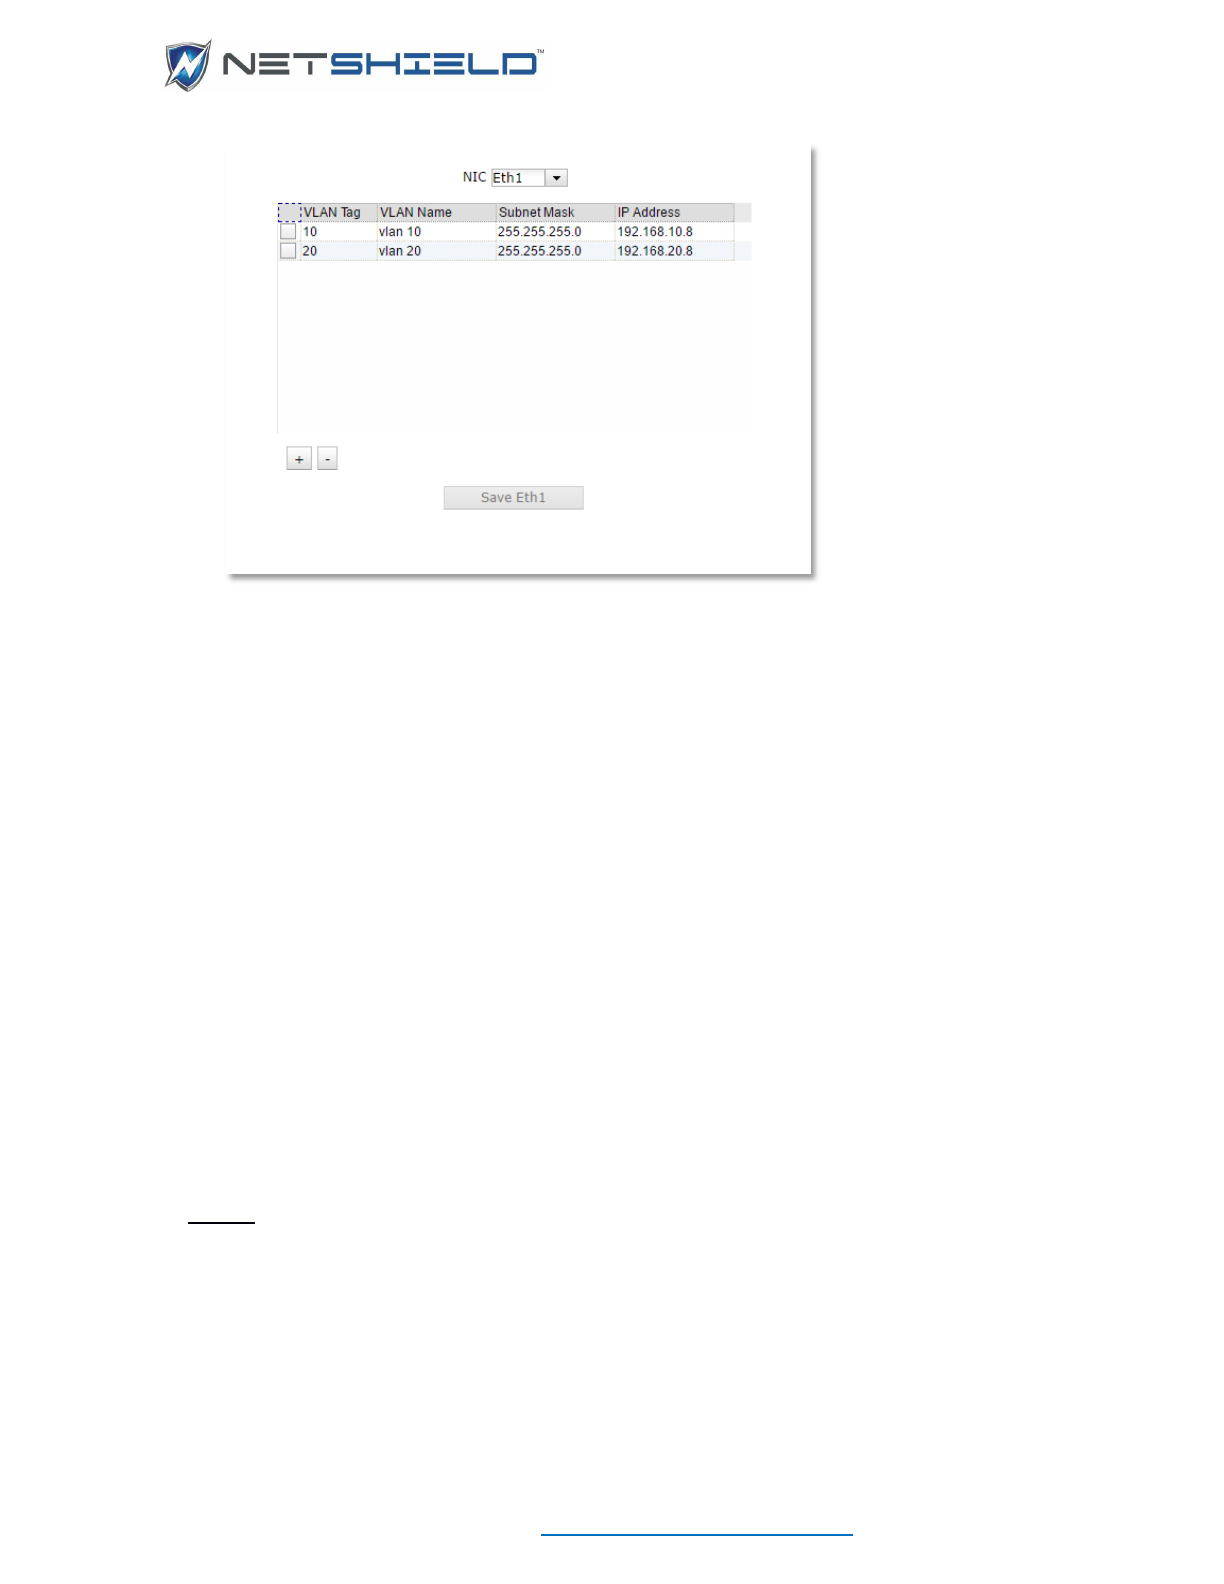
The 7th tab is Configure Multiple VLANs.
USER GUIDE
© NETSHIELD Corporation 2017 | https://www.netshieldcorp.com | 1-800-991-3971
1. Select an Ethernet interface to configure from the NIC dropdown box.
2. Click the ( + ) button to add a VLAN entry for the current interface.
3. Enter the VLAN tag, the VLAN name, the subnet mask, and the IP address.
4. Repeat Steps 2 and 3 for each VLAN the appliance will use on the current interface.
5. Click Save to save the VLAN configuration.
6. Repeat Steps 1 thru 6 for each additional Interface required.
7. To Remove a VLAN entry, click the checkbox to the left side of the item.
8. Now click the ( – ) button.
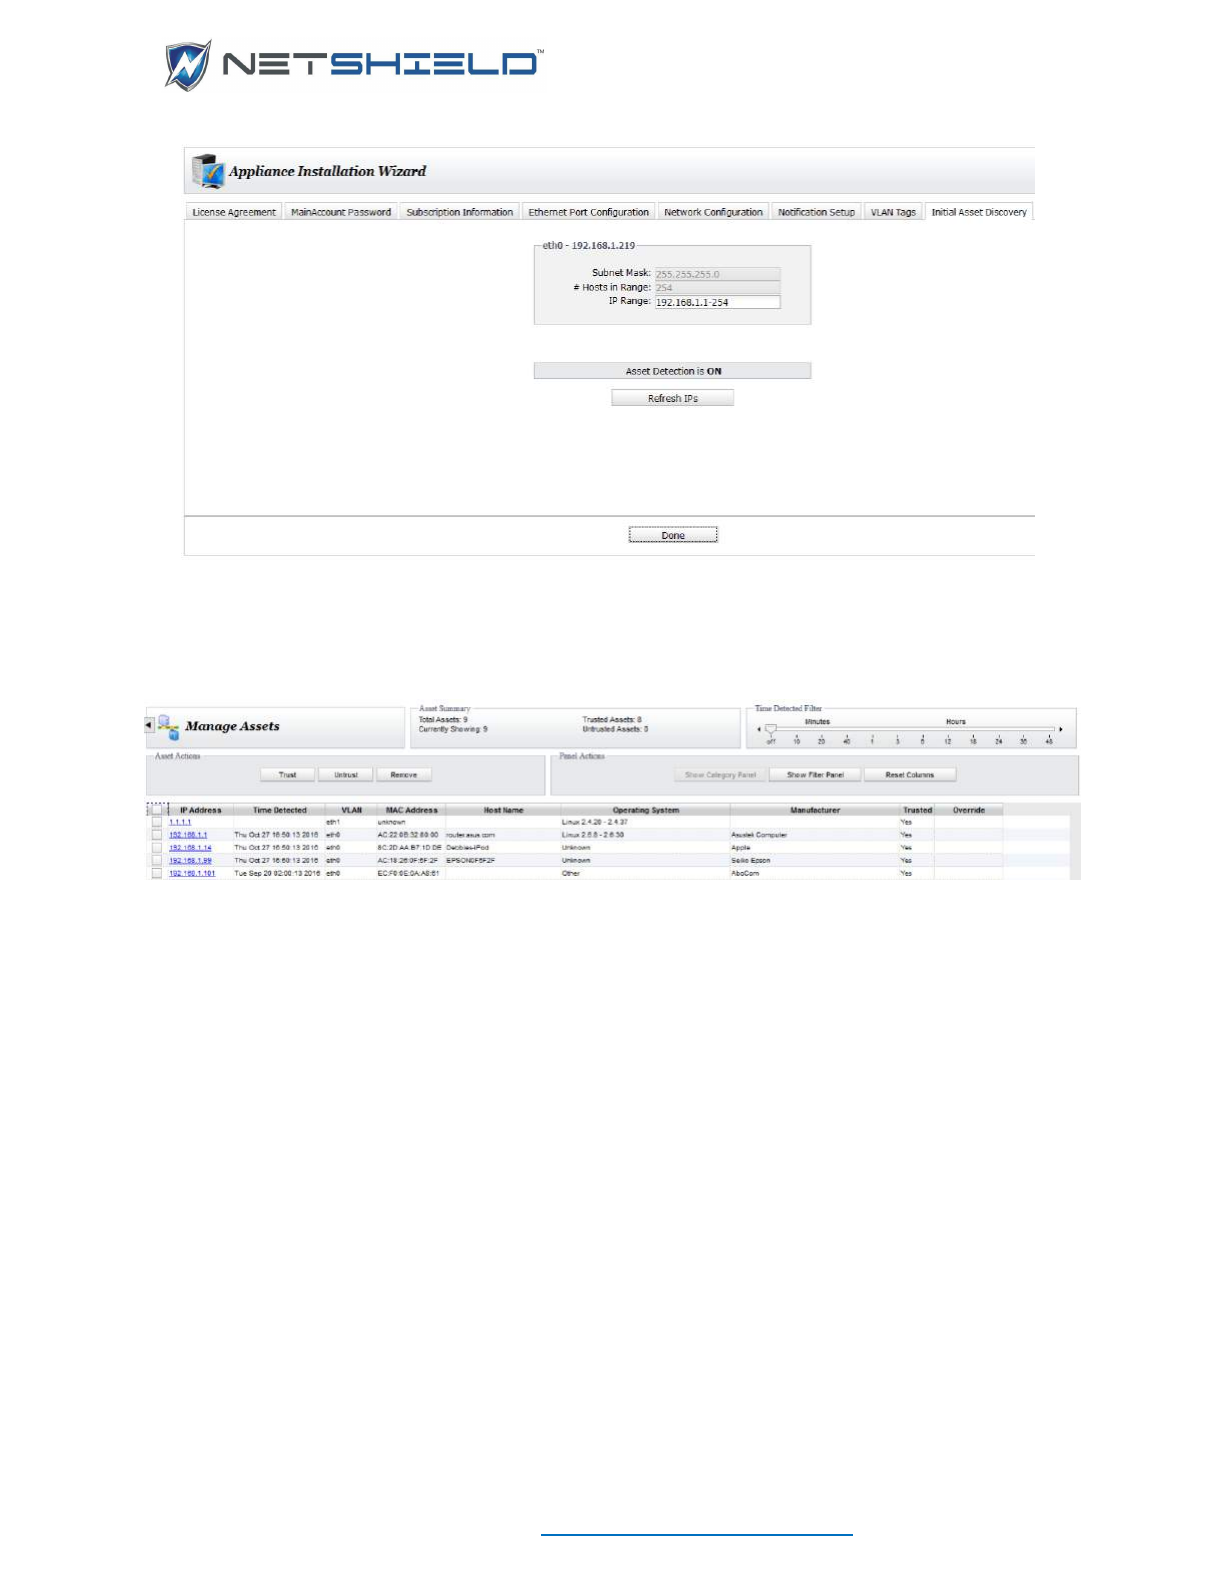
The 8th tab is Initial Asset Discovery.
USER GUIDE
© NETSHIELD Corporation 2017 | https://www.netshieldcorp.com | 1-800-991-3971
1. Click Refresh IPs to perform an initial asset discovery
2. When complete the Manage Assets page opens.
License not activated
If your license has not yet been activated, you will get the following message;
1. Click Continue
2. Go to UpdatesLicense/Subscription.
3. Enter the code sent to you by SnoopWall, or wait for automatic activation (usually
overnight).
4. When the license is activated, you will see a screen similar to this:
SYSTEM MANAGEMENT
The System Menu gives you access to the NetSHIELD system functions such as utilities,
password change, change the system date and time, etc.
USER GUIDE
© NETSHIELD Corporation 2017 | https://www.netshieldcorp.com | 1-800-991-3971
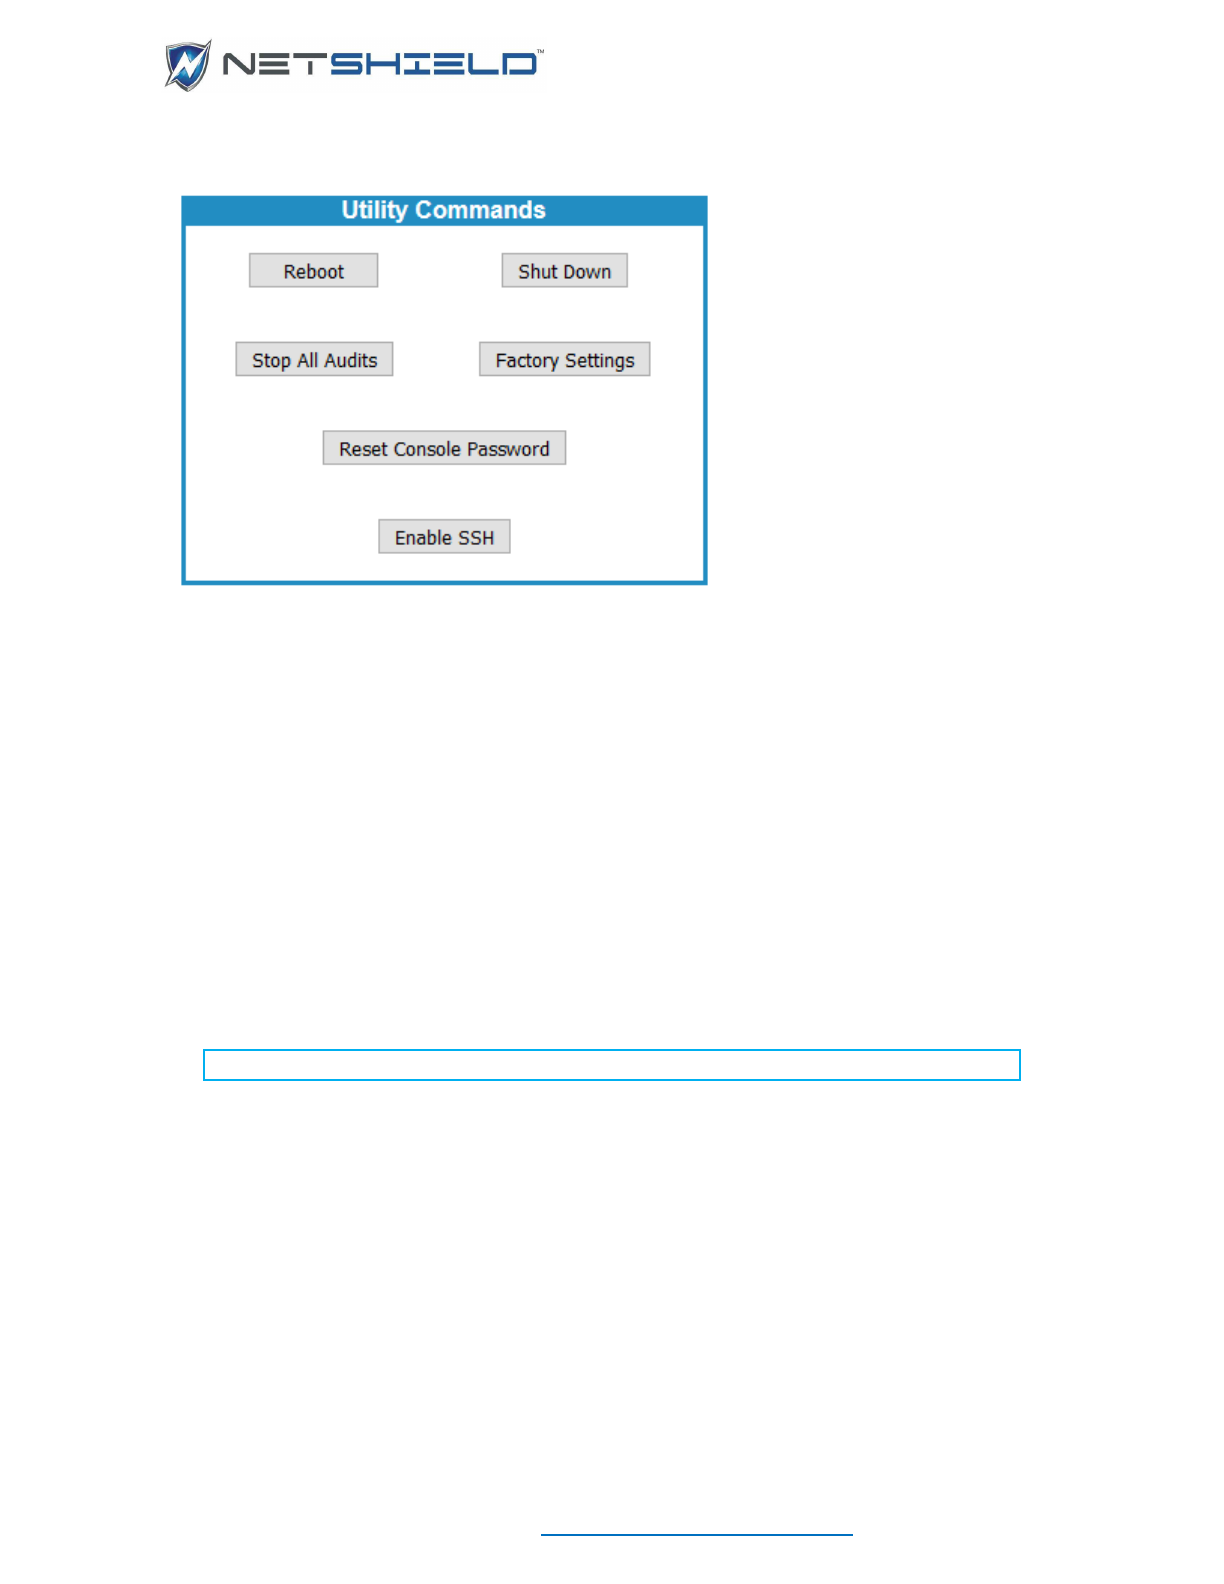
To access system utilities, select System
Utilities from the left menu.
Rebooting NetSHIELD
Restart SnoopWall NetSHIELD without losing any saved information.
• Select System
Utilities from the left menu.
• Click the Reboot button.
Confirm or cancel the reboot. If you proceed, the browser window displays the message Reboot
in Progress.
Rebooting does not change the Scheduled or Inactive status of an audit profile. Any audits in
process when the reboot occurs are not completed. You will receive a warning informing you
that they are currently in process, will stop, and must be restarted later.
NOTE: Wait at least 2 minutes for the reboot to complete.
To shut down SnoopWall NetSHIELD:
• Select System
Utilities from the left menu.
• Click the Shutdown button.
You are asked to confirm or cancel the shutdown. If you proceed, SnoopWall NetSHIELD
operating system will shut down. Manually press the power button to power off.
To restart SnoopWall NetSHIELD, you must manually press the Power button on the appliance.
USER GUIDE
© NETSHIELD Corporation 2017 | https://www.netshieldcorp.com | 1-800-991-3971
Shutting down does not change the Scheduled or Inactive status of any audit. Any audits in
process when the shutdown occurs will stop. You must restart them when SnoopWall
NetSHIELD is powered up again.
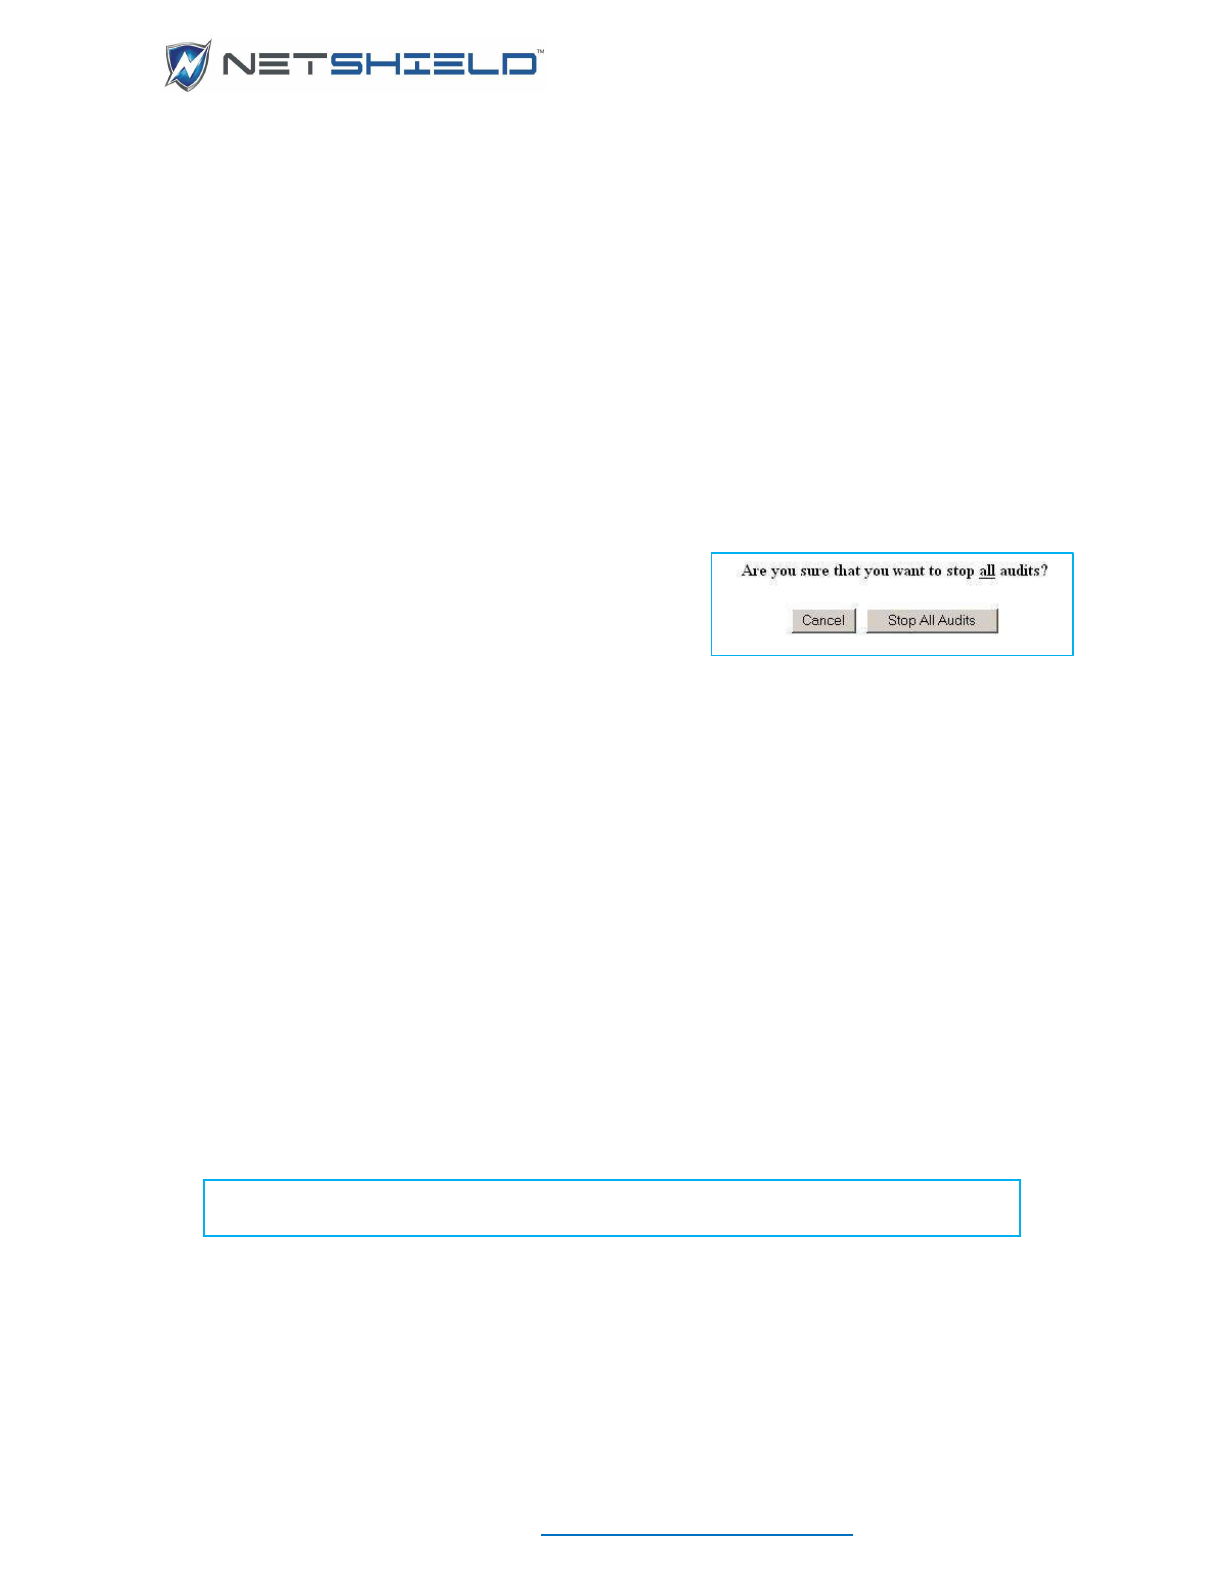
Stopping Audits In-Process
To terminate audits currently running:
• Select System
Utilities from the left menu.
(You can also halt an audit on the Manage Audits page by clicking the Stop button.)
• Click the Stop All Audits button.
You are asked to confirm or cancel the action.
Any audits currently in process do not complete. You
receive a warning saying in-process audits will stop and
must be restarted later.
Any reports already generated remain on the system. You may still view them by selecting
Reports
View Audit Results.
A halted audit does not run again until its next scheduled time. Halting all audits does not
change their Scheduled or Inactive status.
To restart an audit sooner than the next scheduled time:
• Select Audits
Manage Audits from the left menu.
• Select the audit to open it in the Audit Wizard. Click through Audit Wizard pages until you
reach the screen with audit frequency settings. Set the Frequency of Audit to Now.
• Click Next until you complete the Audit Wizard steps, and Save the audit. When the
Manage Audits page opens, click the Start button to begin the audit.
Factory Reset
To return SnoopWall NetSHIELD to the settings with which it was shipped, select System
Utilities from the left menu, and then click Factory Settings.
Important Note: Alerts should always be cleared from the command center
following a factory reset on the client appliance.
Just as with the console factory reset, you will be given the option of retaining the Company
Information, Notification Information, and the appliance name. All the asset information,
categories, audits, reports, etc. will be deleted.
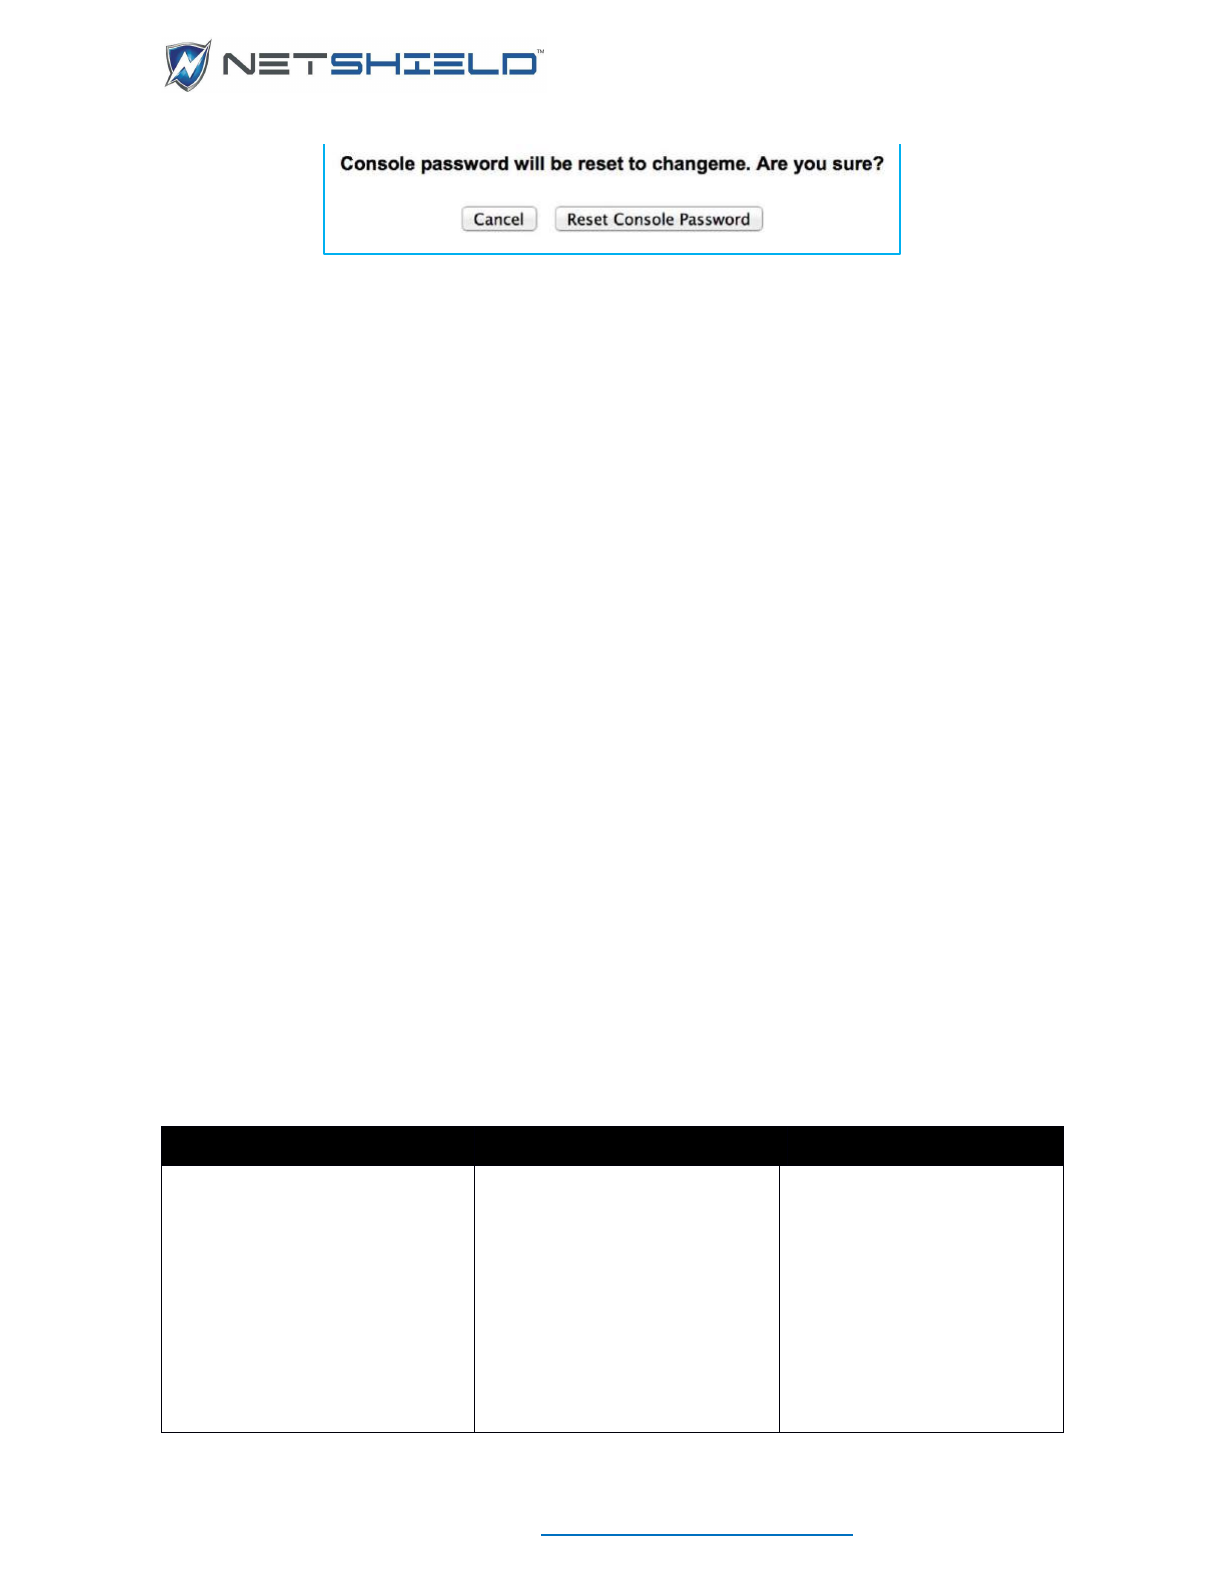
Reset Console Password
To reset the Console Password back to the original changeme, click the Reset Console
Password button on the System
Utilities page.
USER GUIDE
© NETSHIELD Corporation 2017 | https://www.netshieldcorp.com | 1-800-991-3971
Click Reset Console Password to confirm. Make sure you go immediately log in as
MainAccount and go to System
User Management to update the password.
Enable SSH
To Enable SSHreturn SnoopWall NetSHIELD to the settings with which it was shipped, select
System
Utilities from the left menu, and then click Factory Settings.
Any manager-level user may perform this action.
SETTING UP USER ACCOUNTS
Create SnoopWall NetSHIELD user accounts on three levels—Manager, IT Staff, and NAC
User—based on actions you wish the user to be allowed to take. The Main Account that comes
with SnoopWall NetSHIELD is a Manager. Only a Manager user can create other users. All
Manager accounts can create accounts for subordinate managers and IT staff, but the Main
Account can create the entire structure of users if desired. NAC Users have Network Access
Control functionality only – they can control setup and maintenance of SnoopWall NetSHIELD
and systems to be audited, but are not involved in vulnerability remediation.
Understanding Relationships between User Types
Any manager may reassign a job to another IT User or Manager. If a job is not assigned and
becomes escalated, all managers receive email about the job escalation.
IT Staff can view reports, but only Managers can create Executive/Manager reports or query the
database through Reports
Query Vulnerabilities.
A summary of the actions each user type can take is listed in the following table.
Manager
IT Staff
NAC User
All administrative tasks
Add more users
Access all levels of reporting
Set person-hour allocations
Reassign tasks
Access all information in
Workflow Management system
Managers can perform all IT
Staff functions.
Access Workflow to see open
tickets/jobs
Select jobs (assign to oneself)
Access vulnerability reports
Enter workflow comments on
assigned jobs
IT Staff can perform all NAC
User functions.
Access Network Access
Control menu only
Can perform NAC functions
only – cannot access
workflow
USER GUIDE
© NETSHIELD Corporation 2017 | https://www.netshieldcorp.com | 1-800-991-3971
NOTE: As Main Account, you should create all top-level managers first. You may
also create IT Staff accounts that work directly for you. You can delegate creation
of remaining accounts in SnoopWall NetSHIELD. Any manager creating
accounts should enter subordinate managers first, then IT staff users.
The Main Account is the only user who can change his/her own login ID. For all other users, the
parent Manager must make that change. The currently logged in user can change his/her
account, with the following restrictions:
A user may not change their own:
• Access level (from Manager to IT Staff or vice versa)
• Manager
• Login ID, unless you are Main Account
Creating or Editing User Accounts
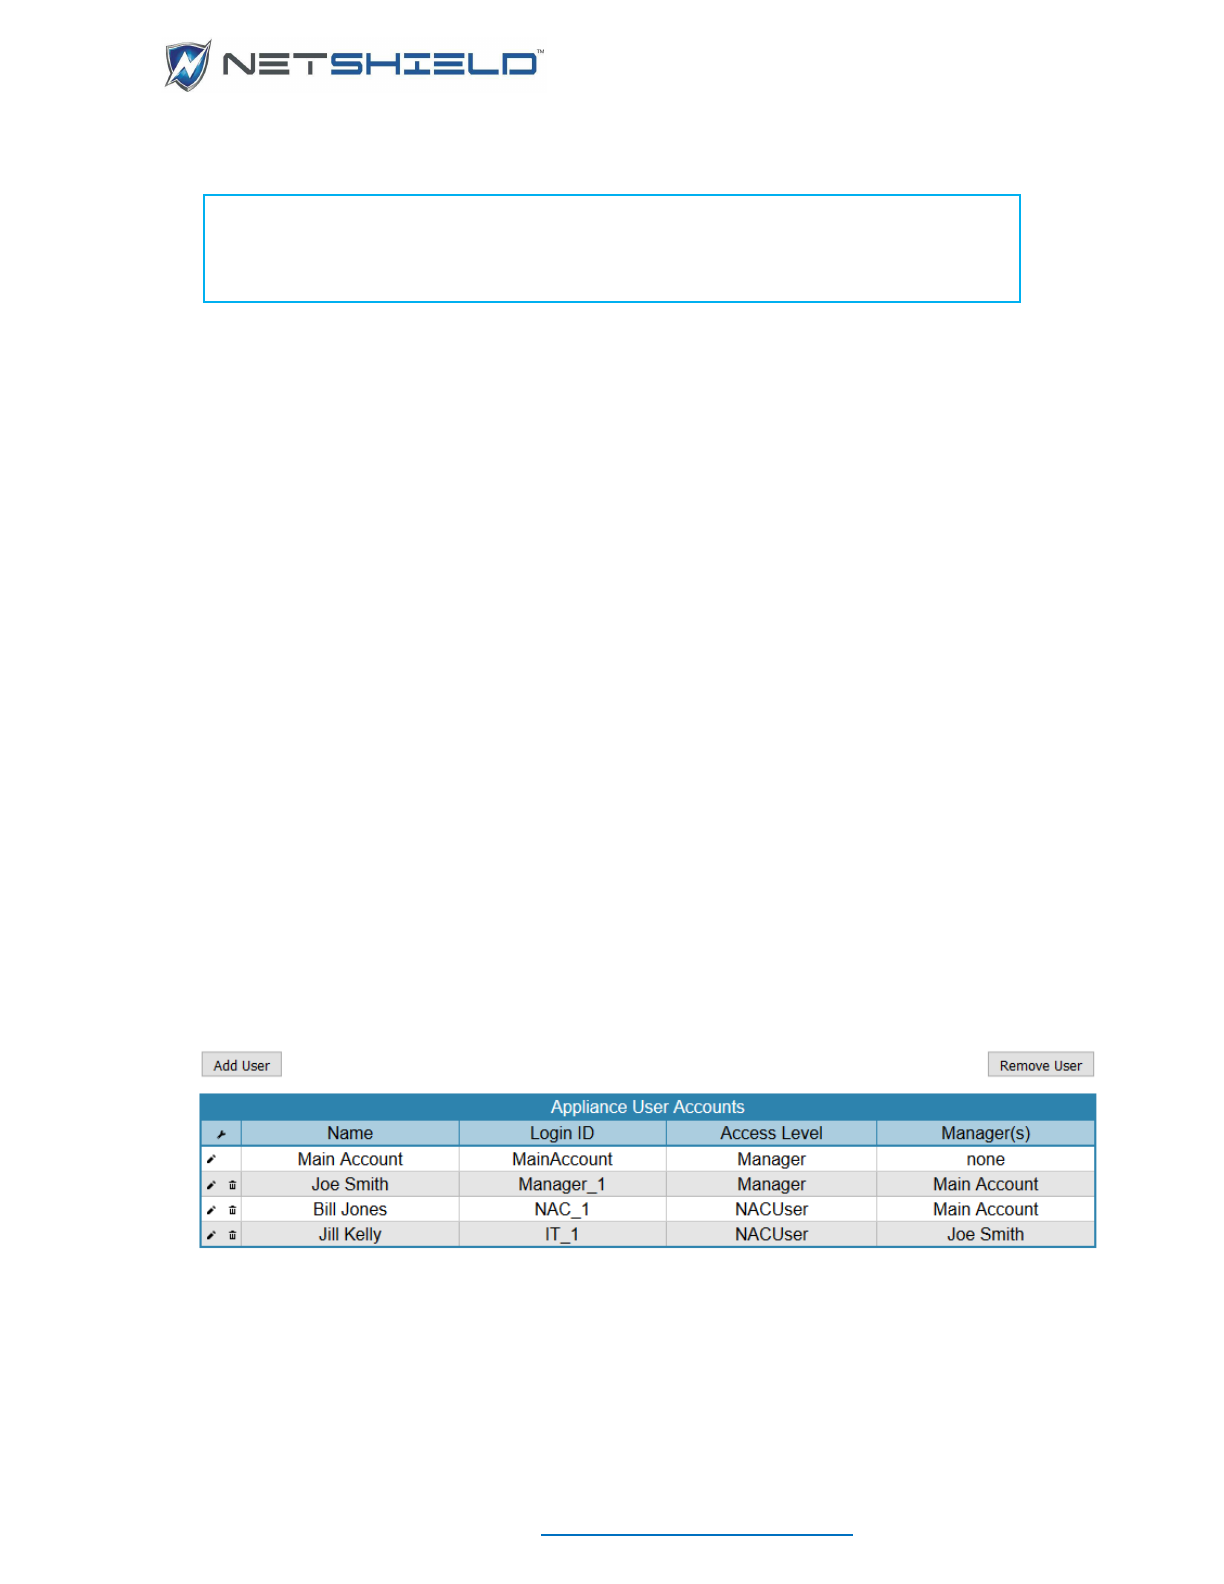
To create or modify user accounts:
• Select System
User Management from the left menu. A list of existing users appears
(initially, only Main Account is shown).
• Click the name of the user to edit, or click Add User button to go to the User Account
Wizard.
USER GUIDE
© NETSHIELD Corporation 2017 | https://www.netshieldcorp.com | 1-800-991-3971
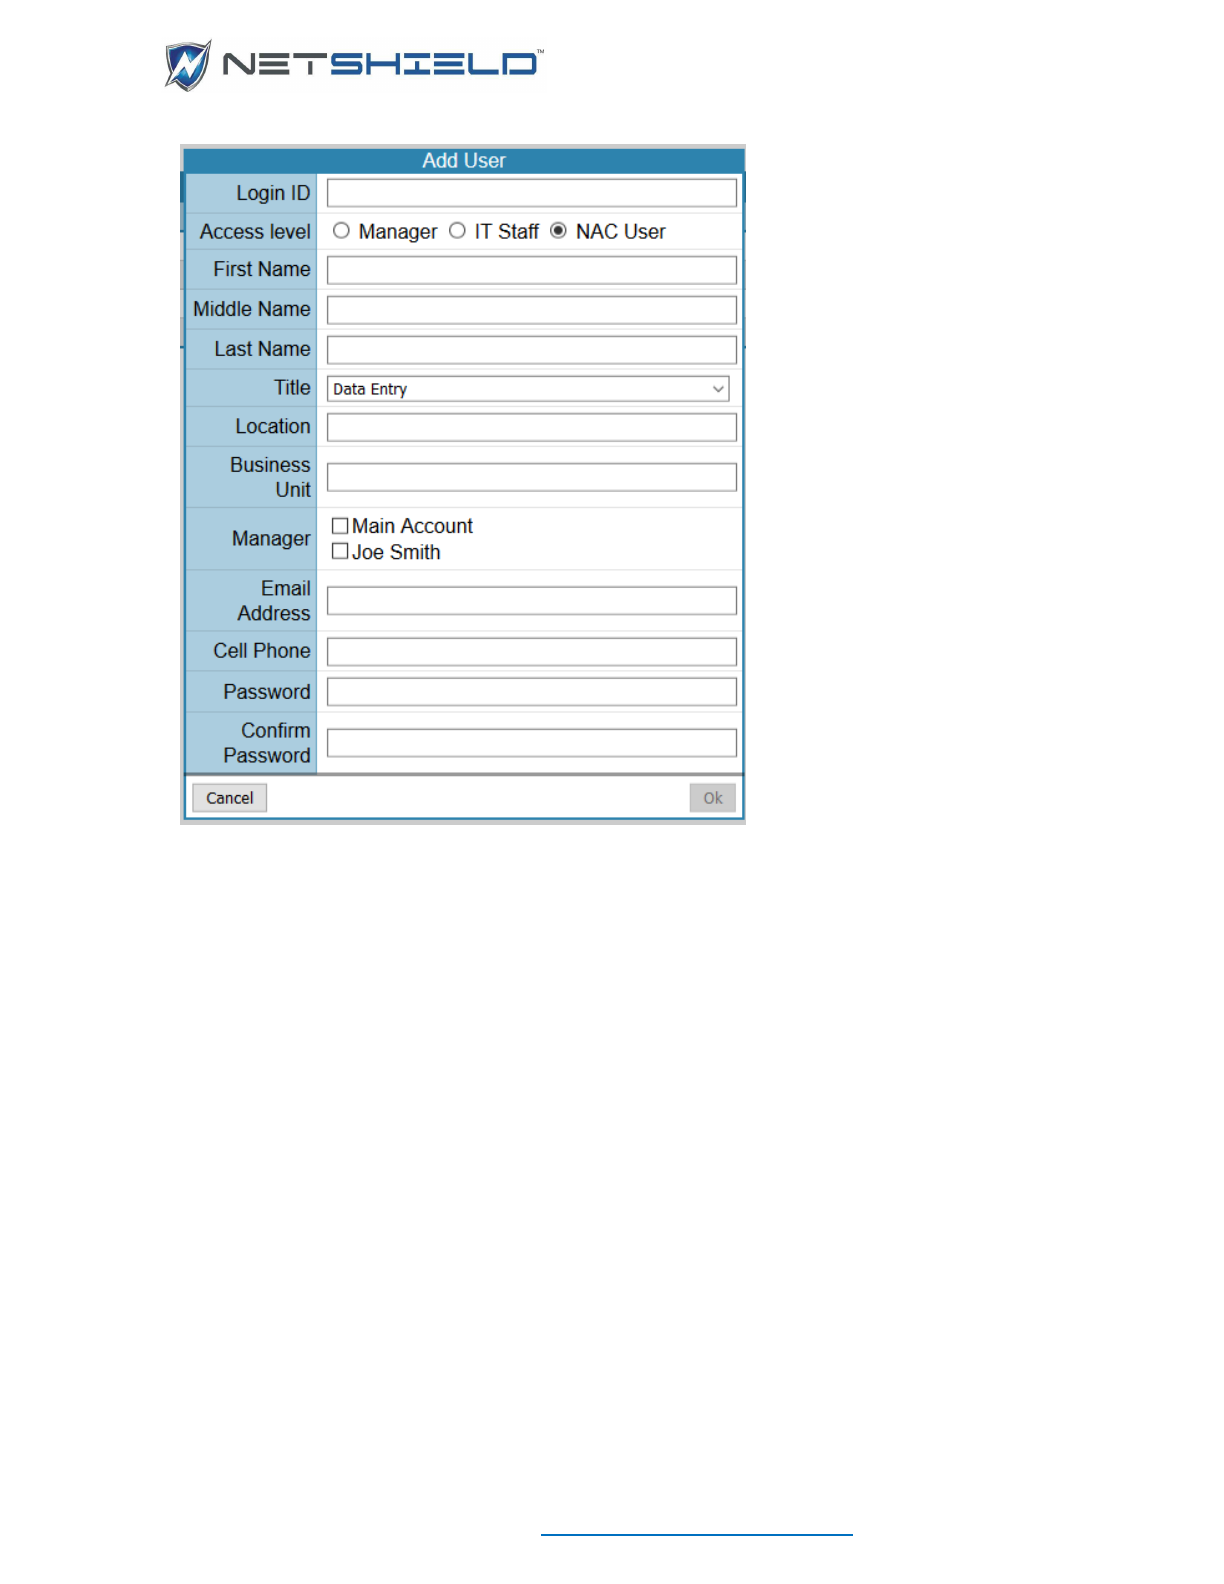
• SnoopWall Appliance Account User Name screen appears. (We suggest you add
Managers first.)
• Click the Select Existing User button to select a person already in the Asset Tracker
database, or fill in the requested name fields.
• Click Next to continue to the Appliance Access Level screen.
NetSHIELD Access Level
Enter Managers first, then IT Staff users, and finally NAC Users.

USER GUIDE
© NETSHIELD Corporation 2017 | https://www.netshieldcorp.com | 1-800-991-3971
• Enter requested information for Login ID, Access Level, First Name, Last Name, Select
Title from the dropdown list, Manager, Email Address and Password with confirmation.
Deleting User Accounts
When users leave your organization, it is recommended you remove their access to
NetSHIELD.
• Select System
User Management from the left menu. A list of existing users.
• Click the trash icon next to the user name and the row will highlight in pink.
• Click the Remove User button
Coordinating User Accounts with Asset Tracker User List
When you create a SnoopWall NetSHIELD account for a user who is already in the Asset
Tracker User List, NetSHIELD recognizes the user name and coordinates the information.
If you delete a user from the Asset Tracker User List, their NetSHIELD user account is also
deleted.
However, if you delete a user account under User Management, the user remains in the Asset
Tracker User List. Theoretically, the person could still be an employee but no longer have
access to NetSHIELD.
USER GUIDE
© NETSHIELD Corporation 2017 | https://www.netshieldcorp.com | 1-800-991-3971
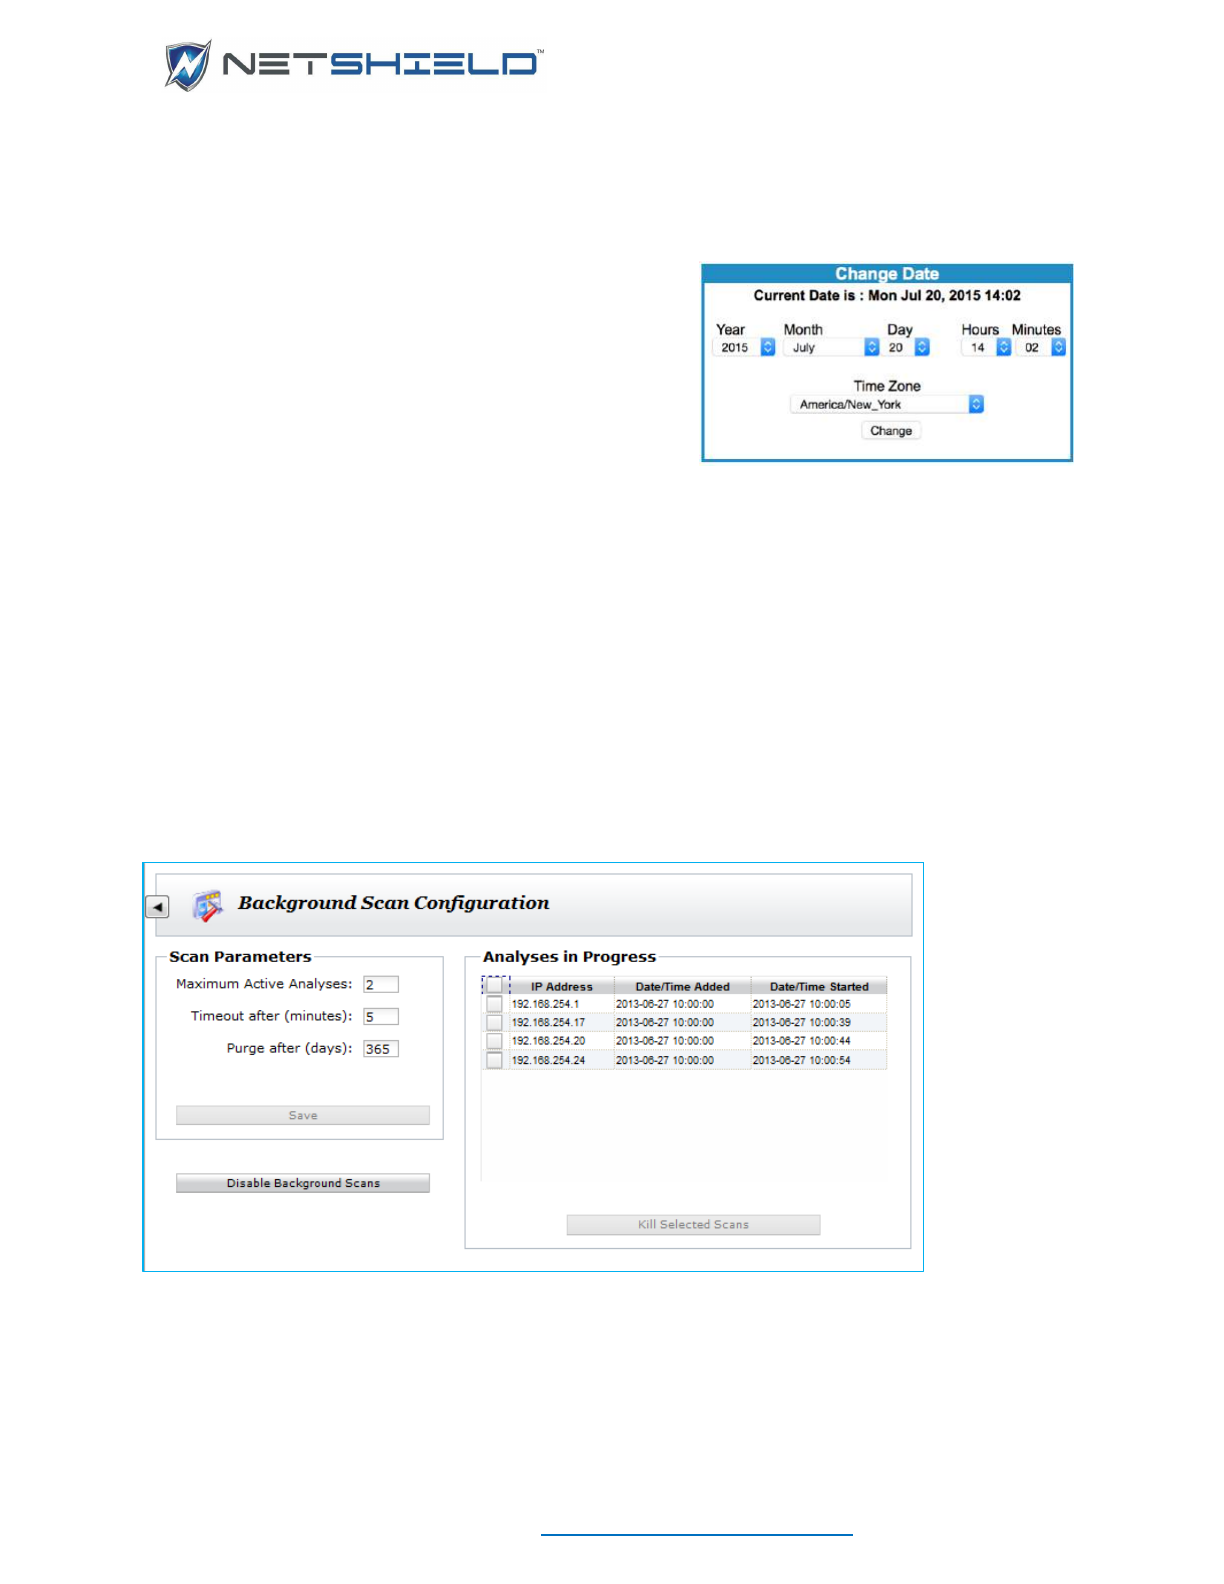
SETTING SYSTEM DATE/TIME
• Set the date and time the first time you log in to
SnoopWall NetSHIELD.
• Click System
Date and Time to set the date and
time on your initial NetSHIELD use.
• The Change Date screen appears.
• Enter the system date and time information. Click the Change button to put the new date
and time into effect. Daylight savings time changes occur automatically.
• Click Save.
BACKGROUND SCANS
To run a daily analysis of the asset inventory in the background to detect changes in the asset
list click System
Background Scans.
Enable background scans by clicking the button on the lower left. The button toggles to Disable
Background Scans. Scans of all assets are queued and scanning begins at 10:00AM using the
parameters indicated. When background scanning is disabled, any active scans are
immediately terminated.
At the upper right are the 3 parameters that control background scanning. Maximum Active
Analyses is the number of scans that can be running simultaneously. It has a range of 1-10.
USER GUIDE
© NETSHIELD Corporation 2017 | https://www.netshieldcorp.com | 1-800-991-3971
Timeout indicates the amount of time a scan will be allowed to run before it is forced to
terminate. Its range is 1-10 minutes. Purge indicates how long the scan results will be kept in
the database. Scan results may be kept for a maximum of 365 days. To view the scan results,
go into the Asset Manager and use the mouse button menu for specific assets.
On the right is the list of active scans. You can force active scans to terminate by selecting one
or more from the list and clicking the Kill Selected Scans button.
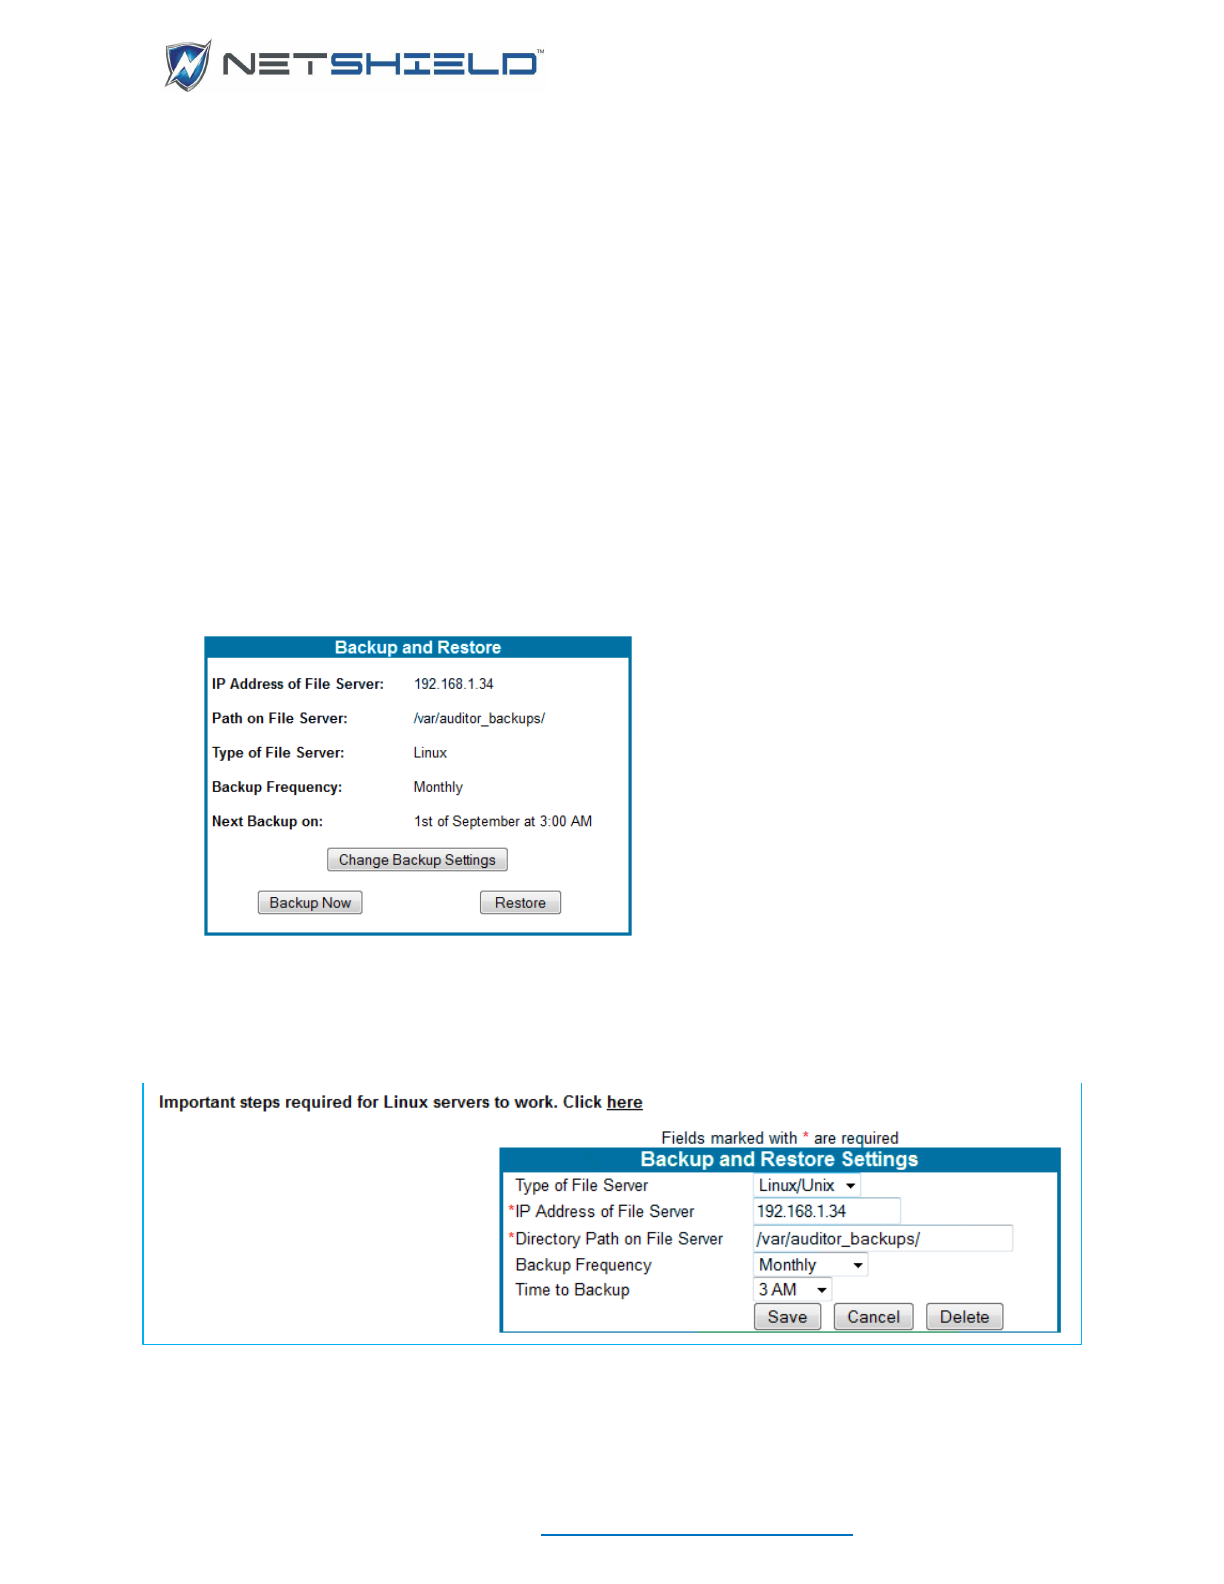
BACKUP AND RESTORE
You will want to back up and restore your SnoopWall NetSHIELD information regularly.
SnoopWall NetSHIELD performs this function for you and sends it to the server of your choice
on a periodic basis.
• Select System
Backup and Restore from the left menu. Your settings, if any, are
displayed on the Backup and Restore page.
• Click the Change Backup Settings button to enter or revise your backup information. The
Backup and Restore Settings page appears.
Select the Type of File Server from the pull down. You have two choices: Windows or
Linux/Unix servers.
USER GUIDE
© NETSHIELD Corporation 2017 | https://www.netshieldcorp.com | 1-800-991-3971
• Fill in the requested technical information for your server.
Windows systems require a username and password for access. As soon as you select
Windows, the form will change
to include these fields.
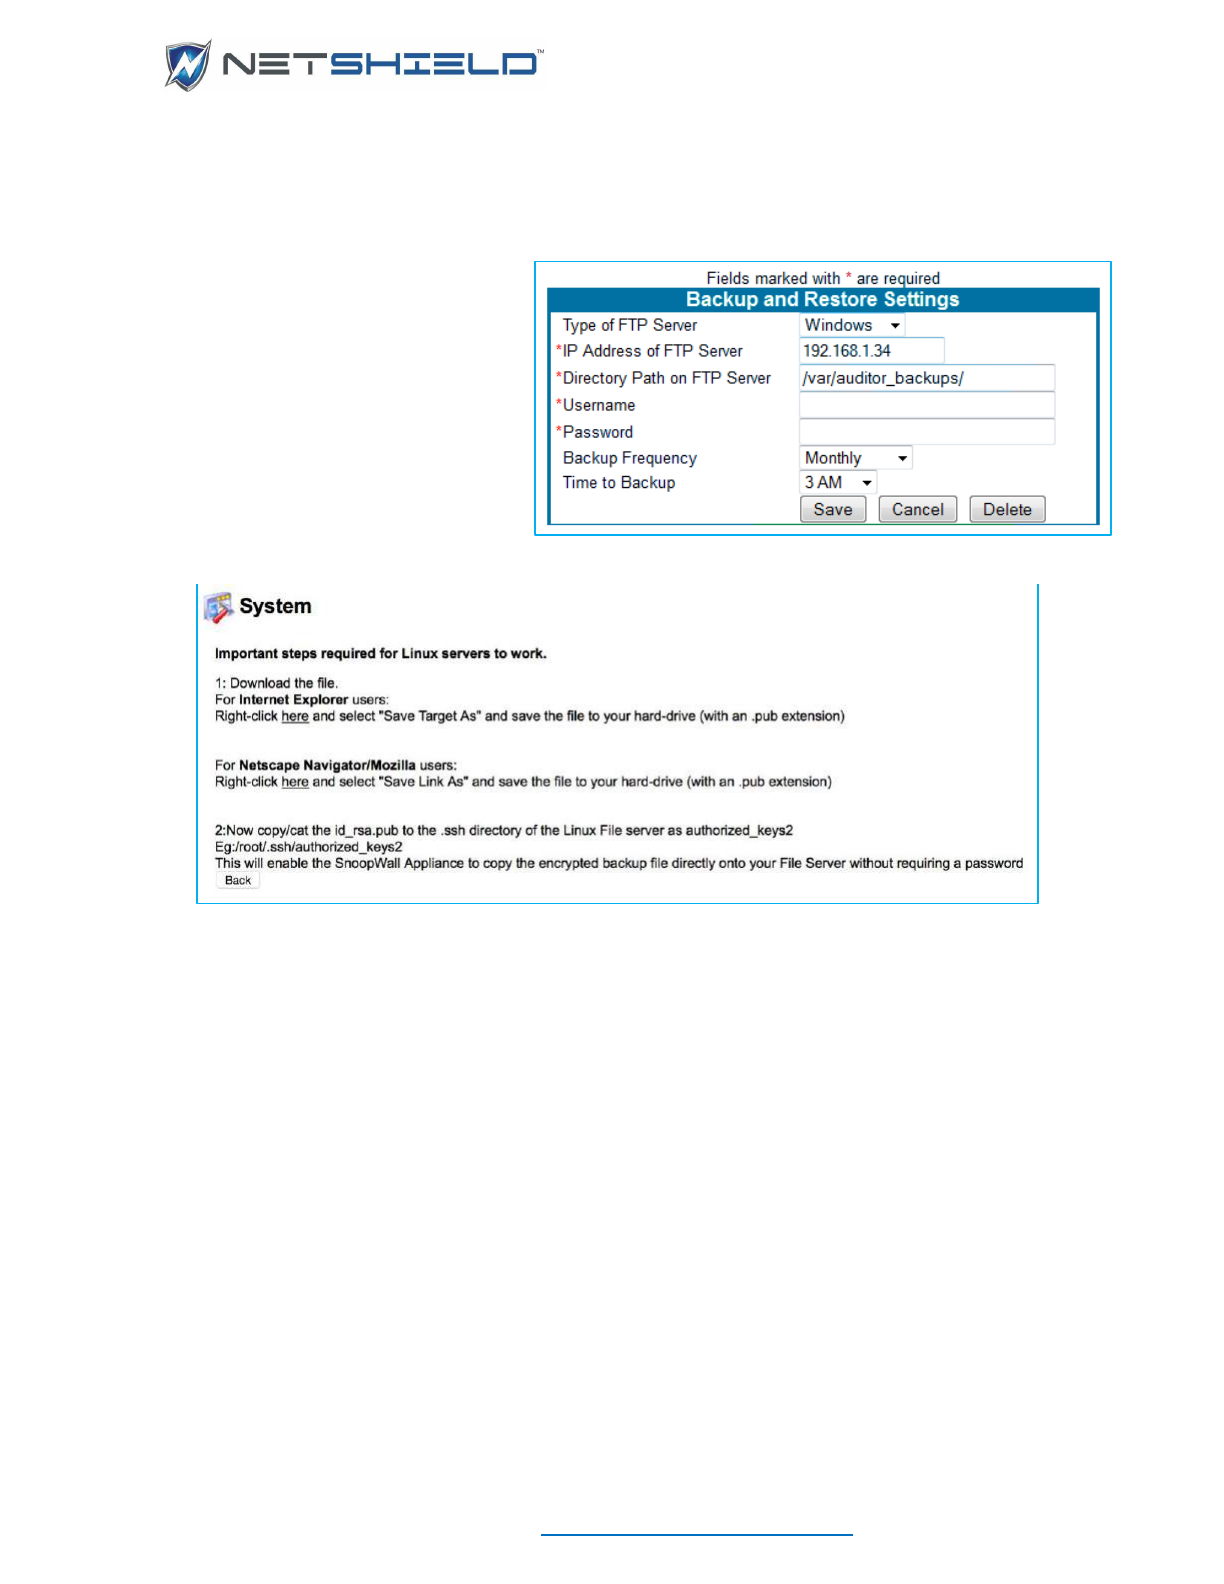
Linux/Unix servers need a
certificate to allow interaction
with the Linux server.
• Click the link at the top of the
page (Important steps required
for Linux servers to work), if
necessary. This takes you to the
Linux Certificate Instruction
page.
• Review the instructions and make the appropriate changes on your system.
• Click the Back button.
• Select a frequency and time for backup in the Backup and Restore Settings box. You can
schedule the backup to run Never, Monthly, Quarterly, Half Yearly, or Yearly, at a specific
time of day.
• Click Save to retain your settings or Cancel to delete the information. You return to the
Backup and Restore page.
Backup Now
SnoopWall NetSHIELD creates a compressed backup file of Reports and Workflow, Audit
Configurations, Asset Tracking Data, NetSHIELD Settings, and NetSHIELD Log(s) when you
backup. The Backup Now feature provides on-demand backups.
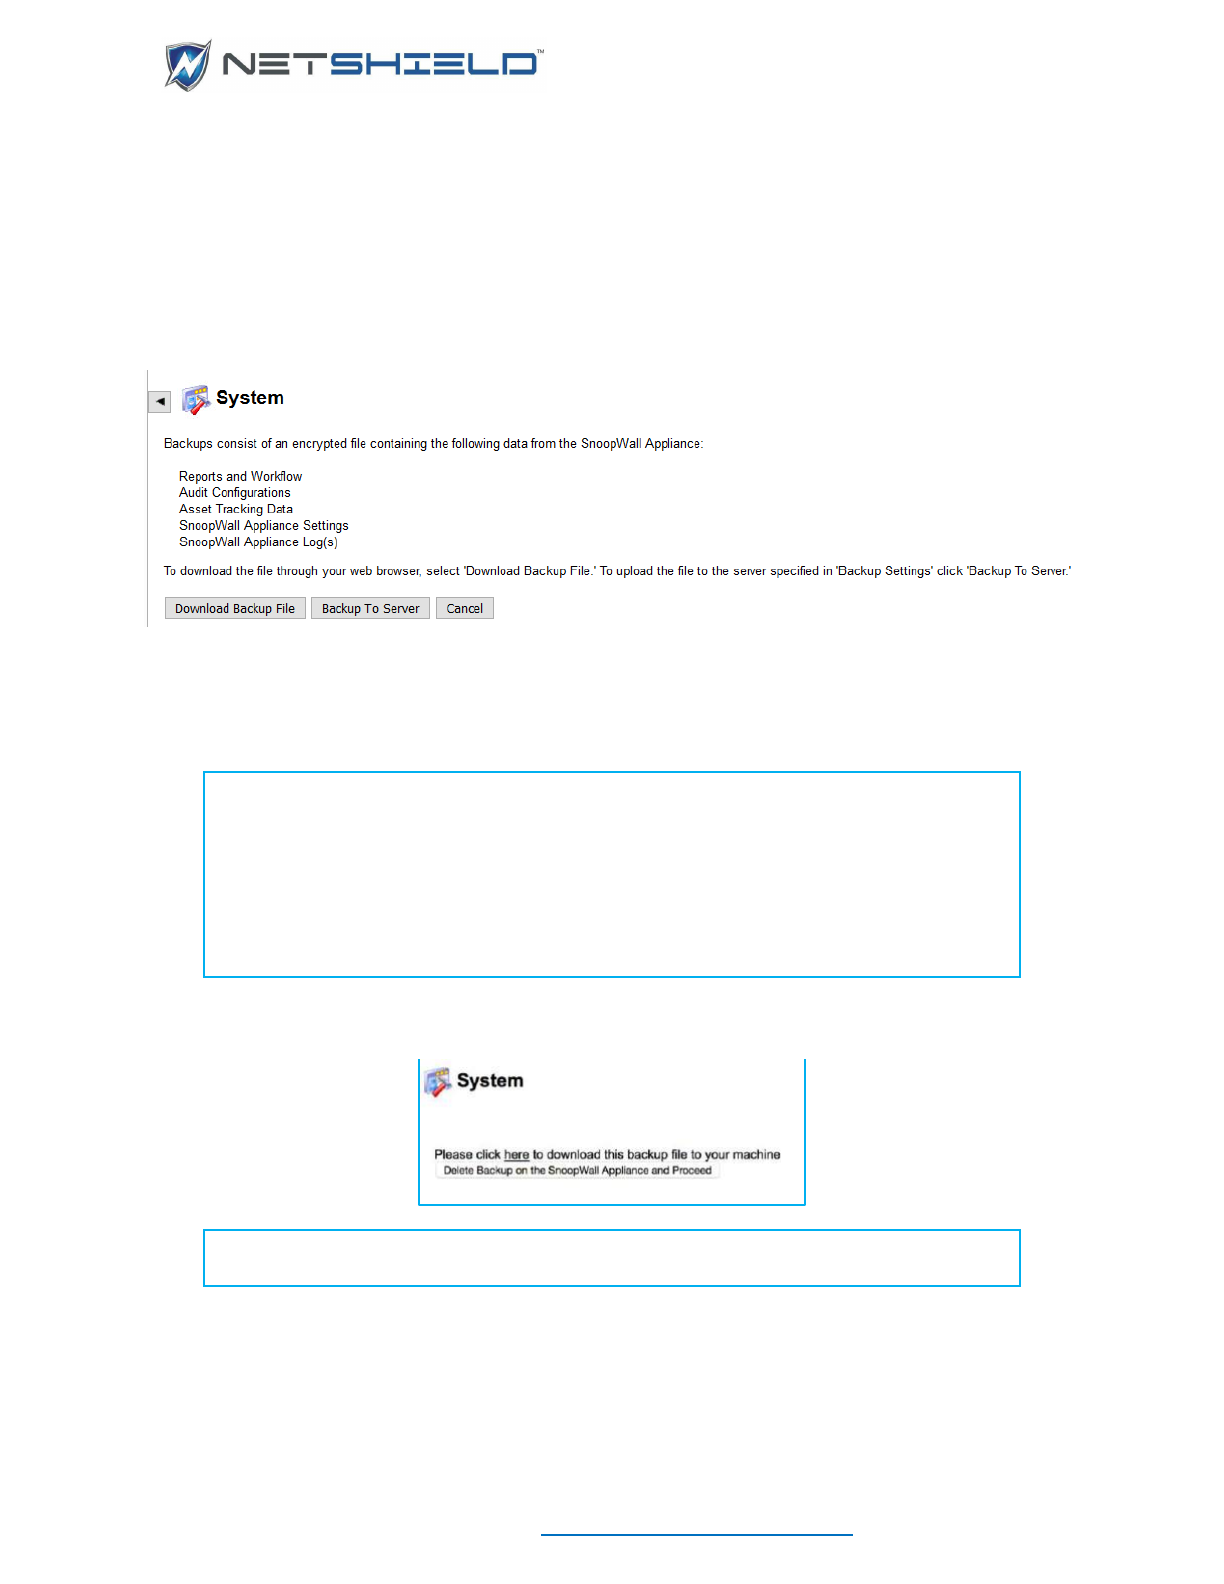
USER GUIDE
© NETSHIELD Corporation 2017 | https://www.netshieldcorp.com | 1-800-991-3971
• Click Backup Now on the Backup and Restore page to start the backup process. This
takes you to the System Backup page (shown below). You can proceed with the backup
or cancel the operation at this point.
• Click Backup Now to continue to the next screen.
• Click the link in the message displayed to identify a destination for the backup file used for
archival storage. This file may be used to restore SnoopWall NetSHIELD appliance (or a
replacement appliance) to the state at which the backup file was created.
NOTE: You cannot open the backup file. You can only save it to your local
machine.
NOTE: Do not change the name of the backup file. Otherwise, it will be
unrecognizable to SnoopWall NetSHIELD if you need to access it later.
NOTE: When you back up this file, remember the Login ID/passwords you use.
You will need them if you must back up again later.
• Click Delete Backup on SnoopWall Appliance and Proceed once the download completes.
NOTE: We suggest you delete the backup file from SnoopWall NetSHIELD to
save valuable space.
Restore
Restore allows you to select a backup file and re-establish SnoopWall NetSHIELD appliance
settings to their state at the time the backup was created.
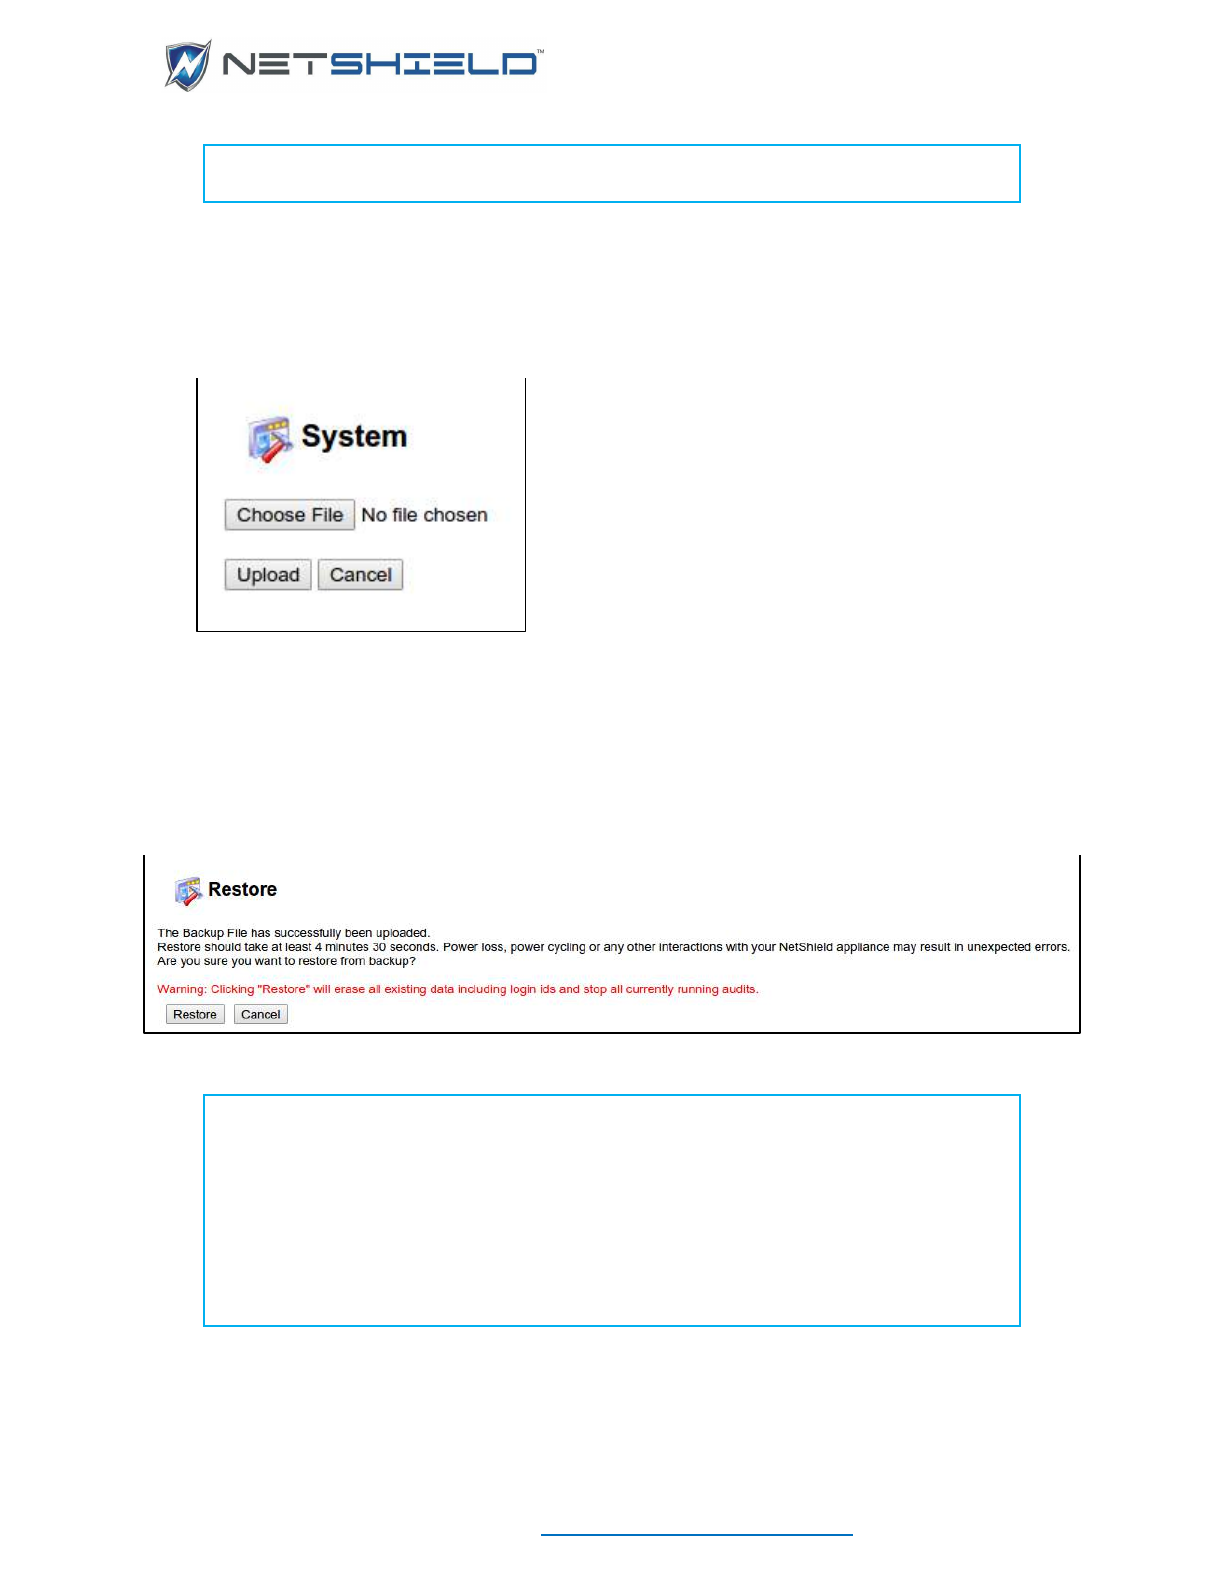
USER GUIDE
© NETSHIELD Corporation 2017 | https://www.netshieldcorp.com | 1-800-991-3971
NOTE: The version and patch state of SnoopWall NetSHIELD is not restored.
Only the data and configuration information reverts to the former state.
• Select System
Backup and Restore from the left menu. This takes you to the Backup
and Restore page.
• Click the Restore button. This takes you to the following screen.
• Select the file from your system using the Browse button.
• Click Upload File Now. This takes you to the following screen.
NOTE: When you upload the new file, remember this process will stop all
currently running audits.
NOTE: Be sure you keep track of all your Login IDs and passwords – new and
old. Once this file is restored, all other versions are gone.
NOTE: Don’t forget – if you must restore this file from an older version, you will
lose your most recent data. You might want to back up the current state before
returning to the previous state.
USER GUIDE
© NETSHIELD Corporation 2017 | https://www.netshieldcorp.com | 1-800-991-3971
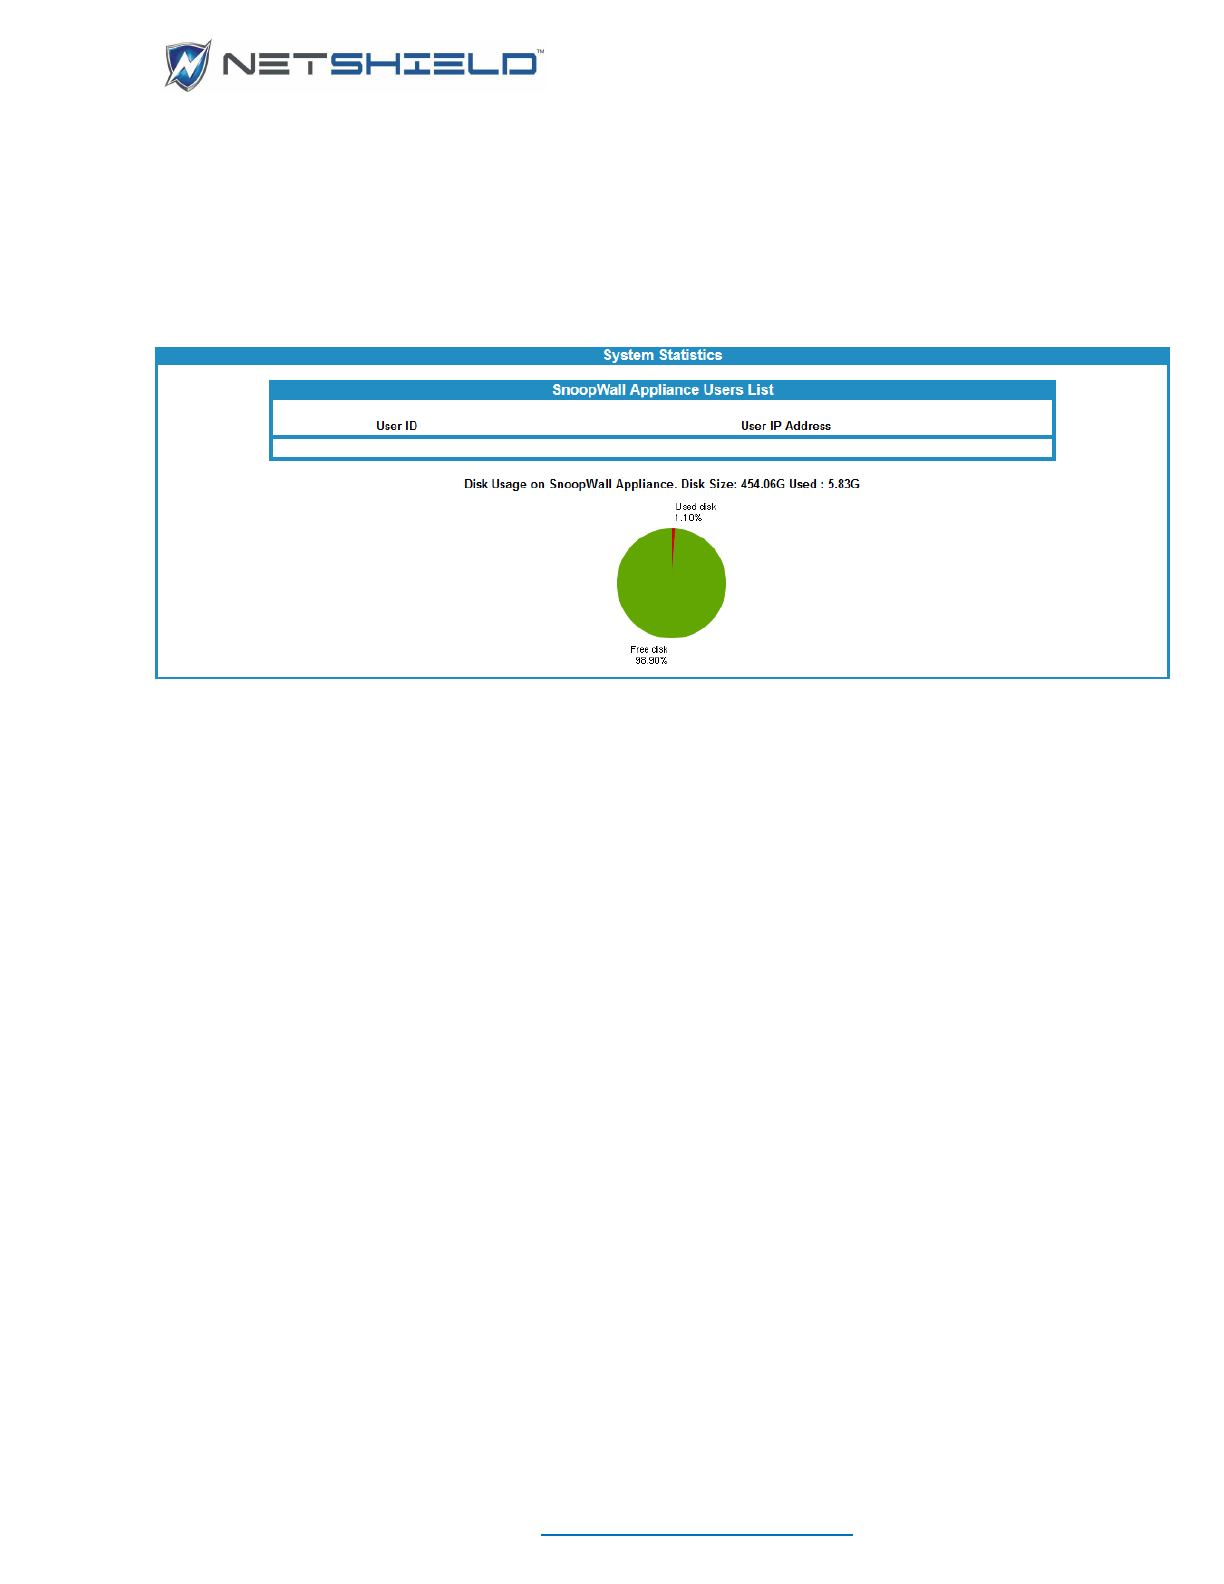
SYSTEM STATISTICS
Check SnoopWall NetSHIELD System Statistics page if you’d like to know how much space is
left on your system.
• Select System
System Statistics from the left menu.
The System Statistics page displays a pie chart indicating the amount of hard disk space left on
the system after SnoopWall NetSHIELD uses what it needs.
Users currently logged into the system are shown for each IP address.
All users have access to the statistics for their system(s), but only MainAccount can see all
systems in use.
When the disk space usage is deemed critical (75%), SnoopWall NetSHIELD displays a
scrolling warning at the bottom of the page.
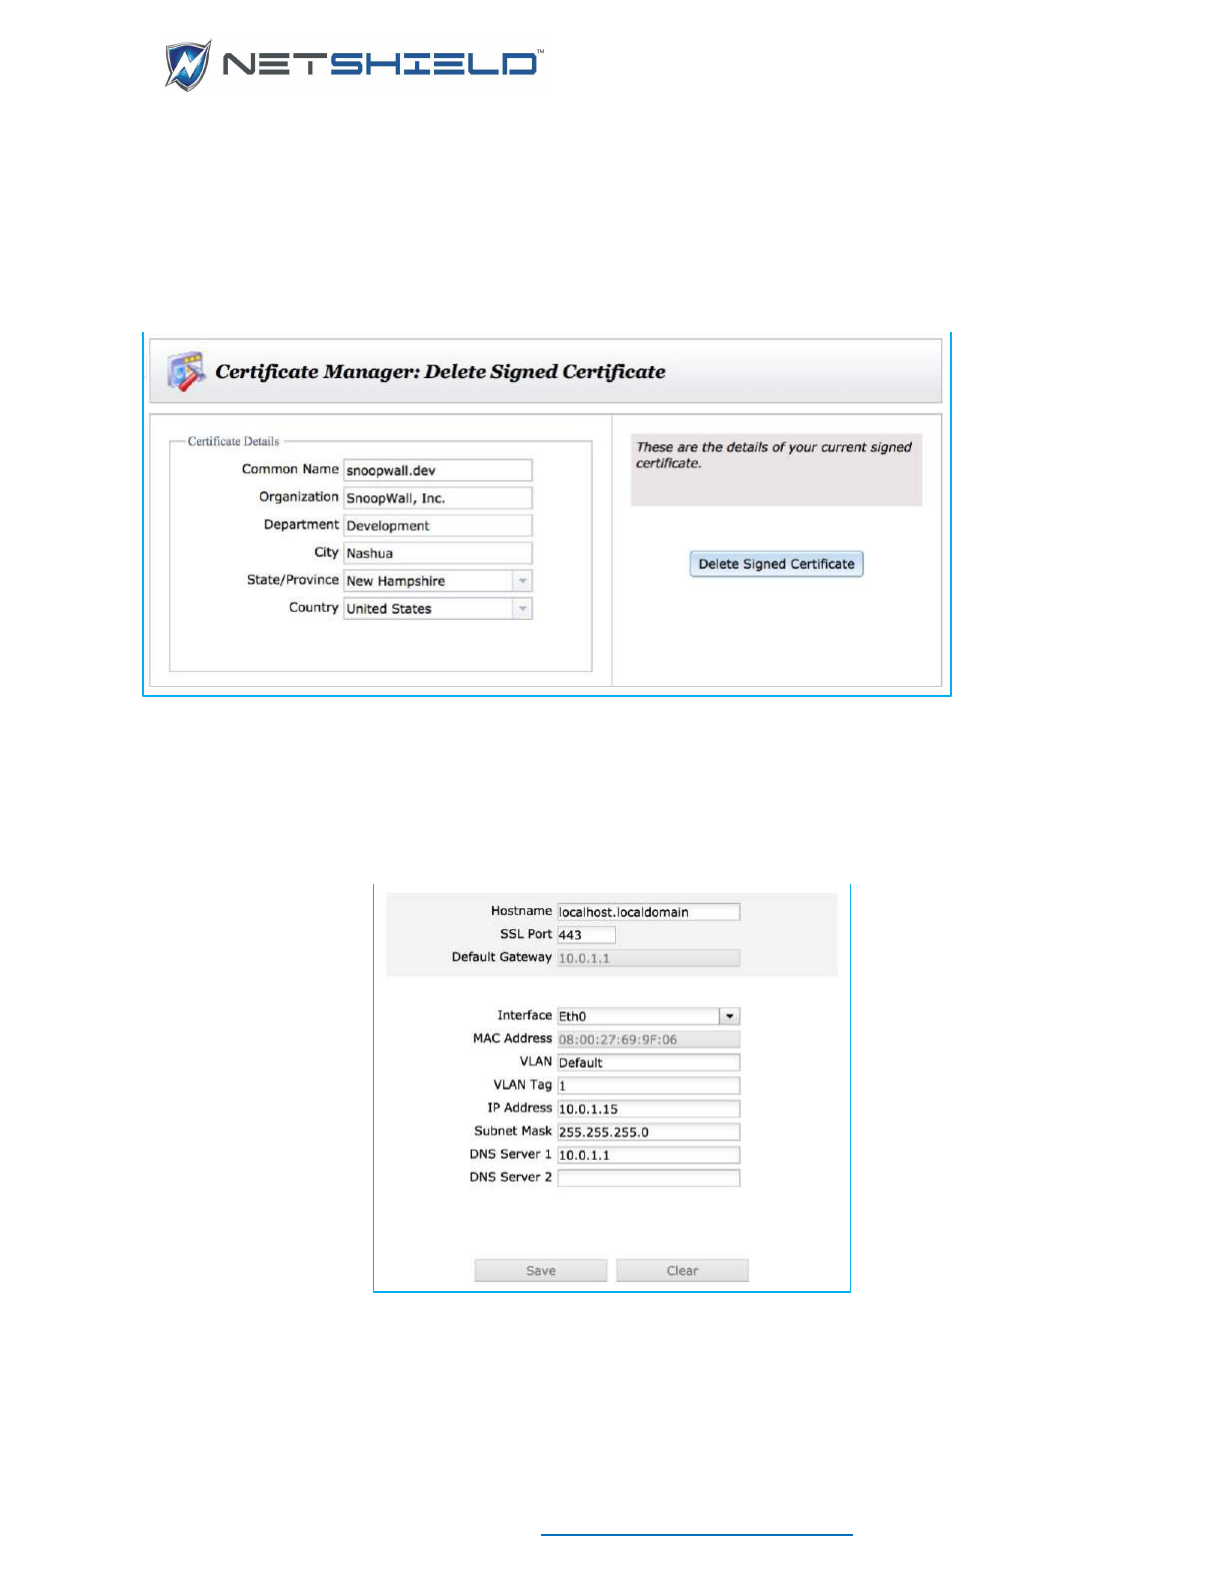
MANAGE SERVER CERTIFICATE
The Certificate Manager located under the System menu, enables you create a Certificate
Signing Request, and then install the signed certificate on your appliance. Certificate Signing
Requests and the certificates themselves can also be deleted with this utility.
Launch the Certificate Manager. The form is auto-filled with any data available from Company
Information, but you can edit it without affecting the stored Company Information.

USER GUIDE
© NETSHIELD Corporation 2017 | https://www.netshieldcorp.com | 1-800-991-3971
Click the Generate button to create the CSR. You can copy and paste it, or download a file
containing it for submission the trusted Certificate Authority of your choice.
Once you receive your certificate, launch the Certificate Manager again. This time, the screen
will enable you to upload the certificate, or delete the CSR you previously created.
USER GUIDE
© NETSHIELD Corporation 2017 | https://www.netshieldcorp.com | 1-800-991-3971
Browse to the certificate file received from the Signing Authority and click upload. This will
upload the file to the server and install it.
If instead, you delete the Certificate Signing Request, you will return to the CSR entry form.
After installing a signed certificate, the Certificate Manager provides a delete button in the rare
case where you might want to delete the signed certificate and revert to a default, self-signed
certificate.
NETWORK CONFIGURATION
The network configuration information you enter controls how SnoopWall NetSHIELD accesses
the network.
To set up your configuration:
• Select Network Configuration
Network Configuration from the left menu. The
Network Configuration screen appears. This application automatically turns off DHCP for
the appliance. If you want the appliance to acquire its IP Address dynamically you must set

USER GUIDE
© NETSHIELD Corporation 2017 | https://www.netshieldcorp.com | 1-800-991-3971
that option on the console. SnoopWall strongly recommends a static IP address for the
appliance.
• The default gateway is display-only, but may be changed on the console if necessary.
• Enter additional or new information if required and click Save to retain the settings.
• With the exception of Eth0, it is possible to clear NICs. When another NIC such as Eth1 is
selected, the button on the right is enabled and its text changes to specify the current NIC.
NOTE: For DHCP Environments, the IP Address, Subnet Mask, and Default
Gateway, and DNS Server settings were assigned automatically during your
installation. You cannot change these values here. Host Name and SSL Port may
be edited.
NOTE: SSL Port is typically 443. This is the default for https. If you use a different
value, your URL will be slightly different.
MULTIPLE NETWORK INTERFACE CARD (NIC) SUPPORT
SnoopWall NetSHIELD supports multiple NICs for the purposes of both auditing and network
access control. The NICs can be configured for completely separate VLANs or subnets,
allowing NetSHIELD to monitor physically disconnected segments.
Most NetSHIELD operations will choose the appropriate NIC for the operation in the
background.
There are some areas where a NIC must be specified.
Important Note: While NetSHIELD supports multiple NICs, these NICs cannot be
configured to reside on the same subnet or VLAN.
USER GUIDE
© NETSHIELD Corporation 2017 | https://www.netshieldcorp.com | 1-800-991-3971
Configuring NICs
• Select Network Configuration
Network Configuration from the left.
• Select the appropriate NIC by selecting the interface from the pull-down menu.
• Enter the configuration information for the NIC and click Save. Ensure that the IP ranges
you enter do not intersect.
SETTING UP NETWORK ACCESS CONTROL
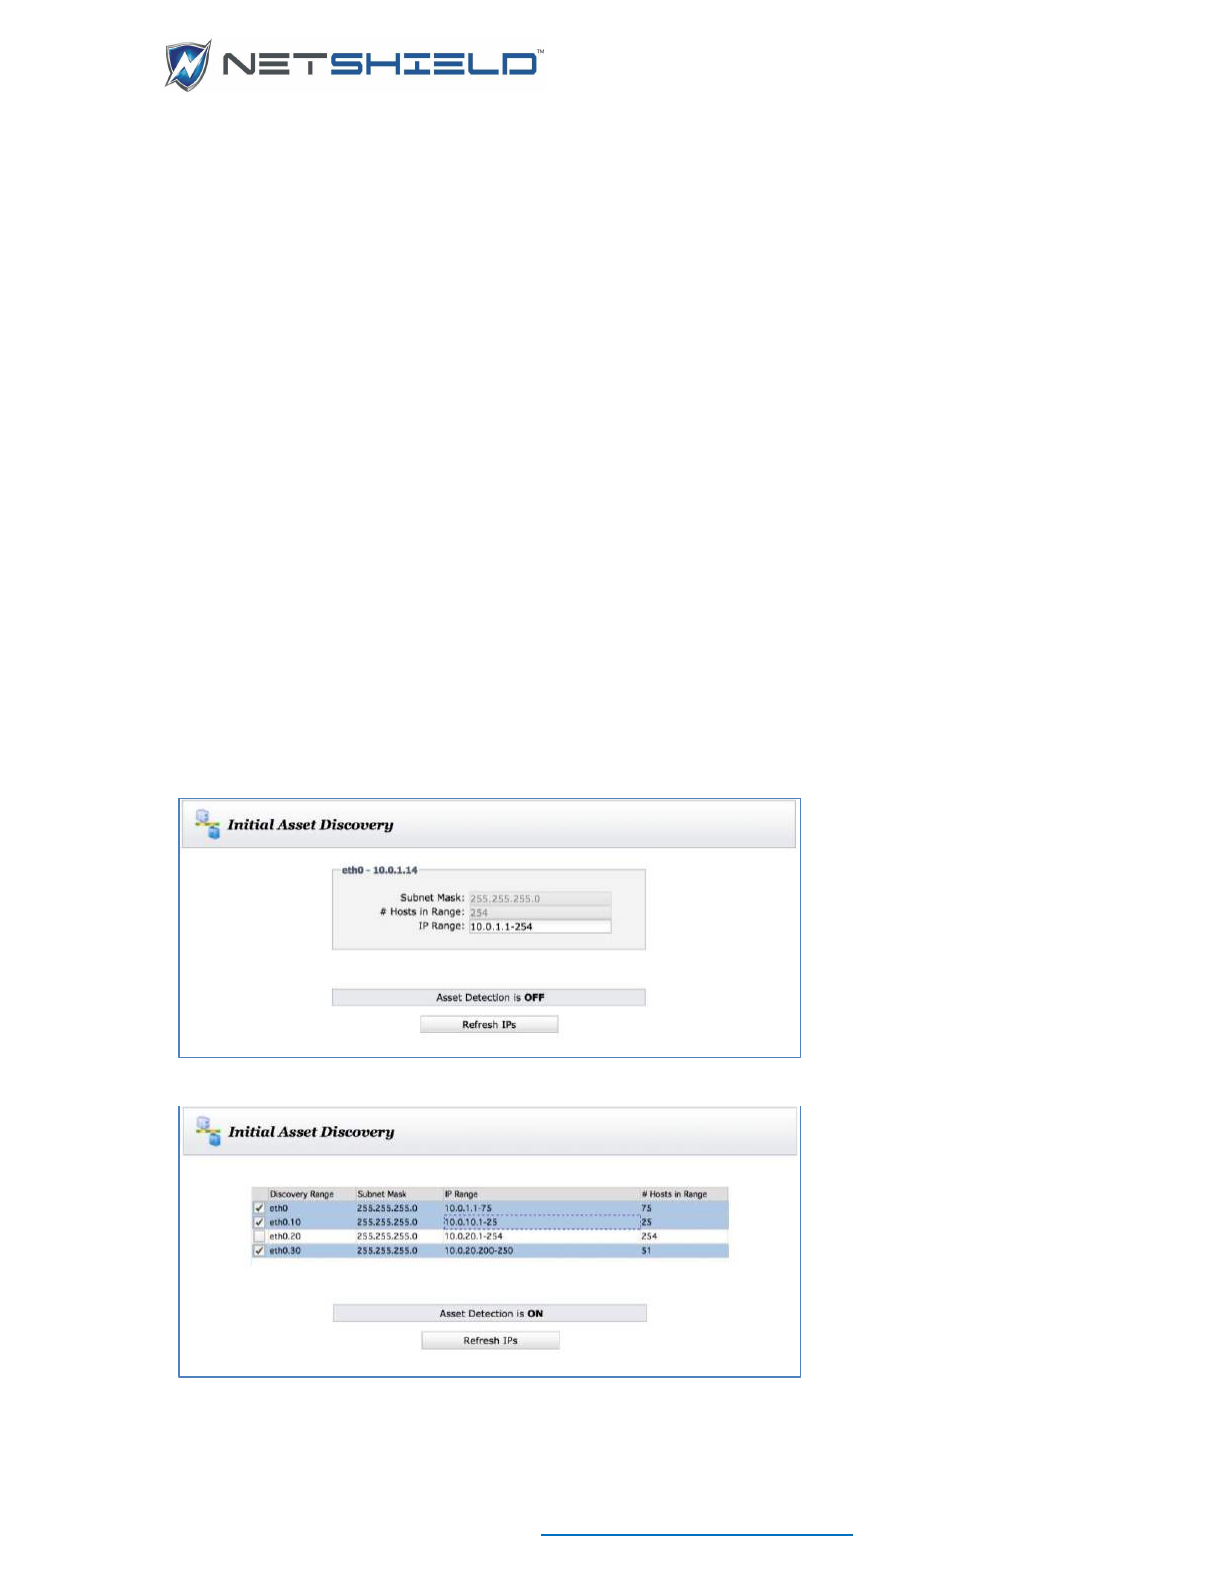
INITIAL ASSET DISCOVERY
Before NetSHIELD can check your assets, it must first find them on your network. To ensure
NetSHIELD finds all assets, be sure all assets are powered on before you initiate the discovery
process.
• Select NAC Configuration
Initial Asset Discovery from the left menu. This reveals one
of two dialogs, depending on your network configuration. This one for a single NIC:
Or this one for multiple NICs or VLANs:
USER GUIDE
© NETSHIELD Corporation 2017 | https://www.netshieldcorp.com | 1-800-991-3971
• The only entries that can be changed are the IP Ranges. Any octet in the IP range may be
changed as long as it doesn’t conflict with the subnet mask. Subnet masks are set in
Network Configuration and VLAN Tag Configuration. Subnets may be excluded from
discovery by unchecking them.
• Click the Refresh IPs button below the Find Network Assets box.
• If asset detection is turned on, a confirmation box will appear warning that asset detection
will be turned off and asking if you want to continue.
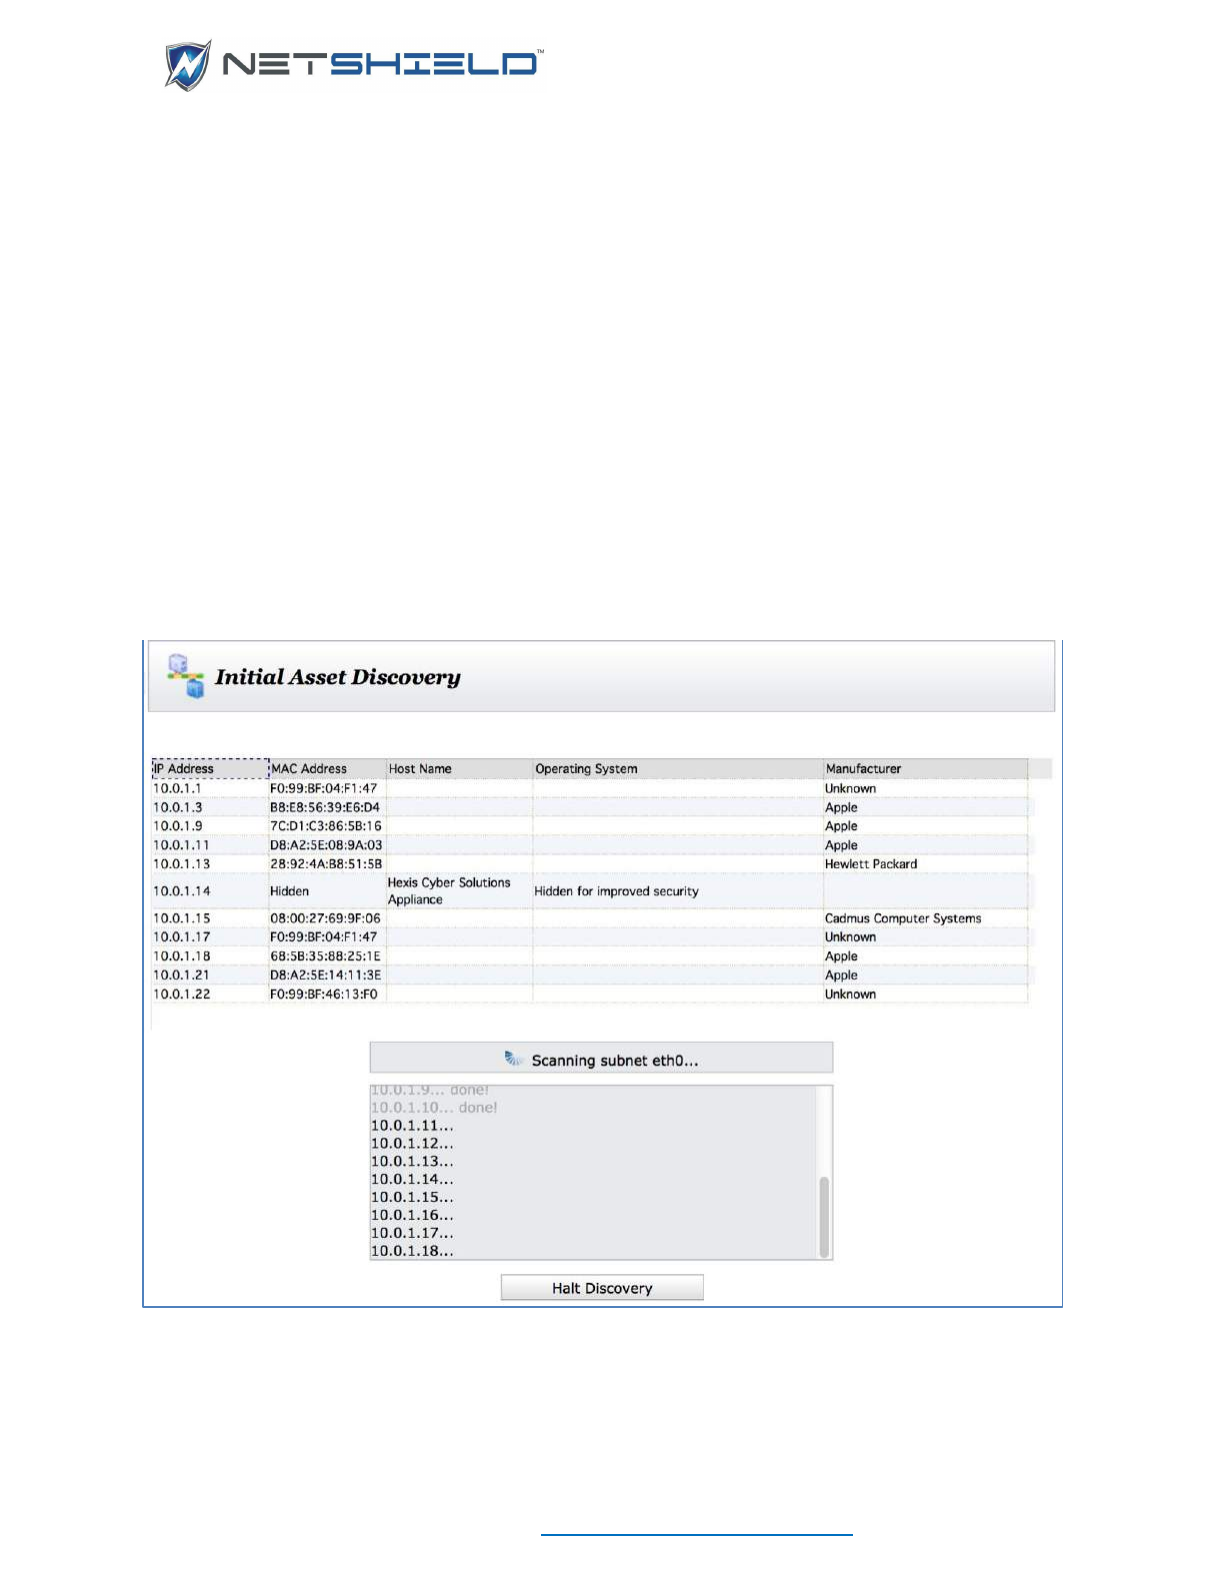
Refresh IPs directs SnoopWall NetSHIELD to examine the network and discover IP addresses
of machines on the network, including routers, firewalls, printers, and other devices as well as
desktops, workstations, and servers. Later, you can include these systems in audits.
After several seconds, the discovered assets begin appearing in a grid. Below that is the status
of the discovery as IP addresses are probed.
You can wait for the refresh to complete or you can stop it in process by clicking the Halt
Discovery button at any time. You are given the option of saving any assets discovered so far.
After the discovery process completes, or when you save a partial discovery, NetSHIELD takes
you to the Manage Assets page. You can review your asset list there.
USER GUIDE
© NETSHIELD Corporation 2017 | https://www.netshieldcorp.com | 1-800-991-3971
HOW SNOOPWALL NETSHIELD GENERATES THE LIST OF IP ADDRESSES
By default, if the discovery process finds any IPs that duplicate existing ones, the latest
hostname and operating system overwrite the old ones.
NOTE: On some systems, the operating system IP Refresh finds may not be the
one you entered when you added the IP address manually.
NOTE: Any IP address behind a Firewall could remain hidden from the IP
Refresh operation and may not appear in the list. You should add any unfound
addresses manually if you want them audited, or disable the Firewall and run the
Asset Discovery again.
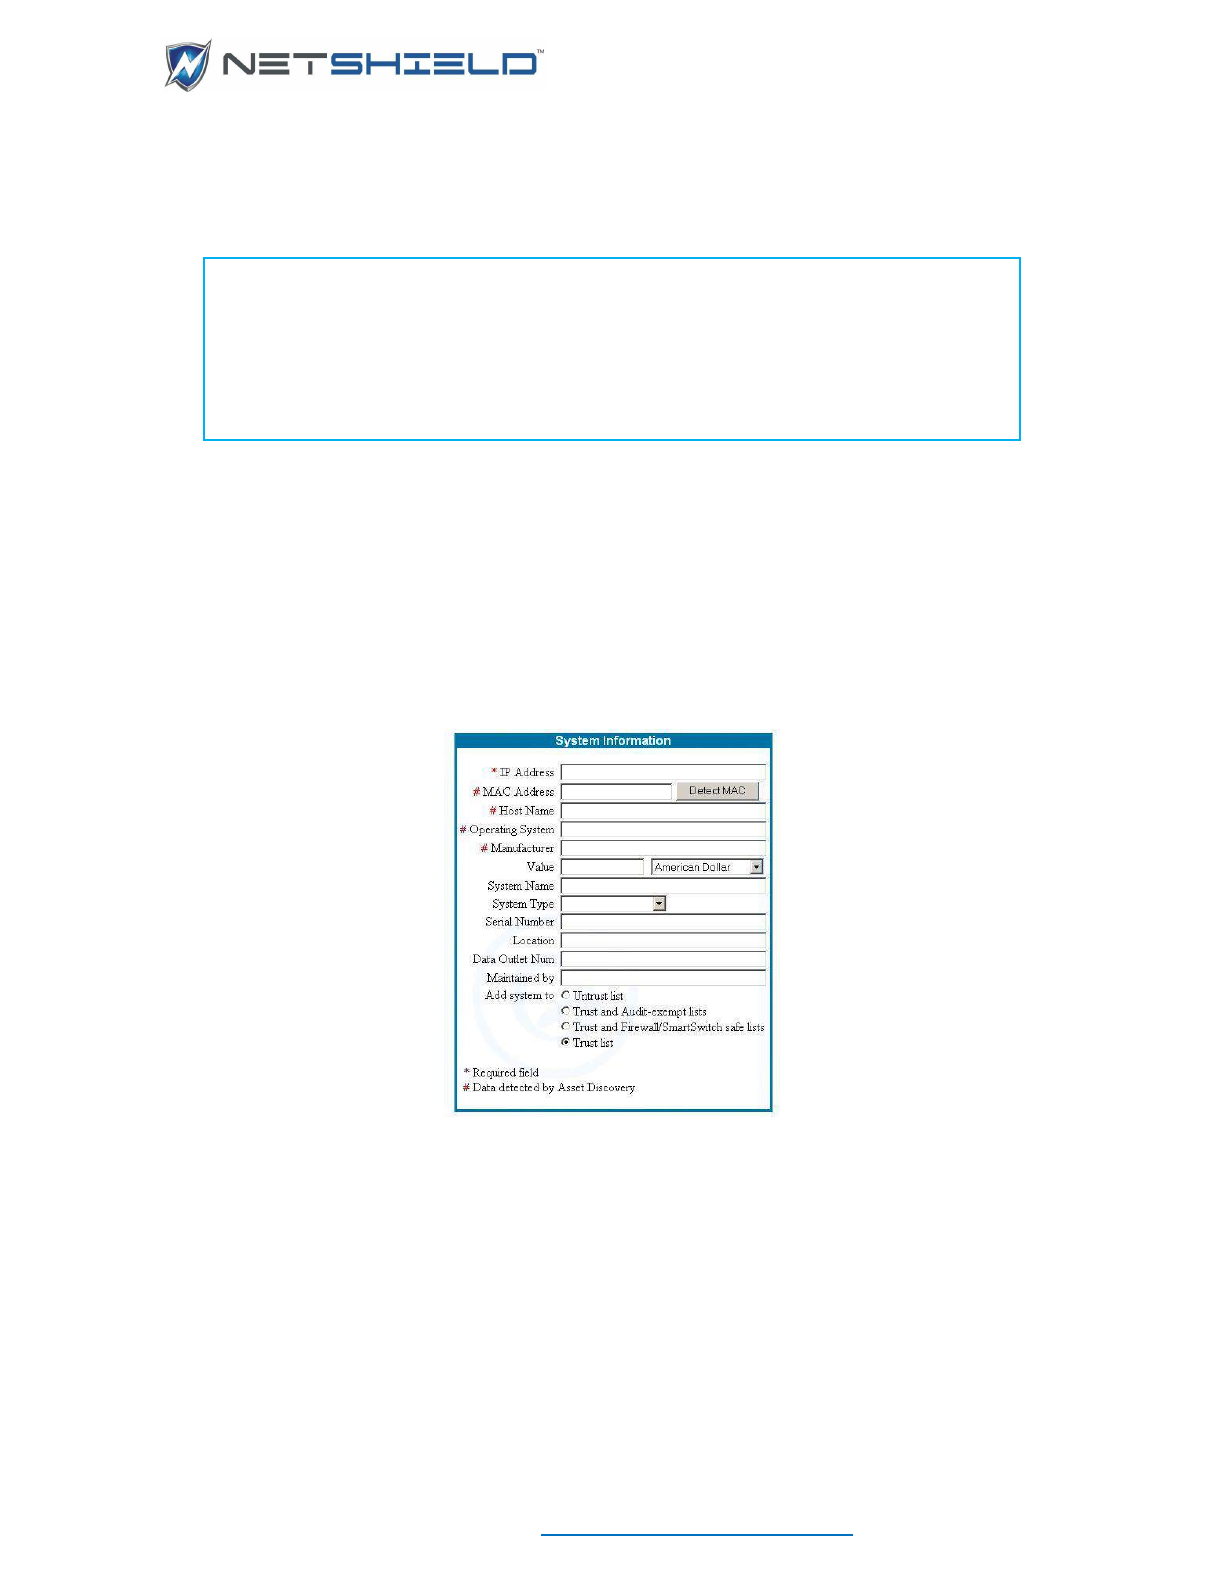
ADDING IP ADDRESSES MANUALLY
• After you run an asset discovery process, you may want to manually add more IPs.
• You can manually add IP addresses by selecting Network Access Control
Add
Assets. This takes you to the System Information screen.
• The IP Address field is required.
• If you are unsure of the MAC address, click the Detect MAC button after you enter the IP
address. The MAC address may be filled in for you if the asset is online. If you have to add
an asset manually because the Asset Discovery process failed to find it, the Detect MAC
button will probably not find it either.
• Host Name, Operating System, and Manufacturer may also be filled in automatically,
depending on current information available for that IP Address.
USER GUIDE
© NETSHIELD Corporation 2017 | https://www.netshieldcorp.com | 1-800-991-3971
Note: Required fields (marked with an asterisk) must contain information. After
you add system data, check the System Information page again. The MAC
Address, Host Name, Operating System, and Manufacturer may be filled in for
you. We strongly recommend you only change the MAC Address and Host Name
fields if it is absolutely necessary.
• Fill in the remaining fields on the page. The table below gives an overview for each field.
System Information Fields
Field
Overview
IP Address (required)
A standard IP address in ###.###.###.### format.
MAC Address
SnoopWall NetSHIELD may fill this field in for you. If you are
unsure of the address, click the Detect MAC button
Host Name
If you do not include the information, this field may be
supplied by SnoopWall NetSHIELD.
Operating System
The software system used on the asset. SnoopWall
NetSHIELD may complete this field for you.
Manufacturer
Name of company that produced the product.
Value
Monetary value of the asset. Choose from over 35
international currencies.
System Name
The name of the asset - not necessarily the host name. This
name is for your own use. It allows you to identify the system.
You can use alphabetic and numeric characters, hyphens,
and underscores.
System Type
System type - such as Laptop, Desktop, Email Server,
Wireless. Choose from 14 options such as Application Server,
File Server, Router, etc. from the pull-down menu.
Serial Number
Alphabetic and numeric characters as well as hyphens are
allowed.
Location
Description of the system location, such as building, wing,
office area, lab, etc.
Data Outlet Number
The number of the line that plugs into the computer, such as
A3.
Asset Notes
Anything you may wish to note about the asset that does not
USER GUIDE
© NETSHIELD Corporation 2017 | https://www.netshieldcorp.com | 1-800-991-3971
fall into the other fields provided.
Maintained by
Name of individual who maintains the system – such as the
system administrator responsible for the asset’s subnet or the
manager of the user’s group.
• The four radio buttons at the bottom of the box allow you to place the asset into one of four
categories. You can manage your assets more efficiently if you use specific
classifications. List categories are defined below. More information is available in the IP
Categories section that follows.
List Categories
List Category
Description
Untrust
Asset that has not been given permission to be on
the network.
Trust and Audit-exempt
Known, clean asset that does not need to be
scanned regularly.
Trust and Firewall/SmartSwitch safe
Known, clean asset that does not need to be
blocked/quarantined at the Firewall or
SmartSwitch.
Trust
Known, clean asset considered part of the
company’s resources.
• Click Add System below the System Information box to enter the asset into the
database.
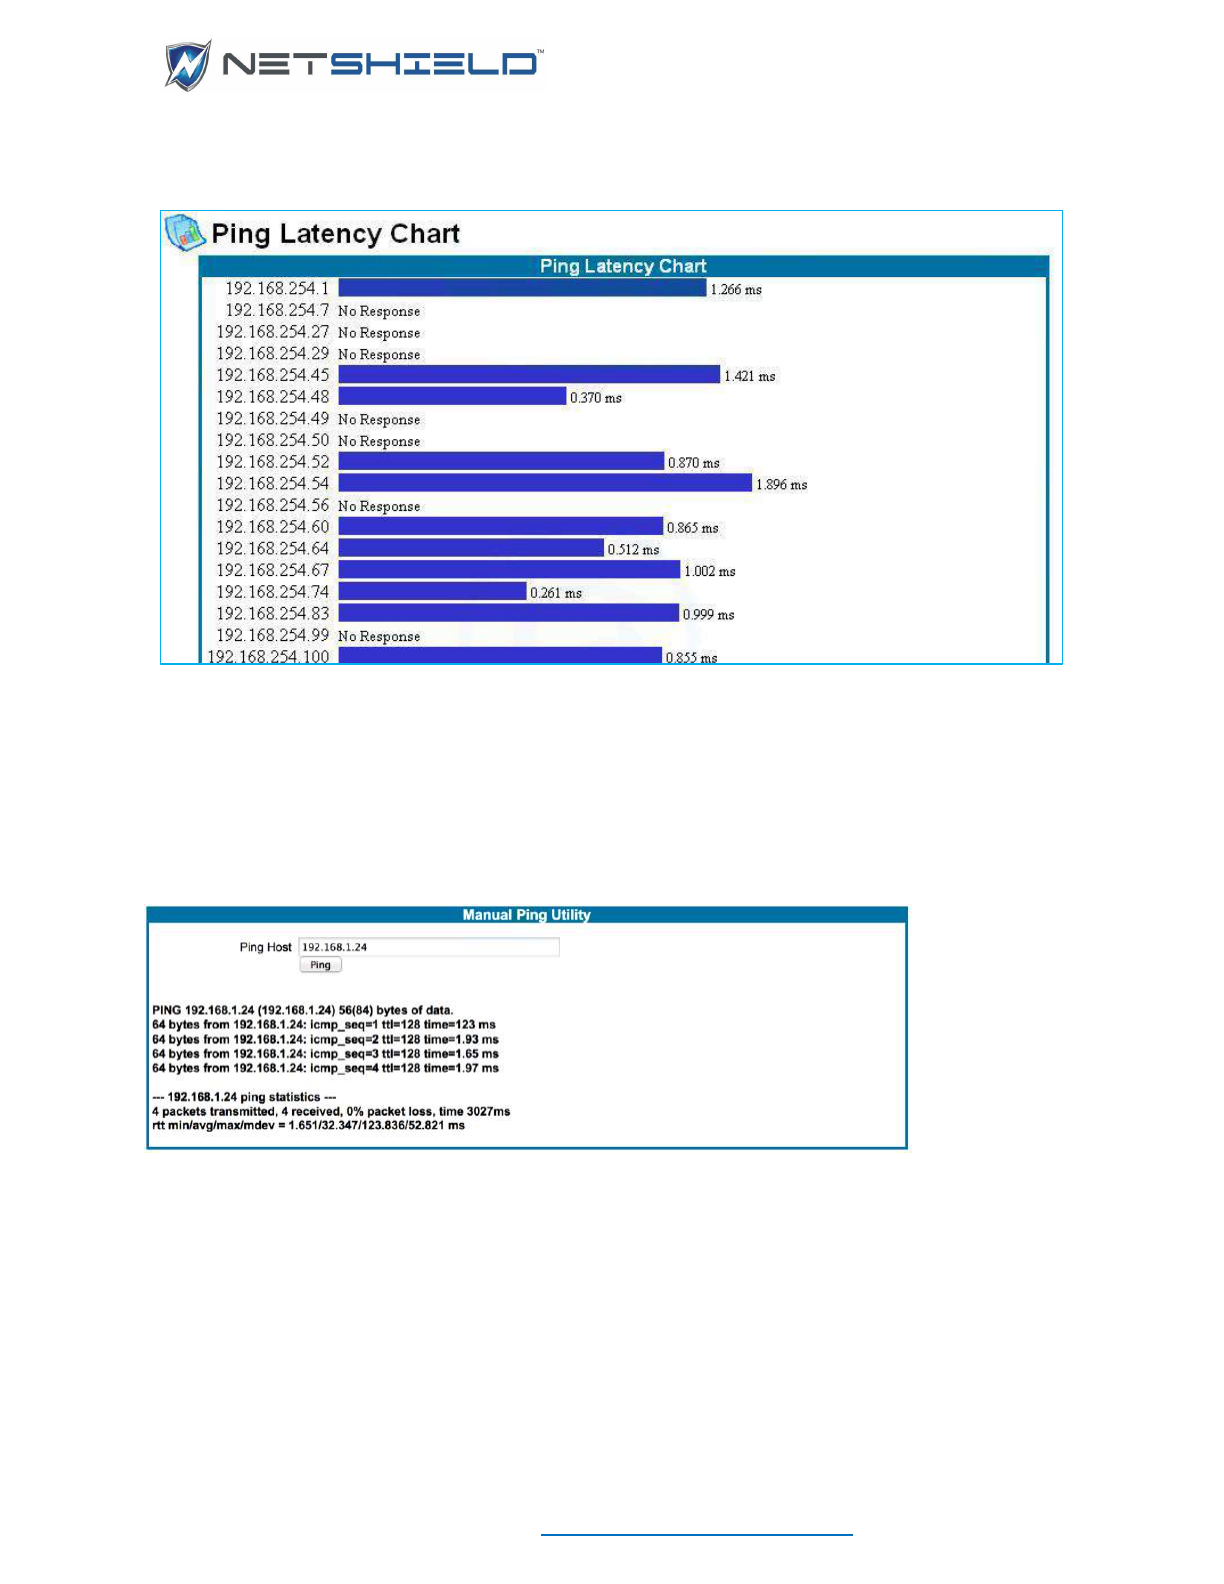
DETERMINING PING RESPONSE OF NODES ON SUBNET
PING LATENCY CHART
You can create a chart showing the ping results for all IP addresses displayed in your audit.
• Select Network Access Control
Ping Latency Chart
The chart shows IP addresses and the number of milliseconds it took the node to respond
to the ping.
The bars compare the length of time for each node’s response.
Systems may not respond because they choose not to, are powered down or disconnected, or
cannot respond in a timely manner.
USER GUIDE
© NETSHIELD Corporation 2017 | https://www.netshieldcorp.com | 1-800-991-3971
To see if the patterns are persistent, click the Refresh button and update the data. Ping latency
data is also available from the Audit Wizard page.
PINGING INDIVIDUAL ASSETS
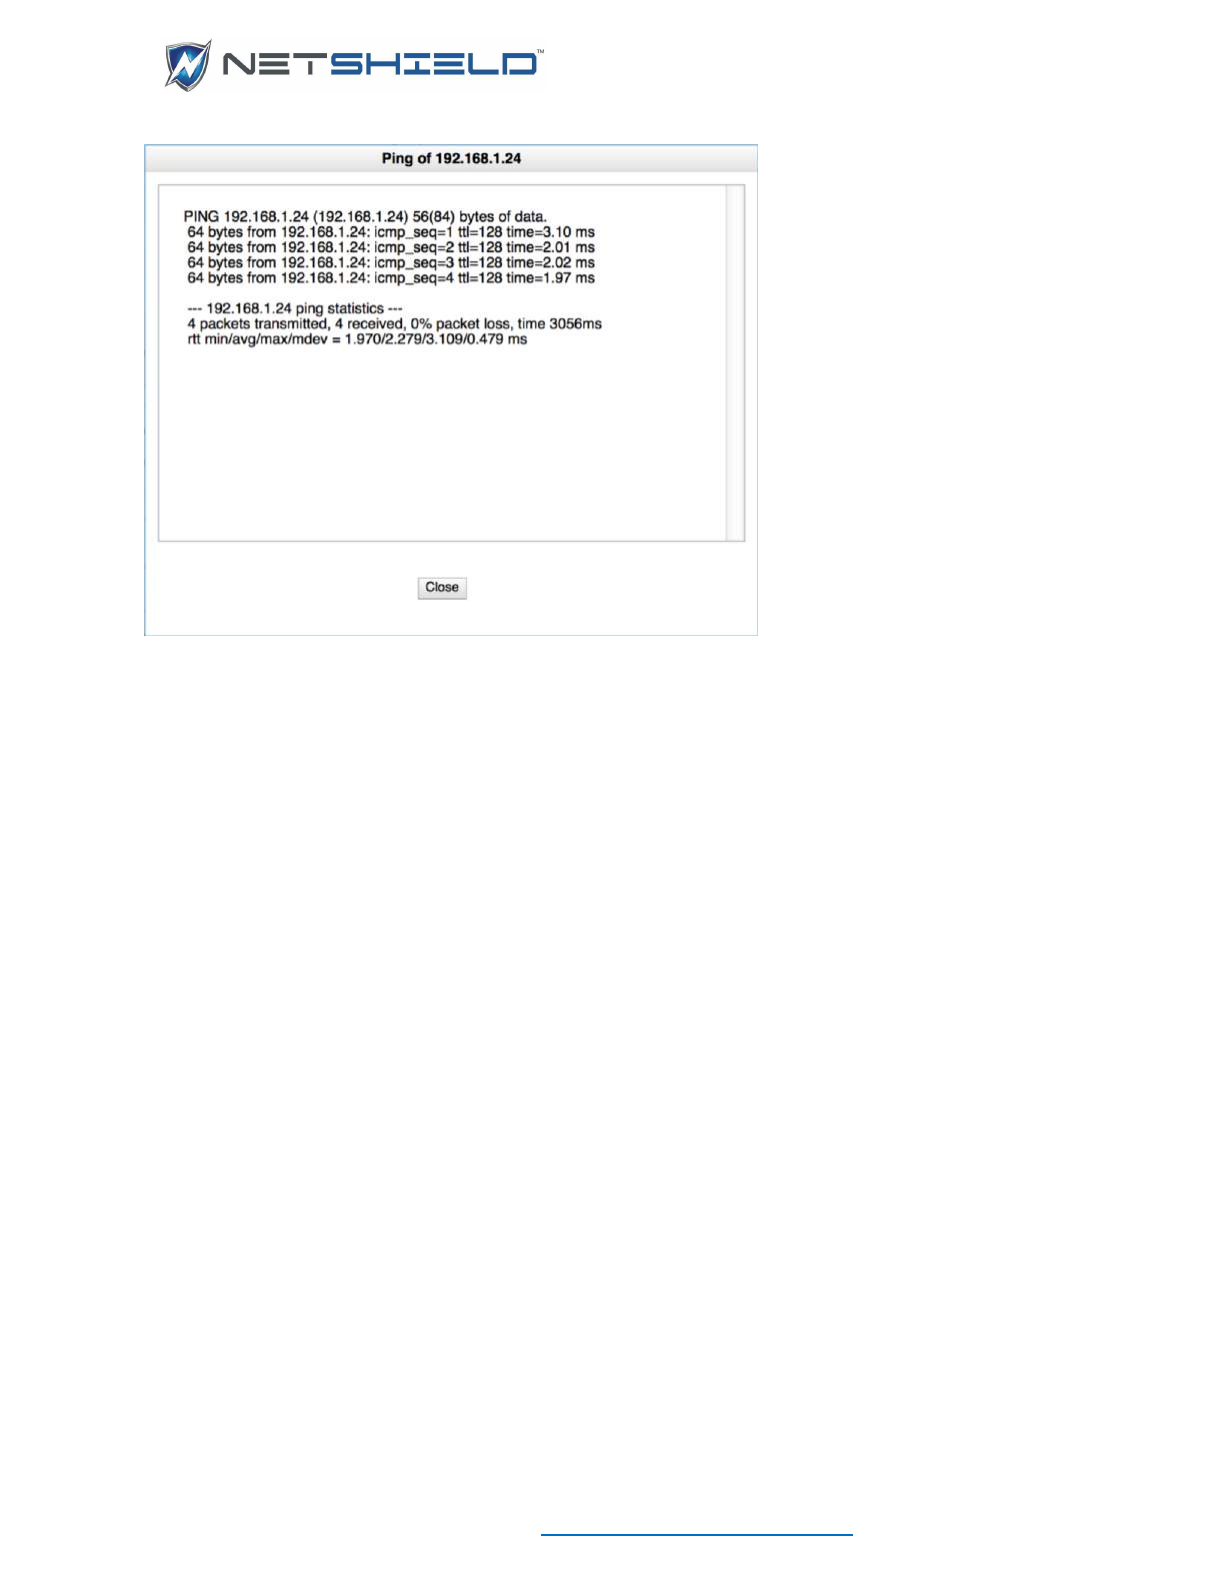
You can also see the ping response for individual assets:
• Select System
Manual Ping
• Enter the IP address of the asset in the field provided and click Ping.
Another way to ping an individual asset is from the Asset Manager.
• Click the second mouse button on any asset in the list, and select Ping from the pop-up
menu.
USER GUIDE
© NETSHIELD Corporation 2017 | https://www.netshieldcorp.com | 1-800-991-3971
IP CATEGORIES
All system information discovered on the network is stored in SnoopWall NetSHIELD database.
This data includes the MAC address and last known IP address for each individual asset, as
well as the asset’s host name and operating system (if known or provided).
You may enter asset information from several places in SnoopWall NetSHIELD, including the
Network Access Control
Add Assets page, or the Edit Asset feature which is available
from both the Network Access Control
Manage Assets page and the Asset Tracker
Systems page. Assets can be assigned to one of the following lists:
• Trust List
• Untrust List
• Audit-Exempt List
• Firewall/SmartSwitch Safe List

USER GUIDE
© NETSHIELD Corporation 2017 | https://www.netshieldcorp.com | 1-800-991-3971
There are three ways a Known Missing Assets may be rectified:
1. The new IP address is determined via Asset Discovery or Asset Detection
2. A user can manually enter the new IP address by editing the system information through
the Asset Tracker
Systems page
3. The Asset Detection System discovers the new IP address
MANAGING ASSETS
The Asset Manager displays all the assets found via Initial Asset Discovery, Asset Detection,
or entered via Add Assets. You can trust and untrust assets, delete them, assign categories,
sort on any column, and filter the display to show a subset of assets. It includes a summary of
the number of assets on the network and the number showing due to filtering. Nano appliances
will show the Total Trusted Assets and the Trusted Asset Limit, while other appliances will
show the number of Trusted Assets and Untrusted Assets.
MANAGE ASSETS OVERVIEW
The Asset Manager shows the current status of all the assets, as well as detailed information
about each asset.
• Select Network Access Control
Manage Assets.
• The Manage Assets page appears.

USER GUIDE
© NETSHIELD Corporation 2017 | https://www.netshieldcorp.com | 1-800-991-3971
• Click on the column headers to sort the grid on that column’s data. A second click on the
same column header will reverse the sort order.
• To move a column to another location, click on the column header and hold the mouse
button down while moving it into the column data area. Quickly release and reclick the
mouse. Move the mouse right and left. A new mouse cursor containing an arrow will
indicate the new location for the column. Release the mouse button; the column will be
moved to the indicated position. Multiple adjacent columns may be selected and moved at
one time.
• Move the mouse to the right-hand edge of any column header. The mouse cursor will
change to indicate the column width may be changed. Click and move the mouse right and
left to change the column width.
• Column width and position preferences will be saved.
• Click the Reset Columns button to restore the default positions and widths.
• Click the second mouse button over any item in the grid. A pop-up menu gives you a
variety of actions that can be performed on one or more selected assets.
• Clicking the checkbox next to one or more assets will allow you to use the Trust, Untrust,
and Remove buttons on multiple assets at once.
USER GUIDE
© NETSHIELD Corporation 2017 | https://www.netshieldcorp.com | 1-800-991-3971
• Scrolling the asset grid right and left will reveal more columns, including category columns
if you have defined any.
• Use the slider in the Time Detected Filter to highlight assets that have been detected
within a selected period via Asset Detection, a background scan, or background ping
sweep. Assets that have not been detected within that period will be displayed in a lighter,
italicized font. Every 10 minutes, each asset known to the appliance is pinged. If the asset
ping was successful, the detection time is updated.
ASSET SUMMARY BOX
The Asset Summary Box shows a quick count of assets and their statuses.
• Total Assets: All unique assets including the appliance itself.
• Currently Showing: All assets including the appliance itself and any VLANs that haven’t
been filtered out.
• Trusted Assets: All unique, trusted assets, not including appliance interfaces or appliance
VLANs. Multi-IP assets will only be counted once.
• Untrusted Assets: Number of untrusted assets on the network.
• Trusted Asset Limit (Nanos only): Number of trusted assets the Nano will allow.
A reminder pop-up containing this information is displayed when you click within the Asset
Summary box.
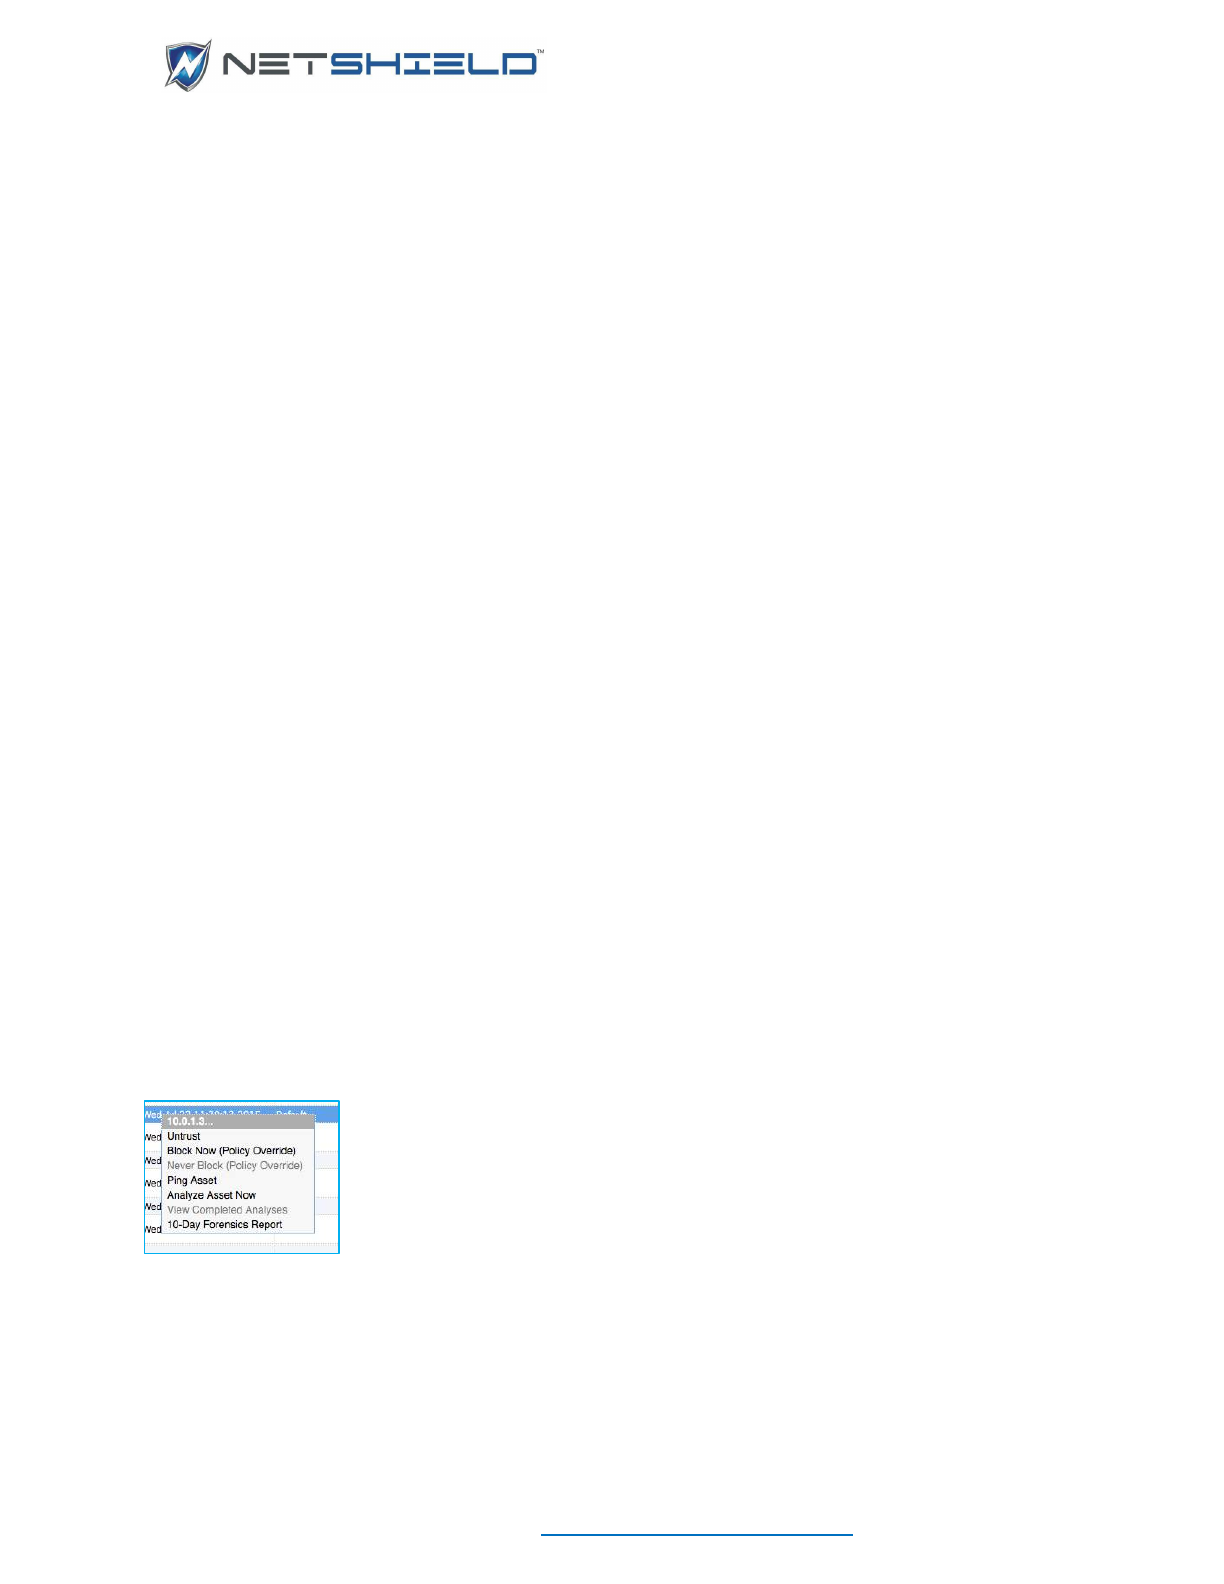
POP-UP MENU
A pop-up menu is available by hovering the mouse over any asset or
selecting multiple assets, and clicking the 2nd mouse button.
The first item is either Trust or Untrust depending on the current status of
the selected asset(s). If there are both trusted and untrusted assets on the
list, the menu item will depend on the status of the first selected item. If its
status is trusted, the menu item will be Untrust; if it is untrusted, the menu
item will be Trust.
Block Now appears only when the asset detection system is running with manual blocking
enabled. This allows you to instantly block any asset. To unblock it, select Trust. When
automatic blocking is used instead of manual blocking, Block Now does not appear, but
untrusting an asset in that case will block it.
USER GUIDE
© NETSHIELD Corporation 2017 | https://www.netshieldcorp.com | 1-800-991-3971
Never Block allows you to add and remove assets from the Never-Block list. If the selected
asset is currently on the list, the menu item changes to Remove from Never-Block List. The
Never-Block list works on the asset’s MAC address, so the asset will never be blocked even if
it’s IP Address changes.
To determine if an asset is online, you can Ping it.
Analyze Asset Now is available only for single selections. It runs a scan on the selected asset
and displays the results. The results of scans are stored for future reference and can be viewed
via View Completed Analyses. (Use System
Background Scans to run periodic scans
automatically).
Only on those appliances that use an Active Domain server will View AD Login Records be
available.
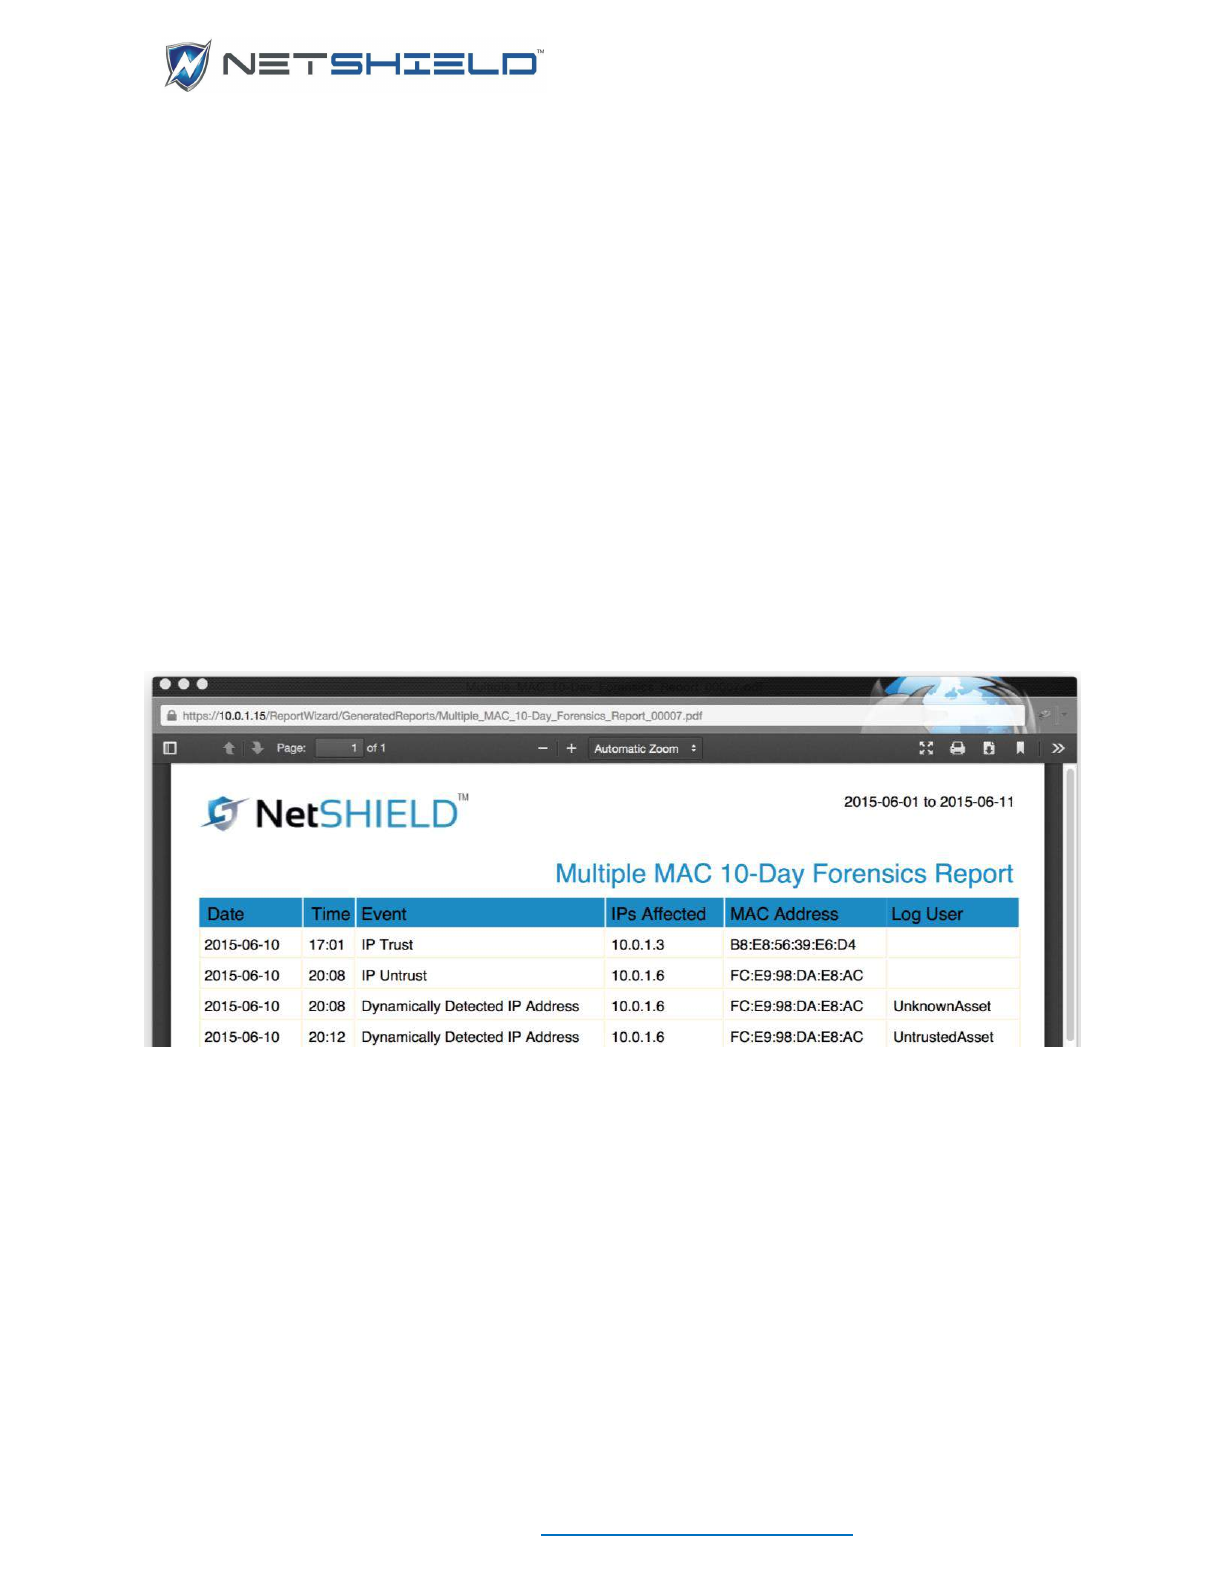
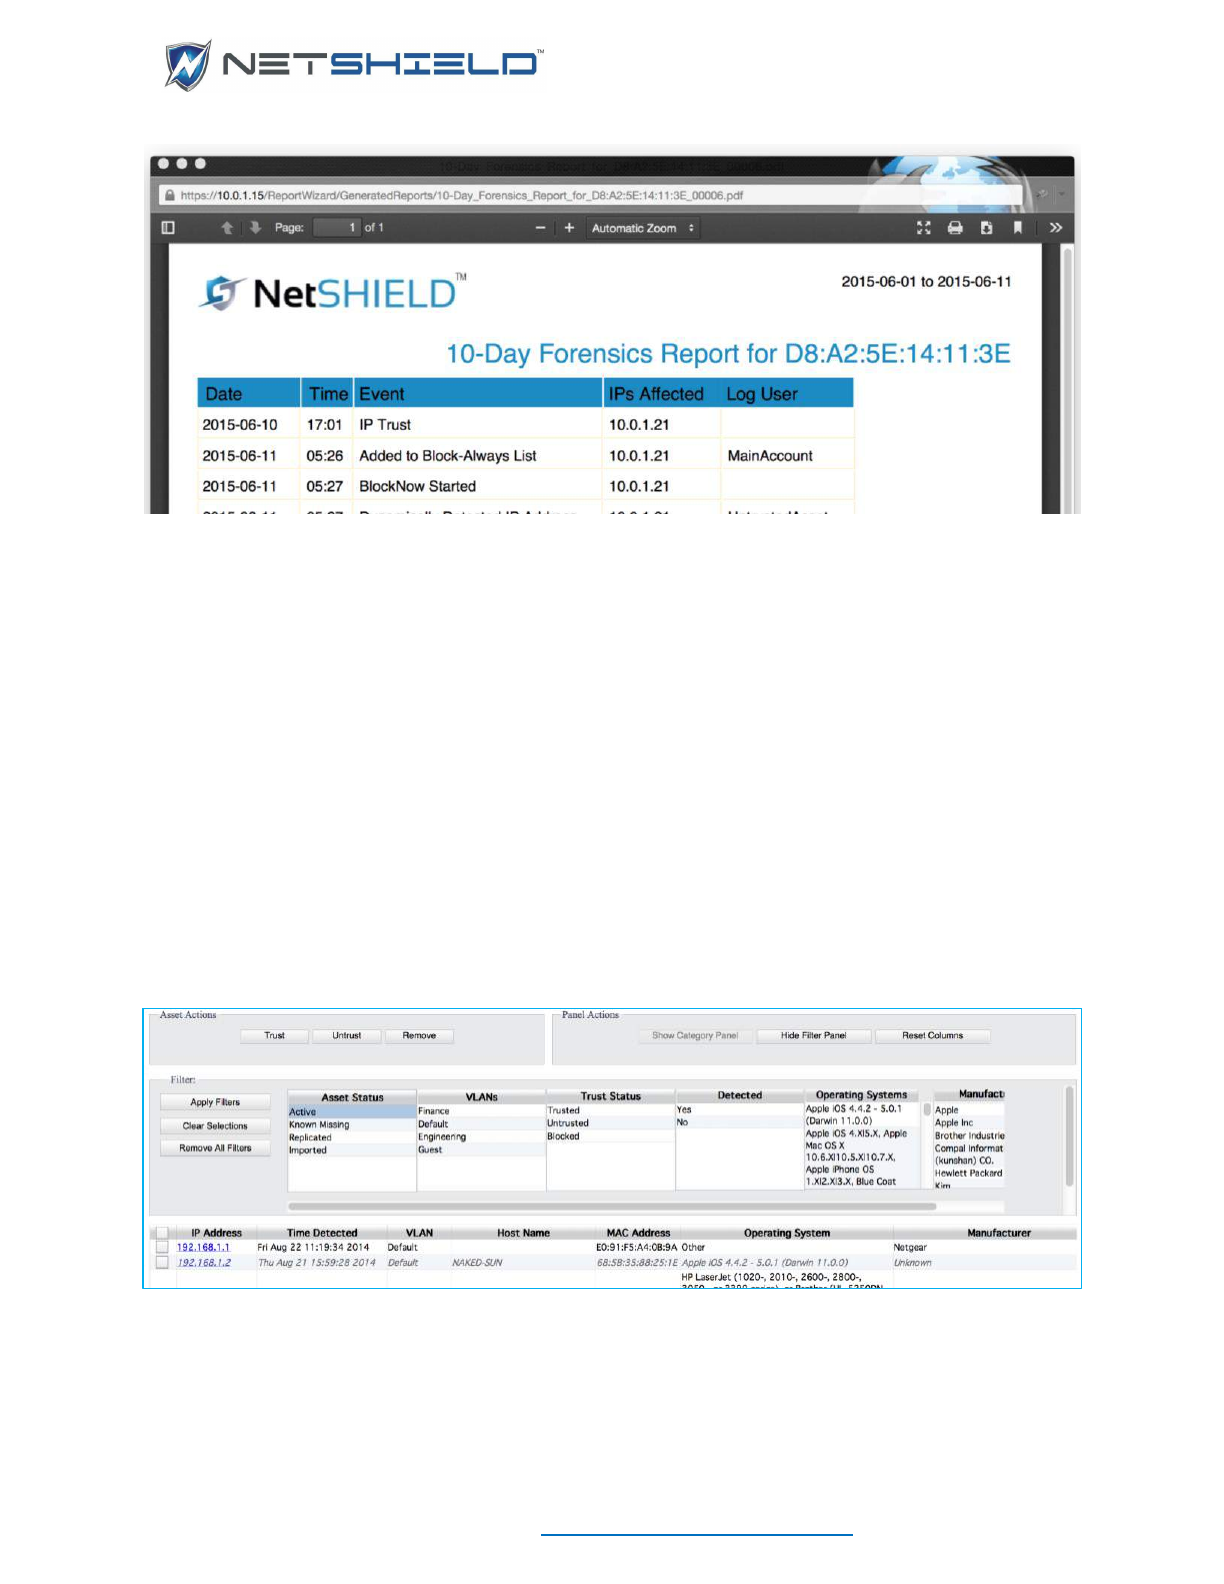
The 10-Day Forensics Report can be obtained for single or multiple assets. It is similar to the
NetSHIELD IP History Report, but it uses the MAC address to select log records rather than the
IP Address.
Select the menu item and the generated PDF will open in a new browser window (make sure
pop-ups are enabled); the report will either contain the single MAC Address in the title with no
MAC Address column, or the title will be Multiple-MAC 10-Day Forensics Report and the IPs
Affected column will be included.
USER GUIDE
© NETSHIELD Corporation 2017 | https://www.netshieldcorp.com | 1-800-991-3971
FILTER PANEL
The filter panel allows you to select criteria to show a limited set of assets in the grid. Click
the Show Filters button to reveal it.
• All the filters appear. You may select one or more items from each filter list except for the
Asset Status, Trust Status, and Detected filters which only allow one item to be selected.
All the others allow multiple selections. Use the Ctrl key to click multiples.
• Clicking multiple items within a list will display any assets that have any of the selected
values for that column. Selecting from multiple filters will limit the asset list to items that
meet the criteria for every filter. So if you choose Untrusted from the Trust Status filter, and
then both Apple and Brother Industries from the Manufacturer Filter, only assets that are
untrusted and are manufactured by either Apple or Brother Industries will be listed.
• Click Apply Filters. The grid is updated to show only assets meeting the selected criteria.
• Click Show Category Panel. The category panel appears. This panel looks similar to the
filter panel, but it allows you to assign categories to assets.
Categories and their values are created using Network Access Control
Manage
Asset Categories application.
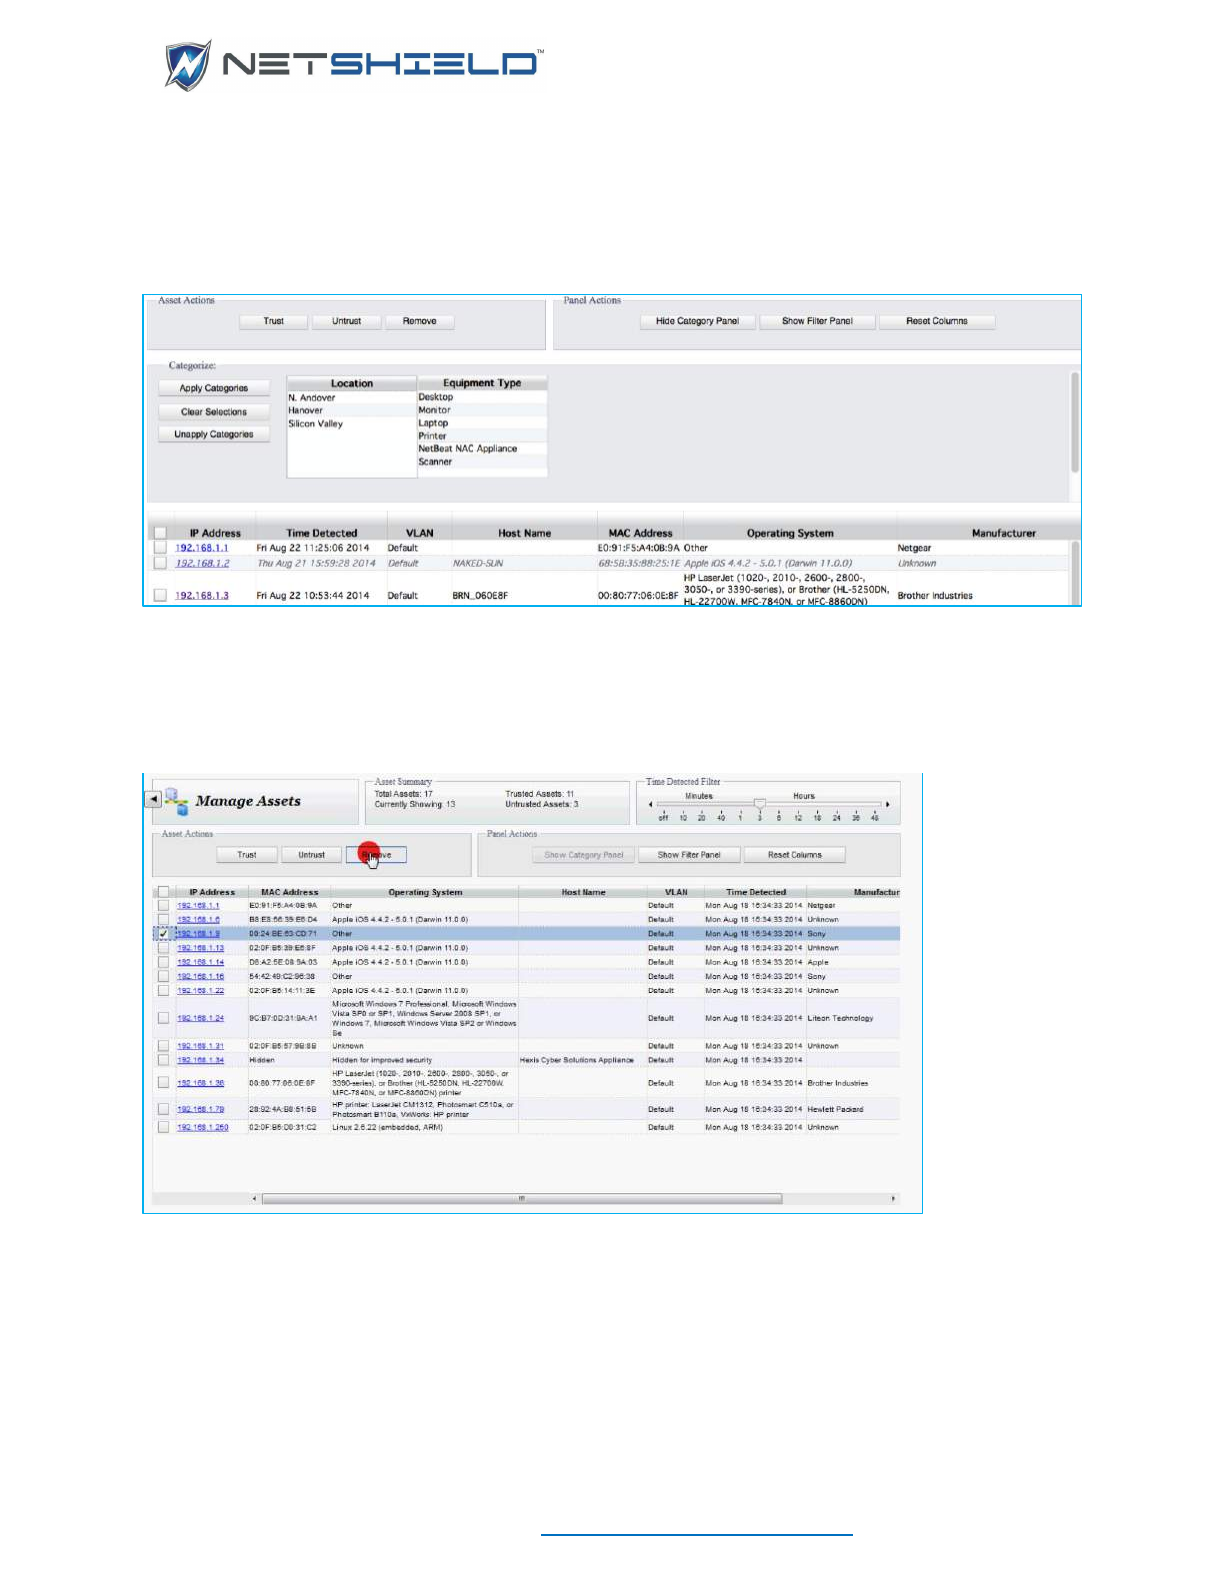
USER GUIDE
© NETSHIELD Corporation 2017 | https://www.netshieldcorp.com | 1-800-991-3971
Select assets using the checkbox at the left. Select a single value from one or more
categories and then click Apply Categories. Scrolling the asset grid to the far right will
show the category value in the category column for the selected assets.
You can assign only one value from a particular category, but you may assign many
categories at one time.
DELETING IP ADDRESSES
• To delete individually selected IP addresses from the list of IPs, click the check boxes next
to the IP addresses and then click the Remove Selected IPs button.
A confirmation dialog will ask you to confirm the deletion.
MANAGING ASSET CATEGORIES
This screen allows you to add categories and values for those categories. The categories can
then be assigned to assets on the page where you can also filter the list of assets by category.
The categories are added as new columns at the far right of the asset grid.
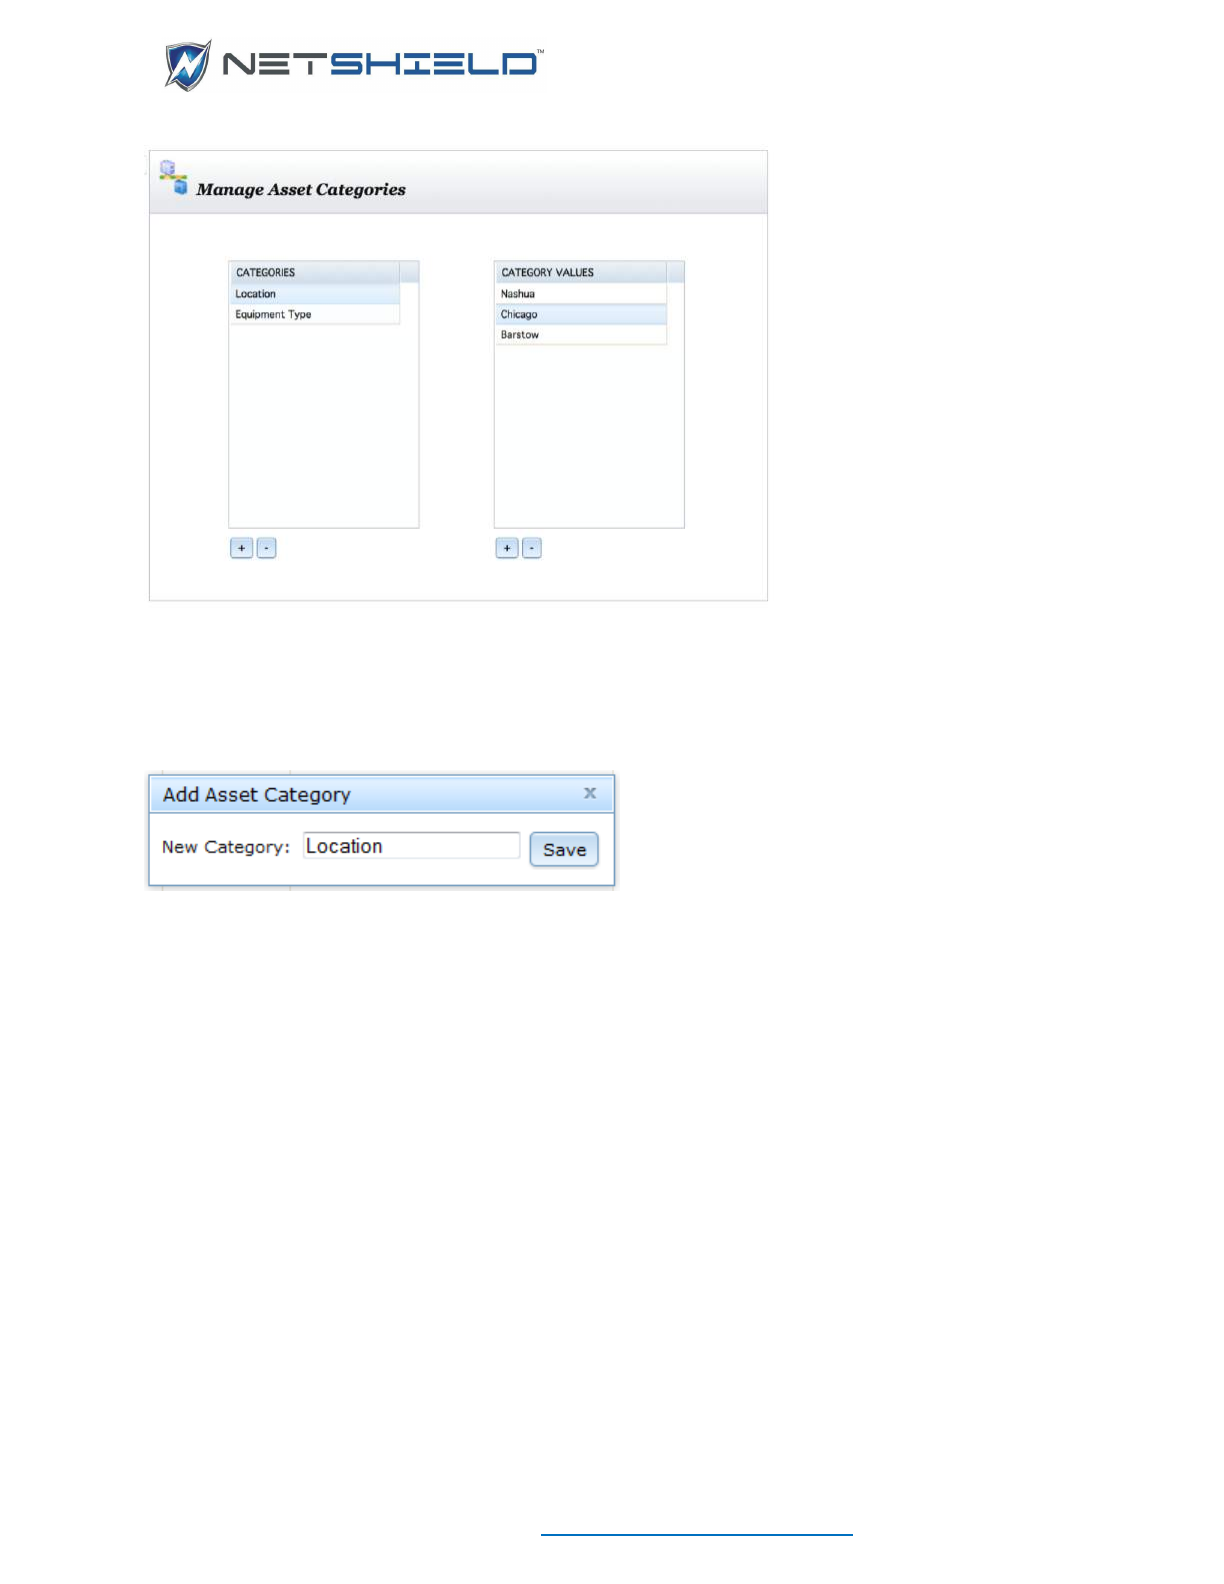
USER GUIDE
© NETSHIELD Corporation 2017 | https://www.netshieldcorp.com | 1-800-991-3971
To indicate where the assets are located create a category called Location with values like
Nashua, Chicago, and Barstow. A category such as Equipment Type can contain values like
Printer, Desktop, and Monitor. Create categories that will meet the needs of the organization.
Under the Categories list box, click the “+” button to get the Add Asset Category dialog. Enter
the name for your new category and click Save.
The new category appears in the Categories list box. In the same fashion, use the “+” button
beneath the Category Values list box to add some values for the new Category.
Deleting Categories and Category Values is done by highlighting the entry you wish to delete
and clicking the ““ button beneath it. You will be asked to confirm the deletion. Deleting a
category will also delete all the associated Category Values.
To modify a Category or Category Value, double click the item. The text will be selected and
you will be able to change it. Hit Enter to indicate you are done.
Your categories will be available to assign to assets and to use for filtering on the Manage
Assets page.
IMPORTING AND EXPORTING ASSET LISTS
You can import and export your asset lists to and from a spreadsheet using this option. It also
allows you to assign categories to assets.
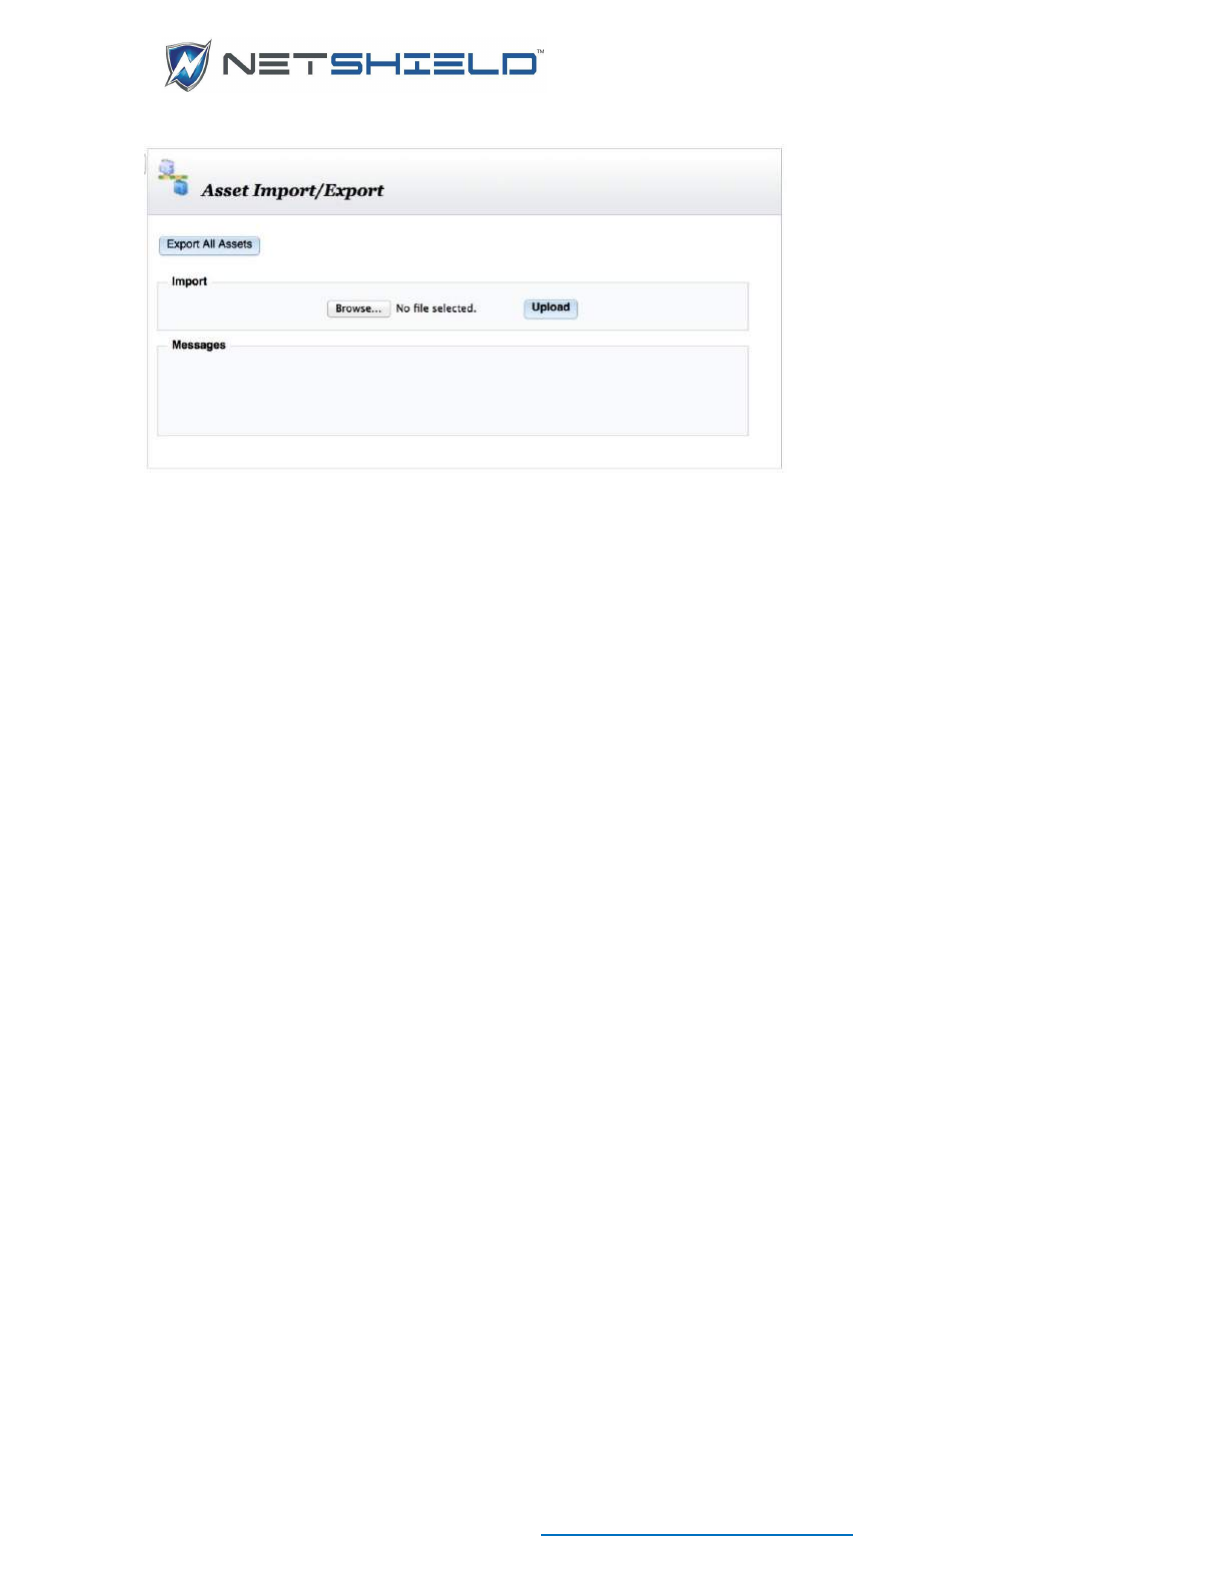
USER GUIDE
© NETSHIELD Corporation 2017 | https://www.netshieldcorp.com | 1-800-991-3971
EXPORTING
Click the button labeled Export All Assets. A dialog will appear asking you to confirm
that you wish to open exported_assets.csv, a comma separated value file. Clicking OK
will launch Excel. The first 8 columns of the exported CSV are always VLAN, IP Address, MAC
Address, Trusted, Host Name, Operating System, Manufacturer, and AD User. There will be
more than 8 columns if you have specified categories in the Manage Asset Categories
application.
IMPORTING
Import uses a comma separated value (CSV) file. Using a spreadsheet containing the
list of assets, create a copy and modify it to contain the same columns that appear in an
exported asset list. Save it as a CSV file. You can also modify an asset list that you
have exported and then import it back in.
Click the Browse button and locate your CSV file in the file browser. Click Upload. A
message will appear in the Messages panel indicating whether the import was
successful and how many records were imported. The first 8 columns of the CSV file
must be the same as the export CSV file and in the same order. Columns beyond #8
may be category assignments you wish to make. At this time, matching categories and
values must already be entered in the database using the Manage Asset Categories
application.
SETTING UP SMARTSWITCH INTEGRATION
If you have smart switches on your network the SnoopWall NetSHIELD can disable the switch
port or move a vulnerable system to a quarantine VLAN.
To set up the switches on SnoopWall NetSHIELD:
Select NAC Configuration
SmartSwitch Integration from the left menu. The SmartSwitch
Integration page appears. The first step is to add switches.
• Click the Add Switch button at the top of the page to open the SmartSwitch Information
window.
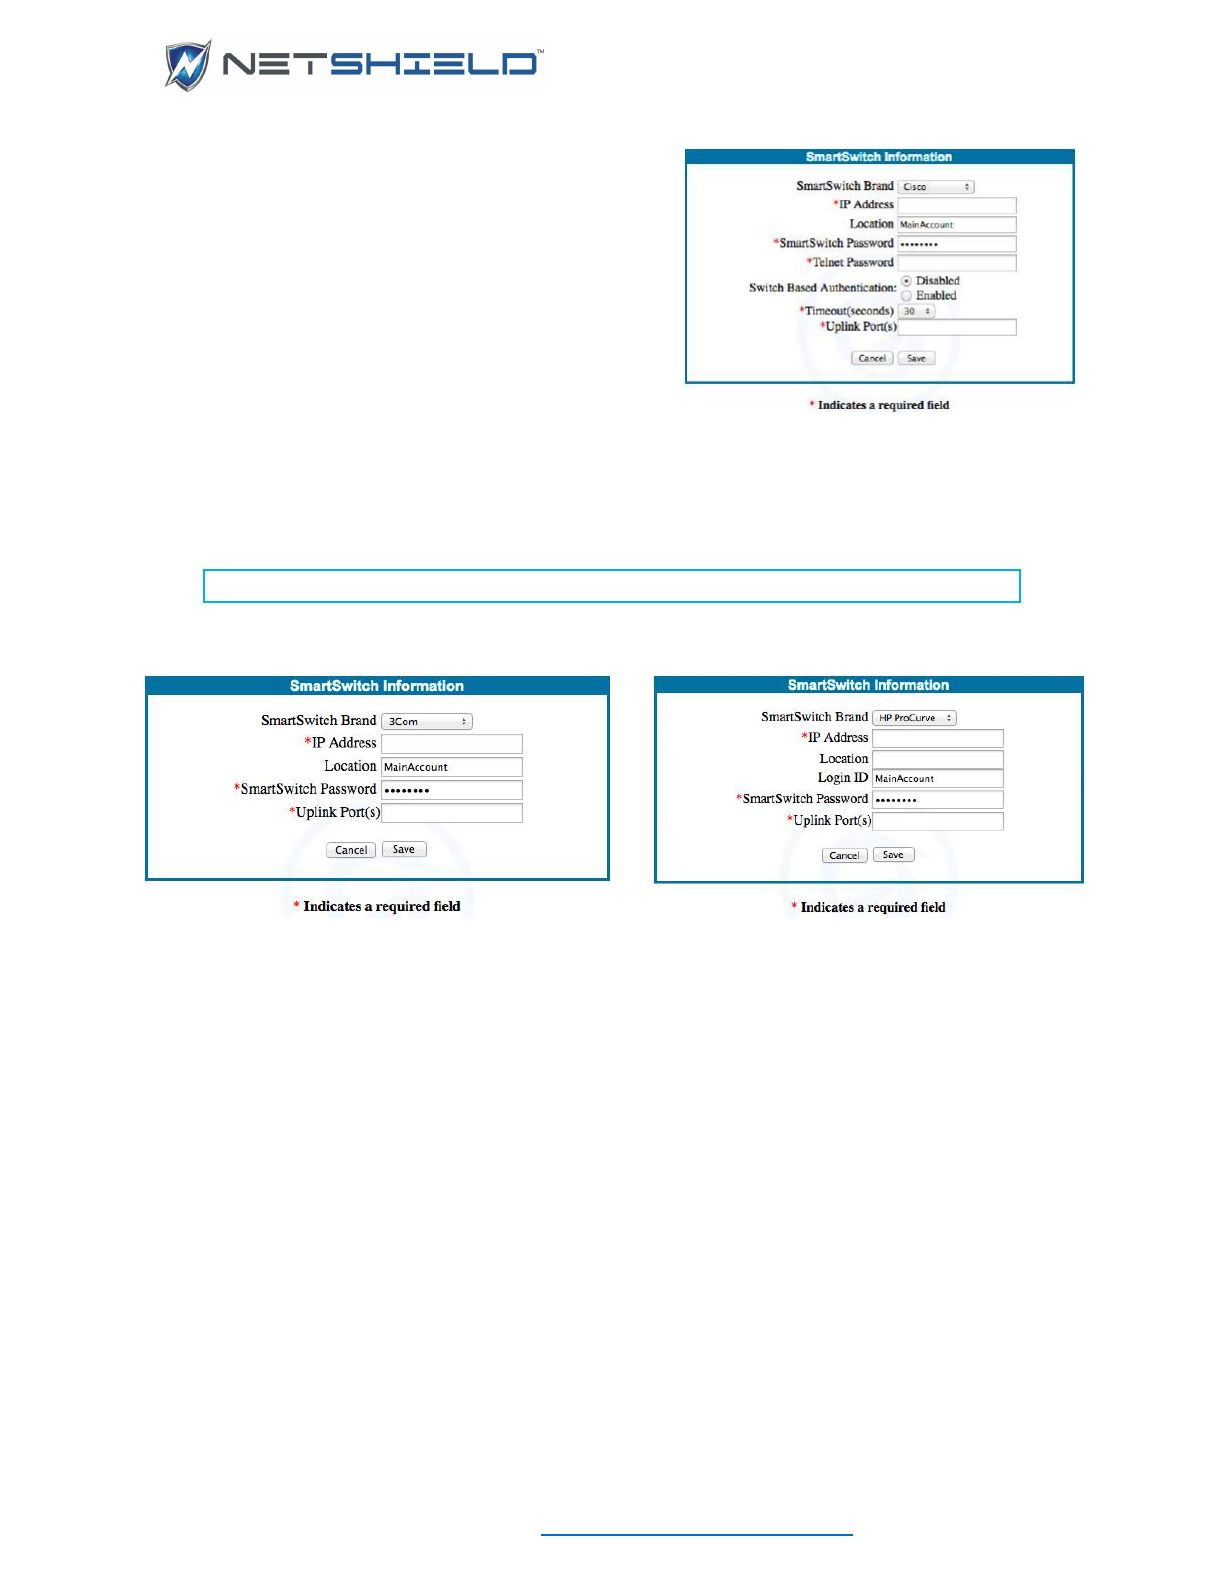
USER GUIDE
© NETSHIELD Corporation 2017 | https://www.netshieldcorp.com | 1-800-991-3971
Choose the SmartSwitch brand.
The SmartSwitch Information window changes based
on the brand you choose. All brands ask for:
• IP Address
• Location
• SmartSwitch Password
• Uplink Port Number
Remaining fields vary based on brand. See illustrations.
NOTE: Be sure the Uplink Port Number is correct or the integration will fail.
• Fill in required and requested information for the selected switch brand.
• Click Save to keep the data or Cancel to delete your entries.
ASSET DETECTION AND VULNERABILITY QUARANTINE™
When a new device plugs into the network, SnoopWall NetSHIELD can dynamically detect its
presence and immediately audit the device for vulnerabilities. You may set the levels at which
you want to audit and the actions you wish it to take upon detecting vulnerabilities.
If SnoopWall NetSHIELD finds vulnerabilities on the device, it can send a message to the
SmartSwitch to block traffic to and from the node.
You can also choose to never block particular IP addresses.
When a device is blocked, SnoopWall NetSHIELD sends an alert indicating blocked ports or IP
addresses.

USER GUIDE
© NETSHIELD Corporation 2017 | https://www.netshieldcorp.com | 1-800-991-3971
One-Click ADS Configuration
SnoopWall NetSHIELD supports One-Click ADS Configuration:
• Select NAC Configuration
Asset Detection System from the left.
• Select one of the predefined ADS configurations:
1) Detect Assets, Alert. Allow Manual Blocking With NetSHIELD Blocking.
2) Detect Assets, Alert and Block With NetSHIELD Blocking.
• Click on Show Advanced and review the settings.
• Click Save to save the settings.
• If Asset Detection is currently disabled, click Enable Asset Detection System.
A few of the Advanced Asset Detection Options are discussed in more detail below:
Enabling NetBIOS Scans
NetBIOS Scans use NetBIOS protocol to discover NetBIOS enabled devices. Enabling this
option will cause the appliance to use NetBIOS scans to scan assets for host names and MAC
addresses during Asset Detection. You should choose to use NetBIOS scans if there is no DNS
server available.
• Click Enable NetBIOS Scans For Windows Host Names or Enable NetBIOS Scans For
MAC Addresses.
• Click Save to save the settings.

USER GUIDE
© NETSHIELD Corporation 2017 | https://www.netshieldcorp.com | 1-800-991-3971
Enabling IP Detection via Packet Inspection
• Packet Sniffing Ranges are defined based on the NetSHIELD configuration.
• To change the range of IP addresses, enter the range of IP addresses the ADS should
monitor via packet inspection. IP addresses within the range extracted from inspected
packets will be handled by the ADS using current configuration settings.
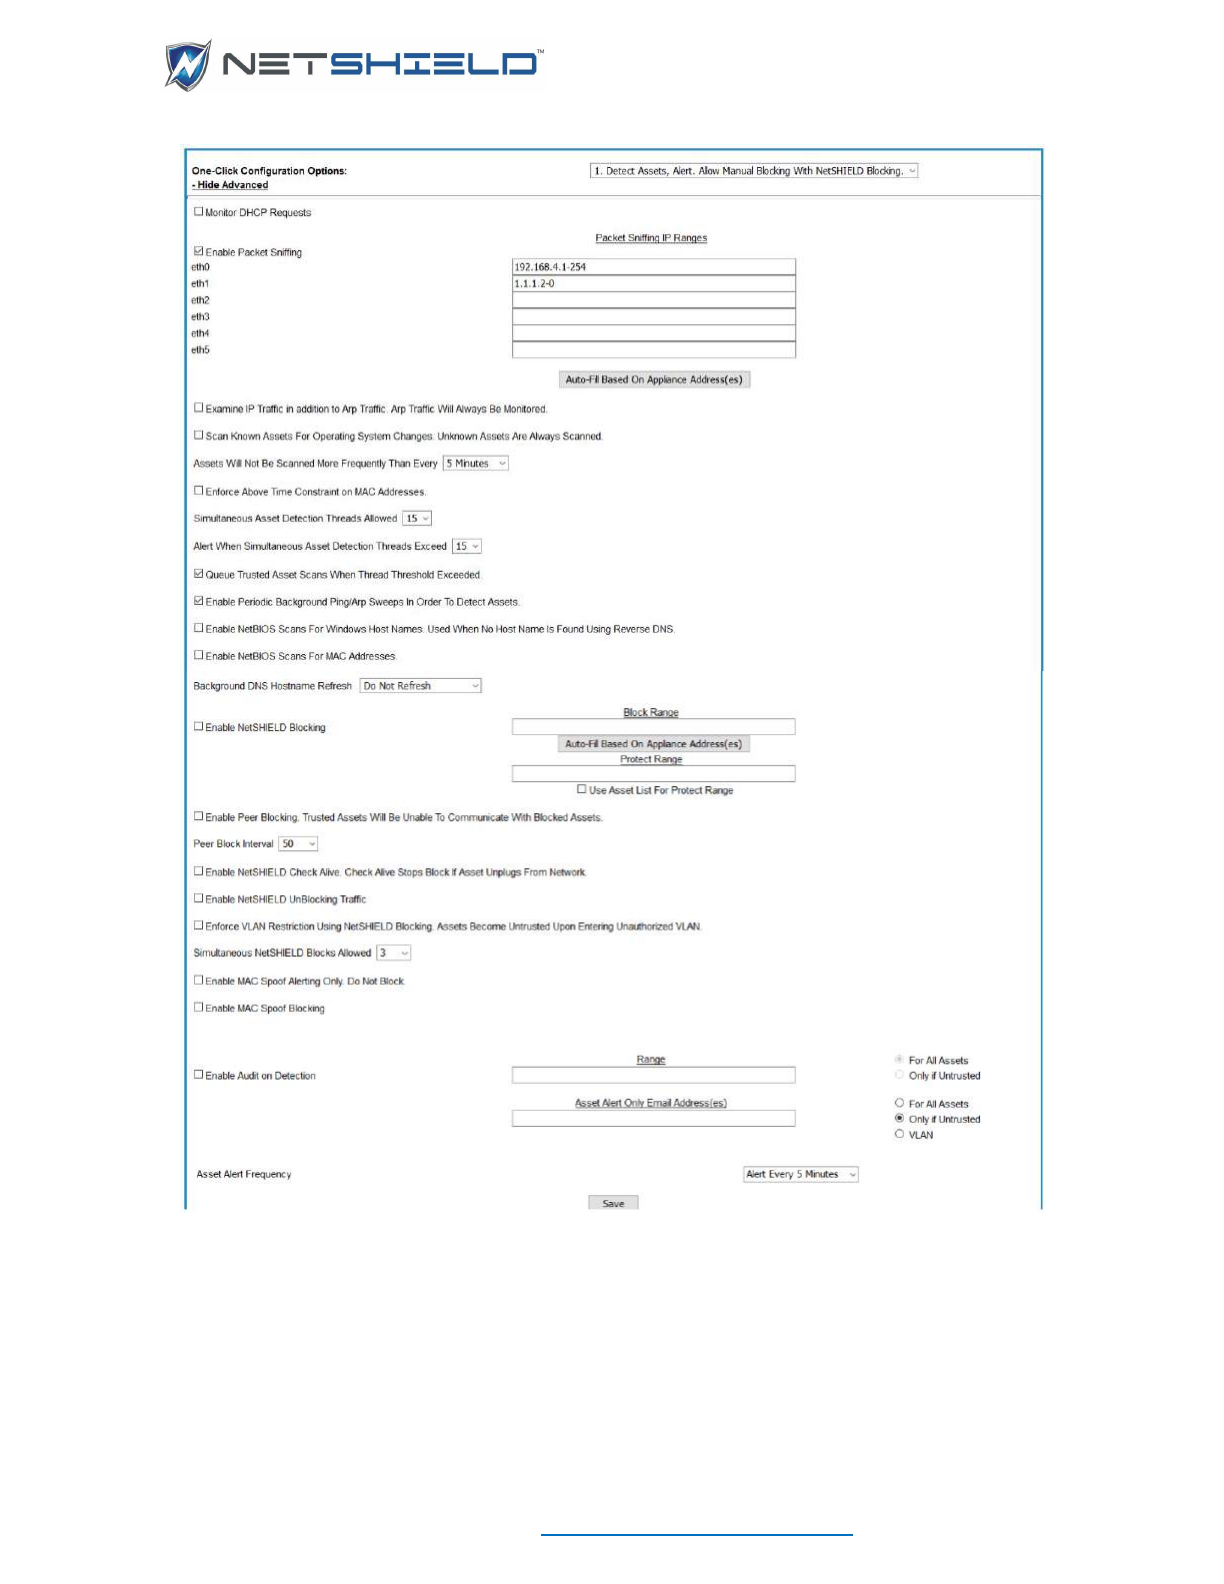
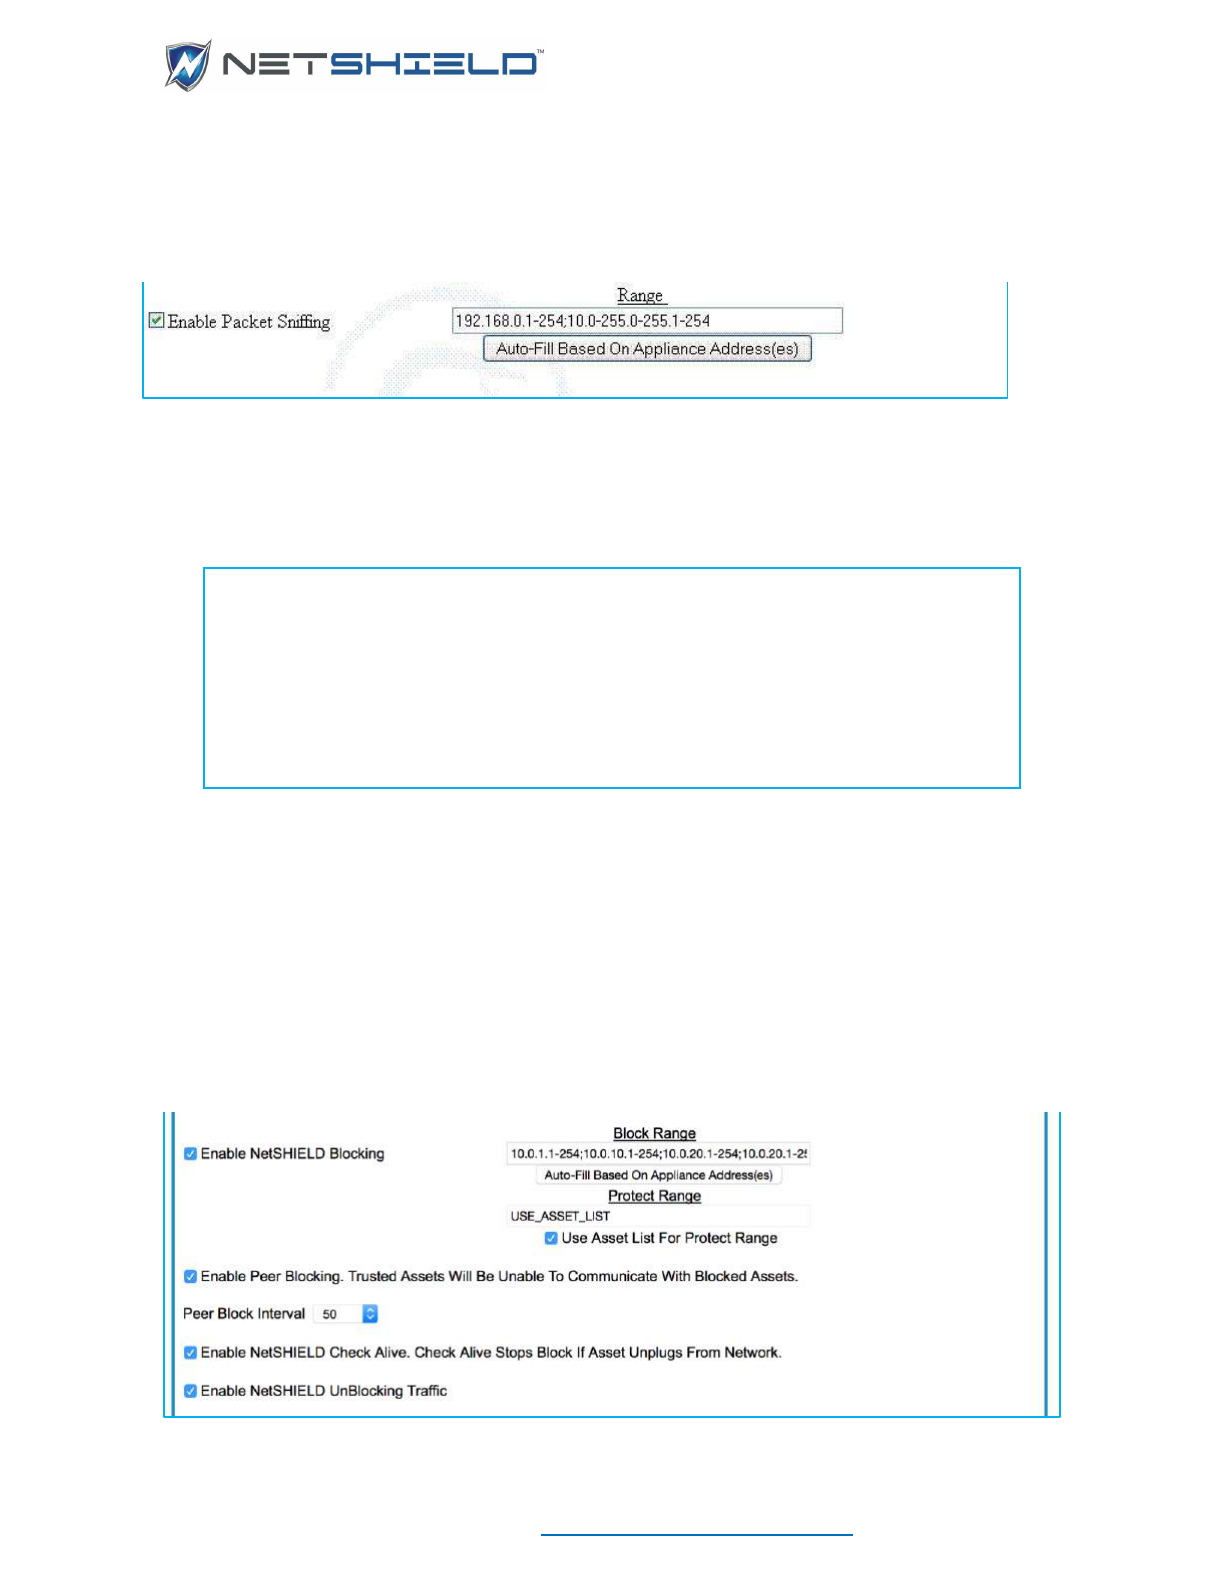
USER GUIDE
© NETSHIELD Corporation 2017 | https://www.netshieldcorp.com | 1-800-991-3971
• Review the settings.
• Click Save to save the settings.
Important Note: Ranges will be based on IP address(es) assigned to the appliance network
interface cards.
NetShield Blocking
NetSHIELD Blocking works by blocking communication routes from Untrusted blocked assets.
Important Note: A full asset discovery should be run prior to enabling NetSHIELD
Blocking. Assets within NetSHIELD Blocking Range will be blocked if they are
Untrusted.
Important Note: Packet Sniffing and NetSHIELD Block Ranges will be based on
IP address(es) assigned to the appliance network interface cards. The appliance
asset list will be used for the protect range. All IP addresses contained in the
asset list, trusted and Untrusted, will be protected from assets blocked with
NetSHIELD blocking.
Enabling Manual NetSHIELD Blocking
Selecting option #1 from the One-Click Configuration options and enabling asset detection. To
block an asset, go to the Asset manager and click the second mouse button over an asset listed
in the grid, and choose Block Now from the pop-up menu.
Enabling Automatic NetSHIELD Blocking
Start by selecting option #2 from the One-Click Configuration options. Open the advanced
settings and examine the following options.
• Select the Enable NetSHIELD Blocking checkbox.

USER GUIDE
© NETSHIELD Corporation 2017 | https://www.netshieldcorp.com | 1-800-991-3971
• In the Block Range field, enter the range of IP addresses that the ADS will attempt to block
using NetSHIELD blocking if an asset is Untrusted.
• To have a range of IP Addresses created click Auto-Fill Based On Appliance Address(es).
• To enter your own range, use a comma separated list of IP Address ranges.
• In the Protect Range field, enter the range of IP addresses or click the Use Asset List For
Protect Range checkbox.
• Select the Enable NetSHIELD Check Alive checkbox to cause the ADS to periodically
determine if the blocked asset exists on the network. If the blocked asset no longer exists,
the blocking will be stopped.
Recommended Setting: Enabled
• Select the Enable NetSHIELD UnBlocking Traffic checkbox to cause the ADS to send
traffic which will attempt to immediately allow network access to an asset which is being
unblocked.
Recommended Setting: Enabled
• Click Save to save your settings.
EXCLUDING ASSETS FROM NETSHIELD BLOCKING
You can choose to have a predefined list of trusted
assets that will never be blocked by NetSHIELD
blocking.
• Select Network Access Control
Never-
Block List. All assets included in the list on the
right will never be blocked by NetSHIELD
Blocking.
• You may add and remove assets to and from the
list from this menu.
• Click Save to save the list.
• You can also put assets on the Never-Block list from the Asset Manager 2nd mouse button
menu.
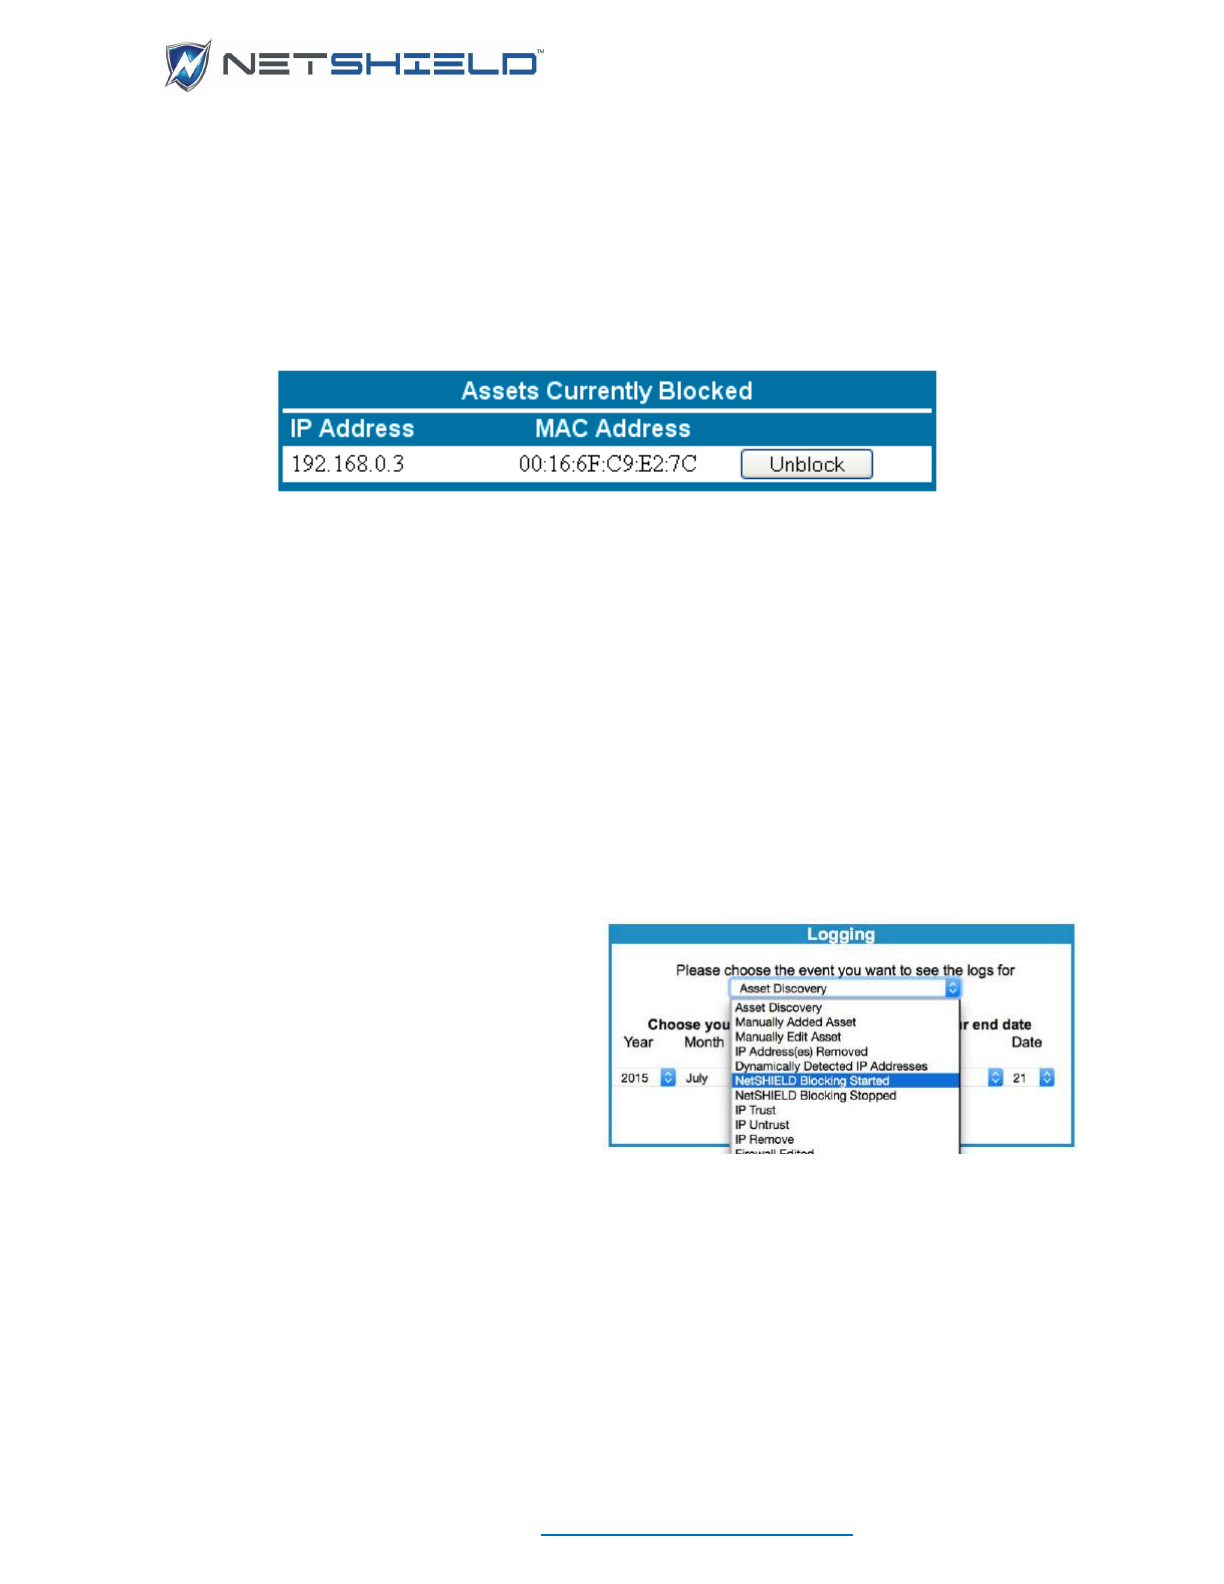
USER GUIDE
© NETSHIELD Corporation 2017 | https://www.netshieldcorp.com | 1-800-991-3971
VIEWING ASSETS BLOCKED WITH NETSHIELD BLOCKING
At any time, you may view a list of all assets currently being blocked by NetSHIELD.
• Select Network Access Control
NetSHIELD Blocking from the left menu to go directly
to NetSHIELD Blocking screen, which displays assets currently blocked with NetSHIELD
Blocking.
• Click Unblock to stop blocking the asset with NetSHIELD Blocking. Assets will also be
marked as trusted when unblocked.
• Blocked assets can also be viewed in the Asset Manager by selecting Blocked from the
Trust Status filter in the Filter Panel.
Note: Marking an asset as Trusted also stops the asset from being blocked with NetSHIELD
Blocking.
VIEWING NETSHIELD BLOCKING LOGS
To view logs of which assets NetSHIELD has
blocked in the past, and when:
• Select Logging
Network from the
left menu to go to the Network Logging
screen.
• Select NetSHIELD Blocking Started.
Click Show Logs to view the log
containing NetSHIELD Blocking started data.
• Select NetSHIELD Blocking Stopped. Click Show Logs to view the log containing
NetSHIELD Blocking stopped data.
For a more complete list, use the Log Reporting Wizard and choose both BlockNow Started and
NAC Blocking Started from the Event filter.

USER GUIDE
© NETSHIELD Corporation 2017 | https://www.netshieldcorp.com | 1-800-991-3971
IMMEDIATELY BLOCKING AN UNTRUSTED ASSET
Blocking an asset every time it attempts to connect to the system will depend on the settings
selected in the Asset Detection System. Asset Detection must be running.
If option #1, Detect Assets, Alert. Allow Manual Blocking is selected:
• Select Network Access Control
Manage Assets from the left menu to go directly to the
Manage Assets screen.
• Select Block Now from the Mouse Button 2 menu.
If option #2, Detect Assets, Alert and Block is selected:
• Select Network Access Control
Manage Assets from the left menu to go directly to the
Manage Assets screen.
Select the checkbox next to the asset to be Untrusted and click the Untrust button in the Asset
Actions pane or select Untrust from the Mouse Button 2 menu.
Important Note: The asset marked as Untrusted must be online and within NetSHIELD Blocking
Range for blocking to be initiated, otherwise it will be marked as untrusted and will be blocked
when it comes online.
ENABLING NETSHIELD UNBLOCKING TRAFFIC
Unblocking traffic will be sent when a blocked asset is marked as trusted.
• Select NAC Configuration
Asset Detection System from the left menu to go directly to
the Asset Detection System configuration screen.
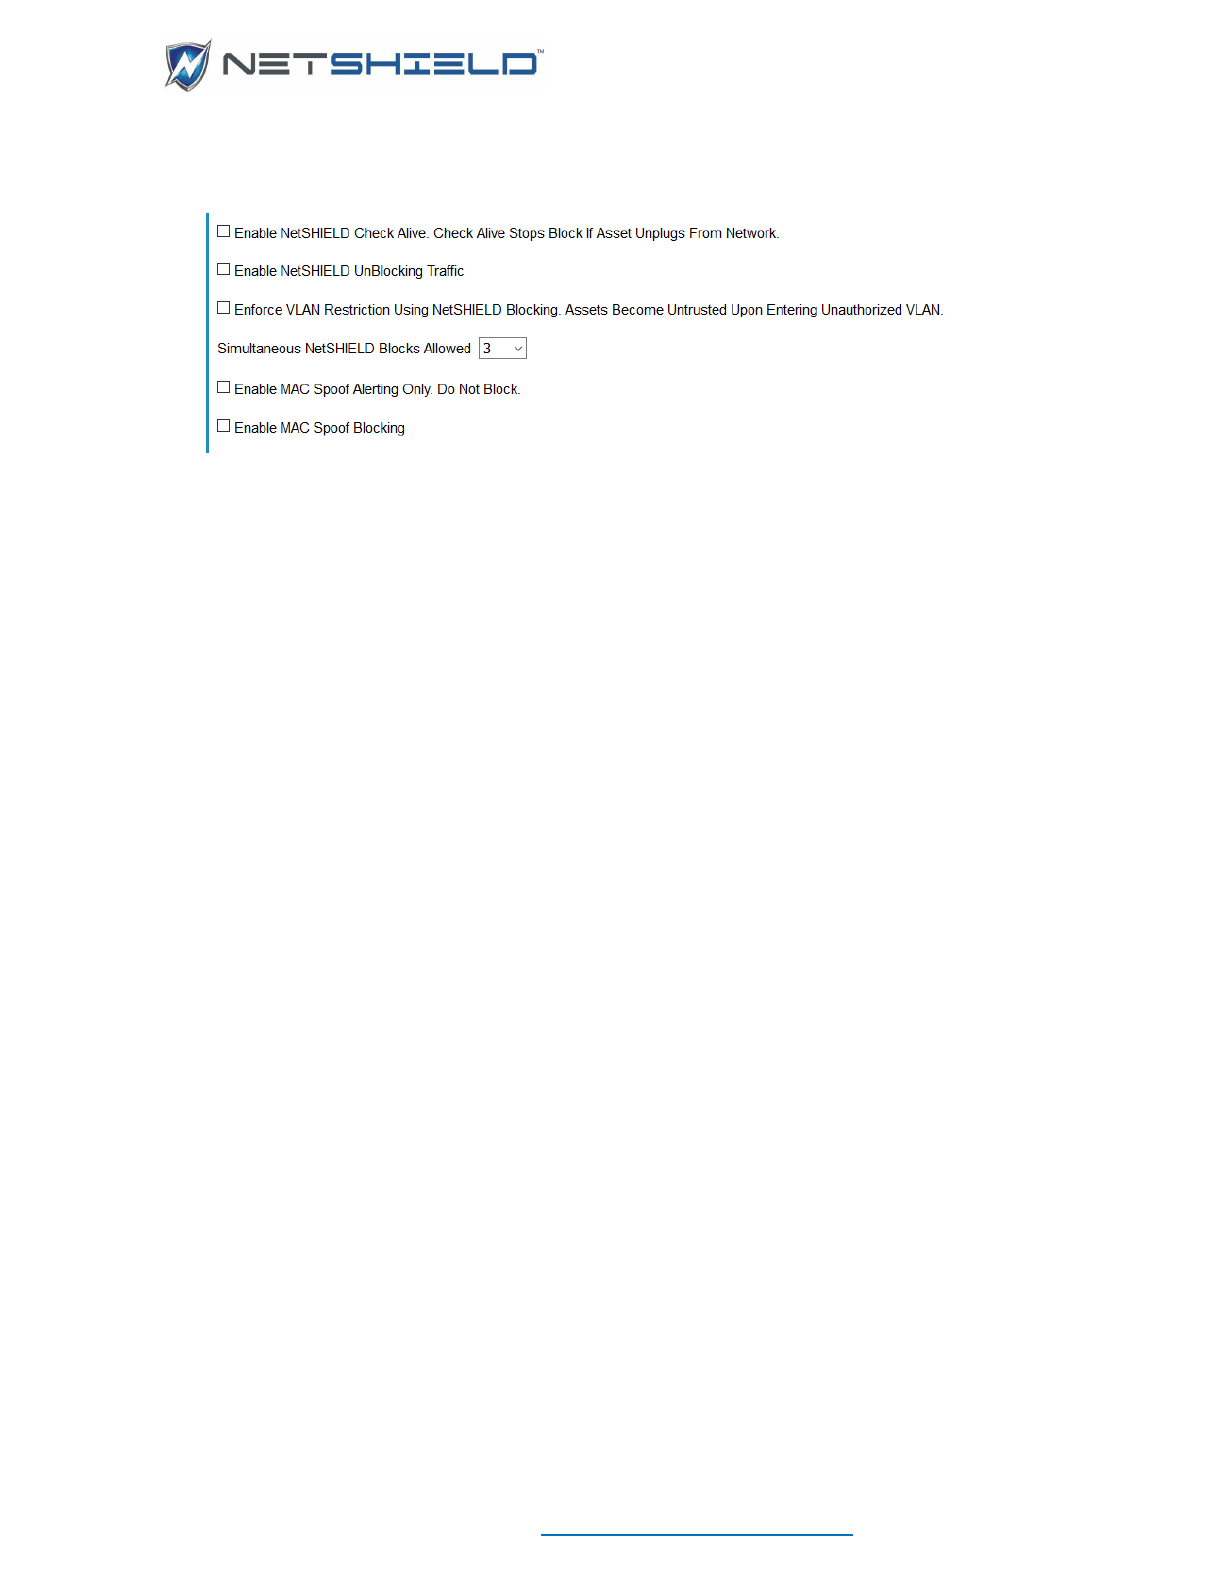
USER GUIDE
© NETSHIELD Corporation 2017 | https://www.netshieldcorp.com | 1-800-991-3971
• Select the Enable NetSHIELD UnBlocking Traffic checkbox.
ENABLING MAC SPOOF ALERTING
If MAC Spoof Alerting is enabled, NetSHIELD will send an alert when multiple IP addresses are
detected for a single MAC address.
• Select NAC Configuration
Asset Detection System from the left menu to go directly to
the Asset Detection System configuration screen.
• Select the Enable MAC Spoof Alerting checkbox.
ENABLING MAC SPOOF BLOCKING
If MAC Spoof Blocking is enabled, SnoopWall NetSHIELD will initiate NetSHIELD blocking
when multiple IP addresses are detected for a single MAC address. All assets assigned to the
single MAC address will be blocked.
• Select NAC Configuration
Asset Detection System from the left menu to go directly to
the Asset Detection System configuration screen.
• Select the Enable MAC Spoof Blocking checkbox.
VIEWING ADS CONFIGURATION SETTINGS
To view the ADS configuration settings:
• Select NAC Configuration
Asset Detection System from the left menu to go directly to
the Asset Detection System configuration screen.
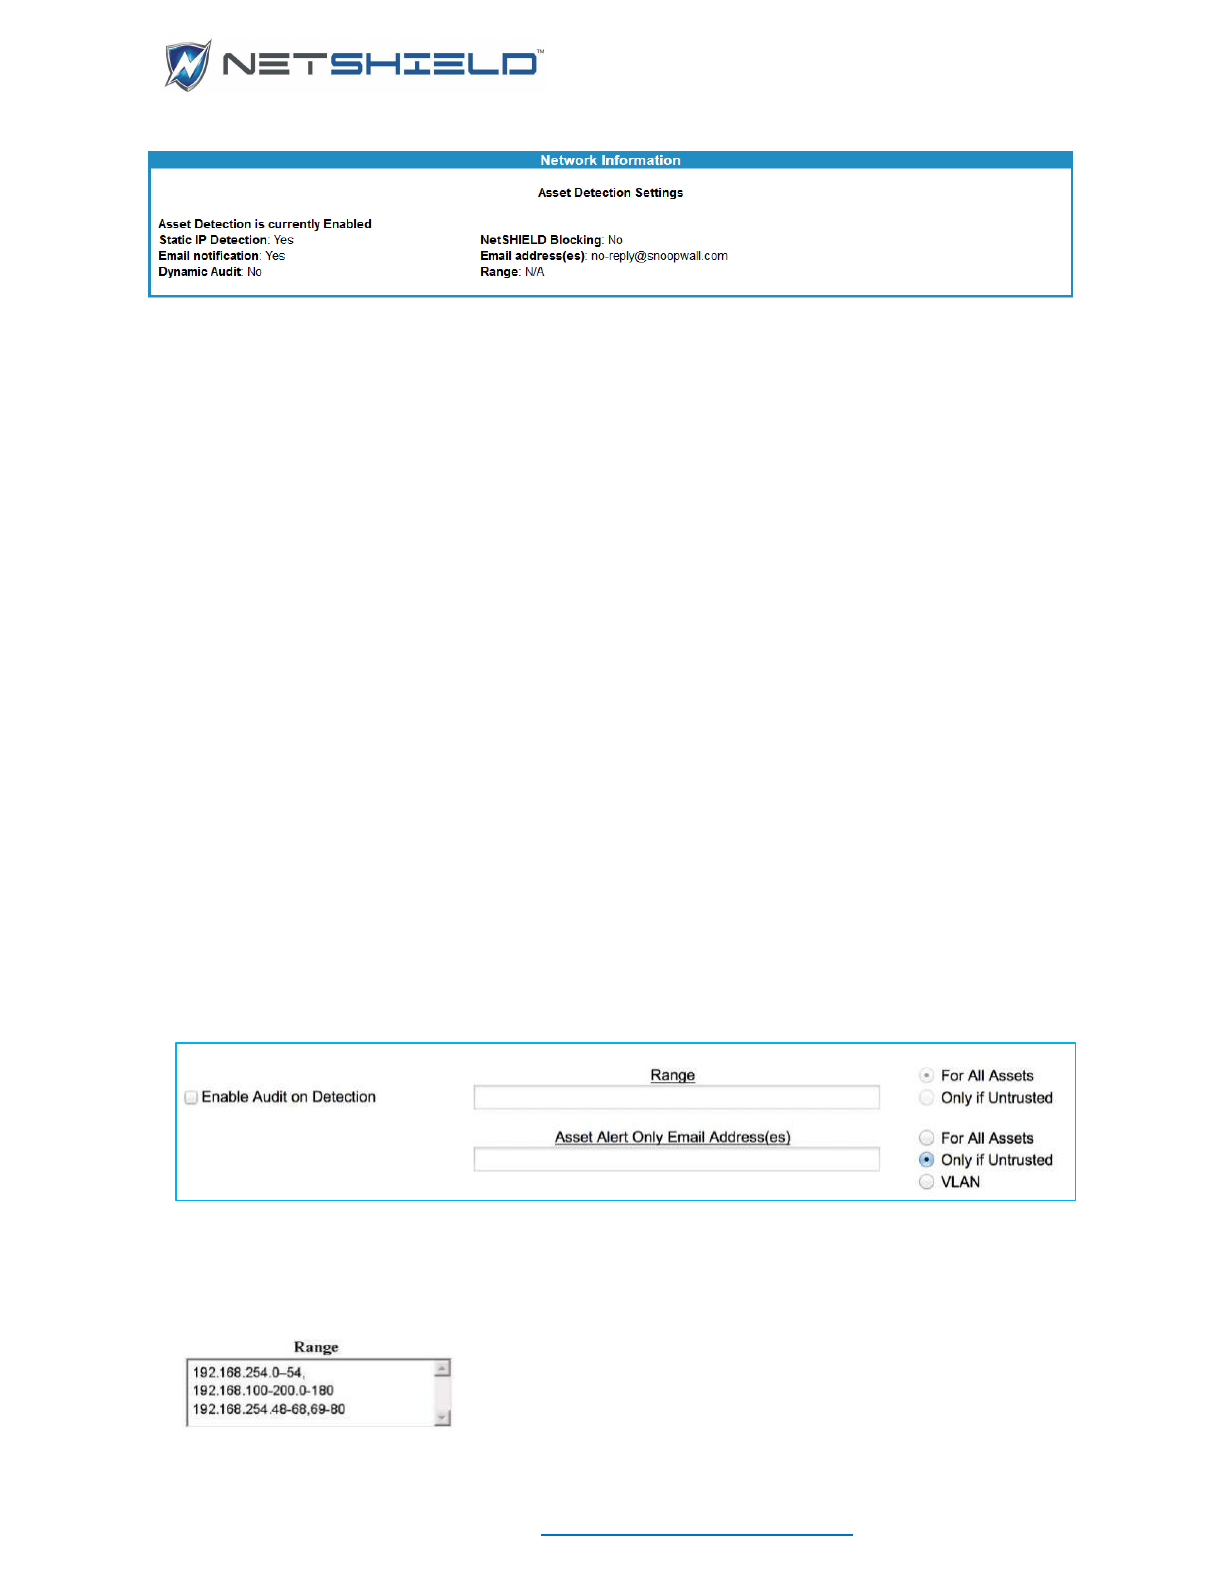
USER GUIDE
© NETSHIELD Corporation 2017 | https://www.netshieldcorp.com | 1-800-991-3971
PREPARING YOUR NETWORK FOR ASSET DETECTION
Asset Detection discovers new devices (such as laptops or wireless routers) upon plug-in or
connection to the network. When new assets are detected, you can choose to have NetSHIELD
perform any of the following actions:
• Quarantine and notify appropriate personnel upon detection of an untrusted asset
• Send an email notification when a new system is detected
• Audit the new system immediately
• Block traffic to/from the new system at the SmartSwitch when vulnerabilities are detected.
Note: For SmartSwitch blocking to take effect, you must set up an interface to the
SmartSwitch.
• Block traffic at the port or IP address level
To create a protocol for SnoopWall NetSHIELD to follow upon discovering new assets,
complete the following fields in the Asset Detection System window under NAC
Configuration
Asset Detection System.
Enable Audit Upon Detection—SnoopWall NetSHIELD will audit assets upon discovery. Check
the appropriate boxes to enable the audit For All Assets or just Untrusted assets. Enter the
network address range(s) to define the detection level.
Enter distinct IP ranges separated by commas, as shown in the illustration.
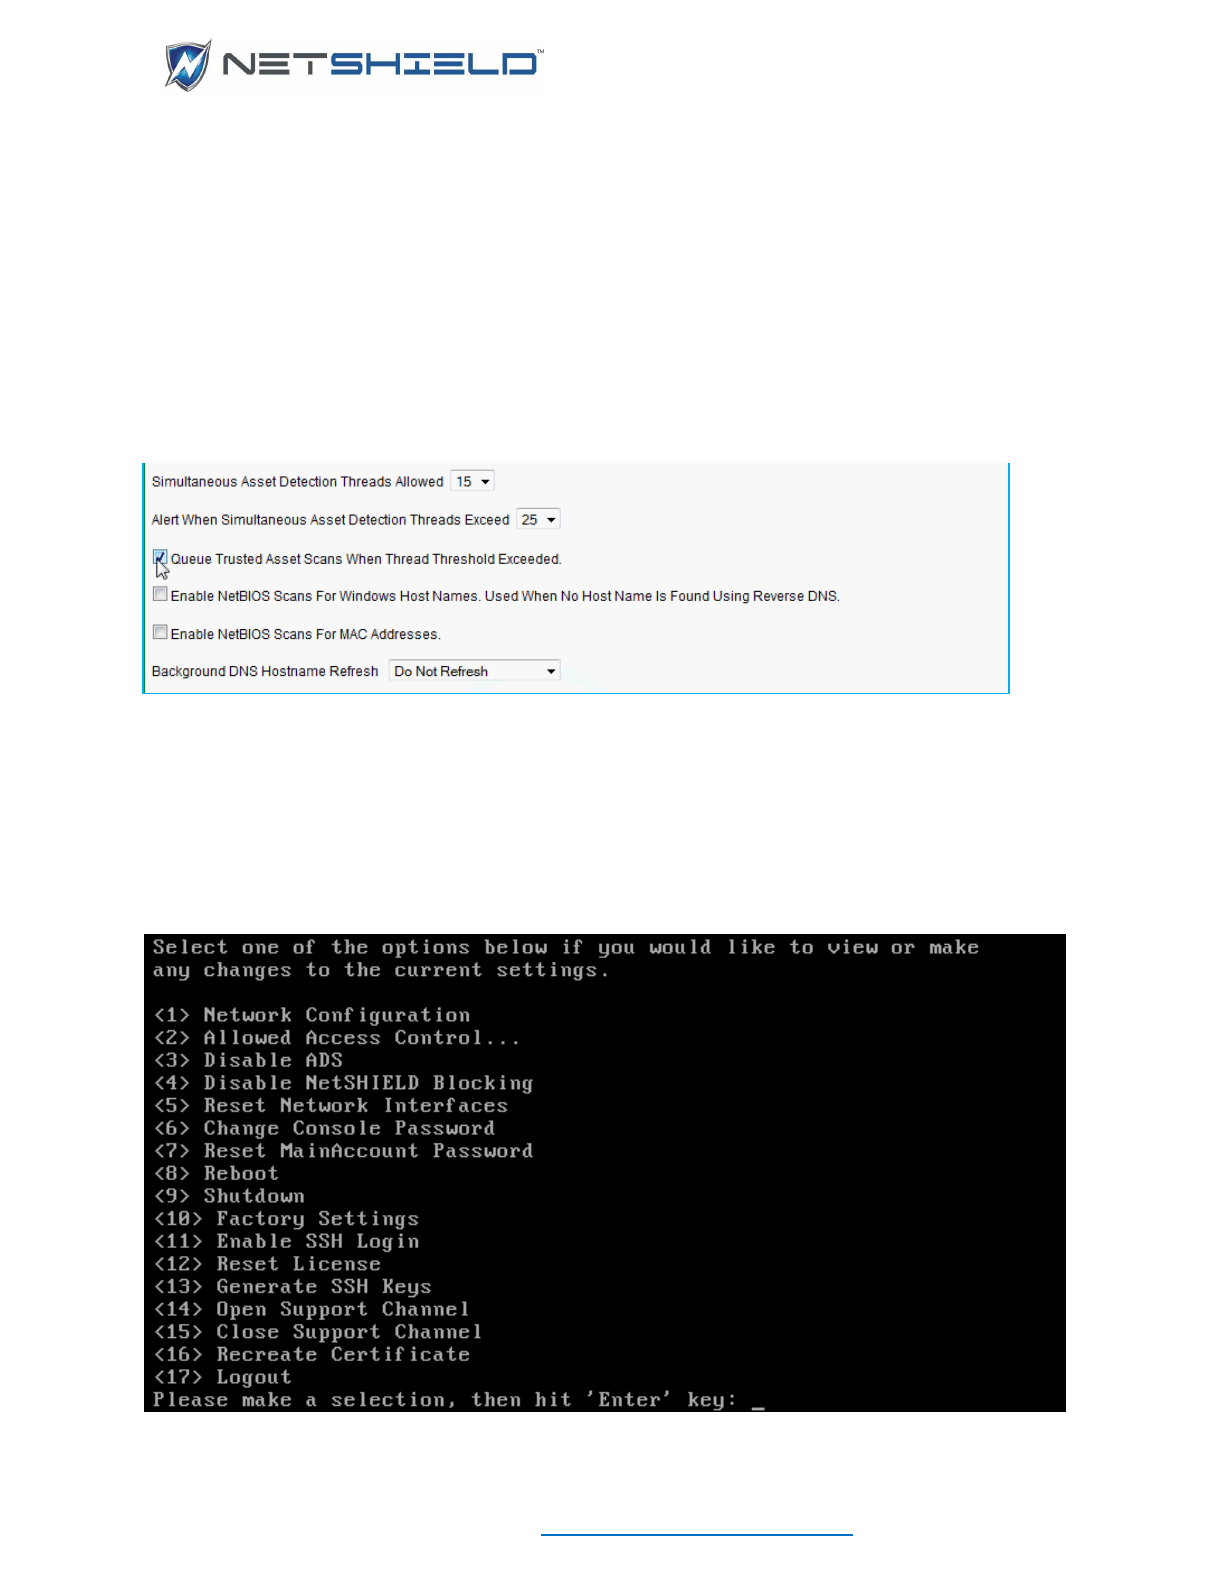
USER GUIDE
© NETSHIELD Corporation 2017 | https://www.netshieldcorp.com | 1-800-991-3971
• Notify by Email—Provide email addresses for individuals who should be notified of detected
assets. They will be notified in addition to the people you designated under Notifications in
Setup.
• You may also select the frequency at which you wish to receive Untrusted asset alerts.
• Click Save.
QUEUING TRUSTED ASSET SCANS
Select Queue Trusted Asset Scans When Thread Threshold Exceeded in order to queue
scans of trusted assets. Scans will only be queued if the thread threshold is exceeded.
DISABLE ADS
To disable the Asset Detection System from the console select menu option #3:

USER GUIDE
© NETSHIELD Corporation 2017 | https://www.netshieldcorp.com | 1-800-991-3971
Upon selecting this option, you will be asked to verify that you really wish to disable the ADS.
Answering Y will disable the ADS and redisplay the menu.
POLICY MANAGER
Under the Network Access Control menu, there is a new item, Manage Policies, which allows
you to set conditions for ensuring NetBIOS names don’t change.
To use the Policy Manager define categories and assign category values to the assets. Click the
Manage Categories button to link directly to the Category Manager to create categories and
values; click Manage Assets to link to the Asset Manager to assign the category values to
assets.
Once you have categories and assets assigned to those categories, you’re ready to create a
policy. Think of it as a sentence: “Alert Only when assets with Category=Category Value have
Hostname/MAC ID mismatch”.
The only Policy Actions currently available are Alert Only and Untrust. The only condition
currently available is Hostname/MAC ID mismatch. The category and category value may be
any that you have defined.
CONFIGURING INVENTORY ALERTS
When an asset is unresponsive SnoopWall NetSHIELD highlights that system in the Systems
(Asset) List on the Asset Tracker page and alerts the designated contact via email.
The Network Monitor engine monitors assets when Inventory Alerts is enabled and determines
when a system is non-responsive. During normal business hours, the Network Monitor engine
performs a simple ping test on each asset at preset intervals (every 1, 5, 10, 20, 30, or 60
minutes). If an asset does not respond, Network Monitor pings it again in 5 minutes. If the asset
does not respond to the second ping, an email alert is sent to the designated contact and the
asset is highlighted in red on the Asset Tracker
Systems page.
Set up Inventory Alerts for specific system groups. This allows you to more easily control the
assets monitored and resources responsible.
To set up Inventory Alerts:
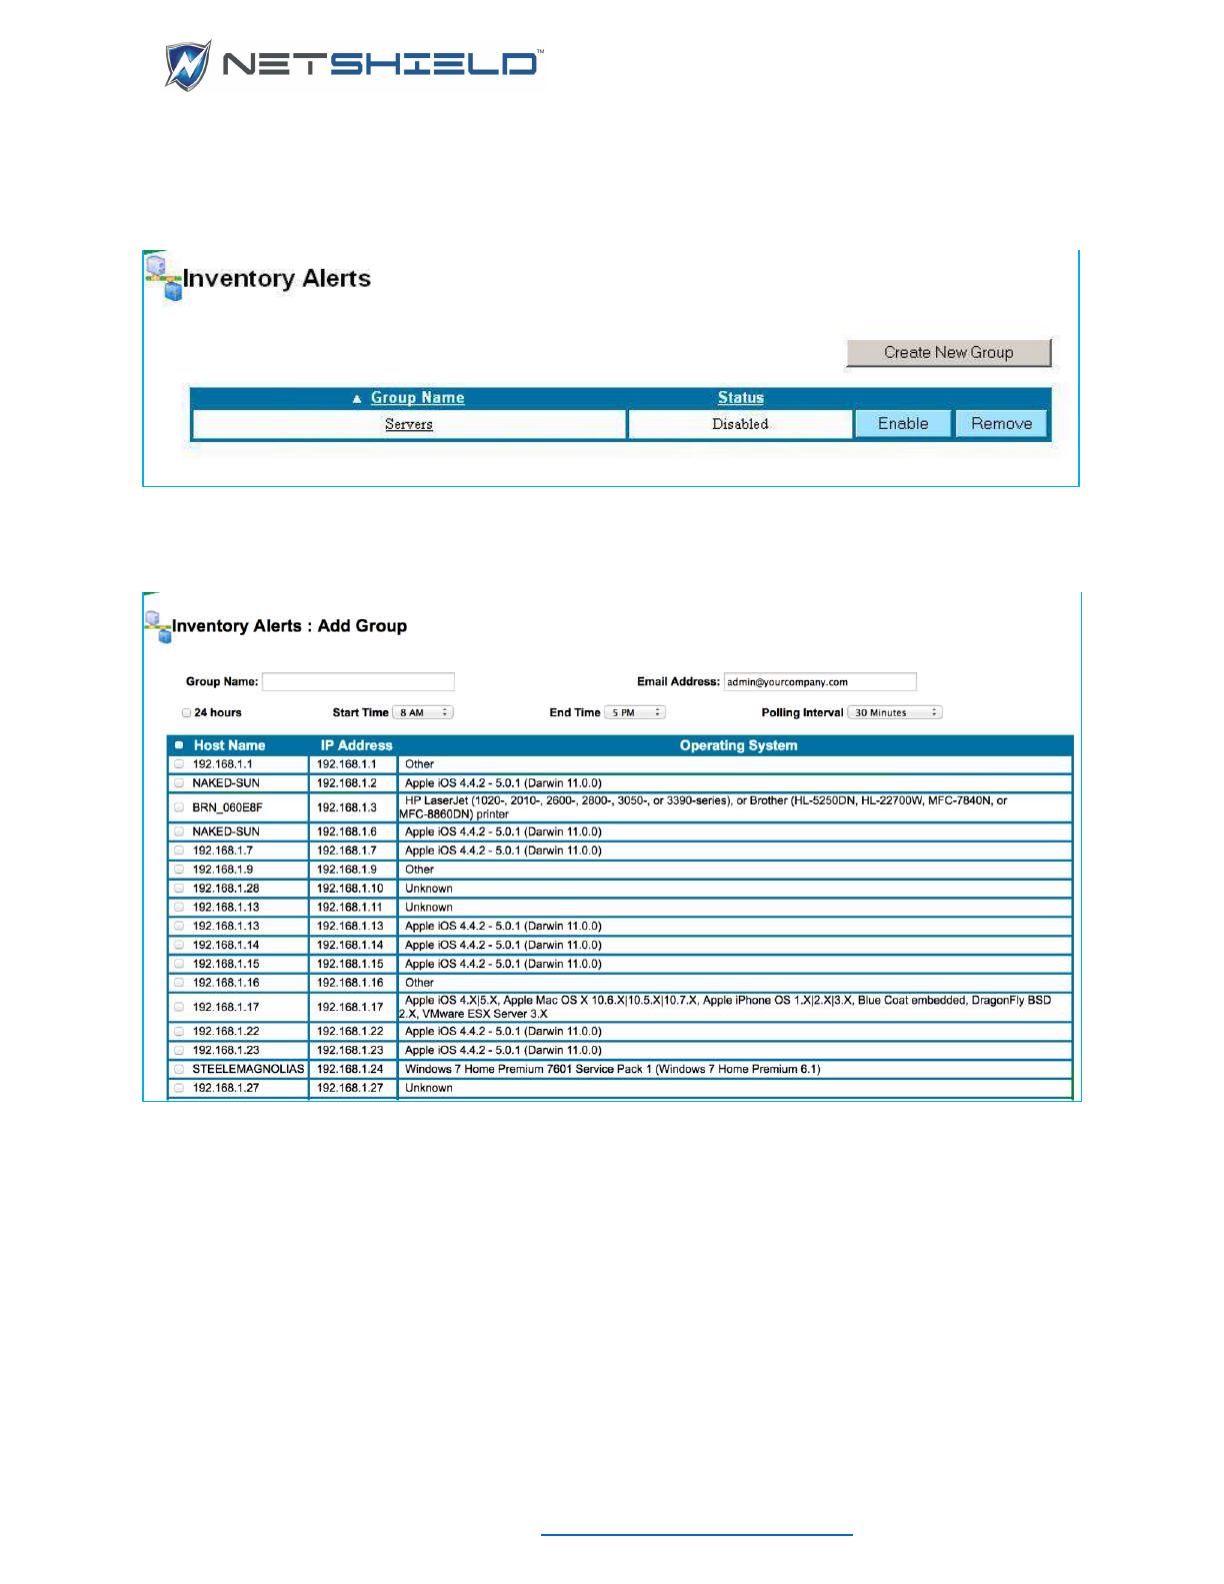
USER GUIDE
© NETSHIELD Corporation 2017 | https://www.netshieldcorp.com | 1-800-991-3971
• Select NAC Configuration
Inventory Alerts from the left menu.
The Inventory Alerts page appears.
• Click the Create New Group button to add the first group of assets for monitoring. This
takes you to the Inventory Alerts: Add Group page.
• Type the Group Name in the box. We suggest you categorize systems in a meaningful way
so they are easier to manage (e.g. Servers, Desktops, Sales Department, etc.).
• Enter the Email Address(es) for the designated contact(s) separated by semi-colons. If no
email address is specified, you are prompted to provide one.
• Select times and Polling Interval.
24 hours – Choose this option if you want the alerts running all day.
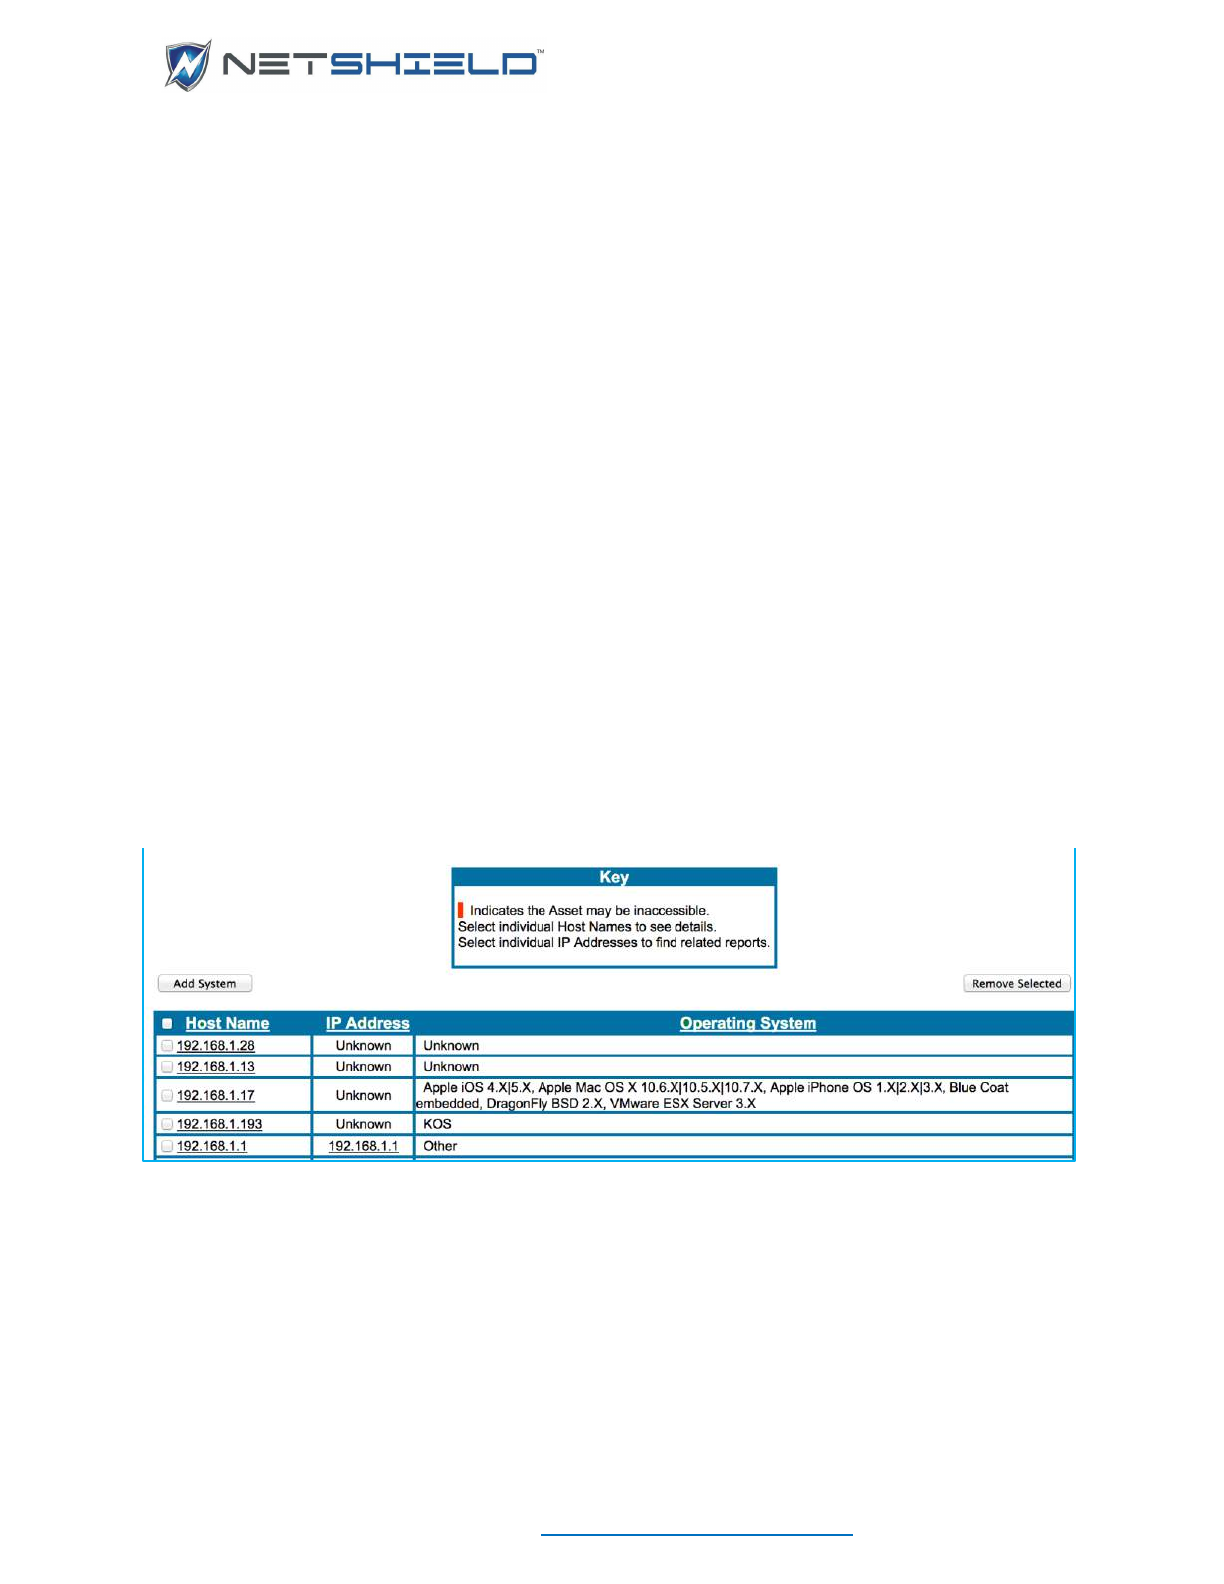
USER GUIDE
© NETSHIELD Corporation 2017 | https://www.netshieldcorp.com | 1-800-991-3971
Start Time and End Time – Select times here if you want the alerts running within a specific
time interval.
Polling Interval – Select the interval most appropriate for your environment (every 1, 5, 10,
20, or 30 minutes; hourly, twice daily, or daily)
• Click the Save button to retain your choices or Cancel to return to the Inventory Alerts
page.
Your new group(s) appears in the list. Groups are listed in the order in which they were created.
View the Group Name and Status here. Buttons on the right side allow you to Enable the alert
or Remove each group from the list, as required.
CONFIGURING ASSET TRACKER
Complete an Initial Asset Discovery from Network Access Control on the left menu before you
use Asset Tracker.
VIEWING SYSTEMS LIST (ASSET LIST) IN ASSET TRACKER
To display a list of current assets:
• Select Asset Tracker
Systems in the left menu to open Asset Tracker.
The Asset Tracker: Systems page appears. The Systems List shows all systems (assets) on
the network. These assets were either entered manually or discovered by SnoopWall
NetSHIELD’s automatic discovery engine during the Asset Discovery process.
As the key indicates:
• A system highlighted in red is not accessible.
• You can click on a system name in the Host Name column to view details about that
asset

USER GUIDE
© NETSHIELD Corporation 2017 | https://www.netshieldcorp.com | 1-800-991-3971
• You can select a system’s IP address (in IP Address column) to find all reports with
information about that system
VIEWING/MODIFYING/ADDING SYSTEMS IN THE ASSET TRACKER
Your assets are listed on the Asset Tracker
Systems page.
To view an existing asset in the list, click on its Host Name in the far left column. The Asset
Tracker: System Information Overview display opens. Displayed is all known information
about the system: its host name, IP address, MAC ID, etc.
SnoopWall NetSHIELD generates a link between the system information and reports generated
by audits to assist you in tracking assets. The date and time (24 hour time is used) the asset
was last audited is indicated near the bottom of the left-most column.
Associated Users is the last item in the first column. You may add users, peripherals, and
software to the database and associate them with particular systems.
Editing/Adding System Information
You can edit existing system information or add new systems from Asset Tracker.
To edit an existing system:
• Select Asset Tracker
Systems from the left menu.
• Click the Host Name you wish to modify. The Asset Tracker: System Information
Overview page appears.
• Click the Edit button at the bottom of the page to reach the Asset Tracker: System
Information page and make the necessary changes. Be sure to click Update System at
the bottom of the page to save your revisions.
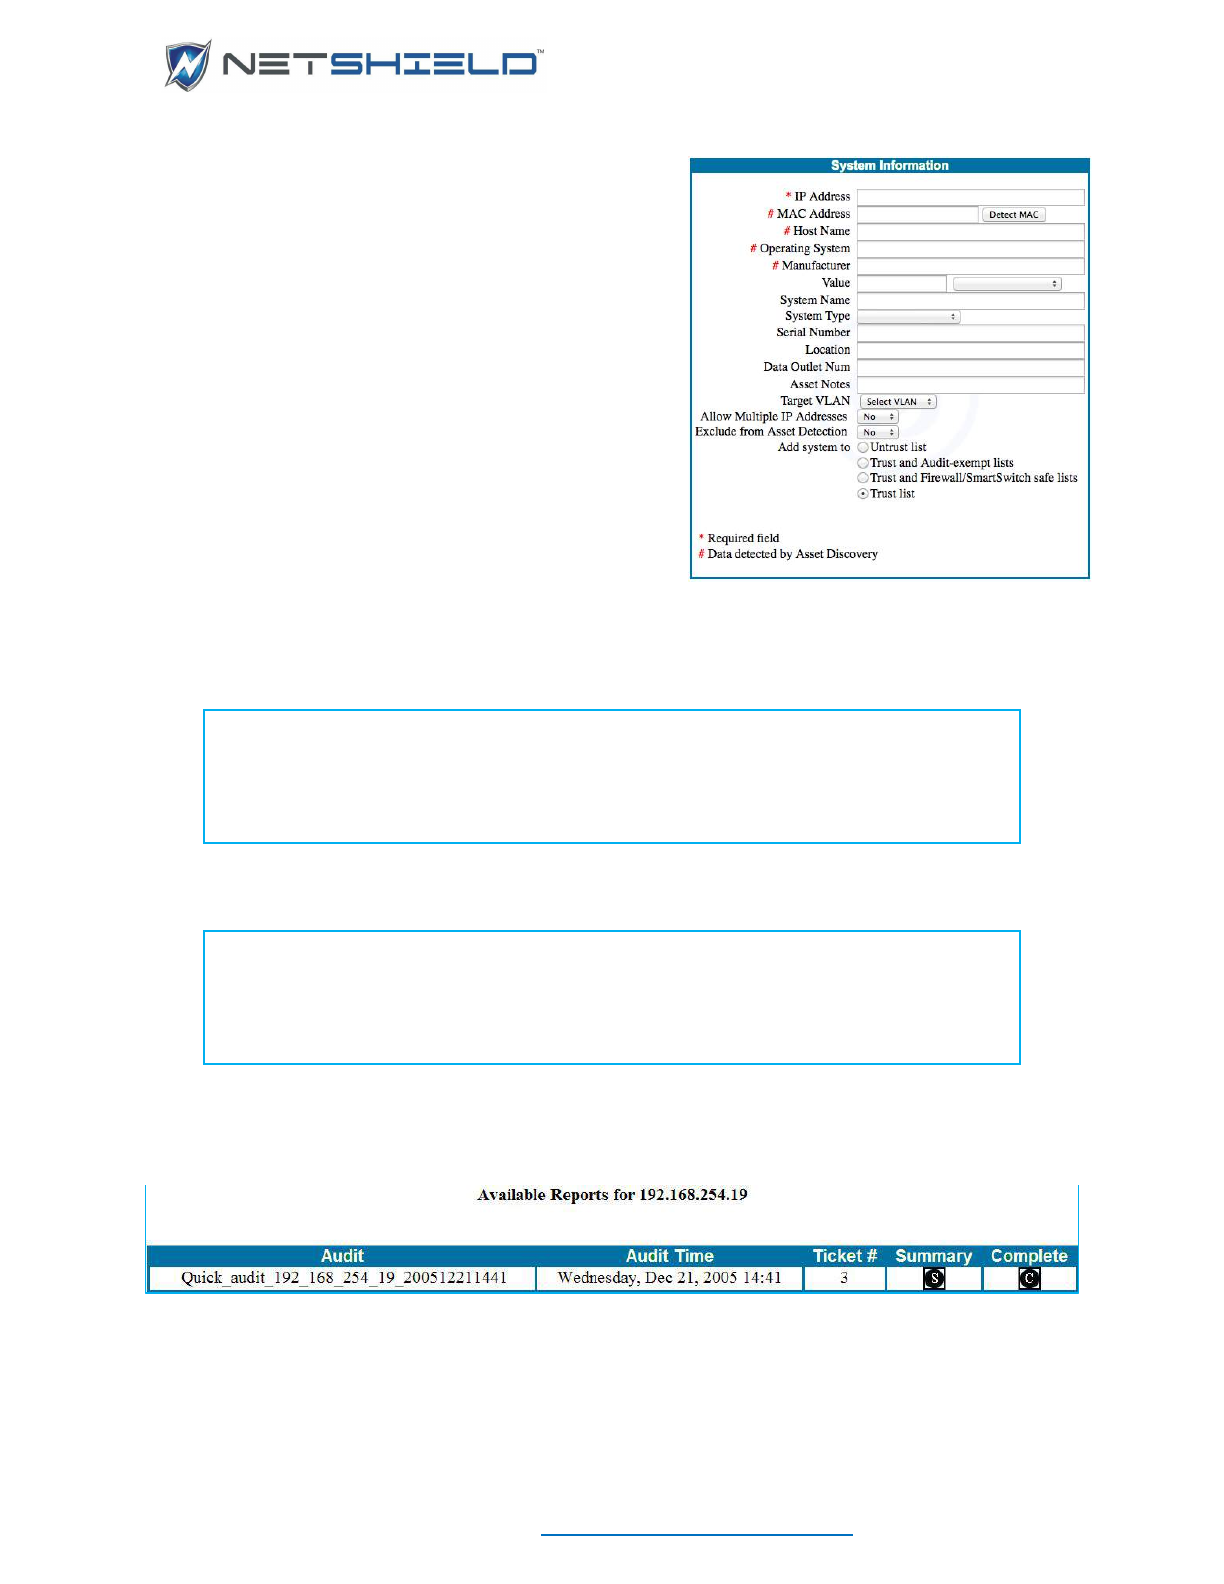
USER GUIDE
© NETSHIELD Corporation 2017 | https://www.netshieldcorp.com | 1-800-991-3971
To add a new system:
• Select Asset Tracker
Systems from the left
menu.
• Click the Add System button to the upper left of
the Asset List. The Asset Tracker: System
Information page appears.
(You can also get to the Asset Tracker: System
Information page by selecting Network Access
Control
Add Assets.)
• Fill in the requested data. For more information
about these fields, see Adding IP Addresses
Manually in the Setting Up Network Access
Control section.
• Click Add System to save your entry.
Note: Required fields (marked with an asterisk) must contain information. After
you add system data, check the System Information page again. The MAC
Address, Host Name, Operating System, and Manufacturer may be filled in for
you. We strongly recommend you only change the MAC Address and Host Name
fields if it is absolutely necessary.
After you modify the list in any way, you should see changes in the Systems List (Asset
List).
NOTE: When generating report summaries on critical servers (in Executive and
Management reports), SnoopWall NetSHIELD refers to systems with the word
Server in the System Type field. If no systems are of type Server, SnoopWall
NetSHIELD reports instead on most vulnerable systems under the heading Most
Vulnerable Critical Servers.
Viewing Asset Report List
SnoopWall NetSHIELD generates a variety of reports you can use to more effectively manage
your assets.
• Select Asset Tracker
Systems from the left menu.
• Click on the IP Address of interest. The Available Reports list for that IP address appears.
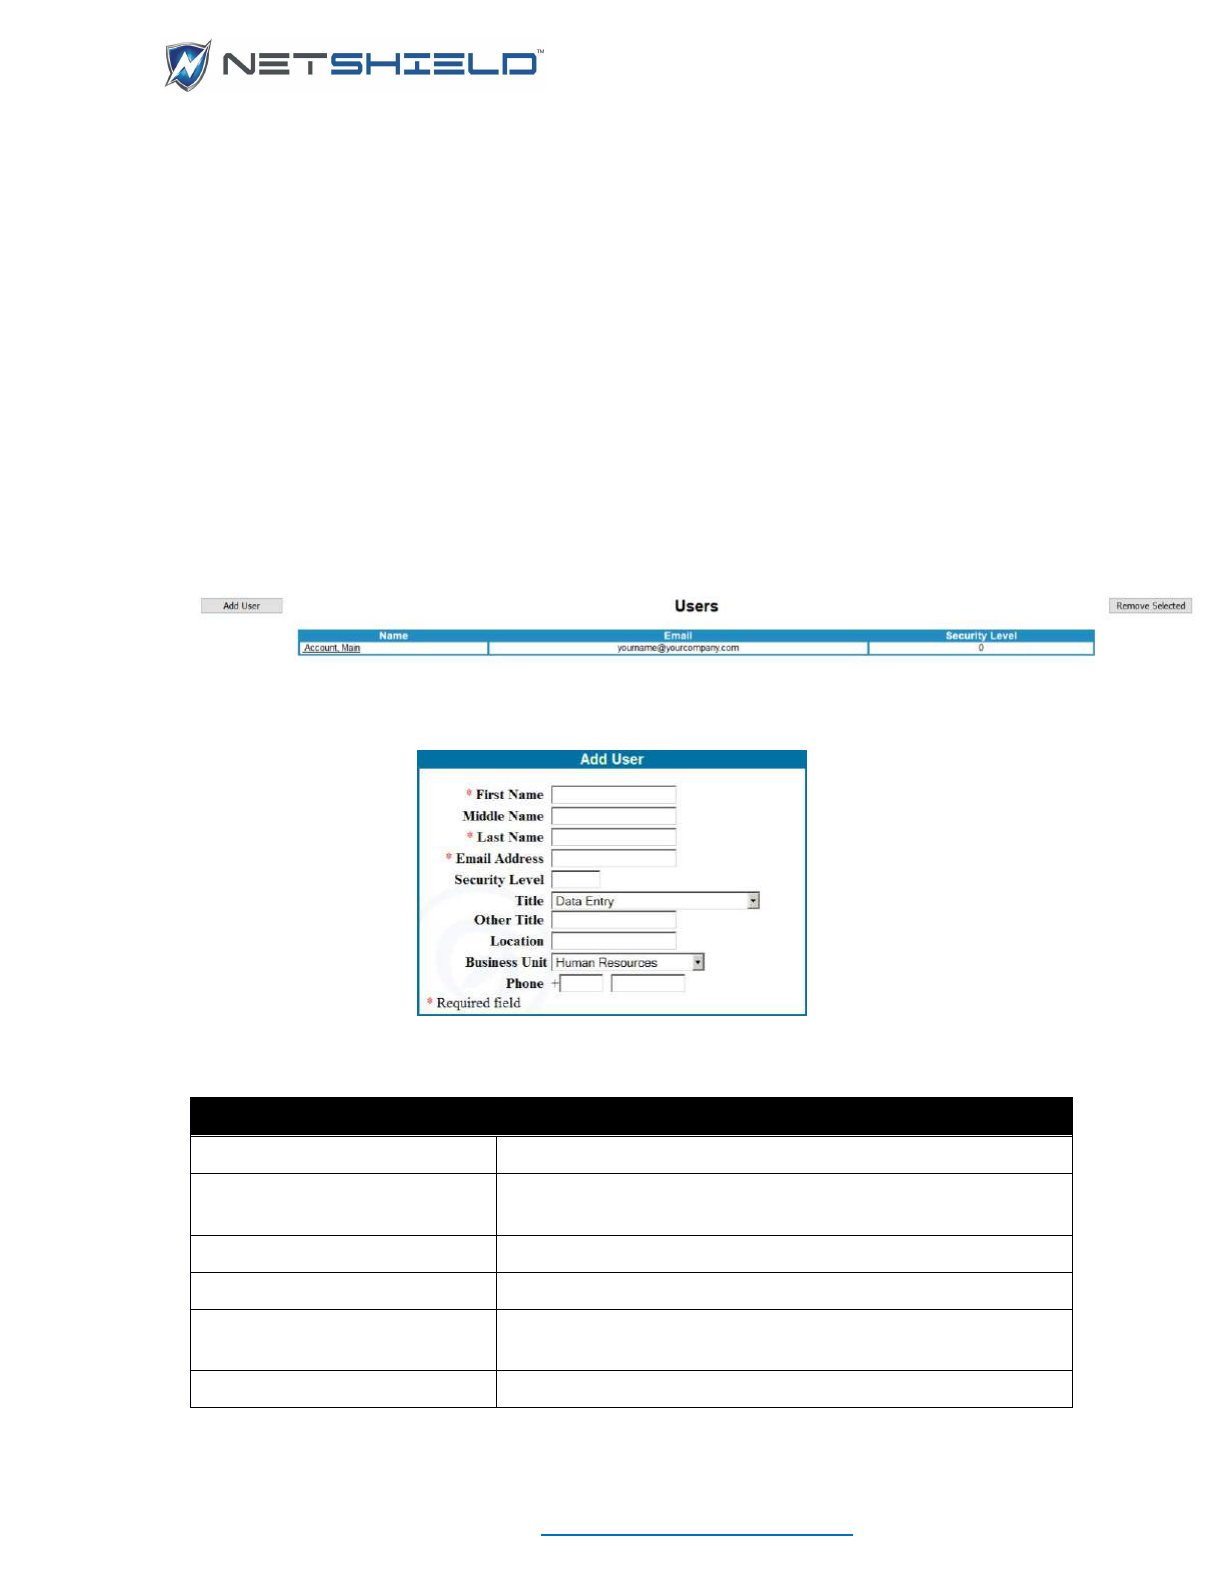
USER GUIDE
© NETSHIELD Corporation 2017 | https://www.netshieldcorp.com | 1-800-991-3971
• See Overview of Report Types and Content for more information on reports.
ADDING USER INFORMATION
You can add users on your network independent of an individual asset. Later, you may
associate users with particular systems (see Associating Users, Software, & Peripherals With
Systems). When you create user accounts under System
User Management, you may
choose from users you have previously added here.
To add user information:
• Select Asset Tracker
Users from the left menu.
• The Asset Tracker: Users page displays with current individuals entered in the system.
Initially, this list is empty.
Click the Add User button to the upper left. The Add User dialog opens.
• Enter the requested information. See the guidelines in the table below.
Item
Guideline
First Name (Required)
Given name.
Middle Name
Not required. May be useful if you have more than one person
with the same first and last name
Last Name (Required)
Family name.
Email Address (Required)
Must be a valid email address.
Security Level
Security level of user, up to 5 digits. This element is a custom
designation for your network.
Title
User’s role.
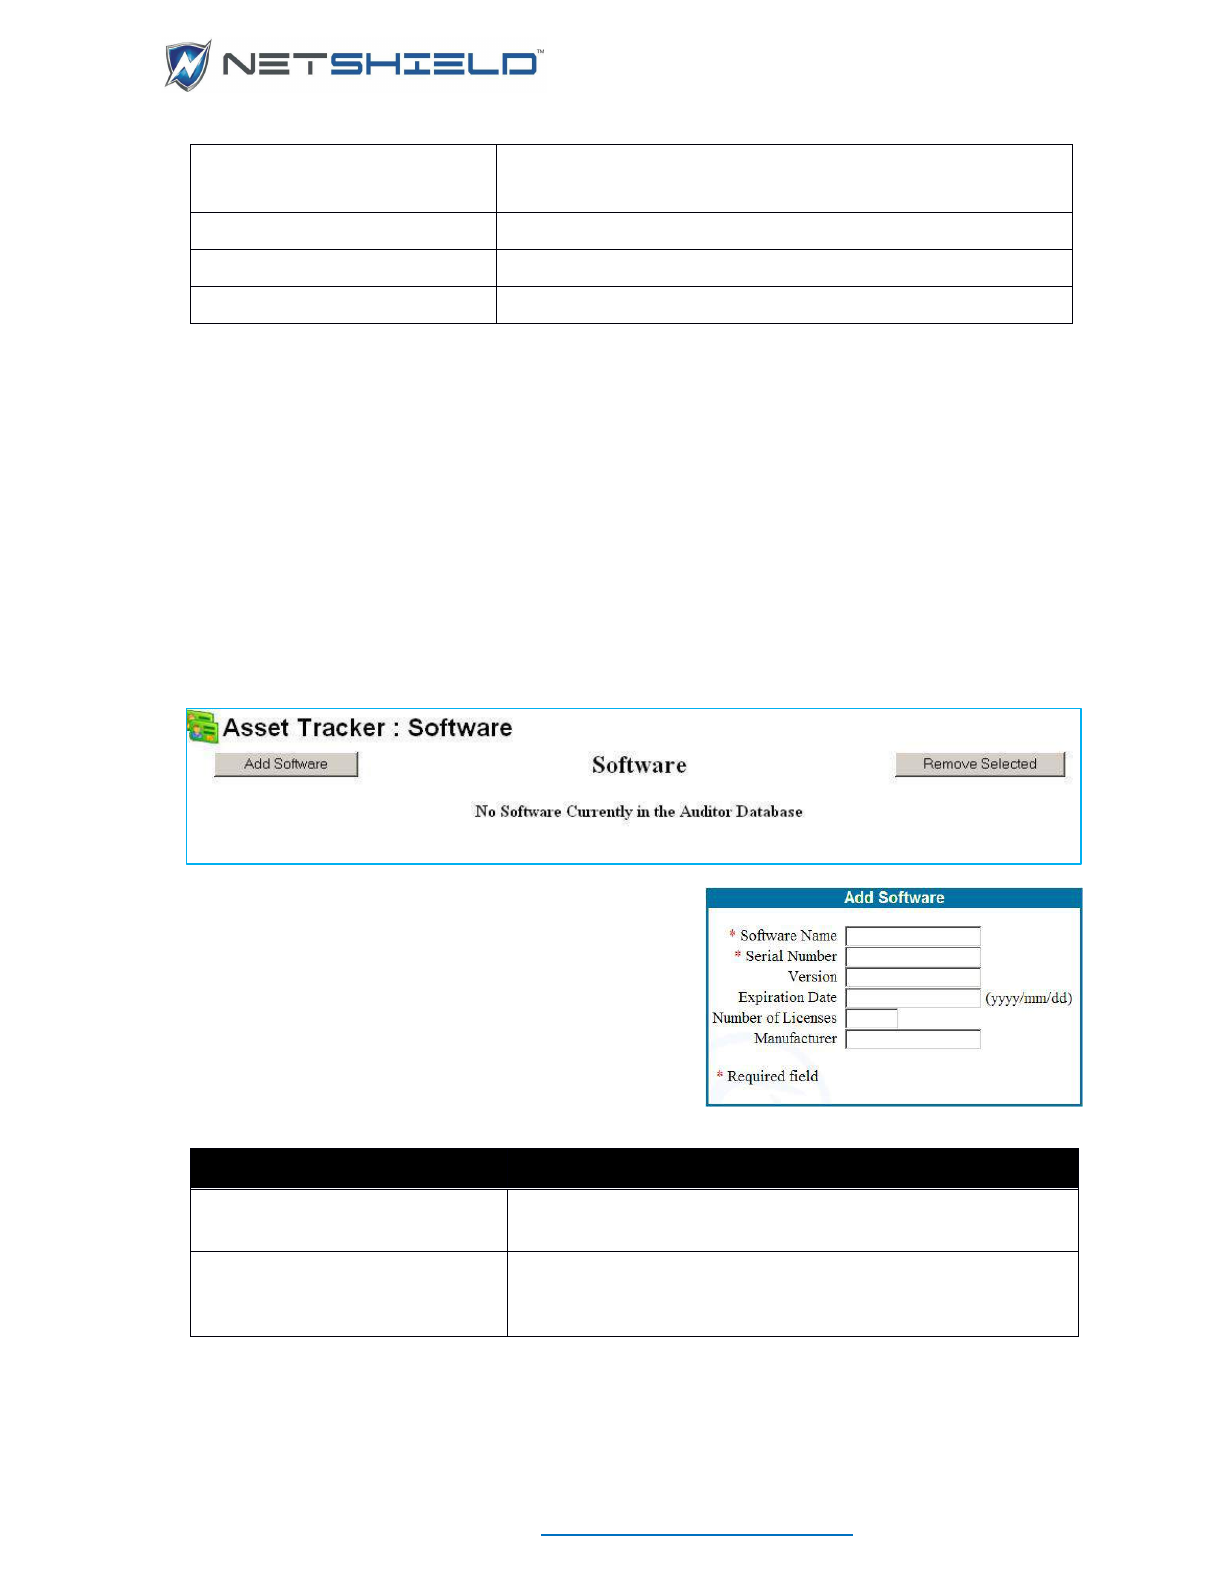
USER GUIDE
© NETSHIELD Corporation 2017 | https://www.netshieldcorp.com | 1-800-991-3971
Other Title
If you selected “Other” from the Title dropdown list, you may
enter a title of your choice here.
Location
User’s location - building, wing, office area, lab, etc.
Business Unit
User’s department.
Phone
User’s phone number.
• When you complete all information about the new user, click Add User to save the data and
return to the Asset Tracker: Users page. As you add users, they are listed in alphabetical
order with their email addresses and security levels.
ADDING SOFTWARE INFORMATION
You can add software on your network independent of an asset. Later, you may associate
software with particular systems (see Associating Users, Software, & Peripherals With
Systems). To enter software:
• Select Asset Tracker
Software from the left menu.
The Asset Tracker: Software List displays. (Initially,
this list is empty, as shown.)
• Click the Add Software button to the left. The Add
Software dialog opens.
• Enter requested data in the form. See Guidelines in
the table below.
Item
Guideline
Software Name (Required)
Do not include the manufacturer’s name in the product name,
e.g., enter Office, not Microsoft Office.
Manufacturer
Enter the name of the software manufacturer without
Corporation, Incorporated, or Inc. The manufacturer’s name is
pre-appended to the product name.
• Click the Add Software button at the bottom of the page when you finish entering software
data. This saves the information and returns you to the Asset Tracker: Software list.
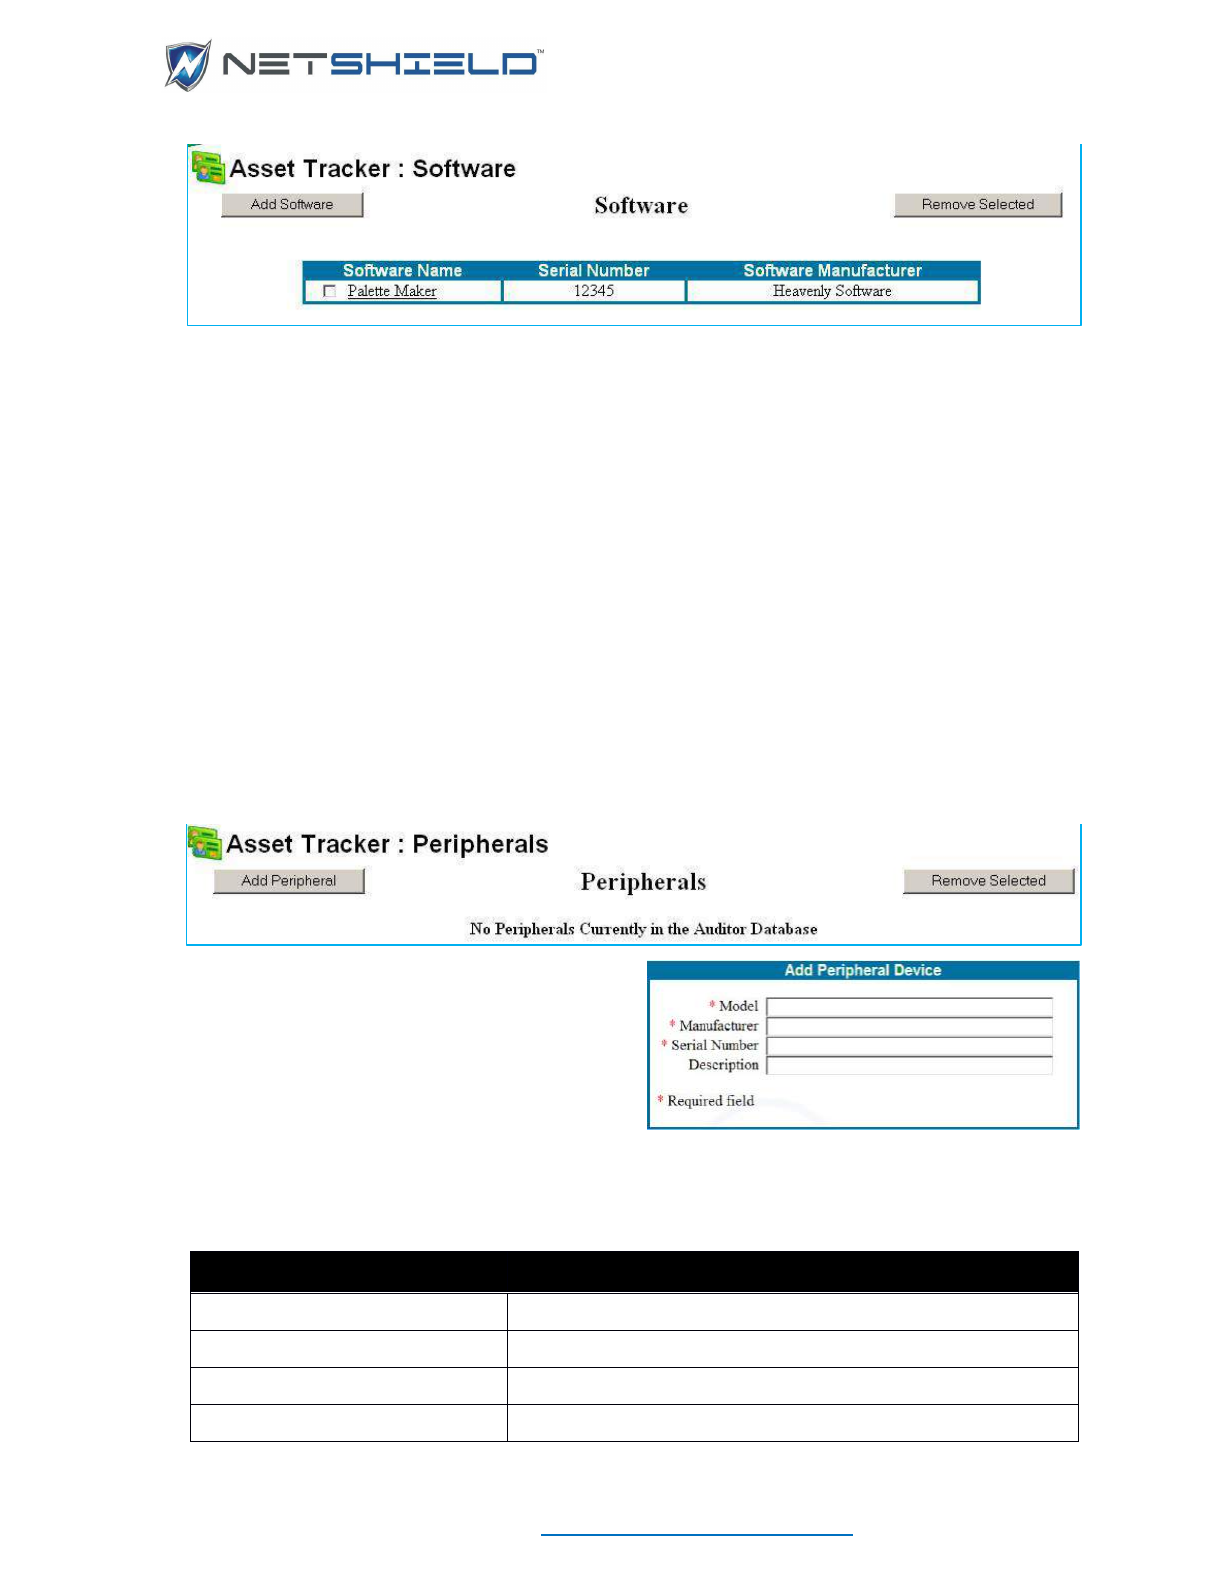
USER GUIDE
© NETSHIELD Corporation 2017 | https://www.netshieldcorp.com | 1-800-991-3971
• You can remove a software package from the list by clicking the check box to the left of its
name, then clicking the Remove Selected button.
ADDING PERIPHERAL INFORMATION
You can add peripherals on your network independently of an asset and later link the equipment
to particular system assets. This list helps you keep track of monitors, printers, and a variety of
other important equipment that may or may not need to be audited, but nevertheless has value
to the company. Later, you may associate peripherals with particular systems (see Associating
Users, Software, & Peripherals With Systems).
To add information about peripherals on your network:
• Select Asset Tracker Peripherals from the left menu.
The Peripherals list displays. Initially, this list is empty, as shown below.
• Click the Add Peripheral button to the upper
left to open the Add Peripheral Device
dialog.
• Fill in requested peripheral data.
• Fields with an asterisk are required; others are optional. See Guidelines in the table below.
Item
Guideline
Model (Required)
Alphabetic and numeric characters and hyphens allowed.
Manufacturer (Required)
Alphabetic and numeric characters and hyphens allowed.
Serial Number (Required)
Alphabetic and numeric characters and hyphens allowed.
Description
Enter up to 75 characters describing the peripheral. You may
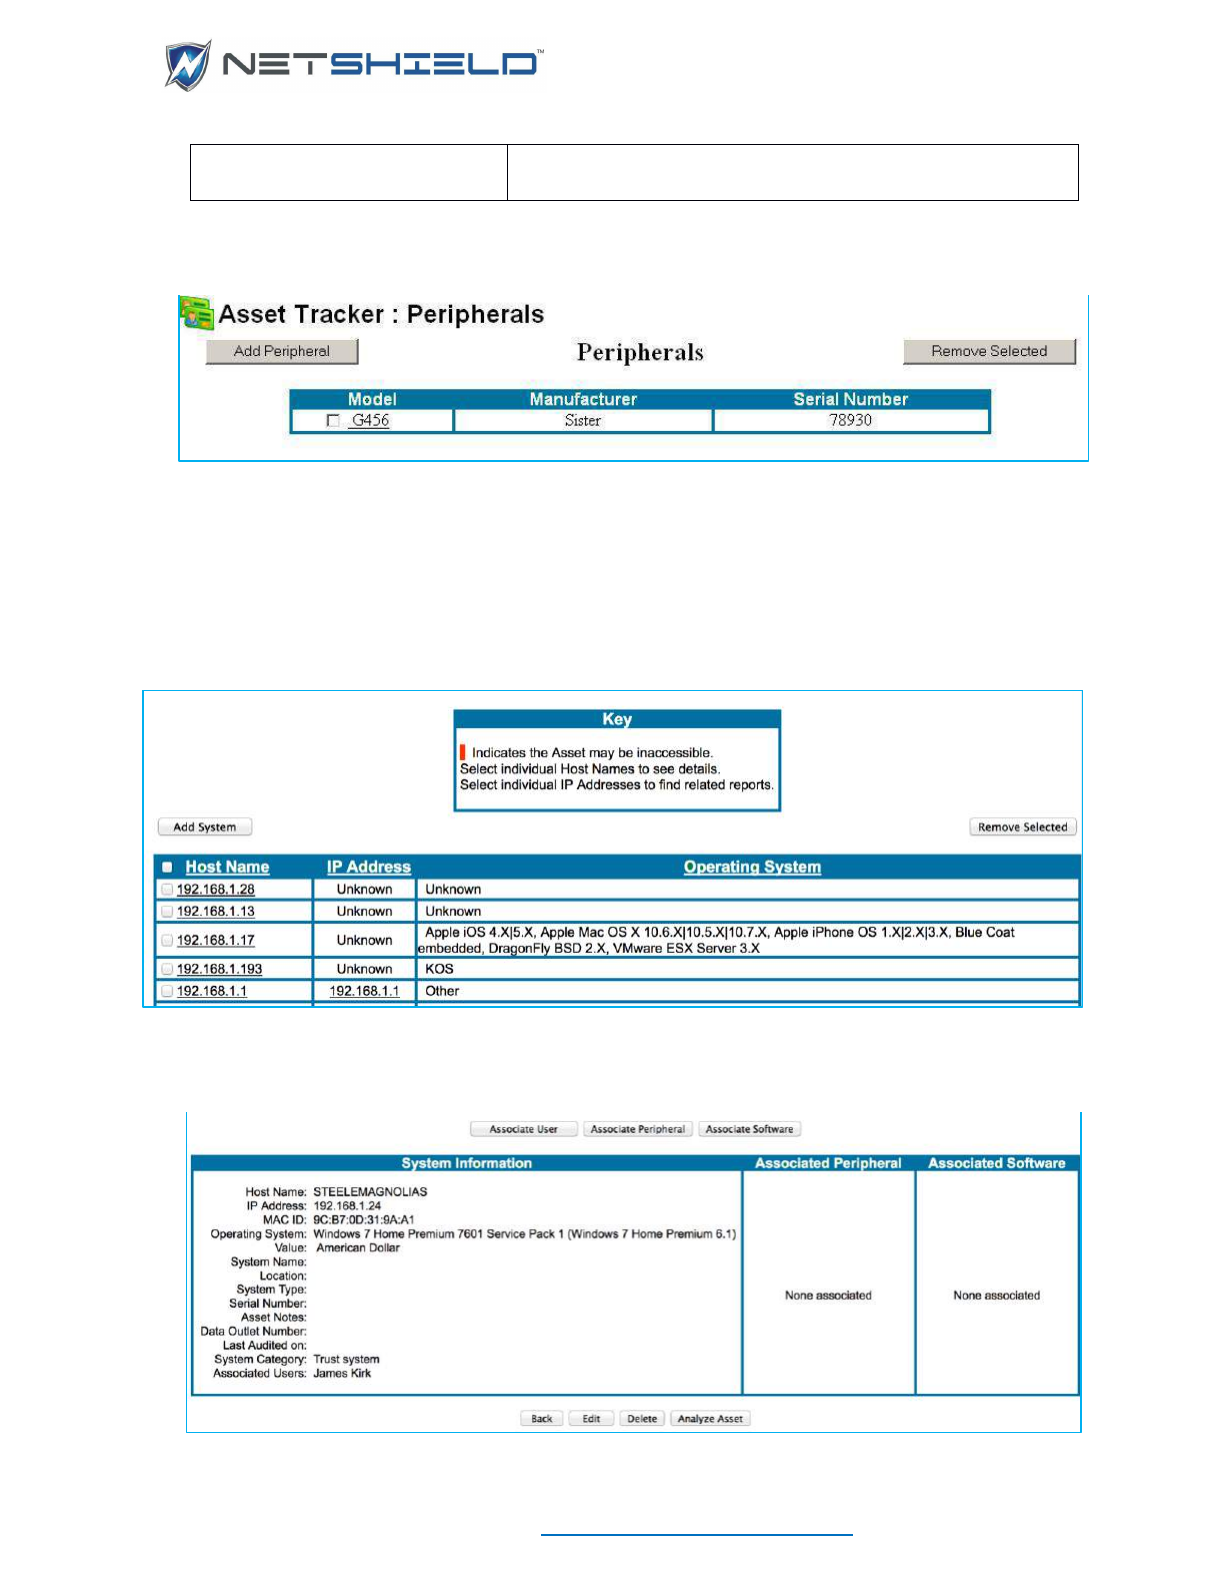
USER GUIDE
© NETSHIELD Corporation 2017 | https://www.netshieldcorp.com | 1-800-991-3971
wish to include other relevant information, such as cartridge
model numbers, year purchased, etc.
• Click the Add Peripheral button at the bottom of the page to save peripheral data. This
returns you to the Peripherals List.
• Remove a peripheral from the list by clicking the check box to the left of its name, and then
clicking the Remove Selected button.
ASSOCIATING USERS, SOFTWARE, & PERIPHERALS WITH SYSTEMS
Once you add users, software, and peripherals to your database, you can associate them with
specific systems. Start at the Asset Tracker: Systems page to make these associations.
• Click the Host Name of the target system. The Asset Tracker: System Information
Overview page opens.
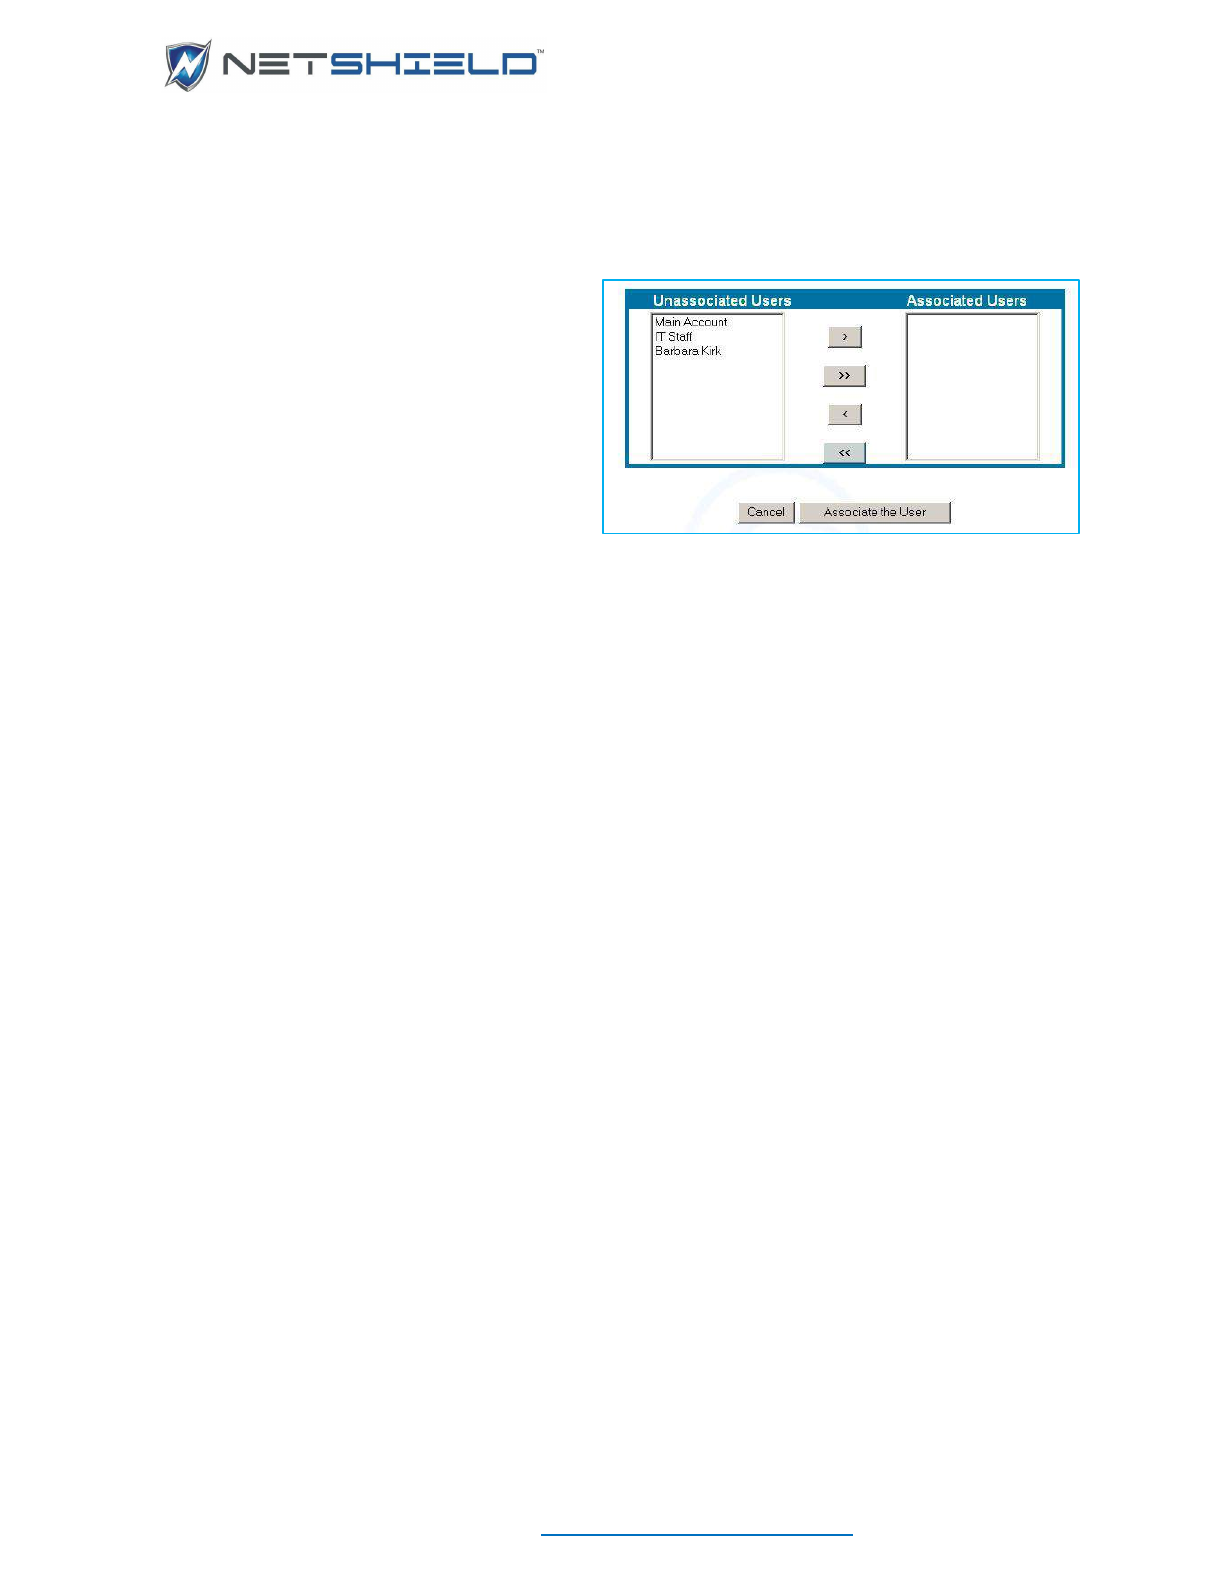
USER GUIDE
© NETSHIELD Corporation 2017 | https://www.netshieldcorp.com | 1-800-991-3971
• The Associate User, Associate Peripheral, and Associate Software buttons are at the
top of the page. These functions allow you to make links with the selected Host Name.
ASSOCIATING USERS WITH SYSTEMS
• Click the Associate User button on the
Asset Tracker: System Information
Overview. Lists of Unassociated and
Associated Users appear.
• Select users from the Unassociated
Users list on the left and click the
arrows in the middle to move them to
the Associated Users list.

USER GUIDE
© NETSHIELD Corporation 2017 | https://www.netshieldcorp.com | 1-800-991-3971
• Click the Associate the User button below
the box to complete the changes.
• When the Asset Tracker: System
Information Overview page redisplays,
notice that the user(s) you selected now
appear in the list of users associated with the
system (bottom of first column).
You may associate as many users as required
with any system.
ASSOCIATING SOFTWARE WITH SYSTEMS
• Click the Associate Software button on the
Asset Tracker: System Information
Overview page shown above.
Lists of Unassociated/Associated Software
appear.
• Select software from the Unassociated
Software list on the left and click the arrows in the middle to move them to the Associated
Software list.
• Click the Associate the Software button below the box to complete the changes.
• When the Asset Tracker: System Information Overview page redisplays, notice the
software you selected now appears in the list of software associated with the system.
You may associate as much software as required with any system.
ASSOCIATING PERIPHERALS WITH SYSTEMS
• Click the Associate Peripherals button on
the Asset Tracker: System Information
Overview page shown above. Lists of
Unassociated and Associated Peripherals
appear.
• Select peripherals from the Unassociated
Peripherals list on the left and click the arrows in the middle to move them to the
Associated Peripherals list.

USER GUIDE
© NETSHIELD Corporation 2017 | https://www.netshieldcorp.com | 1-800-991-3971
• Click the Associate the Peripheral button below the box to complete the changes.
• When the Asset Tracker: System Information Overview page redisplays, notice the
peripheral(s) you selected now appear in the list of peripherals associated with the system.
You may associate as many peripherals as required with any system.
REMOVING ASSETS FROM SNOOPWALL NETSHIELD
To remove assets from all configured audits, the Asset Tracker Systems list, and the Asset
Manager:
• Select Asset Tracker
Systems from the left menu to open the Asset List.
• Click the check box next to the host names you wish to remove from the list.
• Click the Remove Selected button to the upper right of the list. Confirm when prompted.

USER GUIDE
© NETSHIELD Corporation 2017 | https://www.netshieldcorp.com | 1-800-991-3971
MALWARE DETECTION SYSTEM
OVERVIEW
CONFIGURATION MALWARE DETECTION
MALWARE DETECTION SYSTEM
In the event a network asset attempts to contact a known malware IP address, the administrator
will be notified and the asset will be set as untrusted.
A block can occur depending on NetSHIELD™ Appliance settings. Blocked assets are
indicated with a red background in the Asset Manager.
NOTE: Eth1 must be connected and configured as span or mirror
port or Malware Scanning will not stay on. Also Asset Detection
System must be on.

USER GUIDE
© NETSHIELD Corporation 2017 | https://www.netshieldcorp.com | 1-800-991-3971
1. Select NAC Configuration Malware Detection System from the menu.
2. The Malware Detection System screen opens up.
Note: 1. Agentless Malware Detection works in conjunction with NetSHIELD™
Appliance Asset Detection System’s packet sniffing. Assets within the packet sniffing
range will also be scanned for malware when malware detection is enabled.
Assets not within the sniffing range will not be scanned for malware.
2. Agentless Malware Detection works in conjunction with NetSHIELD™
Appliance Asset Detection System’s blocking capabilities. Assets within
NetSHIELD™ Block range will be blocked if they attempt to contact a malware IP
address.

USER GUIDE
© NETSHIELD Corporation 2017 | https://www.netshieldcorp.com | 1-800-991-3971
3. Ensure that the Malware Scanner is enabled.
4. If an Enable Malware Scanning message shows in the box at top left,
5. Click on it to Enable Scanning, the following message appears.
6. The Malware Scanner Control opens.
7. In the Malware Hosts List, Host History and Malware Hosts Detected is shown in the
box on the left.
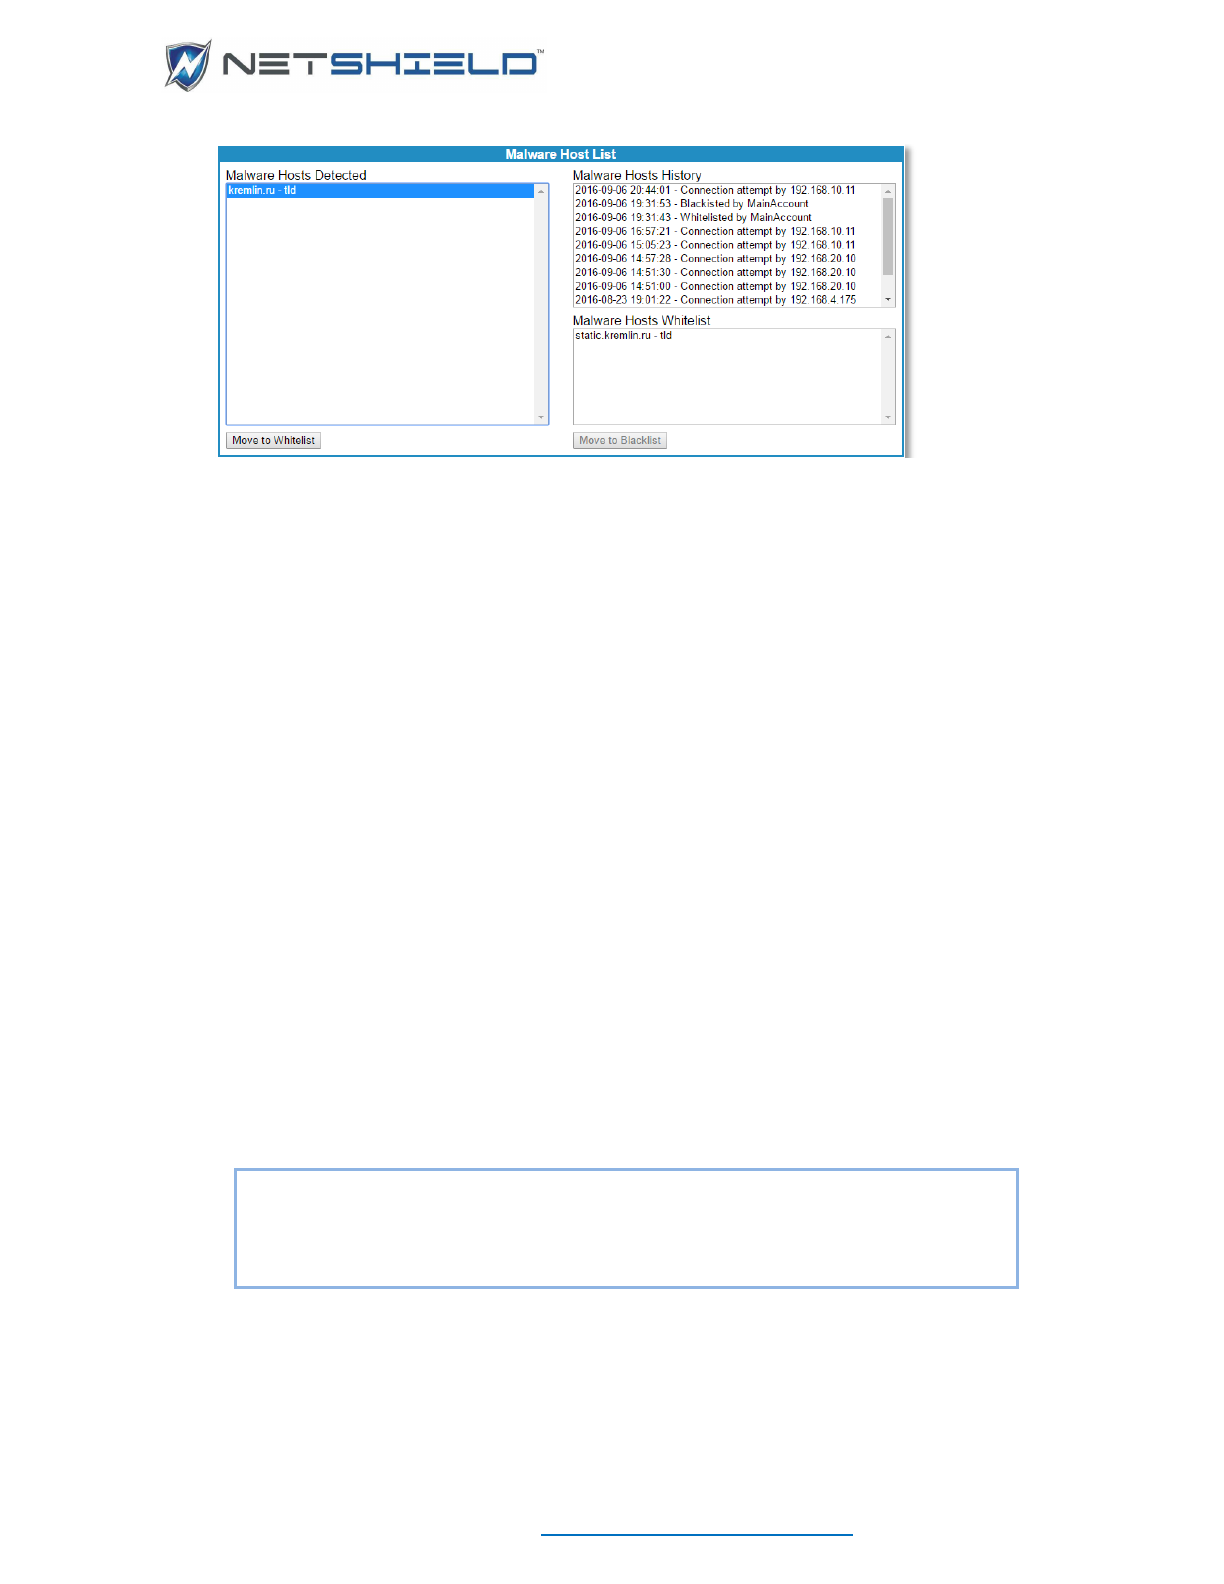
USER GUIDE
© NETSHIELD Corporation 2017 | https://www.netshieldcorp.com | 1-800-991-3971
8. Click on a malware items and the Malware Hosts History appears in the box on the
right.
Managing Whitelist For Detected Malware IP Address(es)
1. To add an IP address to the Whitelist.
2. Select a Malware IP from the Malware Hosts Detected List.
3. Click the Move to Whitelist button to add the IP address to Malware IP Whitelist.
The IP address moves from the Malware Hosts Detected list (left side) to the Malware Hosts
Whitelist (right side).
4. To remove a malware from the Whitelist
5. Highlight it in the Whitelist.
6. Click the Move to Blacklist button and the item returns to the Malware Hoists
Detected list.
The bottom frame of the Scanner contains a Malware Detection log.
Note: Network assets that attempt to contact an IP address on the Whitelist
will not be restricted, set as untrusted, or blocked.

USER GUIDE
© NETSHIELD Corporation 2017 | https://www.netshieldcorp.com | 1-800-991-3971
Managing Manual Malware IP Addresses
1. Select Network Access Control Malware Detection System from the menu.
2. Enter IP Address in the Manual Malware Host List Field.
3. Enter a Description in the Manual Malware Host List Description Field
4. Click the Add Button.
5. To Remove an IP address;
6. To remove an IP address Manually,
7. Click Remove Button and the IP Address will be removed from the list.
Viewing Malware IP Address History
1. Select NAC Configuration Malware Detection System.
2. Select a Malware IP from Malware Hosts Detected List
The Date, Time, and Event Type are listed for the IP address Selected.
NOTE: Specific domains can also manually be set to block exclude domains such
as; .ru, .cn or ,ir.
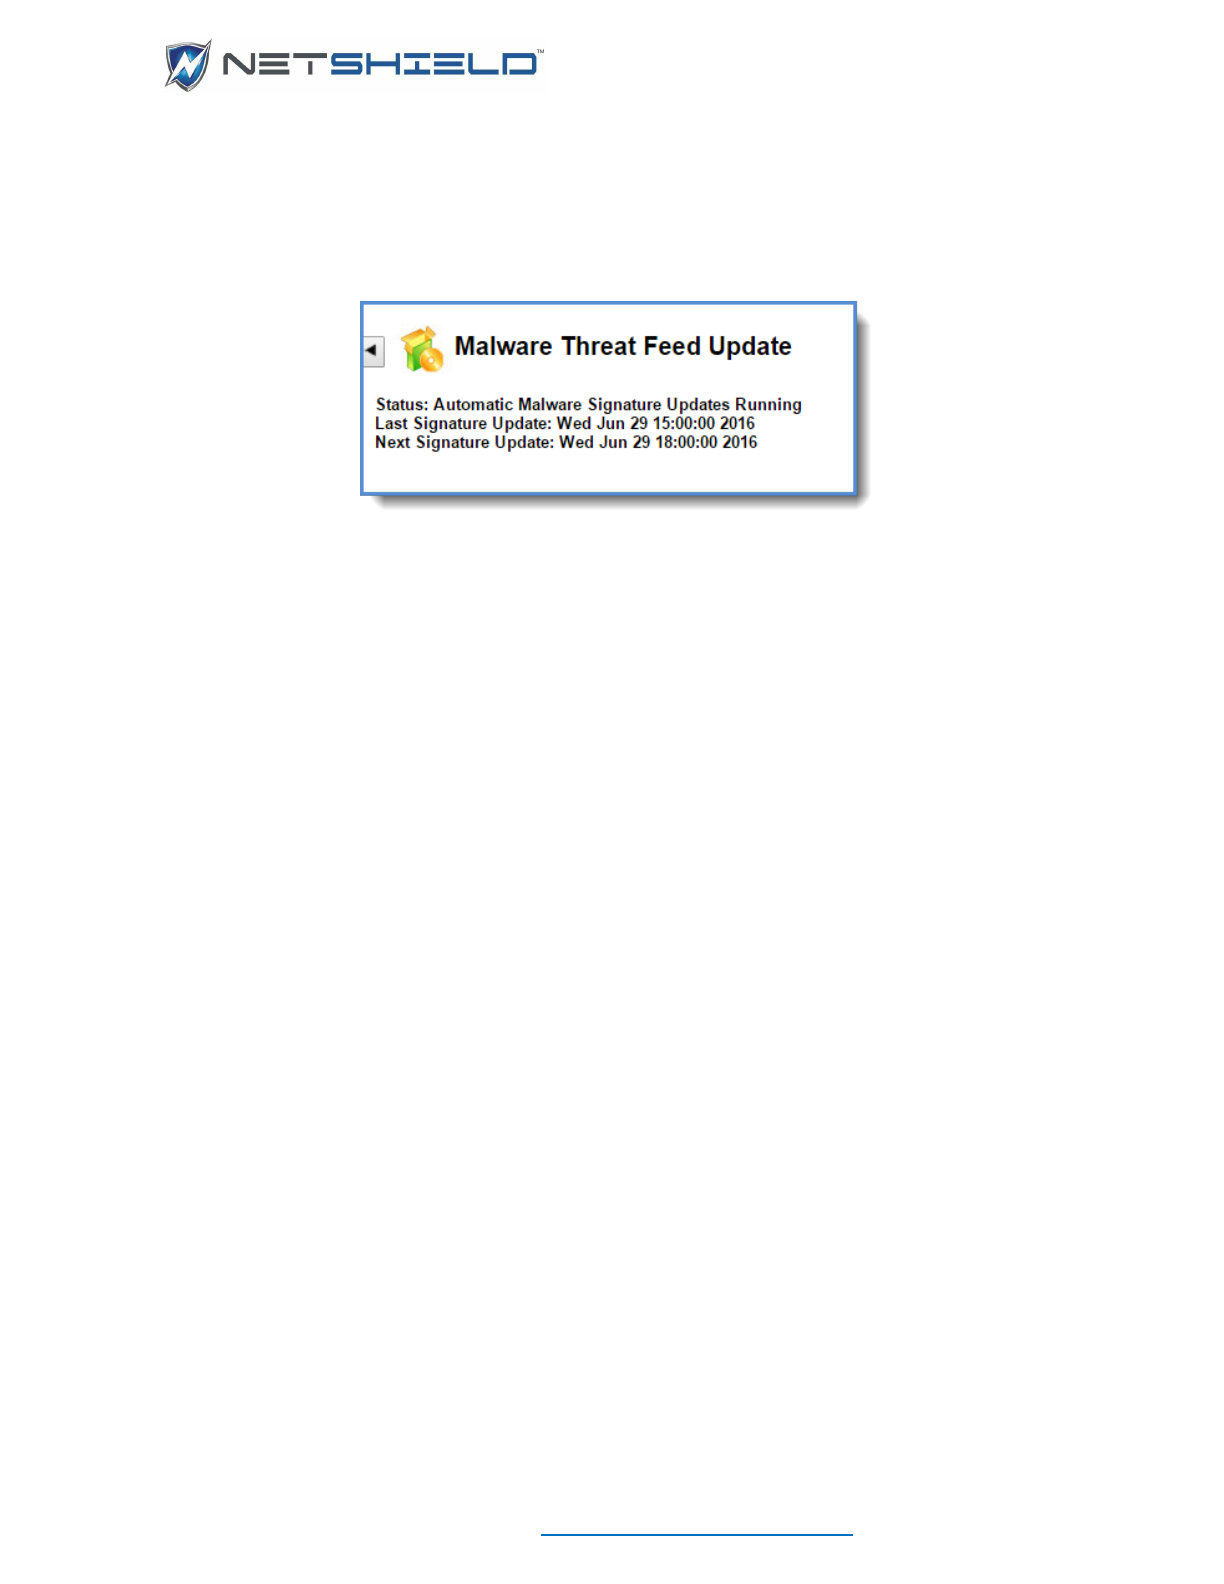
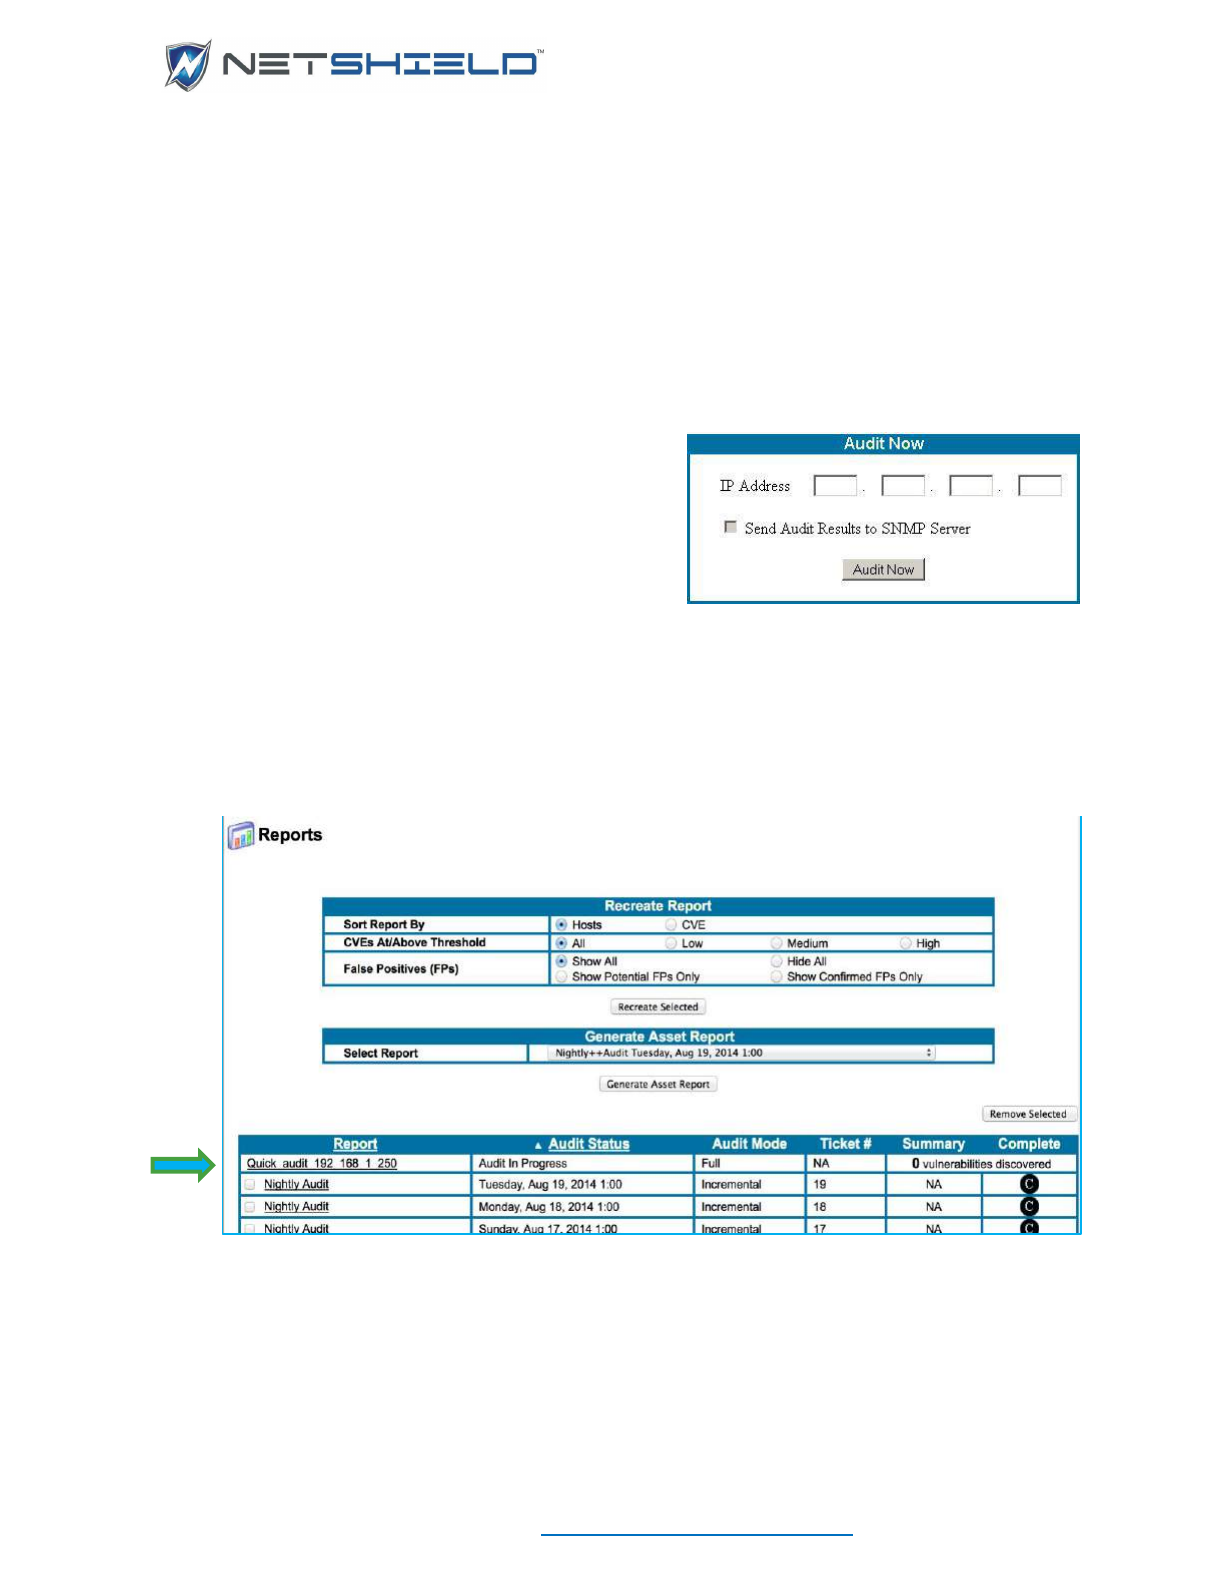
USER GUIDE
© NETSHIELD Corporation 2017 | https://www.netshieldcorp.com | 1-800-991-3971
AUDITS
CREATING AND MANAGING AUDITS
The first step to managing audits is to define a series of audits and save them. Later, as
required, you activate each audit.
To define an audit, specify the timing and IP scope.
Once you define an audit, either run it immediately or schedule the audit and wait for
NetSHIELD to run it as specified.
RUNNING A ONE-CLICK AUDIT
To audit a single IP address in a hurry:
• Select Audits One-Click Audit from the left
menu.
The One-Click Audit Wizard appears with the Audit Now box.
• Enter the desired IP address (#.#.#.# format) and click Audit Now.
If NetSHIELD has trouble finding a system with that IP address, it pops up another box asking
you to confirm the IP address. If it is correct, click the Continue button to proceed.
As soon as the audit starts, the Reports page pops up:
• Click on the Quick Audit entry to get more detail on the audit. (Shown below.)
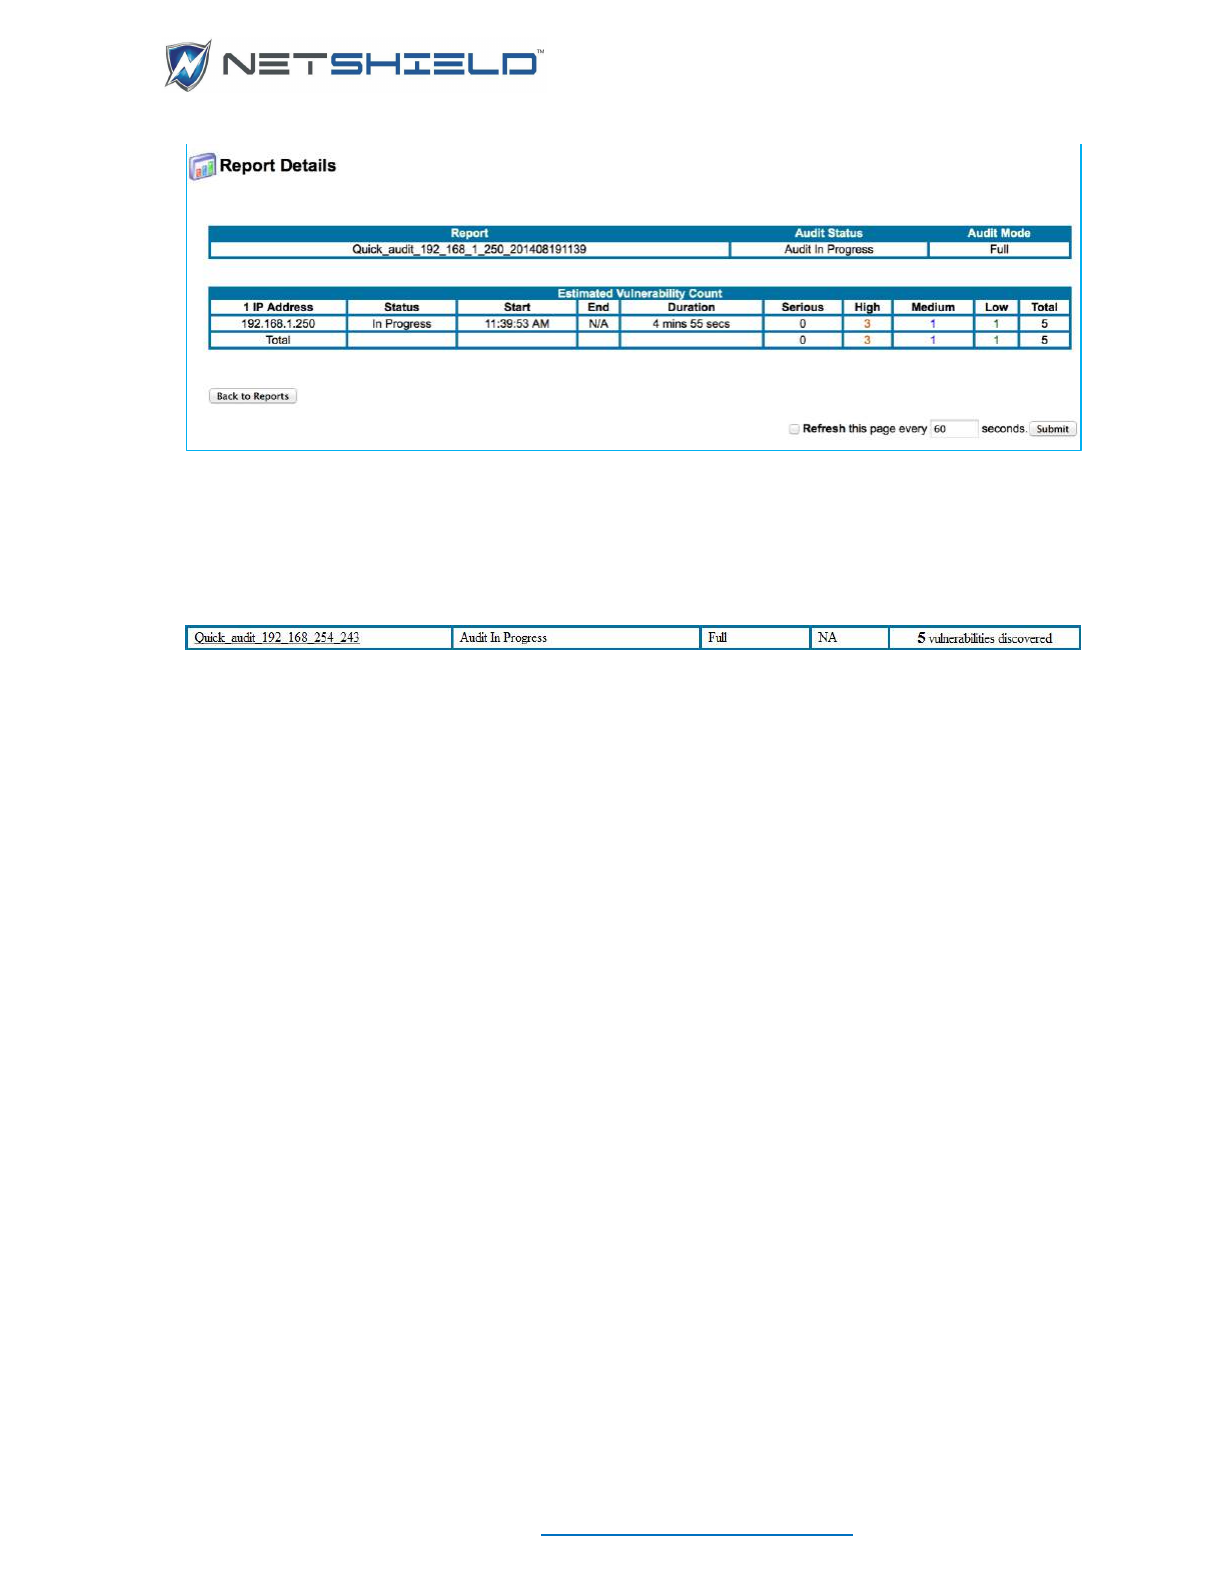
USER GUIDE
© NETSHIELD Corporation 2017 | https://www.netshieldcorp.com | 1-800-991-3971
The name of the Report entry starts with Quick_audit, the IP address, the date, and the
time.
The audit is automatically a Full audit.
When the report is complete, you will see an S in the Summary column and a C in the
Complete column. In the meantime, you will see the count of vulnerabilities found so far.
• Select Reports
View Audit Results from the left menu if you want to leave this page
and return to it in a few minutes.
For more information on reports, including how to add custom comments, identify and hide false
positives, and restrict the content you view to selected levels of vulnerabilities, refer to the
chapter on Working with Vulnerability Reports, Logs & Utilities.
To see how vulnerabilities in reports are assigned to IT staff for remediation, refer to the chapter
on Understanding Workflow and User Responsibilities.

USER GUIDE
© NETSHIELD Corporation 2017 | https://www.netshieldcorp.com | 1-800-991-3971
DEFINING A NEW AUDIT
To create a new audit description (also called an audit definition):
• Click Audits
Audit Wizard from the left menu.
The Audit Wizard appears. Audit Name and Notification Information are on the first page.
Assigning an Audit Name
Enter the name of the new audit definition in the Audit Name field. The name must be one word
and may consist of up to 30 letters, numbers, underscores, hyphens, and spaces, as well as
pound signs (#), ampersands (&), and single quotes ( ‘ ).
We recommend using the name of the department to which the machines belong as the audit
name. This naming convention assists varied audit report users in understanding report
contents without opening and studying the report. The name must be unique to the particular
audit.
NOTE: It’s a good idea to name audits based on the department performing the
audits. Later, all reports from that source have the same name. When
managers/executives create reports, they choose from a list of audits from which
to cull information. If reports have the department name, they can readily select
those of interest.
USER GUIDE
© NETSHIELD Corporation 2017 | https://www.netshieldcorp.com | 1-800-991-3971
Setting Vulnerability Threshold for Notification
• Click an option to indicate the level of vulnerability required for NetSHIELD to send a
notification. See Guidelines in the table below.
Modifying Who Receives
Reports
Fill in the notification field with appropriate email addresses:
• Email - add email addresses separated by commas or semi-colons up to a 100 character
limit.
• SNMP Server and Syslog Server – when checked, information about a completed audit
will be sent to either the SNMP or Syslog server, provided you have configured these for
use. Messages will contain the number and level of vulnerabilities found at each IP
address.
• Check the Attach Summary report to email notification box if you want a Summary
Report included with the notification.
• Click Next to proceed to the second page of the Audit Wizard. You will be prompted for any
missing information before you can proceed.
• Select an Audit Mode to define the audit scope. You may choose between Full, Differential,
Incremental, and Top 20 audits.
Item
Guideline
Any
Any vulnerability, however minor.
Medium
At least one medium level vulnerability, as
indicated in the table of Vulnerability Levels
Definitions (see below).
High
At least one high level vulnerability.
Serious
Only when a serious level of vulnerability
occurs.
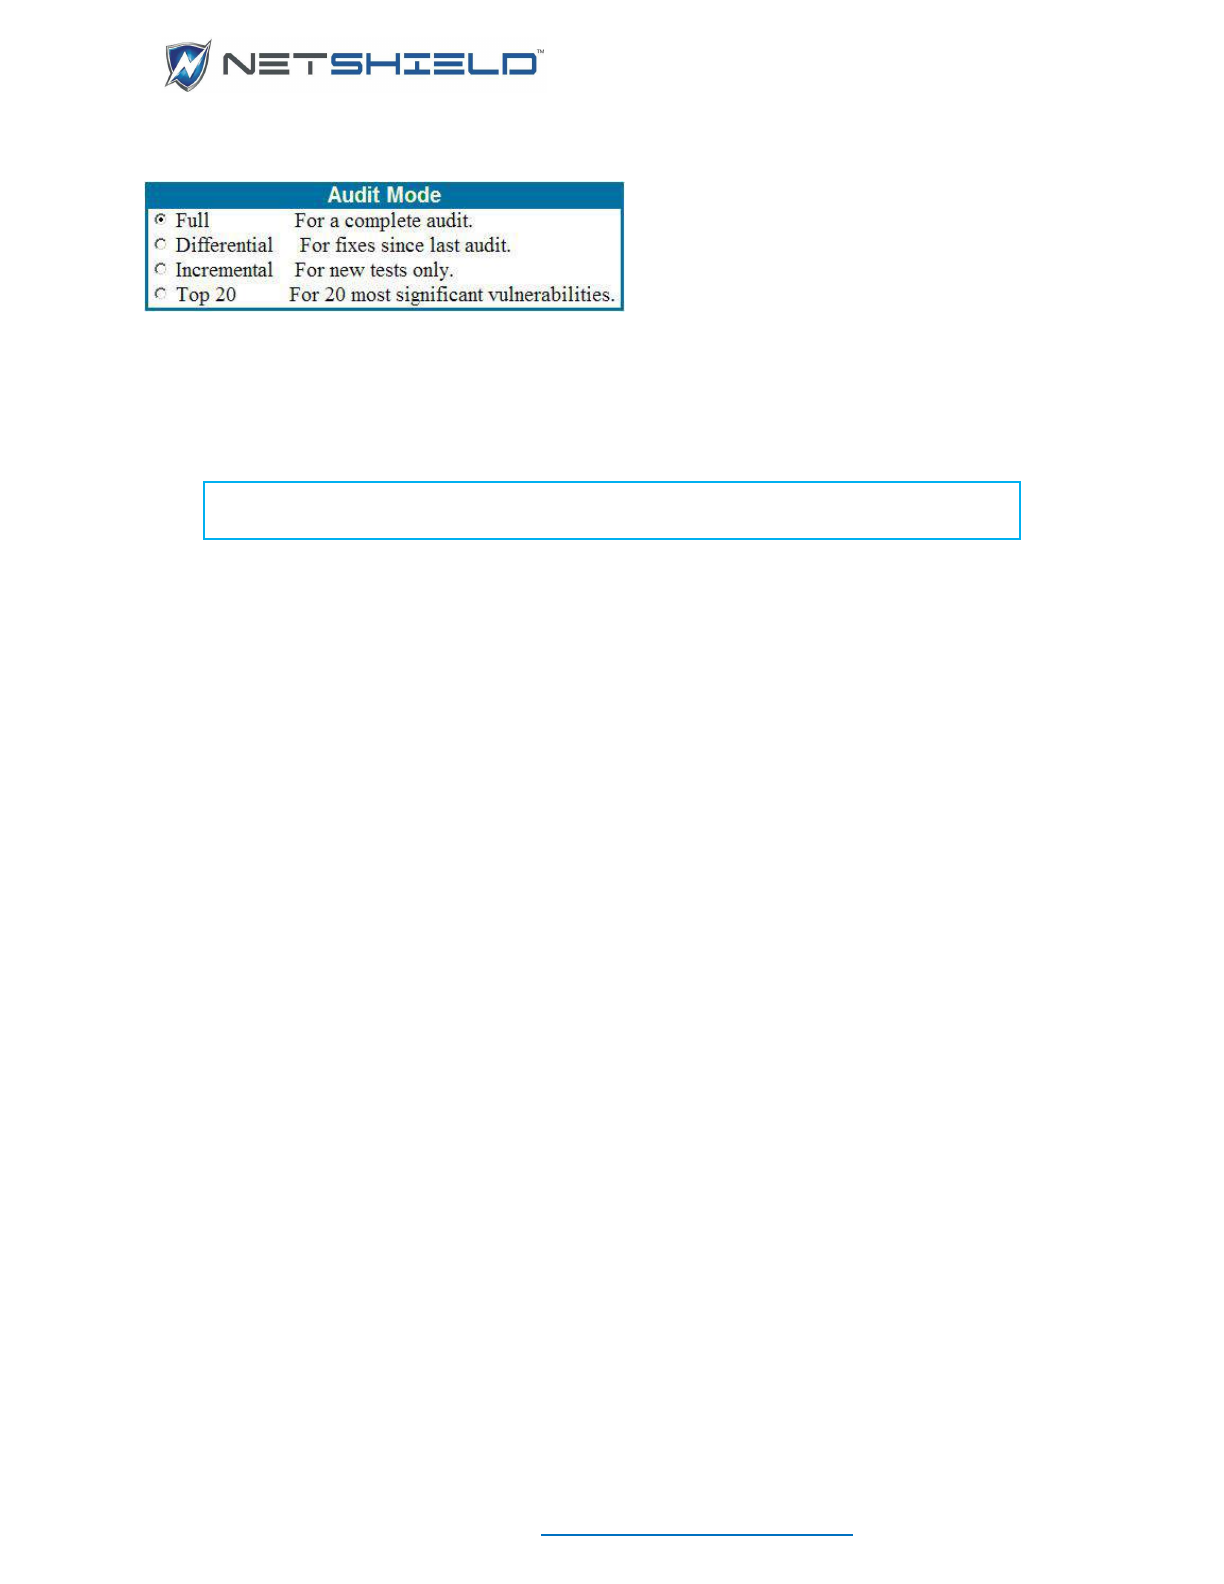
USER GUIDE
© NETSHIELD Corporation 2017 | https://www.netshieldcorp.com | 1-800-991-3971
The first time you audit your network, you should run a Full audit. Later, you can edit the audit
definition to make it Differential, but be sure to save it with the same audit name. Otherwise, if
you create a new audit definition with a different name and make it Differential, it runs a Full
audit the first time and subsequently runs a Differential audit. (See Modifying an Existing Audit’s
Definition.)
NOTE: Since a Differential audit performs a full audit the first time, we suggest
you run Differential audits from the start, rather than change them later.
If you want to run only new vulnerability tests on a machine or group of machines, use the
Incremental option. Incremental never runs a Full audit. SnoopWall NetSHIELD keeps track of
tests run on any given IP address, and runs only those not run before. Incremental audits,
therefore, run more quickly and save time.
SCHEDULING AUDITS
Before you take the next step in the Audit Wizard, you need to think about logistics of
scheduling your audits and all related issues in your particular work environment.
The following sections include Scheduling Audits and Setting Audit Frequency and Start Time.
This information should help you decide appropriate settings for your company.
Take several factors into consideration when determining an audit schedule.
SCHEDULING BACKUPS AND AUDITS
Do not overlap your backup schedule with the audit schedule. To avoid overlap, be aware of
how long the audit may take. Refer to Estimating Audit Length. As a precaution, if you know
how long your backup usually takes, schedule it to run first and schedule audits after you expect
the backup to be complete.
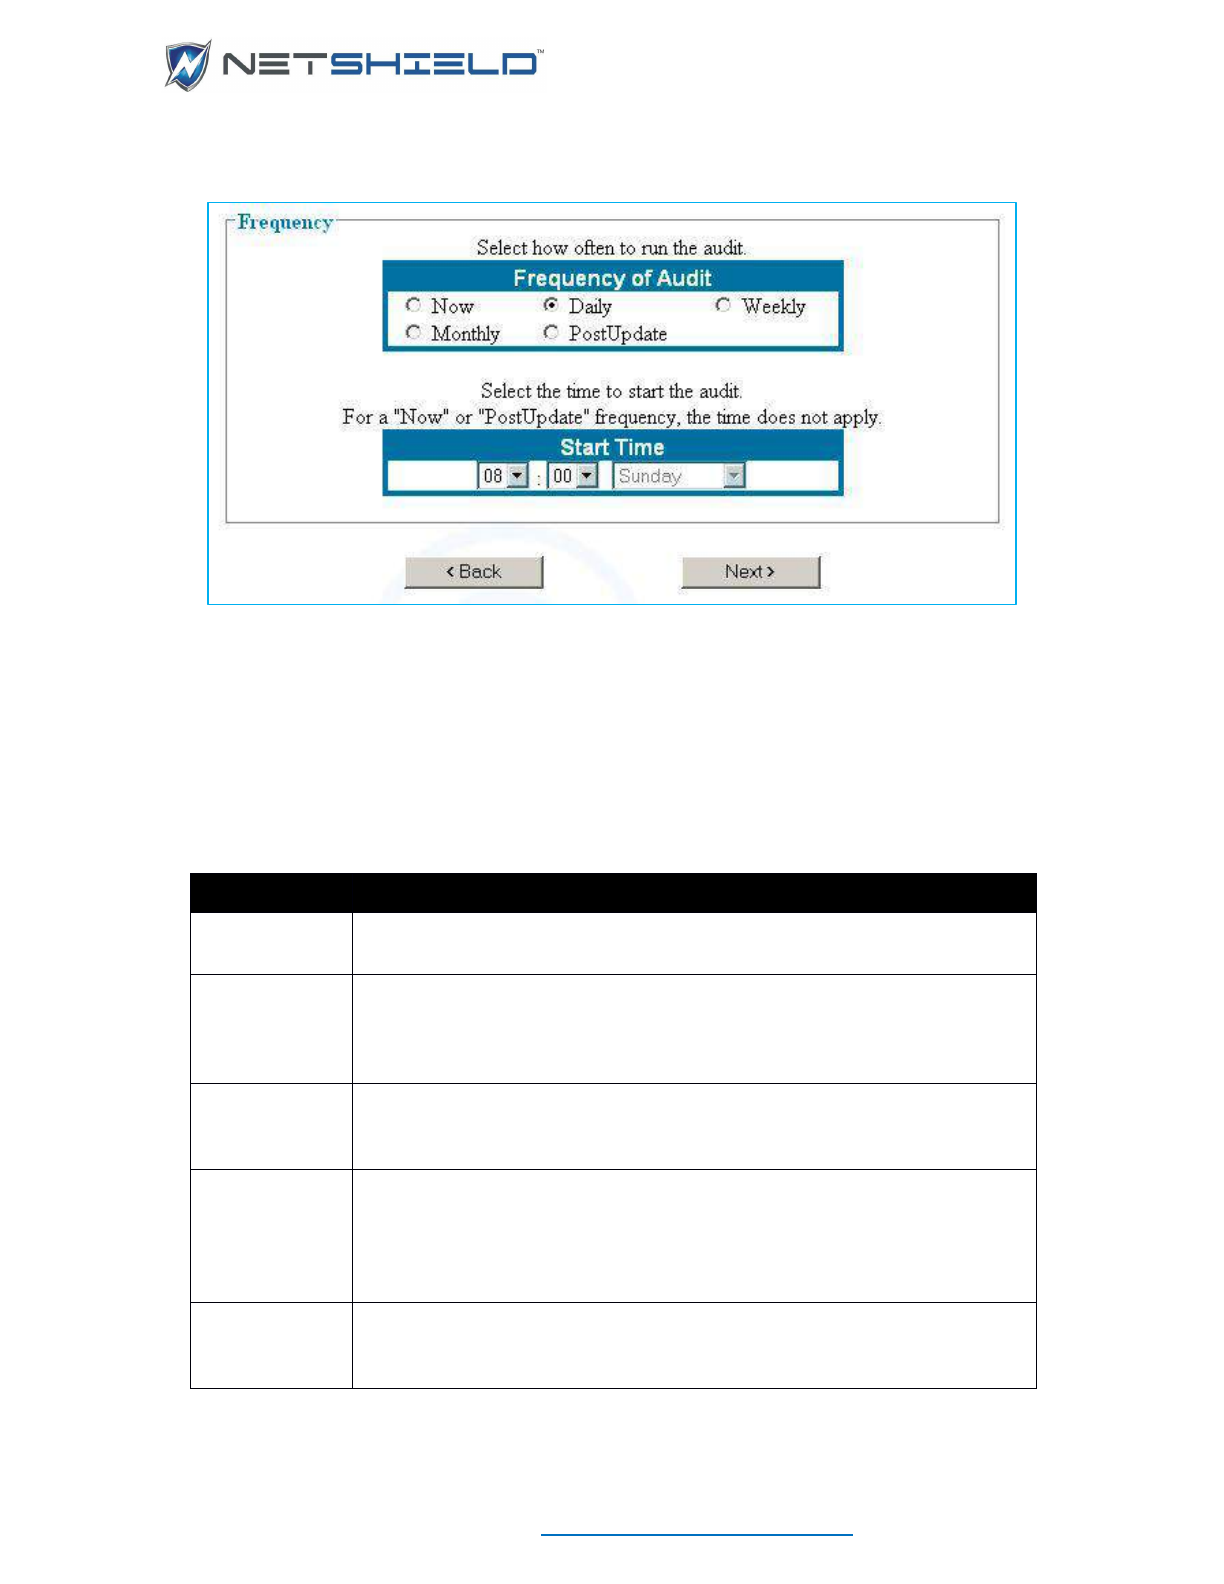
USER GUIDE
© NETSHIELD Corporation 2017 | https://www.netshieldcorp.com | 1-800-991-3971
Setting Audit Frequency and Start Time
The third page of the Audit Wizard allows you to set audit frequency and timing.
The Frequency of Audit and Start Time fields indicate when and how often this audit runs once it
is started from the Audits: Manage page.
• Set Frequency of Audit to one of the settings shown. See setting descriptions in the table
below.
Setting
Description
Now
Runs the audit as soon as it is activated. (Audit automatically returns to
Inactive setting after completion).
Daily
Runs the audit at the same time each day. Use the pull down menus in the
Start Time fields to specify the time of day to begin the test. Any Day of
Week you set is ignored. Once activated, the audit runs every day at the
specified time.
Weekly
Runs the audit at the same time each week as soon as it is activated. Use
the pull downs to select the Start Time and Day of Week. Once activated,
the audit runs every week at the specified time.
Monthly
Runs the audit every month on the Day of Week and at the Start Time you
select as soon as it is activated. For example, if you select Monday, the
test will run on the next Monday in the current month, then on the first
Monday in succeeding months. Once activated, the audit runs every month
at the specified time.
PostUpdate
Runs the audit immediately after a CVE update is downloaded. (Audit
immediately returns to Inactive status after completion and remains
Inactive until the next CVE update is downloaded.)

USER GUIDE
© NETSHIELD Corporation 2017 | https://www.netshieldcorp.com | 1-800-991-3971
NOTE: An audit set to Now runs each time you start it, then reverts to the
Inactive state.
• Set the audit Start Time, if appropriate. (For an audit set to Now or PostUpdate frequency,
the time does not apply.)
Choose the Hour and Minute you want to schedule the audit to start, and then select the day
of the week, if appliacable, from the pull down menu. The day of the week selector will be
disabled for Now, Daily, and PostUpdate audits.
CHOOSING IP ADDRESSES FROM LIST
The fourth page of the Audit Wizard allows you to choose specific IP Addresses for auditing.
Information about your auditing capacity is shown at the top of the page, including:
• Number of IP addresses your license allows you to audit (variable depending on which
appliance you own)
• Number of IP addresses currently selected (IP addresses are selected when the box to the
left of their entry is checked)
• Number of IP addresses already audited
• Link to list of IPs audited so far and their status
• Green (or alternate color, based on browser settings) box that flags Wireless Access Points
After NetSHIELD collects IP addresses on the network, it recognizes:
• Wireless Access Points
• Assets on the Safe List
• Missing systems
• Blocked systems or systems with a blocked port
SELECTING/GROUPING IP ADDRESSES TO AUDIT
Each IP address is listed with a check box to its left. Use the check box to select individual IPs
for audit. The listing also shows IP addresses of subnets; subnets do not have host name or
operating system data.
You must select at least one IP address to audit. Selecting the checkbox in the column header
will select all the IP addresses on the list or within a subnet.

USER GUIDE
© NETSHIELD Corporation 2017 | https://www.netshieldcorp.com | 1-800-991-3971
SAVING THE AUDIT
Review your settings on the Audit Settings page.
NOTE: Before you proceed, ensure no red text appears in the Audit Settings
display. If any IP addresses are shown in red, you either exceeded the number of
IP addresses your license allows you to audit, or an existing audit may show an
unknown IP Address (Known Missing Assets). (See the sections on Known
Missing Assets for more information. These Known Missing Assets are preceded
by the word Previously.)
SnoopWall NetSHIELD indicates the number of IPs in excess of your license in a message at
the top of the window. You must click Edit and deselect enough IPs to reduce the number below
the limit, or you can increase your license limit.
Click Review before saving again. (Your license is not affected until you click Save in the Audit
Settings window and audit those assets. Save is “grayed out” until you are within your license
range).
• Click Save to preserve the audit and exit from the Audit Wizard. This takes you to the
Manage Audits page that displays all defined audits.
ACTIVATING & MANAGING AUDITS
You can manage all audits you create and save on the Manage Audits page. Here you may
start, stop, or delete audits depending on your daily needs. After you save an audit, SnoopWall
NetSHIELD automatically displays this page.
To get here at any time:
• Select Audits
Manage Audits from the left menu.
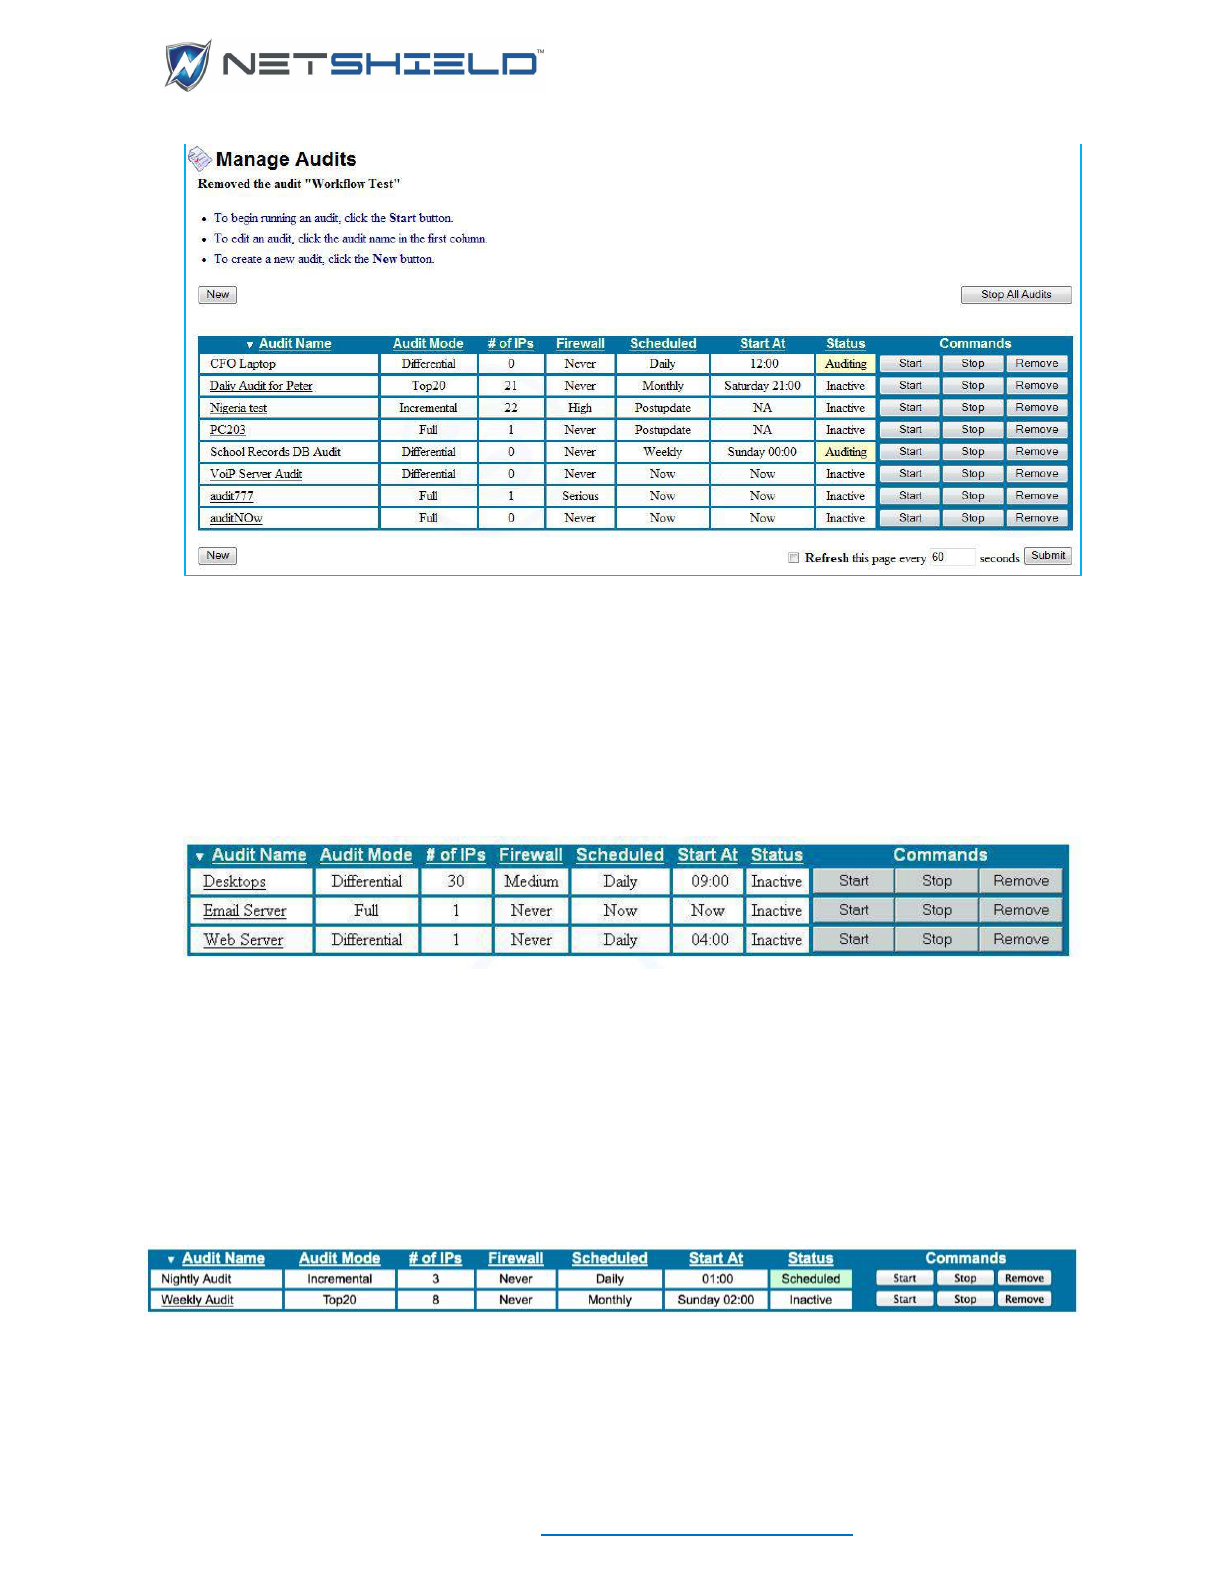
USER GUIDE
© NETSHIELD Corporation 2017 | https://www.netshieldcorp.com | 1-800-991-3971
The Manage Audits page displays all audits saved in the system as well as their audit/CVE test
parameters. The Status column shows the current state (Auditing, Inactive, or Scheduled) of
each audit.
SCHEDULING AN AUDIT TO RUN
The Manage Audits page gives an overview of audit parameters you set earlier.
The first column shows Audit Name. Each audit has its own row with Start, Stop, and Remove
(Command) buttons to the far right.
A Status column just to the left of the Command buttons indicates the audit’s current condition.
The initial status of any audit is Inactive. Inactive audits do not run.
Starting an Audit
• Click the Start command button in the audit row.
Audit Status becomes Scheduled. The audit starts running at the specified Audit Time and Start
Time. If an audit is scheduled for Now, it starts auditing immediately after you click Start, and
the Status changes to Auditing.
Once it starts, an audit’s Status changes to Auditing (See the Manage Audits page for more
information.) When an audit finishes, its Status automatically reverts to Scheduled, unless it is a
Now audit – Now audits revert to Inactive upon completion, but can be run again at any time by
clicking Start.
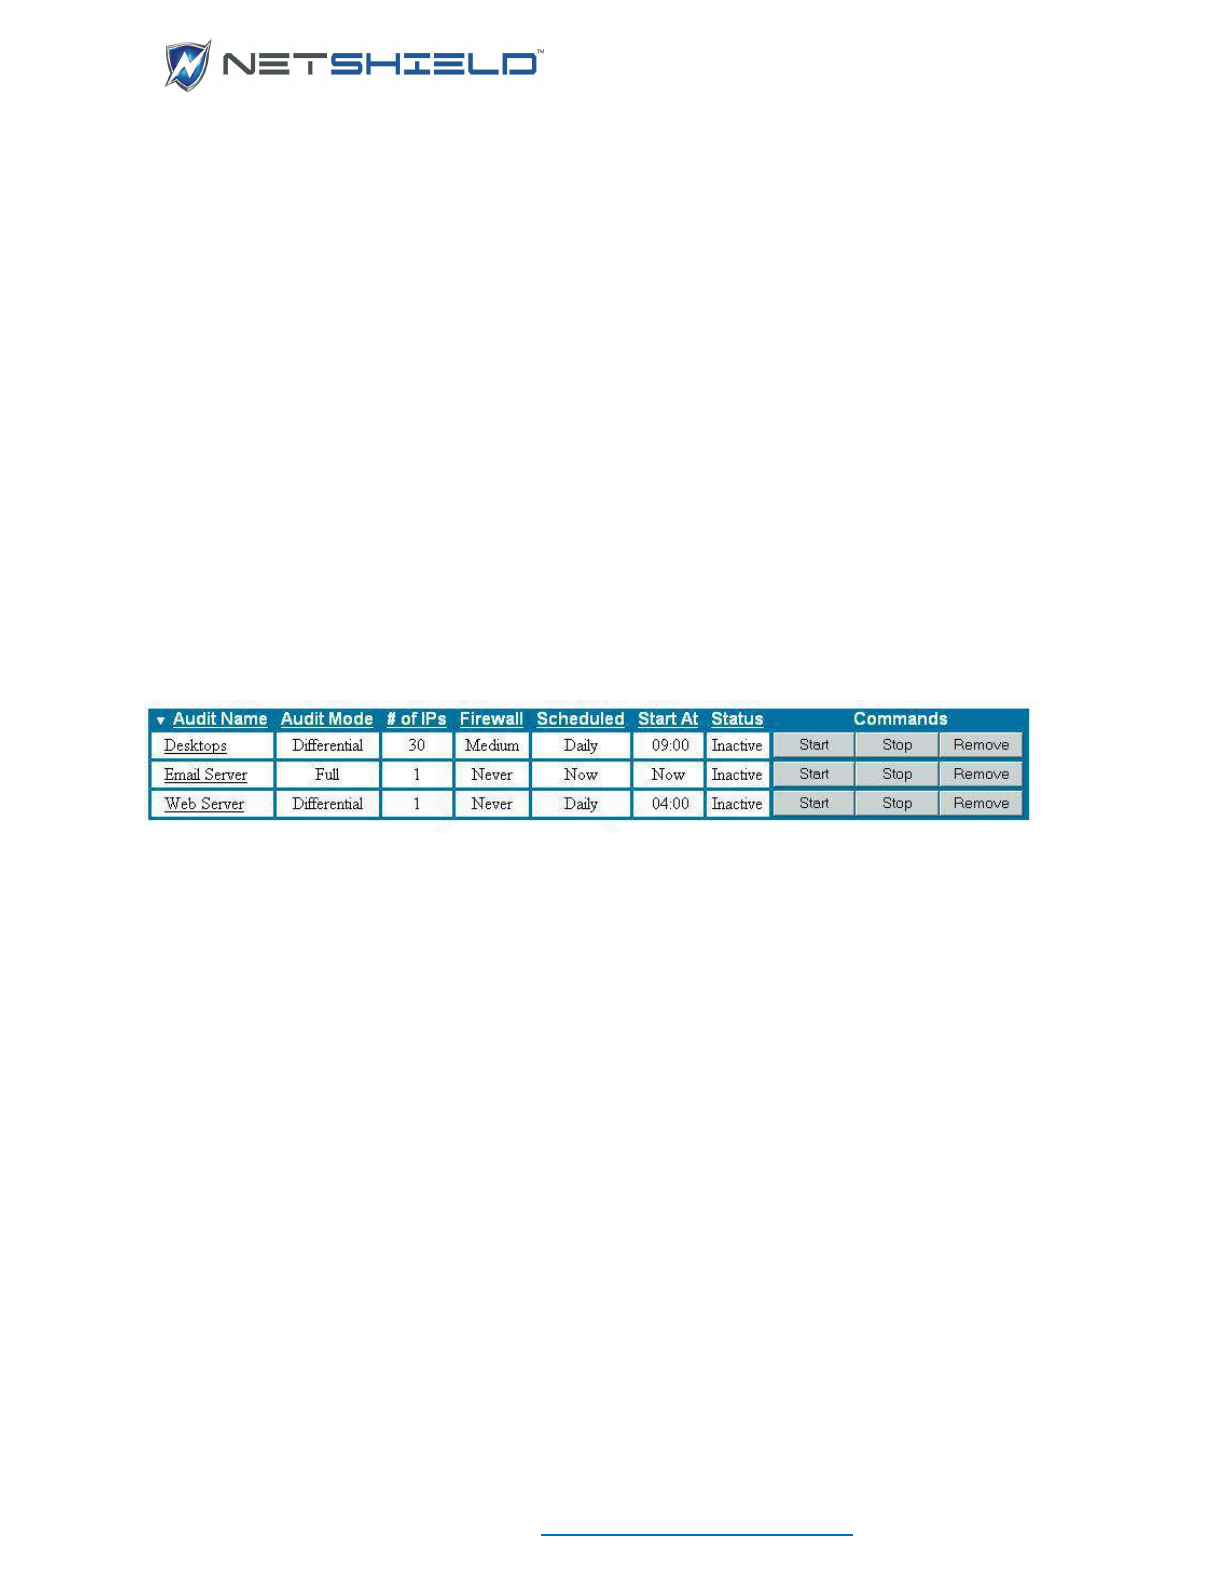
USER GUIDE
© NETSHIELD Corporation 2017 | https://www.netshieldcorp.com | 1-800-991-3971
When an audit is complete and reports are available, the system sends emails to the contacts
designated in the Audit Wizard.
Any number of audits can be Scheduled or Auditing at a given time without interference.
To see the reports:
• Select Reports
View Audit Results from the left menu bar.
For details on how to work with reports, see Working with Vulnerability Reports, and Working
with Logs.
DEACTIVATING AN AUDIT
When you no longer want a particular audit to run but wish to keep it in the system, you can
make it Inactive.
• Select Audits
Manage Audits from the left menu.
• Click the Stop button (far right in the row) for the audit. The Status column indicates it is
Inactive.
The audit stays in the system, but does not run until you change its status to Scheduled again
by clicking Start.
REMOVING AN AUDIT
You can remove a specific audit when you no longer need it.
• Select Audits
Manage Audits from the left menu.
• Click the audit’s Remove button, to the right of the Stop button.
• The audit is deleted from the system and no longer appears on the Manage Audits page.
MODIFYING AN EXISTING AUDIT’S DEFINITION
You can also change parameters for an existing audit from the Manage Audits page.
• Select Audits
Manage Audits from the left menu.

USER GUIDE
© NETSHIELD Corporation 2017 | https://www.netshieldcorp.com | 1-800-991-3971
• Select the Audit Name and click on the link. If the audit is scheduled, there won’t be a link.
Click the Start button to deactivate it.
The Audit Wizard opens and displays information for that audit.
• Make the desired changes as you proceed through the Audit Wizard pages.
• Click Review and check your settings before clicking Save.
• Upon return to the main Manage Audits page, click Start to schedule the audit.
COPYING AN AUDIT TO CREATE A VARIATION
To create a new audit with some or all the parameters from an existing audit definition:
• Select Audits
Manage Audits from the left menu page.
• Select the Audit Name and click on the link. If the audit is scheduled, there won’t be a link.
Click the Start button to deactivate it.
• The Audit Wizard opens and displays the information for that audit.
• Enter the name for the new audit in the Audit Name field. Be sure it is unique.
• Change the parameters as you click through the Audit Wizard pages.
• Click the Save button to save the variant audit.
• Upon return to the main Manage Audits page, click Start to schedule the audit.
REMOVING SYSTEMS/IP ADDRESSES FROM AN AUDIT
To remove system/IP addresses from a particular audit, deselect that IP address in the list, and
then re-save the audit.
• Select Audits
Manage Audits from the left menu.
• Select the Audit Name and click on the link. If the audit is scheduled, there won’t be a link.
Click the Start button to deactivate it.
• This takes you to the Audit Wizard for the selected audit.
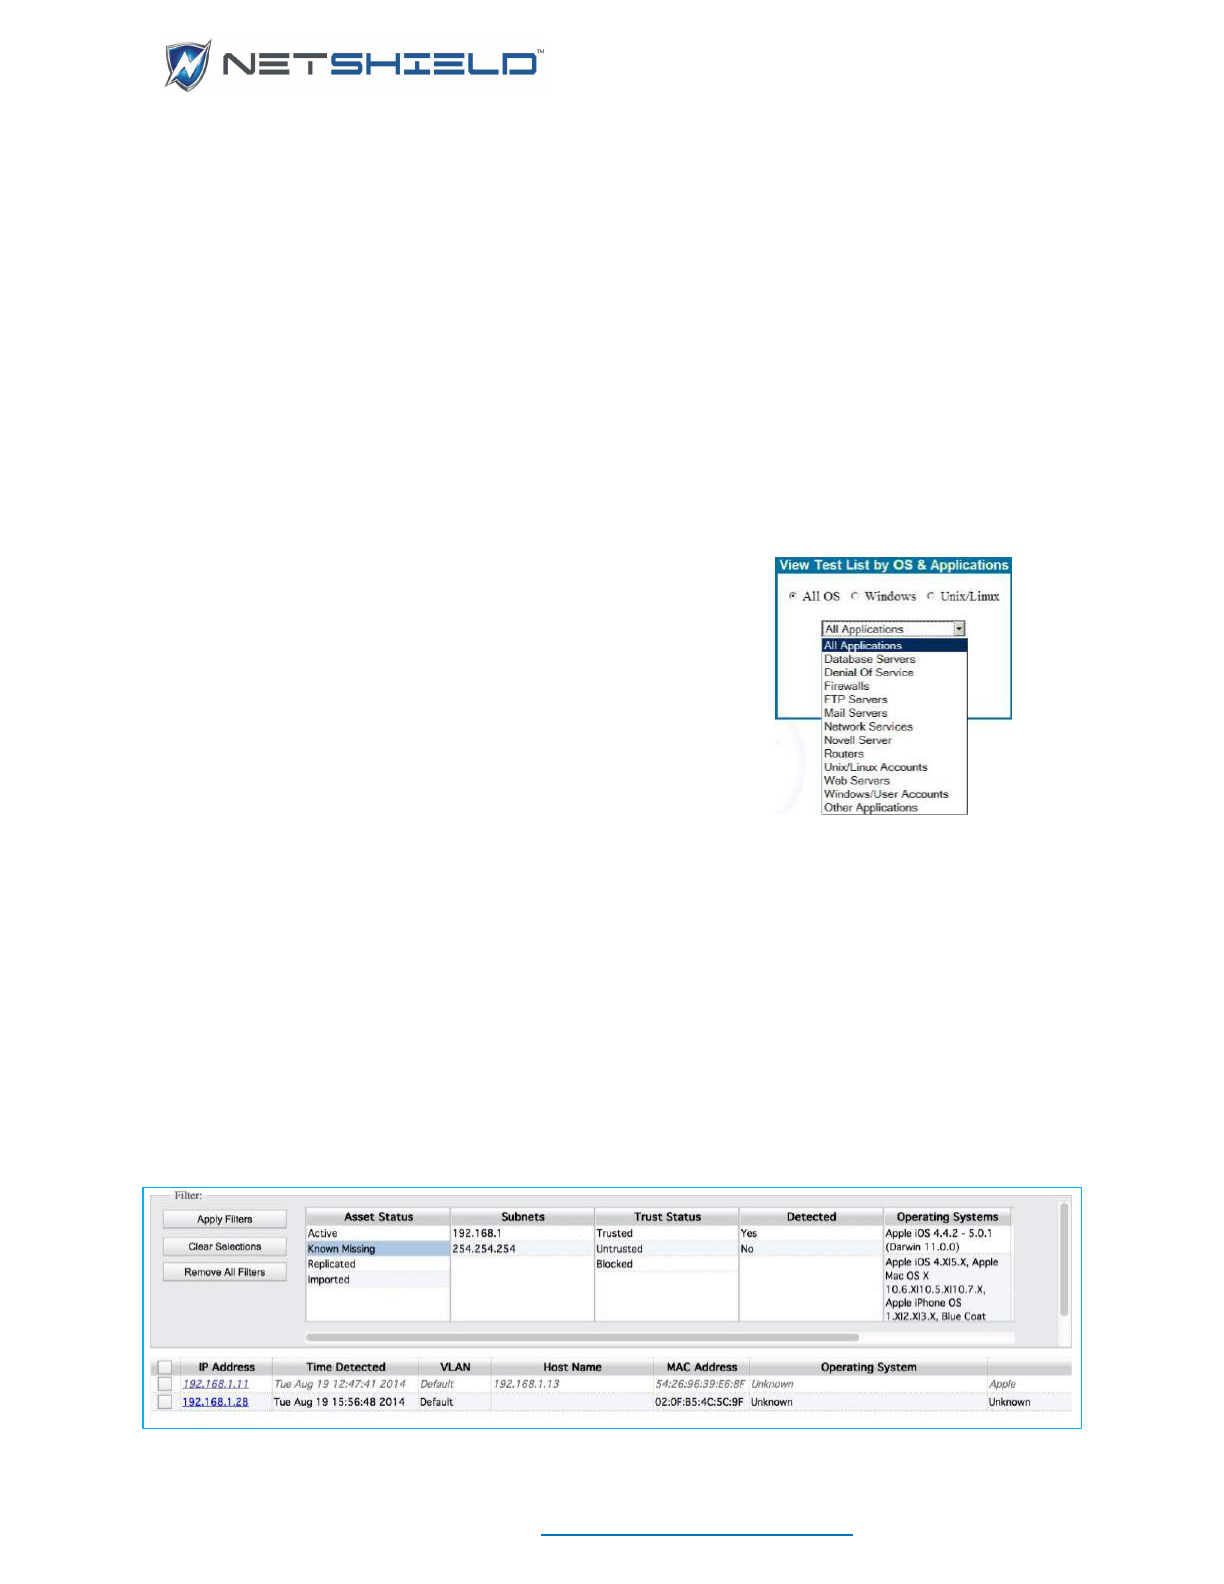
USER GUIDE
© NETSHIELD Corporation 2017 | https://www.netshieldcorp.com | 1-800-991-3971
• Page through the Audit Wizard using the Next button until you reach the list of IP
Addresses.
• Click check boxes next to the IP addresses you want to remove to deselect them.
• Click the Review button to verify your changes.
• Click Save to retain the changes once you are satisfied with your edits.
VIEWING LISTS OF CVE TESTS BY OS AND APPLICATION
You can view information about tests SnoopWall NetSHIELD runs for each operating system or
application at any time.
• Select Audits
View Vulnerability Tests from the left
menu.
The View Test List by OS & Applications box opens.
• Select All OS, Windows, or UNIX/Linux.
• Click the display list to see the available CVE tests.
Choose the test you want to see from the pull-down menu. For example, if you choose
Novell Server from the pull-down list, you see a list of tests SnoopWall NetSHIELD will run
on your Novell Server.
• Click the Display List button to view the results.
MANAGING KNOWN MISSING ASSETS
Sometimes the audits you create contain Known Missing Assets – assets that changed their IP
Address for various reasons since the last scan. One way to view and manage Known Missing
Assets is from the Manage Assets page.
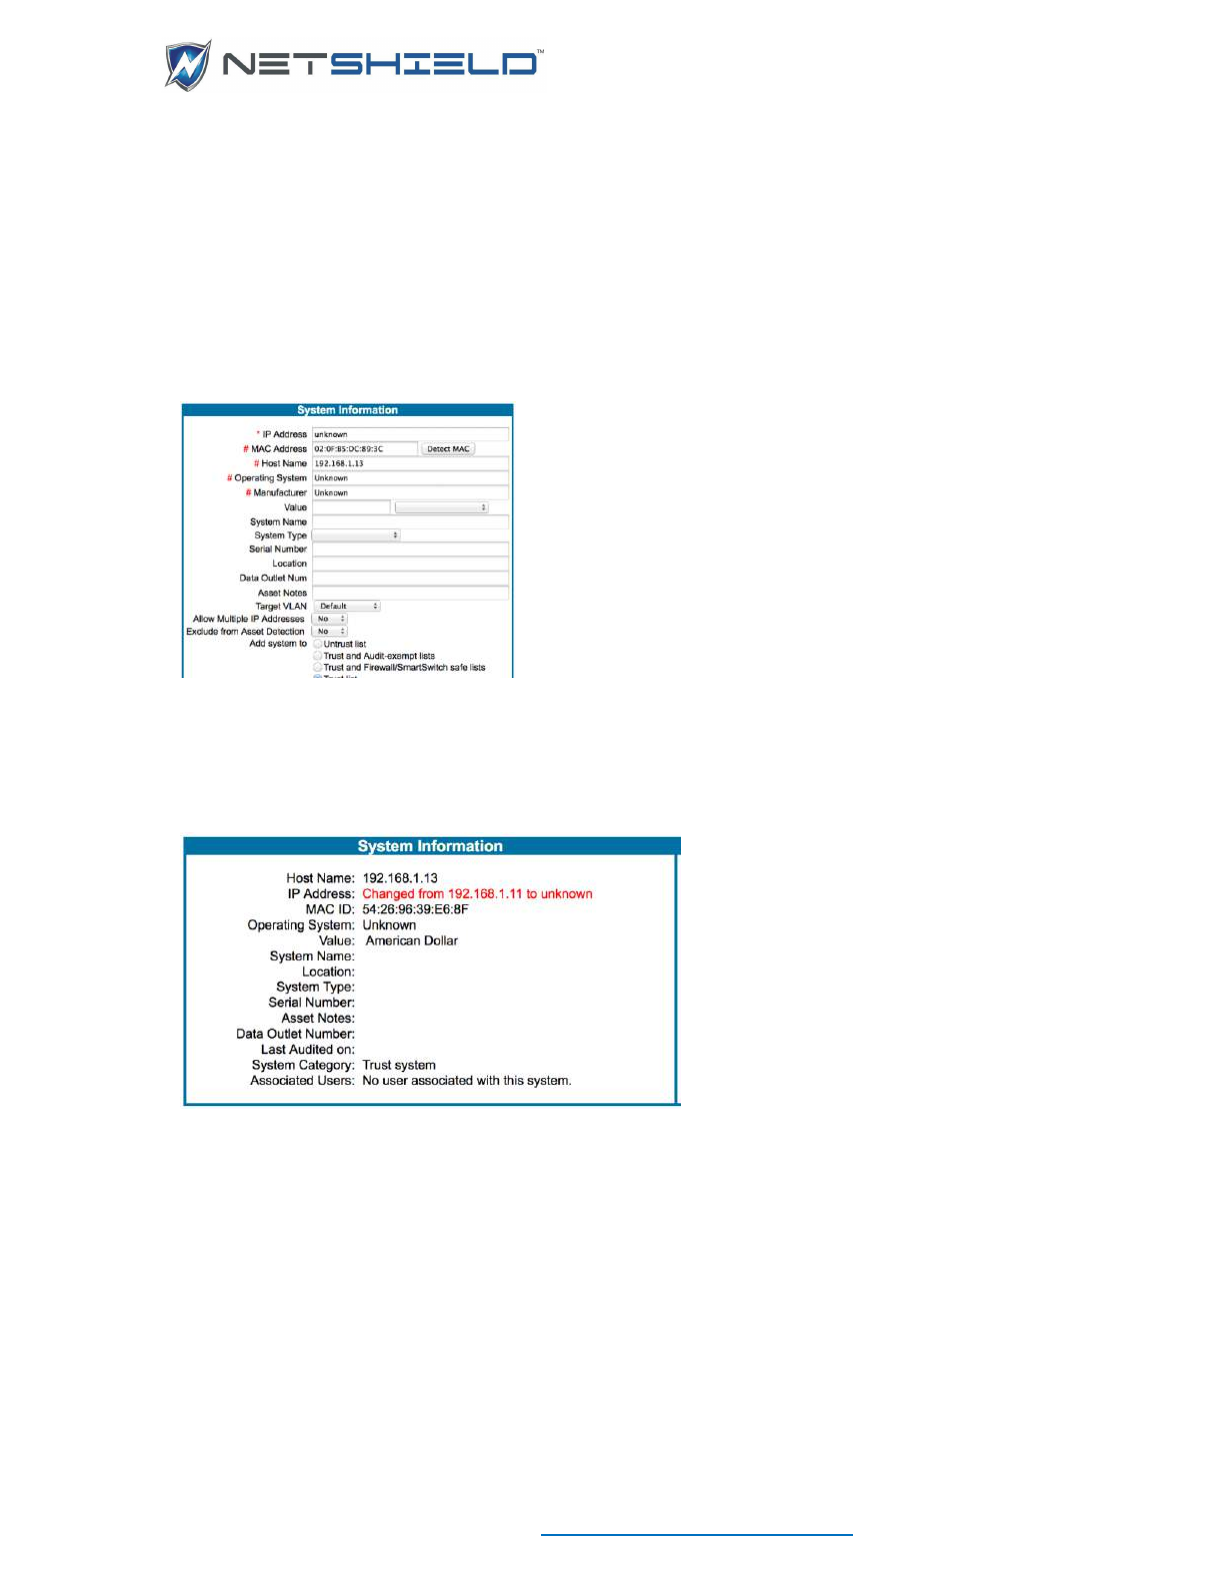
USER GUIDE
© NETSHIELD Corporation 2017 | https://www.netshieldcorp.com | 1-800-991-3971
• Select Network Access Control
Manage Assets from the left menu.
• Select Known Missing from the Asset Status filter.
• If you click on the link for the first IP address above, you go to the Edit Asset page which
shows previously known information about this asset. The IP address is shown as
unknown.
This IP Address is currently Unknown. If you know what it has changed to, you can
manually enter the new IP Address here.
• If you access the asset from the Asset Tracker: Systems page, you will find this entry:
The other option for resolving this Known Missing Assets is to either remove the Known
Missing Asset(s) from the audit or run an Asset Discovery.
VIEWING SNOOPWALL NETSHIELD SCHEDULE
If you want a visual overview of all audits, you can display a schedule in a calendar view.
• Select Audits Schedule from the left menu.
Initially, a weekly view of the schedule displays.
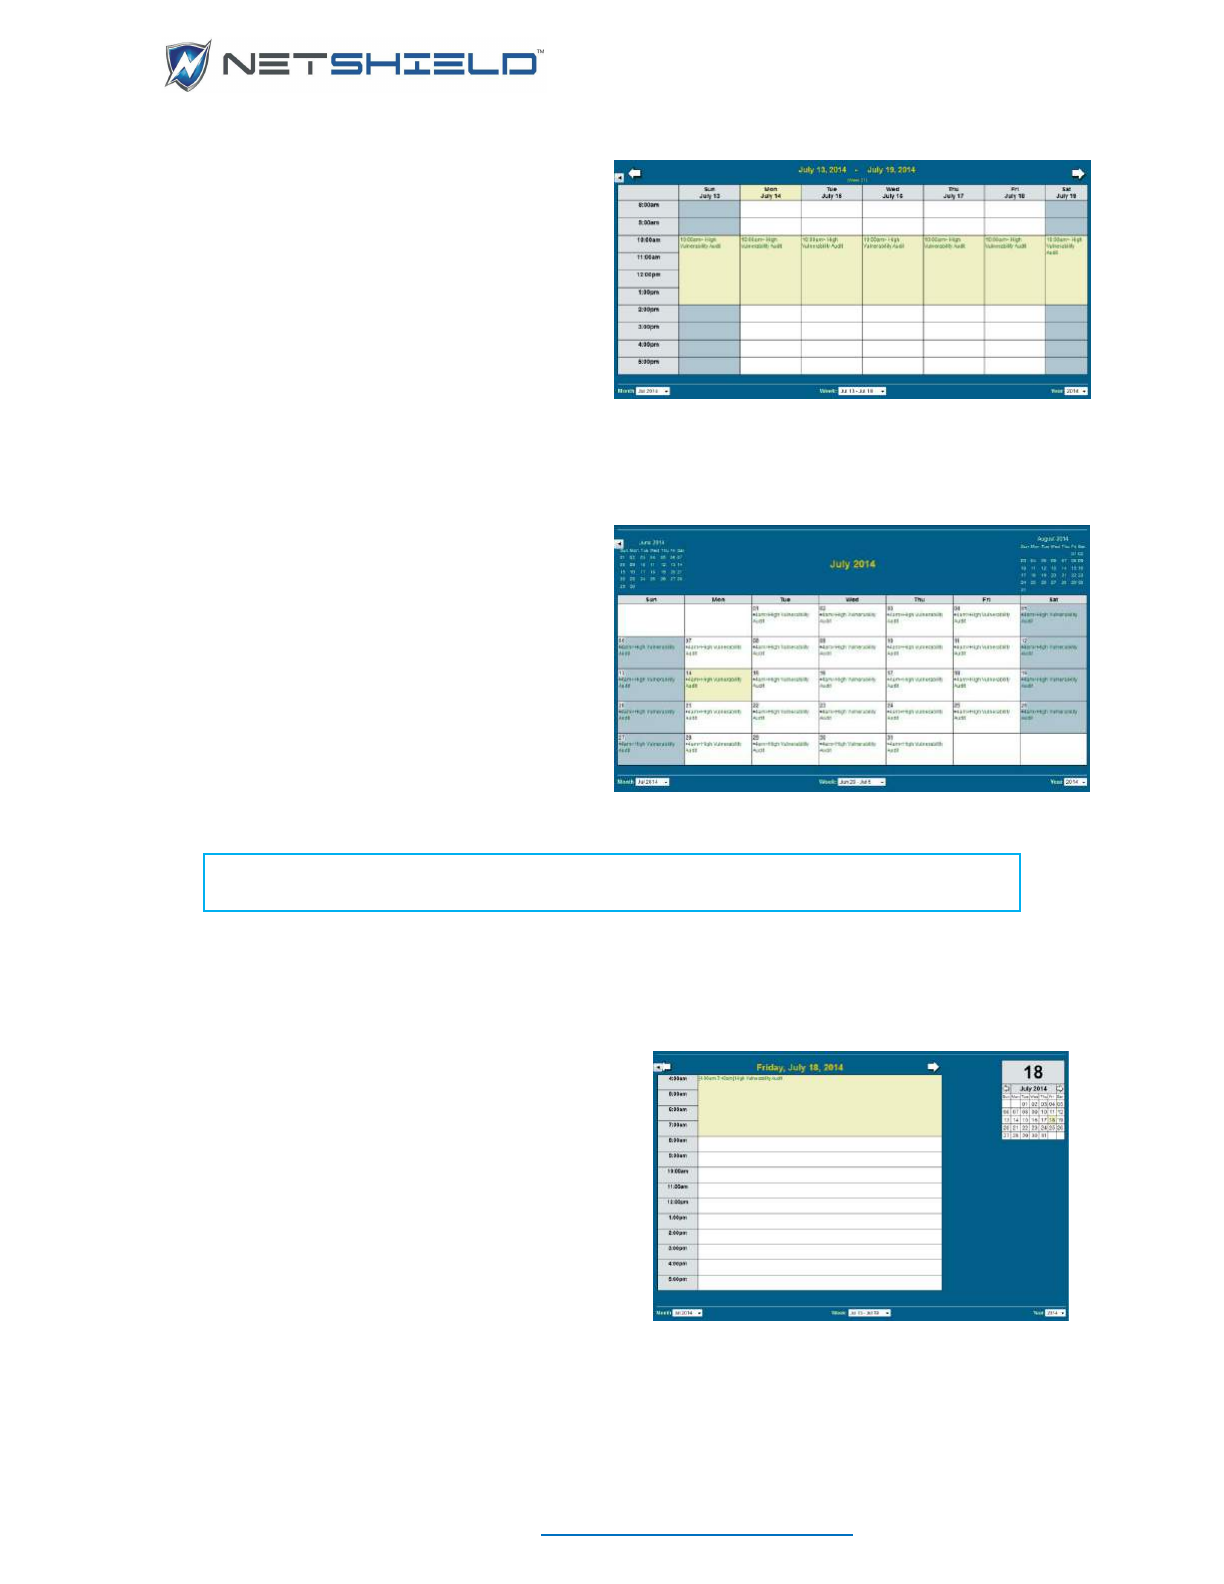
USER GUIDE
© NETSHIELD Corporation 2017 | https://www.netshieldcorp.com | 1-800-991-3971
The illustration shows an example of a
weekly schedule. Time is blocked out for
each audit. More time is blocked out for
audits SnoopWall NetSHIELD estimates
will take longer to run.
• Hold the mouse over any audit name in the
calendar (as shown for Wednesday’s audit
in the illustration) to view a box showing
estimated length of time required for the
audit as well as a list of the IP addresses included in the audit.
VIEWING THE MONTHLY, WEEKLY, OR YEARLY SCHEDULE
Additional schedule formats can be viewed from
pull-down lists, located near the bottom of the
page, labeled Month, Week, and Year.
Month—To see the schedule for a particular
month, select that month from the pull down at
the lower left of the page.
Week—To see the schedule for a particular
week, select that week from the pull down on
the bottom center of the page.
Year—To see the schedule for a particular year
view, select that year from the pull down in the lower right corner of the page.
NOTE: If you have not clicked the Start button for the audit on the Manage Audits
page, the audit will not show in the calendar because it is not yet scheduled.
VIEWING THE DAILY SCHEDULE
When viewing the yearly or monthly schedule, you can click on any specific day to see audits
scheduled for that day in a daily calendar display.
Daily Schedule Details
To see details of the schedule for a particular day,
click on the actual audit in the Monthly, Weekly, or
Daily view.
The audit schedule description appears, including:
• Audit name
• IP addresses to be audited
• Audit frequency

USER GUIDE
© NETSHIELD Corporation 2017 | https://www.netshieldcorp.com | 1-800-991-3971
• Scheduled start time
• Expected audit duration
SEARCHING THE CALENDAR
You can search the calendar for a particular audit.
• Select Search below the Month field in the lower left corner.
• Enter the search parameters in the Keywords field.
• Search for words that appear in the name of the audit.
• The search results indicate the number of matches found and the names of reports
containing that match.
OPENING AUDIT/SCHEDULING FAQ IN THE CALENDAR VIEW
Select FAQ below the Month field in the lower left corner of the Calendar to view answers to
frequently asked questions about audits and reports.
The FAQ page appears in a small separate window.
If you do not find the answer you need, please email SnoopWall Technical Support at .
NATIONAL VULNERABILITY DATABASE
There is a direct link to the National Vulnerability Database maintained by the National Institute
of Standards and Technology (NIST) and sponsored by the Department of Homeland Security.
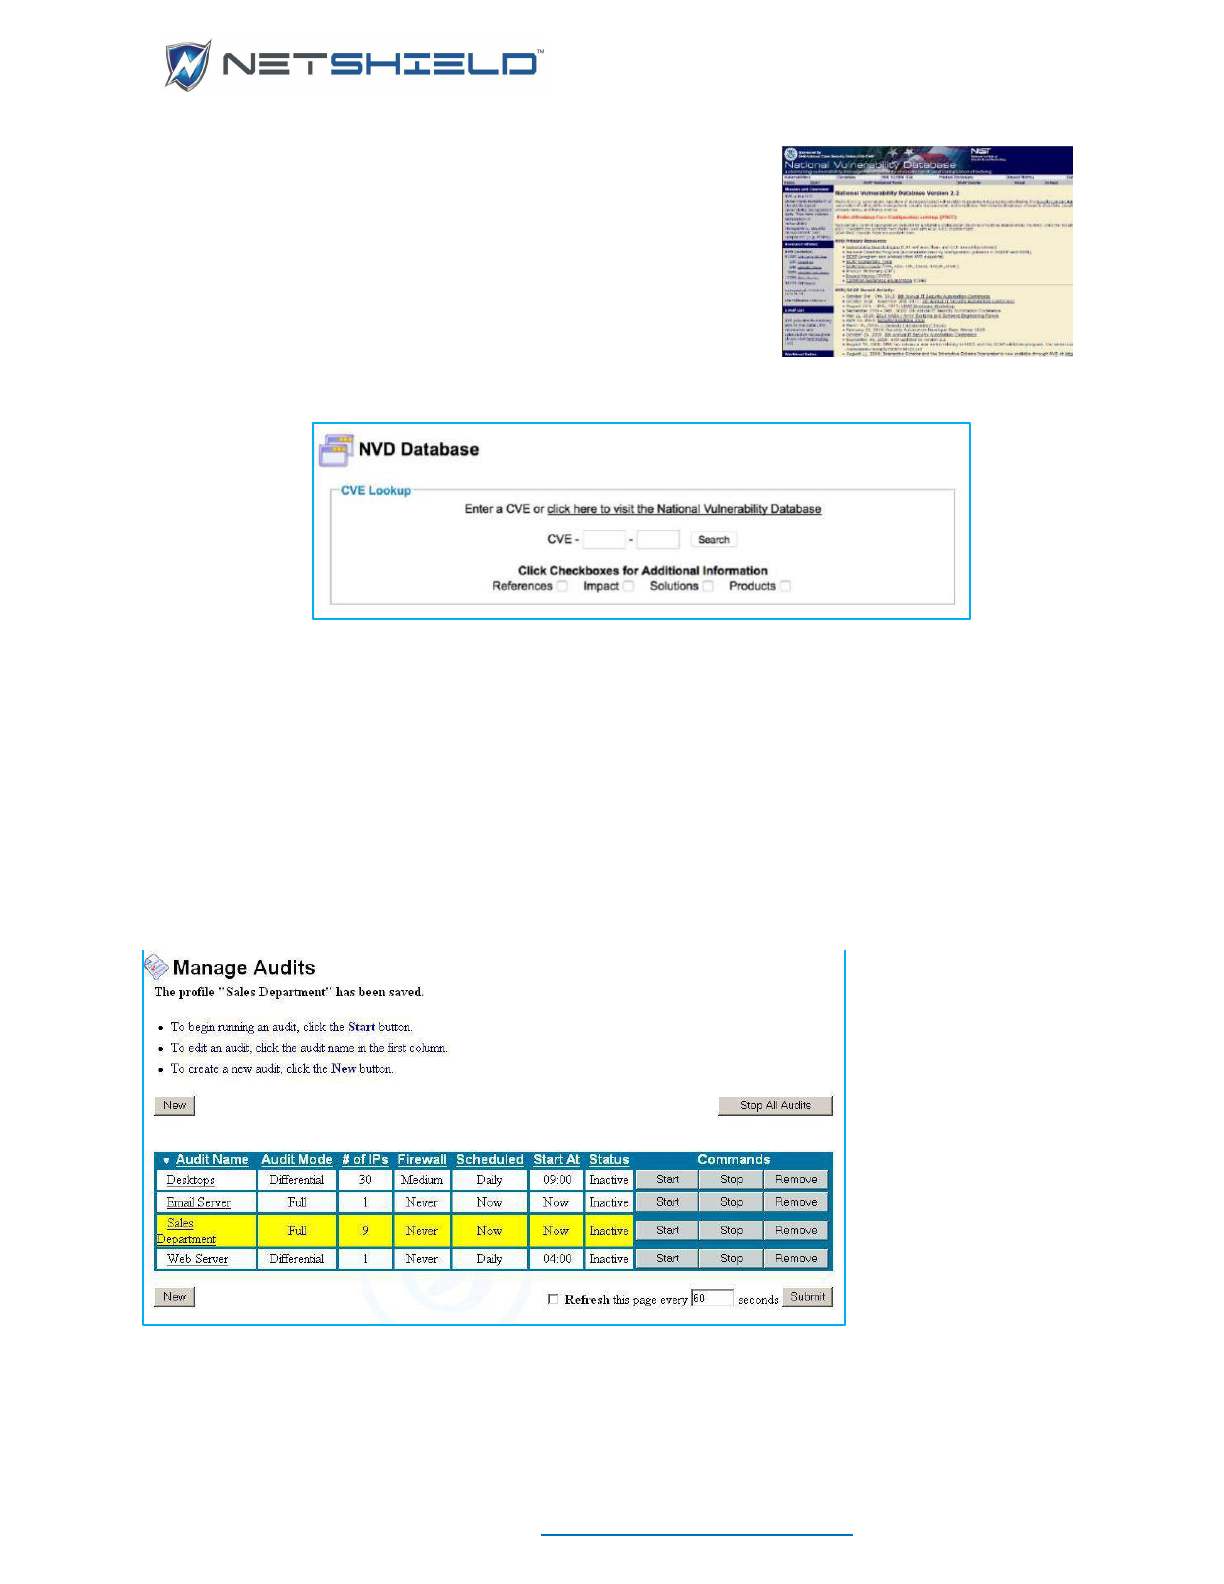
USER GUIDE
© NETSHIELD Corporation 2017 | https://www.netshieldcorp.com | 1-800-991-3971
Here you will find a vulnerability database that integrates
publicly available U.S. Government vulnerability resources as
well as references.
• Select Audits
National Vulnerability Database from
the left menu.
• Click the link to visit the NVD web site or enter the CVE
number of the vulnerability you wish to look up.
• Select the Additional Information you wish to include in the lookup.
• Click the Search button to view results.
MANAGING IN PROCESS AUDITS
Reviewing Audits
There are several options for reviewing in process audits. Let’s say you create an audit called
Sales Department. If you select Audits from the left menu, you will see it listed.
• Click the Sales Department Start button to begin the audit. Once the audit begins, you are
automatically taken to the Reports Page (Reports
View Audit Results) and shown an
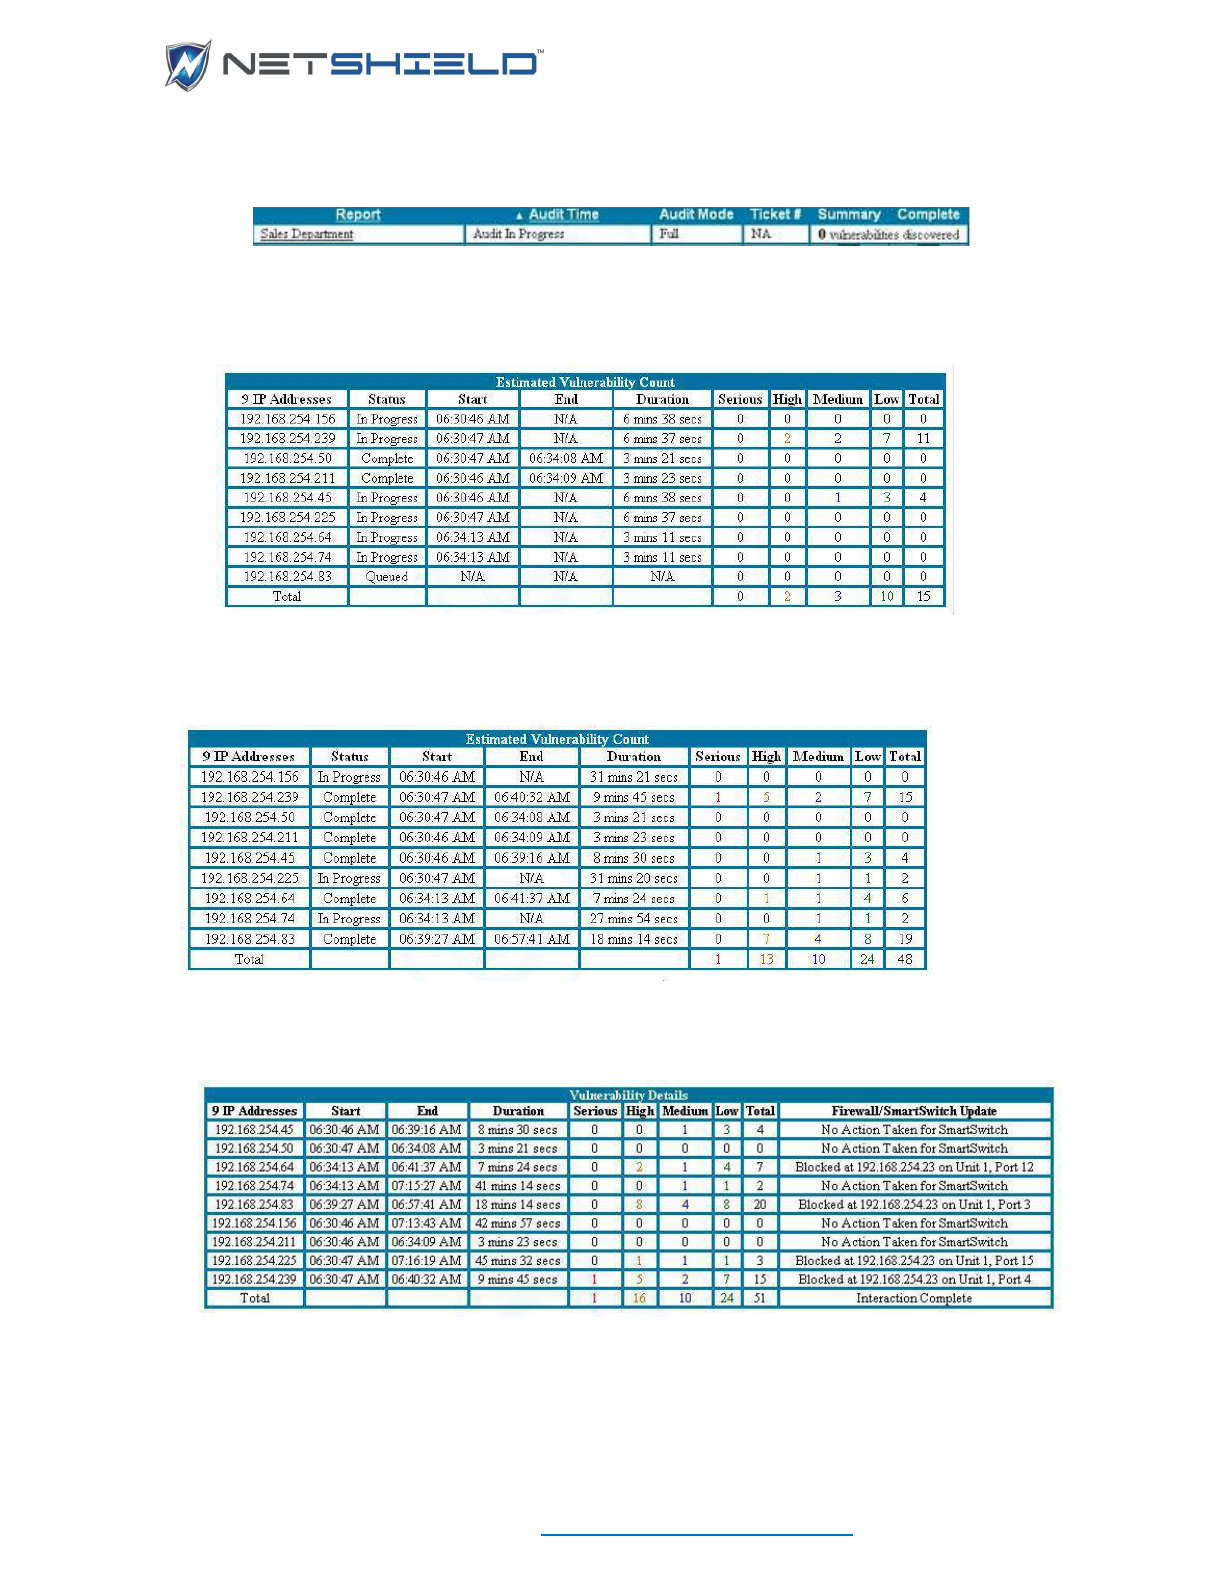
USER GUIDE
© NETSHIELD Corporation 2017 | https://www.netshieldcorp.com | 1-800-991-3971
overview of the audit as it progresses. Here, the audit has started, but no vulnerabilities
have yet been discovered.
• Click on Sales Department link to go to the audit details.
The next illustration shows the status of the Sales Department audit after a few minutes.
Note 15 vulnerabilities have been discovered so far. Two are of high priority.
The data will change as the audit progresses. Now there are 48 total vulnerabilities. (See
the screen below.)
In the final audit screen there are 51 total vulnerabilities present. Notice that the Status
column has disappeared and the Firewall/SmartSwitch Update column has been added
to the far right.
After the Sales Department audit finished, the SmartSwitch blocked the IPs showing high
vulnerabilities. (You specify the SmartSwitch blocking requirements when you create the audit in
the Audit Wizard; NetSHIELD no longer does Firewall blocking).
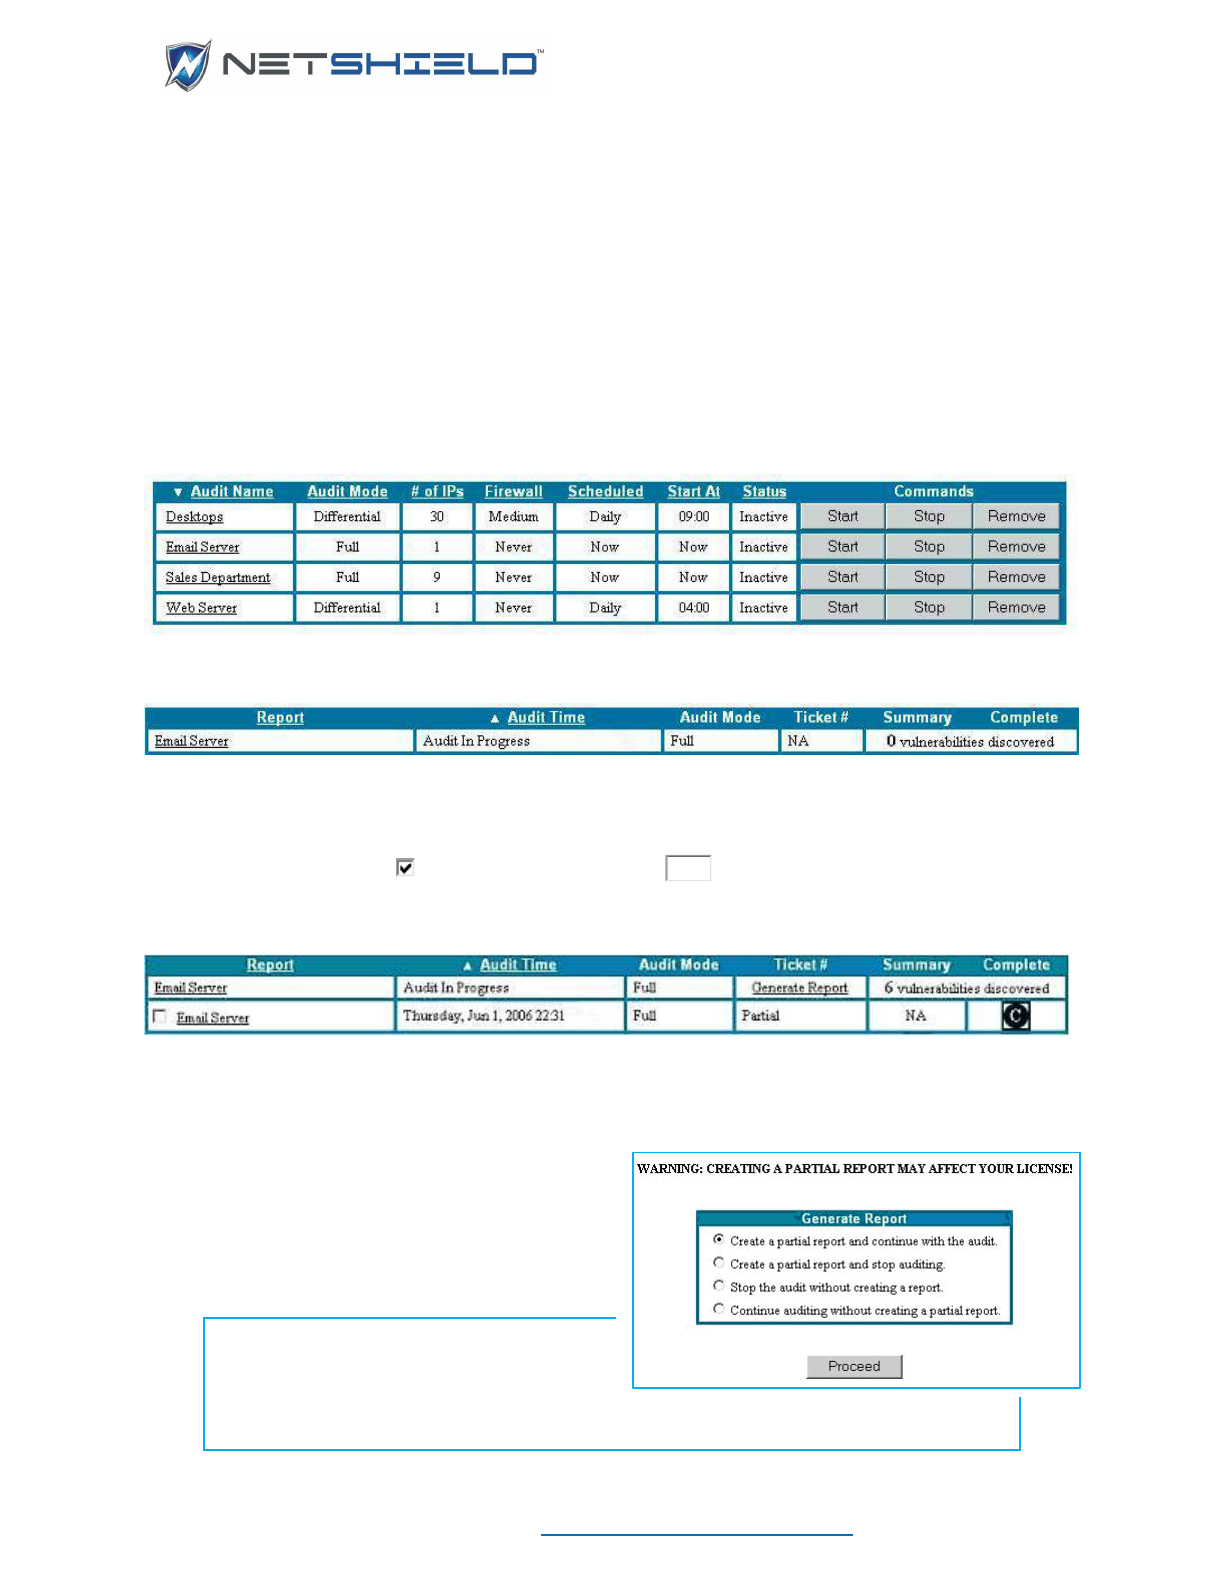
USER GUIDE
© NETSHIELD Corporation 2017 | https://www.netshieldcorp.com | 1-800-991-3971
IP Address 192.168.254.64 in the illustration shows two high vulnerability items. This address
was blocked at SmartSwitch 192.168.254.23 on Unit 1, Port 12.
You can also specify SmartSwitch blocking requirements on the Network Access Control
Asset Detection System page. Blocking rules for this action are displayed on the Network
Access Control
SmartSwitch Integration page.
Viewing Partial Reports
At times it may be helpful to view actual report data before an audit is fully completed – perhaps
to check how things are going, or to view the status of a particular asset.
Let’s say you create an audit called Email Server. If you select Audits
Manage Audits from
the left menu, you will see it listed.
• Click the Email Server Start button to begin the audit.
You are automatically taken to the Reports Page (Reports
View Audit Results), where you
see an overview of the audit.
Initially, there are 0 vulnerabilities discovered, but this number will change as the audit updates.
Make sure you check the Refresh this page every seconds box at the bottom of the
page to get updates. Adjust the refresh rate if necessary.
As the audit progresses, the page will be updated, and you can proceed.
• Click the Generate Report link for this audit to get a partial report (the report is partial
because the audit is still In Progress).
This takes you to the Generate Report
page.
Here you have four options, as shown in
the illustration.
NOTE: A partial audit may affect your
license agreement because you can
only audit a specific number of MAC
addresses with a limited license agreement. You are licensed to audit “N” specific
addresses, not “N” addresses total.
60

USER GUIDE
© NETSHIELD Corporation 2017 | https://www.netshieldcorp.com | 1-800-991-3971
• Decide which Partial Report option works best for you and select the appropriate button.
Click Proceed.
Your choice takes you back to the Reports Page. In this example, we chose Create a
partial report and continue with the audit.
• Click on the button to get your partial report. The report opens in a PDF file.
The Summary and Complete Reports are both available after the audit completes.
GENERATING AND VIEWING ASSET REPORTS
• Select Reports
View Audit Results from the left menu to go directly to the Audit
Results screen.
• Select an audit result to generate an Asset Report for that audit. Assets will also be marked
as trusted when unblocked.
• Click Generate Asset Report.
• Click on one of the generated links to view the report.
Note: Asset reports combine SnoopWall and NVD data. Reports are available in PDF and XML
formats. XML Schema is also available.
Generating and Viewing NetSHIELD Reports.
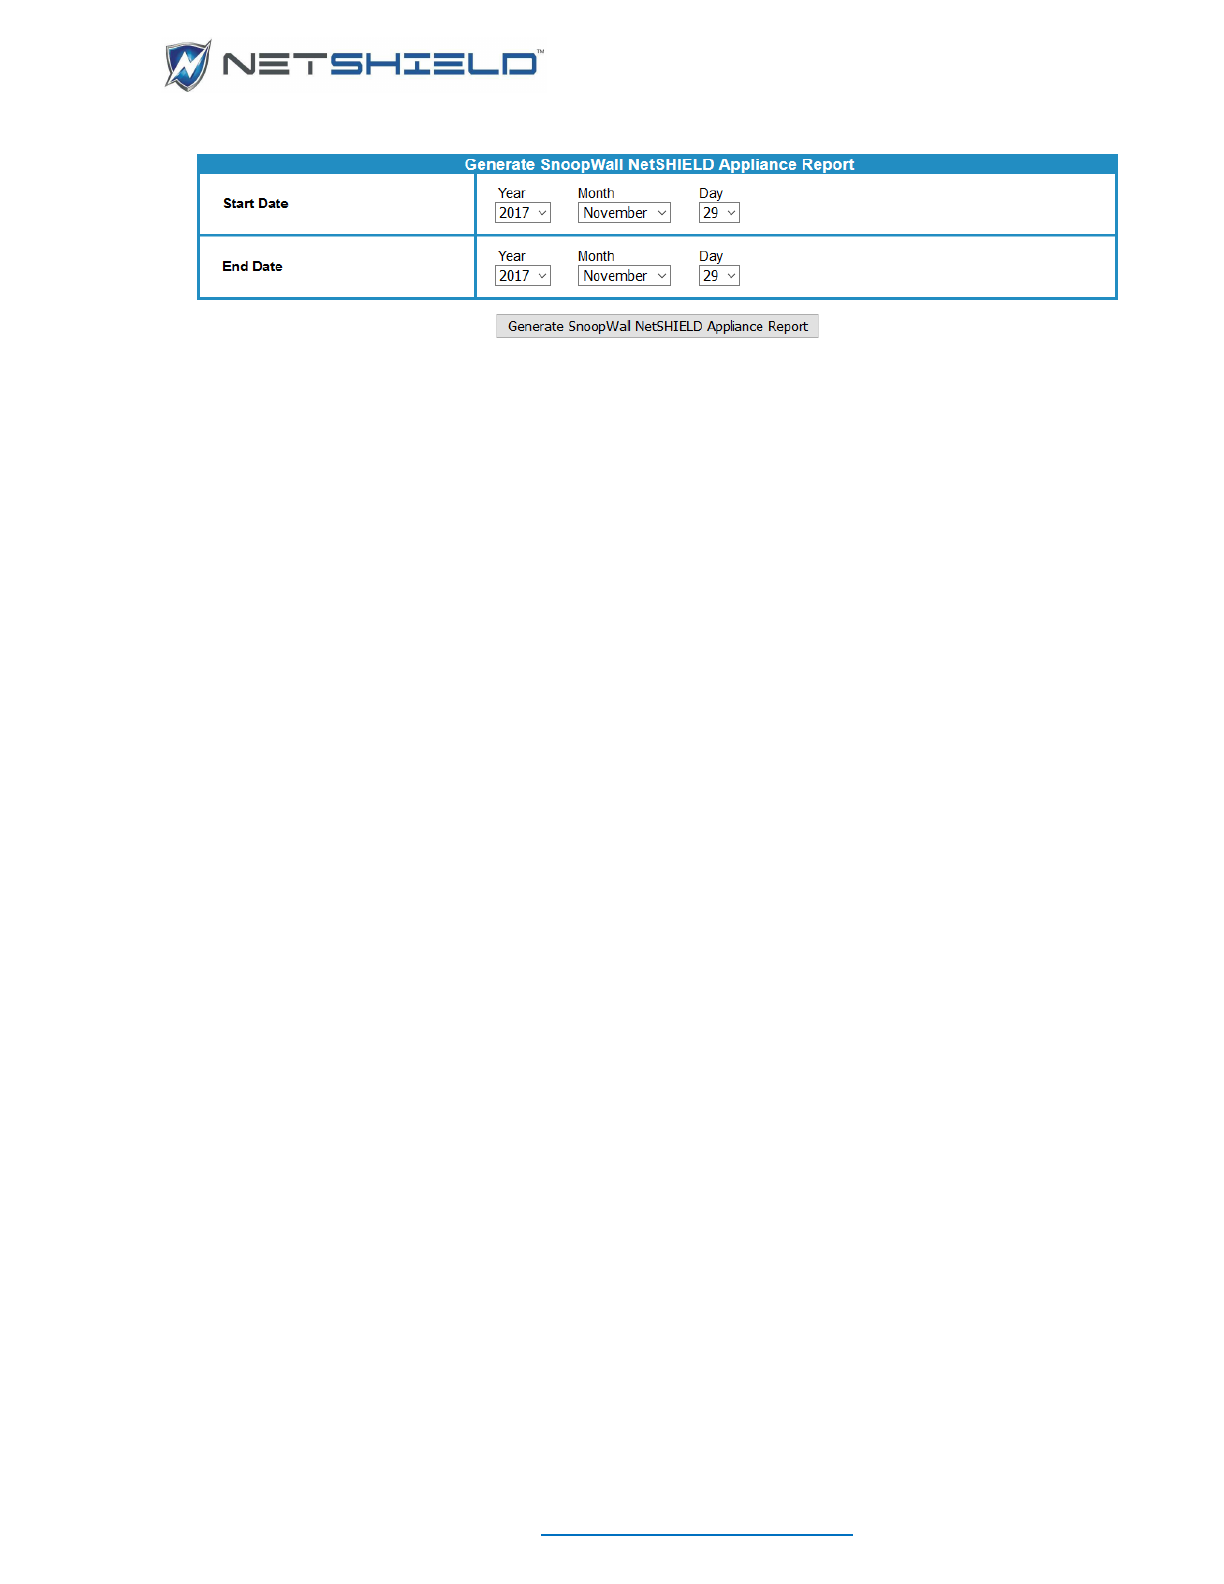
USER GUIDE
© NETSHIELD Corporation 2017 | https://www.netshieldcorp.com | 1-800-991-3971
• Select Reports NetSHIELD Reports from the left menu to go directly to NetSHIELD
Reports screen.
• Select a start date for NetSHIELD report. Assets will also be marked as trusted when
unblocked.
• Select an end date for NetSHIELD report.
• Click Generate NetSHIELD Report.
• Click on the generated link to view the report.
Generating and Viewing IP History Reports
• Select Reports NetSHIELD Reports from the left menu to go directly to NetSHIELD
Reports screen.
• Enter an IP address. Assets will also be marked as trusted when unblocked.
• Select a start date for the IP History report. Assets will also be marked as trusted when
unblocked.
• Select an end date for the IP History report.
• Click Generate IP History Report.
• Click on the generated link to view the report.

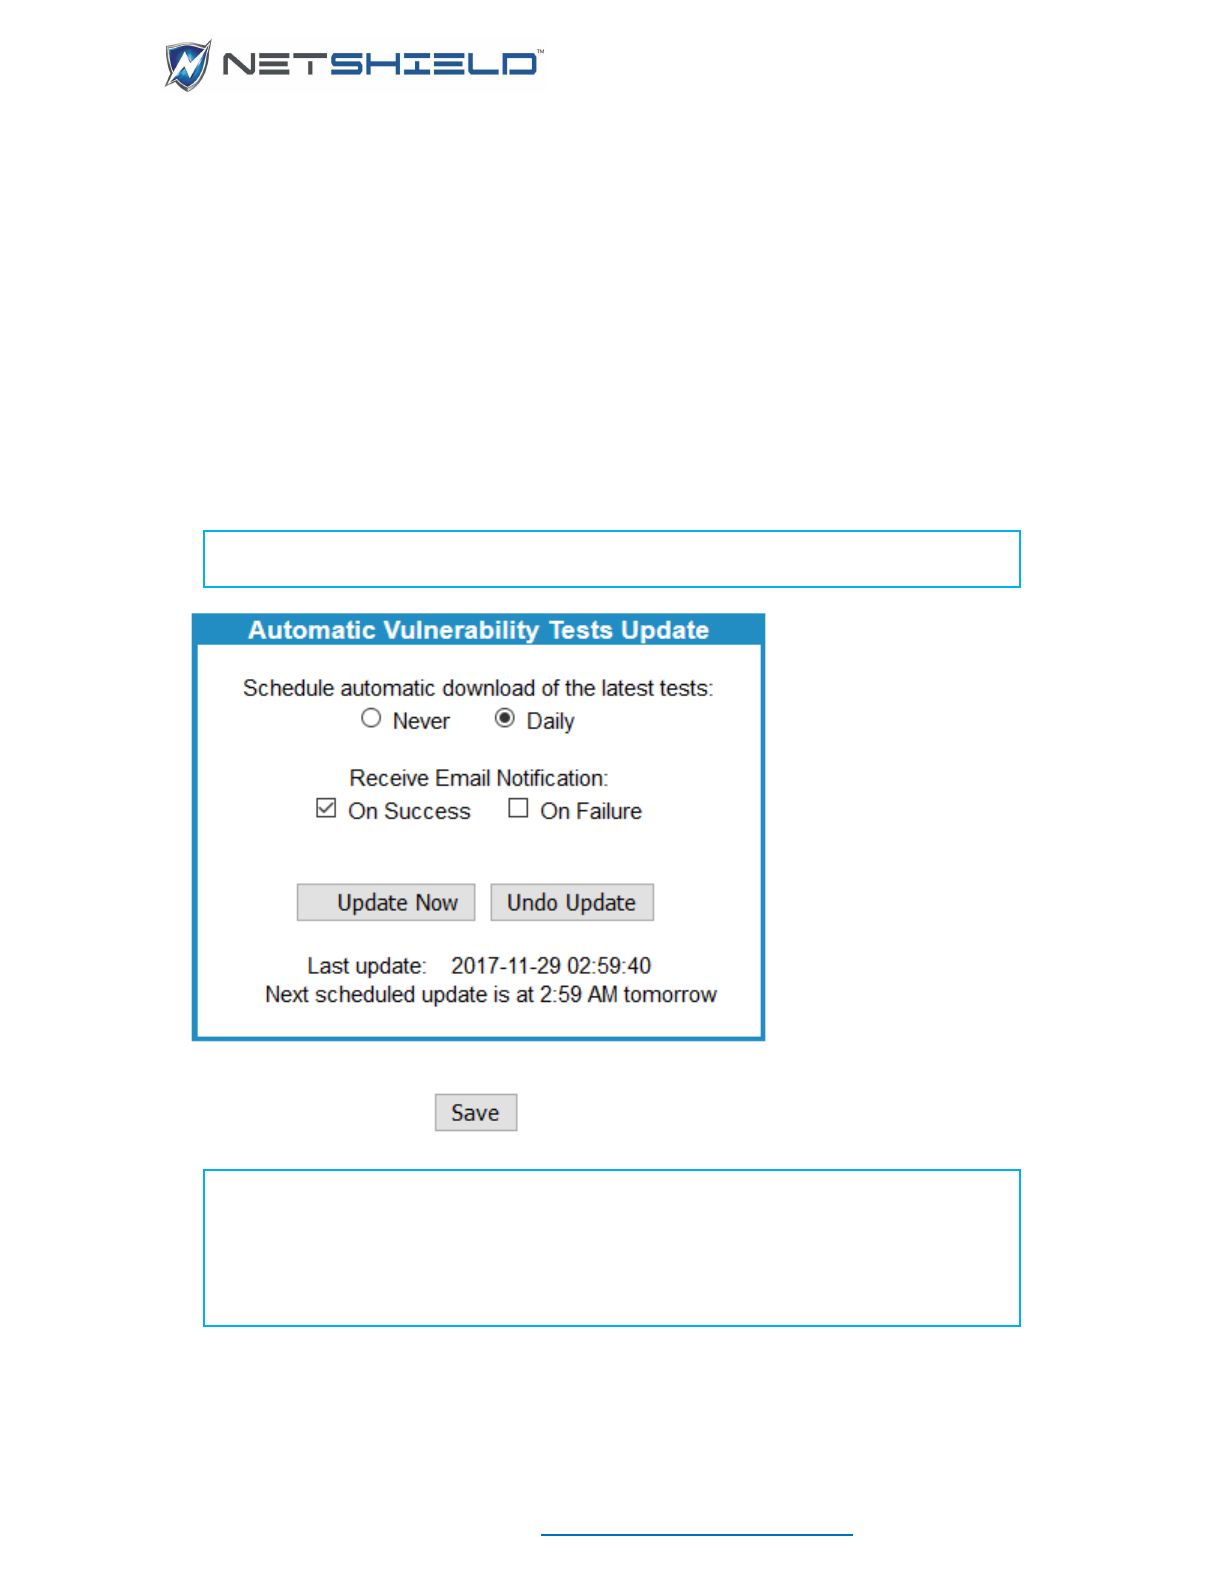
USER GUIDE
© NETSHIELD Corporation 2017 | https://www.netshieldcorp.com | 1-800-991-3971
UPDATES
SETTING UP AUTOMATIC VULNERABILITY UPDATES
You can schedule updates at any time to ensure you are up to date on all the latest tests.
• Select Updates
Vulnerability Tests from the left menu.
• The Automatic Vulnerability Test Updates Update screen appears.
• You can opt to receive updated vulnerability tests over the Internet from the Update Server
automatically every day, or you can manage downloads manually by selecting Never.
Downloads are secure transmissions that access only SnoopWall NetSHIELD appliance.
NOTE: For automatic downloads to occur, you must open port 443 on your
Firewall.
NOTE: The normal setting is Daily. If you click Never, no automatic downloads
occur.
You may still run updates when you wish by clicking the Update Now button – a
single download will occur immediately, but no periodic updates will be
scheduled.
• Choose Update Now or Undo Update to continue.
USER GUIDE
© NETSHIELD Corporation 2017 | https://www.netshieldcorp.com | 1-800-991-3971
Update Now—Click this button to immediately receive updated vulnerability tests from the
Update Server.
You can also request a single download of vulnerabilities at any time. (This may be
necessary later if you initially select the Never option in this setup.)
When you select Update Now, you move to a new screen, where you can choose to
Download Updates if your SnoopWall NetSHIELD appliance is connected to the Internet.
Or you may choose to download the updates to your own machine, and then upload them
to the appliance.
NOTE: We recommend you select Update Now when you first set up SnoopWall
NetSHIELD as well as whenever daily updates have not been performed for a
length of time.
NOTE: Do not change the name of the update file. If the file needs to be
accessed later, SnoopWall NetSHIELD will only be able to locate it if it retains
the same name.
NOTE: Sometimes Windows renames the tar.gz update file to tar.tar or other
variations thereof when it downloads the file. Make sure the file is named tar.gz
after the download.
• After you click Download Updates or Upload Now, you receive a list of new vulnerability
tests (sample shown below). Peruse this list and then decide on your next step. Options are
shown below.
Option
Description
Ignore
This set of tests is not installed
Install Now
New vulnerability tests are installed
Undo Update
Returns you to the previous set of vulnerability tests.
Example: Did you update vulnerability tests but are
not sure that you should have? Click this button.
The previous set of vulnerability tests is stored in a
file, so it can be restored.
You can Cancel if you click this button by mistake.
RETRIEVING SNOOPWALL NETSHIELD SERVICE PACKS/VERSION UPDATES
You may download service pack updates at any time.
• Select Updates
Service Packs from the left menu.
A screen similar to the one below appears. Click Install Patches.
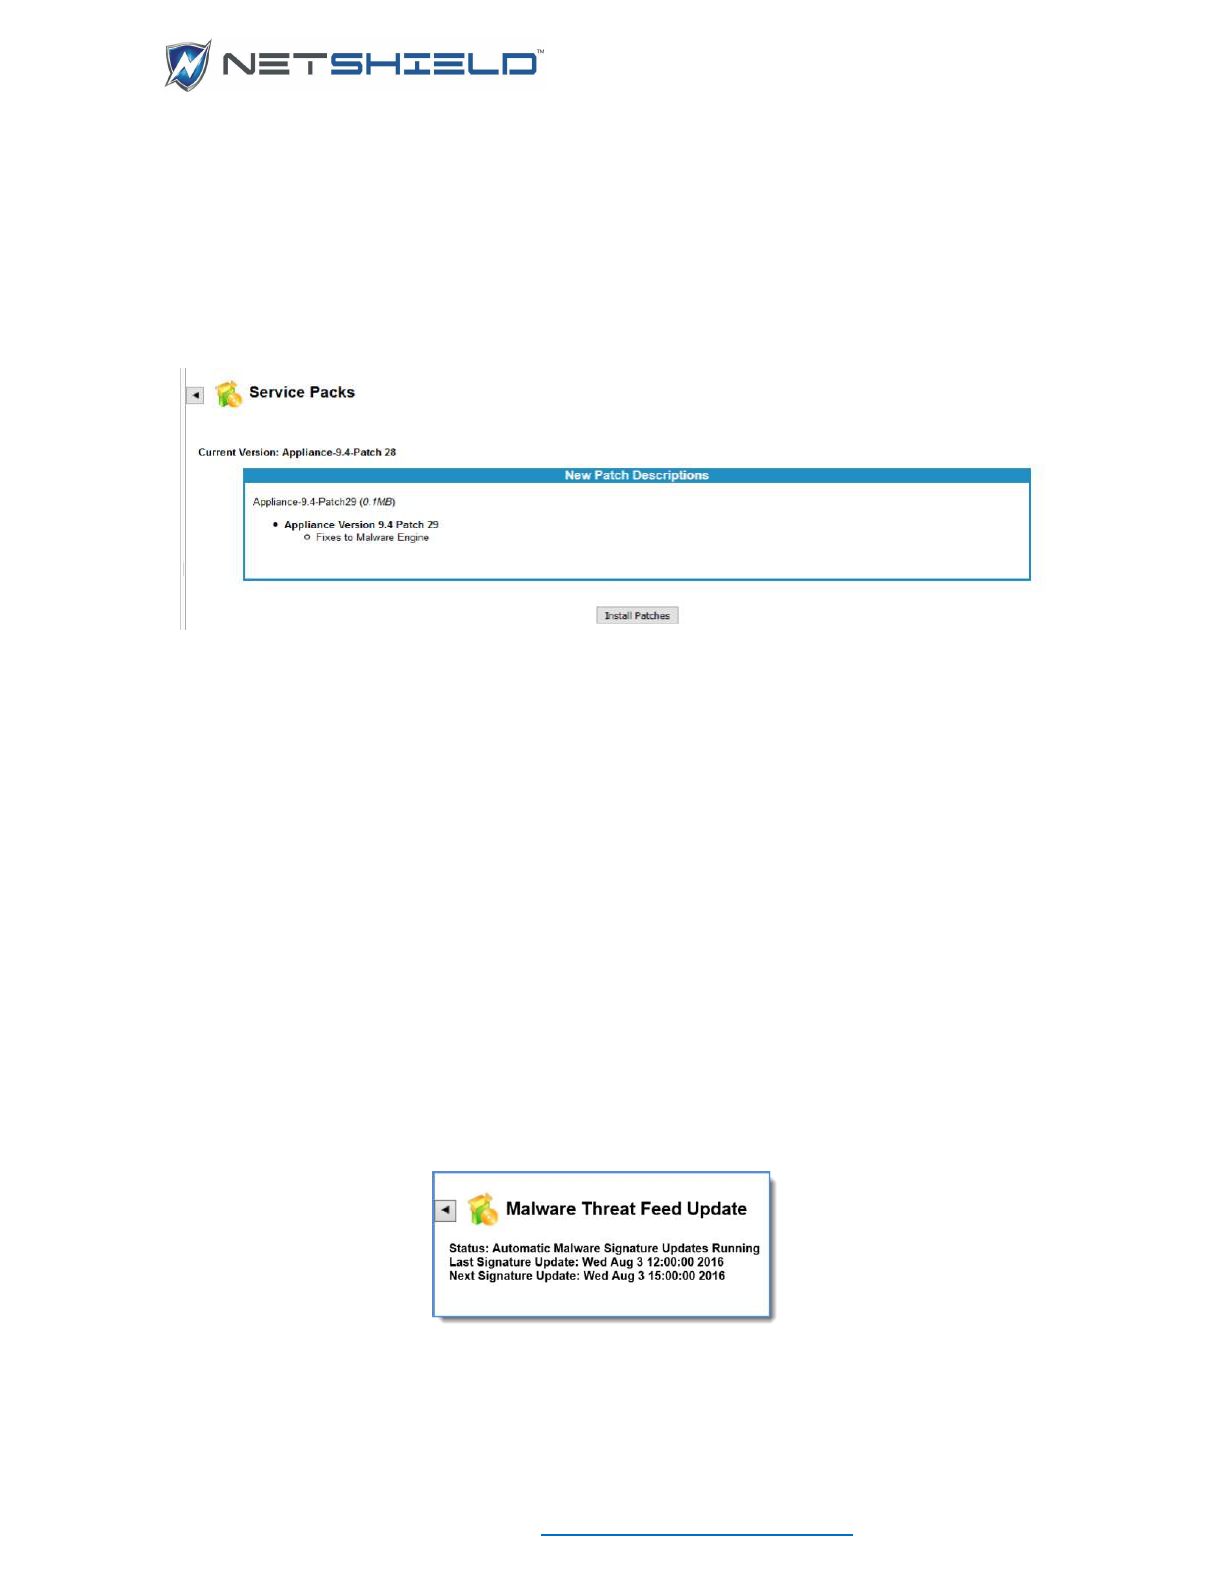
USER GUIDE
© NETSHIELD Corporation 2017 | https://www.netshieldcorp.com | 1-800-991-3971
SERVICE PACK CONFIGURATION
To obtain automatic updates;
1. Select UpdatesService pack Configuration.
2. If the screen shows Software Auto Updates Disabled,
3. Click Enable Software Auto Updates.
You will now receive automatic updates as they become available.
MALWARE THREAT FEED UPDATE
1. Select UpdatesMalware Threat Feed Updates.
2. The current Malware Signature running on the network are displayed.
3. The Last and Next Signature Updates are listed.

USER GUIDE
© NETSHIELD Corporation 2017 | https://www.netshieldcorp.com | 1-800-991-3971
License/Subscription updates
The current license/subscription information is provided on this screen.
Select UpdatesLicense/Subscription.
CONFIGURING A PROXY FOR SERVICE PACK AND VULNERABILITY UPDATES
• SnoopWall NetSHIELD supports the use of a proxy
server for both service pack updates and
vulnerability signature updates.
• Select Network Configuration
Proxy
Configuration from the left menu to go to the Proxy
Configuration screen.
• Select Use Proxy to direct the appliance to use a
proxy server for outgoing connections.
• Enter the proxy server IP address in the IP Address
field.
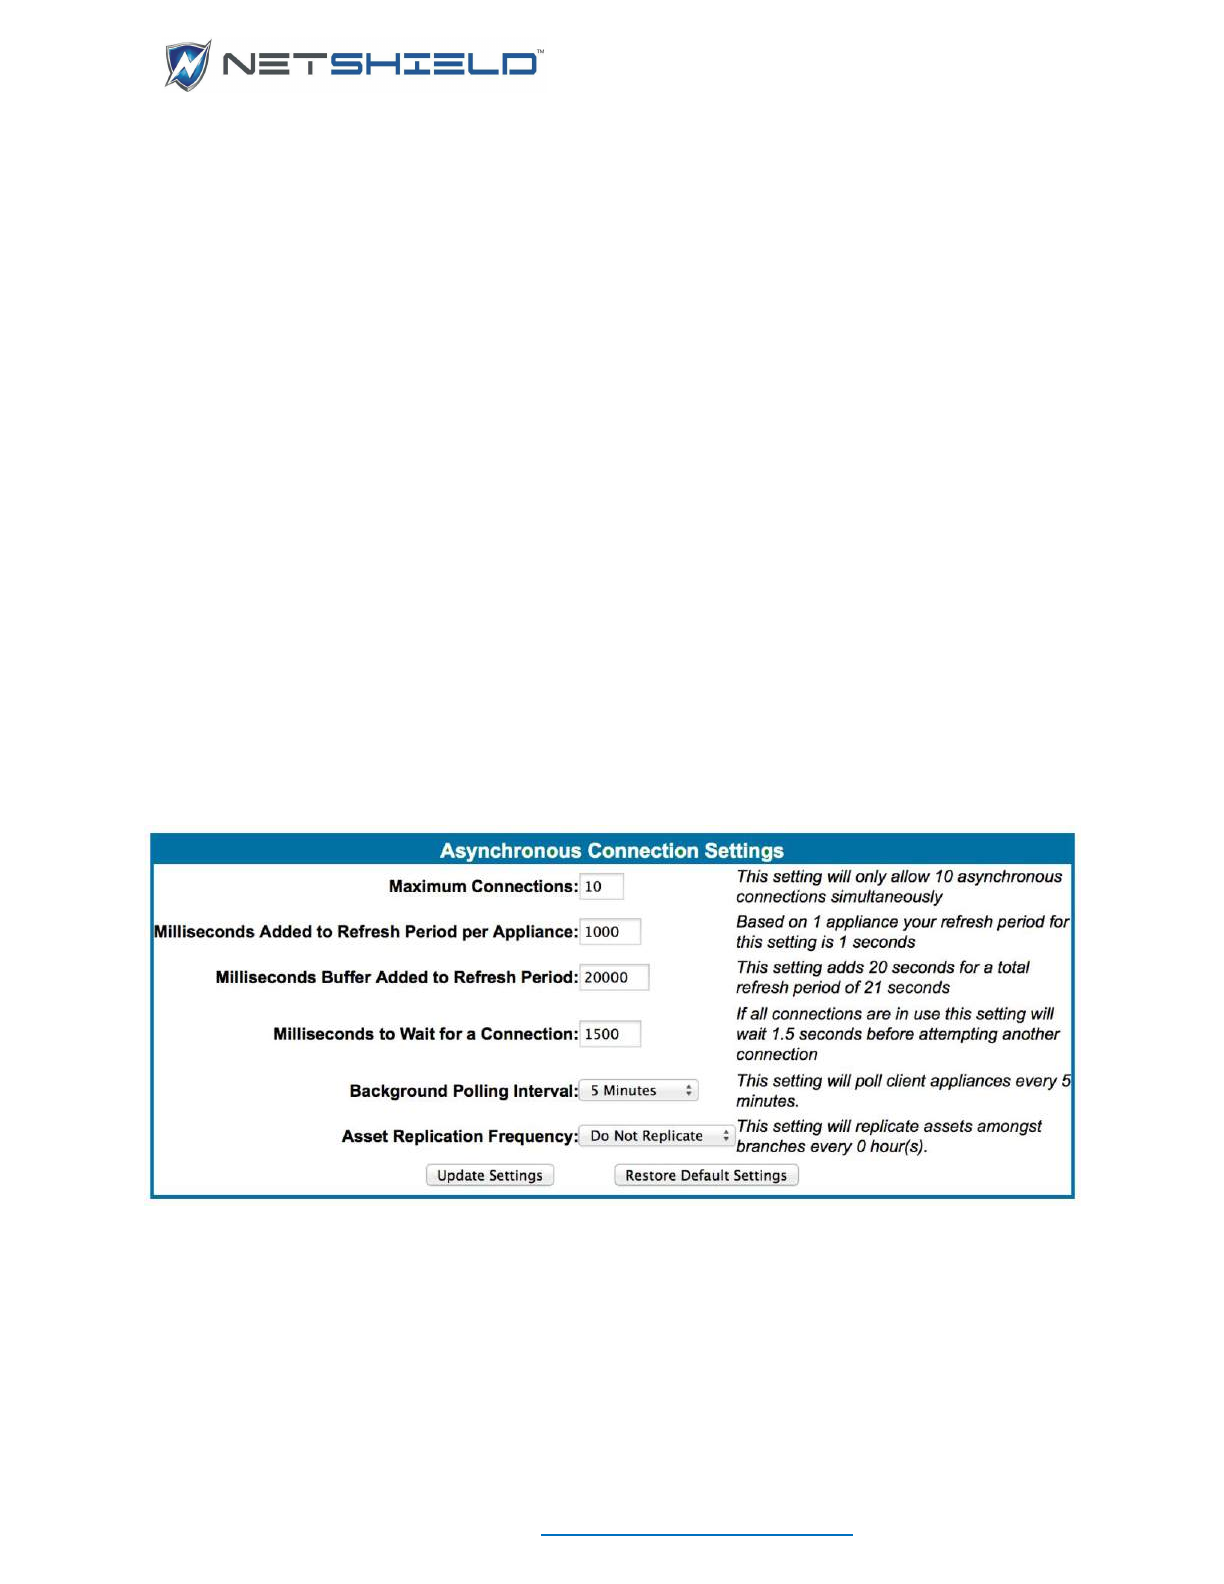
USER GUIDE
© NETSHIELD Corporation 2017 | https://www.netshieldcorp.com | 1-800-991-3971
• Enter the proxy server port in the Port field.
• Select Proxy Requires Login if the proxy server requires a username and password to
login.
• Enter the proxy server username in the Username field.
• Enter the proxy server password in the Password field.
• Click Save to save the configuration.
COMMAND CENTER
The Command Center offers the ability to command and control remote appliances across your
network:
• Remote client appliances can be added and groups of remote appliances can be created.
• In one action, policies and configurations can be saved to all remote appliances included in
a group.
• Remote actions can be performed on remote appliances.

USER GUIDE
© NETSHIELD Corporation 2017 | https://www.netshieldcorp.com | 1-800-991-3971
• Group and appliance status can be quickly viewed on a single screen, providing an easy-
to-use management console.
• The number of appliances the Command Center is able to manage varies depending on
the type of Enterprise appliance you have purchased. Command Center is only available
on the Enterprise appliances.
Appliance
Number of Possible
Managed Appliances
Enterprise 10
Up to 10
Enterprise 100
Up to 100
Enterprise 250
Up to 250
Important Note: SnoopWall Command Center can be used to remotely manage
multiple Nano, Branch Pro, or Enterprise appliances.
Important Note: Intermediate devices, such as firewalls, must be configured to
allow traffic from SnoopWall Command Center to each remote, managed
appliance. Please consult your firewall documentation for more information on
port/traffic forwarding.
To accomplish all this, you will first need to add the appliances that will be managed remotely,
and then arrange them into groups.
MANAGING APPLIANCES
Select Command Center
Manage Appliances from the left menu. The Managed
Appliance page displays a list of SnoopWall NetSHIELD appliances (see table below).
ADDING MANAGED APPLIANCES
(Note: This is only available on the Enterprise variants)
• Select Command Center
Manage Appliances and click the Add Appliance button.
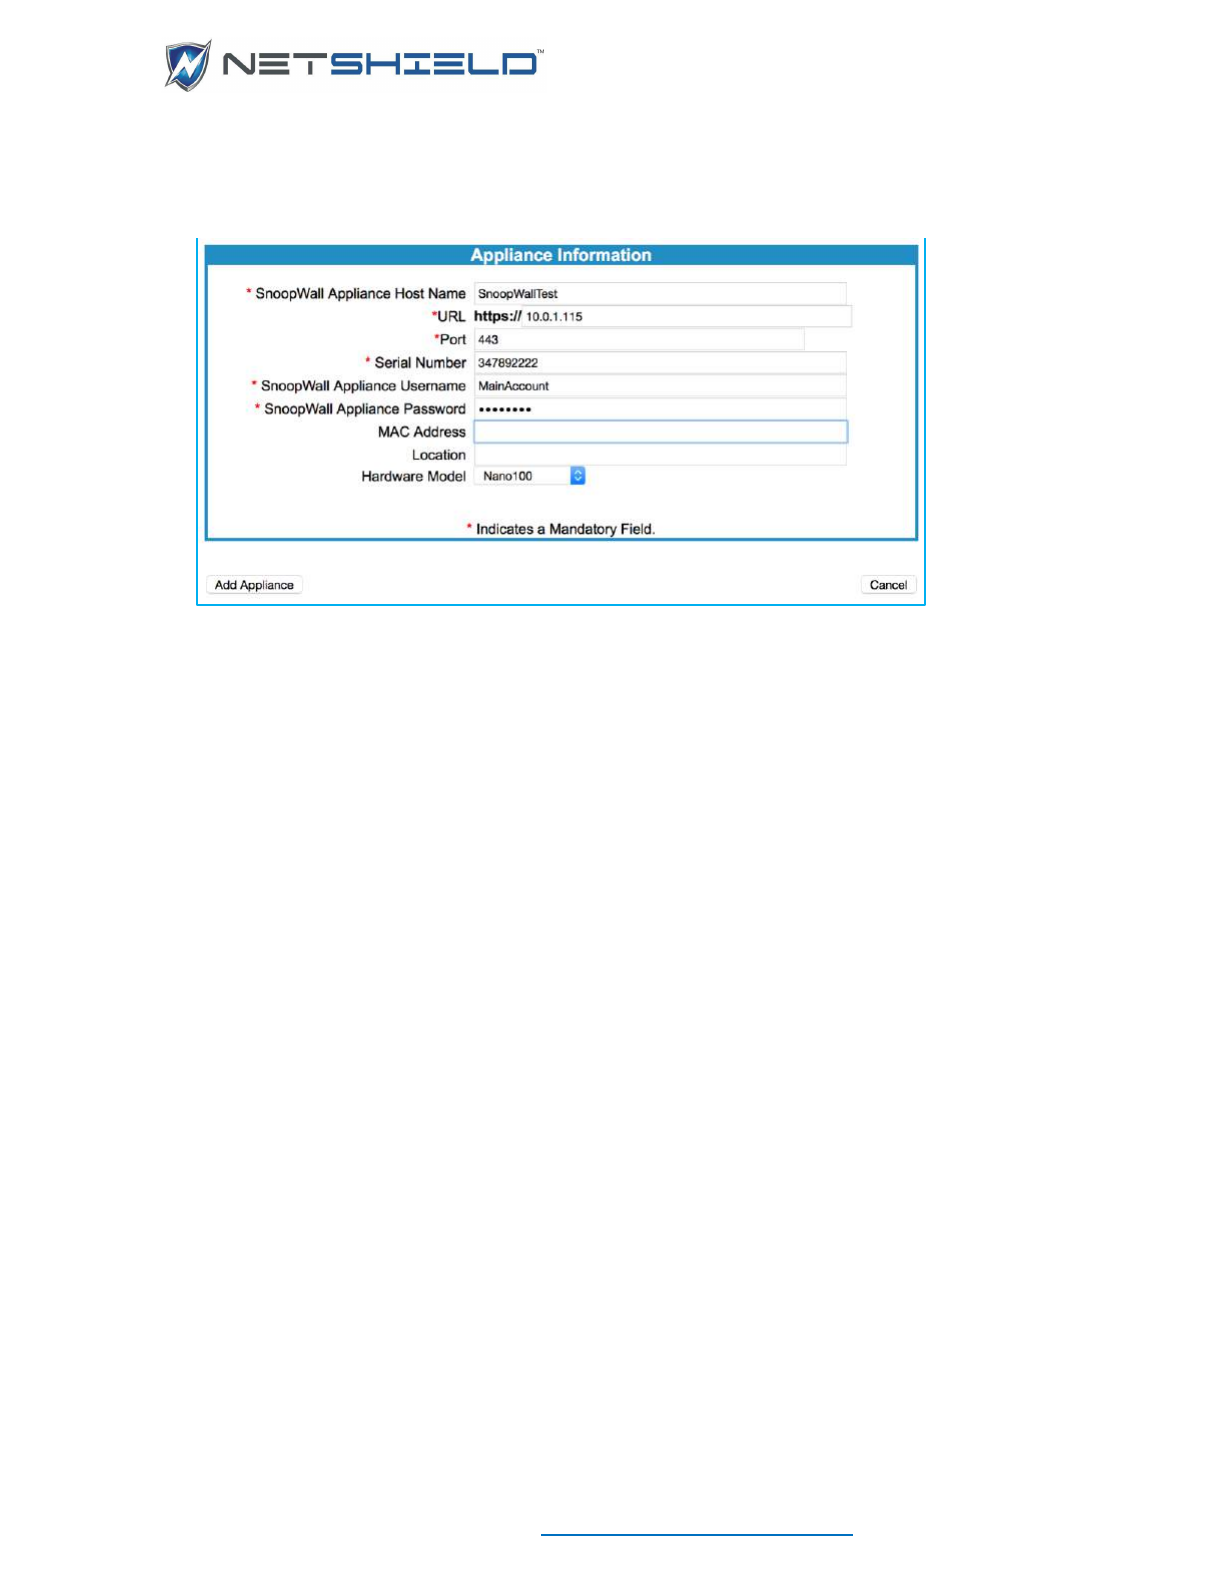
USER GUIDE
© NETSHIELD Corporation 2017 | https://www.netshieldcorp.com | 1-800-991-3971
• This takes you to the Appliance Information screen. Fields with a red asterisk are
required: Appliance Name, URL, and Serial Number.
• Enter appliance information.
If you enter the username and password for the appliance, you will not be asked for that
information when you log on to it while using SnoopWall NetSHIELD interface.
The remaining optional fields are for information that may be useful to the network
administration group, such as the location of the appliance or locations serviced by the
appliance.
• Click Add Appliance to enter the information or Cancel to ignore entries.
Edit Appliance Information
• Click on a hyperlinked SnoopWall Appliance Host Name in the Managed Appliances list
to see its current information. Modify as desired.
Removing Appliances
To remove one or more appliances from the list, click the check box next to the appliance
name(s). When you select all appliances you wish to remove, click the Remove Selected button
in the upper right corner of the page.
ADDING/MANAGING APPLIANCE GROUPS
(Note: This is only available on the Enterprise variants)
Some organizations may have hierarchies of SnoopWall NetSHIELDs. For example, a bank
may have an Enterprise appliance in their main office and smaller Nano/Branch Pro appliances
in branch offices. Appliances in the branches may be centrally managed from the home office.
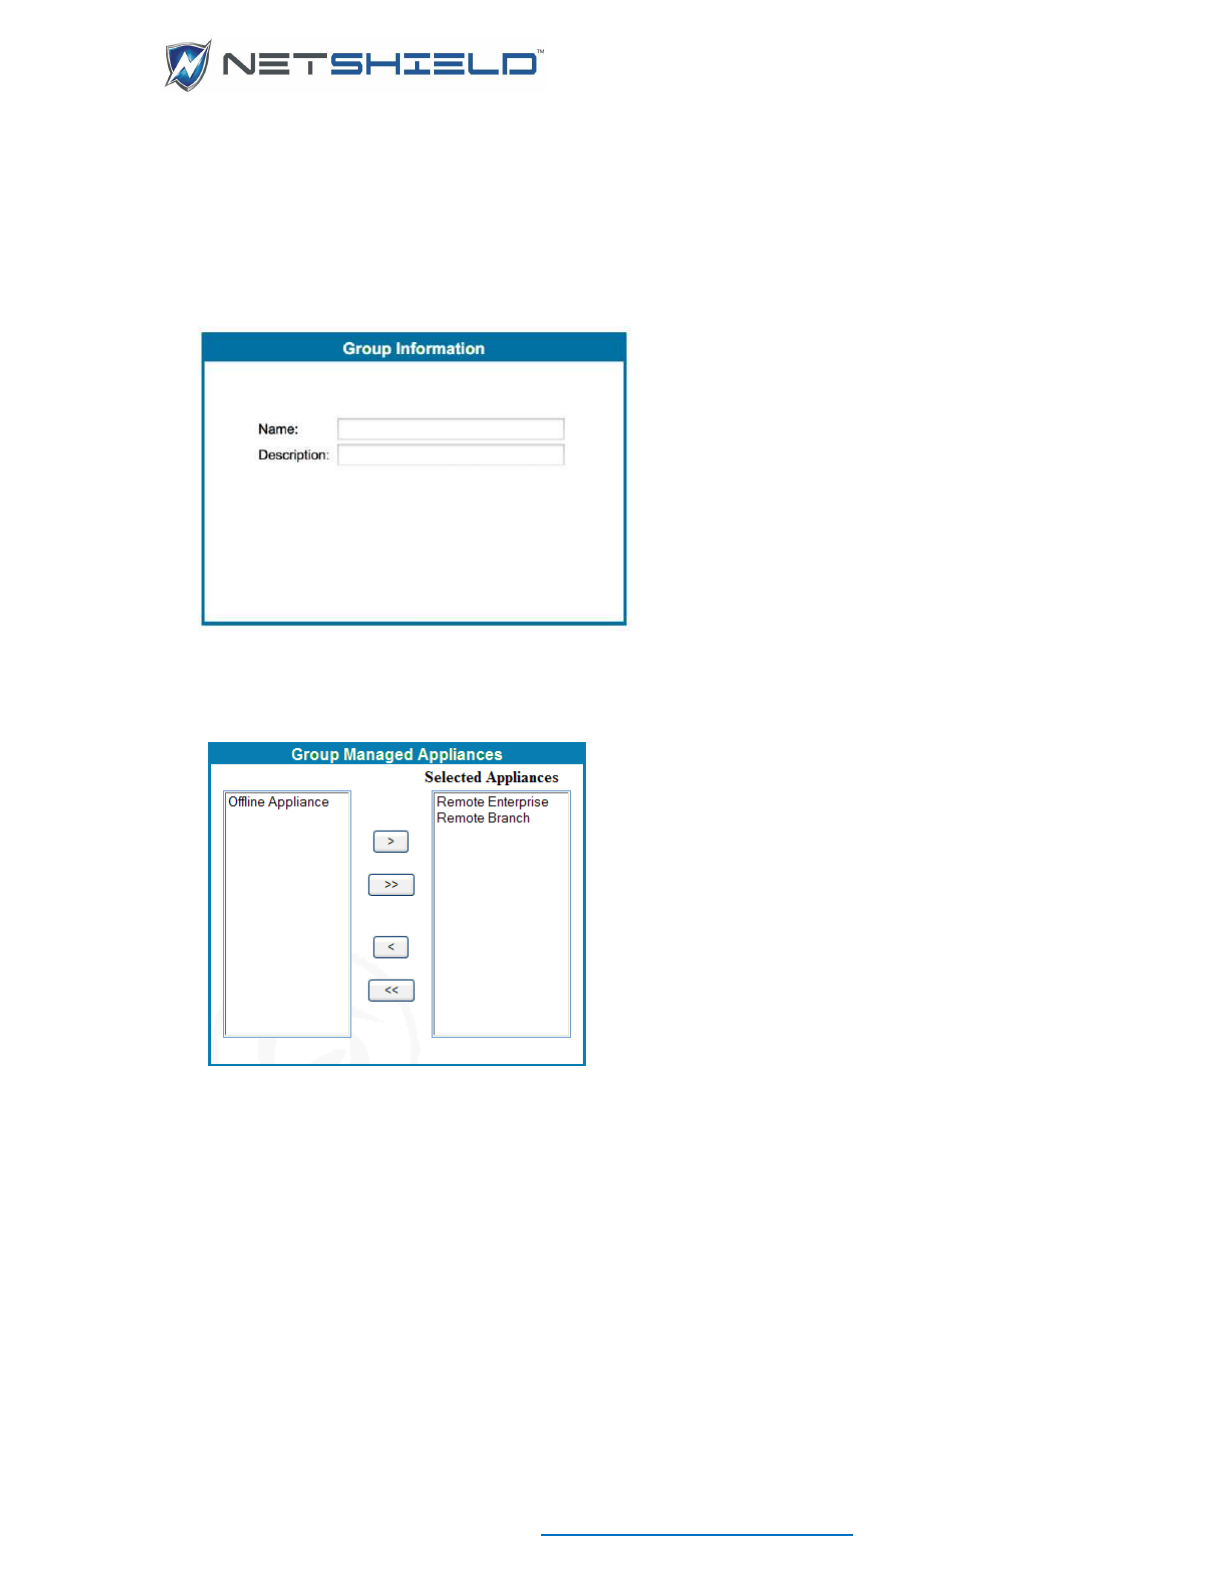
USER GUIDE
© NETSHIELD Corporation 2017 | https://www.netshieldcorp.com | 1-800-991-3971
The add and manage options utilize the same wizard for entering group information and
policies, which can be saved to remote appliances.
• Select Command Center
Add Group Wizard to add groups, or Command Center
Manage Groups to select a group to modify using the Group Wizard. Create a unique
name for the group, or modify the existing name. Click Next.
• Select appliances for the group. Use the arrow buttons to move appliances listed on the left
into the managed group. Click Next.
• Select the Remote Asset Detection Policy. Click Next.
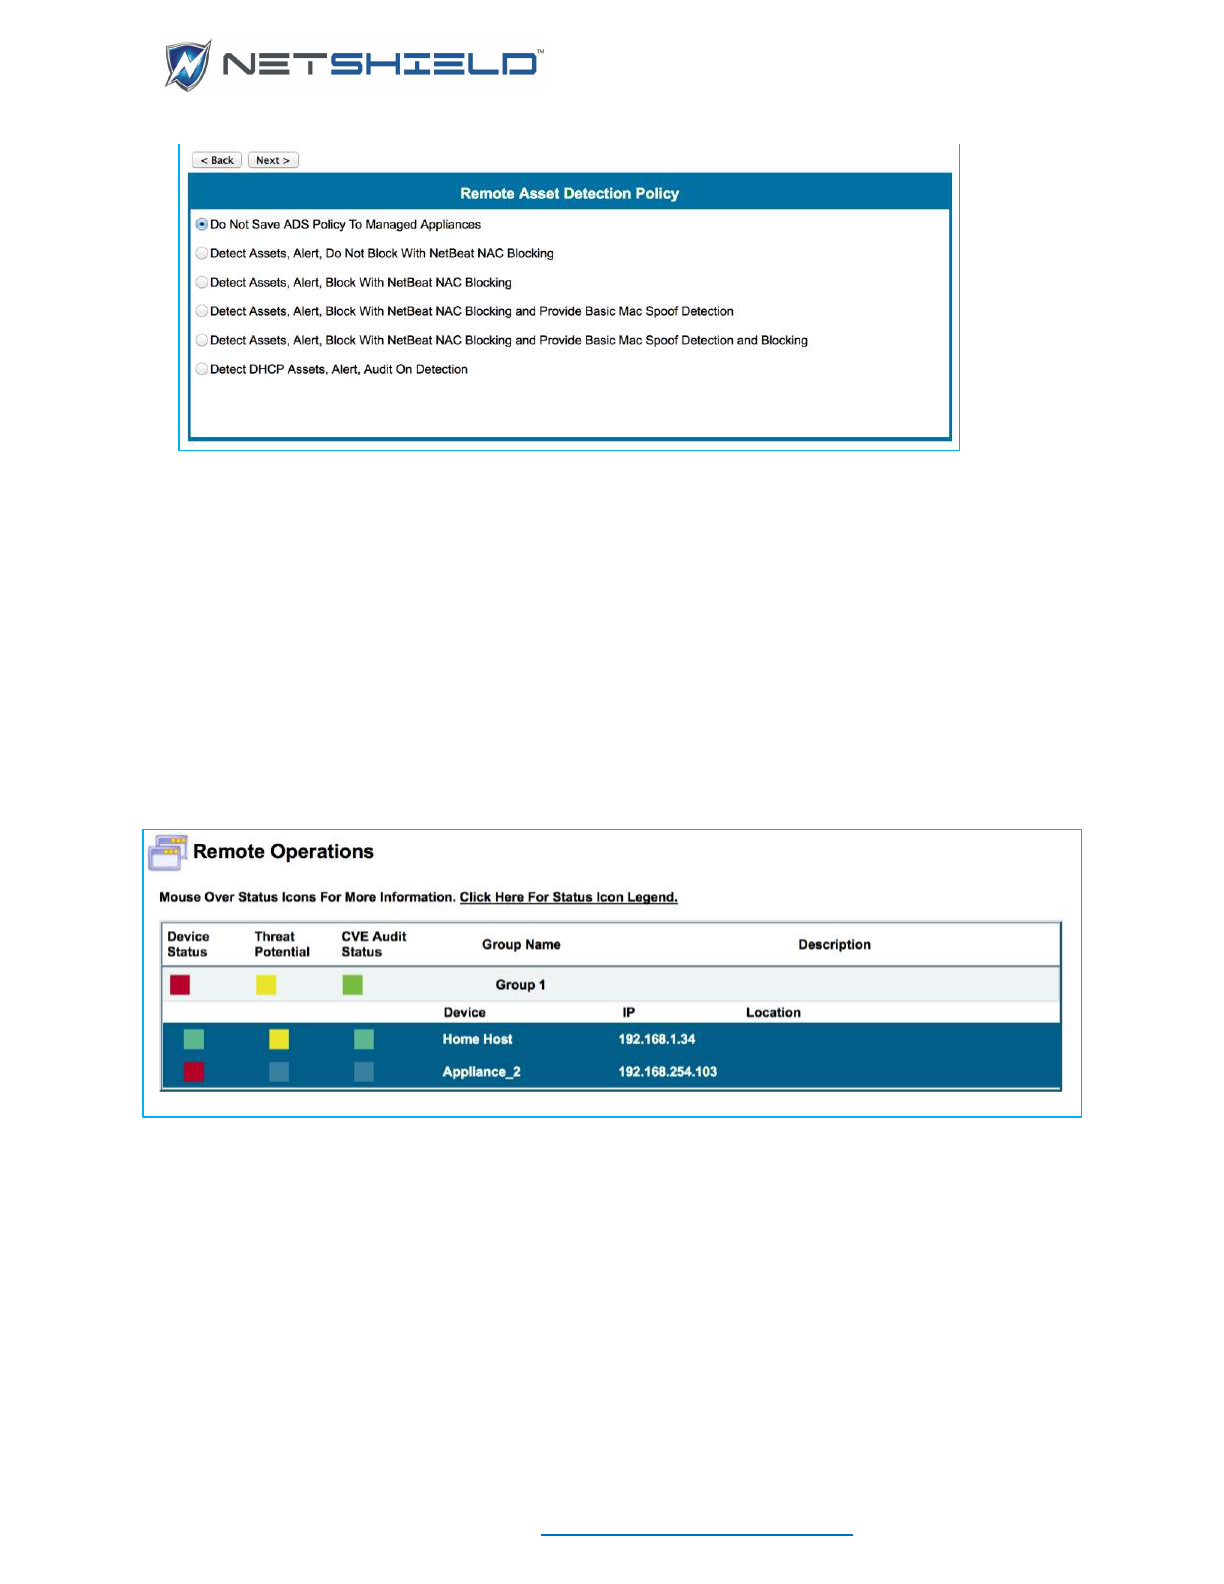
USER GUIDE
© NETSHIELD Corporation 2017 | https://www.netshieldcorp.com | 1-800-991-3971
The last 5 screens of the wizard are setup screens, similar in appearance and identical in
intent to the Setup section on your local appliance. Fill these out with appropriate
information.
• Review the group information and click Save.
REMOTE OPERATIONS
(Note: This is only available on the Enterprise variants)
You can perform a variety of operations on your remote appliances:
• Select Command Center
Remote Operations from the left menu. A list of your
previously-defined groups will be displayed, accompanied by colored icons indicating the
status of the appliances in that group.
• Click the link provided above the table to view the status icon legend.
• Click on a group bar to display the individual appliances (in green) included in the group.
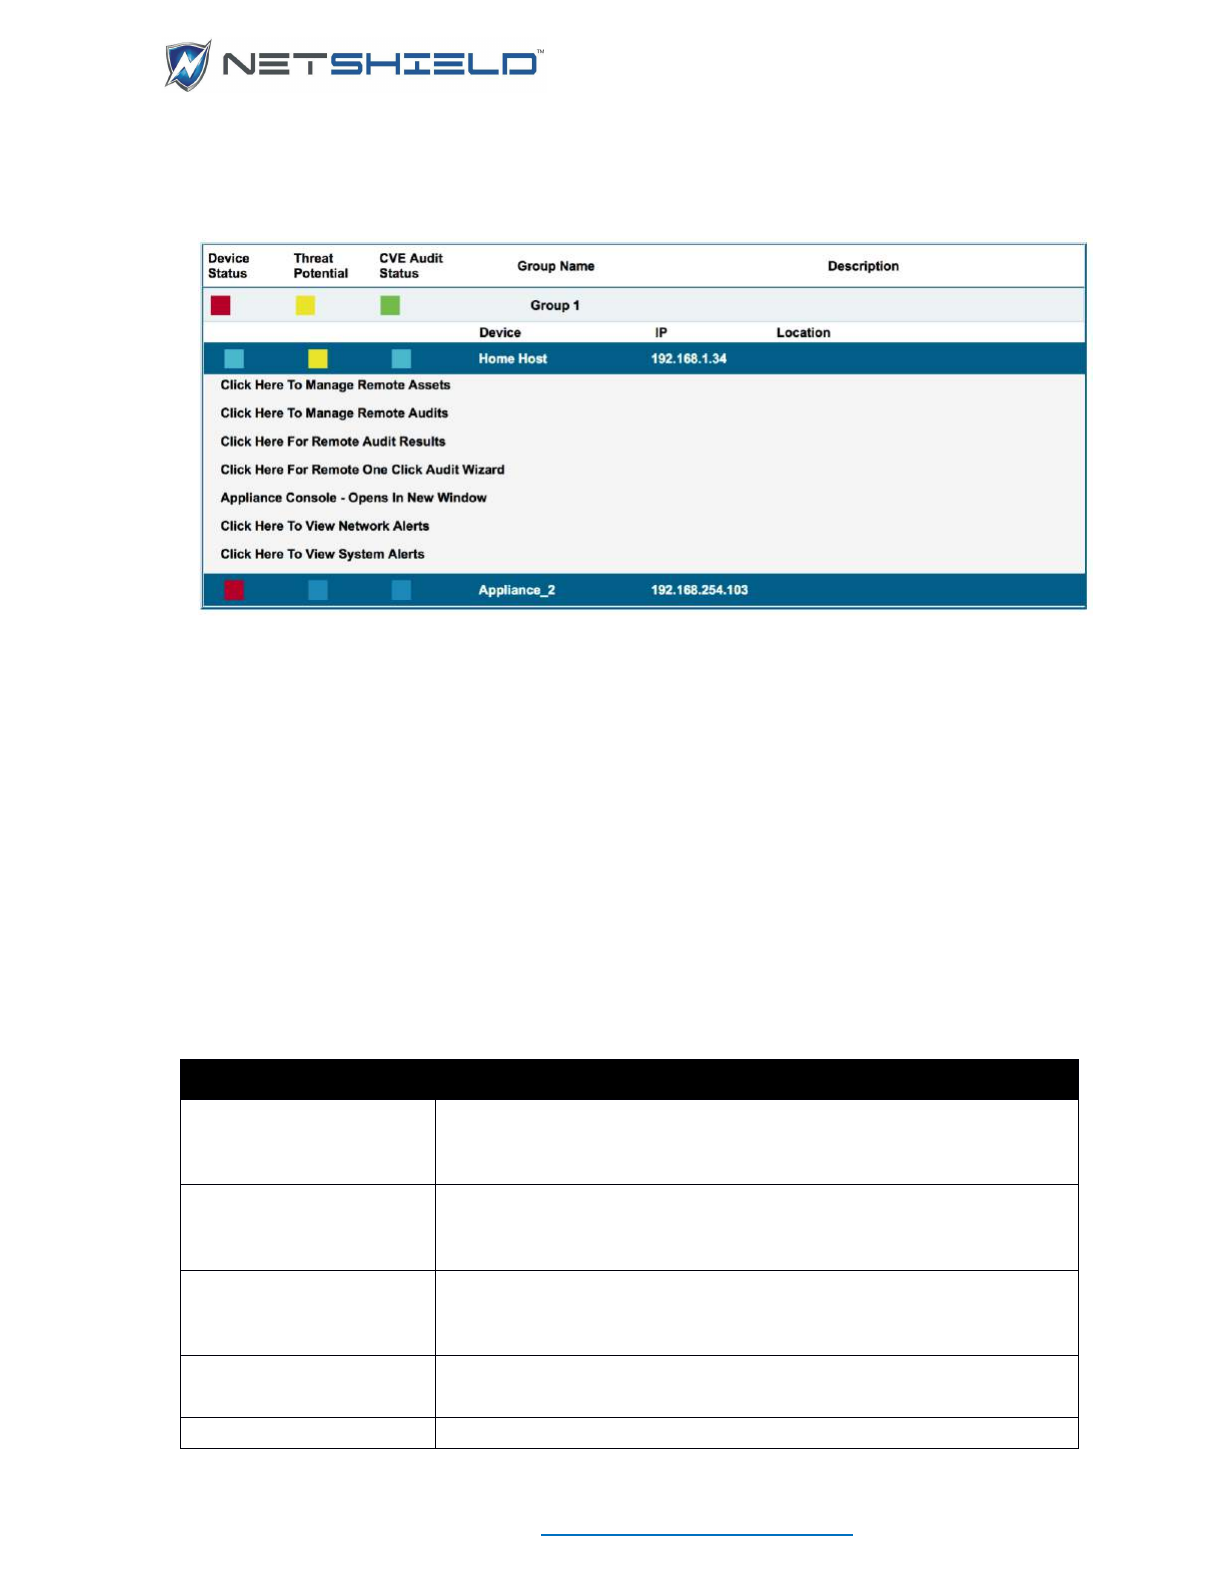
USER GUIDE
© NETSHIELD Corporation 2017 | https://www.netshieldcorp.com | 1-800-991-3971
• Click on an appliance bar to display direct access to remote operations, appliance
consoles, and system and network alerts.
• Click on a remote operation bar to quickly perform remote operations on the remote
appliance.
Clicking on Appliance Console opens an authenticated session with a managed
appliance in its own window.
COMMAND CENTER SYSLOG MESSAGES
SnoopWall Command Center parses remote client appliance logs and sends the events as
syslog messages.
Remote client appliance logs will be queried on regular intervals and the following syslog
messages will be sent to the pre-configured syslog server. The syslog server should be
configured on the appliance on which the command center is running; see Configuring Syslog
Server.
NETWORK SYSLOG MESSAGES
Asset Untrusted
IP Address of Client Appliance | Log ID | IP_Untrust | Date/Time of
Operation | Number of IPs Affected | IP Addresses Affected | MAC
Address of Affected Asset
Asset Trusted
IP Address of Client Appliance | Log ID | IP_Trust | Date/Time of
Operation | Number of IPs Affected | IP Addresses Affected | MAC
Address of Affected Asset
Asset Removed
IP Address of Client Appliance | Log ID | IP_Remove | Date/Time of
Operation | Number of IPs Affected | IP Addresses Affected | MAC
Address of Affected Asset
Multiple Assets Removed
IP Address of Client Appliance | Log ID | Removed_IP_Addresses |
Date/Time of Operation
NetSHIELD Blocking
IP Address of Client Appliance | Log ID |
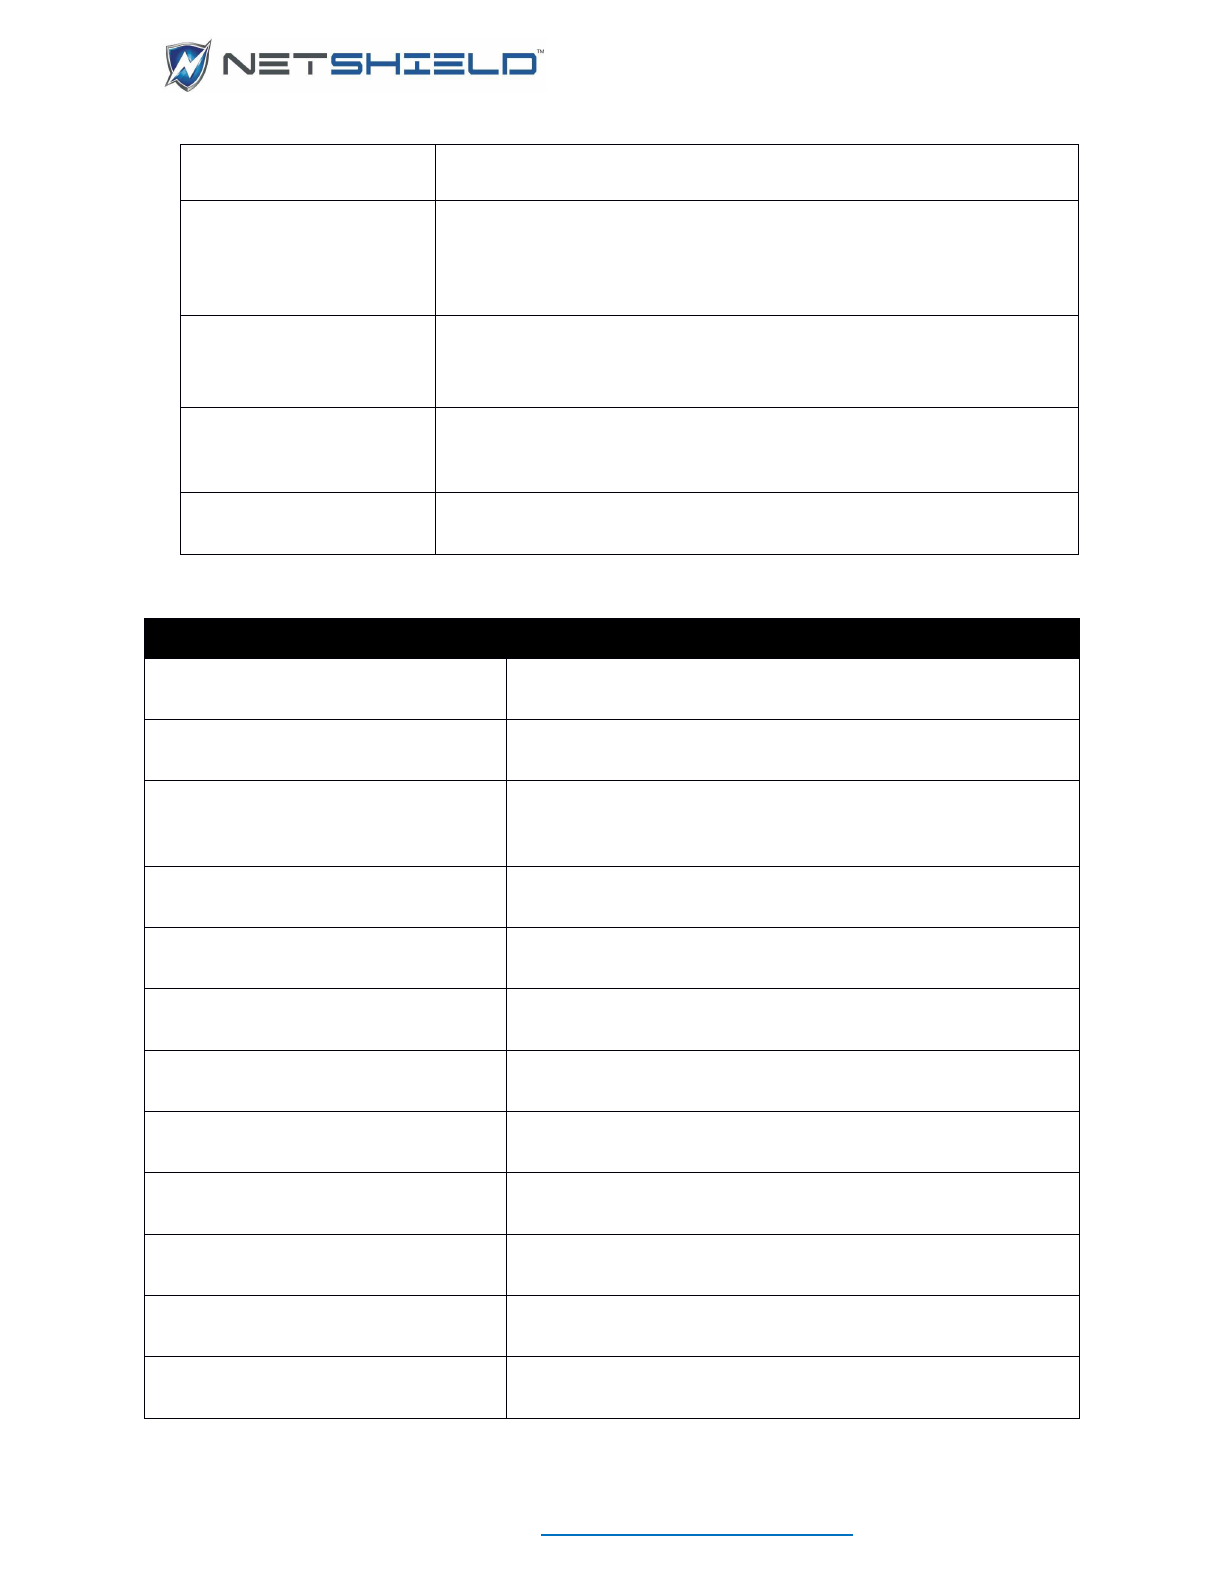
USER GUIDE
© NETSHIELD Corporation 2017 | https://www.netshieldcorp.com | 1-800-991-3971
Started
NetSHIELD_Blocking_Started | Date/Time of Operation | Number of
IPs Affected | IP Addresses Affected | MAC Address of Affected Asset
NetSHIELD Blocking
Stopped
IP Address of Client Appliance | Log ID |
NetSHIELD_Blocking_Stopped | Date/Time of
Operation | Number of IPs Affected | IP Addresses Affected | MAC
Address of Affected Asset
Unknown Asset Detected
IP Address of Client Appliance | Log ID | Unknown_IP_Detected
| Date/Time of Operation | Number of IPs Affected | IP Addresses
Affected | MAC Address of Affected Asset
Untrusted Asset Detected
IP Address of Client Appliance | Log ID | Untrusted_IP_Detected |
Date/Time of Operation | Number of IPs Affected | IP Addresses
Affected | MAC Address of Affected Asset
Asset Discovery
IP Address of Client Appliance | Log ID | Asset_Discovery | Date/Time
of Operation
SYSTEM SYSLOG MESSAGES
Asset Detection System Started
IP Address of Client Appliance | Log ID | ADS_started |
Date/Time of Operation
Command Center Unable to
Communicate with Client Appliance
IP Address of Client Appliance | Appliance_Offline | Date/Time
of Operation
Service Pack Update
IP Address of Client Appliance | Log ID |
Service_Pack_Update | Service Pack Name | Date/Time of
Operation
Activated Audit
IP Address of Client Appliance | Log ID | Activated_Audit |
Audit Name | Date/Time of Operation
Edit Audit
IP Address of Client Appliance | Log ID | Edit_Audit | Audit
Name | Date/Time of Operation
CVE Update
IP Address of Client Appliance | Log ID | CVE_update |
Date/Time of Operation
Deactivate Audit
IP Address of Client Appliance | Log ID | Deactivate_Audit |
Audit Name | Date/Time ofOperation
Reboot
IP Address of Client Appliance | Log ID | Reboot | Date/Time
of Operation
Asset Detection System Stopped
IP Address of Client Appliance | Log ID | ADS_stopped |
Date/Time of Operation
Shutdown
IP Address of Client Appliance | Log ID | Shutdown |
Date/Time of Operation
Create Audit
IP Address of Client Appliance | Log ID | Create_Audit | Audit
Name | Date/Time of Operation
Remove Audit
IP Address of Client Appliance | Log ID | Remove_Audit |
Audit Name | Date/Time of Operation
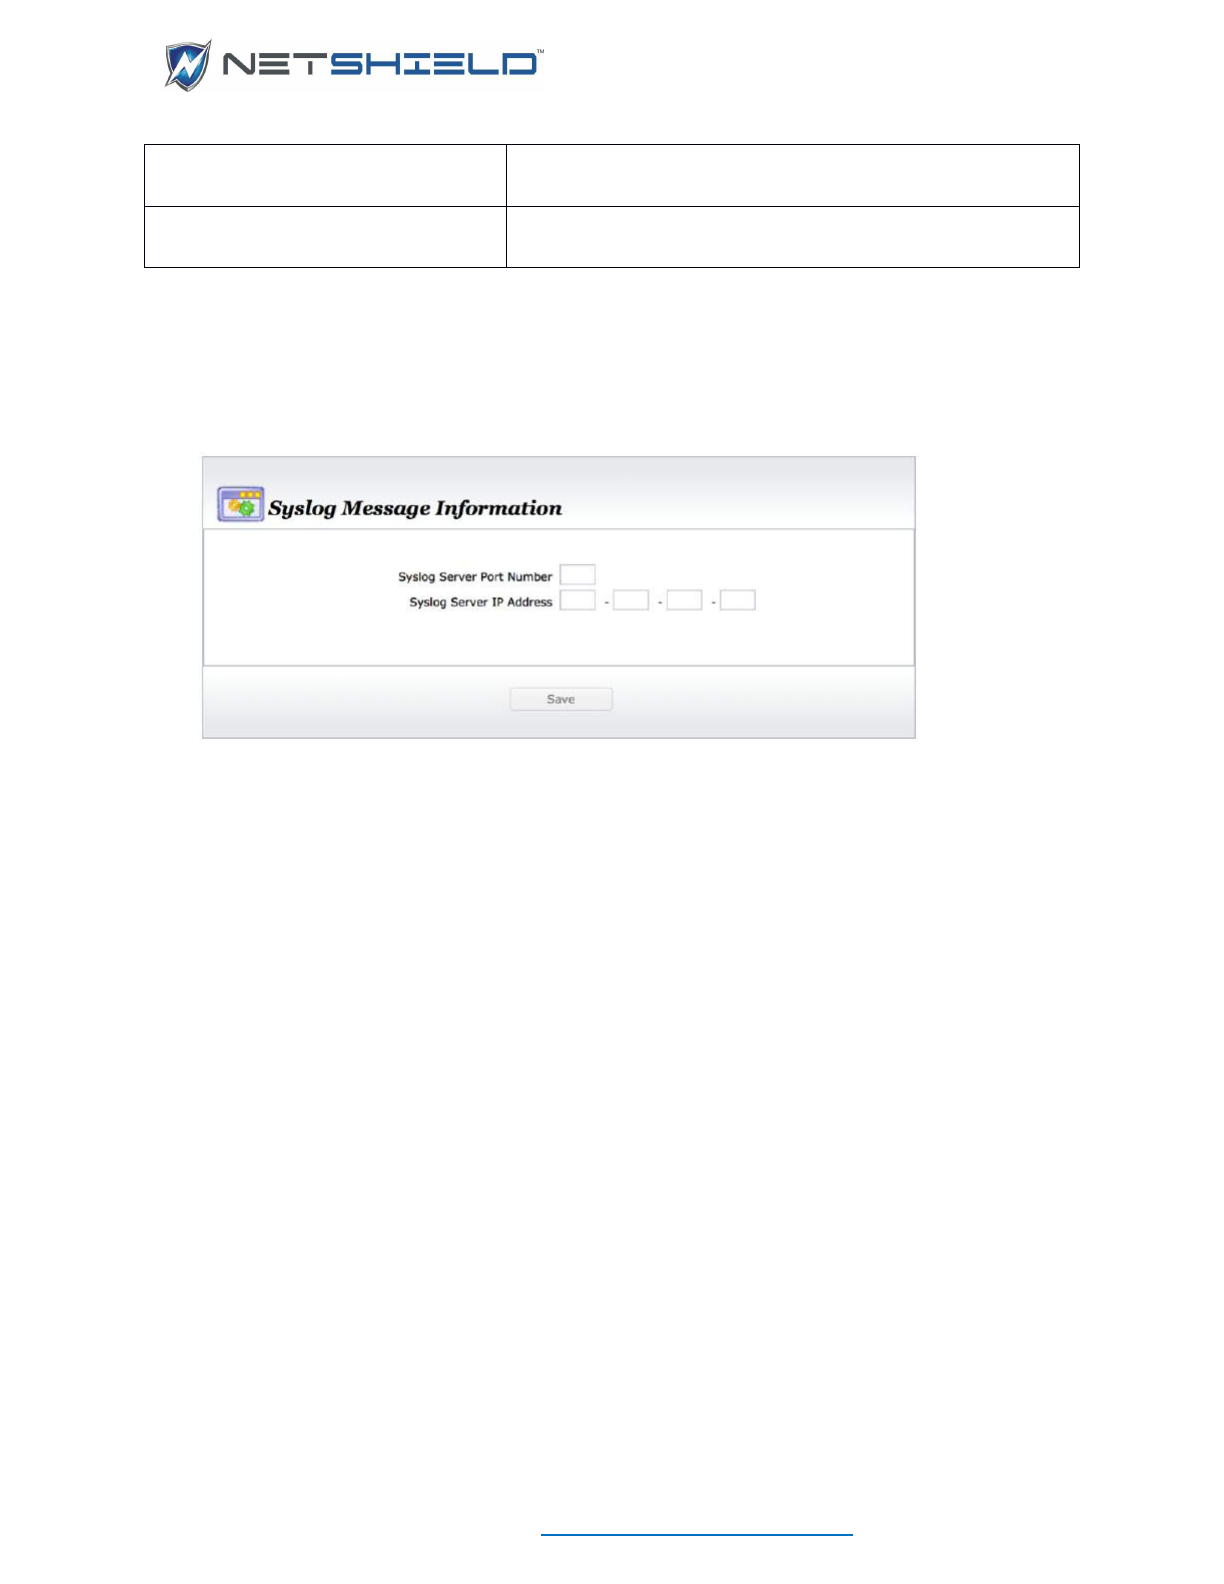
USER GUIDE
© NETSHIELD Corporation 2017 | https://www.netshieldcorp.com | 1-800-991-3971
CONFIGURING THE SYSLOG SERVER
• Select Appliance Setup
Syslog Messages from the Remote Appliance Console menu.
• Enter your syslog server port into the Syslog Port Number field
• Enter your syslog server IP into the Syslog Server IP Address field
• Click Save.
CLEARING COMMAND CENTER ALERTS
Clearing Command Center Alerts will remove all alerts for the selected appliance from the
command center log database. The alerts will not be removed from the selected appliance’s
database. Command Center Alerts should always be cleared following a factory reset.
• Select Command Center
Manage Appliances from the menu.
• Select a managed appliance from the list.
Stop All Audits
IP Address of Client Appliance | Log ID | Stop_All_Audits |
Date/Time of Operation
Factory Settings
IP Address of Client Appliance | Log ID | Factory_Settings |
Date/Time of Operation
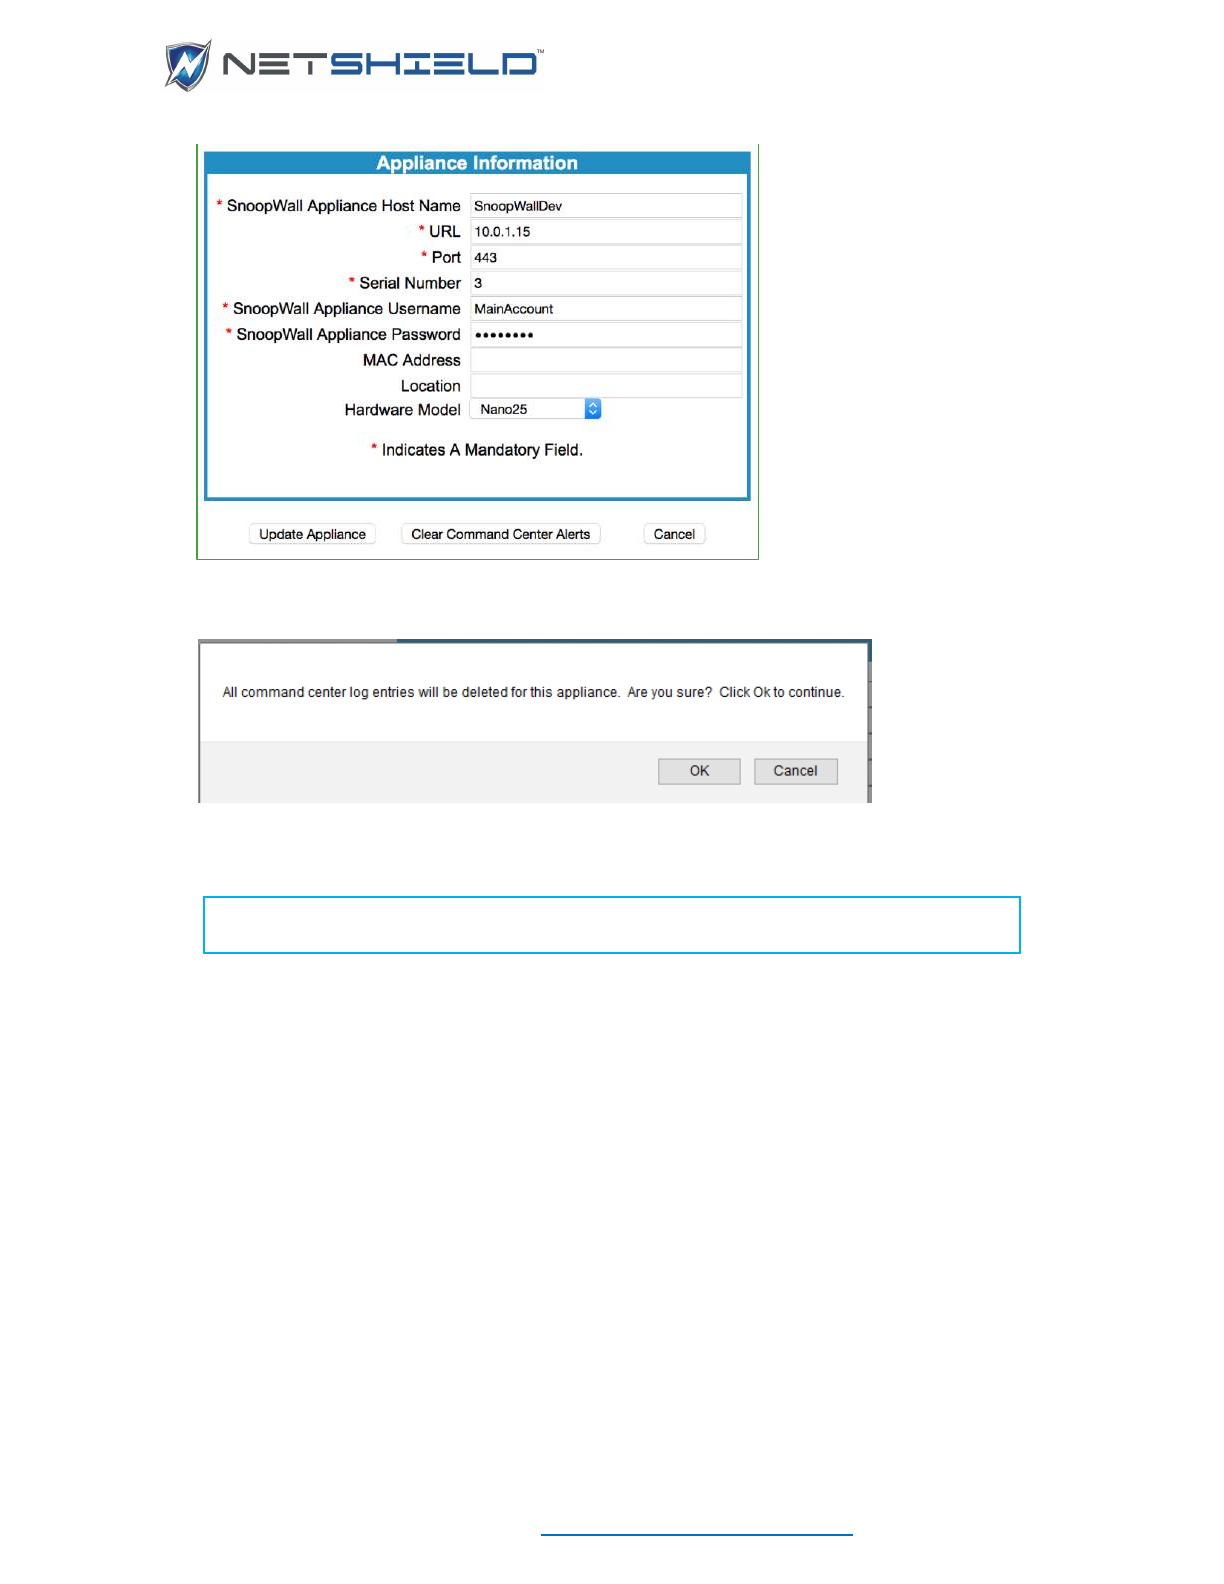


USER GUIDE
© NETSHIELD Corporation 2017 | https://www.netshieldcorp.com | 1-800-991-3971
REPORTS GUIDE
OVERVIEW OF REPORT TYPES AND CONTENT
SnoopWall NetSHIELD appliances produce a wide range of reports for CVE discovery and
remediation. These reports can be run and viewed while auditing and blocking are in progress.
UNDERSTANDING SNOOPWALL NETSHIELD REPORT TYPES
When an audit is complete, it generates two vulnerability report types for Administrators –
Summary and Complete reports. Full and Differential reports contain complete data about all
current vulnerabilities; Incremental reports contain only new vulnerabilities.
SnoopWall NetSHIELD also stores data from those vulnerability assessments along with other
security information to use to create higher-level Management and Executive reports on
demand. You can also query this database to generate a custom report. There are four types of
reports, all saved in PDF format:
• Complete Vulnerability Reports (intended for Network Administrators & IT Staff)
• Summary Vulnerability Reports (intended for Network Administrators)
• Executive Reports (intended for Executives)
• Management Reports (intended for Managers)
The System Administrator and other designated individuals receive email notification when new
Summary and Complete vulnerability reports are ready. Manager users can generate
Executive/Management and Query reports any time, on demand.
NetSHIELD Complete Vulnerability reports provide:
• Comprehensive Vulnerability Assessment with quick-click remediation links
• Links to Common Vulnerabilities and Exposures (CVE) information, where it applies
• Identify areas where CVEs may lead to non-compliance such as reporting for HIPAA,
GLBA, FDA CFR 21 Part 11, SOX, Credit Card Merchant Security Program & others
CVE INFORMATION IN REPORTS
SnoopWall NetSHIELD is a CVE-compatible product. This means you can search for standard
names of Common Vulnerabilities and Exposures (CVEs) assigned by MITRE Corporation.
Details on each CVE NetSHIELD finds are explained in its reports; however, you can find more
information on any CVE by searching the MITRE CVE web site ().
NetSHIELD searches for the latest known CVEs. Because the Update Server is refreshed every
day, you know you have the most up-to-date CVEs and CVE candidates available when you
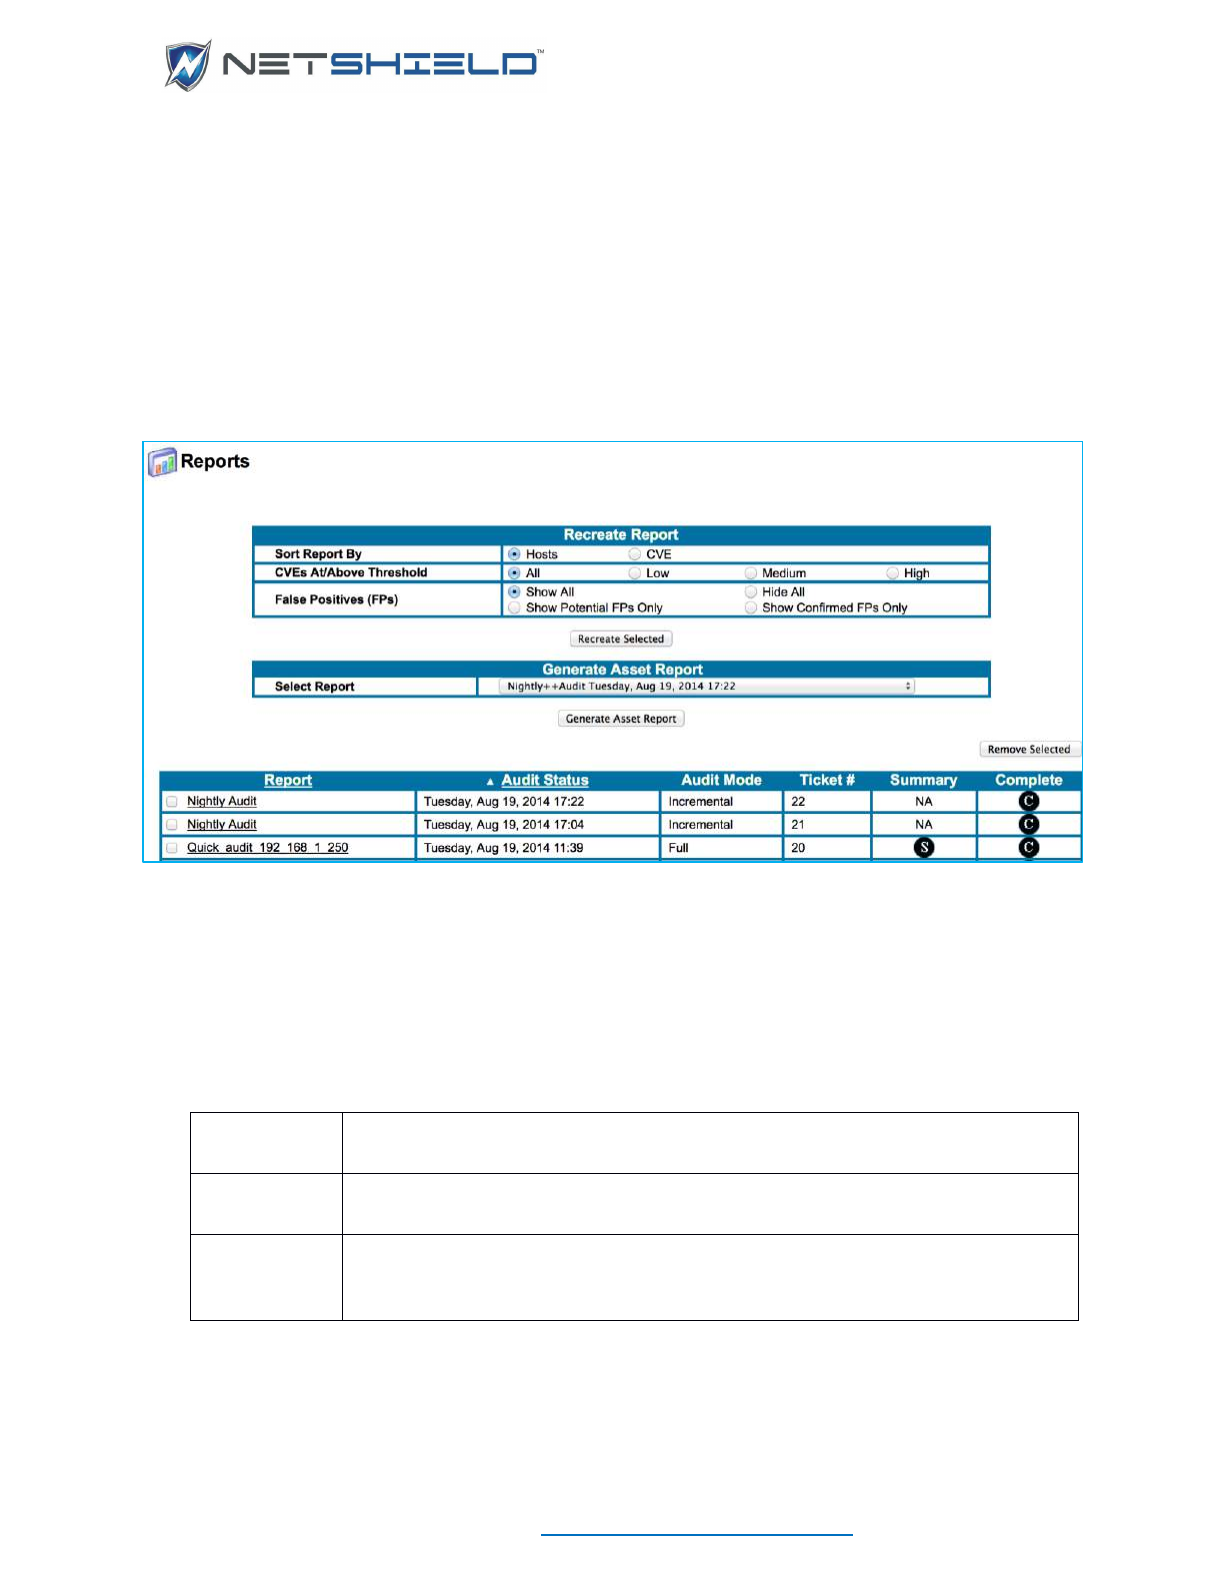
USER GUIDE
© NETSHIELD Corporation 2017 | https://www.netshieldcorp.com | 1-800-991-3971
download new tests. When NetSHIELD finds a CVE, it indicates the name (CVE followed by
several digits) on the report.
SELECTING CONTENT PRESENTED IN REPORTS
Select Reports from the menu panel to open the Reports page.
The Recreate Report box is at the top of the Reports page. Here you choose parameters for
creating your final report. Select how to sort the report, the level of CVE to detail in the report,
and whether or not to include vulnerabilities SnoopWall NetSHIELD believes may be false
positives (Potential) and/or those you have previously confirmed as false positives in the
workflow process.
To see only the most serious vulnerabilities, select High. Detailed information for the levels is
shown in the tables below.
Low
Includes all levels of system vulnerabilities, including low, medium, and high
level.
Medium
Includes only vulnerabilities at the medium and high level. You may want to
select this option after you remediate high-level vulnerabilities.
High
Focuses on the most serious vulnerabilities present on the system and reports
only those. You should start by determining the most serious vulnerabilities and
clean them up before addressing others.
Below the Recreate Report section is a list of all reports generated by all audits. They are
identified by audit report name, the date/time the audit finished, audit mode (Full, Differential,
Incremental, or Top 20), and ticket number.
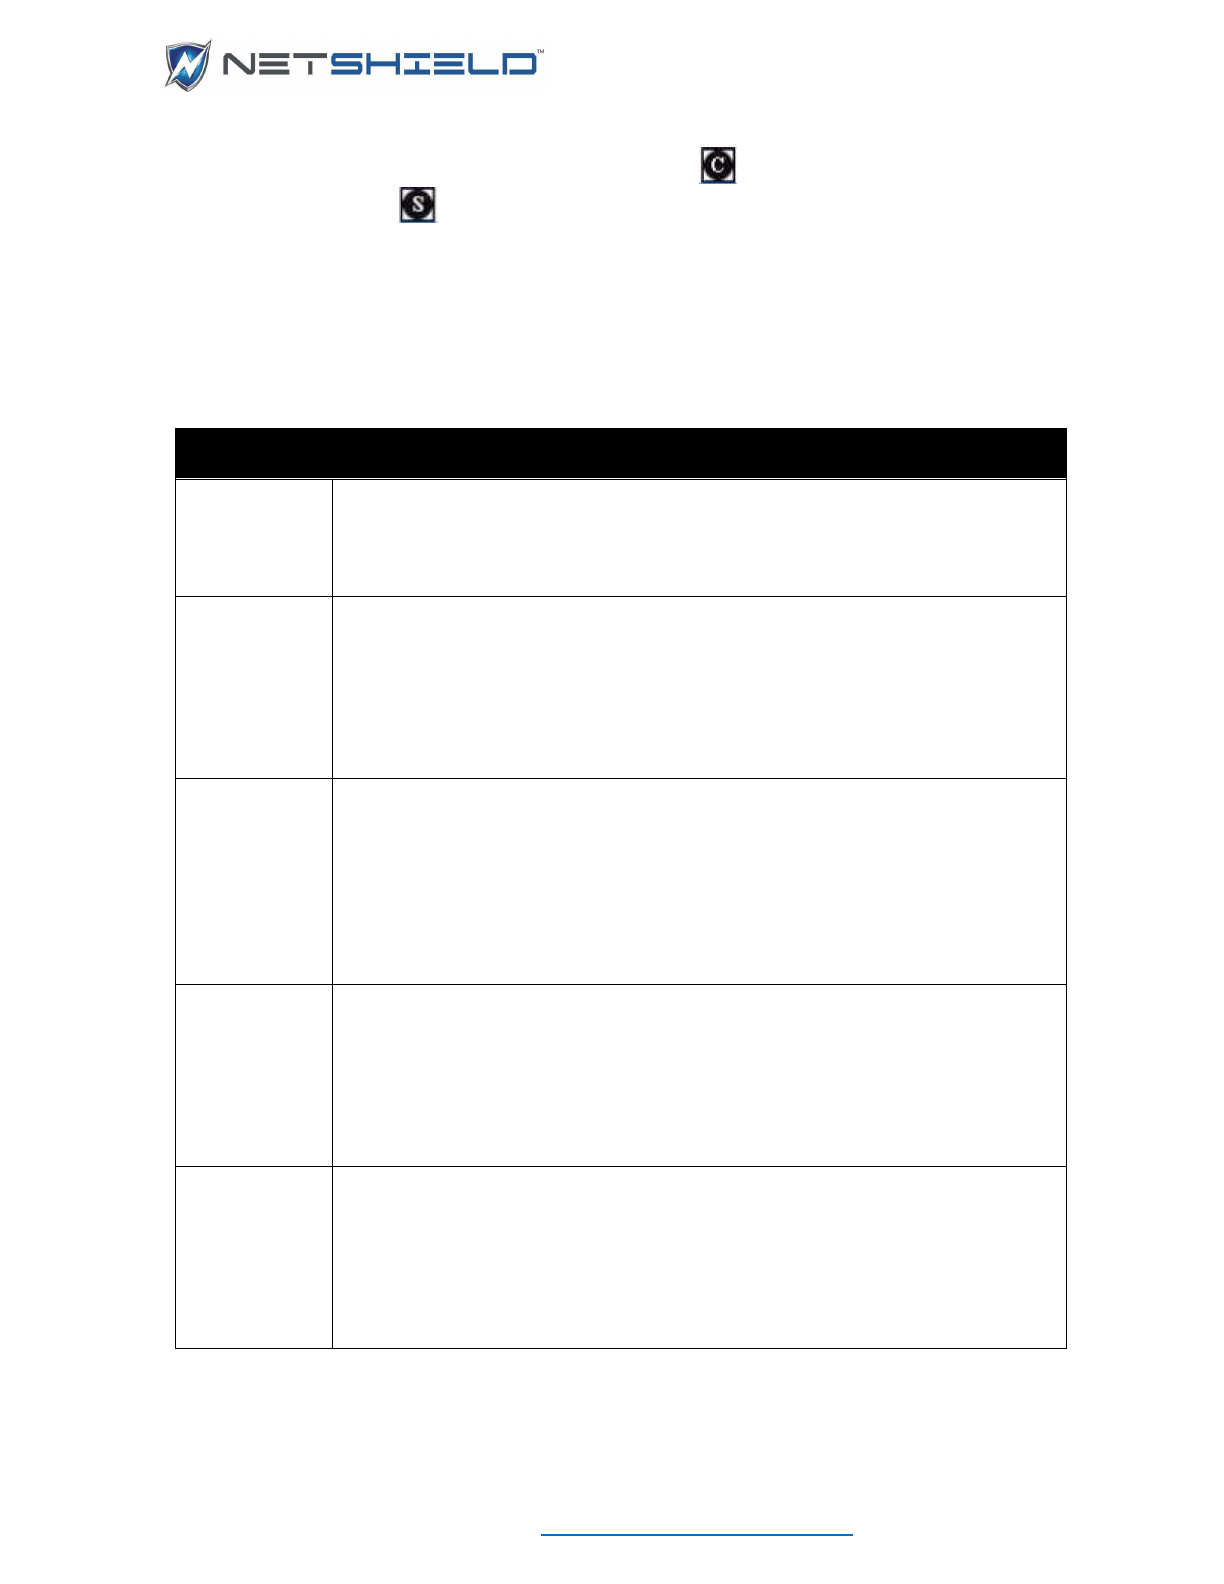
USER GUIDE
© NETSHIELD Corporation 2017 | https://www.netshieldcorp.com | 1-800-991-3971
To view the Complete report from a given audit, click the symbol in its row. To view the
Summary report, click the icon.
The Complete report details vulnerabilities and identifies risks by level of severity: Low, Medium,
High, and Serious vulnerability types.
By default, the report is sorted by vulnerability IDs (ranked with Serious first). Reports contain
technical information relating to each detected risk, with live links to fixes, patches, and updates
that provide resolutions to these vulnerabilities.
Risk Level
Vulnerability Type
Notes
Important notes - show you which ports are open.
Get in the habit of reading Notes on a regular basis since they may indicate
malware running on a port. Check open ports and confirm you want them open.
Low
Less important vulnerability - harder to exploit and usually causes little or no
damage to your network assets.
Always fix Serious and High vulnerabilities first and then review Medium and
Low vulnerabilities. Decide if Low has potential consequence to your
organization. If not, use the Comment field to indicate you don't consider this
vulnerability an issue.
Medium
Slightly more important than a Low-level vulnerability but usually hard to exploit.
Medium level vulnerabilities might allow an attacker to gain access to your
network.
Always fix Serious and High vulnerabilities first, and then review Medium and
Low. Decide if Medium has potential consequence to your organization. If not,
use the Comment field to indicate you don't consider this vulnerability to an
issue.
High
Very important vulnerability that may be easy to exploit and allow an attacker to
cause serious damage to your network.
Fix this vulnerability as soon as possible. If you cannot patch the problem, you
may have to reconfigure the system, shutdown a service or process and/or tune
your firewall and other countermeasures to pick up and block an attack against
this vulnerability.
Serious
Extremely important vulnerability that may be easy to exploit and allow an
attacker to cause critical damage to your network.
Fix this vulnerability as soon as possible. If you cannot patch the problem, you
may have to reconfigure the system, shutdown a service or process and/or tune
your firewall and other countermeasures to pickup and block an attack against
this vulnerability.
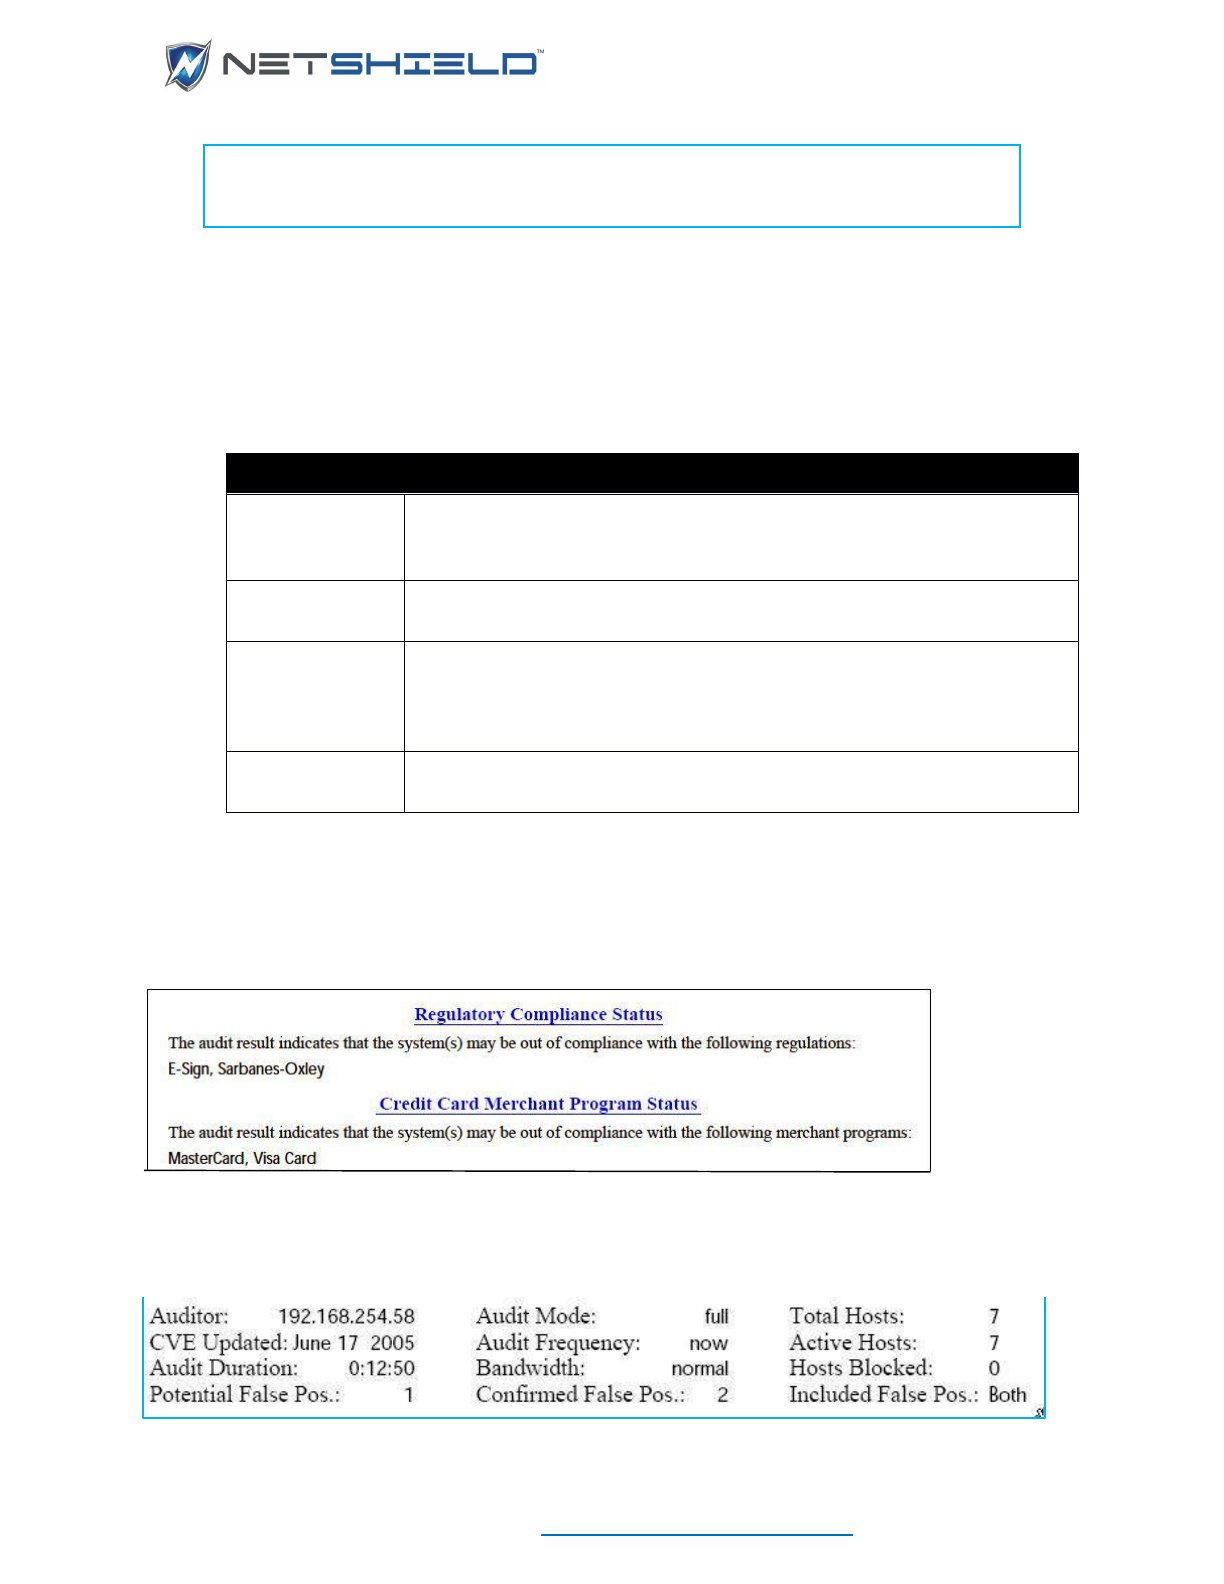
USER GUIDE
© NETSHIELD Corporation 2017 | https://www.netshieldcorp.com | 1-800-991-3971
NOTE: You may see Notes or Info Reporting Levels in your reports. These
levels may describe open ports, operating systems running, services running,
and versions as well as provide security suggestions.
INTERPRETING AND UNDERSTANDING REPORTS
All reports contain two types of information - graphical and descriptive. The graphical data gives
an overview of the risk situation, whereas the descriptive information provides details about
each vulnerability. Within each report type, the various audit scopes produce slightly different
results. The four scopes are Full, Differential, Incremental, and Top 20.
Type
Description
Full
Report will contain all vulnerabilities. This data is included in Executive
and Manager reports as well as Complete and Summary reports intended
for Managers.
Incremental
Report will contain only new vulnerabilities. This data is available only to
Managers.
Differential
Report will contain differential analysis of vulnerabilities since last audit,
including charts and graphs on Fixed Vulnerabilities vs. Open
Vulnerabilities in Summary, Executive, and Manager reports as well as
details in Complete vulnerability reports.
Top 20
Report will contain only the most significant top 20 vulnerability tests. This
report data is available only in Complete and Summary reports
INTERPRETING COMPLETE VULNERABILITY REPORTS
The Audit Results section of the Summary reports sums up Regulatory Compliance Status and
Credit Card Merchant Program Status. Each title links to the details about compliance issues.
Below the Compliance information is information about the audit itself, such as SnoopWall
NetSHIELD’s IP address, the last date/time updates to CVEs were downloaded, the length of
the audit (audit duration), and other basic facts. In addition, you see how many hosts were
active and how many were blocked at the Firewall or SmartSwitch.

USER GUIDE
© NETSHIELD Corporation 2017 | https://www.netshieldcorp.com | 1-800-991-3971
Complete vulnerability reports contain a vertical bar chart like the one shown here that indicates
the prevalence of each type of risk on the network.
Complete reports also show the percentage of vulnerabilities per operating system type in a
single graph. In the following illustration, you see almost 30% of the vulnerable systems are
Windows and over 60% are Linux.
A horizontal bar chart in Complete reports shows more details on each IP address—indicating
exactly the number of vulnerabilities at each risk level on particular hosts.
In Complete Differential reports (created from a Differential audit only), a special section titled
Differential Vulnerability Analysis shows the vulnerability totals broken down by type for the
Current vs. Previous Audits, so you can see the progress being made in the remediation of
these vulnerabilities.
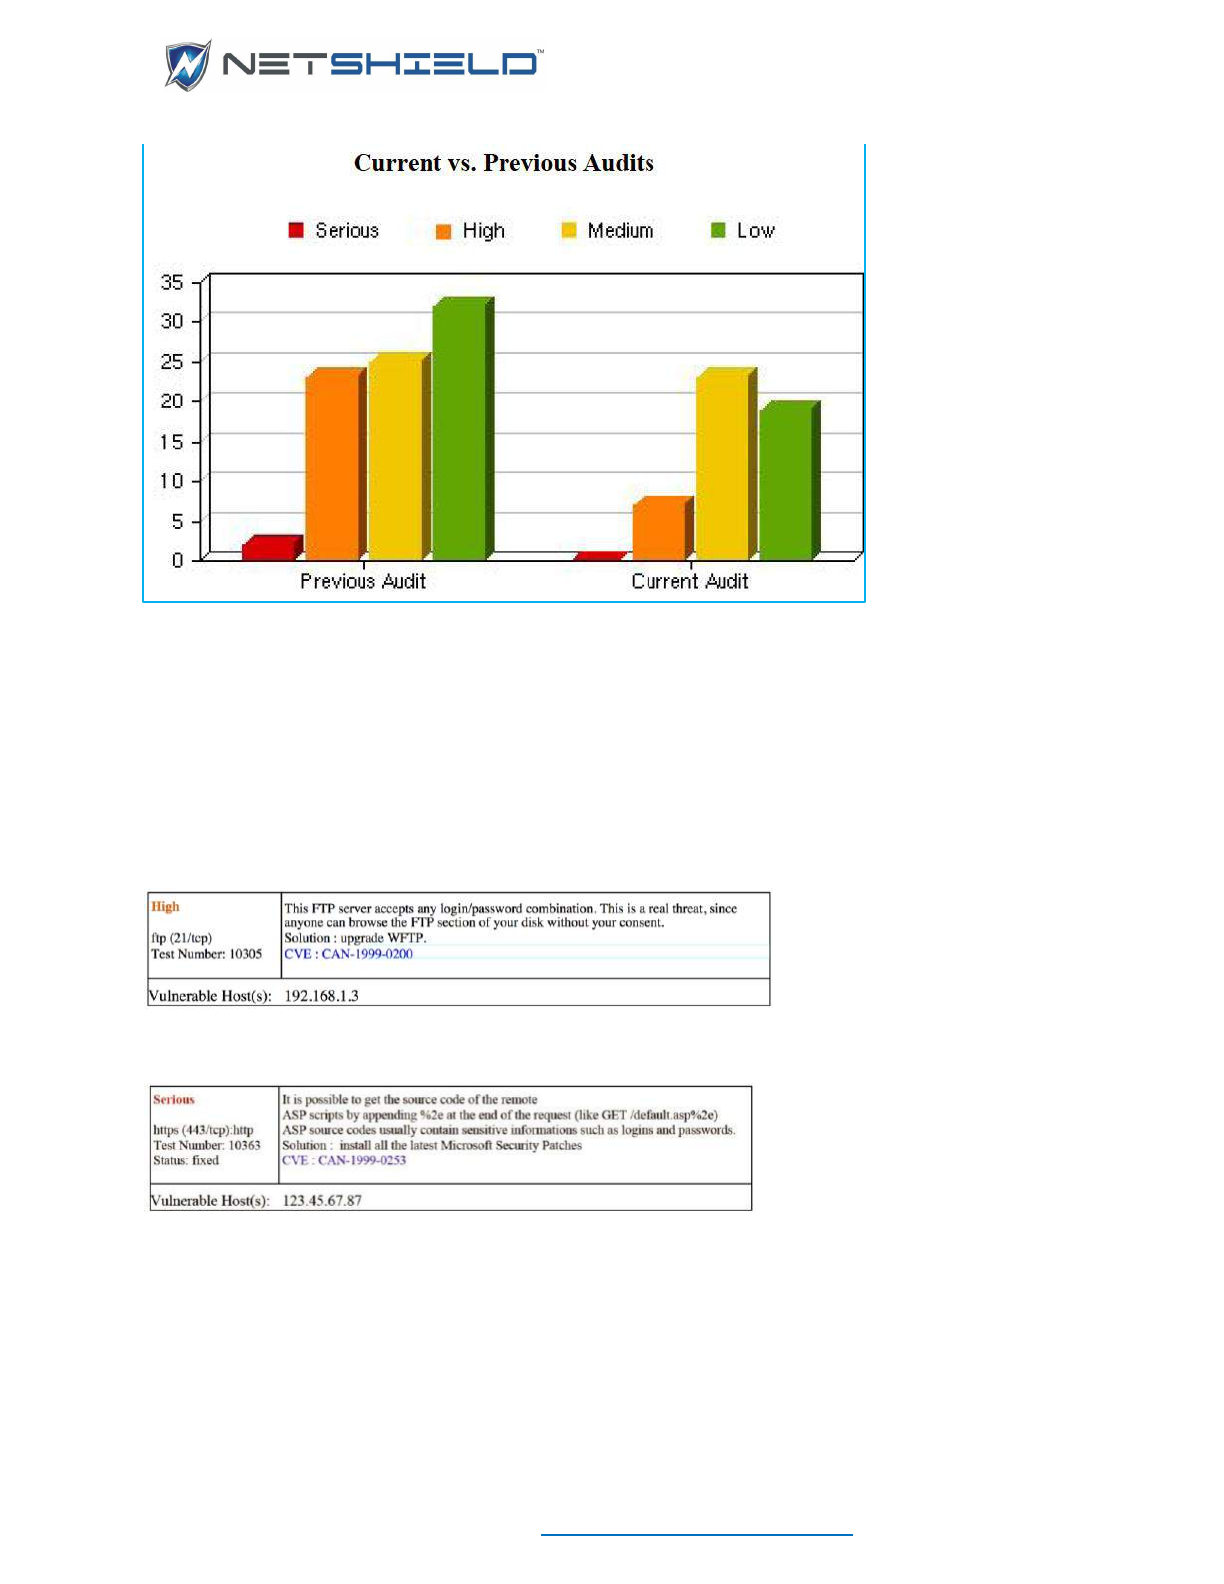
USER GUIDE
© NETSHIELD Corporation 2017 | https://www.netshieldcorp.com | 1-800-991-3971
INTERPRETING VULNERABILITY DESCRIPTIONS
Complete reports (typically read by system administrators and other IT personnel) contain
entries sorted on selections you made earlier under Recreate Report. You can search for
particular CVEs in the PDF report using Acrobat’s search feature and standard CVE names.
A typical serious or high risk is fully explained as in the example shown. In addition, the report
provides details on how to respond to the risk and/or a link to more data about that vulnerability
and how to correct it.
You may also encounter CVE candidates (with the CAN prefix). These are still around although
MITRE retired the term “Candidate” in 2005.
Tabular data in Complete reports indicates the number of vulnerabilities on each machine and a
list of the most critically vulnerable hosts, the number of vulnerabilities they have, and their
operating systems. At the end of the report, an Appendix provides more data on compliance
with regulations and credit card merchant programs.
INTERPRETING SUMMARY REPORTS
The Audit Results section of Summary reports sums up Regulatory Compliance Status and
Credit Card Merchant Program Status.
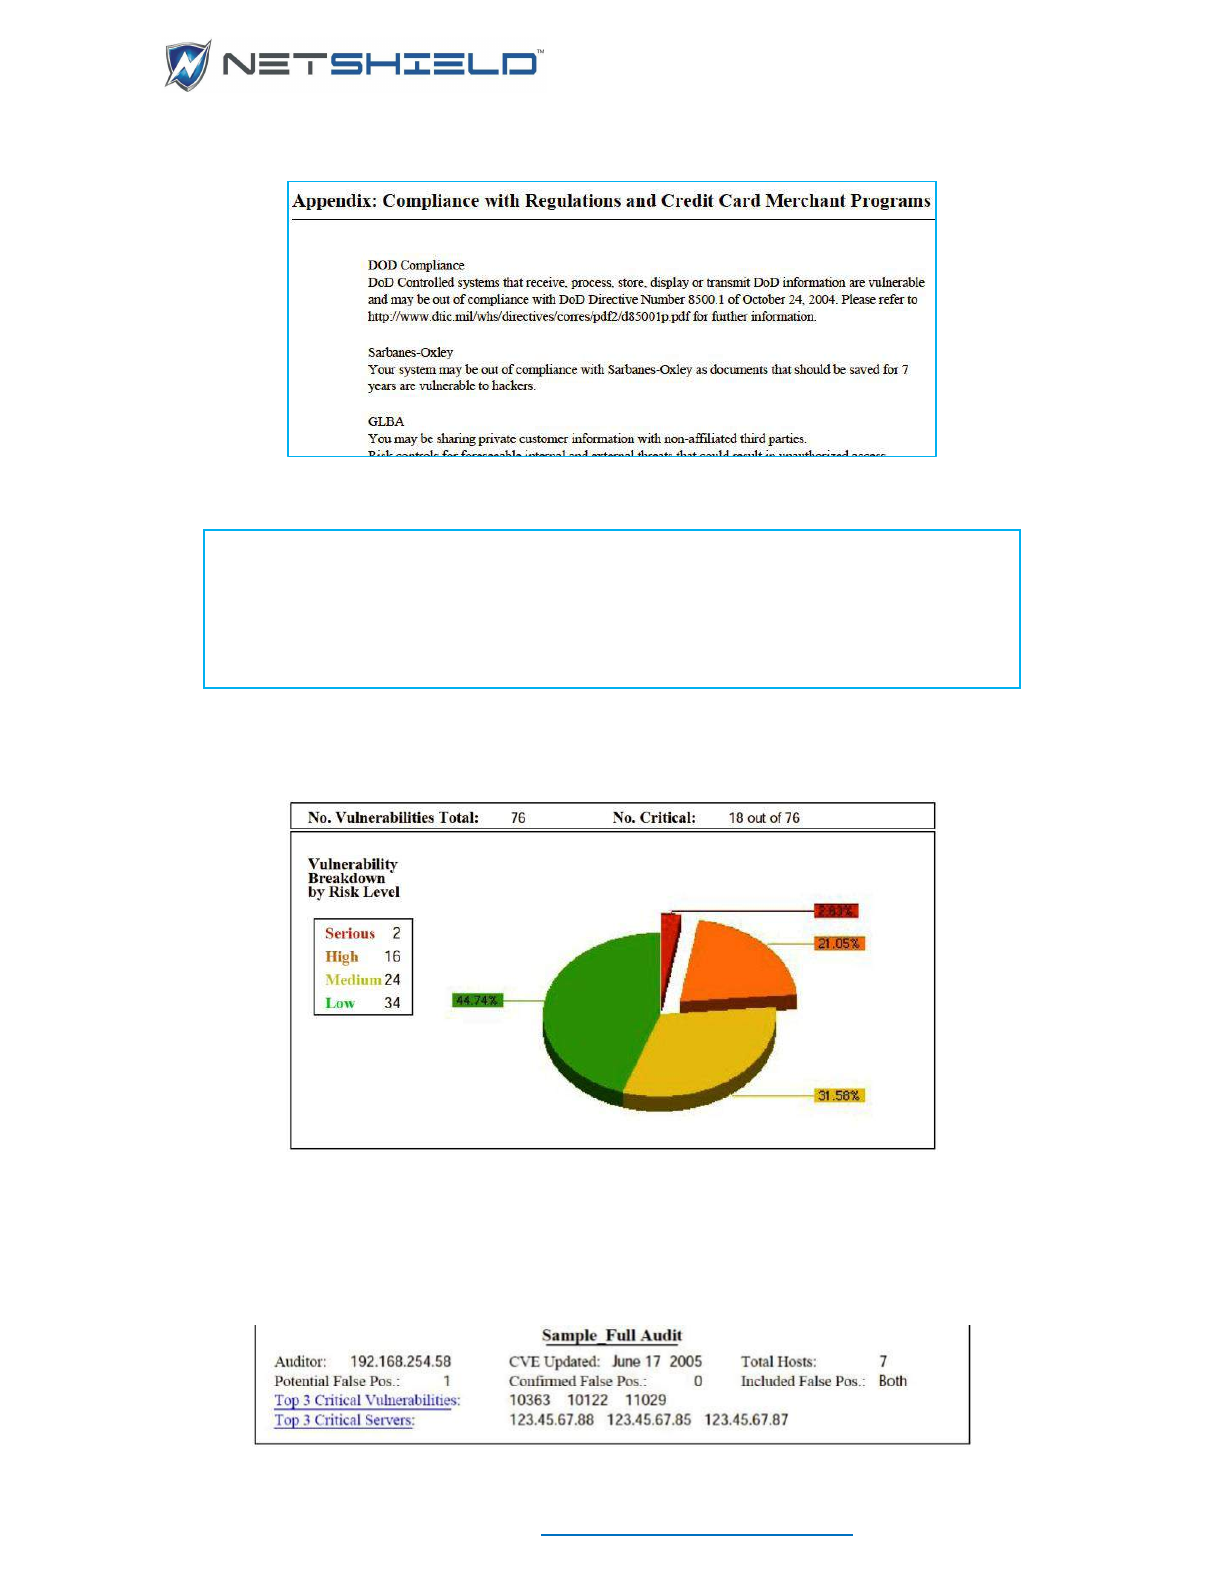
USER GUIDE
© NETSHIELD Corporation 2017 | https://www.netshieldcorp.com | 1-800-991-3971
Each of the titles shown links to details about compliance issues, similar to the sample below.
NOTE: To allow Summary reports to identify a system as a server, be sure to
select a System Type that includes the word Server when completing the System
Information in the Asset Tracker. You can select, for instance, Mail Server or
Web Server, as long as the name includes the word Server. If the reporting
engine cannot find any systems labeled Server, it will report on the three most
vulnerable systems rather than the three most vulnerable servers.
Summary reports display a pie chart that shows the percentage of vulnerabilities at each risk
level and includes actual totals in the legend to the left.
The most serious vulnerabilities always appear in red, high in orange, medium in yellow, and
low in green. The color-coded legend names each level of risk in its color.
In addition, this report presents the three most prevalent critical vulnerabilities on the network
and the three most critically vulnerable servers on the network. There are links to more details
about top vulnerabilities and to a table about the top three critically vulnerable systems.
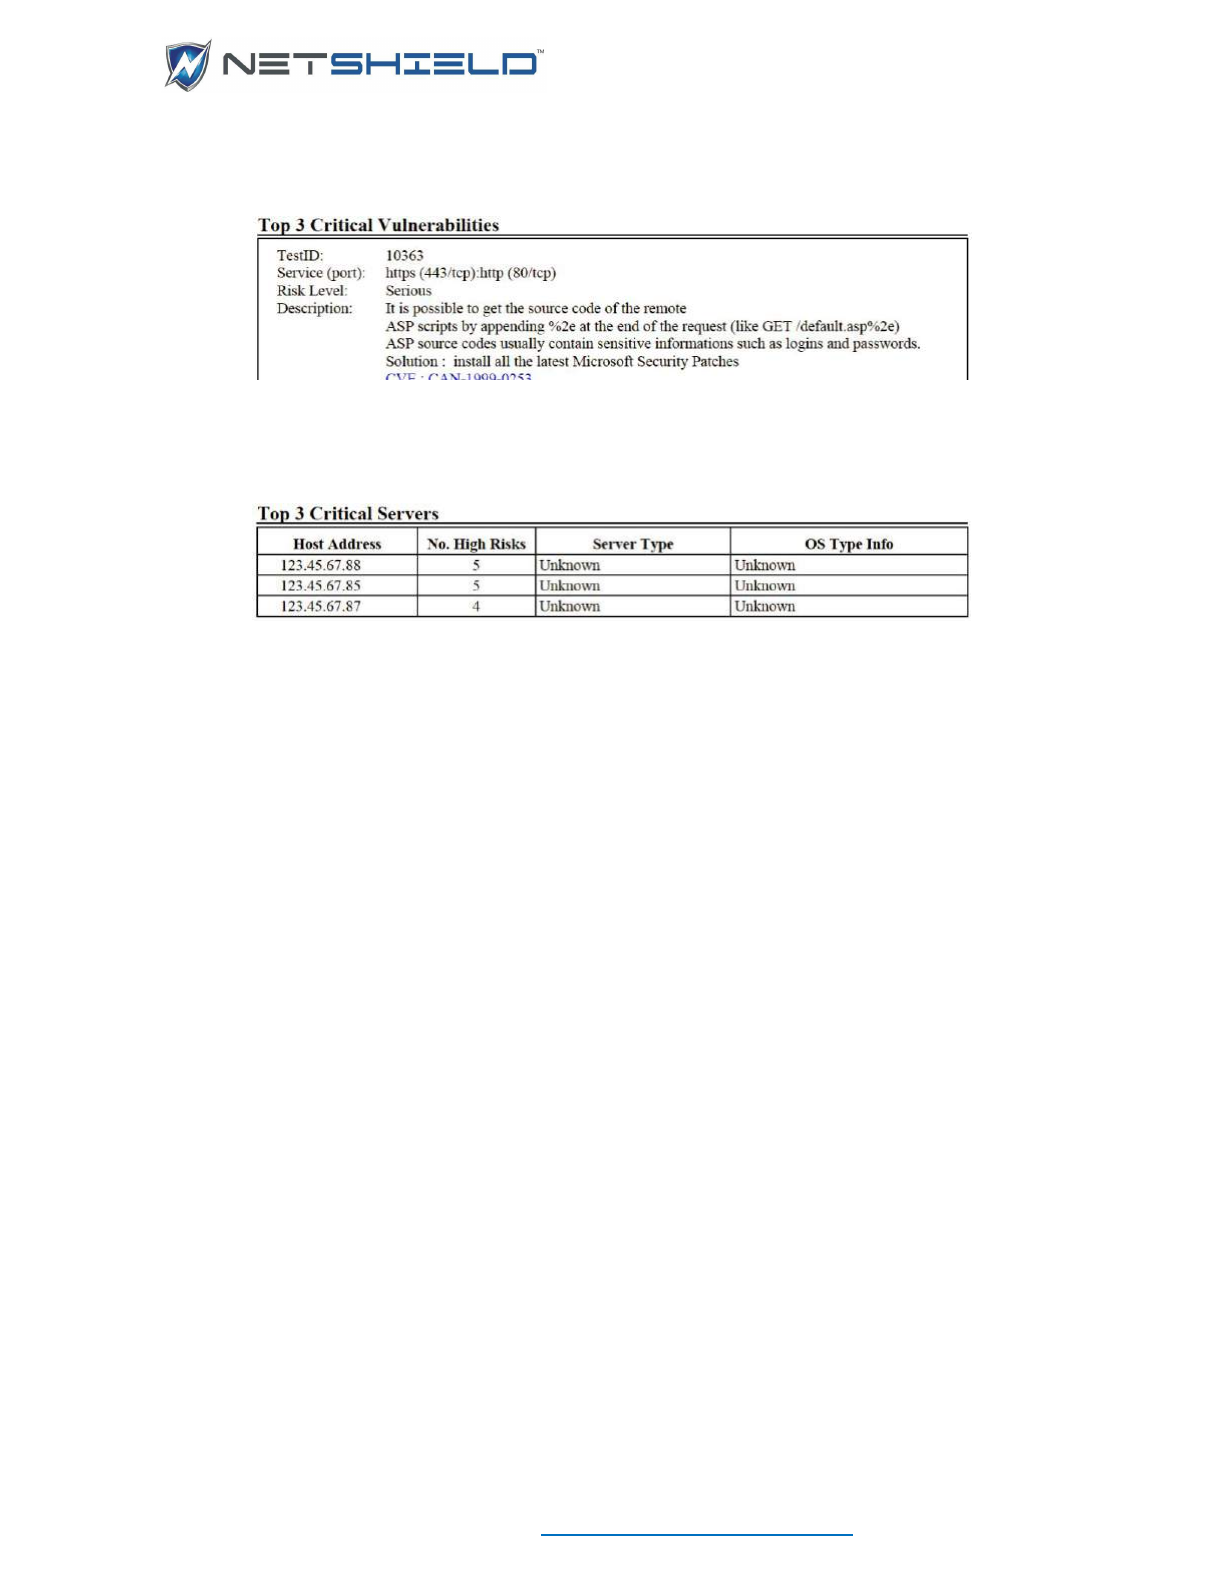
USER GUIDE
© NETSHIELD Corporation 2017 | https://www.netshieldcorp.com | 1-800-991-3971
Details on the top three critical vulnerabilities are similar to those provided in the Complete
report.
The table for the top three critical servers summarizes the number of serious and high
vulnerabilities on those servers and indicates the server type.
REMEDIATION OF VULNERABILITIES IN REPORTS
To remediate a vulnerability, open SnoopWall NetSHIELD in a browser from the system to be
fixed and review the information. Click on the live links in the Description section of the
Complete report for details.
CUSTOM COMMENTS
You can add your own comments to any vulnerability in the report. Those comments remain
linked to that vulnerability even after the audit executes at its next scheduled time and
SnoopWall NetSHIELD generates a new version of the report.
To enter comments to a vulnerability report:
• Select Reports
View Audit Results from the left menu.
• This takes you to the Reports page.
• Click the link for your chosen report. This takes you to the Report Details page.
• Vulnerability Details are listed at the top of the page.
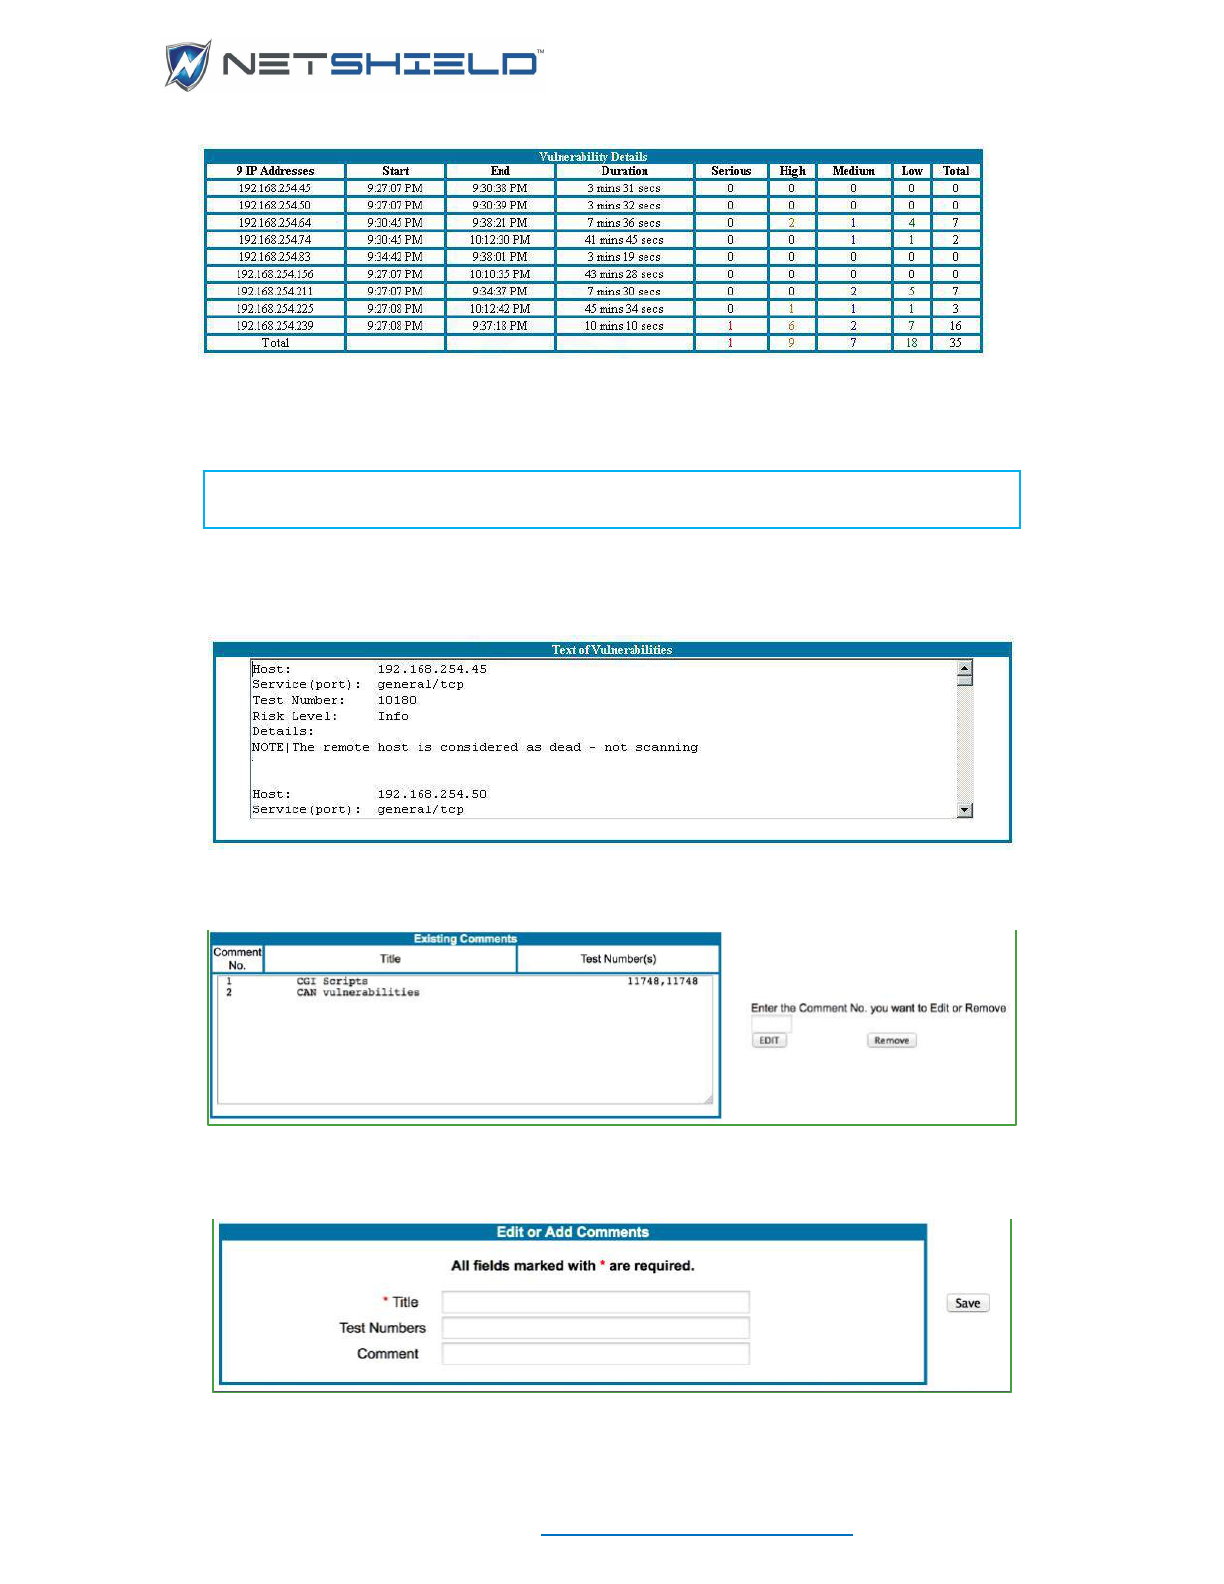
USER GUIDE
© NETSHIELD Corporation 2017 | https://www.netshieldcorp.com | 1-800-991-3971
The description lists the IP addresses of all the machines audited for this report and
indicates the number of vulnerabilities at each level. This information appears even while
the audit is in process.
NOTE: Details of the report content, shown in the subsequent steps, are
available only if the audit completed.
• Move down the screen to see the Text of Vulnerabilities box. You can scroll through the
report and copy text to another file.
• A numbered list of comments you entered is below the report text. Initially, the list is empty.
Adding New Comments
Use the Edit or Add Comments box below the list to add a comment to Existing Comments.
USER GUIDE
© NETSHIELD Corporation 2017 | https://www.netshieldcorp.com | 1-800-991-3971
• Enter the Title and Test Numbers, and then insert your new comment in the Comment
field. See Guidelines below.
Field
Guideline
Title
Only required field. You can enter up to 50 characters. Only the text you
enter in the Comment field appears in the report. Information in the Title
field does not.
Test Numbers
Enter at least one test number (the five-digit vulnerability test number,
not the CVE number) so SnoopWall NetSHIELD knows when to add the
comment to a report.
You can enter up to 42 test numbers in the field, separated by commas.
No space is needed after the comma.
Comment
The comment field may contain up to 300 characters.
NOTE: The Title is a label for your convenience. It allows you to keep better track
of your comments.
• Click Save to retain the comment. SnoopWall NetSHIELD assigns a number to the
comment and it appears in the list.
Editing/Removing Existing Comments
To edit a comment from the Existing Comments list, use the form to the right of list.
• Enter the number of the comment you want to edit, and then click the Edit button.
The information stored in that comment appears in the Edit or Add Comments box below
the list. (You can also delete a comment by entering its number and clicking Remove.)
• Edit the text of the comment in the Comment field and click Save.
The new text appears in the Existing Comments list.
Viewing Comments in Reports
To see Comments in your reports:
• Click the Back to Reports button (near the top of the page) to return to the main Reports
page.
• In the list of reports, click the check box for each report name you want to review.
• Click Recreate Selected button at the top center of the page. The modified reports are
highlighted in yellow (or an alternative color depending on your browser settings).
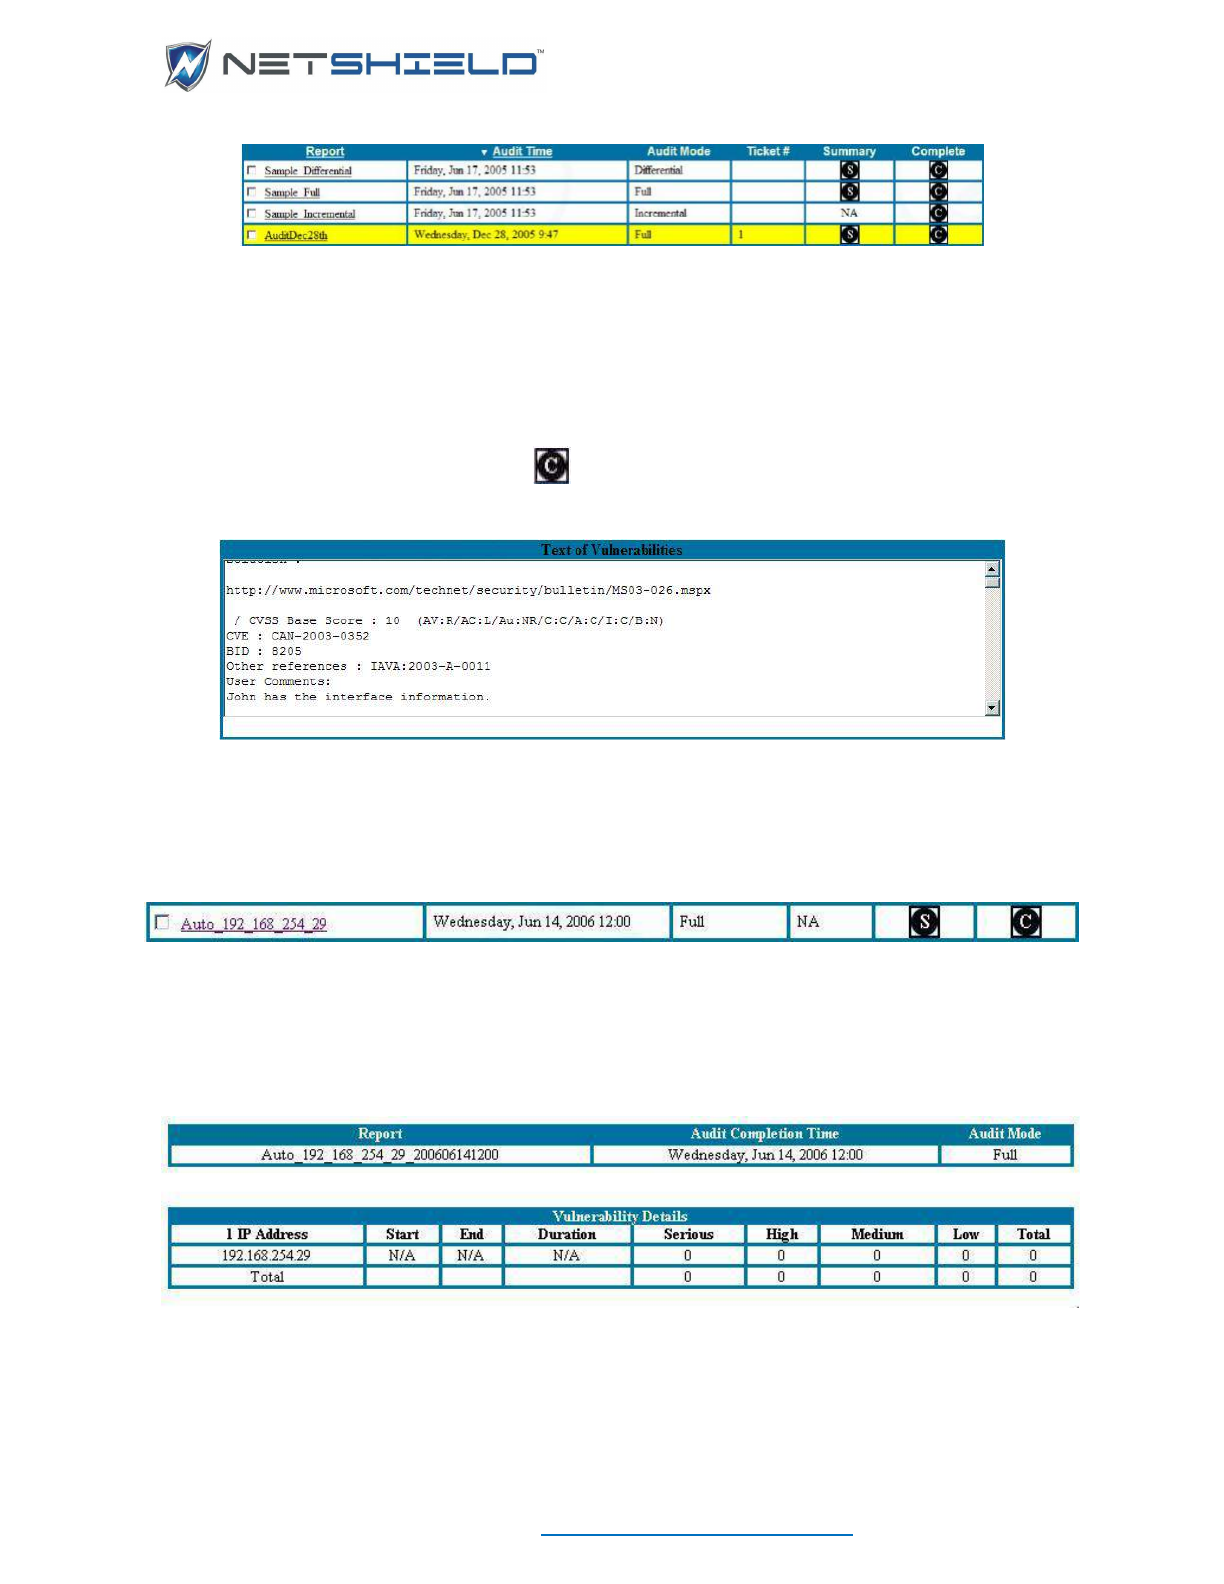
USER GUIDE
© NETSHIELD Corporation 2017 | https://www.netshieldcorp.com | 1-800-991-3971
• Click the Report link to go to the Report Details page.
• Search the Text of Vulnerabilities box for the test number with which the comment is
associated. Scroll to the end of the section for that test number. The comment appears
under User Comments at the end of the vulnerability test information.
Open the report by clicking on the icon. When the vulnerability appears in the report,
the comment follows the end of the description.
FINDING AUTOMATIC REPORTS FOR DYNAMICALLY DETECTED DEVICES
When reports for dynamically detected devices are generated, they are named
Auto_<IP_Address_DateTime>.
• Select Reports or Reports
View Audit Results from the left menu to go to the Reports
page.
• Click on the Report link. This takes you to the Report Details page where you can review
available data, shown below, as well as Text of Vulnerabilities and Comments fields.
REMOVING A REPORT
Use the Reports page to remove reports.
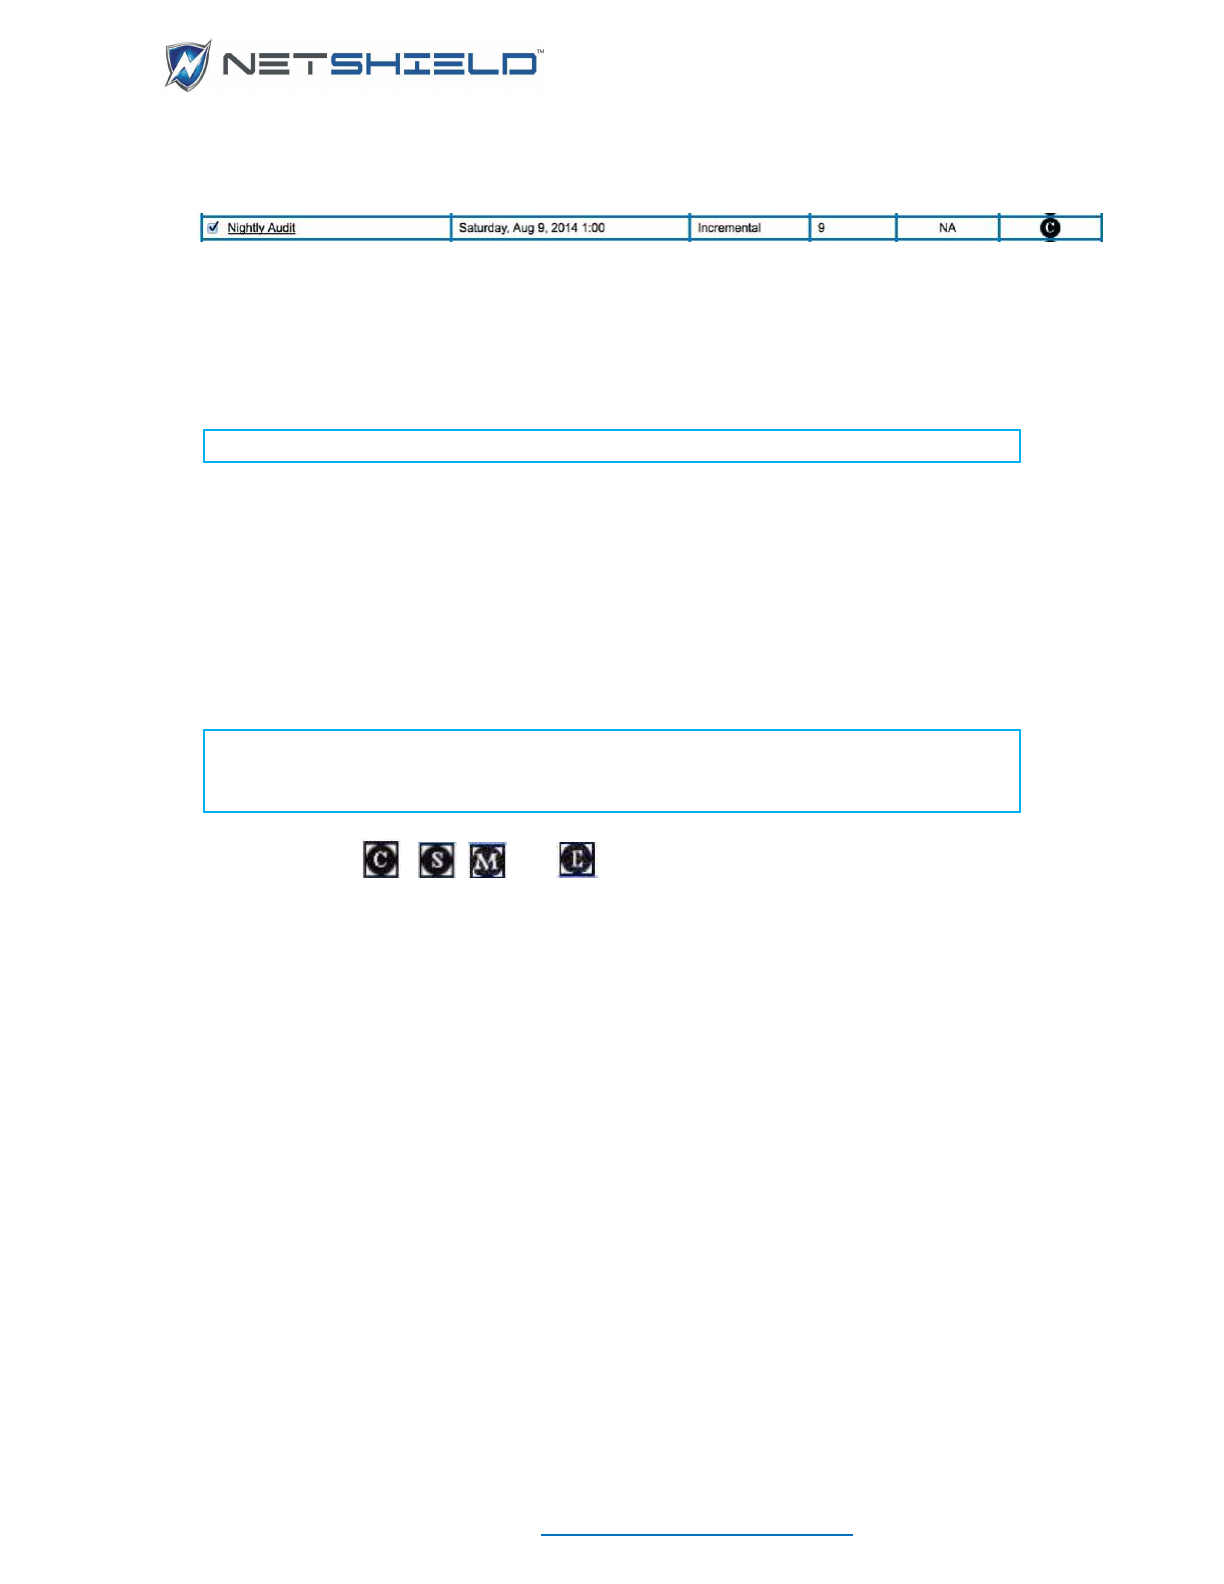
USER GUIDE
© NETSHIELD Corporation 2017 | https://www.netshieldcorp.com | 1-800-991-3971
• Click the check box to the left of the audit name.
• Click the Remove Selected button to the upper or lower right of the reports list. Confirm
the removal when prompted to do so by clicking Continue.
• The Reports page is displayed; the entry no longer appears in the report listing.
NOTE: IT Staff users are not able to remove reports.
SAVING A REPORT TO DISK
To save a report to disk, go to its Reports page.
• Select ReportsView Audit Results for Summary and Complete Reports.
Select Reports
Generate Executive Reports for Executive Reports
Select Reports
Generate Management Reports for Management Reports.
NOTE: We recommend you always store reports only on SnoopWall NetSHIELD
to ensure they remain confidential. If you must save a report locally, do so only
on a secure server.
• Right click on the , , , or report icon, as required.
• Select Save Target As and save to a place in a secure area on a protected machine.
• Select the destination and file name.
• Click Save to retain the report.

USER GUIDE
© NETSHIELD Corporation 2017 | https://www.netshieldcorp.com | 1-800-991-3971
CREATING CUSTOM REPORTS USING QUERIES
Querying Reports Database
• Select Reports
Query Vulnerabilities from the left
menu. This takes you to the Report Query page.
• Choose a search topic:
o IP Address
o Audit Name
o Vulnerability ID
• Choose either IP or Vulnerability ID in the Sort By field.
• Select None, Potential, Confirmed, or Both in the Include False Positives field.
• Click the Next button to continue to the Date Range screen.
• The From date defaults to the earliest date for which data is
available. The To date defaults to today’s date.
• Click Next to continue to the Risk Level screen.
• Select the Risk Level from the choices shown.
• Click Next to see the query results. Some sample results from the Report Query page are
shown below:
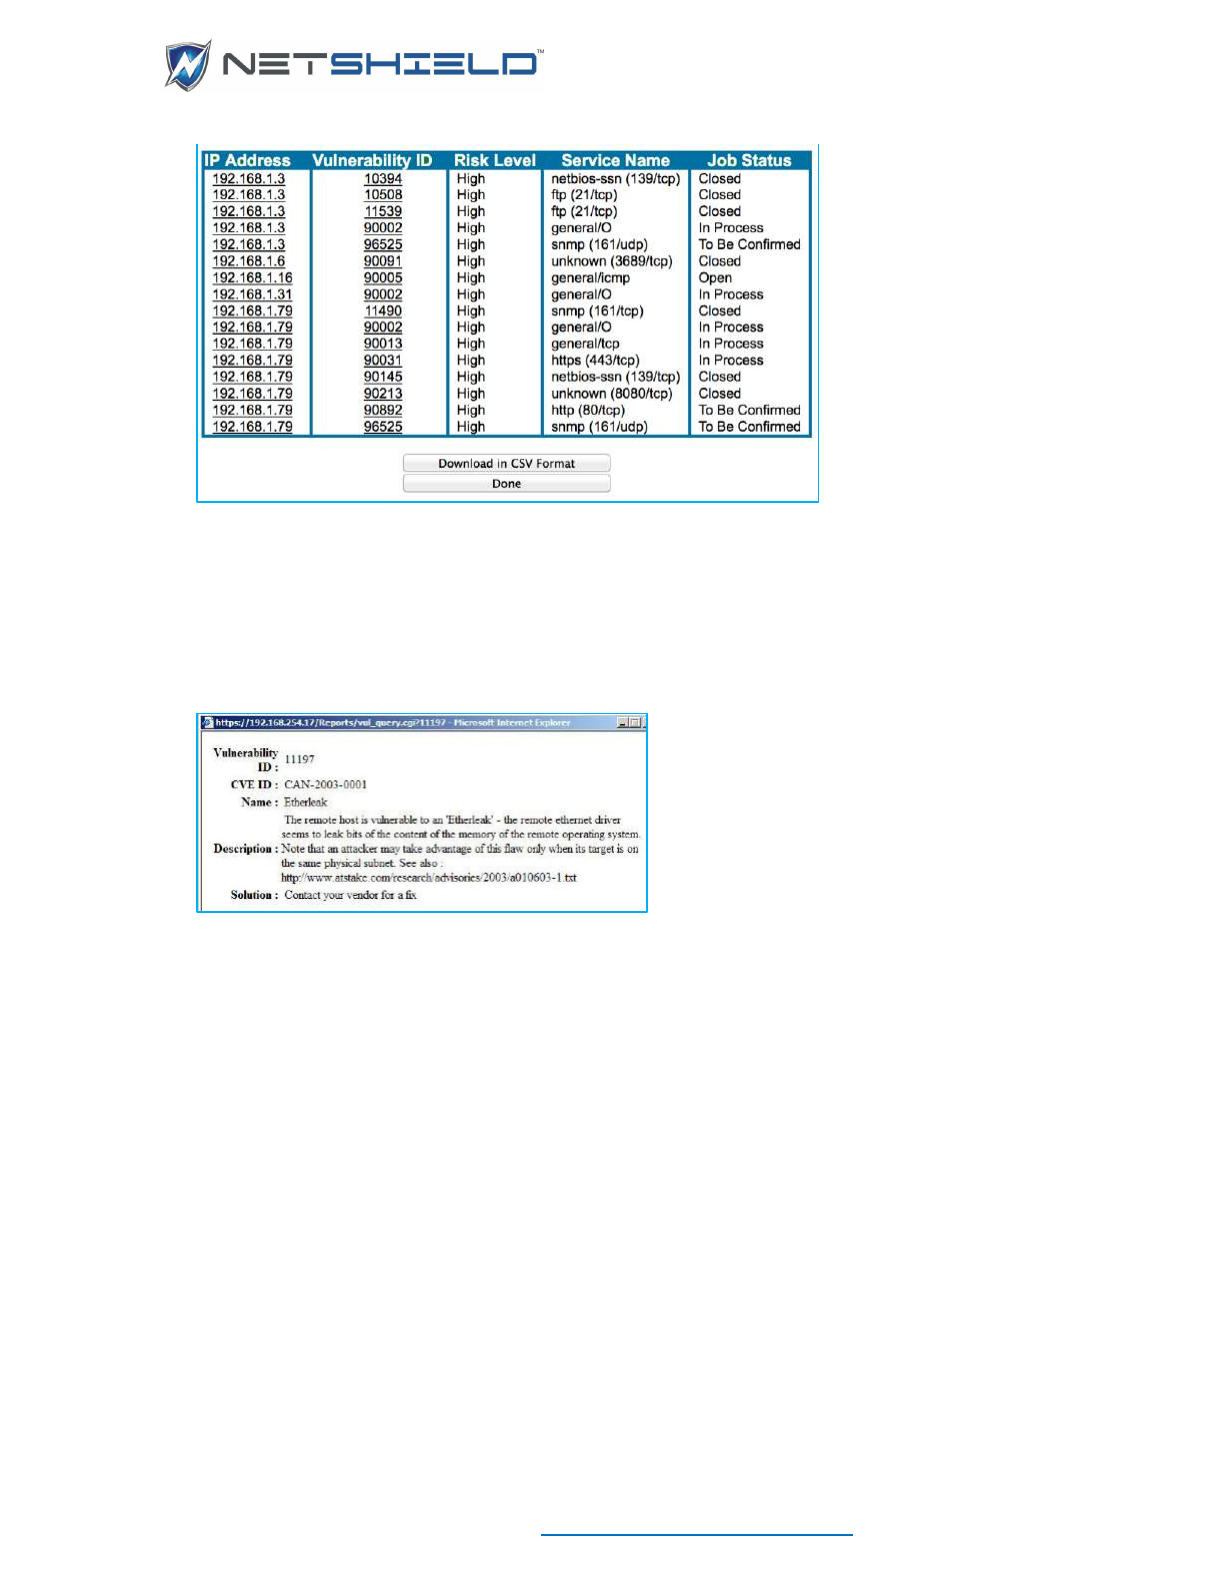
USER GUIDE
© NETSHIELD Corporation 2017 | https://www.netshieldcorp.com | 1-800-991-3971
The Report Query page shows Vulnerability ID, Risk Level, Service Name, and Job Status
for each IP Address listed. It can optionally show False Positives as well.
• Click an individual IP Address in the first column to link to data from the Asset database.
• You can also click on a particular Vulnerability ID to open information about that ID.
Sometimes you may need to use this data for various company and regulatory reports. You can
Download all data in CSV format for each report you generate. This will allow you to use it in
Excel or other reporting systems. If you chose to save the data to a CSV file, the CSV data is
displayed. To save it, click the second mouse button anywhere on the screen, and chose Save
Page As from the pop-up menu. Save the file in the usual manner.
Printing Query Results
To print the query results like a report, be sure you have the page set up to print in Landscape
mode from the browser print settings. Then print the report using browser print functions.
GENERATING MANAGEMENT AND EXECUTIVE REPORTS
REQUIREMENTS FOR EXECUTIVE/MANAGEMENT REPORTS
SnoopWall NetSHIELD automatically creates vulnerability reports when an audit completes.
SnoopWall NetSHIELD also places data from vulnerability assessments and other security
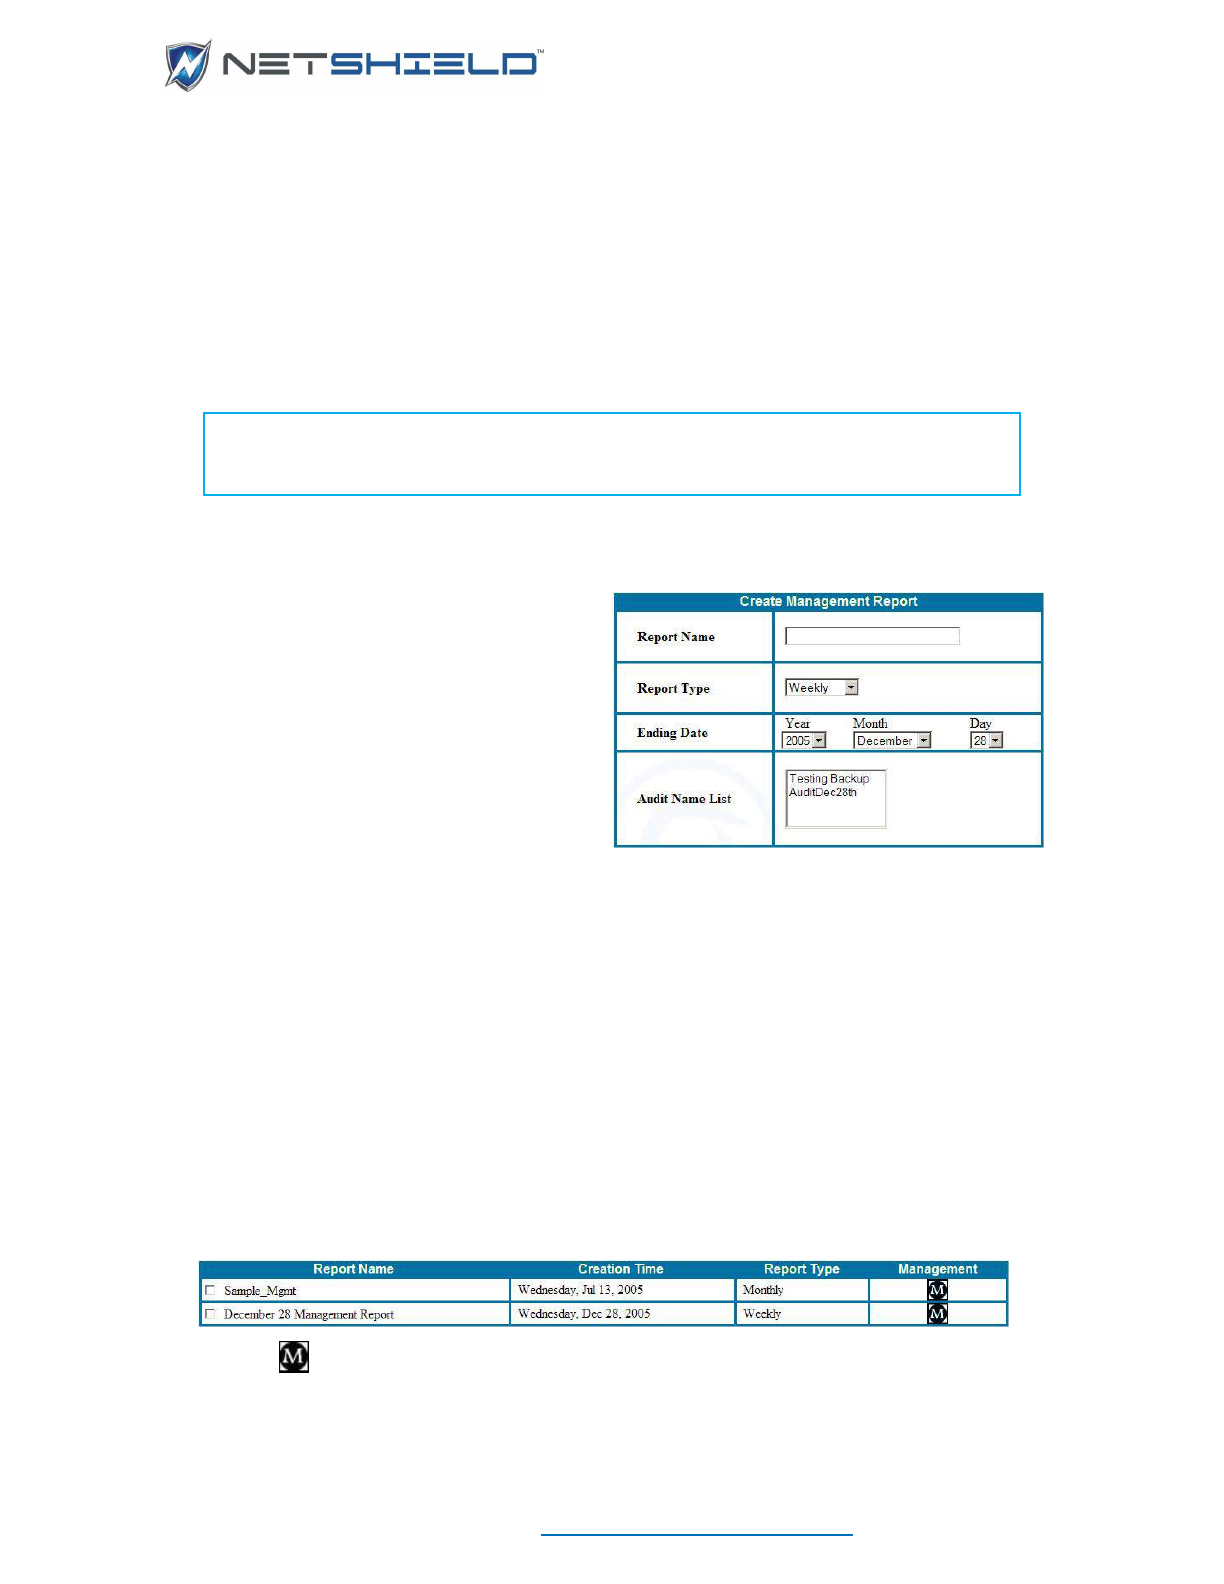
USER GUIDE
© NETSHIELD Corporation 2017 | https://www.netshieldcorp.com | 1-800-991-3971
information from the appliance into a database, which the reporting engine uses to create high-
level Management and Executive reports on demand.
Only Manager level users can generate these two report types.
Some trend charts in Management and Executive reports require minimum amounts of data to
be useful. We recommend you allow at least a month of data to accumulate before expecting
meaningful trend results.
GENERATING MANAGEMENT REPORTS
NOTE to System Administrators: Be sure to supply managers, executives, and IT
staff with the username and password you assign to them when you create their
account.
You must be a Manager level user to access Management or Executive reporting features.
To generate a report:
• Select Reports
Generate Management
Reports from the left menu.
• The Create Management Report screen
appears.
• Enter the Report Name in the name field.
• Select the Report Type based on the
period you want covered -- Weekly, Bi-Weekly, Monthly, or Quarterly.
• Fill in Ending Date.
• Choose one or more audits to include in the report from the Audit Name List. To select
more than one, hold down the Ctrl key to select multiple audits.
• Click Create Report.
• When the report is ready, it will appear in the list of reports along with previous reports you
may have created.
• Click the icon from the column to the far right to view the reports.

USER GUIDE
© NETSHIELD Corporation 2017 | https://www.netshieldcorp.com | 1-800-991-3971
UNDERSTANDING CONTENT OF MANAGEMENT REPORTS
The report type (e.g. Monthly Management Report) and date created are shown at the top of the
Management Report below the report name. Report dates are in the Summary section below
the heading.
While regulatory and credit card compliance information reported is shown in all reports, other
Summary information in the Management report differs from that in vulnerability reports, since it
targets management concerns.
This report summarizes the number of open, fixed, and new vulnerabilities. It also indicates how
many resources/hours were utilized for remediation, and how many jobs were escalated (for
being past due).
The first chart shows an overview of current vulnerabilities in bar chart form, indicating the
number at each risk level.
The next bar chart and table show Vulnerability Status by Risk Level - indicating how many
vulnerabilities at each risk level are new, fixed, and in the process of being fixed.
Trends in Vulnerability Status is the next section. This section presents trend graphs indicating
how many vulnerabilities at each level have been open and how many new ones were
introduced over the reporting period.
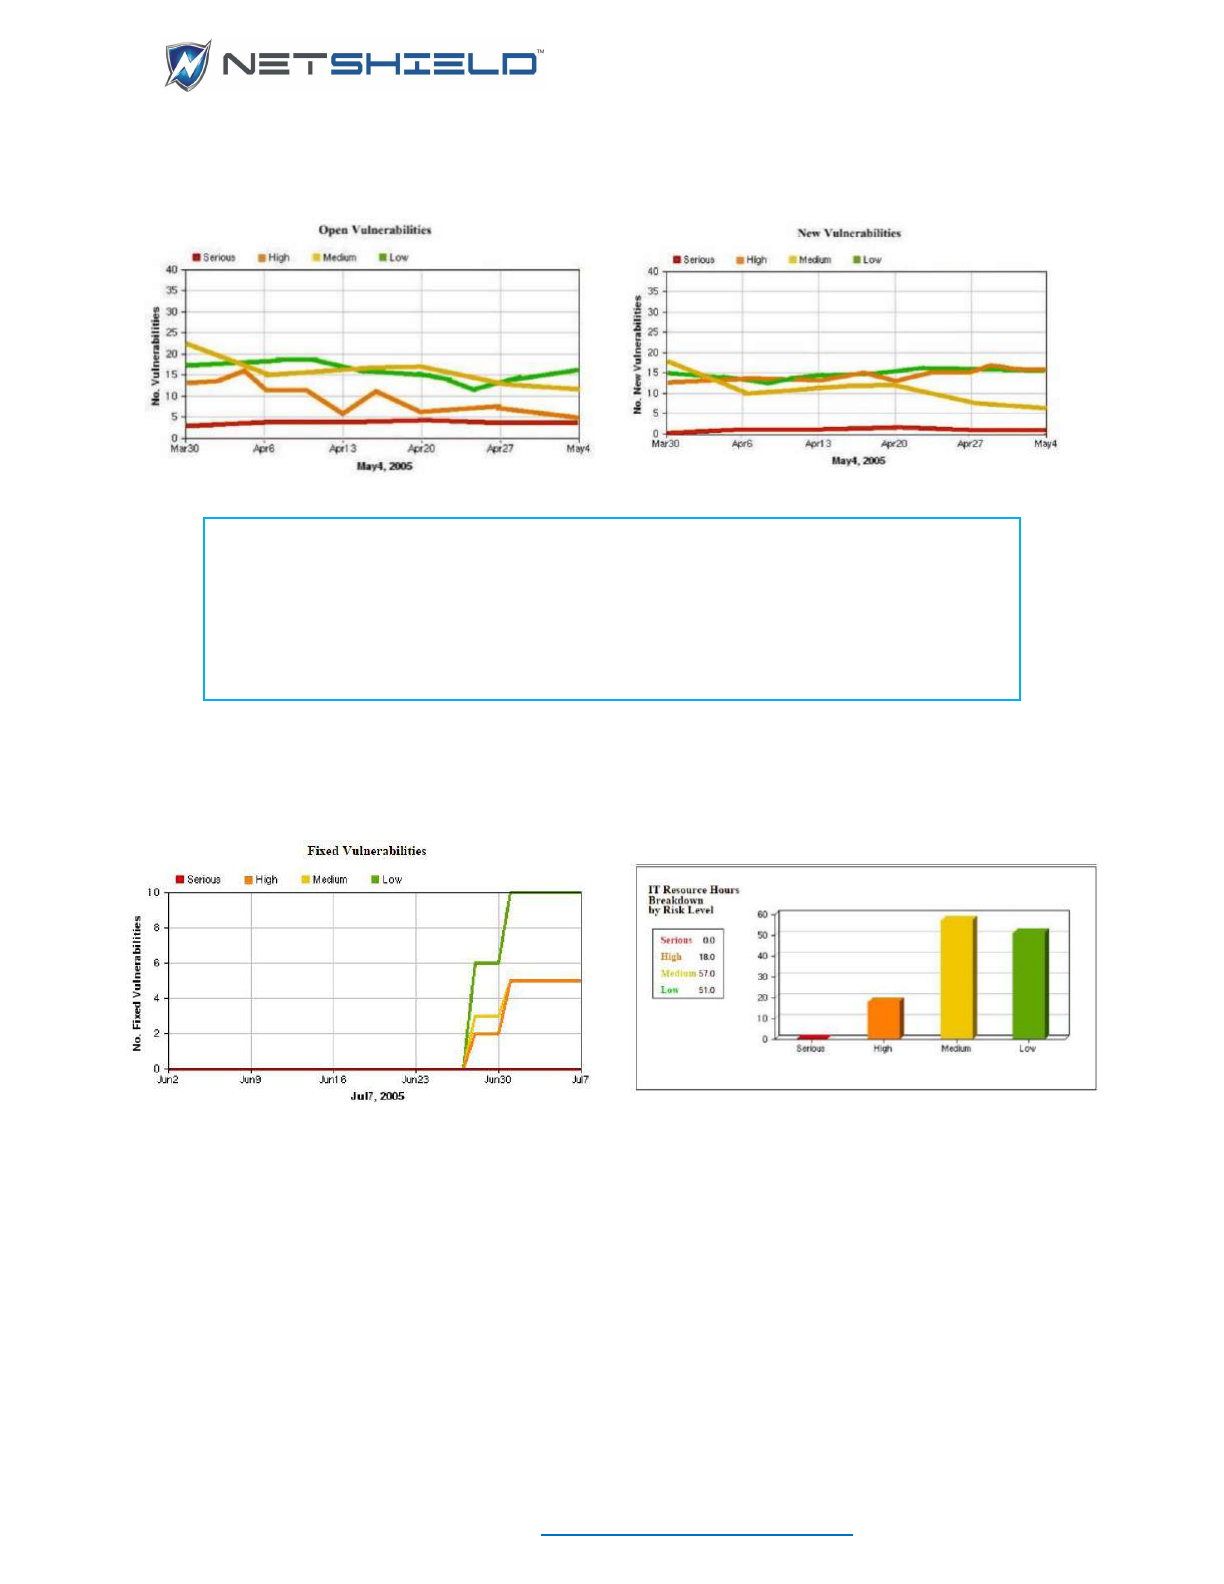
USER GUIDE
© NETSHIELD Corporation 2017 | https://www.netshieldcorp.com | 1-800-991-3971
The two line graphs that follow indicate the number and severity of both open and new
vulnerabilities over the reporting period.
NOTE: The number of data points in the graph depends on the dates of the
audits. If you include weekly audits, you only see weekly data points. If you
include daily audits, you see more data points.
For quarterly, semi-annual, and annual reports, you may choose to use monthly
vulnerability reports for an overview of the data or daily vulnerability reports to
see the most detail.
The next section, Trends in Vulnerability Management Status, graphs the number of
vulnerabilities fixed during the time period and the number of IT resource hours expended to fix
them. The first graph details Fixed Vulnerabilities.
The second graph details Expended IT Resource Hours. It provides a quick view of data, also
available in the Workflow Management System, showing the total work hours used for the
vulnerabilities, broken down by level of severity. Totals are for the time period you chose for the
report.
The final three graphs detail critical vulnerabilities as well as the IT resources currently working
to resolve them.
A table of Critical Vulnerabilities gives the manager a quick view of the most significant
problems on the network, the number of systems affected, and the status of each.
Another table shows Critically Vulnerable Systems to give the manager a quick view of which
systems are in the most trouble.
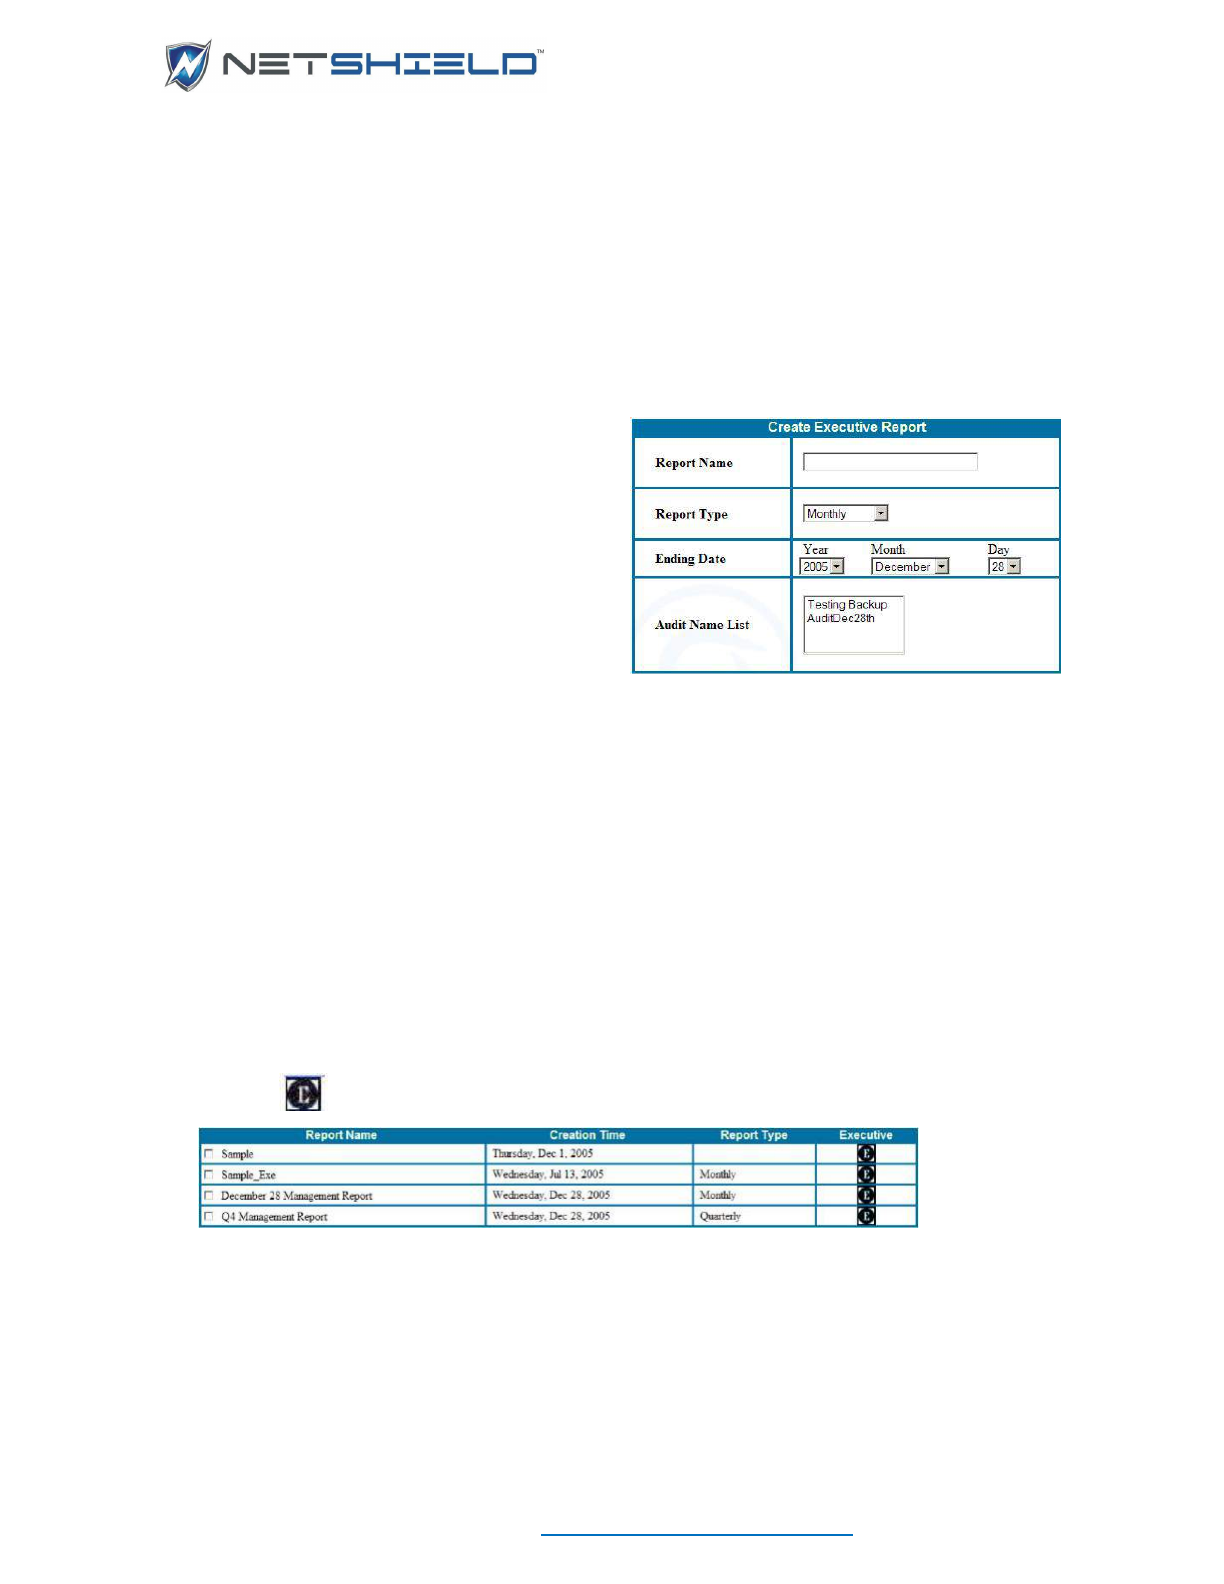
USER GUIDE
© NETSHIELD Corporation 2017 | https://www.netshieldcorp.com | 1-800-991-3971
The last table summarizes the IT Resources working on these vulnerabilities.
Compliance details appear in the Appendix.
GENERATING EXECUTIVE REPORTS
Executive reports provide a broad overview of the company’s network vulnerability status at an
executive level. Manager level users may create executive reports themselves or allow
executives to log on and create their own reports as needed.
Only a Manager level user can generate Executive reports. To generate a report:
• Select Reports
Generate Executive
Reports from the left menu.
• The Create Executive Report box appears.
• Enter the Report Name in the name field.
• Select the Report Type - Monthly, Quarterly,
Semi-Annual, or Annual.
• Fill in the Ending Date.
• Select the audit from the Audit Name List for which you need the report. To select more
than one audit name, hold down the Ctrl key to select multiple items from the list.
• Click the Create Report button below the Create Executive Report box.
• When the report is ready, it will appear in the list of reports along with previous reports you
may have created.
• Click the icon from the report’s rightmost column to view the report.
UNDERSTANDING CONTENT OF EXECUTIVE REPORTS
The report type (e.g. Executive Monthly Report) and date created are shown at the top of the
report below the name. Report dates are in the Summary section below the heading.
Regulatory and credit card compliance information appears next.
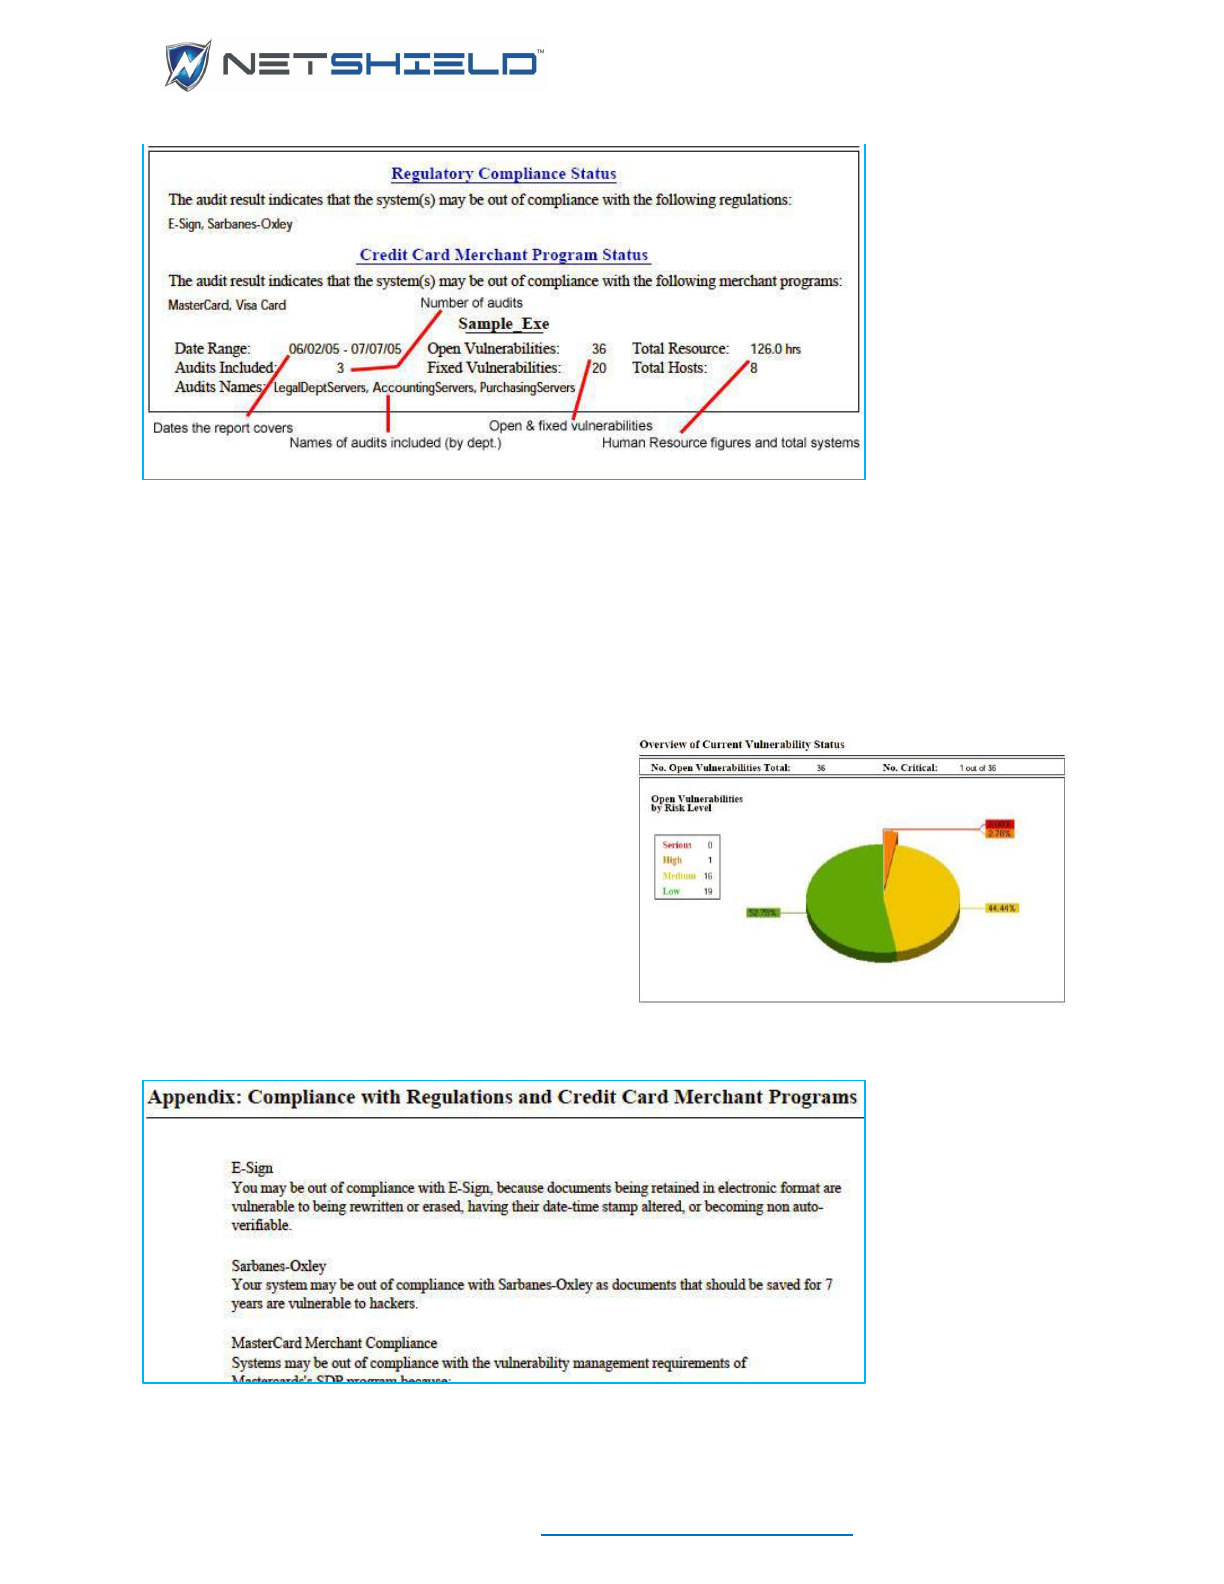
USER GUIDE
© NETSHIELD Corporation 2017 | https://www.netshieldcorp.com | 1-800-991-3971
Other Summary information in the Executive report is less concerned with details, but provides
a view of the general health of the network.
This report type summarizes the number of open/fixed vulnerabilities and how many resource
hours were expended on remediation.
The Executive Report indicates the threshold level for quarantining systems and the number of
SmartSwitch blocking events that occurred in the time period the report covers. This information
provides the executive with a high level view of the impact of vulnerabilities on productivity.
The first page in the executive report displays a
pie chart showing percentages of vulnerabilities at
each level, a basic overview of the vulnerability
status.
Two line graphs show Trends in Vulnerability
Status. These graphs are identical to those
described in the Understanding Content of
Management Reports section earlier in this
chapter.
Executive reports have two additional tables with
information focusing on the Top 10 Critical
Vulnerabilities and the Top 10 Critically Vulnerable Systems found in the time period the report
covers.
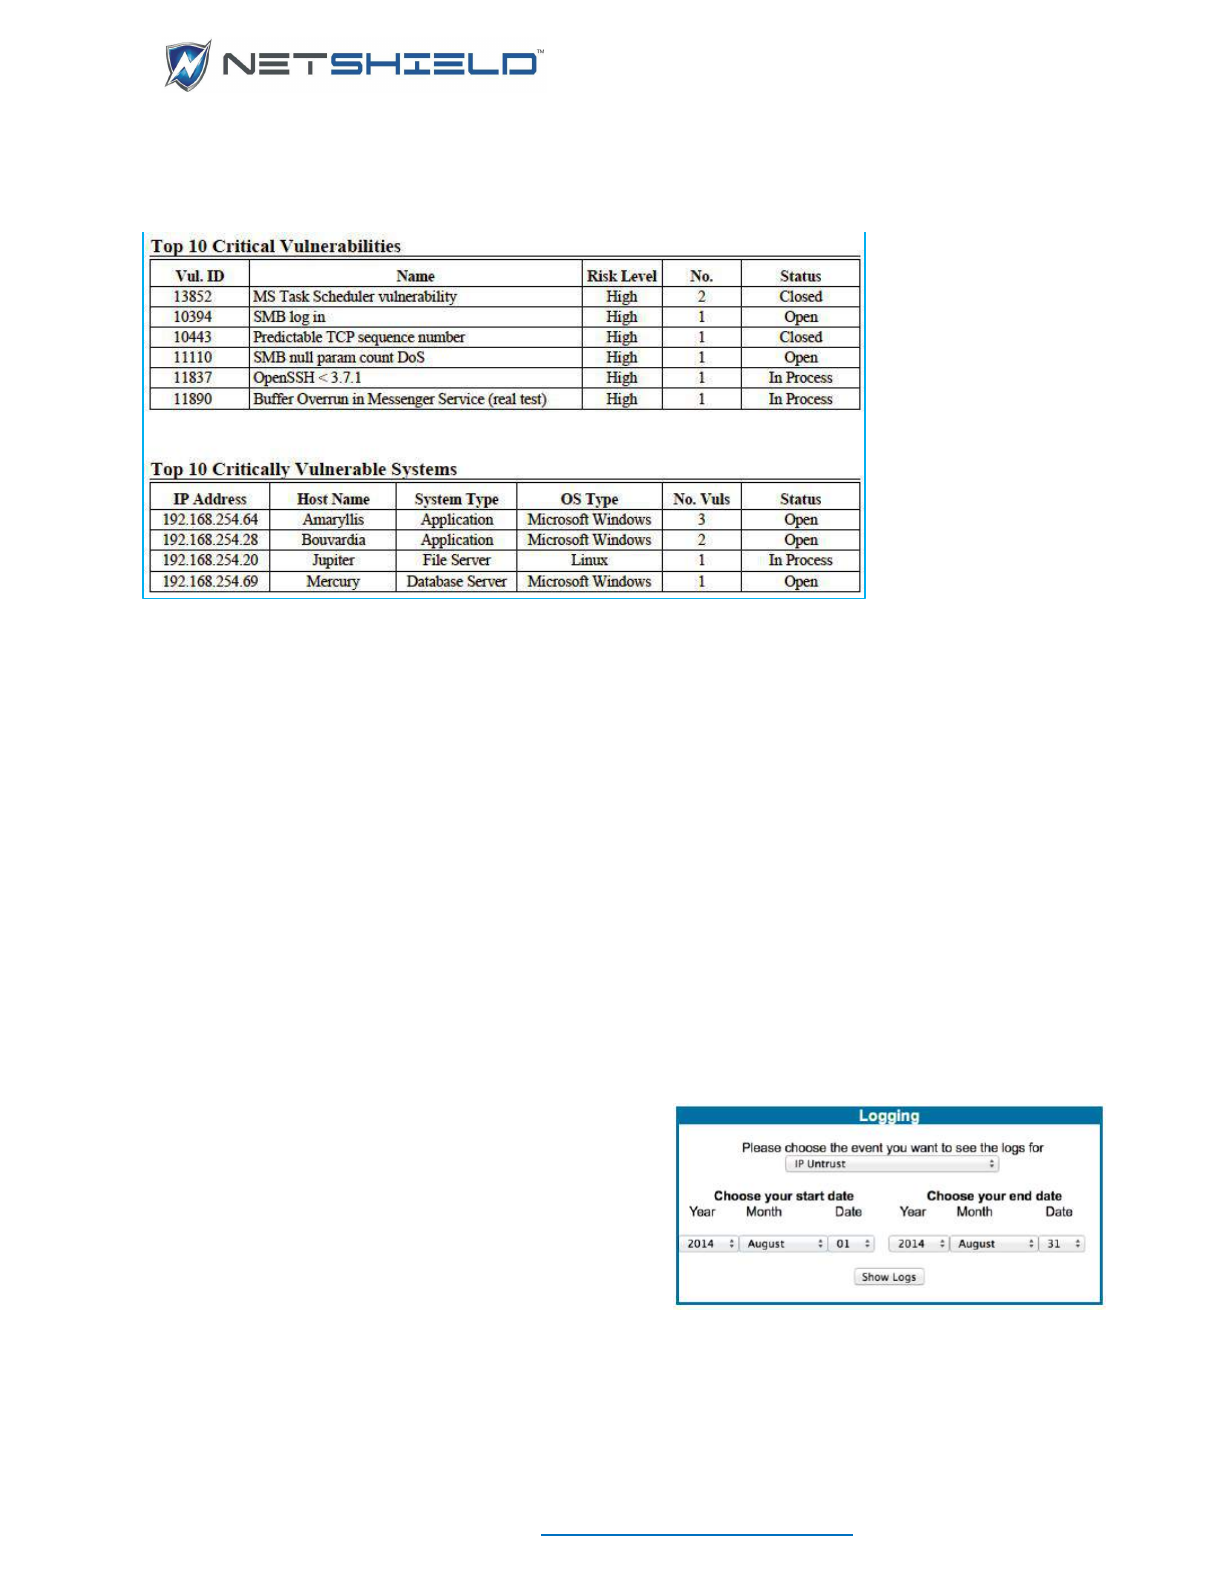
USER GUIDE
© NETSHIELD Corporation 2017 | https://www.netshieldcorp.com | 1-800-991-3971
If your network has ten or less critically vulnerable systems, you’ll see all of them in this tabular
section of the report. If the network has more than ten, this section indicates the top ten systems
with vulnerabilities.
Compliance details appear in the Appendix.
WORKING WITH LOGS
This chapter describes how to use SnoopWall NetSHIELD logs. You must be a Manager User
to access logs.
NetSHIELD logs two types of events - network and system.
• Network Events — Occur on the network SnoopWall NetSHIELD is auditing/monitoring.
• System Events — Occur on the NetSHIELD unit itself.
You have the option of exporting both logs to a CSV format file. This capability is useful for
forensic analysis and regulatory compliance requirements.
VIEWING NETWORK EVENTS LOG
Network Events Logs show significant SnoopWall
NetSHIELD-monitored changes on your network.
• Select Logging
Network from the left menu.
The Logging dialog appears.
• Select an event type from the pull down list.
• Enter the date range.

USER GUIDE
© NETSHIELD Corporation 2017 | https://www.netshieldcorp.com | 1-800-991-3971
• Click Show Logs and the log displays.
You can either perform a New Search to view logs for another parameter or you can Download
Log to a CSV format file. If you chose to save the data to a CSV file, the CSV data is displayed.
To save it, click the second mouse button anywhere on the screen, and chose Save Page As
from the pop-up menu. Save the file in the usual manner.
VIEWING SYSTEM EVENTS LOG
You can also view a log of significant events that occurred on SnoopWall NetSHIELD itself.
• Select Logging
System from the left menu. The
Logging dialog appears. It is identical to that for the
Network Logs. The options in the event pull down are
different.
• Select an event type from the list shown in the pull
down.
• Enter the date range.
• Click Show Logs and the resulting log displays.

USER GUIDE
© NETSHIELD Corporation 2017 | https://www.netshieldcorp.com | 1-800-991-3971
You can either perform a New Search to view logs for another parameter or you can Download
Log to a CSV format file. If you save the data to a CSV file, you are prompted for a location on
your hard drive or network.
LOG REPORTING WIZARD
The Log Reporting Wizard contains all the capability of the separate Network and System
Logging applications, and more. It displays a listing of network and system logs and provides
filters for every column. You can save the report format and have the wizard automatically
generate a PDF on a schedule and have it distributed to whomever you wish.
A user with Manager privileges will see all the records from both the System Log and the
Network Log in chronological order upon opening the Log Reporting Wizard. Since every activity
is logged to one or the other of these tables, a system that has been running for only a few days
can have hundreds of log entries. It doesn’t take long for them to number in the dozens of
thousands. The filters allow you to choose what you are most interested in at this time.
Filtering
The filters look similar to those in the Asset Manager and work in much the same way, except
that when you select any value in the filters, the Log Report Grid is immediately updated to
reflect that selection; there is no Apply Filters button.
There is a slight difference in selecting the From Date and To Date. These values allow you to
select only one value using a calendar selector. Double-click in the field to highlight it, and then
click on the down arrow to bring up the selector:
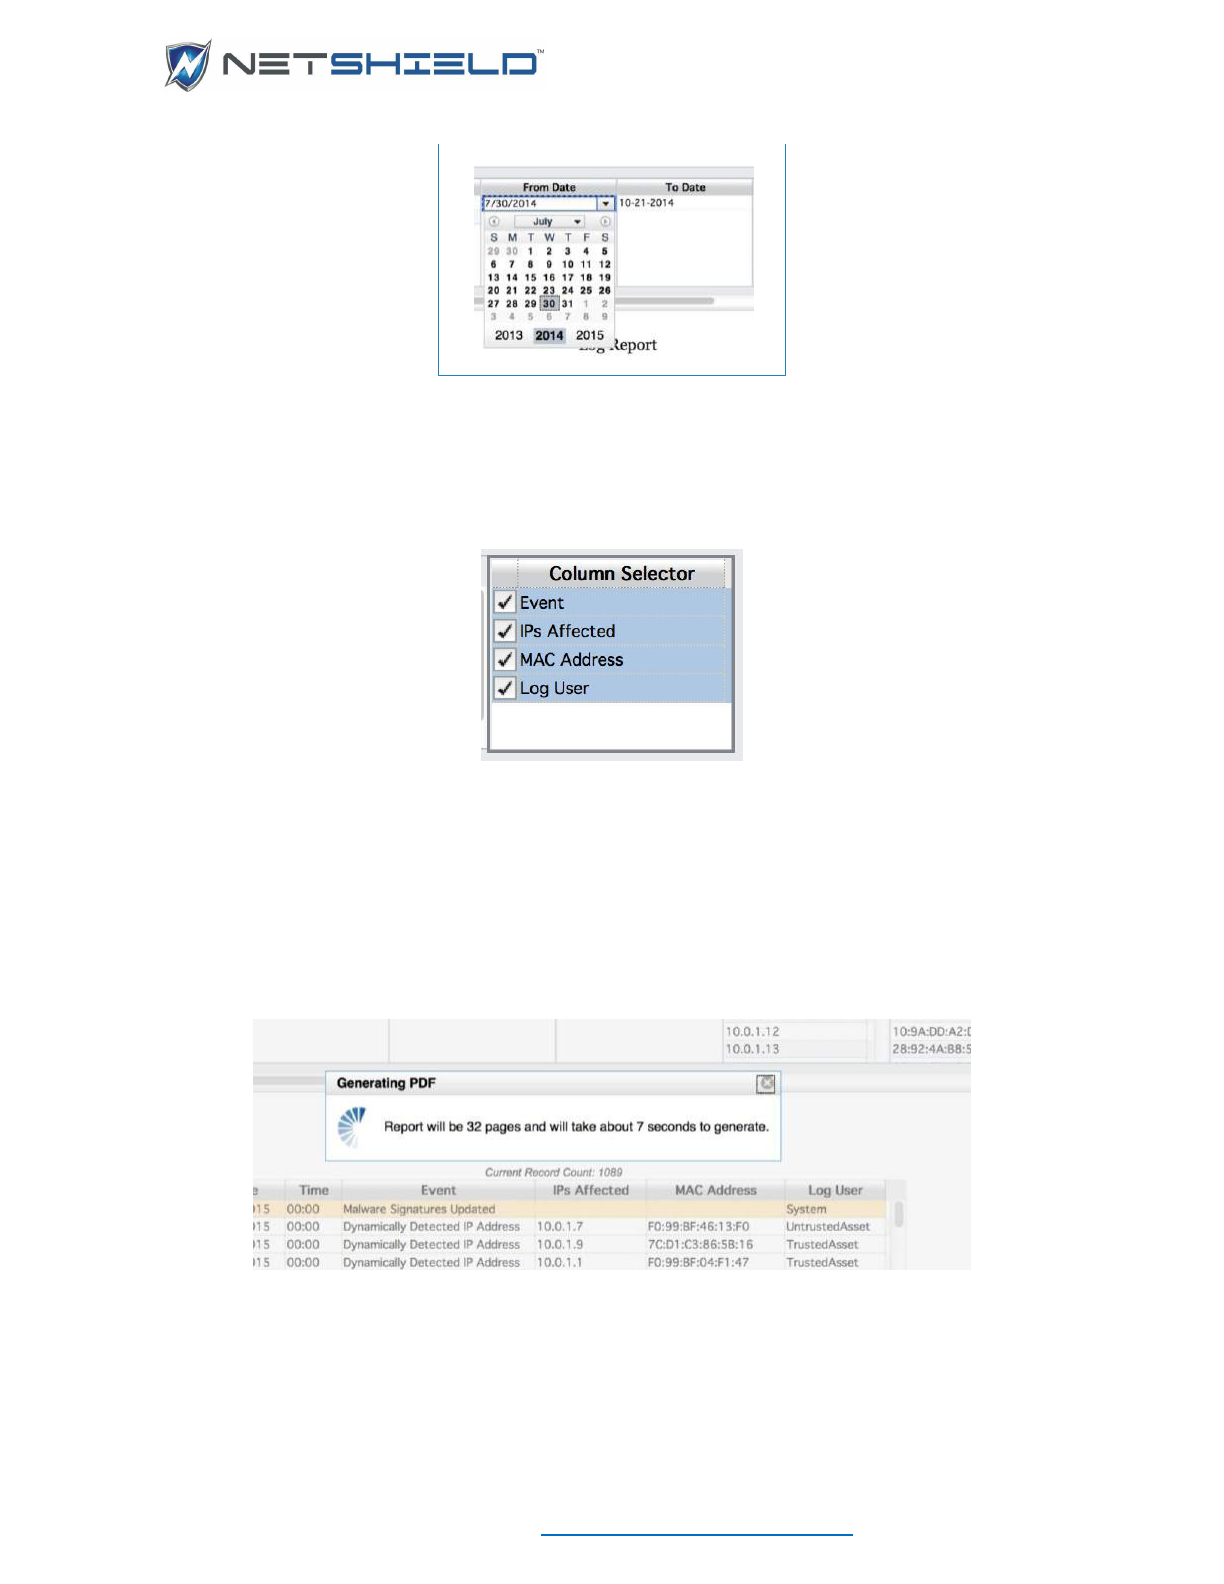
USER GUIDE
© NETSHIELD Corporation 2017 | https://www.netshieldcorp.com | 1-800-991-3971
Use the arrows, drop downs, and year fields within the selector to choose the month and year
you want. Clicking on a day within the month will select that date and close the selector.
The right-most filter (Column Selector), doesn’t filter data, but instead allows you to choose
which columns to show.
If you have selected System entries only, you don’t really need the IPs Affected or MAC
Address columns. Likewise, if you have selected one specific Log User or Event, you don’t
really need those columns. The column selections will be reflected on screen, and in the
generated PDFs.
Generating PDFs
Click Generate PDF to create a PDF file containing all the records currently listed in the grid. A
popup will tell you how many pages the report will be and approximately how long it will take to
generate it. Time estimates are based on a fast internet connection.
The PDF will open automatically in a separate window of your web browser. If it doesn’t appear, check
your browser setup to ensure that pop-ups are allowed.
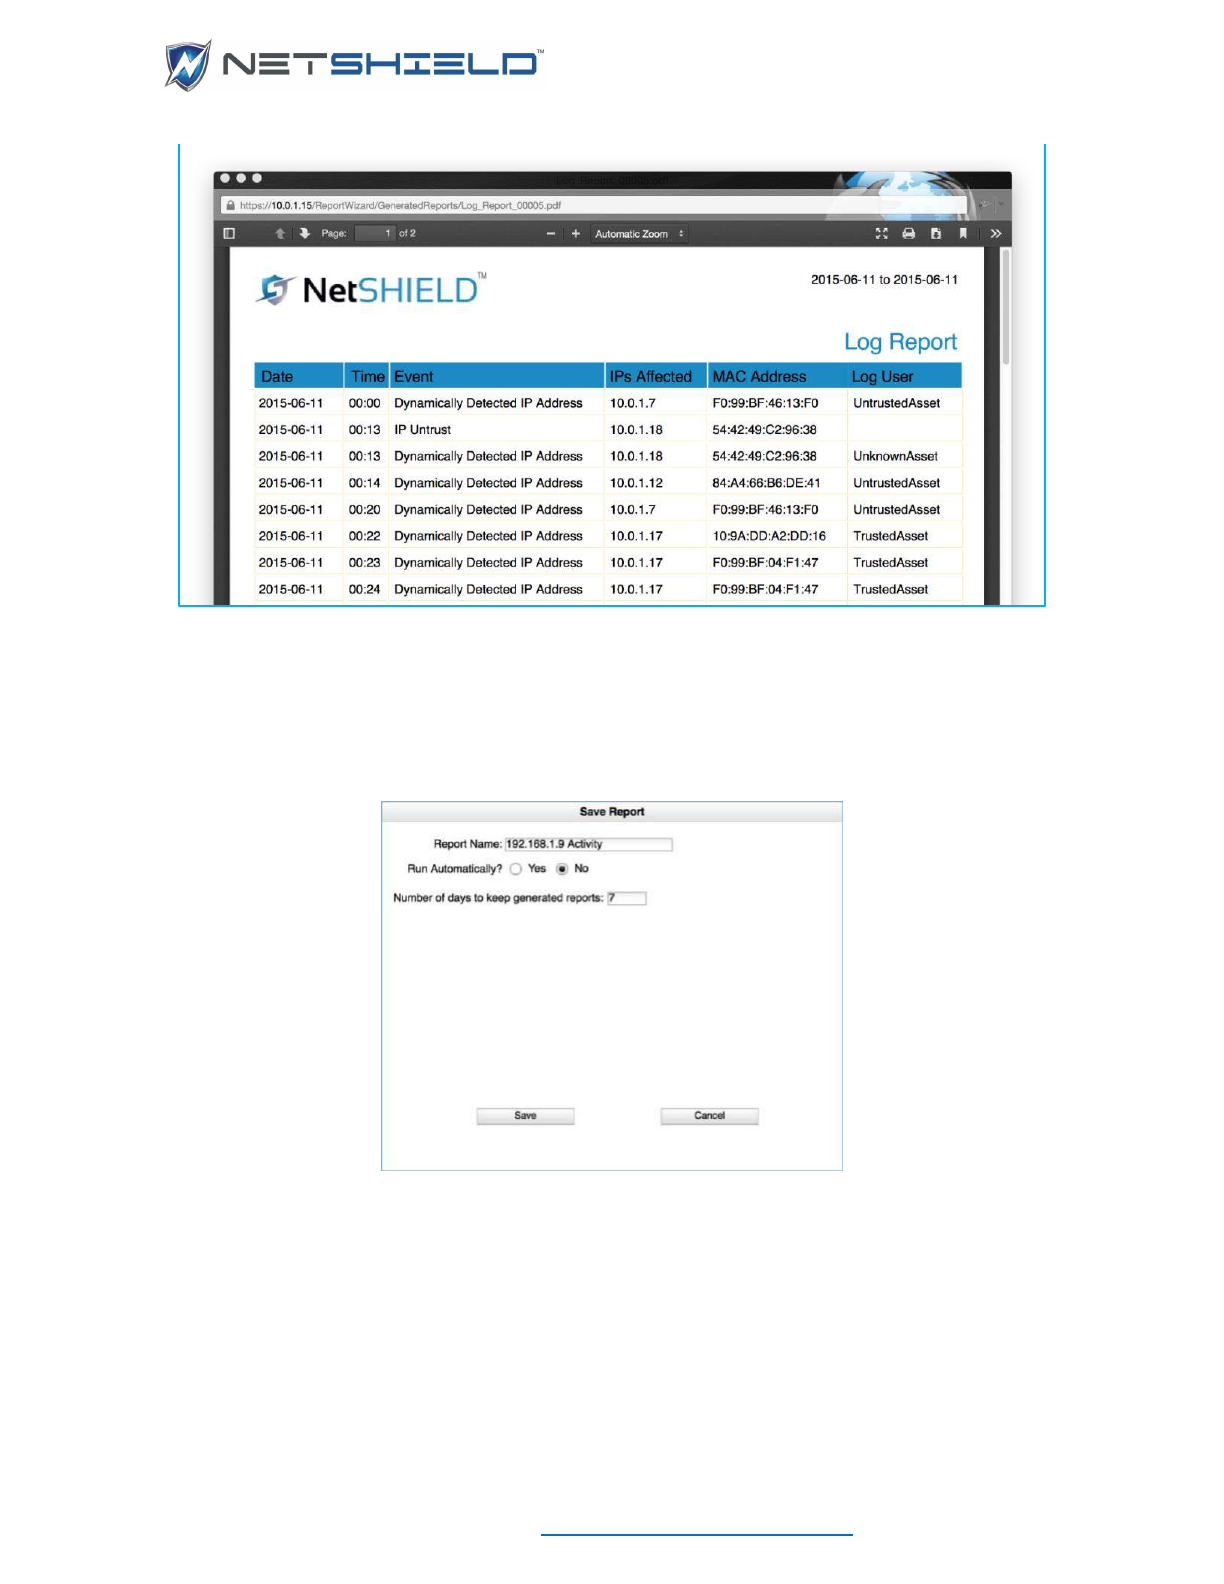
USER GUIDE
© NETSHIELD Corporation 2017 | https://www.netshieldcorp.com | 1-800-991-3971
Saving Reports
You can save your Log Reports to generate again and again either by hand or automatically. To
simply save your filtering criteria and column selections, click Save Report and give the report a
name. Leave the Run Automatically? radio button set to No. If you don’t want to keep the
generated reports on hand for 7 days, change that value. The capability to retrieve those saved
generated reports will be made available in a future release.
You can save reports and set them up to be run on a regular schedule and automatically
distributed to interested members of your organization. To do that, name the report and then
elect to run it automatically. When that radio button is clicked, you will be required to enter some
additional information you. Aspects of the dialog will change depending on the frequency you
select.
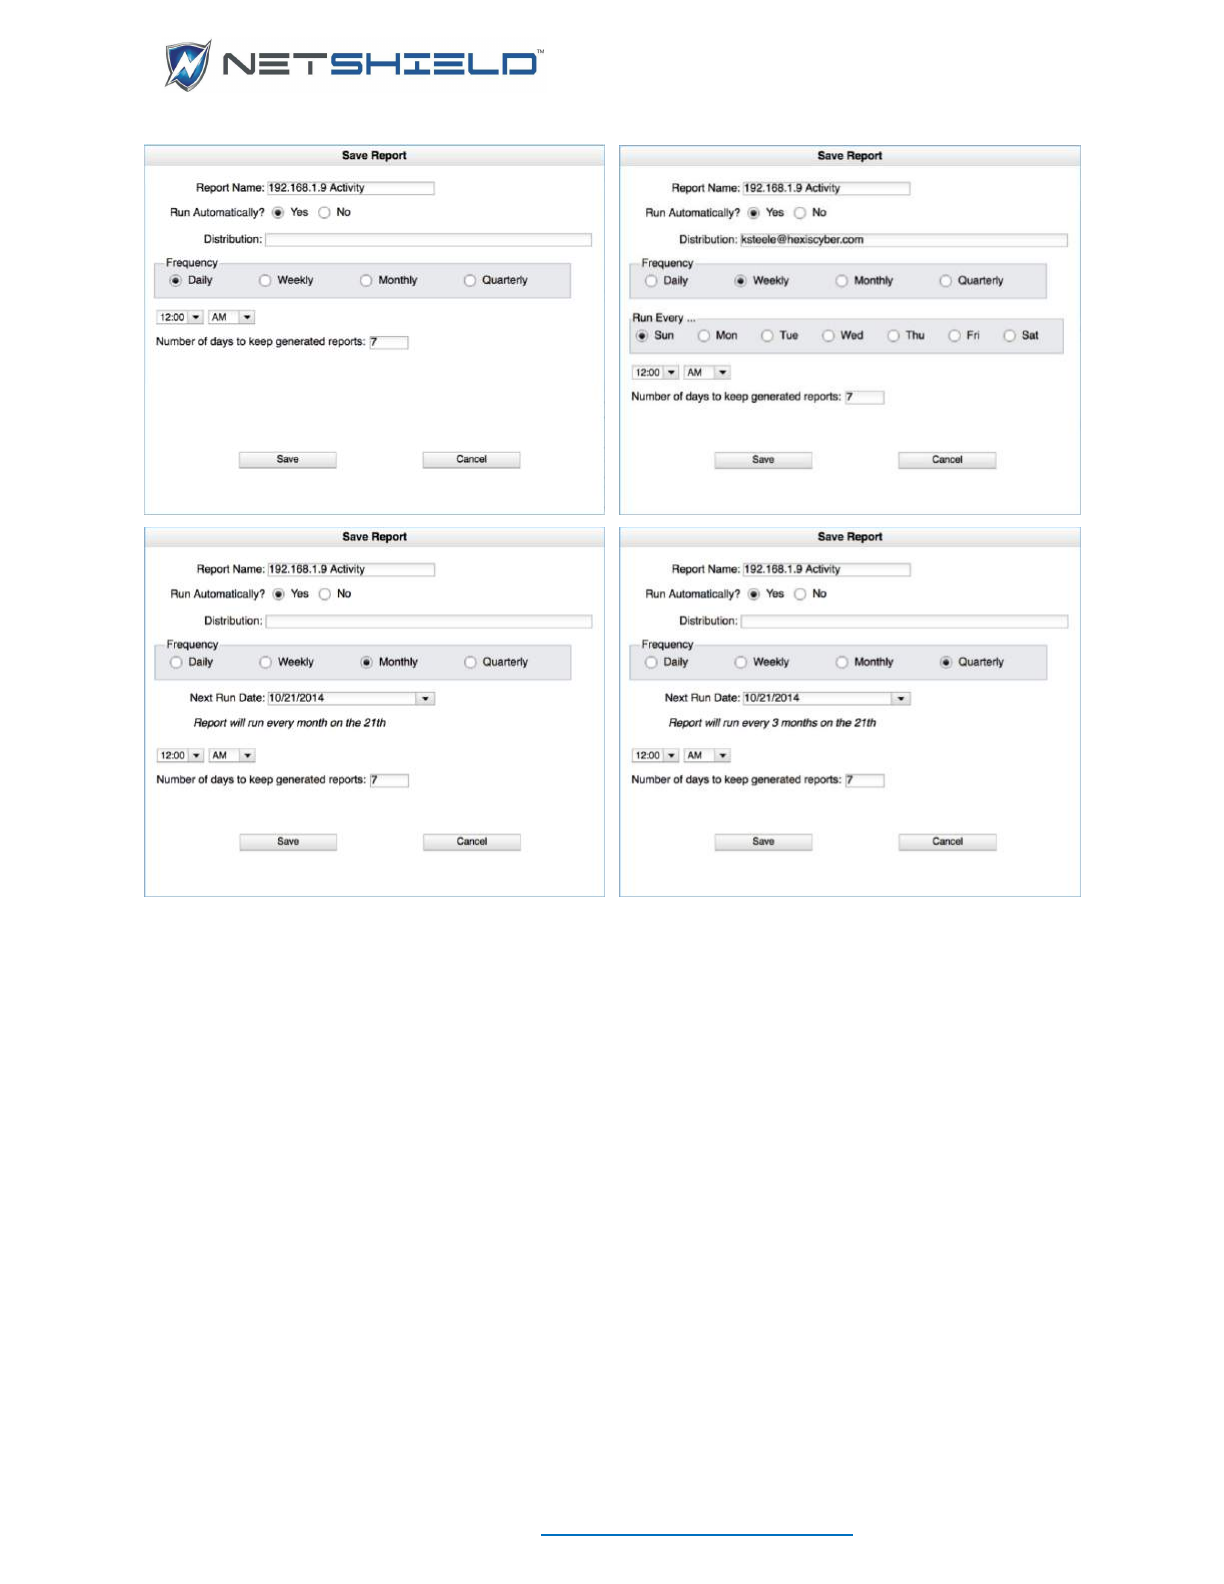
USER GUIDE
© NETSHIELD Corporation 2017 | https://www.netshieldcorp.com | 1-800-991-3971
Provide the next day or date and time you want the report to run, and click Save. The report will
be stored with all the selection criteria. The date range will change every time the report is run to
correspond to the frequency and date specified.
Opening Reports
Once you have saved one or more reports, you can open them, change them, and resave them.
Clicking the Open Report button presents a dialog containing a list of saved reports:
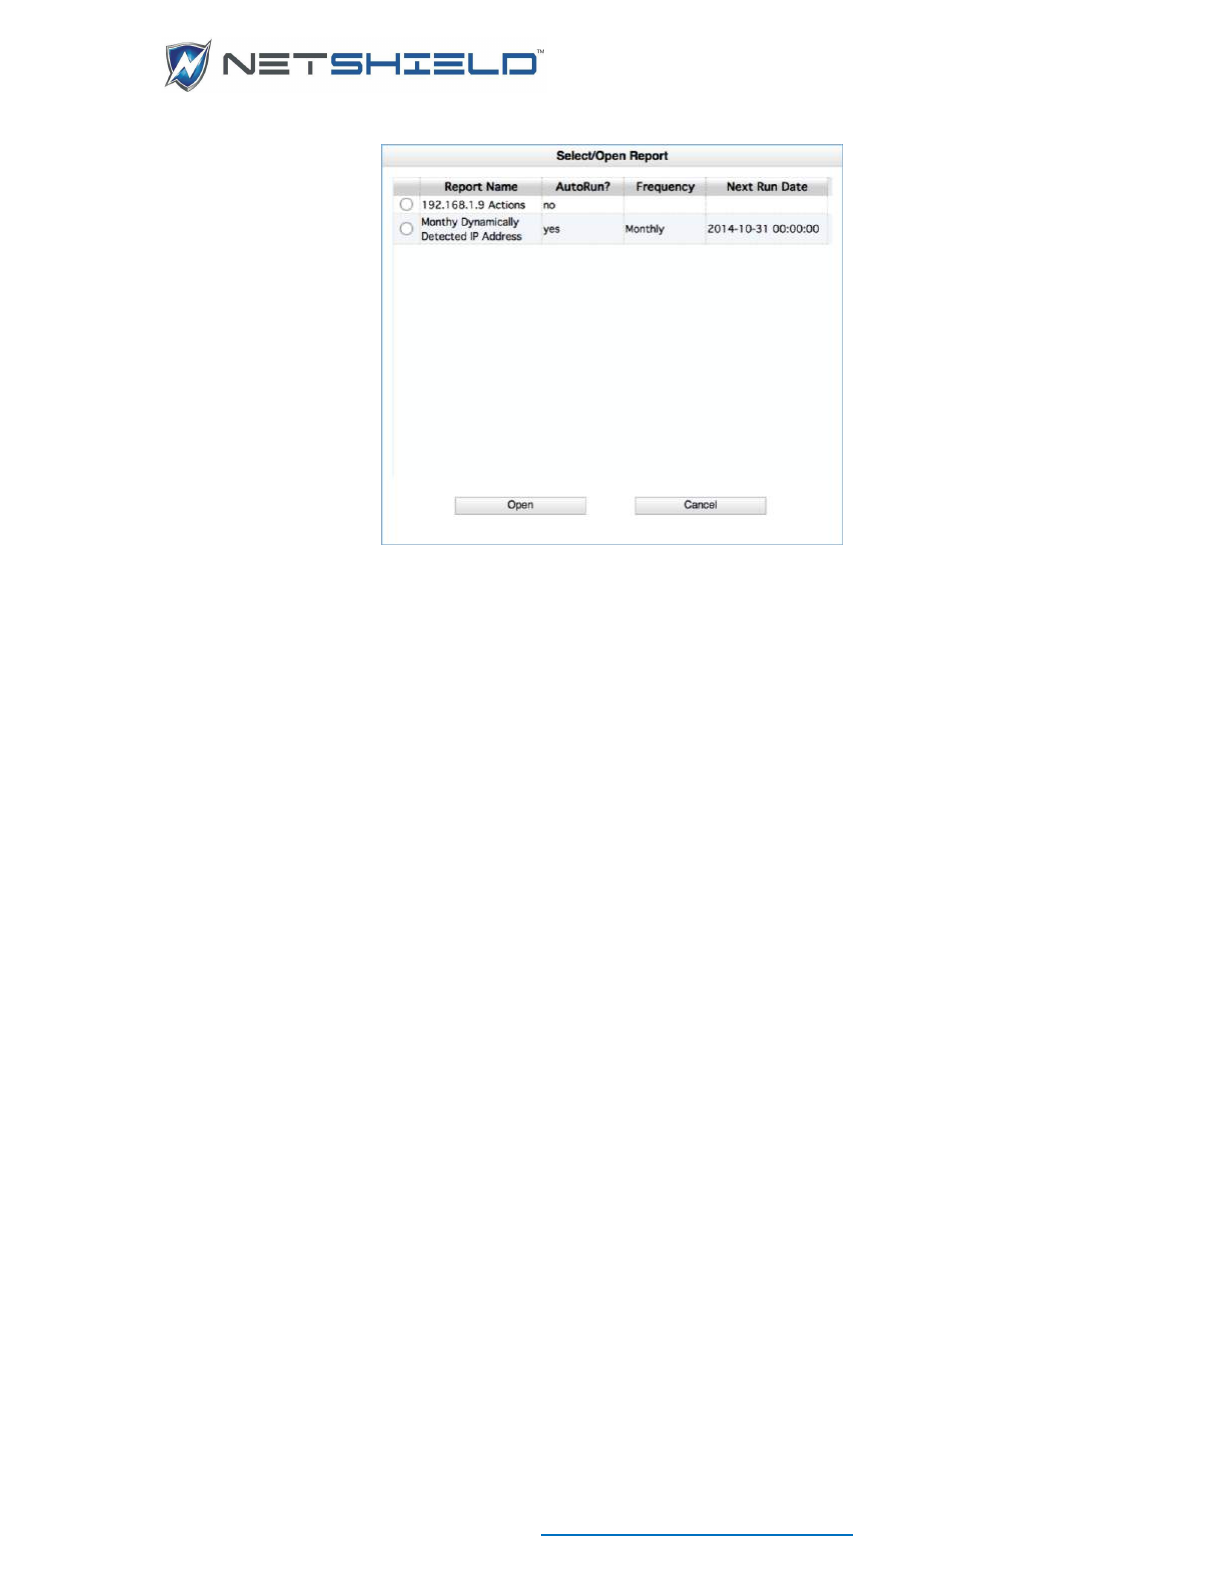
USER GUIDE
© NETSHIELD Corporation 2017 | https://www.netshieldcorp.com | 1-800-991-3971
Click the radio button next to the report you want to use, and click Open. The filter and column
selections will be open, and the log records meeting those criteria will be displayed. You can
make modifications and save it under the same name, or choose a different name.
Sorting
Click on any column header to sort the records on that column. Saving the report with a sort
order specified in this manner will save the sort order. It will be used in subsequent runs of the
report.
Summary
This new feature gives you greater flexibility for viewing log records. It does everything the
existing Network Logging and System Logging applications can do, but it also allows you to
choose more than one event (or action) for display in a single report, and it allows you to specify
users and time ranges as well as date ranges. By choosing a single affected IP, you can
reproduce the capability of the IP History Report; by choosing NAC Blocking Started and NAC
Blocking Stopped from the Action Taken filter, you can reproduce the capability of the
NetSHIELD Report. For a more complete NetSHIELD Report, you can also select BlockNow
Started.

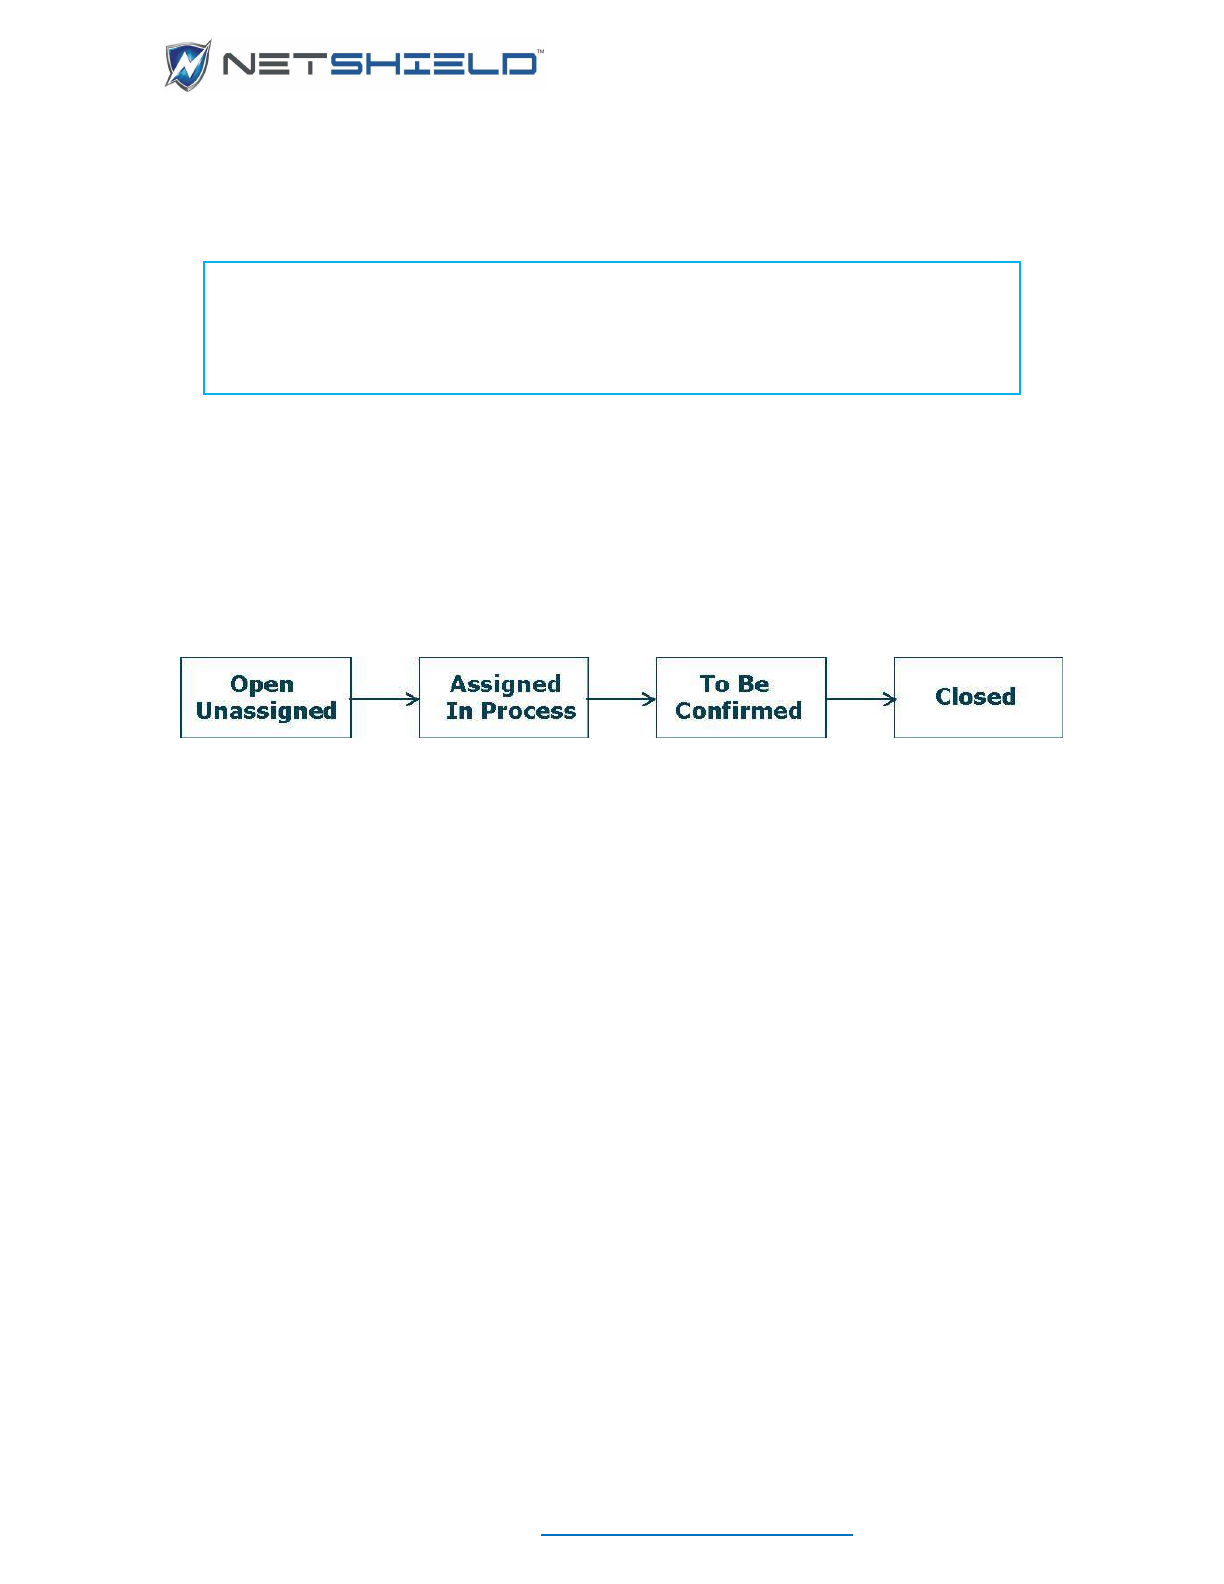
USER GUIDE
© NETSHIELD Corporation 2017 | https://www.netshieldcorp.com | 1-800-991-3971
WORKFLOW /REMEDIATION REQUIREMENTS
This chapter describes how to use SnoopWall NetSHIELD Workflow feature to manage
vulnerability remediation across your organization.
NOTE: To use workflow features, you must create accounts for all users
accessing SnoopWall NetSHIELD.
NOTE: When working on vulnerability remediation, work with vulnerability
reports. For more information on reports, refer to the Reports Guide.
WORKFLOW MANAGEMENT SYSTEM AT A GLANCE
The Workflow Management System creates a single job ticket for each vulnerability found on
the network. Each report has a ticket. SnoopWall NetSHIELD breaks down into individual jobs.
You can then assign due dates to each job.
Each ticket progresses as shown below:
Progression of Job Status
Both Managers and IT Staff can remediate vulnerabilities. If a job is not complete by the due
date set, the job becomes escalated.
Remediation of Vulnerabilities
The first step in the remediation process is for managers to assign job tickets to themselves or
people who report to them.
The individual who completes the necessary work on a vulnerability modifies its status to To Be
Confirmed. The person designated as his/her manager receives notification. S/he clicks on it
and is taken to the log where vulnerability comments are stored. When the Manager agrees the
vulnerability is corrected, the Manager can Close it. If it appears more work is required to fix the
vulnerability, the Manager can change its status back to In Process.
In addition, each Manager can reassign jobs, receive notifications about escalated (past due)
jobs, and search for jobs assigned to anyone in the Manager’s group.
Flagging False Positives
Individuals working on vulnerabilities can also flag a vulnerability as a false positive. His/her
manager must confirm the false positive status before NetSHIELD will store it in the reporting
database.
WORKFLOW SETUP/REMEDIATION STEPS
• Set the guidelines NetSHIELD will use to allocate person hours for remediation of
vulnerabilities at each level.

USER GUIDE
© NETSHIELD Corporation 2017 | https://www.netshieldcorp.com | 1-800-991-3971
• NetSHIELD creates report tickets, each based on vulnerabilities it finds in reports.
• Each report ticket contains multiple jobs. Fixing each individual vulnerability is one job
ticket.
• NetSHIELD uses time guidelines you set (assuming an 8 AM to 5 PM work day) to
generate a due date for each job.
• NetSHIELD lets IT Staff choose their own jobs. When an IT Staff user chooses a
vulnerability, the individual is assigned all instances of that vulnerability across the entire
network.
• NetSHIELD automatically checks to see if jobs are past due twice a day (8 AM and 12
noon), then escalates any jobs it finds to be past due by sending an email to the IT
manager(s).
• Manager level users can reassign jobs to different IT Staff members or adjust person hours
for remediation.
• While a job is in the process of being assigned, the job is placed on hold, so no other
manager can assign it.
• If you have a Manager account, you can assign work to any user who works for you. You
may have both IT Staff users and other Managers working for you. Any IT Staff or Manager
may have multiple managers.
WHO SHOULD LEARN ABOUT VULNERABILITY REMEDIATION
NetSHIELD Vulnerability Remediation Guide is for all IT staff responsible for maintaining the
Company’s internal networks and remediation of vulnerabilities on those networks.
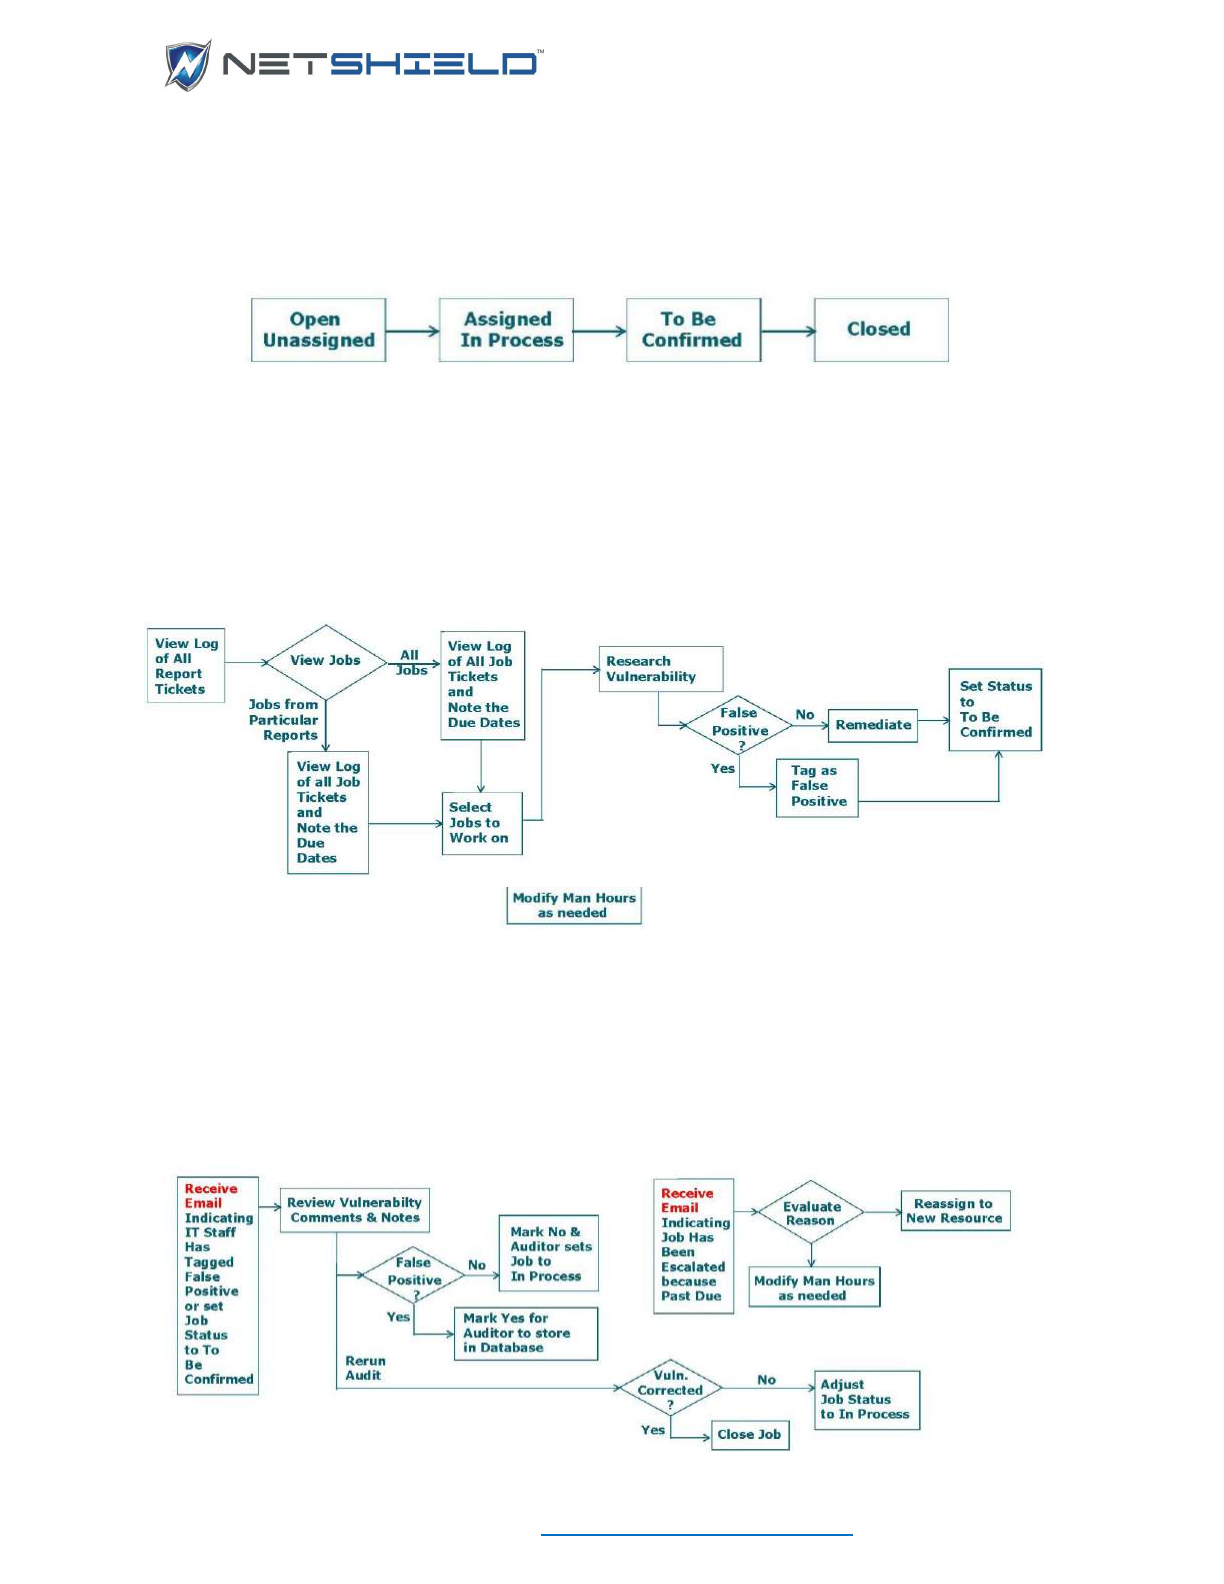
USER GUIDE
© NETSHIELD Corporation 2017 | https://www.netshieldcorp.com | 1-800-991-3971
UNDERSTANDING WORKFLOW AND USER RESPONSIBILITIES
Progression of Job Status
IT STAFF: STEPS FOR REMEDIATION OF VULNERABILITIES
Managing Remediation—Initial Setup
MANAGING REMEDIATION—RESPONDING TO EVENTS AS MANAGER
Every user is designated either a Manager, an IT Staff, or a NAC User member when the initial
user sets up all user accounts. The initial user, MainAccount, is always a Manager.
Responsibilities and privileges of each user type are distinct.
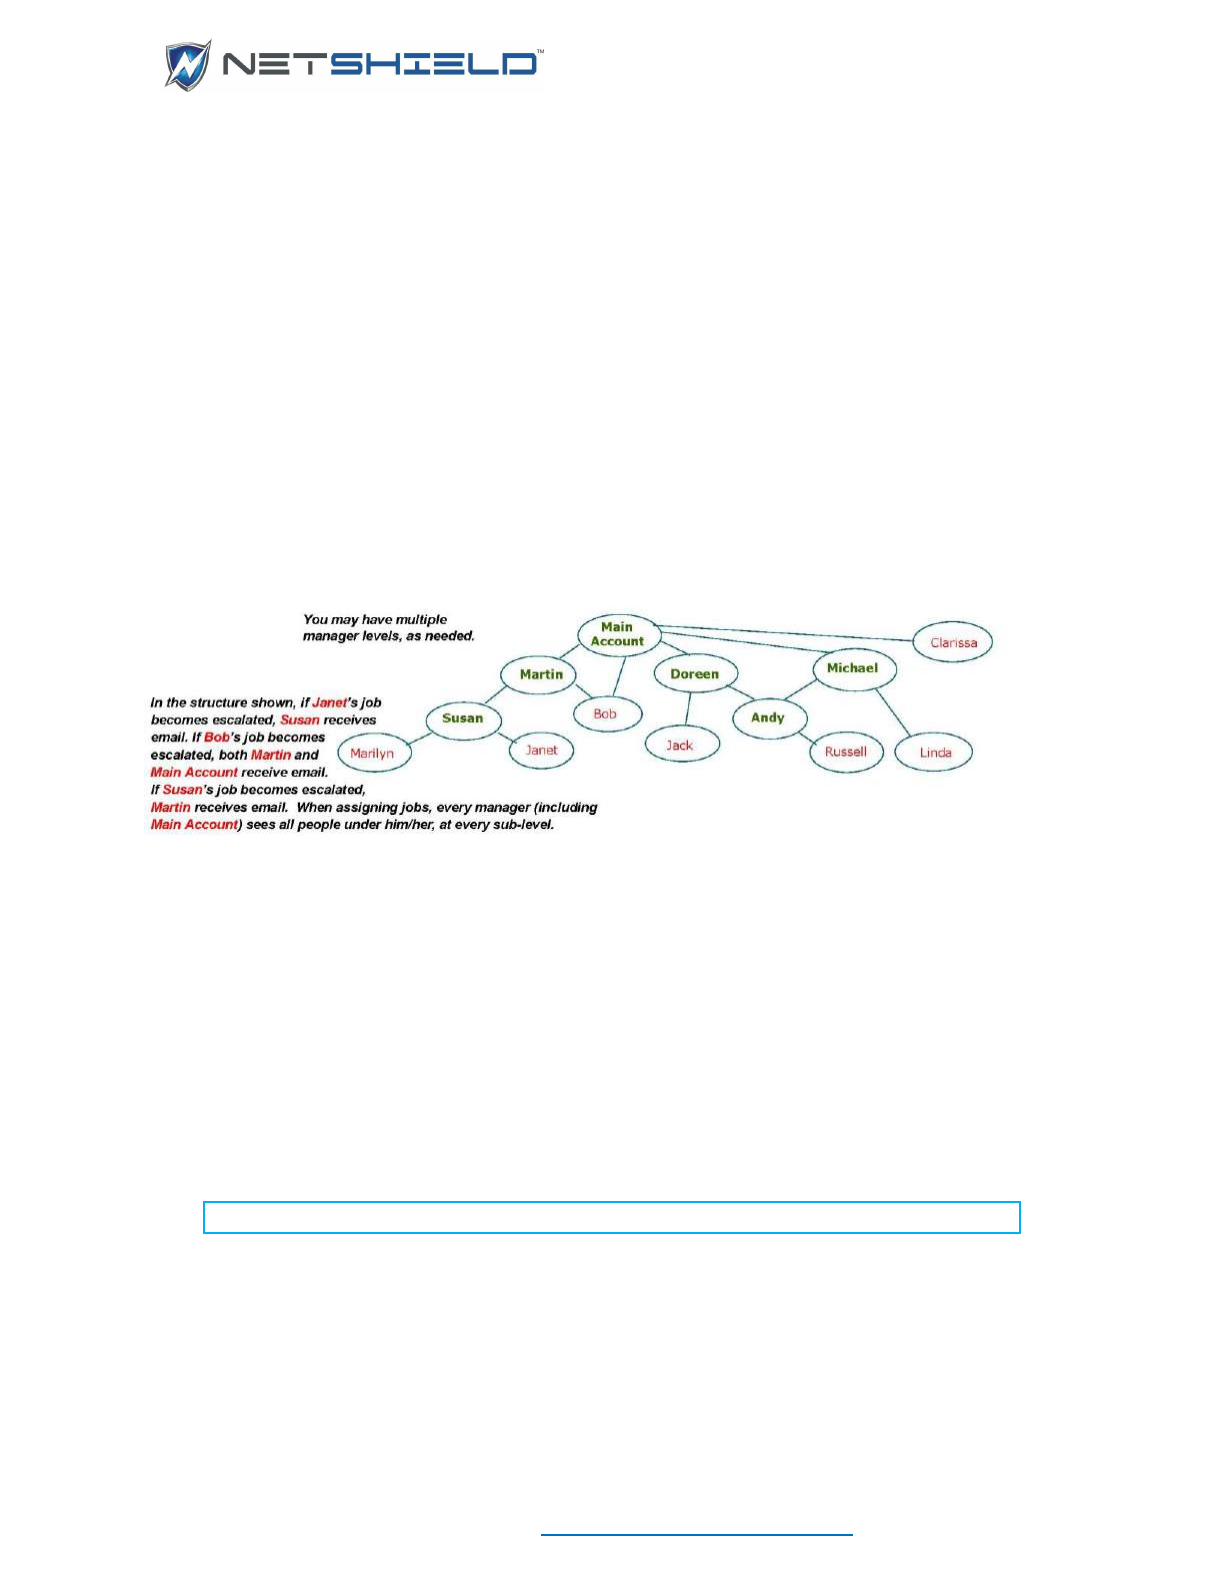
USER GUIDE
© NETSHIELD Corporation 2017 | https://www.netshieldcorp.com | 1-800-991-3971
Managers can assign work to themselves or anyone in their group, regardless of other manager
levels existing within the group. Managers, and only Managers, can modify time allocated for
remediation of vulnerabilities at different risk levels, assign tasks to other users, confirm false
positives, and close jobs.
IT Staff and NAC Users are on the same level in the hierarchy, but have different
responsibilities. IT Staff users can select jobs they wish to work on, change a job status to To
Be Confirmed, or tag a vulnerability as a potential false positive for a particular system. IT Staff
cannot close jobs or confirm false positive status of a vulnerability. NAC Users can only access
Network Access Control functionality and are not involved in vulnerability remediation.
Manager users can also access and create all types of reports. IT Staff can only view reports.
Manager users can remove users from their own organizations. If a Manager removes a sub-
Manager, those who report directly to that sub-Manager are automatically assigned as reporting
to the higher-level Manager.
A diagram illustrating a possible structure of SnoopWall NetSHIELD users in an organization is
shown below.
Any user’s direct Manager receives all notifications of his/her jobs escalated, ready to confirm,
or tagged potential false positives.
Note that a Manager can work for a Manager, and a Manager can do anything an IT Staff user
can do.
If a Manager is taking remediation action on a job, the Manager’s role changes to an IT Staff
user — unable to view his/her own jobs when they are in a To Be Confirmed state. Only the
Manager’s manager can view the To Be Confirmed jobs and change their status to Closed or
revert it to In Process.
USING WORKFLOW IN VULNERABILITY REMEDIATION
Note: Some steps described below are only for managers.
Navigate SnoopWall NetSHIELD using the vertical menu bar on the left of the browser window.
For IT Staff users, the left menu on the browser page contains four top-level selections:
• Reports
• Workflow
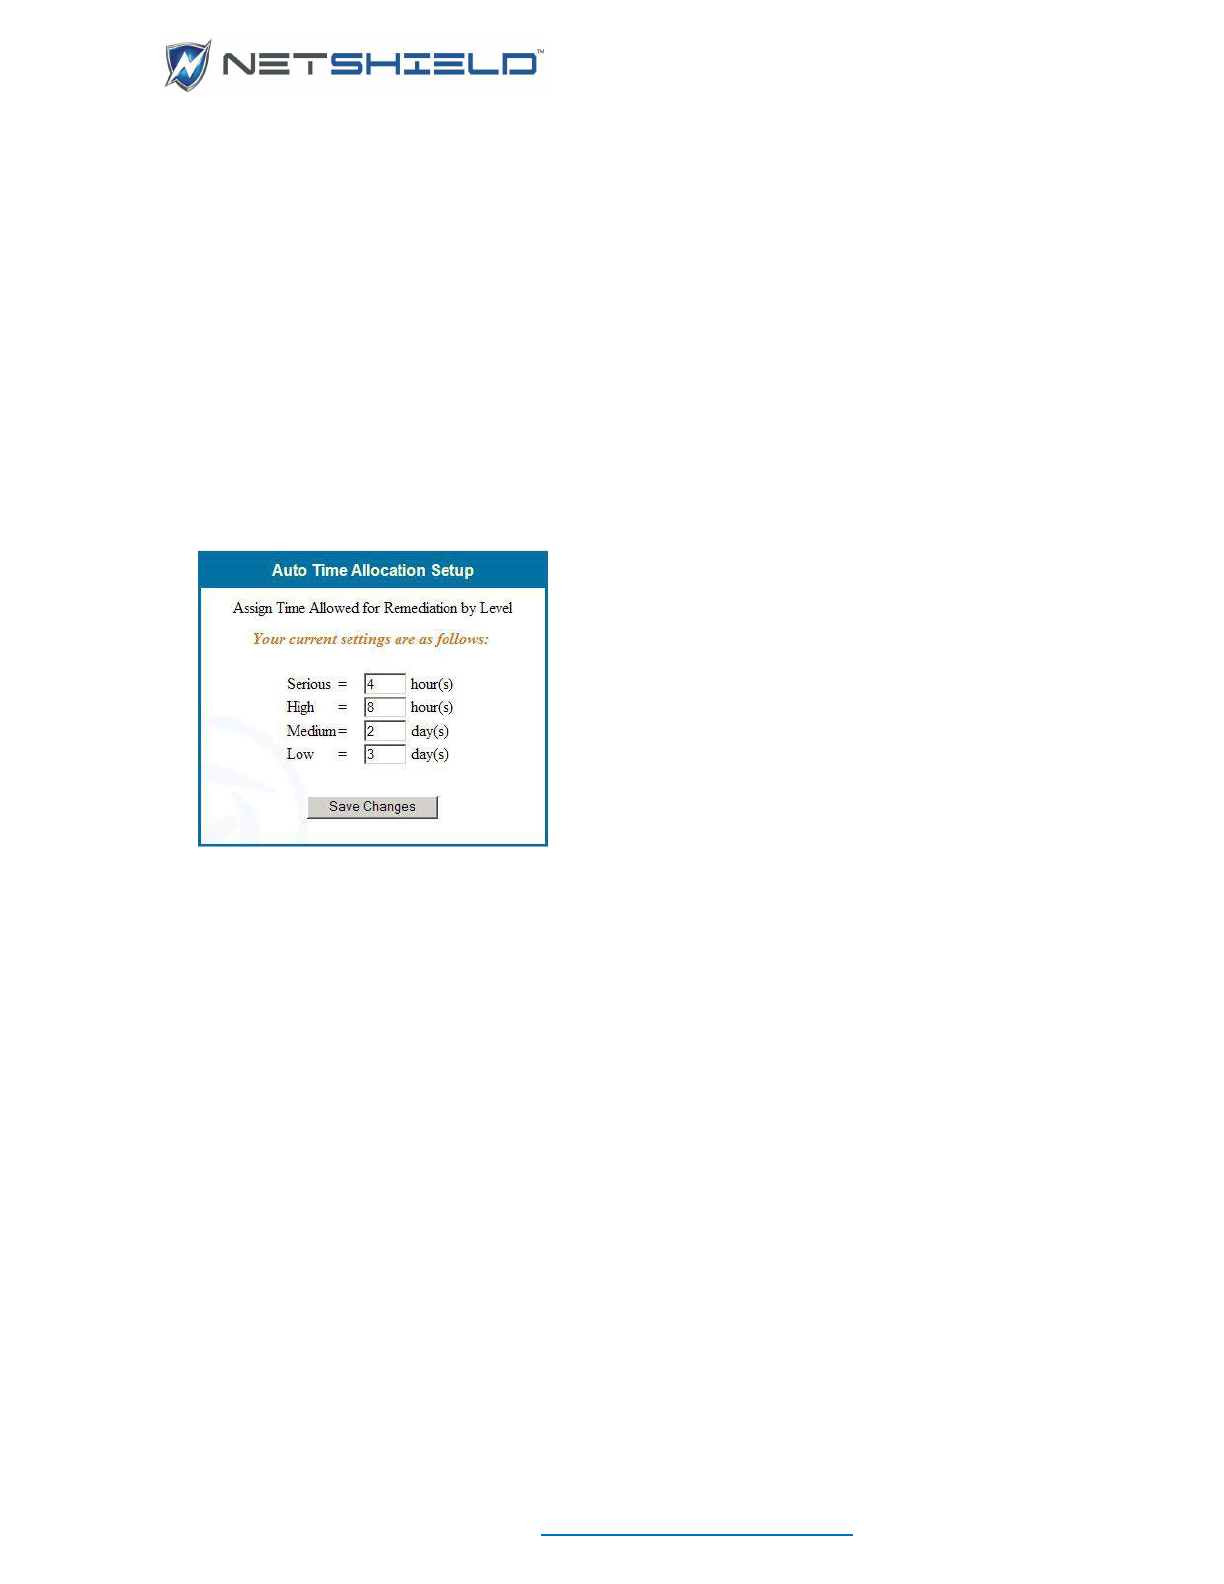
USER GUIDE
© NETSHIELD Corporation 2017 | https://www.netshieldcorp.com | 1-800-991-3971
• Help
• Logout
Use these menus to help you remediate vulnerabilities.
Manager users see a more complete menu, as shown in the System and Audit Setup Guide.
When you are ready to log out, click the Logout selection at the bottom of the menu.
REMEDIATION SCHEDULING
• Select Workflow
Time Allocation Setup from the left menu. The Auto Time Allocation
Setup dialog appears.
• SnoopWall NetSHIELD assigns a due date for each vulnerability found based on the time
allocated for each risk level.
• The calculation uses the time indicated in the Auto Time Allocation Setup dialog. Manager
users can change the number of person hours allowed for remediation.
• Click the Save Changes button when complete.
If the work is not complete before the due date (NetSHIELD automatically checks for past-due
jobs at 8 AM and 12 PM every day), the job gets escalated by sending email to the assigned
user’s manager.
If no user has been assigned the job, NetSHIELD sends the escalation message to all Manager
users.
We recommend you choose trial settings to start. If you find people need more time, tweak the
settings. New settings affect open unassigned jobs only.
Although all users may view these settings, only a Manager user may set the values in this
dialog.
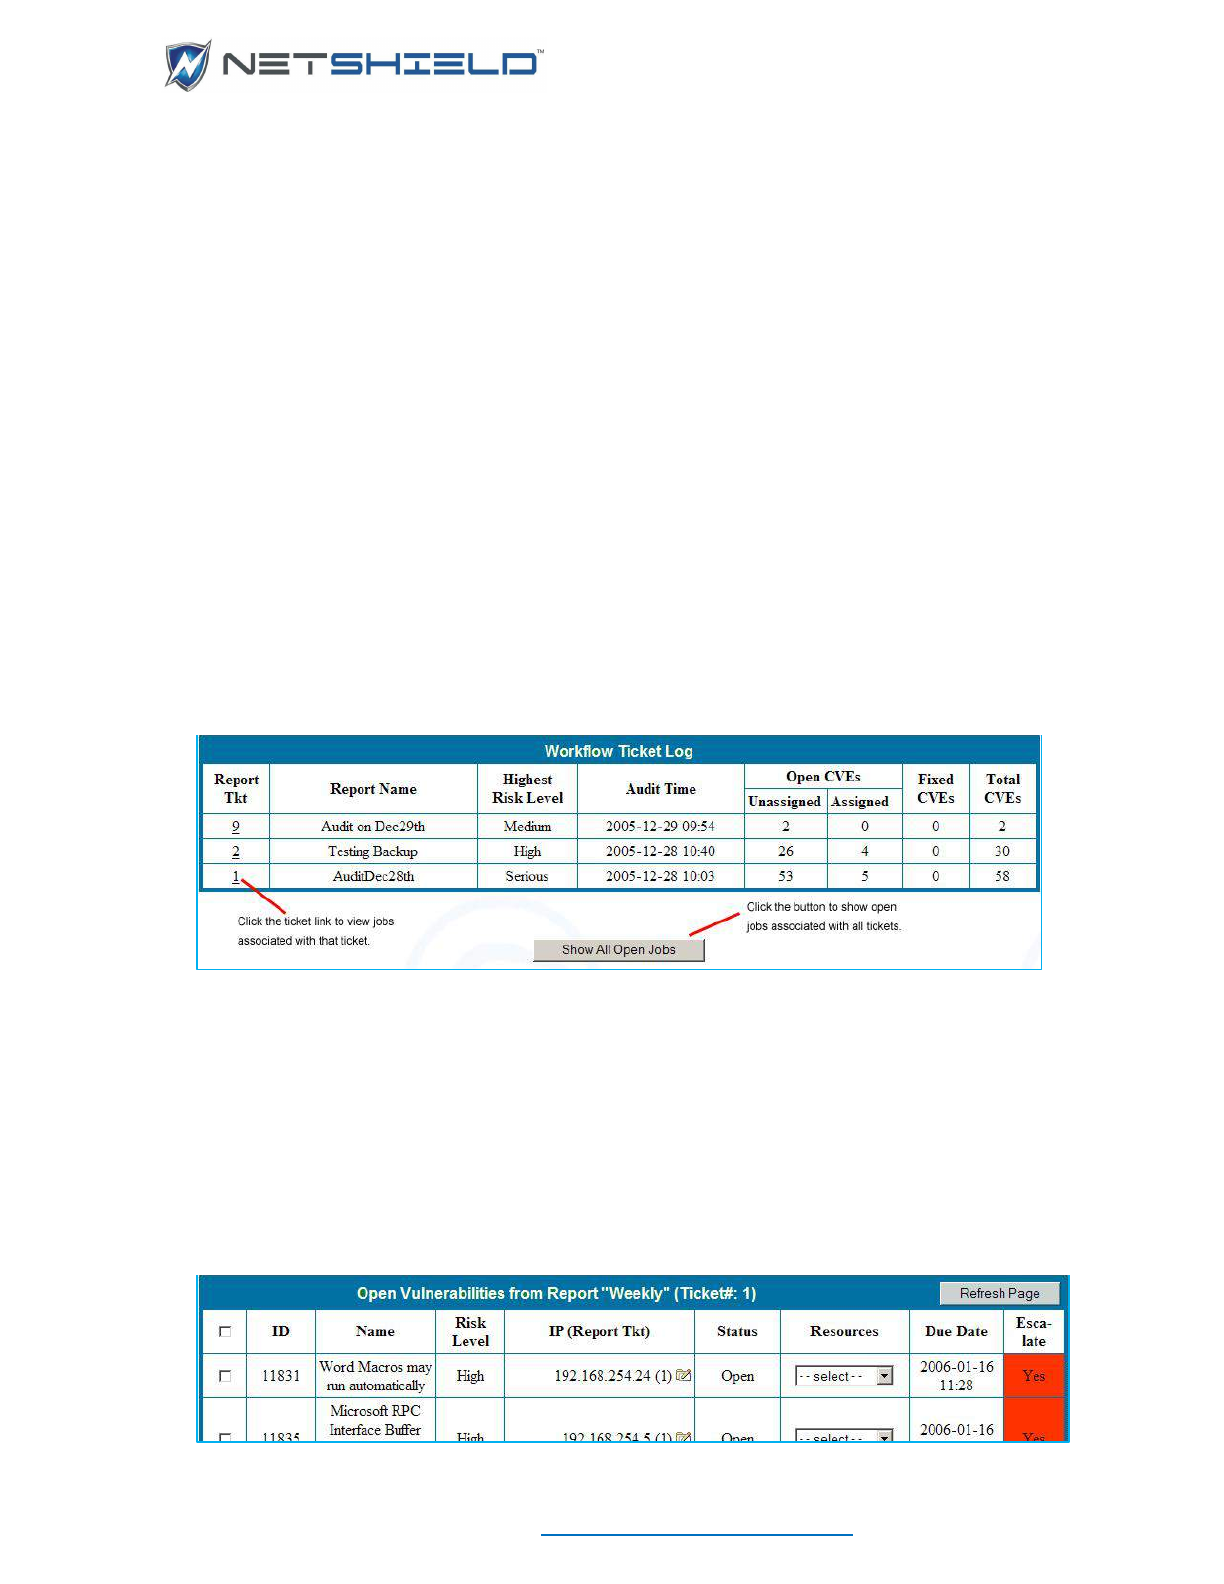
USER GUIDE
© NETSHIELD Corporation 2017 | https://www.netshieldcorp.com | 1-800-991-3971
How SnoopWall NetSHIELD Calculates/Sets Due Dates
Jobs are made up of all instances of a vulnerability on all machines from all SnoopWall
NetSHIELD reports.
For Serious and High vulnerabilities, every instance of a vulnerability is allowed the number of
hours you initially set, but Medium and Low vulnerabilities operate under a sliding time scale.
For example, if you set Medium vulnerabilities to 2 days, the first instance of a Medium
vulnerability is assigned those 2 days. Additional instances of the same vulnerability will be
allowed a quarter of that time (in this instance, a half day each), since once the research on a
vulnerability is done, subsequent fixes should not require as much time.
The time clock on a job starts ticking as soon as the job is assigned.
For scheduling purposes, SnoopWall NetSHIELD assumes workdays are Monday – Friday, 8
AM to 5 PM, with one hour for lunch.
Manager users can adjust due dates and person hour allocations for individual jobs.
THE WORKFLOW TICKET LOG
The Workflow Ticket Log shows Tickets created as a result of audits running on the NetSHIELD
appliance. Tickets are vulnerabilities discovered on the network that are in need of remediation.
• Select Workflow
Ticket Log from the left menu to open the Workflow Ticket Log.
Each audit’s report and number of vulnerabilities are grouped into one of three status
categories:
o Open/Unassigned
o Open/Assigned
o Fixed
• To assign work (only as a Manager), choose a report that has unassigned vulnerabilities
and click on its number in the far left Report Tkt column. The complete list of open jobs
associated with that ticket displays.
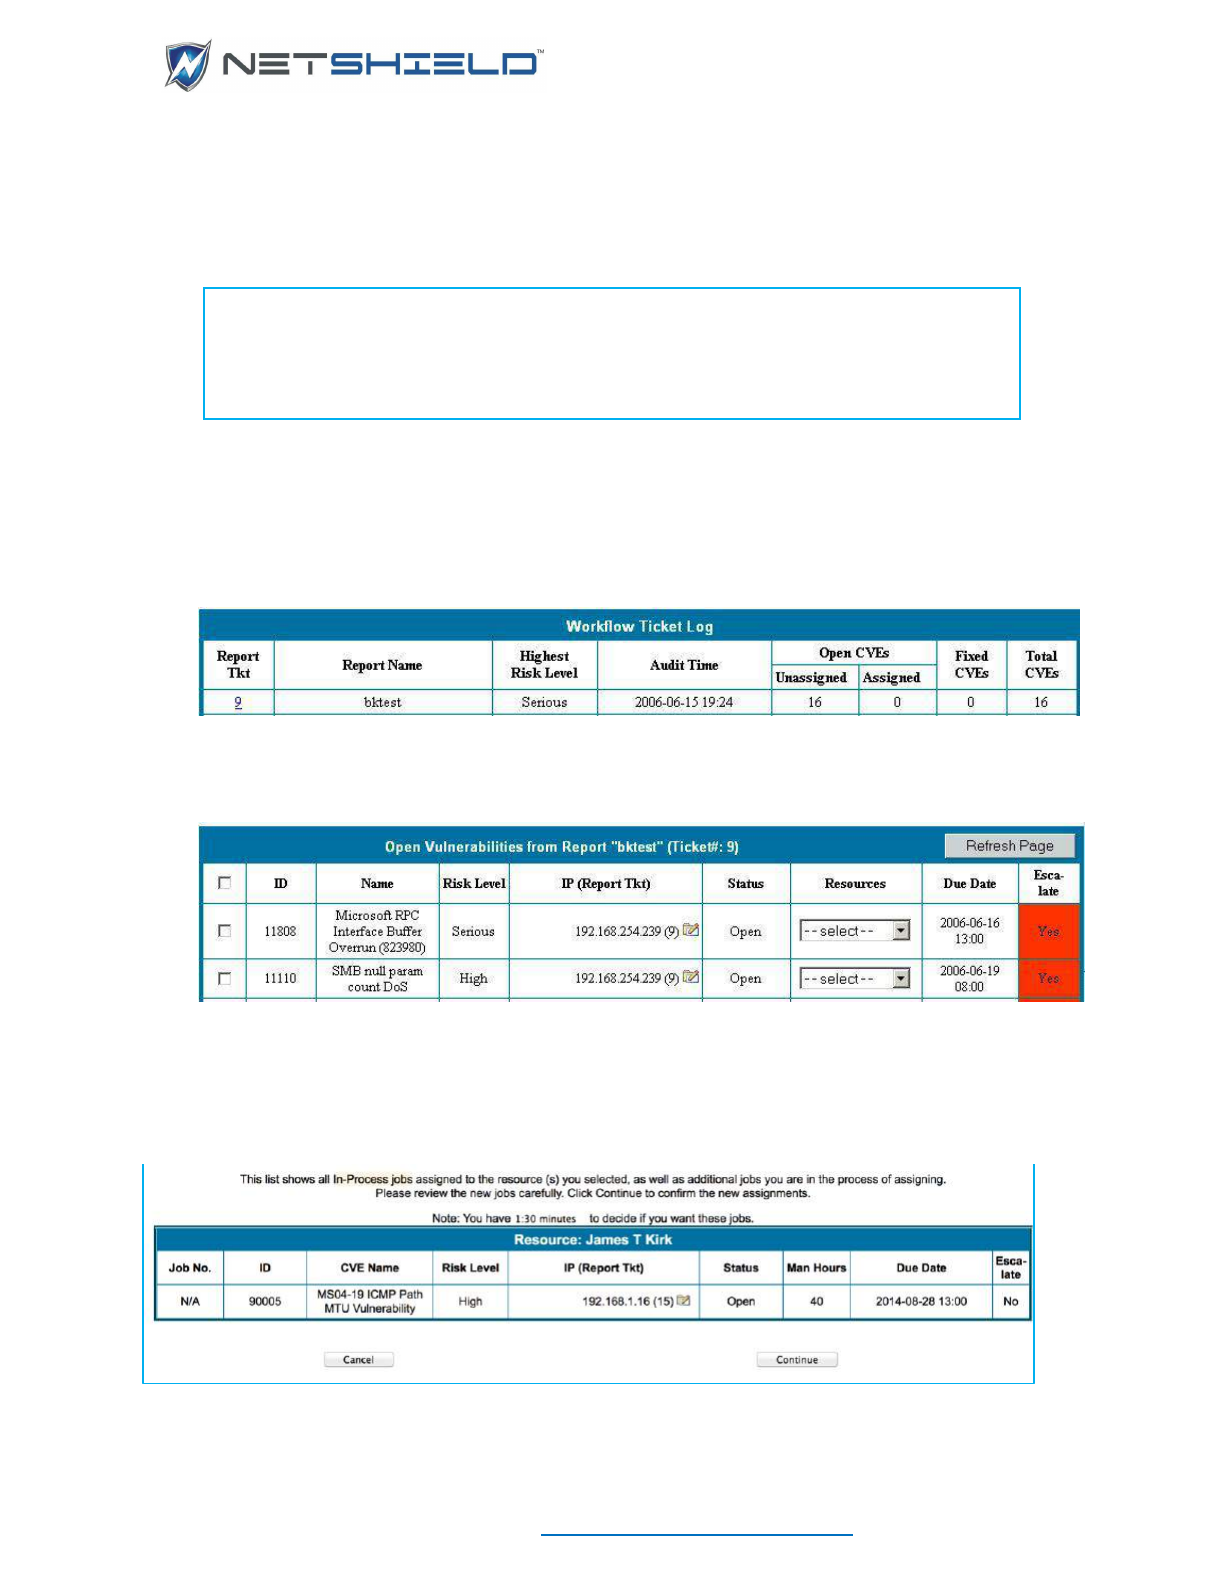
USER GUIDE
© NETSHIELD Corporation 2017 | https://www.netshieldcorp.com | 1-800-991-3971
If a job is escalated before it is assigned, NetSHIELD recalculates the due date as if it were
assigned using the date and time the job is assigned as the Start Time.
SELECTING AND ASSIGNING JOBS
NOTE: When you select a job, you are choosing to fix a particular vulnerability
across all systems on the network SnoopWall NetSHIELD audits.
Notice that each IP on which the vulnerability exists is shown in the IP (Report
Tkt) column.
To select a job:
• Select Workflow
Ticket Log from the left menu.
• The Workflow Ticket Log screen appears.
• Select a Report Tkt by clicking on the hyperlinked entry in the far left column. The box with
Open Vulnerabilities for that report and ticket number opens.
Here you may assign the job to a resource (or yourself) by selecting a name from the
Resources pull-down menu. Don’t forget to check the box on the left to select the item.
The new job(s) remain Open/Unassigned until you confirm the assignment. You have three
minutes to accept the assignment. A message displayed above the table shows the minutes
and seconds remaining.
Once you select a job, you see a list of your jobs, including the new one(s) you just selected.
Another example is shown below.
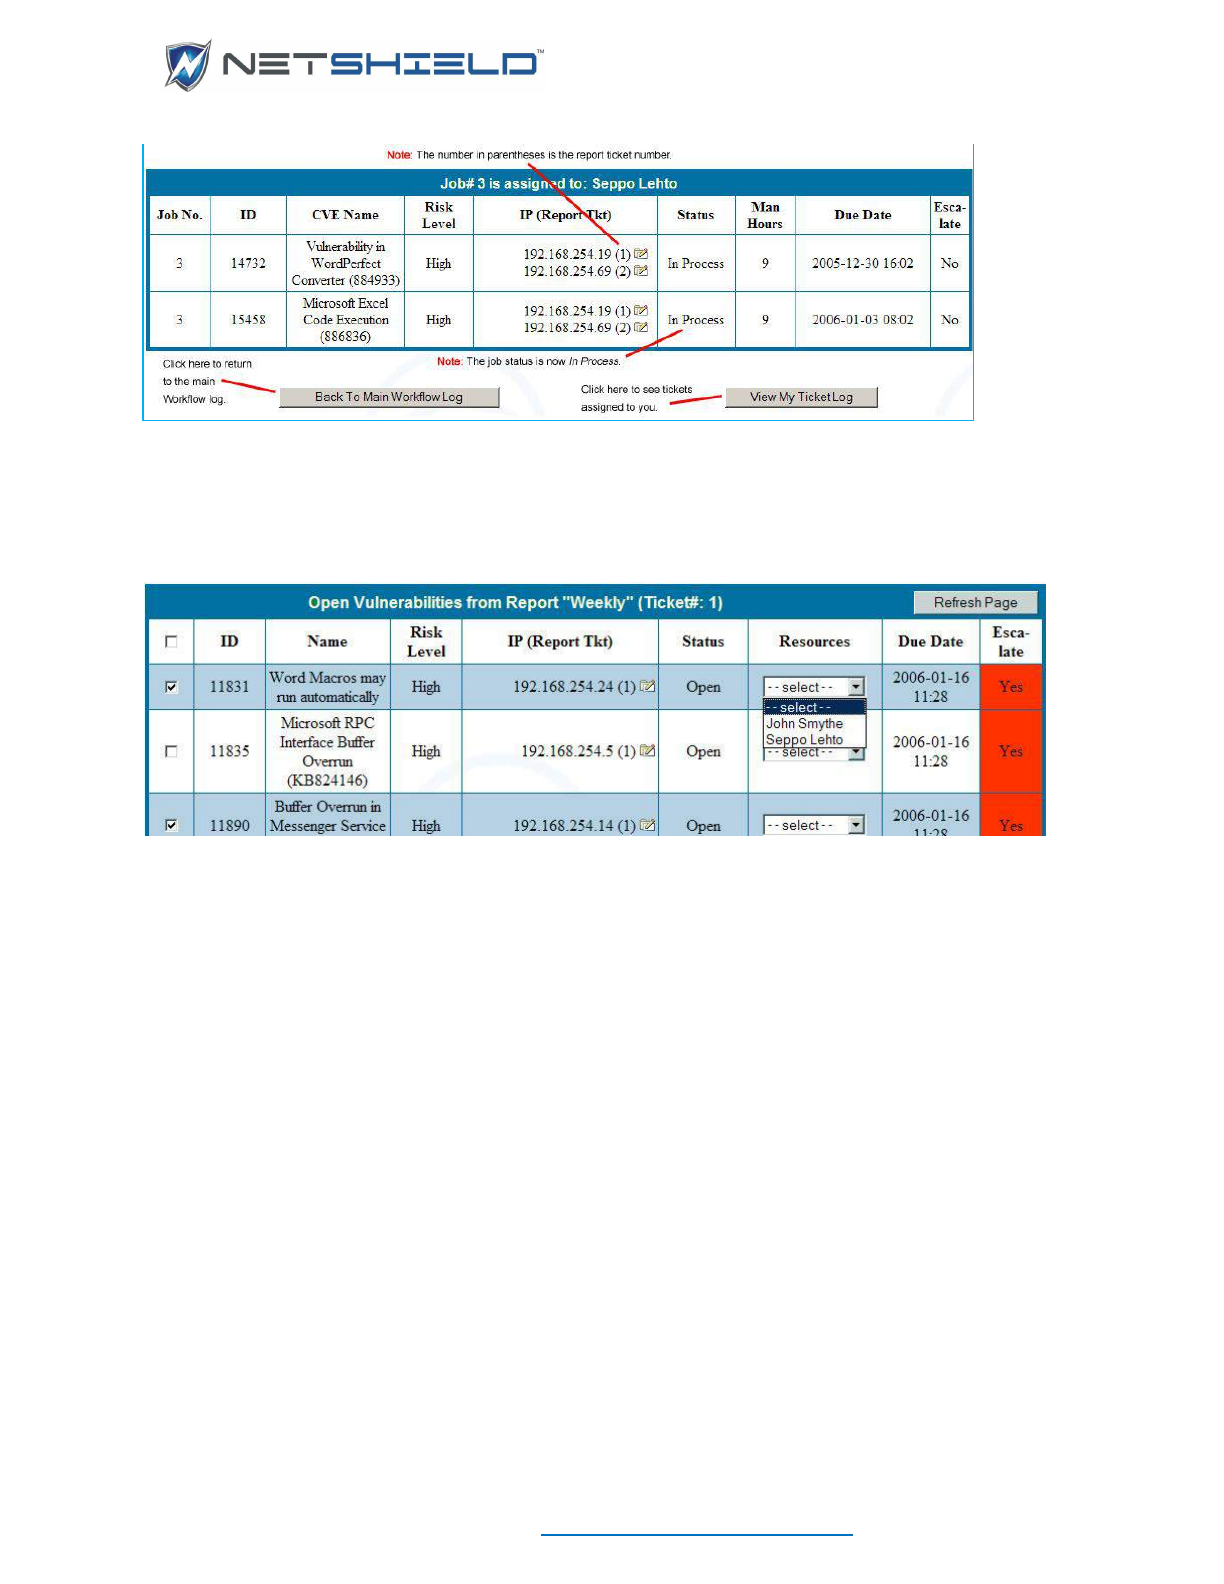
USER GUIDE
© NETSHIELD Corporation 2017 | https://www.netshieldcorp.com | 1-800-991-3971
If you do not click the Continue button below the list to accept jobs within the time limit, the jobs
revert to not on hold and you receive a message indicating you exceeded the time limit.
If a job is past its due date and time and still not ready to confirm, the Escalate column is
highlighted in red and displays Yes. SnoopWall NetSHIELD automatically escalates open
unassigned and assigned jobs past due, and sends an email to the appropriate manager.
To summarize:
• To select jobs to assign, click the check boxes on the left. Multiple IDs selected at the same
time are assigned to a single person and are given a single job number.
• Select a person to resolve the issues by clicking the pull down in the Resources column.
Managers can select either themselves or IT staff employees who work for them.
• After selecting and assigning jobs, click the Assign Selected Job(s) button above or below
the table.
• Click Continue to proceed. You receive a confirmation the job is assigned to you (or your
IT staff member).
The status of the job now becomes In Process.
RECOGNIZING A JOB IS ON HOLD
While you are assigning a job, it remains on hold until the assignment is complete so that no
one else will attempt to assign the same job. If the job is on hold when you view it in the Open
Jobs List, its check box is shaded in gray, as shown below.
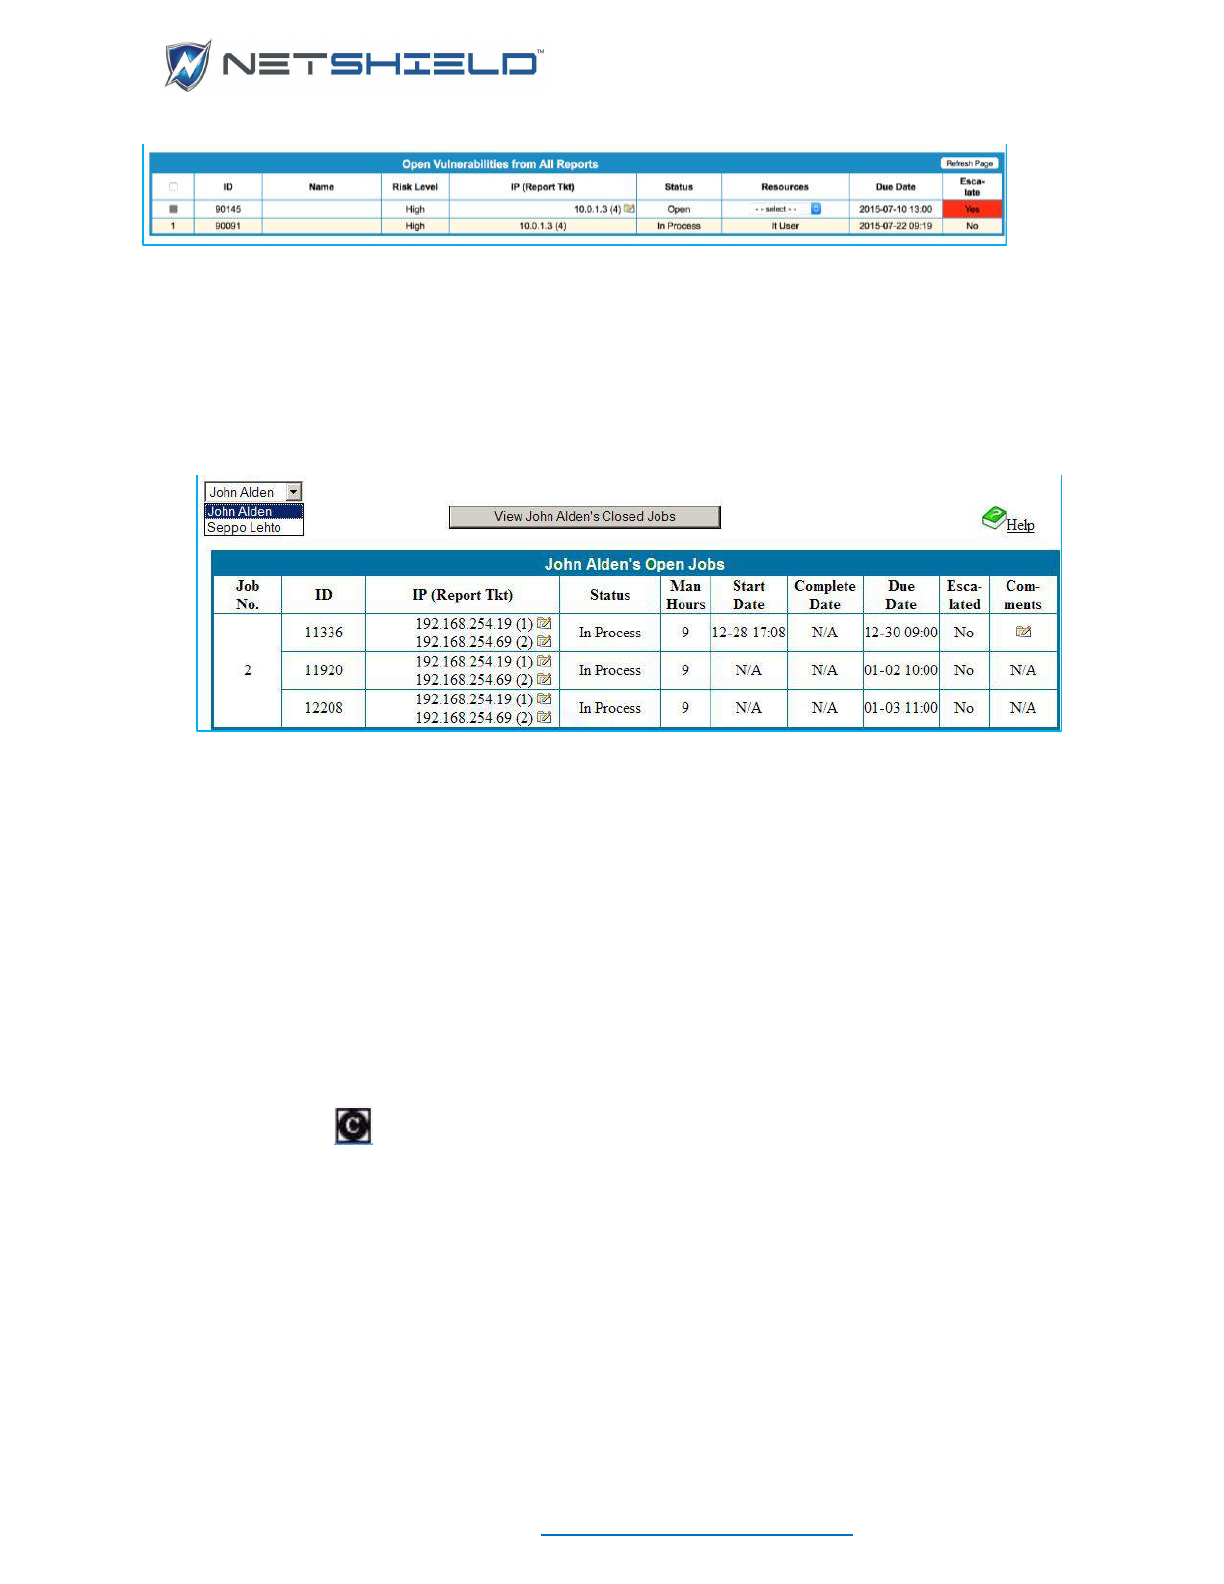
USER GUIDE
© NETSHIELD Corporation 2017 | https://www.netshieldcorp.com | 1-800-991-3971
If you are unable to assign a vulnerability, someone else is already in the process of assigning it
(the check box is gray).
VIEWING LOGS OF ASSIGNED JOBS
• Select Workflow
My Ticket Log from the left menu to see only jobs assigned to you or
people who you manage.
NetSHIELD identifies you by your login, and delivers a complete list of open jobs for which
you are responsible. As you work on jobs, you may make comments in the Workflow
Comments dialog, where you can view the history of the job and modify its status (see
Updating Job Status).
VIEWING VULNERABILITY REPORTS
Vulnerabilities must be remediated before their job statuses can be changed. First view the
associated vulnerability report.
• Select Reports
View Audit Results from the menu.
• Look for the title of the report in the leftmost column of the Reports table and click on the
corresponding icon for the Complete vulnerability report.
For more details on sorting reports and other features of reports, contact your manager or refer
to the Reports Guide.
USING LINKS IN REPORTS
Each vulnerability has a number, which you will find in the detailed section of the report. Each
vulnerability report includes information like that in the example shown here.
A typical serious risk is fully explained. In addition, the report provides details on how to respond
to the risk and/or a link to more data about that vulnerability and information about how to
correct it.
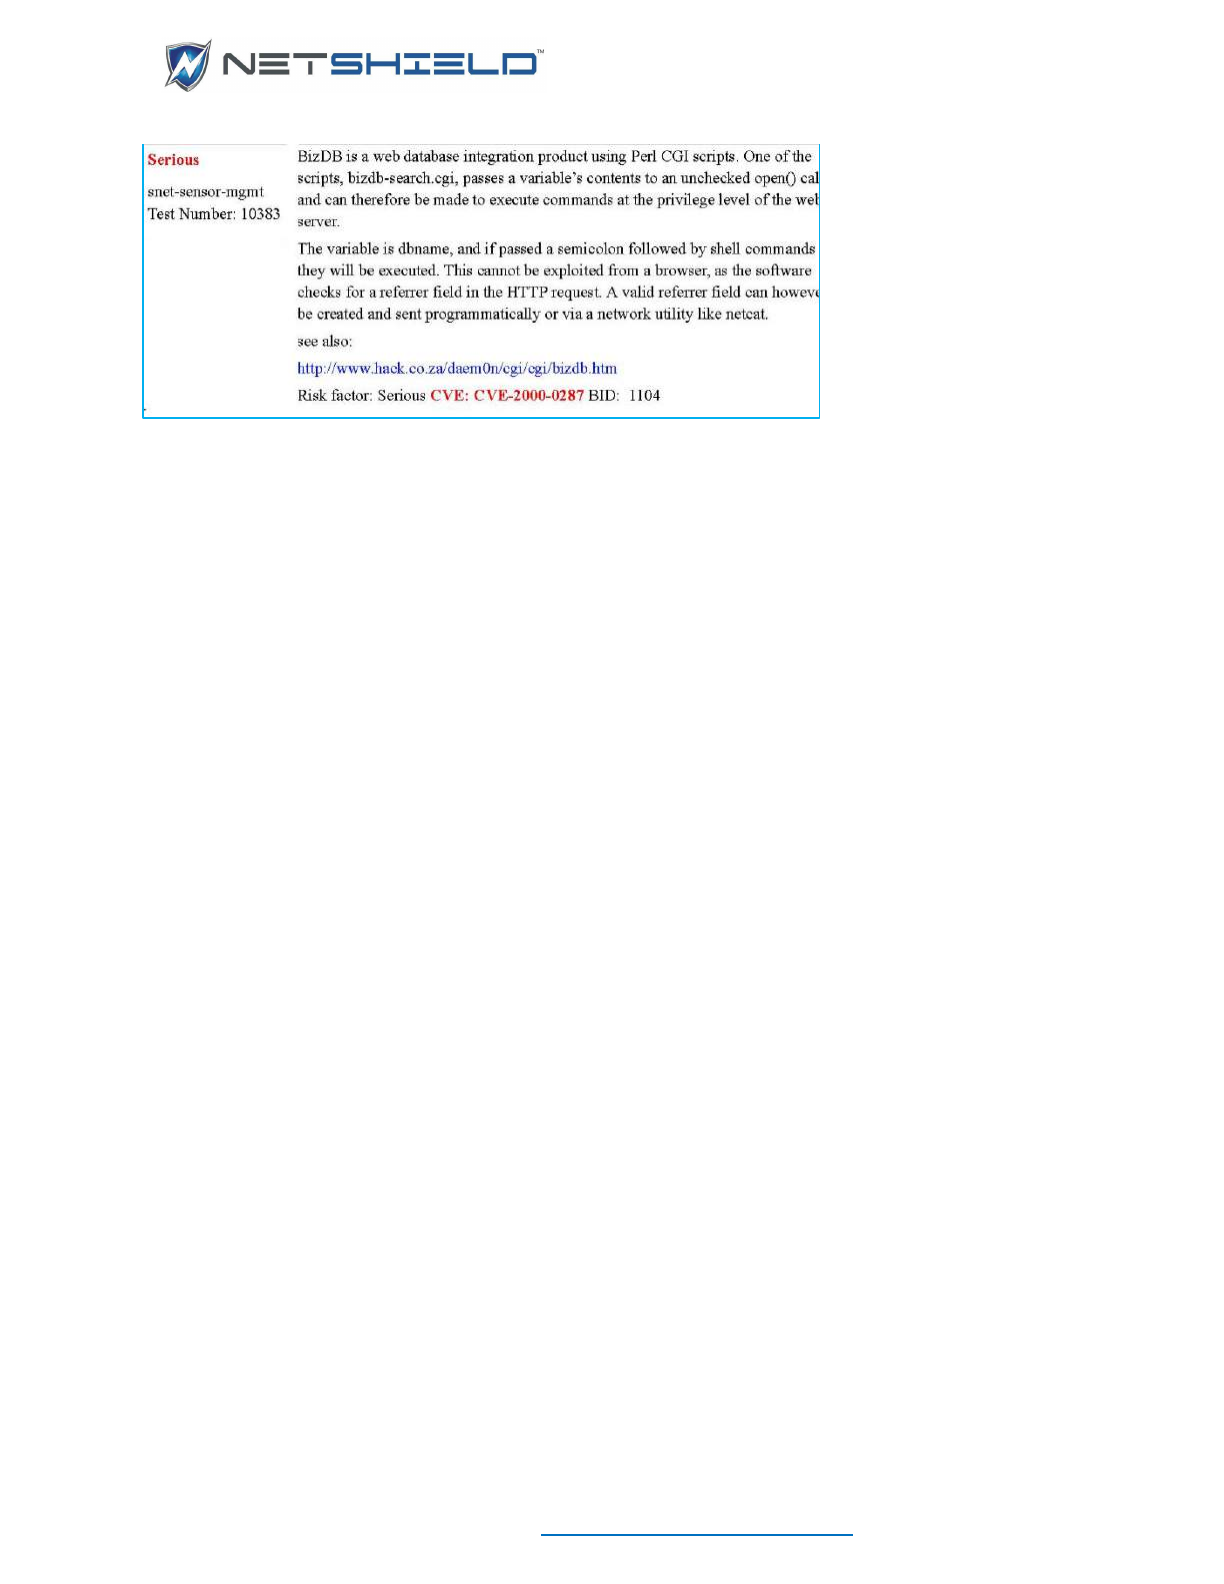
USER GUIDE
© NETSHIELD Corporation 2017 | https://www.netshieldcorp.com | 1-800-991-3971
RESEARCHING CVES AND CANS
There are various steps you can take to research CVEs or CANs. Examples and suggestions
follow:
Check the bottom of the vulnerability description in the report to see if there are any user
comments (under the heading labeled User Comments). Someone else in your organization
may have provided comments, which can be helpful to your research. You should also add your
own entries as you learn about each vulnerability. This information is stored in SnoopWall
NetSHIELD database and becomes part of its knowledge base. Refer to the Reports Guide for
more details on adding comments to reports.
Click on the link provided for more information and/or click on the CVE or CAN (candidate CVE)
name to see more data at the MITRE-run CVE site. Look under References at the MITRE web
site for further information. You may also wish to search Google or other search engines for
more details.
After research is completed, you should have the data necessary to remediate the vulnerability.
Once complete, update the job status.
In some cases, you may determine a vulnerability is a false positive. Should you come to this
conclusion, tag the vulnerability as such so it can be reviewed, confirmed, and removed from
the report. Tagging a false positive is covered in Tagging a Vulnerability as False Positive.
UPDATING JOB STATUS
The status of each job progresses from Open (unassigned) to In Process (assigned) to To Be
Confirmed (when marked as such by the worker assigned to it) to Closed (after manager
verification of completion).
An overview of steps is shown below.
• Select Workflow
My Ticket Log to view your Open Jobs.
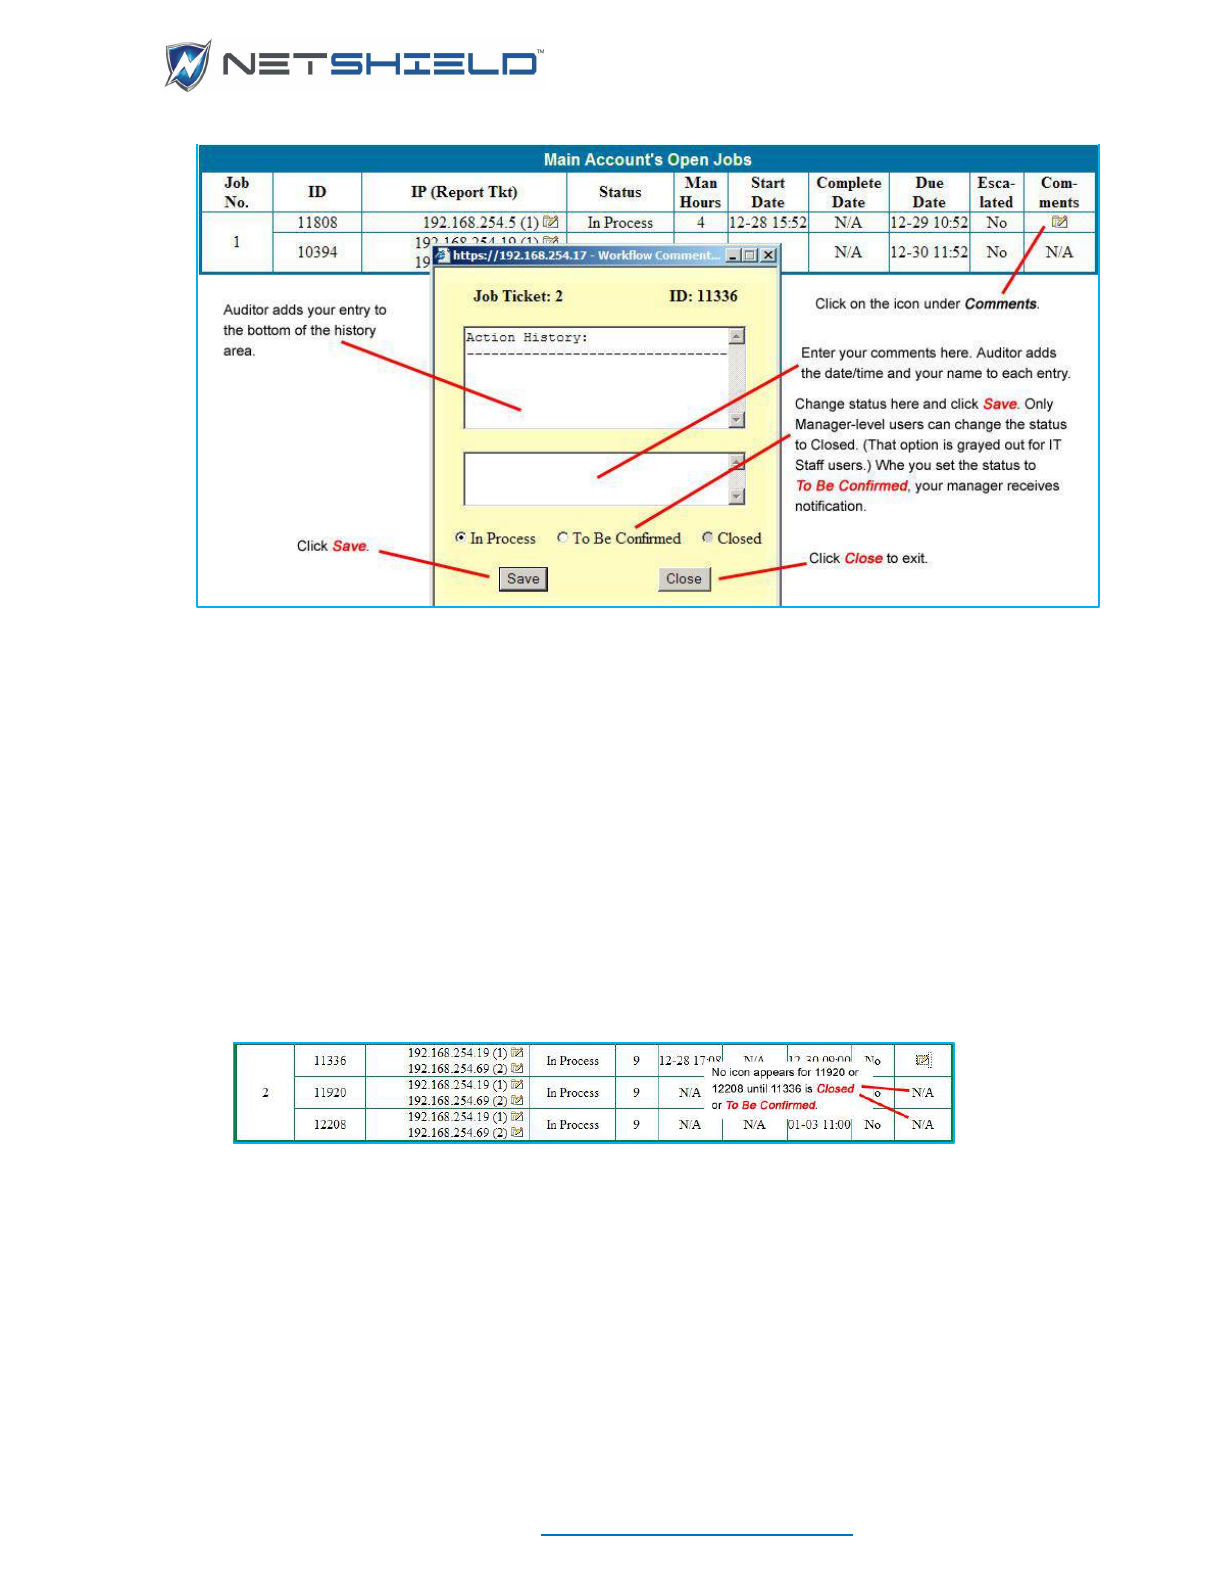
USER GUIDE
© NETSHIELD Corporation 2017 | https://www.netshieldcorp.com | 1-800-991-3971
• Once assigned, a job’s status remains In Process until you set it to To Be Confirmed.
NetSHIELD immediately notifies your manager of the new To Be Confirmed status.
Your manager can then verify the vulnerability is fixed and change its status to Closed (or
back to In Process if there is still an issue).
UPDATING MULTIPLE IDS IN A SINGLE JOB TICKET
If there is more than one job in a single ticket, they are listed in order by priority.
You see the Comments icon for only the first job in the ticket. Set it to To Be Confirmed (if you
are IT Staff).
Managers may see the ticket during the Reassignment process and set the job to Closed.
No icon appears for subsequent jobs until the first one is Closed or To Be Confirmed. See
illustration below.
TAGGING A VULNERABILITY AS A FALSE POSITIVE
• Select Workflow
My Ticket Logs from the left menu.

USER GUIDE
© NETSHIELD Corporation 2017 | https://www.netshieldcorp.com | 1-800-991-3971
The vulnerability exists on a series of IP addresses, listed under the IP (Report Tkt) column.
If you believe a vulnerability to be a false positive, click the icon to the right of the IP address.
This opens the Workflow False Positive dialog. An overview of the process is shown in the
illustration.
DEALING WITH ESCALATED JOBS (MANAGERS ONLY)
You can reassign jobs only if you are a Manager (for example, if someone goes on vacation,
you may want to reassign that person’s jobs). Often, you may need to reassign jobs after they
are escalated. If you assigned a job to any user in your group (IT Staff or another Manager) and
the job becomes escalated, you (as the Manager) receive an email notification stating the job is
escalated. Click the link in the email to go to a screen where you may take action on that job.
If an open, unassigned job becomes escalated, all Manager users receive email notification and
any Manager can reassign it. Before you reassign any jobs, be sure to take a look at the entire
list of escalated jobs.
VIEWING ESCALATED JOBS
• Select Workflow
Show Escalated from the left menu to view escalated jobs.
You may choose to View Escalated Assigned Jobs or View Escalated Open Jobs.
Depending on your choice, you go to one of the following screens.
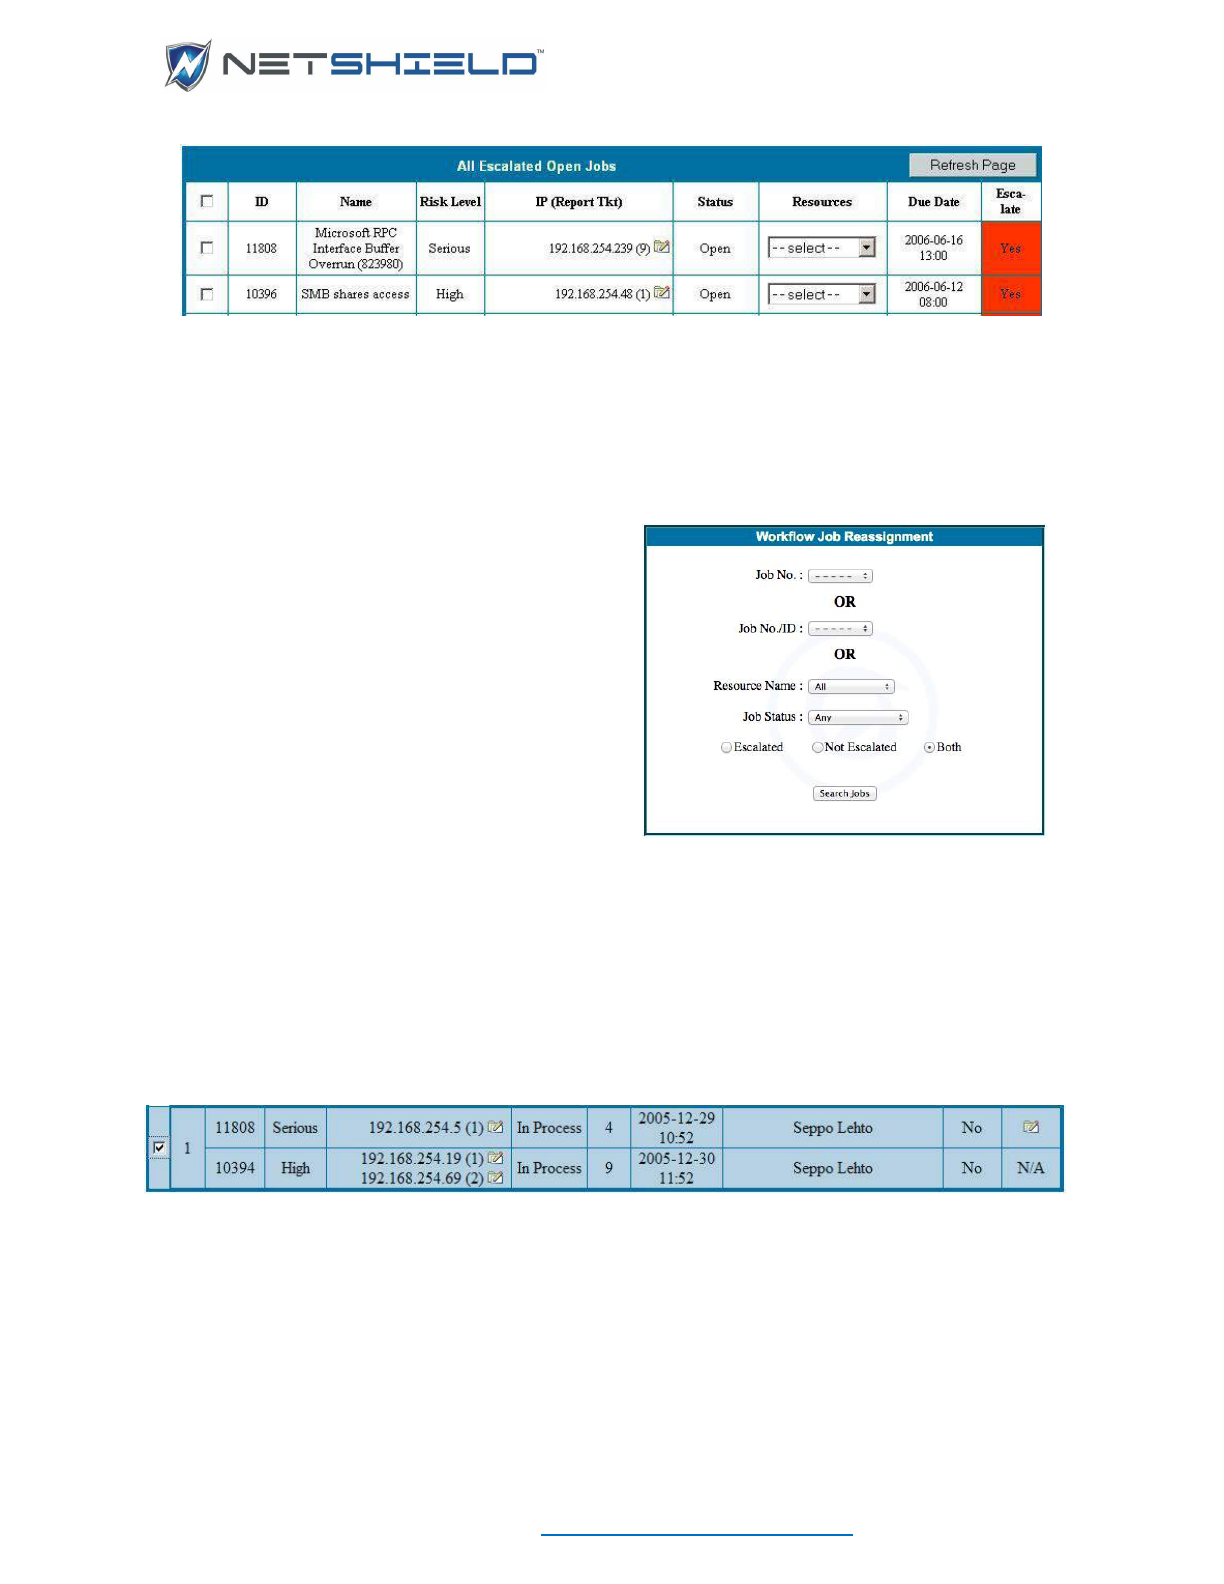
USER GUIDE
© NETSHIELD Corporation 2017 | https://www.netshieldcorp.com | 1-800-991-3971
From the Open (unassigned) Jobs list, you may assign jobs to yourself. A Manager may
assign jobs to anyone in their group.
REASSIGNING JOBS (MANAGERS ONLY)
To reassign jobs (escalated or not):
• Select Workflow Reassign Tickets from the
left menu.
The Workflow Job Reassignment box
appears.
• Select either the Job Number or a
combination of Resource Name(s), Job Status
and one of the Escalated, Not Escalated, or
Both radio buttons.
• Click the Search Jobs button to begin the
search.
• After a list of jobs appears, select the job(s) you want to reassign using the check box(es)
in the far left column.
If you see multiple jobs in a single ticket, the Comments icon will appear for only the first job in
the ticket. No comments can be entered for subsequent jobs until the first one is set to either
Closed or In Process.
You must set the first job in the ticket to either Closed or In Process before you can make
Comments on the next job in the same ticket. The Reassignment log is the only place you can
take this action.
• Click the Reassign Selected Jobs button. A list of jobs appears with a list of resources
working for you.
• Choose the IT Staff Resource from the list.
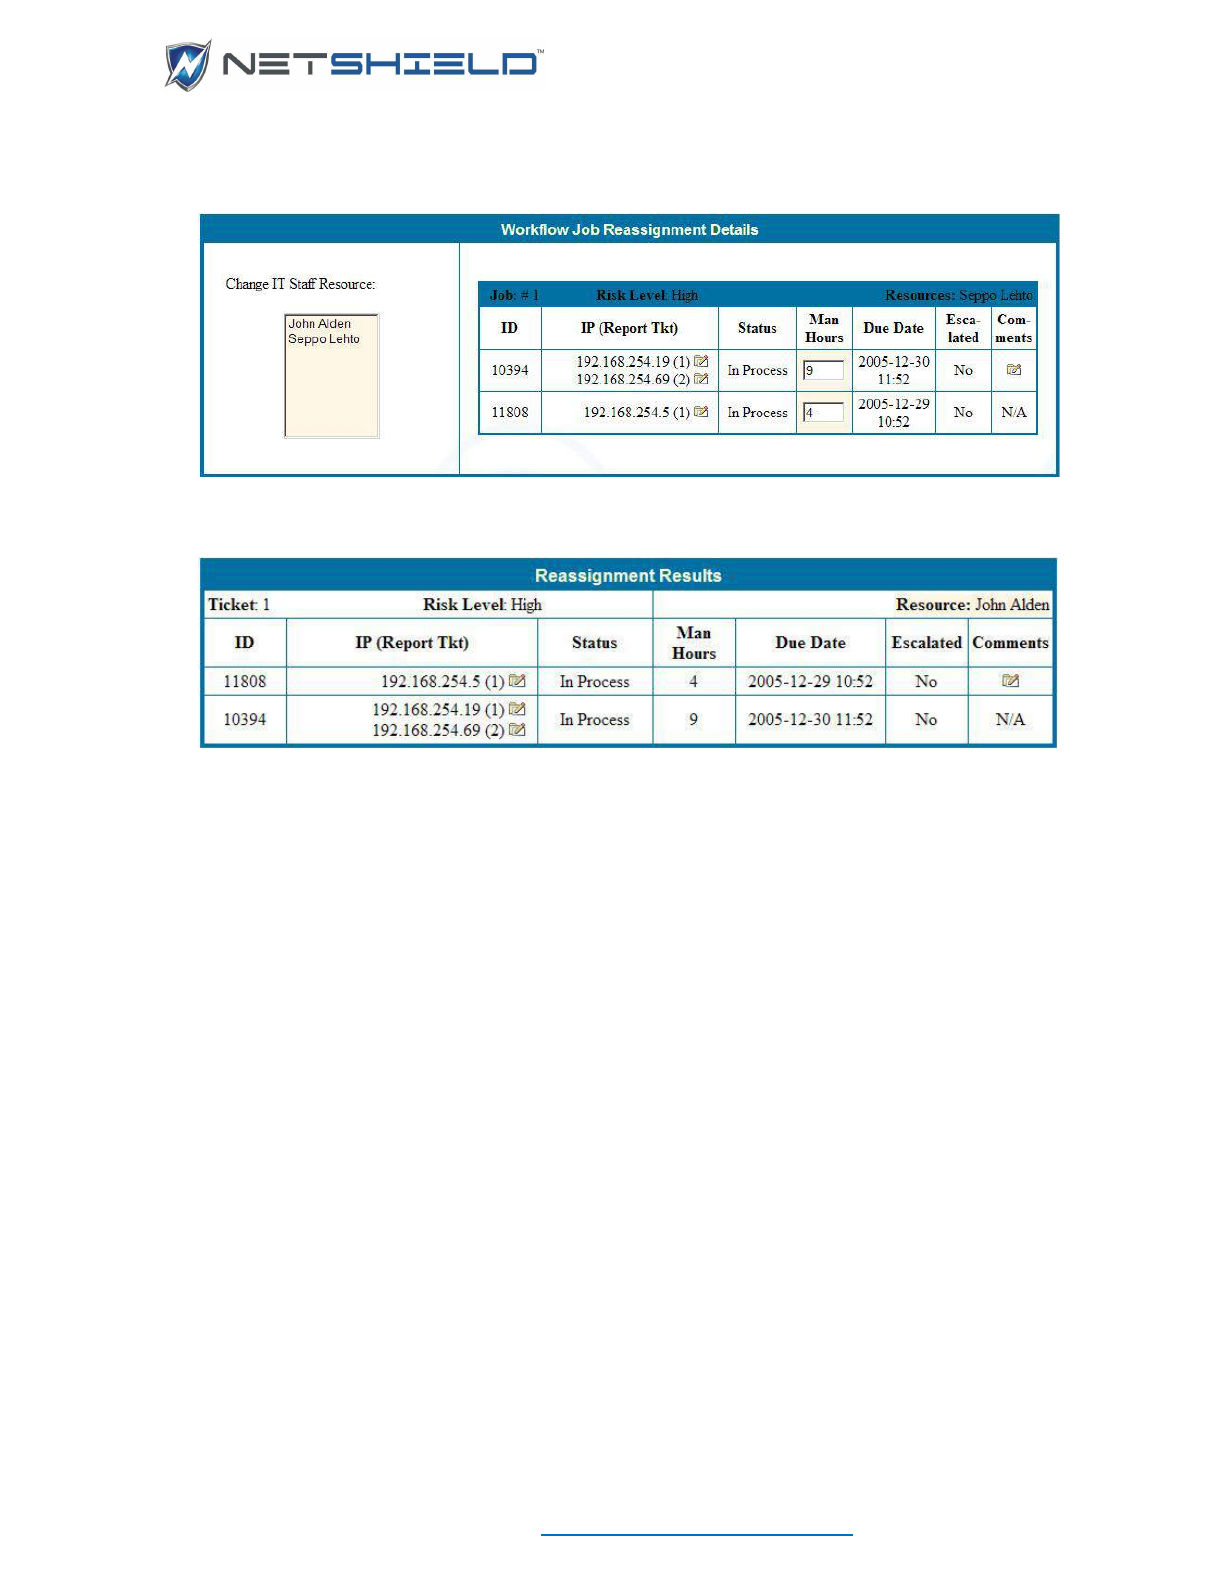
USER GUIDE
© NETSHIELD Corporation 2017 | https://www.netshieldcorp.com | 1-800-991-3971
• If necessary, adjust the number of Man Hours to do the work.
• Click the Continue button.
The Reassignment Results appear showing Ticket number, Risk Level, and the
assigned Resource just below the table heading.
If you selected more than one resource, you’ll see a separate list for each resource.
If you want to change the results, click Change Again to return to the previous screen.
VIEWING JOB LOGS OF SPECIFIC INDIVIDUALS (MANAGERS ONLY)
View job logs for a specific staff member from two places:
• My Tickets Log
• Reassign Tickets
Manager users can view the job log of any staff member in their group.
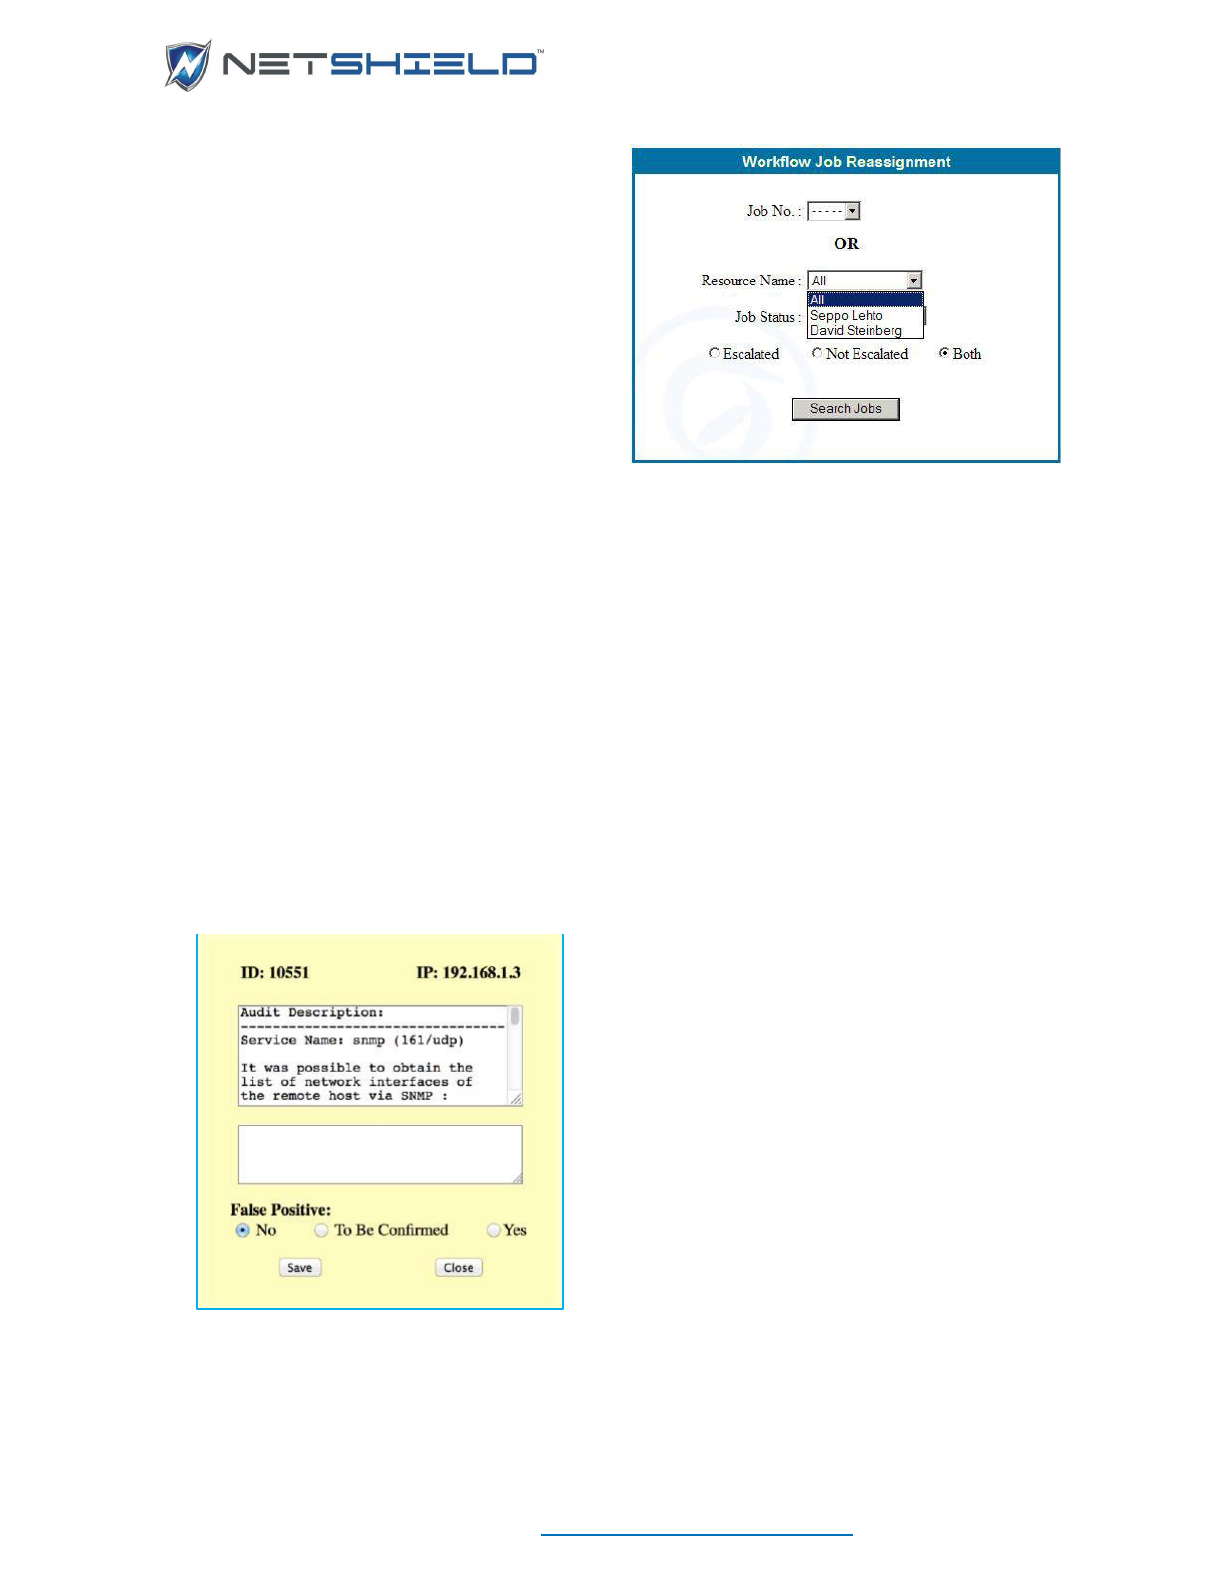
USER GUIDE
© NETSHIELD Corporation 2017 | https://www.netshieldcorp.com | 1-800-991-3971
• Select Workflow
Reassign Tickets from
the left menu. The Workflow Ticket
Reassignment dialog appears.
• Select the staff member’s name from the
Resource Name list.
• Choose Any, In Process, or To Be Confirmed
from the Job Status list, depending on how
comprehensive you want the log to be.
• Choose Escalated, Not Escalated, or Both depending on how comprehensive the log
needs to be.
• Click Search Jobs.
A list of the resource’s jobs appears. From this list, you can reassign a job (see Reassigning
Jobs) or adjust the number of hours allowed for remediation.
CONFIRMING FALSE POSITIVES (MANAGERS ONLY)
If you are a Manager user and a member of your IT staff notes a vulnerability as a false positive,
you will receive an email notification.
You must then either confirm or deny the false positive status. To review a false positive:
• Click the link in the email message. The False Positive dialog pops up.
• Read the explanation the IT Staff user provided. If you agree the vulnerability is a false
positive, click Yes; if not, click No. You may also enter comments in the lower text box.
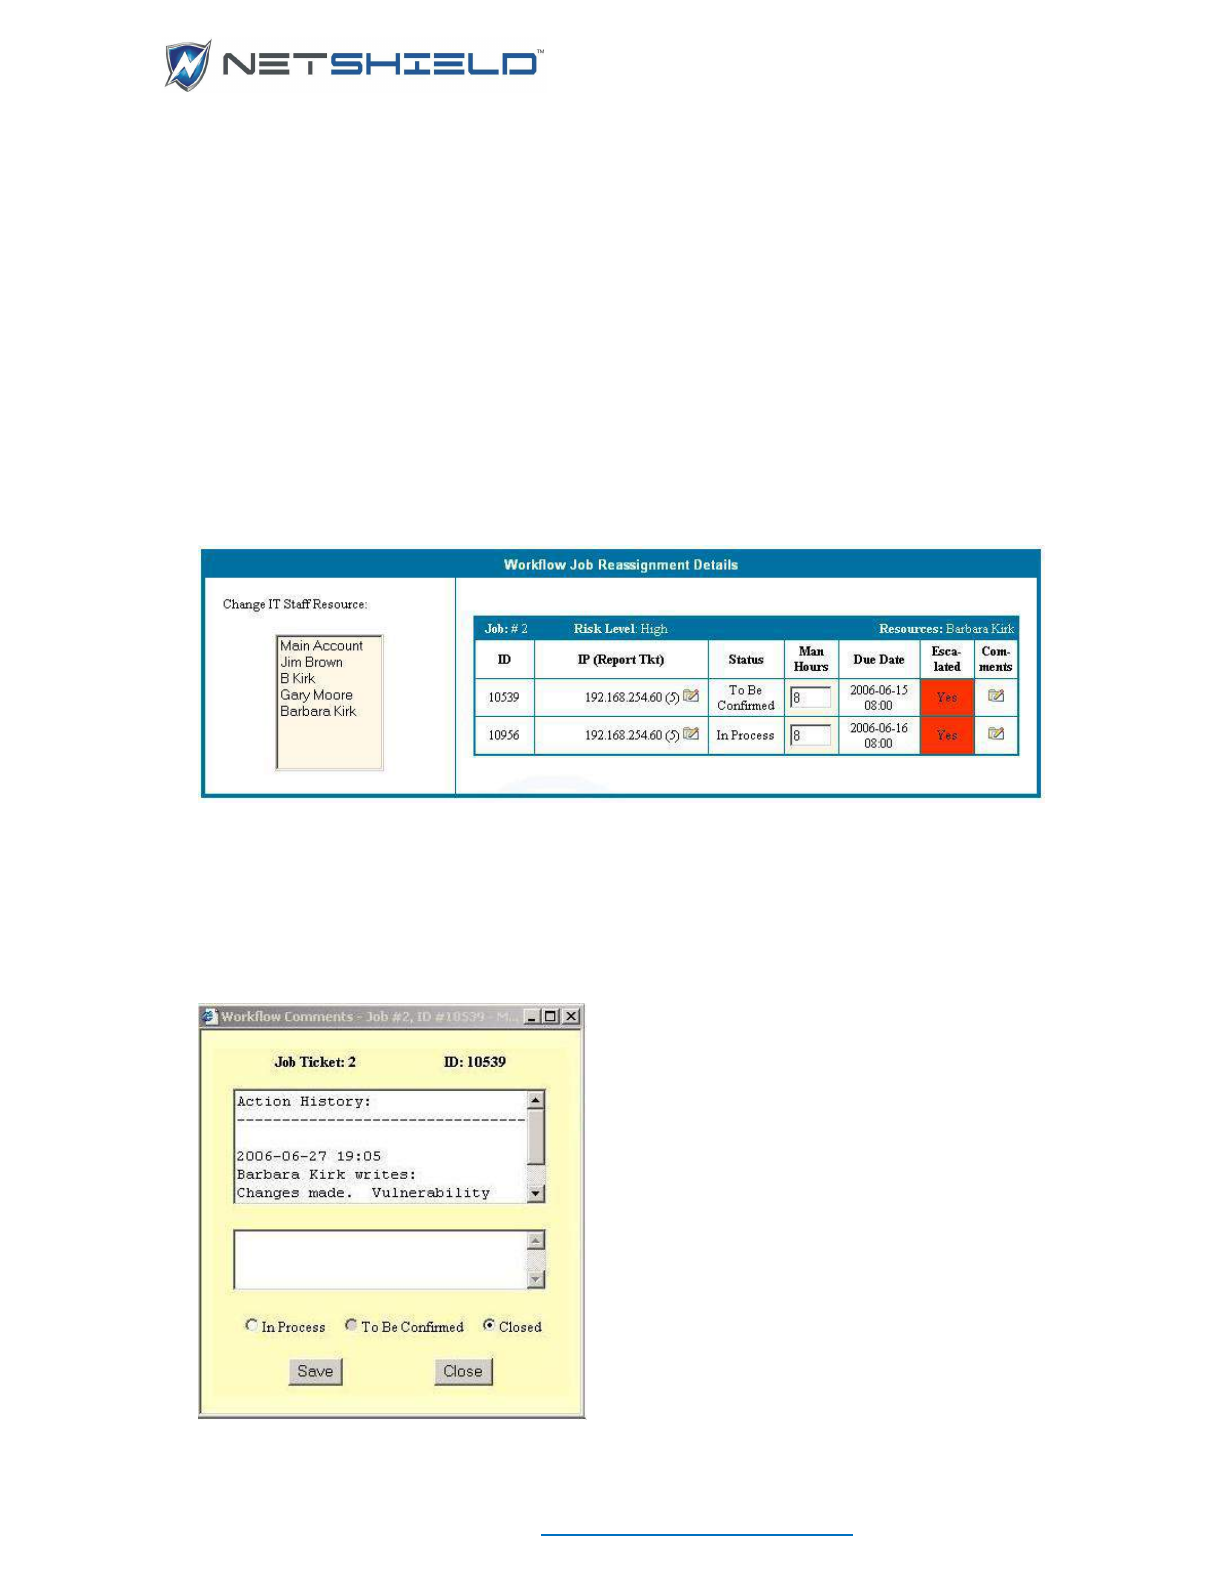
USER GUIDE
© NETSHIELD Corporation 2017 | https://www.netshieldcorp.com | 1-800-991-3971
• Click Save to retain the changes and Close to close the dialog.
Once confirmed as a False Positive, the vulnerability no longer appears in Executive and
Management level reports for that system. Administrators and IT staff have the option of
showing or hiding false positives in vulnerability reports by using Recreate Reports options
(covered in the Reports Guide).
CLOSING A JOB (MANAGERS ONLY)
Managers receive email notification when IT Staff members mark a job’s status as To Be
Confirmed. To respond:
• Click the link in the email message. The Workflow Job Reassignment Details dialog
pops up.
• Click the icon in the Comments field to read Workflow Comments and to change the job
status.
• Select either the In Process or Closed radio button in the Comments dialog box,
depending on the results of a re-audit. The To Be Confirmed radio button is not available.


© NETSHIELD Corporation 2017 | https://www.netshieldcorp.com | 1-800-991-3971
CUSTOMER SERVICE
If you purchased your NetSHIELD appliance from a trusted channel partner of SnoopWall, we
recommend you contact them for support first.
If you still cannot resolve the issue, please send an email to with all the details you can provide
about any problem or situation you are encountering that you need help with. Please include
product serial number and model.
