Secure Store And Forward (SSF) Tutorial NFE Digital Signature Guide
User Manual:
Open the PDF directly: View PDF ![]() .
.
Page Count: 20
ABAP Digital Signature guide for NFE
Disclaimer
The Web sites listed on this page do not contain SAP content and SAP does
not represent or endorse the accuracy or reliability of any of the information,
content, or advertisements (collectively, the "Materials") contained on,
distributed through, or linked, downloaded, or accessed from any of the
services contained on these Web sites. The information listed makes no
claim to completeness, is a snapshot of 01/01/2015 and can change at any
time or expire.
1 PROLOGUE 2
1.1 Installing the SAP Cryptographic Library 2
1.2 Determine the current SAPCryptolib version and patch level 2
1.3 XML Signature Test Program 2
1.4 Required Notes 2
1.5 Check and Warn About Certificates that Expire in Near Future 2
2 NFE INCOMING 3
2.1 Creating the PSE for NFE Signature Check 3
2.2 Import CA certificates 5
3 NFE OUTGOING 12
3.1 Obtain the private certificate 12
3.2 Create PSE 12
3.3 Create SSF application 12
3.4 Set Application Parameters 14
3.5 Load the PSE 16

1 Prologue
Page 2
1 Prologue
1.1 Installing the SAP Cryptographic Library
For the digital signature of NF-e data in the SAP system using Secure Store and Forward
(SSF) you must install the SAP Cryptographic Library (SAPCRYPTOLIB) as described in
SAP Note 662340 - SSF Encryption Using the SAPCryptolib. This is the prerequisite for
the instructions in this manual. To support certificates with SHA-2 hashes the patch level
should be at least on PL29.
1.2 Determine the current SAPCryptolib version and patch level
(1) Run program SSF02
(2) Execute
(3) “Determine Version”
(4) Execute
(5) Version information: “SSFLIB Version 1.555.34”
(6) The last two digits are the patch level
1.3 XML Signature Test Program
The program SECXML_DSIGNATURE provides an UI for testing both Sign and Verify a
XML source and takes the configured PSE application and a local XML file name as input.
SAPCRYPTOLIB with Patch Level 30 is needed as prerequisite.
1.4 Required Notes
To prevent that the XML signature check fails if inclusive canonicalization is specified the
following Notes must be applied:
1866334 CL_SEC_SXML_DSIGNATURE: Inclusive C14N
1666950 XML Signature check fails for inclusive canonicalization
1736879 XML Signature check fails for inclusive canonicalization
1333974 Central Note for WS Security on 7.20
1.5 Check and Warn About Certificates that Expire in Near Future
SSF_ALERT_CERTEXPIRE is a dialog report to check the validity period of certificates
(SAP Note 572035). The task of this report is to provide warnings in the desired time
before the expiry of the validity of installed certificates. The warnings can be provided in a
variety of ways, e.g. via email. You can also schedule this report as a daily background
job.
2.1 Creating the PSE for NFE Signature Check
Page 3
2 NFE Incoming
Importing the CA certificates for verification of the digital signature of
incoming NF-e’s
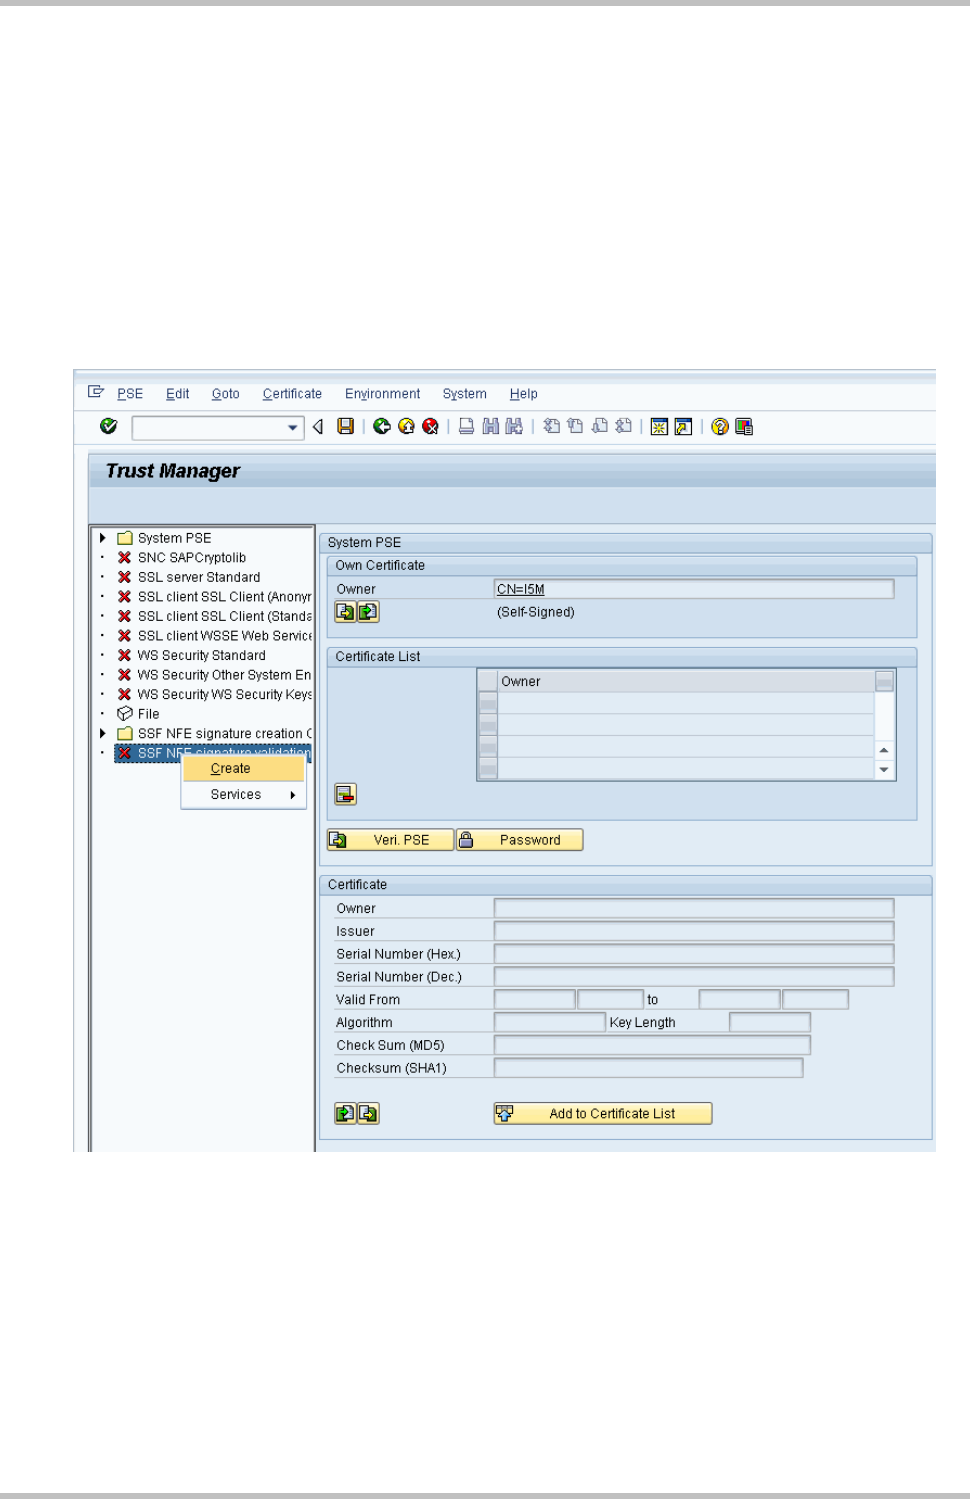
2.1 Creating the PSE for NFE Signature Check
From the Administration workplace use transaction STRUST – SSF: Trust Manager and
create a self-signed PSE for SSF NFE signature validation:

2 NFE Incoming
Page 4
Confirming suggestion of PSE:

2.2 Import CA certificates
Page 5
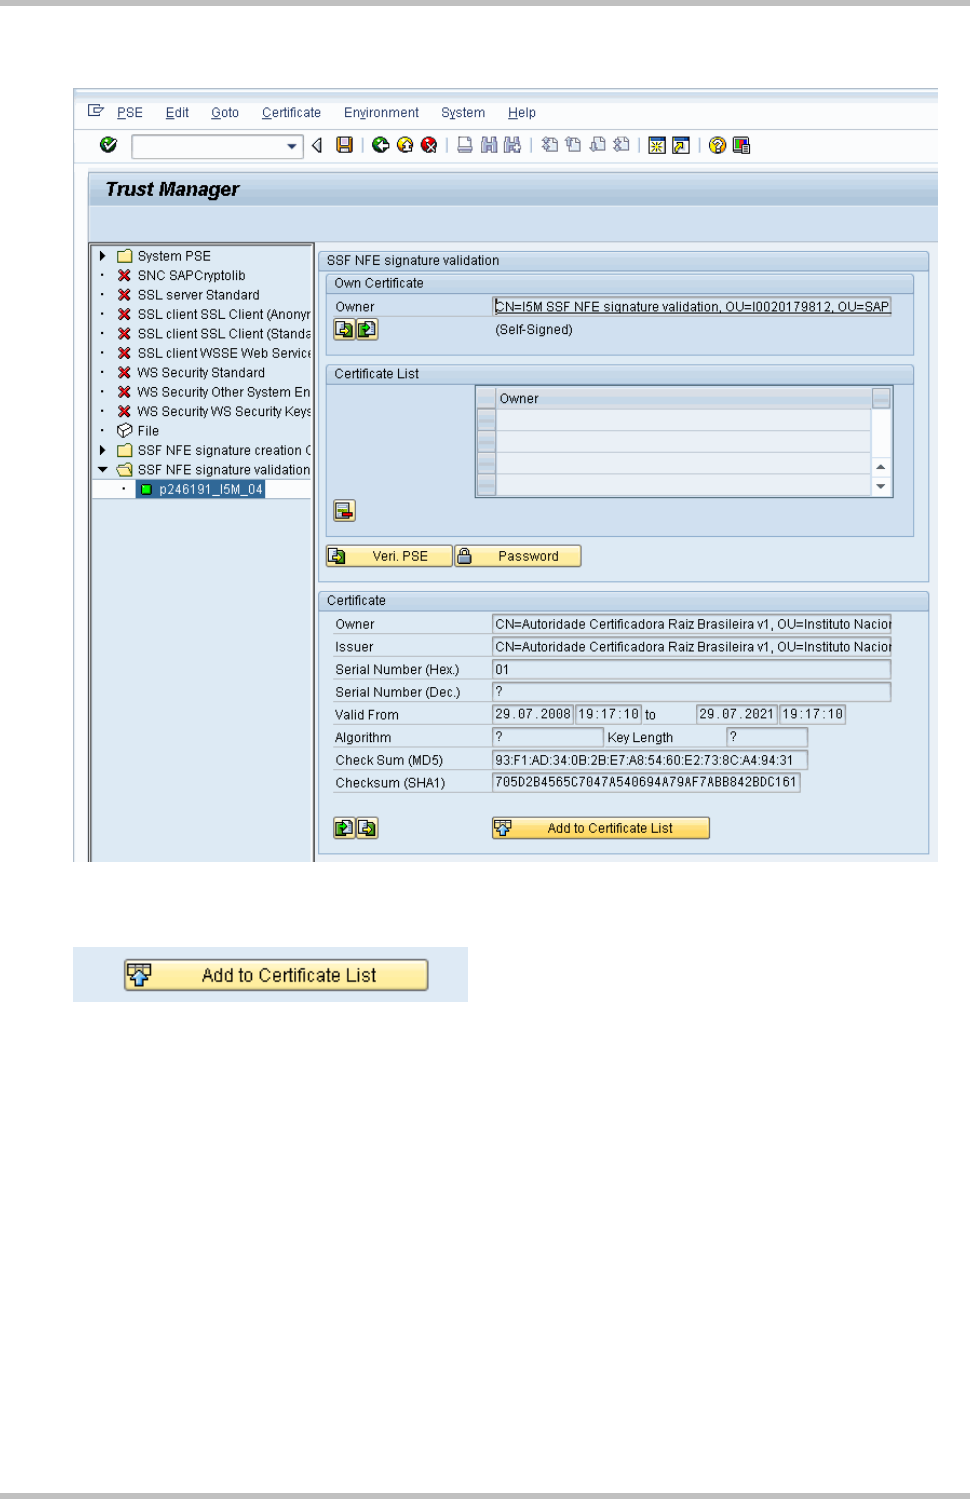
2.2 Import CA certificates
After receive the message “Data saved successfully”, import the CA certificate of the
issuer (the certification authority, e.g. AC CERTISIGN or SERASA) of the signing
certificate (encoded in the XML tag <X509Certificate>). You can download the CA
certificates as described here:
http://www.iti.gov.br > ICP-BRASIL > Repositório
You have to import all CA certificates of the signers of the NF-e you get in your Inbound
scenario, and that might be a double digit number. Still, you don’t need the whole
certificate chain, only the lowest intermediate certificate from each CA.
You can restrict the number by finding out the CA’s of your partner. To speed up a
particular case with a particular partner, you can ask him for the certification provider he
used.
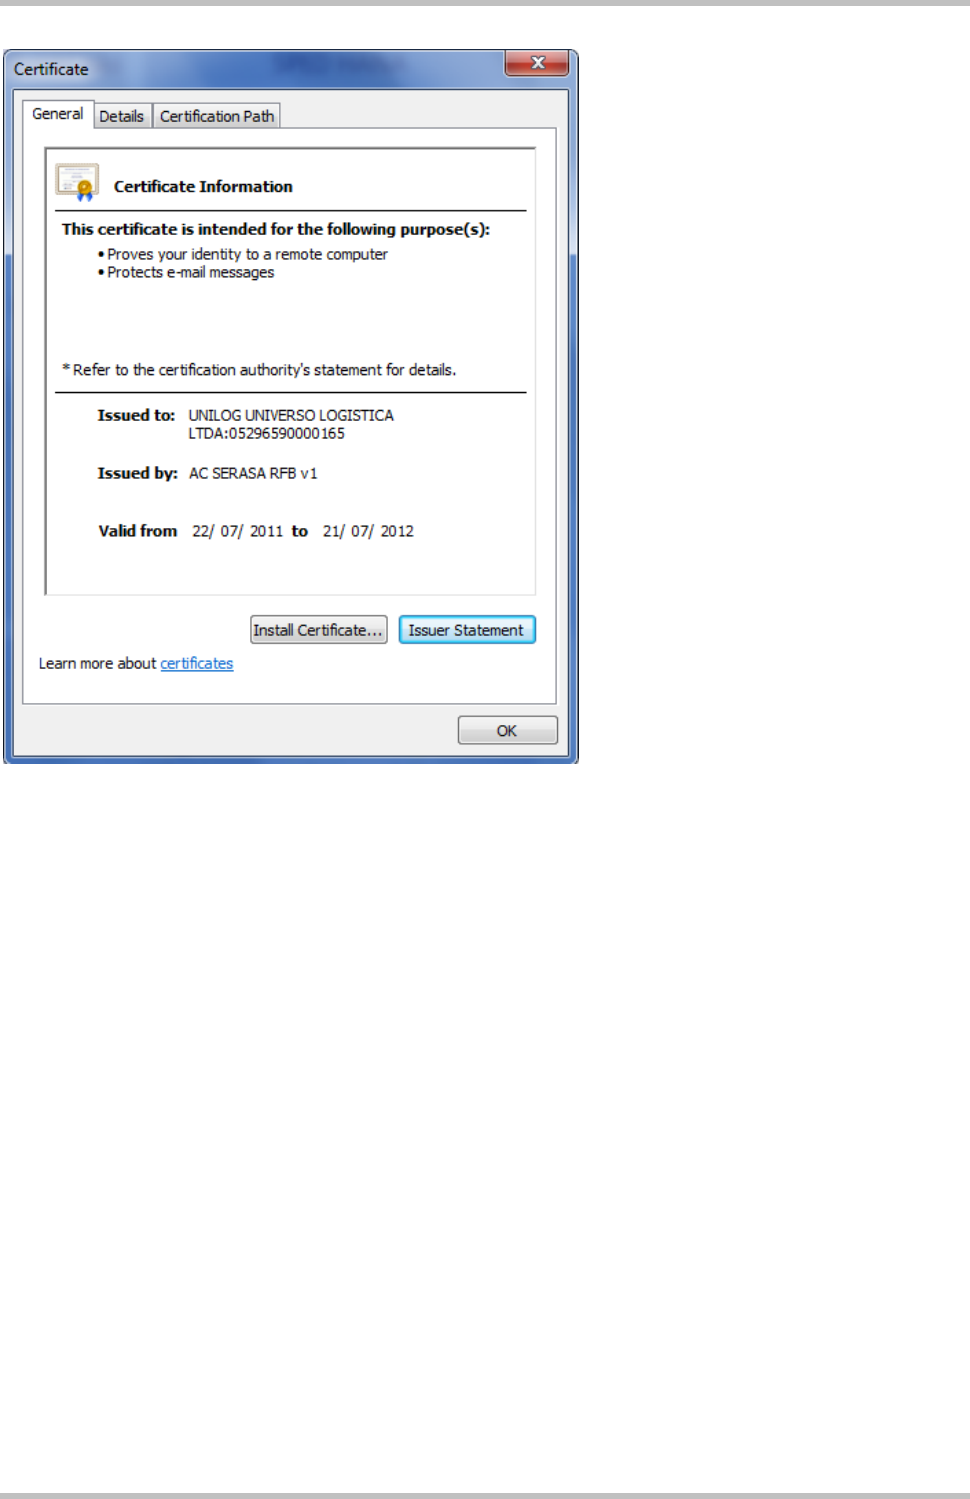
Or to find the CA in the XML of the Inbound-NF-e take the Certificate between the tags
<X509Certificate> and </X509Certificate> and copy the content of X509Certificate tag to a
notepad file between two fixed lines below:
-----BEGIN CERTIFICATE-----
MIIGWjCCBUKgAwIBAgIIe94LRpgIoVYwDQYJKoZIhvcNAQEFBQAwdTELMAkGA1UEBhMCQlIxEzARBgNVBAoTCklDUC1CcmFzaWwx
NjA0BgNVBAsTLVNlY3JldGFyaWEgZGEgUmVjZWl0YSBGZWRlcmFsIGRvIEJyYXNpbCAtIFJGQjEZMBcGA1UEAxMQQUMgU0VSQVNB
IGRvIEJyYXNpbCAtIFJGQjEWMBQGA1UECxMNUkZCIGUtQ05QSiBBMTESMBAGA1UECxMJQVIgU0VSQVNBMTYwNAYDVQQDEy1VTklM
T0cgVU5JVkVSU08gTE9HSVNUSUNBIExUREE6MDUyOTY1OTAwMDAxNjUwgZ8wDQYJKoZIhvcNAQEBBQADgY0AMIGJAoGBAKn+Ghn9
B8WMXAlE+kb9Xg87bzVmCBz312RWmP4IMpY0TGCoHe8ncVTPysiQovwMvJjrXXRZhlCSt1UBCazpYVNY/cdkBiljGg24/S0Yn4N8
xc+XJC2AhpC9dx9MvpbIA9t0WjNsgxTpXBZuYBxPj/7yQbs43T5th5tFy2tH2HzICi91fIO3D1sAdxtGKaDmii9LMIQ==
-----END CERTIFICATE-----
Then save it as .cer-file and double click on the file. Windows will show the certificate:
2 NFE Incoming
Page 6
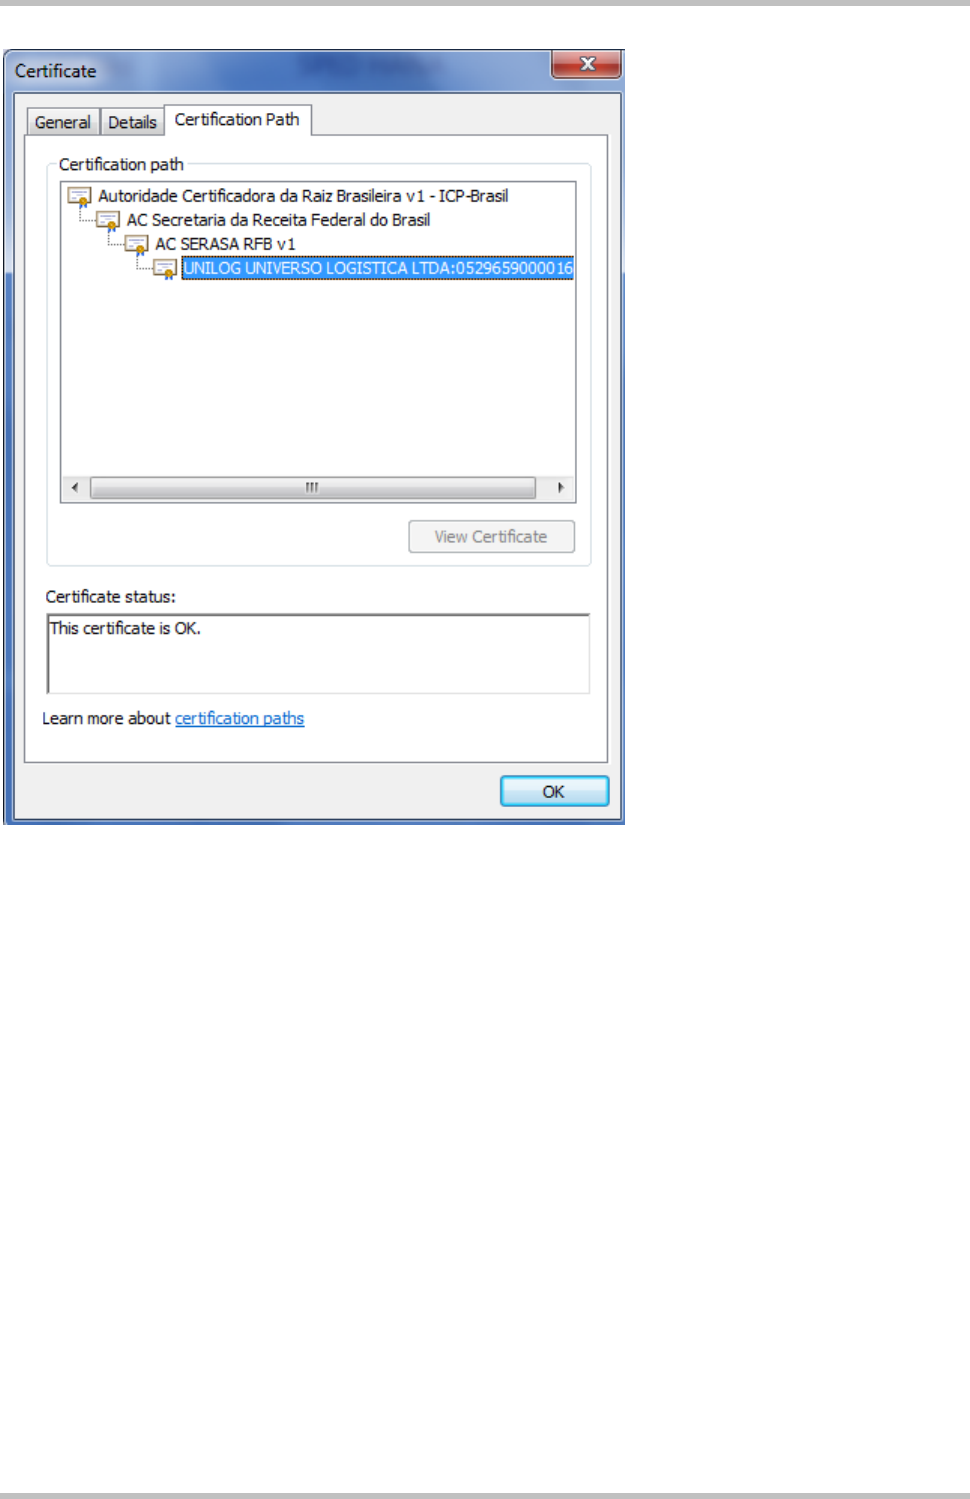
If you have the full chain inside your computer you can also see the path and the name of
the CA:
2.2 Import CA certificates
Page 7
2 NFE Incoming
Page 8
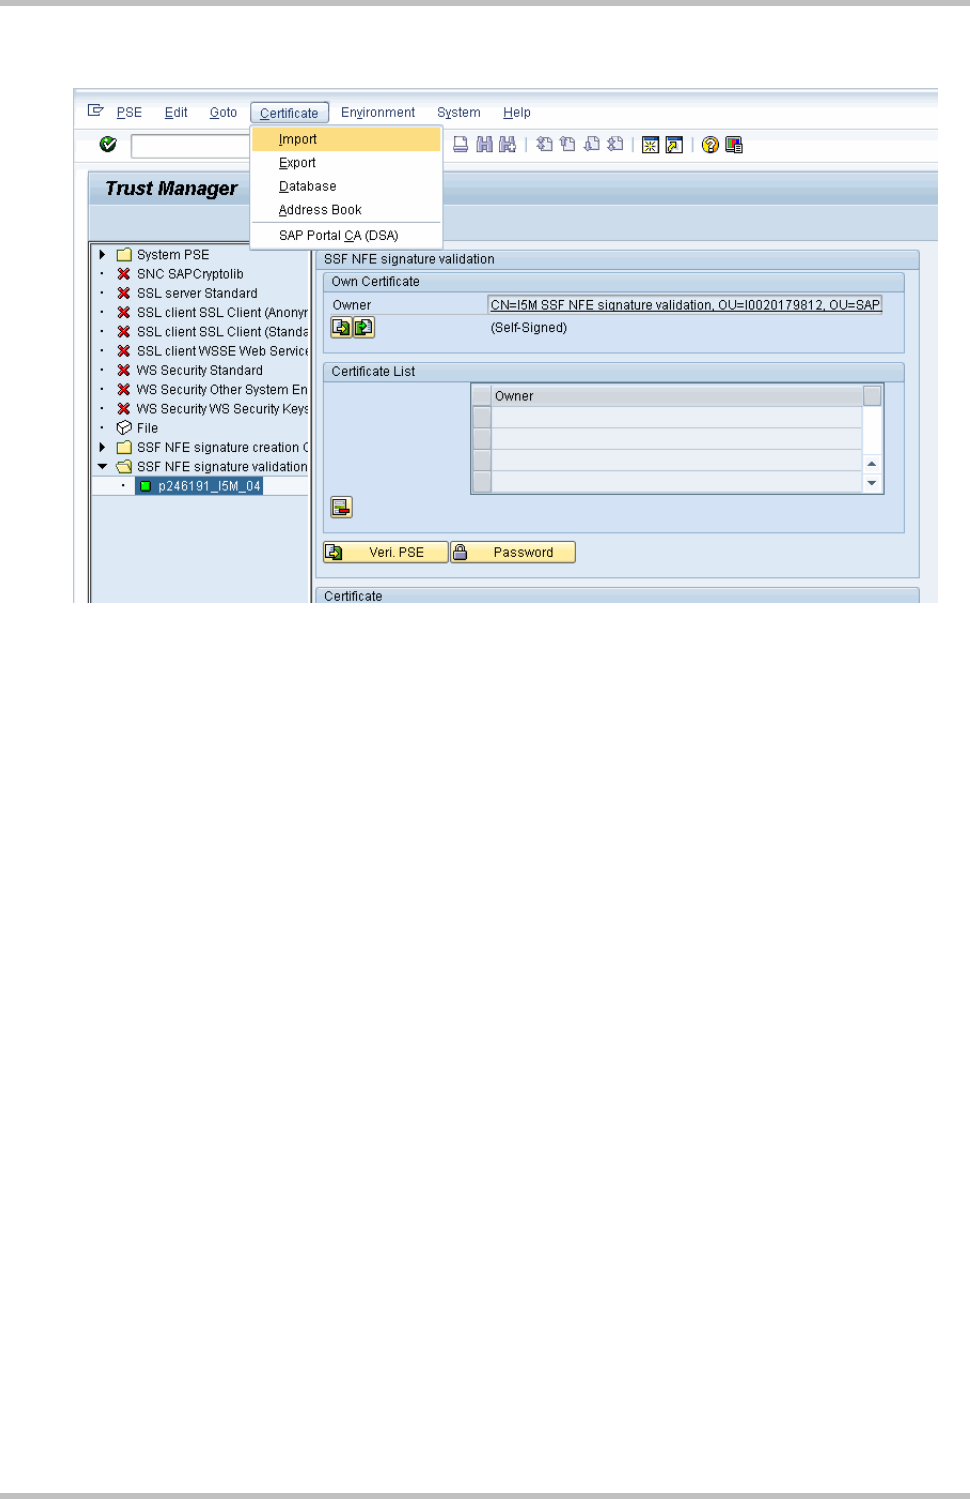
Import the CA certificate of the certification authority in STRUST:

0
Page 9
If receive an error like “SSF kernel error: invalid parameter” try to change file format:
2 NFE Incoming
Page 10
The certificate will be shown on Certificate box:
Click on Add to Certificate List
0
Page 11
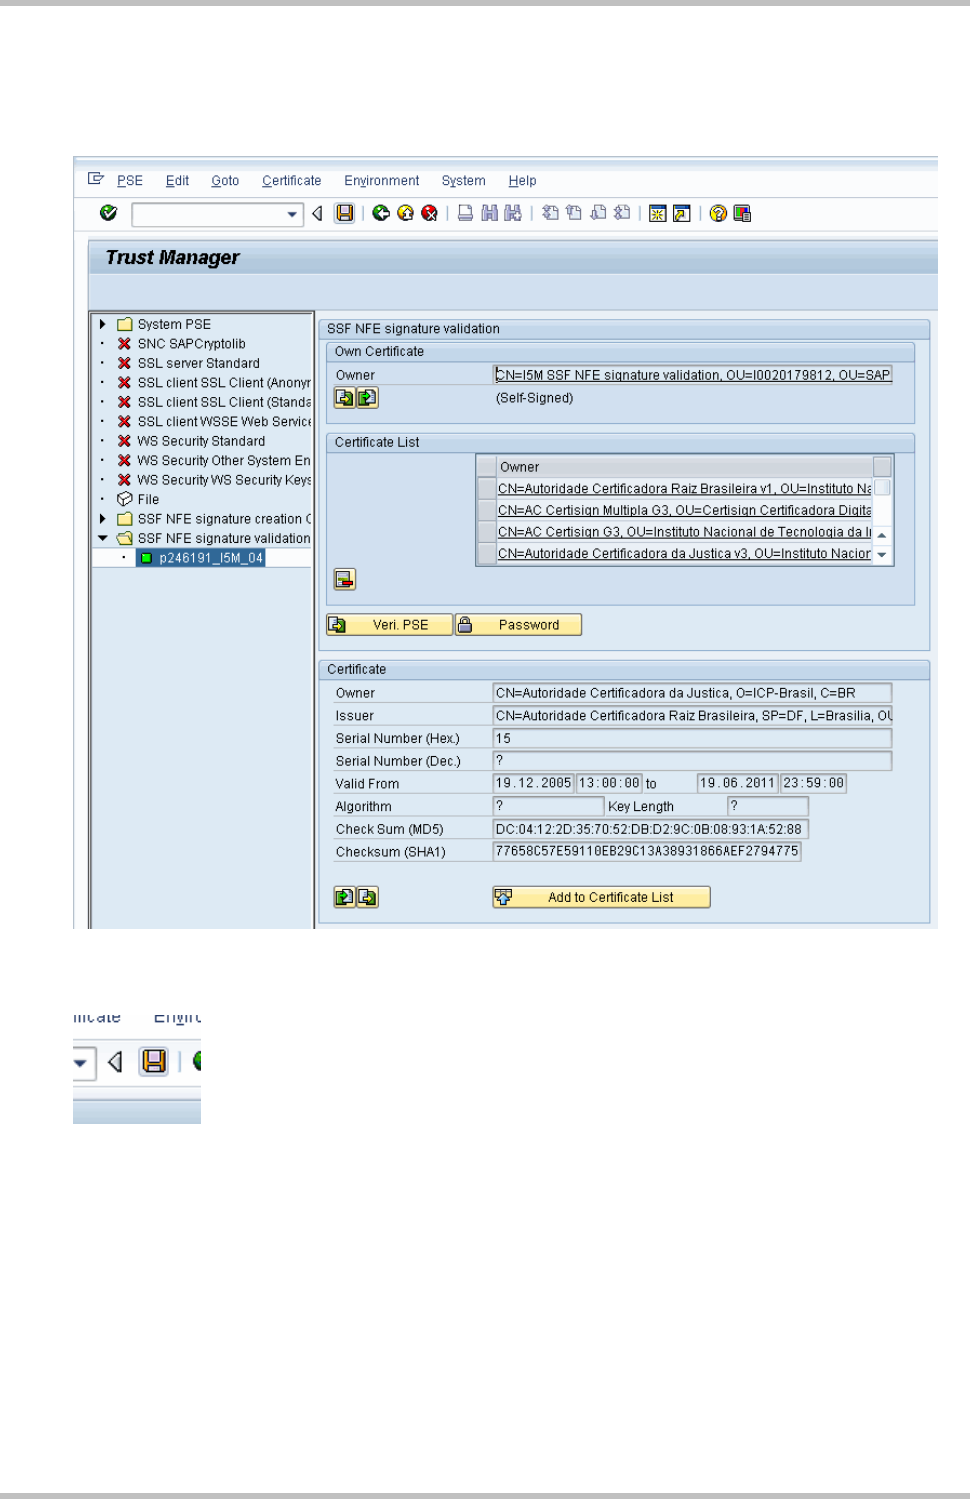
Repeat the same step for other CA certificates
Import one by one the CA certificates for all certification authorities of your business
partners.
After import and add all certificates to list, save it to persist the changes
3 NFE Outgoing
Page 12
3 NFE Outgoing
In the following the customizing of the private certificate for digital signature of outgoing
NF-es is described.
3.1 Obtain the private certificate
In order to issue electronic invoices the xml must be signed using a digital certificate
compliant with ICP-Brasil standards securing the access between the NFE system and the
government's servers.
To obtain the digital certificate you must interact with a Certification Authority. You can find
a completed and updated list of Certificating Authorities on the National Information
Technology Institute (ITI Brazil) website http://www.iti.gov.br. The main Certification
Authorities are: Caixa, Serasa, Certisign, Valid, Digitalsign, Boa Vista.
The Certificating Authorities can issue both certificates as well as certificates in the form of
a physical token; so make sure you request the digital certificate that can be used for e-
commerce transactions in PKSC#12 format with the file ending .pfx.
Hints:
The certificate can also be used for the client authentication using https in PI.
For signing you can also use the physical token and connect it via PI using enhancement spot
/XNFE/CORE_SIGNATURE_CREATE_EN
3.2 Create PSE
Use tool SAPGENPSE to create PSE on the Command Prompt from existing private
certificate as described in Importing a PKCS#12 File:
sapgenpse import_p12 -p <path>file.pse bras.pfx
Hints:
In case of an error that the pfx is missing the certification chain you can complete the chain by adding the missing certificates
with option '-r'. Then the command line should look like this:
sapgenpse import_p12 -r SerasaACPv2.cer -r ICPBrasilv2.cer -p <path>file.pse bras.pfx
Inform the full path for the PSE to be created.
If asked for a PSE PIN enter one or click Return.
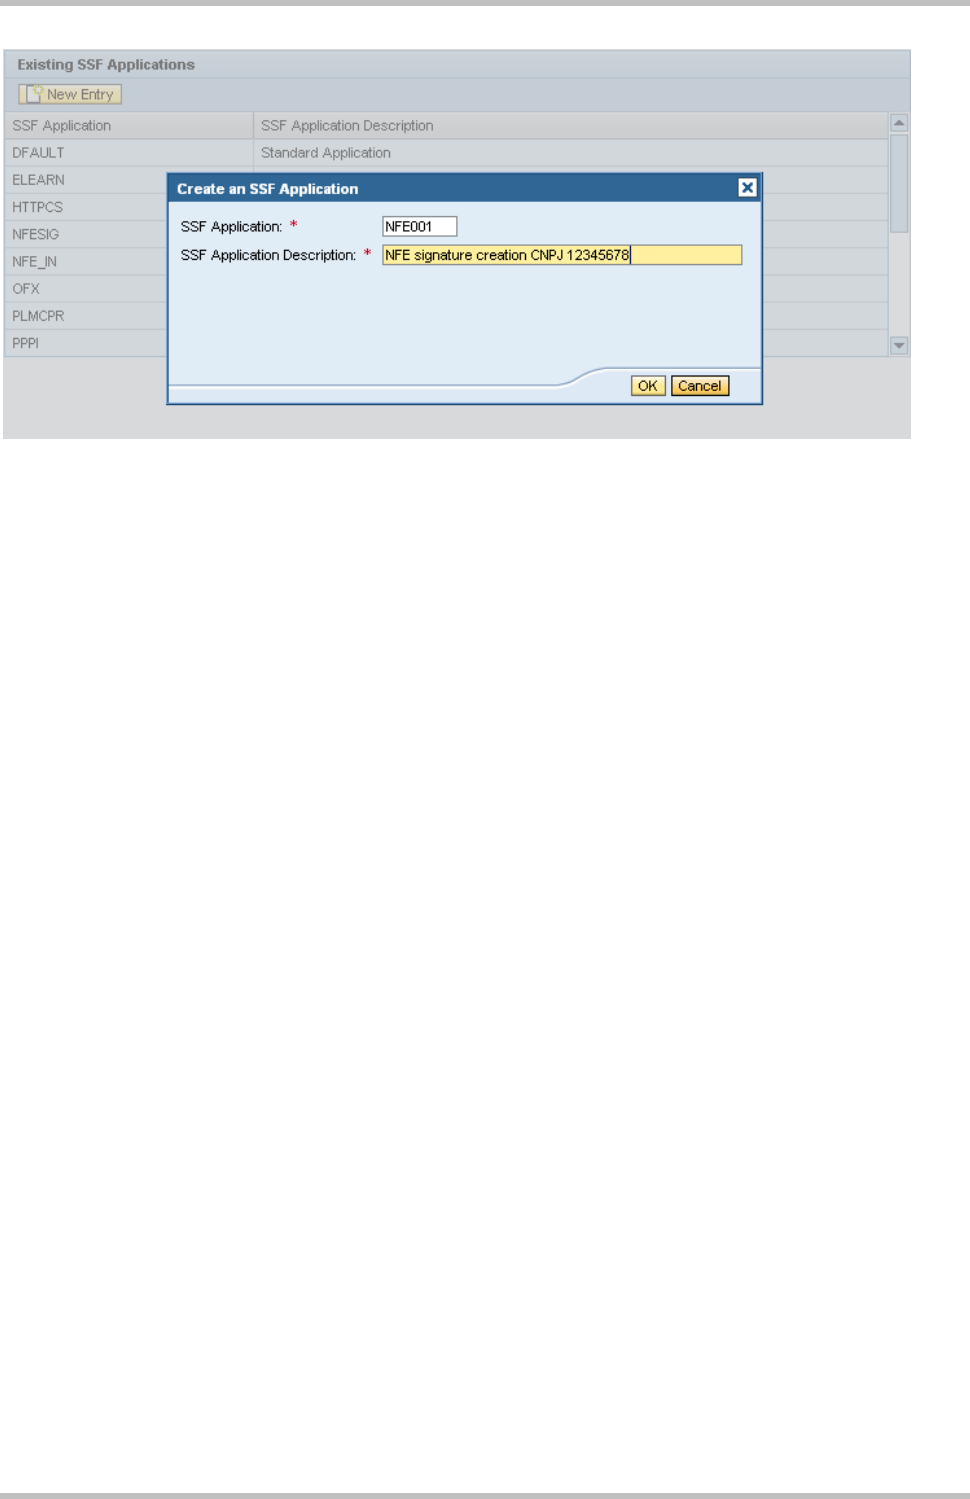
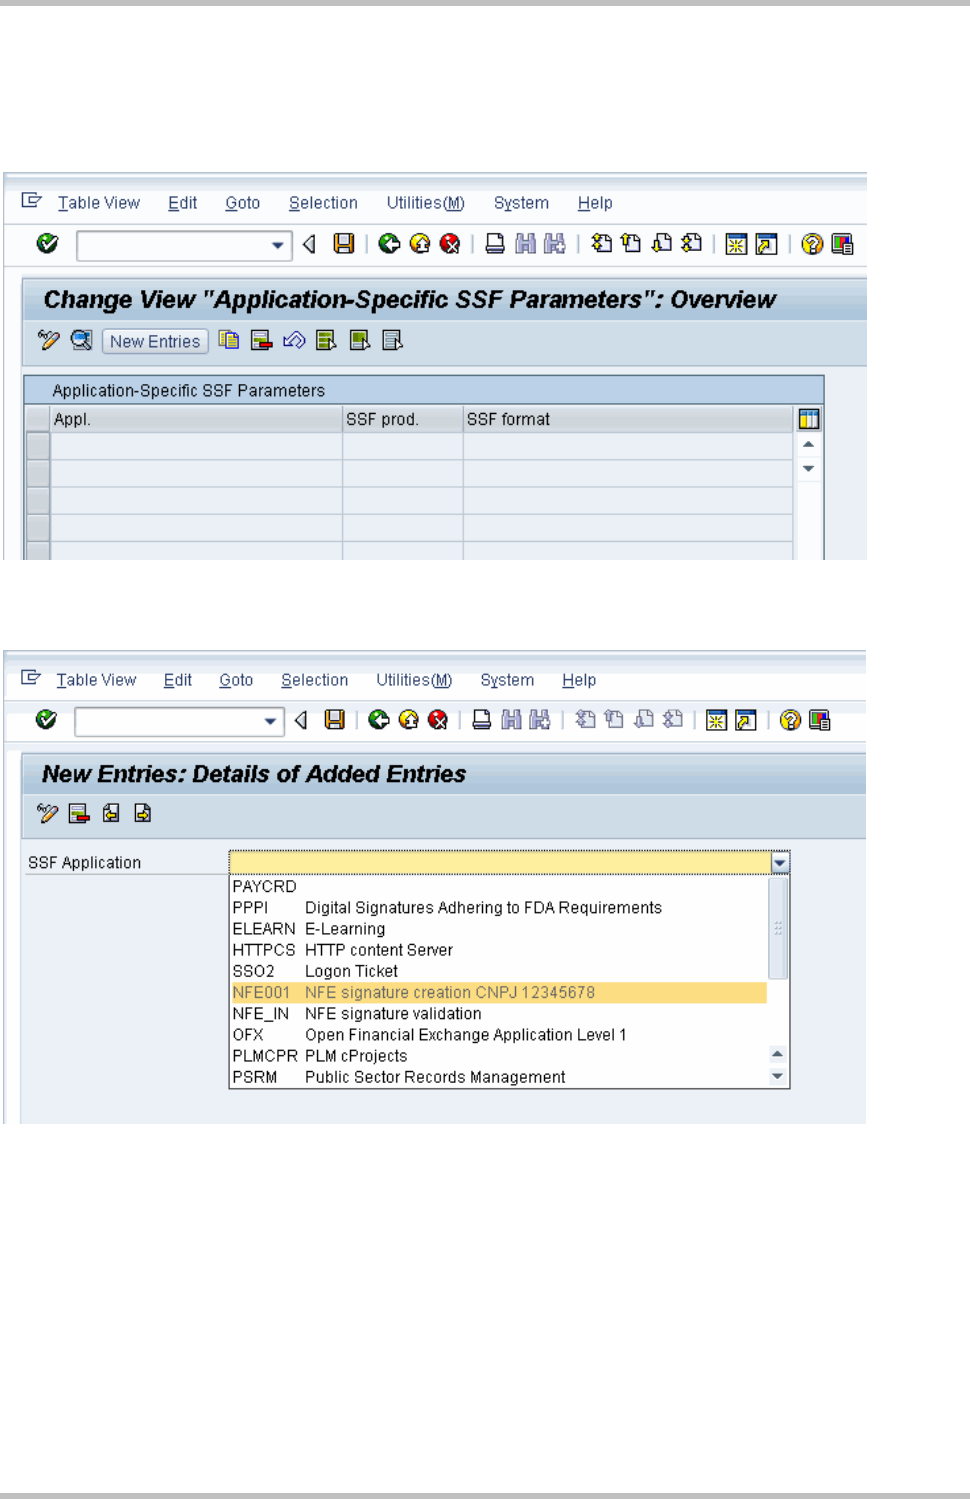
3.3 Create SSF application
From the Administration workplace use application SSF: Define Application. With this
administration UI SSF applications are created and also all attributes are set correctly in
the SSFAPPLIC table. You need a separate SSF application for each private certificate
that you use for signing the NF-e (e.g. for each own tax number). This step has to be done
in all three the dev, test and production systems (no transport).
3.3 Create SSF application
Page 13
The SSF applications have also to be customized in IMG activity Outbound > "Maintain
System Response for Own Tax Numbers".
3 NFE Outgoing
Page 14
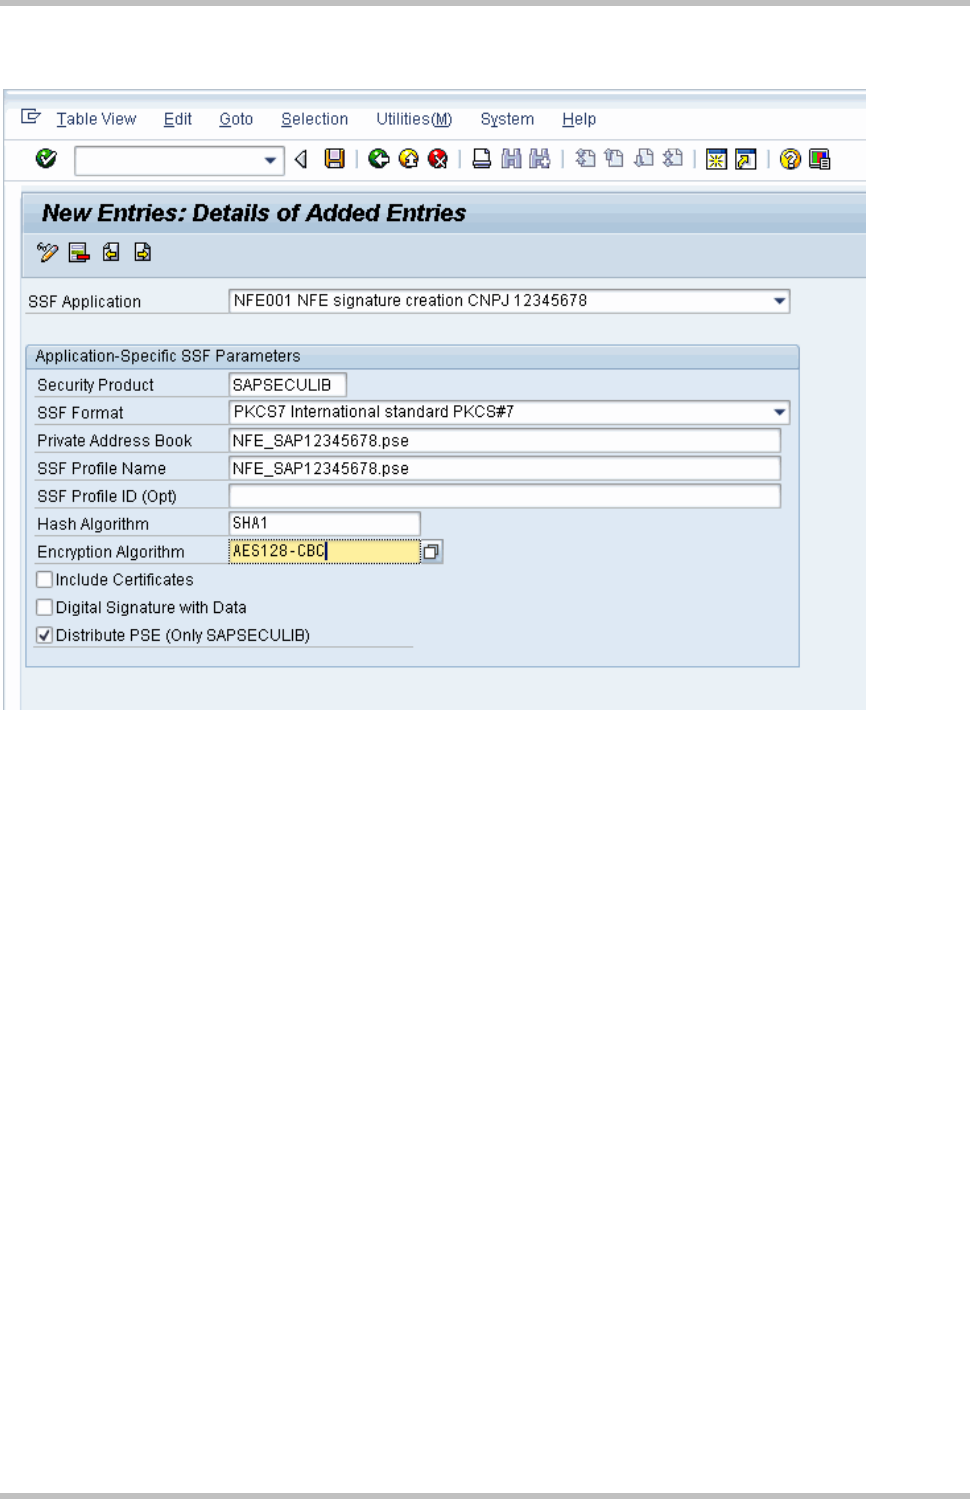
3.4 Set Application Parameters
From the Administration workplace use transaction SSFA – SSF: Set Application
Parameters
Create the configuration for ZNFE01 (for sign NF-es)
3.4 Set Application Parameters
Page 15
Filling data:
3 NFE Outgoing
Page 16
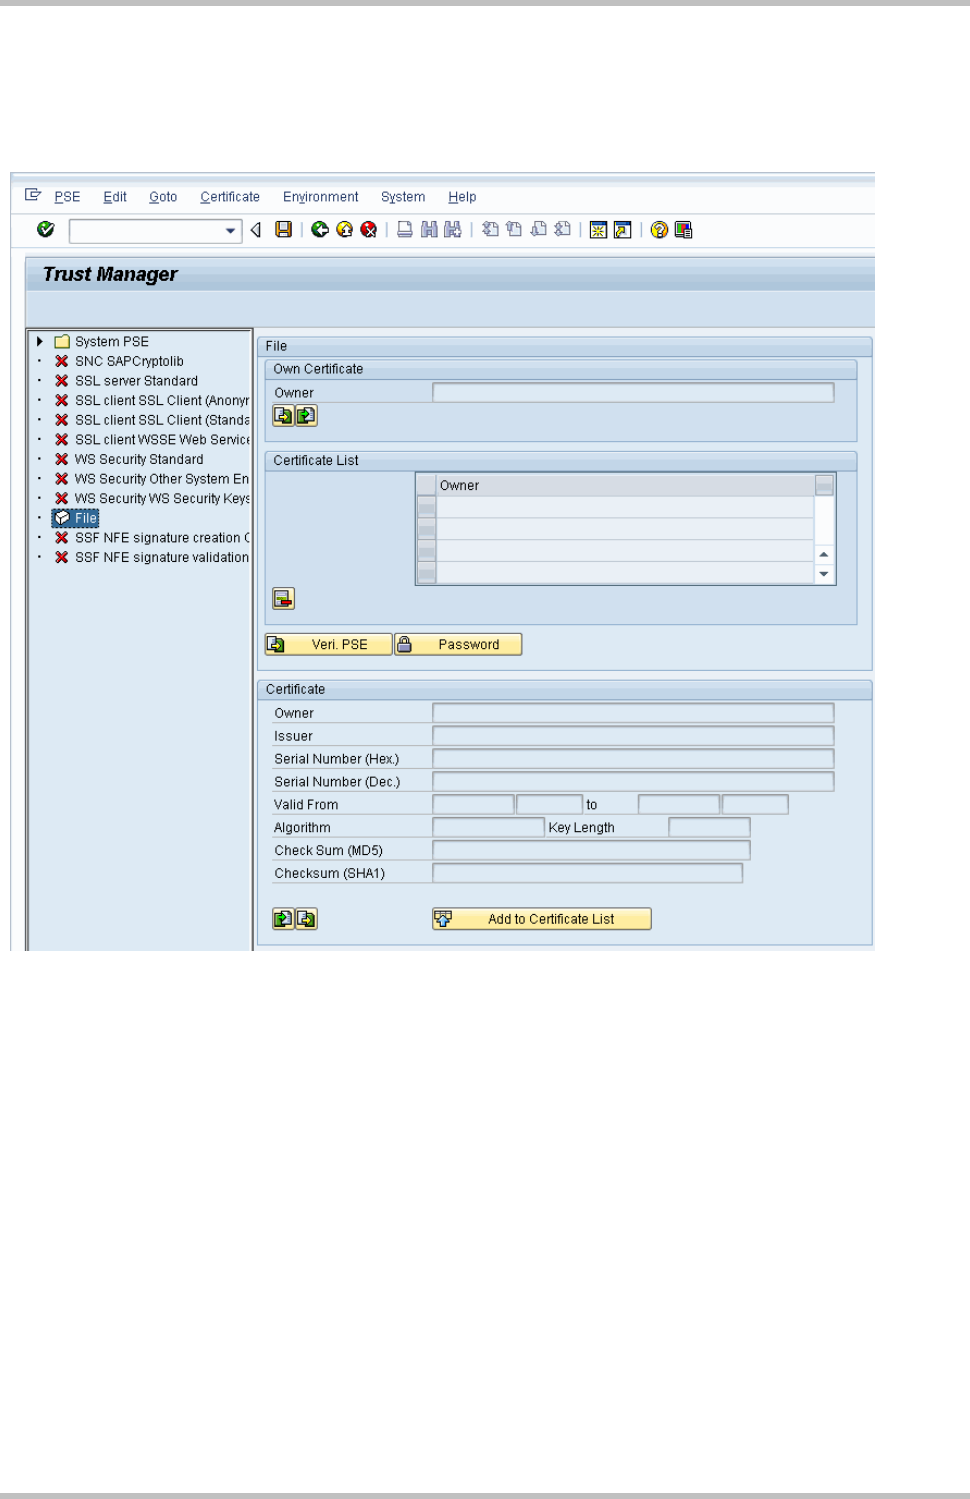
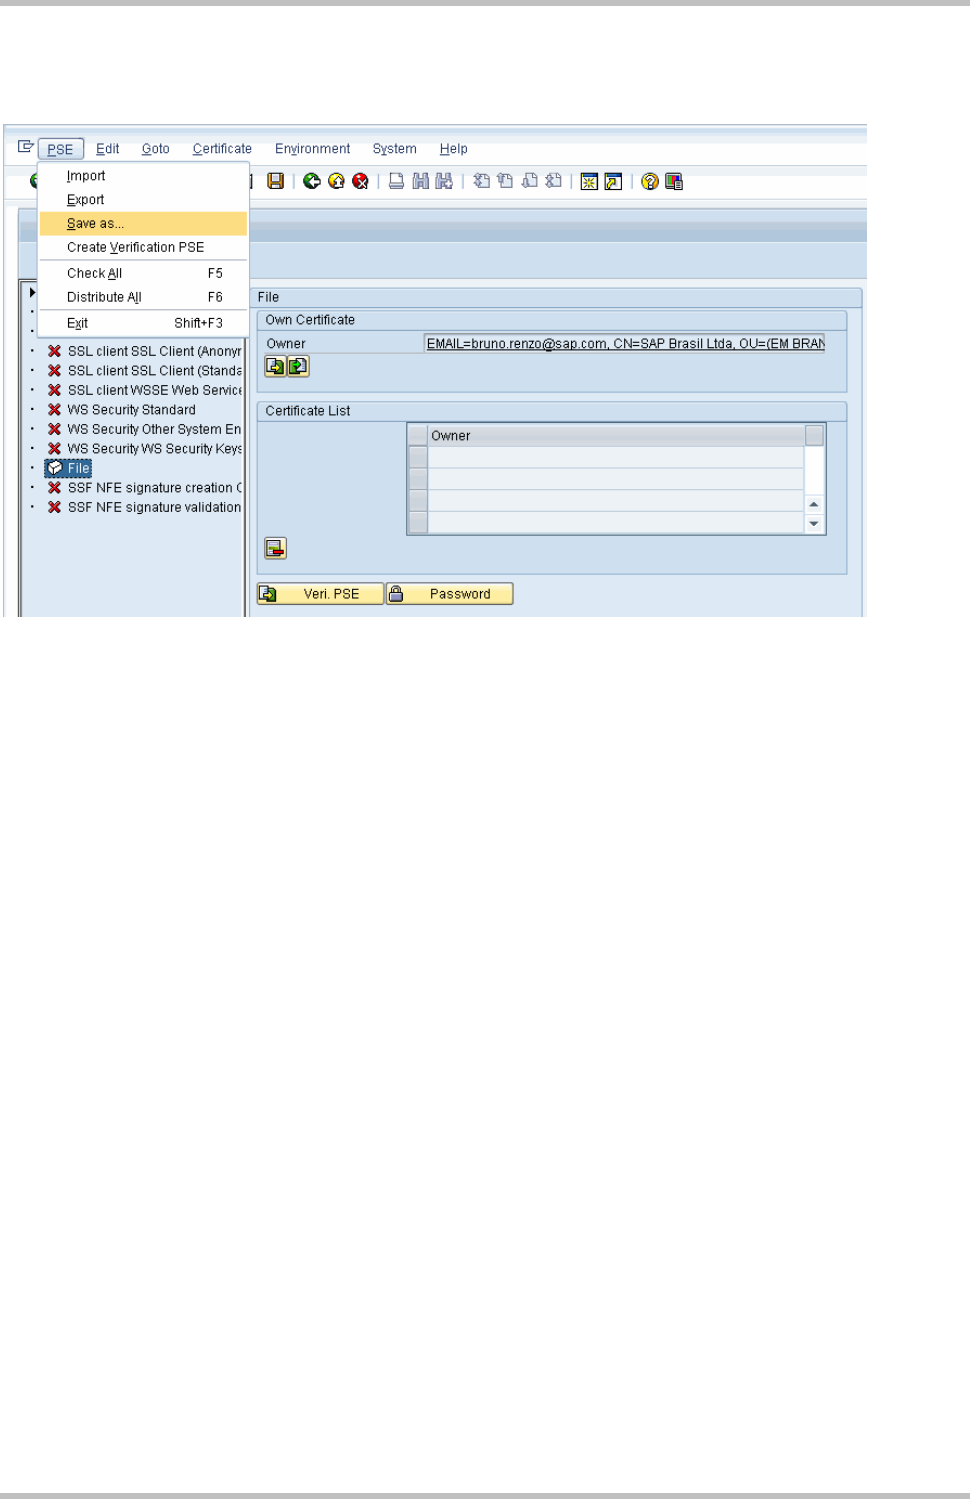
3.5 Load the PSE
From the Administration workplace use transaction STRUST – SSF: Trust Manager and
load the PSE: Double click on File:
3.5 Load the PSE
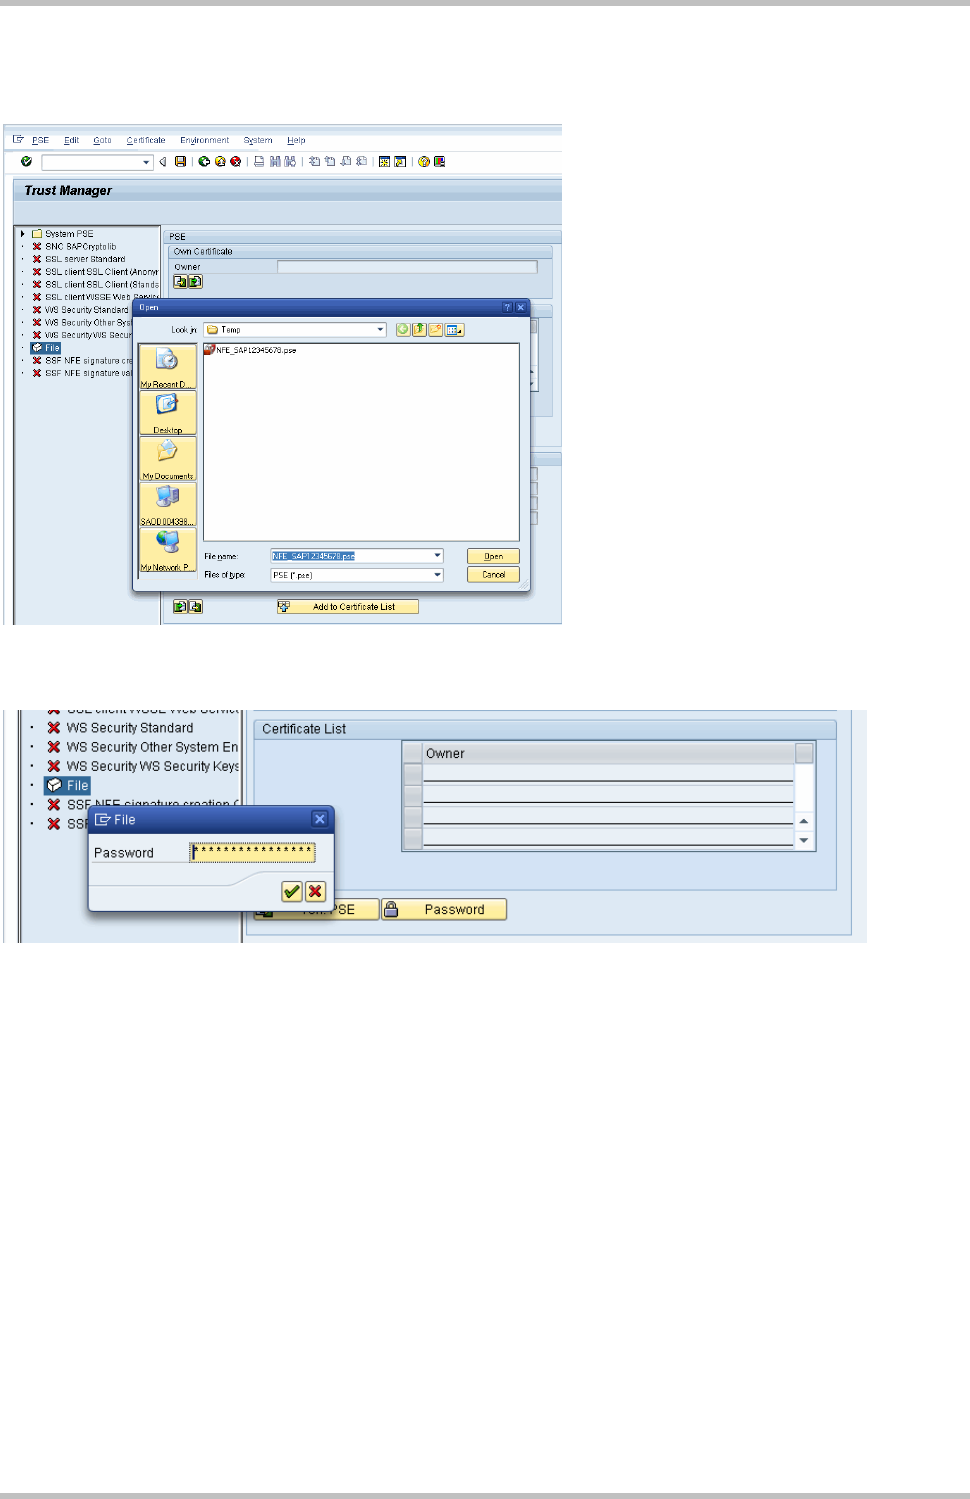
Page 17
Informing the .pse which is copied from server to local machine
Inform the password of PSE
3 NFE Outgoing
Page 18
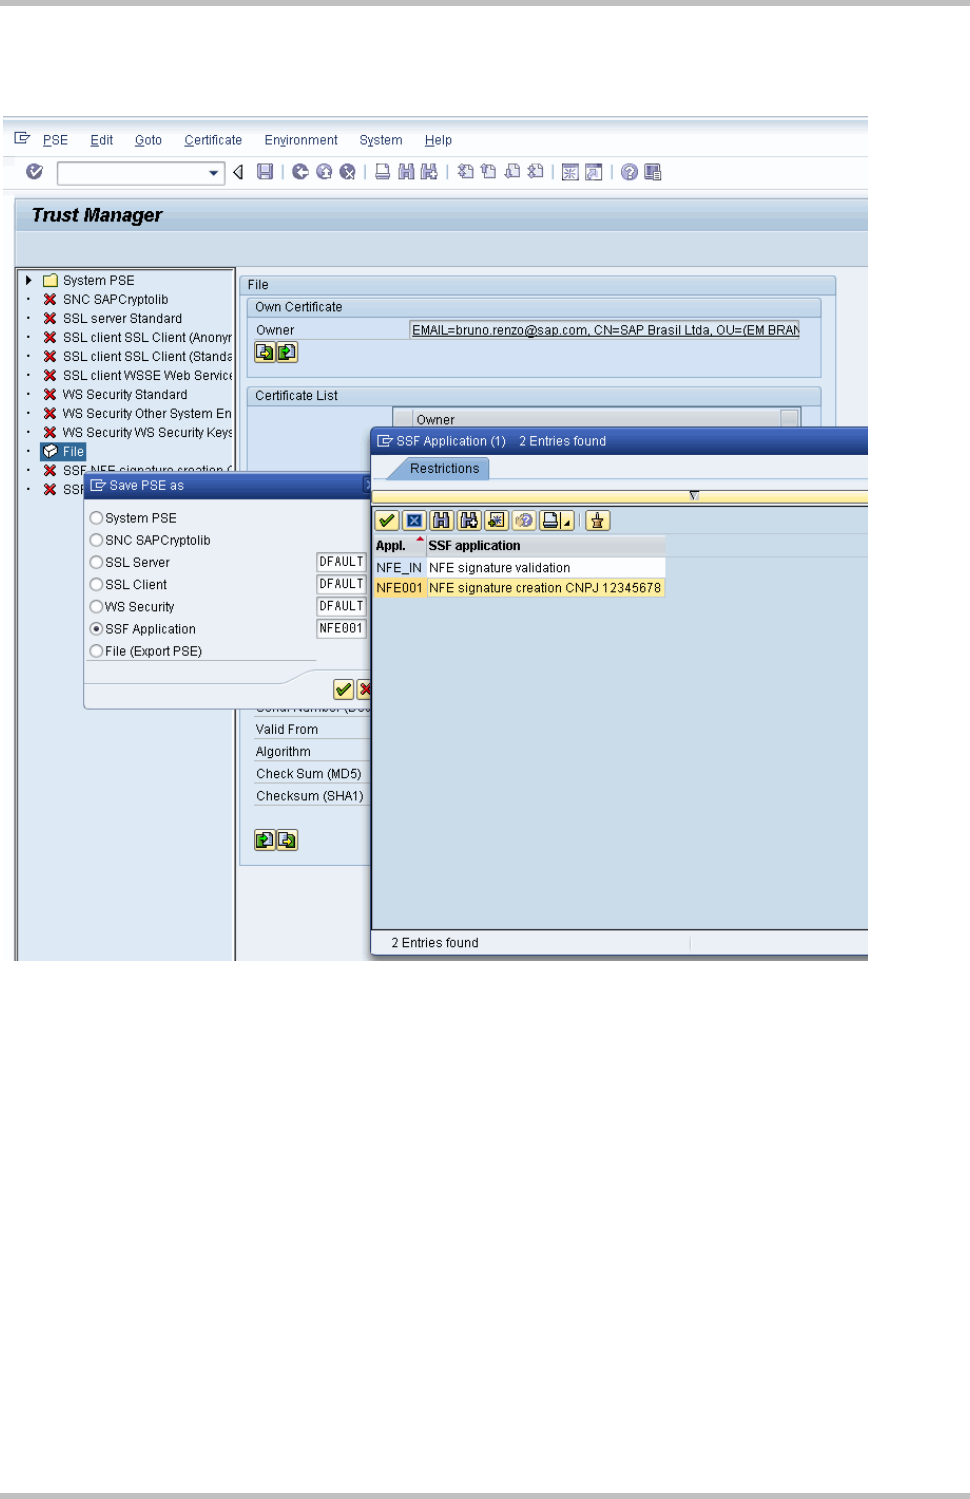
Choosing PSE -> Save as…
3.5 Load the PSE
Page 19
Select SSF application on Save PSE as box, and select and confirm the proper SSF for
signature which are being created:
3 NFE Outgoing
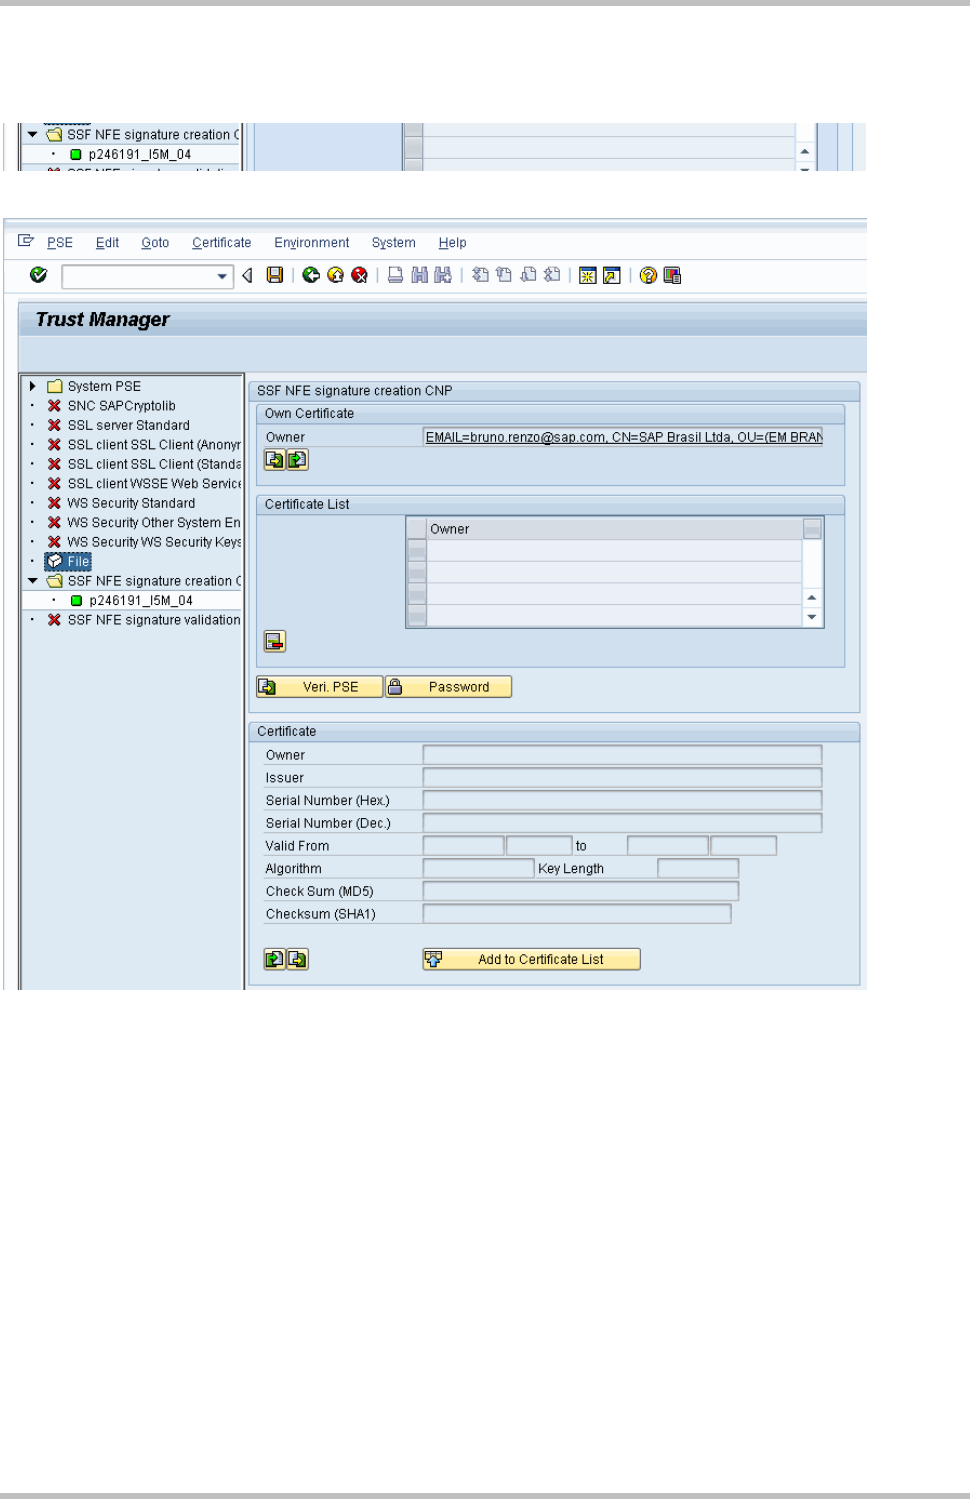
Page 20
Data saved successfully…
