Nginx A Practical Guide Preview Edition
User Manual:
Open the PDF directly: View PDF ![]() .
.
Page Count: 98
- Copyright
- Table of Contents
- Foreword
- Preface
- Chapter 1. Getting Started
- Chapter 2. Basic Configuration
- Chapter 3. CGI, FastCGI, and uWSGI
- Chapter 4. Reverse Proxy
- Chapter 5. Load Balancing

Stephen Corona
nginx
A PRACTICAL GUIDE TO HIGH PERFORMANCE
Compliments of
Building a great app
is just the beginning
See why the world’s most innovative
developers choose NGINX to deliver their
apps – from Airbnb to Netflix to Uber.
Download your free trial NGINX.com
NGINX Plus is a
complete application
delivery platform for
fast, flawless delivery
Load Balancer
Optimize the availability
of apps, APIs, and services
Content Caching
Accelerate local origin servers
and create edge servers
Monitoring & Management
Ensure health, availability, and performance of
apps with devops-friendly tools
Streaming Media
Stream high-quality video
on demand to any device
Web Server
Deliver assets with
speed and efficiency
is Preview Edition of nginx: A Practical Guide to High Performance,
Chapters 1–5, is a work in progress. e nal book is currently scheduled
for release in October 2015 and will be available at oreilly.com and other retailers
once it is published.

Stephen Corona
Boston
nginx
A Practical Guide to High Performance
978-1-491-92477-8
LSI
nginx
by Stephen Corona
Copyright © 2015 Stephen Corona. All rights reserved.
Printed in the United States of America.
Published by O’Reilly Media, Inc., 1005 Gravenstein Highway North, Sebastopol, CA 95472.
O’Reilly books may be purchased for educational, business, or sales promotional use. Online editions are
also available for most titles (http://safaribooksonline.com). For more information, contact our corporate/
institutional sales department: 800-998-9938 or corporate@oreilly.com .
Editor: Allyson MacDonald
See http://www.oreilly.com/catalog/errata.csp?isbn=0636920039426 for release details.
The O’Reilly logo is a registered trademark of O’Reilly Media, Inc. nginx: A Practical Guide to High Perfor‐
mance, the cover image, and related trade dress are trademarks of O’Reilly Media, Inc.
While the publisher and the author have used good faith efforts to ensure that the information and
instructions contained in this work are accurate, the publisher and the author disclaim all responsibility
for errors or omissions, including without limitation responsibility for damages resulting from the use of
or reliance on this work. Use of the information and instructions contained in this work is at your own
risk. If any code samples or other technology this work contains or describes is subject to open source
licenses or the intellectual property rights of others, it is your responsibility to ensure that your use
thereof complies with such licenses and/or rights.

Table of Contents
Foreword. . . . . . . . . . . . . . . . . . . . . . . . . . . . . . . . . . . . . . . . . . . . . . . . . . . . . . . . . . . . . . . . . . . . . . v
Preface. . . . . . . . . . . . . . . . . . . . . . . . . . . . . . . . . . . . . . . . . . . . . . . . . . . . . . . . . . . . . . . . . . . . . . . vii
1. Getting Started. . . . . . . . . . . . . . . . . . . . . . . . . . . . . . . . . . . . . . . . . . . . . . . . . . . . . . . . . . . . 11
Installing nginx 11
Installing from source 12
Modules in nginx 14
Installing from a package 16
2. Basic Conguration. . . . . . . . . . . . . . . . . . . . . . . . . . . . . . . . . . . . . . . . . . . . . . . . . . . . . . . . . 21
The nginx.conf File 21
Configuring and running nginx 22
Filling in the blanks 23
Reloading and Stopping nginx 29
Serving Static Files 31
The Location Block 32
Basic Location Blocks 33
Regular Expression Location Blocks 35
Named Location Blocks 38
Location Block Inheritance 39
Virtualhosts 39
Default Server Block 41
Configuring SSL 42
Sharing a wildcard certificate 43
SNI and the future of SSL 44
iii

3. CGI, FastCGI, and uWSGI. . . . . . . . . . . . . . . . . . . . . . . . . . . . . . . . . . . . . . . . . . . . . . . . . . . . . 47
How CGI works 47
What is FastCGI? 50
FastCGI Basics 50
FastCGI Basic Config 51
4. Reverse Proxy. . . . . . . . . . . . . . . . . . . . . . . . . . . . . . . . . . . . . . . . . . . . . . . . . . . . . . . . . . . . . . 55
Forward Proxy vs Reverse Proxy 55
Configuring a basic Rails Application 57
A more robust reverse proxy 60
Custom Error Pages 63
Adding headers to the upstream 66
Reverse Proxying Node.js & Websockets 69
Reverse Proxy with WebSockets 71
Future Sections in this Chapter 75
5. Load Balancing. . . . . . . . . . . . . . . . . . . . . . . . . . . . . . . . . . . . . . . . . . . . . . . . . . . . . . . . . . . . . 77
Your first load balancer 78
Load Balancing vs Reverse Proxy? 78
Handling Failure 79
Configuring the Upstream Directive 80
Weighted Servers 81
Health Checks 82
Removing a server from the pool 84
Backup Servers 84
Slow Start 85
Load Balancing Methods 87
C10K with nginx 89
Scalable Load Balancer Configuration 89
Tuning Linux for a Network Heavy Load 90
nginx vs ELB vs HAProxy 91
HTTP and TCP Load Balancing 92
Future Sections 93
iv | Table of Contents

Foreword
Nearly 20 years ago, I read my first O’Reilly book, Learning Perl. Like most develop‐
ers, O’Reilly books have been a regular part of my life, helping me learn and make the
most of the amazing technology developed by my peers. Back then I never would
have dreamed that there would one day be a book written about software that I cre‐
ated, yet here we are today.
When I created NGINX, I did not seek to create an application that would be used
worldwide. Even more than a decade ago, the problem of making our applications
fast and reliable was keeping developers like me up late at night. While working at
Rambler (a Russian search engine and web portal) back in 2002, I set out to solve for
the C10K problem: how could we crack 10,000 simultaneous connections to a web
server? NGINX was the first web server software to make 10,000 concurrent connec‐
tions possible, and it saw rapid adoption after I open sourced it in 2004.
Fast forward 10 years, and the use of NGINX is remarkable. As of early 2015, we
power 24% of all web servers and almost half of the world’s busiest sites. Companies
like Airbnb, Netflix, and Uber are using our software to invent the digital future, and
the company we founded a few years ago to provide products and services for
NGINX now has hundreds of customers, who have deployed thousands of instances
of our load-balancing and application-delivery software, NGINX Plus.
This book is another remarkable milestone in our history. The journey here has not
always been a smooth one. As with many popular products, NGINX has been devel‐
oped iteratively and has evolved rapidly. Our users have faced challenges in making
the most of what we built, and the absence of early documentation did not help mat‐
ters. I am eternally grateful to our early community of users who helped translate and
then extend our library of docs, and I hope that the release of this book now helps
millions more adopt NGINX.
Thank you to everyone who has contributed so much to make NGINX what it is
today. Whether you have contributed a patch or module, added to documentation or
knowledge, or have simply used the product and provided feedback, you have helped
v

improve NGINX—together we have made the web better. I hope you continue to use
NGINX, and in return I remain committed to providing you with powerful, light‐
weight software that lets you deliver amazing applications with performance, reliabil‐
ity, and scale.
Igor Sysoev, co-founder and CTO, NGINX
April, 2015
vi | Foreword

Preface
Conventions Used in This Book
The following typographical conventions are used in this book:
Italic
Indicates new terms, URLs, email addresses, filenames, and file extensions.
Constant width
Used for program listings, as well as within paragraphs to refer to program ele‐
ments such as variable or function names, databases, data types, environment
variables, statements, and keywords.
Constant width bold
Shows commands or other text that should be typed literally by the user.
Constant width italic
Shows text that should be replaced with user-supplied values or by values deter‐
mined by context.
This element signifies a tip or suggestion.
This element signifies a general note.
vii

This element indicates a warning or caution.
Using Code Examples
Supplemental material (code examples, exercises, etc.) is available for download at
https://github.com/oreillymedia/title_title.
This book is here to help you get your job done. In general, if example code is offered
with this book, you may use it in your programs and documentation. You do not
need to contact us for permission unless you’re reproducing a significant portion of
the code. For example, writing a program that uses several chunks of code from this
book does not require permission. Selling or distributing a CD-ROM of examples
from O’Reilly books does require permission. Answering a question by citing this
book and quoting example code does not require permission. Incorporating a signifi‐
cant amount of example code from this book into your product’s documentation does
require permission.
We appreciate, but do not require, attribution. An attribution usually includes the
title, author, publisher, and ISBN. For example: “Book Title by Some Author
(O’Reilly). Copyright 2012 Some Copyright Holder, 978-0-596-xxxx-x.”
If you feel your use of code examples falls outside fair use or the permission given
above, feel free to contact us at permissions@oreilly.com.
Safari® Books Online
Safari Books Online is an on-demand digital library that deliv‐
ers expert content in both book and video form from the
world’s leading authors in technology and business.
Technology professionals, software developers, web designers, and business and crea‐
tive professionals use Safari Books Online as their primary resource for research,
problem solving, learning, and certification training.
Safari Books Online offers a range of plans and pricing for enterprise, government,
education, and individuals.
Members have access to thousands of books, training videos, and prepublication
manuscripts in one fully searchable database from publishers like O’Reilly Media,
Prentice Hall Professional, Addison-Wesley Professional, Microsoft Press, Sams, Que,
Peachpit Press, Focal Press, Cisco Press, John Wiley & Sons, Syngress, Morgan Kauf‐
mann, IBM Redbooks, Packt, Adobe Press, FT Press, Apress, Manning, New Riders,
viii | Preface

McGraw-Hill, Jones & Bartlett, Course Technology, and hundreds more. For more
information about Safari Books Online, please visit us online.
How to Contact Us
Please address comments and questions concerning this book to the publisher:
O’Reilly Media, Inc.
1005 Gravenstein Highway North
Sebastopol, CA 95472
800-998-9938 (in the United States or Canada)
707-829-0515 (international or local)
707-829-0104 (fax)
We have a web page for this book, where we list errata, examples, and any additional
information. You can access this page at http://www.oreilly.com/catalog/<catalog
page>.
To comment or ask technical questions about this book, send email to bookques‐
tions@oreilly.com.
For more information about our books, courses, conferences, and news, see our web‐
site at http://www.oreilly.com.
Find us on Facebook: http://facebook.com/oreilly
Follow us on Twitter: http://twitter.com/oreillymedia
Watch us on YouTube: http://www.youtube.com/oreillymedia
Acknowledgments
Preface | ix

CHAPTER 1
Getting Started
nginx, pronounced “engine x” is a web server that’s gained incredible popularity among
the most highly visited websites on the internet.
It isn’t fair to think of nginx as just a web server. It can do so much more— it can serve
HTTP and HTTPS traffic, proxy to Rails, PHP or Node applications, run as a software
load balancer, http cache, off-load ssl or even act as a SMTP, POP3, and IMAP mail server.
Most people think of nginx as a replacement to Apache. That’s true too, when looking at
what the biggest websites on the internet are using today. According to Netcraft, as of
March 2015, nginx is used by 21% of the top 1 million busiest websites on the internet.
As you’ll learn in this book, nginx is all of these things, but at the very core it’s an HTTP
router, a living, breathing part of the web stack that gives developers the flexibility to
build and deploy web apps easier than ever before.
Installing nginx
Let’s get the basics out of the way and get started with installing nginx. While it’s pos‐
sible to run nginx on Windows, it’s not recommended, and the book operates under
the assumption that you’re planning to install and run nginx on a common distribu‐
tion of Linux.
You have two installation options, directly from source or a pre-built package for
your operating system. While installing the package is much more convenient, it’s
typically an outdated version. Fortunately, nginx.org publishes their own set of up-to-
date packages for a variety of operating systems.
11

A note on nginx versions
As typical with open source projects, nginx has multiple version
streams that run in parallel— stable and mainline.
The stable version (often, an even-numbered release, e.g.,“1.4”, “1.6”) is the rec‐
ommended production version. It lags behind any major feature development
but gets critical bug fixes back ported to it. As of writing, the latest stable version
is 1.6.2
The mainline version (often, an odd-numbered release), while still pretty stable,
is where active development is done. It receives new features, faster bug fixes,
and has an overall quicker cadence. That being said, mainline is not bleeding
edge. Many people choose to run mainline in production for new features.
Installing from source
It’s very easy to build nginx from source, but first you’ll need to grab the code. Head
to nginx.org and click the “download” link. You’ll need to choose whether to down‐
load the mainline or stable version, but building them is exactly the same.
For this example, I’m going to download the mainline version, 1.9.2. Once the file is
downloaded (nginx-1.9.2.tar.gz), the next step is to uncompress it and enter the
folder.
$ tar -zxvf nginx-1.9.2.tar.gz
$ cd nginx-1.9.2
From here, building the source code is relatively simple if you have the basic build
tools already installed.
Installing build tools
If you don’t have the basic build tools installed on your machine,
you may need to refer to the documentation for your Linux distri‐
bution.
On Ubuntu or Debian, it’s as simple as installing the build-
essential package.
apt-get install build-essential
On RedHat or CentOS, you’d just install the Development
Tools package group.
yum group install "Development Tools"
12 | Chapter 1: Getting Started

$ ./configure
$ make
$ sudo make install
Installing nginx dependencies
For the most part, nginx is pretty lightweight and doesn’t have very
many library dependencies. That being said, the default build con‐
figuration depends on 3 libraries to be installed:
•PCRE (for the HTTP Rewrite module)
•Zlib (for the HTTP Gzip module)
•OpenSSL (for HTTPS protocol support)
These libraries can be installed from source or through the package
manager.
On my Ubuntu machine, I was able to install these libraries with
the following command:
$ apt-get install libpcre3-dev zlib1g-dev libssl-dev
By default, make install will install nginx and all related files into the folder /usr/
local/nginx/.
The executable binary for nginx will be located at /usr/local/nginx/sbin/nginx.
You can test that everything went correctly and nginx works by running the com‐
mand nginx -V. The -V flag will make nginx print the version number and compile-
time build options. The output should look similar to this:
$ /usr/local/nginx/sbin/nginx -V
nginx version: nginx/1.9.2
built by gcc 4.8.2 (Ubuntu 4.8.2-19ubuntu1)
configure arguments:
Specifying the install location
As mentioned above, the default installation path for nginx is /usr/local/nginx/.
Often times, it’s desirable to change the installation path to conform with the filesys‐
tem layout of the operating system distribution (i.e, to put all daemons in /usr/
sbin or the configuration files in /etc).
To do this, you can specify the path of the base installation directory by passing it to
the configure script with the --prefix flag.
Additionally, you can change the default location for the nginx configuration files
(the default path is /usr/local/nginx/conf). This location can passed to the config‐
ure script by using the --conf-path flag.
Installing from source | 13

For instance, the most common nginx installation would have the nginx binary loca‐
ted in /usr/sbin and the configuration files in /etc/nginx. In order to make this
happen, we’d run the configure script with the following flags:
$ ./configure --prefix=/usr —conf-path=/etc/nginx
Modules in nginx
nginx is an extremely modular piece of software. Even some of seemingly “built-in” pieces
of the software, such as gzip or SSL, are actually built as modules that can be enabled and
disabled during build time.
One of the benefits of building nginx from source is that you’re able to specify exactly the
modules you want, and which ones you don’t. The downside is that if you don’t include
something that you later need, you’ll have to rebuild nginx from source.
By default, nginx comes out of the box with the following modules— some enabled by
default and some disabled by default.
Module Name Flag Description Installed by
Default?
Charset http_charset Adds the Content-Type header to the HTTP response Yes
Gzip http_gzip Compresses the HTTP response Yes
SSI http_ssi Processes Service-Side Includes Yes
Userid http_userid Sets an HTTP Cookie suitable for Client Identication Yes
Access http_access Allows limiting access to certain client IP addresses Yes
Basic Auth http_auth_basic Allows limiting access by validating username and password
using HTTP Basic Authentication
Yes
Auto Index http_autoindex Processes requests ending in “/” and produces a directory
listing
Yes
Geo http_geo Creates variables with values depending on the IP address Yes
Map http_map Creates variables whose values depend on other variable
values
Yes
Split Clients http_split_clients Creates variables for use with split (A/B) testing Yes
Referer http_referer Blocks access depending on the value of the HTTP Referer
Header
Yes
Rewrite http_rewrite Changes the request URI using regular expressions Yes
Proxy http_proxy Allows passing requests to another HTTP server Yes
Fastcgi http_fastcgi Allows passing requests to a FastCGI server Yes
14 | Chapter 1: Getting Started

uWSGI http_uwsgi Allows passing requests to a uWSGI server Yes
SCGI http_scgi Allows passing requests to a SCGI server Yes
Memcached http_memcached Used to obtain values from a Memcached server Yes
Limit Conn http_limit_conn Limit the number of connections per IP address Yes
Limit Req http_limit_req Limit the request processing rate per IP address Yes
Empty GIF http_empty_gif Emits a single-pixel transparent GIF image Yes
Browser http_browser Allows browser detection based on the User-Agent HTTP
Header
Yes
Perl http_perl Implement location and variable handlers in Perl No
SSL http_ssl Handle SSL trac within nginx No
SPDY http_spdy Provides experimental support for SPDY No
RealIP http_realip Change the Client IP Address of the Request No
Addition http_addition Adds text before and after the HTTP response No
XSLT http_xslt Post-process pages with XSLT No
Image Filter http_image_lter Transform images with libgd No
GeoIP http_geoip Create variables with geo information based on the IP Address No
Substitution http_sub Replace text in Pages No
WebDAV http_dav WebDAV pass-through support No
FLV http_v Flash Streaming Video No
MP4 http_mp4 Enables mp4 streaming with seeking ability No
Gunzip http_gunzip On-the-y decompression of gzipped responses No
Gzip Precompression http_gzip_static Serves already pre-compressed static les No
Auth Request http_auth_request Implements client authorization based on the result of a
subrequest
No
Random Index http_random_index Randomize directory index No
Secure Link http_secure_link Protect pages with a secret key No
Degradation http_degradation Allow to return 204 or 444 code for some locations on low
memory condition
No
Stub Status http_stub_status View server statistics No
Enabling modules in nginx is as simple as passing an extra flag to the configuration script.
For instance, if you wanted to enable the SSL module, you’d add the
--with-http_ssl_module flag to enable it.
While the barebones build of nginx will get you through most of this book, I recommend
that you re-build nginx with a few extra modules, specifically SSL, SPDY, RealIP, and Stub
Status.
Installing from source | 15

To accomplish this, re-run the configuration script with the extra flags listed below, as
well as make and make install.
Remember, in order to build the SSL module, you’ll need to have OpenSSL installed on
your machine.
$ ./configure --with-http_ssl_module \
--with-http_spdy_module \
--with-http_realip_module \
--with-http_stub_status_modul
$ make
$ sudo make install
After re-building nginx with the new modules, you may re-run nginx -V to verify that
the new version of nginx, with the modules, have been properly installed.
You will notice in the output that TLS SNI has been enabled, as well as the configuration
arguments we used above.
$ /usr/local/nginx/sbin/nginx -V
nginx version: nginx/1.9.2
built by gcc 4.8.2 (Ubuntu 4.8.2-19ubuntu1)
TLS SNI support enabled
configure arguments: --with-http_ssl_module --with-http_spdy_module
--with-http_realip_module --with-http_stub_status_module
ird party modules
In addition to many built-in modules, nginx also has a massive library of third party
modules that aren’t packaged with the main distribution.
You can find the modules on wiki.nginx.org. There are over 100 third party modules,
including everything from embedded lua scripting to upload progress bars.
Installing from a package
Installing nginx straight from your distributions package manager is easier and faster
compared to building nginx from source.
The tradeoff is that your distribution’s nginx packages are often outdated and you won’t
be able to install any of the 3rd party modules mentioned earlier.
That being said, nginx provides its own up-to-date pre-built packages for many of the
most popular Linux distributions, including RedHat, CentOS, Debian, Ubuntu, and SLES.
16 | Chapter 1: Getting Started

Another advantage of installing nginx from your package manager is that the packages
come with the necessary init or upstart scripts to easily run nginx as a daemon or auto‐
matically start after a reboot.
If you’re just getting started, I highly recommend you take this path— the packages are
built with sane default modules and generally involve less fuss.
Installing the RedHat/CentOS Package
$ sudo yum install nginx
Installing Ubuntu/Debian Package
$ sudo apt-get install nginx
Installing nginx.org Package (Ubuntu/Debian)
First, you’ll need to grab the nginx signing key from their website so that the package
manager can validate the authenticity of the packages.
$ wget http://nginx.org/keys/nginx_signing.key
Once that’s done, the next step is to add the key you just downloaded from nginx.org to
apt, using the apt-key command.
$ sudo apt-key add nginx_signing.key
Now, we need to find the codename of the Ubuntu/Debian release you’re running. The
easiest way to do this is to run lsb_release -a and look for the row labeled Codename.
$ lsb_release -a
No LSB modules are available.
Distributor ID: Ubuntu
Description: Ubuntu 14.04.1 LTS
Release: 14.04
Codename: trusty
In this case, the codename the Ubuntu release I’m using is trusty. We’ll use this informa‐
tion for the next step.
For Debian, open the file /etc/apt/sources.list and add the entries below to the bot‐
tom of the file, replacing codename, with the one from running the lsb_release com‐
mand.
Installing from a package | 17

deb http://nginx.org/packages/debian/ codename nginx
deb-src http://nginx.org/packages/debian/ codename nginx
For Ubuntu, open the file /etc/apt/sources.list and add the entries below to the bot‐
tom of the file, replacing codename, with the one from running the lsb_release com‐
mand.
deb http://nginx.org/packages/ubuntu/ codename nginx
deb-src http://nginx.org/packages/ubuntu/ codename nginx
Great, almost there. The last step is to update apt and install the latest version of nginx.
$ apt-get update
$ apt-get install nginx
In all cases, no matter which route you chose, you can test the success by attempting to
running nginx -V. You should see output should appear to be similar the output below:
$ nginx -V
nginx version: nginx/1.9.2 (Ubuntu)
built by gcc 4.8.2 (Ubuntu 4.8.2-19ubuntu1)
TLS SNI support
enabled configure arguments:
18 | Chapter 1: Getting Started


CHAPTER 2
Basic Conguration
In this chapter, we’ll cover the basics of configuring nginx— from getting it up and
running for the first time, to configuring and running it in production.
The nginx.conf File
Like most software on Linux, the way that nginx works is specified in a configuration
file called nginx.conf.
When nginx is built from source, the path to the configuration file can be specified by
changing the --conf-path flag.
If nginx was installed from source, the default location of the nginx.conf file is /usr/
local/nginx/conf.
If nginx was installed from a package, it may be located in /etc/nginx or /usr/
local/etc/nginx, depending on the package maintainer and Linux distribution.
If you’re not sure where to find the nginx.conf file, you can run nginx -t to deter‐
mine the location.
$ /usr/sbin/nginx -t
nginx: the configuration file /etc/nginx/nginx.conf syntax is ok
nginx: configuration file /etc/nginx/nginx.conf test is successful
What does nginx -t do?
In addition to running as a web server, the nginx binary includes a few extra bits of
utility functions that you can use.
Passing the -t command line flag just tests that the configuration file is valid and exits.
21

Here is a table for reference (this can be accessed by running nginx -h)
Option Description
-?, -h show the help
-v show version and exit
-V show version AND congure options then exit
-t test conguration and exit
-q suppress non-error messages during conguration testing
-s signal send signal to master process: stop, quit, reopen, reload
-p prex set prex path (default: /usr/share/nginx)
-c lename set conguration le (default: /etc/nginx/nginx.conf)
-g directives set global directives out of conguration le
-T dumps the entire conguration to stdout
If you don’t want to use the default path of the nginx configuration file, you can pass
in your own location with nginx -c filename.
For instance, if you decided you wanted to use a nginx.conf file that was located in
your home directory, the command would look something like this:
$ nginx -c /home/user/nginx.conf
Conguring and running nginx
The nginx configuration file is easy to understand and quiet readable— the syntax
reads somewhat like code.
The most basic nginx configuration that does something is shown in the block below.
events {
}
http {
server {
}
}
You can paste this configuration into your nginx.conf file, but before anything hap‐
pens, you need to run the nginx server. There are a few different ways to do that,
depending on if you built nginx from source or installed it from a package.
22 | Chapter 2: Basic Conguration

If you used a package manager to install nginx, it was probably packaged with an init
script that can be used— service nginx start will start the server.
If you installed nginx from source, you can simply run nginx to start the server.
You may not see any output when you start nginx, that’s completely normal. To verify
that nginx is running, you can use ps to check if the process is running or try to
access the web server with curl.
Using ps, you grep the output for nginx, and should see a master and worker process
running.
$ ps aux | grep nginx
root 24323 0.0 0.0 85772 1213 ? Ss 01:24 0:00 nginx: master process
nobody 24324 0.0 0.0 85992 2004 ? S 01:24 0:00 nginx: worker process
Using curl, you should see some HTML output if you try to access port 80 on local‐
host.
$ curl 127.0.0.1
<!DOCTYPE html>
<html>
<head>
<title>Welcome to nginx!</title>
Wait, that’s right— with the simple 7-line configuration file nginx is actually serving
up static files to the internet. By default (with this empty configuration), nginx will
share the contents of the /usr/share/nginx/html directory on port 80.
If you add a file to this directory and try to access it from curl, the contents would be
returned to you.
Filling in the blanks
Obviously, there must be something else going on or some default values if nginx is
serving HTTP requests to /usr/share/nginx/html with a nearly blank configuration
file.
Here is what that same configuration file actually looks like with the default values
added.
Example 2-1. Basic conguration le, with defaults values
user nobody nogroup;
worker_processes 1;
events {
worker_connections 512;
}
Conguring and running nginx | 23

http {
server {
listen *:80;
server_name "";
root /usr/share/nginx/html;
}
}
With this filled out configuration file, you can start to get a sense for what the nginx
configuration syntax looks like and how it works.
The configuration file is made up of directives. There are two types of directives that
you’ll encounter.
Simple Directives
The most basic is called a simple directive. A simple directive is just a simple state‐
ment, like listen *:80;.
The simple directive is made up of a name (listen), the parameters (*:80), and a clos‐
ing semicolon (;).
Simple directives often can take multiple parameters, some of which can be optional.
When a directive has optional parameters, they are typically named parameters and
passed into the directive as a key-value pair OR just the key name for true values.
For instance, the listen directive has 14 optional parameters, which can be specified
in any order. Two of the optional parameters for the listen directive are “ssl” and
“backlog”, which are turned on the example below.
listen *:80 ssl backlog=511;
Note that for ssl, the parameter was passed without a corresponding value. This indi‐
cates a true value and turns SSL on.
Context Directives
The context directive has a similar syntax as the simple directive except instead of
ending in a semicolon, it wraps a group of directives inside of curly braces.
For example, the server block wraps the listen, server_name, and root directives.
Context directives can be nested, and provide somewhat of a configuration inheri‐
tance model within the configuration file.
Examples of context directives are events, http, and server. There are a handful of
other contexts that you’ll see presented in the next few chapters.
24 | Chapter 2: Basic Conguration

Typically, simple directives can only be included in specific context directives. For
example, the listen directive can only be present in the server context. The list of con‐
texts supported is shown in the documentation for each directive.
The last thing to note— there is an implied main context wrapping the configuration
file. Putting something in the main context simply means that it’s at the top-level of
the configuration file and isn’t included under any other context.
Directive Inheritance
nginx has a very lightweight inheritance model. Directives are always inherited down‐
wards.
For example, you may overwrite previously defined directives in nested contexts.
server {
root /usr/share/nginx/html;
location /foo {
root /usr/share;
}
}
While we haven’t covered the location context yet, you can see in the example that
we’re overwriting the root directive.
If the root directive was not explicitly specified inside of the location block, the value
would be inherited from the server context.
The more complex inheritance rules will be covered in the Advanced Configuration
chapter.
So let’s dig into the configuration file and talk about what’s going on with each line,
starting with the first two.
user nobody nogroup;
worker_processes 1;
Lines 1 and 2 configure the user directive and the worker_processes directive. Since
they aren’t wrapped in a context directive, they are implicitly part of the main con‐
text.
The user directive sets the unix user and group that the nginx worker processes will
run as. By default, the user is nobody and the group is nogroup.
Conguring and running nginx | 25

Remember, in the unix world, every process needs to be run as an explicit user. Gen‐
erally, with network facing services, you want the daemon to run with the least
amount of privileges are possible.
Running nginx as a non-root user
If you choose to run nginx as a non-root user, the user directive
will be ignored. nginx will also not be able to bind to ports below
1024.
This user will potentially need to have permission to read and write to the log files,
store temporary data, and read data from static files.
You may notice that if you run ps, there are two nginx processes, a master running as
root and a worker running as nobody.
$ ps aux | grep nginx
root 24484 0.0 0.0 85772 1312 ? Ss 1:38 0:00 nginx: master process
nobody 24485 0.0 0.0 85992 2004 ? S 1:38 0:00 nginx: worker process
On a Linux, only the root user is able to bind to port numbers below port 1024.
Because of this, nginx is typically started as root to allow it to bind to port 80 and port
443.
The master process reads and executes the nginx configuration, binds the necessary
ports, and runs the worker processes.
The worker process, running as the user specified in the configuration file, is where
incoming HTTP requests are served from.
The number of worker processes is configured with the worker_processes directive. By
default the value is 1, meaning that nginx will run 1 worker process.
It’s common practice to set the number of worker processes to the same number of
CPU cores that you have on your machine. The value of auto can be set on
worker_processes to have nginx auto-detect the number of logical CPU cores. For
example, a single Intel CPU core with Hyperthreading enabled will appear as 2 logical
CPU cores.
Events Context
The events context is the next section of the configuration file. This context is used to
configure parts of the connection processing part of nginx.
There can only ever be one events context and it must be in the main context.
events {
worker_connections 512;
}
26 | Chapter 2: Basic Conguration

nginx is an event driven server. Each worker process is single-threaded and runs a
non-blocking event loop to process requests very quickly.
The events context allows you to tweak and tune some of the settings that drive event
loop.
The worker_connections directive sets the maximum number of simultaneous con‐
nections that can be opened by each worker process. The default is 512 connections
per worker process.
This limit doesn’t just include connections from clients (e.g, browsers making
requests to nginx), but also any subsequent connections that nginx has to make to
talk to your PHP or Rails application.
On Linux, each connection is counts as an open file, and there is an operating system
limit on the maximum number of open files allowed per process. If you decide
increase this value, you’ll need to also increase the maximum number of open files
allowed. More on tuning this in the future chapters.
HTTP and Server Contexts
The HTTP context is where you define your HTTP servers and any applicable direc‐
tives.
Typically, the HTTP context and the server contexts go hand-in-hand. That is to say,
the HTTP context is mostly a container for holding one or more server contexts.
Because it’s possible to define multiple server contexts, it’s often convenient to put
shared directives inside of the HTTP context, since the nginx inheritance model will
make these directives apply to all of the server contexts contained within.
The server context can only ever be specified within the HTTP context, and the
HTTP context must always be part of the main context.
http {
server {
listen *:80;
server_name "";
root /usr/share/nginx/html;
}
}
Let’s look at what’s going on here— very simply, we’re creating an HTTP server to lis‐
ten on port 80 of every network interface, with no HTTP Host specified, and a root
path of /usr/share/nginx/html.
Listen Directive.
The listen directive tells the server which network interface and port to listen on, and
defaults to *:80.
Conguring and running nginx | 27

A listen directive may be specified multiple times in a single server block. For exam‐
ple, if you wanted a server to listen on two different ports—
server {
listen *:80;
listen *:81;
}
Typically this is used when you turn on SSL on, for example, to listen for non-SSL
traffic on port 80 and SSL traffic on port 443.
server {
listen *:80;
listen *:443 ssl;
}
Server_name Directive. The server_name directive is used to determine which server
context to use for an incoming request. This directive is very useful for virtual host‐
ing, when you want to host multiple domain names on the same interface and port.
The server_name is matched against the HTTP Host header of the incoming request.
The HTTP Host header is specified by the HTTP client to indicate which domain
name that it’s attempting to access.
For example, an HTTP request made to nginx may look something like this:
GET /foobar.html HTTP/1.0
Host: example.org
User-Agent: FakeUserAgent/1.0
The Host header (example.org) is used to match against the value in the server_name
directive.
The server_name can be an exact domain name (including subdomains), a wildcard,
or regular expression.
A value of “” means that no Host header is necessary.
Root Directive.
The root directive specifies the path of the directory to serve static files out of. Any
and all files in the root directory will become publicly available over HTTP.
server {
listen *:80;
server_name "";
root /usr/share/nginx/html;
}
Given the above configuration, any files in /usr/share/nginx/html can be accessed
via HTTP by making a web request to http://127.0.0.1.
28 | Chapter 2: Basic Conguration

If you were to add the file test.html to this directory, it could be accessed over
HTTP by hitting http://127.0.0.1/test.html.
Likewise, any directory in the URI is just appended to the root path, so a request to
the URL http://127.0.0.1/foo/test.html would resolve to the filesystem
path /usr/share/nginx/html/foo/test.html.
Reloading and Stopping nginx
Earlier in the chapter, we discussed how to start the nginx server. Depending on how
you installed nginx, it’s as simple as running the binary.
Depending on how you’ve installed nginx, it may have come with an init.d script, and
you can start it by running a command line service nginx start.
Ultimately, though, you can just start nginx by running the binary directly, nginx.
When you make a change or modify the nginx configuration, nginx does not pick it
up automatically— you need to reload the process.
You can reload nginx by sending it the standard unix signal, HUP. In order to send a
unix signal to a process, you first need to know the pid (process id). When you start
nginx, it writes the pid of the master process to the file /var/run/nginx.pid.
Putting it all together, to reload nginx, send the HUP signal with the command:
kill -HUP `cat /var/run/nginx.pid`
When you reload nginx, it will actually verify the syntax of your configuration file
first, so you don’t have to worry about accidentally killing nginx if you try to reload it
with an invalid configuration file.
Reloading nginx actually starts new worker processes and kills off the old ones. It’s
able to do this completely gracefully, without dropping or killing any web requests. It
does this by starting the new workers, discontinuing to send traffic to the old work‐
ers, and waiting for the old workers to complete all in-flight requests before killing
them.
Likewise, you can also shutdown nginx gracefully without dropping any in-flight or
processing requests by sending it the QUIT signal:
kill -QUIT `cat /var/run/nginx.pid`
The list of unix signals that nginx responds to (and the behavior) is listed below:
Signal Description
TERM, INT Quick shutdown
QUIT Graceful shutdown
Reloading and Stopping nginx | 29

Signal Description
KILL Halts a stubborn process
HUP Conguration reload
USR1 Reopen the log les (useful for log rotation)
USR2 Upgrade executable on the y
WINCH Gracefully shutdown worker processes
Making conguration changes
Anytime that you make a configuration change to your nginx.conf
file, you’ll have to explicitly tell nginx to reload the configuration
with the HUP signal— nginx does not pick up configuration
changes automatically.
Upgrading the nginx binary without Downtime
When you reload the nginx configuration, it starts new workers, but the master pro‐
cess does not change.
This works great if you’re just updating the configuration, but what if you have a new
version of nginx that you want to deploy?
No worries, nginx can actually upgrade itself on the fly without any downtime.
First, build or install the new version of nginx that you want to run.
Next, find the master process id by running checking the nginx pid file, located
at /var/run/nginx.pid.
$ cat /var/run/nginx.pid
24484
In this example, the master PID is 24484. We need to send it the USR2 signal, which
starts the new master process and new workers.
$ kill -USR2 24484
After sending USR2 to the old master process, nginx will start up a new master pro‐
cess and workers. These two processes will serve incoming requests together.
Next, we need to kill the children of the old nginx master. Since we don’t want to drop
any in-flight requests, we use the WINCH signal to tell the old nginx master to stop
taking new requests and shutdown down the children once all in-flight requests are
finished.
$ kill -WINCH 24484
30 | Chapter 2: Basic Conguration

After a short time, when all in-flight requests are complete, the old nginx children will
shutdown and the upgraded version of nginx will be running and serving request.
There’s still one last thing to do. The old nginx master is still running and hanging
around.
If you need to bail out of the upgrade, you can actually ask the old master to spin up
children and serve requests again by sending it the HUP signal.
Otherwise, you can go ahead and kill the old master by sending it the QUIT signal:
$ kill -QUIT 24484
Serving Static Files
Now that we’ve gone over a bit about the basic directives in the nginx.conf file, let’s
talk about how to do something practical with nginx so that you can begin using it.
The most basic case for nginx is serving static files. While nginx can do plenty of
other things (dynamic web applications, reverse proxying, http caching), the founda‐
tion of nginx all builds on the http and server directives.
Typically, when you serve static files (html, css, javascript, images, etc) from a web
server, all of the files are stored in a common directory called a directory root. The
directory root is the base directory that you want to make available through the web
server.
For example, if you have a document root of /usr/share/nginx/html, when some‐
one requests the URL http://example.org/test.html, the server will attempt to
locate the test.html file inside of the directory /usr/share/nginx/html.
Example 2-2. Nginx with a document root
server {
listen *:80;
root /usr/share/nginx/html;
}
What happens when you access a URL without specifying a file, for example, http://
example.org/? By default, nginx blesses a special file named index.html to be shown
when a filename isn’t specified in the URL.
It’s possible to override this behavior and specify your own default index with
the index directive.
Serving Static Files | 31

Example 2-3. Make foobar.html the index
server {
listen *:80;
root /usr/share/nginx/html;
index ADifferentIndexFile.html;
}
You may also pass multiple index files to the index directive. When you do this, nginx
will check for the existence of each file and serve the first one that exists. The index
file name can include nginx variables. The last file name in the list may also be an
absolute path.
Example 2-4. Multiple index les
server {
listen *:80;
root /usr/share/nginx/html;
index maintenance.html index.html;
}
In the example above, we’re implicitly checking for the existence of the index file
maintenance.html. If it exists, that file is served as the index. If it doesn’t, we proceed
as normal and serve the regular index.html page.
This mechanism is a common way to handle deployments or other scheduled down‐
time— before deploying or making changes, you create a maintenance.html page and
have nginx serve that. When you’re done, just delete the file and it’ll go back to serv‐
ing index.html.
The Location Block
It’s typical to have more advanced needs when serving requests through nginx. The
static file examples in the previous section depends on 1:1 mapping between the path
of the HTTP Request and the filesystem.
For example, a request to http://example.org/foo/bar.html depends on the exis‐
tence of bar.html within the directory foo. This works for simple cases, but often
times it’s not that simple.
This is where the location block shines— it allows us to provide a custom configura‐
tion for incoming request URI by matching it against a prefix string or regular
expression.
If you’re coming from Apache land, it’s an easier and, in my opinion, more elegant
rule to express similar functionality as Rewrite Rules.
32 | Chapter 2: Basic Conguration

Basic Location Blocks
The basic syntax for a location block looks like this:
Example 2-5. Basic location block syntax
location optional_modifier uri_matcher {
configuration_directives
}
Let’s look at a basic example.
Example 2-6. Basic location block example
location / {
root /var/www/html;
}
location /foobar/ {
root /data;
}
The example above defines two prefix location blocks, one for the path / and the
other for the path /foobar/.
The first location block simply serves request URIs matching the prefix / out of the
directory /var/www/html. For example, http://example.org/file.html will be
resolved to /var/www/html/file.html. This is the exact same behavior as completely
skipping the location block and specifying the root directive within the server block.
The second location block does something different. It matches against the prefix /
foobar/ and serves it out of a different directory entirely. When a request URI begins
with the prefix /foobar/, it will use the root directory /data.
So, for example, a request to http://example.org/foobar/test.html will resolve to
the filesystem path /data/foobar/test.html.
Appending the path and replacing the path
Notice that in all of the example so far, when we use the root directive, the request
URI path is appended to the root directive.
Sometimes, instead of appending the URI to the root path, we want to replace it
instead.
The Location Block | 33

To accomplish this, we can use the alias directive instead. It’s similar to root, except it
replaces the specified location.
Example 2-7. Location block using alias
location /gifs/ {
alias /data/images/;
}
In this example, a request to http://example.org/gifs/business_cat.gif will be
resolves to the path /data/images/business_cat.gif.
If we has used root instead, the same request uri would resolve to the path /data/
images/gif/business_cat.gif instead.
The trailing slash is important with alias, as without it, the path would end up being /
data/imagesbusiness_cat.gif
When there are overlapping prefix location blocks, the most specific match is used.
Let’s look at the following example:
Example 2-8. Overlapping prex location blocks
location /foobar/images {
...
}
location /foobar/ {
...
}
In this case, a request URI for http://example.org/foobar/images/gifs/file.gif
will use the /foobar/images location block, even though it matches both blocks. The
order of prefix location blocks does not matter, the most specific match will be used
regardless.
As you’ve noticed, the prefix location blocks match any request URI that are prefixed
with the path specified. You can use the exact match modier (=)to match an exact
request URI.
Example 2-9. Matching an exact request URI
location = /foobar/images/business_cat.gif {
...
}
34 | Chapter 2: Basic Conguration

In this example, the location block will only match the exact request URI for the
path /foobar/images/business_cat.gif. The fact that it matches a filename is not
important, it can match any arbitrary request URI.
Example 2-10. Matching an exact request URI without a lename
location = /foobar/ {
...
}
This location block will only match an exact request URI to /foobar/. It won’t
match /foobar/index.html or anything besides an exact match.
Location blocks with an exact match modifier are the first blocks to be checked for a
match and will terminate the search and immediately be selected for use.
Example 2-11. Example of = block being selected
location = /foobar/ {
...
}
location /foobar/ {
...
}
In the example above, a request URI for /foobar/ will always use the first location
block, even though the prefix block also matches the same request URI.
Because the exact match modifier will immediately terminate the location block
search, you can improve performance by creating exact match blocks for highly
accessed URIs when you have a configuration with many location blocks (this
becomes even more useful with regular expression blocks, discussed in the next sec‐
tion, as they are more intensive to process).
Regular Expression Location Blocks
In the previous section, we discussed prefix and exact match location blocks. These
types of location blocks are very useful but they’re not very dynamic— sometimes
you need to match on more than just the prefix.
Regular expression location blocks give you that power. They allow you to specify a
regular expression that’s used to match the request URI.
Unlike using prefixes, the order of regular expression location blocks matters. Each
block will be processed, in order of declaration, and the first to match the request
URI will be used to serve the request.
The Location Block | 35

Example 2-12. Basic regular expression example
location ~ \.(gif|jpg)$ {
...
}
This location block uses the regular expression \.(gif|jpg)$ to match any URIs
ending in the extension .gif or .jpg.
Notice how the location block also uses a modifier, ~, before the regular expression.
The ~ is the modifier to create a case-sensitive regular expression location block.
Because this example uses a case-sensitive matcher, it will match the URI images/
picture.gif but not images/picture.GIF.
Creating a case-insensitive regular expression location block is almost the same, but
uses the ~* modifier instead.
Example 2-13. Example of a case-insensitive regular expression
location ~* \.(gif|jpg)$ {
...
}
Because regular expression are more processor intensive to process and match
against, use them only when necessary! It will always be faster to process a location
block that uses prefixes than one that uses regular expressions.
Skipping Regular Expressions
There’s one more type of location block modifier that allows us to skip the processing
of regular expressions, the carat and tilde (^~) modifier.
Let’s look at an example where this type of modifier would be useful.
Example 2-14. Overlapping prex and regular expressions
location /foobar/images {
root /var/www/foobar;
}
location ~* \.(gif|jpg)$ {
root /var/www/images;
}
Because regular expressions are matched aer the prefix locations, if there is a
request URI for /foobar/images/dog.gif, the regular expression block will always
be used. The two blocks are competing for the same paths.
36 | Chapter 2: Basic Conguration

One way to solve this would be to rewrite the regular expression to exclude the /
foobar/images path, but this would make it more complicated and confusing.
Instead, we can change the /foobar/images location block to use the carat-tilde
modifier.
Example 2-15. Example using the carat-tilde modier
location ^~ /foobar/images {
root /var/www/foobar;
}
location ~* \.(gif|jpg)$ {
root /var/www/images;
}
When the carat-tilde modifier is chosen as the best prefix for a URI, it is immediately
selected and skips matching against the regular expression blocks.
Therefore, a URI for /foobar/images/dog.gif will use the first location block
while /images/cat.gif will match the regular expression and use the second location
block.
The Location Block Selection Algorithm
At this point, we’ve learned about all of the different types of modifiers that influence
how a request URI is matched to a location block.
Modier Name Description
(none) Prex Matches on the prex of a URI
=
Exact Match Matches an exact URI
~
Case-Sensitive Regular
Exression
Matches a URI against a case-sensitive regular expression
~*
Case-Insensitive Regular
Expression
Matches a URI against a case-insensitive regular expression
^~
Non-Regular Expression
Prex
Matches a URI against a prex and skips regular expression
matching
The Location Block | 37

The exact search algorithm that nginx uses to select the location block is a described
as follows:
1. The exact match location blocks are checked. If an exact match is found, the
search is terminated and the location block is used.
2. All of the prefix location blocks are checked for the most specific (longest)
matching prefix.
a. If the best match has the ^~ modifier, the search is terminated and the block is
used.
3. Each regular expression block is checked in sequential order. If a regular expres‐
sion match occurs, the search is terminated and block is used.
4. If no regular expression block is matched, the best prefix location block deter‐
mined in step #2 is used.
Named Location Blocks
There’s one last type of location block that I haven’t mentioned yet— the named loca‐
tion block. These types of location blocks are a bit different in that they cannot be
used directly for regular request processing and will never match the request URI.
Instead, they are used for internal redirection. Named locations are denoted by the @
prefix.
Example 2-16. Example of unused named location block
location @foobar {
...
}
In the above example, we declare a named location block. In it’s current form it does
nothing! It will never be used unless it’s called explicitly within the nginx configura‐
tion file. So how do we call it?
Example 2-17. Named locations for try_les
location / {
try_files maintenance.html index.html @foobar;
}
location @foobar {
...
}
The example above introduces a new directive, try_les, which checks for the exis‐
tence of the file names provided, in order from left to right, and uses the first one
found to service the request.
38 | Chapter 2: Basic Conguration

The last parameter to try_files may be either an internal redirect using a named
location block (in this case, @foobar) or an explicit error code (shown in the next
example).
When try_files can’t find any of the files in its parameter list, it will redirect to the
@foobar location block and allow the block the handle the request.
We’ll dig into try_files more in Chapter 3 (FastCGI) and Chapter 4 (Reverse
Proxy), as it’s commonly used when talking to dynamic backends, such as PHP and
Ruby applications.
Example 2-18. try_les with an error code
location / {
try_files maintenance.html index.html =404
}
If neither maintenance.html nor index.html are found, try_files will return the HTTP
error code 404.
Location Block Inheritance
Section content goes here
Virtualhosts
So far, we’ve only talked about configuring a single server block, which limits us to
running a single website within nginx.
Fortunately, nginx allows us to define as many server blocks to host as many websites
as we want! This is called virtual hosting.
Example 2-19. Basic virtual hosts example
server {
listen 80;
server_name example.com;
}
server {
listen 80;
server_name foobar.com;
}
Virtualhosts | 39

In the above example, we define two server blocks, both listening on port 80, for the
domain names example.com and foobar.com. These two blocks are completely inde‐
pendent and can define their own location directives.
Remember that server_name can contain subdomains, wildcards, and regular expres‐
sions. The first domain parameter to server_name is considered the primary server
name.
All of these are valid server_name directives:
server_name example.com www.example.com;
Using wildcards:
server_name example.com *.example.com www.example.*;
Alternative way to match both example.com and *.example.com:
server_name .example.com;
You may use a regular expression by prefixing it with a tilde (~):
server_name ~^www[0-9]\.example\.com$;
Regular expressions may also contain captures, allowing you to set dynamic variables
based on the match.
Example 2-20. Example using capture group
server {
listen 80;
server_name ~^(www\.)?(?<domain>.+)$;
location / {
root /sites/$domain;
}
}
This example sets the root path dynamically based on the name of the domain.
Notice how the server_name regex contains the syntax (?<domain>.+)? This is the
syntax for a named capturing group, the name being everything between the brackets.
When you use a named capturing group, you’re basically saying “remember whatever
data matches the regular expression between these two parenthesis”. In this case, that
regular expression is matching everything after the “www.” in the domain name.
Because you’ve asked nginx to remember the data matched in the regular expres‐
sion and you used a named capture group to name it “domain”, the variable $domain
is set with that data and subsequently used a few lines lower to dynamically set the
root path.
40 | Chapter 2: Basic Conguration

We’ll dig into variables later in the chapter, but for now all you need to know is that
they allow you pass dynamic data into various directives.
Default Server Block
When you have multiple server blocks, how does nginx decide which one to use?
First, it matches the IP Address and Port that the request was received on and only
considers server blocks that are listening on that IP Address and Port combina‐
tion (by default, all IP Addresses and Port 80).
After that, nginx matches the HTTP Header “Host” from the request against the
server_name directive in each server block.
If there are more than one server_name directives that match the Host header, the
first matching one will be chosen, similar to how location blocks are chosen.
1. The exact name (www.example.com)
2. The longest wildcard name starting with an asterisk (*.example.com)
3. The longest wild card name ending with an asterisk (www.*)
4. The first matching regular expression, in the order defined in the configuration
If there no server_name directives that match the Host header (or the Host header is
not present), nginx chooses the default server block. Out of the box, the default server
block is the first one defined in the configuration file.
You may explicitly choose the default server block by setting
the default_server parameter on the listen directive.
Example 2-21. Explicitly setting the default_server parameter
server {
listen 80;
server_name example.com;
}
server {
listen 80 default_server;
server_name foobar.com;
}
In the above example, the second server block will match requests to foo‐
bar.com and any requests on port 80 that aren’t to the domain example.com.
Dropping requests without a server name
You can choose to drop requests made to your server without a Host header set, as
this usually signifies an invalid or misbehaving HTTP client.
Virtualhosts | 41

The way you do this is by defining a server block with an empty server_name that
returns a special nginx HTTP error code.
Example 2-22. Server that drops requests
server {
listen 80;
server_name "";
return 444;
}
The return directive stops processing the request and returns the specified HTTP
error code. In this case, we return a non-standard HTTP code, 444, which is special
code that tells nginx to immediately close the connection.
Additionally, if you’d like to drop requests made to your server without an explicitly
defined domain name, you can mark this server block as the default_server.
Conguring SSL
SSL (Secure Sockets Layer) is a way to create a secure connection between an HTTP
Client and an HTTP(S) Server. nginx offers a very robust and high performance SSL
implementation.
To get started with setting up SSL, you’ll need to have an SSL certificate and key.
Example 2-23. Most basic SSL Conguration
server {
listen 80;
listen 443 ssl;
server_name www.foobar.com;
ssl_certificate www.foobar.com.crt;
ssl_certificate_key www.foobar.com.key;
}
You’ll notice a few new things here— first, there are two listen directives specified,
one listening on port 80 and other on 443. This setup allows us to create a compact
server block that server both non-SSL and SSL requests. We use the ssl parameter to
tell nginx that we expect SSL traffic on this port.
The other two new directives are ssl_certicate and ssl_certicate_key. ssl_certifi
cate tells nginx the path to find the signed certificate (in PEM format) for this
domain. Likewise, ssl_certificate_key specifies the path to the key for the certifi‐
cate
42 | Chapter 2: Basic Conguration

If you specify just a filename or relative path (i.e, ssl/certificate.crt), nginx will
prefix the path with the configuration directory, /etc/nginx.
You may also specify an absolute path, i.e /usr/share/ssl/foobar.com.crt.
Beware outdated SSL information
In previous versions of nginx, there were substantially different
ways to configure SSL that are no longer valid syntax or non-
optimal.
For example, in previous versions (prior to 0.7.14) of nginx you
had to configure separate server blocks, one for non-SSL and
another for SSL.
Sharing a wildcard certicate
It’s possible to generate a wildcard SSL certificate that is valid for multiple domains,
or subdomains.
Perhaps we have a certificate for the domain name *.example.com and want to share
it with several server directives that serve various subdomains on example.com.
Instead of having to configure the same ssl_certificate and ssl_certificate_key
directives for each server block, we can set it at the http block level instead, and the
server blocks will inherit the directives.
Example 2-24. Example sharing SSL directives
http {
ssl_certificate star.example.com.crt;
ssl_certificate_key star.example.com.crt;
server {
listen 80;
listen 443 ssl;
server_name www.example.com;
}
server {
listen 80;
listen 443 ssl;
server_name billing.example.com;
}
}
This also has the benefit of having a lighter memory footprint as the certificate data
will only be loaded into nginx one time.
Conguring SSL | 43

SNI and the future of SSL
Up until recently, HTTPS had the major disadvantage that each and every SSL server
had to have its own dedicated IP Address.
The reason for this is that the entire HTTP Payload gets encrypted during the request,
even the HTTP Host Header, which is how you determine which server
block and SSL configuration to use. It’s a catch-22— without the Host header, you
don’t know which SSL configuration to use, and without the SSL configuration, you
can’t decrypt the HTTP Payload to get the Host Header.
Thus, each HTTPS site was put on its own IP Address, so that you could determine
which domain and SSL configuration it belonged to without having access to the
HTTP Host Header.
Unfortunately, we’re quickly running out of IPv4 IP Addresses. They’re getting scarce
and expensive. The one-IP-per-website thing doesn’t scale anymore.
To address this problem, SNI (Server Name Indication) was created. Simply put, an
SNI-enabled browser passes the domain name unencrypted so that we know which
SSL certificate to use. It means that many websites can share a single IP Address
and still have SSL.
That being said, SNI is only supported on modern browsers, specifically:
• Chrome (Windows version only Vista or newer)
• Safari 3.2.1 (Windows version only Vista or newer)
• Firefox 2.0
• MSIE 7.0 (only on Windows Vista or newer)
•Opera 8.0
44 | Chapter 2: Basic Conguration


CHAPTER 3
CGI, FastCGI, and uWSGI
Until the mid-1990s, there wasn’t an easy way to create dynamic pages for the web. If
you wanted to do more than serve static HTML files or images, you’d have to write
your own web server.
Writing your own web server for every application is clearly a case of “reinventing the
wheel”, so it was obvious that something better was needed— a way to extend the web
server.
To serve that need, CGI (Common Gateway Interface) was officially born in 1997.
CGI is an interface for web servers to communicate with programs (or scripts) on the
web server. CGI gave programmers the ability to write their own dynamic web appli‐
cation by extending the web server software.
Because it’s a Common Gateway Interface, CGI is a programming language independ‐
ent.
Although plain CGI isn’t used much in recent years (it’s not even supported out-of-
the box by nginx), it’s worth understanding because the more modern replacements
that we’ll cover later in the chapter are built on it.
How CGI works
CGI works by executing the script or program, on demand, whenever it is requested
by the HTTP client.
We’ve all seen the old school http://example.com/cgi-bin/script.php URLs. What’s
going on there? What’s a cgi-bin anyways? Time for a deep dive.
When a web server receives a request for a CGI script, it simply executes the scripts
directly and returns the output to the browser.
47

For example, for this hypothetical example, let’s pretend we have the following PHP
script that we want to run as a CGI script. The script will be saved to the file system
as script.php.
#!/usr/bin/php
<?php
echo "Content-Type: text/plain\n";
echo "PHP-CGI Script! Woohoo<br>";
echo time();
If you wanted to run this script from the command line on the server yourself, you’d
just type the name of the script, press enter, and it would execute.
$ ./script.php
Content-Type: text/plain
PHP-CGI Script! Woohoo<br>
1429629271
Well, what does that have to do with CGI? Remember, CGI is just a fancy way of say‐
ing “the web server executes the script directly”. When you access script.php from the
web server, it’s just running ./script.php and returning the output to the browser.
You might be thinking, that seems insecure. What if you tried to run dangerous com‐
mands like rm to delete files? If the web server is just running the commands,
couldn’t you run anything? And you’d be right.
That’s where the cgi-bin directory comes in to play. Typically, with CGI, there’s a spe‐
cial directory that’s used to designate which programs are safe to run. This directory
can be named anything, but it’s commonly named and referred to as the cgi-bin
directory.
The other missing piece of CGI is the context, or environment, of the HTTP request.
The CGI script needs a way to retrieve things like the Request URI, Client IP Address,
or Server Host from the HTTP Request.
With CGI, these are all passed into the script as environment variables. For example,
if we wanted our CGI script to output the Client IP Address, we might write the fol‐
lowing:
#!/usr/bin/php
<?php
echo "Content-Type: text/plain\n";
echo "PHP-CGI Script! Woohoo<br>";
echo $_SERVER["REMOTE_IP"];
48 | Chapter 3: CGI, FastCGI, and uWSGI

If we were executing this script from the command line, we’d have to pass in the
REMOTE_IP environment variable, shown below.
$ REMOTE_IP=127.0.0.1 ./script.php
Content-Type: text/plain
PHP-CGI Script! Woohoo<br>
127.0.0.1
When accessed via CGI through the web server, the same thing is happening. There
are a standard group of environment variables that are passed from the web server to
the CGI script to provide context about the web request. These environment variables
are listed in the table below.
Variable Denition Example
GATEWAY_INTERFACE The version of the CGI protocol being used by the web server. CGI/1.1
SERVER_SOFTWARE The name of the web server software making the CGI call. nginx
QUERY_STRING The HTTP query string of the web request. foo=bar&foobar=1
REQUEST_METHOD The HTTP request method POST
CONTENT_TYPE The HTTP Content-Type text/plain
CONTENT_LENGTH The Length of the HTTP Request 100
SCRIPT_FILENAME The path of the CGI script being executed /var/www/cgi-bin/test.php
SCRIPT_NAME The virtual path of the CGI script /cgi-bin/test.php
REQUEST_URI The path to the requested le by the client /cgi-bin/test.php?foo=bar
DOCUMENT_URI The path part of the URL to the cgi script /cgi-bin/test.php
DOCUMENT_ROOT The root path of the server /var/www/html
SERVER_PROTOCOL The type of protocol being used by the client/server HTTP/1.0
REMOTE_ADDR The IP Address of the client 108.22.12.23
REMOTE_PORT The port of the client 9583
SERVER_ADDR The IP Address of the server 192.168.10.1
SERVER_PORT The port of the server 80
SERVER_NAME The server hostname app01
While serving up static html is easy, there’s only so much that can be done with html
and javascript. It’s impossible to create rich applications without a backend or server-
side component.
How CGI works | 49
There’s generally two different ways to use nginx with a backend web application—
FastCGI is one of the ways. The other method, using a reverse proxy, will be covered
in the next chapter.
Typically, FastCGI is only relevant if you’re deploying PHP applications. Most other
languages (Ruby, Node, Go, etc) have moved past CGI and it’s best practice to use a
Reverse Proxy Server.
What is FastCGI?
nginx does not support regular, old-school CGI. In the traditional CGI model, when
the script is accessed, the web server actually has to fork and execute the script.
This has all of the disadvantages that you might imagine. The performance is rela‐
tively poor, since forking is a slow and an expensive system call to make.
The security model is also risky. If an attacker finds a way to upload a script to that
blessed cgi-bin directory, they can run any script that they desire. You don’t want the
webserver to be able to execute any arbitrary script on your server.
However, CGI has one advantage: it’s extremely simple. Plop a perl or php script into
a special directory and you’re good to go. No special servers, no deployment.
FastCGI Basics
FastCGI is a direct replacement for CGI. It solves the performance and security con‐
cerns but adds a little bit of complexity to the way that applications are run.
With CGI, the web server is executing the scripts directly. There is no layer between
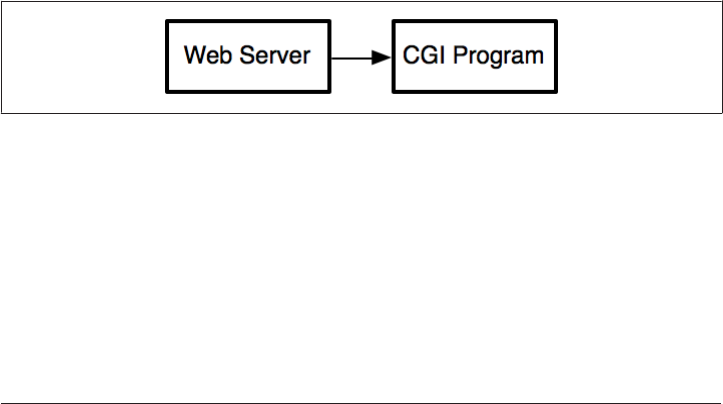
the two- they talk directly.
Figure 3-1. Web Server executing CGI program directly
With FastCGI, things change a little bit. Instead of the web server talking to the pro‐
gram directly, the web server talks to a FastCGI server instead. The FastCGI server is
another daemon/background program, running on the computer, that handles the
task of running the desired script.
50 | Chapter 3: CGI, FastCGI, and uWSGI

Figure 3-2. Web Server executing CGI program through FastCGI Server
When a request comes in, the webserver makes a TCP or Unix Socket request to the
FastCGI server, which runs the script and returns the result to the web server.
The FastCGI server is typically long running, so it doesn’t need to fork itself for each
request, and can typically handle many connections.
This all seems really complex. It’s not. In almost all cases, when you’re writing or con‐
figuring php apps to work with nginx, you’ll almost never have to deal with FastCGI
directly, because PHP has PHP-FPM (PHP FastCGI Process Manager) built in. It does
almost all of the work for you.
FastCGI Basic Cong
Let’s start off with the most basic (yet common) situation. You have a PHP script,
script.php, that you want to run with nginx.
<?php
echo "Running a script from nginx<br>";
echo time();
The desired output for this script is something like
Running a script from nginx
2015-05-01 12:01:01
Conguring PHP-FPM for FastCGI
In order to run PHP as FastCGI, you need to make sure that you have PHP-FPM.
Luckily, PHP-FPM has been bundled with PHP since PHP version 5.3.
FastCGI Basics | 51

If you’re on Ubuntu, you can install PHP-FPM with the command apt-get install
php5-fpm.
To configure php-fpm, you need to edit the configuration file. On Ubuntu, this file is
located in /etc/php5/fpm/pool.d/www.conf
To start php-fpm on Ubuntu, you run the command service php5-fpm start.
location ~ script.php {
fastcgi_pass unix:/var/run/php5-fpm.sock;
fastcgi_index index.php
include fastcgi_params;
}
This location block matches a single PHP script, script.php. When a request comes in
that matches this block (http://example.org/script.php), it will pass, or proxy, the
request to the upstream FastCGI server.
The FastCGI server will use the SCRIPT_FILENAME FastCGI Parameter to deter‐
mine which PHP script to execute.
By default, the SCRIPT_FILENAME parameter is set to the value below
$document_root$fastcgi_script_name
This value just concatenates the $document_root, which is the document root of the
current request (specified by the root directive) and another variable called
$fastcgi_script_name.
$fastcgi_script_name is a variable that’s set automatically by nginx based on the
path of the request URI.
If the request URI ends in a “/” , the value of the fastcgi_index directive is
appended to the end of the URI and set to the $fastcgi_script_name variable. So, for
example, if the request were http://example.org/foobar/, the $fastcgi_script_name
would be set as /foobar/index.php.
Otherwise, $fastcgi_script_name is simply set as request URI.
Watch out for old syntax!
Please be warned about something important!
Many individual PHP Files, Directly Accessible
In the real world, there are two common FastCGI/PHP configuration that people typ‐
ically want.
52 | Chapter 3: CGI, FastCGI, and uWSGI

The first is when you have many individual PHP files in a single directory and want
them to be all individually executable.
Route all requests through index.php
The other typical scenario, especially for modern web applications built on PHP
frameworks such as Zend Framework or Laravel, is to have all requests go through a
central index.php file.
The configuration for this scenario looks like this:
server {
location / {
try_files $uri $uri/ index.php$is_args$args;
}
location ~ \.php$ {
try_files $uri /index.php =404;
fastcgi_pass upstream;
fastcgi_index index.php
fastcgi_split_path_info ^(.+\.php)(.*)$;
fastcgi_param SCRIPT_FILENAME $document_root$fastcgi_scriptName;
}
}
Don’t trust the nginx/PHP Tutorials!
Most websites and tutorials for configuring nginx and PHP are
wrong.
More than wrong, in fact, they unknowingly expose you to a back‐
door— a misconfigured nginx server can allow non-PHP files to be
executed as PHP.
What that means that if your nginx server is misconfigured using
one of the incorrect online tutorials, an attacker could upload their
own PHP file (say, through an image uploader or contact form on
your website) and convince PHP-FPM to execute it!
cgi.x_pathinfo
fastcgi_split_path_info
Future Sections in this Chapter
1. Advanced FastCGI Configuration
2. FastCGI Params
3. PHP and FastCGI Security
4. Python and uWSGI
FastCGI Basics | 53

5. uWSGI vs FastCGI
54 | Chapter 3: CGI, FastCGI, and uWSGI

CHAPTER 4
Reverse Proxy
One of the most popular reasons for running nginx is to serve a dynamic web appli‐
cation written in Ruby, PHP, Node.Js, Python or one of the many web languages
available today.
Unlike Apache, nginx does not have the ability to embed the programming language
interpreter into the webserver, like Apache does with mod_php.
Instead, nginx takes a much lighter weight approach. It’s just a webserver and gener‐
ally tries to keep its footprint very small, running a web application is delegated to a
separate server and proxies upstream.
Forward Proxy vs Reverse Proxy
To fully understand the concept of a reverse proxy, which will be foundational for the
following chapters on Load Balancing and FastCGI, you first need to concept of
a forward proxy.
Forward Proxy
A forward proxy, or sometimes just called proxy, is a common setup in a home or
office network. Basically, the proxy sits between all outgoing internet connections and
the internet. It looks something like this.
55
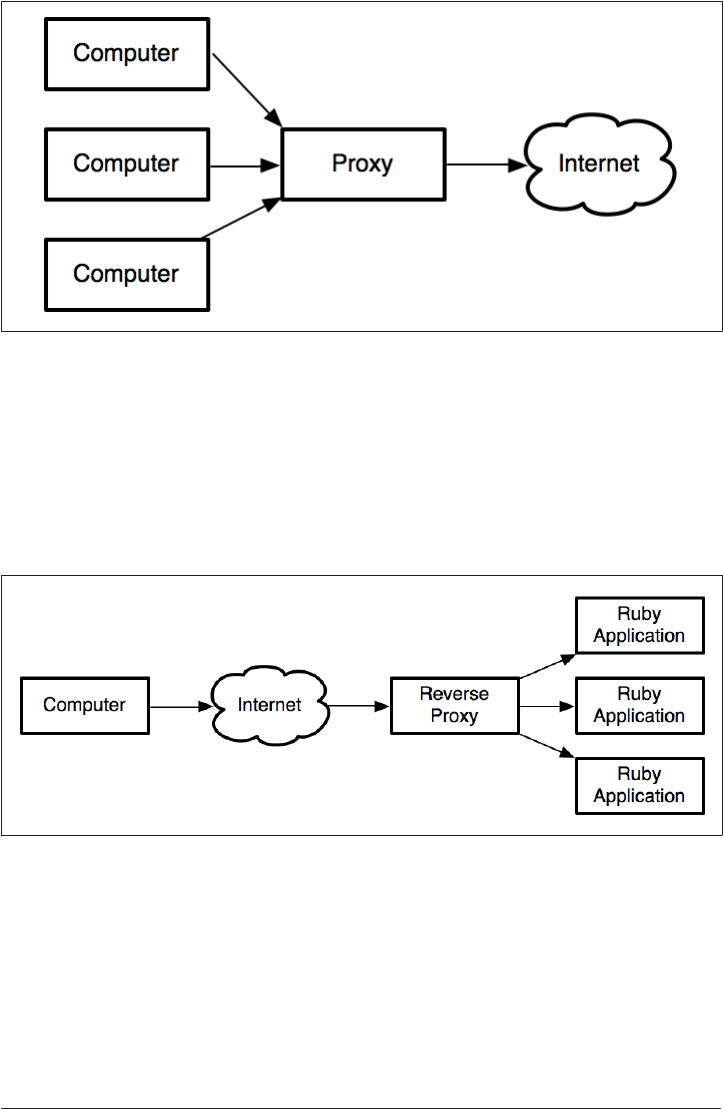
Figure 4-1. Example of a forward proxy conguration
The outgoing connections from the computers are captured and terminated by the
Forward Proxy and forwarded to the Internet. To the Internet, all of the Computers
appear to be coming from the same source— the Forward Proxy.
Reverse Proxy
A reverse proxy is the opposite of a forward proxy and is a common setup for serving
dynamic web applications and load balancing.
Figure 4-2. Example of a reverse proxy conguration
In this example, the reverse proxy multiplexes many connections from the internet to
a dynamic ruby application. The reverse proxy terminates the request and forwards it
to the ruby app.
This is the exact same concept as Load Balancing a Chapter 4— a Load Balancer is
reverse proxy!
56 | Chapter 4: Reverse Proxy

The only difference in the case of load balancing is that typically a load balancer is
communicating upstream to another nginx or web server, located on a different phys‐
ical machine, while the reverse proxy is often talking to a service on the same
machine.
The terms are different but the underlying concepts are nearly identical. In fact,
because reverse proxy just proxies HTTP, and most dynamic web applications speak
HTTP, you can think of it as just a local load balancer.
Conguring a basic Rails Application
The way I like to start digging into advanced concepts is by dissecting a very basic
example and building upon that.
Let’s pretend we have the most basic Ruby on Rails application. You can set this up by
creating a bare-bones Rails application with rails new TestApp and running rails
s within the newly creating TestApp directory.
The rails s command starts a WEBrick listening on port 3000. The WEBrick server
is great for development and testing, but isn’t great for production. In production, I
recommend using puma, unicorn, or thin, but WEBrick will suffice for this example
(the nginx configuration is the same).
If you access http://127.0.0.1:3000 in your browser, you’ll see the stock “Welcome
to Rails” page which looks something like this:
Conguring a basic Rails Application | 57
Figure 4-3. e basic “Welcome to Rails” page
That’s great, but you really want this running port 80, and you don’t want to expose
WEBrick directly to the internet.
Rack-based server (like WEBrick, puma, and unicorn) are great for serving dynamic
content from Rails, but are horribly slow when serving static content. Additionally,
the web serving parts of these servers aren’t nearly as feature rich as nginx— their
purpose is to serve Ruby applications, not be full-featured servers.
What we want to do is use nginx to listen on port 80 and act as a reverse proxy for
this WEBrick server that’s running on port 3000.
It’s all just HTTP, so it doesn’t matter if you’re using Rails, Node.JS, Golang, or some‐
thing else.
The most basic configuration would look something like this:
58 | Chapter 4: Reverse Proxy

Example 4-1. Basic Reverse Proxy conguration
http {
upstream rails_app {
server 127.0.0.1:3000;
}
server {
listen *:80;
root /path/to/application/public;
location / {
proxy_pass http://rails_app;
}
}
}
This configuration has nginx receiving every incoming request on port 80 and for‐
wards it to our WEBrick server running on port 3000.
As simple as it is, you already get massive benefits from putting nginx in front of
WEBrick.
First, it’s much more scalable— WEBrick is single-threaded, so it can only process a
single request at a time. With nginx in front, it can multiplex the incoming connec‐
tions and accept them while it’s waiting for earlier WEBrick to processes to finish.
Second, the error handling is much better. If the upstream server times out or goes
down, nginx will gracefully return 503 Service Unavailable and 502 Bad Gateway
respectively. While throwing a 500 error isn’t exactly ideal, without the reverse proxy
in place, there would be no response at all.
Our configuration still has a problem, however. Notice, that because of the single
“catch-all” location block, we’re still proxying all of the requests through to WEBrick,
What we’d actually prefer to serve all of the static assets (images, javascript, css)
through nginx, since it’s much better at doing that, and can reduce the load put on
WEBrick.
To do that, all we need to do is add a new location block to the configuration for the /
assets directory (which is where all assets are stored in a Rails application).
server {
listen *:80;
root /path/to/application/public;
location / {
proxy_pass http://rails_app;
}
Conguring a basic Rails Application | 59

location /assets {
}
}
We’ve added a new location block to catch anything starting with the prefix /assets.
Because there’s no proxy_pass directive specified in the location block, the default
behavior is to fallback serve files statically from the root path, which is inherited from
the server context, /path/to/application/public/assets.
One last tip— it’s often common to set long lived HTTP cache headers for static
assets. You can accomplish this by adding the expires and add_header directives.
location /assets {
expires max;
add_header Cache-Control public;
}
The expires directive sets the Expires and Cache-Control HTTP headers. The value
can be a specified date, relative time (e.g, 42d), or the constant value max.
When set to max, nginx sets the Expires header to "Thu, 31 Dec 2037 23:55:55
GMT" and Cache-Control header to 10 years.
Even though expires sets a Cache-Control header for us, we still need to tweak it a
bit. By default, the Cache-Control header marks the content as private, which means
that intermediate HTTP caches will not cache the content. Since assets are typically
public and shared across all users, we need to explicitly mark this header as public so
that they have maximum cache-ability.
If you make a web request to a file in the /assets directory, you will see HTTP headers
that look something like this.
$ curl -I 127.0.0.1/assets/test.jpg
HTTP/1.1 200 OK
Server: nginx/1.4.6 (Ubuntu)
Expires: Thu, 31 Dec 2037 23:55:55 GMT
Cache-Control: max-age=315360000
Cache-Control: public
A more robust reverse proxy
Let’s re-visit our reverse proxy configuration and take a look at a slightly more
advanced and flexible configuration.
In Chapter 2, we quickly discussed using try_files, which gives you the ability to
check for the existence of static files before falling back onto another location block.
60 | Chapter 4: Reverse Proxy

This is a convenient way to gracefully take your application down for maintenance.
For example, if you wanted to deploy a new version of your code but had to do a
length database migrate, you might want to display a temporary “come back soon”
page.
Example 4-2. Serving a dynamic application using try_les
server {
listen *:80;
root /path/to/application/public;
location / {
try_files maintenance.html @rails;
}
location @rails {
proxy_pass http://rails_app;
}
}
With this configuration, we’ve moved the proxy_pass directive to it’s own named
location block and check for the existence of maintenance.html, which will short-
circuit forwarding the request to the upstream if it exists.
A simplistic catch-all proxy_pass location block, like I demonstrated in the original
example, also has the disadvantage of forwarding everything onward to the upstream
application unless explicitly defined, like we did for the /assets folder.
What if there was a videos directory inside of the nginx root path that we wanted to
have nginx serve directly? One way to would be to add yet-another location block to
configuration, but that’s kind of a pain. We can use try_files to solve this for us.
Example 4-3. Dynamically checking for le existence with try_les
server {
listen *:80;
root /path/to/application/public;
location / {
try_files $uri $uri/index.html @rails;
}
location @rails {
proxy_pass http://rails_app;
}
}
A more robust reverse proxy | 61

Notice that we use try_files, but this time instead of using a static filename, we’re
using the nginx variable $uri, which contains the normalized (decoded and sani‐
tized) URI of the web request.
This will allow any files and folders in the root path to be served up statically by nginx
and not be forwarded to the upstream backend.
If you’re coming from the Apache world, this is similar to checking for the existence
of a file or directory with RewriteCond before forwarding to the upstream.
An equivalent Apache configuration would look something like this:
Example 4-4. Equivalent Apache conguration
<VirtualHost *:80>
DocumentRoot /path/to/application/public
RewriteEngine On
# This is roughly the same as the behavior our try_files
# configuration above
RewriteCond %{DOCUMENT_ROOT}/%{REQUEST_FILENAME} !-f
RewriteRule ^/(.*)$ balancer://rails [P,QSA,L]
# This is equivalent to upstream in nginx
<Proxy balancer://rails>
BalancerMember http://127.0.0.1:3000
</Proxy>
</VirtualHost>
While using try_files to serve static files before falling back on the backend is best
practice, it’s important to notice that everything in the root path will be publicly acces‐
sible— so you need to make sure that you don’t put anything sensitive or private in
there.
It’s for this reason that we always make sure the nginx root is our public directory. If
we were set the root one level lower, for example, to /path/to/application, anyone
would be able to read source code files directly from nginx by accessing the paths
directly, by going to http://example.org/app/config/secrets.yml.
Upstream with Unix Domain Sockets
When you specify an upstream server with an IP Address, hostname, or port, you’re
telling nginx to use the TCP stack to communicate with it.
That works great when your upstream servers are on remote machines (for example,
in the case of a load balancer), but it incurs a slight performance overhead.
62 | Chapter 4: Reverse Proxy

In the case of a Reverse Proxy configuration where your upstream server is on the
same machine, you can get better performance by skipping the TCP/Network stack
and using Unix Domain Sockets.
A Unix Domain Socket is communication mechanism to do inter-process messaging
within the operating system kernel, using the file system as the name space.
To enable Unix Domain Sockets, you need to first tell your upstream server to listen
on a domain socket instead of TCP.
Unfortunately, WEBrick doesn’t support Unix Domain Sockets, but most other
servers (for Rails and otherwise), do. For this example, we’ll have to use thin.
First, install thin with Rubygems by running the command gem install thin.
Next, instead of running rails s to start WEBrick, run thin start --socket /tmp/
rails.sock. The path that we pass to the --socket flag is the location of the unix
socket.
Once you do that, it’s just a matter of changing your nginx upstream server to talk
over the domain socket instead of TCP.
upstream rails_app {
server unix:/tmp/rails.sock;
}
Custom Error Pages
It’s a fact of life that sometimes our web applications return errors (of course, not
from the code that you wrote).
Typically these errors surface in the form of the standard HTTP status codes. If you
need a refresher, 2xx status codes are for success, 3xx to indicate a redirect, 4xx to
indicate the client did something wrong, and 5xx to indicate that the server did some‐
thing wrong.
For the purposes of discussing errors, we generally care about the 4xx and 5xx codes.
The most common of which are 403 Forbidden, 404 Not Found, 500 Internal
Server Error, and 502 Bad Gateway.
When you request a file that doesn’t exist or that nginx doesn’t have access to, it will
return a very plain 404 Not Found page that looks something like the one below.
A more robust reverse proxy | 63

Figure 4-4. e default error page in nginx
Hiding the nginx version
If you notice, in the error page above, nginx returns the version
and operating system that it’s running on.
By default, nginx will also return the same information on every
HTTP request in the Server HTTP Header.
While I don’t think it gets you much in the way of security, some
people like to hide these identifiers. You can turn them off by set‐
ting the value of the server_tokens directive to o.
server_tokens off;
Likewise, you will see a 500 Internal Server Error if your code doesn’t compile or
hits some fatal error— usually this is returned by your upstream server (thin, uni‐
corn, etc) as a last resort.
Typically, if you see a 502 Bad Gateway, it’s actually coming from nginx. When nginx
returns this status code, it means that it can’t reach the server inside of the upstream
block.
Instead of having to use the (very unattractive) default error pages that come out of
the box with nginx, we can define our own HTML error pages to use with the
error_page directive.
64 | Chapter 4: Reverse Proxy

The error_page directive takes a list of one or more error codes and a file to return as
the body of the error. This is how Twitter made the fail whale page.
Example 4-5. Overriding default nginx error pages
server {
listen *:80;
root /path/to/application/public;
location / {
error_page 404 /404.html;
error_page 500 502 503 504 /50x.html;
try_files $uri $uri/index.html @rails;
}
location @rails {
proxy_pass http://rails_app;
}
}
Other neat things you can do with error_page
The error_page directive has a few other tricks up its sleeve:
It can change the HTTP status code. For instance, if your upstream returned a 500
Internal Server Error, you can change it to a 200 Ok!
You probably shouldn’t do this unless recovering with a static file is appropriate
behavior— many applications and API clients depend on the status code to determine
if there was an error.
The example below will change a 404 Not Found into a 200 and return the static file,
index.html.
error_page 500 =200 /index.html;
It can redirect to a completely dierent URL, sending back a 302 Found with a redi‐
rect location that can be on any server.
The example below will cause any 500 error pages to actually return a 302 Found with
a redirect to http://www.google.com.
error_page 500 http://www.google.com;
It can internally redirect to a named location block, this is useful if you have a dif‐
ferent upstream backend that you want to dynamically generate the error page from.
Note— If you’re thinking about using this for redundancy or high-availability (i.e,
A more robust reverse proxy | 65

trying to re-run the request), you want the proxy_next_upstream directive, which is
described in Chapter 7).
location / {
error_page 404 = @fallback;
}
location @fallback {
proxy_pass http://different_backend;
}
Adding headers to the upstream
Since the mechanics behind Reverse Proxying is just HTTP, that is to say, nginx is just
re-opening a new connection to the backend and forwarding the HTTP data along,
it’s possible to modify the HTTP request within nginx.
This is typical if you want to add or remove some HTTP Headers from the original
request.
A common use-case for this is to tell the backend whether the request came in HTTP
or HTTPS— a secure or non-secure connection.
We can accomplish this with two pieces of knowledge— the first is the
proxy_set_header directive which allows us to add new headers into the forwarded
request to the backend.
The second is the fact that the variable $scheme contains the originating request
scheme, either the value http or https.
Putting it together, we just need to set a new header (the commonly used name for
this is X-Forwarded-Proto) with the value of $scheme! Easy!
Example 4-6. Setting X-Forwarded-Proto for a Reverse Proxy
server {
listen *:80;
root /path/to/application/public;
location / {
try_files $uri $uri/index.html @rails;
}
location @rails {
proxy_set_header X-Forwarded-Proto $scheme;
proxy_pass http://rails_app;
}
}
66 | Chapter 4: Reverse Proxy

By default, nginx will use proxy_set_header to dynamically set the Host header to
the variable $proxy_host, which contains the name and port of the value passed to
proxy_pass.
In the example above, nginx would proxy the request with the Host header set as
rails_app.
This behavior might be undesirable if you want to know the actual host/domain that
was used for the request, for example, if use use the subdomain to identify the
account as is common in many SaaS applications.
You just need to override the Host header with proxy_set_header and pass it the
value $host instead of $proxy_host.
proxy_set_header Host $host;
Real IP Module
A common problem that people often run into when reverse proxying is the inability
to retrieve the client IP Address. Let’s explore this problem for a second and under‐
stand what’s happening under the hood when a request from a client is made to the
load balancer.
A client, 203.0.113.1, makes a web request to an nginx server at example.com, which
resolves to the IP Address 192.0.2.9.
Next, the load balancer at 192.0.2.9 reads the HTTP request from 203.0.113.1 and
proxies the request to one of the app servers inside of its upstream directive.
The million dollar question: What client IP address does the backend think that the
request came from?
The answer is 192.0.2.9— because nginx is proxying the request to the backend, from
the perspective of the backend, it’s technically the originator of the HTTP request.
The snag you run into is, what if, in your application, you’d like to access or log the IP
Address of the client making the request? It’s seemingly impossible because, to the
app server, all of the requests appear to be coming from the load balancer.
The Real IP module in nginx solves this problem. This module is packaged with the
nginx source code, but needs to manually enabled by passing the --with-
http_realip_module flag to the build configuration script. If you’re using a pre-build
nginx package, it probably includes this module already.
How Real IP Works
Typically, with HTTP, the client IP Address is injected as the REMOTE_ADDR HTTP
Header.
Real IP Module | 67

When a client (203.0.113.1) makes a request to nginx (192.0.2.9), the
REMOTE_ADDR header is set to 203.0.113.1. When nginx proxies the request to the
backend, the REMOTE_ADDR header is set to the new client, 192.0.2.9.
When Real IP is enabled on nginx, it injects a new HTTP header into the request—
X-REAL-IP, that contains the original client IP Address (203.0.113.1).
Any applications (Rails, PHP, etc) will be able to access the origin client IP Address by
accessing the REMOTE_ADDR HTTP Header.
How to enable Real IP
To enable Real IP, you need to configure it on your nginx server, and any nginx load
balancers (discussed in Chapter 5).
On the load balancer, add the real_ip_header directive. This directive specifies the
header to use (it’s X-REAL-IP by default). While not mandatory (it’s enabled as long
as the module is installed), it’s best practice to explicitly define it.
http {
real_ip_header X-Real-IP;
server {
...
}
}
On the reverse proxy’s, you need to add the real_ip_header directive again, as well
as specify the set_real_ip_from directive.
The set_real_ip_from directive takes a list of IP Addresses or CIDR blocks of trusted
sources for the X-REAL-IP HTTP Header. Without this, anyone would be able to
spoof their IP Address by making HTTP Requests with bogus values in the X-REAL-
IP HTTP Header.
The value of set_real_ip_from should be the IP Address(es) or CIDR block of your
load balancer, in the case of our example, 203.0.113.1.
http {
real_ip_header X-Real-IP;
set_real_ip_from 203.0.113.1;
server {
...
}
}
If there were multiple load balancers, you’d just have multiple set_real_ip_from state‐
ments. It can also take a CIDR block to cover an entire range of addresses.
http {
real_ip_header X-Real-IP;
68 | Chapter 4: Reverse Proxy

set_real_ip_from 203.0.113.1;
set_real_ip_from 203.0.113.2;
set_real_ip_from 203.0.113.0/24;
server {
...
}
}
Real IP Module vs DIY Approach
It’s possibly to cleverly implement similar functionality as the Real
IP Module using proxy_set_header, something along the lines of:
proxy_set_header X-Real-IP $remote_addr;
Reverse Proxying Node.js & Websockets
In this section, I’ll run through setting up a Reverse Proxy with Node.js instead of
Rails.
The basic concepts are similar as with Rails but we’ll learn a few new techniques,
specifically how to use Websockets.
For this demo, I assume that you have already installed NodeJS and NPM.
First, let’s start by creating the most basic Node application ever— go to a new direc‐
tory and create a new file called app.js.
Example 4-7. Contents of app.js
var http = require('http');
http.createServer(function (request, response) {
time = (new Date).getTime().toString();
response.writeHeader(200, {"Content-Type": "text/plain"});
response.end(time);
}).listen(3000, "127.0.0.1");
console.log("Starting server running at http://127.0.0.1:3000/");
This code starts up an HTTP server listening on port 3000 and will send back the
current unix timestamp to any web request that it receives.
Reverse Proxying Node.js & Websockets | 69
You can run this application directly by running node app.js from the command
line and visiting http://127.0.0.1:3000 in your browser.
Running Node to production
If you’re running Node in product, you most likely want to be using some process
supervisor instead of running the node cli directly.
While you can use the tried-and-true init scripts or supervisord, I highly recommend
a tool such a pm2.
pm2 is a process manager built specifically for running and supervising node applica‐
tions and includes a very useful command line interface, monitoring tools, and log
viewer.
Figure 4-5.
An example of the pm2 user interface
You can install pm2 with npm by running npm install -g pm2
Now, just like before, we want to put nginx in front of our node.js server. The config‐
uration will look shockingly similar to how we configured the reverse proxy for rails.
Example 4-8. Basic Reverse Proxy for Node
http {
upstream node_app {
server 127.0.0.1:3000;
}
server {
listen *:80;
root /path/to/application/public;
location / {
try_files $uri $uri/index.html @node;
}
70 | Chapter 4: Reverse Proxy

location @node {
proxy_pass http://node_app;
}
}
}
Reverse Proxy with WebSockets
WebSockets is a new HTTP protocol that allows for two-way communication over an
HTTP connection and was standardized in 2011.
What this means is that WebSockets allow the browser and the server to have long-
lived two-way connections, which dramatically changes the traditional HTTP model.
Of course, both the browser and the backend application need to support WebSockets
before you can use it. At this point in time, almost all modern versions of all browsers
support WebSockets and while most programming languages support WebSockets
with additional libraries, Node.js has it natively built in. In fact, some would say that
Node.js is built with WebSocket programming in mind.
The way that WebSockets works is that when the client makes an HTTP Request with
two extra HTTP Headers— Connection and Upgrade.
The Connection Header is used to tell the server what do with the connection after
the initial response, and is normally set to Close (to close the connection after the
initial response) or Keep-Alive (to keep it open and re-use it). For WebSockets, the
header value is set to Upgrade, requesting the server to upgrade the connection.
The Upgrade Header tells the server which protocol that the client wants to upgrade
to when the Connection header asks for an upgrade. For WebSockets, the Upgrade
Header is set to websocket.
To upgrade to WebSockets, the client will make a request similar to this:
GET /websocket HTTP/1.1
Host: www.example.org
Upgrade: websocket
Connection: Upgrade
If the server supports Websockets, it will respond with the HTTP status code 101
Switching Protocols instead of the normal 200 Ok, and begin speaking WebSock‐
ets.
The response would look something like this— after which, the client and server
would begin communicating using the WebSocket protocol over the same TCP con‐
nection.
Reverse Proxying Node.js & Websockets | 71

HTTP/1.1 101 Switching Protocols
Upgrade: websocket
Connection: Upgrade
You might think of WebSockets as switching to something similar to a 2-way chat ses‐
sion between the client and server, where both sides are able to send and receive mes‐
sages for a long period of time.
Okay, so what’s the point? Well, out of the box nginx supports WebSockets. Awesome.
But, WebSockets gets a bit more complex with a Reverse Proxy because the upgrade
handshake needs to be forwarded to the backend (not all backends support WebSock‐
ets— so even though nginx does, it can’t assume the backend can too).
In addition to this, the default reverse proxy configuration uses very simple and state‐
less connections to the backend and every new request to nginx creates a new request
to the backend server, 1 for 1— that is, it uses HTTP 1.0 and not HTTP 1.1, which is
required for WebSockets.
Luckily, it’s easy to enable this out of the box by switching the reverse proxy to use
HTTP 1.1 and passing along the Upgrade and Connection headers (these types of
HTTP headers are called hop-by-hop headers and explicitly forbidden by the HTTP
1.1 spec from being passed along by proxies or caches. Normally, headers are forwar‐
ded along by nginx automatically)
Example 4-9. Basic WebSocket Example
location /chat {
proxy_pass http://node_app;
proxy_http_version 1.1;
proxy_set_header Upgrade $http_upgrade;
proxy_set_header Connection "upgrade";
}
We first use proxy_http_version to explicitly set the HTTP version that nginx uses
for communicating with with the backend to be HTTP 1.1. Note that this has no
impact on the HTTP version that the client/browser can use to communicate with
nginx— even if this is not set, nginx will use HTTP 1.1 for communicating with the
end client.
The next thing that we do is use proxy_set_header to set the two previously men‐
tioned headers— Upgrade and Connection.
In the case of Upgrade, we’re setting it to the variable $http_upgrade which is just the
value of the Upgrade header from the original client request.
For the Connection header, we just hard code it as the string upgrade, asking the
backend to upgrade to whatever protocol was passed along.
72 | Chapter 4: Reverse Proxy

The problem with this configuration is that it will attempt to upgrade every HTTP
connection that is made to it, which means that you’d need to have a specific location
block for the WebSocket endpoint if you wanted to share it with a backend that also
supports regular HTTP requests.
We can solve for this by dynamically setting the value of Connection based on the
value of Upgrade, using a new nginx directive called map.
Example 4-10. Dynamically mapping Connection based on Upgrade
map $http_upgrade $connection_upgrade {
'websocket' upgrade;
default close;
}
location @node {
proxy_pass http://node_app;
proxy_http_version 1.1;
proxy_set_header Upgrade $http_upgrade;
proxy_set_header Connection $connection_upgrade;
}
Let’s dissect the map bit, because I always think that these can be confusing at first
glance if you haven’t used it before.
If you were to write it in psuedo-programming language code, the logic would
actually look something like this:
switch ($http_upgrade) {
case "websocket":
$connection_upgrade = "upgrade";
break;
default:
$connection_upgrade = "close";
}
The map block maps between the value of the first variable passed, $http_upgrade,
and uses it to set the values for any subsequent variables passed as parameters, in this
case, $connection_upgrade.
So, when $http_upgrade equals “websocket”, we set $connection_upgrade to
“upgrade”.
The default case sets the value of $connection_upgrade to “close” if it doesn’t match
anything.
Okay, so we’ve got nginx configured to use WebSockets, let’s test this thing out by
changing out Node.JS dummy code to use WebSockets instead of plain old HTTP.
Reverse Proxying Node.js & Websockets | 73

We need to install the websocket library for Node with npm. To do that, just run the
command npm install websocket.
Now, change the app.js file to create a websocket server:
Example 4-11. Example Websocket Node.js Server
var WebSocketServer = require('websocket').server;
var http = require('http');
var server = http.createServer(function (request, response) {
time = (new Date).getTime().toString();
response.writeHeader(200, {"Content-Type": "text/plain"});
response.end(time);
});
server.listen(3000, "127.0.0.1");
console.log("Starting server running at http://127.0.0.1:3000/");
websocketServer = new WebSocketServer({
httpServer: server,
autoAcceptConnections: false
});
websocketServer.on('request', function(request) {
console.log("Received connection");
var connection = request.accept('echo-protocol', request.origin);
time = (new Date).getTime().toString();
connection.SendUTF(time);
});
Don’t forget about timeouts!
Even when using WebSockets, you’re still beholden to the all-mighty nginx timeout!
If a WebSocket sits idle for more than the value of proxy_read_timeout directive
(default— 60 seconds), nginx will close the connection.
While some people recommend setting this value to a really high number, you’ll see
various sources on the internet tell you to set it to 999999 or something, a much bet‐
ter strategy is to implement a ping message that fires every 20 or 30 seconds to keep
the connection alive.
74 | Chapter 4: Reverse Proxy

Future Sections in this Chapter
1. nginx Buffering
2. Keepalive
Future Sections in this Chapter | 75


CHAPTER 5
Load Balancing
One of the most common, and easiest, ways to scale a busy web application is to
use load balancing. The idea behind load balancing is to distribute load, or web traf‐
fic, across multiple application servers.
Let’s take an example— you’ve just created a Ruby on Rails application and deployed
it to a single server. In order to show the world your Rails application, you modify the
DNS zone of your website to point to the Rails app.
So far, all is good. Visitors type in your domain name and get routed straight to your
single application server where nginx serves up your Ruby on Rails application.
That is, until, one of your biggest fans (mom) is so proud of your application that she
submits it to the popular link sharing website, Reddit. Others love your app too, and
they upvote it to the front-page.
Now, there are thousands of people visiting your website, and a single server can’t
possibly handle the load. You know you need to scale out, maybe add some more
servers, but how?
That’s when the load balancer comes in to play— the load balancer receives all of the
incoming traffic and distributes it across a pool of application servers.
There are many types of load balancers, both software (implemented in software) and
hardware (implemented in hardware, typically installed as a device).
nginx has the ability to run as a software load balancer using the http_proxy module,
and it’s one of the most common and useful ways to use nginx in a web stack.
77

Your rst load balancer
To get started, let’s walk through the most basic configuration for a load balancer in
nginx.
http {
upstream backend {
server 192.0.2.10;
server 192.0.2.11;
}
server {
listen 80;
location / {
proxy_pass http://backend;
}
}
}
When run with the configuration above, nginx will take all traffic on port 80 and bal‐
ance it across two servers, 192.0.2.10 and 192.0.2.11.
The key directives that make this work are the proxy_pass and the upstream direc‐
tives.
The default configuration for an upstream is to balance requests using a round-robin
method— for example, the first request will be sent to 192.0.2.10, the second to
192.0.2.11, the third to 192.0.2.10, and so on.
Round-robin load balancing is completely ignorant, so factors like the actual load of
the server or number of connections is not considered.
The proxy_pass directive takes a host and causes nginx to proxy the request to that
host. Since the example is passing in a named upstream (i.e., http://backend), nginx
will pick which host to use depending on the load balancing strategy, round-robin in
this case.
Load Balancing vs Reverse Proxy?
You might be saying to yourself— this is exactly the same thing as reverse proxy‐
ing, and you’d be right! Load balancing is actually a form of reverse proxying with
three fundamental differences:
1. Load Balancers typically reverse proxy across many backends while a traditional
reverse proxy serving a dynamic web application will only reverse proxy to a sin‐
gle backend.
78 | Chapter 5: Load Balancing

2. Load Balancers usually operate at either Layer 7 (Application Layer, i.e, HTTP) or
Layer 4 (Transport Layer, i.e, TCP) while typically you will only operate at the
Application Layer when reverse proxying a modern web application.
3. Scale is critical for load balancers— on busy sites, they will see 20x the amount of
traffic that a single application server receives. For instance, a powerful applica‐
tion server will only need to handle 100-200 requests per second, while a load
balancer may very well receive over 10,000 requests per second.
Handling Failure
What happens when a server goes away?
One important use case of load balancing is to handle failure, when a server crashes,
someone trips over the power cord, or it just seems to go away.
By default, when a single request to a server inside of the upstream directive fails, the
server will be removed from the pool for 10 seconds. These settings are configurable
and will be discussed later in the chapter.
At the most basic, load balancers solve two problems for us:
Load balancers help us scale. They make horizontally scaling easy, by spreading the
load across multiple backends. Instead of having a single very-powerful, very-
expensive server, we can use load balancing to share the load across 5 cheap medium-
powered instead.
Load balancers help us deal with failure. Even if you have plenty of power or only
need a single server to serve your web application, that server will eventually go
down. It will crash. The CPU will get fried. In the age of cloud computing, servers are
ephemeral and not long-lived. Load balancers allow us to be highly available by pro‐
viding redundant backends.
Who load balances to load balancers?
Are you really highly available if you have multiple backend application servers but
only a single load balancer? Aren’t you back into the same position, except now the
load balancer is your single point of failure?
Yup.
You need to have multiple load balancers. But who load balancers to load balances?
The answer is DNS. When you have multiple nginx load balancers for your website,
you can use DNS load balancing to present multiple IPs for a single A Record.
Your rst load balancer | 79

The DNS lookup would return something like the result below:
Example 5-1. DNS Load Balancing
> dig A example.com
; <<>> DiG 9.7.3-P3 <<>> A example.com
;; QUESTION SECTION:
;example.com. IN A
;; ANSWER SECTION:
example.com. 287 IN A 208.0.113.36
example.com. 287 IN A 208.0.113.34
example.com. 287 IN A 208.0.113.38
In the example above, there are 3 load balancers for the website example.com, each
with a different IP.
The drawback here is that although the clients are supposed to chose a random IP
from the list, poorly implemented ones will always use first IP presented. Modern
DNS providers (AWS Route 53 and Dynect come to mind) will randomize the order‐
ing for each DNS request to help mitigate hotspots.
The other drawback is that DNS records are often cached for long periods of time. So,
if a load balancer goes away, the IP Address may still be cached for some users, even if
you remove it from your DNS entry.
Worst still, users get no indication that something is wrong, just a hard error that they
could not connect. Even with DNS TTLs as low as 60s, this is unacceptable.
Therefore, a combination of DNS Load Balancing and a mechanism to re-assign IP
Addresses is necessary to be highly-available. Depending on your provider, you can
use something like keepalived to send heartbeats between servers and takeover the IP
Address of a downed server by sending an ARP broadcast.
Traditionally, keepalived did not work on cloud providers like AWS because they usu‐
ally filter broadcast traffic from the network for security. However, since version
1.2.8, keepalived supports unicast and makes a great way to build high availability
nginx configurations— even on AWS.
Conguring the Upstream Directive
Before we move into more complex scenarios and examples with load balancing, let’s
deep dive into perhaps the most important tunable when using nginx as as a load bal‐
ancer, upstream.
80 | Chapter 5: Load Balancing

We learned about the basic use of upstream in Chapter 4, where we used to connect
to a single Rails or Node backend, but with load balancing, we’ll use it to represent a
group of servers.
For reference, the most basic multi-server upstream block looks something like this:
upstream backend {
server 192.0.2.10;
server 192.0.2.11;
}
The servers in an upstream block can be IP addresses, hostnames, unix domain sock‐
ets, or a mix any of the above.
upstream backend {
# IP Address with Port
server 192.0.2.10:443;
# Hostname
server app1.example.com;
# Unix Socket
server unix:/u/apps/my_app/current/tmp/unicorn.sock
}
Weighted Servers
Weighting alters the proportion of traffic that will be routed to a particular server in
an upstream.
Weights are useful if you want to send more traffic to particular server because it has
faster hardware, or, if you want to send less traffic to a particular server to test a
change on it.
Example 5-2. Example upstream where one server receives 3x more trac
upstream backend {
server app1.example.com weight=3;
server app2.example.com;
server app3.example.com;
}
In the example above, the weight for app1.example.com is set as 3. When the weight
is not specified, as is the case for app2 & app3, it is implied to be 1.
Since app1 has a weight of 3 and app2/app3 have a weight of 1, in the example above,
app1 will have 3x more requests routed to it.
Conguring the Upstream Directive | 81

Example 5-3. Example upstream where one server receives half the trac
upstream backend {
server app1.example.com weight=2;
server app2.example.com weight=2;
server app3.example.com weight=1;
}
In this example, we set the weight as 2 for both app1 & app2. The weight of app3 is set
to 1. Because app3 has a lower weight, it will receive only 20% of the total traffic. This
can be used as a great way to validate configuration changes or new deployments.
Health Checks
In the open-source version of nginx, health checks don’t really exist. What you get
out of the box are passive checks— checks that will remove a server from the pool if it
causes an error a certain number of times.
The default handling is, if an incoming request to an upstream server errors out or
times out once, the server will be removed from the pool for 10s.
The pitfalls with this type of health checking is—
1. It is passively activated, it does not actively check the health of a server except
during the lifecycle of load balancing an incoming request.
2. It does not validate the response of the server. The server might be spewing out
500 errors, but as long as it responds to HTTP, nginx considers it healthy.
You can tweak the behavior of the health checks with three directives: max_fails,
fail_timeout, and proxy_next_upstream.
max_fails
Max fails controls the number of times that the server can be marked as unhealthy
before it is removed from the pool.
The conditions of what is considered “unhealthy” is determined by
proxy_next_upstream.
The default setting is max_fails=1 and is set per server directive within the upstream
directive.
upstream backend {
server app1.example.com max_fails=2;
server app2.example.com max_fails=100;
}
fail_timeout
This directive controls the behavior of two different settings.
82 | Chapter 5: Load Balancing

1. The amount of time to remove the server from the upstream pool when it is
marked as unhealthy.
2. The amount of time that the max_fails count is valid for. That is to say, if
max_fails=2 and fail_timeout=10, the server needs to fail 2 times in 10 seconds
for it to be marked unhealthy.
The default setting is fail_timeout=10 (implied as seconds) and, similar to
max_fails, is set per server directive within the upstream.
upstream backend {
server app1.example.com max_fails=2 fail_timeout=5;
server app2.example.com max_fails=100 fail_timeout=50;
}
proxy_next_upstream
This directive controls the error conditions that will cause an unsuccessful request
and increment the max_fails counter.
As mentioned earlier, the default setup is for nginx to only count complete failures
(an error connecting to the server or a timeout) as a failed request. That behavior is
controlled by this setting.
Below is a table all of the possible values (multiple may be set) for
proxy_next_upstream.
It’s worth noting that there are multiple uses (and settings) for this directive, but in
this section, we’ll only discuss the ones applicable to health checks.
Name Meaning Default?
error An error occurred while communicating with an upstream server Yes
timeout A timeout occurred while communicating with an upstream server Yes
invalid_header A server returned an empty or invalid response Yes
http_500 A server returned a 500 status code No
http_502 A server returned a 502 status code No
http_503 A server returned a 503 status code No
http_504 A server returned a 504 status code No
The values error, timeout, and invalid_header are set as the default for
proxy_next_upstream. In fact, these three settings are not configurable and will
always be set even if they aren’t explicitly set.
For most production setups, I find it useful to also turn on http_502, http_503, and
http_504, because they tend to be signs of an unhealthy server (typically meaning that
the web application is unresponsive or out of workers).
Conguring the Upstream Directive | 83

Typically, I leave http_500 off, as this isn’t always a sign of an unhealthy server and
can be tripped by a broken code path in your web application.
The proxy_next_upstream directive is specified in the location block of the load bal‐
ancer configuration.
In the example below, I turn on health checks for HTTP 502, 503, and 504 status
codes. Note that even though I don’t specify error, timeout, or invalid_header that
they are enabled regardless.
location / {
proxy_next_upstream http_502 http_503 http_504;
proxy_pass http://backend;
}
Removing a server from the pool
Often times it is useful to remove a server from the upstream pool so that it no longer
servers web traffic.
You may want to do this if you’re testing a new configuration, performing upgrades,
or debugging a problem in production.
While you can just remove a server directive from the upstream block completely, it’s
often advantageous to explicitly mark it as down instead. When a server is marked as
down, it is considered completely unavailable and no traffic will be routed to it.
upstream backend {
server app1.example.com;
server app2.example.com down;
server app3.example.com;
}
In the example upstream block above, app2 is marked as permanently down and will
receive no traffic from the load balancer.
The reason that you’d use down to remove a server instead of commenting it out is to
preserve hashes when using a load balancing algorithm such as ip_hash (described
later in the chapter).
Backup Servers
It’s possible to keep a set of backup servers within your pool that will only be used
if all of the other servers in the pool go away.
To do so, simply mark the server with the backup parameter.
upstream backend {
server app1.example.com;
server app2.example.com;
server app3.example.com;
84 | Chapter 5: Load Balancing

server app4.example.com backup;
}
In the example above, I’ve added a new server (app4) to be used as a backup server.
Because it will only receive traffic if all of the hosts in the pool are marked as unavail‐
able, its usefulness is limited to smaller workloads, as you’d need enough backup
servers to handle the traffic for your entire pool.
Slow Start
The server directive supports a slow_start parameter, that tells nginx to dynamically
adjust the weight over time, allowing it to ramp up and slowly begin receiving traffic
after it has become recovered or became available.
This is incredibly useful if you’re running a JIT (Just In Time) compiled language,
such as the JVM, which can take several minutes to warm up and run at optimal
speeds.
The slow_start parameter takes a time, in seconds, that it will use to ramp up the
weight of the server.
Example 5-4. Example demonstrating the slow_start directive
upstream backend {
server app1.example.com slow_start=60s;
server app2.example.com;
}
Conguring the Upstream Directive | 85

DNS Resolution in nginx Upstream Directive
There is one huge gotcha with nginx upstreams that I’ve seen a few
people get bitten by and it takes forever to debug.
The upstream directive allows you to define servers by IP
Addresses or Hostnames.
When you set a server with a hostname, how is it resolved to an
IP Address?
Well the answer is that when nginx first initializes and reads the
configuration file, it resolves the hostnames with a DNS lookup
and caches the IP Address for the lifetime of the process.
If you’re using internal hosts, that’s usually file, as the IPs don’t
often change.
However, if your upstream is an external host or one that has a fre‐
quently changing IP Address, you’re in trouble! Because nginx
caches the IP Address forever, if the IP of a hostname used in a
server directive ever changes, nginx will still use the old IP
Address.
I’ve seen this problem manifest several times, with people configur‐
ing nginx to be a reverse proxy in-front of Amazon ELB (Elastic
Load Balancer).
ELB re-maps IPs between clients very frequently, so it’s incredibly
unreliable to cache the ELB IP Address much longer than the DNS
TTL. Anyways, nginx will be configured to act as a reverse proxy
in-front of ELB and everything will work great, until the IP
Address of the ELB is re-mapped to another client and suddenly
nginx starts reverse proxying to another website! Oops!
Luckily, the fix is simple— we just need to tell nginx to obey the
DNS TTL and re-resolve the hostname.
This can be done by setting the resolve parameter on the server
directive and configuring the resolver directive.
Example 5-5. Example with dynamic DNS Resolution
http {
resolver 8.8.8.8;
upstream backend {
server loadbalancer.east.elb.amazonaws.com resolve;
}
}
For the resolver, you want to pass it the IP Address of a DNS server
that it can use to resolve domains. In the example, I use 8.8.8.8,
which is Google’s public DNS resolver, but it’s preferable to use a
DNS resolver or cache that’s local to your network— I recommend
dnsmasq.
86 | Chapter 5: Load Balancing

Load Balancing Methods
Out of the box, the open-source version of nginx ships with four algorithms for load
balancing traffic.
Weighted Round Robin (Default)
The round robin method is the default load balancing algorithm for nginx. It chooses
a server from the upstream list in sequential order and, once it chooses the last server
in the list, resets back to the top.
If there are weights associated with the servers, they are taken into account during the
round-robin selection and servers with a higher weight will receive proportionately
more traffic.
Least Connections
The least connections load balancing algorithm picks the server that has the least
number of active connections from nginx.
Many often choose this thinking that it’s the fairest or most balanced option, however,
often times the number of active connections is not a reliable indicator of server load.
In my experience, this method tends to cause overwhelming and spiky floods of traf‐
fic to particular servers, especially during times of failure when servers are marked
unavailable by the health check and come back online with 0 active connections.
Turn on this algorithm by specifying the least_conn directive within the upstream
context.
upstream {
least_conn;
server app1.example.com;
server app2.example.com;
}
IP Hash
With round robin and least connection load balancing, when a user makes an HTTP
request and is load balanced to a particular server, they are not guaranteed to have
their request served by the same server for the future requests.
Often times this is desirable, but in some cases, you want the same users to always hit
a particular server, perhaps because of session or file locality.
This method of load balancing is often called sticky sessions— meaning that, once a
user is routed to a server, they are stuck to it and subsequent requests will be served
by the same server.
Conguring the Upstream Directive | 87

Honestly, I don’t recommend using sticky sessions and often it is a symptom of an
unscalable application.
The open-source version of nginx implements sticky sessions by hashing based on
the IP Address of the user. If the IP of the user changes, they will unstick, and the
server they’re routed to may change.
Turn on IP hashing by specifying the ip_hash directive within the upstream context.
upstream {
ip_hash;
server app1.example.com;
server app2.example.com;
}
Because this load balancing algorithm uses a hashing function to determine the
server for a user, all sticky sessions will be remapped if you add or remove any servers
from the pool. The down parameter should be used when removing servers to pre‐
serve the session hashing.
In other words, don’t bet the farm on always having uses routed to the same server, all
of the time.
Hash
The Hash algorithm is very similar to ip_hash, except it allows to hash to a particular
server based on any arbitrary variable in nginx. For example, this can be used to hash
based on the URL or Host.
Hash was originally part of the commercial nginx plus version, but is now available in
the open-source version of nginx.
Example 5-6. Hashing based on the URI
upstream {
hash $uri consistent;
server app1.example.com;
server app2.example.com;
}
In fact, you could implement ip_hash using the hash directive—
Example 5-7. Implementing IP Hash with Hash
upstream {
hash $remote_addr consistent;
server app1.example.com;
server app2.example.com;
}
88 | Chapter 5: Load Balancing

The consistent parameter tells nginx to use the ketama hashing algorithm, which is
almost always desirable, as it prevents a full hash remap when servers are added or
removed.
Sticky Sessions (Cookie Based)
Cookie based sticky sessions are available as part of the commercial nginx plus and
are covered in Chapter 10.
C10K with nginx
Using nginx as a load balancer is all about scalability. Because you typically only have
a handful of load balancers for 10s or 100s of application servers, they see a much
larger number of connections and requests per second.
With load balancers, latency and scalability is much more important and you want to
make sure that you get it right.
The “C10K Problem” is the idea of serving 10,000 simultaneous, concurrent connec‐
tions through a web server.
Since nginx is incredibly scalable, with a bit of tuning (both nginx and the linux ker‐
nel), it can scale to 10,000 connections without much difficulty. In fact, it’s not
unheard of to even scale it to 100,000 or more connections.
The ability for your application to be able to handle it, though, is an entirely different
problem!
Scalable Load Balancer Conguration
Example 5-8. Scalable Load Balancer Conguration
worker_processes auto;
events {
worker_connections 16384;
}
http {
sendfile on;
tcp_nopush on;
keepalive_timeout 90;
server {
listen *:80 backlog=2048 reuseport;
listen *:443 ssl backlog=2048 reuseport;
C10K with nginx | 89

ssl_session_cache shared:SSL:20m;
ssl_session_timeout 10m;
ssl_session_tickets on;
ssl_stapling on;
ssl_stapling_verify on;
ssl_trusted_certificate /etc/nginx/cert/trustchain.crt;
resolver 8.8.8.8 8.8.4.4 valid=300s;
}
Tuning Linux for a Network Heavy Load
You can have the most-optimized nginx configuration, but without tuning your linux
kernel for a network heavy load, you won’t see most of the results.
This is not optional, it’s essential for high performance. The linux kernel offers some
crazy tunables that are hard for even experts to fully understand. While you can find
handfuls of sysctl settings online, it’s usually not a good idea to copy them onto your
machine blindly without fully understanding the (often complicated) implications.
The handful of settings that I’m going to share below are well understood and non-
risky. They also make up over 80% of the performance gains. I’ll also share some set‐
tings to do your own research on.
These kernel flags can be set with the sysctl tool, but will be lost upon reboot. In
order to persistent the changes across reboot, you must add them to /etc/
sysctl.conf or /etc/sysctl.d/.
Listen queue for new connections (net.core.somaxconn)
The net.core.somaxconn flag defines the size of the kernel queue for accepting new
TCP connections and most Linux distributions have it set extremely low, at 128 con‐
nections.
The listen queue defines the maximum number of new, pending connections that can
sit in the socket backlog before the kernel starts rejecting them. Clients that are rejec‐
ted will see a very unhelpful Connection Refused error.
One common tell-tale sign of an undersized listen queue is the “possible SYN flood‐
ing” error log. If you see something like this in your syslog files, you need to increase
the size of your listen queue:
[73920] possible SYN flooding on port 80. Sending cookies.
90 | Chapter 5: Load Balancing

What’s a good value to set? Well, it totally depends on the level of traffic that you’re
load balancing will be receiving, but I recommend setting it high enough to handle
the highest amount of burst traffic that you’ll be able to handle.
That is, if you have enough capacity to handle 10,000 requests per second, set it to
10,000.
You can set the value with the sysctl tool, like so:
sysctl -w net.core.somaxconn=10000
Afterwards, make sure to edit /etc/sysctl.conf and add the following line to the
file:
net.core.somaxconn=10000
nginx vs ELB vs HAProxy
Over the years, I’ve seen many debates on nginx versus other platforms. Because
nginx does so many things— it’s a web server, http router, reverse proxy, load bal‐
ancer, and http cache, so it naturally competes with many other specialized pieces of
software.
The list is long, but is nginx a better choice than AWS ELB, HAProxy, Varnish, or
Apache?
The answer in my mind is a resounding yes.
In my first book on scaling, I even recommended using HAProxy as the load balancer
instead of nginx, but I’ve changed my position.
The reason is that nginx is so incredibly powerful and fast. It doesn’t come with much
bloat and will be easiest part of your infrastructure stack to scale.
Technically, on paper, HAProxy and Varnish may be 5-10% faster than nginx for load
balancing and http caching, respectively. But, you can accomplish the same things
with a much simpler nginx stack and only have to become an expert in one piece of
software. I’d trade that over a marginal gain in speed.
Many people on AWS choose to use ELB out of convenience and because it’s so cheap.
While ELB scales automagically, it’s not very robust in terms of features compared to
nginx. For example, it does not support URI-based routing, HTTP caching, or Vir‐
tualHosts.
Outside of basic setups, if doing anything serious on AWS, I highly recommend using
nginx as your http routing layer.
nginx vs ELB vs HAProxy | 91

HTTP and TCP Load Balancing
So far, we’ve talked about reverse proxying and load balancing in terms of the OSI
Layer 7— the application layer. That is to say, when nginx is acting as a reverse proxy,
it’s actually parsing the HTTP request, processing the headers and body, and creating
a new HTTP request to the backend server. It fully understands the application pro‐
tocol.
Layer 7 load balancing is great from a convenience stand-point. It’s easy to under‐
stand, allows you to add or modify HTTP headers, and allows you to route to custom
locations or server blocks depending on the hostname.
However, this type of load balancing also comes with some disadvantages.
• It can only be used to load balance HTTP
•SSL must terminate at the load balancer
• It’s slower due to the overhead of parsing and repacking the HTTP request
The alternative to Layer 7 load balancing is Layer 4 (TCP) load balancing, which just
forwards the raw TCP packets onwards. There is no parsing of the data, no depend‐
ences on HTTP, and SSL can pass-thru to the backend application servers transpar‐
ently.
Up until April 2015, the only way to do TCP load balancing with nginx was to pay for
the commercial license or use an open-source competitor like HAProxy.
Fortunately, nginx has made TCP Load Balancing part of their open-source offering
as of nginx 1.9.0 and now everyone has access to it for free!
Performance aside, this opens up many new uses cases for nginx, such as using it to
load balance database servers or really anything that speaks TCP.
Example 5-9. Example showing TCP Load Balancing
stream {
server {
listen *:80;
proxy_pass backend;
}
upstream backend {
server app01;
server app02;
server app03;
}
}
92 | Chapter 5: Load Balancing

Two things worth noting— TCP load balancing introduces the stream block that’s
used instead of the http block to define TCP-based servers.
The second thing is that the proxy_pass directive is not contained inside of a location
block, it’s at the top level server block. Location blocks (and many of the other http
specific features) no longer make sense with TCP load balancing.
For instance, you can’t use proxy_set_header to inject an HTTP header. With sim‐
plicity comes faster performance but less robust features.
TCP PROXY Protocol
While most people can live with the reduced feature set of TCP load balancing for
HTTP, the major missing feature is that you can no longer access the IP Address of
the client.
That is, once the load balancer forwards the TCP packets to the backend, the packets
appear to be coming from the load balancer’s IP Address. Because you can no longer
modify the HTTP Headers to inject X-Real-Ip or overwrite Remote-Addr, you’re kind
of stuck.
Fortunately, HAProxy solved this problem by adding the Proxy Protocol to TCP,
which allows reverse proxies to inject the originating source address into the TCP
connection.
To enable this, you’ll have to make a change on both your nginx load balancer and
your reverse proxy servers.
On your load balancer:
stream {
server {
listen *:80;
proxy_pass backend;
proxy_protocol on;
}
}
On the backend servers:
server {
listen *:80 proxy_protocol;
proxy_set_header X-Real-IP $proxy_protocol_addr;
}
Future Sections
1. Caching static content at the Load balancer
Future Sections | 93

2. Keep-Alive for Load balancers
94 | Chapter 5: Load Balancing

