NGS Sequencer Guide
User Manual:
Open the PDF directly: View PDF ![]() .
.
Page Count: 48

Sequencing set-up guidelines for NGS
libraries prepped with Agilent NGS kits
I. Illumina Instruments (SureSelectXT/XT2/QXT, SurSelect
RNA-Seq and HaloPlex/HaloPlexHS)
II. ION Instruments (SureSelectXT and HaloPlex/HaloPlexHS)
1. HiSeq1000/2000 and HiSeq1500/2500
1) Planning a run using IEM (Illumina Experiment Manager)
2) Starting a run in the HCS (HiSeq Control Software) user interface
2. MiSeq
1) Planning a run using IEM
2) Starting a run in the MCS (MiSeq Control Software) user interface
3. NextSeq
1) Planning a run
A. Using IEM (standalone mode)
B. Using BaseSpace
2) Starting a run in the NCS (NextSeq Control Software) user interface
1. Planning a run and reanalyzing a run using the Torrent Server
(applies to PGM, Proton and S5)
2. Starting a run on an ION Instrument

1. bcl to fastq conversion for Illumina sequencing
2. Example sample sheet and other template csv files
A. Example sample sheet
a XT/XT2/RNA-Seq/HaloPlex
b. QXT without adapter trimming
c. QXT with adapter trimming
e. QXT with custom primer and adapter trimming options
e. HaloPlexHS
B. Library prep kit template csv file for BaseSpace
a XT/XT2/RNA-Seq/HaloPlex
b. HaloPlexHS
c. QXT without adapter trimming
e. QXT with custom primer and adapter trimming options
3. How to add Agilent library prep kits as custom Library Prep Kit types in IEM
4. Illumina sequencing reagent kit selection guide
5. Recommended seeding concentrations for Illumina sequencing
6. How to convert an Agilent BED file into a manifest file
7. Considerations for PhiX spike-in
ION SEQUENCING-RELATED
8. ION reagent kits used by Agilent for template preparation and sequencing
9. Seeding concentration for ION sequencing and ION sphere QC
10. How to modify an Agilent BED file to be uploaded to the Ion Server
Sequencing set-up guidelines for NGS
libraries prepped with Agilent NGS kits
III. Appendices

Sequencing set-up guidelines for NGS
libraries prepped with Agilent NGS kits
1. Only works with standalone machines and cannot be set up through BaseSpace
2. When using the MiSeq, the MiSeq Reporter software can be reconfigured to generate
the additional I2 fastq file e.g. the molecular barcode file. Please refer to the “Additional
MiSeq Platform sequencing run setup requirements” in the HaloPlexHS protocol. In any
other situation, the HaloPlexHS data will need to be converted offline using the bcl2fastq
software or Picard tool. Please refer to Appendix 1B for details.
* Versions of software demonstrated in this document:
IEM v1.11.0
HiSeq Control Software v2.2.68
MiSeq Control Software v2.6.2.1
NextSeq Control Software v2.0.2
Torrent Server v5.0.4
Important notes for HaloPlexHS (Illumina):
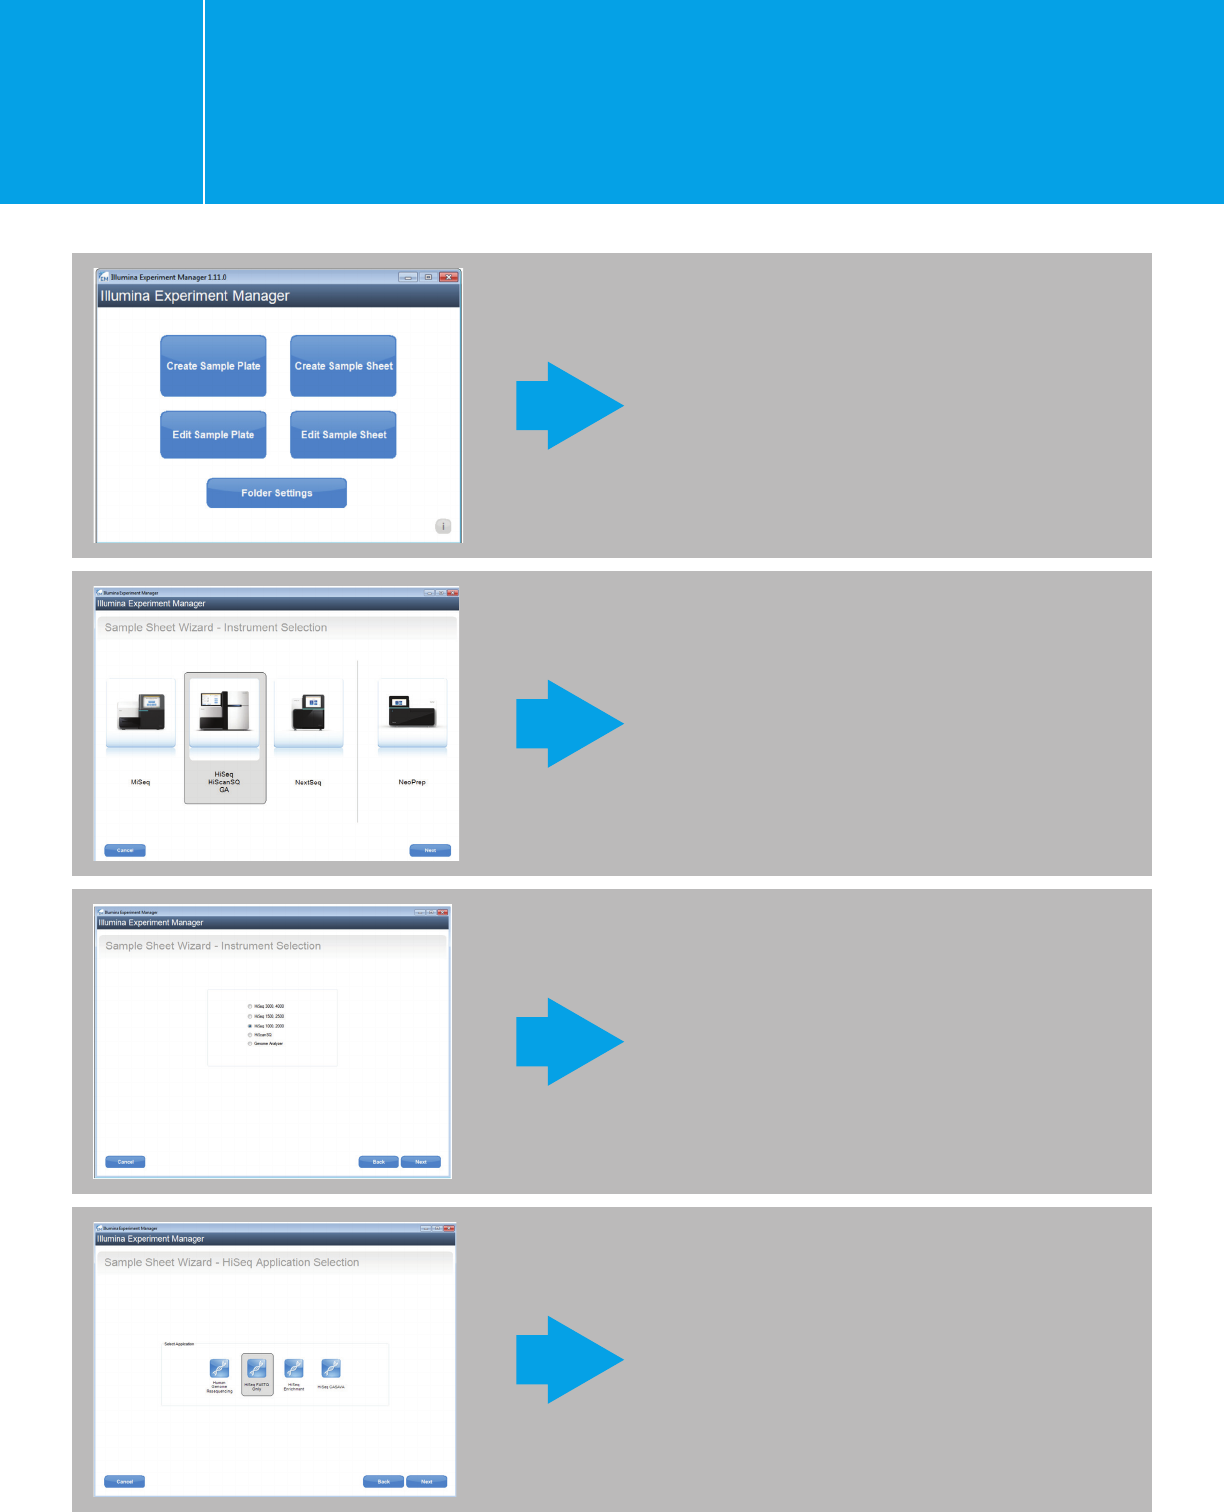
Choose “HiSeq/HiScanSQ/GA.”
Choose the sequencer that will
be used.
Choose “HiSeq FASTQ Only.”
Click “Create Sample Sheet.”
Planning a run on the HiSeq 2000/2500
using IEM for Agilent NGS libraries
I.1.1.
Planning a run on the HiSeq 2000/2500
using IEM for Agilent NGS libraries
I.1.1.
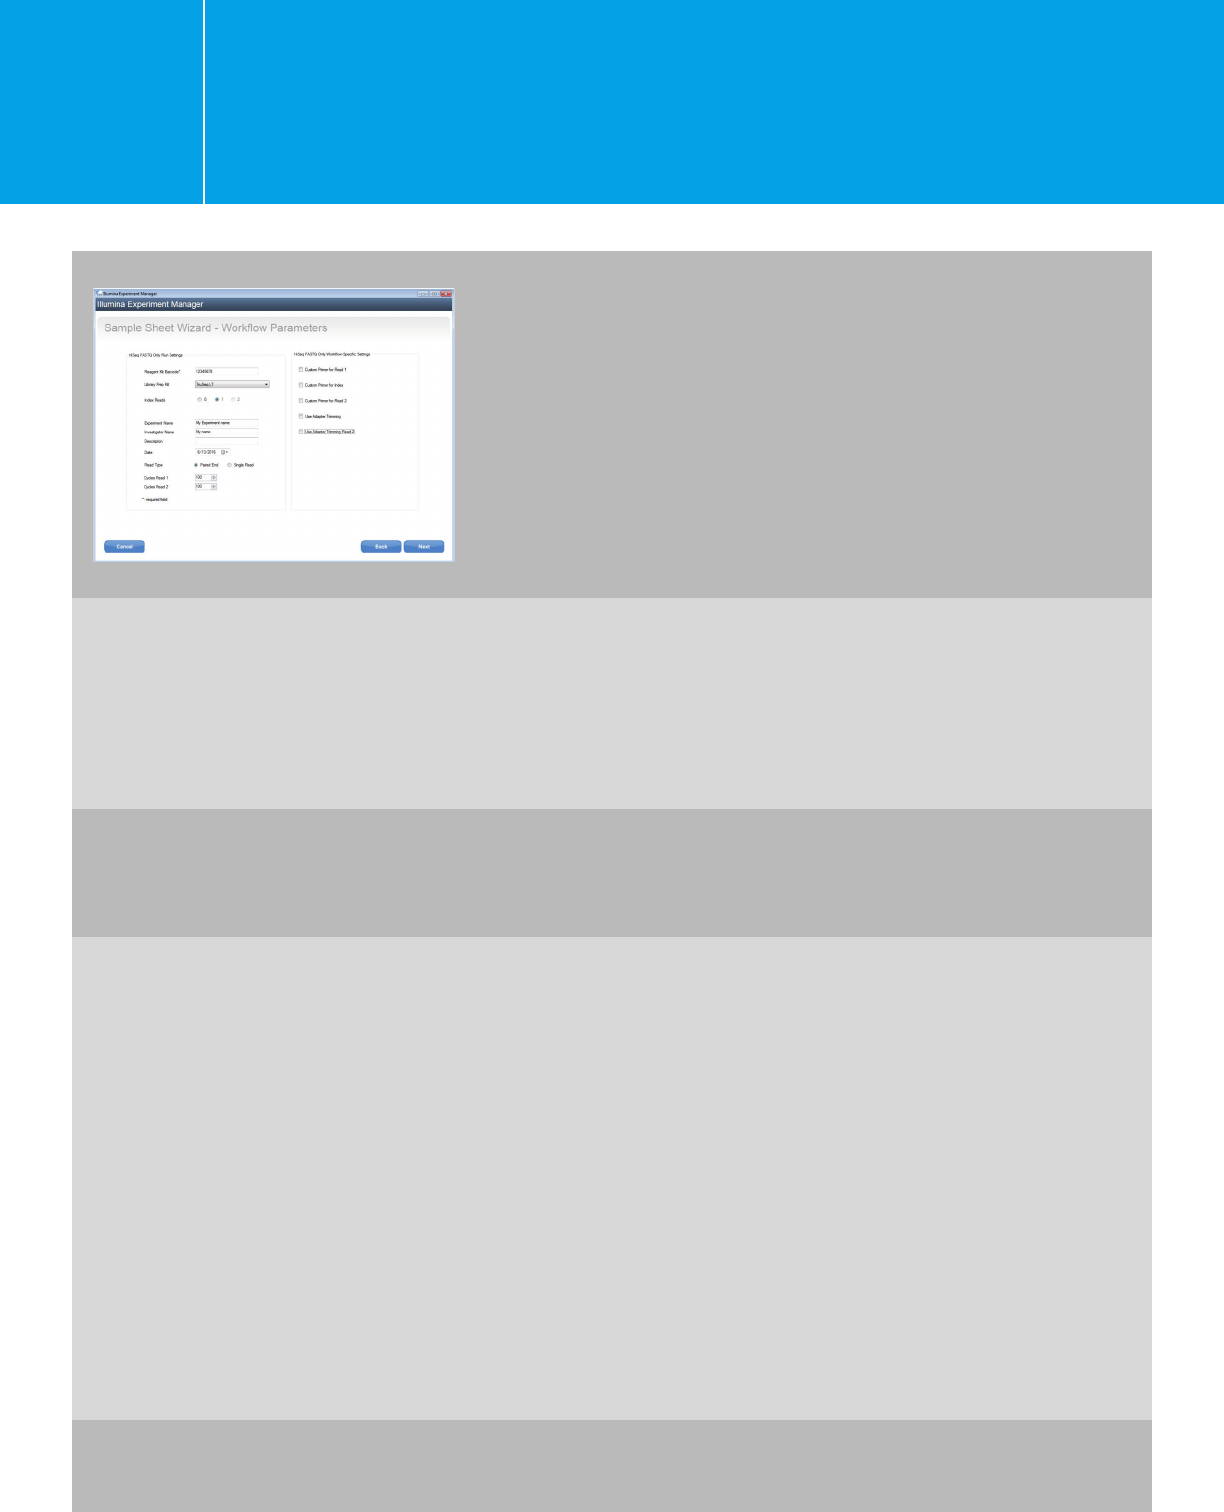
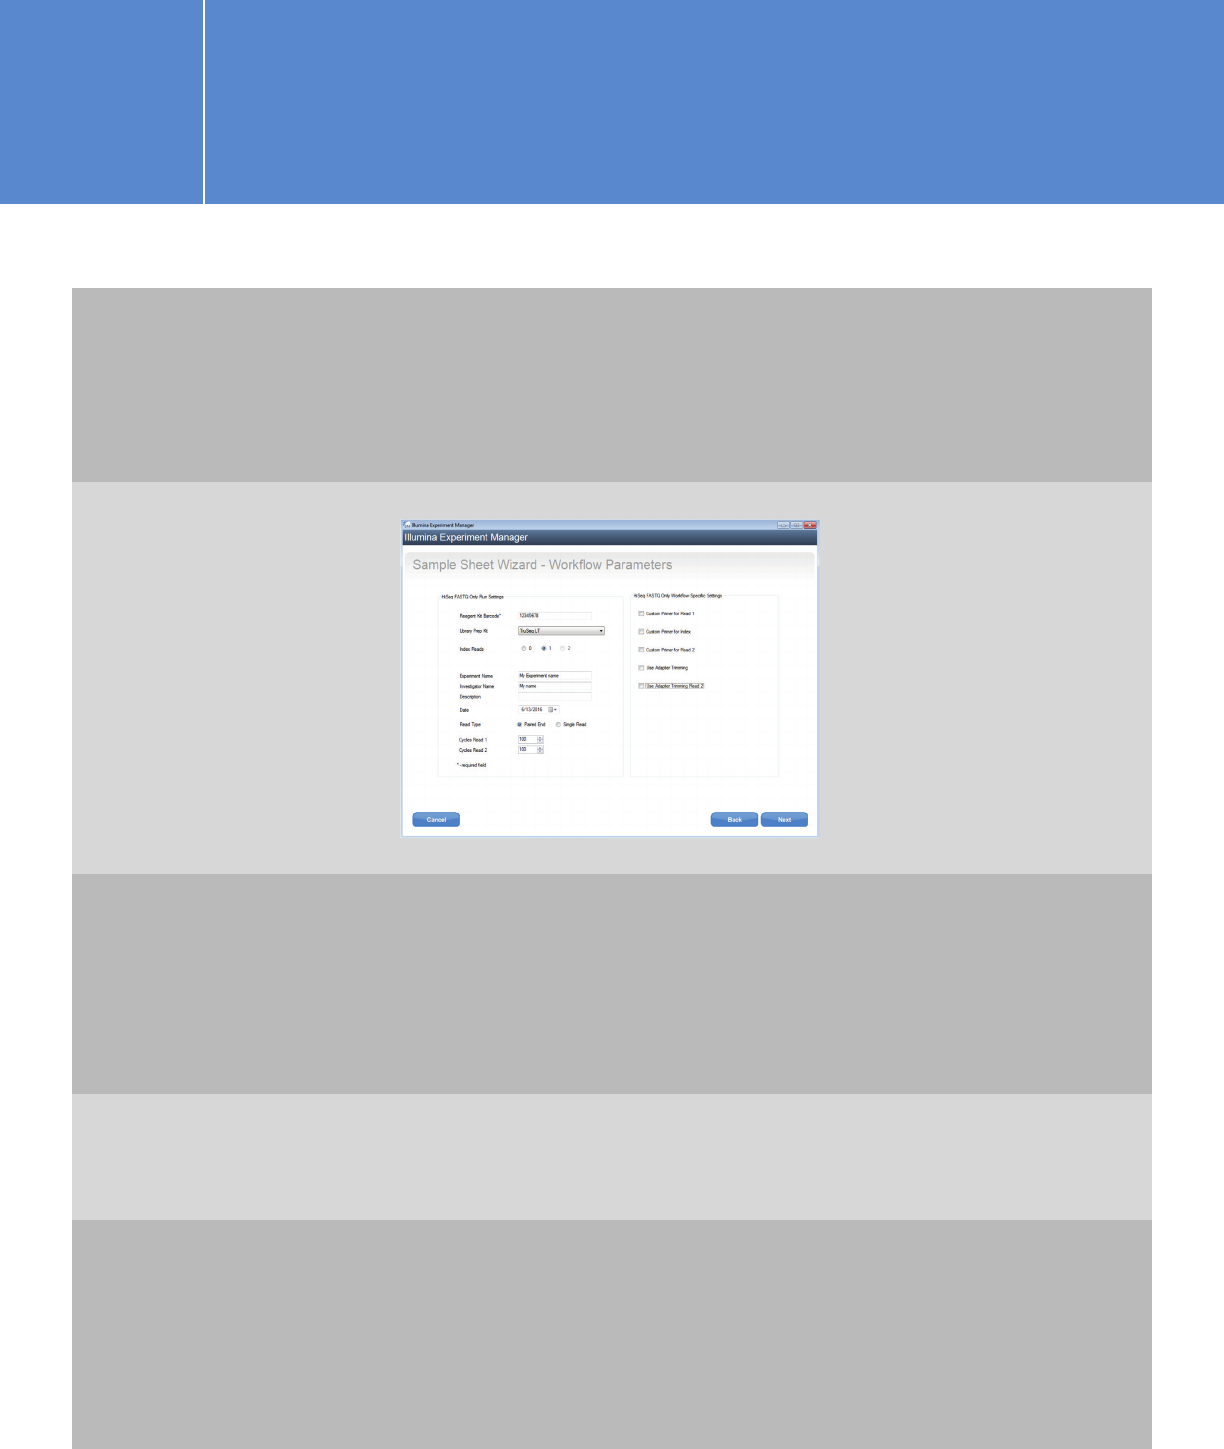
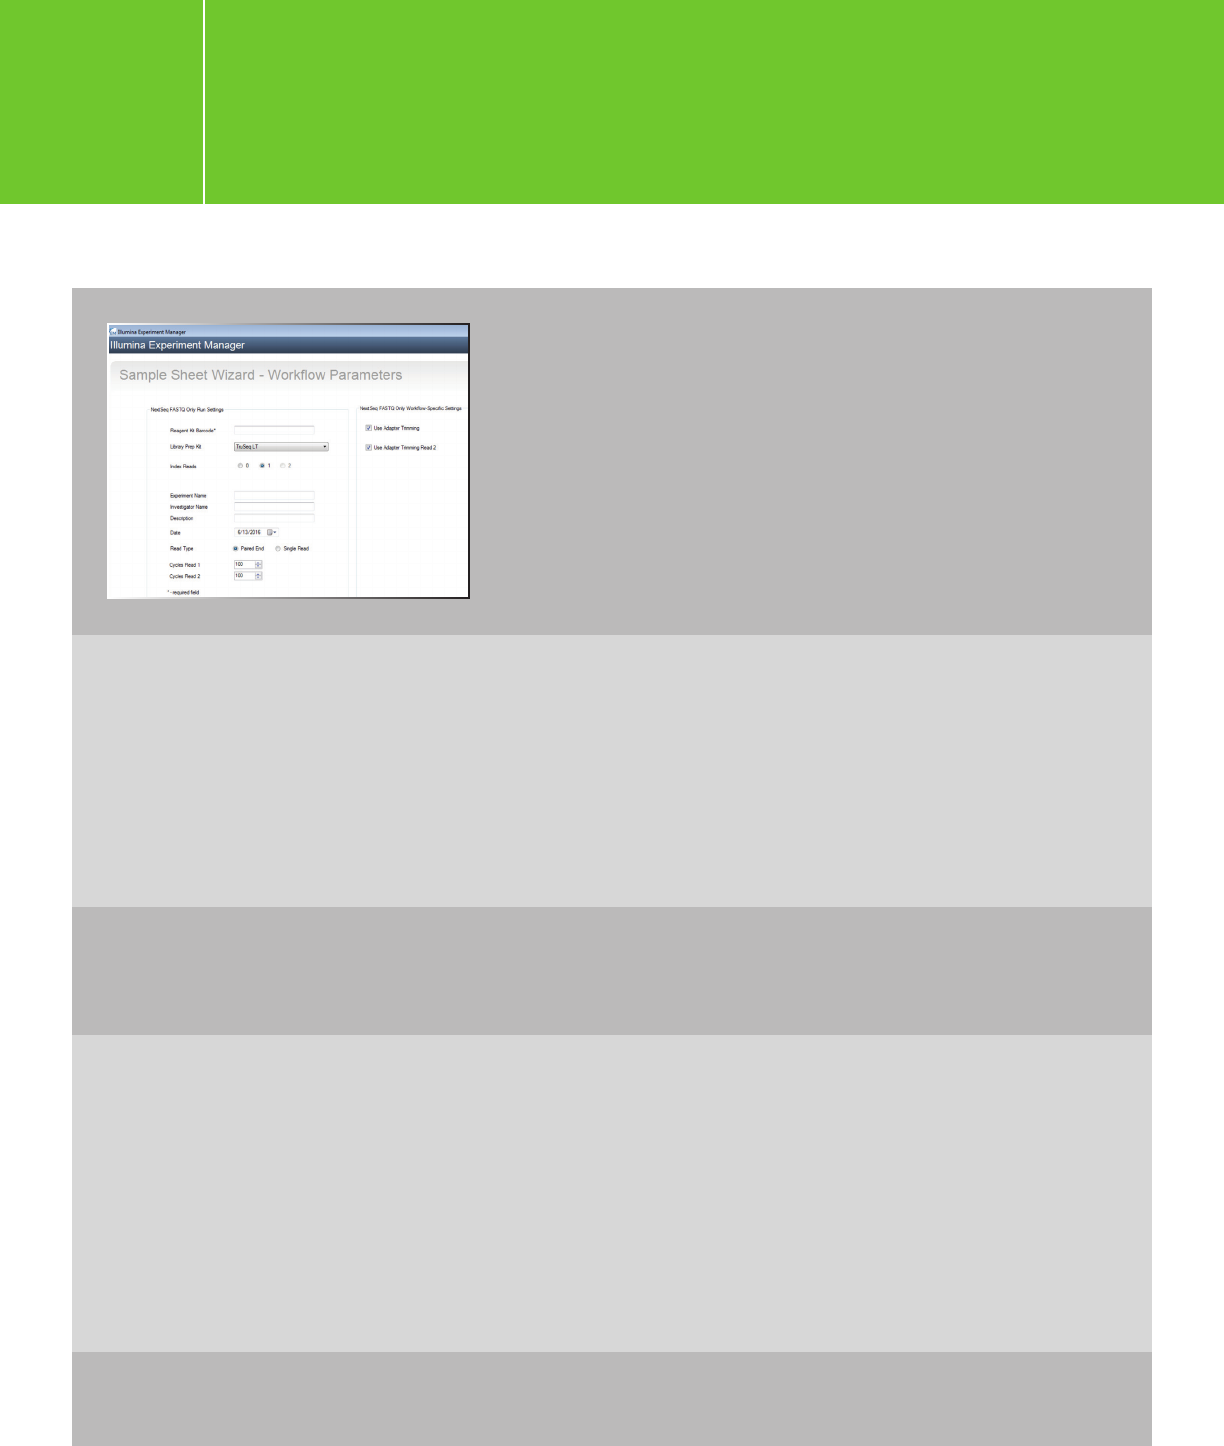
Fill in the fields for: Reagent Kit Barcode, Experiment
Name, Investigator Name, and Description. Paired
End sequencing is recommended for all Agilent
NGS libraries.
For SureSelectXT/XT2/RNA-Seq: Choose TruSeq LT as the Library Prep Kit.
Choose TruSeq LT as the Library Prep Kit. If you are following the shearing size of 150-bp to 200-bp and using a
100-bp or shorter read length, adapter trimming is not necessary. If you are using shorter shearing size or
longer read length and prefer to have Illumina software do the trimming, check the adapter-trimming options.
Otherwise, uncheck these two options and trim adapters later using Agilent SureCall software or the AGeNT toolkit.
For QXT: Choose Nextera XT and either:
(1) leave “Use Adapter Trimming” checked or (2) uncheck this option and trim the adapter using SureCall
or the AGeNT toolkit. Trimming with SureCall or the AGeNT toolkit is recommended.
If you choose the “Use Adapter Trimming” option, you will need to enter the consensus sequence for the
QXT adapters provided in the QXT protocol (CTGTCTCTTGATCACA), when you edit the sample sheet later.
Leave the three “Custom Primer” options unchecked; spike the Agilent read primers into the Illumina read
primers; and place the primer mixtures in their original positions.
Note: Because of possible reagent fill-volume variabilities, we recommend pipetting the appropriate
volumes of the Illumina read primers out of their original tubes and mixing them with required volumes
of the respective QXT read primers in separate tubes. Refer to the QXT protocol/custom primer-preparation
tables for details.) Then place the primer mixtures at positions corresponding to the relevant Illumina read
primers on the reagent rack.
For HaloPlex: Choose TruSeq LT, but uncheck the adapter-trimming option and perform
trimming in SureCall or using the AGeNT toolkit.
For HaloPlexHS: Choose Nextera XT and uncheck “Use Adapter Trimming.”
Planning a run on the HiSeq 2000/2500
using IEM for Agilent NGS libraries
I.1.1.
Note for HaloPlexHS:
Index 2 is the molecular barcode and is not used
for demultiplexing. Use 10 “N”s for index 2 for
all samples in the sample sheet. You will need
to perform offline bcl-to-fastq conversion to
demultiplex using only index 1. In the meantime,
generate a fastq file for index 2; the fastq file will
be needed for HaloPlexHS data analysis. Please
refer to Appendix 1 for more instructions.
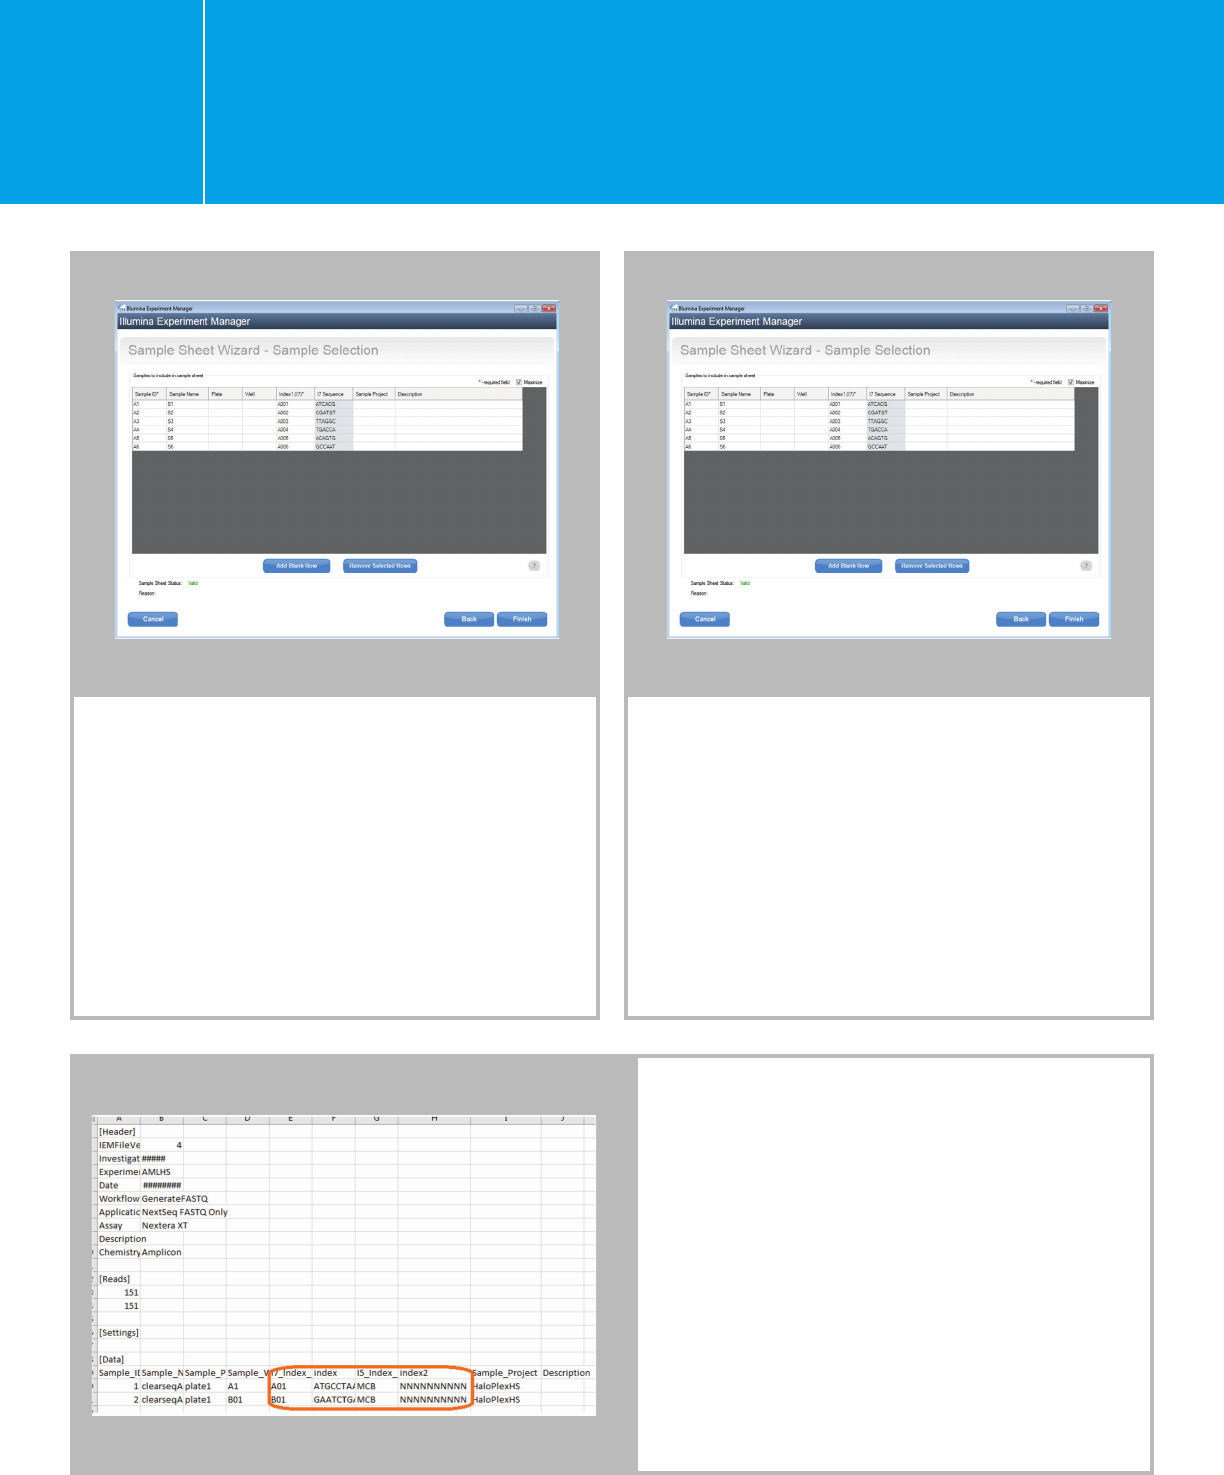
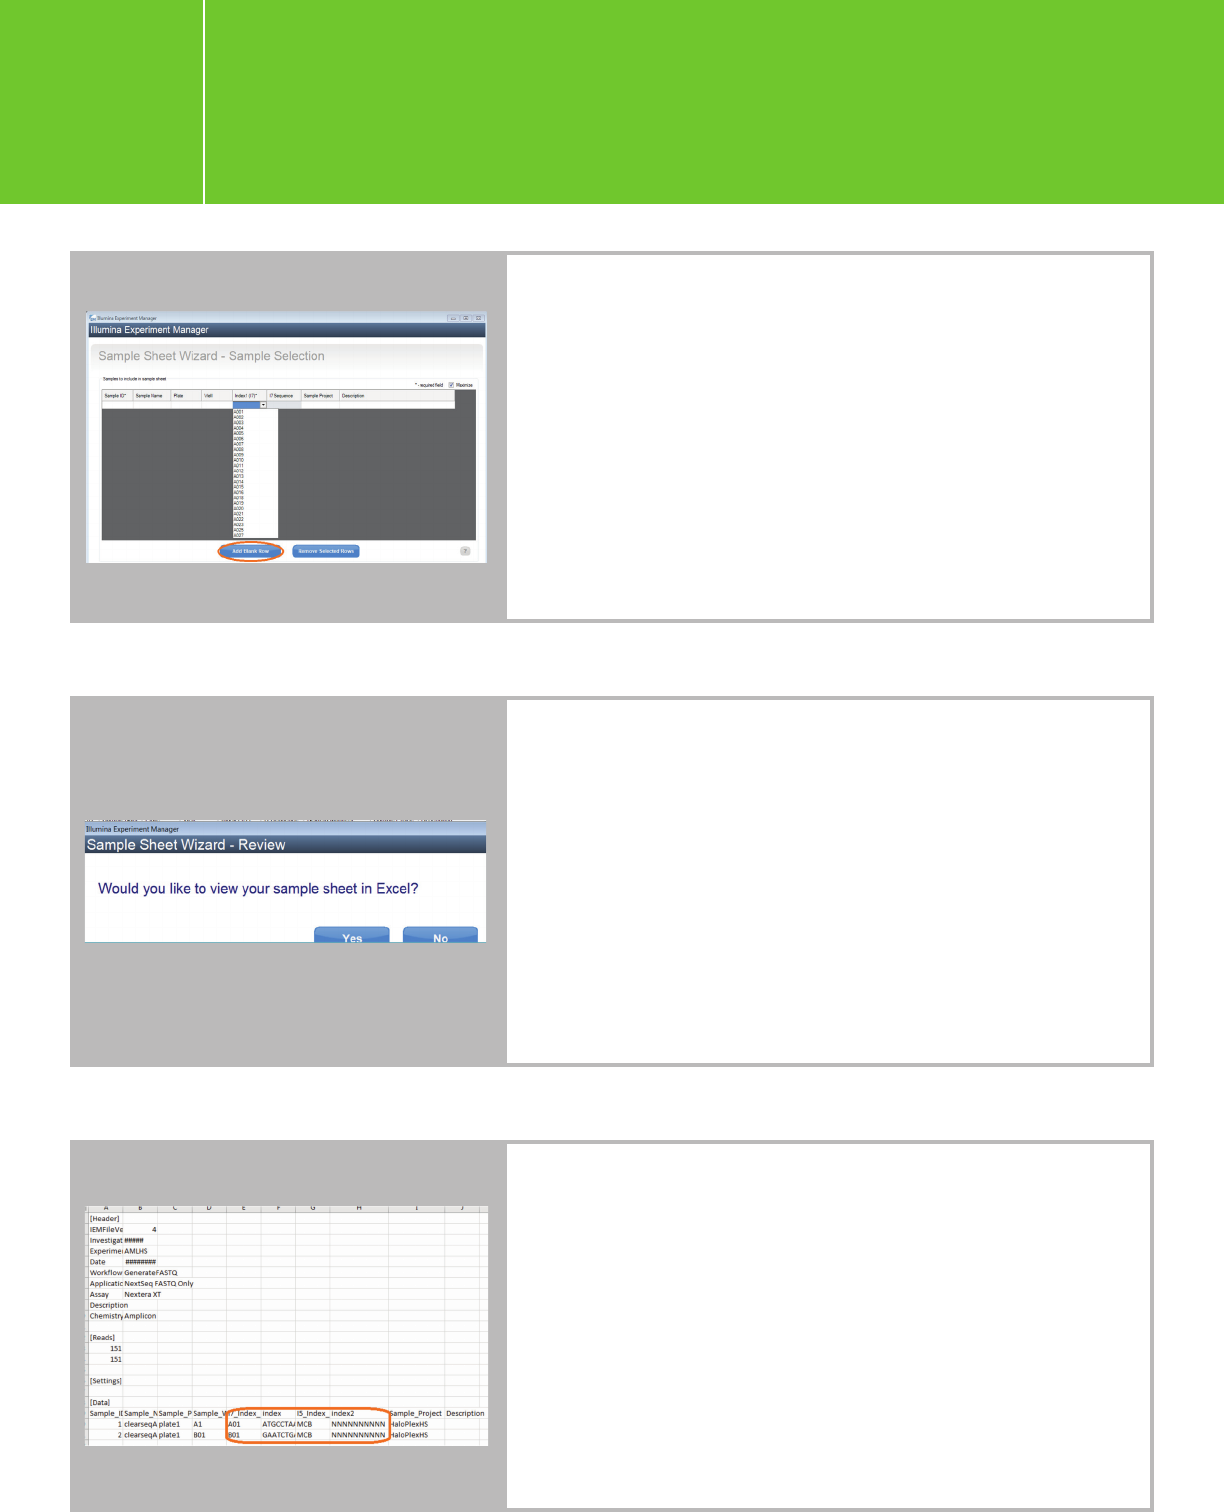
Click “Add Blank Row” for each sample.
Fill in the fields for: Sample ID and Sample
Name. It does not matter what you select for
the index at this time, because you will edit
the sample sheet to enter the correct index
sequences. Click “Finish” to save the sample
sheet. The screen below is single-indexed for
demonstration purposes only.
When asked, “Would you like to view
your sample sheet in Excel?”click “Yes.
Then enter the correct sample index names
and sequences and save the sample sheet.
Copy or move the sample-sheet csv file to the
appropriate location on your HiSeq, if you ran
IEM on a different computer. Refer to Appendix
2A for example sample sheets of respective
library types.
Planning a run on the HiSeq 2000/2500
using IEM for Agilent NGS libraries
I.1.1.
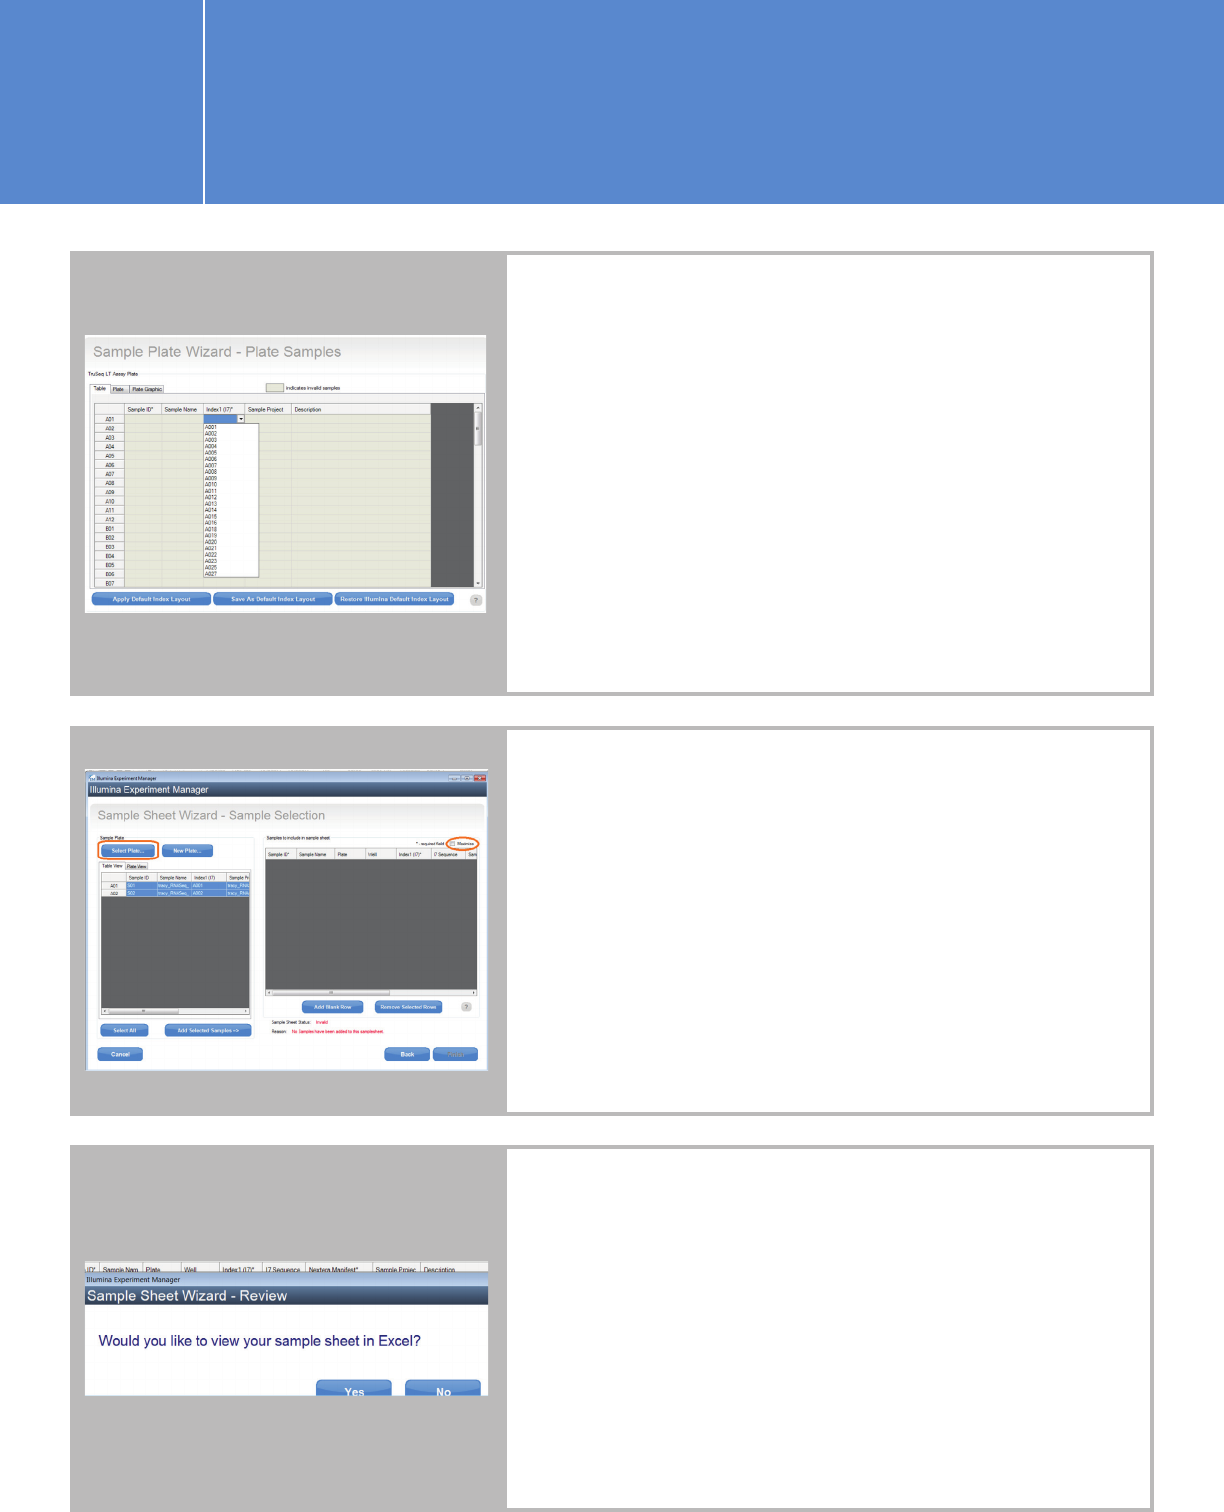
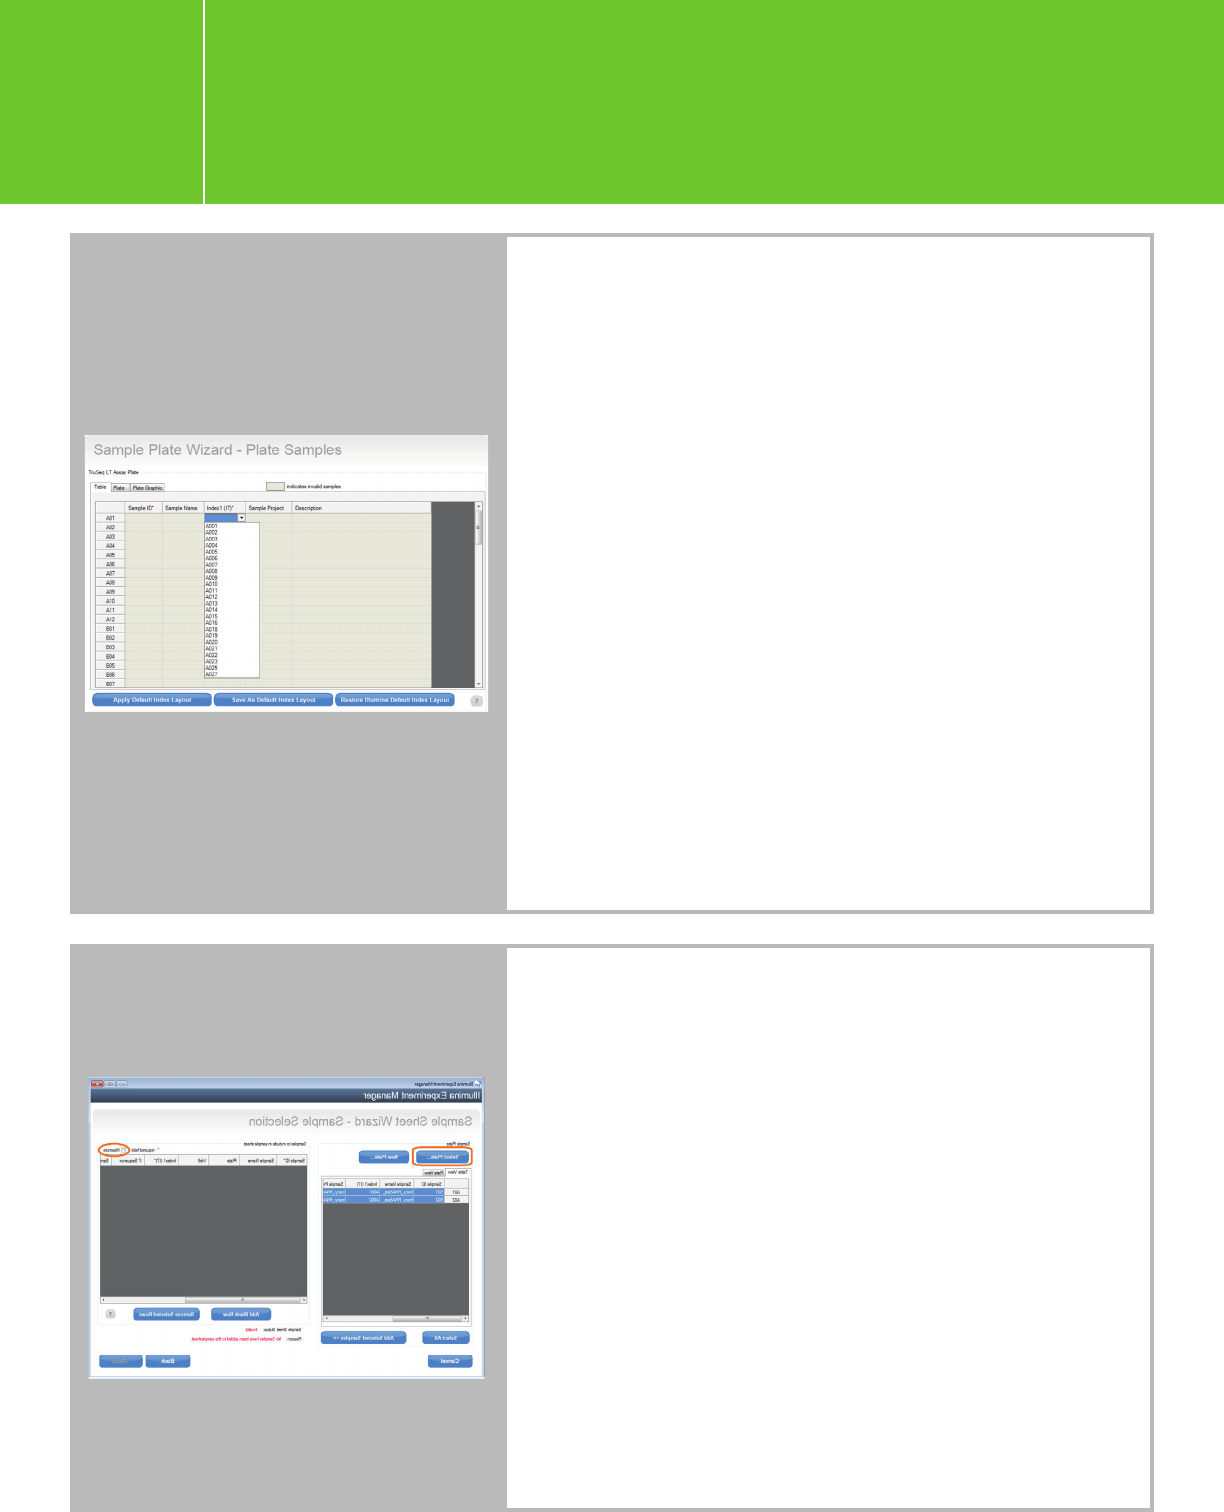
Alternatively, you may create a sample plate first and then use
the sample plate to generate a sample sheet.
n Open IEM and click “Create Sample Plate.”
n On the Library Prep Kit Selection page, choose a Library Prep
Kit for your Agilent Libraries as stated above, e.g., “TruSeq LT” for
the single-indexed SureSelectXT/XT2/RNA-Seq and HaloPlex,
and “Nextera XT” for the dual-indexed QXT and HaloPlexHS
.
n Enter the plate name and choose the appropriate index
configuration.
n Enter your sample information from the “Table” view. Similarly,
choose any index from the drop-down list for now, and the
correct index will be entered when you edit the sample sheet
later (as described above).
n After sample information has been entered in the Table view,
the Plate and Plate Graphic views will automatically populate.
Click “Finish.”
n Go back to the IEM root page and click “Create Sample
Sheet” > “HiSeq/HiScanSQ/GA” > your sequencer> “HiSeq
FASTQ Only.”
n Follow the instructions for the Sample Sheet Wizard – Workflow
Parameters page (see above).
n On the Sample Selection page, uncheck the “Maximize” option
to bring the sample-plate view and sample-sheet view onto
the same page, and then click “Select Plate” to navigate to a
sample plate that you created. Note: If you don’t see the plate
file that you intend to import, it might be because the Library
Prep Kit does not match the one chosen when creating the
sample plate.
n You can also use the “New Plate” option to create a sample
plate here. Either highlight part of the sample plate or click
“Select All” and then click “Add Selected Samples” to move
the samples to the sample sheet. Click “Finish” and save the
sample sheet.
Click “Yes” when you are prompted with the below question,
and edit the index names and sequences.
Note: For QXT, refer to the SureSelectQXT protocol for custom-primer
spike-in guidelines.
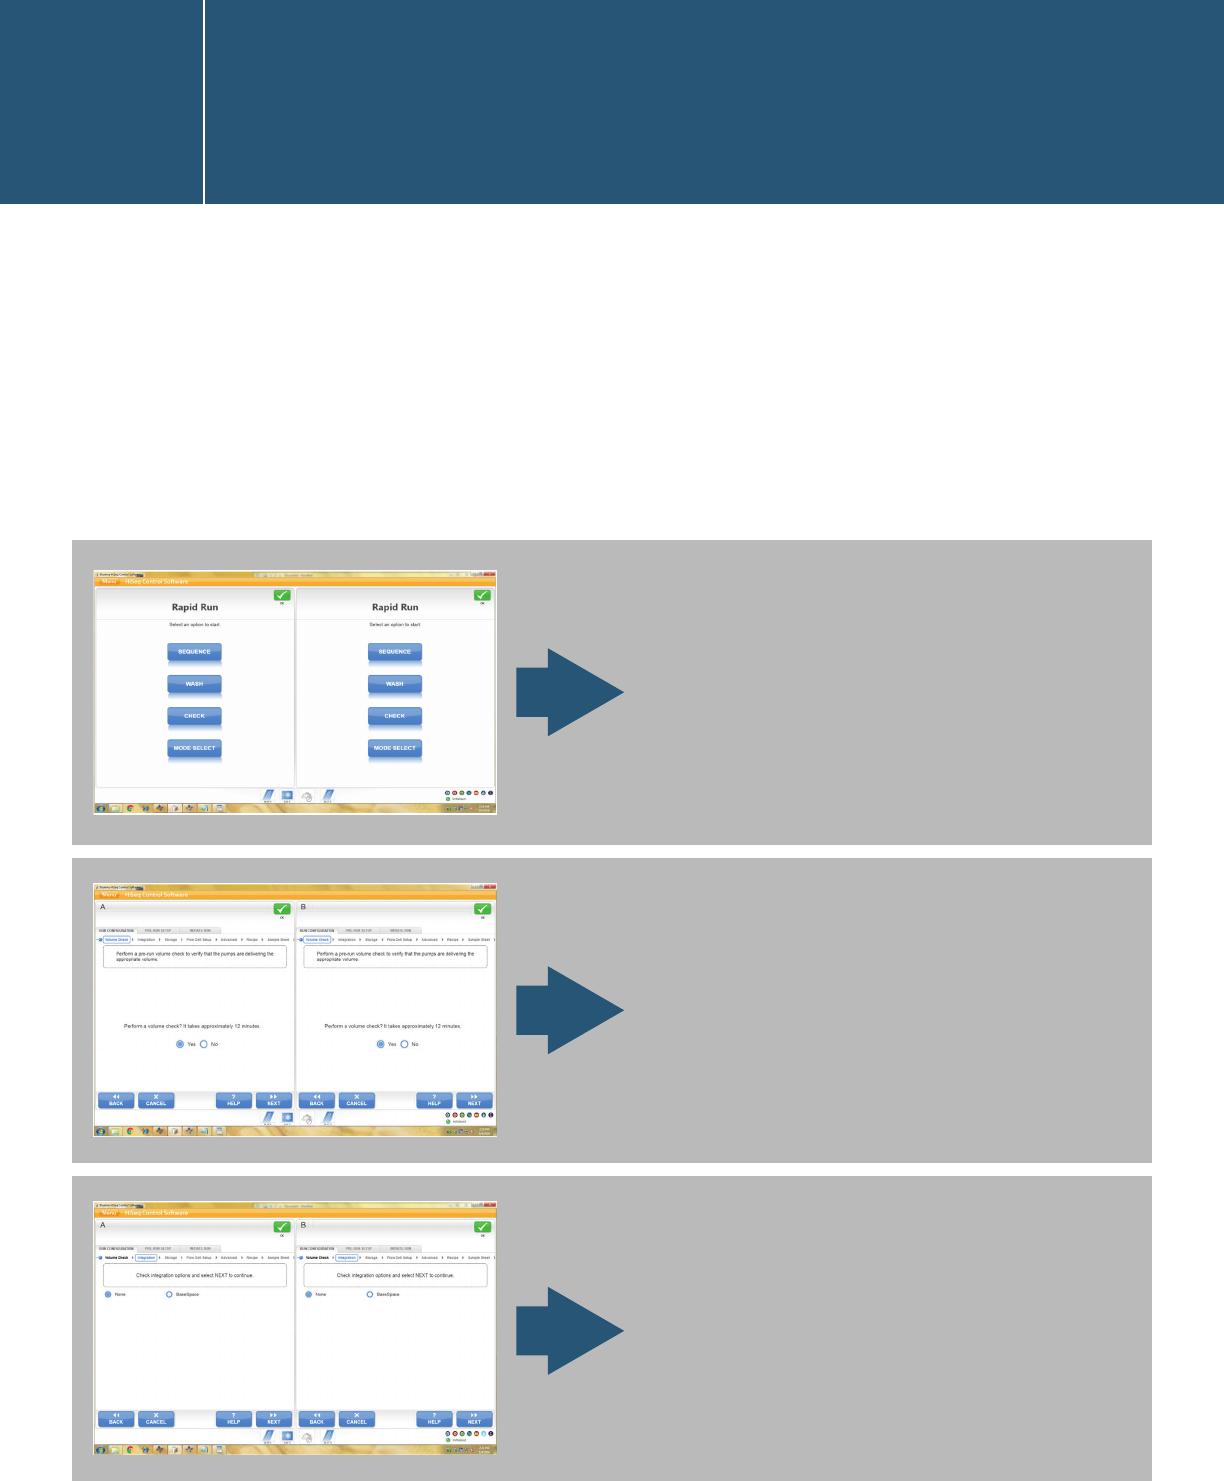
For HiSeq 2500/1500 models that support Rapid Mode, the user interface
bifurcates at the beginning for High Output Mode and Rapid Mode. The
below screen captures are based on Rapid Mode on the HiSeq 2500.
Start the Rapid Mode workflow.
Note that the example on the
left has clusters generated on
a cBot, and the one on the right
represents on-board cluster
generation.
Perform volume check.
Check integration options.
Starting a run in the HiSeq
Control Software user interface
I.1.2.
Flow-cell setup.
Choose storage options.
Advanced settings.
Fill in the recipe. Index type
and number of cycles must
align with the libraries to be
sequenced. The examples in
the below screen are QXT on
the left and XT on the right.
Starting a run in the HiSeq
Control Software user interface
I.1.2.
Enter SBS Kit ID and Cluster Kit ID.
Choose the cluster-generation
option and select the sample
sheet.
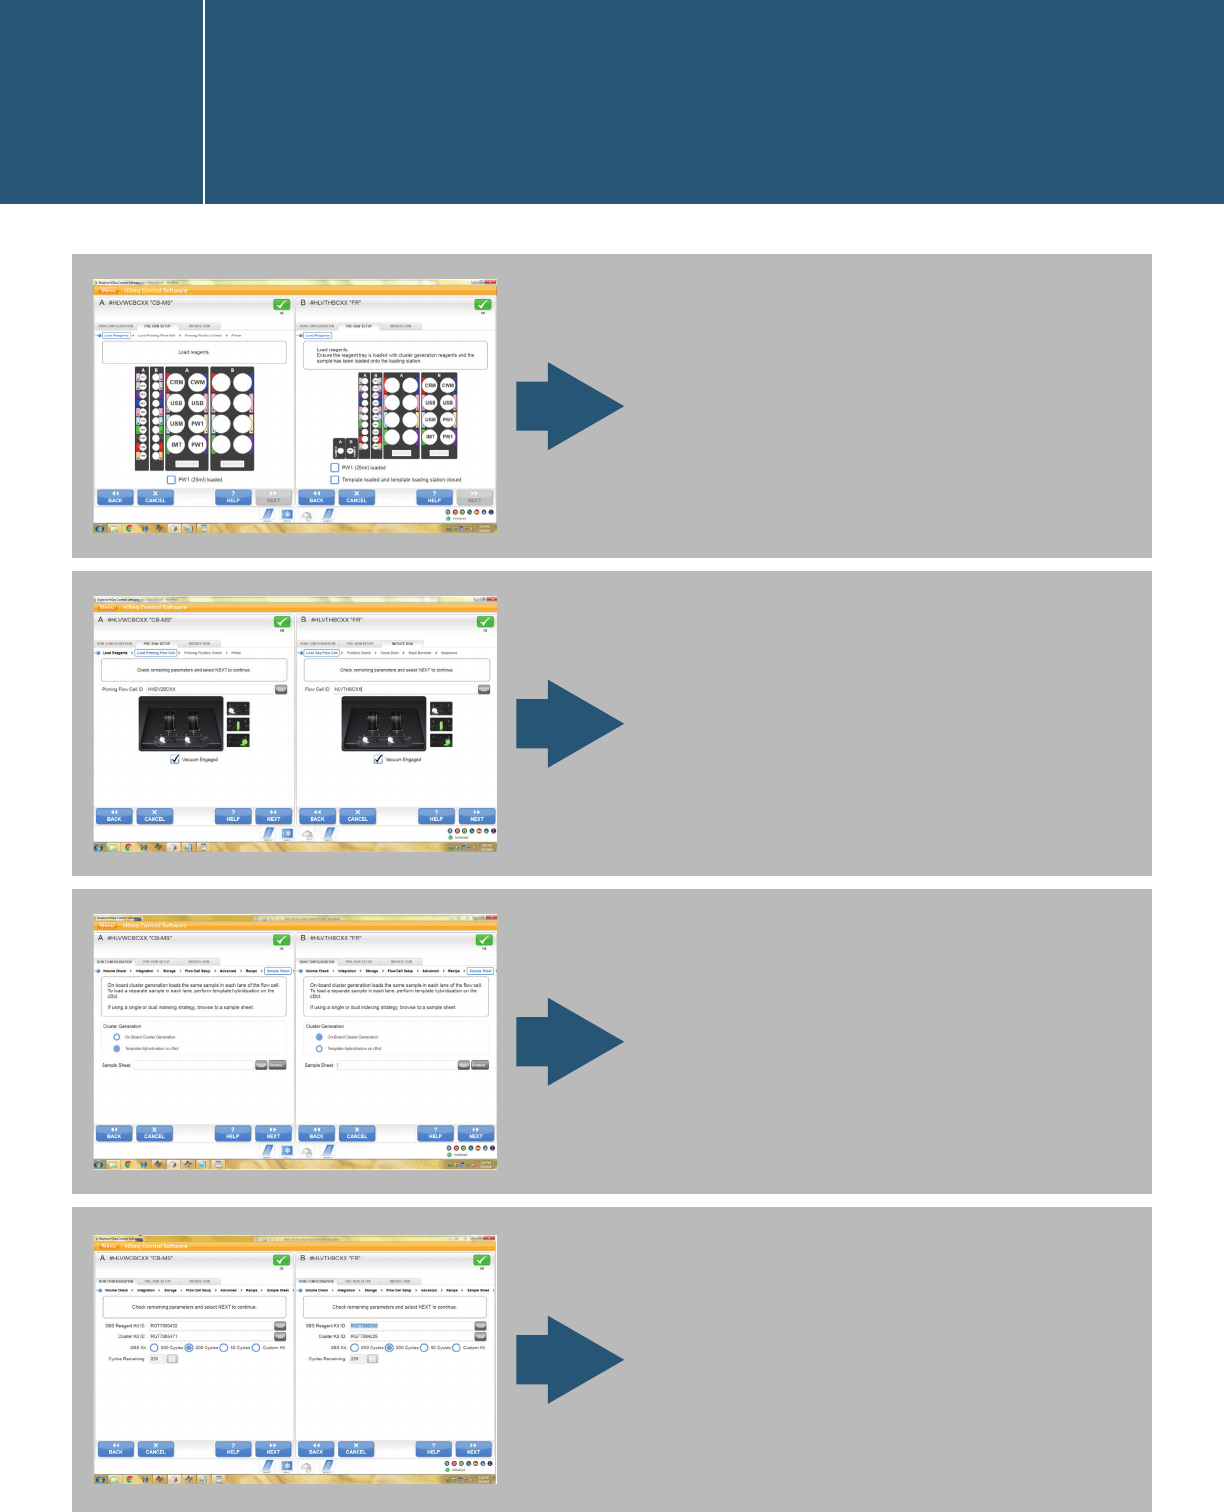
Load reagents.
Load the flow cells, e.g., the
priming flow cell on the left for
clusters generated on a cBot
and the sequencing flow cell on
the right for on-board cluster
generation.
Starting a run in the HiSeq
Control Software user interface
I.1.2.

Starting a run in the HiSeq
Control Software user interface
I.1.2.
Close the door and allow the
machine to read the flow-cell
barcode.
Fluidics check.
Start the run.
The run starts.
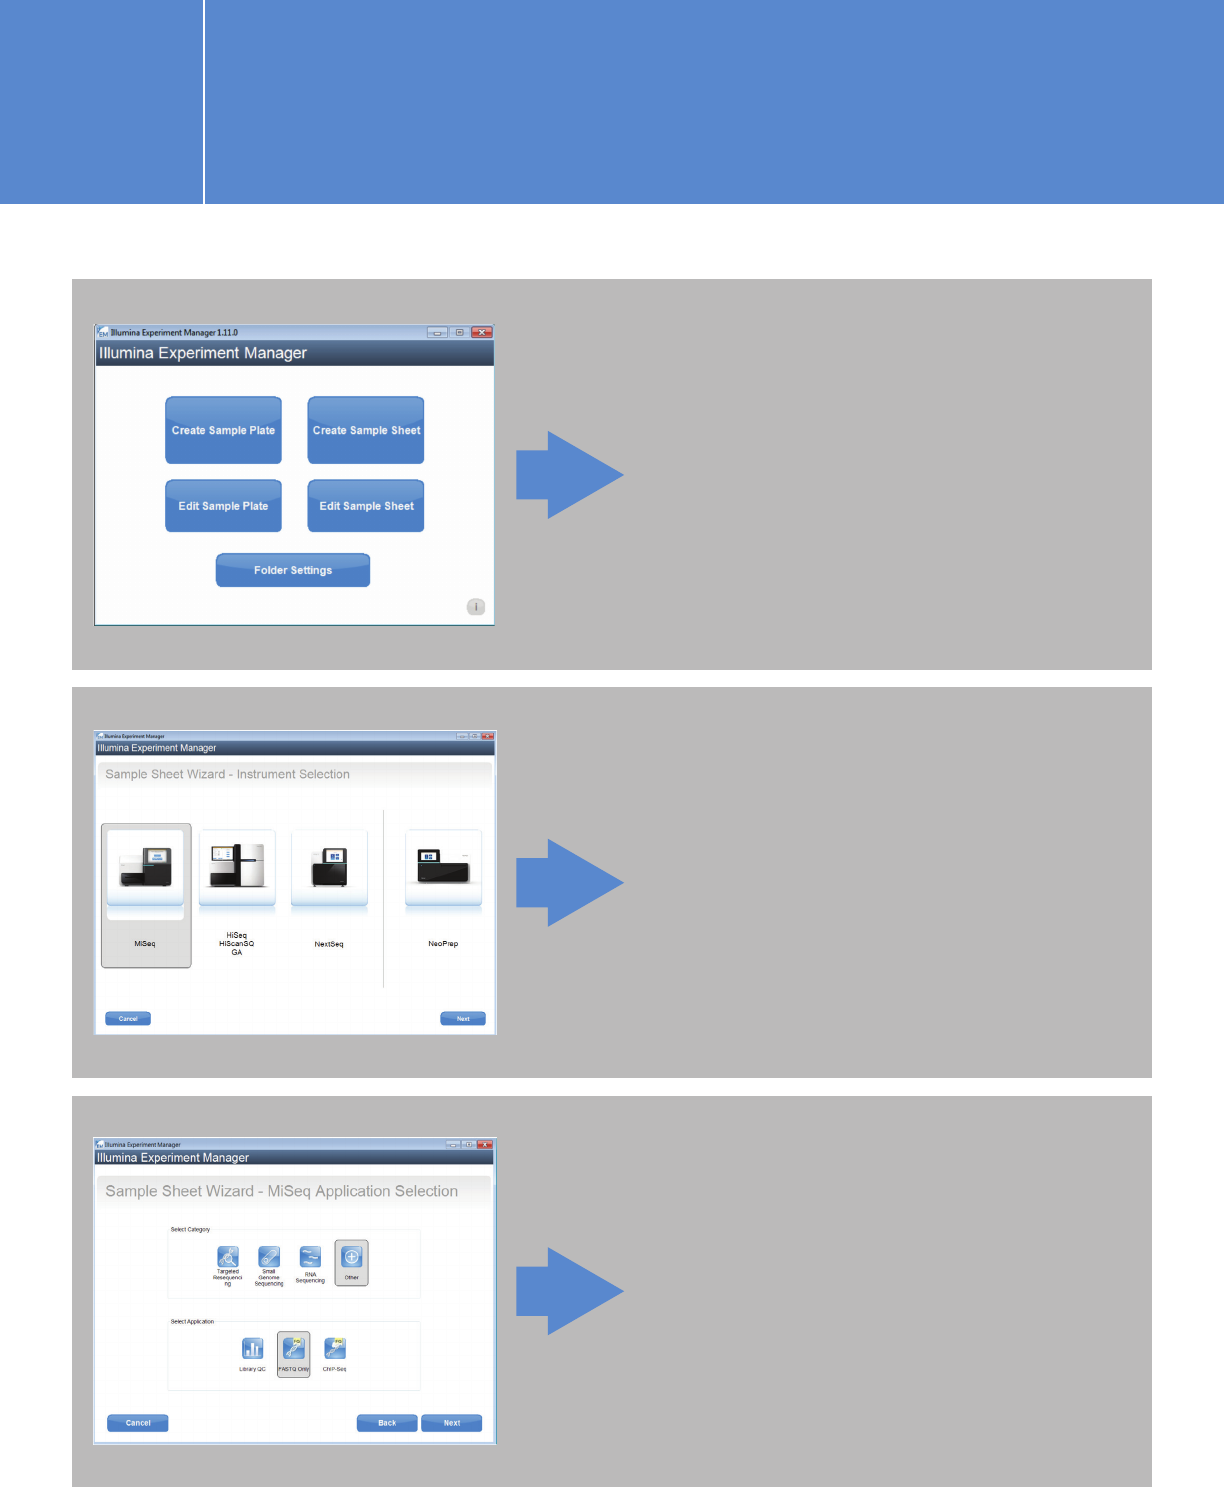
On the next screen (Instrument
Selection), choose “MiSeq.”
Click “Create Sample Sheet.”
On the MiSeq Application
Selection page, we recommend
selecting “Other” as the category
and “FASTQ Only” as the
application.
I.2.1. Planning a run on the MiSeq using
IEM for Agilent NGS libraries
I.2.1. Planning a run on the MiSeq using
IEM for Agilent NGS libraries
On the next screen, fill in the fields for: Barcode, Experiment Name, Investigator Name,
and Description. Specify selections for Library Prep Kit, Read Type, Cycles Read 1, and
Cycles Read 2. You may set Cycles Read 1 and Cycles Read 2 to values based on your
application needs and cartridge capacity.
For SureSelectXT/XT2/RNA-Seq: Choose TruSeq LT as the Library Prep Kit.
If you are following the shearing size of 150-bp to 200-bp, and using 100-bp or shorter read length, adapter
trimming is not necessary. If you are using shorter shearing size or longer read length and prefer to have
Illumina software do the trimming, check the adapter-trimming option. Otherwise, uncheck these two
options and trim adapters later using Agilent SureCall software or the AGeNT trimming tool.
For QXT: Choose Nextera XT and either:
(1) leave “Use Adapter Trimming” checked or (2) (recommended) uncheck this option to trim the adapter
using SureCall or the AGeNT toolkit.
If you choose the “Use Adapter Trimming” option, you will need to enter the consensus sequence for the
QXT adapters provided in the QXT protocol (CTGTCTCTTGATCACA) when you edit the sample sheet.
For HaloPlex: Choose TruSeq LT, but uncheck the adaptor-trimming option and perform
trimming in SureCall or using the AGeNT toolkit.
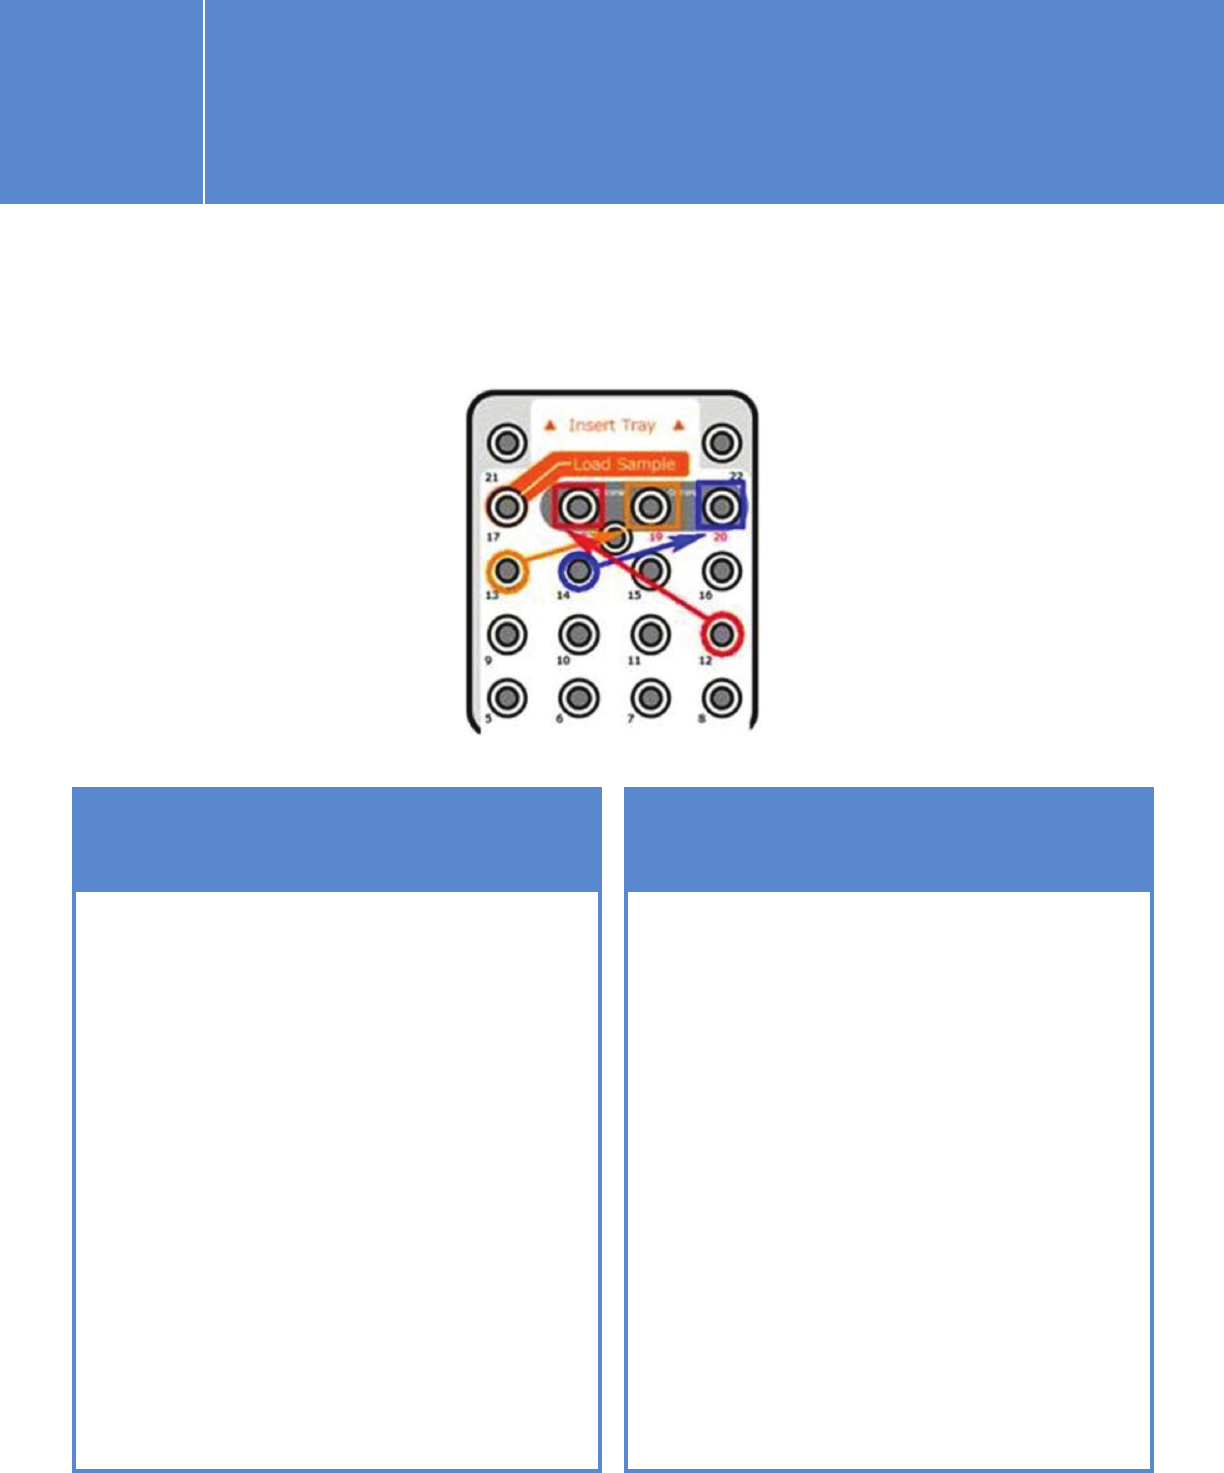
You have two options for placing the QXT read-primer mixtures, and this
determines whether you need to check the “Custom Primer” options on
this screen.
I.2.1. Planning a run on the MiSeq using
IEM for Agilent NGS libraries
OPTION 1 OPTION 2
If you combine the Agilent QXT
read primers with the Illumina
read primers from wells 12, 13,
and 14 and then move the primer
mixtures to wells 18, 19, and 20
in the cartridge (see QXT protocol
for instructions), you should check
all three “Custom Primer” options.
This instructs the MiSeq sippers
to draw primers from the custom
primer wells, e.g., 18, 19, and 20.
Please note that the well positions
do not match the Illumina names
(i.e., HP10 is in position 12).
You can draw the Illumina read
primers out and mix with the
Agilent QXT read primers in clean
tubes, place the primer mixtures
back in the respective original
Illumina read primer positions,
and leave the three “Custom
Primer” options unchecked.
For HaloPlexHS: Choose Nextera
XT and uncheck the Use Adaptor
Trimming option.
I.2.1. Planning a run on the MiSeq using
IEM for Agilent NGS libraries
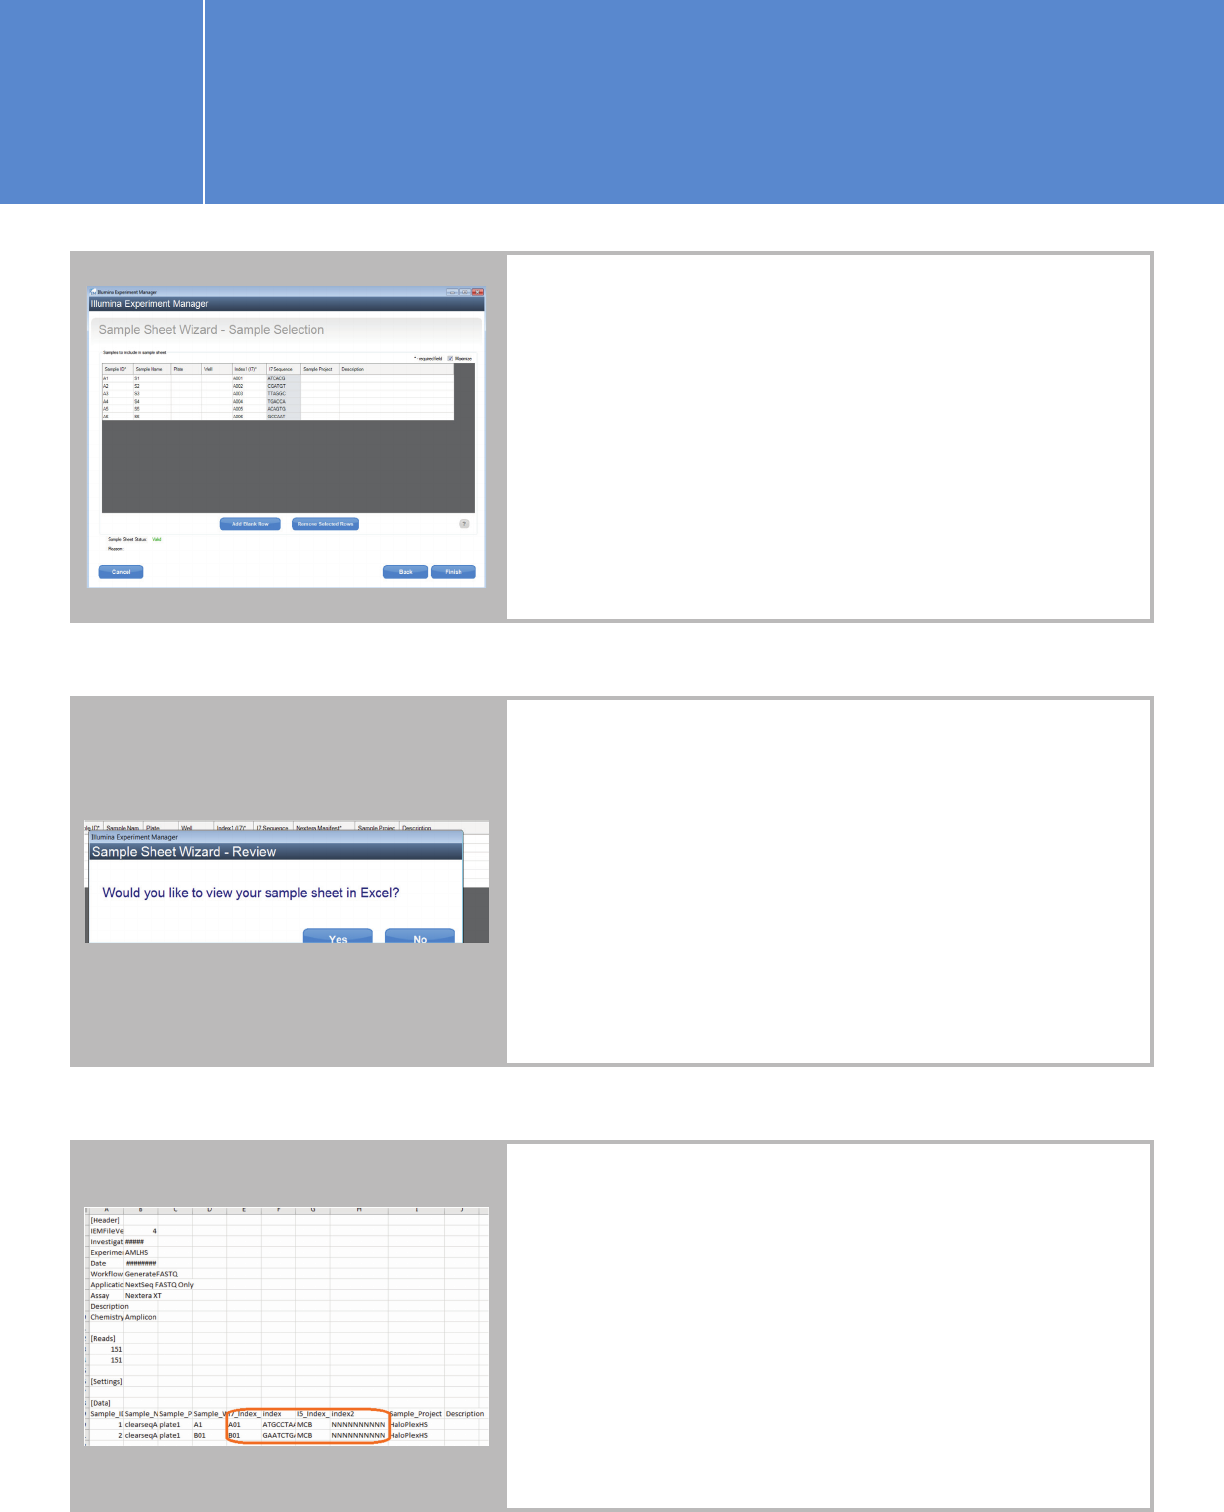
Click “Next” to proceed to the Sample Selection screen.
Add a blank row for each sample. Fill in the SampleID,
Sample Name, and Plate fields. At this point, you can
specify any index and then change it when you edit the
sample sheet later. The screen below is single-index for
demonstration purposes only.
n Click “Finish” to save the sample sheet.
When prompted, if you wish to open the sample sheet in
Excel, click “Yes.” Then enter the correct sample index
names and sequences and save the sample sheet. Copy or
move the sample-sheet csv file to the appropriate location
on your HiSeq, if you ran IEM on a different computer. Refer
to Appendix 2A for example sample sheets of respective
library types.
Note for HaloPlexHS:
Index 2 is the molecular barcode and is not used for
demultiplexing. Use 10 “N”s for index 2 for all samples
in the sample sheet. You would demultiplex HaloPlexHS
sequencing data using only index 1 and would need to
generate the index 2 fastq files in addition to the paired-end
read fastq files for data analysis. To do this, you can either
modify the configuration of the MiSeq Reporter software
or perform offline bcl-to-fastq conversion. Please refer to
Appendix 1 for instructions.
I.2.1. Planning a run on the MiSeq using
IEM for Agilent NGS libraries
Alternatively, you may create a sample plate first and then
use the sample plate to generate a sample sheet.
n Open IEM and click “Create Sample Plate.”
n On the Library Prep Kit Selection page, choose a kit for your
Agilent Libraries, e.g., “TruSeq LT” for the single-indexed
SureSelectXT/XT2 and HaloPlex, and “Nextera XT” for the
dual-indexed QXT and HaloPlexHS
.
n Enter the plate name and choose the appropriate index
configuration.
n Enter your sample information from the Table view. Similarly,
choose any index from the drop-down list for now, and the
correct index will be entered when you edit the sample sheet
later (as described above).
n After sample information has been entered in Table view,
the Plate and Plate Graphic views will automatically
populate. Click “Finish.”
n Go back to the IEM root page and click “Create Sample
Sheet” > “MiSeq” > “FASTQ Only.”
n Follow the instructions for the Sample Sheet Wizard – Workflow
Parameters page (see above).
n On the Sample Selection page, uncheck the “Maximize”
option to bring the sample-plate view and sample sheet
view onto the same page, and then click “Select Plate”
to navigate to a sample plate that you created.
Note for HaloPlexHS:
If you don’t see the plate file that you intend to import, it might
be because the Library Prep Kit does not match the one chosen
when creating the sample plate.
n You can also use the “New Plate” option to create a sample
plate. Either highlight part of the sample plate or click “Select
All” and then click “Add Selected Samples” to move the
samples to the sample sheet. Click “Finish” and save the
sample sheet.
n Click “Yes” when you are prompted with the below question,
and edit the index names and sequences.
Click “SEQUENCE.”
Choose or leave unchecked the
“BaseSpace” option and follow
the workflow provided by the
software.
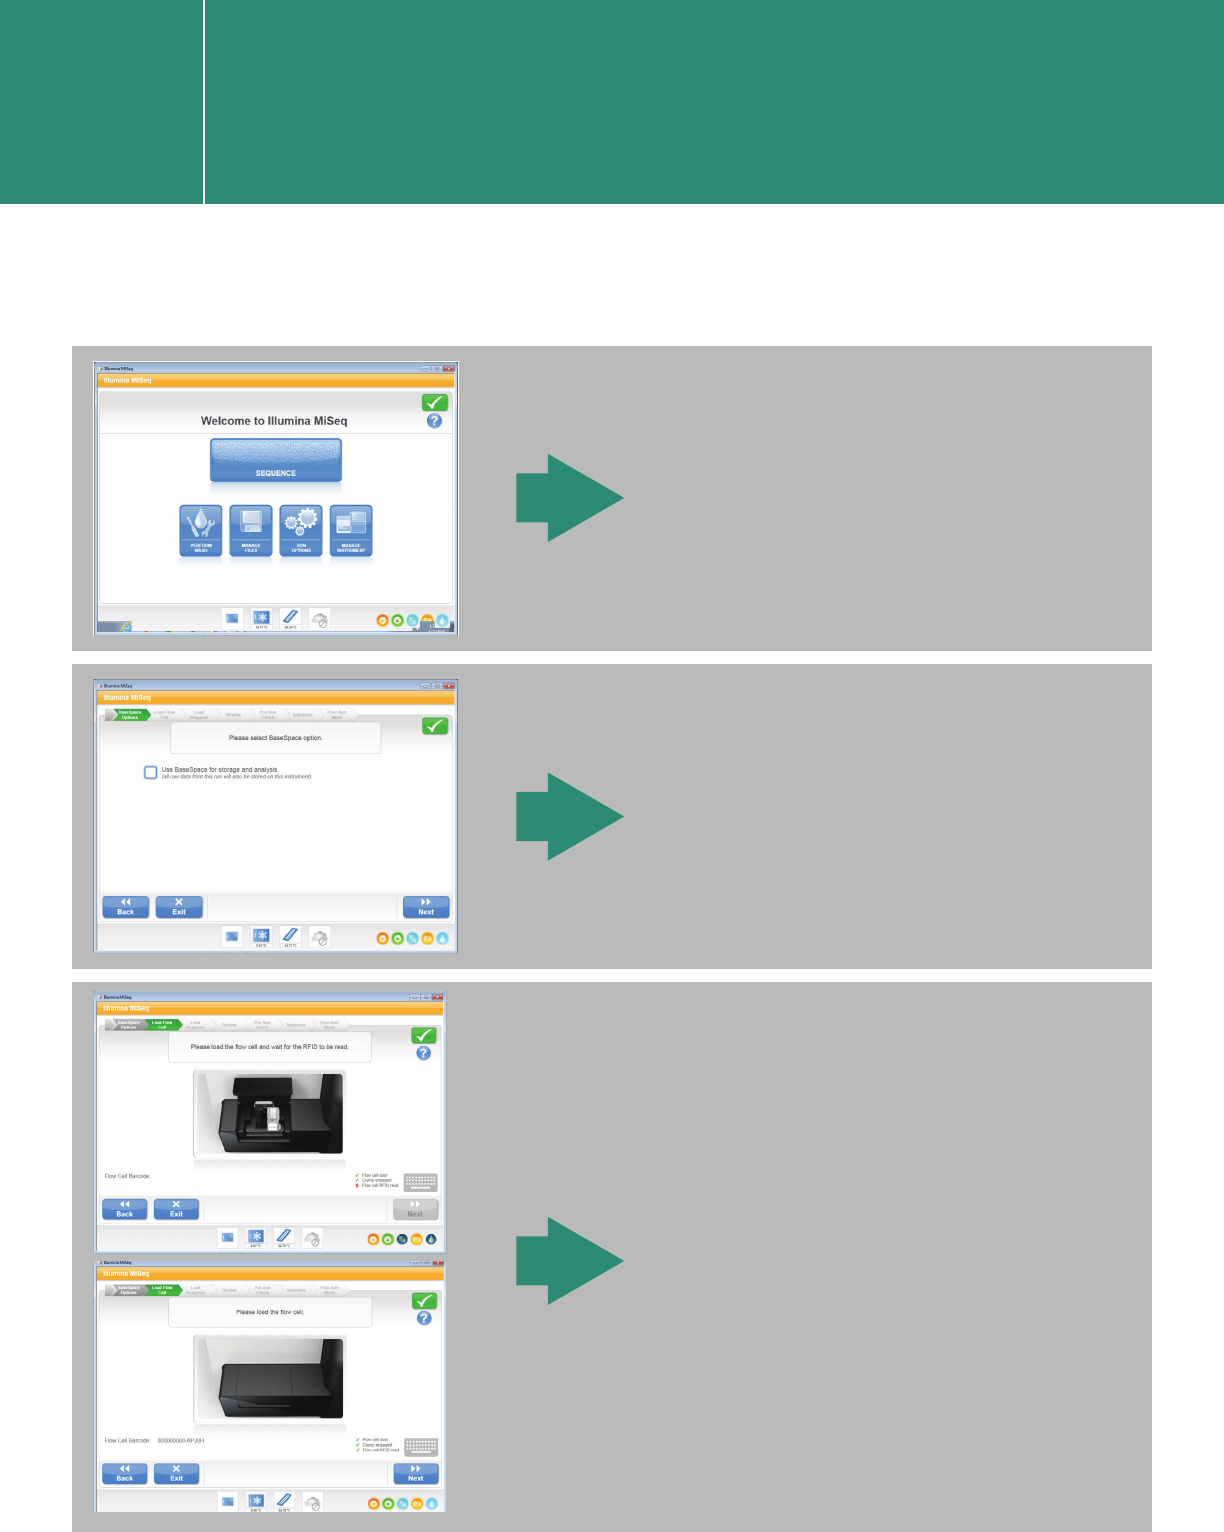
Load the flow cell as guided.
Note: For QXT, refer to the SureSelectQXT protocol for custom-primer
spike-in guidelines.
Starting a run in the MiSeq
Control Software user interface
I.2.2.
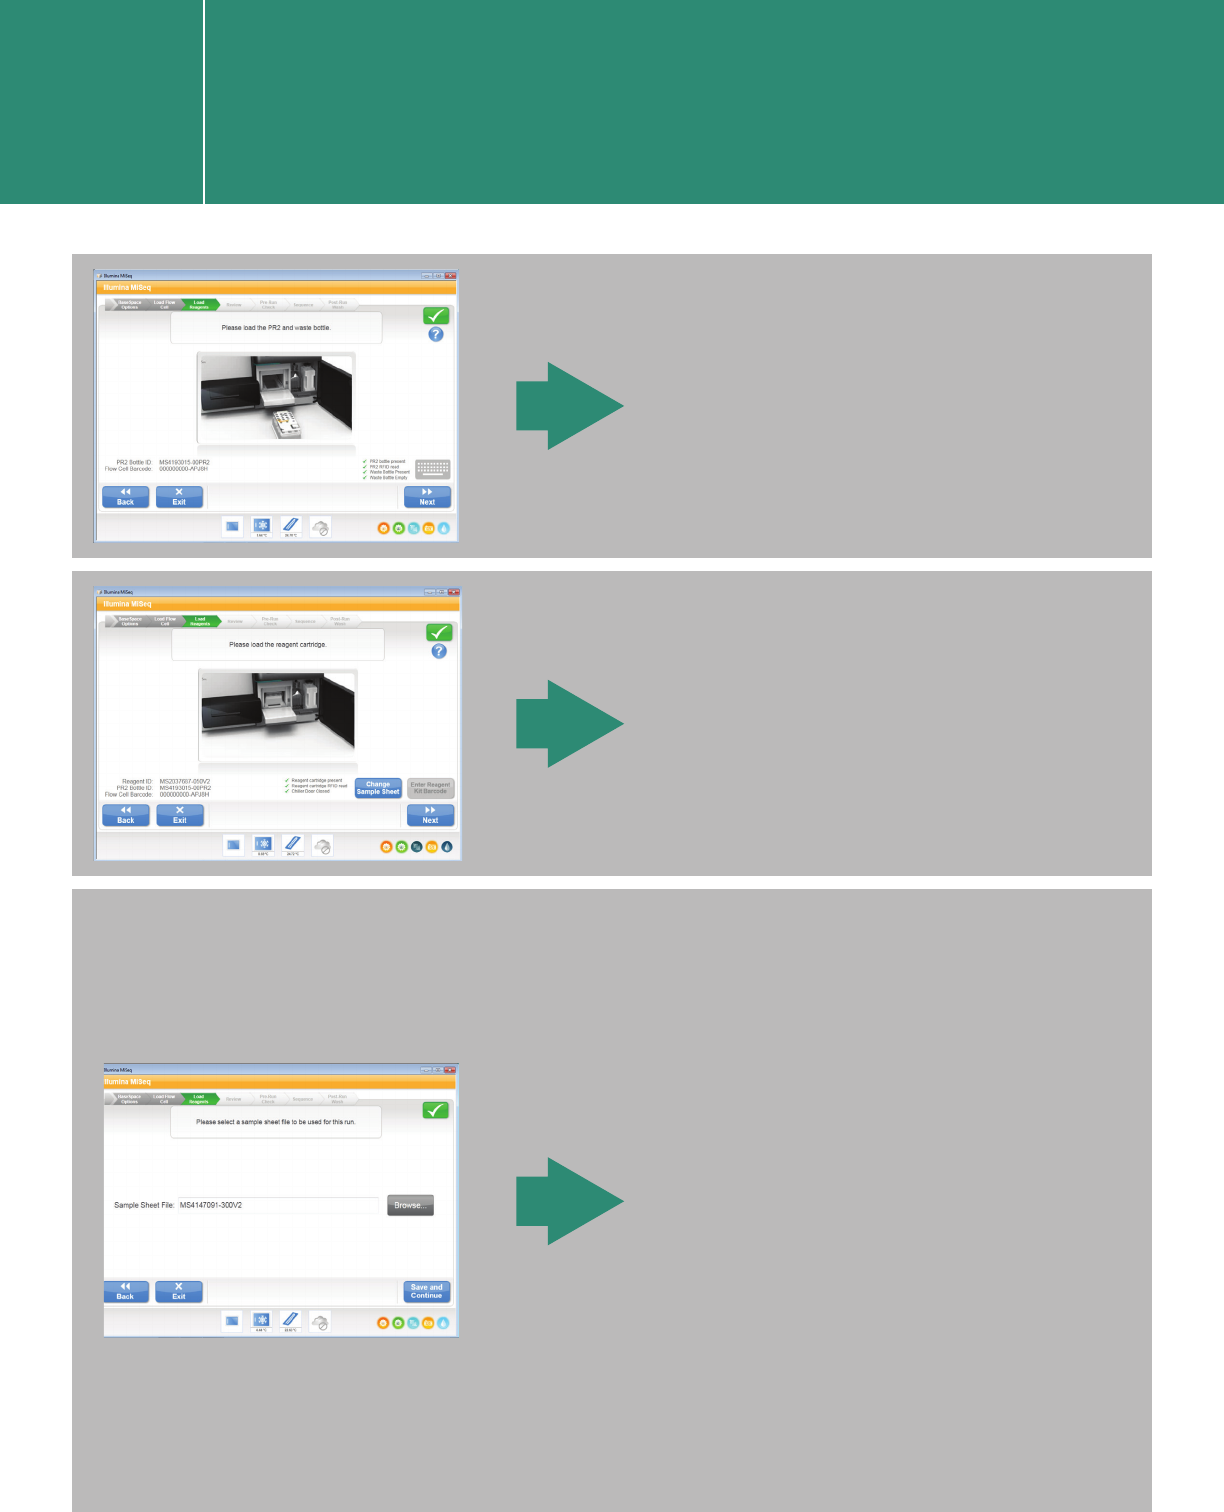
Load the reagent cartridge.
Load the waste bottle.
When you click “Change Sample
Sheet” on the “Please load the
reagent cartridge” screen, it
brings you to the screen below.
Navigate to the sample sheet
(csv file) by clicking “Browse.”
After clicking on “Save and
Continue,” you are brought back
to the previous screen (“Please
load the reagent cartridge.”).
Click “Next.”
Starting a run in the MiSeq
Control Software user interface
I.2.2.
Starting a run in the MiSeq
Control Software user interface
I.2.2.
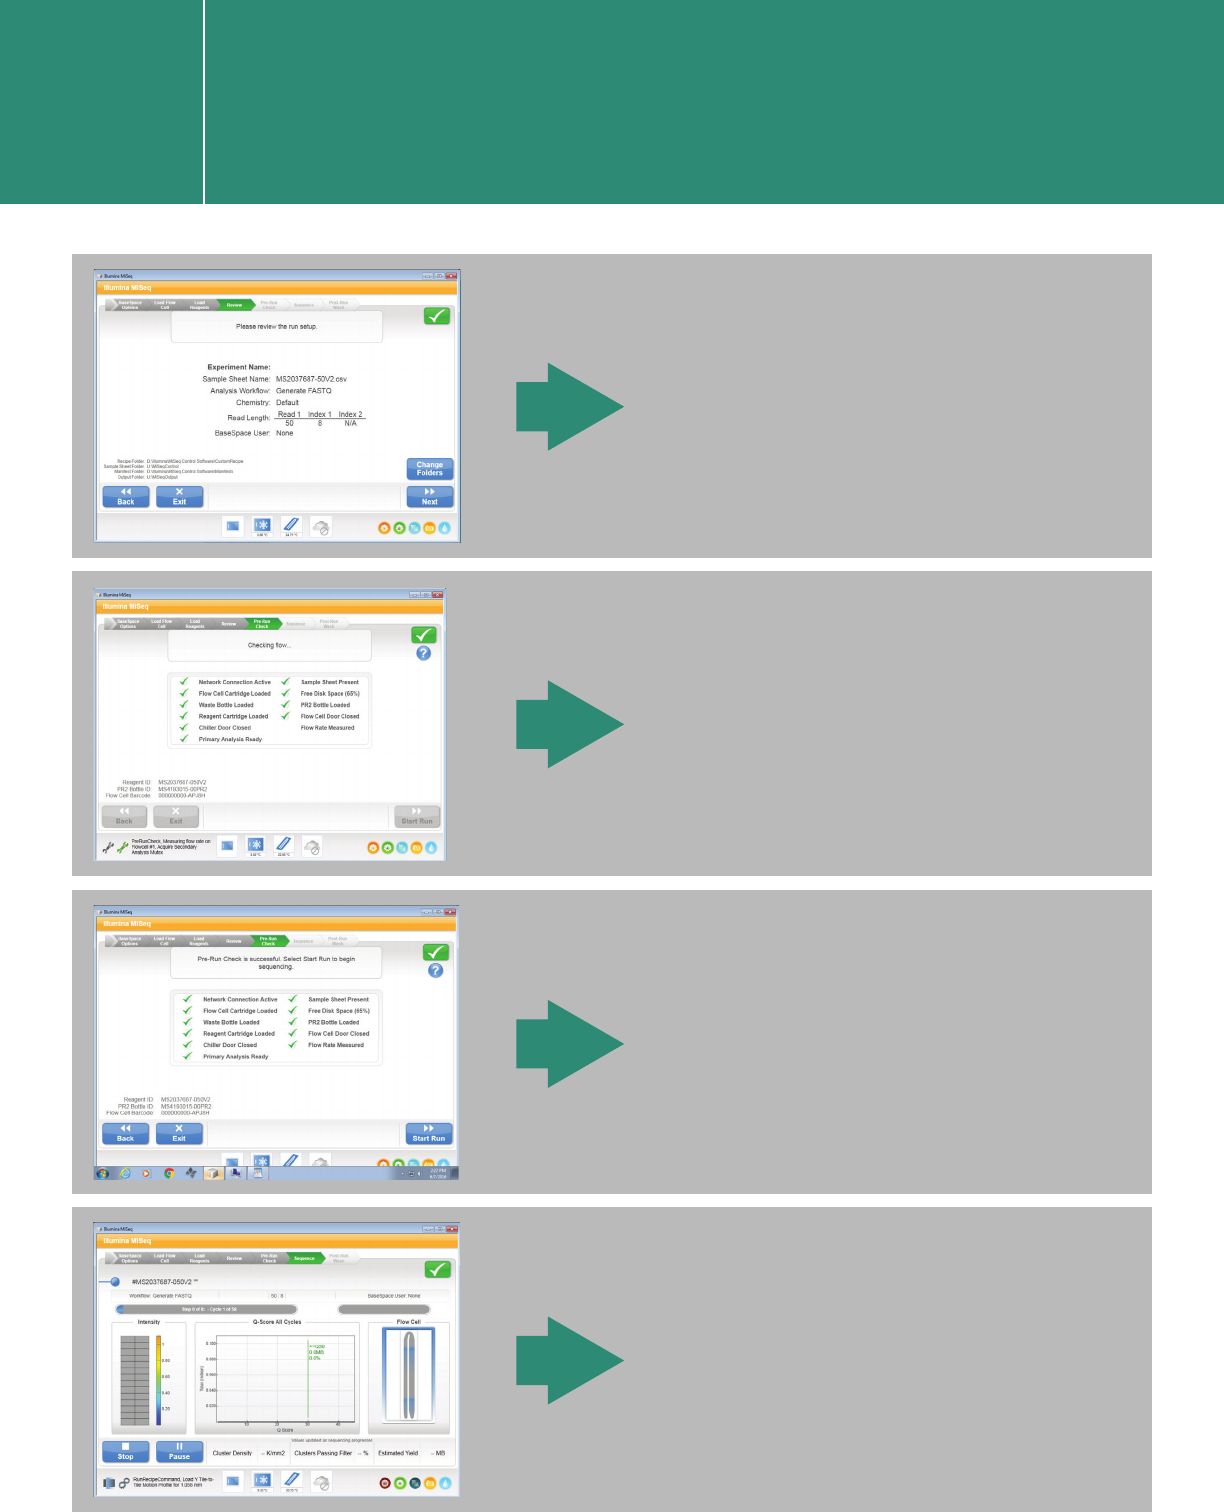
The instrument performs
a pre-run check.
The run starts.
Review the run setup.
The pre-run check completes.
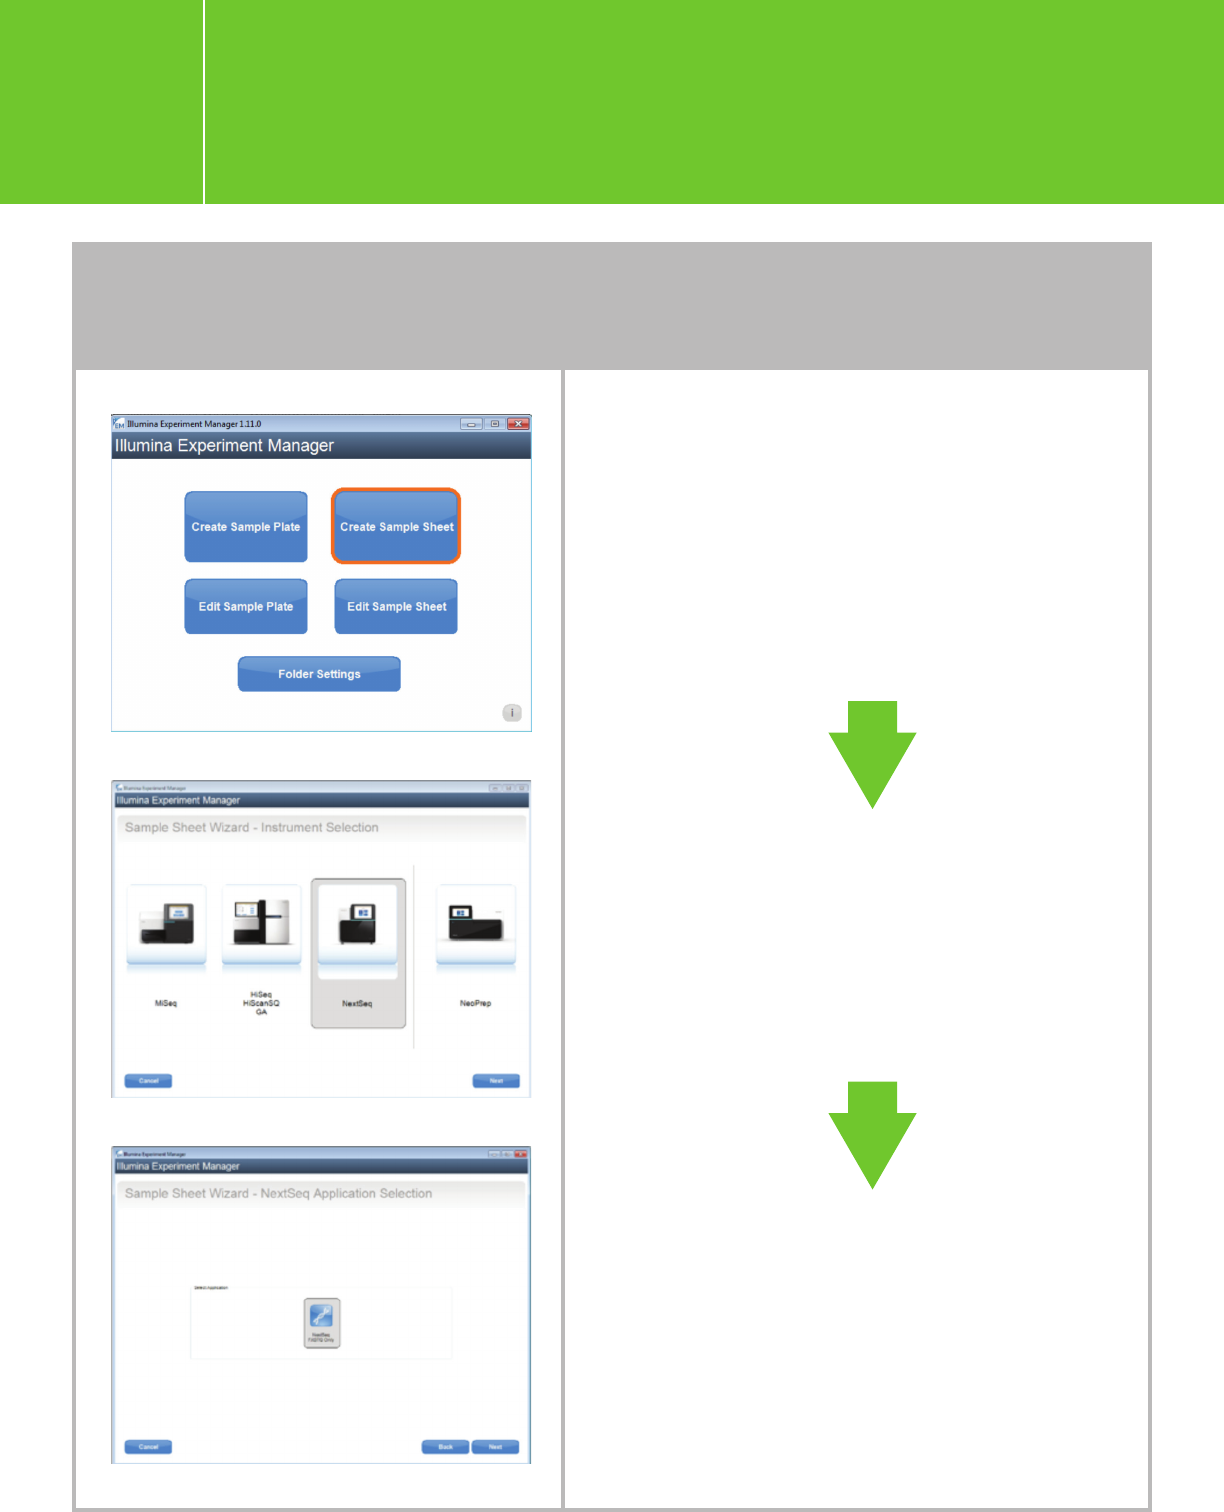
Open IEM, click “Create
Sample Sheet”
“NextSeq”
“FASTQ Only.”
Planning a run using IEM
Planning a run on the NextSeq
for Agilent NGS libraries
I.3.1.
On the Sample Sheet Wizard - Workflow Parameters
page, enter Reagent Kit Barcode, Experiment Name,
Investigator Name, and Description. Paired-end
sequencing is recommended for all Agilent
NGS libraries.
For XT/XT2/RNA-Seq, choose TruSeq LT as the Library Prep Kit.
If you are following the shearing size of 150-bp to 200-bp and using 100-bp or shorter read
length, adapter trimming is not necessary. If you are using shorter shearing size or longer
read length and prefer to have Illumina software do the trimming, check the adapter-
trimming option. Otherwise, uncheck these two options and trim adapters later using
Agilent SureCall software or the AGeNT trimming tool.
For HaloPlex: Choose TruSeq LT, but uncheck the adaptor trimming options and perform
trimming in SureCall or using the AGeNT toolkit.
For HaloPlexHS: Choose Nextera XT and uncheck “Use Adaptor Trimming.”
For QXT: Choose Nextera XT and either:
(1) leave “Use Adapter Trimming” checked or (2) uncheck this option to trim the adapter
using SureCall or the AGeNT toolkit. Trimming with SureCall or the AGeNT toolkit is
recommended.
If you choose the “Use Adapter Trimming” option, you will need to enter the consensus
sequence for the QXT adapters provided in the QXT protocol (CTGTCTCTTGATCACA),
when you edit the sample sheet.
Planning a run on the NextSeq
for Agilent NGS libraries
I.3.1.
Planning a run on the NextSeq
for Agilent NGS libraries
I.3.1.
On the Sample Selection page, click “Add Blank Row”
to add rows and fill in the sample information. You may
choose any index from the drop-down list (same for dual-
indexed samples) at this time. The correct indexes will be
entered when you edit the sample sheet later. The screen
below is single-indexed for demonstration purposes only.
When all sample information is entered, click “Finish”
and save the sample sheet. When prompted with the below
question, click “Yes.” When the sample sheet opens, enter
the actual index names and sequences used. Save the edited
sample sheet to the original location.
Note: For HaloPlexHS
, index 2 is the molecular barcode and
will not be used for demultiplexing. Use 10 “N”s for index 2
for all samples in the sample sheet. You will need to perform
offline bcl-to-fastq conversion to demultiplex using only
index1. In the meantime, generate a fastq file for index 2; the
fastq file will be needed for HaloPlexHS data analysis. Please
refer to Appendix 1 for more instructions. For QXT, refer to
the P5 index sequence table specific to NextSeq in the QXT
protocol, as the index sequences must be entered as the
reverse complement of those used for the HiSeq 2000/2500
and the MiSeq.
Planning a run on the NextSeq
for Agilent NGS libraries
I.3.1.
Alternatively, you may create a sample plate first and then
use the sample plate to generate a sample sheet.
n Open IEM and click “Create Sample Plate.”
n On the Library Prep Kit Selection page, choose a Library
Prep Kit for your Agilent Libraries as stated above,
e.g., “TruSeq LT” for the single-indexed SureSelectXT/XT2/
RNA-Seq and HaloPlex, and “Nextera XT” for the dual-
indexed QXT and HaloPlexHS
.
n Enter the plate name and choose the appropriate index
configuration.
n Enter your sample information from the Table view. The
columns with * are required fields. Similarly, choose any
index from the drop-down list for now, and the correct
index will be entered when you edit the sample sheet
later (as described above).
n After sample information has been entered in Table view,
the Plate and Plate Graphic views will automatically
populate. Click “Finish.”
n Go back to the IEM root page and click “Create Sample
Sheet” > “NextSeq” > “FASTQ Only.”
Follow the instructions for the “Sample Sheet Wizard -
Workflow Parameters page” (see above).
n On the Sample Selection Page, uncheck the “Maximize”
option to bring the sample-plate view and sample-sheet
view onto the same page, and then click “Select Plate” to
navigate to a sample plate that you created. Note: If you
don’t see the plate file that you intend to import, it might
be because the Library Prep Kit does not match the one
chosen when creating the sample plate.
n You can also use the “New Plate” option to create a
sample plate. Either highlight part of the sample plate or
click “Select All” and then click “Add Selected Samples”
to move the samples to the sample sheet. Click “Finish”
and save the sample sheet.
n Click “Yes” when you are prompted with the question
“Would you like to view your sample sheet in Excel?”
and then edit the index names and sequences.
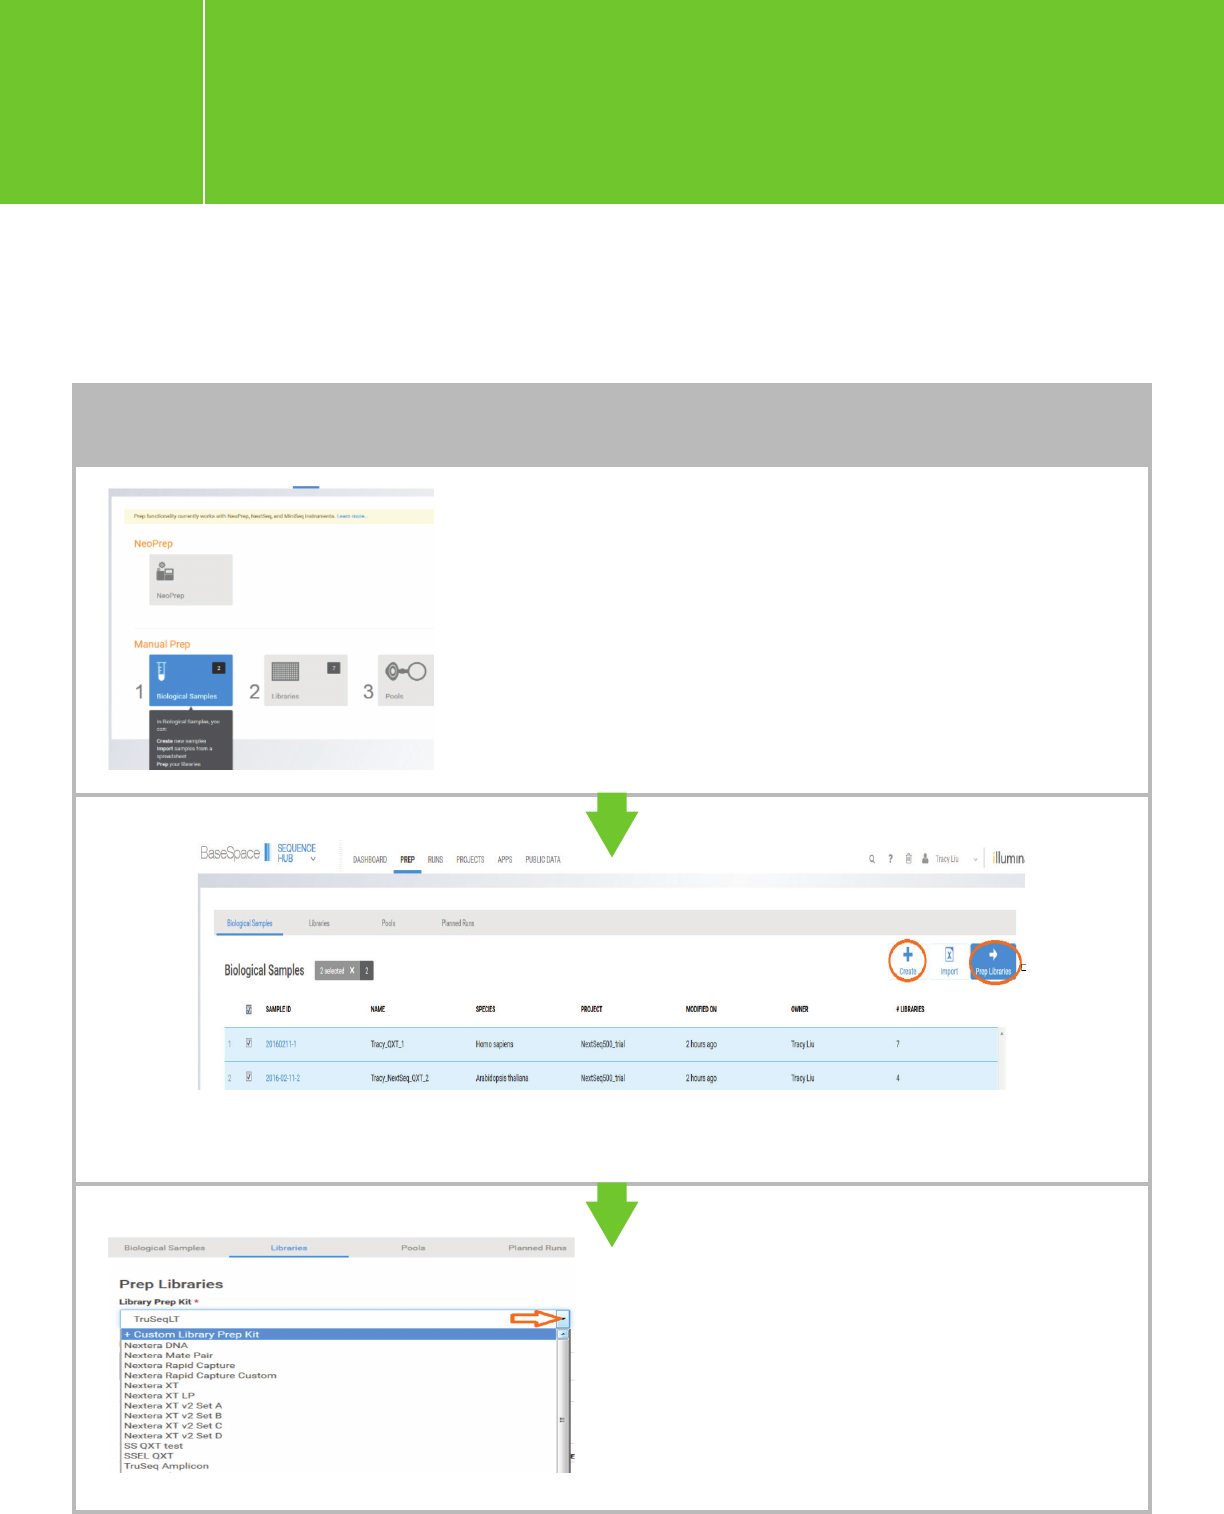
Log into BaseSpace and then go to
PREP > Biological Samples > Create.
Click “+ Custom Library Prep Kit.”
TO ADD SAMPLES INDIVIDUALLY
Planning a run using BaseSpace
*You can either add samples and then add library information (e.g., plan for index usage on the
samples) or import prepared libraries in one step.
Planning a run on the NextSeq
for Agilent NGS libraries
I.3.1.
Enter biological samples one by one, and then choose/check the samples to process with “Prep Libraries.”
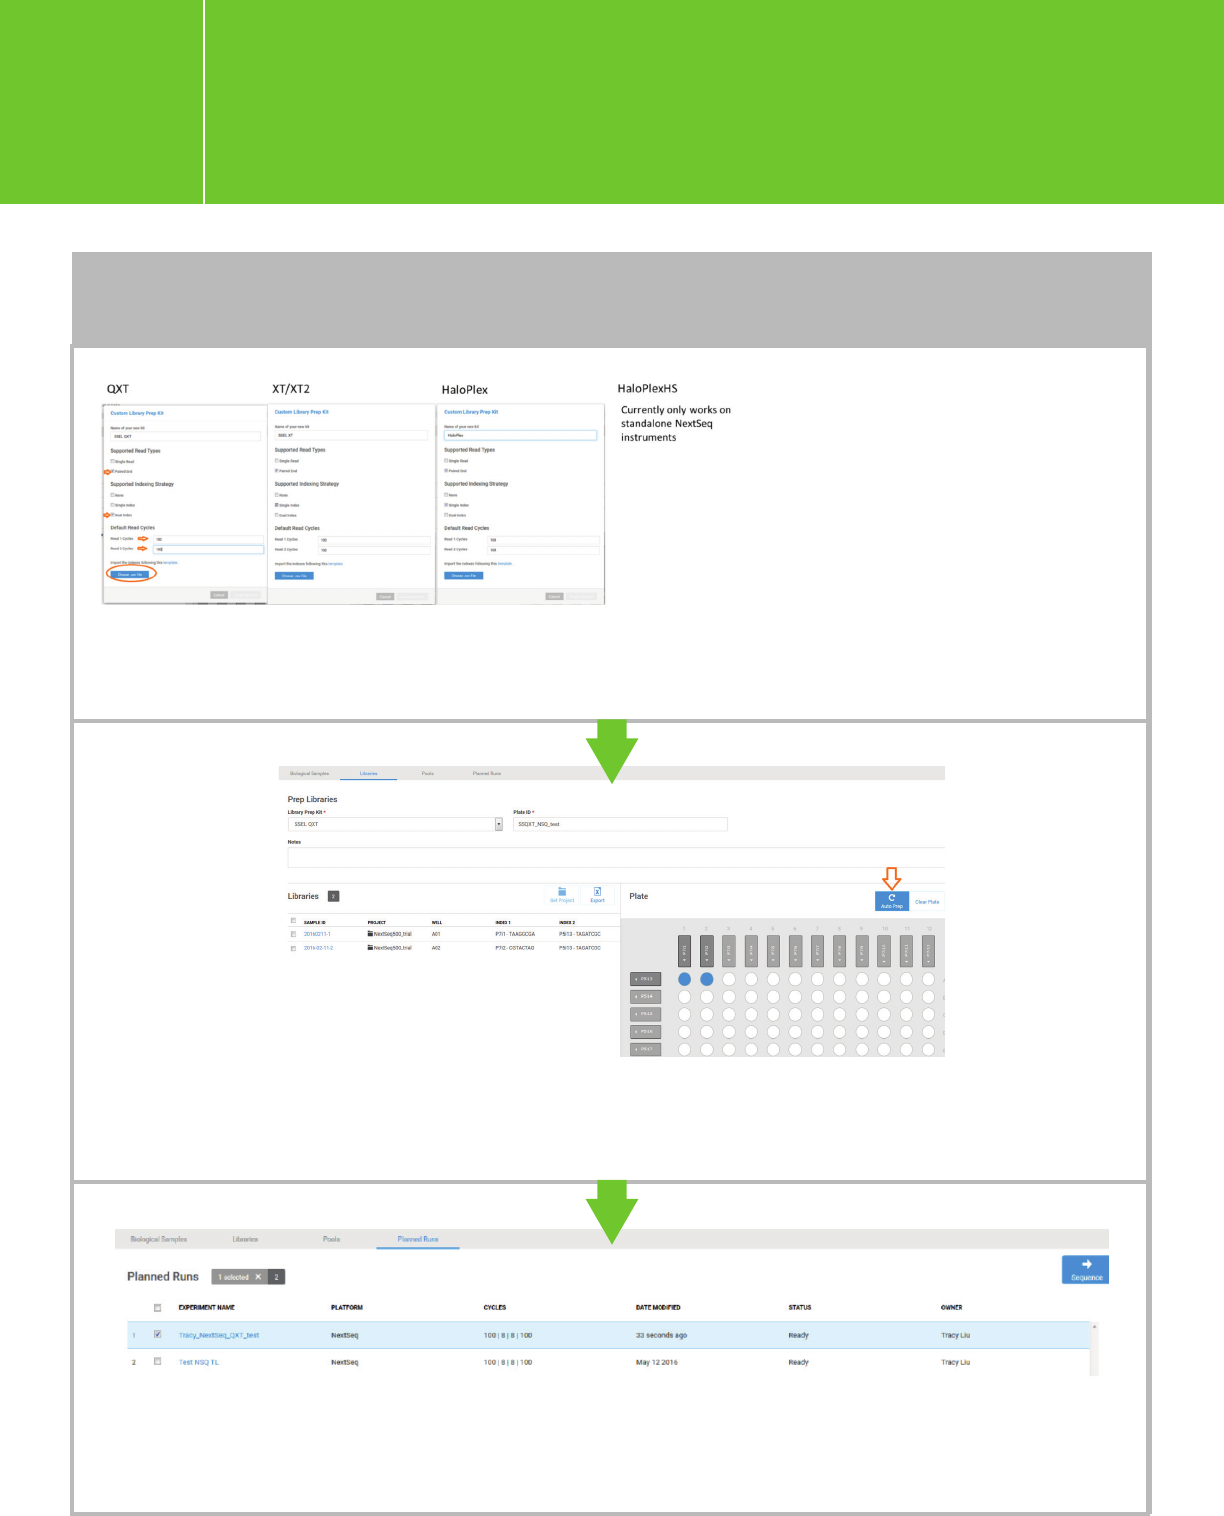
Note for QXT: Because BaseSpace automatically converts the P5 indexes to reverse complement sequences, the
P5 index sequences in the QXT LibraryPrepKit template file that we provide are not reverse complement.
TO ADD SAMPLES INDIVIDUALLY (cont.)
Planning a run on the NextSeq
for Agilent NGS libraries
I.3.1.
Choose the desired Library Prep Kit in the drop-down list, enter a Plate ID, and click “Auto Prep” to
populate the wells and assign indexes to each sample. You can also check the boxes in front of a
sample and drag it to a well.
Proceed to “Pool Libraries” and “Plan Run” following the BaseSpace workflow. A new run will appear
in the list of “Planned Runs.” Check the run you want to sequence, and click “Sequence.” This run will
be ready for sequence and can be retrieved in NCS.
Describe the new Custom Library
Prep Kit in the pop-up window.
Upload the QXT, XT/XT2/RNA-
Seq, or HaloPlex LibraryPrepKit
template .csv file (available in the
appendices). This will generate a
corresponding Library Prep Kit in
the “Library Prep Kit” drop-down
list. Note 100-bp read length is
shown for demonstration only.
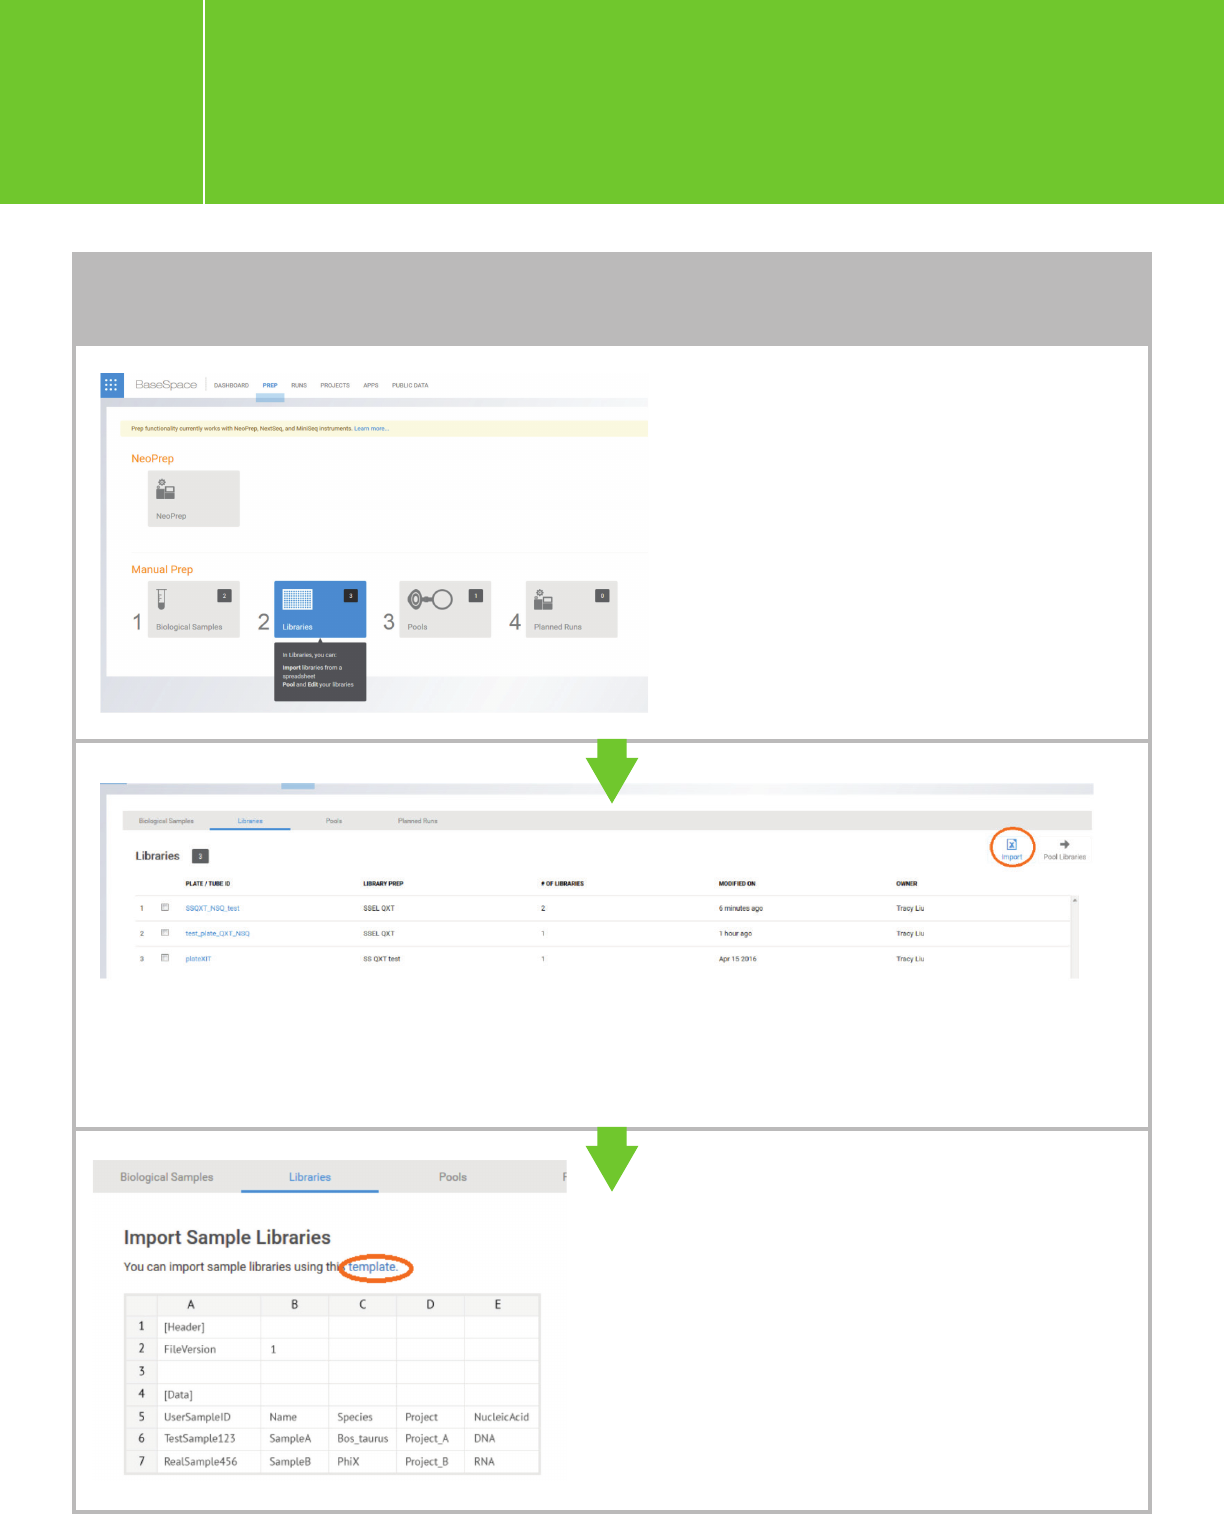
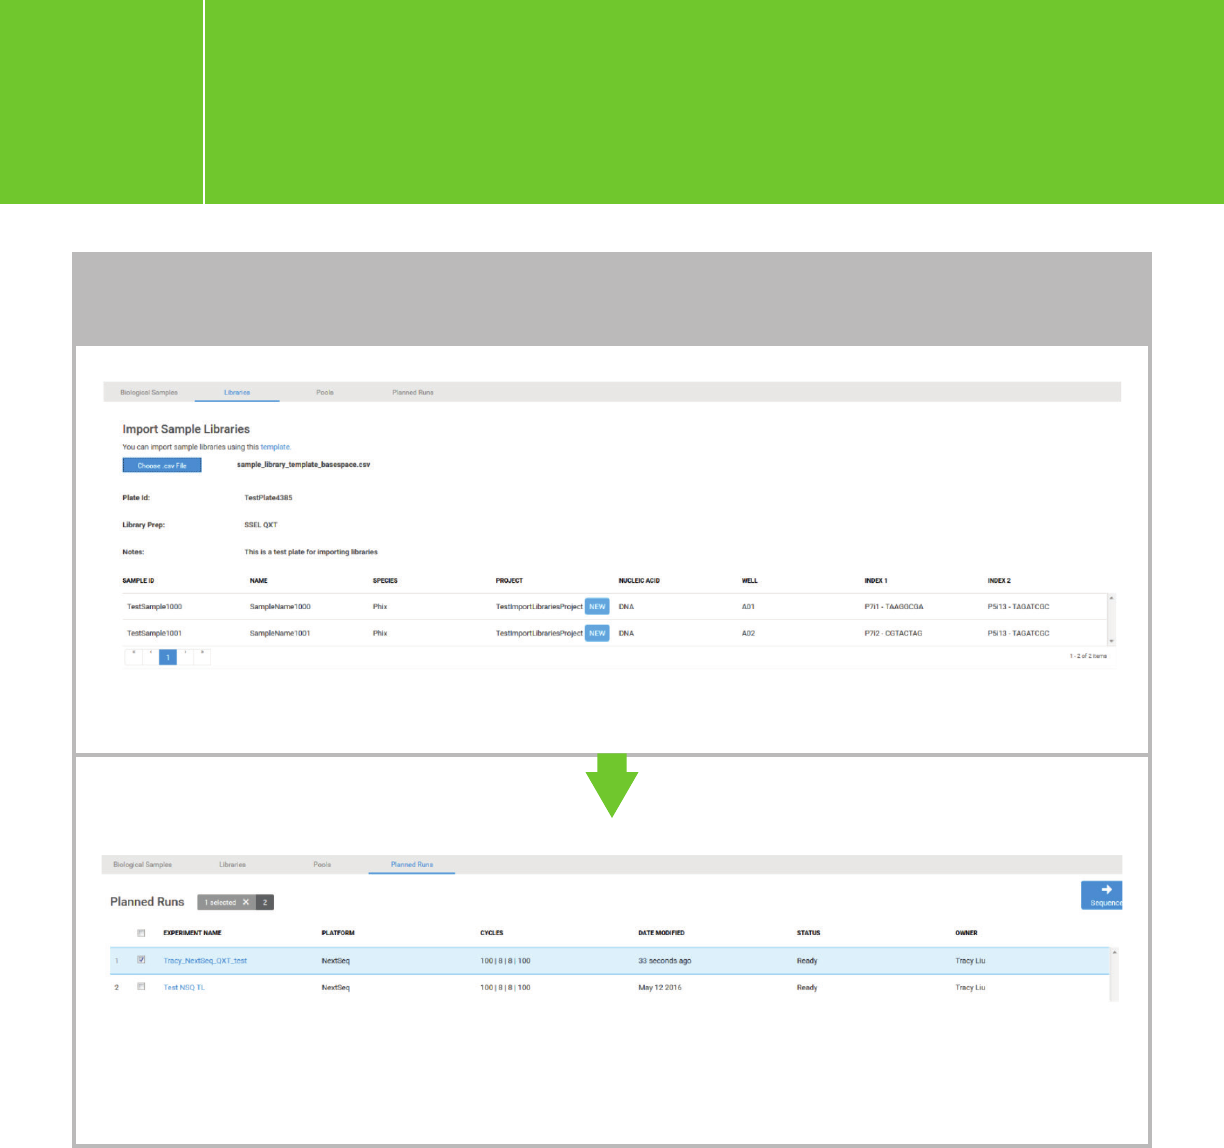
Go to PREP > Libraries.
Import the sample library csv file corresponding to your library type (XT/XT2, QXT, or HaloPlex). You
can download a template from here. Note: The name given in the “LibraryPrepKit” field in the csv file
must exactly match an existing Library Prep Kit (either by Illumina default or created by you), and the
[Header] line cannot be blank.
TO ADD A SAMPLE LIBRARY FILE (e.g. with indexes added/assigned)
A link to download a template is provided in
the import window.
Planning a run on the NextSeq
for Agilent NGS libraries
I.3.1.
Planning a run on the NextSeq
for Agilent NGS libraries
I.3.1.
The samples in the csv file will populate in a plate.
TO ADD A SAMPLE LIBRARY FILE (cont.)
Proceed to “Pool Libraries” and “Plan Run” following the BaseSpace workflow. A new run will appear
in the list of “Planned Runs.” Check the run you want to sequence, and click “Sequence.” This run will
be ready for sequencing and can be retrieved in NCS.
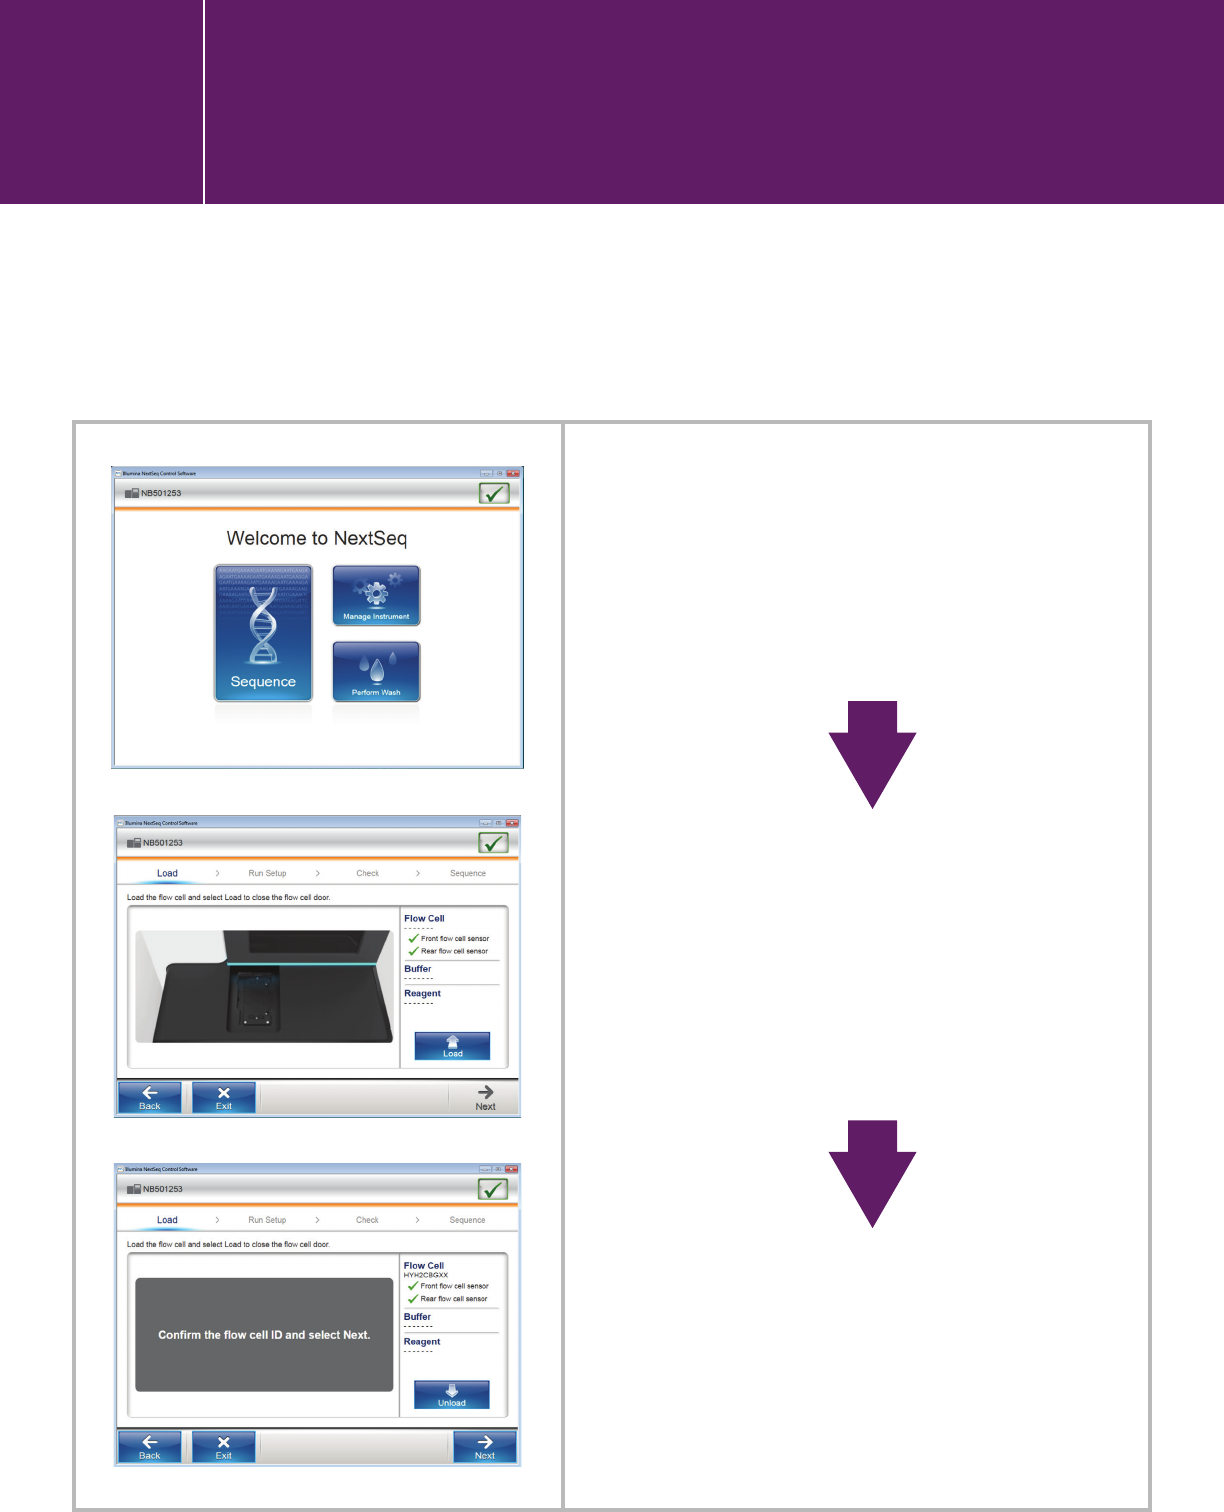
Click “SEQUENCE” and follow
the workflow provided by the
software.
On BaseSpace- and BaseSpace
Onsite-configured machines,
you will log into BaseSpace
after clicking “Sequence.”
Standalone machines proceed
to “Load.”
The instrument scans the
flow-cell ID and checks the
flow-cell sensor.
Note:
1. The screen shots shown in this section are from a run on a stand-alone machine.
2. For QXT, refer to the SureSelectQXT protocol for custom-primer spike-in guidelines.
I.3.2. Starting a run in the NextSeq
Control Software user interface
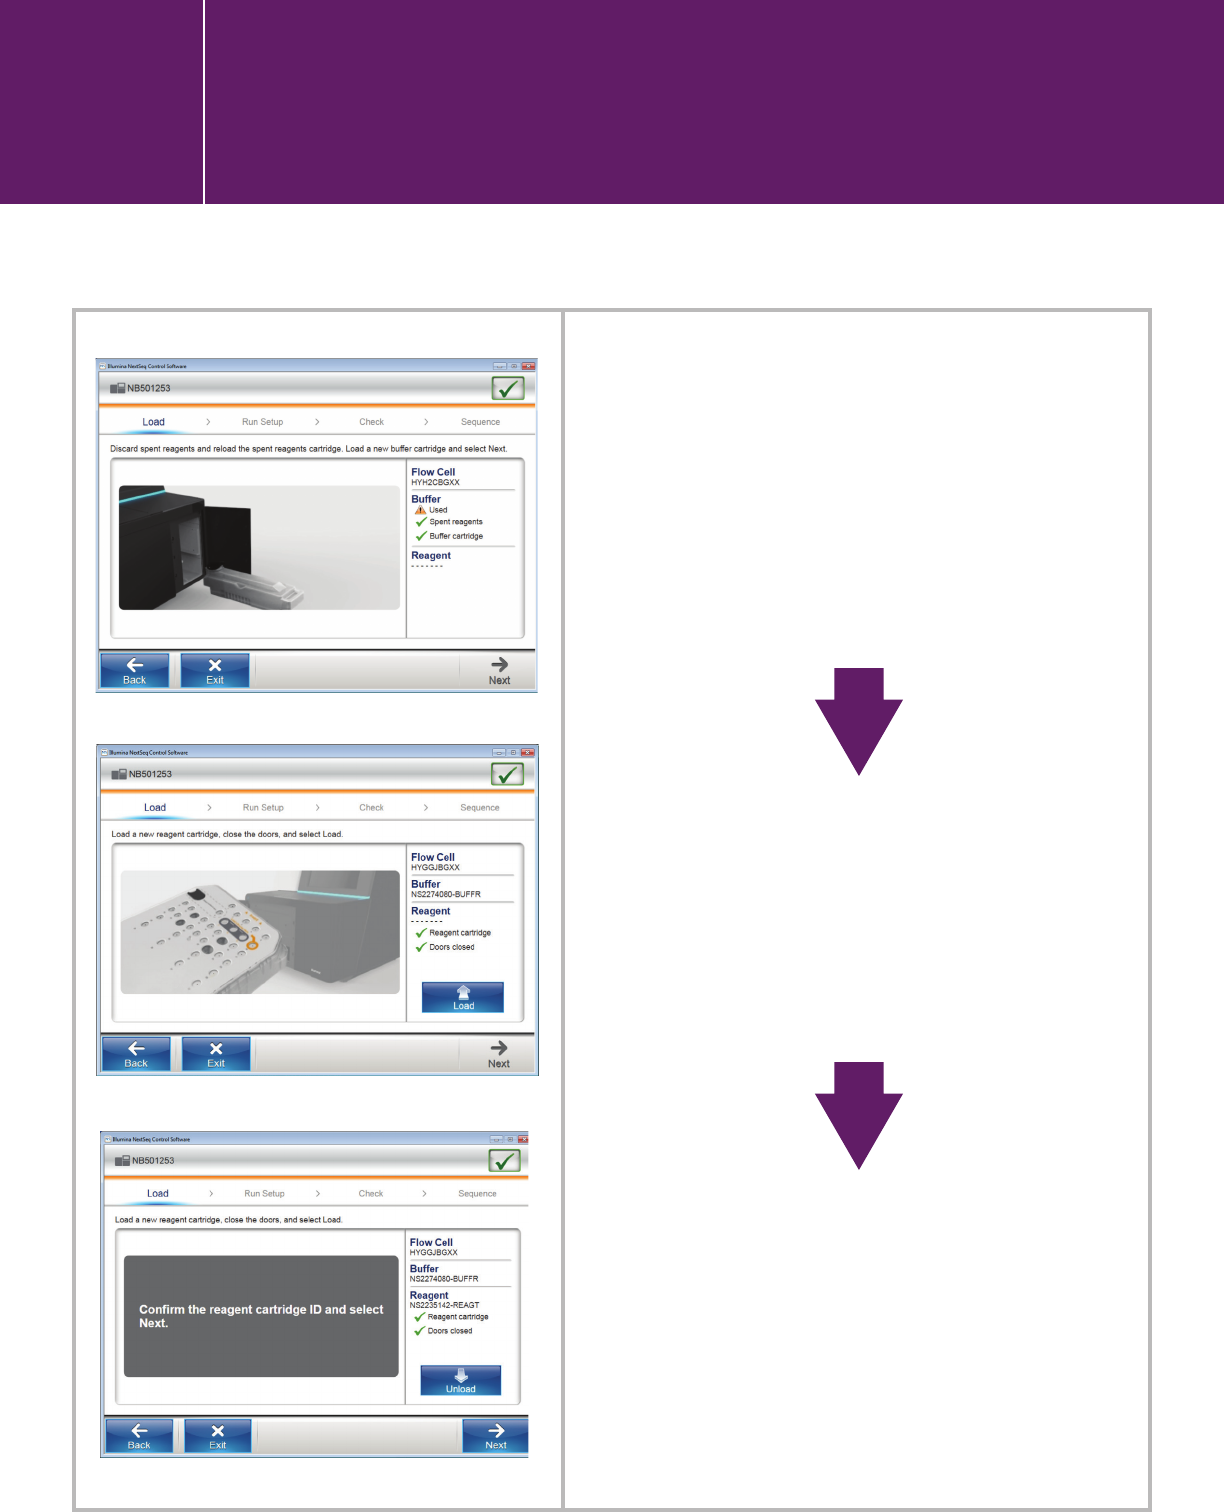
Empty the spent reagent
cartridge and load the buffer
cartridge.
Load the reagent cartridge.
Confirm the reagent cartridge ID.
I.3.2. Starting a run in the NextSeq
Control Software user interface
Starting a run in the NextSeq
Control Software user interface
I.3.2.
On BaseSpace- and BaseSpace Onsite-configured machines, you will be provided
with a screen where you can select a run planned on BaseSpace at the “Run Setup”
step before the run parameter screen shown below.
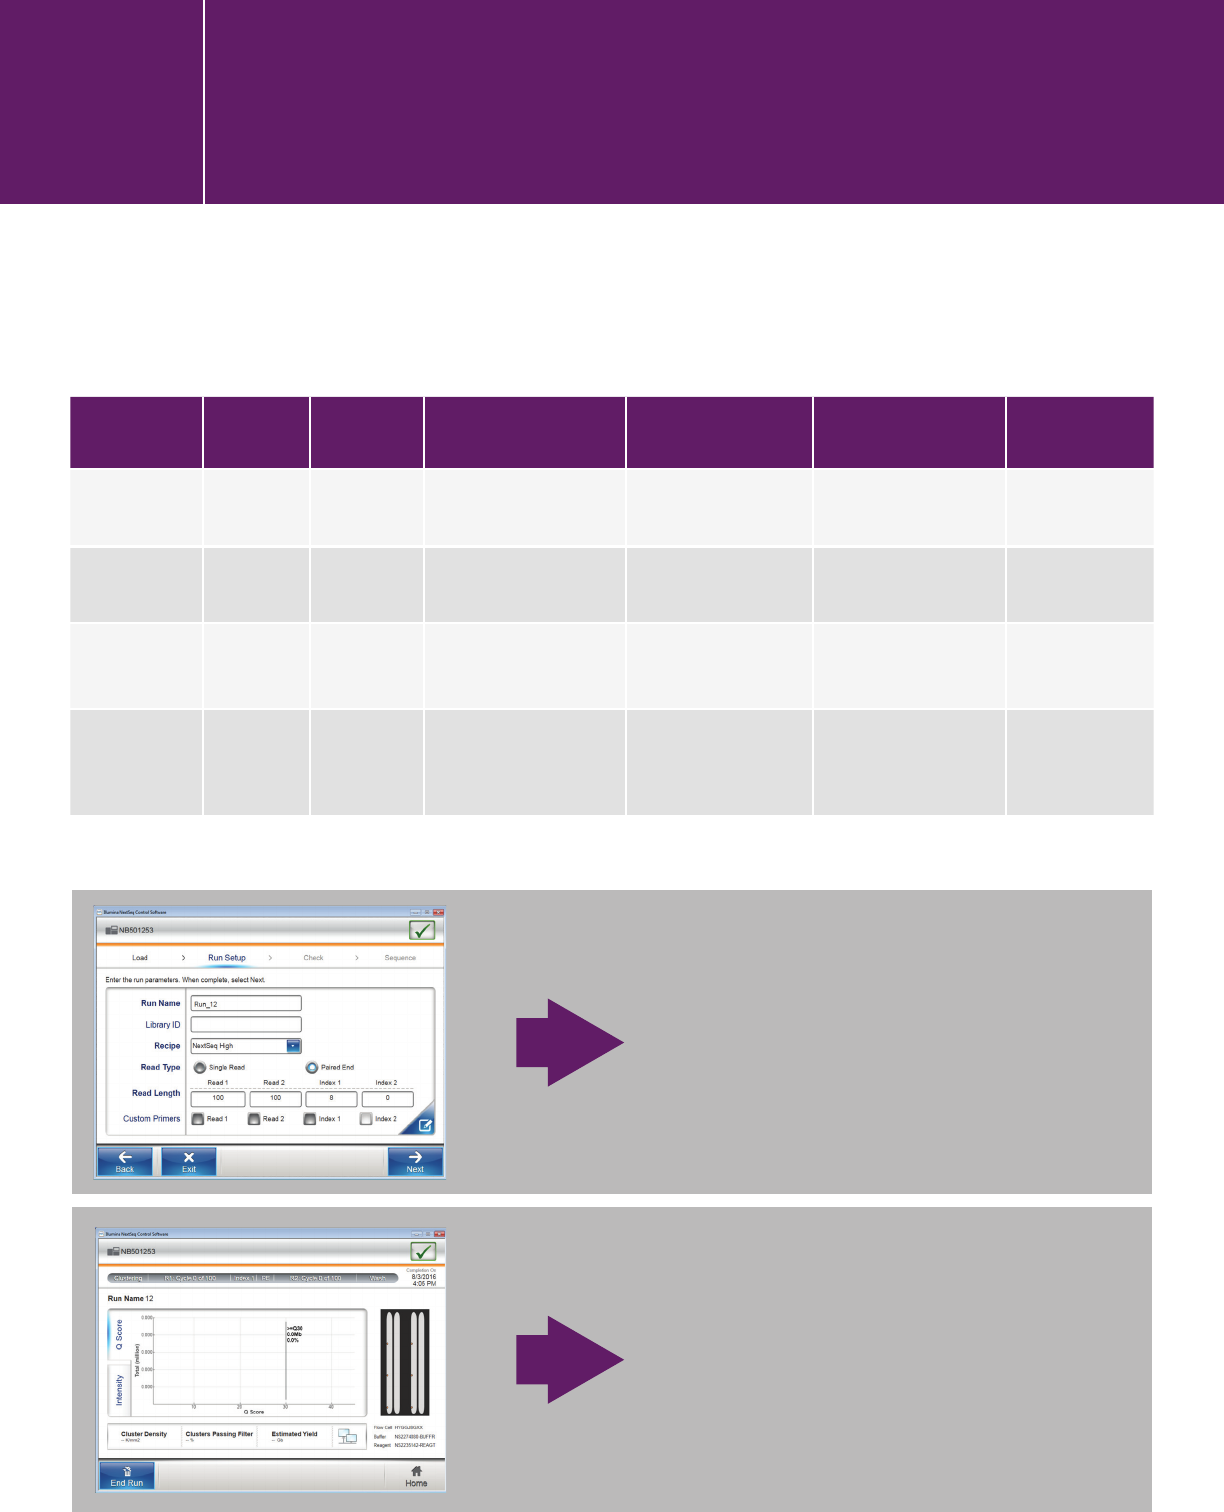
Use the parameters in this table for your Agilent NGS libraries.
Read Type Index Type Read Length Index 1 Read Length Index 2 Read Length Custom Primers
XT/XT2 Paired End single 2x 75/2x100/2x150 bp
8
0
No
QXT Paired End dual 2x 75/2x100/2x150 bp
8 8 Check all 3
HaloPlex Paired End single 2x100 or 2x150 bp
depending on design
8
0
No
HaloPlex
HS
* Paired End dual 2x100 or 2x150 bp
depending on design
8 10 No
The run starts.
*HaloPlexHS can only be set up
on stand-alone machines.
Notes:
n The demonstration of Torrent Server is based on v5.0.4.
n This section should apply to PGM, Proton, and S5, although these settings had not
been validated on the S5 when this document was completed.
n We recommend analyzing sequencing data from the Torrent Server and associated
BAM files with Agilent SureCall software.
n HaloPlexHS data must be reanalyzed to enable modified adapter trimming.
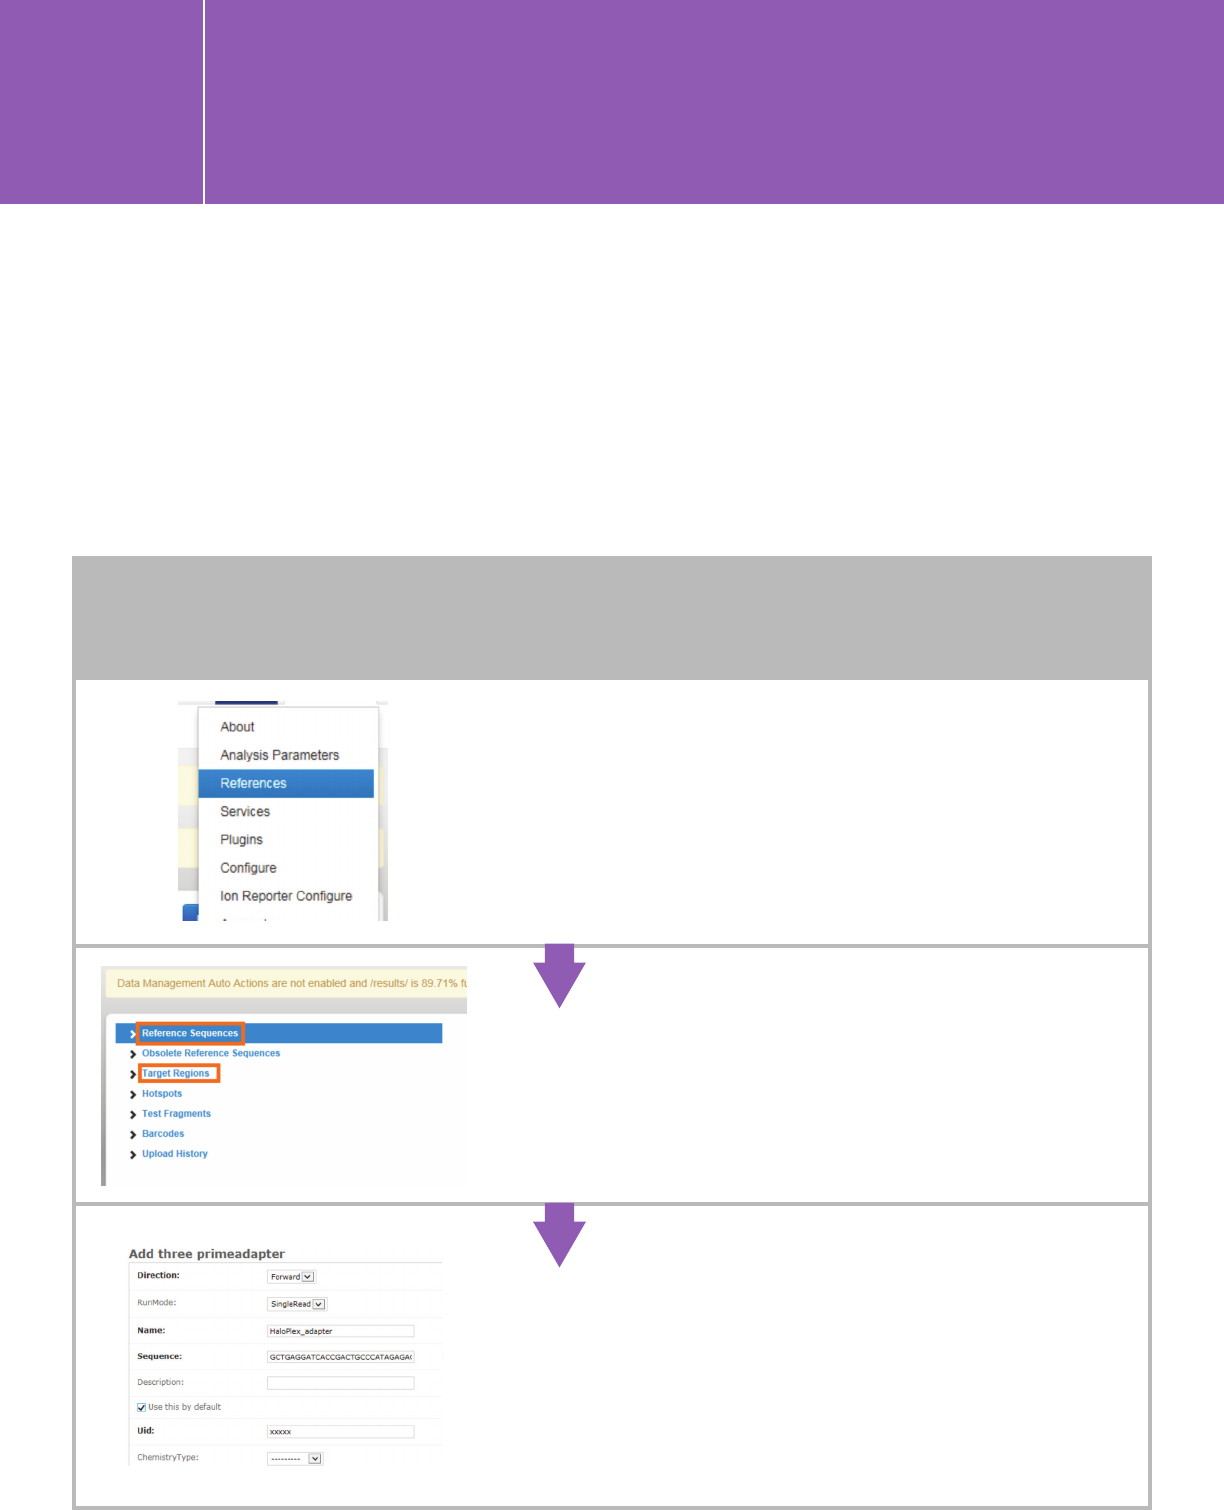
Go to the Reference page by clicking on the gear
icon in the upper right corner.
Add reference genome and target region BED file
(the covered.BED file of your design).
When first sequencing HaloPlex or HaloPlexHS
libraries on the ION instrument, define the
HaloPlex-specific 3’-adapter sequence as a
custom 3’-adapter on the Torrent Server.
Go to http://ionserver/admin/rundb/
threeprimeadapter/add/ and add
GCTGAGGATCACCGACTGCCCATAGAGAGGCTGAGA
in the “Sequence” field. Name it as you see fit,
and save.
PLANNING A RUN ON THE TORRENT SERVER
Add genome and ROI
II.1.
Planning a run and reanalyzing a run
in the Torrent Server for AgilentXT and
HaloPlex/HaloPlexHS libraries
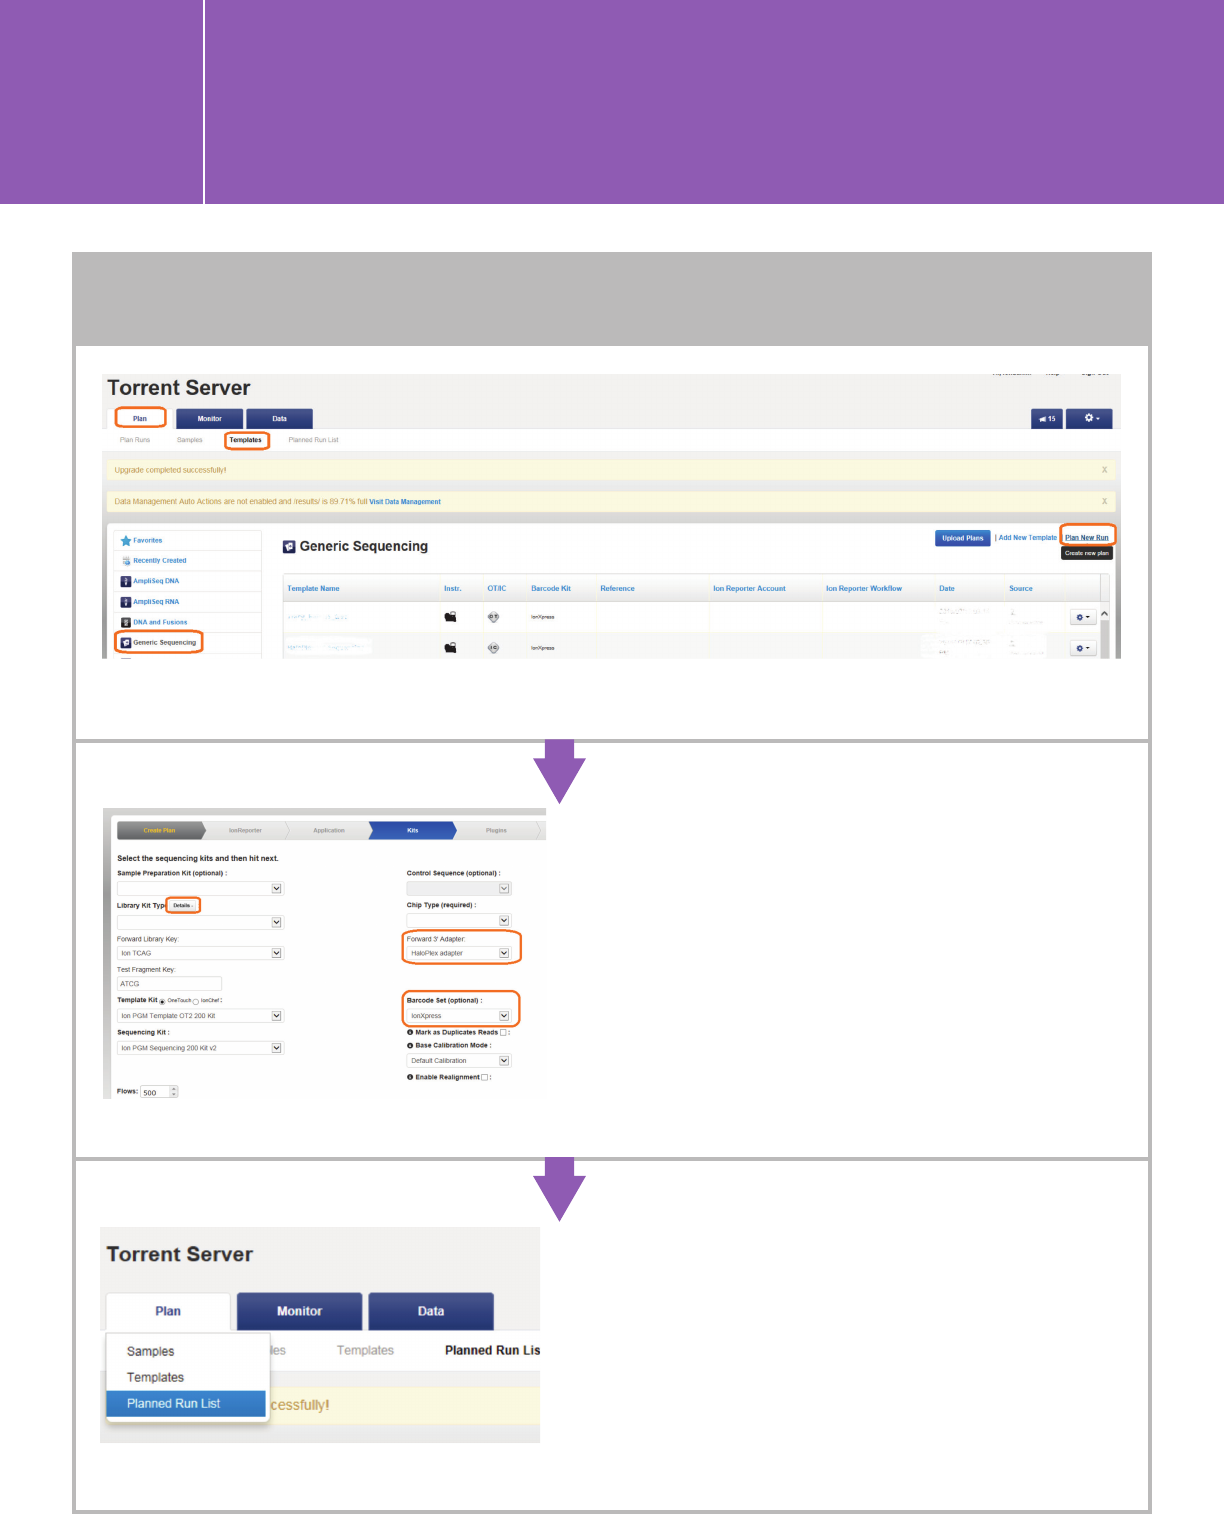
Go to the “Plan” tab, click “Templates” > “Generic Sequencing” > “Plan New Run.”
n Use default settings under the IonReporter and
Application tabs.
n Specify kits, 3’ adapter, and barcode set under the
Kits tab.
Leave the Sample Prep Kit and Library Prep Type fields
blank. For HaloPlex/HaloPlexHS
, click “Details,” and
change the 3' Adapter to the one that you defined
above (A.1). For SureSelect, use the default 3' Adapter
ION P1B. Specify the “Chip Type,” “Template Kit,”
and “Sequencing Kit” you are using, and choose
“IonXpress” barcode set for all Agilent kits.
n Plug-ins are optional. We currently have not
validated any pre-installed plug-ins and recommend
that you run without plug-ins and use SureCall
for analysis.
n Complete the Projects and Plan sections. This
will create a new run under “Planned Run List”
and can be navigated from the touch screen of
the sequencer linked to your Torrent Server. The
Monitor tab lets you monitor the status on the Ion
Chef or the associated sequencing instrument under
“Runs in Progress.”
II.1.
Planning a run and reanalyzing a run
in the Torrent Server for AgilentXT and
HaloPlex/HaloPlexHS libraries
PLAN A RUN

PLAN A RUN
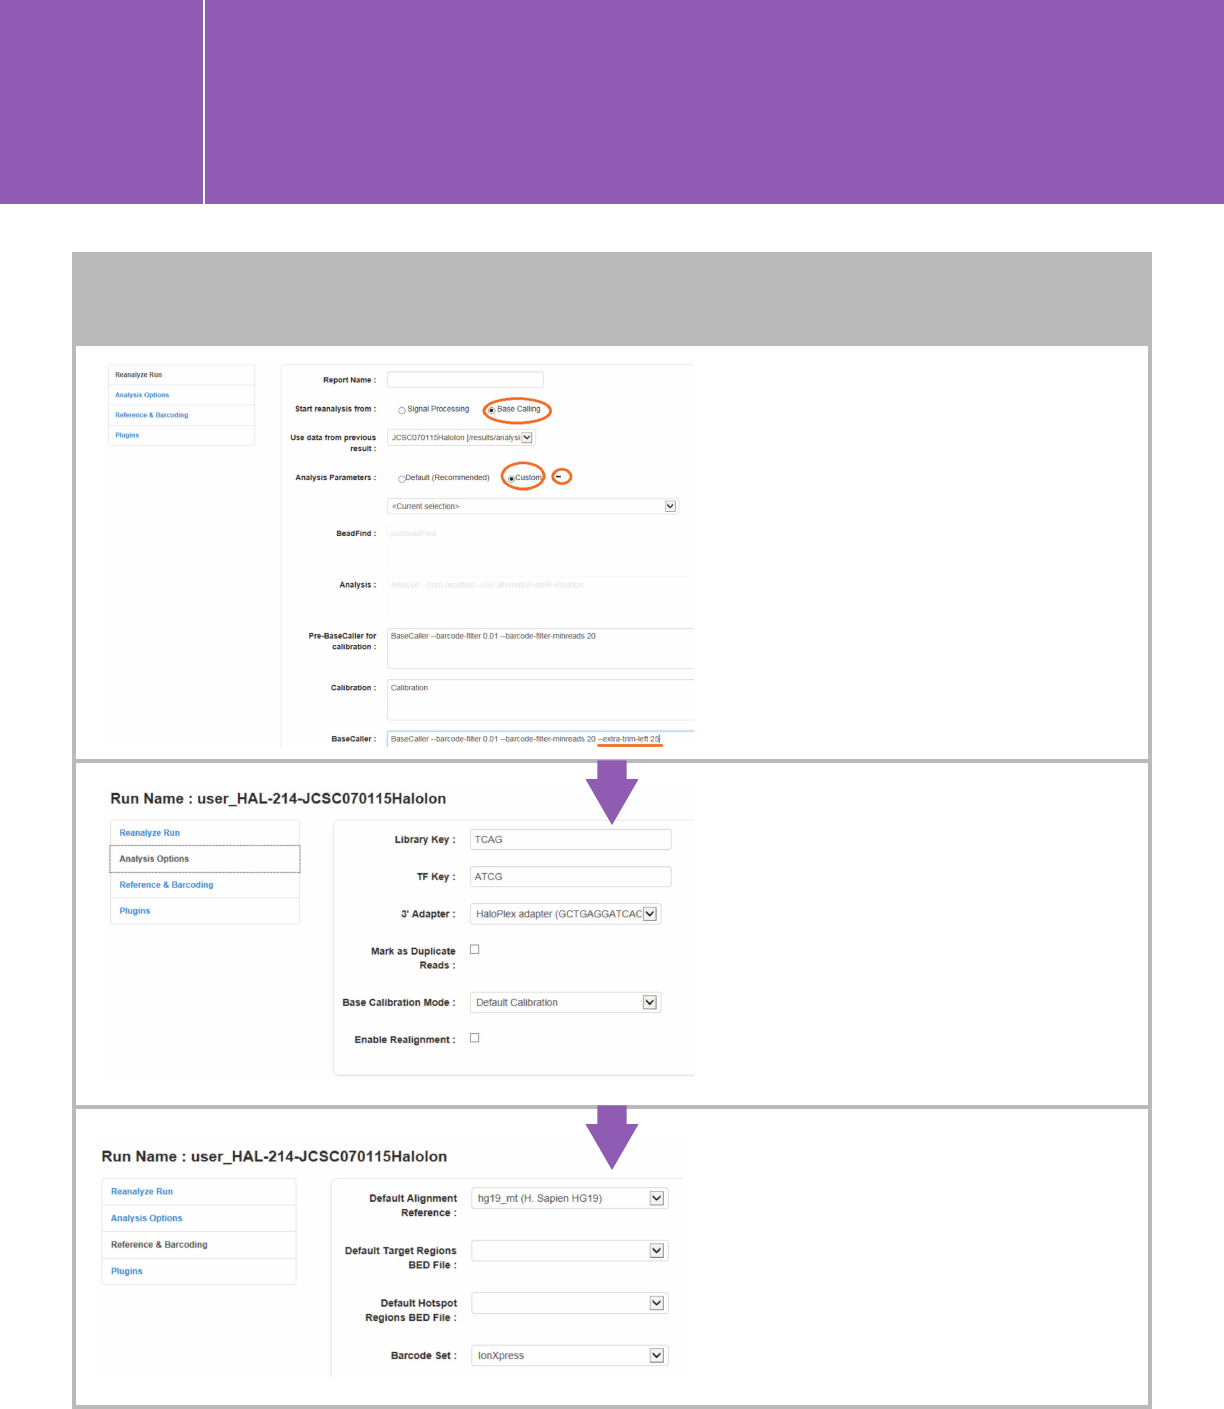
Reanalyzing a run on the Torrent Server
A completed run can be reanalyzed and analysis parameters can be modified when reanalyzing.
Note: HaloPlexHS data must be reanalyzed to trim an additional 15 bases from the 3 prime.
II.1.
Planning a run and reanalyzing a run
in the Torrent Server for AgilentXT and
HaloPlex/HaloPlexHS libraries
Go to “Data” > “Completed Run & Results.” Click the gear icon (far right)
of the run you want to reanalyze and choose “Reanalyze.”
Planning a run and reanalyzing a run
in the Torrent Server for AgilentXT and
HaloPlex/HaloPlexHS libraries
II.1.
Specify the 3' Adapter in the Analysis
Options section. Use the HaloPlex
custom 3' Adapter that was added as
described above (see A. 1) for HaloPlex
or HaloPlexHS data, and ION P1B for
SureSelect. No other changes are
needed in “Analysis Options.”
For HaloPlexHS
, choose “Base Calling”
and “Custom.” Click the plus sign
next to “Custom” to bring the detailed
custom settings. Add text “—extra-
trim-left 25” in the BaseCaller field,
as shown below.
Specify reference genome, regions BED
file, and barcode set in the Reference &
Barcoding section. Use IonXpress as the
barcode set for all Agilent libraries.
PLAN A RUN
Plug-ins are optional. We currently have not validated any pre-installed plug-ins and
recommend that you run without plug-ins and use SureCall for analysis. Click “Start.”
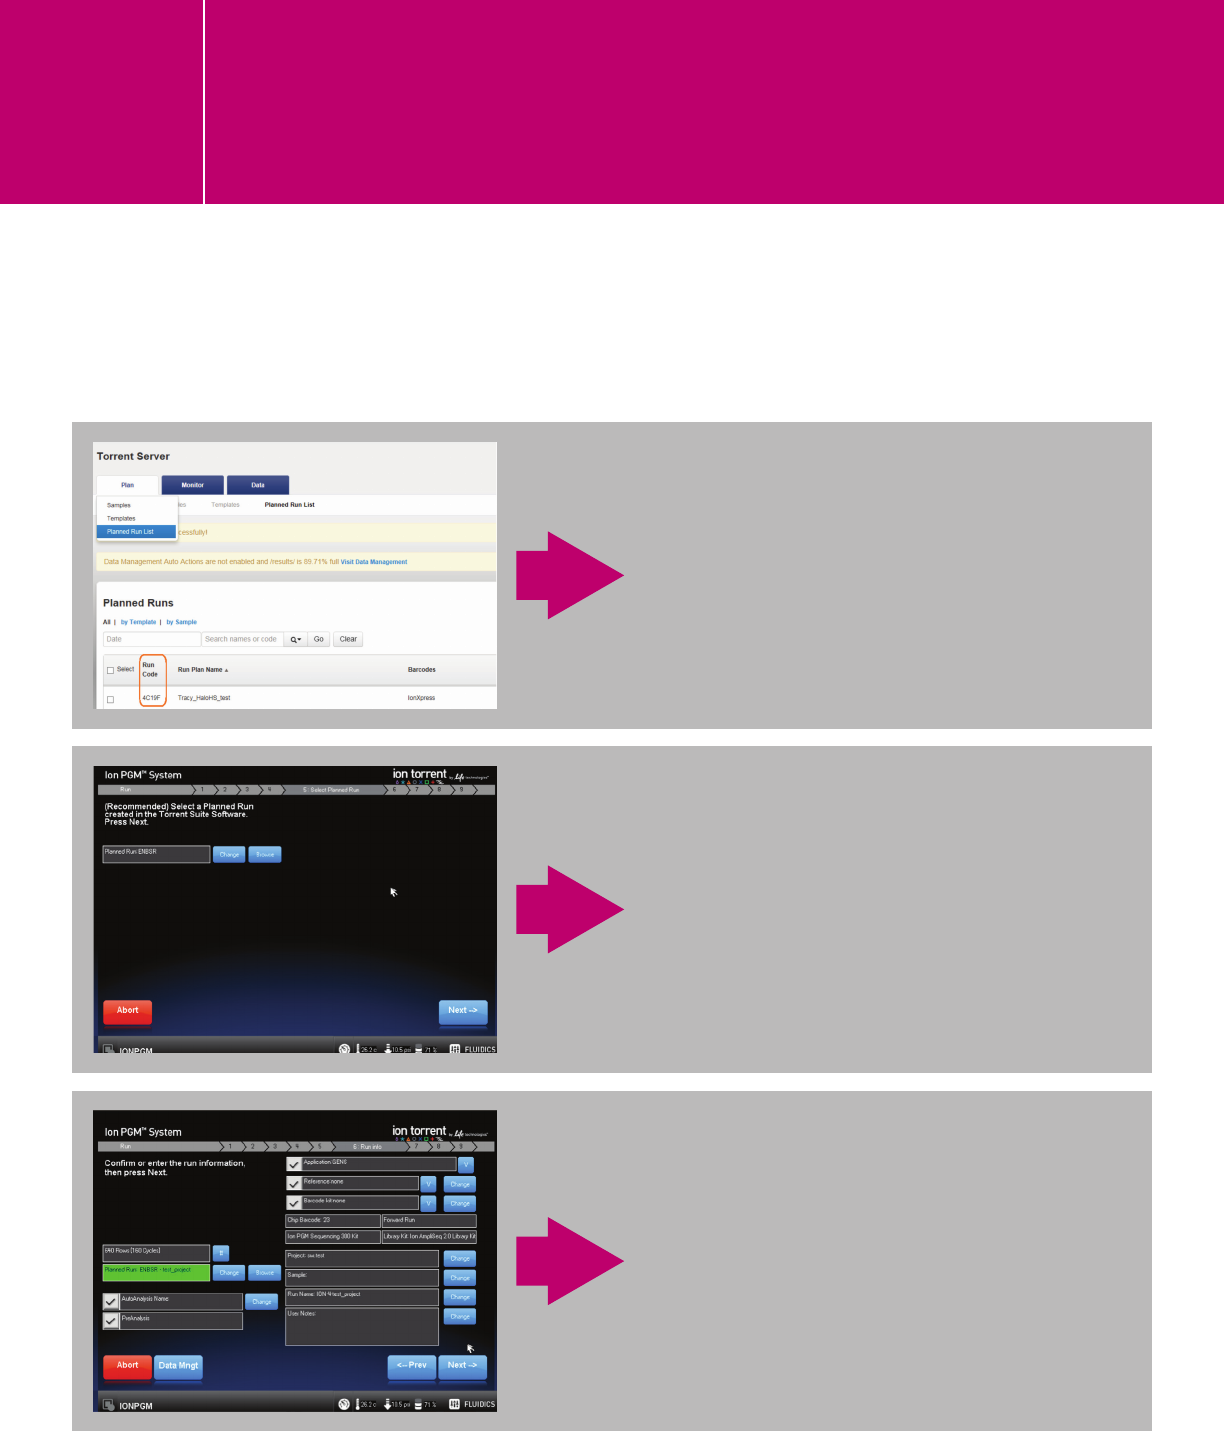
II.2. How to start a run on ION
sequencing instruments
Note: There isn’t anything specific to NGS libraries prepped with the Agilent kit when
launching a planned run on ION sequencing instruments. Follow the ION documentation
to prepare the sequencer and the chip. When a chip is loaded properly, call the planned
run from the touch screen of the sequencer. Below is an example of launching a run
on the ION PGM.*
*The ION PGM touch screen images are adapted from the ION PGM sequencing 200 kit V2 user
guide (Publication Number MAN0007273).
After a run is planned on the Torrent
Server, the run will appear in the
Planned Run List with a unique,
5-digit Run Code.
After the sequencer is properly
initialized and the chip is loaded, click
“Browse,” next to “Planned Run” in
the screen’s header section 5: Select
Planned Run, and then select the run.
Alternatively, enter the Run Code in the
Planned Run field. Click “Next.”
The digital protocol associated with
the selected run will populate in the
Run Info section. Verify the settings
and continue, following the software-
guided workflow to start the run.

Bcl-to-fastq conversion, along with demultiplexing,
typically is done on the instrument. There are
occasions when offline conversion may be needed.
A. When a run was not set up properly and lacks critical parameters, such
as when the Library Prep Kit was not specified. This should be a rare case,
and the conversion can be performed with the Illumina bcl2fastq software
in a standard manner. Download the software from the Illumina website
and consult with Illumina if you need assistance.
III.1. Options for bcl-to-fastq conversion
for Illumina sequencing
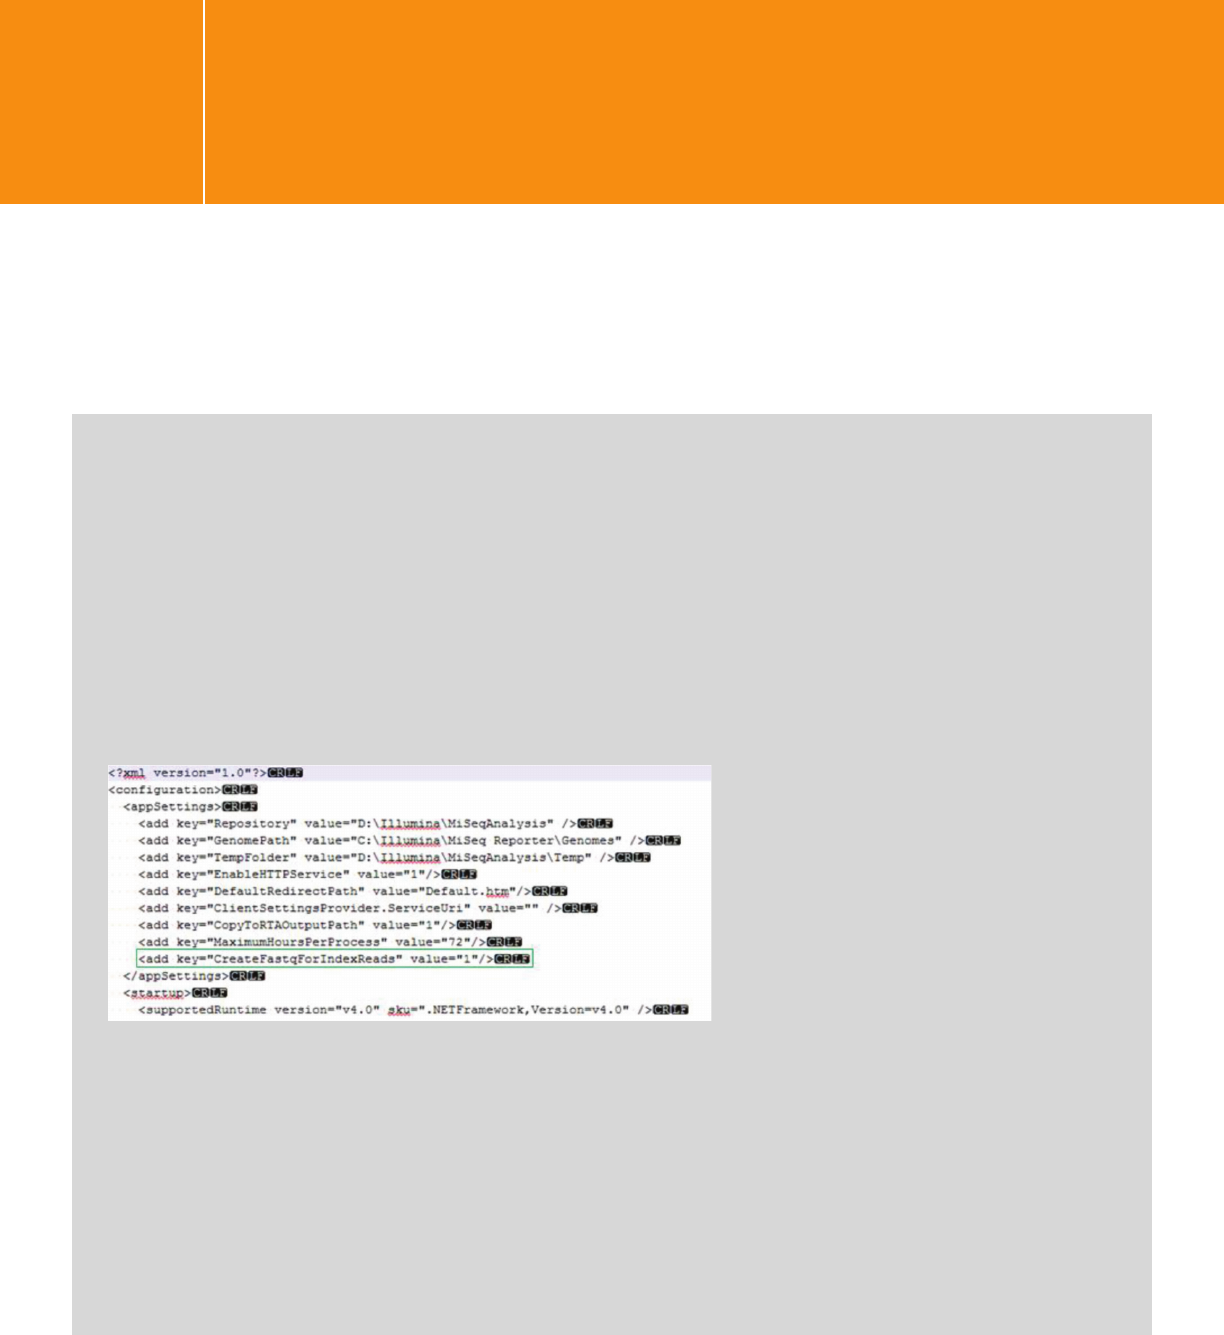
1. When sequencing on a MiSeq, you may modify the MiSeq Reporter software configuration for this
purpose; do so before the sequencing run, if the software is installed on a MiSeq workstation. Or
you may reanalyze the data using stand-alone MiSeq Reporter (this way the change will not affect
subsequent sequencing runs).
The instructions on how to modify the MiSeq Reporter configuration can be found in the HaloPlexHS ILM
protocol under “MiSeq platform sequencing run setup guidelines.”
Basically, modify the MiSeq Reporter configuration file for the instrument that directs the sequencer to
generate a third fastq file for the molecular barcodes in index 2. The configuration XML file is usually found
at: C:/Illumina/MiSeq Reporter/MiSeq/Reporter.exe.config.
The file must be edited with a text
editor and not with Excel. The
syntax of the line must precisely
match the line shown in the green
box, including the < and > brackets
and quotation marks.
The characters shown in black (CR LF) stand for carriage return and linefeed; they may not be visible in
your editor. Do not change any other lines. You may cut and paste from the line below into a blank line
you’ve inserted into the file:
<add key=”CreateFastqForIndexReads” value=”1”/>
Save the file and restart the instrument for this change to take effect.
NOTE: This change will remain in place for all subsequent runs for all assays. If you are running an assay
other than HaloPlexHS
, you may edit the file and change the “1” to a “0.”
B. HaloPlexHS users will likely need to do offline conversion to retrieve the I2 fastq
file, which contains the molecular barcode reads. Currently, there are three
possible ways to obtain the I2 fastq file while generating demultiplexed fastq
files of the paired-end reads.
III.1. Options for bcl-to-fastq conversion
for Illumina sequencing

III.1. Options for bcl-to-fastq conversion
for Illumina sequencing
2. Use Illumina’s bcl2fastq conversion software.
n Use a base mask parameter (“---use-bases-mask Y*,I8,Y10,Y*”), where * represents the read length
n When using v2.17 or a newer version, run it with “--mask-short-adapter-reads 0” so that it doesn’t
delete the index2 read sequence
n Modify the sample sheet to have only the sample index (and not the molecular barcode index) by
clearing the content in the “I5_index_ID” and “index2” columns. The software cannot handle “N”
characters in a barcode sequence.
3. Customers can use Picard tools from the Broad Institute to do bcl-to-fastq conversion, if functional
Illumina software is not available. Below are the commands (using Picard tools 2.4.1 and java 8).
Picard can be downloaded here: http://broadinstitute.github.io/picard/
The tool documentation is here: http://broadinstitute.github.io/picard/command-line-overview.html
Two tools are needed:
ExtractIlluminaBarcodes (to find the barcodes)
IlluminaBasecallsToFastq (to generate the fastq files based on the output of the first command)
Here are the commands that have been used at Agilent:
nohup java -jar picard.jar ExtractIlluminaBarcodes BASECALLS_DIR=<sequencing_run_directory>/
Data/Intensities/BaseCalls/ OUTPUT_DIR=<barcode_output_dir_name> LANE=1 READ_
STRUCTURE=<read_structure> BARCODE_FILE=<barcode_file> METRICS_FILE=<metric_file_name>
NUM_PROCESSORS=<n> &
nohup java -jar picard.jar IlluminaBasecallsToFastq BASECALLS_DIR=<sequencing_run_directory>/
Data/Intensities/BaseCalls/ LANE=1 BARCODES_DIR=<barcode_output_dir_name> READ_
STRUCTURE=<read_structure> FLOWCELL_BARCODE=<FCID> MACHINE_NAME=<machine_name>
RUN_BARCODE=<run_number> ADAPTERS_TO_CHECK=PAIRED_END
NUM_PROCESSORS=<n> READ_NAME_FORMAT=CASAVA_1_8 COMPRESS_OUTPUTS=true
MULTIPLEX_PARAMS=<multiplex_params_file> IGNORE_UNEXPECTED_BARCODES=true TMP_
DIR=<temp_directory_location> &

III.1. Options for bcl-to-fastq conversion
for Illumina sequencing
Variables explained (which is also found in the Picard tool documentation):
n sequencing_run_dir: The sequencing raw data directory
n barcode_output_dir_name: Files with indexes of barcodes will be placed here. (Files will be named by
lane, and tile number with “_barcode.txt” at the end.)
n read_structure: A string explaining which cycle in the read corresponds to which part. T=template,
B=sample barcode, M=molecular barcode, S=skip (i.e., a 2x150 run with 8-bp sample barcode and 10-bp
molecular barcode would be: 150T8B10M150T). The cycle numbers for reads have to match those in the
RunInfo.xml file.
n barcode_file: File listing the barcodes expected (for a run with single sample barcode, columns are:
“library_name” “barcode_sequence_1” and “barcode_name.” File is tab-delimited and those names
have to be in the first row. Library_name must be unique, as does the sample barcode).
n FCID, machine_name, and run_number are used to populate the read name info when using READ_
NAME_FORMAT=CASAVA_1_8
n multiplex_params: Similar to barcode file, but the columns are just “OUTPUT_PREFIX” and
“BARCODE_1.” I used the “library_name” from the other file as the “output_prefix,” for example.
File is also tab-delimited.
n temp_directory_location: Make sure that the tmp directory is large enough to hold a lot of files for
sorting. The default tmp dir on my server doesn’t have enough space, so I have to explicitly tell Picard
to use the other drive.
Picard tools ran in roughly the same amount of time as running with CASAVA. File sizes are correct. If
they want to mimic the default bcl2fastq filtering, they should also set INCLUDE_NON_PF_READS=false
(defaults to true for Picard).
1. Offline bcl-to-fastq conversion for Illumina sequencing. See separate file.
2. Example sample sheet and other template csv files (Read length is shown
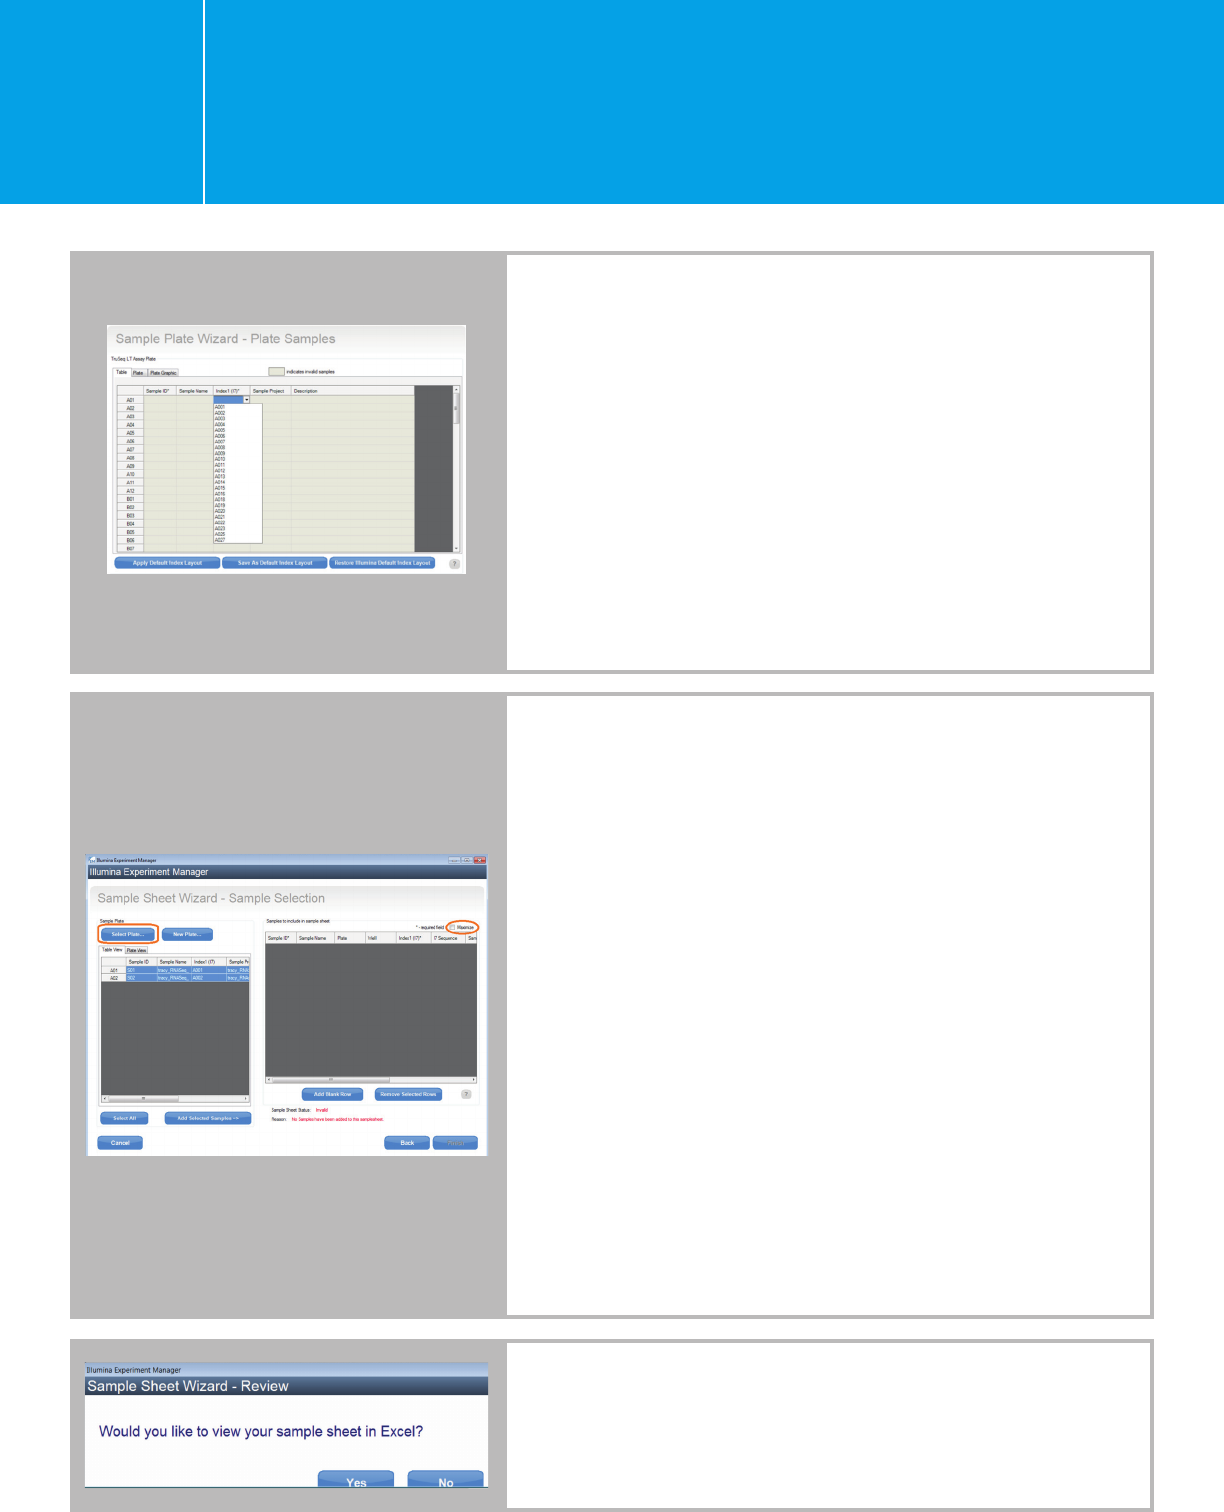
for demonstration purposes only.)
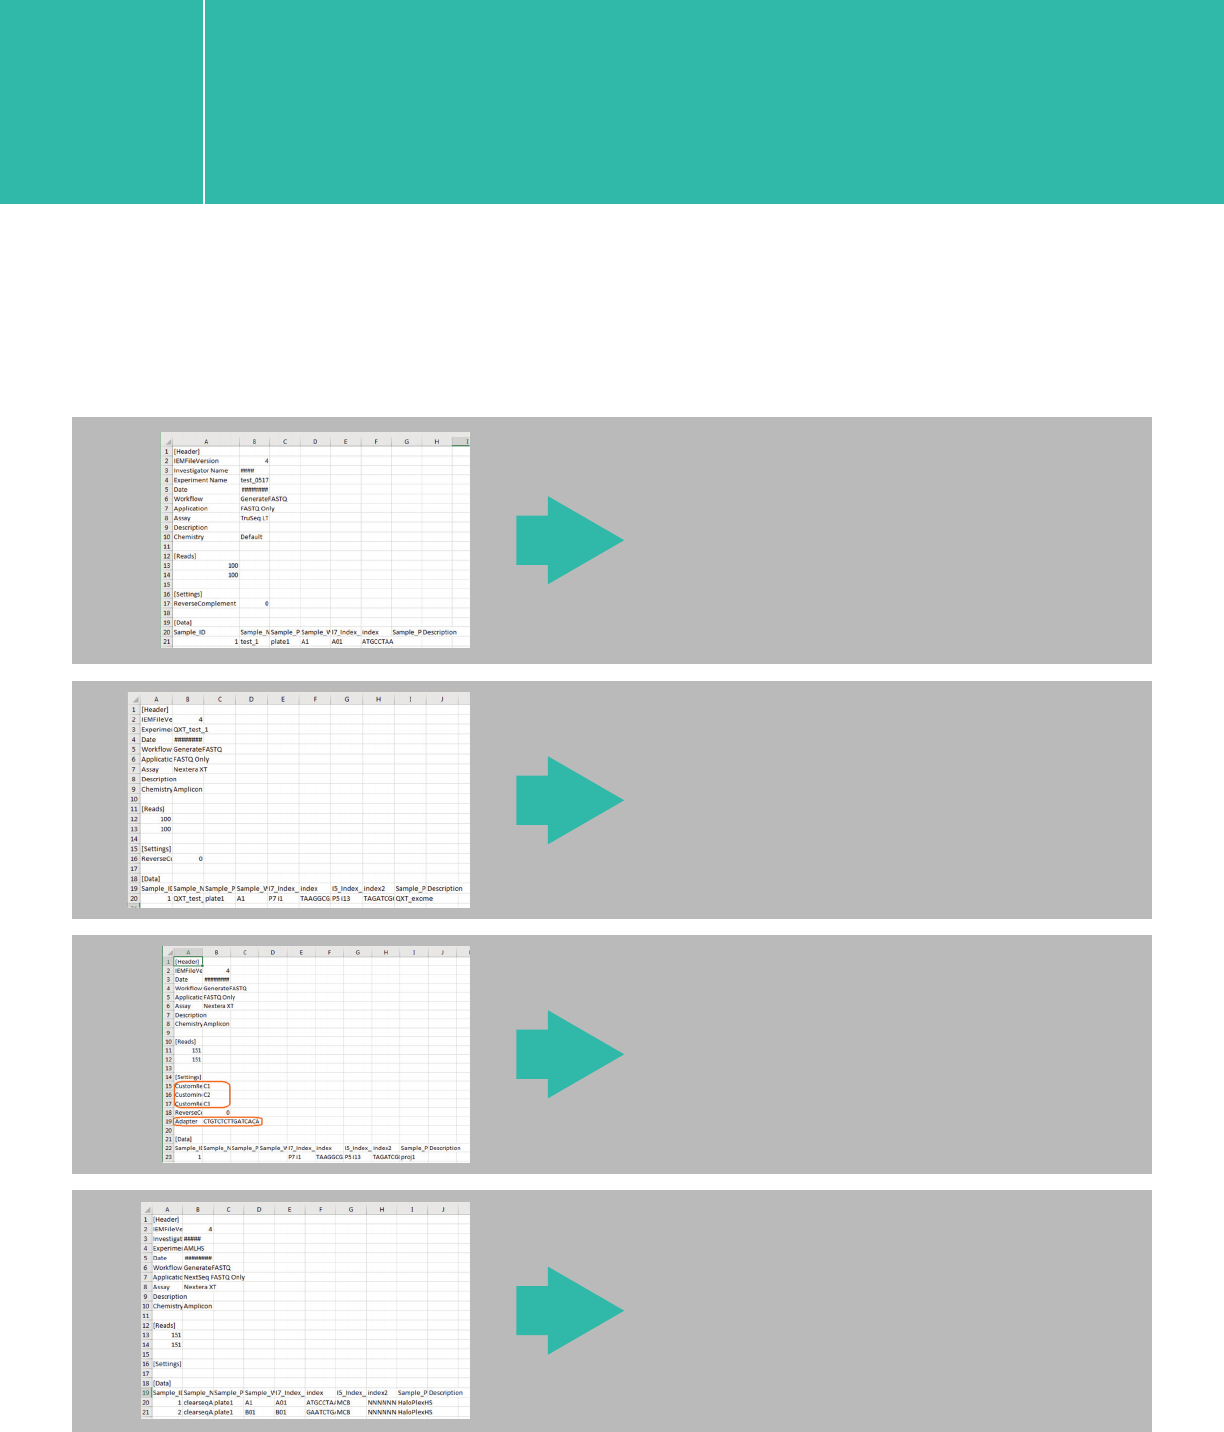
A. Example sample sheet, also available as template csv files upon request
QXT without adapter trimming
XT/XT2/RNA-seq/HaloPlex
HaloPlexHS
QXT with custom primer and
adapter-trimming options
III. Appendices
B. Library Prep Kit template csv files (containing index sequences and index layout) for
BaseSpace available upon request
As an alternative to the method described in section I, which is to use an existing Illumina Library Prep Kit
as a template and then edit the sample sheet to enter Agilent index and adapter sequences, you may
add the Agilent Library Prep Kit as a custom Library Prep Kit in IEM. This way, the custom Library
Prep Kit will be available in the IEM Library Prep Kit drop-down list, and the correct index and adapter
sequences (if adapter-trimming option is enabled) will be entered automatically in the sample sheet.
Follow these steps:
1, Generate custom Library Prep Kit txt file(s) and add the file(s) to
a. C:\Program Files (x86)\Illumina\Illumina Experiment Manager\SamplePrepKits
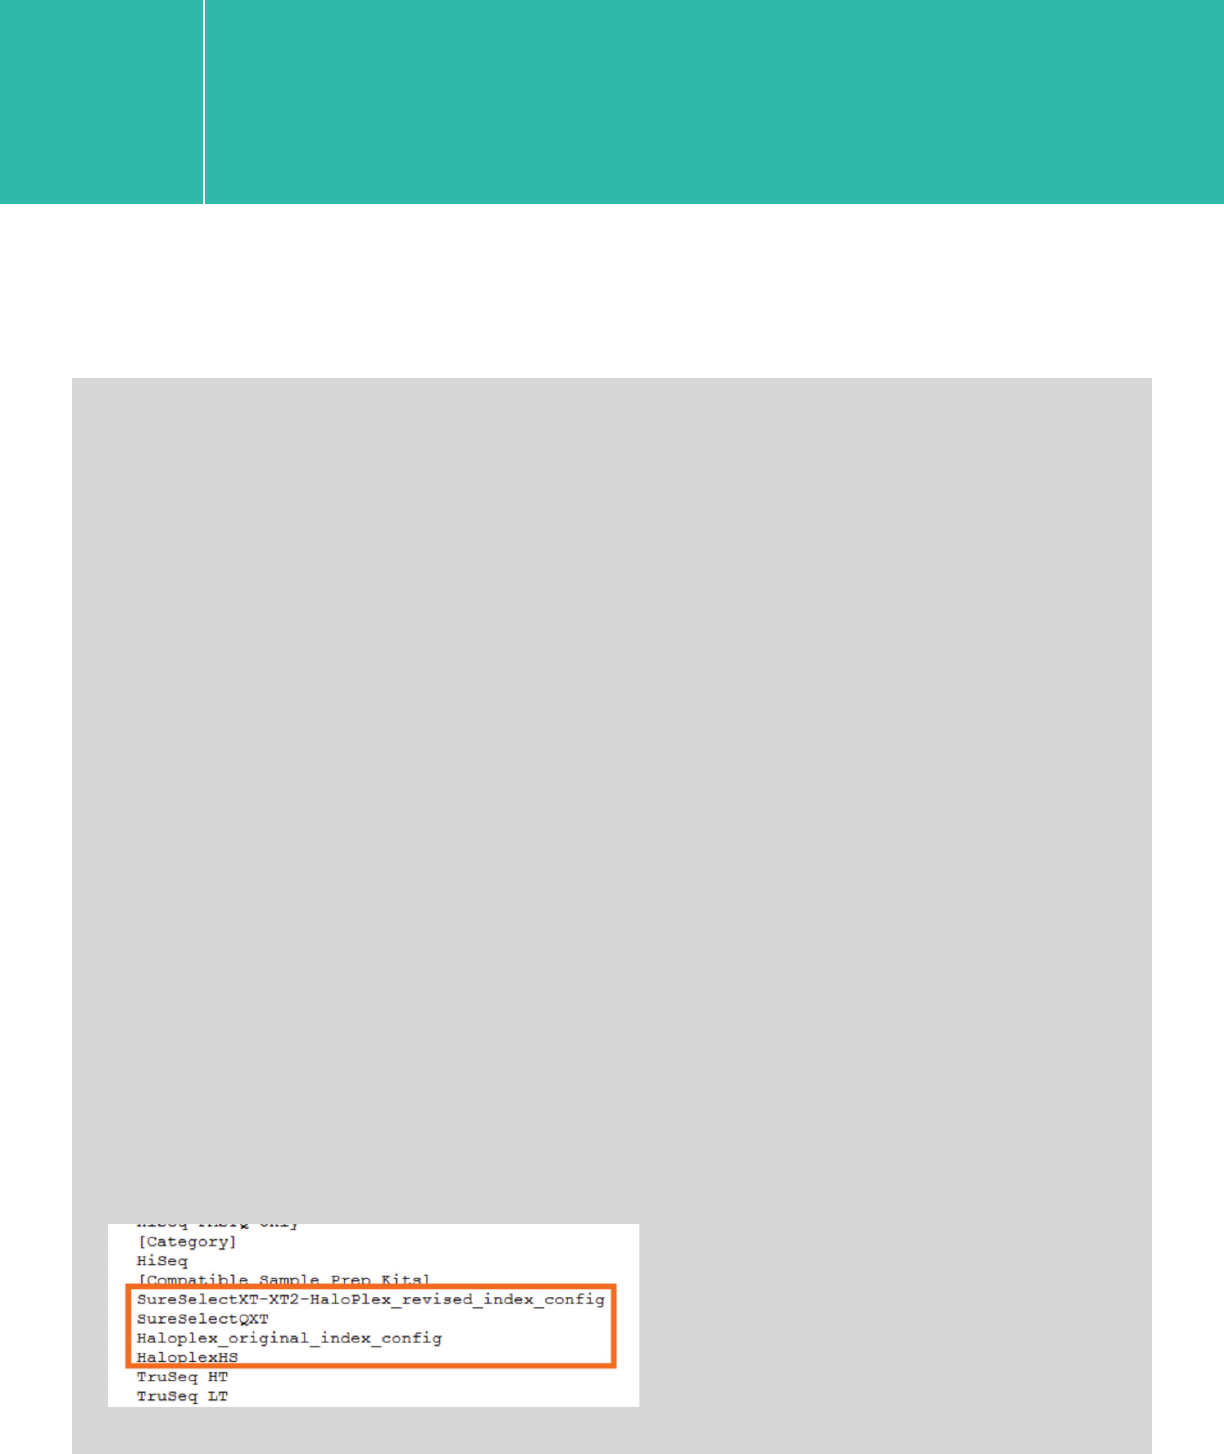
The below files are available for Agilent Library Prep Kits:
Haloplex_original_index_config.txt
HaloplexHS.txt
SureSelectXT-XT2-HaloPlex_revised_index_config.txt
SureSelectQXT.txt
2. Modify the application txt file(s) in
a. C:\Program Files (x86)\Illumina\Illumina Experiment Manager\Applications
b. to add the custom library prep kit(s) under “Compatible Sample Prep Kits.”
We recommend using the Agilent Library Prep Kit under the “FASTQ Only” application, so you
need to modify the following files for respective sequencers:
NextSeqGenerateFASTQ.txt (NextSeq)
HiSeqGenerateFASTQ.txt (HiSeq)
GenerateFASTQ.txt (MiSeq)
Example application txt files are available. The example application txt files have the previously
listed four Agilent Library Prep Kit types added. When adding the example txt file(s) into the
Applications folder, allow overwriting.
c. Re-launch IEM to enable the modifications.
3. How to add Agilent Library Prep Kits as custom Library Prep Kit types in IEM
(so sample sheet can be generated without having to be edited; also refer to the
“Creating Sample Prep Kit Type” section of the IEM user guide.)
III. Appendices

Platform Run Type Read Length SBS Kit Configration Chemistry
HiSeq 2500 Rapid 2x100/2x75 200 Cycle Kit v1/v2
HiSeq 2500 High Output 2x100/2x75 4 x 50 Cycle Kits or
200+50 Cycle Kits v3
HiSeq 2500 High Output 2x100/2x75 250 Cycle Kit v4
HiSeq 2000 All Runs 2x100/2x75 200 Cycle Kit v3
MiSeq All Runs 2x100 300 Cycle Kit v2
MiSeq All Runs 2x75 150 Cycle Kit v3
NextSeq 500/550 All Runs 2x75 150 Cycle Kit v1/v2
NextSeq 500/550 All Runs 2x100 300 Cycle Kit v1/v2
4. Illumina Kit Configuration Selection Guide (The ones that have been validated
internally are highlighted.)
XT/XT2/RNA-Seq
III. Appendices

Platform Run Type Read Length SBS Kit Configration Chemistry
HiSeq 2500 Rapid 2x100/2x75 200 Cycle Kit v1/v2
HiSeq 2500 High Output 2x75 200 Cycle Kit v3
HiSeq 2500 High Output 2x100 4 x 50 Cycle Kits or
200+50 Cycle Kits v3
HiSeq 2500 High Output 2x100/2x75 250 Cycle Kit v4
HiSeq 2000 All Runs 2x75 200 Cycle kit v3
HiSeq 2000 All Runs 2x100 200+50 Cycle Kit v3
MiSeq All Runs 2x100 300 Cycle Kit v2
MiSeq All Runs 2x75 150 Cycle Kit v3
NextSeq 500/550 All Runs 2x100/2x75 300 Cycle Kit v1/v2
QXT
III. Appendices

Platform Run Type Read Length SBS Kit Configration Chemistry
HiSeq 2500 Rapid 2x100 200 Cycle Kit v1/v2
HiSeq 2500 Rapid 2x250 500 Cycle Kit v2
HiSeq 2500 High Output 2x100 200 Cycle Kit v3
HiSeq 2500 High Output 2x100 250 Cycle Kit v4
HiSeq 2000 All Runs 2x100 200 Cycle kit v3
MiSeq All Runs 2x100/2x150 300 Cycle Kit v2
MiSeq All Runs 2x250 500 Cycle Kit v2
MiSeq All Runs 2x250 600 Cycle Kit v3
NextSeq 500/550 All Runs 2x100 300 Cycle Kit v1/v2
HaloPlex
III. Appendices

Platform Run Type Read Length SBS Kit Configration Chemistry
HiSeq 2500 Rapid 2x100 200 Cycle Kit v1/v2
HiSeq 2500 Rapid 2x250 500 Cycle Kit v2
HiSeq 2500 High Output 2x100 4 x 50 Cycle Kits or
200+50 Cycle Kits v3
HiSeq 2500 High Output 2x100 250 Cycle Kit v4
HiSeq 2000 All Runs 2x100 4 x 50 Cycle Kit v3
MiSeq All Runs 2x100/2x150 300 Cycle Kit v2
MiSeq All Runs 2x250 500 Cycle Kit v2
MiSeq All Runs 2x250 600 Cycle Kit v3
NextSeq 500/550 All Runs 2x100 300 Cycle Kit v1/v2
HaloPlexHS
III. Appendices

III. Appendices
5. Recommended seeding concentrations based on internal experience
Internally, we aim for 800 K/mm2 to 900 K/mm2 with the MiSeq and the HiSeq.
MiSeq: With the V2 sequencing kits, our range is mainly in the 9-pM to 13-pM range with
XT/XT2/HaloPlex/HaloPlexHS
. Note that Methyl-Seq has not been sequenced on the MiSeq.
We have not been using the V3 chemistry routinely, but the same range is applied. It is
expected that the V3 chemistry can support higher cluster density, so you may be able to
use higher seeding concentration.
HiSeq 2000: XT/XT2/HaloPlex/HaloPlexHS
, 6 pM to 8 pM. Methyl-Seq, 15 pM.
NextSeq 500: QXT/XT/XT2/HaloPlex, 1.2 pM to 1.4 pM with the V1 chemistry, and 1.8 pM
with the V2 chemistry. Target cluster density, 180 K/mm2 to 200 K/mm2
.
Note:
1) The concentrations above are based on quantitation by TapeStation, with the exception
of QXT whole-genome that would need to be run on a BioA because of the broader
library size range;
2) The clustering outcome can vary from instrument to instrument, and libraries are not all
equal even when concentration appears to be the same. We believe that these seeding
concentrations should achieve a good amount of high-quality data, but please be aware
that further optimization may be needed based on your own experience.
HiSeq 2500 Rapid: XT/XT2/HaloPlex, 8 pM to 12 pM. QXT with target enrichment, 13 pM;
for whole-genome, 20 pM. This is likely because of the broader size distribution of the QXT
whole-genome library. For strand-specific total RNA-Seq, we use 10 pM to 12 pM. (R&D has been
using the Rapid Mode only, but this should be comparable with the high-output mode).

6. How to modify an Agilent BED file into a manifest file
a. Open an Illumina manifest file in Excel for use as a template. For example: https://
support.illumina.com/content/dam/illumina-support/documents/downloads/
productfiles/truseq/truseq-exome-targeted-regions-manifest-v1-2-bed.zip.
b. Clear the contents of columns 1 to 4 in the template file.
d. If the template file has more rows than the BED file, be sure to delete the extra rows.
e. Now you have an empty column 1 in the manifest file. Use the CONCATENATE function
to concatenate columns 2 and 3 (chr, start, and end) and create a name for each row in
column 1. This way you can make sure that each row has a unique name.
c. Open the BED file in Excel. Copy columns 1 to 3 and paste into columns 2 to 4 in the
above template.
f. Save this file as a tab delimited txt file under:
n C:\Users\useraccount\AppData\Roaming\Illumina\Illumina Experiment Manager\Manifests
n This should automatically make the manifest file available from IEM in the drop-down menu.
III. Appendices

III. Appendices
7. Considerations for PhiX spike-in
9. Seeding concentration for ION sequencing and ION Sphere QC
8. ION system and reagent kits that have been used for template preparation and
sequencing of Agilent SureSelectXT PTN and HaloPlex/HaloPlexHS ION libraries
10. How to modify an Agilent BED file for uploading to the Ion Server
It is recommended to always include a standard 1% to 5% PhiX spike-in. This applies to all
Agilent NGS libraries, including the Methyl-Seq library.
For targeted sequencing with low complexity (e.g., <2000 amplicons), it might be helpful to
use a high-concentration spike-in of up to 25%.
Follow the dilution protocol and ION Sphere QC kit recommended for “gDNA Fragment or
Amplicon Library” in the ION template-preparation kit user manuals.
SureSelectXT PTN: Ion PI Template OT2 200 Kit v2 with the Ion OneTouch 2 system, and Ion
PI Template 200 kit v2.
HaloPlex/HaloPlexHS: Ion PGM Template OT2 400 kit with the Ion OneTouch 2 system, and
Ion PGM Sequencing 400 kit..
Note: We have not tested the Hi-Q and Hi-Q view kits, but those also should be compatible.
a. Open the BED file in Excel.
b. Remove the first two lines, which are the browser position and the track name.
c. Remove the fourth column, which contains the annotations.
