NR BY551 BY601 EN(B 1) 18.6 MB
User Manual: 18.6 MB Panasonic Service Manuals - Panasonic Middle East
Open the PDF directly: View PDF ![]() .
.
Page Count: 56
NR-BY551 / NR-BY601
NR-BY551S / NR-BY551M
Operating Instructions / Petunjuk Pengoperasian
/
Refrigerator / Lemari Es / /
:
/
Model No: / Nomor Model
RBD / IND
PGF / GULF
NR-BY551S
NR-BY551M
NR-BY551 NR-BY601
Thank you very much for purchasing Panasonic product
This product is intended for household use only
Terima kasih telah membeli produk Panasonic
Produk ini ditujukan untuk keperluan rumah tangga saja
Before operating this unit, please completely read these instructions especially the safety precautions.
Sebelum menggunakan lemari es ini harap baca seluruh petunjuk, terutama mengenai tindakan pencegahan untuk keselamatan anda.
Disperindag No.0080/1.824.51
Cover NR-BY551-EN-IND-AR-PE.indd 1 11/9/09 2:57:02 PM
2
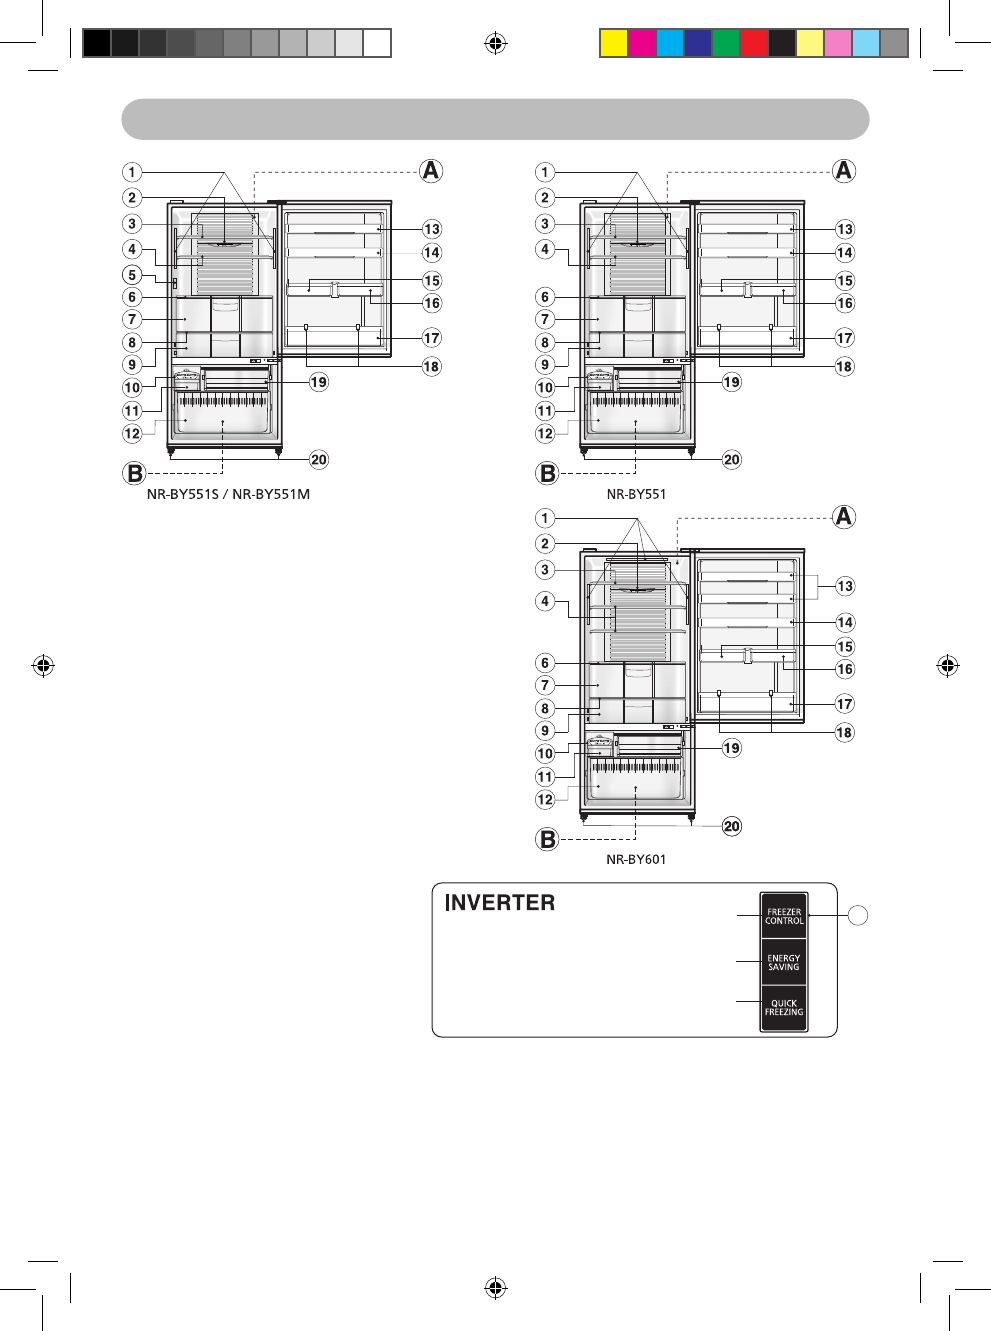
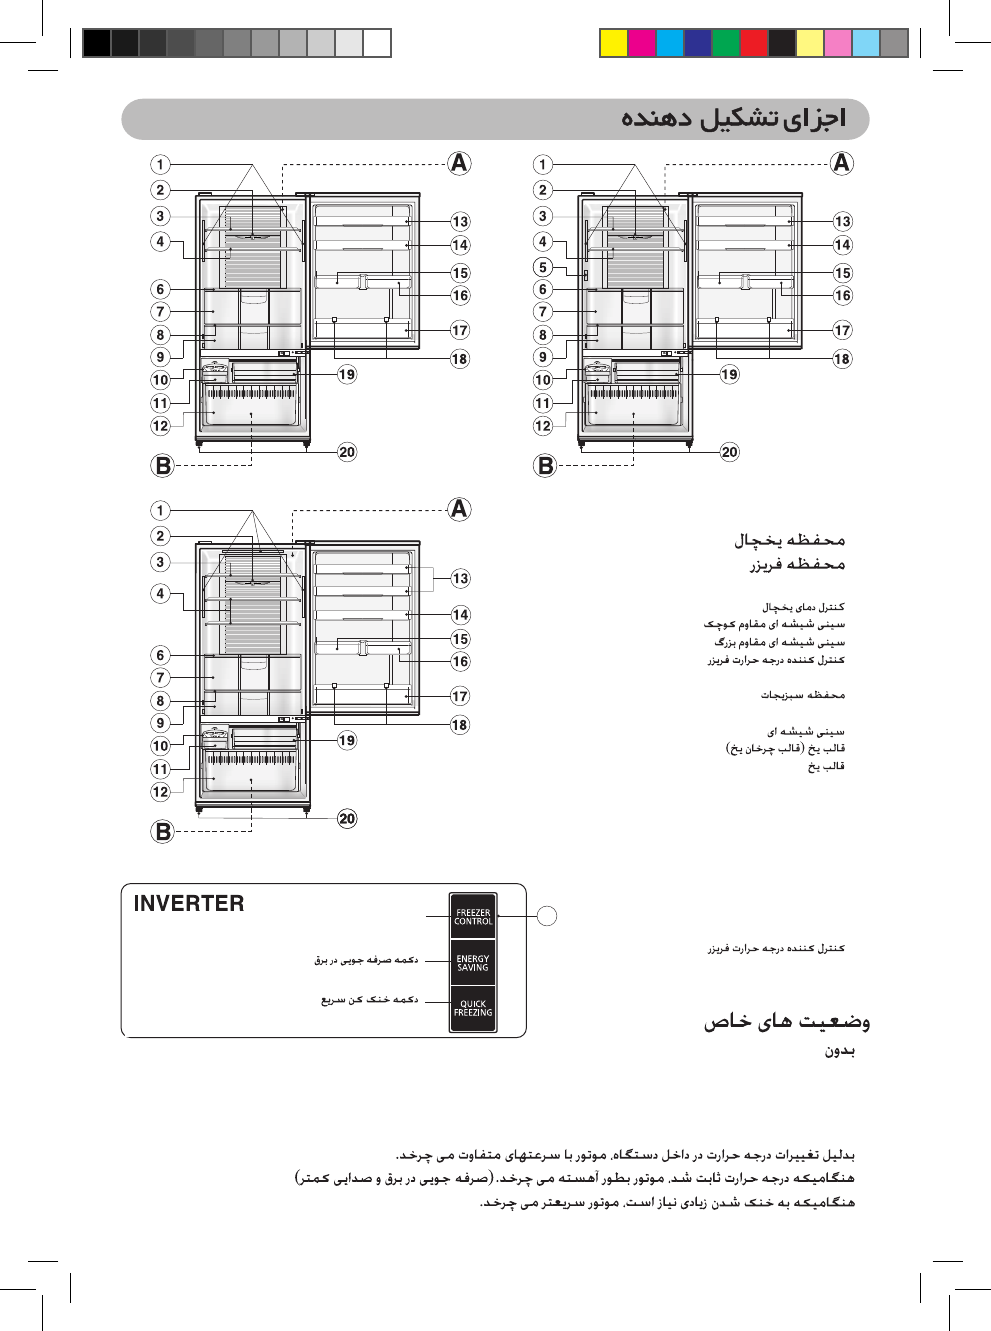
PARTS IDENTIFICATION
SPECIAL FEATURE
1) NON-FLON
This unit uses totally NON-FLON MATERIALS both for refrigerant (Iso-butane (R600a) for NR-BY551,
NR-BY601) and for insulation (Cyclo-Pentane).
So, this refrigerator does not damage to the earth’s ozone layer and has almost no effect on
global warming.
2) INVERTER (For NR-BY551 and NR-BY601)
In accordance of temperature change inside of compartment, the motor runs at different speed.
When temperature is stable, the motor runs at a lower speed. (energy saving & lower noise)
When powerful cooling is required, the motor runs at a higher speed.
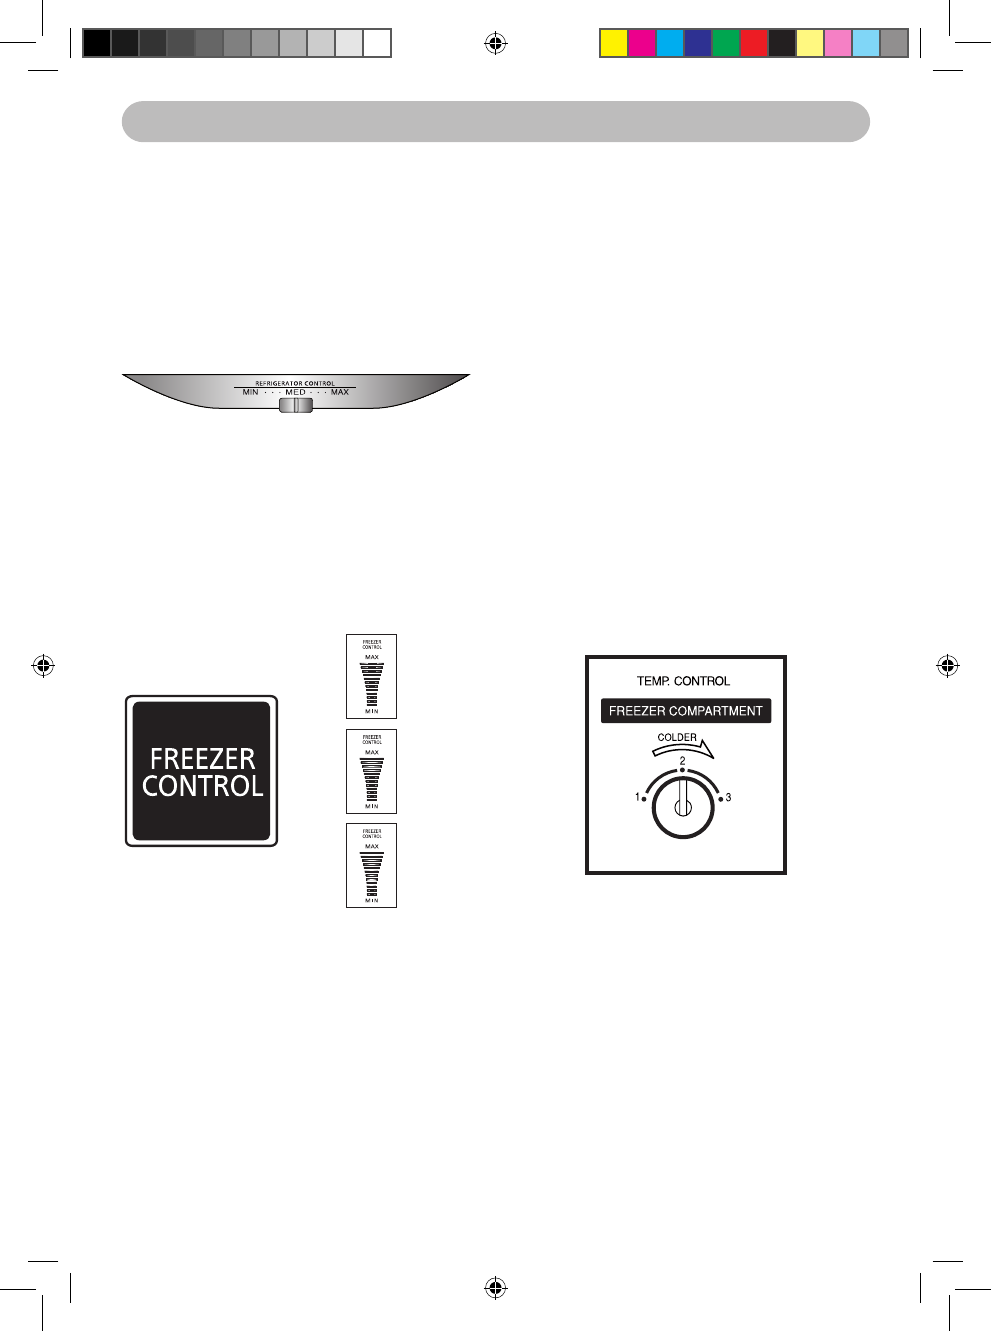
A. REFRIGERATOR COMPARTMENT
B. FREEZER COMPARTMENT
1. LED Lamp
2. Refrigerator Temperature Control
3. Small Tempered Glass Tray
4. Large Tempered Glass Tray
5. Freezer Temperature Control
(NR-BY551S and NR-BY551M)
6. Tempered Glass Tray Crisper
7. Vegetable Case
8. Tempered Glass Tray Chilled
9. Chilled Case
yarT ecI .01
xoB ecI .11
esaC rezeerF mottoB .21
ggE flehS .31
yarT ggE htiw ggE flehS .41
flehS tnemtrapmoC noisivorP tfeL .51
16. Right Provision Compartment Shelf
17. Shelf Bottle
reppotS elttoB edilS .81
esaC rezeerF poT .91
tloB elbatsujdA .02
lortnoC erutarepmeT rezeerF .12
(NR-BY551 and NR-BY601)
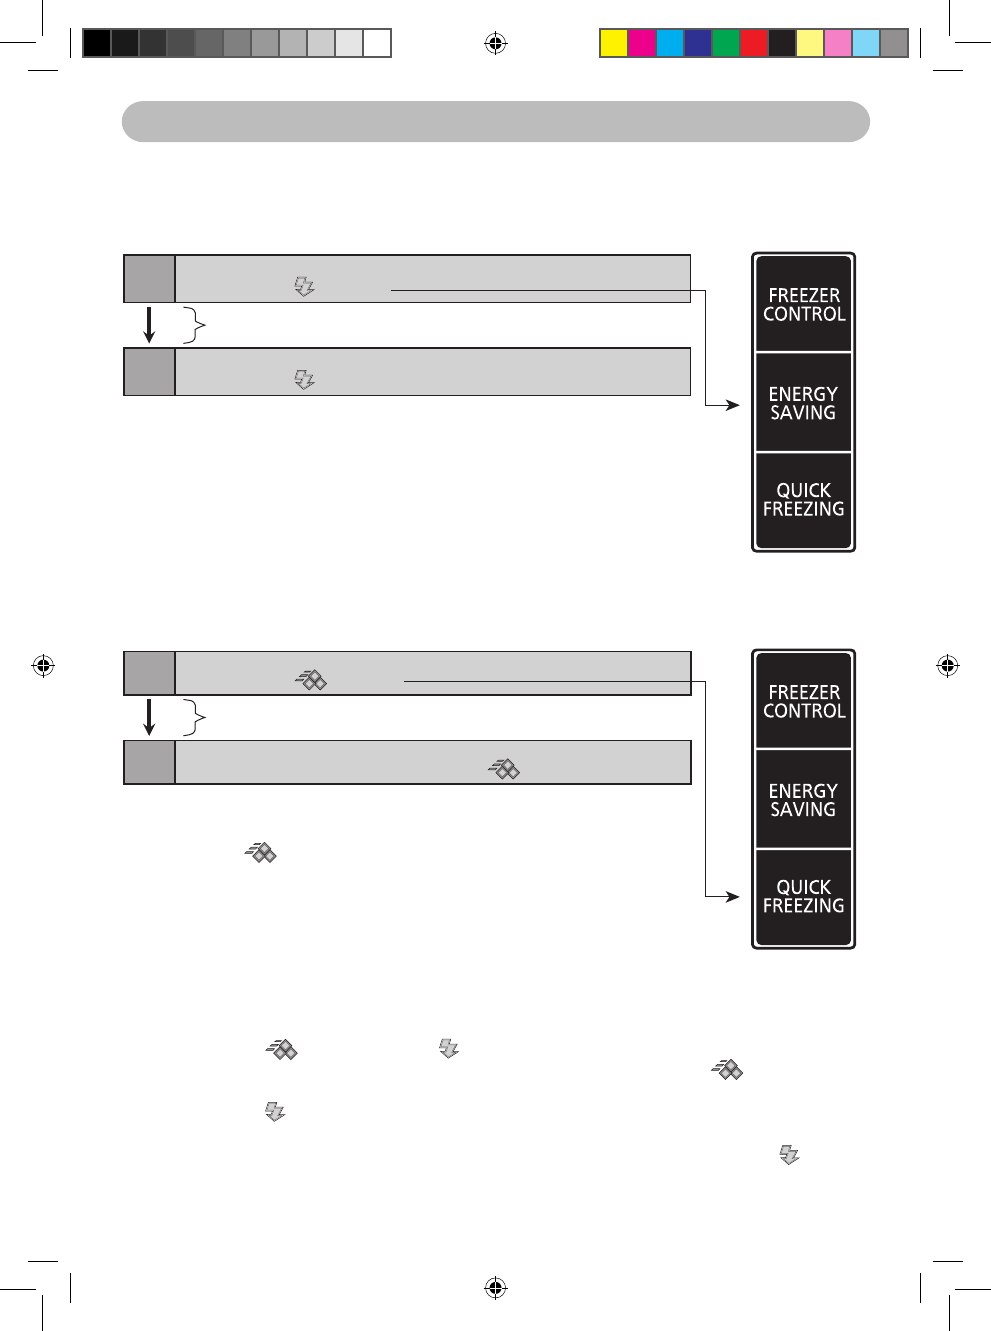
ENERGY SAVING button
QUICK FREEZING button
FREEZER CONTROL button
For only model.
This portion is shown at front of product.
- NR-BY551
- NR-BY601
NR-BY551-BY601-EN(B-1).indd 2 11/4/09 5:09:59 PM
3
CONTENTS
Parts Identification ................................................ 2
Contents, Installation ............................................ 3
Safety precautions ................................................ 4
Caution for using .................................................. 6
Temperature control ............................................. 7
Inverter Control Display ........................................ 9
Food Storage, Food storage in the freezer
compartment, How to make ice cubes .............. 10
How to clean the refrigerator ...............................11
Removing trays for cleaning ................................11
Removing the vegetable case and chilled case
for cleaning ........................................................ 12
Removing the bottom freezer case for cleaning ........
12
Removing shelf egg, shelf bottle and left/right
provision compartment shelf for cleaning ........... 12
Refrigerator instruction guidelines ...................... 13
Troubleshooting .................................................. 13
Specification, Memo .......................................... 14
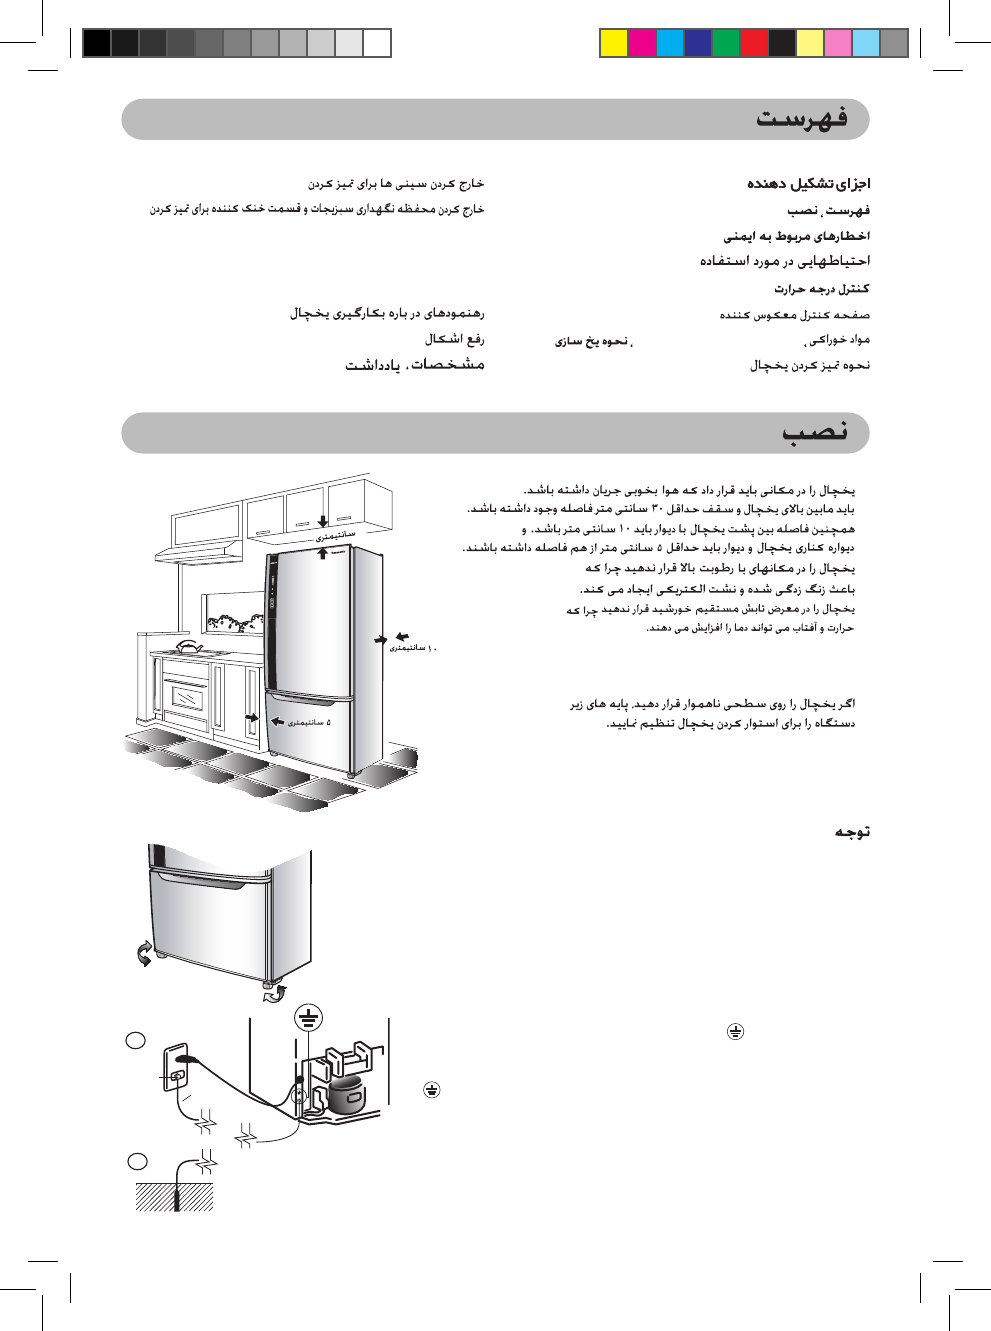
INSTALLATION
1
2
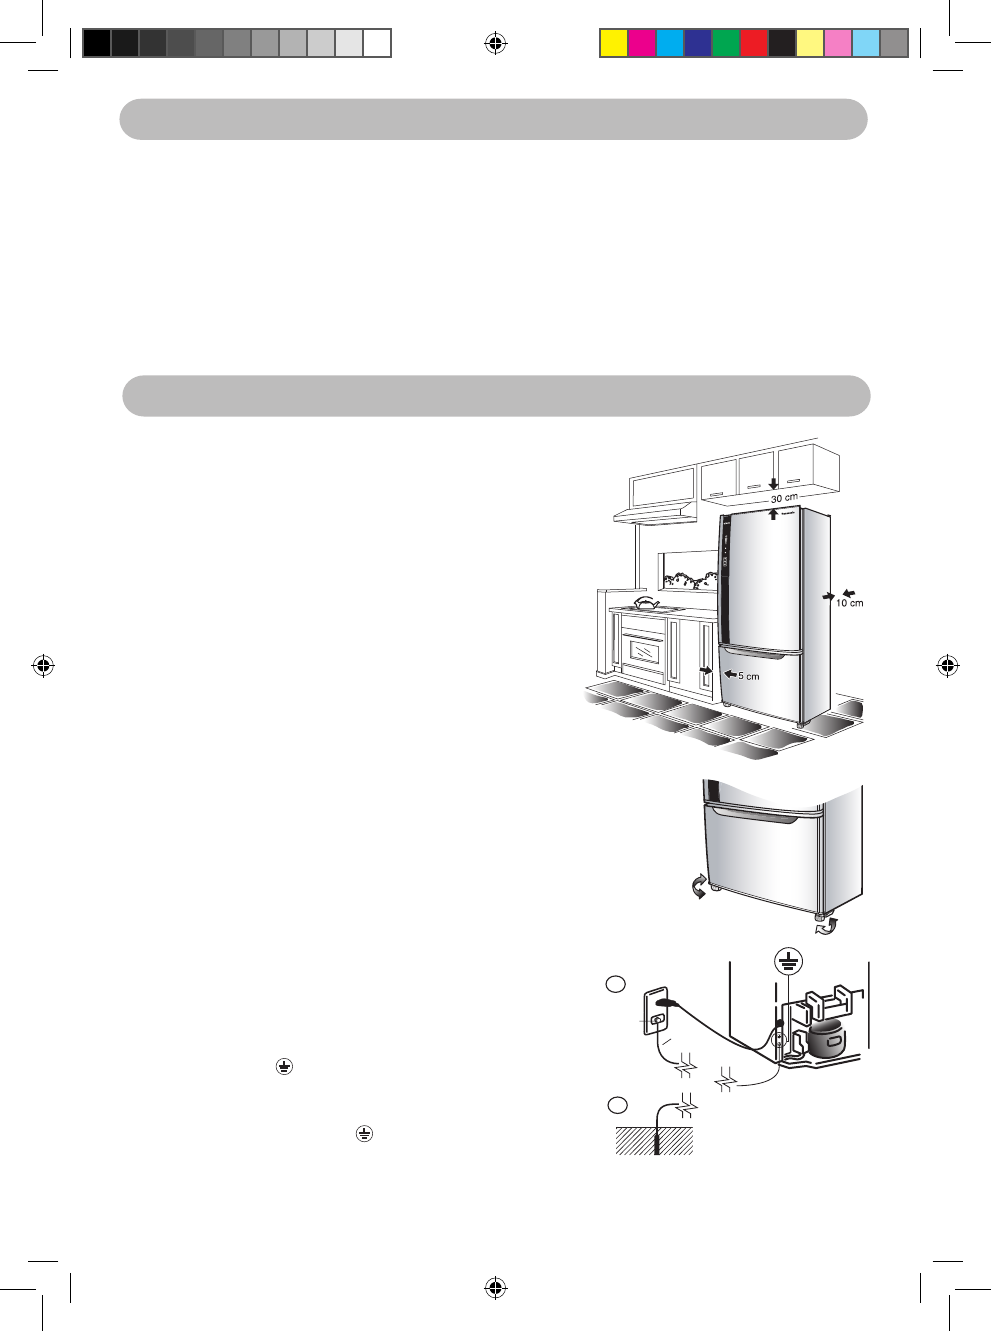
Grounding
receptacle
Ground
wire
Illustration for the
ground connection
For safety, the ground connection should be done
(For a refrigerator with plug (2-pin plug) without any ground wire)
The ground connection will allow prevention of danger resulted from electricity leakage.
The ground connection can be performed in 2 ways as follows:
1. In the case that the grounding receptacle having been prepared for
the socket (plug socket), connect the ground wire to the screw used
for ground connection at the bottom rear of the refrigerator (regarding
the screw used for ground connection, please notice the symbol)
as shown in the illustration 1.
2. In the case that the socket (plug socket) having not been provided
with any grounding receptacle, connect the ground wire to the screw
at the bottom of the refrigerator, (as regards the screw used for
ground connection, please notice the symbol). And then connect
the other end to the ground rod as shown in the illustration 2.
Prohibited spots for ground connection
● Gas pipes and water supply pipes (dangers from electric shock or
explosion).
● The ground wires of telephone cords and lightning rods (dangers from lighting).
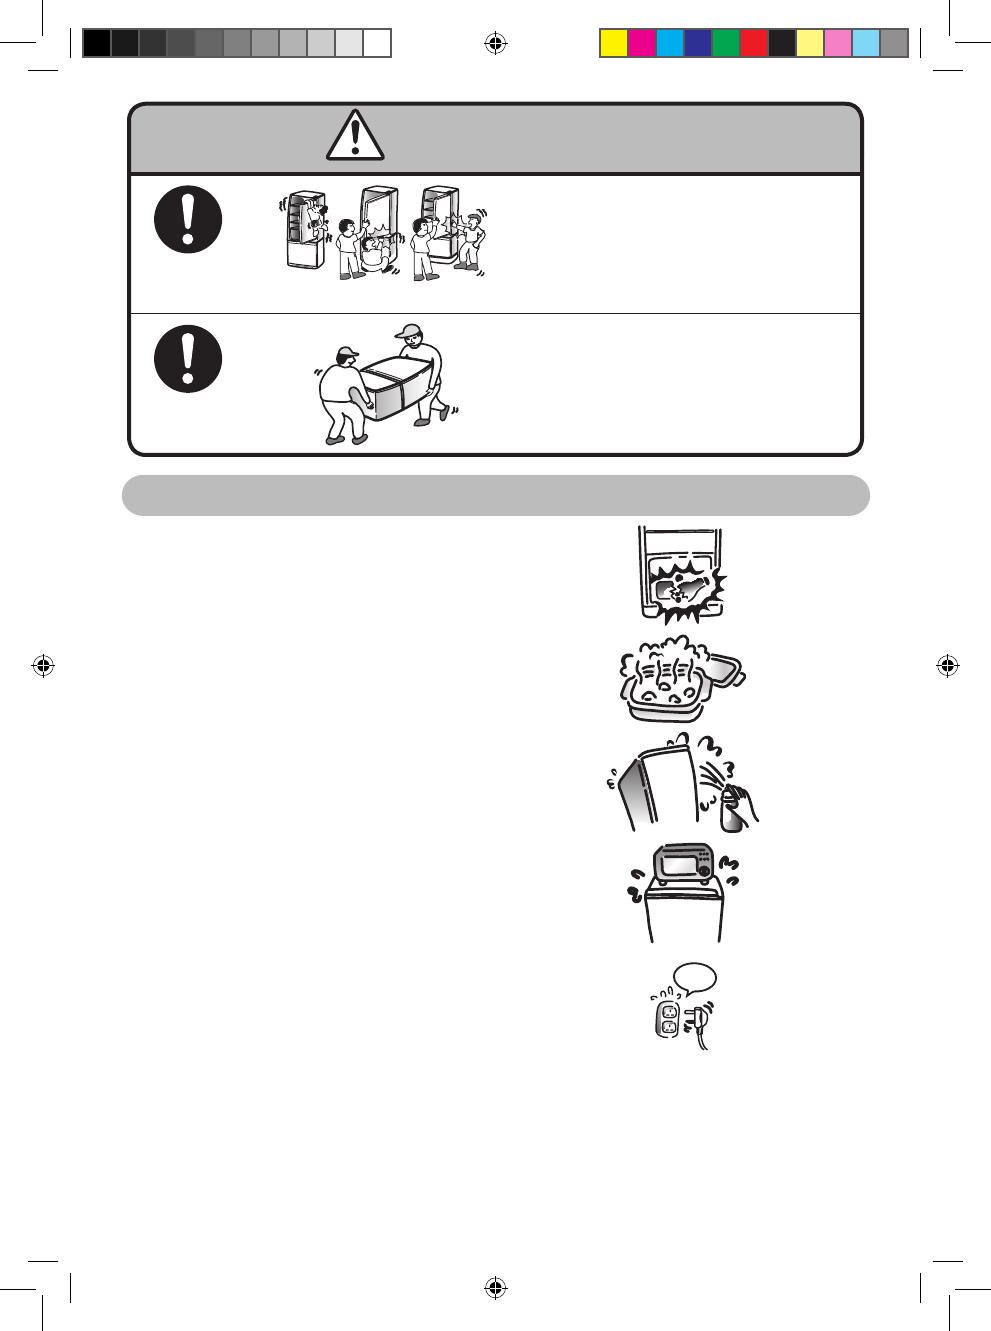
● The refrigerator must be located in the place where there is good air circulation.
There must be a space between the top of the refrigerator and the ceiling
at least 30 cm as well as the space between the wall and the back of the
refrigerator at least 10 cm and the side of the refrigerator and the wall at
least 5 cm.
● Do not locate the refrigerator in the humid
place as rust may form and may cause the electric leakage.
● Do not locate the refrigerator exposing to direct sunlight as the heat and
sunlight will increase the temperature.
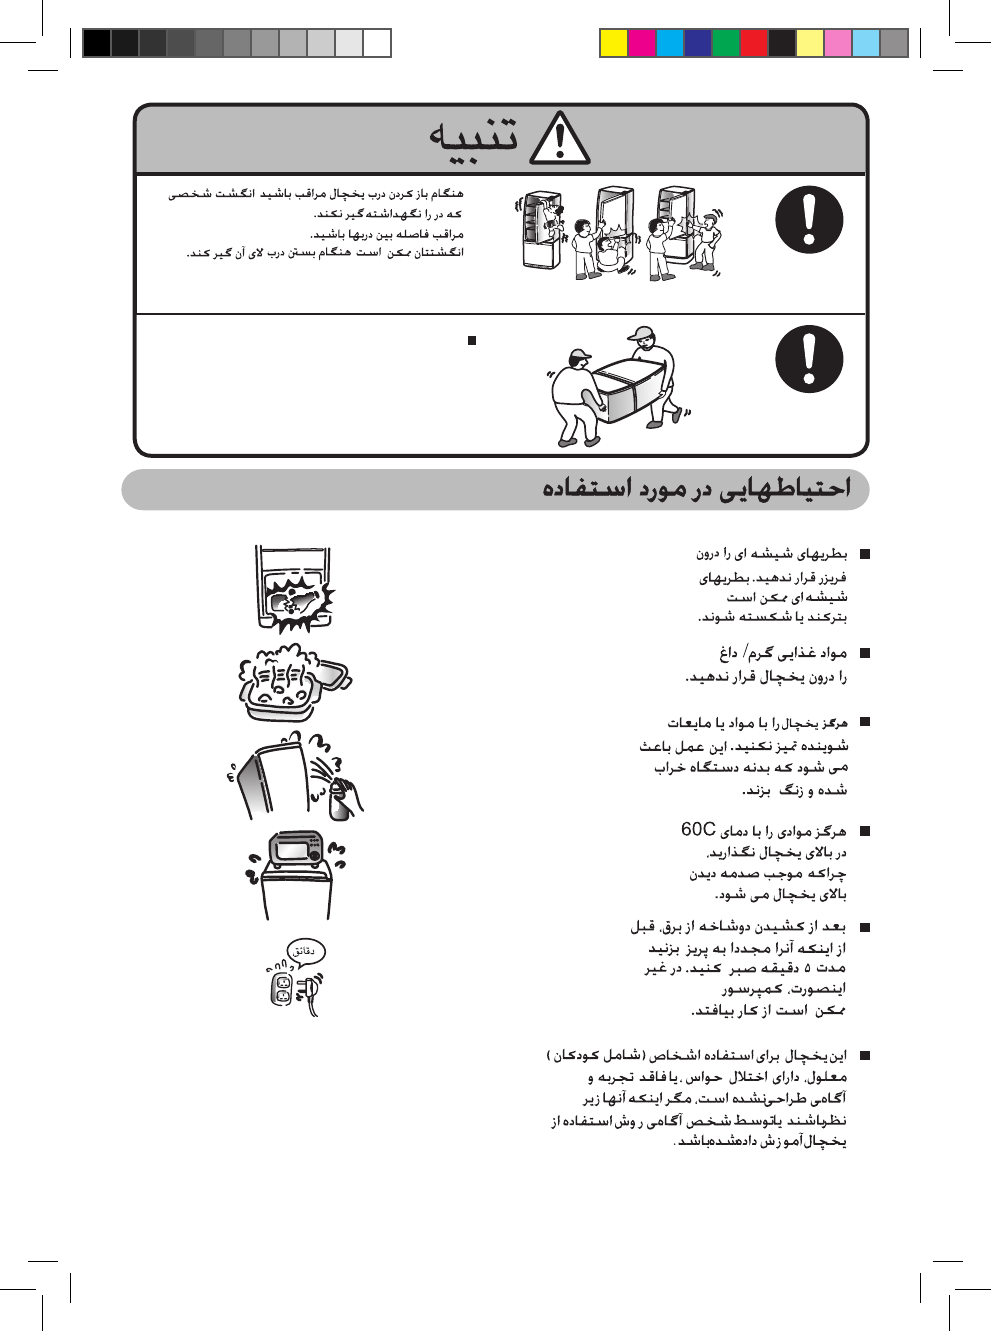
● When moving or shifting the refrigerator, remove all trays and check
to be sure that there is no water in the refrigerator adjust the leveling
stand of refrigerator, then moving the refrigetator and installation in the
location, adjust leveling stand for locking.
● In case of locating the refrigerator on an uneven surface, adjust the
leveling stand to make the refrigerator stands stably.
● If there is no ground wiring plug in refrigerator, it should be connected
with ground connection to prevent hazard from electric leakage.
● The refrigerator LED lamp, specially designed for this refrigerator, function to not
individual replacing. If you need to replacing, please contact Panasonic Service Center.
Remark
The lamp in vegetable case is flashing LED which have function to keep freshness and
increase vitamin C in vegetable and fruits. If you need to replacing or have problem with
this lamp, please contact Panasonic Service Center.
NR-BY551-BY601-EN(B-1).indd 3 11/4/09 5:10:02 PM
4
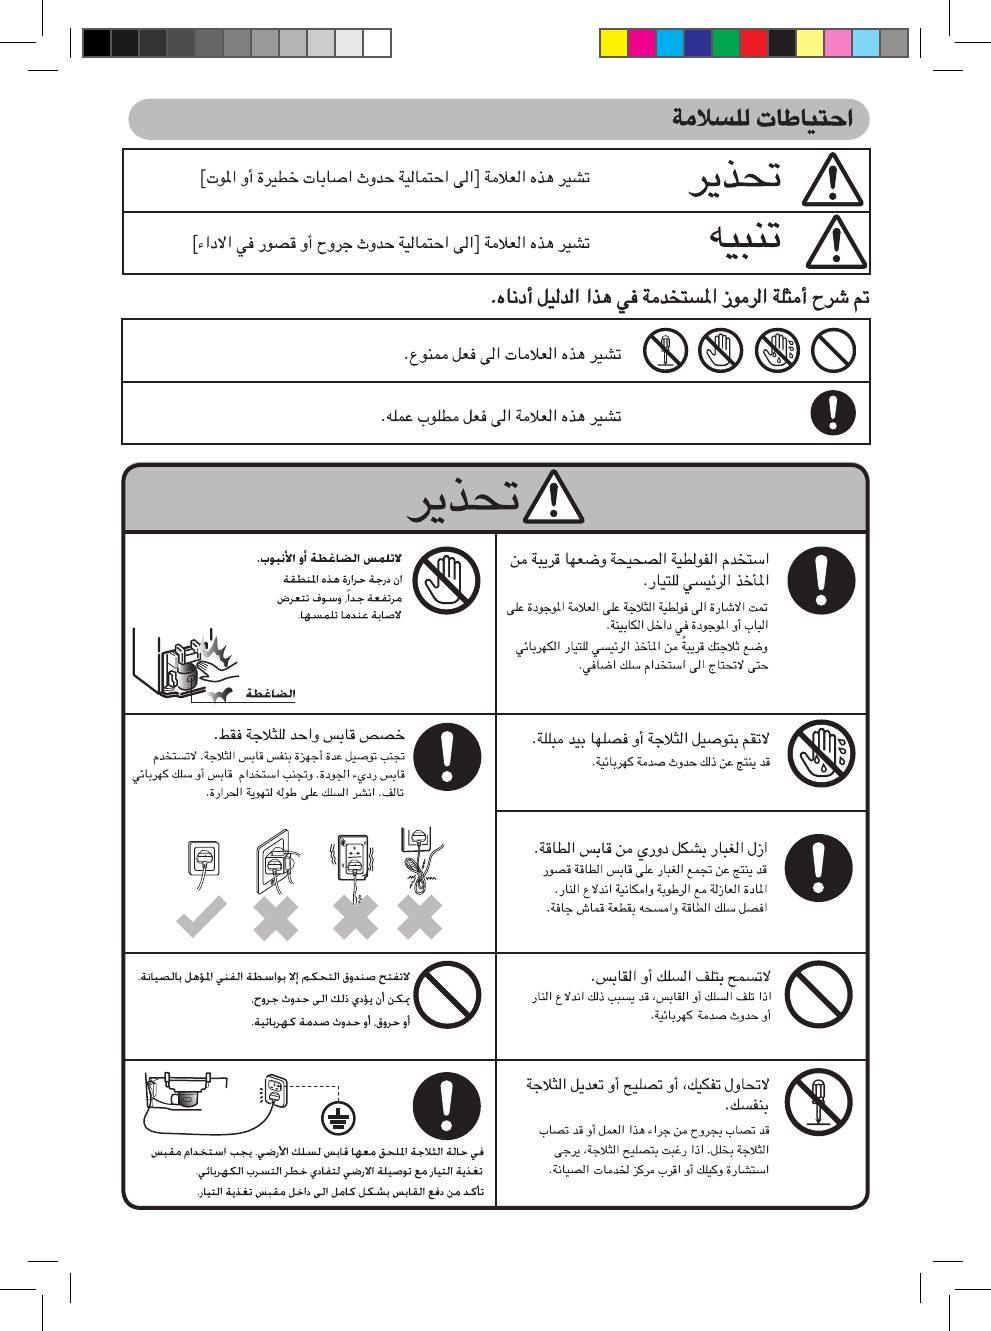
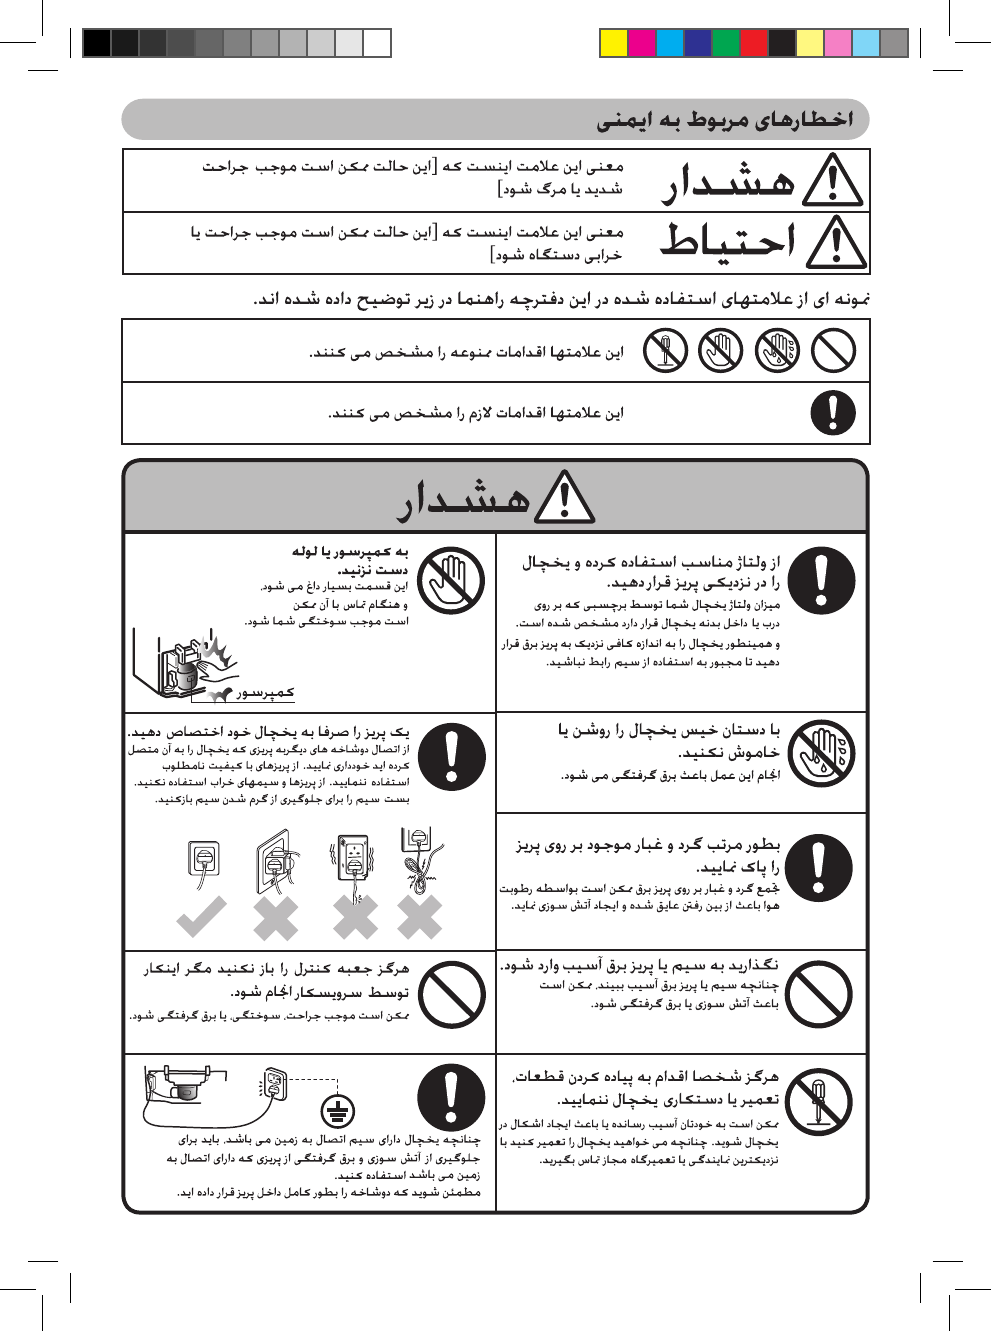
SAFETY PRECAUTIONS
WARNING
This sign means
[It may result in severe injuries or death]
CAUTION
This sign means
[It may result in injuries or malfunction]
The samples of symbols used in this manual are described below.
These signs mean prohibited action.
This sign means required action.
WARNING
Use proper voltage and keep it
close to the outlet.
Your refrigerator’s rated voltage is indicated
on a label put at the door or at the inside of
cabinet.
And place your refrigerator near enough the
electrical outlet so that you do not have to
use an extension cord.
Do not touch compressor or pipe.
This area become high temperature, will
have an accident when you touch it.
Compressor
Do not plug or unplug with wet
hands.
Doing so can result in an electrical shock.
Reserve one plug for the
refrigerator only.
Avoid connect many appliances to the same
plug for the refrigerator. Do not use a plug
with no quality. Avoid using damaged plug or
electric cord. Unroll through the length of the
cord in order to ventilate the heat.
Remove dust periodically from
the power plug.
Dust accumulation on the power plug may
cause an Insulation failure with humidity and
possible fi re.
Unplug the power cord and wipe with dry
cloth.
Do not let the cord or plug be
damaged.
If the cord or plug is damaged, it may cause
fi re or electric shock. Please consult your
dealer or service center when the refrigera-
tor has to be repaired.
Do not open controller box
except by a service personnel.
It may get danger of electrical shock.
Do not try to disassemble,
repair or modify the refrigerator
by yourself.
You may get injured from doing so or the
refrigerator may result in malfunction.
If you want to repair the refrigerator,
please consult your dealer or nearest service
center.
In case of refrigerator with ground wiring
plug, It must be used the socket outlet with
ground connection to prevent hazard from
electric leakage.
Make Sure to push the plug completely
into the socket outlet.
NR-BY551-BY601-EN.indd 4 11/6/09 3:28:41 PM

5
SAFETY PRECAUTIONS
WARNING
Do not damage the cooling circuit
(piping on the back). The flammable refrigerant
may catch fire and lead to an explosion.
Do not use electrical appliances such as a deodorizer
in the refrigerator. (If the refrigerant leaks, then it may
catch fire due to sparks on the contacts.)
Do not fill the gaps around the refrigerator.
(If the refrigerant leaks, then it may catch fire.)
● If you detect a burning smell, disconnect the power
plug.
● If you detect a gas (such as city gas) leak, ventilate
the kitchen.
● A flammable refrigerant is used. If you have dam-
aged the cooling circuit (piping), open the windows
to ventilate the kitchen and contact your dealer.
(Otherwise it may cause an electrical shock, ignition
or explosion.)
● Maintenance work must only be done at workshop
by competent person.
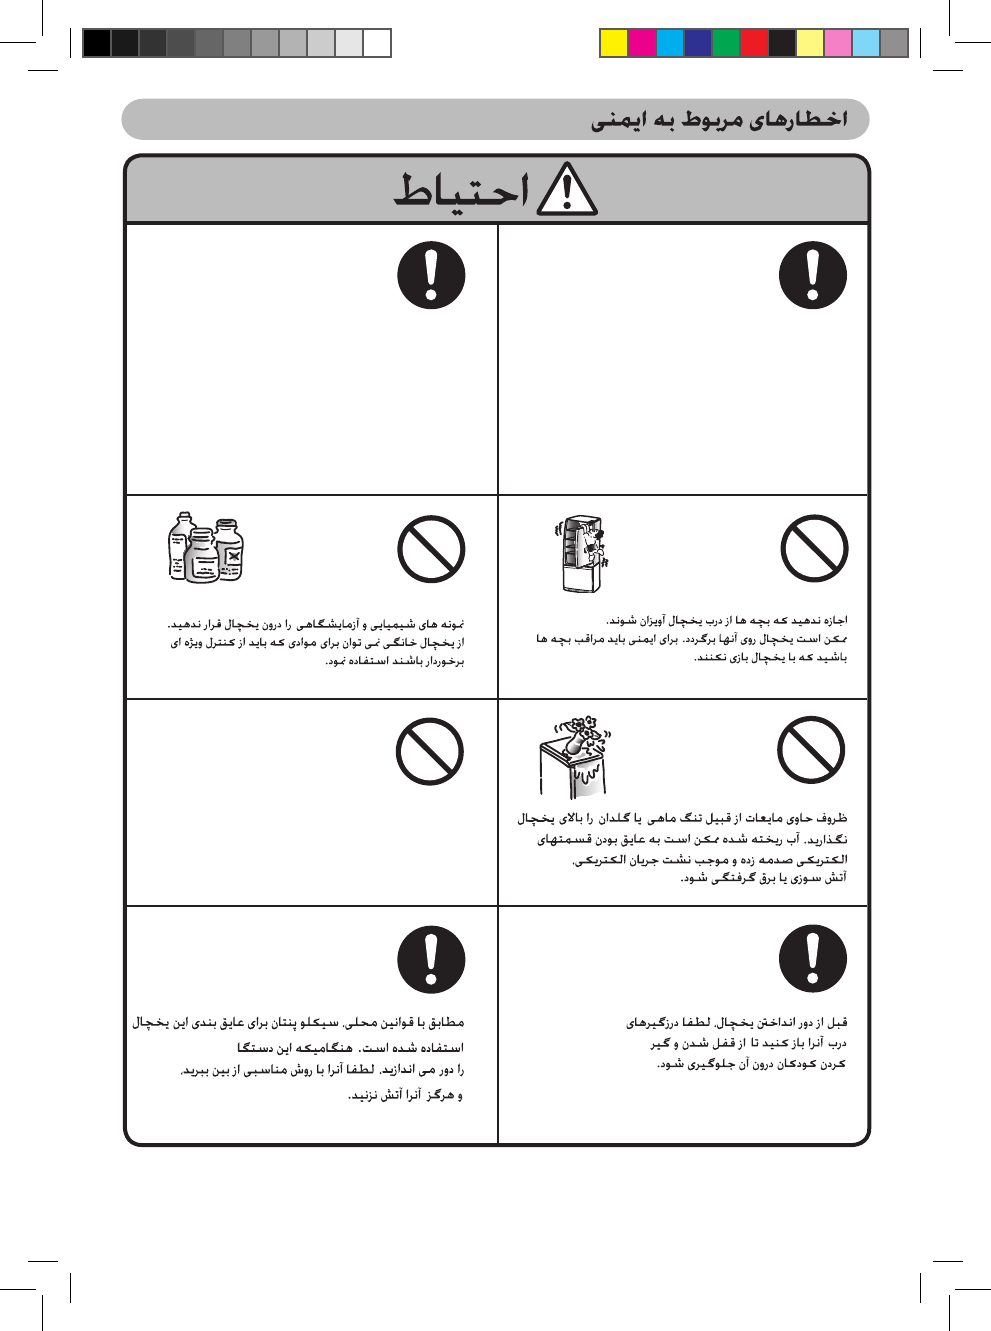
Do not let any kid hang down the refrigerator’s door.
The refrigerator may overturn to the kid. Children should
be supervised to ensure that they do not play with the
refrigerator.
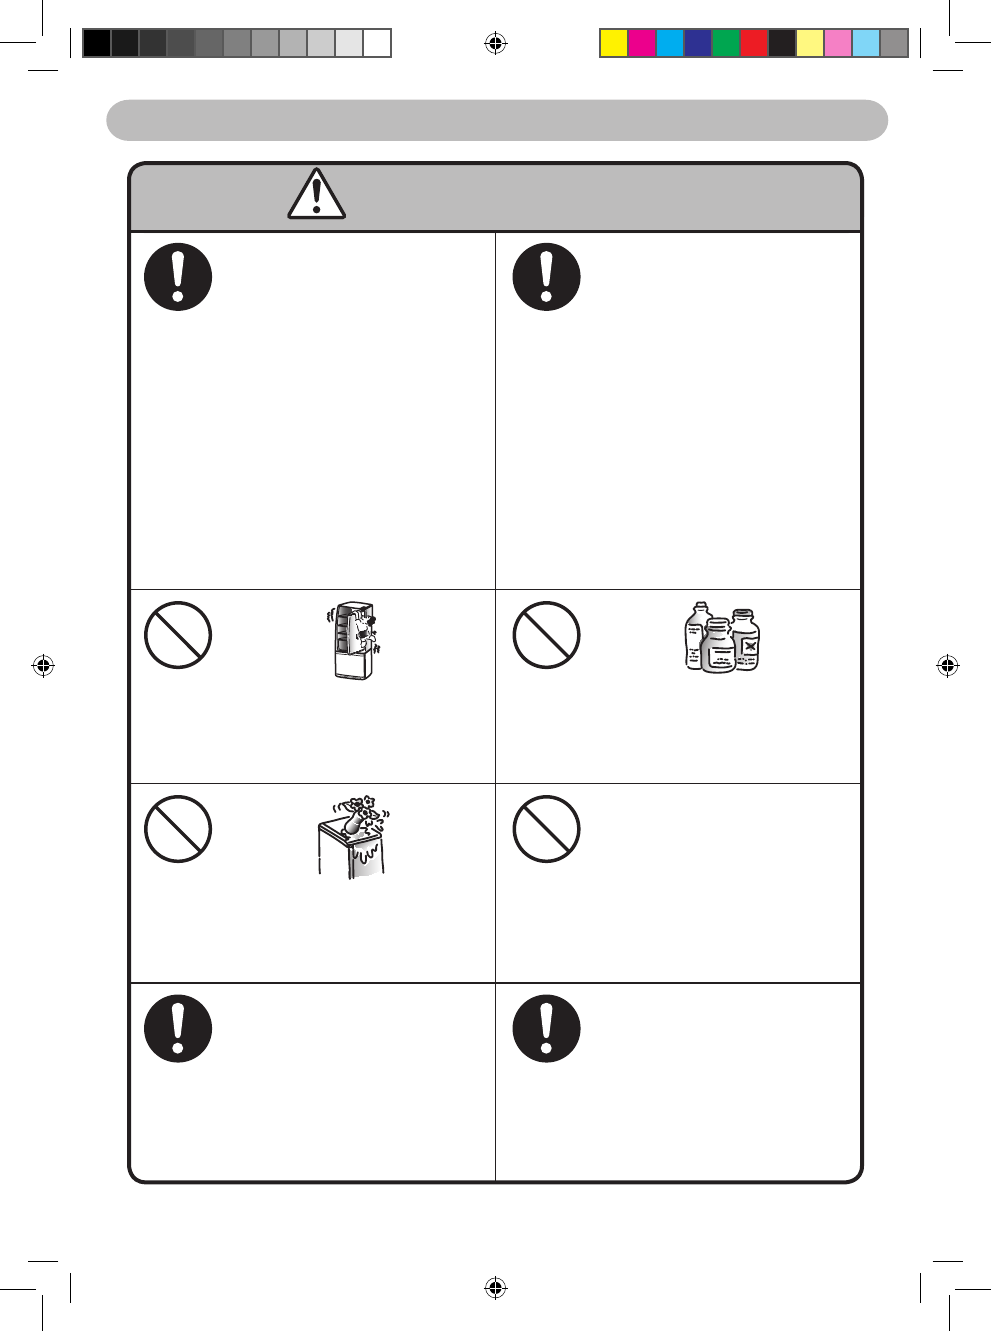
Do not store chemicals or scientific specimen. Home-
Use refrigerator cannot store those requiring a strict
control.
Do not place any water container such as fish-tank or
flower vase on the top of the refrigerator. Spilled water
may damage insulation of electrical components and
cause electrical leakage fire or electrical shocks.
Do not use mechanical devices or other means to
accelerate the defrosting process, other than those
recommended by the manufacturer.
Before taking the refrigerator to be recycled, please
remove all the door opening seal to prevent locking a
child in it.
Regarding to local laws, Cyclo-Pentane is used for
insulation of this refrigerator and flamable gas is used
for refrigerant. When you throw away this unit, please
discard it by proper method, and do not dispose it by
using a fire.
NR-BY551-BY601-EN(B-1).indd 5 11/4/09 5:10:08 PM
6
CAUTION FOR USING
■ Do not freeze glass bottles in the freezer.
The glass bottle may get exploded or
broken.
■ Do not place warm/ hot foodstuff in the
refrigerator.
■ Do not clean the refrigerator with chemical
substance or liquid. It will occur damage
and corrosion on the surface.
■ Do not place things with temperature
higher than 60ºC on the top of the
refrigerator, it may damage the top of the
refrigerator.
■ When the plug is disconnected, leave it for
10 minutes before pluging again. If not,
the compressor may not work.
10
minutes
■ This refrigerator is not intended for use by persons
(including children) with reduced physical, sensory
or mental capabilities, or lack of experience and
knowledge, unless they have supervision or
instruction by a person responsible for their safety.
CAUTION
■ While opening the refrigerator,
be careful not to pinch other one’s hand
holding the door.
■ Mind the gap between the doors.
They may nip your hand while closing the door.
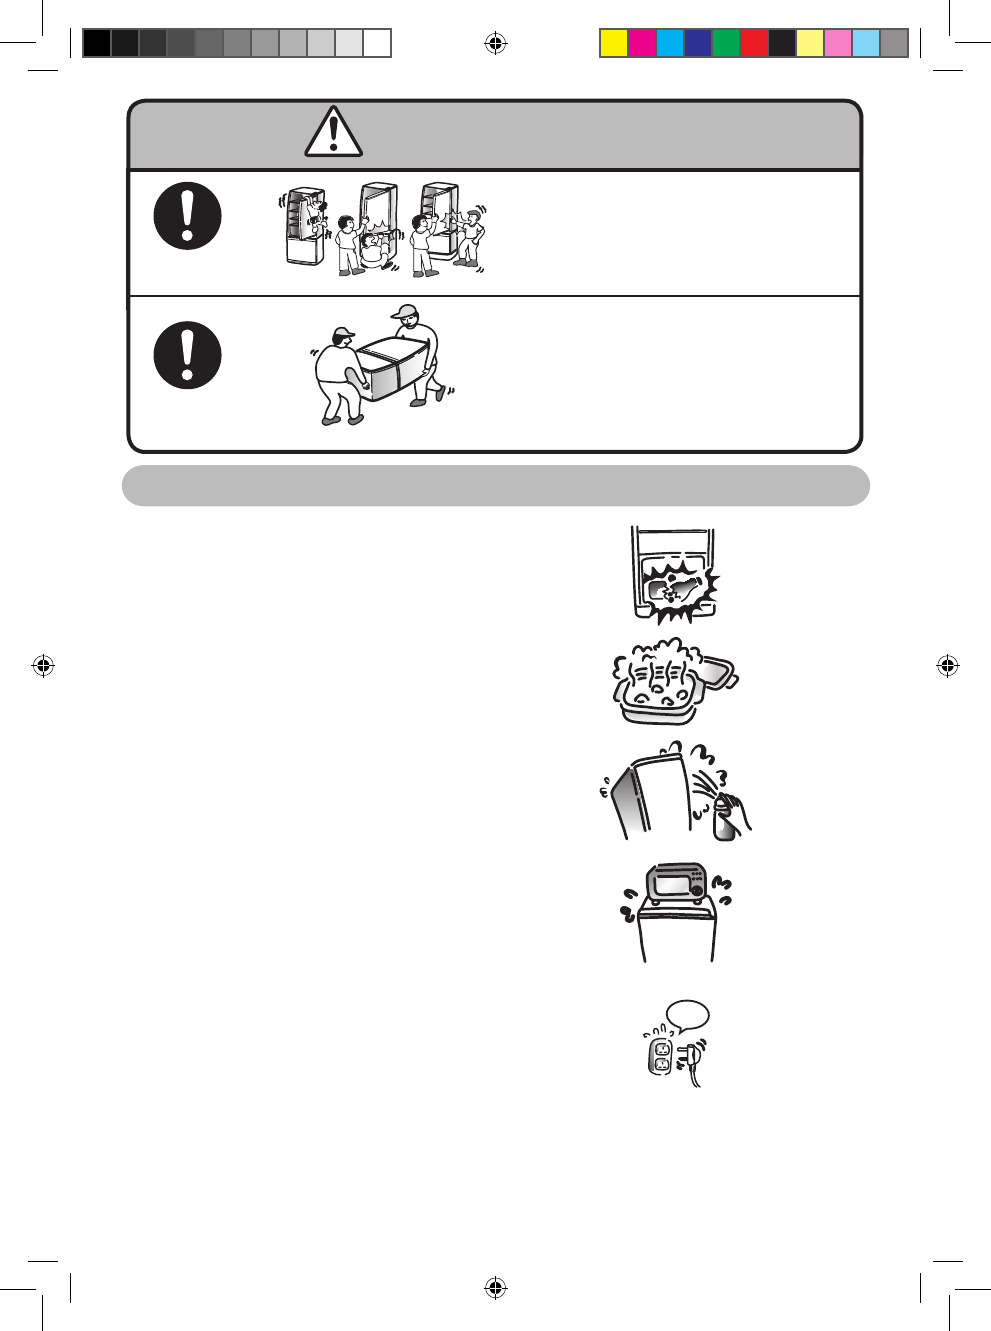
■ Hold the carrying handles when transporting
the refrigerator.
NR-BY551-BY601-EN(B-1).indd 6 11/4/09 5:10:11 PM

7
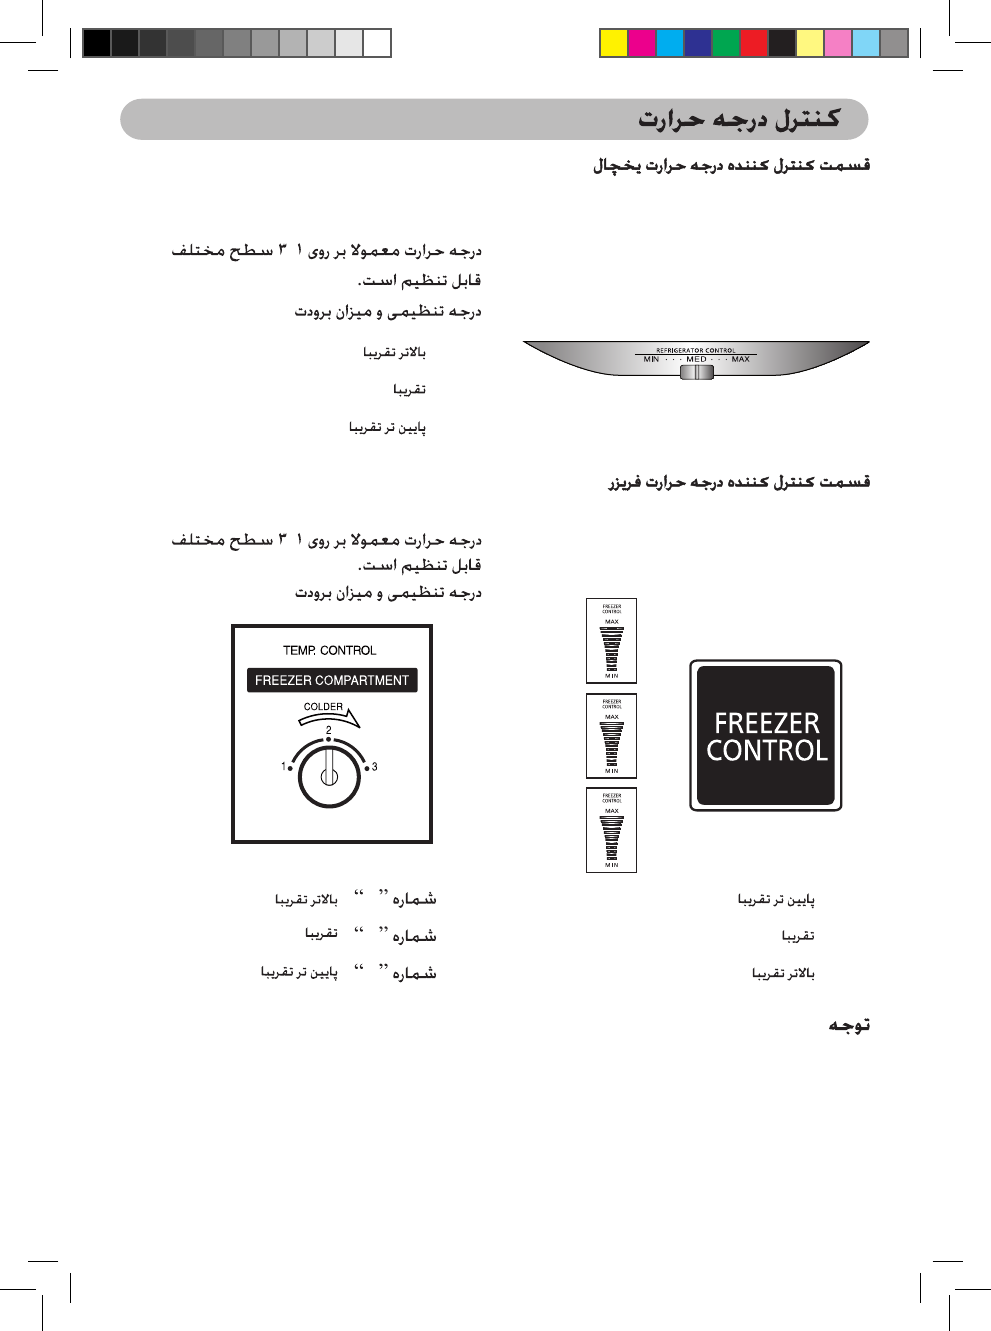
TEMPERATURE CONTROL
Refrigerator compartment temperature control
Model : NR-BY551 and NR-BY601
Model : NR-BY551M and NR-BY551S
The temperature can be adjusted for 1 - 3 levels.
Indicating number and cool level.
“MIN” Higher by approx. 5°C ~ 10°C
“MED” Approx. 2°C ~ 7°C
“MAX” Lower by approx. -1°C ~ 4°C
“MAX” Lower by approx. -19°C ~ -24°C
Approx. -17°C ~ -22°C
“MIN” Higher by approx. -13°C ~ -18°C
Freezer compartment temperature control
Model : NR-BY551 and NR-BY601
Remark
When operate the refrigerator for the first time, after connecting the plug, adjust the
temperature to “MIDDLE” position of each control and leave it for 24 hours for the
effective cooling operation. After that, adjust the temperature as you prefer. If you want to
save the energy, do not adjust the temperature lower than the actual operating condition.
The temperature can be adjusted for
MIN - MAX levels. Indicating operate and
cool level.
Number “1” Higher by approx. -13°C ~ -18°C
Number “2” Approx. -17°C ~ -22°C
Number “3” Lower by approx. -19°C ~ -24°C
Model : NR-BY551M and NR-BY551S
The temperature can be adjusted for 1 - 3
levels. Indicating number and cool level.
NR-BY551-BY601-EN(B-1).indd 7 11/4/09 5:10:12 PM

8
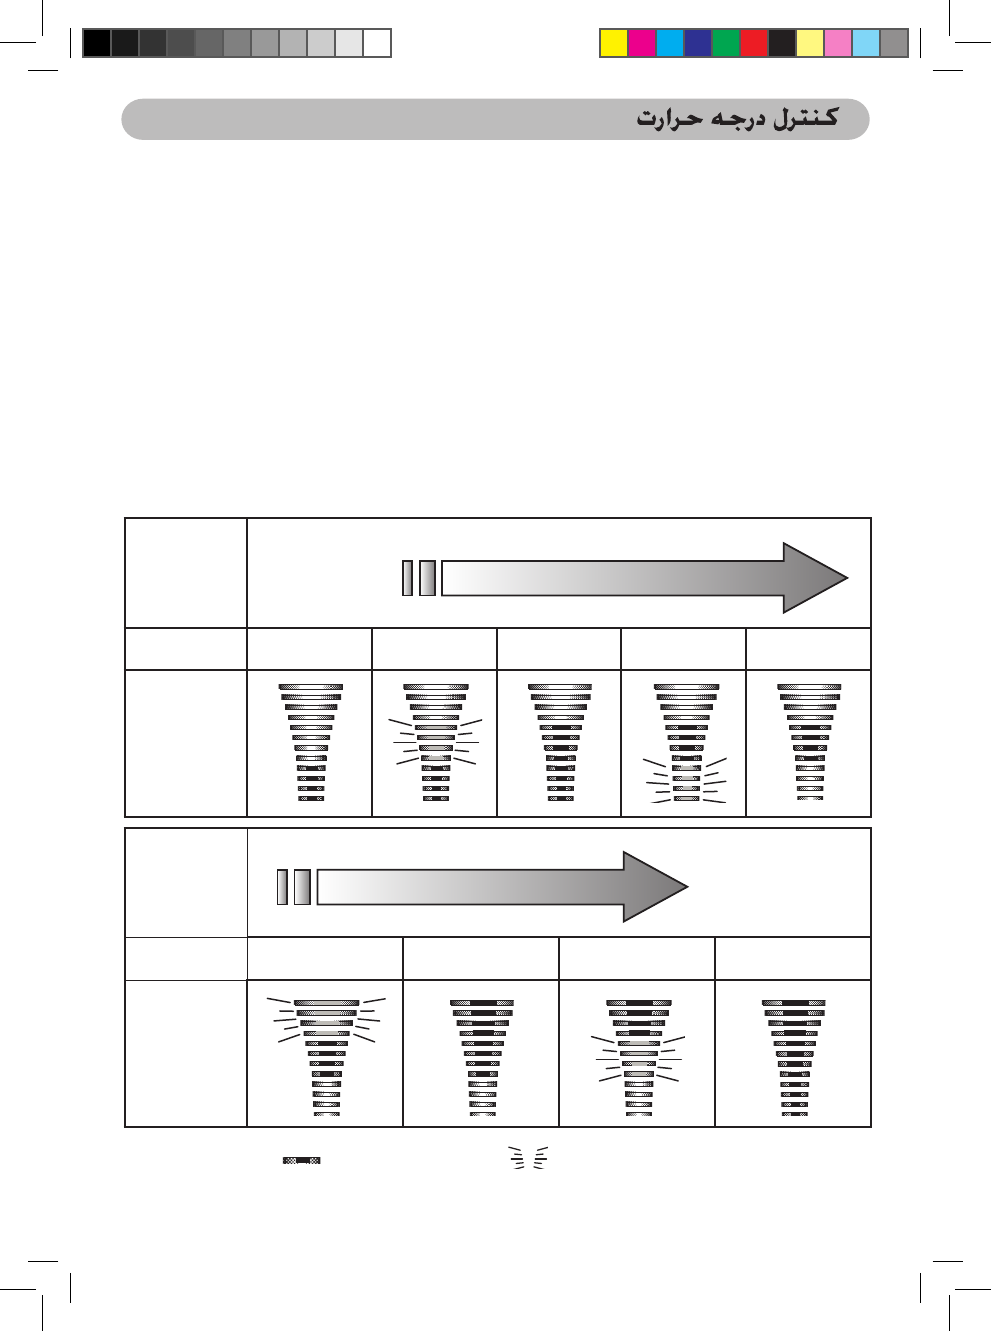
This refrigerator is special design for appropriate use, which can adjust the
temperature level to detailed 9 levels with the following details.
How to operate the “9 levels” mode
1. Set LED display to “MIN” with the “Freezer control” button.
2. Press the “Freezer control” button (for 10 seconds) until the LED display return
to show at “MIN” position.
3. Set “9 levels” mode following below table by pressing the “Freezer control”
button.
To reset the setting “9 levels” mode
Repeat step 1 and 2 , then the refrigerator return to normal operation mode.
TEMPERATURE CONTROL
Cooling
Level Minimum
Step 1 2 3 4 5
FREEZER
CONTROL
LED
DISPLAY
Cooling
Level Maximum
Step 6 7 8 9
FREEZER
CONTROL
LED
DISPLAY
Lighting Blinking
NR-BY551-BY601-EN(B-1).indd 8 11/4/09 5:10:18 PM
9
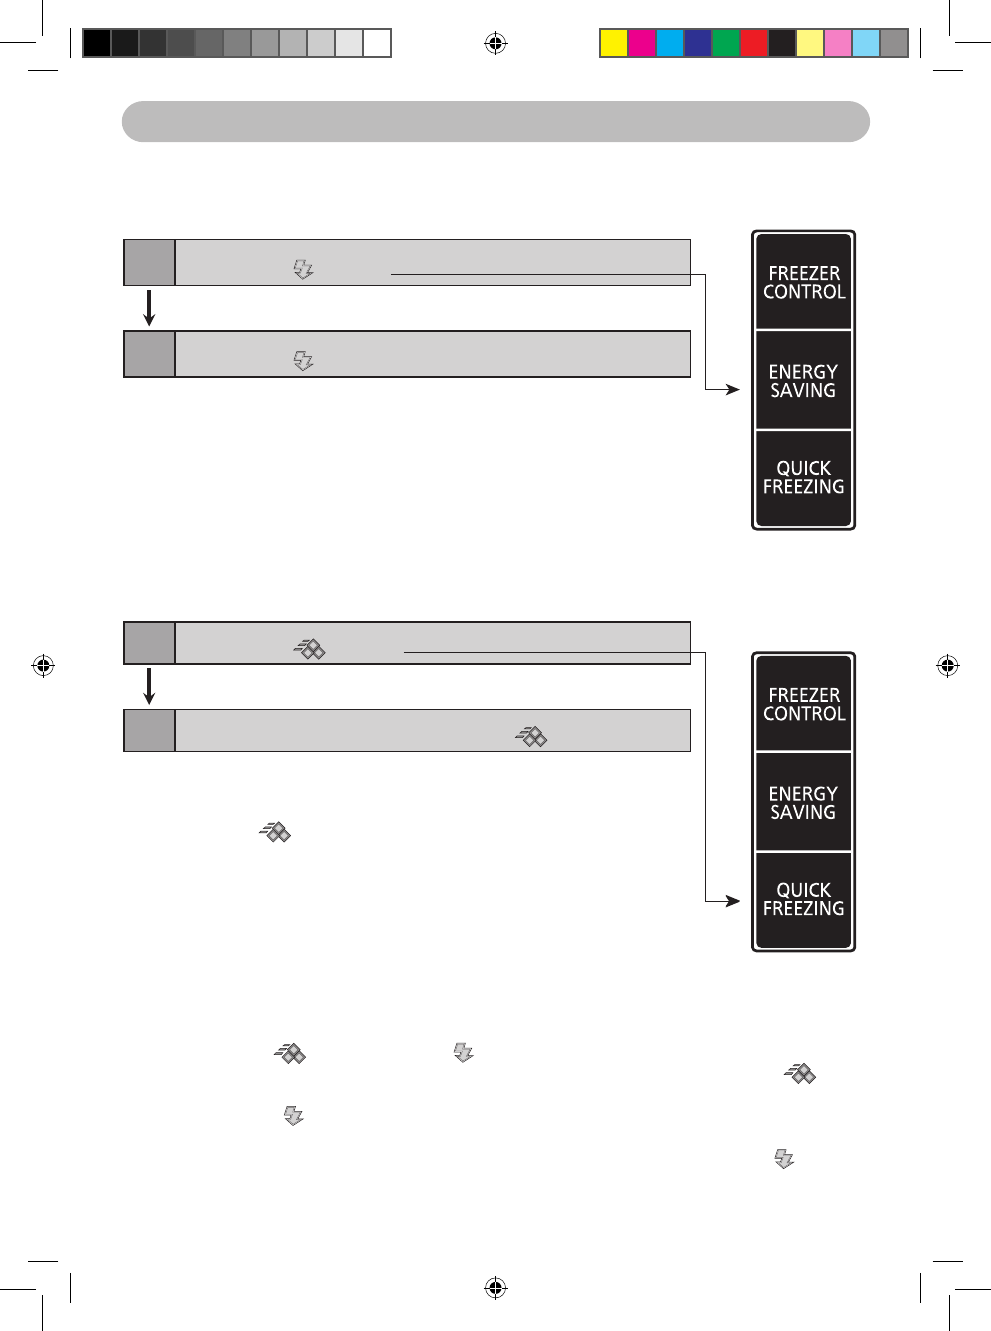
ON Press the button “QUICK FREEZING”
(Blue light LED turns on)
150 min “QUICK FREEZING” mode.
OFF The system will stop operating automatically when it runs for 150 min
and return to normal mode (Blue light LED turns off)
INVERTER CONTROL DISPLAY
How to operate the “ENERGY SAVING” mode
(NR-BY551 and NR-BY601)
■ ENERGY SAVING
Remarks
- If you want to stop the operation, press the button “QUICK FREEZING”.
- Blue light LED flashing means that the defrosting system is now working
“QUICK FREEZING” mode will start right after the defrosting operation
is finished.
- Freezer temp. control does not operate during “QUICK FREEZING” mode.
(The compressor rotation is at the maximum level for “QUICK FREEZING”
mode)
How to operate the “QUICK FREEZING” mode
(NR-BY551 and NR-BY601)
■ QUICK FREEZING
■ Others
- As to the order of functions, “QUICK FREEZING” mode has priority over “ENERGY SAVING” mode.
- When pressing the buttons of both “QUICK FREEZING” and “ENERGY SAVING” at the same time
1. Blue light LED and Blue light LED (“QUICK FREEZING” and “ENERGY SAVING”) turns on.
2. After “QUICK FREEZING” mode for 150 min is finished and its Blue light LED turns off,
“ENERGY SAVING” mode starts to operate.
3. Blue light LED of “ENERGY SAVING” mode continues to turns on from the beginning until
pressing its button again to stop it.
-
When pressing “QUICK FREEZING” button during “ENERGY SAVING” mode, Blue light LED turns on.
“QUICK FREEZING” mode starts to operate and “ENERGY SAVING” mode stops.
Remarks
- Deodorizing function is less effective than normal mode.
- Frequent opening door raise the inner temperature.
* When inner temperature become higher, the rotation of compressor automatically
increase on a temporary base and lowers inner temperature appropriately.
ON Press the button “ENERGY SAVING”
(Blue light LED turns on)
Inner temperature gets slightly higher than normal mode.
OFF Press the button ENERGY SAVING again and return to normal mode
(Blue light LED turns off)
NR-BY551-BY601-EN(B-1).indd 9 11/4/09 5:10:19 PM
10
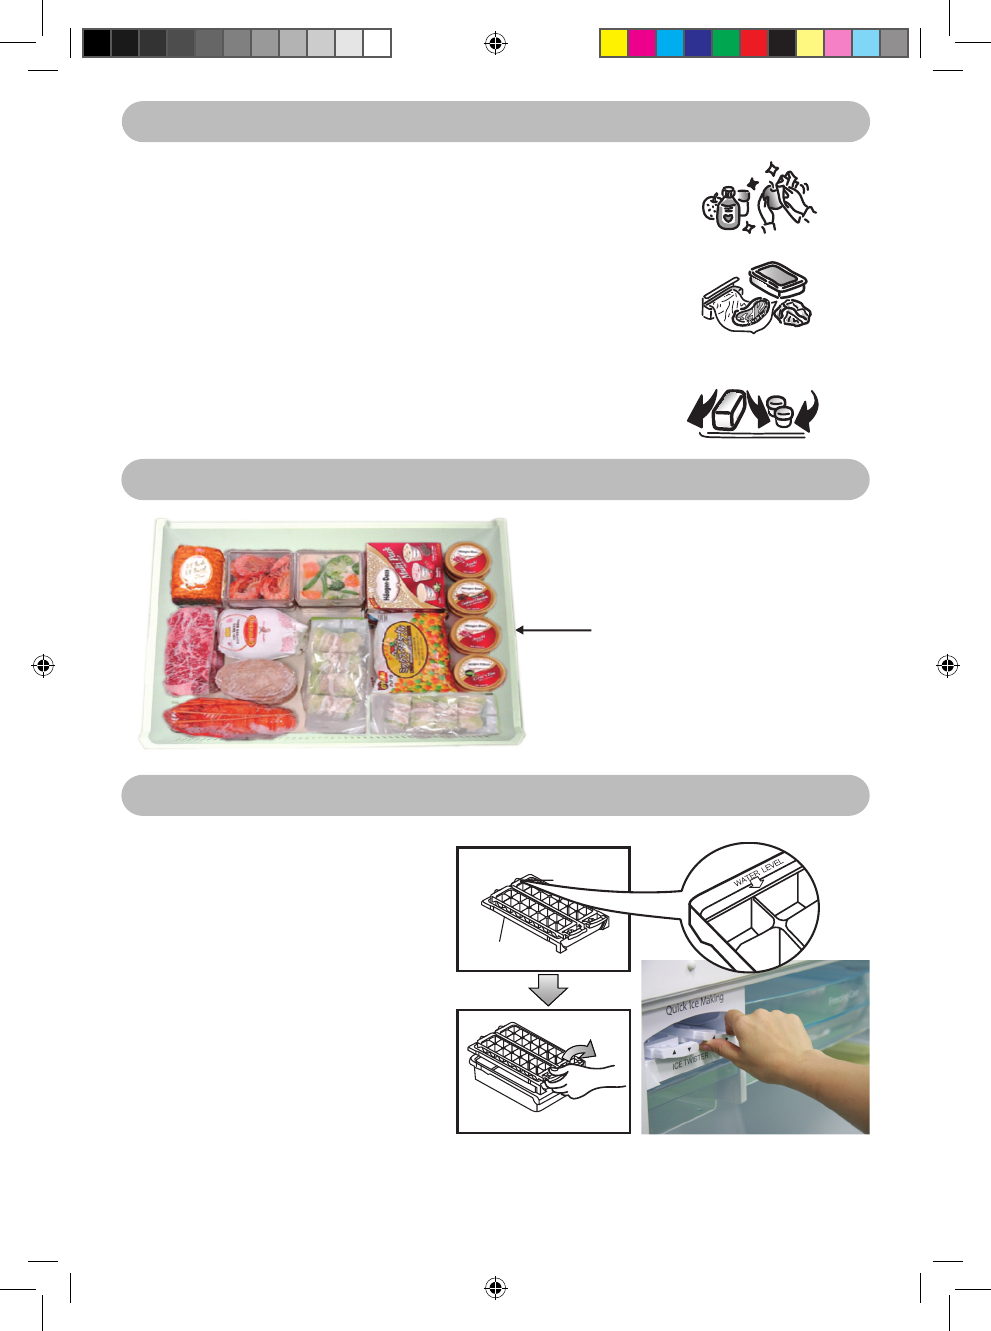
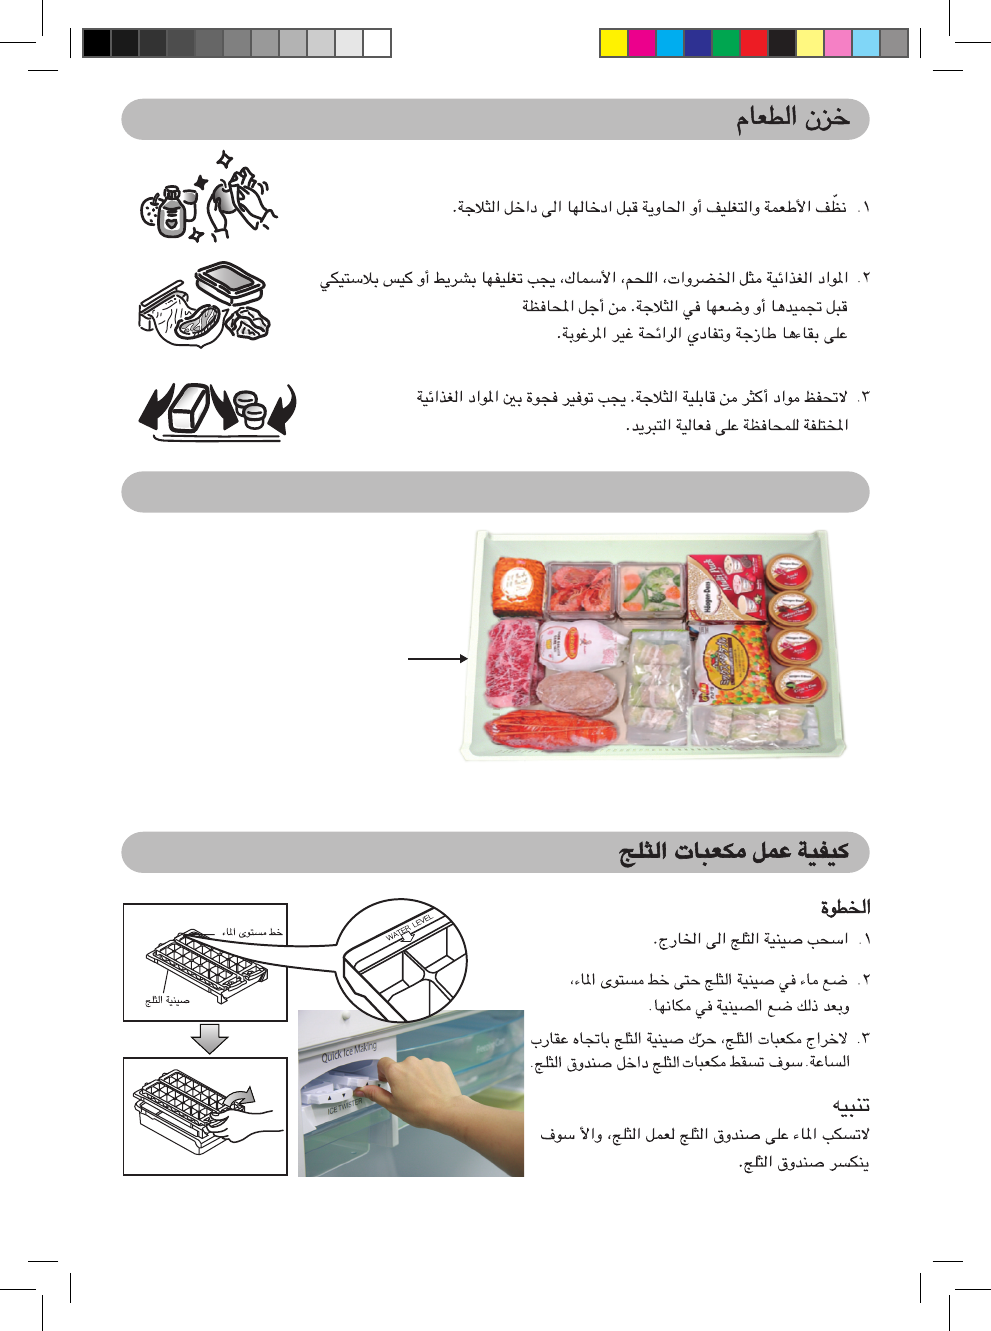
FOOD STORAGE
1. Clean the food and its package or container
before taking it into the refrigerator.
2. Foodstuff such as vegetable, meat, fish should be
wrapped with plastic film or pack in box before freezing
or refrigerating in the refrigerator. This is to maintain
their freshness and to prevent unpleasant odor.
3. Do not overload the refrigerator. Gap must be provided
between foodstuffs to maintain the cooling effect.
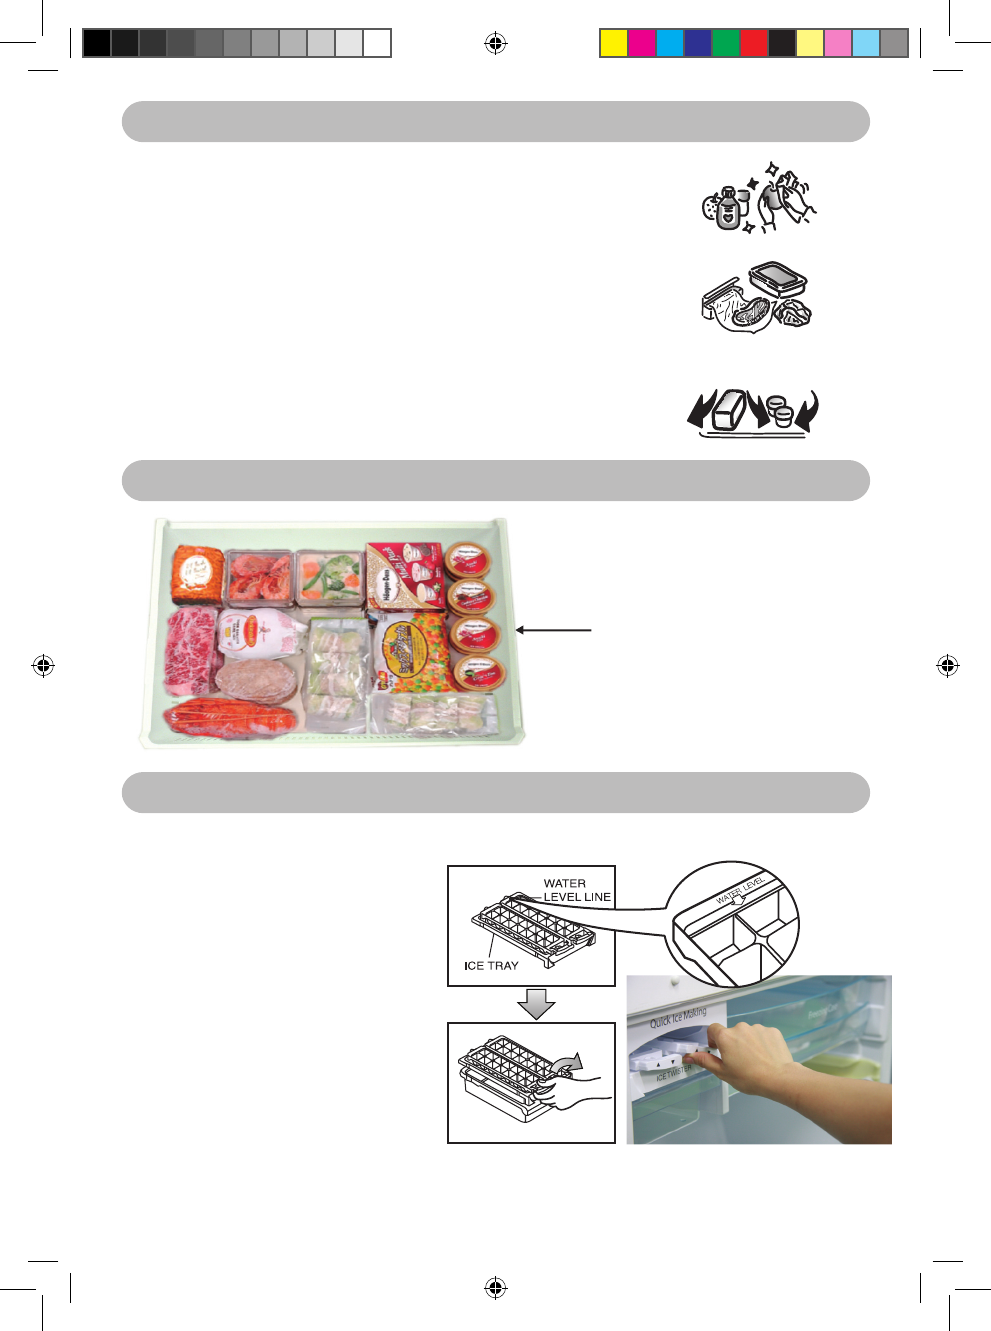
FOOD STORAGE IN THE FREEZER COMPARTMENT
Maximum Storage
If the inserted food exceeds edge of
container, the cooling performance
may be reduced or the compartment
may become frosted.
STEP
1. Pull out the ice tray.
2. Fill water in the ice tray
untill the water level line,
then place in back.
3. To remove ice cubes,
TWIST the ice tray CLOCK WISE
.
The ice cubes will drop
into ice box.
Remark
Do not pour water into the ice
box for ice making, otherwise
the ice box may be cracked.
HOW TO MAKE ICE CUBES
NR-BY551-BY601-EN(B-1).indd 10 11/4/09 5:10:22 PM
11
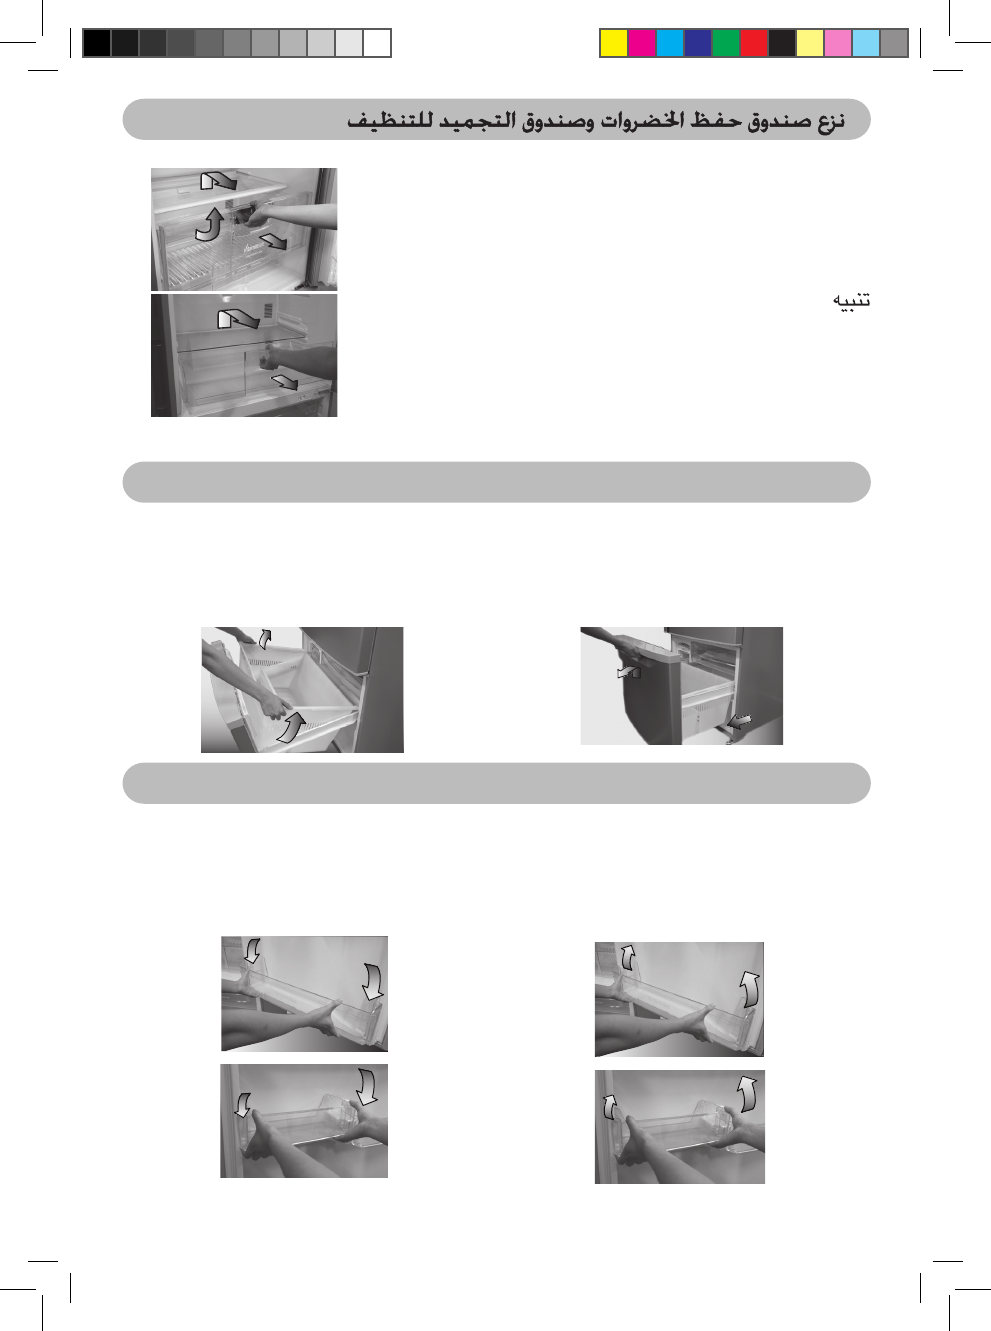
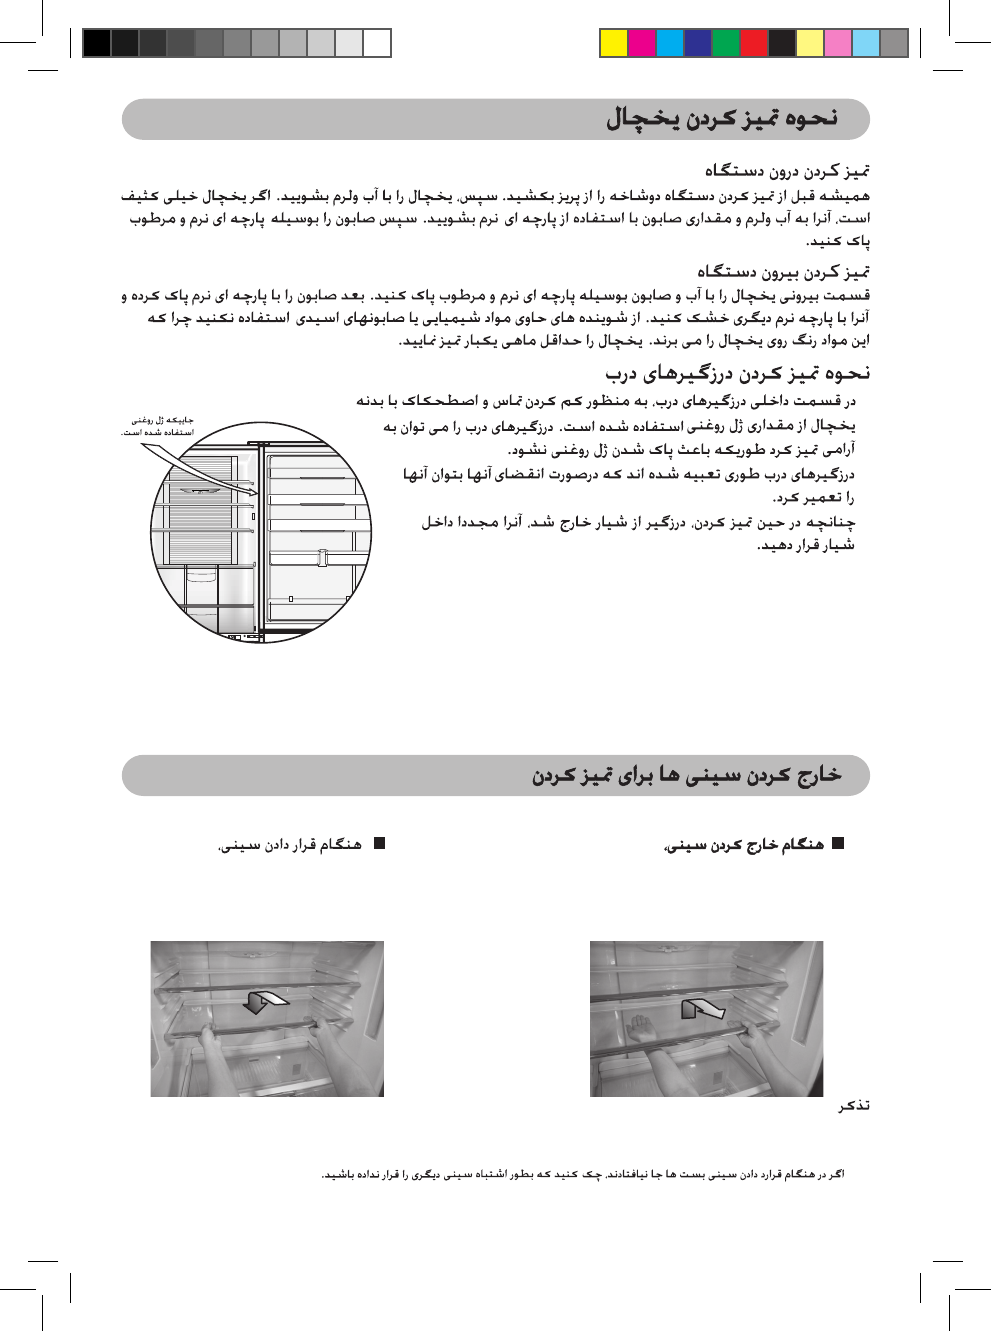
HOW TO CLEAN THE REFRIGERATOR
REMOVING TRAYS FOR CLEANING
Interior cleaning
Always disconnect the plug before cleaning. After that, clean the refrigerator with warm water.
If the refrigerator is very dirty, clean it with warm water and soap using a soft cloth.
Then wipe the soap off using damp soft cloth.
Exterior cleaning
Clean the outer side of the refrigerator with warm water and soap using a soft cloth.
After that wipe the soap off using soft cloth and wipe it with dry soft cloth.
Do not use cleaner with chemical mixture or soap with acid mixture
as it will leave stain on the refrigerator. Clean the refrigerator at least once a month.
Point where petroleum
gel was applied
How to clean the door opening seal
• At the area of inner door opening seal,
petroleum gel was applied to reduce the
friction to the refrigerator body. You can
clean the door opening seal by wiping it
softly and be careful not to wipe off the
petroleum gel.
• The door opening seal fixing is designed to
be replaceable when reaching its end of life.
• When cleaning, if the seal is off from its
groove, push it back into the groove.
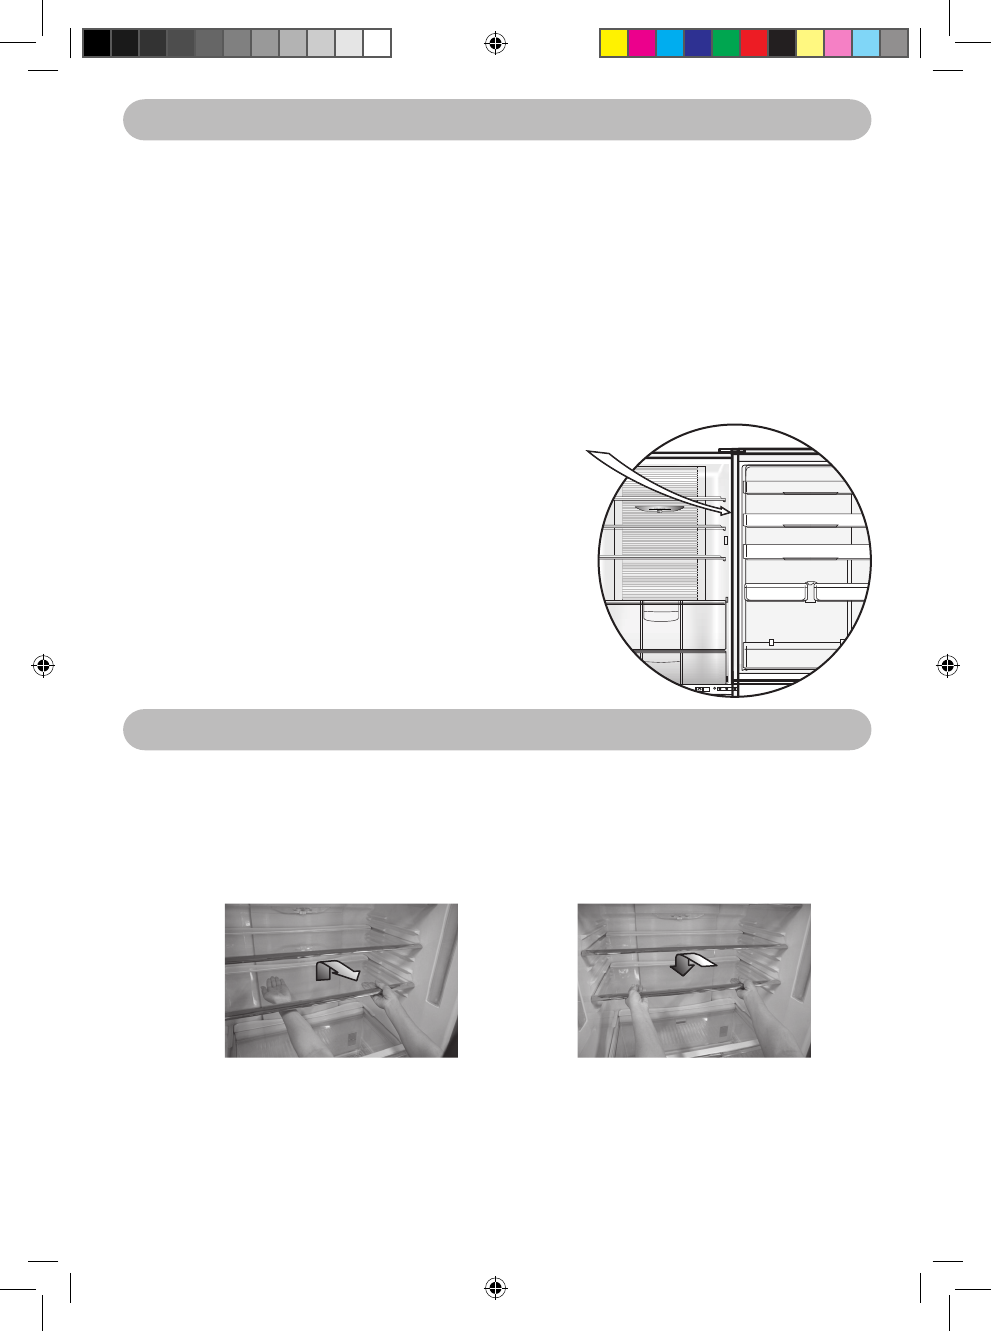
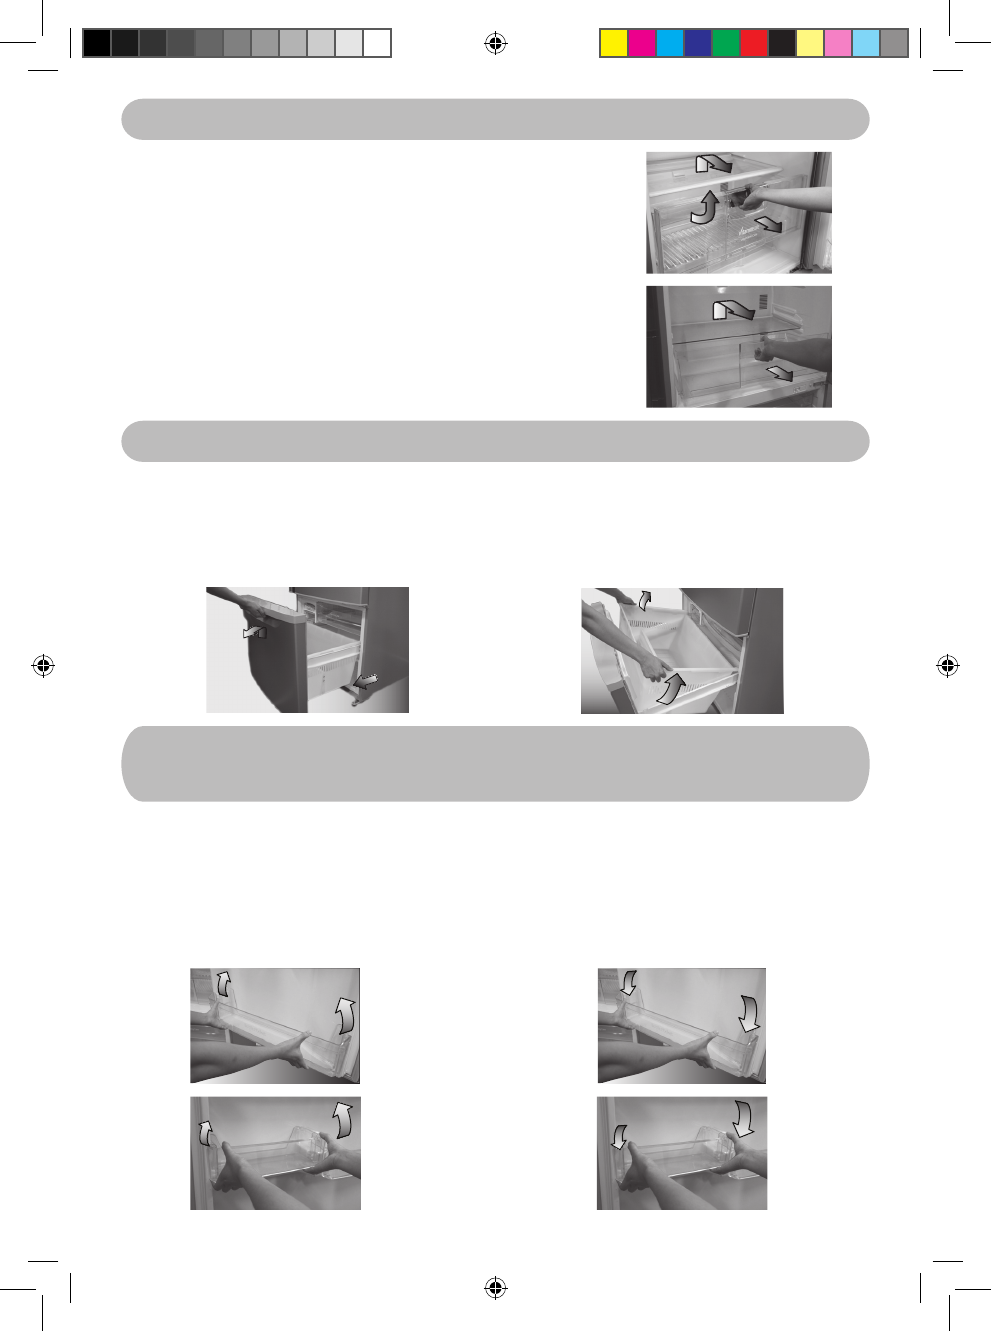
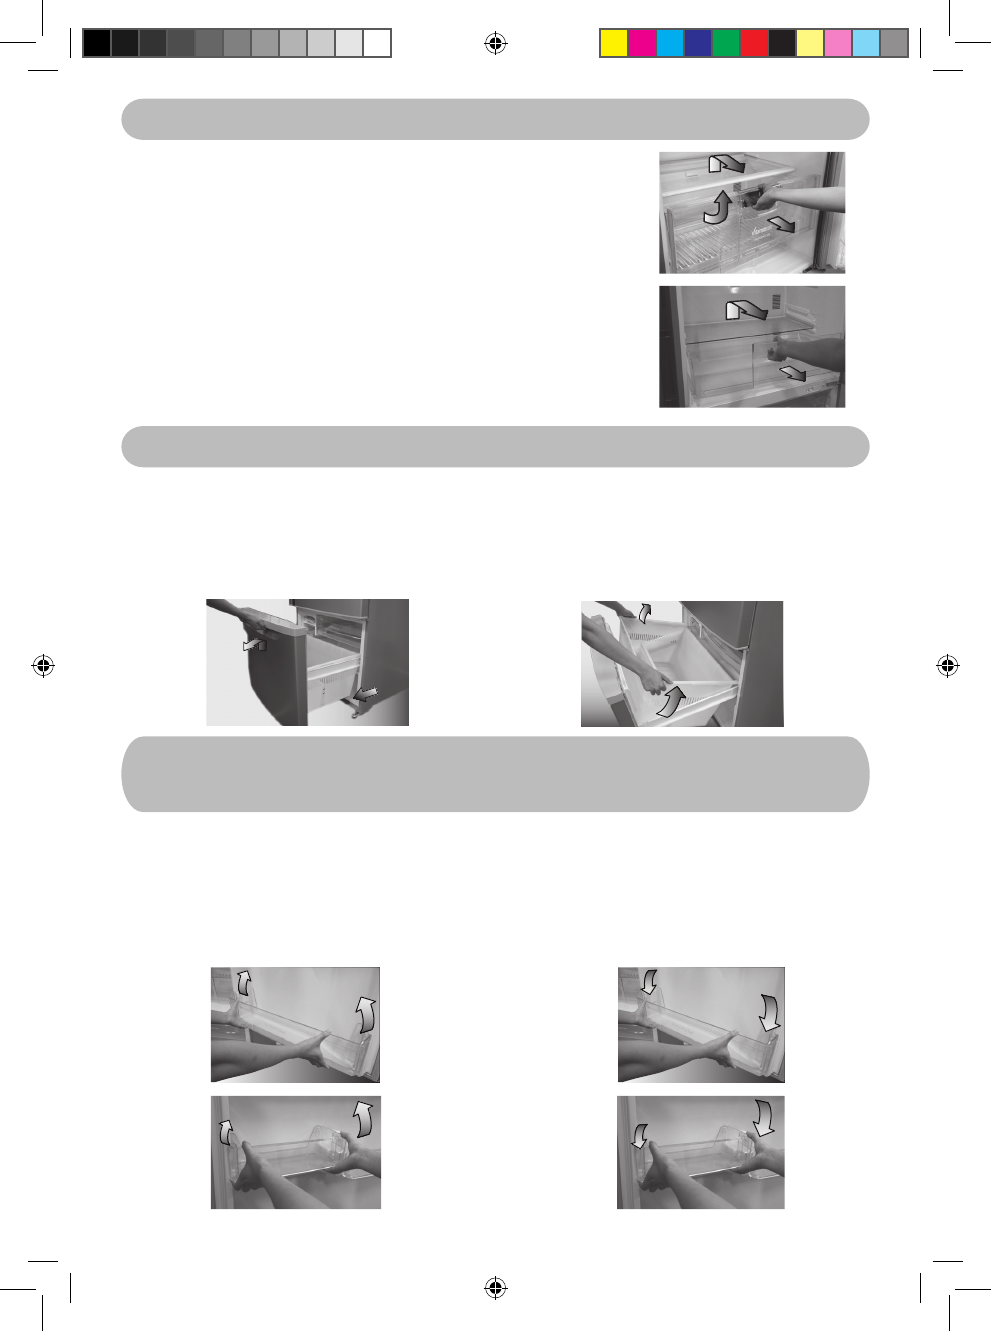
■ When removing the tray,
slightly lift up the innermost of the tray
to release the side claws off the locking
cavity at cabinet wall. Then pull the
tray toward yourself.
■ When attaching the tray,
push until it reaches the end and
then push the innermost downward
to lock its side claws with the locking
cavity at cabinet wall.
Remark
• When removing tray above vegetable case, please pull out the vegetable case first
(Please following page 12) and then follow to removing the tray as above details.
• In case of attaching the tray and it does not lock, check to be sure that you did not
attach a wrong tray.
NR-BY551-BY601-EN(B-1).indd 11 11/4/09 5:10:24 PM
12
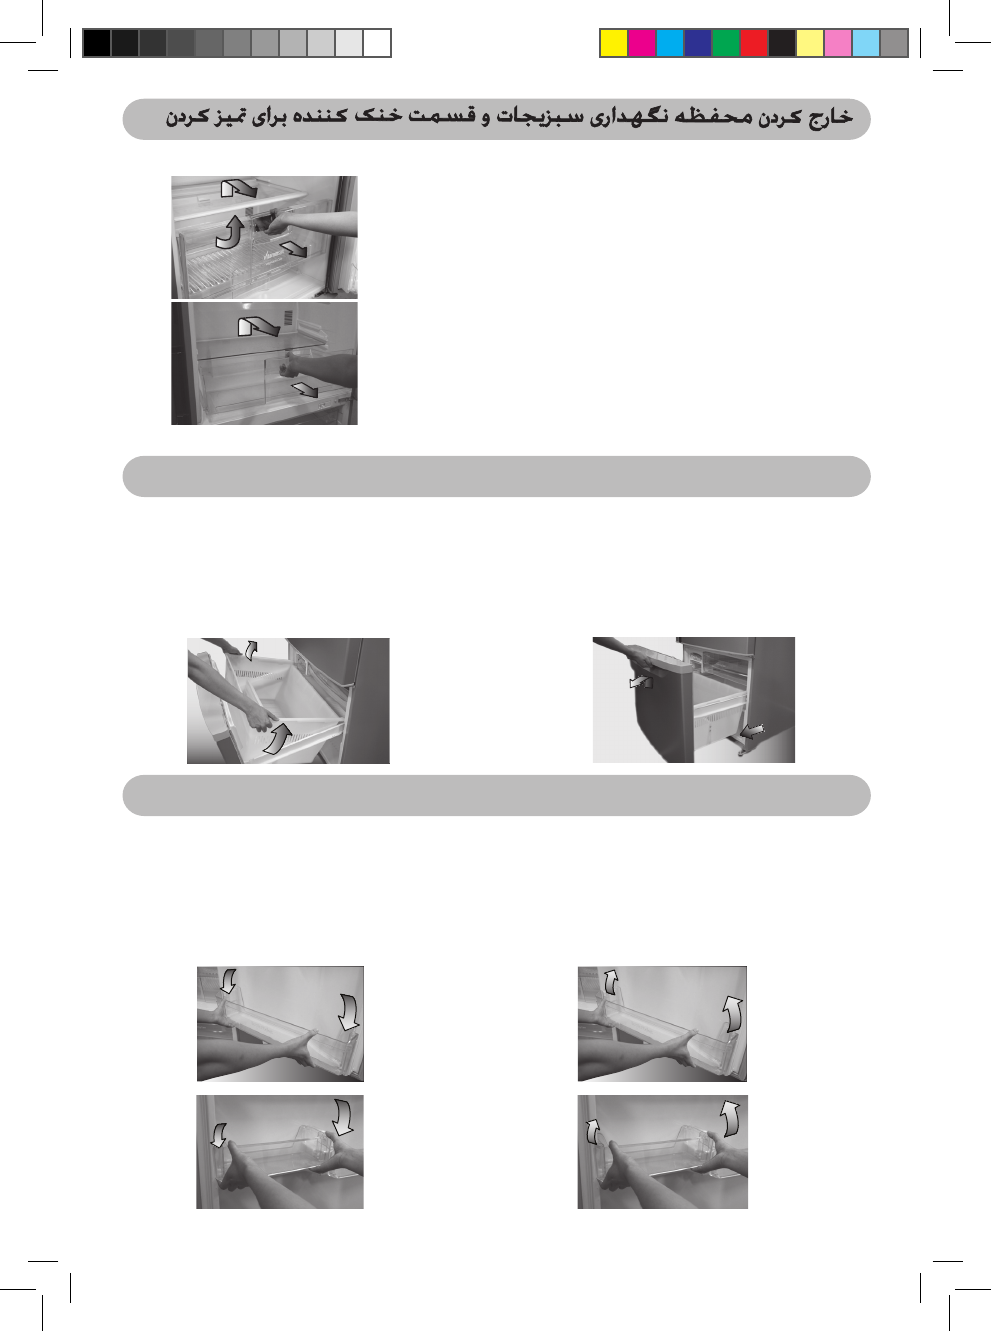
REMOVING THE VEGETABLE CASE AND CHILLED CASE FOR CLEANING
REMOVING THE BOTTOM FREEZER CASE FOR CLEANING
REMOVING SHELF EGG, SHELF BOTTLE AND LEFT/RIGHT
PROVISION COMPARTMENT SHELF FOR CLEANING
■ Removing the vegetable case for cleaning.
1. Pull the handle of vegetable case up a little.
2. Pull the vegetable case toward yourself.
3. Raise up it, then completely take out the vegetable case.
Note
To keep vegetable and fruit and to maintain its vitamins,
please push until it locks properly after use or clean the
vegetable case.
■ Removing the chilled case for cleaning.
1. Pull the chilled case toward yourself.
2. Raise up it, then completely take out the chilled case.
1. Pull the freezer drawer toward yourself.
2. Raise up a bit the front of the freezer drawer
Then pull the freezer drawer until stopper.
3. Lift up the both sides of bottom freezer case
and pull it upward to remove.
g
n
i
k
a
M
e
c
I
k
c
i
u
Q
■ When removing shelf egg,
shelf bottle, left/right provision
compartment shelf
lift up from left and right side and pull
it upward yourself.
■ When attaching shelf egg,
shelf bottle, left/right provision
compartment shelf
put in the shelf egg, shelf bottle, left/right
provision compartment shelf placing it on
both supporter, then press until it reaches
the end of supporter.
NR-BY551-BY601-EN.indd 12 11/6/09 3:29:06 PM

13
1. Do not open the refrigerator frequently or leave it open for a long time. This is to prevent water
dripping inside the refrigerator and will cause the waste of coolness and consumption of energy.
2. Do not refrigerate unnecessary items or hard-to-rot foodstuff such as pumpkin, shallot, garlic,
potato as it will make the refrigerator to work overload and waste the storage space without
necessity.
3. Adjust the temperature according to the actual operating condition for energy saving.
4. Do not refrigerate bottles bigger than the door shelf or the tray as the door will not close
completely causing coolness to leak.
5. Frequently check the door opening seal, it must be closed to the refrigerator’s body completely.
Do not leave the seal dirty or damaged or deteriorated as the coolness will leak and will cause
unnecessary consumption of energy.
6. If you will not be at home for several days or there are nothing refrigerated in the refrigerator, the
plug should be disconnected for energy saving, In this case, clean the refrigerator and leave it
half-open to prevent bad odor.
7. Clean the drain tray located over the compressor at the back of the refrigerator every three
months to prevent the odor generated from humidity.
8. Energy saving dryer pipes and heating pipes embedded around the refrigerator cabinet are
helping to prevent “condensation” on the outer surface of the cabinet without consuming energy.
This will make the outer wall of the refrigerator get warm and that is not a malfunction.
9. Drinking water bottles, beverage bottles such as soft drinks and fruit juices should be sealed
closely to prevent odor to get into the bottles.
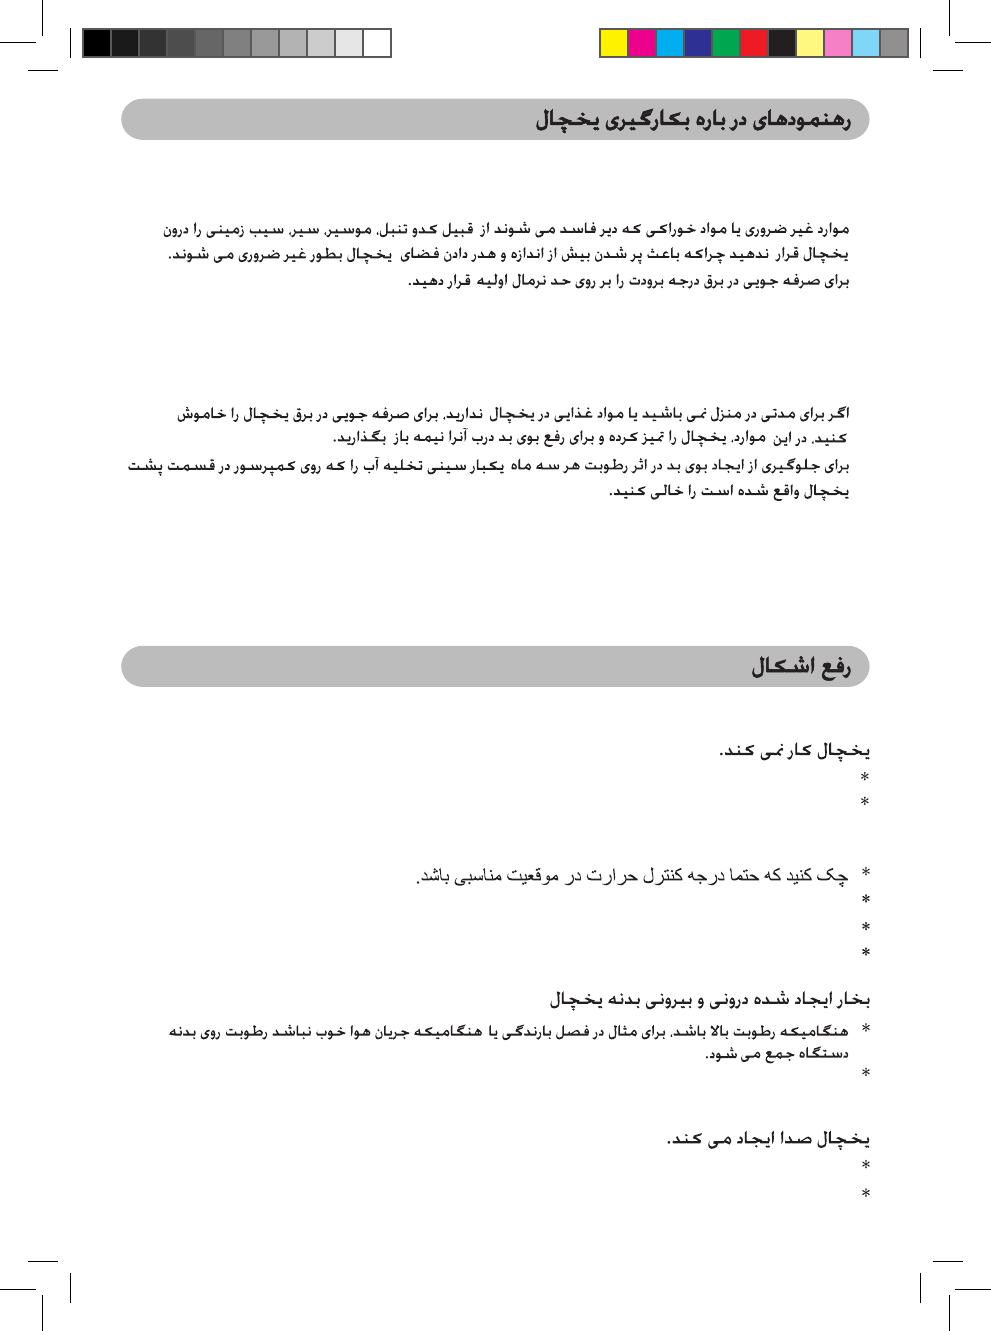
REFRIGERATOR INSTRUCTION GUIDELINES
TROUBLESHOOTING
Before calling for servicing, please check the following.
The refrigerator does not operate.
* Check that the plug and its socket are in good condition.
* Check if there is any problem on main fuse and electrical system of the house.
The refrigerator does not cool properly.
* Check to be sure that the temperature control button is at the proper position.
* Check to see if the refrigerator is overloaded with stuff or there is any hot foodstuff refrigerated
inside.
* Is the refrigerator exposed directly to sunlight or heat source?
* Is the refrigerator door completely closed? Is the refrigerator opened frequently?
Vapor generated inside and outside the cabinet.
* Condensation may appear on the surface of cabinet when humidity is high, e.g. during rainy
season or the air circulation is not good.
* If there is condensation inside, check if the door is completely closed. Is the refrigerator
frequently opened or left open for a long time? Is there any hot foodstuff refrigerated inside?
The refrigerator generates noise.
* Check if the refrigerator is located on a stable floor or is installed properly.
* Check if there is any object in contact with the refrigerator.
NR-BY551-BY601-EN(B-1).indd 13 11/4/09 5:10:26 PM
14
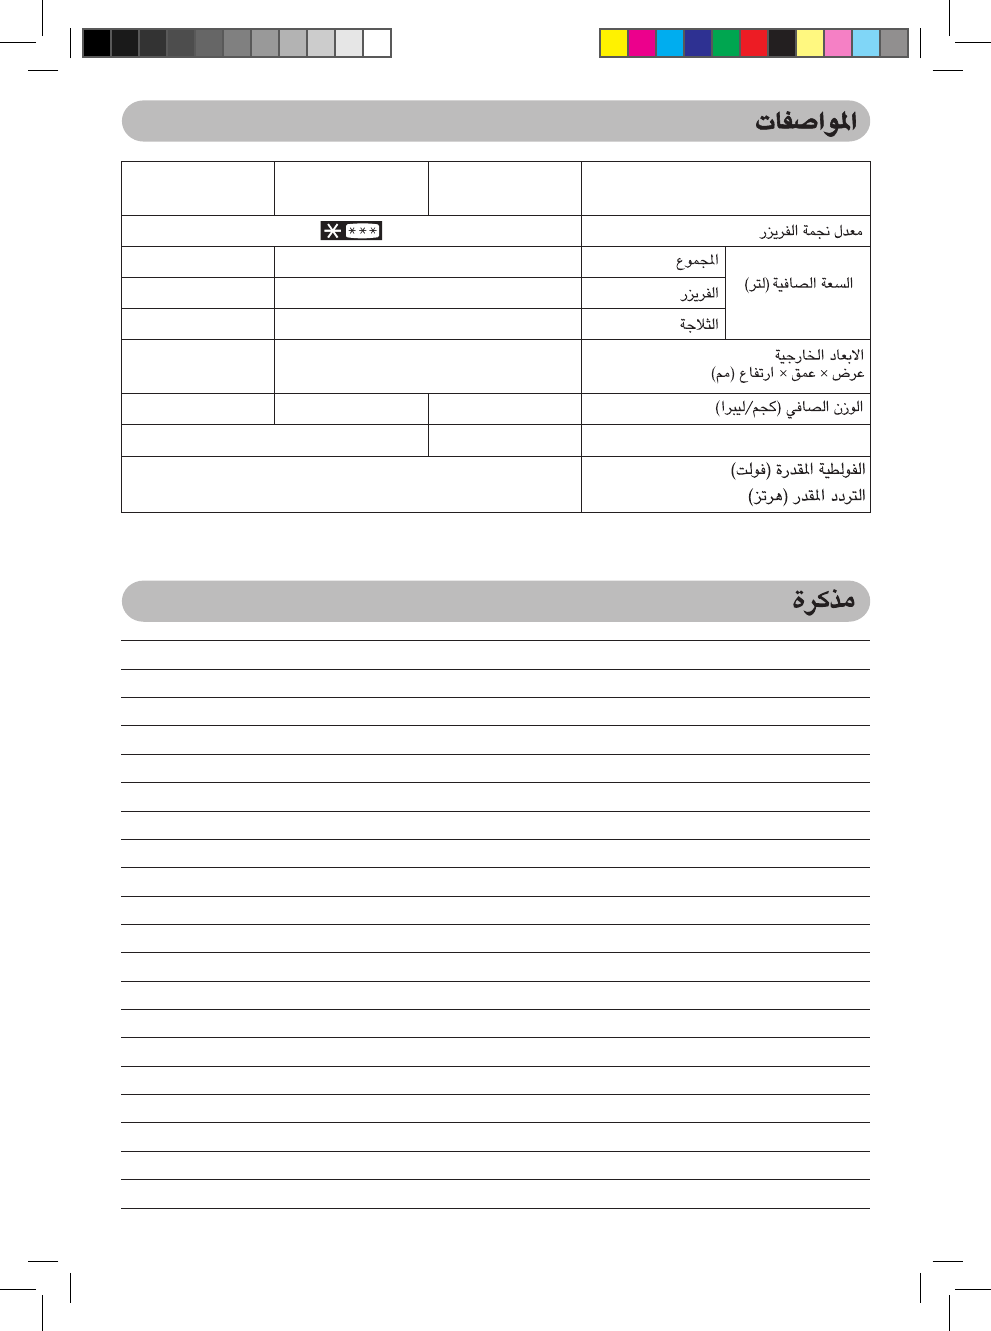
SPECIFICATION
MODEL Series NR-BY551S
NR-BY551M NR-BY551 NR-BY601
Freezer Star Rating
Capacity (L)
(ISO 15502)
Total 551 602
Freezer 153 153
Refrigerator 398 449
Outside Dimensions
Width x Depth x Height (mm) 775 x 745 x 1,714 775 x 745 x 1,846
Net Weight (kg/lb) 82 / 181 80 / 176 86 / 190
Refrigerant Type HFC-134a R-600a
Rated Voltage (V)
Rated Frequency (Hz) Refer to the rating label attach inside of cabinet
MEMO
NR-BY551-BY601-EN(B-1).indd 14 11/4/09 5:10:27 PM
Hanya untuk model.
- NR-BY551
- NR-BY601
Bagian ini ditunjukkan di bagian depan produk.
15
IDENTIFIKASI KOMPONEN-KOMPONEN
FITUR KHUSUS
1) NON-FLON
Unit ini total menggunakan BAHAN NON-FLON baik untuk refrigeran (Iso-butana (R600a) untuk NR-BY551,
NR-BY601) dan untuk insulasi (Siklo-pentana). Jadi, lemari es ini tidak merusak lapisan ozon bumi dan
hampir tidak mempengaruhi pemanasan global.
2) INVERTER (Untuk Seri NR-BY551 dan Seri NR-NR-BY601)
Motor bekerja pada kecepatan yang berbeda, sesuai dengan perubahan temperatur dalam
kompartemen. Ketika temperatur stabil, motor bekerja pada kecepatan yang lebih rendah (hemat
energi dan tidak berisik).
Ketika pendinginan yang kuat dibutuhkan, motor akan bekerja pada kecepatan yang lebih tinggi.
A. KOMPARTEMEN LEMARI ES
B. KOMPARTEMEN FREEZER
1. Lampu LED
2. Pengontrol suhu lemari es
3. Nampan Kecil dari Kaca Diperkeras
4. Nampan Besar dari Kaca Diperkeras
5. Pengontrol Suhu Freezer
(NR-BY551S dan NR-BY551M)
6. Rak Kaca Keras Pengering
7. Kotak sayuran (Vegetable case)
8. Rak Kaca Keras Pendingin
9. Nampan kaca
10.
Rak Pembuat Es
11. Kotak Es
12. Kotak Freezer Bawah
13. Rak Telur
14. Rak Telur dengan Nampan Telur
15. Rak Kompartemen Wadah Kiri
16. Rak Kompartemen Wadah Kanan
17. Rak Botol
18. Penahan Botol Geser
19. Kotak Freezer Atas
20. Baut Setelan
21. Pengontrol Suhu Freezer
(NR-BY551 dan NR-BY601)
Tombol FREEZER CONTROL
Tombol ENERGY SAVING
Tombol QUICK FREEZING
NR-BY551_601-IND.indd 15 11/10/09 2:48:47 PM
16
● Lemari es harus diletakkan di tempat yang mempunyai sirkulasi udara
yang baik. Harus terdapat jarak antara bagian atas lemari es dan langit-
langit kira-kira 30cm, dan jarak antara bagian belakang lemari es kira-kira
10cm, dan jarak antara sisi kanan dan kiri lemari es 5cm.
● Jangan meletakkan lemari es di tempat yang lembab karena dapat
menyebabkan karat dan menyebabkan kerusakan elektrik.
● Jangan menaruh lemari es di tempat yang terkena sinar matahari secara
langsung karena panas dapat menyebabkan kenaikan suhu.
● Saat memindah atau menggeser lemari es, lepas semua nampan dan
pastikan tidak ada air di dalam lemari es. Putar kaki penyejajar hingga
yang terpendek, lalu pindahkan lemari es dan pasang di lokasi tersebut,
atur kembali kaki penyejajar untuk mengunci pada tempatnya.
● Lemari es tanpa steker arde/grounding harus dihubungkan dengan
koneksi arde/grounding untuk mencegah bahaya kebocoran listrik.
● Saat memindahkan atau mengangkat lemari es, keluarkan semua rak
dan periksa apakah ada air dalam lemari es.
● Lampu LED lemari es, dirancang khusus untuk lemari es ini, tidak
dirancang untuk diganti sendiri. Jika Anda memerlukan pergantian,
silakan hubungi Pusat Layanan Panasonic.
Keterangan
Lampu yang ada di kotak sayuran menyalakan LED yang berfungsi
untuk menjaga kesegaran dan meningkatkan Vitamin C pada sayur
dan buah. Jika Anda membutuhkan pergantian atau memiliki masalah
dengan lampu ini, silakan hubungi Pusat Layanan Panasonic.
DAFTAR ISI
Identifikasi komponen-komponen ....................... 15
Daftar isi, Instalasi .............................................. 16
Tindakan pencegahan ........................................ 17
Peringatan untuk pemakaian .............................. 19
Pengontrol suhu ................................................. 20
Tampilan kontrol inverter .................................... 22
Penyimpanan makanan, Penyimpanan makanan di
ruang freezer, Cara membuat es ........................ 23
Cara membersihkan lemari es ........................... 24
Mengeluarkan nampan untuk dibersihkan ......... 24
Pindahkan kotak sayuran dan kotak
penyegar untuk dibersihkan .............................. 25
Melepas kotak freezer bawah untuk dibersihkan ....
25
Melepas rak telur, rak botol dan rak kompartemen
wadah kiri/kanan untuk dibersihkan ................... 25
Panduan Pemakaian Lemari Es ......................... 26
Pemecahan masalah .......................................... 26
Spesifikasi, Catatan ............................................ 27
INSTALASI
1
2
Stop kontak
pentanahan
Kabel
pentanahan
Gambar untuk
sambungan
pentanahan
Untuk keselamatan, sambungan pentanahan harus dibuat.
(Untuk refrigerator dengan steker (steker 2-pin) tanpa dilengkapi kabel pentanahan)
Sambungan pentanahan akan mencegah bahaya akibat kebocoran arus
listrik.
Sambungan pentanahan dapat dibuat dengan 2 cara sebagai berikut:
1. Jika stop kontak pentanahan telah disiapkan untuk soket (soket
steker), sambungkan kabel pentanahan ke sekrup yang digunakan
untuk sambungan pentanahan di bagian belakang bawah refrigerator
(terkait sekrup yang digunakan untuk sambungan pentanahan,
perhatikan simbol ) seperti ditunjukkan pada gambar 1.
2. Jika soket (soket steker) belum dilengkapi dengan stop kontak
pentanasambungkan kabel pentanahan ke sekrup di bagian
bawah refrigerator, (terkait sekruyang digunakan untuk sambungan
pentanahan, perhatikan simbol ). Kemudian sambungkan ujung
lainnya ke batang pentanahan seperti ditunjukkan pada gambar 2.
Tempat yang dilarang untuk pemasangan sambungan pentanahan
● Pipa gas dan pipa suplai air (bahaya akibat kejutan listrik atau ledakan).
● Kabel pentanahan dari pesawat telepon dan batang anti petir (bahaya terkena petir).
NR-BY551_601-IND.indd 16 11/5/09 3:45:00 PM

17
TINDAKAN PENCEGAHAN
Gunakan tegangan yang sesuai dan
letakkan kulkas dekat kotak kontak.
Tegangan listrik untuk kulkas anda ada di label
pada pintu atau bagian luar kabinet.
Tempatkan tusuk kontak kulkas anda dekat dengan
kotak kontak, jadi tidak perlu kabel tambahan.
Jangan menghubungkan atau
mencabut tusuk kontak dengan
tangan basah.
Dapat menyebabkan keseterum.
Bersihkan debu secara periodik dari
tusuk kontak.
Debu yang terkumpul pada tusuk kontak dapat
menyebabkan kegagalan insulasi dengan
kelembaban dan menyebabkan kebakaran.
Cabut tusuk kontak dan lap dengan kain kering.
Kabel atau tusuk kontak jangan
sampai rusak.
Jika kabel atau
tusuk kontak
rusak, dapat
menyebabkan kebakaran atau kesetrum.
Harap hubungi dealer atau pusat layanan terdekat Anda.
Jangan mencoba untuk
membongkar, memperbaiki atau
memodifikasi lemari es sendiri.
Anda bisa terluka atau lemari es akan rusak. Jika
anda ingin memperbaiki lemari es, tanyakan ke
dealer atau layanan perbaikan terdekat.
Tanda ini berarti dilarang untuk melakukan.
Tanda ini berarti harus dilakukan.
PERINGATAN
Jangan menyentuh kompresor atau pipa.
Pada area ini temperatur menjadi tinggi, sehingga
akan terjadi kecelakaan bila anda menyentuhnya.
Sediakan satu
tusuk kontak
untuk
lemari es.
Hindari menghubungkan banyak perangkat ke
tusuk
kontak
yang sama untuk lemari es.
Jangan menggunakan
tusuk kontak
yang tidak
berkualitas. Jangan menggunakan
tusuk kontak
kabel listrik yang rusak. Buka gulungan kabel untuk
melepaskan panas.
Kotak kontrol hanya boleh dibuka
oleh petugas resmi.
Dapat membahayakan, atau sengatan listrik.
Jika lemari es anda menggunakan tusuk kontak
dengan arde, maka gunakan juga kotak kontak yg
menggunakan arde untuk mencegah terjadinya
kebocoran listrik.
Pastikan menekan tusuk kontak dgn baik pada
stokontaknya.
Kompresor
PERINGATAN
tanda ini berarti
[dapat mengakibatkan luka berat atau kematian]
PERHATIAN
tanda ini berarti
[dapat mengakibatkan luka atau kerusakan alat]
Contoh keterangan symbol-simbol yang digunakan dalam petunjuk ini sebagai berikut.
NR-BY551_601-IND.indd 17 11/6/09 3:34:10 PM
18
PERINGATAN
Jangan merusak rangkaian pendingin
(perpipaan di bagian belakang). Refrigeran yang
mudah terbakar dapat menyebabkan kebakaran
dan memicu ledakan.
Jangan menggunakan perangkat elektrik
seperti pengharum ruangan di dalam kulkas.
(Apabila refrigeran bocor, dapat menyebabkan
kebakaran karena percikan api dari kontak.)
Jangan mengisi celah di sekitar lemari es. (Jika
refrigeran mengalami kebocoran, dapat terjadi
kebakaran.)
● Jika Anda mendeteksi bau terbakar, cabut
kabel daya.
● Jika Anda mendeteksi kebocoran gas (seperti
gas elpiji), buka ventilasi udara di dapur.
● Digunakan refrigeran yang dapat terbakar. Apabila
sirkuit pendingin (pipa) rusak, buka jendela untuk
memberikan ventilasi udara ke dalam dapur dan
hubungi dealer tempat pembelian. (Karena dapat
menyebabkan korslet, percikan api atau ledakan)
● Perawatan harus dilakukan hanya di bengkel dan
oleh orang yang berkompeten.
Jangan membiarkan anale-anale bergantung
pada pintu lemari es. Lemari es akan berbalik
menimpa anak-anak. Anak-anak harus diawasi
untuk memastikan bahwa mereka tidak
bermain-main dengan lemari es.
Jangan menyimpan larutan kimia atau
spesimen.
Lemari es yang digunakan di rumah tidak
memerlukan kontrol yang ketat.
Jangan menaruh wadah air seperti akuarium atau vas
bunga di atas lemari es.
Air yang tumpah akan mengakibatkan kerusakan insulasi
pada komponen elektrik dan dapat berakibat kesetrum
atau terbakar.
Jangan
menggunakan perangkat mekanis
atau sejenisnya untuk mempercepat proses
pelelehan, selain yang direkomendasikan oleh
pabrik.
Sebelum membuang lemari es, lepaskan
semua seal pintu untuk mencegah anak-anak
terkunci di dalam lemari es.
Sesuai dengan peraturan setempat,
Cyclopentana digunakan untuk insulasi lemari
es ini. Bila anda membuang lemari es ini, harap
lakukan dengan cara yang benar dan jangan
membuangnya dengan membakar.
TINDAKAN PENCEGAHAN
NR-BY551_601-IND.indd 18 11/6/09 1:01:13 PM
19
PERINGATAN UNTUK PEMAKAIAN
n Jangan membekukan botol kaca dalam freezer.
Botol kaca akan meledak atau pecah.
n Jangan menempatkan makanan hangat/panas ke
dalam lemari es.
n Jangan membersihkan lemari es dengan
larutan atau bahan kimia. Hal tersebut dapat
menyebabkan kerusakan dan korosi pada
permukaan.
■ Jangan menempatkan barang yang bersuhu di
atas 60°C di atas lemari es, dapat merusak bagian
atas lemari es.
■
Saat mencabut kabel, biarkan selama 10 menit
sebelum menghubungkan kembali. Jika tidak,
kompresor tidak akan berfungsi.
■
Lemari es ini tidak diperuntukkan bagi orang
(termasuk anak-anak) yang memiliki kekurangan fisik,
panca indera, atau mental, atau kurang pengalaman
dan pengetahuan, kecuali telah terlebih dahulu diberi
pengarahan atau petunjuk tentang cara penggunaan
lemari es oleh orang yang bertanggung jawab atas
keselamatannya.
10
menit
PERHATIAN
■ Saat membuka lemari es hati-hati agar tidak
menjepit tangan orang lain yang memegang
pintu lemari es.
■ Jaga jarak antar pintu agar tidak menjepit
tangan anda saat menutup.
■ Pegang handel saat memindahkan lemari es.
NR-BY551_601-IND.indd 19 11/5/09 3:45:08 PM
20
PENGONTROL SUHU
Suhu dapat diatur dengan 1-3 tingkat
Tanda nomor dan tingkat pendinginan
“MIN” Lebih tinggi sekitar. 5ºC ~ 10ºC
“MED” Sekitar. 2ºC ~ 7ºC
“MAX” Lebih rendah sekitar. -1ºC ~ 4ºC
“MAX” Lebih rendah sekitar. -19ºC ~ -24ºC
Sekitar. -17ºC ~ -22ºC
“MIN” Lebih tinggi sekitar. -13ºC ~ -18ºC
Kontrol suhu ruangan freezer
Model : NR-BY551 and NR-BY601
Keterangan
Saat mengoperasikan lemari es untuk pertama kalinya, setelah menyambung aliran listrik, atur
suhu ke posisi “MIDDLE” untuk tiap kontrol dan tinggalkan selama 24 jam untuk pendinginan
yang efektif. Kemudian, atur suhu sesuai yang diinginkan. Jika Anda ingin menghemat energi,
jangan mengatur suhu lebih rendah dari kondisi pengoperasian sesungguhnya.
Model : NR-BY551 and NR-BY601
Model : NR-BY551M and NR-BY551S
Kontrol suhu ruangan lemari es
Suhu dapat diatur dengan 1-3 tingkat
Tanda nomor dan tingkat pendinginan
Model : NR-BY551M and NR-BY551S
Nomor “1” Lebih tinggi sekitar. -13ºC ~ -18ºC
Nomor “2” Sekitar. -17ºC ~ -22ºC
Nomor “3” Lebih rendah sekitar. -19ºC ~ -24ºC
Suhu dapat diatur dengan 1-3 tingkat
Tanda nomor dan tingkat pendinginan
NR-BY551_601-IND.indd 20 11/5/09 3:45:11 PM
21
Lemari es ini dirancang khusus untuk penggunaan tertentu yang cocok, di mana Anda
dapat mengubah suhu hingga 9 tingkat dengan penjelasan sebagai berikut.
Cara mengoperasikan mode “9 tingkat”
1. Atur tampilan LED ke “MIN” dengan tombol “Freezer control”.
2. Tekan tombol “Freezer control” (selama 10 detik) sampai tampilan LED kembali
menunjukkan posisi “MIN”.
3. Atur mode “9 tingkat” di tabel berikut dengan menekan tombol “Freezer control”.
Untuk mereset pengaturan mode “9 tingkat”
Ulangi langkah 1 dan 2 , dan lemari es akan kembali ke mode operasi normal.
PENGONTROL SUHU
Tingkat
Pendinginan Minimum
Langkah 1 2 3 4 5
TAMPILAN
LED
KONTROL
FREEZER
Tingkat
Pendinginan Maksimum
Langkah 6 7 8 9
TAMPILAN
LED
KONTROL
FREEZER
Menyala Berkedip
NR-BY551_601-IND.indd 21 11/5/09 3:45:17 PM
22
n Lain-lain
- Sesuai dengan urutan fungsi, “QUICK FREEZING” lebih diprioritaskan dibanding mode “ENERGY
SAVING”.
- Saat menekan kedua tombol “QUICK FREEZING” dan “ENERGY SAVING” bersamaan.
1.
Lampu LED biru dan Lampu LED biru (“QUICK FREEZING” dan “ENERGY SAVING”) menyala.
2. Setelah mode “QUICK FREEZING” selama 150 menit telah selesai dan lampu LED biru telah
mati, mode “ENERGY SAVING” akan mulai beroperasi.
3.
Lampu LED biru dari mode “ENERGY SAVING” akan terus menyala dari awal sampai Anda
menekan tombolnya kembali.
-
Saat menekan tombol “QUICK FREEZING” saat mode “ENERGY SAVING”, lampu LED biru
akan
menyala. Mode “QUICK FREEZING” akan mulai beroperasi dan mode “ENERGY SAVING” akan berhenti.
ON Tekan tombol “QUICK FREEZING”
(Lampu LED biru menyala)
} 150 menit mode “QUICK FREEZING”.
OFF Sistem akan berhenti beroperasi secara otomatiis saat waktu mencapai 150
menit dan kembali ke mode normal (Lampu LED biru mati)
TAMPILAN KONTROL INVERTER
Cara mengoperasikan mode “QUICK FREEZING”
(NR-BY551 dan NR-BY601)
■ QUICK FREEZING
Keterangan
- Jika anda ingin menghentikan pengoperasian, tekan tombol
“QUICK FREEZING”.
- Lampu LED biru berkedip berarti sistem pelelehan sedang bekerja,
mode “QUICK FREEZING” akan memulai tepat setelah operasi pelelehan
selesai.
- Pengontrol suhu FC tidak beroperasi selama mode “QUICK FREEZING”
(Rotasi kompresor pada tingkat maksimum pada mode
“QUICK FREEZING”).
ON Tekan tombol “ENERGY SAVING”
(Lampu LED biru menyala)
} Suhu bagian dalam sedikit lebih tinggi dari mode normal.
OFF Tekan tombol “ENERGY SAVING” kembali dan akan kembali ke mode normal
(Lampu LED biru mati)
Cara mengoperasikan mode “ENERGY SAVING”
(NR-BY551 dan NR-BY601)
■ ENERGY SAVING
Keterangan
- Fungsi deodorizer kurang efektif daripada mode normal.
- Jika pintu lemari es sering dibuka dapat menaikkan suhu dalam.
* Saat suhu dalam semakin tinggi, putaran kompresor secara otomatis
meningkat dan suhu dalam menurun.
NR-BY551_601-IND.indd 22 11/5/09 3:45:18 PM
23
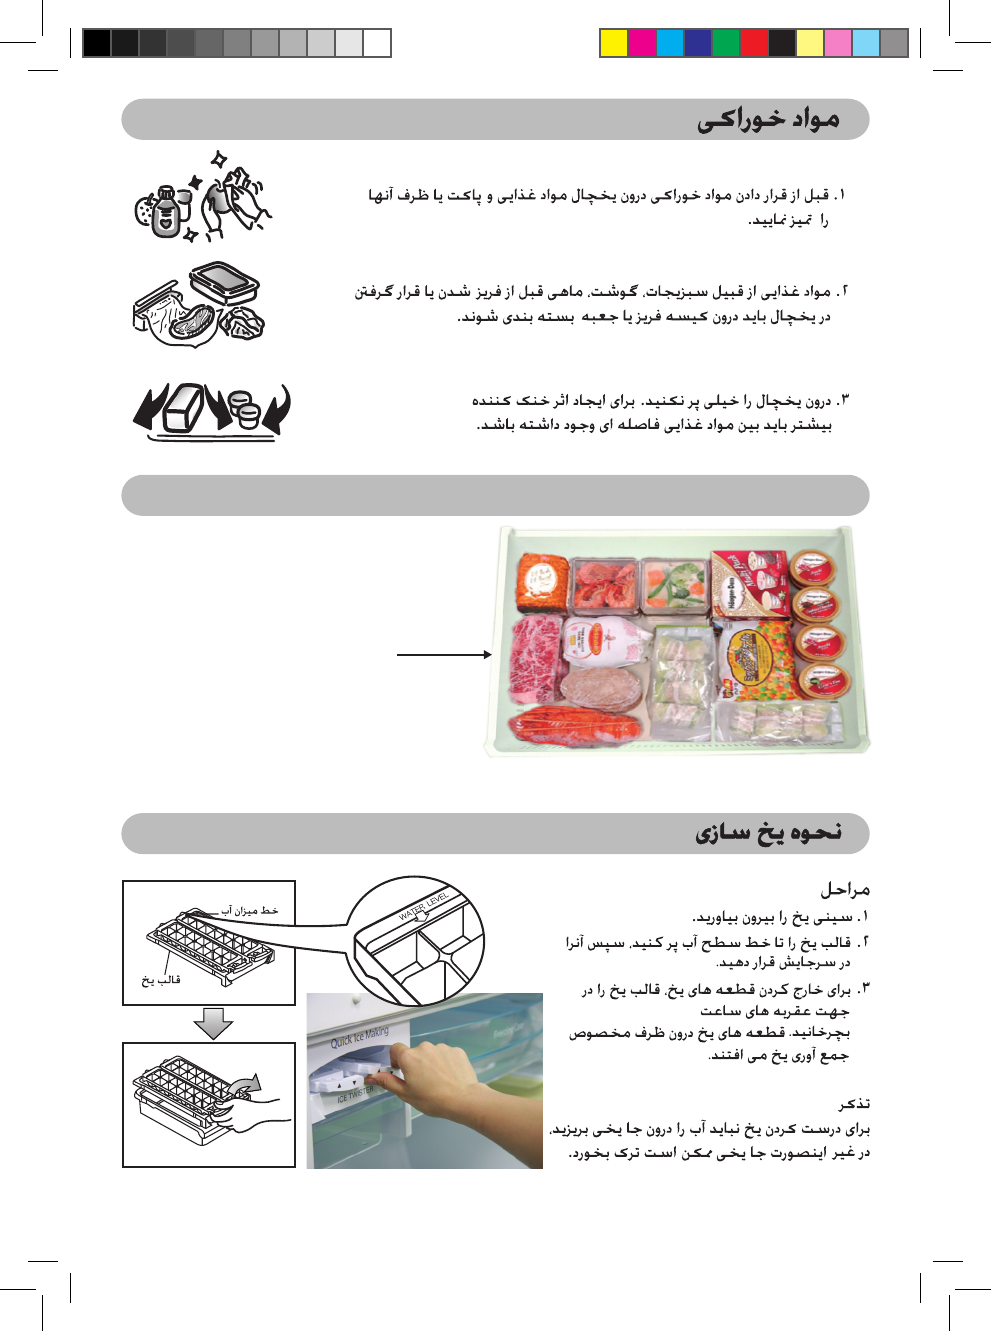
PENYIMPANAN MAKANAN
Penyimpanan Maksimal
Jika makanan yang dimasukkan
melebihi tepi wadah ini,
pendinginan akan memburuk atau
ruang akan membeku.
1. Bersihkan makanan dan pembungkus atau wadah
sebelum dimasukkan ke dalam lemari es.
2. Makanan seperti sayuran, daging, ikan sebaiknya
dibungkus plastik film atau dikemas dalam kotak sebelum
dibekukan atau didinginkan dalam lemari es. Hal ini untuk
menjaga kesegaran dan mencegah bau tak sedap.
3. Jangan memenuhi isi lemari es. Harus terdapat jarak
antar makanan untuk memelihara efek pendinginan.
1. Tarik nampan es.
2. Isi nampan es dengan air sampai
batas ketinggian air, kemudian taruh
di belakang.
3. Untuk mengeluarkan es, PELINTIR
tempat es SEARAH JARUM JAM.
Es batu akan jatuh ke dalam kotak
es.
Jangan menuang air ke kotak es
untuk membuat air, karena akan
membuat kotak es retak.
LANGKAH
Keterangan
GARIS TINGGI
PERMUKAAN AIR
BAKI ES
PENYIMPANAN MAKANAN DI RUANG FREEZER
CARA MEMBUAT ES
NR-BY551_601-IND.indd 23 11/5/09 3:45:23 PM
24
CARA MEMBERSIHKAN LEMARI ES
MENGELUARKAN NAMPAN UNTUK DIBERSIHKAN
Member sihkan
Cabut kabel sebelum membersihkan. Bersihkan dengan air hangat.
Jika lemari es sangat kotor, gunakan air hangat dan sabun dengan menggunakan kain yang halus.
Bersihkan sisa sabun menggunakan kain yang halus.
Membersihkan eksterior
Bersihkan bagian luar lemari es dengan air hangat dan sabun dengan menggunakan kain yang halus.
Setelah mengelap sisa sabun dengan menggunakan kain yang halus kemudian lap kembali dengan kain
halus yang kering. Jangan menggunakan larutan kimia atau sabun dengan campuran asam karena akan
tertinggal pada lemari es. Bersihkan lemari es paling sedikit sekali dalam satu bulan.
Titik tempat penggunaan
gel petroleum
Cara membersihkan seal pembuka pintu.
• Pada area di dalam seal pembuka pintu, gel
petroleum digunakan untuk menurunkan
pergesekan pada body lemari es. Anda dapat
membersihkan seal pembuka pintu dengan
mengelap perlahan-lahan dan hati-hati agar tidak
mengelap gel petroleum.
• Seal pembuka pintu dirancang agar dapat diganti
kembali saat mencapai usia maksimum.
• Saat membersihkan, jika seal keluar karena
dorongan, tekan kembali kedalam celah.
n Saat mengeluarkan nampan,
angkat sedikit bagian paling dalam baki
untuk melepaskan kait samping dari
lubang pengunci di dinding kabinet.
Lalu, tarik baki ke arah Anda.
n Saat memasang nampan,
dorong sampai ke ujung, lalu
dorong bagian dalamnya ke
bawah agar kait samping di lubang
pengunci di dinding kabinet.
• Saat melepas baki yang ada di atas kotak sayuran, tarik dulu kotak sayurannya (Lihat halaman 25),
lalu ikseperti dijelaskan di atas.
• Jika pada saat nampan dipasang tapi tidak mau mengunci, periksa untuk memastikan bahwa anda
tidak memasang nampan yang salah.
Keterangan
NR-BY551_601-IND.indd 24 11/5/09 3:45:25 PM
25
PINDAHKAN KOTAK SAYURAN DAN KOTAK PENYEGAR UNTUK DIBERSIHKAN
MELEPAS KOTAK FREEZER BAWAH UNTUK DIBERSIHKAN
MELEPAS RAK TELUR, RAK BOTOL DAN RAK KOMPARTEMEN
WADAH KIRI/KANAN UNTUK DIBERSIHKAN
■ Melepas kotak sayuran untuk dibersihkan.
1. Tarik handel kotak sayuran sambil diangkat sedikit.
2. Tarik kotak sayuran ke arah Anda.
3. Angkat, lalu lepaskan seluruhnya dari kotak sayuran.
Catatan
Untuk menjaga vitamin sayur dan buah-buahan, tekan sampai mengunci
dengan baik setelah menggunakan atau membersihkan rak sayuran.
■ Melepas kotak penyejuk untuk dibersihkan.
1. Tarik kotak penyejuk ke arah Anda.
2. Angkat, lalu lepaskan seluruhnya dari kotak penyejuk.
1. Tarik laci freezer.
2. Naikkan sedikit bagian depan laci freezer lalu
tarik laci freezer sampai berhenti.
3. Angkat kedua bagian kotak freezer bawah dan
tarik ke atas untuk melepasnya.
g
n
i
k
a
M
e
c
I
k
c
i
u
Q
■ Saat melepas rak telur, rak botol, rak
kompartemen wadah kiri/kanan
naikkan rak dari bagian kiri dan kanan lalu
tarik ke atas.
■ Saat memasang rak telur, rak botol, rak
kompartemen wadah kiri/kanan
taruh di rak telur, rak botol, rak kompartemen
wadah kiri/kanan dengan menempatkannya
di kedua penopang, lalu tekan sampai
menyentuh ujung penopang.
NR-BY551_601-IND.indd 25 11/6/09 3:34:30 PM
26
PANDUAN PEMAKAIAN LEMARI ES
PEMECAHAN MASALAH
1.
Jangan terlalu sering membuka lemari es atau membukanya dalam waktu yang lama. Hal ini untuk
mencegah tumpahnya air dari dalam lemari es dan mengurangi hawa dingin serta boros energi.
2. Jangan mendinginkan benda-benda yang tidak diperlukan atau makanan yang sulit membusuk
seperti labu, bawang merah, bawang putih, kentang, dll karena akan mengakibatkan kelebihan
beban pada kinerja lemari es dan membuang tempat dalam lemari es.
3. Atur suhu sesuai dengan kondisi pengoperasian normal untuk penghematan energi.
4. Jangan mendinginkan botol yang lebih besar dari rak atau nampan pintu, karena kalau ini terjadi
pintu tidak akan dapat menutup sempurna dan akan menyebabkan kebocoran.
5. Sering-seringlah memeriksa segel bukaan pintu, karena harus tertutup rapat pada badan lemari
es. Jangan sampai segel kotor atau rusak atau lebih buruk dari itu karena hawa dingin akan
bocor dan menyebabkan boros energi.
6. Jika anda ingin meninggalkan rumah untuk beberapa hari atau tidak ada makanan yang
didinginkan dalam lemari es, cabut kabel untuk penghematan daya. Dalam hal ini, anda dapat
membersihkan lemari es dan membiarkan pintu terbuka untuk menghilangkan bau.
7. Bersihkan nampan saluran pada kompresor yang berada pada bagian belakang lemari es setiap
tiga bulan untuk mencegah bau dari kelembaban.
8. Pipa pengering dan pipa penghangat hemat energi di sekitar kabinet lemari es digunakan untuk
membantu mencegah “keringat” pada bagian luar kabinet tanpa mengkonsumsi energi. Hal ini
akan menghangatkan dinding luar lemari es namun bukanlah sebuah kerusakan.
9. Botol minum air dan semacamnya semisal minuman ringan dan jus buah-buahan harus tertutup
rapat untuk mencegah bau masuk ke dalam botol.
Sebelum memanggil layanan, periksa hal-hal berikut.
Lemari es tidak beroperasi.
* Periksa apakah kondisi steker dan stop kontak masih bagus.
* Periksa jika ada masalah pada sekering utama dan jaringan listrik rumah.
Lemari es tidak dingin sepenuhnya.
* Periksa untuk memastikan bahwa tombol pengontrol suhu pada posisi yang benar.
* Periksa apakah lemari es terlalu penuh dengan makanan atau apakah ada makanan panas di
dalam lemari es.
* Apakah lemari es terkena cahaya matahari secara langsung atau sumber panas?
* Apakah pintu lemari es tertutup rapat? Apakah lemari es terlalu sering dibuka?
Terdapat embun di dalam atau di luar lemari es
* Pengembunan dapat timbul pada permukaan kabinet ketika kelembaban tinggi, misalnya pada
saat musim hujan atau ketika sirkulasi udara tidak baik.
* Jika ada pengembunan di dalam, periksa apakah pintu tertutup rapat. Apakah lemari es terlalu
sering dibuka atau dibiarkan terbuka dalam waktu yang lama? Apakah ada makanan panas di
dalam lemari es?
Lemari es mengeluarkan suara berisik?
* Periksa apakah lemari es berdiri seimbang atau terpasang dengan benar.
* Periksa apakah ada objek lain yang bersentuhan dengan lemari es.
NR-BY551_601-IND.indd 26 11/5/09 3:45:29 PM

27
SPESIFIKASI
Seri MODEL NR-BY551S
NR-BY551M NR-BY551 NR-BY601
Tingkat pembekuan (Freezer)
Kapasitas bersih (L)
(ISO 15502)
Total 551 602
Freezer 153 153
Refrigerator 398 449
Dimensi Luar
Panjang × Lebar × Tinggi (mm) 775 x 745 x 1,714 775 x 745 x 1,846
Berat Bersih (kg/lb) 82 / 181 80 / 176 86 / 190
Tipe Lemari Es HFC-134a R-600a
Tingkat Tegangan (V)
Tingkat Frekuensi (Hz) Lihat label peringkat yang terpasang di bagian dalam kabinet
CATATAN
NR-BY551_601-IND.indd 27 11/5/09 3:45:29 PM
28
.A
.B
.1
.2
.3
.4
.5
.6
.7
.8
.9
.10
.11
.12
.13
.14
.15
.16
.17
.18
.19
.20
.21
NR-BY551
NR-BY601
FREEZER CONTROL
ENERGY SAVING
QUICK FREEZING
NON-FLON (1
(NR-BY601NR-BY551INVERTER (2
NR-BY551M / NR-BY551S
NR-BY601
)NR-BY551MNR-BY551S(
)NR-BY601NR-BY551(
R600aNON-FLON
29
1
2
37
38
38
38
39
39
40
28
29
30
32
33
35
36
37
●
●
●
●
30
10
5
●
●
●
1
①
2
.②
30
31
●
●
●
●
32
n
n
n
n
n
n
10
33
1-3 MAXMIN
NR-BY601NR-BY551
NR-BY551SNR-BY551M
NR-BY601NR-BY551NR-BY551SNR-BY551M
1-3
5
10
2
7
-1
4
MIN
MED
MAX
”MIDDLE“
24
1
2
3
-24
MAX
-24
MIN
34
1
MIN10 2
3
21
12345
LED
6789
LED

35
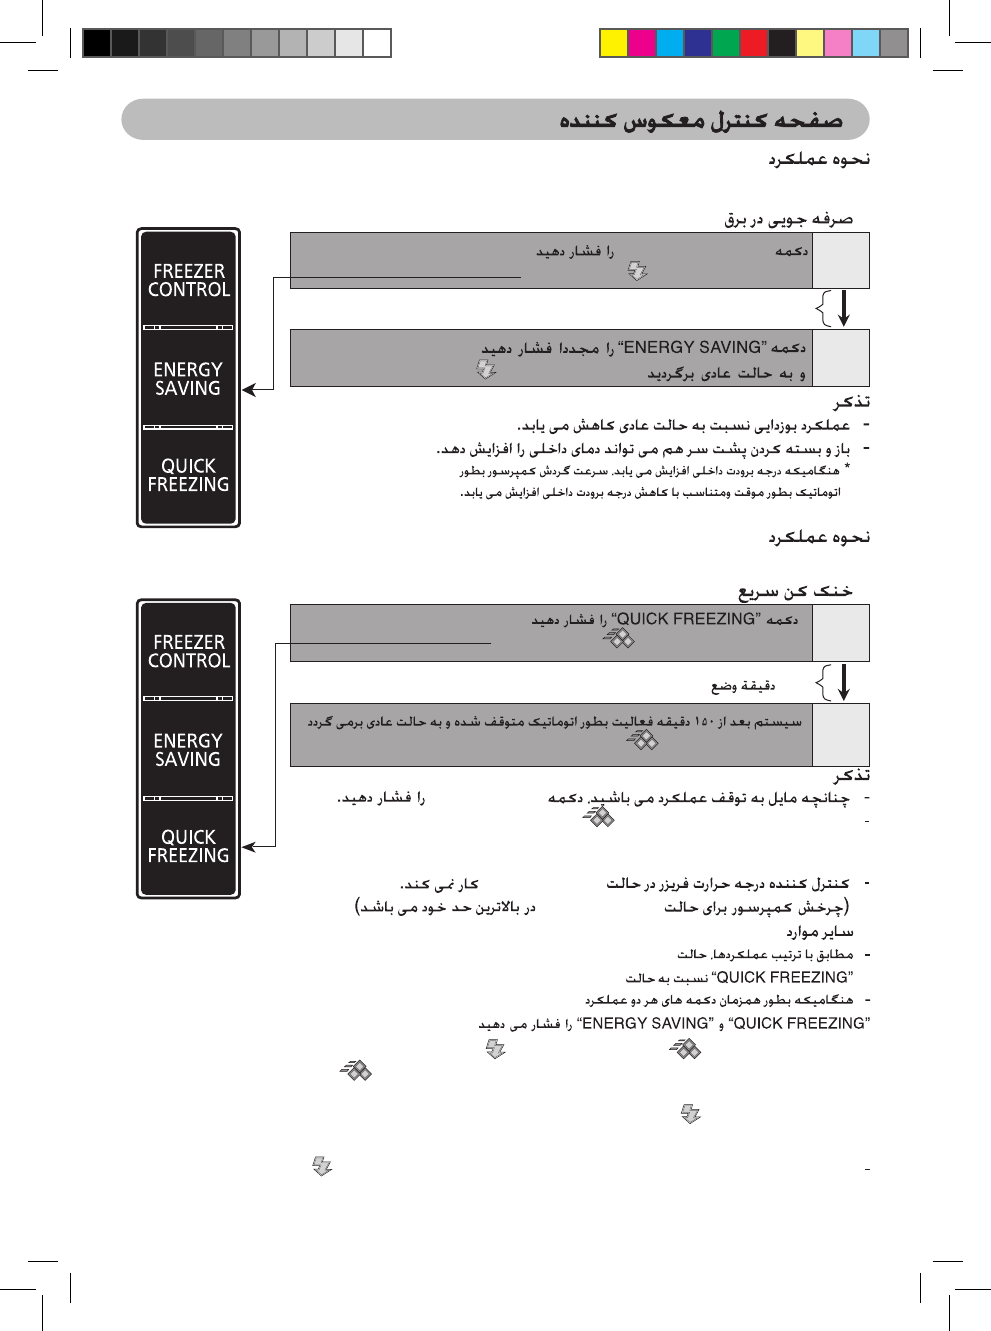
h%.%2'93!6).'v h15)#+&2%%:).'v
h%.%2'93!6).'v h15)#+&2%%:).'v ,%$
,%$
,%$
h15)#+&2%%:).'vh%.%2'93!6).'v
h15)#+&2%%:).'v
h%.%2'93!6).'v
h%.%2'93!6).'v
,%$ h15)#+&2%%:).'v
h%.%2'93!6).'v
h%.%2'93!6).'v h15)#+&2%%:).'v
n
”“ LED LED 1
LED 150 2
LED 3
.LED
”
ON
OFF
n
(NR-BY601NR-BY551
LED
LED
ON
OFF
n
(NR-BY601NR-BY551
150
150
LED
LED
LED
36
37
●
●
●
●
●
■■
38
38
■
■
.
.
.
g
n
i
k
a
M
ec
I
kc
iuQ
g
n
i
k
a
M
ec
I
kc
iuQ
■
■
39
.1
.2
.3
.4
.5
.6
.7
.8
.9
40
NR-BY601 NR-BY551 NR-BY551S
NR-BY551M
602 551
153 153
449 398
R-600a
41
NR-BY551M / NR-BY551S
NR-BY551 -
NR-BY601 -
NR-BY601
NR-BY551
))2
(R600aNON-FLON
A
.A
.B
.1
.2
.3
.4
.5
.6
.7
.8
.9
.10
.11
.12
.13
.14
.15
.16
.17
.18
.19
.20
.21
NR-BY551_601_PE.indd 41 6/11/2552 17:58:47
42
50 ............................................................
51 ....
51 ........................................
51 ............................................................................
52 ......................................................
52 ......................................................................................................
53 ..........................................................................
41 ................................................................................
42 ..............................................................................................
43 ......................................................................
45 ...............................................................
46 .........................................................................................
48 ......................................................................
49 ..........
50 .................................................................................
●
●
●
●
●
●
LED
C
LED
●
1
①
2
②
1
2
NR-BY551_601_PE.indd 42 6/11/2552 17:58:47
43
NR-BY551_601_PE.indd 43 6/11/2552 17:58:48
44
●
●
●
●
NR-BY551_601_PE.indd 44 6/11/2552 17:58:49
45
n
n
NR-BY551_601_PE.indd 45 6/11/2552 17:58:49
46
NR-BY601
NR-BY601
-
-17°C ~ -22°C
-17°C ~ -22°C
-
5°C ~ 10°C
2°C ~ 7°C
MIN
MED
MAX
-19°C ~ -24°C MAX
-13°C ~ -18°C
-19°C ~ -24°C
(“
MIDDLE
24
-1°C ~ 4°C
1
2
3-13°C ~ -18°C MIN
NR-BY551_601_PE.indd 46 6/11/2552 17:58:49
47
9
9
MIN 1
(“MIN10 2
9 3
9
21
12345
6789
NR-BY551_601_PE.indd 47 6/11/2552 17:58:50
48
ON
OFF
ON
OFF
n
n
)
)
150.“QUICK FREEZING”
”“
“”
n
“QUICK FREEZING”
“QUICK FREEZING”
“QUICK FREEZING”
“ENERGY SAVING”
QUICK
FREEZING
1
1502
3
NR-BY551_601_PE.indd 48 6/11/2552 17:58:51
49
NR-BY551_601_PE.indd 49 6/11/2552 17:58:51
50
●
●
●
●
●
51
NR-BY551_601_PE.indd 50 6/11/2552 17:58:51
51
n
.
.
.
PC
n n
g
n
i
k
a
M
ec
I
kc
iuQ
n
g
n
i
k
a
M
ec
I
kc
iuQ
NR-BY551_601_PE.indd 51 6/11/2552 17:58:52
52
.1
.2
.3
.4
.5
.6
.7
.8
.9
NR-BY551_601_PE.indd 52 6/11/2552 17:58:52
53
NR-BY601 NR-BY551 NR-BY551S
NR-BY551M
602 551
(ISO 15502)
153 153
449 398
775 x 745 x 1,846 775 x 745 x 1,714
86 / 190 80 / 176 82 / 181
R-600a HFC-134a
NR-BY551_601_PE.indd 53 6/11/2552 17:58:52
54
NR-BY551_601_PE.indd 54 6/11/2552 17:58:52
55
NR-BY551_601_PE.indd 55 6/11/2552 17:58:52
Panasonic Corporation
http://panasonic.neta
© Panasonic Home Appliances (Thailand) Co., Ltd. 2009
AK - 142740
Printed in Thailand
PHAT0911-0
RBD / IND
PGF / GULF
NR-BY551_601_PE.indd 56 7/11/2552 12:02:38
