PDF Nitsuko DS Administrator Guide
DS Administrator Guide DS Administrator Guide
User Manual: PDF T E X T F I L E S
Open the PDF directly: View PDF ![]() .
.
Page Count: 316 [warning: Documents this large are best viewed by clicking the View PDF Link!]
Administrator’s Guide
Digital
System

●Provides on-line viewing and printing.
●Extensive search and navigation capabilities.
●Ensures more timely turnaround of documents.
●When we provide an Acrobat manual with a product (e.g., Nitsuko TAPI Driver),
you are assured of having the most up-to-date manual available.
●With the installation of a PC fax/modem, it makes faxing of any brochure, user
guide, proposal or manual quick and easy.
●Acrobat Reader programs for Macintosh, DOS and UNIX platforms also can be
provided, if required.
●For Technical Support for the Acrobat Reader, contact:
Adobe Systems, Inc.
1585 Charleston Road
P.O. Box 7900
Mountain View, CA 94039-7900
Telephone Number: 415-961-4400
Adobe FaxY1 (technical/product information by fax): 206-628-5737
Adobe Electronic Bulletin Board (on-line information): 206-623-6984
URL: http://www.adobe.com
●To return to the opening screen, press the HOME key.
telemanuals.com

●In Edit ➮Preferences ➮General, set the following:
–Default Magnification = Fit Width
–Display Splash Screen at Startup = Disabled (box not checked)
–Display Open Dialog Box at Startup = Disabled (box not checked)
●For easiest reading on-screen, select View ➮Fit Width (or Ctrl K). This option
is automatically enabled if you set the
Default Magnification
in General
Preferences as described above.
●To return to the opening screen at any time, press Home.
To scroll up or down on a page, press PageDown or PageUp.
To navigate between pages, press –> or <–.
●To increase the speed with which your Acrobat files load, try one of the following:
– In Windows 3.1, add
ACROREAD.EXE
to your Startup Group (with the Run
Minimized box checked).
– In Windows 95, add
ACROREAD.EXE
to the Windows\Start
Menu\Programs\StartUp folder (with Run Minimized selected).
You’ll have to maximize the first Acrobat file you run.

Contents
●Initializing a New Digital System
●Start-up Programming
●Introduction
●Features
●Programs

Administrator’s Guide
N1872ADG03
Digital
System
telemanuals.com

This manual has been developed by Nitsuko America. It is intended for the use of its
customers and service personnel, and should be read in its entirety before attempting
to install or program the system. Any comments or suggestions for improving this
manual would be appreciated. Forward your remarks to:
Nitsuko America, Telecom Division
4 Forest Parkway
Shelton, CT 06484
Attention: Manager, Technical Publications
Nothing contained in this manual shall be deemed to be, and this manual does not
constitute, a warranty of, or representation with respect to, any of the equipment
covered. This manual is subject to change without notice and Nitsuko America has
no obligation to provide any updates or corrections to this manual. Further, Nitsuko
America also reserves the right, without prior notice, to make changes in equipment
design or components as it deems appropriate. No representation is made that this
manual is complete or accurate in all respects and Nitsuko America shall not be liable
for any errors or omissions. In no event shall Nitsuko America be liable for any
incidental or consequential damages in connection with the use of this manual. This
document contains proprietary information that is protected by copyright. All rights
are reserved. No part of this document may be photocopied or reproduced without
prior written consent of Nitsuko America.
©1994 by Nitsuko America. All Rights Reserved.
Printed in U.S.A.
telemanuals.com

Initializing a New DIGITAL SYSTEM
You must initialize your system (i.e., run Program 20) before using it for the first time.
Initialization automatically enables the factory-installed Default Programming.
CAUTION: Initialization erases all the system programming
and replaces it with the factory-installed default settings.
To initialize your system (run Program 20):
1. Install a display keyset at extension 300 (port 00).
2. Enter the programming mode.
•
Without lifting the handset, dial #775312#.
3. Press key 20 to select Program 20,
System Initialization
.
4. Dial 9 (for yes).
This begins initialization. All calls in progress will
be dropped. Wait 30 seconds before programming.
ABC DEF
GHI JKL MNO
PRS TUV WXY
DIAL
LAST
VOL
UP
SAVE
VOL
DN
FTR
PGM
4
5
11 12 13 14 15 16
MIC/DNDCONFHOLD ICM MSG HF
9
10
ABC DEF
GHI JKL MNO
PRS TUV WX
Y
DIAL
LAST
VOL
UP
SAVE
VOL
DN
FTR
PGM
FRI 08/18 03:34P
1
2
3
4
5
11 12 13 14 15 16
MIC/DNDCONFHOLD ICM MSG HF
6
7
8
9
10
ABC
DEF
JKL
PRS PRS
PGM PGM
ABC
DEF
GHI
JKL
MNO
PRS
TUV
WXY
DIAL
LAST
VOL
UP
SAVE
VOL
DN
FTR
PGM
telemanuals.com

Start-up Programming
Using the following table, you can quickly:
•
Customize the programmable keys for each extension user
•
Change the way calls ring system telephones
•
Set up Voice Mail (if installed)
•
Program Speed Dial numbers for extension users
When you first initialize, your system starts up with all keysets, Electronic Single Line
telephones and DSS Consoles functioning. Each extension user can place and answer
calls on all installed lines. In addition, outside calls flash the line keys and ring at
extensions 300, 302 and 303. All other extensions flash for outside calls but do not ring.
❶Customize an extension’s programmable keys to meet the
user’s needs. For 16-button keysets in an 8-line system, keys 1-8 are
line keys and keys 9-16 are undefined. In a 16-line system, keys 1-16 are
line keys. Turn to Programmable Keys on page 151 and Program 17 on
page 250 to find out more.
For example, use Program 17 to assign an extension’s keys for Park Orbits
(PO + Park Orbit 60-69 + #) or Voice Mail Record (RK + #).
❷Set the ringing for the outside lines at each phone. Review
Outside Calls (Answering) on page 132, then go to Program 18 (II) on
page 263 to set ringing for extensions (RA or DRA + # + Line key + Y or
N + #). You can change an extension’s Access Level in Program 15 (page
244) and allow the user to set the ringing options themselves.
❸Set up Voice Mail. If your system has Voice Mail (see page 185), you’ll
need to set up the following programs:
Program 14
(page 239) Assign circuit type 51 (CIRCUIT TYPE = 51) to each
Voice Mail port.
Program 18 (I)
(page 256) Assign the Voice Mail feature to each Voice Mail port
(VX + # + Y + #)
Program 19
(page 272) Program the Voice Mail ports into a UCD hunt group.
Program 3
(page 205) Indicate that Voice Mail is installed and select a master
extension number (VOICE MAIL = Y + N + # then VX
MSTR EXT = Master extension + #)
Program 12
(page 234) Directly terminate each line the Automated Attendant
should answer (DTD or DTN + # + Master extension + #)
❹Program System and Personal Speed Dial (see page 162).
Use Program 18 (II) (page 263) to enter Personal and System Speed Dial
numbers. User-Programmable Features let co-workers store their own
Personal numbers. If you have an extension installed at 303, use Program
18 (I) (page 256) to assign it a Speed Dial block. Otherwise, the extension
has no Personal Speed Dial.

Introduction . . . . . . . . . . . . . . . . . . . . . . . . . . . . . . . . . . . . . . . . . . . . . . . . . . . . . . . . 1
How To Use This Guide. . . . . . . . . . . . . . . . . . . . . . . . . . . . . . . . . . . . . . . . . . . 1
How to Use Part I . . . . . . . . . . . . . . . . . . . . . . . . . . . . . . . . . . . . . . 1
How to Use Part II (Customizing the System) . . . . . . . . . . . . . . . . 3
General Programming Tips . . . . . . . . . . . . . . . . . . . . . . . . . . . . . . . . . . . . . . . . 4
Using Your Telephone . . . . . . . . . . . . . . . . . . . . . . . . . . . . . . . . . . . . . . . . . . . . 6
The Type of Phone You Have . . . . . . . . . . . . . . . . . . . . . . . . . . . . . 6
Using a Programmable Key with Three Functions . . . . . . . . . . . . 6
If Your Phone Has an Alphanumeric Display. . . . . . . . . . . . . . . . . 7
Your Phone’s Key Lights . . . . . . . . . . . . . . . . . . . . . . . . . . . . . . . . 7
Using Handsfree Instead of the Handset . . . . . . . . . . . . . . . . . . . . 7
Dialing Codes to Use Features . . . . . . . . . . . . . . . . . . . . . . . . . . . . 8
If You Have a DSS Console . . . . . . . . . . . . . . . . . . . . . . . . . . . . . . 8
Customize with User-Programmable Features. . . . . . . . . . . . . . . . 8
Charts and Illustrations . . . . . . . . . . . . . . . . . . . . . . . . . . . . . . . . . . . . . . . . . . 12
The System Number (Dialing) Plan . . . . . . . . . . . . . . . . . . . . . . . 12
User-Programmable Features . . . . . . . . . . . . . . . . . . . . . . . . . . . . 13
Flash Rates for Keysets with Dual Color (Red and Green) LEDs 14
Flash Rates for Keysets with Single Color (Red) LEDs . . . . . . . 15
Multibutton Telephone Key Layout . . . . . . . . . . . . . . . . . . . . . . . 16
Electronic Single Line (ESL) Key Callouts . . . . . . . . . . . . . . . . . 17
DSS Console Key Layout. . . . . . . . . . . . . . . . . . . . . . . . . . . . . . . 18
About Related Documents. . . . . . . . . . . . . . . . . . . . . . . . . . . . . . . . . . . . . . . . 19
Features A – H . . . . . . . . . . . . . . . . . . . . . . . . . . . . . . . . . . . . . . . . . . . . . . . . . . . . . 23
Account Codes. . . . . . . . . . . . . . . . . . . . . . . . . . . . . . . . . . . . . . . . . . . . . . . . . 23
Alarms . . . . . . . . . . . . . . . . . . . . . . . . . . . . . . . . . . . . . . . . . . . . . . . . . . . . . . . 24
Alphanumeric Display . . . . . . . . . . . . . . . . . . . . . . . . . . . . . . . . . . . . . . . . . . . 25
Alternate Attendant . . . . . . . . . . . . . . . . . . . . . . . . . . . . . . . . . . . . . . . . . . . . . 30
Analog Station Interface and Dual OPX/ASI Module . . . . . . . . . . . . . . . . . . 31
Analog Station Interface . . . . . . . . . . . . . . . . . . . . . . . . . . . . . . . . 31
Dual OPX/ASI Module. . . . . . . . . . . . . . . . . . . . . . . . . . . . . . . . . 31
Automatic Call Distribution . . . . . . . . . . . . . . . . . . . . . . . . . . . . . . . . . . . . . . 36
Supervisor Functions . . . . . . . . . . . . . . . . . . . . . . . . . . . . . . . . . . 36
Supervisor’s DSS Console . . . . . . . . . . . . . . . . . . . . . . . . . . . . . . 36
ACD Announcements . . . . . . . . . . . . . . . . . . . . . . . . . . . . . . . . . . 37
Automatic Ringdown. . . . . . . . . . . . . . . . . . . . . . . . . . . . . . . . . . . . . . . . . . . . 39
Automatic Route Selection . . . . . . . . . . . . . . . . . . . . . . . . . . . . . . . . . . . . . . . 40
Call Routing . . . . . . . . . . . . . . . . . . . . . . . . . . . . . . . . . . . . . . . . . 40
Dialing Translation (Special Dialing Instructions) . . . . . . . . . . . 40
Time of Day Selection . . . . . . . . . . . . . . . . . . . . . . . . . . . . . . . . . 40
Hierarchical Class of Service Control . . . . . . . . . . . . . . . . . . . . . 40
Forced Authorization Code . . . . . . . . . . . . . . . . . . . . . . . . . . . . . 40
Separate Routing for Operator Assisted, International and Equal
Access Calls . . . . . . . . . . . . . . . . . . . . . . . . . . . . . . . . . . . . . . . . . 40
Independently Programmed Restriction for Exchanges 976
and 555 . . . . . . . . . . . . . . . . . . . . . . . . . . . . . . . . . . . . . . . . . . . . . 40
Background Music. . . . . . . . . . . . . . . . . . . . . . . . . . . . . . . . . . . . . . . . . . . . . . 42
Battery Backup. . . . . . . . . . . . . . . . . . . . . . . . . . . . . . . . . . . . . . . . . . . . . . . . . 43
Table of Contents
i
telemanuals.com

Call Forwarding. . . . . . . . . . . . . . . . . . . . . . . . . . . . . . . . . . . . . . . . . . . . . . . . . 44
Call Forwarding, Off-Premise. . . . . . . . . . . . . . . . . . . . . . . . . . . . . . . . . . . . . . 46
Call Forwarding System Cancel . . . . . . . . . . . . . . . . . . . . . . . . . . . . . . . . . . . . 47
Call Intercept . . . . . . . . . . . . . . . . . . . . . . . . . . . . . . . . . . . . . . . . . . . . . . . . . . . 48
Call Timer . . . . . . . . . . . . . . . . . . . . . . . . . . . . . . . . . . . . . . . . . . . . . . . . . . . . . 49
Callback. . . . . . . . . . . . . . . . . . . . . . . . . . . . . . . . . . . . . . . . . . . . . . . . . . . . . . . 50
Caller ID . . . . . . . . . . . . . . . . . . . . . . . . . . . . . . . . . . . . . . . . . . . . . . . . . . . . . . 51
Caller ID Displays . . . . . . . . . . . . . . . . . . . . . . . . . . . . . . . . . . . . . 51
Hardware Considerations. . . . . . . . . . . . . . . . . . . . . . . . . . . . . . . . 52
Camp-On (Call Waiting) . . . . . . . . . . . . . . . . . . . . . . . . . . . . . . . . . . . . . . . . . . 55
Centrex/PBX Feature Keys. . . . . . . . . . . . . . . . . . . . . . . . . . . . . . . . . . . . . . . . 57
Class of Service. . . . . . . . . . . . . . . . . . . . . . . . . . . . . . . . . . . . . . . . . . . . . . . . . 58
Conference . . . . . . . . . . . . . . . . . . . . . . . . . . . . . . . . . . . . . . . . . . . . . . . . . . . . 60
Data . . . . . . . . . . . . . . . . . . . . . . . . . . . . . . . . . . . . . . . . . . . . . . . . . . . . . . . . . . 61
Delayed Ringing Assignment . . . . . . . . . . . . . . . . . . . . . . . . . . . . . . . . . . . . . . 62
Dialing Number Preview. . . . . . . . . . . . . . . . . . . . . . . . . . . . . . . . . . . . . . . . . . 63
Direct Inward Lines. . . . . . . . . . . . . . . . . . . . . . . . . . . . . . . . . . . . . . . . . . . . . . 64
Direct Station Selection, DSS Console. . . . . . . . . . . . . . . . . . . . . . . . . . . . . . . 66
Direct Station Selection. . . . . . . . . . . . . . . . . . . . . . . . . . . . . . . . . . . . . . . . . . . 69
Directed Call Pickup . . . . . . . . . . . . . . . . . . . . . . . . . . . . . . . . . . . . . . . . . . . . . 71
Directory Dialing . . . . . . . . . . . . . . . . . . . . . . . . . . . . . . . . . . . . . . . . . . . . . . . 72
Do Not Disturb . . . . . . . . . . . . . . . . . . . . . . . . . . . . . . . . . . . . . . . . . . . . . . . . . 74
Door Box . . . . . . . . . . . . . . . . . . . . . . . . . . . . . . . . . . . . . . . . . . . . . . . . . . . . . 75
Relay Box. . . . . . . . . . . . . . . . . . . . . . . . . . . . . . . . . . . . . . . . . . . . 75
DP and DTMF Compatibility . . . . . . . . . . . . . . . . . . . . . . . . . . . . . . . . . . . . . . 77
Pulse to Tone Conversion. . . . . . . . . . . . . . . . . . . . . . . . . . . . . . . . 77
Equal Access Compatibility . . . . . . . . . . . . . . . . . . . . . . . . . . . . . . . . . . . . . . . 79
Extended Ringing . . . . . . . . . . . . . . . . . . . . . . . . . . . . . . . . . . . . . . . . . . . . . . . 80
Extension Hunting. . . . . . . . . . . . . . . . . . . . . . . . . . . . . . . . . . . . . . . . . . . . . . . 81
Circular Hunting . . . . . . . . . . . . . . . . . . . . . . . . . . . . . . . . . . . . . . 81
Terminal Hunting . . . . . . . . . . . . . . . . . . . . . . . . . . . . . . . . . . . . . 81
Uniform Call Distribution (UCD) . . . . . . . . . . . . . . . . . . . . . . . . . 82
External Alerting Device. . . . . . . . . . . . . . . . . . . . . . . . . . . . . . . . . . . . . . . . . . 84
Flash . . . . . . . . . . . . . . . . . . . . . . . . . . . . . . . . . . . . . . . . . . . . . . . . . . . . . . . . . 85
Flexible Numbering Plan . . . . . . . . . . . . . . . . . . . . . . . . . . . . . . . . . . . . . . . . . 86
Forced Line Disconnect . . . . . . . . . . . . . . . . . . . . . . . . . . . . . . . . . . . . . . . . . . 87
Group Call Pickup. . . . . . . . . . . . . . . . . . . . . . . . . . . . . . . . . . . . . . . . . . . . . . . 88
Group Listen . . . . . . . . . . . . . . . . . . . . . . . . . . . . . . . . . . . . . . . . . . . . . . . . . . . 90
Group Ringing. . . . . . . . . . . . . . . . . . . . . . . . . . . . . . . . . . . . . . . . . . . . . . . . . . 91
Handsfree . . . . . . . . . . . . . . . . . . . . . . . . . . . . . . . . . . . . . . . . . . . . . . . . . . . . . 93
Handsfree, Automatic . . . . . . . . . . . . . . . . . . . . . . . . . . . . . . . . . . . . . . . . . . . . 94
Headset . . . . . . . . . . . . . . . . . . . . . . . . . . . . . . . . . . . . . . . . . . . . . . . . . . . . . . . 95
Hold, Automatic . . . . . . . . . . . . . . . . . . . . . . . . . . . . . . . . . . . . . . . . . . . . . . . . 97
Hold, Exclusive . . . . . . . . . . . . . . . . . . . . . . . . . . . . . . . . . . . . . . . . . . . . . . . . 98
Hold, Regular . . . . . . . . . . . . . . . . . . . . . . . . . . . . . . . . . . . . . . . . . . . . . . . . . . 99
Hotline. . . . . . . . . . . . . . . . . . . . . . . . . . . . . . . . . . . . . . . . . . . . . . . . . . . . . . . 101
Features I – Z . . . . . . . . . . . . . . . . . . . . . . . . . . . . . . . . . . . . . . . . . . . . . . . . . . . . . . 103
Intercom . . . . . . . . . . . . . . . . . . . . . . . . . . . . . . . . . . . . . . . . . . . . . . . . . . . . . 103
Intrusion (Barge-In). . . . . . . . . . . . . . . . . . . . . . . . . . . . . . . . . . . . . . . . . . . . . 106
Last Number Redial . . . . . . . . . . . . . . . . . . . . . . . . . . . . . . . . . . . . . . . . . . . . 107
Table of Contents
ii DIGITAL SYSTEM Administrator’s Guide
telemanuals.com

Line Queuing . . . . . . . . . . . . . . . . . . . . . . . . . . . . . . . . . . . . . . . . . . . . . . . . . 108
Maintenance Utilities and Reports. . . . . . . . . . . . . . . . . . . . . . . . . . . . . . . . . 110
Meet-Me Conference . . . . . . . . . . . . . . . . . . . . . . . . . . . . . . . . . . . . . . . . . . . 111
Message Center . . . . . . . . . . . . . . . . . . . . . . . . . . . . . . . . . . . . . . . . . . . . . . . 112
Message Waiting . . . . . . . . . . . . . . . . . . . . . . . . . . . . . . . . . . . . . . . . . . . . . . 113
Microphone Mute . . . . . . . . . . . . . . . . . . . . . . . . . . . . . . . . . . . . . . . . . . . . . 115
Microphone On/Off . . . . . . . . . . . . . . . . . . . . . . . . . . . . . . . . . . . . . . . . . . . . 116
Monitor . . . . . . . . . . . . . . . . . . . . . . . . . . . . . . . . . . . . . . . . . . . . . . . . . . . . . 117
Multiple Attendants . . . . . . . . . . . . . . . . . . . . . . . . . . . . . . . . . . . . . . . . . . . . 118
Music On Hold. . . . . . . . . . . . . . . . . . . . . . . . . . . . . . . . . . . . . . . . . . . . . . . . 120
Night Answer (Off-Hours Ringing). . . . . . . . . . . . . . . . . . . . . . . . . . . . . . . . 121
Night Ringing . . . . . . . . . . . . . . . . . . . . . . . . . . . . . . . . . . . . . . . . . . . . . . . . 124
Non-Blocking Architecture . . . . . . . . . . . . . . . . . . . . . . . . . . . . . . . . . . . . . . 125
Off-Hook Signaling/Whisper Page . . . . . . . . . . . . . . . . . . . . . . . . . . . . . . . . 126
Whisper Page . . . . . . . . . . . . . . . . . . . . . . . . . . . . . . . . . . . . . . . 126
Off-Hook Ringing. . . . . . . . . . . . . . . . . . . . . . . . . . . . . . . . . . . . 126
Operator Assistance . . . . . . . . . . . . . . . . . . . . . . . . . . . . . . . . . . . . . . . . . . . . 128
Caller Dialing Options . . . . . . . . . . . . . . . . . . . . . . . . . . . . . . . . 128
Simultaneous Call Answering. . . . . . . . . . . . . . . . . . . . . . . . . . . 128
Programmable OPA Messages . . . . . . . . . . . . . . . . . . . . . . . . . . 128
Automatic Attendant Overflow . . . . . . . . . . . . . . . . . . . . . . . . . 129
Other Common Carriers . . . . . . . . . . . . . . . . . . . . . . . . . . . . . . . . . . . . . . . . 131
Outside Calls, Answering . . . . . . . . . . . . . . . . . . . . . . . . . . . . . . . . . . . . . . . 132
Outside Calls, Placing . . . . . . . . . . . . . . . . . . . . . . . . . . . . . . . . . . . . . . . . . . 134
Using a Line Key . . . . . . . . . . . . . . . . . . . . . . . . . . . . . . . . . . . . 134
Using Prime Line . . . . . . . . . . . . . . . . . . . . . . . . . . . . . . . . . . . . 134
Using Line Dial-Up . . . . . . . . . . . . . . . . . . . . . . . . . . . . . . . . . . 134
Using Direct Line (Trunk) Access . . . . . . . . . . . . . . . . . . . . . . . 134
Using Direct Line Group Access . . . . . . . . . . . . . . . . . . . . . . . . 134
Using PBX/Centrex Lines . . . . . . . . . . . . . . . . . . . . . . . . . . . . . 135
Paging. . . . . . . . . . . . . . . . . . . . . . . . . . . . . . . . . . . . . . . . . . . . . . . . . . . . . . . 138
Internal Zone Paging. . . . . . . . . . . . . . . . . . . . . . . . . . . . . . . . . . 138
External Zone Paging . . . . . . . . . . . . . . . . . . . . . . . . . . . . . . . . . 138
Park . . . . . . . . . . . . . . . . . . . . . . . . . . . . . . . . . . . . . . . . . . . . . . . . . . . . . . . . 141
Peripheral Control Unit (PCU) Module . . . . . . . . . . . . . . . . . . . . . . . . . . . . 143
Personal Greeting. . . . . . . . . . . . . . . . . . . . . . . . . . . . . . . . . . . . . . . . . . . . . . 145
Power Failure Telephone . . . . . . . . . . . . . . . . . . . . . . . . . . . . . . . . . . . . . . . . 147
Privacy . . . . . . . . . . . . . . . . . . . . . . . . . . . . . . . . . . . . . . . . . . . . . . . . . . . . . . 148
Privacy Release . . . . . . . . . . . . . . . . . . . . . . . . . . . . . . . . . . . . . . . . . . . . . . . 149
Private Lines. . . . . . . . . . . . . . . . . . . . . . . . . . . . . . . . . . . . . . . . . . . . . . . . . . 150
Programmable Keys. . . . . . . . . . . . . . . . . . . . . . . . . . . . . . . . . . . . . . . . . . . . 151
Line Key . . . . . . . . . . . . . . . . . . . . . . . . . . . . . . . . . . . . . . . . . . . 151
Park Orbit . . . . . . . . . . . . . . . . . . . . . . . . . . . . . . . . . . . . . . . . . . 151
One-Touch Speed Dial . . . . . . . . . . . . . . . . . . . . . . . . . . . . . . . . 151
Hotline . . . . . . . . . . . . . . . . . . . . . . . . . . . . . . . . . . . . . . . . . . . . 151
Loop Group . . . . . . . . . . . . . . . . . . . . . . . . . . . . . . . . . . . . . . . . 151
Loop Switch . . . . . . . . . . . . . . . . . . . . . . . . . . . . . . . . . . . . . . . . 151
Pickup Group . . . . . . . . . . . . . . . . . . . . . . . . . . . . . . . . . . . . . . . 151
Call Coverage . . . . . . . . . . . . . . . . . . . . . . . . . . . . . . . . . . . . . . . 151
Page Zone . . . . . . . . . . . . . . . . . . . . . . . . . . . . . . . . . . . . . . . . . . 151
Table of Contents
iii
telemanuals.com

Automatic Call Timer or Manual Call Timer . . . . . . . . . . . . . . . 151
Record Key . . . . . . . . . . . . . . . . . . . . . . . . . . . . . . . . . . . . . . . . . 151
Removing Lines and Extensions. . . . . . . . . . . . . . . . . . . . . . . . . . . . . . . . . . . 153
Ringing Assignments . . . . . . . . . . . . . . . . . . . . . . . . . . . . . . . . . . . . . . . . . . . 154
Ringing Line Preference . . . . . . . . . . . . . . . . . . . . . . . . . . . . . . . . . . . . . . . . . 155
Ringing Patterns . . . . . . . . . . . . . . . . . . . . . . . . . . . . . . . . . . . . . . . . . . . . . . . 156
Distinctive Ringing . . . . . . . . . . . . . . . . . . . . . . . . . . . . . . . . . . . 156
Save . . . . . . . . . . . . . . . . . . . . . . . . . . . . . . . . . . . . . . . . . . . . . . . . . . . . . . . . . 158
Selectable Display Messages . . . . . . . . . . . . . . . . . . . . . . . . . . . . . . . . . . . . . 159
Silent Monitor . . . . . . . . . . . . . . . . . . . . . . . . . . . . . . . . . . . . . . . . . . . . . . . . . 161
Speed Dial . . . . . . . . . . . . . . . . . . . . . . . . . . . . . . . . . . . . . . . . . . . . . . . . . . . . 162
Personal Speed Dial . . . . . . . . . . . . . . . . . . . . . . . . . . . . . . . . . . . 162
System Speed Dial . . . . . . . . . . . . . . . . . . . . . . . . . . . . . . . . . . . . 162
One-Touch Speed Dial . . . . . . . . . . . . . . . . . . . . . . . . . . . . . . . . . 162
Storing a Pause, Flash or Delay . . . . . . . . . . . . . . . . . . . . . . . . . . 163
Split . . . . . . . . . . . . . . . . . . . . . . . . . . . . . . . . . . . . . . . . . . . . . . . . . . . . . . . . . 167
Station Call Coverage . . . . . . . . . . . . . . . . . . . . . . . . . . . . . . . . . . . . . . . . . . . 169
Station Message Detail Recording . . . . . . . . . . . . . . . . . . . . . . . . . . . . . . . . . 171
System Timers. . . . . . . . . . . . . . . . . . . . . . . . . . . . . . . . . . . . . . . . . . . . . . . . . 172
Telemarketing Dial . . . . . . . . . . . . . . . . . . . . . . . . . . . . . . . . . . . . . . . . . . . . . 174
Tenant Service . . . . . . . . . . . . . . . . . . . . . . . . . . . . . . . . . . . . . . . . . . . . . . . . . 175
Time and Date . . . . . . . . . . . . . . . . . . . . . . . . . . . . . . . . . . . . . . . . . . . . . . . . . 177
Toll Restriction . . . . . . . . . . . . . . . . . . . . . . . . . . . . . . . . . . . . . . . . . . . . . . . . 178
Tone Patterns . . . . . . . . . . . . . . . . . . . . . . . . . . . . . . . . . . . . . . . . . . . . . . . . . . 180
Traffic Management Reporting. . . . . . . . . . . . . . . . . . . . . . . . . . . . . . . . . . . . 181
Transfer . . . . . . . . . . . . . . . . . . . . . . . . . . . . . . . . . . . . . . . . . . . . . . . . . . . . . . 182
Unsupervised Conference (Tandem Calls) . . . . . . . . . . . . . . . . . . . . . . . . . . . 184
Voice Mail/Automated Attendant . . . . . . . . . . . . . . . . . . . . . . . . . . . . . . . . . . 185
Call Forward to Voice Mail (Mailbox Call Forward) . . . . . . . . . 185
Mailbox Message Waiting (Leaving a Voice Message) . . . . . . . . 185
Message View. . . . . . . . . . . . . . . . . . . . . . . . . . . . . . . . . . . . . . . . 185
Transfer to Voice Mail (Mailbox Transfer) . . . . . . . . . . . . . . . . . 185
Conversation Record . . . . . . . . . . . . . . . . . . . . . . . . . . . . . . . . . . 185
Personal Answering Machine Emulation. . . . . . . . . . . . . . . . . . . 185
Voice Module Unit . . . . . . . . . . . . . . . . . . . . . . . . . . . . . . . . . . . . . . . . . . . . . 189
Voice Prompting Messages . . . . . . . . . . . . . . . . . . . . . . . . . . . . . . . . . . . . . . . 191
Volume Controls . . . . . . . . . . . . . . . . . . . . . . . . . . . . . . . . . . . . . . . . . . . . . . . 193
Walking Class of Service . . . . . . . . . . . . . . . . . . . . . . . . . . . . . . . . . . . . . . . . 194
Programming System Options . . . . . . . . . . . . . . . . . . . . . . . . . . . . . . . . . . . . . . . . 197
Program 1: Class of Service . . . . . . . . . . . . . . . . . . . . . . . . . . . . . . . . . . . . . . 197
Table of Contents
iv DIGITAL SYSTEM Administrator’s Guide
telemanuals.com

Only Intercom Calls at Night . . . . . . . . . . . . . . . . . . . . . . . . . . . 197
Off-Premise Call Forward. . . . . . . . . . . . . . . . . . . . . . . . . . . . . . 198
Break-In (Intrusion) . . . . . . . . . . . . . . . . . . . . . . . . . . . . . . . . . . 198
Camp-On to Busy Extension . . . . . . . . . . . . . . . . . . . . . . . . . . . 198
Internal Call Forwarding . . . . . . . . . . . . . . . . . . . . . . . . . . . . . . 198
Toll Restriction Level . . . . . . . . . . . . . . . . . . . . . . . . . . . . . . . . . 198
Only Local Calls (Day or Night) . . . . . . . . . . . . . . . . . . . . . . . . 198
Only Local Calls at Night . . . . . . . . . . . . . . . . . . . . . . . . . . . . . 198
Extended Ring . . . . . . . . . . . . . . . . . . . . . . . . . . . . . . . . . . . . . . 199
Callback (Line Queuing) Priority . . . . . . . . . . . . . . . . . . . . . . . 199
Direct Trunk Access and Camp-On to Busy Line . . . . . . . . . . . 199
Initiate All Call Page . . . . . . . . . . . . . . . . . . . . . . . . . . . . . . . . . 199
Access Page Zones 1-3 . . . . . . . . . . . . . . . . . . . . . . . . . . . . . . . 199
Silent Monitor . . . . . . . . . . . . . . . . . . . . . . . . . . . . . . . . . . . . . . 199
No Flash for Single Line and ACD Supervisor = Y . . . . . . . . . 199
Single Ring for ASI Calls or Only CO Calls Call Forward to
Voice Mail . . . . . . . . . . . . . . . . . . . . . . . . . . . . . . . . . . . . . . . . . . 200
Program 2: Intercom Signaling . . . . . . . . . . . . . . . . . . . . . . . . . . . . . . . . . . . 202
Call Waiting (Camp-On) Tones . . . . . . . . . . . . . . . . . . . . . . . . . 202
Handsfree Reply on Intercom Calls . . . . . . . . . . . . . . . . . . . . . . 202
Voice-Announced Intercom Calls . . . . . . . . . . . . . . . . . . . . . . . 202
Automatic Handsfree . . . . . . . . . . . . . . . . . . . . . . . . . . . . . . . . . 202
Program 3: System Features . . . . . . . . . . . . . . . . . . . . . . . . . . . . . . . . . . . . . 205
Number of Operators . . . . . . . . . . . . . . . . . . . . . . . . . . . . . . . . . 205
Operator Extension . . . . . . . . . . . . . . . . . . . . . . . . . . . . . . . . . . 205
Number of Digits in a System Speed Dial Code . . . . . . . . . . . . 205
Side Tone Test Digit . . . . . . . . . . . . . . . . . . . . . . . . . . . . . . . . . . 205
Voice Mail Installed . . . . . . . . . . . . . . . . . . . . . . . . . . . . . . . . . . 206
Voice Mail Master Extension Number . . . . . . . . . . . . . . . . . . . 206
Enable Dial-Out of # in a Speed Dial Number . . . . . . . . . . . . . 206
Dial 1 Before Area Code (NPA) Calls . . . . . . . . . . . . . . . . . . . . 206
Walking Class of Service Security Code . . . . . . . . . . . . . . . . . . 206
Play MOH for Transferred Calls . . . . . . . . . . . . . . . . . . . . . . . . 206
Baud Rate of Auxiliary Module’s Port . . . . . . . . . . . . . . . . . . . . 206
Program 4: System Timers. . . . . . . . . . . . . . . . . . . . . . . . . . . . . . . . . . . . . . . 210
(01) Park Orbit . . . . . . . . . . . . . . . . . . . . . . . . . . . . . . . . . . . . . . 210
(02) Hold Recall . . . . . . . . . . . . . . . . . . . . . . . . . . . . . . . . . . . . . 210
(03) Camp-On . . . . . . . . . . . . . . . . . . . . . . . . . . . . . . . . . . . . . . 210
(04) Line Response . . . . . . . . . . . . . . . . . . . . . . . . . . . . . . . . . . 210
(05) Modem Reserve . . . . . . . . . . . . . . . . . . . . . . . . . . . . . . . . . 210
(06) Number of Rings Before Recall . . . . . . . . . . . . . . . . . . . . . 210
(07) Number of Delayed Rings . . . . . . . . . . . . . . . . . . . . . . . . . 211
(08) Flash Response . . . . . . . . . . . . . . . . . . . . . . . . . . . . . . . . . . 211
(09) Dial Tone Detect . . . . . . . . . . . . . . . . . . . . . . . . . . . . . . . . . 211
(10) Make . . . . . . . . . . . . . . . . . . . . . . . . . . . . . . . . . . . . . . . . . . 211
(11) Break . . . . . . . . . . . . . . . . . . . . . . . . . . . . . . . . . . . . . . . . . 212
(12) Interdigit . . . . . . . . . . . . . . . . . . . . . . . . . . . . . . . . . . . . . . . 212
Program 5: PBX Access Codes . . . . . . . . . . . . . . . . . . . . . . . . . . . . . . . . . . . 214
Program 6: Toll Restriction . . . . . . . . . . . . . . . . . . . . . . . . . . . . . . . . . . . . . . 216
Table of Contents
v

Active Dialpad (Continuous Dialing) . . . . . . . . . . . . . . . . . . . . . 216
Special N11 Dialing . . . . . . . . . . . . . . . . . . . . . . . . . . . . . . . . . . 216
0 + Dialing . . . . . . . . . . . . . . . . . . . . . . . . . . . . . . . . . . . . . . . . . . 217
International Dialing . . . . . . . . . . . . . . . . . . . . . . . . . . . . . . . . . . 217
Equal Access Dialing . . . . . . . . . . . . . . . . . . . . . . . . . . . . . . . . . 217
1 + NNX Dialing with Allow/Deny Tables . . . . . . . . . . . . . . . . . 217
NNX Dialing with Allow/Deny Tables . . . . . . . . . . . . . . . . . . . . 217
NPA Dialing with Allow/Deny Tables . . . . . . . . . . . . . . . . . . . . 218
6-Digit Analysis with Allow/Deny Tables . . . . . . . . . . . . . . . . . 218
Program 7: Music and Paging. . . . . . . . . . . . . . . . . . . . . . . . . . . . . . . . . . . . . 223
Enable Background Music . . . . . . . . . . . . . . . . . . . . . . . . . . . . . 223
Enable Music on Hold . . . . . . . . . . . . . . . . . . . . . . . . . . . . . . . . . 223
External Page Zone 1 . . . . . . . . . . . . . . . . . . . . . . . . . . . . . . . . . . 223
Audible Ring Over External All Call Page . . . . . . . . . . . . . . . . . 223
External Page Zone 2 (only if Expansion CEU #1 is installed) . 224
BGM to All External Page Zones . . . . . . . . . . . . . . . . . . . . . . . . 224
Interrupted Ring Relays . . . . . . . . . . . . . . . . . . . . . . . . . . . . . . . 224
Paging and Music Gain (Volume) Over External Speakers . . . . 224
Relay 01 Owner (for the Main CEU only) . . . . . . . . . . . . . . . . . 224
Relay 02 Owner (for Expansion CEU #1 only) . . . . . . . . . . . . . 224
Program 8: Display Messages. . . . . . . . . . . . . . . . . . . . . . . . . . . . . . . . . . . . . 227
Programming Line Options . . . . . . . . . . . . . . . . . . . . . . . . . . . . . . . . . . . . . . . . . . 229
Program 10: Line Port Characteristics . . . . . . . . . . . . . . . . . . . . . . . . . . . . . . 229
Line Circuit Type . . . . . . . . . . . . . . . . . . . . . . . . . . . . . . . . . . . . . 229
Line Gain . . . . . . . . . . . . . . . . . . . . . . . . . . . . . . . . . . . . . . . . . . . 229
PBX Line . . . . . . . . . . . . . . . . . . . . . . . . . . . . . . . . . . . . . . . . . . . 229
Side Tone Test . . . . . . . . . . . . . . . . . . . . . . . . . . . . . . . . . . . . . . . 229
Line Name . . . . . . . . . . . . . . . . . . . . . . . . . . . . . . . . . . . . . . . . . . 229
Program 11: Line Groups . . . . . . . . . . . . . . . . . . . . . . . . . . . . . . . . . . . . . . . . 232
Program 12: Line Features . . . . . . . . . . . . . . . . . . . . . . . . . . . . . . . . . . . . . . . 234
Call Pickup Group . . . . . . . . . . . . . . . . . . . . . . . . . . . . . . . . . . . . 234
Toll Restrict . . . . . . . . . . . . . . . . . . . . . . . . . . . . . . . . . . . . . . . . . 234
Direct Termination (Day) . . . . . . . . . . . . . . . . . . . . . . . . . . . . . . 234
Direct Termination (Night) . . . . . . . . . . . . . . . . . . . . . . . . . . . . . 234
Class of Service . . . . . . . . . . . . . . . . . . . . . . . . . . . . . . . . . . . . . . 235
Programming Extension Options . . . . . . . . . . . . . . . . . . . . . . . . . . . . . . . . . . . . . 239
Program 14: Extension Port Char. . . . . . . . . . . . . . . . . . . . . . . . . . . . . . . . . . 239
Extension Numbering Plan for Ports 00-47 . . . . . . . . . . . . . . . . 239
Circuit Type . . . . . . . . . . . . . . . . . . . . . . . . . . . . . . . . . . . . . . . . . 239
DSS Owner Extension (For DSS Consoles Only) . . . . . . . . . . . 241
DSS Block Number (For DSS Consoles Only) . . . . . . . . . . . . . 241
Extension Name . . . . . . . . . . . . . . . . . . . . . . . . . . . . . . . . . . . . . 241
Program 15: Access Level. . . . . . . . . . . . . . . . . . . . . . . . . . . . . . . . . . . . . . . . 244
Program 16: Line & Group Access. . . . . . . . . . . . . . . . . . . . . . . . . . . . . . . . . 247
Program 17: Key Assignments . . . . . . . . . . . . . . . . . . . . . . . . . . . . . . . . . . . . 250
Undefined Key (UK) . . . . . . . . . . . . . . . . . . . . . . . . . . . . . . . . . . 250
Line Key (LK) . . . . . . . . . . . . . . . . . . . . . . . . . . . . . . . . . . . . . . . 250
Loop Switch (LS) . . . . . . . . . . . . . . . . . . . . . . . . . . . . . . . . . . . . 250
Loop Group (LG) . . . . . . . . . . . . . . . . . . . . . . . . . . . . . . . . . . . . 250
Table of Contents
vi DIGITAL SYSTEM Administrator’s Guide

Park Orbit (PO) . . . . . . . . . . . . . . . . . . . . . . . . . . . . . . . . . . . . . 251
One-Touch Speed Dial Key (SD) . . . . . . . . . . . . . . . . . . . . . . . 251
Hotline (HL) . . . . . . . . . . . . . . . . . . . . . . . . . . . . . . . . . . . . . . . . 251
Group Pickup (GP) . . . . . . . . . . . . . . . . . . . . . . . . . . . . . . . . . . 251
Call Coverage (CCK) . . . . . . . . . . . . . . . . . . . . . . . . . . . . . . . . . 251
Page Zone (PO) . . . . . . . . . . . . . . . . . . . . . . . . . . . . . . . . . . . . . 251
Automatic Call Timer (CTA) . . . . . . . . . . . . . . . . . . . . . . . . . . . 251
Manual Call Timer (CTM) . . . . . . . . . . . . . . . . . . . . . . . . . . . . . 252
Record Key (RK) . . . . . . . . . . . . . . . . . . . . . . . . . . . . . . . . . . . . 252
Data Key . . . . . . . . . . . . . . . . . . . . . . . . . . . . . . . . . . . . . . . . . . . 252
Program 18: Extension Features (I). . . . . . . . . . . . . . . . . . . . . . . . . . . . . . . . 256
Do Not Disturb (DND) . . . . . . . . . . . . . . . . . . . . . . . . . . . . . . . 256
Class of Service (COS) . . . . . . . . . . . . . . . . . . . . . . . . . . . . . . . 256
Ring Group Member (RG) . . . . . . . . . . . . . . . . . . . . . . . . . . . . 256
Call Pickup Group Member (CPG) . . . . . . . . . . . . . . . . . . . . . . 256
Privacy Release Group Member (PRG) . . . . . . . . . . . . . . . . . . . 257
Off-Hook Ringing (OHR) . . . . . . . . . . . . . . . . . . . . . . . . . . . . . 257
DSS/BLF Lamps (BLF) . . . . . . . . . . . . . . . . . . . . . . . . . . . . . . . 257
Line Dial-Up (LDU) . . . . . . . . . . . . . . . . . . . . . . . . . . . . . . . . . 257
Page Zone Member (PZ). . . . . . . . . . . . . . . . . . . . . . . . . . . . . . . 257
Extension’s (Station’s) Operator (SO) . . . . . . . . . . . . . . . . . . . . 257
Speed Dial Block (SDB) . . . . . . . . . . . . . . . . . . . . . . . . . . . . . . 257
Voice Mail (VX) . . . . . . . . . . . . . . . . . . . . . . . . . . . . . . . . . . . . 258
Dataset (DS) . . . . . . . . . . . . . . . . . . . . . . . . . . . . . . . . . . . . . . . . 258
Door Box (receive chimes) (DB) . . . . . . . . . . . . . . . . . . . . . . . . 258
Program 18: Extension Features (II) . . . . . . . . . . . . . . . . . . . . . . . . . . . . . . . 263
Day/Night Ringing Assignments (RA) . . . . . . . . . . . . . . . . . . . 263
Night Ringing (NR) . . . . . . . . . . . . . . . . . . . . . . . . . . . . . . . . . . 263
Delayed Ring Assignment (DRA) . . . . . . . . . . . . . . . . . . . . . . . 263
Prime Line Assignment (PLA) . . . . . . . . . . . . . . . . . . . . . . . . . . 264
Ringing Line Preference (RLP) . . . . . . . . . . . . . . . . . . . . . . . . . 264
Direct Station Selection (DSS) . . . . . . . . . . . . . . . . . . . . . . . . . . 264
Hotline Key Assignments (DSS) . . . . . . . . . . . . . . . . . . . . . . . . 264
Headset Installed (HS) . . . . . . . . . . . . . . . . . . . . . . . . . . . . . . . . 264
Incoming Voice-Announced Call (VA). . . . . . . . . . . . . . . . . . . . 264
Voice Page (VP) Thru Speaker . . . . . . . . . . . . . . . . . . . . . . . . . 264
Whisper Page (VO). . . . . . . . . . . . . . . . . . . . . . . . . . . . . . . . . . . 265
Speed Dial (SD) . . . . . . . . . . . . . . . . . . . . . . . . . . . . . . . . . . . . . 265
Program 19: Hunt Groups . . . . . . . . . . . . . . . . . . . . . . . . . . . . . . . . . . . . . . . 272
Circular Hunt Groups . . . . . . . . . . . . . . . . . . . . . . . . . . . . . . . . 272
Terminal Hunt Groups . . . . . . . . . . . . . . . . . . . . . . . . . . . . . . . . 272
ACD and UCD Hunt Groups . . . . . . . . . . . . . . . . . . . . . . . . . . . 272
Initializing the System . . . . . . . . . . . . . . . . . . . . . . . . . . . . . . . . . . . . . . . . . . . . . . 279
Program 20 . . . . . . . . . . . . . . . . . . . . . . . . . . . . . . . . . . . . . . . . . 279
Table of Contents
vii

- For your notes -
Table of Contents
viii DIGITAL SYSTEM Administrator’s Guide

Introduction
How To Use This Guide
The DIGITAL SYSTEM Administrator’s Guide is in two parts:
•Part I: DIGITAL SYSTEM Features
•Part II: DIGITAL SYSTEM Programs
The number plan used in this manual assumes that your system does
not have an AUX Module installed. For example, extension numbers are
presented as 300-347. To find out more about your system’s number plan, and how
it changes when you install an AUX Module, review the chart on page 12.
Part I: DIGITAL SYSTEM Features
Use Part I to learn about the DIGITAL SYSTEM features. Part I describes each
feature, its operating instructions and programming requirements. The features are
arranged in alphabetical order for easy reference.
Each feature in Part I contains the following:
•An Application/Benefit in the leading paragraph. For example, the benefit for
Park looks like this:
•A Description of the feature.
•The Initial Configuration describing how the feature was programmed at the
factory.
•Using the Feature, which tells you how to operate the feature.
•Understanding Related Programming listing the programs you would use to
customize the feature.
How to Use Part I
To use Part I of this guide:
1. Read about a feature.
2. Check its Initial Configuration.
3. If the initial configuration meets your needs, you don’t have to do any additional
programming for that feature.
OR
If the initial configuration does not meet your needs, check the required pro-
grams under the heading Understanding Related Programming and find them
in Part II.
Part II: DIGITAL SYSTEM Programs
Part II contains the programs you use to customize the features. This part describes
each program and its data codes. Part II also shows you how to enter those data codes
into system memory from a programming extension.
✆Be sure a call gets sent to a person even when you don’t know
what part of the building they are in.
How To Use This Guide
Introduction 1

The programs are arranged in numerical order (1-20), and divided into four
categories. The first three categories are system, line, and extension programs. The
fourth category contains only Program 20. Program 20 resets (initializes) the
system.
IMPORTANT
When you program the system for the first time, run Program 20 before any
others. Program 20 initializes your system. It ensures that the initial values
are installed in Programs 1-19. Failure to run Program 20 as described may
result in erratic system operation.
Each DIGITAL SYSTEM program (1-20) in Part II includes:
•A Description of its programmable options.
•A Feature Reference for each programmable option under the heading FOR
FEATURE INFORMATION. Here you’ll find the DIGITAL SYSTEM feature in
Part I that is related to a programmable option.
•The Initial Configuration in the leading paragraph. For example, the initial con-
figuration for Program 2 looks like this:
A Y means Yes or Enabled, and an N means No or Disabled.
•Filling Out the Program Record Form, which lists the data codes for each pro-
grammable option and shows you how to enter them on the Program Record
Form (P/N N1872PRF03).
•Entering Data into Memory, which provides step-by-step instructions for enter-
ing the data codes into memory.
•Understanding Related Programming listing the related DIGITAL SYSTEM
programs.
✆Program 2 is initially set as follows:
•Call Waiting (Camp-On)Tones = Y
•Handsfree Reply on Intercom Calls = Y
•Voice-Announced Intercom Calls = Y
•Automatic Handsfree = Y
How To Use This Guide
2 DIGITAL SYSTEM Administrator’s Guide

How to Use Part II (Customizing the System)
After you read about a feature in Part I and determine you need to customize it by
using its related programs:
1. Read about a program in Part II. If you are programming the system for the first
time, check the initial configuration. Make sure you need to change it.
2. Go to the heading, Filling Out the Program Record Form. Enter the required
data codes on the Program Record Form.
3. Repeat steps 1-2 for each program a feature requires, and for all features you
must customize.
4. Connect a Display Phone to port 00 (extension 300). You can also program the
system from an extension that has program access level 04 (see Program 15).
5. Do the following (described in the box) if you are programming the system for
the first time. Otherwise, go to step 6.
IMPORTANT
When you program the system for the first time, run Program 20 before any
others. Program 20 initializes your system. It ensures that the initial values
are installed in Programs 1-19. Failure to run Program 20 as described may
result in erratic system operation.
6. Use the instructions on the Program Record Form to enter the data codes into
memory from extension 300. You can also use the instructions provided with the
program (see the heading Entering Data into Memory).
How To Use This Guide
Introduction 3

General Programming Tips
Each program has specific instructions on how to enter its data codes into memory.
There are, however, four basic steps to using any program. Once you become
familiar with them, you will not need to continually refer to the specific
programming instructions.
Using a Program
To use a program:
1. Enter the program mode from extension 300 or any ex-
tension that has program access level 04.
-You must use a Display Phone.
2. Enter a program.
3. Enter the data codes using the dial pad, erase any mis-
takes you make, and move through the program’s fea-
ture options.
4. Save and Exit.
Entering the Program Mode:
To enter the program
mode:
Use the Display Phone at extension 300 (or an extension
with program access level 04 [see Program 15]).
1. Do not lift the handset.
2. Press #.
3. Dial SP.
-The code SP stands for "System Program" and is
77 on the dial pad.
4. Dial 5312.
-The code 5312 is the DIGITAL SYSTEM’s
password.
5. Press #.
- If you leave the system in the program mode too
long without pressing a key or dialing a code, two
things happen: you’ll hear reorder (fast busy) tone
and the system will automatically exit the program
mode.
Entering a Program
To enter a program after
you enter the program
mode:
1. Press the program’s key.
-Programmable keys 1-16, the HOLD, CONF,
MIC/DND and ICM keys give you access to programs
1-20, respectively. Keys 1-5 are on the left, keys 6-10
are on the right, keys 11-16 are right under the
dialpad. The HOLD (Program 17), CONF
(Program 18), MIC/DND (Program 19), and ICM
keys (Program 20) are in the last row of keys.
General Programming Tips
4 DIGITAL SYSTEM Administrator’s Guide

Entering Data, Erasing Mistakes and Moving Through
Program Options
To enter data after you
enter a program:
1. Dial the data.
2. Press the # key.
-This step stores the data and moves you to the next
feature option.
For example:
To enter the data code Y
or N (for "Yes" or "No"):
1. Dial Y or N, which is 9 or 6 on the dial pad.
2. Press #.
When you dial data for the last feature option in a program and press #, you exit the
level you are working in and return to the previous level. In some cases, "returning to
the previous level" means you exit the program and, therefore, do not have to press
the SAVE key to exit the program (see below).
To accept (i.e., not
change) the data on
display and move to the
next feature option:
1. Press the # key.
To erase a mistake:
1. Dial * right after you dial the mistake but before you
press the # key to store it.
-If you make an invalid data entry and press #, you
will hear reorder (fast busy) tone. You should then
dial * and re-enter data.
Saving and Exiting
To save and exit after
entering data:
1. Press the SAVE key.
-Pressing SAVE moves you out of a program, one
level at a time.
-You may have to press SAVE several times to exit all
the way out.
General Programming Tips
Introduction 5
Using Your Telephone
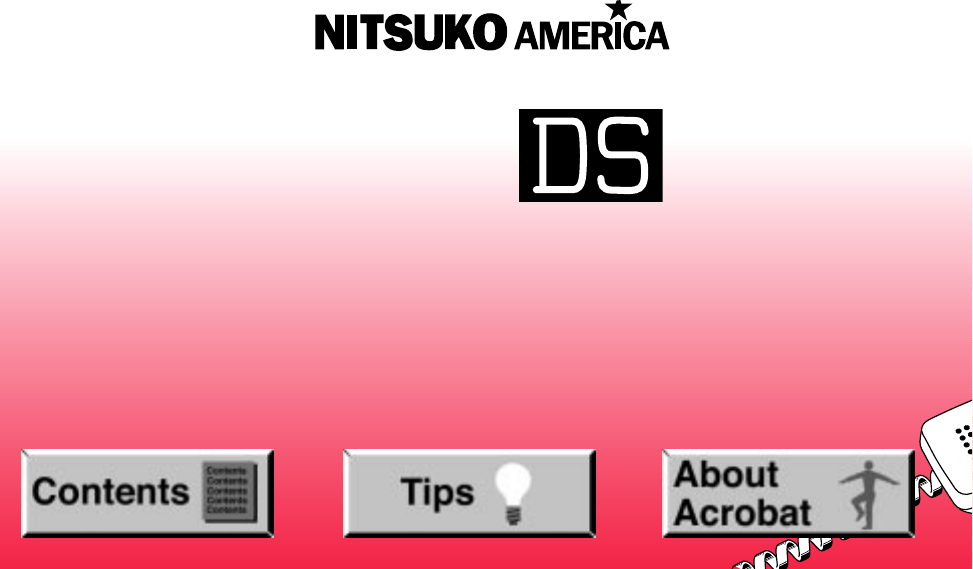
The Type of Phone You Have As the System Administrator, you
have a 16-button telephone (This can
also be referred to as a keyset or a
multibutton phone). Other system
users may have 16-button telephones
as well. Or, they may have Electronic
Single Line (ESL) or 2500 type
(single line) telephones. Instructions
for using 16-button and ESL
telephones are included with each
feature under the heading Using the
Feature. For instructions on 2500 type
telephones, refer to the Analog
Station Interface feature on page 31.
Your phone has 16 programmable keys
and other feature keys that give you
one-button access to certain features.
For example, to place or answer a
Message Waiting, just press MSG. Or,
press MIC/DND to quickly put your
phone in Do Not Disturb. For an
illustration of all the keys on your
phone and what they do, turn to page 16.
Using a Programmable Key with Three Functions
Each of your programmable keys may have up to three functions. For example, a
single key can be a line, Speed Dial
and Direct Station Selection (DSS)
key. When you just press the key,
you get its first level function (e.g.,
line key). When you press ICM, the
key automatically turns into a DSS
key. Press DIAL, and the key
becomes a Speed Dial key.
To find out more about your
programmable keys, turn to page
151.
DIAL
ICM
DSS
(keys 1-15)
Speed Dial
(keys 1-16)
Feature
(keys 1-16)
Using Your Telephone
6 DIGITAL SYSTEM Administrator’s Guide
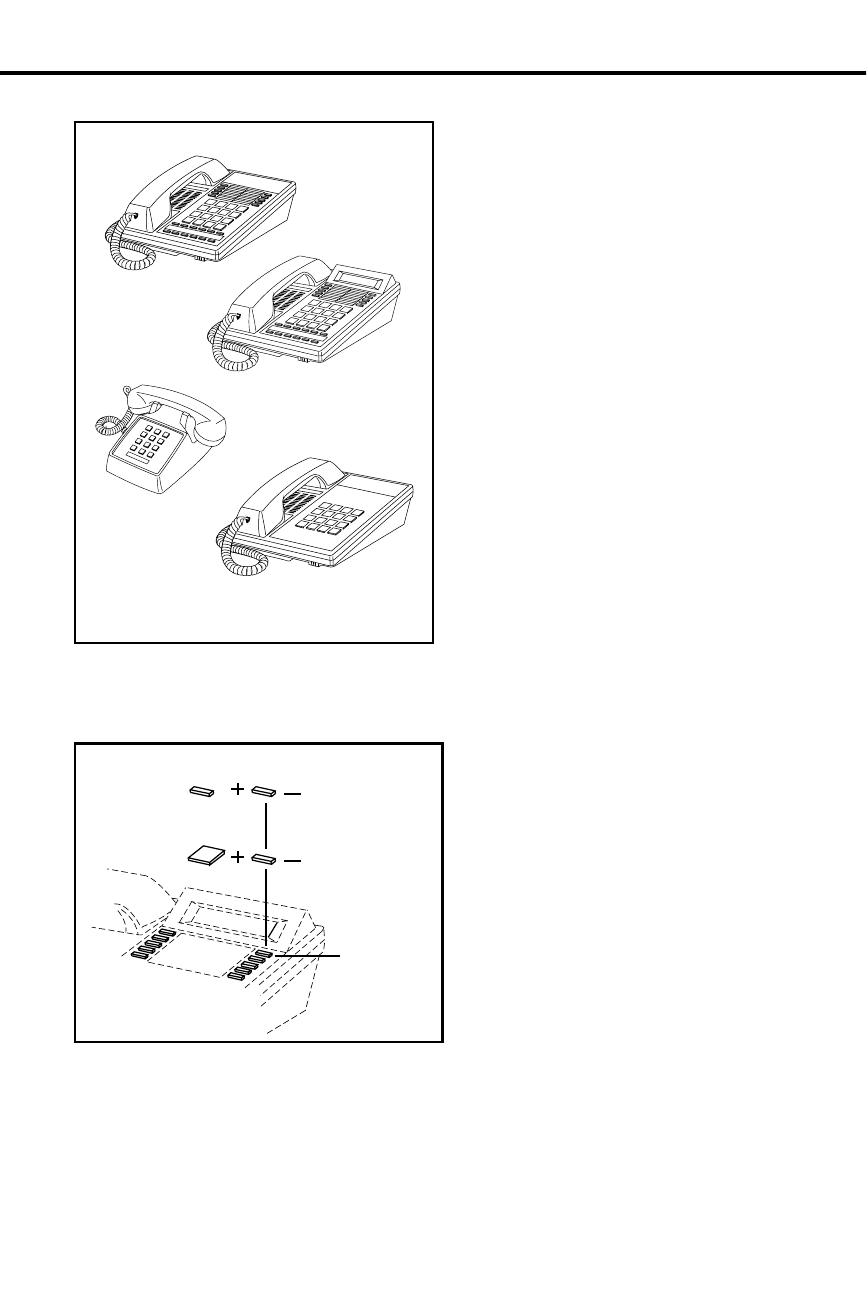
If Your Phone Has an Alphanumeric Display
Your telephone’s Alphanumeric
Display helps you use features and
tells you about your calls. For
example, a ringing outside line may
show you the number of the caller
before you answer. Page 25 shows all
of your phone’s displays. You can
also adjust the brightness of your
display. To find out how, turn to page
29.
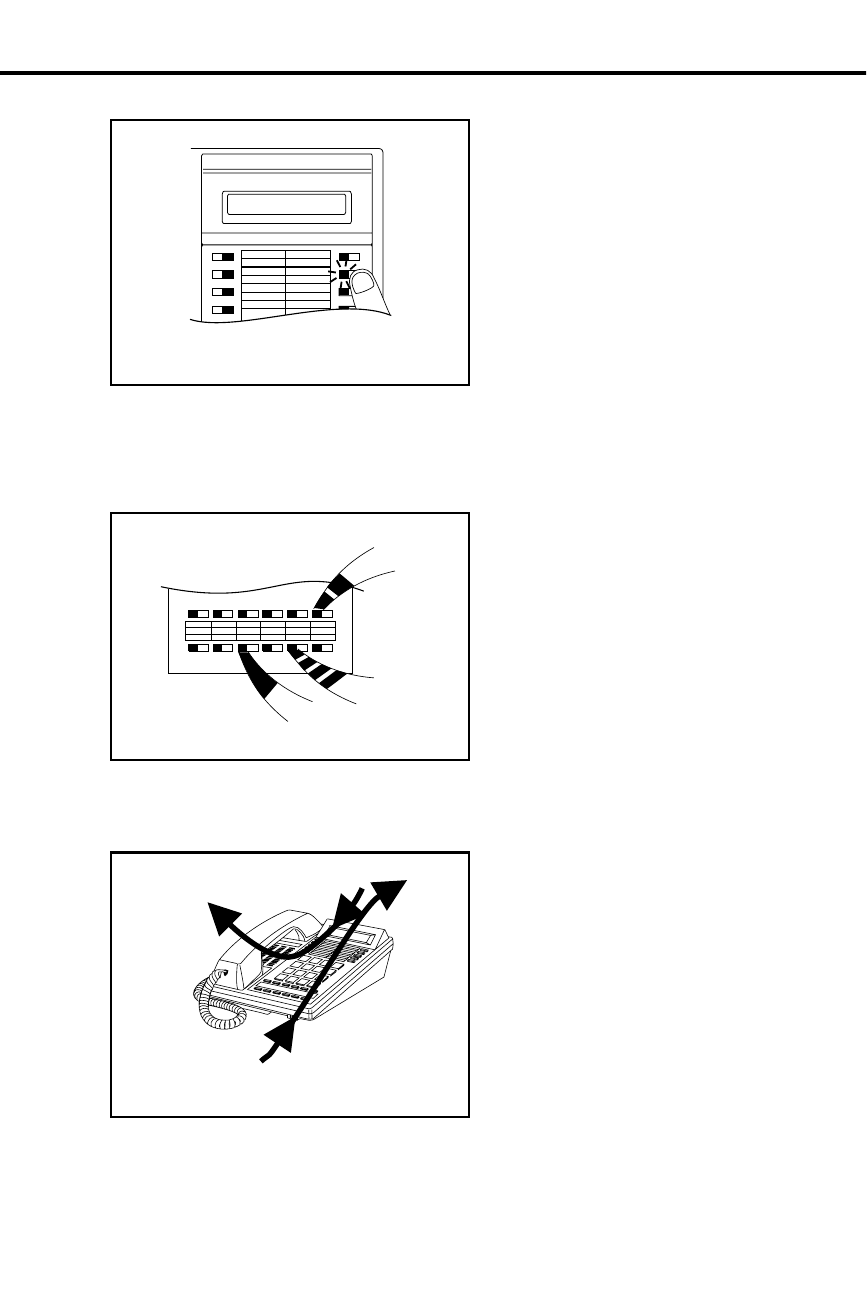
Your Phone’s Key Lights The lights in your phone’s keys help
you use the features. The way they
flash tells you about your call.
Depending on the model of your
phone, your key lights can be red or
both red and green. To find out more
about your key lights, turn to the
charts on pages 14 and 15.
Using Handsfree Instead of the HandsetYour telephone may have a
Speakerphone for Handsfree
operation. This means you can place
and answer calls just by pressing HF.
If your phone has Automatic
Handsfree, you can press a line key
for a Handsfree call without first
pressing HF. With Monitor, you can
press HF to place a call but must lift
the handset to talk or answer. Turn to
page 93 for more on using the
Handsfree options.
MICROPHONE
MUTE
INCOMING CALL
MESSAGE
WAITING
HOLD MIC/DND ICM
CONF MSG HF
FRI 08/18 03:34P
Using Your Telephone
Introduction 7
Dialing Codes to Use Features You can call co-workers, place
outside calls and use many features by
dialing feature access codes. Often,
the code you dial is the first letter in
the feature’s name. For example, dial
C to leave a Callback at a busy
co-worker’s phone. To find out the
codes to dial for outside lines and
co-workers, turn to the chart on page
12.
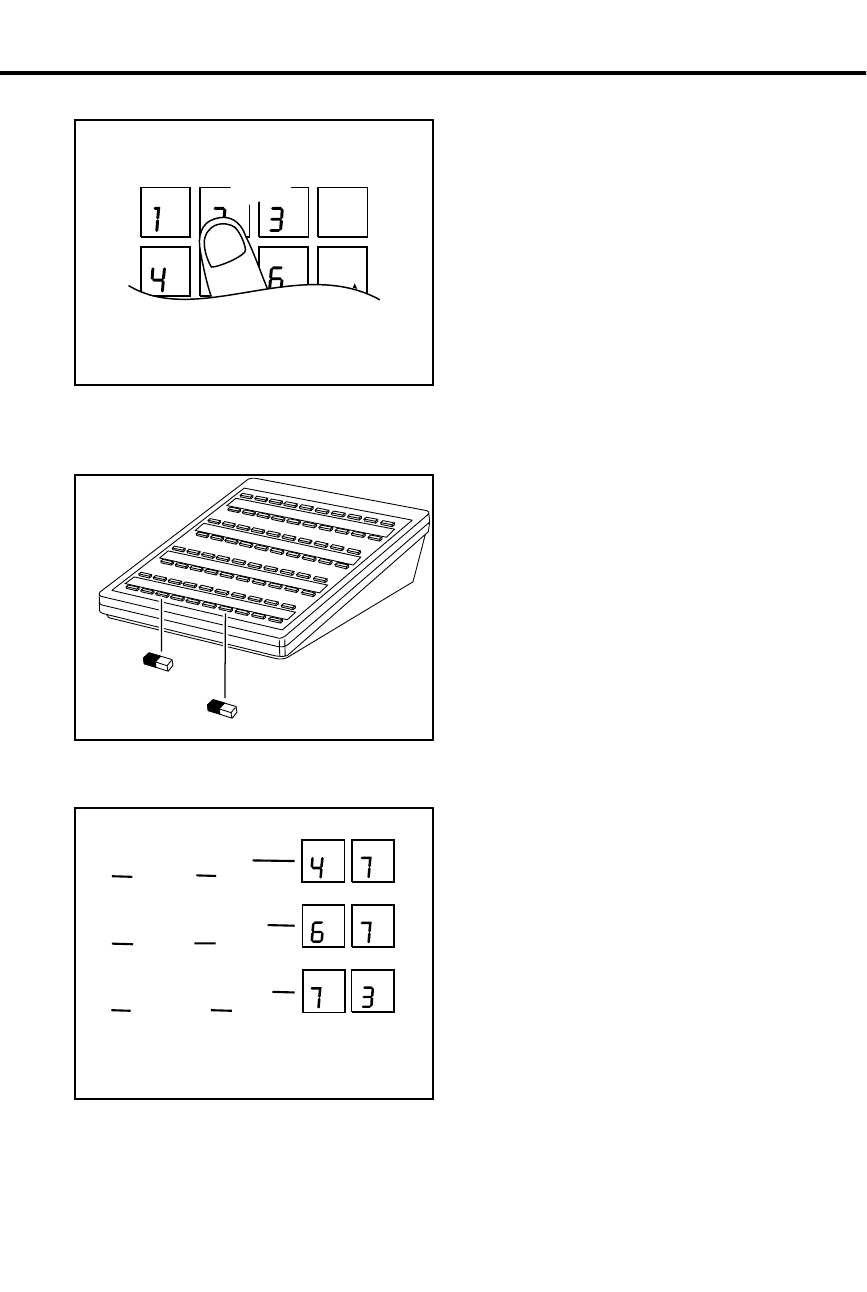
If You Have a DSS Console You may have a DSS Console next to
your phone. When you first use your
DSS Console, many of the keys are
programmed for you. By just pressing
a key, you can easily call (Hotline)
co-workers, Park calls or use Page.
For an illustration of the initial layout
of your DSS Console, turn to page 18.
To find out more on what your DSS
Console can do, turn to page 66.
Customize with User-Programmable Features
With your DIGITAL SYSTEM, you
can customize selected features from
your phone. For an easy-to-use chart
that shows your customizing options,
turn to page 13. Other users with the
proper access level may also be able
to customize features right from the
phone.
AB
DEF
GHI
JKL
MNO
DIAL
LAST
VOL
UP
A
L
L
BA
C
K
C
ALL CALL
PAGE
PARK ORBIT 60
EF
D
P S
R
PR
S
Head Set
Night Ring
Speed Dial
PR
S
M O
N
G I
H
Using Your Telephone
8 DIGITAL SYSTEM Administrator’s Guide

Know when to use your features . . .
Look up what you want to do Then turn to page +
Calling a co-worker
Intercom Calls.....................................103
Paging .................................................138
External Alerting Device ......................84
Automatic Ringdown............................39
Multiple Attendants ............................118
Outside calls
Placing and Answering .......................132
Prime Line Selection...........................134
Ringing Line Preference.....................155
Ringing Assignments..........................154
Delayed Ringing ...................................62
Direct Inward Lines ..............................64
Private Lines .......................................150
Account Codes......................................23
Dialing Number Preview ......................63
Call Timer .............................................49
Flash......................................................85
Centrex/PBX Feature Keys...................57
DP/DTMF Compatibility......................77
Other Common Carriers .....................131
Equal Access .........................................79
Music on Hold ....................................120
Handling and rerouting
your calls
Handsfree..............................................93
Monitor ...............................................117
Hold.......................................................99
Split.....................................................167
Transfer ...............................................182
Park .....................................................141
Call Forwarding ....................................44
Selectable Display Messages..............159
Volume Controls .................................193
Alphanumeric Display..........................25
Ringing Patterns..................................156
Tone Patterns.......................................180
When your call can’t go through
Camp-On...............................................55
Off-Hook Signaling ............................126
Callback ................................................50
Line Queuing ......................................108
Message Waiting.................................113
Message Center...................................112
Voice Mail...........................................185
Whisper Page ......................................126
Intrusion..............................................106
The power of digital voice
processing
Personal Greeting................................145
Operator Assistance ............................128
Voice Prompting Messages.................191
Using Your Telephone
Introduction 9

Know when to use your features . . .
Look up what you want to do Then turn to page +
Placing calls quickly
Speed Dial .......................................... 162
Direct Station Selection ....................... 69
Last Number Redial ........................... 107
Save .................................................... 158
Directory Dialing ................................. 72
When you work in groups
Privacy Release .................................. 149
Group Call Pickup................................ 88
Group Ringing...................................... 91
Directed Call Pickup ............................ 71
Extension Hunting................................ 81
If you need privacy
Do Not Disturb..................................... 74
Microphone Mute, On/Off ................. 115
Headset................................................. 95
Background Music ............................... 42
Have a telephone meeting
Conference ........................................... 60
Unsupervised Conference .................. 184
Group Listen......................................... 90
Meet Me Conference.......................... 111
Streamlining and personalizing
your telephone
Hotline................................................ 101
Direct Station Selection ....................... 69
Programmable Keys........................... 151
Station Call Coverage ........................ 169
Advanced features and call
processing
Automatic Call Distribution................. 36
Caller ID............................................... 51
Telemarketing Dial............................. 174
Voice Module Unit............................. 189
Walking Class of Service ................... 194
Data ...................................................... 61
Features just for attendants
Alarms .................................................. 24
Alternate Attendant .............................. 30
Silent Monitor .................................... 161
Night Answer ..................................... 121
Removing Lines and Ext.................... 153
Forced Line Disconnect ....................... 87
Time and Date .................................... 177
Call Forward System Cancel................ 47
Unique extension types
Door and Relay Box............................. 75
Analog Station Interface ...................... 31
Dial OPX/ASI Module......................... 31
PCU Module....................................... 143
Using Your Telephone
10 DIGITAL SYSTEM Administrator’s Guide

Know when to use your features . . .
Look up what you want to do Then turn to page +
Managing your system
Automatic Route Selection...................40
Battery Backup .....................................43
Power Failure Telephone ....................147
Call Intercept.........................................48
Class of Service ....................................58
Extended Ringing .................................80
Flexible Numbering Plan......................86
Maintenance Reports/Utilities ............110
Non-Blocking System.........................125
Privacy.................................................148
SMDR .................................................171
System Timers.....................................172
Tenant Service.....................................175
Toll Restriction....................................178
Traffic Management............................181
Using Your Telephone
Introduction 11
Charts and I llustrations
This section contains handy charts and illustrations for your reference. You’ll find:
•The dialing plan (the numbers you dial) — see below
•A chart for the system’s User-Programmable features — see page 13
•Flash rates for telephones with dual color (red and green) LEDs — see page 14
•Flash rates for telephones with single color (red) LEDs — see page 15
•Multibutton telephone key layout — see page 16
•Electronic Single Line (ESL) key layout — see page 17
•DSS Console key layout (page 18)
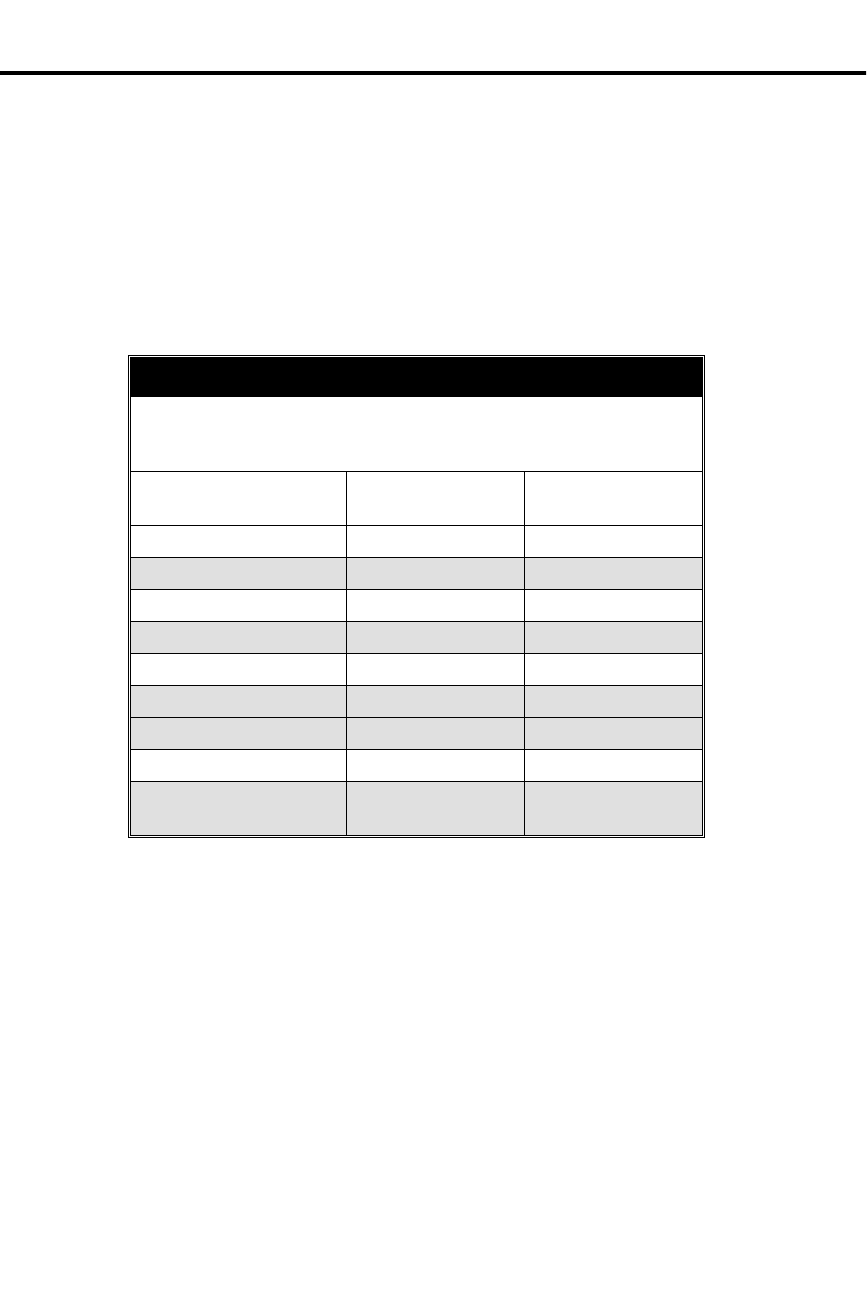
The System Number (Dialing) Plan
Your System’s Dialing Plan
This chart shows the numbers you dial for extensions, outside lines, Ring
Groups and Selectable Display Messages. Ask your communications
manager which system you have, so you’ll know which numbers to dial.
DIGITAL SYSTEM
w/o AUX DIGITAL SYSTEM
w/AUX
Extensions 300-323 300-371
Outside Lines 801-808 801-824
Outside Line Codes 01-08 01-24
Outside Line Groups 9, 90-98 9, 90-98
Outside Line Extensions 348-355 372-395
PCU Extensions – 368-371
Ring Groups 364-371 396-403
Selectable Display Messages 00-15 00-15
Speed Dial Bocks (see
Speed Dial on page 162) 01-28 01-57
Charts and Illustrations
12 DIGITAL SYSTEM Administrator’s Guide

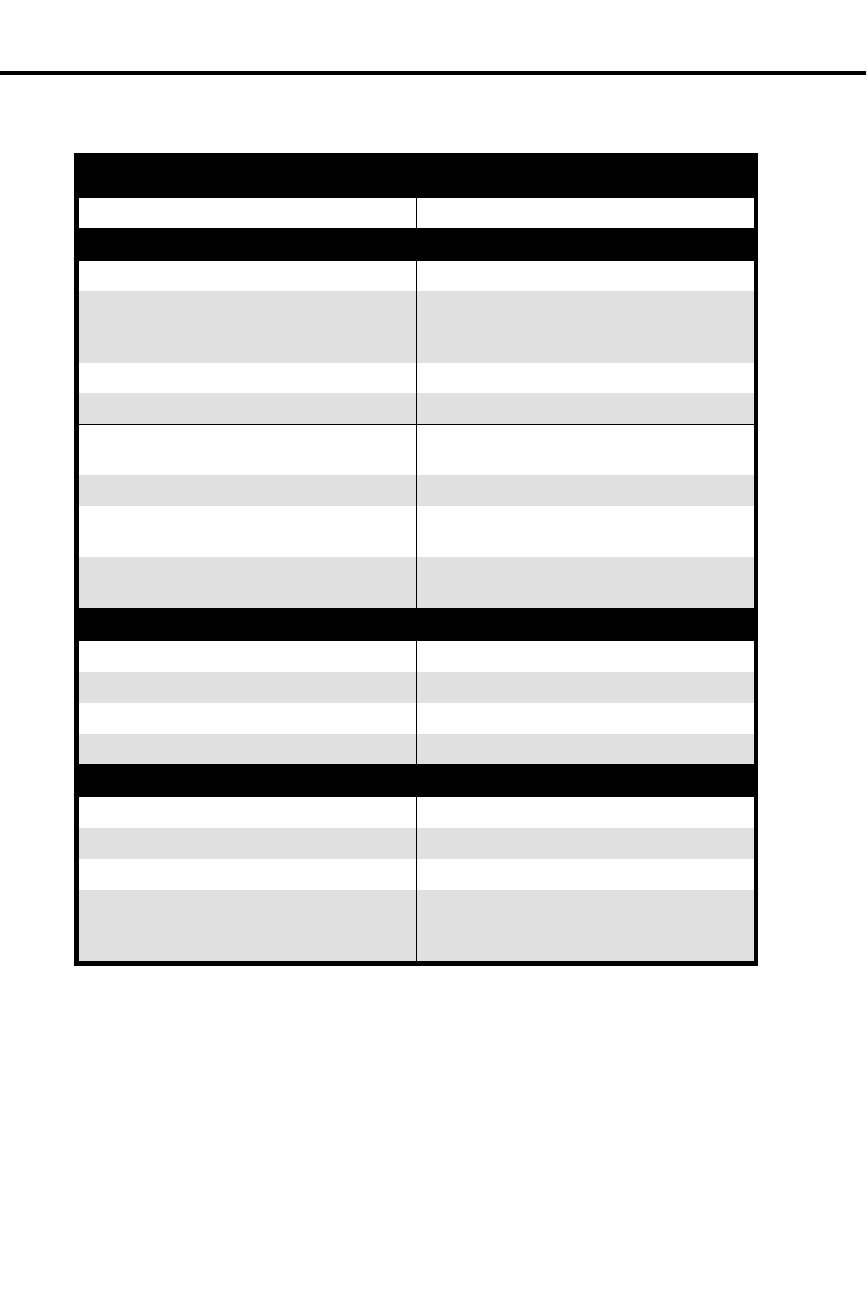
User-Programmable Features
DIGITAL SYSTEM USER-PROGRAMMABLE FEATURES
To program a feature, press # and the feature’s code. For example, to set
Night Ring, press # and dial NR. The remaining steps vary with each feature.
Your access level determines the features you can program. See your
communications manager. Note that enabling RA or NR disables DRA and
vice versa. To disable ringing, disable NR, RA and DRA.
DELAYED RING
ASSIGNMENT # + DRA + Line key +Y(es) or N(o) + SAVE
DSS # + DSS + DSS key + ext. + SAVE
HEADSET # + HS + Y(es) or N(o) + SAVE
HOTLINE # + HL + Hotline key + ext. + SAVE
NIGHT RING # + NR + Line key +Y(es) or N(o) + SAVE
PAGE # + VP + Y(es) or N(o) + SAVE
PRIME LINE # + PLA + Line key + Y(es) or N(o) + SAVE
RING ASSIGNMENT # + RA + Line key + Y(es) or N(o) + SAVE
RINGING LINE
PREFERENCE # + RLP + Y(es) or N(o) + SAVE
SPEED DIAL # + SD + One-Touch Speed key (or bin + #) +
(Display set only) Name or # + line key (or
line/group code + #) or INTERCOM + number (32
digits max.) + SAVE
TIME AND DATE # + TD + Month (01-12) + # + Date (1-31) + # +
Year (2 digits) + # + Hour (00-23) + # + Minutes
(00-59) + SAVE
VOICE ANNOUNCE # + VA + Y(es) or N(o) + SAVE
WHISPER PAGE # + VO + Y(es) or N(o) + SAVE
Charts and Illustrations
Introduction 13
Flash Rates for Keysets with Dual Color (Red and Green) LEDs
Graphite Phone with Dual Color LEDs
Your phone is idle (not on a call) All LEDs out (dark)
Outside Calls
An outside line is busy The line key is On Red
An outside call is ringing your phone The line key flashes Slowly Red if it’s
shared, Off then Quickly Flashing
Green if it’s just for you
And then you answer it The line key is On Green
Or answer it with Privacy released The line key flashes Quickly Green
You place the outside call on Hold The line key is On then Slowly
Flashing Green
Or a co-worker places it on Hold The line key flashes Moderately Red
Or you place the outside call on
Exclusive Hold The line key is On then Quickly
Flashing Green
If a call on Hold recalls to you The line key is Off then Quickly
Flashing Green
Intercom Calls
An Intercom call rings your phone ICM flashes Slowly Green
You answer the Intercom call ICM flashes Quickly Red
You place the Intercom call on Hold HOLD flashes Quickly Green then On
And then it recalls to you ICM flashes Slowly Green
Miscellaneous Features
You activate Microphone Mute MIC/DND is On Red
You activate Do Not Disturb MIC/DND flashes Quickly Red
You have a Message Waiting MSG flashes Quickly Red
You activate Call Forwarding, Personal
Greeting or Selectable Display
Messaging
MSG flashes Slowly Green
Charts and Illustrations
14 DIGITAL SYSTEM Administrator’s Guide

Flash Rates for Keysets with Single Color (Red) LEDs
Phone with Single Color (Red) LEDs
Your phone is idle (not on a call) All LEDs out (dark)
Outside Calls
An outside line is busy The line key is On
An outside call is ringing your phone The line key flashes Slowly if it’s
shared, Off then flashing Quickly if it’s
just for you
And then you answer it The line key is On
Or answer it with Privacy released The line key flashes Quickly
You place the outside call on Hold The line key is On then flashing
Moderately
Or a co-worker places the call on Hold The line key flashes Moderately
Or you place the outside call on
Exclusive Hold The line key is On then flashing Quickly
If a call on Hold recalls to you The line key is Off then flashing
Quickly
Intercom Calls
An Intercom call rings your phone ICM flashes Slowly
You answer the Intercom call ICM flashes Quickly
You place the Intercom call on Hold HOLD is ON then flashes Quickly
And then it recalls to you ICM flashes Slowly
Miscellaneous Features
You activate Microphone Mute MIC/DND is On
You activate Do Not Disturb MIC/DND flashes Quickly
You have a Message Waiting MSG flashes Quickly
You activate Call Forwarding, Personal
Greeting or Selectable Display
Messaging
MSG flashes Slowly
Charts and Illustrations
Introduction 15
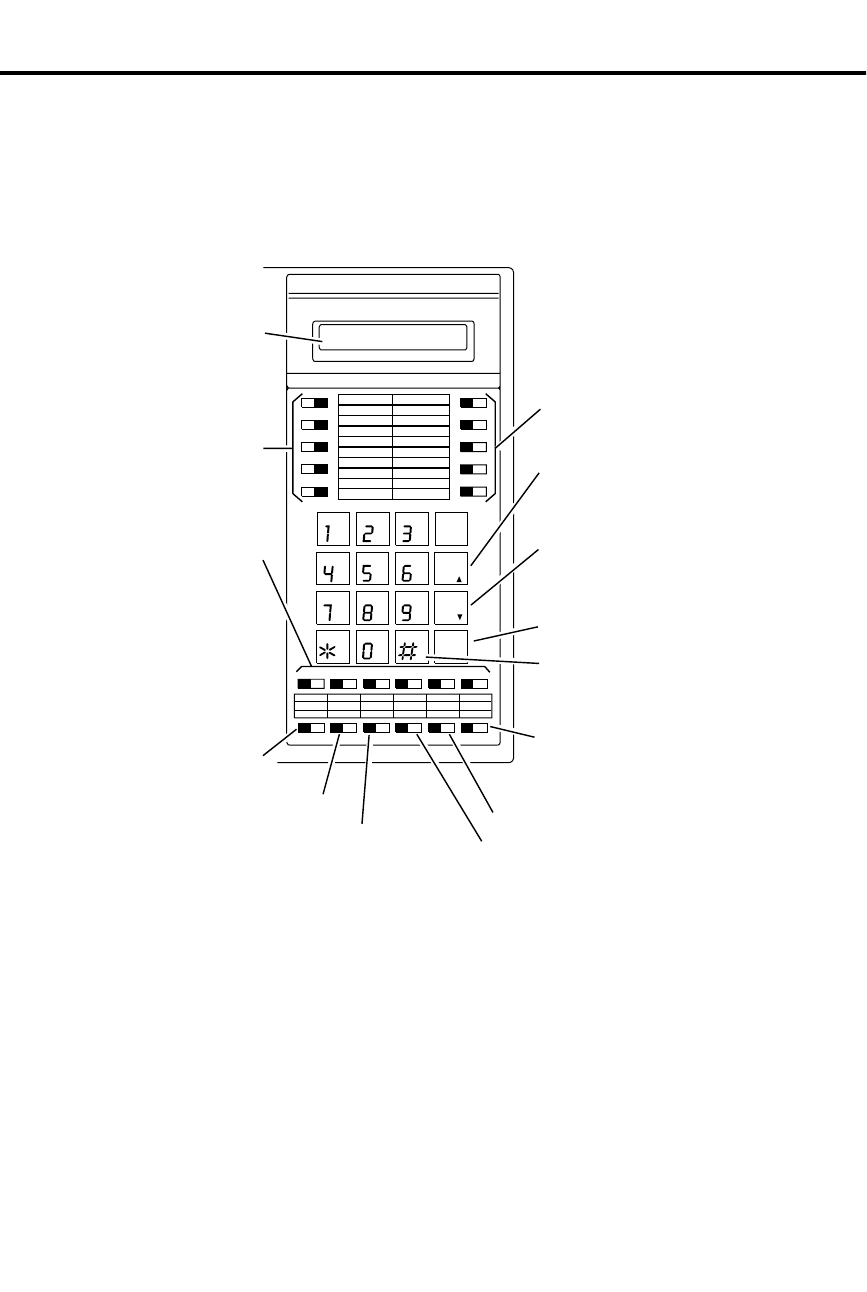
Multibutton Telephone Key Layout
Programmable
Feature Keys
Programmable
Feature Keys
Programmable
Feature Keys
Conference
Intercom
Do Not Disturb,
Microphone Mute
Night Answer Key
(Attendant)
Handsfree
Intercom Loop Key
(Attendant)
Message Waiting
Programming Mode
Feature, Flash
Save
or
Volume Down
Last Number Redial
or
Volume Up
Hold,
Background Music
ABC
DEF
GHI
JKL
MNO
PRS
TUV
WXY
DIAL
LAST
VOL
UP
SAVE
VOL
DN
FTR
PGM
FRI 08/18 03:34P
HOLD MIC/DND ICMCONF MSG
N1870 - 16
HF
Display
1
2
3
4
5
11 12 13 14 15 16
6
7
8
9
10
Charts and Illustrations
16 DIGITAL SYSTEM Administrator’s Guide
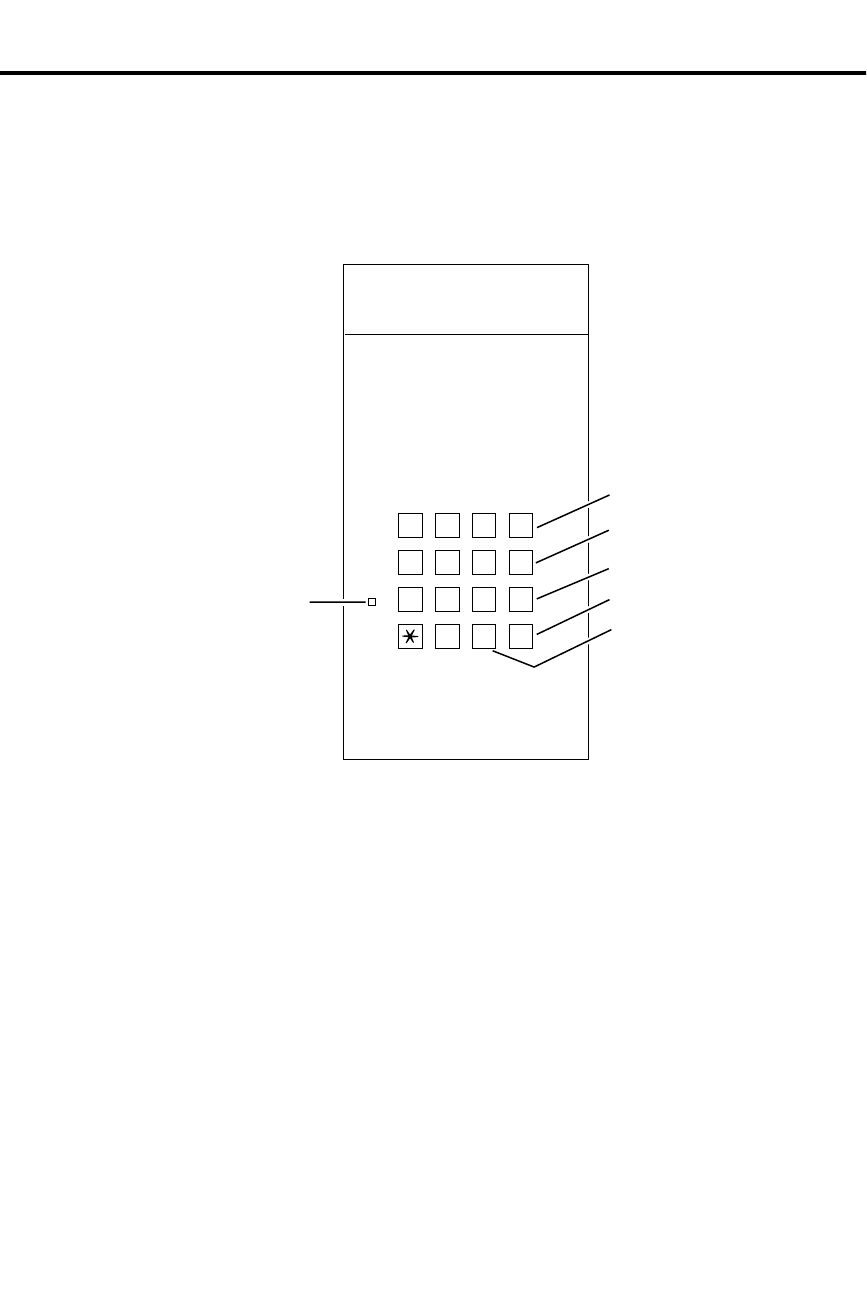
Electronic Single Line (ESL) Key Callouts
Hold
Programming
Mode
Volume Down
Volume Up
Transfer
01850L31
123
456
789
0
TRF
VOL
UP
VOL
DN
HLD
ABC DEF
GHI JKL MNO
PRS TUV WXY
PGM
#
Message
Waiting LED
Charts and Illustrations
Introduction 17

DSS Console Key Layout
301 302 303 304 305 306 307 308 309 310
321 322 323 324 325 326 327 328 329 330
341 342 343 344 345 346 347
311 312 313 314 315 316 317 318 319 320
331 332 333 334 335 336 337 338 339 340
PAGE PAG 1 PAG 2 PAG 3 60 61 62 RLS
N1850 - 50
Charts and Illustrations
18 DIGITAL SYSTEM Administrator’s Guide

About Related Documents
Below are the other DIGITAL SYSTEM manuals and guides that you will find
useful. Periodically check with your Sales Representative to be sure you have most
up-to-date versions.
Description Part Number Helps you . . .
DIGITAL SYSTEM
Program Record Form N1872PRF03 Record the data codes for each
DIGITAL SYSTEM program and
shows you how to enter the data
codes into memory
DIGITAL SYSTEM
Hardware Manual N1870INS02 Understand the DIGITAL SYSTEM
equipment and how to install it
DIGITAL SYSTEM
Installation Template 960-592-00 Quickly install the DIGITAL
SYSTEM and get it up and running
DIGITAL SYSTEM
Feature and Terminal
Programming Manual
N1870SWG03 Understand the DIGITAL SYSTEM
features and shows you how to
program them from a terminal
connected to the AUX Module
DIGITAL SYSTEM
Multibutton Telephone
Feature Handbook
N1870MFH03 Use the DIGITAL SYSTEM features
from a Multibutton Telephone
DIGITAL SYSTEM
Multibutton Telephone
Quick Reference Guide
N1872MBG03 Quickly access the most commonly
used features from a Multibutton
Telephone
DIGITAL SYSTEM
Electronic Single Line
User Guide
N1872SLO02 Quickly access the most commonly
used features from an electronic
Single Line Telephone
About Related Documents
Introduction 19

– For your notes –
About Related Documents
20 DIGITAL SYSTEM Administrator’s Guide

Part I
DIGITAL SYSTEM Features
Part I: DIGITAL SYSTEM Features 21

- For your notes -
22 DIGITAL SYSTEM Administrator’s Guide
telemanuals.com

Feat ures A – H
Account Codes
✆Uniquely identify a call with a special number so it is easy to keep
track of who you talked to and, if necessary, charge them for your
time.
When your system is equipped with Station Message Detail Recording (SMDR), you
can assign a 10-digit Account Code to a call. The Account Code will print out with
the other SMDR data for that call. You enter the code while placing the call or while
on the call.
For introductory information on SMDR, see page 171.
Account Codes and SMDR require the AUX Module and a customer-provided ASCII
record collection device (e.g., printer or terminal). Account Code and SMDR options
are programmed through a terminal connected to the AUX Module. For more
information, see Account Codes and SMDR in the DIGITAL SYSTEM Feature and
Terminal Programming Manual.
Initial Configuration
Account Codes not allowed
Using the Feature
N/A
Understanding Related Programming
Program 3
To set the baud rate of the AUX Module’s port for
terminal programming (LOCAL BAUD = 00 [300], 01
[1200], 02 [2400], 03 [4800], 04 [9600] or 05 [19.2K] + #)
Account Codes
Part I: DIGITAL SYSTEM Features 23
telemanuals.com

Alarms
✆You can, as the attendant, quickly zero in on a system problem and
report it to your service center and/or remove the problem line or
extension from service.
If you are an attendant, your phone’s display may show Alarm messages. You can
view the cause of the Alarm by pressing a single button.
You may see MINOR ALARM, MAJOR ALARM or MAJOR/MINOR ALARM. A
minor alarm occurs when an extension is unplugged or fails, or when a line fails. A
major alarm occurs when an expansion KSU (CEU) fails. A major/minor alarm
occurs when both a major and minor alarm occur simultaneously. After you view an
extension or line failure, you may want to remove the extension or line from service
(see page 153).
When an Alarm displays, your phone will not ring normally for incoming calls. If
your phone has Off-Hook Ringing, it rings with a single beep (repeated). If your
phone does not have Off-Hook Ringing, calls do not ring at all.
Initial Configuration
Alarms occur at attendant extension 300
Using the Feature
To View Alarms from your
attendant phone:
1. Do not lift handset.
2. Press MSG.
-The display shows you the cause of the alarm. For
example, you may see STA 302 FAILED or LINE 02
FA I L E D .
3. Press MSG to see if there are more alarms.
-When you see the first failure message again, you
have gone through the entire list.
4. Lift and replace handset to clear the alarms.
Understanding Related Programming
Program 18 (I)
To assign Off-Hook Ringing to an attendant extension so
their phone "rings" while Alarms display (OHR + # + Y
or N + #)
Program 3
To assign attendant extensions (OPR nn EXT =
Extension number + #)
Alarms
24 DIGITAL SYSTEM Administrator’s Guide

Alphanumeric Display
✆See which extension is calling you, which call you are picking up,
etc.
If you have a Display Phone, you see "feature status messages" on your display when
you use your phone. For example, you see any number you dial, the extension that is
calling you, the name of the line you are answering (if names are programmed), a
recalling Transfer (when the destination extension does not answer it), etc. When
your phone is idle, the display shows you the time and date. In addition, you can
control the brightness of your display.
All the feature status display messages are listed below in alphabetical order. Some
only appear at the attendant phone, and are so noted. See also Selectable Display
Messages on page 159.
This display . . . Appears when you . . .
ACCESS DENIED Try to use company-wide (System Speed Dial)
Directory Dialing from a restricted extension
ALT OPR ASSIGNED
(Attendant extension only) Enable Alternate Attendant
B name Answer a Transfer recall from busy extension with
indicated name
Bin No. = nn Dial # SD, then first digit of a Speed Dial bin
BUSY RECALL nnn Answer a Transfer recall from busy extension nnn
CALL FROM nnn Receive an Intercom call from extension nnn
CALL FROM Lnn Press a key to answer line nn
CALL FROM ORBIT Retrieve a call from a Park Orbit
Caller’s name Receive a call from an extension or answer a line
with indicated name
CANCEL ALT OPR
(Attendant extension only) Cancel Alternate Attendant
CFWD FROM nnn Receive a call forwarded from extension nnn
COMPANY WIDE DIR Dial C for company-wide (System Speed Dial)
Directory Dialing
CONFERENCE CALL Establish a Conference or join a call using Privacy
Release
DATE = nn Set the Time and Date
Date and Time Look at your phone while it is idle
DAY & NIGHT RING Dial # RA to program Ring Assignments
Alphanumeric Display
Part I: DIGITAL SYSTEM Features 25

This display . . . Appears when you . . .
DELAYED RING Dial # DRA to program Delayed Ringing
Assignment
DIAL PREVIEW Dial * to activate Dialing Number Preview
Digits Dial a call
DND OFF Disable Do Not Disturb
DND ON Enable Do Not Disturb
DO NOT DISTURB Call an extension in Do Not Disturb
DSS ASSIGNMENT Dial # DSS to program Direct Station Selection
DSS LAMP FIELD Press ICM
DSS, EXT, 6,9,8 ? Press ICM # (system shows you what you can do
next: press DSS key, dial extension or 6 for
Selectable Display Messages [9 & 8 not available])
EXP. KSU FAILED
(Attendant extension only) Receive a MAJOR ALARM from the system that
the expansion KSU failed
EXT Press ICM # (with DSS suppressed) and system
shows selection options (you can dial an extension)
F name
FWD to nnn Place an Intercom call to an extension that has
forwarded its calls to extension nnn or to extension
with assigned name
GROUP-R PICK-UP Answer (pick up) an outside call ringing a Ring
Group (when your extension is not a member of
the group)
HEADSET = Dial # HS to program Headset operation
HF CIRCUIT BUSY Try to use Handsfree and no system Handsfree
(Speakerphone) circuits are available
HOLD RECALL nnn Pick up a call abandoned on Hold by extension nnn
HOLD/WAIT xx/yy Transfer a call to a busy extension that has xx calls
on Hold and yy calls Camped-On (waiting)
HOT LINES Dial # HL to program Hotline keys
HOUR = nn Set Time and Date
ICM DIRECTORY Dial I for Intercom directory
ICM NO: Press a Direct Station Selection or Hotline key to
program it
INC VOICE CALL = Dial # VA to program voice-announced Intercom
calls
Alphanumeric Display
26 DIGITAL SYSTEM Administrator’s Guide

This display . . . Appears when you . . .
LINE nn Answer an outside call on line nn
LINE nnn FAILED
(Attendant extension only) Press MSG to view a MINOR ALARM and line
nnn has failed
MAJOR ALARM
(Attendant extension only) Receive major alarm from the system
MAJOR/MINOR ALRM
(Attendant extension only) Receive both major and minor alarms from the
system simultaneously
MIKE MUTED Press MIC/DND to turn off the phone’s mic
MINOR ALARM
(Attendant extension only) Receive minor alarm from the system
MINUTES = nn Set the Time and Date
MONTH = Set the Time and Date
MSG FRM nnn View Message Waitings and have one from
extension nnn
Name Place a call, answer a call, or view a Message
Waiting for an extension with a programmed name
NIGHT MODE OFF
(Attendant extension only) Press MIC/DND to disable Night Mode operation
NIGHT MODE ON
(Attendant extension only) Press MIC/DND to enable Night Mode operation
NIGHT RING Dial # NR to program Night Ringing for lines
NO RAM INSTALLED Try to use Speed Dial Directory Dialing in a
system without an AUX Module
NO SPEED DIAL Try to use Personal Speed Dial Directory Dialing
with no Speed Dial blocks assigned in
programming
NO. OF MSG = nn Press MSG to check the number of Voice Mail
messages
ORBIT RECALL nnn Answer a parked call that is recalling extension nnn
OUT OF AREA (Requires Caller ID) Outside caller has dialed from
an area that does not support Caller ID
P Assigned name Pick up (answer) a call for extension with assigned
name
PAGE THRU SPKR = Dial # VP to program paging thru the speaker
PARKED IN nn Park a call in orbit nn
Alphanumeric Display
Part I: DIGITAL SYSTEM Features 27

This display . . . Appears when you . . .
PERSONAL DIR. Dial P for Personal Directory Dialing
PICKUP FROM nnn Pick up a call ringing extension nnn
PRIME LINE Dial # PLA to program a Prime Line
PRIVACY Press line key to have Privacy
PRIVATE (Requires Caller ID) Outside caller has blocked
Caller ID
PRIVATE CALL Press a line key for a line that has Privacy enabled
PROGRAM Dial # to program a feature
R Assigned name Answer recalling line from extension with
assigned name
RELEASE PRIVACY Press a line key to release Privacy on a call for
which you previously established Privacy
RING LINE PREF = Dial # RLP to program Ringing Line Preference
RING NO ANS nnn Answer a line recalling from extension nnn
SELECT LNE/GRP Dial # SD + bin (system wants line or group no.)
SELECT IDLE LINE Press DIAL to place call (using Dial Number
Preview) and system asks you to select a line
SPEED DIAL Dial # SD to store a Speed Dial number
SPEED DIAL BINS Press DIAL to use Speed Dial
Speed Dial name Make a Speed Dial call with a stored name
STA nnn FAILED
(Attendant extension only) Receive a MINOR ALARM that extension nnn
failed
UNAVAILABLE (Requires Caller ID) The telephone company’s
Caller ID is out of service
UNLISTED NAME Try to access Directory Dialing and the system has
no names programmed
WELCOME Unplug and plug in your extension
WHISPER PAGE = Dial # VO to program Whisper Page
YEAR = nn Set Time and Date
Initial Configuration
All displays appear (without names) at Display phones
Alphanumeric Display
28 DIGITAL SYSTEM Administrator’s Guide

Using the Feature
To control the brightness
(contrast) of the display:
1. Press VOL UP or VOL DN while your phone is idle
(Background Music not playing).
Understanding Related Programming
Program 14
To assign extension names so they appear in displays (See
the extension name entry procedure on page 242)
Program 10
To assign line names so they appear in displays (See the
line name entry procedure on page 230)
Alphanumeric Display
Part I: DIGITAL SYSTEM Features 29

Alternate Attenda nt
✆Temporarily leave your attendant position without missing calls or
asking a co-worker to take your place.
If you are an attendant, Alternate Attendant lets you send your incoming calls to
another extension. When you activate Alternate Attendant, outside calls ring your
attendant extension and the alternate extension. Intercom calls ring only the alternate
unless the alternate is busy; then they ring your attendant extension instead.
Initial Configuration
Alternate Attendant enabled for extension 300
Using the Feature
To activate Alternate
Attendant at an attendant
extension:
(This procedure automatically cancels a Do Not Disturb
or Call Forward condition that is active at the alternate.)
1. Lift handset.
-If you have a One-Touch Speed Dial key, you can
press it instead of using steps 2-5.
2. Press ICM.
3. Dial #.
4. Dial alternate’s extension number.
-Do not dial another attendant extension.
5. Dial 3.
-MSG and MIC/DND keys flash.
6. Hang up.
- If the alternate activates DND after you send calls
there, the alternate assignment is canceled.
-An alternate cannot forward calls to yet another
extension.
To cancel Alternate
Attendant:
1. Do not lift handset.
2. Press MIC/DND.
-MSG and MIC/DND keys go out.
Understanding Related Programming
Program 1
To enable/disable Internal Call Forwarding for Class of
Service 00 (CFWD + Y or N + #). This enables or
disables Alternate Attendant for Class of Service 30 (the
attendant’s Class of Service).
Alternate Attendant
30 DIGITAL SYSTEM Administrator’s Guide
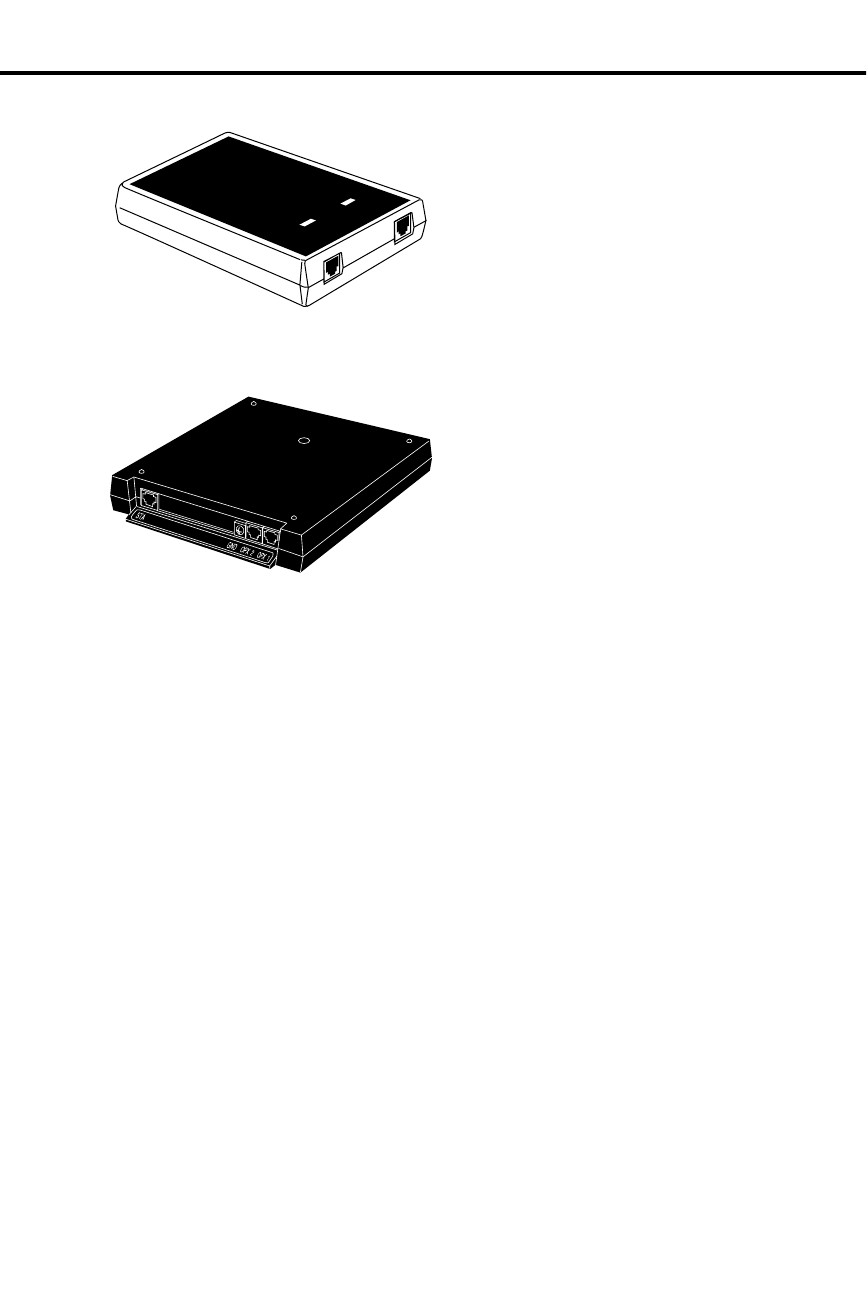
Analog Station Interface and Dual OPX/ASI Module
Analog Station Interface The Analog Station Interface (ASI)
module (P/N 89749) provides standard
2500 set DTMF service at an extension
port. The 2500 set connects to the ASI
and the ASI connects to a extension port.
Each ASI module has an internal DTMF
receiver. For installation instructions, see
P/N N1850ASI03.
Dual OPX/ASI Module The Dual OPX/ASI Module (P/N
88750) provides two 2500 type DTMF
ports from a single extension
connection. The Dual OPX/ASI Module
is a dual port device that connects to the
even (lower) numbered port of adjacent
even and odd numbered station ports.
The Dual OPX/ASI uses both extension
positions (e.g., 304 and 305), even
though it connects only the the lowest
numbered port in the pair. The Dual OPX/ASI Module has two internal DTMF
receivers. For installation instructions, see P/N N1853DPX05.
The ASI and Dual OPX/ASI Module are helpful when you need to install a limited
number of analog interfaces — but do not want to dedicate a line port to each one.
Other devices that can connect to an ASI or Dual OPX/ASI Module include:
•FAX machines
•Credit card terminals
•Modems
•Voice Mail/Automated Attendant
Notes:
•A connected device must:
– Meet FCC Part 68 requirements for Type B ringers (with a REN of 1.0 or
less). For outdialing, the device connected must provide standard DTMF
signals. The ASI provides 50 volt peak-to-peak square wave ringing. The Dual
OPX/ASI Module provides 75 volt peak-to-peak square wave ringing.
– Not use an electromechanical ringer
– (ASI only) Be installed indoors — not off-premise with outdoor wiring)
•Dual OPX/ASI circuits meet the requirements of EIA Specification RS-464-A
for OPS class C (loop resistance to 3,300 ohms, loop current = 16 mA or
greater).
•For each device connected to the ASI or Dual OPX/ASI Module, set its Flash
timer to 600-750 mS.
Initial Configuration
No ASI or Dual OPX/ASI Modules installed
RING
OFF-HOOK
LINE
PHONE
01870L11
1853 - 24A
DUAL OPX/ASI
Analog Station Interface and Dual OPX/ASI Module
Part I: DIGITAL SYSTEM Features 31
Using the Feature
The DIGITAL SYSTEM features available to the ASI and Dual OPX/ASI Module
are listed below with abbreviated operating instructions. To find more information
on a feature, refer to the page number provided.
In the instructions that follow:
•"Lift" = Lift handset.
•"Hookflash" = hold down the hookswitch for about .5 seconds, then release it.
Handling Calls: The Basics
Placing an Outside Call (see
page 134) Using Line Dial-Up: Lift + line code
(801-816) + number
Using Direct Line (Trunk) Access: Lift + line
code (348-363) + number
Using Direct Line Group Access: Lift + line
group (90-98) + number
Placing an Intercom Call
(see page 103) Lift + extension or 0 for attendant
Answering a Call (see page
103 and page 132) To answer any call (all calls ring): Lift
Regular Hold (see page 99) To hold: Hookflash + hang up
To retrieve: Lift + * 7
To retrieve call on hold at another extension:
Lift + * + extension (300-347) or line
(801-816)
Transfer (see page 182) To transfer: Hookflash + extension + wait for
answer + announce call + hang up
To return to call if party does not answer:
Hookflash + * 7
To receive a Transfer when announced: Stay
on line (you are connected when the transferer
hangs up)
Features (In Alphabetical Order)
Account Codes (see page
23) After dialing a number: # + account code + #
While on a call: Hookflash + # + account
code + # + * 7 (to return to call)
Analog Station Interface and Dual OPX/ASI Module
32 DIGITAL SYSTEM Administrator’s Guide

Features (In Alphabetical Order)
Call Forwarding (see page
44 and page 46) To an extension: Lift + # + extension +
forwarding code + hang up
Code 1: Forwards unanswered calls
Code 2: Forwards unanswered and busy calls
Code 3: Forwards all calls
To an outside number: Lift + # + 1 + line
(01-16) that calls will forward on + number to
receive calls + hang up
To cancel forwarding: Lift + # + hang up
Callback (see page 50) To leave callback at busy tone: 2 + hang up
To answer ring: Lift (you get connected to
previously busy extension)
To cancel a callback: Call busy extension
again + * + hang up
To cancel all callbacks: Lift + # * + hang up
Camp-On (Call Waiting) (see
page 55) To send beeps at busy tone: 2 + wait
To answer beeps: Hookflash + * 2 (see also
Split)
Conference (see page 60) Establish call + hookflash + establish call +
hookflash + * #
Directed Call Pickup (see
page 71) Lift + * + extension
Flash (see page 85) This option is only available with AUX
Module software version 02.10 and higher.
While on an outside call:
Hookflash + 7 *
Forced Line Disconnect
(see page 87) Lift + line (348-363 or 801-816 for lines
01-16) + # (to use line for a call: line +
number)
Group Call Pickup (see
page 88) Lift + * 1
Group Ring (see page 91) Lift + Ring Group (364-371 without AUX,
396-403 with AUX)
Intrusion (Barge-In) (see
page 106) At busy tone: 4
Last Number Redial (see
page 107) Lift + * *
Analog Station Interface and Dual OPX/ASI Module
Part I: DIGITAL SYSTEM Features 33

Features (In Alphabetical Order)
Line Queuing (see page 108) At busy tone: 2 + hang up
To answer ring: Lift (you have outside dial
tone and can dial number)
To cancel one: Try to access busy line again +
* + hang up
To cancel all: Lift + # * + hang up
Meet-Me Conference (see
page 111) To set up Meet-Me: Page parties + announce
Meet-Me code (11 or 12) + hookflash + 11 or
12 + do not hang up
To join Meet-Me: Lift + 11 or 12
Night Answer (see page 121) To answer ring over page: Lift + * 0
Off-Hook Signaling (see
page 126) To send at ring-busy tone: 1 + speak after
beeps or wait for answer
Paging (see page 138) To make a page: Lift + 1 * - 8 * + announce +
hang up
Park (see page 141) To park your call: Hookflash + * + park orbit
(extension or 5 + 60-69) + page person to
receive call + hang up
To pick up parked call: Lift + park orbit
Selectable Display
Messages (see page 159) To select: Lift + # 6 + message number 00-15
+ hang up
To cancel: Lift + # + hang up
Silent Monitor (see page
161) At busy tone: 6
Speed Dial (see page 162) To store: Lift + # + Personal bin (50-59,
20-29) or System bin (700-799) + line (01-16)
or line group (90-98) + number + hang up
To call: Lift + Personal bin or System bin
Split (see page 167) To answer waiting call (beeps): Hookflash + *
2
To split between calls: Hookflash + * 7
Tandem Calls (see page 184) Establish call + hookflash + establish call +
hookflash + * # + hang up
Walking Class of Service
(see page 194) Lift + # # + WCOS code + line (01-16) + dial
number
Analog Station Interface and Dual OPX/ASI Module
34 DIGITAL SYSTEM Administrator’s Guide

Understanding Related Programming
Program 14
To assign the correct circuit type to an ASI port
(CIRCUIT TYPE = 51 + #)
Program 1
To assign a single ring to all calls that ring an ASI in a
Class of Service (see also Program 18 [I]) (SINGLE
RING = Y + #)
Program 18 (I)
To assign a Class of Service (from Program 1) to an
extension (COS = 00-27 + #)
Analog Station Interface and Dual OPX/ASI Module
Part I: DIGITAL SYSTEM Features 35

Automatic C all Distribution
✆The system automatically distributes calls to co-workers (agents) in
the same department. No need to have receptionist or attendant
screen and route calls for a department.
Automatic Call Distribution (ACD) uniformly distributes incoming calls among
members of a department (ACD group). Each ACD group consists of member
extensions, called agents, and a master number. When a call rings the master
number, the system automatically routes the call to the agent that has been idle (on
hook) the longest. The call can be a transferred call or Intercom call to the master
number.
Supervisor Functions
Each ACD group can have a supervisor extension. The supervisor must have a
display telephone with a DSS Console. This lets the supervisor monitor the status of
the ACD group and each agent extension. When all ACD agents are busy, the
supervisor’s display shows:
•The number of calls waiting
•The line or extension that has been waiting the longest
•How long the extension or line has been waiting
Using their DSS Console, the supervisor can also take agent extensions in and out of
service as the traffic into the ACD group changes. ACD agents can also remove and
reinstall their own extensions. However, the supervisor can always reinstall an
extension if it was removed by an agent.
Supervisor’s DSS Console
The supervisor’s DSS Console should have a Hotline key for each ACD agent. This
shows at a glance the status of each agent.
When the DSS key is... Agent is...
Off Idle
On Busy
Slow Flash Removed from service
Fast Flash In Do Not Disturb
Optionally, the supervisor’s DSS Console can have a Hotline key for the ACD master
number. This shows the status of the entire ACD group. The key lights when all
agents in the department are busy. As soon as an agent becomes free, the key goes
out.
Automatic Call Distribution
36 DIGITAL SYSTEM Administrator’s Guide

ACD Announcements
ACD Announcements require a Voice Module Unit (P/N 88522) and an AUX Module
with software versions 02.10 or higher. ACD Announcements are not available with
Base software.
An ACD group caller can optionally hear an All Agents Busy announcement when
they first call into the ACD group. This announcement occurs when all ACD agents
are busy and the system automatically queues the call for a free agent. The ACD
supervisors and the attendant can customize the All Agents Busy announcement, if
desired. The system provides one All Agents Busy announcement, shared by all ACD
groups.
Notes:
•Activating Call Forwarding at an ACD group extension disrupts normal hunting.
•Activating Do Not Disturb (DND) at an ACD Group extension temporarily re-
moves it from the group.
•The ACD supervisor display timer requires an AUX Module. If your system
doesn’t have an AUX Module, the supervisor’s display does not show how long
a call has been waiting for an available agent.
•The supervisor cannot be the overflow destination for the ACD group.
•With software versions AUX Module 02.10/Base 02.00 and higher, an ACD
agent with a headset hears silence when they place a call on Hold. With software
versions prior to AUX Module 02.10/Base 02.00, the agent hears dial tone when
they place a call on Hold. Refer to page 95 for more on Headset operation.
Initial Configuration
No ACD groups
Using the Feature
To remove or install a
member agent (from the
supervisor’s extension):
1. Lift handset.
2. Press ICM.
3. Dial #.
4. Press DSS Console key for agent you want to change.
5. Dial 7 to remove an agent; 4 to install.
6. Hang up.
To remove or install
yourself as an agent
(from your agent
extension):
1. Lift handset.
2. Press ICM (except at an ESL set).
3. Dial 6 to remove yourself as an agent; 4 to install.
4. Press # and hang up.
Understanding Related Programming
Program 19
To set up ACD/Hunt Groups (page 272)
Program 4
To set two timers: Camp-On Time (Timer 03 + # +
Duration + # – how long a call waits at a busy ACD group
before ringing the Overflow destination - if any) and
Rings Before Recall (Timer 06 + # + Duration + # – the
Automatic Call Distribution
Part I: DIGITAL SYSTEM Features 37

number of times a call rings an ACD Hunt Group
extension before going to the next one)
Program 17
To assign a DSS Console Hotline key for an ACD master
number (HL + Partner extension + #). The key lights
when all members are busy.
Program 12
To directly terminate a line to an ACD master number so
calls ring it instead of having to be transferred to it (DTD
+ # + Master number + #)
Automatic Call Distribution
38 DIGITAL SYSTEM Administrator’s Guide

Automatic Ringdown
✆Call for information (for example, a reservation desk) just by
lifting the handset.
Automatic Ringdown requires an AUX Module with software version 02.10 or higher.
Automatic Ringdown is not available with Base software.
With Automatic Ringdown, an ESL or 2500 set user (connected to an ASI or Dual
OPX/ASI module) automatically calls a programmed destination when they lift the
handset. This would be helpful, for example in an airline terminal with dedicated
reservation phones. As soon as the caller lifts the handset, the phone rings the
reservation desk. The ringdown phone cannot access any system features (e.g.,
cannot dial digits). The ringdown phone can, however, receive calls.
Initial Configuration
Automatic Ringdown disabled.
Using the Feature
To use Automatic
Ringdown:
1. Lift handset.
-You hear two beeps or ringing. If you hear ringing,
wait for the called party to answer. If you hear two
beeps, you may begin speaking.
Understanding Related Programming
Refer to the DIGITAL SYSTEM Feature and Terminal Programming Manual.
Automatic Ringdown
Part I: DIGITAL SYSTEM Features 39

Automatic R oute Selection
✆Calls go out on the most cost-effective routes, according to the
digits users dial. For example, a call to a branch office can
automatically route over the company’s WATS line.
Automatic Route Selection (ARS) provides call routing and call restriction based on
the digits a user dials. ARS lets you obtain the most cost-effective use of your
system’s connected long distance carriers.
ARS gives you over 8,000 call routing choices — without a custom-ordered rate
structure database. You can make modifications to the routing choices quickly and
easily. This is often necessary as the cost structure of the connected services change.
Note: ARS is an on-line call routing program. You can only customize it from the
programming terminal. To have ARS, your system must be equipped with an AUX
Module.
ARS provides:
Call Routing
ARS can apply 3-digit (Area Code) and 6-digit (Area Code and Exchange) analysis
to every number.
Dialing Translation (Special Dialing Instructions)
ARS can automatically execute stored dialing instructions when it chooses a route
for a call.
Time of Day Selection
You can program route selection according to the time of day/day of week.
Hierarchical Class of Service Control
ARS allows or denies call route choices based on an extension’s Class of Service.
Forced Authorization Code
Designated routes may require the user to enter an Authorization Code before ARS
allows routing. This code is verifiable and is enforced by an extension’s Class of
Service.
Separate Routing for Operator Assisted, International and Equal Access
Calls
To provide unique control, you can program separate routing instructions for
Operator Assisted, International and Equal Access calls.
Independently Programmed Restriction for Exchanges 976 and 555
Restriction for these exchanges is hierarchical according to an extension’s Class of
Service.
Initial Configuration
ARS not installed
Automatic Route Selection
40 DIGITAL SYSTEM Administrator’s Guide

Using the Feature
To place a call using ARS:
1. Lift handset. If you have an ARS loop key, press it and
skip to step 4.
2. Press ICM (except at an ESL set). You hear Intercom
dial tone.
3. Dial ARS access code (9 or 90). You hear another
(higher pitched) dial tone.
4. Dial number.
Understanding Related Programming
You can only program Automatic Route Selection from the programming terminal.
Refer to the DIGITAL SYSTEM Feature and Terminal Programming Manual.
Automatic Route Selection
Part I: DIGITAL SYSTEM Features 41

Background Music
✆Add music to your private work area to create a pleasant
atmosphere.
With a touch of a key you can have Background Music (BGM) play over the speaker
of your extension while it is idle. If a page or call comes in while BGM is playing,
the music stops and starts again when the page or ringing stops.
BGM is available only if the DIGITAL SYSTEM is equipped with an outside music
source (such as a tape player). BGM can also play over external paging speakers, if
your system is equipped and programmed for it.
Initial Configuration
BGM disabled
Using the Feature
BGM is not available to attendant extensions.
To turn BGM on or off
while your extension is
idle:
A system reset or activating Do Not Disturb automatically
turns off BGM.
1. Do not lift handset.
2. Press HOLD.
To adjust the volume of
BGM:
1. Press VOL UP or VOL DN while BGM is on.
-This simultaneously adjusts paging and ringing
volume.
Understanding Related Programming
BGM uses line circuit #04. A line cannot be connected to it. The music source must
meet the following specifications:
Input Impedance 100 K Ohms
Maximum Input -10 dBm
Program 7
To enable BGM (ENABLE BGM = Y + #)
To have music play over customer-provided external
paging speakers, also do the following:
•Enable External Page Zone 1 (EXT PAGE ZN 1 = Y)
•Enable External Page Zone 2 if you have Expansion
CEU #1 (EXT PAGE ZN 2 = Y)
•Enable BGM to All External Page Zones (BGM TO
PG ZN = Y).
•Adjust Paging and Music Gain (Volume) Over
External Speakers (PG/MUSIC GAIN = 01-05)
To install external speakers, see the Hardware Manual.
Background Music
42 DIGITAL SYSTEM Administrator’s Guide

Battery Backup
✆The DIGITAL SYSTEM performs normally during a power
failure.
The Battery Backup feature automatically supplies battery power to a CEU during
AC power failures or brownouts. The recommended battery backup unit is the
Valcom VPB260, and one is required for each CEU. The VPB260 supplies power to
a fully loaded system for approximately two hours.
Initial Configuration
Battery Backup allowed, but only with required equipment
Using the Feature
To install the VPB260, see the Hardware manual. Once installed, Battery Backup is
automatic during a power failure or brownout.
Understanding Related Programming
N/A
Battery Backup
Part I: DIGITAL SYSTEM Features 43

Call Forwarding
✆Go to a meeting in a co-worker’s office and not miss your calls.
Simply send them there.
Call Forwarding lets you reroute your incoming Intercom calls and some outside
calls to a co-worker’s extension or Voice Mail. You can forward one of four types of
calls:
•Ringing calls that you do not answer after a programmed number of rings
•Ringing calls that you do not answer after a programmed number of rings, and
calls that try your phone when it is busy
•All calls, immediately
•Calls picked up by Voice Mail in the Personal Answering Machine Emulation
mode (see page 185)
Notes:
•The system does not forward: Intercom calls from the forwarded destination,
Ring Group calls, calls that ring a Call Coverage key, and outside calls not on Di-
rect Inward Lines.
•Attendants cannot use Call Forwarding; they use Alternate Attendant (on page
30) instead.
Initial Configuration
•Internal Call Forwarding enabled
•A call rings an extension 5 times before being forwarded
Using the Feature
Call Forwarding is not available to an Alternate Attendant. See Alternate Attendant
on page 30 instead.
To forward your calls to
another extension:
At the destination phone, do not do this to forward calls
back to your own phone; simply cancel Call Forwarding
instead.
1. Lift handset.
-If you have a One-Touch Speed Dial key, you can
press it instead of using steps 2-5.
2. Press ICM (except at ESL set) and dial #.
3. Dial extension to receive calls.
-To forward your calls to Voice Mail, press MSG
instead of dialing a co-worker’s extension. Refer to
page 185 for more on Voice Mail.
4. Dial Call Forward code (1,2,3).
-Code 1 forwards ring-no-answer calls
-Code 2 forwards ring-no-answer and busy calls
-Code 3 forwards all calls
-(If forwarded to Voice Mail) Code 4 to enable
Personal Answering Machine Emulation (see page
185)
5. Hang up.
-MSG key flashes.
Call Forwarding
44 DIGITAL SYSTEM Administrator’s Guide

To cancel Call
Forwarding:
The attendant can also cancel your Call Forwards (see
Call Forwarding Cancel on page 47). A power failure,
system reset, or activating Do Not Disturb cancels them
automatically.
1. Lift handset.
-Press ICM (except at ESL set).
2. Dial # and hang up.
-MSG key goes out.
Understanding Related Programming
Program 1
To enable/disable Internal Call Forwarding in a Class of
Service (CALL FWD = Y or N + #) (see also Program 18
[I])
Program 18 (I)
To assign a Class of Service (from Program 1) to an
extension (COS + # + 01-27 + #)
Program 4
To set the Number of Rings Before Recall timer (Timer
06 + # + Duration + # – the number of times a call rings
before being forwarded)
Program 12
To assign Direct Inward Lines to an extension (DTD + #
+ Extension number + #). Only calls on these lines will
get forwarded.
Call Forwarding
Part I: DIGITAL SYSTEM Features 45

Call Forwarding, Off-Premise
✆Go home early in the day and have your calls follow you there or to
your car phone.
If your phone has Direct Inward Lines, Off-Premise Call Forwarding lets you reroute
calls on those lines to an outside telephone number.
Note: To use Call Forwarding, the DIGITAL SYSTEM must be equipped with a
Line module that provides disconnect supervision. In addition, the connected CO
line must also provide disconnect supervision.
Initial Configuration
Off-Premise Call Forwarding disabled
Using the Feature
To forward your calls
off-premise:
1. Lift handset.
-If you have a One-Touch Speed Dial key, you can
press it instead of using steps 2-5.
2. Press ICM (except at an ESL set).
3. Dial # 1 and the line (01-16) you want your calls to for-
ward out on.
-Use a line you have access to.
4. Dial telephone number to receive your calls.
5. Hang up.
-MSG key flashes slowly.
To cancel Call
Forwarding:
The attendant can also cancel your Call Forwards. A
power failure, system reset, or activating Do Not Disturb
cancels them automatically.
1. Lift handset.
2. Press ICM (except at an ESL set).
3. Dial #.
4. Hang up.
-MSG key goes out.
Understanding Related Programming
Program 1
To enable/disable Off-Premise Call Forwarding in a Class
of Service (OFF-P CFWD = Y or N + #) (see also
Program 18 [I])
Program 18 (I)
To assign a Class of Service (from Program 1) to an
extension (COS + # + 01-27 + #)
Program 12
To assign Direct Inward Lines (DTD + # + Extension
number)
Program 16
To give an extension access to the line it will use to
forward calls out on (L + LINE NO. + # + 02 + #)
Call Forwarding, Off-Premise
46 DIGITAL SYSTEM Administrator’s Guide

Call Forwarding System Cancel
✆With Call Forwarding Cancel you can, as the attendant, return the
system to normal status at the end of the work day or after the
weekend so incoming calls ring their normal (not forwarded)
destinations.
If you are an attendant, Call Forwarding System Cancel lets you cancel all Call
Forwarding conditions in the system at once. Using Call Forwarding System Cancel
also cancels three other conditions system-wide: Do Not Disturbs, Personal
Greetings and Selectable Display Messages.
Initial Configuration
Call Forward Cancel allowed for attendant extension 300
Using the Feature
To activate Call
Forwarding Cancel from
your attendant extension:
1. Lift handset.
2. Press ICM.
-ICM lights and you hear dial tone.
3. Press #.
-Dial tone stops.
4. Dial *.
-You hear dial tone again.
5. Hang up.
Understanding Related Programming
Program 3
To assign attendant extensions (OPR nn EXT =
Extension number + #)
Call Forwarding System Cancel
Part I: DIGITAL SYSTEM Features 47

Call Intercep t
✆Users quickly know when they dial an invalid code.
Call Intercept sends fast busy tone to anyone who dials an invalid code while making
a call. In other words, the system automatically prevents (intercepts) an invalid call.
Initial Configuration
Intercept always occurs when appropriate
Using the Feature
N/A
Understanding Related Programming
N/A
Call Intercept
48 DIGITAL SYSTEM Administrator’s Guide

Call Timer
✆Easily keep track of how much time you spend on a call.
If you have a Display Phone, the Call Timer feature lets you time your outside calls.
The duration shows on your display.
Your phone can be programmed for Automatic or Manual Call Timer:
•With Automatic Call Timer, the timer automatically starts when you establish an
incoming or outgoing call.
•With Manual Call Timer, you start the timer by pressing the Manual Call Timer
key.
In addition, you can use the Call Timer feature while your phone is idle to time
events, much like a stopwatch.
Note: If your system has Station Message Detail Recording (SMDR), the system
records and times your calls.
Initial Configuration
Call Timer disabled (no Timer keys programmed)
Using the Feature
To start timing a call
when you have a Manual
Call Timer key:
1. Press Timer key.
-The key lights.
To stop timing a call
before or after you hang
up:
1. Press Timer key.
-The key goes out.
-To reset the timer back to 00:00, press the Timer key
again. After a few seconds, the date and time
reappear.
To use the Call Timer as a
stopwatch while your
phone is idle:
1. Press Timer key to start and stop the stopwatch.
-The key is lit while the stopwatch is on.
-To reset the timer back to 00:00 after you stop,
press the Timer key again. After a few seconds, the
date and time reappears.
Understanding Related Programming
Program 17
To assign Automatic (Press key + CTA + #) or Manual
(Press key + CTM + #) Call Timer keys to an extension
Call Timer
Part I: DIGITAL SYSTEM Features 49

Callback
✆Save time retrying a busy extension. The DIGITAL SYSTEM calls
you back when it becomes idle.
When you make an Intercom call and get busy tone, you can place a Callback
request, hang up, and continue using your extension. The system then does the
following for you:
•Monitors the busy extension and your extension, and calls you back (rings you)
when both extensions are free.
•Calls the previously busy extension when you answer the "callback" ring.
You can leave one Callback per busy extension. For extensions with several
Callbacks, the system processes them in the order they were left.
Note: Attendants cannot use Callback.
Initial Configuration
Callback always allowed
Using the Feature
To use Callback after you
call an extension and
hear busy tone or
ring-busy tone:
You cannot use Callback if you hear fast busy tone.
1. Dial C and hang up.
To answer Callback (long)
rings:
You must answer within five rings or the system cancels
the Callback.
1. Lift handset.
-This connects you to the previously busy extension.
To cancel a specific
Callback after you leave
it:
1. Call the busy extension again.
2. Dial * at busy tone and hang up.
To cancel all your
Callbacks (and Line
Queuing requests):
1. Lift handset and press ICM (except at an ESL set).
2. At a multibutton phone, dial * and press FTR.
OR
At an ESL set, dial # *.
3. Hang up.
Understanding Related Programming
N/A
Callback
50 DIGITAL SYSTEM Administrator’s Guide

Caller ID
✆See your callers name and number before you answer.
Caller ID requires software version AUX Module 2.10/ Base 02.00 or higher.
If your phone has a display, Caller ID can show your incoming caller’s number and
optional name. The Caller ID information will show as either a post-answer or
pre-answer display. With the post-answer display, you’ll see the caller’s number and
optional name after you answer the call. The pre-answer display lets you see the
caller’s number and optional name before you answer the call. You can also use the
pre-answer display to preview incoming calls before you answer them. The Caller ID
pre-answer display is available only if your telephone does not have Automatic
Handsfree (see page 94).
Caller ID supports the phone company’s Called Number Identification (CNI) and
Called Number Delivery (CND) service, when available. These services provide the
Caller ID information (i.e., messages) between the first and second rings of an
incoming call. There are two types of Caller ID message formats currently available:
Single Message Format and Multiple Message Format. With Single Message Format,
the phone company sends only the caller’s phone number (DN). The DN is either 7
or 10 digits long. In Multiple Message Format, the phone company sends the DN and
the caller’s name. The DN for this format is also 7 or 10 digits long, and the name
provided consists of up to 15 characters.
Once installed, Caller ID is enabled for all types of outside calls, including:
•Outside calls that normally ring a phone (see Ring Assignments on page 154)
•Calls transferred from another extension (see Transfer on page 182)
•Calls transferred from Operator Assistance via the Voice Module Unit (see Op-
erator Assistance on page 128)
•Calls transferred from Voice Mail (see Voice Mail on page 185)
•Direct Inward Lines (DILs) (see See Direct Inward Lines on page 64)
•Assigned Night Answer (ANA) Calls (see Night Answer on page 121)
Caller ID Displays
The Table below shows the DN format for each type of Caller ID call:
Type of Call Format of Display
7-digit NNX-nnnn
8-digit nNNX-nnnn
Caller ID
Part I: DIGITAL SYSTEM Features 51

In addition to displaying the DN and name, Caller ID can also display several unique
messages received from the telco:
Message Description
PRIVATE Caller has blocked Caller ID.
Telco will not pass the DN.
OUT OF AREA Caller has dialed from an area
that does not support Caller ID.
UNAVAILABLE Telco’s Caller ID is out of
service.
Your system provides unique displays for incoming Caller ID (CND) and non-Caller
ID (non-CND) trunks. The information a display keyset user sees depends on the
type of incoming trunk call and the type of trunk. The following chart describes the
telephone display for each type of incoming CND and non-CND trunk call for
software versions AUX Module 02.20/Base 02.10 and higher. For software versions
prior to AUX Module 02.20/Base 02.10, the telephone display always showed the
incoming trunk’s Caller ID information (for CND trunks) or programmed name (for
non-CND trunks).
CND Trunk Non-CND Trunk
Unscreened Transfers
Caller ID data for the
incoming trunk. The name/number for the
incoming trunk.
Screened Transfers
The screening extension’s
name/number, followed by
the Caller ID data for the
incoming trunk.
The screening extension’s
name/number (even after
the screening caller hangs
up).
Calls Transferred
by Voice Mail
The Caller ID data for the
transferred trunk. The transferring Voice
Mail port’s name/number.
Key Ring (post-answer)
& Direct Inward Lines
Caller ID data for the
incoming trunk. Name/number for the
incoming trunk.
Hardware Considerations
Caller ID requires the installation of at least one 4CO/CND Caller ID Module (P/N
88512). The Caller ID Module is a standard 4CO Module with additional Caller ID
capability. Each module provides Caller ID service for the lines connected to it. For
example, the inside Caller ID Module in the Main CEU provides Caller ID capability
for lines 1-4. Your system (without an AUX Module) can have up to two Caller ID
Modules, providing Caller ID capability to all eight lines.
Notes:
•Caller ID requires software version AUX Module 2.10/ Base 02.00 or higher. Do
not install Caller ID Modules in a system that uses software prior to AUX Mod-
ule 2.10/ Base 02.00. Caller ID is compatible, however, with older system data-
bases. This allows you to upgrade software without initializing the system.
Caller ID
52 DIGITAL SYSTEM Administrator’s Guide

•Caller ID information prints on the SMDR report along with other call informa-
tion. SMDR requires an AUX Module and an SMDR collection device or
printer. Refer to the DIGITAL SYSTEM Feature and Terminal Programming
Manual for more about SMDR.
Initial Configuration
•Caller ID enabled automatically after you install a Caller ID Module.
•Caller ID pre-answer display disabled (i.e., Automatic Handsfree enabled).
Caller ID
Part I: DIGITAL SYSTEM Features 53

Using the Feature
To answer a Caller ID call
(with the pre-answer
display disabled):
1. Lift handset or press flashing line key.
-You see the incoming caller’s name and number
and you answer the call.
To answer a Caller ID call
(with the pre-answer
display enabled):
(Your phone must have Automatic Handsfree disabled to
use this feature.)
1. Press the flashing line key to display the incoming
caller’s phone number.
-You can press another flashing line key instead of
going to the next step.
2. Press the flashing line key again to display the incom-
ing caller’s name.
-If the telephone company does not offer the name
option, you skip to the next step.
-You can press another flashing line key instead of
going to the next step.
3. Lift the handset to answer the call.
-If you previewed several ringing lines, you’ll
answer the call on the most recently pressed line
key.
To re-display the Caller ID
information for the call
you are on:
1. Press the line key for the call.
Understanding Related Programming
Program 2
To disable Automatic Handsfree (ENABLE AUTO HF =
N + #) in order to enable the Caller ID pre-answer display.
Caller ID
54 DIGITAL SYSTEM Administrator’s Guide

Camp-On (C all Waiting)
✆Be assured that you are connected to a busy extension as soon as it
becomes free.
When you make an Intercom call and get busy tone, Camp-On lets you dial a code
and wait off-hook for the busy extension to become available. Dialing the code may
send Call Waiting beeps to the busy user (if enabled in programming). The
DIGITAL SYSTEM automatically connects you to that extension when the busy user
hangs up or if the busy user chooses to interrupt their call and respond to your beeps.
When a line you want to use is busy, Camp-On also lets you dial a code and wait
off-hook for it to become free. When free, the system gives you dial tone on the line.
On the other hand, when you are busy on a call, you’ll hear Call Waiting beeps when:
•An Intercom caller sends them
•Someone transfers an outside call to you
•You receive an outside call on a line that normally rings your phone. If several
calls come in while you are busy on a call, you’ll hear the beeps only for the first
one. You will not, however, hear any Call Waiting beeps if your extension is pro-
grammed for Privacy.
Initial Configuration
•All extensions can use Camp-On
•Call Waiting tones enabled system-wide
•Privacy disabled except for attendant extension 300
•Attendant extension 300 can Camp-On to a busy line
Using the Feature
To Camp-On to an
extension when you call it
and hear busy tone or
ring-busy tone:
You cannot Camp-On if you hear fast busy tone (the
extension is in Do Not Disturb).
1. Dial C.
-You hear ringing while you wait.
2. Do not hang up and wait to be connected.
-If you choose to hang up, the system converts your
Camp-On to a Callback (see page 50).
To have a Transfer
Camp-On to an extension
after you call it and hear
busy or ring-busy tone:
1. Simply hang up when you hear the busy or ring-busy
tone.
-See also Transfer on page 182.
To Camp-On to a busy
line:
1. Try to access the busy line.
2. Dial C when you hear busy tone.
-Busy tone stops.
3. Do not hang up and wait for dial tone.
-If you choose to hang up, the system converts your
Camp-On to a Line Queuing request (see page 108).
Camp-On (Call Waiting)
Part I: DIGITAL SYSTEM Features 55
telemanuals.com

To answer Call Waiting
beeps from an Intercom
call:
Your hear two beeps and ICM flashes.
1. At a multibutton phone, press ICM to answer the wait-
ing call.
OR
At an ESL set, press HLD and dial * 2.
-Your first call goes on Hold.
-To alternate between the calls, see Split on page
167.
To answer Call Waiting
tones from an outside call:
You hear two beeps and a Line/Loop key flashes.
1. Press HOLD to hold the call you are on.
2. At a multibutton phone, press flashing Line/Loop key.
OR
At an ESL set, dial * 2.
-To alternate between the calls, see Split on page
167.
Understanding Related Programming
Program 1
To allow/deny Camp-On to a busy extension or line in a
Class of Service (CAMP ON or DIR ACC/CMP-ON =
Y or N + # (see also Program 18 [I])
To allow/deny Privacy in a Class of Service (PRIVACY =
Y or N + #). Allow Privacy for any extension that should
not receive Call Waiting beeps (see also Program 18 [I]).
Program 18 (I)
To assign a Class of Service from Program 1 (COS + # +
01-27 + #) to an extension
To enable/disable Off-Hook Ringing at an extension
(OHR + # + Y or N + #). If enabled, the system converts
the extension’s Call Waiting tones to a ring signal over the
speaker.
Program 2
To enable/disable Call Waiting beeps system-wide
(CALL WAIT TONE = Y + #)
Camp-On (Call Waiting)
56 DIGITAL SYSTEM Administrator’s Guide
telemanuals.com

Centrex/PBX Feature Keys
✆Access a PBX/Centrex feature with a single touch.
When your system is installed behind a PBX or Centrex, a PBX/Centrex key lets you
access a PBX/Centrex feature without dialing the feature code. The feature code is
stored in a key so you can just press the key.
PBX/Centrex keys can be enabled only through terminal programming, which
requires the AUX Module. To enable PBX/Centrex keys, see Centrex Compatible
Feature Keys in the DIGITAL SYSTEM Feature and Terminal Programming Manual.
Initial Configuration
No PBX/Centrex keys assigned
Using the Feature
See the DIGITAL SYSTEM Feature and Terminal Programming Manual.
Understanding Related Programming
Program 3
To set the baud rate of the AUX Module’s port for
terminal programming (LOCAL BAUD = 00 [300], 01
[1200], 02 [2400], 03 [4800], 04 [9600] or 05 [19.2K] + #)
Centrex/PBX Feature Keys
Part I: DIGITAL SYSTEM Features 57

Class of Service
✆Each extension can have a customized group of features depending
on its needs.
A Class of Service (COS) is a group of feature and dialing options that you can
assign to an extension. First, you customize a COS by enabling or disabling each
option, then you assign the COS to an extension. You can customize up to 28
different COSs (00-27), and you can assign the same COS to any number of
extensions. In addition, there is a special COS (30) for attendant extensions.
Below are the COS options, their initial setting, and a feature reference. A "Y" code
means the feature is allowed, "N" means denied.
Initial Configuration
•Attendant extension 300 has COS 30 (equivalent to COS 00)
•Extensions 301-347 have COS 01
•Place only Intercom Calls during Night Answer = N
See Night Answer on page 121.
•Off-Premise Call Forward = N
See Off-Premise Call Forward on page 46.
•Break-In (Intrusion) = Y for COS 00; N for others
See Intrusion (Barge-In) on page 106.
•Camp-On (Busy Extension) = Y
See Camp-On on page 55.
•Internal Call Forwarding = Y
See Call Forwarding, Internal on page 44.
•System Speed Dial Access = Y
See Speed Dial on page 162.
•Toll Restriction Level = 00 (not restricted)
See Toll Restriction on page 178.
•Place Only Local Calls (Day or Night Answer mode) = N
See Toll Restriction on page 178.
•Place Only Local Calls during Night Answer = N
See Toll Restriction on page 178.
•Extended Ring = N
See Extended Ringing on page 80.
•Privacy = N
See Privacy on page 148.
•Callback (Line Queuing) Priority = N
See Line Queuing on page 108.
•Direct Line Access & Camp-On to Busy Line = Y for COS 00; N for others
See Placing Outside Calls (Using Direct Line Access) on page 134.
•Initiate All Call Page = Y
See Paging on page 138.
•Access Page Zones 1-3 = Y
See Paging on page 138.
•Silent Monitor = N
See Silent Monitor on page 161.
•No Flash for Electronic Single Line Phones = N
ACD Supervisor Keyset = N
See Automatic Call Distribution on page 36.
Class of Service
58 DIGITAL SYSTEM Administrator’s Guide

•Single Ring for ASI Calls = N
See Analog Station Interface on page 31.
Using the Feature
N/A
Understanding Related Programming
Program 1
To customize Class of Service for an extension or line
(see also Program 18 [I])
Program 18 (I)
To assign a Class of Service from Program 1 to an
extension (COS + # + 01-27 + #)
Class of Service
Part I: DIGITAL SYSTEM Features 59

Conference
✆Conduct a telephone meeting with inside and/or outside parties so
you do not have to leave your office.
Conference lets you set up a three-way telephone conversation. To set up a
Conference, you establish an Intercom or outside call, then add someone to it. You
can add an outside party or an extension user.
To set up a Conference with two outside parties, your system must be equipped with
loop start lines that have disconnect supervision.
Initial Configuration
Conference allowed
Using the Feature
Conference is temporarily unavailable when the system is already accommodating
the maximum number of three-party conversations, which is 8 per system.
To set up a Conference:
1. Establish first call.
2. Press CONF.
-Your call goes on Hold.
-Busy tone means that all Conference circuits are
busy. Try again later.
3. Establish second call.
4. Press CONF again.
-CONF lights and all three of you are connected.
-If the Conference includes at least one other
extension user, you can hang up (leave the
Conference) without disconnecting the remaining
parties.
Understanding Related Programming
N/A
Conference
60 DIGITAL SYSTEM Administrator’s Guide

Data
✆The DIGITAL SYSTEM can also be used for data
communications.
The Data feature lets you connect a Data Module (P/N 88400), a Dataport PCB (P/N
89460), and/or a Modem Pooling PCB (P/N 89465) to the system for data
communications with computers, terminals, printers and other RS-232 devices.
Note: Depending on the version of the your system, you may need to install an AUX
Module to use Dataport and Modem Pooling PCBs. For more information on all
Data devices, see the Data Products Manual (P/N N1850DMG01).
Initial Configuration
For a Data Module:
Baud Mode: Slave Allow DTR Disconnect: Yes
Parity: None, 8 bits Allow Break Disconnect: Yes
Interactive Mode: Yes Auto Baud: Yes
Interactive Echo: Yes Busy on DTR Low: No
RS-232 Controls Active: Yes
Using the Feature
See the Data Products Manual (P/N N1850DMG01).
Understanding Related Programming
Program 14
To assign the correct circuit type (CIRCUIT TYPE = Z +
#) to a Data Module
Program 18 (I)
To configure an extension as a Dataset (DS + # + Y + #)
when it is installed with a Data Module
Program 3
To set the baud rate of the AUX Module’s port for
terminal programming (LOCAL BAUD = 00 [300], 01
[1200], 02 [2400], 03 [4800], 04 [9600] or 05 [19.2K] + #)
Program 4
To set the Modem Reserve timer (Timer 05 + # +
Duration + #) when using a Modem Pooling PCB
Data
Part I: DIGITAL SYSTEM Features 61

Delayed Ringing Assignment
✆Have your calls ring at your secretary’s phone, then at your phone
after a short delay. This way, you are not disturbed by a ringing
call unless your secretary cannot get to it right away.
Delayed Ringing Assignment (DRA) lets you enable or disable delayed day/night
ringing for:
•Lines
•Call Coverage keys
•Pickup Group keys
A call rings the line or key after a pre-programmed delay instead of right away. To
enable/disable DRA, your extension must have program access level 2-5. Enabling
DRA disables immediate Ringing Assignment (see page 154) or Night Ringing (see
page 124).
Initial Configuration
•DRA disabled at all extensions
•Extension 300-305 can program DRA. All other extensions only have program
access level 01.
Using the Feature
To enable/disable Delayed
Ringing Assignment
(DRA) when your
extension has program
access level 2-5:
1. Do not lift handset.
2. Press #.
3. Dial DRA.
-Your Line, Call Coverage, Pickup keys flash or light
steadily. Flashing means Delayed Ring is on;
steadily lit means it is off.
4. Press desired key or dial desired line number.
5. To enable DRA, dial Y.
OR
To disable DRA, dial N.
6. Press # and return to step 4, or press SAVE to finish.
Understanding Related Programming
Program 18 (II)
To enable/disable Delayed Ringing for an extension
(DRA + # + line + Y or N + #)
Program 15
To assign program access level 2-5 to extensions so they
can program Delayed Ringing themselves (PGM ACC
LEVEL = 02-05 + #)
Program 4
To set the Delayed Rings timer (Timer 07 + # + Duration + #)
Program 17
To assign Line (LK + Line 01-16 + #), Call Coverage
(CCK + ext. + #), Pickup (GP + Pickup group 01-07 + #)
keys to an extension
Program 16
To assign line access to an extension (L + Line 01-16 + #
+ 01 or 02 + #)
Delayed Ringing Assignment
62 DIGITAL SYSTEM Administrator’s Guide

Dialing Nu mber Preview
✆Make a mistake in dialing and not have to redial the entire number.
If you have a Display Phone, Dialing Number Preview lets you dial an outside
number, review its digits on your display and correct them, if necessary, before the
system dials out the call. To correct a mistake, you back up to the mistake and enter
the correct digit. Then you simply press a few keys to have the system dial out your
call.
Initial Configuration
Dialing Number Preview always allowed at Display Phones
Using the Feature
To use Dialing Number
Preview:
1. Do not lift handset (unless you are using an attendant
extension).
2. Dial *.
-HF lights.
3. Dial number.
4. Correct any mistakes as follows:
-Press VOL DN to move the cursor left to the
incorrect digit. If you go to far, press VOL UP to
move the cursor right. If the number is correct, go
to step 6.
-Dial the correct digit.
5. Press FTR to move the cursor to the end of the number.
6. Press DIAL.
-If your phone has a Prime Line key (page 134), this
step dials out the call and you can skip step 7.
7. Press Line key to have the system dial your call.
To exit Dialing Number
Preview without dialing
the call:
1. Press HF.
-At an attendant extension, hang up.
Understanding Related Programming
Program 16
To give an extension outgoing access to a line (L + Line
01-16 + # + 02 + # )
Dialing Number Preview
Part I: DIGITAL SYSTEM Features 63

Direct Inward Lines
✆A DIGITAL SYSTEM line can be assigned to a specific extension
so outside callers can directly reach that extension. For example, a
DIL could ring a Sales Manager’s extension, and if unanswered, all
the other salespeople in the group.
The Direct Inward Line (DIL) feature lets you program a line so it rings a specific
destination, and if unanswered, rings other extensions. The initial destination
(termination) for a DIL can be:
•An extension
•The master extension for a UCD Hunt Group (including Voice Mail master ex-
tensions)
•A Ring Group
A DIL always rings its initial destination; there is no need to assign ringing through
system programming. In addition, an extension user can place calls on a DIL.
A DIL can have a day termination and a night termination:
•A line with a day termination to an attendant (operator) rings at the night termi-
nation when the attendant activates Night Answer (see page 121).
•A line with a day termination to a non-attendant extension rings at the night ter-
mination when that extension activates Do Not Disturb (see page 74).
•A line with a day termination to a UCD master extension rings the night termina-
tion when the master extension’s attendant (assigned in Program 18 [I]) activates
Do Not Disturb (see page 74).
•A line with a day termination to a Ring Group rings at the night termination
when extension 300 activates Night Answer.
If the terminated extension or group does not answer the DIL within a programmed
time, the DIL may ring extensions programmed for ringing on that DIL (called "key
ring"). More specifically:
•If a terminated extension does not answer the DIL, the DIL converts to key ring.
•If a member of a terminated UCD Hunt Group does not answer the DIL, the DIL
rings the overflow extension (if one is programmed). If the overflow extension
does not answer, the DIL converts to key ring.
•If a member of a terminated Ring Group does not answer the DIL, the DIL con-
tinues to ring the Ring Group until someone answers or the caller hangs up.
For more information on Ring Groups see page 91. For more information on UCD
Hunt Groups see page 81.
Initial Configuration
No DILs
Direct Inward Lines
64 DIGITAL SYSTEM Administrator’s Guide

Using the Feature
N/A
Understanding Related Programming
Program 12
To make DILs (DTD + # + Extension number + #) (i.e., to
directly terminate a line to an extension, UCD master
extension, or Ring Group)
Program 17
To assign a DIL to a key at an extension (LK + Line
number 01-16 + #). If you do not assign it to a key, it
rings a Loop key.
Program 16
To give an extension (other than the terminated extension)
access to the DIL so they can answer it if it diverts to their
extension (L + Line no. 01-16 + # + 01 or 02 + #)
Program 18 (II)
To assign ringing to the DIL at extensions other than the
terminated extension (RA or DRA + # + Y or N + #)
Program 4
To set the Rings Before Recall timer (Timer 06 + # +
Duration + # - how long a DIL rings an idle/busy
terminated extension or a UCD overflow extension before
diverting to key ring; and, how long a DIL rings a Hunt
Group extension before going to the next Hunt Group
extension)
To set the Camp-On timer (Timer 03 + # + Duration + # -
how long a DIL rings a busy UCD group before going to
the overflow extension)
Program 10
To assign names to the DILs (See line name programming
on page 230)
Direct Inward Lines
Part I: DIGITAL SYSTEM Features 65
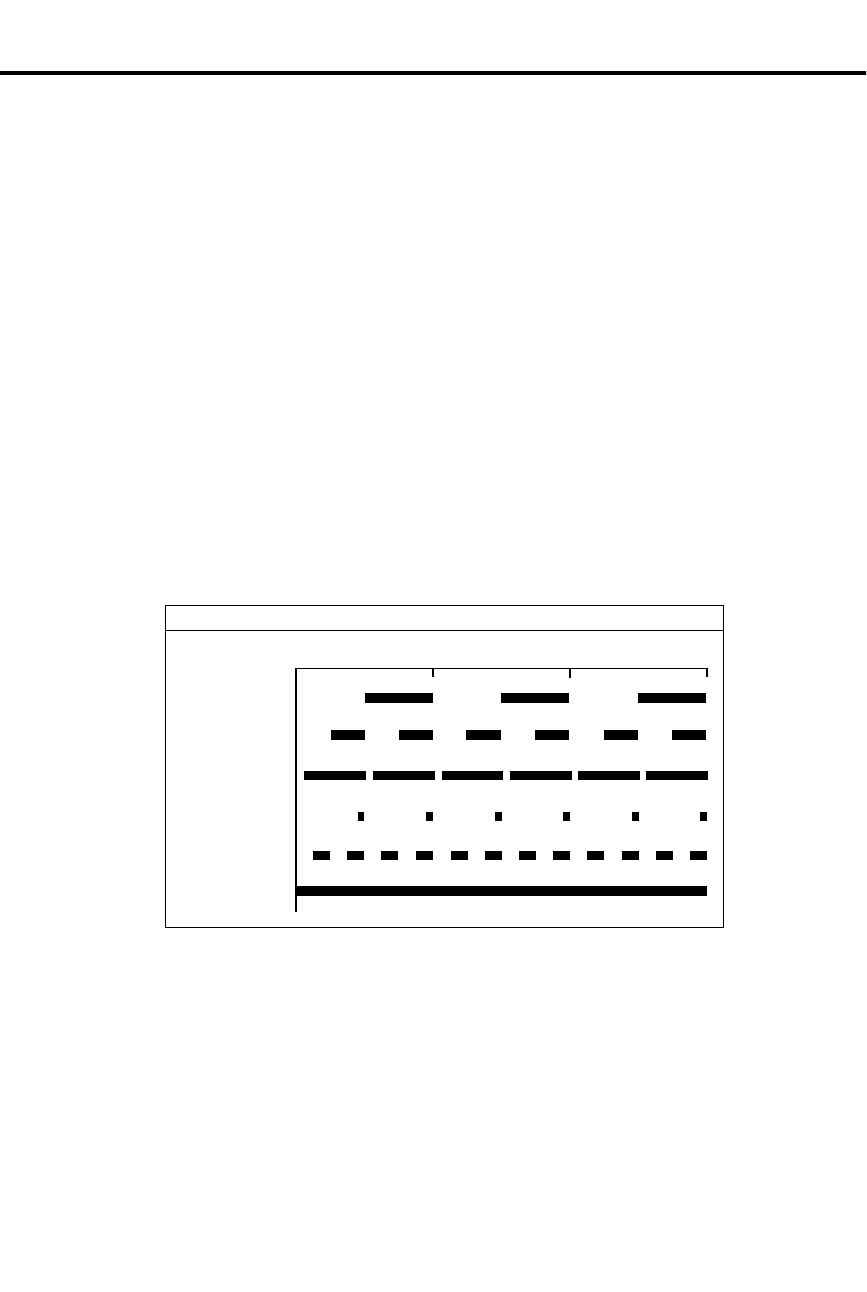
Direct Station Selection, DSS Console
✆Get 80 additional keys to make Intercom calls and use selected
features with one touch. No need to remember, look up, or dial
extension numbers. Your DSS Console can remember and dial
them for you.
A Direct Station Selection (DSS) Console gives you 80 keys for one-button access to
extensions and selected features. This saves time if you do a lot of call processing.
You can have DSS Console keys for:
•Hotline to extensions (see page 101)
•Park Orbits (see page 141)
•Outside Lines (see page 134)
•Page Zones (see page 138)
•DSS Console (One-Touch) Speed Dial (see page 162)
•Release (always on key 80)
DSS Console Busy Lamp Field
The DSS Console Busy Lamp Field shows the status of the associated extension, line
or feature. See the chart below. When programmed for Hotline, the key shows when
the extension is idle, busy or in Do Not Disturb. If the key is a line key, it shows
when the assigned line is ringing, idle, busy, on Hold or recalling. For a Park orbit
key, the key is on when the orbit is in use. If a key is a Page zone or Speed Dial key,
the key is on when the feature is active.
Notes:
•You cannot install a DSS Console in the expansion cabinet.
•The DSS Console is a dual port device, using adjacent even and odd numbered
ports. You must install the DSS Console in the lower (even-number) port of a
port pair. For example, you must plug the console into port 02 (extension 302)
when using the 02/03 port pair.
•You can install as many DSS Consoles as there are available dual ports. How-
ever, the system allows only four unique DSS Console key configurations (lay-
outs). See Understanding Related Programming below.
•For attendants, pressing a DSS Console key while on an outside call automat-
ically puts the outside call on Hold (Automatic Hold).
Line Ringing
0123
(Seconds)
01853C52
On
DSS Console Flash Rates
Line on Hold-
another extension
Exclusive Hold
DND/I-Hold (on Hold
at own extension)
Line on Hold
Recalling
Direct Station Selection, DSS Console
66 DIGITAL SYSTEM Administrator’s Guide

Initial Configuration
•The DSS Console is automatically enabled (circuit type 06) when you plug it in
•Each console is assigned to extension 300
•Each console uses Block (configuration) 01, with key assignments as follows:
Key Assignment
1-47 Extensions 301-347
48-72 Undefined
73-76 Page zones 0-3
77-79 Park orbits 60-62
80 Release
Using the Feature
To use your DSS Console
keys:
1. Lift handset.
2. Press DSS Console key for desired function.
To use your DSS Console
Hotline keys to Transfer
your outside call:
1. Lift handset.
2. Press ICM.
-If you are an attendant, skip this step to Transfer
the call unscreened.
3. Press DSS Console Hotline key.
-If you hear two beeps, speak.
-If you hear ringing, wait for an answer.
-If you hear busy tone, dial C to send Call Waiting
beeps.
-If you hear fast busy, dial I to intrude (override
DND).
Understanding Related Programming
Program 14
To assign Circuit Type (CIRCUIT TYPE = 06), DSS
Owner (DSS OWNER = Extension number), DSS Block
(DSS BLOCK = 01-04) and optional name (see extension
name programming on page 242) to each DSS Console.
The system does, however, assign the correct circuit type,
DSS Owner 300 and DSS Block 01 when you plug in the
DSS Console.
Program 17
To designate the function of each DSS Console key (see
chart below). You must use Program 17 from the
extension assigned to the console.
For this key . . . Enter this code . . .
Undefined UK + #
Direct Station Selection, DSS Console
Part I: DIGITAL SYSTEM Features 67

For this key . . . Enter this code . . .
Line key LK + Line number
(01-16) + #
Park Orbit PO + Park Orbit (60-69)
+ #
Speed Dial SD + 1-79 + #
Hotline HL + Partner ext. (300-
347) + #
Page Zone PO + Page Zone (00-07)
(00=All Call) + #
Program 18 (I)
To assign a Personal Speed Dial block to a DSS Console
if the console has Speed Dial keys (SDB + # + Block
number 01-28 + #).
Program 18 (II)
Program Personal Speed Dial (SD + # + Bin or key + # +
Line name [see page 230] + number + # for the console’s
One-Touch keys).
Direct Station Selection, DSS Console
68 DIGITAL SYSTEM Administrator’s Guide
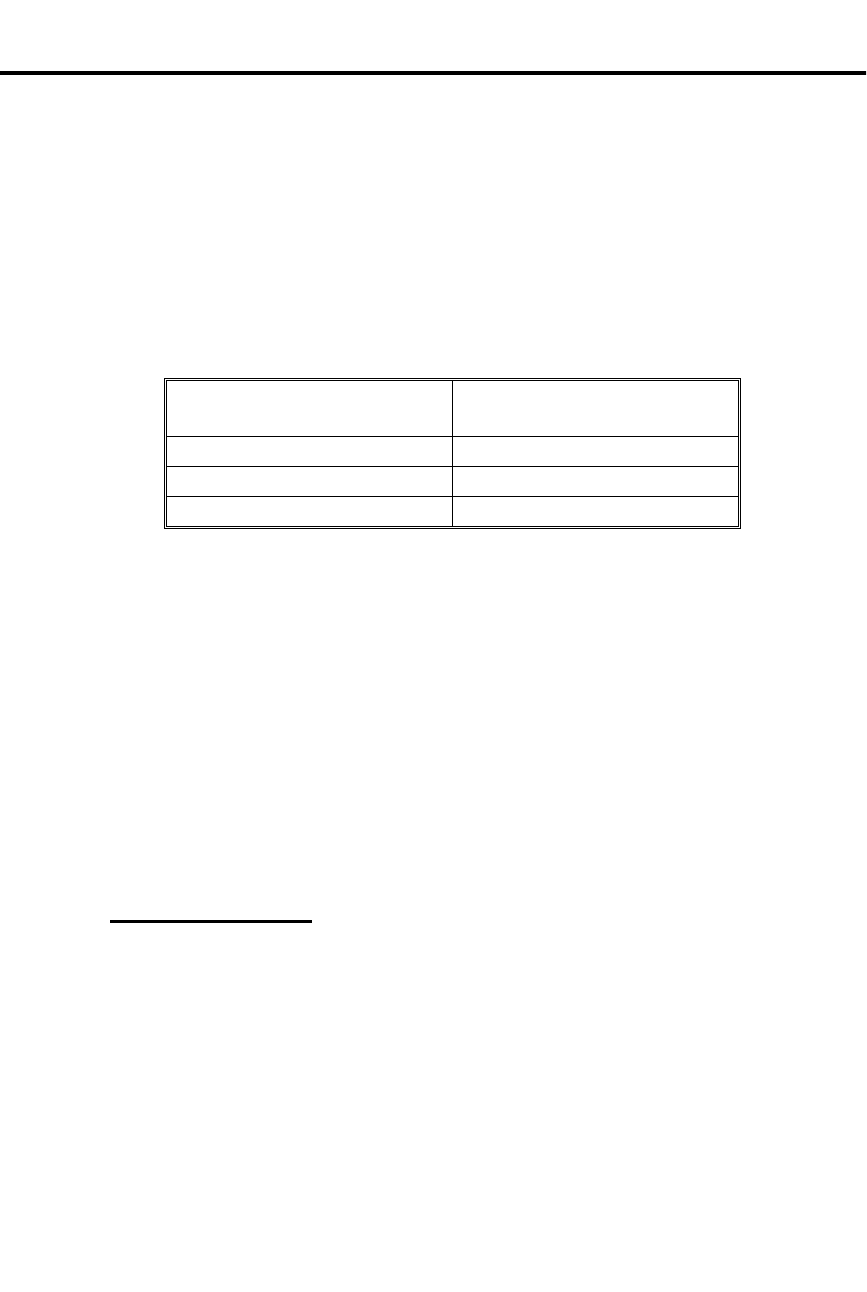
Direct Station Selection
✆Make Intercom calls with two touches. No need to remember, look
up, or dial extension numbers. Your phone can remember and dial
them for you.
Direct Station Selection (DSS) lets you call an extension by pressing two keys: ICM,
then the DSS key for the desired extension. Keys 1-15 are the DSS keys. You can
program a DSS key to call whichever extension you wish as long as your extension
has program access level 1-5. You can also use DSS keys to Transfer calls.
In addition, when you press ICM, the DSS keys show you the status of their
associated extensions (the status is called Busy Lamp Field [BLF] and is described
below).
When the DSS/BLF
key is . . . The extension is . . .
Off Idle
On Busy or ringing
Flashing fast in Do Not Disturb
Direct Station Selection also does the following:
•Signals a busy extension if it is programmed for Off-Hook Signaling (see page
126).
•Lets you manually send Call Waiting beeps (see page 55) to a busy extension if
it is not programmed for Off-Hook Signaling
Direct Station Selection does not, however, let you contact an extension in Do Not
Disturb unless your extension is programmed for Intrusion (see page 106).
Initial Configuration
•DSS/BLF enabled for keys 1-15
•All DSS keys call extension 300
•All extensions can change DSS extension assignments
•DSS keys automatically activate Off-Hook Signaling (Whisper Page)
•Intrusion allowed for attendant extension 300
Using the Feature
To assign an extension to
a DSS key when your
extension has program
access level 1-5:
1. Do not lift handset.
2. Press #.
3. Dial DSS. DSS keys flash fast.
4. Press desired DSS key.
-The key flashes slowly.
5. Dial extension, press #.
6. Return to step 4.
OR
Press SAVE to finish.
-All keys go out.
Direct Station Selection
Part I: DIGITAL SYSTEM Features 69

To place a call using a
DSS key:
1. Lift handset.
2. Press ICM.
-If ICM does not light, you do not have DSS keys.
3. Press lit or unlit DSS key to call the extension.
-If you hear two beeps, speak.
-If you hear ringing, wait for an answer.
-If you hear busy tone, dial C to send Call Waiting
beeps.
-If you hear fast busy, dial I to intrude (override
DND).
To transfer a call using a
DSS key:
1. Press ICM.
-This puts your call on Hold. If ICM does not light,
you do not have DSS keys.
2. Press lit or unlit DSS key to call the extension.
-See step 3 above for your options.
3. Announce the call and hang up.
OR
Hang up to have the call wait at your partner’s exten-
sion unannounced.
-If the person does not pick up the Transfer, it recalls
your phone like a normal Transfer.
Understanding Related Programming
Program 18 (I)
To enable/disable DSS capability on keys 1-15 (BLF + #
+ Y or N + #)
Program 18 (II)
To assign extensions to the DSS keys after you enable
them in Program 18 [I] (DSS + # + Key + Extension
number + #)
Program 15
To assign a program access level to an extension (PGM
ACC LEVEL = 00-05 + #)
Direct Station Selection
70 DIGITAL SYSTEM Administrator’s Guide

Directed Call Pickup
✆Answer someone else’s call from your phone as long as you know
their extension number.
Directed Call Pickup lets you answer, from your extension, a call that is ringing a
co-worker’s extension. You must, however, know the number of the ringing
extension.
Directed Call Pickup does not answer calls ringing another extension’s Call
Coverage keys.
Initial Configuration
Directed Call Pickup always allowed
Using the Feature
To answer a call that is
ringing another extension:
1. Lift handset.
-If you have a One-Touch Speed Dial key, you can
press it instead of using steps 2-4.
2. Press ICM (except at an ESL set).
-You hear dial tone.
3. Dial *.
-Dial tone stops.
4. Dial number of ringing extension.
-This procedure picks up calls other than calls
ringing other extensions. The pick-up order is as
follows:
Ringing Intercom calls
Personal Park calls
Ringing outside calls and Direct Inward Lines
Calls on Hold
Understanding Related Programming
Program 16
To give an extension access to any line it should be able to
pick up (L + Line 01-16 + # + 02 + #)
Directed Call Pickup
Part I: DIGITAL SYSTEM Features 71

Directory Dialing
✆Place Intercom or Speed Dial calls by displaying the name of the
person you want to call — the DIGITAL SYSTEM does the rest for
you. No need to refer to a list of Intercom and Speed Dial numbers
filed away at your desk.
If you have a Display Phone, Directory Dialing lets you make an Intercom or Speed
Dial call by name instead of by number. It works like this:
•You display the name of the person you want to call from a stored directory
("phone book")
•Press a button to have the system dial the person’s number
Intercom Directory Dialing is always available if the system administrator has stored
extension names in memory.
Speed Dial Directory Dialing is available only if your system is equipped with an
AUX Module. If so, you can store names with your Personal Speed Dial numbers as
long as your extension has program access level 1-5. If your extension has program
access level 4-5, you can store 100 System Speed Dial names. To store Speed Dial
names from your phone, see Speed Dial on page 162. Optionally, the system
administrator can store Speed Dial names from a terminal connected to the AUX
Module.
Initial Configuration
Directory Dialing always allowed at Display Phones, but no names are stored initially
Using the Feature
To place a call using
Directory Dialing:
1. Lift handset.
2. Dial code (I, P, or C) for names.
-I = Intercom names
-P = Personal Speed Dial names
-C = System (Company-Wide) Speed Dial names.
-To scroll through the directory, go to step 5.
-If you see, NO RAM INSTALLED, this means only
Intercom Directory Dialing is available.
3. Dial first letter of the desired name.
-For example, to dial G: Dial 4. To dial a blank, Q
or Z: Dial 0 (zero).
-After you dial G, for example, the display shows:
1=G, 2=H, 3=I. "1=G" because G is the first letter
on the 4 button, etc.
4. Dial the number (1, 2, or 3) that corresponds to the let-
ter you just dialed.
-The display shows you the first name stored for that
letter. If you see UNLISTED NAME, this means
there are no stored names for that letter.
5. Press VOL UP or VOL DN to scroll through the direc-
tory until you see the name you want.
-To begin scrolling from the first name again, dial #.
Directory Dialing
72 DIGITAL SYSTEM Administrator’s Guide

6. Press DIAL to have the system dial your call.
To exit Directory Dialing
at any time:
1. Hang up.
Understanding Related Programming
Program 14
To assign a name to an extension for Intercom Directory
Dialing (see extension name programming on page 242)
Program 18 (I)
To assign a Speed Dial block to an extension (SDB + # +
01-28 + #). Names cannot be stored at extensions with
blocks 51-57. Remember: Speed Dial names can be
stored only if the system has an AUX card.
Program 18 (II)
To store Speed Dial numbers and names (SD + # + Bin or
key + # + Line name [refer to line name programming on
page 230] + Number + #)
Program 15
To assign program access level 1-5 (PGM ACC LEVEL
= 01-05 + #) to extensions so they can store their own
Personal Speed Dial numbers and names
To assign program access level 4-5 (PGM ACC LEVEL
= 04-05 + #) to any extension that should be able to store
System Speed Dial names
Directory Dialing
Part I: DIGITAL SYSTEM Features 73

Do Not Disturb
✆Work uninterrupted by phone calls when you have paper work to
do.
Do Not Disturb (DND) lets you block incoming pages, ringing, and Intercom voice
announcements. While in DND, you can still use your extension to process calls and
use features. Incoming outside calls still flash the Line keys and you can answer
them, if you wish.
Someone using Hotline (at a phone or DSS Console) or Intrusion, can however,
override your DND and get through. Likewise, you can use these features to contact
an extension in DND.
Notes:
•Attendants cannot use Do Not Disturb
•Extension Hunting considers an extension in DND to be busy. This may disrupt
normal hunting.
Initial Configuration
Do Not Disturb enabled
Using the Feature
DND is not available to the attendant, even if the attendant is programmed for it.
Pressing the DND key at an attendant extension puts the system in the Night Answer
mode.
To activate DND for your
extension:
1. Do not lift handset.
2. Press DND until it flashes.
Activating DND does the following at your extension:
-Turns off Background Music, if it was on
-Cancels any Call Forwards
-Makes your extension appear busy if it is a Hunt
Group member
To cancel DND at your
extension:
The attendant can automatically cancel a DND condition
at your extension by making it an Alternate Attendant or
by canceling system-wide.
1. Do not lift handset.
2. Press DND until it goes out.
Understanding Related Programming
Program 18 (I)
To allow/deny Do Not Disturb for an extension (DND + #
+ Y or N + #)
Do Not Disturb
74 DIGITAL SYSTEM Administrator’s Guide

Door Box
✆From a Door Box installed at an entrance door, a visitor can press
the call button (like a door bell) to ring your phone.
The Door Box (P/N 88545) is a
self-contained Intercom unit
typically used to monitor an
entrance door. A visitor at the door
can press the Door Box call button
(like a door bell). The Door Box
then sends chime tones to all
extensions programmed to receive
chimes. To answer the chime, the
called extension user just lifts the
handset. This lets the user talk to
the visitor at the Door Box. The
Door Box is convenient to have at a delivery entrance, for example. It is not
necessary to have a co-worker monitor the delivery entrance; they just answer the
Door Box chimes instead.
The system can have up to four Door Boxes (numbered 1-4), installed at extensions
310, 311, 322 and 323 in the Main CEU. Each Door Box has a distinctive chime
pattern.
Relay Box
The Relay Box (P/N 88546) provides relay contacts for up to four Door Box
locations. A relay typically enables an electric strike on an entrance door next to a
Door Box. After answering the Door Box chimes, you can press a dial pad key to
enable the relay which releases the door. The visitor at the door can then enter
without you having to open the entrance door for them.
You can only install a Relay Box at extension 309 in the Main CEU. This provides
relays for the Door Boxes at extensions 311, 322 and 323. The Relay Box has a
normally open (NO) and normally closed (NC) contact for each Door Box. The relay
for the Door Box at extension 310 is currently unavailable.
Notes:
•The Door Box is a weather-tight unit, with an operating temperature range of
20oC to 60oC (-4oF to 140oF). It is not, however, intended for an outdoor installa-
tion directly exposed to the elements (e.g. rain or sunlight).
•You can only use a Door Box with software AUX Module Y2.0/Base Y5.0 or
higher.
Initial Configuration
•No Door Boxes installed
•Relay Box not installed.
Using the Feature
To use the Door Box:
1. Press and release the Door Box button.
Door Box
Part I: DIGITAL SYSTEM Features 75

To answer the Door Box
chimes (from your
phone):
1. Lift handset.
-If you have a Hotline or Call Coverage key, it will
flash. Press the key to answer the Door Box.
To call the Door Box
(from your phone):
1. Lift handset.
2. Press ICM (except at ESL set) and dial Door Box ex-
tension number.
-If the Door Box is idle, your call connects. You
don’t hear any tones or ringing before you go
through.
-If you have a Hotline or Call Coverage key, you can
press it to call the Door Box.
3. (Optional) Release the door strike.
At multibutton set:
Press and hold FTR to release the door.
OR
At ESL set
Dial * (but do not hold it down).
-At a multibutton set, the relay activates as long as
you hold down the FTR key (up to 60 seconds).
-At an ESL set, the relay activates for six seconds
and then automatically releases.
-You can have Relay Boxes for the Door Boxes at
extensions 311, 322 and 323 only.
4. Hang up.
Understanding Related Programming
Program 17
To assign which extensions should have Hotline (Key +
HL + Door Box extension number + #) or Call Coverage
(CCK + Door Box extension number) keys for Door
Boxes.
Program 18 (I)
To assign each Door Box Class of Service 28
(COS + # + 28 + #).
Also, to assign which extensions should receive chime
tones from which Door Boxes (DB + # + DOOR ALERT
= Y or N + # for each Door Box).
Door Box
76 DIGITAL SYSTEM Administrator’s Guide

DP and DT MF Compatib ility
✆Any combination of DP and DTMF Central Office lines can be
connected to the DIGITAL SYSTEM.
With Pulse to Tone Conversion, use your pulse (rotary) lines to
access computer services that require tone dialing (such as
banking, MCI, Sprint, etc.).
You can program the system for either DP or DTMF lines from the Central Office.
Pulse to Tone Conversion
Pulse to Tone Conversion lets you dial digits on a Dial Pulse (rotary) line, then
convert to tone dialing. After you dial the pulse digits, you simply stop dialing for
six seconds. Any digits you dial after the six-second pause will be dialed out as
tones. When you hang up the call, the dialing mode automatically reverts to pulse.
Initial Configuration
All Lines are CO Loop Start DTMF
Pulse to Tone Conversion enabled
Using the Feature
To convert to tone dialing
when using a pulse line:
1. Place call on pulse line and wait six seconds.
2. Dial more digits.
-If you call a Speed Dial number that contains a
pulse line and a pause, the system automatically
dials tone digits after the pause.
Understanding Related Programming
To set the dialing mode of a line
Program 10
To identify the type of line (CIRCUIT TYPE = 10 + #
for CO loop start DTMF, CIRCUIT TYPE = 11 + # for
CO loop start DP) connected to a line port
Program 4
To set the Make (Timer 10 + # + Duration + #), Break
(Timer 11 + # + Duration + #), and Interdigit timers
(Timer 12 + # + Duration + #) for DP lines
To set the Line Response timer (Timer 04 + # + Duration
+ #) for DP and DTMF lines
DP and DTMF Compatibility
Part I: DIGITAL SYSTEM Features 77

To set up Pulse to Tone Conversion
Program 6
To make sure the Active Dialpad option is enabled (ACT
DIAL PAD = Y) in a Toll Restriction level so a user can
continue dialing after a pause; otherwise, Pulse to Tone
Conversion would be disabled (see also Program 1)
Program 1
To assign a Toll Restriction level (TOLL RESTRICT =
01-07) from Program 6 to a Class of Service (see also
Program 18 [I])
Program 18 (I)
To assign a Class of Service from Program 1 (COS =
01-27 + #) to an extension
Program 10
To identify a line as a pulse line (11 = CO loop start DP +
#)
Program 16
To give an extension outgoing access to a line (L + Line
01-16 + # + 02 + #)
DP and DTMF Compatibility
78 DIGITAL SYSTEM Administrator’s Guide

Equal Acc ess Compatibility
✆Use an alternative long distance service without dialing its
telephone number.
If the DIGITAL SYSTEM is installed in an Equal Access area, you can dial a code to
access a long distance carrier other than your main one (i.e., the one you access when
you dial 1). The code is in the form 10XXX, where XXX is the carrier’s
identification code. The identification code is set up by the local telephone company.
In software AUX Module Y2.0/Base Y5.0 or later, the system does not restrict Equal
Access codes. However, it restricts the phone number according to Toll Restriction.
In software versions prior to AUX Module Y2.0/Base Y5.0, once you manually dial
an Equal Access code, you can dial any number (i.e., you have unrestricted dialing)
unless your phone has any of the following options enabled in its Class of Service:
•Only Intercom Call at Night, which prevents Equal Access dialing during the
Night Answer mode.
•Only Local Calls at Night, which prevents Equal Access dialing to long dis-
tances numbers during the Night Answer mode.
•Only Local Calls (Day or Night), which prevents Equal Access dialing to long
distance numbers.
The system never restricts an Equal Access call that is stored in System Speed Dial bin.
Initial Configuration
Equal Access Dialing allowed (if the system is in an Equal Access area)
Using the Feature
To use Equal Access
Dialing:
1. Access an outside line.
-See Placing an Outside Call on page 134.
2. Dial Equal Access code.
3. Dial number.
Understanding Related Programming
Program 6
(Versions prior to AUX Module Y2.0/Base Y5.0)
To allow/deny Equal Access Dialing (EQUAL ACCESS
= Y or N + #). See also Program 1. With AUX Module
terminal programming (AP command), you can
allow/deny specific 10XXX codes.
Program 1
To assign a Toll Level from Program 6 (TOLL
RESTRICT = 01-07 + #) to a Class of Service (see also
Program 18 [I])
To limit Equal Access Dialing using Class of Service
dialing options (see the explanation above)
Program 18 (I)
To assign a Class of Service (COS + #+ 01-27 + #) from
Program 1 to an extension
Equal Access Compatibility
Part I: DIGITAL SYSTEM Features 79

Extended Ringing
✆Calls can ring longer than usual to assist people who can’t readily
get to their phones (like a warehouse worker, for example).
Extended Ringing forces an unanswered call to ring an extension 15 times before the
system can reroute it to another extension. For example, a Transfer would ring an
extension 15 times before recalling the extension that transferred it.
If an extension has Extended Ringing, the following types of calls ring it 15 times
before being rerouted:
•A Hunting call
•A Transfer
•A recalling call on Hold
•A ring-no-answer forwarded call
•A Direct Inward Line
•A Direct Inward Dialing call
Initial Configuration
Extended Ringing disabled
Using the Feature
N/A
Understanding Related Programming
Note: Enabling Extended Ringing overrides Timer 06 (Number of Rings Before
Recall).
Program 1
To enable/disable Extended Ringing in a Class of Service
(EXTENDED RING = Y or N + #). See also Program 18
(I).
Program 18 (I)
To assign a Class of Service (COS + # + 01-27 #) from
Program 1 to an extension
Extended Ringing
80 DIGITAL SYSTEM Administrator’s Guide

Extension Hunting
✆Call handling among people in a sales or service department
becomes very efficient. If one person is busy handling a customer,
the DIGITAL SYSTEM sends a new call to another person in the
group. No need for an attendant to look for an available person to
take a call.
Extension Hunting sends a call through a group of extensions until it is answered. In
other words, if a call tries a Hunt Group extension and it is busy, the call tries (hunts
for) the next available extension in the group, and so on.
The following types of calls hunt when they come into a Hunt Group extension:
•Ringing Intercom calls
•Transferred calls
•Direct Inward Lines
•DISA calls
Voice-announced Intercom calls and lines assigned to a Hunt Group extension
through Program 16 do not hunt.
A Hunt Group can have any number of members, and the system can have any
number of Hunt Groups. However, an extension can be in only one Hunt Group.
There are three types of Extension Hunting:
Circular Hunting
A Circular Hunt Group consists of extensions programmed into an ordered "circular"
list, where the first and last extension are the same (e.g., 304, 305, 306, 307, 304). If
a call is unanswered at one extension, it moves to the next extension in the list. If
still unanswered, it rings all remaining members, circling back to the top of the list if
necessary. If not picked up after ringing all group members:
•An Intercom call continues to ring the last extension in the group
•An outside call rings all extensions programmed for ringing on that line (an un-
answered Transfer call may recall the transferer before ringing the other exten-
sions)
Terminal Hunting
A Terminal Hunt Group consists of extensions programmed into a ordered list (e.g.,
304, 305, 306, 307). If a call is unanswered at one extension, it moves to the next
extension in the list. If still unanswered, it rings the remaining members until it
reaches the bottom of the list; it does not circle back to the top of the list. If still
unanswered:
•An Intercom call continues to ring the last extension in the group
•An outside call can ring the attendant or all extensions programmed for ringing
on that line (an unanswered Transfer may recall the transferer before ringing the
other extensions)
Extension Hunting
Part I: DIGITAL SYSTEM Features 81

Uniform Call Distribution (UCD)
A UCD Hunt Group consists of extensions programmed into a list, and the group is
assigned a master extension number. The UCD Hunting process begins when a call
comes into the master extension number (such as a call transferred to the master number).
The order in which the call rings the member extensions depends on how busy the
extensions have been. The first extension rung is the one that has been idle the longest.
The last extension rung is the one that has been busiest. If all UCD members are busy, the
call waits (Camps-On) for the programmed Camp-On time, then moves to the overflow
extension (if any). If not answered at the overflow extension, a waiting outside call rings
all extensions programmed for ringing on that line.
Notes:
•Hunt Groups can be linked together. For example, a UCD master number can be
the last member of a Terminal Hunt Group, or the overflow for another UCD
Hunt Group.
•Activating at a Hunt Group extension disrupts normal hunting.
•Activating DND at a Hunt Group extension temporarily removes it from the
group. If a "Circular" extension is in DND, an outside call continually cycles
through the group.
•Two attendants (e.g., 307, 304) can be in a circular Hunt Group for special Night
Answer operation (the group = 307, 304, 307 with type 02). Both attendants
must activate Night Answer to put their lines into the Night Answer mode.
•Automatic Call Distribution is similar to UCD Hunting, but with unique supervi-
sor and agent features. Refer to page 36 for the specifics.
•Extension Hunting considers an extension in DND to be busy. This may disrupt
normal hunting.
Initial Configuration
Extension Hunting disabled (No Hunt Groups assigned)
Using the Feature
N/A
Extension Hunting
82 DIGITAL SYSTEM Administrator’s Guide

Understanding Related Programming
Program 19
To set up Hunt Groups (see page 272)
Program 4
To set two timers: Camp-On (Timer 03 + # + Duration + # –
how long a call waits at a busy UCD group) and Rings
Before Recall (Timer 06 + # + Duration + # – the number of
times a call rings a Hunt Group extension before going to the
next one; and, before ringing all extensions with ringing and
access for that line)
Program 17
To assign a Call Coverage (CCK + Master extension
number + #) or Hotline (HL + Master extension number
+ #) key for a UCD master number (key lights when all
members are busy)
Program 12
To directly terminate a line to a UCD master number
(DTD or DTN + # + master number + #) so calls ring it
instead of having to be transferred to it
Program 18 (II)
To disable Whisper Page (VO + # + Y or N + #) for
extensions in Circular and Terminal Hunt Groups
Extension Hunting
Part I: DIGITAL SYSTEM Features 83

External Alerting Device
✆The ringing for incoming calls is amplified so it can be heard in
large noisy areas, such as a machine shop.
An External Alerting Device, such as a bell, can be connected to Relay 01 (located in
the Main CEU) and Relay 02 (located in Expansion CEU #1). You can program the
system so that a relay activates and the bell rings when an incoming call rings one of
the following destinations:
•A line (348-363)
•An extension (300-347)
•A Ring Group (364-371 without AUX, 396-403 with AUX)
The relay activates for day and Night Answer calls with one exception: If you select
extension 300 for a relay, the relay activates only for calls that ring extension 300
while it is in the Night Answer mode. You can also program the relays to have a
steady or interrupted closure, depending on what the External Alerting Device
requires.
An External Alerting Device must be compatible with the following relay
specifications:
Maximum Load 60 mA @ 30 Vdc
10 mA @ 90 Vdc
Initial Configuration
•Relays 01 and 02 activate when a call rings extension 300 during the Night
mode
•Relays 01 and 02 are programmed for steady closure
Using the Feature
See Answering an Outside Call on page 132 or Night Answer on page 121.
Understanding Related Programming
Program 7
To select the type of call that activates a relay (RELAYnn
OWNER = line, extension or Ring Group + #)
To select interrupted or steady closure for the relays
(INTRUP RING RLY = Y or N + #)
Program 16
To give an extension access to the line you assign to a
relay so the extension can answer a call on that line (L +
Line 01-16 + # + 01 or 02 + #)
External Alerting Device
84 DIGITAL SYSTEM Administrator’s Guide

Flash
✆Use your DIGITAL SYSTEM phone to access the PBX/Centrex
features that you are accustomed to.
When your system is installed behind a PBX or Centrex, Flash lets you access
features of the PBX/Centrex while on an outside call. You simply press a key on
your phone and dial the code for the PBX/Centrex feature.
Initial Configuration
•Flash allowed
•Flash timer set at .7 seconds
Using the Feature
To use Flash while you
are on an outside call:
1. Press FTR.
-If your system has software version AUX Module
02.10 or higher, you can use the steps below to
Flash at a 2500 set:
- Hookflash
- Dial 7 *.
2. Wait for PBX/Centrex dial tone.
3. Dial the code for the desired PBX/Centrex feature.
Understanding Related Programming
Program 4
To set the Flash timer (Timer 08 + # + Duration + #)
Program 10
To identify a line as a PBX line (PBX LINE = Y + #)
Program 5
To store PBX Access Codes to access outside lines (PBX
ACC nn = Enter digits + #)
Program 16
To give an extension access to a line (L + Line 01-16. + #
+ 02 + #)
Refer to the DIGITAL SYSTEM Feature and Terminal Programming Manual to
enable Flash at a 2500 set (AUX Module software version 02.10 and higher).
Flash
Part I: DIGITAL SYSTEM Features 85
telemanuals.com

Flexible Nu mbering Plan
✆The DIGITAL SYSTEM numbering plan can be changed to a
numbering plan the customer is more familiar with, if necessary.
Flexible Numbering Plan lets you change the digits that access lines, extensions and
features. For instance, you can change the extension numbers from 300-347 to 500
to 547. The following system numbers can be changed:
•The digit that forces Intercom calls to ring
•First digit of Personal Speed Dial bins
•First digit of System Speed Dial bin numbers
•First digit of extension numbers
•First digit of Ring Group numbers
•First digit of Line numbers
•First digit of Park Orbit codes
•First digit of Line Dial-Up codes
•First digit of Line Group numbers
•The single digit that calls the main attendant
Changing these codes also affects other feature codes.
The Flexible Numbering Plan feature requires the AUX Module and terminal
programming. For more information, see Flexible Numbering Plan in the DIGITAL
SYSTEM Feature and Terminal Programming Manual.
Initial Configuration
•The digit that forces Intercom calls to ring = 1
•The Personal Speed Dial bin numbers = 50-59, 20-29
•System Speed Dial bin numbers = 70-79 or 700-799
•Extension numbers = 300-347
•Line numbers = 348-363
•Ring Group numbers = 364-371 without AUX, 396-403 with AUX
•Park Orbit codes = 60-69
•Line Dial-Up codes = 801-816
•Line Group numbers = 90-98
•The single digit that calls the main attendant = 0
Using the Feature
NA
Understanding Related Programming
Program 3
To set the baud rate of the AUX Module’s port for
terminal programming (LOCAL BAUD = 00 [300], 01
[1200], 02 [2400], 03 [4800], 04 [9600] or 05 [19.2K] + #)
Flexible Numbering Plan
86 DIGITAL SYSTEM Administrator’s Guide
telemanuals.com

Forced Line Disconnect
✆Quickly get an outside line for an emergency call when all lines are
busy.
Forced Line Disconnect lets you disconnect an outside call that is going on at another
extension. The outside line becomes idle and you can use it, for example, to make a
call. You can also use Forced Line Disconnect to disconnect a busy (seized) outside
line if it does not properly disconnect after the outside party hangs up. Normally,
only attendants use Forced Line Disconnect.
Forced Line Disconnect is primarily for attendants to use in emergencies and for
maintenance technicians to use when there is a problem with a line.
Initial Configuration
Forced Line Disconnect enabled for attendant extension 300
Using the Feature
To disconnect a busy line
(by dialing a code):
1. Lift handset.
2. Press ICM.
3. Dial the busy line’s number (348-363) for lines 01-16.
-You hear busy tone.
4. Dial # to disconnect the line.
-You hear Intercom dial tone. To place a call on the
line, do step 3 again and dial the number.
To disconnect a busy line
(by pressing a Line key):
1. Lift handset.
2. Press Line key for busy line.
-You hear busy tone.
3. Dial # to disconnect the line.
-The Line key goes out and you hear Intercom dial
tone. To place a call on the line, press the Line key
and dial the number.
Understanding Related Programming
Program 1
To enable Direct Line (Trunk) Access in a Class of
Service (DIR ACC/CMP-ON = Y + #); it must be
enabled for Forced Line Disconnect to work (see also
Program 18 [I])
Program 18 (I)
To assign a Class of Service from Program 1 (COS + # +
01-27 + #) to each extension that should be able to use
Forced Line Disconnect
Program 16
To give an extension access to a line (L + Line 01-16 + #
+ 02 + #)
Program 17
To assign a line to a key at an extension (LK + Line 01-16
+ #)
Forced Line Disconnect
Part I: DIGITAL SYSTEM Features 87

Group Call Pickup
✆Easily answer a call ringing your group (e.g., department) even if
you don’t know which extension is ringing.
Group Call Pickup places your extension in a Pickup Group with other extensions so
you can easily pick up (answer) each other’s calls. In other words, anyone in the
group can pick up a call ringing any other extension in the group by dialing a simple
code (* 1). Group Call Pickup answers the following types of calls:
•Ringing Intercom calls
•Transferred Calls
•Outside calls on Direct Inward Lines
•Outside calls on lines that have been assigned, through system programming, to
the Pickup Group
To further simplify answering calls that ring a Pickup Group, your extension can be
assigned a Pickup Group key. This way, when a call rings any extension in the
group, the key flashes and you simply press it to answer the call. If your extension
has program access level 2-5, you can assign ringing to a Pickup Group key so when
a call rings an extension in the group, your extension rings. Also see Delayed
Ringing Assignment on page 62 and Ringing Assignment on page 154.
The system can accommodate up to seven Pickup Groups (01-07). Any number of
extensions can be in a group, but an extension can only be in one group.
Initial Configuration
•No Pickup Groups
•No Pickup Group keys
•No Direct Inward Lines assigned to extensions
•No lines assigned to Pickup Groups
•Extension 301-305 can program ringing. All other extensions only have access
level 01.
Using the Feature
To answer a call ringing
your Pickup Group from
any extension in that
Pickup Group:
This procedure does not answer Ring Group calls at other
extensions in the Pickup Group.
1. Lift handset.
-If you have a One-Touch Speed Dial key, you can
press it instead of using steps 2-4.
2. Press ICM (except at an ESL set).
3. Dial *.
4. Dial 1.
To answer a call ringing a
Pickup Group using the
Pickup key for the group:
1. Lift handset.
2. If not connected, press flashing Pickup key.
Group Call Pickup
88 DIGITAL SYSTEM Administrator’s Guide

Understanding Related Programming
Program 18 (I)
To assign an extension to a Pickup Group (CPG + # +
Group number 01-07 + #)
Program 17
To assign a Pickup Group key to an extension (GP +
Group number 01-07 + #). You can also assign a Pickup
Group key to an extension that is not in a Pickup Group
so the extension can answer calls ringing that group.
Program 18 (II)
To assign ringing to a Pickup key at an extension (RA or
DRA + # + Key + Y + #)
Program 15
To assign program access level 2-5 (PGM ACC LEVEL
= 02-05 + #) to Pickup Group extensions so they can
program ringing for Pickup keys themselves
Program 12
To assign a line to a Pickup Group (CPG + # + Pickup
Group 01-07 + # )
Group Call Pickup
Part I: DIGITAL SYSTEM Features 89

Group Listen
✆Broadcast an important call over your speaker so all your
colleagues can hear the information at once. They can give you
feedback on the information without the person on the line hearing
their comments.
While you talk to someone using the handset, you can activate Group Listen to
broadcast that person’s voice over your phone’s speaker. Anyone in the general
vicinity of your phone can hear what the caller says, but that person will only hear
what you say into the handset.
Note: Attendants cannot use Group Listen.
Initial Configuration
Group Listen always allowed
Using the Feature
Attendant and Headset extensions cannot use Group Listen.
To activate Group Listen
while on a handset call:
1. Press HF, but do not hang up.
-HF flashes slowly and the speaker is on.
To cancel Group Listen
(without terminating your
call):
1. Do not hang up the handset.
2. Press HF. HF goes out and the speaker is off.
-You can still talk to the other person using the
handset.
To terminate (hang up) a
call after activating Group
Listen:
1. Press HF, then hang up the handset.
OR
Hang up the handset, then press HF.
Understanding Related Programming
N/A
Group Listen
90 DIGITAL SYSTEM Administrator’s Guide

Group Ringing
✆Call a group of extensions by dialing a single code.
The extensions in your system can be placed into Ring Groups. When you make an
Intercom call or Transfer to a Ring Group, all extensions in the group ring
simultaneously. If your extension is in a Ring Group, you can answer any call that
rings your group by simply lifting the handset.
Your system can also be set up so that incoming outside calls ring all extensions in a
Ring Group directly (i.e., without having to be transferred to the group).
The system can accommodate up to eight different Ring Groups (01-08). The dial-up
codes for Ring Groups 01-08 are 364-371(without AUX) or 396-403 (with AUX).
Note:
If you upgrade your Base CEU by adding an AUX Module with software version
01.05 or higher, you must reprogram the Ring Group direct terminations in Program
12. See Understanding Related Programming on the next page.
Initial Configuration
No Ring Groups programmed
Using the Feature
To make an Intercom call
to a Ring Group:
1. Lift handset.
2. Press ICM (except at an ESL set).
-ICM lights and you hear dial tone.
3. Dial Ring Group number (364-371 without AUX, 396-
403 with AUX).
To transfer your outside
call to a Ring Group:
1. Press ICM.
-At an ESL set, press TRF instead. Your call goes on
Hold.
2. Dial Ring Group number (364-371 without AUX, 396-
403 with AUX).
3. Hang up.
-If the group is busy, the transferred call Camps-On
(waits) until someone in the group is free or the
transferred caller hangs up. The call will not recall
your extension.
To answer a call that
rings your Ring Group:
The call rings like any other Intercom or outside call.
1. Lift handset.
-You cannot use Automatic Handsfree to answer the
call.
Group Ringing
Part I: DIGITAL SYSTEM Features 91

To answer a call that
rings someone else’s
Ring Group:
If it’s an outside call, you can answer it only if you have
access to that line.
1. Lift handset.
-If you have a Call Coverage key (see page 169) for
the other group, just press the key instead of using
steps 2-4.
2. Press ICM (except at an ESL set).
-ICM lights and you hear dial tone.
3. Dial *. Dial tone stops.
4. Dial Ring Group number (364-371 without AUX, 396-
403 with AUX).
Understanding Related Programming
Program 18 (I)
To assign extensions to a Ring Group (RG + # + Ring
Group Number 01-08 + #). Do not assign an attendant or
Hunt Group extension to a Ring Group.
Program 12
To directly terminate a line (i.e., assign a Direct Inward
Line [DIL]) to a Ring Group (DTD + # + Ring Group
extension number 364-371 w/o AUX or 396-403 w/AUX
+ # ). When a call comes in on the DIL, all extensions in
the group ring.
Program 17
To assign a DIL to a key (LK + Line number 01-16 + #)
at every extension in the Ring Group (if desired)
To change the first digit of Ring Group numbers, see
Flexible Numbering Plan on page 86
Group Ringing
92 DIGITAL SYSTEM Administrator’s Guide

Handsfree
✆Move across the office while on a call and still talk to the caller —
your phone’s microphone picks up your voice from any point in the
room.
With a Handsfree phone, you can place calls, answer ringing calls, and activate
features without lifting the handset; instead, you use the speaker and microphone in
your phone (see also Automatic Handsfree on the next page). If you do not have a
Handsfree phone, read Monitor on page 117.
To answer a voice-announced Intercom call Handsfree, see Intercom Call on page
103.
Note: Attendants cannot use Handsfree.
Initial Configuration
Handsfree capability at all Handsfree phones
Using the Feature
Handsfree is not available to attendant or Headset extensions, or when the system is
already accommodating the maximum number of Handsfree conversations, which is
12 per CEU.
To activate Handsfree
instead of lifting the
handset:
1. Press HF. HF lights.
- If MIC/DND also lights, your phone does not have
Handsfree or all Handsfree circuits are busy.
To talk on a Handsfree
call:
1. Speak toward the phone.
-To turn off the mic, see Microphone Mute on page
115 . If you hear a beep while on a call, see Split on
page 167.
To hang up a Handsfree
call:
1. Press HF.
-HF goes out.
To change a handset call
into a Handsfree call:
1. Press HF. HF flashes.
2. Hang up the handset.
-HF lights steadily.
To change a Handsfree
call into a handset call:
1. Lift handset.
-HF goes out.
Understanding Related Programming
N/A
Handsfree
Part I: DIGITAL SYSTEM Features 93

Handsfree , Auto matic
✆Use the Handsfree (HF) feature without pressing the HF key.
Automatic Handsfree lets you activate Handsfree for a call or feature by just pressing
the primary key for that call or feature. There is no need to press the HF key first
(see also Handsfree on page 93).
With a Handsfree phone, you can always use Automatic Handsfree for:
•Dialing Number Preview
•Directory Dialing
•Intercom (when you press ICM)
•Last Number Redial and Save
•Speed Dial (when you press a One-Touch Speed Dial key or DIAL)
You can also use Automatic Handsfree for the features below, but only if the system
is programmed for Automatic Handsfree:
•Outside Calls (for all types of Line keys)
•Group Call Pickup (with a Pickup key)
•Paging (with a Page key)
•Park (with a Park Orbit key)
•Call Coverage (with a Call Coverage key)
If you do not have a Handsfree phone, see Monitor on page 117.
Initial Configuration
Automatic Handsfree enabled
Using the Feature
Automatic Handsfree is not available to attendant or Headset extensions, or when the
system is already accommodating the maximum number of Handsfree conversations,
which is 12 per CEU.
To use Automatic
Handsfree:
Do not lift handset or press HF.
1. Press (first) key for feature.
-HF lights, Handsfree is activated.
2. Press remaining keys for feature. To place a call, for ex-
ample:
-Press Line key to get dial tone over the speaker.
-Dial the number.
Understanding Related Programming
Program 2
To allow/deny Automatic Handsfree system-wide (HF
REPLY = Y or N + #)
Program 17
To assign a line/feature to a key at an extension (see page
250)
Handsfree, Automatic
94 DIGITAL SYSTEM Administrator’s Guide

Headset
✆Have the privacy of a handset call without having to hold the
handset. And, the Headset frees up both hands so you can easily
process paperwork while you are on a call.
If you have a multibutton phone, you can use a Headset instead of a handset to
process calls. While in the Headset mode, you hear the following signals in the
Headset instead of the speaker: ringing, Paging, Background Music. If your
extension has program access level 2-5, you can enable/disable Headset operation
right from your phone. The recommended Headset is the Plantronic Supra Star Mate
(Model MH0530-1).
With a Headset, you cannot use: Group Listen, Handsfree, Microphone Mute, Prime
Line, Ringing Line Preference, and you will not receive voice-announced Intercom
calls.
Notes:
•If you are an attendant, you should have a DSS Console when using a headset.
•Enabling the headset lowers the volumes at your phone. To readjust the vol-
umes, refer to Volume Controls on page 193.
CAUTION: Do not enable Distinctive Ringing for an outside line if any extensions
use headsets. See page 156 for more on Distinctive Ringing.
Initial Configuration
•Headset operation disabled
•Extensions 300-305 can enable/disable Headset operation. All other extensions
only have program access level 01.
Using the Feature
To install the Headset
while your phone is idle:
1. Make sure your phone is programmed for a Headset.
2. Unplug the handset.
-Leave it in the cradle.
3. Plug in the Headset.
To enable/disable
Headset operation when
your extension has
program access level 2-5:
1. Do not lift handset.
2. Press #.
3. Dial HS.
4. Dial Y to enable Headset.
OR
Dial N to disable Headset.
5. Press SAVE.
To use the Headset for all
features in this guide
(multibutton phone only):
1. Press HF when you see "Lift handset" or "Hang up".
-HF lights when you are on a call and goes out
when you hang up.
Headset
Part I: DIGITAL SYSTEM Features 95

To answer a call using the
Headset (attendant’s
only):
1. Press RLS on the DSS Console.
-If you have Ringing Line Preference, this answers
the call.
2. Press the flashing line or Intercom loop key.
To place a call using the
headset (attendant’s only):
1. Press RLS on the DSS Console.
2. Press the line or Intercom loop key.
-If you have Ringing Line Preference, press the line
or Intercom loop key before pressing RLS.
Understanding Related Programming
Program 18 (II)
To enable/disable Headset operation for an extension (HS
+ # + Y or N + #)
Program 15
To assign program access level 2-5 (PGM ACC LEVEL
= 02-05 + #) to extensions so they can enable/disable
Headset operation themselves
Headset
96 DIGITAL SYSTEM Administrator’s Guide

Hold, Automatic
✆Speed up your call processing by pressing one less key.
Automatic Hold lets you be on a call and activate a feature without first pressing the
HOLD key to hold your call. The system automatically places a call on Regular
Hold for you when you press the following keys: ICM, CONF, Call Coverage,
Hotline, or Page. This way, for example, you can be on a call and start a Conference
call by simply pressing CONF — no need to press HOLD, then CONF.
If you are an attendant and on a call, pressing a Line key also places your call on
Regular Hold automatically.
For more information on Regular Hold, see page 99.
Initial Configuration
Automatic Hold always allowed when you press above mentioned keys
Using the Feature
See above
Understanding Related Programming
See Regular Hold on page 99.
Hold, Automatic
Part I: DIGITAL SYSTEM Features 97

Hold, Exclusive
✆Ensure that a held call of a sensitive nature does not get picked up
at another extension.
Exclusive Hold lets you place an outside call on Hold at your extension so that it
cannot be picked up at another extension. An outside line on Exclusive Hold appears
busy to all other extensions that have access to the line. While a call waits on
Exclusive Hold, you can process other calls or use another feature. Callers on
Exclusive Hold hear Music on Hold or silence, not the conversation in your work
area.
If you leave a call on Exclusive Hold longer than the programmed Hold Recall time,
the call recalls (rings) your extension to remind you. If you do not answer the recall,
the call rings all extensions that normally ring on that line.
Initial Configuration
•Exclusive Hold always allowed
•Hold Recall time is 30 seconds
•Held calls recall for 5 rings before ringing other extensions
•Music on Hold disabled
Using the Feature
To place an outside call
on Exclusive Hold:
1. Press HOLD twice.
-The Line/Loop key flashes at your extension; lights
steadily (appearing busy) at all others.
2. Hang up.
To retrieve an outside call
on Exclusive Hold:
1.1. Lift handset at your phone.
2. Press flashing Line/Loop key.
-The key lights steadily.
Understanding Related Programming
Program 4
To set two timers: Hold Recall (Timer 02 + # + Duration
+ #) and Rings Before Recall (Timer 06 + # + Duration +
# – number of times a recall rings before ringing all
extensions with ringing on that line)
Program 7
To enable/disable Music On Hold (ENABLE MOH = Y
or N + #) when the system is equipped with a
customer-provided music source (for more information,
see Music on Hold on page 120)
Hold, Exclusive
98 DIGITAL SYSTEM Administrator’s Guide

Hold, Regular
✆Answer an outside call at co-worker’s phone, then go to your own
phone to retrieve it. Or vice versa.
Regular Hold lets you place an outside or Intercom call in a temporary waiting state.
While a call waits on Regular Hold, you can process other calls or use another
feature. A waiting caller on Hold hears silence or Music on Hold, not the
conversation in your work area. See also Automatic Hold on page 97 and Exclusive
Hold on page 98.
When you place an outside call on Regular Hold, it can be picked up from any
extension with access to that line. When you place an Intercom call on Regular
Hold, it can be picked up only from the phone you used to hold it.
If you leave a call on Regular Hold longer than the programmed Hold Recall time,
the call recalls (rings) your extension to remind you. If you do not answer a recalling
outside call within a programmed number of rings, it rings all extensions that
normally receive ringing on that line.
Initial Configuration
•Regular Hold always allowed
•Hold Recall time is 30 seconds
•Held outside calls recall for 5 rings before ringing other extensions
•Music on Hold disabled
Using the Feature
To place a call on Regular
Hold:
1. Press HOLD.
-Outside calls flash at your extension and at others
with access to the line. To see the difference in the
flash patterns, see pages 14 and 15.
2. Hang up.
-Do not hang up if it’s a Handsfree or
voice-announced Intercom call (the system will
disconnect these calls).
To retrieve an outside call
from Regular Hold when
the call is flashing a key:
1. Lift handset.
2. Press flashing Line/Loop key.
-The Line key lights steadily.
To retrieve an outside call
on Regular Hold when the
call is not flashing a key:
This is the case when someone places a call on Regular
Hold at another extension and you do not have a Line key
for the call.
1. Lift handset.
2. Press ICM (except at an ESL set).
-ICM lights and you hear dial tone.
3. Dial *.
-Dial tone stops.
Hold, Regular
Part I: DIGITAL SYSTEM Features 99

4. Dial line access code (801-816) or extension number
(300-347).
-Dialing an extension number in step 4 also picks up
other types of calls at that extension. The pick-up
order is as follows:
Ringing Intercom calls
Personal Park calls
Ringing outside calls and Direct Inward Lines
Calls on Hold
To retrieve an Intercom
call from Regular Hold
before it recalls (i.e.,
when the HOLD key is
still flashing):
1. Lift handset.
2. If you hear dial tone, press ICM.
-Otherwise, skip this step. Also, if you have an ESL
set, skip this step.
3. Press flashing HOLD key.
-HOLD goes out, ICM flashes fast.
To retrieve an Intercom
call from Regular Hold
when it is recalling (when
HOLD is out and ICM is
flashing fast):
1. Lift handset if you hear ringing.
OR
Speak toward the phone if you hear two beeps.
Understanding Related Programming
Program 4
To set two timers: Hold Recall (Timer 02 + # + Duration
+ #) and Rings Before Recall (Timer 06 + # + Duration +
# – number of times a recall rings before ringing all
extensions with ringing on that line)
Program 16
To give an extension access to every line it should be able
to pick up from Hold (L + Line 01-16 + # + 01 or 02 + #)
Program 7
To enable/disable Music On Hold (ENABLE MOH = Y
or N + #). For more information, see Music on Hold on
page 120.
Hold, Regular
100 DIGITAL SYSTEM Administrator’s Guide
Hotline
✆Speed up Intercom calls to co-workers you frequently call. Touch
one button to get through.
Hotline lets you place a call or Transfer a call to another extension (your Hotline
partner) by pressing a single key — the Hotline key for that extension. If your
extension has programming access level 2-5, you can change the partner extension
associated with a Hotline key.
In addition, a Hotline key shows you the status of the partner extension:
When the key is... The partner extension is...
Off Idle
On Busy or ringing
Flashing fast In Do Not Disturb (DND)
The Hotline feature also does the following:
•Signals your partner extension when it is busy, if your partner is programmed for
Off-Hook Signaling (see page 126)
•Lets you manually send Call Waiting beeps to your busy partner, if your partner
is not programmed for Off-Hook Signaling
•Lets you contact your partner extension when it is in Do Not Disturb
Initial Configuration
•No Hotline keys programmed.
•Extensions 300-305 can change Hotline partner extensions. All other extensions
only have program access level 01.
•Hotline automatically activates Off-Hook Signaling
Using the Feature
To assign a partner to
your Hotline key when
your extension has
program access level 2-5:
1. Do not lift handset.
2. Press #.
3. Dial HL.
4. Press desired Hotline key.
5. Dial desired extension number.
6. Return to step 4.
OR
Press SAVE to finish.
To place a call to your
Hotline partner:
1. Lift handset.
2. Press Hotline key once if it is lit or unlit.
-If you hear two beeps, speak.
-If you hearing ringing, wait for an answer.
-If you hear busy tone, dial C to send Call Waiting
beeps.
-If you hear fast busy tone, this means your partner
is on a call while in DND. You cannot get through.
Hotline
Part I: DIGITAL SYSTEM Features 101

OR
Press Hotline key twice if it is flashing fast.
-This overrides your partner’s DND and you hear
ringing.
To transfer your outside
call to your Hotline
partner:
1. Press Hotline key once if it is lit or unlit.
-See step 2 above for your options. If you hear busy
tone, you do not have to dial C to send beeps. Just
hang up (see step 2 below).
OR
Press Hotline key twice if the key is flashing.
-In either case, your outside call goes on Hold.
2. Announce the call and hang up.
OR
Hang up to have the call wait at your partner’s exten-
sion unannounced.
-If your partner does not pick up the Transfer, it
recalls your phone like a normal Transfer.
Understanding Related Programming
Program 17
To assign Hotline keys and partners to an extension (HL
+ Partner extension + #)
Program 18 (II)
To change Hotline assignments (DSS + # + Key + Partner
extension + #)
Program 15
To give extensions program access level 2-5 (PGM ACC
LEVEL = 02-05 + #) so they change Hotline partner
extensions themselves
Hotline
102 DIGITAL SYSTEM Administrator’s Guide

Features I – Z
Intercom
✆Easily contact your co-workers.
The DIGITAL SYSTEM Intercom feature lets you call another DIGITAL SYSTEM
extension user by dialing their extension number. You can also call attendant
extensions by dialing their extension number or 0 for the main attendant, 01- 04 for
other attendants.
Your system can be programmed for ringing or voice-announced Intercom calls. In
other words, when you place an Intercom call to an extension, your call will either:
•Ring the extension
•Alert the extension with two beeps. After you hear the beeps, you can speak --
your voice will be announced over the speaker of that extension.
If your system is programmed for ringing Intercom calls, voice-announced Intercom
calls are not available.
If your system is programmed for voice-announced Intercom calls, you can:
•Force an Intercom call to ring the called extension, if you wish.
•Disable incoming voice-announced Intercom calls so all Intercom calls ring your
extension. Your extension must, however, have program access level 3-5.
•Answer a voice-announced call by just speaking toward the phone if your sys-
tem is programmed for Handsfree Reply. If not, you answer a voice-announced
Intercom call by lifting the handset.
Notes:
•Attendants and Headset extensions do not receive voice-announced Intercom
calls.
•When placing a Handsfree Intercom call from a non-Handsfree telephone to a
Handsfree telephone, your call will ring. The call will not voice-announce.
Initial Configuration
•Voice-announced Intercom calls enabled system-wide
•Handsfree Reply enabled
•Extensions 301-305 can program voice-announced calls. All other extensions
only have program access level 01.
•One attendant at extension 300
•Dialing 0 calls extension 300
•Extension ports 00-47 have extension numbers 300-347, respectively
•No extensions have names (at a Display Phone, the extension’s name appears in
all displays that would normally show the extension’s number)
Using the Feature
Also see Handsfree on page 93.
To place an Intercom call:
1. Lift handset.
-If you do not lift the handset and your phone does
not have Handsfree, your call always rings the
other extension.
Intercom
Part I: DIGITAL SYSTEM Features 103

2. Press ICM (except at an ESL set).
-ICM lights and you hear dial tone.
-To force the call to ring the extension, dial 1 before
dialing the extension number in step 3.
3. Dial extension (300-347).
OR
Dial 0 for main attendant or 01-04 for other attendants.
-ICM flashes fast when the call goes through.
-You cannot call your attendant during the Night
Answer mode.
4. If you hear ringing, wait for an answer.
OR
If you hear two beeps, you can speak right away.
To answer an Intercom
call that comes over your
speaker (you hear two
short beeps):
1. Speak toward the phone.
If you hear two long beeps, this means one of two
things:
-The microphone is off (see page 116). Turn it on or
lift the handset to speak.
-Handsfree Reply is disabled. Lift the handset to
speak.
To answer an Intercom
call that rings your phone:
If you are an attendant, the HF key flashes slowly. If you
are not an attendant, ICM flashes slowly.
1. Lift handset.
-ICM flashes fast.
2. Press HF (if you are the attendant).
To enable/disable
voice-announced
Intercom calls when your
extension has program
access level 3-5:
You can do this only if the system is programmed for
voice-announced Intercom calls.
1. Do not lift handset.
2. Press #.
3. Dial VA.
4. Dial Y to enable voice-announced calls.
OR
Dial N to disable voice-announced calls (i.e., to enable
ringing calls).
5. Press SAVE.
Understanding Related Programming
Program 2
To enable/disable voice-announced Intercom calls
system-wide (VOICE CALLS = Y or N + #)
To enable/disable Handsfree Reply system-wide (HF
REPLY + Y or N + #)
Program 18 (II)
To enable/disable voice-announced Intercom calls for
specific extensions (VA + # + Y or N + #). The system
Intercom
104 DIGITAL SYSTEM Administrator’s Guide

must be programmed for voice-announced Intercom calls
in Program 2.
Program 15
To assign program access level 3-5 (PGM ACC LEVEL
= 03-05 + #) to extensions so they can enable/disable
voice-announced Intercom calls themselves
Program 18(I)
To assign an attendant to an extension (SO + # +
Extension + #). This is the attendant that gets called when
the extension user dials 0.
Program 14
To assign extension numbers to ports (STN PORT nn =
300-323 + #) and to assign the correct circuit type to an
extension port (CIRCUIT TYPE = 00 [ESL], 01 [MB] or
02 [MB Display])
To program a name for an extension (refer to extension
name programming on page 242). Display Phone users
see this name in displays instead of the extension’s
number.
Program 3
To assign the number of attendants (operators) in the
system (NO. OF OPRS = 01-04 + #) and to assign their
extension numbers (OPR nn EXT = Extension + #)
To change the first digit of extension numbers, the digit that forces Intercom calls to
ring, or the single digit that calls the operator, see Flexible Numbering Plan on page
86.
Intercom
Part I: DIGITAL SYSTEM Features 105

Intrusion (Barge-In)
✆Quickly interrupt a co-worker’s telephone call to deliver an
emergency message
Intrusion (Barge-In) lets you use your phone to break into a co-worker’s telephone
call and have a three-party conversation. You can also use Intrusion to contact an
extension in Do Not Disturb (DND). You cannot use Intrusion to break into a
Conference call or an extension programmed for Privacy.
CAUTION: An unauthorized Intrusion may be interpreted as an invasion of privacy.
Initial Configuration
•Intrusion enabled for attendant extension 300
•Privacy disabled except for attendant extension 300
Using the Feature
Intrusion is temporarily unavailable when the system is already accommodating the
maximum number of three-party conversations, which is 8 per system.
To use Intrusion after you
call an extension and
hear busy tone, fast busy
tone (for DND), or
ring-busy tone:
1. Dial I (digit 4).
-Busy tone stops and the system sends two warning
beeps to your co-worker.
-If busy tone continues, you cannot intrude.
-You hear ringing if you override DND. Wait for an
answer (skip steps 2-3).
2. Wait for the CONF key to light.
3. Speak.
Understanding Related Programming
Program 1
To enable/disable Intrusion in a Class of Service
(BREAK-IN = Y or N + #). See also Program 18 (I).
To allow/deny Privacy in a Class of Service (PRIVACY =
Y or N + #). Allow Privacy for any extension that should
not be intruded upon (see also Program 18 [I]).
Program 18 (I)
To assign a Class of Service from Program 1 to an
extension (COS + # + 01-27 + #)
Intrusion (Barge-In)
106 DIGITAL SYSTEM Administrator’s Guide

Last Number Redial
✆Remake your last call by touching two buttons. Very handy for
retrying busy numbers.
Last Number Redial lets you redial the last outside number you called without
manually redialing the digits. The system remembers the last call you made and will
dial it out for you on the same line you used for the original call unless you manually
select a different one.
You can use Last Number Redial to redial calls up to 24 digits long. If, however, you
wait more than six seconds between dialing the digits of the original call, Last
Number Redial only redials the digits after the six-second pause.
Initial Configuration
Last Number Redial always enabled
Using the Feature
A power failure erases the last number you called and you cannot use Last Number
Redial to redial it.
To place a call using Last
Number Redial:
1. Lift handset.
-To have the call dial out on a line other than the
original one: Access an idle outgoing line before
you do step 2.
2. Press DIAL.
-You hear dial tone.
3. Press LAST to have the call dial out.
-Immediate busy tone means the original line is
busy. Press an idle outgoing Line key to have your
call go out.
Understanding Related Programming
Program 16
To give an extension outgoing access to a line (L + Line
number + # + 02 + #)
Program 17
To assign a line to a key at an extension (LK + Line
number 01-16 + #)
Last Number Redial
Part I: DIGITAL SYSTEM Features 107

Line Queuing
✆Wait for a busy line to become free without "watching your phone"
or retrying the line. The DIGITAL SYSTEM monitors the line and
gives it to you when it’s free.
Line Queuing lets you place your extension in queue (on a "waiting list") for a busy
outgoing line to become free. As soon as it does, the DIGITAL SYSTEM rings your
phone with a long ("callback") ring. When you answer it, you have dial tone on that
line. If your extension is busy when the line is free, the DIGITAL SYSTEM rings
your extension later.
If a few extensions queue for a line, the DIGITAL SYSTEM rings the ones
programmed for Line Queuing Priority (if any), then any others that queued, in the
order they queued.
Initial Configuration
Line Queuing always allowed
Using the Feature
Line Queuing is not available to attendant extensions.
To queue for a busy line:
You can also do this when you use Last Number Redial,
Save, or Speed Dial and immediately get busy tone,
which means the stored line is busy.
1. Try to access the busy line.
-You hear busy tone.
2. Dial C.
3. Hang up.
To answer a callback
(long) ring:
If you do not answer, the DIGITAL SYSTEM removes
your extension from the queue.
1. Lift handset.
-You hear outside dial tone (or your Last Number
Redial, Save, or Speed Dial call dialing out).
To cancel a Line Queuing
request before the system
calls you:
1. Try to access the busy line.
-You hear busy tone.
2. Dial *.
3. Hang up.
To cancel all your Line
Queuing (and Callback)
requests:
A power failure or system reset automatically cancels
them.
1. Lift handset.
2. Press ICM (except at an ESL set).
3. At a multibutton phone, dial * and press FTR.
OR
At an ESL set, dial # *.
4. Hang up.
Line Queuing
108 DIGITAL SYSTEM Administrator’s Guide

Understanding Related Programming
Program 1
To allow Line Queuing (Callback) Priority in a Class of
Service (CBACK PRIORITY = Y + #). See also
Program 18 (I).
Program 18 (I)
To assign a Class of Service from Program 1 to each
extension that should have Line Queuing Priority (COS +
# + 01-27 + #)
Line Queuing
Part I: DIGITAL SYSTEM Features 109

Maintenance Utilities and Rep orts
✆It’s easy to investigate and diagnose a problem in the system.
There may be no need for a service call.
The system provides diagnostic and maintenance utilities and reports to help
troubleshoot the system.
There are 30-35 diagnostic/maintenance/report options, five of which are shown
below:
•List Toll Restriction data
•Swap extension ports
•Reset expansion CEUs
•Display the status of every line and extension
•List programmable key data
Maintenance Utilities and Reports requires the AUX Module and terminal
programming. For more information, see System Reports, Diagnostics and
Maintenance Utilities in the DIGITAL SYSTEM Feature and Terminal Programming
Manual.
Initial Configuration
Diagnostics/Maintenance Utilities and Reports not available without the AUX
Module and terminal programming
Using the Feature
N/A
Understanding Related Programming
Program 3
To set the baud rate of the AUX Module’s port for
terminal programming (LOCAL BAUD = 00 [300], 01
[1200], 02 [2400], 03 [4800], 04 [9600] or 05 [19.2K] + #)
Maintenance Utilities and Reports
110 DIGITAL SYSTEM Administrator’s Guide

Meet- Me C onfe rence
✆Conduct a telephone meeting with two people in the office even
when you don’t know where they are.
Meet-Me Conference lets you set up a three-way telephone conversation. You page
the people you want in the Conference and wait without hanging up. Then, from any
phone, they dial the Meet-Me Conference code (11 or 12) to be connected to you.
Initial Configuration
Meet Conference always allowed
Using the Feature
Meet-Me Conference is temporarily unavailable when the system is already
accommodating the maximum number of three-party conversations, which is 8 per
system.
To set up a Meet-Me
Conference:
1. Page parties and announce the Meet-Me Conference
Code (11 or 12). Do not hang up.
-See Paging on page 138.
2. Press ICM (except at an ESL set).
-You hear dial tone.
3. Dial the Meet-Me Conference code you announced in
step 1.
4. Do not hang up. Wait for parties to join.
-When the first person joins, ICM flashes fast.
-When the second person joins, CONF lights.
-One party can hang up without disconnecting the
other two.
To join a Meet-Me
Conference after you are
paged:
You must respond within one minute of the page.
1. Lift handset and press ICM (except at ESL set).
-You hear dial tone.
2. Dial announced Meet-Me Conference code (11 or 12).
-When the first person joins, ICM flashes fast.
-When the second person joins, CONF lights.
-One party can hang up without disconnecting the
other two.
Understanding Related Programming
N/A
Meet-Me Conference
Part I: DIGITAL SYSTEM Features 111

Message Center
✆Share a mailbox with co-workers. Leave messages in the Message
Center, or listen to messages others have left.
A Message Center is a shared mailbox available to a keyset user with a programmed
Message Center key. Any keyset user with a Message Center key can leave a message
in the Message Center or listen to messages others have left. For example, a Service
Department dispatcher could have Message Center keys for each of the company’s
products. When all technicians are busy, the dispatcher could send any additional
calls to the Message Center assigned to the specific product. As technicians become
available, they can select the messages for the product group they want to service
first.
Since each Message Center requires an uninstalled (phantom) extension port, the
system allows as many Message Centers as there are available uninstalled extensions.
In addition, a keyset can have as many Message Center keys as it has available
programmable keys.
Notes:
•Message Center requires an AUX Module with software version 02.10 or higher.
Message Center is not available with Base software.
•Message Center requires NVM-2002 software version 2.06 or higher or NVM-
202 software version 1.03 or higher. For more information on installing and us-
ing Voice Mail, refer to page 185.
Initial Configuration
Message Center not installed.
Using the Feature
To call the Message
Center:
1. Lift handset or press HF.
2. Press the Message Center key.
-When the Message Center has messages waiting,
your Message Center key flashes at a unique rate.
Understanding Related Programming
Refer to the DIGITAL SYSTEM Feature and Terminal Programming Manual.
Message Center
112 DIGITAL SYSTEM Administrator’s Guide

Message Waiting
✆Let a busy co-worker know you need a return call without having
to leave a note at their desk.
When you call a busy, "no-answer," or DND (Do Not Disturb) extension, Message
Waiting lets you leave a message indication at that extension requesting a return call.
The message indication is a flashing MSG key, and the message recipient can
respond at their convenience. When the recipient responds (answers the Message
Waiting), the system automatically places an Intercom call to you (the person who
left it).
You can leave a Message Waiting at any number of extensions, and any number of
your co-workers can leave a Message Waiting at your extension.
You can also do the following with Message Waiting:
•Cancel all Message Waitings left at your extension
•Cancel Message Waitings that you left
•View the extensions that left you Message Waitings (if you have a Display
Phone)
Initial Configuration
Message Waiting always allowed (except if Voice Mail is installed)
Using the Feature
A power failure or system reset cancels all active Message Waitings.
To leave a Message
Waiting when you call an
extension and hear busy
tone, ring-busy, fast busy,
or get no-answer:
You cannot leave a Message Waiting at an attendant
extension.
1. At a multibutton phone, press MSG.
OR
At an ESL set, dial 6.
2. Hang up.
-The MSG key flashes fast at the extension you
called.
To cancel a Message
Waiting you left:
This option is not available in systems using AUX
Module software version 02.10 and higher.
1. Lift handset.
2. Press ICM (except at an ESL set).
3. Dial extension that has your Message Waiting.
4. Hang up.
To cancel all Message
Waitings left at your
extension:
In systems using AUX Module Software version 02.10
and higher, this is the only way to cancel Message
Waitings. Note that this also cancels Callback and Line
Queuing requests.
1. Lift handset.
2. Press ICM (except at an ESL set).
3. Dial # *.
4. Hang up.
Message Waiting
Part I: DIGITAL SYSTEM Features 113

To answer a Message
Waiting (your MSG key is
flashing fast):
1. Lift handset.
2. At a multibutton phone, press MSG.
OR
At an ESL set, dial * 6.
-MSG goes out and the system connects you to the
extension that left the message.
-If MSG continues to flash, this means you have
more messages.
To view and selectively
answer your messages (if
you have a Display
phone):
1. Do not lift handset.
2. Press MSG to see the first message.
3. Repeatedly press MSG to see other messages, if any.
4. When you see the extension you want to call: Lift hand-
set, press MSG.
-MSG goes out and the system connects you to the
extension that left the message. If MSG continues
to flash, this means you have more messages.
Understanding Related Programming
N/A
Message Waiting
114 DIGITAL SYSTEM Administrator’s Guide

Microphone Mute
✆Privately confer with someone in your work area while on a
Handsfree call.
Microphone Mute lets you turn off the microphone while you are on a Handsfree
call. With the microphone off, you can listen to the person on the other end, but that
person will not be able to hear what people are saying in your work area. To talk to
the person on the phone, you must cancel Microphone Mute (i.e., turn the
microphone back on). See also Microphone On/Off on page 116.
Initial Configuration
Microphone Mute always allowed
Using the Feature
Microphone Mute is not available to attendant or Headset extensions.
To activate Microphone
Mute while on a
Handsfree call:
1. Press MIC/DND.
-MIC/DND lights.
To cancel Microphone
Mute:
Canceling it automatically cancels any Call Forwards or
Selectable Display Messages at your extension.
1. Press MIC/DND until it goes out.
-If MIC/DND flashes, your microphone is back on
but your extension is in Do Not Disturb. Press it
again.
Understanding Related Programming
N/A
Microphone Mute
Part I: DIGITAL SYSTEM Features 115
telemanuals.com

Microphone On/Off
✆Make sure a conversation in your work area is not overheard by
Intercom callers.
Microphone On/Off lets you turn off your phone’s microphone while your phone is
idle. With the microphone off, Intercom callers who make voice announcements
over your speaker will not be able to hear what people are saying in your work area
at the moment the call comes through. To talk to the Intercom caller, you must turn
the microphone back on or lift the handset. See also Microphone Mute on page 115.
Initial Configuration
Microphone On/Off always allowed
Using the Feature
Microphone On/Off is not available to attendant or Headset extensions.
To turn off the
microphone while your
phone is idle:
1. Press MIC/DND.
-MIC/DND lights.
-When a voice-announced Intercom call comes in,
you will hear two long beeps instead of the usual
two short beeps.
To turn your microphone
back on:
Turning it back on automatically cancels any Call
Forwards or Selectable Display Messages at your
extension.
1. Press MIC/DND until it goes out.
-If MIC/DND flashes, your microphone is back on
but your extension is in Do Not Disturb. Press it
again.
Understanding Related Programming
N/A
Microphone On/Off
116 DIGITAL SYSTEM Administrator’s Guide

Monitor
✆Dial a call, then use both hands to work while you wait for someone
to answer — no need to hold the handset to your ear while you
wait. Or, use Monitor to wait on Hold without holding the handset
to your ear.
Monitor lets you dial calls and activate features without lifting the handset; instead,
you press the HF key. When you want to talk, however, you must lift the handset.
Note: The Monitor feature, as described here, is for non-Handsfree phones. If you
have a Handsfree phone, read Handsfree on page 93 or Automatic Handsfree on page
94.
Initial Configuration
Monitor capability at all non-Handsfree phones
Using the Feature
Monitor is not available to attendant or Headset extensions.
To use Monitor to dial a
call or activate a feature:
1. Do not lift handset.
2. Press HF instead of lifting handset.
-HF and MIC/DND light.
-If MIC/DND does not light, use Handsfree instead.
-If your system has Automatic Handsfree, you can
skip steps 1 and 2.
3. Press keys for call or feature.
To talk on the phone
during Monitor:
1. Lift handset.
-HF goes out.
To hang up while using
Monitor call:
1. Press HF.
-HF goes out.
To change from the
handset to Monitor:
You can do this while on Hold, waiting for the other party
to return.
1. Press HF.
-HF flashes.
2. Hang up the handset.
-HF lights steady.
Understanding Related Programming
Program 2
To allow/deny Automatic Handsfree (ENABLE AUTO
HF = Y or N + #)
Monitor
Part I: DIGITAL SYSTEM Features 117

Multiple Atte ndants
✆Incoming calls can be split up among attendants to speed up call
processing.
The DIGITAL SYSTEM can have up to four attendants. This lets you reduce the call
traffic into the main attendant phone by assigning some lines to the main attendant
and the remaining lines to another attendant.
Each attendant must have a Display Multibutton Telephone. Two keys on the
attendant’s Display Telephone have different functions than those same keys on a
non-attendant Display Phone.
The following DIGITAL SYSTEM features can be activated only from an attendant
extension:
•Alarms (see page 24)
•Automatic Hold using a Line key (see page 97)
•Alternate Attendant (see page 30)
•Forced Line Disconnect (see page 87)
•Removing Extensions and Lines From Service (see page 153)
•Night Answer (see page 121)
The following DIGITAL SYSTEM features are not available to an attendant
extension:
•Call Forwarding
•Callback
•Do Not Disturb
•Group Listen
•Handsfree, Automatic Handsfree, Monitor
•Line Queuing
•Message Waiting (receiving)
•Off-Hook Signaling (receiving)
•Paging (receiving)
In addition, the attendants should not have Ringing Line Preference or Prime Line.
Initial Configuration
One attendant at extension 300
Using the Feature
The attendant phone is used like any other Multibutton (any exceptions are noted in
individual feature operations).
To call an attendant, see Intercom Calls on page 103.
Understanding Related Programming
Program 3
To assign attendants (OPR nn EXT = Extension number
+ #). Attendant 01 must be extension 300.
Multiple Attendants
118 DIGITAL SYSTEM Administrator’s Guide

Program 18 (I)
To assign Off-Hook Ringing to an attendant (OHR + # +
Y or N + #). This allows the phone to ring (beep) while
Alarms display at the attendant phone.
To assign an attendant (operator) to each extension (SO +
# + Extension number + #). This is the attendant that gets
called when the user presses ICM and dials 0.
Program 16
To assign line access to attendant extensions (L + Line
number 01-16 + # + 02 + #)
Program 17
To assign a line to a key at an attendant extension (LK +
Line number 01-16 + #)
Program 18 (I)
To manually assign the proper Class of Service (COS + #
+ 01-27 + #) to an extension when you change it from an
attendant to a non-attendant. Non-attendant extensions
use COS 01-27; attendant extensions use COS 30.
Multiple Attendants
Part I: DIGITAL SYSTEM Features 119
telemanuals.com

Music On Hold
✆Callers on Hold can listen to music while they wait.
Music On Hold (MOH) sends music to calls on Hold, parked calls, and transferred
calls. If there is no Music On Hold in the system, callers on Hold hear silence.
Music on Hold requires a customer-provided music source (e.g., tape player or
receiver).
Note: In accordance with U.S. copyright law, a license may be required from the
American Society of Composers, Authors and Publishers (ASCAP) or other similar
organizations, if radio, television broadcasts or music and other material not in the
public domain are transmitted through the Music On Hold feature of
telecommunications systems. Your equipment manufacturer and supplier hereby
disclaim any liability arising out of the failure to obtain such a license.
The music source must be compatible with the following system specifications:
Input Impedance 100 K Ohms
Maximum Input - 10 dBm
The music source can also be used for Background Music (see page 42). To install
the music source, see the Hardware Manual.
Initial Configuration
•Music on Hold not available
•MOH for Transfers disabled
Using the Feature
N/A
Understanding Related Programming
Program 7
To enable/disable MOH (ENABLE MOH = Y or N + #)
Program 3
To enable/disable MOH on transfer (PLAY MOH
TRANS = Y or N + #)
Music On Hold
120 DIGITAL SYSTEM Administrator’s Guide

Night Answer (Off-Hours Ringing)
✆You can, as the attendant: Send calls to extensions at night so other
people (perhaps security personnel) can answer them until you
return in the morning.
If you are the attendant, Night Answer (Off-Hours Ringing) lets you place the system
in the "night" mode so your incoming calls ring at other destinations. Your system
may be set up for Assigned Night Answer or Universal Night Answer.
•Assigned Night Answer sends calls to extensions, Ring Groups or UCD Hunt
Group extensions.
•Universal Night Answer sends calls to the external paging system so they ring
over the paging speakers. Or, the calls can ring an External Alerting Device,
such as a bell. You activate Assigned Night Answer and Universal Night Answer
in the same way.
Note: Non-attendant extensions or UCD Groups with Direct Inward Lines can put
their extensions in the "Night Answer" mode by activating Do Not Disturb (see
Direct Inward Lines on page 64 and Do Not Disturb on page 74).
Initial Configuration
• Night Answer is available to attendant extension 300
• No night destinations assigned
Using the Feature
To activate Night Answer
at an attendant extension:
1. Do not lift handset.
2. Press MIC/DND until it flashes.
-MIC/DND flashes fast. Extension users cannot
make Intercom calls to your attendant extension
while it is in the Night mode.
-If your attendant extension is in a Circular Hunt
Group with another attendant extension, both of
you have to activate Night Answer in order for the
system to go into the Night Answer mode.
To cancel Night Answer:
1. Do not lift handset.
2. Press flashing MIC/DND.
-MIC/DND goes out.
To answer a call that
rings an extension during
Night Answer:
1. Lift handset.
2. Press flashing key.
-If Ringing Line Preference is enabled, there is no
need to press the key.
To answer a call that
rings the paging speakers
or a bell:
1. Lift handset.
2. Press ICM (except at an ESL set)
-ICM lights and you hear dial tone.
3. Dial *.
-Dial tone stops.
4. Dial 0.
Night Answer (Off-Hours Ringing)
Part I: DIGITAL SYSTEM Features 121

-If you hear busy tone, you cannot answer that line
from that phone.
Understanding Related Programming
For Universal or Assigned Night Answer:
Program 18 (I)
To enable Do Not Disturb for any attendant extension that
should be able to activate Night Answer (DND + # + Y or
N + #)
Program 3
To assign attendant extensions (OPR nn EXT =
Extension number + #)
Program 19
To assign two attendants to a Circular Hunt Group, if
desired (HUNT TYPE = 01, 02 or 03 + Extension + #).
First and last extension in the group must be the same.
Both attendants must activate Night Answer for the
system to go into the Night mode.
For Assigned Night Answer:
Program 12
To enable day and night ringing destinations. For a line
that should ring an attendant during the day and elsewhere
at night:
1. Make the line’s day destination (termination) an atten-
dant extension (DTD + # + Extension + #). This makes
the line ring that attendant during the day mode.
2. Make the line’s night termination a particular exten-
sion, UCD master number, or Ring Group (DTN + # +
Extension, UCD master or Ring Group + #). This
makes the line ring the night termination when its atten-
dant (assigned in step 1) activates Night Answer. If an
extension or UCD group does not answer, the call rings
all extension with access (see Program 16) and ringing
(see Program 18 [II]).
OR
Make the line’s night termination 300, which is the in-
itial (default) setting for all lines (DTN + # + 300 + #).
When the line’s attendant (assigned in step 1) activates
Night Answer, the line rings at any extension that has
incoming access (see Program 16) and ringing (see Pro-
gram 18 [II]) for that line.
Program 16
To give an extension access to a line (L + Line number
01-16 + # + 01 or 02 + #)
Program 18 (II)
To assign day/night ringing or just night ringing to a line
at an extension (RA or NR + # + Line key + Y or N + #)
For Universal Night Answer (ringing over paging speakers)
Line port 04 must be available for the External All Call Page Zone. To install the
Paging Speakers, see the Hardware Manual.
Night Answer (Off-Hours Ringing)
122 DIGITAL SYSTEM Administrator’s Guide

Program 7
To enable External Page Zones 1 or 2 (EXT PAGE ZN 1
or EXT PAGE ZN 2 = Y + #)
To enable audible (ringing) over the External All Call
Page (AUDIBLE RNG = Y + #)
Program 12
To assign extension 300 as the night termination of any
line that should ring over the paging speakers (DTN + # +
300 + #). The line rings over the paging speakers when
extension 300 goes into the Night Answer mode.
Program 16
To let an extension access the lines that ring over the
paging speakers so they can answer them (L + Line
number 01-16 + # + 01 or 02 + #)
For Universal Night (ringing a bell):
See External Alerting Devices on page 84.
Night Answer (Off-Hours Ringing)
Part I: DIGITAL SYSTEM Features 123

Night Ringing
✆Help answer calls at night, when the attendant goes home.
Night Ringing (NR) lets you make a line ring at your extension only when the line’s
attendant goes into the Night Answer mode. A line’s attendant is usually the
attendant who answers the line. Night Ringing is for those lines that appear at your
extension, but do not normally ring it.
To enable or disable NR, your extension must have program access level 2-5.
Enabling NR automatically disables Ringing Assignment (see page 154) or Delayed
Ringing Assignment (see page 62).
Initial Configuration
•NR disabled at all extensions
•Extension 300-305 can program NR. All other extensions only have access level
01.
Using the Feature
To enable/disable Night
Ringing (NR) for a line:
1. Do not lift handset.
2. Press #.
3. Dial NR.
-Your Line keys flash or light steadily. Flashing
means Night Ring is on; steadily means it is off.
4. Press desired Line key.
OR
Dial line number (01-16).
5. To enable Night Ring, dial Y.
OR
To disable Night Ring, dial N.
6. Press # and return to step 4, press SAVE to finish
Understanding Related Programming
Program 16
To assign incoming lines to an extension (L + Line
number 01-16 + # + 01 or 02 + #)
Program 18 (II)
To enable/disable Night Ringing for a line at an extension
(NR + # + Line key + Y or N + #). A line follows its
Night Ringing assignment under two conditions (set in
Program 12): When its night termination is 300 (DTN +
# + 300 + #) and when its terminated day attendant (DTD
+ # + Extension + #) activates Night Answer.
Program 15
To assign program access level 2-5 (PGM ACC LEVEL
= 02-05 + #) to extensions so they can program NR
themselves
Night Ringing
124 DIGITAL SYSTEM Administrator’s Guide

Non-Blocking Architecture
✆Everyone can be on the phone at once.
Non-Blocking Architecture means that all the extensions and lines can be busy on
calls simultaneously, without blocking or interfering with one another.
The system allows simultaneous handset and Handsfree calls, with a maximum of 12
simultaneous Handsfree calls per CEU. So if 12 Handsfree calls are in progress and
someone tries to make a Handsfree call, the system emits a busy tone and the person
must make a handset call instead.
Note: The DIGITAL SYSTEM has 12 dialing buffers. This means that a maximum
of 12 people can simultaneously dial calls (i.e., without being blocked).
Initial Configuration
Non-Blocking architecture always available
Using the Feature
N/A
Understanding Related Programming
N/A
Non-Blocking Architecture
Part I: DIGITAL SYSTEM Features 125

Off-Hook Signaling/Whisper Page
✆You can break into a co-worker’s call and talk to them without the
other person on the line hearing you.
When you call a busy multibutton extension, Off-Hook Signaling lets you send a
signal to the busy user. Depending on programming, sending the signal can result in
a Whisper Page or Off-Hook Ringing.
Whisper Page
Whisper Page sends two beeps into the handset of the busy user. After the beeps
sound, you can speak. The busy user hears your voice over their conversation, but
the other person does not hear you. The busy user can also respond to you without
the other person hearing. Whisper Pages do not occur if the busy user is on a
Handsfree/Monitor call. Off-Hook Ringing may occur instead, depending on
programming.
Off-Hook Ringing
Off-Hook Ringing sends a beep (repeated) over the speaker of the busy extension.
While the beep sounds at the busy extension, you hear ringing and must wait for the
busy user to respond.
On the other hand, when you receive a Whisper Page or Off-Hook Ringing, you can
respond or not respond, as is convenient. If your extension has program access level
3-5, you can disable or enable incoming Whisper Pages. To block Off-Hook Signals
while on a particular call, activate Do Not Disturb.
Initial Configuration
•Whisper Page enabled
•Off-Hook Ringing disabled
•Extension 301-305 can enable/disable Whisper Page. All other extensions only
have access level 01.
Using the Feature
To use Off-Hook
Signaling when you call
an extension and hear
ring-busy tone:
You can’t send a signal if you hear busy tone.
1. Dial 1.
2. If you hear two beeps: Speak.
OR
If you hear ringing: Wait for the called party to answer.
OR
If you hear busy or fast busy tone, you cannot send a
signal. Hang up.
-Pressing a lit Hotline, Call Coverage, or DSS key
automatically activates Off-Hook Signaling. For
more information, see Hotline on page 101, Call
Coverage on page 169, and Direct Station
Selection on page 69.
Off-Hook Signaling/Whisper Page
126 DIGITAL SYSTEM Administrator’s Guide

Using the Feature
To enable/disable
incoming Whisper Page
when your extension has
program access level 3-5:
1. Do not lift handset.
2. Press #.
3. Dial VO.
4. Dial Y to enable.
OR
Dial N to disable.
5. Press SAVE.
To respond to a Whisper
Page in your handset:
You hear two beeps, then your co-worker’s voice. The
ICM key flashes fast.
1. Press and hold MIC/DND to talk.
2. Release MIC/DND to talk to initial caller.
To answer an Off-Hook
Signal you hear over your
speaker:
You hear a single beep repeated. ICM flashes fast if you
are on an Intercom call or slowly if you are on an outside
call.
1. Press HOLD to hold an Intercom call.
-If you are on an outside call, you can skip this step
(doing step 2 automatically places an outside call
on Exclusive Hold).
2. Press flashing ICM.
-If you are on an outside call, the HOLD and Line
key flashes.
-If you are on an Intercom call: HOLD and ICM
flashes.
-To switch (alternate) between the two calls, see
Split on page 167.
Understanding Related Programming
Program 18 (II)
To enable/disable incoming Whisper Pages for an
extension (VO + # + Y or N + #)
Program 15
To assign program access level 3-5 to extensions so they
can enable/disable Whisper Page themselves (PGM ACC
LEVEL = 03-05 #)
Program 18 (I)
To assign Off-Hook Ringing to an extension (OHR + # +
Y or N + #)
Off-Hook Signaling/Whisper Page
Part I: DIGITAL SYSTEM Features 127

Operator Assistance
✆Have your system automatically answer outside calls and provide
dialing options to your callers — even without Voice Mail.
Operator Assistance requires a Voice Module Unit (P/N 88522) and an AUX Module
with software version 02.10 or higher. Operator Assistance is not available with Base
software.
Operator Assistance (OPA) automatically answers calls on designated trunks and
provides dialing options to callers. With OPA, callers can dial extensions and hunt
groups directly, without human intervention. OPA saves system users call processing
time and provides immediate call answering to outside callers.
Operator Assistance provides:
•Caller Dialing Options
- Direct dialing to any extension, ring group or ACD/UCD hunt group
- Single-digit access to selected extensions, ring groups or ACD/UCD
hunt groups
•Simultaneous call answering
•Programmable OPA messages
•Automatic attendant overflow
Caller Dialing Options
When a call rings a trunk, OPA answers the call (if programmed) and plays a
prerecorded message to the caller. The message normally provides a company
greeting and describes the options the caller may dial. For example, a caller may
hear, "Hello. You have reached XYZ Corporation. Dial 4 for Technical Service or 5
for Sales." The outside caller listens to the message (up to 16 seconds long) and dials
accordingly. The caller may then dial:1
•Leading digit 3 plus any three-digit extension, ring group or ACD/UCD hunt
group number. In software versions AUX Module 2.0/Base 5.0 and higher, the
leading digit can be any digit from 1-9.
•A single digit for an extension, ring group or ACD\UCD hunt group. Allowed
single-digit options are 1, 2, and 4-9
Simultaneous Call Answering
OPA can answer up to three calls simultaneously, using three separate VMU ports. If
all VMU ports are busy, the call queues for an idle port and the outside caller hears
ringing. If the internal extension dialed is busy, the outside caller hears a special
message describing additional dialing options.
Programmable OPA Messages
The system allows the attendant to record six Operator Assistance messages,
numbered 02-07. In programming, the system administrator can assign an incoming
call to any one of these messages. This allows OPA to answer an incoming call and
play the appropriate message to the caller.
Operator Assistance
128 DIGITAL SYSTEM Administrator’s Guide
1If the caller does not dial a digit, the call rings all extensions with programmed key ringing
for the trunk. This is the only option available to Dial Pulse (DP) telephone callers.

Automatic Attendant Overflow
Operator Assistance also provides call overflow for attendants. With call overflow, an
unanswered call to an attendant routes to an OPA message after a programmed
interval. The caller can then use the announced options.
Initial Configuration
Operator Assistance not installed.
Using the Feature
To initialize (erase) all
OPA messages (if you are
an attendant or ACD
Supervisor):
This also erases the ACD All Agents Busy message and
Personal Greetings. You must initialize all messages after
you first install the VMU.
1. Lift handset.
2. Press ICM.
3. Press #.
4. Dial 68.
5. Press #.
6. Dial 9.
-If you change your mind, dial 6 to cancel this
procedure.
To record an OPA
message (if you are an
attendant or ACD
Supervisor):
1. Lift handset.
2. Press ICM.
3. Press #.
4. Dial 68.
5. Dial OPA message number (02-07).
-Message 02 is the error message. A caller dialing
an incorrect code hears message 02. Make sure you
program this message.
-Message 00 is the ACD/UCD overflow message.
Refer to Automatic Call Distribution.
-Message 01 is the "All lines are busy..." message.
Even though you can record message 01, the system
uses the preset "All lines are busy..." message
instead.
6. Wait for voice instructions, then begin recording.
-You can record a message up to 16 seconds long.
The system indicates if your message is too long.
To listen to a previously
recorded OPA message
(from your attendant or
ACD Supervisor
extension):
1. Lift handset.
2. Press ICM.
3. Press #.
4. Dial 685.
5. Dial OPA message number (02-07).
-You can also listen to messages 00 and 01.
Operator Assistance
Part I: DIGITAL SYSTEM Features 129

To call into the system
using Operator
Assistance:
1. Dial system telephone number.
2. After OPA answers your call, dial announced option:
Dial single-digit option.
OR
Dial 3 plus the extension number you wish to reach.
Understanding Related Programming
Refer to the DIGITAL SYSTEM Feature and Terminal Programming Manual.
Operator Assistance
130 DIGITAL SYSTEM Administrator’s Guide

Other Common Carriers
✆Use Other Common Carriers such as, MCI, GTE Sprint, etc.
The DIGITAL SYSTEM lets you access Other Common Carriers (OCCs), like MCI
and GTE Sprint, in two different ways. You can:
•Manually dial their telephone number and any other required codes.
•Store their telephone number, a pause, and their security code (or other required
numbers) in a Personal Speed Dial bin. When you access the bin, the system di-
als out the number, then pauses (waits) for dial tone from the OCC. When the
DIGITAL SYSTEM detects OCC dial tone, it dials out any other stored digits.
Optionally, the system administrator can store an OCC telephone number and other
required codes in a System Speed Dial bin for quick access by everyone in the
system.
Initial Configuration
The DIGITAL SYSTEM is always compatible with OCCs
Using the Feature
To manually make a call to an OCC: See Placing an Outside Call on page 134.
To store an OCC’s number in a Speed Dial bin: See Speed Dial on page 162.
Understanding Related Programming
Program 6
To enable/disable Active Dialpad (Continuous Dialing) in
a Toll Restriction level (ACT DIAL PAD = Y or N + #).
Enabling it lets a user manually dial digits during an
established outside call. This way, a user can establish a
call to an OCC, wait for OCC dial tone, then dial more
digits (see also Program 1).
Note: Continuous Dialing is always allowed at ASIs.
Program 1
To assign a Toll Level (from Program 6) to a Class of
Service (TOLL RESTRICT = 01-07 + #). You can
assign Toll Level 0 or a Toll Level that has Active Dialpad
enabled (see also Program 18 [I]).
Program 18 (I)
To assign a Class of Service from Program 1 to an
extension (COS + # + 01-27 + #).
Other Common Carriers
Part I: DIGITAL SYSTEM Features 131

Outside Ca lls, Answering
✆Answering an outside call can be just as easy as lifting the handset.
When an outside call comes into your extension, its Line key flashes slowly, if the
line has a designated key. If a line does not have a designated key, the call flashes a
"catch-all" key, called a Loop key.
The call may ring or not ring, depending on programming. If your extension has
program access level 2-5, you can program, right from your phone, how the lines
ring (see Ringing Assignments starting on page 154).
In addition, calls may ring over the paging speakers or they may ring a bell
(especially at night).
Initial Configuration
•All extensions have incoming and outgoing access to all lines
•If the system has one CEU, keys 1-8 are Line keys and access lines 01-08. Keys
9-16 are undefined. With two or three CEUs, keys 1-16 are Line keys and ac-
cess lines 01-16.
•No Loop keys assigned
•Outside calls to extensions 300, 302, 303 flash and ring. Outside calls to other
extensions only flash.
•Extensions 300-305 can program ringing. All other extensions only have pro-
gram access level 01.
•All lines are CO Loop Start and have no name assigned (a line’s name appears
when a Display Phone user answers a call on that line)
Using the Feature
To answer an outside call
that comes into your
extension:
1. Lift handset.
2. If not connected, press flashing Line or Loop key.
-If the line is a Prime Line (see page 134) or your
extension is programmed for Ringing Line
Preference (see page 155), you do not have to press
the key to answer the call.
To answer an outside call
that rings over the paging
speakers or a bell:
1. Lift handset.
2. Press ICM (except at an ESL set).
-ICM lights, you hear dial tone.
3. Dial * 0.
Understanding Related Programming
Program 10
To define line attributes:
Type (CIRCUIT TYPE = 10 or 11 + #)
Gain (LINE GAIN = 01-05 + #)
Outside Calls, Answering
132 DIGITAL SYSTEM Administrator’s Guide

Side tone (SIDE TONE TEST = Y or N)
Name (refer to page 230 for more on programming line
names)
Program 16
To allow/deny an extension incoming access to a line (L +
Line number 01-16 + # + 01 or 02 + #)
Program 17
To assign a line to a key at an extension (LK + Line
number 01-16 + #)
To assign a Loop (Switch) key to every extension (LS +
#). A Loop key flashes for incoming calls that do not
appear under a Line key. Make sure you assign one Loop
key to each extension so all incoming calls can appear
somewhere.
Program 18 (II)
To assign ringing to a line at an extension (RA or DRA +
# + Line key + Y or N + #). Make sure the attendant
extension has ringing for all lines (this ensures that a call
rings or recalls somewhere).
Program 15
To assign program access level 2-5 (PGM ACC LEVEL
= 02-05 + #) to extensions so they can program ringing
right from their phones
Program 4
To set the Delayed Ring timer (Timer 07 + # + Duration +
#) if you assign Delayed Ringing to a line in Program 18
(II)
For additional ways of routing incoming calls to extensions, see:
•Direct Inward Lines (see page 64)
•Group Ring (see page 91)
•Extension Hunting (see page 81)
•Multiple Attendants (see page 118)
•Night Answer (see page 121)
•Private Lines (see page 150)
To have an incoming call ring a bell, see External Alerting Device on page 84.
To have an incoming call ring the external paging speakers, see Paging on page 138.
Outside Calls, Answering
Part I: DIGITAL SYSTEM Features 133

Outside Ca lls, Placing
✆You can place outside calls by:
•Using a Line Key
•Using Prime Line
•Using Line Dial-Up
•Using Direct Line (Trunk) Access
•Using Direct Line Group Access
•Using PBX/Centrex Lines
Placing an outside call simply involves getting an outside line, then dialing your
number. Your system may, however, be set up with certain Toll Restrictions which
limit the types of calls you can place (e.g., international calls).
The different ways you can place a call include:
Using a Line Key
You press a Line key to get an outside line, then dial your number.
Using Prime Line
You lift your handset to get outside dial tone on a specific Line key, then dial your
number. If your extension has program access level 2-5, you can program, right from
your phone, the Line key you want to be your Prime Line key. Prime Line keys are
not, however, meant for attendant or Headset extensions.
Note: If you assign a Prime Line, the system automatically assigns Ringing Line
Preference to that line (see page 155). And, Ringing Line Preference overrides Prime
Line (i.e., if a call rings in and you lift the handset, you answer the call instead of
getting dial tone on your Prime Line).
Using Line Dial-Up
You dial a three-digit code to get an outside line, then dial your number. Codes
801-816 access lines 01-16.
Using Direct Line (Trunk) Access
You dial a three-digit code to get an outside line, then dial your number. Codes
348-363 access lines 01-16.
This method is primarily for attendants because it also provides access to special
features. With Direct Line Access you can also:
•Place any type of call (unrestricted dialing)
•Camp-On to a busy line (see page 55)
•Use Forced Line Disconnect (see page 87),
•Remove Lines and Extensions from Service (see page 153)
Using Direct Line Group Access
You dial a two-digit code to get the first available line in a group of lines, then dial
your number. Codes 90-98 access line groups 00-08. If your phone has a key for a
particular group, you can just press the key instead of dialing the group’s code. If
your system has Automatic Route Selection (ARS), you’ll dial either 9 or 90 before
placing your call. See page 40 for more information on ARS.
Outside Calls, Placing
134 DIGITAL SYSTEM Administrator’s Guide

Note: To have line groups, the DIGITAL SYSTEM must be equipped with an AUX
Module.
Using PBX/Centrex Lines
When the DIGITAL SYSTEM is installed behind a PBX/Centrex, you place an
outside call as follows:
•Use one of the above methods to get PBX/Centrex dial tone.
•Dial a one- or two-digit PBX/Centrex Access Code to get outside dial tone.
•Dial your number. To call a PBX/Centrex extension, you do not dial the
PBX/Centrex Access Code. To access PBX/Centrex features, see page 136.
Initial Configuration
•No PBX/Centrex lines (all lines are CO Loop Start DTMF)
•All extensions have outgoing and incoming access to all lines
•If the system has one CEU, keys 1-8 are Line keys and access lines 01-08. Keys
9-16 are undefined. With two or three CEUs, keys 1-16 are Line keys and ac-
cess lines 01-16.
•Line Dial-Up enabled
•Prime Line disabled. Extensions 301-305 can program Prime Lines. All other
extensions only have program access level 01.
•Direct Line (Trunk) Access enabled for attendant extension 300
•Direct Line Group Access disabled (no groups programmed)
•No Toll Restrictions (all types of calls are allowed)
Using the Feature
See also Headset on page 95 and Handsfree on page 93.
To place a call using a
Line key:
1. Lift handset and press Line key.
-The key lights, you hear dial tone.
2. Dial number.
To program a Line key for
Prime Line Assignment
(PLA) when your
extension has program
access level 2-5:
Do not program PLA if you are an attendant or are using
a Headset.
1. Do not lift handset.
2. Press # and dial PLA.
3. Press desired Line key.
4. Dial Y to enable; N to disable.
5. Press SAVE.
To place a call using your
Prime Line key:
1. Lift handset.
-The key lights, you hear dial tone.
2. Dial number.
-To use another Line key, press it before dialing your
number.
To answer a call on your
Prime Line:
1. Lift handset.
-The key lights steadily.
Outside Calls, Placing
Part I: DIGITAL SYSTEM Features 135

To place a call using Line
Dial-Up or Direct Line
(Trunk) Access or Direct
Line Group Access:
1. Lift handset.
2. Press ICM (except at an ESL set), then dial:
-801-816 for lines 01-16
-348-363 for lines 01-16
-90-98 for line groups 00-08
-When you press ICM, the key lights and you hear
Intercom dial tone.
-When you dial a code, ICM goes out and you hear
outside dial tone.
OR
Press key for line group. You hear outside dial tone.
3. Dial number.
To place a call on a
PBX/Centrex line:
1. Lift handset.
2. Use one of the methods above to get PBX/Centrex dial
tone.
3. Dial PBX Access code to get outside dial tone. To
place a call to a PBX/Centrex extension, skip step 3.
4. Dial number.
Understanding Related Programming
For all calling methods:
Program 10
To define line attributes:
Circuit type (CIRCUIT TYPE = 10 or 11 + #)
Gain (LINE GAIN = 01-05 + #)
Line type (PBX LINE = Y or N + #)
Side tone (SIDE TONE TEST = Y or N)
Name (refer to page 230 for more on programming line
names)
Program 16
To allow/deny an extension outgoing access to a line (L +
Line number 01-16 + # + 00, 01 or 02 + #)
Program 4
To set the Line Response timer (Timer 04 + # + Duration
+ #)
Program 6
To set up Toll Restrictions (see page 216 for more
information)
To change the first digit of line numbers, line dial-up
codes, or line group numbers, see Flexible Numbering
Plan on page 86.
Make sure you refer to the programming above before you do the
programming that follows.
For Line Keys:
Program 17
To assign a line to a key at an extension or DSS Console
(LK + Line number 01-16 + #)
Outside Calls, Placing
136 DIGITAL SYSTEM Administrator’s Guide

For Prime Line:
Program 17
To assign a line to a key to an extension (LK + Line
number 01-16 + #)
Program 18 (II)
To enable/disable a Prime Line key for an extension (PLA
+ # + Press key + Y or N + #)
Program 15
To assign program access level 2-5 to extensions so they
can program their own Prime Line key (PGM ACC
LEVEL = 02-05 + #)
For Line Dial-Up:
Program 18 (I)
To allow/deny Line Dial-Up for an extension (LDU + # +
Y or N + #)
For Direct Line Access:
Program 1
To allow/deny Direct Line (Trunk) Access in a Class of
Service (DIR ACC/CMP-ON = Y or N + #). See also
Program 18 (I).
Program 18 (I)
To assign an extension a Class of Service from Program 1
(COS + # + 01=27 + #)
For Direct Line Group Access (when DIGITAL SYSTEM has AUX
Module):
If you program line groups, the FCC classifies the DIGITAL SYSTEM as a hybrid.
Use the FCC registration number on your CEU that has "MF-E" on the end. If you
do not program line groups, the FCC classifies the DIGITAL SYSTEM as a key
system. Use the FCC registration number on your CEU that has "KF-E" on the end.
Program 11
To place lines into groups (TRK GRP NO. = 90-98 + # +
Line 0-16 + # [repeat last two steps to add additional
lines])
Program 16
To allow/deny an extension access line groups (G +
Group number 90-98 + # + Y or N + #). With a terminal,
you can program one-digit access to line group 90 using
the QY command
Program 17
To assign a line group to a key at an extension (LG +
Loop group 00-08 for line groups 90-98 + #)
For PBX Lines:
Program 5
To store PBX Access Codes (PBX ACC nn = Enter code
+ #)
Program 4
To set the Flash timer (Timer 08 + # + Duration + #)
Outside Calls, Placing
Part I: DIGITAL SYSTEM Features 137

Paging
✆Make an important announcement to a group of people. Or,
quickly locate someone who is away from their phone.
Paging lets you use your phone to broadcast an announcement over speakers. The
announcement can be up to 90 seconds long. There are two types of Paging:
Internal Zone Paging and External Zone Paging.
Internal Zone Paging
Internal Zone Paging lets you broadcast an announcement over the speakers of idle
Multibutton extensions. You can page:
•A group of extensions (Internal Page Zone), or
•All Internal Page Zones at once (All Call Page). An All Call Page automatically
overrides an Internal Zone Page that is in progress.
Regarding incoming pages to your extension:
•If your phone has program access level 3-5, you can enable or disable incoming
pages over your speaker.
•If you are the attendant, you do not receive pages over your speaker.
•If you are using a Headset, you hear incoming pages in your Headset.
•You can activate Do Not Disturb to block incoming pages.
External Zone Paging
External Zone Paging lets you broadcast an announcement over external paging
speakers (called External Zones), if your system is equipped with them. These
speakers are typically installed in the ceilings or walls.
With one CEU, your system can have an External Zone 1. With two CEUs, your
system can also have External Zone 2. Making an All Call Page (to all Internal
Zones) also sends your announcement to all external paging speakers. Making a
page sends your announcement to the external paging speakers in that zone. In
software versions prior to AUX Module Y2.0/Base Y5.0, the Main CEU broadcasts
All Call Page. The Expansion CEU #1 broadcasts All Call Page and Zone 1.
In addition, if your extension has a Page key for a particular zone, you can use the
key to make pages. When the key is lit, the zone is busy. When the key is unlit, the
zone is available.
Initial Configuration
•All extensions can make and receive All Call pages
•No Internal Pages Zones
•No External Page Zones
•Extension 301-305 can enable/disable incoming pages. All other extensions
have program access level 01.
Using the Feature
To make an All Call Page
or Zone Page:
Remember: You can make an All Call Page even if an
Internal Zone Page is in progress.
1. Lift handset.
Paging
138 DIGITAL SYSTEM Administrator’s Guide

-If you have a Page key or One-Touch Speed Dial
key for the desired zone, you can press it instead of
using steps 2-3.
2. Press ICM (except at an ESL set).
-ICM lights and you hear dial tone.
3. Dial Page Zone code.
-For:. . . . . . . . . . . . . Dial:
All Call . . . . . . . . . . 1 *
Zone 1. . . . . . . . . . . 2 *
Zone 2. . . . . . . . . . . 3 *
Zone 3. . . . . . . . . . . 4 *
Zone 4. . . . . . . . . . . 5 *
Zone 5. . . . . . . . . . . 6 *
Zone 6. . . . . . . . . . . 7 *
Zone 7. . . . . . . . . . . 8 *
-You hear two beeps. If you hear busy tone, try
again later.
4. Make announcement.
5. Hang up.
To enable or disable
incoming pages when
your extension has
program access level 3-5:
1. Do not lift handset.
2. Press #.
3. Dial VP (for voice page).
4. Dial Y to enable.
OR
Dial N to disable.
5. Press SAVE.
Understanding Related Programming
For Internal Paging:
Program 1
To allow/deny the capability of initiating an All Call Page
in a Class of Service (ALL CALL PAGE = Y or N + #).
See also Program 18 (I).
To allow/deny the capability of initiating a Page to
Internal Zone 1-3 in a Class of Service (PAGE ZONE n =
Y or N + #). See also Program 18 (II).
Program 18 (I)
To assign a Class of Service (from Program 1) to an
extension (COS + # + 01-27 + #)
To assign an extension to an Internal Page Zone (PZ + # +
Page zone 01-07 + #). An extension can be in only one
Internal Zone.
Program 18 (II)
To enable or disable incoming pages for an extension (VP
+ # + Y or N + # to receive only All Call Page). Also see
Program 15.
Program 15
To assign program access level 3-5 to extensions so they
can enable/disable incoming pages themselves (PGM
ACC LEVEL = 03-05 + #)
Paging
Part I: DIGITAL SYSTEM Features 139

Program 17
To assign a page zone to a key at an extension (P0 + # +
Page zone 01-07 or 00 for All Call + #)
For External Paging:
If you have External Zone 1 Paging, the system disables line port 04 in the Main
CEU. If you have External Zone 2 Paging, the system disables line port 04 in
Expansion CEU #1 (line port 04 is equivalent to line 12). To install the speakers, see
the Hardware Manual.
Program 7
To enable External Page Zone 1 in the Main CEU (EXT
PAGE ZN 1 = Y + #).
To enable External Page Zone 2 in Expansion CEU #1
(EXT PAGE ZN 2 = Y + #).
(Prior to software version AUX Module Y2.0/Base Y5.0,
this program assigned All Call to the Main CEU and Zone
1 to Expansion CEU #1.)
To control the volume of pages (PG/MUSIC GAIN =
01-05 + #). This option only appears if you also program
Background Music to play over External Page Zones
(BGM TO PG ZN = Y + #).
To have music play over the External Paging Speakers, see Background Music on
page 42.
To have Night Answer calls ring over external paging speakers, see Night Answer on
page 121.
Paging
140 DIGITAL SYSTEM Administrator’s Guide

Park
✆Be sure that a call gets sent to a person even when you don’t know
what part of the building they are in.
Park lets you send an outside call into an "Orbit" (which is a special waiting state) so
that a person can pick it up from any extension in the system. After you park a call
using a Park Orbit code, you page the person for whom it is intended. The paged
person then dials the Park Orbit code from any extension to pick up the call.
You can park a call so it waits in a:
•System Orbit, by using codes 60-69 or a Park Orbit key (if your phone has one).
If someone does not pick up the call within the Park Orbit time, it recalls your
extension. If you do not answer a recall within the Rings Before Recall time, the
call rings all extensions that normally ring on that line.
•Personal Orbit (at someone’s extension), by using an extension number. If some-
one does not pick up the call within the Hold Recall time, it recalls your exten-
sion. If you do not answer a recall within the Rings Before Recall time, the call
rings all extensions that normally ring on that line.
Initial Configuration
•Park allowed
•No Park Orbit keys assigned
•Park Orbits 60-67 are 60 seconds, Park Orbits 68-69 are permanently 300 sec-
onds (five minutes)
•The Hold Recall time for Personal Orbits is 60 seconds
•The Rings Before Recall time is 5 rings
Using the Feature
To park a call in a System
or Personal Orbit:
1. At a multibutton phone, press ICM while on a call.
OR
At an ESL set, press TRF.
-If you have a One-Touch Speed Dial key, you can
press it instead of using steps 1-2.
2. For System Park: Dial Park Orbit code (60-69) or
press Park Orbit key.
OR
For Personal Park: Dial *, then extension number.
-If you hear busy tone, press ICM and dial a
different code (only one call can wait in a System
Orbit).
-With Personal Park, the call goes on Exclusive
Hold at your extension and the other (it does not
ring). You can park any number of calls at the
same extension.
3. Page person to receive call and announce orbit.
-See Paging on page 138.
4. Hang up.
Park
Part I: DIGITAL SYSTEM Features 141

To pick up a parked call:
To pick up a parked outside call, you must use an
extension that has access to that line.
1. Lift handset.
-If you have a One-Touch Speed Dial key, you can
press it instead of using steps 2-3.
2. Press ICM (except at an ESL set).
3. For System Park: Dial announced Park Orbit Code or
press Park Orbit key for that Orbit.
OR
For Personal Park: Dial *, then announced extension
number.
-The procedure for picking up Personal Park calls
also picks up other types of calls. The pick-up
order is as follows:
Ringing Intercom calls
Personal Park calls
Ringing outside calls and Direct Inward Lines
Calls on Hold
Understanding Related Programming
Program 4
To change the Park Orbit time for Orbits 60-67 (Timer 01
+ # + Duration + #)
Program 17
To assign a System Park Orbit (60-69) to a key at an
extension (PO + Park Orbit 60-69 + #)
Program 16
To let an extension access any line it should be able to
pick up from an Orbit (L + Line number 01-16 + # + 01
or 02 + #)
To change the first digit of System Park Orbit codes, see Flexible Numbering Plan on
page 86.
Park
142 DIGITAL SYSTEM Administrator’s Guide

Peripheral Control Unit (PCU) Module
✆Install a PCU to get two more External Page Zones, fax switching,
alarm sensors, tone (DTMF) decoders and 500/2500 set connections.
The Peripheral Control Unit (PCU)
requires AUX Module software
version Y2.1 or higher. The PCU is
not available with Base software.
The 12SCU/PCU Peripheral
Control Unit (PCU) Module (P/N
88530) provides 12 digital station
ports and gives your system the
following additional features:
•Two External Paging Zones
Each PCU provides two External Paging zones with associated control circuits.
These zones are in addition to the external zones in each CEU. When you call
the external zone, the system automatically activates the associated PCU control
circuits. If your system uses the PCU for External Paging, it cannot also use it
for Tone Decoding, On-Premise Telephones or Fax Switching.
•Tone Decoder
The PCU Module has an internal Tone Decoder that you can use for DTMF de-
tection. You’ll need DTMF detection if your system has DISA trunks connected.
If your system uses the PCU for Tone Decoding, it cannot also use it for External
Paging, On-Premise Telephones or Fax Switching.
•On-Premise 500/2500 Type Telephone Connection
You can connect up to two single line (500 or 2500 type) telephones to each
PCU. Both phones share the same circuit for "party line" type operation. If your
system uses the PCU for On-Premise Telephones, you cannot also use it for Ex-
ternal Paging, Tone Decoding or Fax Switching. Also, you cannot use the
500/2500 port for Voice Mail applications.
•Fax Switching
With the Fax Switching feature, the PCU can answer an incoming call and auto-
matically switch it to a fax machine or modem. If you use the PCU for Fax
Switching, you cannot also use it for External Paging, Tone Decoding or On-
Premise Telephones.
•Alarm Sensor
Each PCU has an Alarm Sensor that you can connect to either a Normally Open
or Normally Closed dry alarm relay contact. When the alarm activates, the sys-
tem alerts selected extensions with a distinctive signal. You can use the Alarm
Sensor function with either the External Paging, Tone Decoding, On-Premise
Telephones or Fax Switching functions.
N1853 - 24
SECONDARY PRIMARY
12 SCU/PCU
Peripheral Control Unit (PCU) Module
Part I: DIGITAL SYSTEM Features 143

Note: You can install up to four PCUs in a system: two in the main CEU and two in
Expansion CEU #1. You cannot install PCUs in Expansion CEU #2. For additional
PCU installation and programming instructions, refer to P/N N1853PCU01.
Initial Configuration
Not enabled.
Using the Feature
Refer to the PCU Installation and Programming Instructions (P/N N1853PCU01).
Understanding Related Programming
Refer to the PCU Installation and Programming Instructions (P/N N1853PCU01).
Peripheral Control Unit (PCU) Module
144 DIGITAL SYSTEM Administrator’s Guide

Personal Gr eeting
✆While you’re away from your phone, handle your calls with a
personal touch. Let your Personal Greeting pick up your call and
then automatically forward it to a co-worker.
Personal Greeting requires a Voice Module Unit (P/N 88522) and an AUX Module
with software version 02.10 or higher. Personal Greeting is not available with Base
software.
You can record a Personal Greeting (i.e., brief message) for your extension. Once
recorded, callers to your extension hear the Personal Greeting. After playing the
message, Personal Greeting can automatically forward calls to an extension you
specify. You can have the recorded greeting optionally play for all calls or just
Intercom calls.
Personal Greeting lets you handle unanswered calls with a personal touch. For
example, you (e.g., Fred Jones) could record, "Hello, this is Fred Jones. I’m on
vacation this week and Joan Smith will be handling my calls. Thank you." You
could then redirect your calls to Joan Smith’s extension. Callers to your phone would
first hear the recorded message, then the system would then send them to Joan’s
phone.
There are three broadcast channels and two record channels in the VMU Module.
This means that the system can play and record three greetings at the same time. The
system queues users for an available record channel by consecutive extension
number. The queued users hear ringing while waiting.
Notes:
•Personal Greetings cannot be longer than 16 seconds. The total of all Personal
Greetings cannot exceed 4 minutes and 15 seconds (i.e., 256 seconds).
•Personal Greetings are lost when power fails.
Initial Configuration
No Personal Greetings recorded.
Using the Feature
To record a Personal
Greeting:
If you already have a Personal Greeting recorded, the new
greeting replaces the old.
1. Lift handset.
2. Press ICM.
-If you have an ESL set, skip this step.
3. Press #.
4. Dial 68.
5. Dial Personal Greeting option. The options are:
-2 All Calls forwarded, greeting plays for all
callers (and Transfer screens)
-4 All Calls forwarded, greeting for Intercom calls
only
-A voice message asks you to start recording.
Personal Greeting
Part I: DIGITAL SYSTEM Features 145

-If you hear, "Audio file is full," you cannot record a
Personal Greeting. The system greeting total
exceeds 256 seconds. Go to "To cancel your
Personal Greeting" and cancel your greeting.
6. Start recording when you hear the beep.
-Your Personal Greeting cannot be longer than 16
seconds.
7. (Optional) Dial the number of the extension that should
receive your calls.
-If you skip this step, callers just hear your message.
The forwarding assignment remains until you
cancel it, even if the VMU fails or is removed.
8. Hang up.
To cancel your Personal
Greeting:
1. Lift handset.
2. Press ICM.
-If you have an ESL set, skip this step.
3. Press # and hang up.
-If you want to use Personal Greeting again, you’ll
have to record a new greeting.
To erase all Personal
Greetings system-wide
(from your attendant or
ACD Supervisor
extension):
This also erases all the system’s Operator Assistance
messages and the ACD All Agents Busy announcement.
1. Lift handset.
2. Press ICM.
3. Press #.
4. Dial 68.
5. Press #, 9.
-To cancel this procedure, dial 6.
Understanding Related Programming
Refer to the DIGITAL SYSTEM Feature and Terminal Programming Manual.
Personal Greeting
146 DIGITAL SYSTEM Administrator’s Guide

Power Failure Telephone
✆Use a standard 2500 set as a Power Failure Telephone.
A standard 500/2500 set can be connected to a Line module so that if AC power fails,
you can use the 500/2500 set to place and receive calls. One 500/2500 set can be
connected to each Line module. To
install a 500/2500 set as a Power Failure
Telephone, see the Hardware Manual.
Initial Configuration
No Power Failure Telephones installed
Using the Feature
To make a call on a Power
Failure telephone:
1. Lift handset.
2. Dial number.
To answer a call when the
Power Failure telephone
rings:
1. Lift handset.
Understanding Related Programming
N/A
01870L12
2500 Set
Power Failure Telephone
Part I: DIGITAL SYSTEM Features 147

Privacy
✆Calls in progress are not interrupted by other callers.
Privacy prevents an extension from receiving the following interruptions while on a
call:
•Intrusion (Barge-In) attempts (page 106)
•Silent Monitor attempts (page 161)
•Camp-On (Call Waiting) signals (page 55)
Privacy does not prevent Off-Hook Signaling attempts (page 126).
Note: While on an Intercom call, a user with Privacy will hear Intrusion and Call
Waiting beeps directed to the other extension user. However, this will not occur if
the other extension also has Privacy enabled.
Initial Configuration
Privacy disabled except for attendant extension 300
Using the Feature
N/A
Understanding Related Programming
Program 1
To enable/disable Privacy in a Class of Service
(PRIVACY = Y or N + #). See also Program 18 (I).
Program 18 (I)
To assign a Class of Service (from Program 1) to an
extension (COS + # + 01-27 + #)
Privacy
148 DIGITAL SYSTEM Administrator’s Guide

Privacy Rele ase
✆Convert an outside call into a Conference call with a single touch.
No need to dial codes.
Privacy Release lets you quickly join a co-worker’s outside call, creating a
three-party Conference. You can use Privacy Release as long as your co-worker:
•Is a member of your Privacy Release Group
•Has not activated Privacy
•Is not on Conference call
Initial Configuration
No Privacy Release Groups defined
Using the Feature
Privacy Release is temporarily unavailable when the system is already
accommodating the maximum number of three-party conversations, which is 8 per
system.
To join a co-worker’s
outside call (when your
co-worker is a member of
your Privacy Release
Group):
1. Lift handset.
-If that group member just placed the call, you must
wait six seconds before doing step 2.
2. Press the busy Line key for the call you want to join.
-The CONF key lights at your phone and at your
co-worker’s. You hear the conversation and can
join it.
-If you hear busy tone, you cannot join the call.
To prevent a member of
your Privacy Release
Group from interrupting
an outside call you are on
(i.e., to activate Privacy):
1. Press the flickering Line key of your call.
-The Line key lights steadily. No group members can
join that call.
Understanding Basic Programming
Program 18 (I)
To assign an extension to a Privacy Release Group (PRG
+ # + Privacy Release Group 01-99 + #)
Program 16
To give Privacy Release Group members outgoing access
to lines they should be able to join (L + Line 01-16 + # +
02 + #)
Program 17
To assign a key to each line intended for Privacy Release
at an extension (LK + Line number 01-16 + #)
Privacy Release
Part I: DIGITAL SYSTEM Features 149

Private Lines
✆An executive or group of executives can have their own line.
A Private Line is a line that is dedicated to an extension or group of extensions. A
Private Line can be incoming only or incoming and outgoing.
Initial Configuration
No Private Lines
Using the Feature
You place, answer, and Transfer calls on a Private Line as you would on any other
line.
Understanding Related Programming
Program 16
To assign an extension access to the Private Line (L +
Line 01-16 + # + 02 + #)
Since a Private Line is assigned to an extension like any
other line (i.e., by using Program 16), it has all the
features and restrictions of normal (non-Private) lines.
Program 17
To assign the Private Line to a key at an extension (LK +
Line number 01-16 + #)
Program 18 (II)
To assign ringing to the Private Line (RA or DRA + # +
Key + Y or N + #)
Program 10
To assign the correct circuit type (CIRCUIT TYPE = 10
[loop start DTMF] or 11 [loop start DP] + #) and name to
a Private Line. Refer to page 230 for more on storing line
names.
Private Lines
150 DIGITAL SYSTEM Administrator’s Guide
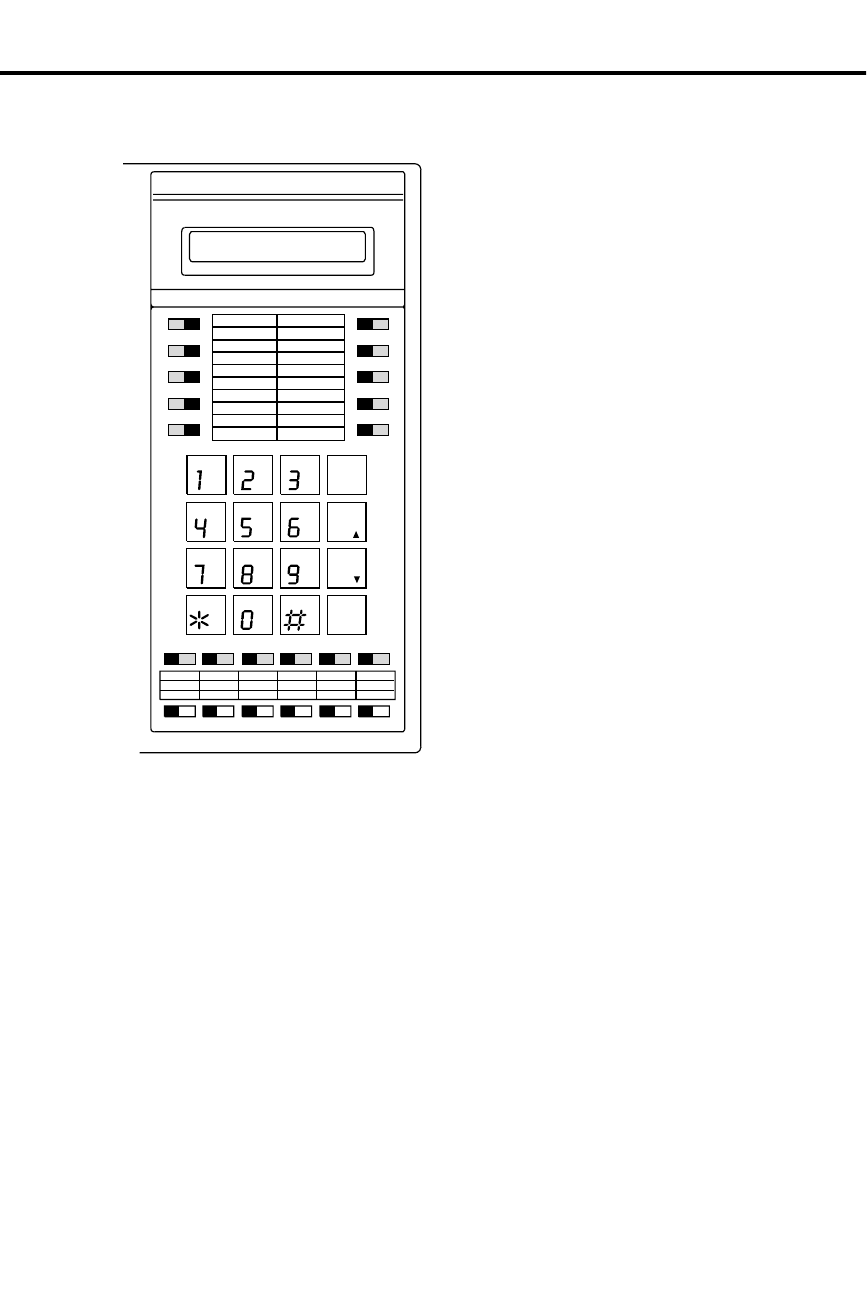
Programmable Keys
The multibutton phone has 16 Programmable Keys (shaded), numbered 1-16. Keys
1-5 are on the left, 6-10 on the right, and 11-16 under the dialpad.
Each key can be assigned a function,
through system programming, so you can
just press the key to activate the assigned
function.
The available functions for a programmable
key are listed below:
Line Key
For Placing an Outside Call (see page 134)
and Answering an Outside Call (see page
132)
Park Orbit
For Park (see page 141)
One-Touch Speed Dial
For Speed Dial (see page 162)
Hotline
For Hotline (see page 101)
Loop Group
For Placing an Outside Call/Using Direct
Line Group Access (see page 134)
Loop Switch
For Answering an Outside Call (see page
132)
Pickup Group
For Group Call Pickup (see page 88)
Call Coverage
For Call Coverage (see page 169)
Page Zone
For Paging (see page 138)
Automatic Call Timer or Manual Call Timer
For Call Timer (see page 49)
Record Key
For Voice Mail (see page 185)
ABC
DEF
GHI
JKL
MNO
PRS
TUV
WXY
DIAL
LAST
VOL
UP
SAVE
VOL
DN
FTR
PGM
FRI 08/18 03:34P
HOLD MIC/DND ICMCONF MSG HF
1
2
3
4
5
11 12 13 14 15 16
6
7
8
9
10
Programmable Keys
Part I: DIGITAL SYSTEM Features 151
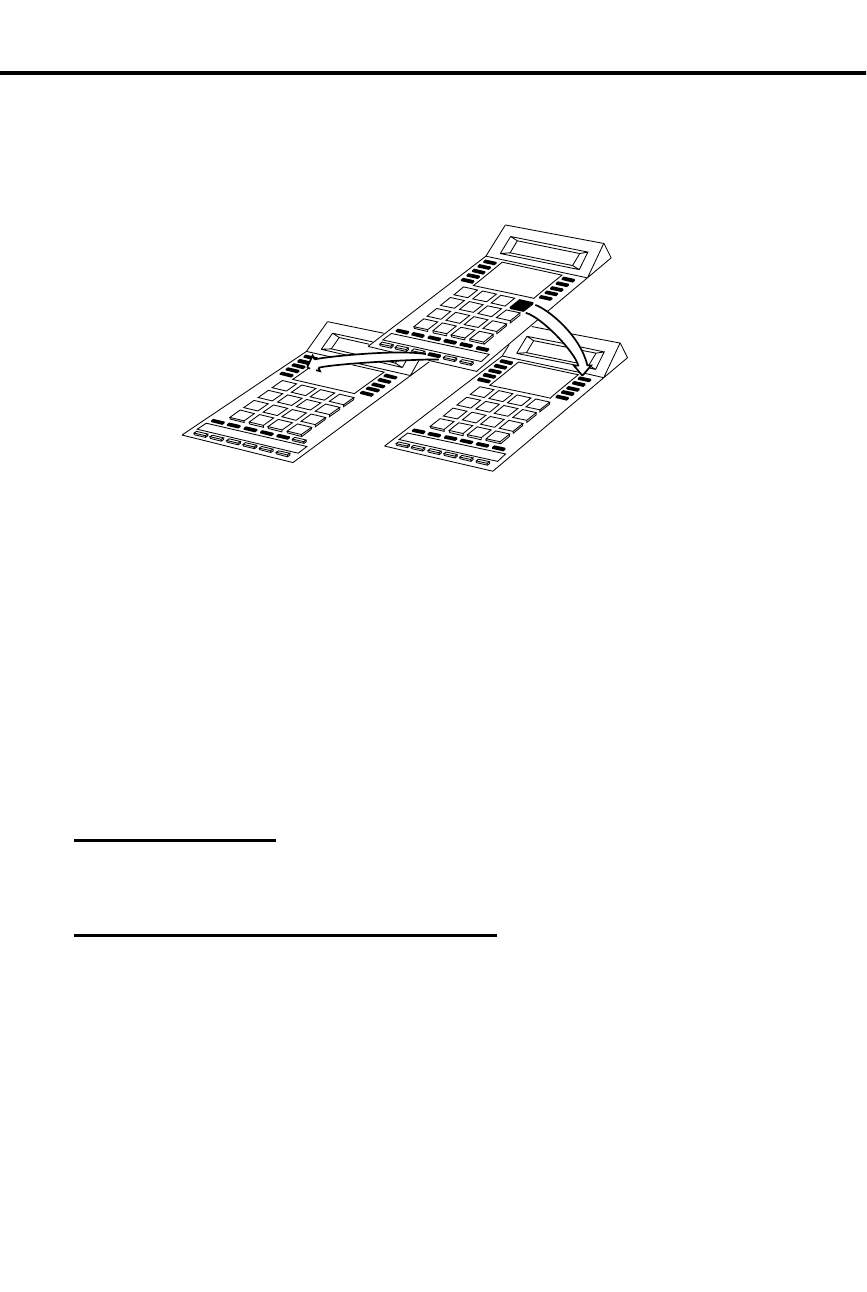
On multibutton phones, some programmable keys may have two additional
functions. Keys 1-16 become Speed Dial keys when you press DIAL (see page
162). When you press ICM, keys 1-15 become DSS keys (see page 69).
Initial Configuration
•If the system has one CEU, keys 1-8 are programmed as Line keys and access
lines 01-08. Keys 9-16 are undefined.
•If the system has two or three CEUs, keys 1-16 are programmed as Line keys
and access lines 01-16.
•When you press ICM, DSS keys 1-15 each call extension 300.
•When you press DIAL, keys 1-5 access Personal Speed Dial bins 50-54, keys 6-
10 access bins 55-59, and keys 11-16 access bins 20-25.
Using the Feature
See the page reference for each programmable key.
Understanding Related Programming
Program 17
To assign a function to a programmable key (see page
250).
01870L4 (I)
When you press
DIAL, keys 1-16
change to
Speed Dial bin keys.
When you press a key (1-16)
you activate the feature
assigned to the key.
When you press ICM,
keys 1-15 change to
Direct Station Selection
and Busy Lamp
Field keys.
55
56
57
58
59
50
51
52
53
54
1
2
3
4
5
6
7
8
9
10
11 12 13 14 15 16
11 12 13 14 15
1
2
3
4
5
6
7
8
9
10
20 21 22 23 24 25
Programmable Keys
152 DIGITAL SYSTEM Administrator’s Guide

Removing Lines and Extensions
✆As the attendant, you can ensure maximum system performance by
removing a noisy or faulty extension or line from service until it
can be repaired.
If you are an attendant, you can remove lines and extensions from service. You may
want to do this after viewing an Alarm that tells you an extension or line failed (see
page 24). When you remove an extension or line from service, that extension or line
appears busy to anyone trying to use or call it. After the line or extension is repaired,
you can return it to service.
Initial Configuration
Attendant extension 300 can remove extensions and lines from service
Using the Feature
Removing an extension from service automatically cancels its Call Forwarding
conditions or Selectable Display Messages (if any).
To remove a line or
extension from service:
1. Lift handset.
2. Press ICM.
-ICM lights and you hear dial tone.
3. Press #.
-Dial tone stops.
4. Dial line (348-363 for lines 01-16) or extension (300-347).
5. Dial 0.
-You hear dial tone again.
6. Hang up.
-The key for the line or extension (if there is one) lights.
To return a line or
extension to service:
1. Lift handset and press ICM.
-ICM lights and you hear dial tone.
2. Press #.
-Dial tone stops.
3. Dial line (348-363 for lines 01-16) or extension and
hang up.
-The key associated with the line and/or extension
goes out.
Understanding Related Programming
Program 1
To allow/deny Direct Line (Trunk) Access in Class of
Service 00, which is the attendant’s COS (DIR
ACC/CMP-ON = Y or N + #). If you deny it, the
attendant cannot remove lines/extensions from service.
Program 3
To assign attendant extensions (OPR nn EXT =
Extension number + #)
Removing Lines and Extensions
Part I: DIGITAL SYSTEM Features 153

Ringing Assignments
✆Select the lines you want to ring.
Ringing Assignments (RA) lets you enable or disable immediate day/night ringing for:
•Lines
•Call Coverage keys
•Pickup Group keys
To enable/disable Ring Assignments, your extension must have program access level
2-5. Enabling RA automatically disables Delayed Ringing Assignment (see page 62)
or Night Ring (see page 124).
Initial Configuration
•RA enabled for lines 1-16 at extensions 300, 302, 303 only
•RA disabled for Call Coverage and Pickup Group keys
•Extension 300-305 can program RA. Other extensions only have access level 01.
Using the Feature
To enable/disable Ringing
Assignments (RA) when
your extension has
program access level 2-5:
1. Do not lift handset.
2. Press #.
3. Dial RA.
-Your Line, Call Coverage, Pickup keys flash or light
steadily. Flashing means immediate ring is on;
steadily lit means it is off.
4. Press desired key.
OR
Dial desired line number.
5. To enable immediate ring, dial Y.
OR
To disable immediate ring, dial N.
6. Press # and return to step 4, or press SAVE.
Understanding Related Programming
Program 18 (II)
To enable/disable Ring Assignments for an extension
(RA, NR or DRA + # + Press key + Y or N + #
Program 15
To assign program access level 2-5 to extensions (PGM
ACC LEVEL = 02-05 + #) so they can enable/disable
Ring Assignments themselves
Program 16
To assign line access to an extension (L + Line 01-16 + #
+ 01 or 02 + #)
Program 17
To assign Line, Call Coverage, and Group Pickup keys to
an extension.
For a line key: LK + Line number 01-16 + #
For a Call Coverage key: CCK + Covered extension + #
For a Group Pickup key: GP + Pickup Group 01-07
Ringing Assignments
154 DIGITAL SYSTEM Administrator’s Guide

Ringing Line Preference
✆Answer calls in a single step, much like you do with your phone at
home.
Ringing Line Preference (RLP) lets you answer calls ringing a Line or Loop key by
just lifting the handset. To enable or disable RLP, your extension must have program
access level of 2-5. If several calls are ringing your extension, RLP answers
Intercom calls first, then outside calls, starting with the one on the lowest numbered
line.
Notes:
•If you have a Prime Line Key (see page 134), the system automatically assigns
RLP to that line.
•Ringing Line Preference overrides Prime Line. So if a call rings in, lifting the
handset answers the call; it does not give you dial tone on your Prime Line.
Initial Configuration
•RLP disabled at all extensions
•Extensions 301-305 can program RLP. All other extensions only have program
access level 01.
Using the Feature
Do not enable Ringing Line Preference for attendant or Headset extensions.
To enable/disable Ringing
Line Preference (RLP)
when your extension has
program access level 2-5:
1. Do not lift handset.
2. Press #.
3. Dial RLP.
4. To enable RLP, dial Y.
OR
To disable RLP, dial N.
5. Press SAVE.
To answer a call when
RLP is enabled:
1. Lift handset.
Understanding Related Programming
Program 18 (II)
To enable/disable RLP for an extension (RLP + # + Y or
N + #)
Program 15
To assign program access level 2-5 (PGM ACC LEVEL
= 02-05 + #) to extensions so they can enable or disable
RLP themselves
Program 16
To assign line access to an extension (L + Line number
01-16 + # + 01 or 02 + #)
Ringing Line Preference
Part I: DIGITAL SYSTEM Features 155
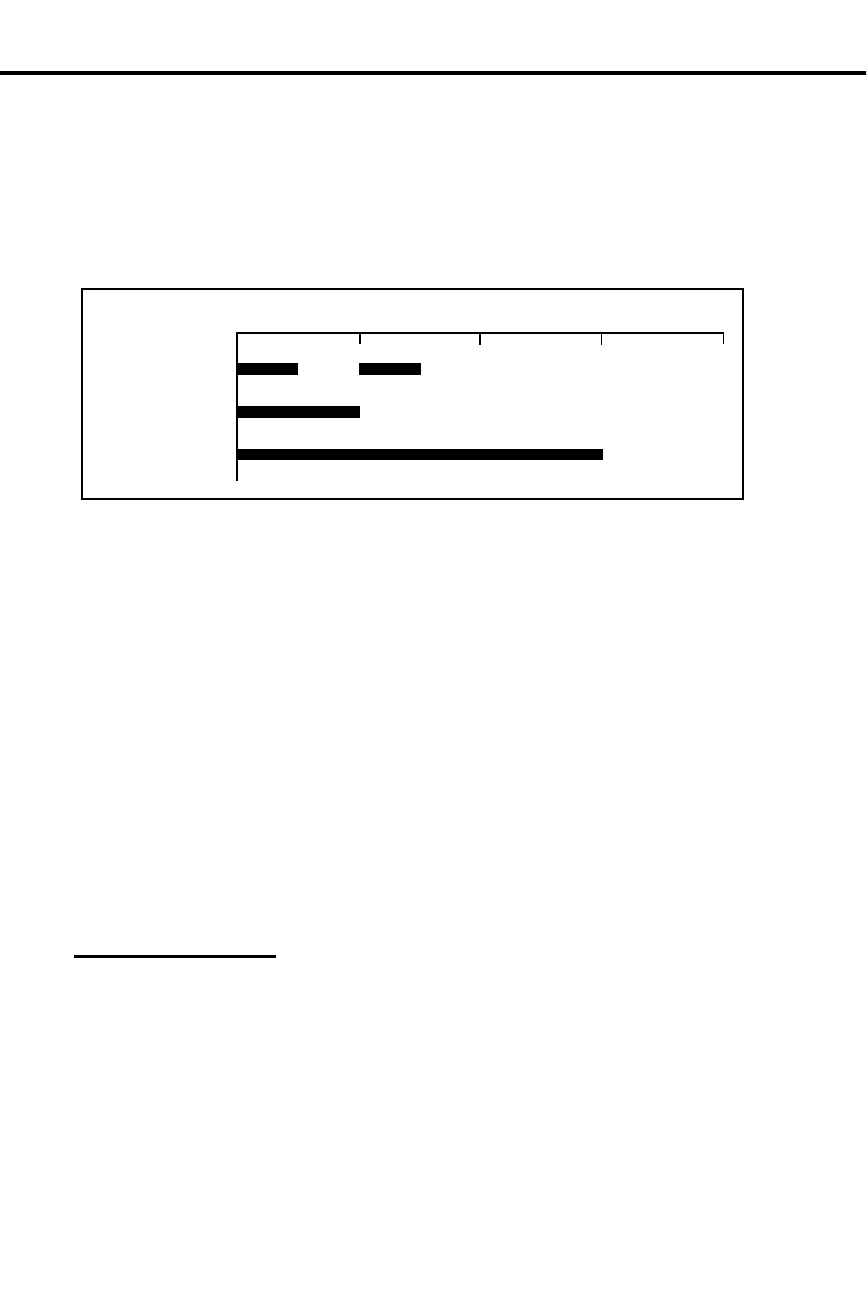
Ringing Patterns
✆Easily identify the type of call ringing your phone.
The DIGITAL SYSTEM provides ringing at three different durations so you know
which kind of call is ringing your phone (see the chart below). As you can see from
the chart, outside calls ring with two short rings, Intercom calls with one long ring
(repeated). The Callback ring is the ring you hear for the Callback and Line Queuing
features.
The DIGITAL SYSTEM also provides ringing at four different pitches. Extension
300 rings at one pitch, 301 at another, 302 at another, and 303 at yet another. Then
the pattern repeats for the next group of four extensions (e.g., extension 304 rings at
the same pitch as 300).
Distinctive Ringing
Optionally, you can have certain outside calls ring with two high-pitched tones,
rather than the two normal rings. You may want to do this if your system has a
customer-provided Door Box connected to a line circuit. Ringing on the Door Box
line will sound different than the ringing on your other lines. This Distinctive
Ringing option is only available on software versions AUX Module Y2.0/Base Y5.0
and above.
CAUTION: Do not enable Distinctive Ringing for a line if any extensions use
headsets.
Initial Configuration
All calls ring as described above
Using the Feature
N/A
Outside Calls
Intercom Calls
01 34
(Seconds)
01870C15
2
Callback
Ringing Patterns
156 DIGITAL SYSTEM Administrator’s Guide

Understanding Related Programming
Program 1
To assign a single ring to all calls that ring an ASI in a
Class of Service (SINGLE RING = Y + #). See also
Program 18 (I). This means Intercom calls, outside calls,
and Callbacks ring with a single ring at the Intercom
duration (1 second).
Program 12
To assign COS 20 (COS + # + 20 + #) to each line with
Distinctive Ringing
Program 18 (I)
To assign a Class of Service from Program 1 to an
extension (COS + # + 01-27 + #)
Ringing Patterns
Part I: DIGITAL SYSTEM Features 157

Save
✆Call a busy number in the morning, quickly "save" it in memory,
then periodically retry it throughout the day by touching two keys.
You do not waste time looking up the number again.
Save lets you store (save) in memory the last outside number you dialed so you can
easily redial it later on. Save lets you store numbers up to 24 digits long. After you
save a number, you can make other calls without affecting it. The saved number
stays in memory until you save a new one in its place.
When you call a saved number, the system dials it out on the same line used for the
original call unless you manually select a different line.
Initial Configuration
Save always allowed
Using the Feature
A power failure or system reset erases a saved number from memory.
To save an outside
number after you dial it:
1. Do not hang up.
2. Press DIAL.
-The Line key goes out.
3. Press SAVE.
-The Line key lights again.
To call a saved outside
number:
1. Lift handset.
-To have the call dial out on a line other than the
original one: Access an idle outgoing line before
you do step 2.
2. Press DIAL.
-You hear dial tone.
3. Press SAVE to have the call dial out.
-Immediate busy tone means the original line is
busy. Press an idle outgoing Line key to have your
call go out.
Understanding Related Programming
Program 16
To give an extension outgoing access to a line (L + Line
number 01-16 + # + 02 + #)
Program 17
To assign a line to a key at an extension (LK + Line
number 01-16 + #)
Save
158 DIGITAL SYSTEM Administrator’s Guide

Selectable Display Messages
✆Let co-workers know your where-abouts without having to call
each one individually.
The Selectable Display Messages feature lets you "attach" a message to your phone
so Display Phone users see it on their display when they call you. For example,
when you leave for vacation, you could select the message: ON VACATION (if your
system has it). This way, when Display Phone users call and you do not answer, they
know why.
Your system can store up to 16 messages for you to choose from, numbered 00-15.
Messages 00-07 are special in that you can add digits to the end of them as long as
the entire message does not exceed 16 characters (including blank spaces). For
example, you could add a telephone number to the end of the message, CALL. This
way, the message would read CALL XXX XXXX so people would know where to
reach you.
Initial Configuration
00 = CALL
01 = BACK BY
02 = MEETING IN RM
03 = OUT TO LUNCH
04 = GONE FOR THE DAY
05 = ON VACATION
06 = ON BUSINESS TRIP
07 = IN THE MEETING
08 = BACK BY 10AM
09 = BACK BY 11AM
10 = BACK BY NOON
11 = BACK BY 2PM
12 = BACK BY 4PM
13 = BACK TOMORROW
14 = BACK NEXT WEEK
15 = HAVE A GOOD DAY
If the system has an AUX Module, there are no messages initially.
Using the Feature
You can select only one message for your phone at a time. You do not have to cancel
an old message in order to select a new message.
To directly select a
specific Selectable
Display Message:
These steps automatically cancel a Call Forwarding
condition.
1. Lift handset.
-If you have a One-Touch Speed Dial key, you can
press it instead of using steps 2-6.
2. Press ICM (except at an ESL set).
-You hear dial tone.
3. Press #.
-Dial tone stops.
4. Dial M.
5. Dial message number (00-15).
-To add digits to 00-07, dial them.
6. Hang up.
-MSG flashes.
Selectable Display Messages
Part I: DIGITAL SYSTEM Features 159

To select a message by
scrolling through them
(when you have a Display
Phone):
This automatically cancels a Call Forwarding condition at
your phone.
1. Lift handset.
2. Press ICM.
-You hear dial tone.
3. Press #.
-Dial tone stops.
4. Dial M.
5. Press VOL UP or VOL DN to scroll through the mes-
sages. Stop at the one you want.
-VOL UP scrolls this way: Message 00, 01, 02,...15.
-VOL DN scrolls this way: 00, 15, 14, 13...01.
-To add digits to messages 00-07, simply dial them.
6. Press DIAL, then SAVE.
-If you add digits to messages 00-07, skip this step.
7. Hang up.
-MSG flashes.
To cancel a message:
Activating Do Not Disturb automatically cancels a
message.
1. Lift handset.
2. Press ICM (except at an ESL set).
-You hear dial tone.
3. Press #.
-Dial tone stops.
4. Hang up.
-MSG goes out.
Understanding Related Programming
Program 8
To store or change the messages (MESSAGE NO. =
600-615 + # + Enter message). Refer to page 227 for
more on programming messages.
Selectable Display Messages
160 DIGITAL SYSTEM Administrator’s Guide

Silent Monitor
✆As a Customer Service supervisor, for example, listen to the way a
trainee handles outside callers.
Silent Monitor lets you enter a co-worker’s outside call and listen to the conversation
without sending any warning tones to indicate your presence. You simply call your
co-worker’s extension and dial the Silent Monitor code. If your co-worker is on an
Intercom call, you hear only the person who is talking to your co-worker, not the
co-worker you called. Normally, Silent Monitor is only for attendants and
supervisors.
Silent Monitor does not let you break into calls at extensions programmed for
Privacy.
CAUTION: Since Silent Monitor provides no warning tones, using this feature may
be interpreted as an invasion of privacy.
Initial Configuration
•Silent Monitor disabled
•Privacy disabled except for attendant extension 300
Using the Feature
If your extension is in a Call Pickup Group, you can only monitor other extensions
in the group.
To use Silent Monitor to
listen to a call at another
extension:
1. Lift handset.
2. Press ICM (except at an ESL set).
3. Dial number of extension you want to monitor.
-You hear busy tone.
4. Dial 6 to break in and listen.
-If you still hear busy tone, this means you cannot
monitor the call.
To cancel Silent Monitor:
1. Hang up.
Understanding Related Programming
Program 1
To allow/deny Silent Monitor in a Class of Service
(MONITOR = Y or N + #). Also see Program 18 (I).
To allow/deny Privacy in a Class of Service (PRIVACY =
Y or N + #). Allow Privacy for any extension that should
not be monitored (see also Program 18 [I]).
Program 18 (I)
To assign a Class of Service from Program 1 to an
extension (COS + # + 01-27 + #)
Silent Monitor
Part I: DIGITAL SYSTEM Features 161

Spee d Di al
✆Save time dialing the outside numbers you frequently call.
Speed Dial allows a number to be stored in a memory bin so you can call the number
by dialing its bin or by pressing its key. If the DIGITAL SYSTEM is equipped with
an AUX Module, a 16-character name can be stored with a number. The name
appears on a Display Phone when the number is called.
There are two types of Speed Dial: Personal and System.
Personal Speed Dial
Personal Speed Dial lets you store 20 numbers at your extension as long as your
extension has program access level 1-5. You store numbers in bins 50-59 and 20-29
and call them as follows:
•Press DIAL, then dial the bin number, or
•Press DIAL, then press the corresponding bin key (1-16).
-There are no keys for bins 26-29. To dial these bins you need to dial the bin
number.
The system administrator can also store numbers for you.
System Speed Dial
System Speed Dial lets the system administrator store numbers in system memory
from any extension that has program access level 4-5. System Speed Dial numbers
can be called from any extension in the system. For example, the system
administrator may store the number for your company’s branch office so everyone
has quick access to it. The system does not apply your Toll Restrictions to System
Speed Dial numbers (i.e., you can call them even if you are normally restricted from
manually placing the same call). Depending on how your system is programmed,
there may be 10 System numbers stored in bins 70-79 or 100 numbers stored in bins
700-799.
One-Touch Speed Dial
In addition, the system administrator can assign One-Touch Speed Dial keys to your
extension. A One-Touch Speed Dial key also corresponds to a bin number. You just
press the key to call the stored number. There is no need to press DIAL first. You
can also store "Intercom" feature codes in a One-Touch Speed Dial key. For
example, you could store the Call Forwarding codes (#, extension, Call Forward
code) in a bin and activate Call Forwarding by pressing the key. If you have a DSS
Console, you can have One-Touch Speed Dial on keys 1-79 for an additional 79
Personal Speed Dial bins.
Storing Long Numbers
A bin can store 16 digits, including a pause or "#" character (if allowed). Numbers
longer than 16 digits flow to the next consecutive bin. Long numbers can also be
stored in two consecutive bins, then linked together when you want to call the long
number.
Speed Dial
162 DIGITAL SYSTEM Administrator’s Guide

Storing a Pause, Flash or Delay
You can store a Pause in a Speed Dial bin by pressing HOLD where you want the
Pause to occur. When you use the stored number, the system stops dialing when it
encounters the pause and waits for a second dial tone. If the second dial tone occurs,
dialing continues. You might want to use a Pause if your Speed Dial number calls a
dial-up service (like a banking service) that automatically returns second dial tone.
The pause ensures that your number doesn’t dial out too soon. (If you don’t get
second dial tone, you can always dial * to force the remaining digits to dial out.)
In some cases, you may want to store a Delay in lieu of a Pause. A Delay is a fixed
wait interval that doesn’t monitor for second dial tone. Use Delay, for example, if
you’re not sure the dial-up service will return second dial tone. After the first part of
your Speed Dial bin dials out, the system waits the Delay interval and then dials the
remaining digits. To store a Delay, press DIAL where you want the delay to occur.
The Delay option is only available in software version AUX Module 02.10/Base
02.00 and higher.
You can also store a Flash command in a Speed Dial bin. You might want to do this
if your system is behind a Centrex or PBX and you need to use certain Centrex or
PBX features. For example, a Flash command frequently initiates a PBX Transfer. To
enter the Flash command while programming the Speed Dial bin, press MSG where
you want the Flash to occur. The Flash option is only available in software version
AUX Module 02.10/Base 02.00 and higher.
Initial Configuration
•Each extension can store 20 Personal Speed Dial numbers except 303 (there is
no Speed Dial block of memory assigned to 303)
•Extensions 300-305 can store System Speed Dial numbers. All other extensions
only have program access level 01.
•There are 100 System Speed Dial bins (700-799)
•All extensions can access System Speed Dial numbers
•Speed Dial Names can only be stored if the system has an AUX Module
•One-Touch Speed Dial keys not assigned
•The system waits 10 seconds for dial tone before sending out a Speed Dial num-
ber. The system waits 30 seconds for dial tone when it encounters a pause.
Using the Feature
To store a Personal or
System Speed Dial
number:
To store a Personal Speed Dial number, your extension
must have program access level 1-5.
To store a System Speed Dial number, your extension
must have access level 4-5.
1. Do not lift handset.
2. Press #.
3. Dial SD.
4. For System Speed Dial: Dial bin 70-79 or 700-799,
press #.
OR
For Personal Speed Dial: Dial bin (50-59, 20-29) and
press # or press illuminated One-Touch Speed Dial key
(on phone or DSS Console).
Speed Dial
Part I: DIGITAL SYSTEM Features 163

5. If the system lets you store a name:
At a Display Phone: Enter a name, press #. Or, to skip
the name, press # and go to step 6.
At a Standard Phone: Press # and go to step 6.
OR
If the system does not let you store a name, go to step 6
-To enter a letter in a name:
Dial letter. Zero button = blank, Q, Z, (in that
order).
Dial digit (1, 2, 3) = letter’s position on button
(e.g., dial 1 to get the 1st letter). To erase last
letter, press LAST.
6. Dial a line (01-16) or group 90-98 (if your system has
line groups) and press #, or press a Line key.
-To store Intercom codes, press ICM instead of
storing a line, then dial the codes in step 7.
7. Dial number, including a pause *, # (if allowed).
-To enter a pause, press HOLD.
-To enter a Flash, press MSG.
-To enter a Delay, press DIAL.
-To enter *: Press DIAL, dial *.
-To enter #: Press DIAL, dial #.
8. Hang up.
To call a Personal or
System Speed Dial
number (by using the bin
number or bin key):
1. Lift handset.
-To preselect a line instead of using the line stored
with the number:
Press desired Line key.
Press ICM in step 2, then go to step 3.
2. Press DIAL (except at an ESL set).
3. Dial System Speed Dial bin (70-79, 700-799).
OR
Dial Personal Speed Dial bin (50-59 or 20-29).
OR
Press Personal Speed Dial bin key (1-16).
-Your number dials out.
-Immediate busy tone means the stored line is busy.
Press an idle outgoing Line key to have your call
dial out.
-If the number contains a pause, you may have to
dial * to restart the dialing.
To call a Personal or
System Speed Dial
number (by pressing a
One-Touch Speed Dial
key):
1. Lift handset.
-To preselect a line instead of using the line stored
with the number: Simply press the desired Line key.
2. Press One-Touch Speed Dial key (on your phone or
DSS Console) for desired number.
Speed Dial
164 DIGITAL SYSTEM Administrator’s Guide

-Your number dials out. Immediate busy tone means
the stored line is busy. Press an idle outgoing Line
key to have your call dial out.
-If the number contains a pause, you may have to
dial * to restart the dialing.
To link Speed Dial
numbers stored in
different bins (multibutton
phones only):
1. Place first Speed Dial call.
2. Press One-Touch Speed Dial key for next number.
OR
Press DIAL, then dial bin or press bin key for next
number.
Understanding Related Programming
Program 1
To allow/deny access to System Speed Dial numbers in a
Class of Service. Also see Program 18 (I).
Program 18 (I)
To assign a Class of Service from Program 1 to an
extension (COS + # + 01-27 + #)
To assign a Speed Dial block of memory to an extension
(SDB + # + 01-28 + #). A block lets a user store 20
numbers. If the system has an AUX Module, the block
also lets a user store a name with a number except for
blocks 51-57.
Note: Initially, extension 303 has no Speed Dial block
assigned. If you have an extension installed at 303, and it
needs Speed Dial, use this program to assign it an
available Speed Dial block.
To enable Line Dial-Up (LDU + # + Y + #) for each
extension that should be allowed to dial line codes
(01-16) while storing Speed Dial numbers.
Program 3
To determine how many digits are in a System Speed Dial
code (# SYS SD DGTS = 02 or 03). Two digits allows 10
numbers to be stored under codes 70-79; 3 digits allows
100 numbers to be stored under codes 700-799).
To enable or disable the dialing out of a "#" character in a
System Speed Dial number (DIAL # ENABLE = Y or N
+ #)
Program 17
To assign One-Touch Speed Dial keys to an extension or
DSS Console (SD + # + Bin number [50-59 or 20-29 at
telephone, Bin number 700-799 at DSS Console] + #)
Program 4
To set the Dial Tone Detection timer (Timer 09 + #
Duration + #). This sets the amount of time the system
should wait for dial tone before sending out a Speed Dial
number or after a stored pause.
Program 18 (II)
To store Personal Speed Dial or System Speed Dial
numbers (see page 269)
Speed Dial
Part I: DIGITAL SYSTEM Features 165

Program 15
To assign a program access level to extensions so they can
store Speed Dial numbers themselves (PGM ACC
LEVEL = 01-05 for personal, 04 & 05 for system + #)
Program 16
To give an extension outgoing access to a line so it can
store and call Speed Dial numbers (L + Line number
01-16 + # + 01 or 02 + #)
To change the first digit of Personal or System Speed Dial codes, see Flexible
Numbering Plan on page 86.
Speed Dial
166 DIGITAL SYSTEM Administrator’s Guide

Split
✆Handle two calls at once.
When you are on a call and you hear two Call Waiting beeps in your handset or
Off-Hook Ringing (ringing over your speaker), this means another call is trying to
reach you. Split lets you answer the second call, then alternate between the two.
If you are on a call and hear two beeps in your handset followed by your co-worker’s
voice, see Off-Hook Signaling/Whisper Page on page 126.
Initial Configuration
•Split always allowed
•Call Waiting beeps enabled
•Off-Hook Ringing disabled
•Whisper Page enabled
Using the Feature
At your multibutton
phone, to answer an
Intercom call when you
are on the phone (ICM
flashes):
1. Press ICM.
-Your first call goes on Hold.
2. To alternate: Press ICM, dial * 7.
At your multibutton
phone, to answer an
outside call when you are
on an Intercom call (a
Line/Loop key flashes):
1. Press HOLD to hold your Intercom call.
2. Press flashing Line key.
3. To alternate: Press ICM, dial * 7.
At your multibutton
phone, to answer an
outside call when you are
on an outside call (a
Line/Loop key flashes):
1. Press HOLD to hold the call you are on.
2. Press flashing Line or Loop key.
3. To alternate, repeat steps 1-2.
At your ESL set, to Split
between a new call and
your current call:
1. Press HLD to put current call on Hold.
2. Dial * 2 to answer waiting call.
3. Press HLD again.
4. Dial * 7 to answer the call on hold.
-Repeat steps 3 and 4 to continue alternating
between the calls.
Split
Part I: DIGITAL SYSTEM Features 167

Understanding Related Programming
Program 2
To enable/disable Call Waiting beeps (CALL WAIT
TONE = N + #)
Program 18 (II)
To enable/disable incoming Whisper Page at an extension
(VO + # + Y or N + #)
Program 18 (I)
To enable/disable Off-Hook Ringing at an extension
(OHR + # + Y or N + #)
Split
168 DIGITAL SYSTEM Administrator’s Guide
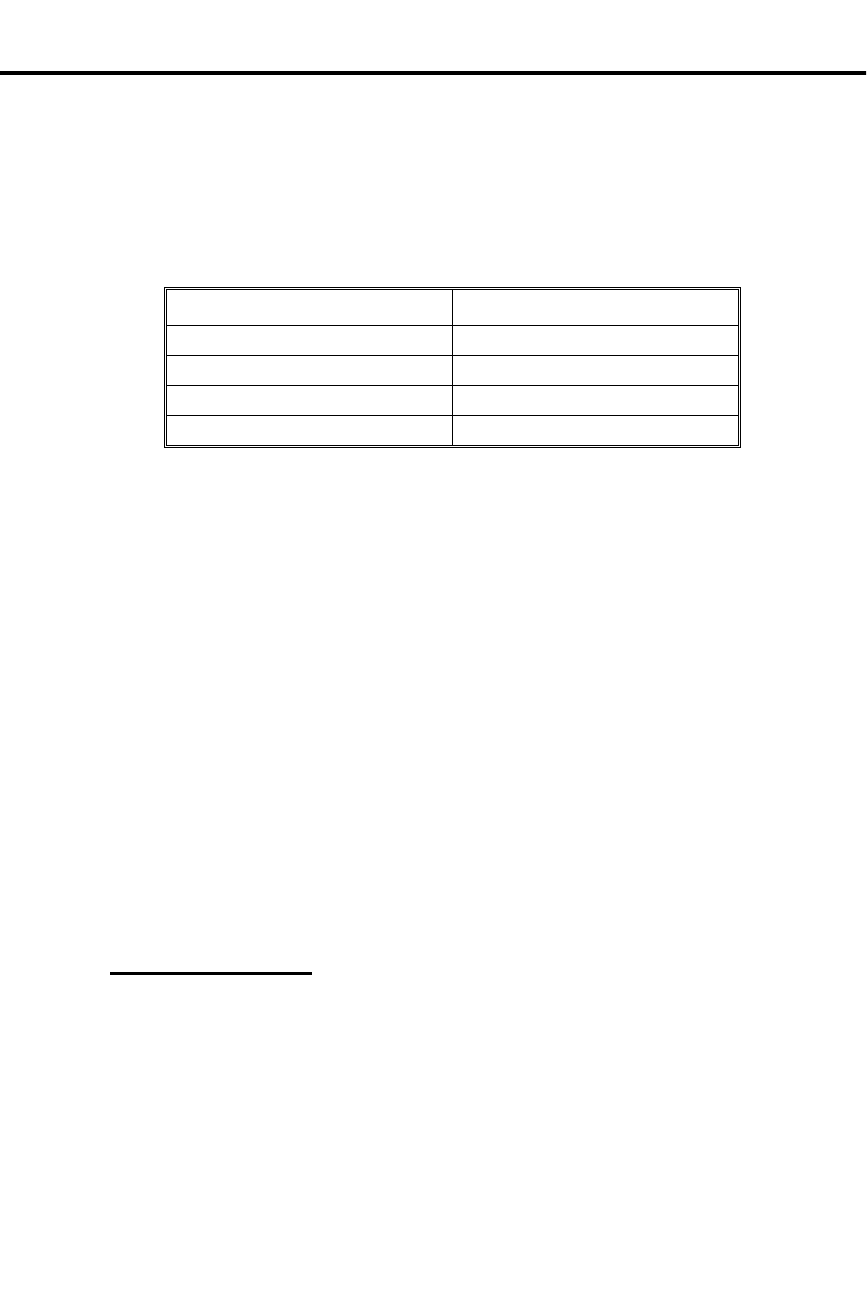
Station Call Coverage
✆Touch one key at your phone to answer a co-worker’s call. No
codes to dial.
Call Coverage lets you answer a call ringing a co-worker’s extension by pressing
your Call Coverage key for that extension (called the "covered" extension). In
addition, you can use the Call Coverage key to make an Intercom call or Transfer to
the covered extension. The Call Coverage key shows you the status of the covered
extension:
When the Call Coverage key is... The covered extension is...
Off Idle
On Busy
Flashing Slowly Ringing
Flashing fast In Do Not Disturb
The Call Coverage feature also does the following:
•Signals a busy covered extension, if it’s programmed for Off-Hook Signaling
(see page 126)
•Lets you Camp-On to the busy covered extension, if it’s not programmed for Off-
Hook Signaling (see page 126)
•Lets you contact the covered extension when it is in Do Not Disturb
And, if your extension has the proper program access level, you can enhance the Call
Coverage feature as follows:
•With access level 2-5, you can assign ringing to a Call Coverage key so when a
call rings the covered extension, your extension rings, too. See Delayed Ringing
Assignment on page 62 and Ringing Assignment on page 154.
•With program access level 1-5, you can change the covered extension assigned
to a Call Coverage key (see Direct Station Selection on page 69).
Initial Configuration
•No Call Coverage keys programmed
•All Call Coverage keys activate Off-Hook Signaling (Whisper Page)
•Extensions 300-305 can program ringing for Call Coverage keys. All other exten-
sions have program access level 01.
•All extensions can change a Call Coverage key’s extension
Using the Feature
To answer a call using a
Call Coverage key:
1. Lift handset.
2. Press (slow) flashing Call Coverage key.
-The key goes out, ICM or a Line key lights.
To place a call to a
covered extension:
1. Lift handset.
2. Press Call Coverage key once if it is lit or unlit.
-If you hear two beeps, speak.
-If you hearing ringing, wait for an answer.
Station Call Coverage
Part I: DIGITAL SYSTEM Features 169

-If you hear busy tone, dial C to Camp-On.
-If you hear fast busy tone, this means your partner
is busy on a call and has DND on. You cannot get
through.
OR
1. Lift handset
2. Press Call Coverage key twice if it is flashing fast.
- This overrides the covered extension’s DND and
you hear ringing.
To Transfer an outside
call to a covered
extension:
1. Press Call Coverage key.
-The call goes on Exclusive Hold (Line key and
HOLD key flash). ICM flashes fast.
2. Announce the call, then hang up.
OR
Hang up to send the call unannounced.
-If you hear beeps, speak. If you hear ringing, wait
for an answer.
-You can also hang up when you hear busy tone to
have the call Camp-On (wait) at that extension.
Understanding Related Programming
Program 17
To assign Call Coverage keys to an extension (CCK + # +
Covered extension + #). If you want Call Coverage keys
for ACD/UCD master numbers, your system must have an
AUX Module.
Program 16
To give an extension access to any line it should be able to
answer at the covered extension (L + Line number 01-16
+ # + 01 or 02 + #)
Program 18 (II)
To assign ringing to a Call Coverage key (RA or DRA +
# + Press key + Y or N + #)
Program 15
To assign program access level 2-5 to extensions so they
program ringing themselves (PGM ACC LEVEL =
02-05 + #)
Station Call Coverage
170 DIGITAL SYSTEM Administrator’s Guide

Station Message Detail Recor ding
✆It’s easy to keep track of the calls made at each extension.
Station Message Detail Recording (SMDR) provides a record of the system’s outside
calls. The record can display on a terminal or be sent to a printer. The record shows
the following information about a call:
•Date of the call
•Last extension on the call
•Line used for the call
•Number dialed (for outgoing calls only)
•Account Code, if entered (for more information, see Account Codes on page 23)
•Start time of the call
•Duration of the call
SMDR requires the AUX Module and a customer-provided ASCII record collection
device (e.g., terminal or printer). SMDR options are programmed through a terminal
connected to the AUX Module. For more information, see SMDR in the DIGITAL
SYSTEM Feature and Terminal Programming Manual.
Initial Configuration
SMDR not available without an AUX Module and terminal programming
Using the Feature
N/A
Understanding Related Programming
Program 3
To set the baud rate of the AUX Module’s port for
terminal programming (LOCAL BAUD = 00 [300], 01
[1200], 02 [2400], 03 [4800], 04 [9600] or 05 [19.2K] + #)
Station Message Detail Recording
Part I: DIGITAL SYSTEM Features 171

System Timers
✆Customize the duration of certain feature options.
There are timers in the system that can be customized through programming. The
timers affect extensions, lines, features and system performance. The available
timers are as follows:
The Park Orbit timer determines how long a call stays in a system Park Orbit before
it recalls the extension that parked it (see Park on page 141).
The Hold Recall timer determines how long a call stays on Hold before it recalls the
extension that placed it on Hold (see Regular Hold on page 99, Exclusive Hold on
page 98, and Automatic Hold on page 97).
The Camp-On timer determines how long a transferred call or Direct Inward Line
Camps-On to a:
•Busy UCD Hunt Group before it rings the overflow extension
•Busy ESL/ASI before it recalls the transferring extension
The Line Response timer determines how long the system waits before assuming
that a seized outgoing line is defective (i.e., defective = the system does not detect
loop current from the telephone company). The time you select must be compatible
with your local telephone company.
The Modem Reserve timer determines how long the system reserves a modem (for a
user) from the modem pool before returning it to the pool.
The Number of Rings Before Recall timer sets the number of times:
• A recalling held outside call rings the extension that placed it on Hold before it
changes to "key ring" and rings all extensions programmed for ringing on that
line
•A transferred call rings an idle or busy Multibutton extension before recalling
the transferring extension (see Transfer on page 182)
•A transferred call rings an idle ESL/ASI before recalling the transferring exten-
sion
•A recalling Transfer rings the transferer before it changes to "key ring" and rings
all extensions programmed for ringing on that line
•A call rings a Hunt Group extension before ringing the next extension in the
group (see Extension Hunting on page 81)
•A call rings an extension in the ring-no-answer Call Forwarding mode before the
system forwards the call to the destination extension (see Call Forwarding on
page 44)
•A Direct Inward Line (i.e., a directly terminated line in Program 12) rings an
idle or busy Multibutton or UCD overflow extension before it changes to "key
ring" and rings all extensions programmed for ringing on that line (see Direct In-
ward Lines on page 64)
The Number of Delayed Rings timer determines how many rings the system
suppresses before a call audibly rings an extension that is programmed for Delayed
Ringing (see Delayed Ringing Assignment on page 62).
System Timers
172 DIGITAL SYSTEM Administrator’s Guide

The Flash Response timer determines how long a line circuit opens to allow the CO
or PBX to recognize it as a Flash. The value you select must be compatible with
your CO or PBX (see Flash on page 85).
The Dial Tone Detect timer determines how long the system waits to detect dial tone
before sending out a Speed Dial call. The system uses three times this value for a
pause in a Speed Dial number (see Speed Dial on page 162).
The Make timer determines how long the relays close on Dial Pulse (DP) lines.
The Break timer determines how long the relays open on Dial Pulse (DP) lines.
The Interdigit timer determines how long of a pause there is between digits dialed
on a Dial Pulse (DP) line.
Initial Configuration
•Park Orbit = 60s •Number of Delayed Rings = 3
•Hold Recall = 60s •Flash Response = .7s
•Camp-On = 60s •Dial Tone Detect = 10s
•Line Response = 1.5s •Make = 40ms
•Modem Reserve = 30s •Break = 60ms
•Number of Rings Before Recall = 5 •Interdigit = 640ms
Using the Feature
N/A
Understanding Related Programming
Program 4
To set the duration of the timers (Timer number 01-12 + #
+ Duration + #)
System Timers
Part I: DIGITAL SYSTEM Features 173

Telemarketing Dia l
✆Have the PC connected to your keyset dial your outside calls.
Telemarketing Dial requires an AUX Module with Software Version 02.10 or higher.
Telemarketing Dial is not available with Base software.
If you have a keyset, Telemarketing Dial lets you have your PC dial outside calls.
This is great if you are a telemarketer, for example, because you can use auto-dialing
or database dialing for placing calls. To use Telemarketing Dial, you must have:
•Your PC connected to a modem, which is in turn connected to an ASI
•A Call Coverage key for the ASI
•Communications software installed in the PC
After the PC places the call, the supervisory tones provided through the modem help
you monitor the progress of the call. When the called party answers, just press the
Call Coverage key to converse.
Initial Configuraton
Telemarketing Dial not enabled.
Using the Feature
To use Telemarketing Dial:
1. From the PC connected to the ASI, use the communica-
tion software’s Directory Dialing to place the call.
2. When the called party answers, press the Call Cover-
age Key for the ASI.
-The call is in the Privacy Release mode (line key
flashes fast). To enable privacy for the call, press
the line key.
Understanding Related Programming
Refer to the DIGITAL SYSTEM Feature and Terminal Programming Manual.
Telemarketing Dial
174 DIGITAL SYSTEM Administrator’s Guide

Tenant Service
✆A single DIGITAL SYSTEM can serve more than one business.
The DIGITAL SYSTEM can be divided up so that more than one tenant (business)
can use it. If each tenant requires its own attendant (operator), the DIGITAL
SYSTEM can accommodate up to four tenants. Otherwise, the DIGITAL SYSTEM
can accommodate any number of tenants.
In addition to having its own attendant, each tenant can have their own:
•Outside lines or line groups
•Internal Page Zones (seven zones are available)
Note: Members of one tenant group can place Intercom calls to members of another
tenant group.
Initial Configuration
All extensions in same tenant group (they are all assigned to attendant 300)
Using the Feature
N/A
Understanding Related Programming
For attendant programming, use:
Program 3
To assign the number of attendants/operators (NO. OF
OPRS = 01-04 + #) and their extension numbers (OPR
nn EXT = Extension number + #). If there are two
tenants and each wants its own operator, enter 2 in this
program and then enter the desired extension numbers.
Program 18 (I)
To assign to an extension its attendant extension from
Program 3 (SO + # + Extension number + #). The
attendant you assign to an extension is the one that gets
called when the extension user dials 0.
For line and line group programming:
Program 11
To make line groups (TRK GRP NO. = 90-98 + # +
Enter line number + # [repeat last two steps to add more
lines to group])
Program 16
To assign lines and/or line groups to each extension in a
tenant group. Make sure each tenant has access to a
different set of lines/groups.
For lines: L + Line 01-16 + # + 01/02 for access or 00 for
no access + #
For line groups: G + Line Group number 90-98 + # + Y
for access or N for no access + #
Program 17
To assign a line to a key at an extension (LK + Line 0-16
+ #)
Tenant Service
Part I: DIGITAL SYSTEM Features 175

Program 18 (II)
To assign ringing to lines at an extension (RA or DRA +
# + Press line + Y or N + #).
See also Placing an Outside Call on page 134 and
Answering an Outside Call on page 132.
For Paging programming:
Program 1
To enable/disable the capability of making an All Call
Page in a Class of Service (ALL CALL PAGE = Y or N
+ #). Also see Program 18(I). Since all tenant groups
would probably not want to hear an All Call Page, you
may want to disable this.
To enable/disable the capability of making a Page to
Zones 1-3 in a Class of Service (PAGE ZONE n = Y or
N + #). Also see Program 18(I). You may want to enable
zone 1 paging for one tenant and disable it for another.
All extensions can page zones 4-7, regardless of
programming.
Program 18 (I)
To assign a Class of Service from Program 1 to an
extension (COS + # + 01-27 + #)
To assign extensions to Internal Page Zones (PZ + # +
01-07 + #). Tenant A’s extensions should not be in the
same page zones as tenant B’s extensions.
See also Paging on page 138.
Tenant Service
176 DIGITAL SYSTEM Administrator’s Guide

Time and Da te
✆Quickly see both the time and date in a glance. No need to refer to
a separate clock and calendar. And you can reset it, if necessary.
The Time and Date feature shows you the time and date on your phone’s display.
The time and date also appear on the following system features:
•Station Message Detail Recording
•Diagnostic/Maintenance Utilities and System Reports
•Traffic Management Report
If your extension has program access level 4-5, you can reset the Time and Date from
your phone. If you do, you reset the Time and Date for all of the above mentioned
features.
Initial Configuration
Extension 300-305 can set the Time and Date. All other extensions only have access
level 01.
Using the Feature
To reset the time and date
(TD) when your extension
has program access level
4 or 5:
1. Do not lift handset.
2. Press #.
3. Dial TD.
4. Dial month (01-12), press #.
5. Dial date (1-31), press #.
6. Dial last two digits of the year, press #.
7. Dial hour (00-23), press #.
-For example, 14 = 2:00 PM
8. Dial minutes (00-59), press #.
9. Press SAVE.
-You hear a confirmation tone.
-If, for example, you wish to change only the
minutes, do steps 1-3, then press the # key until you
see, MINUTES =. Dial the new minutes, press #,
then press SAVE.
Understanding Related Programming
Program 15
To assign program access level 4-5 to any extension that
should be able to change the Time and Date (PGM ACC
LEVEL = 04 or 05 + #)
Time and Date
Part I: DIGITAL SYSTEM Features 177

Toll Restriction
✆Long distance calls can be limited to control the cost of
communications.
Toll Restriction limits the types of calls a user may dial from their extension. The
system applies Toll Restriction (i.e., limits calls) for a particular extension according
to the Toll Restriction level (01-07) assigned to that extension through its Class of
Service. Each Toll Restriction level can be customized to enable or disable the
following:
•Continuous dialing (for access to special services, such as MCI)
•Special access (N11) dialing (such as 411 Directory Assistance)
•Outside Operator (0 +) dialing
•Direct international dialing
•Equal Access dialing (see page 79)
•1 + NNX (long distance exchange) dialing
•NXX (local exchange) dialing
•NPA (area code) dialing
•Six-digit (NPA and NNX) dialing. This type of dialing limits a user to dialing
only specific exchanges (NNX) within specific area codes (NPA).
When the DIGITAL SYSTEM is installed behind a PBX, the system applies Toll
Restriction after the user dials the PBX Access Code.
Toll Restriction does not restrict 911 calls, System Speed Dial calls, or calls made
using Direct Line (Trunk) Access. A user can also activate Walking Class of Service
to override dialing restrictions (see Walking Class of Service on page 194).
Additional dialing restrictions can be set up in a Class of Service (Only Intercom
Calls at Night, Only Local Calls Day or Night, Only Local Calls at Night). These
restrictions override any restrictions set up in a Toll Restriction level (01-07).
Note: Beginning with AUX Module software version Y2.0, the system
accommodates telephone companies that use exchange (NNX) numbering for Area
Codes (NPAs). This option is not available in Base software.
Initial Configuration
No Toll Restriction (all types of calls allowed)
Using the Feature
When a user dials a call that is restricted, the systems sends a fast busy tone to the
user. If Station Message Detail Recording (SMDR) is installed, the restricted
(blocked) call shows up on the SMDR report.
Understanding Related Programming
Program 6
To set up Toll Restriction levels 01-07 (see page 216).
Also see Program 1.
Toll Restriction
178 DIGITAL SYSTEM Administrator’s Guide

Program 1
To assign a Toll Restriction level from Program 6 to a
Class of Service (TOLL RESTRICT = 01-07 + #). Also
see Program 18 (I).
To set up the following (additional) dialing restrictions in
a Class of Service:
Only Intercom Calls at Night (ICM NITE ONLY + Y +
#)
Only Local Calls Day or Night (LOCAL ONLY = Y + #)
Only Local Calls at Night (LOCAL NIGHT = Y + #).
Also see Program 18 (I).
These restrictions override any restrictions set up in
Program 6.
Program 18 (I)
To assign a Class of Service from Program 1 to an
extension (COS + # + 01-27 + #)
Program 12
To assign Toll Restriction to a line (TR + # + Y + #).
Initially, Toll Restriction is applied to every line at an
extension. You would want to leave it that way except for
WATS line, for example.
Program 3
To identify whether the calling area requires a "1" before
dialing an area code (NPA) (1 + NPA REQUIRED = Y
or N + #)
Program 16
To give an extension outgoing access to lines (L + Line
01-16 + # + 02 + #)
Toll Restriction
Part I: DIGITAL SYSTEM Features 179
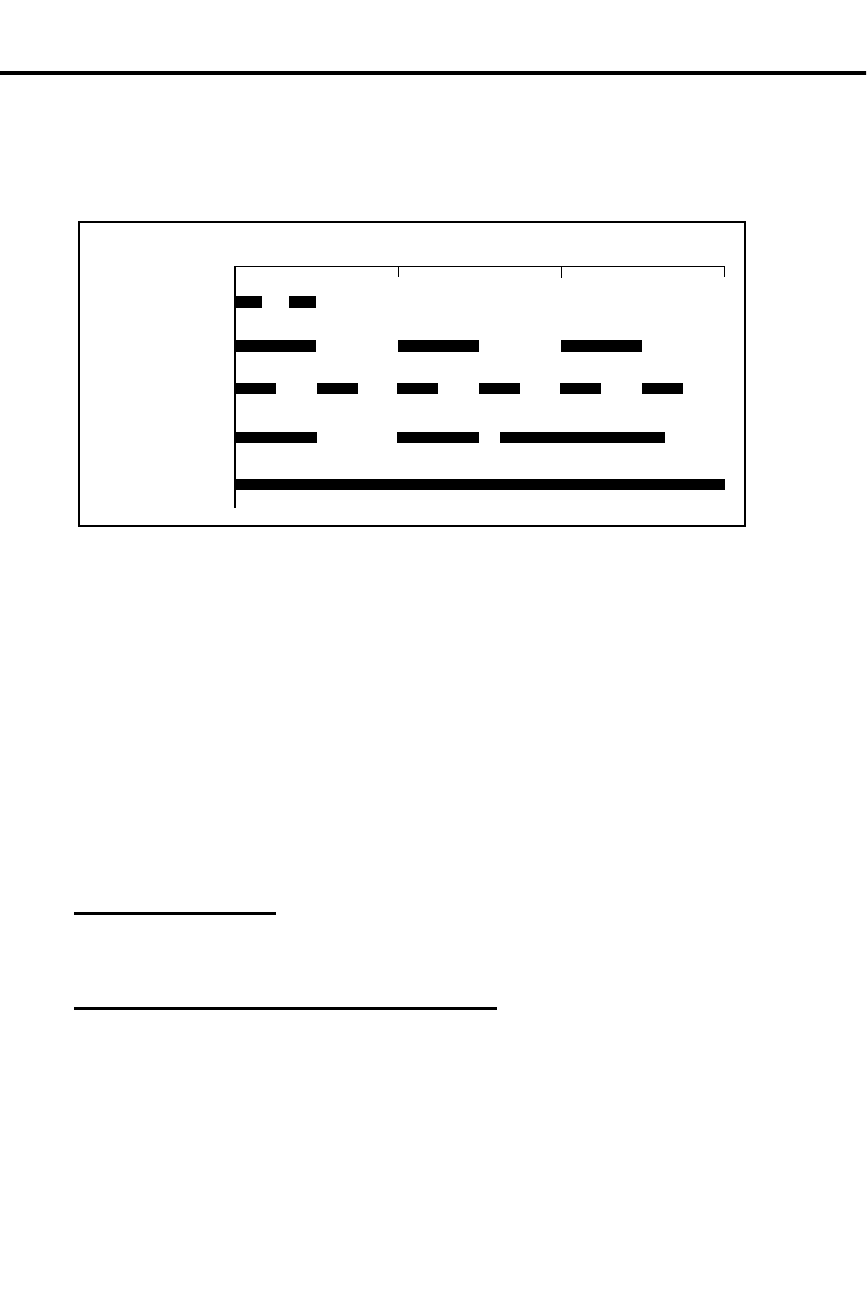
Tone Patterns
✆Identify certain feature conditions by becoming familiar with their
corresponding tone patterns.
The DIGITAL SYSTEM provides tones of different durations to indicate certain
conditions (see the chart below).
You most commonly hear:
•Two beeps when you make a voice-announced Intercom call to an extension or
send Call Waiting signals
•Busy tone when you call a busy extension
•Fast busy tone when you call an extension in Do Not Disturb
•Ring-Busy tone when you call a busy extension that is programmed for Off-
Hook Signaling
•Dial tone when you press ICM or a Line key to a make a call
You may also hear some of these tones when you use other features. If so, this guide
will tell you in the operating instructions for a feature.
Initial Configuration
As described above
Using the Feature
N/A
Understanding Related Programming
N/A
Two Beeps
Busy Tone
0123
(Seconds)
01870C16
Fast Busy
Ringbusy
Dial Tone
RINGING
Tone Patterns
180 DIGITAL SYSTEM Administrator’s Guide

Traffic Management Reporting
✆It’s easy to see which lines and extensions are being overused or
underused so you can make the appropriate adjustments.
Traffic Management System (TMS) Reporting provides a record of the system’s call
activity for both Intercom and outside calls. The record can display on a terminal or
be sent to a printer. A TMS record shows the call activity for each installed
extension, line, line group, and Uniform Call Distribution (UCD) group. For
example, the TMS report would show the following call activity data for a line:
•Total number of calls received, answered, and terminated
•Total number of "Long Wait" calls (calls that ring longer than the TMS "Long
Wait" time)
•Total number of abandoned calls (where the outside caller hangs up while the
call is on Hold, parked or being transferred)
•Total number of outgoing calls
•Total time the line was in use
Traffic Management Reporting requires the AUX Module and a customer-provided
ASCII record collection device (e.g., terminal or printer). Traffic Management
Reporting options are programmed through a terminal connected to the AUX
Module. For more information, see Traffic Management Reporting in the DIGITAL
SYSTEM Feature and Terminal Programming Manual.
Initial Configuration
Traffic Management Reporting not available without AUX Module and terminal
programming
Using the Feature
N/A
Understanding Related Programming
Program 3
To set the baud rate of the AUX Module’s port for
terminal programming (LOCAL BAUD = 00 [300], 01
[1200], 02 [2400], 03 [4800], 04 [9600] or 05 [19.2K] + #)
Traffic Management Reporting
Part I: DIGITAL SYSTEM Features 181

Tran sfer
✆Quickly send a call to another extension when your caller needs to
talk to someone else in your company.
Transfer lets you send your outside call to another extension. You can Transfer any
outside line to another extension, even if that extension does not have access to the
line. And you can Transfer calls to busy extensions. The transferred call Camps-On
(waits) at the busy extension and sends two beep tones to the busy user (if your
system is programmed for Call Waiting tones).
You can Transfer a call in two ways. You can:
•Announce (screen) the Transfer before actually completing the Transfer
•Transfer the call directly, without announcing (screening) it
A transferred caller may hear Music on Hold (if available).
If the extension receiving the Transfer does not pick up (answer) the Transfer, it
recalls your extension. If you do not answer the recall, the call rings at all extensions
that are programmed for ringing on that line.
Initial Configuration
•Transfer always allowed
•Transfers to busy extension and sends the busy extension Call Waiting beeps
•Transfers will ring busy ASIs for 60 seconds and other extensions for 3 rings be-
fore recalling the transferer
•Transfers will recall for 3 rings before ringing other extensions
•Transferred callers do not hear Music on Hold
Using the Feature
To Transfer your outside
call:
You can also use a Hotline key (page 101), Call Coverage
key (page 169), or DSS key (see page 69).
1. Press ICM.
OR
If you have an ESL set, press TRF.
-ICM lights, you hear dial tone. Your call goes on
Exclusive Hold under the HOLD key.
2. Dial extension number.
-You see the Line key for the call. If you hear busy
tone, hang up to have the call Camp-On.
3. Announce the call:
If you hear beeps, you can speak right away. If the per-
son does not want the Transfer, press the key for the
call.
OR
If you hear ringing, wait for an answer, then speak.
-To Transfer the call unannounced, skip step 3.
4. Hang up.
-Your Transfer goes through.
Transfer
182 DIGITAL SYSTEM Administrator’s Guide

To receive a Transfer:
The Line key for the transferred line flashes. If you do
not have a Line key for the transferred line, your Loop
key flashes.
1. Lift handset.
2. If not connected, press flashing Line/Loop key.
Understanding Related Programming
Program 2
To enable/disable Call Waiting tones system-wide (CALL
WAIT TONE = Y or N + #). If enabled, Transfers to busy
extensions send the tones to the busy user.
Program 3
To enable/disable Music On Hold for transferred calls
(PLAY MOH TRANS = Y or N + #)
Program 4
To set Rings Before Recall timer (Timer 06 + # +
Duration + #). This is the number of times a Transfer
rings an idle or busy Multibutton or an idle ESL/ASI
before recalling; and, the number of times a Transfer
recall rings before ringing all extensions that are
programmed for ringing on that line.
To set the Camp-On timer (Timer 03 + # + Duration + #).
This is how long a call Camps-On to a busy ESL/ASI
before recalling.
Program 16
To give an extension access to a line (L + Line 01-16 + #
+ 01 or 02 + #)
Program 17
To assign a line to a key at an extension (LK + Line 01-16
+ #)
To assign a Loop key to an extension.
For Loop Switch: LS + #
For Loop Group: LG + Group (00-08 for groups 90-98) +
#
Program 18 (II)
To assign ringing to a line at any extension that should
ring during Transfer recall (RA or DRA + # + Line key +
Y or N + #). Transfers themselves always ring the
destination extension.
Transfer
Part I: DIGITAL SYSTEM Features 183

Unsupervised Conference (Tandem Calls)
✆You can, as a dispatcher: Answer a call from a salesman who is on
the road, then connect his call to a salesman in another state. No
need for the first salesman to hang up and call the other salesman.
Tandem Calls let you set up a Conference with two outside parties, then drop out of
the conversation leaving the two outside parties connected.
Initial Configuration
Tandem Calls disabled
Tandem Calls can be enabled only through terminal programming, which requires the
AUX Module. To enable Tandem Calls, see Tandem Trunking in the DIGITAL
SYSTEM Feature and Terminal Programming Manual.
Note: To use Tandem Calls, the DIGITAL SYSTEM must be equipped with a Line
module that provides disconnect supervision. In addition, the connected CO line
must also provide disconnect supervision.
Using the Feature
N/A
Understanding Related Programming
Program 3
To set the baud rate of the AUX Module’s port for
terminal programming (LOCAL BAUD = 00 [300], 01
[1200], 02 [2400], 03 [4800], 04 [9600] or 05 [19.2K] + #)
Unsupervised Conference (Tandem Calls)
184 DIGITAL SYSTEM Administrator’s Guide

Voice Mail/Automated Attendant
✆Send and receive recorded messages. No need to carry a
hand-written note to someone’s desk. Also, have the Automated
Attendant automatically answer your company’s outside calls.
Your DIGITAL SYSTEM is compatible with Integrated Voice Messaging, which
provides Automated Attendant and Voice Mail.
The Automated Attendant answers your company’s incoming calls. An outside caller
hears a recording which explains their dialing options. The caller can then dial an
extension or the code for Voice Mail.
Voice Mail lets an outside caller leave a recorded message in your voice "mailbox",
and it lets you leave one in a co-worker’s mailbox. More specifically, Voice Mail
enhances the DIGITAL SYSTEM with the following features:
Call Forward to Voice Mail (Mailbox Call Forward)
Lets you send your incoming calls to Voice Mail. Voice Mail answers the call and lets
the caller leave a message.
Mailbox Message Waiting (Leaving a Voice Message)
Lets you call a busy, no-answer, DND extension, then press a key to leave a recorded
message in that person’s mailbox.
Message View
Lets you view the number of voice messages you have, if you have a Display Phone.
Transfer to Voice Mail (Mailbox Transfer)
Lets you Transfer a call to your own mailbox or to a co-worker’s mailbox.
Conversation Record
Lets you record a phone conversation, if your phone has a Record key. The
conversation gets stored in your mailbox as if it were a message.
Personal Answering Machine Emulation
(Only available on software versions AUX Module Y2.1/Base Y5.1 or higher)
Lets you screen calls to your mailbox, just like a personal answering machine. When
your mailbox answers, you hear two alert tones and your caller’s incoming message.
You can lift the handset to intercept the message or let it go through. (If you don’t
want to hear the incoming message, just press HF after it begins. It will go to your
mailbox anyway.) This option applies to all calls that ring your extension directly
(not Call Coverage, Group Call Pickup and Group Ring calls). Personal Answering
Machine Emulation can answer all calls or just trunk calls.
If Voice Mail is installed, the DIGITAL SYSTEM’s Message Waiting feature is not
available.
Initial Configuration
Voice Mail not installed
Voice Mail/Automated Attendant
Part I: DIGITAL SYSTEM Features 185

Using the Feature
For more specifics, see the documentation for your Integrated Voice Messaging
system.
To call your mailbox (from
your multibutton phone):
1. Lift handset.
2. Press MSG.
3. Wait for the voice prompt.
4. Dial your security code.
-You can store your security code in a One-Touch
Speed Dial key.
To call your mailbox (from
your ESL set):
1. Lift handset.
2. Dial voice mail master number.
3. Wait for the voice prompt.
4. Dial # and your mailbox number.
5. Wait for the voice prompt.
6. Dial your security code.
To activate Call
Forwarding to Voice Mail:
1. Lift handset.
2. Press ICM (except at an ESL set).
3. Dial #.
4. Press MSG key or dial Voice Mail master extension
number.
5. Dial Call Forward code (1,2,3,4).
-Code 1 forwards ring-no-answer calls
-Code 2 forwards ring-no-answer and busy calls
-Code 3 forwards all calls
-Code 4 activates Personal Answering Machine
Emulation
6. Hang up.
-MSG key flashes.
To cancel Call Forwarding
to Voice Mail:
1. Lift handset.
2. Press ICM (except at an ESL set).
-You hear dial tone.
3. Dial #.
-Dial tone stops.
4. Hang up.
-MSG key goes out.
To Transfer a call to a
co-worker’s mailbox
(multibutton phone only):
1. Press ICM.
-Your call goes on Exclusive Hold.
2. Press MSG.
3. Dial co-worker’s extension.
-With AUX Module software version 02.10 and
higher, you can Transfer to any destination within
the system’s number plan (000-999).
4. Hang up.
Voice Mail/Automated Attendant
186 DIGITAL SYSTEM Administrator’s Guide

To record a conversation
(if your multibutton phone
has a record key):
1. Press Record key to start and stop recording.
To view how many voice
messages you have (if
you have a display
phone):
MSG flashes fast when you have messages in your
mailbox.
1. Do not lift handset.
2. Press MSG.
Understanding Related Programming
Voice Mail requires Analog Station Interfaces (see page 31).
Note: Use the programs below in the order they are listed.
Program 14
To assign an ASI circuit type (CIRCUIT TYPE = 51) to
each extension port intended for Voice Mail
Program 18 (I)
To assign the Voice Mail feature to each Voice Mail
extension port selected in Program 14 (VX + # + Y + #)
Program 19
To set up a UCD Hunt Group as follows:
•Hunt Type = 05 (HUNT TYPE = 05 + #)
•Master Extension = Voice Mail master extension that
you selected in Program 3 (MASTER EXT = Master
extension + #)
•Overflow Extension = Operator Extension that you
assigned to the Voice Mail master extension in
Program 18 (I) (UCD OVERFLOW = Master
extension + #)
•UCD Members = Voice Mail extensions you selected
in Program 18 (UCD MEMBER + Extension
number + # [repeat last two steps to add more
members])
Program 3
To indicate that a Voice Mail system is installed (VOICE
MAIL = Y + #). Also, select a master extension number
for Voice Mail (VX MSTR EXT = Extension number +
#). Use any of the Voice Mail extensions selected in
Program 14.
Program 12
To directly terminate each line that the Automated
Attendant should answer to the Voice Mail master
extension you selected in Program 3 (DTD or DTN + # +
Voice mail master extension + #)
Program 17
To assign a Record key to an extension (RK + #)
Program 16
To assign to each Voice Mail port (selected in Program
14) outgoing access to the lines used by the VX Message
Notification and Message Reminder features (L + Line
number 01-16 + # + 01 or 02 + #)
Voice Mail/Automated Attendant
Part I: DIGITAL SYSTEM Features 187

To enable the Mailbox Message Waiting feature for an extension, also
use:
Program 19
To form a Terminal Hunt Group with the following
members: the extension that should have the Mailbox
Message Waiting feature and the Voice Mail master
extension (in that order).
HUNT TYPE = 01, 02 or 03 + #
HUNT STN = Extension number + # (repeat last two
steps to add more members)
Turn to page 272 for more information on programming a
Terminal Hunt Group.
For Personal Answering Machine Emulation, also use:
Program 1
To assign a Class of Service that enables Personal
Answering Machine Emulation for all calls (SINGLE
RING = N) or just outside calls (SINGLE RING = Y).
This only applies to software versions AUX Module
Y2.1/Base Y5.1 or higher.
Voice Mail/Automated Attendant
188 DIGITAL SYSTEM Administrator’s Guide

Voice Module Unit
✆Add digital voice recording and playback to your system — along
with the standard DIGITAL SYSTEM Voice Prompting Messages.
The Voice Module Unit (P/N 88522) requires an AUX Module with software version
02.10 or higher. The Voice Module Unit is not available with Base software.
The Voice Module Unit (P/N 88522) is a 12 Station Module enhanced with three
channels of digital recording and playback capability. When added to your system,
the VMU provides the following important new features:
•ACD Announcements
•Operator Assistance (OPA)
•Personal Greeting
•Voice Prompting Messages
In addition to playing back the standard DIGITAL SYSTEM Voice Prompting
Messages, the VMU can also store additional system and user messages. The VMU
provides up to 63 seconds of system message storage and 4 minutes and 15 seconds
of user storage. The system messages are those recorded for Operator Assistance and
ACD/UCD purposes. The user messages are the Personal Greetings (which can be up
to 16 seconds long). The system messages are battery backed-up and are retained for
about two weeks without system power. The user messages are dynamic and are lost
when power fails or the system resets.
Note:
•You must install the VMU only as the inside station module in the main CEU.
Do not install the VMU in any other cabinet or any other position. The VMU is
operational about 20 seconds after system power-up, reset or initialization of the
VMU messages.
•Before using the VMU for the first time, you must initialize the VMU messages.
Initial Configuration
VMU is fully functional after it is installed and initialized. See Using the Feature
below for initialization instructions.
Using the Feature
To initialize the VMU
messages:
Before using the VMU for the first time, you must
initialize the VMU messages.
-Initializing erases all the existing VMU messages, if
any.
1. Lift handset.
2. Press ICM.
3. Press #.
4. Dial 68.
5. Press #.
6. Dial 9.
-If you change your mind, dial 6 to cancel this
procedure.
Voice Module Unit
Part I: DIGITAL SYSTEM Features 189

Understanding Related Programming
N/A
Voice Module Unit
190 DIGITAL SYSTEM Administrator’s Guide

Voice Prompting Messages
✆Voice Prompting Messages tell you the status of your call, remind
you when you activate certain features, and even announce the time
and your own extension number.
Voice Prompting Messages require a Voice Module Unit (P/N 88522) and an AUX
Module with software version 02.10 or higher. Voice Prompting Messages are not
available with Base software.
The system plays Voice Prompting Messages to inform a user of the status of their
call. Voice Prompting Messages help a user as the call progresses. In addition, Voice
Prompting Messages remind users when they have activated certain features (such as
Call Forwarding). The chart below shows the Voice Prompting Messages.
Voice Prompting Messages
This message... Occurs when user...
All lines are busy. For automatic
Callback please press the Callback key. Tries to place a call when all lines in the
rotary are busy.
Audio file is full. Tries to record a Personal Greeting and
no VMU Module memory is available.
Please do not disturb. Calls an extension in DND.
Please hold on. All lines are busy. Your
call will be answered when a line
becomes free.
Calls a busy UCD or ACD group.
Please hold on, your call is being
rerouted. Calls an extension that is Call Forwarded
off-premise.
Please start recording <beep>. Starts to record a Personal Greeting,
OPA announcement, etc.
<beep> Recording finished. Exceeds time allotted for recording a
Personal Greeting, OPA announcement,
etc. Also occurs if user pauses too long
while recording.
The lowest cost line is busy. Please wait
for the next one. Places a call using ARS when all trunks
in the preferred service are busy.
The number you have dialed is not in
service. Calls a valid, but inoperative extension.
The time is... Dials 8 on an idle extension.
This is station... Dials 6 on an idle extension.
You have a message. Has a Message Waiting (voice or Voice
Messaging System).
Your call cannot go through. Please call
the operator. Tries to place a Toll Restricted call.
Voice Prompting Messages
Part I: DIGITAL SYSTEM Features 191

Voice Prompting Messages
This message... Occurs when user...
Your calls have been forwarded. Has forwarded calls. Message
periodically reminds user that calls are
forwarded.
Vacant number. Calls an invalid (not installed) extension.
Initial Configuration
Voice Prompting Messages occur as indicated in the chart above when the VMU
Module is installed and initialized.
Using the Feature
N/A
Understanding Related Programming
Refer to the DIGITAL SYSTEM Feature and Terminal Programming Manual.
Voice Prompting Messages
192 DIGITAL SYSTEM Administrator’s Guide

Volume Controls
✆Adjust the volume of calls and certain features. Handy when it’s
especially noisy in the office.
You can use the VOL UP and VOL DN keys to raise or lower the volume of the
following:
•Background Music (adjusting this volume also changes the volume of incoming
ringing and paged announcements)
•Voice levels over the handset
•Voice levels over the speaker (i.e., Handsfree volume)
You can also use VOL UP and VOL DN to control the brightness of your display.
When you adjust the volume for Background Music or voice levels on Intercom
calls, the volume remains where you set it until you change it again.
When you adjust the volume for voice levels on outside calls, the volume remains
where you set it only for the duration of the call. The volume returns to a pre-set
(usually mid-range) value for the next outside call.
Note: Beginning with AUX Module software Y2.0, the system can optionally retain
the user-set volume for trunk calls. This option is not available with Base software.
Initial Configuration
Mid-range volume
Using the Feature
To adjust the volume of
Background Music,
incoming ringing, paged
announcements, and the
brightness of your
display:
1. Press VOL UP or VOL DN while the feature is active
or while the phone is idle.
To adjust the volume for
handset or Handsfree
voice levels:
1. Press VOL UP or VOL DN while on a call.
Understanding Related Programming
Program 10
To set the volume (gain) for a line (LINE GAIN = 01-05
+ #). This is the "preset" volume a line takes on after the
user hangs up a call on that line.
Volume Controls
Part I: DIGITAL SYSTEM Features 193

Walking Class of Service
✆Make any type of outside call from any phone in the system,
regardless of the phone’s dialing restrictions. No need to find an
"unrestricted" phone when you need to make a special call.
Walking Class of Service lets you temporarily override an extension’s dialing
restrictions by dialing a security code at that extension. Dialing the code overrides
the restrictions set up in Class of Service (Program 1).
For example, if an extension’s Class of Service restricts long distance calls, dialing
the security code at that extension removes those restrictions and all others. In other
words, once you dial the security code, you can place any type of call on that
extension’s outgoing lines. When you hang up, the extension’s normal dialing
restrictions are automatically reinstated, though you can redial the call you just made
without using the security code. You can redial it using Last Number Redial or Save.
Initial Configuration
Walking Class of Service disabled (no security code is programmed)
Using the Feature
To use Walking Class of
Service to place an
outside call:
1. Lift handset.
2. Press ICM (except at an ESL set).
-ICM lights and you hear dial tone.
3. Dial # twice.
-Dial tone stops.
4. Dial Walking Class of Service security code.
-ICM goes out and you hear Intercom dial tone
again.
5. Dial an access code or press a Line key for an outgoing
line at that extension.
-Codes 801-816 for lines 1-16 (if Line Dial-Up is
allowed)
-Codes 348-363 for lines 1-16 (if Direct Line
(Trunk) Access is allowed)
-Codes 90-98 for Line Groups (if line group access
is allowed)
6. Dial your call.
-After you dial the call, you can redial it using Last
Number Redial. You can also store the number at
that phone using Save, then redial it later using
Save.
Understanding Related Programming
Program 3
To define a Walking Class of Service security code
(SECURITY + Up to eight digits + #)
Walking Class of Service
194 DIGITAL SYSTEM Administrator’s Guide

Part II
DIGITAL SYSTEM Programs
Part II: DIGITAL SYSTEM Programs 195

- For your notes -
196 DIGITAL SYSTEM Administrator’s Guide

Programming System Options
Program 1: Class of Service
✆Program 1 is initially set as follows for each COS:
•
Only Intercom Calls at Night = N
•
Off-Premise Call Forward = N
•
Break-In (Intrusion) = Y for COS 00; N for COS 01-27
•
Camp-On (Busy Extension) = Y
•
Internal Call Forwarding = Y
•
System Speed Dial Access = Y
•
Toll Restriction Level = 00 (not restricted)
•
Only Local Calls (Day or Night) = N
•
Only Local Calls at Night = N
•
Extended Ring = N
•
Privacy = N
•
Callback (Line Queuing) Priority = N
•
Direct Trunk Access and Camp-On to Busy Line = Y for COS 00; N for
COS 01-27
•
Initiate All Call Page = Y
•
Access Page Zones 1-3 = Y
•
Silent Monitor = N
•
No Flash for Single Line or
ACD Supervisor = N (i.e., Flash allowed and ACD Supervisor not allowed)
•
Single Ring for ASI Calls or
Only CO Call Forwarding to Voice Mail (software version AUX Module
Y2.1/Base Y5.1 or higher) = N
Program 1 lets you customize a Class of Service (COS). You do this by enabling or
disabling each of its feature options (see below). After you customize a COS, you
use Program 18 (I) to assign it to an extension so the extension has access to (or
cannot access) the COS’s features.
You can customize up to 28 COSs (00-27), and you can assign the same COS to
more than one extension. COS 30 is a special COS reserved for the attendant. The
system automatically assigns COS 30 to any extension you designate as an operator
in Program 3. You customize COS 30 by customizing COS 00.
Below are the COSs feature and dialing options:
Only Intercom Calls at Night
Use this option to determine whether an extension can place only Intercom Calls
during the Night Answer mode. If you enter "Y," the extension cannot place outside
calls (or use Flash) when its attendant (assigned in Program 18 [I]) goes into the
Night Answer Mode. This holds true even if the extension’s COS has a Toll
Restriction Level (see next page) that allows outside calls.
FOR FEATURE INFORMATION: See Night Answer on page 121.
System Options Program 1: Class of Service
Part II: DIGITAL SYSTEM Programs 197

Off-Premise Call Forward
Use this option to allow/deny Off-Premise Call Forwarding.
FOR FEATURE INFORMATION: See Call Forwarding, Off-Premise on page 46.
Break-In (Intrusion)
Use this option to allow/deny Intrusion (Barge-In). Extensions programmed for
Intrusion cannot intrude upon extensions programmed for Privacy (see below).
FOR FEATURE INFORMATION: See Intrusion (Barge-In) on page 106.
Camp-On to Busy Extension
Use this option to allow/deny Camp-On to a busy extension.
FOR FEATURE INFORMATION: See Call Waiting (Camp-On) on page 55.
Internal Call Forwarding
Use this option to allow/deny Internal Call Forwarding. Allowing Internal Call
Forwarding for COS 00 lets the attendant activate Alternate Attendant.
FOR FEATURE INFORMATION: See Call Forwarding on page 44, and Alternate Attendant
on page 30.
System Speed Dial Access
Use this option to determine whether an extension can call System Speed Dial
numbers.
FOR FEATURE INFORMATION: See Speed Dial on page 162.
Toll Restriction Level
Use this option to assign a Toll Restriction Level (00-07) to an extension.
FOR FEATURE INFORMATION: See Toll Restriction on page 178.
Only Local Calls (Day or Night)
Use this option to determine whether an extension can place only local and Intercom
calls (during Day or Night Answer mode). If you enter a "Y," the extension can place
the following types of outside calls:
•
7-digit calls
•
1 + 911 and 911 calls
•
1 + 800 + NNX + nnn calls
The extension will not be able to place toll (1 + NNX) or long distance calls to other
area codes even if the extension’s COS has a Toll Restriction Level (see above) that
normally allows them.
FOR FEATURE INFORMATION: N/A
Only Local Calls at Night
Use this option to determine whether an extension can place only local and Intercom
calls during the Night Answer mode. If you enter a Y, the extension can place the
following outside calls when its attendant (assigned in Program 18 [I]) goes into the
Night Answer mode:
•
7-digit calls
•
1 + 911 and 911 calls
•
1 + 800 + NNX + nnn calls
Program 1: Class of Service System Options
198 DIGITAL SYSTEM Administrator’s Guide

The extension will not be able to place toll (1 + NNX) or long distance calls to other
area codes even if the extension’s COS has a Toll Restriction Level (see above) that
normally allows them.
FOR FEATURE INFORMATION: N/A
Extended Ring
Use this option to enable/disable Extended Ringing.
FOR FEATURE INFORMATION: See Extended Ringing on page 80.
Privacy
Use this option to enable/disable Privacy.
FOR FEATURE INFORMATION: See Privacy on page 148.
Callback (Line Queuing) Priority
Use this option to determine whether an extension has priority status when there are
several Line Queuing requests in the system. If you enter "Y," the priority extension
receives a Callback before any non-priority extensions. If a few priority extensions
make a Line Queuing request, the one that makes it first gets called back first, and so
on.
FOR FEATURE INFORMATION: See Line Queuing on page 108.
Direct Trunk Access and Camp-On to Busy Line
Use this option to determine whether an extension can use Direct Line (Trunk)
Access and Camp-On for a busy line.
FOR FEATURE INFORMATION: See Placing an Outside Call (Using Direct Line [Trunk]
Access) on page 134 and Camp-On on page 55.
Initiate All Call Page
Use this option to determine whether an extension can make All Call Pages. See also
Access to Page Zones 1-3 below.
FOR FEATURE INFORMATION: See Paging on page 138.
Access Page Zones 1-3
Use this option to determine whether an extension can make pages to Internal Zones
1-3. All extensions can always access Internal Zones 4-7. Also see Initiate All Call
Page above.
FOR FEATURE INFORMATION: See Paging on page 138.
Silent Monitor
Use this option to allow/deny Silent Monitor. Silent Monitor cannot break into a call
at an extension programmed for Privacy (see above).
FOR FEATURE INFORMATION: See Silent Monitor on page 161.
No Flash for Single Line and ACD Supervisor = Y
For ESL sets, use this option to determine whether the ESL extension can use the
Flash feature. For ACD Supervisor keysets, use this option to indicate that the
extension is an ACD supervisor.
System Options Program 1: Class of Service
Part II: DIGITAL SYSTEM Programs 199
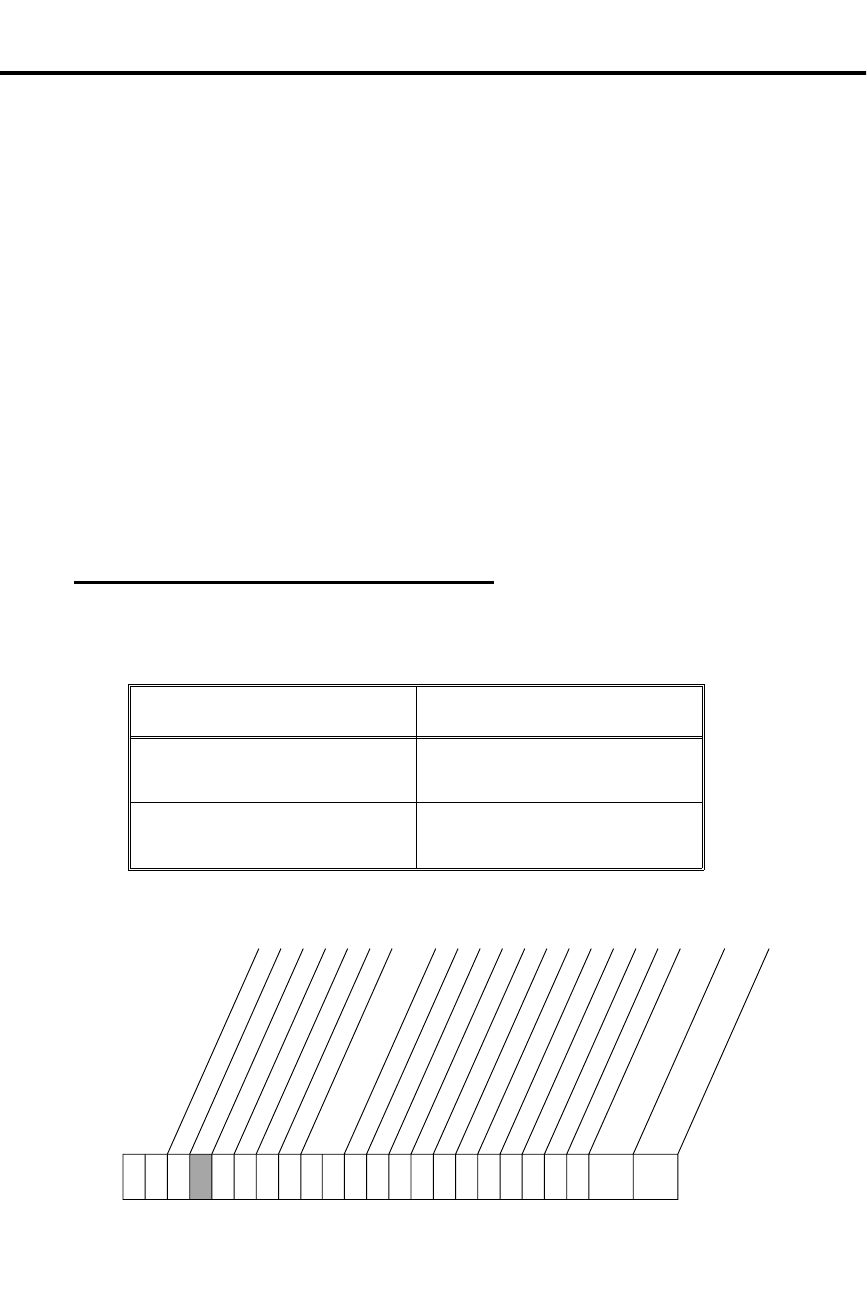
Note: Entering "Y" for No Flash for Single Line means the system does not support
Flash for Single Line phones, while entering "N" means it does.
FOR FEATURE INFORMATION: See Flash on page 85 and Automatic Call Distribution
on page 36.
Single Ring for ASI Calls or Only CO Calls Call Forward to Voice Mail
Use this option to enable/disable a Single Ring for calls into an Analog Station
Interface (ASI). If you enable Single Ring, outside calls, Intercom calls, and
Callbacks ring with a single ring repeated (i.e., they follow the typical Intercom ring
pattern).
For software versions AUX Module Y2.1/Base Y5.1 or higher, also use this option to
control the types of calls Voice Mail Personal Answering Machine Emulation
answers. If enabled (Y), Personal Answering Machine Emulation answers only
outside calls. Intercom calls to the extension go through normally. If disabled (N),
Personal Answering Machine Emulation answers all calls (Intercom and outside).
FOR FEATURE INFORMATION: See Ringing Patterns on page 156, Analog Station
Interface on page 31 and Voice Mail (Personal
Answering Machine Emulation) on page 185.
Filling Out the Program Record Form
1. Select a COS (00-27).
2. Enter data from the following chart.
In this box . . . Enter this data . . .
A feature’s data box Y to enable the feature
N to disable the feature
Toll Restriction Level Enter 00 - Not restricted
01-07 (Toll Levels 01-07)
Example
COS 03 has Internal Call Forwarding disabled (only this option will be shown).
Only Intercom Calls at Night
Off-Premise Call Forward
Break-In (Intrusion)
Camp-On (Busy Extension)
Internal Call Forward
System Speed Dial
Toll Restriction Level
Extended Ring
Privacy
Callback Priority
All Call Page
Silent Monitor
COS
01853I1 (D)
0 3
Only Local Calls (Day/Night)
Only Local Calls at Night
Direct Trunk Access/Camp-On
Page Zone 1 Access
Page Zone 2 Access
Page Zone 3 Access
No Single Line Flash/
ACD Supervisor
N
Single Ring for ASI/OPX
Only CO Call FWD to VX
Program 1: Class of Service System Options
200 DIGITAL SYSTEM Administrator’s Guide

Entering Data Into Memory
To enter Program 1 data:
1. Enter program mode.
-Press # + dial SP + dial 5312 + press #.
2. Press key 1 to enter Program 1.
3. Dial COS No., press #.
4. To accept the displayed data: Press #.
OR
To change or enter data: Dial data, press #.
-To erase data before pressing #: Dial *.
5. Repeat step 4 for all data.
-If you finish and do not see "COS. NO.": Press
SAVE before step 6.
6. Select an option:
To program another COS: Go to step 3.
OR
To exit Program 1: Press SAVE once.
OR
To exit the program mode: Press SAVE twice.
-To enter another program after exiting: Press its
key.
Understanding Related Programming
After customizing a Class of Service, use:
Program 18 (I)
To assign a COS to one or more extensions
For Camp-On to a busy extension:
Program 2
To enable (Camp-On) Call Waiting tones system-wide
For Toll Restriction:
Program 6
To set up different types of Toll Restrictions
For Internal Page Zones:
Program 18 (I)
To assign extensions to internal zones
For the ACD Supervisor:
Program 19
To set up ACD Groups
System Options Program 1: Class of Service
Part II: DIGITAL SYSTEM Programs 201

Program 2: Intercom Signaling
✆Program 2 is initially set as follows:
•
Call Waiting (Camp-On) Tones = Y
•
Handsfree Reply on Intercom Calls = Y
•
Voice-Announced Intercom Calls = Y
•
Automatic Handsfree = Y
Program 2 lets you enable or disable the following options for all extensions in the
system:
Call Waiting (Camp-On) Tones
Use this option to enable/disable Call Waiting Tones (double-beeps).
If you assign Off-Hook Ringing to a particular extension (Program 18 [I]), the
system converts its Call Waiting tones into Off-Hook Ringing.
FOR FEATURE INFORMATION: See Call Waiting (Camp-On) on page 55.
Handsfree Reply on Intercom Calls
Use this option to enable/disable Handsfree Reply for voice-announced Intercom
calls. Enabling this option has no affect on the system unless you enable
voice-announced Intercom calls for the system (see the option below).
FOR FEATURE INFORMATION: See Intercom on page 103.
Voice-Announced Intercom Calls
Use this option to enable/disable voice-announced Intercom calls. If you disable
them, the extensions can only receive ringing Intercom calls.
Note: Attendants, extensions in the Headset mode, and ASI ports do not receive
voice-announced calls even if you enable them in this program.
FOR FEATURE INFORMATION: See Intercom calls page 103.
Automatic Handsfree
Use this option to enable/disable Automatic Handsfree.
FOR FEATURE INFORMATION: See Automatic Handsfree on page 94.
Program 2: Intercom Signaling System Options
202 DIGITAL SYSTEM Administrator’s Guide
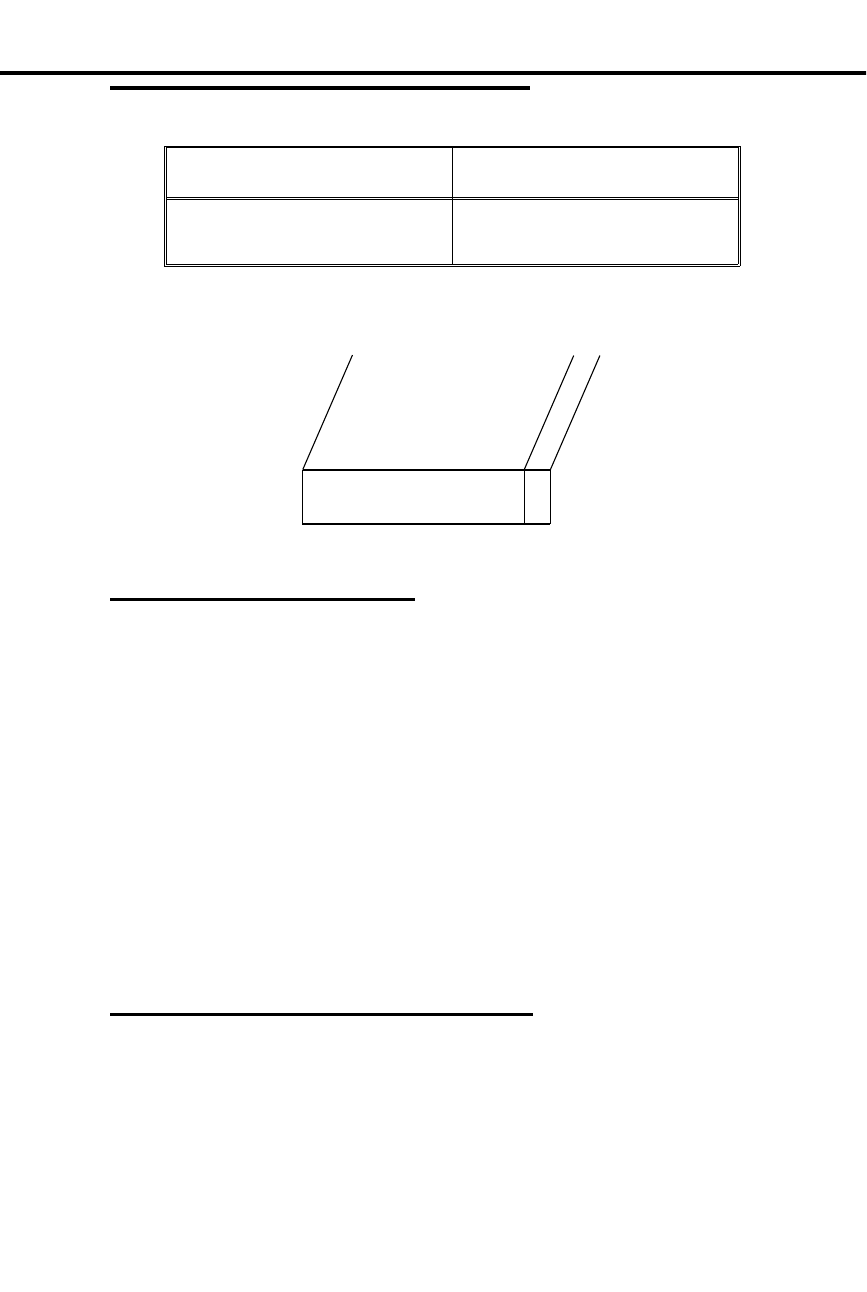
Filling Out the Program Record Form
In this box . . . Enter this data . . .
A feature’s data box Y to enable the feature
N to disable the feature
Example
Voice-Announced Intercom calls are disabled.
Entering Data Into Memory
To enter Program 2 data:
1. Enter program mode.
-Press # + dial SP + dial 5312 + press #.
2. Press key 2 to enter Program 2.
3. To accept the displayed data: Press #.
OR
To change or enter data: Dial data, press #.
-To erase data before pressing #: Dial *.
4. Repeat step 3 for all data.
-If you finish and do not see, "SAVE TO EXIT":
Press SAVE before step 5.
5. Select an option:
To enter another program: Press its key.
OR
To exit the program mode: Press SAVE once.
Understanding Related Programming
For Call Waiting Tones:
Program 1
To allow/deny an extension the capability of sending
Waiting Tones in a Class of Service (see also Program 18
[I])
Feature
Name
01853I12 (D)
Voice-Announced Calls
Feature Data
N
System Options Program 2: Intercom Signaling
Part II: DIGITAL SYSTEM Programs 203

To enable/disable Privacy for an extension in a Class of
Service (see also Program 18 [I]). If enabled, an extension
does not receive Call Waiting tones.
Program 18 (I)
To assign a Class of Service (from Program 1) to an
extension
To have an extension hear the Call Waiting tones as
Off-Hook Ringing instead of a double beep
Program 4
To set the Rings Before Recall timer (how long a call
waits at a busy extension before recalling the extension
that sent the Call Waiting tones)
For Voice-Announced Intercom calls (when they are programmed
system-wide):
Program 18 (II)
To enable/disable incoming voice-announced calls at an
extension
Program 15
To assign a program access level 3-5 to extensions so they
can enable/disable incoming voice-announced Intercom
calls themselves
Program 2: Intercom Signaling System Options
204 DIGITAL SYSTEM Administrator’s Guide

Program 3: System Features
✆Program 3 is initially set as follows:
•
Number of Operators = 01
•
Operator Extension = 300 for Operator 01
•
Number of Digits in a System Speed Dial Code = 03 (the codes are
700-799)
•
Side Tone Test Digit = 2
•
Voice Mail Installed = N
•
Voice Mail Master Extension Number = 300 (none assigned)
•
Enable Dial-out of # in a Speed Dial Number = N
•
Dial 1 Before Area Code (NPA) Calls = Y
•
Walking Class of Service Security Code = None
•
Play MOH for Transferred Calls = N
•
Baud Rate of Auxiliary Module’s Port = 300
Program 3 lets you set the following options for the system:
Number of Operators
Use this option to determine the number of operators (attendants) in the system. The
system can accommodate up to four operators. If you ever decrease the number of
operators in the system (i.e. you remove an operator), you must change the Class of
Service of the old operator extension to 01-27. Otherwise, it still behaves as an
operator extension. Also see Operator Extension below.
FOR FEATURE INFORMATION: See Multiple Attendants on page 118.
Operator Extension
Use this option to assign the operator (attendant) extensions (300-347). The main
operator (01) should be 300. Also see Number of Operators above.
FOR FEATURE INFORMATION: See Multiple Attendants on page 118.
Number of Digits in a System Speed Dial Code
Use this option to select the number of digits in a System Speed Dial code (bin). The
bins can have two or three digits.
If you select two-digit bins, the system uses bin numbers 70-79 to store up to 10
System Speed Dial numbers.
If you select three-digit bins, the system uses bin numbers 700-799 to store up to 100
System Speed Dial numbers.
FOR FEATURE INFORMATION: See Speed Dial on page 162.
Side Tone Test Digit
Use this option to select the side tone test digit (0-9). This is the digit that the system
dials out on a line to adjust the transmission characteristics (side tone) of that line.
The system tests all installed lines upon power-up or when you request a side tone
test through Program 10. Be sure that the digit you select does not access an
operator, trunk, or feature.
FOR FEATURE INFORMATION: N/A
System Options Program 3: System Features
Part II: DIGITAL SYSTEM Programs 205

Voice Mail Installed
Use this option to indicate whether or not a Voice Mail system is installed.
Note: Use the VX programs in the following order: 14, 18 (I), 3, 19, 12, 17, 16.
FOR FEATURE INFORMATION: See Voice Mail on page 185.
Voice Mail Master Extension Number
Use this option to select the master extension number (301-347) for Voice Mail (VX).
Note: Use the VX programs in the following order: 14, 18 (I), 3, 19, 12, 17, 16.
FOR FEATURE INFORMATION: See Voice Mail on page 185.
Enable Dial-out of # in a Speed Dial Number
Use this option to determine whether the DIGITAL SYSTEM can dial out a "#"
character stored in a Speed Dial bin. You may have to disallow dial-out when the
DIGITAL SYSTEM is installed behind a PBX that uses "#" to access certain features.
FOR FEATURE INFORMATION: See Speed Dial on page 162.
Dial 1 Before Area Code (NPA) Calls
Use this option to specify whether the system is in an area that requires the user to
dial 1 before an area code.
FOR FEATURE INFORMATION: See Dialing (Toll) Restrictions on page 178.
Walking Class of Service Security Code
Use this option to define a Walking Class of Service Security Code (up to 8 digits).
FOR FEATURE INFORMATION: See Walking Class of Service on page 194.
Play MOH for Transferred calls
Use this option to enable/disable Music On Hold for transferred calls.
FOR FEATURE INFORMATION: See Music on Hold on page 120.
Baud Rate of Auxiliary Module’s Port
Use this option to select the baud rate for the communications port on the AUX
Module. Do this if you want to program the DIGITAL SYSTEM from a terminal
connected to the AUX port. For more information, see the DIGITAL SYSTEM
Feature and Terminal Programming Manual.
FOR FEATURE INFORMATION: N/A
Program 3: System Features System Options
206 DIGITAL SYSTEM Administrator’s Guide
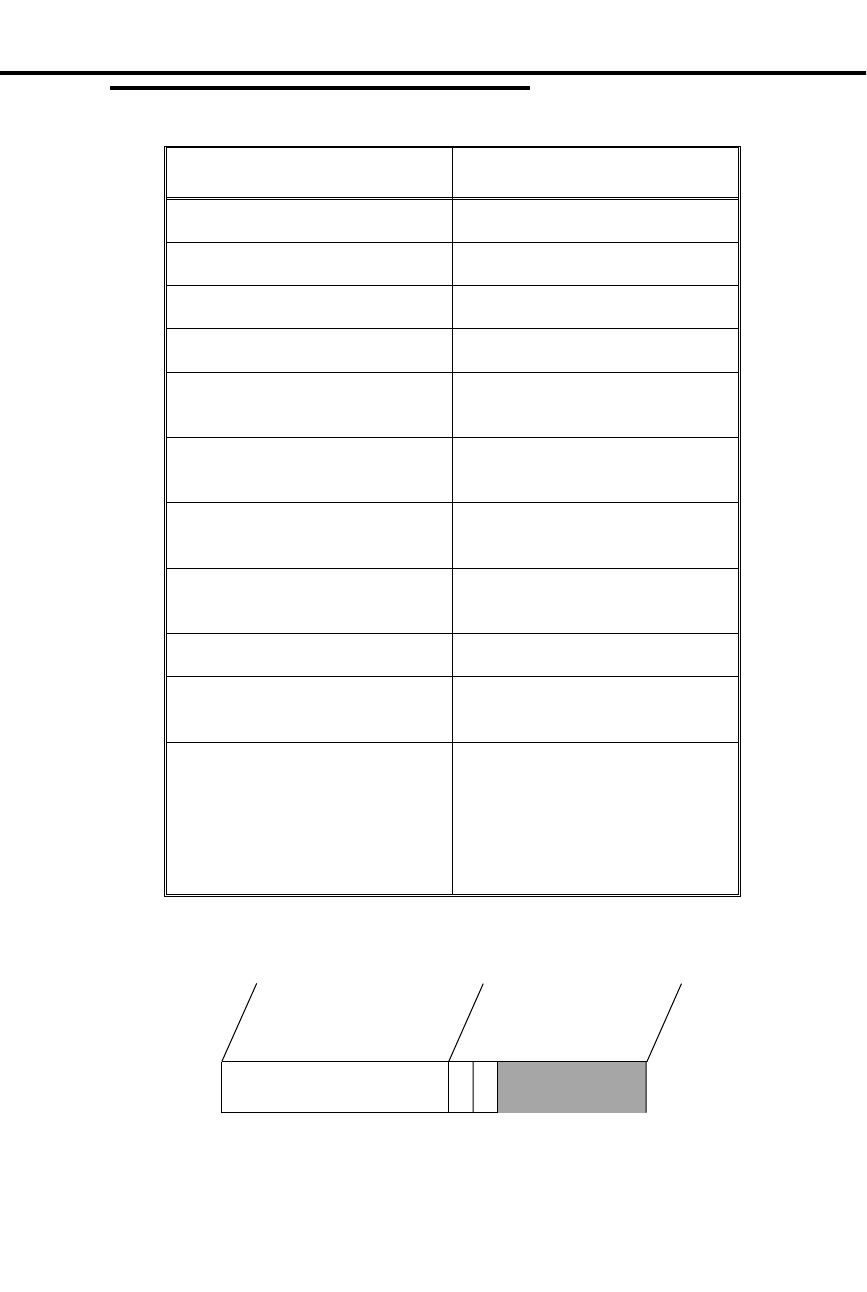
Filling Out the Program Record Form
In this box . . . Enter this data . . .
# Operators 00-04
Operator XX Extension 300-347
# System Speed Dial Digits 02-03
Side Tone Test Digit 0-9
Voice Mail Y - installed
N - not installed
Voice Mail Master Ext 300 - none assigned
301-347 (extensions 301-347)
Dial-out "#" in Speed Dial Y - enable dial-out
N - disable dial-out
Dial 1 Before Area Code Y - 1 is required
N - 1 is not required
Walking COS Security Code Up to eight digits
Play MOH on Transfer Y - enable
N - disable
AUX Port’s Baud Rate 00 - 300 baud
01 - 1200 baud
02 - 2400 baud
03 - 4800 baud
04 - 9600 baud
05 - 19.2 K baud
Example
There are two digits in a Speed Dial bin.
Feature
Name
01853I11 (D)
# System Speed Dial Digits
Feature
Data
0 2
System Options Program 3: System Features
Part II: DIGITAL SYSTEM Programs 207

Entering Data Into Memory
To enter Program 3 data:
1. Enter program mode.
-Press # + dial SP + dial 5312 + press #.
2. Press key 3 to enter Program 3.
3. To accept the displayed data: Press #.
OR
To change or enter data: Dial data, press #.
-To erase data before pressing #: Dial *.
4. Repeat step 3 for all data.
-If you finish and do not see, "SAVE TO EXIT":
Press SAVE before step 5.
5. Select an option:
To select another program: Press its key.
OR
To exit the program mode: Press SAVE once.
Understanding Related Programming
For attendant (operator):
Program 1
To customize the attendant Class of Service 00
To manually assign the proper Class of Service (COS) to
an extension when you change it from an attendant phone
to a non-attendant phone. Non-attendant phones use COS
01-27.
For Side Tone Test Digit:
Program 10
To activate Side Tone test
For Voice Mail (VX):
Program 14
To assign an ASI circuit type (51) to each extension port
intended for VX
Program 18 (I)
To assign the VX feature to each VX extension, selected
in Program 14
Program 19
To set up a UCD Hunt Group with the following
characteristics:
(a) Hunt Type = 05
(b) Master Extension = VX master extension selected in
Program 3
(c) Overflow Extension = Operator extension assigned to
the VX master extension in Program 18 (I)
(d) UCD Members = VX extensions selected in
Program 18
Program 12
To directly terminate each line the Automated Attendant
should answer to the VX master extension selected in
Program 3
Program 3: System Features System Options
208 DIGITAL SYSTEM Administrator’s Guide

Program 17
To assign a Record key to an extension for recording
conversations
Program 16
To assign to each Voice Mail extension (selected in
Program 18) outgoing access to the lines used by the
VX’s Message Notification and Message Reminder
features
For Dial 1 + Area Code:
Program 6
To set up Toll Restrictions
System Options Program 3: System Features
Part II: DIGITAL SYSTEM Programs 209

Program 4: System Timers
✆Program 4 is initially set as follows for timers 01-12:
•
(01) Park Orbit = 60s
•
(02) Hold Recall = 60s
•
(03) Camp-On = 60s
•
(04) Line Response = 1.5s
•
(05) Modem Reserve = 30s
•
(06) Number of Rings Before Recall = 5
•
(07) Number of Delayed Rings= 3
•
(08) Flash Response = .7s
•
(09) Dial Tone Detect = 10s
•
(10) Make = 40ms
•
(11) Break = 60ms
•
(12) Interdigit = 640ms
Program 4 lets you set the duration of the following system timers:
(01) Park Orbit
Use this timer to determine how long (00-970 seconds) a call stays in a System Park
Orbit (60-67) before it recalls the extension that parked it. Park Orbits 68 and 69 are
permanently set at 5 minutes (300 seconds) each.
FOR FEATURE INFORMATION: See Park on page 141.
(02) Hold Recall
Use this timer to determine how long (00-970 seconds) a call stays on Hold before it
recalls the extension that placed it on Hold.
FOR FEATURE INFORMATION: See Regular Hold on page 99, Exclusive Hold on page
98, and Automatic Hold on page 97.
(03) Camp-On
Use this timer to determine how long (00-970 seconds) a transferred call or Direct
Inward Line Camps-On to a:
•
Busy UCD Hunt Group before it rings the overflow extension
•
Busy ESL/ASI before it recalls the transferer
FOR FEATURE INFORMATION: See Extension Hunting on page 81, Transfer on page
182, Direct Inward Line on page 64.
(04) Line Response
Use this timer to determine how long (.5-9.9 seconds) the system waits before
assuming that a seized outgoing line is defective (i.e., defective = the system does not
detect loop current from the telco). The time you select must be compatible with
your local telco.
(05) Modem Reserve
Use this timer to determine how long (0-970 seconds) the system reserves a modem
(for a user) from the modem pool before returning it to the pool.
FOR FEATURE INFORMATION: See Data on page 61.
(06) Number of Rings Before Recall
Use this timer to set the number of times (03-15):
Program 4: System Timers System Options
210 DIGITAL SYSTEM Administrator’s Guide

•
A recalling held outside call rings the extension that placed it on Hold before it
changes to "key ring" and rings all extensions programmed for ringing on that
line
•
A transferred call rings an idle or busy Multibutton or an idle ESL/ASI before re-
calling the transferring extension
•
A recalling Transfer rings the transferring extension before it changes to "key
ring" and rings all extensions programmed for ringing on that line
•
A call rings a Hunt Group extension before ringing the next extension in the
group
•
A call rings an extension in the ring-no-answer Call Forwarding mode before the
system forwards the call to the destination extension
•
A Direct Inward Line (i.e., a directly terminated line in Program 12) rings an
idle or busy Multibutton or UCD overflow extension before it changes to "key
ring" and rings all extensions programmed for ringing on that line
FOR FEATURE INFORMATION: See Regular Hold on page 99, Transfer on page 182 ,
Extension Hunting on page 81, Call Forwarding,
Internal on page 44, and Direct Inward Lines on
page 64.
(07) Number of Delayed Rings
Use this timer to determine how many rings (01-10) the system suppresses before a
call audibly rings an extension programmed for Delayed Ringing (Program 18 [II]).
FOR FEATURE INFORMATION: See Delayed Ringing Assignment on page 62.
(08) Flash Response
Use this timer to determine how long (0-2.5 seconds) a line circuit must open for the
PBX/Centrex to recognize it as a Flash (time must be compatible with PBX/Centrex).
Note: The actual duration of the Flash is approximately 50ms less than the number
you enter, so enter a value 50ms higher than the PBX/Centrex requires.
FOR FEATURE INFORMATION: See Using Flash for Centrex/PBX on page 85.
(09) Dial Tone Detect
Use this timer to determine how long (10-60 seconds) the system waits for dial tone
before sending out a Speed Dial call. The system uses three times this value for a
pause you insert in a Speed Dial number.
Note: The system needs the first dial tone to be at least .5 seconds long, and the
second dial tone to be at least 2.5 seconds long.
FOR FEATURE INFORMATION: See Speed Dial on page162.
(10) Make
Use this timer to determine how long (04-1020 milliseconds) the relays close on
Dial Pulse (DP) lines. You can only enter a value that is a multiple of 04 (e.g., 04,
08, etc.), and it must be compatible with the requirements of the local telco.
FOR FEATURE INFORMATION: See Dial Pulse (DP) and Dual Tone Multifrequency
(DTMF) Compatibility on page 77.
System Options Program 4: System Timers
Part II: DIGITAL SYSTEM Programs 211

(11) Break
Use this timer to determine how long (04-1020 milliseconds) the relays open on Dial
Pulse (DP) lines. You can only enter a value that is a multiple of 04 (e.g., 04, 08,
etc.), and it must be compatible with the requirements of the local telco.
FOR FEATURE INFORMATION: See Dial Pulse (DP) and Dual Tone Multifrequency
(DTMF) Compatibility on page 77.
(12) Interdigit
Use this timer to determine how long (04-1020 milliseconds) of a pause there is
between digits dialed on a Dial Pulse (DP) line. You can only enter a value that is a
multiple of 04 (e.g., 04, 08, etc.), and it must be compatible with the local telco.
FOR FEATURE INFORMATION: See Dial Pulse (DP) and Dual Tone Multifrequency
(DTMF) Compatibility on page 77.
Filling Out the Program Record Form
In the Duration boxes for . . . Enter this data . . .
(01) Park Orbit 00-970
(02) Hold Recall 00-970
(03) Camp-On 00-970
(04) Line Response 05-99 (5 = .5s; 99 = 9.9s)
(05) Modem Reserve 00-970
(06) # Rings Bef. Recall 03-15
(07) # Delayed Rings 01-10
(08) Flash Response 00-25 (e.g., 01 = .1s or 100 ms)
Note: The actual duration of the
Flash is approximately 50ms
less than the number you enter
(09) Dial Tone Detect 01-06 (01 = 10s; 06 = 60s)
(10) Make 04, 08, 12, 16...1020
(11) Break 04, 08, 12, 16...1020
(12) Interdigit 04, 08, 12, 16...1020
Program 4: System Timers System Options
212 DIGITAL SYSTEM Administrator’s Guide

Example
The Hold Recall timer is set for 90 seconds.
Entering Data Into Memory
To enter Program 4 data:
1. Enter program mode.
-Press # + dial SP + dial 5312 + press #.
2. Press key 4 to enter Program 4.
3. Dial Timer No., press #.
4. To accept the displayed data: Press #.
OR
To change or enter data: Dial data, press #.
-To erase data before pressing #: Dial *.
5. Repeat steps 3-4 for remaining timers.
6. Select an option:
To exit Program 4: Press SAVE once.
OR
To enter another program after exiting: Press its key.
OR
To exit the program mode: Press SAVE twice.
Understanding Related Programming
N/A
Timer
No.
0 2
Timer
Name
Duration
01853I10 (D)
Hold Recall
9 0
System Options Program 4: System Timers
Part II: DIGITAL SYSTEM Programs 213
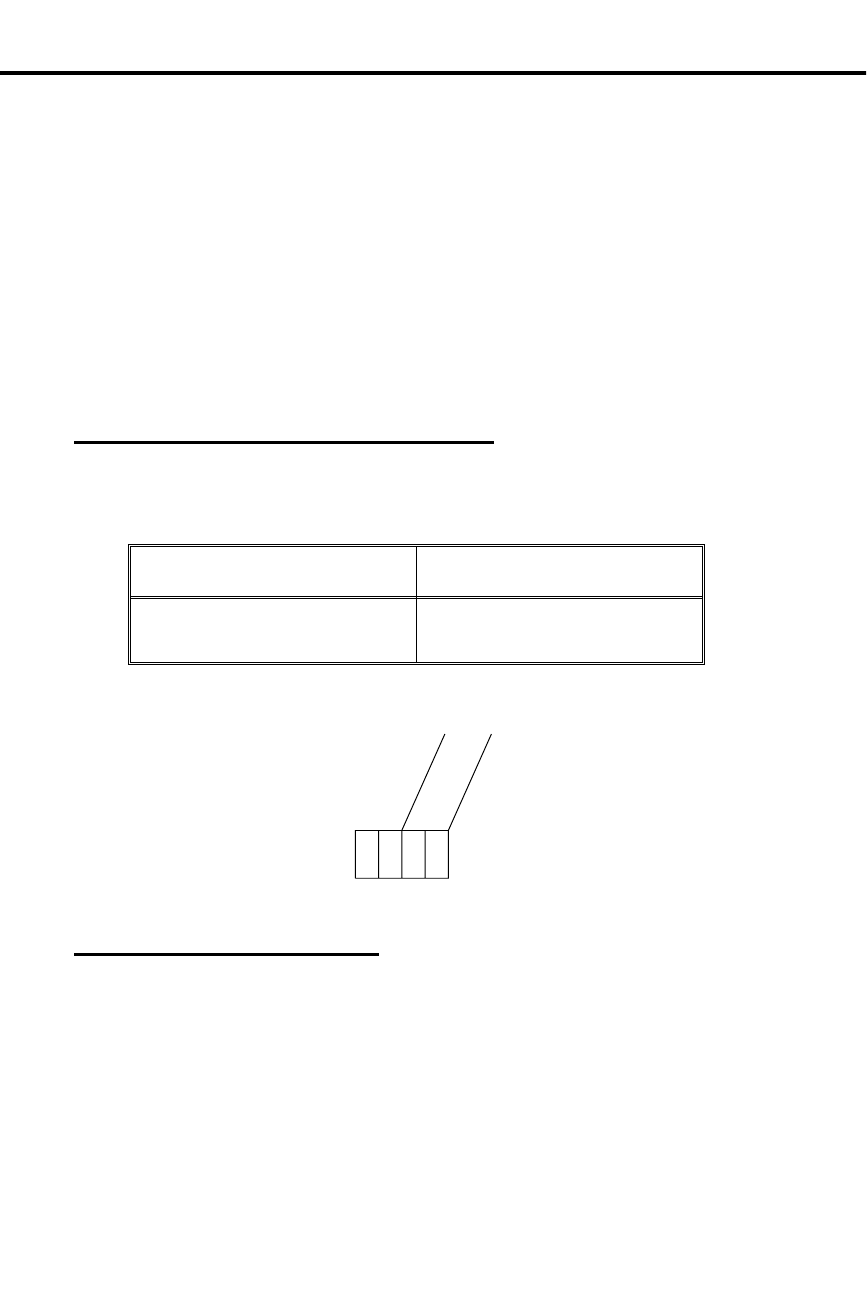
Program 5: PBX Access Codes
✆Program 5 is initially set as follows:
•
PBX Access Codes = None
Program 5 lets you store up to 11 PBX Access Codes in system memory. A PBX
Access Code is a code that a DIGITAL SYSTEM extension user dials for an outside
line when the DIGITAL SYSTEM is installed behind a PBX. The codes can be one
or two digits long, and a two-digit code can have a wild card character (X). For
example, if you enter 9X, the system recognizes 90-99 as valid PBX Access codes.
Use this program to store PBX Access Codes only if the DIGITAL SYSTEM is
providing Toll Restriction (via Program 6). If the PBX is providing Toll Restriction
instead, simply identify the PBX lines in Program 10, and leave Program 5 empty.
FOR FEATURE INFORMATION: See PBX/Centrex Feature Keys on page 57.
Filling Out the Program Record Form
1. Select an ID number (01-11).
2. Enter data from the following chart.
In this box . . . Enter this data . . .
PBX Access Code One or two digits (enter an "X"
for a wild card)
Example PBX Access Code 01 is 9.
Entering Data Into Memory
To enter Program 5 data:
1. Enter program mode.
-Press # + dial SP + dial 5312 + press #.
2. Press key 5 to enter Program 5.
3. To accept the displayed data: Press #.
OR
To change or enter data: Dial data, press #.
-To erase a code: Dial *, press #.
-To enter a wild card: Press DIAL, then dial X
(digit 9).
4. Repeat step 3 for all data.
0 1
PBX Access
Code
ID
No.
01853I15 (D)
9
Program 5: PBX Access Codes System Options
214 DIGITAL SYSTEM Administrator’s Guide

-If you finish and do not see, "SAVE TO EXIT":
Press SAVE before step 5.
5. Select an option:
To enter another program: Press its key.
OR
To exit the program mode: Press SAVE once.
Understanding Related Programming
Program 10
To identify a line as a PBX line
System Options Program 5: PBX Access Codes
Part II: DIGITAL SYSTEM Programs 215

Program 6: Toll Restriction
✆Program 6 is initially set as follows for Toll Restriction levels (01-07):
•
Active Dialpad = Y
•
Special N11 Dialing = Y
•
0 + Dialing = Y
•
International Dialing = Y
•
Equal Access Dialing = Y
•
1 + NNX Dialing = Y
Allow or Deny Tables = Empty
•
NNX Dialing = Y
Allow or Deny Tables = Empty
•
NPA Dialing = Y
Allow or Deny Tables = Empty
•
6-Digit Analysis = Y
Allow or Deny Tables = Empty
Program 6 lets you customize a Toll Restriction level. A Toll Restriction level is a set
of nine dialing options for making outside calls. You customize a Toll Restriction
level by enabling or disabling these dialing options. For example, you can customize
a Toll Restriction Level so that long distance calls to other area codes are disabled.
You can customize up to seven unique Toll Restriction levels (01-07). After you
customize a Toll Restriction level, you assign it to an extension to define the type of
outside calls that can be made from the extension. You make the assignment in two
steps:
•
Use Program 1 to assign the Toll Restriction level to a Class of Service.
•
Use Program 18 (Part I) to assign the Class of Service to an extension.
In addition, you can customize three other dialing options in a Class of Service
(Program 1). They are called: Only Local Calls (Day or Night), Only Local Calls at
Night, and Only Intercom Calls at Night. Enabling any of these overrides (takes
precedence over) any restrictions set up in a COS’s Toll Restriction Level.
The nine Toll Restriction options are as follows:
Active Dialpad (Continuous Dialing)
Use this option to determine whether a user can manually dial digits during an
established outside call. The need to dial digits during a call typically arises when a
user calls an Other Common Carrier (OCC). After the OCC answers, the user needs
to dial more digits (security code and other digits the OCC requires).
FOR FEATURE INFORMATION: See Using Other Common Carriers on page 131.
Special N11 Dialing
Use this option to allow/deny manually-dialed calls to N11 or 1 + N11 (N = 2 to 8).
The system does not restrict 911 or 1 + 911. For information on international calls
(011), see the next two options.
FOR FEATURE INFORMATION: See Toll Restriction on page 178.
Program 6: Toll Restriction System Options
216 DIGITAL SYSTEM Administrator’s Guide

0 + Dialing
Use this option to allow or deny manually-dialed calls that begin with a zero (0).
These calls usually include operator-assisted or credit card calls, and international
calls (011 +). Disabling "0 +" dialing automatically disables international calls and
you can ignore the option below.
To disable international calls but allow other calls that begin with a zero, enter Y for
this option and N for the next option (below).
FOR FEATURE INFORMATION: See Toll Restriction on page 178.
International Dialing
Use this option to allow or deny international calls that begin with 011. To allow or
deny international calls that begin in a different way (e.g., calls to certain parts of
Mexico or Canada that start with an area code), use the NPA Dialing option below.
To allow International dialing, you must also allow "0 +" dialing above.
FOR FEATURE INFORMATION: See Toll Restriction on page 178.
Equal Access Dialing
Use this option to determine whether a user can manually dial calls using Equal
Access Codes (10XXX). This option only applies to software versions prior to AUX
Module Y2.0/Base Y5.0.
FOR FEATURE INFORMATION: See Equal Access Compatibility on page 79.
1 + NNX Dialing with Allow/Deny Tables
Use this option to allow or deny manually-dialed toll calls to specific exchanges (i.e.,
1 + NNX calls, where NNX is the exchange).
To deny all 1 + NNX calls: Enter N and leave the Allow/Deny Tables empty.
To allow all 1 + NNX calls: Enter Y and leave the Allow/Deny Tables empty.
To allow only specific 1 + NNX calls: Enter Y for this option, then create an Allow
or Deny Table.
•
With an Allow Table: Enter the NNX codes (up to 48) the users can dial. Any
codes you do not enter are automatically denied.
•
With a Deny Table: Enter the NNX codes (up to 48) the users cannot dial. Any
codes you do not enter are automatically allowed.
FOR FEATURE INFORMATION: See Toll Restriction on page 178.
NNX Dialing with Allow/Deny Tables
Use this option to allow or deny manually-dialed calls to specific exchanges (i.e.,
NNX calls, where NNX is the exchange or conflict code).
To deny all NNX calls: Enter N and leave the Allow/Deny Tables empty.
To allow all NNX calls: Enter Y and leave the Allow/Deny Tables empty.
System Options Program 6: Toll Restriction
Part II: DIGITAL SYSTEM Programs 217

To allow only specific NNX calls: Enter Y for this option, then create an Allow or
Deny Table.
•
With an Allow Table: Enter the NNX codes (up to 48) the users can dial. Any
codes you do not enter are automatically denied.
•
With a Deny Table: Enter the NNX codes (up to 48) the users cannot dial. Any
codes you do not enter are automatically allowed.
FOR FEATURE INFORMATION: See Toll Restriction on page 178.
NPA Dialing with Allow/Deny Tables
Use this option to allow or deny manually-dialed calls to specific area codes (i.e.,
NPA calls or 1 + NPA calls, where NPA is the area code).
To deny all NPA or 1 + NPA calls: Enter N and leave the Allow/Deny Tables empty.
To allow all NPA or 1 + NPA calls: Enter Y and leave the Allow/Deny Tables empty.
To allow only specific NPA or 1 + NPA calls: Enter Y for this option, then create an
Allow or Deny Table.
•
With an Allow Table: Enter the NPA codes (up to 48) the users can dial. Any
codes you do not enter are automatically denied.
•
With a Deny Table: Enter the NPA codes (up to 48) the users cannot dial. Any
codes you do not enter are automatically allowed.
Make sure you allow NPA or 1 + NPA calls if you want 6-digit analysis (see below).
FOR FEATURE INFORMATION: See Toll Restriction on page 178.
6-Digit Analysis with Allow/Deny Tables
Use this option to allow or deny manually-dialed calls to specific exchanges (NNX)
in specific area codes (NPA). In other words, the call is allowed or denied based on
the first 6 digits of the telephone number.
To bypass 6-digit analysis: Enter N and leave the Allow/Deny Tables empty.
To use 6-digit analysis: Enter Y for NPA calls (above). Enter Y for 6-digit analysis.
Enter each area code (up to 10) intended for 6-digit analysis with its allowed or
denied exchanges.
•
With an Allow Table: Enter the NNX codes (up to 48) the users can dial. Any
codes you do not enter are automatically denied.
•
With a Deny Table: Enter the NNX codes (up to 48) the users cannot dial. Any
codes you do not enter are automatically allowed.
FOR FEATURE INFORMATION: See Toll Restriction on page 178.
Program 6: Toll Restriction System Options
218 DIGITAL SYSTEM Administrator’s Guide

Filling Out the Program Record Form
Before you fill in the data, make a copy of the three Toll Restriction forms for each
toll level you wish to program.
In this box . . . Enter this data . . .
Toll Level 01-07
Feature boxes (except
Allow/Deny) Y - enable the feature
N - disable the feature
Allow/Deny boxes A - for an "Allow" table
D - for a "Deny" table
In this table . . . Enter this data . . .
Table # 1 At top of table: Circle "Allow"
or "Deny"
In body of table: Enter allowed
or denied NNX codes for toll
calls
Table # 2 At top of table: Circle "Allow"
or "Deny"
In body of table: Enter allowed
or denied NNX codes for local
calls
In this table . . . Enter this data . . .
Table # 3 At top of table: Circle "Allow"
or "Deny"
In body of table: Enter allowed
or denied NPA codes for long
distance calls
Tables # 4-13 At top of table: Circle "Allow"
or "Deny." Enter NPA code
intended for 6-digit analysis
In body of table: Enter allowed
or denied NNX codes
System Options Program 6: Toll Restriction
Part II: DIGITAL SYSTEM Programs 219

Filling Out the Program Record Form
Example
For Toll Level 02, International Dialing is not allowed, but all other calls that begin
with zero (0) are allowed (only this option will be shown).
Entering Data Into Memory
To enter Program 6 data:
1. Enter program mode.
-Press # + dial SP + dial 5312 + press #.
2. Press key 6 to enter Program 6.
3. For first-time programming or to initialize (reset) all
toll restriction levels: Dial I to initialize, then dial Y.
Otherwise, go to step 4.
-If you change your mind after dialing I, dial N. You
return to the TOLL PROG/INIT? prompt (i.e., the
beginning of step 3).
4. Dial P to program (change) the toll restriction values.
-If you hear re-order tone and leave the program
mode, this means you must go to step 1 and
initialize in step 3.
5. Dial toll restriction level, press #.
6. To accept the displayed data: Press #.
OR
To change or enter data: Dial data, press #.
-To erase data before pressing #: Dial *.
-You do not need to press # after dialing "A" or "D".
-When you see, "ADD-DELETE-LIST", you can
add, delete or list codes in the Allow/Deny Tables
(go to the proper Tables on the next two pages).
7. Repeat steps 6 until you enter all data for a toll level.
-If you finish and do not see, "TOLL LEVEL": Press
# until you do see it.
01853I2 (D)
Active Dial Pad
Special N11 Dialing
0 + Dialing
International Dialing
Equal Access Dialing
1 + NXX Dialing
Allow or Deny (See Table #1)
NXX Dialing
Allow or Deny (See Table #2)
NPA Dialing
Allow or Deny (See Table #3)
6-Digit Analysis
Toll
Level
0 2 Y N
Program 6: Toll Restriction System Options
220 DIGITAL SYSTEM Administrator’s Guide

8. Select an option:
To program another toll level: Go to step 5.
OR
To exit Program 6: Press SAVE once.
OR
To exit the program mode: Press SAVE twice.
-To enter another program after exiting: Press its
key.
To use the 1 + NXX, NNX,
or NPA Tables when you
see "ADD-DELETE-LIST"
on the display:
1. Dial A for ADD, D for DELETE, or L for LIST.
OR
Press # to exit the table and go to step 6 in the first pro-
cedure.
-If you list, you see four codes at a time.
2. To add/delete codes: Dial them.
OR
To list more codes or exit at the end of the list: Press #
and go to step 1 in this procedure.
-Step 3 does not apply to listing.
3. To save changes and exit the table: Press # and go to
step 6 in the first procedure.
OR
To save changes and return to "ADD-DELETE-LIST":
Press SAVE and go to step 1 in this procedure.
To use the 6-Digit
Analysis Tables when you
see ADD-DELETE-LIST on
the display:
1. Dial A for ADD, D for DELETE, or L for LIST.
OR
Press # to exit the table (and the program).
2. Dial the area code intended for 6-digit analysis.
-If you selected "listing" in step 1, you see the codes
now, four at a time. To see more codes or exit at the
end of the list: Press # and return to step 1 in this
procedure. Steps 3-6 do not apply to listing.
3. Dial A for an Allow Table of NXX codes.
OR
Dial D for a Deny Table of NXX codes.
4. Dial codes to be added or deleted.
5. Select an option:
To save changes and go to "ADD-DELETE-LIST" for
another area code: Press SAVE and go to step 1 in this
procedure.
OR
To save changes and exit the toll level: Press # and go
to step 6 in the first procedure.
OR
To save and exit Program 6: Press SAVE three times.
OR
To save and exit the program mode: Press SAVE four
times.
System Options Program 6: Toll Restriction
Part II: DIGITAL SYSTEM Programs 221

-To enter another program after exiting: Press its
key.
Understanding Related Programming
Program 1
To assign a Toll Level (from Program 6) to a Class of
Service (see also Program 18 [I])
To set up additional dialing restrictions in a Class of
Service: Only Local Calls (Day or Night), Only Local
Calls at Night, Only Intercom Calls at Night (see also
Program 18 [I])
Program 18 (I)
To assign a Class of Service (from Program 1) to an
extension
Program 3
To identify whether the calling area requires a "1" before
dialing an area code (NPA)
Program 12
To assign Toll Restriction to a line. Initially, Toll
Restriction is applied to every line. You would want to
leave it that way except for a WATS line, for example.
Program 6: Toll Restriction System Options
222 DIGITAL SYSTEM Administrator’s Guide

Program 7: Music and Paging
✆Program 7 is initially set as follows:
•
Enable Background Music = N
•
Enable Music on Hold = N
•
External Page Zone 1 = N
•
Audible Ring Over External All Call Page = Y
•
External Page Zone 2 (with Expansion CEU #1 only) = N
•
BGM to All External Page Zones = N
•
Interrupted Ring Relays = N
•
Paging and Music Gain (Volume) Over External Speakers = - 6dB
•
Relay 01 Owner (for the Main CEU only) = 300
•
Relay 02 Owner = 300 (for Expansion CEU #1 only)
Program 7 lets you select various options for:
•
Music On Hold
•
Background Music
•
External Paging
•
Relays for the External Alerting Devices
Enable Background Music
Use this option to enable/disable BGM.
Note: If you enable BGM, you cannot connect a line to line port 04 because the
system uses it for BGM. As soon as you enter Y for BGM, the system enters X in
Program 10 for line 04’s circuit type, which means "uninstalled."
FOR FEATURE INFORMATION: See Background Music on page 42.
Enable Music on Hold
Use this option to enable/disable MOH. If you enable MOH, but not BGM, only
outside calls receive MOH. If you enable MOH and BGM, outside and Intercom
calls receive MOH.
FOR FEATURE INFORMATION: See Music On Hold on page 120.
External Page Zone 1
Use this option to send Internal Zone 1 pages over external paging speakers. Also see
Paging and Music Gain (Volume) Over External Speakers in this program. Prior to
software version AUX Module Y2.0/Base Y5.0, this option enabled All Call Page.
Note: If you enable External Page Zone 1, you cannot connect a line to line port 04
in the main CEU. The system uses it for External Paging Zone 1. As soon as you
enter Y for External Paging Zone 1, the system enters X in Program 10 for line 04’s
circuit type, which means "uninstalled". Do not connect the Paging amplifier to line
04. See your hardware manual for additional details.
FOR FEATURE INFORMATION: See Paging on page 138.
Audible Ring Over External All Call Page
Use this option to send ringing over the External All Call Page when a call comes
into extension 300 during the Night Answer mode.
FOR FEATURE INFORMATION: See Paging on page 138.
System Options Program 7: Music and Paging
Part II: DIGITAL SYSTEM Programs 223

External Page Zone 2 (only if Expansion CEU #1 is installed)
Use this option to send Internal Zone 2 pages over external paging speakers. Also
see Paging and Music Gain (Volume) Over External Speakers below. Prior to
software version AUX Module Y2.0/Base Y5.0, this enabled External Page Zone 1.
Note: If you enable External Page Zone 2, you cannot connect a line to line port 04
(line 12) in Expansion CEU #1. The system uses it for External Page Zone 2. As
soon as you enter Y for External Zone 2, the system enters X in Program 10 for line
12’s circuit type, which means "uninstalled." Do not connect the Paging amplifier to
line 12. See your hardware manual for additional details.
FOR FEATURE INFORMATION: See Paging on page 138.
BGM to All External Page Zones
Use this option to send Background Music over the external paging equipment when
the equipment is idle (e.g., not receiving a page). Also enable the following in this
program: Enable Background Music, External Page Zone 1, External Page Zone 2,
Paging and Music Gain (Volume) Over External Speakers.
FOR FEATURE INFORMATION: See Background Music on page 42.
Interrupted Ring Relays
Use this option to control the operation of Relays 01 and 02 (see below). You can
force the relays to follow a call’s ring cycle (i.e., interrupted closure) or you can force
the relays to stayed closed until someone answers the call (uninterrupted/steady
closure).
FOR FEATURE INFORMATION: See External Alerting Devices on page 84.
Paging and Music Gain (Volume) Over External Speakers
Use this option to control the volume of Paging and Background Music over the
external paging speakers. This option is only available if you enable BGM to All
External Page Zones above.
FOR FEATURE INFORMATION: See Background Music on page 42, and Paging on page
138.
Relay 01 Owner (for the Main CEU only)
Use this option to determine which type of day/night call activates Relay 01 for an
External Alerting Device. There are three choices:
•
A call on a specific line (348-363)
•
A call to a specific Ring Group (364-371 without AUX, 396-403 with AUX)
•
A call to an extension (300-347), except Callbacks
Note: When you assign extension 300 as the Relay 01 owner, only Night calls that
ring 300 activate the relay.
FOR FEATURE INFORMATION: See External Alerting Devices on page 84.
Relay 02 Owner (for Expansion CEU #1 only)
Use this option to determine which type of day/night call activates Relay 02 for an
External Alerting Device. There are three choices:
•
A call on a specific line (348-363)
•
A call to a specific Ring Group (364-371 without AUX, 396-403 with AUX)
Program 7: Music and Paging System Options
224 DIGITAL SYSTEM Administrator’s Guide

•
A call to an extension (300-347), except Callbacks
Note: If you select 300, only Night calls that ring 300 activate the relay.
FOR FEATURE INFORMATION: See External Alerting Devices on page 84.
Filling Out the Program Record Form
In this box . . . Enter this data . . .
Background Music (BGM) Y - enable
N - disable
Music On Hold Y - enable
N - disable
Ext. Page Zone 1 Y - enable
N - disable
Ring over All Call Y - enable
N - disable
Ext. Page Zone 2 Y - enable
N - disable
BGM Music to Ext. Zones Y - enable
N - disable
Interrupted Ring Relays Y - interrupted
N - uninterrupted
Page/Music Volume 01 - -6 dB (soft)
02 - -3 dB
03 - 0 dB (medium)
04 - +3 dB
05 - +6 dB (loud)
Relay 01 Owner 348-363 for calls on lines
300-347 for calls to extensions
364-371 (without AUX) or
396-403 (with AUX) for Ring
Group Calls
Relay 02 Owner 348-363 for calls on lines
300-347 for calls to extensions
364-371 (without AUX) or
396-403 (with AUX) for Ring
Group Calls
System Options Program 7: Music and Paging
Part II: DIGITAL SYSTEM Programs 225

Example
The Paging/Music Volume is set at the medium volume.
Entering Data Into Memory:
To enter Program 7 data:
1. Enter program mode.
-Press # + dial SP + dial 5312 + press #.
2. Press key 7 to enter Program 7.
3. To accept the displayed data: Press #.
OR
To change or enter data: Dial data, press #.
-To erase data before pressing #: Dial *.
4. Repeat step 3 for all data.
-If you finish and do not see, "SAVE TO EXIT":
Press SAVE before step 5.
5. Select an option:
To enter another program: Press its key.
OR
To exit the program mode: Press SAVE.
Understanding Related Programming
For Relays: Program 16
To provide an extension with incoming access to a line so
it can answer that line when it rings over an External Page
Zone
Feature
Name
01853I13 (D)
Page/Music Volume
Feature
Data
0 3
Program 7: Music and Paging System Options
226 DIGITAL SYSTEM Administrator’s Guide

Program 8: Display Messages
✆Program 8 is initially set as follows for messages 600-615:
•
600 = CALL
•
601 = BACK BY
•
602 = MEETING IN RM
•
603 = OUT TO LUNCH
•
604 = GONE FOR THE DAY
•
605 = ON VACATION
•
606 = ON BUSINESS TRIP
•
607 = IN THE MEETING
•
608 = BACK BY 10AM
•
609 = BACK BY 11AM
•
610 = BACK BY NOON
•
611 = BACK BY 2PM
•
612 = BACK BY 4PM
•
613 = BACK TOMORROW
•
614 = BACK NEXT WEEK
•
615 = HAVE A GOOD DAY
Note: When the system has an AUX Module, there are no messages initially.
Program 8 lets you store up to 16 messages in system memory for the Selectable
Display Messages feature.
You store the messages under the numbers 600-615 (the corresponding numbers a
user would dial for these messages are 00-15). Each message can contain up to 16
characters (numbers, letters, and blank spaces). Messages 600-607 are special in that
an extension user can add digits to the end of them as long as the entire message does
not exceed 16 characters. For example, a user can add a telephone number to the end
of message 600 so it reads, CALL XXX XXXX. If you choose to change the initial
messages for 600-607, be sure to add a blank space at the end of the message so that
any digits a user may add do not appear right next to the last character of the message.
FOR FEATURE INFORMATION: See Selectable Display Messages on page 159.
Filling Out the Program Record Form
In this box . . . Enter this data . . .
Message Up to 16 characters (numbers,
letters, blank spaces)
System Options Program 8: Display Messages
Part II: DIGITAL SYSTEM Programs 227

Example
Message 600 is as follows: IN CONFERENCE.
Entering Data Into Memory
To enter Program 8 data:
1. Enter program mode.
-Press # + dial SP + dial 5312 + press #.
2. Press key 8 to enter Program 8.
3. Dial Message No., press #.
4. To accept the displayed data: Press #.
OR
To erase the displayed data: Dial *, then enter message
data or (press # and go to step 3).
OR
To change or enter data: Enter the message, press #. To
enter a message:
-Press the dial pad button for the desired letter or
number. To enter a blank space, Q, or Z, press 0.
-To make a letter appear: Dial the number (1, 2, or
3) that corresponds to the letter’s position on the
button (e.g. dial 1 if you want the first letter on the
button).
OR
To make a number appear: Dial 4.
Note: To make a blank space, Q, or Z to appear:
Dial 1, 2, or 3, respectively.
-Repeat a-b for all characters (to erase the previous
character, press LAST).
5. Repeat steps 3-4 for all messages.
6. Select an option:
To exit Program 8: Press SAVE once.
OR
To exit the program mode: Press SAVE twice.
-To enter another program after exiting: Press its
key.
Understanding Related Programming
N/A
6 0 0
Message
Message
No.
01853I16 (D)
I N C O N F E R E N C E
Program 8: Display Messages System Options
228 DIGITAL SYSTEM Administrator’s Guide

Programming Line Options
Program 10: Line Port Characteristics
✆Program 10 is initially set as follows for each line (01-16):
•
Line Circuit Type = CO (Central Office) Loop Start Line with DTMF
signaling
•
Line Gain = 0 dB
•
PBX Line = N
•
Side Tone Test = N
•
Line Name = Unassigned
Program 10 lets you define the following characteristics for each line (01-16):
Line Circuit Type
Use this option to identify the type of line connected to each line port.
FOR FEATURE INFORMATION: See Dial Pulse (DP) and Dual Tone Multifrequency
(DTMF) Compatibility on page 77.
Line Gain
Use this option to adjust the audio volume for a line. The extension user can also
adjust the volume of a conversation on an outside line by pressing the VOL UP and
VOL DN keys (the user cannot, however, adjust the volume past the highest or lowest
volume offered in this program). With each press, the volume raises or lowers 3 dB.
When a user hangs up an outside call, the line’s volume returns to the value you
select here.
FOR FEATURE INFORMATION: See Volume Controls on page 193.
PBX Line
Use this option to identify a line as a PBX line.
FOR FEATURE INFORMATION: See Placing an Outside Call (Using PBX/Centrex
Lines) on page 135.
Side Tone Test
Use this option to activate a side tone test on the line. This is a test that the system
performs on a line to adjust the transmission characteristics of the line. The system
tests all installed lines upon power-up or when you request one using this program.
FOR FEATURE INFORMATION: N/A
Line Name
Use this option to assign a 16-character name to a line. The name you select for line
XX replaces the display "LINE XX" when a user answers a call on that line.
FOR FEATURE INFORMATION: N/A
Line Options Program 10: Line Port Characteristics
Part II: DIGITAL SYSTEM Programs 229
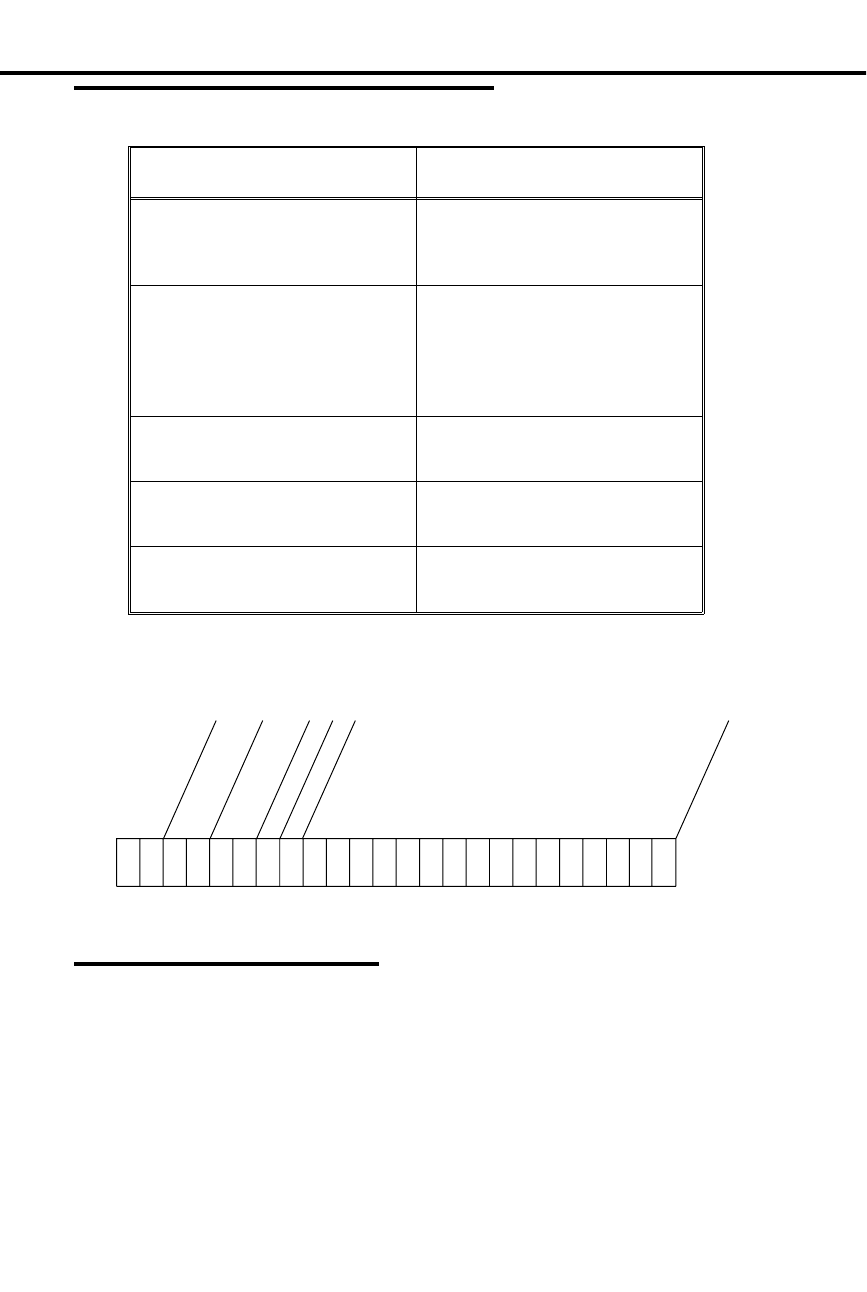
Filling Out the Program Record Form
In this box . . . Enter this data . . .
Circuit Type 10 - CO Loop Start, DTMF
11 - CO Loop Start, DP
X - Not installed
Line Gain 01 - -6 dB
02 - -3 dB
03 - 0 dB (normal)
04 - +3 dB
05 - +6 dB
PBX Line Y - PBX Line
N - Non-PBX Line
Side Tone Test Y - enable side tone test
N - bypass side tone test
Name Up to 16 characters (letters,
numbers, blank spaces)
Example
Line 04 is a CO Loop Start DP line with normal Line Gain, no Side Tone Test and
the name, MR. JONES.
Entering Data Into Memory
To enter Program 10 data:
1. Enter program mode.
-Press # + dial SP + dial 5312 + press #.
2. Press key 10 to enter Program 10.
3. Dial Line No., press #.
4. To accept the displayed data: Press #.
OR
To change or enter data: Dial data, press #. To enter a
name:
-Press the dial pad button for the letter or number.
To enter a blank space, Q, or Z, press 0.
Circuit Type
Line Gain
PBX Line
Name
Line
01853I3 (D)
0 4
Side Tone Test
1 1 0 3 N N M R J O N E S
Program 10: Line Port Characteristics Line Options
230 DIGITAL SYSTEM Administrator’s Guide

-To get a letter to appear: Dial the number (1, 2, or
3) that corresponds to the letter’s position on the
button (e.g. dial 1 if you want the first letter).
OR
To make a number appear: Dial 4.
Note: To make a blank space, Q, or Z appear:
Dial 1, 2, or 3, respectively.
-Repeat a-b for all characters (to erase the previous
character, press LAST).
-To erase data before pressing #: Dial *. To enter
circuit type X: Press DIAL, dial X (9).
5. Repeat step 4 for all data.
-If you finish and do not see, "LINE NO.": Press
SAVE before step 6.
6. Select an option:
To enter data for another line: Go to step 3.
OR
To exit Program 10: Press SAVE once.
OR
To exit the program mode: Press SAVE twice.
-To enter another program after exiting: Press its
key.
Understanding Related Programming
Program 3
To select a digit for the side tone test
Program 5
To store PBX Access Codes if there are PBX lines
Program 11
To place lines into groups
Program 12
To assign features to lines
Program 16
To let an extension access a line or line group
Program 17
To assign a line to a key at an extension
Program 18 (II)
To assign ringing to lines at an extension
Line Options Program 10: Line Port Characteristics
Part II: DIGITAL SYSTEM Programs 231
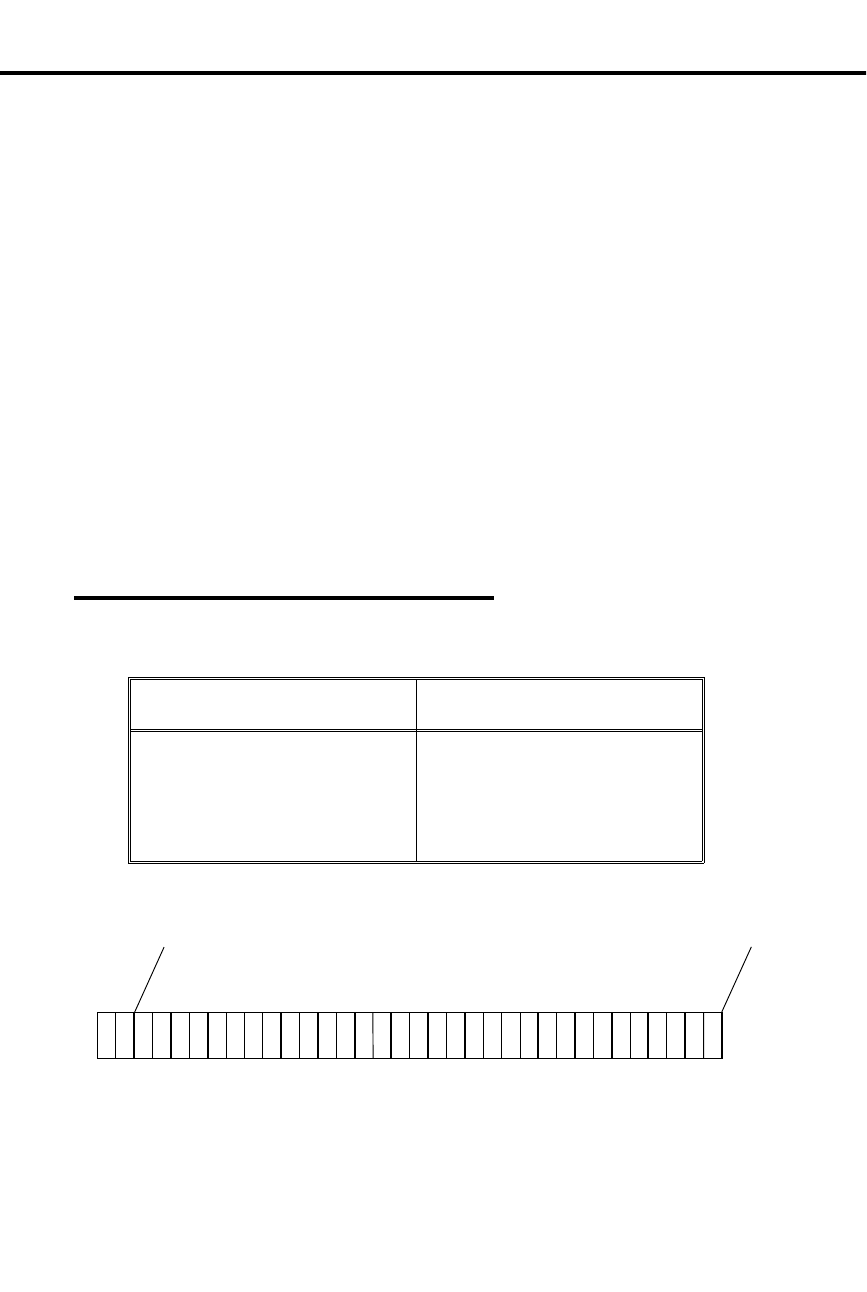
Program 11: Line Groups
✆Program 11 is initially set as follows:
•
No Line Groups
Program 11 lets you place lines into groups for placing outside calls. When an
extension user selects a line group to place a call, the DIGITAL SYSTEM gives the
user the first available line in the group. You can program line groups only if the
DIGITAL SYSTEM is equipped with an AUX Module.
The DIGITAL SYSTEM can accommodate up to nine line groups, numbered 90-98.
Any number of lines can be in a group, but a group should contain similar types of
lines (e.g., WATS band 5 or WATS band 3). You also place Direct Inward Lines
(assigned in Program 12) into a group. If you do this and someone uses a DIL for an
outgoing call, the DIL is simply not available for incoming calls.
If the DIGITAL SYSTEM has line groups, the FCC classifies it as a hybrid. You
must use the FCC registration number on your CEU that ends in "MF-E." If your
system does not use line groups, the FCC classifies it as a key system. You must use
the FCC registration number on your CEU that ends in "KF-E."
FOR FEATURE INFORMATION: See Placing an Outside Call (Using Direct Line Group
Access) on page 134.
Filling Out the Program Record Form
1. Select a group (90-98).
In this box . . . Enter this data . . .
Line Group Members Lines (01-16) that belong to the
group. List the lines in the
order the DIGITAL SYSTEM
should check them for
availability.
Example
Line group 90 contains lines 04, 05, 06.
Line
Members
Group
01870C27 (E)
9 0
0 4 0 5 0 6
Program 11: Line Groups Line Options
232 DIGITAL SYSTEM Administrator’s Guide

Entering Data Into Memory
To enter Program 11 data:
1. Enter program mode.
-Press # + dial SP + dial 5312 + press #.
2. Press key 11 to enter Program 11.
3. Dial Line (Trunk) Group No., press #.
4. To accept the displayed data: Press #.
OR
To change or enter data: Dial line data, press #.
-To erase a data entry before you press #: Dial *.
-To remove a line from a group, dial * when you see
it. Dialing * when you see the first line removes all
lines from the group.
5. Repeat steps 4-5 for all lines.
6. Press SAVE.
7. Select an option:
To enter data for another group: Go to step 3.
OR
To exit Program 11: Press SAVE once.
OR
To exit the program mode: Press SAVE twice.
-To enter another program after exiting: Press its
key.
Understanding Related Programming
Program 16
To give an extension access to a line group
To give an extension access to the lines in a line group
Program 10
To assign the correct circuit type to all lines in a group
Program 17
To assign a line group to a key at an extension
QY (terminal)
To let users access line group 90 by dialing 9 (if you can
do terminal programming through the AUX Module).
With "dial 9" access, the user cannot access line groups
91-98.
To change the first digit of line group numbers, see Flexible Numbering Plan on page
86.
Line Options Program 11: Line Groups
Part II: DIGITAL SYSTEM Programs 233

Program 12: Line Features
✆Program 12 is initially set as follows for each line (01-16):
•
Call Pickup Group = 00 (does not ring a Pickup Group)
•
Toll Restrict = Y
•
Direct Termination (Day) = 300 (not directly terminated)
•
Direct Termination (Night) = 300 (not directly terminated)
•
Class of Service = 01 (no Distinctive Ringing)
Program 12 lets you assign the following features to each line (01-16) in the system:
Call Pickup Group
Use this option to have an incoming line ring all the extensions in a Pickup Group
(01-07).
FOR FEATURE INFORMATION: See Group Call Pickup on page 88.
Toll Restrict
Use this option to enable/disable Toll Restriction for calls made on a line. Typically,
if you set up Toll Restrictions in Program 6, you would want the system to apply
them to all lines except, for example, WATS lines.
FOR FEATURE INFORMATION: See Toll Restriction on page 178.
Direct Termination (Day)
Use this option to determine the day termination for a Direct Inward Line (DIL). A
DIL can ring one of the following terminations during the day:
•
An extension (301-347), but not a Data Module
•
A UCD or Voice Mail (VX) master extension (301-347)
•
A Ring Group (364-371 without AUX or 396-403 with AUX)
A terminated extension/group has both incoming and outgoing access to the DIL and
ringing on the DIL. There is no need to assign access in Program 16 or ringing in
Program 18 (II).
Note: If a line’s day termination is 300, this means the line is not directly terminated
(i.e., is not a DIL). The line follows the access assignments made in Program 16 and
the ring assignments made in Program 18 (II).
FOR FEATURE INFORMATION: See Direct Inward Lines on page 64.
Direct Termination (Night)
Use this option to determine the night termination for a Direct Inward Line (DIL). A
DIL can ring one of the following terminations during the Night Answer mode:
•
An extension (301-347), but not a Data Module
•
A UCD or Voice Mail master extension (301-347)
•
A Ring Group (364-371 without AUX or 396-403 with AUX)
A terminated extension/group has both incoming and outgoing access to the DIL and
ringing on the DIL. There is no need to assign access in Program 16 or ringing in
Program 18 (II).
Note: If a line’s night termination is 300, this means the line is not directly
terminated (i.e., is not a DIL). The line follows the access assignments made in
Program 16 and the ring assignments made in Program 18 (II).
Program 12: Line Features Line Options
234 DIGITAL SYSTEM Administrator’s Guide

FOR FEATURE INFORMATION: See Direct Inward Lines on page 64.
Class of Service
Use this option to set Class of Service for outside lines (normally COS 01). If you
want an outside line to have Distinctive Ringing, assign it COS 20.
FOR FEATURE INFORMATION: See Ringing Patterns (Distinctive Ringing) on
page 156. Do not assign Distinctive Ringing if
any extensions have headsets.
Filling Out the Program Record Form
1. Select a Line (01-16).
In this box . . . Enter this data . . .
CPG (Call Pickup Group) 00 - Rings no group
01-07 - Rings group 01-07
TR (Toll Restrict) Y - enable
N - disable
DTD (Direct Termination Day) 300 - Not directly terminated
301-347 - Ext. or Master Ext.
364-371 (without AUX) or
396-403 (with AUX) for Ring
Group
DTN (Direct Termination Night) 300 - Not directly terminated
301-347 - Ext. or Master Ext.
364-371 (without AUX) or
396-403 (with AUX) for Ring
Group
COS (Class of Service) 01- Distinctive Ringing disabled
20- Distinctive Ringing enabled
Example
Line 03 belongs to Call Pickup Group 06, receives Toll Restriction, and is directly
terminated to extension 308 during the day.
Line Options Program 12: Line Features
Part II: DIGITAL SYSTEM Programs 235
telemanuals.com

Entering Data Into Memory
To enter Program 12 data:
1. Enter program mode.
-Press # + dial SP + dial 5312 + press #.
2. Press key 12 to enter Program 12.
3. Dial Line No., press #.
4. Dial abbreviation for desired feature, press #.
5. To accept the displayed data: Press #.
OR
To change or enter data: Dial data, press #.
-To accept DTD or DTN data, you may have to press
SAVE instead.
-To erase a data entry before you press #: Dial *.
6. Repeat steps 4-5 for all features.
7. Press SAVE.
8. Select an option:
OR
To enter data for another line: Dial Y and go to step 3.
OR
To exit Program 12: Press SAVE once.
OR
To exit the program mode: Press SAVE twice.
-To enter another program after exiting: Press its
key.
Understanding Related Programming
For lines in Pickup Groups:
Program 18 (I)
To place extensions in Pickup Groups
Program 17
To assign a Pickup Group to a key (if desired)
Program 18 (II)
To assign ringing to Pickup Group keys (if desired)
For directly terminated lines (DILs):
Program 17
To assign a DIL to a key (if desired)
Program 18 (I)
To make a Ring Group (if a DIL terminates there)
Program 19
To make a UCD Hunt Group (if a DIL terminates there)
0 3
Line
01853I4
TR (Toll Restriction)
DTD (Direct Termination Day)
DTN (Direct Termination Nite)
0 6 Y 3 0 8
CPG (Call Pickup Group)
COS (Class of Service)
Program 12: Line Features Line Options
236 DIGITAL SYSTEM Administrator’s Guide
telemanuals.com

Program 4
To set the Rings Before Recall timer (how long the DIL
rings before diverting)
To set the Camp-On timer for DILs to UCD Hunt Groups
Program 10
To assign a name to a DIL
Program 16
To give an extension (other than the terminated extension)
access to the DIL so they can answer it if it diverts to their
extension
Program 18 (II)
To assign ringing to the DIL at extensions other than the
terminated extension
Line Options Program 12: Line Features
Part II: DIGITAL SYSTEM Programs 237

– For your notes –
Program 12: Line Features Line Options
238 DIGITAL SYSTEM Administrator’s Guide

Programming Extension Options
Program 14: Extension Port Char.
✆Program 14 is initially set as follows for each station (extension)
port:
•
Extension Numbering Plan for Ports 00-47 = extensions 300-347,
respectively
•
Extension Circuit Type = X (not installed)
•
DSS Owner Extension = 300
•
DSS Block Number = 01
•
Extension Name = Unassigned
Program 14 lets you define the following characteristics for each extension port
(00-47):
Extension Numbering Plan for Ports 00-47
Use this option to assign an extension number (300-347) to an extension port
(00-47). If you change the initial numbering plan, the system makes sure there are
not duplicates (e.g., if you assign port A’s extension number to port B, the system
automatically assigns port B’s extension to port A).
FOR FEATURE INFORMATION: N/A
Circuit Type
Use this option to identify the device installed at an extension port. The chart below
shows the circuit type for each device, its load (power) factor and the number of ports
it requires. The load factor helps you determine the maximum number of devices you
can connect to a CEU. The load factor maximum per CEU is 24.
Device Circuit Type Load Factor No. of Ports
Standard keyset 01 (auto-ID) 1 1
Display keyset 02 (auto-ID) 1 1
DSS Console 06 (auto-ID) 2 2
Dual OPX/ASI Module 51 (no auto-ID) 3 2
ASI 51 (no auto-ID) 1 1
ESL 00 (auto-ID) 1 1
Door Box X (no auto-ID) 1 1 (310/311/
322/323 only)
Relay Box X (no auto-ID) 1 1 (309 only)
– For information only –
PCU Module - 2 (Main and Exp
CEU # 1 only)
VMU Module - 0 (Main CEU only)
AUX Module - 0 (Main CEU only)
SAUX Module - 0 Exp CEU # 1
(w/2 CEUs)
Exp CEU #2
(w/3 CEUs)
Extension Options Program 14: Extension Port Char.
Part II: DIGITAL SYSTEM Programs 239
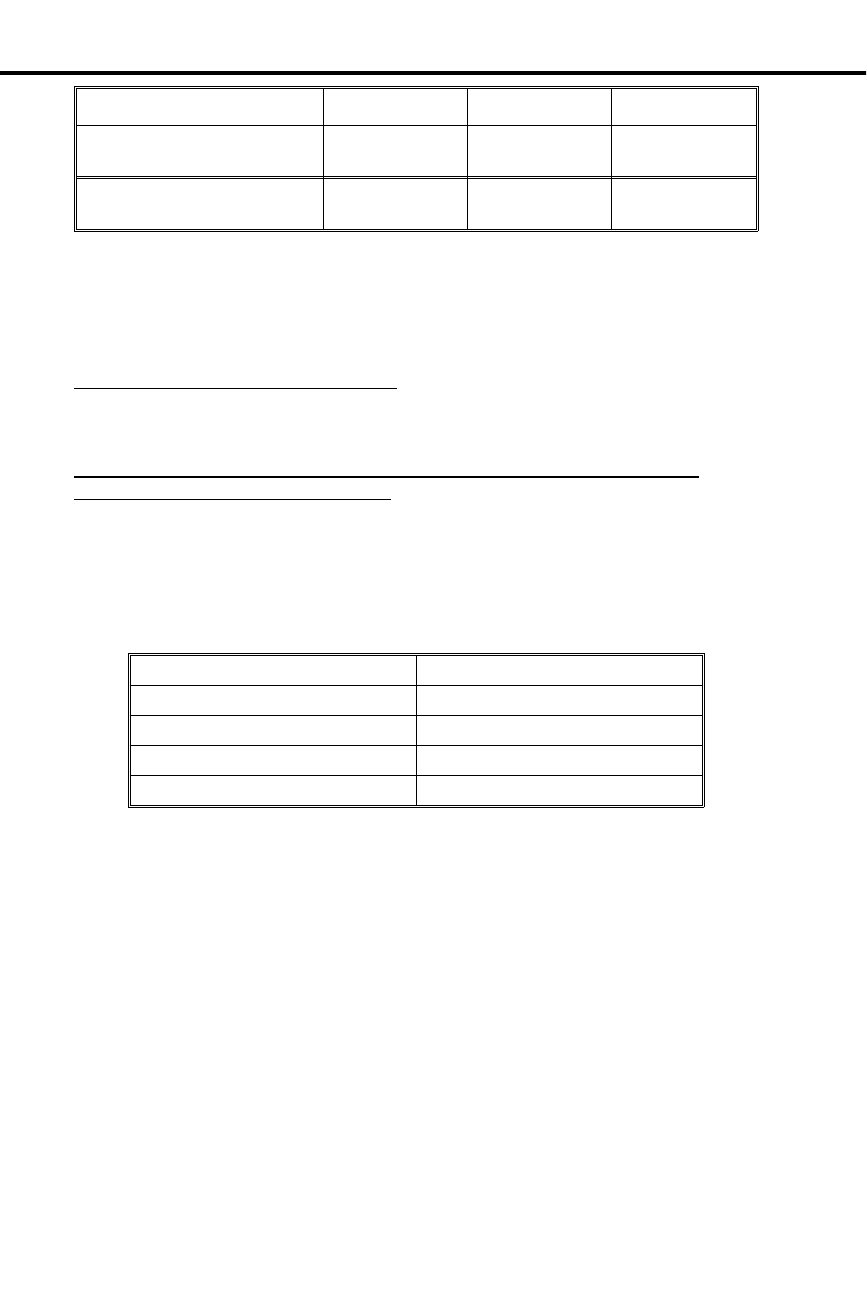
Device Circuit Type Load Factor No. of Ports
XAUX Module - 0 Exp CEU #1
(w/3 CEUs)
Data Module
(see text below) Z/01
(no auto-ID) 11
You can also install a Data Module (P/N 88400). Before you install the Data
Module, you should do the required programming (see below). If you install the
Data Module (with or without an extension) before you do the programming, you
must unplug the Data Module and extension (if any), then plug them back in.
To program a stand-alone Data Module:
Use Program 14 to assign circuit type Z to the Data Module’s port (you must actually
enter ZY on the Program Record Form).
To program a Data Module (installed in an odd port) with a Multibutton Phone
(installed in the consecutive even port):
1. Use Program 14 to assign circuit type 01 to the odd port.
2. Use Program 14 to assign the correct Multibutton circuit type to the even port (01
for a Standard Multibutton or 02 for a Display Multibutton).
3. Use Program 18 (I) to enable the Dataset (DS) option for the even port.
The initial configuration of a Data Module is as follows:
Baud Mode: Slave Allow DTR Disconnect: Yes
Parity: None, 8 bits Allow Break Disconnect: Yes
Interactive Mode: Yes Auto Baud: Yes
Interactive Echo: Yes Busy on DTR Low: No
RS-232 Controls Active: Yes
To change these settings and for installation instructions, see the Data Products
Manual (N1850DMG01).
Notes:
•
Attendant 01 should be extension 300 and have a Display Phone.
•
The DSS Console is a dual port device, using adjacent even and odd numbered
ports. You must install the DSS Console in the lower (even-number) port of a
port pair. For example, you must plug the console into port 02 (extension 302)
when using the 02/03 port pair.
•
You cannot change the circuit type of a system programming extension while us-
ing it to program; you must use another extension with access level 04 (see Pro-
gram 15).
•
When you install a Multibutton telephone, the system assigns the correct circuit
type. This does not happen for a Data Module, the Multibutton paired with a
Data Module, or an ASI or a Dual OPX/ASI Module.
Program 14: Extension Port Char. Extension Options
240 DIGITAL SYSTEM Administrator’s Guide

FOR FEATURE INFORMATION: See The Type of Phone You Have on page 6, Analog
Station Interface on page 31 and Data on page
61.
DSS Owner Extension (For DSS Consoles Only)
Use this option to identify the extension that is paired with a DSS Console.
FOR FEATURE INFORMATION: See Direct Station Selection, DSS Console on page 66.
DSS Block Number (For DSS Console Only)
Use this option to assign a memory block (01-04) to a Console for its key
configuration.
FOR FEATURE INFORMATION: See Direct Station Selection, DSS Console on page 66.
Extension Name
Use this option to assign a 16-character name to an extension. The name can include
letters, numbers, and blank spaces (the first character cannot be a number). This
name appears in displays instead of the extension’s number and is used for Directory
Dialing.
FOR FEATURE INFORMATION: See Alphanumeric Display on page 25 and Directory
Dialing on page 72.
Filling Out the Program Record Form
1. Select a port (00-47).
In this box . . . Enter this data . . .
Extension No. 300-347
Circuit Type 00 - Electronic Single Line
01 - Multibutton Non-Display
02 - Multibutton Display
06 - DSS Console
51 - ASI or Dual OPX/ASI
52 - Digital Voice Mail Port
Card
Z - Stand-Alone Data Module
X - Not installed
Note: For details on
programming a Data Module
with an extension, see previous
page.
DSS Owner 300-347 - Extension paired with
the DSS Console
DSS Block 01-04
Name Up to 16 letters, numbers, blanks
Extension Options Program 14: Extension Port Char.
Part II: DIGITAL SYSTEM Programs 241

Example
Port 03 is set up as follows: It has extension number 307, an Electronic Single Line
Phone connected to it, and the name MR. SMITH.
Entering Data Into Memory
To enter Program 14 data:
1. Enter program mode.
-Press # + dial SP + dial 5312 + press #.
2. Press key 14 to enter Program 14.
3. Dial Port No., press #.
4. To accept the displayed data: Press #.
OR
To change or enter data: Dial data, press #.
-To erase a data entry before you press #: Dial *.
-To enter a circuit type of X: Press DIAL, dial X. To
enter circuit type Z: Press DIAL, dial 0.
To enter a name
-Press the dial pad button for the desired letter or
number. To enter a blank space, Q, or Z, press 0.
-To make a letter appear: Dial the number (1, 2, or
3) that corresponds to the letter’s position on the
button (e.g. dial 1 if you want the first letter on the
button).
OR
To make a number appear: Dial 4.
Note: To make a blank space, Q, or Z to appear:
Dial 1, 2, or 3, respectively.
-Repeat a-b for all characters (to erase the previous
character, press LAST).
5. Repeat step 4 for all data.
-If you finish and do not see, "STN PORT NO.":
Press SAVE before step 6.
6. Select an option:
To enter data for another port: Go to step 3.
OR
To exit Program 14: Press SAVE.
OR
To exit the program mode: Press SAVE twice.
0 3
Circuit Type
DSS Owner
DSS Block
Name
Extension No.
Port
01853I5 (D)
3 0 7 0 0 S M I T HM R
Program 14: Extension Port Char. Extension Options
242 DIGITAL SYSTEM Administrator’s Guide

-After exiting, you can select another program.
Understanding Related Programming
For a Data Module installed with an extension:
Program 18 (I)
To program the extension as a Dataset
Extension Options Program 14: Extension Port Char.
Part II: DIGITAL SYSTEM Programs 243

Program 15: Access Level
✆Program 15 is initially set as follows:
•
Extension 300 has access level 05.
•
Extensions 301-305 have access level 04.
•
Extensions 306-347 have access level 01.
Program 15 lets you assign a programming access level (00-04) to extensions
(301-347). Extension 300 permanently has access level 05, and you cannot assign
level 05 to any other extension. The access level determines:
•
Whether you can use the extension to do system programming. You can always
do system programming from extension 300, which has access level 05, or from
any extension that has access level 04.
•
Which features the user can program from their phone (see the table below). For
example, with access level 01, an extension user can program two of these fea-
tures from their own phone: Direct Station Selection and Speed Dial numbers.
From the system programming extension, however, you can program any of
these features (except Time and Date) for an extension even if its access level
does not allow the user to program that feature (see Program 18 [Part II]).
User-Programmable
Features Access Level
00 01 02 03 04 05
Delayed Ring Assignment
————✔✔
FOR FEATURE INFORMATION: See Delayed Ringing on page 62.
Direct Station Selection
—✔✔✔✔✔
FOR FEATURE INFORMATION: See Direct Station Selection on page 69.
Hotline
———✔✔✔
FOR FEATURE INFORMATION: See Hotline on page 101.
Headset
——✔✔✔✔
FOR FEATURE INFORMATION: See Headset on page 95
Night Ringing
——✔✔✔✔
FOR FEATURE INFORMATION: See Night Ringing on page 124.
Prime Line Assignment
——✔✔✔✔
FOR FEATURE INFORMATION: See Placing an Outside call (Using Prime Line)
on page 134.
Ringing Assignment
——✔✔✔✔
FOR FEATURE INFORMATION: See Ringing Assignments on page 154.
Program 15: Access Level Extension Options
244 DIGITAL SYSTEM Administrator’s Guide

User-Programmable
Features Access Level
00 01 02 03 04 05
Ringing Line Preference
FOR FEATURE INFORMATION: See Ringing Line Preference on page 155.
Speed Dial
(Storing Personal Numbers)
—✔✔✔✔✔
FOR FEATURE INFORMATION: See Speed Dial on page 162.
Speed Dial
(Storing System Numbers)
————✔✔
FOR FEATURE INFORMATION: See Speed Dial on page 162.
Time and Date
————✔✔
FOR FEATURE INFORMATION: See Time and Date on page 177.
Voice Announce
———✔✔✔
FOR FEATURE INFORMATION: See Intercom Calls on page 103.
Whisper Page
———✔✔✔
FOR FEATURE INFORMATION: See Off-Hook Signaling/Whisper Page on
page 126.
Voice Page (Thru Speaker)
———✔✔✔
FOR FEATURE INFORMATION: See Paging on page 138.
Extension Options Program 15: Access Level
Part II: DIGITAL SYSTEM Programs 245
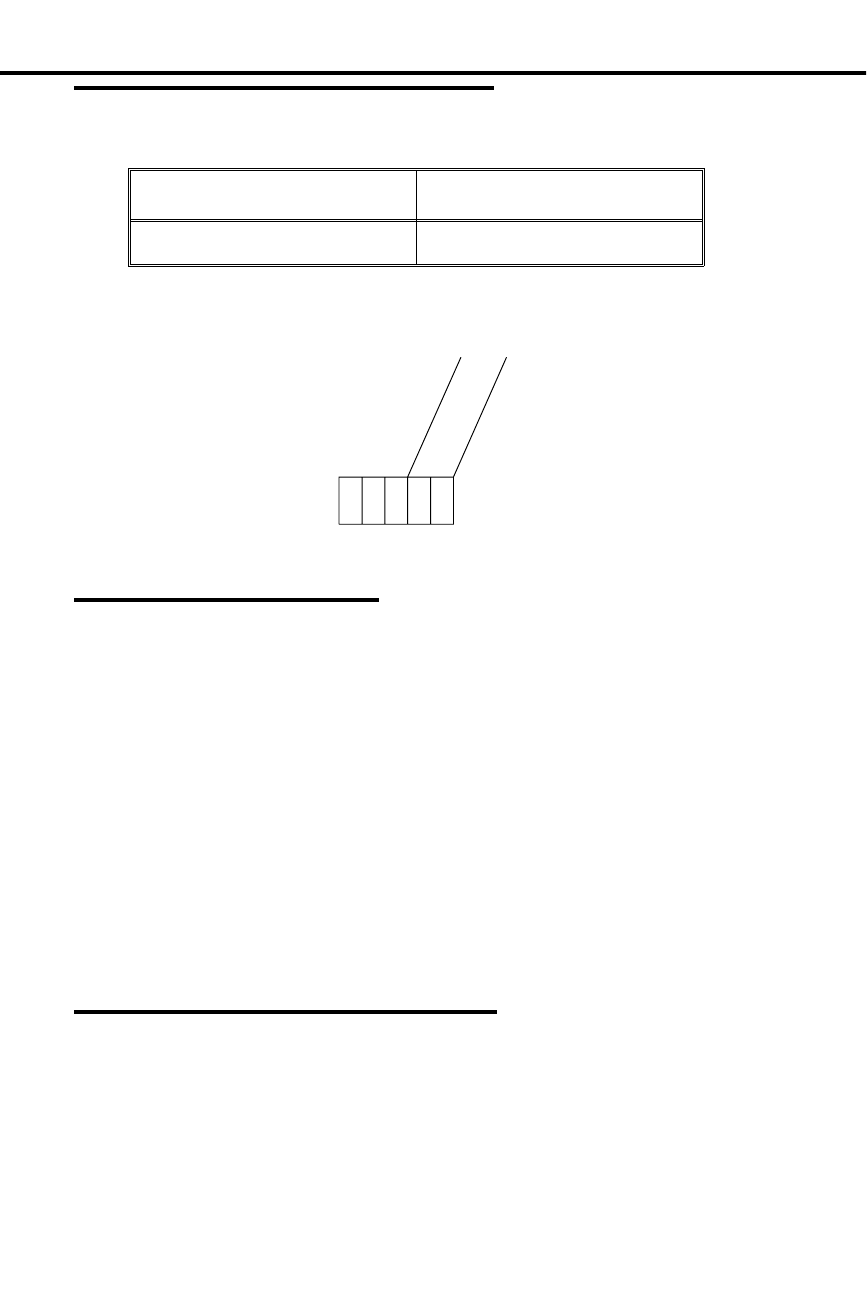
Filling Out the Program Record Form
1. Select an extension.
In this box . . . Enter this data . . .
Program Access Level 00-05
Example
Extension 305 has programming access level 03.
Entering Data Into Memory
To enter Program 15 data:
1. Enter program mode.
-Press # + dial SP + dial 5312 + press #.
2. Press key 15 to enter Program 15.
3. Dial extension number, press #.
-To erase a data entry before you press #: Dial *.
4. To accept the displayed data: Press #.
OR
To change or enter data: Dial data, press #.
5. Repeat steps 3-4 for all extensions.
6. Select an option:
To exit Program 15: Press SAVE once.
OR
To exit the program mode: Press SAVE twice.
-To enter another program after exiting: Press its
key.
Understanding Related Programming
N/A
3 0 5
Program Access
Level
Ext.
01853I14 (D)
0 3
Program 15: Access Level Extension Options
246 DIGITAL SYSTEM Administrator’s Guide

Program 16: Line & Group Access
✆Program 16 is initially set as follows for each extension:
•
Access to Lines 01-16 = Incoming and Outgoing
•
Access to Line Groups 90-98 = Y, though no Line Groups exist in
Program 11
Program 16 lets you give an extension access to lines 01-16 and line groups 90-98.
You can give an extension:
•
No access to a line.
•
Only incoming access to a line, so the extension can only answer calls on that
line.
•
Both incoming and outgoing access to a line, so the extension can place and an-
swer calls on that line.
•
No access to line groups 90-95 (you cannot prevent an extension from using line
groups 96-98).
•
Outgoing access to a line group so the extension can use it to place calls. An ex-
tension cannot have incoming access to a line group.
FOR FEATURE INFORMATION: See Placing an Outside Call on 134 and Answering an
Outside Call on page 132.
Filling Out the Program Record Form
1. Select an extension (300-347).
In this box . . . Enter this data . . .
Line XX Access 0 - No access to line XX
1 - Only incoming access to
line XX
2 - Incoming & outgoing access
to line XX
Group XX Access Y - enable outgoing access to
group XX
N - disable access to group XX
Example
In an 8-Line system, extension 305 has full access to lines 01, 03, 06; no access to
the other lines; and outgoing access to line group 90.
Ext.
3 0 5
Line 01 Access
Line 02 Access
Line 03 Access
Line 04 Access
Line 05 Access
Line 06 Access
Line 07 Access
Line 08 Access
Line 09 Access
Line 10 Access
Line 11 Access
Line 12 Access
Line 13 Access
Line 14 Access
Line 15 Access
Line 16 Access
Group 90 Access
Group 91 Access
Group 92 Access
Group 93 Access
Group 94 Access
Group 95 Access
01870C22 (D)
2 0 2 0 0 2 0 0 Y N N N N N
Extension Options Program 16: Line & Group Access
Part II: DIGITAL SYSTEM Programs 247

Entering Data Into Memory
To enter Program 16 data:
1. Enter program mode.
-Press # + dial SP + dial 5312 + press #.
2. Press key 16 to enter Program 16.
3. Dial extension number, press #.
-To erase a data entry before you press #: Dial *.
4. Dial L to enter line access data.
OR
Dial G to enter group data.
5. Dial Line No., press #.
OR
Dial Group No., press #.
6. To accept the displayed data: Press #.
OR
To change or enter data: Dial data, press #.
7. Repeat steps 5-6 for remaining lines or groups.
8. Press SAVE.
9. Select an option:
To enter line or group data for same extension: Go to
step 4.
OR
To exit Program 16: Press SAVE twice.
OR
To exit the program mode: Press SAVE three times.
-To enter another program after exiting: Press its
key.
Understanding Related Programming
For line access:
Program 10
To identify line characteristics (type, gain, name)
Program 17
To assign a line to a key at an extension
To assign a Loop key to an extension. The Loop key
flashes for incoming calls on lines without Line keys.
Program 18 (II)
To assign ringing to lines at an extension
Program 1
To enable/disable Direct Line (Trunk) Access in a Class
of Service (see also Program 18 [I]). Direct Line Access
lets a user access lines 01-16 by dialing 348-363.
Program 18 (I)
To assign a Class of Service (from Program 1) to an
extension
To allow Line Dial-Up for an extension. This lets a user
access lines 01-16 by dialing 801-816.
Program 12
To directly terminate a line to an extension so it rings only
that extension. A directly terminated line is both
incoming and outgoing without making it so in Program
16. For more information, see Direct Inward Line on page
64.
Program 16: Line & Group Access Extension Options
248 DIGITAL SYSTEM Administrator’s Guide

For line group access:
Program 10
To identify line characteristics (type, gain, name)
Program 11
To place lines into groups
Program 17
To assign a line group to a key
Extension Options Program 16: Line & Group Access
Part II: DIGITAL SYSTEM Programs 249

Program 17: Key Assignments
✆Program 17 is initially set as follows:
•
On a Multibutton Phone in an 8-Line System:
- Keys 1-8 = Lines 1-8
- Keys 9-16 = Undefined
•
On a Multibutton Phone in a 16-Line System:
- Keys 1-16 = Lines 1-16
•
On a DSS Console:
- Keys 1-47 = Hotlines to extensions 301-347
- Keys 48-72 = Undefined
- Key 73 = All Call Page
- Key 74 = Internal Page Zone 1
- Key 75 = Internal Page Zone 2
- Key 76 = Internal Page Zone 3
- Key 77 = Park Orbit 60
- Key 78 = Park Orbit 61
- Key 79 = Park Orbit 62
- Key 80 = Release
Program 17 lets you assign functions to the programmable keys at a:
•
Multibutton Telephone. Keys 1-16 are programmable.
•
80-Button DSS Console. Keys 1-79 are programmable.
For example, you can assign a Park Orbit (60-69) to a key so that a user can just
press the key to access the orbit instead of dialing the Park Orbit code.
The choices for a programmable key are below. All of them are available to a
Multibutton Phone, but not all to a DSS Console. (The key functions that are not
available to a DSS Console are labeled "Multibutton Only").
Undefined Key (UK)
Use this option to give a key no function.
FOR FEATURE INFORMATION: N/A
Line Key (LK)
Use this option to assign a line (01-16) to a key. Do not assign the same line to two
different keys.
FOR FEATURE INFORMATION: See Placing an Outside Call (Using a Line key) on page
134 and Answering an Outside Call on page 132.
Loop Switch (LS)
(Multibutton Only) Use this option to assign a Loop Switch key to an extension. A
Loop Switch key flashes for incoming calls that do not appear under a Line key.
Make sure you assign one Loop key to each extension so incoming calls can appear
somewhere.
FOR FEATURE INFORMATION: See Answering an Outside Call on page 132.
Loop Group (LG)
(Multibutton Only) Use this option to assign a line group (00-08) to a key. Codes
00-08 correspond to line groups 90-98 .
Program 17: Key Assignments Extension Options
250 DIGITAL SYSTEM Administrator’s Guide

FOR FEATURE INFORMATION: See Placing an Outside Call (Using Direct Line Group
Access) on page 134.
Park Orbit (PO)
Use this option to assign a System Park Orbit (60-69) to a key.
FOR FEATURE INFORMATION: See Park on page 141.
One-Touch Speed Dial Key (SD)
Use this option to assign a Speed Dial bin to a key. On a Multibutton phone, you can
assign a Personal bin (50-59, 20-29) or a System bin (70-79 or 700-799). On a DSS
Console, you can assign bins 1-79 to the keys.
Note: On a Multibutton phone, keys 1-16 automatically represent Personal Speed
Dial bins 50-59 and 20-25 (i.e., without using Program 17). Note that bins 26-29 do
not have keys assigned to them but can be called by pressing DIAL, then the two
digits of the appropriate bin. To call a number that is stored under the bin keys, a
user presses DIAL, then the key (a two-touch call). If you use Program 17 to make a
one-touch Personal Speed Dial key, the bin you assign: (a) overwrites the original
personal bin number (b) lets the user call the stored number by just pressing the key
(no need to press DIAL).
FOR FEATURE INFORMATION: See Speed Dial on page 162.
Hotline (HL)
Use this option to assign a Hotline key and its associated extension (300-347).
FOR FEATURE INFORMATION: See Hotline on page 101.
Group Pickup (GP)
(Multibutton Only) Use this option to assign a Pickup Group (01-07) to a key.
FOR FEATURE INFORMATION: See Group Call Pickup on page 88.
Call Coverage (CCK)
(Multibutton Only) Use this option to assign a Call Coverage key.
Notes:
•
If you assign the Call Coverage function to a DSS key (1-15), the system
changes the DSS key’s extension assignment to match the Call Coverage exten-
sion and vice versa.
•
You can use the DSS procedure in Program 18 (II) to change a Call Coverage ex-
tension even if the Call Coverage key is not also a DSS key.
FOR FEATURE INFORMATION: See Call Coverage on page 169.
Page Zone (PO)
Use this option to assign a page zone (00-07) to a key.
FOR FEATURE INFORMATION: See Paging on page 138.
Automatic Call Timer (CTA)
(Multibutton Only) Use this option to assign an Automatic Call Timer key.
FOR FEATURE INFORMATION: See Call Timer on page 49.
Extension Options Program 17: Key Assignments
Part II: DIGITAL SYSTEM Programs 251

Manual Call Timer (CTM)
(Multibutton Only) Use this option to assign a manual Call Timer key.
FOR FEATURE INFORMATION: See Call Timer on page 49.
Record Key (RK)
(Multibutton Only) Use this option to assign a Record key when the system is
installed with Voice Mail.
FOR FEATURE INFORMATION: See Voice Mail on page 185.
Data Key
(Multibutton Only) To assign a Data Key to a phone, you must define the phone as a
Dataset in Program 18 (I). When you do, key 16 automatically becomes the Data
key; there is no need to make any assignment in Program 17. Be sure, however, that
you do not assign some other function to key 16 using Program 17.
FOR FEATURE INFORMATION: See Data on page 61.
Program 17: Key Assignments Extension Options
252 DIGITAL SYSTEM Administrator’s Guide

Filling Out the Program Record Form
1. Select a key on the appropriate phone drawing.
To assign this function . . . Enter this abbreviation +
number code (if any) . . .
Undefined key UK
Line key LK + Line number (01-16)
Loop Switch
(Multibutton Only) LS
Loop Group
(Multibutton Only) LG + Group (00-08)
Park Orbit PO + Park Orbit (60-69)
Speed Dial On a Multibutton:
SD + Personal bin (50-59, 20-29)
OR
SD + System bin (700-799)
On a DSS Console:
SD + 1-79
Hotline HL + Partner ext. (300-347)
Group Pickup
(Multibutton Only) GP + Pickup Group (00-07)
Note: 00 = Not a member
Call Coverage key
(Multibutton Only) CCK + Covered ext. (300-347)
Page Zone P0 (zero) + Page Zone (00-07)
Note: 00 = All Call
Call Timer (Automatic)
(Multibutton Only) CTA
Call Timer (Manual)
(Multibutton Only) CTM
Record key
(Multibutton Only) RK
Data key
(Multibutton Only) See Program 18 (I), Dataset
Extension Options Program 17: Key Assignments
Part II: DIGITAL SYSTEM Programs 253
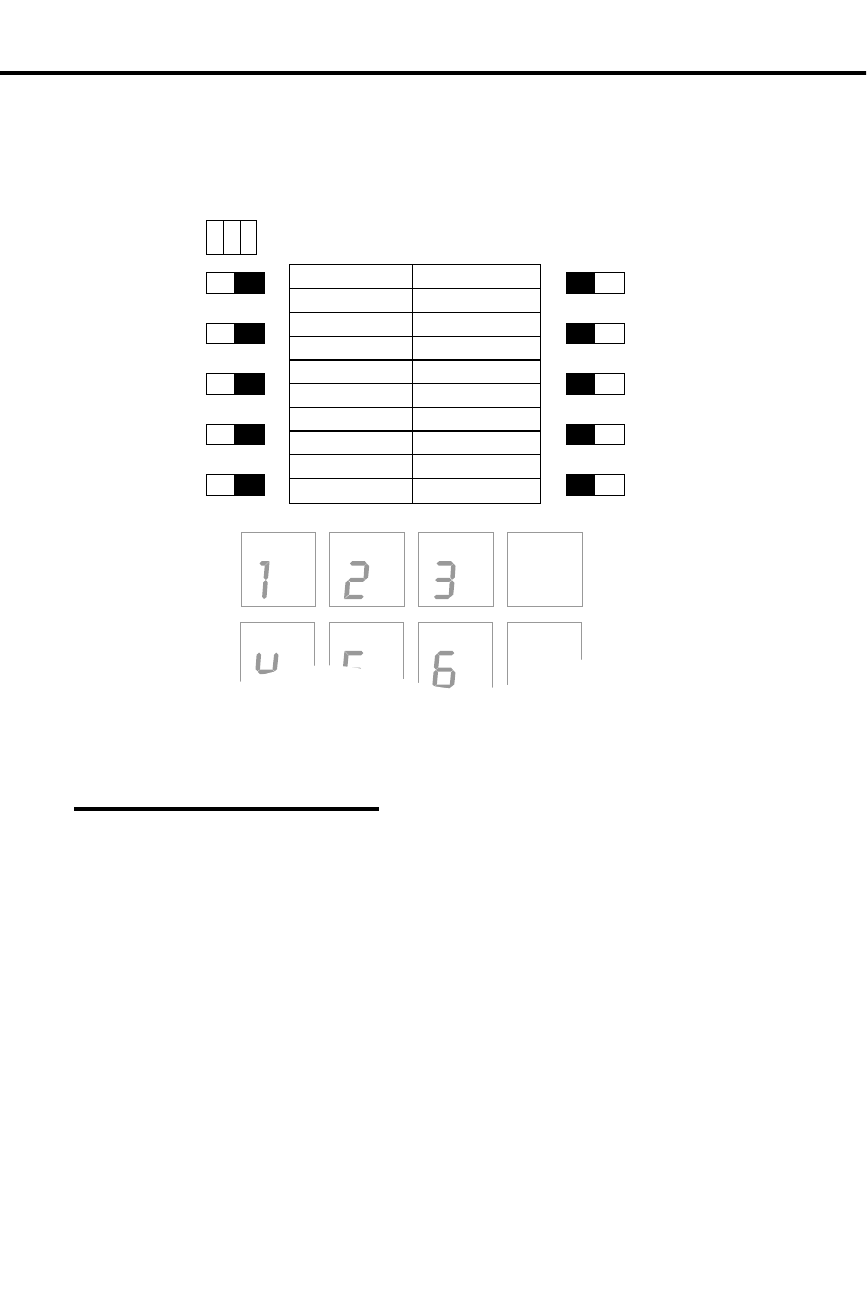
Example
Extension 307 is a Multibutton phone with the following key assignments:
Keys 1-5 are Loop Switch keys, keys 6-8 are lines 01-03, key 9 accesses Page Zone
07, and key 10 accesses Park Orbit 62 (no assignments will be shown for the other
keys).
Entering Data Into Memory
To enter Program 17 data:
1. Enter program mode.
-Press # + dial SP + dial 5312 + press #.
-If you are programming assignments for a DSS
Console, you must program from the phone
assigned to the console.
2. Press key 17 (HOLD key) to enter Program 17.
-You see "DEST. ICM NO:" (for destination
extension).
3. Dial extension (XXX) to be programmed, press #.
-You see "SOURCE:" (for source extension). If you
are programming assignments for your DSS
Console, enter your extension number.
ABC
DEF
GHI
JKL
MNO
DIAL
LAST
VOL
UP
N1870 - 28
1
2
3
4
5
6
7
8
9
10
LK01
LK02
LK03
P007
PO62
LS
LS
LS
LS
LS
Ext.
307
Program 17: Key Assignments Extension Options
254 DIGITAL SYSTEM Administrator’s Guide

4. To program the keys at extension XXX: Dial extension
XXX again, press #.
OR
To copy keys from extension YYY onto XXX: Dial
YYY, press #, then go to step 8 if you do not need to
change certain keys after you copy; otherwise, go to
step 5.
-If you are programming assignments for your DSS
Console, enter your extension number.
-This procedure does not copy:
Speed Dial (stored) numbers.
Ring Assign. (Program 18 [II])
Line Access (Program 16)
5. Press key you wish to program.
-For DSS Consoles, press the DSS Console key.
6. To accept the displayed data: Press #.
OR
To change or enter data: Dial data, press #.
7. Repeat steps 5-6 for all keys.
8. Press SAVE.
9. Select an option:
To program another extension: Dial Y, then go to step
3.OR
To exit Program 17: Press SAVE once.
OR
To exit the program mode: Press SAVE twice.
-To enter another program after exiting: Press its
key.
Understanding Related Programming
See the feature reference for each key.
Extension Options Program 17: Key Assignments
Part II: DIGITAL SYSTEM Programs 255

Program 18: Extension Features (I)
✆Program 18 is initially set as follows for each extension:
•
Do Not Disturb = Y
•
Class of Service =
- 30 for ext. 300
- 01 for ext. 301-347
•
Ring Group Member = 00 (not a member)
•
Call Pickup Group Member= 00 (not a member)
•
Privacy Release Group Member = 00 (not a member)
•
Off-Hook Ringing = N
•
Busy Lamp Field (BLF) and Direct Station Selection (DSS) for Keys 1-15
on a Multibutton Phone = Y
•
Line Dial-Up = Y
•
Page Zone Member = 00 (receives only All Call pages)
•
Extension’s (Station’s) Operator = 300
•
Speed Dial Block =
- Blocks 01-05 for System Speed Dial numbers
- Block 06-07 for exts. 300-301; 08 for 302; 00 (no block) for 303; 09-28
for 304-323
•
Voice Mail = N
•
Dataset = N
•
Door Box (receive chimes) = N
Program 18 (Part I) lets you assign the following features to an extension. For
information on other extension features, see Program 18 (Part II).
Do Not Disturb (DND)
Use this option to allow/deny Do Not Disturb at an extension. Enabling Do Not
Disturb for an attendant extension lets the attendant put the system in the Night
Answer mode.
FOR FEATURE INFORMATION: See Do Not Disturb on page 74, and Night Answer on
page 121.
Class of Service (COS)
Use this option to assign a Class of Service (00-27) to an extension. The system
automatically assigns COS 30 to any extension you designate as an operator in
Program 3. COS 30 is the same as COS 00. When, however, you remove an
operator from the system, you must manually assign it a non-operator COS (01-27).
FOR FEATURE INFORMATION: See Class of Service on page 58.
Ring Group Member (RG)
Use this option to make an extension a member of a Ring Group (01-08). A Ring
Group extension should not also be in a Hunt Group or an attendant extension. Ring
Groups 01-08 correspond to Ring Group numbers 364-371 (without AUX) or
396-403 (with AUX).
FOR FEATURE INFORMATION: See Group Ringing on page 91.
Call Pickup Group Member (CPG)
Use this option to assign an extension to a Pickup Group (01-07).
FOR FEATURE INFORMATION: See Group Call Pickup on page 88.
Program 18: Extension Features (I) Extension Options
256 DIGITAL SYSTEM Administrator’s Guide

Privacy Release Group Member (PRG)
Use this option to assign a Multibutton extension to a Privacy Release Group (01-99).
FOR FEATURE INFORMATION: See Privacy Release on page 149.
Off-Hook Ringing (OHR)
Use this option to enable/disable Off-Hook Ringing at an extension. Enabling
Off-Hook Ringing for an extension also converts its Call Waiting beeps into
Off-Hook Ringing.
Always assign Off-Hook Ring to an attendant. Analog Station Interfaces do not
receive Off-Hook Ringing even if you enable it here.
To see how Off-Hook Ringing and Whisper Page programming interact, see Whisper
Page in Program 18 (II).
FOR FEATURE INFORMATION: See Off-Hook Signaling/Whisper Page on page 126.
DSS/BLF Lamps (BLF)
Use this option to let a Multibutton extension use keys 1-15 as Direct Station
Selection/Busy Lamp Field (DSS/BLF) keys.
FOR FEATURE INFORMATION: See Direct Station Selection on page 69.
Line Dial-Up (LDU)
Use this option to determine whether an extension can access lines (01-16) by dialing
codes 801-816. Enable this option for each extension that should be allowed to dial
line codes (01-16) while storing Speed Dial numbers.
FOR FEATURE INFORMATION: See Placing an Outside Call (Using Line Dial-Up) on
page 134 and Speed Dial on page 162.
Page Zone Member (PZ)
Use this option to assign an extension to an Internal Page Zone (00-07). An
extension can be in only one Internal Zone. An extension in Zones 01-07 receives a
page made to its assigned zone and All Call Pages. An extension in Zone 00 receives
only All Call Pages.
FOR FEATURE INFORMATION: See Paging on page 138.
Extension’s (Station’s) Operator (SO)
Use this option to designate which operator (attendant) gets called when the
extension user dials 0.
FOR FEATURE INFORMATION: See Intercom page 103.
Speed Dial Block (SDB)
Use this option to assign a Personal Speed Dial block (of memory) to an extension or
DSS Console. If your system doesn’t have an AUX Module, there are 28 Speed Dial
blocks in the system, numbered 01-28, and each block can store 20 Speed Dial
numbers (i.e., each block has 20 storage bins). However, not all 28 blocks are
available for Personal Speed Dial numbers. The blocks available for Personal Speed
Dial numbers depends on how many System Speed Dial numbers (bins) you select
for the system in Program 3 (see table below).
Extension Options Program 18: Extension Features (I)
Part II: DIGITAL SYSTEM Programs 257

# System Speed
Numbers Blocks Used for System
Speed Dial Blocks Available for
Personal Speed Dial
10 1/2 of 01 (1/2 of 01)-28
100 01-05 06-28
Three more things you need to know about assigning blocks are these:
•
A DSS uses four consecutive blocks. So if you assign block 05, for example, the
DSS Console actually uses 05, 06, 07, and 08.
•
You can assign the same block to more than one extension when, for example,
there are more extensions than blocks. The extension users would share access
to the 20 bins in the block. For example, one person could use bins 50-59 and
the other could use bins 20-29 (to store Speed Dial numbers, see Program 18
[Part II]).
•
If your system has an AUX Module, you have 57 Speed Dial blocks (numbered
1-57).
•
Initially, extension 303 has no Speed Dial block assigned. If you have an exten-
sion installed at 303, and it needs Speed Dial, use this program to assign it a
block.
FOR FEATURE INFORMATION: See Speed Dial on page 162.
Voice Mail (VX)
Use this option to assign the Voice Mail (VX) feature to each ASI extension port
designated for Voice Mail in Program 14.
Note: Use the VX programs in the following order: 14, 18 (I), 3, 19, 12, 17, 16.
FOR FEATURE INFORMATION: See Voice Mail on page 185.
Dataset (DS)
Use this option to program an extension as a Dataset when the extension is installed
with a Data Module. Remember: The extension must be installed in an
even-numbered port and you should program the port before you plug in the
extension. If you plug it in before programming it, you must unplug it and plug it
back in. As soon as you program an extension as a Dataset, key 16 becomes the Data
key.
FOR FEATURE INFORMATION: See Data on page 61.
Door Box (receive chimes) (DB)
Use this option to program an extension to receive Door Box chime tones.
FOR FEATURE INFORMATION: See Door Box on page 75.
Filling Out the Program Record Form
1. Select an extension (300-347).
Program 18: Extension Features (I) Extension Options
258 DIGITAL SYSTEM Administrator’s Guide

In this box . . . Enter this data . . .
DND (Do Not Disturb) Y - enable
N - disable
COS (Class of Service) 00-30
RG (Ring Group) 00-08
Note: 00 = Not a member
CPG (Call Pickup Group) 00-07
Note: 00 = Not a member
PRG (Privacy Release Group) 00-99
Note: 00 = Not a member
OHR (Off-Hook Ring) Y - enable
N - disable
BLF (DSS/BLF Lamps) Y - enable
N - disable
LDU (Line Dial-Up) Y - enable
N - disable
PZ (Page Zone) 00 - Receives All Call only
01-07 - Receives All Call and
pages to Zones 01-07
SO (Station Operator) Ext. 300-347
SDB (Speed Dial Block) 00-28
Note: 00 = No block assigned
VX (Voice Mail) Y - enable
N - disable
DS (Dataset) Y - enable
N - disable
DB (Door Boxes 1-4) Y - enable
N - disable
Extension Options Program 18: Extension Features (I)
Part II: DIGITAL SYSTEM Programs 259
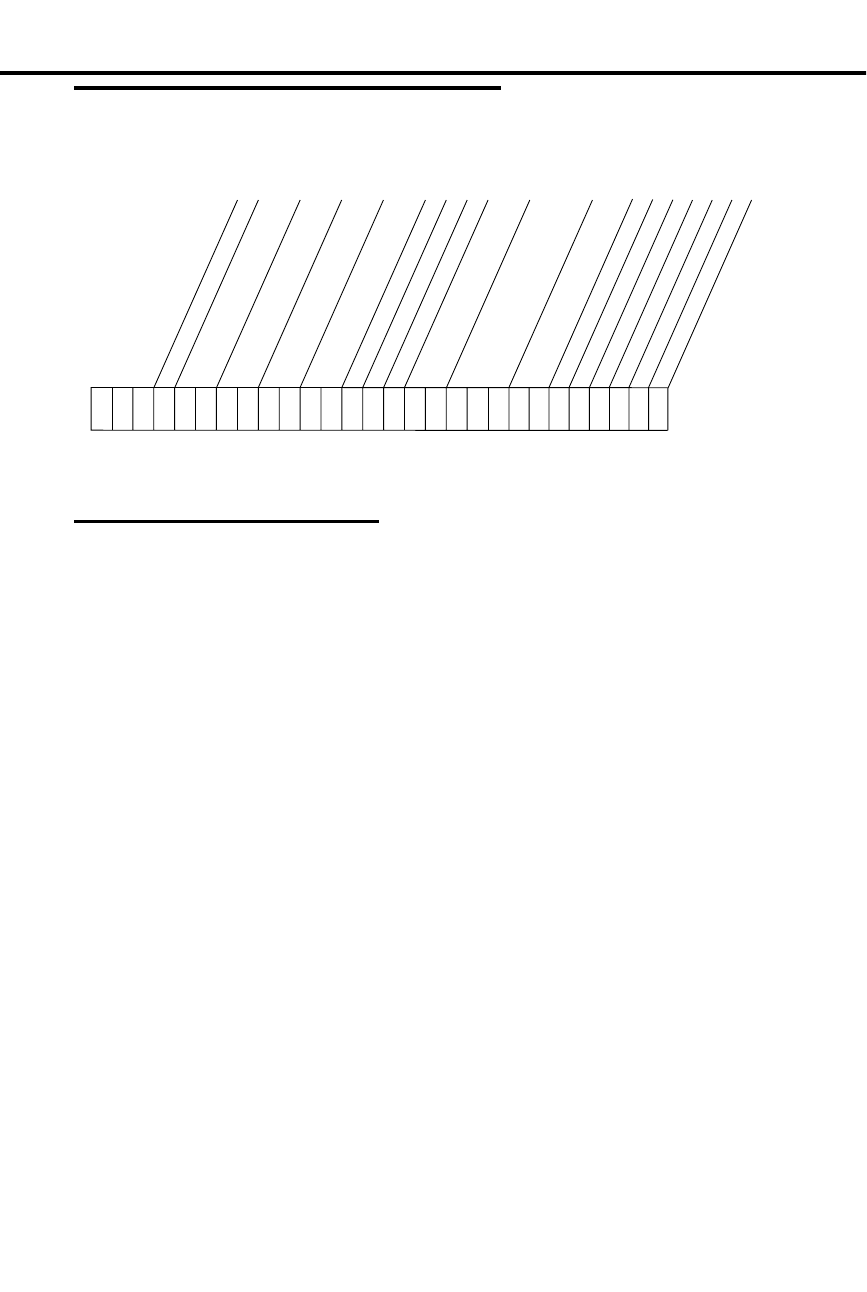
Filling Out the Program Record Form
Example
Extension 305 has Do Not Disturb disabled (no other options will be shown).
Entering Data Into Memory
To enter Program 18 (Part
I) data:
1. Enter program mode.
-Press # + dial SP + dial 5312 + press #.
2. Press key 18 (CONF key) to enter Program 18.
3. Dial extension number, press #.
4. Dial abbreviation for desired feature, press #.
-To dial PZ: Dial P, then 0 (zero).
5. To accept the displayed data: Press #.
OR
To change or enter data: Dial data, press #.
-To erase a data entry before you press #: Dial *.
-To accept the SO (station operator) data, you may
have to press SAVE instead.
6. Repeat steps 4-5 for all features.
7. Press SAVE.
OR
Enter Program 18 (Part II) data for the same extension
as follows: Go to step 4 in the procedures for Program
18 (Part II).
8. Select an option:
To enter data for another extension: Dial Y, then go to
step 3.
OR
To exit Program 18: Press SAVE once.
OR
To exit the program mode: Press SAVE twice.
-To enter another program after exiting: Press its
key.
3 0 5
Ext.
01853I8 (D)
DND (Do Not Disturb)
COS (Class of Service)
RG (Ring Group)
CPG (Call Pickup Group)
PRG (Privacy Release Group)
OHR (Off-Hook Ring)
BLF (DSS/BLF Lamps)
LDU (Line Dial-Up)
PZ (Page Zone Member)
SO (Station Operator)
SDB (Speed Dial Block)
VX (Voice Mail)
DS (Dataset)
N
DB (Door Box) - Alert 4
DB (Door Box) - Alert 3
DB (Door Box) - Alert 2
DB (Door Box) - Alert 1
Program 18: Extension Features (I) Extension Options
260 DIGITAL SYSTEM Administrator’s Guide

Understanding Related Programming
For Class of Service:
Program 1
To set up a Class of Service
For Privacy Release Groups:
Program 16
To give an extension outgoing access to the lines intended
for Privacy Release
Program 17
To assign a Privacy Release line to a key at an extension
For DSS/BLF:
Program 18 (II)
To determine which extensions the DSS keys call
For Line Dial-Up:
Program 16
To give an extension outgoing access to lines
For Page Zones:
Program 18 (II)
To enable/disable incoming pages at an extension
For Speed Dial Blocks:
Program 3
To select the number of System Speed Dial numbers
For Voice Mail (VX):
Program 14
To assign an ASI circuit type (51) to each extension
intended for VX
Program 3
To install VX and select a VX master number from the
ones selected in Program 18 (I)
Program 19
To set up the following UCD Hunt Group:
(a) Hunt Type = 05
(b) Master Extension = VX master number selected in
Program 3
(c) Overflow Extension = Operator extension
assigned to VX master extension in Program 18 (I)
(d) UCD Members = VX extensions selected in
Program 18
Program 12
To directly terminate each line the Automated Attendant
should answer to the VX master number selected in
Program 3
Program 17
To assign a Record key to an extension
Program 16
To assign to each Voice Mail port (selected in Program
14) outgoing access to the lines used by the VX’s
Message Notification and Message Reminder features.
For a Dataset extension:
Program 14
To program the accompanying Data Module with the
correct circuit type
Extension Options Program 18: Extension Features (I)
Part II: DIGITAL SYSTEM Programs 261

For Door Box:
Program 18(I)
Each Digital Door Box extension must have Class of
Service 28.
Program 18: Extension Features (I) Extension Options
262 DIGITAL SYSTEM Administrator’s Guide

Program 18: Extension Features (II)
✆Program 18 is initially set as follows for each extension:
•
Day/Night Ringing Assignments = Y for all lines at ext. 300; N for all
lines at all other extensions; N for all Call Coverage and Pickup keys
•
Night Ringing = N for all lines
•
Delayed Ringing Assignment = N for all lines; N for all Call Coverage
and Pickup keys
•
Prime Line Assignment = N for all lines
•
Ringing Line Preference = N for all lines
•
Direct Station Selection Key Assignments = Keys 1-15 at a Multibutton
phone each call extension 300
•
Hotline Key Assignments
•
Headset Installed = N
•
Incoming Voice-Announced Call = N
•
Voice Page Thru Speaker = Y
•
Whisper Page = Y
•
Speed Dial = No numbers stored
Program 18 (Part II) lets you assign the following features to an extension. With the
proper programming access level, a Multibutton extension user can also program
these features from their phone (see Program 15).
For information on other extension features, see Program 18, Part I.
Day/Night Ringing Assignments (RA)
Use this option to enable/disable immediate day/night ringing for an extension’s
lines, Call Coverage keys, and Pickup Group keys. Enabling immediate ring
automatically disables Night Ringing or Delayed Ringing (see below).
Note: To have a line ring an ESL/ASI phone, you must directly terminate the line to
the phone using Program 12.
FOR FEATURE INFORMATION: See Ringing Assignments on page 154.
Night Ringing (NR)
Use this option to enable or disable immediate ringing during the Night Answer
mode for the lines at a Multibutton phone. Enabling Night Ring automatically
disables Delayed Ringing or Day/Night Ringing Assignments (see below and above).
FOR FEATURE INFORMATION: See Night Ringing on page 124 and Night
Answer on page 121.
Delayed Ring Assignment (DRA)
Use this option to enable/disable delayed day/night ringing for an extension’s lines,
Call Coverage keys, and Pickup Group keys. Enabling Delayed Ringing Assignment
automatically disables ringing assigned through Ringing Assignment or Night
Ringing (see above).
Note: Do not enable Delayed Ringing for a Call Coverage key assigned to the UCD
master extension number unless your system has an AUX Module.
FOR FEATURE INFORMATION: See Delayed Ringing Assignment on page 62.
Extension Options Program 18: Extension Features (II)
Part II: DIGITAL SYSTEM Programs 263

Prime Line Assignment (PLA)
Use this option to enable/disable a Prime Line key for a Multibutton phone. When
you enable Prime Line for a Line key, the system automatically assigns Ringing Line
Preference (below) to that Line key. Do not assign a Prime Line to an attendant or
Headset extension.
FOR FEATURE INFORMATION: See Placing an Outside call (Using Prime Line)
on page 134.
Ringing Line Preference (RLP)
Use this option to assign Ringing Line Preference to a Multibutton extension. Do not
assign Ringing Line Preference to a headset or attendant extension.
FOR FEATURE INFORMATION: See Ringing Line Preference on page 155.
Direct Station Selection (DSS)
Use this option to change a DSS (or Call Coverage) key’s assigned extension.
Notes:
•
You must assign the Call Coverage function (and extension) to a key through
Program 17 before you can use this DSS procedure to change its extension.
•
If you change the extension for a DSS key that is also a Call Coverage key, the
system assigns that extension to the Call Coverage key.
FOR FEATURE INFORMATION: See Direct Station Selection on page 69 or Call
Coverage on page 169.
Hotline Key Assignments (DSS)
Use this option to change a Hotline key’s assigned extension.
FOR FEATURE INFORMATION: See Hotline on page 101.
Headset Installed (HS)
Use this option to enable/disable Headset capability for an extension. If you enable
Headset, do not enable Prime Line Assignment or Ringing Line Preference (above).
FOR FEATURE INFORMATION: See Headset on page 95.
Incoming Voice-Announced Call (VA)
Use this option to enable/disable voice-announced Intercom calls at an extension.
This option does not apply to attendant extensions (attendants do not receive
voice-announced Intercom calls) and ASI extensions.
FOR FEATURE INFORMATION: See Intercom Calls on page 103.
Voice Page (VP)Thru Speaker
Use this option to enable/disable incoming pages over the speaker of an extension.
This option does not apply to attendant extensions (attendants do not receive pages)
and ASI extensions.
FOR FEATURE INFORMATION: See Paging on page 138.
Program 18: Extension Features (II) Extension Options
264 DIGITAL SYSTEM Administrator’s Guide

Whisper Page (VO)
Use this option to determine whether a Multibutton extension receives Whisper
Page. This option does not apply to attendant extensions (attendants do not receive
Whisper Page). Disable Whisper Page for extensions in Circular or Terminal Hunt
Groups.
The chart below shows you how Off-Hook Ringing (Program 18 [I]) and Whisper
Page (VO) programming interact when the caller is using the handset or Handsfree
and the person receiving the Off-Hook Signaling ("Dest.") is using the handset or
Handsfree.
Caller Dest. OHR VO Result after dialing 1
Handset
Handset
Handsfree
Handsfree
Handset
Handsfree
Handset
Handsfree
N
N
N
N
Y
Y
Y
Y
Whisper Page to dest.
No Off-Hook Signaling
No Off-Hook Signaling
No Off-Hook Signaling
Handset
Handset
Handsfree
Handsfree
Handset
Handsfree
Handset
Handsfree
N
N
N
N
N
N
N
N
Off-Hook Signaling
Off-Hook Signaling
No Off-Hook Signaling
No Off-Hook Signaling
Handset
Handset
Handsfree
Handsfree
Handset
Handsfree
Handset
Handsfree
Y
Y
Y
Y
Y
Y
Y
Y
Whisper Page to dest.
Off-Hook Signaling
No Off-Hook Signaling
Off-Hook ring if dest. has
HF – otherwise no Off-Hook
Signals
Handset
Handset
Handsfree
Handsfree
Handset
Handsfree
Handset
Handsfree
Y
Y
Y
Y
N
N
N
N
Off-Hook Signaling
Off-Hook Signaling
Off-Hook Signaling
Off-Hook Signaling
FOR FEATURE INFORMATION: See Off-Hook Signaling (Whisper Page) on page 126.
Speed Dial (SD)
Use this option to store Personal Speed Dial numbers at an extension/DSS Console
or System Speed Dial numbers for the system. You can store Personal Speed Dial
numbers in bins 50-59 and 20-29 at a Multibutton phone. You can also store
Personal Speed Dial numbers in extension and DSS Console One-Touch Speed Dial
keys. You can store System Speed Dial numbers in bins 70-79 or 700-799 (i.e., in
whatever bins you selected in Program 3). If you have a DSS Console, you can also
use this option to store numbers in your console One-Touch Speed Dial keys.
Note: From a system programming extension you can store, at an extension, any
Personal Speed Dial number that is allowed by the toll level of that system
programming extension.
FOR FEATURE INFORMATION: See Speed Dial on page 162.
Extension Options Program 18: Extension Features (II)
Part II: DIGITAL SYSTEM Programs 265
Filling Out the Program Record Form
For Day/Night Ring Assignment (RA), Night Ringing (NR), Delayed Ring
Assignment (DRA), Prime Line Assignment (PLA):
1. Select a feature (e.g., RA).
In this box . . . Enter this data . . .
Line (01-16) Y - enable feature for the line
N - disable feature for the line
For Direct Station Selection (DSS) and Call Coverage:
In this box . . . Enter this data . . .
Key Extension to be called (300-347)
For Headset (HS), Voice-Announced Calls (VA), Voice Page Thru Speaker
(VP), Whisper Page (VO), Ringing Line Preference (RLP):
In this box . . . Enter this data . . .
Feature Data Y - enable feature
N - disable feature
For Personal Speed Dial (SD):
Across from this heading . . . Enter this data . . .
Bin or Key Telephone Number, up to 32
digits (when a number is longer
than 16 digits, record digits
17-32 in the next consecutive
bin)
Program 18: Extension Features (II) Extension Options
266 DIGITAL SYSTEM Administrator’s Guide
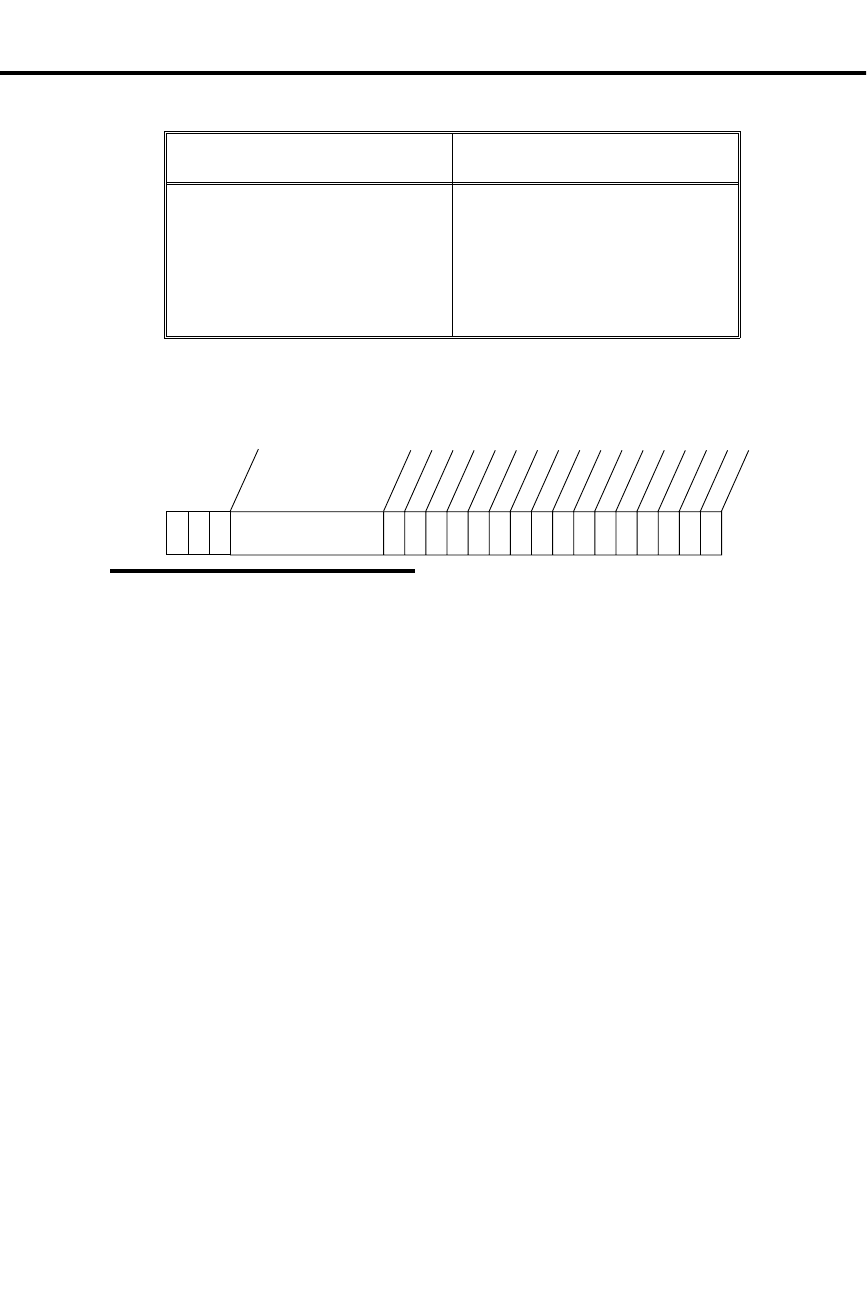
For System Speed Dial (SD):
Across from this heading . . . Enter this data . . .
Bin Complete the bin number (70-79
or 700-799), then enter the
telephone number, up to 32 digits
(when a number is longer than 16
digits, record digits 17-32 in the
next consecutive bin)
Example
In an 8-Line system, extension 307 has immediate Day/Night ringing on lines 1-5
(no other options will be shown).
Entering Data Into Memory
To enter Program 18 data
for RA, NR, DRA, PLA:
1. Enter the program mode.
-Press # + dial SP + dial 5312 + press #.
2. Press key 18 (CONF key) to enter Program 18.
3. Dial extension number, press #.
4. Dial the abbreviation for the desired feature, press #.
-The Line keys you can program light steadily or
flash. Steady means the feature is disabled,
flashing means it is enabled.
5. Store a line as follows: Dial a line number or press a lit
Line key.
6. To change or enter data: Dial data (Y[es] or N[o]),
press #.
7. Repeat steps 5-6 for all lines.
8. Select an option:
To program another feature: Press SAVE and go to
step 4 (in a Program 18 procedure).
OR
To program another extension: Press SAVE twice, dial
Y, and go to step 3 (in any Program 18 procedure).
OR
To exit Program 18: Press SAVE three times.
OR
To exit the program mode: Press SAVE four times.
-To enter another program after exiting: Press its
key.
3 0 7
Ext.
Line 02
Line 03
Line 04
Line 05
Line 06
Line 07
Line 08
Line 09
Line 10
Line 11
Line 12
Line 13
Line 14
Line 15
Line 16
RA (Ringing Assign.)
01853I17 (D)
Line 01
Feature
Name
Y Y Y Y Y N N N
Extension Options Program 18: Extension Features (II)
Part II: DIGITAL SYSTEM Programs 267

To enter Program 18 data
for DSS (or Call
Coverage) and Hotline:
1. Enter the program mode.
-Press # + dial SP + dial 5312 + press #.
2. Press key 18 (CONF key) to enter Program 18.
3. Dial ext. number, press #.
4. Dial DSS or HL, press #. DSS keys (1-15), any Call
Coverage and Hotline keys flash.
5. Press a flashing key.
6. To accept the displayed data:
Press #.
OR
To change or enter data: Dial data, press #.
7. Repeat steps 5-6 for all keys.
8. Select an option:
To program another extension for DSS or the other fea-
tures: Press SAVE twice, dial Y, and go to step 3 (in
any Program 18 procedure).
OR
To program another feature for the same extension:
Press SAVE and go to step 4 (in any Program 18 proce-
dure).
OR
To exit Program 18: Press SAVE three times.
OR
To exit the program mode: Press SAVE four times.
-To enter another program after exiting: Press its
key.
To enter Program 18 data
for HS, VA, VP, VO, RLP:
1. Enter the program mode.
-Press # + dial SP + dial 5312 + press #.
2. Press key 18 (CONF key) to enter Program 18.
3. Dial extension number, press #.
4. Dial the abbreviation for the desired feature, press #.
5. To accept the displayed data: Press #.
OR
To change or enter data: Dial data, press #.
6. Select an option:
To program another feature: Go to step 4 (in any Pro-
gram 18 procedure).
OR
To program another extension: Press SAVE, dial Y, and
go to step 3 (in any Program 18 procedure).
OR
To exit Program 18: Press SAVE twice.
OR
To exit the program mode: Press SAVE three times.
-To enter another program after exiting: Press its
key.
Program 18: Extension Features (II) Extension Options
268 DIGITAL SYSTEM Administrator’s Guide

To enter Program 18 data
for SD:
1. Enter the program mode.
-Press # + dial SP + dial 5312 + press #.
2. Press key 18 (CONF key) to enter Program 18.
3. Dial extension number, press #.
-For System Speed Dial, dial the number of the
extension you are programming from.
4. Dial SD, press #.
5. Press a lit One-Touch Personal Speed Dial key or (Dial
Personal bins 50-59 or 20-29, press #).
OR
Dial System Speed Dial bin, press #.
-You make One-Touch Speed Dial keys using
Program 17.
6. If you can store a name:
Enter a name, press #. Or, just press # to not store a
name and go to step 7.
OR
If you cannot store a name, go to step 7.
To enter a letter, number, blank:
-Press dial pad button that has desired character.
Zero button= blank, Q, Z, (in that order).
-Dial digit (1, 2, 3) = letter’s position on button
(e.g., dial 1 for 1st letter),
OR
Dial 4 for the button’s number.
-To erase last char., press LAST.
7. Dial a line (01-16) or press a Line key or dial a group
90-98 (if your system has line groups).
-Fast busy tone means: Go to step 4, select another
line in step 7.
-To store Intercom feature codes: Press ICM in step
7, dial codes in step 8.
8. To accept the displayed data: Press #.
OR
To change or enter data: Dial telephone number data,
press #.
-Numbers longer than 16 digits automatically flow
to the next bin.
-To enter a pause, press HOLD.
-To enter a Flash, press MSG, or to enter a Delay,
press DIAL. These options are only available with
software versions AUX Module 02.10/Base 02.00
and higher.
-To enter *: DIAL + dial *.
-To enter #: DIAL + dial #
-To erase a data entry before you press #: Dial *.
Extension Options Program 18: Extension Features (II)
Part II: DIGITAL SYSTEM Programs 269

9. Select an option:
To program more bins: Go to step 5.
OR
To program another feature: Press SAVE once and go
to step 4 (in any Program 18 procedure).
OR
To program another extension: Press SAVE twice, dial
Y, and go to step 3 (in any Program 18 procedure).
OR
To exit Program 18: Press SAVE three times.
OR
To exit the program mode: Press SAVE four times.
-To enter another program after exiting: Press its
key.
Understanding Related Programming
For any option in Program 18, Part II:
Program 15
To assign the appropriate program access level to
extensions so the users can program Program 18 [II]
options themselves
For RA, NR, DRA, PLA, RLP:
Program 16
To give an extension access to a line
Program 4
To set the Delayed Ring timer (for DRA only)
Program 17
To assign a line to a key at an extension (required for PLA
only)
To assign Call Coverage or Pickup keys (for RA, DRA)
For DSS keys:
Program 18 (I)
To enable DSS/BLF keys
For Voice-Announced Intercom calls:
Program 2
To enable voice calls system-wide
For Voice Pages Thru Speaker:
Program 18 (I)
To assign an extension to a page zone
For Speed Dial numbers:
Program 16
To provide an extension with access to a line so you can
store a line with a Personal Speed Dial number
Program 1
To allow/deny access to System Speed Dial numbers in a
Class of Service (see also Program 18 [I])
Program 18 (I)
To assign a Class of Service (from Program 1) to an
extension
Program 18: Extension Features (II) Extension Options
270 DIGITAL SYSTEM Administrator’s Guide

Program 3
To enable/disable dial-out of # in a Speed Dial number
To select the System Speed Dial bin numbers
Program 17
To assign Speed Dial keys, if desired
Program 4
To set the Dial Tone Detection timer (this sets the time the
system waits for dial tone before sending out a Speed Dial
number or after a stored pause)
Extension Options Program 18: Extension Features (II)
Part II: DIGITAL SYSTEM Programs 271

Program 19: Hunt Groups
✆Program 19 is initially set as follows:
•
Circular Hunt Groups = None
•
Terminal Hunt Groups = None
•
UCD/ACD Hunt Groups = None
Program 19 lets you set up Hunt Groups for the Extension Hunting feature. You can
create three types of Hunt Groups:
Circular Hunt Groups
To make Circular Hunt Groups, place extensions into a group in the order you want a
call to hunt. Make the first and last extension in the group the same to form the
circle (loop). An example of a Circular Hunt Group would be: 304, 305, 306, 307,
304. You must also assign a Hunt Type (01, 02, or 03) to each extension in the group
(see the next page for an explanation of these Hunt Types). Each extension in the
group can have a different Hunt Type.
Terminal Hunt Groups
To make Terminal Hunt Groups, place extensions into a group in the order you want
a call to hunt. You must also assign a Hunt Type (01, 02, or 03) to each extension in
the group (see next page for an explanation of these Hunt Types). Each extension in
the group can have a different Hunt Type.
Notes:
•
To have an unanswered outside call ring an attendant, make sure the last exten-
sion in the Terminal Hunt Group is an attendant extension with Hunt Type 00.
•
To have an unanswered outside call ring all extensions that have ringing and ac-
cess on that line, make sure the last extension in the Terminal Hunt Group is a
non-attendant extension with Hunt Type 00. In this case, an unanswered transfer
recalls the transferer before ringing the other extensions.
ACD and UCD Hunt Groups
To make Uniform Call Distribution (UCD) Hunt Groups, you assign a master
extension number to the group, and a hunt type 04 or 05. With type 05, you can also
enter an overflow extension. Then, you enter the members of the group in any order.
For information on UCD Hunt Types, see the next page.
To form an Automatic Call Distribution (ACD) Hunt Group, first form a UCD group,
then assign an ACD Supervisor Extension.
Note:
•
The master extension number must be an uninstalled extension unless it is a mas-
ter number for Voice Mail or Modem Pooling.
FOR FEATURE INFORMATION: See Extension Hunting on page 81 and Automatic Call
Distribution on page 36.
Program 19: Hunt Groups Extension Options
272 DIGITAL SYSTEM Administrator’s Guide

Filling Out the Program Record Form
For Circular and Terminal Groups:
In this box . . . Enter this data . . .
Member Ext. 301-347
Hunt Type 01 - Busy/unanswered outside
calls are sent through the group
02 - Busy/unanswered outside
and Intercom calls are sent
through the group
03 - Unanswered outside calls
are sent through the group
For UCD/ACD Groups
In this box . . . Enter this data . . .
Hunt Type 04-UCD with no overflow
05-UCD with overflow
Master Ext. 301-347
Overflow Ext. (for type 05) 301-347 (do not use Superv.
ext.)
Member Ext. 301-347
Supervisor Ext. 301-347
Extension Options Program 19: Hunt Groups
Part II: DIGITAL SYSTEM Programs 273
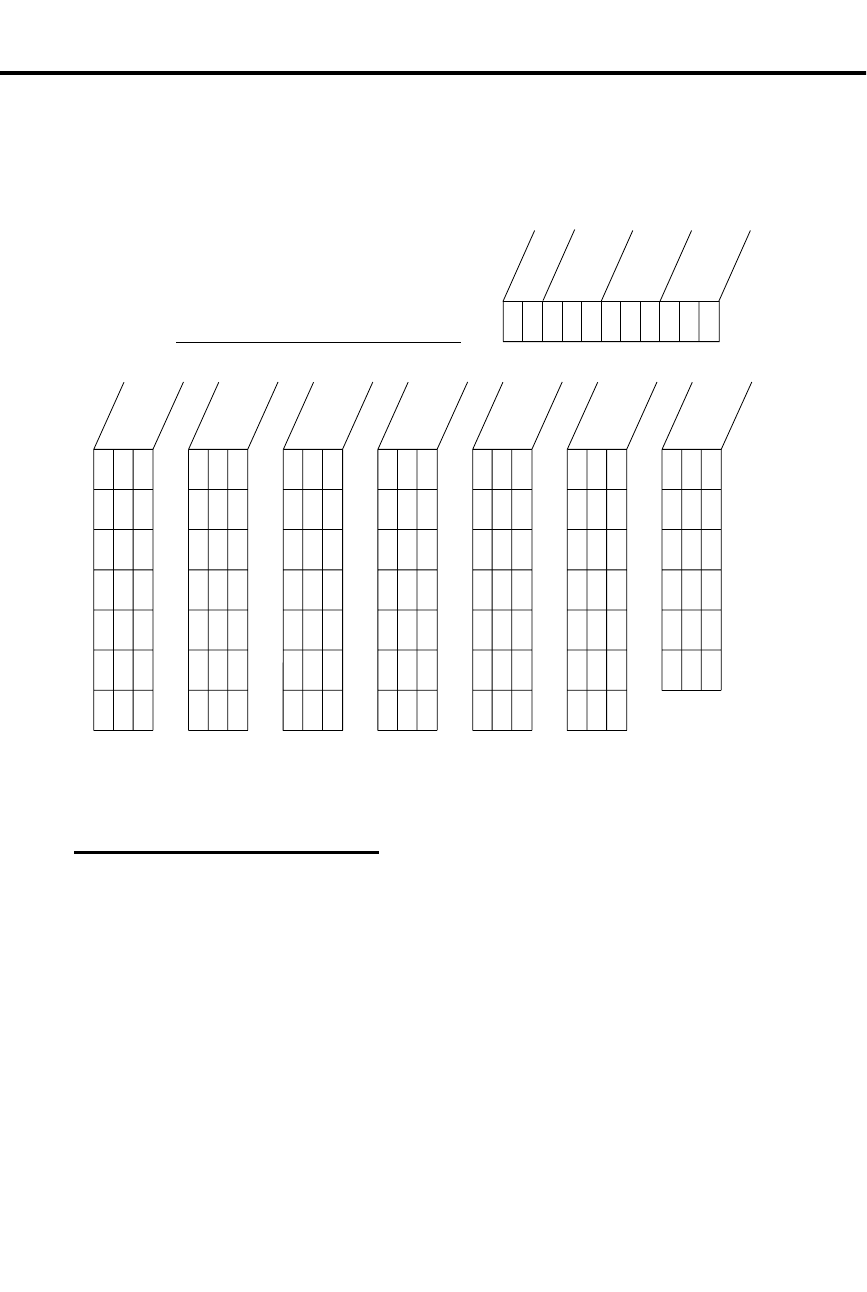
Example
There is a type 05 ACD group for Sales with Master Ext. 306, Overflow Ext. 307,
Supervisor Ext. 301 and Member Exts. 310, 311, 312, 313.
.
Entering Data Into Memory
To enter Program 19 data
for Circular/Terminal Hunt
(types 01, 02, 03):
1. Enter program mode.
-Press # + dial SP + dial 5312 + press #.
2. On a Multibutton phone, press key 19 (MIC/DND key)
to enter Program 19.
3. Dial 01, 02, or 03 to let the system know you want Cir-
cular or Terminal Hunting, not UCD.
-It doesn’t matter which of the three numbers you
enter.
4. Dial Member Ext., press #.
5. Dial Hunt Type for the extension, press #.
6. Repeat steps 4-5 for all Member Exts.
01853C14 (H)
Member
Ext.
Member
Ext.
Member
Ext.
Member
Ext.
Member
Ext.
Member
Ext.
Member
Ext.
Group Name
Overflow
Ext.
Hunt
Type
Master
Ext.
Supervisor
Ext.
0 5 3 0 6 3 0 7 3 0 1
3 1 0
3 1 1
3 1 2
3 1 3
Sales
Program 19: Hunt Groups Extension Options
274 DIGITAL SYSTEM Administrator’s Guide

7. Select an option:
To program another group: Press # until you see
HUNT TYPE -, then go to step 3 (in any Program 19
procedure).
OR
To exit Program 19: Press SAVE once.
OR
To exit the program mode: Press SAVE twice.
-To enter another program after exiting: Press its
key.
To delete a member of a
Circular/Terminal Group:
1. Enter program mode.
-Press # + dial SP + dial 5312 + #.
2. On a Multibutton phone, press key 19 (MIC/DND key)
to enter Program 19.
3. Dial 01, 02, or 03 to let the system know you want Cir-
cular or Terminal Hunt, not UCD.
-It doesn’t matter which of the three numbers you
dial.
4. Dial first Member Ext. in group, press #.
5. Press # until you see the extension you want to delete.
6. If the extension is the last extension in a Terminal
Hunt: Dial 300, press #.
OR
If the extension is in the middle of the group: Dial the
extension that comes after it, press #.
If the group is 304, 305, 306 and you want to delete
305:
-Press # until you see 305 (as explained in step 5).
-Dial 306, press # (as explained in step 6).
7. Continue as follows:
-Press # until you see HUNT TYPE - .
-Dial 01, 02, or 03, press #.
-Dial the extension you just deleted, press #.
-Dial 00 for Hunt Type, press #.
8. Press SAVE until you exit the program mode.
To add a member to a
Circular or Terminal
Group:
1. Enter program mode.
-Press # + dial SP + dial 5312 + press #.
2. On a Multibutton phone, press key 19 (MIC/DND) to
enter Program 19.
3. Dial 01, 02, or 03 to let the system know you want Cir-
cular or Terminal Hunting, not UCD Hunt.
-It doesn’t matter which of the three numbers you
dial.
4. Dial first Member Ext., press #.
5. Press # until you see the extension before which you
want to add an extension.
Extension Options Program 19: Hunt Groups
Part II: DIGITAL SYSTEM Programs 275

-For example, if the group is 304, 305, 306 and you
want to add 307 before 306, press # until you see
306.
6. Dial the extension you want to add, press #. Dial its
Hunt Type, press #. Repeat for the extension after it.
-Using the example, above, do this step for 307, then
306.
7. Press # until you see "HUNT TYPE-."
8. Press SAVE until you exit the program mode.
To enter (or delete)
Program 19 data for
UCD/ACD Hunt Groups
(type 04, 05):
1. Enter program mode.
-Press # + dial SP + dial 5312 + press #.
2. On a Multibutton phone, press key 19 (MIC/DND key)
to enter Program 19.
3. Dial Hunt Type, press #.
4. Dial Master Ext., press #. After step 4 or 5 (depending
on Hunt type), you see the "MASTER EXT." prompt
again.
5. If using type 04: Go to step 6.
OR
For using 05: Dial the overflow extension, press #.
6. Press # to move past "MASTER EXT." prompt.
- You see: UCD MEMBER
OR
To delete the entire group: Dial *, press SAVE, go to
step 10.
7. To enter a Member Ext.: Dial Member Ext., press #.
OR
To delete a Member Ext.: Dial * (you’ll see the next
member).
-To add a Member Ext. to an existing group: Press
# until you see: UCD MEMBER (without an
extension). Then, dial the Member Ext., press #.
8. Repeat step 7 for all members and press SAVE.
9. Select an option:
To program another group: Go to step 3 (in any Pro-
gram 19 procedure).
OR
To exit Program 19: Press SAVE.
OR
To exit the program mode: Press SAVE twice.
-To enter another program after exiting: Press its
key.
To enter Program 19 data
for ACD Supervisor:
1. Enter program mode.
-Press # + dial SP + dial 5312 + press #.
2. On a Multibutton phone, press key 19 (MIC/DND key)
to enter Program 19.
3. Dial 00 for Hunt Type, press #.
Program 19: Hunt Groups Extension Options
276 DIGITAL SYSTEM Administrator’s Guide

4. Dial Master Ext. for the Supervisor’s group, press #.
-You see "UCD MEMBER."
5. Dial Supervisor Ext., press #.
6. Select an option:
To program another Supervisor: Go to step 3.
OR
To exit Program 19: Press SAVE.
OR
To exit the program mode: Press SAVE twice.
-To enter another program after exiting: Press its
key.
To delete an ACD
Supervisor:
1. Enter program mode.
-Press # + dial SP + dial 5312 + press #.
2. On a Multibutton phone, press key 19 (MIC/DND key)
to enter Program 19.
3. Dial Hunt Type for Supervisor’s group, press #.
4. Dial Master Ext. for Supervisor’s Group, press #.
5. Press # until you see the Supervisor’s extension num-
ber.
6. Dial *.
7. Press SAVE.
8. Select an option:
To delete more Supervisors: Go to step 3.
OR
To exit Program 19: Press SAVE.
OR
To exit the program mode: Press SAVE twice.
-To enter another program after exiting: Press its
key.
Understanding Related Programming
For UCD or ACD Groups:
Program 3
To select a VX Master Extension Number if the system is
installed with Voice Mail
Programs 1,18 (I)
To set up a Class of Service (COS) that allows an ACD
Supervisor; To assign that COS to the Supervisor
extensions
Program 17
To assign Hotline or Call Coverage keys to the
Supervisor’s Console or Supervisor’s extension for each
ACD member and for the master extension
Program 4
To set the Camp-On timer
Program 12
To directly terminate a trunk to an UCD/ACD master
extension
Extension Options Program 19: Hunt Groups
Part II: DIGITAL SYSTEM Programs 277

- For your notes -
Program 19: Hunt Groups Extension Options
278 DIGITAL SYSTEM Administrator’s Guide

Initializing the System
Program 20
✆Program 20 is initially set as follows:
•
N/A
Program 20 automatically assigns the initial (default) value to all the feature options
in Programs 1-19. To quickly review the initial values of a program, turn to the first
page of that program and refer to the shaded box in the upper left-hand corner.
FOR FEATURE INFORMATION: N/A
Filling Out the Program Record Form
N/A
Entering Data Into Memory
To use Program 20:
1. Enter program mode.
-Press # + dial SP + dial 5312 + press #.
2. On a Multibutton phone, press key 20 (ICM key) to en-
ter Program 20.
3. Dial Y to initialize and wait for the date and time.
OR
Dial N to exit Program 20.
-When you see the date and time, this means the
database has been initialized.
-To select another program: Press its key.
OR
To exit the program mode: Press SAVE.
Understanding Related Programming
N/A
System Initialization Program 20
Part II: DIGITAL SYSTEM Programs 279

– For your notes –
Program 20 System Initialization
280 DIGITAL SYSTEM Administrator’s Guide

1+NNX Dialing, Programming Allow/ Deny Tables . . . . . . . . . . . . . . . . 217
500/2500 Sets as Power Failure Telephones . . . . . . . . . . . . . . . . . . . . . 6, 147
6-Digit Analysis, Programming Tables . . . . . . . . . . . . . . . . . . . . . . . . . . . 218
AAccess Level, Extension, Programming . . . . . . . . . . . . . . . . . . . . . . 244 - 246
Access Page Zones 1-3, Programming . . . . . . . . . . . . . . . . . . . . . . . . . . . 199
Account Codes. . . . . . . . . . . . . . . . . . . . . . . . . . . . . . . . . . . . . . . . . . . . . . . 23
ACD ACD Announcements . . . . . . . . . . . . . . . . . . . . . . . . . . . . . . . . . . 37
See Automatic Call Distribution
ACD Supervisor Programming . . . . . . . . . . . . . . . . . . . . . . . . . . . . . . . . . 199
Active Dial Pad, Programming . . . . . . . . . . . . . . . . . . . . . . . . . . . . . . . . . 216
Adjusting the Volume Controls . . . . . . . . . . . . . . . . . . . . . . . . . . . . . . . . . 193
Alarm. . . . . . . . . . . . . . . . . . . . . . . . . . . . . . . . . . . . . . . . . . . . . . . . . . . . . . 24
Alerting Device, External . . . . . . . . . . . . . . . . . . . . . . . . . . . . . . . . . . . . . . 84
All Agents Busy, ACD. . . . . . . . . . . . . . . . . . . . . . . . . . . . . . . . . . . . . . . . . 37
All Page (Initiate), Programming . . . . . . . . . . . . . . . . . . . . . . . . . . . . . . . 199
Alphanumeric Display. . . . . . . . . . . . . . . . . . . . . . . . . . . . . . . . . . . . . . 25 - 29
Display Brightness . . . . . . . . . . . . . . . . . . . . . . . . . . . . . . . . . . . . 29
Introduction to. . . . . . . . . . . . . . . . . . . . . . . . . . . . . . . . . . . . . . . . . 7
AlternateSee Split
Alternate Attendant . . . . . . . . . . . . . . . . . . . . . . . . . . . . . . . . . . . . . . . . . . . 30
Analog Station Interface . . . . . . . . . . . . . . . . . . . . . . . . . . . . . . . . . . . . 31 - 35
Feature Operation . . . . . . . . . . . . . . . . . . . . . . . . . . . . . . . . . . . . . 32
Answering Machine Emulation. . . . . . . . . . . . . . . . . . . . . . . . . . . . . . . . . 185
Answering Outside Calls. . . . . . . . . . . . . . . . . . . . . . . . . . . . . . . . . . 132 - 133
ARS See Automatic Route Selection
ASI See Analog Station Interface
Assigned Night Answer. . . . . . . . . . . . . . . . . . . . . . . . . . . . . . . . . . . . . . . 121
Assigning Ringing at Night. . . . . . . . . . . . . . . . . . . . . . . . . . . . . . . . . . . . 124
Attendant
Extension’s Operator, Programming . . . . . . . . . . . . . . . . . . . . . 257
Attendant Features Only
Alarm . . . . . . . . . . . . . . . . . . . . . . . . . . . . . . . . . . . . . . . . . . . . . . 24
Alternate Attendant . . . . . . . . . . . . . . . . . . . . . . . . . . . . . . . . . . . . 30
Call Forwarding System Cancel . . . . . . . . . . . . . . . . . . . . . . . . . . 47
Forced Line Disconnect . . . . . . . . . . . . . . . . . . . . . . . . . . . . . . . . 87
Night Answer . . . . . . . . . . . . . . . . . . . . . . . . . . . . . . . . . . . . . . . 121
Silent Monitor. . . . . . . . . . . . . . . . . . . . . . . . . . . . . . . . . . . . . . . 161
Attendant, Features Not Available to
Call Forwarding . . . . . . . . . . . . . . . . . . . . . . . . . . . . . . . . . . . . . . 44
Callback . . . . . . . . . . . . . . . . . . . . . . . . . . . . . . . . . . . . . . . . . . . . 50
Do Not Disturb . . . . . . . . . . . . . . . . . . . . . . . . . . . . . . . . . . . . . . . 74
Group Listen . . . . . . . . . . . . . . . . . . . . . . . . . . . . . . . . . . . . . . . . . 90
Handsfree . . . . . . . . . . . . . . . . . . . . . . . . . . . . . . . . . . . . . . . . . . . 93
Attendants
Index
Index - 1
telemanuals.com

Multiple Positions . . . . . . . . . . . . . . . . . . . . . . . . . . . . . . . 118 - 119
Authorization Codes, Forced
ARS . . . . . . . . . . . . . . . . . . . . . . . . . . . . . . . . . . . . . . . . . . . . . . . . 40
Automated Attendant . . . . . . . . . . . . . . . . . . . . . . . . . . . . . . . . . . . . 185 - 188
See also Operator Assistance
Automatic Call Answering
See Voice Mail
Automatic Call Distribution . . . . . . . . . . . . . . . . . . . . . . . . . . . . . . . . . 36 - 38
Supervisor Functions . . . . . . . . . . . . . . . . . . . . . . . . . . . . . . . . . . . 36
Supervisor’s DSS Console . . . . . . . . . . . . . . . . . . . . . . . . . . . . . . . 36
Automatic Handsfree . . . . . . . . . . . . . . . . . . . . . . . . . . . . . . . . . . . . . . . . . . 94
Automatic Handsfree, Programming . . . . . . . . . . . . . . . . . . . . . . . . . . . . . 202
Automatic Hold. . . . . . . . . . . . . . . . . . . . . . . . . . . . . . . . . . . . . . . . . . . . . . . 97
Automatic Ringdown . . . . . . . . . . . . . . . . . . . . . . . . . . . . . . . . . . . . . . . . . . 39
Automatic Route Selection. . . . . . . . . . . . . . . . . . . . . . . . . . . . . . . . . . 40 - 41
976/555 Restriction . . . . . . . . . . . . . . . . . . . . . . . . . . . . . . . . . . . . 40
Call Routing . . . . . . . . . . . . . . . . . . . . . . . . . . . . . . . . . . . . . . . . . . 40
Class of Service Control . . . . . . . . . . . . . . . . . . . . . . . . . . . . . . . . 40
Dialing Translation. . . . . . . . . . . . . . . . . . . . . . . . . . . . . . . . . . . . . 40
Forced Authorization Codes. . . . . . . . . . . . . . . . . . . . . . . . . . . . . . 40
Options . . . . . . . . . . . . . . . . . . . . . . . . . . . . . . . . . . . . . . . . . . . . . . 40
Separate Routing . . . . . . . . . . . . . . . . . . . . . . . . . . . . . . . . . . . . . . 40
Time of Day Selection . . . . . . . . . . . . . . . . . . . . . . . . . . . . . . . . . . 40
AUX Port Baud Rate, Programming . . . . . . . . . . . . . . . . . . . . . . . . . . . . . 206
BBackground Music . . . . . . . . . . . . . . . . . . . . . . . . . . . . . . . . . . . . . . . . . . . . 42
Adjusting the Volume. . . . . . . . . . . . . . . . . . . . . . . . . . . . . . . . . . . 42
See also Music and Paging
Turning On and Off . . . . . . . . . . . . . . . . . . . . . . . . . . . . . . . . . . . . 42
Background Music Enable, Programming . . . . . . . . . . . . . . . . . . . . . . . . . 223
Barge-In . . . . . . . . . . . . . . . . . . . . . . . . . . . . . . . . . . . . . . . . . . . . . . . . . . . 106
Battery Backup . . . . . . . . . . . . . . . . . . . . . . . . . . . . . . . . . . . . . . . . . . . . . . . 43
Baud Rate, AUX Port, Programming . . . . . . . . . . . . . . . . . . . . . . . . . . . . . 206
BGM See Background Music
BGM to External Page Zones, Programming. . . . . . . . . . . . . . . . . . . . . . . 224
Blocking Signals from Other Callers
See Privacy
Break Time . . . . . . . . . . . . . . . . . . . . . . . . . . . . . . . . . . . . . . . . . . . . . . . . . 173
Break Time, Programming . . . . . . . . . . . . . . . . . . . . . . . . . . . . . . . . . . . . . 212
Break-In (Intrusion), Programming . . . . . . . . . . . . . . . . . . . . . . . . . . . . . . 198
CCall Coverage . . . . . . . . . . . . . . . . . . . . . . . . . . . . . . . . . . . . . . . . . . 169 - 170
Call Coverage Key, Programming . . . . . . . . . . . . . . . . . . . . . . . . . . . . . . . 251
Call Forwarding . . . . . . . . . . . . . . . . . . . . . . . . . . . . . . . . . . . . . . . . . . 44 - 45
Canceling . . . . . . . . . . . . . . . . . . . . . . . . . . . . . . . . . . . . . . . . . . . . 45
Enabling . . . . . . . . . . . . . . . . . . . . . . . . . . . . . . . . . . . . . . . . . . . . . 44
Personal Greeting . . . . . . . . . . . . . . . . . . . . . . . . . . . . . . . . 145 - 146
To Voice Mail . . . . . . . . . . . . . . . . . . . . . . . . . . . . . . . . . . . . . . . . 185
Index
Index - 2 DIGITAL SYSTEM Administrator’s Guide

Call Forwarding at Attendant
See Alternate Attendant
Call Forwarding System Cancel . . . . . . . . . . . . . . . . . . . . . . . . . . . . . . . . . 47
Call Forwarding, Off Premise . . . . . . . . . . . . . . . . . . . . . . . . . . . . . . . . . . . 46
Call Intercept . . . . . . . . . . . . . . . . . . . . . . . . . . . . . . . . . . . . . . . . . . . . . . . . 48
Call Park . . . . . . . . . . . . . . . . . . . . . . . . . . . . . . . . . . . . . . . . . . . . . . 141 - 142
Call Pickup
Directed. . . . . . . . . . . . . . . . . . . . . . . . . . . . . . . . . . . . . . . . . . . . . 71
Call Pickup Group, Line, Programming . . . . . . . . . . . . . . . . . . . . . . . . . . 234
Call Pickup, Group . . . . . . . . . . . . . . . . . . . . . . . . . . . . . . . . . . . . . . . . 88 - 89
Call Privacy . . . . . . . . . . . . . . . . . . . . . . . . . . . . . . . . . . . . . . . . . . . . . . . . 148
Call Routing, ARS. . . . . . . . . . . . . . . . . . . . . . . . . . . . . . . . . . . . . . . . . . . . 40
Call Timer . . . . . . . . . . . . . . . . . . . . . . . . . . . . . . . . . . . . . . . . . . . . . . . . . . 49
Auto. . . . . . . . . . . . . . . . . . . . . . . . . . . . . . . . . . . . . . . . . . . . . . . . 49
Automatic, Key Programming . . . . . . . . . . . . . . . . . . . . . . . . . . 251
Manual . . . . . . . . . . . . . . . . . . . . . . . . . . . . . . . . . . . . . . . . . . . . . 49
Manual, Key Programming. . . . . . . . . . . . . . . . . . . . . . . . . . . . . 252
Call Waiting . . . . . . . . . . . . . . . . . . . . . . . . . . . . . . . . . . . . . . . . . . . . . . 55 - 56
Call Waiting (Camp On), Programming . . . . . . . . . . . . . . . . . . . . . . . . . . 202
Callback. . . . . . . . . . . . . . . . . . . . . . . . . . . . . . . . . . . . . . . . . . . . . . . . . . . . 50
Canceling . . . . . . . . . . . . . . . . . . . . . . . . . . . . . . . . . . . . . . . . . . . 50
Line . . . . . . . . . . . . . . . . . . . . . . . . . . . . . . . . . . . . . . . . . . . 108 - 109
Callback (Line Queuing) Priority, Programming . . . . . . . . . . . . . . . . . . . 199
Called Number Delivery (CND)
See Caller ID
Called Number Identification (CNI)
See Caller ID
Caller ID . . . . . . . . . . . . . . . . . . . . . . . . . . . . . . . . . . . . . . . . . . . . . . . . 51 - 54
Displays. . . . . . . . . . . . . . . . . . . . . . . . . . . . . . . . . . . . . . . . . . . . . 51
Hardware Considerations . . . . . . . . . . . . . . . . . . . . . . . . . . . . . . . 52
Post-Answer Display . . . . . . . . . . . . . . . . . . . . . . . . . . . . . . . . . . 51
Pre-Answer Display . . . . . . . . . . . . . . . . . . . . . . . . . . . . . . . . . . . 51
Camp-On . . . . . . . . . . . . . . . . . . . . . . . . . . . . . . . . . . . . . . . . . . . . . . . . 55 - 56
Camp-On Timer. . . . . . . . . . . . . . . . . . . . . . . . . . . . . . . . . . . . . . . . . . . . . 172
Camp-On Timer, Programming. . . . . . . . . . . . . . . . . . . . . . . . . . . . . . . . . 210
Camp-On to Busy Extension, Programming. . . . . . . . . . . . . . . . . . . . . . . 198
Canceling Call Forwarding System-Wide. . . . . . . . . . . . . . . . . . . . . . . . . . 47
Centrex Lines. . . . . . . . . . . . . . . . . . . . . . . . . . . . . . . . . . . . . . . . . . . . . . . 135
Centrex/PBX Feature Keys . . . . . . . . . . . . . . . . . . . . . . . . . . . . . . . . . . . . . 57
Circuit Type, Lines, Programming . . . . . . . . . . . . . . . . . . . . . . . . . . . . . . 229
Circular Hunting . . . . . . . . . . . . . . . . . . . . . . . . . . . . . . . . . . . . . . . . . . . . . 81
Class of Service . . . . . . . . . . . . . . . . . . . . . . . . . . . . . . . . . . . . . . . . . . . 58 - 59
Access Page Zones 1-3, Programming . . . . . . . . . . . . . . . . . . . . 199
ACD Supervisor Programming. . . . . . . . . . . . . . . . . . . . . . . . . . 199
All Page (Initiate), Programming . . . . . . . . . . . . . . . . . . . . . . . . 199
Assigning to an Extension . . . . . . . . . . . . . . . . . . . . . . . . . . . . . 256
Break-In (Intrusion), Programming . . . . . . . . . . . . . . . . . . . . . . 198
Callback (Line Queuing) Priority, Programming . . . . . . . . . . . . 199
Camp-On to Busy Extension, Programming . . . . . . . . . . . . . . . 198
Direct Trunk Access & Camp-On, Programming . . . . . . . . . . . 199
Extended Ring, Programming . . . . . . . . . . . . . . . . . . . . . . . . . . 199
Index
Index - 3

Internal Call Forwarding, Programming . . . . . . . . . . . . . . . . . . . 198
Lines . . . . . . . . . . . . . . . . . . . . . . . . . . . . . . . . . . . . . . . . . . . . . . . 235
No Flash at ESL, Programming . . . . . . . . . . . . . . . . . . . . . . . . . . 199
Off-Premise Call Forward, Programming . . . . . . . . . . . . . . . . . . 198
Only Intercom Calls at Night, Programming. . . . . . . . . . . . . . . . 197
Only Local Calls (Day or Night), Programming . . . . . . . . . . . . . 198
Only Local Calls at Night, Programming . . . . . . . . . . . . . . . . . . 198
Privacy, Programming . . . . . . . . . . . . . . . . . . . . . . . . . . . . . . . . . 199
Silent Monitor, Programming . . . . . . . . . . . . . . . . . . . . . . . . . . . 199
Single Ring for ASI Calls, Programming . . . . . . . . . . . . . . . . . . 200
System Speed Dial Access, Programming. . . . . . . . . . . . . . . . . . 198
Toll Restriction Level, Programming. . . . . . . . . . . . . . . . . . . . . . 198
Walking . . . . . . . . . . . . . . . . . . . . . . . . . . . . . . . . . . . . . . . . . . . . 194
See also Walking Class of Service
Class of Service Control
Automatic Route Selection . . . . . . . . . . . . . . . . . . . . . . . . . . . . . . 40
CND See Caller ID
CO CallsAnswering . . . . . . . . . . . . . . . . . . . . . . . . . . . . . . . . . . . . . 132 - 133
Placing . . . . . . . . . . . . . . . . . . . . . . . . . . . . . . . . . . . . . . . . 134 - 137
Codes Dialing Codes to Use Features. . . . . . . . . . . . . . . . . . . . . . . . . . . . . 8
Conference . . . . . . . . . . . . . . . . . . . . . . . . . . . . . . . . . . . . . . . . . . . . . . . . . . 60
Add On . . . . . . . . . . . . . . . . . . . . . . . . . . . . . . . . . . . . . . . . . . . . . . 60
Meet-Me. . . . . . . . . . . . . . . . . . . . . . . . . . . . . . . . . . . . . . . . . . . . 111
Unsupervised . . . . . . . . . . . . . . . . . . . . . . . . . . . . . . . . . . . . . . . . 184
Continuous Dialing, Programming. . . . . . . . . . . . . . . . . . . . . . . . . . . . . . . 216
Conversation Record. . . . . . . . . . . . . . . . . . . . . . . . . . . . . . . . . . . . . . . . . . 185
Cutting off the Microphone . . . . . . . . . . . . . . . . . . . . . . . . . . . . . . . . . . . . 116
DData. . . . . . . . . . . . . . . . . . . . . . . . . . . . . . . . . . . . . . . . . . . . . . . . . . . . . . . . 61
Data Key, Programming. . . . . . . . . . . . . . . . . . . . . . . . . . . . . . . . 252
Dataset, Programming . . . . . . . . . . . . . . . . . . . . . . . . . . . . . . . . . 258
Date and Time. . . . . . . . . . . . . . . . . . . . . . . . . . . . . . . . . . . . . . . . . . . . . . . 177
Delay, in a Speed Dial Bin . . . . . . . . . . . . . . . . . . . . . . . . . . . . . . . . . . . . . 163
Delayed Ringing . . . . . . . . . . . . . . . . . . . . . . . . . . . . . . . . . . . . . . . . . . . . . . 13
Delayed Ringing Assignment
Programming . . . . . . . . . . . . . . . . . . . . . . . . . . . . . . . . . . . . . . . . 263
Delayed Ringing Assignments . . . . . . . . . . . . . . . . . . . . . . . . . . . . . . . . . . . 62
Dial 1 Before Area Code, Programming . . . . . . . . . . . . . . . . . . . . . . . . . . 206
Dial Tone Detect Time . . . . . . . . . . . . . . . . . . . . . . . . . . . . . . . . . . . . . . . . 173
Dial Tone Detect Time, Programming . . . . . . . . . . . . . . . . . . . . . . . . . . . . 211
Dialing Codes to Use Features . . . . . . . . . . . . . . . . . . . . . . . . . . . . . . . . . . . . 8
Dialing from Your PC
See Telemarketing Dial
Dialing Handsfree . . . . . . . . . . . . . . . . . . . . . . . . . . . . . . . . . . . . . . . . . . . . . 93
Dialing Number Preview . . . . . . . . . . . . . . . . . . . . . . . . . . . . . . . . . . . . . . . 63
Dialing Plan . . . . . . . . . . . . . . . . . . . . . . . . . . . . . . . . . . . . . . . . . . . . . . . . . 12
Dialing Restrictions
Index
Index - 4 DIGITAL SYSTEM Administrator’s Guide

See Toll Restriction
Dialing Translation, ARS . . . . . . . . . . . . . . . . . . . . . . . . . . . . . . . . . . . . . . 40
Digital Door Box . . . . . . . . . . . . . . . . . . . . . . . . . . . . . . . . . . . . . . . . . . 75 - 76
DIL Direct DIL Termination (Day), Programming . . . . . . . . . . . . . . 234
DILs See Direct Inward Lines
Direct DIL Termination (Night), Programming . . . . . . . . . . . . . . . . . . . . 234
Direct Inward Lines. . . . . . . . . . . . . . . . . . . . . . . . . . . . . . . . . . . . . . . . 64 - 65
Direct Station Selection
DSS Console. . . . . . . . . . . . . . . . . . . . . . . . . . . . . . . . . . . . . . 66 - 68
Extension. . . . . . . . . . . . . . . . . . . . . . . . . . . . . . . . . . . . . . . . . 69 - 70
Programming . . . . . . . . . . . . . . . . . . . . . . . . . . . . . . . . . . . 257, 264
Direct Trunk Access & Camp-On Programming . . . . . . . . . . . . . . . . . . . 199
Directed Call Pickup . . . . . . . . . . . . . . . . . . . . . . . . . . . . . . . . . . . . . . . . . . 71
Directory Dialing. . . . . . . . . . . . . . . . . . . . . . . . . . . . . . . . . . . . . . . . . . 72 - 73
Disconnecting Lines . . . . . . . . . . . . . . . . . . . . . . . . . . . . . . . . . . . . . . . . . . 87
Display Messages . . . . . . . . . . . . . . . . . . . . . . . . . . . . . . . . . . . . . . . 159 - 160
Display Messages, Programming . . . . . . . . . . . . . . . . . . . . . . . . . . . 227 - 228
Distinctive Ringing . . . . . . . . . . . . . . . . . . . . . . . . . . . . . . . . . . . . . . . . . . 156
Programming . . . . . . . . . . . . . . . . . . . . . . . . . . . . . . . . . . . . . . . 235
DND See Do Not Disturb
Do Not Disturb . . . . . . . . . . . . . . . . . . . . . . . . . . . . . . . . . . . . . . . . . . . . . . 74
Programming . . . . . . . . . . . . . . . . . . . . . . . . . . . . . . . . . . . . . . . 256
Door Box . . . . . . . . . . . . . . . . . . . . . . . . . . . . . . . . . . . . . . . . . . . . . . . . 75 - 76
Door Strike Release
See Relay Box
DP and DTMF Compatibility . . . . . . . . . . . . . . . . . . . . . . . . . . . . . . . . 77 - 78
DSS If You Have a DSS Console . . . . . . . . . . . . . . . . . . . . . . . . . . . . . . 8
DSS Console . . . . . . . . . . . . . . . . . . . . . . . . . . . . . . . . . . . . . . . . . . . . . 66 - 68
DSS Console Block, Programming. . . . . . . . . . . . . . . . . . . . . . . . . . . . . . 241
DSS Console Owner, Programming . . . . . . . . . . . . . . . . . . . . . . . . . . . . . 241
EEqual Access Compatibility . . . . . . . . . . . . . . . . . . . . . . . . . . . . . . . . . . . . 79
Equal Access Dialing, Programming . . . . . . . . . . . . . . . . . . . . . . . . . . . . 217
Equal Access Routing
ARS. . . . . . . . . . . . . . . . . . . . . . . . . . . . . . . . . . . . . . . . . . . . . . . . 40
Exchange Restriction
ARS. . . . . . . . . . . . . . . . . . . . . . . . . . . . . . . . . . . . . . . . . . . . . . . . 40
Exclusive Hold . . . . . . . . . . . . . . . . . . . . . . . . . . . . . . . . . . . . . . . . . . . . . . 98
Extended Ring, Programming. . . . . . . . . . . . . . . . . . . . . . . . . . . . . . . . . . 199
Extended Ringing . . . . . . . . . . . . . . . . . . . . . . . . . . . . . . . . . . . . . . . . . . . . 80
Extending Calls to a Co-Worker
See Transfer
Extension Callback . . . . . . . . . . . . . . . . . . . . . . . . . . . . . . . . . . . . . . . . . . . 50
Extension Circuit Type, Programming . . . . . . . . . . . . . . . . . . . . . . . . . . . 239
Extension Class of Service . . . . . . . . . . . . . . . . . . . . . . . . . . . . . . . . . . 58 - 59
Extension Features (I)
Index
Index - 5

Class of Service, Assigning to an Extension . . . . . . . . . . . . . . . . 256
Dataset, Programming . . . . . . . . . . . . . . . . . . . . . . . . . . . . . . . . . 258
Direct Station Selection, Programming . . . . . . . . . . . . . . . . . . . . 257
Do Not Disturb, Programming. . . . . . . . . . . . . . . . . . . . . . . . . . . 256
Group Call Pickup, Member Programming. . . . . . . . . . . . . . . . . 256
Group Ring Member, Programming . . . . . . . . . . . . . . . . . . . . . . 256
Line Dial Up, Programming . . . . . . . . . . . . . . . . . . . . . . . . . . . . 257
Off-Hook Signaling, Programming . . . . . . . . . . . . . . . . . . . . . . . 257
Operator for Extension, Programming. . . . . . . . . . . . . . . . . . . . . 257
Paging, Zone Member, Programming . . . . . . . . . . . . . . . . . . . . . 257
Privacy Release Groups, Programming . . . . . . . . . . . . . . . . . . . . 257
Speed Dial Block, Programming . . . . . . . . . . . . . . . . . . . . . . . . . 257
Voice Mail Key, Programming. . . . . . . . . . . . . . . . . . . . . . . . . . . 258
Extension Features (II)
Direct Station Selection, Programming . . . . . . . . . . . . . . . . . . . . 264
Headset, Programming. . . . . . . . . . . . . . . . . . . . . . . . . . . . . . . . . 264
Hotline, Programming . . . . . . . . . . . . . . . . . . . . . . . . . . . . . . . . . 264
Incoming Voice Call, Programming. . . . . . . . . . . . . . . . . . . . . . . 264
Night Ringing. . . . . . . . . . . . . . . . . . . . . . . . . . . . . . . . . . . . . . . . 263
Page (Voice Page), Programming . . . . . . . . . . . . . . . . . . . . . . . . 264
Prime Line Assignment, Programming . . . . . . . . . . . . . . . . . . . . 264
Ringing Assignments, Day/Night, Programming . . . . . . . . . . . . 263
Ringing Assignments, Delayed, Programming . . . . . . . . . . . . . . 263
Ringing Line Preference, Programming . . . . . . . . . . . . . . . . . . . 264
Speed Dial, Storing (Using Program 18 [II]). . . . . . . . . . . . . . . . 265
Whisper Page, Programming . . . . . . . . . . . . . . . . . . . . . . . . . . . . 265
Extension Hotline . . . . . . . . . . . . . . . . . . . . . . . . . . . . . . . . . . . . . . . 101 - 102
Extension Hunting . . . . . . . . . . . . . . . . . . . . . . . . . . . . . . . . . . . . . . . . 81 - 83
Circular Hunting. . . . . . . . . . . . . . . . . . . . . . . . . . . . . . . . . . . . . . . 81
Programming . . . . . . . . . . . . . . . . . . . . . . . . . . . . . . . . . . . 272 - 278
Terminal Hunting . . . . . . . . . . . . . . . . . . . . . . . . . . . . . . . . . . . . . . 81
Uniform Call Distribution (UCD) . . . . . . . . . . . . . . . . . . . . . . . . . 82
Extension Key Assignments
Automatic Call Timer Key, Programming . . . . . . . . . . . . . . . . . . 251
Call Coverage, Programming. . . . . . . . . . . . . . . . . . . . . . . . . . . . 251
Data Key, Programming. . . . . . . . . . . . . . . . . . . . . . . . . . . . . . . . 252
Group Pickup, Programming . . . . . . . . . . . . . . . . . . . . . . . . . . . . 251
Hotline, Programming . . . . . . . . . . . . . . . . . . . . . . . . . . . . . . . . . 251
Line Key, Programming . . . . . . . . . . . . . . . . . . . . . . . . . . . . . . . . 250
Loop Group Keys, Programming. . . . . . . . . . . . . . . . . . . . . . . . . 250
Manual Call Timer Key, Programming . . . . . . . . . . . . . . . . . . . . 252
One-Touch Speed Dial Key, Programming . . . . . . . . . . . . . . . . . 251
Page Zone Key, Programming . . . . . . . . . . . . . . . . . . . . . . . . . . . 251
Park Orbit Key, Programming . . . . . . . . . . . . . . . . . . . . . . . . . . . 251
Record Key, Programming. . . . . . . . . . . . . . . . . . . . . . . . . . . . . . 252
Switched Loop Keys, Programming . . . . . . . . . . . . . . . . . . . . . . 250
Undefined Key, Programming . . . . . . . . . . . . . . . . . . . . . . . . . . . 250
Extension Numbering, Programming. . . . . . . . . . . . . . . . . . . . . . . . . . . . . 239
Extension Port Characteristics
Circuit Type, Programming . . . . . . . . . . . . . . . . . . . . . . . . . . . . . 239
DSS Owner. . . . . . . . . . . . . . . . . . . . . . . . . . . . . . . . . . . . . . . . . . 241
Index
Index - 6 DIGITAL SYSTEM Administrator’s Guide
telemanuals.com

Extension Name . . . . . . . . . . . . . . . . . . . . . . . . . . . . . . . . . . . . . 241
Extension Numbering, Programming. . . . . . . . . . . . . . . . . . . . . 239
Extension Port Characteristics, Programming . . . . . . . . . . . . . . . . . . . . . 239
Extensions
Access Level, Programming . . . . . . . . . . . . . . . . . . . . . . . . 244 - 246
Key Assignments, Programming . . . . . . . . . . . . . . . . . . . . 250 - 255
Line Access, Programming. . . . . . . . . . . . . . . . . . . . . . . . . 247 - 249
Line Group Access, Programming . . . . . . . . . . . . . . . . . . . 247 - 249
Name, Programming. . . . . . . . . . . . . . . . . . . . . . . . . . . . . . . . . . 241
Operator, Programming . . . . . . . . . . . . . . . . . . . . . . . . . . . . . . . 257
Removing . . . . . . . . . . . . . . . . . . . . . . . . . . . . . . . . . . . . . . . . . . 153
External Alerting Device . . . . . . . . . . . . . . . . . . . . . . . . . . . . . . . . . . . . . . . 84
External Zone Paging . . . . . . . . . . . . . . . . . . . . . . . . . . . . . . . . . . . . . . . . 138
FFeature Keys for Centrex/PBX . . . . . . . . . . . . . . . . . . . . . . . . . . . . . . . . . . 57
Flash. . . . . . . . . . . . . . . . . . . . . . . . . . . . . . . . . . . . . . . . . . . . . . . . . . . . . . . 85
In a Speed Dial Bin. . . . . . . . . . . . . . . . . . . . . . . . . . . . . . . . . . . 163
Flash Response Time. . . . . . . . . . . . . . . . . . . . . . . . . . . . . . . . . . . . . . . . . 173
Flash Response Time, Programming. . . . . . . . . . . . . . . . . . . . . . . . . . . . . 211
Flexible Numbering Plan. . . . . . . . . . . . . . . . . . . . . . . . . . . . . . . . . . . . . . . 86
Flexible Numbering Plan, Extensions. . . . . . . . . . . . . . . . . . . . . . . . . . . . 239
Forced Authorization Codes
ARS. . . . . . . . . . . . . . . . . . . . . . . . . . . . . . . . . . . . . . . . . . . . . . . . 40
Forced Line Disconnect. . . . . . . . . . . . . . . . . . . . . . . . . . . . . . . . . . . . . . . . 87
GGain, Lines, Programming . . . . . . . . . . . . . . . . . . . . . . . . . . . . . . . . . . . . 229
Group Call Pickup . . . . . . . . . . . . . . . . . . . . . . . . . . . . . . . . . . . . . . . . . 88 - 89
Key Programming. . . . . . . . . . . . . . . . . . . . . . . . . . . . . . . . . . . . 251
Member, Programming. . . . . . . . . . . . . . . . . . . . . . . . . . . . . . . . 256
Group Listen . . . . . . . . . . . . . . . . . . . . . . . . . . . . . . . . . . . . . . . . . . . . . . . . 90
Group Ring
Member, Programming. . . . . . . . . . . . . . . . . . . . . . . . . . . . . . . . 256
Group Ringing. . . . . . . . . . . . . . . . . . . . . . . . . . . . . . . . . . . . . . . . . . . . 91 - 92
Groups Call Pickup . . . . . . . . . . . . . . . . . . . . . . . . . . . . . . . . . . . . . . . 88 - 89
Line Group Access, Extensions, Programming . . . . . . . . . 247 - 249
Groups, Lines, Programming . . . . . . . . . . . . . . . . . . . . . . . . . . . . . . 232 - 233
GTE Sprint
See Other Common Carriers
HHandsfree. . . . . . . . . . . . . . . . . . . . . . . . . . . . . . . . . . . . . . . . . . . . . . . . . . . 93
Automatic . . . . . . . . . . . . . . . . . . . . . . . . . . . . . . . . . . . . . . . . . . . 94
Using Handsfree Instead of the Handset . . . . . . . . . . . . . . . . . . . . 7
Handsfree Dialing (without a speakerphone) . . . . . . . . . . . . . . . . . . . . . . 117
Handsfree Reply on Intercom, Programming . . . . . . . . . . . . . . . . . . . . . . 202
Headset Programming . . . . . . . . . . . . . . . . . . . . . . . . . . . . . . . . . . . . . . . 264
Headset. . . . . . . . . . . . . . . . . . . . . . . . . . . . . . . . . . . . . . . . . . . . . . . . . . 95 - 96
Index
Index - 7
telemanuals.com

Hearing Tones from Other Callers
See Off-Hook Signaling
Hierarchial Class of Service Control, ARS . . . . . . . . . . . . . . . . . . . . . . . . . 40
Hold Automatic. . . . . . . . . . . . . . . . . . . . . . . . . . . . . . . . . . . . . . . . . . . . 97
Exclusive . . . . . . . . . . . . . . . . . . . . . . . . . . . . . . . . . . . . . . . . . . . . 98
Regular . . . . . . . . . . . . . . . . . . . . . . . . . . . . . . . . . . . . . . . . . 99 - 100
Hold Recall Timer. . . . . . . . . . . . . . . . . . . . . . . . . . . . . . . . . . . . . . . . . . . . 172
Hold Recall Timer, Programming. . . . . . . . . . . . . . . . . . . . . . . . . . . . . . . . 210
Hold, Intercom
See Hold, Regular
Hold, System
See Hold, Regular
Hotline. . . . . . . . . . . . . . . . . . . . . . . . . . . . . . . . . . . . . . . . . . . . . . . . 101 - 102
Programming . . . . . . . . . . . . . . . . . . . . . . . . . . . . . . . . . . . . 251, 264
Hunting Circular. . . . . . . . . . . . . . . . . . . . . . . . . . . . . . . . . . . . . . . . . . . . . . 81
Terminal . . . . . . . . . . . . . . . . . . . . . . . . . . . . . . . . . . . . . . . . . . . . . 81
UCD . . . . . . . . . . . . . . . . . . . . . . . . . . . . . . . . . . . . . . . . . . . . . . . . 82
Hunting, Extension . . . . . . . . . . . . . . . . . . . . . . . . . . . . . . . . . . . . . . . . 81 - 83
IIdentifying Tone Patterns . . . . . . . . . . . . . . . . . . . . . . . . . . . . . . . . . . . . . . 180
Incoming Voice Call, Programming . . . . . . . . . . . . . . . . . . . . . . . . . . . . . . 264
Integrated Voice Messaging
See Voice Mail
Intercept of Calls. . . . . . . . . . . . . . . . . . . . . . . . . . . . . . . . . . . . . . . . . . . . . . 48
IntercomIncoming Voice Call, Programming. . . . . . . . . . . . . . . . . . . . . . . 264
Intercom . . . . . . . . . . . . . . . . . . . . . . . . . . . . . . . . . . . . . . . . . . . . . . 103 - 105
Intercom Signaling
Automatic Handsfree, Programming . . . . . . . . . . . . . . . . . . . . . . 202
Call Waiting (Camp On), Programming . . . . . . . . . . . . . . . . . . . 202
Handsfree Reply on Intercom, Programming . . . . . . . . . . . . . . . 202
Voice Announced Intercom Calls, Programming . . . . . . . . . . . . 202
Interdigit Time . . . . . . . . . . . . . . . . . . . . . . . . . . . . . . . . . . . . . . . . . . . . . . 173
Interdigit Time, Programming . . . . . . . . . . . . . . . . . . . . . . . . . . . . . . . . . . 212
Internal Call Forwarding, Programming . . . . . . . . . . . . . . . . . . . . . . . . . . 198
Internal Zone Paging. . . . . . . . . . . . . . . . . . . . . . . . . . . . . . . . . . . . . 138 - 140
International Call Routing
ARS . . . . . . . . . . . . . . . . . . . . . . . . . . . . . . . . . . . . . . . . . . . . . . . . 40
International Dialing, Programming. . . . . . . . . . . . . . . . . . . . . . . . . . . . . . 217
Intrusion (Barge-In) . . . . . . . . . . . . . . . . . . . . . . . . . . . . . . . . . . . . . . . . . . 106
KKeys, Extensions, Programming. . . . . . . . . . . . . . . . . . . . . . . . . . . . 250 - 255
LLast Number Redial . . . . . . . . . . . . . . . . . . . . . . . . . . . . . . . . . . . . . . . . . . 107
Leaving a Message Waiting . . . . . . . . . . . . . . . . . . . . . . . . . . . . . . . 113 - 114
Leaving a Voice Message . . . . . . . . . . . . . . . . . . . . . . . . . . . . . . . . . . . . . . 185
Index
Index - 8 DIGITAL SYSTEM Administrator’s Guide

LEDs Your Telephone’s Key Lights . . . . . . . . . . . . . . . . . . . . . . . . . . . . . 7
Line & Group Access, Extensions, Programming . . . . . . . . . . . . . . 247 - 249
Line Circuit Type, Programming. . . . . . . . . . . . . . . . . . . . . . . . . . . . . . . . 229
Line Disconnect
Forced . . . . . . . . . . . . . . . . . . . . . . . . . . . . . . . . . . . . . . . . . . . . . . 87
Line Features
Call Pickup Group, Programming . . . . . . . . . . . . . . . . . . . . . . . 234
Class of Service. . . . . . . . . . . . . . . . . . . . . . . . . . . . . . . . . . . . . . 235
Direct DIL Termination (Day), Programming . . . . . . . . . . . . . . 234
Direct DIL Termination (Night), Programming . . . . . . . . . . . . . 234
Toll Restriction, Programming . . . . . . . . . . . . . . . . . . . . . . . . . . 234
Line Gain, Programming. . . . . . . . . . . . . . . . . . . . . . . . . . . . . . . . . . . . . . 229
Line Groups, Programming. . . . . . . . . . . . . . . . . . . . . . . . . . . . . . . . 232 - 233
Line Keys, Programming. . . . . . . . . . . . . . . . . . . . . . . . . . . . . . . . . . . . . . 250
Line Name, Programming . . . . . . . . . . . . . . . . . . . . . . . . . . . . . . . . . . . . . 229
Line Preference . . . . . . . . . . . . . . . . . . . . . . . . . . . . . . . . . . . . . . . . . . . . . 155
Line Queuing . . . . . . . . . . . . . . . . . . . . . . . . . . . . . . . . . . . . . . . . . . . 108 - 109
Line Response Time . . . . . . . . . . . . . . . . . . . . . . . . . . . . . . . . . . . . . . . . . 172
Line Response Timer, Programming. . . . . . . . . . . . . . . . . . . . . . . . . . . . . 210
Line Rotaries
See Line Groups
Lines Circuit Type, Programming . . . . . . . . . . . . . . . . . . . . . . . . . . . . 229
Direct DIL Termination (Day), Programming . . . . . . . . . . . . . . 234
Direct DIL Termination (Night), Programming . . . . . . . . . . . . . 234
Group Call Pickup, Programming . . . . . . . . . . . . . . . . . . . . . . . 234
Keys, Programming . . . . . . . . . . . . . . . . . . . . . . . . . . . . . . . . . . 250
Line Gain, Programming . . . . . . . . . . . . . . . . . . . . . . . . . . . . . . 229
Line Name, Programming . . . . . . . . . . . . . . . . . . . . . . . . . . . . . 229
PBX Line, Programming . . . . . . . . . . . . . . . . . . . . . . . . . . . . . . 229
Removing . . . . . . . . . . . . . . . . . . . . . . . . . . . . . . . . . . . . . . . . . . 153
Side Tone Test, Programming. . . . . . . . . . . . . . . . . . . . . . . . . . . 229
Toll Restriction, Programming . . . . . . . . . . . . . . . . . . . . . . . . . . 234
Loop Keys, Programming . . . . . . . . . . . . . . . . . . . . . . . . . . . . . . . . . . . . . 250
Loud Ringing. . . . . . . . . . . . . . . . . . . . . . . . . . . . . . . . . . . . . . . . . . . . . . . . 84
MMailbox Call Forwarding . . . . . . . . . . . . . . . . . . . . . . . . . . . . . . . . . . . . . 185
Mailbox Transfer . . . . . . . . . . . . . . . . . . . . . . . . . . . . . . . . . . . . . . . . . . . . 185
Mailboxes
See Voice Mail
Maintenance Utilities and Reports . . . . . . . . . . . . . . . . . . . . . . . . . . . . . . 110
Make Time, Programming. . . . . . . . . . . . . . . . . . . . . . . . . . . . . . . . . . . . . 211
Make Timer . . . . . . . . . . . . . . . . . . . . . . . . . . . . . . . . . . . . . . . . . . . . . . . . 173
MCI See Other Common Carriers
Meet-Me Conference. . . . . . . . . . . . . . . . . . . . . . . . . . . . . . . . . . . . . . . . . 111
Message Center . . . . . . . . . . . . . . . . . . . . . . . . . . . . . . . . . . . . . . . . . . . . . 112
Message View, Voice Mail. . . . . . . . . . . . . . . . . . . . . . . . . . . . . . . . . . . . . 185
Message Waiting . . . . . . . . . . . . . . . . . . . . . . . . . . . . . . . . . . . . . . . . 113 - 114
Index
Index - 9

To Voice Mail . . . . . . . . . . . . . . . . . . . . . . . . . . . . . . . . . . . . . . . . 185
Messages, from VMU. . . . . . . . . . . . . . . . . . . . . . . . . . . . . . . . . . . . 191 - 192
Microphone Cutoff . . . . . . . . . . . . . . . . . . . . . . . . . . . . . . . . . . . . . . . . . . . 116
Microphone Mute . . . . . . . . . . . . . . . . . . . . . . . . . . . . . . . . . . . . . . . . . . . . 115
Modem Reserve Time. . . . . . . . . . . . . . . . . . . . . . . . . . . . . . . . . . . . . . . . . 172
Modem Reserve Timer, Programming . . . . . . . . . . . . . . . . . . . . . . . . . . . . 210
MOH See Music on Hold
Monitor Silent. . . . . . . . . . . . . . . . . . . . . . . . . . . . . . . . . . . . . . . . . . . . . . . 161
Monitor. . . . . . . . . . . . . . . . . . . . . . . . . . . . . . . . . . . . . . . . . . . . . . . . . . . . 117
Multibutton Telephone . . . . . . . . . . . . . . . . . . . . . . . . . . . . . . . . . . . . . . . . . . 6
Programmable Keys. . . . . . . . . . . . . . . . . . . . . . . . . . . . . . 151 - 152
Multiple Attendant Positions . . . . . . . . . . . . . . . . . . . . . . . . . . . . . . 118 - 119
Multiple Tenants
See Tenant Service
Music and Paging
Background Music Enable, Programming. . . . . . . . . . . . . . . . . . 223
BGM to External Page Zones, Programming . . . . . . . . . . . . . . . 224
Music on Hold Enable, Programming . . . . . . . . . . . . . . . . . . . . . 223
Paging and Music Gain, Programming . . . . . . . . . . . . . . . . . . . . 224
Paging, External All Call Audible Ring. . . . . . . . . . . . . . . . . . . . 223
Paging, External All Call, Programming . . . . . . . . . . . . . . . . . . . 223
Paging, External Zone 1, Programming. . . . . . . . . . . . . . . . . . . . 223
Paging, External Zone 2, Programming. . . . . . . . . . . . . . . . . . . . 224
Paging, Relay 01 Owner, Programming . . . . . . . . . . . . . . . . . . . 224
Paging, Relay 02 Owner, Programming . . . . . . . . . . . . . . . . . . . 224
Ringing, Interrupted Ring Relays, Programming . . . . . . . . . . . . 224
Music and Paging Gain, Programming . . . . . . . . . . . . . . . . . . . . . . . . . . . 224
Music on Hold . . . . . . . . . . . . . . . . . . . . . . . . . . . . . . . . . . . . . . . . . . . . . . 120
See also Music and Paging
Music on Hold Enable, Programming . . . . . . . . . . . . . . . . . . . . . . . . . . . . 223
Muting the Microphone . . . . . . . . . . . . . . . . . . . . . . . . . . . . . . . . . . . . . . . 115
NN11 (Special) Dialing, Programming. . . . . . . . . . . . . . . . . . . . . . . . . . . . . 216
Name, Extensions, Programming . . . . . . . . . . . . . . . . . . . . . . . . . . . . . . . . 241
Name, Lines, Programming . . . . . . . . . . . . . . . . . . . . . . . . . . . . . . . . . . . . 229
Night Answer . . . . . . . . . . . . . . . . . . . . . . . . . . . . . . . . . . . . . . . . . . 121 - 123
External Alerting . . . . . . . . . . . . . . . . . . . . . . . . . . . . . . . . . . . . . 123
Night Ringing
Assignments, Programming. . . . . . . . . . . . . . . . . . . . . . . . . . . . . 263
Direct DIL Termination (Night), Programming. . . . . . . . . . . . . . 234
Night Ringing Assignments . . . . . . . . . . . . . . . . . . . . . . . . . . . . . . . . . . . . 124
Night Service . . . . . . . . . . . . . . . . . . . . . . . . . . . . . . . . . . . . . . . . . . 121 - 123
NNX Dialing, Programming Allow/Deny Tables. . . . . . . . . . . . . . . . . . . . 217
No Flash at ESL, Programming . . . . . . . . . . . . . . . . . . . . . . . . . . . . . . . . . 199
Non-Blocking System Architecture . . . . . . . . . . . . . . . . . . . . . . . . . . . . . . 125
NPA Dialing, Programming Allow/Deny Tables . . . . . . . . . . . . . . . . . . . . 218
Number of Delayed Rings . . . . . . . . . . . . . . . . . . . . . . . . . . . . . . . . . . . . . 172
Number of Delayed Rings, Programming . . . . . . . . . . . . . . . . . . . . . . . . . 211
Index
Index - 10 DIGITAL SYSTEM Administrator’s Guide

Number of Operators, Programming. . . . . . . . . . . . . . . . . . . . . . . . . . . . . 205
Number of Rings Before Recall . . . . . . . . . . . . . . . . . . . . . . . . . . . . . . . . 172
Number of Rings Before Recall, Programming . . . . . . . . . . . . . . . . . . . . 210
Number of System Speed Dial Dgts, Programming . . . . . . . . . . . . . . . . . 205
Number Preview . . . . . . . . . . . . . . . . . . . . . . . . . . . . . . . . . . . . . . . . . . . . . 63
Number Redial. . . . . . . . . . . . . . . . . . . . . . . . . . . . . . . . . . . . . . . . . . . . . . 107
Number Save . . . . . . . . . . . . . . . . . . . . . . . . . . . . . . . . . . . . . . . . . . . . . . . 158
Numbering
Flexible . . . . . . . . . . . . . . . . . . . . . . . . . . . . . . . . . . . . . . . . . . . . . 86
OOCC See Other Common Carriers
Off-Hook Ringing . . . . . . . . . . . . . . . . . . . . . . . . . . . . . . . . . . . . . . . . . . . 126
Off-Hook Signaling . . . . . . . . . . . . . . . . . . . . . . . . . . . . . . . . . . . . . . 126 - 127
Programming . . . . . . . . . . . . . . . . . . . . . . . . . . . . . . . . . . . . . . . 257
Off-Hours Ringing. . . . . . . . . . . . . . . . . . . . . . . . . . . . . . . . . . . . . . . 121 - 123
Off-Premise Call Forwarding, Programming . . . . . . . . . . . . . . . . . . . . . . 198
One-Touch Speed Dial Key, Programming . . . . . . . . . . . . . . . . . . . . . . . . 251
Only Intercom Calls at Night, Programming . . . . . . . . . . . . . . . . . . . . . . 197
Only Local Calls (Day or Night), Programming. . . . . . . . . . . . . . . . . . . . 198
Only Local Calls at Night, Programming . . . . . . . . . . . . . . . . . . . . . . . . . 198
OperatorProgramming . . . . . . . . . . . . . . . . . . . . . . . . . . . . . . . . . . . . . . . 257
Operator (0+) Dialing, Programming . . . . . . . . . . . . . . . . . . . . . . . . . . . . 217
Operator Assistance . . . . . . . . . . . . . . . . . . . . . . . . . . . . . . . . . . . . . . 128 - 130
Operator Assistance Routing
ARS. . . . . . . . . . . . . . . . . . . . . . . . . . . . . . . . . . . . . . . . . . . . . . . . 40
Operator Extension, Programming . . . . . . . . . . . . . . . . . . . . . . . . . . . . . . 205
Operators (Number of), Programming . . . . . . . . . . . . . . . . . . . . . . . . . . . 205
OPX Call Forwarding . . . . . . . . . . . . . . . . . . . . . . . . . . . . . . . . . . . . . . . . . 46
Other Common Carriers . . . . . . . . . . . . . . . . . . . . . . . . . . . . . . . . . . . . . . 131
Outside Calls
Answering. . . . . . . . . . . . . . . . . . . . . . . . . . . . . . . . . . . . . . 132 - 133
Placing. . . . . . . . . . . . . . . . . . . . . . . . . . . . . . . . . . . . . . . . . 134 - 137
Placing, using Direct Line (Trunk) Access. . . . . . . . . . . . . . . . . 134
Placing, using Direct Line Group Access. . . . . . . . . . . . . . . . . . 134
Placing, using Line Dial-Up . . . . . . . . . . . . . . . . . . . . . . . . . . . . 134
Placing, using PBX/Centrex lines . . . . . . . . . . . . . . . . . . . . . . . 135
Placing, using Prime Line. . . . . . . . . . . . . . . . . . . . . . . . . . . . . . 134
Private Lines . . . . . . . . . . . . . . . . . . . . . . . . . . . . . . . . . . . . . . . . 150
Transfer . . . . . . . . . . . . . . . . . . . . . . . . . . . . . . . . . . . . . . . . 182 - 183
Outside Calls, Answering
Caller ID . . . . . . . . . . . . . . . . . . . . . . . . . . . . . . . . . . . . . . . . . 51 - 54
Outside Calls, Placing
Line Dial Up, Programming . . . . . . . . . . . . . . . . . . . . . . . . . . . . 257
Overriding Dialing Restrictions
See Walking Class of Service
Index
Index - 11

PPage Programming . . . . . . . . . . . . . . . . . . . . . . . . . . . . . . . . . . . . . . . . 264
Paging . . . . . . . . . . . . . . . . . . . . . . . . . . . . . . . . . . . . . . . . . . . . . . 138 - 140
External . . . . . . . . . . . . . . . . . . . . . . . . . . . . . . . . . . . . . . . . . . . . 138
Internal . . . . . . . . . . . . . . . . . . . . . . . . . . . . . . . . . . . . . . . . 138 - 140
See also Music and Paging
Page Zone Key, Programming . . . . . . . . . . . . . . . . . . . . . . . . . . . 251
Zone Member, Programming. . . . . . . . . . . . . . . . . . . . . . . . . . . . 257
Paging and Music Gain, Programming . . . . . . . . . . . . . . . . . . . . . . . . . . . 224
Paging, External All Call Audible Ring . . . . . . . . . . . . . . . . . . . . . . . . . . . 223
Paging, External All Call, Programming . . . . . . . . . . . . . . . . . . . . . . . . . . 223
Paging, External Zone 1, Programming . . . . . . . . . . . . . . . . . . . . . . . . . . . 223
Paging, External Zone 2, Programming . . . . . . . . . . . . . . . . . . . . . . . . . . . 224
Paging, Relay 01 Owner, Programming . . . . . . . . . . . . . . . . . . . . . . . . . . . 224
Paging, Relay 02 Owner, Programming . . . . . . . . . . . . . . . . . . . . . . . . . . . 224
Park. . . . . . . . . . . . . . . . . . . . . . . . . . . . . . . . . . . . . . . . . . . . . . . . . . 141 - 142
Orbit Key, Programming . . . . . . . . . . . . . . . . . . . . . . . . . . . . . . . 251
Park Orbit Time, Programming . . . . . . . . . . . . . . . . . . . . . . . . . . . . . . . . . 210
Park Orbit Timer . . . . . . . . . . . . . . . . . . . . . . . . . . . . . . . . . . . . . . . . . . . . . 172
Pause, in a Speed Dial Bin . . . . . . . . . . . . . . . . . . . . . . . . . . . . . . . . . . . . . 163
PBX Feature Keys. . . . . . . . . . . . . . . . . . . . . . . . . . . . . . . . . . . . . . . . . . . . . 57
PBX Line, Programming . . . . . . . . . . . . . . . . . . . . . . . . . . . . . . . . . . . . . . 229
PBX/Centrex Lines. . . . . . . . . . . . . . . . . . . . . . . . . . . . . . . . . . . . . . . . . . . 135
PC Dialing. . . . . . . . . . . . . . . . . . . . . . . . . . . . . . . . . . . . . . . . . . . . . . . . . . 174
PCU (Peripheral Control Unit). . . . . . . . . . . . . . . . . . . . . . . . . . . . . 143 - 144
Peripheral Control Unit (PCU). . . . . . . . . . . . . . . . . . . . . . . . . . . . . 143 - 144
Personal Answering Machine Emulation . . . . . . . . . . . . . . . . . . . . . . . . . . 185
Personal Greeting . . . . . . . . . . . . . . . . . . . . . . . . . . . . . . . . . . . . . . . 145 - 146
Personal Park Orbits . . . . . . . . . . . . . . . . . . . . . . . . . . . . . . . . . . . . . 141 - 142
Personal Speed Dial . . . . . . . . . . . . . . . . . . . . . . . . . . . . . . . . . . . . . . . . . . 162
Phones The Type You Have . . . . . . . . . . . . . . . . . . . . . . . . . . . . . . . . . . . . . 6
Pickup Group Call . . . . . . . . . . . . . . . . . . . . . . . . . . . . . . . . . . . . . . . 88 - 89
Pickup Group, Line, Programming . . . . . . . . . . . . . . . . . . . . . . . . . . . . . . 234
Placing Outside Calls . . . . . . . . . . . . . . . . . . . . . . . . . . . . . . . . . . . . 134 - 137
Play MOH for Transferred Calls, Programming . . . . . . . . . . . . . . . . . . . . 206
Power Failure Telephone . . . . . . . . . . . . . . . . . . . . . . . . . . . . . . . . . . . . . . 147
Prime Line Selection. . . . . . . . . . . . . . . . . . . . . . . . . . . . . . . . . . . . . . . . . . 134
Programming . . . . . . . . . . . . . . . . . . . . . . . . . . . . . . . . . . . . . . . . 264
Privacy . . . . . . . . . . . . . . . . . . . . . . . . . . . . . . . . . . . . . . . . . . . . . . . . . . . 148
Privacy Release . . . . . . . . . . . . . . . . . . . . . . . . . . . . . . . . . . . . . . . . . . . . . . 149
Group, Programming . . . . . . . . . . . . . . . . . . . . . . . . . . . . . . . . . . 257
Privacy Release Groups
See Privacy Release
Privacy, Programming. . . . . . . . . . . . . . . . . . . . . . . . . . . . . . . . . . . . . . . . . 199
Private Lines . . . . . . . . . . . . . . . . . . . . . . . . . . . . . . . . . . . . . . . . . . . . . . . . 150
Program 10: Line Port Characteristics . . . . . . . . . . . . . . . . . . . . . . . 229 - 231
Program 11: Line Groups . . . . . . . . . . . . . . . . . . . . . . . . . . . . . . . . . 232 - 233
Program 12: Line Features . . . . . . . . . . . . . . . . . . . . . . . . . . . . . . . . 234 - 238
Index
Index - 12 DIGITAL SYSTEM Administrator’s Guide

Program 14: Extension Port Characteristics . . . . . . . . . . . . . . . . . . . 239 - 243
Program 15: Access Level (Extension) . . . . . . . . . . . . . . . . . . . . . . . 244 - 246
Program 16: Line and Group Access. . . . . . . . . . . . . . . . . . . . . . . . . 247 - 249
Program 17: Key Assignments . . . . . . . . . . . . . . . . . . . . . . . . . . . . . 250 - 255
Program 18: Extension Features (I) . . . . . . . . . . . . . . . . . . . . . . . . . 256 - 262
Program 18: Extension Features (II) . . . . . . . . . . . . . . . . . . . . . . . . . 263 - 271
Program 19: Hunt Groups . . . . . . . . . . . . . . . . . . . . . . . . . . . . . . . . . 272 - 278
Program 1: Class of Service . . . . . . . . . . . . . . . . . . . . . . . . . . . . . . . 197 - 201
Program 20: System Initialization. . . . . . . . . . . . . . . . . . . . . . . . . . . 279 - 280
Program 2: Intercom Signaling . . . . . . . . . . . . . . . . . . . . . . . . . . . . . 202 - 204
Program 3: System Features . . . . . . . . . . . . . . . . . . . . . . . . . . . . . . . 205 - 209
Program 4: System Timers . . . . . . . . . . . . . . . . . . . . . . . . . . . . . . . . 210 - 213
Program 5: PBX Access Codes . . . . . . . . . . . . . . . . . . . . . . . . . . . . . 214 - 215
Program 6: Toll Restriction . . . . . . . . . . . . . . . . . . . . . . . . . . . . . . . . 216 - 222
Program 7: Music and Paging . . . . . . . . . . . . . . . . . . . . . . . . . . . . . . 223 - 226
Program 8: Display Messages . . . . . . . . . . . . . . . . . . . . . . . . . . . . . . 227 - 228
Programmable Keys . . . . . . . . . . . . . . . . . . . . . . . . . . . . . . . . . . . . . 151 - 152
Call Coverage . . . . . . . . . . . . . . . . . . . . . . . . . . . . . . . . . . . . . . . 151
Call Timer . . . . . . . . . . . . . . . . . . . . . . . . . . . . . . . . . . . . . . . . . . 151
Hotline. . . . . . . . . . . . . . . . . . . . . . . . . . . . . . . . . . . . . . . . . . . . . 151
Line Keys . . . . . . . . . . . . . . . . . . . . . . . . . . . . . . . . . . . . . . . . . . 151
Loop Group. . . . . . . . . . . . . . . . . . . . . . . . . . . . . . . . . . . . . . . . . 151
Loop Switch . . . . . . . . . . . . . . . . . . . . . . . . . . . . . . . . . . . . . . . . 151
One-Touch Speed Dial . . . . . . . . . . . . . . . . . . . . . . . . . . . . . . . . 151
Page Zone . . . . . . . . . . . . . . . . . . . . . . . . . . . . . . . . . . . . . . . . . . 151
Park Orbit Keys. . . . . . . . . . . . . . . . . . . . . . . . . . . . . . . . . . . . . . 151
Pickup Group . . . . . . . . . . . . . . . . . . . . . . . . . . . . . . . . . . . . . . . 151
Record Key . . . . . . . . . . . . . . . . . . . . . . . . . . . . . . . . . . . . . . . . . 151
Tri-Level Keys . . . . . . . . . . . . . . . . . . . . . . . . . . . . . . . . . . . . . . 152
Using a Key with Three Functions . . . . . . . . . . . . . . . . . . . . . . . . . 6
Programmable Keys, Assignments . . . . . . . . . . . . . . . . . . . . . . . . . . 250 - 255
Prompts, Voice . . . . . . . . . . . . . . . . . . . . . . . . . . . . . . . . . . . . . . . . . . 191 - 192
Pulse to Tone Conversion . . . . . . . . . . . . . . . . . . . . . . . . . . . . . . . . . . . 77 - 78
QQueuing for Lines . . . . . . . . . . . . . . . . . . . . . . . . . . . . . . . . . . . . . . . 108 - 109
RRecord Conversation . . . . . . . . . . . . . . . . . . . . . . . . . . . . . . . . . . . . . . . . . 185
Redial . . . . . . . . . . . . . . . . . . . . . . . . . . . . . . . . . . . . . . . . . . . . . . . . . . . . 107
Regular Hold . . . . . . . . . . . . . . . . . . . . . . . . . . . . . . . . . . . . . . . . . . . . 99 - 100
Relay Box . . . . . . . . . . . . . . . . . . . . . . . . . . . . . . . . . . . . . . . . . . . . . . . . . . 75
Removing Lines and Extensions . . . . . . . . . . . . . . . . . . . . . . . . . . . . . . . . 153
Reports . . . . . . . . . . . . . . . . . . . . . . . . . . . . . . . . . . . . . . . . . . . . . . . . . . . 110
Traffic Management Reporting. . . . . . . . . . . . . . . . . . . . . . . . . . 181
Reports SMDR . . . . . . . . . . . . . . . . . . . . . . . . . . . . . . . . . . . . . . . . . . . . . 171
Restricting Outside Calls
See Toll Restriction
Restriction for Exchanges 976 and 555 . . . . . . . . . . . . . . . . . . . . . . . . . . . 40
Ringdown, Automatic . . . . . . . . . . . . . . . . . . . . . . . . . . . . . . . . . . . . . . . . . 39
Index
Index - 13

Ringing Extended. . . . . . . . . . . . . . . . . . . . . . . . . . . . . . . . . . . . . . . . . . . . . 80
External . . . . . . . . . . . . . . . . . . . . . . . . . . . . . . . . . . . . . . . . . . . . . 84
Ringing Assignments . . . . . . . . . . . . . . . . . . . . . . . . . . . . . . . . . . . . . . 13, 154
At Night . . . . . . . . . . . . . . . . . . . . . . . . . . . . . . . . . . . . . . . . . . . . 124
Day/Night, Programming. . . . . . . . . . . . . . . . . . . . . . . . . . . . . . . 263
Delayed. . . . . . . . . . . . . . . . . . . . . . . . . . . . . . . . . . . . . . . . . . . . . . 62
Ringing Assignments, Delayed
See Delayed Ringing Assignments
Ringing Assignments, Night
See Night Ringing
Ringing Line Preference . . . . . . . . . . . . . . . . . . . . . . . . . . . . . . . . . . . . . . . 155
Programming . . . . . . . . . . . . . . . . . . . . . . . . . . . . . . . . . . . . . . . . 264
Ringing Patterns . . . . . . . . . . . . . . . . . . . . . . . . . . . . . . . . . . . . . . . . 156 - 157
Ringing, Group . . . . . . . . . . . . . . . . . . . . . . . . . . . . . . . . . . . . . . . . . . . 91 - 92
Ringing, Interrupted Ring Relays, Programming. . . . . . . . . . . . . . . . . . . . 224
RLP See Ringing Line Preference
Rotaries See Line Groups
SSave. . . . . . . . . . . . . . . . . . . . . . . . . . . . . . . . . . . . . . . . . . . . . . . . . . . . . . . 158
Selectable Display Messages . . . . . . . . . . . . . . . . . . . . . . . . . . . . . . 159 - 160
Selectable Display Messages, Programming . . . . . . . . . . . . . . . . . . 227 - 228
Sending Calls to a Co-Worker
See Transfer
Separate Routing
ARS . . . . . . . . . . . . . . . . . . . . . . . . . . . . . . . . . . . . . . . . . . . . . . . . 40
Setting the Time and Date. . . . . . . . . . . . . . . . . . . . . . . . . . . . . . . . . . . . . . 177
Side Tone Test, Programming. . . . . . . . . . . . . . . . . . . . . . . . . . . . . . . 205, 229
Silent Monitor. . . . . . . . . . . . . . . . . . . . . . . . . . . . . . . . . . . . . . . . . . . . . . . 161
Silent Monitor, Programming. . . . . . . . . . . . . . . . . . . . . . . . . . . . . . . . . . . 199
Single Ring for ASI Calls . . . . . . . . . . . . . . . . . . . . . . . . . . . . . . . . . . . . . . 200
SMDR. . . . . . . . . . . . . . . . . . . . . . . . . . . . . . . . . . . . . . . . . . . . . . . . . . . . . 171
Speed Dial
Block, Programming . . . . . . . . . . . . . . . . . . . . . . . . . . . . . . . . . . 257
Line Dial-Up Programming . . . . . . . . . . . . . . . . . . . . . . . . . . . . . 257
One-Touch Speed Dial . . . . . . . . . . . . . . . . . . . . . . . . . . . . . . . . . 162
One-Touch Speed Dial Key, Programming . . . . . . . . . . . . . . . . . 251
Personal . . . . . . . . . . . . . . . . . . . . . . . . . . . . . . . . . . . . . . . 162 - 166
Storing (Using Program 18 [II]) . . . . . . . . . . . . . . . . . . . . . . . . . 265
Storing a Pause, Flash or Delay . . . . . . . . . . . . . . . . . . . . . . . . . . 163
Storing Long Numbers. . . . . . . . . . . . . . . . . . . . . . . . . . . . . . . . . 162
System . . . . . . . . . . . . . . . . . . . . . . . . . . . . . . . . . . . . . . . . . . . . . 162
Speed Dial Access, Programming . . . . . . . . . . . . . . . . . . . . . . . . . . . . . . . 198
Speed Dial Enable # Dial-Out, Programming . . . . . . . . . . . . . . . . . . . . . . 206
Split. . . . . . . . . . . . . . . . . . . . . . . . . . . . . . . . . . . . . . . . . . . . . . . . . . 167 - 168
Station Call Coverage . . . . . . . . . . . . . . . . . . . . . . . . . . . . . . . . . . . . 169 - 170
Station Message Detail Recording . . . . . . . . . . . . . . . . . . . . . . . . . . . . . . . 171
Station-to-Station Calling
Index
Index - 14 DIGITAL SYSTEM Administrator’s Guide

See Intercom
Supervisor Monitoring . . . . . . . . . . . . . . . . . . . . . . . . . . . . . . . . . . . . . . . 161
Switching Between Calls
See Split
System Architecture, Non-Blocking . . . . . . . . . . . . . . . . . . . . . . . . . . . . . 125
System Features
AUX Port Baud Rate, Programming . . . . . . . . . . . . . . . . . . . . . 206
Dial 1 Before Area Code, Programming . . . . . . . . . . . . . . . . . . 206
Number of Operators, Programming . . . . . . . . . . . . . . . . . . . . . 205
Number of System Speed Dial Dgts, Programming. . . . . . . . . . 205
Operator Extension, Programming. . . . . . . . . . . . . . . . . . . . . . . 205
Play MOH for Transferred Calls, Programming . . . . . . . . . . . . 206
Side Tone Test, Programming. . . . . . . . . . . . . . . . . . . . . . . . . . . 205
Speed Dial Enable # Dial-Out, Programming . . . . . . . . . . . . . . 206
Voice Mail Installed (Enabled), Programming. . . . . . . . . . . . . . 206
Walking Class of Service Code, Programming . . . . . . . . . . . . . 206
System Hold
See Hold, Regular
System Numbering
Flexible . . . . . . . . . . . . . . . . . . . . . . . . . . . . . . . . . . . . . . . . . . . . . 86
System Options
Voice Mail Master Extension, Programming . . . . . . . . . . . . . . . 206
System Park Orbits . . . . . . . . . . . . . . . . . . . . . . . . . . . . . . . . . . . . . . 141 - 142
System Reports
SMDR . . . . . . . . . . . . . . . . . . . . . . . . . . . . . . . . . . . . . . . . . . . . . 171
Traffic Management Reporting. . . . . . . . . . . . . . . . . . . . . . . . . . 181
System Reports and Utilities. . . . . . . . . . . . . . . . . . . . . . . . . . . . . . . . . . . 110
System Speed Dial. . . . . . . . . . . . . . . . . . . . . . . . . . . . . . . . . . . . . . . . . . . 162
System Timers . . . . . . . . . . . . . . . . . . . . . . . . . . . . . . . . . . . . . . . . . . 172 - 173
Break . . . . . . . . . . . . . . . . . . . . . . . . . . . . . . . . . . . . . . . . . . . . . . 173
Break Timer, Programming . . . . . . . . . . . . . . . . . . . . . . . . . . . . 212
Camp-On. . . . . . . . . . . . . . . . . . . . . . . . . . . . . . . . . . . . . . . . . . . 172
Camp-On Timer, Programming . . . . . . . . . . . . . . . . . . . . . . . . . 210
Dial Tone Detect . . . . . . . . . . . . . . . . . . . . . . . . . . . . . . . . . . . . . 173
Dial Tone Detect Timer, Programming. . . . . . . . . . . . . . . . . . . . 211
Flash Response . . . . . . . . . . . . . . . . . . . . . . . . . . . . . . . . . . . . . . 173
Flash Response Timer, Programming. . . . . . . . . . . . . . . . . . . . . 211
Hold Recall . . . . . . . . . . . . . . . . . . . . . . . . . . . . . . . . . . . . . . . . . 172
Hold Recall Timer, Programming. . . . . . . . . . . . . . . . . . . . . . . . 210
Interdigit . . . . . . . . . . . . . . . . . . . . . . . . . . . . . . . . . . . . . . . . . . . 173
Interdigit Timer, Programming. . . . . . . . . . . . . . . . . . . . . . . . . . 212
Line Response. . . . . . . . . . . . . . . . . . . . . . . . . . . . . . . . . . . . . . . 172
Line Response Timer, Programming . . . . . . . . . . . . . . . . . . . . . 210
Make . . . . . . . . . . . . . . . . . . . . . . . . . . . . . . . . . . . . . . . . . . . . . . 173
Make Timer, Programming. . . . . . . . . . . . . . . . . . . . . . . . . . . . . 211
Modem Reserve . . . . . . . . . . . . . . . . . . . . . . . . . . . . . . . . . . . . . 172
Modem Reserve Timer, Programming . . . . . . . . . . . . . . . . . . . . 210
Number of Delayed Rings . . . . . . . . . . . . . . . . . . . . . . . . . . . . . 172
Number of Delayed Rings, Programming . . . . . . . . . . . . . . . . . 211
Number of Rings Before Recall . . . . . . . . . . . . . . . . . . . . . . . . . 172
Number of Rings Before Recall, Programming . . . . . . . . . . . . . 210
Index
Index - 15

Park Orbit . . . . . . . . . . . . . . . . . . . . . . . . . . . . . . . . . . . . . . . . . . . 172
Park Orbit Timer, Programming . . . . . . . . . . . . . . . . . . . . . . . . . 210
System Tones
Tone Patterns . . . . . . . . . . . . . . . . . . . . . . . . . . . . . . . . . . . . . . . . 180
TTable of Displays . . . . . . . . . . . . . . . . . . . . . . . . . . . . . . . . . . . . . . . . . . . . . 25
Tandem Calls. . . . . . . . . . . . . . . . . . . . . . . . . . . . . . . . . . . . . . . . . . . . . . . . 184
Telemarketing Dial . . . . . . . . . . . . . . . . . . . . . . . . . . . . . . . . . . . . . . . . . . . 174
Telephone Key Lights (LEDs) . . . . . . . . . . . . . . . . . . . . . . . . . . . . . . . . . . . . 7
Telephone Tone Patterns . . . . . . . . . . . . . . . . . . . . . . . . . . . . . . . . . . . . . . . 180
Tenant Service. . . . . . . . . . . . . . . . . . . . . . . . . . . . . . . . . . . . . . . . . . 175 - 176
Terminal Hunting . . . . . . . . . . . . . . . . . . . . . . . . . . . . . . . . . . . . . . . . . . . . . 81
Text Messages. . . . . . . . . . . . . . . . . . . . . . . . . . . . . . . . . . . . . . . . . . 159 - 160
Time and Date. . . . . . . . . . . . . . . . . . . . . . . . . . . . . . . . . . . . . . . . . . . . . . . 177
Time of Day Selection, ARS. . . . . . . . . . . . . . . . . . . . . . . . . . . . . . . . . . . . . 40
Timers See System Timers
TMS Reports
See Traffic Management Reporting
Toll Restriction . . . . . . . . . . . . . . . . . . . . . . . . . . . . . . . . . . . . . . . . . 178 - 179
1+NNX Dialing, Programming Allow/Deny Tables . . . . . . . . . . 217
6-Digit Analysis, Programming Tables . . . . . . . . . . . . . . . . . . . . 218
Active Dial Pad, Programming . . . . . . . . . . . . . . . . . . . . . . . . . . 216
Equal Access Dialing, Programming . . . . . . . . . . . . . . . . . . . . . . 217
International Dialing, Programming . . . . . . . . . . . . . . . . . . . . . . 217
N11 (Special) Dialing, Programming . . . . . . . . . . . . . . . . . . . . . 216
NNX Dialing, Programming Allow/Deny Tables . . . . . . . . . . . . 217
NPA Dialing, Programming Allow/Deny Tables . . . . . . . . . . . . . 218
Operator (0+) Dialing, Programming . . . . . . . . . . . . . . . . . . . . . 217
Toll Restriction Level, Programming . . . . . . . . . . . . . . . . . . . . . . . . . . . . . 198
Toll Restriction Override
See Walking Class of Service
Toll Restriction, Line, Programming . . . . . . . . . . . . . . . . . . . . . . . . . . . . . 234
Tone Patterns. . . . . . . . . . . . . . . . . . . . . . . . . . . . . . . . . . . . . . . . . . . . . . . . 180
Traffic Management Reporting. . . . . . . . . . . . . . . . . . . . . . . . . . . . . . . . . . 181
Transfer Voice Mail . . . . . . . . . . . . . . . . . . . . . . . . . . . . . . . . . . . . . . . . . . 185
Transfer. . . . . . . . . . . . . . . . . . . . . . . . . . . . . . . . . . . . . . . . . . . . . . . 182 - 183
Trunk Calls
Answering . . . . . . . . . . . . . . . . . . . . . . . . . . . . . . . . . . . . . 132 - 133
Placing . . . . . . . . . . . . . . . . . . . . . . . . . . . . . . . . . . . . . . . . 134 - 137
Placing, Using a Line Key . . . . . . . . . . . . . . . . . . . . . . . . . . . . . . 134
Trunk Disconnect
Forced. . . . . . . . . . . . . . . . . . . . . . . . . . . . . . . . . . . . . . . . . . . . . . . 87
Trunk Queuing . . . . . . . . . . . . . . . . . . . . . . . . . . . . . . . . . . . . . . . . . 108 - 109
Trunks See Lines, Removing . . . . . . . . . . . . . . . . . . . . . . . . . . . . . . . . . . 153
Index
Index - 16 DIGITAL SYSTEM Administrator’s Guide

UUCD (Uniform Call Distribution) Hunting. . . . . . . . . . . . . . . . . . . . . . . . . 82
UCD Messages . . . . . . . . . . . . . . . . . . . . . . . . . . . . . . . . . . . . . . . . . . . . . 191
Undefined Key, Programming. . . . . . . . . . . . . . . . . . . . . . . . . . . . . . . . . . 250
Universal Night Answer . . . . . . . . . . . . . . . . . . . . . . . . . . . . . . . . . . . . . . 121
Unsupervised Conference . . . . . . . . . . . . . . . . . . . . . . . . . . . . . . . . . . . . . 184
UPS See Battery Backup
User Programming
Chart . . . . . . . . . . . . . . . . . . . . . . . . . . . . . . . . . . . . . . . . . . . . . . . 13
User-Programmable Features
Chart . . . . . . . . . . . . . . . . . . . . . . . . . . . . . . . . . . . . . . . . . . . . . . . 13
Customize with User-Programmable Features. . . . . . . . . . . . . . . . 8
Delayed Ringing Assignment . . . . . . . . . . . . . . . . . . . . . . . . . . . . 62
Direct Station Selection . . . . . . . . . . . . . . . . . . . . . . . . . . . . . 69 - 70
Group Call Pickup . . . . . . . . . . . . . . . . . . . . . . . . . . . . . . . . . 88 - 89
Headset . . . . . . . . . . . . . . . . . . . . . . . . . . . . . . . . . . . . . . . . . . 95 - 96
Hotline. . . . . . . . . . . . . . . . . . . . . . . . . . . . . . . . . . . . . . . . . 101 - 102
Intercom Voice Announcements . . . . . . . . . . . . . . . . . . . . . 103 - 105
Night Ringing . . . . . . . . . . . . . . . . . . . . . . . . . . . . . . . . . . . . . . . 124
One-Touch Speed Dial Keys. . . . . . . . . . . . . . . . . . . . . . . . . . . . 162
Paging . . . . . . . . . . . . . . . . . . . . . . . . . . . . . . . . . . . . . . . . . 138 - 140
Prime Line Selection. . . . . . . . . . . . . . . . . . . . . . . . . . . . . . . . . . 134
Ringing Assignments . . . . . . . . . . . . . . . . . . . . . . . . . . . . . . . . . 154
Ringing Line Preference . . . . . . . . . . . . . . . . . . . . . . . . . . . . . . . 155
See Program 18 (II). . . . . . . . . . . . . . . . . . . . . . . . . . . . . . . 263 - 271
Station Call Coverage . . . . . . . . . . . . . . . . . . . . . . . . . . . . . 169 - 170
Utilities and Reports . . . . . . . . . . . . . . . . . . . . . . . . . . . . . . . . . . . . . . . . . 110
VViewing Voice Mail Messages. . . . . . . . . . . . . . . . . . . . . . . . . . . . . . . . . . 185
VMU (Voice Module Unit) . . . . . . . . . . . . . . . . . . . . . . . . . . . . . . . . 189 - 190
Voice Mail . . . . . . . . . . . . . . . . . . . . . . . . . . . . . . . . . . . . . . . . . . . . . 185 - 188
Answering Machine Emulation . . . . . . . . . . . . . . . . . . . . . . . . . 185
Call Forwarding . . . . . . . . . . . . . . . . . . . . . . . . . . . . . . . . . . . . . 185
Conversation Record. . . . . . . . . . . . . . . . . . . . . . . . . . . . . . . . . . 185
Key Programming. . . . . . . . . . . . . . . . . . . . . . . . . . . . . . . . . . . . 258
Leaving a Message . . . . . . . . . . . . . . . . . . . . . . . . . . . . . . . . . . . 185
Mailbox Message Waiting . . . . . . . . . . . . . . . . . . . . . . . . . . . . . 185
Message Center. . . . . . . . . . . . . . . . . . . . . . . . . . . . . . . . . . . . . . 112
Message View . . . . . . . . . . . . . . . . . . . . . . . . . . . . . . . . . . . . . . . 185
Personal Answering Machine Emulation . . . . . . . . . . . . . . . . . . 185
Record Key, Programming . . . . . . . . . . . . . . . . . . . . . . . . . . . . . 252
Transfer . . . . . . . . . . . . . . . . . . . . . . . . . . . . . . . . . . . . . . . . . . . . 185
Voice Mail Installed (Enabled), Programming . . . . . . . . . . . . . . . . . . . . . 206
Voice Mail Master Extension, Programming . . . . . . . . . . . . . . . . . . . . . . 206
Voice Module Unit . . . . . . . . . . . . . . . . . . . . . . . . . . . . . . . . . . . . . . 189 - 190
Voic e Over
see Whisper Page
Voice Prompting Messages . . . . . . . . . . . . . . . . . . . . . . . . . . . . . . . . 191 - 192
Index
Index - 17

Voice-Announced Intercom Calls, Programming. . . . . . . . . . . . . . . . . . . . 202
Volume Controls . . . . . . . . . . . . . . . . . . . . . . . . . . . . . . . . . . . . . . . . . . . . . 193
WWalking Class of Service . . . . . . . . . . . . . . . . . . . . . . . . . . . . . . . . . . . . . . 194
Walking Class of Service Code, Programming . . . . . . . . . . . . . . . . . . . . . 206
Whisper Page . . . . . . . . . . . . . . . . . . . . . . . . . . . . . . . . . . . . . . . . . . 126 - 127
Programming . . . . . . . . . . . . . . . . . . . . . . . . . . . . . . . . . . . . . . . . 265
Index
Index - 18 DIGITAL SYSTEM Administrator’s Guide

Nitsuko America, Telecom Division
4 Forest Parkway
Shelton, CT 06484
TEL:
203-926-5400
FAX:
203-929-0535
Other Important Telephone Numbers
Sales 203-926-5450
Customer Service 203-926-5444
Customer Service FAX 203-926-5454
Technical Service 203-925-8801
Discontinued Product Service 900-990-2541
Technical Training 203-926-5430
Emergency Technical Service (After Hours)
(Excludes discontinued products) 203-929-7920

4 Forest Parkway, Shelton, CT 06484
TEL: 203-926-5400 FAX: 203-929-0535
Part No. NI872ADG03 August 1994
Issue 1-0 Printed in U.S.A. (183)
