Noma 052 8853 Timer Manual
User Manual: Noma-052-8853-timer-manual
Open the PDF directly: View PDF ![]() .
.
Page Count: 1
AlOMA!
A. Functl.....
1.
2.
3.
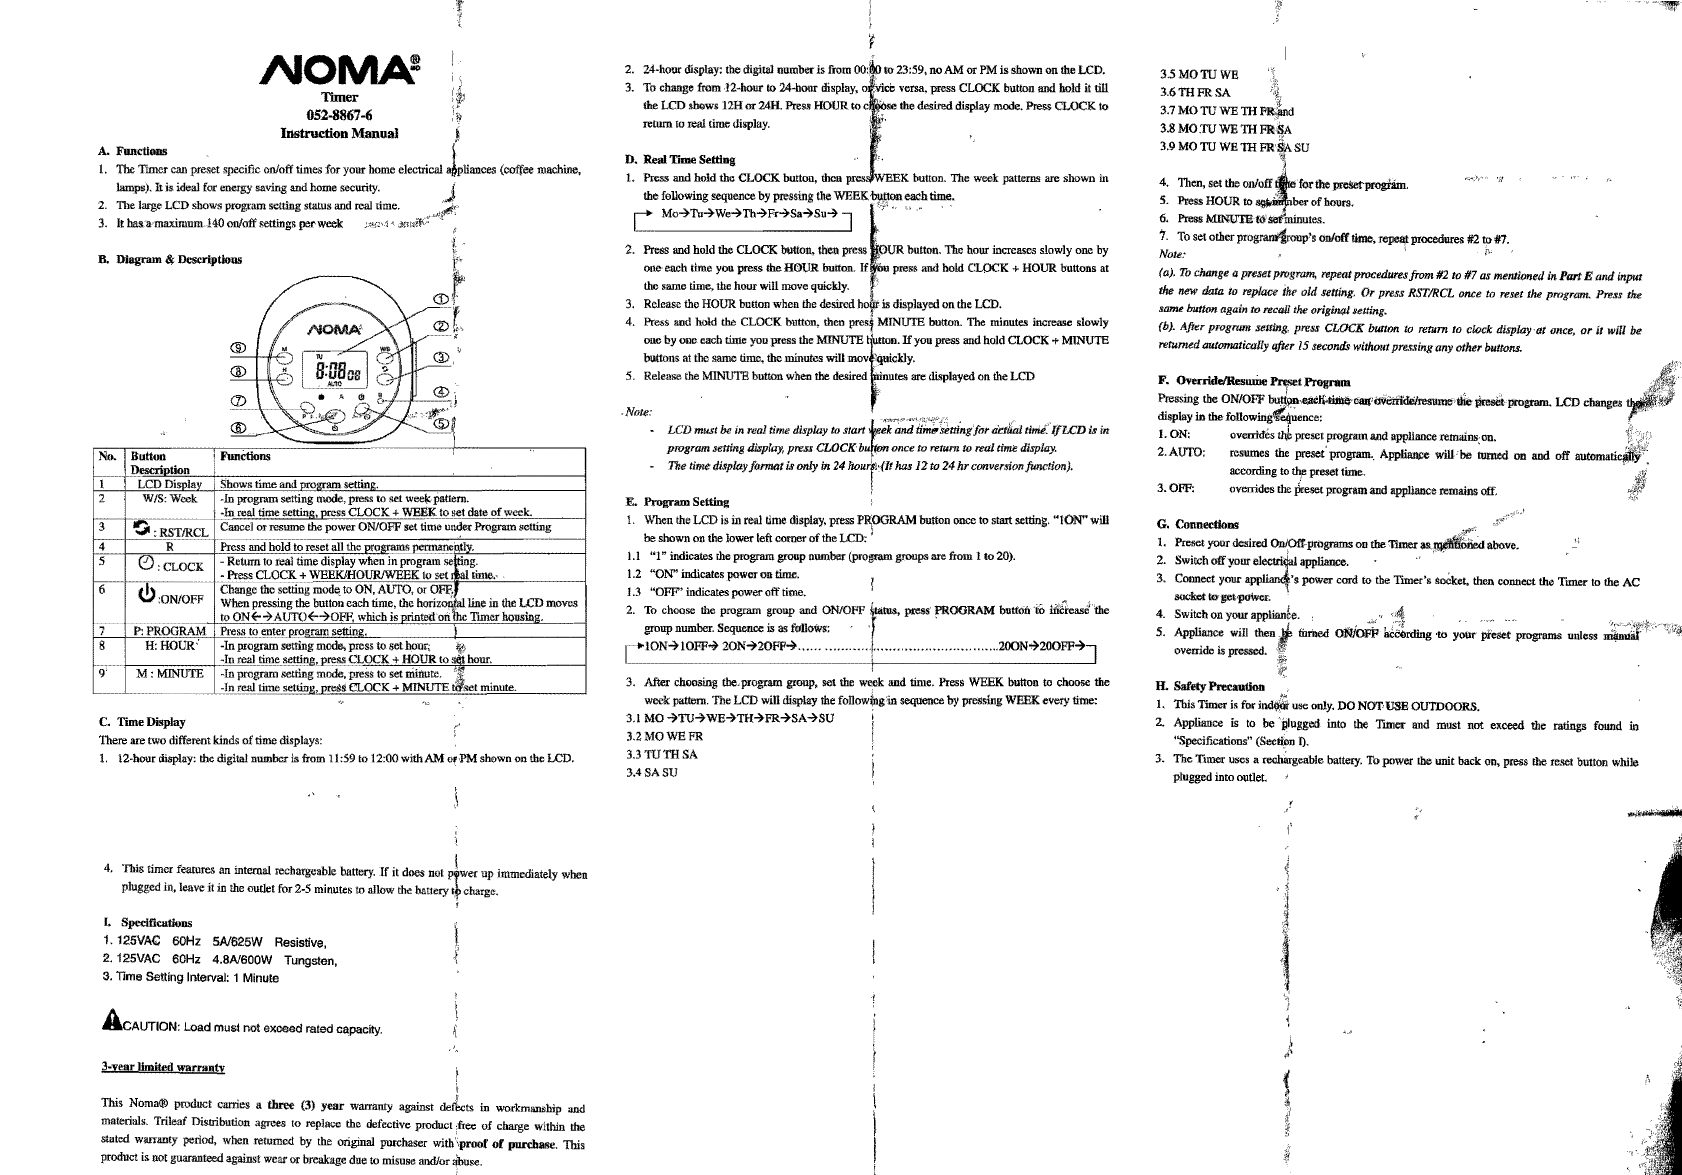
B.
Diagram
~
(coffee machine,
W/S;Week
Button
,J)••criDtlon
No.
6
3
4
:5
Shows time andprogram settin...
9'
1M:
MINUTE
TheTimer can preset specific on/off times for your home electrical
lamps), It is ideal for energy saving and home security.
The large LCD shows program setting status and real time.
It hesa·meaJmum.140 ooIoff settings per week
Timer
052-8867-6
IIlstructiOD
Manual
Descriptlous
C. Time Display
There are two different kinds of time displays:
1. 12-hour display: the digital number is from 11:5910 12:00
withAM
0rPM
shown on the LCD.
i
4. This timer features an internal rechargeable battery.
If
it does not !'Twer up immediately when
plugged in. leave it in the outlet for 2-5 minutes 10 allow the battery Itcharge.
r
L Speclllcatlouo
1. 125VAC 60Hz SAl625W Resistive,
2. 12SVAC 60Hz
4.8A1600W
Tungsten,
3. TImeSelling Interval: 1 Minute
ACAUTION:
Load
must
not exceedratedcapacity.
3-year
Umited wl!!T!!!lty ,
\
This
Noma®
product carries a three (3)
year
warranty against defects in workmanship and
materials. Trileef Distribudon agrees 10 replace the defective product free of charge within the
staled warranty period, when returned by the original purchaser with'\proot·
of
purdlase.
This
productis not guaranteed againstwearor breakage due to misuseand/orabuse.
2. 24-hour display: the digital number is from
oo:lIo
to 23:59, no AM or PM is shown on the LCD.
3. To change
frnml2-hour
10 24-hour display,
<>iV!.
'.'
co versa. press CLOCK button andhnld it tiU
the LCD shows 12H or 24IL
Pres.
HOUR
to
c~se
the desired display mode.
Press
CLOCK
10
retum
10 real
ume
display.
D, Real
TIme
Setting
l.
Press
and hold the
CLOCK
button, then button. The week patterns are shown in
the following sequence by pressing the
WEEK
~
each
time.
r=:
Mo~Ta~We~Th~Fr~Sa~Su~
J
2. Press and bold the
CLOCK
button, thenpress
.
button. The hour increases slowly one by
one
each time you
press
the
HOUR
holton. If press andhnld CLOCK+ HOUR buttons at
the same time, the
hour
will move qlriekly.
3. Release tho HOUR button when the
desired
hojlt is displayed on the LCD.
4. Press and hold the
CLOCK
button, then
pres,
MINUTE button. The minutes increase slowly
one by
one
each time you press the
MINUTEf
If
you press and hold
CLOCK
+
MINUTE
......•
tIon...
•
hnttons at the sarae time, the minutes will IDOV''1nickly.
5. Release the MINUTE button when the desired . . utes are displayed on the LCD
.Nme:
LCD must be in realtime display to start
ie
..
;k;;;;;;'li;;:;f~ttingf"r
dctlfm tirtli:I/LCD it; in
programsettingdisplay.press
CLOCK:
bU&on
once to returnto real time display.
Thetime di.'playformttf is only in 24 hoUr,(11has 12 to 24 hr conversionfunction).
E.
Program
Setting
I. When the LCD is in real time display, press
P~OORAM
hntton once to start setting.
"t0N"
will
be shown on the lower left
comer
of the LCD; ,
1.1
"I"
indicates the program group number (progrant groups are from I to 20).
1.2
"ON"
indicates
power
on time,
1.3 ''OFF' indicates
power
off lime.
2. To choose the program group and ON/OfIF t press PROGRAM bnttoirto
ifI[reas~the
group uumher. Sequence is as f<lIlows: '
"ION~IOFF~
20N~20~
:
2()()N~200fIF~J
I
3.
After
choosing tbe.program group, set the wook and time. Press WEEK bullon to choose the
week pattern. The LCD will display the follow(ngin sequence by pressing
WEEK
every lime:
3.1
MO~TU~WE~TH~FR~SA~SU
I
3.2MOWEFR
I
3.3TUTHSA
3.4SA SU
3.5
MOTU
WE
3.6THFRSA
3.8 MO.TU WE TH
3.9 MO TU WE TH FR
4. Then, set the on/off
I"'forthe
preSet'progIlim.
5. Press
HOUR
to~herofhours.
6. Press MINUTEtO'se(talnutes.
7. To set
other
prog~p's
ooIolf
tim<:,
repel\!
procedures #2 to #7.
Note:'
r·'
(a). To changea presetprogram,repeatproceduresfrom #2 to #7 as mentionedin
Pt1l1
E andinput
the new data to replace
ilw
old setting. Or press RST/RCL once to reset the
program:
Press the
samebuttonagainto recallthe
originQ;l
setting.
(b). After program setting. press CLOCK button to return to clock display'at once, or it will be
returnedautomaticallyqfter 15secondswithoutpressingany other buttons.
F.
OverrideIResmi:re
Pn,set
Program
Pressing the ON/OFF
burism,e;ltJl:.tiIiIlt_,iW~ume.1I!i,
~program.
LCD cbangas
display in the
fOUowing'1feli~ence:
I. ON: overrides
th~
preset program andappliance remalns-oa,
2. AUTO; resumes the preset' program-. Applianl:e
will'bu
turned on and off automatic!i'llY"
according to
t!¥'
preset lime.
3. OFF: override. thepresetprogram andapplianee remains off.
G, Connectlobs
,,1*"
1. Preset your desired
Oa(OfI'.programs
on the
Thner
...
,~<ilied
ahnve.
2. Switch off .
3. Conne
socket
""
pI.poWer.
4. Switch on your applinab.. ,
"~c'
,,~
5. AlmUance will
thenJJ.
tin1led
OiIiIIOW
ace~rding
-to your preser programs unless
IL
I. This Timer is fer
indil!lr
us.
only. DO
NOT,
USEOUTDOORS.
2. Appliance is to be 'ilIugged into the Timer and must not exceed the
ratings
found in
"Specification." (Section
n.
3. The TImer uses a rechargeable
battery,
To power the unit hack on, press the reaet button while
plugged into cutlet.
,
-.-
"
'J
t
Safety
Precautlorl
.
,\
~~'
~
~
http://waterheatertimer.org/plug-in-timers.html#052
