Nook Tablet 10 1 Manual
2019-03-29
: Nook-Tablet-10-1-Manual nook-tablet-10-1-manual 4179 manuals tablets
Open the PDF directly: View PDF ![]() .
.
Page Count: 72
Barnes & Noble NOOK Tablet User Guide01
Tablet® 10.1”
User Guide
Barnes & Noble NOOK Tablet User Guide02
Nook Digital, LLC. 1166 Avenue of the Americas, 18th Floor, New York, NY 10036
© 2018 Nook Digital, LLC. All rights reserved. NOOK, NOOK Tablet, Bookstore, B&N Read-
outs and the NOOK logos are trademarks or registered trademarks of Nook Digital, LLC or
its afliates. Patent Pending. Wi-Fi is a registered trademark of the Wi-Fi Alliance. All trademarks
or registered trademarks that are not the property of Nook Digital, LLC or its afliates are the
property of their respective owners. Screenshots and product images are simulated; they may
differ from the actual product and are subject to change. Use of NOOK is subject to the Terms
of Service and Privacy Policy located in the Settings area of your NOOK and at www.NOOK.
com/legal. Contains Reader® Mobile technology by Adobe Systems Incorporated.
Model: BNTV650 Version: 1.0.0.
Barnes & Noble NOOK Tablet User Guide03
Table of Contents
Introduction –––––––––––––––––––––––––––––––––––––––––––––––––––––– 04
Getting to Know Your NOOK –––––––––––––––––––––––––––––––––––––––– 05
Buttons & Ports ––––––––––––––––––––––––––––––––––––––––––––––––––– 06
Charge the Battery –––––––––––––––––––––––––––––––––––––––––––––––– 08
Getting Started ––––––––––––––––––––––––––––––––––––––––––––––––––– 11
Initial Setup of Your NOOK ––––––––––––––––––––––––––––––––––––––––––– 12
Setting Up Your NOOK Account ––––––––––––––––––––––––––––––––––––––– 17
Home Screen –––––––––––––––––––––––––––––––––––––––––––––––––––– 19
NOOK by Barnes & Noble –––––––––––––––––––––––––––––––––––––––––– 24
Home Screen ––––––––––––––––––––––––––––––––––––––––––––––––––––– 25
How to Read a Book ––––––––––––––––––––––––––––––––––––––––––––––– 28
Bookstore –––––––––––––––––––––––––––––––––––––––––––––––––––––– 31
Library –––––––––––––––––––––––––––––––––––––––––––––––––––––––– 34
Proles ––––––––––––––––––––––––––––––––––––––––––––––––––––––––– 37
NOOK Settings –––––––––––––––––––––––––––––––––––––––––––––––––– 42
NOOK Search ––––––––––––––––––––––––––––––––––––––––––––––––––– 43
Adding More Storage to Your NOOK –––––––––––––––––––––––––––––––––––– 45
Applications & Customizing Your NOOK Home Screen –––––––––––––––––––––––– 47
App Drawer ––––––––––––––––––––––––––––––––––––––––––––––––––––––– 48
NOOK Apps –––––––––––––––––––––––––––––––––––––––––––––––––––– 48
Google Apps –––––––––––––––––––––––––––––––––––––––––––––––––––– 50
Customizing Your NOOK Home Screen –––––––––––––––––––––––––––––––––– 52
Android Settings ––––––––––––––––––––––––––––––––––––––––––––––––––– 54
Access Settings ––––––––––––––––––––––––––––––––––––––––––––––––––––– 55
Wi-Fi ––––––––––––––––––––––––––––––––––––––––––––––––––––––––– 55
Legal Information –––––––––––––––––––––––––––––––––––––––––––––––––– 64
One Year Limited Warranty ––––––––––––––––––––––––––––––––––––––––––––– 65
Trademarks and Copyrights –––––––––––––––––––––––––––––––––––––––––– 69
FCC Notices –––––––––––––––––––––––––––––––––––––––––––––––––––––– 71
Terms of Service ––––––––––––––––––––––––––––––––––––––––––––––––– 72
Barnes & Noble NOOK Tablet User Guide04
Introduction
This User Guide is designed to help you get the most enjoyment out of your NOOK Tablet® 10.1”.
Contact Us
If you have questions about your NOOK® that this guide doesn’t answer, be sure to visit the
NOOK online support center at: http://www.nook.com/support
The online support center offers additional information about your NOOK, including:
• A PDF version of this NOOK User Guide that you can download to your computer
• Frequently Asked Questions
You can also contact Barnes & Noble Customer Support by sending email to
NOOK@barnesandnoble.com or by calling +1-800-843-2665 (1-800-THE-BOOK) and selecting
the option for Digital Technical Support. Outside the United States, please call +1-201-438-1834.
Stay in Touch
Follow us on Facebook and Twitter to receive daily reviews, exclusive offers, and free NOOK Books®.
http://www.facebook.com/nookBN
http://www.twitter.com/nookbn
Barnes & Noble NOOK Tablet User Guide 05
Getting to Know Your NOOK
Barnes & Noble NOOK Tablet User Guide06
Buttons & Ports
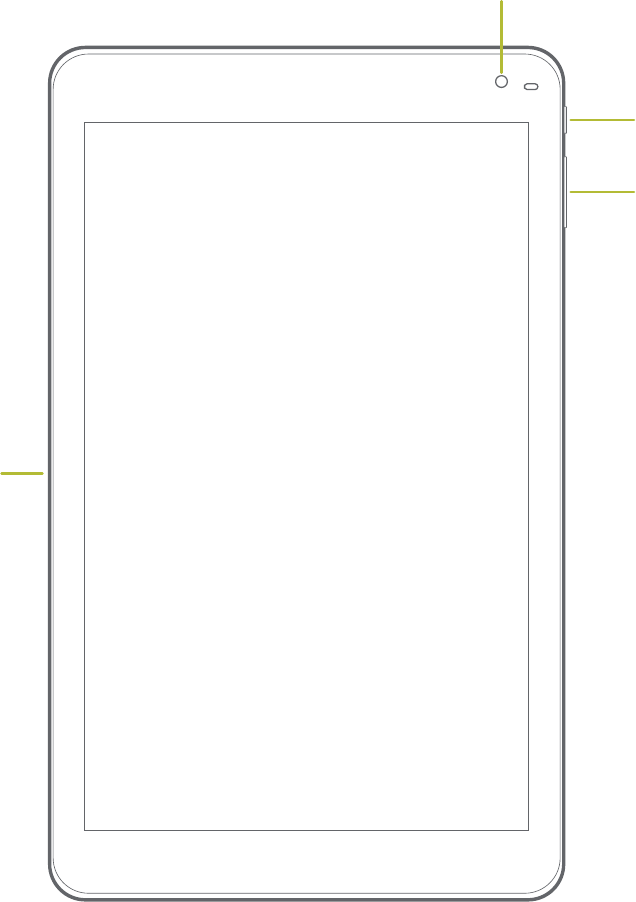
Front View
Power Button
Front Camera
Volume Button
Quick
Connector
Barnes & Noble NOOK Tablet User Guide 07
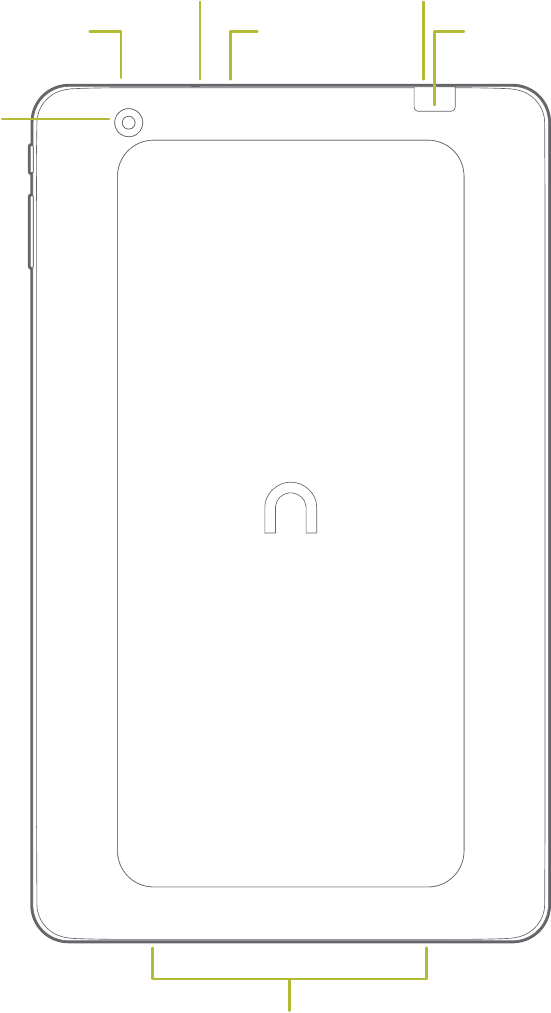
Back View
microSD Card Slot
Microphone
Reset Button
Micro USB/
Charger Port
Headphone Jack
Speakers
Rear Camera
Barnes & Noble NOOK Tablet User Guide08
Reset Button
If the tablet is not responding to button presses or screen touches, you can quickly restart the tablet
by using a pin or paperclip to press the recessed reset button located on the top of the tablet
adjacent to the micro SD card slot.
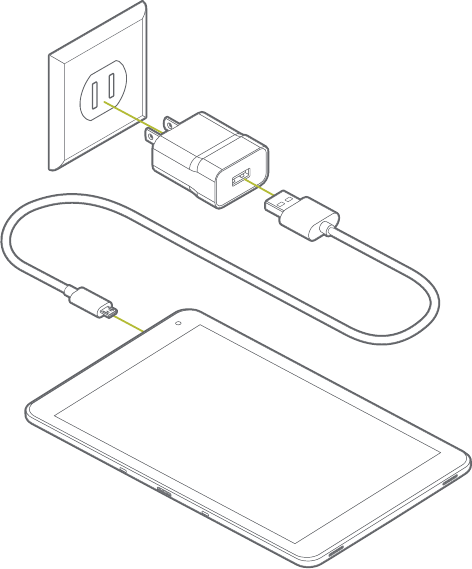
Charge the Battery
Your NOOK is powered by a rechargeable, standard Li-Ion battery and a Wall/USB.
The battery comes partially charged. A fully discharged battery requires up to four hours of
charge time.
1. Insert the Micro USB Cable into your
NOOK Tablet’s Micro USB Port.
2. Connect the Micro USB Cable to the
Power Adapter provided with your NOOK Tablet 10.1”, then plug the Power Adapter into a
standard AC power outlet.
3. When charging is complete, unplug the
Power Adapter from the power outlet and remove the Micro USB Cable from your
NOOK.
Wall outlet
Power Adapter
Micro USB Cable
NOOK Tablet
Barnes & Noble NOOK Tablet User Guide 09
Safety and Care
This section explains important information about safety and about caring for your NOOK.
Water
CAUTION:
Your NOOK device, cables, and adapters are not waterproof. To avoid risk of electric shock,
overheating, melting, burns or other injury or damage, keep the device and all accessories
away from water and other liquids.
Do not use the cable if either end of the cable gets wet or is exposed to liquid spray or excessive
moisture. Do not expose your NOOK device, cables, and power adapter to wet or damp conditions.
Avoid exposing the device to liquid or food. If liquid is spilled on the device while it is on, turn
it off immediately. Clean the screen of your NOOK with a soft, lint-free or microber cloth
and avoid using spray or liquid cleaners on the screen.
Electricity
Your NOOK is an electrical device. Follow the same basic safety procedures you would follow
with any electrical device.
When charging your NOOK, use only the custom USB cable and power adapter included
with your NOOK.
Airplanes
When using your NOOK on an airplane, be sure to follow the instructions of the ight crew.
To turn your NOOK’s wireless networking on or off, do this:
1. Drag down the status bar to reveal the Quick Settings menu.
2. Tap the Wi-Fi switch on or off. Or tap the Airplane Mode switch to on. vvAirplane Mode
turns off wireless networking but allows other features on your NOOK to work as usual.
3. Tap anywhere outside the Quick Settings window to close it.
Electronic Equipment
If you are around sensitive electronic equipment–for example, if you are in a hospital–ask if
you may use your NOOK. Settings such as intensive care units might forbid the use of any
electronic device, with or without networking.
Battery
Your NOOK includes a non-replaceable lithium ion battery. Do not attempt to replace the
battery. If you suspect your battery is having problems, please contact Customer Service.
Barnes & Noble NOOK Tablet User Guide10
Caution About High Audio Volume
WARNING:
Exposure to loud noise from any source for extended periods of time may affect your hearing.
The louder the volume, the faster your hearing may be affected. To protect your hearing:
• Limit the amount of time you use headsets or headphones at high volume.
• Avoid turning up the volume to block out noisy surroundings.
• Turn the volume down if you can’t hear people speaking near you. If you experience
hearing discomfort, including the sensation of pressure or fullness in your ears, ringing in
your ears, or muted speech, you should stop listening to the device through your headset
or headphones and have your hearing checked.
Caring for the Touchscreen
You should clean the touchscreen on your NOOK from time to time. Clean the screen with
a damp soft cloth, such as a micro-ber cloth. Micro-ber cloths are available from Barnes &
Noble stores and from partner retailers. Do not use any chemicals to clean the screen.
Barnes & Noble NOOK Tablet User Guide 11
Getting Started
Turn Your NOOK On and Off
Turning On
To turn on your NOOK, press the Power
Button on your NOOK. Hold the button
down for 2 seconds and release it.
Turning Off
1. Press and hold the Power Button until
your NOOK options menu displays.
2. Tap Power off.
3. On the window that appears, tap POWER
OFF.
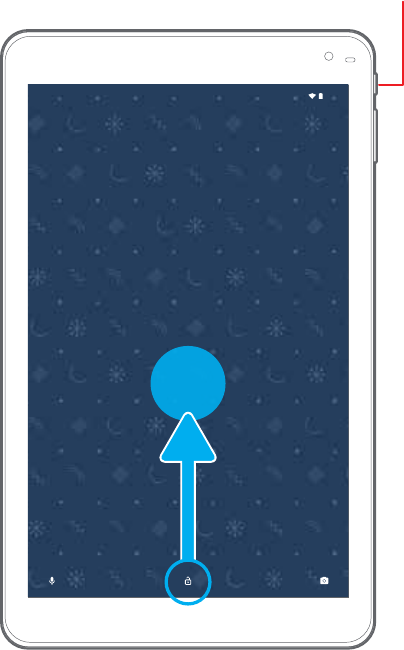
Unlock and Lock Your NOOK
Unlock Your NOOK
To unlock your NOOK, press the Power
Button, then touch and drag the Lock icon
with your nger across the screen as
shown below.
Lock Your NOOK
By default, your NOOK locks automatically
when the screen times out.
To lock your NOOK manually, press the Power Button.
Secure Your NOOK
Use your NOOK’s screen lock features to secure your NOOK.
Set Up a Secure Screen Lock
The default Screen lock is Swipe, which offers no security. To choose a more secure screen
lock, see Set a Screen Lock.
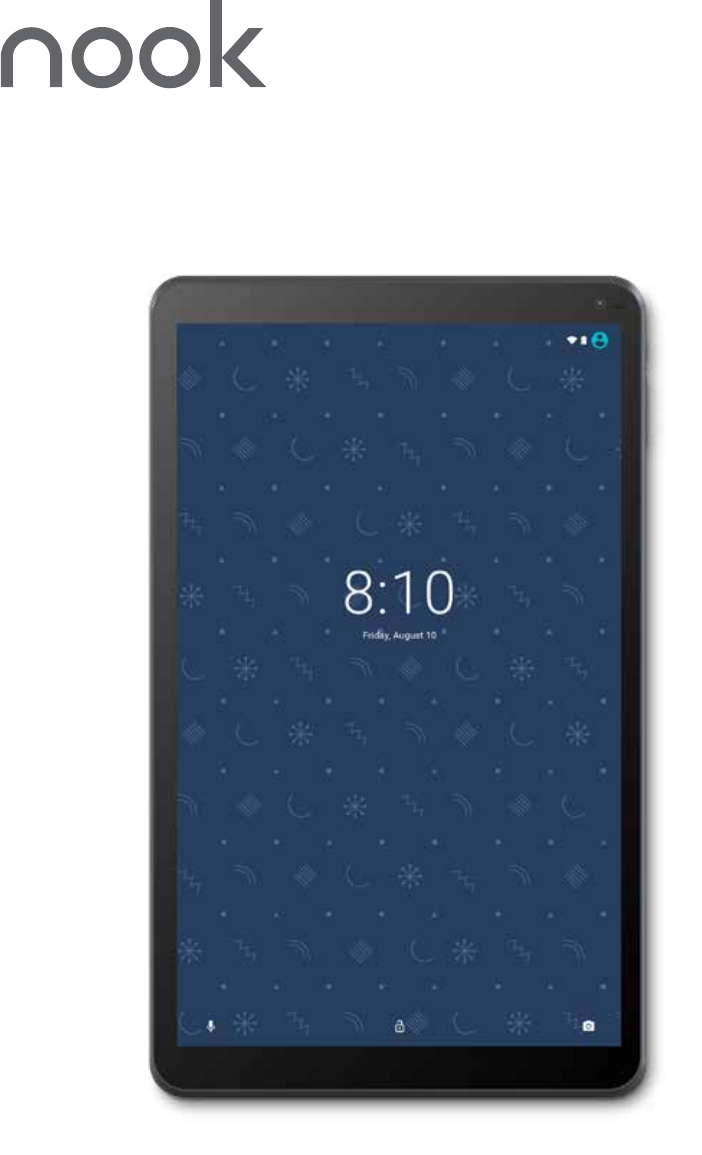
8:10
Friday, August 10
Power

Barnes & Noble NOOK Tablet User Guide12
Initial Setup of Your NOOK
The initial setup process for your NOOK Tablet® 10.1” guides you through setting up two types
of accounts:
• A Google account for accessing the Google Play Store.
• A NOOK account for accessing the Bookstore® and NOOK content such as NOOK
Books®, and the NOOK Newsstand®.
You have to connect to a Wi-Fi network to set up your NOOK.
Selecting a Language
When you rst turn on your NOOK, it displays a NOOK Tablet welcome screen.
Select your preferred language and tap the yellow arrow to continue.
Barnes & Noble NOOK Tablet User Guide 13
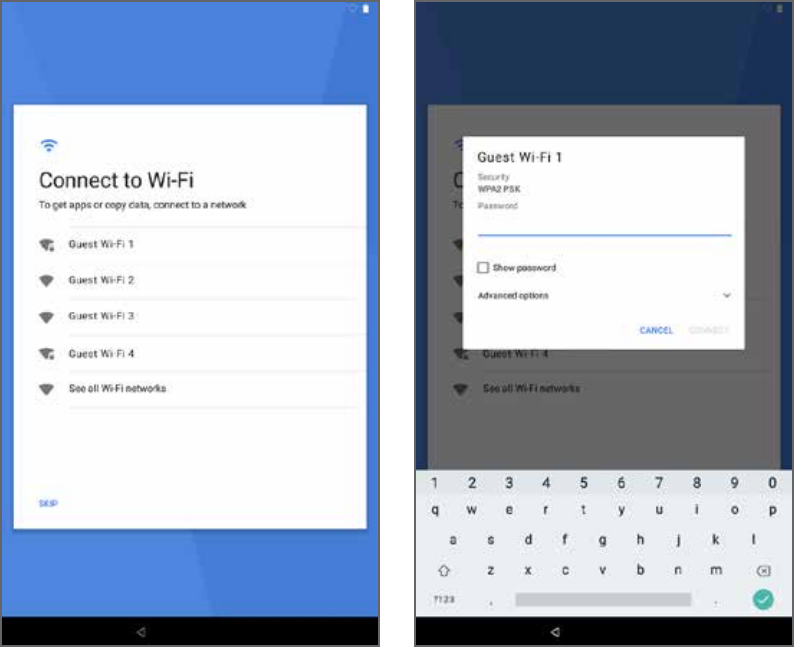
Selecting a Wi-Fi Network
Tap the name of the Wi-Fi network to which you want to connect. If the network displays a lock
symbol, you are prompted to enter a password to connect to the network.
If you do not know the password, ask the network administrator.
Once you have entered the password in the password dialog box, tap Connect.
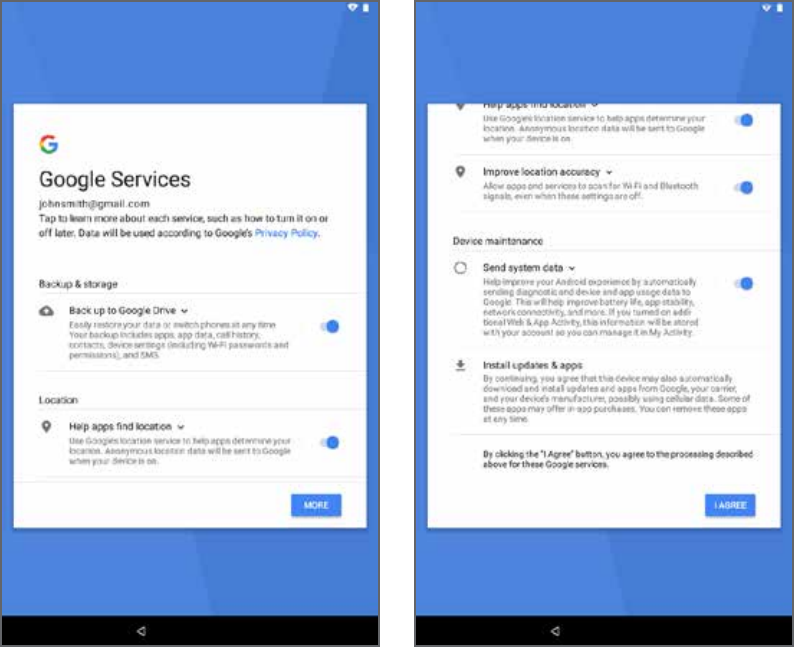
Setting up Google Account

Barnes & Noble NOOK Tablet User Guide14
Your NOOK prompts you to sign in to your Google account or to create a Google account if
you do not have one.
Your NOOK uses your Google Account to fully utilize its Android features, including Gmail,
Google Hangouts, and the Google Play Store.
To create a new Google Account or set up your Google Account on your NOOK at any time,
use Accounts settings. For more information, see Accounts.
From the Home screen, tap App Drawer > Settings > Accounts > Add account > Google.
Barnes & Noble NOOK Tablet User Guide 15
Select what Google services you wish to participate in by tapping on each checkbox to select/
deselect.
If you sign into a Google account there is also an option to set it up similar to any Phone/Tablet
device your Google account is logged into, this shows up as a screen during OOBE post login
with Google account.
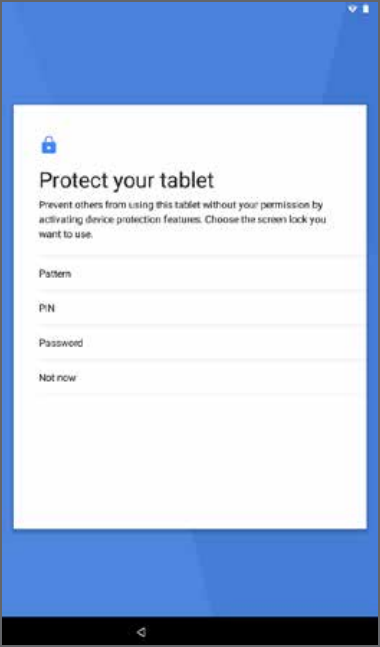
Barnes & Noble NOOK Tablet User Guide16
Options to protect your NOOK.
Barnes & Noble NOOK Tablet User Guide 17
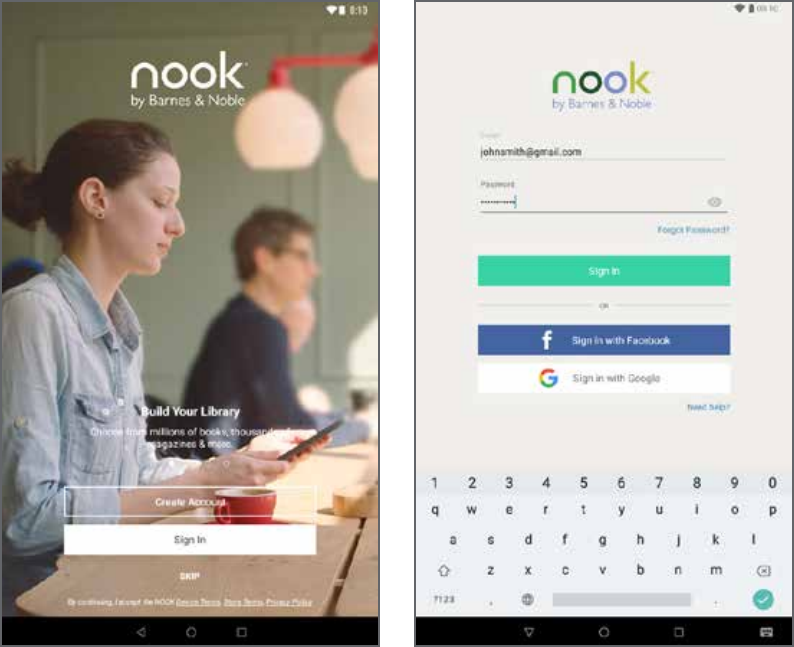
Setting Up Your NOOK Account
NOOK Account
Use your existing NOOK account or create a new one to make the best use of the NOOK
features on your NOOK. For more information, see Setting Up Your NOOK.
For more information about the NOOK features, see NOOK.
NOOK Legal Information
To read the NOOK Device Terms of Service, the Bookstore Terms of Service, and the NOOK
Privacy Policy, open the NOOK Settings app and tap Legal Information. Your NOOK displays
links to popup windows with each of these documents.
To view NOOK legal information online, visit: NOOK.com/legal.
Registering an Existing NOOK Account
If you already have a Barnes & Noble or NOOK account, tap Sign In.
1. On the Sign In screen, enter the email address and password for your account.
2. Tap Sign In.
Barnes & Noble NOOK Tablet User Guide18
Creating a New NOOK Account
If you do not already have a Barnes & Noble or NOOK account, tap Create Account.
1. On the screen for creating your account, enter:
• Your rst name
• Your last name
• The email address you want to use for your NOOK account
• A password
• A security question
2. Tap Submit. Your NOOK opens a dialog box with links to legal notices, including the NOOK
Device Terms of Service, the Bookstore Terms of Service, and the NOOK Privacy Policy. To
read any of these notices, tap its link.
3. If you have read the legal notices and accept them, tap “Accept”.
If you do not accept the legal terms, you cannot use your NOOK.
Next you will set up a credit card for your account. You have the option of skipping this step,
but you will not be able to make any purchases in the Bookstore until a credit card has been
added to your account.
4. Add credit card information for your account. Enter:
• The rst name on the credit card account.
• The last name on the credit card account.
5. Tap the pop-up menu to select the card type.
Choose from:
• Visa
• MasterCard
• American Express
• Discover
• DinersClub
• JCB
6. Tap pop-up menus to select the expiration date for the credit card, and then tap Next.
7. Enter the billing address for the credit card, and then tap Submit.
Enter:
• Street address
• City
• State
• ZIP Code
• Country (either the United States or Canada)
Your NOOK enters this information and creates your account.
Barnes & Noble NOOK Tablet User Guide 19
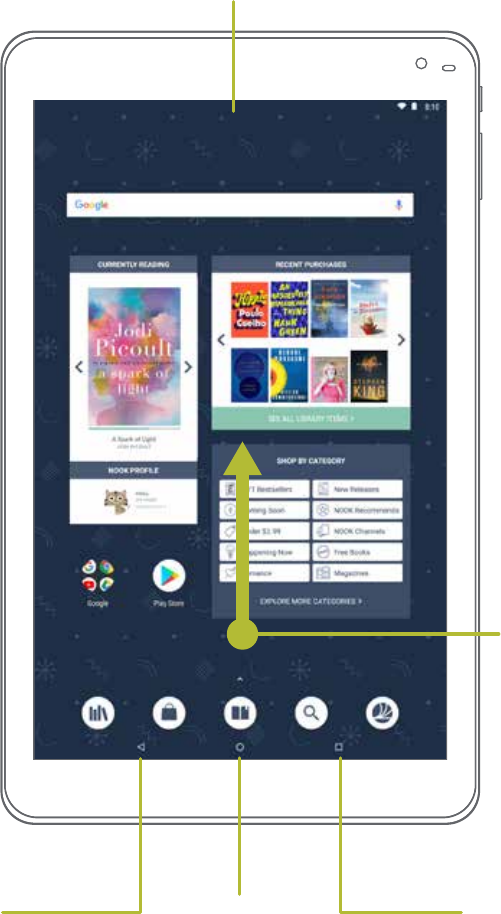
Home Screen
Once the initial setup is completed, the Home screen appears.
Home
Return to the
Home screen.
Return
Go back to the
previous screen.
Swipe up on the
Home screen to
open the App
Drawer and
access all your
downloaded apps.
Multitask
Switch between
your open apps.
Status Bar
The Status Bar includes the time and icons for battery
status, Wi-Fi connectivity and notifications.
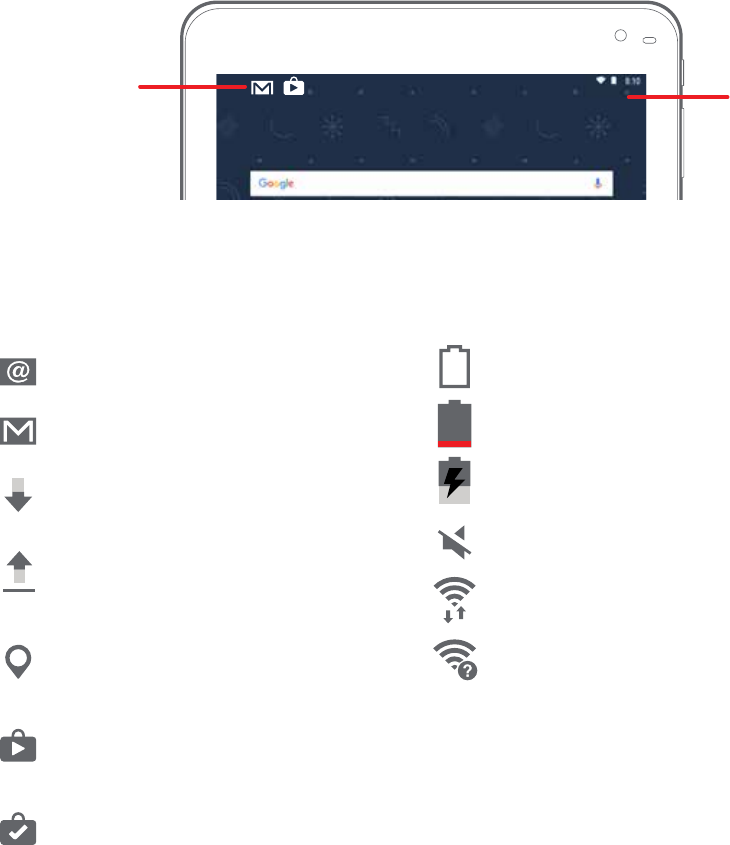
Barnes & Noble NOOK Tablet User Guide20
Notication Icons
New email: New email has arrived.
New Gmail: New Gmail has arrived.
File download in progress: Download
of a le or app is in progress.
File upload in progress: File is being
uploaded or sent.
GPS active: Location service (GPS) is
active and acquiring a signal.
App updates available: App updates are
available from the Google Play store.
App updates complete: App installation
or updates are complete.
Status Icons
Battery full: Battery is fully charged.
Battery low: Battery is low.
Battery charging: Battery is charging.
Mute mode: Mute mode is enabled.
Wi-Fi active: Wi-Fi is active.
Wi-Fi available: A Wi-Fi network is
available.
Notication
Icons Status Icons
Barnes & Noble NOOK Tablet User Guide 21
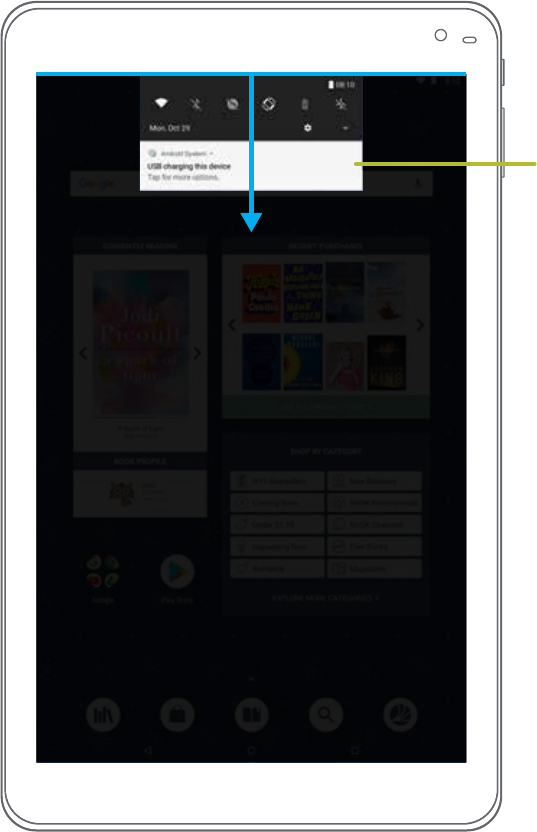
Notications Panel
To display the Notication Panel, swipe down from the top edge of the screen.
Swipe down
Notication
Panel
Barnes & Noble NOOK Tablet User Guide22
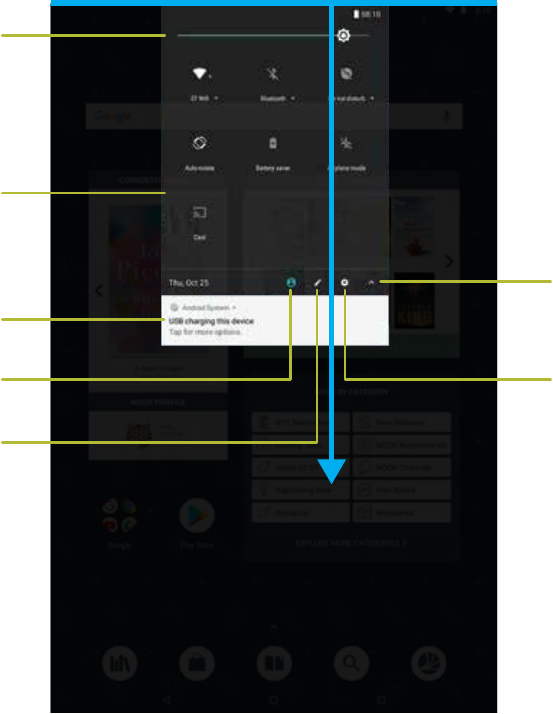
Quick Settings Panel
Quick Settings
The Quick Settings Panel provides quick access to your NOOK functions such as Wi-Fi, allowing
you to quickly turn them on or off.
To display the Quick Settings Panel, tap the clock area shown below.
To close the Quick Settings Panel, swipe upward from the bottom of the screen or
tap outside panel
Notifications
Quick
Settings
Panel
Customize
Quick Settings
Screen
Brightness
Change
User Profile
Hide Quick
Settings Panel
Go to
Settings
Swipe down
Barnes & Noble NOOK Tablet User Guide 23
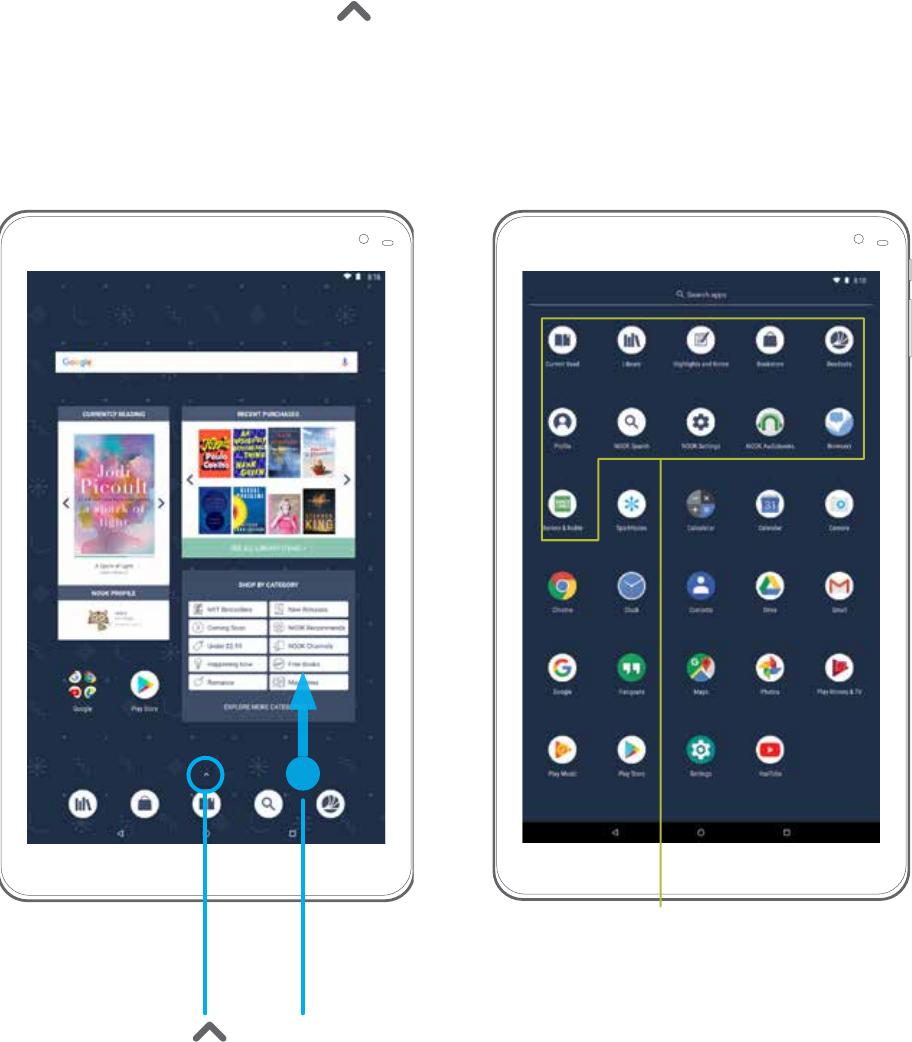
App Drawer
The App Drawer displays apps that are installed on your NOOK.
To access the App Drawer, tap or swipe upward on the homescreen.
Tap or swipe upward
on the home screen
App DrawerHome Screen
NOOK apps
Barnes & Noble NOOK Tablet User Guide24
NOOK by Barnes & Noble
Barnes & Noble NOOK Tablet User Guide 25
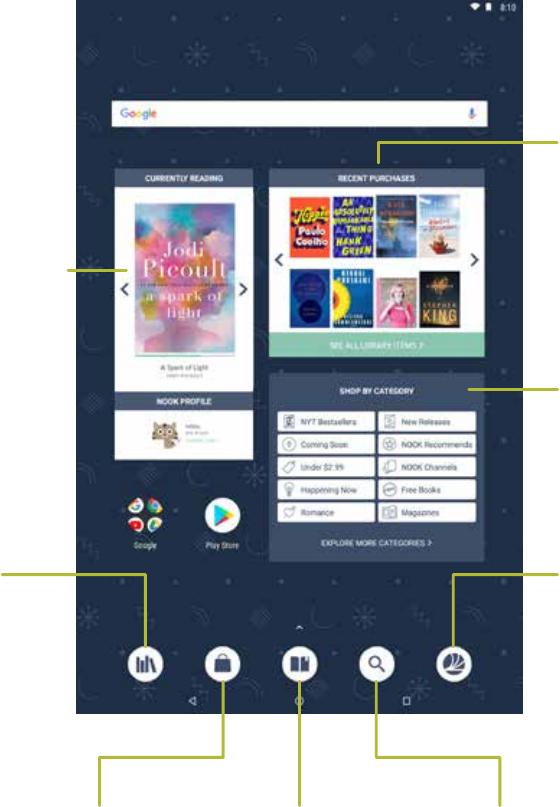
Home Screen
The Home screen features widgets and app shortcuts that provide quick and easy access to
your Library and to new NOOK Content.
Current Read
A quick link to the
most recent book
or periodical you’ve
been reading.
Current Read
Recent Purchases
Swipe right and
left to view more
content.
Bookstore
Shop the latest
recommendations
from Barnes &
Noble booksellers.
Bookstore
Favorite
B&N Readouts
Shop the latest
recommendations
from Barnes &
Noble booksellers.
NOOK Search
Find a book you
own or one you're
interested in buying.
NOOK
Library
Access and
organize all
books and
periodicals
your own.

Barnes & Noble NOOK Tablet User Guide26
App Shortcuts
The Home screen features shortcuts to these apps:
Library
View and organize all your digital books, magazines, newspapers, and comic books..
Bookstore
Shop for your next read with the help of B&N booksellers. Browse personalized recommen-
dations and special offers.
Current Read
Opens the book or magazine you have been reading most recently.
B&N Readouts®
Enjoy a daily dose of discovery with quick, compelling excerpts and articles from B&N editors.
Search
Quickly nd an item in your Library or Bookstore. Search by title, author, or keyword.
Barnes & Noble NOOK Tablet User Guide 27
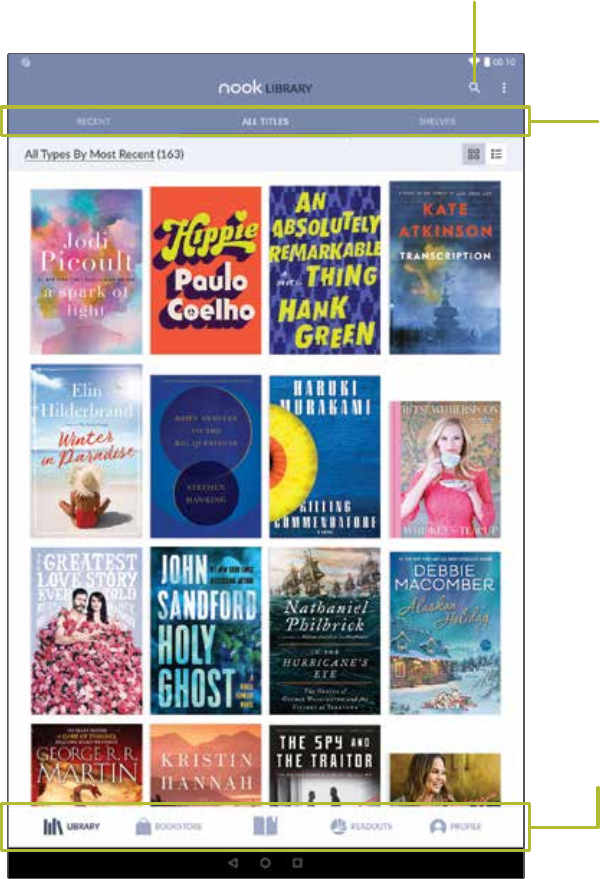
NOOK Navigation
While in any of the NOOK apps found on Home, navigate the different sections available using
the tabs along the top. For example, visit Recent, All Titles, and Shelves within Library.
Plus, use the navigation menu along the bottom to easily jump to Library, Bookstore, Readouts,
Prole, or open your Current Read.
Simply tap on the item you wish to go to.
Tip: Tap on the active icon in the bottom navigation to auto-scroll to the top of the screen or
return to the main page of that section.
Search
Tabs
Navigation
Menu

Barnes & Noble NOOK Tablet User Guide28
How to read a book
To open a book or periodical in the Library or the Library widget, tap the cover of the item.
Turn Pages
To turn to the next page, tap the right side of the screen or swipe from the right side of the screen.
To turn back to the previous page, tap the left side of the screen or swipe from the left side of
the screen.
Display the Table of Contents
1. Tap the center of the page.
2. Tap Table of Contents to open the Contents window.
3. Tap a chapter or section to open it.
Place a Bookmark
Tap the upper right hand corner of the screen to add a Bookmark ribbon.
View a List of Bookmarks
1. Tap the center of the page.
2. Tap Table of Contents to open the Contents window.
3. Tap the BOOKMARKS.
4. Tap the page in the list of bookmarked pages to open that page.
Change Type Size, Font, Margins, and Other Page Elements
1. Tap the center of the page.
2. Tap Text Settings to open the Text Options window.
3. Select the type size, font, margins, line spacing, and color theme you want. If the publisher has
recommended a page design, you can switch to it by moving the slider for Publisher Defaults
to on.
Search a Book
1. Tap the center of the page.
2. Tap to open the options menu.
3. Tap Find in Book.
4. Type the word or phrase you want to nd.

Barnes & Noble NOOK Tablet User Guide 29
5. Tap Search on the keyboard.
View the Details Page
1. Tap the center of the page.
2. Tap to open the options menu.
3. Tap View Details.
Congure Reader Settings
1. Tap the center of the page.
2. Tap to open the options menu.
3. Tap Settings.
4. On the Settings screen, tap an option to congure the Reader.
Display the Status Bar in Books
By default, your NOOK does not display the black Status Bar with the battery and Wi-Fi icons,
the clock, and other notications when you are reading a book.
To display the Status Bar in books:
Change the Page Turn Effect
Your NOOK offers a choice of three animated effects when you turn a page in a NOOK Book
or other EPUB-formatted ebook or magazine. The page can curl as though you were turning
a paper page, one page can slide smoothly to the other, or there can be no special effect at all
as the one page simply ashes to the next.
To select the Page Turn Effect you want for Books:
1. From the Home screen, tap App Drawer > NOOK Settings, and then tap Reader.
2. Tap Books, and then select the Page Turn Effect you want: None, Slide, or Curl.
To change this setting for Magazines, tap Magazines & Newspapers, and select the turn
effect you want: Slide or Curl.
Read Newspapers and Magazines
Newspapers and magazines use many of the same reading features as books.
Page View and ArticleView®
Some magazines and newspapers present two ways of viewing content.
Page View presents an onscreen replica of the printed page.

Barnes & Noble NOOK Tablet User Guide30
ArticleView displays the text of an article in an easy-to-read, scrollable format. You can scroll
up and down to read the article. Swipe right and left to move from one article to another.
In publications that support these features, a button at the bottom of the screen lets you tog-
gle between Page View and ArticleView.
In publications that do not support Page View and ArticleView, use the navigation tools and
gestures you use in books to move from page to page and section to section.
1. From the Home screen, tap App Drawer > NOOK Settings, and then tap Reader.
2. Tap Always Show Status Bar, making sure that the checkbox is selected.
Additional Features in ArticleView
In ArticleView, tap the center of the page to open Reading Tools at the top of the Screen.
• Tap Text Settings to open controls for formatting the page.
• Tap the grid icon (9 small squares) to display all pages as thumbnail images in a scrollable
grid. To jump to a page in the grid, tap it.
• Tap Table of Contents to see a scrollable table of contents for the publication.
Comics
Your NOOK supports comics. Zoom View Letterboxing is a feature that lets you move from
frame to frame, even if the frames are different sizes.
To turn on Zoom View Lettering boxing:
1. From the Home screen, tap App Drawer > NOOK Settings.
2. Tap Reader > Zoom View Letterboxing to enable.
Open DRM-protected Files
DRM stands for Digital Rights Management. DRM software protects books from being copied,
sold, or distributed in an unauthorized manner.
Your NOOK and the Barnes & Noble website automatically make sure that when you buy
and download a NOOK Book, the NOOK Book recognizes you as its legitimate owner and
presents its contents for you to read on your NOOK.
Barnes & Noble NOOK Tablet User Guide 31
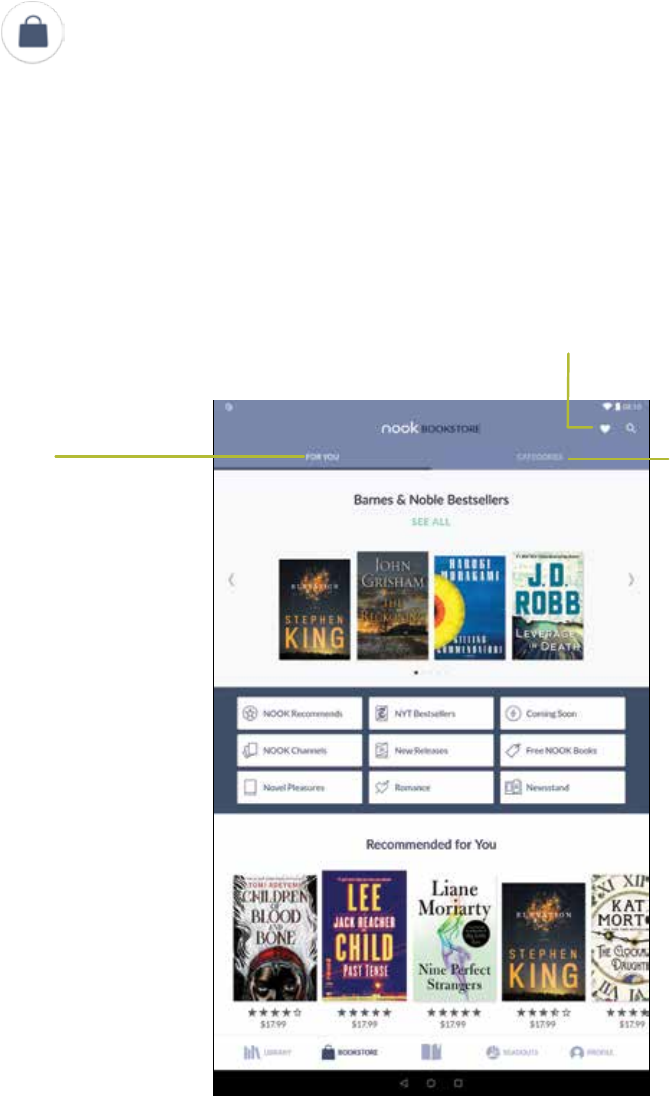
Bookstore
Visit Bookstore to nd your next read. By default, you will nd a shortcut to Bookstore on the
Home screen. It is also accessible from the App Drawer.
Switch between the two tabs of Bookstore for two different shopping experiences.
For You
Browse curated collections of
books from B&N booksellers,
recommended based on your
reading habits. Plus, find special
offers and seasonal promotions.
Categories
Dive into the extensive
NOOK catalog to explore
books and periodicals by
genre and subject.
Wishlist
View your saved items.
Barnes & Noble NOOK Tablet User Guide32
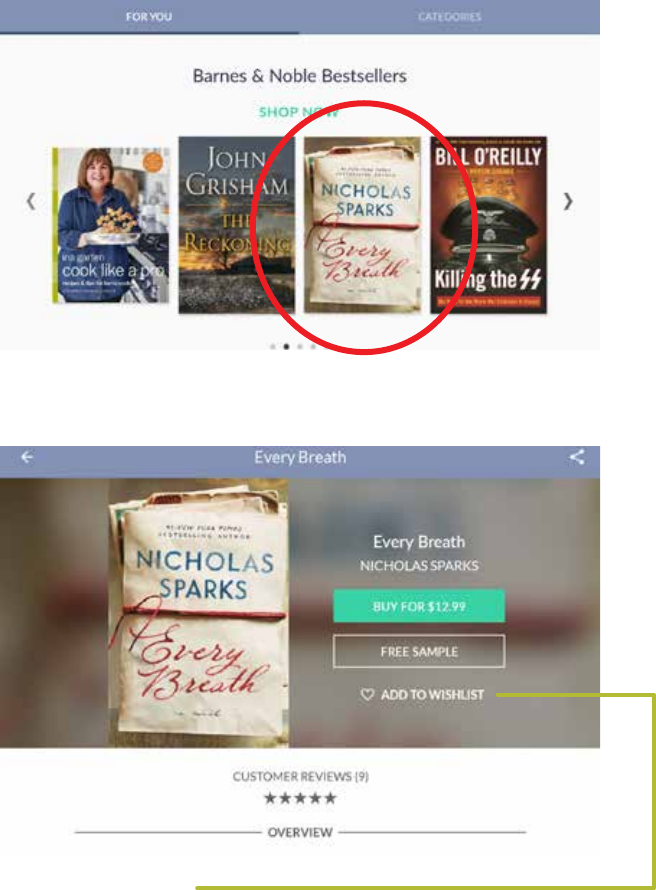
Buy a Book
1. In Bookstore, tap a book cover to open its Details page.
2. Tap the green Buy button, and then tap Conrm.
Add an Item to Your Wishlist
Save items for later by adding them to your Wishlist. Your NOOK Wishlist is also accessible
on bn.com.
1. In Bookstore, tap an item’s cover to open its Details page.
2. Tap Add to Wishlist.
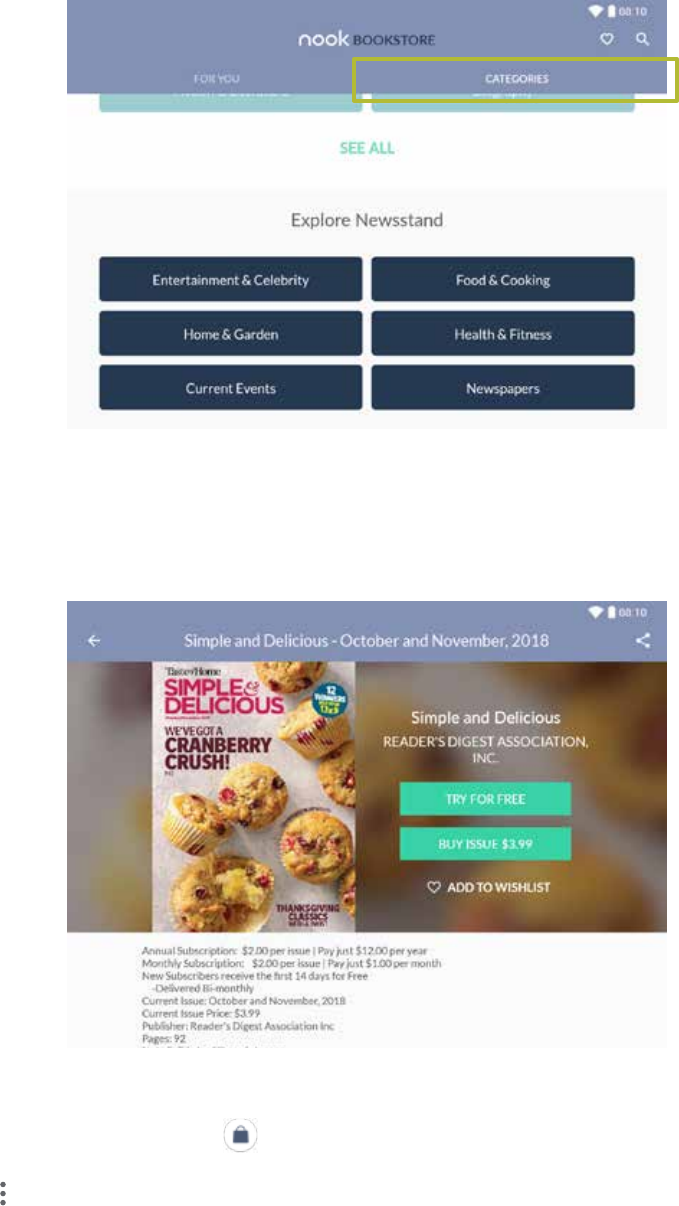
Buy a Single Issue of a Magazine or Newspaper
1. In Bookstore, tap a magazine or newspaper cover to open its Details page.
2. Tap the green Buy Issue button, and then tap Conrm.
Barnes & Noble NOOK Tablet User Guide 33
Subscribe to a Magazine or Newspaper
1. From the Bookstore, tap on Categories.
2. Find a magazine or newspaper, and tap to open its Details page.
3. Tap the green Try for Free button. If the periodical offers a choice of annual or monthly
subscriptions, tap the type of subscription.
4. Tap Start My Free Trial.
View Your Wishlist
1. From the Home screen, tap Bookstore.
2. Tap > Wishlist.
Barnes & Noble NOOK Tablet User Guide34
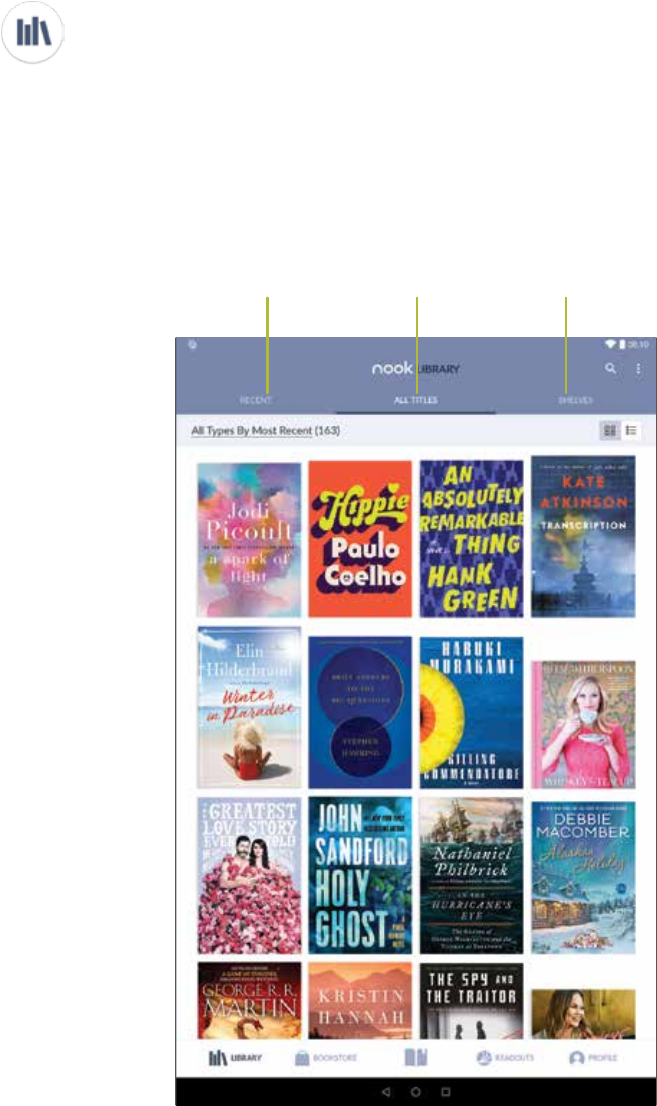
Library
Visit Library to view all your digital books, magazines, newspapers, and comic books. By de-
fault, you will nd a shortcut to Library on the Home screen. It is also accessible from the App
Drawer.
Library has three different views of your content.
To Open Any Item in Your Library
Tap the cover of the item. If the item isn’t downloaded to your device, the download will be-
gin. Once the download is complete, tap the cover of the item again to open it.
All Titles
View and organize all
your Library content.
Shelves
Create custom collections
with your items.
Recent
Quick access to your
most recent reads and
purchases.

Barnes & Noble NOOK Tablet User Guide 35
Organize Library Items into Shelves
You can create custom shelves to organize your Library content. Items added to shelves re-
main visible in all areas of Library by default. To change this, visit NOOK Settings.
Create a Shelf
1. In Library > Shelves tab, tap +.
2. Type a name for the shelf, then tap Continue.
3. Select the items you want to include in the shelf by tapping on the cover.
4. Tap Add.
Manage the Content in a Shelf
To add or remove content in a shelf that you previously created:
1. In Library > Shelves tab, tap a shelf to open it.
2. Tap > Manage Content in Shelf
3. Tap on items to select or deselect them, and then tap Update.
Rename a Shelf
1. In Library > Shelves tab, tap a shelf to open it.
2. Tap > Rename Shelf
3. Type a new name for the shelf, and then tap Rename.
Remove a Shelf
1. In Library > Shelves tab, tap a shelf to open it.
2. Tap > Remove Shelf, and then tap Remove.
View Content in Your NOOK Archive
You can archive books and periodicals in the NOOK Cloud.
1. In Library > All Titles tab, tap the sort/lter control on the top left.
2. In the window that opens, tap on “Filter by.”
3. Select “Archived.”
4. Tap off screen to close the window.

Barnes & Noble NOOK Tablet User Guide36
Refresh the Content in Your Library
If you don’t see an item in your Library, it likely needs a refresh. To refresh the content in your
Library, pull down on the screen.
Add Items to the NOOK Cloud
To free up storage space on your device, you can add completed items to the NOOK Cloud.
The cover of the items will remain in your Library, so that you can download them again later.
1. In Library, tap and hold on the cover of an item.
2. Tap Move to Cloud.
Remove an Item from Your NOOK
You can remove an item such as a book from your NOOK. An image of the item remains in
your Library, so that you can download it again later if you like.
1. From the Home screen, tap App Drawer > Library.
2. Tap and hold on the cover of the item.
3. Tap Remove from your NOOK.
Barnes & Noble NOOK Tablet User Guide 37
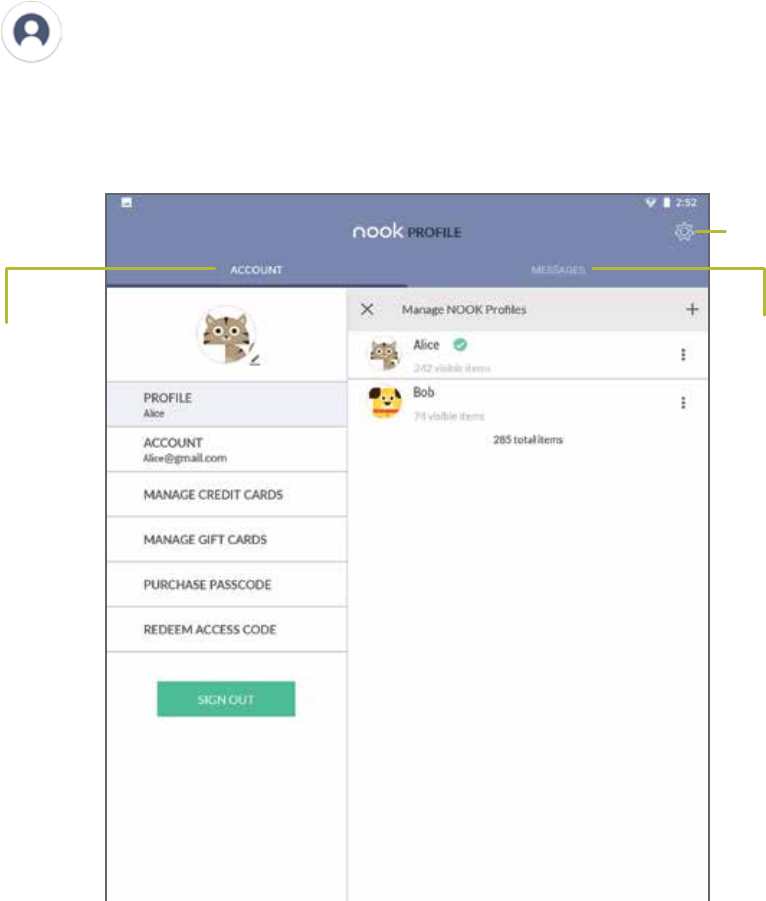
Prole
Visit Prole to manage your account and view your Messages. Prole is accessible from the App
Drawer.
View Account Information
1. In Prole > Account tab, tap Account on the left sidebar. You will see:
• The email address associated with the owner’s Barnes & Noble NOOK account.
• The name associated with the account owner.
• The country of residence.
*To make edits to your account information, visit Manage Account on bn.com.
Manage Credit Cards
You can only have one credit card associated with your device. To change the credit card on le:
1. In Prole > Account tab, tap Manage Credit Cards on the left sidebar.
Messages
View notifications
about special offers
and new releases.
Account
Manage your
account details
and create new
NOOK Profiles
for members of
your family.
An additional way
to access NOOK
Settings.
*Learn more about
NOOK Proles on
page 38

Barnes & Noble NOOK Tablet User Guide38
2. If you already have a credit card associated with your account, tap the Update button. Otherwise,
tap Add New Credit Card.
3. Enter the information for the card you want to associate with your account, and then tap Add
New Credit Card.
Manage Gift Cards
To add a Barnes & Noble gift card to your account:
1. In Prole > Account tab, tap Manage Gift Cards on the left sidebar.
2. Tap the Add New Gift Card button.
3. Enter the Card or Certicate Number and the PIN, and then tap Save Gift Card.
Redeem an Access Code for NOOK Content
1. In Prole > Account tab, tap Redeem Access Code on the left sidebar.
2. Enter the 13-digit access code and tap Redeem Code.
Types of NOOK Proles
Your NOOK supports three types of NOOK Proles:
• Primary NOOK Prole: This is the prole created by default when you register your
NOOK. This prole can view all the content on your NOOK an. It can also create and
edit proles for other users and manage those proles’ access to content. All purchases
made on the NOOK are processed using the payment method associated with this prole.
• Adult NOOK Prole: An adult prole can purchase any type of content. An adult prole
can also control which content is visible to itself and which content is visible to any child
prole. It can also set parental controls for child proles. It cannot control which content
is visible to the primary prole.
• Child NOOK Prole: By default, a child prole can only view and purchase content authorized
by the primary prole or through parental controls congured by an adult prole. A child
prole does not have the ability to create or edit other proles. It cannot override paren-
tal controls.
Set up a New or Existing Adult NOOK Prole
To set up an adult prole:
1. From the App Drawer, tap Prole.
2. Tap the (+) sign in the upper right corner.

Barnes & Noble NOOK Tablet User Guide 39
3. Enter details and tap Create New Prole to complete.
Switch Between NOOK Proles
To switch between NOOK proles:
1. From the App Drawer, tap Prole.
2. On the right panel, tap the Prole Name you wish to switch to.
Delete a NOOK Prole
Deleting a user’s NOOK prole does NOT remove the primary user account from your NOOK.
To delete a NOOK prole:
1. From the App Drawer, tap Prole.
2. Tap on at the account you want to delete.
3. Tap on Delete. Conrm the removal in the following dialog.
Create a Child NOOK Prole
Using NOOK Prole, you can limit the types of content that child proles can view and purchase.
You set up parental controls when you create a child prole. You can adjust them later if you
like by editing the child prole.
Using prole management, you can control whether or not a specic child prole can:
• Browse the Bookstore
• Purchase from Bookstore only when using your NOOK account password
• Shop only for kids’ content in the Bookstore
• Access Reads for kids
To create a Child NOOK Prole:
1. From the App Drawer, tap Prole.
2. Tap the (+) sign in the upper right corner.
3. Type a rst name for the child prole, tap the check box next to child prole, enter the child’s
age, and accept the terms and conditions, and then tap “Next”.
4. Select the permission that you want to enable, and then tap “Next” to complete.

Barnes & Noble NOOK Tablet User Guide40
NOTE: To add more parental controls on apps and web browsing, you need to use the Android
Settings to create an Android Restricted Prole and/or add a Screen Lock. Using the Android
Restricted Prole settings you can choose which apps, features, and content an Android
restricted prole user can see and use.
Add an Android restricted prole
1. Tap App Drawer > Settings.
2. Under “Device”, tap Users Add user or prole.
3. Tap Restricted prole. It will prompt you to enter a lock screen PIN for the device owner user.
The new restricted prole opens with a list.
• To name the prole, tap “New prole”. Type the name and tap “OK”.
• To pick which listed apps, features, and settings the prole acan see and use, tap the On/
Off switches and Settings.
NOTE: It is highly recommended to enable the “Location” option to avoid issues with app
performance.
4. At the top left, tap “Back”.
5. Tap the “New prole”.
Delete an Android restrected prole
1. Tap App Drawer > Settings.
2. Under “Device”, tap Users > Add user or prole.
3. Tap Restricted prole.
4. Next to the prole, tap Trash.
Manage Content for a NOOK Prole
Share Content
The same content can be shared by multiple proles. Each prole may need to download the
content independently to access it.
For example, if the Primary Prole owns a particular NOOK Book and grants another prole
access to it, the book may appear in the other prole’s Library with a download icon, indicating
that the book is available for download. To read the book, the other prole simply has to tap
its cover to download it to the prole’s storage area on your NOOK.
Annotations, such as notes and highlights, are specic to a prole. If one prole makes notes

Barnes & Noble NOOK Tablet User Guide 41
and highlights in a book, they will not be visible to other proles reading the same book.
Similarly, if two proles own the same book, their reading positions in the book are tracked in-
dependently. If one prole reads to page XXX and the other prole reads to page XXX, each
prole will be taken to his or her most recently read page when the book is reopened. The
rst prole will be returned to page XXX; the second prole to page XXX.
Assign Content to Other Proles
The primary prole can assign content to adult proles and child proles. An adult prole can
assign content to child proles.
Manage Access to a Single Item
To manage access to a particular book, magazine, or other Library item:
1. From the Library, tap and hold on the cover of the item.
2. Tap Assign to Proles.
3. Tap the checkboxes to select which proles should have access to the item, and tap “SAVE”.
Manage Access to Many Items or Content Categories
To manage access to many items or item categories,
1. From the App Drawer, tap Prole.
3. Tap the pencil icon next to the Prole you want to edit. Tap “Manage Content.”
4. Select the content you want to make available for this prole. Tap “Done.”
Manage Parental Controls for a Child NOOK Prole
To manage parental controls for a child prole:
1. From the App Drawer, tap Prole.
2. Tap the pencil icon next to the Prole you want to edit. Tap “Parental Controls.”
3. Use the toggles to turn permissions on or off for this child prole.
4. Tap done.
NOTE: NOOK parental controls do not control non-NOOK apps, such as apps in the Google
Play store.

Barnes & Noble NOOK Tablet User Guide42
NOOK Settings
Visit NOOK Settings to make customizations to the application and access Support information.
NOOK Settings is accessible from the App Drawer.
Congure the Currently Reading Widget
To select the type of content displayed by the Currently Reading widget on the Home screen:
1. Tap App Drawer > NOOK Settings.
2. In NOOK Settings, tap “Library” on the left sidebar.
3. Tap the Recent Content Display options and select “Content Types”.
Congure Adobe DRM Settings
DRM stands for Digital Rights Management, a system for managing publication and distribution
rights for digital content. To gain authorized access to content protected with Adobe DRM on
your NOOK, you need to obtain a free Adobe ID from Adobe and to enter that ID on your
NOOK.
This is required for loading books from the public library on your NOOK.
Once you have your Adobe ID:
1. In NOOK Settings, tap Reader on the left sidebar.
2. Tap Adobe DRM Settings.
3. Tap Add Adobe ID and enter the email address and password for your Adobe
ID, and then tap OK.

Barnes & Noble NOOK Tablet User Guide 43
NOOK Search
NOOK Search lets you quickly search for items in your Library and in Bookstore. By default,
you will nd a shortcut to NOOK Search on the Home screen. It is also accessible from the
App Drawer.
1. From the Home screen, tap NOOK Search.
2. As you type, suggestions will display for matching words and phrases in your Library and in Bookstore.
3. When you see the word or phrase you are searching for, tap it.
Sideloading Files
Sideloading means transferring les from your personal computer to your NOOK over the
USB cable.
If your personal computer is a Mac, you will need to install a free software program, Android
File Transfer (AFT), on your computer before you can transfer les to and from your NOOK.
AFT is available here: https://www.android.com/letransfer/.
If your computer is a PC, it will automatically detect your NOOK and install the software drivers
it needs, if they are not already installed.
To sideload content:
1. Connect your NOOK’s USB cable to a USB port on your computer.
2. Connect the other end of the cable to your NOOK’s Charger/Accessory Port on the top edge
of your NOOK.
3. On your NOOK, swipe down from the top edge of the display to open the Notications menu
and tap on “USB for charging”.
4. Select “Transfer les (MTP)”.
5. Using the File Explorer on your computer look for and open “BNTV650” to access the storage
on your NOOK.
Once you have connected your NOOK to your computer, you will be able to access your
NOOK’s storage as though it were another drive connected to your computer.
6. Select the les you want to transfer from your computer, then drag and drop them from your
computer to the storage of your NOOK.
Barnes & Noble NOOK Tablet User Guide44
NOTE: You can view PDF documents using the Nook software by copying the PDF le from
your computer to the Nook/copy folder location in internal storage.
7. Once you nish sideloading the les you want to transfer, disconnect your NOOK from your
computer by using your computer’s le system to eject your NOOK as if you are ejecting a
disk.
8. Use your NOOK’s File Manager app to view les copied to your NOOK’s storage.
To view the amount of storage available on your NOOK, open the Settings app, and select
“Storage & USB”.
You can also transfer les to your NOOK using Dropbox or any other le-sharing app you
have installed on your NOOK.
Barnes & Noble NOOK Tablet User Guide 45
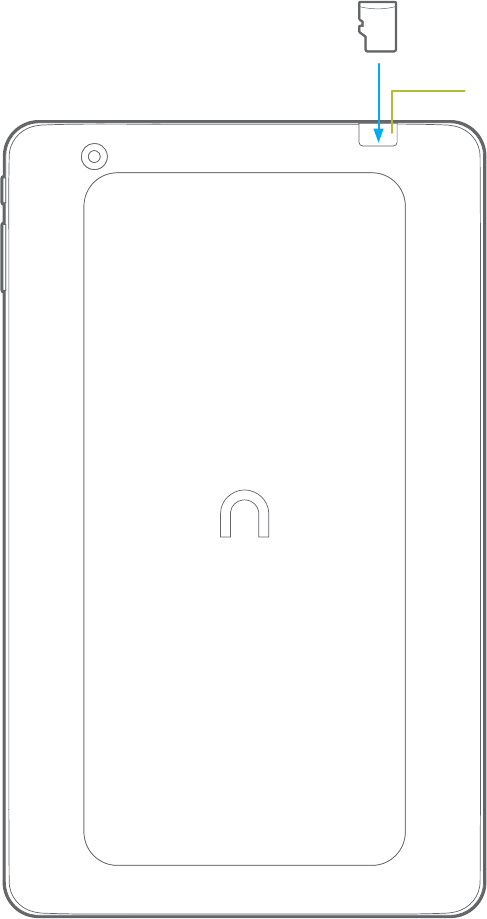
Adding More Storage to Your NOOK
Expanding the storage
Your NOOK supports microSD cards up to 256GB (not included).
To install a microSD card, carefully insert the card as shown below into the card slot until it
clicks and locks into place.
To remove the microSD card, gently press it inward to eject.
microSD Card
microSD Card Slot

Barnes & Noble NOOK Tablet User Guide46
microSD™ Card
Android™ 8.1 Oreo™ allows the SD card to function in two ways:
1. Portable Storage (Default and recommended)
This option is recommended for users who only plan to use their SD card for media storage,
or plan to switch between multiple SD cards. The default write disk will be set to Internal Stor-
age, which means that all captured photos & video, screenshots, downloaded Ebooks, etc. are
stored in Internal Storage. If you want to change the default write disk to SD card, you can do
so by going into Settings > Storage & USB, then select the SD card as Default write disk.
Some eBooks can only be downloaded to SD card from your Library once you enable the
settings from NOOK Settings.
2. Internal Storage
This option is recommended for users who wish to expand the existing storage of their tablet,
and plan to always keep their SD card inserted. This option adopts your SD card into the tablet’s
internal storage to increase storage space for supported apps and data.
Removing the SD card after it is set to Internal storage will prevent access to all apps and data
stored on it until it is re-inserted. Your SD card will also not be readable by other devices until it
is formatted.
How to change/format from Portable Storage (Default) to Internal Storage:
1. Insert SD card.
2. Tap on the notication prompt.
3. Select “Use as internal storage”.
4. Complete the prompts until internal storage format set up is nished.
Conguring the NOOK App for the microSD Card
1. After inserting and conguring your microSD Card, open App Drawer > Nook
Settings.
2. Select “Download & Storage” and check “Download to SD card”. Eligible NOOK Content
will be stored on the microSD.
Digital Rights Management and Publishers guidelines will affect the list of content eligible for
downloading on an SD card.
Barnes & Noble NOOK Tablet User Guide 47
Applications & Customizing Your NOOK
Home Screen
Barnes & Noble NOOK Tablet User Guide48
App Drawer
You can access and launch all applications from the App Drawer.
1. From the Home screen, tap or swipe up along the length of the home screen..
2. Tap an app’s icon to launch it.
3. To return to the Home screen, press the Home button.
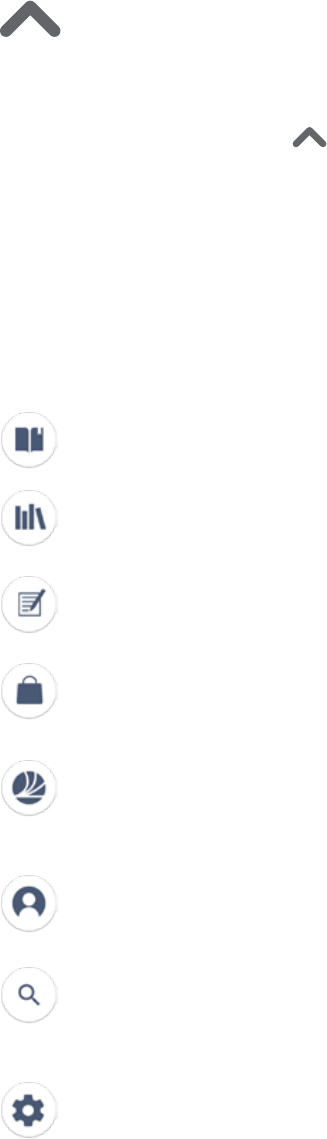
NOOK Apps
The following NOOK applications are preloaded on your NOOK.
Current Read
Tap to open the book or magazine you are currently reading.
Library
View and organize all your digital books, magazines, newspapers, and comic books.
Highlights and Notes
View all highlights and notes you’ve made in your books.
Bookstore
Shop personalized recommendations and expertly curated lists from B&N booksellers.
Readouts
Enjoy a daily dose of discovery with quick, compelling excerpts and articles from
B&N editors.
Prole
Manage your account information and create new Proles for family members.
NOOK Search
Use NOOK Search to quickly nd an item in your Library or Bookstore. Search by
title, author, or keyword.
NOOK Settings
NOOK Settings provides access to the conguration settings for Library, Bookstore,
and other NOOK features.
To read the NOOK Device Terms of Service, the Book NOOK Store Terms of Service,
and the NOOK Privacy Policy, open the NOOK Settings app and tap Legal. Your NOOK
displays links to pop-up windows with each of these documents.

Barnes & Noble NOOK Tablet User Guide 49
The latest NOOK Device Terms of Service, NOOK Store Terms of Service, and Privacy
Policy are located here:http://NOOK.com/legal
NOOK Audiobooks
Opens the NOOK Audiobooks app where you can shop for and listern to digital audiobooks.
Browsery
Talk about books and get recommendations for new ones from a community of fellow readers.
Barnes & Noble
Tap to visit barnesandnoble.com.

Barnes & Noble NOOK Tablet User Guide50
Google Apps
Enjoy these apps from Google. Certain apps require a Google Account.
Visit google.com to learn more.
Chrome
Browse the Internet and bring your open tabs, bookmarks and address bar data from
your computer to your mobile device.
Visit google.com/chrome/browser/mobile to learn more about Chrome™.
Drive
Open, view, rename, and share your Google Docs™ and les.
Visit drive.google.com to learn more about Google Drive™.
Gmail
Send and receive email with Gmail, Google’s web-based email service.
Visit gmail.com to learn more.
Google
Search not only the Internet, but also the apps and contents of your NOOK.
Hangouts
Meet friends and family online, share photos, host video calls, and send SMS and Hangouts
messages.
Visit hangouts.google.com to learn more.
Maps
Find your current location and get directions and other location-based information.
You must enable Location services to use Google Maps™.
Visit google.com/maps to learn more.

Barnes & Noble NOOK Tablet User Guide 51
Photos
Automatically backs up your photos and videos to your Google Account.
Visit photos.google.com to learn more about Google Photos™.
Play Movies & TV
Watch movies and TV shows purchased from Google Play. You can stream them instant-
ly or download them for viewing when you are not connected to the Internet. You can
also view videos saved on your NOOK.
Visit play.google.com/store/movies to learn more.
Play Music
Play music and audio les on your NOOK.
Visit play.google.com/music to learn more.
Play Store
Find new apps, movies and TV shows, music, books, magazines, and games in Google
Play store.
Visit play.google.com/store to learn more.
YouTube
View and upload YouTube™ videos from your NOOK.
Visit youtube.com to learn more.

Barnes & Noble NOOK Tablet User Guide52
Customizing your NOOK Home Screen
Change the Wallpaper
Change the look of the Home and Lock screens with wallpaper. You can display a favorite picture
or choose from preloaded wallpapers.
1. Press and hold the center of the Home screen, and select Wallpapers.
2. Select either “Wallpapers” or “Photos”
3. Select a wallpaper or photo, and then select “Set wallpaper”.
Widgets
Widgets are self-contained apps that run on the Home screen.There are all kinds of widgets,
including links to a specic contact, Internet bookmarks, Gmail and email accounts, and many
others.
Add a Widget to the Home screen
1. Press and hold the center of the Home screen, and select Widgets.
2. Touch and hold a widget, drag it to the Home screen, and release it.
Remove a Widget
From the Home screen, press and hold a widget to release it and drag the widget to “X
Remove”, and release it.
Removing a widget does not delete the widget, it just removes the widget from the Home screen.
You can use app shortcuts to launch an app from any Home screen.
Shortcuts
Place your favorite apps on the Home screen.
Add a Shortcut to the Home screen
1. Tap Apps on the Home screen.
2. Touch and hold an app, and drag it to the Home screen and release it.
Remove a Shortcut
Press and hold the shortcut, and drag it to “X Remove”.
Removing a shortcut does not delete the app, it just removes the shortcut from the Home
screen.
Barnes & Noble NOOK Tablet User Guide 53
Folders
Place folders on the Home screen to organize items.
Create a Folder
You can create app folders on the Home screen.
1. Press and hold an app shortcut and drag it on top of another app shortcut until a highlighted
box appears.
2. Release the app shortcut to create the folder.
3. Tap “Unnamed Folder” to enter a name for the folder.
4. Tap anywhere outside of the folder to close it.
5. To add more apps, touch and hold an app shortcut and drag it to the folder.
Remove a Folder from the Home screen
1. Press and hold the folder, and drag it into “X Remove”.
Barnes & Noble NOOK Tablet User Guide54
Android Settings
Barnes & Noble NOOK Tablet User Guide 55
Congure your NOOK’s connections and settings, add accounts, and customize
Home screens, apps, and features.
Access Settings
There are a couple of ways to access your NOOK’s Android settings.
From the Home screen, tap App Drawer > Settings, or drag down from the Status
bar to display the Notication panel, and then tap Settings.
Search for Settings
If you are not sure exactly where to nd a certain setting, you can use the Search feature.
1. From the Home screen, tap App Drawer > Settings, and then tap Search.
• Enter a word or words in the Search eld. As you type, settings that match are displayed
on the screen.
• Tap an entry to go to that setting.
Wi-Fi
Wi-Fi is a term used for certain types of Wireless Local Area Networks (WLAN). Wi-Fi
communication requires access to a wireless Access Point (AP).
Turn Wi-Fi On or Off
Turning Wi-Fi on makes your NOOK able to discover and connect to compatible in-range
wireless APs.
1. From the Home screen, tap App Drawer > Settings >Network & Internet.
2. Tap Wi-Fi, and then tap On/Off to turn Wi-Fi on or off.
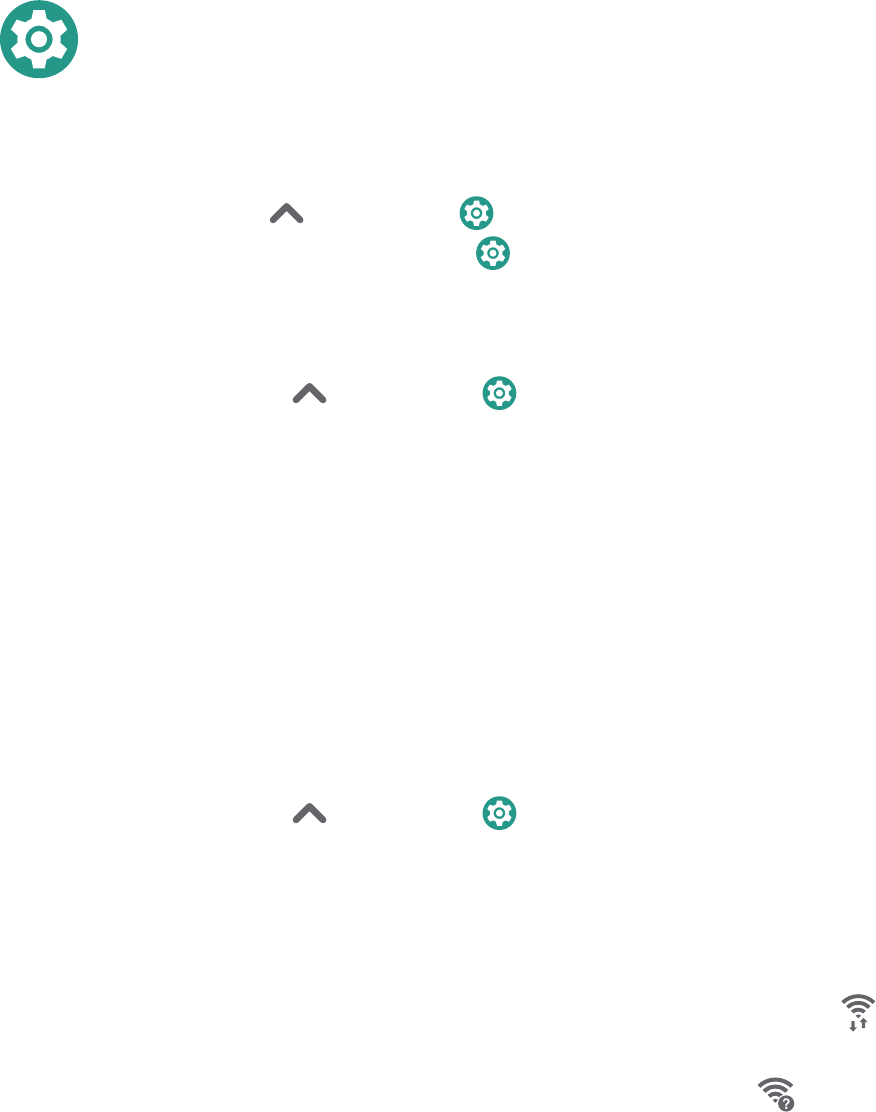
Wi-Fi Status Indicators
Status bar icons indicate your current Wi-Fi connection status:
• When Wi-Fi is connected, active, and communicating with a wireless Access Point,
Wi-Fi active is displayed in the Status bar.
• If a Wi-Fi access point is available, but your NOOK is not connected to it, Wi-Fi
available is displayed. It may also be displayed if there is a communication issue with the
target wireless Access Point.
Wi-Fi Networks
To scan for a Wi-Fi network and connect to it:

Barnes & Noble NOOK Tablet User Guide56
1. From the Home screen, tap App Drawer > Settings.
2. Tap Wi-Fi, and then tap On/Off to turn on Wi-Fi.
• When Wi-Fi is turned on, your NOOK automatically scans for available networks and
displays them.
3. Tap the network you want to connect to.
• When you select an open network, you are automatically connected to the network.
Otherwise, enter a password to connect.
Manually Connect to a Wi-Fi Network
You can connect your NOOK to a Wi-Fi network manually.
1. From the Home screen, tap App Drawer > Settings.
2. Tap Wi-Fi, and then tap On/Off to turn on Wi-Fi.
3. Scroll to the bottom and tap on “+ Add network”
4. Enter information about the Wi-Fi network:
• Network name: Enter the name of the Wi-Fi network (also known as the SSID).
• Security: Select a security option and enter your password.
• Show advanced options: Add advanced options such as IP settings and Proxy settings.
5. Tap “SAVE” to store the new information and connect to your target wireless Access Point.
Wi-Fi Options
The Wi-Fi settings menu allows you to set up many of your NOOK’s advanced Wi-Fi services.
1. From the Home screen, tap App Drawer > Settings.
2. Tap Wi-Fi, and then tap On/Off to turn on Wi-Fi.
3. Tap Wi-Fi Preferences for options:
• Open network notication. Receive notications when open networks in range are
detected.
• Advanced:

Barnes & Noble NOOK Tablet User Guide 57
- Install certicates: Install authentication certicates.
- WPS push button: Set up a connection to a WPS (Wi-Fi Protected Setup) router or
other equipment.
- Network Rating Provider
- WPS PIN entry: View the PIN used by your NOOK to set up a PIN-secured connection
to a Wi-Fi router or other equipment (not congurable).
- MAC address: View your NOOK’s MAC address, which is required when connecting
to some secured networks (not congurable).
- IP address: View your NOOK’s IP address (not congurable).
Wi-Fi Direct
Wi-Fi Direct allows direct device-to-device connections using Wi-Fi, without having to connect
to a Wi-Fi network.
1. From the Home screen, tap App Drawer > Settings.
2. Tap Wi-Fi, and then tap On/Off to turn on Wi-Fi.
• Wi-Fi must be on to congure settings.
3. Tap Wi-Fi Preferences > Advanced > Wi-Fi Direct. Your NOOK automatically scans for
nearby Wi-Fi
Direct devices.
4. Select a device, and then follow the prompts to complete the connection.
Bluetooth
Bluetooth is a short-range communications technology that connects your NOOK wirelessly
to a number of Bluetooth devices, such as headsets and hands-free car Bluetooth systems, and
Bluetooth-enabled computers, printers, and wireless devices.
The Bluetooth communication range is approximately 30 feet.
Turn Bluetooth On or Off
Use the settings menu to turn your NOOK’s Bluetooth on or off.
1. From the Home screen, tap App Drawer > Settings > Connected Devices.
2. Tap Bluetooth, and then tap On/Off to turn Bluetooth on or off.

Barnes & Noble NOOK Tablet User Guide58
Bluetooth Status Indicator
Status bar icons indicate your current Bluetooth connection status:
• When Bluetooth is turned on, Bluetooth is displayed in the Status bar.
Scan for Bluetooth Devices
When you want to pair with another Bluetooth device, you can scan for nearby devices that
are visible.
1. From the Home screen, tap App Drawer > Settings > Connected Devices.
2. Tap Bluetooth, and then tap On/Off to turn on Bluetooth.
• When Bluetooth is rst turned on, it scans for nearby Bluetooth devices and displays them.
Pair Bluetooth Devices
The Bluetooth pairing process allows you to establish trusted connections between your
NOOK and another Bluetooth device.
Pairing between two Bluetooth devices is a one-time process. Once a pairing is created, your
NOOK continues to recognize their partnership and exchange information without having to
re-enter a passcode.
1. From the Home screen, tap App Drawer > Settings > Connected Devices.
2. Tap Bluetooth, and then tap On/Off to turn on Bluetooth.
3. Tap on “+ Pair new device”
• Make sure that the target device is discoverable so that your NOOK can nd it. Refer to the
instructions that came with the device to nd out how to set it to discoverable mode.
4. Tap the name of the target device when you see it displayed in the Bluetooth devices section.
• Your NOOK automatically tries to pair with the target device. If automatic pairing fails,
enter the passcode supplied with the target device.
Due to different specications and features of other Bluetooth-compatible devices, display and
operations may be different, and functions such as transfer or exchange may not be possible
with all Bluetooth compatible devices.
Rename a Paired Device
Once you have paired your NOOK to another device, you can rename the paired device to
make it easier to recognize.
Barnes & Noble NOOK Tablet User Guide 59
1. From the Home screen, tap App Drawer > Settings > Connected Devices.
2. Tap Bluetooth, and then tap On/Off to turn on Bluetooth.
3. Tap Settings next to the previously paired device.
4. Enter a new name, and tap OK.
Delete a Paired Device (Unpair)
When you unpair from a Bluetooth device, the two devices no longer recognize each other.
To connect again, you have to pair the devices.
1. From the Home screen, tap App Drawer > Settings > Connected Devices.
2. Tap Bluetooth, and then tap On/Off to turn on Bluetooth.
3. Tap Settings next to the paired device, and then tap Forget to delete the paired device.
Airplane Mode
Airplane mode disconnects your NOOK from all networks and turns off connectivity features,
such as Wi-Fi and Bluetooth.
While in Airplane mode, you can use other features such as playing music, watching videos, and
other ofine applications.
Enable Airplane Mode
To enable or disable Airplane mode:
1. Swipe down the top of the Home screen to Quick Settings panel.
2. Tap Airplane mode to enable or disable the option.
Location Services
Google Location History™ stores and uses your NOOK’s most recent location data. Google
apps, such as Google Maps, can use this data to improve your search results based on places
that you have visited.
1. From the Home screen, tap App Drawer > Settings > Security & Location
2. Tap Location.
3. Tap On/Off to turn on Location services.
4. Tap Google Location History and sign in to your Google Account for more options.

Barnes & Noble NOOK Tablet User Guide60
Accessibility
Accessibility services are special features that make using your NOOK easier for those with
certain physical disabilities.
You can download additional accessibility applications from the Google Play store.
1. From the Home screen, tap App Drawer > Settings.
2. Tap Accessibility for options:
Vision
• “Talk Back”: Give spoken feedback aloud to assist blind and low-vision users.
- Talk Back can collect all of the text you enter, except passwords, including personal
data and credit card numbers. It may also log your user interface interactions with your
NOOK.
• Speak passwords: Read the characters aloud as you enter your passwords.
• Text-to-speech: Set your preferred TTS engine and options.
• Accessibility shortcut: Quickly enable accessibility features in two quick steps.
• Font size: Set the font size.
• Magnication gestures: Use exaggerated gestures such as triple-tapping, double pinching,
and dragging two ngers across the screen.
• Negative colors: Reverse the display of colors from white text on a black background to
black text on a white background.
• Color adjustment: Adjust the color of the screen if you are color blind or have difculty
reading the display because of the screen color.
User & Accounts
Set up and manage accounts, including your Google Account, email, and social networking accounts.
Depending on the account, you can choose to synchronize your calendar, contacts, and other
types of content.
Add an Account
You can add and manage all your email, social networking, and picture and video sharing accounts.
1. From the Home screen, tap App Drawer > Settings.

Barnes & Noble NOOK Tablet User Guide 61
2. Tap Accounts > Add account.
3. Tap one of the account types.
4. Follow the prompts to enter your credentials and set up the account.
Synchronize Accounts
You can synchronize your calendar, contacts, and other types of accounts.
1. From the Home screen, tap App Drawer > Settings.
2. Tap User & Accounts > [Account type].
3. Tap an account to view the sync settings for that account.
• Tap individual data items to sync.
• Tap > Sync now to synchronize the account.
Account Settings
Each account has its own set of settings. In addition, you can congure common settings for all
accounts of the same type.
Account settings and available features vary between account types and service providers.
Contact your service provider for more information on your account’s settings.
1. From the Home screen, tap App Drawer > Settings.
2. Tap User & Accounts > [Account type].
3. Tap an account to congure that account’s sync settings.
4. Tap other available options for the account type.
Remove an Account
You can remove accounts from your NOOK.
1. From the Home screen, tap App Drawer > Settings.
2. Tap User & Accounts > [Account type].
3. Tap the account > Remove account.

Barnes & Noble NOOK Tablet User Guide62
Google Settings
Congure your NOOK’s Google settings.
Customize Google
To customize your Google settings:
1. From the Home screen, tap App Drawer.
2. Tap Google, and select an option to customize:
• Ads: Congure your Google advertising prole.
• Location: Congure your Google location settings.
• Nearby: Use your NOOK’s sensors to connect with nearby devices.
• Search: Congure your Google search settings and Google Now settings.
• Security: Congure the Android Device Manager and apps security settings.
• Set up nearby device: Set up another device using Wi-Fi and Bluetooth.
Note: Other options also available. These options may change if you are signed in to your
Google Account.
Backup and Reset
Back up your data to Google servers. You can also reset your NOOK to its factory defaults.
Backup and Restore
• Back up my data: Enable back up of application data, Wi-Fi passwords, and other settings
to Google servers.
• Backup account: Select a Google Account to be used as your backup account.
• Automatic restore: Enable automatic restoration of settings from Google servers. When
enabled, backed-up settings are restored when you reinstall an application.
Factory Data Reset
You can reset your NOOK to factory defaults, erasing all data from your NOOK.
This action permanently erases ALL data from your NOOK, including Google or other account
settings, system and application data and settings, downloaded applications, as well as your music,
photos, videos, and other les. Any data stored on an external SD card is not affected.
Barnes & Noble NOOK Tablet User Guide 63
Before resetting your NOOK:
1. Verify that the information you want to keep has transferred to your storage area.
2. Log in to your Google Account and conrm your user name and password.
To reset your NOOK:
1. From the Home screen, tap App Drawer > Settings > System.
2. Tap Reset Options > Erase all data (factory reset).
3. Tap Reset Tablet device and follow the prompts to perform the reset.
4. When your NOOK restarts, follow the prompts to set up your NOOK.
About your NOOK
View information about your NOOK, including current status, legal information, hardware and
software versions, and more.
1. From the Home screen, tap App Drawer > Settings > System.
2. System update: Check for and install available software updates.
3. Tap About device, and then tap items for more details:
• Software update: Check for and install available software updates.
• Status: View the status of the battery, network, and other information about your NOOK.
• Legal information: View legal notices and other legal information.
• Additional device information includes the Model number, Android version, Build number,
and more.
Barnes & Noble NOOK Tablet User Guide64
Legal Information
Barnes & Noble NOOK Tablet User Guide 65
One Year Limited Warranty
THE FOLLOWING WARRANTY TERMS WERE IN EFFECT AS OF THE DATE YOUR
DEVICE WAS MANUFACTURED, AND ARE PROVIDED FOR YOUR REFERENCE ONLY.
THE ACTUAL TERMS OF YOUR WARRANTY ARE THE TERMS THAT WERE IN EFFECT
AS OF THE DATE OF YOUR PURCHASE, WHICH MAY BE DIFFERENT THAN THE TERMS
SET FORTH HEREIN. TO FIND THE EXACT TERMS OF YOUR WARRANTY, PLEASE GO
TO NOOK.com/support AND REVIEW THE TERMS APPLICABLE AS OF THE DATE OF
YOUR PURCHASE.
ONE YEAR LIMITED WARRANTY
This Limited Warranty provides for specic legal rights with respect to your NOOK® device.
Please review it care- fully. You may also have other rights, which vary from state to state.
WHAT WARRANTIES APPLY TO MY NOOK? What is Covered?
This Limited Warranty covers your NOOK. For purposes of this Limited Warranty, “NOOK”
means only the hard- ware comprising: (i) your NOOK device; and (ii) the peripherals included
in the packaging with your NOOK device.
Express Warranty
Subject to the terms and conditions of this Limited Warranty, barnesandnoble.com llc (“B&N”)
warrants to the original retail purchaser only (“you”) that your NOOK will be free from defects
in materials and workmanship under nor- mal consumer use for a period of one (1) year
from the date of original retail purchase (the “Warranty Period”). This express warranty is not
transferable to subsequent owners of the product. If your NOOK was originally purchased by
someone else as a gift for you, as shown by a gift receipt, you will be considered the “original
retail purchaser” of that NOOK.
Implied Warranty
You may also have implied warranties under the laws of some jurisdictions. To the extent
permitted by applicable law, such implied warranties are limited to the duration of the Warran-
ty Period. Some jurisdictions do not allow limitations on the duration of an implied warranty,
so this limitation may not apply to you. You may not assign or otherwise transfer such implied
warranties. However, some jurisdictions extend the protection of implied warranties to subse-
quent consumers, so this limitation may not apply to you.
Barnes & Noble NOOK Tablet User Guide66
HOW DO I MAKE A WARRANTY CLAIM OR OTHERWISE ARRANGE FOR THE RETURN OF MY
NOOK?
To make a warranty claim or arrange for the return of your NOOK pursuant to the NOOK
TERMS OF SERVICE, you must contact B&N at one of the following numbers during the War-
ranty Period:
• Within the United States - 1-800-THE-BOOK (843-2665)
• Outside the United States - +1-201-438-1834
HOW DO I RETURN MY NOOK TO B&N?
When you contact B&N at one of the numbers above, B&N will provide instructions to you as
to how and where
to return your NOOK. Your NOOK must be shipped, prepaid and insured, in appropriate pro-
tective packaging, together with proof of purchase and the Return Authorization Number provided
by B&N, to the address specied by B&N. You must return your NOOK within the timeframe
provided by B&N. You may also be required to provide a credit card to obtain an advance
replacement before B&N receives your NOOK at its returns center.
All returned NOOKs become the property of B&N.
Before you send your NOOK to B&N, it is your responsibility to back up any data, software or
les stored on your NOOK because B&N will only return your NOOK to you if it is not covered
by this Limited Warranty and B&N has not provided an advance replacement. B&N is not responsi-
ble for any loss of your data, software or les or for the cost of backing up your data, software or
les.
If you do not comply with the terms above or with B&N’s instructions, there may be delays in
service or you may incur additional expenses. In particular, if you do not return your NOOK
within the timeframe specied by B&N, B&N reserves the right to charge you the purchase
price for a replacement NOOK. You will be solely responsible for any cost, expense, loss or
the like relating to your failure to comply with such terms or B&N’s instructions.
B&N DOES NOT PROVIDE, AND HEREBY DISCLAIMS, ANY EXPRESS OR IMPLIED WARRAN-
Barnes & Noble NOOK Tablet User Guide 67
TIES REGARDING ITS WARRANTY SERVICES, INCLUDING, WITHOUT LIMITATION, ALL
DUTIES (IF ANY) OF WORK- MANLIKE EFFORT AND OF REASONABLE CARE.
IF I MAKE A WARRANTY CLAIM, WHAT WILL B&N DO WHEN IT RECEIVES MY NOOK?
When B&N receives your NOOK, it will examine it and determine whether it is covered by
this Limited Warranty. If, upon examination, B&N determines that your NOOK is covered by
this Limited Warranty, B&N will, within a reason- able period of time, at B&N’s option and in
its sole discretion, and at no additional charge, do one of the following:
• replace your NOOK with a new or refurbished model; or
• refund the purchase price you paid for your NOOK.
If B&N replaces your NOOK, B&N will bear the cost of sending a replacement NOOK to you,
freight prepaid.
THE FOREGOING IS YOUR SOLE AND EXCLUSIVE REMEDY FOR BREACH OF WAR-
RANTY OR FOR ANY OTHER CLAIMS OTHERWISE RELATING TO THIS LIMITED WAR-
RANTY.
WHAT WILL BE THE WARRANTY PERIOD IF MY NOOK IS REPLACED?
If your NOOK is replaced during the Warranty Period, it will be covered by this Limited War-
ranty for the remainder of the original Warranty Period or ninety (90) days from the date of
shipment of the replaced NOOK, whichever is longer.
WHAT IF MY NOOK IS NOT COVERED BY THIS LIMITED WARRANTY?
If your NOOK is not covered by this Limited Warranty, B&N will return your NOOK to you,
at your expense, or will charge your credit card for any advance replacement NOOK provided
to you.
Barnes & Noble NOOK Tablet User Guide68
WHAT IS NOT COVERED BY THE WARRANTY?
This Limited Warranty does not cover damage or malfunctions caused by accident, disaster,
misuse (including any use in a manner contrary to the instructions contained in any user guide
or on the packaging of the device), abuse, negligence or other external causes; third-party
products; Internet or telecommunications failures; commercial use; unauthorized opening, use,
service, tampering, alteration, repair or modication; or inadequate packing or shipping proce-
dures. This Limited Warranty also does not cover cosmetic damage or normal wear and tear.
This Limited Warranty does not apply to NOOKs sold as used, refurbished or reconditioned,
except to the extent that such NOOK is a certied pre-owned NOOK that was purchased
directly from B&N or from a B&N authorized reseller of certied pre-owned NOOKs. This
Limited Warranty will be void if the Serial Number on your NOOK has been removed, tam-
pered with or defaced or if your NOOK has been opened or serviced without authorization,
tampered with, altered or modied. Please note that opening the back cover of your NOOK
to change the battery, external SD card or back cover will void this Limited Warranty, except
to the extent that such opening is done through a customer-accessible opening and in accor-
dance with the instructions provided with the NOOK.
This Limited Warranty applies to your NOOK only (i.e., the hardware), and not to the soft-
ware within your NOOK. Please refer to the NOOK TERMS OF SERVICE for your rights and
remedies with respect to such software.
Similarly, this Limited Warranty does not cover downloaded data or materials, or accessories
and peripherals, except as expressly provided above.
WHAT OTHER LEGAL TERMS APPLY TO THIS LIMITED WARRANTY?
Disclaimer
TO THE EXTENT PERMITTED BY APPLICABLE LAW, THIS LIMITED WARRANTY AND
THE REMEDIES SET FORTH ABOVE ARE EXCLUSIVE AND IN LIEU OF ALL OTHER
WARRANTIES, REMEDIES AND CONDITIONS, WHETHER ORAL, WRITTEN, STATU-
TORY, EXPRESS OR IMPLIED. TO THE EXTENT PERMITTED BY APPLICABLE LAW, B&N
SPECIFICALLY DISCLAIMS ANY AND ALL WARRANTIES AND CONDITIONS NOT
EXPRESSLY PROVIDED FOR IN THIS LIMITED WARRANTY, INCLUDING, WITHOUT
LIMITATION, WARRAN- TIES OF MERCHANTABILITY, NON-INFRINGEMENT, SECURITY,
Barnes & Noble NOOK Tablet User Guide 69
FITNESS FOR A PARTICULAR PURPOSE AND AGAINST HIDDEN OR LATENT DEFECTS.
Modication
No employee or representative of B&N or its afliates or any third party is authorized to make
any modication, extension or addition to this Limited Warranty. If any term of this Limited
Warranty is held to be illegal or unenforceable, the remaining terms of this Limited Warranty
will remain in full force and effect.
Exclusion of Indirect Damages
TO THE MAXIMUM EXTENT PERMITTED BY LAW, NEITHER B&N NOR ITS AFFILIATES
NOR ITS LICENSORS WILL BE LIABLE TO YOU OR ANY THIRD PARTY FOR ANY
CONSEQUENTIAL, SPECIAL, INCIDENTAL, PUNITIVE OR OTHER INDIRECT DAMAGES
ARISING FROM, RELATING TO OR CONNECTED WITH YOUR PURCHASE OR USE OF
YOUR NOOK, INCLUDING, WITHOUT LIMITATION, LOST PROFITS, LOST REVENUE
OR LOST DATA, REGARDLESS OF THE CAUSE OF ACTION ON WHICH THE CLAIM
IS BASED, INCLUDING, WITHOUT LIMITATION, NEGLIGENCE, TORT, CONTRACT,
STRICT LIABILITY, PRODUCT DEFECT OR MIS- REPRESENTATION, EVEN IF ADVISED OF
THE POSSIBILITY OF SUCH DAMAGES OCCURRING, AND EVEN IF ANY REMEDY FAILS
OF ITS ESSENTIAL PURPOSE.
Some states do not allow the exclusion or limitation of incidental or consequential damages, so
the above exclusion may not apply to you.
Applicable Law
This Limited Warranty is valid only in the United States of America. The laws of the State of
New York, U.S.A. will apply to this Limited Warranty, though the laws of your state of resi-
dence may apply to any tort claims and any claims under any consumer protection statutes, as
provided under applicable law.
Trademarks and Copyrights
Adobe
Your NOOK contains Adobe® Reader® Mobile software under license from Adobe Systems In-
corporated, Copyright © 1995-2011 Adobe Systems Incorporated. All rights reserved. Adobe®,
Reader®, and Reader Mobile are either registered trademarks or trademarks of Adobe Systems
Incorporated in the United States and/or other countries.
Bluetooth
Bluetooth is a registered trademark of Bluetooth SIG, Inc.
Wi-Fi
Barnes & Noble NOOK Tablet User Guide70
Wi-Fi and Wi-Fi Alliance are registered trademarks of the Wi-Fi Alliance.
Dictionary
Your NOOK includes the Merriam-Webster’s Collegiate® Dictionary, Eleventh Edition, with
Geographical and Biographical Information. Merriam-Webster and Collegiate are trademarks of
Merriam-Webster, Inc. and are used herein pursuant to license. Copyright © 2009-2011 Merri-
am-Webster, Inc. All rights reserved.
Fonts
Mundo Sans™
Mundo Sans is a trademark of Monotype Imaging Inc. and may be registered in certain jurisdictions.
Baskerville™
Baskerville is a trademark of The Monotype Corporation and may be registered in certain jurisdictions.
Georgia™
Georgia is a trademark of Microsoft Corporation which is registered in the U.S. Patent and
Trademark Ofce and certain other jurisdictions.
Ascender®
Ascender is a trademark of Ascender Corporation which is registered in the U.S. Patent and
Trademark Ofce and certain other jurisdictions.
Malabar™
Malabar is a trademark of Monotype GmbH and may be registered in certain jurisdictions.
Joanna®
Joanna is a trademark of The Monotype Corporation registered in the U.S. Patent and Trademark
Ofce and may be registered in certain jurisdictions.
Google
Android and Google Play are trademarks of Google LLC; Oreo is a trademark of Mondelez
International, Inc. group.
microSD and microSDHC
The microSD and microSDHC marks and logos are trademarks of SD-3C, LLC.
Additional Information
Additional copyright, trademark, and other notices may be found in the NOOK Terms of Service:
http://NOOK.com/support
Barnes & Noble NOOK Tablet User Guide 71
FCC Notices
FCC IDs
NOOK Tablet 10.1”: RBD-BNTV650
MODEL: BNTV650
This device complies with Part 15 of the FCC Rules. Operation is subject to the following two
conditions: (1) this de- vice may not cause harmful interference, and (2) this device must accept
any interference received, including interfer- ence that may cause undesired operation.
FEDERAL COMMUNICATIONS COMMISSION (FCC) STATEMENT INFORMATION TO THE USER
CAUTION: Changes or modi cations to the equipment not expressly approved by the party
responsible for compli- ance could void the user’s authority to operate the equipment.
This equipment has been tested and found to comply with the limits for a Class B digital device,
pursuant to Part 15 of the FCC Rules. These limits are designed to provide reasonable protec-
tion against harmful interference in a residential installation. This equipment generates, uses and
can radiate radio frequency energy and, if not installed and used in accordance with the instruc-
tions, may cause harmful interference to radio communications. However, there is no guarantee
that interference will not occur in a particular installation. If this equipment does cause harmful
inter- ference to radio or television reception, which can be determined by turning the equip-
ment o and on, the user is encouraged to try to correct the interference by one or more of
the following measures:
1. Reorient or relocate the receiving antenna.
2. Increase the separation between the equipment and receiver.
3. If applicable, connect the equipment into an outlet on a circuit di erent from that to which
the receiver is connected.
4. Consult the dealer or an experienced radio / TV technician for help.
FCC/IC Radiation Exposure Statement
This equipment complies with FCC/IC radiation exposure limits set forth for an uncontrolled
environment. This device is designed for hand-held operation only. The antenna(s) used for
this transmitter must not be collocated or operating in conjunction with any other antenna or
transmitter within a host device, except in accordance with FCC/ IC multi-transmitter product
procedures.
Cet équipement est conforme aux limites d’exposition au rayonnement de la FCC/IC établies
pour un envi- ronnement non contrôlé. Cet appareil est conçu pour un fonctionnement porta-
tif uniquement. L’antenne (ou les antennes) utilisée pour cet émetteur ne doit pas être placée
à proximité d’une autre antenne ou d’un autre émetteur, ni être utilisée de pair avec de tels
autres appareils à moins de se conformer aux procédures relatives aux émetteurs multiples de
la FCC/IC.

Barnes & Noble NOOK Tablet User Guide72
In order to certify this device for sale in the US, Canada and Europe, this device has been
tested for RF exposure compliance at a quali ed test laboratory and has been found to comply
with the regulations regarding exposure to RF Energy under the recommendations of the Inter-
national Commission on Non-Ionizing Radiation Protection (ICNIRP). The tests are performed
in positions and locations as required by the FCC, IC and The Council of the European Union
for each model.
Terms of Service
To read the NOOK Device Terms of Service, the Book NOOK Store Terms of Service, and the
NOOK Privacy Policy, open the NOOK Settings app and tap Legal. Your NOOK displays links
to pop-up windows with each of these documents.
The latest NOOK Terms of Service, Bookstore Terms of Service, and Privacy Policy are located
here: http://NOOK.com/legal
