Norstone Installation Guide(3)
User Manual:
Open the PDF directly: View PDF ![]() .
.
Page Count: 20
- Introduction to the Rock Panel
- Norstone Natural Stone Rock Panels are produced by Norstone Pty Ltd., of Sydney Australia. For information not contained in this document, contact your local Norstone distributor for assistance. The Rock Panel concept is aimed at providing the look a...
- Tools and Material needed
- Preparing your substrate for installation
- Installing the Rock Panels
- Post Installation Guidelines
- Disclaimer
- Appendix A – Substrate Detail
n o r s t o n e
r o c k p a n e l s
A N a t u r a l S t o n e V e n e e r S y s t e m
TEL: 866 717 4548 EMAIL: SALES@NORSTONEUSA.COM WEB: WWW.NORSTONEUSA.COM
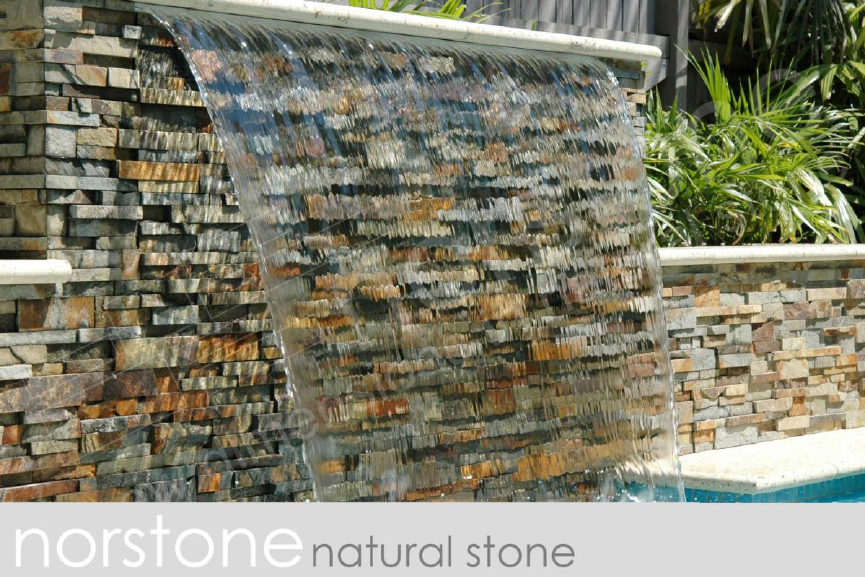
norstone is a manufacturer and supplier of premium natural
stone products for designer residential and commercial world
markets. Established in 2002, norstone has forged its name by
maintaining the highest standards in the industry for quality
control, product design, and customer service. We’re as
passionate about your project as you are.
Norstone Prefabricated Stone Veneer Rock Panel Installation Guide
page 2 of 20
© 2008 Norstone USA 6/11/2008
Table of Contents
Introduction to the Rock Panel ........................................................................... 3
Tools and Material needed ................................................................................. 4
Preparing your substrate for installation ............................................................. 4
Installing over open stud walls ......................................................................... 5
Installing over block, brick, cmu, or poured concrete ................................ 6
Installing over steel ............................................................................................ 7
Installing the Rock Panels ..................................................................................... 7
How to address corners .................................................................................... 9
Special Note on moisture rich environments and freeze thaw climates 10
Post Installation Guidelines ................................................................................. 11
Cleaning ............................................................................................................ 11
Sealing ............................................................................................................... 11
Ongoing Maintenance ................................................................................... 12
Disclaimer ............................................................................................................. 13
Appendix A – Substrate Detail .......................................................................... 14
Norstone Prefabricated Stone Veneer Rock Panel Installation Guide
page 3 of 20
© 2008 Norstone USA 6/11/2008
Introduction to the Rock Panel
Norstone Natural Stone Rock Panels are produced by Norstone Pty Ltd., of
Sydney Australia. For information not contained in this document, contact
your local Norstone distributor for assistance. The Rock Panel concept is
aimed at providing the look and feel of stacked natural stone at the low
cost installation and speed of tile. Norstone Rock Panels strictly adhere to
the following physical properties:
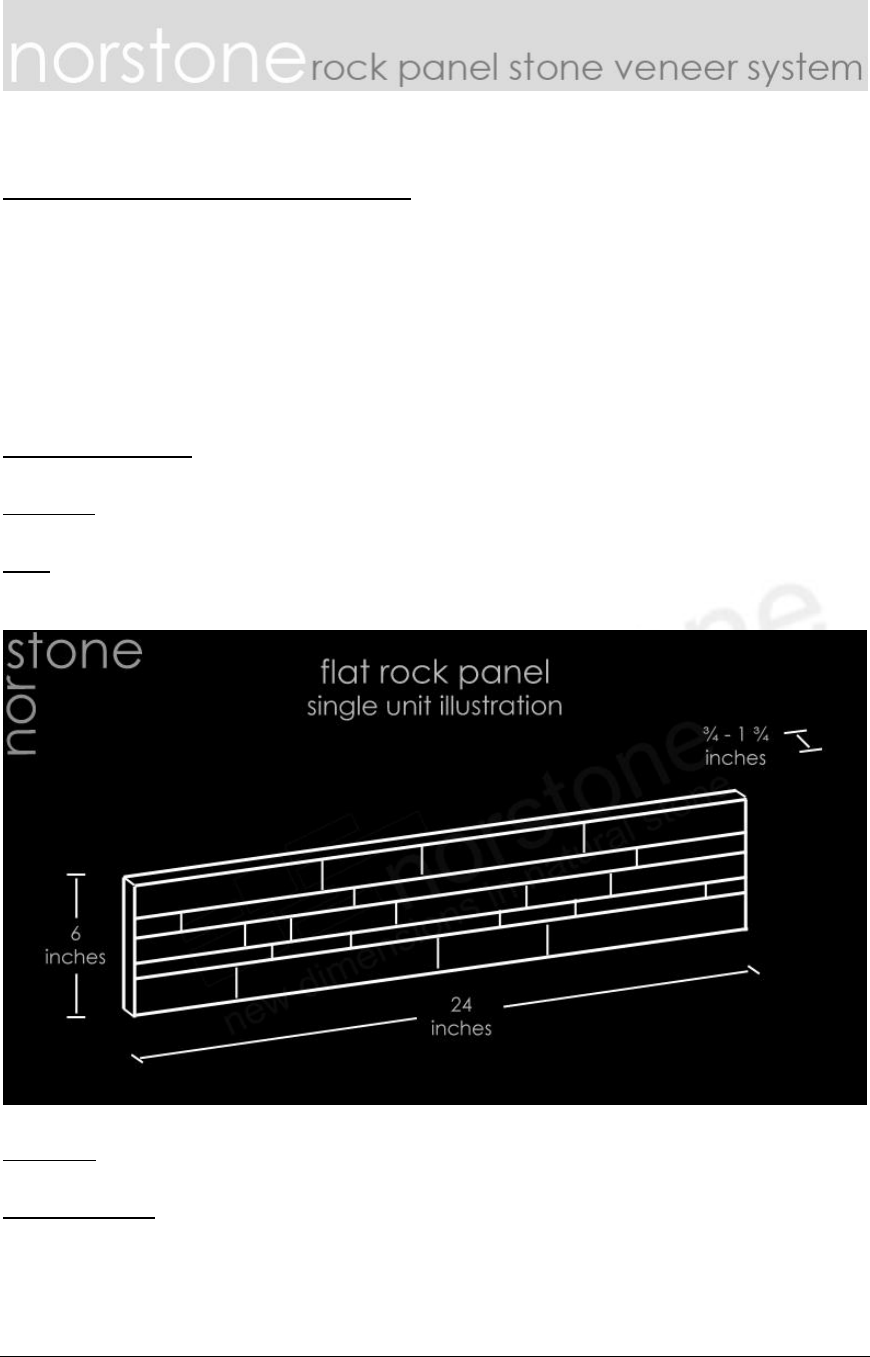
CLASSIFICATION: Quartzite-based sedimentary stone.
COLOR: Ochre Blend, Charcoal, White, Ivory, or Chalk
SIZE: 6” Tall by 24” Long, or 1 Square Foot in face coverage. Thickness varies
between approx ¾” to 1 ¾”.
WEIGHT: approx 12lbs per panel, or square foot.
PACKAGING: 4 panels per box = 4 square feet per box; 48 boxes per crate =
192 square feet per crate
Norstone Prefabricated Stone Veneer Rock Panel Installation Guide
page 4 of 20
© 2008 Norstone USA 6/11/2008
Estimating Stone Required
Determine the amount of the Norstone Rock panels to be ordered by
measuring the area to be covered. Measure the length times the height
to determine the square footage required. Subtract the square footage
for window and door openings. Measure the vertical linear feet of the
external corners to determine the amount of corner units required, if
necessary. Always allow a minimum of 10% for error and wastage when
ordering.
Professional Installation Recommended
Norstone Rock Panels can be installed by most home handyman with a
limited knowledge of building and construction; however we strongly
recommend they be installed by professional licensed tradesmen.
Return to Table of Contents
Tools and Material needed
[1] For cutting and modifying Rock Panels, a quality brick or tile water saw
with a continuous rim diamond blade is required and should tilt if miter
cuts are necessary; these are usually available for hire on a daily basis
from large equipment hire firms in your area. If pre-fabricated corner units
are to be used, or if the mitering of corners is not required, a tilting wet
saw is not necessary. [2] An angle grinder may be used for around small
protrusions in the wall such as pipes, steelwork etc. [3] Steel trowel, [4] ½”
(half-inch) notched trowel, [5] scraper, [6] stiff wire brush, [7] masonry
brush, [8] large sponge, [9] selected Rock Panels and [10] recommended
tile thinset adhesive, meeting or exceeding ANSI 118.4 & 118.11 standards.
Optional materials that may be required, depending on the substrate and
application include:
Metal Lath
Thick Bed Mortar
Waterproofing Membrane
Natural Stone Sealer
Return to Table of Contents

Norstone Prefabricated Stone Veneer Rock Panel Installation Guide
page 5 of 20
© 2008 Norstone USA 6/11/2008
Preparing your substrate for installation
It is mandatory that local building codes be followed in the installation of
Norstone Rock Panels. Please consult your building authority with any
specific questions relating to the local building codes.
Rock panels weigh approximately 12 lbs per sq ft; therefore it is critical
that they are fixed to an appropriate substrate to ensure a successful
installation. Rock Panels may be applied over any masonry surface,
concrete block, brick, cement, etc. Painted surfaces must be
sandblasted, or otherwise stripped of paint. If a new wall needs to be built
of a thinner and lighter substrate, then there is only one product suitable -
fibrous cement board. Norstone Rock Panels SHOULD NOT be installed
over drywall or sheetrock.
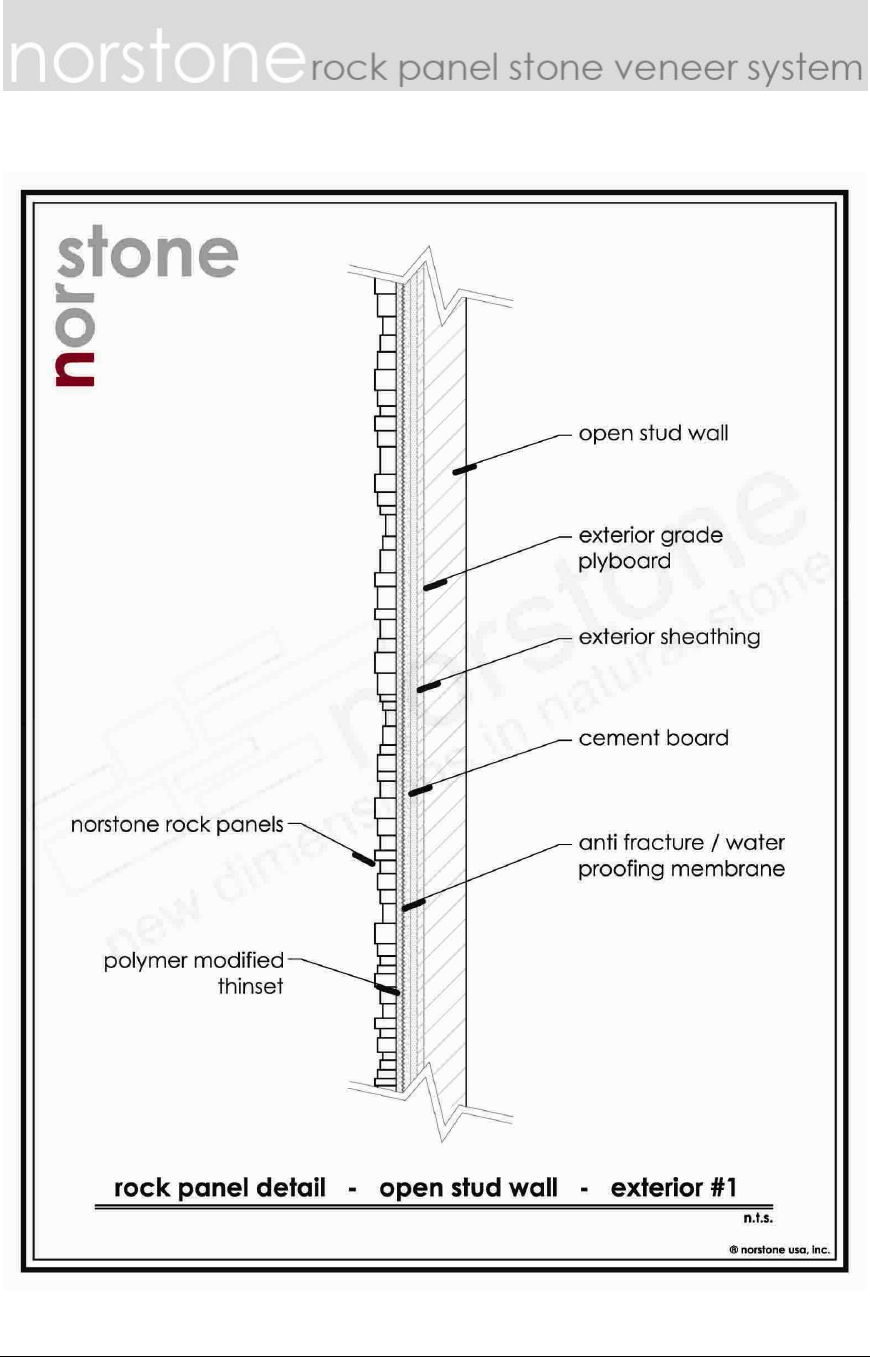
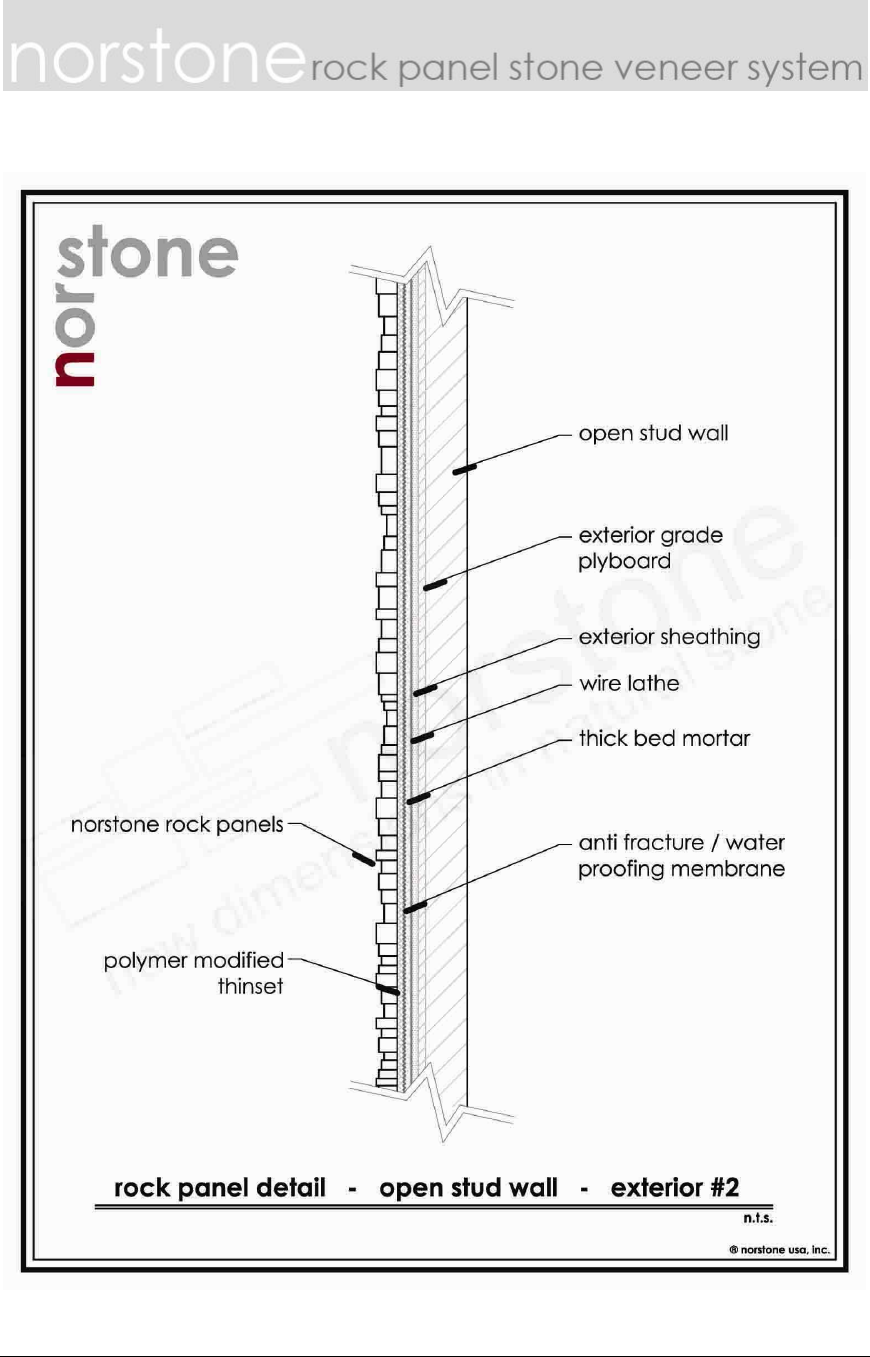
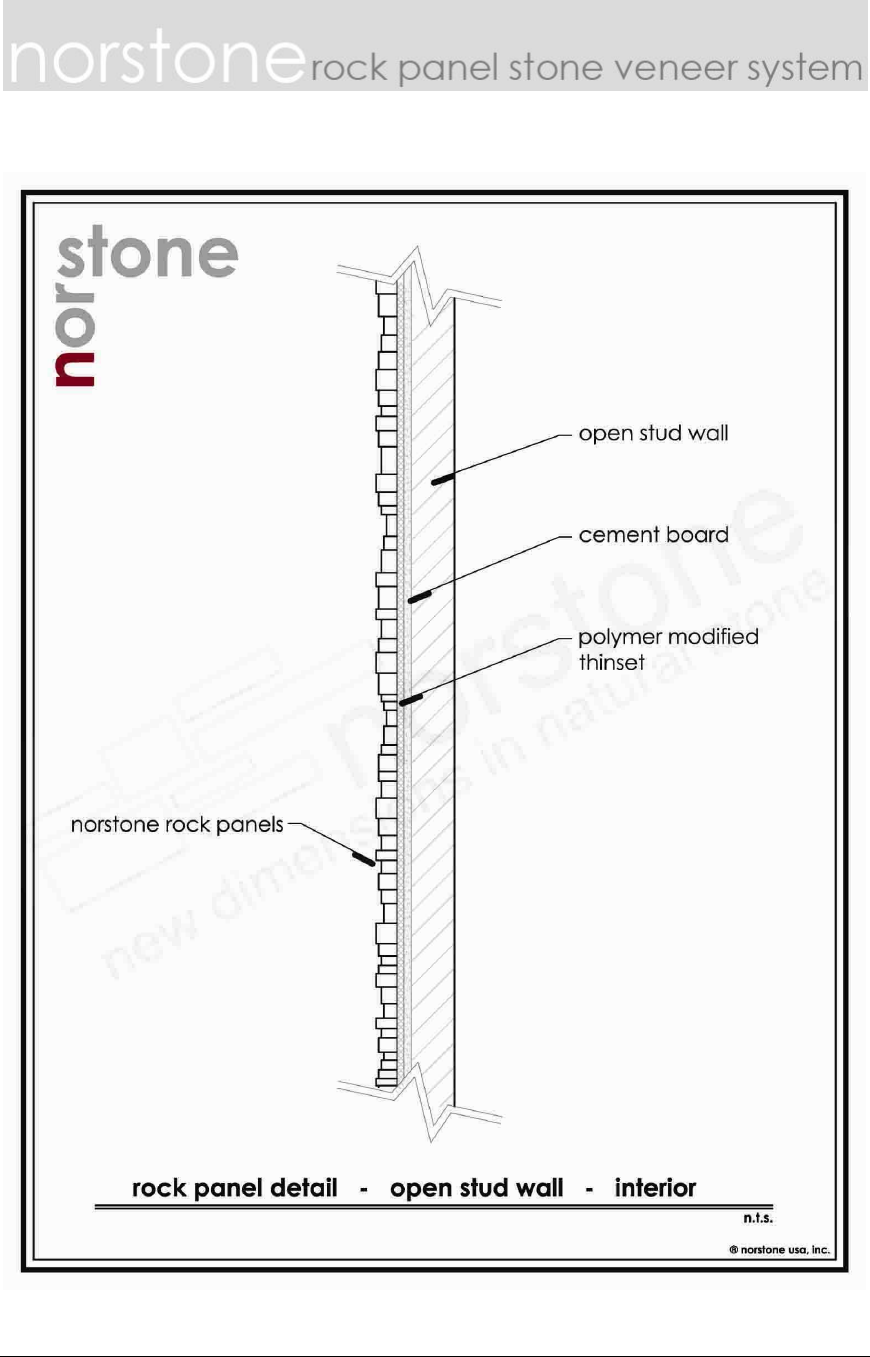
Installing over open stud walls
Rock panels can be installed over open stud walls using either fibrous
cement board or a combination of plyboard, lath, and scratch coat. First
ensure the wood or steel frame is structurally capable of supporting the
weight of the rock panels.
If using fibrous cement board, it must be a minimum of 5/8” thick to
support the weight of the rock panels and must be securely fixed to the
framework of either wood or steel. We suggest that the board be glued
and screwed to the frame. First, cover the entire frame, where contact
with the fibrous cement board is made, with a good quality mastic type
adhesive and then fix the fibrous cement board to the frame, screwing at
24 inch centers using screws that are a minimum of 2 inches long. To
ensure safety, strength and permanent fixing, this work should only be
done by a qualified and licensed builder. If project is either exterior or will
be exposed to moisture, a waterproofing / anti fracture membrane, to
comply with ANSI 118.10 will be required between the fibrous cement
board and the setting material.
Norstone Prefabricated Stone Veneer Rock Panel Installation Guide
page 6 of 20
© 2008 Norstone USA 6/11/2008
If using plyboard, it must be exterior grade and covered with an exterior
sheathing product such as 15 lb builders felt or 4 mil polyethylene. A 3.4#
galvanized diamond wire metal lath is then to be affixed to the substrate
per manufacturer’s recommendations and then covered with a thick bed
mortar mix. If project is either exterior or will be exposed to moisture, a
waterproofing / anti fracture membrane, to comply with ANSI 118.10 will
be required between the scratch coat and the setting material.
Please refer to Appendix A for detailed substrate drawings over open stud
walls.
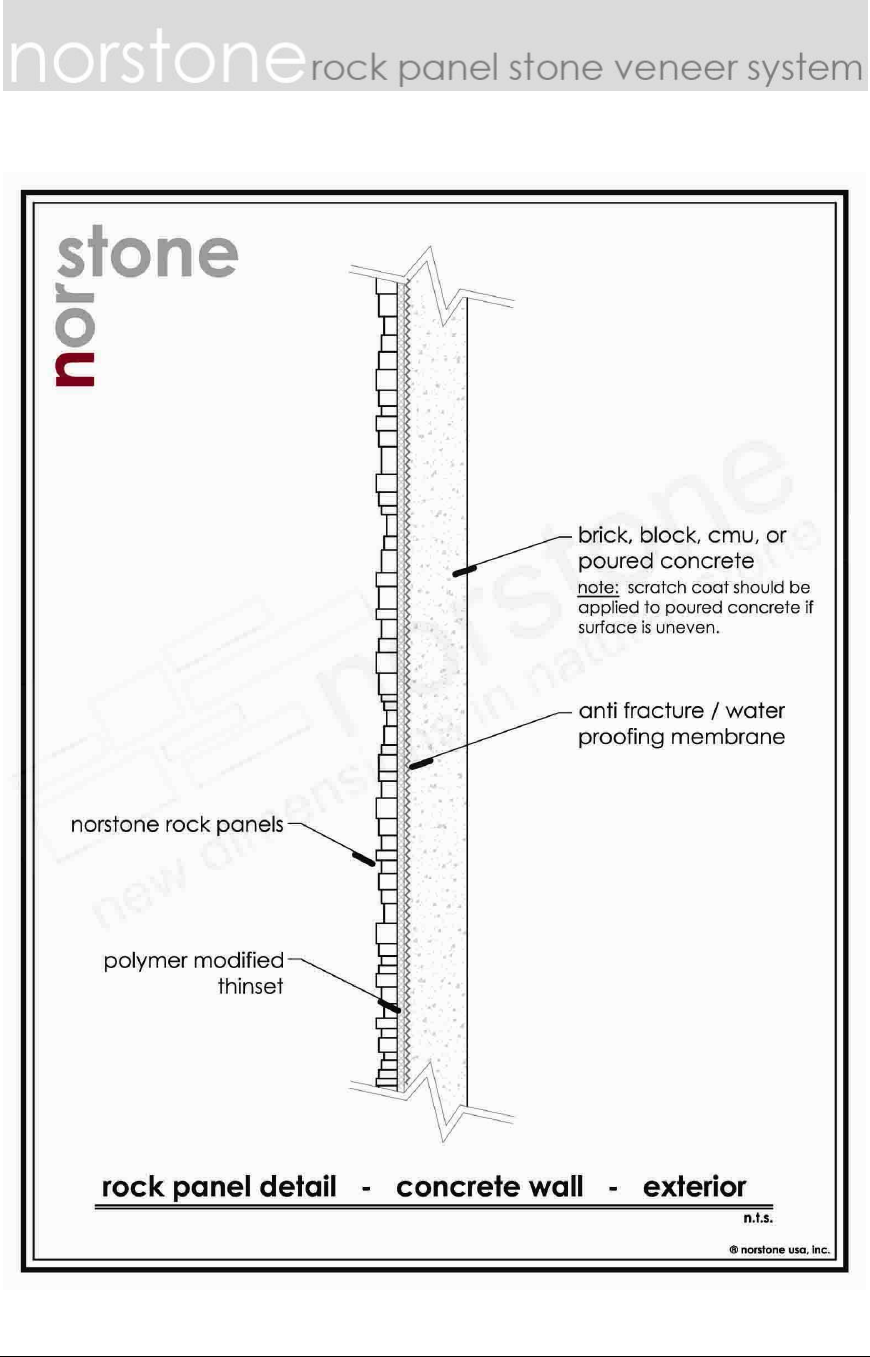
Installing over block, brick, cmu, or poured concrete
First ensure that the surface is clean and free of any foreign agents,
including paint that may interfere with the bond between stone and
substrate. This may require light sandblasting or waterblasting.
** Special note for pre-fabricated concrete tilt up construction – all
release agents must be removed from concrete surfaces prior to Norstone
Rock Panel installation.
Next, in all installations over brick, or over other concrete substrates with
uneven surfaces, a thick bed mortar mix, is troweled onto the substrate to
even out any inconsistencies in the substrate and provide a mortar base
with which to adhere the setting material to. If the project is either exterior
or will be exposed to moisture, a waterproofing / anti fracture membrane,
to comply with ANSI 118.10 will be required between the mortar bed and
the setting material.
Please refer to Appendix A for detailed substrate drawings over concrete
substrates.
Norstone Prefabricated Stone Veneer Rock Panel Installation Guide
page 7 of 20
© 2008 Norstone USA 6/11/2008
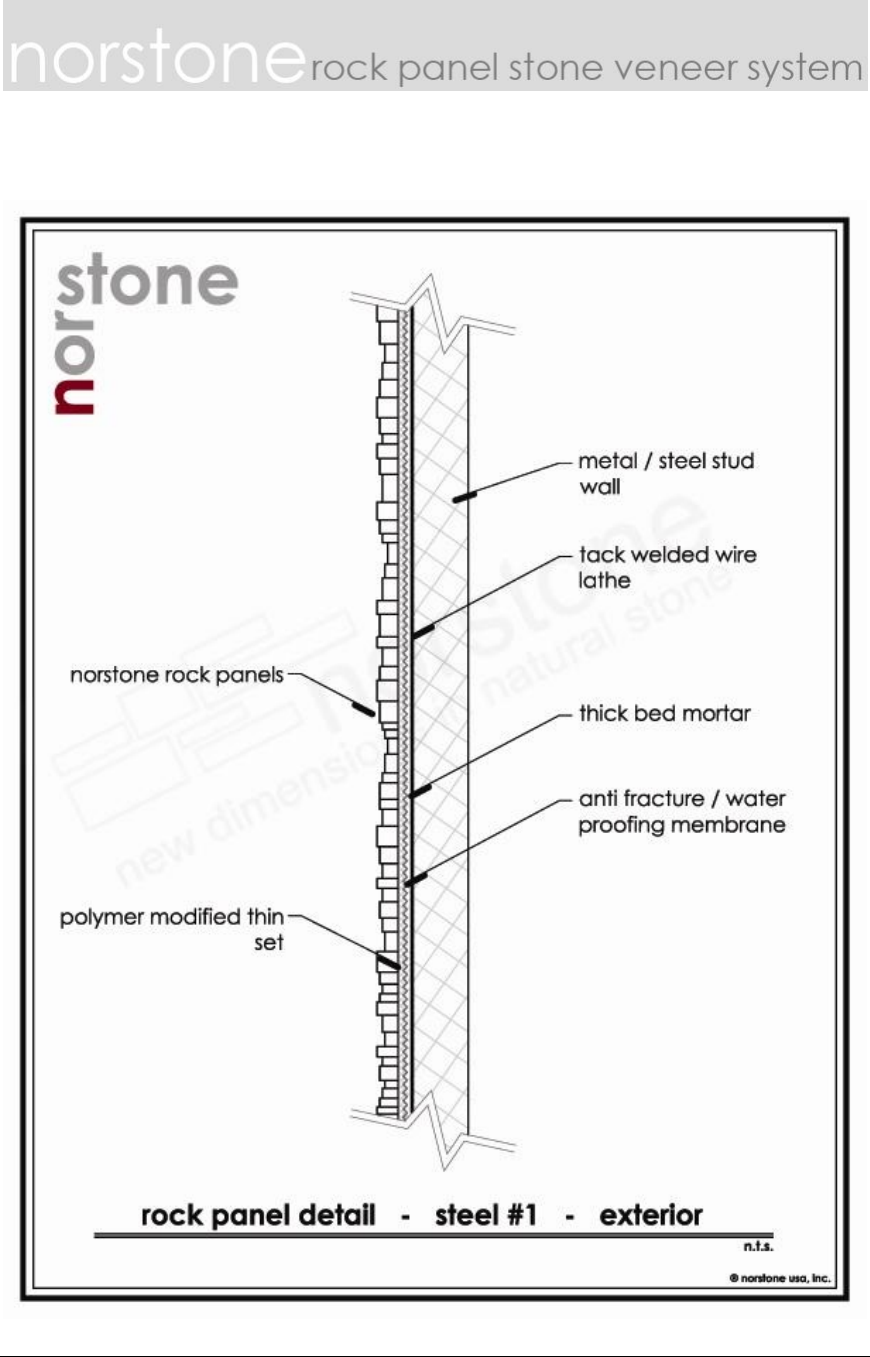
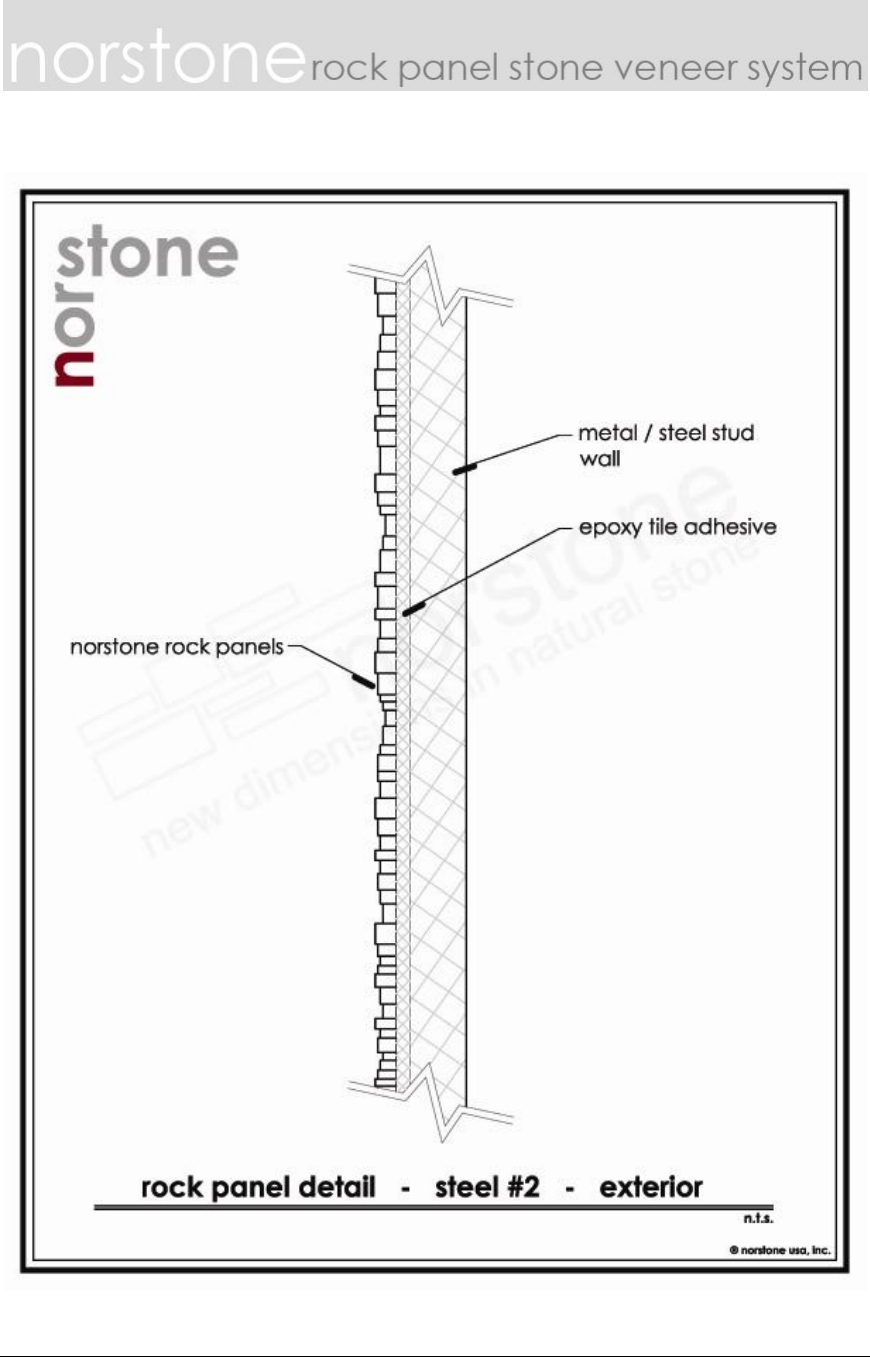
Installing over steel
First ensure that the surface is clean and free of any surface
contamination, such as rust, dirt, paint, and manufacturing oils. Refer to
the steel manufacturer’s guidelines for adequately removing all
manufacturing oils as to not interfere with the bond between Rock Panel
and substrate. If possible, tack weld a wire lath onto the steel in
accordance with ANSI A108.0 – 3.3 standards. Once the lath is in place, a
thick bed mortar mix is troweled onto the steel to fully cover the lath and
form a suitable bonding substrate with which to adhere the setting
material to. If the project is either exterior or will be exposed to moisture, a
waterproofing / anti fracture membrane, to comply with ANSI 118.10 will
be required between the mortar bed and the setting material.
Alternatively, Norstone Rock Panels can be adhered directly to a
contaminant-free steel substrate using an epoxy based tile adhesive
meeting or exceeding ANSI 118.3 standards. This method should only be
used when tack welding wire lath and creating a mortar bed on the steel
substrate is not feasible. A waterproofing / anti fracture membrane is not
required in this method.
Please refer to Appendix A for detailed substrate drawings over steel.
Return to Table of Contents
Installing the Rock Panels
Make certain the back of each rock panel is free of dirt, sand, or loose
particles. When necessary, wash them completely. If the back of the
panel is dry, dampen it first with a wet sponge, but do not saturate. This
prevents the rock panel from pulling the moisture from the adhesive,
allowing it to cure naturally and with a stronger bond.
Norstone Prefabricated Stone Veneer Rock Panel Installation Guide
page 8 of 20
© 2008 Norstone USA 6/11/2008
Select a tile adhesive that meets or exceeds ANSI 118.4 and 118.11
standard, and mix per the manufacturer's instructions. When laying rock
panels it is necessary to start the bottom row on a level line in order to
maintain consistent levels in each row as you work up the wall. Always
start installing Rock Panels at the bottom row, and start each row at an
outside corner if one exists. It is also important that they rest on a secure
base such as a concrete floor or footing to help carry the weight until the
thinset has fully set. The panels should be laid in a randomized, staggered
fashion, in an effort to minimize any vertical seams lining up from one
course to the next. The panels should not be "stacked" one on top of the
other in a single line up the wall, nor laid in a running or brick bond
pattern as this increases the likelihood of patterned or vertical seams
being visible from the wall.
When fixing the rock panels use a generous amount of recommended tile
adhesive and apply it to the back of each panel and to the wall. It is
important to screed the tile adhesive on to the wall as would normally be
the application method used for laying tiles. By applying the adhesive to
the back of each panel and to the wall, this ensures the maximum
possible adhesion to your wall surface, as all the gaps, voids and cracks
are filled.
Press each rock panel into the adhesive, rotating slightly, forcing some of
the adhesive to squeeze out freely. Any adhesive forced out beyond the
finished joint or on the panel surface itself must be removed before the
adhesive is allowed to set. Tight joints will provide a neat appearance. Be
sure not to allow any adhesive to harden on the face of the rock panels
as this will help in the cleanup process.

Norstone Prefabricated Stone Veneer Rock Panel Installation Guide
page 9 of 20
© 2008 Norstone USA 6/11/2008
How to address corners
Outside 90 degree corners can be handled either by [1] using Norstone
pre-fabricated finger jointed corner units or [2] miter-cutting individual flat
panels. Corner units provide for a smooth, finished look, and are easier to
install, but are appropriate for 90 degree corners only. Mitering provides
for a nice clean edge at the corner, however do require a higher level of
skill to fabricate on site. Miter-cuts should be used in all off-angle (45°, 60°,
etc) corner applications.
Corner Units are installed by forming the corner on site, cutting the returns
down to size as necessary, and adhering the stone to the substrate in the
same manner as a flat panel. Corner units stand 6 inches tall, and are
comprised of two sides: one approximately 8 inches, and the other
approximately 16 inches. Special care should be made to alternate the
returns as the installation progresses up the corner so as to prevent any
patterns forming in the wall which may lead to the appearance of
vertical seams.
Norstone Prefabricated Stone Veneer Rock Panel Installation Guide
page 10 of 20
© 2008 Norstone USA 6/11/2008
To use a miter cut for an outside corner, select one rock panel and mark
the point where the join should be, which is determined by the position of
the adjoining rock panels. Once you have marked where to make your
cut, make a straight cut to separate the panel into two pieces; once the
panel has been cut into two separate pieces, cut each on a 45 degree
miter to form a right angle. NOT making a straight cut (or separating the
panel) prior to the mitered cut could render the thicker pieces on the
opposing panel vulnerable to direct attack from the saw blade, so it is
important to designate and separate the panel prior to mitering it.
Once cut, check the panel to make sure it forms a perfect 90° corner. The
color, the width and thickness of the stone pieces should match to form a
continuous look that seems to "flow" around the corner. Never use 2
different panels to form a corner. Every Rock Panel is unique so the results
would be very disappointing, because nothing matches.
Special Note on moisture rich environments and freeze thaw climates
Natural stone is an excellent choice of building material for any
environment and climate, be it interior or exterior, adjacent or completely
submerged in water, desert hot or polar cold. Certain products should be
used and procedures followed in some of these environments, as noted
below:
Moisture Rich Environments – It is critical that a waterproofing
membrane meeting or exceeding ANSI 118.10 standards be
applied between the substrate and tile adhesive to form a
waterproof barrier. This will ensure moisture will not reach the
substrate material and potentially degrade its ability to support the
Rock Panels.
Pool Applications – It is especially important to thoroughly seal your
pool application; note that you may be required to re-seal your
pool application more frequently than other areas of your project.
We recommend re-sealing your pool application every 18-24
months, or sooner if you notice your sealer has worn off or any
adverse affect to your stone.
Norstone Prefabricated Stone Veneer Rock Panel Installation Guide
page 11 of 20
© 2008 Norstone USA 6/11/2008
Freeze / Thaw Climates – Norstone Rock Panels will not be affected
at all by the normal freezing and thawing of the climate which they
are exposed to, however, the same cannot be said about the
substrate to which they are applied. It is critical that a waterproof /
anti-fracture membrane meeting or exceeding ANSI 118.10
standards be applied between the substrate and tile adhesive to
form a water and fracture proof barrier, capable of resisting
substrate movement during freeze thaw cycles.
Return to Table of Contents
Post Installation Guidelines
Cleaning
Work carefully and meticulously, to avoid adhesive dropping onto the
Rock Panels during installation. Should some thinset find its way onto the
face of a Rock Panels, allow it to dry until it is crumbly, then pick it off
carefully, and use a bristle brush to lightly scuff the spot where the
adhesive may have left a slight mark.
Excess dirt and film may be removed using clean water and a stiff brush. It
is important not to allow excessive adhesive to dry on face of the Rock
Panels. Carefully remove it with a damp rag prior to it hardening.
WARNING: Acidic cleaning agents must not be used under any
circumstances as this will cause unnecessary damage to natural stone
and void any warranty.
Sealing
Natural Stone products must be sealed with a good quality penetrating
sealer for all exterior applications. Always test the sealer on an off-cut or in
an inconspicuous place on the finished stone wall before applying to the
entire stone surface.
Follow the manufacturer's instructions regarding the application of the
sealer. Sealed stone may be easier to keep clean than unsealed stone
and certain sealers also repel stains. However, sealers must be periodically
reapplied, especially on exterior applications, and could alter the natural
coloring of the stone.
Norstone Prefabricated Stone Veneer Rock Panel Installation Guide
page 12 of 20
© 2008 Norstone USA 6/11/2008
If you’ve installed Norstone in a pool, it will be important to re-seal your
application periodically We recommend every 18-24 months, or whenever
you notice that your sealer has worn off. This maintenance will ensure the
stone stays stable and in good condition.
Ongoing Maintenance
Though natural stone will last many lifetimes, routine maintenance may be
required from time to time. Depending on the application – as with any wall
finish - various types of scaling or build-up may occur. Should you
experience a need to clean your Rock Panels please adhere to the
following recommendations:
1. Regular dusting for interior applications and hose washing for exterior
applications is recommended.
2. In the event that cleaning agents are needed, please select a
natural detergent that is non-corrosive and non-acidic to remove
build-up in problem areas. Test your detergent in an inconspicuous
place to verify compatibility and results.
3. In some cases, a low grade pressure wash may be used. However,
the stone should never be exposed to a direct angle of attack from
the nozzle. Note that up-close attack from a pressure washer may
corrode the stone, so please stand a minimum of 5 feet away when
pressure washing.
WARNING
Please DO NOT:
1. Acid wash the stone.
2. High-Pressure Wash the stone (directly or indirectly).
3. Use any sharp object, such as a steel scraper, knife, or screwdriver, to
remove stubborn deposits from the face of the stone. This can result
in damage to the natural texture of the product.
Return to Table of Contents
Norstone Prefabricated Stone Veneer Rock Panel Installation Guide
page 13 of 20
© 2008 Norstone USA 6/11/2008
Disclaimer
This Installation Guide is intended for general informational purposes only
and should not be considered as professional technical or legal advice. It is
designed as a reference only and shall not be construed as a substitute to
seeking professional advice relevant to your particular circumstances to
evaluate its accuracy, completeness and relevance for your specified
application, or employing professional and licensed contractors to install
Norstone Rock Panels. Therefore Norstone does not take any responsibility
for any error or misinformation that may be contained within this guide.
Return to Table of Contents
Norstone Prefabricated Stone Veneer Rock Panel Installation Guide
page 14 of 20
© 2008 Norstone USA 6/11/2008
Appendix A – Substrate Detail
Appendix A details proper installation procedures over various substrates
in both interior and exterior applications. Please direct all questions to
your local Norstone office at 866-717-4548.
Open Stud – cement board – Exterior…………………………………………...15
Open Stud – Lathe and Mortar – Exterior………………………………………..16
Open Stud – Interior………………………………………………………………….17
Concrete...…………………………………………………………………………….18
Steel – Epoxy Adhesive……………………………………………………………...19
Steel – Lathe and Mortar……………………………………………………………20
Return to Table of Contents
Norstone Prefabricated Stone Veneer Rock Panel Installation Guide
page 15 of 20
© 2008 Norstone USA 6/11/2008
Norstone Prefabricated Stone Veneer Rock Panel Installation Guide
page 16 of 20
© 2008 Norstone USA 6/11/2008
Norstone Prefabricated Stone Veneer Rock Panel Installation Guide
page 17 of 20
© 2008 Norstone USA 6/11/2008
Norstone Prefabricated Stone Veneer Rock Panel Installation Guide
page 18 of 20
© 2008 Norstone USA 6/11/2008
Norstone Prefabricated Stone Veneer Rock Panel Installation Guide
page 19 of 20
© 2008 Norstone USA 6/11/2008
Norstone Prefabricated Stone Veneer Rock Panel Installation Guide
page 20 of 20
© 2008 Norstone USA 6/11/2008
