NovoScreenote_User_Guide(en)_proofread_20140419_cleanx Novo Screennote
User Manual: NovoScreennote
Open the PDF directly: View PDF ![]() .
.
Page Count: 24
User Guide

Novo
Screenote
User
Guide
- 2 -
Table of Contents
LEGAL NOTICE ........................................................................................... 3
1. INTRODUCTION .................................................................................. 4
1.1 About NovoScreenote Software ....................................................................... 4
1.2 System Requirements ....................................................................................... 4
2. INSTALLING NOVOSCREENOTE ................................................... 5
2.1 Installing NovoScreenote on your PC (Windows) .............................................. 5
2.2 Installing NovoScreenote on your PC (Mac) ...................................................... 9
3. WORKING WITH NOVOSCREENOTE ....................................... 14
3.1 Overview ........................................................................................................ 14
3.2 Annotation mode ........................................................................................... 16
3.3 Cut .................................................................................................................. 16
3.4 Zoom .............................................................................................................. 17
3.5 Screen Record ................................................................................................. 18
3.6 Document Camera .......................................................................................... 18
3.7 Email Screenshot ............................................................................................ 19
3.8 Settings ........................................................................................................... 19
4. TROUBLE SHOOTING ..................................................................... 21

Novo
Screenote
User
Guide
- 3 -
Legal Notice
Copyright @ Vivitek Corporation. All Rights Reserved.
The contents of this manual can be changed for product enhancement.
Part of or all of this manual cannot be changed or transmitted to other parties without
permission of Vivitek corporation.
Information of Novo Interactive Tools
For latest information and software, please contact local sales representative.

Novo
Screenote
User
Guide
- 4 -
1. Introduction
1.1 About NovoScreenote Software
NovoScreenote is a software application suite that turns your Interactive Projector into a
powerful, fully integrated interactive digital presentation system. From classrooms to
conference rooms, NovoScreenote helps you deliver dynamic presentations to students,
prospective clients, or co-workers. With NovoScreenote software, you can display documents,
access web pages, and play video on a projection screen that responds to the IR pens.
NovoScreenote allows you to
- Directly annotate on desktop screen, unobtrusive to applications currently running
- Save, record, and email these annotations
You can use the NovoScreenote software with or without the Interactive Projector to prepare
an integrated, highly dynamic, and interactive presentation material. With the features
provided, the NovoScreenote software helps you raise the level of participation in group
discussions, design review meetings, brainstorming sessions, and sales demonstrations.
Together with Interactive Projector, NovoScreenote is the perfect solution for more effective
teaching, meetings, general presentations, and team oriented collaboration.
1.2 System Requirements
You can get the best results from the NovoScreenote software if your computer has the
necessary components to support all its’ features.
Minimum requirement
CPU Intel
®
Core
™
, 2GHz or higher
(i5 and above are preferred)
OS Windows XP and Windows 7 (32 bits and 64 bits)
Mac OS X v10.7 and later
RAM 4GB
Novo
Screenote
User
Guide
- 5 -
2. Installing NovoScreenote
2.1 Installing NovoScreenote on your PC (Windows)
The installation wizard guides you through the NovoScreenote setup process on your computer.
To start the installation, follow these steps:
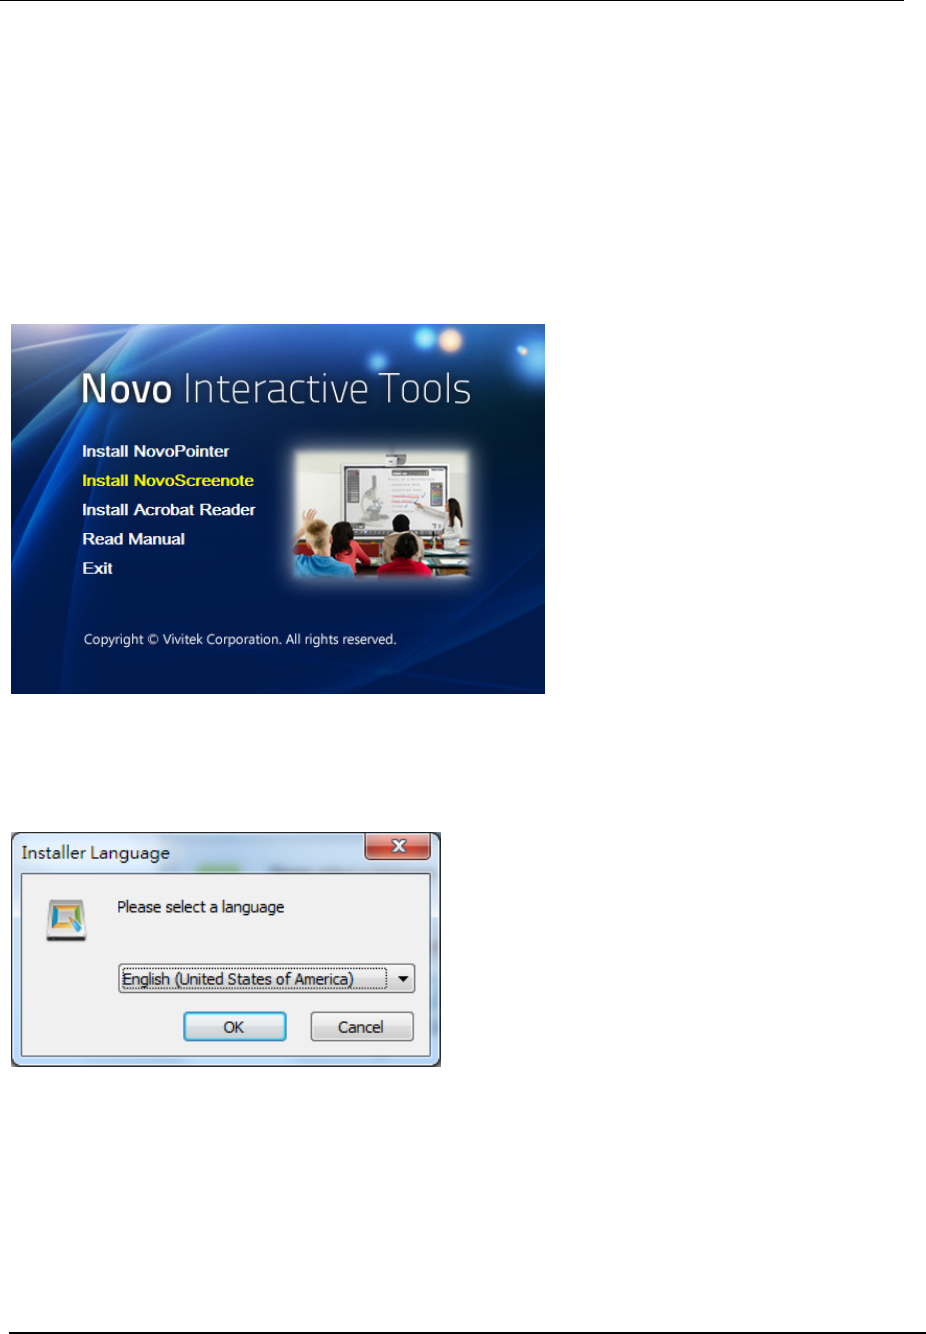
1. Insert Novo Interactive Tools CD into the CD-ROM drive.
2. Click “Install NovoScreenote” and follow the screen prompts.
3. Select your preferred language. Click OK to proceed.
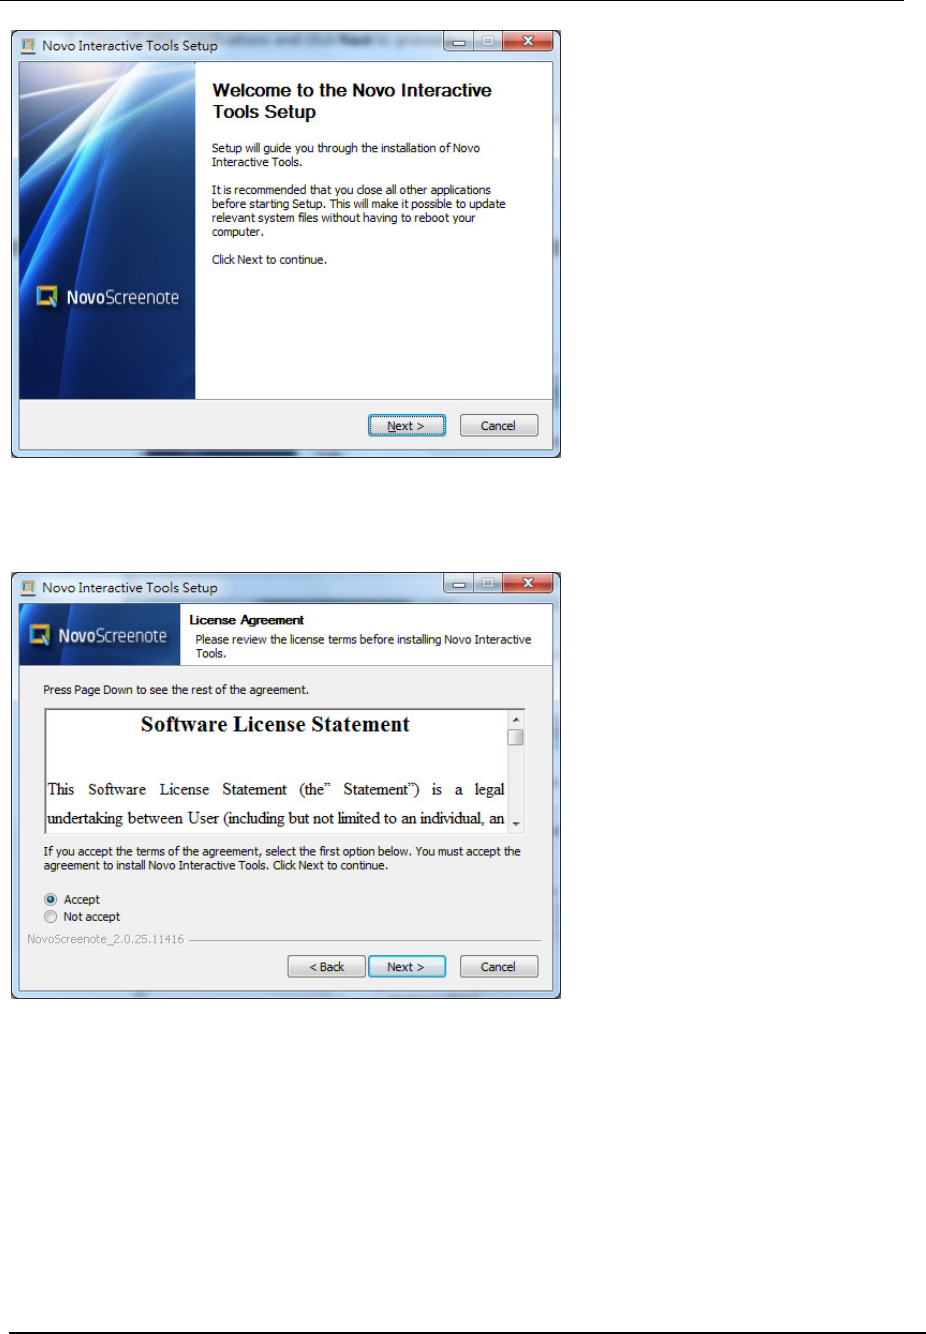
4. Close all other applications and click Next to proceed.
Novo
Screenote
User
Guide
- 6 -
5. Read the license agreement and select Accept
AcceptAccept
Accept then click Next
NextNext
Next
to proceed.
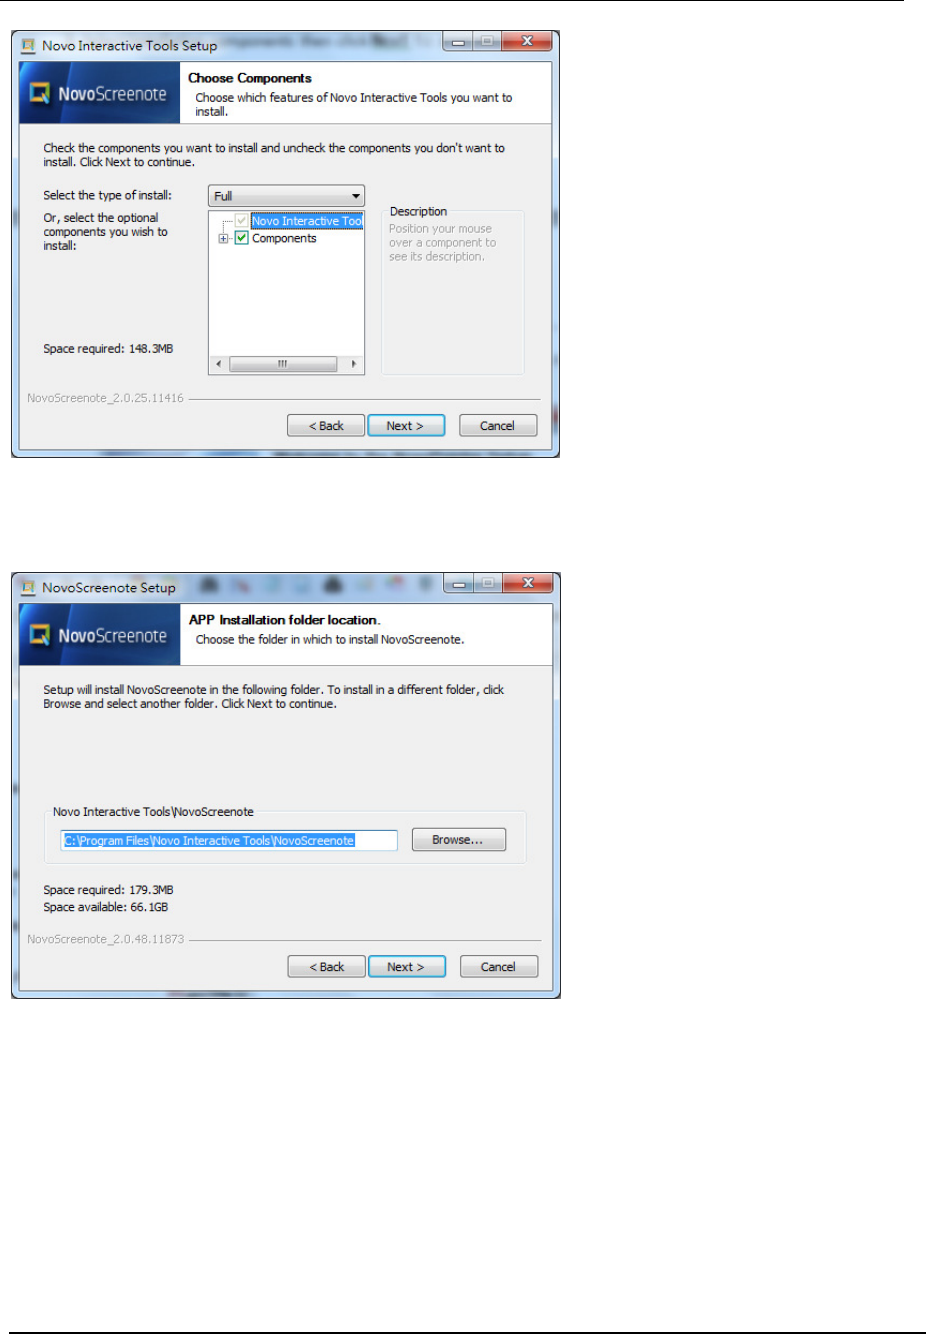
6. View installation components then click Next to proceed.
Novo
Screenote
User
Guide
- 7 -
7. Select the destination folder then click Next
NextNext
Next to proceed.
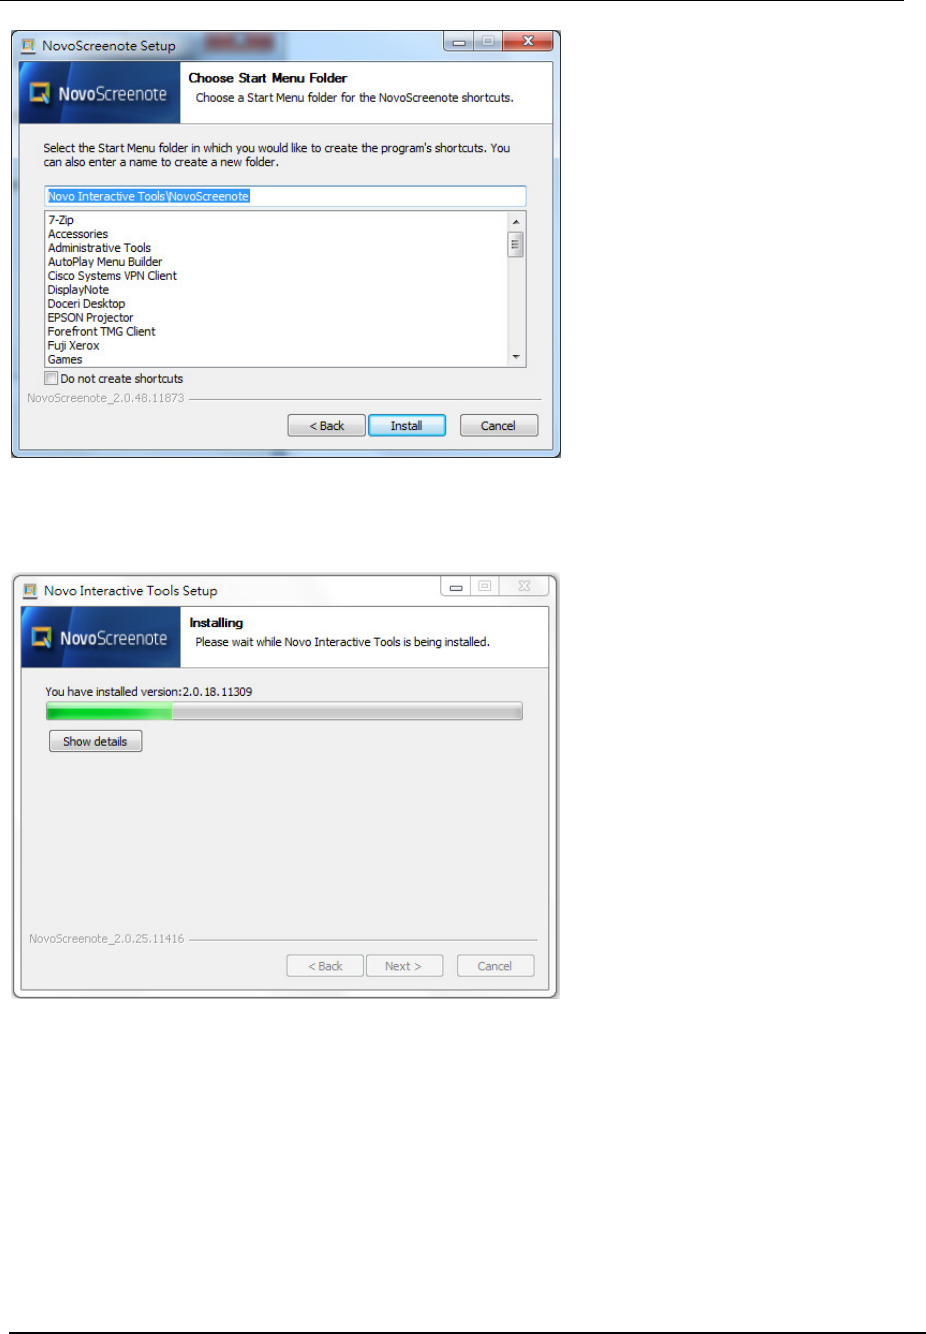
8. Select the Start Menu folder where you'd like to create the NovoScreenote shortcut. Then
click Install to proceed.
Novo
Screenote
User
Guide
- 8 -
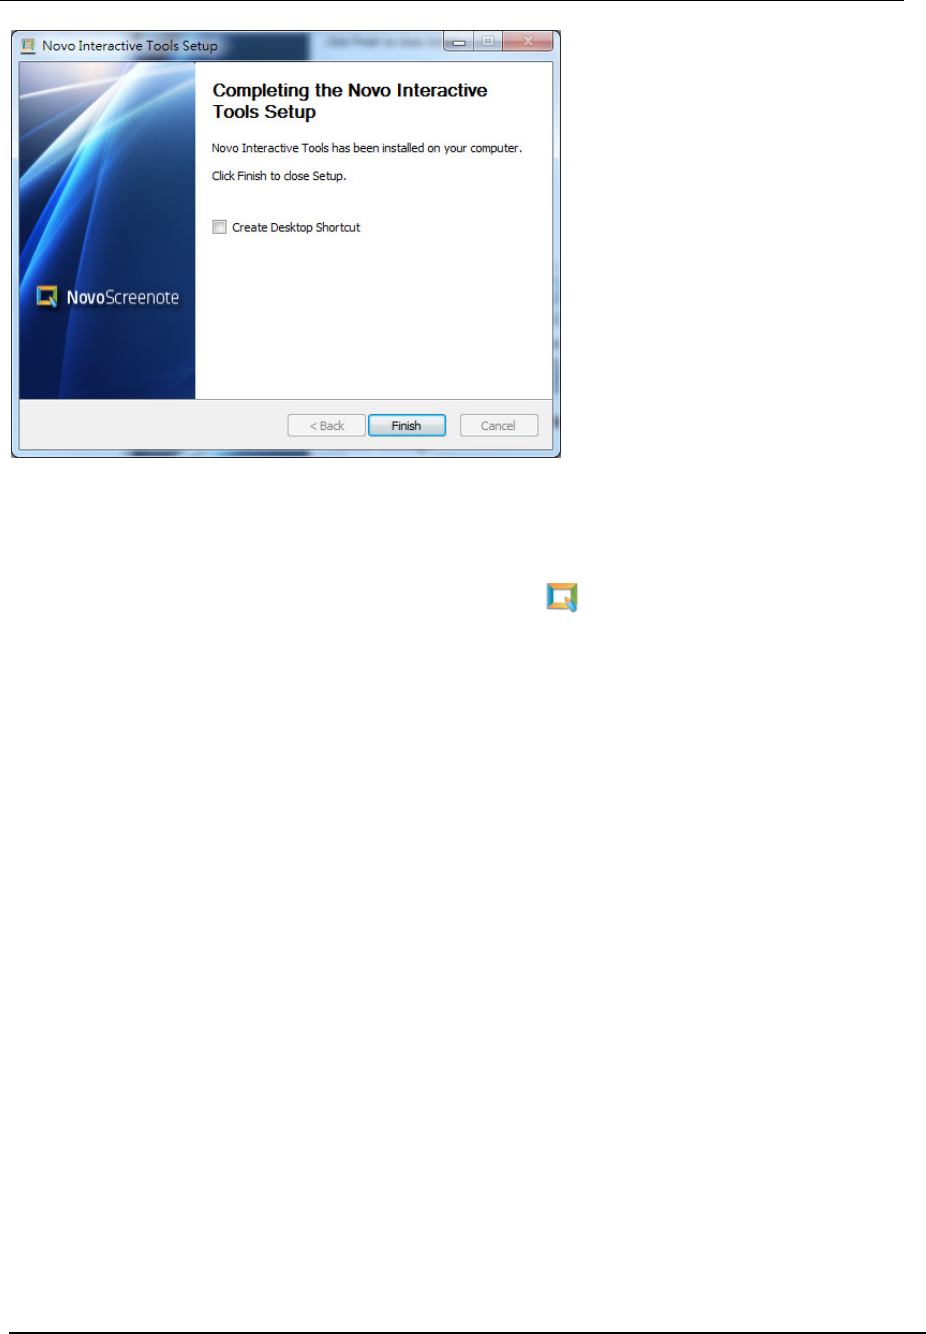
The Installation progress screen is shown below.
9. Check Create Desktop Shortcut and click Finish to complete the installation.
Novo
Screenote
User
Guide
- 9 -
10. Once you are done with the setup and you select to create desktop shortcut, you should see
the following icons under NovoScreenote program group .
2.2 Installing NovoScreenote on your PC (Mac)
The installation wizard guides you through the NovoScreenote setup process on your computer.
To start the installation, follow these steps:
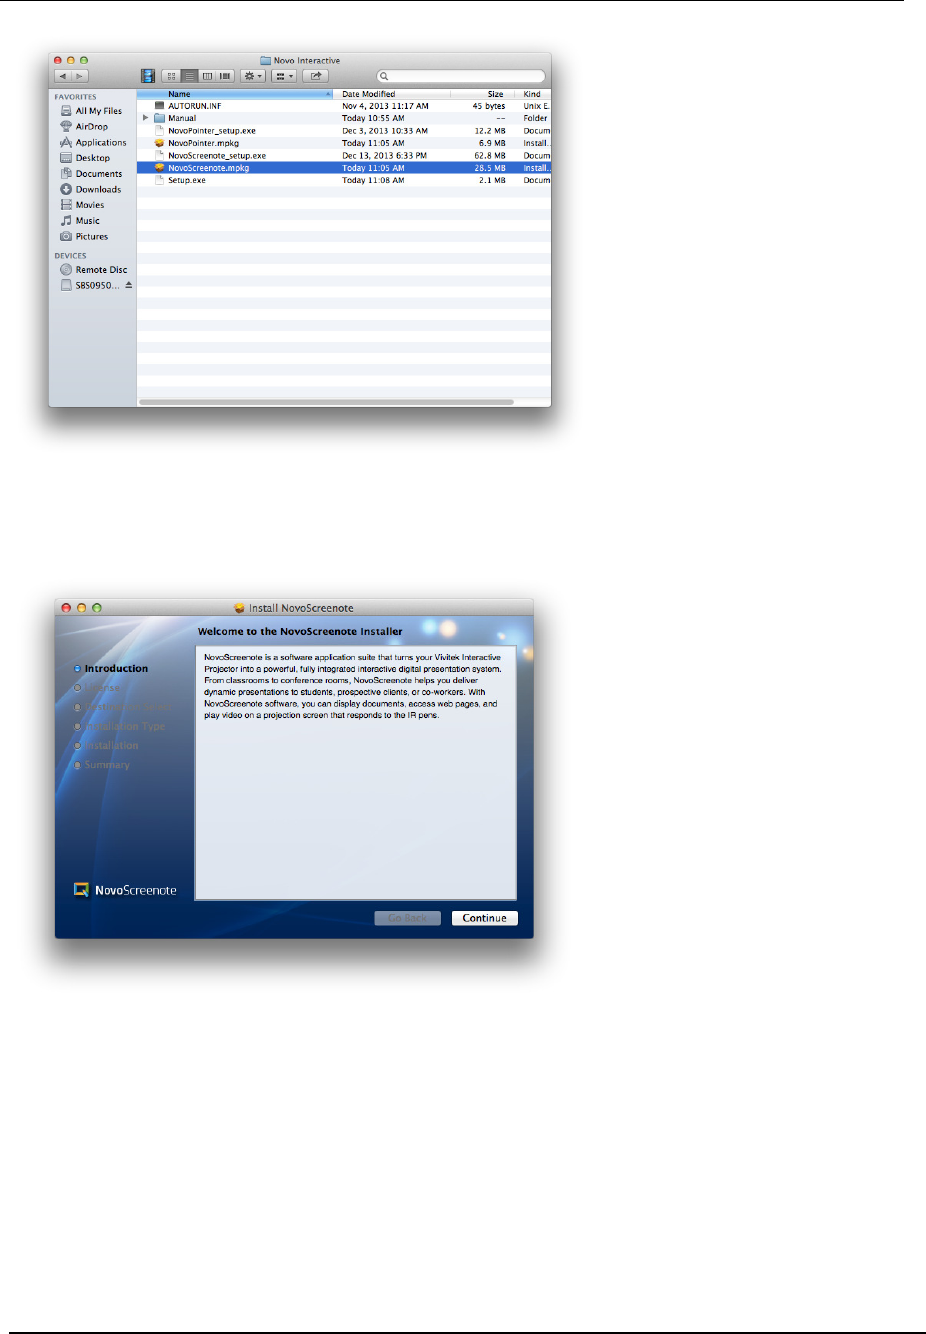
1. Insert Novo Interactive Tools CD into the CD-ROM drive. The disc icon is displayed on your
desktop, then double-click the disc icon.
2. When the disc contents are displayed, double-click the NovoScreenote.mpkg icon and follow
the screen prompts.
Novo
Screenote
User
Guide
- 10 -
3. The installation start screen is displayed. Click Continue to proceed.
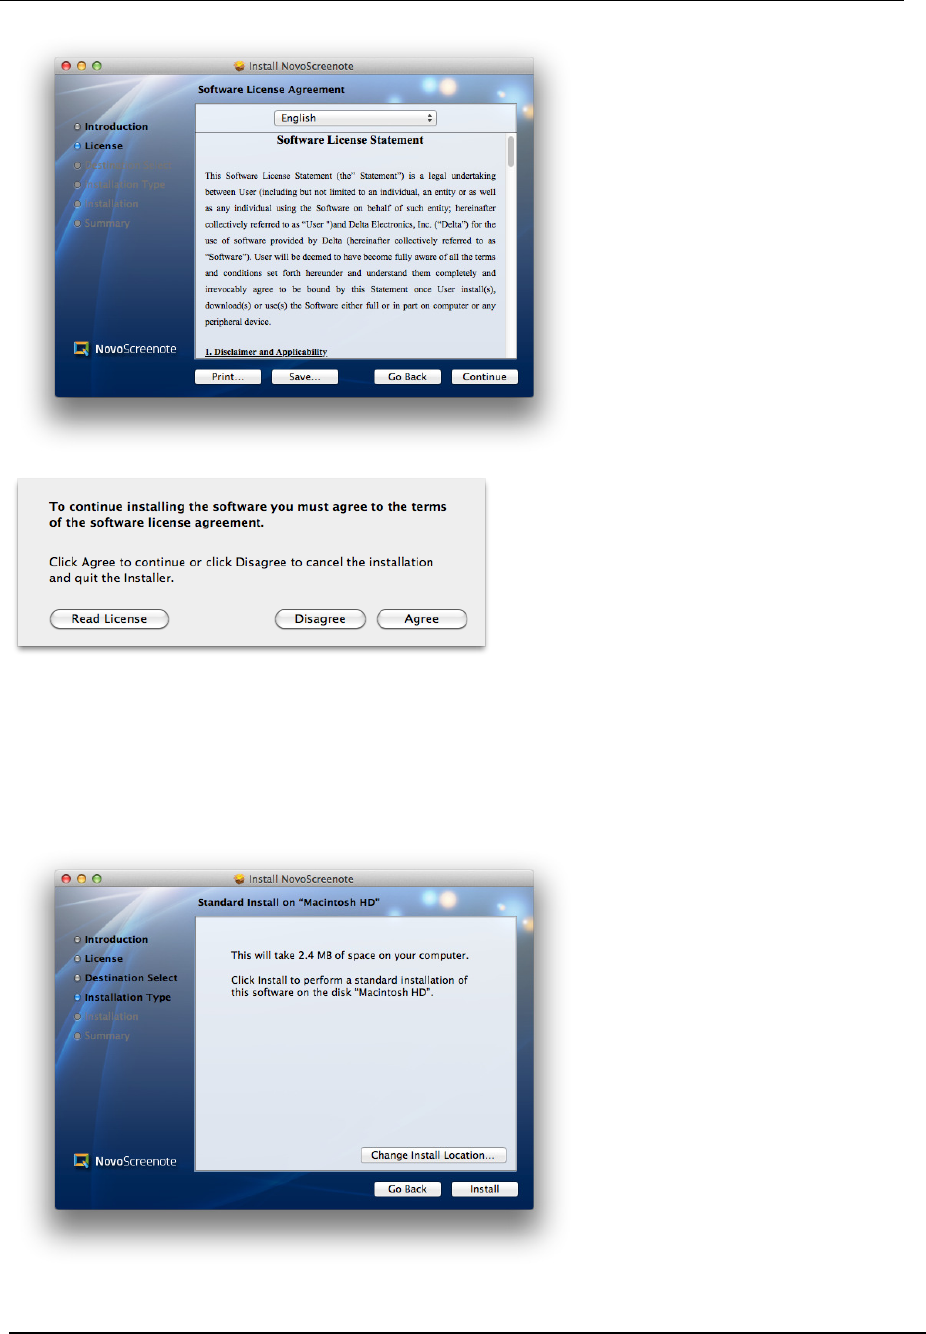
5. Read the Software License Agreement and select Continue then click Agree to proceed.
Novo
Screenote
User
Guide
- 11 -
6. The installation screen is displayed. If you want to install as default settings, click Install. If
you want to change the installation destination, click Change Installation
Location....
Novo
Screenote
User
Guide
- 12 -
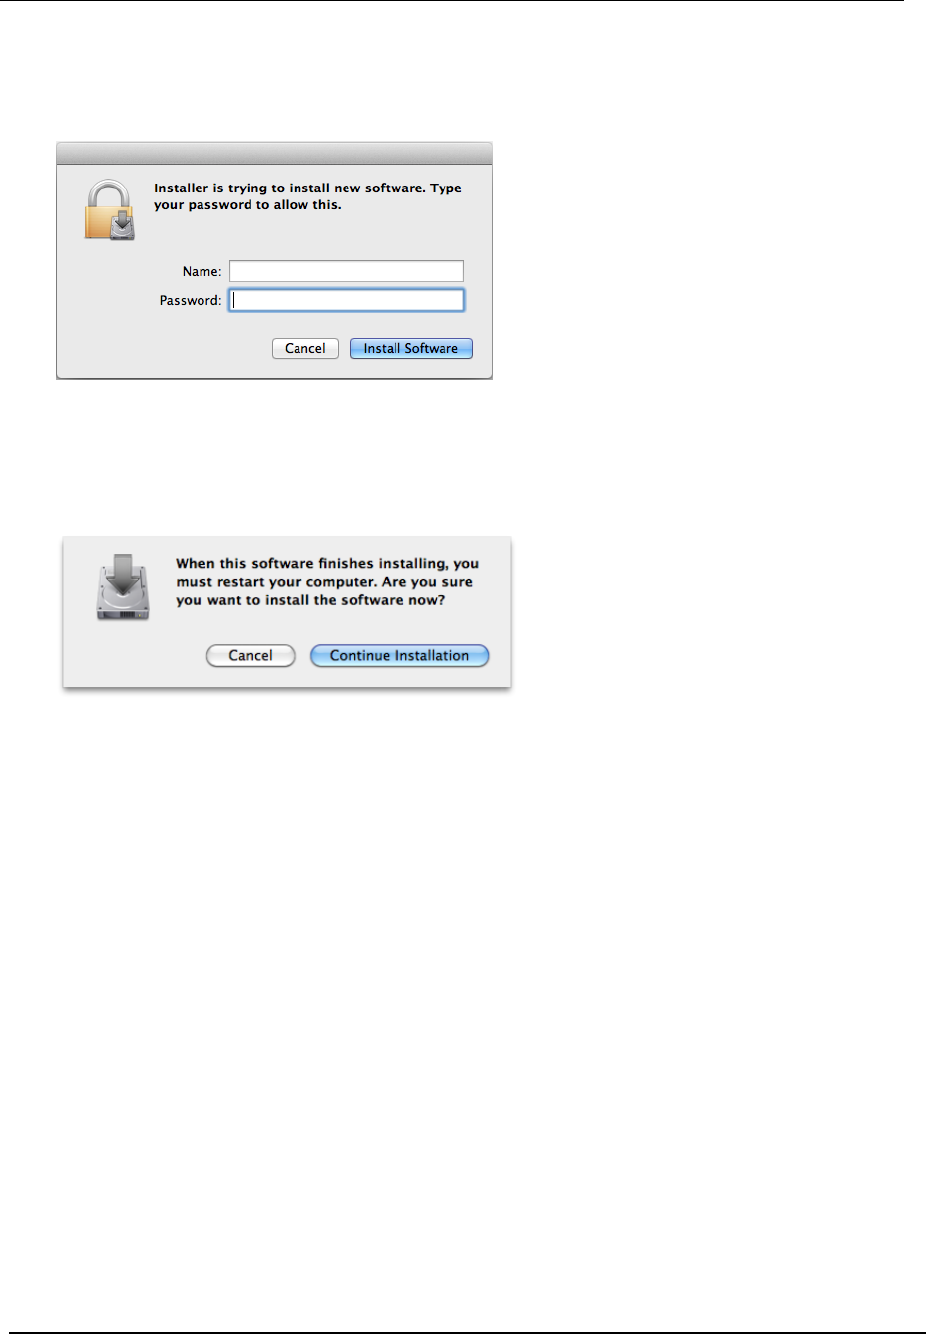
7. Enter the information of a user with administrator rights for the computer, and
then click Install Software.
8. A confirmation screen about restarting after the end of installation is displayed. Click
Continue Installation.
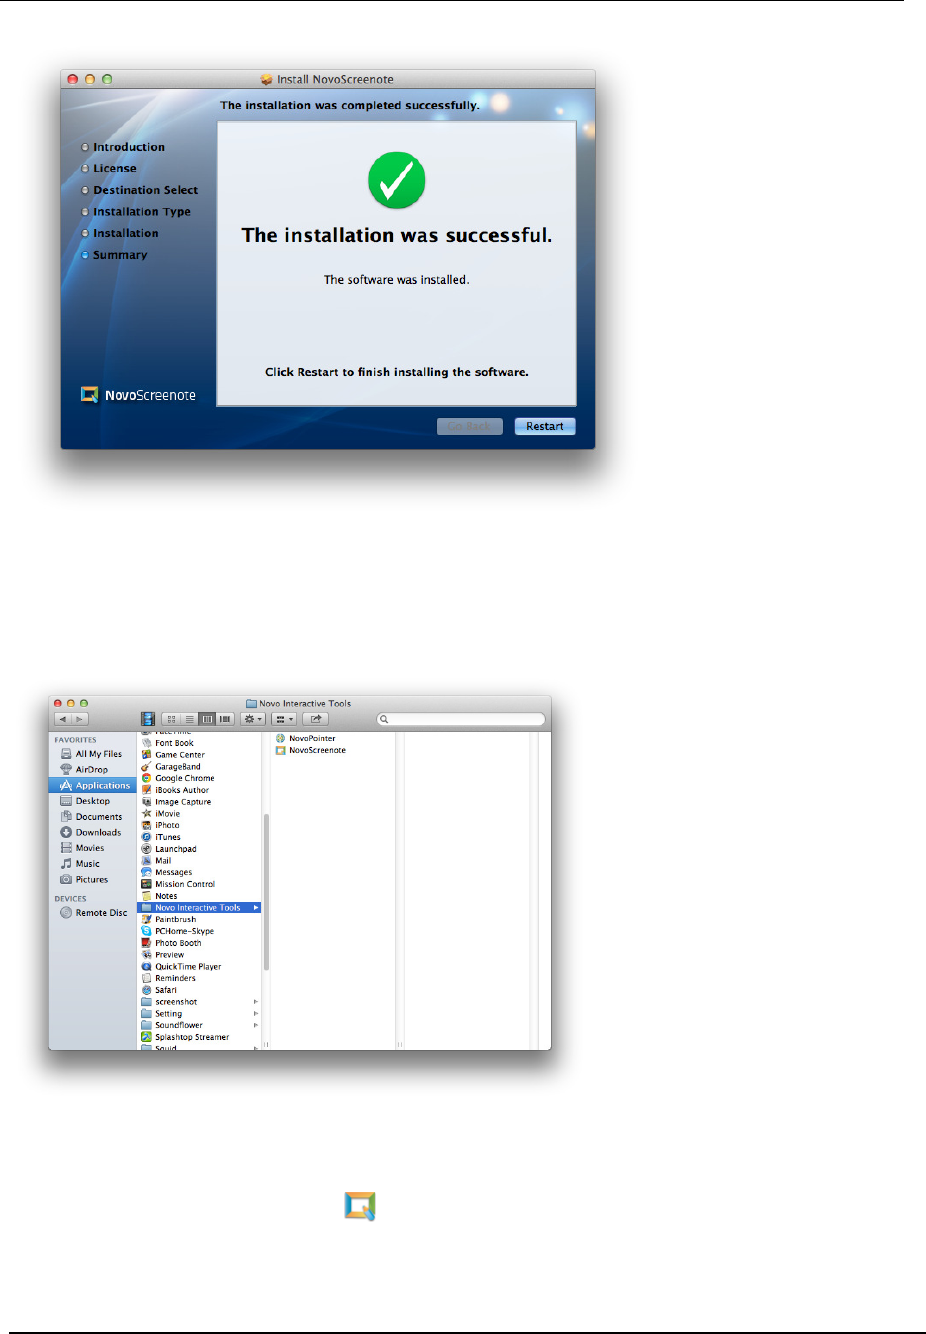
9. After installation, the setup finishing screen is displayed. Depending on your computer,
restarting confirmation screen is displayed. In this case, be sure to restart your computer before
you start using NovoScreenote.
Novo
Screenote
User
Guide
- 13 -
10. NovoScreenote Software can be started from Finder. Select NovoScreenote from
Applications.
11. You can see the following icons in the Application folder Novo Interactive Tools.
Novo
Screenote
User
Guide
- 14 -
3. Working with NovoScreenote
3.1 Overview
Connect the Interactive Projector USB Plug to the USB port of the PC before using the software
NovoScreenote.
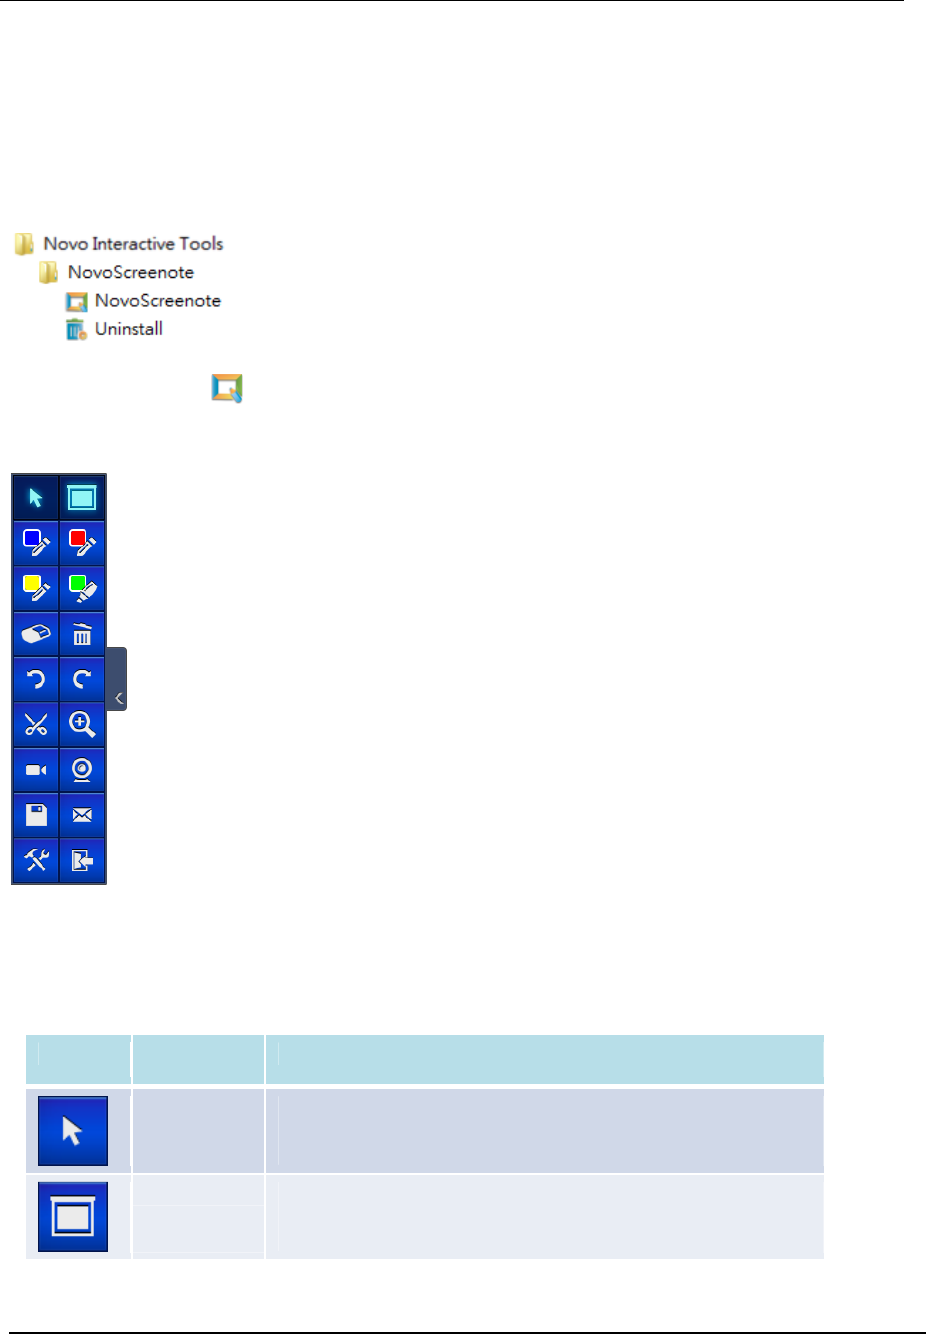
When you first open NovoScreenote, you will see the display below on the left side of your
desktop screen.
The NovoScreenote software provides a shortcut for the following functions. Please note that
the Markers, Highlighter, and Eraser are “sticky function” and you need to click the Cursor
Mode button to exit them.
Icon Usage
Cursor Mode
Cursor mode is used to exit from Annotation mode. Click the button
to enter Cursor mode. Click markers or highlighter to enter
Annotation mode.
Blank Page
Click to make whole desktop into a blank page. Click again to restore
to desktop mode. The annotation will be kept separately in desktop
mode or Blank page mode.
Novo
Screenote
User
Guide
- 15 -
Markers
Click any one of marker icons to write and draw on the desktop or
Blank Page. Click again to select the line thickness and color through
the dialog box.
Highlighter
Click to highlight any objects with a virtual highlighter. Click again to
select the line thickness and color through the dialog box.
Eraser
Click to erase drawing with a virtual eraser.
Clear
Clear all annotation on the desktop or blank page.
Undo
Undo the last change (applicable for up to fifteen levels into the
activity history).
Redo
Restore the last change.
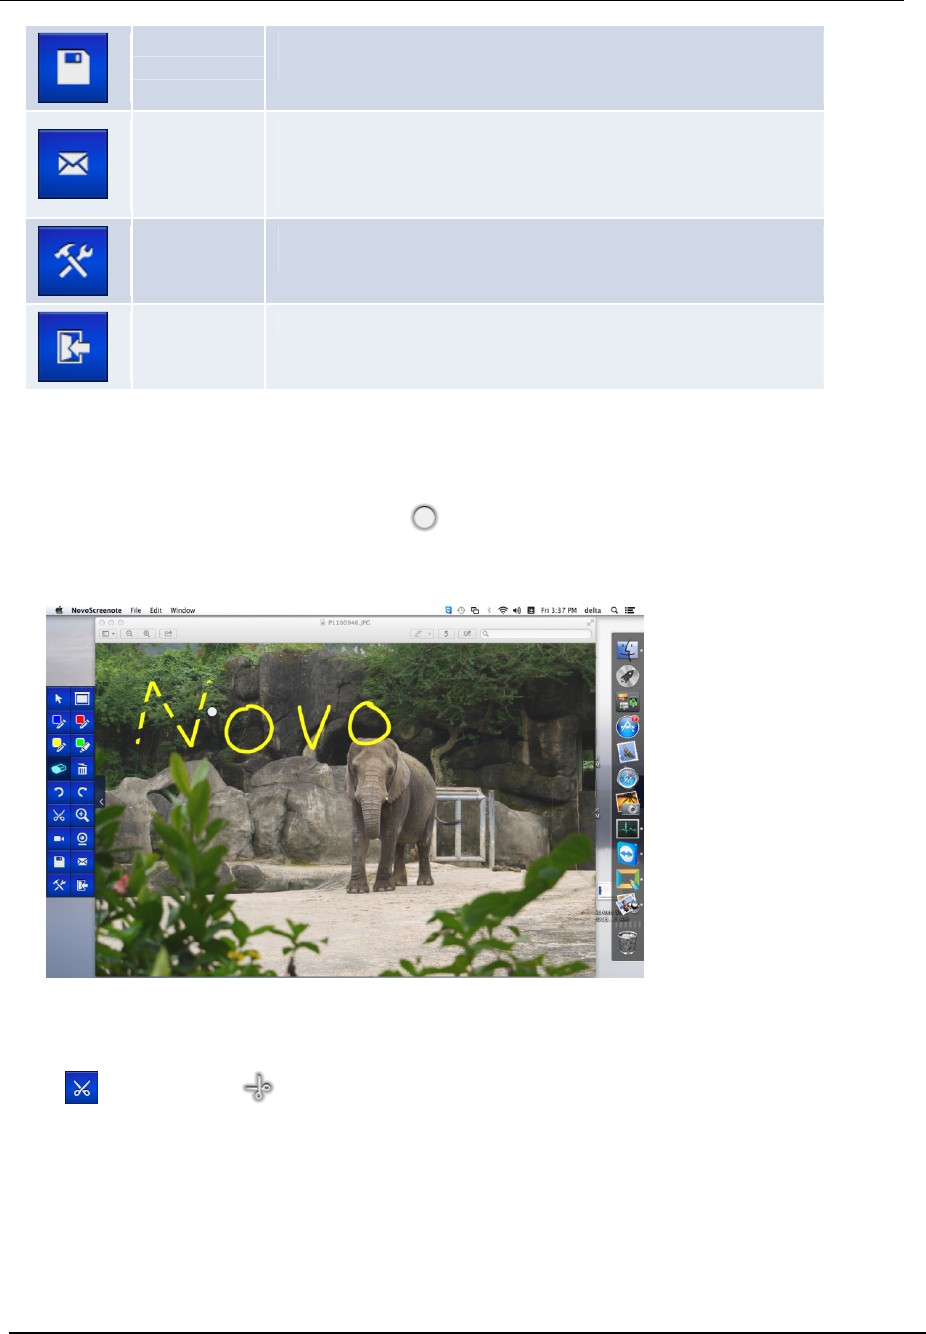
Cut
Cut can be used to copy a selected
rectangular region and store it in
the system clipboard.
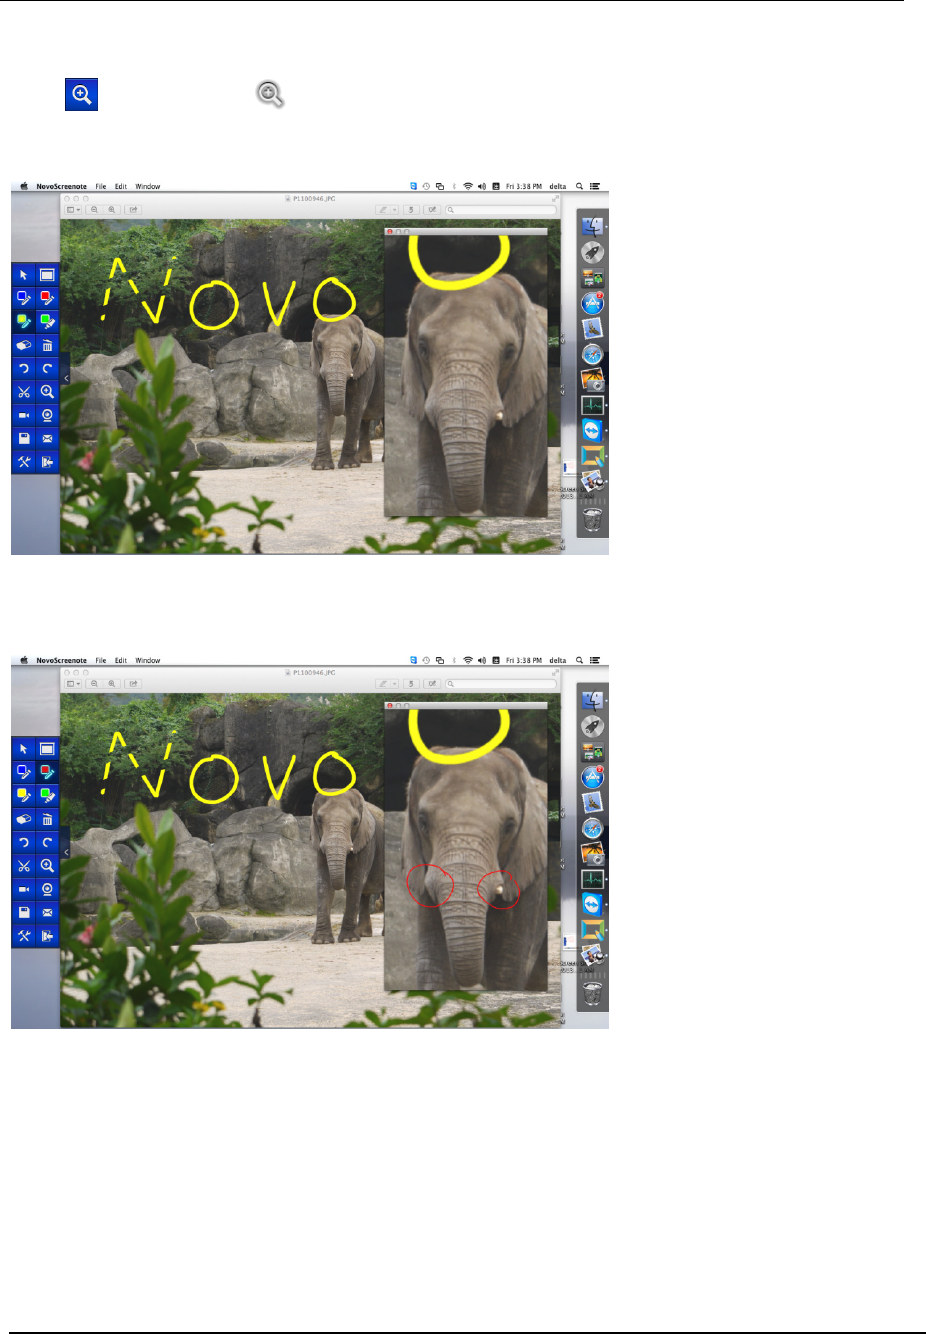
Zoom
Zoom in on a selected area. The annotation made on the Zoom
window will be applied to the desktop or blank page after terminate
the Zoom Window.
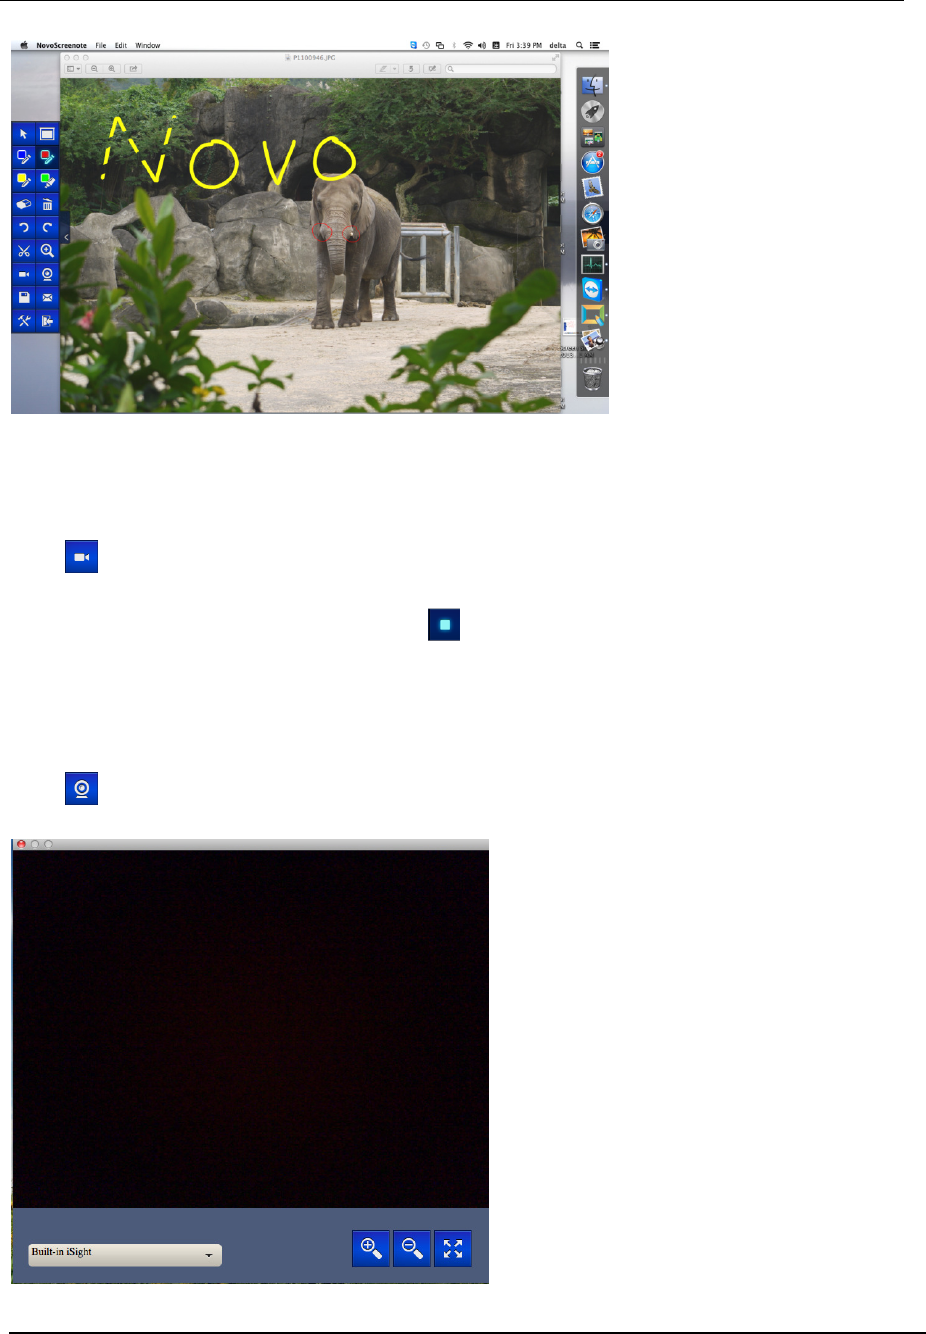
Screen Record
The screen record function lets you record all actions performed and
displayed on the desktop, as well as the audio output, during a
presentation. The recording is saved as an AVI file in predefined
workspace.
Stop the recording
by
clicking
.
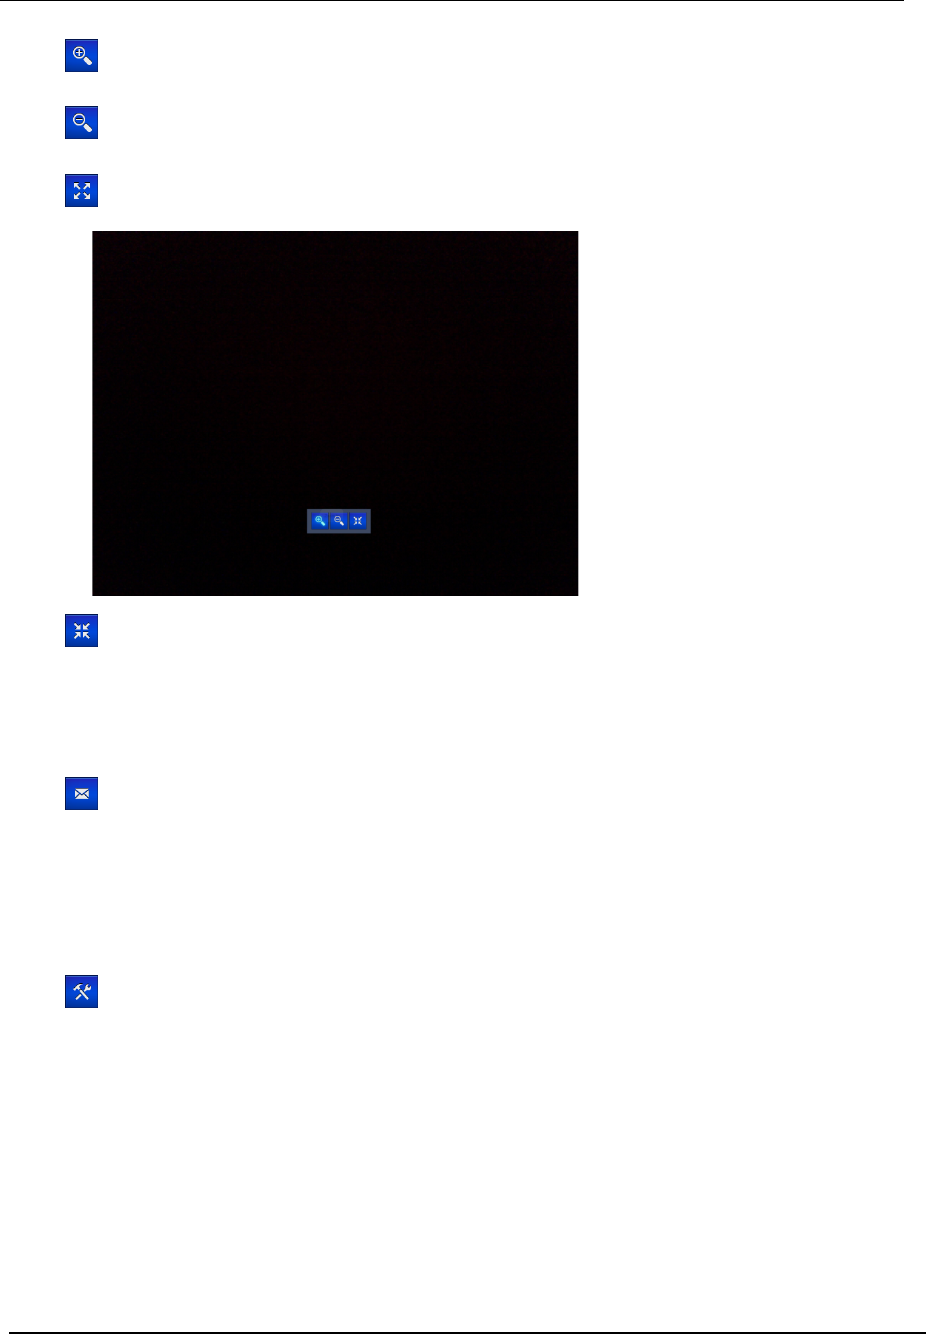
Document
Camera
Perform real-time video presentation by using your PC’s webcam or a
document camera device. An example usage of the document
camera is to display the content of a book or document.
Novo
Screenote
User
Guide
- 16 -
Save Screen
Save the current page as a PNG image file. The image file will be
saved to predefined workspace.
Email Screenshot
Email the current screenshot as an attachment via default email
application. The supported file formats are:
- Adobe Reader file (PDF)
- Image (JPG/ PNG)
Settings
Configure the system settings, such as workspace path, language,
attachment file format, and video quality of screen recording.
Exit
Exit the application.
3.2 Annotation mode
You can use Markers, Highlighters and Eraser to make annotation on the desktop or
Blank Page. You can make annotation up to 5 IR pens at the same time.
3.3 Cut
Click and use cursor to select a rectangle area on the screen. The selected area will be
saved into clipboard.
Novo
Screenote
User
Guide
- 17 -
3.4 Zoom
Click and use cursor to select a rectangle area on the screen. The selected area will
be enlarged and displayed in the dialog.
The annotation made on the Zoom window will be applied to the desktop or blank page after
terminate the Zoom Window.
Novo
Screenote
User
Guide
- 18 -
3.5 Screen Record
Click to start recording all actions performed and displayed on the desktop. A time counter
will be shown on the top of the screen. Click to stop recording.
3.6 Document Camera
Click to launch embedded web camera or document camera screen as below.
Novo
Screenote
User
Guide
- 19 -
Click to zoom in the camera.
Click to zoom out the camera.
Click to make camera in full screen mode as below screen
Click to exit the full screen mode.
3.7 Email Screenshot
Click to launch default Email application and attached with current screenshot in pre-set
file format.
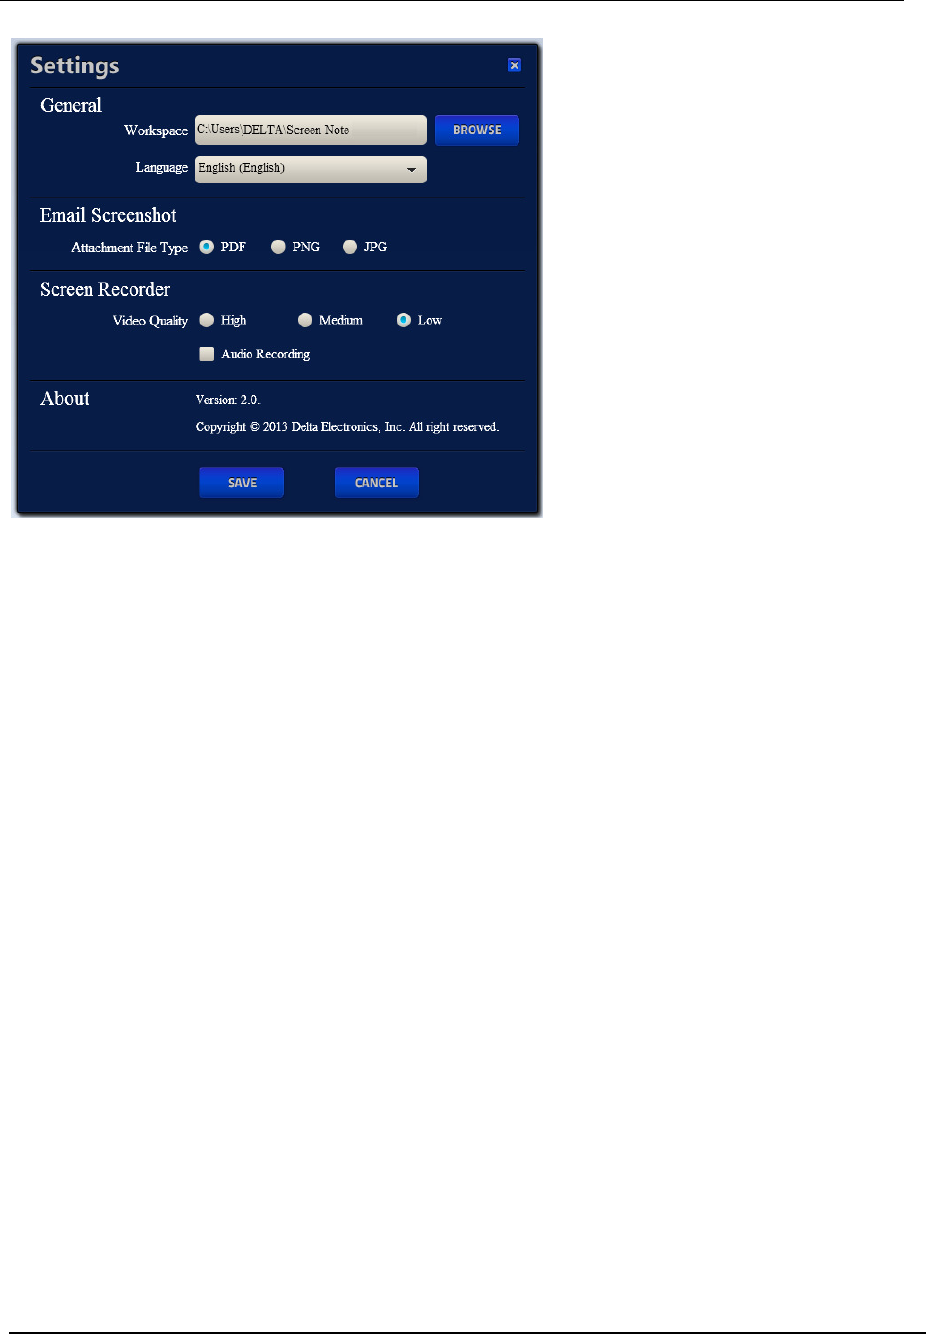
3.8 Settings
Click to launch Settings dialogue, click button again to close the dialogue.
You can browse a different workspace for files generated by function Screen Record, Save
Screen or Email Screenshot.
Novo
Screenote
User
Guide
- 20 -

Novo
Screenote
User
Guide
- 21 -
4. Troubleshooting
This chapter describes commonly-found issues and solutions when using NovoScreenote.
I can’t install NovoScreenote.
Log on as Administrator to install/uninstall NovoScreenote.
On Mac, please make sure the OS version is 10.7 or above.
Multi-touch doesn’t work for me on Windows 7.
After NovoPointer software is installed, multi-touch function will be automatically enabled.
Alternatively, you can go to [Control Panel]->[Programs and Features]->[Turn Windows feature
on or off] to enable [Tablet PC Components].
NovoScreenote and Microsoft Paint are two of the software programs that support multi-touch
operations.
I can’t annotate the screen using two pens simultaneously.
Please install NovoPointer software to enable multi-touch feature, as described in the
above-mentioned issue.
It says “No camera device found.” But I do have a camera device connected.
NovoScreenote does not support plug-and-play device detection. Please enable the camera
device connected to the PC before launching NovoScreenote.
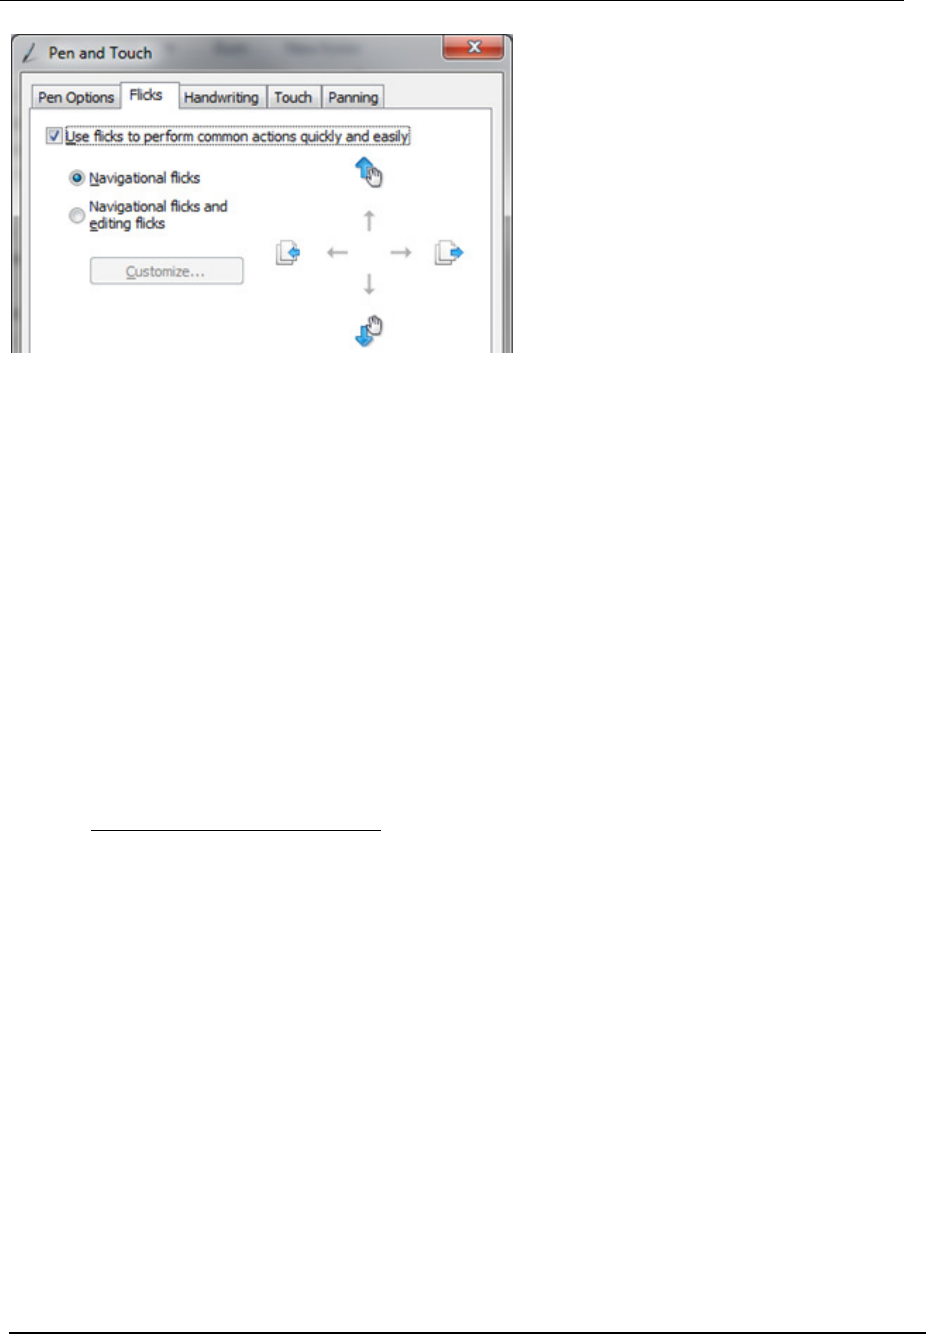
While I am making on-screen annotation, some gesture indicators keep popping
up which is quite annoying.
These indicators are called “flicks” in Windows 7. You need to turn off this feature to prevent
these indicators from showing up. Here are the steps:
1. Select [Start] -> [Control Panel] -> [Pen and Touch]. Then a “Pen and Touch” dialog pops
up.
2. Uncheck “Use flicks to perform common actions quickly and easily” in tab “Flicks.”
3. Click button “OK.”
Novo
Screenote
User
Guide
- 22 -
While I am annotating the screen, my “drawing” seems very slow to appear.
This problem is likely caused by a slow CPU, insufficient memory (RAM), or improper
configuration of the computer’s graphics controller.
1. Ensure the hardware resources on your PC are adequate. The hardware requirements can
be found in section1.2 “System Requirements” of this manual.
2. Close unnecessary applications or desktop widgets to free up more CPU power and
memory.
3. Check the graphics controller’s settings of the computer. Usually this issue can be fixed by
installing the latest graphics driver from your computer supplier. Additionally, you may
need to tune some parameters to improve its performance. The followings are two
examples of doing so.
3.1 Installing Latest Graphics Driver
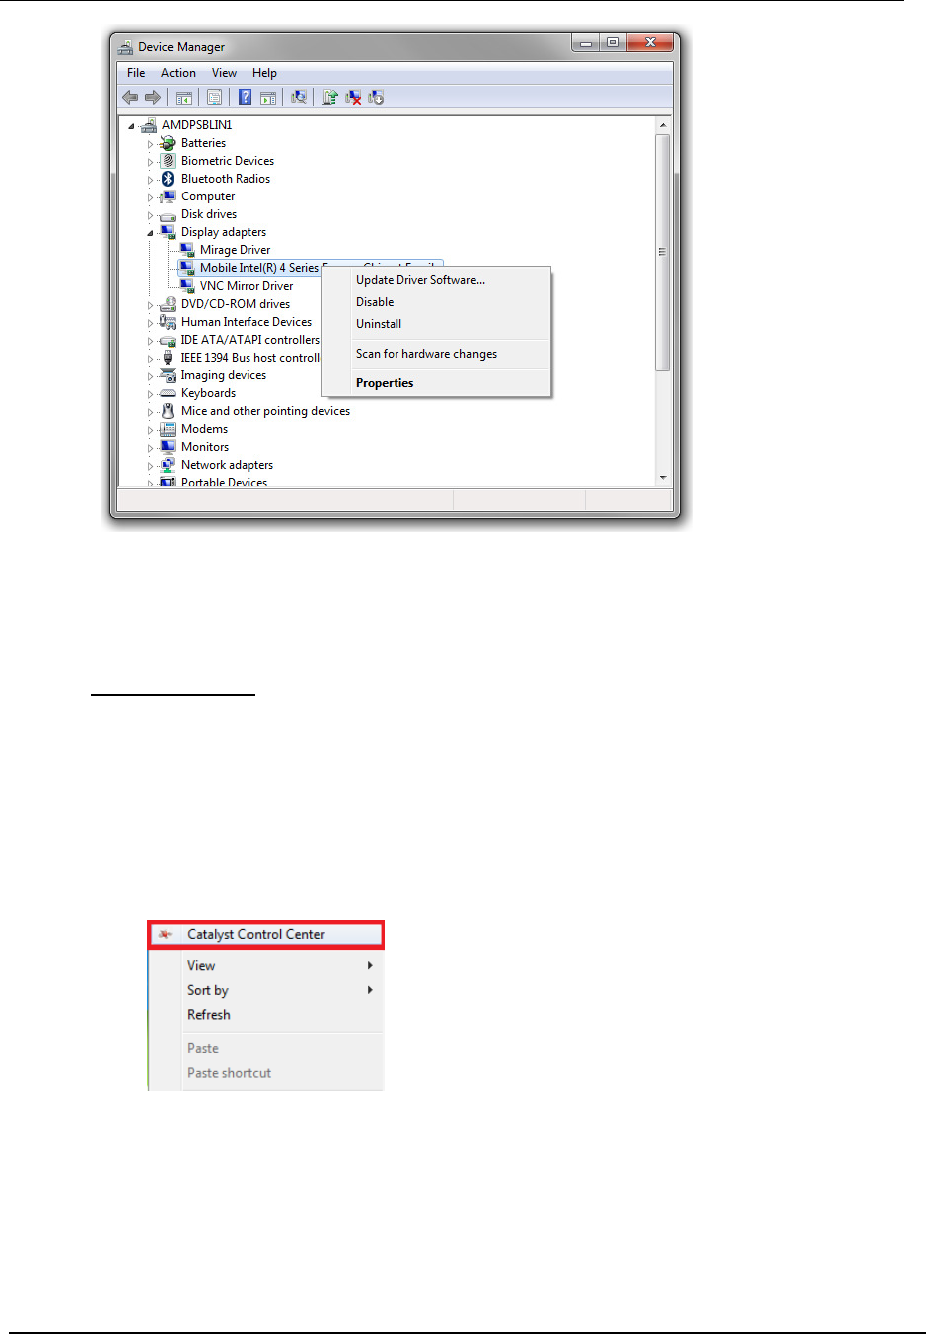
Step 1. Download the latest graphics driver from your computer supplier.
Step 2. Select [Start] -> [Control Panel] -> [Device Manager]. You should see a list of the
devices installed on this computer. Expand “Display adapters” to show the
graphics controller used on your system. Right-click on this item to bring up a
popup menu, which you can select to “Update Driver Software” or “Uninstall.”
To do a clean re-installation, you may select “Uninstall” to proceed.
Novo
Screenote
User
Guide
- 23 -
Step 3. Then, follow the on-screen instructions and you should be able to install a new
graphics driver.
3.2 Parameter Tuning
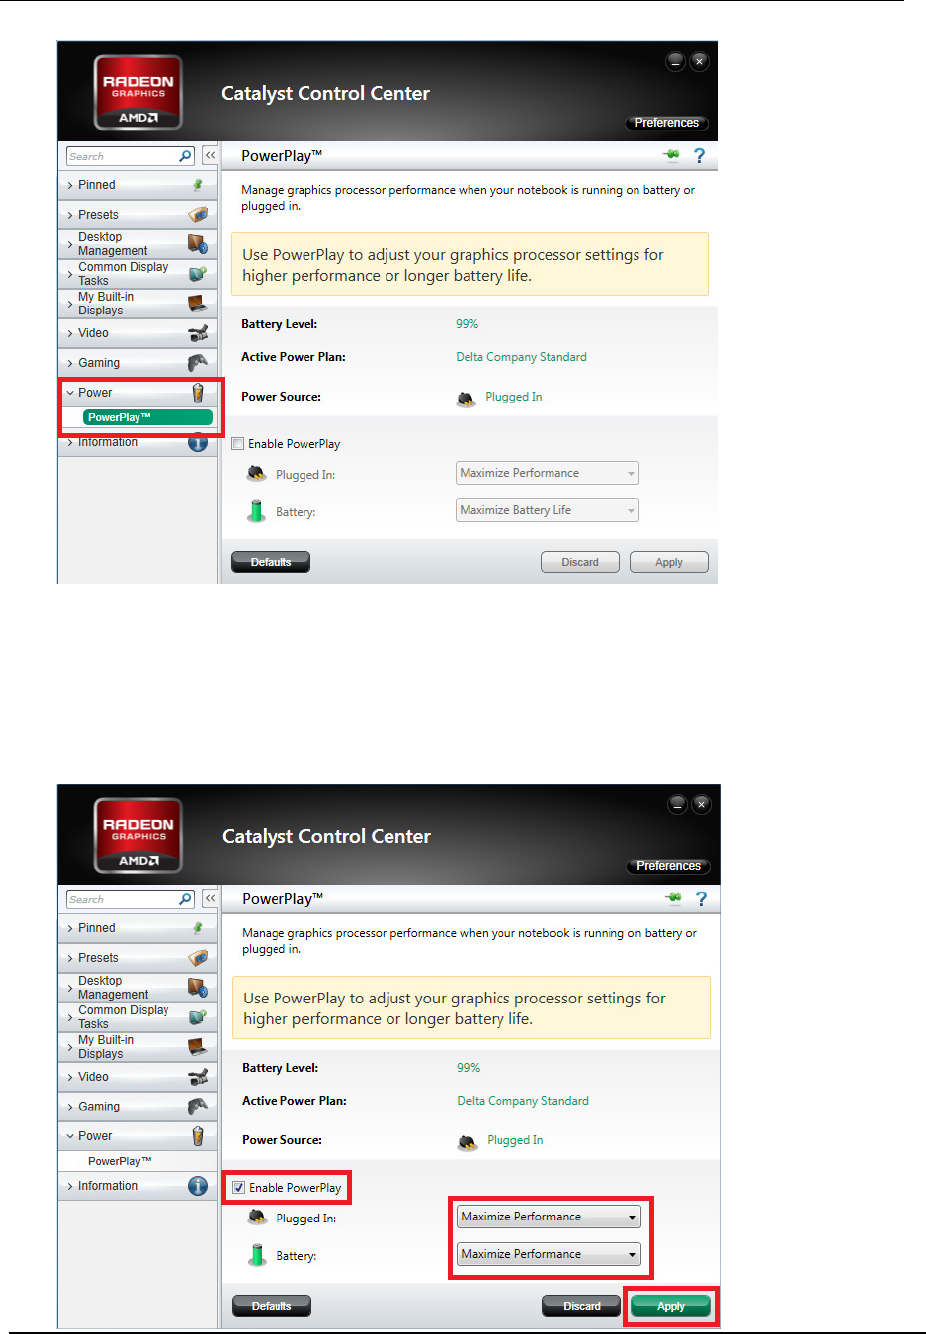
Some graphics driver software has some advanced control options. For example, if you are
running AMD (ATI) Catalyst Control Center, you will need to set the PowerPlay setting to
“Maximize Performance.” Here are the steps.
Step 1. Open the Catalyst Control Center by right-clicking the desktop and selecting
“Catalyst (TM) Control Center”.
Step 2. Select menu item “PowerPlay.”
Novo
Screenote
User
Guide
- 24 -
Step 3. Check “Enable PowerPlay.”
i. Set “Plugged in” setting to “Maximize Performance”
ii. Set “Battery” setting to “Maximize Performance”
Then, click “Apply” to confirm.
