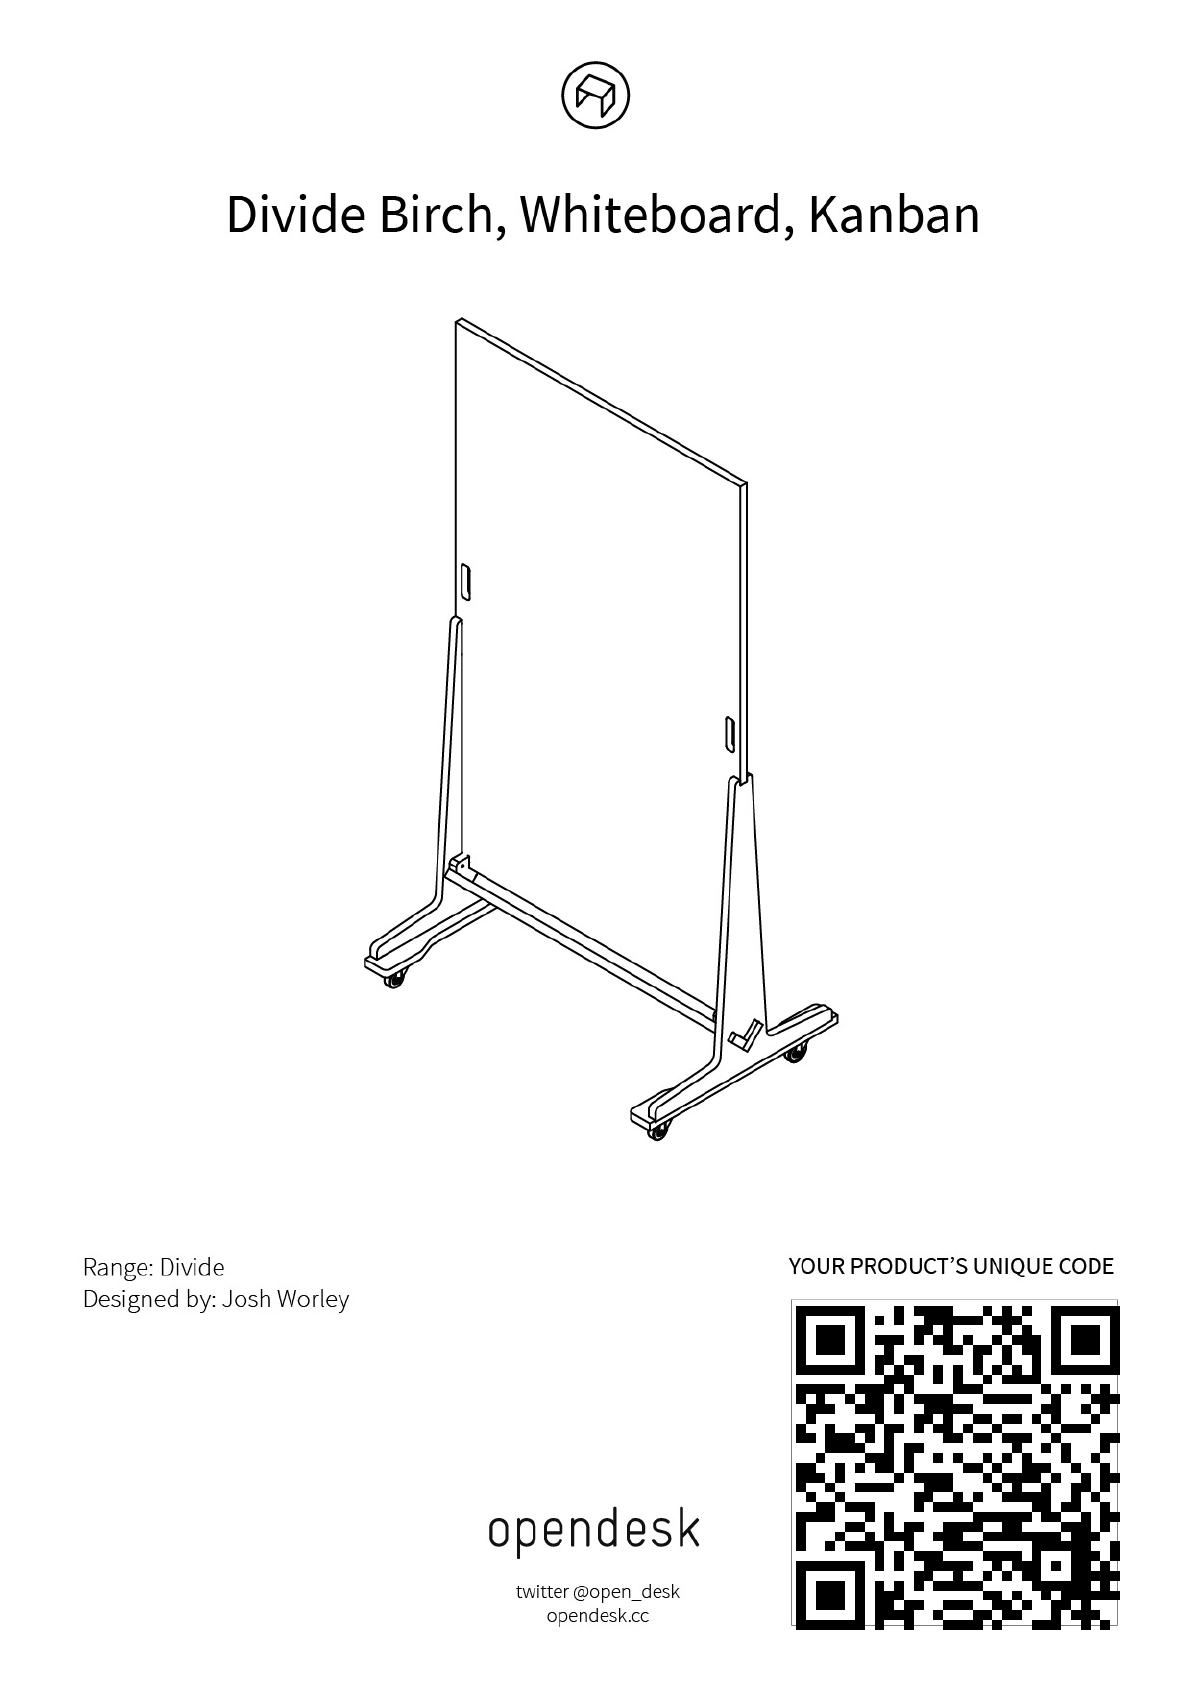
OD 203765 Assembly Guide
User Manual:
Open the PDF directly: View PDF ![]() .
.
Page Count: 6
Downloaded by alex on
2018-04-04 for non-commercial use.
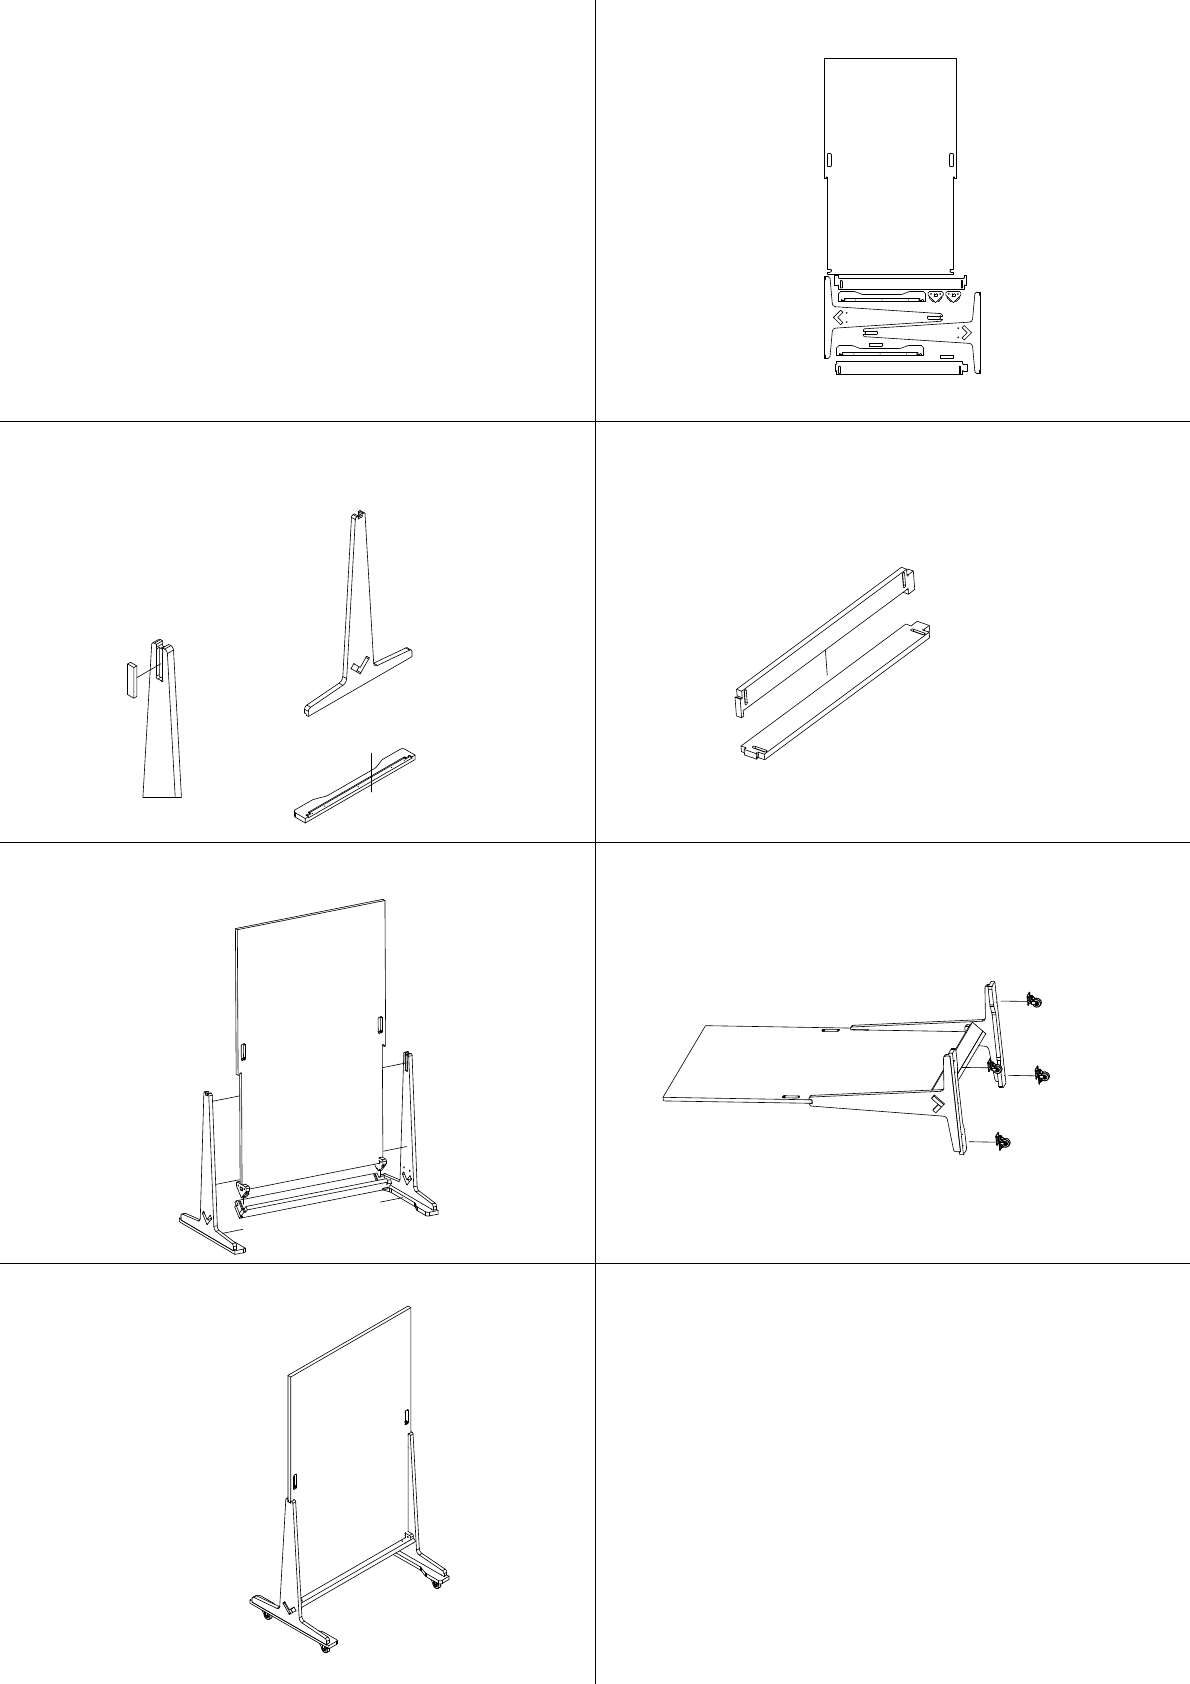
1. PARTS
3. GLUE THE "V" BEAM TOGETHER
2. GLUE LEGS COMPOENTS TOGETHER AND
SCREW THEM TOGETHER USING THE PILOT
HOLES
4. ASSEMBLE BOARD, LEGS AND INSERTS TO THE
"V" BEAM
PRODUCT ASSEMBLY
INSTRUCTIONS
PRODUCT: DIVIDE STANDARD
RANGE: DIVIDE
DESIGNERS: JOSH WORLEY
PUBLISHED: 08 / 06 / 2017
PRODUCT VERSION: 3_0_0
HARDWARE & TOOLS REQUIRED:
- PVA WOOD GLUE
- CLAMPS
- 8X 40MM WOOD SCREWS
- 4X M6 INSERTS
- 4X M6 30MM BOLTS
- 4X CASTORS: 75mm DIAMETER RUBBER
(X2 BRAKED WHEELS, X2 STANDARD WHEELS + SCREWS)
X2
5. FIT THE CASTORS
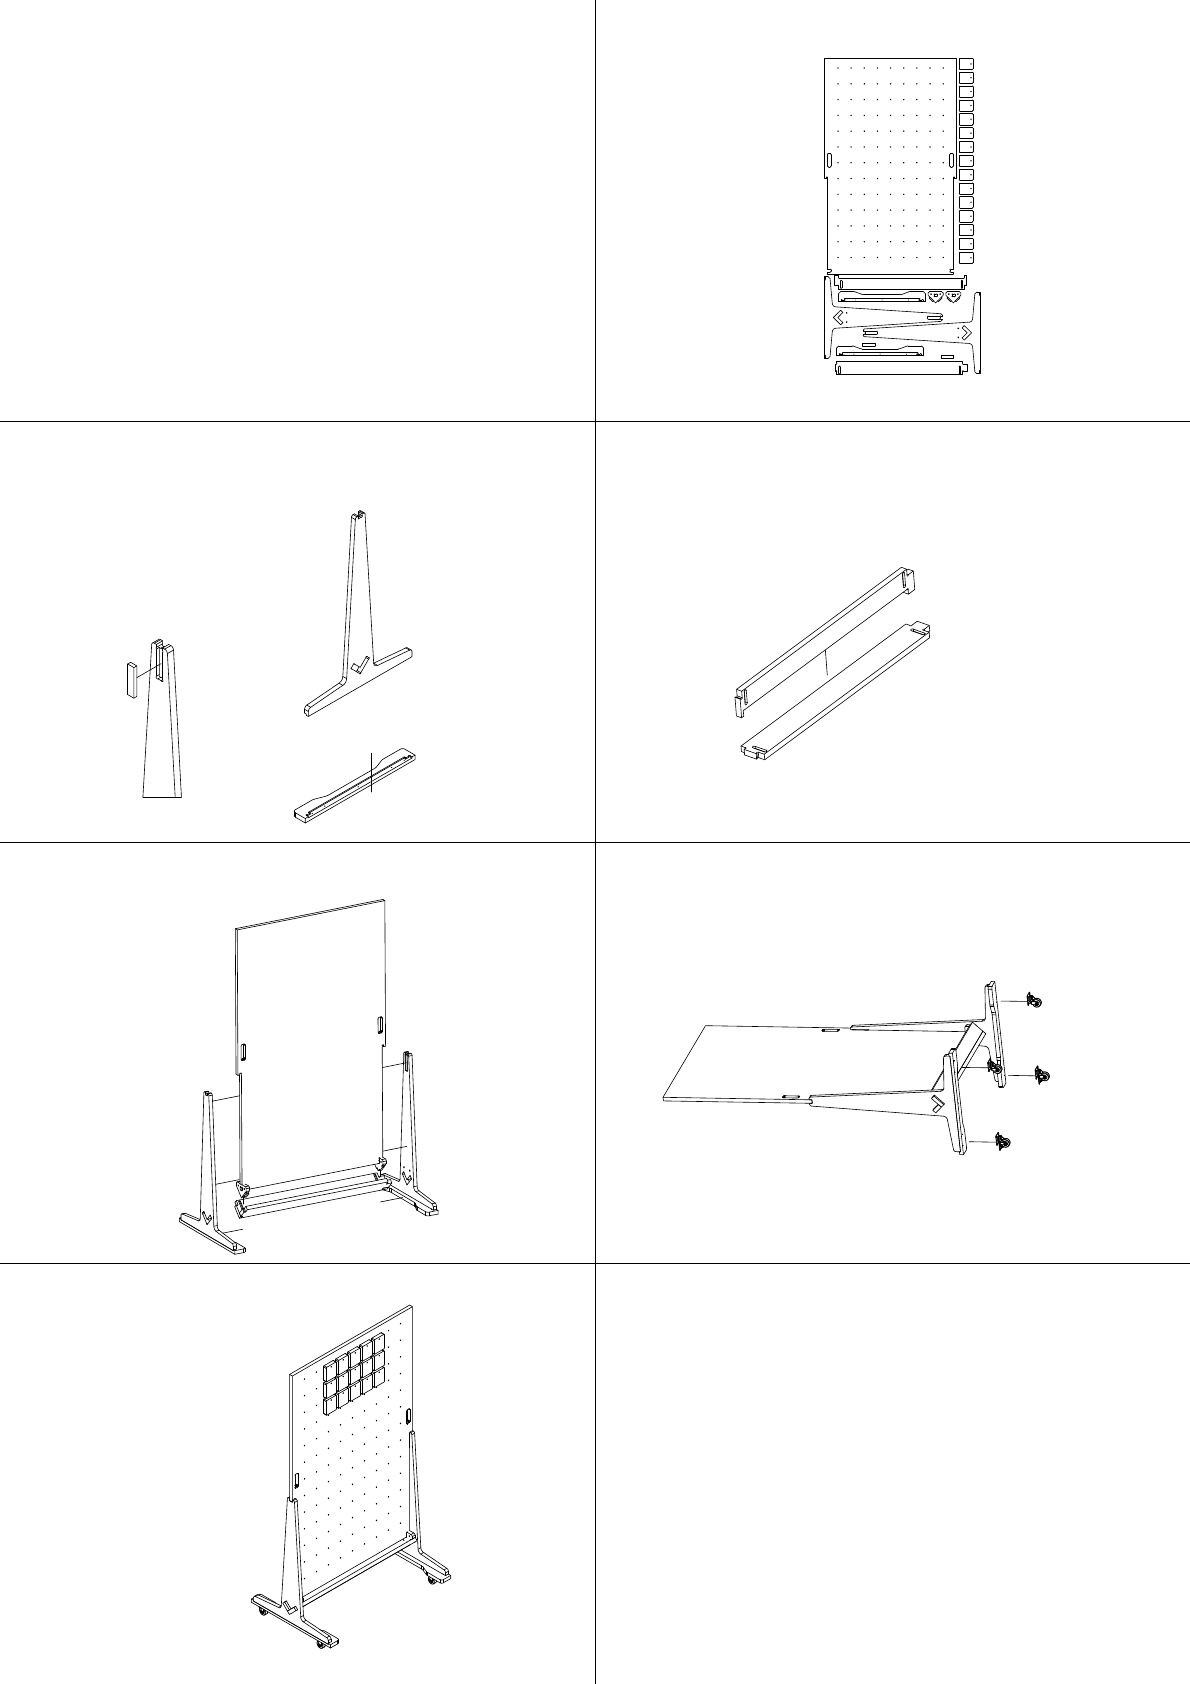
1. PARTS
3. GLUE THE "V" BEAM TOGETHER
2. GLUE LEGS COMPOENTS TOGETHER AND
SCREW THEM TOGETHER USING THE PILOT
HOLES
4. ASSEMBLE BOARD, LEGS AND INSERTS TO THE
"V" BEAM
PRODUCT ASSEMBLY
INSTRUCTIONS
PRODUCT: DIVIDE KANBAN
RANGE: DIVIDE
DESIGNERS: JOSH WORLEY
PUBLISHED: 08 / 06 / 2017
PRODUCT VERSION: 3_0_0
HARDWARE & TOOLS REQUIRED:
- PVA WOOD GLUE
- CLAMPS
- 8X 40MM WOOD SCREWS
- 4X M6 INSERTS
- 4X M6 30MM BOLTS
- 4X CASTORS: 75mm DIAMETER RUBBER
(X2 BRAKED WHEELS, X2 STANDARD WHEELS + SCREWS)
X2
5. FIT THE CASTORS

Divide 24mm Assembly Instructions:
Parts:
1x Panel (Whiteboard)
1x Brace Beam (2 parts)
2x Legs
2x Leg Pegs
2x Leg Plates
2x Brace Beam Blocks
4x Castors.
Hardware:
4x Inserts and bolts.
8x 30mm Screws.
Standard Steps:
1. Sand and oil brace beam blocks and Leg Pegs
2. Sand and oil Leg Plates
3. Sand and oil Brace Beam
4. Sand and oil and assemble Legs
5. Sand and oil Panel
4. Assemble.
Instructions:
1. Grab the two pegs together. With grit 240, sand around the whole ply edge, no oil. Grab the two brace
beam blocks together. With grit 240, sand around the whole ply edge. Oil in the same order, wipe dry, put
under workbench or to the side.
2. Grab the two plates together. With grit 240, sand around the whole ply edge. Oil in the same order,
wipe dry, put under workbench or to the side.
3. Grab the two beams together. With grit 240, sand around the whole ply edge. Oil in the same order,
wipe dry, put under workbench or to the side.
4. Grab the two Legs together. With grit 240, sand around the whole ply edge. Oil in the same order, wipe
dry. Add a thin layer of glue in the pocket at the top of each leg and bang in the leg pegs. Add a thin layer
of glue along the pocket of the leg plates and offer them up to the bottom of the leg, add the screws to the
plate, joining them to the leg. Screw the castors into position at each end. Add the inserts to the inside of
each leg.

5. With grit 240, sand around the whole ply edge. Oil in the same order, wipe dry. Tap on the brace beam
blocks on each bottom corner of the panel, make sure the teeth are facing inward.
6. Lay one leg flat on the ground and add the two brace beam parts into the ‘v’. Slide into position the
panel whilst still on its side. Add the two bolts to the brace beam block and lock to the inside of the leg.
Add the second leg on top of the panel and ‘v’ beam then screw the bolts up into the leg again. Stand the
divide up on its feet and check for stability.
Standard Actual Timings:
1. Sand and oil brace beam blocks and Leg Pegs 3 min
2. Sand and oil Leg Plates 3.5 min
3. Sand and oil Brace Beam 6 min
4. Sand and oil and assemble Legs 18 min
5. Sand and oil Panel 12 min
4. Assemble. 3.5 min
Total: 46 min
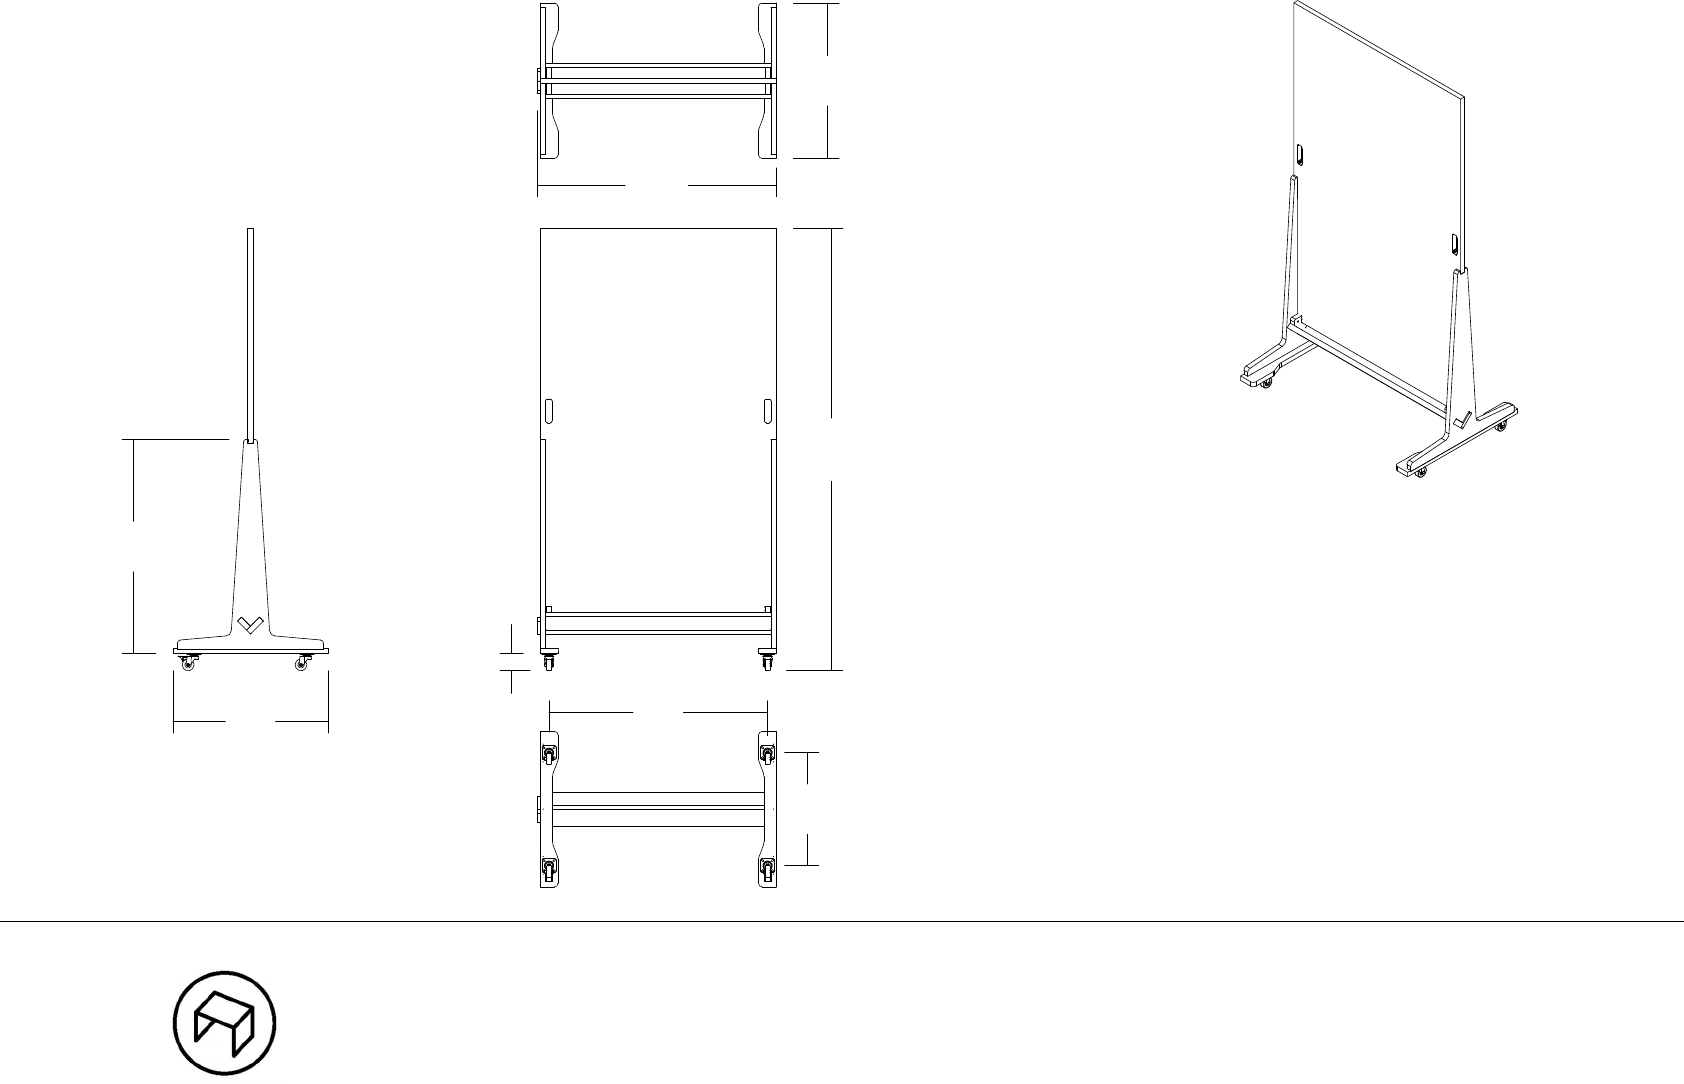
Divide Standard
Product General Arrangement
DIVIDE
Designed by Josh Worley
DRAWING:
SCALE: 1/24
PUBLISH DATE: 08 / 06 / 2017
PRODUCT VERSION: V3.0.0
PRODUCT CODE: DIV_DIV_STD_658x1012x1871_SA
1871658
658
907
72
478
925
1012
