2017 Lexus RX 350 Quick Guide OM0E025U
User Manual: 2017 Lexus RX 350 Quick Guide 2017 Lexus RX 350 Owners Manual Transmission |
Open the PDF directly: View PDF ![]() .
.
Page Count: 102 [warning: Documents this large are best viewed by clicking the View PDF Link!]
- 2017 RX350 Quick Guide Owner's Manual (OM0E025U)
- Table of Contents
- Overview
- Floor Mat Installation
- Keys
- Smart Access System with Push-button Start
- Theft Deterrent System
- Engine (Ignition) Switch
- Automatic Transmission (vehicles without paddle shift switches)
- Automatic Transmission (vehicles with paddle shift switches)
- Driving Mode Select Switch
- Turn Signal Lever
- Parking Brake
- Brake Hold
- Multi-information Display
- Head-up Display (if equipped)
- Eco Driving Indicator
- Headlights
- Automatic High Beam (if equipped)
- Fog Lights
- Windshield Wipers and Washer
- Rear Window Wiper and Washer
- Lexus Safety System+ (if equipped)
- Dynamic Radar Cruise Control with Full-speed Range (if equipped)
- Cruise Control (if equipped)
- LKA (Lane-Keeping Assist) (if equipped)
- Tire Pressure Warning System
- Intuitive Parking Assist (if equipped)
- Intelligent Clearance Sonar (ICS) (if equipped)
- Panoramic View Monitor (if equipped)
- BSM (Blind Spot Monitor) (if equipped)
- Remote Touch (with Navigation System)
- Navigation System (if equipped)
- Hands-free System For Cellular Phone(with Navigation System)
- Audio System (with Navigation System)
- Lexus Display Audio Controller (with Lexus Display Audio)
- Hands-Free System For Cellular Phone(with Lexus Display Audio)
- Audio System (with Lexus Display Audio)
- Portable Audio Device Ports
- Rear Seat Entertainment System Features (if equipped)
- Lexus Climate Concierge (if equipped)
- Air Conditioning System
- Seat Heaters (if equipped)/Seat Ventilators (if equipped)
- Voice Command System
- Garage Door Opener
- LEXUS Enform Safety Connect (if equipped)
- Lexus Enform (for U.S.A., if equipped)
- Information Services (if equipped)
- Door Locks
- Power Windows
- Moon Roof (if equipped)
- Panoramic Moon Roof (if equipped)
- Fuel Tank Cap
- Power Back Door
- What to do if...

1
The Quick Guide is not intended as a substitute for your
Owner’s
Manual
. We strongly encourage you to review the
Owner’s
Manual
and supplementary manuals so you will have a better
understanding of your vehicle’s capabilities and limitations.
Air Conditioning System*
Adjusting the temperature setting..........................................................................................75
Adjusting the fan speed setting................................................................................................75
Change the airflow mode...........................................................................................................75
Control screen................................................................................................................................75
Side display operation screen
(Vehicles with a navigation system [12.3-inch display])..........................................76
Option control screen................................................................................................................. 77
Using the automatic mode......................................................................................................... 77
S-FLOW mode............................................................................................................................... 77
Adjusting the temperature for driver and passenger seats separately
(“DUAL” mode)....................................................................................................................... 77
Audio System (with Lexus Display Audio)*
Lexus Display Audio operation buttons...............................................................................69
Using the steering wheel switches to change audio sources......................................69
Audio menu screen.......................................................................................................................70
Operating the audio system using the steering wheel switches................................72
Audio System (with Navigation System)*
Audio control screen .................................................................................................................... 61
Remote control (steering wheel audio switches).............................................................. 61
Basic operation...............................................................................................................................62
Radio...................................................................................................................................................62
DVD player/CD player ..............................................................................................................63
Operating an iPod.........................................................................................................................64
Automatic High Beam......................................................................................................................35
Automatic Transmission (vehicles with paddle shift switches)....................................... 19
Automatic Transmission (vehicles without paddle shift switches) ............................... 17
Brake Hold .............................................................................................................................................26
BSM (Blind Spot Monitor)..............................................................................................................52
Cruise Control.....................................................................................................................................45
Door Locks............................................................................................................................................ 90
Driving Mode Select Switch..........................................................................................................22
Dynamic Radar Cruise Control with Full-speed Range..................................................42
*: This feature may be operated by Voice command (See P.79)

2
Eco Driving Indicator ....................................................................................................................... 33
Engine (Ignition) Switch ....................................................................................................................15
Floor Mat Installation .......................................................................................................................... 11
Fog Lights............................................................................................................................................... 36
Fuel Tank Cap...................................................................................................................................... 94
Garage Door Opener .....................................................................................................................83
Hands-Free System For Cellular Phone (with Lexus Display Audio)*
How to register a Bluetooth® device................................................................................... 66
Registering favorites.................................................................................................................... 66
Dialing................................................................................................................................................ 66
Dialing from the phonebook .....................................................................................................67
When the phonebook is empty................................................................................................67
Dialing from favorites ...................................................................................................................67
To answer the phone ...................................................................................................................68
Operating a phone using the steering wheel switches.................................................68
Hands-free System For Cellular Phone (with Navigation System)*
Bluetooth® phone pairing.........................................................................................................58
Contact transfer ............................................................................................................................ 59
Calling by name.............................................................................................................................60
Receiving a call ..............................................................................................................................60
Steering switches ..........................................................................................................................60
Head-up Display...................................................................................................................................31
Headlights.............................................................................................................................................. 34
Information Services ........................................................................................................................89
Intelligent Clearance Sonar (ICS)............................................................................................. 49
Intuitive Parking Assist.................................................................................................................... 49
Keys ............................................................................................................................................................12
Lexus Climate Concierge...............................................................................................................74
Lexus Display Audio Controller (with Lexus Display Audio)........................................ 65
Lexus Enform........................................................................................................................................ 87
LEXUS Enform Safety Connect.................................................................................................85
Lexus Safety System+ ........................................................................................................................41
LKA (Lane-Keeping Assist) ...........................................................................................................47
*: This feature may be operated by Voice command (See P.79)

3
Moon Roof .............................................................................................................................................92
Multi-information Display ..............................................................................................................27
Navigation System*
Register home.................................................................................................................................56
Destination search.........................................................................................................................57
Voice Command System...........................................................................................................79
Panoramic Moon Roof.....................................................................................................................92
Panoramic View Monitor............................................................................................................... 50
Parking Brake.......................................................................................................................................25
Portable Audio Device Ports........................................................................................................72
Power Back Door ...............................................................................................................................95
Power Windows.................................................................................................................................... 91
Rear Seat Entertainment System Features ...........................................................................73
Rear Window Wiper and Washer ..............................................................................................40
Remote Touch (with Navigation System)................................................................................53
Seat Heaters/Seat Ventilators ....................................................................................................78
Smart Access System with Push-button Start........................................................................ 13
Theft Deterrent System.................................................................................................................... 14
Tire Pressure Warning System ....................................................................................................48
Turn Signal Lever................................................................................................................................24
Voice Command System*
Basic operation...............................................................................................................................79
Command list................................................................................................................................. 80
Windshield Wipers and Washer..................................................................................................37
*: This feature may be operated by Voice command (See P.79)

4
5
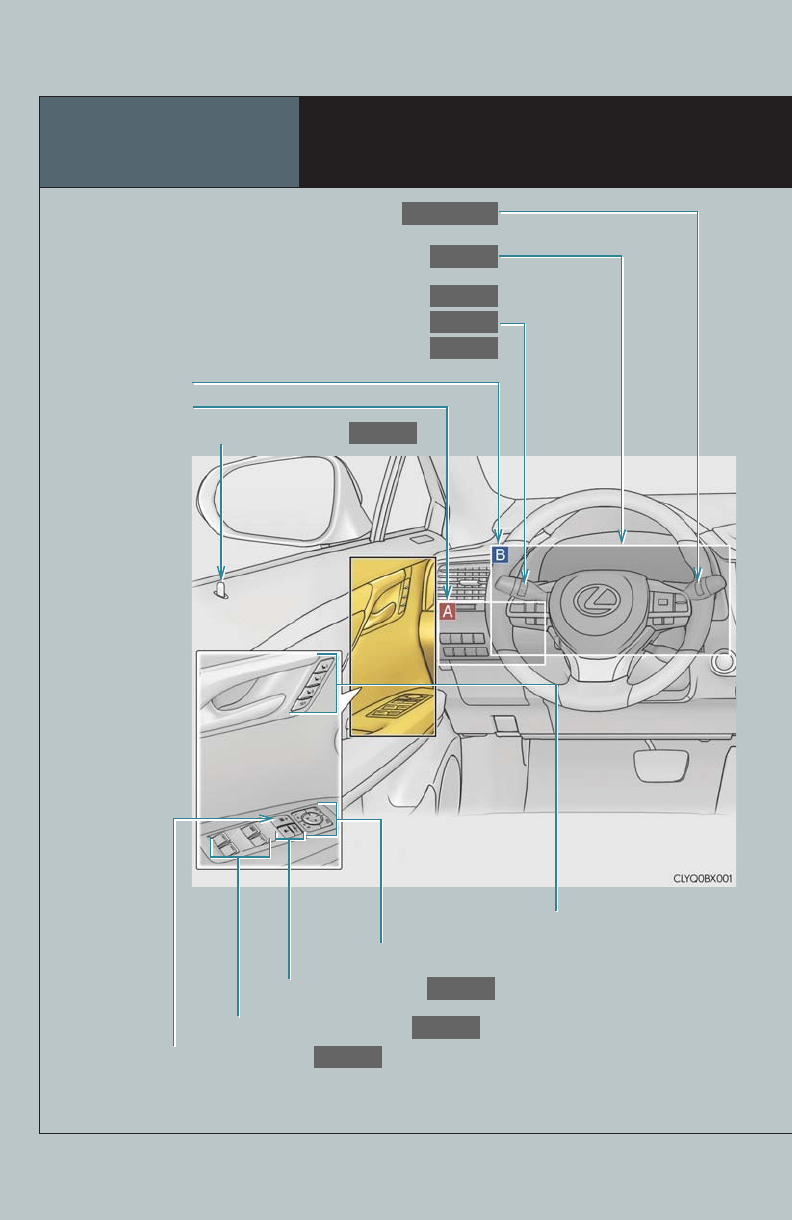
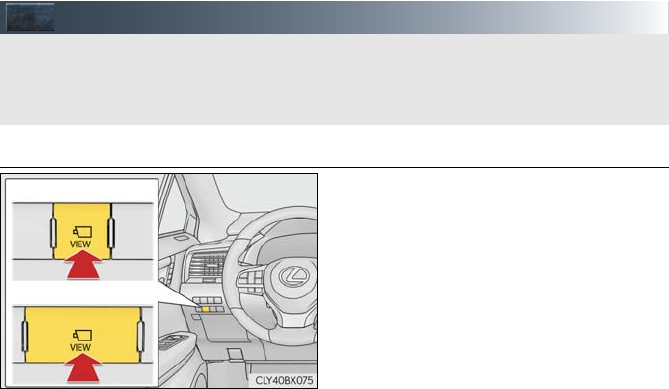
Overview Instrument Panel
Windshield wiper and washer switch
P.36, 40
Multi-information display
P.27
Turn signal lever
Headlight switch
Fog light switch
P.24
P.34
P.36
Door lock switches
P.90
See P.8
See P.7
Driving position memory switches∗*
Power window switches
P.91
Outside rear view mirror switches*
Inside lock buttons
P.90
Window lock switch
P.91


8
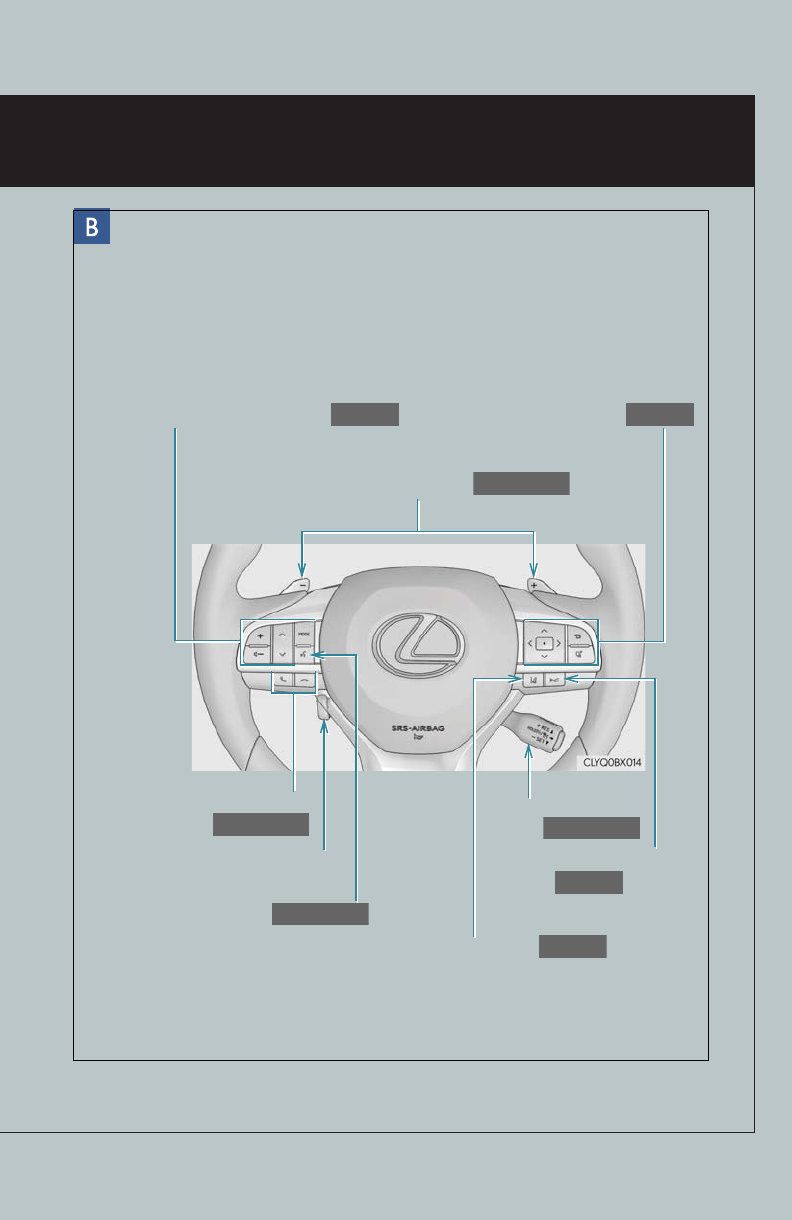
Paddle shift switches∗
P.20, 21
Meter control switches
P.29
Audio remote control switches
P.61
Telephone switches
P.60, 68
Tilt and telescopic steering
control switch*
Talk switch
P.60, 68
LKA (Lane-Keeping Assist) switch∗
P.47
Cruise control switch
P.42, 45
Vehicle-to-vehicle distance
button∗
P.43
∗: If equipped
*: Refer to “OWNER’S MANUAL”.
9
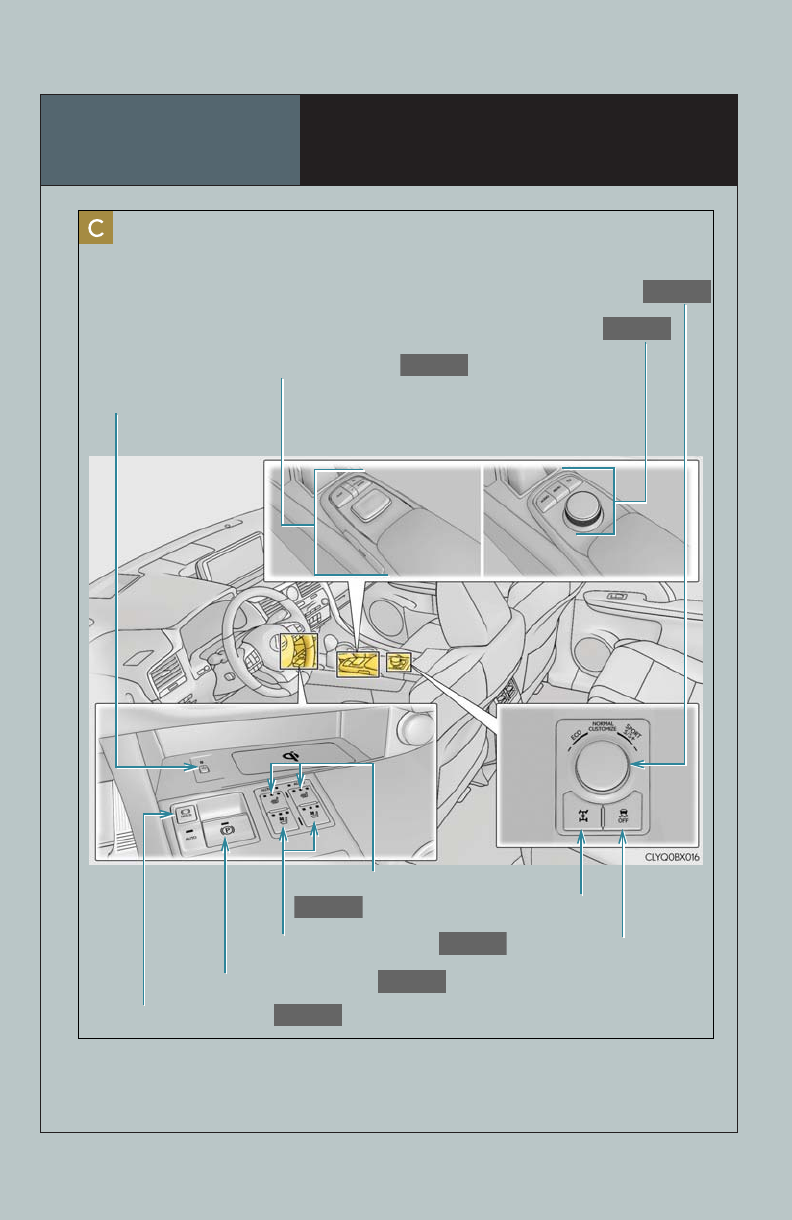
Overview Instrument Panel
∗: If equipped
*: Refer to “OWNER’S MANUAL”.
Driving mode select switch
P.22
Lexus Display Audio controller∗
P.65
Remote Touch∗
P.53
Wireless charger
switch∗*
Brake hold switch
P.26
Parking brake switch
P.25
Seat ventilator switches∗
P.78
Front seat heater switches∗
P.78
VSC OFF switch*
All-wheel drive lock switch∗*

11
Floor Mat Installation
Insert the retaining hooks (clips) into
the floor mat eyelets.
Turn the upper knob of each retaining
hook (clip) to secure the floor mats in
place.
*: Always align the marks.
The shape of the retaining hooks (clips) may differ from that shown in the illustration.
Use only floor mats designed specifically for vehicles of the same model and model year
as your vehicle. Fix them securely in place onto the carpet.
1
*
2
12
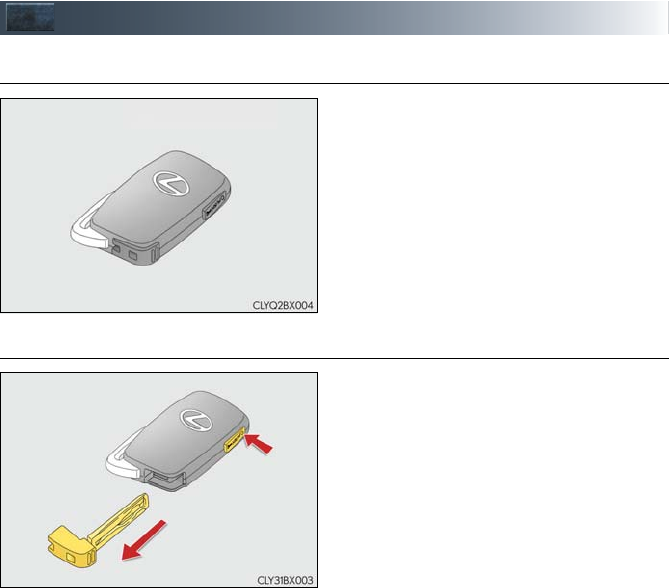
Keys
■Electronic key
Smart access system with push-button start
(→P.13, 15)
Wireless remote control (→P.13)
■Mechanical key
.
To take out the mechanical key, push the
release button and take the key out.
The mechanical key can only be inserted
in one direction, as the key only has
grooves on one side. If the key cannot be
inserted in a lock cylinder, turn it over
and re-attempt to insert it.
After using the mechanical key, store it in
the electronic key. Carry the mechanical
key together with the electronic key.
If the electronic key battery is depleted
or the entry function does not operate
properly, you will need the mechanical
key.
13
■Wireless remote control
Locks all the doors
Unlocks all the doors
Opens the windows*2 and the moon
roof*1, 2 or panoramic moon roof*1, 2
Opens and closes the power back
door
Sounds the alarm
*1: If equipped
*2:This setting must be customized at your
Lexus dealer.
Smart Access System with Push-button Start
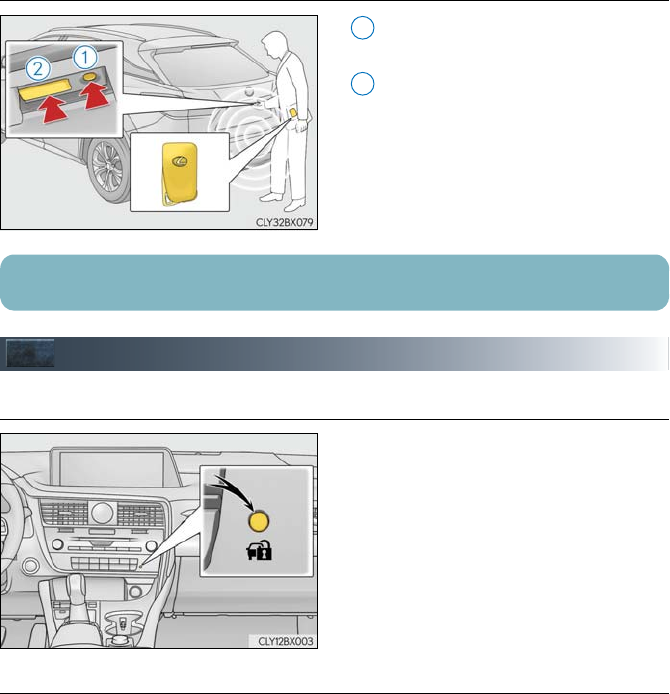
■Entering and exiting the vehicle
Grip the driver’s door handle to unlock
the door. Grip any passenger door
handle to unlock all the doors.
Make sure to touch the sensor on the
back of the handle.
The doors cannot be unlocked for 3
seconds after the doors are locked.
Touch the lock sensor (indentation on
the surface of the door handle) to lock
all the doors.
Check that the door is securely locked.
1
2
3
4
5
The following operations can be performed simply by carrying the electronic key on your
person, for example in your pocket. The driver should always carry the electronic key.
For details on starting the engine, see page 15.
1
2
14
■Locking and unlocking the power back door
Locks all the doors
Check that the door is securely locked.
Unlocks all the doors
The doors cannot be unlocked for 3
seconds after the doors are locked.
Theft Deterrent System
■Engine immobilizer system
The indicator light flashes after the engine
switch has been turned off to indicate that
the system is operating.
The indicator light stops flashing after the
engine switch has been turned to ACCES-
SORY or IGNITION ON mode to indicate
that the system has been canceled.
■Alarm
The alarm uses light and sound to give an alert when an intrusion is detected.
To set the alarm:
Close the doors and hood, and lock all the doors. The system will be set automatically after
30 seconds.
The indicator light changes from being on to flashing when the system is set.
To deactivate or stop the alarm:
●Unlock the doors.
●Turn the engine switch to ACCESSORY or IGNITION ON mode, or start the engine.
(The alarm will be deactivated or stopped after a few seconds.)
1
2
For details on what to do when the electronic key does not operate properly, see page 100.
15
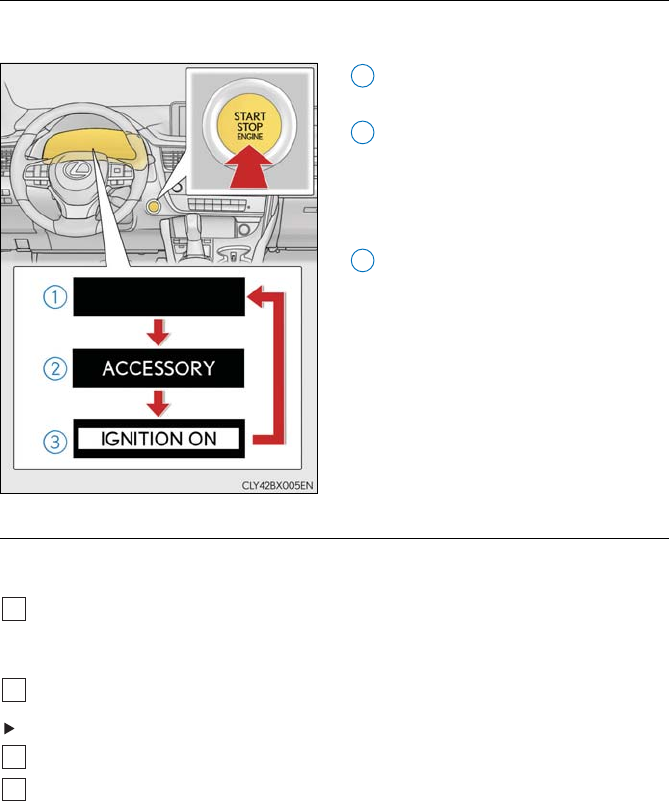
Engine (Ignition) Switch
■Starting the engine
Check that the parking brake is set.
Check that the shift lever is in P.
Firmly depress the brake pedal.
and a message will be displayed
on the multi-information display.
If it is not displayed, the engine can-
not be started.
Press the engine switch shortly and
firmly.
When operating the engine switch,
one short, firm press is enough.
It is not necessary to press and hold
the switch.
The engine will crank until it starts or
for up to 30 seconds, whichever is
less.
Continue depressing the brake pedal
until the engine is completely started.
The engine can be started from any
engine switch mode.
■Stopping the engine
Stop the vehicle completely.
Set the parking brake, and shift the shift lever to P.
Press the engine switch.
Release the brake pedal and check that the display on the meters is off.
Performing the following operations when carrying the electronic key on your person
starts the engine or changes engine switch modes.
1
2
3
4
1
2
3
4
16
■Changing engine switch modes
Modes can be changed by pressing the engine switch with brake pedal released. (The mode
changes each time the switch is pressed.)
Off*
The emergency flashers can be used.
ACCESSORY mode
Some electrical components such as
the audio system can be used.
“ACCESSORY” will be displayed on
the meters.
IGNITION ON mode
All electrical components can be used.
“IGNITION ON” will be displayed on
the meters.
*: If the shift lever is in a position other than
P when turning off the engine, the
engine switch will be turned to ACCES-
SORY mode, not to off.
■If your vehicle has to be stopped in an emergency
Only in an emergency, such as if it becomes impossible to stop the vehicle in the normal way,
stop the vehicle using the following procedure:
Steadily step on the brake pedal with both feet and firmly depress it.
Do not pump the brake pedal repeatedly as this will increase the effort required to
slow the vehicle.
Shift the shift lever to N.
If the shift lever is shifted to N
After slowing down, stop the vehicle in a safe place by the road.
Stop the engine.
1
2
3
1
2
3
4
17
If the shift lever cannot be shifted to N
Keep depressing the brake pedal with both feet to reduce vehicle speed as much as
possible.
To stop the engine, press and hold the
engine switch for 2 consecutive seconds or
more, or press it briefly 3 times or more in
succession.
Stop the vehicle in a safe place by the road.
Automatic Transmission (vehicles
without paddle shift switches)
■Shifting the shift lever
While the engine switch is in IGNITION ON mode, move the shift lever with the
brake pedal depressed.
When shifting the shift lever between P and D, make sure that the vehicle is com-
pletely stopped.
3
Press and hold for 2 seconds or more, or
press briefly 3 times or more
4
5
18
■Shift position purpose
*1: Shifting to the D position allows the system to select a gear suitable for the driving con-
ditions. Setting the shift lever to the D position is recommended for normal driving.
*2: Selecting shift ranges using S mode restricts the upper limit of the possible gear ranges,
controls engine braking forces, and prevents unnecessary upshifting.
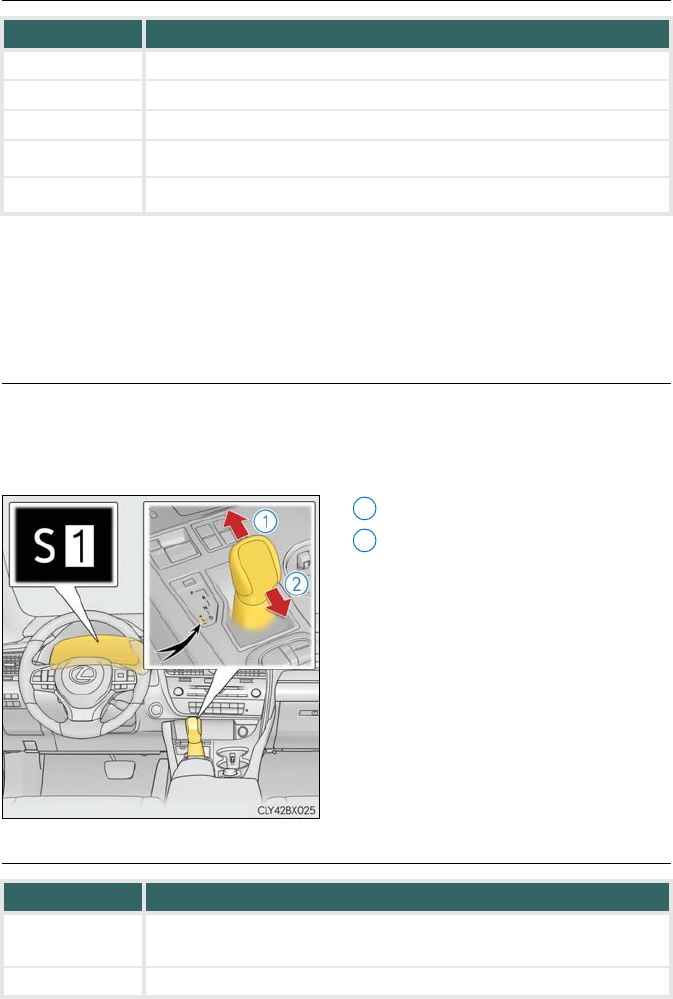
■Selecting shift ranges in S mode
To enter S mode, shift the shift lever to the S position. The shift range can then be selected by
operating the shift lever. Changing the shift range allows restriction of the upper limit of the
gears to be used, preventing unnecessary upshifting and enabling the level of engine brak-
ing force to be selected.
Upshifting
Downshifting
The initial shift range in S mode is set
automatically between 3 and 7
according to vehicle speed and driving
conditions.
■Shift ranges and their functions
A lower shift range will provide greater engine braking forces than a higher shift range.
Shift position Objective or function
PParking the vehicle/starting the engine
RReversing
NCondition in which the power is not transmission
DNormal driving*1
SS mode driving*2
1
2
Meter display Function
S2 - S8 A gear in the range between 1 and the selected gear is automatically
chosen depending on vehicle speed and driving conditions
S1 Setting the gear at 1
19
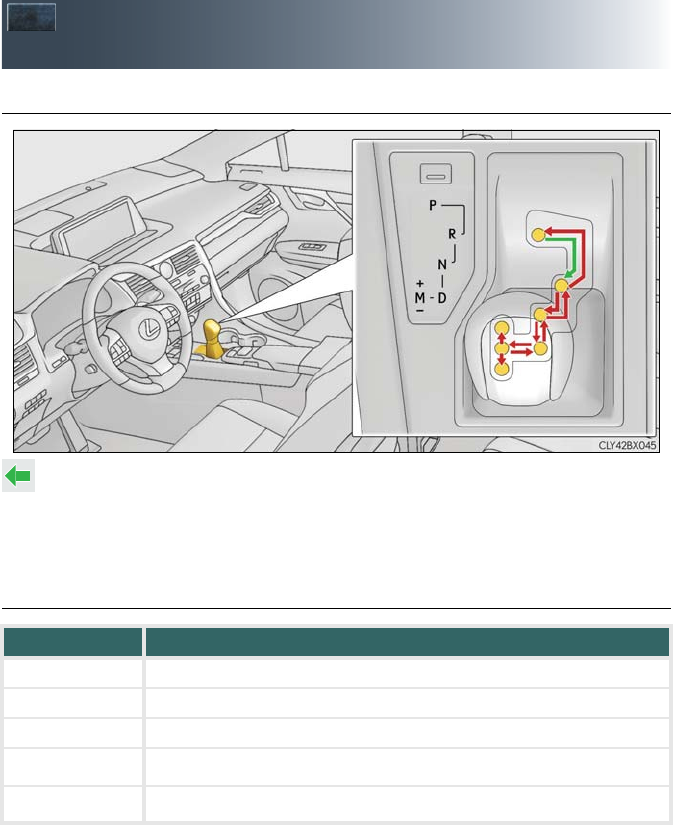
Automatic Transmission (vehicles
with paddle shift switches)
■Shifting the shift lever
While the engine switch is in IGNITION ON mode, move the shift lever with the
brake pedal depressed.
When shifting the shift lever between P and D, make sure that the vehicle is com-
pletely stopped.
■Shift position purpose
*1: Shifting to the D position allows the system to select a gear suitable for the driving con-
ditions.
Setting the shift lever to the D position is recommended for normal driving.
*2: Selecting gears using M mode fixes the gear step, controls engine braking force, and
prevents unnecessary upshifting.
Shift position Objective or function
PParking the vehicle/starting the engine
RReversing
NCondition in which the power is not transmission
DNormal driving*1
MM mode driving*2
20
■Selecting shift ranges in the D position
When the “-” paddle shift switch is operated, the shift range will be downshifted to a range
that enables engine braking force that is suitable to driving conditions. When the “+” paddle
shift switch is operated, the shift range will be one gear higher than the gear in use during
normal D position driving.
Upshifting
Downshifting
The selected shift range, from D1 to
D8, will be displayed on the meters.
■Shift ranges and their functions
A lower shift range will provide greater engine braking forces than a higher shift range.
1
2
Meter display Function
D2 - D8 A gear in the range between 1 and the selected gear is automatically
chosen depending on vehicle speed and driving conditions
D1 Setting the gear at 1
21
■Selecting gears in the M position
To enter M mode, shift the shift lever to M. Gears can then be selected by operating the shift
lever or paddle shift switches, allowing you to drive in the gear of your choosing.
Upshifting
Downshifting
The gear changes once every time the
shift lever or paddle shift switch is
operated.
The selected gear, from M1 to M8, will
be fixed and displayed on the meter.
1
2
When in the M position, the gear will not change unless the shift lever or paddle shift
switches are operated. However, even when in the M position, the gears will be automati-
cally changed in the following situation:
•When vehicle speed drops (downshift only).
•When the automatic transmission fluid or engine coolant temperature is low.
•When the automatic transmission fluid temperature is high (upshift only).
•When the needle of the tachometer is in the red zone (the range which exceeds the
allowable revs of the engine).
In the following situations, the gear will not shift even if the shift lever or paddle shift switches
are operated.
•The vehicle speed is low (upshift only).
22
Driving Mode Select Switch
Vehicles without Adaptive Variable Suspension System
Normal mode
Provides an optimal balance of fuel economy, quietness, and dynamic performance.
Suitable for city driving.
Press the switch to change the driving mode to normal mode when Eco drive mode or
sport mode is selected.
Eco drive mode
Helps the driver accelerate in an eco-friendly manner and improve fuel economy
through moderate throttle characteristics and by controlling the operation of the air
conditioning system (heating/cooling).
When not in Eco drive mode, if the driving mode select switch is turned to the left, the
Eco drive mode indicator will come on.
Sport mode
Controls the transmission and engine to provide quick, powerful acceleration. This
mode also changes the steering feel, making it suitable for when agile driving response
is desired, such as when driving on roads with many curves.
When not in sport mode, if the driving mode select switch is turned to the right, the
“SPORT” indicator will comes on.
The driving modes can be selected to suit driving conditions.
1
2
3
23
Vehicles with Adaptive Variable Suspension System
Normal mode/Customized mode
Normal mode and customized mode are selected by pressing the driving mode select
switch. Each time the switch is pressed, the driving mode changes between normal
mode and customized mode. When customized mode is selected, the “CUSTOMIZE”
indicator will be illuminated.
When Eco drive mode or sport mode is selected, pressing the switch changes the driv-
ing mode to normal mode.
•Normal mode
Provides an optimal balance of fuel economy, quietness, and dynamic performance.
Suitable for city driving.
• Customized mode
Allows you to drive with the following functions set to your preferred settings.
Customized mode settings can only be changed on the drive mode customization
display of the audio system screen.
1
Function Setting
Powertrain
Normal
Power
Eco
Chassis Normal
Sport
Air conditioning system Normal
Eco
24
Eco drive mode
Helps the driver accelerate in an eco-friendly manner and improve fuel economy
through moderate throttle characteristics and by controlling the operation of the air
conditioning system (heating/cooling).
When not in Eco drive mode, if the driving mode select switch is turned to the left, the
Eco drive mode indicator will come on.
Sport mode
•SPORT S mode
Controls the transmission and engine to provide quick, powerful acceleration. This
mode is suitable for when agile driving response is desired, such as when driving on
roads with many curves.
When not in SPORT S mode, if the driving mode select switch is turned to the right,
the “SPORT S” indicator will come on.
•SPORT S+ mode
Helps to ensure steering performance and driving stability by simultaneously con-
trolling the steering and suspension in addition to the transmission and engine. Suit-
able for sportier driving.
When in SPORT S mode, if the driving mode select switch is turned to the right, the
“SPORT S+” indicator will come on.
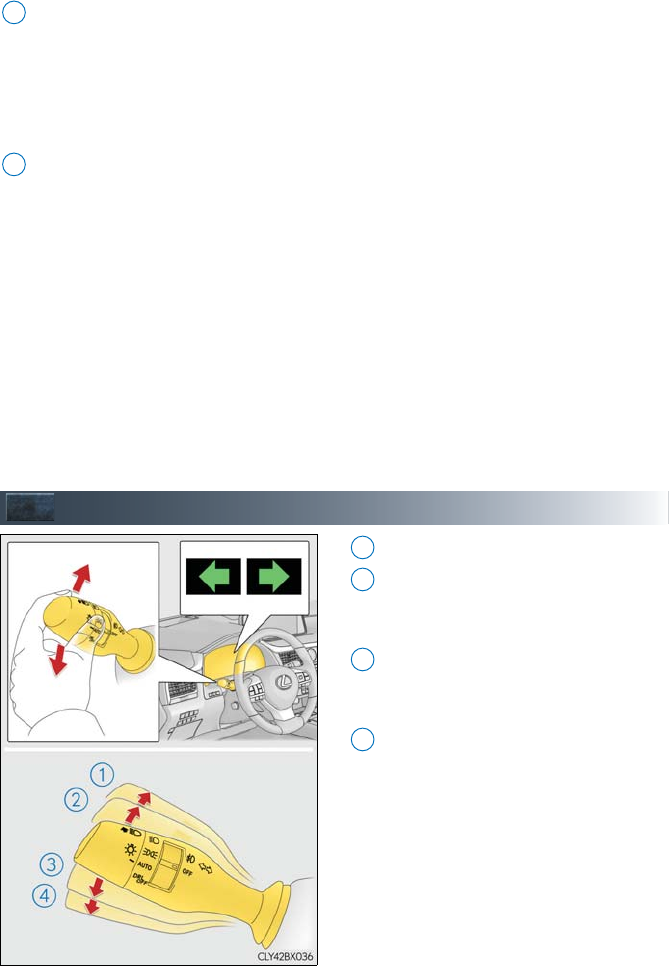
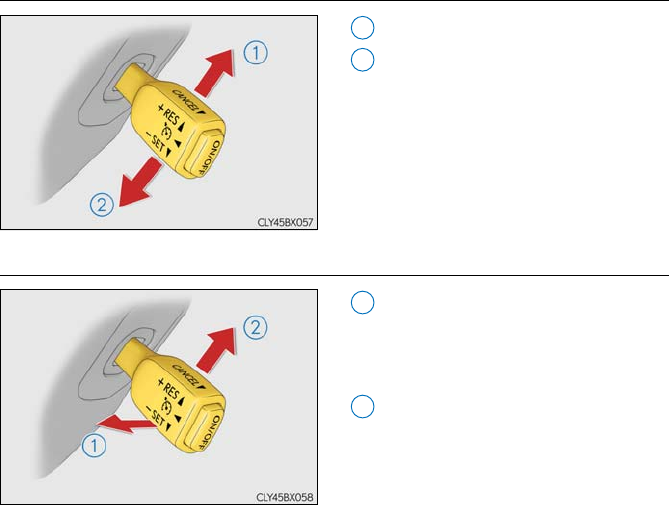
Turn Signal Lever
Right turn
Lane change to the right (move the
lever partway and release it)
The right hand signals will flash 3 times.
Lane change to the left (move the lever
partway and release it)
The left hand signals will flash 3 times.
Left turn
2
3
1
2
3
4
25
Parking Brake
■Automatic mode
The parking brake is set or released automatically according to shift lever operation.
Even when in automatic mode, the parking brake can be set and released manually.
Turns automatic mode on (while the
vehicle is stopped, pull and hold the
parking brake switch until the auto-
matic mode lamp turns on)
• When the shift lever is moved out of
P, the parking brake will be released,
and the parking brake indicator light
and parking brake lamp turn off.
• When the shift lever is moved into P,
the parking brake will be set, and the
parking brake indicator light and
parking brake lamp turn on.
Operate the shift lever with the brake
pedal depressed.
Turns automatic mode off (while the
vehicle is stopped, press and hold the
parking brake switch until the auto-
matic mode lamp turns off)
■Manual mode
The parking brake can be set and released manually.
Sets the parking brake
The parking brake indicator light and
parking brake lamp will turn on.
Pull and hold the parking brake switch
if an emergency occurs and it is neces-
sary to operate the parking brake while
driving.
Releases the parking brake
Operate the parking brake switch
while depressing the brake pedal.
Make sure that the parking brake indi-
cator light and parking brake lamp turn
off.
If the parking brake indicator light and park-
ing brake lamp flashes, operate the switch
again.
U.S.A. Canada
Automatic
mode lamp
Parking
brake lamp
1
2
U.S.A. Canada
Parking
brake lamp
1
2
26
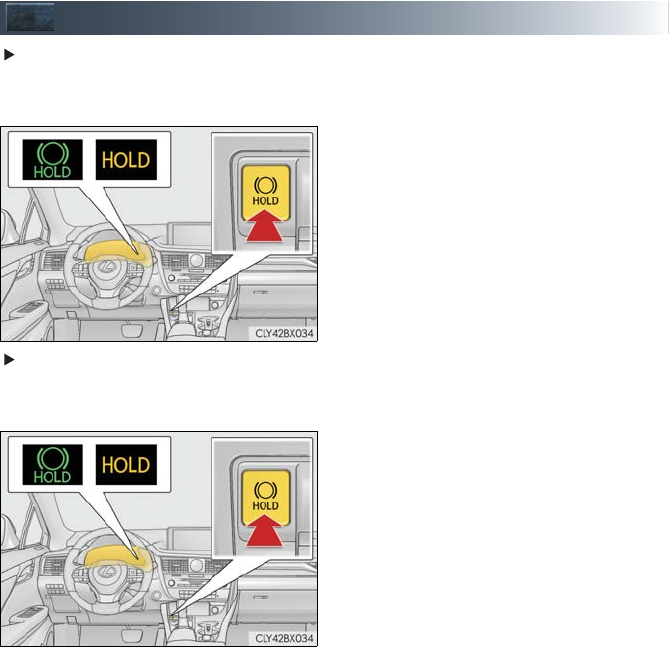
Brake Hold
Vehicles without paddle shift switches
The brake hold system keeps the brake applied when the shift lever is in D, S or N with the
system on and the brake pedal has been depressed to stop the vehicle.
Turns the brake hold system on
The brake hold standby indicator
(green) comes on. While the system is
holding the brake, the brake hold oper-
ated indicator (yellow) comes on.
The system releases the brake when the
accelerator pedal is depressed with the shift
lever in D or S to allow smooth start off.
Vehicles with paddle shift switches
The brake hold system keeps the brake applied when the shift lever is in D, M or N with the
system on and the brake pedal has been depressed to stop the vehicle.
Turns the brake hold system on
The brake hold standby indicator
(green) comes on. While the system is
holding the brake, the brake hold oper-
ated indicator (yellow) comes on.
The system releases the brake when the
accelerator pedal is depressed with the shift
lever in D or M to allow smooth start off.
27
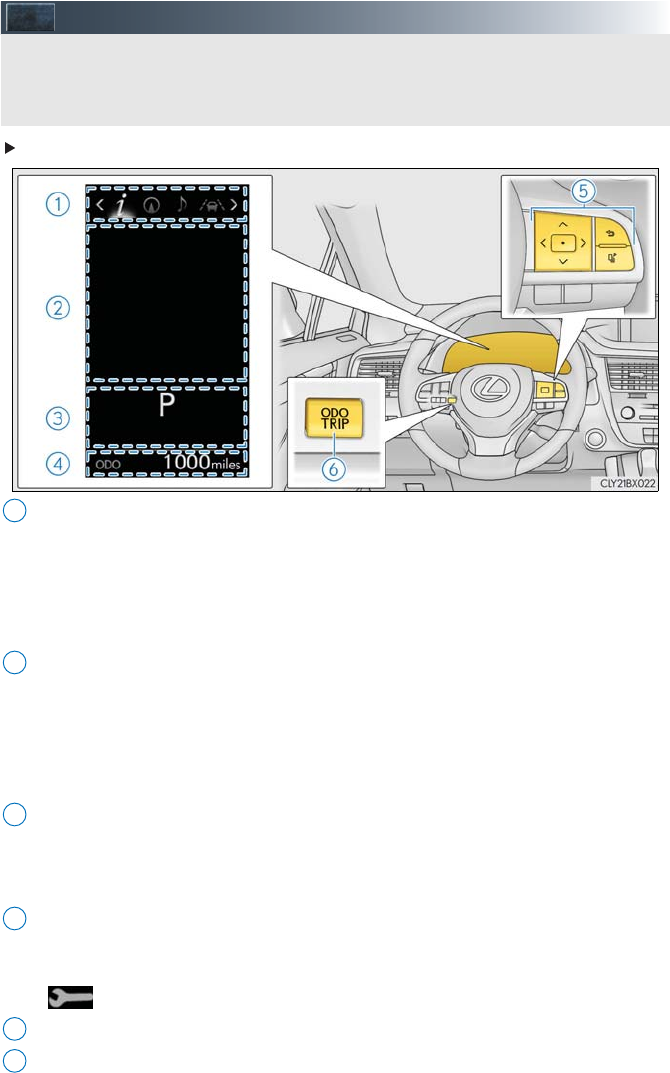
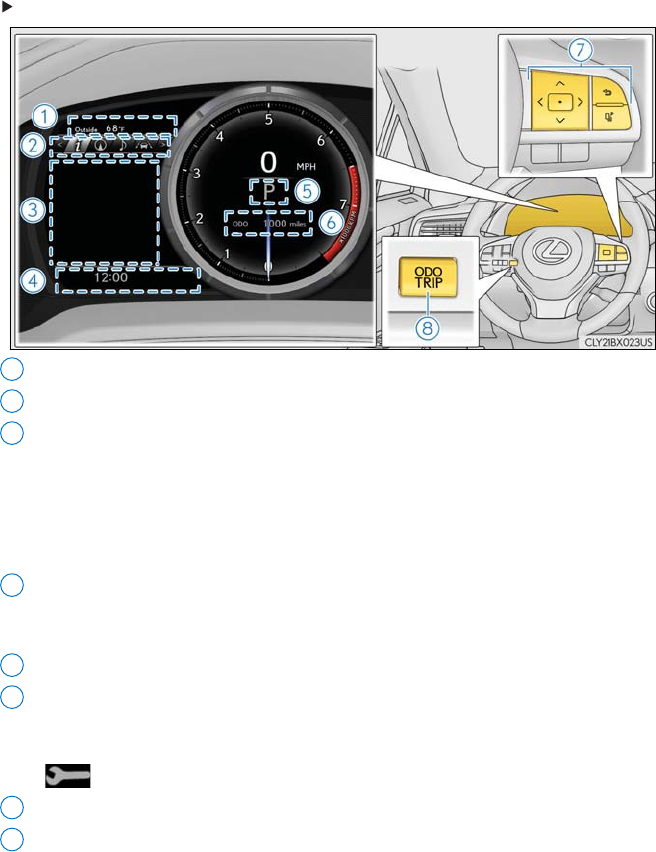
Multi-information Display
Except F SPORT models
Menu icon display area (→P. 30)
Displays the following items.
When a menu icon is not selected, the outside temperature and clock are displayed.
•Menu icons
• Outside temperature
•Clock
Content display area
A variety of information can be displayed by selecting a menu icon. Additionally, warn-
ing or suggestion/advice pop-up displays will be displayed in some situations.
• Menu icon content
• Suggestion function
• Warning message
Indicator/shift position display area
Displays the following items:
•Indicators
• Shift position display
Odometer/trip meter display area
Displays the following items:
• Odometer/trip meter
• Distance until next engine oil change
Meter control switches (→P. 29)
“ODO/TRIP” switch (→P. 29)
The multi-information display presents the driver with a variety of driving-related data,
such as the current outside temperature. The multi-information display can also be used
to change the display settings and other settings.
1
2
3
4
5
6
28
F SPORT models
Outside temperature
Menu icons (→P. 30)
Content display area
A variety of information can be displayed by selecting a menu icon. Additionally, warn-
ing or suggestion/advice pop-up displays will be displayed in some situations.
• Menu icon content
• Suggestion function
• Warning message
Indicators/clock
•Indicators
•Clock
Shift position display
Odometer/trip meter display area
Displays the following items:
• Odometer/trip meter
• Distance until next engine oil change
Meter control switches (→P. 29)
“ODO/TRIP” switch (→P. 29)
1
2
3
4
5
6
7
8
29
■Using the multi-information display
■Using the content display area
The content display area is operated using the meter control switches.
: Select menu icons
: Change displayed content,
scroll up/down the screen
and move the cursor
Press: Enter/Set
Press and hold: Reset
Return to the previous screen
Pressing and holding the switch will
display the first screen of the selected
menu icon.
Press: Display the top screen
Press and hold: Register current
screen as the top screen
■Using the odometer/trip meter display area
Items in this area are operated using the “ODO/TRIP” switch.
Press: Change displayed item
Each time the switch is pressed, the dis-
played item will be changed.
Press and hold: Reset
Display the desired trip meter and press
and hold the switch to reset the trip
meter.
1
2
3
4
30
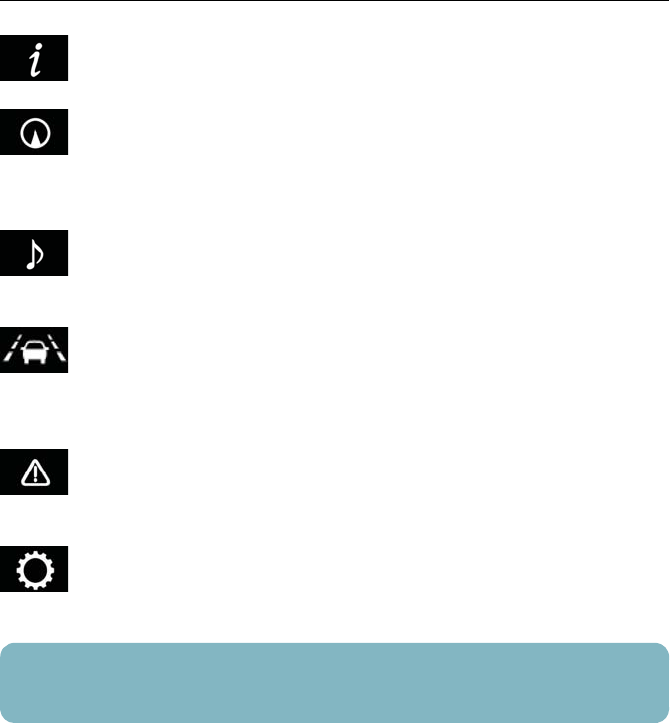
■Menu icons
Select a menu icon to display its content.
Drive information
Select to display various drive data.
Navigation system-linked display (if equipped)
Select to display the following navigation system-linked information.
• Route guidance
• Compass display (heading-up display)
Audio system-linked display
Select to enable selection of an audio source or track on the meter using the
meter control switches.
Driving assist system information (if equipped)
Select to display the operational status of the following systems:
• Dynamic radar cruise control with full-speed range
• LKA (Lane-Keeping Assist)
Warning message display
Select to display warning messages and measures to be taken if a malfunction is
detected.
Settings display
Select to change the meter display settings and other settings.
If a problem is detected in any of the vehicle’s systems, a warning message is shown on the
multi-information display.
31
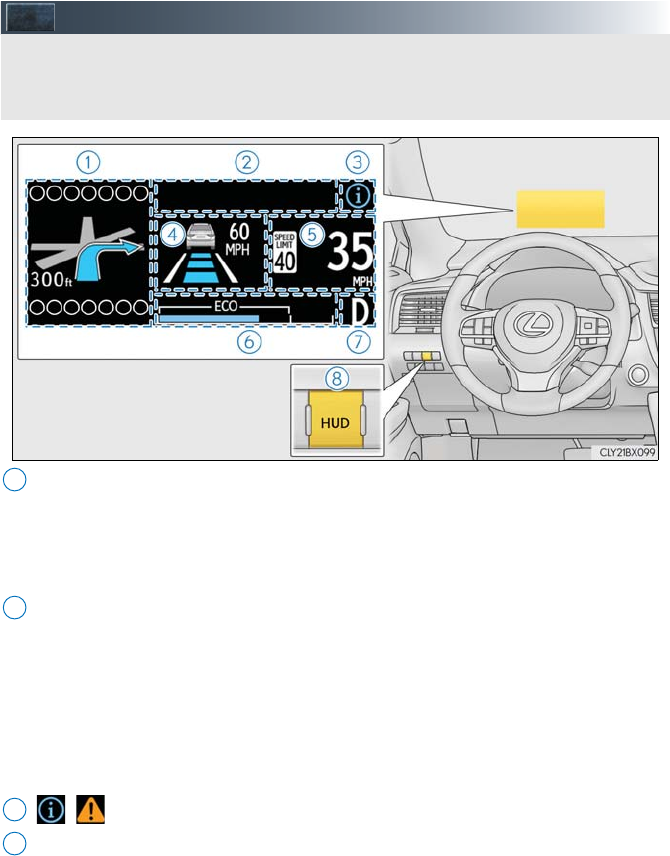
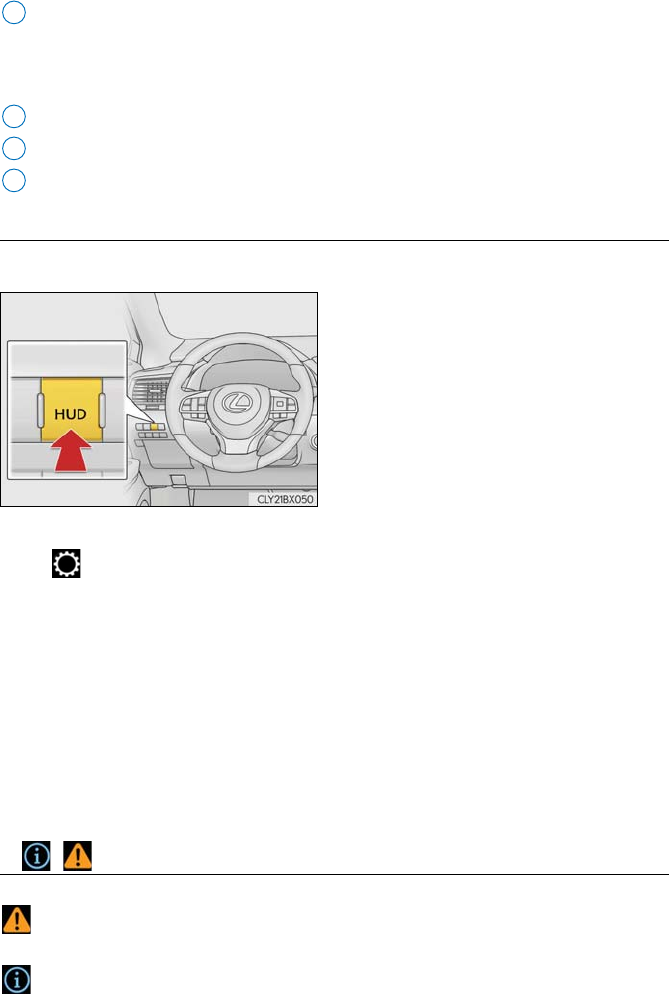
Head-up Display (if equipped)
Navigation system-linked display area (if equipped)
Displays the following items, which are linked to the navigation system:
•Street name
• Route guidance to destination
•Compass
Message display area
Displays the following items:
• Pre-collision warning (Pre-collision system) (if equipped)
• Alert from the Intelligent Clearance Sonar system (if equipped)
• Notification message (Dynamic radar cruise control with full-speed range) (if
equipped)
• Audio system operation status
• Outside temperature
/ icon (→P. 32)
Driving assist system status display area (if equipped)
Displays the operational status of the following systems:
• Dynamic radar cruise control with full-speed range
• LKA (Lane-Keeping Assist)
• Intuitive parking assist
• Intelligent Clearance Sonar (ICS)
Displayed content is the same as that displayed on the multi-information display. For
details, refer to the explanations of each system.
The head-up display is linked to the meters and navigation system (if equipped) and proj-
ects a variety of information in front of the driver, such as the current vehicle speed and
route guidance to a set destination.
1
2
3
4
32
Vehicle speed display area
Displays the following items:
• Vehicle speed
• Speed limit (vehicles with a navigation system)
Eco Driving Indicator/Tachometer (→P. 33)
Shift position display
HUD (Head-up display) switch
■Using the head-up display
■Enabling/Disabling the head-up display
Press the HUD (Head-up display) switch.
■Changing settings of the head-up display
Select on the multi-information display to change the following settings:
●Display brightness/position
Select to adjust the brightness and position of the head-up display.
●Display content
Select to enable/disable the following items:
• Route guidance to destination (if equipped)
• Driving assist system status (if equipped)
• Compass (if equipped)
• Audio system operation status
●Eco Driving Indicator/Tachometer
Select to display Eco Driving Indicator/tachometer/no content.
■/ icons
Displays the following multi-information display linked icons:
: Master warning icon
Displayed when a warning message is displayed on the multi-information display.
: Information icon
Displayed when a suggestion/advice pop-up display is displayed on the multi-informa-
tion display.
5
6
7
8

33
■Eco Driving Indicator/Tachometer
■Eco Driving Indicator
Eco Driving Indicator Zone Display
Eco driving ratio based on accelera-
tion
Zone of Eco driving
Displayed content is the same as that
displayed on the multi-information dis-
play (Eco Driving Indicator). For
details, refer to P. 33.
■Tachometer
Displays the engine speed in revolutions per minute.
Eco Driving Indicator
Eco Driving Indicator Light
During Eco-friendly acceleration (Eco
driving), the Eco Driving Indicator
Light will turn on. When the accelera-
tion exceeds the Zone of Eco driving,
or when the vehicle is stopped, the light
turns off.
Eco Driving Indicator Zone Display
Suggests the Zone of Eco driving with
current Eco driving ratio based on
acceleration.
Eco driving ratio based on accelera-
tion
If the acceleration exceeds the Zone of
Eco driving, the right side of the Eco
Driving Indicator Zone Display will illu-
minate.
Zone of Eco driving
Eco Driving Indicator will not operate under the following conditions:
●The shift lever is in any position other than D.
●A paddle shift switch (if equipped) is operated.
●Sport mode is selected.
●The vehicle speed is approximately 80 mph (130 km/h) or higher.
1
2
3
The head-up display may seem dark or hard to see when viewed through sunglasses,
especially polarized sunglasses.
Adjust the brightness of the head-up display or remove your sunglasses.
1
2
3
4
34
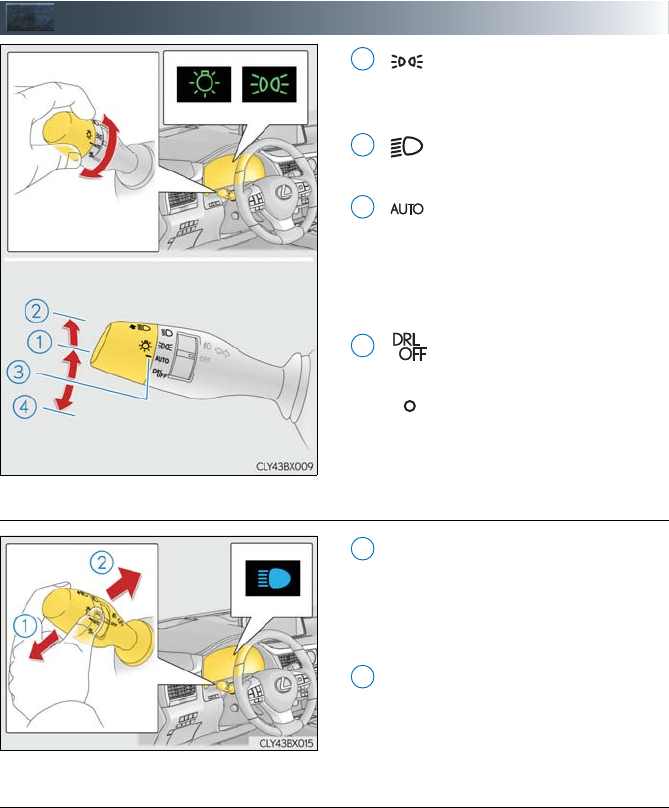
Headlights
The side marker, parking, tail,
license plate and instrument
panel lights turn on.
The headlights and all the lights
listed above turn on.
When the engine switch is in
IGNITION ON mode, the
headlights and all the lights
listed above turn on and off
automatically.
Off
The daytime running lights turn
on.
■Turning on the high beam headlights
With the headlights on, push the lever
away from you to turn on the high
beams.
Pull the lever toward you to the center
position to turn the high beams off.
Pull the lever toward you and release it
to flash the high beams once.
You can flash the high beams with the
headlights on or off.
■AFS (Adaptive Front-lighting System) (if equipped)
AFS (Adaptive Front-lighting System) secures excellent visibility at intersections and on
curves by automatically adjusting the direction of the light axis of the headlights according
to vehicle speed and the degree of the tire’s angle as controlled by steering input.
AFS operates at speeds of 6 mph (10 km/h) or higher.
CanadaU.S.A.
1
2
3
4
(U.S.A.)
(Canada)
1
2
35
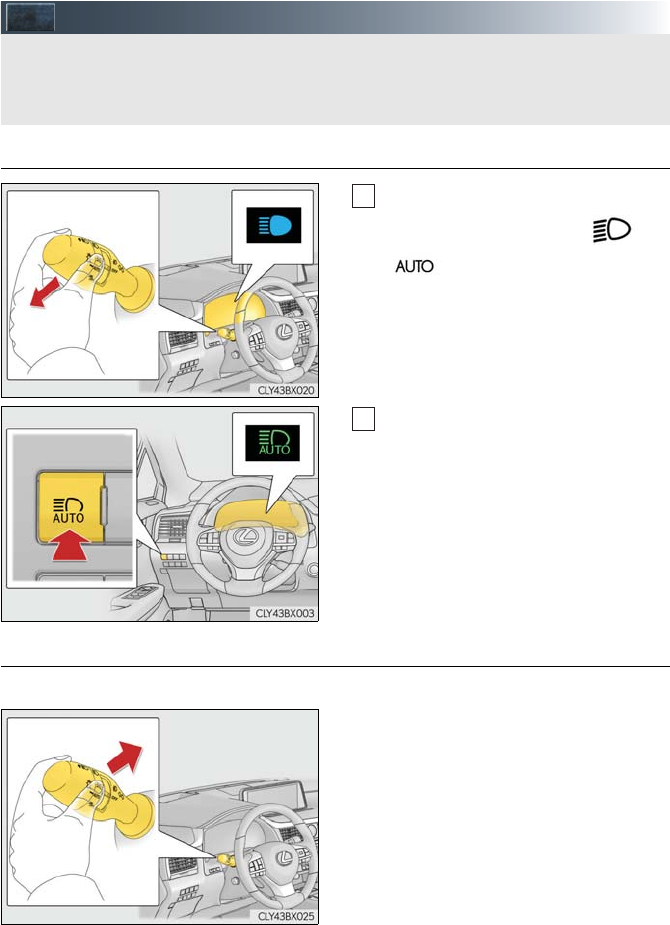
Automatic High Beam (if equipped)
■Activating the Automatic High Beam
Push the lever away from you with the
headlight switch in the or
position.
Press the Automatic High Beam
switch.
The Automatic High Beam indicator
will come on when the system is oper-
ating.
■Turning the high beams on/off manually
●Switching to the low beams
Pull the lever to its original position.
The Automatic High Beam indicator will
turn off.
Push the lever away from you to activate
the Automatic High Beam system again.
The Automatic High Beam uses a camera sensor located behind the upper portion of
the windshield to assess the brightness of the lights of vehicles ahead, streetlights, etc.,
and automatically turns the high beams on or off as necessary.
1
2
36
●Switching to the high beams
Press the Automatic High Beam switch.
The Automatic High Beam indicator will
turn off and the high beam indicator will
turn on.
Press the switch to activate the Auto-
matic High Beam system again.
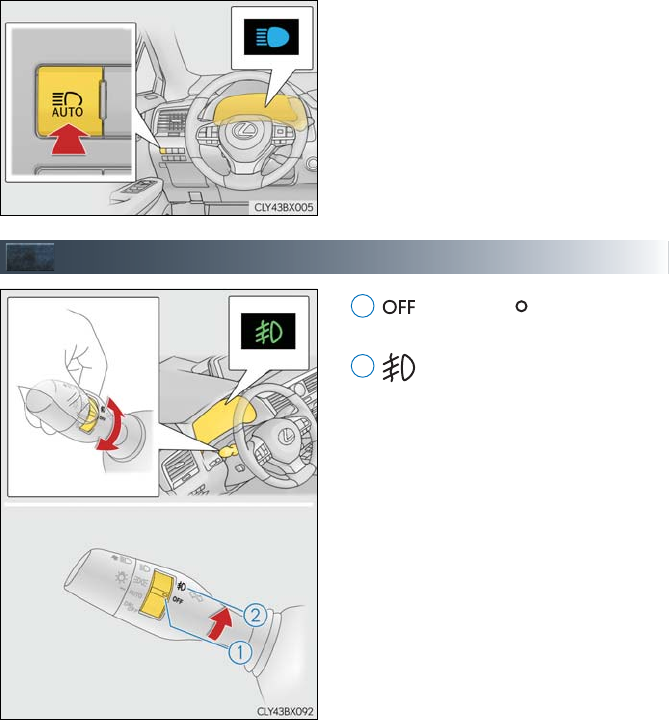
Fog Lights
(U.S.A.) or (Canada)
Turns the fog lights off
Turns the front fog lights on
1
2
37
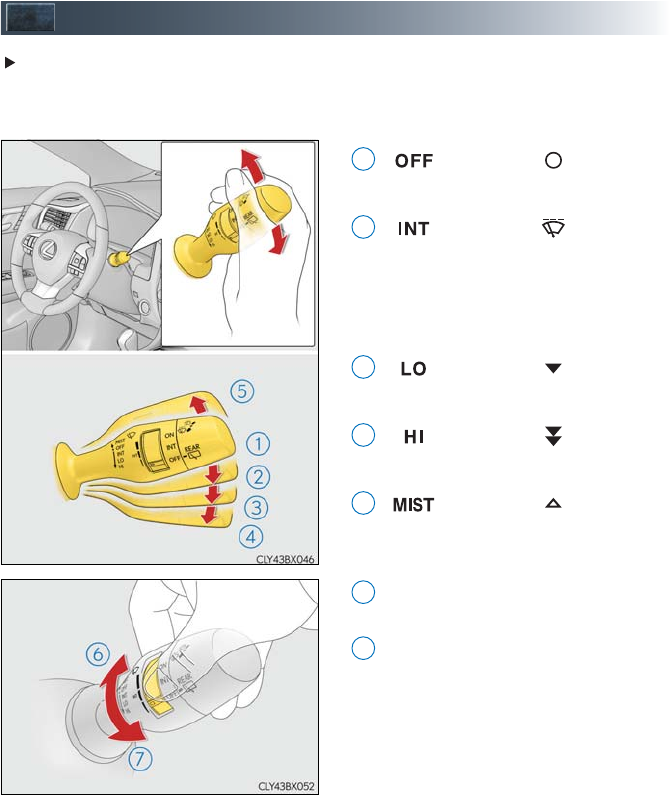
Windshield Wipers and Washer
Intermittent windshield wipers with interval adjuster
Wiper intervals can be adjusted when intermittent operation is selected.
The interval of intermittent operation varies according to vehicle speed.
(U.S.A.) or (Canada)
Off
(U.S.A.) or (Canada)
Intermittent operation
The intermittent windshield wiper
operates more frequently as vehicle
speed becomes higher.
(U.S.A.) or (Canada)
Low speed operation
(U.S.A.) or (Canada)
High speed operation
(U.S.A.) or (Canada)
Temporary operation
Increases the intermittent windshield
wiper frequency
Decreases the intermittent windshield
wiper frequency
1
2
3
4
5
6
7
38
Washer/wiper dual operation
The wipers will automatically operate a
couple of times after the washer
squirts.
Vehicles with headlight cleaners:
When the engine switch is in IGNI-
TION ON mode and the headlights
are on, if the lever is pulled, the head-
light cleaners will operate once. After
this, the headlight cleaners will operate
every 5th time the lever is pulled.
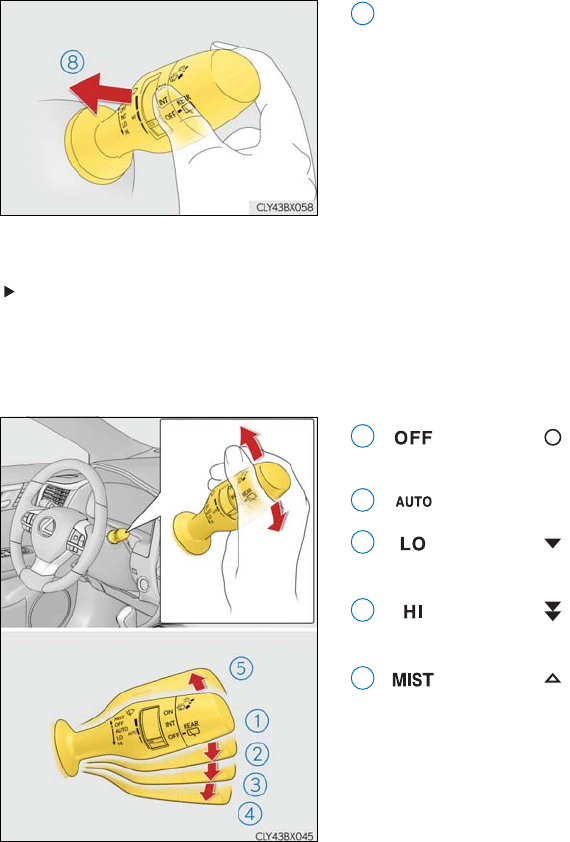
Rain-sensing windshield wipers
When “AUTO” is selected, the wipers will operate automatically when the sensor detects
falling rain. The system automatically adjusts wiper timing in accordance with rain volume
and vehicle speed.
The sensor sensitivity can be adjusted when “AUTO” is selected.
(U.S.A.) or (Canada)
Off
Rain-sensing operation
(U.S.A.) or (Canada)
Low speed operation
(U.S.A.) or (Canada)
High speed operation
(U.S.A.) or (Canada)
Temporary operation
8
1
2
3
4
5
39
Increases the sensitivity
Decreases the sensitivity
Washer/wiper dual operation
The wipers will automatically operate a
couple of times after the washer
squirts.
Vehicles with headlight cleaners:
When the engine switch is in IGNI-
TION ON mode and the headlights
are on, if the lever is pulled, the head-
light cleaners will operate once. After
this, the headlight cleaners will operate
every 5th time the lever is pulled.
6
7
8
40
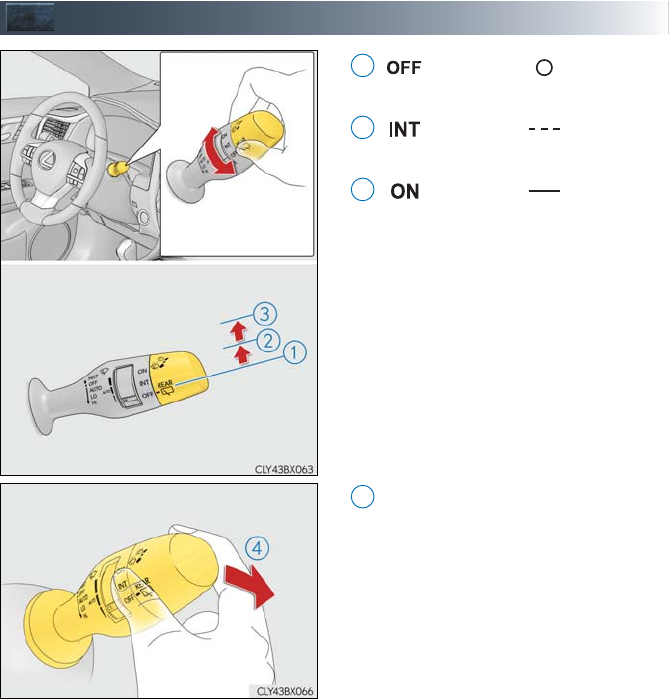
Rear Window Wiper and Washer
(U.S.A.) or (Canada)
Off
(U.S.A.) or (Canada)
Intermittent operation
(U.S.A.) or (Canada)
Normal operation
Washer/wiper dual operation
The wiper will automatically operate a
couple of times after the washer
squirts.
1
2
3
4

41
Lexus Safety System+ (if equipped)
■PCS (Pre-Collision System)
The pre-collision system uses a radar sensor and camera sensor to detect vehicles and
pedestrians* in front of your vehicle. When the system determines that the possibility of a
frontal collision with a vehicle or pedestrian is high, a warning operates to urge the driver to
take evasive action and the potential brake pressure is increased to help the driver avoid the
collision. If the system determines that the possibility of a frontal collision with a vehicle or
pedestrian is extremely high, the brakes are automatically applied to help avoid the collision
or help reduce the impact of the collision.
■LKA (Lane-Keeping Assist)
→.P. 47
■Automatic High Beam
→P. 35
■Dynamic radar cruise control with full-speed range
→P. 42
*: Depending on the region in which the vehicle was sold, the pedestrian detection function
may not be available. For details, refer to the “OWNER’S MANUAL”.
The Lexus Safety System+ consists of the following drive assist systems and contributes
to a safe and comfortable driving experience:
42
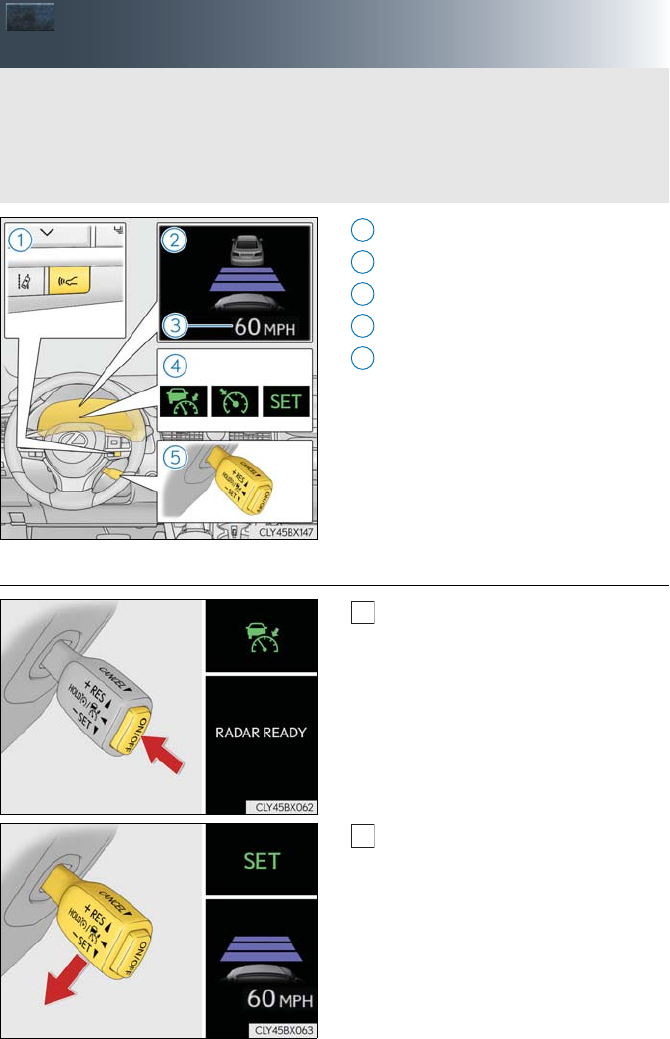
Dynamic Radar Cruise Control with
Full-speed Range (if equipped)
Vehicle-to-vehicle distance button
Display
Set speed
Indicators
Cruise control switch
■Setting the vehicle speed (vehicle-to-vehicle distance control mode)
Press the “ON/OFF” button to activate
the cruise control.
Radar cruise control indicator will
come on and a message will be dis-
played on the multi-information dis-
play.
Press the button again to deactivate
the cruise control.
Accelerate or decelerate, with accel-
erator pedal operation, to the desired
vehicle speed (above approximately
30 mph [50 km/h]) and push the lever
down to set the speed.
Cruise control “SET” indicator will
come on.
The vehicle speed at the moment the
lever is released becomes the set
speed.
In vehicle-to-vehicle distance control mode, the vehicle automatically accelerates,
decelerates and stops to match the speed changes of the preceding vehicle even if the
accelerator pedal is not depressed. In constant speed control mode, the vehicle runs at a
fixed speed.
Use the dynamic radar cruise control with full-speed range on freeways and highways.
1
2
3
4
5
1
2
43
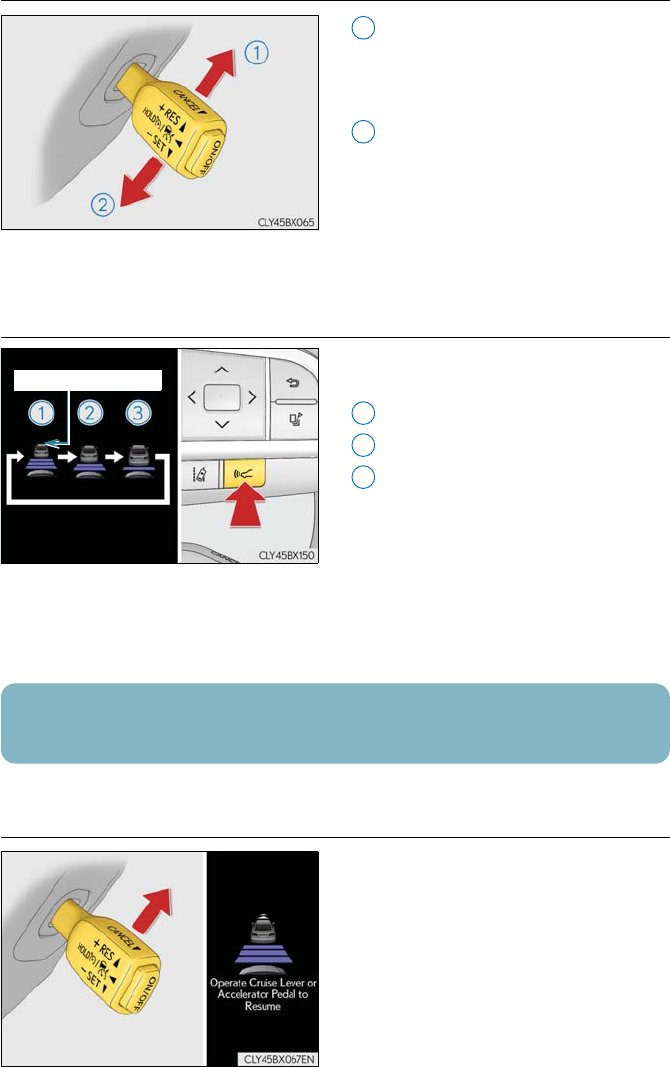
■Adjusting the set speed
Increases the speed
(Except when the vehicle has been
stopped by system control in vehicle-
to-vehicle distance control mode)
Decreases the speed
Fine adjustment: Momentarily move the
lever in the desired direction.
Large adjustment: Hold the lever up or
down to change the speed, and release
when the desired speed is reached.
■Changing the vehicle-to-vehicle distance (vehicle-to-vehicle distance con-
trol mode)
Pressing the button changes the vehicle-to-
vehicle distance as follows:
Long
Medium
Short
The vehicle-to-vehicle distance is set
automatically to long mode when the
engine switch is turned to IGNITION
ON mode.
If a vehicle is running ahead of you, the
preceding vehicle mark will also be dis-
played.
■Resuming follow-up cruising when the vehicle has been stopped by system
control (vehicle-to-vehicle distance control mode)
After the vehicle ahead of you starts off,
push the lever up.
Your vehicle will also resume follow-up
cruising if the accelerator pedal is
depressed after the vehicle ahead of you
starts off.
1
2
Preceding vehicle mark
1
2
3
The vehicle-to-vehicle distance control mode maintains the preset cruising speed as long
as no vehicle is detected ahead.
44
■Canceling and resuming the speed control
Pulling the lever toward you cancels
the speed control.
The speed control is also canceled
when the brake pedal is depressed.
(When the vehicle has been stopped
by system control, depressing the
brake pedal does not cancel the set-
ting.)
Pushing the lever up resumes the
cruise control and returns vehicle
speed to the set speed.
However, when a vehicle ahead is not
detected, cruise control does not
resume when the vehicle speed is
approximately 25 mph (40 km/h) or
less.
■Selecting constant speed control mode
With the cruise control off, press and
hold the “ON/OFF” button for 1.5 sec-
onds or more.
Immediately after the “ON/OFF”
button is pressed, the radar cruise
control indicator will come on. After-
wards, it switches to the cruise con-
trol indicator.
Switching to constant speed control
mode is only possible when operating
the lever with the cruise control off.
Accelerate or decelerate, with accel-
erator pedal operation, to the desired
vehicle speed (above approximately
30 mph [50 km/h]) and push the lever
down to set the speed.
Cruise control “SET” indicator will
come on.
The vehicle speed at the moment the
lever is released becomes the set
speed.
1
2
1
2
45
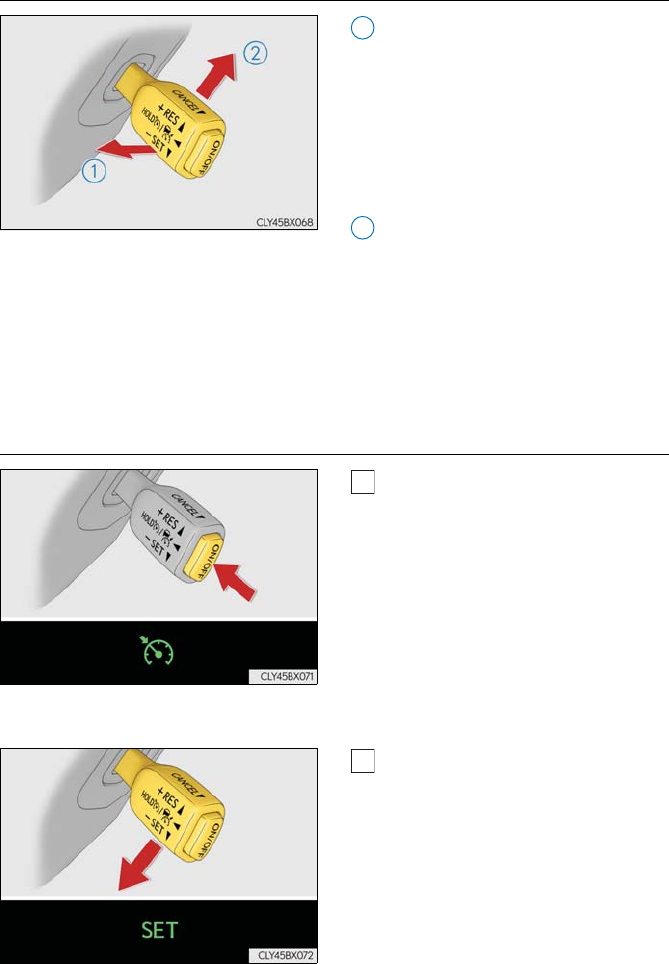
Cruise Control (if equipped)
Set speed
Indicators
Cruise control switch
■Setting the vehicle speed
Press the “ON/OFF” button to activate
the cruise control.
Cruise control indicator will be dis-
played on the multi-information dis-
play.
Press the button again to deactivate
the cruise control.
Accelerate or decelerate, with accel-
erator pedal operation, to the desired
vehicle speed (above approximately
25 mph [40 km/h]) and push the lever
down to set the speed.
Cruise control “SET” indicator and
set speed will be displayed on the
multi-information display.
The vehicle speed at the moment the
lever is released becomes the set
speed.
Use the cruise control to maintain a set speed without operating the accelerator pedal.
1
2
3
1
2
46
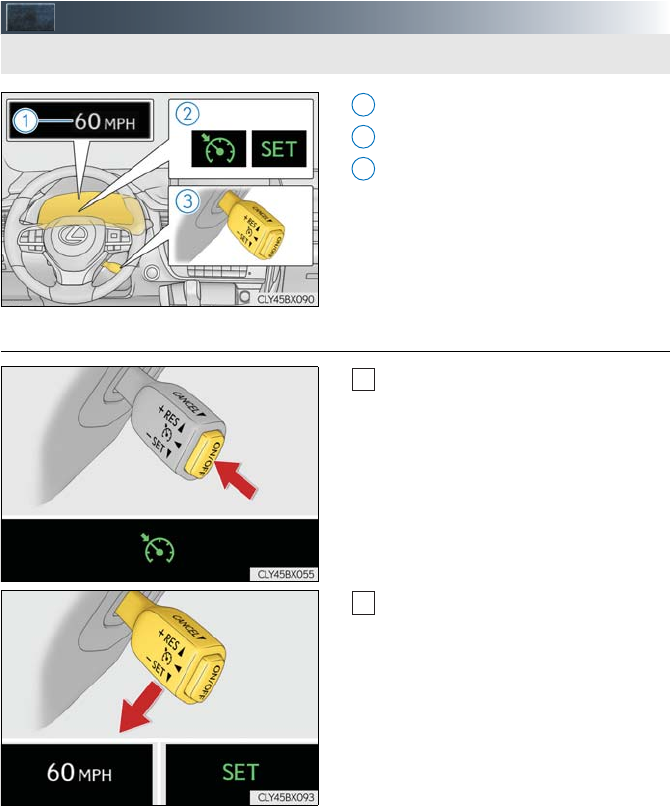
■Adjusting the set speed
Increases the speed
Decreases the speed
Fine adjustment: Momentarily move the
lever in the desired direction.
Large adjustment: Hold the lever in the
desired direction.
■Canceling and resuming the constant speed control
Pulling the lever toward you cancels
the constant speed control.
The speed setting is also canceled
when the brake pedal is depressed.
Pushing the lever up resumes the con-
stant speed control.
However, resuming is available when
the vehicle speed is more than approx-
imately 25 mph (40 km/h).
1
2
1
2
47
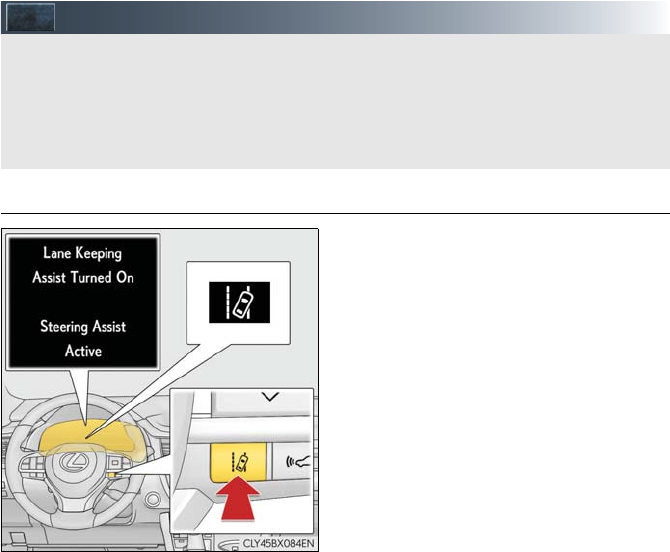
LKA (Lane-Keeping Assist) (if equipped)
■Turning LKA system on
Press the LKA switch to turn the LKA sys-
tem on.
The LKA indicator illuminates and a
message is displayed on the multi-infor-
mation display.
Press the LKA switch again to turn the
LKA system off.
When the LKA system is turned on or
off, operation of the LKA system contin-
ues in the same condition the next time
the engine is started.
When driving on highways and freeways with white or yellow lines, this function alerts the
driver when the vehicle might depart from its lane and provides assistance by operating
the steering wheel to keep the vehicle in its lane. Furthermore, the system also provides
steering assistance when dynamic radar cruise control with full-speed range is operating
to keep the vehicle in its lane.
48
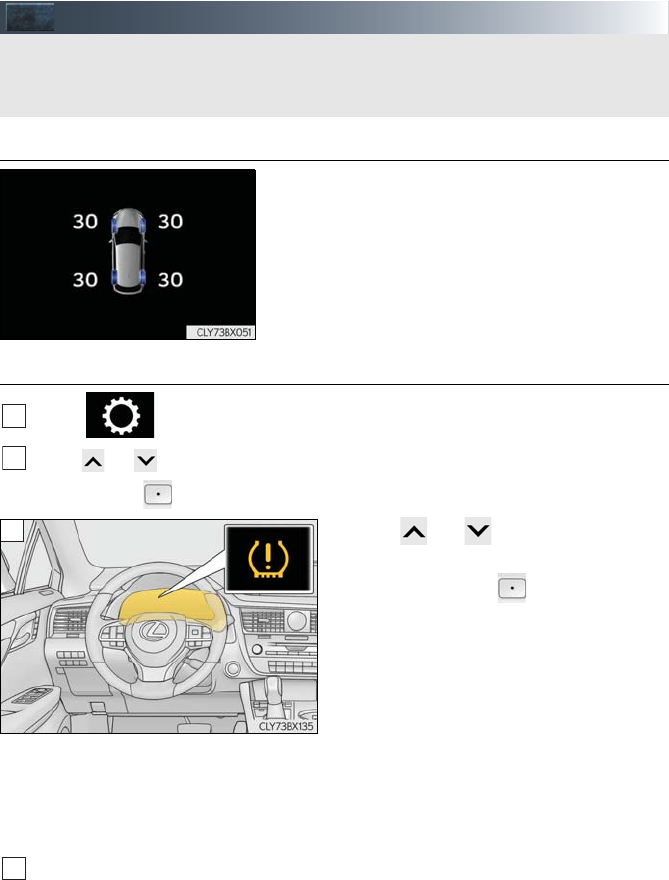
Tire Pressure Warning System
■The tire inflation pressure display function
The tire pressure detected by the tire pres-
sure warning system can be displayed on
the multi-information display.
■Initializing the tire pressure warning system
Select on the multi-information display.
Press or of the meter control switch, select the “Vehicle Settings” screen and
then press the .
Press or of the meter control
switch, select the “TPMS” screen and then
press and hold the until the tire pres-
sure warning light blinks slowly 3 times.
“- -” will be displayed for inflation pres-
sure of each tire on the multi-information
display while the tire pressure warning
system determines the position of each
tire.
When position of each tire is deter-
mined, the inflation pressure of each tire
will be displayed on the multi-informa-
tion display.
Drive the vehicle at approximately 25 mph (40 km/h) or more for approximately 10 to
30 minutes until the inflation pressure of each tire is displayed on the multi-information
display.
If tire inflation pressure becomes low before the inflation pressure is displayed, the tire
pressure warning light will come on.
Depending on the vehicle and driving conditions, initialization may take up to approx-
imately 1 hour to complete.
Your vehicle is equipped with a tire pressure warning system that uses tire pressure warn-
ing valves and transmitters to detect low tire inflation pressure before serious problems
arise.
1
2
3
4
49
Intuitive Parking Assist (if equipped)
■Turning the intuitive parking assist on/off
Press “<” or “>” of the meter control
switches, select .
Press “∧” or “∨” of the meter control
switches, select “Parking Assist”.
When on, the indicator light comes
on to inform the driver that the system
is operational.
Intelligent Clearance Sonar (ICS)
(if equipped)
■Turning the Intelligent Clearance Sonar system on/off
Select on the multi-information
display.
Press or of the meter control
switch and select “ICS”.
Press of the meter control
switch.
Select the “Yes” and push .
The distance from your vehicle to nearby obstacles when parallel parking or maneuver-
ing into a garage is measured by the sensors and communicated via the displays and a
buzzer. Always check the surrounding area when using this system.
1
2
If a collision with an object may occur due to the vehicle suddenly moving forward due to
an accidental accelerator pedal operation, the vehicle moving the unintended direction
due to the wrong shift position being selected, or while parking or traveling at low
speeds, the sensors detect objects, such a wall, in the traveling direction of the vehicle,
and the system operates to lessen an impact with an object and reduce the resulting
damage.
1
2
3
4
50
Panoramic View Monitor (if equipped)
■Camera switch
The camera switch is located as shown in
the illustration.
Panoramic view monitor assists the driver in viewing the surroundings, when operating at
low speeds, by combining the front, side and rear cameras and displaying a vehicle over-
head image on the screen.
Type A
Type B
51
■How to switch the display
When you press the camera switch or shift the shift lever to the “R” position while the engine
switch is in IGNITION ON mode, the panoramic view monitor operates.
The monitor displays various views of the position of the vehicle. (The following is an exam-
ple)
Map screen,
audio screen, etc. Moving view
Rear view &
panoramic view
Side views Wide front view &
panoramic view
Map screen,
audio screen, etc.
Pressing the camera switch
Shifting the shift lever
Selecting the display mode switching button
See-through view
Wide rear view
52
BSM (Blind Spot Monitor) (if equipped)
The Blind Spot Monitor is a system that has 2 functions;
●The BSM (Blind Spot Monitor) function
Assists the driver in making a decision when changing lanes
●The RCTA (Rear Cross Traffic Alert) function
Assists the driver when backing up
These functions use same sensors.
Multi-information display
Turning the BSM function/RCTA function on/off.
The RCTA function is available when the BSM function is on.
Outside rear view mirror indicators
BSM function:
When a vehicle is detected in a blind spot of the outside rear view mirrors or approach-
ing rapidly from behind into a blind spot, the outside rear view mirror indicator on the
detected side will illuminate. If the turn signal lever is operated toward the detected
side, the outside rear view mirror indicator flashes.
RCTA function:
When a vehicle approaching from the right or left at the rear of the vehicle is detected,
both outside rear view mirror indicators will flash.
“BSM” indicator/“RCTA” indicator
When the BSM function/RCTA function is turned on, the indicator illuminates.
Monitor screen display (RCTA function only) (if equipped)
If a vehicle approaching from the right or left at the rear of the vehicle is detected, the
RCTA icon for the detected side will be displayed on the monitor screen.
This illustration shows an example of a vehicle approaching from the left at the rear of
the vehicle.
RCTA buzzer (RCTA function only)
If a vehicle approaching from the right or left at the rear of the vehicle is detected, a
buzzer will sound. The buzzer also sounds for approximately 1 second immediately
after the BSM function is operated to turn the system on.
1
2
3
4
5
53
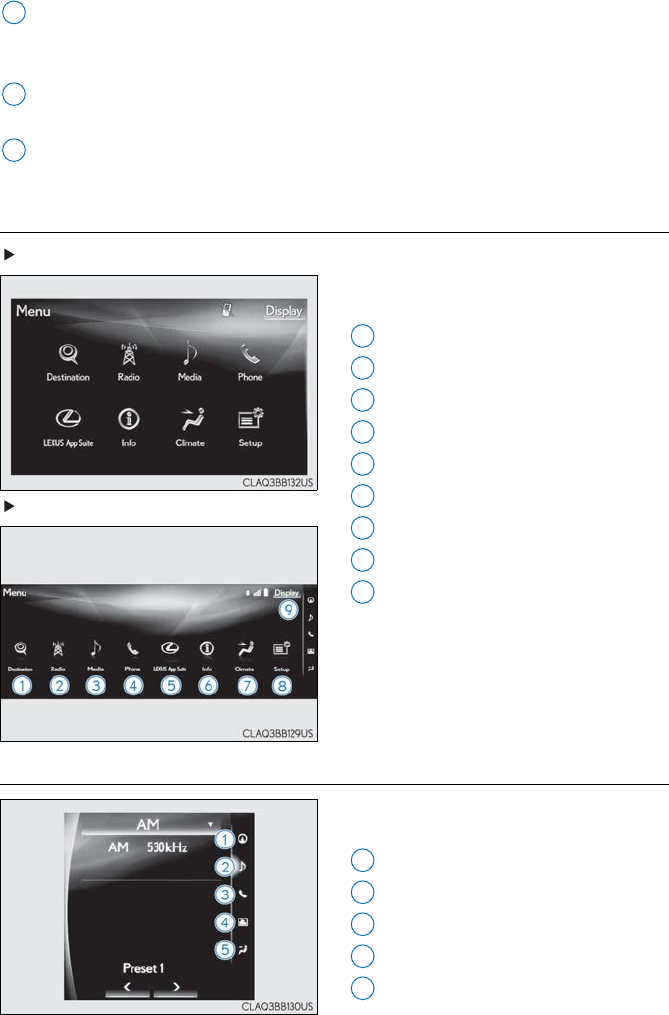
Remote Touch (with Navigation System)
■Basic operation
Vehicles with 8-inch display
Vehicles with 12.3-inch display
“HOME” button
Press this button to display the home screen.
“∧•∨” button
Press this button to change map scale and scroll through lists.
Back button
Press to display the previous screen.
“MENU” button
Press to display the “Menu” screen. (→P.54)
The Remote Touch can be used to operate the Remote Touch screens.
1
2
3
4
54
Remote Touch knob
Move in the desired direction to select a function, letter and screen button.
Press the knob to enter the selected function, letter or screen button.
“ENTER” button
Press to enter the selected function, letter or screen button.
“MAP” button
Press this button to display the vehicle’s current position.
■Menu
With 8-inch display
Press the “MENU” button on the Remote
Touch to display the “Menu” screen.
“Destination” (→P.57)
“Radio” (→P.62)
“Media” (→P.61)
“Phone” (→P.58)
“LEXUS App Suite”
“Info”
“Climate” (→P.75)
“Setup”
“Display” (→P.55)
With 12.3-inch display
■Side Display
The following functions can be displayed
and operated on the side display.
Navigation
Audio
Phone
Vehicle information
Air conditioning system (→P.75)
5
6
7
1
2
2
3
34
45
6
7
8
89
1
2
3
34
45

55
■Display
Press the “MENU” button on the Remote
Touch and select “Display” on the “Menu”
screen.
Turns the screen off
Displays the screen in “Day Mode”
with the headlight switch on
Adjust the screen display
Adjust the camera display
■Screen scroll operation
To scroll over the map, place the cursor
mark in the desired position and then press
and hold the Remote Touch knob.
Indicates the street name, city name,
etc. for the selected point
Displays various information for the
selected point
Indicates the distance from the current
position to the cursor mark
Zooms in on the map
Zooms out on the map
■Setting a route
While route guidance is operating, you can change the route using the following method.
With 8-inch display
Press the “MENU” button on the
Remote Touch, then select “Nav.”.
With 12.3-inch display
Press the “MAP” button on the Remote
Touch.
Select .
Select “Edit Route”.
1
2
3
4
1
2
3
4
5
2
1
1
2
3
56
The following settings can be
accessed.
Adding destinations
Deleting destinations
Reordering destinations
Route preferences
Route type
Detour setting
Starting from adjacent road
Navigation System (if equipped)
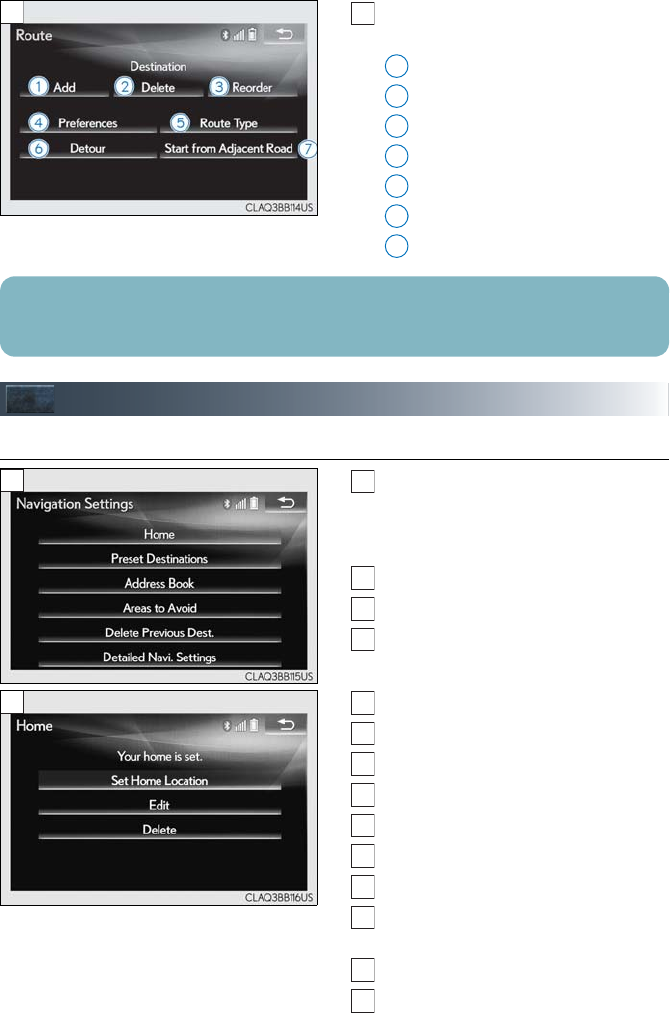
■Register home
Press the “MENU” button on the
Remote Touch.
Please refer to page 53 for the
Remote Touch operation.
Select “Setup”.
Select “Navigation.”.
Select “Home”.
Select “Set Home Location”.
Select “Address”.
Select “City”.
Enter a city name and select “OK”.
Select the desired city name.
Enter a street name and select “OK”.
Select the desired street name.
Enter a house number and select
“OK”.
Select “Enter”.
Select “OK”.
4
4
1
2
3
4
5
26
7
Some functions are unavailable while the vehicle is in motion. Refer to the “NAVIGATION
SYSTEM OWNER’S MANUAL”.
4
1
2
3
4
5
5
6
7
8
9
10
11
12
13
14
57
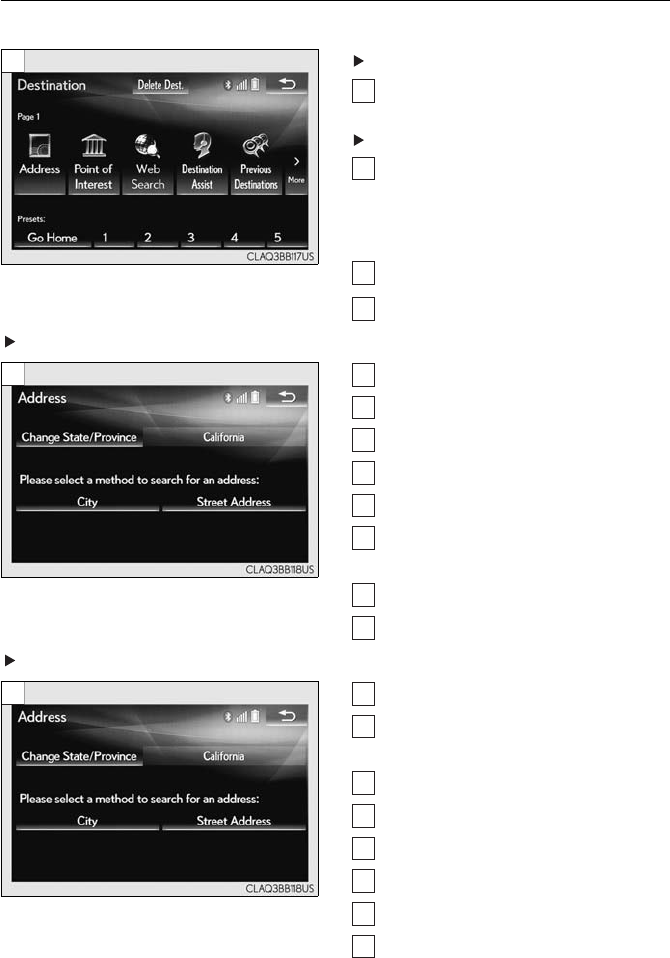
■Destination search
■Search by address
With 8-inch display
Press the “MENU” button on the
Remote Touch, then select “Nav.”.
With 12.3-inch display
Press the “MAP” button on the Remote
Touch.
Please refer to page 53 for the
Remote Touch operation.
Select “Dest.”.
Select “Address”.
Search by city
Select “City”.
Enter a city name and select “OK”.
Select the desired city name.
Enter a street name and select “OK”.
Select the desired street name.
Enter a house number and select
“OK”.
Select “Go”.
Select “OK”.
Search by street address
Select “Street Address”.
Enter a house number and select
“OK”.
Enter a street name and select “OK”.
Select the desired street name.
Enter a city name and select “OK”.
Select the desired city name.
Select “Go”.
Select “OK”.
3
1
1
2
3
4
4
5
6
7
8
9
10
11
4
4
5
6
7
8
9
10
11
58
■Search by point of interest
With 8-inch display
Press the “MENU” button on the
Remote Touch, then select “Nav.”.
With 12.3-inch display
Press the “MAP” button on the Remote
Touch.
Please refer to page 53 for the
Remote Touch operation.
Select “Dest.”.
Select “Point of Interest”.
Hands-free System For Cellular Phone
(with Navigation System)
■Bluetooth® phone pairing
To use the hands-free system, it is necessary to register a Bluetooth® phone with the system.
Please refer to the cellular phone manufacturer’s user guide for pairing procedures, or go to
http://www.lexus.com/MobileLink for more phone information.
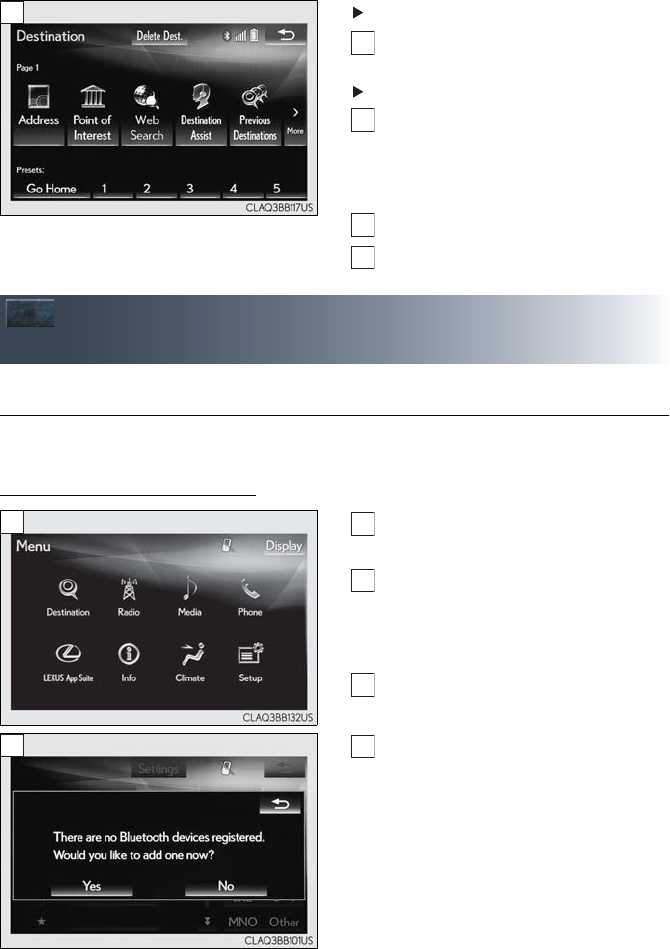
Turn the Bluetooth® connection set-
ting of your cellular phone on.
Press the “MENU” button on the
Remote Touch.
Please refer to page 53 for the
Remote Touch operation.
Select “Phone”.
Select “Yes” to register a phone.
3
1
1
2
3
3
1
2
3
4
4
59
When this screen is displayed, search
for the device name displayed on this
screen on the screen of your
Bluetooth® device.
Register the Bluetooth® device using
your Bluetooth® device.
Check that a confirmation screen is
displayed indicating pairing was suc-
cessful.
Check that “Connected” is displayed
and registration is complete.
■Contact transfer
Press the “MENU” button on the
Remote Touch.
Please refer to page 53 for the
Remote Touch operation.
Select “Setup”.
Select “Phone”.
Select “Contact/Call History”.
Select the desired contact to add to the
favorites list.
Check that a confirmation screen is
displayed when the operation is com-
plete.
5
5
6
7
7
8
5
1
2
3
4
5
6
Contact transfer may not be possible depending on phone model.
60
■Calling by name
You can call by giving a name registered in the contact list. For details, refer to the
“NAVIGATION SYSTEM OWNER’S MANUAL”.
Press the talk switch.
Say “Call <contacts> <phone types>”.
In the same manner as it is displayed on
the screen, “Call <contacts> <phone
types>”, after saying “Call a contact”
say the name, or the name and type of
phone, of a contact.
For example: “Call a contact”, “John
Smith” or “Call a contact”, “Mary
Davis”, “Mobile”
■Receiving a call
When a call is received, call screen is displayed with a sound.
Call screen can also be displayed on the side display.
Press on the steering wheel to talk on the phone.
To refuse to receive the call, press on the steering wheel.
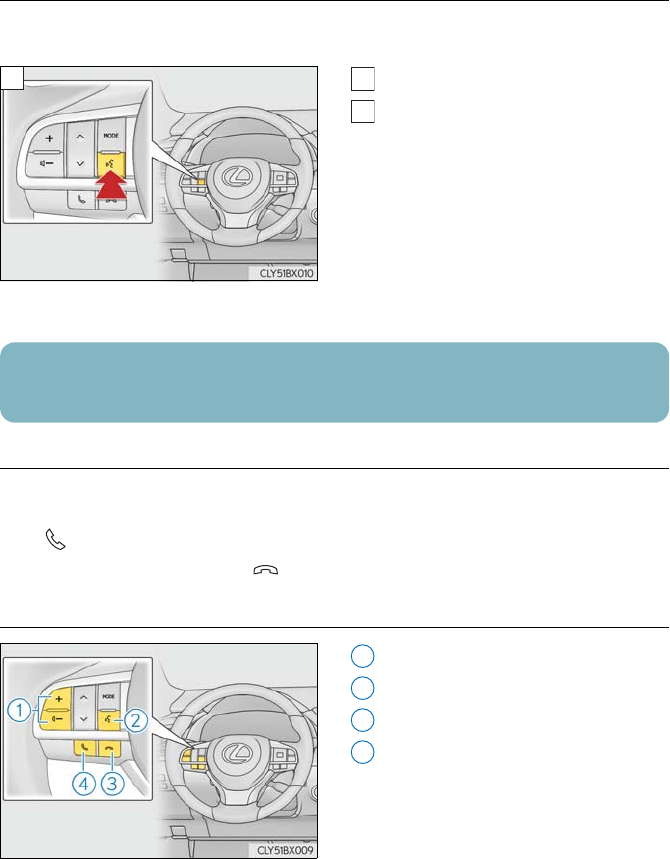
■Steering switches
Increases/decreases volume
Start the voice command system
End call/Refuse call
Sending/Receiving/Phone top screen
display
1
1
2
Talk switch: Pressing this switch turns the voice command system on. Say a command after
the beep.
1
2
3
4
61
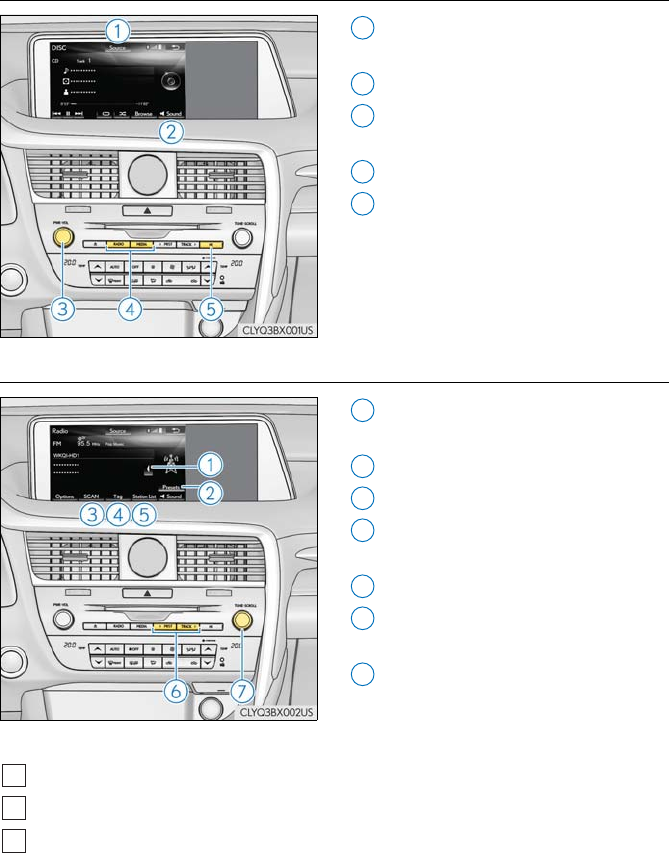
Audio System (with Navigation System)
■Audio control screen
Follow the procedure below to display the audio control screen.
Press the “MENU” button on the
Remote Touch.
Please refer to page 53 for the
Remote Touch operation.
The “Menu” screen will be displayed.
Using the Remote Touch, select
“Radio” or “Media”.
■Remote control (steering wheel audio switches)
Some audio features can be controlled using the switches on the steering wheel.
Adjust volume
Radio mode: Select a radio station/
channel
Audio CD mode: Select a track
MP3/WMA/AAC disc mode: Select a
file
DVD mode: Select a chapter
iPod mode: Select a track/file
Select audio source
Play/Pause
Turn mute on/off
2
1
2
1
2
3
62
■Basic operation
Display the audio source selection
screen
Display the sound setting screen
Adjust volume
Turn the audio system on/off
Select a radio/media mode
Play/Pause
Turn mute on/off
■Radio
Display the cache radio operation but-
tons
Display the radio preset buttons
Scan for receivable stations/channels
Select to store artist and song title
information
Display a list of receivable stations
Select a preset station/channel
Seek for a station/channel
Step up/down frequencies/channels
Move up/down the list
■Entering station/channel presets
Select the desired station/channel by using the tune, the seek or the scan function.
Select “Presets”.
Select one of the screen buttons and hold it until a beep is heard, indicating that the sta-
tion/channel has been set.
1
2
3
4
5
1
2
3
4
5
6
7
1
2
3
63
■DVD player/CD player
■Playing an audio CD
Select a track
Rewind
Play/Pause
Select a track
Fast forward
Set repeat playback
Set random playback
Display a track list
Eject a disc
Select a track
Fast forward/rewind
Select a track
Move up/down the list
■Playing a CD with MP3/WMA/AAC files
Select a folder
Select a file
Rewind
Play/Pause
Select a file
Fast forward
Set repeat playback
Set random playback
Display a folder list
Eject a disc
Select a file
Fast forward/rewind
Select a file
Move up/down the list
1
2
3
4
5
6
7
8
9
1
2
3
4
5
6
7
8
9
10
64
■Playing a DVD
Display full screen video
Select a chapter
Rewind
Stop the video screen
Play/Pause
Select a chapter
Fast forward/Slow forward
Eject a disc
Select a chapter
Fast forward/rewind
Select a chapter
■Operating an iPod
Select a track
Rewind
Play/Pause
Select a track
Fast forward
Set repeat playback
Set random playback
Display the play mode selection screen
Select a track
Fast forward/rewind
Select a track
Move up/down the list
1
2
3
4
5
6
7
8
1
2
3
4
5
6
7
8
65
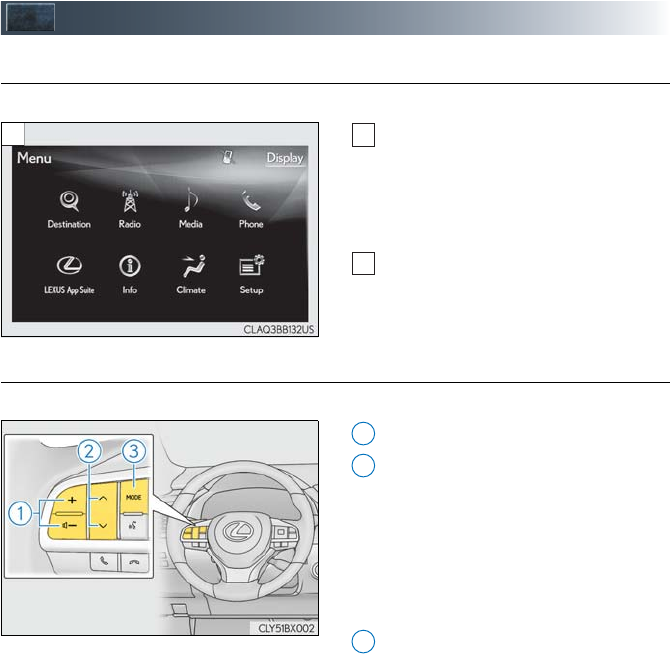
Lexus Display Audio Controller (with
Lexus Display Audio)
Display the “Source” screen or audio
top screen
Display the “Menu” screen (→P.65)
Back button
Display the previous screen
Turn or move the controller to select a
function and number.
Move the controller to display the left
or right side of the screen.
Push the controller to enter the
selected function and number.
■“Menu” screen
To display the “Menu” screen, press the “MENU” button on the Lexus Display Audio con-
troller.
*: Available in the 48 states, D.C. and Alaska
By using the Lexus Display Audio controller, you can control the audio system, hands-
free system, etc.
1
2
3
4
Button Function
“Radio” Display the radio top screen
“Media” Display the media top screen
“Climate” Display the air conditioning control screen (→P.75)
“Phone” Display the phone top screen
“Connected
Navi”*
If a turn-by-turn navigation application has been downloaded to a con-
nected phone, the application will be displayed and can be used.
“Info” Display the “Information” screen
“Setup” Display the “Setup” screen
“Display” Display the display settings screen

66
■Screen for display settings
Go to “Display”: “MENU” button → “Display”
Turn off screen.
Adjust screen quality.
Adjust screen quality of the rear view
monitor camera.
Change to day mode.
Hands-Free System For Cellular Phone
(with Lexus Display Audio)
■How to register a Bluetooth® device
Turn the Bluetooth® connection setting of your device set to on.
Go to “Bluetooth* Setup”: “MENU” button → “Setup” → “Bluetooth*”
Move the controller to the left and then select “Add Device”.
When this screen is displayed, search
for the device name displayed on this
screen on your Bluetooth® device.
Register the Bluetooth® device using
your Bluetooth® device.
*: Bluetooth is a registered trademark of
Bluetooth SIG, Inc.
■Registering favorites
You can register the desired contact from the phonebook. Up to 15 contacts per phone can
be registered.
Go to “Add Favorite”: “MENU” button → “Setup” → “Phone” → “Contact/Call His-
tory” → “Add Favorite”
Choose the contact to register.
■Dialing
Go to “Dial Pad”: “MENU” button → “Phone” → “Dial Pad”
Input a phone number.
Press the off-hook switch on the steering wheel or select .
1
2
3
4
1
2
3
4
5
1
2
1
2
3

67
■Dialing from the phonebook
Go to “Contacts”: “MENU” button → “Phone” → “Contacts”
Choose the desired contact to call from the list.
Choose the number and then press the off-hook switch on the steering wheel or press
the controller.
■When the phonebook is empty
You can transfer the phone numbers in a Bluetooth® phone to the system.
Operation methods differ between PBAP (Phone Book Access Profile) compatible and
PBAP incompatible Bluetooth® phones. If the cellular phone does not support either PBAP
or OPP (Object Push Profile) service, you cannot transfer contacts.
Press the off-hook switch on the steering wheel.
If the phonebook is empty, a message will be displayed.
For a PBAP compatible Bluetooth® phone and “Automatic Transfer” is off
To enable automatic transfer of new contacts from a cellular phone every time it is con-
nected, select “Always”.
Select “Once” if you want to transfer new contacts from a cellular phone.
For a PBAP incompatible and OPP compatible Bluetooth® phone
Select “Transfer” and operate your cellular phone to transfer new contacts from a cellu-
lar phone.
Select “Add” if you want to add a new contact manually.
■Dialing from favorites
You can make a call using numbers registered in the favorites.
Go to “Favorites”: “MENU” button → “Phone” → “Favorites”
Choose the desired contact to call from the list.
Choose the number and then press the off-hook switch on the steering wheel or press
the controller.
1
2
3
1
2
2
1
2
3
68
■To answer the phone
Press the off-hook switch on the steering
wheel or select .
■Operating a phone using the steering wheel switches
Volume switch
During an incoming call: Adjusts the
ring tone volume
During speaking on the phone: Adjusts
in call volume
The voice guidance volume cannot be
adjusted using this button.
Talk switch
Press: Turns the voice command sys-
tem on
Press and hold: Turns the voice com-
mand system off
On-hook switch
•End call
•Refuse call
Off-hook switch
•Start call
• Receiving
• Phone top screen display
1
2
3
4
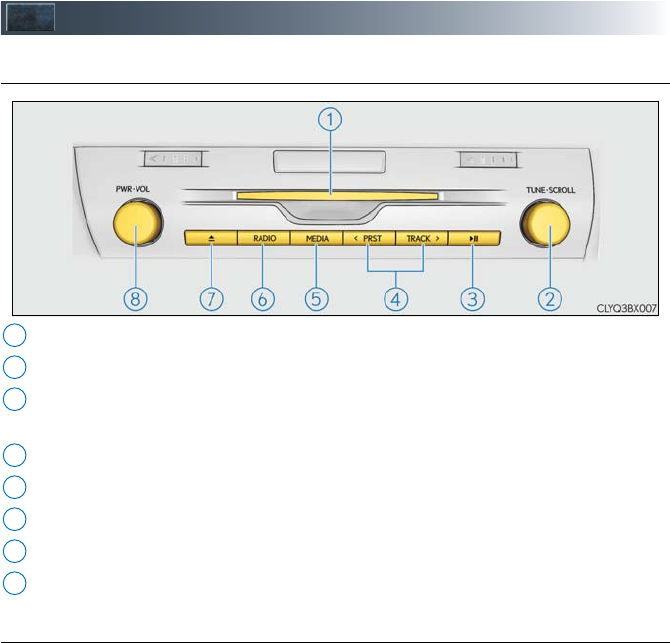
69
Audio System (with Lexus Display Audio)
■Lexus Display Audio operation buttons
Disc slot
Seek up or down for a radio station, or to access a desired track or file.
Except radio and A/V mode: Pause or resume playing a track.
Radio and A/V mode: Turn mute on/off.
Select a radio station band, track or file.
Display the media top screen.
Display the radio top screen.
Eject a disc.
Press to turn the audio system on/off, and turn to adjust the volume.
■Using the steering wheel switches to change audio sources
Press the “MODE” switch when the audio system is turned on. The audio source changes
each time the “MODE” switch is pressed.
1
2
3
4
5
6
7
8
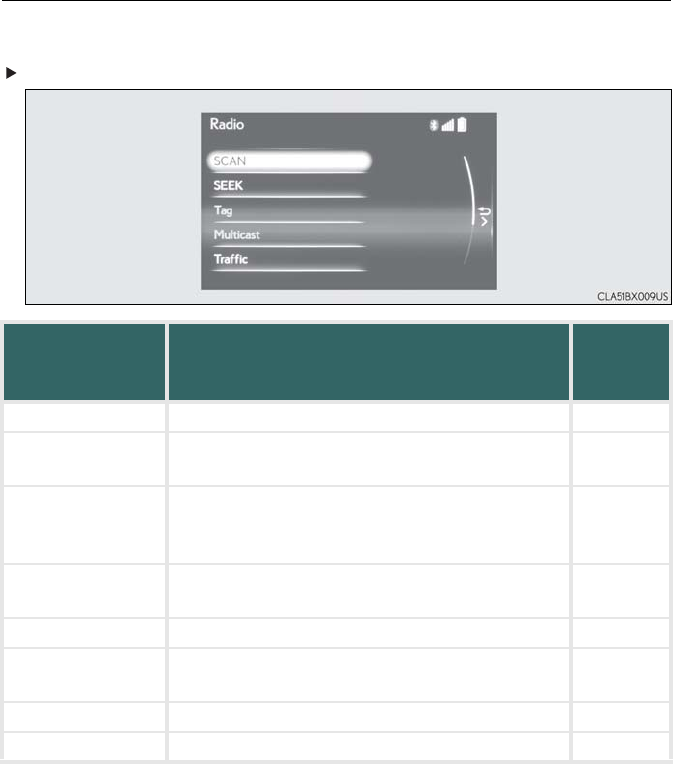
70
■Audio menu screen
To display the audio menu screen, move the controller to the left while on an audio top
screen.
Radio mode
Button Function
Target
radio
mode
“SCAN” Scans for receivable stations AM, FM
“SEEK” Seeks a station of the nearest frequency (stops
when a station is found) AM, FM
“Tag”
Captures the song title and artist name information
for potential purchase (when the “HD)” indicator on
the selected station is appears)
FM
“Multicast” Changes the channel of HD Radio (HD2, HD3,
HD4 where applicable) FM
“Traffic” Seeks a station of the traffic announcement FM
“HD Radio” Selects to set the station list shows of HD radio on/
off AM, FM
“Radio Settings” Changes radio settings All mode
“Sound Settings” Changes sound settings All mode
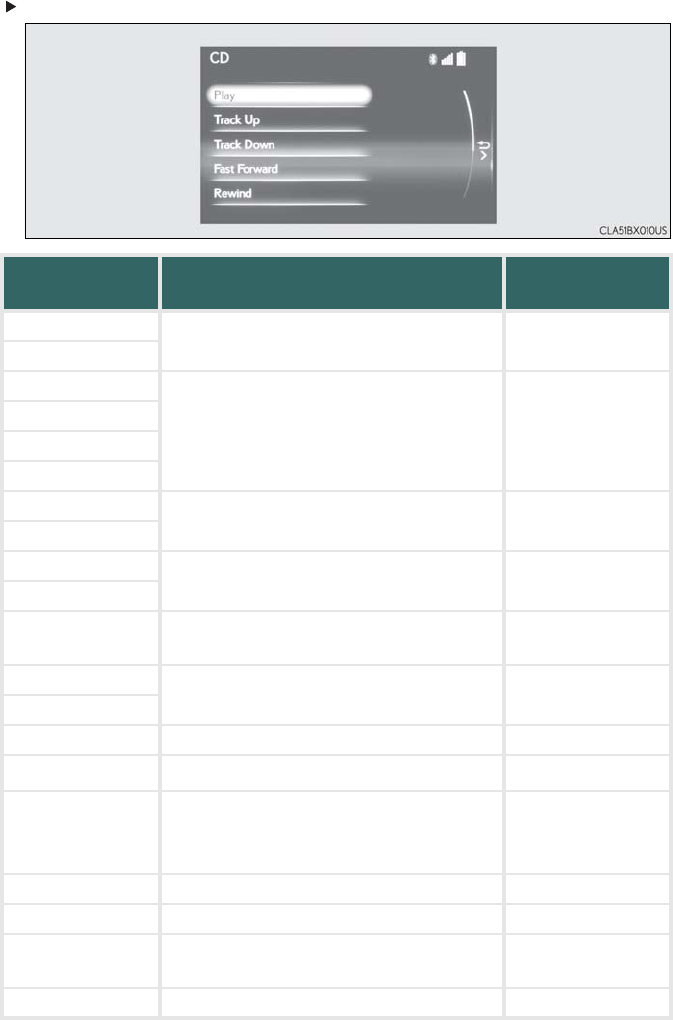
71
Media mode
Button Function Target audio
source
“Play” Plays or pauses a track/file All media (except
A/V)
“Pause”
“Track Up”
Selects a track/file All media (except
A/V)
“Track Down”
“File Up”
“File Down”
“Folder Up” Selects a folder/album MP3/WMA/AAC
disc, USB
“Folder Down”
“Fast Forward” Selects and hold: Fast-forward or rewind a
track/file
All media (except
A/V)
“Rewind”
“Repeat” Selects a repeat mode All media (except
A/V)
“Random” Selects a random/shuffle play mode All media (except
A/V)
“Shuffle”
“Full Screen” Selects a full screen mode iPod, A/V
“Connect” Connects a Bluetooth® device Bluetooth®
“Cover Art Set-
tings” Changes the cover art settings
CD, MP3/WMA/
AAC disc,
Bluetooth®
“iPod Settings” Changes iPod settings iPod
“USB Settings” Changes USB settings USB
“External Video
Settings” Changes A/V settings A/V
“Sound Settings” Changes sound settings All media
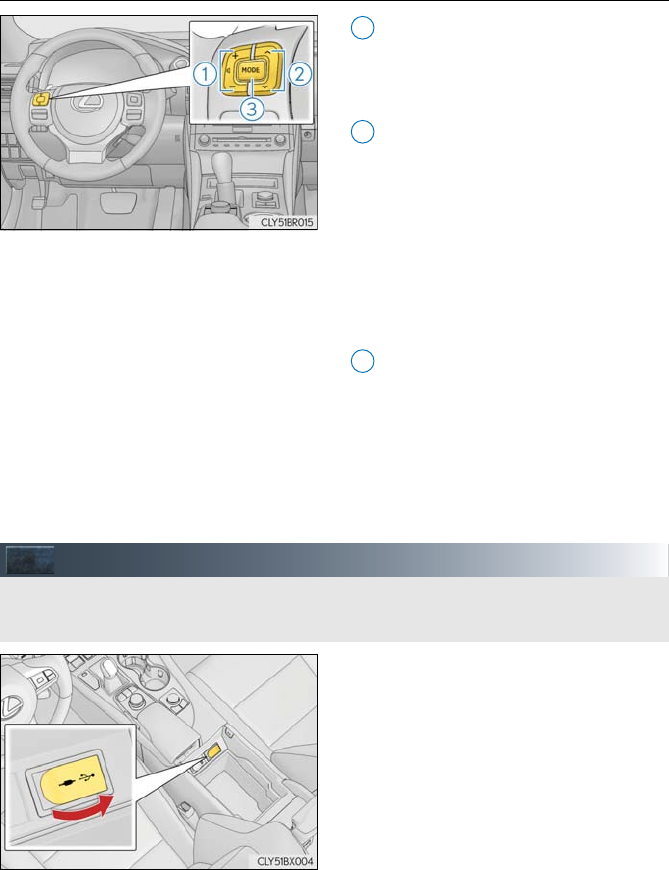
72
■Operating the audio system using the steering wheel switches
Volume switch
• Increases/decreases volume
• Press and hold: Continuously
increases/decreases volume
Radio mode:
• Press: Select a radio station
• Press and hold: Seek up/down
CD, MP3/WMA/AAC disc,
Bluetooth®, iPod or USB mode:
• Press: Select a track/file/video
• Press and hold: Continuously tracks/
files/videos up/down. (MP3/WMA/
AAC disc, iPod or USB)
“MODE” switch
• Turns the power on, selects audio
source
• Press and hold this switch to mute or
pause the current operation. To can-
cel the mute or pause, press and
hold.
Portable Audio Device Ports
Press the console box knob, open the cover
and connect the portable audio device.
1
2
3
This port can be used to connect a portable audio device and listen to it through the vehi-
cle’s speakers.
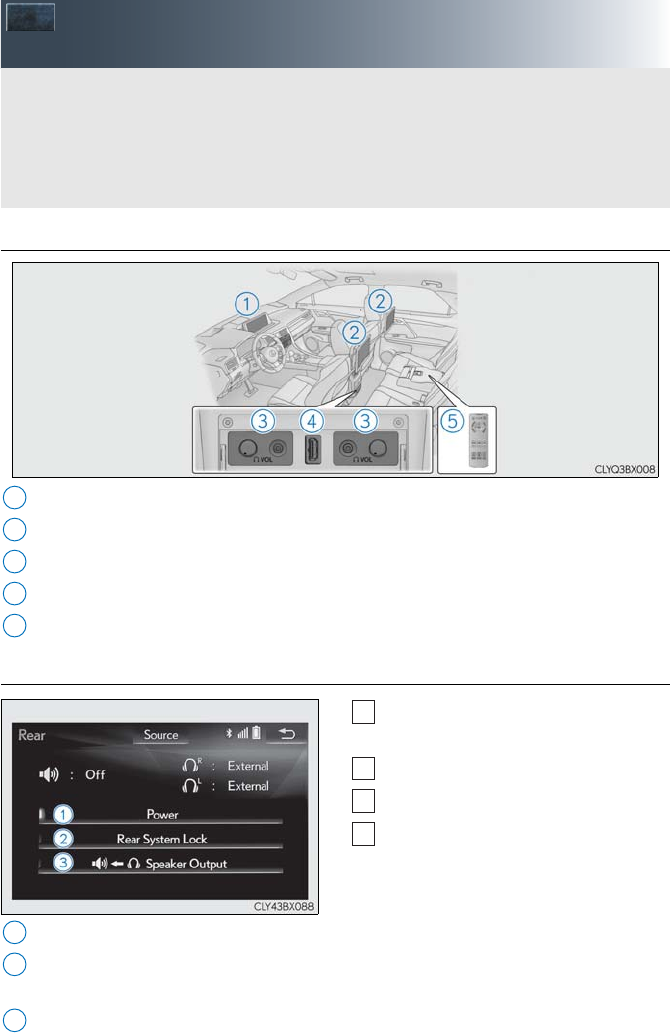
73
Rear Seat Entertainment System
Features (if equipped)
■Overview
Front audio/visual system
Displays
Headphone volume control dials and headphone jacks
A/V input port (HDMI port)
Remote controller
■Operating rear seat entertainment system from the front seats
Press the “RADIO” or “MEDIA” button
on the instrument panel.
Select “Source”.
Select “Rear”.
Select the desired button.
Select to turn the rear seat entertainment system on/off.
Select to lock the system so passengers in the rear seats cannot operate the rear seat
entertainment system.
Select to output sound from rear seat entertainment system over the speakers in the
vehicle. Select “Right” or “Left” to select for which screen sound will be output.
The rear seat entertainment system is designed for the rear passengers to enjoy audio/
visual system. When audio/visual equipment is connected to the A/V input port, rear
passengers can enjoy different audio sources on each display.
The system can be used when the engine switch is in ACCESSORY or IGNITION ON
mode.
1
2
3
4
5
1
2
3
4
1
2
3
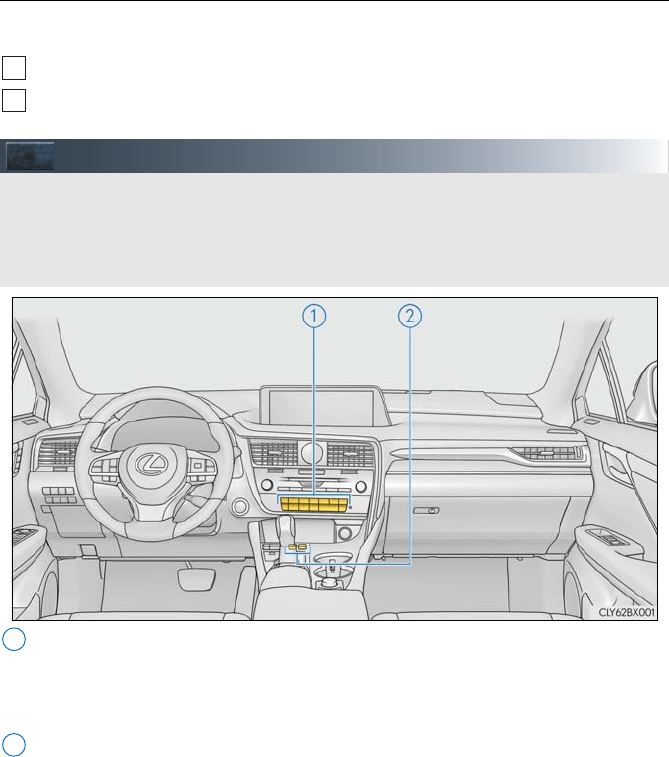
74
■Selecting the source
The front and rear audio/visual source can be controlled from the rear seat entertainment
system.
Press the “SOURCE” button on the remote controller.
Select the desired source.
Lexus Climate Concierge (if equipped)
Automatic air conditioning system
Set the air conditioning system to automatic mode.
The temperature for the driver’s seat and front passenger’s seat can be adjusted individ-
ually.
Seat heaters and ventilators
Select “AUTO” mode on each seat.
Seat heater or ventilation is automatically selected according to the set temperature of
the air conditioning system, outside temperature, etc.
1
2
The climate control seats are automatically controlled according to the set temperature
of the air conditioning system, outside temperature, cabin temperature, etc. Lexus Cli-
mate Concierge allows a comfortable condition to be maintained without adjusting each
system.
1
2
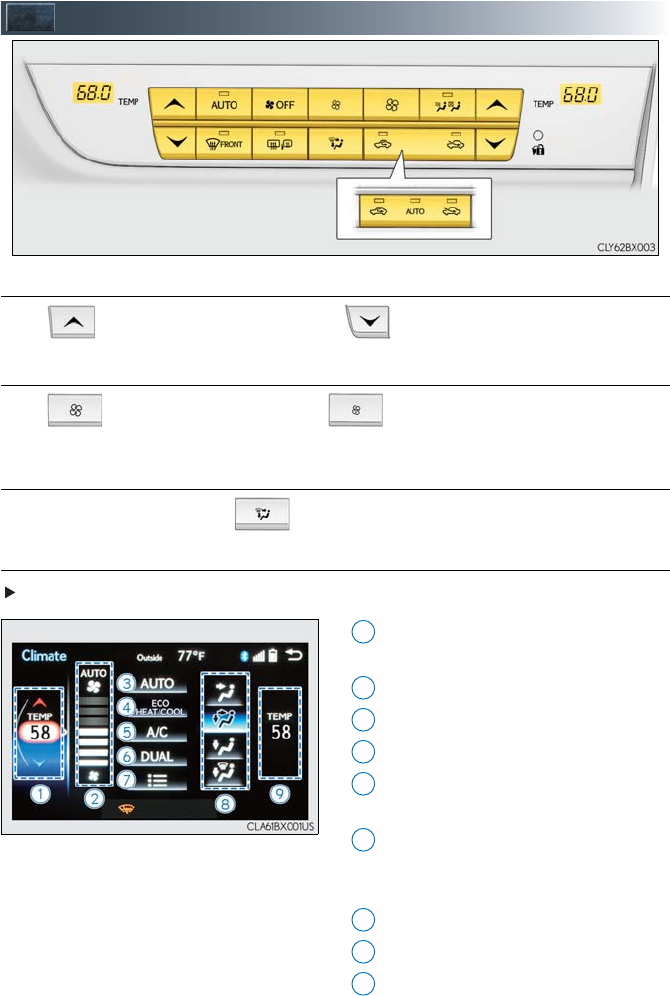
75
Air Conditioning System
■Adjusting the temperature setting
Press to increase the temperature and to decrease the temperature.
■Adjusting the fan speed setting
Press to increase the fan speed and to decrease the fan speed.
Press the “OFF” button to turn the fan off.
■Change the airflow mode
To change the air outlets, press .
■Control screen
Vehicles with a Lexus Display Audio system
Adjust the left-hand side temperature
setting
Adjust the fan speed setting
Select to set auto mode on/off
Select to set eco mode on/off
Select to set cooling and dehumidifica-
tion function on/off
Adjust the temperature for driver and
passenger seats separately (“DUAL”
mode)
Display the option control screen
Select the air flow mode
Adjust the right-hand side temperature
setting
1
2
3
4
5
6
7
8
9
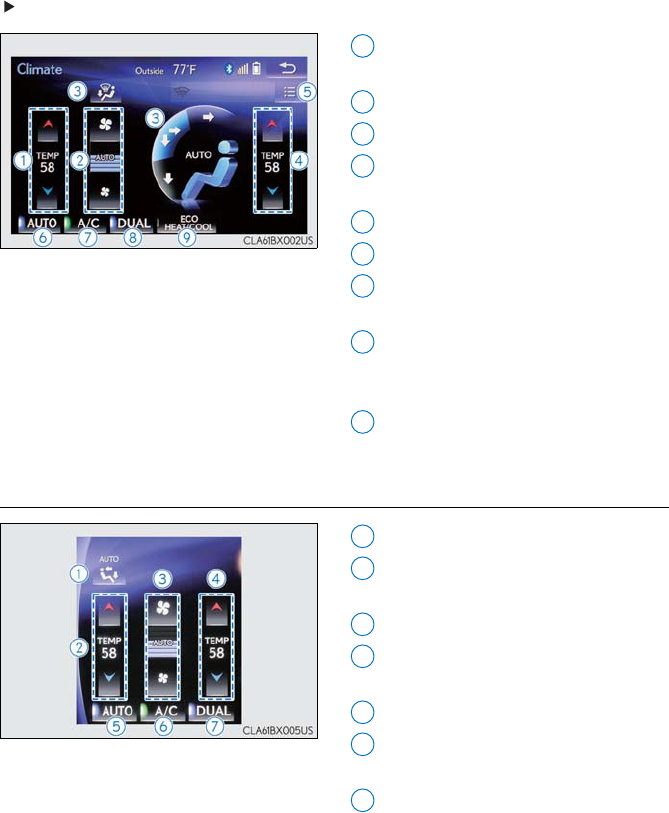
76
Vehicles with a navigation system
Adjust the left-hand side temperature
setting
Adjust the fan speed setting
Select the air flow mode
Adjust the right-hand side temperature
setting
Display the option control screen
Select to set automatic mode on/off
Select to set cooling and dehumidifica-
tion function on/off
Adjust the temperature for driver and
passenger seats separately (“DUAL”
mode)
Select to set eco mode on/off
■Side display operation screen (Vehicles with a navigation system [12.3-inch
display])
Select the air flow mode
Adjust the left-hand side temperature
setting
Adjust the fan speed setting
Adjust the right-hand side temperature
setting
Select to set auto mode on/off
Select to set cooling and dehumidifica-
tion function on/off
Adjust the temperature for driver and
passenger seats separately (“DUAL”
mode)
1
2
3
4
5
6
7
8
9
1
2
3
4
5
6
7

77
■Option control screen
Select on the air conditioning control screen to display the option control
screen. The functions can be switched on and off.
Prevent ice from building up on the windshield and wiper blades (if equipped)
■Using the automatic mode
Press the “AUTO” button to turn on the airflow and adjust the temperature setting.
■S-FLOW mode
In S-FLOW mode, priority for the airflow is given to the front seats, reducing the airflow and
air conditioning effect on the rear seats.
If a passenger is not detected in the front passenger seat, priority for the airflow will be given
to the driver's seat only.
In this case, the temperature indicator for the front passenger side will turn off.
S-FLOW mode will be activated automatically according to the set temperature, outside
temperature, etc.
The indicator comes on when S-FLOW mode is on.
■Adjusting the temperature for driver and passenger seats separately
(“DUAL” mode)
To turn on the “DUAL” mode, perform any of the following procedures:
●Select “DUAL” on the air conditioning control screen.
●Select “DUAL” on the side display operation screen.(Vehicles with a navigation system
[12.3-inch display])
●Adjust the temperature setting of the passenger side with the passenger side tempera-
ture adjustment button.
The indicator comes on when the “DUAL” mode is on.
Vehicles with a Lexus Display Audio
system
Vehicles with a navigation system
1
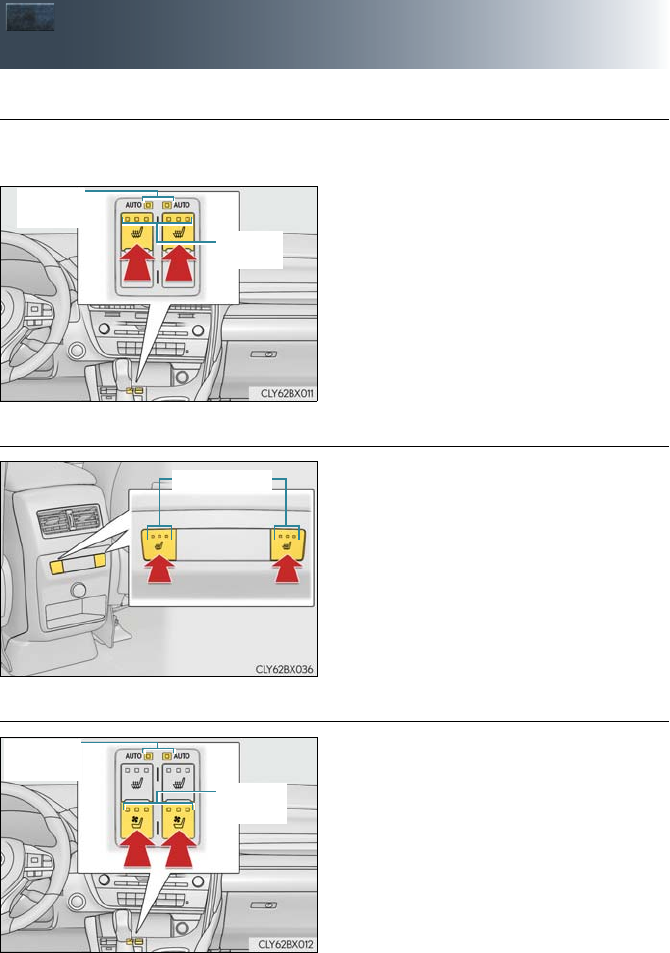
78
Seat Heaters (if equipped)/
Seat Ventilators (if equipped)
■Front seat heaters
When any switch is pressed, the system is set to automatic mode and the “AUTO” indicator
(green) lights up.
Each time the switch is pressed, the opera-
tion condition changes as follows.
Hi (3 segments lit) → Mid (2 segments lit)
→ Lo (1 segment lit) → Off
The level indicator (amber) lights up
during operation.
■Rear seat heaters
Each time the switch is pressed, the opera-
tion condition changes as follows.
Hi (3 segments lit) → Mid (2 segments lit)
→ Lo (1 segment lit) → Off
The level indicator (amber) lights up
during operation.
■Seat ventilators
When any switch is pressed, the system is
set to automatic mode and the “AUTO”
indicator (green) lights up.
Each time the switch is pressed, the opera-
tion condition changes as follows.
Hi (3 segments lit) → Mid (2 segments lit)
→ Lo (1 segment lit) → Off
The level indicator (green) lights up
during operation.
Level
indicator
“AUTO”
indicator
Level indicator
Level indicator
Level indicator
Level indicator
Level
indicator
“AUTO”
indicator

79
Voice Command System
■Basic operation
Press the talk switch on the steering
wheel.
If you know the command:
Press the talk switch again.
If you do not know the command:
Follow the voice guidance to learn the
command and then press the talk
switch again.
Say a command after the beep.
Continue on to pages 80-83 for a detailed list of Voice Commands for the following cate-
gories:
Basic. . . . . . . . . . . . . . . . . . . . . . . . . . . . . . . . . . . . . . . . . . . . . . . . . . . . . . page 80
Apps. . . . . . . . . . . . . . . . . . . . . . . . . . . . . . . . . . . . . . . . . . . . . . . . . . . . . . page 80
Navi . . . . . . . . . . . . . . . . . . . . . . . . . . . . . . . . . . . . . . . . . . . . . . . . . . . . . . page 80
Phone. . . . . . . . . . . . . . . . . . . . . . . . . . . . . . . . . . . . . . . . . . . . . . . . . . . . . page 81
Radio . . . . . . . . . . . . . . . . . . . . . . . . . . . . . . . . . . . . . . . . . . . . . . . . . . . . . page 81
Audio . . . . . . . . . . . . . . . . . . . . . . . . . . . . . . . . . . . . . . . . . . . . . . . . . . . . . page 82
Info . . . . . . . . . . . . . . . . . . . . . . . . . . . . . . . . . . . . . . . . . . . . . . . . . . . . . . . page 82
Climate . . . . . . . . . . . . . . . . . . . . . . . . . . . . . . . . . . . . . . . . . . . . . . . . . . . page 83
1
2
3
■Important voice commands information and tips
•Voice commands can be used while driving.
•You must wait until after the beep to say a command.
•If you know what command to use, you can press the talk switch at any time to inter-
rupt the voice guidance.
•If a desired outcome is not shown, or if no selections are available, press on the
steering wheel to return to the previous screen.
NOTE: When entering voice commands you must wait until after the beep to speak.

80
■Command list
Basic
Apps (vehicles with navigation system)
Navi (vehicles with navigation system)
*: For example; “Gas stations”, “Restaurants”, etc.
Command Action
“Help” Prompts voice guidance to offer examples of com-
mands or operation methods
“Go Back” Returns to the previous screen
“Go to <tab>” Displays the command list of the selected tab
“More Hints” Displays more commonly used commands
“Cancel” Cancels the voice command system
Command Action
“Launch <apps>” Activates the LEXUS App Suite application
Command Action
“Find <POI category>” Displays a list of <POI category*> near the current
position
“Enter an Address” Enables setting a destination by saying the address
“Go Home” Displays the route to home
“Pause Guidance” Stops the route guidance
“Resume Guidance” Resumes the route guidance
“Show <POI> icons” Displays the specified POI icons
“Delete Destination” Deletes the destination
“Previous Destination” Displays previous destinations

81
Phone
Radio
Command Action
“Redial” Places a call to the phone number of the latest outgo-
ing call
“Call Back” Places a call to the phone number of latest incoming
call
“Show Recent Calls” Displays the call history screen
“Dial <phone number>” Places a call to the said phone number
“Call <contacts> <phonetypes>” Place a call to the said phone type of the contact from
the phone book
“Mobile Assistant” Activates Apple’s Siri® Eyes Free mode
Command Action
“Tune to <frequency> AM” Changes the radio to the specified AM frequency
“Tune to <frequency> FM” Changes the radio to the specified FM frequency
“Play <genre> station” Changes the radio to an FM station of the specified
genre
“Tune to FM <frequency>
HD <number>” Changes the radio to the specified HD radio station
“Tune to preset <number>” Changes the radio to the specified preset radio sta-
tion
“Tune to <name>” Changes the radio to the satellite radio channel with
the specified name
“Tune to channel <number>” Changes the radio to the specified satellite radio
channel number
“Play <genre> satellite station” Changes the radio to a satellite radio channel of the
specified genre
“AM Radio” Selects AM radio mode
“FM Radio” Selects FM radio mode
“Sirius XM” Selects satellite radio mode

82
Audio
*: Bluetooth is a registered trademark of Bluetooth SIG, Inc.
Info (vehicles with navigation system)
Command Action
“Play Playlist <name>” Plays tracks from the selected playlist
“Play Artist <name>” Plays tracks from the selected artist
“Play Song <name>” Plays the selected track
“Play Album <name>” Plays tracks from the selected album
“Turn Music On” Turns the audio system on
“Turn Music Off” Turns the audio system off
“Disc” Selects the selected disc mode
“USB” Selects USB audio mode
“iPod” Selects iPod audio mode
“Bluetooth* Audio” Selects Bluetooth® audio mode
“A.V.” Selects VTR mode
“Auxiliary” Selects AUX audio mode
Command Action
“Destination Assist” Connects the system to the Lexus response center
“Show Forecast” Displays weather information
“Show Traffic” Displays traffic information
“Lexus Insider” Displays the Lexus insider list
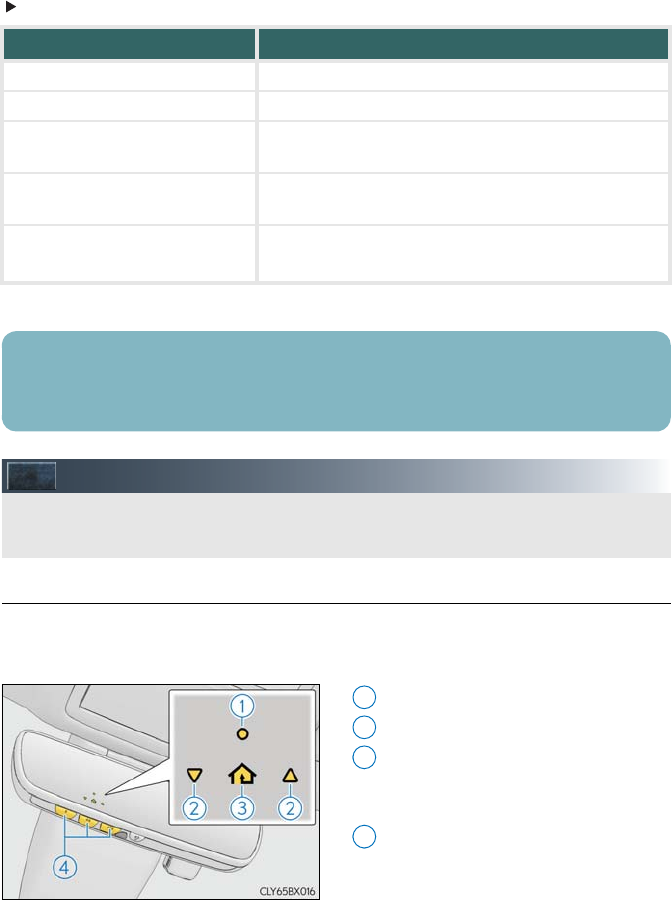
83
Climate
*: Only within the possible temperature range of the air conditioning system
Garage Door Opener
■Programming the HomeLink®
The HomeLink® wireless control system in your vehicle has 3 buttons which can be pro-
grammed to operate 3 different devices. Refer to the programming methods on the follow-
ing pages to determine the method which is appropriate for the device.
HomeLink® indicator light
Garage door operation indicators
HomeLink® icon
Illuminates while HomeLink® is oper-
ating.
Buttons
Command Action
“Turn Climate Control On” Turns air conditioning system on
“Turn Climate Control Off” Turns air conditioning system off
“Warmer” Increases the temperature of the air conditioning sys-
tem
“Cooler” Decreases the temperature of the air conditioning
system
“<#> degrees” Changes the set temperature of the air conditioning
system to <#> degrees*
Commands relating to operation of the audio/visual and air conditioning systems can only
be performed when the audio and air conditioning systems are turned on. Refer to the
“OWNER’S MANUAL” and “NAVIGATION SYSTEM OWNER’S MANUAL”.
The garage door opener can be programmed to operate garage doors, gates, entry
doors, door locks, home lighting systems, security systems, and other devices.
1
2
23
34
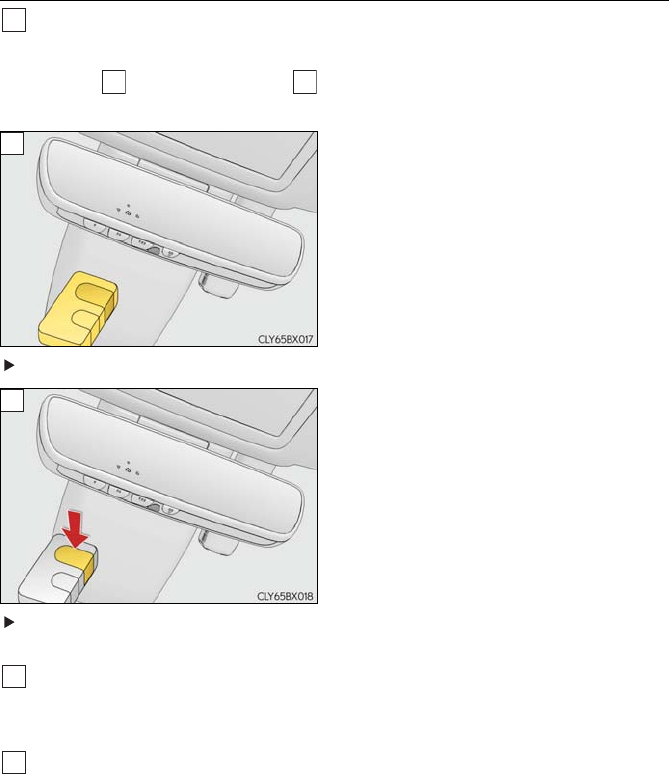
84
■Programming HomeLink®
Press and release the HomeLink® button you want to program and check that the
HomeLink® indicator light flashes (orange).
Perform within 60 seconds of , or the indicator light will stop flashing and pro-
gramming will not be able to be completed.
Point the remote control transmitter for the
device at the rear view mirror, 1 to 3 in. (25
to 75 mm) from the HomeLink® buttons.
Keep the HomeLink® indicator light in view
while programming.
For U.S.A. owners
Press and hold the handheld transmitter
button until the HomeLink® indicator light
changes from slowly flashing orange to rap-
idly flashing green (rolling code) or continu-
ously lit green (fixed code), then release the
button.
Programming an entry gate (for U.S.A. owners)/Programming a device in the Cana-
dian market
Press and release the remote control transmitter button at 2 second intervals, repeat-
edly, until the HomeLink® indicator light changes from slowly flashing (orange) to rap-
idly flashing (green) (rolling code) or continuously lit (green) (fixed code).
Test the HomeLink® operation by pressing the newly programmed button and observ-
ing the indicator light:
●Device with fixed code: If the indicator light is solid/continuous, programming has
been completed and your garage door or other device should operate when the
HomeLink® button is pressed and released.
●Device with rolling code: If the indicator light flashes rapidly, your garage door
opener motor (or other device) is equipped with a rolling code. Complete the pro-
gramming process by firmly pressing and holding the programmed HomeLink®
button for 2 seconds and then release the button.
●If the garage door or other device does not operate, proceed to “If your garage
door is of the rolling code type:”.
1
3
1
2
3
3
4
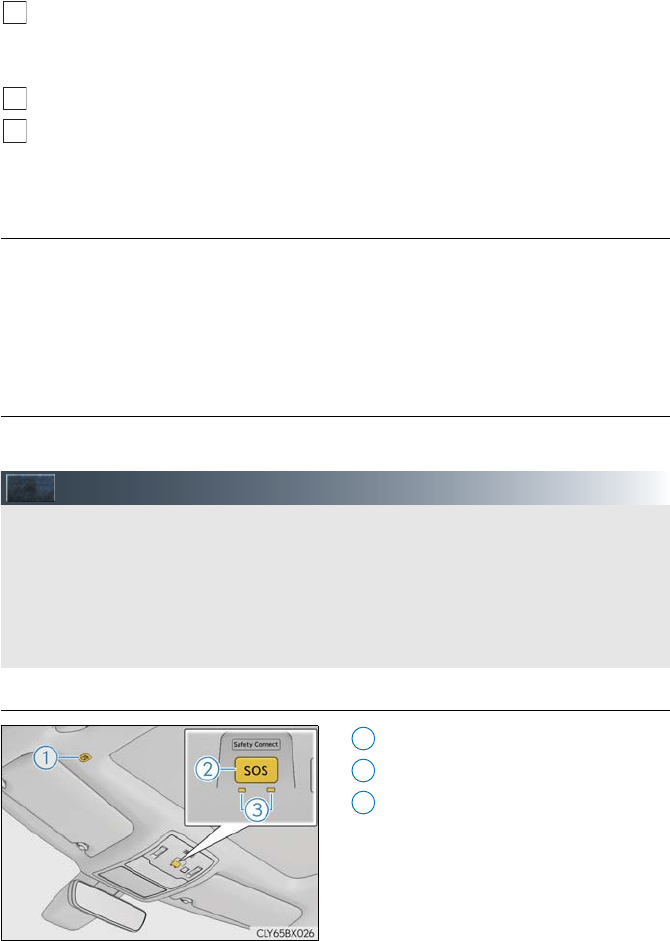
85
Repeat the steps above to program another device for any of the remaining Home-
Link® buttons.
If your garage door is of the rolling code type:
Press the training button on the motor-head unit in your garage.
Press and hold the vehicle’s programmed HomeLink® button for 2 seconds and
release it. Repeat this step once again.
If the door does not open, press and release the same button once again.
■Programming other devices
For U.S.A. owners:
To program an entry gate, see the Owner’s Manual.
To program other devices, contact your Lexus dealer.
For Canadian owners:
To program all other devices, follow the same procedure as for garage door programming.
■Operating HomeLink®
Press the appropriate HomeLink® button. The HomeLink® indicator light should turn on.
LEXUS Enform Safety Connect (if equipped)
■System components
Microphone
“SOS” button
LED light indicators
5
6
7
Safety Connect is a subscription-based telematics service that uses Global Positioning
System (GPS) data and embedded cellular technology to provide safety and security
features to subscribers. Safety Connect is supported by Lexus’ designated response
center, which operates 24 hours per day, 7 days per week.
Safety Connect service is available by subscription on select, telematics hardware-
equipped vehicles.
1
2
3

86
■Services
Subscribers have the following Safety Connect services available:
●Automatic Collision Notification*
In case of either airbag deployment or severe rear-end collision, the system is designed
to automatically call the response center. The responding agent receives the vehicle’s
location and attempts to speak with the vehicle occupants to assess the level of emer-
gency. If the occupants are unable to communicate, the agent automatically treats the
call as an emergency, contacts the nearest emergency services provider to describe the
situation, and requests that assistance be sent to the location.
*: U.S. Patent No. 7,508,298 B2
●Stolen Vehicle Location
If your vehicle is stolen, Safety Connect can work with local authorities to assist them in
locating and recovering the vehicle. After filing a police report, call the Safety Connect
response center at 1-800-25-LEXUS (1-800-255-3987) and follow the prompts for
Safety Connect to initiate this service.
In addition to assisting law enforcement with recovery of a stolen vehicle, Safety-Con-
nect-equipped vehicle location data may, under certain circumstances, be shared with
third parties to locate your vehicle. Further information is available at Lexus.com.
●Emergency Assistance Button (“SOS”)
In the event of an emergency on the road, push the “SOS” button to reach the Safety
Connect response center. The answering agent will determine your vehicle’s location,
assess the emergency, and dispatch the necessary assistance required.
If you accidentally press the “SOS” button, tell the response-center agent that you are
not experiencing an emergency.
●Enhanced Roadside Assistance
Enhanced Roadside Assistance adds GPS data to the already included warranty-based
Lexus roadside service.
Subscribers can press the “SOS” button to reach a Safety Connect response-center
agent, who can help with a wide range of needs, such as: towing, flat tire, fuel delivery, etc.
For a description of the Enhanced Roadside Assistance services and their limitations,
please see the Safety Connect Terms and Conditions, which are available at Lexus.com.
■Subscription
After you have signed the Telematics Subscription Service Agreement and are enrolled,
you can begin receiving services.
A variety of subscription terms is available for purchase. Contact your Lexus dealer, call 1-
800-25-LEXUS (1-800-255-3987) or push the “SOS” button in your vehicle for further
subscription details.

87
Lexus Enform (for U.S.A., if equipped)
■Function achieved by using a cellular phone (with navigation system)
■Services
Of the functions included with Lexus Enform, only LEXUS App Suite can be achieved by
using a cellular phone.
LEXUS App Suite is a service that enables the usable contents of a cellular phone to be dis-
played on and operated from the navigation screen. Before LEXUS App Suite can be used,
a few settings need to be performed.
●LEXUS App Suite
When LEXUS App Suite is activated, an application may need to update. By updating, an
application can be kept the latest version. To updating the application, it is necessary to
download the updated data and install it.
■Subscription
LEXUS App Suite will be available on a trial period included upon purchase of a new vehi-
cle. User registration is required to start using the service.
When a trial period has elapsed after purchasing a new vehicle, a fee will be charged to
renew the contract. Services requiring a separate contract can also be used. For details,
refer to http://www.lexus.com/enform/ or call 1-800-255-3987.
■Function achieved by using DCM and the navigation system (with naviga-
tion system)
■Services
Of the functions included with Lexus Enform, LEXUS Enform Destinations (Destination
Assist, eDestination), and Lexus Insider can be achieved by making DCM cooperate with
the navigation system.
These are subscription-based telematics services that use Global Positioning System (GPS)
data, embedded cellular technology to provide safety and security as well as convenience
features to subscribers. The services are supported by Lexus’ designated response center,
which operates 24 hours a day, 7 days a week.
The services are available by subscription on select, telematics hardware-equipped vehi-
cles.
●Destination Assist
Destination Assist provides you with live assistance for finding destinations via the Lexus
response center. You can request either a specific business, address, or ask for help
locating your desired destination by category, such as restaurants, gas stations, shopping
centers or other points of interest (POI).
After you tell the agent your choice of destination, its coordinates are sent wirelessly to
your vehicle’s navigation system.
Lexus Enform is a service that includes Safety Connect, Service Connect, Remote, Des-
tinations, Insider and App Suite.
For details, refer to the “OWNER’S MANUAL” and “NAVIGATION SYSTEM
OWNER’S MANUAL”.

88
●eDestination
With the eDestination feature, you can go online, and via the Lexus.com owner’s Web
site, select and organize destinations of your choice and then wirelessly send them to
your vehicle’s navigation system.
Up to 200 locations can be stored online and accessed or updated at any time.
Locations can be organized into up to 20 personalized folders.
You must first go online at www.lexus.com/drivers/ to view the Owners site where you
will need to register and log in. After this, personalized folders that contain the locations
to be sent to your vehicle can be created. (See Lexus Enform Guide for more informa-
tion.)
●Lexus Insider
Lexus Insider is an optional service that can send audio messages, or articles, to partici-
pating owners’ vehicles via the navigation system. Potential Lexus Insider subjects might
include, for example, Lexus vehicle technology tips, updates on regional Lexus events, or
audio excerpts from Lexus Magazine articles.
■Subscription
After you have signed the Telematics Subscription Service Agreement and are enrolled,
you can begin receiving services. A variety of subscription terms are available.
Contact your Lexus dealer, call 1-800-25-LEXUS (1-800-255-3987), or select the “Des-
tination Assist” in your vehicle for further subscription details.
■Function achieved by using DCM
■Services
Of the functions included with Lexus Enform Safety Connect, Safety Connect can be
achieved by using DCM.
●Lexus Enform Safety Connect (→P.85)
■LEXUS Enform Remote
■Services
Lexus Enform Remote is a cellular phone application that lets you view and remotely control
certain aspects of your vehicle.
For details about the functions and services of this application, refer to
http://www.lexus.com/enform/. For further details, contact your Lexus dealer.
Function of the Lexus Enform Remote is achieved by using an embedded cellular device in
the vehicle (DCM: Data Communication Module).
■Subscription
→P.88

89
■LEXUS Enform Service Connect
■Services
Lexus Enform Service Connect uses embedded telematics hardware to collect and transmit
vehicle data that allows Lexus to provide:
●Vehicle Health Report (VHR)
Safety Recalls, Service Campaigns, Current Vehicle Alerts, Required Maintenance,
Vehicle Condition Status
●Maintenance Notifications
●Vehicle Alert Notifications
For details about this service and how to register, refer to
http://www.lexus.com/enform/.
The Lexus Enform Service Connect function is achieved by using a vehicle Data Communi-
cation Module (DCM).
■Subscription
→P.88
Information Services (if equipped)
■Services
●Traffic Information
Traffic data can be received via HD Radio broadcast or LEXUS App Suite to display traf-
fic information on the map screen.
●Doppler Weather Information
Doppler weather radar information can be received via HD Radio broadcast or by the
LEXUS App Suite application on a Bluetooth® phone.
For details about the LEXUS App Suite application, refer to the “NAVIGATION SYS-
TEM OWNER’S MANUAL”.
Data service information, which is comprised of traffic information and weather informa-
tion, can be received via HD Radio broadcast and by the LEXUS App Suite application
on a Bluetooth® phone. The receiving method can be set to both or only via HD Radio
broadcast.
For details about the LEXUS App Suite application, refer to the “NAVIGATION SYS-
TEM OWNER'S MANUAL”.
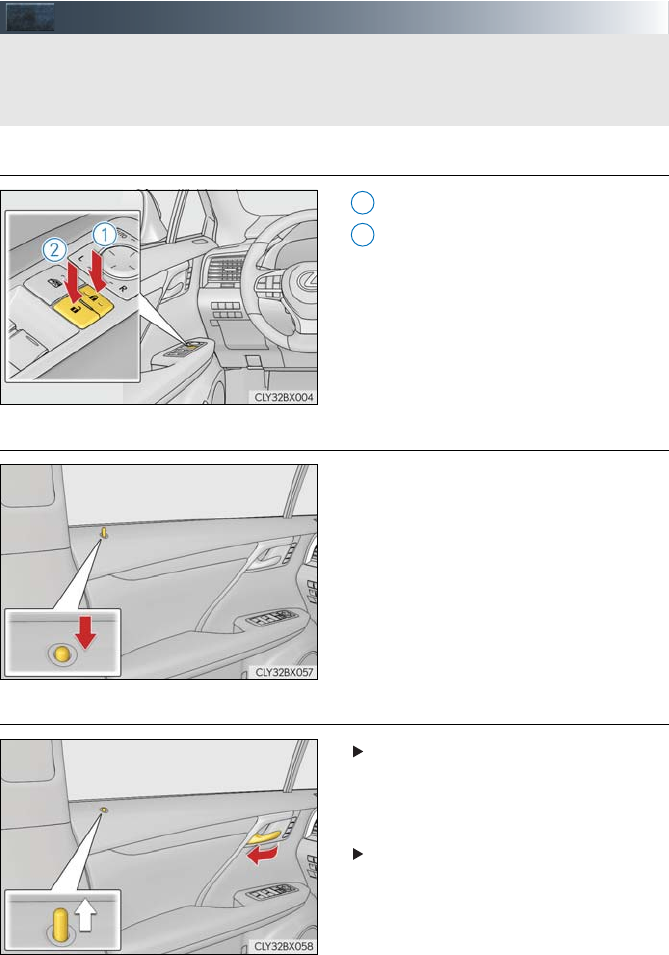
90
Door Locks
■Door lock switches (to lock/unlock)
Locks all the doors
Unlocks all the doors
■Inside lock buttons (to lock)
Push down the inside lock button to lock the
door.
■Inside door handles (to unlock)
For the front doors
Pull the handle to unlock and open the door.
When the door is unlocked, the inside
lock button will pop up.
For the rear doors
Pull the handle to unlock the door. Pull the
handle a second time to open the door.
When the door is unlocked, the inside
lock button will pop up.
The vehicle can be locked and unlocked using the entry function, wireless remote control
or door lock switches.
For details the entry function or wireless remote control (→ P.12, 13)
1
2
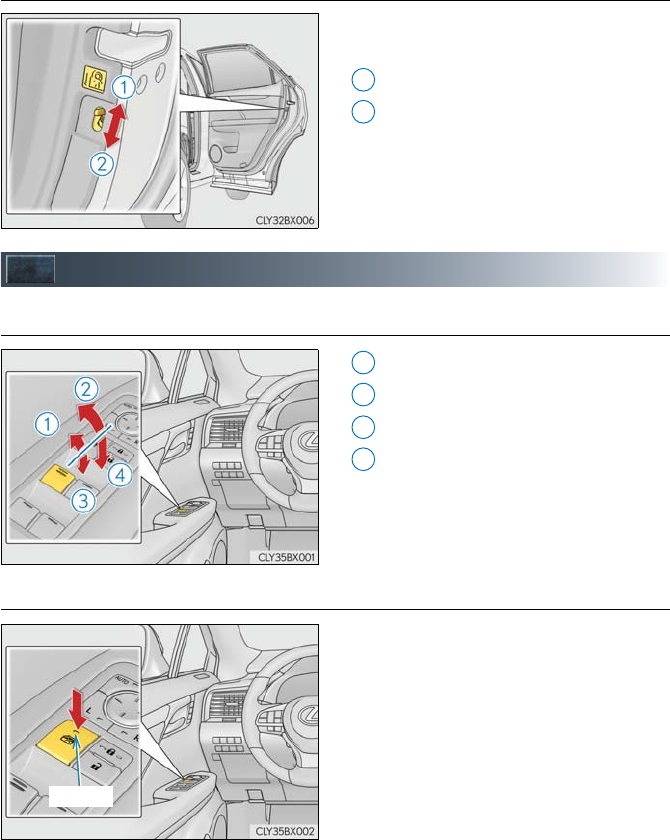
91
■Rear door child-protector lock
The door cannot be opened from inside the
vehicle when the lock is set.
Unlock
Lock
These locks can be set to prevent chil-
dren from opening the rear doors.
Push down on each rear door switch to
lock both rear doors.
Power Windows
■Power window switches
Closing
One-touch closing*
Opening
One-touch opening*
*: To stop the window partway, operate the
switch in the opposite direction.
■Window lock switch
Press the switch down to lock the passen-
ger windows. The indicator light will come
on when the passenger windows are
locked.
Use this switch to prevent children from
accidentally opening or closing a pas-
senger window.
The passenger windows can still be
opened and closed using the driver’s
switch even if the lock switch is on.
1
2
1
2
3
4
Indicator
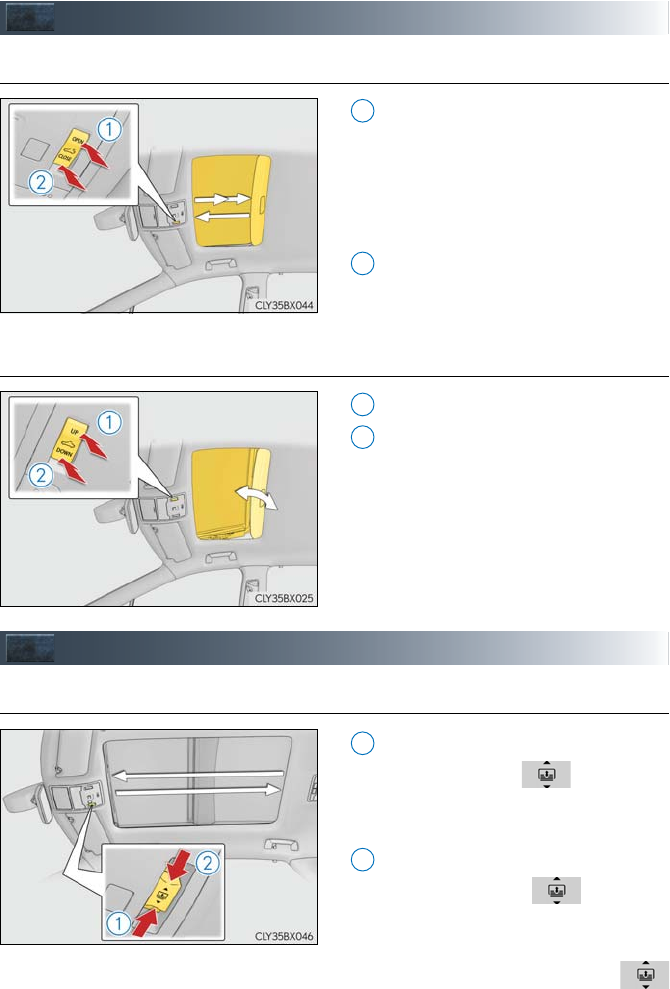
92
Moon Roof (if equipped)
■Opening and closing
Opens the moon roof*
The moon roof stops slightly before the
fully open position to reduce wind
noise.
Press the switch again to fully open the
moon roof.
Closes the moon roof*
*: Lightly press either side of the moon roof
switch to stop the moon roof partway.
■Tilting up and down
Tilts the moon roof up*
Tilts the moon roof down*
*: Lightly press either side of the moon roof
switch to stop the moon roof partway.
Panoramic Moon Roof (if equipped)
■Opening and closing the electronic sunshade
Opens the electronic sunshade
Slide and hold the switch back-
ward. The electronic sunshade will fully
open automatically.*
Closes the electronic sunshade
Slide and hold the switch for-
ward. The electronic sunshade will fully
close automatically.*
*: Quickly slide and release the
switch in either direction to stop the
electronic sunshade partway.
1
2
1
2
1
2
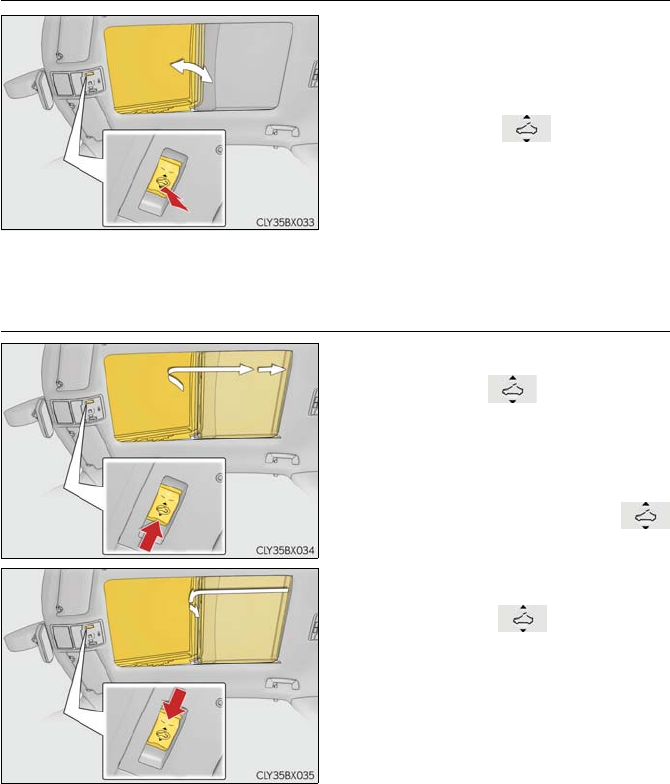
93
■Tilting the panoramic moon roof up and down
Tilts the panoramic moon roof up (press)*
When the panoramic moon roof is tilted
up, the electronic sunshade will open to
the half-open position of the roof.
*: Lightly press the switch again to
stop the panoramic moon roof partway.
Tilts the panoramic moon roof down (press
and hold)
The panoramic moon roof can be tilted
down only when it is in the tilt-up posi-
tion.
■Opening and closing the panoramic moon roof
Opens the panoramic moon roof*
Slide and hold the switch backward.
The panoramic moon roof and electronic
sunshade will open automatically.
The panoramic moon roof can be
opened from the tilt-up position.
*: Quickly slide and release the
switch in either direction to stop the pan-
oramic moon roof partway.
Closes the panoramic moon roof
Slide and hold the switch forward.
The panoramic moon roof will fully close
automatically.

94
Fuel Tank Cap
■Before refueling the vehicle
●Close all the doors and windows, and turn the engine switch off.
●Confirm the type of fuel.
■Opening the fuel tank cap
With the doors unlocked, press the
center of the rear edge of the fuel filler
door.
Push inward and take your hand away
to slightly open the fuel filler door.
Then open the door fully by hand.
Turn the fuel tank cap slowly and
remove it, then put it into the holder on
the fuel filler door.
1
2
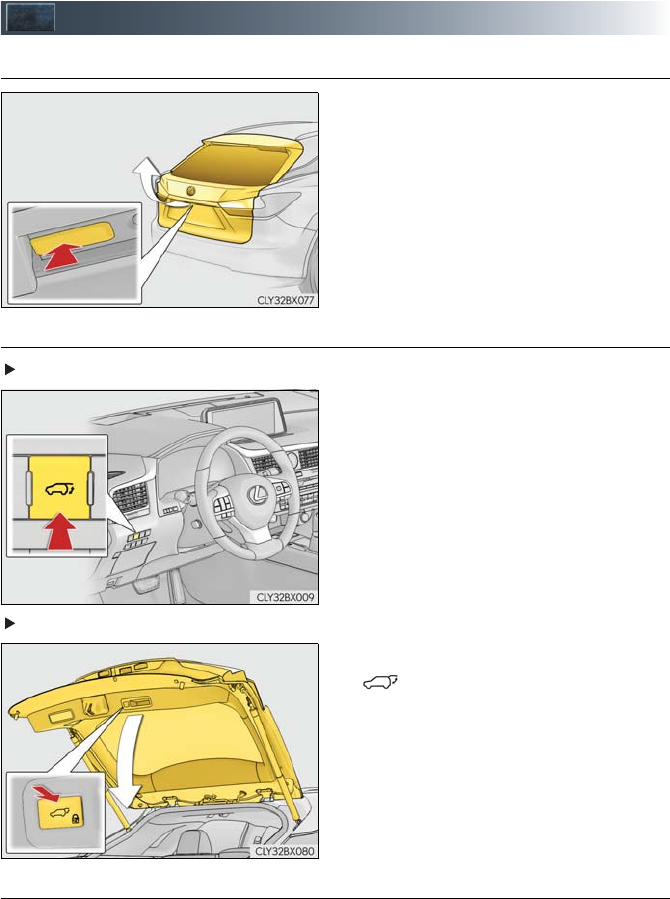
95
Power Back Door
■Back door opener switch
When the power back door is unlocked:
Press the back door opener switch.
When the power back door is locked:
While carrying an electronic key, press and
hold the back door opener switch.
■Power back door switches
Instrument panel
To open or close the power back door,
press and hold the switch for approximately
1 second.
Power back door
To close the power back door, press the
switch.
■Wireless remote control
→P.13
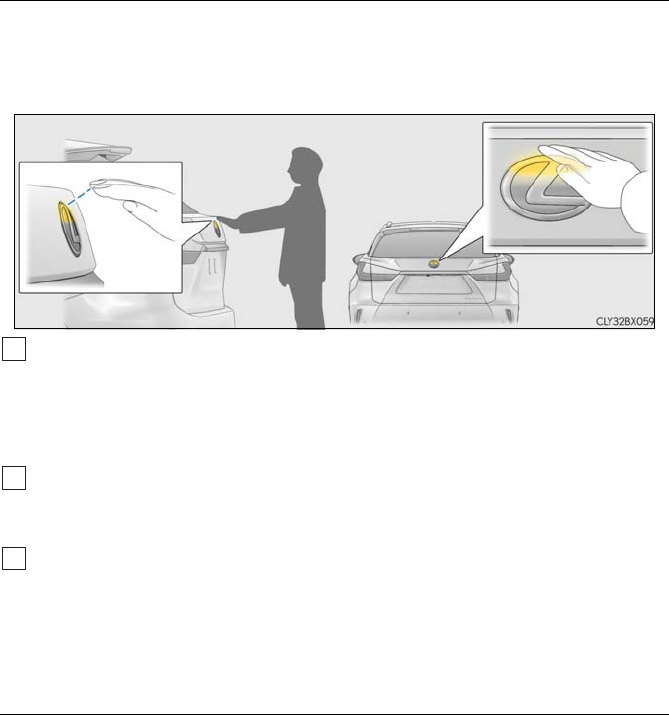
96
■Touchless sensor (vehicles with a touchless power back door)
The touchless power back door enables automatic opening of the power back door by
holding a hand over the upper part of the rear emblem or touching the upper part of the
rear emblem. When operating the touchless power back door, make sure that the touchless
sensor operation is enabled and that you are carrying an electronic key.
While carrying an electronic key, move your hand slowly toward the upper part of the
rear emblem and hold it there until a buzzer sounds. (The upper part of the rear
emblem can also be touched.)
When all of the doors are locked: When your hand is detected, all of the doors will be
unlocked.
Immediately after the buzzer sounds, move your hand away.
If you do not move your hand away, a buzzer will sound twice and the power back
door will not operate.
Check that the power back door begins to open.
To stop the power back door partway, touch the rear emblem.
To operate the power back door again, use a power back door switch. (Holding your
hand over the upper part of the rear emblem will not operate the touchless sensor
again.)
■Back door closer
In the event that the power back door is left slightly open, the back door closer will automat-
ically close it to the fully closed position.
1
2
3
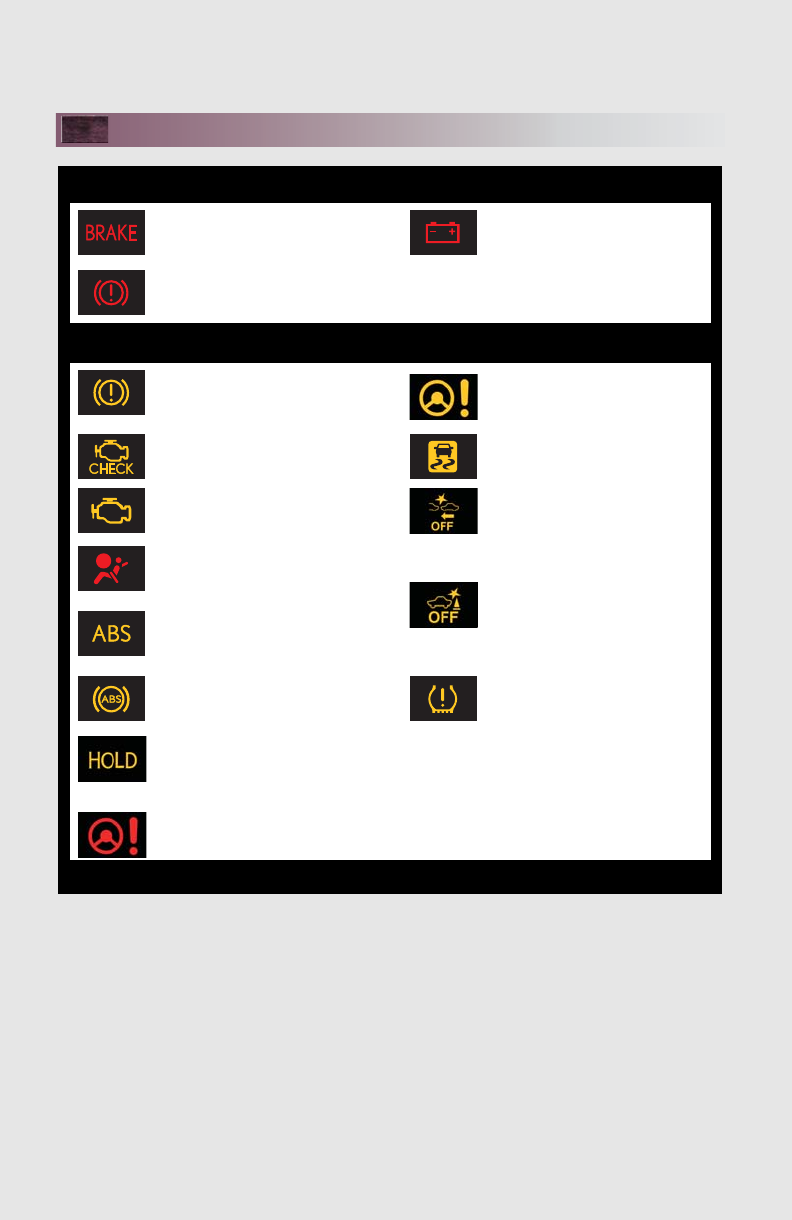
What to do if...
97
List of Warning/Indicator Lights
Stop the vehicle immediately. Continuing to drive the vehicle may be dangerous.
(U.S.A.)
Brake system
warning light
Charging system warning
light (if equipped)
(Canada)
Have the vehicle inspected immediately.
Brake system warning light Electric power steering
system warning light
(U.S.A.) Malfunction
indicator lamp
Slip indicator
(Canada)
(flashes with a
buzzer
sounding)
PCS warning light
(if equipped)
SRS warning light
(flashes with a
buzzer
sounding)
ICS OFF indicator
(if equipped)
(U.S.A.)
ABS warning light
(Canada)
(Blinking and
then continu-
ously on)
Tire pressure warning light
(Flashes)
Brake hold operated
indicator
Electric power steering
system warning light
For further information, refer to the Owner’s Manual.
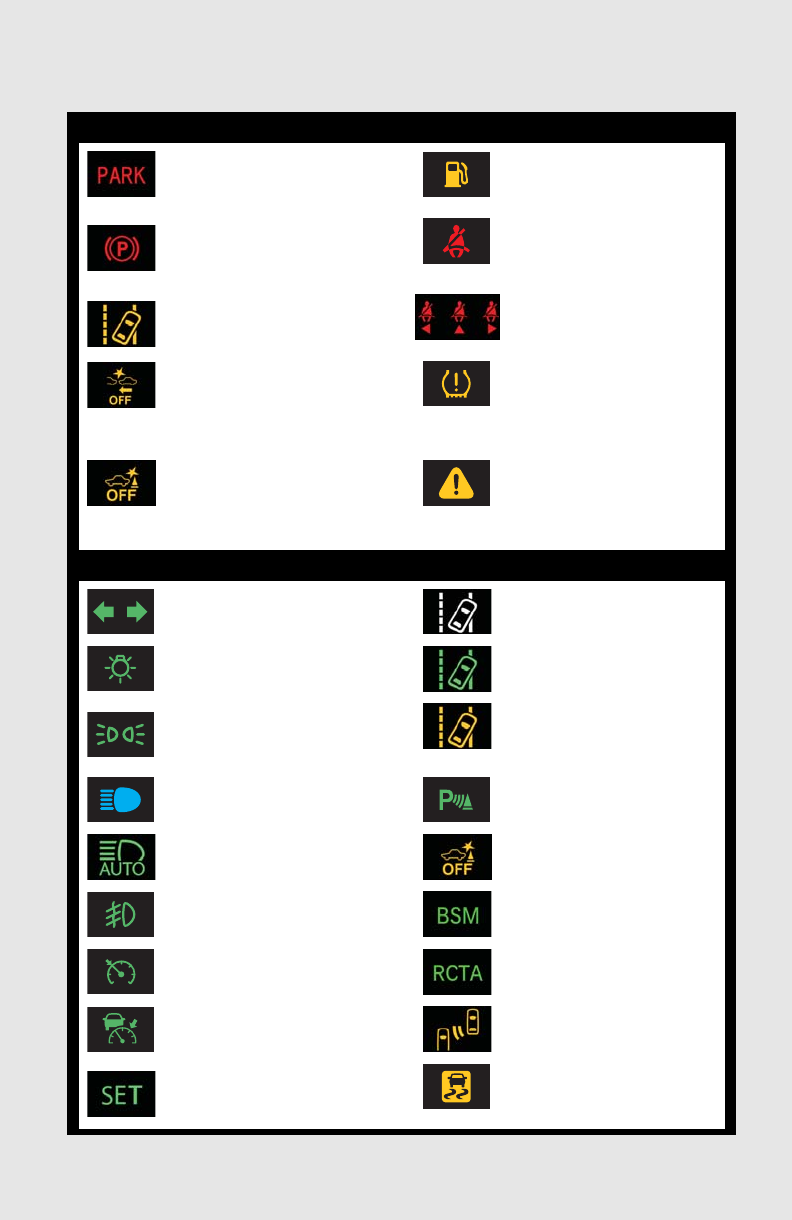
98
What to do if...
Follow the correction procedures.
(Flashes)
(U.S.A.)
Parking brake
indicator
Low fuel level warning light
Driver’s and front
passenger’s seat belt
reminder light
(Flashes)
(Canada)
Rear passengers’ seat
belt reminder light
(if equipped)
LKA indicator (if equipped)
(flashes with-
out a buzzer
sounding)
PCS warning light
(if equipped) (Illuminates
without
blinking)
Tire pressure warning light*
(flashes with-
out a buzzer
sounding)
ICS OFF indicator
(if equipped)
Master warning light
See the Owner’s Manual
Turn signal indicator LKA indicator (if equipped)
Headlight indicator (U.S.A.) LKA indicator (if equipped)
Tail light indicator (Canada)
(Flashes)
LKA indicator (if equipped)
Headlight high beam indicator Intuitive parking assist
indicator (if equipped)
Automatic High Beam
indicator (if equipped)
ICS OFF indicator
(if equipped)
Fog light indicator “BSM” indicator (if equipped)
Cruise control indicator “RCTA” indicator
(if equipped)
Radar cruise control indicator
(if equipped)
BSM outside rear view
mirror indicators (if equipped)
Cruise control “SET” indicator
(Flashes)
Slip indicator
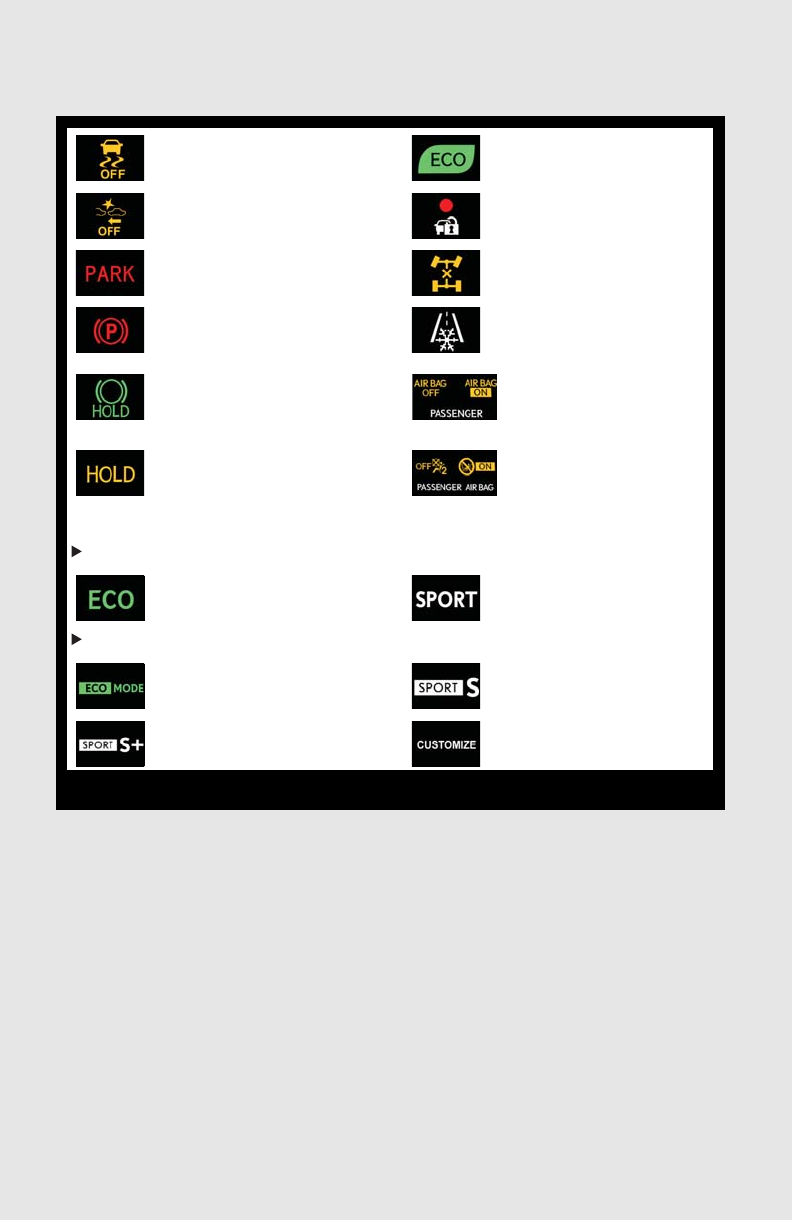
What to do if...
99
*: It also comes on due to natural causes such as natural air leaks and tire inflation pressure
changes caused by temperature. Adjust the tire inflation pressure to the specified level.
The light will turn off after a few minutes. In case the light does not turn off even if the tire
inflation pressure is adjusted, have the system checked by your Lexus dealer.
VSC OFF indicator Eco Driving Indicator Light
PCS warning light
(if equipped) Security indicator
(U.S.A.) Parking brake
indicator
All-wheel drive lock indicator
(AWD models only)
(Canada) Low outside temperature
indicator
Brake hold standby indicator
“AIR BAG
ON/OFF” indicator
(U.S.A.)
Brake hold operated
indicator
“AIR BAG
ON/OFF” indicator
(Canada)
●Drive mode indicators
Except F SPORT models
Eco drive mode indicator “SPORT” indicator
F SPORT models
Eco drive mode indicator “SPORT S” indicator
“SPORT S+” indicator “CUSTOMIZE” indicator
For further information, refer to the Owner’s Manual.
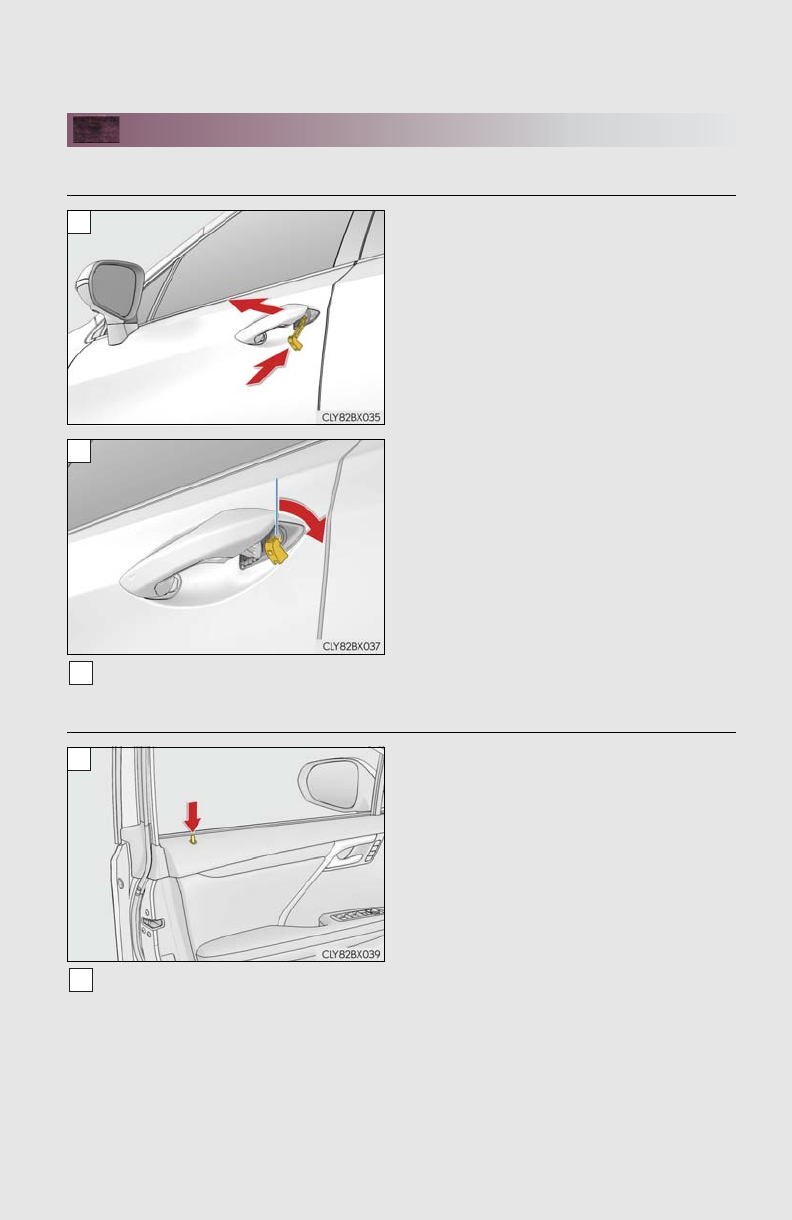
100
What to do if...
If the electronic key does not operate properly
■Unlocking and locking the doors
Insert the mechanical key while pulling on
the driver’s door handle.
Unlocking the door.
Turning the key rearward unlocks the
driver’s door. Turning the key again unlocks
the other doors.
Remove the key, return the handle, and then pull the handle again.
■Locking the door
With the door open, push down the inside
lock button.
Close the door.
1
2
3
1
2
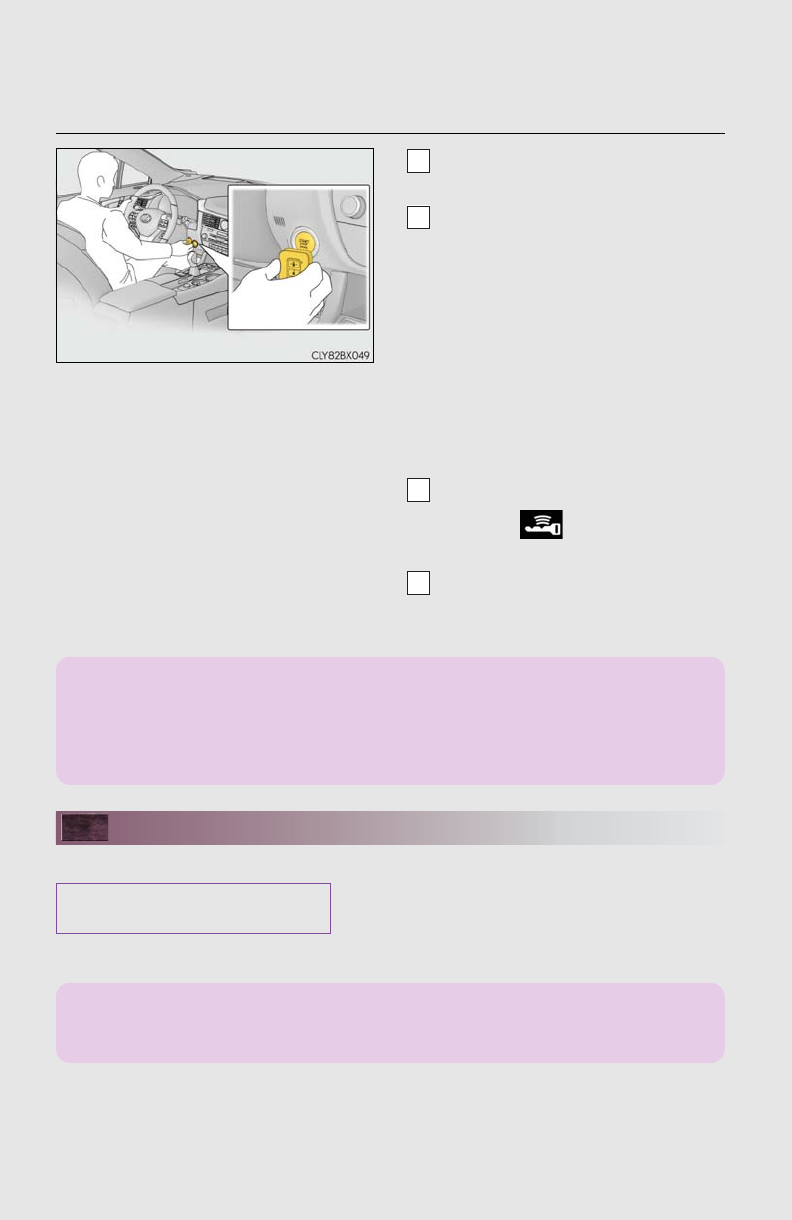
What to do if...
101
■Starting the engine
Ensure that the shift lever is in P and
depress the brake pedal.
Touch the Lexus emblem side of the
electronic key to the engine switch.
When the electronic key is detected,
a buzzer sounds and the engine
switch will turn to IGNITION ON
mode.
When the smart access system with
push-button start is deactivated in
customization setting, the engine
switch will turn to ACCESSORY
mode.
Firmly depress the brake pedal and
check that is shown on the multi-
information display.
Press the engine switch.
In the event that the engine still cannot be started, contact your Lexus dealer.
If the engine doesn’t start
Make sure that the correct operating procedures have been followed.
Make sure that the brake pedal is firmly
depressed when attempting to start the
engine. (→P.15)
1
2
3
4
If the electronic key battery is depleted, a warning message will be shown on the multi-
information display. Replace the battery with a new one. For instructions on replacing the
battery, refer to the “OWNER’S MANUAL”. If you need further assistance, contact your
Lexus dealer.
Brake pedal
If the engine still does not start, see the “OWNER’S MANUAL” for more information or
contact your Lexus dealer.

102
Your Lexus dealer
Your Lexus dealer will provide quality maintenance and any other assistance
you may require.
If there is not a Lexus dealer near you, please call the following number:
■U.S. OWNERS
●In the U.S. mainland or Canada:
Lexus Roadside Assistance
1-800-25-LEXUS or 1-800-255-3987 (Toll-Free)
●In Hawaii:
Servco Automotive Roadside Assistance/Customer Services
1-800-25-LEXUS or 1-800-255-3987 (Toll-Free)
■CANADIAN OWNERS
●In Canada or the U.S. mainland:
Lexus Roadside Assistance/Customer Service
1-800-26-LEXUS or 1-800-265-3987 (Toll-Free)
Please access our websites for further information.
●The U.S. mainland: www.lexus.com
●Hawaii: www.servcolexus.com
●Canada: www.lexus.ca
©2016 TOYOTA MOTOR CORPORATION
All rights reserved. This material may not be reproduced or copied, in whole or in part,
without the written permission of Toyota Motor Corporation.
