OMS 2.0 Book
OMS 2.0 Book OMS 2.0 Book
User Manual: OMS 2.0 Book
Open the PDF directly: View PDF ![]() .
.
Page Count: 46
- CHAPTER 1: Overview
- CHAPTER 2: Software Installation & CHAPTER 2: Defi...
- CHAPTER 3: Connecting your MIDI Studio
- CHAPTER 4: Easy Setup Procedure
- CHAPTER 5: Creating a New Studio Setup CHAPTER 5: ...
- CHAPTER 6: Configuring the OMS Drivers
- CHAPTER 7: Defining MIDI Devices
- CHAPTER 8: Connecting Devices in the CHAPTER 8: St...
- CHAPTER 9: Testing your Studio Setup CHAPTER 9: Do...
Open Music System (OMS)
Version 2.0
Opcode Systems, Inc.
3950 Fabian Way, Suite 100
Palo Alto, CA 94303
Opcode Part Number: 110-0211-02
Copyright ©1994 Opcode Systems, Inc. All rights reserved. This document may not, in whole or
part, be copied, photocopied, reproduced, translated or converted to any electronic or machine
readable form without prior consent of Opcode Systems, Inc.
OMS 2.0 Book Page 1 onsdag 14 februari 1996 09:26
OPCODE DISCLAIMER
OPCODE SYSTEMS, INC. (“OPCODE”)
MAKES NO WARRANTIES, EXPRESS OR
IMPLIED, INCLUDING WITHOUT LIMITA-
TION THE IMPLIED WARRANTIES OF
MERCHANTABILITY AND FITNESS FOR A
PARTICULAR PURPOSE, REGARDING THE
OPCODE SOFTWARE. OPCODE DOES NOT
WARRANT, GUARANTEE OR MAKE ANY
REPRESENTATIONS REGARDING THE
USE OR THE RESULTS OF THE USE OF
THE OPCODE SOFTWARE IN TERMS OF
ITS CORRECTNESS, ACCURACY, RELIABIL-
ITY, CURRENTNESS OR OTHERWISE. THE
ENTIRE RISK AS TO THE RESULTS AND
PERFORMANCE OF THE OPCODE SOFT-
WARE IS ASSUMED BY YOU. THE
EXCLUSION OF IMPLIED WARRANTIES IS
NOT PERMITTED BY SOME STATES. THE
ABOVE EXCLUSION MAY NOT APPLY TO
YOU.
IN NO EVENT WILL OPCODE, ITS DIREC-
TORS, OFFICERS, EMPLOYEES OR
AGENTS BE LIABLE TO YOU FOR ANY
CONSEQUENTIAL, INCIDENTAL OR INDI-
RECT DAMAGES (INCLUDING DAMAGES
FOR LOSS OF BUSINESS PROFITS, BUSI-
NESS INTERRUPTION, LOSS OF BUSINESS
INFORMATION, AND THE LIKE) ARISING
OUT OF THE USE OR INABILITY TO USE
THE OPCODE SOFTWARE EVEN IF
OPCODE HAS BEEN ADVISED OF THE
POSSIBILITY OF SUCH DAMAGES.
BECAUSE SOME STATES DO NOT ALLOW
THE EXCLUSION OR LIMITATION OF LIA-
BILITY FOR CONSEQUENTIAL OR
INCIDENTAL DAMAGES, THE ABOVE LIM-
ITATIONS MAY NOT APPLY TO YOU.
ACKNOWLEDGMENTS
Open Music System (OMS) written by Doug
Wyatt.
OMS manual written by Gregory A. Simpson
and Jon Drukman.
Special thanks to Mike Aaron for original text
and Doug Wyatt for technical editing.
OMS 2.0 Book Page 2 onsdag 14 februari 1996 09:26

OMS Manual
i
TABLE OF CONTENTS
PART 1: Getting Started with OMS 1
CHAPTER 1: Overview 3
Introduction to the Open Music System™ (OMS) ........................... 3
How to Read this Manual .................................................................... 4
What This Manual Doesn’t Cover ...................................................... 4
Manual Conventions ............................................................................ 5
CHAPTER 2: Software Installation & Definitions 7
Installing OMS...................................................................................... 7
Software Definitions............................................................................. 8
Studio Setup Documents ................................................................... 11
CHAPTER 3: Connecting your MIDI Studio 13
Connect your MIDI Interface to your Macintosh........................... 13
CHAPTER 4: Easy Setup Procedure 15
Using the Easy Setup Procedure...................................................... 15
PART 2: Studio Setups In Detail 19
CHAPTER 5: Creating a New Studio Setup Document 21
Launching the OMS Setup Application............................................ 21
Configuring OMS............................................................................... 22
Saving the Studio Setup Document.................................................. 24
Small and Large Icons........................................................................ 24
OMS 2.0 Book Page i onsdag 14 februari 1996 09:26

Table of Contents
ii
Opcode Systems, Inc.
CHAPTER 6: Configuring the OMS Drivers 27
Standard Interface.............................................................................. 27
SampleCell .......................................................................................... 28
MacProteus......................................................................................... 28
CHAPTER 7: Defining MIDI Devices 29
Defining MIDI Devices...................................................................... 29
Editing a Device ................................................................................. 31
CHAPTER 8: Connecting Devices in the Studio Setup Document 33
Automatic Device Connection .......................................................... 33
Manual Device Connection............................................................... 33
Disconnecting Cables ........................................................................ 34
Connecting Devices to Multi-Port Interfaces.................................. 35
Examples............................................................................................. 37
CHAPTER 9: Testing your Studio Setup Document 39
Entering Test Mode........................................................................... 39
Testing Mac-to-Device Connections ................................................ 39
Testing Device-to-Mac Connections ................................................ 40
Leaving Test Mode............................................................................. 40
OMS 2.0 Book Page ii onsdag 14 februari 1996 09:26

OMS Manual
1
PART 1: Getting Started with OMS
OMS 2.0 Book Page 1 onsdag 14 februari 1996 09:26

PART 1: Getting Started with OMS
2
Opcode Systems, Inc.
OMS 2.0 Book Page 2 onsdag 14 februari 1996 09:26

OMS Manual
3
CHAPTER 1: Overview
INTRODUCTION TO THE OPEN
MUSIC SYSTEM™ (OMS)
The Open Music System (OMS) is a Mac-
intosh system extension that bridges the
gap between MIDI applications and MIDI
hardware. It has many functions and
features:
•
OMS acts as a central MIDI
driver
. OMS-compatible applications
use OMS to communicate with all the
MIDI hardware in your studio. These
applications no longer require their
own dedicated MIDI drivers and,
therefore, work with a greater variety
of hardware.
•
OMS provides a central location
for defining and storing a detailed
description of your MIDI studio
.
With OMS, you enter information
about all the devices in your MIDI
studio once. OMS-compatible applica-
tions then reference that setup. If you
change your studio, simply inform
OMS of the change and all OMS-com-
patible applications immediately
reflect your new studio configuration.
•
OMS gives you access to hun-
dreds of MIDI channels
. You can
use OMS with either a standard Mac-
intosh MIDI interface (such as
Opcode’s MIDI Translator or
Studio 3) or with multi-port inter-
faces (such as Opcode’s Studio 4 and
Studio 5, Mark of the Unicorn’s MIDI
Time Piece I and II, or Lone Wolf’s
MIDITap). OMS is like a palette from
which you pick the devices and MIDI
channels that you’ll need. Your MIDI
interface determines the number of
simultaneous MIDI channels, but
OMS gives it access to every device
and MIDI channel in your studio.
•
OMS helps manage patch names.
Using the OMS Name Manager, you
can keep track of the
names
of the
sounds loaded in your devices. Since
this service is part of OMS, the name
information is available in any OMS-
compatible application.
Since OMS is a system extension, its ser-
vices are available to applications every
time you start your computer. It doesn’t
take up much memory or control the
Macintosh serial ports until an OMS-com-
patible application asks for its services.
OMS 2.0 Book Page 3 onsdag 14 februari 1996 09:26

PART 1: Getting Started with OMS
4
Opcode Systems, Inc.
HOW TO READ THIS MANUAL
NOTE: Macintosh and MIDI experts may
be able to start using OMS simply by read-
ing Chapter 4: Easy Setup Procedure and
by following the on-line help, referring to
other sections of this manual for reference.
This manual assumes that you are famil-
iar with basic Macintosh operations. If
you’re not, please read the Macintosh
manual. In particular, you should be com-
fortable with clicking, double-clicking,
dragging, choosing, selecting, scrolling,
windows and pop-up menus.
Also, you should have a basic understand-
ing of MIDI. If you don’t, you may wish to
purchase Opcode’s Book of MIDI™
Hypercard stack or read one of the many
basic MIDI reference books available.
This manual accurately describes OMS
operations at the time of its printing. How-
ever, updates and changes may occur.
Always look for change information in the
Read Me folder on your master program
disk.
This manual is divided into three parts:
•
Getting Started with OMS
—This
part includes this introductory chap-
ter, a chapter on software installation
and definitions, instructions on con-
necting MIDI interfaces, and a quick
start guide to OMS for users who
don’t need fine control over their
studio setups.
•
Studio Setups In Detail
—This part
is a detailed look at the Studio Setup
procedure and discusses using the
OMS Setup application.
The Name Manager, while a part of OMS,
is not discussed in this manual. Refer to
the manual for the specific application in
which you’re using the Name Manager.
WHAT THIS MANUAL DOESN’T
COVER
OMS provides support for a wide variety
of features. In order to help you find just
the information that you need, Opcode
provides small documents called Techni-
cal Publications that address specific
topics not covered in this manual. At the
time of printing, there are technical publi-
cations for:
Publication # Pub Name
1950401 QuickTime Music OMS
Driver
1950402 Using OMS with MIDI
Manager
1950403 Using OMS with a MIDI
Time Piece
1950404 Using OMS with a MIDI
Patchbay
1950405 Special Studio Setup
Techniques
OMS 2.0 Book Page 4 onsdag 14 februari 1996 09:26
CHAPTER 1: Overview
OMS Manual
5
Other publications will be made available
in the future. To obtain a current list, or to
order publications, contact Opcode tech-
nical support, or look on Opcode’s online
support areas. If you can download files
from online services, you can download
the technical publications right away.
To reach Opcode Technical Support:
MANUAL CONVENTIONS
This manual uses a number of conven-
tions that make it easier to discuss and
understand certain on-screen actions.
Mouse Actions
This manual uses the following terms to
describe various mouse actions:
•
Click
: When the manual instructs
you to
click
, position the mouse
where you’re told and press once on
the mouse button, then immediately
release it.
•
Double-click
: When the manual
instructs you to
double-click
, position
the mouse where you’re told and rap-
idly press and release the mouse
button twice.
•
Press and hold
: When the manual
instructs you to
press and hold
, posi-
tion the mouse where you’re told,
press the mouse button and hold it
down until instructed to release it.
•
Release
: When the manual instructs
you to
release
, let up on the mouse
button (which you were probably
holding down because of an earlier
press and hold
instruction).
•
Drag
: When the manual instructs you
to
drag
, position the mouse where
you’re told, then press the mouse
button and hold it down as you move
the mouse.
•
Move
: When the manual instructs
you to
move
the mouse, simply move
it to another location on the screen
without pressing its button.
Choose vs. Select
The words “choose” and “select” are often
interchangeable in conversational
English. In this manual, however, there is
a distinct difference between the two
terms.
1950406 OMS Menu Reference
1950501 Performance Tips and
Troubleshooting
1950502 Working with Opcode
Applications
1950503 Glossary of Terms
Phone 415-856-3333 (M-F, 9-5
Pacific Standard Time)
FAX 415-856-3331
FTP ftp.opcode.com
World-Wide
Web http://www.opcode.com
E-mail OpcodeS@aol.com
Publication # Pub Name
OMS 2.0 Book Page 5 onsdag 14 februari 1996 09:26
PART 1: Getting Started with OMS
6
Opcode Systems, Inc.
•
Select
: When the manual tells you to
“select” something, it stays selected.
This is the case with checkboxes and
menu options.
•
Choose
: When the manual tells you
to “choose” something, a one-time
action is performed. This is the case
with most commands; they perform
their chosen action only once.
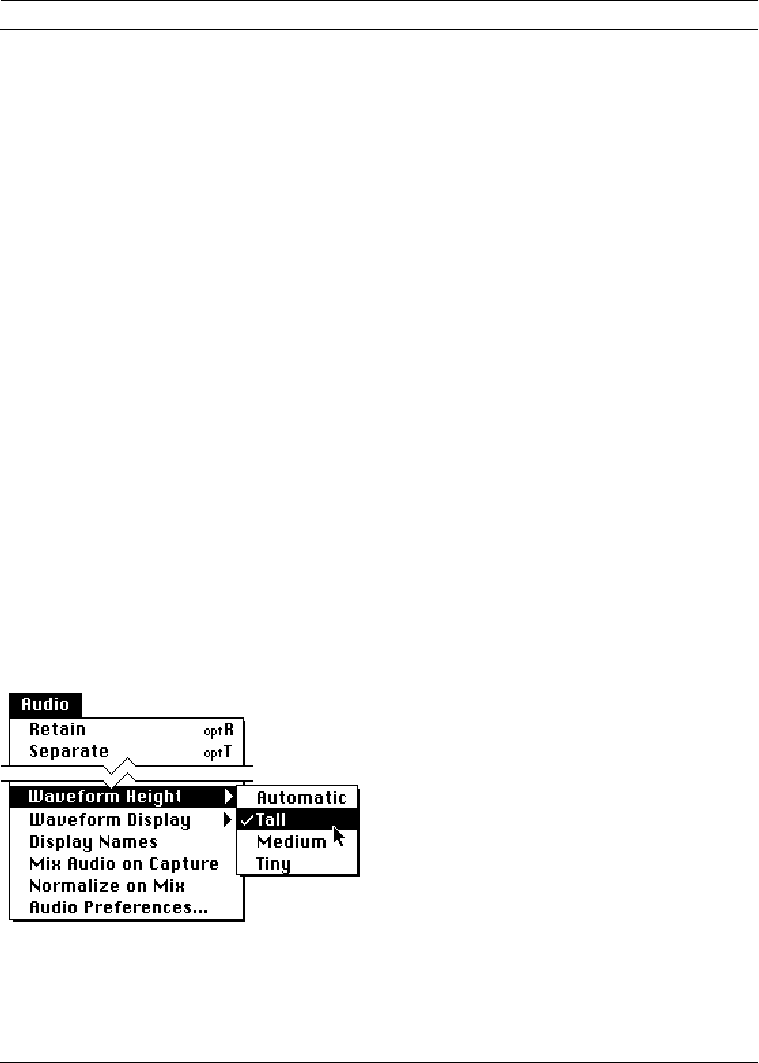
Menu Commands
This manual uses a shorthand technique
to invoke various menu items. For
instance, this manual might say:
“Select
Audio>Waveform Height>Tall
.”
What this means in plain English is
“select the
Tall
option from the
Audio
menu’s
Waveform Height
submenu.”
Although the shorthand technique results
in sub-standard grammar, it’s easier to
read and decipher than a complete sen-
tence because it displays the menu’s
hierarchical structure plainly and simply.
Figure 1.1: Shorthand Invocation of Menu Items
OMS 2.0 Book Page 6 onsdag 14 februari 1996 09:26

OMS Manual
7
CHAPTER 2: Software Installation &
Definitions
INSTALLING OMS
Your OMS disk contains an installer pro-
gram that looks like this:
Figure 2.1: OMS Installer icon
Double-click the installer icon to launch
the installer. The installer prompts you
each step of the way with yes or no ques-
tions. Answer the questions and the
installer will automatically put the
required files in their proper locations.
NOTE
: If you experience a crash when
installing OMS, disable all extensions
(restart the Macintosh while holding down
the Shift key) and run the Installer again.
What’s Installed
The Installer places all the necessary
OMS files onto your hard disk automati-
cally. After running the Installer and
restarting your Macintosh, you can begin
to use OMS.
This chapter lists exactly what files the
Installer places onto your hard disk and
where it places them.
If you are updating from an older version
of OMS, your previous Studio Setup docu-
ments will be read by the new OMS Setup
application.
CAUTION
: Do not relocate or rename any
files or folders that the Installer places in
the System Folder. You may delete unneces-
sary files, but some files are essential for
OMS operation. See Software Definitions
(pg. 8) for more information.
Here is an overview of the OMS file
layout:
• The Open Music System extension is
placed into the Extensions folder.
• A folder named OMS Folder is cre-
ated within the System Folder and
OMS drivers are placed inside it.
• OMS applications are placed inside a
folder that you name during the
installation process. The default name
is “OMS applications”.
You can move the applications folder, but
the extension and OMS Folder must
remain in their initial locations.
OMS 2.0 Book Page 7 onsdag 14 februari 1996 09:26
PART 1: Getting Started with OMS
8
Opcode Systems, Inc.
SOFTWARE DEFINITIONS
This section describes each file that the
installer could possibly place on your hard
disk. If, after reading the definition, you
are sure you won’t need the file, you can
throw it away. For instance, if you don’t
have a Studio 3 interface, there is no
reason to have the Studio 3 OMS Driver
on your hard drive.
Future releases of OMS may add new
files or features, so consult the READ ME
document on your master disk for addi-
tional information.
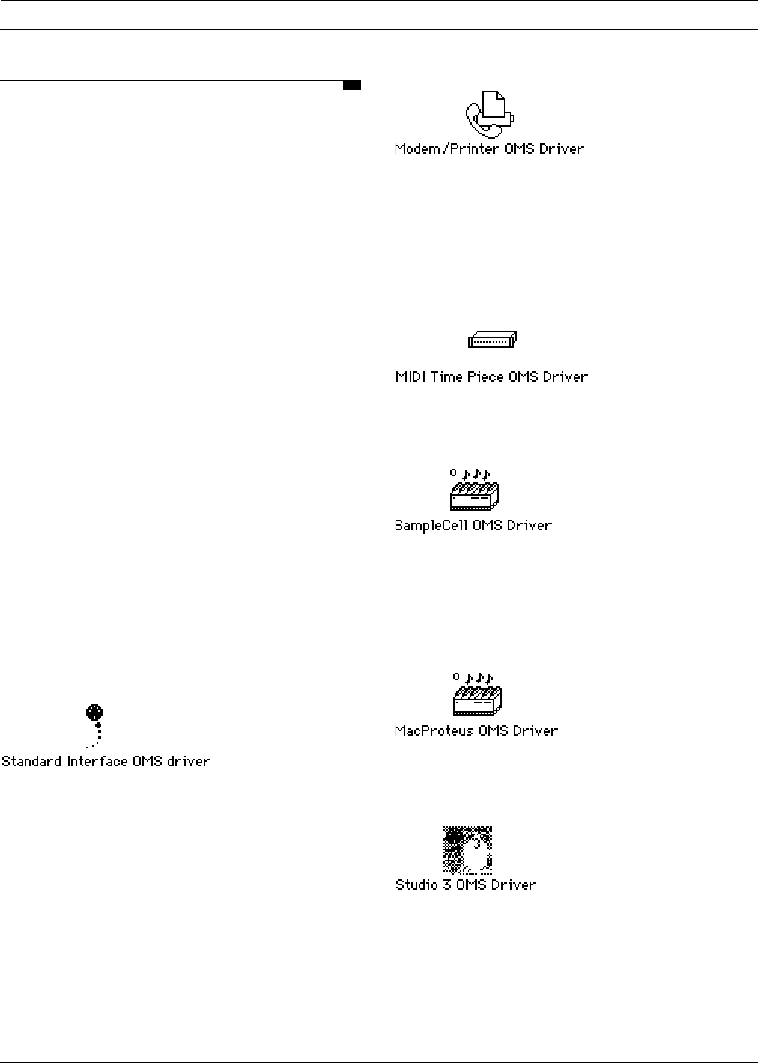
Drivers
OMS drivers allow OMS to work with a
variety of products that either connect to
the Macintosh, or live inside it. You may
remove any drivers that you don’t need
from your hard disk. Drivers are located
in the OMS Folder inside your System
Folder. The following drivers are cur-
rently available:
Provides the ability for OMS to work with
any standard Macintosh MIDI Interface
(such as a MIDI Translator, or
Studio Plus Two).
A serial hardware driver, designed to
allow MIDI interfaces to be connected in
a hardware independent fashion. At the
moment it only supports the built-in
modem and printer ports, but may in the
future support other serial hardware.
Provides the ability for OMS to work with
a Mark of the Unicorn MIDI Time Piece.
Provides the ability for OMS to work with
a Digidesign SampleCell card (v1.2 or
higher), without requiring MIDI
Manager.
Provides the ability for OMS to work with
a Digidesign MacProteus card.
Use this driver if you have an Opcode
Studio 3 MIDI interface connected to the
Macintosh. It adds a special Studio 3
OMS 2.0 Book Page 8 onsdag 14 februari 1996 09:26
CHAPTER 2: Software Installation & Definitions
OMS Manual
9
menu to OMS Setup that allows you to
configure the interface’s SMPTE func-
tions and ports.
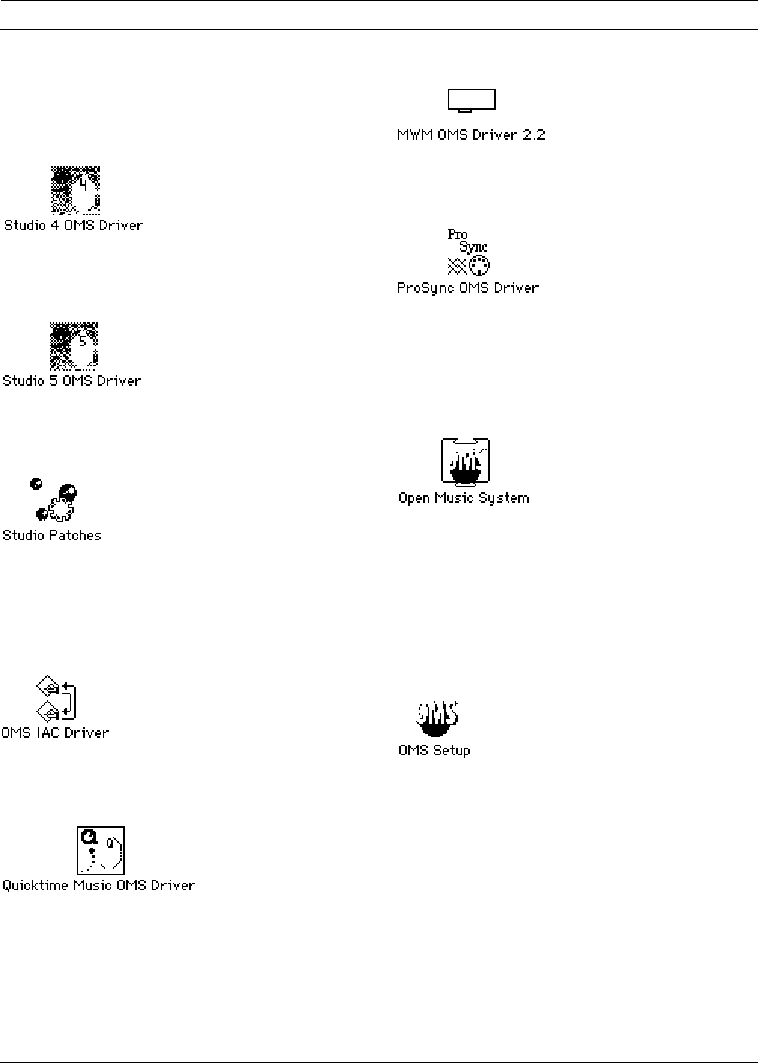
This driver allows OMS to work with
Opcode’s Studio 4 interface.
This driver allows OMS to work with
Opcode’s Studio 5 interface.
This driver is the companion to the Studio
5 OMS Driver. It allows the Studio 5 to
use Studio Patches. See the Studio
Patches Manual for details.
Provides support for Inter-Application
Communication.
Allows OMS to access the music support
built in to Quicktime 2.0 and later.
Allows OMS to access the MacWave-
Maker card.
This driver allows OMS to work with
Opcode’s Translator ProSync interface.
Open Music System
This is the system extension that routes
MIDI between applications and MIDI
devices. You should not remove this file
from your hard disk.
Applications
OMS Setup is an application that you use
to tell OMS about your MIDI studio. This
information is contained and displayed in
a Studio Setup document. You can create
more than one Studio Setup document to
OMS 2.0 Book Page 9 onsdag 14 februari 1996 09:26
PART 1: Getting Started with OMS
10
Opcode Systems, Inc.
mirror more than one studio setup, but
you can only use one Studio Setup docu-
ment at a time.
If you change the connections in your
MIDI studio or add or remove a device,
use the OMS Setup application to make
the corresponding changes in the Studio
Setup document or create a new docu-
ment that accurately represents the
changes.
You should not remove this application
from your hard disk.
If you have a relatively uncomplicated
studio configuration, you can use OMS’
“Easy Setup” feature to automatically
create Studio Setup documents. See
Studio Setup Documents
(pg. 11) for more
information.
This application allows you to create
patches for Opcode’s Studio 4 and
Studio 5 multi-port interfaces. For more
information, see the Studio Patches
Manual.
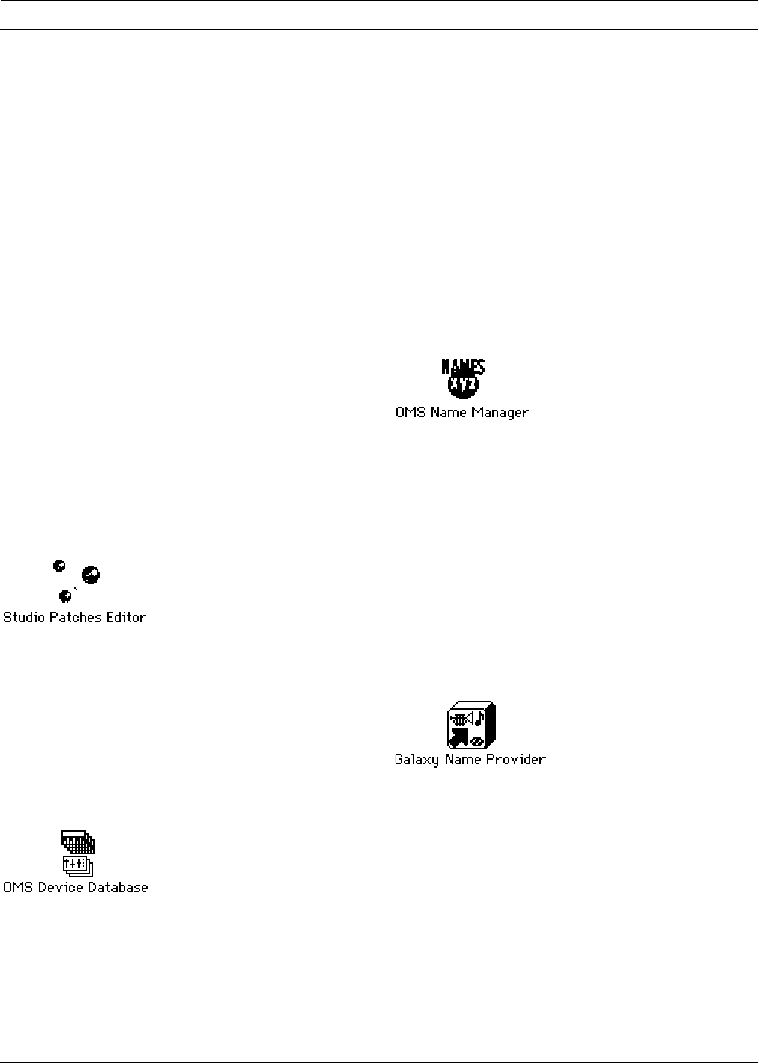
OMS Device Database
This file contains information about vari-
ous MIDI devices. It partially determines
which devices appear in the manufac-
turer/model menus in OMS Setup (Other
applications may install their own addi-
tions to OMS Device Info as separate files
and, if you use Galaxy, any devices in the
Galaxy Installed Modules file are added to
the manufacturer/model menus). The
manufacturer/model menus are dis-
cussed in Chapter 7: Defining MIDI
Devices. You should not remove this file
from your hard disk.
OMS Name Manager
The OMS Name Manager is a component
of OMS that supports sharing of patch,
note and control names between
applications.
Name Providers
A name provider is a module that
retrieves names from an application’s
documents.
OMS comes with this module for interfac-
ing with Opcode’s Galaxy patch librarian
software.
OMS 2.0 Book Page 10 onsdag 14 februari 1996 09:26
CHAPTER 2: Software Installation & Definitions
OMS Manual
11
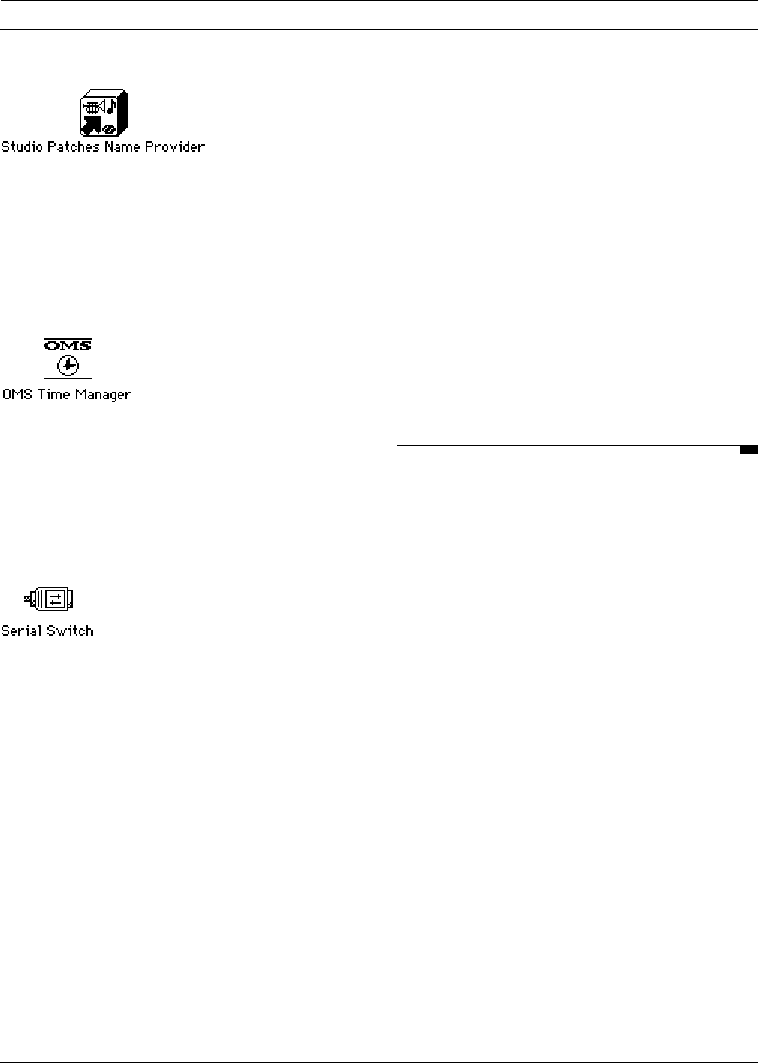
This module allows OMS to retrieve patch
names from Studio Patches documents.
(See the Studio Patches manual for more
information.)
OMS Time Manager
The Time Manager is a component of
OMS that provides timing service. With
this module, diverse applications can be
synchronized to one clock source—OMS.
Serial Switch
The serial switch is required for the fol-
lowing computers: IIfx, Quadra 900,
Quadra 950. If you have one of these com-
puters, then you must use this control
panel in order to use MIDI applications.
Choose “Compatible” instead of “Faster”
in the control panel if you’re running
MIDI applications. The Serial Switch is
installed automatically only if you have
one of the requisite computers. If you do
not use these computers, and you’ve man-
ually installed the Serial Switch, you may
remove it from your hard disk.
Factory Names Folder
Any device that comes with default
patches can list their names in a file which
goes inside the Factory Names folder.
These names will always be available in
programs that make use of the OMS
Name Manager.
OMS Preferences Folder
Customized choices and a reference to
your current Studio Setup are stored in
files within this folder.
STUDIO SETUP DOCUMENTS
The centerpiece of OMS is the Studio
Setup Document. This is a file that is cre-
ated automatically by OMS, or manually
by you, that contains information about:
• MIDI interface hardware physically
connected to the Macintosh (eg:
Studio 4 Interface, MIDI Time Piece)
• Cards inside the Macintosh (eg: Sam-
plecell, MacProteus)
• “Virtual Devices” (eg: QuickTime
Music driver)
• MIDI devices connected to MIDI
interfaces (eg: drum machines, syn-
thesizers, etc.)
OMS 2.0 Book Page 11 onsdag 14 februari 1996 09:26

PART 1: Getting Started with OMS
12 Opcode Systems, Inc.
You can store any number of Studio Setup
documents to describe any number of stu-
dios or studio configurations, but OMS
can reference only one Studio Setup docu-
ment at a time. This is called the current
Studio Setup document.
Once you’ve defined a current Studio
Setup document, OMS knows each instru-
ment’s name, port, MIDI reception
channel(s), device ID and many other
details. This information is provided to all
OMS-compatible applications such as
Vision, Galaxy, MAX, Overture and oth-
ers. Within these applications, you simply
select and work with devices by name—
OMS handles the rest. Any time you
change your current Studio Setup docu-
ment, OMS automatically provides the
updated information to all your OMS-com-
patible applications.
Easy Setup vs. Custom Setup
There are two methods for defining a
Studio Setup document:
• Easy Setup: this automated proce-
dure is invoked when there is no
current Studio Setup document and
an OMS-compatible application is
opened. Chapter 4: Easy Setup Proce-
dure describes this method.
• Custom Setup: if you need a higher
degree of control, you can use the
OMS Setup application to create cus-
tomized Studio Setup documents.
This procedure is described in
Chapter 5: Creating a New Studio
Setup Document, and the rest of
Part 2.
Remember, Easy Setup was designed to
be a “quick and dirty” way to get going. If
you have a complicated studio configura-
tion (eg: devices connected via MIDI
Thru jacks, or devices whose input and
output port numbers aren’t the same),
you will need to use the OMS Setup appli-
cation to create a custom Studio Setup
document.
OMS 2.0 Book Page 12 onsdag 14 februari 1996 09:26

OMS Manual 13
CHAPTER 3: Connecting your MIDI Studio
In this chapter you’ll connect the various
interfaces and MIDI devices in your stu-
dio. All MIDI studios are different, so the
techniques discussed in this chapter are
very general. You should consult the man-
uals that came with your MIDI devices
and interfaces to set up the best MIDI
studio for your needs.
CONNECT YOUR MIDI
INTERFACE TO YOUR
MACINTOSH
If you have not already done so, connect
your MIDI interface to the Macintosh and
your MIDI devices to the interface. Con-
sult your interface and synthesizer
manuals for more details. The following
examples will aid you in connecting your
devices. Follow the example that most
closely resembles your MIDI studio.
If your MIDI studio is already connected,
you can skip this chapter.
Connecting a Single Port
Standard MIDI Interface
This example assumes that you have a
single-port standard MIDI interface con-
nected to the Macintosh Modem port and
to three MIDI synthesizers.
aTurn off power to both your
Macintosh and your MIDI interface.
bAttach your MIDI interface to either
the Macintosh Modem port or Printer
port.
This example assumes you’ll use the
Modem port.
cConnect standard MIDI cables from
the MIDI IN connectors of each
synthesizer to the MIDI OUT
connectors on the Macintosh
interface.
dConnect a standard MIDI cable from
the MIDI OUT connector of your
master controller to the MIDI IN
connector on the interface box.
eTurn on your MIDI interface and your
Macintosh.
OMS 2.0 Book Page 13 onsdag 14 februari 1996 09:26
PART 1: Getting Started with OMS
14 Opcode Systems, Inc.
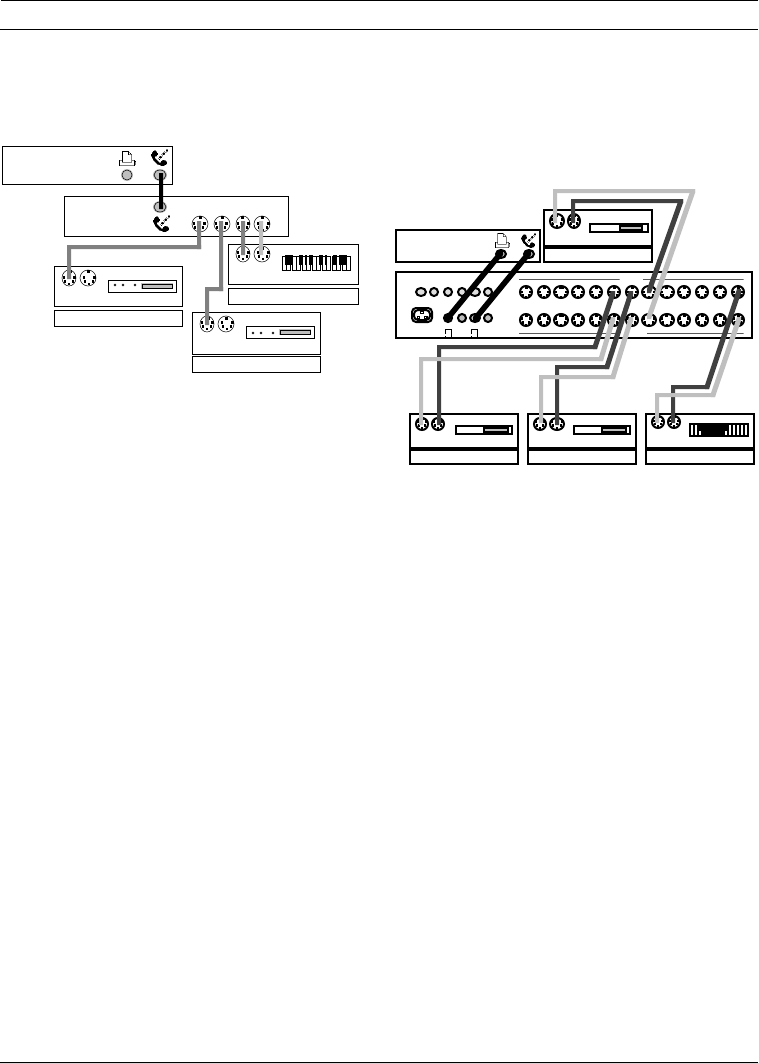
Figure 3.1 illustrates a simple studio with
a single port standard MIDI interface.
Figure 3.1: Standard One-Port MIDI Interface
Connecting a Multi-Port Interface
This example assumes that you have a
multi-port MIDI interface connected to
both Macintosh serial ports.
aTurn off power to both your
Macintosh and your interface.
bConnect either or both of the
Macintosh serial ports to the
interface.
This example assumes that you connect
both.
cConnect MIDI devices to like-
numbered pairs of MIDI ports on the
interface.
dTurn on your interface and
Macintosh.
Figure 3.2 illustrates a simple studio
incorporating a Studio 5. Use similar con-
nections for the Studio 4, MIDI Time
Piece or other multi-port interfaces.
Figure 3.2: Studio 5 Two-Port Connection
MIDI
OUT
MACINTOSH
IN OUT
Emu Proteus/1
IN OUT
Korg M1
MIDI
OUT
MIDI
IN
MIDI
OUT
IN OUT
Roland R-8M
STANDARD
MIDI
INTERFACE
IN OUT
Oberheim Matrix-1000
IN OUT
Roland R-8M
IN OUT
Emu Proteus/1
IN OUT
Korg M1
MACINTOSH
BA
OUT
MIDI OUT
MIDI IN
IN
B
THRU A
THRU
12345678910111213
IN
AUDIOFS2FS1FC1
OMS 2.0 Book Page 14 onsdag 14 februari 1996 09:26
OMS Manual 15
CHAPTER 4: Easy Setup Procedure
If you’re in a hurry to get started, you can
use OMS’ “Easy Setup” feature to quickly
create Studio Setup documents.
This chapter assumes that you have
hooked up your MIDI interfaces, cards
and devices. If you haven’t, do so now. If
you don’t know how, see
Chapter 3: Connecting your MIDI Studio
and the manuals supplied with your inter-
faces and devices.
Before continuing, make sure that you’ve
restarted your Macintosh after installing
OMS.
USING THE EASY SETUP
PROCEDURE
aOpen any OMS-compatible
application, such as Vision.
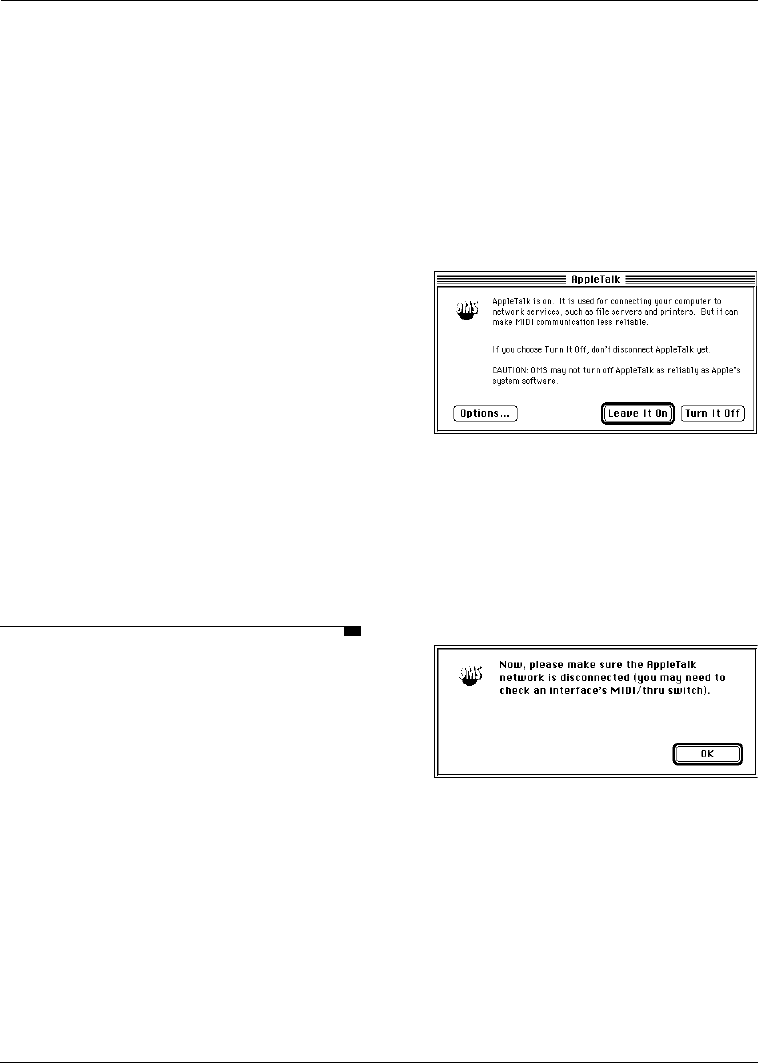
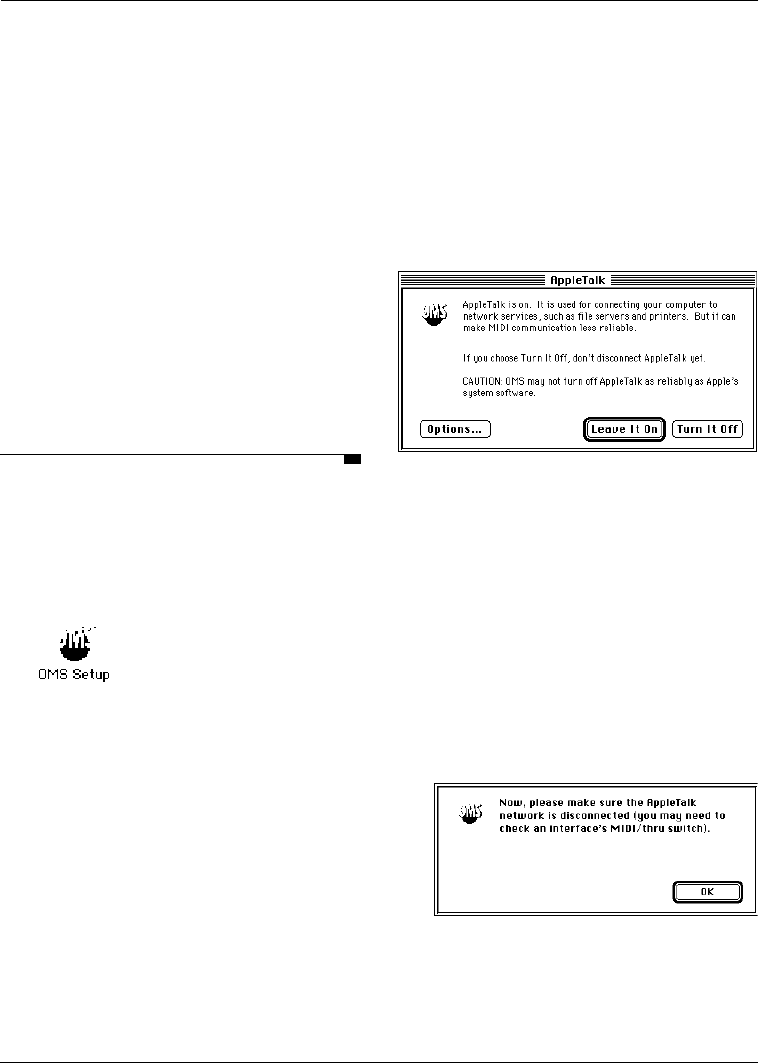
bIf AppleTalk is active, you’ll see the
dialog box shown in Figure 4.1.
Figure 4.1: AppleTalk Alert Dialog Box
You should not use AppleTalk with MIDI
applications, so...
cClick Turn it Off in the AppleTalk
Alert box to turn off AppleTalk.
You’ll see the dialog box shown in
Figure 4.2
Figure 4.2: Disconnect AppleTalk Dialog Box
dDisconnect your AppleTalk network
and click OK.
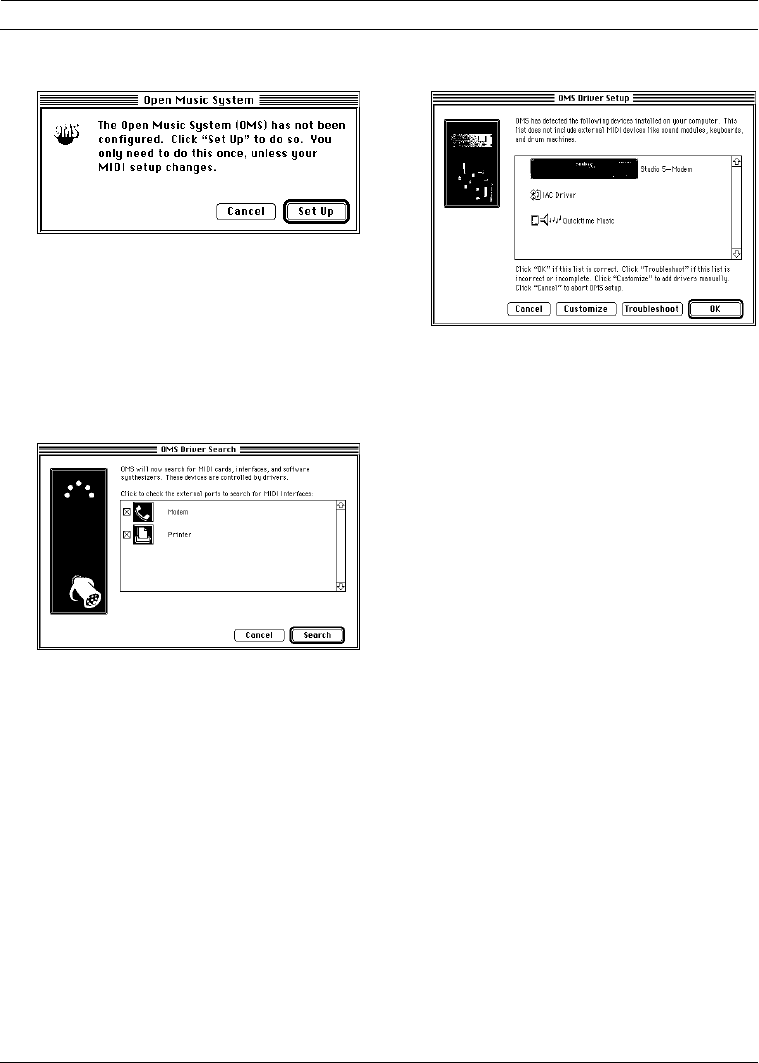
eOMS warns you that there is no
current Studio Setup information.
OMS 2.0 Book Page 15 onsdag 14 februari 1996 09:26
PART 1: Getting Started with OMS
16 Opcode Systems, Inc.
Click Set Up to start the Easy Setup
procedure.
fA dialog box appears with
checkboxes for both serial ports.
Check the serial ports that you want
OMS drivers to search for interface
hardware.
Ports without MIDI interfaces should
NOT be checked. Checking non-MIDI
ports can cause your computer to crash.
gClick Search to continue.
OMS asks all the installed OMS drivers
to look for hardware or software that they
can communicate with. When all the
drivers have had their turn, the following
dialog box appears:
hAt this stage, you have four choices:
You can click Cancel to abort the entire
procedure.
If you want to add interfaces to OMS
manually, click Customize. You will be
presented with each possible interface in
turn and asked to click Add or Don’t
Add.
If the automatic process didn’t work, you
can click Troubleshoot. OMS will
present you with some information about
possible sources of trouble and offer to
scan again for interfaces.
If your setup was properly identified,
click OK.
iOnce you have supplied a valid list of
interfaces, OMS begins identifying
connected devices.
Some MIDI devices can provide informa-
tion about themselves. If OMS can
automatically identify a device, its name
will appear in the identified device list.
OMS 2.0 Book Page 16 onsdag 14 februari 1996 09:26

CHAPTER 4: Easy Setup Procedure
OMS Manual 17
It is unlikely that OMS will successfully
identify all your devices. However, if you
have devices that you think should have
been identified, but weren’t, click Trou-
bleshoot to view a checklist of
common problems with auto-ID.
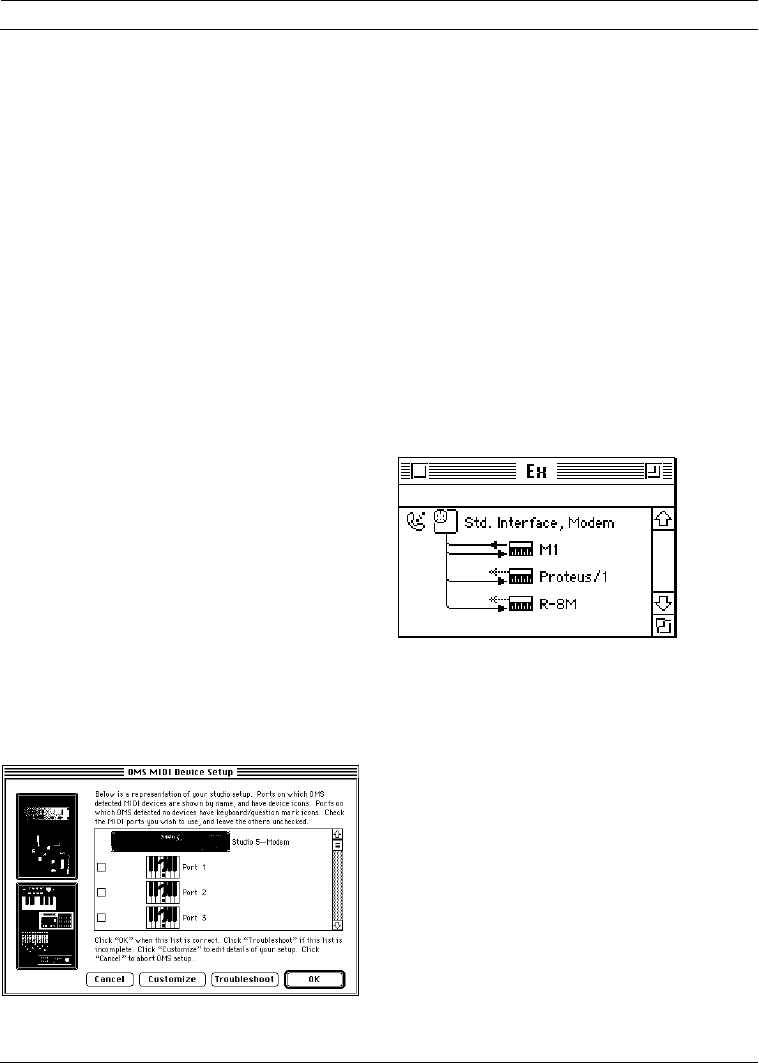
jCheck the ports to which MIDI
devices are connected. For example,
if you have devices on ports 3 and 5,
make sure the boxes for ports 3 and 5
are checked before clicking OK.
You have now created an “Easy Setup”
Studio Setup document. OMS-compatible
applications will refer to automatically
identified devices by name. Ports contain-
ing devices that aren’t automatically
identified are named generically (eg:
“Port 7”) and have all 16 MIDI channels
enabled for transmitting and receiving.
Automatically created setups are given
names like “Auto Setup 8/21/95, 6:53
PM”, and stored in the OMS Folder. You
can open and modify them using OMS
Setup
OMS 2.0 Book Page 17 onsdag 14 februari 1996 09:26

PART 1: Getting Started with OMS
18 Opcode Systems, Inc.
OMS 2.0 Book Page 18 onsdag 14 februari 1996 09:26

OMS Manual 19
PART 2: Studio Setups In Detail
OMS 2.0 Book Page 19 onsdag 14 februari 1996 09:26

PART 2: Studio Setups In Detail
20 Opcode Systems, Inc.
OMS 2.0 Book Page 20 onsdag 14 februari 1996 09:26
OMS Manual 21
CHAPTER 5: Creating a New Studio Setup
Document
In this chapter you’ll use the OMS Setup
application to open a new Studio Setup
document that contains device drivers for
all MIDI interfaces, cards, and “virtual
devices” (such as the QuickTime Music
driver) that are connected to your
Macintosh.
LAUNCHING THE OMS SETUP
APPLICATION
aDouble-click the OMS Setup icon
located on your hard disk to open the
OMS Setup application.
Figure 5.1: OMS Setup Icon
AppleTalk
If AppleTalk is active the first time you
launch OMS Setup, you’ll see the dialog
box shown in Figure 5.2. If AppleTalk is
not active, you will not see this dialog box
and can proceed to Configuring OMS
(pg. 22).
Figure 5.2: AppleTalk Alert Dialog Box
You should not use AppleTalk with MIDI
applications, so...
bClick Turn it Off in the AppleTalk
Alert box to turn off AppleTalk.
OMS Setup remembers whether you
want AppleTalk on or off, and future alert
boxes display your previous AppleTalk
preference as the default (highlighted)
button.
You’ll see the dialog box shown in
Figure 5.3
Figure 5.3: Disconnect AppleTalk Dialog Box
cDisconnect your AppleTalk network
and click OK.
OMS 2.0 Book Page 21 onsdag 14 februari 1996 09:26
PART 2: Studio Setups In Detail
22 Opcode Systems, Inc.
BACKGROUND: AppleTalk is the Mac-
intosh communication protocol for local
area networks (LANs). If AppleTalk is
active, and LocalTalk is selected in the Net-
work control panel, no MIDI
communication can take place over the
Printer port and MIDI communication is
made less reliable over the Modem port.
CONFIGURING OMS
After double-clicking the OMS Setup
application and disabling AppleTalk (if
necessary), you’ll see the dialog box
shown in Figure 5.4.
Figure 5.4: Configuring OMS Dialog
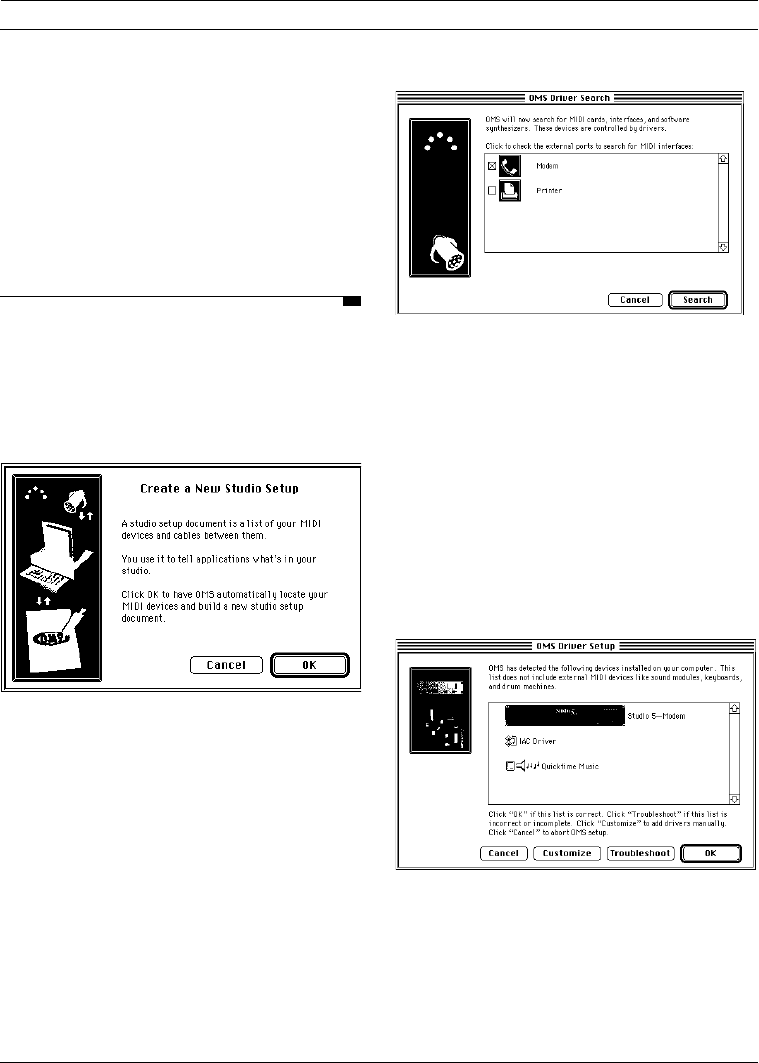
Click OK to proceed. The following dialog
box appears:
OMS drivers will scan the ports of your
machine for connected MIDI interfaces.
Check the serial ports you want searched.
Click Search to begin. OMS asks its driv-
ers to search the selected port(s) for
MIDI interfaces and the Macintosh for
MIDI cards (such as SampleCell or
MacProteus) or “virtual devices” (such as
the QuickTime Music driver).
When the search is complete, you will see
the following dialog box:
Figure 5.5: Completed search dialog box
At this stage you have four options:
• You can click Cancel to abort the
entire procedure.
OMS 2.0 Book Page 22 onsdag 14 februari 1996 09:26
CHAPTER 5: Creating a New Studio Setup Document
OMS Manual 23
• If you want to add interfaces to OMS
manually, click Customize. You will
be presented with each possible inter-
face in turn and asked to click Add or
Don’t Add.
• If the automatic process didn’t work,
you can click Troubleshoot. OMS
will present you with some informa-
tion about possible sources of trouble
and offer to scan again for interfaces.
• If your setup was properly identified,
click OK.
Device Identification
After locating the interfaces, OMS queries
all possible ports for device identification.
Some newer MIDI devices can tell OMS
their manufacturer and model. Any
devices you have that are capable of sup-
plying this information will be
automatically configured into the Studio
Setup document. If nothing shows up, you
have to enter the device information man-
ually. This is discussed in
Chapter 7: Defining MIDI Devices.
When the Device ID process is finished,
the following dialog appears:
The four available buttons function simi-
larly to the ones described in the Interface
Search section. The following differences
apply:
•Customize and OK both proceed to
the normal Studio Setup document
windowStudio Setup document
window.
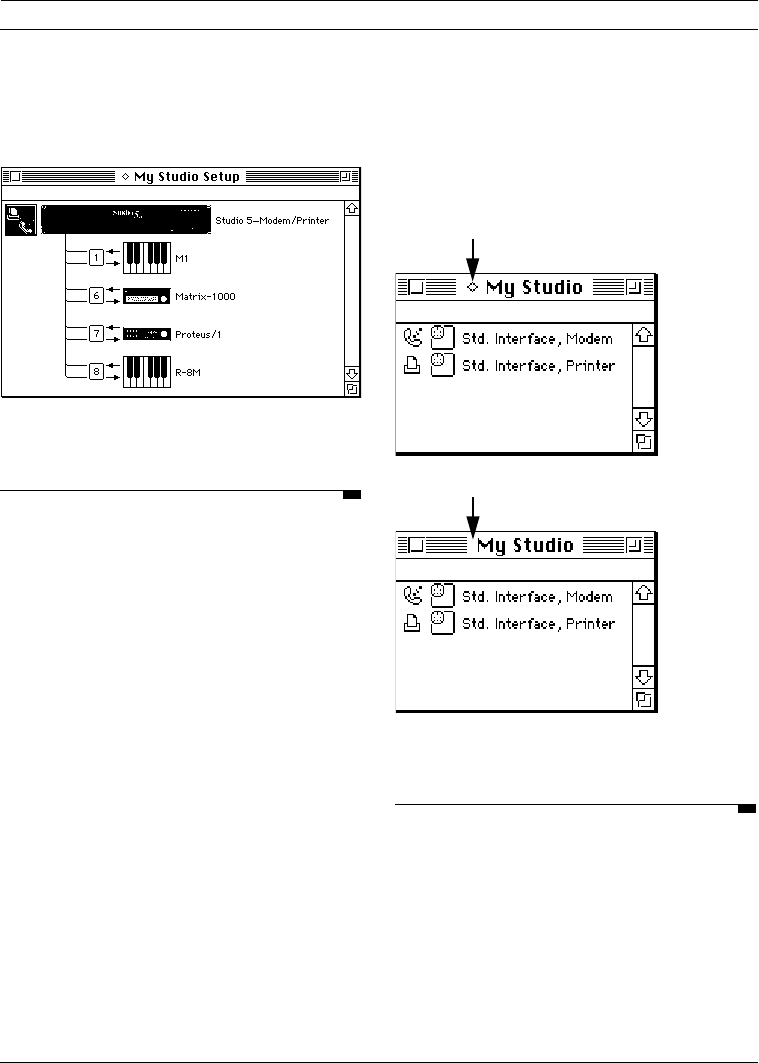
Examples
The simple MIDI studio example shown
in Figure 3.1 on page 14 produces the
Studio Setup document shown in
Figure 5.6.
Figure 5.6: New Studio Setup Document for
Figure 3.1
OMS 2.0 Book Page 23 onsdag 14 februari 1996 09:26
PART 2: Studio Setups In Detail
24 Opcode Systems, Inc.
Similarly, the studio shown in Figure 3.2
on page 14 produces the Studio Setup
document shown in Figure 5.7.
Figure 5.7: New Studio Setup Document for
Figure 3.2
SAVING THE STUDIO SETUP
DOCUMENT
At this point, OMS Setup will display a
directory dialog box. Use it to save your
Studio Setup document with whatever
name you like. The document will be
saved and “made current.”
When you make a Studio Setup document
current, you tell OMS that this document
accurately reflects the connection and
configuration of your MIDI devices. OMS
applications derive their knowledge of
your studio only from the current Studio
Setup document. You may have several
Studio Setup documents, each of which
reflects different studio configurations (or
studios). Only one Studio Setup docu-
ment, however, can be the current
document. The current Studio Setup doc-
ument is indicated by a small diamond to
the left of its name (as illustrated in
Figure 5.8).
Figure 5.8: Indicating Current Studio Setup
Document
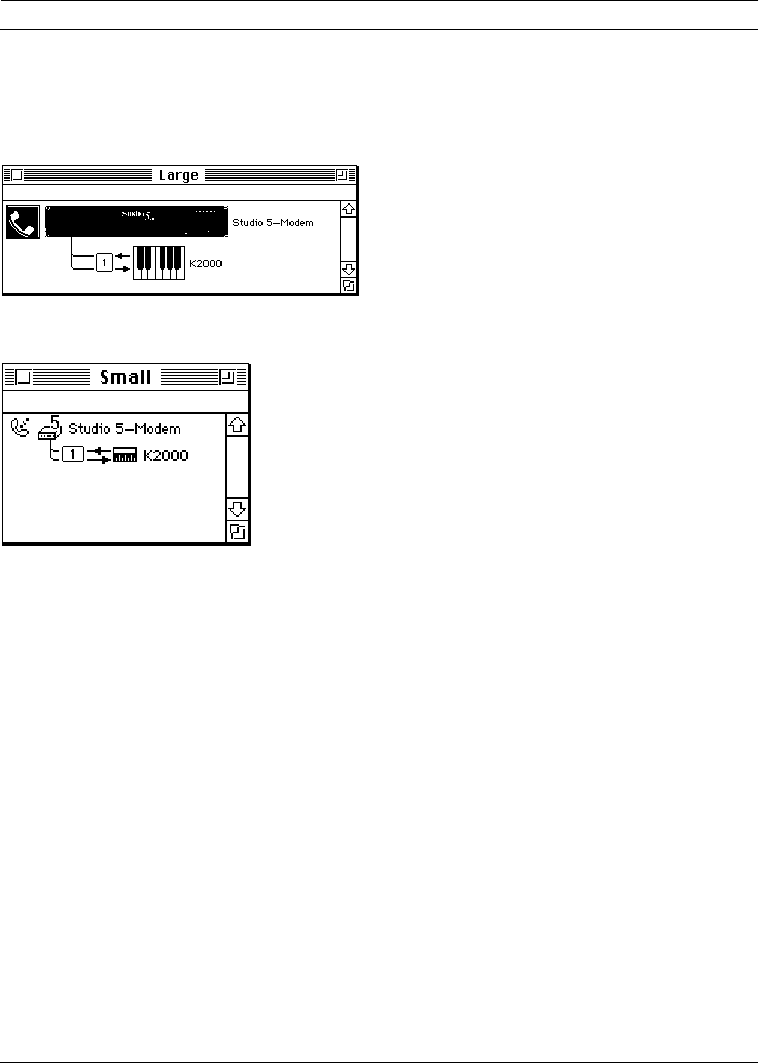
SMALL AND LARGE ICONS
OMS can display icons in a Studio Setup
document in either small or large format.
This is user-configurable and is controlled
through the icon size parameter on the
Edit>Preferences dialog box.
Diamond indicates that Studio Setup
document is current
No diamond indicates that Studio Setup
document is not current
OMS 2.0 Book Page 24 onsdag 14 februari 1996 09:26
CHAPTER 5: Creating a New Studio Setup Document
OMS Manual 25
Throughout the rest of this manual we
will show Studio Setup documents in the
small icon view.
Figure 5.9: Large icon Studio Setup
Figure 5.10: Same setup, small icon view
OMS 2.0 Book Page 25 onsdag 14 februari 1996 09:26

PART 2: Studio Setups In Detail
26 Opcode Systems, Inc.
OMS 2.0 Book Page 26 onsdag 14 februari 1996 09:26

OMS Manual 27
CHAPTER 6: Configuring the OMS Drivers
Now that you have a Studio Setup docu-
ment that recognizes all MIDI interfaces
and MIDI cards attached to your Macin-
tosh, you’ll need to verify the
configuration of their OMS drivers. For
Opcode interfaces, check the manual that
comes with the interface for details.
This chapter tells you how to configure
drivers for non-OMS devices. Just read
the sections, if any, that pertain to your
studio, then proceed to the next chapter.
STANDARD INTERFACE
If the Standard Interface OMS driver is in
your OMS folder and one or more stan-
dard MIDI interfaces are connected to the
Macintosh, you’ll see a standard interface
icon for each port that OMS Setup finds
connected to a standard interface.
Figure 6.1: Studio Setup Document w/Standard
Interfaces
aDouble-click each interface icon in
your Studio Setup document to open
its port configuration dialog box.
Figure 6.2: Standard Interface Configuration
Dialog
bSelect the appropriate clock
frequency setting for your interface.
This is usually determined automatically.
See your interface manual if you have
problems.
cSelect “Has synchronizer” if the
interface connected to this port has
built-in synchronization functions.
dClick OK.
OMS 2.0 Book Page 27 onsdag 14 februari 1996 09:26
PART 2: Studio Setups In Detail
28 Opcode Systems, Inc.
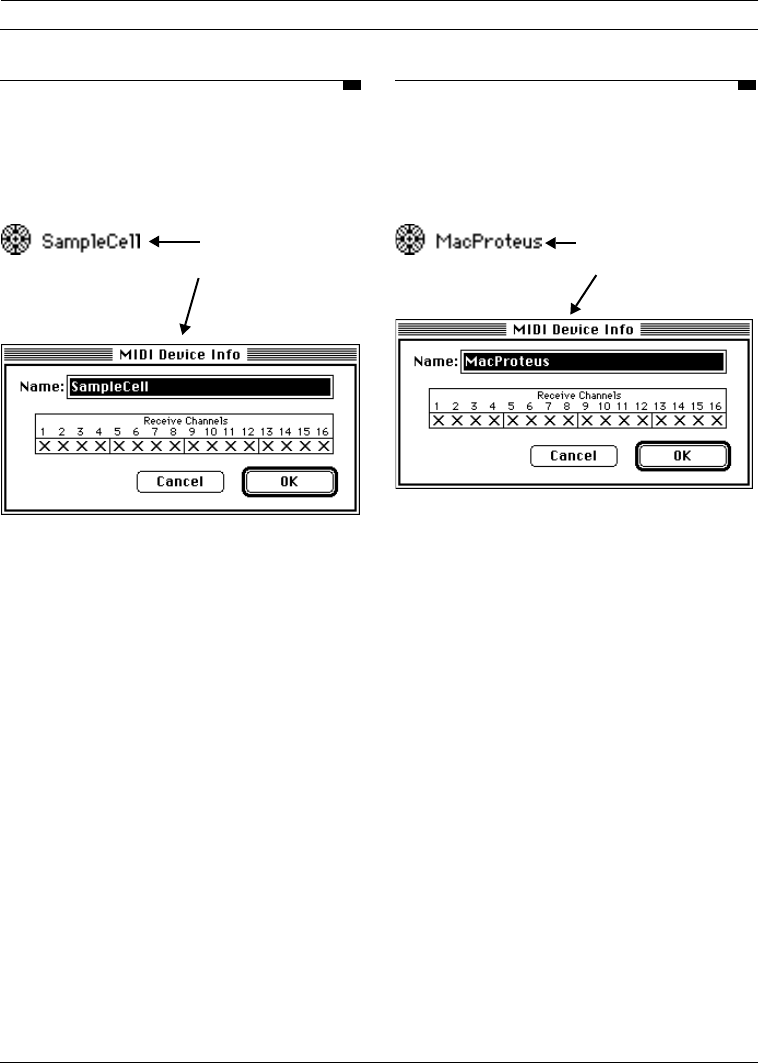
SAMPLECELL
OMS Setup displays one SampleCell icon
for each SampleCell card found by OMS
Setup.
Figure 6.3: SampleCell Icon and Device Info Dialog
aDouble-click each SampleCell icon to
open its MIDI Device Info dialog box.
bUse this dialog box to rename the
device (if desired) and to set the MIDI
receive channels for each
SampleCell card.
Make sure you have version 1.2 or higher
of the SampleCell editor and the Sample-
Cell driver. Remove the SampleCell MIDI
Manager driver from your System Folder
if you’re using the OMS driver. The only
time you need the original SampleCell
MIDI Manager driver is if you choose to
use MIDI Manager without OMS.
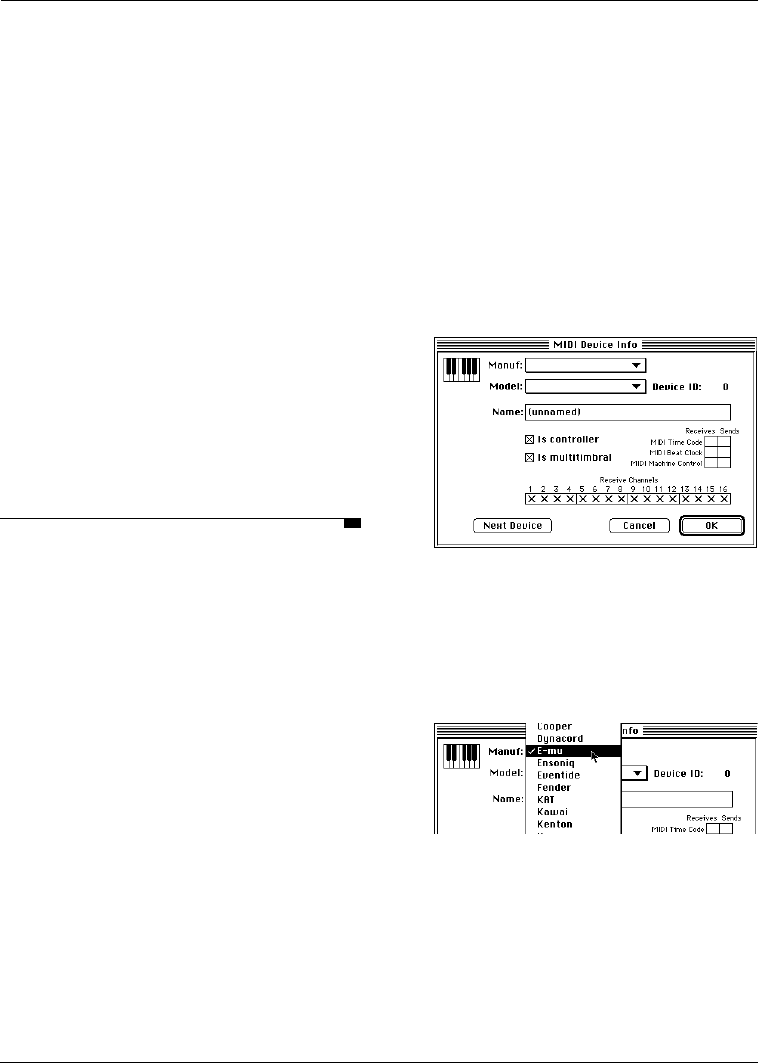
MACPROTEUS
OMS Setup displays one MacProteus icon
for each MacProteus card found by OMS
Setup.
Figure 6.4: MacProteus Icon and Device Info Dialog
aDouble-click each MacProteus icon to
open its MIDI Device Info dialog box.
bUse this dialog box to set the MIDI
receive channels for each card and to
rename the device (if desired).
Keep the MacProteus MIDI Manager
driver in your System Folder if you wish
to use the MacProteus Front Panel appli-
cation—otherwise you can remove it.
The MacProteus Batteries INIT is com-
patible with the OMS MacProteus driver.
Double-click the
SampleCell Device
Icon to open its
MIDI Device Info
dialog.
Double-click the MacProteu
s
Device Icon to open its MID
I
Device Info dialog.
OMS 2.0 Book Page 28 onsdag 14 februari 1996 09:26
OMS Manual 29
CHAPTER 7: Defining MIDI Devices
Now that you’ve saved a current Studio
Setup document that’s properly config-
ured for your MIDI interface and cards,
you’ll need to define your various MIDI
devices.
This chapter tells you how to use OMS
Setup to define MIDI devices (such as
synthesizers, MIDI effect units and MIDI
controllers).
DEFINING MIDI DEVICES
In this section, you’ll define all the MIDI
devices in your studio.
aIf the current Studio Setup document
isn’t already open, choose
File>Open Current Studio Setup.
New devices are connected to the first
interface in the Studio Setup document
automatically. You can connect new
devices to some other interface or MIDI
device by selecting it prior to defining the
new device.
Follow through these steps for each MIDI
device in your studio.
bChoose Studio>New Device to
open a MIDI Device Information dialog
box.
Figure 7.1: Device Info Dialog Box
cChoose a manufacturer from the pop-
up Manufacturer menu by clicking
the pop-up menu, dragging to the
desired manufacturer and releasing
the mouse.
Figure 7.2: Choosing a MIDI Device’s
Manufacturer
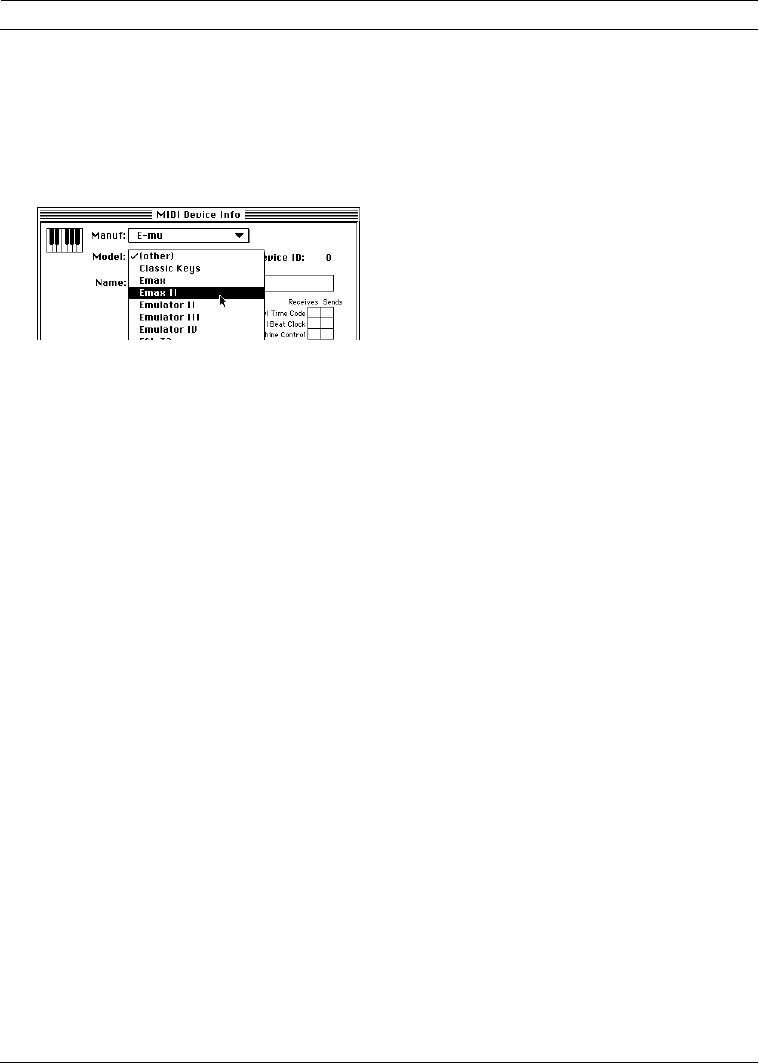
dChoose a model from the pop-up
Model menu by clicking the pop-up
OMS 2.0 Book Page 29 onsdag 14 februari 1996 09:26
PART 2: Studio Setups In Detail
30 Opcode Systems, Inc.
menu, dragging to the desired model
and releasing the mouse.
For many devices, this will automatically
set the “Is controller” and “Is multitimbral”
boxes to their proper settings.
Figure 7.3: Choosing a MIDI Device’s Model
If OMS doesn’t list your MIDI device or if
you wish to refer to the device by a dif-
ferent name, type a name into the Name
field.
eCheck the appropriate Controller and
Multitimbral check boxes.
Check the “Is controller” check box if
your MIDI device sends MIDI note or
control data.
Check the “Is multitimbral” check box if
the MIDI device responds to MIDI on
more than one channel.
fCheck all the MIDI channels that will
receive data.
If the “Is multitimbral” check box is not
checked, your device can receive on
only one MIDI channel. If the “Is multitim-
bral” check box is checked, you can
select multiple receive channels.
gSet the Device ID numerical to match
the device ID setting of your MIDI
device.
If you’ll be sending patches (or other
system exclusive data) to and from a
device, you’ll need to set the Device ID
numerical to match your unit’s device ID.
The Device ID numerical is set automati-
cally to the MIDI Receive Channel if the
“Is multitimbral” check box is not
checked. You can enter a different
Device ID number if you wish. If you
don’t know how to set a numerical, see
Appendix A.
hCheck the appropriate MIDI Time
Code check boxes.
You need to check these boxes only if
you intend to use MTC for synchroniza-
tion and your MIDI Device sends or
receives MIDI Time Code. Most common
MIDI devices do not send or receive
MIDI Time Code.
iCheck the appropriate MIDI Beat
Clock check boxes.
Many modern MIDI drum machines and
synthesizers with built-in sequencers are
able to send and receive MIDI Beat
Clock. You should check these boxes if
you want to synchronize playback of
these various devices. Check the “Sends
MIDI Beat Clock” check box if your MIDI
device receives MIDI Beat Clock and
you intend to slave another device or
Macintosh application to that timing data.
Check the “Receives MIDI Beat Clock”
check box if your MIDI device receives
MIDI Beat Clock and you intend to syn-
chronize the device to another timing
source.
OMS 2.0 Book Page 30 onsdag 14 februari 1996 09:26

CHAPTER 7: Defining MIDI Devices
OMS Manual 31
jCheck the appropriate MIDI
Machine Control check boxes.
Repeat these steps for every MIDI device
in your studio.
kChoose File>Save to save your
Studio Setup document.
NOTE: If you select an interface in the
Studio Setup document prior to defining a
new device, the newly defined device will be
connected to the selected interface. If you do
not select an interface, the new device will
be connected to the first interface in the
Studio Setup document. For more informa-
tion about manipulating device
connections, see Chapter 8: Connecting
Devices in the Studio Setup Document.
MIDI Device Example
Figure 7.4 illustrates a typical device.
Figure 7.4: Sample Korg M1 Device Description
This example shows an M1 synthesizer.
The M1 is a multitimbral instrument with
an on-board sequencer. It can send and
receive MIDI Beat Clock, has a keyboard
for generating notes and can respond on
eight MIDI channels at once (selection of
channels 1-8 was arbitrary—you can use
any MIDI channels you want).
EDITING A DEVICE
You can edit MIDI devices in your Studio
Setup document. This is useful when you
change a device or make a mistake. To
edit a MIDI device:
aClick the device to select it and
choose MIDI Device Info from the
Studio menu.
Alternately, you can double-click the
device icon to open its MIDI Device Info
dialog automatically.
bMake any necessary changes, then
click the OK button.
cChoose File>Save to save your
current Studio Setup document and
its changes.
If you only want to edit a device’s icon:
aSelect the device and choose Device
Icon from the Studio menu.
Alternately, you can option-double-click
the device icon to open its Device Icon
dialog box.
bChoose a new icon, then click the OK
button.
cChoose File>Save to save your
current Studio Setup document and
its changes.
OMS 2.0 Book Page 31 onsdag 14 februari 1996 09:26

PART 2: Studio Setups In Detail
32 Opcode Systems, Inc.
OMS 2.0 Book Page 32 onsdag 14 februari 1996 09:26

OMS Manual 33
CHAPTER 8: Connecting Devices in the
Studio Setup Document
In this chapter, you’ll connect all the
device icons in your Studio Setup docu-
ment to mirror the way that actual MIDI
devices are connected in your studio.
When you finish connecting device icons,
your Studio Setup document will function
as a graphic representation of the MIDI
components in your studio.
IMPORTANT: The Studio Setup docu-
ment should reflect, as accurately as
possible, the actual connection of MIDI
devices in your studio. OMS-compatible
applications derive their knowledge of the
devices in your studio from the Studio
Setup document.
AUTOMATIC DEVICE
CONNECTION
At this point in the tutorial, every OMS
user will have a very different Studio
Setup document. Before the tutorial pro-
ceeds, you should know a little about how
devices connect in the Studio Setup
document.
If an interface is not highlighted when you
select New Device, the new device is
added at the top of the studio setup win-
dow, “floating” unconnected to any
interface. Otherwise, the device is added
to the first available interface.
If the Studio Setup document doesn’t
reflect the connections between your
MIDI devices and interfaces, you’ll need
to make manual device connections. Rear-
ranging device icons in your Studio Setup
document is easy, and is discussed in the
following section.
MANUAL DEVICE CONNECTION
To connect a device to an interface or
other MIDI device:
aClick and hold the mouse on a device.
bDrag the mouse to the MIDI interface
or other device to which you want it
connected.
OMS 2.0 Book Page 33 onsdag 14 februari 1996 09:26
PART 2: Studio Setups In Detail
34 Opcode Systems, Inc.
cRelease the mouse when the device
to which you want to connect
becomes highlighted.
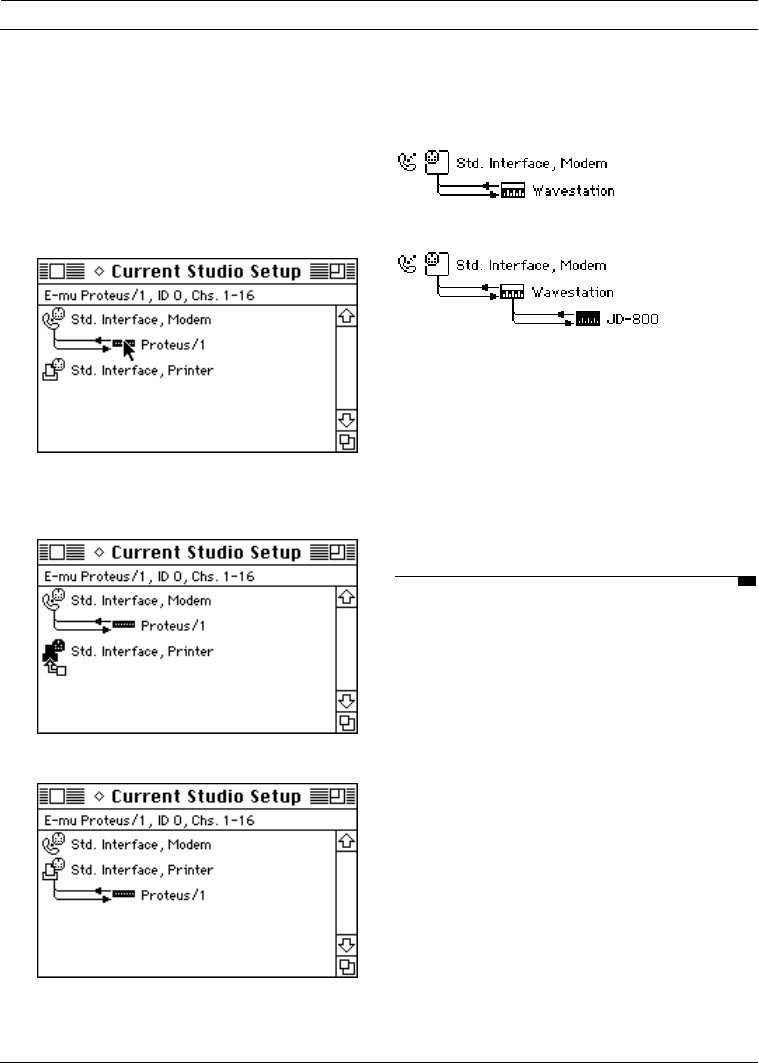
Figure 7.5 shows a simple example of
this process.
Figure 7.5: Connecting Devices Manually
Figure 7.6 illustrates some typical device
connections.
Figure 7.6: Various Device Connections
You can open a Define Device dialog box
for a device by double-clicking the device
icon. You can edit the name of any device
in the Studio Setup document by selecting
the name and typing a new name.
DISCONNECTING CABLES
A connected device is represented by a
pair of lines running in and out of its left
side. These lines represent MIDI cables
and the arrows indicate the direction of
MIDI data flow.
1. Click and hold the mouse button
on the device you want to move.
2. Drag the mouse to the device to
which you're connecting the dragged
device.
3. Release the mouse button.
Device connected to
a standard interface
Device connected to
another device’s MIDI Thru
OMS 2.0 Book Page 34 onsdag 14 februari 1996 09:26
CHAPTER 8: Connecting Devices in the Studio Setup Document
OMS Manual 35
Your studio may contain some devices
that have only one MIDI cable connected
to them. You can represent this connec-
tion by disconnecting a cable in the Studio
Setup document. To do so:
aClick a cable’s directional arrow to
remove that cable from the Studio
Setup document.
A gray arrow remains beside the device
icon, indicating where to click if you want
to reconnect that cable. The right-most
illustration in Figure 7.6 shows a discon-
nected cable.
Your studio may also contain some
devices that are not connected to any-
thing—they’re in your studio, but they’re
not in use. You can define these devices in
a Studio Setup document and still show
that they’re completely disconnected. To
do so:
aClick both cables’ directional arrows
to remove the cables from the Studio
Setup document.
The MIDI device is disconnected and
moves automatically to the top of the
Studio Setup document.
CONNECTING DEVICES TO
MULTI-PORT INTERFACES
The Studio 4, Studio 5 and MIDI Time
Piece are multi-port MIDI interfaces with
built-in MIDI routing abilities—they have
numerous ports to which you connect
MIDI devices, and can be networked for
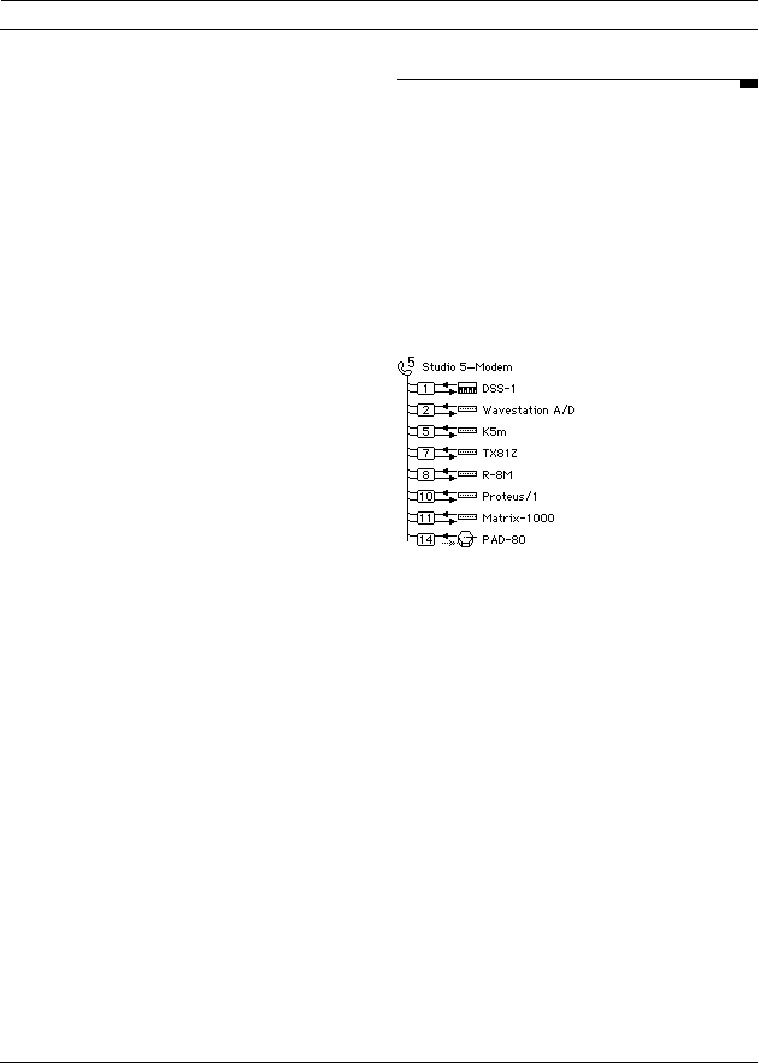
even more MIDI port pairs. Figure 7.7
illustrates a Studio Setup document con-
taining a Studio 5 and eight MIDI devices.
Figure 7.7: Studio 5 with Devices Connected
Port numbers for a multi-port interface
are represented by small, boxed numeri-
cals in the MIDI path to each device. You
must set the Studio Setup document’s
port numbers to match each device’s
multi-port interface number.
OMS 2.0 Book Page 35 onsdag 14 februari 1996 09:26

PART 2: Studio Setups In Detail
36 Opcode Systems, Inc.
aSelect a port number by clicking it.
Figure 7.8: Selecting a Port Number
bType the number of the port pair to
which that MIDI device is connected.
You can also set a port by dragging the
mouse vertically up and down while
holding down the mouse button. Numeri-
cal editing is discussed in the “Working
With Opcode Applications” Technical
Publication.
Multi-Port Interfaces and OMS-
Compatible Applications
In general, if you choose a multi-port
interface as a MIDI data source within an
OMS-compatible application, only data
generated by that interface (not data from
the attached devices) is sent to the Macin-
tosh. If the application needs to receive
data from an attached device, you should
choose that device as a MIDI data source
within the OMS-compatible application.
Specifically:
•Studio 4: In OMS-compatible appli-
cations, if you choose the Studio 4 as
a MIDI data source, only timecode
from the Studio 4 and MIDI beat
clock from any devices connected to
the Studio 4 are sent to the applica-
tion—other types of MIDI data from
devices attached to the Studio 4 are
not sent. Select devices by name
(rather than selecting the interface) if
you want to use them as non-sync
MIDI sources.
•Studio 5: In OMS-compatible appli-
cations, if you choose the Studio 5 as
a MIDI data source, only data gener-
ated by the Studio 5 (timecode,
footswitches and audio events) is sent
to the application—other types of
MIDI data from devices attached to
the Studio 5 are not sent. Select
devices by name (rather than select-
ing the interface) if you want to use
them as MIDI sources.
NOTE: For further details about using the
Studio 4 or Studio 5 with OMS, see their
respective manuals. For additional infor-
mation about the MIDI Time Piece, see the
MIDI Time Piece Technical Publication.
OMS 2.0 Book Page 36 onsdag 14 februari 1996 09:26
CHAPTER 8: Connecting Devices in the Studio Setup Document
OMS Manual 37
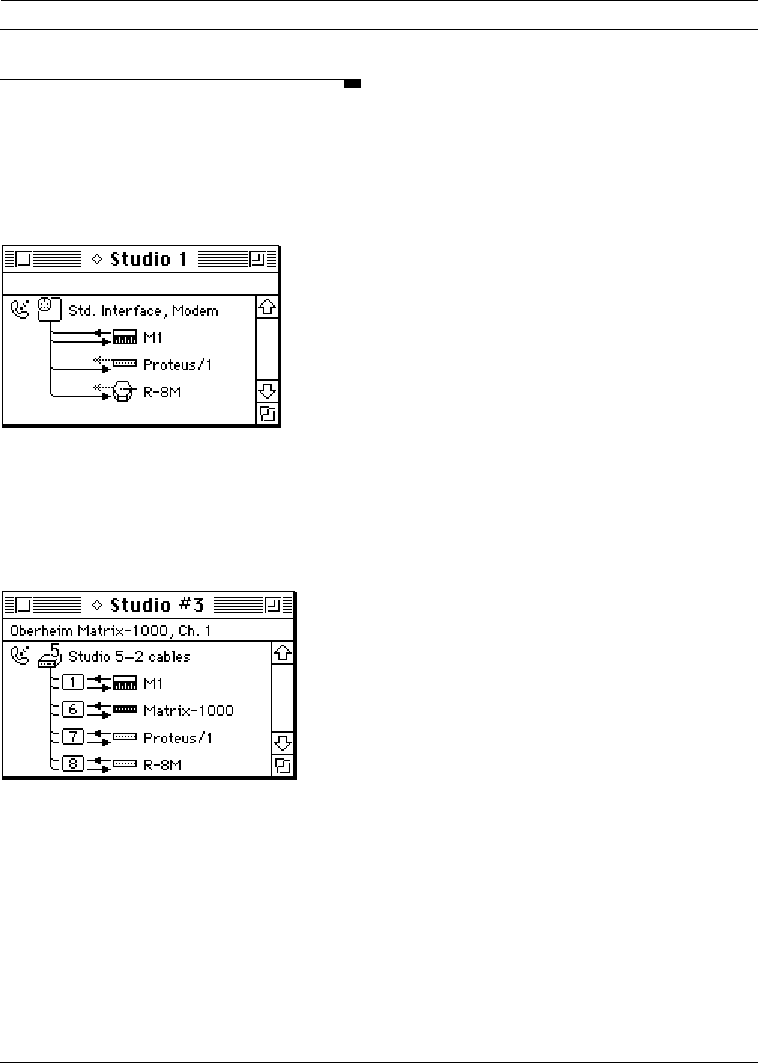
EXAMPLES
At this point in the tutorial, the simple
MIDI studio example shown in Figure 3.1
on page 14 would have the Studio Setup
document shown in Figure 7.9.
Figure 7.9: Complete Studio Setup Document for
Figure 3.1
Similarly, the studio shown in Figure 3.2
on page 14 would have Studio Setup docu-
ment shown in Figure 7.10.
Figure 7.10: Complete Studio Setup Document for
Figure 3.2
OMS 2.0 Book Page 37 onsdag 14 februari 1996 09:26

PART 2: Studio Setups In Detail
38 Opcode Systems, Inc.
OMS 2.0 Book Page 38 onsdag 14 februari 1996 09:26

OMS Manual 39
CHAPTER 9: Testing your Studio Setup
Document
OMS Setup provides a test mode to check
the accuracy of your Studio Setup
document.
ENTERING TEST MODE
aChoose Open Current Studio
Setup from the File menu if your
current Studio Setup document is not
active.
bChoose Test Studio from the
Studio menu.
The Test Studio command toggles test
mode on and off. When test mode is
active, Test Studio will have a check
next to it in the Studio menu. Also, the
cursor in the Studio setup document will
change to an eighth note when it’s over a
MIDI device or interface icon.
TESTING MAC-TO-DEVICE
CONNECTIONS
You can test the flow of MIDI data from
the Macintosh into each of the MIDI
devices.
aClick a MIDI device icon with the note
cursor.
This sends random notes to the device
on the MIDI channels to which the
device listens. To make sure the notes
are audible, a MIDI volume message
sets every channel’s volume to 127.
Listen for a cacophony of notes (or
watch for MIDI indicating LED’s) when
you click a device icon.
Figure 8.1: Testing MIDI Device Inputs
OMS 2.0 Book Page 39 onsdag 14 februari 1996 09:26

PART 2: Studio Setups In Detail
40 Opcode Systems, Inc.
TESTING DEVICE-TO-MAC
CONNECTIONS
To test MIDI data flow from MIDI devices
into the Macintosh, each device must be
able to generate MIDI data. On controller
instruments just strike a key, pluck a
string or hit a pad. When the Macintosh
receives the MIDI data, a voice from the
Macintosh says “MIDI received” and the
line that represents the MIDI cable in the
Studio Setup document flashes. The
“MIDI received” message will not re-trig-
ger more than once every five seconds,
but the flashing line will continue to indi-
cate data arrival.
NOTE: If your Studio Setup contains
MIDI merging (multiple sources into one
port), the wrong arrow may flash when test-
ing MIDI connections from devices to the
Macintosh. When MIDI comes in from any
of those sources, only one of them is going to
flash, and it won’t necessarily be the one
that really sent the data.
For devices that have no keyboard, the
best way to test MIDI data flow to the
Macintosh is to initiate a bulk dump from
that MIDI device.
LEAVING TEST MODE
aChoose Studio>Test Studio to
turn-off OMS Setup’s test mode.
OMS 2.0 Book Page 40 onsdag 14 februari 1996 09:26

OMS Manual 41
INDEX
A
AppleTalk alert 21
C
Configuring OMS dialog box 22
Connecting a MIDI interface 13
Connecting devices
automatically 33
manually 33
Current Studio Setup document 24
Custom Setup 12
D
Definitions
OMS files 8
Device Info file 10
Devices
auto setup connections 33
defining 29
editing 31
manual setup connections 33
Documentation conventions 5
Driver types 8
E
Easy Setup
creating 15
definition 12
M
MacProteus
configuring 28
OMS driver definition 8
Manual
conventions 5
how to use 4
MIDI Interfaces
connecting 13
MIDI Time Piece
connecting to devices 35
OMS driver definition 8
N
New Device
define 29
O
OMS
configuring 22
definition 3
OMS Device Info file 10
OMS Setup 21
P
Patchbays
editing 31
Port configuration
standard interface 27
Q
QuickTime music 9
S
SampleCell
configuring 28
OMS driver definition 8
Serial hardware 8
Serial Switch control panel 11
Software definitions 8
Standard Interface
OMS driver definition 8
port configuration 27
Studio Setup
auto device connection 33
connecting multi-port interfaces 35
defining devices 29
editing devices 31
manual device connection 33
testing 39
Studio 3
OMS 2.0 Book Page 41 onsdag 14 februari 1996 09:26

Index
42 Opcode Systems, Inc.
OMS driver definition 8
Studio 4
and OMS-compatible applications 36
connecting to devices 35
OMS driver definition 9
Studio 5
and OMS-compatible applications 36
connecting to devices 35
OMS driver definition 9
Synchronizer
indicate interface 27
T
Testing a Studio Setup document 39
OMS 2.0 Book Page 42 onsdag 14 februari 1996 09:26
