OPCUAClient Guide
User Manual:
Open the PDF directly: View PDF ![]() .
.
Page Count: 52

UNIVERSITY OF PADUA
Department of Management and Engineering
First-cycle degree in Mechanic and Mechatronic Engineering
Implementation of an open source
OPC UA client for Android
Supervisor
Dr. Federico Tramarin
Candidate
Luca Zanrosso
1118302
Academic Year 2017 - 2018
Contents
Introduction ................................. 1
1 What is OPC UA? ............................ 3
1.1 Features ................................ 4
1.1.1 Functional Equivalence . . . . . . . . . . . . . . . . . . . . 4
1.1.2 Platform Independence . . . . . . . . . . . . . . . . . . . . 5
1.1.3 Security ............................ 5
1.1.4 Extensible........................... 6
1.1.5 Information Modeling . . . . . . . . . . . . . . . . . . . . . 6
1.2 Architecture.............................. 7
1.2.1 DataModel .......................... 7
1.2.2 Transport ........................... 8
1.2.3 Baseservicies ......................... 10
1.2.4 Information Models . . . . . . . . . . . . . . . . . . . . . . 10
1.2.5 Companion Models . . . . . . . . . . . . . . . . . . . . . . 11
1.2.6 Vendor Specific Extension . . . . . . . . . . . . . . . . . . 12
1.3 Profiles................................. 12
1.4 Communication Models . . . . . . . . . . . . . . . . . . . . . . . . 13
2 Why use Android? ............................ 17
2.1 OpenSource.............................. 17
2.2 Technology for more people in more places . . . . . . . . . . . . . 17
2.3 MostusedOS............................. 17
2.4 Android Studio and Google Play . . . . . . . . . . . . . . . . . . 18
2.5 Documentation ............................ 18
3 Set up the development environment ................ 19
3.1 JDK8 ................................. 19
3.2 Maven ................................. 20
3.3 UPCUAJavaStack ......................... 22
3.4 SLF4J ................................. 23
3.5 SpongyCastle............................. 23
3.6 SimulationServer........................... 23
3.7 AndroidStudio ............................ 24
3.7.1 Emulator ........................... 25
4 Create a simple client app ....................... 27
4.1 Addlibraries ............................. 27
4.2 Permissions .............................. 27
4.3 AsyncTask............................... 29
4.4 CreateaClient ............................ 30
4.5 Discoverendpoints .......................... 31
4.6 ActivateaSession........................... 32
4.6.1 Readavalue ......................... 32
4.6.2 Writeavalue ......................... 33
4.7 UserInterface............................. 33
5 Data Security ............................... 37
5.1 Encryption .............................. 37
5.2 Certificates .............................. 37
5.3 Security modes and policies . . . . . . . . . . . . . . . . . . . . . 40
5.4 User authentication . . . . . . . . . . . . . . . . . . . . . . . . . . 41
5.5 Change server settings . . . . . . . . . . . . . . . . . . . . . . . . 41
Conclusion ................................... 45
References ................................... 47
Introduction
OPC UA is a modern communication standard that provides many features in-
cluding security, scalability and cross-platform. All these features allow OPC UA
to be used in a wide range of applications. In particular, the platform indepen-
dence allows OPC UA to adapt to different operating systems, including Android.
Android is the most popular operating system in the world and can be installed
in very different devices: from smartphones to cars, from TVs to watches.
Despite this, there are currently very few resources to develop an Android
client that uses OPC UA technology. In addition to being limited the resources
available are often to be paid. From this point was born the idea and the challenge
of this thesis: develop a simple open source app that allows you to use the basic
features of OPC UA on Android.
The thesis is divided into five chapters. The first chapter explains what OPC
UA is, its characteristics and the protocol architecture. In the second chapter
the reasons are specified that led to develop a client on Android. In the third
chapter the software and libraries needed for the development and testing the
application are explained in details. In the fourth chapter through Android Studio
it is possible to create the client, which deals with reading and writing a variable
on a test server. Particular attention has been paid to all aspects that are part
of the Android ecosystem and that are not considered if you create a client that
uses only Java. In the fifth chapter, the topics that concern security are explored:
encryption, certificates, security policies and user authentication.
1
2
Chapter 1
What is OPC UA?
For a general overview of what OPC and OPC UA are, reference was made directly
to the official documentation of the OPC Foundation [1, 2, 3].
OPC is the interoperability standard for the secure and reliable exchange of
data in the industrial automation space and in other industries. It is platform
independent and ensures the seamless flow of information among devices from
multiple vendors. The OPC Foundation is responsible for the development and
maintenance of this standard.
The OPC standard is a series of specifications developed by industry vendors,
end-users and software developers. These specifications define the interface be-
tween Clients and Servers, as well as Servers and Servers, including access to
real-time data, monitoring of alarms and events, access to historical data and
other applications.
When the standard was first released in 1996, its purpose was to abstract PLC
specific protocols into a standardized interface allowing HMI (Human-Machine In-
terface) and SCADA (Supervisory Control and Data Acquisition) systems to in-
terface with a “middle-man” who would convert generic-OPC read/write requests
into device-specific requests and vice-versa.
Initially, the OPC standard was restricted to the Windows operating system.
As such, the acronym OPC was borne from OLE (object linking and embedding)
for Process Control. These specifications, which are now known as OPC Classic,
have enjoyed widespread adoption across multiple industries, including manufac-
turing, building automation, oil and gas, renewable energy and utilities, among
others.
With the introduction of service-oriented architectures in manufacturing sys-
tems came new challenges in security and data modeling. The OPC Foundation
developed the OPC UA specifications to address these needs and at the same time
provided a feature-rich technology open-platform architecture that was future-
3
proof, scalable and extensible.
Today the acronym OPC stands for Open Platform Communications.
1.1 Features
The OPC Unified Architecture (UA), released in 2006, is a platform independent
service-oriented architecture that integrates all the functionality of the individual
OPC Classic specifications into one extensible framework.
This multi-layered approach accomplishes the original design specification
goals of:
•Functional equivalence: all COM (Component Object Model) OPC Classic
specifications are mapped to UA
•Platform independence: from an embedded micro-controller to cloud-based
infrastructure
•Security: encryption, authentication, and auditing
•Extensibility: ability to add new features without affecting existing appli-
cations
•Comprehensive information modeling: for defining complex information
1.1.1 Functional Equivalence
Building on the success of OPC Classic, OPC UA was designed to enhance and
surpass the capabilities of the OPC Classic specifications. OPC UA is functionally
equivalent to OPC Classic, yet capable of much more:
•Discovery: find the availability of OPC Servers on local PCs and/or networks
•Address space: all data is represented hierarchically (e.g. files and folders)
allowing for simple and complex structures to be discovered and utilized by
OPC Clients
•On-demand: read and write data/information based on access-permissions
•Subscriptions: monitor data/information and report-by-exception when val-
ues change based on a client’s criteria
•Events: notify important information based on client’s criteria
4
•Methods: clients can execute programs, etc. based on methods defined on
the server
•Integration between OPC UA products and OPC Classic products is easily
accomplished with COM/Proxy wrappers that are available in the download
section.
1.1.2 Platform Independence
Given the wide array of available hardware platforms and operating systems,
platform independence is essential. OPC UA functions on any of the following
and more:
•Hardware platforms: traditional PC hardware, cloud-based servers, PLCs,
micro-controllers (ARM etc.)
•Operating Systems: Microsoft Windows, Apple OSX, Android, or any dis-
tribution of Linux, etc.
OPC UA provides the necessary infrastructure for interoperability across the
enterprise, from machine-to-machine, machine-to-enterprise and everything in-
between.
1.1.3 Security
One of the most important considerations in choosing a technology is security.
OPC UA is firewall-friendly while addressing security concerns by providing a
suite of controls:
•Transport: numerous protocols are defined providing options such as the
ultra-fast OPC-binary transport or the more universally compatible SOAP-
HTTPS
•Session Encryption: messages are transmitted securely at 128 or 256 bit
encryption levels
•Message Signing: messages are received exactly as they were sent
•Sequenced Packets: exposure to message replay attacks is eliminated with
sequencing
•Authentication: each UA client and server is identified through OpenSSL
certificates providing control over which applications and systems are per-
mitted to connect with each other
5
•User Control: applications can require users to authenticate (login creden-
tials, certificate, etc.) and can further restrict and enhance their capabilities
with access rights and address-space “views” Auditing: activities by user
and/or system are logged providing an access audit trail
1.1.4 Extensible
The multi-layered architecture of OPC UA provides a “future proof” framework.
Innovative technologies and methodologies such as new transport protocols, secu-
rity algorithms, encoding standards, or application-services can be incorporated
into OPC UA while maintaining backwards compatibility for existing products.
UA products built today will work with the products of tomorrow.
1.1.5 Information Modeling
The OPC UA information modeling framework turns data into information. With
complete object-oriented capabilities, even the most complex multi-level struc-
tures can be modeled and extended. Data-types and structures are defined in
profiles. For example, the existing OPC Classic specifications were modeled into
UA profiles which can also be extended by other organizations.
6
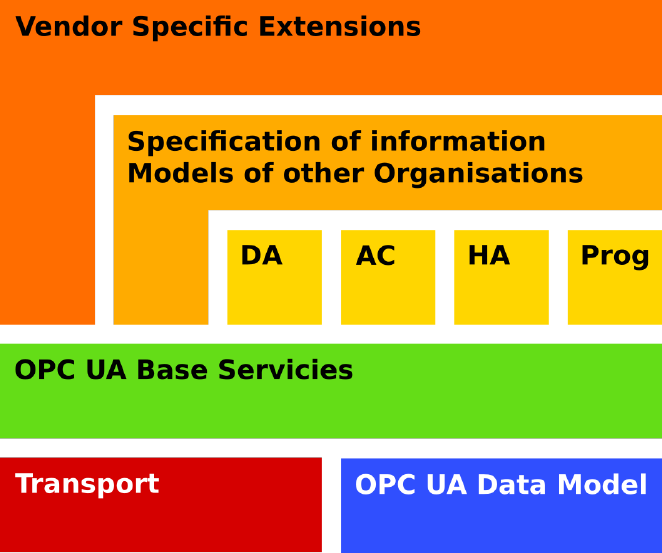
1.2 Architecture
The OPC UA architecture is a Service Orientated Architecture (SOA) and is
based on different logical levels, as shown in Fig. 1.1.
Figure 1.1: OPC UA architecture.
1.2.1 Data Model
Address Space is a standard way for UA OPC Servers to represent Objects to
Clients, such as processes, systems, and information.
To do this, all Objects must be represented according to the model in the Fig.
1.2. Objects are defined in terms of Variables, Methods and relations with other
Objects. Variables represent values while Methods are sequences of instructions
similar to the logic used in object-oriented programming.
Objects and their components are represented in the AddressSpace as a set of
Nodes described by Attributes and References. Attributes are data elements that
describe Nodes while References are used to relate Nodes to each other.
In OPC UA there are eight classes of nodes extending a base node called
BaseNode. Each NodeClass defines a set of attributes that extend the attributes
present in the BaseNode. The tables show the attributes of all the nodes.
7
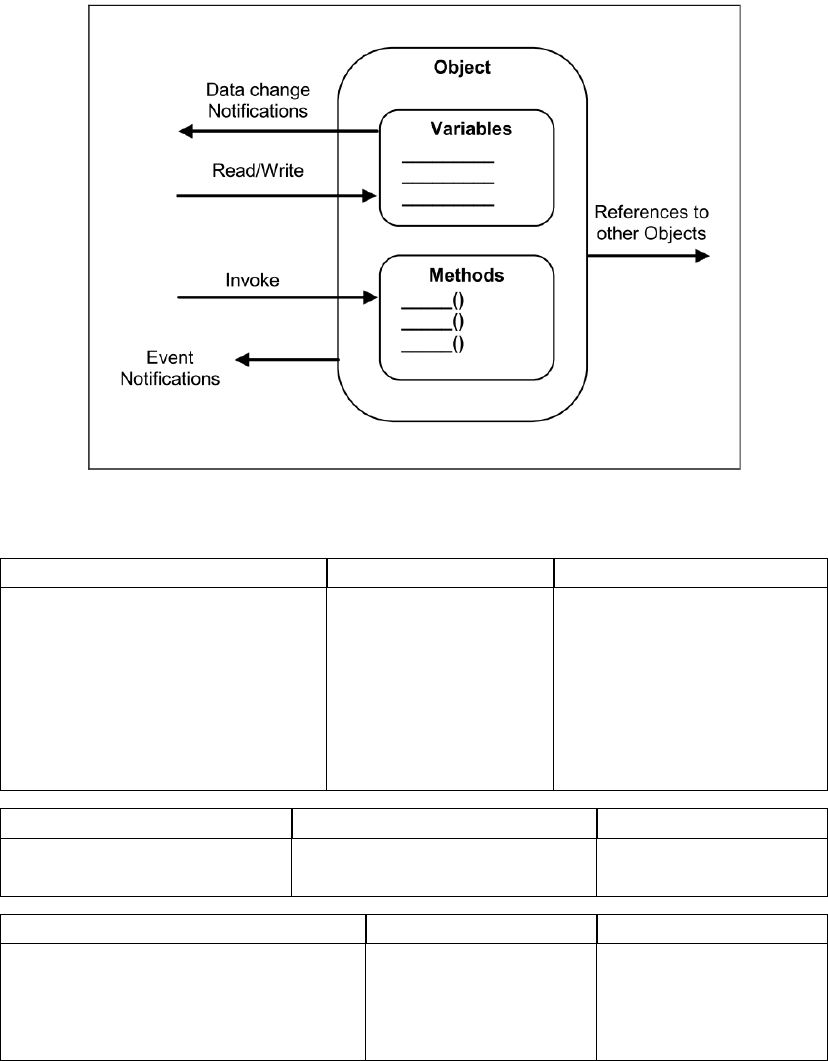
Figure 1.2: OPC UA Object Model.
BaseNode Object Variable
NodeID: NodeID EventNotifier: Byte Value
NodeClass: NodeClass DataType: NodeID
BrowseName: QualifiedName ArraySize: Int32
DisplayName: LocalizedText AccessLevel: Byte
UserAccessLevel: Byte
MinSamplingInterval:
Int32
Method View ObjectType
Executable: Boolean ContainsNoLoops: Boolean IsAbstract: Boolean
UserExecutable: Boolean EventNotifier: Byte
ReferenceType VariableType DataType
IsAbstract: Boolean Value IsAbstract: Boolean
Symmetric: Boolean DataType: NodeID
InverseName: LocalizedText ArraySize: Int32
IsAbstract: Boolean
1.2.2 Transport
Currently OPC UA uses 2 transport protocols, called ”protocol bindings” and
a combination of both. All three variants can be used in parallel. A developer
8
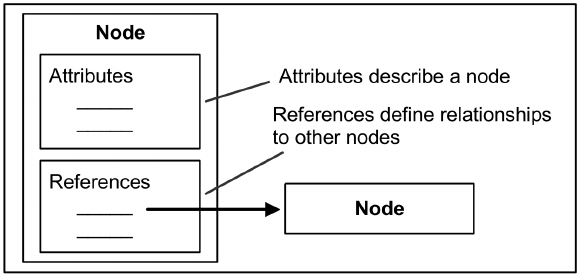
Figure 1.3: OPC UA Node Model.
only needs to pay attention to the URL of the servers: opc.tcp://server for binary
protocols and http:// for WebService. OPC UA works completely transparently
from the API, so a developer can easily switch from one protocol to another.
Below are the main features of the protocols that can be used:
•Binary protocol (UA Binary):
–Mandatory
–Best performance, smallest overhead
–Requires minimal resources (no XML, SOAP and HTTP required)
–Only one TCP port is used for communication (4840) and can be easily
enabled through the firewall.
•Web Service (XML-SOAP):
–Optional
–Widely supported by available devices
–Firewall friendly: port 443 (https) usually works without additional
configuration
•Hybrid (UA Binary via HTTPS)
–Optional
–Less overhead than XML-SOAP
–Combines the advantages of both protocols: binary encoded payload
in a HTTPS frame
–Firewall friendly
9
1.2.3 Base servicies
OPC UA defines 36 fixed methods called Base Servicies with which you can man-
age any type of operation. These methods are grouped into 9 service sets:
•SecureChannel service set: retrieve endpoint and security configuration to
establish a secure connection
•Session service set: create and administrate the connection between appli-
cation
•NodeManagement service set: allow clients to add, modify and delete nodes
in the server’s address space
•View service set: navigate and follow references in the server’s address space,
search for and filter information.
•Attribute service set: read and write node attributes, such as value, histor-
ical data and events.
•Method service set: invoke methods which a server provides at the nodes in
its address space
•MonitoredItem service set: create a set of attributes of nodes to be moni-
tored by the server and for which changes should be reported
•Subscription service set: create, modify, or delete monitored items
•Query service set: filter and search for information in the server’s address
space
1.2.4 Information Models
To ensure that the transmitted information can be understood by different sys-
tems, there are identical information models for each device. These models are
defined directly by OPC UA and guarantee a very important point: flexibility.
The information models are:
•Data Access (DA): deals with the representation and use of automation data
in Servers, such as:
–Discovery: locate other OPC UA products available on a PC/network.
–Browsing: browse the address space of a Server to obtain a list of usable
Nodes.
10
–Read: read 1...n Nodes in a single call and obtain the value, quality,
timestamp, and a success/failure code for each element.
–Write: write to 1...n Nodes in a single call while obtaining the suc-
cess/failure code for each individual element.
–Subscription: request a Server to monitor Nodes and to send a notifi-
cation to the Client when the value changes.
•Alarms & Conditions (AC): contains the rappresentation of alarm system,
and includes the following features:
–Receive Alarms: the alarms generated by the Server will be delivered
to the Client for processing.
–Receive Audit Events: the audit events generated by the Server will
be delivered to the Client for processing, such as when a User logs in,
logs out, access records, adds comments to records etc.
–Respond to Alarms: the Client permit you to acknowledge, shelve,
respond, and add comments to alarms etc.
–Filter: the Client provides options for the filtration of events.
•Historical Access (HA): defines the handling of historical data and events,
specifying the representation of the data in the Address Space. Some opera-
tions that are permitted are, for example, reading, writing, and subscribing.
•Programs (Prog): Programs are complex functions in a server or underlying
system that can be invoked and managed by a Client. Programs can rep-
resent any level of functionality within a system or process in which client
control or intervention is required and progress monitoring is desired. This
Information Model defines the specifications that Programs must have, such
as the state of program execution and the results data handling.
1.2.5 Companion Models
On top of the OPC Foundation’s information models there are the companion
models. Other standardization organizations use OPC technology and describe
their data in companion models. Models must be described according to OPC
UA specifications. It is possible to do this on top of the standard models already
defined by the OPC foundation, but also directly.
11
1.2.6 Vendor Specific Extension
The last level concerns the specific extensions of vendors for information models.
Vendors can define personalized models in addition to existing models to satisfy
particular needs.
1.3 Profiles
Another very important feature of OPC UA is its scalability: the ability to scale
OPC UA from very small devices to very large devices as needed. This feature is
guaranteed by Profiles.
The OPC UA describes a number of Services and a variety of information
models. These Services and information models can be referred to as features of
a Server or Client. Servers and Clients need to be able to describe which features
they support and wish to have certified. The individual features are grouped into
ConformanceUnits which are further grouped into Profiles.
ConformanceUnit is the smallest part of each functionality and grouping mul-
tiple ConformanceUnits generates a Profile. A Profile is an aggregation of Con-
formanceUnits and other Profiles. To support a Profile, an application has to
support the ConformanceUnits and all aggregated Profiles.
Scalability is guaranteed by the fact that each application can choose which
Profiles to support.
The macro categories of profiles defined by OPC UA are:
•Client: Profiles of this category specify functions of an OPC UA Client.
•Global Directory Service: Profiles of this category specify functions for
global discovery and certificate management.
•Security: Profiles of this category specify security related functions. Security
policies are part of this category. Profiles of this category apply to Servers
and Clients.
•Server: Profiles of this category specify functions of an OPC UA Server.
•Transport: Profiles of this category specify specific protocol mappings. These
Profiles apply to Servers and Clients.
Depending on the requirements, the user can add one or more Conformance
Units or Profiles to existing Profiles.
For example, the Standard OPC UA Server Profile requires Address Space,
Data Access, Security and Binary Protocol functionality. In addition, you can
add additional features such as Alarm & Conditions, Historical Access, etc.
12

Some ConformanceUnits used in the implementation of this client are:
•Discovery Client Get Endpoints Basic: uses the GetEndpoints Service to
obtain all Endpoints for a given Server URI.
•Session Client Base: uses the Session Service Set (CreateSession, Activate-
Session, and CloseSession).
•Attribute Client Read Base: uses the Read Service to read one or more
Attributes of one or more Nodes. This includes use of an IndexRange to
select a single element or a range of elements when the Attribute value is
an array.
•Attribute Client Write Base: uses the Write Service to write values to one or
more Attributes of one or more Nodes. This includes use of an IndexRange
to select a single element or a range of elements when the Attribute value
is an array.
•Attribute Client Write Quality & Timestamp: uses the Write Service to
write StatusCode and/or Timestamps along with a Value.
•Security User Name Password: The Server supports User Name/Password
combination(s). The token will be encrypted if required by the security
policy of the User Token Policy or by the security policy of the endpoint.
•Security Certificate Validation: includes structure and signature examina-
tion.
•Security TLS RSA with AES 256 CBC SHA256: The connection is estab-
lished using TLS RSA WITH AES 256 CBC SHA256.
•Security Encryption Required: Encryption is required using the algorithms
provided in the security algorithm suite.
•Security Signing Required: Signing is required using the algorithms provided
in the security algorithm suite.
•Protocol UA TCP: Support the UA TCP transport protocol.
1.4 Communication Models
The UPC UA has two types of communication models: Client/Server and Pub/-
Sub.
The main features of Client/Server technology are as follows:
13
•TCP based Request/Response
•Peer-to-peer connection/session required
•High resources consumption for more than 500 connections
•Safe transport, acknowledgment of every message
•Useful for large amounts of flexible data
The Client/Server model is used for local networks such as LANs. Ensures
fast and reliable transmission if there are not too many devices connected.
For Pub/Sub technology the main features are:
•UDP based Pub/Sub
•Connection-less, broadcast-style communication
•Limited consumption for more than one thousand subscribers
•Cyclic publish of all data
•Useful for small amounts of flexible data
In this system, the publisher does not need to be aware of the identity of
subscribers; it only publishes its message to the dispatcher. Subscribers contact
the dispatcher by subscribing to receive messages. A subscriber may subscribe
only to messages received from certain publishers, or with certain characteristics.
It is a useful system to use on global networks, where millions of users can be
present.
For this project it was assumed to be in an industrial environment, so the
Client/Server model will be used.
The OPC UA systems architecture models Clients and Servers as interacting
partners. Each system may contain multiple Clients and Servers. Each Client
may interact concurrently with one or more Servers, and each Server may interact
concurrently with one or more Clients.
The Figure 1.4 shows the interactions between Client and Server.
The Figure 1.5 shows the structure that each OPC UA client must have.
The official documentation specifies that ”the Client Application is the code
that implements the function of the Client. It uses the Client API to send and
receive OPC UA Service requests and responses to the Server. The Client API is
an internal interface that isolates the Client application code from an OPC UA
Communication Stack. The OPC UA Communication Stack converts Client API
14
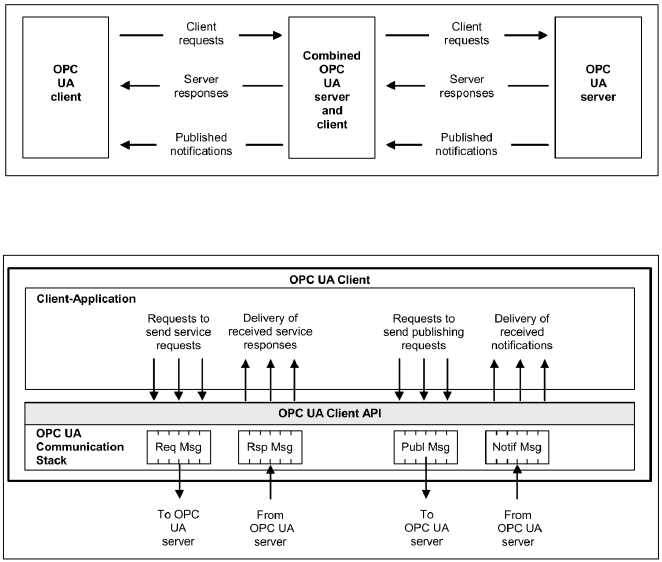
Figure 1.4: OPC UA System architecture.
Figure 1.5: OPC UA Client architecture.
calls into Messages and sends them to the Server at the request of the Client
application.”
In the following chapters the code to be implemented to create a simple Client
will be explained step by step.
15
16
Chapter 2
Why use Android?
As you can read from the previous chapter, OPC UA is compatible with a multi-
tude of hardware devices and operating systems, including Android. This chapter
briefly explains the reasons why you chose to use this OS.
2.1 Open Source
The first choice to use Android for the development of an OPC UA client is that
it is completely open source [4]. Android encourages innovation by giving device
manufacturers the freedom to customize their phones and the operating system
itself. This means that anyone, even competitors, can download, install, modify
and distribute its source code for free. The result? More people have access to
the potential of mobile technology than ever before.
2.2 Technology for more people in more places
Because Android source code can be downloaded, customized, and distributed for
free by anyone, many manufacturers have been able to make mobile devices at
more affordable prices than their competitors, allowing people around the world
to access mobile device technology that was previously out of reach.
2.3 Most used OS
The reasons described in the previous paragraphs have made Android the most
widely used OS in the world, not only for smartphones. Globally, Android cur-
rently has a market share of about 40% [5], while in the mobile market it has
about 75% [6]. It’s therefore natural to choose this OS for app development.
17
2.4 Android Studio and Google Play
Google offers developers important tools for developing and deploying apps.
The first of all is Android Studio: it is the official IDE (Integrated Development
Environment) and is completely free. This IDE is the fastest tools for building
apps on every type of Android device.
Another important tool that can be used is Google Play, the main store used
by Android for app distribution. Registration for the Google Play Console cur-
rently involves a one-time fee of $25. The console offers many features including
statistics, user feedbacks, user acquisition and version management.
2.5 Documentation
Last but not least, it is the huge amount of documentation that you can find on
the web for free. You can learn how to develop apps from scratch without paying
a penny, and community support is incredible.
18
Chapter 3
Set up the development
environment
This chapter describes all the programs, libraries and steps needed to set up the
work environment for the development of Android apps. In general, the steps
below are described in the OPC Foundation’s guide [7], but some parts have been
modified and specified for use in Android.
3.1 JDK 8
To use the Java Stack of OPC UA you need to use Maven, and Maven needs Java.
So the first step is to download the Java SE Development Kit 8 (JDK 8) [8]. This
guide uses Oracle software, but you can also download OpenJDK, depending on
the operating system you are using. On the download page accept the license
agreement and download the version for your operating system. Then install Java
following the installer’s instructions.
To use Java in Windows, you must set the path in the environment variables.
For example, in Windows 10:
•Search for Environment Variables in the search bar, then select Edit the
system environment variables.
•Click the Environment Variables... button (Figure 3.1a).
•In the System Variables section click New (Figure 3.1b).
•In the Variable Name field, enter JAVA_HOME (Figure 3.1c).
•In the Variable Value field, enter the JDK installation path (If you did
not change the path during installation, it should look like
C:\Program Files\Java\jdk.8.0_162).
19
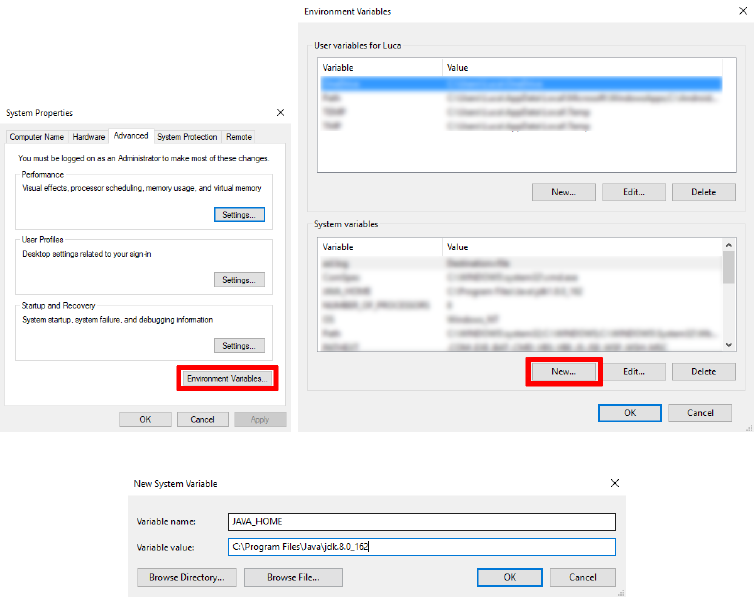
•Click on OK. The environment variable has been set correctly.
(a) System Properties. (b) Environment Variables.
(c) New System Variable.
Figure 3.1: How to set the Java PATH in Windows.
For other versions of Windows you can search the Web but once you have
found the environment variable screen the procedure is the same.
For other operating systems, it is recommended to search directly online.
3.2 Maven
Apache Maven is a software project management and comprehension tool. Based
on the concept of a project object model (POM), Maven can manage a project’s
build, reporting and documentation from a central piece of information [9]. These
are the steps to install it:
•Download Maven from the official download page [10]. If you are using Win-
dows, download the Binary zip archive, (e.g. apache-maven-3.5.3-bin.zip).
For other operating systems, please refer directly to the online guide [11].
20
•Extract the archive to C:\Program Files or in another directory you prefer.
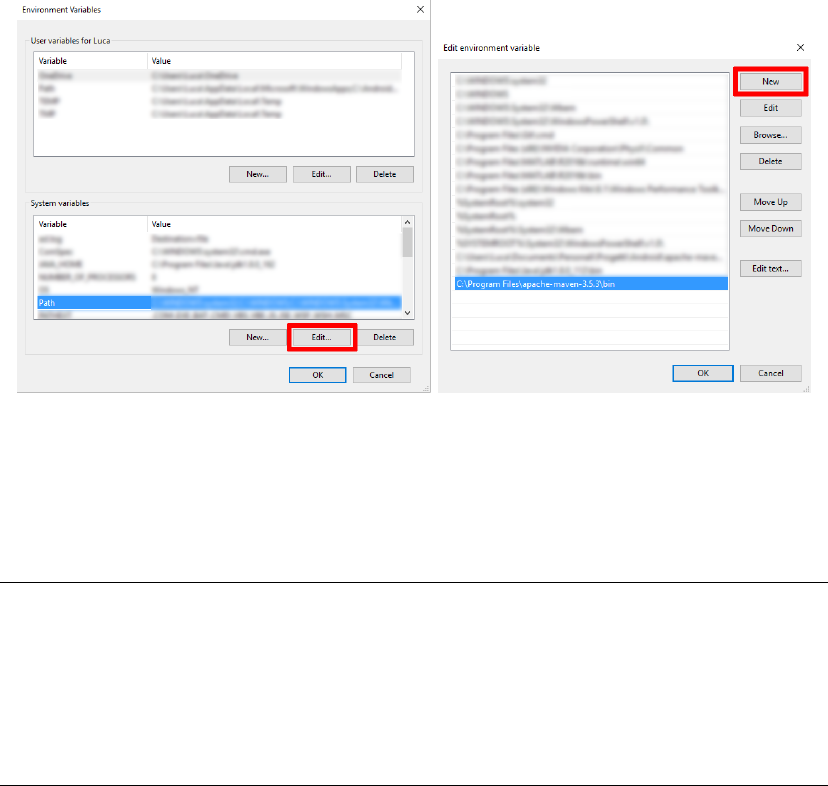
•Add the bin directory in the newly extracted directory to the PATH environ-
ment variable:
–In the environment variables window seen in the previous paragraph,
select the PATH variable and click on Edit or New if it does not exist
(Figure 3.2a).
–Click on New and enter the path to the bin folder (e.g.
C:\Program Files\apache-maven-3.5.3\bin), then click OK (Fig-
ure 3.2b).
(a) Environment Variables. (b) Edit environment variable.
Figure 3.2: How to set the Maven PATH in Windows.
To confirm if Maven works correctly, open the command prompt or terminal,
write mvn -v and press enter. The result should be similar to the code below.
Apache Maven 3.5.3 (3383c37e1f9e9b3bc3df5050c29c8aff9f295297;
2018-02-24T20:49:05+01:00)
Maven home: C:\Program Files\apache-maven-3.5.3\bin\..
Java version: 1.8.0_162, vendor: Oracle Corporation
Java home: C:\Program Files\Java\jdk1.8.0_162\jre
Default locale: en_US, platform encoding: Cp1252
OS name: "windows 10", version: "10.0", arch: "amd64", family: "windows"
21
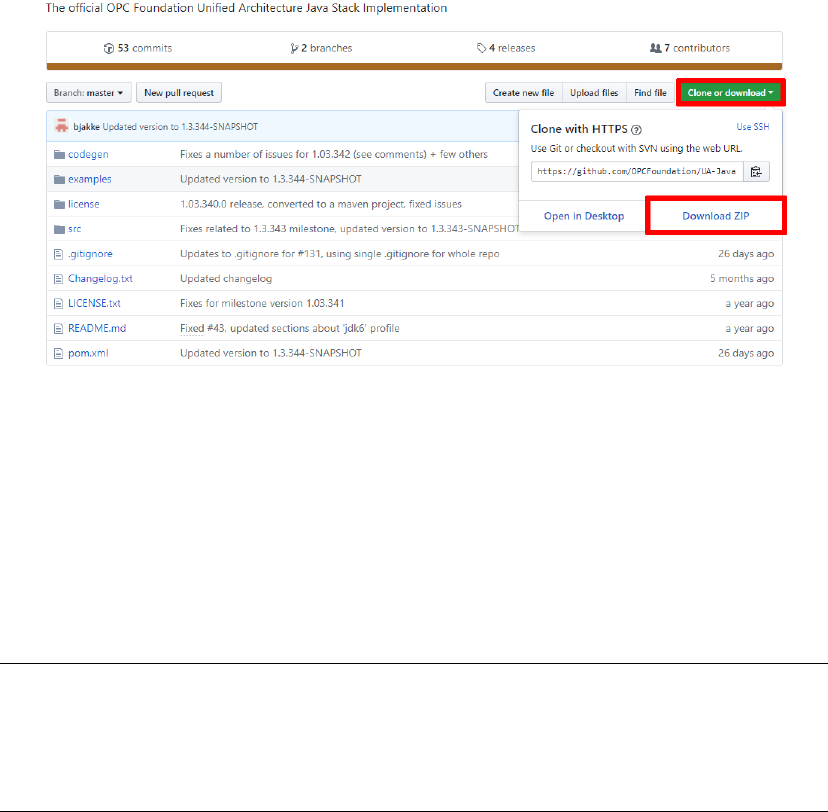
3.3 UPC UA Java Stack
Now that Maven has been installed you can build the opc ua java stack. Download
the stack directly from the github page of opc foundation [7]. Press Clone or
download, then Download ZIP, as in Figure 3.3.
Figure 3.3: Download OPC UA Java Stack.
Extract the folder, which should be called UA-Java-master, then open the
prompt (or terminal) and go to the newly created directory (e.g. for Windows
cd Downloads\UA-Java-master).
Type mvn package, then wait until the job is finished. If the command is
successful, a similar message should appear:
[INFO] BUILD SUCCESS
[INFO] --------------------------------------------------
[INFO] Total time: 01:49 min
[INFO] Finished at: 2018-04-18T23:18:15+02:00
[INFO] --------------------------------------------------
In the UA-Java-master folder there will be a new folder target, which contains
the required jar file (e.g. opcuastack1.3.344SNAPSHOT.jar). Create a new
folder and call it libs, then copy the jar file inside it: it will be imported into
Android Studio together with the other jars in the last paragraph.
22
3.4 SLF4J
In addition to the stack, you need additional libraries. The first is called SLF4J.
The Simple Logging Facade for Java (SLF4J) is a simple facade for logging systems
allowing the end-user to plug-in the desired logging system at deployment time
[12].
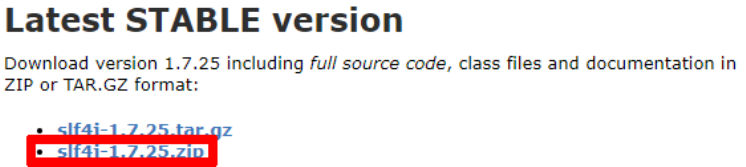
Download the zip file (e.g. slf4j-1.7.25.zip, Figure 3.4) from the download
page [13]. Extract the contents, then copy the file slf4j-api-1.7.25.jar to the libs
folder.
Figure 3.4: Download SLF4J.
3.5 Spongy Castle
The OPC foundation recommends using Bouncy Castle, which is a collection of
APIs for cryptography. Unfortunately Android does not support these libraries,
so Spongy Castle was created [14]. Spongy Castle is the stock Bouncy Castle
libraries with a couple of small changes to make it work on Android.
You will need three files that you can download directly from the main page
as shown in the Figure 3.5, that is:
•core
•prov
•bcpkix-jdk15on
Copy downloaded files (e.g. core-1.58.0.0 and prov-1.58.0.0) to the libs
folder
3.6 Simulation Server
To test the app you will need a simulation server. A very good software is the
Prosys OPC UA Simulation Server [15]. Among the many features this software
allows you to:
23
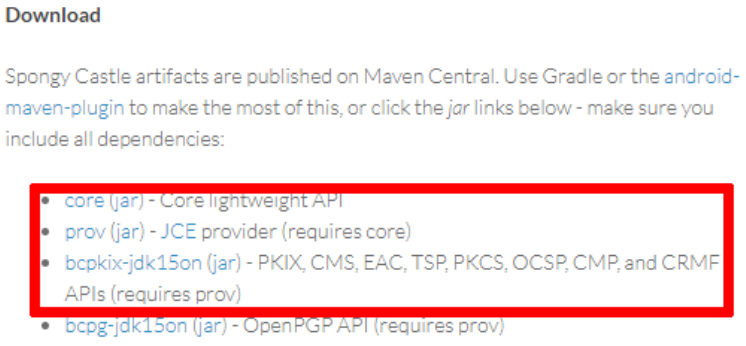
Figure 3.5: Download Spongy Castle.
•Check the security level of the endpoints
•Check user authentication method
•Manage Certificates
•Simulating variables
Once you have downloaded and installed the software, the interface should be
similar to the Figure 3.6. The Connection Address (UA TCP) contains the opc
address of the server.
3.7 Android Studio
The last step is to install and configure Android Studio. In the download page
[16] press DOWNLOAD ANDROID STUDIO.
Follow the steps of the installer, then start Android Studio. If you are in-
stalling the software for the first time, it is recommended that you use the default
settings. The first time you launch Android Studio, you will need to download
the components necessary for the development of the app, such as the Android
SDK, the support libraries and the emulator.
Once the installation of the components is complete, a new window called
New Project will appear:
•Click on Start a new Android Studio project. Rename the project, for
example OPC UA Client, and then press Next.
24
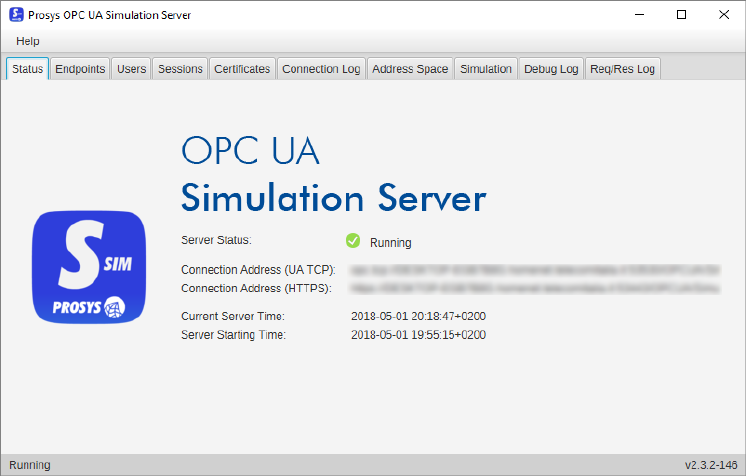
Figure 3.6: Prosys OPC UA Simulation Server.
•In the new window Target Android Devices leave everything unchanged
and press Next.
•In the Add an Activity to Mobile window, select Empty Activity,
then select Next.
•In the last window leave everything unchanged, press Finish and wait for
the Gradle configuration.
After these last steps Android Studio will finally open.
3.7.1 Emulator
You can use a physical device or an emulator to test your apps. If you choose the
second option just click on the AVD Manager button shown in the Figure 3.7 and
follow the steps:
•In the window that appears click Create Virtual Device.
•Choose a template you prefer and press Next
•Choose the version of android that will have the emulator installed. It is
recommended that you use the image with the highest recommended API
Level and then press Next.
25

•In the last window press Finish.
The virtual device is now configured: now you have all the tools to develop
the Android client and in the next chapter will be shown how to do it.
Figure 3.7: Android Virtual Device Manager.
26
Chapter 4
Create a simple client app
This chapter describes the steps to create a simple app that can read and write
values on a server.
The app’s full code, which includes this and the next chapter, can be found at
https://github.com/lucazanrosso/OPCUAClient.
4.1 Add libraries
Before starting to write code, it is necessary that the libraries downloaded in
the previous chapter and contained in the libs folder are imported into Android
Studio. Copy the libs folder into the app folder contained in the main project
folder (e.g. C:\Users\Luca\AndroidStudioProjects\OPCUAClient\app).
Now through Android Studio, change the view from Android to Project,
then select the jar files you just copied, as shown in the Figure 4.1. Right-click and
click Add As Library.... Finally, restore the view from Project to Android.
Now you have all the libraries you need to create the client.
4.2 Permissions
Android is installed mostly on personal devices. As described on the Android
Developers website [17], the purpose of a permission is to protect the privacy
of an Android user. Android apps must request permission to access sensitive
user data (such as contacts and SMS), as well as certain system features (such
as camera and internet). Depending on the feature, the system might grant the
permission automatically or might prompt the user to approve the request.
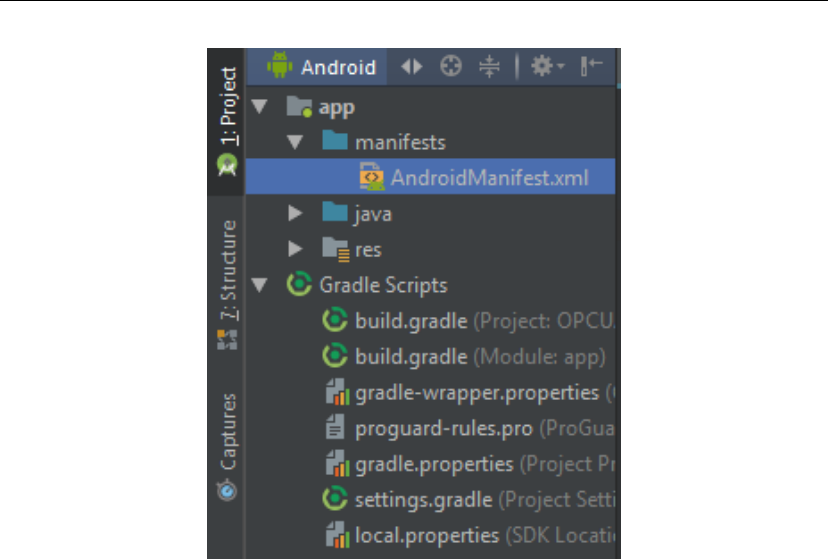
For this app you will need to ask permission to connect to the network. In the
AndroidManifest.xml file (Figure 4.2) add the following permission
<uses-permission android:name="android.permission.INTERNET" />
27
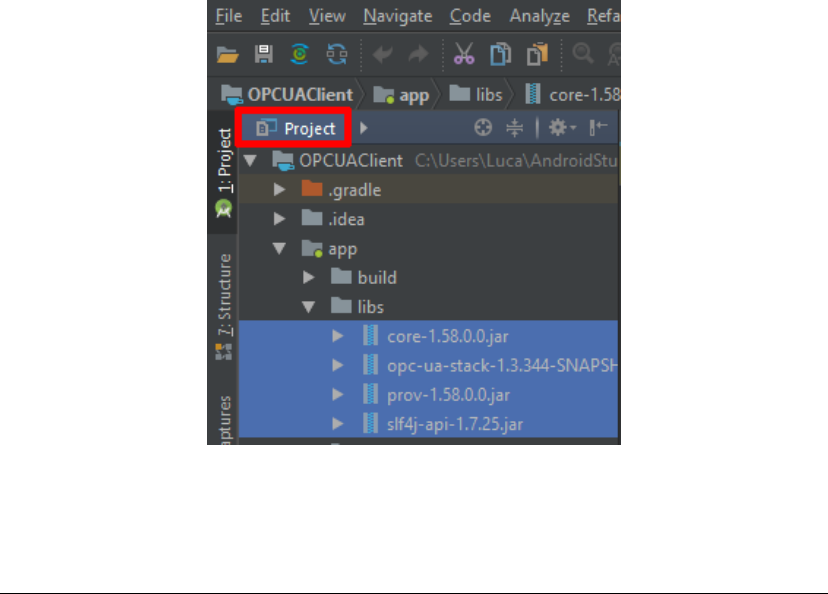
Figure 4.1: Libraries location.
The end result should be similar to the following code:
<?xml version="1.0" encoding="utf-8"?>
<manifest xmlns:android="http://schemas.android.com/apk/res/android"
package="com.lucazanrosso.opcuaclient">
<uses-permission android:name="android.permission.INTERNET" />
<application
android:allowBackup="true"
android:icon="@mipmap/ic_launcher"
android:label="@string/app_name"
android:roundIcon="@mipmap/ic_launcher_round"
android:supportsRtl="true"
android:theme="@style/AppTheme">
<activity android:name=".MainActivity">
<intent-filter>
<action android:name="android.intent.action.MAIN" />
<category
android:name="android.intent.category.LAUNCHER" />
</intent-filter>
</activity>
</application>
28
</manifest>
Figure 4.2: AndroidManifest location.
4.3 AsyncTask
The android documentation specifies [17, 18]: since the NetworkFragment runs on
the UI thread by default, it uses an AsyncTask to run the network operations on
a background thread. AsyncTask enables proper and easy use of the UI thread.
This class allows you to perform background operations and publish results on
the UI thread without having to manipulate threads and/or handlers.
AsyncTask must be subclassed to be used. The subclass will override at least
one method (doInBackground(Params...)), and most often will override a second
one (onPostExecute(Result).)
So, connection to the server must be established via ConnectionAsyncTask,
which will be contained within the MainActivity class. To use the Connec-
tionAsyncTask simply call the method
new ConnectionAsyncTask().execute(null, null, null);
The code of the ConnectionAsyncTask is as follows:
29

private class ConnectionAsyncTask extends AsyncTask<String, String,
String> {
@Override
protected String doInBackground(String... params) {
return "Do something here";
}
@Override
protected void onPostExecute(String result) {
}
}
All the connection work (creating the client, discovering endpoints and acti-
vating the session) will be done within the doInBackground() method.
4.4 Create a Client
Before creating the client you need to create a try catch block within the doIn-
Background() method to handle exceptions. Now simply write the following lines
of code:
Application myClientApplication = new Application();
// Create Client Application Instance Certificate
KeyPair myClientApplicationInstanceCertificate;
String certificateCommonName = "UA Sample Client";
System.out.println("Generating new Certificate for Client using CN: " +
certificateCommonName);
String applicationUri = myClientApplication.getApplicationUri();
String organisation = "Sample Organisation";
int validityTime = 3650;
myClientApplicationInstanceCertificate = CertificateUtils
.createApplicationInstanceCertificate(certificateCommonName,
organisation, applicationUri, validityTime);
// Create Client
Client myClient = new Client(myClientApplication);
myClientApplication
.addApplicationInstanceCertificate(
myClientApplicationInstanceCertificate);
30

From the code you notice that before creating the client you need to create
a certificate: in this case a new certificate is created every time you establish a
connection. This solution is acceptable if the server does not provide for security
measures, but in real situations you will find it difficult. For safer solutions, see
the next chapter.
The certificate requires the following parameters:
•Name of the certificate
•Name of the organisation
•Application Uri obtained from the new Application() instance
•Validity, set here for a duration of 10 years.
The client is then created and the certificate is associated with it.
4.5 Discover endpoints
The code for discovering endpoints is as follows:
// Discover endpoints
EndpointDescription[] endpoints =
myClient.discoverEndpoints("opc.tcp://myServer");
// Filter out all but opc.tcp protocol endpoints
endpoints = EndpointUtil.selectByProtocol(endpoints, "opc.tcp");
// Sort endpoints by security level. The lowest level at the beginning,
the highest at the end of the array
endpoints = EndpointUtil.sortBySecurityLevel(endpoints);
// Choose one endpoint.
EndpointDescription endpoint = endpoints[0];
To find the endpoints, you need to know the opc.tcp address of the server
(e.g opc.tcp://myServer) and the security levels adopted. Also in this case it is
assumed that the server has no security measures, so just order the endpoints by
security level and choose the one with lower security.
Note that only endpoints using opc.tcp protocols have been filtered out, while
https protocols are ignored.
31

4.6 Activate a Session
To activate a session with the server just write:
// Create the session from the chosen endpoint
SessionChannel mySession = myClient.createSessionChannel(endpoint);
// Activate the session.
mySession.activate();
// Read and write variables here
// Close the session
mySession.close();
mySession.closeAsync();
The code is easy to interpret: a session is created and activated through the
client and the chosen endpoint.
After the operations have been completed, it is very important to always close
the session.
4.6.1 Read a value
To read and write a node it is sufficient to know two attributes:
•NameSpace Index
•Identifier
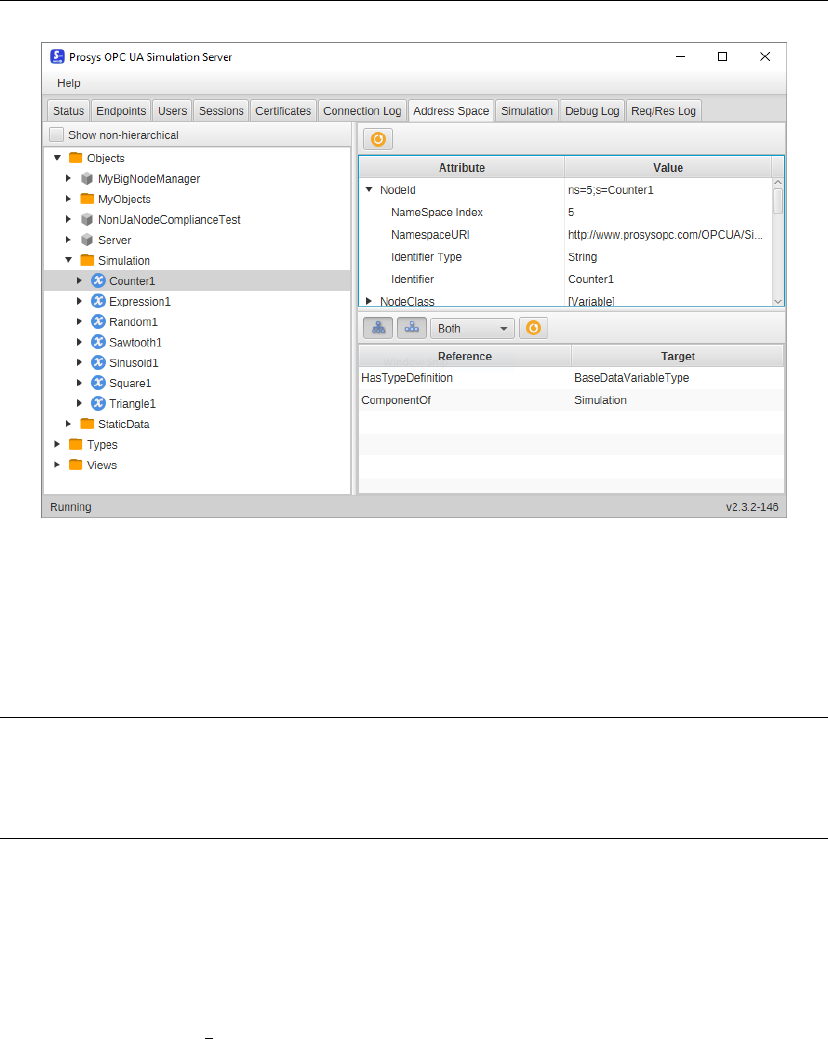
The simulation server installed in the previous chapter contains a section of
Simulation: in this window there are many nodes, and their value changes de-
pending on the function chosen.
In the Address Space section you can get more information about these
nodes. Select Objects, then Simulation, and then Counter1 (Figure 4.3). By
expanding the NodeId attribute you can recognize the NameSpace Index (5)
and the Identifier (Counter1). Another important parameter is the Identifier
Type, which in this case is a String type, which must be used to correctly read
the node value.
To read the Counter1 node value you need to write:
// Read a variable
NodeId nodeId = new NodeId(5, "Counter1");
ReadValueId readValueId = new ReadValueId(nodeId, Attributes.Value,
null,null);
32
ReadResponse res = mySession.Read(null, 500.0,
TimestampsToReturn.Source, readValueId);
DataValue[] dataValue = res.getResults();
String result = dataValue[0].getValue().toString();
Figure 4.3: Counter1 node.
4.6.2 Write a value
To write the value in a node just code:
// Write a variable. In this case the same variable read is set to 0
WriteValue writeValue = new WriteValue(nodeId, Attributes.Value, null,
new DataValue(new Variant(0)));
mySession.Write(null, writeValue);
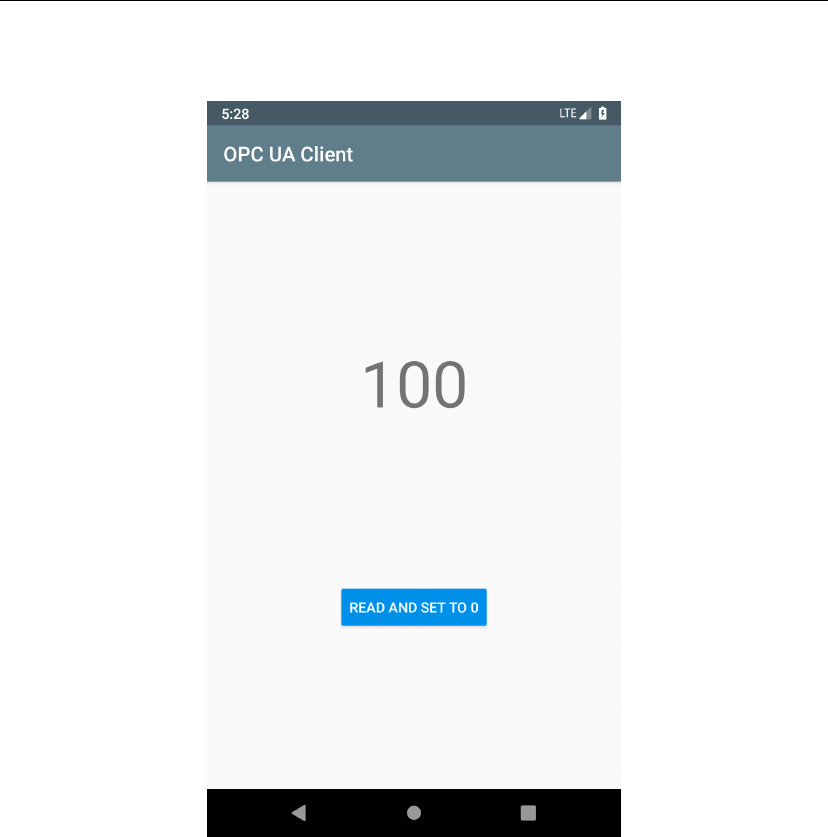
4.7 User Interface
The user interface used in this app is the simplest one you can create: a Button
and a TextView. The graphic part that refers to the MainActivity class is located
in the file activity main.xml as shown in the Figure 4.4 and the code is as
follows:
33

<?xml version="1.0" encoding="utf-8"?>
<android.support.constraint.ConstraintLayout
xmlns:android="http://schemas.android.com/apk/res/android"
xmlns:app="http://schemas.android.com/apk/res-auto"
xmlns:tools="http://schemas.android.com/tools"
android:layout_width="match_parent"
android:layout_height="match_parent"
tools:context=".MainActivity">
<TextView
android:id="@+id/text_view"
android:layout_width="wrap_content"
android:layout_height="wrap_content"
android:text="Hello World!"
android:textSize="64sp"
app:layout_constraintTop_toTopOf="parent"
app:layout_constraintBottom_toTopOf="@id/button_read"
app:layout_constraintLeft_toLeftOf="parent"
app:layout_constraintRight_toRightOf="parent" />
<android.support.v7.widget.AppCompatButton
android:id="@+id/button_read"
android:layout_width="wrap_content"
android:layout_height="wrap_content"
android:text="@string/button_read"
android:onClick="connect"
android:textColor="@android:color/white"
app:backgroundTint="@color/colorAccent"
app:layout_constraintTop_toBottomOf="@id/text_view"
app:layout_constraintLeft_toRightOf="parent"
app:layout_constraintRight_toLeftOf="parent"
app:layout_constraintBottom_toBottomOf="parent" />
</android.support.constraint.ConstraintLayout>
For an explanation of how the various components and attributes work, please
refer directly to the online guide.
As you can see from the code, the Button component has the attribute
android:onClick="connect". A method with the same name must be entered
in the MainActivity, and it will contain this simple line of code that uses the
ConnectionAsyncTak to establish a connection with the server.
public void connect(View view) {
34
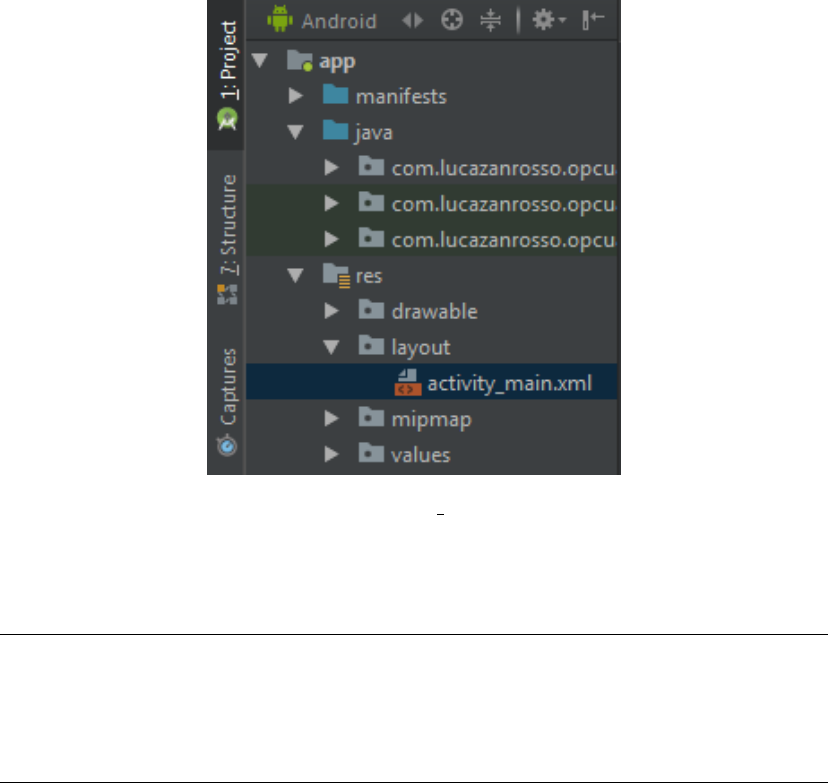
Figure 4.4: activity main location.
new ConnectionAsyncTask().execute(null,null,null);
}
For TextView, you need to create an instance within the MainActivity class,
then connect it to the layout TextView using the findViewById() method. Fi-
nally, the onPostExecute() method will display the result obtained by the doIn-
Background() method in the TextView. Here is the code:
TextView textView;
@Override
protected void onCreate(Bundle savedInstanceState) {
super.onCreate(savedInstanceState);
setContentView(R.layout.activity_main);
textView = findViewById(R.id.text_view);
}
private class ConnectionAsyncTask extends AsyncTask<String, String,
String> {
...
35
@Override
protected void onPostExecute(String result) {
textView.setText(result);
}
}
The Figure 4.5 shows the appearance of the application if you use the code
just explained.
Figure 4.5: UI Appearance.
36

Chapter 5
Data Security
This chapter will focus on one of the key aspects in the business environment but
also in everyday life: data security.
5.1 Encryption
Encryption is essential for secure data transmission. As explained in Chapter 3,
Spongy Castle is a library for encryption. In order to be used, enter this code in
the MainActivity class:
// Bouncy Castle encryption
static {
Security.insertProviderAt(new
org.spongycastle.jce.provider.BouncyCastleProvider(), 1);
}
5.2 Certificates
A digital certificate is an electronic document used to prove the ownership of a
public key. As explained in the previous chapter, a new certificate is currently
created every time the app connects with the server. This is a problem if the
server only allows you to establish a connection with trusted certificates. In fact,
the first time you search for a connection, the certificate is always rejected and the
connection is cancelled. If the server determines that the certificate is trusted, the
next connection will be successful. But if you create a new certificate every time
you try, the connection can never happen! So you need to create a permanent
certificate that will be accepted each time you connect.
37

The first step is to create a class that allows you to create the certificate and
the private key. The example provided by the OPC Foundation has been taken
as a reference [7], adapting it to be used in Android.
public class ExampleKeys {
private static final String PRIVKEY_PASSWORD = "keyPassword";
/**
* Load file certificate and private key from applicationName.der &
.pfx - or create ones if they do not exist
* @return the KeyPair composed of the certificate and private key
*/
public static KeyPair getCert(Context context,
ApplicationDescription applicationDescription)
throws ServiceResultException
{
String applicationName =
applicationDescription.getApplicationName().getText();
String applicationUri = applicationDescription.getProductUri();
File certFile = new File(context.getFilesDir(),applicationName +
".der");
File privKeyFile = new
File(context.getFilesDir(),applicationName+ ".pem");
try {
Cert myCertificate = Cert.load( certFile );
PrivKey myPrivateKey = PrivKey.load( privKeyFile,
PRIVKEY_PASSWORD );
return new KeyPair(myCertificate, myPrivateKey);
}catch (CertificateException e) {
throw new ServiceResultException( e );
}catch (IOException e) {
try {
String hostName =
InetAddress.getLocalHost().getHostName();
KeyPair keys =
CertificateUtils.createApplicationInstanceCertificate(
applicationName, null, applicationUri, 3650, hostName);
keys.getCertificate().save(certFile);
keys.getPrivateKey().save(privKeyFile);
return keys;
}catch (Exception e1) {
throw new ServiceResultException( e1 );
38

}
}catch (NoSuchAlgorithmException e) {
throw new ServiceResultException( e );
}catch (InvalidKeyException e) {
throw new ServiceResultException( e );
}catch (InvalidKeySpecException e) {
throw new ServiceResultException( e );
}catch (NoSuchPaddingException e) {
throw new ServiceResultException( e );
}catch (InvalidAlgorithmParameterException e) {
throw new ServiceResultException( e );
}catch (IllegalBlockSizeException e) {
throw new ServiceResultException( e );
}catch (BadPaddingException e) {
throw new ServiceResultException( e );
}catch (InvalidParameterSpecException e) {
throw new ServiceResultException( e );
}
}
}
After that in the MainActivity you must replace the code described in the
paragraph 4.4 with the one below.
// Create ApplicationDescription
ApplicationDescription applicationDescription = new
ApplicationDescription();
applicationDescription.setApplicationName(new
LocalizedText("AndroidClient", Locale.ENGLISH));
applicationDescription.setApplicationUri("urn:localhost:AndroidClient");
applicationDescription.setProductUri("urn:lucazanrosso:AndroidClient");
applicationDescription.setApplicationType(ApplicationType.Client);
// Create Client Application Instance Certificate
KeyPair myClientApplicationInstanceCertificate =
ExampleKeys.getCert(getApplicationContext(),
applicationDescription);
// Create Client
Client myClient = Client.createClientApplication(
myClientApplicationInstanceCertificate);
Note that the ExampleKeys.getCert() method accepts two parameters:
39

•The first, getApplicationContext(), is used to store the certificate and pri-
vate key in memory.
•The second, applicationDescription, contains all the information regarding
the OPC UA application, needed to create the certificate.
5.3 Security modes and policies
Now that the certificate has been created, you must choose the security level of
the communication. There are three security modes:
•None, is the one used in the previous chapter and does not provide for safety
measures.
•Sign, adds a digital signature to your message to ensure its authenticity.
•SignAndEncrypt, in addition to the digital signature, the message is also
encrypted.
Finally, if the message has been signed, select the security policy that will affect
the level of protection of the signature. Three security policies are available, sorted
by security level in ascending order:
•BASIC128RSA15
•BASIC256
•BASIC256SHA256
The code uses the SignAndEncrypt security mode and BASIC256SHA256 se-
curity policy:
// Filter out all but Signed & Encrypted endpoints
endpoints = EndpointUtil.selectByMessageSecurityMode(endpoints,
MessageSecurityMode.SignAndEncrypt);
// Filter out all but Basic256Sha256 cryption endpoints
endpoints = EndpointUtil.selectBySecurityPolicy(endpoints,
SecurityPolicy.BASIC256SHA256);
40
5.4 User authentication
The last point about security is authentication. The server can determine that
users must be authenticated for a secure connection, so a username and password
are required for each user. On the client side, to authenticate, simply replace the
line mySession.activate() with the following one:
mySession.activate("myUsername","myPassword");
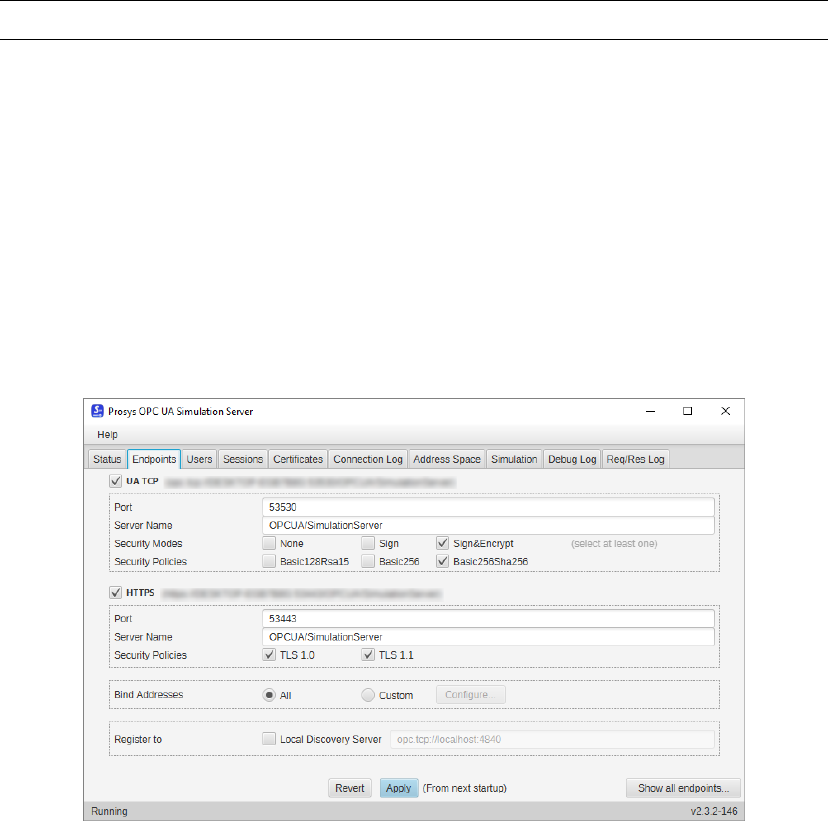
5.5 Change server settings
All that remains is to change some of the server settings to adapt them to the
client’s security measures:
•In the Prosys OPC UA Simulation Server software, select the Endpoints
section. Check the boxes as in Figure 5.1. In the line Security modes
only the Sign&Encrypt item should remain and in the Security Policy only
Basic256Sha256 should remain.
Figure 5.1: Securty modes and policies.
•In the Users section create a new user with the same username and password
used in the client (Figure 5.2).
41
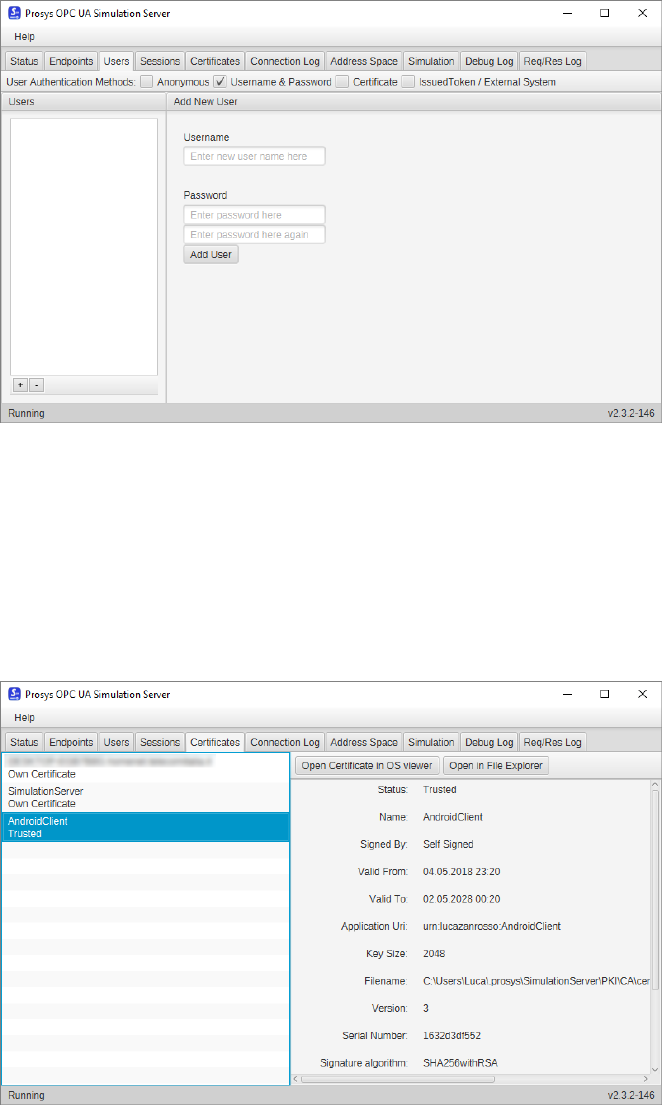
Figure 5.2: User authentication.
•As explained in paragraph 5.2, the certificate will be rejected the first time
the connection is attempted. In the Certificates section there will be a
certificate named AndroidClient with the Rejected status. To change it to
Trusted just right click and put Trust select (Figure 5.3).
Figure 5.3: Certificates.
42
Now communication between client and server is secure. These simple concepts
can be applied to any type of project.
43
44
Conclusion
This project was born with the intent to lay the foundations for creating An-
droid clients that use the OPC UA standard, given the almost absent amount of
information that can be found free of charge.
What is explained paves the way for the development of systems of any kind,
even very complex, such as large industrial systems or global IT services, always
focusing on the security of the data transmitted.
The final intent is to share the project through the GitHub platform to the
whole world for free, so as to facilitate the initial approach between OPC UA and
Android.
45
46
References
[1] OPC Foundation. What is opc? https://opcfoundation.org/about/
what-is-opc/.
[2] OPC Foundation. Classic. https://opcfoundation.org/about/
opc-technologies/opc-classic/.
[3] OPC Foundation. Unified architecture. https://opcfoundation.org/
about/opc-technologies/opc-ua/.
[4] Google. Android is for everyone. https://www.android.com/intl/en_us/
everyone/.
[5] StatCounter. Operating system market share worldwide. http://gs.
statcounter.com/os-market-share.
[6] StatCounter. Mobile operating system market share worldwide. http://gs.
statcounter.com/os-market-share/mobile/worldwide.
[7] OPC Foundation. The official opc foundation unified architecture java stack
implementation. https://github.com/OPCFoundation/UA-Java.
[8] Oracle. Java se development kit 8 downloads. http://www.oracle.com/
technetwork/java/javase/downloads/jdk8-downloads-2133151.html.
[9] The Apache Software Foundation. Welcome to apache maven. https://
maven.apache.org/.
[10] The Apache Software Foundation. Downloading apache maven. https://
maven.apache.org/download.cgi.
[11] The Apache Software Foundation. Installing apache maven. http://maven.
apache.org/install.html.
[12] QOS.ch. Installing apache maven. https://www.slf4j.org/.
[13] QOS.ch. Latest stable version. https://www.slf4j.org/download.html.
47
[14] Roberto Tyley. Spongy castle. https://rtyley.github.io/
spongycastle/.
[15] Prosys. Prosys opc ua simulation server download. https://downloads.
prosysopc.com/opc-ua-simulation-server-downloads.php.
[16] Google. Android studio, the official ide for android. https://developer.
android.com/studio/index.html.
[17] Google. Permissions overview. https://developer.android.com/guide/
topics/permissions/overview.
[18] Google. Asynctask. https://developer.android.com/reference/
android/os/AsyncTask.
48
