Programming Python OReilly 4th Ed. Ed
User Manual: OReilly-Programming-Python-4th-ed.
Open the PDF directly: View PDF ![]() .
.
Page Count: 1628 [warning: Documents this large are best viewed by clicking the View PDF Link!]
- Table of Contents
- Preface
- Part I. The Beginning
- Part II. System Programming
- Chapter 2. System Tools
- Chapter 3. Script Execution Context
- “I’d Like to Have an Argument, Please”
- Current Working Directory
- Command-Line Arguments
- Shell Environment Variables
- Standard Streams
- Chapter 4. File and Directory Tools
- “Erase Your Hard Drive in Five Easy Steps!”
- File Tools
- Directory Tools
- Chapter 5. Parallel System Tools
- “Telling the Monkeys What to Do”
- Forking Processes
- Threads
- Program Exits
- Interprocess Communication
- The multiprocessing Module
- Other Ways to Start Programs
- A Portable Program-Launch Framework
- Other System Tools Coverage
- Chapter 6. Complete System Programs
- “The Greps of Wrath”
- A Quick Game of “Find the Biggest Python File”
- Splitting and Joining Files
- Generating Redirection Web Pages
- A Regression Test Script
- Copying Directory Trees
- Comparing Directory Trees
- Searching Directory Trees
- Visitor: Walking Directories “++”
- Playing Media Files
- Automated Program Launchers (External)
- Part III. GUI Programming
- Chapter 7. Graphical User Interfaces
- “Here’s Looking at You, Kid”
- Python GUI Development Options
- tkinter Overview
- Climbing the GUI Learning Curve
- tkinter Coding Alternatives
- Adding Buttons and Callbacks
- Adding User-Defined Callback Handlers
- Adding Multiple Widgets
- Customizing Widgets with Classes
- Reusable GUI Components with Classes
- The End of the Tutorial
- Python/tkinter for Tcl/Tk Converts
- Chapter 8. A tkinter Tour, Part 1
- Chapter 9. A tkinter Tour, Part 2
- Chapter 10. GUI Coding Techniques
- “Building a Better Mousetrap”
- GuiMixin: Common Tool Mixin Classes
- GuiMaker: Automating Menus and Toolbars
- ShellGui: GUIs for Command-Line Tools
- GuiStreams: Redirecting Streams to Widgets
- Reloading Callback Handlers Dynamically
- Wrapping Up Top-Level Window Interfaces
- GUIs, Threads, and Queues
- More Ways to Add GUIs to Non-GUI Code
- The PyDemos and PyGadgets Launchers
- Chapter 11. Complete GUI Programs
- “Python, Open Source, and Camaros”
- PyEdit: A Text Editor Program/Object
- Running PyEdit
- PyEdit Changes in Version 2.0 (Third Edition)
- PyEdit Changes in Version 2.1 (Fourth Edition)
- PyEdit Source Code
- PyPhoto: An Image Viewer and Resizer
- PyView: An Image and Notes Slideshow
- PyDraw: Painting and Moving Graphics
- PyClock: An Analog/Digital Clock Widget
- PyToe: A Tic-Tac-Toe Game Widget
- Where to Go from Here
- Chapter 7. Graphical User Interfaces
- Part IV. Internet Programming
- Chapter 12. Network Scripting
- “Tune In, Log On, and Drop Out”
- Python Internet Development Options
- Plumbing the Internet
- Socket Programming
- Handling Multiple Clients
- Making Sockets Look Like Files and Streams
- A Simple Python File Server
- Chapter 13. Client-Side Scripting
- “Socket to Me!”
- FTP: Transferring Files over the Net
- Transferring Files with ftplib
- Transferring Directories with ftplib
- Transferring Directory Trees with ftplib
- Processing Internet Email
- POP: Fetching Email
- SMTP: Sending Email
- email: Parsing and Composing Mail Content
- Message Objects
- Basic email Package Interfaces in Action
- Unicode, Internationalization, and the Python 3.1 email Package
- Parser decoding requirement
- Text payload encodings: Handling mixed type results
- Text payload encodings: Using header information to decode
- Message header encodings: email package support
- Message address header encodings and parsing, and header creation
- Workaround: Message text generation for binary attachment payloads is broken
- Workaround: Message composition for non-ASCII text parts is broken
- Summary: Solutions and workarounds
- A Console-Based Email Client
- The mailtools Utility Package
- NNTP: Accessing Newsgroups
- HTTP: Accessing Websites
- The urllib Package Revisited
- Other Client-Side Scripting Options
- Chapter 14. The PyMailGUI Client
- “Use the Source, Luke”
- Major PyMailGUI Changes
- A PyMailGUI Demo
- Getting Started
- Loading Mail
- Threading Model
- Load Server Interface
- Offline Processing with Save and Open
- Sending Email and Attachments
- Viewing Email and Attachments
- Email Replies and Forwards and Recipient Options
- Deleting Email
- POP Message Numbers and Synchronization
- Handling HTML Content in Email
- Mail Content Internationalization Support
- Alternative Configurations and Accounts
- Multiple Windows and Status Messages
- PyMailGUI Implementation
- PyMailGUI: The Main Module
- SharedNames: Program-Wide Globals
- ListWindows: Message List Windows
- ViewWindows: Message View Windows
- messagecache: Message Cache Manager
- popuputil: General-Purpose GUI Pop Ups
- wraplines: Line Split Tools
- html2text: Extracting Text from HTML (Prototype, Preview)
- mailconfig: User Configurations
- textConfig: Customizing Pop-Up PyEdit Windows
- PyMailGUIHelp: User Help Text and Display
- altconfigs: Configuring for Multiple Accounts
- Ideas for Improvement
- Chapter 15. Server-Side Scripting
- “Oh, What a Tangled Web We Weave”
- What’s a Server-Side CGI Script?
- Running Server-Side Examples
- Climbing the CGI Learning Curve
- Saving State Information in CGI Scripts
- The Hello World Selector
- Refactoring Code for Maintainability
- More on HTML and URL Escapes
- Transferring Files to Clients and Servers
- Chapter 16. The PyMailCGI Server
- Chapter 12. Network Scripting
- Part V. Tools and Techniques
- Chapter 17. Databases and Persistence
- “Give Me an Order of Persistence, but Hold the Pickles”
- Persistence Options in Python
- DBM Files
- Pickled Objects
- Shelve Files
- The ZODB Object-Oriented Database
- SQL Database Interfaces
- ORMs: Object Relational Mappers
- PyForm: A Persistent Object Viewer (External)
- Chapter 18. Data Structures
- Chapter 19. Text and Language
- Chapter 20. Python/C Integration
- “I Am Lost at C”
- Extending Python in C: Overview
- A Simple C Extension Module
- The SWIG Integration Code Generator
- Wrapping C Environment Calls
- Wrapping C++ Classes with SWIG
- Other Extending Tools
- Embedding Python in C: Overview
- Basic Embedding Techniques
- Registering Callback Handler Objects
- Using Python Classes in C
- Other Integration Topics
- Chapter 17. Databases and Persistence
- Part VI. The End
- Chapter 21. Conclusion: Python and the Development Cycle
- Index

Programming Python

FOURTH EDITION
Programming Python
Mark Lutz
Beijing
•
Cambridge
•
Farnham
•
Köln
•
Sebastopol
•
Tokyo
Programming Python, Fourth Edition
by Mark Lutz
Copyright © 2011 Mark Lutz. All rights reserved.
Printed in the United States of America.
Published by O’Reilly Media, Inc., 1005 Gravenstein Highway North, Sebastopol, CA 95472.
O’Reilly books may be purchased for educational, business, or sales promotional use. Online editions
are also available for most titles (http://my.safaribooksonline.com). For more information, contact our
corporate/institutional sales department: (800) 998-9938 or corporate@oreilly.com.
Editor: Julie Steele
Production Editor: Teresa Elsey
Proofreader: Teresa Elsey
Indexer: Lucie Haskins
Cover Designer: Karen Montgomery
Interior Designer: David Futato
Illustrator: Robert Romano
Printing History:
October 1996: First Edition.
March 2001: Second Edition.
August 2006: Third Edition.
December 2010: Fourth Edition.
Nutshell Handbook, the Nutshell Handbook logo, and the O’Reilly logo are registered trademarks of
O’Reilly Media, Inc. Programming Python, the image of an African rock python, and related trade dress
are trademarks of O’Reilly Media, Inc.
Many of the designations used by manufacturers and sellers to distinguish their products are claimed as
trademarks. Where those designations appear in this book, and O’Reilly Media, Inc., was aware of a
trademark claim, the designations have been printed in caps or initial caps.
While every precaution has been taken in the preparation of this book, the publisher and author assume
no responsibility for errors or omissions, or for damages resulting from the use of the information con-
tained herein.
ISBN: 978-0-596-15810-1
[QG]
1292258056

Table of Contents
Preface . . . . . . . . . . . . . . . . . . . . . . . . . . . . . . . . . . . . . . . . . . . . . . . . . . . . . . . . . . . . . . . . . . . xxiii
Part I. The Beginning
1. A Sneak Preview . . . . . . . . . . . . . . . . . . . . . . . . . . . . . . . . . . . . . . . . . . . . . . . . . . . . . . . . 3
“Programming Python: The Short Story” 3
The Task 4
Step 1: Representing Records 4
Using Lists 4
Using Dictionaries 9
Step 2: Storing Records Persistently 14
Using Formatted Files 14
Using Pickle Files 19
Using Per-Record Pickle Files 22
Using Shelves 23
Step 3: Stepping Up to OOP 26
Using Classes 27
Adding Behavior 29
Adding Inheritance 29
Refactoring Code 31
Adding Persistence 34
Other Database Options 36
Step 4: Adding Console Interaction 37
A Console Shelve Interface 37
Step 5: Adding a GUI 40
GUI Basics 40
Using OOP for GUIs 42
Getting Input from a User 44
A GUI Shelve Interface 46
Step 6: Adding a Web Interface 52
CGI Basics 52
v

Running a Web Server 55
Using Query Strings and urllib 57
Formatting Reply Text 59
A Web-Based Shelve Interface 60
The End of the Demo 69
Part II. System Programming
2. System Tools .......................................................... 73
“The os.path to Knowledge” 73
Why Python Here? 73
The Next Five Chapters 74
System Scripting Overview 75
Python System Modules 76
Module Documentation Sources 77
Paging Documentation Strings 78
A Custom Paging Script 79
String Method Basics 80
Other String Concepts in Python 3.X: Unicode and bytes 82
File Operation Basics 83
Using Programs in Two Ways 84
Python Library Manuals 85
Commercially Published References 86
Introducing the sys Module 86
Platforms and Versions 86
The Module Search Path 87
The Loaded Modules Table 88
Exception Details 89
Other sys Module Exports 90
Introducing the os Module 90
Tools in the os Module 90
Administrative Tools 91
Portability Constants 92
Common os.path Tools 92
Running Shell Commands from Scripts 94
Other os Module Exports 100
3. Script Execution Context . .............................................. 103
“I’d Like to Have an Argument, Please” 103
Current Working Directory 104
CWD, Files, and Import Paths 104
CWD and Command Lines 106
vi | Table of Contents

Command-Line Arguments 106
Parsing Command-Line Arguments 107
Shell Environment Variables 109
Fetching Shell Variables 110
Changing Shell Variables 111
Shell Variable Fine Points: Parents, putenv, and getenv 112
Standard Streams 113
Redirecting Streams to Files and Programs 114
Redirected Streams and User Interaction 119
Redirecting Streams to Python Objects 123
The io.StringIO and io.BytesIO Utility Classes 126
Capturing the stderr Stream 127
Redirection Syntax in Print Calls 127
Other Redirection Options: os.popen and subprocess Revisited 128
4. File and Directory Tools . ............................................... 135
“Erase Your Hard Drive in Five Easy Steps!” 135
File Tools 135
The File Object Model in Python 3.X 136
Using Built-in File Objects 137
Binary and Text Files 146
Lower-Level File Tools in the os Module 155
File Scanners 160
Directory Tools 163
Walking One Directory 164
Walking Directory Trees 168
Handling Unicode Filenames in 3.X: listdir, walk, glob 172
5. Parallel System Tools . ................................................. 177
“Telling the Monkeys What to Do” 177
Forking Processes 179
The fork/exec Combination 182
Threads 186
The _thread Module 189
The threading Module 199
The queue Module 204
Preview: GUIs and Threads 208
More on the Global Interpreter Lock 211
Program Exits 213
sys Module Exits 214
os Module Exits 215
Shell Command Exit Status Codes 216
Process Exit Status and Shared State 219
Table of Contents | vii

Thread Exits and Shared State 220
Interprocess Communication 222
Anonymous Pipes 224
Named Pipes (Fifos) 234
Sockets: A First Look 236
Signals 240
The multiprocessing Module 243
Why multiprocessing? 243
The Basics: Processes and Locks 245
IPC Tools: Pipes, Shared Memory, and Queues 248
Starting Independent Programs 254
And Much More 256
Why multiprocessing? The Conclusion 257
Other Ways to Start Programs 258
The os.spawn Calls 258
The os.startfile call on Windows 261
A Portable Program-Launch Framework 263
Other System Tools Coverage 268
6. Complete System Programs . ........................................... 271
“The Greps of Wrath” 271
A Quick Game of “Find the Biggest Python File” 272
Scanning the Standard Library Directory 272
Scanning the Standard Library Tree 273
Scanning the Module Search Path 274
Scanning the Entire Machine 276
Printing Unicode Filenames 279
Splitting and Joining Files 282
Splitting Files Portably 283
Joining Files Portably 286
Usage Variations 289
Generating Redirection Web Pages 292
Page Template File 293
Page Generator Script 294
A Regression Test Script 297
Running the Test Driver 299
Copying Directory Trees 304
Comparing Directory Trees 308
Finding Directory Differences 309
Finding Tree Differences 311
Running the Script 314
Verifying Backups 316
Reporting Differences and Other Ideas 317
viii | Table of Contents

Searching Directory Trees 319
Greps and Globs and Finds 320
Rolling Your Own find Module 321
Cleaning Up Bytecode Files 324
A Python Tree Searcher 327
Visitor: Walking Directories “++” 330
Editing Files in Directory Trees (Visitor) 334
Global Replacements in Directory Trees (Visitor) 336
Counting Source Code Lines (Visitor) 338
Recoding Copies with Classes (Visitor) 339
Other Visitor Examples (External) 341
Playing Media Files 343
The Python webbrowser Module 347
The Python mimetypes Module 348
Running the Script 350
Automated Program Launchers (External) 351
Part III. GUI Programming
7. Graphical User Interfaces . .............................................. 355
“Here’s Looking at You, Kid” 355
GUI Programming Topics 355
Running the Examples 357
Python GUI Development Options 358
tkinter Overview 363
tkinter Pragmatics 363
tkinter Documentation 364
tkinter Extensions 364
tkinter Structure 366
Climbing the GUI Learning Curve 368
“Hello World” in Four Lines (or Less) 368
tkinter Coding Basics 369
Making Widgets 370
Geometry Managers 370
Running GUI Programs 371
tkinter Coding Alternatives 372
Widget Resizing Basics 373
Configuring Widget Options and Window Titles 375
One More for Old Times’ Sake 376
Packing Widgets Without Saving Them 377
Adding Buttons and Callbacks 379
Widget Resizing Revisited: Expansion 380
Table of Contents | ix

Adding User-Defined Callback Handlers 382
Lambda Callback Handlers 383
Deferring Calls with Lambdas and Object References 384
Callback Scope Issues 385
Bound Method Callback Handlers 391
Callable Class Object Callback Handlers 392
Other tkinter Callback Protocols 393
Binding Events 394
Adding Multiple Widgets 395
Widget Resizing Revisited: Clipping 396
Attaching Widgets to Frames 397
Layout: Packing Order and Side Attachments 397
The Packer’s Expand and Fill Revisited 398
Using Anchor to Position Instead of Stretch 399
Customizing Widgets with Classes 400
Standardizing Behavior and Appearance 401
Reusable GUI Components with Classes 403
Attaching Class Components 405
Extending Class Components 407
Standalone Container Classes 408
The End of the Tutorial 410
Python/tkinter for Tcl/Tk Converts 412
8. A tkinter Tour, Part 1 . ................................................. 415
“Widgets and Gadgets and GUIs, Oh My!” 415
This Chapter’s Topics 415
Configuring Widget Appearance 416
Top-Level Windows 419
Toplevel and Tk Widgets 421
Top-Level Window Protocols 422
Dialogs 426
Standard (Common) Dialogs 426
The Old-Style Dialog Module 438
Custom Dialogs 439
Binding Events 443
Other bind Events 447
Message and Entry 448
Message 448
Entry 449
Laying Out Input Forms 451
tkinter “Variables” and Form Layout Alternatives 454
Checkbutton, Radiobutton, and Scale 457
Checkbuttons 457
x | Table of Contents

Radio Buttons 462
Scales (Sliders) 467
Running GUI Code Three Ways 471
Attaching Frames 471
Independent Windows 476
Running Programs 478
Images 484
Fun with Buttons and Pictures 487
Viewing and Processing Images with PIL 491
PIL Basics 491
Displaying Other Image Types with PIL 493
Creating Image Thumbnails with PIL 496
9. A tkinter Tour, Part 2 .................................................. 507
“On Today’s Menu: Spam, Spam, and Spam” 507
Menus 507
Top-Level Window Menus 508
Frame- and Menubutton-Based Menus 512
Windows with Both Menus and Toolbars 517
Listboxes and Scrollbars 522
Programming Listboxes 524
Programming Scroll Bars 525
Packing Scroll Bars 526
Text 528
Programming the Text Widget 530
Adding Text-Editing Operations 533
Unicode and the Text Widget 538
Advanced Text and Tag Operations 548
Canvas 550
Basic Canvas Operations 550
Programming the Canvas Widget 551
Scrolling Canvases 554
Scrollable Canvases and Image Thumbnails 557
Using Canvas Events 560
Grids 564
Why Grids? 564
Grid Basics: Input Forms Revisited 565
Comparing grid and pack 566
Combining grid and pack 568
Making Gridded Widgets Expandable 570
Laying Out Larger Tables with grid 574
Time Tools, Threads, and Animation 582
Using Threads with tkinter GUIs 584
Table of Contents | xi

Using the after Method 585
Simple Animation Techniques 588
Other Animation Topics 593
The End of the Tour 595
Other Widgets and Options 595
10. GUI Coding Techniques ................................................ 597
“Building a Better Mousetrap” 597
GuiMixin: Common Tool Mixin Classes 598
Widget Builder Functions 598
Mixin Utility Classes 599
GuiMaker: Automating Menus and Toolbars 603
Subclass Protocols 607
GuiMaker Classes 608
GuiMaker Self-Test 608
BigGui: A Client Demo Program 609
ShellGui: GUIs for Command-Line Tools 613
A Generic Shell-Tools Display 613
Application-Specific Tool Set Classes 615
Adding GUI Frontends to Command Lines 617
GuiStreams: Redirecting Streams to Widgets 623
Using Redirection for the Packing Scripts 627
Reloading Callback Handlers Dynamically 628
Wrapping Up Top-Level Window Interfaces 630
GUIs, Threads, and Queues 635
Placing Data on Queues 636
Placing Callbacks on Queues 640
More Ways to Add GUIs to Non-GUI Code 646
Popping Up GUI Windows on Demand 647
Adding a GUI As a Separate Program: Sockets (A Second Look) 649
Adding a GUI As a Separate Program: Command Pipes 654
The PyDemos and PyGadgets Launchers 662
PyDemos Launcher Bar (Mostly External) 662
PyGadgets Launcher Bar 667
11. Complete GUI Programs . ............................................... 671
“Python, Open Source, and Camaros” 671
Examples in Other Chapters 672
This Chapter’s Strategy 673
PyEdit: A Text Editor Program/Object 674
Running PyEdit 675
PyEdit Changes in Version 2.0 (Third Edition) 682
PyEdit Changes in Version 2.1 (Fourth Edition) 684
xii | Table of Contents

PyEdit Source Code 693
PyPhoto: An Image Viewer and Resizer 716
Running PyPhoto 717
PyPhoto Source Code 719
PyView: An Image and Notes Slideshow 727
Running PyView 727
PyView Source Code 732
PyDraw: Painting and Moving Graphics 738
Running PyDraw 738
PyDraw Source Code 738
PyClock: An Analog/Digital Clock Widget 747
A Quick Geometry Lesson 747
Running PyClock 751
PyClock Source Code 754
PyToe: A Tic-Tac-Toe Game Widget 762
Running PyToe 762
PyToe Source Code (External) 763
Where to Go from Here 766
Part IV. Internet Programming
12. Network Scripting . ................................................... 771
“Tune In, Log On, and Drop Out” 771
Internet Scripting Topics 772
Running Examples in This Part of the Book 775
Python Internet Development Options 777
Plumbing the Internet 780
The Socket Layer 781
The Protocol Layer 782
Python’s Internet Library Modules 785
Socket Programming 787
Socket Basics 788
Running Socket Programs Locally 794
Running Socket Programs Remotely 795
Spawning Clients in Parallel 798
Talking to Reserved Ports 801
Handling Multiple Clients 802
Forking Servers 803
Threading Servers 815
Standard Library Server Classes 818
Multiplexing Servers with select 820
Summary: Choosing a Server Scheme 826
Table of Contents | xiii

Making Sockets Look Like Files and Streams 827
A Stream Redirection Utility 828
A Simple Python File Server 840
Running the File Server and Clients 842
Adding a User-Interface Frontend 843
13. Client-Side Scripting ................................................... 853
“Socket to Me!” 853
FTP: Transferring Files over the Net 854
Transferring Files with ftplib 854
Using urllib to Download Files 857
FTP get and put Utilities 860
Adding a User Interface 867
Transferring Directories with ftplib 874
Downloading Site Directories 874
Uploading Site Directories 880
Refactoring Uploads and Downloads for Reuse 884
Transferring Directory Trees with ftplib 892
Uploading Local Trees 893
Deleting Remote Trees 895
Downloading Remote Trees 899
Processing Internet Email 899
Unicode in Python 3.X and Email Tools 900
POP: Fetching Email 901
Mail Configuration Module 902
POP Mail Reader Script 905
Fetching Messages 906
Fetching Email at the Interactive Prompt 909
SMTP: Sending Email 910
SMTP Mail Sender Script 911
Sending Messages 913
Sending Email at the Interactive Prompt 919
email: Parsing and Composing Mail Content 921
Message Objects 922
Basic email Package Interfaces in Action 924
Unicode, Internationalization, and the Python 3.1 email Package 926
A Console-Based Email Client 947
Running the pymail Console Client 952
The mailtools Utility Package 956
Initialization File 957
MailTool Class 958
MailSender Class 959
MailFetcher Class 967
xiv | Table of Contents

MailParser Class 976
Self-Test Script 983
Updating the pymail Console Client 986
NNTP: Accessing Newsgroups 991
HTTP: Accessing Websites 994
The urllib Package Revisited 997
Other urllib Interfaces 999
Other Client-Side Scripting Options 1002
14. The PyMailGUI Client ................................................. 1005
“Use the Source, Luke” 1005
Source Code Modules and Size 1006
Why PyMailGUI? 1008
Running PyMailGUI 1010
Presentation Strategy 1010
Major PyMailGUI Changes 1011
New in Version 2.1 and 2.0 (Third Edition) 1011
New in Version 3.0 (Fourth Edition) 1012
A PyMailGUI Demo 1019
Getting Started 1020
Loading Mail 1025
Threading Model 1027
Load Server Interface 1030
Offline Processing with Save and Open 1031
Sending Email and Attachments 1033
Viewing Email and Attachments 1037
Email Replies and Forwards and Recipient Options 1043
Deleting Email 1049
POP Message Numbers and Synchronization 1051
Handling HTML Content in Email 1053
Mail Content Internationalization Support 1055
Alternative Configurations and Accounts 1059
Multiple Windows and Status Messages 1060
PyMailGUI Implementation 1062
PyMailGUI: The Main Module 1063
SharedNames: Program-Wide Globals 1066
ListWindows: Message List Windows 1067
ViewWindows: Message View Windows 1085
messagecache: Message Cache Manager 1095
popuputil: General-Purpose GUI Pop Ups 1098
wraplines: Line Split Tools 1100
html2text: Extracting Text from HTML (Prototype, Preview) 1102
mailconfig: User Configurations 1105
Table of Contents | xv

textConfig: Customizing Pop-Up PyEdit Windows 1110
PyMailGUIHelp: User Help Text and Display 1111
altconfigs: Configuring for Multiple Accounts 1114
Ideas for Improvement 1116
15. Server-Side Scripting ................................................. 1125
“Oh, What a Tangled Web We Weave” 1125
What’s a Server-Side CGI Script? 1126
The Script Behind the Curtain 1126
Writing CGI Scripts in Python 1128
Running Server-Side Examples 1130
Web Server Options 1130
Running a Local Web Server 1131
The Server-Side Examples Root Page 1133
Viewing Server-Side Examples and Output 1134
Climbing the CGI Learning Curve 1135
A First Web Page 1135
A First CGI Script 1141
Adding Pictures and Generating Tables 1146
Adding User Interaction 1149
Using Tables to Lay Out Forms 1157
Adding Common Input Devices 1163
Changing Input Layouts 1166
Passing Parameters in Hardcoded URLs 1170
Passing Parameters in Hidden Form Fields 1172
Saving State Information in CGI Scripts 1174
URL Query Parameters 1176
Hidden Form Input Fields 1176
HTTP “Cookies” 1177
Server-Side Databases 1181
Extensions to the CGI Model 1182
Combining Techniques 1183
The Hello World Selector 1183
Checking for Missing and Invalid Inputs 1190
Refactoring Code for Maintainability 1192
Step 1: Sharing Objects Between Pages—A New Input Form 1193
Step 2: A Reusable Form Mock-Up Utility 1196
Step 3: Putting It All Together—A New Reply Script 1199
More on HTML and URL Escapes 1201
URL Escape Code Conventions 1202
Python HTML and URL Escape Tools 1203
Escaping HTML Code 1203
Escaping URLs 1204
xvi | Table of Contents

Escaping URLs Embedded in HTML Code 1205
Transferring Files to Clients and Servers 1209
Displaying Arbitrary Server Files on the Client 1211
Uploading Client Files to the Server 1218
More Than One Way to Push Bits over the Net 1227
16. The PyMailCGI Server ................................................. 1229
“Things to Do When Visiting Chicago” 1229
The PyMailCGI Website 1230
Implementation Overview 1230
New in This Fourth Edition (Version 3.0) 1233
New in the Prior Edition (Version 2.0) 1235
Presentation Overview 1236
Running This Chapter’s Examples 1237
The Root Page 1239
Configuring PyMailCGI 1240
Sending Mail by SMTP 1241
The Message Composition Page 1242
The Send Mail Script 1242
Error Pages 1246
Common Look-and-Feel 1246
Using the Send Mail Script Outside a Browser 1247
Reading POP Email 1249
The POP Password Page 1250
The Mail Selection List Page 1251
Passing State Information in URL Link Parameters 1254
Security Protocols 1257
The Message View Page 1259
Passing State Information in HTML Hidden Input Fields 1262
Escaping Mail Text and Passwords in HTML 1264
Processing Fetched Mail 1266
Reply and Forward 1267
Delete 1268
Deletions and POP Message Numbers 1272
Utility Modules 1276
External Components and Configuration 1276
POP Mail Interface 1277
POP Password Encryption 1278
Common Utilities Module 1286
Web Scripting Trade-Offs 1291
PyMailCGI Versus PyMailGUI 1292
The Web Versus the Desktop 1293
Other Approaches 1296
Table of Contents | xvii

Part V. Tools and Techniques
17. Databases and Persistence ............................................ 1303
“Give Me an Order of Persistence, but Hold the Pickles” 1303
Persistence Options in Python 1303
DBM Files 1305
Using DBM Files 1305
DBM Details: Files, Portability, and Close 1308
Pickled Objects 1309
Using Object Pickling 1310
Pickling in Action 1311
Pickle Details: Protocols, Binary Modes, and _pickle 1314
Shelve Files 1315
Using Shelves 1316
Storing Built-in Object Types in Shelves 1317
Storing Class Instances in Shelves 1318
Changing Classes of Objects Stored in Shelves 1320
Shelve Constraints 1321
Pickled Class Constraints 1323
Other Shelve Limitations 1324
The ZODB Object-Oriented Database 1325
The Mostly Missing ZODB Tutorial 1326
SQL Database Interfaces 1329
SQL Interface Overview 1330
An SQL Database API Tutorial with SQLite 1332
Building Record Dictionaries 1339
Tying the Pieces Together 1342
Loading Database Tables from Files 1344
SQL Utility Scripts 1347
SQL Resources 1354
ORMs: Object Relational Mappers 1354
PyForm: A Persistent Object Viewer (External) 1356
18. Data Structures ...................................................... 1359
“Roses Are Red, Violets Are Blue; Lists Are Mutable,
and So Is Set Foo” 1359
Implementing Stacks 1360
Built-in Options 1360
A Stack Module 1362
A Stack Class 1364
Customization: Performance Monitors 1366
Optimization: Tuple Tree Stacks 1367
xviii | Table of Contents

Optimization: In-Place List Modifications 1369
Timing the Improvements 1371
Implementing Sets 1373
Built-in Options 1374
Set Functions 1375
Set Classes 1377
Optimization: Moving Sets to Dictionaries 1378
Adding Relational Algebra to Sets (External) 1382
Subclassing Built-in Types 1383
Binary Search Trees 1385
Built-in Options 1385
Implementing Binary Trees 1386
Trees with Both Keys and Values 1388
Graph Searching 1390
Implementing Graph Search 1390
Moving Graphs to Classes 1393
Permuting Sequences 1395
Reversing and Sorting Sequences 1397
Implementing Reversals 1398
Implementing Sorts 1399
Data Structures Versus Built-ins: The Conclusion 1400
PyTree: A Generic Tree Object Viewer 1402
19. Text and Language . .................................................. 1405
“See Jack Hack. Hack, Jack, Hack” 1405
Strategies for Processing Text in Python 1405
String Method Utilities 1406
Templating with Replacements and Formats 1408
Parsing with Splits and Joins 1409
Summing Columns in a File 1410
Parsing and Unparsing Rule Strings 1412
Regular Expression Pattern Matching 1415
The re Module 1416
First Examples 1416
String Operations Versus Patterns 1418
Using the re Module 1421
More Pattern Examples 1425
Scanning C Header Files for Patterns 1427
XML and HTML Parsing 1429
XML Parsing in Action 1430
HTML Parsing in Action 1435
Advanced Language Tools 1438
Custom Language Parsers 1440
Table of Contents | xix

The Expression Grammar 1440
The Parser’s Code 1441
Adding a Parse Tree Interpreter 1449
Parse Tree Structure 1454
Exploring Parse Trees with the PyTree GUI 1456
Parsers Versus Python 1457
PyCalc: A Calculator Program/Object 1457
A Simple Calculator GUI 1458
PyCalc—A “Real” Calculator GUI 1463
20. Python/C Integration ................................................. 1483
“I Am Lost at C” 1483
Extending and Embedding 1484
Extending Python in C: Overview 1486
A Simple C Extension Module 1487
The SWIG Integration Code Generator 1491
A Simple SWIG Example 1491
Wrapping C Environment Calls 1495
Adding Wrapper Classes to Flat Libraries 1499
Wrapping C Environment Calls with SWIG 1500
Wrapping C++ Classes with SWIG 1502
A Simple C++ Extension Class 1503
Wrapping the C++ Class with SWIG 1505
Using the C++ Class in Python 1507
Other Extending Tools 1511
Embedding Python in C: Overview 1514
The C Embedding API 1515
What Is Embedded Code? 1516
Basic Embedding Techniques 1518
Running Simple Code Strings 1519
Running Code Strings with Results and Namespaces 1522
Calling Python Objects 1524
Running Strings in Dictionaries 1526
Precompiling Strings to Bytecode 1528
Registering Callback Handler Objects 1530
Registration Implementation 1531
Using Python Classes in C 1535
Other Integration Topics 1538
xx | Table of Contents

Part VI. The End
21. Conclusion: Python and the Development Cycle . . . . . . . . . . . . . . . . . . . . . . . . . . . 1543
“That’s the End of the Book, Now Here’s the Meaning of Life” 1544
“Something’s Wrong with the Way We Program Computers” 1544
The “Gilligan Factor” 1544
Doing the Right Thing 1545
The Static Language Build Cycle 1546
Artificial Complexities 1546
One Language Does Not Fit All 1546
Enter Python 1547
But What About That Bottleneck? 1548
Python Provides Immediate Turnaround 1549
Python Is “Executable Pseudocode” 1550
Python Is OOP Done Right 1550
Python Fosters Hybrid Applications 1551
On Sinking the Titanic 1552
So What’s “Python: The Sequel”? 1555
In the Final Analysis… 1555
Index .................................................................... 1557
Table of Contents | xxi

Preface
“And Now for Something Completely Different…”
This book explores ways to apply the Python programming language in common ap-
plication domains and realistically scaled tasks. It’s about what you can do with the
language once you’ve mastered its fundamentals.
This book assumes you are relatively new to each of the application domains it covers—
GUIs, the Internet, databases, systems programming, and so on—and presents each
from the ground up, in tutorial fashion. Along the way, it focuses on commonly used
tools and libraries, rather than language fundamentals. The net result is a resource that
provides readers with an in-depth understanding of Python’s roles in practical, real-
world programming work.
As a subtheme, this book also explores Python’s relevance as a software development
tool—a role that many would classify as well beyond those typically associated with
“scripting.” In fact, many of this book’s examples are scaled specifically for this pur-
pose; among these, we’ll incrementally develop email clients that top out at thousands
of lines of code. Programming at this full scale will always be challenging work, but
we’ll find that it’s also substantially quicker and easier when done with Python.
This Fourth Edition has been updated to present the language, libraries, and practice
of Python 3.X. Specifically, its examples use Python 3.1—the most recent version of
Python at the time of writing—and its major examples were tested successfully under
the third alpha release of Python 3.2 just prior to publication, but they reflect the version
of the language common to the entire 3.X line. This edition has also been reorganized
in ways that both streamline some of its former material and allow for coverage of newly
emerged tools and topics.
Because this edition’s readership will include both newcomers as well as prior edition
veterans, I want to use this Preface to expand on this book’s purpose and scope before
we jump into code.
xxiii

About This Book
This book is a tutorial introduction to using Python in common application domains
and tasks. It teaches how to apply Python for system administration, GUIs, and the
Web, and explores its roles in networking, databases, frontend scripting layers, text
processing, and more. Although the Python language is used along the way, this book’s
focus is on application to real-world tasks instead of language fundamentals.
This Book’s Ecosystem
Because of its scope, this book is designed to work best as the second of a two-volume
set, and to be supplemented by a third. Most importantly, this book is an applications
programming follow-up to the core language book Learning Python, whose subjects
are officially prerequisite material here. Here’s how the three books are related:
•Learning Python covers the fundamentals of Python programming in depth. It fo-
cuses on the core Python language, and its topics are prerequisite to this book.
•Programming Python, this book, covers the application of Python to real-world
programming tasks. It focuses on libraries and tools, and it assumes you already
know Python fundamentals.
•Python Pocket Reference provides a quick reference to details not listed exhaustively
here. It doesn’t teach much, but it allows you to look up details fast.
In some sense, this book is to application programming what Learning Python is to the
core language—a gradual tutorial, which makes almost no assumptions about your
background and presents each topic from the ground up. By studying this book’s cov-
erage of Web basics, for example, you’ll be equipped to build simple websites, and you
will be able to make sense of more advanced frameworks and tools as your needs evolve.
GUIs are similarly taught incrementally, from basic to advanced.
In addition, this book is designed to be supplemented by the quick-reference book
Python Pocket Reference, which provides the small details finessed here and serves as
a resource for looking up the fine points. That book is reference only, and is largely
void of both examples and narrative, but it serves to augment and complement both
Learning Python’s fundamentals and Programming Python’s applications. Because its
current Fourth Edition gives both Python 2.X and 3.X versions of the tools it covers,
that book also serves as a resource for readers transitioning between the two Python
lines (more on this in a moment).*
* Disclosure: I am the author of all three books mentioned in this section, which affords me the luxury of tightly
controlling their scopes in order to avoid overlap. It also means that as an author, I try to avoid commenting
on the many other Python books available, some of which are very good and may cover topics not addressed
in any of my own books. Please see the Web for other Python resources. All three of my books reflect my 13
years on the Python training trail and stem from the original Programming Python written back in 1995 <insert
grizzled prospector photo here>.
xxiv | Preface

What This Book Is Not
Because of the scopes carved out by the related books I just mentioned, this book’s
scope follows two explicit constraints:
• It does not cover Python language fundamentals
• It is not intended as a language reference
The former of these constraints reflects the fact that core language topics are the ex-
clusive domain of Learning Python, and I encourage you to consult that book before
tackling this one if you are completely new to the Python language, as its topics are
assumed here. Some language techniques are shown by example in this book too, of
course, and the larger examples here illustrate how core concepts come together into
realistic programs. OOP, for example, is often best sampled in the context of the larger
programs we’ll write here. Officially, though, this book assumes you already know
enough Python fundamentals to understand its example code. Our focus here is mostly
on libraries and tools; please see other resources if the basic code we’ll use in that role
is unclear.
The latter of the two constraints listed above reflects what has been a common mis-
conception about this book over the years (indeed, this book might have been better
titled Applying Python had we been more clairvoyant in 1995). I want to make this as
clear as I can: this is not a reference book. It is a tutorial. Although you can hunt for
some details using the index and table of contents, this book is not designed for that
purpose. Instead, Python Pocket Reference provides the sort of quick reference to details
that you’ll find useful once you start writing nontrivial code on your own. There are
other reference-focused resources available, including other books and Python’s own
reference manuals set. Here, the goal is a gradual tutorial that teaches you how to apply
Python to common tasks but does not document minute details exhaustively.
About This Fourth Edition
If this is the first edition of this book you’ve seen, you’re probably less interested in
recent changes, and you should feel free to skip ahead past this section. For readers of
prior editions, though, this Fourth Edition of this book has changed in three important
ways:
• It’s been updated to cover Python 3.X (only).
• It’s been slimmed down to sharpen its focus and make room for new topics.
• It’s been updated for newly emerged topics and tools in the Python world.
The first of these is probably the most significant—this edition employs the Python 3.X
language, its version of the standard library, and the common practice of its users. To
better explain how this and the other two changes take shape in this edition, though,
I need to fill in a few more details.
Preface | xxv

Specific Changes in This Edition
Because the prior versions of this book were widely read, here is a quick rundown of
some of the most prominent specific changes in this edition:
Its existing material was shortened to allow for new topics
The prior edition of this book was also a 1600-page volume, which didn’t allow
much room for covering new Python topics (Python 3.X’s Unicode orientation
alone implies much new material). Luckily, recent changes in the Python world
have allowed us to pare down some less critical existing material this time around,
in order to free up room for new coverage.
Depth was not sacrificed in the process, of course, and this is still just as substantial
a book as before. In general, though, avoiding new growth was a primary goal of
this update; many of the other specific changes and removals I'll mention below
were made, in part, to help accommodate new topics.
It covers 3.X (only)
This book’s examples and narrative have been updated to reflect and use the 3.X
version of Python. Python 2.X is no longer supported here, except where 3.X and
2.X Pythons overlap. Although the overlap is large enough to make this of use to
2.X readers too, this is now officially a 3.X-only text.
This turns out to be a major factor behind the lack of growth in this edition. By
restricting our scope to Python 3.X—the incompatible successor to the Python 2.X
line, and considered to be Python’s future—we were able to avoid doubling the
coverage size in places where the two Python lines differ. This version limit is es-
pecially important in a book like this that is largely about more advanced examples,
which can be listed in only one version’s style.
For readers who still straddle the 2.X and 3.X worlds, I’ll say more about Python
3.X changes later in this Preface. Probably the most significant 3.X-related change
described there is the new Internationalization support in PyEdit and PyMailGUI;
though 2.X had Unicode too, its new prominence in 3.X almost forces such systems
to rethink their former ASCII-only ways.
Inclusion of newly emerged libraries and tools
Since the prior edition, a variety of new libraries and tools have either come online
or risen in popularity, and they get new mention here. This includes new standard
library tools such as subprocess (in Chapters 2 and 3) and multiprocessing (in
Chapter 5), as well as new third-party web frameworks and ORM database toolkits.
Most of these are not covered extensively (many popular third-party extensions
are complex systems in their own right and are best covered by dedicated books),
but they are at the least introduced in summary form here.
For example, Python 3.1’s new tkinter.ttk Tk themed widget set shows up in
Chapter 7 now, but only briefly; as a rule, this edition prefers to mention such
extensions in passing, rather than attempting to show you code without adequate
explanation.
xxvi | Preface

This Preface was tightened up
I’ve removed all the instructions for using and running program examples. Instead,
please consult the README file in the examples distribution for example usage details.
Moreover, most of the original acknowledgments are gone here because they are
redundant with those in Learning Python; since that book is now considered a
prerequisite, duplication of material here is unwarranted. A description of book
contents was also deleted; please see the table of contents for a preview of this
book’s structure.
The initial Python overview chapter is gone
I’ve removed the prior edition’s “managerial summary” chapter which introduced
Python’s strong points, prominent users, philosophies, and so on. Proselytizing
does play an important role in a field that sometimes asks the “why” questions less
often than it should. Indeed, if advocacy had not been part of the Python experi-
ence, we’d probably all be using Perl or shell languages today!
However, this chapter has now grown completely redundant with a similar chapter
in Learning Python. Since that book is a precursor to this one, I opted to not devote
space to restating “Pythonista” propaganda here (fun as it may be). Instead, this
book assumes you already know why Python is worth using, and we jump right
into applying it here.
The conclusion’s postscripts are gone
This book’s conclusion comes from the first edition, and it is now 15 years old.
Naturally, some of it reflects the Python mindset from that period more than that
of today. For example, its focus on Python’s role in hybrid applications seemed
more important in 1995 than in 2010; in today’s much larger Python world, most
Python users never deal with linked-in C code at all.
In prior editions, I added postscripts for each edition to elaborate on and update
the ideas presented in the book’s conclusion. These postscripts are gone now, re-
placed by a short note at the start of the conclusion. I opted to keep the conclusion
itself, though, because it’s still relevant to many readers and bears some historic
value. Well, that, plus the jokes…
The forewords are gone
For reasons similar to those of the prior two points, the accumulated forewords
from the prior three editions were also dropped this time around. You can read all
about Python creator Guido van Rossum’s historical rationale for Python’s evolu-
tion in numerous places on the Web, if you are so inclined. If you are interested in
how Python has changed technically over the years, see also the “What’s New”
documents that are part of the Python standard manuals set (available at http://
www.python.org/doc, and installed alongside Python on Windows and other
platforms).
The C integration part has been reduced to just one chapter
I’ve reduced the C extending and embedding part’s material to one shorter chapter
at the end of the tools part, which briefly introduces the core concepts in this
Preface | xxvii

domain. Only a fraction of Python users must care about linking in C libraries
today, and those who do already have the skills required to read the larger and
more compete example of integration present in the source code of Python itself.
There is still enough to hint at possibilities here, but vast amounts of C code have
been cut, in deference to the better examples you’ll find in Python’s own code.
The systems programming part was condensed and reworked
The former two larger system examples chapters have been merged into one shorter
one, with new or greatly rewritten examples. In fact, this part (Part II) was probably
overhauled the most of any part in the book. It incorporates new tools such as
subprocess and multiprocessing, introduces sockets earlier, and removes dated
topics and examples still lingering from prior editions. Frankly, a few of the file-
oriented examples here dated back to the 1990s, and were overdue for a general
refresh. The initial chapter in this part was also split into two to make its material
easier to read (shell context, including streams, gets its own chapter now), and a
few large program listings here (including the auto-configuring launcher scripts)
are now external suggested reading.
Some larger examples were removed (but are available in the examples distribution)
Along the same lines, two of the larger GUI examples in the prior edition, PyTree
and PyForm, have been removed. Instead, their updated code is available in the
book’s examples distribution package, as suggested supplemental reading. You’ll
still find many larger examples covered and listed in this edition—including both
GUI- and Web-based renderings of full-featured email clients, along with image
viewers, calculators, clocks, Unicode-aware text editors, drawing programs, re-
gression test scripts, and more. However, because the code of the examples re-
moved doesn’t add much to what is already covered, and because they were already
largely self-study examples anyhow, I’ve made them optional and external to the
printed text in this edition.
The advanced Internet topics chapter was replaced by brief summaries
I’ve cut the advanced Internet topics chapter completely, leaving only simple sum-
maries at the start of the Internet part (intentionally mirroring the GUI option
summaries at the start of the GUI part). This includes prior coverage for tools such
as the ZOPE web framework, COM, Windows active scripting and ASP,
HTMLgen, Python Server Pages (PSP), Jython, and the now very dated Grail sys-
tem. Some of these systems still receive honorable mention in the summaries, but
none are now presented in any sort of detail. Summaries of new tools (including
many of those listed in the following paragraph) were added to this set, but again,
in brief fashion with no example code.
Despite authors’ best attempts to foresee the future, the Web domain evolves faster
than books like this can. For instance, Web frameworks like Django, Google’s App
Engine, TurboGears, pylons, and web2py are now popular alternatives to ZOPE.
Similarly, the .NET framework supersedes much of COM on Windows;
IronPython now provides the same type of integration for .NET as Jython did first
xxviii | Preface

for Java; and active scripting has been eclipsed by AJAX and JavaScript-oriented
frameworks on the client such as Flex, Silverlight, and pyjamas (generally known
today as rich Internet applications, RIAs). Culture shift aside, the examples for-
merly presented in this category were by themselves also insufficient to either teach
or do justice to the subject tools.
Rather than including incomplete (and nearly useless) coverage of tools that are
prone to both evolution and demise during this edition’s expected lifespan, I now
provide only brief overviews of the current hot topics in the Web domain, and I
encourage readers to search the Web for more details. More to the point, the goal
of the book you’re reading is to impart the sort of in-depth knowledge of Internet
and Web fundamentals that will allow you to use more advanced systems well,
when you’re ready to take the leap.
One exception here: the XML material of this prior chapter was spared and relo-
cated in expanded form to the text processing chapter (where it probably belonged
all along). In a related vein, the coverage of ZOPE’s ZODB object-oriented database
was retained, although it was shortened radically to allow new coverage of ORMs
such as SQLObject and SQLAlchemy (again, in overview form).
Use of tools available for 3.X today
At this writing, Python 3.X is still in its adoption phase, and some of the third-party
tools that this book formerly employed in its examples are still available in Python
2.X form only. To work around this temporary flux, I’ve changed some code to
use alternatives that already support 3.X today.
The most notable of these is the SQL database section—this now uses the in-
process SQLite library, which is a standard part of Python and already in 3.X form,
rather than the enterprise-level MySQL interface which is still at 2.X today. Luckily,
the Python portable database API allows scripts to work largely the same on both,
so this is a minor pragmatic sacrifice.
Of special note, the PIL extension used to display JPEGs in the GUI part was ported
to 3.1 just when it was needed for this update, thanks to Fredrik Lundh. It’s still
not officially released in 3.X form as I submit the final draft of this book in July
2010, but it should be soon, and 3.X patches are provided in the book examples
package as a temporary measure.
Advanced core language topics are not covered here
More advanced Python language tools such as descriptors, properties, decorators,
metaclasses, and Unicode text processing basics are all part of the core Python
language. Because of that, they are covered in the Fourth Edition of Learning Py-
thon, not here. For example, Unicode text and the changes it implies for files,
filenames, sockets, and much more are discussed as encountered here, but the
fundamentals of Unicode itself are not presented in complete depth. Some of the
topics in this category are arguably application-level related too (or at least of in-
terest to tool builders and API developers in general), but their coverage in Learning
Preface | xxix

Python allows us to avoid additional growth here. Please see that book for more
on these subjects.
Other random bits
Naturally, there were additional smaller changes made along the way. For example,
tkinter’s grid method is used instead of pack for layout of most input forms, because
it yields a more consistent layout on platforms where label font sizes don’t match
up with entry widget height (including on a Windows 7 netbook laptop, this edi-
tion’s development machine). There’s also new material scattered throughout, in-
cluding a new exploration of redirecting streams to sockets in the Internet part; a
new threaded and Unicode-aware “grep” dialog and process-wide change tests on
exit in the PyEdit example; and other things you are probably better off uncovering
along the way than reading further about in this Preface.
I also finally replaced some remaining “#” comment blocks at the top of source
files with docstrings (even, for consistency, in scripts not meant to be imported,
though some “#” lines are retained in larger examples to offset the text); changed
a few lingering “while 1” to “while True”; use += more often; and cleaned up a few
other cases of now-dated coding patterns. Old habits may die hard, but such up-
dates make the examples both more functional and more representative of com-
mon practice today.
Although new topics were added, all told, four chapters were cut outright (the non-
technical introduction, one of the system example chapters, advanced Internet topics,
and one integration chapter), some additional examples and material were trimmed
(including PyForm and PyTree), and focus was deliberately restricted to Python 3.X
and application fundamentals to conserve space.
What’s Left, Then?
The combined effect of all the changes just outlined is that this edition more concisely
and sharply reflects its core focus—that of a tutorial introduction to ways to apply
Python in common programming domains. Nevertheless, as you can tell from this
book’s page count, it is still a substantial and in-depth book, designed to be a first step
on your path to mastering realistic applications of Python.
Contrary to recent trends (and at some risk of being branded a heretic), I firmly believe
that the job of books like this one is to elevate their readers, not pander to them. Low-
ering the intellectual bar does a disservice both to readers and to the fields in which
they hope to work. While that means you won’t find as many cartoons in this book as
in some, this book also won’t insult you by emphasizing entertainment at the expense
of technical depth. Instead, the goal of my books is to impart sophisticated concepts
in a satisfying and substantive way and to equip you with the tools you’ll need in the
real world of software development.
xxx | Preface

There are many types of learners, of course, and no one book can ever satisfy every
possible audience. In fact, that’s why the original version of this book later became two,
with language basics delegated to Learning Python. Moreover, one can make a case for
a distinction between programmers, who must acquire deep software development
skills, and scripters, who do not. For some, a rudimentary knowledge of programming
may be enough to leverage a system or library that solves the problem at hand. That is,
until their coding forays start encroaching on the realm of full-scale software engineer-
ing—a threshold that can inspire disappointment at worst, but a better appreciation
of the challenging nature of this field at best.
No matter which camp you’re from, it’s important to understand this book’s intent up-
front. If you’re looking for a shortcut to proficiency that’s light on technical content,
you probably won’t be happy with this book (or the software field in general). If your
goal is to master programming Python well, though, and have some fun along the way,
you’ll probably find this book to be an important piece of your learning experience.
At the end of the day, learning to program well is much more demanding than implied
by some contemporary media. If you’re willing to invest the focus and effort required,
though, you’ll find that it’s also much more rewarding. This is especially true for those
who equip themselves for the journey with a programmer-friendly tool like Python.
While no book or class can turn you into a Python “Master of the Universe” by itself,
this book’s goal is to help you get there, by shortening your start-up time and providing
a solid foundation in Python’s most common application domains.
Python 3.X Impacts on This Book
As mentioned, this edition now covers Python 3.X only. Python 3.X is an incompatible
version of the language. The 3.X core language itself is very similar to Python 2.X, but
there are substantial changes in both the language and its many standard libraries.
Although some readers with no prior background in 2.X may be able to bypass the
differences, the changes had a big impact on the content of this edition. For the still
very large existing Python 2.X user base, this section documents the most noteworthy
changes in this category.
If you’re interested in 2.X differences, I also suggest finding a copy of the Fourth Edition
of the book Python Pocket Reference described earlier. That book gives both 2.X and
3.X versions of core language structures, built-in functions and exceptions, and many
of the standard library modules and tools used in this book. Though not designed to
be a reference or version translator per se, the Fourth Edition of Learning Python sim-
ilarly covers both 2.X and 3.X, and as stated, is prerequisite material to this book. The
goal of this 3.X-only Programming Python is not to abandon the current vast 2.X user
base in favor of a still imaginary one for 3.X; it is to help readers with the migration,
and avoid doubling the size of an already massive book.
Preface | xxxi

Specific 3.X Changes
Luckily, many of the 2.X/3.X differences that impact this book’s presentation are trivial.
For instance, the tkinter GUI toolkit, used extensively in this book, is shown under its
3.X tkinter name and package structure only; its 2.X Tkinter module incarnation is
not described. This mostly boils down to different import statements, but only their
Python 3 versions are given here. Similarly, to satisfy 3.X module naming conventions,
2.X’s anydbm, Queue, thread, StringIO.StringIO, and urllib.open become dbm, queue,
_thread, io.StringIO, and urllib.request.urlopen, respectively, in both Python 3.X
and this edition. Other tools are similarly renamed.
On the other hand, 3.X implies broader idiomatic changes which are, of course, more
radical. For example, Python 3.X’s new Unicode awareness has inspired fully Interna-
tionalized versions of the PyEdit text editor and the PyMailGUI email client examples
in this edition (more on this in a moment). Furthermore: the replacement of
os.popen2 with the subprocess module required new examples; the demise of
os.path.walk in favor of os.walk allowed some examples to be trimmed; the new Uni-
code and binary dichotomy of files and strings impacted a host of additional existing
examples and material; and new modules such as multiprocessing offer new options
covered in this edition.
Beyond such library changes, core language changes in Python 3 are also reflected in
this book’s example code. For instance, changes to 2.X’s print, raw_input, keys,
has_key, map, and apply all required changes here. In addition, 3.X’s new package-
relative import model impacted a few examples including mailtools and expression
parsers, and its different flavor of division forced some minor math updates in canvas-
based GUI examples such as PyClock, PyDraw, and PyPhoto.
Of note here, I did not change all % string formatting expressions to use the new
str.format, since both forms are supported in Python 3.1, and it now appears that they
will be either indefinitely or forever. In fact, per a “grep” we’ll build and run in Chap-
ter 11’s PyEdit example, it seems that this expression still appears over 3,000 times in
Python 3.1’s own library code. Since I cannot predict Python evolution completely, see
the first chapter for more on this if it ever requires updates in an unexpected future.
Also because of the 3.X scope, this edition is unable to use some third-party packages
that are still in 2.X form only, as described earlier. This includes the leading MySQL
interface, ZODB, PyCrypto, and others; as also mentioned, PIL was ported to 3.1 for
use in this book, but this required a special patch and an official 3.X release is still
presently pending. Many of these may be available in 3.X form by the time you read
these words, assuming the Python world can either break some of the current cross
dependencies in 2.X packages or adopt new 3.X-only tools.
xxxii | Preface

Language Versus Library: Unicode
As a book focused on applications instead of core language fundamentals, language
changes are not always obtrusive here. Indeed, in retrospect the book Learning Py-
thon may have been affected by 3.X core language changes more than this book. In
most cases here, more example changes were probably made in the name of clarity or
functionality than in support of 3.X itself.
On the other hand, Python 3.X does impact much code, and the impacts can be subtle
at times. Readers with Python 2.X backgrounds will find that while 3.X core language
changes are often simple to apply, updates required for changes in the 3.X standard
library are sometimes more far reaching.
Chief among these, Python 3.X’s Unicode strings have had broad ramifications. Let’s
be honest: to people who have spent their lives in an ASCII world, the impacts of the
3.X Unicode model can be downright aggravating at times! As we’ll see in this book, it
affects file content; file names; pipe descriptors; sockets; text in GUIs; Internet proto-
cols such as FTP and email; CGI scripts; and even some persistence tools. For better
or worse, once we reach the world of applications programming as covered in this book,
Unicode is no longer an optional topic for many or most Python 3.X programmers.
Of course, Unicode arguably never should have been entirely optional for many pro-
grammers in the first place. Indeed, we’ll find that things that may have appeared to
work in 2.X never really did—treating text as raw byte strings can mask issues such as
comparison results across encodings (see the grep utility of Chapter 11’s PyEdit for a
prime example of code that should fail in the face of Unicode mismatches). Python 3.X
elevates such issues to potentially every programmer’s panorama.
Still, porting nontrivial code to 3.X is not at all an insurmountable task. Moreover,
many readers of this edition have the luxury of approaching Python 3.X as their first
Python and need not deal with existing 2.X code. If this is your case, you’ll find Python
3.X to be a robust and widely applicable scripting and programming language, which
addresses head-on many issues that once lurked in the shadows in 2.X.
Python 3.1 Limitations: Email, CGI
There’s one exception that I should call out here because of its impact on major book
examples. In order to make its code relevant to the widest possible audience, this book’s
major examples are related to Internet email and have much new support in this edition
for Internationalization and Unicode in this domain. Chapter 14’s PyMailGUI and
Chapter 16’s PyMailCGI, and all the prior examples they reuse, fall into this category.
This includes the PyEdit text editor—now Unicode-aware for files, display, and greps.
On this front, there is both proverbial good news and bad. The good news is that in
the end, we will be able to develop the feature-rich and fully Internationalized PyMail-
GUI email client in this book, using the email package as it currently exists. This will
include support for arbitrary encodings in both text content and message headers, for
Preface | xxxiii

both viewing and composing messages. The less happy news is that this will come at
some cost in workaround complexity in Python 3.1.
Unfortunately, as we’ll learn in Chapter 13, the email package in Python 3.1 has a
number of issues related to str/bytes combinations in Python 3.X. For example, there’s
no simple way to guess the encoding needed to convert mail bytes returned by the
poplib module to the str expected by the email parser. Moreover, the email package
is currently broken altogether for some types of messages, and it has uneven or type-
specific support for some others.
This situation appears to be temporary. Some of the issues encountered in this book
are already scheduled to be repaired (in fact, one such fix in 3.2 required a last-minute
patch to one of this book’s 3.1 workarounds in Chapter 13). Furthermore, a new version
of email is being developed to accommodate the 3.X Unicode/bytes dichotomy more
accurately, but it won’t materialize until long after this book is published, and it might
be backward-incompatible with the current package’s API, much like Python 3.X itself.
Because of that, this book both codes workarounds and makes some assumption along
the way, but please watch its website (described ahead) for required updates in future
Pythons. One upside here is that the dilemmas posed neatly reflect those common in
realistic programming—an underlying theme of this text.
These issues in the email package are also inherited by the cgi module for CGI file
uploads, which are in large measure broken in 3.1. CGI scripts are a basic technique
eclipsed by many web frameworks today, but they still serve as an entry-level way to
learn Web fundamentals and are still at the heart of many larger toolkits. A future fix
seems likely for this 3.1 flaw as well, but we have to make do with nonbinary CGI file
uploads for this edition in Chapters 15 and 16, and limited email attachments in Py-
MailCGI. This seems less than ideal nearly two years after 3.0’s release, but such is life
in the dynamic worlds of both software development at large and books that aim to
lead the curve instead of following it.
Using Book Examples
Because this book’s examples form much of its content, I want to say a few words about
them up front.
Where to Look for Examples and Updates
As before, examples, updates, corrections, and supplements for this book will be main-
tained at the author’s website, which lives officially at the following URL:
http://www.rmi.net/~lutz/about-pp4e.html
This page at my book support website will contain links to all supplemental information
related to this version of the book. Because I don’t own that domain name, though, if
xxxiv | Preface

that link ceases to be during this book’s shelf life, try the following alternative site as a
fallback option:
http://learning-python.com/books/about-pp4e.html (alternative location)
If neither of those links work, try a general web search (which, of course, is what most
readers will probably try first anyhow).
Wherever it may live, this website (as well as O’Reilly’s, described in the next section)
is where you can fetch the book examples distribution package—an archive file con-
taining all of the book’s examples, as well as some extras that are mentioned but not
listed in the book itself. To work along without having to type the examples manually,
download the package, unpack it, and consult its README.txt file for usage details.
I’ll describe how example labels and system prompts in this book imply file locations
in the package when we use our first script in the first chapter.
As for the first three editions, I will also be maintaining an informal “blog” on this
website that describes Python changes over time and provides general book-related
notes and updates that you should consider a supplemental appendix to this text.
O’Reilly’s website for this book, described later in this Preface, also has an errata report
system, and you can report issues at either my site or O’Reilly’s. I tend to keep my book
websites more up to date, but it’s not impossible that O’Reilly’s errata page may su-
persede mine for this edition. In any event, you should consider the union of these two
lists to be the official word on book corrections and updates.
Example Portability
The examples in this book were all developed, tested, and run under Windows 7, and
Python 3.1. The book’s major examples were all tested and ran successfully on the
upcoming Python 3.2, too (its alpha 3 release), just before the book went to the printer,
so most or all of this book applies to Python 3.2 as well. In addition, the C code of
Chapter 20 and a handful of parallel programming examples were run under Cygwin
on Windows to emulate a Unix environment.
Although Python and its libraries are generally platform neutral, some of this book’s
code may require minor changes to run on other platforms, such as Mac OS X, Linux,
and other Unix variants. The tkinter GUI examples, as well as some systems program-
ming scripts, may be especially susceptible to platform differences. Some portability
issues are pointed out along the way, but others may not be explicitly noted.
Since I had neither time nor budget to test on and accommodate all possible machines
that readers might use over the lifespan of this book, updates for platform-specific
behaviors will have to fall into the suggested exercises category. If you find a platform
dependency and wish to submit a patch for it, though, please see the updates site listed
earlier; I’ll be happy to post any platform patches from readers there.
Preface | xxxv

Demo Launchers
The book examples package described earlier also includes portable example demo
launcher scripts named PyDemos and PyGadgets, which provide a quick look at some
of this book’s major GUI- and Web-based examples. These scripts and their launchers,
located at the top of the examples tree, can be run to self-configure program and module
search paths, and so can generally be run immediately on compatible platforms, in-
cluding Windows. See the package’s README files as well as the overviews near the
end of Chapters 6 and 10 for more on these scripts.
Code Reuse Policies
We now interrupt this Preface for a word from the legal department. This book is here
to help you get your job done. In general, you may use the code in this book in your
programs and documentation. You do not need to contact us for permission unless
you’re reproducing a significant portion of the code. For example, writing a program
that uses several chunks of code from this book does not require permission. Selling or
distributing a CD-ROM of examples from O’Reilly books does require permission.
Answering a question by citing this book and quoting example code does not require
permission. Incorporating a significant amount of example code from this book into
your product’s documentation does require permission.
We appreciate, but do not require, attribution. An attribution usually includes the title,
author, publisher, and ISBN. For example: “Programming Python, Fourth Edition, by
Mark Lutz (O’Reilly). Copyright 2011 Mark Lutz, 978-0-596-15810-1.”
Contacting O’Reilly
I described my own examples and updates sites in the prior section. In addition to that
advice, you can also address comments and questions about this book to the publisher:
O’Reilly Media, Inc.
1005 Gravenstein Highway North
Sebastopol, CA 95472
800-998-9938 (in the United States and Canada)
707-827-7000 (international/local)
707-829-0104 (fax)
As mentioned, O’Reilly maintains a web page for this book, which lists errata, exam-
ples, and any additional information. You can access this page at:
http://oreilly.com/catalog/9780596158101
To comment or ask technical questions about this book, send email to:
bookquestions@oreilly.com
xxxvi | Preface

For more information about books, conferences, software, Resource Centers, and the
O’Reilly Network, see the O’Reilly website at:
http://www.oreilly.com
Conventions Used in This Book
The following font conventions are used in this book:
Italic
Used for file and directory names, to emphasize new terms when first introduced,
and for some comments within code sections
Constant width
Used for code listings and to designate modules, methods, options, classes, func-
tions, statements, programs, objects, and HTML tags
Constant width bold
Used in code sections to show user input
Constant width italic
Used to mark replaceables
This icon designates a note related to the nearby text.
This icon designates a warning related to the nearby text.
Acknowledgments
I acknowledged numerous people in the preface of Learning Python, Fourth Edition,
less than a year ago; because that book is a precursor to this one, and because the set
is largely the same, I won’t repeat the list in its entirety here. In short, though, I’m
grateful to:
• O’Reilly, for promoting Python, and publishing “meaty” books in the Open Source
domain
• The Python community, which has occupied sizeable portions of my world
since 1992
• The thousands of students who attended the 250 Python classes I’ve taught
since 1997
Preface | xxxvii

• The hundreds of thousands who read the 12 editions of the three Python books
I’ve written since 1995
• Monty Python, Python’s namesake, for so many great bits to draw from (more in
the next chapter)
Although writing is ultimately a solitary task, the ideas that spring forth owe much to
the input of many. I’m thankful for all the feedback I’ve been fortunate to receive over
the last 18 years, both from classes and from readers. Students really are the best teach-
ers of teachers.
On the (overly) personal front, I’d like to thank my brothers and sister for old days, as
well as my children, Michael, Samantha, and Roxanne, for bragging rights.
And I’m especially thankful for my wife, Vera, who somehow managed to append very
good things to this otherwise immutable object.
—Mark Lutz, July 2010
xxxviii | Preface

So, What’s Python?
As discussed, this book won’t devote much space to Python fundamentals, and we’ll
defer an abstract discussion of Python roles until the Conclusion, after you’ve had a
chance to see it in action firsthand. If you are looking for a concise definition of this
book’s topic, though, try this:
Python is a general-purpose, open source computer programming language. It is opti-
mized for software quality, developer productivity, program portability, and compo-
nent integration. Python is used by at least hundreds of thousands of developers around
the world in areas such as Internet scripting, systems programming, user interfaces,
product customization, numeric programming, and more. It is generally considered to
be among the top four or five most widely-used programming languages in the world
today.
As a popular language focused on shrinking development time, Python is deployed in
a wide variety of products and roles. Counted among its current user base are Google,
YouTube, Industrial Light & Magic, ESRI, the BitTorrent file sharing system, NASA’s
Jet Propulsion Lab, the game Eve Online, and the National Weather Service. Python’s
application domains range from system administration, website development, cell
phone scripting, and education to hardware testing, investment analysis, computer
games, and spacecraft control.
Among other things, Python sports a remarkably simple, readable, and maintainable
syntax; integration with external components coded in other languages; a multi-
paradigm design, with OOP, functional, and modular structures; and a vast collection
of precoded interfaces and utilities. Its tool set makes it a flexible and agile language,
ideal for both quick tactical tasks as well as longer-range strategic application devel-
opment efforts. Although it is a general-purpose language, Python is often called a
scripting language because it makes it easy to utilize and direct other software
components.
Perhaps Python’s best asset, though, is simply that it makes software development more
rapid and enjoyable. There is a class of people for whom programming is an end in
itself. They enjoy the challenge. They write software for the pure pleasure of doing so
and often view commercial or career reward as secondary consequence. This is the class
that largely invented the Internet, open source, and Python. This is also the class that
has historically been a primary audience for this book. As they’ve often relayed, with
a tool like Python, programming can be just plain fun.
To truly understand how, read on; though something of a side effect, much of this book
serves as a demonstration of Python’s ideals in action in real-world code. As we’ll see,
especially when combined with toolkits for GUIs, websites, systems programming, and
so on, Python serves as enabling technology.
Preface | xxxix

PART I
The Beginning
This part of the book gets things started by taking us on a quick tour that reviews Python
fundamental prerequisites and introduces some of the most common ways it is applied.
Chapter 1
This chapter kicks things off by using a simple example—recording information
about people—to briefly introduce some of the major Python application domains
we’ll be studying in this book. We’ll migrate the same example through multiple
steps. Along the way, we’ll meet databases, GUIs, websites, and more. This is
something of a demo chapter, designed to pique your interest. We won’t learn the
full story here, but we’ll have a chance to see Python in action before digging into
the details. This chapter also serves as a review of some core language ideas you
should be familiar with before starting this book, such as data representation and
object-oriented programming (OOP).
The point of this part of the book is not to give you an in-depth look at Python, but
just to let you sample its application and to provide you with a quick look at some of
Python’s broader goals and purposes.

CHAPTER 1
A Sneak Preview
“Programming Python: The Short Story”
If you are like most people, when you pick up a book as large as this one, you’d like to
know a little about what you’re going to be learning before you roll up your sleeves.
That’s what this chapter is for—it provides a demonstration of some of the kinds of
things you can do with Python, before getting into the details. You won’t learn the full
story here, and if you’re looking for complete explanations of the tools and techniques
applied in this chapter, you’ll have to read on to later parts of the book. The point here
is just to whet your appetite, review a few Python basics, and preview some of the topics
to come.
To do this, I’ll pick a fairly simple application task—constructing a database of
records—and migrate it through multiple steps: interactive coding, command-line
tools, console interfaces, GUIs, and simple web-based interfaces. Along the way, we’ll
also peek at concepts such as data representation, object persistence, and object-
oriented programming (OOP); explore some alternatives that we’ll revisit later in the
book; and review some core Python ideas that you should be aware of before reading
this book. Ultimately, we’ll wind up with a database of Python class instances, which
can be browsed and changed from a variety of interfaces.
I’ll cover additional topics in this book, of course, but the techniques you will see here
are representative of some of the domains we’ll explore later. And again, if you don’t
completely understand the programs in this chapter, don’t worry because you
shouldn’t—not yet anyway. This is just a Python demo. We’ll fill in the rest of the
details soon enough. For now, let’s start off with a bit of fun.
3

Readers of the Fourth Edition of Learning Python might recognize some
aspects of the running example used in this chapter—the characters here
are similar in spirit to those in the OOP tutorial chapter in that book,
and the later class-based examples here are essentially a variation on a
theme. Despite some redundancy, I’m revisiting the example here for
three reasons: it serves its purpose as a review of language fundamentals;
some readers of this book haven’t read Learning Python; and the exam-
ple receives expanded treatment here, with the addition of GUI and Web
interfaces. That is, this chapter picks up where Learning Python left off,
pushing this core language example into the realm of realistic applica-
tions—which, in a nutshell, reflects the purpose of this book.
The Task
Imagine, if you will, that you need to keep track of information about people for some
reason. Maybe you want to store an address book on your computer, or perhaps you
need to keep track of employees in a small business. For whatever reason, you want to
write a program that keeps track of details about these people. In other words, you
want to keep records in a database—to permanently store lists of people’s attributes
on your computer.
Naturally, there are off-the-shelf programs for managing databases like these. By writ-
ing a program for this task yourself, however, you’ll have complete control over its
operation. You can add code for special cases and behaviors that precoded software
may not have anticipated. You won’t have to install and learn to use yet another data-
base product. And you won’t be at the mercy of a software vendor to fix bugs or add
new features. You decide to write a Python program to manage your people.
Step 1: Representing Records
If we’re going to store records in a database, the first step is probably deciding what
those records will look like. There are a variety of ways to represent information about
people in the Python language. Built-in object types such as lists and dictionaries are
often sufficient, especially if we don’t initially care about processing the data we store.
Using Lists
Lists, for example, can collect attributes about people in a positionally ordered way.
Start up your Python interactive interpreter and type the following two statements:
>>> bob = ['Bob Smith', 42, 30000, 'software']
>>> sue = ['Sue Jones', 45, 40000, 'hardware']
4 | Chapter 1: A Sneak Preview

We’ve just made two records, albeit simple ones, to represent two people, Bob and Sue
(my apologies if you really are Bob or Sue, generically or otherwise*). Each record is a
list of four properties: name, age, pay, and job fields. To access these fields, we simply
index by position; the result is in parentheses here because it is a tuple of two results:
>>> bob[0], sue[2] # fetch name, pay
('Bob Smith', 40000)
Processing records is easy with this representation; we just use list operations. For
example, we can extract a last name by splitting the name field on blanks and grabbing
the last part, and we can give someone a raise by changing their list in-place:
>>> bob[0].split()[-1] # what's bob's last name?
'Smith'
>>> sue[2] *= 1.25 # give sue a 25% raise
>>> sue
['Sue Jones', 45, 50000.0, 'hardware']
The last-name expression here proceeds from left to right: we fetch Bob’s name, split
it into a list of substrings around spaces, and index his last name (run it one step at a
time to see how).
Start-up pointers
Since this is the first code in this book, here are some quick pragmatic pointers for
reference:
• This code may be typed in the IDLE GUI; after typing python at a shell prompt (or
the full directory path to it if it’s not on your system path); and so on.
• The >>> characters are Python’s prompt (not code you type yourself).
• The informational lines that Python prints when this prompt starts up are usually
omitted in this book to save space.
• I’m running all of this book’s code under Python 3.1; results in any 3.X release
should be similar (barring unforeseeable Python changes, of course).
• Apart from some system and C integration code, most of this book’s examples are
run under Windows 7, though thanks to Python portability, it generally doesn’t
matter unless stated otherwise.
If you’ve never run Python code this way before, see an introductory resource such as
O’Reilly’s Learning Python for help with getting started. I’ll also have a few words to
say about running code saved in script files later in this chapter.
* No, I’m serious. In the Python classes I teach, I had for many years regularly used the name “Bob Smith,”
age 40.5, and jobs “developer” and “manager” as a supposedly fictitious database record—until a class in
Chicago, where I met a student named Bob Smith, who was 40.5 and was a developer and manager. The
world is stranger than it seems.
Step 1: Representing Records | 5

A database list
Of course, what we’ve really coded so far is just two variables, not a database; to collect
Bob and Sue into a unit, we might simply stuff them into another list:
>>> people = [bob, sue] # reference in list of lists
>>> for person in people:
print(person)
['Bob Smith', 42, 30000, 'software']
['Sue Jones', 45, 50000.0, 'hardware']
Now the people list represents our database. We can fetch specific records by their
relative positions and process them one at a time, in loops:
>>> people[1][0]
'Sue Jones'
>>> for person in people:
print(person[0].split()[-1]) # print last names
person[2] *= 1.20 # give each a 20% raise
Smith
Jones
>>> for person in people: print(person[2]) # check new pay
36000.0
60000.0
Now that we have a list, we can also collect values from records using some of Python’s
more powerful iteration tools, such as list comprehensions, maps, and generator
expressions:
>>> pays = [person[2] for person in people] # collect all pay
>>> pays
[36000.0, 60000.0]
>>> pays = map((lambda x: x[2]), people) # ditto (map is a generator in 3.X)
>>> list(pays)
[36000.0, 60000.0]
>>> sum(person[2] for person in people) # generator expression, sum built-in
96000.0
To add a record to the database, the usual list operations, such as append and extend,
will suffice:
>>> people.append(['Tom', 50, 0, None])
>>> len(people)
3
>>> people[-1][0]
'Tom'
Lists work for our people database, and they might be sufficient for some programs,
but they suffer from a few major flaws. For one thing, Bob and Sue, at this point, are
6 | Chapter 1: A Sneak Preview

just fleeting objects in memory that will disappear once we exit Python. For another,
every time we want to extract a last name or give a raise, we’ll have to repeat the kinds
of code we just typed; that could become a problem if we ever change the way those
operations work—we may have to update many places in our code. We’ll address these
issues in a few moments.
Field labels
Perhaps more fundamentally, accessing fields by position in a list requires us to mem-
orize what each position means: if you see a bit of code indexing a record on magic
position 2, how can you tell it is extracting a pay? In terms of understanding the code,
it might be better to associate a field name with a field value.
We might try to associate names with relative positions by using the Python range built-
in function, which generates successive integers when used in iteration contexts (such
as the sequence assignment used initially here):
>>> NAME, AGE, PAY = range(3) # 0, 1, and 2
>>> bob = ['Bob Smith', 42, 10000]
>>> bob[NAME]
'Bob Smith'
>>> PAY, bob[PAY]
(2, 10000)
This addresses readability: the three uppercase variables essentially become field
names. This makes our code dependent on the field position assignments, though—
we have to remember to update the range assignments whenever we change record
structure. Because they are not directly associated, the names and records may become
out of sync over time and require a maintenance step.
Moreover, because the field names are independent variables, there is no direct map-
ping from a record list back to its field’s names. A raw record list, for instance, provides
no way to label its values with field names in a formatted display. In the preceding
record, without additional code, there is no path from value 42 to label AGE:
bob.index(42) gives 1, the value of AGE, but not the name AGE itself.
We might also try this by using lists of tuples, where the tuples record both a field name
and a value; better yet, a list of lists would allow for updates (tuples are immutable).
Here’s what that idea translates to, with slightly simpler records:
>>> bob = [['name', 'Bob Smith'], ['age', 42], ['pay', 10000]]
>>> sue = [['name', 'Sue Jones'], ['age', 45], ['pay', 20000]]
>>> people = [bob, sue]
This really doesn’t fix the problem, though, because we still have to index by position
in order to fetch fields:
>>> for person in people:
print(person[0][1], person[2][1]) # name, pay
Step 1: Representing Records | 7

Bob Smith 10000
Sue Jones 20000
>>> [person[0][1] for person in people] # collect names
['Bob Smith', 'Sue Jones']
>>> for person in people:
print(person[0][1].split()[-1]) # get last names
person[2][1] *= 1.10 # give a 10% raise
Smith
Jones
>>> for person in people: print(person[2])
['pay', 11000.0]
['pay', 22000.0]
All we’ve really done here is add an extra level of positional indexing. To do better, we
might inspect field names in loops to find the one we want (the loop uses tuple assign-
ment here to unpack the name/value pairs):
>>> for person in people:
for (name, value) in person:
if name == 'name': print(value) # find a specific field
Bob Smith
Sue Jones
Better yet, we can code a fetcher function to do the job for us:
>>> def field(record, label):
for (fname, fvalue) in record:
if fname == label: # find any field by name
return fvalue
>>> field(bob, 'name')
'Bob Smith'
>>> field(sue, 'pay')
22000.0
>>> for rec in people:
print(field(rec, 'age')) # print all ages
42
45
If we proceed down this path, we’ll eventually wind up with a set of record interface
functions that generically map field names to field data. If you’ve done any Python
coding in the past, though, you probably already know that there is an easier way to
code this sort of association, and you can probably guess where we’re headed in the
next section.
8 | Chapter 1: A Sneak Preview

Using Dictionaries
The list-based record representations in the prior section work, though not without
some cost in terms of performance required to search for field names (assuming you
need to care about milliseconds and such). But if you already know some Python, you
also know that there are more efficient and convenient ways to associate property
names and values. The built-in dictionary object is a natural:
>>> bob = {'name': 'Bob Smith', 'age': 42, 'pay': 30000, 'job': 'dev'}
>>> sue = {'name': 'Sue Jones', 'age': 45, 'pay': 40000, 'job': 'hdw'}
Now, Bob and Sue are objects that map field names to values automatically, and they
make our code more understandable and meaningful. We don’t have to remember what
a numeric offset means, and we let Python search for the value associated with a field’s
name with its efficient dictionary indexing:
>>> bob['name'], sue['pay'] # not bob[0], sue[2]
('Bob Smith', 40000)
>>> bob['name'].split()[-1]
'Smith'
>>> sue['pay'] *= 1.10
>>> sue['pay']
44000.0
Because fields are accessed mnemonically now, they are more meaningful to those who
read your code (including you).
Other ways to make dictionaries
Dictionaries turn out to be so useful in Python programming that there are even more
convenient ways to code them than the traditional literal syntax shown earlier—e.g.,
with keyword arguments and the type constructor, as long as the keys are all strings:
>>> bob = dict(name='Bob Smith', age=42, pay=30000, job='dev')
>>> sue = dict(name='Sue Jones', age=45, pay=40000, job='hdw')
>>> bob
{'pay': 30000, 'job': 'dev', 'age': 42, 'name': 'Bob Smith'}
>>> sue
{'pay': 40000, 'job': 'hdw', 'age': 45, 'name': 'Sue Jones'}
by filling out a dictionary one field at a time (recall that dictionary keys are pseudo-
randomly ordered):
>>> sue = {}
>>> sue['name'] = 'Sue Jones'
>>> sue['age'] = 45
>>> sue['pay'] = 40000
>>> sue['job'] = 'hdw'
>>> sue
{'job': 'hdw', 'pay': 40000, 'age': 45, 'name': 'Sue Jones'}
Step 1: Representing Records | 9

and by zipping together name/value lists:
>>> names = ['name', 'age', 'pay', 'job']
>>> values = ['Sue Jones', 45, 40000, 'hdw']
>>> list(zip(names, values))
[('name', 'Sue Jones'), ('age', 45), ('pay', 40000), ('job', 'hdw')]
>>> sue = dict(zip(names, values))
>>> sue
{'job': 'hdw', 'pay': 40000, 'age': 45, 'name': 'Sue Jones'}
We can even make dictionaries from a sequence of key values and an optional starting
value for all the keys (handy to initialize an empty dictionary):
>>> fields = ('name', 'age', 'job', 'pay')
>>> record = dict.fromkeys(fields, '?')
>>> record
{'job': '?', 'pay': '?', 'age': '?', 'name': '?'}
Lists of dictionaries
Regardless of how we code them, we still need to collect our dictionary-based records
into a database; a list does the trick again, as long as we don’t require access by key at
the top level:
>>> bob
{'pay': 30000, 'job': 'dev', 'age': 42, 'name': 'Bob Smith'}
>>> sue
{'job': 'hdw', 'pay': 40000, 'age': 45, 'name': 'Sue Jones'}
>>> people = [bob, sue] # reference in a list
>>> for person in people:
print(person['name'], person['pay'], sep=', ') # all name, pay
Bob Smith, 30000
Sue Jones, 40000
>>> for person in people:
if person['name'] == 'Sue Jones': # fetch sue's pay
print(person['pay'])
40000
Iteration tools work just as well here, but we use keys rather than obscure positions (in
database terms, the list comprehension and map in the following code project the da-
tabase on the “name” field column):
>>> names = [person['name'] for person in people] # collect names
>>> names
['Bob Smith', 'Sue Jones']
>>> list(map((lambda x: x['name']), people)) # ditto, generate
['Bob Smith', 'Sue Jones']
>>> sum(person['pay'] for person in people) # sum all pay
70000
10 | Chapter 1: A Sneak Preview

Interestingly, tools such as list comprehensions and on-demand generator expressions
can even approach the utility of SQL queries here, albeit operating on in-memory
objects:
>>> [rec['name'] for rec in people if rec['age'] >= 45] # SQL-ish query
['Sue Jones']
>>> [(rec['age'] ** 2 if rec['age'] >= 45 else rec['age']) for rec in people]
[42, 2025]
>>> G = (rec['name'] for rec in people if rec['age'] >= 45)
>>> next(G)
'Sue Jones'
>>> G = ((rec['age'] ** 2 if rec['age'] >= 45 else rec['age']) for rec in people)
>>> G.__next__()
42
And because dictionaries are normal Python objects, these records can also be accessed
and updated with normal Python syntax:
>>> for person in people:
print(person['name'].split()[-1]) # last name
person['pay'] *= 1.10 # a 10% raise
Smith
Jones
>>> for person in people: print(person['pay'])
33000.0
44000.0
Nested structures
Incidentally, we could avoid the last-name extraction code in the prior examples by
further structuring our records. Because all of Python’s compound datatypes can be
nested inside each other and as deeply as we like, we can build up fairly complex in-
formation structures easily—simply type the object’s syntax, and Python does all the
work of building the components, linking memory structures, and later reclaiming their
space. This is one of the great advantages of a scripting language such as Python.
The following, for instance, represents a more structured record by nesting a dictionary,
list, and tuple inside another dictionary:
>>> bob2 = {'name': {'first': 'Bob', 'last': 'Smith'},
'age': 42,
'job': ['software', 'writing'],
'pay': (40000, 50000)}
Step 1: Representing Records | 11

Because this record contains nested structures, we simply index twice to go two levels
deep:
>>> bob2['name'] # bob's full name
{'last': 'Smith', 'first': 'Bob'}
>>> bob2['name']['last'] # bob's last name
'Smith'
>>> bob2['pay'][1] # bob's upper pay
50000
The name field is another dictionary here, so instead of splitting up a string, we simply
index to fetch the last name. Moreover, people can have many jobs, as well as minimum
and maximum pay limits. In fact, Python becomes a sort of query language in such
cases—we can fetch or change nested data with the usual object operations:
>>> for job in bob2['job']: print(job) # all of bob's jobs
software
writing
>> bob2['job'][-1] # bob's last job
'writing'
>>> bob2['job'].append('janitor') # bob gets a new job
>>> bob2
{'job': ['software', 'writing', 'janitor'], 'pay': (40000, 50000), 'age': 42, 'name':
{'last': 'Smith', 'first': 'Bob'}}
It’s OK to grow the nested list with append, because it is really an independent object.
Such nesting can come in handy for more sophisticated applications; to keep ours sim-
ple, we’ll stick to the original flat record structure.
Dictionaries of dictionaries
One last twist on our people database: we can get a little more mileage out of diction-
aries here by using one to represent the database itself. That is, we can use a dictionary
of dictionaries—the outer dictionary is the database, and the nested dictionaries are
the records within it. Rather than a simple list of records, a dictionary-based database
allows us to store and retrieve records by symbolic key:
>>> bob = dict(name='Bob Smith', age=42, pay=30000, job='dev')
>>> sue = dict(name='Sue Jones', age=45, pay=40000, job='hdw')
>>> bob
{'pay': 30000, 'job': 'dev', 'age': 42, 'name': 'Bob Smith'}
>>> db = {}
>>> db['bob'] = bob # reference in a dict of dicts
>>> db['sue'] = sue
>>>
>>> db['bob']['name'] # fetch bob's name
'Bob Smith'
>>> db['sue']['pay'] = 50000 # change sue's pay
>>> db['sue']['pay'] # fetch sue's pay
50000
12 | Chapter 1: A Sneak Preview

Notice how this structure allows us to access a record directly instead of searching for
it in a loop—we get to Bob’s name immediately by indexing on key bob. This really is
a dictionary of dictionaries, though you won’t see all the gory details unless you display
the database all at once (the Python pprint pretty-printer module can help with legi-
bility here):
>>> db
{'bob': {'pay': 30000, 'job': 'dev', 'age': 42, 'name': 'Bob Smith'}, 'sue':
{'pay': 50000, 'job': 'hdw', 'age': 45, 'name': 'Sue Jones'}}
>>> import pprint
>>> pprint.pprint(db)
{'bob': {'age': 42, 'job': 'dev', 'name': 'Bob Smith', 'pay': 30000},
'sue': {'age': 45, 'job': 'hdw', 'name': 'Sue Jones', 'pay': 50000}}
If we still need to step through the database one record at a time, we can now rely on
dictionary iterators. In recent Python releases, a dictionary iterator produces one key
in a for loop each time through (for compatibility with earlier releases, we can also call
the db.keys method explicitly in the for loop rather than saying just db, but since
Python 3’s keys result is a generator, the effect is roughly the same):
>>> for key in db:
print(key, '=>', db[key]['name'])
bob => Bob Smith
sue => Sue Jones
>>> for key in db:
print(key, '=>', db[key]['pay'])
bob => 30000
sue => 50000
To visit all records, either index by key as you go:
>>> for key in db:
print(db[key]['name'].split()[-1])
db[key]['pay'] *= 1.10
Smith
Jones
or step through the dictionary’s values to access records directly:
>>> for record in db.values(): print(record['pay'])
33000.0
55000.0
>>> x = [db[key]['name'] for key in db]
>>> x
['Bob Smith', 'Sue Jones']
>>> x = [rec['name'] for rec in db.values()]
Step 1: Representing Records | 13

>>> x
['Bob Smith', 'Sue Jones']
And to add a new record, simply assign it to a new key; this is just a dictionary, after all:
>>> db['tom'] = dict(name='Tom', age=50, job=None, pay=0)
>>>
>>> db['tom']
{'pay': 0, 'job': None, 'age': 50, 'name': 'Tom'}
>>> db['tom']['name']
'Tom'
>>> list(db.keys())
['bob', 'sue', 'tom']
>>> len(db)
3
>>> [rec['age'] for rec in db.values()]
[42, 45, 50]
>>> [rec['name'] for rec in db.values() if rec['age'] >= 45] # SQL-ish query
['Sue Jones', 'Tom']
Although our database is still a transient object in memory, it turns out that this
dictionary-of-dictionaries format corresponds exactly to a system that saves objects
permanently—the shelve (yes, this should probably be shelf, grammatically speaking,
but the Python module name and term is shelve). To learn how, let’s move on to the
next section.
Step 2: Storing Records Persistently
So far, we’ve settled on a dictionary-based representation for our database of records,
and we’ve reviewed some Python data structure concepts along the way. As mentioned,
though, the objects we’ve seen so far are temporary—they live in memory and they go
away as soon as we exit Python or the Python program that created them. To make our
people persistent, they need to be stored in a file of some sort.
Using Formatted Files
One way to keep our data around between program runs is to write all the data out to
a simple text file, in a formatted way. Provided the saving and loading tools agree on
the format selected, we’re free to use any custom scheme we like.
Test data script
So that we don’t have to keep working interactively, let’s first write a script that initi-
alizes the data we are going to store (if you’ve done any Python work in the past, you
know that the interactive prompt tends to become tedious once you leave the realm of
simple one-liners). Example 1-1 creates the sort of records and database dictionary
we’ve been working with so far, but because it is a module, we can import it repeatedly
without having to retype the code each time. In a sense, this module is a database itself,
but its program code format doesn’t support automatic or end-user updates as is.
14 | Chapter 1: A Sneak Preview

Example 1-1. PP4E\Preview\initdata.py
# initialize data to be stored in files, pickles, shelves
# records
bob = {'name': 'Bob Smith', 'age': 42, 'pay': 30000, 'job': 'dev'}
sue = {'name': 'Sue Jones', 'age': 45, 'pay': 40000, 'job': 'hdw'}
tom = {'name': 'Tom', 'age': 50, 'pay': 0, 'job': None}
# database
db = {}
db['bob'] = bob
db['sue'] = sue
db['tom'] = tom
if __name__ == '__main__': # when run as a script
for key in db:
print(key, '=>\n ', db[key])
As usual, the __name__ test at the bottom of Example 1-1 is true only when this file is
run, not when it is imported. When run as a top-level script (e.g., from a command
line, via an icon click, or within the IDLE GUI), the file’s self-test code under this test
dumps the database’s contents to the standard output stream (remember, that’s what
print function-call statements do by default).
Here is the script in action being run from a system command line on Windows. Type
the following command in a Command Prompt window after a cd to the directory where
the file is stored, and use a similar console window on other types of computers:
...\PP4E\Preview> python initdata.py
bob =>
{'job': 'dev', 'pay': 30000, 'age': 42, 'name': 'Bob Smith'}
sue =>
{'job': 'hdw', 'pay': 40000, 'age': 45, 'name': 'Sue Jones'}
tom =>
{'job': None, 'pay': 0, 'age': 50, 'name': 'Tom'}
File name conventions
Since this is our first source file (a.k.a. “script”), here are three usage notes for this
book’s examples:
• The text ...\PP4E\Preview> in the first line of the preceding example listing stands
for your operating system’s prompt, which can vary per platform; you type just the
text that follows this prompt (python initdata.py).
• Like all examples in this book, the system prompt also gives the directory in the
downloadable book examples package where this command should be run. When
running this script using a command-line in a system shell, make sure the shell’s
current working directory is PP4E\Preview. This can matter for examples that use
files in the working directory.
Step 2: Storing Records Persistently | 15

• Similarly, the label that precedes every example file’s code listing tells you where
the source file resides in the examples package. Per the Example 1-1 listing label
shown earlier, this script’s full filename is PP4E\Preview\initdata.py in the
examples tree.
We’ll use these conventions throughout the book; see the Preface for more on getting
the examples if you wish to work along. I occasionally give more of the directory path
in system prompts when it’s useful to provide the extra execution context, especially
in the system part of the book (e.g., a “C:\” prefix from Windows or more directory
names).
Script start-up pointers
I gave pointers for using the interactive prompt earlier. Now that we’ve started running
script files, here are also a few quick startup pointers for using Python scripts in general:
• On some platforms, you may need to type the full directory path to the Python
program on your machine; if Python isn’t on your system path setting on Windows,
for example, replace python in the command with C:\Python31\python (this as-
sumes you’re using Python 3.1).
• On most Windows systems you also don’t need to type python on the command
line at all; just type the file’s name to run it, since Python is registered to open “.py”
script files.
• You can also run this file inside Python’s standard IDLE GUI (open the file and
use the Run menu in the text edit window), and in similar ways from any of the
available third-party Python IDEs (e.g., Komodo, Eclipse, NetBeans, and the Wing
IDE).
• If you click the program’s file icon to launch it on Windows, be sure to add an
input() call to the bottom of the script to keep the output window up. On other
systems, icon clicks may require a #! line at the top and executable permission via
a chmod command.
I’ll assume here that you’re able to run Python code one way or another. Again, if you’re
stuck, see other books such as Learning Python for the full story on launching Python
programs.
Data format script
Now, all we have to do is store all of this in-memory data in a file. There are a variety
of ways to accomplish this; one of the most basic is to write one piece of data at a time,
with separators between each that we can use when reloading to break the data apart.
Example 1-2 shows one way to code this idea.
16 | Chapter 1: A Sneak Preview

Example 1-2. PP4E\Preview\make_db_file.py
"""
Save in-memory database object to a file with custom formatting;
assume 'endrec.', 'enddb.', and '=>' are not used in the data;
assume db is dict of dict; warning: eval can be dangerous - it
runs strings as code; could also eval() record dict all at once;
could also dbfile.write(key + '\n') vs print(key, file=dbfile);
"""
dbfilename = 'people-file'
ENDDB = 'enddb.'
ENDREC = 'endrec.'
RECSEP = '=>'
def storeDbase(db, dbfilename=dbfilename):
"formatted dump of database to flat file"
dbfile = open(dbfilename, 'w')
for key in db:
print(key, file=dbfile)
for (name, value) in db[key].items():
print(name + RECSEP + repr(value), file=dbfile)
print(ENDREC, file=dbfile)
print(ENDDB, file=dbfile)
dbfile.close()
def loadDbase(dbfilename=dbfilename):
"parse data to reconstruct database"
dbfile = open(dbfilename)
import sys
sys.stdin = dbfile
db = {}
key = input()
while key != ENDDB:
rec = {}
field = input()
while field != ENDREC:
name, value = field.split(RECSEP)
rec[name] = eval(value)
field = input()
db[key] = rec
key = input()
return db
if __name__ == '__main__':
from initdata import db
storeDbase(db)
This is a somewhat complex program, partly because it has both saving and loading
logic and partly because it does its job the hard way; as we’ll see in a moment, there
are better ways to get objects into files than by manually formatting and parsing them.
For simple tasks, though, this does work; running Example 1-2 as a script writes the
database out to a flat file. It has no printed output, but we can inspect the database file
interactively after this script is run, either within IDLE or from a console window where
Step 2: Storing Records Persistently | 17

you’re running these examples (as is, the database file shows up in the current working
directory):
...\PP4E\Preview> python make_db_file.py
...\PP4E\Preview> python
>>> for line in open('people-file'):
... print(line, end='')
...
bob
job=>'dev'
pay=>30000
age=>42
name=>'Bob Smith'
endrec.
sue
job=>'hdw'
pay=>40000
age=>45
name=>'Sue Jones'
endrec.
tom
job=>None
pay=>0
age=>50
name=>'Tom'
endrec.
enddb.
This file is simply our database’s content with added formatting. Its data originates
from the test data initialization module we wrote in Example 1-1 because that is the
module from which Example 1-2’s self-test code imports its data. In practice, Exam-
ple 1-2 itself could be imported and used to store a variety of databases and files.
Notice how data to be written is formatted with the as-code repr call and is re-created
with the eval call, which treats strings as Python code. That allows us to store and re-
create things like the None object, but it is potentially unsafe; you shouldn’t use eval if
you can’t be sure that the database won’t contain malicious code. For our purposes,
however, there’s probably no cause for alarm.
Utility scripts
To test further, Example 1-3 reloads the database from a file each time it is run.
Example 1-3. PP4E\Preview\dump_db_file.py
from make_db_file import loadDbase
db = loadDbase()
for key in db:
print(key, '=>\n ', db[key])
print(db['sue']['name'])
And Example 1-4 makes changes by loading, updating, and storing again.
18 | Chapter 1: A Sneak Preview

Example 1-4. PP4E\Preview\update_db_file.py
from make_db_file import loadDbase, storeDbase
db = loadDbase()
db['sue']['pay'] *= 1.10
db['tom']['name'] = 'Tom Tom'
storeDbase(db)
Here are the dump script and the update script in action at a system command line;
both Sue’s pay and Tom’s name change between script runs. The main point to notice
is that the data stays around after each script exits—our objects have become persistent
simply because they are mapped to and from text files:
...\PP4E\Preview> python dump_db_file.py
bob =>
{'pay': 30000, 'job': 'dev', 'age': 42, 'name': 'Bob Smith'}
sue =>
{'pay': 40000, 'job': 'hdw', 'age': 45, 'name': 'Sue Jones'}
tom =>
{'pay': 0, 'job': None, 'age': 50, 'name': 'Tom'}
Sue Jones
...\PP4E\Preview> python update_db_file.py
...\PP4E\Preview> python dump_db_file.py
bob =>
{'pay': 30000, 'job': 'dev', 'age': 42, 'name': 'Bob Smith'}
sue =>
{'pay': 44000.0, 'job': 'hdw', 'age': 45, 'name': 'Sue Jones'}
tom =>
{'pay': 0, 'job': None, 'age': 50, 'name': 'Tom Tom'}
Sue Jones
As is, we’ll have to write Python code in scripts or at the interactive command line for
each specific database update we need to perform (later in this chapter, we’ll do better
by providing generalized console, GUI, and web-based interfaces instead). But at a basic
level, our text file is a database of records. As we’ll learn in the next section, though, it
turns out that we’ve just done a lot of pointless work.
Using Pickle Files
The formatted text file scheme of the prior section works, but it has some major limi-
tations. For one thing, it has to read the entire database from the file just to fetch one
record, and it must write the entire database back to the file after each set of updates.
Although storing one record’s text per file would work around this limitation, it would
also complicate the program further.
For another thing, the text file approach assumes that the data separators it writes out
to the file will not appear in the data to be stored: if the characters => happen to appear
in the data, for example, the scheme will fail. We might work around this by generating
XML text to represent records in the text file, using Python’s XML parsing tools, which
we’ll meet later in this text, to reload; XML tags would avoid collisions with actual
Step 2: Storing Records Persistently | 19

data’s text, but creating and parsing XML would complicate the program substantially
too.
Perhaps worst of all, the formatted text file scheme is already complex without being
general: it is tied to the dictionary-of-dictionaries structure, and it can’t handle anything
else without being greatly expanded. It would be nice if a general tool existed that could
translate any sort of Python data to a format that could be saved in a file in a single step.
That is exactly what the Python pickle module is designed to do. The pickle module
translates an in-memory Python object into a serialized byte stream—a string of bytes
that can be written to any file-like object. The pickle module also knows how to re-
construct the original object in memory, given the serialized byte stream: we get back
the exact same object. In a sense, the pickle module replaces proprietary data formats
—its serialized format is general and efficient enough for any program. With pickle,
there is no need to manually translate objects to data when storing them persistently,
and no need to manually parse a complex format to get them back. Pickling is similar
in spirit to XML representations, but it’s both more Python-specific, and much simpler
to code.
The net effect is that pickling allows us to store and fetch native Python objects as they
are and in a single step—we use normal Python syntax to process pickled records.
Despite what it does, the pickle module is remarkably easy to use. Example 1-5 shows
how to store our records in a flat file, using pickle.
Example 1-5. PP4E\Preview\make_db_pickle.py
from initdata import db
import pickle
dbfile = open('people-pickle', 'wb') # use binary mode files in 3.X
pickle.dump(db, dbfile) # data is bytes, not str
dbfile.close()
When run, this script stores the entire database (the dictionary of dictionaries defined
in Example 1-1) to a flat file named people-pickle in the current working directory. The
pickle module handles the work of converting the object to a string. Example 1-6 shows
how to access the pickled database after it has been created; we simply open the file
and pass its content back to pickle to remake the object from its serialized string.
Example 1-6. PP4E\Preview\dump_db_pickle.py
import pickle
dbfile = open('people-pickle', 'rb') # use binary mode files in 3.X
db = pickle.load(dbfile)
for key in db:
print(key, '=>\n ', db[key])
print(db['sue']['name'])
Here are these two scripts at work, at the system command line again; naturally, they
can also be run in IDLE, and you can open and inspect the pickle file by running the
same sort of code interactively as well:
20 | Chapter 1: A Sneak Preview

...\PP4E\Preview> python make_db_pickle.py
...\PP4E\Preview> python dump_db_pickle.py
bob =>
{'pay': 30000, 'job': 'dev', 'age': 42, 'name': 'Bob Smith'}
sue =>
{'pay': 40000, 'job': 'hdw', 'age': 45, 'name': 'Sue Jones'}
tom =>
{'pay': 0, 'job': None, 'age': 50, 'name': 'Tom'}
Sue Jones
Updating with a pickle file is similar to a manually formatted file, except that Python
is doing all of the formatting work for us. Example 1-7 shows how.
Example 1-7. PP4E\Preview\update-db-pickle.py
import pickle
dbfile = open('people-pickle', 'rb')
db = pickle.load(dbfile)
dbfile.close()
db['sue']['pay'] *= 1.10
db['tom']['name'] = 'Tom Tom'
dbfile = open('people-pickle', 'wb')
pickle.dump(db, dbfile)
dbfile.close()
Notice how the entire database is written back to the file after the records are changed
in memory, just as for the manually formatted approach; this might become slow for
very large databases, but we’ll ignore this for the moment. Here are our update and
dump scripts in action—as in the prior section, Sue’s pay and Tom’s name change
between scripts because they are written back to a file (this time, a pickle file):
...\PP4E\Preview> python update_db_pickle.py
...\PP4E\Preview> python dump_db_pickle.py
bob =>
{'pay': 30000, 'job': 'dev', 'age': 42, 'name': 'Bob Smith'}
sue =>
{'pay': 44000.0, 'job': 'hdw', 'age': 45, 'name': 'Sue Jones'}
tom =>
{'pay': 0, 'job': None, 'age': 50, 'name': 'Tom Tom'}
Sue Jones
As we’ll learn in Chapter 17, the Python pickling system supports nearly arbitrary object
types—lists, dictionaries, class instances, nested structures, and more. There, we’ll also
learn about the pickler’s text and binary storage protocols; as of Python 3, all protocols
use bytes objects to represent pickled data, which in turn requires pickle files to be
opened in binary mode for all protocols. As we’ll see later in this chapter, the pickler
and its data format also underlie shelves and ZODB databases, and pickled class in-
stances provide both data and behavior for objects stored.
In fact, pickling is more general than these examples may imply. Because they accept
any object that provides an interface compatible with files, pickling and unpickling may
Step 2: Storing Records Persistently | 21

be used to transfer native Python objects to a variety of media. Using a network socket,
for instance, allows us to ship pickled Python objects across a network and provides
an alternative to larger protocols such as SOAP and XML-RPC.
Using Per-Record Pickle Files
As mentioned earlier, one potential disadvantage of this section’s examples so far is
that they may become slow for very large databases: because the entire database must
be loaded and rewritten to update a single record, this approach can waste time. We
could improve on this by storing each record in the database in a separate flat file. The
next three examples show one way to do so; Example 1-8 stores each record in its own
flat file, using each record’s original key as its filename with a .pkl appended (it creates
the files bob.pkl, sue.pkl, and tom.pkl in the current working directory).
Example 1-8. PP4E\Preview\make_db_pickle_recs.py
from initdata import bob, sue, tom
import pickle
for (key, record) in [('bob', bob), ('tom', tom), ('sue', sue)]:
recfile = open(key + '.pkl', 'wb')
pickle.dump(record, recfile)
recfile.close()
Next, Example 1-9 dumps the entire database by using the standard library’s glob
module to do filename expansion and thus collect all the files in this directory with
a .pkl extension. To load a single record, we open its file and deserialize with pickle;
we must load only one record file, though, not the entire database, to fetch one record.
Example 1-9. PP4E\Preview\dump_db_pickle_recs.py
import pickle, glob
for filename in glob.glob('*.pkl'): # for 'bob','sue','tom'
recfile = open(filename, 'rb')
record = pickle.load(recfile)
print(filename, '=>\n ', record)
suefile = open('sue.pkl', 'rb')
print(pickle.load(suefile)['name']) # fetch sue's name
Finally, Example 1-10 updates the database by fetching a record from its file, changing
it in memory, and then writing it back to its pickle file. This time, we have to fetch and
rewrite only a single record file, not the full database, to update.
Example 1-10. PP4E\Preview\update_db_pickle_recs.py
import pickle
suefile = open('sue.pkl', 'rb')
sue = pickle.load(suefile)
suefile.close()
22 | Chapter 1: A Sneak Preview

sue['pay'] *= 1.10
suefile = open('sue.pkl', 'wb')
pickle.dump(sue, suefile)
suefile.close()
Here are our file-per-record scripts in action; the results are about the same as in the
prior section, but database keys become real filenames now. In a sense, the filesystem
becomes our top-level dictionary—filenames provide direct access to each record.
...\PP4E\Preview> python make_db_pickle_recs.py
...\PP4E\Preview> python dump_db_pickle_recs.py
bob.pkl =>
{'pay': 30000, 'job': 'dev', 'age': 42, 'name': 'Bob Smith'}
sue.pkl =>
{'pay': 40000, 'job': 'hdw', 'age': 45, 'name': 'Sue Jones'}
tom.pkl =>
{'pay': 0, 'job': None, 'age': 50, 'name': 'Tom'}
Sue Jones
...\PP4E\Preview> python update_db_pickle_recs.py
...\PP4E\Preview> python dump_db_pickle_recs.py
bob.pkl =>
{'pay': 30000, 'job': 'dev', 'age': 42, 'name': 'Bob Smith'}
sue.pkl =>
{'pay': 44000.0, 'job': 'hdw', 'age': 45, 'name': 'Sue Jones'}
tom.pkl =>
{'pay': 0, 'job': None, 'age': 50, 'name': 'Tom'}
Sue Jones
Using Shelves
Pickling objects to files, as shown in the preceding section, is an optimal scheme in
many applications. In fact, some applications use pickling of Python objects across
network sockets as a simpler alternative to network protocols such as the SOAP and
XML-RPC web services architectures (also supported by Python, but much heavier than
pickle).
Moreover, assuming your filesystem can handle as many files as you’ll need, pickling
one record per file also obviates the need to load and store the entire database for each
update. If we really want keyed access to records, though, the Python standard library
offers an even higher-level tool: shelves.
Shelves automatically pickle objects to and from a keyed-access filesystem. They behave
much like dictionaries that must be opened, and they persist after each program exits.
Because they give us key-based access to stored records, there is no need to manually
manage one flat file per record—the shelve system automatically splits up stored re-
cords and fetches and updates only those records that are accessed and changed. In
this way, shelves provide utility similar to per-record pickle files, but they are usually
easier to code.
Step 2: Storing Records Persistently | 23

The shelve interface is just as simple as pickle: it is identical to dictionaries, with extra
open and close calls. In fact, to your code, a shelve really does appear to be a persistent
dictionary of persistent objects; Python does all the work of mapping its content to and
from a file. For instance, Example 1-11 shows how to store our in-memory dictionary
objects in a shelve for permanent keeping.
Example 1-11. PP4E\Preview\make_db_shelve.py
from initdata import bob, sue
import shelve
db = shelve.open('people-shelve')
db['bob'] = bob
db['sue'] = sue
db.close()
This script creates one or more files in the current directory with the name people-
shelve as a prefix (in Python 3.1 on Windows, people-shelve.bak, people-shelve.dat, and
people-shelve.dir). You shouldn’t delete these files (they are your database!), and you
should be sure to use the same base name in other scripts that access the shelve.
Example 1-12, for instance, reopens the shelve and indexes it by key to fetch its stored
records.
Example 1-12. PP4E\Preview\dump_db_shelve.py
import shelve
db = shelve.open('people-shelve')
for key in db:
print(key, '=>\n ', db[key])
print(db['sue']['name'])
db.close()
We still have a dictionary of dictionaries here, but the top-level dictionary is really a
shelve mapped onto a file. Much happens when you access a shelve’s keys—it uses
pickle internally to serialize and deserialize objects stored, and it interfaces with a
keyed-access filesystem. From your perspective, though, it’s just a persistent dictionary.
Example 1-13 shows how to code shelve updates.
Example 1-13. PP4E\Preview\update_db_shelve.py
from initdata import tom
import shelve
db = shelve.open('people-shelve')
sue = db['sue'] # fetch sue
sue['pay'] *= 1.50
db['sue'] = sue # update sue
db['tom'] = tom # add a new record
db.close()
Notice how this code fetches sue by key, updates in memory, and then reassigns to the
key to update the shelve; this is a requirement of shelves by default, but not always of
more advanced shelve-like systems such as ZODB, covered in Chapter 17. As we’ll see
24 | Chapter 1: A Sneak Preview

later, shelve.open also has a newer writeback keyword argument, which, if passed
True, causes all records loaded from the shelve to be cached in memory, and automat-
ically written back to the shelve when it is closed; this avoids manual write backs on
changes, but can consume memory and make closing slow.
Also note how shelve files are explicitly closed. Although we don’t need to pass mode
flags to shelve.open (by default it creates the shelve if needed, and opens it for reads
and writes otherwise), some underlying keyed-access filesystems may require a close
call in order to flush output buffers after changes.
Finally, here are the shelve-based scripts on the job, creating, changing, and fetching
records. The records are still dictionaries, but the database is now a dictionary-like
shelve which automatically retains its state in a file between program runs:
...\PP4E\Preview> python make_db_shelve.py
...\PP4E\Preview> python dump_db_shelve.py
bob =>
{'pay': 30000, 'job': 'dev', 'age': 42, 'name': 'Bob Smith'}
sue =>
{'pay': 40000, 'job': 'hdw', 'age': 45, 'name': 'Sue Jones'}
Sue Jones
...\PP4E\Preview> python update_db_shelve.py
...\PP4E\Preview> python dump_db_shelve.py
bob =>
{'pay': 30000, 'job': 'dev', 'age': 42, 'name': 'Bob Smith'}
sue =>
{'pay': 60000.0, 'job': 'hdw', 'age': 45, 'name': 'Sue Jones'}
tom =>
{'pay': 0, 'job': None, 'age': 50, 'name': 'Tom'}
Sue Jones
When we ran the update and dump scripts here, we added a new record for key tom
and increased Sue’s pay field by 50 percent. These changes are permanent because the
record dictionaries are mapped to an external file by shelve. (In fact, this is a particularly
good script for Sue—something she might consider scheduling to run often, using a
cron job on Unix, or a Startup folder or msconfig entry on Windows…)
What’s in a Name?
Though it’s a surprisingly well-kept secret, Python gets its name from the 1970s British
TV comedy series Monty Python’s Flying Circus. According to Python folklore, Guido
van Rossum, Python’s creator, was watching reruns of the show at about the same time
he needed a name for a new language he was developing. And as they say in show
business, “the rest is history.”
Because of this heritage, references to the comedy group’s work often show up in ex-
amples and discussion. For instance, the name Brian appears often in scripts; the words
spam, lumberjack, and shrubbery have a special connotation to Python users; and pre-
sentations are sometimes referred to as The Spanish Inquisition. As a rule, if a Python
user starts using phrases that have no relation to reality, they’re probably borrowed
Step 2: Storing Records Persistently | 25

from the Monty Python series or movies. Some of these phrases might even pop up in
this book. You don’t have to run out and rent The Meaning of Life or The Holy Grail
to do useful work in Python, of course, but it can’t hurt.
While “Python” turned out to be a distinctive name, it has also had some interesting
side effects. For instance, when the Python newsgroup, comp.lang.python, came online
in 1994, its first few weeks of activity were almost entirely taken up by people wanting
to discuss topics from the TV show. More recently, a special Python supplement in the
Linux Journal magazine featured photos of Guido garbed in an obligatory “nice red
uniform.”
Python’s news list still receives an occasional post from fans of the show. For instance,
one early poster innocently offered to swap Monty Python scripts with other fans. Had
he known the nature of the forum, he might have at least mentioned whether they were
portable or not.
Step 3: Stepping Up to OOP
Let’s step back for a moment and consider how far we’ve come. At this point, we’ve
created a database of records: the shelve, as well as per-record pickle file approaches
of the prior section suffice for basic data storage tasks. As is, our records are represented
as simple dictionaries, which provide easier-to-understand access to fields than do lists
(by key, rather than by position). Dictionaries, however, still have some limitations that
may become more critical as our program grows over time.
For one thing, there is no central place for us to collect record processing logic. Ex-
tracting last names and giving raises, for instance, can be accomplished with code like
the following:
>>> import shelve
>>> db = shelve.open('people-shelve')
>>> bob = db['bob']
>>> bob['name'].split()[-1] # get bob's last name
'Smith'
>>> sue = db['sue']
>>> sue['pay'] *= 1.25 # give sue a raise
>>> sue['pay']
75000.0
>>> db['sue'] = sue
>>> db.close()
This works, and it might suffice for some short programs. But if we ever need to change
the way last names and raises are implemented, we might have to update this kind of
code in many places in our program. In fact, even finding all such magical code snippets
could be a challenge; hardcoding or cutting and pasting bits of logic redundantly like
this in more than one place will almost always come back to haunt you eventually.
It would be better to somehow hide—that is, encapsulate—such bits of code. Functions
in a module would allow us to implement such operations in a single place and thus
26 | Chapter 1: A Sneak Preview

avoid code redundancy, but still wouldn’t naturally associate them with the records
themselves. What we’d like is a way to bind processing logic with the data stored in
the database in order to make it easier to understand, debug, and reuse.
Another downside to using dictionaries for records is that they are difficult to expand
over time. For example, suppose that the set of data fields or the procedure for giving
raises is different for different kinds of people (perhaps some people get a bonus each
year and some do not). If we ever need to extend our program, there is no natural way
to customize simple dictionaries. For future growth, we’d also like our software to
support extension and customization in a natural way.
If you’ve already studied Python in any sort of depth, you probably already know that
this is where its OOP support begins to become attractive:
Structure
With OOP, we can naturally associate processing logic with record data—classes
provide both a program unit that combines logic and data in a single package and
a hierarchy that allows code to be easily factored to avoid redundancy.
Encapsulation
With OOP, we can also wrap up details such as name processing and pay increases
behind method functions—i.e., we are free to change method implementations
without breaking their users.
Customization
And with OOP, we have a natural growth path. Classes can be extended and cus-
tomized by coding new subclasses, without changing or breaking already working
code.
That is, under OOP, we program by customizing and reusing, not by rewriting. OOP
is an option in Python and, frankly, is sometimes better suited for strategic than for
tactical tasks. It tends to work best when you have time for upfront planning—some-
thing that might be a luxury if your users have already begun storming the gates.
But especially for larger systems that change over time, its code reuse and structuring
advantages far outweigh its learning curve, and it can substantially cut development
time. Even in our simple case, the customizability and reduced redundancy we gain
from classes can be a decided advantage.
Using Classes
OOP is easy to use in Python, thanks largely to Python’s dynamic typing model. In fact,
it’s so easy that we’ll jump right into an example: Example 1-14 implements our data-
base records as class instances rather than as dictionaries.
Example 1-14. PP4E\Preview\person_start.py
class Person:
def __init__(self, name, age, pay=0, job=None):
Step 3: Stepping Up to OOP | 27

self.name = name
self.age = age
self.pay = pay
self.job = job
if __name__ == '__main__':
bob = Person('Bob Smith', 42, 30000, 'software')
sue = Person('Sue Jones', 45, 40000, 'hardware')
print(bob.name, sue.pay)
print(bob.name.split()[-1])
sue.pay *= 1.10
print(sue.pay)
There is not much to this class—just a constructor method that fills out the instance
with data passed in as arguments to the class name. It’s sufficient to represent a database
record, though, and it can already provide tools such as defaults for pay and job fields
that dictionaries cannot. The self-test code at the bottom of this file creates two in-
stances (records) and accesses their attributes (fields); here is this file’s output when
run under IDLE (a system command-line works just as well):
Bob Smith 40000
Smith
44000.0
This isn’t a database yet, but we could stuff these objects into a list or dictionary as
before in order to collect them as a unit:
>>> from person_start import Person
>>> bob = Person('Bob Smith', 42)
>>> sue = Person('Sue Jones', 45, 40000)
>>> people = [bob, sue] # a "database" list
>>> for person in people:
print(person.name, person.pay)
Bob Smith 0
Sue Jones 40000
>>> x = [(person.name, person.pay) for person in people]
>>> x
[('Bob Smith', 0), ('Sue Jones', 40000)]
>>> [rec.name for rec in people if rec.age >= 45] # SQL-ish query
['Sue Jones']
>>> [(rec.age ** 2 if rec.age >= 45 else rec.age) for rec in people]
[42, 2025]
Notice that Bob’s pay defaulted to zero this time because we didn’t pass in a value for
that argument (maybe Sue is supporting him now?). We might also implement a class
that represents the database, perhaps as a subclass of the built-in list or dictionary types,
with insert and delete methods that encapsulate the way the database is implemented.
We’ll abandon this path for now, though, because it will be more useful to store these
28 | Chapter 1: A Sneak Preview

records persistently in a shelve, which already encapsulates stores and fetches behind
an interface for us. Before we do, though, let’s add some logic.
Adding Behavior
So far, our class is just data: it replaces dictionary keys with object attributes, but it
doesn’t add much to what we had before. To really leverage the power of classes, we
need to add some behavior. By wrapping up bits of behavior in class method functions,
we can insulate clients from changes. And by packaging methods in classes along with
data, we provide a natural place for readers to look for code. In a sense, classes combine
records and the programs that process those records; methods provide logic that in-
terprets and updates the data (we say they are object-oriented, because they always
process an object’s data).
For instance, Example 1-15 adds the last-name and raise logic as class methods; meth-
ods use the self argument to access or update the instance (record) being processed.
Example 1-15. PP4E\Preview\person.py
class Person:
def __init__(self, name, age, pay=0, job=None):
self.name = name
self.age = age
self.pay = pay
self.job = job
def lastName(self):
return self.name.split()[-1]
def giveRaise(self, percent):
self.pay *= (1.0 + percent)
if __name__ == '__main__':
bob = Person('Bob Smith', 42, 30000, 'software')
sue = Person('Sue Jones', 45, 40000, 'hardware')
print(bob.name, sue.pay)
print(bob.lastName())
sue.giveRaise(.10)
print(sue.pay)
The output of this script is the same as the last, but the results are being computed by
methods now, not by hardcoded logic that appears redundantly wherever it is required:
Bob Smith 40000
Smith
44000.0
Adding Inheritance
One last enhancement to our records before they become permanent: because they are
implemented as classes now, they naturally support customization through the inher-
itance search mechanism in Python. Example 1-16, for instance, customizes the last
Step 3: Stepping Up to OOP | 29

section’s Person class in order to give a 10 percent bonus by default to managers when-
ever they receive a raise (any relation to practice in the real world is purely coincidental).
Example 1-16. PP4E\Preview\manager.py
from person import Person
class Manager(Person):
def giveRaise(self, percent, bonus=0.1):
self.pay *= (1.0 + percent + bonus)
if __name__ == '__main__':
tom = Manager(name='Tom Doe', age=50, pay=50000)
print(tom.lastName())
tom.giveRaise(.20)
print(tom.pay)
When run, this script’s self-test prints the following:
Doe
65000.0
Here, the Manager class appears in a module of its own, but it could have been added
to the person module instead (Python doesn’t require just one class per file). It inherits
the constructor and last-name methods from its superclass, but it customizes just the
giveRaise method (there are a variety of ways to code this extension, as we’ll see later).
Because this change is being added as a new subclass, the original Person class, and any
objects generated from it, will continue working unchanged. Bob and Sue, for example,
inherit the original raise logic, but Tom gets the custom version because of the class
from which he is created. In OOP, we program by customizing, not by changing.
In fact, code that uses our objects doesn’t need to be at all aware of what the raise
method does—it’s up to the object to do the right thing based on the class from which
it is created. As long as the object supports the expected interface (here, a method called
giveRaise), it will be compatible with the calling code, regardless of its specific type,
and even if its method works differently than others.
If you’ve already studied Python, you may know this behavior as polymorphism; it’s a
core property of the language, and it accounts for much of your code’s flexibility. When
the following code calls the giveRaise method, for example, what happens depends on
the obj object being processed; Tom gets a 20 percent raise instead of 10 percent be-
cause of the Manager class’s customization:
>>> from person import Person
>>> from manager import Manager
>>> bob = Person(name='Bob Smith', age=42, pay=10000)
>>> sue = Person(name='Sue Jones', age=45, pay=20000)
>>> tom = Manager(name='Tom Doe', age=55, pay=30000)
>>> db = [bob, sue, tom]
30 | Chapter 1: A Sneak Preview

>>> for obj in db:
obj.giveRaise(.10) # default or custom
>>> for obj in db:
print(obj.lastName(), '=>', obj.pay)
Smith => 11000.0
Jones => 22000.0
Doe => 36000.0
Refactoring Code
Before we move on, there are a few coding alternatives worth noting here. Most of these
underscore the Python OOP model, and they serve as a quick review.
Augmenting methods
As a first alternative, notice that we have introduced some redundancy in Exam-
ple 1-16: the raise calculation is now repeated in two places (in the two classes). We
could also have implemented the customized Manager class by augmenting the inherited
raise method instead of replacing it completely:
class Manager(Person):
def giveRaise(self, percent, bonus=0.1):
Person.giveRaise(self, percent + bonus)
The trick here is to call back the superclass’s version of the method directly, passing in
the self argument explicitly. We still redefine the method, but we simply run the gen-
eral version after adding 10 percent (by default) to the passed-in percentage. This coding
pattern can help reduce code redundancy (the original raise method’s logic appears in
only one place and so is easier to change) and is especially handy for kicking off su-
perclass constructor methods in practice.
If you’ve already studied Python OOP, you know that this coding scheme works be-
cause we can always call methods through either an instance or the class name. In
general, the following are equivalent, and both forms may be used explicitly:
instance.method(arg1, arg2)
class.method(instance, arg1, arg2)
In fact, the first form is mapped to the second—when calling through the instance,
Python determines the class by searching the inheritance tree for the method name and
passes in the instance automatically. Either way, within giveRaise, self refers to the
instance that is the subject of the call.
Display format
For more object-oriented fun, we could also add a few operator overloading methods
to our people classes. For example, a __str__ method, shown here, could return a string
Step 3: Stepping Up to OOP | 31

to give the display format for our objects when they are printed as a whole—much
better than the default display we get for an instance:
class Person:
def __str__(self):
return '<%s => %s>' % (self.__class__.__name__, self.name)
tom = Manager('Tom Jones', 50)
print(tom) # prints: <Manager => Tom Jones>
Here __class__ gives the lowest class from which self was made, even though
__str__ may be inherited. The net effect is that __str__ allows us to print instances
directly instead of having to print specific attributes. We could extend this __str__ to
loop through the instance’s __dict__ attribute dictionary to display all attributes ge-
nerically; for this preview we’ll leave this as a suggested exercise.
We might even code an __add__ method to make + expressions automatically call the
giveRaise method. Whether we should is another question; the fact that a + expression
gives a person a raise might seem more magical to the next person reading our code
than it should.
Constructor customization
Finally, notice that we didn’t pass the job argument when making a manager in Ex-
ample 1-16; if we had, it would look like this with keyword arguments:
tom = Manager(name='Tom Doe', age=50, pay=50000, job='manager')
The reason we didn’t include a job in the example is that it’s redundant with the class
of the object: if someone is a manager, their class should imply their job title. Instead
of leaving this field blank, though, it may make more sense to provide an explicit con-
structor for managers, which fills in this field automatically:
class Manager(Person):
def __init__(self, name, age, pay):
Person.__init__(self, name, age, pay, 'manager')
Now when a manager is created, its job is filled in automatically. The trick here is to
call to the superclass’s version of the method explicitly, just as we did for the
giveRaise method earlier in this section; the only difference here is the unusual name
for the constructor method.
Alternative classes
We won’t use any of this section’s three extensions in later examples, but to demon-
strate how they work, Example 1-17 collects these ideas in an alternative implementa-
tion of our Person classes.
32 | Chapter 1: A Sneak Preview

Example 1-17. PP4E\Preview\person_alternative.py
"""
Alternative implementation of person classes, with data, behavior,
and operator overloading (not used for objects stored persistently)
"""
class Person:
"""
a general person: data+logic
"""
def __init__(self, name, age, pay=0, job=None):
self.name = name
self.age = age
self.pay = pay
self.job = job
def lastName(self):
return self.name.split()[-1]
def giveRaise(self, percent):
self.pay *= (1.0 + percent)
def __str__(self):
return ('<%s => %s: %s, %s>' %
(self.__class__.__name__, self.name, self.job, self.pay))
class Manager(Person):
"""
a person with custom raise
inherits general lastname, str
"""
def __init__(self, name, age, pay):
Person.__init__(self, name, age, pay, 'manager')
def giveRaise(self, percent, bonus=0.1):
Person.giveRaise(self, percent + bonus)
if __name__ == '__main__':
bob = Person('Bob Smith', 44)
sue = Person('Sue Jones', 47, 40000, 'hardware')
tom = Manager(name='Tom Doe', age=50, pay=50000)
print(sue, sue.pay, sue.lastName())
for obj in (bob, sue, tom):
obj.giveRaise(.10) # run this obj's giveRaise
print(obj) # run common __str__ method
Notice the polymorphism in this module’s self-test loop: all three objects share the
constructor, last-name, and printing methods, but the raise method called is dependent
upon the class from which an instance is created. When run, Example 1-17 prints the
following to standard output—the manager’s job is filled in at construction, we get the
new custom display format for our objects, and the new version of the manager’s raise
method works as before:
<Person => Sue Jones: hardware, 40000> 40000 Jones
<Person => Bob Smith: None, 0.0>
<Person => Sue Jones: hardware, 44000.0>
<Manager => Tom Doe: manager, 60000.0>
Step 3: Stepping Up to OOP | 33

Such refactoring (restructuring) of code is common as class hierarchies grow and evolve.
In fact, as is, we still can’t give someone a raise if his pay is zero (Bob is out of luck);
we probably need a way to set pay, too, but we’ll leave such extensions for the next
release. The good news is that Python’s flexibility and readability make refactoring
easy—it’s simple and quick to restructure your code. If you haven’t used the language
yet, you’ll find that Python development is largely an exercise in rapid, incremental,
and interactive programming, which is well suited to the shifting needs of real-world
projects.
Adding Persistence
It’s time for a status update. We now have encapsulated in the form of classes custom-
izable implementations of our records and their processing logic. Making our class-
based records persistent is a minor last step. We could store them in per-record pickle
files again; a shelve-based storage medium will do just as well for our goals and is often
easier to code. Example 1-18 shows how.
Example 1-18. PP4E\Preview\make_db_classes.py
import shelve
from person import Person
from manager import Manager
bob = Person('Bob Smith', 42, 30000, 'software')
sue = Person('Sue Jones', 45, 40000, 'hardware')
tom = Manager('Tom Doe', 50, 50000)
db = shelve.open('class-shelve')
db['bob'] = bob
db['sue'] = sue
db['tom'] = tom
db.close()
This file creates three class instances (two from the original class and one from its
customization) and assigns them to keys in a newly created shelve file to store them
permanently. In other words, it creates a shelve of class instances; to our code, the
database looks just like a dictionary of class instances, but the top-level dictionary is
mapped to a shelve file again. To check our work, Example 1-19 reads the shelve and
prints fields of its records.
Example 1-19. PP4E\Preview\dump_db_classes.py
import shelve
db = shelve.open('class-shelve')
for key in db:
print(key, '=>\n ', db[key].name, db[key].pay)
bob = db['bob']
print(bob.lastName())
print(db['tom'].lastName())
34 | Chapter 1: A Sneak Preview

Note that we don’t need to reimport the Person class here in order to fetch its instances
from the shelve or run their methods. When instances are shelved or pickled, the un-
derlying pickling system records both instance attributes and enough information to
locate their classes automatically when they are later fetched (the class’s module simply
has to be on the module search path when an instance is loaded). This is on purpose;
because the class and its instances in the shelve are stored separately, you can change
the class to modify the way stored instances are interpreted when loaded (more on this
later in the book). Here is the shelve dump script’s output just after creating the shelve
with the maker script:
bob =>
Bob Smith 30000
sue =>
Sue Jones 40000
tom =>
Tom Doe 50000
Smith
Doe
As shown in Example 1-20, database updates are as simple as before (compare this to
Example 1-13), but dictionary keys become attributes of instance objects, and updates
are implemented by class method calls instead of hardcoded logic. Notice how we still
fetch, update, and reassign to keys to update the shelve.
Example 1-20. PP4E\Preview\update_db_classes.py
import shelve
db = shelve.open('class-shelve')
sue = db['sue']
sue.giveRaise(.25)
db['sue'] = sue
tom = db['tom']
tom.giveRaise(.20)
db['tom'] = tom
db.close()
And last but not least, here is the dump script again after running the update script;
Tom and Sue have new pay values, because these objects are now persistent in the
shelve. We could also open and inspect the shelve by typing code at Python’s interactive
command line; despite its longevity, the shelve is just a Python object containing Python
objects.
bob =>
Bob Smith 30000
sue =>
Sue Jones 50000.0
tom =>
Tom Doe 65000.0
Smith
Doe
Step 3: Stepping Up to OOP | 35

Tom and Sue both get a raise this time around, because they are persistent objects in
the shelve database. Although shelves can also store simpler object types such as lists
and dictionaries, class instances allow us to combine both data and behavior for our
stored items. In a sense, instance attributes and class methods take the place of records
and processing programs in more traditional schemes.
Other Database Options
At this point, we have a full-fledged database system: our classes simultaneously im-
plement record data and record processing, and they encapsulate the implementation
of the behavior. And the Python pickle and shelve modules provide simple ways to
store our database persistently between program executions. This is not a relational
database (we store objects, not tables, and queries take the form of Python object pro-
cessing code), but it is sufficient for many kinds of programs.
If we need more functionality, we could migrate this application to even more powerful
tools. For example, should we ever need full-blown SQL query support, there are in-
terfaces that allow Python scripts to communicate with relational databases such as
MySQL, PostgreSQL, and Oracle in portable ways.
ORMs (object relational mappers) such as SQLObject and SqlAlchemy offer another
approach which retains the Python class view, but translates it to and from relational
database tables—in a sense providing the best of both worlds, with Python class syntax
on top, and enterprise-level databases underneath.
Moreover, the open source ZODB system provides a more comprehensive object da-
tabase for Python, with support for features missing in shelves, including concurrent
updates, transaction commits and rollbacks, automatic updates on in-memory com-
ponent changes, and more. We’ll explore these more advanced third-party tools in
Chapter 17. For now, let’s move on to putting a good face on our system.
“Buses Considered Harmful”
Over the years, Python has been remarkably well supported by the volunteer efforts of
both countless individuals and formal organizations. Today, the nonprofit Python
Software Foundation (PSF) oversees Python conferences and other noncommercial ac-
tivities. The PSF was preceded by the PSA, a group that was originally formed in re-
sponse to an early thread on the Python newsgroup that posed the semiserious question:
“What would happen if Guido was hit by a bus?”
These days, Python creator Guido van Rossum is still the ultimate arbiter of proposed
Python changes. He was officially anointed the BDFL—Benevolent Dictator for Life—
of Python at the first Python conference and still makes final yes and no decisions on
language changes (and apart from 3.0’s deliberate incompatibilities, has usually said
no: a good thing in the programming languages domain, because Python tends to
change slowly and in backward-compatible ways).
36 | Chapter 1: A Sneak Preview

But Python’s user base helps support the language, work on extensions, fix bugs, and
so on. It is a true community project. In fact, Python development is now a completely
open process—anyone can inspect the latest source code files or submit patches by
visiting a website (see http://www.python.org for details).
As an open source package, Python development is really in the hands of a very large
cast of developers working in concert around the world—so much so that if the BDFL
ever does pass the torch, Python will almost certainly continue to enjoy the kind of
support its users have come to expect. Though not without pitfalls of their own, open
source projects by nature tend to reflect the needs of their user communities more than
either individuals or shareholders.
Given Python’s popularity, bus attacks seem less threatening now than they once did.
Of course, I can’t speak for Guido.
Step 4: Adding Console Interaction
So far, our database program consists of class instances stored in a shelve file, as coded
in the preceding section. It’s sufficient as a storage medium, but it requires us to run
scripts from the command line or type code interactively in order to view or process its
content. Improving on this is straightforward: simply code more general programs that
interact with users, either from a console window or from a full-blown graphical
interface.
A Console Shelve Interface
Let’s start with something simple. The most basic kind of interface we can code would
allow users to type keys and values in a console window in order to process the database
(instead of writing Python program code). Example 1-21, for instance, implements a
simple interactive loop that allows a user to query multiple record objects in the shelve
by key.
Example 1-21. PP4E\Preview\peopleinteract_query.py
# interactive queries
import shelve
fieldnames = ('name', 'age', 'job', 'pay')
maxfield = max(len(f) for f in fieldnames)
db = shelve.open('class-shelve')
while True:
key = input('\nKey? => ') # key or empty line, exc at eof
if not key: break
try:
record = db[key] # fetch by key, show in console
Step 4: Adding Console Interaction | 37

except:
print('No such key "%s"!' % key)
else:
for field in fieldnames:
print(field.ljust(maxfield), '=>', getattr(record, field))
This script uses the getattr built-in function to fetch an object’s attribute when given
its name string, and the ljust left-justify method of strings to align outputs (max
field, derived from a generator expression, is the length of the longest field name).
When run, this script goes into a loop, inputting keys from the interactive user (tech-
nically, from the standard input stream, which is usually a console window) and dis-
playing the fetched records field by field. An empty line ends the session. If our shelve
of class instances is still in the state we left it near the end of the last section:
...\PP4E\Preview> dump_db_classes.py
bob =>
Bob Smith 30000
sue =>
Sue Jones 50000.0
tom =>
Tom Doe 65000.0
Smith
Doe
We can then use our new script to query the object database interactively, by key:
...\PP4E\Preview> peopleinteract_query.py
Key? => sue
name => Sue Jones
age => 45
job => hardware
pay => 50000.0
Key? => nobody
No such key "nobody"!
Key? =>
Example 1-22 goes further and allows interactive updates. For an input key, it inputs
values for each field and either updates an existing record or creates a new object and
stores it under the key.
Example 1-22. PP4E\Preview\peopleinteract_update.py
# interactive updates
import shelve
from person import Person
fieldnames = ('name', 'age', 'job', 'pay')
db = shelve.open('class-shelve')
while True:
key = input('\nKey? => ')
if not key: break
38 | Chapter 1: A Sneak Preview

if key in db:
record = db[key] # update existing record
else: # or make/store new rec
record = Person(name='?', age='?') # eval: quote strings
for field in fieldnames:
currval = getattr(record, field)
newtext = input('\t[%s]=%s\n\t\tnew?=>' % (field, currval))
if newtext:
setattr(record, field, eval(newtext))
db[key] = record
db.close()
Notice the use of eval in this script to convert inputs (as usual, that allows any Python
object type, but it means you must quote string inputs explicitly) and the use of
setattr call to assign an attribute given its name string. When run, this script allows
any number of records to be added and changed; to keep the current value of a record’s
field, press the Enter key when prompted for a new value:
Key? => tom
[name]=Tom Doe
new?=>
[age]=50
new?=>56
[job]=None
new?=>'mgr'
[pay]=65000.0
new?=>90000
Key? => nobody
[name]=?
new?=>'John Doh'
[age]=?
new?=>55
[job]=None
new?=>
[pay]=0
new?=>None
Key? =>
This script is still fairly simplistic (e.g., errors aren’t handled), but using it is much easier
than manually opening and modifying the shelve at the Python interactive prompt,
especially for nonprogrammers. Run the query script to check your work after an up-
date (we could combine query and update into a single script if this becomes too cum-
bersome, albeit at some cost in code and user-experience complexity):
Key? => tom
name => Tom Doe
age => 56
job => mgr
pay => 90000
Key? => nobody
name => John Doh
Step 4: Adding Console Interaction | 39

age => 55
job => None
pay => None
Key? =>
Step 5: Adding a GUI
The console-based interface approach of the preceding section works, and it may be
sufficient for some users assuming that they are comfortable with typing commands in
a console window. With just a little extra work, though, we can add a GUI that is more
modern, easier to use, less error prone, and arguably sexier.
GUI Basics
As we’ll see later in this book, a variety of GUI toolkits and builders are available for
Python programmers: tkinter, wxPython, PyQt, PythonCard, Dabo, and more. Of
these, tkinter ships with Python, and it is something of a de facto standard.
tkinter is a lightweight toolkit and so meshes well with a scripting language such as
Python; it’s easy to do basic things with tkinter, and it’s straightforward to do more
advanced things with extensions and OOP-based code. As an added bonus, tkinter
GUIs are portable across Windows, Linux/Unix, and Macintosh; simply copy the
source code to the machine on which you wish to use your GUI. tkinter doesn’t come
with all the bells and whistles of larger toolkits such as wxPython or PyQt, but that’s
a major factor behind its relative simplicity, and it makes it ideal for getting started in
the GUI domain.
Because tkinter is designed for scripting, coding GUIs with it is straightforward. We’ll
study all of its concepts and tools later in this book. But as a first example, the first
program in tkinter is just a few lines of code, as shown in Example 1-23.
Example 1-23. PP4E\Preview\tkinter001.py
from tkinter import *
Label(text='Spam').pack()
mainloop()
From the tkinter module (really, a module package in Python 3), we get screen device
(a.k.a. “widget”) construction calls such as Label; geometry manager methods such as
pack; widget configuration presets such as the TOP and RIGHT attachment side hints we’ll
use later for pack; and the mainloop call, which starts event processing.
This isn’t the most useful GUI ever coded, but it demonstrates tkinter basics and it
builds the fully functional window shown in Figure 1-1 in just three simple lines of
code. Its window is shown here, like all GUIs in this book, running on Windows 7; it
works the same on other platforms (e.g., Mac OS X, Linux, and older versions of Win-
dows), but renders in with native look and feel on each.
40 | Chapter 1: A Sneak Preview

You can launch this example in IDLE, from a console command line, or by clicking its
icon—the same way you can run other Python scripts. tkinter itself is a standard part
of Python and works out-of-the-box on Windows and others, though you may need
extra configuration or install steps on some computers (more details later in this book).
It’s not much more work to code a GUI that actually responds to a user: Exam-
ple 1-24 implements a GUI with a button that runs the reply function each time it is
pressed.
Example 1-24. PP4E\Preview\ tkinter101.py
from tkinter import *
from tkinter.messagebox import showinfo
def reply():
showinfo(title='popup', message='Button pressed!')
window = Tk()
button = Button(window, text='press', command=reply)
button.pack()
window.mainloop()
This example still isn’t very sophisticated—it creates an explicit Tk main window for
the application to serve as the parent container of the button, and it builds the simple
window shown in Figure 1-2 (in tkinter, containers are passed in as the first argument
when making a new widget; they default to the main window). But this time, each time
you click the “press” button, the program responds by running Python code that pops
up the dialog window in Figure 1-3.
Figure 1-2. tkinter101.py main window
Notice that the pop-up dialog looks like it should for Windows 7, the platform on
which this screenshot was taken; again, tkinter gives us a native look and feel that is
appropriate for the machine on which it is running. We can customize this GUI in many
ways (e.g., by changing colors and fonts, setting window titles and icons, using photos
Figure 1-1. tkinter001.py window
Step 5: Adding a GUI | 41
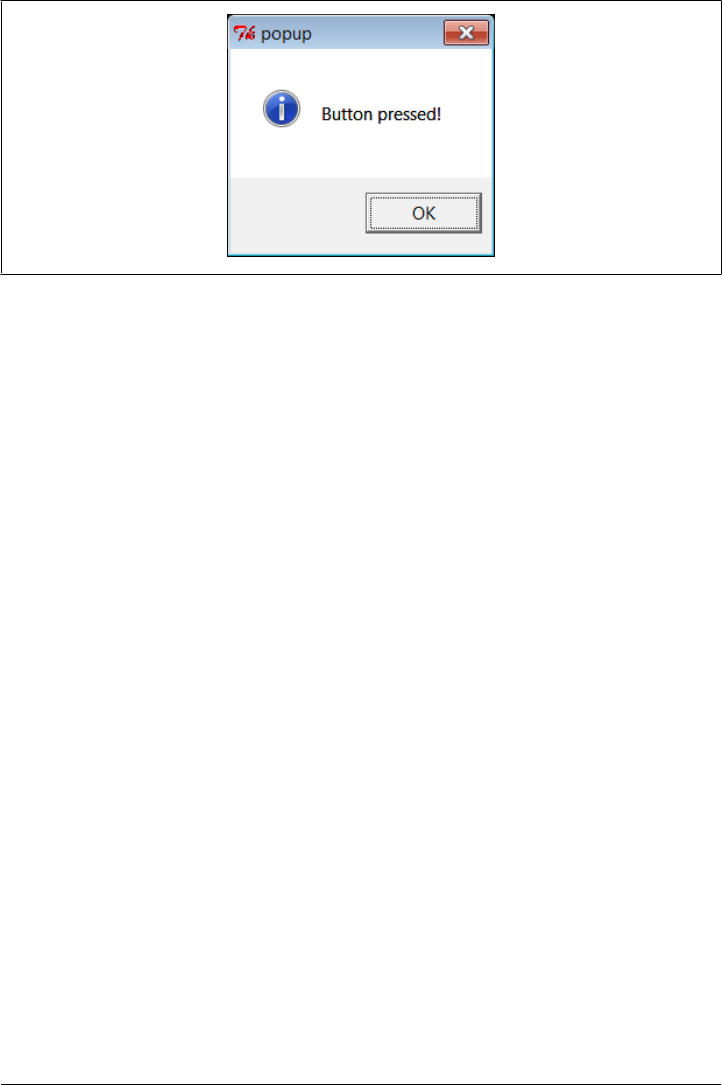
on buttons instead of text), but part of the power of tkinter is that we need to set only
the options we are interested in tailoring.
Using OOP for GUIs
All of our GUI examples so far have been top-level script code with a function for
handling events. In larger programs, it is often more useful to code a GUI as a subclass
of the tkinter Frame widget—a container for other widgets. Example 1-25 shows our
single-button GUI recoded in this way as a class.
Example 1-25. PP4E\Preview\tkinter102.py
from tkinter import *
from tkinter.messagebox import showinfo
class MyGui(Frame):
def __init__(self, parent=None):
Frame.__init__(self, parent)
button = Button(self, text='press', command=self.reply)
button.pack()
def reply(self):
showinfo(title='popup', message='Button pressed!')
if __name__ == '__main__':
window = MyGui()
window.pack()
window.mainloop()
The button’s event handler is a bound method—self.reply, an object that remembers
both self and reply when later called. This example generates the same window and
pop up as Example 1-24 (Figures 1-2 and 1-3); but because it is now a subclass of
Frame, it automatically becomes an attachable component—i.e., we can add all of the
widgets this class creates, as a package, to any other GUI, just by attaching this Frame
to the GUI. Example 1-26 shows how.
Figure 1-3. tkinter101.py common dialog pop up
42 | Chapter 1: A Sneak Preview
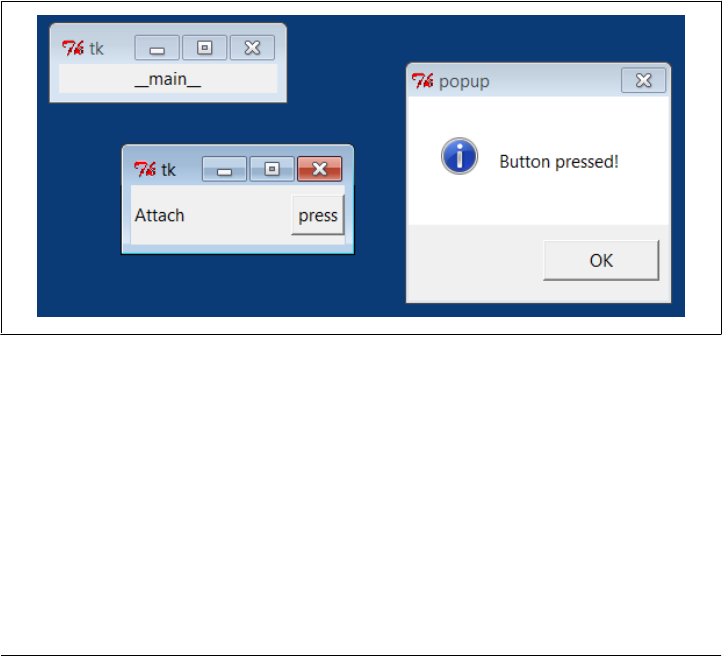
Example 1-26. PP4E\Preview\attachgui.py
from tkinter import *
from tkinter102 import MyGui
# main app window
mainwin = Tk()
Label(mainwin, text=__name__).pack()
# popup window
popup = Toplevel()
Label(popup, text='Attach').pack(side=LEFT)
MyGui(popup).pack(side=RIGHT) # attach my frame
mainwin.mainloop()
This example attaches our one-button GUI to a larger window, here a Toplevel pop-
up window created by the importing application and passed into the construction call
as the explicit parent (you will also get a Tk main window; as we’ll learn later, you always
do, whether it is made explicit in your code or not). Our one-button widget package is
attached to the right side of its container this time. If you run this live, you’ll get the
scene captured in Figure 1-4; the “press” button is our attached custom Frame.
Figure 1-4. Attaching GUIs
Moreover, because MyGui is coded as a class, the GUI can be customized by the usual
inheritance mechanism; simply define a subclass that replaces the parts that differ. The
reply method, for example, can be customized this way to do something unique, as
demonstrated in Example 1-27.
Example 1-27. PP4E\Preview\customizegui.py
from tkinter import mainloop
from tkinter.messagebox import showinfo
from tkinter102 import MyGui
Step 5: Adding a GUI | 43
class CustomGui(MyGui): # inherit init
def reply(self): # replace reply
showinfo(title='popup', message='Ouch!')
if __name__ == '__main__':
CustomGui().pack()
mainloop()
When run, this script creates the same main window and button as the original MyGui
class. But pressing its button generates a different reply, as shown in Figure 1-5, because
the custom version of the reply method runs.
Figure 1-5. Customizing GUIs
Although these are still small GUIs, they illustrate some fairly large ideas. As we’ll see
later in the book, using OOP like this for inheritance and attachment allows us to reuse
packages of widgets in other programs—calculators, text editors, and the like can be
customized and added as components to other GUIs easily if they are classes. As we’ll
also find, subclasses of widget class can provide a common appearance or standardized
behavior for all their instances—similar in spirit to what some observers might call GUI
styles or themes. It’s a normal byproduct of Python and OOP.
Getting Input from a User
As a final introductory script, Example 1-28 shows how to input data from the user in
an Entry widget and display it in a pop-up dialog. The lambda it uses defers the call to
the reply function so that inputs can be passed in—a common tkinter coding pattern;
without the lambda, reply would be called when the button is made, instead of when
it is later pressed (we could also use ent as a global variable within reply, but that makes
it less general). This example also demonstrates how to change the icon and title of a
top-level window; here, the window icon file is located in the same directory as the
script (if the icon call in this script fails on your platform, try commenting-out the call;
icons are notoriously platform specific).
44 | Chapter 1: A Sneak Preview
Example 1-28. PP4E\Preview\tkinter103.py
from tkinter import *
from tkinter.messagebox import showinfo
def reply(name):
showinfo(title='Reply', message='Hello %s!' % name)
top = Tk()
top.title('Echo')
top.iconbitmap('py-blue-trans-out.ico')
Label(top, text="Enter your name:").pack(side=TOP)
ent = Entry(top)
ent.pack(side=TOP)
btn = Button(top, text="Submit", command=(lambda: reply(ent.get())))
btn.pack(side=LEFT)
top.mainloop()
As is, this example is just three widgets attached to the Tk main top-level window; later
we’ll learn how to use nested Frame container widgets in a window like this to achieve
a variety of layouts for its three widgets. Figure 1-6 gives the resulting main and pop-
up windows after the Submit button is pressed. We’ll see something very similar later
in this chapter, but rendered in a web browser with HTML.
Figure 1-6. Fetching input from a user
The code we’ve seen so far demonstrates many of the core concepts in GUI program-
ming, but tkinter is much more powerful than these examples imply. There are more
than 20 widgets in tkinter and many more ways to input data from a user, including
multiple-line text, drawing canvases, pull-down menus, radio and check buttons, and
scroll bars, as well as other layout and event handling mechanisms. Beyond tkinter
itself, both open source extensions such as PMW, as well as the Tix and ttk toolkits
now part of Python’s standard library, can add additional widgets we can use in our
Step 5: Adding a GUI | 45
Python tkinter GUIs and provide an even more professional look and feel. To hint at
what is to come, let’s put tkinter to work on our database of people.
A GUI Shelve Interface
For our database application, the first thing we probably want is a GUI for viewing the
stored data—a form with field names and values—and a way to fetch records by key.
It would also be useful to be able to update a record with new field values given its key
and to add new records from scratch by filling out the form. To keep this simple, we’ll
use a single GUI for all of these tasks. Figure 1-7 shows the window we are going to
code as it looks in Windows 7; the record for the key sue has been fetched and displayed
(our shelve is as we last left it again). This record is really an instance of our class in our
shelve file, but the user doesn’t need to care.
Figure 1-7. peoplegui.py main display/input window
Coding the GUI
Also, to keep this simple, we’ll assume that all records in the database have the same
sets of fields. It would be a minor extension to generalize this for any set of fields (and
come up with a general form GUI constructor tool in the process), but we’ll defer such
evolutions to later in this book. Example 1-29 implements the GUI shown in Figure 1-7.
Example 1-29. PP4E\Preview\peoplegui.py
"""
Implement a GUI for viewing and updating class instances stored in a shelve;
the shelve lives on the machine this script runs on, as 1 or more local files;
"""
from tkinter import *
from tkinter.messagebox import showerror
import shelve
shelvename = 'class-shelve'
fieldnames = ('name', 'age', 'job', 'pay')
46 | Chapter 1: A Sneak Preview

def makeWidgets():
global entries
window = Tk()
window.title('People Shelve')
form = Frame(window)
form.pack()
entries = {}
for (ix, label) in enumerate(('key',) + fieldnames):
lab = Label(form, text=label)
ent = Entry(form)
lab.grid(row=ix, column=0)
ent.grid(row=ix, column=1)
entries[label] = ent
Button(window, text="Fetch", command=fetchRecord).pack(side=LEFT)
Button(window, text="Update", command=updateRecord).pack(side=LEFT)
Button(window, text="Quit", command=window.quit).pack(side=RIGHT)
return window
def fetchRecord():
key = entries['key'].get()
try:
record = db[key] # fetch by key, show in GUI
except:
showerror(title='Error', message='No such key!')
else:
for field in fieldnames:
entries[field].delete(0, END)
entries[field].insert(0, repr(getattr(record, field)))
def updateRecord():
key = entries['key'].get()
if key in db:
record = db[key] # update existing record
else:
from person import Person # make/store new one for key
record = Person(name='?', age='?') # eval: strings must be quoted
for field in fieldnames:
setattr(record, field, eval(entries[field].get()))
db[key] = record
db = shelve.open(shelvename)
window = makeWidgets()
window.mainloop()
db.close() # back here after quit or window close
This script uses the widget grid method to arrange labels and entries, instead of pack;
as we’ll see later, gridding arranges by rows and columns, and so it is a natural for forms
that horizontally align labels with entries well. We’ll also see later that forms can usually
be laid out just as nicely using pack with nested row frames and fixed-width labels.
Although the GUI doesn’t handle window resizes well yet (that requires configuration
options we’ll explore later), adding this makes the grid and pack alternatives roughly
the same in code size.
Step 5: Adding a GUI | 47
Notice how the end of this script opens the shelve as a global variable and starts the
GUI; the shelve remains open for the lifespan of the GUI (mainloop returns only after
the main window is closed). As we’ll see in the next section, this state retention is very
different from the web model, where each interaction is normally a standalone program.
Also notice that the use of global variables makes this code simple but unusable outside
the context of our database; more on this later.
Using the GUI
The GUI we’re building is fairly basic, but it provides a view on the shelve file and
allows us to browse and update the file without typing any code. To fetch a record from
the shelve and display it on the GUI, type its key into the GUI’s “key” field and click
Fetch. To change a record, type into its input fields after fetching it and click Update;
the values in the GUI will be written to the record in the database. And to add a new
record, fill out all of the GUI’s fields with new values and click Update—the new record
will be added to the shelve file using the key and field inputs you provide.
In other words, the GUI’s fields are used for both display and input. Figure 1-8 shows
the scene after adding a new record (via Update), and Figure 1-9 shows an error dialog
pop up issued when users try to fetch a key that isn’t present in the shelve.
Figure 1-8. peoplegui.py after adding a new persistent object
Figure 1-9. peoplegui.py common error dialog pop up
48 | Chapter 1: A Sneak Preview

Notice how we’re using repr again to display field values fetched from the shelve and
eval to convert field values to Python objects before they are stored in the shelve. As
mentioned previously, this is potentially dangerous if someone sneaks some malicious
code into our shelve, but we’ll finesse such concerns for now.
Keep in mind, though, that this scheme means that strings must be quoted in input
fields other than the key—they are assumed to be Python code. In fact, you could type
an arbitrary Python expression in an input field to specify a value for an update. Typing
"Tom"*3 in the name field, for instance, would set the name to TomTomTom after an update
(for better or worse!); fetch to see the result.
Even though we now have a GUI for browsing and changing records, we can still check
our work by interactively opening and inspecting the shelve file or by running scripts
such as the dump utility in Example 1-19. Remember, despite the fact that we’re now
viewing records in a GUI’s windows, the database is a Python shelve file containing
native Python class instance objects, so any Python code can access it. Here is the dump
script at work after adding and changing a few persistent objects in the GUI:
...\PP4E\Preview> python dump_db_classes.py
sue =>
Sue Jones 50000.0
bill =>
bill 9999
nobody =>
John Doh None
tomtom =>
Tom Tom 40000
tom =>
Tom Doe 90000
bob =>
Bob Smith 30000
peg =>
1 4
Smith
Doe
Future directions
Although this GUI does the job, there is plenty of room for improvement:
• As coded, this GUI is a simple set of functions that share the global list of input
fields (entries) and a global shelve (db). We might instead pass db in to
makeWidgets, and pass along both these two objects as function arguments to the
callback handlers using the lambda trick of the prior section. Though not crucial in
a script this small, as a rule of thumb, making your external dependencies explicit
like this makes your code both easier to understand and reusable in other contexts.
• We could also structure this GUI as a class to support attachment and customiza-
tion (globals would become instance attributes), though it’s unlikely that we’ll need
to reuse such a specific GUI.
Step 5: Adding a GUI | 49

• More usefully, we could pass in the fieldnames tuple as an input parameter to the
functions here to allow them to be used for other record types in the future. Code
at the bottom of the file would similarly become a function with a passed-in shelve
filename, and we would also need to pass in a new record construction call to the
update function because Person could not be hardcoded. Such generalization is
beyond the scope of this preview, but it makes for a nice exercise if you are so
inclined. Later, I’ll also point you to a suggested reading example in the book
examples package, PyForm, which takes a different approach to generalized form
construction.
• To make this GUI more user friendly, it might also be nice to add an index window
that displays all the keys in the database in order to make browsing easier. Some
sort of verification before updates might be useful as well, and Delete and Clear
buttons would be simple to code. Furthermore, assuming that inputs are Python
code may be more bother than it is worth; a simpler input scheme might be easier
and safer. (I won’t officially say these are suggested exercises too, but it sounds like
they could be.)
• We could also support window resizing (as we’ll learn, widgets can grow and shrink
with the window) and provide an interface for calling methods available on stored
instances’ classes too (as is, the pay field can be updated, but there is no way to
invoke the giveRaise method).
• If we plan to distribute this GUI widely, we might package it up as a standalone
executable program—a frozen binary in Python terminology—using third-party
tools such as Py2Exe, PyInstaller, and others (search the Web for pointers). Such
a program can be run directly without installing Python on the receiving end, be-
cause the Python bytecode interpreter is included in the executable itself.
I’ll leave all such extensions as points to ponder, and revisit some of them later in this
book.
Before we move on, two notes. First, I should mention that even more graphical pack-
ages are available to Python programmers. For instance, if you need to do graphics
beyond basic windows, the tkinter Canvas widget supports freeform graphics. Third-
party extensions such as Blender, OpenGL, VPython, PIL, VTK, Maya, and PyGame
provide even more advanced graphics, visualization, and animation tools for use with
Python scripts. Moreover, the PMW, Tix, and ttk widget kits mentioned earlier extend
tkinter itself. See Python’s library manual for Tix and ttk, and try the PyPI site or a web
search for third-party graphics extensions.
And in deference to fans of other GUI toolkits such as wxPython and PyQt, I should
also note that there are other GUI options to choose from and that choice is sometimes
very subjective. tkinter is shown here because it is mature, robust, fully open source,
well documented, well supported, lightweight, and a standard part of Python. By most
accounts, it remains the standard for building portable GUIs in Python.
50 | Chapter 1: A Sneak Preview

Other GUI toolkits for Python have pros and cons of their own, discussed later in this
book. For example, some exchange code simplicity for richer widget sets. wxPython,
for example, is much more feature-rich, but it’s also much more complicated to use.
By and large, though, other toolkits are variations on a theme—once you’ve learned
one GUI toolkit, others are easy to pick up. Because of that, we’ll focus on learning one
toolkit in its entirety in this book instead of sampling many partially.
Although they are free to employ network access at will, programs written with tradi-
tional GUIs like tkinter generally run on a single, self-contained machine. Some con-
sider web pages to be a kind of GUI as well, but you’ll have to read the next and final
section of this chapter to judge that for yourself.
For a Good Time…
There’s much more to the tkinter toolkit than we’ve touched on in this preview, of
course, and we’ll study it in depth in this book. As another quick example to hint at
what’s possible, though, the following script, fungui.py, uses the Python random module
to pick from a list, makes new independent windows with Toplevel, and uses the tkinter
after callback to loop by scheduling methods to run again after a number of
milliseconds:
from tkinter import *
import random
fontsize = 30
colors = ['red', 'green', 'blue', 'yellow', 'orange', 'cyan', 'purple']
def onSpam():
popup = Toplevel()
color = random.choice(colors)
Label(popup, text='Popup', bg='black', fg=color).pack(fill=BOTH)
mainLabel.config(fg=color)
def onFlip():
mainLabel.config(fg=random.choice(colors))
main.after(250, onFlip)
def onGrow():
global fontsize
fontsize += 5
mainLabel.config(font=('arial', fontsize, 'italic'))
main.after(100, onGrow)
main = Tk()
mainLabel = Label(main, text='Fun Gui!', relief=RAISED)
mainLabel.config(font=('arial', fontsize, 'italic'), fg='cyan',bg='navy')
mainLabel.pack(side=TOP, expand=YES, fill=BOTH)
Button(main, text='spam', command=onSpam).pack(fill=X)
Button(main, text='flip', command=onFlip).pack(fill=X)
Button(main, text='grow', command=onGrow).pack(fill=X)
main.mainloop()
Run this on your own to see how it works. It creates a main window with a custom
label and three buttons—one button pops up a new window with a randomly colored
label, and the other two kick off potentially independent timer loops, one of which
Step 5: Adding a GUI | 51

keeps changing the color used in the main window, and another that keeps expanding
the main window label’s font. Be careful if you do run this, though; the colors flash,
and the label font gets bigger 10 times per second, so be sure you are able to kill the
main window before it gets away from you. Hey—I warned you!
Step 6: Adding a Web Interface
GUI interfaces are easier to use than command lines and are often all we need to simplify
access to data. By making our database available on the Web, though, we can open it
up to even wider use. Anyone with Internet access and a web browser can access the
data, regardless of where they are located and which machine they are using. Anything
from workstations to cell phones will suffice. Moreover, web-based interfaces require
only a web browser; there is no need to install Python to access the data except on the
single-server machine. Although traditional web-based approaches may sacrifice some
of the utility and speed of in-process GUI toolkits, their portability gain can be
compelling.
As we’ll also see later in this book, there are a variety of ways to go about scripting
interactive web pages of the sort we’ll need in order to access our data. Basic server-
side CGI scripting is more than adequate for simple tasks like ours. Because it’s perhaps
the simplest approach, and embodies the foundations of more advanced techniques,
CGI scripting is also well-suited to getting started on the Web.
For more advanced applications, a wealth of toolkits and frameworks for Python—
including Django, TurboGears, Google’s App Engine, pylons, web2py, Zope, Plone,
Twisted, CherryPy, Webware, mod_python, PSP, and Quixote—can simplify common
tasks and provide tools that we might otherwise need to code from scratch in the CGI
world. Though they pose a new set of tradeoffs, emerging technologies such as Flex,
Silverlight, and pyjamas (an AJAX-based port of the Google Web Toolkit to Python,
and Python-to-JavaScript compiler) offer additional paths to achieving interactive or
dynamic user-interfaces in web pages on clients, and open the door to using Python in
Rich Internet Applications (RIAs).
I’ll say more about these tools later. For now, let’s keep things simple and code a CGI
script.
CGI Basics
CGI scripting in Python is easy as long as you already have a handle on things like
HTML forms, URLs, and the client/server model of the Web (all topics we’ll address
in detail later in this book). Whether you’re aware of all the underlying details or not,
the basic interaction model is probably familiar.
In a nutshell, a user visits a website and receives a form, coded in HTML, to be filled
out in his or her browser. After submitting the form, a script, identified within either
52 | Chapter 1: A Sneak Preview
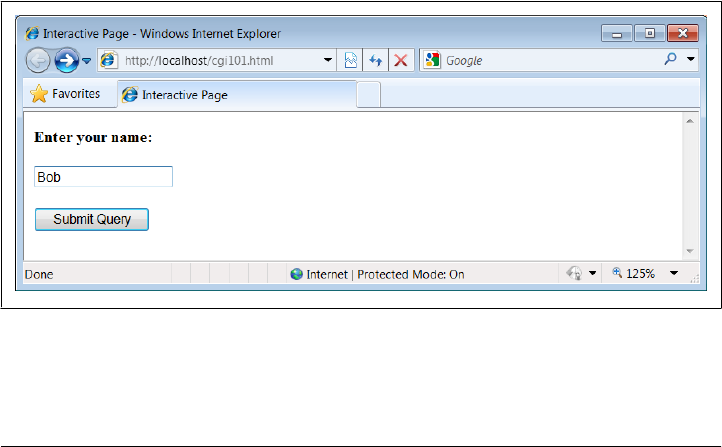
the form or the address used to contact the server, is run on the server and produces
another HTML page as a reply. Along the way, data typically passes through three
programs: from the client browser, to the web server, to the CGI script, and back again
to the browser. This is a natural model for the database access interaction we’re after—
users can submit a database key to the server and receive the corresponding record as
a reply page.
We’ll go into CGI basics in depth later in this book, but as a first example, let’s start
out with a simple interactive example that requests and then echoes back a user’s name
in a web browser. The first page in this interaction is just an input form produced by
the HTML file shown in Example 1-30. This HTML file is stored on the web server
machine, and it is transferred to the web browser running on the client machine upon
request.
Example 1-30. PP4E\Preview\cgi101.html
<html>
<title>Interactive Page</title>
<body>
<form method=POST action="cgi-bin/cgi101.py">
<P><B>Enter your name:</B>
<P><input type=text name=user>
<P><input type=submit>
</form>
</body></html>
Notice how this HTML form names the script that will process its input on the server
in its action attribute. This page is requested by submitting its URL (web address).
When received by the web browser on the client, the input form that this code produces
is shown in Figure 1-10 (in Internet Explorer here).
Figure 1-10. cgi101.html input form page
When this input form is submitted, a web server intercepts the request (more on the
web server in a moment) and runs the Python CGI script in Example 1-31. Like the
Step 6: Adding a Web Interface | 53
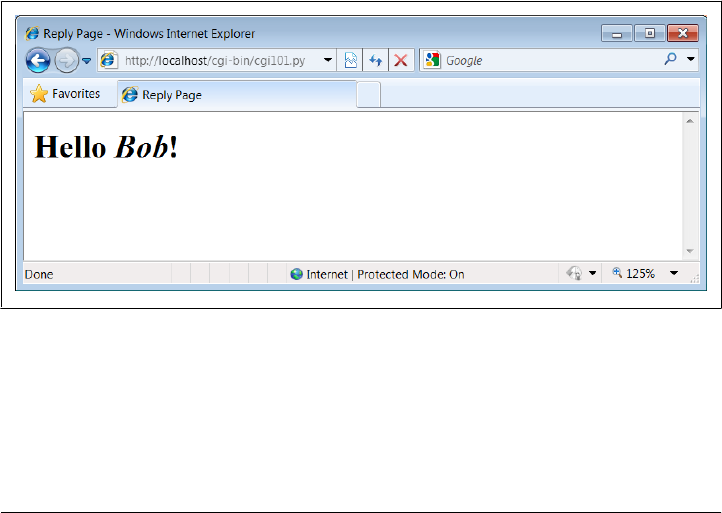
HTML file, this Python script resides on the same machine as the web server; it’s run
on the server machine to handle the inputs and generate a reply to the browser on the
client. It uses the cgi module to parse the form’s input and insert it into the HTML
reply stream, properly escaped. The cgi module gives us a dictionary-like interface to
form inputs sent by the browser, and the HTML code that this script prints winds up
rendering the next page on the client’s browser. In the CGI world, the standard output
stream is connected to the client through a socket.
Example 1-31. PP4E\Preview\cgi-bin\cgi101.py
#!/usr/bin/python
import cgi
form = cgi.FieldStorage() # parse form data
print('Content-type: text/html\n') # hdr plus blank line
print('<title>Reply Page</title>') # html reply page
if not 'user' in form:
print('<h1>Who are you?</h1>')
else:
print('<h1>Hello <i>%s</i>!</h1>' % cgi.escape(form['user'].value))
And if all goes well, we receive the reply page shown in Figure 1-11—essentially, just
an echo of the data we entered in the input page. The page in this figure is produced
by the HTML printed by the Python CGI script running on the server. Along the way,
the user’s name was transferred from a client to a server and back again—potentially
across networks and miles. This isn’t much of a website, of course, but the basic prin-
ciples here apply, whether you’re just echoing inputs or doing full-blown e-whatever.
Figure 1-11. cgi101.py script reply page for input form
If you have trouble getting this interaction to run on Unix-like systems, you may need
to modify the path to your Python in the #! line at the top of the script file and make
it executable with a chmod command, but this is dependent on your web server (again,
more on the missing server piece in a moment).
54 | Chapter 1: A Sneak Preview

Also note that the CGI script in Example 1-31 isn’t printing complete HTML: the
<html> and <body> tags of the static HTML file in Example 1-30 are missing. Strictly
speaking, such tags should be printed, but web browsers don’t mind the omissions,
and this book’s goal is not to teach legalistic HTML; see other resources for more on
HTML.
GUIs versus the Web
Before moving on, it’s worth taking a moment to compare this basic CGI example with
the simple GUI of Example 1-28 and Figure 1-6. Here, we’re running scripts on a server
to generate HTML that is rendered in a web browser. In the GUI, we make calls to
build the display and respond to events within a single process and on a single machine.
The GUI runs multiple layers of software, but not multiple programs. By contrast, the
CGI approach is much more distributed—the server, the browser, and possibly the
CGI script itself run as separate programs that usually communicate over a network.
Because of such differences, the standalone GUI model may be simpler and more direct:
there is no intermediate server, replies do not require invoking a new program, no
HTML needs to be generated, and the full power of a GUI toolkit is at our disposal.
On the other hand, a web-based interface can be viewed in any browser on any com-
puter and only requires Python on the server machine.
And just to muddle the waters further, a GUI can also employ Python’s standard library
networking tools to fetch and display data from a remote server (that’s how web
browsers do their work internally), and some newer frameworks such as Flex, Silver-
light, and pyjamas provide toolkits that support more full-featured user interfaces
within web pages on the client (the RIAs I mentioned earlier), albeit at some added cost
in code complexity and software stack depth. We’ll revisit the trade-offs of the GUI
and CGI schemes later in this book, because it’s a major design choice today. First, let’s
preview a handful of pragmatic issues related to CGI work before we apply it to our
people database.
Running a Web Server
Of course, to run CGI scripts at all, we need a web server that will serve up our HTML
and launch our Python scripts on request. The server is a required mediator between
the browser and the CGI script. If you don’t have an account on a machine that has
such a server available, you’ll want to run one of your own. We could configure and
run a full production-level web server such as the open source Apache system (which,
by the way, can be tailored with Python-specific support by the mod_python extension).
For this chapter, however, I instead wrote a simple web server in Python using the code
in Example 1-32.
We’ll revisit the tools used in this example later in this book. In short, because Python
provides precoded support for various types of network servers, we can build a
Step 6: Adding a Web Interface | 55

CGI-capable and portable HTTP web server in just 8 lines of code (and a whopping 16
if we include comments and blank lines).
As we’ll see later in this book, it’s also easy to build proprietary network servers with
low-level socket calls in Python, but the standard library provides canned implemen-
tations for many common server types, web based or otherwise. The socketserver
module, for instance, supports threaded and forking versions of TCP and UDP servers.
Third-party systems such as Twisted provide even more implementations. For serving
up web content, the standard library modules used in Example 1-32 provide what
we need.
Example 1-32. PP4E\Preview\webserver.py
"""
Implement an HTTP web server in Python that knows how to run server-side
CGI scripts coded in Python; serves files and scripts from current working
dir; Python scripts must be stored in webdir\cgi-bin or webdir\htbin;
"""
import os, sys
from http.server import HTTPServer, CGIHTTPRequestHandler
webdir = '.' # where your html files and cgi-bin script directory live
port = 80 # default http://localhost/, else use http://localhost:xxxx/
os.chdir(webdir) # run in HTML root dir
srvraddr = ("", port) # my hostname, portnumber
srvrobj = HTTPServer(srvraddr, CGIHTTPRequestHandler)
srvrobj.serve_forever() # run as perpetual daemon
The classes this script uses assume that the HTML files to be served up reside in the
current working directory and that the CGI scripts to be run live in a cgi-bin or htbin
subdirectory there. We’re using a cgi-bin subdirectory for scripts, as suggested by the
filename of Example 1-31. Some web servers look at filename extensions to detect CGI
scripts; our script uses this subdirectory-based scheme instead.
To launch the server, simply run this script (in a console window, by an icon click, or
otherwise); it runs perpetually, waiting for requests to be submitted from browsers and
other clients. The server listens for requests on the machine on which it runs and on
the standard HTTP port number 80. To use this script to serve up other websites, either
launch it from the directory that contains your HTML files and a cgi-bin subdirectory
that contains your CGI scripts, or change its webdir variable to reflect the site’s root
directory (it will automatically change to that directory and serve files located there).
But where in cyberspace do you actually run the server script? If you look closely
enough, you’ll notice that the server name in the addresses of the prior section’s ex-
amples (near the top right of the browser after the http://) is always localhost. To keep
this simple, I am running the web server on the same machine as the web browser;
that’s what the server name “localhost” (and the equivalent IP address “127.0.0.1”)
means. That is, the client and server machines are the same: the client (web browser)
56 | Chapter 1: A Sneak Preview

and server (web server) are just different processes running at the same time on the
same computer.
Though not meant for enterprise-level work, this turns out to be a great way to test
CGI scripts—you can develop them on the same machine without having to transfer
code back to a remote server machine after each change. Simply run this script from
the directory that contains both your HTML files and a cgi-bin subdirectory for scripts
and then use http://localhost/… in your browser to access your HTML and script files.
Here is the trace output the web server script produces in a Windows console window
that is running on the same machine as the web browser and launched from the direc-
tory where the HTML files reside:
...\PP4E\Preview> python webserver.py
mark-VAIO - - [28/Jan/2010 18:34:01] "GET /cgi101.html HTTP/1.1" 200 -
mark-VAIO - - [28/Jan/2010 18:34:12] "POST /cgi-bin/cgi101.py HTTP/1.1" 200 -
mark-VAIO - - [28/Jan/2010 18:34:12] command: C:\Python31\python.exe -u C:\Users
\mark\Stuff\Books\4E\PP4E\dev\Examples\PP4E\Preview\cgi-bin\cgi101.py ""
mark-VAIO - - [28/Jan/2010 18:34:13] CGI script exited OK
mark-VAIO - - [28/Jan/2010 18:35:25] "GET /cgi-bin/cgi101.py?user=Sue+Smith HTTP
/1.1" 200 -
mark-VAIO - - [28/Jan/2010 18:35:25] command: C:\Python31\python.exe -u C:\Users
\mark\Stuff\Books\4E\PP4E\dev\Examples\PP4E\Preview\cgi-bin\cgi101.py
mark-VAIO - - [28/Jan/2010 18:35:26] CGI script exited OK
One pragmatic note here: you may need administrator privileges in order to run a server
on the script’s default port 80 on some platforms: either find out how to run this way
or try running on a different port. To run this server on a different port, change the port
number in the script and name it explicitly in the URL (e.g., http://localhost:8888/).
We’ll learn more about this convention later in this book.
And to run this server on a remote computer, upload the HTML files and CGI scripts
subdirectory to the remote computer, launch the server script on that machine, and
replace “localhost” in the URLs with the domain name or IP address of your server
machine (e.g., http://www.myserver.com/). When running the server remotely, all the
interaction will be as shown here, but inputs and replies will be automatically shipped
across network connections, not routed between programs running on the same
computer.
To delve further into the server classes our web server script employs, see their imple-
mentation in Python’s standard library (C:\Python31\Lib for Python 3.1); one of the
major advantages of open source system like Python is that we can always look under
the hood this way. In Chapter 15, we’ll expand Example 1-32 to allow the directory
name and port numbers to be passed in on the command line.
Using Query Strings and urllib
In the basic CGI example shown earlier, we ran the Python script by filling out and
submitting a form that contained the name of the script. Really, server-side CGI scripts
can be invoked in a variety of ways—either by submitting an input form as shown so
Step 6: Adding a Web Interface | 57
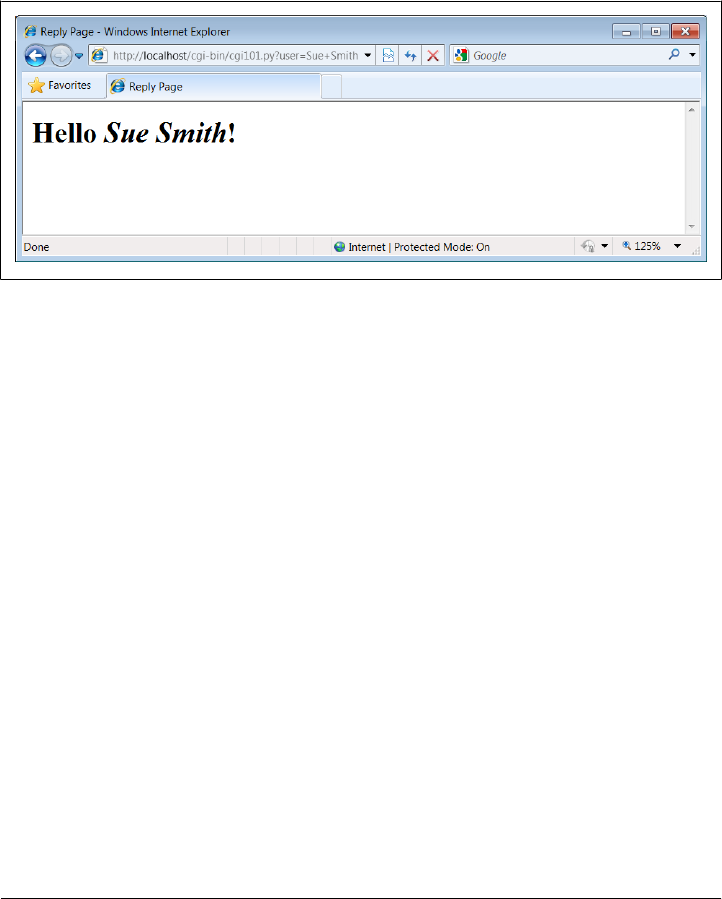
far or by sending the server an explicit URL (Internet address) string that contains inputs
at the end. Such an explicit URL can be sent to a server either inside or outside of a
browser; in a sense, it bypasses the traditional input form page.
For instance, Figure 1-12 shows the reply generated by the server after typing a URL of
the following form in the address field at the top of the web browser (+ means a space
here):
http://localhost/cgi-bin/cgi101.py?user=Sue+Smith
Figure 1-12. cgi101.py reply to GET-style query parameters
The inputs here, known as query parameters, show up at the end of the URL after
the ?; they are not entered into a form’s input fields. Adding inputs to URLs is some-
times called a GET request. Our original input form uses the POST method, which
instead ships inputs in a separate step. Luckily, Python CGI scripts don’t have to dis-
tinguish between the two; the cgi module’s input parser handles any data submission
method differences for us.
It’s even possible, and often useful, to submit URLs with inputs appended as query
parameters completely outside any web browser. The Python urllib m o d u l e p a c k a g e ,
for instance, allows us to read the reply generated by a server for any valid URL. In
effect, it allows us to visit a web page or invoke a CGI script from within another script;
your Python code, instead of a browser, acts as the web client. Here is this module in
action, run from the interactive command line:
>>> from urllib.request import urlopen
>>> conn = urlopen('http://localhost/cgi-bin/cgi101.py?user=Sue+Smith')
>>> reply = conn.read()
>>> reply
b'<title>Reply Page</title>\n<h1>Hello <i>Sue Smith</i>!</h1>\n'
>>> urlopen('http://localhost/cgi-bin/cgi101.py').read()
b'<title>Reply Page</title>\n<h1>Who are you?</h1>\n'
>>> urlopen('http://localhost/cgi-bin/cgi101.py?user=Bob').read()
b'<title>Reply Page</title>\n<h1>Hello <i>Bob</i>!</h1>\n'
58 | Chapter 1: A Sneak Preview
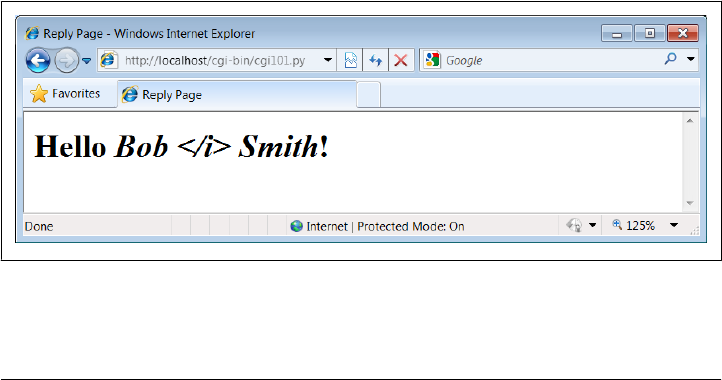
The urllib module package gives us a file-like interface to the server’s reply for a URL.
Notice that the output we read from the server is raw HTML code (normally rendered
by a browser). We can process this text with any of Python’s text-processing tools,
including:
• String methods to search and split
• The re regular expression pattern-matching module
• Full-blown HTML and XML parsing support in the standard library, including
html.parser, as well as SAX-, DOM-, and ElementTree–style XML parsing tools.
When combined with such tools, the urllib package is a natural for a variety of
techniques—ad-hoc interactive testing of websites, custom client-side GUIs, “screen
scraping” of web page content, and automated regression testing systems for remote
server-side CGI scripts.
Formatting Reply Text
One last fine point: because CGI scripts use text to communicate with clients, they
need to format their replies according to a set of rules. For instance, notice how Ex-
ample 1-31 adds a blank line between the reply’s header and its HTML by printing an
explicit newline (\n) in addition to the one print adds automatically; this is a required
separator.
Also note how the text inserted into the HTML reply is run through the cgi.escape
(a.k.a. html.escape in Python 3.2; see the note under “Python HTML and URL Escape
Tools” on page 1203) call, just in case the input includes a character that is special in
HTML. For example, Figure 1-13 shows the reply we receive for form input Bob </i>
Smith—the </i> in the middle becomes </i> in the reply, and so doesn’t interfere
with real HTML code (use your browser’s view source option to see this for yourself);
if not escaped, the rest of the name would not be italicized.
Figure 1-13. Escaping HTML characters
Step 6: Adding a Web Interface | 59
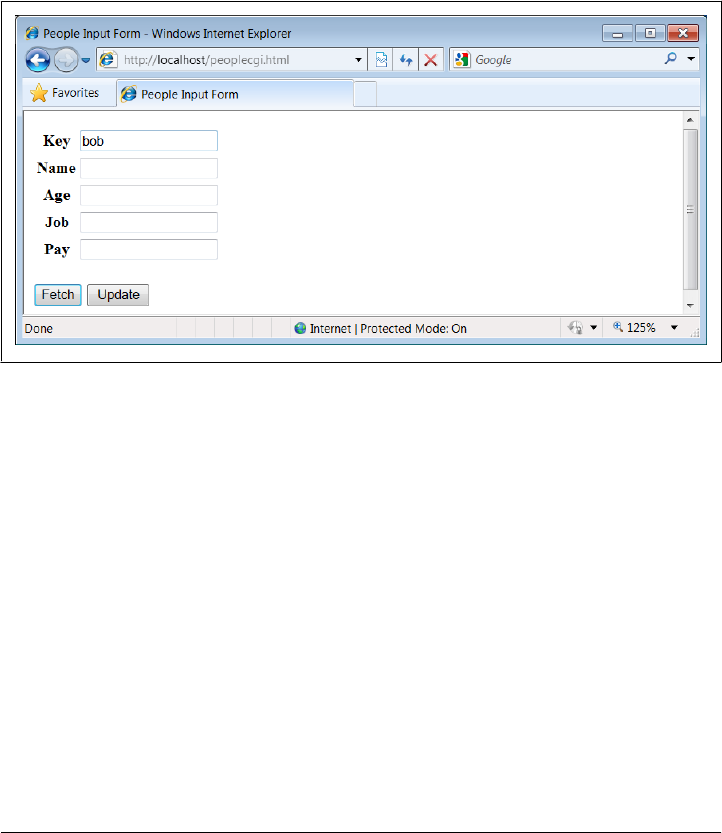
Escaping text like this isn’t always required, but it is a good rule of thumb when its
content isn’t known; scripts that generate HTML have to respect its rules. As we’ll see
later in this book, a related call, urllib.parse.quote, applies URL escaping rules to text.
As we’ll also see, larger frameworks often handle text formatting tasks for us.
A Web-Based Shelve Interface
Now, to use the CGI techniques of the prior sections for our database application, we
basically just need a bigger input and reply form. Figure 1-14 shows the form we’ll
implement for accessing our database in a web browser.
Figure 1-14. peoplecgi.html input page
Coding the website
To implement the interaction, we’ll code an initial HTML input form, as well as a
Python CGI script for displaying fetch results and processing update requests. Exam-
ple 1-33 shows the input form’s HTML code that builds the page in Figure 1-14.
Example 1-33. PP4E\Preview\peoplecgi.html
<html>
<title>People Input Form</title>
<body>
<form method=POST action="cgi-bin/peoplecgi.py">
<table>
<tr><th>Key <td><input type=text name=key>
<tr><th>Name<td><input type=text name=name>
<tr><th>Age <td><input type=text name=age>
<tr><th>Job <td><input type=text name=job>
<tr><th>Pay <td><input type=text name=pay>
</table>
60 | Chapter 1: A Sneak Preview

<p>
<input type=submit value="Fetch", name=action>
<input type=submit value="Update", name=action>
</form>
</body></html>
To handle form (and other) requests, Example 1-34 implements a Python CGI script
that fetches and updates our shelve’s records. It echoes back a page similar to that
produced by Example 1-33, but with the form fields filled in from the attributes of
actual class objects in the shelve database.
As in the GUI, the same web page is used for both displaying results and inputting
updates. Unlike the GUI, this script is run anew for each step of user interaction, and
it reopens the database each time (the reply page’s action field provides a link back to
the script for the next request). The basic CGI model provides no automatic memory
from page to page, so we have to start from scratch each time.
Example 1-34. PP4E\Preview\cgi-bin\peoplecgi.py
"""
Implement a web-based interface for viewing and updating class instances
stored in a shelve; the shelve lives on server (same machine if localhost)
"""
import cgi, shelve, sys, os # cgi.test() dumps inputs
shelvename = 'class-shelve' # shelve files are in cwd
fieldnames = ('name', 'age', 'job', 'pay')
form = cgi.FieldStorage() # parse form data
print('Content-type: text/html') # hdr, blank line is in replyhtml
sys.path.insert(0, os.getcwd()) # so this and pickler find person
# main html template
replyhtml = """
<html>
<title>People Input Form</title>
<body>
<form method=POST action="peoplecgi.py">
<table>
<tr><th>key<td><input type=text name=key value="%(key)s">
$ROWS$
</table>
<p>
<input type=submit value="Fetch", name=action>
<input type=submit value="Update", name=action>
</form>
</body></html>
"""
# insert html for data rows at $ROWS$
rowhtml = '<tr><th>%s<td><input type=text name=%s value="%%(%s)s">\n'
rowshtml = ''
for fieldname in fieldnames:
rowshtml += (rowhtml % ((fieldname,) * 3))
Step 6: Adding a Web Interface | 61

replyhtml = replyhtml.replace('$ROWS$', rowshtml)
def htmlize(adict):
new = adict.copy()
for field in fieldnames: # values may have &, >, etc.
value = new[field] # display as code: quoted
new[field] = cgi.escape(repr(value)) # html-escape special chars
return new
def fetchRecord(db, form):
try:
key = form['key'].value
record = db[key]
fields = record.__dict__ # use attribute dict
fields['key'] = key # to fill reply string
except:
fields = dict.fromkeys(fieldnames, '?')
fields['key'] = 'Missing or invalid key!'
return fields
def updateRecord(db, form):
if not 'key' in form:
fields = dict.fromkeys(fieldnames, '?')
fields['key'] = 'Missing key input!'
else:
key = form['key'].value
if key in db:
record = db[key] # update existing record
else:
from person import Person # make/store new one for key
record = Person(name='?', age='?') # eval: strings must be quoted
for field in fieldnames:
setattr(record, field, eval(form[field].value))
db[key] = record
fields = record.__dict__
fields['key'] = key
return fields
db = shelve.open(shelvename)
action = form['action'].value if 'action' in form else None
if action == 'Fetch':
fields = fetchRecord(db, form)
elif action == 'Update':
fields = updateRecord(db, form)
else:
fields = dict.fromkeys(fieldnames, '?') # bad submit button value
fields['key'] = 'Missing or invalid action!'
db.close()
print(replyhtml % htmlize(fields)) # fill reply from dict
This is a fairly large script, because it has to handle user inputs, interface with the
database, and generate HTML for the reply page. Its behavior is fairly straightforward,
though, and similar to the GUI of the prior section.
62 | Chapter 1: A Sneak Preview

Directories, string formatting, and security
A few fine points before we move on. First of all, make sure the web server script we
wrote earlier in Example 1-32 is running before you proceed; it’s going to catch our
requests and route them to our script.
Also notice how this script adds the current working directory (os.getcwd) to the
sys.path module search path when it first starts. Barring a PYTHONPATH change, this is
required to allow both the pickler and this script itself to import the person module one
level up from the script. Because of the new way the web server runs CGI scripts in
Python 3, the current working directory isn’t added to sys.path, even though the
shelve’s files are located there correctly when opened. Such details can vary per server.
The only other feat of semi-magic the CGI script relies on is using a record’s attribute
dictionary (__dict__) as the source of values when applying HTML escapes to field
values and string formatting to the HTML reply template string in the last line of the
script. Recall that a %(key)code replacement target fetches a value by key from a
dictionary:
>>> D = {'say': 5, 'get': 'shrubbery'}
>>> D['say']
5
>>> S = '%(say)s => %(get)s' % D
>>> S
'5 => shrubbery'
By using an object’s attribute dictionary, we can refer to attributes by name in the format
string. In fact, part of the reply template is generated by code. If its structure is con-
fusing, simply insert statements to print replyhtml and to call sys.exit, and run from
a simple command line. This is how the table’s HTML in the middle of the reply is
generated (slightly formatted here for readability):
<table>
<tr><th>key<td><input type=text name=key value="%(key)s">
<tr><th>name<td><input type=text name=name value="%(name)s">
<tr><th>age<td><input type=text name=age value="%(age)s">
<tr><th>job<td><input type=text name=job value="%(job)s">
<tr><th>pay<td><input type=text name=pay value="%(pay)s">
</table>
This text is then filled in with key values from the record’s attribute dictionary by string
formatting at the end of the script. This is done after running the dictionary through a
utility to convert its values to code text with repr and escape that text per HTML
conventions with cgi.escape (again, the last step isn’t always required, but it’s generally
a good practice).
These HTML reply lines could have been hardcoded in the script, but generating them
from a tuple of field names is a more general approach—we can add new fields in the
future without having to update the HTML template each time. Python’s string pro-
cessing tools make this a snap.
Step 6: Adding a Web Interface | 63

In the interest of fairness, I should point out that Python’s newer str.format method
could achieve much the same effect as the traditional % format expression used by this
script, and it provides specific syntax for referencing object attributes which to some
might seem more explicit than using __dict__ keys:
>>> D = {'say': 5, 'get': 'shrubbery'}
>>> '%(say)s => %(get)s' % D # expression: key reference
'5 => shrubbery'
>>> '{say} => {get}'.format(**D) # method: key reference
'5 => shrubbery'
>>> from person import Person
>>> bob = Person('Bob', 35)
>>> '%(name)s, %(age)s' % bob.__dict__ # expression: __dict__ keys
'Bob, 35'
>>> '{0.name} => {0.age}'.format(bob) # method: attribute syntax
'Bob => 35'
Because we need to escape attribute values first, though, the format method call’s at-
tribute syntax can’t be used directly this way; the choice is really between both tech-
nique’s key reference syntax above. (At this writing, it’s not clear which formatting
technique may come to dominate, so we take liberties with using either in this book;
if one replaces the other altogether someday, you’ll want to go with the winner.)
In the interest of security, I also need to remind you one last time that the eval call used
in this script to convert inputs to Python objects is powerful, but not secure—it happily
runs any Python code, which can perform any system modifications that the script’s
process has permission to make. If you care, you’ll need to trust the input source, run
in a restricted environment, or use more focused input converters like int and float.
This is generally a larger concern in the Web world, where request strings might arrive
from arbitrary sources. Since we’re all friends here, though, we’ll ignore the threat.
Using the website
Despite the extra complexities of servers, directories, and strings, using the web inter-
face is as simple as using the GUI, and it has the added advantage of running on any
machine with a browser and Web connection. To fetch a record, fill in the Key field
and click Fetch; the script populates the page with field data grabbed from the corre-
sponding class instance in the shelve, as illustrated in Figure 1-15 for key bob.
Figure 1-15 shows what happens when the key comes from the posted form. As usual,
you can also invoke the CGI script by instead passing inputs on a query string at the
end of the URL; Figure 1-16 shows the reply we get when accessing a URL of the
following form:
http://localhost/cgi-bin/peoplecgi.py?action=Fetch&key=sue
64 | Chapter 1: A Sneak Preview
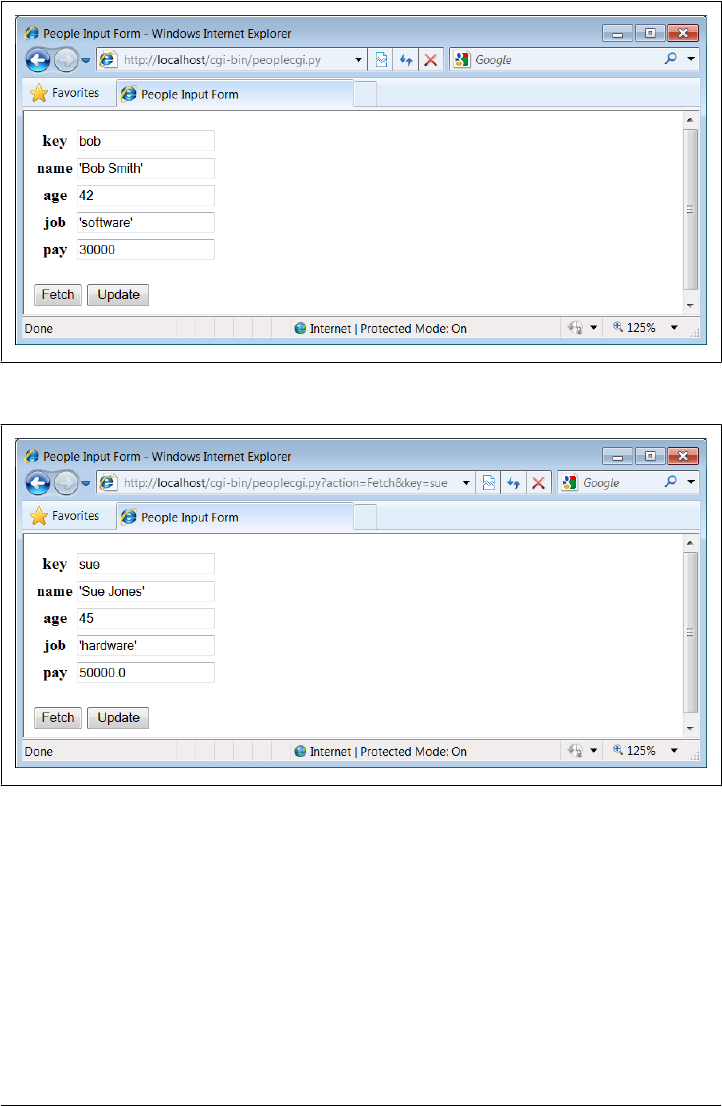
As we’ve seen, such a URL can be submitted either within your browser or by scripts
that use tools such as the urllib package. Again, replace “localhost” with your server’s
domain name if you are running the script on a remote machine.
To update a record, fetch it by key, enter new values in the field inputs, and click
Update; the script will take the input fields and store them in the attributes of the class
instance in the shelve. Figure 1-17 shows the reply we get after updating sue.
Figure 1-15. peoplecgi.py reply page
Figure 1-16. peoplecgi.py reply for query parameters
Step 6: Adding a Web Interface | 65
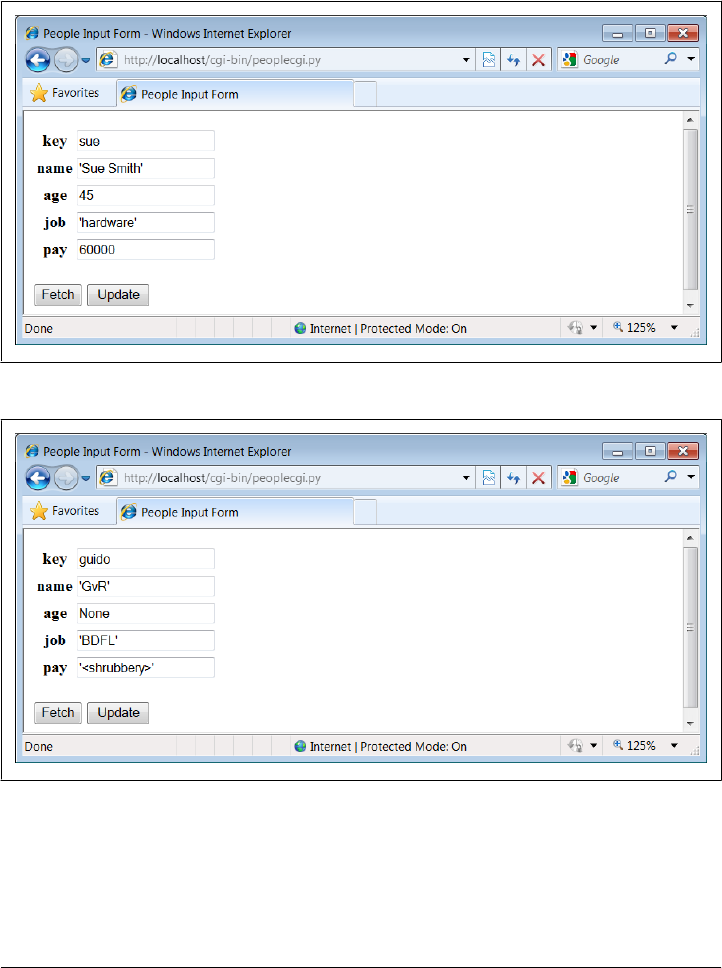
Finally, adding a record works the same as in the GUI: fill in a new key and field values
and click Update; the CGI script creates a new class instance, fills out its attributes,
and stores it in the shelve under the new key. There really is a class object behind the
web page here, but we don’t have to deal with the logic used to generate it.
Figure 1-18 shows a record added to the database in this way.
Figure 1-17. peoplecgi.py update reply
Figure 1-18. peoplecgi.py after adding a new record
In principle, we could also update and add records by submitting a URL—either from
a browser or from a script—such as:
http://localhost/cgi-bin/
peoplecgi.py?action=Update&key=sue&pay=50000&name=Sue+Smith& ...more...
66 | Chapter 1: A Sneak Preview

Except for automated tools, though, typing such a long URL will be noticeably more
difficult than filling out the input page. Here is part of the reply page generated for the
“guido” record’s display of Figure 1-18 (use your browser’s “view page source” option
to see this for yourself). Note how the < and > characters are translated to HTML escapes
with cgi.escape before being inserted into the reply:
<tr><th>key<td><input type=text name=key value="guido">
<tr><th>name<td><input type=text name=name value="'GvR'">
<tr><th>age<td><input type=text name=age value="None">
<tr><th>job<td><input type=text name=job value="'BDFL'">
<tr><th>pay<td><input type=text name=pay value="'<shrubbery>'">
As usual, the standard library urllib module package comes in handy for testing our
CGI script; the output we get back is raw HTML, but we can parse it with other standard
library tools and use it as the basis of a server-side script regression testing system run
on any Internet-capable machine. We might even parse the server’s reply fetched this
way and display its data in a client-side GUI coded with tkinter; GUIs and web pages
are not mutually exclusive techniques. The last test in the following interaction shows
a portion of the error message page’s HTML that is produced when the action is missing
or invalid in the inputs, with line breaks added for readability:
>>> from urllib.request import urlopen
>>> url = 'http://localhost/cgi-bin/peoplecgi.py?action=Fetch&key=sue'
>>> urlopen(url).read()
b'<html>\n<title>People Input Form</title>\n<body>\n
<form method=POST action="peoplecgi.py">\n <table>\n
<tr><th>key<td><input type=text name=key value="sue">\n
<tr><th>name<td><input type=text name=name value="\'Sue Smith\'">\n
<tr><t ...more deleted...
>>> urlopen('http://localhost/cgi-bin/peoplecgi.py').read()
b'<html>\n<title>People Input Form</title>\n<body>\n
<form method=POST action="peoplecgi.py">\n <table>\n
<tr><th>key<td><input type=text name=key value="Missing or invalid action!">\n
<tr><th>name<td><input type=text name=name value="\'?\'">\n
<tr><th>age<td><input type=text name=age value="\'?\'">\n<tr> ...more deleted...
In fact, if you’re running this CGI script on “localhost,” you can use both the last
section’s GUI and this section’s web interface to view the same physical shelve file—
these are just alternative interfaces to the same persistent Python objects. For compar-
ison, Figure 1-19 shows what the record we saw in Figure 1-18 looks like in the GUI;
it’s the same object, but we are not contacting an intermediate server, starting other
scripts, or generating HTML to view it.
And as before, we can always check our work on the server machine either interactively
or by running scripts. We may be viewing a database through web browsers and GUIs,
but, ultimately, it is just Python objects in a Python shelve file:
>>> import shelve
>>> db = shelve.open('class-shelve')
>>> db['sue'].name
'Sue Smith'
Step 6: Adding a Web Interface | 67

>>> db['guido'].job
'BDFL'
>>> list(db['guido'].name)
['G', 'v', 'R']
>>> list(db.keys())
['sue', 'bill', 'nobody', 'tomtom', 'tom', 'bob', 'peg', 'guido']
Here in action again is the original database script we wrote in Example 1-19 before
we moved on to GUIs and the web; there are many ways to view Python data:
...\PP4E\Preview> dump_db_classes.py
sue =>
Sue Smith 60000
bill =>
bill 9999
nobody =>
John Doh None
tomtom =>
Tom Tom 40000
tom =>
Tom Doe 90000
bob =>
Bob Smith 30000
peg =>
1 4
guido =>
GvR <shrubbery>
Smith
Doe
Future directions
Naturally, there are plenty of improvements we could make here, too:
• The HTML code of the initial input page in Example 1-33, for instance, is some-
what redundant with the script in Example 1-34, and it could be automatically
generated by another script that shares common information.
Figure 1-19. Same object displayed in the GUI
68 | Chapter 1: A Sneak Preview

• In fact, we might avoid hardcoding HTML in our script completely if we use one
of the HTML generator tools we’ll meet later, including HTMLgen (a system for
creating HTML from document object trees) and PSP (Python Server Pages, a
server-side HTML templating system for Python similar to PHP and ASP).
• For ease of maintenance, it might also be better to split the CGI script’s HTML
code off to a separate file in order to better divide display from logic (different
parties with possibly different skill sets could work on the different files).
• Moreover, if this website might be accessed by many people simultaneously, we
would have to add file locking or move to a database such as ZODB or MySQL to
support concurrent updates. ZODB and other full-blown database systems would
also provide transaction rollbacks in the event of failures. For basic file locking,
the os.open call and its flags provide the tools we need.
•ORMs (object relational mappers) for Python such as SQLObject and SQLAlchemy
mentioned earlier might also allow us to gain concurrent update support of an
underlying relational database system, but retain our Python class view of the data.
• In the end, if our site grows much beyond a few interactive pages, we might also
migrate from basic CGI scripting to a more complete web framework such as one
of those mentioned at the start of this section— Django, TurboGears, pyjamas,
and others. If we must retain information across pages, tools such as cookies, hid-
den inputs, mod_python session data, and FastCGI may help too.
• If our site eventually includes content produced by its own users, we might tran-
sition to Plone, a popular open source Python- and Zope-based site builder that,
using a workflow model, delegates control of site content to its producers.
• And if wireless or cloud interfaces are on our agenda, we might eventually migrate
our system to cell phones using a Python port such as those available for scripting
Nokia platforms and Google’s Android, or to a cloud-computing platform such as
Google’s Python-friendly App Engine. Python tends to go wherever technology
trends lead.
For now, though, both the GUI and web-based interfaces we’ve coded get the job done.
The End of the Demo
And that concludes our sneak preview demo of Python in action. We’ve explored data
representation, OOP, object persistence, GUIs, and website basics. We haven’t studied
any of these topics in any great depth. Hopefully, though, this chapter has piqued your
curiosity about Python applications programming.
In the rest of this book, we’ll delve into these and other application programming tools
and topics, in order to help you put Python to work in your own programs. In the next
chapter, we begin our tour with the systems programming and administration tools
available to Python programmers.
The End of the Demo | 69

The Python “Secret Handshake”
I’ve been involved with Python for some 18 years now as of this writing in 2010, and I
have seen it grow from an obscure language into one that is used in some fashion in
almost every development organization and a solid member of the top four or five most
widely-used programming languages in the world. It has been a fun ride.
But looking back over the years, it seems to me that if Python truly has a single legacy,
it is simply that Python has made quality a more central focus in the development world.
It was almost inevitable. A language that requires its users to line up code for readability
can’t help but make people raise questions about good software practice in general.
Probably nothing summarizes this aspect of Python life better than the standard li-
brary this module—a sort of Easter egg in Python written by Python core developer
Tim Peters, which captures much of the design philosophy behind the language. To
see this for yourself, go to any Python interactive prompt and import the module
(naturally, it’s available on all platforms):
>>> import this
The Zen of Python, by Tim Peters
Beautiful is better than ugly.
Explicit is better than implicit.
Simple is better than complex.
Complex is better than complicated.
Flat is better than nested.
Sparse is better than dense.
Readability counts.
Special cases aren't special enough to break the rules.
Although practicality beats purity.
Errors should never pass silently.
Unless explicitly silenced.
In the face of ambiguity, refuse the temptation to guess.
There should be one-- and preferably only one --obvious way to do it.
Although that way may not be obvious at first unless you're Dutch.
Now is better than never.
Although never is often better than *right* now.
If the implementation is hard to explain, it's a bad idea.
If the implementation is easy to explain, it may be a good idea.
Namespaces are one honking great idea -- let's do more of those!
>>>
Worth special mention, the “Explicit is better than implicit” rule has become known
as “EIBTI” in the Python world—one of Python’s defining ideas, and one of its sharpest
contrasts with other languages. As anyone who has worked in this field for more than
a few years can attest, magic and engineering do not mix. Python has not always fol-
lowed all of these guidelines, of course, but it comes very close. And if Python’s main
contribution to the software world is getting people to think about such things, it seems
like a win. Besides, it looked great on the T-shirt.
70 | Chapter 1: A Sneak Preview

PART II
System Programming
This first in-depth part of the book presents Python’s system programming tools—
interfaces to services in the underlying operating system as well as the context of an
executing program. It consists of the following chapters:
Chapter 2
This chapter provides a comprehensive first look at commonly used system inter-
face tools. It starts slowly and is meant in part as a reference for tools and techniques
we’ll be using later in the book.
Chapter 3
This chapter continues the tour begun in Chapter 2, by showing how Python’s
system interfaces are applied to process standard streams, command-line argu-
ments, shell variables, and more.
Chapter 4
This chapter continues our survey of system interfaces by focusing on tools and
techniques used to process files and directories in Python. We’ll learn about binary
files, tree walkers, and so on.
Chapter 5
This chapter is an introduction to Python’s library support for running programs
in parallel. Here, you’ll find coverage of threads, process forks, pipes, sockets,
signals, queues, and the like.
Chapter 6
This last chapter is a collection of typical system programming examples that draw
upon the material of the prior four chapters. Python scripts here perform real tasks;
among other things, they split and join files, compare and copy directory trees, test
other programs, and search and launch files.
Although this part of the book emphasizes systems programming tasks, the tools
introduced are general-purpose and are used often in later chapters.

CHAPTER 2
System Tools
“The os.path to Knowledge”
This chapter begins our in-depth look at ways to apply Python to real programming
tasks. In this and the following chapters, you’ll see how to use Python to write system
tools, GUIs, database applications, Internet scripts, websites, and more. Along the way,
we’ll also study larger Python programming concepts in action: code reuse, maintain-
ability, object-oriented programming (OOP), and so on.
In this first part of the book, we begin our Python programming tour by exploring
the systems application domain—scripts that deal with files, programs, and the general
environment surrounding a program. Although the examples in this domain focus on
particular kinds of tasks, the techniques they employ will prove to be useful in later
parts of the book as well. In other words, you should begin your journey here, unless
you are already a Python systems programming wizard.
Why Python Here?
Python’s system interfaces span application domains, but for the next five chapters,
most of our examples fall into the category of system tools—programs sometimes called
command-line utilities, shell scripts, system administration, systems programming,
and other permutations of such words. Regardless of their title, you are probably al-
ready familiar with this sort of script; these scripts accomplish such tasks as processing
files in a directory, launching test programs, and so on. Such programs historically have
been written in nonportable and syntactically obscure shell languages such as DOS
batch files, csh, and awk.
Even in this relatively simple domain, though, some of Python’s better attributes shine
brightly. For instance, Python’s ease of use and extensive built-in library make it simple
(and even fun) to use advanced system tools such as threads, signals, forks, sockets,
and their kin; such tools are much less accessible under the obscure syntax of shell
languages and the slow development cycles of compiled languages. Python’s support
for concepts like code clarity and OOP also help us write shell tools that can be read,
73

maintained, and reused. When using Python, there is no need to start every new script
from scratch.
Moreover, we’ll find that Python not only includes all the interfaces we need in order
to write system tools, but it also fosters script portability. By employing Python’s stand-
ard library, most system scripts written in Python are automatically portable to all major
platforms. For instance, you can usually run in Linux a Python directory-processing
script written in Windows without changing its source code at all—simply copy over
the source code. Though writing scripts that achieve such portability utopia requires
some extra effort and practice, if used well, Python could be the only system scripting
tool you need to use.
The Next Five Chapters
To make this part of the book easier to study, I have broken it down into five chapters:
• In this chapter, I’ll introduce the main system-related modules in overview fashion.
We’ll meet some of the most commonly used system tools here for the first time.
• In Chapter 3, we continue exploring the basic system interfaces by studying their
role in core system programming concepts: streams, command-line arguments,
environment variables, and so on.
•Chapter 4 focuses on the tools Python provides for processing files, directories,
and directory trees.
• In Chapter 5, we’ll move on to cover Python’s standard tools for parallel
processing—processes, threads, queues, pipes, signals, and more.
•Chapter 6 wraps up by presenting a collection of complete system-oriented pro-
grams. The examples here are larger and more realistic, and they use the tools
introduced in the prior four chapters to perform real, practical tasks. This collection
includes both general system scripts, as well as scripts for processing directories of
files.
Especially in the examples chapter at the end of this part, we will be concerned as much
with system interfaces as with general Python development concepts. We’ll see non-
object-oriented and object-oriented versions of some examples along the way, for in-
stance, to help illustrate the benefits of thinking in more strategic ways.
“Batteries Included”
This chapter, and those that follow, deal with both the Python language and its standard
library—a collection of precoded modules written in Python and C that are automat-
ically installed with the Python interpreter. Although Python itself provides an easy-to-
use scripting language, much of the real action in Python development involves this
vast library of programming tools (a few hundred modules at last count) that ship with
the Python package.
74 | Chapter 2: System Tools

In fact, the standard library is so powerful that it is not uncommon to hear Python
described as batteries included—a phrase generally credited to Frank Stajano meaning
that most of what you need for real day-to-day work is already there for importing.
Python’s standard library, while not part of the core language per se, is a standard part
of the Python system and you can expect it to be available wherever your scripts run.
Indeed, this is a noteworthy difference between Python and some other scripting lan-
guages—because Python comes with so many library tools “out of the box,” supple-
mental sites like Perl’s CPAN are not as important.
As we’ll see, the standard library forms much of the challenge in Python programming.
Once you’ve mastered the core language, you’ll find that you’ll spend most of your time
applying the built-in functions and modules that come with the system. On the other
hand, libraries are where most of the fun happens. In practice, programs become most
interesting when they start using services external to the language interpreter: networks,
files, GUIs, XML, databases, and so on. All of these are supported in the Python
standard library.
Beyond the standard library, there is an additional collection of third-party packages
for Python that must be fetched and installed separately. As of this writing, you can
find most of these third-party extensions via general web searches, and using the links
at http://www.python.org and at the PyPI website (accessible from http://www.python
.org). Some third-party extensions are large systems in their own right; NumPy, Django,
and VPython, for instance, add vector processing, website construction, and visuali-
zation, respectively.
If you have to do something special with Python, chances are good that either its support
is part of the standard Python install package or you can find a free and open source
module that will help. Most of the tools we’ll employ in this text are a standard part of
Python, but I’ll be careful to point out things that must be installed separately. Of
course, Python’s extreme code reuse idiom also makes your programs dependent on
the code you reuse; in practice, though, and as we’ll see repeatedly in this book, pow-
erful libraries coupled with open source access speed development without locking you
into an existing set of features or limitations.
System Scripting Overview
To begin our exploration of the systems domain, we will take a quick tour through the
standard library sys and os modules in this chapter, before moving on to larger system
programming concepts. As you can tell from the length of their attribute lists, both of
these are large modules—the following reflects Python 3.1 running on Windows 7
outside IDLE:
C:\...\PP4E\System> python
Python 3.1.1 (r311:74483, Aug 17 2009, 17:02:12) [MSC v.1500 32 bit (...)] on win32
Type "help", "copyright", "credits" or "license" for more information.
>>> import sys, os
>>> len(dir(sys)) # 65 attributes
65
System Scripting Overview | 75

>>> len(dir(os)) # 122 on Windows, more on Unix
122
>>> len(dir(os.path)) # a nested module within os
52
The content of these two modules may vary per Python version and platform. For
example, os is much larger under Cygwin after building Python 3.1 from its source code
there (Cygwin is a system that provides Unix-like functionality on Windows; it is dis-
cussed further in “More on Cygwin Python for Windows” on page 185):
$ ./python.exe
Python 3.1.1 (r311:74480, Feb 20 2010, 10:16:52)
[GCC 3.4.4 (cygming special, gdc 0.12, using dmd 0.125)] on cygwin
Type "help", "copyright", "credits" or "license" for more information.
>>> import sys, os
>>> len(dir(sys))
64
>>> len(dir(os))
217
>>> len(dir(os.path))
51
As I’m not going to demonstrate every item in every built-in module, the first thing I
want to do is show you how to get more details on your own. Officially, this task also
serves as an excuse for introducing a few core system scripting concepts; along the way,
we’ll code a first script to format documentation.
Python System Modules
Most system-level interfaces in Python are shipped in just two modules: sys and os.
That’s somewhat oversimplified; other standard modules belong to this domain too.
Among them are the following:
glob
For filename expansion
socket
For network connections and Inter-Process Communication (IPC)
threading, _thread, queue
For running and synchronizing concurrent threads
time, timeit
For accessing system time details
subprocess, multiprocessing
For launching and controlling parallel processes
signal, select, shutil, tempfile, and others
For various other system-related tasks
Third-party extensions such as pySerial (a serial port interface), Pexpect (an Expect
work-alike for controlling cross-program dialogs), and even Twisted (a networking
76 | Chapter 2: System Tools

framework) can be arguably lumped into the systems domain as well. In addition, some
built-in functions are actually system interfaces as well—the open function, for example,
interfaces with the file system. But by and large, sys and os together form the core of
Python’s built-in system tools arsenal.
In principle at least, sys exports components related to the Python interpreter itself
(e.g., the module search path), and os contains variables and functions that map to the
operating system on which Python is run. In practice, this distinction may not always
seem clear-cut (e.g., the standard input and output streams show up in sys, but they
are arguably tied to operating system paradigms). The good news is that you’ll soon
use the tools in these modules so often that their locations will be permanently stamped
on your memory.*
The os module also attempts to provide a portable programming interface to the un-
derlying operating system; its functions may be implemented differently on different
platforms, but to Python scripts, they look the same everywhere. And if that’s still not
enough, the os module also exports a nested submodule, os.path, which provides a
portable interface to file and directory processing tools.
Module Documentation Sources
As you can probably deduce from the preceding paragraphs, learning to write system
scripts in Python is mostly a matter of learning about Python’s system modules. Luckily,
there are a variety of information sources to make this task easier—from module at-
tributes to published references and books.
For instance, if you want to know everything that a built-in module exports, you can
read its library manual entry; study its source code (Python is open source software,
after all); or fetch its attribute list and documentation string interactively. Let’s import
sys in Python 3.1 and see what it has to offer:
C:\...\PP4E\System> python
>>> import sys
>>> dir(sys)
['__displayhook__', '__doc__', '__excepthook__', '__name__', '__package__',
'__stderr__', '__stdin__', '__stdout__', '_clear_type_cache', '_current_frames',
'_getframe', 'api_version', 'argv', 'builtin_module_names', 'byteorder',
'call_tracing', 'callstats', 'copyright', 'displayhook', 'dllhandle',
'dont_write_bytecode', 'exc_info', 'excepthook', 'exec_prefix', 'executable',
'exit', 'flags', 'float_info', 'float_repr_style', 'getcheckinterval',
'getdefaultencoding', 'getfilesystemencoding', 'getprofile', 'getrecursionlimit',
'getrefcount', 'getsizeof', 'gettrace', 'getwindowsversion', 'hexversion',
'int_info', 'intern', 'maxsize', 'maxunicode', 'meta_path', 'modules', 'path',
'path_hooks', 'path_importer_cache', 'platform', 'prefix', 'ps1', 'ps2',
'setcheckinterval', 'setfilesystemencoding', 'setprofile', 'setrecursionlimit',
* They may also work their way into your subconscious. Python newcomers sometimes describe a phenomenon
in which they “dream in Python” (insert overly simplistic Freudian analysis here…).
System Scripting Overview | 77

'settrace', 'stderr', 'stdin', 'stdout', 'subversion', 'version', 'version_info',
'warnoptions', 'winver']
The dir function simply returns a list containing the string names of all the attributes
in any object with attributes; it’s a handy memory jogger for modules at the interactive
prompt. For example, we know there is something called sys.version, because the
name version came back in the dir result. If that’s not enough, we can always consult
the __doc__ string of built-in modules:
>>> sys.__doc__
"This module provides access to some objects used or maintained by the\ninterpre
ter and to functions that interact strongly with the interpreter.\n\nDynamic obj
ects:\n\nargv -- command line arguments; argv[0] is the script pathname if known
\npath -- module search path; path[0] is the script directory, else ''\nmodules
-- dictionary of loaded modules\n\ndisplayhook -- called to show results in an i
...lots of text deleted here..."
Paging Documentation Strings
The __doc__ built-in attribute just shown usually contains a string of documentation,
but it may look a bit weird when displayed this way—it’s one long string with embedded
end-line characters that print as \n, not as a nice list of lines. To format these strings
for a more humane display, you can simply use a print function-call statement:
>>> print(sys.__doc__)
This module provides access to some objects used or maintained by the
interpreter and to functions that interact strongly with the interpreter.
Dynamic objects:
argv -- command line arguments; argv[0] is the script pathname if known
path -- module search path; path[0] is the script directory, else ''
modules -- dictionary of loaded modules
...lots of lines deleted here...
The print built-in function, unlike interactive displays, interprets end-line characters
correctly. Unfortunately, print doesn’t, by itself, do anything about scrolling or paging
and so can still be unwieldy on some platforms. Tools such as the built-in help func-
tion can do better:
>>> help(sys)
Help on built-in module sys:
NAME
sys
FILE
(built-in)
MODULE DOCS
http://docs.python.org/library/sys
78 | Chapter 2: System Tools

DESCRIPTION
This module provides access to some objects used or maintained by the
interpreter and to functions that interact strongly with the interpreter.
Dynamic objects:
argv -- command line arguments; argv[0] is the script pathname if known
path -- module search path; path[0] is the script directory, else ''
modules -- dictionary of loaded modules
...lots of lines deleted here...
The help function is one interface provided by the PyDoc system—standard library
code that ships with Python and renders documentation (documentation strings, as
well as structural details) related to an object in a formatted way. The format is either
like a Unix manpage, which we get for help, or an HTML page, which is more grandiose.
It’s a handy way to get basic information when working interactively, and it’s a last
resort before falling back on manuals and books.
A Custom Paging Script
The help function we just met is also fairly fixed in the way it displays information;
although it attempts to page the display in some contexts, its page size isn’t quite right
on some of the machines I use. Moreover, it doesn’t page at all in the IDLE GUI, instead
relying on manual use if the scrollbar—potentially painful for large displays. When I
want more control over the way help text is printed, I usually use a utility script of my
own, like the one in Example 2-1.
Example 2-1. PP4E\System\more.py
"""
split and interactively page a string or file of text
"""
def more(text, numlines=15):
lines = text.splitlines() # like split('\n') but no '' at end
while lines:
chunk = lines[:numlines]
lines = lines[numlines:]
for line in chunk: print(line)
if lines and input('More?') not in ['y', 'Y']: break
if __name__ == '__main__':
import sys # when run, not imported
more(open(sys.argv[1]).read(), 10) # page contents of file on cmdline
The meat of this file is its more function, and if you know enough Python to be qualified
to read this book, it should be fairly straightforward. It simply splits up a string around
end-line characters, and then slices off and displays a few lines at a time (15 by default)
to avoid scrolling off the screen. A slice expression, lines[:15], gets the first 15 items
in a list, and lines[15:] gets the rest; to show a different number of lines each time,
System Scripting Overview | 79

pass a number to the numlines argument (e.g., the last line in Example 2-1 passes 10 to
the numlines argument of the more function).
The splitlines string object method call that this script employs returns a list of sub-
strings split at line ends (e.g., ["line", "line",...]). An alternative splitlines method
does similar work, but retains an empty line at the end of the result if the last line is
\n terminated:
>>> line = 'aaa\nbbb\nccc\n'
>>> line.split('\n')
['aaa', 'bbb', 'ccc', '']
>>> line.splitlines()
['aaa', 'bbb', 'ccc']
As we’ll see more formally in Chapter 4, the end-of-line character is normally always
\n (which stands for a byte usually having a binary value of 10) within a Python script,
no matter what platform it is run upon. (If you don’t already know why this matters,
DOS \r characters in text are dropped by default when read.)
String Method Basics
Now, Example 2-1 is a simple Python program, but it already brings up three important
topics that merit quick detours here: it uses string methods, reads from a file, and is set
up to be run or imported. Python string methods are not a system-related tool per se,
but they see action in most Python programs. In fact, they are going to show up
throughout this chapter as well as those that follow, so here is a quick review of some
of the more useful tools in this set. String methods include calls for searching and
replacing:
>>> mystr = 'xxxSPAMxxx'
>>> mystr.find('SPAM') # return first offset
3
>>> mystr = 'xxaaxxaa'
>>> mystr.replace('aa', 'SPAM') # global replacement
'xxSPAMxxSPAM'
The find call returns the offset of the first occurrence of a substring, and replace does
global search and replacement. Like all string operations, replace returns a new string
instead of changing its subject in-place (recall that strings are immutable). With these
methods, substrings are just strings; in Chapter 19, we’ll also meet a module called
re that allows regular expression patterns to show up in searches and replacements.
In more recent Pythons, the in membership operator can often be used as an alternative
to find if all we need is a yes/no answer (it tests for a substring’s presence). There are
also a handful of methods for removing whitespace on the ends of strings—especially
useful for lines of text read from a file:
>>> mystr = 'xxxSPAMxxx'
>>> 'SPAM' in mystr # substring search/test
80 | Chapter 2: System Tools

True
>>> 'Ni' in mystr # when not found
False
>>> mystr.find('Ni')
-1
>>> mystr = '\t Ni\n'
>>> mystr.strip() # remove whitespace
'Ni'
>>> mystr.rstrip() # same, but just on right side
'\t Ni'
String methods also provide functions that are useful for things such as case conver-
sions, and a standard library module named string defines some useful preset variables,
among other things:
>>> mystr = 'SHRUBBERY'
>>> mystr.lower() # case converters
'shrubbery'
>>> mystr.isalpha() # content tests
True
>>> mystr.isdigit()
False
>>> import string # case presets: for 'in', etc.
>>> string.ascii_lowercase
'abcdefghijklmnopqrstuvwxyz'
>>> string.whitespace # whitespace characters
' \t\n\r\x0b\x0c'
There are also methods for splitting up strings around a substring delimiter and putting
them back together with a substring in between. We’ll explore these tools later in this
book, but as an introduction, here they are at work:
>>> mystr = 'aaa,bbb,ccc'
>>> mystr.split(',') # split into substrings list
['aaa', 'bbb', 'ccc']
>>> mystr = 'a b\nc\nd'
>>> mystr.split() # default delimiter: whitespace
['a', 'b', 'c', 'd']
>>> delim = 'NI'
>>> delim.join(['aaa', 'bbb', 'ccc']) # join substrings list
'aaaNIbbbNIccc'
>>> ' '.join(['A', 'dead', 'parrot']) # add a space between
'A dead parrot'
System Scripting Overview | 81

>>> chars = list('Lorreta') # convert to characters list
>>> chars
['L', 'o', 'r', 'r', 'e', 't', 'a']
>>> chars.append('!')
>>> ''.join(chars) # to string: empty delimiter
'Lorreta!'
These calls turn out to be surprisingly powerful. For example, a line of data columns
separated by tabs can be parsed into its columns with a single split call; the more.py
script uses the splitlines variant shown earlier to split a string into a list of line strings.
In fact, we can emulate the replace call we saw earlier in this section with a split/join
combination:
>>> mystr = 'xxaaxxaa'
>>> 'SPAM'.join(mystr.split('aa')) # str.replace, the hard way!
'xxSPAMxxSPAM'
For future reference, also keep in mind that Python doesn’t automatically convert
strings to numbers, or vice versa; if you want to use one as you would use the other,
you must say so with manual conversions:
>>> int("42"), eval("42") # string to int conversions
(42, 42)
>>> str(42), repr(42) # int to string conversions
('42', '42')
>>> ("%d" % 42), '{:d}'.format(42) # via formatting expression, method
('42', '42')
>>> "42" + str(1), int("42") + 1 # concatenation, addition
('421', 43)
In the last command here, the first expression triggers string concatenation (since both
sides are strings), and the second invokes integer addition (because both objects are
numbers). Python doesn’t assume you meant one or the other and convert automati-
cally; as a rule of thumb, Python tries to avoid magic—and the temptation to guess—
whenever possible. String tools will be covered in more detail later in this book (in fact,
they get a full chapter in Part V), but be sure to also see the library manual for additional
string method tools.
Other String Concepts in Python 3.X: Unicode and bytes
Technically speaking, the Python 3.X string story is a bit richer than I’ve implied here.
What I’ve shown so far is the str object type—a sequence of characters (technically,
Unicode “code points” represented as Unicode “code units”) which represents both
ASCII and wider Unicode text, and handles encoding and decoding both manually on
request and automatically on file transfers. Strings are coded in quotes (e.g., 'abc'),
along with various syntax for coding non-ASCII text (e.g., '\xc4\xe8', '\u00c4\u00e8').
82 | Chapter 2: System Tools

Really, though, 3.X has two additional string types that support most str string oper-
ations: bytes—a sequence of short integers for representing 8-bit binary data, and
bytearray—a mutable variant of bytes. You generally know you are dealing with
bytes if strings display or are coded with a leading “b” character before the opening
quote (e.g., b'abc', b'\xc4\xe8'). As we’ll see in Chapter 4, files in 3.X follow a similar
dichotomy, using str in text mode (which also handles Unicode encodings and line-
end conversions) and bytes in binary mode (which transfers bytes to and from files
unchanged). And in Chapter 5, we’ll see the same distinction for tools like sockets,
which deal in byte strings today.
Unicode text is used in Internationalized applications, and many of Python’s binary-
oriented tools deal in byte strings today. This includes some file tools we’ll meet along
the way, such as the open call, and the os.listdir and os.walk tools we’ll study in
upcoming chapters. As we’ll see, even simple directory tools sometimes have to be
aware of Unicode in file content and names. Moreover, tools such as object pickling
and binary data parsing are byte-oriented today.
Later in the book, we’ll also find that Unicode also pops up today in the text displayed
in GUIs; the bytes shipped other networks; Internet standard such as email; and even
some persistence topics such as DBM files and shelves. Any interface that deals in text
necessarily deals in Unicode today, because str is Unicode, whether ASCII or wider.
Once we reach the realm of the applications programming presented in this book,
Unicode is no longer an optional topic for most Python 3.X programmers.
In this book, we’ll defer further coverage of Unicode until we can see it in the context
of application topics and practical programs. For more fundamental details on how
3.X’s Unicode text and binary data support impact both string and file usage in some
roles, please see Learning Python, Fourth Edition; since this is officially a core language
topic, it enjoys in-depth coverage and a full 45-page dedicated chapter in that book.
File Operation Basics
Besides processing strings, the more.py script also uses files—it opens the external file
whose name is listed on the command line using the built-in open function, and it reads
that file’s text into memory all at once with the file object read method. Since file objects
returned by open are part of the core Python language itself, I assume that you have at
least a passing familiarity with them at this point in the text. But just in case you’ve
flipped to this chapter early on in your Pythonhood, the following calls load a file’s
contents into a string, load a fixed-size set of bytes into a string, load a file’s contents
into a list of line strings, and load the next line in the file into a string, respectively:
open('file').read() # read entire file into string
open('file').read(N) # read next N bytes into string
open('file').readlines() # read entire file into line strings list
open('file').readline() # read next line, through '\n'
System Scripting Overview | 83

As we’ll see in a moment, these calls can also be applied to shell commands in Python
to read their output. File objects also have write methods for sending strings to the
associated file. File-related topics are covered in depth in Chapter 4, but making an
output file and reading it back is easy in Python:
>>> file = open('spam.txt', 'w') # create file spam.txt
>>> file.write(('spam' * 5) + '\n') # write text: returns #characters written
21
>>> file.close()
>>> file = open('spam.txt') # or open('spam.txt').read()
>>> text = file.read() # read into a string
>>> text
'spamspamspamspamspam\n'
Using Programs in Two Ways
Also by way of review, the last few lines in the more.py file in Example 2-1 introduce
one of the first big concepts in shell tool programming. They instrument the file to be
used in either of two ways—as a script or as a library.
Recall that every Python module has a built-in __name__ variable that Python sets to the
__main__ string only when the file is run as a program, not when it’s imported as a
library. Because of that, the more function in this file is executed automatically by the
last line in the file when this script is run as a top-level program, but not when it is
imported elsewhere. This simple trick turns out to be one key to writing reusable script
code: by coding program logic as functions rather than as top-level code, you can also
import and reuse it in other scripts.
The upshot is that we can run more.py by itself or import and call its more function
elsewhere. When running the file as a top-level program, we list on the command line
the name of a file to be read and paged: as I’ll describe in more depth in the next chapter,
words typed in the command that is used to start a program show up in the built-in
sys.argv list in Python. For example, here is the script file in action, paging itself (be
sure to type this command line in your PP4E\System directory, or it won’t find the input
file; more on command lines later):
C:\...\PP4E\System> python more.py more.py
"""
split and interactively page a string or file of text
"""
def more(text, numlines=15):
lines = text.splitlines() # like split('\n') but no '' at end
while lines:
chunk = lines[:numlines]
lines = lines[numlines:]
for line in chunk: print(line)
More?y
if lines and input('More?') not in ['y', 'Y']: break
84 | Chapter 2: System Tools

if __name__ == '__main__':
import sys # when run, not imported
more(open(sys.argv[1]).read(), 10) # page contents of file on cmdline
When the more.py file is imported, we pass an explicit string to its more function, and
this is exactly the sort of utility we need for documentation text. Running this utility
on the sys module’s documentation string gives us a bit more information in human-
readable form about what’s available to scripts:
C:\...\PP4E\System> python
>>> from more import more
>>> import sys
>>> more(sys.__doc__)
This module provides access to some objects used or maintained by the
interpreter and to functions that interact strongly with the interpreter.
Dynamic objects:
argv -- command line arguments; argv[0] is the script pathname if known
path -- module search path; path[0] is the script directory, else ''
modules -- dictionary of loaded modules
displayhook -- called to show results in an interactive session
excepthook -- called to handle any uncaught exception other than SystemExit
To customize printing in an interactive session or to install a custom
top-level exception handler, assign other functions to replace these.
stdin -- standard input file object; used by input()
More?
Pressing “y” or “Y” here makes the function display the next few lines of documenta-
tion, and then prompt again, unless you’ve run past the end of the lines list. Try this
on your own machine to see what the rest of the module’s documentation string looks
like. Also try experimenting by passing a different window size in the second
argument—more(sys.__doc__, 5) shows just 5 lines at a time.
Python Library Manuals
If that still isn’t enough detail, your next step is to read the Python library manual’s
entry for sys to get the full story. All of Python’s standard manuals are available online,
and they often install alongside Python itself. On Windows, the standard manuals are
installed automatically, but here are a few simple pointers:
• On Windows, click the Start button, pick All Programs, select the Python entry
there, and then choose the Python Manuals item. The manuals should magically
appear on your display; as of Python 2.4, the manuals are provided as a Windows
help file and so support searching and navigation.
• On Linux or Mac OS X, you may be able to click on the manuals’ entries in a file
explorer or start your browser from a shell command line and navigate to the library
manual’s HTML files on your machine.
System Scripting Overview | 85

• If you can’t find the manuals on your computer, you can always read them online.
Go to Python’s website at http://www.python.org and follow the documentation
links there. This website also has a simple searching utility for the manuals.
However you get started, be sure to pick the Library manual for things such as sys; this
manual documents all of the standard library, built-in types and functions, and more.
Python’s standard manual set also includes a short tutorial, a language reference, ex-
tending references, and more.
Commercially Published References
At the risk of sounding like a marketing droid, I should mention that you can also
purchase the Python manual set, printed and bound; see the book information page at
http://www.python.org for details and links. Commercially published Python reference
books are also available today, including Python Essential Reference, Python in a Nut-
shell, Python Standard Library, and Python Pocket Reference. Some of these books are
more complete and come with examples, but the last one serves as a convenient memory
jogger once you’ve taken a library tour or two.†
Introducing the sys Module
But enough about documentation sources (and scripting basics)—let’s move on to
system module details. As mentioned earlier, the sys and os modules form the core of
much of Python’s system-related tool set. To see how, we’ll turn to a quick, interactive
tour through some of the tools in these two modules before applying them in bigger
examples. We’ll start with sys, the smaller of the two; remember that to see a full list
of all the attributes in sys, you need to pass it to the dir function (or see where we did
so earlier in this chapter).
Platforms and Versions
Like most modules, sys includes both informational names and functions that take
action. For instance, its attributes give us the name of the underlying operating system
on which the platform code is running, the largest possible “natively sized” integer on
this machine (though integers can be arbitrarily long in Python 3.X), and the version
number of the Python interpreter running our code:
C:\...\PP4E\System> python
>>> import sys
† Full disclosure: I also wrote the last of the books listed as a replacement for the reference appendix that
appeared in the first edition of this book; it’s meant to be a supplement to the text you’re reading, and its
latest edition also serves as a translation resource for Python 2.X readers. As explained in the Preface, the
book you’re holding is meant as tutorial, not reference, so you’ll probably want to find some sort of reference
resource eventually (though I’m nearly narcissistic enough to require that it be mine).
86 | Chapter 2: System Tools

>>> sys.platform, sys.maxsize, sys.version
('win32', 2147483647, '3.1.1 (r311:74483, Aug 17 2009, 17:02:12) ...more deleted...')
>>> if sys.platform[:3] == 'win': print('hello windows')
...
hello windows
If you have code that must act differently on different machines, simply test the
sys.platform string as done here; although most of Python is cross-platform, nonport-
able tools are usually wrapped in if tests like the one here. For instance, we’ll see later
that some program launch and low-level console interaction tools may vary per plat-
form—simply test sys.platform to pick the right tool for the machine on which your
script is running.
The Module Search Path
The sys module also lets us inspect the module search path both interactively and
within a Python program. sys.path is a list of directory name strings representing the
true search path in a running Python interpreter. When a module is imported, Python
scans this list from left to right, searching for the module’s file on each directory named
in the list. Because of that, this is the place to look to verify that your search path is
really set as intended.‡
The sys.path list is simply initialized from your PYTHONPATH setting—the content of
any .pth path files located in Python’s directories on your machine plus system
defaults—when the interpreter is first started up. In fact, if you inspect sys.path inter-
actively, you’ll notice quite a few directories that are not on your PYTHONPATH:
sys.path also includes an indicator for the script’s home directory (an empty string—
something I’ll explain in more detail after we meet os.getcwd) and a set of standard
library directories that may vary per installation:
>>> sys.path
['', 'C:\\PP4thEd\\Examples', ...plus standard library paths deleted... ]
Surprisingly, sys.path can actually be changed by a program, too. A script can use list
operations such as append, extend, insert, pop, and remove, as well as the del statement
to configure the search path at runtime to include all the source directories to which it
needs access. Python always uses the current sys.path setting to import, no matter what
you’ve changed it to:
>>> sys.path.append(r'C:\mydir')
>>> sys.path
['', 'C:\\PP4thEd\\Examples', ...more deleted..., 'C:\\mydir']
‡ It’s not impossible that Python sees PYTHONPATH differently than you do. A syntax error in your system shell
configuration files may botch the setting of PYTHONPATH, even if it looks fine to you. On Windows, for example,
if a space appears around the = of a DOS set command in your configuration file (e.g., set NAME = VALUE),
you may actually set NAME to an empty string, not to VALUE!
Introducing the sys Module | 87

Changing sys.path directly like this is an alternative to setting your PYTHONPATH shell
variable, but not a very permanent one. Changes to sys.path are retained only until the
Python process ends, and they must be remade every time you start a new Python
program or session. However, some types of programs (e.g., scripts that run on a web
server) may not be able to depend on PYTHONPATH settings; such scripts can instead
configure sys.path on startup to include all the directories from which they will need
to import modules. For a more concrete use case, see Example 1-34 in the prior
chapter—there we had to tweak the search path dynamically this way, because the web
server violated our import path assumptions.
Windows Directory Paths
Notice the use of a raw string literal in the sys.path configuration code: because back-
slashes normally introduce escape code sequences in Python strings, Windows users
should be sure to either double up on backslashes when using them in DOS directory
path strings (e.g., in "C:\\dir", \\ is an escape sequence that really means \), or use
raw string constants to retain backslashes literally (e.g., r"C:\dir").
If you inspect directory paths on Windows (as in the sys.path interaction listing), Py-
thon prints double \\ to mean a single \. Technically, you can get away with a
single \ in a string if it is followed by a character Python does not recognize as the rest
of an escape sequence, but doubles and raw strings are usually easier than memorizing
escape code tables.
Also note that most Python library calls accept either forward (/) or backward (\)
slashes as directory path separators, regardless of the underlying platform. That is, /
usually works on Windows too and aids in making scripts portable to Unix. Tools in
the os and os.path modules, described later in this chapter, further aid in script path
portability.
The Loaded Modules Table
The sys module also contains hooks into the interpreter; sys.modules, for example, is
a dictionary containing one name:module entry for every module imported in your
Python session or program (really, in the calling Python process):
>>> sys.modules
{'reprlib': <module 'reprlib' from 'c:\python31\lib\reprlib.py'>, ...more deleted...
>>> list(sys.modules.keys())
['reprlib', 'heapq', '__future__', 'sre_compile', '_collections', 'locale', '_sre',
'functools', 'encodings', 'site', 'operator', 'io', '__main__', ...more deleted... ]
>>> sys
<module 'sys' (built-in)>
>>> sys.modules['sys']
<module 'sys' (built-in)>
88 | Chapter 2: System Tools

We might use such a hook to write programs that display or otherwise process all the
modules loaded by a program (just iterate over the keys of sys.modules).
Also in the interpret hooks category, an object’s reference count is available via
sys.getrefcount, and the names of modules built-in to the Python executable are listed
in sys.builtin_module_names. See Python’s library manual for details; these are mostly
Python internals information, but such hooks can sometimes become important to
programmers writing tools for other programmers to use.
Exception Details
Other attributes in the sys module allow us to fetch all the information related to the
most recently raised Python exception. This is handy if we want to process exceptions
in a more generic fashion. For instance, the sys.exc_info function returns a tuple with
the latest exception’s type, value, and traceback object. In the all class-based exception
model that Python 3 uses, the first two of these correspond to the most recently raised
exception’s class, and the instance of it which was raised:
>>> try:
... raise IndexError
... except:
... print(sys.exc_info())
...
(<class 'IndexError'>, IndexError(), <traceback object at 0x019B8288>)
We might use such information to format our own error message to display in a GUI
pop-up window or HTML web page (recall that by default, uncaught exceptions ter-
minate programs with a Python error display). The first two items returned by this call
have reasonable string displays when printed directly, and the third is a traceback object
that can be processed with the standard traceback module:
>>> import traceback, sys
>>> def grail(x):
... raise TypeError('already got one')
...
>>> try:
... grail('arthur')
... except:
... exc_info = sys.exc_info()
... print(exc_info[0])
... print(exc_info[1])
... traceback.print_tb(exc_info[2])
...
<class 'TypeError'>
already got one
File "<stdin>", line 2, in <module>
File "<stdin>", line 2, in grail
The traceback module can also format messages as strings and route them to specific
file objects; see the Python library manual for more details.
Introducing the sys Module | 89

Other sys Module Exports
The sys module exports additional commonly-used tools that we will meet in the con-
text of larger topics and examples introduced later in this part of the book. For instance:
• Command-line arguments show up as a list of strings called sys.argv.
• Standard streams are available as sys.stdin, sys.stdout, and sys.stderr.
• Program exit can be forced with sys.exit calls.
Since these lead us to bigger topics, though, we will cover them in sections of their own.
Introducing the os Module
As mentioned, os is the larger of the two core system modules. It contains all of the
usual operating-system calls you use in C programs and shell scripts. Its calls deal with
directories, processes, shell variables, and the like. Technically, this module provides
POSIX tools—a portable standard for operating-system calls—along with platform-
independent directory processing tools as the nested module os.path. Operationally,
os serves as a largely portable interface to your computer’s system calls: scripts written
with os and os.path can usually be run unchanged on any platform. On some platforms,
os includes extra tools available just for that platform (e.g., low-level process calls on
Unix); by and large, though, it is as cross-platform as is technically feasible.
Tools in the os Module
Let’s take a quick look at the basic interfaces in os. As a preview, Table 2-1 summarizes
some of the most commonly used tools in the os module, organized by functional area.
Table 2-1. Commonly used os module tools
Tasks Tools
Shell variables os.environ
Running programs os.system, os.popen, os.execv, os.spawnv
Spawning processes os.fork, os.pipe, os.waitpid, os.kill
Descriptor files, locks os.open, os.read, os.write
File processing os.remove, os.rename, os.mkfifo, os.mkdir, os.rmdir
Administrative tools os.getcwd, os.chdir, os.chmod, os.getpid, os.listdir, os.access
Portability tools os.sep, os.pathsep, os.curdir, os.path.split, os.path.join
Pathname tools os.path.exists('path'), os.path.isdir('path'), os.path.getsize('path')
If you inspect this module’s attributes interactively, you get a huge list of names that
will vary per Python release, will likely vary per platform, and isn’t incredibly useful
90 | Chapter 2: System Tools

until you’ve learned what each name means (I’ve let this line-wrap and removed most
of this list to save space—run the command on your own):
>>> import os
>>> dir(os)
['F_OK', 'MutableMapping', 'O_APPEND', 'O_BINARY', 'O_CREAT', 'O_EXCL', 'O_NOINH
ERIT', 'O_RANDOM', 'O_RDONLY', 'O_RDWR', 'O_SEQUENTIAL', 'O_SHORT_LIVED', 'O_TEM
PORARY', 'O_TEXT', 'O_TRUNC', 'O_WRONLY', 'P_DETACH', 'P_NOWAIT', 'P_NOWAITO', '
P_OVERLAY', 'P_WAIT', 'R_OK', 'SEEK_CUR', 'SEEK_END', 'SEEK_SET', 'TMP_MAX',
...9 lines removed here...
'pardir', 'path', 'pathsep', 'pipe', 'popen', 'putenv', 'read', 'remove', 'rem
ovedirs', 'rename', 'renames', 'rmdir', 'sep', 'spawnl', 'spawnle', 'spawnv', 's
pawnve', 'startfile', 'stat', 'stat_float_times', 'stat_result', 'statvfs_result
', 'strerror', 'sys', 'system', 'times', 'umask', 'unlink', 'urandom', 'utime',
'waitpid', 'walk', 'write']
Besides all of these, the nested os.path module exports even more tools, most of which
are related to processing file and directory names portably:
>>> dir(os.path)
['__all__', '__builtins__', '__doc__', '__file__', '__name__', '__package__',
'_get_altsep', '_get_bothseps', '_get_colon', '_get_dot', '_get_empty',
'_get_sep', '_getfullpathname', 'abspath', 'altsep', 'basename', 'commonprefix',
'curdir', 'defpath', 'devnull', 'dirname', 'exists', 'expanduser', 'expandvars',
'extsep', 'genericpath', 'getatime', 'getctime', 'getmtime', 'getsize', 'isabs',
'isdir', 'isfile', 'islink', 'ismount', 'join', 'lexists', 'normcase', 'normpath',
'os', 'pardir', 'pathsep', 'realpath', 'relpath', 'sep', 'split', 'splitdrive',
'splitext', 'splitunc', 'stat', 'supports_unicode_filenames', 'sys']
Administrative Tools
Just in case those massive listings aren’t quite enough to go on, let’s experiment inter-
actively with some of the more commonly used os tools. Like sys, the os module comes
with a collection of informational and administrative tools:
>>> os.getpid()
7980
>>> os.getcwd()
'C:\\PP4thEd\\Examples\\PP4E\\System'
>>> os.chdir(r'C:\Users')
>>> os.getcwd()
'C:\\Users'
As shown here, the os.getpid function gives the calling process’s process ID (a unique
system-defined identifier for a running program, useful for process control and unique
name creation), and os.getcwd returns the current working directory. The current
working directory is where files opened by your script are assumed to live, unless their
names include explicit directory paths. That’s why earlier I told you to run the following
command in the directory where more.py lives:
C:\...\PP4E\System> python more.py more.py
Introducing the os Module | 91

The input filename argument here is given without an explicit directory path (though
you could add one to page files in another directory). If you need to run in a different
working directory, call the os.chdir function to change to a new directory; your code
will run relative to the new directory for the rest of the program (or until the next
os.chdir call). The next chapter will have more to say about the notion of a current
working directory, and its relation to module imports when it explores script execution
context.
Portability Constants
The os module also exports a set of names designed to make cross-platform program-
ming simpler. The set includes platform-specific settings for path and directory sepa-
rator characters, parent and current directory indicators, and the characters used to
terminate lines on the underlying computer.
>>> os.pathsep, os.sep, os.pardir, os.curdir, os.linesep
(';', '\\', '..', '.', '\r\n')
os.sep is whatever character is used to separate directory components on the platform
on which Python is running; it is automatically preset to \ on Windows, / for POSIX
machines, and : on some Macs. Similarly, os.pathsep provides the character that sep-
arates directories on directory lists, : for POSIX and ; for DOS and Windows.
By using such attributes when composing and decomposing system-related strings in
our scripts, we make the scripts fully portable. For instance, a call of the form dir
path.split(os.sep) will correctly split platform-specific directory names into compo-
nents, though dirpath may look like dir\dir on Windows, dir/dir on Linux, and
dir:dir on some Macs. As mentioned, on Windows you can usually use forward slashes
rather than backward slashes when giving filenames to be opened, but these portability
constants allow scripts to be platform neutral in directory processing code.
Notice also how os.linesep comes back as \r\n here—the symbolic escape code which
reflects the carriage-return + line-feed line terminator convention on Windows, which
you don’t normally notice when processing text files in Python. We’ll learn more about
end-of-line translations in Chapter 4.
Common os.path Tools
The nested module os.path provides a large set of directory-related tools of its own.
For example, it includes portable functions for tasks such as checking a file’s type
(isdir, isfile, and others); testing file existence (exists); and fetching the size of a file
by name (getsize):
>>> os.path.isdir(r'C:\Users'), os.path.isfile(r'C:\Users')
(True, False)
>>> os.path.isdir(r'C:\config.sys'), os.path.isfile(r'C:\config.sys')
(False, True)
>>> os.path.isdir('nonesuch'), os.path.isfile('nonesuch')
92 | Chapter 2: System Tools

(False, False)
>>> os.path.exists(r'c:\Users\Brian')
False
>>> os.path.exists(r'c:\Users\Default')
True
>>> os.path.getsize(r'C:\autoexec.bat')
24
The os.path.isdir and os.path.isfile calls tell us whether a filename is a directory or
a simple file; both return False if the named file does not exist (that is, nonexistence
implies negation). We also get calls for splitting and joining directory path strings,
which automatically use the directory name conventions on the platform on which
Python is running:
>>> os.path.split(r'C:\temp\data.txt')
('C:\\temp', 'data.txt')
>>> os.path.join(r'C:\temp', 'output.txt')
'C:\\temp\\output.txt'
>>> name = r'C:\temp\data.txt' # Windows paths
>>> os.path.dirname(name), os.path.basename(name)
('C:\\temp', 'data.txt')
>>> name = '/home/lutz/temp/data.txt' # Unix-style paths
>>> os.path.dirname(name), os.path.basename(name)
('/home/lutz/temp', 'data.txt')
>>> os.path.splitext(r'C:\PP4thEd\Examples\PP4E\PyDemos.pyw')
('C:\\PP4thEd\\Examples\\PP4E\\PyDemos', '.pyw')
os.path.split separates a filename from its directory path, and os.path.join puts them
back together—all in entirely portable fashion using the path conventions of the ma-
chine on which they are called. The dirname and basename calls here return the first and
second items returned by a split simply as a convenience, and splitext strips the file
extension (after the last .). Subtle point: it’s almost equivalent to use string split and
join method calls with the portable os.sep string, but not exactly:
>>> os.sep
'\\'
>>> pathname = r'C:\PP4thEd\Examples\PP4E\PyDemos.pyw'
>>> os.path.split(pathname) # split file from dir
('C:\\PP4thEd\\Examples\\PP4E', 'PyDemos.pyw')
>>> pathname.split(os.sep) # split on every slash
['C:', 'PP4thEd', 'Examples', 'PP4E', 'PyDemos.pyw']
>>> os.sep.join(pathname.split(os.sep))
'C:\\PP4thEd\\Examples\\PP4E\\PyDemos.pyw'
>>> os.path.join(*pathname.split(os.sep))
'C:PP4thEd\\Examples\\PP4E\\PyDemos.pyw'
Introducing the os Module | 93

The last join call require individual arguments (hence the *) but doesn’t insert a first
slash because of the Windows drive syntax; use the preceding str.join method instead
if the difference matters. The normpath call comes in handy if your paths become a
jumble of Unix and Windows separators:
>>> mixed
'C:\\temp\\public/files/index.html'
>>> os.path.normpath(mixed)
'C:\\temp\\public\\files\\index.html'
>>> print(os.path.normpath(r'C:\temp\\sub\.\file.ext'))
C:\temp\sub\file.ext
This module also has an abspath call that portably returns the full directory pathname
of a file; it accounts for adding the current directory as a path prefix, .. parent syntax,
and more:
>>> os.chdir(r'C:\Users')
>>> os.getcwd()
'C:\\Users'
>>> os.path.abspath('') # empty string means the cwd
'C:\\Users'
>>> os.path.abspath('temp') # expand to full pathname in cwd
'C:\\Users\\temp'
>>> os.path.abspath(r'PP4E\dev') # partial paths relative to cwd
'C:\\Users\\PP4E\\dev'
>>> os.path.abspath('.') # relative path syntax expanded
'C:\\Users'
>>> os.path.abspath('..')
'C:\\'
>>> os.path.abspath(r'..\examples')
'C:\\examples'
>>> os.path.abspath(r'C:\PP4thEd\chapters') # absolute paths unchanged
'C:\\PP4thEd\\chapters'
>>> os.path.abspath(r'C:\temp\spam.txt')
'C:\\temp\\spam.txt'
Because filenames are relative to the current working directory when they aren’t fully
specified paths, the os.path.abspath function helps if you want to show users what
directory is truly being used to store a file. On Windows, for example, when GUI-based
programs are launched by clicking on file explorer icons and desktop shortcuts, the
execution directory of the program is the clicked file’s home directory, but that is not
always obvious to the person doing the clicking; printing a file’s abspath can help.
Running Shell Commands from Scripts
The os module is also the place where we run shell commands from within Python
scripts. This concept is intertwined with others, such as streams, which we won’t cover
fully until the next chapter, but since this is a key concept employed throughout this
94 | Chapter 2: System Tools

part of the book, let’s take a quick first look at the basics here. Two os functions allow
scripts to run any command line that you can type in a console window:
os.system
Runs a shell command from a Python script
os.popen
Runs a shell command and connects to its input or output streams
In addition, the relatively new subprocess module provides finer-grained control over
streams of spawned shell commands and can be used as an alternative to, and even for
the implementation of, the two calls above (albeit with some cost in extra code
complexity).
What’s a shell command?
To understand the scope of the calls listed above, we first need to define a few terms.
In this text, the term shell means the system that reads and runs command-line strings
on your computer, and shell command means a command-line string that you would
normally enter at your computer’s shell prompt.
For example, on Windows, you can start an MS-DOS console window (a.k.a. “Com-
mand Prompt”) and type DOS commands there—commands such as dir to get a di-
rectory listing, type to view a file, names of programs you wish to start, and so on. DOS
is the system shell, and commands such as dir and type are shell commands. On Linux
and Mac OS X, you can start a new shell session by opening an xterm or terminal
window and typing shell commands there too—ls to list directories, cat to view files,
and so on. A variety of shells are available on Unix (e.g., csh, ksh), but they all read and
run command lines. Here are two shell commands typed and run in an MS-DOS console
box on Windows:
C:\...\PP4E\System> dir /B ...type a shell command line
helloshell.py ...its output shows up here
more.py ...DOS is the shell on Windows
more.pyc
spam.txt
__init__.py
C:\...\PP4E\System> type helloshell.py
# a Python program
print('The Meaning of Life')
Running shell commands
None of this is directly related to Python, of course (despite the fact that Python
command-line scripts are sometimes confusingly called “shell tools”). But because the
os module’s system and popen calls let Python scripts run any sort of command that the
underlying system shell understands, our scripts can make use of every command-line
tool available on the computer, whether it’s coded in Python or not. For example, here
Introducing the os Module | 95

is some Python code that runs the two DOS shell commands typed at the shell prompt
shown previously:
C:\...\PP4E\System> python
>>> import os
>>> os.system('dir /B')
helloshell.py
more.py
more.pyc
spam.txt
__init__.py
0
>>> os.system('type helloshell.py')
# a Python program
print('The Meaning of Life')
0
>>> os.system('type hellshell.py')
The system cannot find the file specified.
1
The 0s at the end of the first two commands here are just the return values of the system
call itself (its exit status; zero generally means success). The system call can be used to
run any command line that we could type at the shell’s prompt (here, C:\...\PP4E
\System>). The command’s output normally shows up in the Python session’s or pro-
gram’s standard output stream.
Communicating with shell commands
But what if we want to grab a command’s output within a script? The os.system call
simply runs a shell command line, but os.popen also connects to the standard input or
output streams of the command; we get back a file-like object connected to the com-
mand’s output by default (if we pass a w mode flag to popen, we connect to the com-
mand’s input stream instead). By using this object to read the output of a command
spawned with popen, we can intercept the text that would normally appear in the
console window where a command line is typed:
>>> open('helloshell.py').read()
"# a Python program\nprint('The Meaning of Life')\n"
>>> text = os.popen('type helloshell.py').read()
>>> text
"# a Python program\nprint('The Meaning of Life')\n"
>>> listing = os.popen('dir /B').readlines()
>>> listing
['helloshell.py\n', 'more.py\n', 'more.pyc\n', 'spam.txt\n', '__init__.py\n']
Here, we first fetch a file’s content the usual way (using Python files), then as the output
of a shell type command. Reading the output of a dir command lets us get a listing of
files in a directory that we can then process in a loop. We’ll learn other ways to obtain
such a list in Chapter 4; there we’ll also learn how file iterators make the readlines call
96 | Chapter 2: System Tools

in the os.popen example above unnecessary in most programs, except to display the
list interactively as we did here (see also “subprocess, os.popen, and Itera-
tors” on page 101 for more on the subject).
So far, we’ve run basic DOS commands; because these calls can run any command line
that we can type at a shell prompt, they can also be used to launch other Python scripts.
Assuming your system search path is set to locate your Python (so that you can use the
shorter “python” in the following instead of the longer “C:\Python31\python”):
>>> os.system('python helloshell.py') # run a Python program
The Meaning of Life
0
>>> output = os.popen('python helloshell.py').read()
>>> output
'The Meaning of Life\n'
In all of these examples, the command-line strings sent to system and popen are hard-
coded, but there’s no reason Python programs could not construct such strings at
runtime using normal string operations (+, %, etc.). Given that commands can be dy-
namically built and run this way, system and popen turn Python scripts into flexible and
portable tools for launching and orchestrating other programs. For example, a Python
test “driver” script can be used to run programs coded in any language (e.g., C++, Java,
Python) and analyze their output. We’ll explore such a script in Chapter 6. We’ll also
revisit os.popen in the next chapter in conjunction with stream redirection; as we’ll find,
this call can also send input to programs.
The subprocess module alternative
As mentioned, in recent releases of Python the subprocess module can achieve the same
effect as os.system and os.popen; it generally requires extra code but gives more control
over how streams are connected and used. This becomes especially useful when streams
are tied in more complex ways.
For example, to run a simple shell command like we did with os.system earlier, this
new module’s call function works roughly the same (running commands like “type”
that are built into the shell on Windows requires extra protocol, though normal exe-
cutables like “python” do not):
>>> import subprocess
>>> subprocess.call('python helloshell.py') # roughly like os.system()
The Meaning of Life
0
>>> subprocess.call('cmd /C "type helloshell.py"') # built-in shell cmd
# a Python program
print('The Meaning of Life')
0
>>> subprocess.call('type helloshell.py', shell=True) # alternative for built-ins
# a Python program
print('The Meaning of Life')
0
Introducing the os Module | 97

Notice the shell=True in the last command here. This is a subtle and platform-
dependent requirement:
• On Windows, we need to pass a shell=True argument to subprocess tools like
call and Popen (shown ahead) in order to run commands built into the shell. Win-
dows commands like “type” require this extra protocol, but normal executables
like “python” do not.
• On Unix-like platforms, when shell is False (its default), the program command
line is run directly by os.execvp, a call we’ll meet in Chapter 5. If this argument is
True, the command-line string is run through a shell instead, and you can specify
the shell to use with additional arguments.
More on some of this later; for now, it’s enough to note that you may need to pass
shell=True to run some of the examples in this section and book in Unix-like environ-
ments, if they rely on shell features like program path lookup. Since I’m running code
on Windows, this argument will often be omitted here.
Besides imitating os.system, we can similarly use this module to emulate the
os.popen call used earlier, to run a shell command and obtain its standard output text
in our script:
>>> pipe = subprocess.Popen('python helloshell.py', stdout=subprocess.PIPE)
>>> pipe.communicate()
(b'The Meaning of Life\r\n', None)
>>> pipe.returncode
0
Here, we connect the stdout stream to a pipe, and communicate to run the command
to completion and receive its standard output and error streams’ text; the command’s
exit status is available in an attribute after it completes. Alternatively, we can use other
interfaces to read the command’s standard output directly and wait for it to exit (which
returns the exit status):
>>> pipe = subprocess.Popen('python helloshell.py', stdout=subprocess.PIPE)
>>> pipe.stdout.read()
b'The Meaning of Life\r\n'
>>> pipe.wait()
0
In fact, there are direct mappings from os.popen calls to subprocess.Popen objects:
>>> from subprocess import Popen, PIPE
>>> Popen('python helloshell.py', stdout=PIPE).communicate()[0]
b'The Meaning of Life\r\n'
>>>
>>> import os
>>> os.popen('python helloshell.py').read()
'The Meaning of Life\n'
As you can probably tell, subprocess is extra work in these relatively simple cases. It
starts to look better, though, when we need to control additional streams in flexible
ways. In fact, because it also allows us to process a command’s error and input streams
98 | Chapter 2: System Tools

in similar ways, in Python 3.X subprocess replaces the original os.popen2, os.popen3,
and os.popen4 calls which were available in Python 2.X; these are now just use cases
for subprocess object interfaces. Because more advanced use cases for this module deal
with standard streams, we’ll postpone additional details about this module until we
study stream redirection in the next chapter.
Shell command limitations
Before we move on, you should keep in mind two limitations of system and popen. First,
although these two functions themselves are fairly portable, their use is really only as
portable as the commands that they run. The preceding examples that run DOS dir
and type shell commands, for instance, work only on Windows, and would have to be
changed in order to run ls and cat commands on Unix-like platforms.
Second, it is important to remember that running Python files as programs this way is
very different and generally much slower than importing program files and calling
functions they define. When os.system and os.popen are called, they must start a brand-
new, independent program running on your operating system (they generally run the
command in a new process). When importing a program file as a module, the Python
interpreter simply loads and runs the file’s code in the same process in order to generate
a module object. No other program is spawned along the way.§
There are good reasons to build systems as separate programs, too, and in the next
chapter we’ll explore things such as command-line arguments and streams that allow
programs to pass information back and forth. But in many cases, imported modules
are a faster and more direct way to compose systems.
If you plan to use these calls in earnest, you should also know that the os.system call
normally blocks—that is, pauses—its caller until the spawned command line exits. On
Linux and Unix-like platforms, the spawned command can generally be made to run
independently and in parallel with the caller by adding an & shell background operator
at the end of the command line:
os.system("python program.py arg arg &")
On Windows, spawning with a DOS start command will usually launch the command
in parallel too:
os.system("start program.py arg arg")
§ The Python code exec(open(file).read()) also runs a program file’s code, but within the same process that
called it. It’s similar to an import in that regard, but it works more as if the file’s text had been pasted into
the calling program at the place where the exec call appears (unless explicit global or local namespace
dictionaries are passed). Unlike imports, such an exec unconditionally reads and executes a file’s code (it
may be run more than once per process), no module object is generated by the file’s execution, and unless
optional namespace dictionaries are passed in, assignments in the file’s code may overwrite variables in the
scope where the exec appears; see other resources or the Python library manual for more details.
Introducing the os Module | 99

In fact, this is so useful that an os.startfile call was added in recent Python releases.
This call opens a file with whatever program is listed in the Windows registry for the
file’s type—as though its icon has been clicked with the mouse cursor:
os.startfile("webpage.html") # open file in your web browser
os.startfile("document.doc") # open file in Microsoft Word
os.startfile("myscript.py") # run file with Python
The os.popen call does not generally block its caller (by definition, the caller must be
able to read or write the file object returned) but callers may still occasionally become
blocked under both Windows and Linux if the pipe object is closed—e.g., when gar-
bage is collected—before the spawned program exits or the pipe is read exhaustively
(e.g., with its read() method). As we will see later in this part of the book, the Unix
os.fork/exec and Windows os.spawnv calls can also be used to run parallel programs
without blocking.
Because the os module’s system and popen calls, as well as the subprocess module, also
fall under the category of program launchers, stream redirectors, and cross-process
communication devices, they will show up again in the following chapters, so we’ll
defer further details for the time being. If you’re looking for more details right away,
be sure to see the stream redirection section in the next chapter and the directory listings
section in Chapter 4.
Other os Module Exports
That’s as much of a tour around os as we have space for here. Since most other os
module tools are even more difficult to appreciate outside the context of larger appli-
cation topics, we’ll postpone a deeper look at them until later chapters. But to let you
sample the flavor of this module, here is a quick preview for reference. Among the os
module’s other weapons are these:
os.environ
Fetches and sets shell environment variables
os.fork
Spawns a new child process on Unix-like systems
os.pipe
Communicates between programs
os.execlp
Starts new programs
os.spawnv
Starts new programs with lower-level control
os.open
Opens a low-level descriptor-based file
os.mkdir
Creates a new directory
100 | Chapter 2: System Tools

os.mkfifo
Creates a new named pipe
os.stat
Fetches low-level file information
os.remove
Deletes a file by its pathname
os.walk
Applies a function or loop body to all parts of an entire directory tree
And so on. One caution up front: the os module provides a set of file open, read, and
write calls, but all of these deal with low-level file access and are entirely distinct from
Python’s built-in stdio file objects that we create with the built-in open function. You
should normally use the built-in open function, not the os module, for all but very special
file-processing needs (e.g., opening with exclusive access file locking).
In the next chapter we will apply sys and os tools such as those we’ve introduced here
to implement common system-level tasks, but this book doesn’t have space to provide
an exhaustive list of the contents of modules we will meet along the way. Again, if you
have not already done so, you should become acquainted with the contents of modules
such as os and sys using the resources described earlier. For now, let’s move on to
explore additional system tools in the context of broader system programming
concepts—the context surrounding a running script.
subprocess, os.popen, and Iterators
In Chapter 4, we’ll explore file iterators, but you’ve probably already studied the basics
prior to picking up this book. Because os.popen objects have an iterator that reads one
line at a time, their readlines method call is usually superfluous. For example, the
following steps through lines produced by another program without any explicit reads:
>>> import os
>>> for line in os.popen('dir /B *.py'): print(line, end='')
...
helloshell.py
more.py
__init__.py
Interestingly, Python 3.1 implements os.popen using the subprocess.Popen object that
we studied in this chapter. You can see this for yourself in file os.py in the Python
standard library on your machine (see C:\Python31\Lib on Windows); the os.popen
result is an object that manages the Popen object and its piped stream:
>>> I = os.popen('dir /B *.py')
>>> I
<os._wrap_close object at 0x013BC750>
Because this pipe wrapper object defines an __iter__ method, it supports line iteration,
both automatic (e.g., the for loop above) and manual. Curiously, although the pipe
wrapper object supports direct __next__ method calls as though it were its own iterator
Introducing the os Module | 101

(just like simple files), it does not support the next built-in function, even though the
latter is supposed to simply call the former:
>>> I = os.popen('dir /B *.py')
>>> I.__next__()
'helloshell.py\n'
>>> I = os.popen('dir /B *.py')
>>> next(I)
TypeError: _wrap_close object is not an iterator
The reason for this is subtle—direct __next__ calls are intercepted by a __getattr__
defined in the pipe wrapper object, and are properly delegated to the wrapped object;
but next function calls invoke Python’s operator overloading machinery, which in 3.X
bypasses the wrapper’s __getattr__ for special method names like __next__. Since the
pipe wrapper object doesn’t define a __next__ of its own, the call is not caught and
delegated, and the next built-in fails. As explained in full in the book Learning Py-
thon, the wrapper’s __getattr__ isn’t tried because 3.X begins such searches at the class,
not the instance.
This behavior may or may not have been anticipated, and you don’t need to care if you
iterate over pipe lines automatically with for loops, comprehensions, and other tools.
To code manual iterations robustly, though, be sure to call the iter built-in first—this
invokes the __iter__ defined in the pipe wrapper object itself, to correctly support both
flavors of advancement:
>>> I = os.popen('dir /B *.py')
>>> I = iter(I) # what for loops do
>>> I.__next__() # now both forms work
'helloshell.py\n'
>>> next(I)
'more.py\n'
102 | Chapter 2: System Tools

CHAPTER 3
Script Execution Context
“I’d Like to Have an Argument, Please”
Python scripts don’t run in a vacuum (despite what you may have heard). Depending
on platforms and startup procedures, Python programs may have all sorts of enclosing
context—information automatically passed in to the program by the operating system
when the program starts up. For instance, scripts have access to the following sorts of
system-level inputs and interfaces:
Current working directory
os.getcwd g i v e s a c c e s s t o t h e d i r e c t o r y f r o m w h i c h a s c r i p t i s s t a r t e d , a n d m a n y f i l e
tools use its value implicitly.
Command-line arguments
sys.argv gives access to words typed on the command line that are used to start
the program and that serve as script inputs.
Shell variables
os.environ provides an interface to names assigned in the enclosing shell (or a
parent program) and passed in to the script.
Standard streams
sys.stdin, stdout, and stderr e x p o r t t h e t h r e e i n p u t / o u t p u t s t r e a m s t h a t a r e a t t h e
heart of command-line shell tools, and can be leveraged by scripts with print op-
tions, the os.popen call and subprocess module introduced in Chapter 2, the
io.StringIO class, and more.
Such tools can serve as inputs to scripts, configuration parameters, and so on. In this
chapter, we will explore all these four context’s tools—both their Python interfaces
and their typical roles.
103

Current Working Directory
The notion of the current working directory (CWD) turns out to be a key concept in
some scripts’ execution: it’s always the implicit place where files processed by the script
are assumed to reside unless their names have absolute directory paths. As we saw
earlier, os.getcwd lets a script fetch the CWD name explicitly, and os.chdir allows a
script to move to a new CWD.
Keep in mind, though, that filenames without full pathnames map to the CWD and
have nothing to do with your PYTHONPATH setting. Technically, a script is always
launched from the CWD, not the directory containing the script file. Conversely, im-
ports always first search the directory containing the script, not the CWD (unless the
script happens to also be located in the CWD). Since this distinction is subtle and tends
to trip up beginners, let’s explore it in a bit more detail.
CWD, Files, and Import Paths
When you run a Python script by typing a shell command line such as python
dir1\dir2\file.py, the CWD is the directory you were in when you typed this com-
mand, not dir1\dir2. On the other hand, Python automatically adds the identity of the
script’s home directory to the front of the module search path such that file.py can
always import other files in dir1\dir2 no matter where it is run from. To illustrate, let’s
write a simple script to echo both its CWD and its module search path:
C:\...\PP4E\System> type whereami.py
import os, sys
print('my os.getcwd =>', os.getcwd()) # show my cwd execution dir
print('my sys.path =>', sys.path[:6]) # show first 6 import paths
input() # wait for keypress if clicked
Now, running this script in the directory in which it resides sets the CWD as expected
and adds it to the front of the module import search path. We met the sys.path module
search path earlier; its first entry might also be the empty string to designate CWD
when you’re working interactively, and most of the CWD has been truncated to “...”
here for display:
C:\...\PP4E\System> set PYTHONPATH=C:\PP4thEd\Examples
C:\...\PP4E\System> python whereami.py
my os.getcwd => C:\...\PP4E\System
my sys.path => ['C:\\...\\PP4E\\System', 'C:\\PP4thEd\\Examples', ...more... ]
But if we run this script from other places, the CWD moves with us (it’s the directory
where we type commands), and Python adds a directory to the front of the module
search path that allows the script to still see files in its own home directory. For instance,
when running from one level up (..), the System name added to the front of sys.path
will be the first directory that Python searches for imports within whereami.py; it points
imports back to the directory containing the script that was run. Filenames without
104 | Chapter 3: Script Execution Context

complete paths, though, will be mapped to the CWD (C:\PP4thEd\Examples\PP4E),
not the System subdirectory nested there:
C:\...\PP4E\System> cd ..
C:\...\PP4E> python System\whereami.py
my os.getcwd => C:\...\PP4E
my sys.path => ['C:\\...\\PP4E\\System', 'C:\\PP4thEd\\Examples', ...more... ]
C:\...\PP4E> cd System\temp
C:\...\PP4E\System\temp> python ..\whereami.py
my os.getcwd => C:\...\PP4E\System\temp
my sys.path => ['C:\\...\\PP4E\\System', 'C:\\PP4thEd\\Examples', ...]
The net effect is that filenames without directory paths in a script will be mapped to
the place where the command was typed (os.getcwd), but imports still have access to
the directory of the script being run (via the front of sys.path). Finally, when a file is
launched by clicking its icon, the CWD is just the directory that contains the clicked
file. The following output, for example, appears in a new DOS console box when
whereami.py is double-clicked in Windows Explorer:
my os.getcwd => C:\...\PP4E\System
my sys.path => ['C:\\...\\PP4E\\System', ...more... ]
In this case, both the CWD used for filenames and the first import search directory are
the directory containing the script file. This all usually works out just as you expect,
but there are two pitfalls to avoid:
• Filenames might need to include complete directory paths if scripts cannot be sure
from where they will be run.
• Command-line scripts cannot always rely on the CWD to gain import visibility to
files that are not in their own directories; instead, use PYTHONPATH settings and
package import paths to access modules in other directories.
For example, scripts in this book, regardless of how they are run, can always import
other files in their own home directories without package path imports (import file
here), but must go through the PP4E package root to find files anywhere else in the
examples tree (from PP4E.dir1.dir2 import filethere), even if they are run from the
directory containing the desired external module. As usual for modules, the PP4E
\dir1\dir2 directory name could also be added to PYTHONPATH to make files there visible
everywhere without package path imports (though adding more directories to PYTHON
PATH increases the likelihood of name clashes). In either case, though, imports are al-
ways resolved to the script’s home directory or other Python search path settings, not
to the CWD.
Current Working Directory | 105

CWD and Command Lines
This distinction between the CWD and import search paths explains why many scripts
in this book designed to operate in the current working directory (instead of one whose
name is passed in) are run with command lines such as this one:
C:\temp> python C:\...\PP4E\Tools\cleanpyc.py process cwd
In this example, the Python script file itself lives in the directory C:\...\PP4E\Tools, but
because it is run from C:\temp, it processes the files located in C:\temp (i.e., in the CWD,
not in the script’s home directory). To process files elsewhere with such a script, simply
cd to the directory to be processed to change the CWD:
C:\temp> cd C:\PP4thEd\Examples
C:\PP4thEd\Examples> python C:\...\PP4E\Tools\cleanpyc.py process cwd
Because the CWD is always implied, a cd command tells the script which directory to
process in no less certain terms than passing a directory name to the script explicitly,
like this (portability note: you may need to add quotes around the *.py in this and other
command-line examples to prevent it from being expanded in some Unix shells):
C:\...\PP4E\Tools> python find.py *.py C:\temp process named dir
In this command line, the CWD is the directory containing the script to be run (notice
that the script filename has no directory path prefix); but since this script processes a
directory named explicitly on the command line (C:\temp), the CWD is irrelevant. Fi-
nally, if we want to run such a script located in some other directory in order to process
files located in yet another directory, we can simply give directory paths to both:
C:\temp> python C:\...\PP4E\Tools\find.py *.cxx C:\PP4thEd\Examples\PP4E
Here, the script has import visibility to files in its PP4E\Tools home directory and pro-
cesses files in the directory named on the command line, but the CWD is something
else entirely (C:\temp). This last form is more to type, of course, but watch for a variety
of CWD and explicit script-path command lines like these in this book.
Command-Line Arguments
The sys module is also where Python makes available the words typed on the command
that is used to start a Python script. These words are usually referred to as command-
line arguments and show up in sys.argv, a built-in list of strings. C programmers may
notice its similarity to the C argv array (an array of C strings). It’s not much to look at
interactively, because no command-line arguments are passed to start up Python in this
mode:
>>> import sys
>>> sys.argv
['']
106 | Chapter 3: Script Execution Context

To really see what arguments are about, we need to run a script from the shell command
line. Example 3-1 shows an unreasonably simple one that just prints the argv list for
inspection.
Example 3-1. PP4E\System\testargv.py
import sys
print(sys.argv)
Running this script prints the command-line arguments list; note that the first item is
always the name of the executed Python script file itself, no matter how the script was
started (see “Executable Scripts on Unix” on page 108).
C:\...\PP4E\System> python testargv.py
['testargv.py']
C:\...\PP4E\System> python testargv.py spam eggs cheese
['testargv.py', 'spam', 'eggs', 'cheese']
C:\...\PP4E\System> python testargv.py -i data.txt -o results.txt
['testargv.py', '-i', 'data.txt', '-o', 'results.txt']
The last command here illustrates a common convention. Much like function argu-
ments, command-line options are sometimes passed by position and sometimes by
name using a “-name value” word pair. For instance, the pair -i data.txt means the
-i option’s value is data.txt (e.g., an input filename). Any words can be listed, but
programs usually impose some sort of structure on them.
Command-line arguments play the same role in programs that function arguments do
in functions: they are simply a way to pass information to a program that can vary per
program run. Because they don’t have to be hardcoded, they allow scripts to be more
generally useful. For example, a file-processing script can use a command-line argu-
ment as the name of the file it should process; see Chapter 2’s more.py script (Exam-
ple 2-1) for a prime example. Other scripts might accept processing mode flags, Internet
addresses, and so on.
Parsing Command-Line Arguments
Once you start using command-line arguments regularly, though, you’ll probably find
it inconvenient to keep writing code that fishes through the list looking for words. More
typically, programs translate the arguments list on startup into structures that are more
conveniently processed. Here’s one way to do it: the script in Example 3-2 scans the
argv list looking for -optionname optionvalue word pairs and stuffs them into a dic-
tionary by option name for easy retrieval.
Command-Line Arguments | 107

Example 3-2. PP4E\System\testargv2.py
"collect command-line options in a dictionary"
def getopts(argv):
opts = {}
while argv:
if argv[0][0] == '-': # find "-name value" pairs
opts[argv[0]] = argv[1] # dict key is "-name" arg
argv = argv[2:]
else:
argv = argv[1:]
return opts
if __name__ == '__main__':
from sys import argv # example client code
myargs = getopts(argv)
if '-i' in myargs:
print(myargs['-i'])
print(myargs)
You might import and use such a function in all your command-line tools. When run
by itself, this file just prints the formatted argument dictionary:
C:\...\PP4E\System> python testargv2.py
{}
C:\...\PP4E\System> python testargv2.py -i data.txt -o results.txt
data.txt
{'-o': 'results.txt', '-i': 'data.txt'}
Naturally, we could get much more sophisticated here in terms of argument patterns,
error checking, and the like. For more complex command lines, we could also use
command-line processing tools in the Python standard library to parse arguments:
• The getopt module, modeled after a Unix/C utility of the same name
• The optparse module, a newer alternative, generally considered to be more
powerful
Both of these are documented in Python’s library manual, which also provides usage
examples which we’ll defer to here in the interest of space. In general, the more con-
figurable your scripts, the more you must invest in command-line processing logic
complexity.
Executable Scripts on Unix
Unix and Linux users: you can also make text files of Python source code directly
executable by adding a special line at the top with the path to the Python interpreter
and giving the file executable permission. For instance, type this code into a text file
called myscript:
#!/usr/bin/python
print('And nice red uniforms')
108 | Chapter 3: Script Execution Context

The first line is normally taken as a comment by Python (it starts with a #); but when
this file is run, the operating system sends lines in this file to the interpreter listed after
#! in line 1. If this file is made directly executable with a shell command of the form
chmod +x myscript, it can be run directly without typing python in the command, as
though it were a binary executable program:
% myscript a b c
And nice red uniforms
When run this way, sys.argv will still have the script’s name as the first word in the
list: ["myscript", "a", "b", "c"], exactly as if the script had been run with the more
explicit and portable command form python myscript a b c. Making scripts directly
executable is actually a Unix trick, not a Python feature, but it’s worth pointing out
that it can be made a bit less machine dependent by listing the Unix env command at
the top instead of a hardcoded path to the Python executable:
#!/usr/bin/env python
print('Wait for it...')
When coded this way, the operating system will employ your environment variable
settings to locate your Python interpreter (your PATH variable, on most platforms). If
you run the same script on many machines, you need only change your environment
settings on each machine (you don’t need to edit Python script code). Of course, you
can always run Python files with a more explicit command line:
% python myscript a b c
This assumes that the python interpreter program is on your system’s search path setting
(otherwise, you need to type its full path), but it works on any Python platform with a
command line. Since this is more portable, I generally use this convention in the book’s
examples, but consult your Unix manpages for more details on any of the topics men-
tioned here. Even so, these special #! lines will show up in many examples in this book
just in case readers want to run them as executables on Unix or Linux; on other plat-
forms, they are simply ignored as Python comments.
Note that on recent flavors of Windows, you can usually also type a script’s filename
directly (without the word python) to make it go, and you don’t have to add a #! line
at the top. Python uses the Windows registry on this platform to declare itself as the
program that opens files with Python extensions (.py and others). This is also why you
can launch files on Windows by clicking on them.
Shell Environment Variables
Shell variables, sometimes known as environment variables, are made available to Py-
thon scripts as os.environ, a Python dictionary-like object with one entry per variable
setting in the shell. Shell variables live outside the Python system; they are often set at
your system prompt or within startup files or control-panel GUIs and typically serve
as system-wide configuration inputs to programs.
Shell Environment Variables | 109

In fact, by now you should be familiar with a prime example: the PYTHONPATH module
search path setting is a shell variable used by Python to import modules. By setting it
once in your operating system, its value is available every time a Python program is run.
Shell variables can also be set by programs to serve as inputs to other programs in an
application; because their values are normally inherited by spawned programs, they
can be used as a simple form of interprocess communication.
Fetching Shell Variables
In Python, the surrounding shell environment becomes a simple preset object, not spe-
cial syntax. Indexing os.environ by the desired shell variable’s name string (e.g.,
os.environ['USER']) is the moral equivalent of adding a dollar sign before a variable
name in most Unix shells (e.g., $USER), using surrounding percent signs on DOS
(%USER%), and calling getenv("USER") in a C program. Let’s start up an interactive session
to experiment (run in Python 3.1 on a Windows 7 laptop):
>>> import os
>>> os.environ.keys()
KeysView(<os._Environ object at 0x013B8C70>)
>>> list(os.environ.keys())
['TMP', 'COMPUTERNAME', 'USERDOMAIN', 'PSMODULEPATH', 'COMMONPROGRAMFILES',
...many more deleted...
'NUMBER_OF_PROCESSORS', 'PROCESSOR_LEVEL', 'USERPROFILE', 'OS', 'PUBLIC', 'QTJAVA']
>>> os.environ['TEMP']
'C:\\Users\\mark\\AppData\\Local\\Temp'
Here, the keys method returns an iterable of assigned variables, and indexing fetches
the value of the shell variable TEMP on Windows. This works the same way on Linux,
but other variables are generally preset when Python starts up. Since we know about
PYTHONPATH, let’s peek at its setting within Python to verify its content (as I wrote this,
mine was set to the root of the book examples tree for this fourth edition, as well as a
temporary development location):
>>> os.environ['PYTHONPATH']
'C:\\PP4thEd\\Examples;C:\\Users\\Mark\\temp'
>>> for srcdir in os.environ['PYTHONPATH'].split(os.pathsep):
... print(srcdir)
...
C:\PP4thEd\Examples
C:\Users\Mark\temp
>>> import sys
>>> sys.path[:3]
['', 'C:\\PP4thEd\\Examples', 'C:\\Users\\Mark\\temp']
PYTHONPATH is a string of directory paths separated by whatever character is used to
separate items in such paths on your platform (e.g., ; on DOS/Windows, : on Unix
and Linux). To split it into its components, we pass to the split string method an
110 | Chapter 3: Script Execution Context

os.pathsep delimiter—a portable setting that gives the proper separator for the under-
lying machine. As usual, sys.path is the actual search path at runtime, and reflects the
result of merging in the PYTHONPATH setting after the current directory.
Changing Shell Variables
Like normal dictionaries, the os.environ object supports both key indexing and
assignment. As for dictionaries, assignments change the value of the key:
>>> os.environ['TEMP']
'C:\\Users\\mark\\AppData\\Local\\Temp
>>> os.environ['TEMP'] = r'c:\temp'
>>> os.environ['TEMP']
'c:\\temp'
But something extra happens here. In all recent Python releases, values assigned to
os.environ keys in this fashion are automatically exported to other parts of the appli-
cation. That is, key assignments change both the os.environ object in the Python pro-
gram as well as the associated variable in the enclosing shell environment of the running
program’s process. Its new value becomes visible to the Python program, all linked-in
C modules, and any programs spawned by the Python process.
Internally, key assignments to os.environ call os.putenv—a function that changes the
shell variable outside the boundaries of the Python interpreter. To demonstrate how
this works, we need a couple of scripts that set and fetch shell variables; the first is
shown in Example 3-3.
Example 3-3. PP4E\System\Environment\setenv.py
import os
print('setenv...', end=' ')
print(os.environ['USER']) # show current shell variable value
os.environ['USER'] = 'Brian' # runs os.putenv behind the scenes
os.system('python echoenv.py')
os.environ['USER'] = 'Arthur' # changes passed to spawned programs
os.system('python echoenv.py') # and linked-in C library modules
os.environ['USER'] = input('?')
print(os.popen('python echoenv.py').read())
This setenv.py script simply changes a shell variable, USER, and spawns another script
that echoes this variable’s value, as shown in Example 3-4.
Example 3-4. PP4E\System\Environment\echoenv.py
import os
print('echoenv...', end=' ')
print('Hello,', os.environ['USER'])
Shell Environment Variables | 111

No matter how we run echoenv.py, it displays the value of USER in the enclosing shell;
when run from the command line, this value comes from whatever we’ve set the variable
to in the shell itself:
C:\...\PP4E\System\Environment> set USER=Bob
C:\...\PP4E\System\Environment> python echoenv.py
echoenv... Hello, Bob
When spawned by another script such as setenv.py using the os.system and os.popen
tools we met earlier, though, echoenv.py gets whatever USER settings its parent program
has made:
C:\...\PP4E\System\Environment> python setenv.py
setenv... Bob
echoenv... Hello, Brian
echoenv... Hello, Arthur
?Gumby
echoenv... Hello, Gumby
C:\...\PP4E\System\Environment> echo %USER%
Bob
This works the same way on Linux. In general terms, a spawned program always
inherits environment settings from its parents. Spawned programs are programs started
with Python tools such as os.spawnv, the os.fork/exec combination on Unix-like plat-
forms, and os.popen, os.system, and the subprocess module on a variety of platforms.
All programs thus launched get the environment variable settings that exist in the parent
at launch time.*
From a larger perspective, setting shell variables like this before starting a new program
is one way to pass information into the new program. For instance, a Python configu-
ration script might tailor the PYTHONPATH variable to include custom directories just
before launching another Python script; the launched script will have the custom search
path in its sys.path because shell variables are passed down to children (in fact, watch
for such a launcher script to appear at the end of Chapter 6).
Shell Variable Fine Points: Parents, putenv, and getenv
Notice the last command in the preceding example—the USER variable is back to its
original value after the top-level Python program exits. Assignments to os.environ keys
are passed outside the interpreter and down the spawned programs chain, but never
back up to parent program processes (including the system shell). This is also true in
C programs that use the putenv library call, and it isn’t a Python limitation per se.
* This is by default. Some program-launching tools also let scripts pass environment settings that are different
from their own to child programs. For instance, the os.spawnve call is like os.spawnv, but it accepts a dictionary
argument representing the shell environment to be passed to the started program. Some os.exec* variants
(ones with an “e” at the end of their names) similarly accept explicit environments; see the os.exec* call
formats in Chapter 5 for more details.
112 | Chapter 3: Script Execution Context

It’s also likely to be a nonissue if a Python script is at the top of your application. But
keep in mind that shell settings made within a program usually endure only for that
program’s run and for the run of its spawned children. If you need to export a shell
variable setting so that it lives on after Python exits, you may be able to find platform-
specific extensions that do this; search http://www.python.org or the Web at large.
Another subtlety: as implemented today, changes to os.environ automatically call
os.putenv, which runs the putenv call in the C library if it is available on your platform
to export the setting outside Python to any linked-in C code. However, although
os.environ changes call os.putenv, direct calls to os.putenv do not update os.environ
to reflect the change. Because of this, the os.environ mapping interface is generally
preferred to os.putenv.
Also note that environment settings are loaded into os.environ on startup and not on
each fetch; hence, changes made by linked-in C code after startup may not be reflected
in os.environ. Python does have a more focused os.getenv call today, but it is simply
translated into an os.environ fetch on most platforms (or all, in 3.X), not into a call to
getenv in the C library. Most applications won’t need to care, especially if they are pure
Python code. On platforms without a putenv call, os.environ can be passed as a pa-
rameter to program startup tools to set the spawned program’s environment.
Standard Streams
The sys module is also the place where the standard input, output, and error streams
of your Python programs live; these turn out to be another common way for programs
to communicate:
>>> import sys
>>> for f in (sys.stdin, sys.stdout, sys.stderr): print(f)
...
<_io.TextIOWrapper name='<stdin>' encoding='cp437'>
<_io.TextIOWrapper name='<stdout>' encoding='cp437'>
<_io.TextIOWrapper name='<stderr>' encoding='cp437'>
The standard streams are simply preopened Python file objects that are automatically
connected to your program’s standard streams when Python starts up. By default, all
of them are tied to the console window where Python (or a Python program) was star-
ted. Because the print and input built-in functions are really nothing more than user-
friendly interfaces to the standard output and input streams, they are similar to using
stdout and stdin in sys directly:
>>> print('hello stdout world')
hello stdout world
>>> sys.stdout.write('hello stdout world' + '\n')
hello stdout world
19
Standard Streams | 113

>>> input('hello stdin world>')
hello stdin world>spam
'spam'
>>> print('hello stdin world>'); sys.stdin.readline()[:-1]
hello stdin world>
eggs
'eggs'
Standard Streams on Windows
Windows users: if you click a .py Python program’s filename in a Windows file explorer
to start it (or launch it with os.system), a DOS console window automatically pops up
to serve as the program’s standard stream. If your program makes windows of its own,
you can avoid this console pop-up window by naming your program’s source-code file
with a .pyw extension, not with a .py extension. The .pyw extension simply means
a .py source file without a DOS pop up on Windows (it uses Windows registry settings
to run a custom version of Python). A .pyw file may also be imported as usual.
Also note that because printed output goes to this DOS pop up when a program is
clicked, scripts that simply print text and exit will generate an odd “flash”—the DOS
console box pops up, output is printed into it, and the pop up goes away immediately
(not the most user-friendly of features!). To keep the DOS pop-up box around so that
you can read printed output, simply add an input() call at the bottom of your script to
pause for an Enter key press before exiting.
Redirecting Streams to Files and Programs
Technically, standard output (and print) text appears in the console window where a
program was started, standard input (and input) text comes from the keyboard, and
standard error text is used to print Python error messages to the console window. At
least that’s the default. It’s also possible to redirect these streams both to files and to
other programs at the system shell, as well as to arbitrary objects within a Python script.
On most systems, such redirections make it easy to reuse and combine general-purpose
command-line utilities.
Redirection is useful for things like canned (precoded) test inputs: we can apply a single
test script to any set of inputs by simply redirecting the standard input stream to a
different file each time the script is run. Similarly, redirecting the standard output
stream lets us save and later analyze a program’s output; for example, testing systems
might compare the saved standard output of a script with a file of expected output to
detect failures.
Although it’s a powerful paradigm, redirection turns out to be straightforward to use.
For instance, consider the simple read-evaluate-print loop program in Example 3-5.
114 | Chapter 3: Script Execution Context

Example 3-5. PP4E\System\Streams\teststreams.py
"read numbers till eof and show squares"
def interact():
print('Hello stream world') # print sends to sys.stdout
while True:
try:
reply = input('Enter a number>') # input reads sys.stdin
except EOFError:
break # raises an except on eof
else: # input given as a string
num = int(reply)
print("%d squared is %d" % (num, num ** 2))
print('Bye')
if __name__ == '__main__':
interact() # when run, not imported
As usual, the interact function here is automatically executed when this file is run, not
when it is imported. By default, running this file from a system command line makes
that standard stream appear where you typed the Python command. The script simply
reads numbers until it reaches end-of-file in the standard input stream (on Windows,
end-of-file is usually the two-key combination Ctrl-Z; on Unix, type Ctrl-D instead†):
C:\...\PP4E\System\Streams> python teststreams.py
Hello stream world
Enter a number>12
12 squared is 144
Enter a number>10
10 squared is 100
Enter a number>^Z
Bye
But on both Windows and Unix-like platforms, we can redirect the standard input
stream to come from a file with the < filename shell syntax. Here is a command session
in a DOS console box on Windows that forces the script to read its input from a text
file, input.txt. It’s the same on Linux, but replace the DOS type command with a Unix
cat command:
C:\...\PP4E\System\Streams> type input.txt
8
6
C:\...\PP4E\System\Streams> python teststreams.py < input.txt
Hello stream world
† Notice that input raises an exception to signal end-of-file, but file read methods simply return an empty string
for this condition. Because input also strips the end-of-line character at the end of lines, an empty string result
means an empty line, so an exception is necessary to specify the end-of-file condition. File read methods
retain the end-of-line character and denote an empty line as "\n" instead of "". This is one way in which
reading sys.stdin directly differs from input. The latter also accepts a prompt string that is automatically
printed before input is accepted.
Standard Streams | 115

Enter a number>8 squared is 64
Enter a number>6 squared is 36
Enter a number>Bye
Here, the input.txt file automates the input we would normally type interactively—the
script reads from this file rather than from the keyboard. Standard output can be sim-
ilarly redirected to go to a file with the > filename shell syntax. In fact, we can combine
input and output redirection in a single command:
C:\...\PP4E\System\Streams> python teststreams.py < input.txt > output.txt
C:\...\PP4E\System\Streams> type output.txt
Hello stream world
Enter a number>8 squared is 64
Enter a number>6 squared is 36
Enter a number>Bye
This time, the Python script’s input and output are both mapped to text files, not to
the interactive console session.
Chaining programs with pipes
On Windows and Unix-like platforms, it’s also possible to send the standard output
of one program to the standard input of another using the | shell character between
two commands. This is usually called a “pipe” operation because the shell creates a
pipeline that connects the output and input of two commands. Let’s send the output
of the Python script to the standard more command-line program’s input to see how
this works:
C:\...\PP4E\System\Streams> python teststreams.py < input.txt | more
Hello stream world
Enter a number>8 squared is 64
Enter a number>6 squared is 36
Enter a number>Bye
Here, teststreams’s standard input comes from a file again, but its output (written by
print calls) is sent to another program, not to a file or window. The receiving program
is more, a standard command-line paging program available on Windows and Unix-like
platforms. Because Python ties scripts into the standard stream model, though, Python
scripts can be used on both ends. One Python script’s output can always be piped into
another Python script’s input:
C:\...\PP4E\System\Streams> type writer.py
print("Help! Help! I'm being repressed!")
print(42)
C:\...\PP4E\System\Streams> type reader.py
print('Got this: "%s"' % input())
import sys
data = sys.stdin.readline()[:-1]
print('The meaning of life is', data, int(data) * 2)
116 | Chapter 3: Script Execution Context

C:\...\PP4E\System\Streams> python writer.py
Help! Help! I'm being repressed!
42
C:\...\PP4E\System\Streams> python writer.py | python reader.py
Got this: "Help! Help! I'm being repressed!"
The meaning of life is 42 84
This time, two Python programs are connected. Script reader gets input from script
writer; both scripts simply read and write, oblivious to stream mechanics. In practice,
such chaining of programs is a simple form of cross-program communications. It makes
it easy to reuse utilities written to communicate via stdin and stdout in ways we never
anticipated. For instance, a Python program that sorts stdin text could be applied to
any data source we like, including the output of other scripts. Consider the Python
command-line utility scripts in Examples 3-6 and 3-7 which sort and sum lines in the
standard input stream.
Example 3-6. PP4E\System\Streams\sorter.py
import sys # or sorted(sys.stdin)
lines = sys.stdin.readlines() # sort stdin input lines,
lines.sort() # send result to stdout
for line in lines: print(line, end='') # for further processing
Example 3-7. PP4E\System\Streams\adder.py
import sys
sum = 0
while True:
try:
line = input() # or call sys.stdin.readlines()
except EOFError: # or for line in sys.stdin:
break # input strips \n at end
else:
sum += int(line) # was sting.atoi() in 2nd ed
print(sum)
We can apply such general-purpose tools in a variety of ways at the shell command line
to sort and sum arbitrary files and program outputs (Windows note: on my prior XP
machine and Python 2.X, I had to type “python file.py” here, not just “file.py,” or else
the input redirection failed; with Python 3.X on Windows 7 today, either form works):
C:\...\PP4E\System\Streams> type data.txt
123
000
999
042
C:\...\PP4E\System\Streams> python sorter.py < data.txt sort a file
000
042
123
999
Standard Streams | 117

C:\...\PP4E\System\Streams> python adder.py < data.txt sum file
1164
C:\...\PP4E\System\Streams> type data.txt | python adder.py sum type output
1164
C:\...\PP4E\System\Streams> type writer2.py
for data in (123, 0, 999, 42):
print('%03d' % data)
C:\...\PP4E\System\Streams> python writer2.py | python sorter.py sort py output
000
042
123
999
C:\...\PP4E\System\Streams> writer2.py | sorter.py shorter form
...same output as prior command on Windows...
C:\...\PP4E\System\Streams> python writer2.py | python sorter.py | python adder.py
1164
The last command here connects three Python scripts by standard streams—the output
of each prior script is fed to the input of the next via pipeline shell syntax.
Coding alternatives for adders and sorters
A few coding pointers here: if you look closely, you’ll notice that sorter.py reads all of
stdin at once with the readlines method, but adder.py reads one line at a time. If the
input source is another program, some platforms run programs connected by pipes in
parallel. On such systems, reading line by line works better if the data streams being
passed are large, because readers don’t have to wait until writers are completely finished
to get busy processing data. Because input just reads stdin, the line-by-line scheme
used by adder.py can always be coded with manual sys.stdin reads too:
C:\...\PP4E\System\Streams> type adder2.py
import sys
sum = 0
while True:
line = sys.stdin.readline()
if not line: break
sum += int(line)
print(sum)
This version utilizes the fact that int allows the digits to be surrounded by whitespace
(readline returns a line including its \n, but we don’t have to use [:-1] or rstrip() to
remove it for int). In fact, we can use Python’s more recent file iterators to achieve the
same effect—the for loop, for example, automatically grabs one line each time through
when we iterate over a file object directly (more on file iterators in the next chapter):
C:\...\PP4E\System\Streams> type adder3.py
import sys
sum = 0
118 | Chapter 3: Script Execution Context

for line in sys.stdin: sum += int(line)
print(sum)
Changing sorter to read line by line this way may not be a big performance boost,
though, because the list sort method requires that the list already be complete. As we’ll
see in Chapter 18, manually coded sort algorithms are generally prone to be much
slower than the Python list sorting method.
Interestingly, these two scripts can also be coded in a much more compact fashion in
Python 2.4 and later by using the new sorted built-in function, generator expressions,
and file iterators. The following work the same way as the originals, with noticeably
less source-file real estate:
C:\...\PP4E\System\Streams> type sorterSmall.py
import sys
for line in sorted(sys.stdin): print(line, end='')
C:\...\PP4E\System\Streams> type adderSmall.py
import sys
print(sum(int(line) for line in sys.stdin))
In its argument to sum, the latter of these employs a generator expression, which is much
like a list comprehension, but results are returned one at a time, not in a physical list.
The net effect is space optimization. For more details, see a core language resource,
such as the book Learning Python.
Redirected Streams and User Interaction
Earlier in this section, we piped teststreams.py output into the standard more command-
line program with a command like this:
C:\...\PP4E\System\Streams> python teststreams.py < input.txt | more
But since we already wrote our own “more” paging utility in Python in the preceding
chapter, why not set it up to accept input from stdin too? For example, if we change
the last three lines of the more.py file listed as Example 2-1 in the prior chapter…
if __name__ == '__main__': # when run, not when imported
import sys
if len(sys.argv) == 1: # page stdin if no cmd args
more(sys.stdin.read())
else:
more(open(sys.argv[1]).read())
…it almost seems as if we should be able to redirect the standard output of
teststreams.py into the standard input of more.py:
C:\...\PP4E\System\Streams> python teststreams.py < input.txt | python ..\more.py
Hello stream world
Enter a number>8 squared is 64
Enter a number>6 squared is 36
Enter a number>Bye
Standard Streams | 119

This technique generally works for Python scripts. Here, teststreams.py takes input
from a file again. And, as in the last section, one Python program’s output is piped to
another’s input—the more.py script in the parent (..) directory.
But there’s a subtle problem lurking in the preceding more.py command. Really, chain-
ing worked there only by sheer luck: if the first script’s output is long enough that
more has to ask the user if it should continue, the script will utterly fail (specifically,
when input for user interaction triggers EOFError).
The problem is that the augmented more.py uses stdin for two disjointed purposes. It
reads a reply from an interactive user on stdin by calling input, but now it also accepts
the main input text on stdin. When the stdin stream is really redirected to an input
file or pipe, we can’t use it to input a reply from an interactive user; it contains only the
text of the input source. Moreover, because stdin is redirected before the program even
starts up, there is no way to know what it meant prior to being redirected in the com-
mand line.
If we intend to accept input on stdin and use the console for user interaction, we have
to do a bit more: we would also need to use special interfaces to read user replies from
a keyboard directly, instead of standard input. On Windows, Python’s standard library
msvcrt module provides such tools; on many Unix-like platforms, reading from device
file /dev/tty will usually suffice.
Since this is an arguably obscure use case, we’ll delegate a complete solution to a sug-
gested exercise. Example 3-8 shows a Windows-only modified version of the more
script that pages the standard input stream if called with no arguments, but also makes
use of lower-level and platform-specific tools to converse with a user at a keyboard if
needed.
Example 3-8. PP4E\System\Streams\moreplus.py
"""
split and interactively page a string, file, or stream of
text to stdout; when run as a script, page stdin or file
whose name is passed on cmdline; if input is stdin, can't
use it for user reply--use platform-specific tools or GUI;
"""
import sys
def getreply():
"""
read a reply key from an interactive user
even if stdin redirected to a file or pipe
"""
if sys.stdin.isatty(): # if stdin is console
return input('?') # read reply line from stdin
else:
if sys.platform[:3] == 'win': # if stdin was redirected
import msvcrt # can't use to ask a user
msvcrt.putch(b'?')
120 | Chapter 3: Script Execution Context

key = msvcrt.getche() # use windows console tools
msvcrt.putch(b'\n') # getch() does not echo key
return key
else:
assert False, 'platform not supported'
#linux?: open('/dev/tty').readline()[:-1]
def more(text, numlines=10):
"""
page multiline string to stdout
"""
lines = text.splitlines()
while lines:
chunk = lines[:numlines]
lines = lines[numlines:]
for line in chunk: print(line)
if lines and getreply() not in [b'y', b'Y']: break
if __name__ == '__main__': # when run, not when imported
if len(sys.argv) == 1: # if no command-line arguments
more(sys.stdin.read()) # page stdin, no inputs
else:
more(open(sys.argv[1]).read()) # else page filename argument
Most of the new code in this version shows up in its getreply function. The file’s
isatty method tells us whether stdin is connected to the console; if it is, we simply
read replies on stdin as before. Of course, we have to add such extra logic only to scripts
that intend to interact with console users and take input on stdin. In a GUI application,
for example, we could instead pop up dialogs, bind keyboard-press events to run call-
backs, and so on (we’ll meet GUIs in Chapter 7).
Armed with the reusable getreply function, though, we can safely run our moreplus
utility in a variety of ways. As before, we can import and call this module’s function
directly, passing in whatever string we wish to page:
>>> from moreplus import more
>>> more(open('adderSmall.py').read())
import sys
print(sum(int(line) for line in sys.stdin))
Also as before, when run with a command-line argument, this script interactively pages
through the named file’s text:
C:\...\PP4E\System\Streams> python moreplus.py adderSmall.py
import sys
print(sum(int(line) for line in sys.stdin))
C:\...\PP4E\System\Streams> python moreplus.py moreplus.py
"""
split and interactively page a string, file, or stream of
text to stdout; when run as a script, page stdin or file
whose name is passed on cmdline; if input is stdin, can't
use it for user reply--use platform-specific tools or GUI;
"""
Standard Streams | 121

import sys
def getreply():
?n
But now the script also correctly pages text redirected into stdin from either a file or a
command pipe, even if that text is too long to fit in a single display chunk. On most
shells, we send such input via redirection or pipe operators like these:
C:\...\PP4E\System\Streams> python moreplus.py < moreplus.py
"""
split and interactively page a string, file, or stream of
text to stdout; when run as a script, page stdin or file
whose name is passed on cmdline; if input is stdin, can't
use it for user reply--use platform-specific tools or GUI;
"""
import sys
def getreply():
?n
C:\...\PP4E\System\Streams> type moreplus.py | python moreplus.py
"""
split and interactively page a string, file, or stream of
text to stdout; when run as a script, page stdin or file
whose name is passed on cmdline; if input is stdin, can't
use it for user reply--use platform-specific tools or GUI;
"""
import sys
def getreply():
?n
Finally, piping one Python script’s output into this script’s input now works as expec-
ted, without botching user interaction (and not just because we got lucky):
......\System\Streams> python teststreams.py < input.txt | python moreplus.py
Hello stream world
Enter a number>8 squared is 64
Enter a number>6 squared is 36
Enter a number>Bye
Here, the standard output of one Python script is fed to the standard input of another
Python script located in the same directory: moreplus.py reads the output of
teststreams.py.
All of the redirections in such command lines work only because scripts don’t care what
standard input and output really are—interactive users, files, or pipes between pro-
grams. For example, when run as a script, moreplus.py simply reads stream
sys.stdin; the command-line shell (e.g., DOS on Windows, csh on Linux) attaches
such streams to the source implied by the command line before the script is started.
122 | Chapter 3: Script Execution Context

Scripts use the preopened stdin and stdout file objects to access those sources, regard-
less of their true nature.
And for readers keeping count, we have just run this single more pager script in four
different ways: by importing and calling its function, by passing a filename command-
line argument, by redirecting stdin to a file, and by piping a command’s output to
stdin. By supporting importable functions, command-line arguments, and standard
streams, Python system tools code can be reused in a wide variety of modes.
Redirecting Streams to Python Objects
All of the previous standard stream redirections work for programs written in any lan-
guage that hook into the standard streams and rely more on the shell’s command-line
processor than on Python itself. Command-line redirection syntax like < filename and
| program is evaluated by the shell, not by Python. A more Pythonesque form of redi-
rection can be done within scripts themselves by resetting sys.stdin and sys.stdout to
file-like objects.
The main trick behind this mode is that anything that looks like a file in terms of
methods will work as a standard stream in Python. The object’s interface (sometimes
called its protocol), and not the object’s specific datatype, is all that matters. That is:
• Any object that provides file-like read methods can be assigned to sys.stdin to
make input come from that object’s read methods.
• Any object that defines file-like write methods can be assigned to sys.stdout; all
standard output will be sent to that object’s methods.
Because print and input simply call the write and readline methods of whatever objects
sys.stdout and sys.stdin happen to reference, we can use this technique to both pro-
vide and intercept standard stream text with objects implemented as classes.
If you’ve already studied Python, you probably know that such plug-and-play com-
patibility is usually called polymorphism—it doesn’t matter what an object is, and it
doesn’t matter what its interface does, as long as it provides the expected interface.
This liberal approach to datatypes accounts for much of the conciseness and flexibility
of Python code. Here, it provides a way for scripts to reset their own streams. Exam-
ple 3-9 shows a utility module that demonstrates this concept.
Example 3-9. PP4E\System\Streams\redirect.py
"""
file-like objects that save standard output text in a string and provide
standard input text from a string; redirect runs a passed-in function
with its output and input streams reset to these file-like class objects;
"""
import sys # get built-in modules
class Output: # simulated output file
Standard Streams | 123

def __init__(self):
self.text = '' # empty string when created
def write(self, string): # add a string of bytes
self.text += string
def writelines(self, lines): # add each line in a list
for line in lines: self.write(line)
class Input: # simulated input file
def __init__(self, input=''): # default argument
self.text = input # save string when created
def read(self, size=None): # optional argument
if size == None: # read N bytes, or all
res, self.text = self.text, ''
else:
res, self.text = self.text[:size], self.text[size:]
return res
def readline(self):
eoln = self.text.find('\n') # find offset of next eoln
if eoln == −1: # slice off through eoln
res, self.text = self.text, ''
else:
res, self.text = self.text[:eoln+1], self.text[eoln+1:]
return res
def redirect(function, pargs, kargs, input): # redirect stdin/out
savestreams = sys.stdin, sys.stdout # run a function object
sys.stdin = Input(input) # return stdout text
sys.stdout = Output()
try:
result = function(*pargs, **kargs) # run function with args
output = sys.stdout.text
finally:
sys.stdin, sys.stdout = savestreams # restore if exc or not
return (result, output) # return result if no exc
This module defines two classes that masquerade as real files:
Output
Provides the write method interface (a.k.a. protocol) expected of output files but
saves all output in an in-memory string as it is written.
Input
Provides the interface expected of input files, but provides input on demand from
an in-memory string passed in at object construction time.
The redirect function at the bottom of this file combines these two objects to run a
single function with input and output redirected entirely to Python class objects. The
passed-in function to run need not know or care that its print and input function calls
and stdin and stdout method calls are talking to a class rather than to a real file, pipe,
or user.
To demonstrate, import and run the interact function at the heart of the test
streams script of Example 3-5 that we’ve been running from the shell (to use the
124 | Chapter 3: Script Execution Context

redirection utility function, we need to deal in terms of functions, not files). When run
directly, the function reads from the keyboard and writes to the screen, just as if it were
run as a program without redirection:
C:\...\PP4E\System\Streams> python
>>> from teststreams import interact
>>> interact()
Hello stream world
Enter a number>2
2 squared is 4
Enter a number>3
3 squared is 9
Enter a number^Z
Bye
>>>
Now, let’s run this function under the control of the redirection function in
redirect.py and pass in some canned input text. In this mode, the interact function
takes its input from the string we pass in ('4\n5\n6\n'—three lines with explicit end-
of-line characters), and the result of running the function is a tuple with its return value
plus a string containing all the text written to the standard output stream:
>>> from redirect import redirect
>>> (result, output) = redirect(interact, (), {}, '4\n5\n6\n')
>>> print(result)
None
>>> output
'Hello stream world\nEnter a number>4 squared is 16\nEnter a number>5 squared
is 25\nEnter a number>6 squared is 36\nEnter a number>Bye\n'
The output is a single, long string containing the concatenation of all text written to
standard output. To make this look better, we can pass it to print or split it up with
the string object’s splitlines method:
>>> for line in output.splitlines(): print(line)
...
Hello stream world
Enter a number>4 squared is 16
Enter a number>5 squared is 25
Enter a number>6 squared is 36
Enter a number>Bye
Better still, we can reuse the more.py module we wrote in the preceding chapter
(Example 2-1); it’s less to type and remember, and it’s already known to work well (the
following, like all cross-directory imports in this book’s examples, assumes that the
directory containing the PP4E root is on your module search path—change your PYTHON
PATH setting as needed):
>>> from PP4E.System.more import more
>>> more(output)
Hello stream world
Enter a number>4 squared is 16
Enter a number>5 squared is 25
Standard Streams | 125

Enter a number>6 squared is 36
Enter a number>Bye
This is an artificial example, of course, but the techniques illustrated are widely appli-
cable. For instance, it’s straightforward to add a GUI interface to a program written to
interact with a command-line user. Simply intercept standard output with an object
such as the Output class instance shown earlier and throw the text string up in a window.
Similarly, standard input can be reset to an object that fetches text from a graphical
interface (e.g., a popped-up dialog box). Because classes are plug-and-play compatible
with real files, we can use them in any tool that expects a file. Watch for a GUI stream-
redirection module named guiStreams in Chapter 10 that provides a concrete imple-
mentation of some of these ideas.
The io.StringIO and io.BytesIO Utility Classes
The prior section’s technique of redirecting streams to objects proved so handy that
now a standard library module automates the task for many use cases (though some
use cases, such as GUIs, may still require more custom code). The standard library tool
provides an object that maps a file object interface to and from in-memory strings. For
example:
>>> from io import StringIO
>>> buff = StringIO() # save written text to a string
>>> buff.write('spam\n')
5
>>> buff.write('eggs\n')
5
>>> buff.getvalue()
'spam\neggs\n'
>>> buff = StringIO('ham\nspam\n') # provide input from a string
>>> buff.readline()
'ham\n'
>>> buff.readline()
'spam\n'
>>> buff.readline()
''
As in the prior section, instances of StringIO objects can be assigned to sys.stdin and
sys.stdout to redirect streams for input and print calls and can be passed to any code
that was written to expect a real file object. Again, in Python, the object interface, not
the concrete datatype, is the name of the game:
>>> from io import StringIO
>>> import sys
>>> buff = StringIO()
>>> temp = sys.stdout
>>> sys.stdout = buff
>>> print(42, 'spam', 3.141) # or print(..., file=buff)
126 | Chapter 3: Script Execution Context

>>> sys.stdout = temp # restore original stream
>>> buff.getvalue()
'42 spam 3.141\n'
Note that there is also an io.BytesIO class with similar behavior, but which maps file
operations to an in-memory bytes buffer, instead of a str string:
>>> from io import BytesIO
>>> stream = BytesIO()
>>> stream.write(b'spam')
>>> stream.getvalue()
b'spam'
>>> stream = BytesIO(b'dpam')
>>> stream.read()
b'dpam'
Due to the sharp distinction that Python 3X draws between text and binary data, this
alternative may be better suited for scripts that deal with binary data. We’ll learn more
about the text-versus-binary issue in the next chapter when we explore files.
Capturing the stderr Stream
We’ve been focusing on stdin and stdout redirection, but stderr can be similarly reset
to files, pipes, and objects. Although some shells support this, it’s also straightforward
within a Python script. For instance, assigning sys.stderr to another instance of a class
such as Output or a StringIO object in the preceding section’s example allows your script
to intercept text written to standard error, too.
Python itself uses standard error for error message text (and the IDLE GUI interface
intercepts it and colors it red by default). However, no higher-level tools for standard
error do what print and input do for the output and input streams. If you wish to print
to the error stream, you’ll want to call sys.stderr.write() explicitly or read the next
section for a print call trick that makes this easier.
Redirecting standard errors from a shell command line is a bit more complex and less
portable. On most Unix-like systems, we can usually capture stderr output by using
shell-redirection syntax of the form command > output 2>&1. This may not work on some
platforms, though, and can even vary per Unix shell; see your shell’s manpages for more
details.
Redirection Syntax in Print Calls
Because resetting the stream attributes to new objects was so popular, the Python
print built-in is also extended to include an explicit file to which output is to be sent.
A statement of this form:
print(stuff, file=afile) # afile is an object, not a string name
Standard Streams | 127

prints stuff to afile instead of to sys.stdout. The net effect is similar to simply as-
signing sys.stdout to an object, but there is no need to save and restore in order to
return to the original output stream (as shown in the section on redirecting streams to
objects). For example:
import sys
print('spam' * 2, file=sys.stderr)
will send text the standard error stream object rather than sys.stdout for the duration
of this single print call only. The next normal print statement (without file) prints to
standard output as usual. Similarly, we can use either our custom class or the standard
library’s class as the output file with this hook:
>>> from io import StringIO
>>> buff = StringIO()
>>> print(42, file=buff)
>>> print('spam', file=buff)
>>> print(buff.getvalue())
42
spam
>>> from redirect import Output
>>> buff = Output()
>>> print(43, file=buff)
>>> print('eggs', file=buff)
>>> print(buff.text)
43
eggs
Other Redirection Options: os.popen and subprocess Revisited
Near the end of the preceding chapter, we took a first look at the built-in os.popen
function and its subprocess.Popen relative, which provide a way to redirect another
command’s streams from within a Python program. As we saw, these tools can be used
to run a shell command line (a string we would normally type at a DOS or csh prompt)
but also provide a Python file-like object connected to the command’s output stream—
reading the file object allows a script to read another program’s output. I suggested that
these tools may be used to tap into input streams as well.
Because of that, the os.popen and subprocess tools are another way to redirect streams
of spawned programs and are close cousins to some of the techniques we just met.
Their effect is much like the shell | command-line pipe syntax for redirecting streams
to programs (in fact, their names mean “pipe open”), but they are run within a script
and provide a file-like interface to piped streams. They are similar in spirit to the
redirect function, but are based on running programs (not calling functions), and the
command’s streams are processed in the spawning script as files (not tied to class ob-
jects). These tools redirect the streams of a program that a script starts, instead of
redirecting the streams of the script itself.
128 | Chapter 3: Script Execution Context

Redirecting input or output with os.popen
In fact, by passing in the desired mode flag, we redirect either a spawned program’s
output or input streams to a file in the calling scripts, and we can obtain the spawned
program’s exit status code from the close method (None means “no error” here). To
illustrate, consider the following two scripts:
C:\...\PP4E\System\Streams> type hello-out.py
print('Hello shell world')
C:\...\PP4E\System\Streams> type hello-in.py
inp = input()
open('hello-in.txt', 'w').write('Hello ' + inp + '\n')
These scripts can be run from a system shell window as usual:
C:\...\PP4E\System\Streams> python hello-out.py
Hello shell world
C:\...\PP4E\System\Streams> python hello-in.py
Brian
C:\...\PP4E\System\Streams> type hello-in.txt
Hello Brian
As we saw in the prior chapter, Python scripts can read output from other programs
and scripts like these, too, using code like the following:
C:\...\PP4E\System\Streams> python
>>> import os
>>> pipe = os.popen('python hello-out.py') # 'r' is default--read stdout
>>> pipe.read()
'Hello shell world\n'
>>> print(pipe.close()) # exit status: None is good
None
But Python scripts can also provide input to spawned programs’ standard input
streams—passing a “w” mode argument, instead of the default “r”, connects the re-
turned object to the spawned program’s input stream. What we write on the spawning
end shows up as input in the program started:
>>> pipe = os.popen('python hello-in.py', 'w') # 'w'--write to program stdin
>>> pipe.write('Gumby\n')
6
>>> pipe.close() # \n at end is optional
>>> open('hello-in.txt').read() # output sent to a file
'Hello Gumby\n'
The popen call is also smart enough to run the command string as an independent
process on platforms that support such a notion. It accepts an optional third argument
that can be used to control buffering of written text, which we’ll finesse here.
Standard Streams | 129

Redirecting input and output with subprocess
For even more control over the streams of spawned programs, we can employ the
subprocess module we introduced in the preceding chapter. As we learned earlier, this
module can emulate os.popen functionality, but it can also achieve feats such as
bidirectional stream communication (accessing both a program’s input and output)
and tying the output of one program to the input of another.
For instance, this module provides multiple ways to spawn a program and get both its
standard output text and exit status. Here are three common ways to leverage this
module to start a program and redirect its output stream (recall from Chapter 2 that
you may need to pass a shell=True argument to Popen and call to make this section’s
examples work on Unix-like platforms as they are coded here):
C:\...\PP4E\System\Streams> python
>>> from subprocess import Popen, PIPE, call
>>> X = call('python hello-out.py') # convenience
Hello shell world
>>> X
0
>>> pipe = Popen('python hello-out.py', stdout=PIPE)
>>> pipe.communicate()[0] # (stdout, stderr)
b'Hello shell world\r\n'
>>> pipe.returncode # exit status
0
>>> pipe = Popen('python hello-out.py', stdout=PIPE)
>>> pipe.stdout.read()
b'Hello shell world\r\n'
>>> pipe.wait() # exit status
0
The call in the first of these three techniques is just a convenience function (there are
more of these which you can look up in the Python library manual), and the
communicate in the second is roughly a convenience for the third (it sends data to stdin,
reads data from stdout until end-of-file, and waits for the process to end):
Redirecting and connecting to the spawned program’s input stream is just as simple,
though a bit more complex than the os.popen approach with 'w' file mode shown in
the preceding section (as mentioned in the last chapter, os.popen is implemented with
subprocess, and is thus itself just something of a convenience function today):
>>> pipe = Popen('python hello-in.py', stdin=PIPE)
>>> pipe.stdin.write(b'Pokey\n')
6
>>> pipe.stdin.close()
>>> pipe.wait()
0
>>> open('hello-in.txt').read() # output sent to a file
'Hello Pokey\n'
130 | Chapter 3: Script Execution Context

In fact, we can use obtain both the input and output streams of a spawned program with
this module. Let’s reuse the simple writer and reader scripts we wrote earlier to
demonstrate:
C:\...\PP4E\System\Streams> type writer.py
print("Help! Help! I'm being repressed!")
print(42)
C:\...\PP4E\System\Streams> type reader.py
print('Got this: "%s"' % input())
import sys
data = sys.stdin.readline()[:-1]
print('The meaning of life is', data, int(data) * 2)
Code like the following can both read from and write to the reader script—the pipe
object has two file-like objects available as attached attributes, one connecting to the
input stream, and one to the output (Python 2.X users might recognize these as equiv-
alent to the tuple returned by the now-defunct os.popen2):
>>> pipe = Popen('python reader.py', stdin=PIPE, stdout=PIPE)
>>> pipe.stdin.write(b'Lumberjack\n')
11
>>> pipe.stdin.write(b'12\n')
3
>>> pipe.stdin.close()
>>> output = pipe.stdout.read()
>>> pipe.wait()
0
>>> output
b'Got this: "Lumberjack"\r\nThe meaning of life is 12 24\r\n'
As we’ll learn in Chapter 5, we have to be cautious when talking back and forth to a
program like this; buffered output streams can lead to deadlock if writes and reads are
interleaved, and we may eventually need to consider tools like the Pexpect utility as a
workaround (more on this later).
Finally, even more exotic stream control is possible—the following connects two pro-
grams, by piping the output of one Python script into another, first with shell syntax,
and then with the subprocess module:
C:\...\PP4E\System\Streams> python writer.py | python reader.py
Got this: "Help! Help! I'm being repressed!"
The meaning of life is 42 84
C:\...\PP4E\System\Streams> python
>>> from subprocess import Popen, PIPE
>>> p1 = Popen('python writer.py', stdout=PIPE)
>>> p2 = Popen('python reader.py', stdin=p1.stdout, stdout=PIPE)
>>> output = p2.communicate()[0]
>>> output
b'Got this: "Help! Help! I\'m being repressed!"\r\nThe meaning of life is 42 84\r\n'
>>> p2.returncode
0
Standard Streams | 131

We can get close to this with os.popen, but that the fact that its pipes are read or write
(and not both) prevents us from catching the second script’s output in our code:
>>> import os
>>> p1 = os.popen('python writer.py', 'r')
>>> p2 = os.popen('python reader.py', 'w')
>>> p2.write( p1.read() )
36
>>> X = p2.close()
Got this: "Help! Help! I'm being repressed!"
The meaning of life is 42 84
>>> print(X)
None
From the broader perspective, the os.popen call and subprocess module are Python’s
portable equivalents of Unix-like shell syntax for redirecting the streams of spawned
programs. The Python versions also work on Windows, though, and are the most
platform-neutral way to launch another program from a Python script. The command-
line strings you pass to them may vary per platform (e.g., a directory listing requires an
ls on Unix but a dir on Windows), but the call itself works on all major Python
platforms.
On Unix-like platforms, the combination of the calls os.fork, os.pipe, os.dup, and
some os.exec variants can also be used to start a new independent program with
streams connected to the parent program’s streams. As such, it’s yet another way to
redirect streams and a low-level equivalent to tools such as os.popen (os.fork is available
in Cygwin’s Python on Windows).
Since these are all more advanced parallel processing tools, though, we’ll defer further
details on this front until Chapter 5, especially its coverage of pipes and exit status
codes. And we’ll resurrect subprocess again in Chapter 6, to code a regression tester
that intercepts all three standard streams of spawned test scripts—inputs, outputs, and
errors.
But first, Chapter 4 continues our survey of Python system interfaces by exploring the
tools available for processing files and directories. Although we’ll be shifting focus
somewhat, we’ll find that some of what we’ve learned here will already begin to come
in handy as general system-related tools. Spawning shell commands, for instance, pro-
vides ways to inspect directories, and the file interface we will expand on in the next
chapter is at the heart of the stream processing techniques we have studied here.
132 | Chapter 3: Script Execution Context

Python Versus csh
If you are familiar with other common shell script languages, it might be useful to see
how Python compares. Here is a simple script in a Unix shell language called csh that
mails all the files in the current working directory with a suffix of .py (i.e., all Python
source files) to a hopefully fictitious address:
#!/bin/csh
foreach x (*.py)
echo $x
mail eric@halfabee.com -s $x < $x
end
An equivalent Python script looks similar:
#!/usr/bin/python
import os, glob
for x in glob.glob('*.py'):
print(x)
os.system('mail eric@halfabee.com -s %s < %s' % (x, x))
but is slightly more verbose. Since Python, unlike csh, isn’t meant just for shell scripts,
system interfaces must be imported and called explicitly. And since Python isn’t just a
string-processing language, character strings must be enclosed in quotes, as in C.
Although this can add a few extra keystrokes in simple scripts like this, being a general-
purpose language makes Python a better tool once we leave the realm of trivial pro-
grams. We could, for example, extend the preceding script to do things like transfer
files by FTP, pop up a GUI message selector and status bar, fetch messages from an
SQL database, and employ COM objects on Windows, all using standard Python tools.
Python scripts also tend to be more portable to other platforms than csh. For instance,
if we used the Python SMTP interface module to send mail instead of relying on a Unix
command-line mail tool, the script would run on any machine with Python and an
Internet link (as we’ll see in Chapter 13, SMTP requires only sockets). And like C, we
don’t need $ to evaluate variables; what else would you expect in a free language?
Standard Streams | 133

CHAPTER 4
File and Directory Tools
“Erase Your Hard Drive in Five Easy Steps!”
This chapter continues our look at system interfaces in Python by focusing on file and
directory-related tools. As you’ll see, it’s easy to process files and directory trees with
Python’s built-in and standard library support. Because files are part of the core Python
language, some of this chapter’s material is a review of file basics covered in books like
Learning Python, Fourth Edition, and we’ll defer to such resources for more back-
ground details on some file-related concepts. For example, iteration, context managers,
and the file object’s support for Unicode encodings are demonstrated along the way,
but these topics are not repeated in full here. This chapter’s goal is to tell enough of the
file story to get you started writing useful scripts.
File Tools
External files are at the heart of much of what we do with system utilities. For instance,
a testing system may read its inputs from one file, store program results in another file,
and check expected results by loading yet another file. Even user interface and Internet-
oriented programs may load binary images and audio clips from files on the underlying
computer. It’s a core programming concept.
In Python, the built-in open function is the primary tool scripts use to access the files
on the underlying computer system. Since this function is an inherent part of the Python
language, you may already be familiar with its basic workings. When called, the open
function returns a new file object that is connected to the external file; the file object
has methods that transfer data to and from the file and perform a variety of file-related
operations. The open function also provides a portable interface to the underlying file-
system—it works the same way on every platform on which Python runs.
Other file-related modules built into Python allow us to do things such as manipulate
lower-level descriptor-based files (os); copy, remove, and move files and collections of
files (os a n d shutil); store data and objects in files by key (dbm a n d shelve); and access
135

SQL databases (sqlite3 and third-party add-ons). The last two of these categories are
related to database topics, addressed in Chapter 17.
In this section, we’ll take a brief tutorial look at the built-in file object and explore a
handful of more advanced file-related topics. As usual, you should consult either Py-
thon’s library manual or reference books such as Python Pocket Reference for further
details and methods we don’t have space to cover here. Remember, for quick interactive
help, you can also run dir(file) on an open file object to see an attributes list that
includes methods; help(file) for general help; and help(file.read) for help on a spe-
cific method such as read, though the file object implementation in 3.1 provides less
information for help than the library manual and other resources.
The File Object Model in Python 3.X
Just like the string types we noted in Chapter 2, file support in Python 3.X is a bit richer
than it was in the past. As we noted earlier, in Python 3.X str strings always represent
Unicode text (ASCII or wider), and bytes and bytearray strings represent raw binary
data. Python 3.X draws a similar and related distinction between files containing text
and binary data:
•Text files contain Unicode text. In your script, text file content is always a str
string—a sequence of characters (technically, Unicode “code points”). Text files
perform the automatic line-end translations described in this chapter by default
and automatically apply Unicode encodings to file content: they encode to and
decode from raw binary bytes on transfers to and from the file, according to a
provided or default encoding name. Encoding is trivial for ASCII text, but may be
sophisticated in other cases.
•Binary files contain raw 8-bit bytes. In your script, binary file content is always a
byte string, usually a bytes object—a sequence of small integers, which supports
most str operations and displays as ASCII characters whenever possible. Binary
files perform no translations of data when it is transferred to and from files: no line-
end translations or Unicode encodings are performed.
In practice, text files are used for all truly text-related data, and binary files store items
like packed binary data, images, audio files, executables, and so on. As a programmer
you distinguish between the two file types in the mode string argument you pass to
open: adding a “b” (e.g., 'rb', 'wb') means the file contains binary data. For coding new
file content, use normal strings for text (e.g., 'spam' or bytes.decode()) and byte strings
for binary (e.g., b'spam' or str.encode()).
Unless your file scope is limited to ASCII text, the 3.X text/binary distinction can
sometimes impact your code. Text files create and require str strings, and binary files
use byte strings; because you cannot freely mix the two string types in expressions, you
must choose file mode carefully. Many built-in tools we’ll use in this book make the
choice for us; the struct and pickle modules, for instance, deal in byte strings in 3.X,
136 | Chapter 4: File and Directory Tools

and the xml package in Unicode str. You must even be aware of the 3.X text/binary
distinction when using system tools like pipe descriptors and sockets, because they
transfer data as byte strings today (though their content can be decoded and encoded
as Unicode text if needed).
Moreover, because text-mode files require that content be decodable per a Unicode
encoding scheme, you must read undecodable file content in binary mode, as byte
strings (or catch Unicode exceptions in try statements and skip the file altogether).
This may include both truly binary files as well as text files that use encodings that are
nondefault and unknown. As we’ll see later in this chapter, because str strings are
always Unicode in 3.X, it’s sometimes also necessary to select byte string mode for the
names of files in directory tools such as os.listdir, glob.glob, and os.walk if they
cannot be decoded (passing in byte strings essentially suppresses decoding).
In fact, we’ll see examples where the Python 3.X distinction between str text and
bytes binary pops up in tools beyond basic files throughout this book—in Chapters
5 and 12 when we explore sockets; in Chapters 6 and 11 when we’ll need to ignore
Unicode errors in file and directory searches; in Chapter 12, where we’ll see how client-
side Internet protocol modules such as FTP and email, which run atop sockets, imply
file modes and encoding requirements; and more.
But just as for string types, although we will see some of these concepts in action in this
chapter, we’re going to take much of this story as a given here. File and string objects
are core language material and are prerequisite to this text. As mentioned earlier, be-
cause they are addressed by a 45-page chapter in the book Learning Python, Fourth
Edition, I won’t repeat their coverage in full in this book. If you find yourself confused
by the Unicode and binary file and string concepts in the following sections, I encourage
you to refer to that text or other resources for more background information in this
domain.
Using Built-in File Objects
Despite the text/binary dichotomy in Python 3.X, files are still very straightforward to
use. For most purposes, in fact, the open built-in function and its files objects are all
you need to remember to process files in your scripts. The file object returned by
open has methods for reading data (read, readline, readlines); writing data (write,
writelines); freeing system resources (close); moving to arbitrary positions in the file
(seek); forcing data in output buffers to be transferred to disk (flush); fetching the
underlying file handle (fileno); and more. Since the built-in file object is so easy to use,
let’s jump right into a few interactive examples.
Output files
To make a new file, call open with two arguments: the external name of the file to be
created and a mode string w (short for write). To store data on the file, call the file object’s
write method with a string containing the data to store, and then call the close method
File Tools | 137

to close the file. File write calls return the number of characters or bytes written (which
we’ll sometimes omit in this book to save space), and as we’ll see, close calls are often
optional, unless you need to open and read the file again during the same program or
session:
C:\temp> python
>>> file = open('data.txt', 'w') # open output file object: creates
>>> file.write('Hello file world!\n') # writes strings verbatim
18
>>> file.write('Bye file world.\n') # returns number chars/bytes written
18
>>> file.close() # closed on gc and exit too
And that’s it—you’ve just generated a brand-new text file on your computer, regardless
of the computer on which you type this code:
C:\temp> dir data.txt /B
data.txt
C:\temp> type data.txt
Hello file world!
Bye file world.
There is nothing unusual about the new file; here, I use the DOS dir and type com-
mands to list and display the new file, but it shows up in a file explorer GUI, too.
In the open function call shown in the preceding example, the first argument
can optionally specify a complete directory path as part of the filename string. If we
pass just a simple filename without a path, the file will appear in Python’s current
working directory. That is, it shows up in the place where the code is run. Here, the
directory C:\temp on my machine is implied by the bare filename data.txt, so this ac-
tually creates a file at C:\temp\data.txt. More accurately, the filename is relative to the
current working directory if it does not include a complete absolute directory path. See
“Current Working Directory” on page 104 (Chapter 3), for a refresher on this topic.
Also note that when opening in w mode, Python either creates the external file if it does
not yet exist or erases the file’s current contents if it is already present on your machine
(so be careful out there—you’ll delete whatever was in the file before).
Notice that we added an explicit \n end-of-line character to lines written to the
file; unlike the print built-in function, file object write methods write exactly what they
are passed without adding any extra formatting. The string passed to write shows up
character for character on the external file. In text files, data written may undergo line-
end or Unicode translations which we’ll describe ahead, but these are undone when
the data is later read back.
Output files also sport a writelines method, which simply writes all of the strings in a
list one at a time without adding any extra formatting. For example, here is a write
lines equivalent to the two write calls shown earlier:
file.writelines(['Hello file world!\n', 'Bye file world.\n'])
Opening.
Writing.
138 | Chapter 4: File and Directory Tools

This call isn’t as commonly used (and can be emulated with a simple for loop or other
iteration tool), but it is convenient in scripts that save output in a list to be written later.
The file close method used earlier finalizes file contents and frees up system
resources. For instance, closing forces buffered output data to be flushed out to disk.
Normally, files are automatically closed when the file object is garbage collected by the
interpreter (that is, when it is no longer referenced). This includes all remaining open
files when the Python session or program exits. Because of that, close calls are often
optional. In fact, it’s common to see file-processing code in Python in this idiom:
open('somefile.txt', 'w').write("G'day Bruce\n") # write to temporary object
open('somefile.txt', 'r').read() # read from temporary object
Since both these expressions make a temporary file object, use it immediately, and do
not save a reference to it, the file object is reclaimed right after data is transferred, and
is automatically closed in the process. There is usually no need for such code to call the
close method explicitly.
In some contexts, though, you may wish to explicitly close anyhow:
• For one, because the Jython implementation relies on Java’s garbage collector, you
can’t always be as sure about when files will be reclaimed as you can in standard
Python. If you run your Python code with Jython, you may need to close manually
if many files are created in a short amount of time (e.g. in a loop), in order to avoid
running out of file resources on operating systems where this matters.
• For another, some IDEs, such as Python’s standard IDLE GUI, may hold on to
your file objects longer than you expect (in stack tracebacks of prior errors, for
instance), and thus prevent them from being garbage collected as soon as you might
expect. If you write to an output file in IDLE, be sure to explicitly close (or flush)
your file if you need to reliably read it back during the same IDLE session. Other-
wise, output buffers might not be flushed to disk and your file may be incomplete
when read.
• And while it seems very unlikely today, it’s not impossible that this auto-close on
reclaim file feature could change in future. This is technically a feature of the file
object’s implementation, which may or may not be considered part of the language
definition over time.
For these reasons, manual close calls are not a bad idea in nontrivial programs, even if
they are technically not required. Closing is a generally harmless but robust habit to
form.
Ensuring file closure: Exception handlers and context managers
Manual file close method calls are easy in straight-line code, but how do you ensure
file closure when exceptions might kick your program beyond the point where the close
call is coded? First of all, make sure you must—files close themselves when they are
collected, and this will happen eventually, even when exceptions occur.
Closing.
File Tools | 139

If closure is required, though, there are two basic alternatives: the try statement’s
finally clause is the most general, since it allows you to provide general exit actions
for any type of exceptions:
myfile = open(filename, 'w')
try:
...process myfile...
finally:
myfile.close()
In recent Python releases, though, the with statement provides a more concise alterna-
tive for some specific objects and exit actions, including closing files:
with open(filename, 'w') as myfile:
...process myfile, auto-closed on statement exit...
This statement relies on the file object’s context manager: code automatically run both
on statement entry and on statement exit regardless of exception behavior. Because the
file object’s exit code closes the file automatically, this guarantees file closure whether
an exception occurs during the statement or not.
The with statement is notably shorter (3 lines) than the try/finally alternative, but it’s
also less general—with applies only to objects that support the context manager pro-
tocol, whereas try/finally allows arbitrary exit actions for arbitrary exception con-
texts. While some other object types have context managers, too (e.g., thread locks),
with is limited in scope. In fact, if you want to remember just one exit actions option,
try/finally is the most inclusive. Still, with yields less code for files that must be closed
and can serve well in such specific roles. It can even save a line of code when no
exceptions are expected (albeit at the expense of further nesting and indenting file
processing logic):
myfile = open(filename, 'w') # traditional form
...process myfile...
myfile.close()
with open(filename) as myfile: # context manager form
...process myfile...
In Python 3.1 and later, this statement can also specify multiple (a.k.a. nested) context
managers—any number of context manager items may be separated by commas, and
multiple items work the same as nested with statements. In general terms, the 3.1 and
later code:
with A() as a, B() as b:
...statements...
Runs the same as the following, which works in 3.1, 3.0, and 2.6:
with A() as a:
with B() as b:
...statements...
140 | Chapter 4: File and Directory Tools

For example, when the with statement block exits in the following, both files’ exit
actions are automatically run to close the files, regardless of exception outcomes:
with open('data') as fin, open('results', 'w') as fout:
for line in fin:
fout.write(transform(line))
Context manager–dependent code like this seems to have become more common in
recent years, but this is likely at least in part because newcomers are accustomed to
languages that require manual close calls in all cases. In most contexts there is no need
to wrap all your Python file-processing code in with statements—the files object’s auto-
close-on-collection behavior often suffices, and manual close calls are enough for many
other scripts. You should use the with or try options outlined here only if you must
close, and only in the presence of potential exceptions. Since standard C Python auto-
matically closes files on collection, though, neither option is required in many (and
perhaps most) scripts.
Input files
Reading data from external files is just as easy as writing, but there are more methods
that let us load data in a variety of modes. Input text files are opened with either a mode
flag of r (for “read”) or no mode flag at all—it defaults to r if omitted, and it commonly
is. Once opened, we can read the lines of a text file with the readlines method:
C:\temp> python
>>> file = open('data.txt') # open input file object: 'r' default
>>> lines = file.readlines() # read into line string list
>>> for line in lines: # BUT use file line iterator! (ahead)
... print(line, end='') # lines have a '\n' at end
...
Hello file world!
Bye file world.
The readlines method loads the entire contents of the file into memory and gives it to
our scripts as a list of line strings that we can step through in a loop. In fact, there are
many ways to read an input file:
file.read()
Returns a string containing all the characters (or bytes) stored in the file
file.read(N)
Returns a string containing the next N characters (or bytes) from the file
file.readline()
Reads through the next \n and returns a line string
file.readlines()
Reads the entire file and returns a list of line strings
File Tools | 141

Let’s run these method calls to read files, lines, and characters from a text file—the
seek(0) call is used here before each test to rewind the file to its beginning (more on
this call in a moment):
>>> file.seek(0) # go back to the front of file
>>> file.read() # read entire file into string
'Hello file world!\nBye file world.\n'
>>> file.seek(0) # read entire file into lines list
>>> file.readlines()
['Hello file world!\n', 'Bye file world.\n']
>>> file.seek(0)
>>> file.readline() # read one line at a time
'Hello file world!\n'
>>> file.readline()
'Bye file world.\n'
>>> file.readline() # empty string at end-of-file
''
>>> file.seek(0) # read N (or remaining) chars/bytes
>>> file.read(1), file.read(8) # empty string at end-of-file
('H', 'ello fil')
All of these input methods let us be specific about how much to fetch. Here are a few
rules of thumb about which to choose:
•read() and readlines() load the entire file into memory all at once. That makes
them handy for grabbing a file’s contents with as little code as possible. It also
makes them generally fast, but costly in terms of memory for huge files—loading
a multigigabyte file into memory is not generally a good thing to do (and might not
be possible at all on a given computer).
• On the other hand, because the readline() and read(N) calls fetch just part of the
file (the next line or N-character-or-byte block), they are safer for potentially big
files but a bit less convenient and sometimes slower. Both return an empty string
when they reach end-of-file. If speed matters and your files aren’t huge, read or
readlines may be a generally better choice.
• See also the discussion of the newer file iterators in the next section. As we’ll see,
iterators combine the convenience of readlines() with the space efficiency of read
line() and are the preferred way to read text files by lines today.
The seek(0) call used repeatedly here means “go back to the start of the file.” In our
example, it is an alternative to reopening the file each time. In files, all read and write
operations take place at the current position; files normally start at offset 0 when opened
and advance as data is transferred. The seek call simply lets us move to a new position
for the next transfer operation. More on this method later when we explore random
access files.
142 | Chapter 4: File and Directory Tools

Reading lines with file iterators
In older versions of Python, the traditional way to read a file line by line in a for loop
was to read the file into a list that could be stepped through as usual:
>>> file = open('data.txt')
>>> for line in file.readlines(): # DON'T DO THIS ANYMORE!
... print(line, end='')
If you’ve already studied the core language using a first book like Learning Python, you
may already know that this coding pattern is actually more work than is needed today—
both for you and your computer’s memory. In recent Pythons, the file object includes
an iterator which is smart enough to grab just one line per request in all iteration con-
texts, including for loops and list comprehensions. The practical benefit of this exten-
sion is that you no longer need to call readlines in a for loop to scan line by line—the
iterator reads lines on request automatically:
>>> file = open('data.txt')
>>> for line in file: # no need to call readlines
... print(line, end='') # iterator reads next line each time
...
Hello file world!
Bye file world.
Better still, you can open the file in the loop statement itself, as a temporary which will
be automatically closed on garbage collection when the loop ends (that’s normally the
file’s sole reference):
>>> for line in open('data.txt'): # even shorter: temporary file object
... print(line, end='') # auto-closed when garbage collected
...
Hello file world!
Bye file world.
Moreover, this file line-iterator form does not load the entire file into a line’s list all at
once, so it will be more space efficient for large text files. Because of that, this is the
prescribed way to read line by line today. If you want to see what really happens inside
the for loop, you can use the iterator manually; it’s just a __next__ method (run by the
next built-in function), which is similar to calling the readline method each time
through, except that read methods return an empty string at end-of-file (EOF) and the
iterator raises an exception to end the iteration:
>>> file = open('data.txt') # read methods: empty at EOF
>>> file.readline()
'Hello file world!\n'
>>> file.readline()
'Bye file world.\n'
>>> file.readline()
''
>>> file = open('data.txt') # iterators: exception at EOF
>>> file.__next__() # no need to call iter(file) first,
'Hello file world!\n' # since files are their own iterator
File Tools | 143

>>> file.__next__()
'Bye file world.\n'
>>> file.__next__()
Traceback (most recent call last):
File "<stdin>", line 1, in <module>
StopIteration
Interestingly, iterators are automatically used in all iteration contexts, including the
list constructor call, list comprehension expressions, map calls, and in membership
checks:
>>> open('data.txt').readlines() # always read lines
['Hello file world!\n', 'Bye file world.\n']
>>> list(open('data.txt')) # force line iteration
['Hello file world!\n', 'Bye file world.\n']
>>> lines = [line.rstrip() for line in open('data.txt')] # comprehension
>>> lines
['Hello file world!', 'Bye file world.']
>>> lines = [line.upper() for line in open('data.txt')] # arbitrary actions
>>> lines
['HELLO FILE WORLD!\n', 'BYE FILE WORLD.\n']
>>> list(map(str.split, open('data.txt'))) # apply a function
[['Hello', 'file', 'world!'], ['Bye', 'file', 'world.']]
>>> line = 'Hello file world!\n'
>>> line in open('data.txt') # line membership
True
Iterators may seem somewhat implicit at first glance, but they’re representative of the
many ways that Python makes developers’ lives easier over time.
Other open options
Besides the w and (default) r file open modes, most platforms support an a mode string,
meaning “append.” In this output mode, write methods add data to the end of the file,
and the open call will not erase the current contents of the file:
>>> file = open('data.txt', 'a') # open in append mode: doesn't erase
>>> file.write('The Life of Brian') # added at end of existing data
>>> file.close()
>>>
>>> open('data.txt').read() # open and read entire file
'Hello file world!\nBye file world.\nThe Life of Brian'
In fact, although most files are opened using the sorts of calls we just ran, open actually
supports additional arguments for more specific processing needs, the first three of
which are the most commonly used—the filename, the open mode, and a buffering
specification. All but the first of these are optional: if omitted, the open mode argument
144 | Chapter 4: File and Directory Tools

defaults to r (input), and the buffering policy is to enable full buffering. For special
needs, here are a few things you should know about these three open arguments:
Filename
As mentioned earlier, filenames can include an explicit directory path to refer to
files in arbitrary places on your computer; if they do not, they are taken to be names
relative to the current working directory (described in the prior chapter). In general,
most filename forms you can type in your system shell will work in an open call.
For instance, a relative filename argument r'..\temp\spam.txt' on Windows
means spam.txt in the temp subdirectory of the current working directory’s
parent—up one, and down to directory temp.
Open mode
The open function accepts other modes, too, some of which we’ll see at work later
in this chapter: r+, w+, and a+ to open for reads and writes, and any mode string
with a b to designate binary mode. For instance, mode r+ means both reads and
writes are allowed on an existing file; w+ allows reads and writes but creates the file
anew, erasing any prior content; rb and wb read and write data in binary mode
without any translations; and wb+ and r+b both combine binary mode and input
plus output. In general, the mode string defaults to r for read but can be w for write
and a for append, and you may add a + for update, as well as a b or t for binary or
text mode; order is largely irrelevant.
As we’ll see later in this chapter, the + modes are often used in conjunction with
the file object’s seek method to achieve random read/write access. Regardless of
mode, file contents are always strings in Python programs—read methods return
a string, and we pass a string to write methods. As also described later, though, the
mode string implies which type of string is used: str for text mode or bytes and
other byte string types for binary mode.
Buffering policy
The open call also takes an optional third buffering policy argument which lets you
control buffering for the file—the way that data is queued up before being trans-
ferred, to boost performance. If passed, 0 means file operations are unbuffered
(data is transferred immediately, but allowed in binary modes only), 1 means they
are line buffered, and any other positive value means to use a full buffering (which
is the default, if no buffering argument is passed).
As usual, Python’s library manual and reference texts have the full story on additional
open arguments beyond these three. For instance, the open call supports additional
arguments related to the end-of-line mapping behavior and the automatic Unicode
encoding of content performed for text-mode files. Since we’ll discuss both of these
concepts in the next section, let’s move ahead.
File Tools | 145

Binary and Text Files
All of the preceding examples process simple text files, but Python scripts can also open
and process files containing binary data—JPEG images, audio clips, packed binary data
produced by FORTRAN and C programs, encoded text, and anything else that can be
stored in files as bytes. The primary difference in terms of your code is the mode argu-
ment passed to the built-in open function:
>>> file = open('data.txt', 'wb') # open binary output file
>>> file = open('data.txt', 'rb') # open binary input file
Once you’ve opened binary files in this way, you may read and write their contents
using the same methods just illustrated: read, write, and so on. The readline and
readlines methods as well as the file’s line iterator still work here for text files opened
in binary mode, but they don’t make sense for truly binary data that isn’t line oriented
(end-of-line bytes are meaningless, if they appear at all).
In all cases, data transferred between files and your programs is represented as Python
strings within scripts, even if it is binary data. For binary mode files, though, file content
is represented as byte strings. Continuing with our text file from preceding examples:
>>> open('data.txt').read() # text mode: str
'Hello file world!\nBye file world.\nThe Life of Brian'
>>> open('data.txt', 'rb').read() # binary mode: bytes
b'Hello file world!\r\nBye file world.\r\nThe Life of Brian'
>>> file = open('data.txt', 'rb')
>>> for line in file: print(line)
...
b'Hello file world!\r\n'
b'Bye file world.\r\n'
b'The Life of Brian'
This occurs because Python 3.X treats text-mode files as Unicode, and automatically
decodes content on input and encodes it on output. Binary mode files instead give us
access to file content as raw byte strings, with no translation of content—they reflect
exactly what is stored on the file. Because str strings are always Unicode text in 3.X,
the special bytes string is required to represent binary data as a sequence of byte-size
integers which may contain any 8-bit value. Because normal and byte strings have al-
most identical operation sets, many programs can largely take this on faith; but keep
in mind that you really must open truly binary data in binary mode for input, because
it will not generally be decodable as Unicode text.
Similarly, you must also supply byte strings for binary mode output—normal strings
are not raw binary data, but are decoded Unicode characters (a.k.a. code points) which
are encoded to binary on text-mode output:
>>> open('data.bin', 'wb').write(b'Spam\n')
5
>>> open('data.bin', 'rb').read()
146 | Chapter 4: File and Directory Tools

b'Spam\n'
>>> open('data.bin', 'wb').write('spam\n')
TypeError: must be bytes or buffer, not str
But notice that this file’s line ends with just \n, instead of the Windows \r\n that showed
up in the preceding example for the text file in binary mode. Strictly speaking, binary
mode disables Unicode encoding translation, but it also prevents the automatic end-
of-line character translation performed by text-mode files by default. Before we can
understand this fully, though, we need to study the two main ways in which text files
differ from binary.
Unicode encodings for text files
As mentioned earlier, text-mode file objects always translate data according to a default
or provided Unicode encoding type, when the data is transferred to and from external
file. Their content is encoded on files, but decoded in memory. Binary mode files don’t
perform any such translation, which is what we want for truly binary data. For instance,
consider the following string, which embeds a Unicode character whose binary value
is outside the normal 7-bit range of the ASCII encoding standard:
>>> data = 'sp\xe4m'
>>> data
'späm'
>>> 0xe4, bin(0xe4), chr(0xe4)
(228, '0b11100100', 'ä')
It’s possible to manually encode this string according to a variety of Unicode encoding
types—its raw binary byte string form is different under some encodings:
>>> data.encode('latin1') # 8-bit characters: ascii + extras
b'sp\xe4m'
>>> data.encode('utf8') # 2 bytes for special characters only
b'sp\xc3\xa4m'
>>> data.encode('ascii') # does not encode per ascii
UnicodeEncodeError: 'ascii' codec can't encode character '\xe4' in position 2:
ordinal not in range(128)
Python displays printable characters in these strings normally, but nonprintable bytes
show as \xNN hexadecimal escapes which become more prevalent under more sophis-
ticated encoding schemes (cp500 in the following is an EBCDIC encoding):
>>> data.encode('utf16') # 2 bytes per character plus preamble
b'\xff\xfes\x00p\x00\xe4\x00m\x00'
>>> data.encode('cp500') # an ebcdic encoding: very different
b'\xa2\x97C\x94'
The encoded results here reflect the string’s raw binary form when stored in files. Man-
ual encoding is usually unnecessary, though, because text files handle encodings
automatically on data transfers—reads decode and writes encode, according
File Tools | 147

to the encoding name passed in (or a default for the underlying platform: see
sys.getdefaultencoding). Continuing our interactive session:
>>> open('data.txt', 'w', encoding='latin1').write(data)
4
>>> open('data.txt', 'r', encoding='latin1').read()
'späm'
>>> open('data.txt', 'rb').read()
b'sp\xe4m'
If we open in binary mode, though, no encoding translation occurs—the last command
in the preceding example shows us what’s actually stored on the file. To see how file
content differs for other encodings, let’s save the same string again:
>>> open('data.txt', 'w', encoding='utf8').write(data) # encode data per utf8
4
>>> open('data.txt', 'r', encoding='utf8').read() # decode: undo encoding
'späm'
>>> open('data.txt', 'rb').read() # no data translations
b'sp\xc3\xa4m'
This time, raw file content is different, but text mode’s auto-decoding makes the string
the same by the time it’s read back by our script. Really, encodings pertain only to
strings while they are in files; once they are loaded into memory, strings are simply
sequences of Unicode characters (“code points”). This translation step is what we want
for text files, but not for binary. Because binary modes skip the translation, you’ll want
to use them for truly binary data. If fact, you usually must—trying to write unencodable
data and attempting to read undecodable data is an error:
>>> open('data.txt', 'w', encoding='ascii').write(data)
UnicodeEncodeError: 'ascii' codec can't encode character '\xe4' in position 2:
ordinal not in range(128)
>>> open(r'C:\Python31\python.exe', 'r').read()
UnicodeDecodeError: 'charmap' codec can't decode byte 0x90 in position 2:
character maps to <undefined>
Binary mode is also a last resort for reading text files, if they cannot be decoded per the
underlying platform’s default, and the encoding type is unknown—the following re-
creates the original strings if encoding type is known, but fails if it is not known unless
binary mode is used (such failure may occur either on inputting the data or printing it,
but it fails nevertheless):
>>> open('data.txt', 'w', encoding='cp500').writelines(['spam\n', 'ham\n'])
>>> open('data.txt', 'r', encoding='cp500').readlines()
['spam\n', 'ham\n']
>>> open('data.txt', 'r').readlines()
UnicodeDecodeError: 'charmap' codec can't decode byte 0x81 in position 2:
character maps to <undefined>
>>> open('data.txt', 'rb').readlines()
[b'\xa2\x97\x81\x94\r%\x88\x81\x94\r%']
148 | Chapter 4: File and Directory Tools

>>> open('data.txt', 'rb').read()
b'\xa2\x97\x81\x94\r%\x88\x81\x94\r%'
If all your text is ASCII you generally can ignore encoding altogether; data in files maps
directly to characters in strings, because ASCII is a subset of most platforms’ default
encodings. If you must process files created with other encodings, and possibly on
different platforms (obtained from the Web, for instance), binary mode may be required
if encoding type is unknown. Keep in mind, however, that text in still-encoded binary
form might not work as you expect: because it is encoded per a given encoding scheme,
it might not accurately compare or combine with text encoded in other schemes.
Again, see other resources for more on the Unicode story. We’ll revisit the Unicode
story at various points in this book, especially in Chapter 9, to see how it relates to the
tkinter Text widget, and in Part IV, covering Internet programming, to learn what it
means for data shipped over networks by protocols such as FTP, email, and the Web
at large. Text files have another feature, though, which is similarly a nonfeature for
binary data: line-end translations, the topic of the next section.
End-of-line translations for text files
For historical reasons, the end of a line of text in a file is represented by different char-
acters on different platforms. It’s a single \n character on Unix-like platforms, but the
two-character sequence \r\n on Windows. That’s why files moved between Linux and
Windows may look odd in your text editor after transfer—they may still be stored using
the original platform’s end-of-line convention.
For example, most Windows editors handle text in Unix format, but Notepad has been
a notable exception—text files copied from Unix or Linux may look like one long line
when viewed in Notepad, with strange characters inside (\n). Similarly, transferring a
file from Windows to Unix in binary mode retains the \r characters (which often appear
as ^M in text editors).
Python scripts that process text files don’t normally have to care, because the files object
automatically maps the DOS \r\n sequence to a single \n. It works like this by default—
when scripts are run on Windows:
• For files opened in text mode, \r\n is translated to \n when input.
• For files opened in text mode, \n is translated to \r\n when output.
• For files opened in binary mode, no translation occurs on input or output.
On Unix-like platforms, no translations occur, because \n is used in files. You should
keep in mind two important consequences of these rules. First, the end-of-line character
for text-mode files is almost always represented as a single \n within Python scripts,
regardless of how it is stored in external files on the underlying platform. By mapping
to and from \n on input and output, Python hides the platform-specific difference.
The second consequence of the mapping is subtler: when processing binary files, binary
open modes (e.g, rb, wb) effectively turn off line-end translations. If they did not, the
File Tools | 149

translations listed previously could very well corrupt data as it is input or output—a
random \r in data might be dropped on input, or added for a \n in the data on output.
The net effect is that your binary data would be trashed when read and written—
probably not quite what you want for your audio files and images!
This issue has become almost secondary in Python 3.X, because we generally cannot
use binary data with text-mode files anyhow—because text-mode files automatically
apply Unicode encodings to content, transfers will generally fail when the data cannot
be decoded on input or encoded on output. Using binary mode avoids Unicode errors,
and automatically disables line-end translations as well (Unicode error can be caught
in try statements as well). Still, the fact that binary mode prevents end-of-line transla-
tions to protect file content is best noted as a separate feature, especially if you work
in an ASCII-only world where Unicode encoding issues are irrelevant.
Here’s the end-of-line translation at work in Python 3.1 on Windows—text mode
translates to and from the platform-specific line-end sequence so our scripts are
portable:
>>> open('temp.txt', 'w').write('shrubbery\n') # text output mode: \n -> \r\n
10
>>> open('temp.txt', 'rb').read() # binary input: actual file bytes
b'shrubbery\r\n'
>>> open('temp.txt', 'r').read() # test input mode: \r\n -> \n
'shrubbery\n'
By contrast, writing data in binary mode prevents all translations as expected, even if
the data happens to contain bytes that are part of line-ends in text mode (byte strings
print their characters as ASCII if printable, else as hexadecimal escapes):
>>> data = b'a\0b\rc\r\nd' # 4 escape code bytes, 4 normal
>>> len(data)
8
>>> open('temp.bin', 'wb').write(data) # write binary data to file as is
8
>>> open('temp.bin', 'rb').read() # read as binary: no translation
b'a\x00b\rc\r\nd'
But reading binary data in text mode, whether accidental or not, can corrupt the data
when transferred because of line-end translations (assuming it passes as decodable at
all; ASCII bytes like these do on this Windows platform):
>>> open('temp.bin', 'r').read() # text mode read: botches \r !
'a\x00b\nc\nd'
Similarly, writing binary data in text mode can have as the same effect—line-end bytes
may be changed or inserted (again, assuming the data is encodable per the platform’s
default):
>>> open('temp.bin', 'w').write(data) # must pass str for text mode
TypeError: must be str, not bytes # use bytes.decode() for to-str
>>> data.decode()
'a\x00b\rc\r\nd'
150 | Chapter 4: File and Directory Tools

>>> open('temp.bin', 'w').write(data.decode())
8
>>> open('temp.bin', 'rb').read() # text mode write: added \r !
b'a\x00b\rc\r\r\nd'
>>> open('temp.bin', 'r').read() # again drops, alters \r on input
'a\x00b\nc\n\nd'
The short story to remember here is that you should generally use \n to refer to end-
line in all your text file content, and you should always open binary data in binary file
modes to suppress both end-of-line translations and any Unicode encodings. A file’s
content generally determines its open mode, and file open modes usually process file
content exactly as we want.
Keep in mind, though, that you might also need to use binary file modes for text in
special contexts. For instance, in Chapter 6’s examples, we’ll sometimes open text files
in binary mode to avoid possible Unicode decoding errors, for files generated on arbi-
trary platforms that may have been encoded in arbitrary ways. Doing so avoids encod-
ing errors, but also can mean that some text might not work as expected—searches
might not always be accurate when applied to such raw text, since the search key must
be in bytes string formatted and encoded according to a specific and possibly incom-
patible encoding scheme.
In Chapter 11’s PyEdit, we’ll also need to catch Unicode exceptions in a “grep” direc-
tory file search utility, and we’ll go further to allow Unicode encodings to be specified
for file content across entire trees. Moreover, a script that attempts to translate between
different platforms’ end-of-line character conventions explicitly may need to read text
in binary mode to retain the original line-end representation truly present in the file; in
text mode, they would already be translated to \n by the time they reached the script.
It’s also possible to disable or further tailor end-of-line translations in text mode with
additional open arguments we will finesse here. See the newline argument in open ref-
erence documentation for details; in short, passing an empty string to this argument
also prevents line-end translation but retains other text-mode behavior. For this chap-
ter, let’s turn next to two common use cases for binary data files: packed binary data
and random access.
Parsing packed binary data with the struct module
By using the letter b in the open call, you can open binary datafiles in a platform-neutral
way and read and write their content with normal file object methods. But how do you
process binary data once it has been read? It will be returned to your script as a simple
string of bytes, most of which are probably not printable characters.
If you just need to pass binary data along to another file or program, your work is
done—for instance, simply pass the byte string to another file opened in binary mode.
And if you just need to extract a number of bytes from a specific position, string slicing
will do the job; you can even follow up with bitwise operations if you need to. To get
File Tools | 151

at the contents of binary data in a structured way, though, as well as to construct its
contents, the standard library struct module is a more powerful alternative.
The struct module provides calls to pack and unpack binary data, as though the data
was laid out in a C-language struct declaration. It is also capable of composing and
decomposing using any endian-ness you desire (endian-ness determines whether the
most significant bits of binary numbers are on the left or right side). Building a binary
datafile, for instance, is straightforward—pack Python values into a byte string and
write them to a file. The format string here in the pack call means big-endian (>), with
an integer, four-character string, half integer, and floating-point number:
>>> import struct
>>> data = struct.pack('>i4shf', 2, 'spam', 3, 1.234)
>>> data
b'\x00\x00\x00\x02spam\x00\x03?\x9d\xf3\xb6'
>>> file = open('data.bin', 'wb')
>>> file.write(data)
14
>>> file.close()
Notice how the struct module returns a bytes string: we’re in the realm of binary data
here, not text, and must use binary mode files to store. As usual, Python displays most
of the packed binary data’s bytes here with \xNN hexadecimal escape sequences, because
the bytes are not printable characters. To parse data like that which we just produced,
read it off the file and pass it to the struct module with the same format string—you
get back a tuple containing the values parsed out of the string and converted to Python
objects:
>>> import struct
>>> file = open('data.bin', 'rb')
>>> bytes = file.read()
>>> values = struct.unpack('>i4shf', data)
>>> values
(2, b'spam', 3, 1.2339999675750732)
Parsed-out strings are byte strings again, and we can apply string and bitwise operations
to probe deeper:
>>> bin(values[0] | 0b1) # accessing bits and bytes
'0b11'
>>> values[1], list(values[1]), values[1][0]
(b'spam', [115, 112, 97, 109], 115)
Also note that slicing comes in handy in this domain; to grab just the four-character
string in the middle of the packed binary data we just read, we can simply slice it out.
Numeric values could similarly be sliced out and then passed to struct.unpack for
conversion:
>>> bytes
b'\x00\x00\x00\x02spam\x00\x03?\x9d\xf3\xb6'
>>> bytes[4:8]
b'spam'
152 | Chapter 4: File and Directory Tools

>>> number = bytes[8:10]
>>> number
b'\x00\x03'
>>> struct.unpack('>h', number)
(3,)
Packed binary data crops up in many contexts, including some networking tasks, and
in data produced by other programming languages. Because it’s not part of every pro-
gramming job’s description, though, we’ll defer to the struct module’s entry in the
Python library manual for more details.
Random access files
Binary files also typically see action in random access processing. Earlier, we mentioned
that adding a + to the open mode string allows a file to be both read and written. This
mode is typically used in conjunction with the file object’s seek method to support
random read/write access. Such flexible file processing modes allow us to read bytes
from one location, write to another, and so on. When scripts combine this with binary
file modes, they may fetch and update arbitrary bytes within a file.
We used seek earlier to rewind files instead of closing and reopening. As mentioned,
read and write operations always take place at the current position in the file; files
normally start at offset 0 when opened and advance as data is transferred. The seek call
lets us move to a new position for the next transfer operation by passing in a byte offset.
Python’s seek method also accepts an optional second argument that has one of three
values—0 for absolute file positioning (the default); 1 to seek relative to the current
position; and 2 to seek relative to the file’s end. That’s why passing just an offset of 0
to seek is roughly a file rewind operation: it repositions the file to its absolute start. In
general, seek supports random access on a byte-offset basis. Seeking to a multiple of a
record’s size in a binary file, for instance, allows us to fetch a record by its relative
position.
Although you can use seek without + modes in open (e.g., to just read from random
locations), it’s most flexible when combined with input/output files. And while you
can perform random access in text mode, too, the fact that text modes perform Unicode
encodings and line-end translations make them difficult to use when absolute byte
offsets and lengths are required for seeks and reads—your data may look very different
when stored in files. Text mode may also make your data nonportable to platforms
with different default encodings, unless you’re willing to always specify an explicit
encoding for opens. Except for simple unencoded ASCII text without line-ends, seek
tends to works best with binary mode files.
To demonstrate, let’s create a file in w+b mode (equivalent to wb+) and write some data
to it; this mode allows us to both read and write, but initializes the file to be empty if
it’s already present (all w modes do). After writing some data, we seek back to file start
to read its content (some integer return values are omitted in this example again for
brevity):
File Tools | 153

>>> records = [bytes([char] * 8) for char in b'spam']
>>> records
[b'ssssssss', b'pppppppp', b'aaaaaaaa', b'mmmmmmmm']
>>> file = open('random.bin', 'w+b')
>>> for rec in records: # write four records
... size = file.write(rec) # bytes for binary mode
...
>>> file.flush()
>>> pos = file.seek(0) # read entire file
>>> print(file.read())
b'ssssssssppppppppaaaaaaaammmmmmmm'
Now, let’s reopen our file in r+b mode; this mode allows both reads and writes again,
but does not initialize the file to be empty. This time, we seek and read in multiples of
the size of data items (“records”) stored, to both fetch and update them at random:
c:\temp> python
>>> file = open('random.bin', 'r+b')
>>> print(file.read()) # read entire file
b'ssssssssppppppppaaaaaaaammmmmmmm'
>>> record = b'X' * 8
>>> file.seek(0) # update first record
>>> file.write(record)
>>> file.seek(len(record) * 2) # update third record
>>> file.write(b'Y' * 8)
>>> file.seek(8)
>>> file.read(len(record)) # fetch second record
b'pppppppp'
>>> file.read(len(record)) # fetch next (third) record
b'YYYYYYYY'
>>> file.seek(0) # read entire file
>>> file.read()
b'XXXXXXXXppppppppYYYYYYYYmmmmmmmm'
c:\temp> type random.bin # the view outside Python
XXXXXXXXppppppppYYYYYYYYmmmmmmmm
Finally, keep in mind that seek can be used to achieve random access, even if it’s just
for input. The following seeks in multiples of record size to read (but not write) fixed-
length records at random. Notice that it also uses r text mode: since this data is simple
ASCII text bytes and has no line-ends, text and binary modes work the same on this
platform:
c:\temp> python
>>> file = open('random.bin', 'r') # text mode ok if no encoding/endlines
>>> reclen = 8
>>> file.seek(reclen * 3) # fetch record 4
>>> file.read(reclen)
'mmmmmmmm'
>>> file.seek(reclen * 1) # fetch record 2
>>> file.read(reclen)
154 | Chapter 4: File and Directory Tools

'pppppppp'
>>> file = open('random.bin', 'rb') # binary mode works the same here
>>> file.seek(reclen * 2) # fetch record 3
>>> file.read(reclen) # returns byte strings
b'YYYYYYYY'
But unless your file’s content is always a simple unencoded text form like ASCII and
has no translated line-ends, text mode should not generally be used if you are going to
seek—line-ends may be translated on Windows and Unicode encodings may make
arbitrary transformations, both of which can make absolute seek offsets difficult to use.
In the following, for example, the positions of characters after the first non-ASCII no
longer match between the string in Python and its encoded representation on the file:
>>> data = 'sp\xe4m' # data to your script
>>> data, len(data) # 4 unicode chars, 1 nonascii
('späm', 4)
>>> data.encode('utf8'), len(data.encode('utf8')) # bytes written to file
(b'sp\xc3\xa4m', 5)
>>> f = open('test', mode='w+', encoding='utf8') # use text mode, encoded
>>> f.write(data)
>>> f.flush()
>>> f.seek(0); f.read(1) # ascii bytes work
's'
>>> f.seek(2); f.read(1) # as does 2-byte nonascii
'ä'
>>> data[3] # but offset 3 is not 'm' !
'm'
>>> f.seek(3); f.read(1)
UnicodeDecodeError: 'utf8' codec can't decode byte 0xa4 in position 0:
unexpected code byte
As you can see, Python’s file modes provide flexible file processing for programs that
require it. In fact, the os module offers even more file processing options, as the next
section describes.
Lower-Level File Tools in the os Module
The os module contains an additional set of file-processing functions that are distinct
from the built-in file object tools demonstrated in previous examples. For instance, here
is a partial list of os file-related calls:
os.open( path, flags, mode )
Opens a file and returns its descriptor
os.read( descriptor, N )
Reads at most N bytes and returns a byte string
os.write( descriptor, string )
Writes bytes in byte string string to the file
File Tools | 155

os.lseek( descriptor, position , how )
Moves to position in the file
Technically, os calls process files by their descriptors, which are integer codes or “han-
dles” that identify files in the operating system. Descriptor-based files deal in raw bytes,
and have no notion of the line-end or Unicode translations for text that we studied in
the prior section. In fact, apart from extras like buffering, descriptor-based files gener-
ally correspond to binary mode file objects, and we similarly read and write bytes
strings, not str strings. However, because the descriptor-based file tools in os are lower
level and more complex than the built-in file objects created with the built-in open
function, you should generally use the latter for all but very special file-processing
needs.*
Using os.open files
To give you the general flavor of this tool set, though, let’s run a few interactive ex-
periments. Although built-in file objects and os module descriptor files are processed
with distinct tool sets, they are in fact related—the file system used by file objects simply
adds a layer of logic on top of descriptor-based files.
In fact, the fileno file object method returns the integer descriptor associated with a
built-in file object. For instance, the standard stream file objects have descriptors 0, 1,
and 2; calling the os.write function to send data to stdout by descriptor has the same
effect as calling the sys.stdout.write method:
>>> import sys
>>> for stream in (sys.stdin, sys.stdout, sys.stderr):
... print(stream.fileno())
...
0
1
2
>>> sys.stdout.write('Hello stdio world\n') # write via file method
Hello stdio world
18
>>> import os
>>> os.write(1, b'Hello descriptor world\n') # write via os module
Hello descriptor world
23
Because file objects we open explicitly behave the same way, it’s also possible to process
a given real external file on the underlying computer through the built-in open function,
tools in the os module, or both (some integer return values are omitted here for brevity):
* For instance, to process pipes, described in Chapter 5. The Python os.pipe call returns two file descriptors,
which can be processed with os module file tools or wrapped in a file object with os.fdopen. When used with
descriptor-based file tools in os, pipes deal in byte strings, not text. Some device files may require lower-level
control as well.
156 | Chapter 4: File and Directory Tools

>>> file = open(r'C:\temp\spam.txt', 'w') # create external file, object
>>> file.write('Hello stdio file\n') # write via file object method
>>> file.flush() # else os.write to disk first!
>>> fd = file.fileno() # get descriptor from object
>>> fd
3
>>> import os
>>> os.write(fd, b'Hello descriptor file\n') # write via os module
>>> file.close()
C:\temp> type spam.txt # lines from both schemes
Hello stdio file
Hello descriptor file
os.open mode flags
So why the extra file tools in os? In short, they give more low-level control over file
processing. The built-in open function is easy to use, but it may be limited by the un-
derlying filesystem that it uses, and it adds extra behavior that we do not want. The
os module lets scripts be more specific—for example, the following opens a descriptor-
based file in read-write and binary modes by performing a binary “or” on two mode
flags exported by os:
>>> fdfile = os.open(r'C:\temp\spam.txt', (os.O_RDWR | os.O_BINARY))
>>> os.read(fdfile, 20)
b'Hello stdio file\r\nHe'
>>> os.lseek(fdfile, 0, 0) # go back to start of file
>>> os.read(fdfile, 100) # binary mode retains "\r\n"
b'Hello stdio file\r\nHello descriptor file\n'
>>> os.lseek(fdfile, 0, 0)
>>> os.write(fdfile, b'HELLO') # overwrite first 5 bytes
5
C:\temp> type spam.txt
HELLO stdio file
Hello descriptor file
In this case, binary mode strings rb+ and r+b in the basic open call are equivalent:
>>> file = open(r'C:\temp\spam.txt', 'rb+') # same but with open/objects
>>> file.read(20)
b'HELLO stdio file\r\nHe'
>>> file.seek(0)
>>> file.read(100)
b'HELLO stdio file\r\nHello descriptor file\n'
>>> file.seek(0)
>>> file.write(b'Jello')
5
>>> file.seek(0)
>>> file.read()
b'Jello stdio file\r\nHello descriptor file\n'
File Tools | 157

But on some systems, os.open flags let us specify more advanced things like exclusive
access (O_EXCL) and nonblocking modes (O_NONBLOCK) when a file is opened. Some of
these flags are not portable across platforms (another reason to use built-in file objects
most of the time); see the library manual or run a dir(os) call on your machine for an
exhaustive list of other open flags available.
One final note here: using os.open w i t h t h e O_EXCL f l a g i s t h e m o s t p o r t a b l e w a y t o lock
files for concurrent updates or other process synchronization in Python today. We’ll
see contexts where this can matter in the next chapter, when we begin to explore
multiprocessing tools. Programs running in parallel on a server machine, for instance,
may need to lock files before performing updates, if multiple threads or processes might
attempt such updates at the same time.
Wrapping descriptors in file objects
We saw earlier how to go from file object to field descriptor with the fileno f i l e o b j e c t
method; given a descriptor, we can use os module tools for lower-level file access to
the underlying file. We can also go the other way—the os.fdopen call wraps a file de-
scriptor in a file object. Because conversions work both ways, we can generally use
either tool set—file object or os module:
>>> fdfile = os.open(r'C:\temp\spam.txt', (os.O_RDWR | os.O_BINARY))
>>> fdfile
3
>>> objfile = os.fdopen(fdfile, 'rb')
>>> objfile.read()
b'Jello stdio file\r\nHello descriptor file\n'
In fact, we can wrap a file descriptor in either a binary or text-mode file object: in text
mode, reads and writes perform the Unicode encodings and line-end translations we
studied earlier and deal in str strings instead of bytes:
C:\...\PP4E\System> python
>>> import os
>>> fdfile = os.open(r'C:\temp\spam.txt', (os.O_RDWR | os.O_BINARY))
>>> objfile = os.fdopen(fdfile, 'r')
>>> objfile.read()
'Jello stdio file\nHello descriptor file\n'
In Python 3.X, the built-in open c a l l a l s o a c c e p t s a f i l e d e s c r i p t o r i n s t e a d o f a f i l e n a m e
string; in this mode it works much like os.fdopen, but gives you greater control—for
example, you can use additional arguments to specify a nondefault Unicode encoding
for text and suppress the default descriptor close. Really, though, os.fdopen accepts
the same extra-control arguments in 3.X, because it has been redefined to do little but
call back to the built-in open (see os.py in the standard library):
C:\...\PP4E\System> python
>>> import os
>>> fdfile = os.open(r'C:\temp\spam.txt', (os.O_RDWR | os.O_BINARY))
>>> fdfile
3
158 | Chapter 4: File and Directory Tools

>>> objfile = open(fdfile, 'r', encoding='latin1', closefd=False)
>>> objfile.read()
'Jello stdio file\nHello descriptor file\n'
>>> objfile = os.fdopen(fdfile, 'r', encoding='latin1', closefd=True)
>>> objfile.seek(0)
>>> objfile.read()
'Jello stdio file\nHello descriptor file\n'
We’ll make use of this file object wrapper technique to simplify text-oriented pipes and
other descriptor-like objects later in this book (e.g., sockets have a makefile method
which achieves similar effects).
Other os module file tools
The os module also includes an assortment of file tools that accept a file pathname
string and accomplish file-related tasks such as renaming (os.rename), deleting
(os.remove), and changing the file’s owner and permission settings (os.chown,
os.chmod). Let’s step through a few examples of these tools in action:
>>> os.chmod('spam.txt', 0o777) # enable all accesses
This os.chmod file permissions call passes a 9-bit string composed of three sets of three
bits each. From left to right, the three sets represent the file’s owning user, the file’s
group, and all others. Within each set, the three bits reflect read, write, and execute
access permissions. When a bit is “1” in this string, it means that the corresponding
operation is allowed for the assessor. For instance, octal 0777 is a string of nine “1”
bits in binary, so it enables all three kinds of accesses for all three user groups; octal
0600 means that the file can be read and written only by the user that owns it (when
written in binary, 0600 octal is really bits 110 000 000).
This scheme stems from Unix file permission settings, but the call works on Windows
as well. If it’s puzzling, see your system’s documentation (e.g., a Unix manpage) for
chmod. Moving on:
>>> os.rename(r'C:\temp\spam.txt', r'C:\temp\eggs.txt') # from, to
>>> os.remove(r'C:\temp\spam.txt') # delete file?
WindowsError: [Error 2] The system cannot find the file specified: 'C:\\temp\\...'
>>> os.remove(r'C:\temp\eggs.txt')
The os.rename call used here changes a file’s name; the os.remove file deletion call
deletes a file from your system and is synonymous with os.unlink (the latter reflects
the call’s name on Unix but was obscure to users of other platforms).† The os module
also exports the stat system call:
† For related tools, see also the shutil module in Python’s standard library; it has higher-level tools for copying
and removing files and more. We’ll also write directory compare, copy, and search tools of our own in
Chapter 6, after we’ve had a chance to study the directory tools presented later in this chapter.
File Tools | 159

>>> open('spam.txt', 'w').write('Hello stat world\n') # +1 for \r added
17
>>> import os
>>> info = os.stat(r'C:\temp\spam.txt')
>>> info
nt.stat_result(st_mode=33206, st_ino=0, st_dev=0, st_nlink=0, st_uid=0, st_gid=0,
st_size=18, st_atime=1267645806, st_mtime=1267646072, st_ctime=1267645806)
>>> info.st_mode, info.st_size # via named-tuple item attr names
(33206, 18)
>>> import stat
>>> info[stat.ST_MODE], info[stat.ST_SIZE] # via stat module presets
(33206, 18)
>>> stat.S_ISDIR(info.st_mode), stat.S_ISREG(info.st_mode)
(False, True)
The os.stat call returns a tuple of values (really, in 3.X a special kind of tuple with
named items) giving low-level information about the named file, and the stat module
exports constants and functions for querying this information in a portable way. For
instance, indexing an os.stat result on offset stat.ST_SIZE returns the file’s size, and
calling stat.S_ISDIR with the mode item from an os.stat result checks whether the file
is a directory. As shown earlier, though, both of these operations are available in the
os.path module, too, so it’s rarely necessary to use os.stat except for low-level file
queries:
>>> path = r'C:\temp\spam.txt'
>>> os.path.isdir(path), os.path.isfile(path), os.path.getsize(path)
(False, True, 18)
File Scanners
Before we leave our file tools survey, it’s time for something that performs a more
tangible task and illustrates some of what we’ve learned so far. Unlike some shell-tool
languages, Python doesn’t have an implicit file-scanning loop procedure, but it’s simple
to write a general one that we can reuse for all time. The module in Example 4-1 defines
a general file-scanning routine, which simply applies a passed-in Python function to
each line in an external file.
Example 4-1. PP4E\System\Filetools\scanfile.py
def scanner(name, function):
file = open(name, 'r') # create a file object
while True:
line = file.readline() # call file methods
if not line: break # until end-of-file
function(line) # call a function object
file.close()
The scanner function doesn’t care what line-processing function is passed in, and that
accounts for most of its generality—it is happy to apply any single-argument function
160 | Chapter 4: File and Directory Tools

that exists now or in the future to all of the lines in a text file. If we code this module
and put it in a directory on the module search path, we can use it any time we need to
step through a file line by line. Example 4-2 is a client script that does simple line
translations.
Example 4-2. PP4E\System\Filetools\commands.py
#!/usr/local/bin/python
from sys import argv
from scanfile import scanner
class UnknownCommand(Exception): pass
def processLine(line): # define a function
if line[0] == '*': # applied to each line
print("Ms.", line[1:-1])
elif line[0] == '+':
print("Mr.", line[1:-1]) # strip first and last char: \n
else:
raise UnknownCommand(line) # raise an exception
filename = 'data.txt'
if len(argv) == 2: filename = argv[1] # allow filename cmd arg
scanner(filename, processLine) # start the scanner
The text file hillbillies.txt contains the following lines:
*Granny
+Jethro
*Elly May
+"Uncle Jed"
and our commands script could be run as follows:
C:\...\PP4E\System\Filetools> python commands.py hillbillies.txt
Ms. Granny
Mr. Jethro
Ms. Elly May
Mr. "Uncle Jed"
This works, but there are a variety of coding alternatives for both files, some of which
may be better than those listed above. For instance, we could also code the command
processor of Example 4-2 in the following way; especially if the number of command
options starts to become large, such a data-driven approach may be more concise
and easier to maintain than a large if statement with essentially redundant actions (if
you ever have to change the way output lines print, you’ll have to change it in only one
place with this form):
commands = {'*': 'Ms.', '+': 'Mr.'} # data is easier to expand than code?
def processLine(line):
try:
print(commands[line[0]], line[1:-1])
except KeyError:
raise UnknownCommand(line)
File Tools | 161

The scanner could similarly be improved. As a rule of thumb, we can also usually speed
things up by shifting processing from Python code to built-in tools. For instance, if
we’re concerned with speed, we can probably make our file scanner faster by using the
file’s line iterator to step through the file instead of the manual readline loop in Ex-
ample 4-1 (though you’d have to time this with your Python to be sure):
def scanner(name, function):
for line in open(name, 'r'): # scan line by line
function(line) # call a function object
And we can work more magic in Example 4-1 with the iteration tools like the map built-
in function, the list comprehension expression, and the generator expression. Here are
three minimalist’s versions; the for loop is replaced by map or a comprehension, and
we let Python close the file for us when it is garbage collected or the script exits (these
all build a temporary list of results along the way to run through their iterations, but
this overhead is likely trivial for all but the largest of files):
def scanner(name, function):
list(map(function, open(name, 'r')))
def scanner(name, function):
[function(line) for line in open(name, 'r')]
def scanner(name, function):
list(function(line) for line in open(name, 'r'))
File filters
The preceding works as planned, but what if we also want to change a file while scanning
it? Example 4-3 shows two approaches: one uses explicit files, and the other uses the
standard input/output streams to allow for redirection on the command line.
Example 4-3. PP4E\System\Filetools\filters.py
import sys
def filter_files(name, function): # filter file through function
input = open(name, 'r') # create file objects
output = open(name + '.out', 'w') # explicit output file too
for line in input:
output.write(function(line)) # write the modified line
input.close()
output.close() # output has a '.out' suffix
def filter_stream(function): # no explicit files
while True: # use standard streams
line = sys.stdin.readline() # or: input()
if not line: break
print(function(line), end='') # or: sys.stdout.write()
if __name__ == '__main__':
filter_stream(lambda line: line) # copy stdin to stdout if run
162 | Chapter 4: File and Directory Tools

Notice that the newer context managers feature discussed earlier could save us a few
lines here in the file-based filter of Example 4-3, and also guarantee immediate file
closures if the processing function fails with an exception:
def filter_files(name, function):
with open(name, 'r') as input, open(name + '.out', 'w') as output:
for line in input:
output.write(function(line)) # write the modified line
And again, file object line iterators could simplify the stream-based filter’s code in this
example as well:
def filter_stream(function):
for line in sys.stdin: # read by lines automatically
print(function(line), end='')
Since the standard streams are preopened for us, they’re often easier to use. When run
standalone, it simply parrots stdin to stdout:
C:\...\PP4E\System\Filetools> filters.py < hillbillies.txt
*Granny
+Jethro
*Elly May
+"Uncle Jed"
But this module is also useful when imported as a library (clients provide the line-
processing function):
>>> from filters import filter_files
>>> filter_files('hillbillies.txt', str.upper)
>>> print(open('hillbillies.txt.out').read())
*GRANNY
+JETHRO
*ELLY MAY
+"UNCLE JED"
We’ll see files in action often in the remainder of this book, especially in the more
complete and functional system examples of Chapter 6. First though, we turn to tools
for processing our files’ home.
Directory Tools
One of the more common tasks in the shell utilities domain is applying an operation
to a set of files in a directory—a “folder” in Windows-speak. By running a script on a
batch of files, we can automate (that is, script) tasks we might have to otherwise run
repeatedly by hand.
For instance, suppose you need to search all of your Python files in a development
directory for a global variable name (perhaps you’ve forgotten where it is used). There
are many platform-specific ways to do this (e.g., the find and grep commands in Unix),
but Python scripts that accomplish such tasks will work on every platform where Py-
thon works—Windows, Unix, Linux, Macintosh, and just about any other platform
Directory Tools | 163

commonly used today. If you simply copy your script to any machine you wish to use
it on, it will work regardless of which other tools are available there; all you need is
Python. Moreover, coding such tasks in Python also allows you to perform arbitrary
actions along the way—replacements, deletions, and whatever else you can code in the
Python language.
Walking One Directory
The most common way to go about writing such tools is to first grab a list of the names
of the files you wish to process, and then step through that list with a Python for loop
or other iteration tool, processing each file in turn. The trick we need to learn here,
then, is how to get such a directory list within our scripts. For scanning directories there
are at least three options: running shell listing commands with os.popen, matching
filename patterns with glob.glob, and getting directory listings with os.listdir. They
vary in interface, result format, and portability.
Running shell listing commands with os.popen
How did you go about getting directory file listings before you heard of Python? If you’re
new to shell tools programming, the answer may be “Well, I started a Windows file
explorer and clicked on things,” but I’m thinking here in terms of less GUI-oriented
command-line mechanisms.
On Unix, directory listings are usually obtained by typing ls in a shell; on Windows,
they can be generated with a dir command typed in an MS-DOS console box. Because
Python scripts may use os.popen to run any command line that we can type in a shell,
they are the most general way to grab a directory listing inside a Python program. We
met os.popen in the prior chapters; it runs a shell command string and gives us a file
object from which we can read the command’s output. To illustrate, let’s first assume
the following directory structures—I have both the usual dir and a Unix-like ls com-
mand from Cygwin on my Windows laptop:
c:\temp> dir /B
parts
PP3E
random.bin
spam.txt
temp.bin
temp.txt
c:\temp> c:\cygwin\bin\ls
PP3E parts random.bin spam.txt temp.bin temp.txt
c:\temp> c:\cygwin\bin\ls parts
part0001 part0002 part0003 part0004
The parts and PP3E names are a nested subdirectory in C:\temp here (the latter is a copy
of the prior edition’s examples tree, which I used occasionally in this text). Now, as
164 | Chapter 4: File and Directory Tools

we’ve seen, scripts can grab a listing of file and directory names at this level by simply
spawning the appropriate platform-specific command line and reading its output (the
text normally thrown up on the console window):
C:\temp> python
>>> import os
>>> os.popen('dir /B').readlines()
['parts\n', 'PP3E\n', 'random.bin\n', 'spam.txt\n', 'temp.bin\n', 'temp.txt\n']
Lines read from a shell command come back with a trailing end-of-line character, but
it’s easy enough to slice it off; the os.popen result also gives us a line iterator just like
normal files:
>>> for line in os.popen('dir /B'):
... print(line[:-1])
...
parts
PP3E
random.bin
spam.txt
temp.bin
temp.txt
>>> lines = [line[:-1] for line in os.popen('dir /B')]
>>> lines
['parts', 'PP3E', 'random.bin', 'spam.txt', 'temp.bin', 'temp.txt']
For pipe objects, the effect of iterators may be even more useful than simply avoiding
loading the entire result into memory all at once: readlines will always block the caller
until the spawned program is completely finished, whereas the iterator might not.
The dir and ls commands let us be specific about filename patterns to be matched and
directory names to be listed by using name patterns; again, we’re just running shell
commands here, so anything you can type at a shell prompt goes:
>>> os.popen('dir *.bin /B').readlines()
['random.bin\n', 'temp.bin\n']
>>> os.popen(r'c:\cygwin\bin\ls *.bin').readlines()
['random.bin\n', 'temp.bin\n']
>>> list(os.popen(r'dir parts /B'))
['part0001\n', 'part0002\n', 'part0003\n', 'part0004\n']
>>> [fname for fname in os.popen(r'c:\cygwin\bin\ls parts')]
['part0001\n', 'part0002\n', 'part0003\n', 'part0004\n']
These calls use general tools and work as advertised. As I noted earlier, though, the
downsides of os.popen are that it requires using a platform-specific shell command and
it incurs a performance hit to start up an independent program. In fact, different listing
tools may sometimes produce different results:
>>> list(os.popen(r'dir parts\part* /B'))
['part0001\n', 'part0002\n', 'part0003\n', 'part0004\n']
Directory Tools | 165

>>>
>>> list(os.popen(r'c:\cygwin\bin\ls parts/part*'))
['parts/part0001\n', 'parts/part0002\n', 'parts/part0003\n', 'parts/part0004\n']
The next two alternative techniques do better on both counts.
The glob module
The term globbing comes from the * wildcard character in filename patterns; per com-
puting folklore, a * matches a “glob” of characters. In less poetic terms, globbing simply
means collecting the names of all entries in a directory—files and subdirectories—
whose names match a given filename pattern. In Unix shells, globbing expands filename
patterns within a command line into all matching filenames before the command is
ever run. In Python, we can do something similar by calling the glob.glob built-in—a
tool that accepts a filename pattern to expand, and returns a list (not a generator) of
matching file names:
>>> import glob
>>> glob.glob('*')
['parts', 'PP3E', 'random.bin', 'spam.txt', 'temp.bin', 'temp.txt']
>>> glob.glob('*.bin')
['random.bin', 'temp.bin']
>>> glob.glob('parts')
['parts']
>>> glob.glob('parts/*')
['parts\\part0001', 'parts\\part0002', 'parts\\part0003', 'parts\\part0004']
>>> glob.glob('parts\part*')
['parts\\part0001', 'parts\\part0002', 'parts\\part0003', 'parts\\part0004']
The glob call accepts the usual filename pattern syntax used in shells: ? means any one
character, * means any number of characters, and [] is a character selection set.‡ The
pattern should include a directory path if you wish to glob in something other than the
current working directory, and the module accepts either Unix or DOS-style directory
separators (/ or \). This call is implemented without spawning a shell command (it uses
os.listdir, described in the next section) and so is likely to be faster and more portable
and uniform across all Python platforms than the os.popen schemes shown earlier.
Technically speaking, glob is a bit more powerful than described so far. In fact, using
it to list files in one directory is just one use of its pattern-matching skills. For instance,
it can also be used to collect matching names across multiple directories, simply because
each level in a passed-in directory path can be a pattern too:
>>> for path in glob.glob(r'PP3E\Examples\PP3E\*\s*.py'): print(path)
...
‡ In fact, glob just uses the standard fnmatch module to match name patterns; see the fnmatch description in
Chapter 6’s find module example for more details.
166 | Chapter 4: File and Directory Tools

PP3E\Examples\PP3E\Lang\summer-alt.py
PP3E\Examples\PP3E\Lang\summer.py
PP3E\Examples\PP3E\PyTools\search_all.py
Here, we get back filenames from two different directories that match the s*.py pattern;
because the directory name preceding this is a * wildcard, Python collects all possible
ways to reach the base filenames. Using os.popen to spawn shell commands achieves
the same effect, but only if the underlying shell or listing command does, too, and with
possibly different result formats across tools and platforms.
The os.listdir call
The os module’s listdir call provides yet another way to collect filenames in a Python
list. It takes a simple directory name string, not a filename pattern, and returns a list
containing the names of all entries in that directory—both simple files and nested
directories—for use in the calling script:
>>> import os
>>> os.listdir('.')
['parts', 'PP3E', 'random.bin', 'spam.txt', 'temp.bin', 'temp.txt']
>>>
>>> os.listdir(os.curdir)
['parts', 'PP3E', 'random.bin', 'spam.txt', 'temp.bin', 'temp.txt']
>>>
>>> os.listdir('parts')
['part0001', 'part0002', 'part0003', 'part0004']
This, too, is done without resorting to shell commands and so is both fast and portable
to all major Python platforms. The result is not in any particular order across platforms
(but can be sorted with the list sort method or sorted built-in function); returns base
filenames without their directory path prefixes; does not include names “.” or “..” if
present; and includes names of both files and directories at the listed level.
To compare all three listing techniques, let’s run them here side by side on an explicit
directory. They differ in some ways but are mostly just variations on a theme for this
task—os.popen returns end-of-lines and may sort filenames on some platforms,
glob.glob accepts a pattern and returns filenames with directory prefixes, and os.list
dir takes a simple directory name and returns names without directory prefixes:
>>> os.popen('dir /b parts').readlines()
['part0001\n', 'part0002\n', 'part0003\n', 'part0004\n']
>>> glob.glob(r'parts\*')
['parts\\part0001', 'parts\\part0002', 'parts\\part0003', 'parts\\part0004']
>>> os.listdir('parts')
['part0001', 'part0002', 'part0003', 'part0004']
Of these three, glob and listdir are generally better options if you care about script
portability and result uniformity, and listdir seems fastest in recent Python releases
(but gauge its performance yourself—implementations may change over time).
Directory Tools | 167

Splitting and joining listing results
In the last example, I pointed out that glob returns names with directory paths, whereas
listdir gives raw base filenames. For convenient processing, scripts often need to split
glob results into base files or expand listdir results into full paths. Such translations
are easy if we let the os.path module do all the work for us. For example, a script that
intends to copy all files elsewhere will typically need to first split off the base filenames
from glob results so that it can add different directory names on the front:
>>> dirname = r'C:\temp\parts'
>>>
>>> import glob
>>> for file in glob.glob(dirname + '/*'):
... head, tail = os.path.split(file)
... print(head, tail, '=>', ('C:\\Other\\' + tail))
...
C:\temp\parts part0001 => C:\Other\part0001
C:\temp\parts part0002 => C:\Other\part0002
C:\temp\parts part0003 => C:\Other\part0003
C:\temp\parts part0004 => C:\Other\part0004
Here, the names after the => represent names that files might be moved to. Conversely,
a script that means to process all files in a different directory than the one it runs in will
probably need to prepend listdir results with the target directory name before passing
filenames on to other tools:
>>> import os
>>> for file in os.listdir(dirname):
... print(dirname, file, '=>', os.path.join(dirname, file))
...
C:\temp\parts part0001 => C:\temp\parts\part0001
C:\temp\parts part0002 => C:\temp\parts\part0002
C:\temp\parts part0003 => C:\temp\parts\part0003
C:\temp\parts part0004 => C:\temp\parts\part0004
When you begin writing realistic directory processing tools of the sort we’ll develop in
Chapter 6, you’ll find these calls to be almost habit.
Walking Directory Trees
You may have noticed that almost all of the techniques in this section so far return the
names of files in only a single directory (globbing with more involved patterns is the
only exception). That’s fine for many tasks, but what if you want to apply an operation
to every file in every directory and subdirectory in an entire directory tree?
For instance, suppose again that we need to find every occurrence of a global name in
our Python scripts. This time, though, our scripts are arranged into a module pack-
age: a directory with nested subdirectories, which may have subdirectories of their own.
We could rerun our hypothetical single-directory searcher manually in every directory
in the tree, but that’s tedious, error prone, and just plain not fun.
168 | Chapter 4: File and Directory Tools

Luckily, in Python it’s almost as easy to process a directory tree as it is to inspect a single
directory. We can either write a recursive routine to traverse the tree, or use a tree-
walker utility built into the os module. Such tools can be used to search, copy, compare,
and otherwise process arbitrary directory trees on any platform that Python runs on
(and that’s just about everywhere).
The os.walk visitor
To make it easy to apply an operation to all files in a complete directory tree, Python
comes with a utility that scans trees for us and runs code we provide at every directory
along the way: the os.walk function is called with a directory root name and automat-
ically walks the entire tree at root and below.
Operationally, os.walk is a generator function—at each directory in the tree, it yields a
three-item tuple, containing the name of the current directory as well as lists of both
all the files and all the subdirectories in the current directory. Because it’s a generator,
its walk is usually run by a for loop (or other iteration tool); on each iteration, the
walker advances to the next subdirectory, and the loop runs its code for the next level
of the tree (for instance, opening and searching all the files at that level).
That description might sound complex the first time you hear it, but os.walk is fairly
straightforward once you get the hang of it. In the following, for example, the loop
body’s code is run for each directory in the tree rooted at the current working directory
(.). Along the way, the loop simply prints the directory name and all the files at the
current level after prepending the directory name. It’s simpler in Python than in English
(I removed the PP3E subdirectory for this test to keep the output short):
>>> import os
>>> for (dirname, subshere, fileshere) in os.walk('.'):
... print('[' + dirname + ']')
... for fname in fileshere:
... print(os.path.join(dirname, fname)) # handle one file
...
[.]
.\random.bin
.\spam.txt
.\temp.bin
.\temp.txt
[.\parts]
.\parts\part0001
.\parts\part0002
.\parts\part0003
.\parts\part0004
In other words, we’ve coded our own custom and easily changed recursive directory
listing tool in Python. Because this may be something we would like to tweak and reuse
elsewhere, let’s make it permanently available in a module file, as shown in Exam-
ple 4-4, now that we’ve worked out the details interactively.
Directory Tools | 169

Example 4-4. PP4E\System\Filetools\lister_walk.py
"list file tree with os.walk"
import sys, os
def lister(root): # for a root dir
for (thisdir, subshere, fileshere) in os.walk(root): # generate dirs in tree
print('[' + thisdir + ']')
for fname in fileshere: # print files in this dir
path = os.path.join(thisdir, fname) # add dir name prefix
print(path)
if __name__ == '__main__':
lister(sys.argv[1]) # dir name in cmdline
When packaged this way, the code can also be run from a shell command line. Here it
is being launched with the root directory to be listed passed in as a command-line
argument:
C:\...\PP4E\System\Filetools> python lister_walk.py C:\temp\test
[C:\temp\test]
C:\temp\test\random.bin
C:\temp\test\spam.txt
C:\temp\test\temp.bin
C:\temp\test\temp.txt
[C:\temp\test\parts]
C:\temp\test\parts\part0001
C:\temp\test\parts\part0002
C:\temp\test\parts\part0003
C:\temp\test\parts\part0004
Here’s a more involved example of os.walk in action. Suppose you have a directory tree
of files and you want to find all Python source files within it that reference the mime
types module we’ll study in Chapter 6. The following is one (albeit hardcoded and
overly specific) way to accomplish this task:
>>> import os
>>> matches = []
>>> for (dirname, dirshere, fileshere) in os.walk(r'C:\temp\PP3E\Examples'):
... for filename in fileshere:
... if filename.endswith('.py'):
... pathname = os.path.join(dirname, filename)
... if 'mimetypes' in open(pathname).read():
... matches.append(pathname)
...
>>> for name in matches: print(name)
...
C:\temp\PP3E\Examples\PP3E\Internet\Email\mailtools\mailParser.py
C:\temp\PP3E\Examples\PP3E\Internet\Email\mailtools\mailSender.py
C:\temp\PP3E\Examples\PP3E\Internet\Ftp\mirror\downloadflat.py
C:\temp\PP3E\Examples\PP3E\Internet\Ftp\mirror\downloadflat_modular.py
C:\temp\PP3E\Examples\PP3E\Internet\Ftp\mirror\ftptools.py
C:\temp\PP3E\Examples\PP3E\Internet\Ftp\mirror\uploadflat.py
C:\temp\PP3E\Examples\PP3E\System\Media\playfile.py
170 | Chapter 4: File and Directory Tools

This code loops through all the files at each level, looking for files with .py at the end
of their names and which contain the search string. When a match is found, its full
name is appended to the results list object; alternatively, we could also simply build a
list of all .py files and search each in a for loop after the walk. Since we’re going to code
much more general solution to this type of problem in Chapter 6, though, we’ll let this
stand for now.
If you want to see what’s really going on in the os.walk generator, call its __next__
method (or equivalently, pass it to the next built-in function) manually a few times,
just as the for loop does automatically; each time, you advance to the next subdirectory
in the tree:
>>> gen = os.walk(r'C:\temp\test')
>>> gen.__next__()
('C:\\temp\\test', ['parts'], ['random.bin', 'spam.txt', 'temp.bin', 'temp.txt'])
>>> gen.__next__()
('C:\\temp\\test\\parts', [], ['part0001', 'part0002', 'part0003', 'part0004'])
>>> gen.__next__()
Traceback (most recent call last):
File "<stdin>", line 1, in <module>
StopIteration
The library manual documents os.walk further than we will here. For instance, it sup-
ports bottom-up instead of top-down walks with its optional topdown=False argument,
and callers may prune tree branches by deleting names in the subdirectories lists of the
yielded tuples.
Internally, the os.walk call generates filename lists at each level with the os.listdir call
we met earlier, which collects both file and directory names in no particular order and
returns them without their directory paths; os.walk segregates this list into subdirec-
tories and files (technically, nondirectories) before yielding a result. Also note that
walk uses the very same subdirectories list it yields to callers in order to later descend
into subdirectories. Because lists are mutable objects that can be changed in place, if
your code modifies the yielded subdirectory names list, it will impact what walk does
next. For example, deleting directory names will prune traversal branches, and sorting
the list will order the walk.
Recursive os.listdir traversals
The os.walk tool does the work of tree traversals for us; we simply provide loop code
with task-specific logic. However, it’s sometimes more flexible and hardly any more
work to do the walking ourselves. The following script recodes the directory listing
script with a manual recursive traversal function (a function that calls itself to repeat
its actions). The mylister function in Example 4-5 is almost the same as lister in
Example 4-4 but calls os.listdir to generate file paths manually and calls itself recur-
sively to descend into subdirectories.
Directory Tools | 171

Example 4-5. PP4E\System\Filetools\lister_recur.py
# list files in dir tree by recursion
import sys, os
def mylister(currdir):
print('[' + currdir + ']')
for file in os.listdir(currdir): # list files here
path = os.path.join(currdir, file) # add dir path back
if not os.path.isdir(path):
print(path)
else:
mylister(path) # recur into subdirs
if __name__ == '__main__':
mylister(sys.argv[1]) # dir name in cmdline
As usual, this file can be both imported and called or run as a script, though the fact
that its result is printed text makes it less useful as an imported component unless its
output stream is captured by another program.
When run as a script, this file’s output is equivalent to that of Example 4-4, but not
identical—unlike the os.walk version, our recursive walker here doesn’t order the walk
to visit files before stepping into subdirectories. It could by looping through the file-
names list twice (selecting files first), but as coded, the order is dependent on os.list
dir results. For most use cases, the walk order would be irrelevant:
C:\...\PP4E\System\Filetools> python lister_recur.py C:\temp\test
[C:\temp\test]
[C:\temp\test\parts]
C:\temp\test\parts\part0001
C:\temp\test\parts\part0002
C:\temp\test\parts\part0003
C:\temp\test\parts\part0004
C:\temp\test\random.bin
C:\temp\test\spam.txt
C:\temp\test\temp.bin
C:\temp\test\temp.txt
We’ll make better use of most of this section’s techniques in later examples in Chap-
ter 6 and in this book at large. For example, scripts for copying and comparing directory
trees use the tree-walker techniques introduced here. Watch for these tools in action
along the way. We’ll also code a find utility in Chapter 6 that combines the tree traversal
of os.walk with the filename pattern expansion of glob.glob.
Handling Unicode Filenames in 3.X: listdir, walk, glob
Because all normal strings are Unicode in Python 3.X, the directory and file names
generated by os.listdir, os.walk, and glob.glob so far in this chapter are technically
Unicode strings. This can have some ramifications if your directories contain unusual
names that might not decode properly.
172 | Chapter 4: File and Directory Tools

Technically, because filenames may contain arbitrary text, the os.listdir works in two
modes in 3.X: given a bytes argument, this function will return filenames as encoded
byte strings; given a normal str string argument, it instead returns filenames as Unicode
strings, decoded per the filesystem’s encoding scheme:
C:\...\PP4E\System\Filetools> python
>>> import os
>>> os.listdir('.')[:4]
['bigext-tree.py', 'bigpy-dir.py', 'bigpy-path.py', 'bigpy-tree.py']
>>> os.listdir(b'.')[:4]
[b'bigext-tree.py', b'bigpy-dir.py', b'bigpy-path.py', b'bigpy-tree.py']
The byte string version can be used if undecodable file names may be present. Because
os.walk and glob.glob both work by calling os.listdir internally, they inherit this
behavior by proxy. The os.walk tree walker, for example, calls os.listdir at each di-
rectory level; passing byte string arguments suppresses decoding and returns byte string
results:
>>> for (dir, subs, files) in os.walk('..'): print(dir)
...
..
..\Environment
..\Filetools
..\Processes
>>> for (dir, subs, files) in os.walk(b'..'): print(dir)
...
b'..'
b'..\\Environment'
b'..\\Filetools'
b'..\\Processes'
The glob.glob tool similarly calls os.listdir internally before applying name patterns,
and so also returns undecoded byte string names for byte string arguments:
>>> glob.glob('.\*')[:3]
['.\\bigext-out.txt', '.\\bigext-tree.py', '.\\bigpy-dir.py']
>>>
>>> glob.glob(b'.\*')[:3]
[b'.\\bigext-out.txt', b'.\\bigext-tree.py', b'.\\bigpy-dir.py']
Given a normal string name (as a command-line argument, for example), you can force
the issue by converting to byte strings with manual encoding to suppress decoding:
>>> name = '.'
>>> os.listdir(name.encode())[:4]
[b'bigext-out.txt', b'bigext-tree.py', b'bigpy-dir.py', b'bigpy-path.py']
The upshot is that if your directories may contain names which cannot be decoded
according to the underlying platform’s Unicode encoding scheme, you may need to
pass byte strings to these tools to avoid Unicode encoding errors. You’ll get byte strings
back, which may be less readable if printed, but you’ll avoid errors while traversing
directories and files.
Directory Tools | 173

This might be especially useful on systems that use simple encodings such as ASCII or
Latin-1, but may contain files with arbitrarily encoded names from cross-machine cop-
ies, the Web, and so on. Depending upon context, exception handlers may be used to
suppress some types of encoding errors as well.
We’ll see an example of how this can matter in the first section of Chapter 6, where an
undecodable directory name generates an error if printed during a full disk scan (al-
though that specific error seems more related to printing than to decoding in general).
Note that the basic open built-in function allows the name of the file being opened to
be passed as either Unicode str or raw bytes, too, though this is used only to name the
file initially; the additional mode argument determines whether the file’s content is
handled in text or binary modes. Passing a byte string filename allows you to name files
with arbitrarily encoded names.
Unicode policies: File content versus file names
In fact, it’s important to keep in mind that there are two different Unicode concepts
related to files: the encoding of file content and the encoding of file name. Python pro-
vides your platform’s defaults for these settings in two different attributes; on
Windows 7:
>>> import sys
>>> sys.getdefaultencoding() # file content encoding, platform default
'utf-8'
>>> sys.getfilesystemencoding() # file name encoding, platform scheme
'mbcs'
These settings allow you to be explicit when needed—the content encoding is used
when data is read and written to the file, and the name encoding is used when dealing
with names prior to transferring data. In addition, using bytes for file name tools may
work around incompatibilities with the underlying file system’s scheme, and opening
files in binary mode can suppress Unicode decoding errors for content.
As we’ve seen, though, opening text files in binary mode may also mean that the raw
and still-encoded text will not match search strings as expected: search strings must
also be byte strings encoded per a specific and possibly incompatible encoding scheme.
In fact, this approach essentially mimics the behavior of text files in Python 2.X, and
underscores why elevating Unicode in 3.X is generally desirable—such text files some-
times may appear to work even though they probably shouldn’t. On the other hand,
opening text in binary mode to suppress Unicode content decoding and avoid decoding
errors might still be useful if you do not wish to skip undecodable files and content is
largely irrelevant.
174 | Chapter 4: File and Directory Tools

As a rule of thumb, you should try to always provide an encoding name for text content
if it might be outside the platform default, and you should rely on the default Unicode
API for file names in most cases. Again, see Python’s manuals for more on the Unicode
file name story than we have space to cover fully here, and see Learning Python, Fourth
Edition, for more on Unicode in general.
In Chapter 6, we’re going to put the tools we met in this chapter to realistic use. For
example, we’ll apply file and directory tools to implement file splitters, testing systems,
directory copies and compares, and a variety of utilities based on tree walking. We’ll
find that Python’s directory tools we met here have an enabling quality that allows us
to automate a large set of real-world tasks. First, though, Chapter 5 concludes our basic
tool survey, by exploring another system topic that tends to weave its way into a wide
variety of application domains—parallel processing in Python.
Directory Tools | 175

CHAPTER 5
Parallel System Tools
“Telling the Monkeys What to Do”
Most computers spend a lot of time doing nothing. If you start a system monitor tool
and watch the CPU utilization, you’ll see what I mean—it’s rare to see one hit 100
percent, even when you are running multiple programs.* T h e r e a r e j u s t t o o m a n y d e l a y s
built into software: disk accesses, network traffic, database queries, waiting for users
to click a button, and so on. In fact, the majority of a modern CPU’s capacity is often
spent in an idle state; faster chips help speed up performance demand peaks, but much
of their power can go largely unused.
Early on in computing, programmers realized that they could tap into such unused
processing power by running more than one program at the same time. By dividing the
CPU’s attention among a set of tasks, its capacity need not go to waste while any given
task is waiting for an external event to occur. The technique is usually called parallel
processing (and sometimes “multiprocessing” or even “multitasking”) because many
tasks seem to be performed at once, overlapping and parallel in time. It’s at the heart
of modern operating systems, and it gave rise to the notion of multiple-active-window
computer interfaces we’ve all come to take for granted. Even within a single program,
dividing processing into tasks that run in parallel can make the overall system faster,
at least as measured by the clock on your wall.
Just as important is that modern software systems are expected to be responsive to
users regardless of the amount of work they must perform behind the scenes. It’s usually
unacceptable for a program to stall while busy carrying out a request. Consider an
email-browser user interface, for example; when asked to fetch email from a server, the
program must download text from a server over a network. If you have enough email
or a slow enough Internet link, that step alone can take minutes to finish. But while the
* To watch on Windows, click the Start button, select All Programs → Accessories → System Tools → Resource
Monitor, and monitor CPU/Processor usage (Task Manager’s Performance tab may give similar results). The
graph rarely climbed above single-digit percentages on my laptop machine while writing this footnote (at
least until I typed while True: pass in a Python interactive session window…).
177

download task proceeds, the program as a whole shouldn’t stall—it still must respond
to screen redraws, mouse clicks, and so on.
Parallel processing comes to the rescue here, too. By performing such long-running
tasks in parallel with the rest of the program, the system at large can remain responsive
no matter how busy some of its parts may be. Moreover, the parallel processing model
is a natural fit for structuring such programs and others; some tasks are more easily
conceptualized and coded as components running as independent, parallel entities.
There are two fundamental ways to get tasks running at the same time in Python—
process forks and spawned threads. Functionally, both rely on underlying operating
system services to run bits of Python code in parallel. Procedurally, they are very dif-
ferent in terms of interface, portability, and communication. For instance, at this writ-
ing direct process forks are not supported on Windows under standard Python (though
they are under Cygwin Python on Windows).
By contrast, Python’s thread support works on all major platforms. Moreover, the
os.spawn family of calls provides additional ways to launch programs in a platform-
neutral way that is similar to forks, and the os.popen and os.system calls and
subprocess module we studied in Chapters 2 and 3 can be used to portably spawn
programs with shell commands. The newer multiprocessing module offers additional
ways to run processes portably in many contexts.
In this chapter, which is a continuation of our look at system interfaces available to
Python programmers, we explore Python’s built-in tools for starting tasks in parallel,
as well as communicating with those tasks. In some sense, we’ve already begun doing
so—os.system, os.popen, and subprocess, which we learned and applied over the last
three chapters, are a fairly portable way to spawn and speak with command-line pro-
grams, too. We won’t repeat full coverage of those tools here.
Instead, our emphasis in this chapter is on introducing more direct techniques—forks,
threads, pipes, signals, sockets, and other launching techniques—and on using Py-
thon’s built-in tools that support them, such as the os.fork call and the threading,
queue, and multiprocessing modules. In the next chapter (and in the remainder of this
book), we use these techniques in more realistic programs, so be sure you understand
the basics here before flipping ahead.
One note up front: although the process, thread, and IPC mechanisms we will explore
in this chapter are the primary parallel processing tools in Python scripts, the third party
domain offers additional options which may serve more advanced or specialized roles.
As just one example, the MPI for Python system allows Python scripts to also employ
the Message Passing Interface (MPI) standard, allowing Python programs to exploit
multiple processors in various ways (see the Web for details). While such specific ex-
tensions are beyond our scope in this book, the fundamentals of multiprocessing that
we will explore here should apply to more advanced techniques you may encounter in
your parallel futures.
178 | Chapter 5: Parallel System Tools

Forking Processes
Forked processes are a traditional way to structure parallel tasks, and they are a fun-
damental part of the Unix tool set. Forking is a straightforward way to start an inde-
pendent program, whether it is different from the calling program or not. Forking is
based on the notion of copying programs: when a program calls the fork routine, the
operating system makes a new copy of that program and its process in memory and
starts running that copy in parallel with the original. Some systems don’t really copy
the original program (it’s an expensive operation), but the new copy works as if it were
a literal copy.
After a fork operation, the original copy of the program is called the parent process,
and the copy created by os.fork is called the child process. In general, parents can make
any number of children, and children can create child processes of their own; all forked
processes run independently and in parallel under the operating system’s control, and
children may continue to run after their parent exits.
This is probably simpler in practice than in theory, though. The Python script in Ex-
ample 5-1 forks new child processes until you type the letter q at the console.
Example 5-1. PP4E\System\Processes\fork1.py
"forks child processes until you type 'q'"
import os
def child():
print('Hello from child', os.getpid())
os._exit(0) # else goes back to parent loop
def parent():
while True:
newpid = os.fork()
if newpid == 0:
child()
else:
print('Hello from parent', os.getpid(), newpid)
if input() == 'q': break
parent()
Python’s process forking tools, available in the os module, are simply thin wrappers
over standard forking calls in the system library also used by C language programs. To
start a new, parallel process, call the os.fork built-in function. Because this function
generates a copy of the calling program, it returns a different value in each copy: zero
in the child process and the process ID of the new child in the parent.
Forking Processes | 179

Programs generally test this result to begin different processing in the child only; this
script, for instance, runs the child function in child processes only.†
Because forking is ingrained in the Unix programming model, this script works well on
Unix, Linux, and modern Macs. Unfortunately, this script won’t work on the standard
version of Python for Windows today, because fork is too much at odds with the Win-
dows model. Python scripts can always spawn threads on Windows, and the multi
processing module described later in this chapter provides an alternative for running
processes portably, which can obviate the need for process forks on Windows in con-
texts that conform to its constraints (albeit at some potential cost in low-level control).
The script in Example 5-1 does work on Windows, however, if you use the Python
shipped with the Cygwin system (or build one of your own from source-code with
Cygwin’s libraries). Cygwin is a free, open source system that provides full Unix-like
functionality for Windows (and is described further in “More on Cygwin Python for
Windows” on page 185). You can fork with Python on Windows under Cygwin, even
though its behavior is not exactly the same as true Unix forks. Because it’s close enough
for this book’s examples, though, let’s use it to run our script live:
[C:\...\PP4E\System\Processes]$ python fork1.py
Hello from parent 7296 7920
Hello from child 7920
Hello from parent 7296 3988
Hello from child 3988
Hello from parent 7296 6796
Hello from child 6796
q
These messages represent three forked child processes; the unique identifiers of all the
processes involved are fetched and displayed with the os.getpid call. A subtle point:
the child process function is also careful to exit explicitly with an os._exit call. We’ll
discuss this call in more detail later in this chapter, but if it’s not made, the child process
would live on after the child function returns (remember, it’s just a copy of the original
process). The net effect is that the child would go back to the loop in parent and start
forking children of its own (i.e., the parent would have grandchildren). If you delete
the exit call and rerun, you’ll likely have to type more than one q to stop, because
multiple processes are running in the parent function.
In Example 5-1, each process exits very soon after it starts, so there’s little overlap in
time. Let’s do something slightly more sophisticated to better illustrate multiple forked
processes running in parallel. Example 5-2 starts up 5 copies of itself, each copy count-
ing up to 5 with a one-second delay between iterations. The time.sleep standard library
† At least in the current Python implementation, calling os.fork in a Python script actually copies the Python
interpreter process (if you look at your process list, you’ll see two Python entries after a fork). But since the
Python interpreter records everything about your running script, it’s OK to think of fork as copying your
program directly. It really will if Python scripts are ever compiled to binary machine code.
180 | Chapter 5: Parallel System Tools

call simply pauses the calling process for a number of seconds (you can pass a floating-
point value to pause for fractions of seconds).
Example 5-2. PP4E\System\Processes\fork-count.py
"""
fork basics: start 5 copies of this program running in parallel with
the original; each copy counts up to 5 on the same stdout stream--forks
copy process memory, including file descriptors; fork doesn't currently
work on Windows without Cygwin: use os.spawnv or multiprocessing on
Windows instead; spawnv is roughly like a fork+exec combination;
"""
import os, time
def counter(count): # run in new process
for i in range(count):
time.sleep(1) # simulate real work
print('[%s] => %s' % (os.getpid(), i))
for i in range(5):
pid = os.fork()
if pid != 0:
print('Process %d spawned' % pid) # in parent: continue
else:
counter(5) # else in child/new process
os._exit(0) # run function and exit
print('Main process exiting.') # parent need not wait
When run, this script starts 5 processes immediately and exits. All 5 forked processes
check in with their first count display one second later and every second thereafter.
Notice that child processes continue to run, even if the parent process that created them
terminates:
[C:\...\PP4E\System\Processes]$ python fork-count.py
Process 4556 spawned
Process 3724 spawned
Process 6360 spawned
Process 6476 spawned
Process 6684 spawned
Main process exiting.
[4556] => 0
[3724] => 0
[6360] => 0
[6476] => 0
[6684] => 0
[4556] => 1
[3724] => 1
[6360] => 1
[6476] => 1
[6684] => 1
[4556] => 2
[3724] => 2
[6360] => 2
Forking Processes | 181

[6476] => 2
[6684] => 2
...more output omitted...
The output of all of these processes shows up on the same screen, because all of them
share the standard output stream (and a system prompt may show up along the way,
too). Technically, a forked process gets a copy of the original process’s global memory,
including open file descriptors. Because of that, global objects like files start out with
the same values in a child process, so all the processes here are tied to the same single
stream. But it’s important to remember that global memory is copied, not shared; if a
child process changes a global object, it changes only its own copy. (As we’ll see, this
works differently in threads, the topic of the next section.)
The fork/exec Combination
In Examples 5-1 and 5-2, child processes simply ran a function within the Python pro-
gram and then exited. On Unix-like platforms, forks are often the basis of starting
independently running programs that are completely different from the program that
performed the fork call. For instance, Example 5-3 forks new processes until we type
q again, but child processes run a brand-new program instead of calling a function in
the same file.
Example 5-3. PP4E\System\Processes\fork-exec.py
"starts programs until you type 'q'"
import os
parm = 0
while True:
parm += 1
pid = os.fork()
if pid == 0: # copy process
os.execlp('python', 'python', 'child.py', str(parm)) # overlay program
assert False, 'error starting program' # shouldn't return
else:
print('Child is', pid)
if input() == 'q': break
If you’ve done much Unix development, the fork/exec combination will probably look
familiar. The main thing to notice is the os.execlp call in this code. In a nutshell, this
call replaces (overlays) the program running in the current process with a brand new
program. Because of that, the combination of os.fork and os.execlp means start a new
process and run a new program in that process—in other words, launch a new program
in parallel with the original program.
182 | Chapter 5: Parallel System Tools

os.exec call formats
The arguments to os.execlp specify the program to be run by giving command-line
arguments used to start the program (i.e., what Python scripts know as sys.argv). If
successful, the new program begins running and the call to os.execlp itself never returns
(since the original program has been replaced, there’s really nothing to return to). If
the call does return, an error has occurred, so we code an assert after it that will always
raise an exception if reached.
There are a handful of os.exec variants in the Python standard library; some allow us
to configure environment variables for the new program, pass command-line argu-
ments in different forms, and so on. All are available on both Unix and Windows, and
they replace the calling program (i.e., the Python interpreter). exec comes in eight fla-
vors, which can be a bit confusing unless you generalize:
os.execv(program, commandlinesequence)
The basic “v” exec form is passed an executable program’s name, along with a list
or tuple of command-line argument strings used to run the executable (that is, the
words you would normally type in a shell to start a program).
os.execl(program, cmdarg1, cmdarg2,... cmdargN)
The basic “l” exec form is passed an executable’s name, followed by one or more
command-line arguments passed as individual function arguments. This is the
same as os.execv(program, (cmdarg1, cmdarg2,...)).
os.execlp
os.execvp
Adding the letter p to the execv and execl names means that Python will locate the
executable’s directory using your system search-path setting (i.e., PATH).
os.execle
os.execve
Adding a letter e to the execv and execl names means an extra, last argument is a
dictionary containing shell environment variables to send to the program.
os.execvpe
os.execlpe
Adding the letters p and e to the basic exec names means to use the search path
and to accept a shell environment settings dictionary.
So when the script in Example 5-3 calls os.execlp, individually passed parameters
specify a command line for the program to be run on, and the word python maps to an
executable file according to the underlying system search-path setting environment
variable (PATH). It’s as if we were running a command of the form python child.py 1
in a shell, but with a different command-line argument on the end each time.
Forking Processes | 183

Spawned child program
Just as when typed at a shell, the string of arguments passed to os.execlp by the fork-
exec script in Example 5-3 starts another Python program file, as shown in Example 5-4.
Example 5-4. PP4E\System\Processes\child.py
import os, sys
print('Hello from child', os.getpid(), sys.argv[1])
Here is this code in action on Linux. It doesn’t look much different from the original
fork1.py, but it’s really running a new program in each forked process. More observant
readers may notice that the child process ID displayed is the same in the parent program
and the launched child.py program; os.execlp simply overlays a program in the same
process:
[C:\...\PP4E\System\Processes]$ python fork-exec.py
Child is 4556
Hello from child 4556 1
Child is 5920
Hello from child 5920 2
Child is 316
Hello from child 316 3
q
There are other ways to start up programs in Python besides the fork/exec combination.
For example, the os.system and os.popen calls and subprocess module which we ex-
plored in Chapters 2 and 3 allow us to spawn shell commands. And the os.spawnv call
and multiprocessing module, which we’ll meet later in this chapter, allow us to start
independent programs and processes more portably. In fact, we’ll see later that multi
processing’s process spawning model can be used as a sort of portable replacement for
os.fork in some contexts (albeit a less efficient one) and used in conjunction with the
os.exec* calls shown here to achieve a similar effect in standard Windows Python.
We’ll see more process fork examples later in this chapter, especially in the program
exits and process communication sections, so we’ll forego additional examples here.
We’ll also discuss additional process topics in later chapters of this book. For instance,
forks are revisited in Chapter 12 to deal with servers and their zombies—dead processes
lurking in system tables after their demise. For now, let’s move on to threads, a subject
which at least some programmers find to be substantially less frightening…
184 | Chapter 5: Parallel System Tools

More on Cygwin Python for Windows
As mentioned, the os.fork call is present in the Cygwin version of Python on Windows.
Even though this call is missing in the standard version of Python for Windows, you
can fork processes on Windows with Python if you install and use Cygwin. However,
the Cygwin fork call is not as efficient and does not work exactly the same as a fork on
true Unix systems.
Cygwin is a free, open source package which includes a library that attempts to provide
a Unix-like API for use on Windows machines, along with a set of command-line tools
that implement a Unix-like environment. It makes it easier to apply Unix skills and
code on Windows computers.
According to its FAQ documentation, though, “Cygwin fork() essentially works like a
noncopy on write version of fork() (like old Unix versions used to do). Because of this
it can be a little slow. In most cases, you are better off using the spawn family of calls
if possible.” Since this book’s fork examples don’t need to care about performance,
Cygwin’s fork suffices.
In addition to the fork call, Cygwin provides other Unix tools that would otherwise not
be available on all flavors of Windows, including os.mkfifo (discussed later in this
chapter). It also comes with a gcc compiler environment for building C extensions for
Python on Windows that will be familiar to Unix developers. As long as you’re willing
to use Cygwin libraries to build your application and power your Python, it’s very close
to Unix on Windows.
Like all third-party libraries, though, Cygwin adds an extra dependency to your sys-
tems. Perhaps more critically, Cygwin currently uses the GNU GPL license, which adds
distribution requirements beyond those of standard Python. Unlike using Python itself,
shipping a program that uses Cygwin libraries may require that your program’s source
code be made freely available (though RedHat offers a “buy-out” option which can
relieve you of this requirement). Note that this is a complex legal issue, and you should
study Cygwin’s license on your own if this may impact your programs. Its license does,
however, impose more constraints than Python’s (Python uses a “BSD”-style license,
not the GPL).
Despite licensing issue, Cygwin still can be a great way to get Unix-like functionality
on Windows without installing a completely different operating system such as
Linux—a more complete but generally more complex option. For more details, see
http://cygwin.com or run a search for Cygwin on the Web.
See also the standard library’s multiprocessing module and os.spawn family of calls,
covered later in this chapter, for alternative way to start parallel tasks and programs on
Unix and Windows that do not require fork and exec calls. To run a simple function
call in parallel on Windows (rather than on an external program), also see the section
on standard library threads later in this chapter. Threads, multiprocessing, and
os.spawn calls work on Windows in standard Python.
Forking Processes | 185

Fourth Edition Update: As I was updating this chapter in February 2010, Cygwin’s
official Python was still Python 2.5.2. To get Python 3.1 under Cygwin, it had to be
built from its source code. If this is still required when you read this, make sure you
have gcc and make installed on your Cygwin, then fetch Python’s source code package
from python.org, unpack it, and build Python with the usual commands:
./configure
make
make test
sudo make install
This will install Python as python3. The same procedure works on all Unix-like plat-
forms; on OS X and Cygwin, the executable is called python.exe; elsewhere it’s named
python. You can generally skip the last two of the above steps if you’re willing to run
Python 3.1 out of your own build directory. Be sure to also check if Python 3.X is a
standard Cygwin package by the time you read this; when building from source you
may have to tweak a few files (I had to comment-out a #define in Modules/main.c), but
these are too specific and temporal to get into here.
Threads
Threads are another way to start activities running at the same time. In short, they run
a call to a function (or any other type of callable object) in parallel with the rest of the
program. Threads are sometimes called “lightweight processes,” because they run in
parallel like forked processes, but all of them run within the same single process. While
processes are commonly used to start independent programs, threads are commonly
used for tasks such as nonblocking input calls and long-running tasks in a GUI. They
also provide a natural model for algorithms that can be expressed as independently
running tasks. For applications that can benefit from parallel processing, some devel-
opers consider threads to offer a number of advantages:
Performance
Because all threads run within the same process, they don’t generally incur a big
startup cost to copy the process itself. The costs of both copying forked processes
and running threads can vary per platform, but threads are usually considered less
expensive in terms of performance overhead.
Simplicity
To many observers, threads can be noticeably simpler to program, too, especially
when some of the more complex aspects of processes enter the picture (e.g., process
exits, communication schemes, and zombie processes, covered in Chapter 12).
Shared global memory
On a related note, because threads run in a single process, every thread shares the
same global memory space of the process. This provides a natural and easy way
for threads to communicate—by fetching and setting names or objects accessible
to all the threads. To the Python programmer, this means that things like global
186 | Chapter 5: Parallel System Tools

scope variables, passed objects and their attributes, and program-wide interpreter
components such as imported modules are shared among all threads in a program;
if one thread assigns a global variable, for instance, its new value will be seen by
other threads. Some care must be taken to control access to shared items, but to
some this seems generally simpler to use than the process communication tools
necessary for forked processes, which we’ll meet later in this chapter and book
(e.g., pipes, streams, signals, sockets, etc.). Like much in programming, this is not
a universally shared view, however, so you’ll have to weigh the difference for your
programs and platforms yourself.
Portability
Perhaps most important is the fact that threads are more portable than forked
processes. At this writing, os.fork is not supported by the standard version of
Python on Windows, but threads are. If you want to run parallel tasks portably in
a Python script today and you are unwilling or unable to install a Unix-like library
such as Cygwin on Windows, threads may be your best bet. Python’s thread tools
automatically account for any platform-specific thread differences, and they pro-
vide a consistent interface across all operating systems. Having said that, the rela-
tively new multiprocessing module described later in this chapter offers another
answer to the process portability issue in some use cases.
So what’s the catch? There are three potential downsides you should be aware of before
you start spinning your threads:
Function calls versus programs
First of all, threads are not a way—at least, not a direct way—to start up another
program. Rather, threads are designed to run a call to a function (technically, any
callable, including bound and unbound methods) in parallel with the rest of the
program. As we saw in the prior section, by contrast, forked processes can either
call a function or start a new program. Naturally, the threaded function can run
scripts with the exec built-in function and can start new programs with tools such
as os.system, os.popen and the subprocess module, especially if doing so is itself a
long-running task. But fundamentally, threads run in-program functions.
In practice, this is usually not a limitation. For many applications, parallel functions
are sufficiently powerful. For instance, if you want to implement nonblocking input
and output and avoid blocking a GUI or its users with long-running tasks, threads
do the job; simply spawn a thread to run a function that performs the potentially
long-running task. The rest of the program will continue independently.
Thread synchronization and queues
Secondly, the fact that threads share objects and names in global process memory
is both good news and bad news—it provides a communication mechanism, but
we have to be careful to synchronize a variety of operations. As we’ll see, even
operations such as printing are a potential conflict since there is only one
sys.stdout per process, which is shared by all threads.
Threads | 187

Luckily, the Python queue module, described in this section, makes this simple:
realistic threaded programs are usually structured as one or more producer (a.k.a.
worker) threads that add data to a queue, along with one or more consumer threads
that take the data off the queue and process it. In a typical threaded GUI, for
example, producers may download or compute data and place it on the queue; the
consumer—the main GUI thread—checks the queue for data periodically with a
timer event and displays it in the GUI when it arrives. Because the shared queue is
thread-safe, programs structured this way automatically synchronize much cross-
thread data communication.
The global interpreter lock (GIL)
Finally, as we’ll learn in more detail later in this section, Python’s implementation
of threads means that only one thread is ever really running its Python language
code in the Python virtual machine at any point in time. Python threads are true
operating system threads, but all threads must acquire a single shared lock when
they are ready to run, and each thread may be swapped out after running for a short
period of time (currently, after a set number of virtual machine instructions, though
this implementation may change in Python 3.2).
Because of this structure, the Python language parts of Python threads cannot today
be distributed across multiple CPUs on a multi-CPU computer. To leverage more
than one CPU, you’ll simply need to use process forking, not threads (the amount
and complexity of code required for both are roughly the same). Moreover, the
parts of a thread that perform long-running tasks implemented as C extensions can
run truly independently if they release the GIL to allow the Python code of other
threads to run while their task is in progress. Python code, however, cannot truly
overlap in time.
The advantage of Python’s implementation of threads is performance—when it
was attempted, making the virtual machine truly thread-safe reportedly slowed all
programs by a factor of two on Windows and by an even larger factor on Linux.
Even nonthreaded programs ran at half speed.
Even though the GIL’s multiplexing of Python language code makes Python
threads less useful for leveraging capacity on multiple CPU machines, threads are
still useful as programming tools to implement nonblocking operations, especially
in GUIs. Moreover, the newer multiprocessing module we’ll meet later offers an-
other solution here, too—by providing a portable thread-like API that is imple-
mented with processes, programs can both leverage the simplicity and
programmability of threads and benefit from the scalability of independent pro-
cesses across CPUs.
Despite what you may think after reading the preceding overview, threads are remark-
ably easy to use in Python. In fact, when a program is started it is already running a
thread, usually called the “main thread” of the process. To start new, independent
threads of execution within a process, Python code uses either the low-level _thread
module to run a function call in a spawned thread, or the higher-level threading module
188 | Chapter 5: Parallel System Tools

to manage threads with high-level class-based objects. Both modules also provide tools
for synchronizing access to shared objects with locks.
This book presents both the _thread and threading modules, and its
examples use both interchangeably. Some Python users would recom-
mend that you always use threading rather than _thread in general. In
fact, the latter was renamed from thread to _thread in 3.X to suggest
such a lesser status for it. Personally, I think that is too extreme (and
this is one reason this book sometimes uses as thread in imports to
retain the original module name). Unless you need the more powerful
tools in threading, the choice is largely arbitrary, and the threading
module’s extra requirements may be unwarranted.
The basic thread module does not impose OOP, and as you’ll see in the
examples of this section, is very straightforward to use. The threading
module may be better for more complex tasks which require per-thread
state retention or joins, but not all threaded programs require its extra
tools, and many use threads in more limited scopes. In fact, this is
roughly the same as comparing the os.walk call and visitor classes we’ll
meet in Chapter 6—both have valid audiences and use cases. The most
general Python rule of thumb applies here as always: keep it simple,
unless it has to be complex.
The _thread Module
Since the basic _thread module is a bit simpler than the more advanced threading
module covered later in this section, let’s look at some of its interfaces first. This module
provides a portable interface to whatever threading system is available in your platform:
its interfaces work the same on Windows, Solaris, SGI, and any system with an installed
pthreads POSIX threads implementation (including Linux and others). Python scripts
that use the Python _thread module work on all of these platforms without changing
their source code.
Basic usage
Let’s start off by experimenting with a script that demonstrates the main thread inter-
faces. The script in Example 5-5 spawns threads until you reply with a q at the console;
it’s similar in spirit to (and a bit simpler than) the script in Example 5-1, but it goes
parallel with threads instead of process forks.
Example 5-5. PP4E\System\Threads\thread1.py
"spawn threads until you type 'q'"
import _thread
def child(tid):
Threads | 189

print('Hello from thread', tid)
def parent():
i = 0
while True:
i += 1
_thread.start_new_thread(child, (i,))
if input() == 'q': break
parent()
This script really contains only two thread-specific lines: the import of the _thread
module and the thread creation call. To start a thread, we simply call the
_thread.start_new_thread function, no matter what platform we’re programming
on.‡ This call takes a function (or other callable) object and an arguments tuple and
starts a new thread to execute a call to the passed function with the passed arguments.
It’s almost like Python’s function(*args) call syntax, and similarly accepts an optional
keyword arguments dictionary, too, but in this case the function call begins running in
parallel with the rest of the program.
Operationally speaking, the _thread.start_new_thread call itself returns immediately
with no useful value, and the thread it spawns silently exits when the function being
run returns (the return value of the threaded function call is simply ignored). Moreover,
if a function run in a thread raises an uncaught exception, a stack trace is printed and
the thread exits, but the rest of the program continues. With the _thread module, the
entire program exits silently on most platforms when the main thread does (though as
we’ll see later, the threading module may require special handling if child threads are
still running).
In practice, though, it’s almost trivial to use threads in a Python script. Let’s run this
program to launch a few threads; we can run it on both Unix-like platforms and Win-
dows this time, because threads are more portable than process forks—here it is
spawning threads on Windows:
C:\...\PP4E\System\Threads> python thread1.py
Hello from thread 1
Hello from thread 2
Hello from thread 3
Hello from thread 4
q
‡ The _thread examples in this book now all use start_new_thread. This call is also available as
thread.start_new for historical reasons, but this synonym may be removed in a future Python release. As of
Python 3.1, both names are still available, but the help documentation for start_new claims that it is obsolete;
in other words, you should probably prefer the other if you care about the future (and this book must!).
190 | Chapter 5: Parallel System Tools

Each message here is printed from a new thread, which exits almost as soon as it is
started.
Other ways to code threads with _thread
Although the preceding script runs a simple function, any callable object may be run in
the thread, because all threads live in the same process. For instance, a thread can also
run a lambda function or bound method of an object (the following code is part of file
thread-alts.py in the book examples package):
import _thread # all 3 print 4294967296
def action(i): # function run in threads
print(i ** 32)
class Power:
def __init__(self, i):
self.i = i
def action(self): # bound method run in threads
print(self.i ** 32)
_thread.start_new_thread(action, (2,)) # simple function
_thread.start_new_thread((lambda: action(2)), ()) # lambda function to defer
obj = Power(2)
_thread.start_new_thread(obj.action, ()) # bound method object
As we’ll see in larger examples later in this book, bound methods are especially useful
in this role—because they remember both the method function and instance object,
they also give access to state information and class methods for use within and during
the thread.
More fundamentally, because threads all run in the same process, bound methods run
by threads reference the original in-process instance object, not a copy of it. Hence, any
changes to its state made in a thread will be visible to all threads automatically. More-
over, since bound methods of a class instance pass for callables interchangeably with
simple functions, using them in threads this way just works. And as we’ll see later, the
fact that they are normal objects also allows them to be stored freely on shared queues.
Running multiple threads
To really understand the power of threads running in parallel, though, we have to do
something more long-lived in our threads, just as we did earlier for processes. Let’s
mutate the fork-count program of the prior section to use threads. The script in Ex-
ample 5-6 starts 5 copies of its counter function running in parallel threads.
Example 5-6. PP4E\System\Threads\thread-count.py
"""
thread basics: start 5 copies of a function running in parallel;
Threads | 191

uses time.sleep so that the main thread doesn't die too early--
this kills all other threads on some platforms; stdout is shared:
thread outputs may be intermixed in this version arbitrarily.
"""
import _thread as thread, time
def counter(myId, count): # function run in threads
for i in range(count):
time.sleep(1) # simulate real work
print('[%s] => %s' % (myId, i))
for i in range(5): # spawn 5 threads
thread.start_new_thread(counter, (i, 5)) # each thread loops 5 times
time.sleep(6)
print('Main thread exiting.') # don't exit too early
Each parallel copy of the counter function simply counts from zero up to four here and
prints a message to standard output for each count.
Notice how this script sleeps for 6 seconds at the end. On Windows and Linux machines
this has been tested on, the main thread shouldn’t exit while any spawned threads are
running if it cares about their work; if it does exit, all spawned threads are immediately
terminated. This differs from processes, where spawned children live on when parents
exit. Without the sleep here, the spawned threads would die almost immediately after
they are started.
This may seem ad hoc, but it isn’t required on all platforms, and programs are usually
structured such that the main thread naturally lives as long as the threads it starts. For
instance, a user interface may start an FTP download running in a thread, but the
download lives a much shorter life than the user interface itself. Later in this section,
we’ll also see different ways to avoid this sleep using global locks and flags that let
threads signal their completion.
Moreover, we’ll later find that the threading module both provides a join method that
lets us wait for spawned threads to finish explicitly, and refuses to allow a program to
exit at all if any of its normal threads are still running (which may be useful in this case,
but can require extra work to shut down in others). The multiprocessing module we’ll
meet later in this chapter also allows spawned children to outlive their parents, though
this is largely an artifact of its process-based model.
Now, when Example 5-6 is run on Windows 7 under Python 3.1, here is the output I get:
C:\...\PP4E\System\Threads> python thread-count.py
[1] => 0
[1] => 0
[0] => 0
[1] => 0
[0] => 0
[2] => 0
[3] => 0
192 | Chapter 5: Parallel System Tools

[3] => 0
[1] => 1
[3] => 1
[3] => 1
[0] => 1[2] => 1
[3] => 1
[0] => 1[2] => 1
[4] => 1
[1] => 2
[3] => 2[4] => 2
[3] => 2[4] => 2
[0] => 2
[3] => 2[4] => 2
[0] => 2
[2] => 2
[3] => 2[4] => 2
[0] => 2
[2] => 2
...more output omitted...
Main thread exiting.
If this looks odd, it’s because it should. In fact, this demonstrates probably the most
unusual aspect of threads. What’s happening here is that the output of the 5 threads
run in parallel is intermixed—because all the threaded function calls run in the same
process, they all share the same standard output stream (in Python terms, there is just
one sys.stdout file between them, which is where printed text is sent). The net effect
is that their output can be combined and confused arbitrarily. In fact, this script’s
output can differ on each run. This jumbling of output grew even more pronounced in
Python 3, presumably due to its new file output implementation.
More fundamentally, when multiple threads can access a shared resource like this, their
access must be synchronized to avoid overlap in time—as explained in the next section.
Synchronizing access to shared objects and names
One of the nice things about threads is that they automatically come with a cross-task
communications mechanism: objects and namespaces in a process that span the life of
threads are shared by all spawned threads. For instance, because every thread runs in
the same process, if one Python thread changes a global scope variable, the change can
be seen by every other thread in the process, main or child. Similarly, threads can share
and change mutable objects in the process’s memory as long as they hold a reference
to them (e.g., passed-in arguments). This serves as a simple way for a program’s threads
to pass information—exit flags, result objects, event indicators, and so on—back and
forth to each other.
The downside to this scheme is that our threads must sometimes be careful to avoid
changing global objects and names at the same time. If two threads may change a shared
object at once, it’s not impossible that one of the two changes will be lost (or worse,
Threads | 193

will silently corrupt the state of the shared object completely): one thread may step on
the work done so far by another whose operations are still in progress. The extent to
which this becomes an issue varies per application, and sometimes it isn’t an issue at all.
But even things that aren’t obviously at risk may be at risk. Files and streams, for ex-
ample, are shared by all threads in a program; if multiple threads write to one stream
at the same time, the stream might wind up with interleaved, garbled data. Exam-
ple 5-6 of the prior section was a simple demonstration of this phenomenon in action,
but it’s indicative of the sorts of clashes in time that can occur when our programs go
parallel. Even simple changes can go awry if they might happen concurrently. To be
robust, threaded programs need to control access to shared global items like these so
that only one thread uses them at once.
Luckily, Python’s _thread module comes with its own easy-to-use tools for synchro-
nizing access to objects shared among threads. These tools are based on the concept
of a lock—to change a shared object, threads acquire a lock, make their changes, and
then release the lock for other threads to grab. Python ensures that only one thread can
hold a lock at any point in time; if others request it while it’s held, they are blocked
until the lock becomes available. Lock objects are allocated and processed with simple
and portable calls in the _thread module that are automatically mapped to thread lock-
ing mechanisms on the underlying platform.
For instance, in Example 5-7, a lock object created by _thread.allocate_lock is ac-
quired and released by each thread around the print call that writes to the shared
standard output stream.
Example 5-7. PP4E\System\Threads\thread-count-mutex.py
"""
synchronize access to stdout: because it is shared global,
thread outputs may be intermixed if not synchronized
"""
import _thread as thread, time
def counter(myId, count): # function run in threads
for i in range(count):
time.sleep(1) # simulate real work
mutex.acquire()
print('[%s] => %s' % (myId, i)) # print isn't interrupted now
mutex.release()
mutex = thread.allocate_lock() # make a global lock object
for i in range(5): # spawn 5 threads
thread.start_new_thread(counter, (i, 5)) # each thread loops 5 times
time.sleep(6)
print('Main thread exiting.') # don't exit too early
Really, this script simply augments Example 5-6 to synchronize prints with a thread
lock. The net effect of the additional lock calls in this script is that no two threads will
194 | Chapter 5: Parallel System Tools

ever execute a print call at the same point in time; the lock ensures mutually exclusive
access to the stdout stream. Hence, the output of this script is similar to that of the
original version, except that standard output text is never mangled by overlapping
prints:
C:\...\PP4E\System\Threads> thread-count-mutex.py
[0] => 0
[1] => 0
[3] => 0
[2] => 0
[4] => 0
[0] => 1
[1] => 1
[3] => 1
[2] => 1
[4] => 1
[0] => 2
[1] => 2
[3] => 2
[4] => 2
[2] => 2
[0] => 3
[1] => 3
[3] => 3
[4] => 3
[2] => 3
[0] => 4
[1] => 4
[3] => 4
[4] => 4
[2] => 4
Main thread exiting.
Though somewhat platform-specific, the order in which the threads check in with their
prints may still be arbitrary from run to run because they execute in parallel (getting
work done in parallel is the whole point of threads, after all); but they no longer collide
in time while printing their text. We’ll see other cases where the lock idiom comes in
to play later in this chapter—it’s a core component of the multithreading model.
Waiting for spawned thread exits
Besides avoiding print collisions, thread module locks are surprisingly useful. They can
form the basis of higher-level synchronization paradigms (e.g., semaphores) and can
be used as general thread communication devices.§ For instance, Example 5-8 uses a
global list of locks to know when all child threads have finished.
§ They cannot, however, be used to directly synchronize processes. Since processes are more independent, they
usually require locking mechanisms that are more long-lived and external to programs. Chapter 4’s
os.open call with an open flag of O_EXCL allows scripts to lock and unlock files and so is ideal as a cross-process
locking tool. See also the synchronization tools in the multiprocessing and threading modules and the IPC
section later in this chapter for other general synchronization ideas.
Threads | 195

Example 5-8. PP4E\System\Threads\thread-count-wait1.py
"""
uses mutexes to know when threads are done in parent/main thread,
instead of time.sleep; lock stdout to avoid comingled prints;
"""
import _thread as thread
stdoutmutex = thread.allocate_lock()
exitmutexes = [thread.allocate_lock() for i in range(10)]
def counter(myId, count):
for i in range(count):
stdoutmutex.acquire()
print('[%s] => %s' % (myId, i))
stdoutmutex.release()
exitmutexes[myId].acquire() # signal main thread
for i in range(10):
thread.start_new_thread(counter, (i, 100))
for mutex in exitmutexes:
while not mutex.locked(): pass
print('Main thread exiting.')
A lock’s locked method can be used to check its state. To make this work, the main
thread makes one lock per child and tacks them onto a global exitmutexes list (re-
member, the threaded function shares global scope with the main thread). On exit,
each thread acquires its lock on the list, and the main thread simply watches for all
locks to be acquired. This is much more accurate than naïvely sleeping while child
threads run in hopes that all will have exited after the sleep. Run this on your own to
see its output—all 10 spawned threads count up to 100 (they run in arbitrarily inter-
leaved order that can vary per run and platform, but their prints run atomically and do
not comingle), before the main thread exits.
Depending on how your threads run, this could be even simpler: since threads share
global memory anyhow, we can usually achieve the same effect with a simple global
list of integers instead of locks. In Example 5-9, the module’s namespace (scope) is
shared by top-level code and the threaded function, as before. exitmutexes refers to the
same list object in the main thread and all threads it spawns. Because of that, changes
made in a thread are still noticed in the main thread without resorting to extra locks.
Example 5-9. PP4E\System\Threads\thread-count-wait2.py
"""
uses simple shared global data (not mutexes) to know when threads
are done in parent/main thread; threads share list but not its items,
assumes list won't move in memory once it has been created initially
"""
import _thread as thread
stdoutmutex = thread.allocate_lock()
196 | Chapter 5: Parallel System Tools

exitmutexes = [False] * 10
def counter(myId, count):
for i in range(count):
stdoutmutex.acquire()
print('[%s] => %s' % (myId, i))
stdoutmutex.release()
exitmutexes[myId] = True # signal main thread
for i in range(10):
thread.start_new_thread(counter, (i, 100))
while False in exitmutexes: pass
print('Main thread exiting.')
The output of this script is similar to the prior—10 threads counting to 100 in parallel
and synchronizing their prints along the way. In fact, both of the last two counting
thread scripts produce roughly the same output as the original thread_count.py, albeit
without stdout corruption and with larger counts and different random ordering of
output lines. The main difference is that the main thread exits immediately after (and
no sooner than!) the spawned child threads:
C:\...\PP4E\System\Threads> python thread-count-wait2.py
...more deleted...
[4] => 98
[6] => 98
[8] => 98
[5] => 98
[0] => 99
[7] => 98
[9] => 98
[1] => 99
[3] => 99
[2] => 99
[4] => 99
[6] => 99
[8] => 99
[5] => 99
[7] => 99
[9] => 99
Main thread exiting.
Coding alternatives: busy loops, arguments, and context managers
Notice how the main threads of both of the last two scripts fall into busy-wait loops at
the end, which might become significant performance drains in tight applications. If
so, simply add a time.sleep call in the wait loops to insert a pause between end tests
and to free up the CPU for other tasks: this call pauses the calling thread only (in this
case, the main one). You might also try experimenting with adding sleep calls to the
thread function to simulate real work.
Threads | 197

Passing in the lock to threaded functions as an argument instead of referencing it in the
global scope might be more coherent, too. When passed in, all threads reference the
same object, because they are all part of the same process. Really, the process’s object
memory is shared memory for threads, regardless of how objects in that shared memory
are referenced (whether through global scope variables, passed argument names, object
attributes, or another way).
And while we’re at it, the with statement can be used to ensure thread operations around
a nested block of code, much like its use to ensure file closure in the prior chapter. The
thread lock’s context manager acquires the lock on with statement entry and releases
it on statement exit regardless of exception outcomes. The net effect is to save one line
of code, but also to guarantee lock release when exceptions are possible. Exam-
ple 5-10 adds all these coding alternatives to our threaded counter script.
Example 5-10. PP4E\System\Threads\thread-count-wait3.py
"""
passed in mutex object shared by all threads instead of globals;
use with context manager statement for auto acquire/release;
sleep calls added to avoid busy loops and simulate real work
"""
import _thread as thread, time
stdoutmutex = thread.allocate_lock()
numthreads = 5
exitmutexes = [thread.allocate_lock() for i in range(numthreads)]
def counter(myId, count, mutex): # shared object passed in
for i in range(count):
time.sleep(1 / (myId+1)) # diff fractions of second
with mutex: # auto acquire/release: with
print('[%s] => %s' % (myId, i))
exitmutexes[myId].acquire() # global: signal main thread
for i in range(numthreads):
thread.start_new_thread(counter, (i, 5, stdoutmutex))
while not all(mutex.locked() for mutex in exitmutexes): time.sleep(0.25)
print('Main thread exiting.')
When run, the different sleep times per thread make them run more independently:
C:\...\PP4E\System\Threads> thread-count-wait3.py
[4] => 0
[3] => 0
[2] => 0
[4] => 1
[1] => 0
[3] => 1
[4] => 2
[2] => 1
[3] => 2
[4] => 3
198 | Chapter 5: Parallel System Tools

[4] => 4
[0] => 0
[1] => 1
[2] => 2
[3] => 3
[3] => 4
[2] => 3
[1] => 2
[2] => 4
[0] => 1
[1] => 3
[1] => 4
[0] => 2
[0] => 3
[0] => 4
Main thread exiting.
Of course, threads are for much more than counting. We’ll put shared global data to
more practical use in “Adding a User Interface” on page 867, where it will serve as
completion signals from child processing threads transferring data over a network to a
main thread controlling a tkinter GUI display, and again later in Chapter 10’s thread-
tools and Chapter 14’s PyMailGUI to post results of email operations to a GUI (watch
for “Preview: GUIs and Threads” on page 208 for more pointers on this topic). Global
data shared among threads also turns out to be the basis of queues, which are discussed
later in this chapter; each thread gets or puts data using the same shared queue object.
The threading Module
The Python standard library comes with two thread modules: _thread, the basic lower-
level interface illustrated thus far, and threading, a higher-level interface based on
objects and classes. The threading module internally uses the _thread module to im-
plement objects that represent threads and common synchronization tools. It is loosely
based on a subset of the Java language’s threading model, but it differs in ways that
only Java programmers would notice.‖ Example 5-11 morphs our counting threads
example again to demonstrate this new module’s interfaces.
Example 5-11. PP4E\System\Threads\thread-classes.py
"""
thread class instances with state and run() for thread's action;
uses higher-level Java-like threading module object join method (not
mutexes or shared global vars) to know when threads are done in main
parent thread; see library manual for more details on threading;
"""
import threading
‖But in case this means you, Python’s lock and condition variables are distinct objects, not something inherent
in all objects, and Python’s Thread class doesn’t have all the features of Java’s. See Python’s library manual
for further details.
Threads | 199

class Mythread(threading.Thread): # subclass Thread object
def __init__(self, myId, count, mutex):
self.myId = myId
self.count = count # per-thread state information
self.mutex = mutex # shared objects, not globals
threading.Thread.__init__(self)
def run(self): # run provides thread logic
for i in range(self.count): # still sync stdout access
with self.mutex:
print('[%s] => %s' % (self.myId, i))
stdoutmutex = threading.Lock() # same as thread.allocate_lock()
threads = []
for i in range(10):
thread = Mythread(i, 100, stdoutmutex) # make/start 10 threads
thread.start() # starts run method in a thread
threads.append(thread)
for thread in threads:
thread.join() # wait for thread exits
print('Main thread exiting.')
The output of this script is the same as that shown for its ancestors earlier (again, threads
may be randomly distributed in time, depending on your platform):
C:\...\PP4E\System\Threads> python thread-classes.py
...more deleted...
[4] => 98
[8] => 97
[9] => 97
[5] => 98
[3] => 99
[6] => 98
[7] => 98
[4] => 99
[8] => 98
[9] => 98
[5] => 99
[6] => 99
[7] => 99
[8] => 99
[9] => 99
Main thread exiting.
Using the threading module this way is largely a matter of specializing classes. Threads
in this module are implemented with a Thread object, a Python class which we may
customize per application by providing a run method that defines the thread’s action.
For example, this script subclasses Thread with its own Mythread class; the run method
will be executed by the Thread framework in a new thread when we make a Mythread
and call its start method.
200 | Chapter 5: Parallel System Tools

In other words, this script simply provides methods expected by the Thread framework.
The advantage of taking this more coding-intensive route is that we get both per-thread
state information (the usual instance attribute namespace), and a set of additional
thread-related tools from the framework “for free.” The Thread.join method used near
the end of this script, for instance, waits until the thread exits (by default); we can use
this method to prevent the main thread from exiting before its children, rather than
using the time.sleep calls and global locks and variables we relied on in earlier threading
examples.
The example script also uses threading.Lock to synchronize stream access as before
(though this name is really just a synonym for _thread.allocate_lock in the current
implementation). The threading module may provide the extra structure of classes, but
it doesn’t remove the specter of concurrent updates in the multithreading model in
general.
Other ways to code threads with threading
The Thread class can also be used to start a simple function, or any other type of callable
object, without coding subclasses at all—if not redefined, the Thread class’s default
run method simply calls whatever you pass to its constructor’s target argument, with
any provided arguments passed to args (which defaults to () for none). This allows us
to use Thread to run simple functions, too, though this call form is not noticeably sim-
pler than the basic _thread module. For instance, the following code snippets sketch
four different ways to spawn the same sort of thread (see four-threads*.py in the exam-
ples tree; you can run all four in the same script, but would have to also synchronize
prints to avoid overlap):
import threading, _thread
def action(i):
print(i ** 32)
# subclass with state
class Mythread(threading.Thread):
def __init__(self, i):
self.i = i
threading.Thread.__init__(self)
def run(self): # redefine run for action
print(self.i ** 32)
Mythread(2).start() # start invokes run()
# pass action in
thread = threading.Thread(target=(lambda: action(2))) # run invokes target
thread.start()
# same but no lambda wrapper for state
threading.Thread(target=action, args=(2,)).start() # callable plus its args
# basic thread module
_thread.start_new_thread(action, (2,)) # all-function interface
Threads | 201

As a rule of thumb, class-based threads may be better if your threads require per-thread
state, or can leverage any of OOP’s many benefits in general. Your thread classes don’t
necessarily have to subclass Thread, though. In fact, just as in the _thread module, the
thread’s target in threading may be any type of callable object. When combined with
techniques such as bound methods and nested scope references, the choice between
coding techniques becomes even less clear-cut:
# a non-thread class with state, OOP
class Power:
def __init__(self, i):
self.i = i
def action(self):
print(self.i ** 32)
obj = Power(2)
threading.Thread(target=obj.action).start() # thread runs bound method
# nested scope to retain state
def action(i):
def power():
print(i ** 32)
return power
threading.Thread(target=action(2)).start() # thread runs returned function
# both with basic thread module
_thread.start_new_thread(obj.action, ()) # thread runs a callable object
_thread.start_new_thread(action(2), ())
As usual, the threading APIs are as flexible as the Python language itself.
Synchronizing access to shared objects and names revisited
Earlier, we saw how print operations in threads need to be synchronized with locks to
avoid overlap, because the output stream is shared by all threads. More formally,
threads need to synchronize their changes to any item that may be shared across thread
in a process—both objects and namespaces. Depending on a given program’s goals,
this might include:
• Mutable object in memory (passed or otherwise referenced objects whose lifetimes
span threads)
• Names in global scopes (changeable variables outside thread functions and classes)
• The contents of modules (each has just one shared copy in the system’s module
table)
For instance, even simple global variables can require coordination if concurrent up-
dates are possible, as in Example 5-12.
202 | Chapter 5: Parallel System Tools

Example 5-12. PP4E\System\Threads\thread-add-random.py
"prints different results on different runs on Windows 7"
import threading, time
count = 0
def adder():
global count
count = count + 1 # update a shared name in global scope
time.sleep(0.5) # threads share object memory and global names
count = count + 1
threads = []
for i in range(100):
thread = threading.Thread(target=adder, args=())
thread.start()
threads.append(thread)
for thread in threads: thread.join()
print(count)
Here, 100 threads are spawned to update the same global scope variable twice (with a
sleep between updates to better interleave their operations). When run on Windows 7
with Python 3.1, different runs produce different results:
C:\...\PP4E\System\Threads> thread-add-random.py
189
C:\...\PP4E\System\Threads> thread-add-random.py
200
C:\...\PP4E\System\Threads> thread-add-random.py
194
C:\...\PP4E\System\Threads> thread-add-random.py
191
This happens because threads overlap arbitrarily in time: statements, even the simple
assignment statements like those here, are not guaranteed to run to completion by
themselves (that is, they are not atomic). As one thread updates the global, it may be
using the partial result of another thread’s work in progress. The net effect is this seem-
ingly random behavior. To make this script work correctly, we need to again use thread
locks to synchronize the updates—when Example 5-13 is run, it always prints 200 as
expected.
Example 5-13. PP4E\System\Threads\thread-add-synch.py
"prints 200 each time, because shared resource access synchronized"
import threading, time
count = 0
def adder(addlock): # shared lock object passed in
Threads | 203

global count
with addlock:
count = count + 1 # auto acquire/release around stmt
time.sleep(0.5)
with addlock:
count = count + 1 # only 1 thread updating at once
addlock = threading.Lock()
threads = []
for i in range(100):
thread = threading.Thread(target=adder, args=(addlock,))
thread.start()
threads.append(thread)
for thread in threads: thread.join()
print(count)
Although some basic operations in the Python language are atomic and need not be
synchronized, you’re probably better off doing so for every potential concurrent up-
date. Not only might the set of atomic operations change over time, but the internal
implementation of threads in general can as well (and in fact, it may in Python 3.2, as
described ahead).
Of course, this is an artificial example (spawning 100 threads to add twice isn’t exactly
a real-world use case for threads!), but it illustrates the issues that threads must address
for any sort of potentially concurrent updates to shared object or name. Luckily, for
many or most realistic applications, the queue module of the next section can make
thread synchronization an automatic artifact of program structure.
Before we move ahead, I should point out that besides Thread and Lock, the
threading module also includes higher-level objects for synchronizing access to shared
items (e.g., Semaphore, Condition, Event)—many more, in fact, than we have space to
cover here; see the library manual for details. For more examples of threads and forks
in general, see the remainder this chapter as well as the examples in the GUI and net-
work scripting parts of this book. We will thread GUIs, for instance, to avoid blocking
them, and we will thread and fork network servers to avoid denying service to clients.
We’ll also explore the threading module’s approach to program exits in the absence of
join calls in conjunction with queues—our next topic.
The queue Module
You can synchronize your threads’ access to shared resources with locks, but you often
don’t have to. As mentioned, realistically scaled threaded programs are often structured
as a set of producer and consumer threads, which communicate by placing data on,
and taking it off of, a shared queue. As long as the queue synchronizes access to itself,
this automatically synchronizes the threads’ interactions.
204 | Chapter 5: Parallel System Tools

The Python queue module implements this storage device. It provides a standard queue
data structure—a first-in first-out (fifo) list of Python objects, in which items are added
on one end and removed from the other. Like normal lists, the queues provided by this
module may contain any type of Python object, including both simple types (strings,
lists, dictionaries, and so on) and more exotic types (class instances, arbitrary callables
like functions and bound methods, and more).
Unlike normal lists, though, the queue object is automatically controlled with thread
lock acquire and release operations, such that only one thread can modify the queue
at any given point in time. Because of this, programs that use a queue for their cross-
thread communication will be thread-safe and can usually avoid dealing with locks of
their own for data passed between threads.
Like the other tools in Python’s threading arsenal, queues are surprisingly simple to
use. The script in Example 5-14, for instance, spawns two consumer threads that watch
for data to appear on the shared queue and four producer threads that place data on
the queue periodically after a sleep interval (each of their sleep durations differs to
simulate a real, long-running task). In other words, this program runs 7 threads (in-
cluding the main one), 6 of which access the shared queue in parallel.
Example 5-14. PP4E\System\Threads\queuetest.py
"producer and consumer threads communicating with a shared queue"
numconsumers = 2 # how many consumers to start
numproducers = 4 # how many producers to start
nummessages = 4 # messages per producer to put
import _thread as thread, queue, time
safeprint = thread.allocate_lock() # else prints may overlap
dataQueue = queue.Queue() # shared global, infinite size
def producer(idnum):
for msgnum in range(nummessages):
time.sleep(idnum)
dataQueue.put('[producer id=%d, count=%d]' % (idnum, msgnum))
def consumer(idnum):
while True:
time.sleep(0.1)
try:
data = dataQueue.get(block=False)
except queue.Empty:
pass
else:
with safeprint:
print('consumer', idnum, 'got =>', data)
if __name__ == '__main__':
for i in range(numconsumers):
thread.start_new_thread(consumer, (i,))
for i in range(numproducers):
Threads | 205

thread.start_new_thread(producer, (i,))
time.sleep(((numproducers-1) * nummessages) + 1)
print('Main thread exit.')
Before I show you this script’s output, I want to highlight a few points in its code.
Arguments versus globals
Notice how the queue is assigned to a global variable; because of that, it is shared by
all of the spawned threads (all of them run in the same process and in the same global
scope). Since these threads change an object instead of a variable name, it would work
just as well to pass the queue object in to the threaded functions as an argument—the
queue is a shared object in memory, regardless of how it is referenced (see
queuetest2.py in the examples tree for a full version that does this):
dataQueue = queue.Queue() # shared object, infinite size
def producer(idnum, dataqueue):
for msgnum in range(nummessages):
time.sleep(idnum)
dataqueue.put('[producer id=%d, count=%d]' % (idnum, msgnum))
def consumer(idnum, dataqueue): ...
if __name__ == '__main__':
for i in range(numproducers):
thread.start_new_thread(producer, (i, dataQueue))
for i in range(numproducers):
thread.start_new_thread(producer, (i, dataQueue))
Program exit with child threads
Also notice how this script exits when the main thread does, even though consumer
threads are still running in their infinite loops. This works fine on Windows (and most
other platforms)—with the basic _thread module, the program ends silently when the
main thread does. This is why we’ve had to sleep in some examples to give threads time
to do their work, but is also why we do not need to be concerned about exiting while
consumer threads are still running here.
In the alternative threading module, though, the program will not exit if any spawned
threads are running, unless they are set to be daemon threads. Specifically, the entire
program exits when only daemon threads are left. Threads inherit a default initial dae-
monic value from the thread that creates them. The initial thread of a Python program
is considered not daemonic, though alien threads created outside this module’s control
are considered daemonic (including some threads created in C code). To override in-
herited defaults, a thread object’s daemon flag can be set manually. In other words,
nondaemon threads prevent program exit, and programs by default do not exit until
all threading-managed threads finish.
206 | Chapter 5: Parallel System Tools

This is either a feature or nonfeature, depending on your program—it allows spawned
worker threads to finish their tasks in the absence of join calls or sleeps, but it can
prevent programs like the one in Example 5-14 from shutting down when they wish.
To make this example work with threading, use the following alternative code (see
queuetest3.py in the examples tree for a complete version of this, as well as thread-count-
threading.py, also in the tree, for a case where this refusal to exit can come in handy):
import threading, queue, time
def producer(idnum, dataqueue): ...
def consumer(idnum, dataqueue): ...
if __name__ == '__main__':
for i in range(numconsumers):
thread = threading.Thread(target=consumer, args=(i, dataQueue))
thread.daemon = True # else cannot exit!
thread.start()
waitfor = []
for i in range(numproducers):
thread = threading.Thread(target=producer, args=(i, dataQueue))
waitfor.append(thread)
thread.start()
for thread in waitfor: thread.join() # or time.sleep() long enough here
print('Main thread exit.')
We’ll revisit the daemons and exits issue in Chapter 10 while studying GUIs; as we’ll
see, it’s no different in that context, except that the main thread is usually the GUI itself.
Running the script
Now, as coded in Example 5-14, the following is the output of this example when run
on my Windows machine. Notice that even though the queue automatically coordi-
nates the communication of data between the threads, this script still must use a lock
to manually synchronize access to the standard output stream; queues synchronize data
passing, but some programs may still need to use locks for other purposes. As in prior
examples, if the safeprint lock is not used, the printed lines from one consumer may
be intermixed with those of another. It is not impossible that a consumer may be paused
in the middle of a print operation:
C:\...\PP4E\System\Threads> queuetest.py
consumer 1 got => [producer id=0, count=0]
consumer 0 got => [producer id=0, count=1]
consumer 1 got => [producer id=0, count=2]
consumer 0 got => [producer id=0, count=3]
consumer 1 got => [producer id=1, count=0]
consumer 1 got => [producer id=2, count=0]
consumer 0 got => [producer id=1, count=1]
consumer 1 got => [producer id=3, count=0]
consumer 0 got => [producer id=1, count=2]
Threads | 207

consumer 1 got => [producer id=2, count=1]
consumer 1 got => [producer id=1, count=3]
consumer 1 got => [producer id=3, count=1]
consumer 0 got => [producer id=2, count=2]
consumer 1 got => [producer id=2, count=3]
consumer 1 got => [producer id=3, count=2]
consumer 1 got => [producer id=3, count=3]
Main thread exit.
Try adjusting the parameters at the top of this script to experiment with different sce-
narios. A single consumer, for instance, would simulate a GUI’s main thread. Here is
the output of a single-consumer run—producers still add to the queue in fairly random
fashion, because threads run in parallel with each other and with the consumer:
C:\...\PP4E\System\Threads> queuetest.py
consumer 0 got => [producer id=0, count=0]
consumer 0 got => [producer id=0, count=1]
consumer 0 got => [producer id=0, count=2]
consumer 0 got => [producer id=0, count=3]
consumer 0 got => [producer id=1, count=0]
consumer 0 got => [producer id=2, count=0]
consumer 0 got => [producer id=1, count=1]
consumer 0 got => [producer id=3, count=0]
consumer 0 got => [producer id=1, count=2]
consumer 0 got => [producer id=2, count=1]
consumer 0 got => [producer id=1, count=3]
consumer 0 got => [producer id=3, count=1]
consumer 0 got => [producer id=2, count=2]
consumer 0 got => [producer id=2, count=3]
consumer 0 got => [producer id=3, count=2]
consumer 0 got => [producer id=3, count=3]
Main thread exit.
In addition to the basics used in our script, queues may be fixed or infinite in size, and
get and put calls may or may not block; see the Python library manual for more details
on queue interface options. Since we just simulated a typical GUI structure, though,
let’s explore the notion a bit further.
Preview: GUIs and Threads
We will return to threads and queues and see additional thread and queue examples
when we study GUIs later in this book. The PyMailGUI example in Chapter 14, for
instance, will make extensive use of thread and queue tools introduced here and de-
veloped further in Chapter 10, and Chapter 9 will discuss threading in the context of
the tkinter GUI toolkit once we’ve had a chance to study it. Although we can’t get into
code at this point, threads are usually an integral part of most nontrivial GUIs. In fact,
the activity model of many GUIs is a combination of threads, a queue, and a timer-
based loop.
Here’s why. In the context of a GUI, any operation that can block or take a long time
to complete must be spawned off to run in parallel so that the GUI (the main thread)
208 | Chapter 5: Parallel System Tools

remains active and continues responding to its users. Although such tasks can be run
as processes, the efficiency and shared-state model of threads make them ideal for this
role. Moreover, since most GUI toolkits do not allow multiple threads to update the
GUI in parallel, updates are best restricted to the main thread.
Because only the main thread should generally update the display, GUI programs typ-
ically take the form of a main GUI thread and one or more long-running producer
threads—one for each long-running task being performed. To synchronize their points
of interface, all of the threads share data on a global queue: non-GUI threads post
results, and the GUI thread consumes them.
More specifically:
• The main thread handles all GUI updates and runs a timer-based loop that wakes
up periodically to check for new data on the queue to be displayed on-screen. In
Python’s tkinter toolkit, for instance, the widget after(msecs, func, *args) method
can be used to schedule queue-check events. Because such events are dispatched
by the GUI’s event processor, all GUI updates occur only in this main thread (and
often must, due to the lack of thread safety in GUI toolkits).
• The child threads don’t do anything GUI-related. They just produce data and put
it on the queue to be picked up by the main thread. Alternatively, child threads
can place a callback function on the queue, to be picked up and run by the main
thread. It’s not generally sufficient to simply pass in a GUI update callback function
from the main thread to the child thread and run it from there; the function in
shared memory will still be executed in the child thread, and potentially in parallel
with other threads.
Since threads are much more responsive than a timer event loop in the GUI, this scheme
both avoids blocking the GUI (producer threads run in parallel with the GUI), and
avoids missing incoming events (producer threads run independent of the GUI event
loop and as fast as they can). The main GUI thread will display the queued results as
quickly as it can, in the context of a slower GUI event loop.
Also keep in mind that regardless of the thread safety of a GUI toolkit, threaded GUI
programs must still adhere to the principles of threaded programs in general—access
to shared resources may still need to be synchronized if it falls outside the scope of the
producer/consumer shared queue model. If spawned threads might also update an-
other shared state that is used by the main GUI thread, thread locks may also be required
to avoid operation overlap. For instance, spawned threads that download and cache
email probably cannot overlap with others that use or update the same cache. That is,
queues may not be enough; unless you can restrict threads’ work to queuing their
results, threaded GUIs still must address concurrent updates.
We’ll see how the threaded GUI model can be realized in code later in this book. For
more on this subject, see especially the discussion of threaded tkinter GUIs in
Threads | 209

Chapter 9, the thread queue tools implemented in Chapter 10, and the PyMailGUI
example in Chapter 14.
Later in this chapter, we’ll also meet the multiprocessing module, whose process and
queue support offers new options for implementing this GUI model using processes
instead of threads; as such, they work around the limitations of the thread GIL, but
may incur extra performance overheads that can vary per platform, and may not be
directly usable at all in threading contexts (the direct shared and mutable object state
of threads is not supported, though messaging is). For now, let’s cover a few final thread
fine points.
Thread Timers versus GUI Timers
Interestingly, the threading module exports a general timer function, which, like the
tkinter widget after method, can be used to run another function after a timer has
expired:
Timer(N.M, somefunc).start() # after N.M seconds run somefunc
Timer objects have a start() method to set the timer as well as a cancel() method to
cancel the scheduled event, and they implement the wait state in a spawned thread.
For example, the following prints a message after 5.5 seconds:
>>> import sys
>>> from threading import Timer
>>> t = Timer(5.5, lambda: print('Spam!')) # spawned thread
>>> t.start()
>>> Spam!
This may be useful in a variety of contexts, but it doesn’t quite apply to GUIs: because
the time-delayed function call is run in a spawned thread, not in the main GUI thread,
it should not generally perform GUI updates. Because the tkinter after method is run
from the main thread’s event processing loop instead, it runs in the main GUI thread
and can freely update the GUI.
As a preview, for instance, the following displays a pop-up message window in 5.5
seconds in the main thread of a tkinter GUI (you might also have to run win.main
loop() in some interfaces):
>>> from tkinter import Tk
>>> from tkinter.messagebox import showinfo
>>> win = Tk()
>>> win.after(5500, lambda: showinfo('Popup', 'Spam!'))
The last call here schedules the function to be run once in the main GUI thread, but it
does not pause the caller during the wait, and so does not block the GUI. It’s equivalent
to this simpler form:
>>> win.after(5500, showinfo, 'Popup', 'Spam')
Stay tuned for much more on tkinter in the next part of this book, and watch for the
full story on its after timer events in Chapter 9 and the roles of threads in GUIs in
Chapter 10.
210 | Chapter 5: Parallel System Tools

More on the Global Interpreter Lock
Although it’s a lower-level topic than you generally need to do useful thread work in
Python, the implementation of Python’s threads can have impacts on both performance
and coding. This section summarizes implementation details and some of their
ramifications.
Threads implementation in the upcoming Python 3.2: This section de-
scribes the current implementation of threads up to and including Py-
thon 3.1. At this writing, Python 3.2 is still in development, but one of
its likely enhancements is a new version of the GIL that provides better
performance, especially on some multicore CPUs. The new GIL imple-
mentation will still synchronize access to the PVM (Python language
code is still multiplexed as before), but it will use a context switching
scheme that is more efficient than the current N-bytecode-instruction
approach.
Among other things, the current sys.setcheckinterval call will likely
be replaced with a timer duration call in the new scheme. Specifically,
the concept of a check interval for thread switches will be abandoned
and replaced by an absolute time duration expressed in seconds. It’s
anticipated that this duration will default to 5 milliseconds, but it will
be tunable through sys.setswitchinterval.
Moreover, there have been a variety of plans made to remove the GIL
altogether (including goals of the Unladen Swallow project being con-
ducted by Google employees), though none have managed to produce
any fruit thus far. Since I cannot predict the future, please see Python
release documents to follow this (well…) thread.
Strictly speaking, Python currently uses the global interpreter lock (GIL) mechanism
introduced at the start of this section, which guarantees that one thread, at most, is
running code within the Python interpreter at any given point in time. In addition, to
make sure that each thread gets a chance to run, the interpreter automatically switches
its attention between threads at regular intervals (in Python 3.1, by releasing and ac-
quiring the lock after a number of bytecode instructions) as well as at the start of long-
running operations (e.g., on some file input/output requests).
This scheme avoids problems that could arise if multiple threads were to update Python
system data at the same time. For instance, if two threads were allowed to simultane-
ously change an object’s reference count, the result might be unpredictable. This
scheme can also have subtle consequences. In this chapter’s threading examples, for
instance, the stdout stream can be corrupted unless each thread’s call to write text is
synchronized with thread locks.
Moreover, even though the GIL prevents more than one Python thread from running
at the same time, it is not enough to ensure thread safety in general, and it does not
Threads | 211

address higher-level synchronization issues at all. For example, as we saw, when more
than one thread might attempt to update the same variable at the same time, the threads
should generally be given exclusive access to the object with locks. Otherwise, it’s not
impossible that thread switches will occur in the middle of an update statement’s
bytecode.
Locks are not strictly required for all shared object access, especially if a single thread
updates an object inspected by other threads. As a rule of thumb, though, you should
generally use locks to synchronize threads whenever update rendezvous are possible
instead of relying on artifacts of the current thread implementation.
The thread switch interval
Some concurrent updates might work without locks if the thread-switch interval is set
high enough to allow each thread to finish without being swapped out. The
sys.setcheckinterval(N) call sets the frequency with which the interpreter checks for
things like thread switches and signal handlers.
This interval defines the number of bytecode instructions before a switch. It does not
need to be reset for most programs, but it can be used to tune thread performance.
Setting higher values means switches happen less often: threads incur less overhead but
they are less responsive to events. Setting lower values makes threads more responsive
to events but increases thread switch overhead.
Atomic operations
Because of the way Python uses the GIL to synchronize threads’ access to the virtual
machine, whole statements are not generally thread-safe, but each bytecode instruction
is. Because of this bytecode indivisibility, some Python language operations are thread-
safe—also called atomic, because they run without interruption—and do not require
the use of locks or queues to avoid concurrent update issues. For instance, as of this
writing, list.append, fetches and some assignments for variables, list items, dictionary
keys, and object attributes, and other operations were still atomic in standard C Python;
others, such as x = x+1 (and any operation in general that reads data, modifies it, and
writes it back) were not.
As mentioned earlier, though, relying on these rules is a bit of a gamble, because they
require a deep understanding of Python internals and may vary per release. Indeed, the
set of atomic operations may be radically changed if a new free-threaded implementa-
tion ever appears. As a rule of thumb, it may be easier to use locks for all access to global
and shared objects than to try to remember which types of access may or may not be
safe across multiple threads.
C API thread considerations
Finally, if you plan to mix Python with C, also see the thread interfaces described in
the Python/C API standard manual. In threaded programs, C extensions must release
212 | Chapter 5: Parallel System Tools

and reacquire the GIL around long-running operations to let the Python language por-
tions of other Python threads run during the wait. Specifically, the long-running C
extension function should release the lock on entry and reacquire it on exit when re-
suming Python code.
Also note that even though the Python code in Python threads cannot truly overlap in
time due to the GIL synchronization, the C-coded portions of threads can. Any number
may be running in parallel, as long as they do work outside the scope of the Python
virtual machine. In fact, C threads may overlap both with other C threads and with
Python language threads run in the virtual machine. Because of this, splitting code off
to C libraries is one way that Python applications can still take advantage of multi-CPU
machines.
Still, it may often be easier to leverage such machines by simply writing Python pro-
grams that fork processes instead of starting threads. The complexity of process and
thread code is similar. For more on C extensions and their threading requirements, see
Chapter 20. In short, Python includes C language tools (including a pair of GIL man-
agement macros) that can be used to wrap long-running operations in C-coded exten-
sions and that allow other Python language threads to run in parallel.
A process-based alternative: multiprocessing (ahead)
By now, you should have a basic grasp of parallel processes and threads, and Python’s
tools that support them. Later in this chapter, we’ll revisit both ideas to study the
multiprocessing module—a standard library tool that seeks to combine the simplicity
and portability of threads with the benefits of processes, by implementing a threading-
like API that runs processes instead of threads. It seeks to address the portability issue
of processes, as well as the multiple-CPU limitations imposed in threads by the GIL,
but it cannot be used as a replacement for forking in some contexts, and it imposes
some constraints that threads do not, which stem from its process-based model (for
instance, mutable object state is not directly shared because objects are copied across
process boundaries, and unpickleable objects such as bound methods cannot be as
freely used).
Because the multiprocessing module also implements tools to simplify tasks such as
inter-process communication and exit status, though, let’s first get a handle on Python’s
support in those domains as well, and explore some more process and thread examples
along the way.
Program Exits
As we’ve seen, unlike C, there is no “main” function in Python. When we run a program,
we simply execute all of the code in the top-level file, from top to bottom (i.e., in the
filename we listed in the command line, clicked in a file explorer, and so on). Scripts
Program Exits | 213

normally exit when Python falls off the end of the file, but we may also call for program
exit explicitly with tools in the sys and os modules.
sys Module Exits
For example, the built-in sys.exit function ends a program when called, and earlier
than normal:
>>> sys.exit(N) # exit with status N, else exits on end of script
Interestingly, this call really just raises the built-in SystemExit exception. Because of
this, we can catch it as usual to intercept early exits and perform cleanup activities; if
uncaught, the interpreter exits as usual. For instance:
C:\...\PP4E\System> python
>>> import sys
>>> try:
... sys.exit() # see also: os._exit, Tk().quit()
... except SystemExit:
... print('ignoring exit')
...
ignoring exit
>>>
Programming tools such as debuggers can make use of this hook to avoid shutting
down. In fact, explicitly raising the built-in SystemExit exception with a Python raise
statement is equivalent to calling sys.exit. More realistically, a try block would catch
the exit exception raised elsewhere in a program; the script in Example 5-15, for in-
stance, exits from within a processing function.
Example 5-15. PP4E\System\Exits\testexit_sys.py
def later():
import sys
print('Bye sys world')
sys.exit(42)
print('Never reached')
if __name__ == '__main__': later()
Running this program as a script causes it to exit before the interpreter falls off the end
of the file. But because sys.exit raises a Python exception, importers of its function
can trap and override its exit exception or specify a finally cleanup block to be run
during program exit processing:
C:\...\PP4E\System\Exits> python testexit_sys.py
Bye sys world
C:\...\PP4E\System\Exits> python
>>> from testexit_sys import later
>>> try:
... later()
... except SystemExit:
214 | Chapter 5: Parallel System Tools

... print('Ignored...')
...
Bye sys world
Ignored...
>>> try:
... later()
... finally:
... print('Cleanup')
...
Bye sys world
Cleanup
C:\...\PP4E\System\Exits> # interactive session process exits
os Module Exits
It’s possible to exit Python in other ways, too. For instance, within a forked child proc-
ess on Unix, we typically call the os._exit function rather than sys.exit; threads may
exit with a _thread.exit call; and tkinter GUI applications often end by calling some-
thing named Tk().quit(). We’ll meet the tkinter module later in this book; let’s take
a look at os exits here.
On os._exit, the calling process exits immediately instead of raising an exception that
could be trapped and ignored. In fact, the process also exits without flushing output
stream buffers or running cleanup handlers (defined by the atexit standard library
module), so this generally should be used only by child processes after a fork, where
overall program shutdown actions aren’t desired. Example 5-16 illustrates the basics.
Example 5-16. PP4E\System\Exits\testexit_os.py
def outahere():
import os
print('Bye os world')
os._exit(99)
print('Never reached')
if __name__ == '__main__': outahere()
Unlike sys.exit, os._exit is immune to both try/except and try/finally interception:
C:\...\PP4E\System\Exits> python testexit_os.py
Bye os world
C:\...\PP4E\System\Exits> python
>>> from testexit_os import outahere
>>> try:
... outahere()
... except:
... print('Ignored')
...
Bye os world # exits interactive process
C:\...\PP4E\System\Exits> python
Program Exits | 215

>>> from testexit_os import outahere
>>> try:
... outahere()
... finally:
... print('Cleanup')
...
Bye os world # ditto
Shell Command Exit Status Codes
Both the sys and os exit calls we just met accept an argument that denotes the exit
status code of the process (it’s optional in the sys call but required by os). After exit,
this code may be interrogated in shells and by programs that ran the script as a child
process. On Linux, for example, we ask for the status shell variable’s value in order to
fetch the last program’s exit status; by convention, a nonzero status generally indicates
that some sort of problem occurred:
[mark@linux]$ python testexit_sys.py
Bye sys world
[mark@linux]$ echo $status
42
[mark@linux]$ python testexit_os.py
Bye os world
[mark@linux]$ echo $status
99
In a chain of command-line programs, exit statuses could be checked along the way as
a simple form of cross-program communication.
We can also grab hold of the exit status of a program run by another script. For instance,
as introduced in Chapters 2 and 3, when launching shell commands, exit status is
provided as:
• The return value of an os.system call
• The return value of the close method of an os.popen object (for historical reasons,
None is returned if the exit status was 0, which means no error occurred)
• A variety of interfaces in the subprocess module (e.g., the call function’s return
value, a Popen object’s returnvalue attribute and wait method result)
In addition, when running programs by forking processes, the exit status is available
through the os.wait and os.waitpid calls in a parent process.
Exit status with os.system and os.popen
Let’s look at the case of the shell commands first—the following, run on Linux, spawns
Example 5-15, and Example 5-16 reads the output streams through pipes and fetches
their exit status codes:
[mark@linux]$ python
>>> import os
>>> pipe = os.popen('python testexit_sys.py')
216 | Chapter 5: Parallel System Tools

>>> pipe.read()
'Bye sys world\012'
>>> stat = pipe.close() # returns exit code
>>> stat
10752
>>> hex(stat)
'0x2a00'
>>> stat >> 8 # extract status from bitmask on Unix-likes
42
>>> pipe = os.popen('python testexit_os.py')
>>> stat = pipe.close()
>>> stat, stat >> 8
(25344, 99)
This code works the same under Cygwin Python on Windows. When using os.popen
on such Unix-like platforms, for reasons we won’t go into here, the exit status is actually
packed into specific bit positions of the return value; it’s really there, but we need to
shift the result right by eight bits to see it. Commands run with os.system send their
statuses back directly through the Python library call:
>>> stat = os.system('python testexit_sys.py')
Bye sys world
>>> stat, stat >> 8
(10752, 42)
>>> stat = os.system('python testexit_os.py')
Bye os world
>>> stat, stat >> 8
(25344, 99)
All of this code works under the standard version of Python for Windows, too, though
exit status is not encoded in a bit mask (test sys.platform if your code must handle
both formats):
C:\...\PP4E\System\Exits> python
>>> os.system('python testexit_sys.py')
Bye sys world
42
>>> os.system('python testexit_os.py')
Bye os world
99
>>> pipe = os.popen('python testexit_sys.py')
>>> pipe.read()
'Bye sys world\n'
>>> pipe.close()
42
>>>
>>> os.popen('python testexit_os.py').close()
99
Program Exits | 217

Output stream buffering: A first look
Notice that the last test in the preceding code didn’t attempt to read the command’s
output pipe. If we do, we may have to run the target script in unbuffered mode with the
-u Python command-line flag or change the script to flush its output manually with
sys.stdout.flush. Otherwise, the text printed to the standard output stream might not
be flushed from its buffer when os._exit is called in this case for immediate shutdown.
By default, standard output is fully buffered when connected to a pipe like this; it’s only
line-buffered when connected to a terminal:
>>> pipe = os.popen('python testexit_os.py')
>>> pipe.read() # streams not flushed on exit
''
>>> pipe = os.popen('python -u testexit_os.py') # force unbuffered streams
>>> pipe.read()
'Bye os world\n'
Confusingly, you can pass mode and buffering argument to specify line buffering in
both os.popen and subprocess.Popen, but this won’t help here—arguments passed to
these tools pertain to the calling process’s input end of the pipe, not to the spawned
program’s output stream:
>>> pipe = os.popen('python testexit_os.py', 'r', 1) # line buffered only
>>> pipe.read() # but my pipe, not program's!
''
>>> from subprocess import Popen, PIPE
>>> pipe = Popen('python testexit_os.py', bufsize=1, stdout=PIPE) # for my pipe
>>> pipe.stdout.read() # doesn't help
b''
Really, buffering mode arguments in these tools pertain to output the caller writes to
a command’s standard input stream, not to output read from that command.
If required, the spawned script itself can also manually flush its output buffers period-
ically or before forced exits. More on buffering when we discuss the potential for
deadlocks later in this chapter, and again in Chapters 10 and 12 where we’ll see how it
applies to sockets. Since we brought up subprocess, though, let’s turn to its exit tools
next.
Exit status with subprocess
The alternative subprocess module offers exit status in a variety of ways, as we saw in
Chapters 2 and 3 (a None value in returncode indicates that the spawned program has
not yet terminated):
C:\...\PP4E\System\Exits> python
>>> from subprocess import Popen, PIPE, call
>>> pipe = Popen('python testexit_sys.py', stdout=PIPE)
>>> pipe.stdout.read()
b'Bye sys world\r\n'
218 | Chapter 5: Parallel System Tools

>>> pipe.wait()
42
>>> call('python testexit_sys.py')
Bye sys world
42
>>> pipe = Popen('python testexit_sys.py', stdout=PIPE)
>>> pipe.communicate()
(b'Bye sys world\r\n', None)
>>> pipe.returncode
42
The subprocess module works the same on Unix-like platforms like Cygwin, but unlike
os.popen, the exit status is not encoded, and so it matches the Windows result (note
that shell=True is needed to run this as is on Cygwin and Unix-like platforms, as we
learned in Chapter 2; on Windows this argument is required only to run commands
built into the shell, like dir):
[C:\...\PP4E\System\Exits]$ python
>>> from subprocess import Popen, PIPE, call
>>> pipe = Popen('python testexit_sys.py', stdout=PIPE, shell=True)
>>> pipe.stdout.read()
b'Bye sys world\n'
>>> pipe.wait()
42
>>> call('python testexit_sys.py', shell=True)
Bye sys world
42
Process Exit Status and Shared State
Now, to learn how to obtain the exit status from forked processes, let’s write a simple
forking program: the script in Example 5-17 forks child processes and prints child
process exit statuses returned by os.wait calls in the parent until a “q” is typed at the
console.
Example 5-17. PP4E\System\Exits\testexit_fork.py
"""
fork child processes to watch exit status with os.wait; fork works on Unix
and Cygwin but not standard Windows Python 3.1; note: spawned threads share
globals, but each forked process has its own copy of them (forks share file
descriptors)--exitstat is always the same here but will vary if for threads;
"""
import os
exitstat = 0
def child(): # could os.exit a script here
global exitstat # change this process's global
exitstat += 1 # exit status to parent's wait
Program Exits | 219

print('Hello from child', os.getpid(), exitstat)
os._exit(exitstat)
print('never reached')
def parent():
while True:
newpid = os.fork() # start a new copy of process
if newpid == 0: # if in copy, run child logic
child() # loop until 'q' console input
else:
pid, status = os.wait()
print('Parent got', pid, status, (status >> 8))
if input() == 'q': break
if __name__ == '__main__': parent()
Running this program on Linux, Unix, or Cygwin (remember, fork still doesn’t work
on standard Windows Python as I write the fourth edition of this book) produces the
following sort of results:
[C:\...\PP4E\System\Exits]$ python testexit_fork.py
Hello from child 5828 1
Parent got 5828 256 1
Hello from child 9540 1
Parent got 9540 256 1
Hello from child 3152 1
Parent got 3152 256 1
q
If you study this output closely, you’ll notice that the exit status (the last number prin-
ted) is always the same—the number 1. Because forked processes begin life as copies
of the process that created them, they also have copies of global memory. Because of
that, each forked child gets and changes its own exitstat global variable without
changing any other process’s copy of this variable. At the same time, forked processes
copy and thus share file descriptors, which is why prints go to the same place.
Thread Exits and Shared State
In contrast, threads run in parallel within the same process and share global memory.
Each thread in Example 5-18 changes the single shared global variable, exitstat.
Example 5-18. PP4E\System\Exits\testexit_thread.py
"""
spawn threads to watch shared global memory change; threads normally exit
when the function they run returns, but _thread.exit() can be called to
exit calling thread; _thread.exit is the same as sys.exit and raising
SystemExit; threads communicate with possibly locked global vars; caveat:
may need to make print/input calls atomic on some platforms--shared stdout;
"""
220 | Chapter 5: Parallel System Tools

import _thread as thread
exitstat = 0
def child():
global exitstat # process global names
exitstat += 1 # shared by all threads
threadid = thread.get_ident()
print('Hello from child', threadid, exitstat)
thread.exit()
print('never reached')
def parent():
while True:
thread.start_new_thread(child, ())
if input() == 'q': break
if __name__ == '__main__': parent()
The following shows this script in action on Windows; unlike forks, threads run in the
standard version of Python on Windows, too. Thread identifiers created by Python
differ each time—they are arbitrary but unique among all currently active threads and
so may be used as dictionary keys to keep per-thread information (a thread’s id may be
reused after it exits on some platforms):
C:\...\PP4E\System\Exits> python testexit_thread.py
Hello from child 4908 1
Hello from child 4860 2
Hello from child 2752 3
Hello from child 8964 4
q
Notice how the value of this script’s global exitstat is changed by each thread, because
threads share global memory within the process. In fact, this is often how threads com-
municate in general. Rather than exit status codes, threads assign module-level globals
or change shared mutable objects in-place to signal conditions, and they use thread
module locks and queues to synchronize access to shared items if needed. This script
might need to synchronize, too, if it ever does something more realistic—for global
counter changes, but even print and input may have to be synchronized if they overlap
stream access badly on some platforms. For this simple demo, we forego locks by as-
suming threads won’t mix their operations oddly.
As we’ve learned, a thread normally exits silently when the function it runs returns,
and the function return value is ignored. Optionally, the _thread.exit function can be
called to terminate the calling thread explicitly and silently. This call works almost
exactly like sys.exit (but takes no return status argument), and it works by raising a
SystemExit exception in the calling thread. Because of that, a thread can also prema-
turely end by calling sys.exit or by directly raising SystemExit. Be sure not to call
os._exit within a thread function, though—doing so can have odd results (the last time
Program Exits | 221

I tried, it hung the entire process on my Linux system and killed every thread in the
process on Windows!).
The alternative threading module for threads has no method equivalent to
_thread.exit(), but since all that the latter does is raise a system-exit exception, doing
the same in threading has the same effect—the thread exits immediately and silently,
as in the following sort of code (see testexit-threading.py in the example tree for this
code):
import threading, sys, time
def action():
sys.exit() # or raise SystemExit()
print('not reached')
threading.Thread(target=action).start()
time.sleep(2)
print('Main exit')
On a related note, keep in mind that threads and processes have default lifespan models,
which we explored earlier. By way of review, when child threads are still running, the
two thread modules’ behavior differs—programs on most platforms exit when the pa-
rent thread does under _thread, but not normally under threading unless children are
made daemons. When using processes, children normally outlive their parent. This
different process behavior makes sense if you remember that threads are in-process
function calls, but processes are more independent and autonomous.
When used well, exit status can be used to implement error detection and simple com-
munication protocols in systems composed of command-line scripts. But having said
that, I should underscore that most scripts do simply fall off the end of the source to
exit, and most thread functions simply return; explicit exit calls are generally employed
for exceptional conditions and in limited contexts only. More typically, programs com-
municate with richer tools than integer exit codes; the next section shows how.
Interprocess Communication
As we saw earlier, when scripts spawn threads—tasks that run in parallel within the
program—they can naturally communicate by changing and inspecting names and
objects in shared global memory. This includes both accessible variables and attributes,
as well as referenced mutable objects. As we also saw, some care must be taken to use
locks to synchronize access to shared items that can be updated concurrently. Still,
threads offer a fairly straightforward communication model, and the queue module can
make this nearly automatic for many programs.
Things aren’t quite as simple when scripts start child processes and independent pro-
grams that do not share memory in general. If we limit the kinds of communications
that can happen between programs, many options are available, most of which we’ve
222 | Chapter 5: Parallel System Tools

already seen in this and the prior chapters. For example, the following simple mecha-
nisms can all be interpreted as cross-program communication devices:
• Simple files
• Command-line arguments
• Program exit status codes
• Shell environment variables
• Standard stream redirections
• Stream pipes managed by os.popen and subprocess
For instance, sending command-line options and writing to input streams lets us pass
in program execution parameters; reading program output streams and exit codes gives
us a way to grab a result. Because shell environment variable settings are inherited by
spawned programs, they provide another way to pass context in. And pipes made by
os.popen or subprocess allow even more dynamic communication. Data can be sent
between programs at arbitrary times, not only at program start and exit.
Beyond this set, there are other tools in the Python library for performing Inter-Process
Communication (IPC). This includes sockets, shared memory, signals, anonymous and
named pipes, and more. Some vary in portability, and all vary in complexity and utility.
For instance:
•Signals allow programs to send simple notification events to other programs.
•Anonymous pipes allow threads and related processes that share file descriptors to
pass data, but generally rely on the Unix-like forking model for processes, which
is not universally portable.
•Named pipes are mapped to the system’s filesystem—they allow completely unre-
lated programs to converse, but are not available in Python on all platforms.
•Sockets map to system-wide port numbers—they similarly let us transfer data be-
tween arbitrary programs running on the same computer, but also between pro-
grams located on remote networked machines, and offer a more portable option.
While some of these can be used as communication devices by threads, too, their full
power becomes more evident when leveraged by separate processes which do not share
memory at large.
In this section, we explore directly managed pipes (both anonymous and named), as
well as signals. We also take a first look at sockets here, but largely as a preview; sockets
can be used for IPC on a single machine, but because the larger socket story also involves
their role in networking, we’ll save most of their details until the Internet part of this
book.
Other IPC tools are available to Python programmers (e.g., shared memory as provided
by the mmap module) but are not covered here for lack of space; search the Python
Interprocess Communication | 223

manuals and website for more details on other IPC schemes if you’re looking for some-
thing more specific.
After this section, we’ll also study the multiprocessing module, which offers additional
and portable IPC options as part of its general process-launching API, including shared
memory, and pipes and queues of arbitrary pickled Python objects. For now, let’s study
traditional approaches first.
Anonymous Pipes
Pipes, a cross-program communication device, are implemented by your operating
system and made available in the Python standard library. Pipes are unidirectional
channels that work something like a shared memory buffer, but with an interface re-
sembling a simple file on each of two ends. In typical use, one program writes data on
one end of the pipe, and another reads that data on the other end. Each program sees
only its end of the pipes and processes it using normal Python file calls.
Pipes are much more within the operating system, though. For instance, calls to read
a pipe will normally block the caller until data becomes available (i.e., is sent by the
program on the other end) instead of returning an end-of-file indicator. Moreover, read
calls on a pipe always return the oldest data written to the pipe, resulting in a first-in-
first-out model—the first data written is the first to be read. Because of such properties,
pipes are also a way to synchronize the execution of independent programs.
Pipes come in two flavors—anonymous and named. Named pipes (often called fifos)
are represented by a file on your computer. Because named pipes are really external
files, the communicating processes need not be related at all; in fact, they can be inde-
pendently started programs.
By contrast, anonymous pipes exist only within processes and are typically used in
conjunction with process forks as a way to link parent and spawned child processes
within an application. Parent and child converse over shared pipe file descriptors, which
are inherited by spawned processes. Because threads run in the same process and share
all global memory in general, anonymous pipes apply to them as well.
Anonymous pipe basics
Since they are more traditional, let’s start with a look at anonymous pipes. To illustrate,
the script in Example 5-19 uses the os.fork call to make a copy of the calling process
as usual (we met forks earlier in this chapter). After forking, the original parent process
and its child copy speak through the two ends of a pipe created with os.pipe prior to
the fork. The os.pipe call returns a tuple of two file descriptors—the low-level file iden-
tifiers we met in Chapter 4—representing the input and output sides of the pipe. Be-
cause forked child processes get copies of their parents’ file descriptors, writing to the
pipe’s output descriptor in the child sends data back to the parent on the pipe created
before the child was spawned.
224 | Chapter 5: Parallel System Tools

Example 5-19. PP4E\System\Processes\pipe1.py
import os, time
def child(pipeout):
zzz = 0
while True:
time.sleep(zzz) # make parent wait
msg = ('Spam %03d' % zzz).encode() # pipes are binary bytes
os.write(pipeout, msg) # send to parent
zzz = (zzz+1) % 5 # goto 0 after 4
def parent():
pipein, pipeout = os.pipe() # make 2-ended pipe
if os.fork() == 0: # copy this process
child(pipeout) # in copy, run child
else: # in parent, listen to pipe
while True:
line = os.read(pipein, 32) # blocks until data sent
print('Parent %d got [%s] at %s' % (os.getpid(), line, time.time()))
parent()
If you run this program on Linux, Cygwin, or another Unix-like platform (pipe is avail-
able on standard Windows Python, but fork is not), the parent process waits for the
child to send data on the pipe each time it calls os.read. It’s almost as if the child and
parent act as client and server here—the parent starts the child and waits for it to initiate
communication.# To simulate differing task durations, the child keeps the parent wait-
ing one second longer between messages with time.sleep calls, until the delay has
reached four seconds. When the zzz delay counter hits 005, it rolls back down to 000
and starts again:
[C:\...\PP4E\System\Processes]$ python pipe1.py
Parent 6716 got [b'Spam 000'] at 1267996104.53
Parent 6716 got [b'Spam 001'] at 1267996105.54
Parent 6716 got [b'Spam 002'] at 1267996107.55
Parent 6716 got [b'Spam 003'] at 1267996110.56
Parent 6716 got [b'Spam 004'] at 1267996114.57
Parent 6716 got [b'Spam 000'] at 1267996114.57
Parent 6716 got [b'Spam 001'] at 1267996115.59
Parent 6716 got [b'Spam 002'] at 1267996117.6
Parent 6716 got [b'Spam 003'] at 1267996120.61
Parent 6716 got [b'Spam 004'] at 1267996124.62
Parent 6716 got [b'Spam 000'] at 1267996124.62
#We will clarify the notions of “client” and “server” in the Internet programming part of this book. There,
we’ll communicate with sockets (which we’ll see later in this chapter are roughly like bidirectional pipes for
programs running both across networks and on the same machine), but the overall conversation model is
similar. Named pipes (fifos), described ahead, are also a better match to the client/server model because they
can be accessed by arbitrary, unrelated processes (no forks are required). But as we’ll see, the socket port
model is generally used by most Internet scripting protocols—email, for instance, is mostly just formatted
strings shipped over sockets between programs on standard port numbers reserved for the email protocol.
Interprocess Communication | 225

Parent 6716 got [b'Spam 001'] at 1267996125.63
...etc.: Ctrl-C to exit...
Notice how the parent received a bytes string through the pipe. Raw pipes normally
deal in binary byte strings when their descriptors are used directly this way with the
descriptor-based file tools we met in Chapter 4 (as we saw there, descriptor read and
write tools in os always return and expect byte strings). That’s why we also have to
manually encode to bytes when writing in the child—the string formatting operation
is not available on bytes. As the next section shows, it’s also possible to wrap a pipe
descriptor in a text-mode file object, much as we did in the file examples in Chap-
ter 4, but that object simply performs encoding and decoding automatically on trans-
fers; it’s still bytes in the pipe.
Wrapping pipe descriptors in file objects
If you look closely at the preceding output, you’ll see that when the child’s delay counter
hits 004, the parent ends up reading two messages from the pipe at the same time; the
child wrote two distinct messages, but on some platforms or configurations (other than
that used here) they might be interleaved or processed close enough in time to be fetched
as a single unit by the parent. Really, the parent blindly asks to read, at most, 32 bytes
each time, but it gets back whatever text is available in the pipe, when it becomes
available.
To distinguish messages better, we can mandate a separator character in the pipe. An
end-of-line makes this easy, because we can wrap the pipe descriptor in a file object
with os.fdopen and rely on the file object’s readline method to scan up through the
next \n separator in the pipe. This also lets us leverage the more powerful tools of the
text-mode file object we met in Chapter 4. Example 5-20 implements this scheme for
the parent’s end of the pipe.
Example 5-20. PP4E\System\Processes\pipe2.py
# same as pipe1.py, but wrap pipe input in stdio file object
# to read by line, and close unused pipe fds in both processes
import os, time
def child(pipeout):
zzz = 0
while True:
time.sleep(zzz) # make parent wait
msg = ('Spam %03d\n' % zzz).encode() # pipes are binary in 3.X
os.write(pipeout, msg) # send to parent
zzz = (zzz+1) % 5 # roll to 0 at 5
def parent():
pipein, pipeout = os.pipe() # make 2-ended pipe
if os.fork() == 0: # in child, write to pipe
os.close(pipein) # close input side here
child(pipeout)
226 | Chapter 5: Parallel System Tools

else: # in parent, listen to pipe
os.close(pipeout) # close output side here
pipein = os.fdopen(pipein) # make text mode input file object
while True:
line = pipein.readline()[:-1] # blocks until data sent
print('Parent %d got [%s] at %s' % (os.getpid(), line, time.time()))
parent()
This version has also been augmented to close the unused end of the pipe in each process
(e.g., after the fork, the parent process closes its copy of the output side of the pipe
written by the child); programs should close unused pipe ends in general. Running with
this new version reliably returns a single child message to the parent each time it reads
from the pipe, because they are separated with markers when written:
[C:\...\PP4E\System\Processes]$ python pipe2.py
Parent 8204 got [Spam 000] at 1267997789.33
Parent 8204 got [Spam 001] at 1267997790.03
Parent 8204 got [Spam 002] at 1267997792.05
Parent 8204 got [Spam 003] at 1267997795.06
Parent 8204 got [Spam 004] at 1267997799.07
Parent 8204 got [Spam 000] at 1267997799.07
Parent 8204 got [Spam 001] at 1267997800.08
Parent 8204 got [Spam 002] at 1267997802.09
Parent 8204 got [Spam 003] at 1267997805.1
Parent 8204 got [Spam 004] at 1267997809.11
Parent 8204 got [Spam 000] at 1267997809.11
Parent 8204 got [Spam 001] at 1267997810.13
...etc.: Ctrl-C to exit...
Notice that this version’s reads also return a text data str object now, per the default
r text mode for os.fdopen. As mentioned, pipes normally deal in binary byte strings
when their descriptors are used directly with os file tools, but wrapping in text-mode
files allows us to use str strings to represent text data instead of bytes. In this example,
bytes are decoded to str when read by the parent; using os.fdopen and text mode in
the child would allow us to avoid its manual encoding call, but the file object would
encode the str data anyhow (though the encoding is trivial for ASCII bytes like those
used here). As for simple files, the best mode for processing pipe data in is determined
by its nature.
Anonymous pipes and threads
Although the os.fork call required by the prior section’s examples isn’t available on
standard Windows Python, os.pipe is. Because threads all run in the same process and
share file descriptors (and global memory in general), this makes anonymous pipes
usable as a communication and synchronization device for threads, too. This is an
arguably lower-level mechanism than queues or shared names and objects, but it pro-
vides an additional IPC option for threads. Example 5-21, for instance, demonstrates
the same type of pipe-based communication occurring between threads instead of
processes.
Interprocess Communication | 227

Example 5-21. PP4E\System\Processes\pipe-thread.py
# anonymous pipes and threads, not processes; this version works on Windows
import os, time, threading
def child(pipeout):
zzz = 0
while True:
time.sleep(zzz) # make parent wait
msg = ('Spam %03d' % zzz).encode() # pipes are binary bytes
os.write(pipeout, msg) # send to parent
zzz = (zzz+1) % 5 # goto 0 after 4
def parent(pipein):
while True:
line = os.read(pipein, 32) # blocks until data sent
print('Parent %d got [%s] at %s' % (os.getpid(), line, time.time()))
pipein, pipeout = os.pipe()
threading.Thread(target=child, args=(pipeout,)).start()
parent(pipein)
Since threads work on standard Windows Python, this script does too. The output is
similar here, but the speakers are in-process threads, not processes (note that because
of its simple-minded infinite loops, at least one of its threads may not die on a Ctrl-C—
on Windows you may need to use Task Manager to kill the python.exe process running
this script or close its window to exit):
C:\...\PP4E\System\Processes> pipe-thread.py
Parent 8876 got [b'Spam 000'] at 1268579215.71
Parent 8876 got [b'Spam 001'] at 1268579216.73
Parent 8876 got [b'Spam 002'] at 1268579218.74
Parent 8876 got [b'Spam 003'] at 1268579221.75
Parent 8876 got [b'Spam 004'] at 1268579225.76
Parent 8876 got [b'Spam 000'] at 1268579225.76
Parent 8876 got [b'Spam 001'] at 1268579226.77
Parent 8876 got [b'Spam 002'] at 1268579228.79
...etc.: Ctrl-C or Task Manager to exit...
Bidirectional IPC with anonymous pipes
Pipes normally let data flow in only one direction—one side is input, one is output.
What if you need your programs to talk back and forth, though? For example, one
program might send another a request for information and then wait for that informa-
tion to be sent back. A single pipe can’t generally handle such bidirectional conversa-
tions, but two pipes can. One pipe can be used to pass requests to a program and
another can be used to ship replies back to the requestor.
This really does have real-world applications. For instance, I once added a GUI interface
to a command-line debugger for a C-like programming language by connecting two
processes with pipes this way. The GUI ran as a separate process that constructed and
228 | Chapter 5: Parallel System Tools

sent commands to the non-GUI debugger’s input stream pipe and parsed the results
that showed up in the debugger’s output stream pipe. In effect, the GUI acted like a
programmer typing commands at a keyboard and a client to the debugger server. More
generally, by spawning command-line programs with streams attached by pipes, sys-
tems can add new interfaces to legacy programs. In fact, we’ll see a simple example of
this sort of GUI program structure in Chapter 10.
The module in Example 5-22 demonstrates one way to apply this idea to link the input
and output streams of two programs. Its spawn function forks a new child program and
connects the input and output streams of the parent to the output and input streams
of the child. That is:
• When the parent reads from its standard input, it is reading text sent to the child’s
standard output.
• When the parent writes to its standard output, it is sending data to the child’s
standard input.
The net effect is that the two independent programs communicate by speaking over
their standard streams.
Example 5-22. PP4E\System\Processes\pipes.py
"""
spawn a child process/program, connect my stdin/stdout to child process's
stdout/stdin--my reads and writes map to output and input streams of the
spawned program; much like tying together streams with subprocess module;
"""
import os, sys
def spawn(prog, *args): # pass progname, cmdline args
stdinFd = sys.stdin.fileno() # get descriptors for streams
stdoutFd = sys.stdout.fileno() # normally stdin=0, stdout=1
parentStdin, childStdout = os.pipe() # make two IPC pipe channels
childStdin, parentStdout = os.pipe() # pipe returns (inputfd, outoutfd)
pid = os.fork() # make a copy of this process
if pid:
os.close(childStdout) # in parent process after fork:
os.close(childStdin) # close child ends in parent
os.dup2(parentStdin, stdinFd) # my sys.stdin copy = pipe1[0]
os.dup2(parentStdout, stdoutFd) # my sys.stdout copy = pipe2[1]
else:
os.close(parentStdin) # in child process after fork:
os.close(parentStdout) # close parent ends in child
os.dup2(childStdin, stdinFd) # my sys.stdin copy = pipe2[0]
os.dup2(childStdout, stdoutFd) # my sys.stdout copy = pipe1[1]
args = (prog,) + args
os.execvp(prog, args) # new program in this process
assert False, 'execvp failed!' # os.exec call never returns here
if __name__ == '__main__':
Interprocess Communication | 229

mypid = os.getpid()
spawn('python', 'pipes-testchild.py', 'spam') # fork child program
print('Hello 1 from parent', mypid) # to child's stdin
sys.stdout.flush() # subvert stdio buffering
reply = input() # from child's stdout
sys.stderr.write('Parent got: "%s"\n' % reply) # stderr not tied to pipe!
print('Hello 2 from parent', mypid)
sys.stdout.flush()
reply = sys.stdin.readline()
sys.stderr.write('Parent got: "%s"\n' % reply[:-1])
The spawn function in this module does not work on standard Windows Python (re-
member that fork isn’t yet available there today). In fact, most of the calls in this module
map straight to Unix system calls (and may be arbitrarily terrifying at first glance to
non-Unix developers!). We’ve already met some of these (e.g., os.fork), but much of
this code depends on Unix concepts we don’t have time to address well in this text.
But in simple terms, here is a brief summary of the system calls demonstrated in this
code:
os.fork
Copies the calling process as usual and returns the child’s process ID in the parent
process only.
os.execvp
Overlays a new program in the calling process; it’s just like the os.execlp used
earlier but takes a tuple or list of command-line argument strings (collected with
the *args form in the function header).
os.pipe
Returns a tuple of file descriptors representing the input and output ends of a pipe,
as in earlier examples.
os.close(fd)
Closes the descriptor-based file fd.
os.dup2(fd1,fd2)
Copies all system information associated with the file named by the file descriptor
fd1 to the file named by fd2.
In terms of connecting standard streams, os.dup2 is the real nitty-gritty here. For ex-
ample, the call os.dup2(parentStdin,stdinFd) essentially assigns the parent process’s
stdin file to the input end of one of the two pipes created; all stdin reads will henceforth
come from the pipe. By connecting the other end of this pipe to the child process’s copy
of the stdout stream file with os.dup2(childStdout,stdoutFd), text written by the child
to its sdtdout winds up being routed through the pipe to the parent’s stdin stream. The
effect is reminiscent of the way we tied together streams with the subprocess module
in Chapter 3, but this script is more low-level and less portable.
230 | Chapter 5: Parallel System Tools

To test this utility, the self-test code at the end of the file spawns the program shown
in Example 5-23 in a child process and reads and writes standard streams to converse
with it over two pipes.
Example 5-23. PP4E\System\Processes\pipes-testchild.py
import os, time, sys
mypid = os.getpid()
parentpid = os.getppid()
sys.stderr.write('Child %d of %d got arg: "%s"\n' %
(mypid, parentpid, sys.argv[1]))
for i in range(2):
time.sleep(3) # make parent process wait by sleeping here
recv = input() # stdin tied to pipe: comes from parent's stdout
time.sleep(3)
send = 'Child %d got: [%s]' % (mypid, recv)
print(send) # stdout tied to pipe: goes to parent's stdin
sys.stdout.flush() # make sure it's sent now or else process blocks
The following is our test in action on Cygwin (it’s similar other Unix-like platforms like
Linux); its output is not incredibly impressive to read, but it represents two programs
running independently and shipping data back and forth through a pipe device man-
aged by the operating system. This is even more like a client/server model (if you imag-
ine the child as the server, responding to requests sent from the parent). The text in
square brackets in this output went from the parent process to the child and back to
the parent again, all through pipes connected to standard streams:
[C:\...\PP4E\System\Processes]$ python pipes.py
Child 9228 of 9096 got arg: "spam"
Parent got: "Child 9228 got: [Hello 1 from parent 9096]"
Parent got: "Child 9228 got: [Hello 2 from parent 9096]"
Output stream buffering revisited: Deadlocks and flushes
The two processes of the prior section’s example engage in a simple dialog, but it’s
already enough to illustrate some of the dangers lurking in cross-program communi-
cations. First of all, notice that both programs need to write to stderr to display a
message; their stdout streams are tied to the other program’s input stream. Because
processes share file descriptors, stderr is the same in both parent and child, so status
messages show up in the same place.
More subtly, note that both parent and child call sys.stdout.flush after they print text
to the output stream. Input requests on pipes normally block the caller if no data is
available, but it seems that this shouldn’t be a problem in our example because there
are as many writes as there are reads on the other side of the pipe. By default, though,
sys.stdout is buffered in this context, so the printed text may not actually be transmitted
until some time in the future (when the output buffers fill up). In fact, if the flush calls
are not made, both processes may get stuck on some platforms waiting for input from
the other—input that is sitting in a buffer and is never flushed out over the pipe. They
Interprocess Communication | 231

wind up in a deadlock state, both blocked on input calls waiting for events that never
occur.
Technically, by default stdout is just line-buffered when connected to a terminal, but
it is fully buffered when connected to other devices such as files, sockets, and the pipes
used here. This is why you see a script’s printed text in a shell window immediately as
it is produced, but not until the process exits or its buffer fills when its output stream
is connected to something else.
This output buffering is really a function of the system libraries used to access pipes,
not of the pipes themselves (pipes do queue up output data, but they never hide it from
readers!). In fact, it appears to occur in this example only because we copy the pipe’s
information over to sys.stdout, a built-in file object that uses stream buffering by de-
fault. However, such anomalies can also occur when using other cross-process tools.
In general terms, if your programs engage in a two-way dialog like this, there are a
variety of ways to avoid buffering-related deadlock problems:
•Flushes: As demonstrated in Examples 5-22 and 5-23, manually flushing output
pipe streams by calling the file object flush method is an easy way to force buffers
to be cleared. Use sys.stdout.flush for the output stream used by print.
•Arguments: As introduced earlier in this chapter, the -u Python command-line flag
turns off full buffering for the sys.stdout stream in Python programs. Setting your
PYTHONUNBUFFERED environment variable to a nonempty value is equivalent to pass-
ing this flag but applies to every program run.
•Open modes: It’s possible to use pipes themselves in unbuffered mode. Either use
low-level os module calls to read and write pipe descriptors directly, or pass a buffer
size argument of 0 (for unbuffered) or 1 (for line-buffered) to os.fdopen to disable
buffering in the file object used to wrap the descriptor. You can use open arguments
the same way to control buffering for output to fifo files (described in the next
section). Note that in Python 3.X, fully unbuffered mode is allowed only for binary
mode files, not text.
•Command pipes: As mentioned earlier in this chapter, you can similarly specify
buffering mode arguments for command-line pipes when they are created by
os.popen and subprocess.Popen, but this pertains to the caller’s end of the pipe, not
those of the spawned program. Hence it cannot prevent delayed outputs from the
latter, but can be used for text sent to another program’s input pipe.
•Sockets: As we’ll see later, the socket.makefile call accepts a similar buffering mode
argument for sockets (described later in this chapter and book), but in Python 3.X
this call requires buffering for text-mode access and appears to not support line-
buffered mode (more on this on Chapter 12).
•Tools: For more complex tasks, we can also use higher-level tools that essentially
fool a program into believing it is connected to a terminal. These address programs
232 | Chapter 5: Parallel System Tools

not written in Python, for which neither manual flush calls nor -u are an option.
See “More on Stream Buffering: pty and Pexpect” on page 233.
Thread can avoid blocking a main GUI, too, but really just delegate the problem (the
spawned thread will still be deadlocked). Of the options listed, the first two—manual
flushes and command-line arguments—are often the simplest solutions. In fact, be-
cause it is so useful, the second technique listed above merits a few more words. Try
this: comment-out all the sys.stdout.flush calls in Examples 5-22 and 5-23 (the files
pipes.py and pipes-testchild.py) and change the parent’s spawn call in pipes.py to this
(i.e., add a -u command-line argument):
spawn('python', '-u', 'pipes-testchild.py', 'spam')
Then start the program with a command line like this: python -u pipes.py. It will work
as it did with the manual stdout flush calls, because stdout will be operating in unbuf-
fered mode in both parent and child.
We’ll revisit the effects of unbuffered output streams in Chapter 10, where we’ll code
a simple GUI that displays the output of a non-GUI program by reading it over both a
nonblocking socket and a pipe in a thread. We’ll explore the topic again in more depth
in Chapter 12, where we will redirect standard streams to sockets in more general ways.
Deadlock in general, though, is a bigger problem than we have space to address fully
here. On the other hand, if you know enough that you want to do IPC in Python, you’re
probably already a veteran of the deadlock wars.
Anonymous pipes allow related tasks to communicate but are not directly suited for
independently launched programs. To allow the latter group to converse, we need to
move on to the next section and explore devices that have broader visibility.
More on Stream Buffering: pty and Pexpect
On Unix-like platforms, you may also be able to use the Python pty standard library
module to force another program’s standard output to be unbuffered, especially if it’s
not a Python program and you cannot change its code.
Technically, default buffering for stdout in other programs is determined outside Py-
thon by whether the underlying file descriptor refers to a terminal. This occurs in the
stdio file system library and cannot be controlled by the spawning program. In general,
output to terminals is line buffered, and output to nonterminals (including files, pipes,
and sockets) is fully buffered. This policy is used for efficiency. Files and streams created
within a Python script follow the same defaults, but you can specify buffering policies
in Python’s file creation tools.
The pty module essentially fools the spawned program into thinking it is connected to
a terminal so that only one line is buffered for stdout. The net effect is that each newline
flushes the prior line—typical of interactive programs, and what you need if you wish
to grab each piece of the printed output as it is produced.
Note, however, that the pty module is not required for this role when spawning Python
scripts with pipes: simply use the -u Python command-line flag, pass line-buffered mode
Interprocess Communication | 233

arguments to file creation tools, or manually call sys.stdout.flush() in the spawned
program. The pty module is also not available on all Python platforms today (most
notably, it runs on Cygwin but not the standard Windows Python).
The Pexpect package, a pure-Python equivalent of the Unix expect program, uses pty
to provide additional functionality and to handle interactions that bypass standard
streams (e.g., password inputs). See the Python library manual for more on pty, and
search the Web for Pexpect.
Named Pipes (Fifos)
On some platforms, it is also possible to create a long-lived pipe that exists as a real
named file in the filesystem. Such files are called named pipes (or, sometimes, fifos)
because they behave just like the pipes created by the previous section’s programs.
Because fifos are associated with a real file on your computer, though, they are external
to any particular program—they do not rely on memory shared between tasks, and so
they can be used as an IPC mechanism for threads, processes, and independently
launched programs.
Once a named pipe file is created, clients open it by name and read and write data using
normal file operations. Fifos are unidirectional streams. In typical operation, a server
program reads data from the fifo, and one or more client programs write data to it. In
addition, a set of two fifos can be used to implement bidirectional communication just
as we did for anonymous pipes in the prior section.
Because fifos reside in the filesystem, they are longer-lived than in-process anonymous
pipes and can be accessed by programs started independently. The unnamed, in-
process pipe examples thus far depend on the fact that file descriptors (including pipes)
are copied to child processes’ memory. That makes it difficult to use anonymous pipes
to connect programs started independently. With fifos, pipes are accessed instead by
a filename visible to all programs running on the computer, regardless of any parent/
child process relationships. In fact, like normal files, fifos typically outlive the programs
that access them. Unlike normal files, though, the operating system synchronizes fifo
access, making them ideal for IPC.
Because of their distinctions, fifo pipes are better suited as general IPC mechanisms for
independent client and server programs. For instance, a perpetually running server
program may create and listen for requests on a fifo that can be accessed later by arbi-
trary clients not forked by the server. In a sense, fifos are an alternative to the socket
port interface we’ll meet in the next section. Unlike sockets, though, fifos do not directly
support remote network connections, are not available in standard Windows Python
today, and are accessed using the standard file interface instead of the more unique
socket port numbers and calls we’ll study later.
234 | Chapter 5: Parallel System Tools

Named pipe basics
In Python, named pipe files are created with the os.mkfifo call, which is available today
on Unix-like platforms, including Cygwin’s Python on Windows, but is not currently
available in standard Windows Python. This call creates only the external file, though;
to send and receive data through a fifo, it must be opened and processed as if it were a
standard file.
To illustrate, Example 5-24 is a derivation of the pipe2.py script listed in Exam-
ple 5-20, but rewritten here to use fifos rather than anonymous pipes. Much like
pipe2.py, this script opens the fifo using os.open in the child for low-level byte string
access, but with the open built-in in the parent to treat the pipe as text; in general, either
end may use either technique to treat the pipe’s data as bytes or text.
Example 5-24. PP4E\System\Processes\pipefifo.py
"""
named pipes; os.mkfifo is not available on Windows (without Cygwin);
there is no reason to fork here, since fifo file pipes are external
to processes--shared fds in parent/child processes are irrelevent;
"""
import os, time, sys
fifoname = '/tmp/pipefifo' # must open same name
def child():
pipeout = os.open(fifoname, os.O_WRONLY) # open fifo pipe file as fd
zzz = 0
while True:
time.sleep(zzz)
msg = ('Spam %03d\n' % zzz).encode() # binary as opened here
os.write(pipeout, msg)
zzz = (zzz+1) % 5
def parent():
pipein = open(fifoname, 'r') # open fifo as text file object
while True:
line = pipein.readline()[:-1] # blocks until data sent
print('Parent %d got "%s" at %s' % (os.getpid(), line, time.time()))
if __name__ == '__main__':
if not os.path.exists(fifoname):
os.mkfifo(fifoname) # create a named pipe file
if len(sys.argv) == 1:
parent() # run as parent if no args
else: # else run as child process
child()
Because the fifo exists independently of both parent and child, there’s no reason to fork
here. The child may be started independently of the parent as long as it opens a fifo file
by the same name. Here, for instance, on Cygwin the parent is started in one shell
Interprocess Communication | 235

window and then the child is started in another. Messages start appearing in the parent
window only after the child is started and begins writing messages onto the fifo file:
[C:\...\PP4E\System\Processes] $ python pipefifo.py # parent window
Parent 8324 got "Spam 000" at 1268003696.07
Parent 8324 got "Spam 001" at 1268003697.06
Parent 8324 got "Spam 002" at 1268003699.07
Parent 8324 got "Spam 003" at 1268003702.08
Parent 8324 got "Spam 004" at 1268003706.09
Parent 8324 got "Spam 000" at 1268003706.09
Parent 8324 got "Spam 001" at 1268003707.11
Parent 8324 got "Spam 002" at 1268003709.12
Parent 8324 got "Spam 003" at 1268003712.13
Parent 8324 got "Spam 004" at 1268003716.14
Parent 8324 got "Spam 000" at 1268003716.14
Parent 8324 got "Spam 001" at 1268003717.15
...etc: Ctrl-C to exit...
[C:\...\PP4E\System\Processes]$ file /tmp/pipefifo # child window
/tmp/pipefifo: fifo (named pipe)
[C:\...\PP4E\System\Processes]$ python pipefifo.py -child
...Ctrl-C to exit...
Named pipe use cases
By mapping communication points to a file system entity accessible to all programs run
on a machine, fifos can address a broad range of IPC goals on platforms where they are
supported. For instance, although this section’s example runs independent programs,
named pipes can also be used as an IPC device by both in-process threads and directly
forked related processes, much as we saw for anonymous pipes earlier.
By also supporting unrelated programs, though, fifo files are more widely applicable to
general client/server models. For example, named pipes can make the GUI and
command-line debugger integration I described earlier for anonymous pipes even more
flexible—by using fifo files to connect the GUI to the non-GUI debugger’s streams, the
GUI could be started independently when needed.
Sockets provide similar functionality but also buy us both inherent network awareness
and broader portability to Windows—as the next section explains.
Sockets: A First Look
Sockets, implemented by the Python socket module, are a more general IPC device
than the pipes we’ve seen so far. Sockets let us transfer data between programs running
on the same computer, as well as programs located on remote networked machines.
When used as an IPC mechanism on the same machine, programs connect to sockets
by a machine-global port number and transfer data. When used as a networking con-
nection, programs provide both a machine name and port number to transfer data to
a remotely-running program.
236 | Chapter 5: Parallel System Tools

Socket basics
Although sockets are one of the most commonly used IPC tools, it’s impossible to fully
grasp their API without also seeing its role in networking. Because of that, we’ll defer
most of our socket coverage until we can explore their use in network scripting in
Chapter 12. This section provides a brief introduction and preview, so you can compare
with the prior section’s named pipes (a.k.a. fifos). In short:
• Like fifos, sockets are global across a machine; they do not require shared memory
among threads or processes, and are thus applicable to independent programs.
• Unlike fifos, sockets are identified by port number, not filesystem path name; they
employ a very different nonfile API, though they can be wrapped in a file-like object;
and they are more portable: they work on nearly every Python platform, including
standard Windows Python.
In addition, sockets support networking roles that go beyond both IPC and this chap-
ter’s scope. To illustrate the basics, though, Example 5-25 launches a server and 5
clients in threads running in parallel on the same machine, to communicate over a
socket—because all threads connect to the same port, the server consumes the data
added by each of the clients.
Example 5-25. PP4E\System\Processes\socket_preview.py
"""
sockets for cross-task communication: start threads to communicate over sockets;
independent programs can too, because sockets are system-wide, much like fifos;
see the GUI and Internet parts of the book for more realistic socket use cases;
some socket servers may also need to talk to clients in threads or processes;
sockets pass byte strings, but can be pickled objects or encoded Unicode text;
caveat: prints in threads may need to be synchronized if their output overlaps;
"""
from socket import socket, AF_INET, SOCK_STREAM # portable socket api
port = 50008 # port number identifies socket on machine
host = 'localhost' # server and client run on same local machine here
def server():
sock = socket(AF_INET, SOCK_STREAM) # ip addresses tcp connection
sock.bind(('', port)) # bind to port on this machine
sock.listen(5) # allow up to 5 pending clients
while True:
conn, addr = sock.accept() # wait for client to connect
data = conn.recv(1024) # read bytes data from this client
reply = 'server got: [%s]' % data # conn is a new connected socket
conn.send(reply.encode()) # send bytes reply back to client
def client(name):
sock = socket(AF_INET, SOCK_STREAM)
sock.connect((host, port)) # connect to a socket port
sock.send(name.encode()) # send bytes data to listener
reply = sock.recv(1024) # receive bytes data from listener
Interprocess Communication | 237

sock.close() # up to 1024 bytes in message
print('client got: [%s]' % reply)
if __name__ == '__main__':
from threading import Thread
sthread = Thread(target=server)
sthread.daemon = True # don't wait for server thread
sthread.start() # do wait for children to exit
for i in range(5):
Thread(target=client, args=('client%s' % i,)).start()
Study this script’s code and comments to see how the socket objects’ methods are used
to transfer data. In a nutshell, with this type of socket the server accepts a client con-
nection, which by default blocks until a client requests service, and returns a new socket
connected to the client. Once connected, the client and server transfer byte strings by
using send and receive calls instead of writes and reads, though as we’ll see later in the
book, sockets can be wrapped in file objects much as we did earlier for pipe descriptors.
Also like pipe descriptors, unwrapped sockets deal in binary bytes strings, not text
str; that’s why string formatting results are manually encoded again here.
Here is this script’s output on Windows:
C:\...\PP4E\System\Processes> socket_preview.py
client got: [b"server got: [b'client1']"]
client got: [b"server got: [b'client3']"]
client got: [b"server got: [b'client4']"]
client got: [b"server got: [b'client2']"]
client got: [b"server got: [b'client0']"]
This output isn’t much to look at, but each line reflects data sent from client to server,
and then back again: the server receives a bytes string from a connected client and
echoes it back in a larger reply string. Because all threads run in parallel, the order in
which the clients are served is random on this machine.
Sockets and independent programs
Although sockets work for threads, the shared memory model of threads often allows
them to employ simpler communication devices such as shared names and objects and
queues. Sockets tend to shine brighter when used for IPC by separate processes and
independently launched programs. Example 5-26, for instance, reuses the server
and client functions of the prior example, but runs them in both processes and threads
of independently launched programs.
Example 5-26. PP4E\System\Processes\socket-preview-progs.py
"""
same socket, but talk between independent programs too, not just threads;
server here runs in a process and serves both process and thread clients;
sockets are machine-global, much like fifos: don't require shared memory
"""
from socket_preview import server, client # both use same port number
238 | Chapter 5: Parallel System Tools

import sys, os
from threading import Thread
mode = int(sys.argv[1])
if mode == 1: # run server in this process
server()
elif mode == 2: # run client in this process
client('client:process=%s' % os.getpid())
else: # run 5 client threads in process
for i in range(5):
Thread(target=client, args=('client:thread=%s' % i,)).start()
Let’s run this script on Windows, too (again, this portability is a major advantage of
sockets). First, start the server in a process as an independently launched program in
its own window; this process runs perpetually waiting for clients to request connections
(and as for our prior pipe example you may need to use Task Manager or a window
close to kill the server process eventually):
C:\...\PP4E\System\Processes> socket-preview-progs.py 1
Now, in another window, run a few clients in both processes and thread, by launching
them as independent programs—using 2 as the command-line argument runs a single
client process, but 3 spawns five threads to converse with the server on parallel:
C:\...\PP4E\System\Processes> socket-preview-progs.py 2
client got: [b"server got: [b'client:process=7384']"]
C:\...\PP4E\System\Processes> socket-preview-progs.py 2
client got: [b"server got: [b'client:process=7604']"]
C:\...\PP4E\System\Processes> socket-preview-progs.py 3
client got: [b"server got: [b'client:thread=1']"]
client got: [b"server got: [b'client:thread=2']"]
client got: [b"server got: [b'client:thread=0']"]
client got: [b"server got: [b'client:thread=3']"]
client got: [b"server got: [b'client:thread=4']"]
C:\..\PP4E\System\Processes> socket-preview-progs.py 3
client got: [b"server got: [b'client:thread=3']"]
client got: [b"server got: [b'client:thread=1']"]
client got: [b"server got: [b'client:thread=2']"]
client got: [b"server got: [b'client:thread=4']"]
client got: [b"server got: [b'client:thread=0']"]
C:\...\PP4E\System\Processes> socket-preview-progs.py 2
client got: [b"server got: [b'client:process=6428']"]
Socket use cases
This section’s examples illustrate the basic IPC role of sockets, but this only hints at
their full utility. Despite their seemingly limited byte string nature, higher-order use
cases for sockets are not difficult to imagine. With a little extra work, for instance:
Interprocess Communication | 239

• Arbitrary Python objects like lists and dictionaries (or at least copies of them) can
be transferred over sockets, too, by shipping the serialized byte strings produced
by Python’s pickle module introduced in Chapter 1 and covered in full in
Chapter 17.
• As we’ll see in Chapter 10, the printed output of a simple script can be redirected
to a GUI window, by connecting the script’s output stream to a socket on which
a GUI is listening in nonblocking mode.
• Programs that fetch arbitrary text off the Web might read it as byte strings over
sockets, but manually decode it using encoding names embedded in content-type
headers or tags in the data itself.
• In fact, the entire Internet can be seen as a socket use case—as we’ll see in Chap-
ter 12, at the bottom, email, FTP, and web pages are largely just formatted byte
string messages shipped over sockets.
Plus any other context in which programs exchange data—sockets are a general, port-
able, and flexible tool. For instance, they would provide the same utility as fifos for the
GUI/debugger example used earlier, but would also work in Python on Windows and
would even allow the GUI to connect to a debugger running on a different computer
altogether. As such, they are seen by many as a more powerful IPC tool.
Again, you should consider this section just a preview; because the grander socket story
also entails networking concepts, we’ll defer a more in-depth look at the socket API
until Chapter 12. We’ll also see sockets again briefly in Chapter 10 in the GUI stream
redirection use case listed above, and we’ll explore a variety of additional socket use
cases in the Internet part of this book. In Part IV, for instance, we’ll use sockets to
transfer entire files and write more robust socket servers that spawn threads or processes
to converse with clients to avoid denying connections. For the purposes of this chapter,
let’s move on to one last traditional IPC tool—the signal.
Signals
For lack of a better analogy, signals are a way to poke a stick at a process. Programs
generate signals to trigger a handler for that signal in another process. The operating
system pokes, too—some signals are generated on unusual system events and may kill
the program if not handled. If this sounds a little like raising exceptions in Python, it
should; signals are software-generated events and the cross-process analog of excep-
tions. Unlike exceptions, though, signals are identified by number, are not stacked, and
are really an asynchronous event mechanism outside the scope of the Python interpreter
controlled by the operating system.
In order to make signals available to scripts, Python provides a signal module that
allows Python programs to register Python functions as handlers for signal events. This
module is available on both Unix-like platforms and Windows (though the Windows
version may define fewer kinds of signals to be caught). To illustrate the basic signal
240 | Chapter 5: Parallel System Tools

interface, the script in Example 5-27 installs a Python handler function for the signal
number passed in as a command-line argument.
Example 5-27. PP4E\System\Processes\signal1.py
"""
catch signals in Python; pass signal number N as a command-line arg,
use a "kill -N pid" shell command to send this process a signal; most
signal handlers restored by Python after caught (see network scripting
chapter for SIGCHLD details); on Windows, signal module is available,
but it defines only a few signal types there, and os.kill is missing;
"""
import sys, signal, time
def now(): return time.ctime(time.time()) # current time string
def onSignal(signum, stackframe): # python signal handler
print('Got signal', signum, 'at', now()) # most handlers stay in effect
signum = int(sys.argv[1])
signal.signal(signum, onSignal) # install signal handler
while True: signal.pause() # wait for signals (or: pass)
There are only two signal module calls at work here:
signal.signal
Takes a signal number and function object and installs that function to handle that
signal number when it is raised. Python automatically restores most signal handlers
when signals occur, so there is no need to recall this function within the signal
handler itself to reregister the handler. That is, except for SIGCHLD, a signal handler
remains installed until explicitly reset (e.g., by setting the handler to SIG_DFL to
restore default behavior or to SIG_IGN to ignore the signal). SIGCHLD behavior is
platform specific.
signal.pause
Makes the process sleep until the next signal is caught. A time.sleep call is similar
but doesn’t work with signals on my Linux box; it generates an interrupted system
call error. A busy while True: pass loop here would pause the script, too, but may
squander CPU resources.
Here is what this script looks like running on Cygwin on Windows (it works the same
on other Unix-like platforms like Linux): a signal number to watch for (12) is passed
in on the command line, and the program is made to run in the background with an
& shell operator (available in most Unix-like shells):
[C:\...\PP4E\System\Processes]$ python signal1.py 12 &
[1] 8224
$ ps
PID PPID PGID WINPID TTY UID STIME COMMAND
I 8944 1 8944 8944 con 1004 18:09:54 /usr/bin/bash
8224 7336 8224 10020 con 1004 18:26:47 /usr/local/bin/python
Interprocess Communication | 241

8380 7336 8380 428 con 1004 18:26:50 /usr/bin/ps
$ kill −12 8224
Got signal 12 at Sun Mar 7 18:27:28 2010
$ kill −12 8224
Got signal 12 at Sun Mar 7 18:27:30 2010
$ kill −9 8224
[1]+ Killed python signal1.py 12
Inputs and outputs can be a bit jumbled here because the process prints to the same
screen used to type new shell commands. To send the program a signal, the kill shell
command takes a signal number and a process ID to be signaled (8224); every time a
new kill command sends a signal, the process replies with a message generated by a
Python signal handler function. Signal 9 always kills the process altogether.
The signal module also exports a signal.alarm function for scheduling a SIGALRM signal
to occur at some number of seconds in the future. To trigger and catch timeouts, set
the alarm and install a SIGALRM handler as shown in Example 5-28.
Example 5-28. PP4E\System\Processes\signal2.py
"""
set and catch alarm timeout signals in Python; time.sleep doesn't play
well with alarm (or signal in general in my Linux PC), so we call
signal.pause here to do nothing until a signal is received;
"""
import sys, signal, time
def now(): return time.asctime()
def onSignal(signum, stackframe): # python signal handler
print('Got alarm', signum, 'at', now()) # most handlers stay in effect
while True:
print('Setting at', now())
signal.signal(signal.SIGALRM, onSignal) # install signal handler
signal.alarm(5) # do signal in 5 seconds
signal.pause() # wait for signals
Running this script on Cygwin on Windows causes its onSignal handler function to be
invoked every five seconds:
[C:\...\PP4E\System\Processes]$ python signal2.py
Setting at Sun Mar 7 18:37:10 2010
Got alarm 14 at Sun Mar 7 18:37:15 2010
Setting at Sun Mar 7 18:37:15 2010
Got alarm 14 at Sun Mar 7 18:37:20 2010
Setting at Sun Mar 7 18:37:20 2010
Got alarm 14 at Sun Mar 7 18:37:25 2010
Setting at Sun Mar 7 18:37:25 2010
Got alarm 14 at Sun Mar 7 18:37:30 2010
242 | Chapter 5: Parallel System Tools

Setting at Sun Mar 7 18:37:30 2010
...Ctrl-C to exit...
Generally speaking, signals must be used with cautions not made obvious by the ex-
amples we’ve just seen. For instance, some system calls don’t react well to being inter-
rupted by signals, and only the main thread can install signal handlers and respond to
signals in a multithreaded program.
When used well, though, signals provide an event-based communication mechanism.
They are less powerful than data streams such as pipes, but are sufficient in situations
in which you just need to tell a program that something important has occurred and
don’t need to pass along any details about the event itself. Signals are sometimes also
combined with other IPC tools. For example, an initial signal may inform a program
that a client wishes to communicate over a named pipe—the equivalent of tapping
someone’s shoulder to get their attention before speaking. Most platforms reserve one
or more SIGUSR signal numbers for user-defined events of this sort. Such an integration
structure is sometimes an alternative to running a blocking input call in a spawned
thread.
See also the os.kill(pid, sig) call for sending signals to known processes from within
a Python script on Unix-like platforms, much like the kill shell command used earlier;
the required process ID can be obtained from the os.fork call’s child process ID return
value or from other interfaces. Like os.fork, this call is also available in Cygwin Python,
but not in standard Windows Python. Also watch for the discussion about using signal
handlers to clean up “zombie” processes in Chapter 12.
The multiprocessing Module
Now that you know about IPC alternatives and have had a chance to explore processes,
threads, and both process nonportability and thread GIL limitations, it turns out that
there is another alternative, which aims to provide just the best of both worlds. As
mentioned earlier, Python’s standard library multiprocessing module package allows
scripts to spawn processes using an API very similar to the threading module.
This relatively new package works on both Unix and Windows, unlike low-level process
forks. It supports a process spawning model which is largely platform-neutral, and
provides tools for related goals, such as IPC, including locks, pipes, and queues. In
addition, because it uses processes instead of threads to run code in parallel, it effec-
tively works around the limitations of the thread GIL. Hence, multiprocessing allows
the programmer to leverage the capacity of multiple processors for parallel tasks, while
retaining much of the simplicity and portability of the threading model.
Why multiprocessing?
So why learn yet another parallel processing paradigm and toolkit, when we already
have the threads, processes, and IPC tools like sockets, pipes, and thread queues that
The multiprocessing Module | 243

we’ve already studied? Before we get into the details, I want to begin with a few words
about why you may (or may not) care about this package. In more specific terms,
although this module’s performance may not compete with that of pure threads or
process forks for some applications, this module offers a compelling solution for many:
• Compared to raw process forks, you gain cross-platform portability and powerful
IPC tools.
• Compared to threads, you essentially trade some potential and platform-
dependent extra task start-up time for the ability to run tasks in truly parallel fash-
ion on multi-core or multi-CPU machines.
On the other hand, this module imposes some constraints and tradeoffs that threads
do not:
• Since objects are copied across process boundaries, shared mutable state does not
work as it does for threads—changes in one process are not generally noticed in
the other. Really, freely shared state may be the most compelling reason to use
threads; its absence in this module may prove limiting in some threading contexts.
• Because this module requires pickleability for both its processes on Windows, as
well as some of its IPC tools in general, some coding paradigms are difficult or
nonportable—especially if they use bound methods or pass unpickleable objects
such as sockets to spawned processes.
For instance, common coding patterns with lambda that work for the threading module
cannot be used as process target callables in this module on Windows, because they
cannot be pickled. Similarly, because bound object methods are also not pickleable, a
threaded program may require a more indirect design if it either runs bound methods
in its threads or implements thread exit actions by posting arbitrary callables (possibly
including bound methods) on shared queues. The in-process model of threads supports
such direct lambda and bound method use, but the separate processes of
multiprocessing do not.
In fact we’ll write a thread manager for GUIs in Chapter 10 that relies on queueing
in-process callables this way to implement thread exit actions—the callables are queued
by worker threads, and fetched and dispatched by the main thread. Because the
threaded PyMailGUI program we’ll code in Chapter 14 both uses this manager to queue
bound methods for thread exit actions and runs bound methods as the main action of
a thread itself, it could not be directly translated to the separate process model implied
by multiprocessing.
Without getting into too many details here, to use multiprocessing, PyMailGUI’s ac-
tions might have to be coded as simple functions or complete process subclasses for
pickleability. Worse, they may have to be implemented as simpler action identifiers
dispatched in the main process, if they update either the GUI itself or object state in
general —pickling results in an object copy in the receiving process, not a reference to
the original, and forks on Unix essentially copy an entire process. Updating the state
244 | Chapter 5: Parallel System Tools

of a mutable message cache copied by pickling it to pass to a new process, for example,
has no effect on the original.
The pickleability constraints for process arguments on Windows can limit
multiprocessing’s scope in other contexts as well. For instance, in Chapter 12, we’ll
find that this module doesn’t directly solve the lack of portability for the os.fork call
for traditionally coded socket servers on Windows, because connected sockets are not
pickled correctly when passed into a new process created by this module to converse
with a client. In this context, threads provide a more portable and likely more efficient
solution.
Applications that pass simpler types of messages, of course, may fare better. Message
constraints are easier to accommodate when they are part of an initial process-based
design. Moreover, other tools in this module, such as its managers and shared memory
API, while narrowly focused and not as general as shared thread state, offer additional
mutable state options for some programs.
Fundamentally, though, because multiprocessing is based on separate processes, it
may be best geared for tasks which are relatively independent, do not share mutable
object state freely, and can make do with the message passing and shared memory tools
provided by this module. This includes many applications, but this module is not nec-
essarily a direct replacement for every threaded program, and it is not an alternative to
process forks in all contexts.
To truly understand both this module package’s benefits, as well as its tradeoffs, let’s
turn to a first example and explore this package’s implementation along the way.
The Basics: Processes and Locks
We don’t have space to do full justice to this sophisticated module in this book; see its
coverage in the Python library manual for the full story. But as a brief introduction, by
design most of this module’s interfaces mirror the threading and queue modules we’ve
already met, so they should already seem familiar. For example, the multiprocessing
module’s Process class is intended to mimic the threading module’s Thread class we
met earlier—it allows us to launch a function call in parallel with the calling script;
with this module, though, the function runs in a process instead of a thread. Exam-
ple 5-29 illustrates these basics in action:
Example 5-29. PP4E\System\Processes\multi1.py
"""
multiprocess basics: Process works like threading.Thread, but
runs function call in parallel in a process instead of a thread;
locks can be used to synchronize, e.g. prints on some platforms;
starts new interpreter on windows, forks a new process on unix;
"""
import os
from multiprocessing import Process, Lock
The multiprocessing Module | 245

def whoami(label, lock):
msg = '%s: name:%s, pid:%s'
with lock:
print(msg % (label, __name__, os.getpid()))
if __name__ == '__main__':
lock = Lock()
whoami('function call', lock)
p = Process(target=whoami, args=('spawned child', lock))
p.start()
p.join()
for i in range(5):
Process(target=whoami, args=(('run process %s' % i), lock)).start()
with lock:
print('Main process exit.')
When run, this script first calls a function directly and in-process; then launches a call
to that function in a new process and waits for it to exit; and finally spawns five function
call processes in parallel in a loop—all using an API identical to that of the
threading.Thread model we studied earlier in this chapter. Here’s this script’s output
on Windows; notice how the five child processes spawned at the end of this script
outlive their parent, as is the usual case for processes:
C:\...\PP4E\System\Processes> multi1.py
function call: name:__main__, pid:8752
spawned child: name:__main__, pid:9268
Main process exit.
run process 3: name:__main__, pid:9296
run process 1: name:__main__, pid:8792
run process 4: name:__main__, pid:2224
run process 2: name:__main__, pid:8716
run process 0: name:__main__, pid:6936
Just like the threading.Thread class we met earlier, the multiprocessing.Process object
can either be passed a target with arguments (as done here) or subclassed to redefine
its run action method. Its start method invokes its run method in a new process, and
the default run simply calls the passed-in target. Also like threading, a join method
waits for child process exit, and a Lock object is provided as one of a handful of process
synchronization tools; it’s used here to ensure that prints don’t overlap among pro-
cesses on platforms where this might matter (it may not on Windows).
Implementation and usage rules
Technically, to achieve its portability, this module currently works by selecting from
platform-specific alternatives:
• On Unix, it forks a new child process and invokes the Process object’s run method
in the new child.
246 | Chapter 5: Parallel System Tools

• On Windows, it spawns a new interpreter by using Windows-specific process cre-
ation tools, passing the pickled Process object in to the new process over a pipe,
and starting a “python -c” command line in the new process, which runs a special
Python-coded function in this package that reads and unpickles the Process and
invokes its run method.
We met pickling briefly in Chapter 1, and we will study it further later in this book.
The implementation is a bit more complex than this, and is prone to change over time,
of course, but it’s really quite an amazing trick. While the portable API generally hides
these details from your code, its basic structure can still have subtle impacts on the way
you’re allowed to use it. For instance:
• On Windows, the main process’s logic should generally be nested under a __name__
== __main__ test as done here when using this module, so it can be imported freely
by a new interpreter without side effects. As we’ll learn in more detail in Chap-
ter 17, unpickling classes and functions requires an import of their enclosing mod-
ule, and this is the root of this requirement.
• Moreover, when globals are accessed in child processes on Windows, their values
may not be the same as that in the parent at start time, because their module will
be imported into a new process.
• Also on Windows, all arguments to Process must be pickleable. Because this in-
cludes target, targets should be simple functions so they can be pickled; they can-
not be bound or unbound object methods and cannot be functions created with a
lambda. See pickle in Python’s library manual for more on pickleability rules;
nearly every object type works, but callables like functions and classes must be
importable—they are pickled by name only, and later imported to recreate byte-
code. On Windows, objects with system state, such as connected sockets, won’t
generally work as arguments to a process target either, because they are not
pickleable.
• Similarly, instances of custom Process subclasses must be pickleable on Windows
as well. This includes all their attribute values. Objects available in this package
(e.g., Lock in Example 5-29) are pickleable, and so may be used as both Process
constructor arguments and subclass attributes.
• IPC objects in this package that appear in later examples like Pipe and Queue accept
only pickleable objects, because of their implementation (more on this in the next
section).
• On Unix, although a child process can make use of a shared global item created in
the parent, it’s better to pass the object as an argument to the child process’s con-
structor, both for portability to Windows and to avoid potential problems if such
objects were garbage collected in the parent.
There are additional rules documented in the library manual. In general, though, if you
stick to passing in shared objects to processes and using the synchronization and
The multiprocessing Module | 247

communication tools provided by this package, your code will usually be portable and
correct. Let’s look next at a few of those tools in action.
IPC Tools: Pipes, Shared Memory, and Queues
While the processes created by this package can always communicate using general
system-wide tools like the sockets and fifo files we met earlier, the multiprocessing
module also provides portable message passing tools specifically geared to this purpose
for the processes it spawns:
• Its Pipe object provides an anonymous pipe, which serves as a connection between
two processes. When called, Pipe returns two Connection objects that represent the
ends of the pipe. Pipes are bidirectional by default, and allow arbitrary pickleable
Python objects to be sent and received. On Unix they are implemented internally
today with either a connected socket pair or the os.pipe call we met earlier, and
on Windows with named pipes specific to that platform. Much like the Process
object described earlier, though, the Pipe object’s portable API spares callers from
such things.
• Its Value and Array objects implement shared process/thread-safe memory for
communication between processes. These calls return scalar and array objects
based in the ctypes module and created in shared memory, with access synchron-
ized by default.
• Its Queue object serves as a FIFO list of Python objects, which allows multiple pro-
ducers and consumers. A queue is essentially a pipe with extra locking mechanisms
to coordinate more arbitrary accesses, and inherits the pickleability constraints of
Pipe.
Because these devices are safe to use across multiple processes, they can often serve to
synchronize points of communication and obviate lower-level tools like locks, much
the same as the thread queues we met earlier. As usual, a pipe (or a pair of them) may
be used to implement a request/reply model. Queues support more flexible models; in
fact, a GUI that wishes to avoid the limitations of the GIL might use the
multiprocessing module’s Process and Queue to spawn long-running tasks that post
results, rather than threads. As mentioned, although this may incur extra start-up
overhead on some platforms, unlike threads today, tasks coded this way can be as truly
parallel as the underlying platform allows.
One constraint worth noting here: this package’s pipes (and by proxy, queues) pickle
the objects passed through them, so that they can be reconstructed in the receiving
process (as we’ve seen, on Windows the receiver process may be a fully independent
Python interpreter). Because of that, they do not support unpickleable objects; as sug-
gested earlier, this includes some callables like bound methods and lambda functions
(see file multi-badq.py in the book examples package for a demonstration of code that
violates this constraint). Objects with system state, such as sockets, may fail as well.
248 | Chapter 5: Parallel System Tools

Most other Python object types, including classes and simple functions, work fine on
pipes and queues.
Also keep in mind that because they are pickled, objects transferred this way are effec-
tively copied in the receiving process; direct in-place changes to mutable objects’ state
won’t be noticed in the sender. This makes sense if you remember that this package
runs independent processes with their own memory spaces; state cannot be as freely
shared as in threading, regardless of which IPC tools you use.
multiprocessing pipes
To demonstrate the IPC tools listed above, the next three examples implement three
flavors of communication between parent and child processes. Example 5-30 uses a
simple shared pipe object to send and receive data between parent and child processes.
Example 5-30. PP4E\System\Processes\multi2.py
"""
Use multiprocess anonymous pipes to communicate. Returns 2 connection
object representing ends of the pipe: objects are sent on one end and
received on the other, though pipes are bidirectional by default
"""
import os
from multiprocessing import Process, Pipe
def sender(pipe):
"""
send object to parent on anonymous pipe
"""
pipe.send(['spam'] + [42, 'eggs'])
pipe.close()
def talker(pipe):
"""
send and receive objects on a pipe
"""
pipe.send(dict(name='Bob', spam=42))
reply = pipe.recv()
print('talker got:', reply)
if __name__ == '__main__':
(parentEnd, childEnd) = Pipe()
Process(target=sender, args=(childEnd,)).start() # spawn child with pipe
print('parent got:', parentEnd.recv()) # receive from child
parentEnd.close() # or auto-closed on gc
(parentEnd, childEnd) = Pipe()
child = Process(target=talker, args=(childEnd,))
child.start()
print('parent got:', parentEnd.recv()) # receieve from child
parentEnd.send({x * 2 for x in 'spam'}) # send to child
The multiprocessing Module | 249

child.join() # wait for child exit
print('parent exit')
When run on Windows, here’s this script’s output—one child passes an object to the
parent, and the other both sends and receives on the same pipe:
C:\...\PP4E\System\Processes> multi2.py
parent got: ['spam', 42, 'eggs']
parent got: {'name': 'Bob', 'spam': 42}
talker got: {'ss', 'aa', 'pp', 'mm'}
parent exit
This module’s pipe objects make communication between two processes portable (and
nearly trivial).
Shared memory and globals
Example 5-31 uses shared memory to serve as both inputs and outputs of spawned
processes. To make this work portably, we must create objects defined by the package
and pass them to Process constructors. The last test in this demo (“loop4”) probably
represents the most common use case for shared memory—that of distributing com-
putation work to multiple parallel processes.
Example 5-31. PP4E\System\Processes\multi3.py
"""
Use multiprocess shared memory objects to communicate.
Passed objects are shared, but globals are not on Windows.
Last test here reflects common use case: distributing work.
"""
import os
from multiprocessing import Process, Value, Array
procs = 3
count = 0 # per-process globals, not shared
def showdata(label, val, arr):
"""
print data values in this process
"""
msg = '%-12s: pid:%4s, global:%s, value:%s, array:%s'
print(msg % (label, os.getpid(), count, val.value, list(arr)))
def updater(val, arr):
"""
communicate via shared memory
"""
global count
count += 1 # global count not shared
val.value += 1 # passed in objects are
for i in range(3): arr[i] += 1
if __name__ == '__main__':
250 | Chapter 5: Parallel System Tools

scalar = Value('i', 0) # shared memory: process/thread safe
vector = Array('d', procs) # type codes from ctypes: int, double
# show start value in parent process
showdata('parent start', scalar, vector)
# spawn child, pass in shared memory
p = Process(target=showdata, args=('child ', scalar, vector))
p.start(); p.join()
# pass in shared memory updated in parent, wait for each to finish
# each child sees updates in parent so far for args (but not global)
print('\nloop1 (updates in parent, serial children)...')
for i in range(procs):
count += 1
scalar.value += 1
vector[i] += 1
p = Process(target=showdata, args=(('process %s' % i), scalar, vector))
p.start(); p.join()
# same as prior, but allow children to run in parallel
# all see the last iteration's result because all share objects
print('\nloop2 (updates in parent, parallel children)...')
ps = []
for i in range(procs):
count += 1
scalar.value += 1
vector[i] += 1
p = Process(target=showdata, args=(('process %s' % i), scalar, vector))
p.start()
ps.append(p)
for p in ps: p.join()
# shared memory updated in spawned children, wait for each
print('\nloop3 (updates in serial children)...')
for i in range(procs):
p = Process(target=updater, args=(scalar, vector))
p.start()
p.join()
showdata('parent temp', scalar, vector)
# same, but allow children to update in parallel
ps = []
print('\nloop4 (updates in parallel children)...')
for i in range(procs):
p = Process(target=updater, args=(scalar, vector))
p.start()
ps.append(p)
for p in ps: p.join()
# global count=6 in parent only
The multiprocessing Module | 251

# show final results here # scalar=12: +6 parent, +6 in 6 children
showdata('parent end', scalar, vector) # array[i]=8: +2 parent, +6 in 6 children
The following is this script’s output on Windows. Trace through this and the code to
see how it runs; notice how the changed value of the global variable is not shared by
the spawned processes on Windows, but passed-in Value and Array objects are. The
final output line reflects changes made to shared memory in both the parent and
spawned children—the array’s final values are all 8.0, because they were incremented
twice in the parent, and once in each of six spawned children; the scalar value similarly
reflects changes made by both parent and child; but unlike for threads, the global is
per-process data on Windows:
C:\...\PP4E\System\Processes> multi3.py
parent start: pid:6204, global:0, value:0, array:[0.0, 0.0, 0.0]
child : pid:9660, global:0, value:0, array:[0.0, 0.0, 0.0]
loop1 (updates in parent, serial children)...
process 0 : pid:3900, global:0, value:1, array:[1.0, 0.0, 0.0]
process 1 : pid:5072, global:0, value:2, array:[1.0, 1.0, 0.0]
process 2 : pid:9472, global:0, value:3, array:[1.0, 1.0, 1.0]
loop2 (updates in parent, parallel children)...
process 1 : pid:9468, global:0, value:6, array:[2.0, 2.0, 2.0]
process 2 : pid:9036, global:0, value:6, array:[2.0, 2.0, 2.0]
process 0 : pid:9548, global:0, value:6, array:[2.0, 2.0, 2.0]
loop3 (updates in serial children)...
parent temp : pid:6204, global:6, value:9, array:[5.0, 5.0, 5.0]
loop4 (updates in parallel children)...
parent end : pid:6204, global:6, value:12, array:[8.0, 8.0, 8.0]
If you imagine the last test here run with a much larger array and many more parallel
children, you might begin to sense some of the power of this package for distributing
work.
Queues and subclassing
Finally, besides basic spawning and IPC tools, the multiprocessing module also:
• Allows its Process class to be subclassed to provide structure and state retention
(much like threading.Thread, but for processes).
• Implements a process-safe Queue object which may be shared by any number of
processes for more general communication needs (much like queue.Queue, but for
processes).
Queues support a more flexible multiple client/server model. Example 5-32, for in-
stance, spawns three producer threads to post to a shared queue and repeatedly polls
for results to appear—in much the same fashion that a GUI might collect results in
parallel with the display itself, though here the concurrency is achieved with processes
instead of threads.
252 | Chapter 5: Parallel System Tools

Example 5-32. PP4E\System\Processes\multi4.py
"""
Process class can also be subclassed just like threading.Thread;
Queue works like queue.Queue but for cross-process, not cross-thread
"""
import os, time, queue
from multiprocessing import Process, Queue # process-safe shared queue
# queue is a pipe + locks/semas
class Counter(Process):
label = ' @'
def __init__(self, start, queue): # retain state for use in run
self.state = start
self.post = queue
Process.__init__(self)
def run(self): # run in newprocess on start()
for i in range(3):
time.sleep(1)
self.state += 1
print(self.label ,self.pid, self.state) # self.pid is this child's pid
self.post.put([self.pid, self.state]) # stdout file is shared by all
print(self.label, self.pid, '-')
if __name__ == '__main__':
print('start', os.getpid())
expected = 9
post = Queue()
p = Counter(0, post) # start 3 processes sharing queue
q = Counter(100, post) # children are producers
r = Counter(1000, post)
p.start(); q.start(); r.start()
while expected: # parent consumes data on queue
time.sleep(0.5) # this is essentially like a GUI,
try: # though GUIs often use threads
data = post.get(block=False)
except queue.Empty:
print('no data...')
else:
print('posted:', data)
expected -= 1
p.join(); q.join(); r.join() # must get before join putter
print('finish', os.getpid(), r.exitcode) # exitcode is child exit status
Notice in this code how:
•The time.sleep calls in this code’s producer simulate long-running tasks.
• All four processes share the same output stream; print calls go the same place and
don’t overlap badly on Windows (as we saw earlier, the multiprocessing module
also has a shareable Lock object to synchronize access if required).
The multiprocessing Module | 253

• The exit status of child process is available after they finish in their exitcode
attribute.
When run, the output of the main consumer process traces its queue fetches, and the
(indented) output of spawned child producer processes gives process IDs and state.
C:\...\PP4E\System\Processes> multi4.py
start 6296
no data...
no data...
@ 8008 101
posted: [8008, 101]
@ 6068 1
@ 3760 1001
posted: [6068, 1]
@ 8008 102
posted: [3760, 1001]
@ 6068 2
@ 3760 1002
posted: [8008, 102]
@ 8008 103
@ 8008 -
posted: [6068, 2]
@ 6068 3
@ 6068 -
@ 3760 1003
@ 3760 -
posted: [3760, 1002]
posted: [8008, 103]
posted: [6068, 3]
posted: [3760, 1003]
finish 6296 0
If you imagine the “@” lines here as results of long-running operations and the others
as a main GUI thread, the wide relevance of this package may become more apparent.
Starting Independent Programs
As we learned earlier, independent programs generally communicate with system-
global tools such as sockets and the fifo files we studied earlier. Although processes
spawned by multiprocessing can leverage these tools, too, their closer relationship
affords them the host of additional IPC communication devices provided by this
module.
Like threads, multiprocessing is designed to run function calls in parallel, not to start
entirely separate programs directly. Spawned functions might use tools like os.system,
os.popen, and subprocess to start a program if such an operation might block the caller,
but there’s otherwise often no point in starting a process that just starts a program
(you might as well start the program and skip a step). In fact, on Windows,
multiprocessing today uses the same process creation call as subprocess, so there’s little
point in starting two processes to run one.
254 | Chapter 5: Parallel System Tools

It is, however, possible to start new programs in the child processes spawned, using
tools like the os.exec* calls we met earlier—by spawning a process portably with
multiprocessing and overlaying it with a new program this way, we start a new inde-
pendent program, and effectively work around the lack of the os.fork call in standard
Windows Python.
This generally assumes that the new program doesn’t require any resources passed in
by the Process API, of course (once a new program starts, it erases that which was
running), but it offers a portable equivalent to the fork/exec combination on Unix.
Furthermore, programs started this way can still make use of more traditional IPC tools,
such as sockets and fifos, we met earlier in this chapter. Example 5-33 illustrates the
technique.
Example 5-33. PP4E\System\Processes\multi5.py
"Use multiprocessing to start independent programs, os.fork or not"
import os
from multiprocessing import Process
def runprogram(arg):
os.execlp('python', 'python', 'child.py', str(arg))
if __name__ == '__main__':
for i in range(5):
Process(target=runprogram, args=(i,)).start()
print('parent exit')
This script starts 5 instances of the child.py script we wrote in Example 5-4 as inde-
pendent processes, without waiting for them to finish. Here’s this script at work on
Windows, after deleting a superfluous system prompt that shows up arbitrarily in the
middle of its output (it runs the same on Cygwin, but the output is not interleaved
there):
C:\...\PP4E\System\Processes> type child.py
import os, sys
print('Hello from child', os.getpid(), sys.argv[1])
C:\...\PP4E\System\Processes> multi5.py
parent exit
Hello from child 9844 2
Hello from child 8696 4
Hello from child 1840 0
Hello from child 6724 1
Hello from child 9368 3
This technique isn’t possible with threads, because all threads run in the same process;
overlaying it with a new program would kill all its threads. Though this is unlikely to
be as fast as a fork/exec combination on Unix, it at least provides similar and portable
functionality on Windows when required.
The multiprocessing Module | 255

And Much More
Finally, multiprocessing provides many more tools than these examples deploy, in-
cluding condition, event, and semaphore synchronization tools, and local and remote
managers that implement servers for shared object. For instance, Example 5-34 dem-
onstrates its support for pools—spawned children that work in concert on a given task.
Example 5-34. PP4E\System\Processes\multi6.py
"Plus much more: process pools, managers, locks, condition,..."
import os
from multiprocessing import Pool
def powers(x):
#print(os.getpid()) # enable to watch children
return 2 ** x
if __name__ == '__main__':
workers = Pool(processes=5)
results = workers.map(powers, [2]*100)
print(results[:16])
print(results[-2:])
results = workers.map(powers, range(100))
print(results[:16])
print(results[-2:])
When run, Python arranges to delegate portions of the task to workers run in parallel:
C:\...\PP4E\System\Processes> multi6.py
[4, 4, 4, 4, 4, 4, 4, 4, 4, 4, 4, 4, 4, 4, 4, 4]
[4, 4]
[1, 2, 4, 8, 16, 32, 64, 128, 256, 512, 1024, 2048, 4096, 8192, 16384, 32768]
[316912650057057350374175801344, 633825300114114700748351602688]
And a little less…
To be fair, besides such additional features and tools, multiprocessing also comes with
additional constraints beyond those we’ve already covered (pickleability, mutable state,
and so on). For example, consider the following sort of code:
def action(arg1, arg2):
print(arg1, arg2)
if __name__ == '__main__':
Process(target=action, args=('spam', 'eggs')).start() # shell waits for child
This works as expected, but if we change the last line to the following it fails on Win-
dows because lambdas are not pickleable (really, not importable):
Process(target=(lambda: action('spam', 'eggs'))).start() # fails!-not pickleable
256 | Chapter 5: Parallel System Tools

This precludes a common coding pattern that uses lambda to add data to calls, which
we’ll use often for callbacks in the GUI part of this book. Moreover, this differs from
the threading module that is the model for this package—calls like the following which
work for threads must be translated to a callable and arguments:
threading.Thread(target=(lambda: action(2, 4))).start() # but lambdas work here
Conversely, some behavior of the threading module is mimicked by multiprocessing,
whether you wish it did or not. Because programs using this package wait for child
processes to end by default, we must mark processes as daemon if we don’t want to block
the shell where the following sort of code is run (technically, parents attempt to ter-
minate daemonic children on exit, which means that the program can exit when only
daemonic children remain, much like threading):
def action(arg1, arg2):
print(arg1, arg2)
time.sleep(5) # normally prevents the parent from exiting
if __name__ == '__main__':
p = Process(target=action, args=('spam', 'eggs'))
p.daemon = True # don't wait for it
p.start()
There’s more on some of these issues in the Python library manual; they are not show-
stoppers by any stretch, but special cases and potential pitfalls to some. We’ll revisit
the lambda and daemon issues in a more realistic context in Chapter 8, where we’ll use
multiprocessing to launch GUI demos independently.
Why multiprocessing? The Conclusion
As this section’s examples suggest, multiprocessing provides a powerful alternative
which aims to combine the portability and much of the utility of threads with the fully
parallel potential of processes and offers additional solutions to IPC, exit status, and
other parallel processing goals.
Hopefully, this section has also given you a better understanding of this module’s
tradeoffs discussed at its beginning. In particular, its separate process model precludes
the freely shared mutable state of threads, and bound methods and lambdas are pro-
hibited by both the pickleability requirements of its IPC pipes and queues, as well as
its process action implementation on Windows. Moreover, its requirement of pickle-
ability for process arguments on Windows also precludes it as an option for conversing
with clients in socket servers portably.
While not a replacement for threading in all applications, though, multiprocessing
offers compelling solutions for many. Especially for parallel-programming tasks which
can be designed to avoid its limitations, this module can offer both performance and
portability that Python’s more direct multitasking tools cannot.
The multiprocessing Module | 257

Unfortunately, beyond this brief introduction, we don’t have space for a more complete
treatment of this module in this book. For more details, refer to the Python library
manual. Here, we turn next to a handful of additional program launching tools and a
wrap up of this chapter.
Other Ways to Start Programs
We’ve seen a variety of ways to launch programs in this book so far—from the os.fork/
exec combination on Unix, to portable shell command-line launchers like os.system,
os.popen, and subprocess, to the portable multiprocessing module options of the last
section. There are still other ways to start programs in the Python standard library,
some of which are more platform neutral or obscure than others. This section wraps
up this chapter with a quick tour through this set.
The os.spawn Calls
The os.spawnv and os.spawnve calls were originally introduced to launch programs on
Windows, much like a fork/exec c a l l c o m b i n a t i o n o n U n i x - l i k e p l a t f o r m s . T o d a y , t h e s e
calls work on both Windows and Unix-like systems, and additional variants have been
added to parrot os.exec.
In recent versions of Python, the portable subprocess module has started to supersede
these calls. In fact, Python’s library manual includes a note stating that this module has
more powerful and equivalent tools and should be preferred to os.spawn calls. More-
over, the newer multiprocessing module can achieve similarly portable results today
when combined with os.exec calls, as we saw earlier. Still, the os.spawn calls continue
to work as advertised and may appear in Python code you encounter.
The os.spawn family of calls execute a program named by a command line in a new
process, on both Windows and Unix-like systems. In basic operation, they are similar
to the fork/exec call combination on Unix and can be used as alternatives to the
system a n d popen c a l l s w e ’ v e a l r e a d y l e a r n e d . I n t h e f o l l o w i n g i n t e r a c t i o n , f o r i n s t a n c e ,
we start a Python program with a command line in two traditional ways (the second
also reads its output):
C:\...\PP4E\System\Processes> python
>>> print(open('makewords.py').read())
print('spam')
print('eggs')
print('ham')
>>> import os
>>> os.system('python makewords.py')
spam
eggs
ham
0
258 | Chapter 5: Parallel System Tools

>>> result = os.popen('python makewords.py').read()
>>> print(result)
spam
eggs
ham
The equivalent os.spawn calls achieve the same effect, with a slightly more complex call
signature that provides more control over the way the program is launched:
>>> os.spawnv(os.P_WAIT, r'C:\Python31\python', ('python', 'makewords.py'))
spam
eggs
ham
0
>>> os.spawnl(os.P_NOWAIT, r'C:\Python31\python', 'python', 'makewords.py')
1820
>>> spam
eggs
ham
The spawn calls are also much like forking programs in Unix. They don’t actually copy
the calling process (so shared descriptor operations won’t work), but they can be used
to start a program running completely independent of the calling program, even on
Windows. The script in Example 5-35 makes the similarity to Unix programming pat-
terns more obvious. It launches a program with a fork/exec combination on Unix-like
platforms (including Cygwin), or an os.spawnv call on Windows.
Example 5-35. PP4E\System\Processes\spawnv.py
"""
start up 10 copies of child.py running in parallel;
use spawnv to launch a program on Windows (like fork+exec);
P_OVERLAY replaces, P_DETACH makes child stdout go nowhere;
or use portable subprocess or multiprocessing options today!
"""
import os, sys
for i in range(10):
if sys.platform[:3] == 'win':
pypath = sys.executable
os.spawnv(os.P_NOWAIT, pypath, ('python', 'child.py', str(i)))
else:
pid = os.fork()
if pid != 0:
print('Process %d spawned' % pid)
else:
os.execlp('python', 'python', 'child.py', str(i))
print('Main process exiting.')
To make sense of these examples, you have to understand the arguments being passed
to the spawn calls. In this script, we call os.spawnv with a process mode flag, the full
directory path to the Python interpreter, and a tuple of strings representing the shell
command line with which to start a new program. The path to the Python interpreter
Other Ways to Start Programs | 259

executable program running a script is available as sys.executable. In general, the
process mode flag is taken from these predefined values:
os.P_NOWAIT and os.P_NOWAITO
The spawn functions will return as soon as the new process has been created, with
the process ID as the return value. Available on Unix and Windows.
os.P_WAIT
The spawn functions will not return until the new process has run to completion
and will return the exit code of the process if the run is successful or “-signal” if a
signal kills the process. Available on Unix and Windows.
os.P_DETACH and os.P_OVERLAY
P_DETACH is similar to P_NOWAIT, but the new process is detached from the console
of the calling process. If P_OVERLAY is used, the current program will be replaced
(much like os.exec). Available on Windows.
In fact, there are eight different calls in the spawn family, which all start a program but
vary slightly in their call signatures. In their names, an “l” means you list arguments
individually, “p” means the executable file is looked up on the system path, and “e”
means a dictionary is passed in to provide the shelled environment of the spawned
program: the os.spawnve call, for example, works the same way as os.spawnv but accepts
an extra fourth dictionary argument to specify a different shell environment for the
spawned program (which, by default, inherits all of the parent’s settings):
os.spawnl(mode, path, ...)
os.spawnle(mode, path, ..., env)
os.spawnlp(mode, file, ...) # Unix only
os.spawnlpe(mode, file, ..., env) # Unix only
os.spawnv(mode, path, args)
os.spawnve(mode, path, args, env)
os.spawnvp(mode, file, args) # Unix only
os.spawnvpe(mode, file, args, env) # Unix only
Because these calls mimic the names and call signatures of the os.exec variants, see
earlier in this chapter for more details on the differences between these call forms.
Unlike the os.exec calls, only half of the os.spawn forms—those without system path
checking (and hence without a “p” in their names)—are currently implemented on
Windows. All the process mode flags are supported on Windows, but detach and
overlay modes are not available on Unix. Because this sort of detail may be prone to
change, to verify which are present, be sure to see the library manual or run a dir built-
in function call on the os module after an import.
Here is the script in Example 5-35 at work on Windows, spawning 10 independent
copies of the child.py Python program we met earlier in this chapter:
C:\...\PP4E\System\Processes> type child.py
import os, sys
print('Hello from child', os.getpid(), sys.argv[1])
C:\...\PP4E\System\Processes> python spawnv.py
260 | Chapter 5: Parallel System Tools

Hello from child −583587 0
Hello from child −558199 2
Hello from child −586755 1
Hello from child −562171 3
Main process exiting.
Hello from child −581867 6
Hello from child −588651 5
Hello from child −568247 4
Hello from child −563527 7
Hello from child −543163 9
Hello from child −587083 8
Notice that the copies print their output in random order, and the parent program exits
before all children do; all of these programs are really running in parallel on Windows.
Also observe that the child program’s output shows up in the console box where
spawnv.py was run; when using P_NOWAIT, standard output comes to the parent’s con-
sole, but it seems to go nowhere when using P_DETACH (which is most likely a feature
when spawning GUI programs).
But having shown you this call, I need to again point out that both the subprocess and
multiprocessing modules offer more portable alternatives for spawning programs with
command lines today. In fact, unless os.spawn calls provide unique behavior you can’t
live without (e.g., control of shell window pop ups on Windows), the platform-specific
alternatives code of Example 5-35 can be replaced altogether with the portable multi
processing code in Example 5-33.
The os.startfile call on Windows
Although os.spawn calls may be largely superfluous today, there are other tools that
can still make a strong case for themselves. For instance, the os.system call can be used
on Windows to launch a DOS start command, which opens (i.e., runs) a file inde-
pendently based on its Windows filename associations, as though it were clicked.
os.startfile makes this even simpler in recent Python releases, and it can avoid block-
ing its caller, unlike some other tools.
Using the DOS start command
To understand why, first you need to know how the DOS start command works in
general. Roughly, a DOS command line of the form start command works as if command
were typed in the Windows Run dialog box available in the Start button menu. If
command is a filename, it is opened exactly as if its name was double-clicked in the
Windows Explorer file selector GUI.
For instance, the following three DOS commands automatically start Internet Explorer,
my registered image viewer program, and my sound media player program on the files
named in the commands. Windows simply opens the file with whatever program is
associated to handle filenames of that form. Moreover, all three of these programs run
independently of the DOS console box where the command is typed:
Other Ways to Start Programs | 261

C:\...\PP4E\System\Media> start lp4e-preface-preview.html
C:\...\PP4E\System\Media> start ora-lp4e.jpg
C:\...\PP4E\System\Media> start sousa.au
Because the start command can run any file and command line, there is no reason it
cannot also be used to start an independently running Python program:
C:\...\PP4E\System\Processes> start child.py 1
This works because Python is registered to open names ending in .py when it is installed.
The script child.py is launched independently of the DOS console window even though
we didn’t provide the name or path of the Python interpreter program. Because
child.py simply prints a message and exits, though, the result isn’t exactly satisfying: a
new DOS window pops up to serve as the script’s standard output, and it immediately
goes away when the child exits. To do better, add an input call at the bottom of the
program file to wait for a key press before exiting:
C:\...\PP4E\System\Processes> type child-wait.py
import os, sys
print('Hello from child', os.getpid(), sys.argv[1])
input("Press <Enter>") # don't flash on Windows
C:\...\PP4E\System\Processes> start child-wait.py 2
Now the child’s DOS window pops up and stays up after the start command has
returned. Pressing the Enter key in the pop-up DOS window makes it go away.
Using start in Python scripts
Since we know that Python’s os.system and os.popen can be called by a script to run
any command line that can be typed at a DOS shell prompt, we can also start inde-
pendently running programs from a Python script by simply running a DOS start
command line. For instance:
C:\...\PP4E\System\Media> python
>>> import os
>>> cmd = 'start lp4e-preface-preview.html' # start IE browser
>>> os.system(cmd) # runs independent
0
The Python os.system calls here start whatever web page browser is registered on your
machine to open .html files (unless these programs are already running). The launched
programs run completely independent of the Python session—when running a DOS
start command, os.system does not wait for the spawned program to exit.
262 | Chapter 5: Parallel System Tools

The os.startfile call
In fact, start is so useful that recent Python releases also include an os.startfile call,
which is essentially the same as spawning a DOS start command with os.system and
works as though the named file were double-clicked. The following calls, for instance,
have a similar effect:
>>> os.startfile('lp-code-readme.txt')
>>> os.system('start lp-code-readme.txt')
Both pop up the text file in Notepad on my Windows computer. Unlike the second of
these calls, though, os.startfile provides no option to wait for the application to close
(the DOS start command’s /WAIT option does) and no way to retrieve the application’s
exit status (returned from os.system).
On recent versions of Windows, the following has a similar effect, too, because the
registry is used at the command line (though this form pauses until the file’s viewer is
closed—like using start /WAIT):
>>> os.system('lp-code-readme.txt') # 'start' is optional today
This is a convenient way to open arbitrary document and media files, but keep in mind
that the os.startfile call works only on Windows, because it uses the Windows reg-
istry to know how to open a file. In fact, there are even more obscure and nonportable
ways to launch programs, including Windows-specific options in the PyWin32 pack-
age, which we’ll finesse here. If you want to be more platform neutral, consider using
one of the other many program launcher tools we’ve seen, such as os.popen or
os.spawnv. Or better yet, write a module to hide the details—as the next and final
section demonstrates.
A Portable Program-Launch Framework
With all of these different ways to start programs on different platforms, it can be
difficult to remember what tools to use in a given situation. Moreover, some of these
tools are called in ways that are complicated and thus easy to forget. Although modules
like subprocess and multiprocessing offer fully portable options today, other tools
sometimes provide more specific behavior that’s better on a given platform; shell win-
dow pop ups on Windows, for example, are often better suppressed.
I write scripts that need to launch Python programs often enough that I eventually wrote
a module to try to hide most of the underlying details. By encapsulating the details in
this module, I’m free to change them to use new tools in the future without breaking
code that relies on them. While I was at it, I made this module smart enough to auto-
matically pick a “best” launch scheme based on the underlying platform. Laziness is
the mother of many a useful module.
A Portable Program-Launch Framework | 263

Example 5-36 collects in a single module many of the techniques we’ve met in this
chapter. It implements an abstract superclass, LaunchMode, which defines what it means
to start a Python program named by a shell command line, but it doesn’t define how.
Instead, its subclasses provide a run method that actually starts a Python program ac-
cording to a given scheme and (optionally) define an announce method to display a
program’s name at startup time.
Example 5-36. PP4E\launchmodes.py
"""
###################################################################################
launch Python programs with command lines and reusable launcher scheme classes;
auto inserts "python" and/or path to Python executable at front of command line;
some of this module may assume 'python' is on your system path (see Launcher.py);
subprocess module would work too, but os.popen() uses it internally, and the goal
is to start a program running independently here, not to connect to its streams;
multiprocessing module also is an option, but this is command-lines, not functions:
doesn't make sense to start a process which would just do one of the options here;
new in this edition: runs script filename path through normpath() to change any
/ to \ for Windows tools where required; fix is inherited by PyEdit and others;
on Windows, / is generally allowed for file opens, but not by all launcher tools;
###################################################################################
"""
import sys, os
pyfile = (sys.platform[:3] == 'win' and 'python.exe') or 'python'
pypath = sys.executable # use sys in newer pys
def fixWindowsPath(cmdline):
"""
change all / to \ in script filename path at front of cmdline;
used only by classes which run tools that require this on Windows;
on other platforms, this does not hurt (e.g., os.system on Unix);
"""
splitline = cmdline.lstrip().split(' ') # split on spaces
fixedpath = os.path.normpath(splitline[0]) # fix forward slashes
return ' '.join([fixedpath] + splitline[1:]) # put it back together
class LaunchMode:
"""
on call to instance, announce label and run command;
subclasses format command lines as required in run();
command should begin with name of the Python script
file to run, and not with "python" or its full path;
"""
def __init__(self, label, command):
self.what = label
self.where = command
def __call__(self): # on call, ex: button press callback
self.announce(self.what)
self.run(self.where) # subclasses must define run()
def announce(self, text): # subclasses may redefine announce()
264 | Chapter 5: Parallel System Tools

print(text) # methods instead of if/elif logic
def run(self, cmdline):
assert False, 'run must be defined'
class System(LaunchMode):
"""
run Python script named in shell command line
caveat: may block caller, unless & added on Unix
"""
def run(self, cmdline):
cmdline = fixWindowsPath(cmdline)
os.system('%s %s' % (pypath, cmdline))
class Popen(LaunchMode):
"""
run shell command line in a new process
caveat: may block caller, since pipe closed too soon
"""
def run(self, cmdline):
cmdline = fixWindowsPath(cmdline)
os.popen(pypath + ' ' + cmdline) # assume nothing to be read
class Fork(LaunchMode):
"""
run command in explicitly created new process
for Unix-like systems only, including cygwin
"""
def run(self, cmdline):
assert hasattr(os, 'fork')
cmdline = cmdline.split() # convert string to list
if os.fork() == 0: # start new child process
os.execvp(pypath, [pyfile] + cmdline) # run new program in child
class Start(LaunchMode):
"""
run command independent of caller
for Windows only: uses filename associations
"""
def run(self, cmdline):
assert sys.platform[:3] == 'win'
cmdline = fixWindowsPath(cmdline)
os.startfile(cmdline)
class StartArgs(LaunchMode):
"""
for Windows only: args may require real start
forward slashes are okay here
"""
def run(self, cmdline):
assert sys.platform[:3] == 'win'
os.system('start ' + cmdline) # may create pop-up window
class Spawn(LaunchMode):
"""
run python in new process independent of caller
A Portable Program-Launch Framework | 265

for Windows or Unix; use P_NOWAIT for dos box;
forward slashes are okay here
"""
def run(self, cmdline):
os.spawnv(os.P_DETACH, pypath, (pyfile, cmdline))
class Top_level(LaunchMode):
"""
run in new window, same process
tbd: requires GUI class info too
"""
def run(self, cmdline):
assert False, 'Sorry - mode not yet implemented'
#
# pick a "best" launcher for this platform
# may need to specialize the choice elsewhere
#
if sys.platform[:3] == 'win':
PortableLauncher = Spawn
else:
PortableLauncher = Fork
class QuietPortableLauncher(PortableLauncher):
def announce(self, text):
pass
def selftest():
file = 'echo.py'
input('default mode...')
launcher = PortableLauncher(file, file)
launcher() # no block
input('system mode...')
System(file, file)() # blocks
if sys.platform[:3] == 'win':
input('DOS start mode...') # no block
StartArgs(file, file)()
if __name__ == '__main__': selftest()
Near the end of the file, the module picks a default class based on the sys.platform
attribute: PortableLauncher is set to a class that uses spawnv on Windows and one that
uses the fork/exec combination elsewhere; in recent Pythons, we could probably just
use the spawnv scheme on most platforms, but the alternatives in this module are used
in additional contexts. If you import this module and always use its Portable
Launcher attribute, you can forget many of the platform-specific details enumerated in
this chapter.
To run a Python program, simply import the PortableLauncher class, make an instance
by passing a label and command line (without a leading “python” word), and then call
266 | Chapter 5: Parallel System Tools

the instance object as though it were a function. The program is started by a call op-
eration—by its __call__ operator-overloading method, instead of a normally named
method—so that the classes in this module can also be used to generate callback han-
dlers in tkinter-based GUIs. As we’ll see in the upcoming chapters, button-presses in
tkinter invoke a callable object with no arguments; by registering a PortableLauncher
instance to handle the press event, we can automatically start a new program from
another program’s GUI. A GUI might associate a launcher with a GUI’s button press
with code like this:
Button(root, text=name, command=PortableLauncher(name, commandLine))
When run standalone, this module’s selftest function is invoked as usual. As coded,
System blocks the caller until the program exits, but PortableLauncher (really, Spawn or
Fork) and Start do not:
C:\...\PP4E> type echo.py
print('Spam')
input('press Enter')
C:\...\PP4E> python launchmodes.py
default mode...
echo.py
system mode...
echo.py
Spam
press Enter
DOS start mode...
echo.py
As more practical applications, this file is also used in Chapter 8 to launch GUI dialog
demos independently, and again in a number of Chapter 10’s examples, including
PyDemos and PyGadgets—launcher scripts designed to run major examples in this
book in a portable fashion, which live at the top of this book’s examples distribution
directory. Because these launcher scripts simply import PortableLauncher and register
instances to respond to GUI events, they run on both Windows and Unix unchanged
(tkinter’s portability helps, too, of course). The PyGadgets script even customizes
PortableLauncher to update a GUI label at start time:
class Launcher(launchmodes.PortableLauncher): # use wrapped launcher class
def announce(self, text): # customize to set GUI label
Info.config(text=text)
We’ll explore these two client scripts, and others, such as Chapter 11’s PyEdit after we
start coding GUIs in Part III. Partly because of its role in PyEdit, this edition extends
this module to automatically replace forward slashes with backward slashes in the
script’s file path name. PyEdit uses forward slashes in some filenames because they are
allowed in file opens on Windows, but some Windows launcher tools require the
backslash form instead. Specifically, system, popen, and startfile in os require back-
slashes, but spawnv does not. PyEdit and others inherit the new pathname fix of
fixWindowsPath here simply by importing and using this module’s classes; PyEdit
A Portable Program-Launch Framework | 267

eventually changed so as to make this fix irrelevant for its own use case (see Chap-
ter 11), but other clients still acquire the fix for free.
Also notice how some of the classes in this example use the sys.executable path string
to obtain the Python executable’s full path name. This is partly due to their role in user-
friendly demo launchers. In prior versions that predated sys.executable, these classes
instead called two functions exported by a module named Launcher.py to find a suitable
Python executable, regardless of whether the user had added its directory to the system
PATH variable’s setting.
This search is no longer required. Since I’ll describe this module’s other roles in the
next chapter, and since this search has been largely precluded by Python’s perpetual
pandering to programmers’ professional proclivities, I’ll postpone any pointless peda-
gogical presentation here. (Period.)
Other System Tools Coverage
That concludes our tour of Python system tools. In this and the prior three chapters,
we’ve met most of the commonly used system tools in the Python library. Along the
way, we’ve also learned how to use them to do useful things such as start programs,
process directories, and so on. The next chapter wraps up this domain by using the
tools we’ve just met to implement scripts that do useful and more realistic system-level
work.
Still other system-related tools in Python appear later in this text. For instance:
• Sockets, used to communicate with other programs and networks and introduced
briefly here, show up again in Chapter 10 in a common GUI use case and are
covered in full in Chapter 12.
• Select calls, used to multiplex among tasks, are also introduced in Chapter 12 as a
way to implement servers.
• File locking with os.open, introduced in Chapter 4, is discussed again in conjunc-
tion with later examples.
• Regular expressions, string pattern matching used by many text processing tools
in the system administration domain, don’t appear until Chapter 19.
Moreover, things like forks and threads are used extensively in the Internet scripting
chapters: see the discussion of threaded GUIs in Chapters 9 and 10; the server imple-
mentations in Chapter 12; the FTP client GUI in Chapter 13; and the PyMailGUI pro-
gram in Chapter 14. Along the way, we’ll also meet higher-level Python modules, such
as socketserver, which implement fork and thread-based socket server code for us. In
fact, many of the last four chapters’ tools will pop up constantly in later examples in
this book—about what one would expect of general-purpose portable libraries.
268 | Chapter 5: Parallel System Tools

Last, but not necessarily least, I’d like to point out one more time that many additional
tools in the Python library don’t appear in this book at all. With hundreds of library
modules, more appearing all the time, and even more in the third-party domain, Python
book authors have to pick and choose their topics frugally! As always, be sure to browse
the Python library manuals and Web early and often in your Python career.
Other System Tools Coverage | 269

CHAPTER 6
Complete System Programs
“The Greps of Wrath”
This chapter wraps up our look at the system interfaces domain in Python by presenting
a collection of larger Python scripts that do real systems work—comparing and copying
directory trees, splitting files, searching files and directories, testing other programs,
configuring launched programs’ shell environments, and so on. The examples here are
Python system utility programs that illustrate typical tasks and techniques in this do-
main and focus on applying built-in tools, such as file and directory tree processing.
Although the main point of this case-study chapter is to give you a feel for realistic
scripts in action, the size of these examples also gives us an opportunity to see Python’s
support for development paradigms like object-oriented programming (OOP) and re-
use at work. It’s really only in the context of nontrivial programs such as the ones we’ll
meet here that such tools begin to bear tangible fruit. This chapter also emphasizes the
“why” of system tools, not just the “how”; along the way, I’ll point out real-world needs
met by the examples we’ll study, to help you put the details in context.
One note up front: this chapter moves quickly, and a few of its examples are largely
listed just for independent study. Because all the scripts here are heavily documented
and use Python system tools described in the preceding chapters, I won’t go through
all the code in exhaustive detail. You should read the source code listings and experi-
ment with these programs on your own computer to get a better feel for how to combine
system interfaces to accomplish realistic tasks. All are available in source code form in
the book’s examples distribution and most work on all major platforms.
I should also mention that most of these are programs I have really used, not examples
written just for this book. They were coded over a period of years and perform widely
differing tasks, so there is no obvious common thread to connect the dots here other
than need. On the other hand, they help explain why system tools are useful in the first
place, demonstrate larger development concepts that simpler examples cannot, and
bear collective witness to the simplicity and portability of automating system tasks with
Python. Once you’ve mastered the basics, you’ll wish you had done so sooner.
271

A Quick Game of “Find the Biggest Python File”
Quick: what’s the biggest Python source file on your computer? This was the query
innocently posed by a student in one of my Python classes. Because I didn’t know either,
it became an official exercise in subsequent classes, and it provides a good example of
ways to apply Python system tools for a realistic purpose in this book. Really, the query
is a bit vague, because its scope is unclear. Do we mean the largest Python file in a
directory, in a full directory tree, in the standard library, on the module import search
path, or on your entire hard drive? Different scopes imply different solutions.
Scanning the Standard Library Directory
For instance, Example 6-1 is a first-cut solution that looks for the biggest Python file
in one directory—a limited scope, but enough to get started.
Example 6-1. PP4E\System\Filetools\bigpy-dir.py
"""
Find the largest Python source file in a single directory.
Search Windows Python source lib, unless dir command-line arg.
"""
import os, glob, sys
dirname = r'C:\Python31\Lib' if len(sys.argv) == 1 else sys.argv[1]
allsizes = []
allpy = glob.glob(dirname + os.sep + '*.py')
for filename in allpy:
filesize = os.path.getsize(filename)
allsizes.append((filesize, filename))
allsizes.sort()
print(allsizes[:2])
print(allsizes[-2:])
This script uses the glob module to run through a directory’s files and detects the largest
by storing sizes and names on a list that is sorted at the end—because size appears first
in the list’s tuples, it will dominate the ascending value sort, and the largest percolates
to the end of the list. We could instead keep track of the currently largest as we go, but
the list scheme is more flexible. When run, this script scans the Python standard li-
brary’s source directory on Windows, unless you pass a different directory on the com-
mand line, and it prints both the two smallest and largest files it finds:
C:\...\PP4E\System\Filetools> bigpy-dir.py
[(0, 'C:\\Python31\\Lib\\build_class.py'), (56, 'C:\\Python31\\Lib\\struct.py')]
[(147086, 'C:\\Python31\\Lib\\turtle.py'), (211238, 'C:\\Python31\\Lib\\decimal.
py')]
C:\...\PP4E\System\Filetools> bigpy-dir.py .
[(21, '.\\__init__.py'), (461, '.\\bigpy-dir.py')]
272 | Chapter 6: Complete System Programs

[(1940, '.\\bigext-tree.py'), (2547, '.\\split.py')]
C:\...\PP4E\System\Filetools> bigpy-dir.py ..
[(21, '..\\__init__.py'), (29, '..\\testargv.py')]
[(541, '..\\testargv2.py'), (549, '..\\more.py')]
Scanning the Standard Library Tree
The prior section’s solution works, but it’s obviously a partial answer—Python files
are usually located in more than one directory. Even within the standard library, there
are many subdirectories for module packages, and they may be arbitrarily nested. We
really need to traverse an entire directory tree. Moreover, the first output above is dif-
ficult to read; Python’s pprint (for “pretty print”) module can help here. Exam-
ple 6-2 puts these extensions into code.
Example 6-2. PP4E\System\Filetools\bigpy-tree.py
"""
Find the largest Python source file in an entire directory tree.
Search the Python source lib, use pprint to display results nicely.
"""
import sys, os, pprint
trace = False
if sys.platform.startswith('win'):
dirname = r'C:\Python31\Lib' # Windows
else:
dirname = '/usr/lib/python' # Unix, Linux, Cygwin
allsizes = []
for (thisDir, subsHere, filesHere) in os.walk(dirname):
if trace: print(thisDir)
for filename in filesHere:
if filename.endswith('.py'):
if trace: print('...', filename)
fullname = os.path.join(thisDir, filename)
fullsize = os.path.getsize(fullname)
allsizes.append((fullsize, fullname))
allsizes.sort()
pprint.pprint(allsizes[:2])
pprint.pprint(allsizes[-2:])
When run, this new version uses os.walk to search an entire tree of directories for the
largest Python source file. Change this script’s trace variable if you want to track its
progress through the tree. As coded, it searches the Python standard library’s source
tree, tailored for Windows and Unix-like locations:
C:\...\PP4E\System\Filetools> bigpy-tree.py
[(0, 'C:\\Python31\\Lib\\build_class.py'),
(0, 'C:\\Python31\\Lib\\email\\mime\\__init__.py')]
[(211238, 'C:\\Python31\\Lib\\decimal.py'),
(380582, 'C:\\Python31\\Lib\\pydoc_data\\topics.py')]
A Quick Game of “Find the Biggest Python File” | 273

Scanning the Module Search Path
Sure enough—the prior section’s script found smallest and largest files in subdirecto-
ries. While searching Python’s entire standard library tree this way is more inclusive,
it’s still incomplete: there may be additional modules installed elsewhere on your com-
puter, which are accessible from the module import search path but outside Python’s
source tree. To be more exhaustive, we could instead essentially perform the same tree
search, but for every directory on the module import search path. Example 6-3 adds
this extension to include every importable Python-coded module on your computer—
located both on the path directly and nested in package directory trees.
Example 6-3. PP4E\System\Filetools\bigpy-path.py
"""
Find the largest Python source file on the module import search path.
Skip already-visited directories, normalize path and case so they will
match properly, and include line counts in pprinted result. It's not
enough to use os.environ['PYTHONPATH']: this is a subset of sys.path.
"""
import sys, os, pprint
trace = 0 # 1=dirs, 2=+files
visited = {}
allsizes = []
for srcdir in sys.path:
for (thisDir, subsHere, filesHere) in os.walk(srcdir):
if trace > 0: print(thisDir)
thisDir = os.path.normpath(thisDir)
fixcase = os.path.normcase(thisDir)
if fixcase in visited:
continue
else:
visited[fixcase] = True
for filename in filesHere:
if filename.endswith('.py'):
if trace > 1: print('...', filename)
pypath = os.path.join(thisDir, filename)
try:
pysize = os.path.getsize(pypath)
except os.error:
print('skipping', pypath, sys.exc_info()[0])
else:
pylines = len(open(pypath, 'rb').readlines())
allsizes.append((pysize, pylines, pypath))
print('By size...')
allsizes.sort()
pprint.pprint(allsizes[:3])
pprint.pprint(allsizes[-3:])
print('By lines...')
allsizes.sort(key=lambda x: x[1])
274 | Chapter 6: Complete System Programs

pprint.pprint(allsizes[:3])
pprint.pprint(allsizes[-3:])
When run, this script marches down the module import path and, for each valid di-
rectory it contains, attempts to search the entire tree rooted there. In fact, it nests loops
three deep—for items on the path, directories in the item’s tree, and files in the direc-
tory. Because the module path may contain directories named in arbitrary ways, along
the way this script must take care to:
• Normalize directory paths—fixing up slashes and dots to map directories to a
common form.
• Normalize directory name case—converting to lowercase on case-insensitive Win-
dows, so that same names match by string equality, but leaving case unchanged
on Unix, where it matters.
• Detect repeats to avoid visiting the same directory twice (the same directory might
be reached from more than one entry on sys.path).
• Skip any file-like item in the tree for which os.path.getsize fails (by default
os.walk itself silently ignores things it cannot treat as directories, both at the top
of and within the tree).
• Avoid potential Unicode decoding errors in file content by opening files in binary
mode in order to count their lines. Text mode requires decodable content, and
some files in Python 3.1’s library tree cannot be decoded properly on Windows.
Catching Unicode exceptions with a try statement would avoid program exits, too,
but might skip candidate files.
This version also adds line counts; this might add significant run time to this script too,
but it’s a useful metric to report. In fact, this version uses this value as a sort key to
report the three largest and smallest files by line counts too—this may differ from results
based upon raw file size. Here’s the script in action in Python 3.1 on my Windows 7
machine; since these results depend on platform, installed extensions, and path set-
tings, your sys.path and largest and smallest files may vary:
C:\...\PP4E\System\Filetools> bigpy-path.py
By size...
[(0, 0, 'C:\\Python31\\lib\\build_class.py'),
(0, 0, 'C:\\Python31\\lib\\email\\mime\\__init__.py'),
(0, 0, 'C:\\Python31\\lib\\email\\test\\__init__.py')]
[(161613, 3754, 'C:\\Python31\\lib\\tkinter\\__init__.py'),
(211238, 5768, 'C:\\Python31\\lib\\decimal.py'),
(380582, 78, 'C:\\Python31\\lib\\pydoc_data\\topics.py')]
By lines...
[(0, 0, 'C:\\Python31\\lib\\build_class.py'),
(0, 0, 'C:\\Python31\\lib\\email\\mime\\__init__.py'),
(0, 0, 'C:\\Python31\\lib\\email\\test\\__init__.py')]
[(147086, 4132, 'C:\\Python31\\lib\\turtle.py'),
(150069, 4268, 'C:\\Python31\\lib\\test\\test_descr.py'),
(211238, 5768, 'C:\\Python31\\lib\\decimal.py')]
A Quick Game of “Find the Biggest Python File” | 275

Again, change this script’s trace variable if you want to track its progress through the
tree. As you can see, the results for largest files differ when viewed by size and lines—
a disparity which we’ll probably have to hash out in our next requirements meeting.
Scanning the Entire Machine
Finally, although searching trees rooted in the module import path normally includes
every Python source file you can import on your computer, it’s still not complete.
Technically, this approach checks only modules; Python source files which are top-
level scripts run directly do not need to be included in the module path. Moreover, the
module search path may be manually changed by some scripts dynamically at runtime
(for example, by direct sys.path updates in scripts that run on web servers) to include
additional directories that Example 6-3 won’t catch.
Ultimately, finding the largest source file on your computer requires searching your
entire drive—a feat which our tree searcher in Example 6-2 almost supports, if we
generalize it to accept the root directory name as an argument and add some of the bells
and whistles of the path searcher version (we really want to avoid visiting the same
directory twice if we’re scanning an entire machine, and we might as well skip errors
and check line-based sizes if we’re investing the time). Example 6-4 implements such
general tree scans, outfitted for the heavier lifting required for scanning drives.
Example 6-4. PP4E\System\Filetools\bigext-tree.py
"""
Find the largest file of a given type in an arbitrary directory tree.
Avoid repeat paths, catch errors, add tracing and line count size.
Also uses sets, file iterators and generator to avoid loading entire
file, and attempts to work around undecodable dir/file name prints.
"""
import os, pprint
from sys import argv, exc_info
trace = 1 # 0=off, 1=dirs, 2=+files
dirname, extname = os.curdir, '.py' # default is .py files in cwd
if len(argv) > 1: dirname = argv[1] # ex: C:\, C:\Python31\Lib
if len(argv) > 2: extname = argv[2] # ex: .pyw, .txt
if len(argv) > 3: trace = int(argv[3]) # ex: ". .py 2"
def tryprint(arg):
try:
print(arg) # unprintable filename?
except UnicodeEncodeError:
print(arg.encode()) # try raw byte string
visited = set()
allsizes = []
for (thisDir, subsHere, filesHere) in os.walk(dirname):
if trace: tryprint(thisDir)
thisDir = os.path.normpath(thisDir)
276 | Chapter 6: Complete System Programs

fixname = os.path.normcase(thisDir)
if fixname in visited:
if trace: tryprint('skipping ' + thisDir)
else:
visited.add(fixname)
for filename in filesHere:
if filename.endswith(extname):
if trace > 1: tryprint('+++' + filename)
fullname = os.path.join(thisDir, filename)
try:
bytesize = os.path.getsize(fullname)
linesize = sum(+1 for line in open(fullname, 'rb'))
except Exception:
print('error', exc_info()[0])
else:
allsizes.append((bytesize, linesize, fullname))
for (title, key) in [('bytes', 0), ('lines', 1)]:
print('\nBy %s...' % title)
allsizes.sort(key=lambda x: x[key])
pprint.pprint(allsizes[:3])
pprint.pprint(allsizes[-3:])
Unlike the prior tree version, this one allows us to search in specific directories, and
for specific extensions. The default is to simply search the current working directory
for Python files:
C:\...\PP4E\System\Filetools> bigext-tree.py
.
By bytes...
[(21, 1, '.\\__init__.py'),
(461, 17, '.\\bigpy-dir.py'),
(818, 25, '.\\bigpy-tree.py')]
[(1696, 48, '.\\join.py'),
(1940, 49, '.\\bigext-tree.py'),
(2547, 57, '.\\split.py')]
By lines...
[(21, 1, '.\\__init__.py'),
(461, 17, '.\\bigpy-dir.py'),
(818, 25, '.\\bigpy-tree.py')]
[(1696, 48, '.\\join.py'),
(1940, 49, '.\\bigext-tree.py'),
(2547, 57, '.\\split.py')]
For more custom work, we can pass in a directory name, extension type, and trace level
on the command-line now (trace level 0 disables tracing, and 1, the default, shows
directories visited along the way):
C:\...\PP4E\System\Filetools> bigext-tree.py .. .py 0
By bytes...
[(21, 1, '..\\__init__.py'),
(21, 1, '..\\Filetools\\__init__.py'),
A Quick Game of “Find the Biggest Python File” | 277

(28, 1, '..\\Streams\\hello-out.py')]
[(2278, 67, '..\\Processes\\multi2.py'),
(2547, 57, '..\\Filetools\\split.py'),
(4361, 105, '..\\Tester\\tester.py')]
By lines...
[(21, 1, '..\\__init__.py'),
(21, 1, '..\\Filetools\\__init__.py'),
(28, 1, '..\\Streams\\hello-out.py')]
[(2547, 57, '..\\Filetools\\split.py'),
(2278, 67, '..\\Processes\\multi2.py'),
(4361, 105, '..\\Tester\\tester.py')]
This script also lets us scan for different file types; here it is picking out the smallest
and largest text file from one level up (at the time I ran this script, at least):
C:\...\PP4E\System\Filetools> bigext-tree.py .. .txt 1
..
..\Environment
..\Filetools
..\Processes
..\Streams
..\Tester
..\Tester\Args
..\Tester\Errors
..\Tester\Inputs
..\Tester\Outputs
..\Tester\Scripts
..\Tester\xxold
..\Threads
By bytes...
[(4, 2, '..\\Streams\\input.txt'),
(13, 1, '..\\Streams\\hello-in.txt'),
(20, 4, '..\\Streams\\data.txt')]
[(104, 4, '..\\Streams\\output.txt'),
(172, 3, '..\\Tester\\xxold\\README.txt.txt'),
(435, 4, '..\\Filetools\\temp.txt')]
By lines...
[(13, 1, '..\\Streams\\hello-in.txt'),
(22, 1, '..\\spam.txt'),
(4, 2, '..\\Streams\\input.txt')]
[(20, 4, '..\\Streams\\data.txt'),
(104, 4, '..\\Streams\\output.txt'),
(435, 4, '..\\Filetools\\temp.txt')]
And now, to search your entire system, simply pass in your machine’s root directory
name (use / instead of C:\ on Unix-like machines), along with an optional file extension
type (.py is just the default now). The winner is…(please, no wagering):
C:\...\PP4E\dev\Examples\PP4E\System\Filetools> bigext-tree.py C:\
C:\
C:\$Recycle.Bin
C:\$Recycle.Bin\S-1-5-21-3951091421-2436271001-910485044-1004
C:\cygwin
278 | Chapter 6: Complete System Programs

C:\cygwin\bin
C:\cygwin\cygdrive
C:\cygwin\dev
C:\cygwin\dev\mqueue
C:\cygwin\dev\shm
C:\cygwin\etc
...MANY more lines omitted...
By bytes...
[(0, 0, 'C:\\cygwin\\...\\python31\\Python-3.1.1\\Lib\\build_class.py'),
(0, 0, 'C:\\cygwin\\...\\python31\\Python-3.1.1\\Lib\\email\\mime\\__init__.py'),
(0, 0, 'C:\\cygwin\\...\\python31\\Python-3.1.1\\Lib\\email\\test\\__init__.py')]
[(380582, 78, 'C:\\Python31\\Lib\\pydoc_data\\topics.py'),
(398157, 83, 'C:\\...\\Install\\Source\\Python-2.6\\Lib\\pydoc_topics.py'),
(412434, 83, 'C:\\Python26\\Lib\\pydoc_topics.py')]
By lines...
[(0, 0, 'C:\\cygwin\\...\\python31\\Python-3.1.1\\Lib\\build_class.py'),
(0, 0, 'C:\\cygwin\\...\\python31\\Python-3.1.1\\Lib\\email\\mime\\__init__.py'),
(0, 0, 'C:\\cygwin\\...\\python31\\Python-3.1.1\\Lib\\email\\test\\__init__.py')]
[(204107, 5589, 'C:\\...\Install\\Source\\Python-3.0\\Lib\\decimal.py'),
(205470, 5768, 'C:\\cygwin\\...\\python31\\Python-3.1.1\\Lib\\decimal.py'),
(211238, 5768, 'C:\\Python31\\Lib\\decimal.py')]
The script’s trace logic is preset to allow you to monitor its directory progress. I’ve
shortened some directory names to protect the innocent here (and to fit on this page).
This command may take a long time to finish on your computer—on my sadly under-
powered Windows 7 netbook, it took 11 minutes to scan a solid state drive with some
59G of data, 200K files, and 25K directories when the system was lightly loaded (8
minutes when not tracing directory names, but half an hour when many other appli-
cations were running). Nevertheless, it provides the most exhaustive solution to the
original query of all our attempts.
This is also as complete a solution as we have space for in this book. For more fun,
consider that you may need to scan more than one drive, and some Python source files
may also appear in zip archives, both on the module path or not (os.walk silently ignores
zip files in Example 6-3). They might also be named in other ways—with .pyw exten-
sions to suppress shell pop ups on Windows, and with arbitrary extensions for some
top-level scripts. In fact, top-level scripts might have no filename extension at all, even
though they are Python source files. And while they’re generally not Python files, some
importable modules may also appear in frozen binaries or be statically linked into the
Python executable. In the interest of space, we’ll leave such higher resolution (and
potentially intractable!) search extensions as suggested exercises.
Printing Unicode Filenames
One fine point before we move on: notice the seemingly superfluous exception handling
in Example 6-4’s tryprint function. When I first tried to scan an entire drive as shown
in the preceding section, this script died on a Unicode encoding error while trying to
A Quick Game of “Find the Biggest Python File” | 279

print a directory name of a saved web page. Adding the exception handler skips the
error entirely.
This demonstrates a subtle but pragmatically important issue: Python 3.X’s Unicode
orientation extends to filenames, even if they are just printed. As we learned in Chap-
ter 4, because filenames may contain arbitrary text, os.listdir returns filenames in two
different ways—we get back decoded Unicode strings when we pass in a normal str
argument, and still-encoded byte strings when we send a bytes:
>>> import os
>>> os.listdir('.')[:4]
['bigext-tree.py', 'bigpy-dir.py', 'bigpy-path.py', 'bigpy-tree.py']
>>> os.listdir(b'.')[:4]
[b'bigext-tree.py', b'bigpy-dir.py', b'bigpy-path.py', b'bigpy-tree.py']
Both os.walk (used in the Example 6-4 script) and glob.glob inherit this behavior for
the directory and file names they return, because they work by calling os.listdir in-
ternally at each directory level. For all these calls, passing in a byte string argument
suppresses Unicode decoding of file and directory names. Passing a normal string as-
sumes that filenames are decodable per the file system’s Unicode scheme.
The reason this potentially mattered to this section’s example is that running the tree
search version over an entire hard drive eventually reached an undecodable filename
(an old saved web page with an odd name), which generated an exception when the
print function tried to display it. Here’s a simplified recreation of the error, run in a
shell window (Command Prompt) on Windows:
>>> root = r'C:\py3000'
>>> for (dir, subs, files) in os.walk(root): print(dir)
...
C:\py3000
C:\py3000\FutureProofPython - PythonInfo Wiki_files
C:\py3000\Oakwinter_com Code » Porting setuptools to py3k_files
Traceback (most recent call last):
File "<stdin>", line 1, in <module>
File "C:\Python31\lib\encodings\cp437.py", line 19, in encode
return codecs.charmap_encode(input,self.errors,encoding_map)[0]
UnicodeEncodeError: 'charmap' codec can't encode character '\u2019' in position
45: character maps to <undefined>
One way out of this dilemma is to use bytes strings for the directory root name—this
suppresses filename decoding in the os.listdir calls run by os.walk, and effectively
limits the scope of later printing to raw bytes. Since printing does not have to deal with
encodings, it works without error. Manually encoding to bytes prior to printing works
too, but the results are slightly different:
>>> root.encode()
b'C:\\py3000'
>>> for (dir, subs, files) in os.walk(root.encode()): print(dir)
...
280 | Chapter 6: Complete System Programs

b'C:\\py3000'
b'C:\\py3000\\FutureProofPython - PythonInfo Wiki_files'
b'C:\\py3000\\Oakwinter_com Code \xbb Porting setuptools to py3k_files'
b'C:\\py3000\\What\x92s New in Python 3_0 \x97 Python Documentation'
>>> for (dir, subs, files) in os.walk(root): print(dir.encode())
...
b'C:\\py3000'
b'C:\\py3000\\FutureProofPython - PythonInfo Wiki_files'
b'C:\\py3000\\Oakwinter_com Code \xc2\xbb Porting setuptools to py3k_files'
b'C:\\py3000\\What\xe2\x80\x99s New in Python 3_0 \xe2\x80\x94 Python Documentation'
Unfortunately, either approach means that all the directory names printed during the
walk display as cryptic byte strings. To maintain the better readability of normal strings,
I instead opted for the exception handler approach used in the script’s code. This avoids
the issues entirely:
>>> for (dir, subs, files) in os.walk(root):
... try:
... print(dir)
... except UnicodeEncodeError:
... print(dir.encode()) # or simply punt if enocde may fail too
...
C:\py3000
C:\py3000\FutureProofPython - PythonInfo Wiki_files
C:\py3000\Oakwinter_com Code » Porting setuptools to py3k_files
b'C:\\py3000\\What\xe2\x80\x99s New in Python 3_0 \xe2\x80\x94 Python Documentation'
Oddly, though, the error seems more related to printing than to Unicode encodings of
filenames—because the filename did not fail until printed, it must have been decodable
when its string was created initially. That’s why wrapping up the print in a try suffices;
otherwise, the error would occur earlier.
Moreover, this error does not occur if the script’s output is redirected to a file, either
at the shell level (bigext-tree.py c:\ > out), or by the print call itself (print(dir,
file=F)). In the latter case the output file must later be read back in binary mode, as
text mode triggers the same error when printing the file’s content to the shell window
(but again, not until printed). In fact, the exact same code that fails when run in a system
shell Command Prompt on Windows works without error when run in the IDLE GUI
on the same platform—the tkinter GUI used by IDLE handles display of characters that
printing to standard output connected to a shell terminal window does not:
>>> import os # run in IDLE (a tkinter GUI), not system shell
>>> root = r'C:\py3000'
>>> for (dir, subs, files) in os.walk(root): print(dir)
C:\py3000
C:\py3000\FutureProofPython - PythonInfo Wiki_files
C:\py3000\Oakwinter_com Code » Porting setuptools to py3k_files
C:\py3000\What's New in Python 3_0 — Python Documentation_files
In other words, the exception occurs only when printing to a shell window, and long
after the file name string is created. This reflects an artifact of extra translations
A Quick Game of “Find the Biggest Python File” | 281

performed by the Python printer, not of Unicode file names in general. Because we have
no room for further exploration here, though, we’ll have to be satisfied with the fact
that our exception handler sidesteps the printing problem altogether. You should still
be aware of the implications of Unicode filename decoding, though; on some platforms
you may need to pass byte strings to os.walk in this script to prevent decoding errors
as filenames are created.*
Since Unicode is still relatively new in 3.1, be sure to test for such errors on your com-
puter and your Python. Also see also Python’s manuals for more on the treatment of
Unicode filenames, and the text Learning Python for more on Unicode in general. As
noted earlier, our scripts also had to open text files in binary mode because some might
contain undecodable content too. It might seem surprising that Unicode issues can crop
up in basic printing like this too, but such is life in the brave new Unicode world. Many
real-world scripts don’t need to care much about Unicode, of course—including those
we’ll explore in the next section.
Splitting and Joining Files
Like most kids, mine spent a lot of time on the Internet when they were growing up.
As far as I could tell, it was the thing to do. Among their generation, computer geeks
and gurus seem to have been held in the same sort of esteem that my generation once
held rock stars. When kids disappeared into their rooms, chances were good that they
were hacking on computers, not mastering guitar riffs (well, real ones, at least). It may
or may not be healthier than some of the diversions of my own misspent youth, but
that’s a topic for another kind of book.
Despite the rhetoric of techno-pundits about the Web’s potential to empower an up-
coming generation in ways unimaginable by their predecessors, my kids seemed to
spend most of their time playing games. To fetch new ones in my house at the time,
they had to download to a shared computer which had Internet access and transfer
those games to their own computers to install. (Their own machines did not have
Internet access until later, for reasons that most parents in the crowd could probably
expand upon.)
The problem with this scheme is that game files are not small. They were usually much
too big to fit on a floppy or memory stick of the time, and burning a CD or DVD took
away valuable game-playing time. If all the machines in my house ran Linux, this would
have been a nonissue. There are standard command-line programs on Unix for chop-
ping a file into pieces small enough to fit on a transfer device (split), and others for
* For a related print issue, see Chapter 14’s workaround for program aborts when printing stack tracebacks
to standard output from spawned programs. Unlike the problem described here, that issue does not appear
to be related to Unicode characters that may be unprintable in shell windows but reflects another regression
for standard output prints in general in Python 3.1, which may or may not be repaired by the time you read
this text. See also the Python environment variable PYTHONIOENCODING, which can override the default
encoding used for standard streams.
282 | Chapter 6: Complete System Programs

putting the pieces back together to re-create the original file (cat). Because we had all
sorts of different machines in the house, though, we needed a more portable solution.†
Splitting Files Portably
Since all the computers in my house ran Python, a simple portable Python script came
to the rescue. The Python program in Example 6-5 distributes a single file’s contents
among a set of part files and stores those part files in a directory.
Example 6-5. PP4E\System\Filetools\split.py
#!/usr/bin/python
"""
################################################################################
split a file into a set of parts; join.py puts them back together;
this is a customizable version of the standard Unix split command-line
utility; because it is written in Python, it also works on Windows and
can be easily modified; because it exports a function, its logic can
also be imported and reused in other applications;
################################################################################
"""
import sys, os
kilobytes = 1024
megabytes = kilobytes * 1000
chunksize = int(1.4 * megabytes) # default: roughly a floppy
def split(fromfile, todir, chunksize=chunksize):
if not os.path.exists(todir): # caller handles errors
os.mkdir(todir) # make dir, read/write parts
else:
for fname in os.listdir(todir): # delete any existing files
os.remove(os.path.join(todir, fname))
partnum = 0
input = open(fromfile, 'rb') # binary: no decode, endline
while True: # eof=empty string from read
chunk = input.read(chunksize) # get next part <= chunksize
if not chunk: break
partnum += 1
filename = os.path.join(todir, ('part%04d' % partnum))
fileobj = open(filename, 'wb')
fileobj.write(chunk)
fileobj.close() # or simply open().write()
input.close()
assert partnum <= 9999 # join sort fails if 5 digits
return partnum
† I should note that this background story stems from the second edition of this book, written in 2000. Some
ten years later, floppies have largely gone the way of the parallel port and the dinosaur. Moreover, burning
a CD or DVD is no longer as painful as it once was; there are new options today such as large flash memory
cards, wireless home networks, and simple email; and naturally, my home computers configuration isn’t
what it once was. For that matter, some of my kids are no longer kids (though they’ve retained some backward
compatibility with their former selves).
Splitting and Joining Files | 283

if __name__ == '__main__':
if len(sys.argv) == 2 and sys.argv[1] == '-help':
print('Use: split.py [file-to-split target-dir [chunksize]]')
else:
if len(sys.argv) < 3:
interactive = True
fromfile = input('File to be split? ') # input if clicked
todir = input('Directory to store part files? ')
else:
interactive = False
fromfile, todir = sys.argv[1:3] # args in cmdline
if len(sys.argv) == 4: chunksize = int(sys.argv[3])
absfrom, absto = map(os.path.abspath, [fromfile, todir])
print('Splitting', absfrom, 'to', absto, 'by', chunksize)
try:
parts = split(fromfile, todir, chunksize)
except:
print('Error during split:')
print(sys.exc_info()[0], sys.exc_info()[1])
else:
print('Split finished:', parts, 'parts are in', absto)
if interactive: input('Press Enter key') # pause if clicked
By default, this script splits the input file into chunks that are roughly the size of a
floppy disk—perfect for moving big files between the electronically isolated machines
of the time. Most importantly, because this is all portable Python code, this script will
run on just about any machine, even ones without their own file splitter. All it requires
is an installed Python. Here it is at work splitting a Python 3.1 self-installer executable
located in the current working directory on Windows (I’ve omitted a few dir output
lines to save space here; use ls -l on Unix):
C:\temp> cd C:\temp
C:\temp> dir python-3.1.msi
...more...
06/27/2009 04:53 PM 13,814,272 python-3.1.msi
1 File(s) 13,814,272 bytes
0 Dir(s) 188,826,189,824 bytes free
C:\temp> python C:\...\PP4E\System\Filetools\split.py -help
Use: split.py [file-to-split target-dir [chunksize]]
C:\temp> python C:\...\P4E\System\Filetools\split.py python-3.1.msi pysplit
Splitting C:\temp\python-3.1.msi to C:\temp\pysplit by 1433600
Split finished: 10 parts are in C:\temp\pysplit
C:\temp> dir pysplit
...more...
02/21/2010 11:13 AM <DIR> .
02/21/2010 11:13 AM <DIR> ..
02/21/2010 11:13 AM 1,433,600 part0001
02/21/2010 11:13 AM 1,433,600 part0002
284 | Chapter 6: Complete System Programs

02/21/2010 11:13 AM 1,433,600 part0003
02/21/2010 11:13 AM 1,433,600 part0004
02/21/2010 11:13 AM 1,433,600 part0005
02/21/2010 11:13 AM 1,433,600 part0006
02/21/2010 11:13 AM 1,433,600 part0007
02/21/2010 11:13 AM 1,433,600 part0008
02/21/2010 11:13 AM 1,433,600 part0009
02/21/2010 11:13 AM 911,872 part0010
10 File(s) 13,814,272 bytes
2 Dir(s) 188,812,328,960 bytes free
Each of these generated part files represents one binary chunk of the file
python-3.1.msi—a chunk small enough to fit comfortably on a floppy disk of the time.
In fact, if you add the sizes of the generated part files given by the ls command, you’ll
come up with exactly the same number of bytes as the original file’s size. Before we see
how to put these files back together again, here are a few points to ponder as you study
this script’s code:
Operation modes
This script is designed to input its parameters in either interactive or command-
line mode; it checks the number of command-line arguments to find out the mode
in which it is being used. In command-line mode, you list the file to be split and
the output directory on the command line, and you can optionally override the
default part file size with a third command-line argument.
In interactive mode, the script asks for a filename and output directory at the con-
sole window with input and pauses for a key press at the end before exiting. This
mode is nice when the program file is started by clicking on its icon; on Windows,
parameters are typed into a pop-up DOS box that doesn’t automatically disappear.
The script also shows the absolute paths of its parameters (by running them
through os.path.abspath) because they may not be obvious in interactive mode.
Binary file mode
This code is careful to open both input and output files in binary mode (rb, wb),
because it needs to portably handle things like executables and audio files, not just
text. In Chapter 4, we learned that on Windows, text-mode files automatically map
\r\n end-of-line sequences to \n on input and map \n to \r\n on output. For true
binary data, we really don’t want any \r characters in the data to go away when
read, and we don’t want any superfluous \r characters to be added on output.
Binary-mode files suppress this \r mapping when the script is run on Windows
and so avoid data corruption.
In Python 3.X, binary mode also means that file data is bytes objects in our script,
not encoded str text, though we don’t need to do anything special—this script’s
file processing code runs the same on Python 3.X as it did on 2.X. In fact, binary
mode is required in 3.X for this program, because the target file’s data may not be
encoded text at all; text mode requires that file content must be decodable in 3.X,
and that might fail both for truly binary data and text files obtained from other
Splitting and Joining Files | 285

platforms. On output, binary mode accepts bytes and suppresses Unicode encod-
ing and line-end translations.
Manually closing files
This script also goes out of its way to manually close its files. As we also saw
in Chapter 4, we can often get by with a single line: open(partname,
'wb').write(chunk). This shorter form relies on the fact that the current Python
implementation automatically closes files for you when file objects are reclaimed
(i.e., when they are garbage collected, because there are no more references to the
file object). In this one-liner, the file object would be reclaimed immediately, be-
cause the open result is temporary in an expression and is never referenced by a
longer-lived name. Similarly, the input file is reclaimed when the split function
exits.
However, it’s not impossible that this automatic-close behavior may go away in
the future. Moreover, the Jython Java-based Python implementation does not re-
claim unreferenced objects as immediately as the standard Python. You should
close manually if you care about the Java port, your script may potentially create
many files in a short amount of time, and it may run on a machine that has a limit
on the number of open files per program. Because the split function in this module
is intended to be a general-purpose tool, it accommodates such worst-case
scenarios. Also see Chapter 4’s mention of the file context manager and the with
statement; this provides an alternative way to guarantee file closes.
Joining Files Portably
Back to moving big files around the house: after downloading a big game program file,
you can run the previous splitter script by clicking on its name in Windows Explorer
and typing filenames. After a split, simply copy each part file onto its own floppy (or
other more modern medium), walk the files to the destination machine, and re-create
the split output directory on the target computer by copying the part files. Finally, the
script in Example 6-6 is clicked or otherwise run to put the parts back together.
Example 6-6. PP4E\System\Filetools\join.py
#!/usr/bin/python
"""
################################################################################
join all part files in a dir created by split.py, to re-create file.
This is roughly like a 'cat fromdir/* > tofile' command on unix, but is
more portable and configurable, and exports the join operation as a
reusable function. Relies on sort order of filenames: must be same
length. Could extend split/join to pop up Tkinter file selectors.
################################################################################
"""
import os, sys
readsize = 1024
286 | Chapter 6: Complete System Programs

def join(fromdir, tofile):
output = open(tofile, 'wb')
parts = os.listdir(fromdir)
parts.sort()
for filename in parts:
filepath = os.path.join(fromdir, filename)
fileobj = open(filepath, 'rb')
while True:
filebytes = fileobj.read(readsize)
if not filebytes: break
output.write(filebytes)
fileobj.close()
output.close()
if __name__ == '__main__':
if len(sys.argv) == 2 and sys.argv[1] == '-help':
print('Use: join.py [from-dir-name to-file-name]')
else:
if len(sys.argv) != 3:
interactive = True
fromdir = input('Directory containing part files? ')
tofile = input('Name of file to be recreated? ')
else:
interactive = False
fromdir, tofile = sys.argv[1:]
absfrom, absto = map(os.path.abspath, [fromdir, tofile])
print('Joining', absfrom, 'to make', absto)
try:
join(fromdir, tofile)
except:
print('Error joining files:')
print(sys.exc_info()[0], sys.exc_info()[1])
else:
print('Join complete: see', absto)
if interactive: input('Press Enter key') # pause if clicked
Here is a join in progress on Windows, combining the split files we made a moment
ago; after running the join script, you still may need to run something like zip, gzip,
or tar to unpack an archive file unless it’s shipped as an executable, but at least the
original downloaded file is set to go‡:
C:\temp> python C:\...\PP4E\System\Filetools\join.py -help
Use: join.py [from-dir-name to-file-name]
‡ It turns out that the zip, gzip, and tar commands can all be replaced with pure Python code today, too. The
gzip module in the Python standard library provides tools for reading and writing compressed gzip files,
usually named with a .gz filename extension. It can serve as an all-Python equivalent of the standard gzip
and gunzip command-line utility programs. This built-in module uses another module called zlib that
implements gzip-compatible data compressions. In recent Python releases, the zipfile module can be
imported to make and use ZIP format archives (zip is an archive and compression format, gzip is a
compression scheme), and the tarfile module allows scripts to read and write tar archives. See the Python
library manual for details.
Splitting and Joining Files | 287

C:\temp> python C:\...\PP4E\System\Filetools\join.py pysplit mypy31.msi
Joining C:\temp\pysplit to make C:\temp\mypy31.msi
Join complete: see C:\temp\mypy31.msi
C:\temp> dir *.msi
...more...
02/21/2010 11:21 AM 13,814,272 mypy31.msi
06/27/2009 04:53 PM 13,814,272 python-3.1.msi
2 File(s) 27,628,544 bytes
0 Dir(s) 188,798,611,456 bytes free
C:\temp> fc /b mypy31.msi python-3.1.msi
Comparing files mypy31.msi and PYTHON-3.1.MSI
FC: no differences encountered
The join script simply uses os.listdir to collect all the part files in a directory created
by split, and sorts the filename list to put the parts back together in the correct order.
We get back an exact byte-for-byte copy of the original file (proved by the DOS fc
command in the code; use cmp on Unix).
Some of this process is still manual, of course (I never did figure out how to script the
“walk the floppies to your bedroom” step), but the split and join scripts make it both
quick and simple to move big files around. Because this script is also portable Python
code, it runs on any platform to which we cared to move split files. For instance, my
home computers ran both Windows and Linux at the time; since this script runs on
either platform, the gamers were covered. Before we move on, here are a couple of
implementation details worth underscoring in the join script’s code:
Reading by blocks or files
First of all, notice that this script deals with files in binary mode but also reads each
part file in blocks of 1 KB each. In fact, the readsize setting here (the size of each
block read from an input part file) has no relation to chunksize in split.py (the total
size of each output part file). As we learned in Chapter 4, this script could instead
read each part file all at once: output.write(open(filepath, 'rb').read()). The
downside to this scheme is that it really does load all of a file into memory at once.
For example, reading a 1.4 MB part file into memory all at once with the file object
read method generates a 1.4 MB string in memory to hold the file’s bytes. Since
split allows users to specify even larger chunk sizes, the join script plans for the
worst and reads in terms of limited-size blocks. To be completely robust, the
split script could read its input data in smaller chunks too, but this hasn’t become
a concern in practice (recall that as your program runs, Python automatically re-
claims strings that are no longer referenced, so this isn’t as wasteful as it might
seem).
Sorting filenames
If you study this script’s code closely, you may also notice that the join scheme it
uses relies completely on the sort order of filenames in the parts directory. Because
it simply calls the list sort method on the filenames list returned by os.listdir, it
implicitly requires that filenames have the same length and format when created
288 | Chapter 6: Complete System Programs

by split. To satisfy this requirement, the splitter uses zero-padding notation in a
string formatting expression ('part%04d') to make sure that filenames all have the
same number of digits at the end (four). When sorted, the leading zero characters
in small numbers guarantee that part files are ordered for joining correctly.
Alternatively, we could strip off digits in filenames, convert them with int, and sort
numerically, by using the list sort method’s keys argument, but that would still
imply that all filenames must start with the some type of substring, and so doesn’t
quite remove the file-naming dependency between the split and join scripts. Be-
cause these scripts are designed to be two steps of the same process, though, some
dependencies between them seem reasonable.
Usage Variations
Finally, let’s run a few more experiments with these Python system utilities to demon-
strate other usage modes. When run without full command-line arguments, both
split and join are smart enough to input their parameters interactively. Here they are
chopping and gluing the Python self-installer file on Windows again, with parameters
typed in the DOS console window:
C:\temp> python C:\...\PP4E\System\Filetools\split.py
File to be split? python-3.1.msi
Directory to store part files? splitout
Splitting C:\temp\python-3.1.msi to C:\temp\splitout by 1433600
Split finished: 10 parts are in C:\temp\splitout
Press Enter key
C:\temp> python C:\...\PP4E\System\Filetools\join.py
Directory containing part files? splitout
Name of file to be recreated? newpy31.msi
Joining C:\temp\splitout to make C:\temp\newpy31.msi
Join complete: see C:\temp\newpy31.msi
Press Enter key
C:\temp> fc /B python-3.1.msi newpy31.msi
Comparing files python-3.1.msi and NEWPY31.MSI
FC: no differences encountered
When these program files are double-clicked in a Windows file explorer GUI, they work
the same way (there are usually no command-line arguments when they are launched
this way). In this mode, absolute path displays help clarify where files really are. Re-
member, the current working directory is the script’s home directory when clicked like
this, so a simple name actually maps to a source code directory; type a full path to make
the split files show up somewhere else:
[in a pop-up DOS console box when split.py is clicked]
File to be split? c:\temp\python-3.1.msi
Directory to store part files? c:\temp\parts
Splitting c:\temp\python-3.1.msi to c:\temp\parts by 1433600
Split finished: 10 parts are in c:\temp\parts
Press Enter key
Splitting and Joining Files | 289

[in a pop-up DOS console box when join.py is clicked]
Directory containing part files? c:\temp\parts
Name of file to be recreated? c:\temp\morepy31.msi
Joining c:\temp\parts to make c:\temp\morepy31.msi
Join complete: see c:\temp\morepy31.msi
Press Enter key
Because these scripts package their core logic in functions, though, it’s just as easy to
reuse their code by importing and calling from another Python component (make sure
your module import search path includes the directory containing the PP4E root first;
the first abbreviated line here is one way to do so):
C:\temp> set PYTHONPATH=C:\...\dev\Examples
C:\temp> python
>>> from PP4E.System.Filetools.split import split
>>> from PP4E.System.Filetools.join import join
>>>
>>> numparts = split('python-3.1.msi', 'calldir')
>>> numparts
10
>>> join('calldir', 'callpy31.msi')
>>>
>>> import os
>>> os.system('fc /B python-3.1.msi callpy31.msi')
Comparing files python-3.1.msi and CALLPY31.msi
FC: no differences encountered
0
A word about performance: all the split and join tests shown so far process a 13 MB
file, but they take less than one second of real wall-clock time to finish on my Windows
7 2GHz Atom processor laptop computer—plenty fast for just about any use I could
imagine. Both scripts run just as fast for other reasonable part file sizes, too; here is the
splitter chopping up the file into 4MB and 500KB parts:
C:\temp> C:\...\PP4E\System\Filetools\split.py python-3.1.msi tempsplit 4000000
Splitting C:\temp\python-3.1.msi to C:\temp\tempsplit by 4000000
Split finished: 4 parts are in C:\temp\tempsplit
C:\temp> dir tempsplit
...more...
Directory of C:\temp\tempsplit
02/21/2010 01:27 PM <DIR> .
02/21/2010 01:27 PM <DIR> ..
02/21/2010 01:27 PM 4,000,000 part0001
02/21/2010 01:27 PM 4,000,000 part0002
02/21/2010 01:27 PM 4,000,000 part0003
02/21/2010 01:27 PM 1,814,272 part0004
4 File(s) 13,814,272 bytes
2 Dir(s) 188,671,983,616 bytes free
290 | Chapter 6: Complete System Programs

C:\temp> C:\...\PP4E\System\Filetools\split.py python-3.1.msi tempsplit 500000
Splitting C:\temp\python-3.1.msi to C:\temp\tempsplit by 500000
Split finished: 28 parts are in C:\temp\tempsplit
C:\temp> dir tempsplit
...more...
Directory of C:\temp\tempsplit
02/21/2010 01:27 PM <DIR> .
02/21/2010 01:27 PM <DIR> ..
02/21/2010 01:27 PM 500,000 part0001
02/21/2010 01:27 PM 500,000 part0002
02/21/2010 01:27 PM 500,000 part0003
02/21/2010 01:27 PM 500,000 part0004
02/21/2010 01:27 PM 500,000 part0005
...more lines omitted...
02/21/2010 01:27 PM 500,000 part0024
02/21/2010 01:27 PM 500,000 part0025
02/21/2010 01:27 PM 500,000 part0026
02/21/2010 01:27 PM 500,000 part0027
02/21/2010 01:27 PM 314,272 part0028
28 File(s) 13,814,272 bytes
2 Dir(s) 188,671,946,752 bytes free
The split can take noticeably longer to finish, but only if the part file’s size is set small
enough to generate thousands of part files—splitting into 1,382 parts works but runs
slower (though some machines today are quick enough that you might not notice):
C:\temp> C:\...\PP4E\System\Filetools\split.py python-3.1.msi tempsplit 10000
Splitting C:\temp\python-3.1.msi to C:\temp\tempsplit by 10000
Split finished: 1382 parts are in C:\temp\tempsplit
C:\temp> C:\...\PP4E\System\Filetools\join.py tempsplit manypy31.msi
Joining C:\temp\tempsplit to make C:\temp\manypy31.msi
Join complete: see C:\temp\manypy31.msi
C:\temp> fc /B python-3.1.msi manypy31.msi
Comparing files python-3.1.msi and MANYPY31.MSI
FC: no differences encountered
C:\temp> dir tempsplit
...more...
Directory of C:\temp\tempsplit
02/21/2010 01:40 PM <DIR> .
02/21/2010 01:40 PM <DIR> ..
02/21/2010 01:39 PM 10,000 part0001
02/21/2010 01:39 PM 10,000 part0002
02/21/2010 01:39 PM 10,000 part0003
02/21/2010 01:39 PM 10,000 part0004
02/21/2010 01:39 PM 10,000 part0005
Splitting and Joining Files | 291

...over 1,000 lines deleted...
02/21/2010 01:40 PM 10,000 part1378
02/21/2010 01:40 PM 10,000 part1379
02/21/2010 01:40 PM 10,000 part1380
02/21/2010 01:40 PM 10,000 part1381
02/21/2010 01:40 PM 4,272 part1382
1382 File(s) 13,814,272 bytes
2 Dir(s) 188,651,008,000 bytes free
Finally, the splitter is also smart enough to create the output directory if it doesn’t yet
exist and to clear out any old files there if it does exist—the following, for example,
leaves only new files in the output directory. Because the joiner combines whatever files
exist in the output directory, this is a nice ergonomic touch. If the output directory was
not cleared before each split, it would be too easy to forget that a prior run’s files are
still there. Given that target audience for these scripts, they needed to be as forgiving
as possible; your user base may vary (though you often shouldn’t assume so).
C:\temp> C:\...\PP4E\System\Filetools\split.py python-3.1.msi tempsplit 5000000
Splitting C:\temp\python-3.1.msi to C:\temp\tempsplit by 5000000
Split finished: 3 parts are in C:\temp\tempsplit
C:\temp> dir tempsplit
...more...
Directory of C:\temp\tempsplit
02/21/2010 01:47 PM <DIR> .
02/21/2010 01:47 PM <DIR> ..
02/21/2010 01:47 PM 5,000,000 part0001
02/21/2010 01:47 PM 5,000,000 part0002
02/21/2010 01:47 PM 3,814,272 part0003
3 File(s) 13,814,272 bytes
2 Dir(s) 188,654,452,736 bytes free
Of course, the dilemma that these scripts address might today be more easily addressed
by simply buying a bigger memory stick or giving kids their own Internet access. Still,
once you catch the scripting bug, you’ll find the ease and flexibility of Python to be
powerful and enabling tools, especially for writing custom automation scripts like
these. When used well, Python may well become your Swiss Army knife of
computing.
Generating Redirection Web Pages
Moving is rarely painless, even in cyberspace. Changing your website’s Internet address
can lead to all sorts of confusion. You need to ask known contacts to use the new
address and hope that others will eventually stumble onto it themselves. But if you rely
on the Internet, moves are bound to generate at least as much confusion as an address
change in the real world.
Unfortunately, such site relocations are often unavoidable. Both Internet Service Pro-
viders (ISPs) and server machines can come and go over the years. Moreover, some ISPs
292 | Chapter 6: Complete System Programs

let their service fall to intolerably low levels; if you are unlucky enough to have signed
up with such an ISP, there is not much recourse but to change providers, and that often
implies a change of web addresses.§
Imagine, though, that you are an O’Reilly author and have published your website’s
address in multiple books sold widely all over the world. What do you do when your
ISP’s service level requires a site change? Notifying each of the hundreds of thousands
of readers out there isn’t exactly a practical solution.
Probably the best you can do is to leave forwarding instructions at the old site for some
reasonably long period of time—the virtual equivalent of a “We’ve Moved” sign in a
storefront window. On the Web, such a sign can also send visitors to the new site
automatically: simply leave a page at the old site containing a hyperlink to the page’s
address at the new site, along with timed auto-relocation specifications. With such
forward-link files in place, visitors to the old addresses will be only one click or a few
seconds away from reaching the new ones.
That sounds simple enough. But because visitors might try to directly access the address
of any file at your old site, you generally need to leave one forward-link file for every
old file—HTML pages, images, and so on. Unless your prior server supports auto-
redirection (and mine did not), this represents a dilemma. If you happen to enjoy doing
lots of mindless typing, you could create each forward-link file by hand. But given that
my home site contained over 100 HTML files at the time I wrote this paragraph, the
prospect of running one editor session per file was more than enough motivation for
an automated solution.
Page Template File
Here’s what I came up with. First of all, I create a general page template text file, shown
in Example 6-7, to describe how all the forward-link files should look, with parts to be
filled in later.
Example 6-7. PP4E\System\Filetools\template.html
<HTML>
<head>
<META HTTP-EQUIV="Refresh" CONTENT="10; URL=http://$server$/$home$/$file$">
<title>Site Redirection Page: $file$</title>
</head>
<BODY>
<H1>This page has moved</H1>
<P>This page now lives at this address:
§ It happens. In fact, most people who spend any substantial amount of time in cyberspace could probably tell
a horror story or two. Mine goes like this: a number of years ago, I had an account with an ISP that went
completely offline for a few weeks in response to a security breach by an ex-employee. Worse, not only was
personal email disabled, but queued up messages were permanently lost. If your livelihood depends on email
and the Web as much as mine does, you’ll appreciate the havoc such an outage can wreak.
Generating Redirection Web Pages | 293

<P><A HREF="http://$server$/$home$/$file$">
http://$server$/$home$/$file$</A>
<P>Please click on the new address to jump to this page, and
update any links accordingly. You will be redirectly shortly.
</P>
<HR>
</BODY></HTML>
To fully understand this template, you have to know something about HTML, a web
page description language that we’ll explore in Part IV. But for the purposes of this
example, you can ignore most of this file and focus on just the parts surrounded by
dollar signs: the strings $server$, $home$, and $file$ are targets to be replaced with real
values by global text substitutions. They represent items that vary per site relocation
and file.
Page Generator Script
Now, given a page template file, the Python script in Example 6-8 generates all the
required forward-link files automatically.
Example 6-8. PP4E\System\Filetools\site-forward.py
"""
################################################################################
Create forward-link pages for relocating a web site.
Generates one page for every existing site html file; upload the generated
files to your old web site. See ftplib later in the book for ways to run
uploads in scripts either after or during page file creation.
################################################################################
"""
import os
servername = 'learning-python.com' # where site is relocating to
homedir = 'books' # where site will be rooted
sitefilesdir = r'C:\temp\public_html' # where site files live locally
uploaddir = r'C:\temp\isp-forward' # where to store forward files
templatename = 'template.html' # template for generated pages
try:
os.mkdir(uploaddir) # make upload dir if needed
except OSError: pass
template = open(templatename).read() # load or import template text
sitefiles = os.listdir(sitefilesdir) # filenames, no directory prefix
count = 0
for filename in sitefiles:
if filename.endswith('.html') or filename.endswith('.htm'):
fwdname = os.path.join(uploaddir, filename)
print('creating', filename, 'as', fwdname)
294 | Chapter 6: Complete System Programs

filetext = template.replace('$server$', servername) # insert text
filetext = filetext.replace('$home$', homedir) # and write
filetext = filetext.replace('$file$', filename) # file varies
open(fwdname, 'w').write(filetext)
count += 1
print('Last file =>\n', filetext, sep='')
print('Done:', count, 'forward files created.')
Notice that the template’s text is loaded by reading a file; it would work just as well to
code it as an imported Python string variable (e.g., a triple-quoted string in a module
file). Also observe that all configuration options are assignments at the top of the
script, not command-line arguments; since they change so seldom, it’s convenient to
type them just once in the script itself.
But the main thing worth noticing here is that this script doesn’t care what the template
file looks like at all; it simply performs global substitutions blindly in its text, with a
different filename value for each generated file. In fact, we can change the template file
any way we like without having to touch the script. Though a fairly simple technique,
such a division of labor can be used in all sorts of contexts—generating “makefiles,”
form letters, HTML replies from CGI scripts on web servers, and so on. In terms of
library tools, the generator script:
• Uses os.listdir to step through all the filenames in the site’s directory
(glob.glob would work too, but may require stripping directory prefixes from file
names)
• Uses the string object’s replace method to perform global search-and-replace op-
erations that fill in the $-delimited targets in the template file’s text, and endswith
to skip non-HTML files (e.g., images—most browsers won’t know what to do with
HTML text in a “.jpg” file)
• Uses os.path.join and built-in file objects to write the resulting text out to a
forward-link file of the same name in an output directory
The end result is a mirror image of the original website directory, containing only
forward-link files generated from the page template. As an added bonus, the generator
script can be run on just about any Python platform—I can run it on my Windows
laptop (where I’m writing this book), as well as on a Linux server (where my http://
learning-python.com domain is hosted). Here it is in action on Windows:
C:\...\PP4E\System\Filetools> python site-forward.py
creating about-lp.html as C:\temp\isp-forward\about-lp.html
creating about-lp1e.html as C:\temp\isp-forward\about-lp1e.html
creating about-lp2e.html as C:\temp\isp-forward\about-lp2e.html
creating about-lp3e.html as C:\temp\isp-forward\about-lp3e.html
creating about-lp4e.html as C:\temp\isp-forward\about-lp4e.html
...many more lines deleted...
creating training.html as C:\temp\isp-forward\training.html
creating whatsnew.html as C:\temp\isp-forward\whatsnew.html
Generating Redirection Web Pages | 295
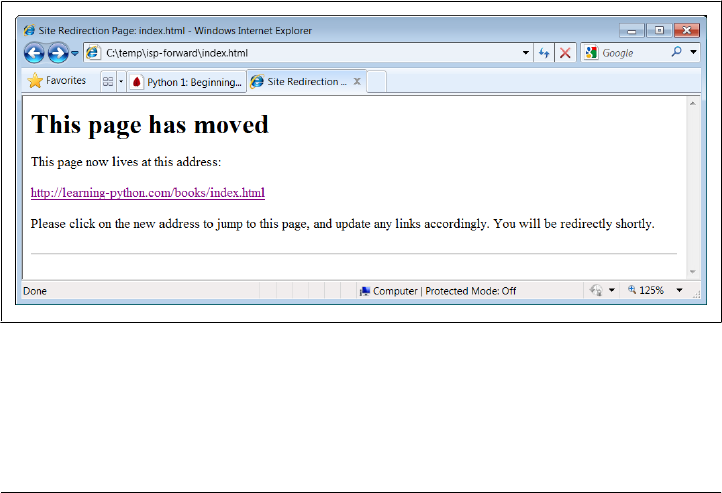
creating whatsold.html as C:\temp\isp-forward\whatsold.html
creating xlate-lp.html as C:\temp\isp-forward\xlate-lp.html
creating zopeoutline.htm as C:\temp\isp-forward\zopeoutline.htm
Last file =>
<HTML>
<head>
<META HTTP-EQUIV="Refresh" CONTENT="10; URL=http://learning-python.com/books/zop
eoutline.htm">
<title>Site Redirection Page: zopeoutline.htm</title>
</head>
<BODY>
<H1>This page has moved</H1>
<P>This page now lives at this address:
<P><A HREF="http://learning-python.com/books/zopeoutline.htm">
http://learning-python.com/books/zopeoutline.htm</A>
<P>Please click on the new address to jump to this page, and
update any links accordingly. You will be redirectly shortly.
</P>
<HR>
</BODY></HTML>
Done: 124 forward files created.
To verify this script’s output, double-click on any of the output files to see what they
look like in a web browser (or run a start command in a DOS console on Windows—
e.g., start isp-forward\about-lp4e.html). Figure 6-1 shows what one generated page
looks like on my machine.
Figure 6-1. Site-forward output file page
To complete the process, you still need to install the forward links: upload all the
generated files in the output directory to your old site’s web directory. If that’s too
much to do by hand, too, be sure to see the FTP site upload scripts in Chapter 13 for
296 | Chapter 6: Complete System Programs

an automatic way to do that step with Python as well (PP4E\Internet\Ftp\upload-
flat.py will do the job). Once you’ve started scripting in earnest, you’ll be amazed at
how much manual labor Python can automate. The next section provides another
prime example.
A Regression Test Script
Mistakes happen. As we’ve seen, Python provides interfaces to a variety of system serv-
ices, along with tools for adding others. Example 6-9 shows some of the more com-
monly used system tools in action. It implements a simple regression test system for
Python scripts—it runs each in a directory of Python scripts with provided input and
command-line arguments, and compares the output of each run to the prior run’s re-
sults. As such, this script can be used as an automated testing system to catch errors
introduced by changes in program source files; in a big system, you might not know
when a fix is really a bug in disguise.
Example 6-9. PP4E\System\Tester\tester.py
"""
################################################################################
Test a directory of Python scripts, passing command-line arguments,
piping in stdin, and capturing stdout, stderr, and exit status to
detect failures and regressions from prior run outputs. The subprocess
module spawns and controls streams (much like os.popen3 in Python 2.X),
and is cross-platform. Streams are always binary bytes in subprocess.
Test inputs, args, outputs, and errors map to files in subdirectories.
This is a command-line script, using command-line arguments for
optional test directory name, and force-generation flag. While we
could package it as a callable function, the fact that its results
are messages and output files makes a call/return model less useful.
Suggested enhancement: could be extended to allow multiple sets
of command-line arguments and/or inputs per test script, to run a
script multiple times (glob for multiple ".in*" files in Inputs?).
Might also seem simpler to store all test files in same directory
with different extensions, but this could grow large over time.
Could also save both stderr and stdout to Errors on failures, but
I prefer to have expected/actual output in Outputs on regressions.
################################################################################
"""
import os, sys, glob, time
from subprocess import Popen, PIPE
# configuration args
testdir = sys.argv[1] if len(sys.argv) > 1 else os.curdir
forcegen = len(sys.argv) > 2
print('Start tester:', time.asctime())
print('in', os.path.abspath(testdir))
A Regression Test Script | 297

def verbose(*args):
print('-'*80)
for arg in args: print(arg)
def quiet(*args): pass
trace = quiet
# glob scripts to be tested
testpatt = os.path.join(testdir, 'Scripts', '*.py')
testfiles = glob.glob(testpatt)
testfiles.sort()
trace(os.getcwd(), *testfiles)
numfail = 0
for testpath in testfiles: # run all tests in dir
testname = os.path.basename(testpath) # strip directory path
# get input and args
infile = testname.replace('.py', '.in')
inpath = os.path.join(testdir, 'Inputs', infile)
indata = open(inpath, 'rb').read() if os.path.exists(inpath) else b''
argfile = testname.replace('.py', '.args')
argpath = os.path.join(testdir, 'Args', argfile)
argdata = open(argpath).read() if os.path.exists(argpath) else ''
# locate output and error, scrub prior results
outfile = testname.replace('.py', '.out')
outpath = os.path.join(testdir, 'Outputs', outfile)
outpathbad = outpath + '.bad'
if os.path.exists(outpathbad): os.remove(outpathbad)
errfile = testname.replace('.py', '.err')
errpath = os.path.join(testdir, 'Errors', errfile)
if os.path.exists(errpath): os.remove(errpath)
# run test with redirected streams
pypath = sys.executable
command = '%s %s %s' % (pypath, testpath, argdata)
trace(command, indata)
process = Popen(command, shell=True, stdin=PIPE, stdout=PIPE, stderr=PIPE)
process.stdin.write(indata)
process.stdin.close()
outdata = process.stdout.read()
errdata = process.stderr.read() # data are bytes
exitstatus = process.wait() # requires binary files
trace(outdata, errdata, exitstatus)
# analyze results
if exitstatus != 0:
print('ERROR status:', testname, exitstatus) # status and/or stderr
if errdata:
print('ERROR stream:', testname, errpath) # save error text
open(errpath, 'wb').write(errdata)
298 | Chapter 6: Complete System Programs

if exitstatus or errdata: # consider both failure
numfail += 1 # can get status+stderr
open(outpathbad, 'wb').write(outdata) # save output to view
elif not os.path.exists(outpath) or forcegen:
print('generating:', outpath) # create first output
open(outpath, 'wb').write(outdata)
else:
priorout = open(outpath, 'rb').read() # or compare to prior
if priorout == outdata:
print('passed:', testname)
else:
numfail += 1
print('FAILED output:', testname, outpathbad)
open(outpathbad, 'wb').write(outdata)
print('Finished:', time.asctime())
print('%s tests were run, %s tests failed.' % (len(testfiles), numfail))
We’ve seen the tools used by this script earlier in this part of the book—subprocess,
os.path, glob, files, and the like. This example largely just pulls these tools together to
solve a useful purpose. Its core operation is comparing new outputs to old, in order to
spot changes (“regressions”). Along the way, it also manages command-line arguments,
error messages, status codes, and files.
This script is also larger than most we’ve seen so far, but it’s a realistic and representative
system administration tool (in fact, it’s derived from a similar tool I actually used in the
past to detect changes in a compiler). Probably the best way to understand how it works
is to demonstrate what it does. The next section steps through a testing session to be
read in conjunction with studying the test script’s code.
Running the Test Driver
Much of the magic behind the test driver script in Example 6-9 has to do with its
directory structure. When you run it for the first time in a test directory (or force it to
start from scratch there by passing a second command-line argument), it:
• Collects scripts to be run in the Scripts subdirectory
• Fetches any associated script input and command-line arguments from the
Inputs and Args subdirectories
• Generates initial stdout output files for tests that exit normally in the Outputs
subdirectory
• Reports tests that fail either by exit status code or by error messages appearing in
stderr
On all failures, the script also saves any stderr error message text, as well as any
stdout data generated up to the point of failure; standard error text is saved to a file in
the Errors subdirectory, and standard output of failed tests is saved with a special
A Regression Test Script | 299

“.bad” filename extension in Outputs (saving this normally in the Outputs subdirectory
would trigger a failure when the test is later fixed!). Here’s a first run:
C:\...\PP4E\System\Tester> python tester.py . 1
Start tester: Mon Feb 22 22:13:38 2010
in C:\Users\mark\Stuff\Books\4E\PP4E\dev\Examples\PP4E\System\Tester
generating: .\Outputs\test-basic-args.out
generating: .\Outputs\test-basic-stdout.out
generating: .\Outputs\test-basic-streams.out
generating: .\Outputs\test-basic-this.out
ERROR status: test-errors-runtime.py 1
ERROR stream: test-errors-runtime.py .\Errors\test-errors-runtime.err
ERROR status: test-errors-syntax.py 1
ERROR stream: test-errors-syntax.py .\Errors\test-errors-syntax.err
ERROR status: test-status-bad.py 42
generating: .\Outputs\test-status-good.out
Finished: Mon Feb 22 22:13:41 2010
8 tests were run, 3 tests failed.
To run each script, the tester configures any preset command-line arguments provided,
pipes in fetched canned input (if any), and captures the script’s standard output and
error streams, along with its exit status code. When I ran this example, there were 8
test scripts, along with a variety of inputs and outputs. Since the directory and file
naming structures are the key to this example, here is a listing of the test directory I
used—the Scripts directory is primary, because that’s where tests to be run are
collected:
C:\...\PP4E\System\Tester> dir /B
Args
Errors
Inputs
Outputs
Scripts
tester.py
xxold
C:\...\PP4E\System\Tester> dir /B Scripts
test-basic-args.py
test-basic-stdout.py
test-basic-streams.py
test-basic-this.py
test-errors-runtime.py
test-errors-syntax.py
test-status-bad.py
test-status-good.py
The other subdirectories contain any required inputs and any generated outputs asso-
ciated with scripts to be tested:
C:\...\PP4E\System\Tester> dir /B Args
test-basic-args.args
test-status-good.args
300 | Chapter 6: Complete System Programs

C:\...\PP4E\System\Tester> dir /B Inputs
test-basic-args.in
test-basic-streams.in
C:\...\PP4E\System\Tester> dir /B Outputs
test-basic-args.out
test-basic-stdout.out
test-basic-streams.out
test-basic-this.out
test-errors-runtime.out.bad
test-errors-syntax.out.bad
test-status-bad.out.bad
test-status-good.out
C:\...\PP4E\System\Tester> dir /B Errors
test-errors-runtime.err
test-errors-syntax.err
I won’t list all these files here (as you can see, there are many, and all are available in
the book examples distribution package), but to give you the general flavor, here are
the files associated with the test script test-basic-args.py:
C:\...\PP4E\System\Tester> type Scripts\test-basic-args.py
# test args, streams
import sys, os
print(os.getcwd()) # to Outputs
print(sys.path[0])
print('[argv]')
for arg in sys.argv: # from Args
print(arg) # to Outputs
print('[interaction]') # to Outputs
text = input('Enter text:') # from Inputs
rept = sys.stdin.readline() # from Inputs
sys.stdout.write(text * int(rept)) # to Outputs
C:\...\PP4E\System\Tester> type Args\test-basic-args.args
-command -line --stuff
C:\...\PP4E\System\Tester> type Inputs\test-basic-args.in
Eggs
10
C:\...\PP4E\System\Tester> type Outputs\test-basic-args.out
C:\Users\mark\Stuff\Books\4E\PP4E\dev\Examples\PP4E\System\Tester
C:\Users\mark\Stuff\Books\4E\PP4E\dev\Examples\PP4E\System\Tester\Scripts
[argv]
.\Scripts\test-basic-args.py
-command
-line
--stuff
[interaction]
Enter text:EggsEggsEggsEggsEggsEggsEggsEggsEggsEggs
A Regression Test Script | 301

And here are two files related to one of the detected errors—the first is its captured
stderr, and the second is its stdout generated up to the point where the error occurred;
these are for human (or other tools) inspection, and are automatically removed the next
time the tester script runs:
C:\...\PP4E\System\Tester> type Errors\test-errors-runtime.err
Traceback (most recent call last):
File ".\Scripts\test-errors-runtime.py", line 3, in <module>
print(1 / 0)
ZeroDivisionError: int division or modulo by zero
C:\...\PP4E\System\Tester> type Outputs\test-errors-runtime.out.bad
starting
Now, when run again without making any changes to the tests, the test driver script
compares saved prior outputs to new ones and detects no regressions; failures desig-
nated by exit status and stderr messages are still reported as before, but there are no
deviations from other tests’ saved expected output:
C:\...\PP4E\System\Tester> python tester.py
Start tester: Mon Feb 22 22:26:41 2010
in C:\Users\mark\Stuff\Books\4E\PP4E\dev\Examples\PP4E\System\Tester
passed: test-basic-args.py
passed: test-basic-stdout.py
passed: test-basic-streams.py
passed: test-basic-this.py
ERROR status: test-errors-runtime.py 1
ERROR stream: test-errors-runtime.py .\Errors\test-errors-runtime.err
ERROR status: test-errors-syntax.py 1
ERROR stream: test-errors-syntax.py .\Errors\test-errors-syntax.err
ERROR status: test-status-bad.py 42
passed: test-status-good.py
Finished: Mon Feb 22 22:26:43 2010
8 tests were run, 3 tests failed.
But when I make a change in one of the test scripts that will produce different output
(I changed a loop counter to print fewer lines), the regression is caught and reported;
the new and different output of the script is reported as a failure, and saved in
Outputs as a “.bad” for later viewing:
C:\...\PP4E\System\Tester> python tester.py
Start tester: Mon Feb 22 22:28:35 2010
in C:\Users\mark\Stuff\Books\4E\PP4E\dev\Examples\PP4E\System\Tester
passed: test-basic-args.py
FAILED output: test-basic-stdout.py .\Outputs\test-basic-stdout.out.bad
passed: test-basic-streams.py
passed: test-basic-this.py
ERROR status: test-errors-runtime.py 1
ERROR stream: test-errors-runtime.py .\Errors\test-errors-runtime.err
ERROR status: test-errors-syntax.py 1
ERROR stream: test-errors-syntax.py .\Errors\test-errors-syntax.err
ERROR status: test-status-bad.py 42
passed: test-status-good.py
Finished: Mon Feb 22 22:28:38 2010
302 | Chapter 6: Complete System Programs

8 tests were run, 4 tests failed.
C:\...\PP4E\System\Tester> type Outputs\test-basic-stdout.out.bad
begin
Spam!
Spam!Spam!
Spam!Spam!Spam!
Spam!Spam!Spam!Spam!
end
One last usage note: if you change the trace variable in this script to be verbose, you’ll
get much more output designed to help you trace the programs operation (but probably
too much for real testing runs):
C:\...\PP4E\System\Tester> tester.py
Start tester: Mon Feb 22 22:34:51 2010
in C:\Users\mark\Stuff\Books\4E\PP4E\dev\Examples\PP4E\System\Tester
--------------------------------------------------------------------------------
C:\Users\mark\Stuff\Books\4E\PP4E\dev\Examples\PP4E\System\Tester
.\Scripts\test-basic-args.py
.\Scripts\test-basic-stdout.py
.\Scripts\test-basic-streams.py
.\Scripts\test-basic-this.py
.\Scripts\test-errors-runtime.py
.\Scripts\test-errors-syntax.py
.\Scripts\test-status-bad.py
.\Scripts\test-status-good.py
--------------------------------------------------------------------------------
C:\Python31\python.exe .\Scripts\test-basic-args.py -command -line --stuff
b'Eggs\r\n10\r\n'
--------------------------------------------------------------------------------
b'C:\\Users\\mark\\Stuff\\Books\\4E\\PP4E\\dev\\Examples\\PP4E\\System\\Tester\r
\nC:\\Users\\mark\\Stuff\\Books\\4E\\PP4E\\dev\\Examples\\PP4E\\System\\Tester\\
Scripts\r\n[argv]\r\n.\\Scripts\\test-basic-args.py\r\n-command\r\n-line\r\n--st
uff\r\n[interaction]\r\nEnter text:EggsEggsEggsEggsEggsEggsEggsEggsEggsEggs'
b''
0
passed: test-basic-args.py
...more lines deleted...
Study the test driver’s code for more details. Naturally, there is much more to the
general testing story than we have space for here. For example, in-process tests don’t
need to spawn programs and can generally make do with importing modules and testing
them in try exception handler statements. There is also ample room for expansion and
customization in our testing script (see its docstring for starters). Moreover, Python
comes with two testing frameworks, doctest and unittest (a.k.a. PyUnit), which pro-
vide techniques and structures for coding regression and unit tests:
unittest
An object-oriented framework that specifies test cases, expected results, and test
suites. Subclasses provide test methods and use inherited assertion calls to specify
expected results.
A Regression Test Script | 303

doctest
Parses out and reruns tests from an interactive session log that is pasted into a
module’s docstrings. The logs give test calls and expected results; doctest essen-
tially reruns the interactive session.
See the Python library manual, the PyPI website, and your favorite Web search engine
for additional testing toolkits in both Python itself and the third-party domain.
For automated testing of Python command-line scripts that run as independent pro-
grams and tap into standard script execution context, though, our tester does the job.
Because the test driver is fully independent of the scripts it tests, we can drop in new
test cases without having to update the driver’s code. And because it is written in Py-
thon, it’s quick and easy to change as our testing needs evolve. As we’ll see again in the
next section, this “scriptability” that Python provides can be a decided advantage for
real tasks.
Testing Gone Bad?
Once we learn about sending email from Python scripts in Chapter 13, you might also
want to augment this script to automatically send out email when regularly run tests
fail (e.g., when run from a cron job on Unix). That way, you don’t even need to re-
member to check results. Of course, you could go further still.
One company I worked for added sound effects to compiler test scripts; you got an
audible round of applause if no regressions were found and an entirely different noise
otherwise. (See playfile.py at the end of this chapter for hints.)
Another company in my development past ran a nightly test script that automatically
isolated the source code file check-in that triggered a test regression and sent a nasty
email to the guilty party (and his or her supervisor). Nobody expects the Spanish
Inquisition!
Copying Directory Trees
My CD writer sometimes does weird things. In fact, copies of files with odd names can
be totally botched on the CD, even though other files show up in one piece. That’s not
necessarily a showstopper; if just a few files are trashed in a big CD backup copy, I can
always copy the offending files elsewhere one at a time. Unfortunately, drag-and-drop
copies on some versions of Windows don’t play nicely with such a CD: the copy op-
eration stops and exits the moment the first bad file is encountered. You get only as
many files as were copied up to the error, but no more.
In fact, this is not limited to CD copies. I’ve run into similar problems when trying to
back up my laptop’s hard drive to another drive—the drag-and-drop copy stops with
an error as soon as it reaches a file with a name that is too long or odd to copy (common
304 | Chapter 6: Complete System Programs

in saved web pages). The last 30 minutes spent copying is wasted time; frustrating, to
say the least!
There may be some magical Windows setting to work around this feature, but I gave
up hunting for one as soon as I realized that it would be easier to code a copier in Python.
The cpall.py script in Example 6-10 is one way to do it. With this script, I control what
happens when bad files are found—I can skip over them with Python exception han-
dlers, for instance. Moreover, this tool works with the same interface and effect on
other platforms. It seems to me, at least, that a few minutes spent writing a portable
and reusable Python script to meet a need is a better investment than looking for sol-
utions that work on only one platform (if at all).
Example 6-10. PP4E\System\Filetools\cpall.py
"""
################################################################################
Usage: "python cpall.py dirFrom dirTo".
Recursive copy of a directory tree. Works like a "cp -r dirFrom/* dirTo"
Unix command, and assumes that dirFrom and dirTo are both directories.
Was written to get around fatal error messages under Windows drag-and-drop
copies (the first bad file ends the entire copy operation immediately),
but also allows for coding more customized copy operations in Python.
################################################################################
"""
import os, sys
maxfileload = 1000000
blksize = 1024 * 500
def copyfile(pathFrom, pathTo, maxfileload=maxfileload):
"""
Copy one file pathFrom to pathTo, byte for byte;
uses binary file modes to supress Unicde decode and endline transform
"""
if os.path.getsize(pathFrom) <= maxfileload:
bytesFrom = open(pathFrom, 'rb').read() # read small file all at once
open(pathTo, 'wb').write(bytesFrom)
else:
fileFrom = open(pathFrom, 'rb') # read big files in chunks
fileTo = open(pathTo, 'wb') # need b mode for both
while True:
bytesFrom = fileFrom.read(blksize) # get one block, less at end
if not bytesFrom: break # empty after last chunk
fileTo.write(bytesFrom)
def copytree(dirFrom, dirTo, verbose=0):
"""
Copy contents of dirFrom and below to dirTo, return (files, dirs) counts;
may need to use bytes for dirnames if undecodable on other platforms;
may need to do more file type checking on Unix: skip links, fifos, etc.
"""
fcount = dcount = 0
for filename in os.listdir(dirFrom): # for files/dirs here
Copying Directory Trees | 305

pathFrom = os.path.join(dirFrom, filename)
pathTo = os.path.join(dirTo, filename) # extend both paths
if not os.path.isdir(pathFrom): # copy simple files
try:
if verbose > 1: print('copying', pathFrom, 'to', pathTo)
copyfile(pathFrom, pathTo)
fcount += 1
except:
print('Error copying', pathFrom, 'to', pathTo, '--skipped')
print(sys.exc_info()[0], sys.exc_info()[1])
else:
if verbose: print('copying dir', pathFrom, 'to', pathTo)
try:
os.mkdir(pathTo) # make new subdir
below = copytree(pathFrom, pathTo) # recur into subdirs
fcount += below[0] # add subdir counts
dcount += below[1]
dcount += 1
except:
print('Error creating', pathTo, '--skipped')
print(sys.exc_info()[0], sys.exc_info()[1])
return (fcount, dcount)
def getargs():
"""
Get and verify directory name arguments, returns default None on errors
"""
try:
dirFrom, dirTo = sys.argv[1:]
except:
print('Usage error: cpall.py dirFrom dirTo')
else:
if not os.path.isdir(dirFrom):
print('Error: dirFrom is not a directory')
elif not os.path.exists(dirTo):
os.mkdir(dirTo)
print('Note: dirTo was created')
return (dirFrom, dirTo)
else:
print('Warning: dirTo already exists')
if hasattr(os.path, 'samefile'):
same = os.path.samefile(dirFrom, dirTo)
else:
same = os.path.abspath(dirFrom) == os.path.abspath(dirTo)
if same:
print('Error: dirFrom same as dirTo')
else:
return (dirFrom, dirTo)
if __name__ == '__main__':
import time
dirstuple = getargs()
if dirstuple:
print('Copying...')
start = time.clock()
306 | Chapter 6: Complete System Programs

fcount, dcount = copytree(*dirstuple)
print('Copied', fcount, 'files,', dcount, 'directories', end=' ')
print('in', time.clock() - start, 'seconds')
This script implements its own recursive tree traversal logic and keeps track of both
the “from” and “to” directory paths as it goes. At every level, it copies over simple files,
creates directories in the “to” path, and recurs into subdirectories with “from” and “to”
paths extended by one level. There are other ways to code this task (e.g., we might
change the working directory along the way with os.chdir calls or there is probably an
os.walk solution which replaces from and to path prefixes as it walks), but extending
paths on recursive descent works well in this script.
Notice this script’s reusable copyfile function—just in case there are multigigabyte
files in the tree to be copied, it uses a file’s size to decide whether it should be read all
at once or in chunks (remember, the file read method without arguments actually loads
the entire file into an in-memory string). We choose fairly large file and block sizes,
because the more we read at once in Python, the faster our scripts will typically run.
This is more efficient than it may sound; strings left behind by prior reads will be
garbage collected and reused as we go. We’re using binary file modes here again, too,
to suppress the Unicode encodings and end-of-line translations of text files—trees may
contain arbitrary kinds of files.
Also notice that this script creates the “to” directory if needed, but it assumes that the
directory is empty when a copy starts up; for accuracy, be sure to remove the target
directory before copying a new tree to its name, or old files may linger in the target tree
(we could automatically remove the target first, but this may not always be desired).
This script also tries to determine if the source and target are the same; on Unix-like
platforms with oddities such as links, os.path.samefile does a more accurate job than
comparing absolute file names (different file names may be the same file).
Here is a copy of a big book examples tree (I use the tree from the prior edition
throughout this chapter) in action on Windows; pass in the name of the “from” and
“to” directories to kick off the process, redirect the output to a file if there are too many
error messages to read all at once (e.g., > output.txt), and run an rm –r or rmdir /S
shell command (or similar platform-specific tool) to delete the target directory first if
needed:
C:\...\PP4E\System\Filetools> rmdir /S copytemp
copytemp, Are you sure (Y/N)? y
C:\...\PP4E\System\Filetools> cpall.py C:\temp\PP3E\Examples copytemp
Note: dirTo was created
Copying...
Copied 1430 files, 185 directories in 10.4470980971 seconds
C:\...\PP4E\System\Filetools> fc /B copytemp\PP3E\Launcher.py
C:\temp\PP3E\Examples\PP3E\Launcher.py
Comparing files COPYTEMP\PP3E\Launcher.py and C:\TEMP\PP3E\EXAMPLES\PP3E\LAUNCHER.PY
FC: no differences encountered
Copying Directory Trees | 307

You can use the copy function’s verbose argument to trace the process if you wish. At
the time I wrote this edition in 2010, this test run copied a tree of 1,430 files and 185
directories in 10 seconds on my woefully underpowered netbook machine (the built-
in time.clock call is used to query the system time in seconds); it may run arbitrarily
faster or slower for you. Still, this is at least as fast as the best drag-and-drop I’ve timed
on this machine.
So how does this script work around bad files on a CD backup? The secret is that it
catches and ignores file exceptions, and it keeps walking. To copy all the files that are
good on a CD, I simply run a command line such as this one:
C:\...\PP4E\System\Filetools> python cpall.py G:\Examples C:\PP3E\Examples
Because the CD is addressed as “G:” on my Windows machine, this is the command-
line equivalent of drag-and-drop copying from an item in the CD’s top-level folder,
except that the Python script will recover from errors on the CD and get the rest. On
copy errors, it prints a message to standard output and continues; for big copies, you’ll
probably want to redirect the script’s output to a file for later inspection.
In general, cpall c a n b e p a s s e d a n y a b s o l u t e d i r e c t o r y p a t h o n y o u r m a c h i n e , e v e n t h o s e
that indicate devices such as CDs. To make this go on Linux, try a root directory such
as /dev/cdrom or something similar to address your CD drive. Once you’ve copied a
tree this way, you still might want to verify; to see how, let’s move on to the next
example.
Comparing Directory Trees
Engineers can be a paranoid sort (but you didn’t hear that from me). At least I am. It
comes from decades of seeing things go terribly wrong, I suppose. When I create a CD
backup of my hard drive, for instance, there’s still something a bit too magical about
the process to trust the CD writer program to do the right thing. Maybe I should, but
it’s tough to have a lot of faith in tools that occasionally trash files and seem to crash
my Windows machine every third Tuesday of the month. When push comes to shove,
it’s nice to be able to verify that data copied to a backup CD is the same as the original—
or at least to spot deviations from the original—as soon as possible. If a backup is ever
needed, it will be really needed.
Because data CDs are accessible as simple directory trees in the file system, we are once
again in the realm of tree walkers—to verify a backup CD, we simply need to walk its
top-level directory. If our script is general enough, we will also be able to use it to verify
other copy operations as well—e.g., downloaded tar files, hard-drive backups, and so
on. In fact, the combination of the cpall script of the prior section and a general tree
comparison would provide a portable and scriptable way to copy and verify data sets.
We’ve already studied generic directory tree walkers, but they won’t help us here di-
rectly: we need to walk two directories in parallel and inspect common files along the
way. Moreover, walking either one of the two directories won’t allow us to spot files
308 | Chapter 6: Complete System Programs

and directories that exist only in the other. Something more custom and recursive seems
in order here.
Finding Directory Differences
Before we start coding, the first thing we need to clarify is what it means to compare
two directory trees. If both trees have exactly the same branch structure and depth, this
problem reduces to comparing corresponding files in each tree. In general, though, the
trees can have arbitrarily different shapes, depths, and so on.
More generally, the contents of a directory in one tree may have more or fewer entries
than the corresponding directory in the other tree. If those differing contents are file-
names, there is no corresponding file to compare with; if they are directory names, there
is no corresponding branch to descend through. In fact, the only way to detect files and
directories that appear in one tree but not the other is to detect differences in each level’s
directory.
In other words, a tree comparison algorithm will also have to perform directory com-
parisons along the way. Because this is a nested and simpler operation, let’s start by
coding and debugging a single-directory comparison of filenames in Example 6-11.
Example 6-11. PP4E\System\Filetools\dirdiff.py
"""
################################################################################
Usage: python dirdiff.py dir1-path dir2-path
Compare two directories to find files that exist in one but not the other.
This version uses the os.listdir function and list difference. Note that
this script checks only filenames, not file contents--see diffall.py for an
extension that does the latter by comparing .read() results.
################################################################################
"""
import os, sys
def reportdiffs(unique1, unique2, dir1, dir2):
"""
Generate diffs report for one dir: part of comparedirs output
"""
if not (unique1 or unique2):
print('Directory lists are identical')
else:
if unique1:
print('Files unique to', dir1)
for file in unique1:
print('...', file)
if unique2:
print('Files unique to', dir2)
for file in unique2:
print('...', file)
def difference(seq1, seq2):
Comparing Directory Trees | 309

"""
Return all items in seq1 only;
a set(seq1) - set(seq2) would work too, but sets are randomly
ordered, so any platform-dependent directory order would be lost
"""
return [item for item in seq1 if item not in seq2]
def comparedirs(dir1, dir2, files1=None, files2=None):
"""
Compare directory contents, but not actual files;
may need bytes listdir arg for undecodable filenames on some platforms
"""
print('Comparing', dir1, 'to', dir2)
files1 = os.listdir(dir1) if files1 is None else files1
files2 = os.listdir(dir2) if files2 is None else files2
unique1 = difference(files1, files2)
unique2 = difference(files2, files1)
reportdiffs(unique1, unique2, dir1, dir2)
return not (unique1 or unique2) # true if no diffs
def getargs():
"Args for command-line mode"
try:
dir1, dir2 = sys.argv[1:] # 2 command-line args
except:
print('Usage: dirdiff.py dir1 dir2')
sys.exit(1)
else:
return (dir1, dir2)
if __name__ == '__main__':
dir1, dir2 = getargs()
comparedirs(dir1, dir2)
Given listings of names in two directories, this script simply picks out unique names
in the first and unique names in the second, and reports any unique names found as
differences (that is, files in one directory but not the other). Its comparedirs function
returns a true result if no differences were found, which is useful for detecting differ-
ences in callers.
Let’s run this script on a few directories; differences are detected and reported as names
unique in either passed-in directory pathname. Notice that this is only a structural
comparison that just checks names in listings, not file contents (we’ll add the latter in
a moment):
C:\...\PP4E\System\Filetools> dirdiff.py C:\temp\PP3E\Examples copytemp
Comparing C:\temp\PP3E\Examples to copytemp
Directory lists are identical
C:\...\PP4E\System\Filetools> dirdiff.py C:\temp\PP3E\Examples\PP3E\System ..
Comparing C:\temp\PP3E\Examples\PP3E\System to ..
Files unique to C:\temp\PP3E\Examples\PP3E\System
... App
310 | Chapter 6: Complete System Programs

... Exits
... Media
... moreplus.py
Files unique to ..
... more.pyc
... spam.txt
... Tester
... __init__.pyc
The unique function is the heart of this script: it performs a simple list difference
operation. When applied to directories, unique items represent tree differences, and
common items are names of files or subdirectories that merit further comparisons or
traversals. In fact, in Python 2.4 and later, we could also use the built-in set object type
if we don’t care about the order in the results—because sets are not sequences, they
would not maintain any original and possibly platform-specific left-to-right order of
the directory listings provided by os.listdir. For that reason (and to avoid requiring
users to upgrade), we’ll keep using our own comprehension-based function instead
of sets.
Finding Tree Differences
We’ve just coded a directory comparison tool that picks out unique files and directories.
Now all we need is a tree walker that applies dirdiff at each level to report unique
items, explicitly compares the contents of files in common, and descends through di-
rectories in common. Example 6-12 fits the bill.
Example 6-12. PP4E\System\Filetools\diffall.py
"""
################################################################################
Usage: "python diffall.py dir1 dir2".
Recursive directory tree comparison: report unique files that exist in only
dir1 or dir2, report files of the same name in dir1 and dir2 with differing
contents, report instances of same name but different type in dir1 and dir2,
and do the same for all subdirectories of the same names in and below dir1
and dir2. A summary of diffs appears at end of output, but search redirected
output for "DIFF" and "unique" strings for further details. New: (3E) limit
reads to 1M for large files, (3E) catch same name=file/dir, (4E) avoid extra
os.listdir() calls in dirdiff.comparedirs() by passing results here along.
################################################################################
"""
import os, dirdiff
blocksize = 1024 * 1024 # up to 1M per read
def intersect(seq1, seq2):
"""
Return all items in both seq1 and seq2;
a set(seq1) & set(seq2) woud work too, but sets are randomly
ordered, so any platform-dependent directory order would be lost
"""
return [item for item in seq1 if item in seq2]
Comparing Directory Trees | 311

def comparetrees(dir1, dir2, diffs, verbose=False):
"""
Compare all subdirectories and files in two directory trees;
uses binary files to prevent Unicode decoding and endline transforms,
as trees might contain arbitrary binary files as well as arbitrary text;
may need bytes listdir arg for undecodable filenames on some platforms
"""
# compare file name lists
print('-' * 20)
names1 = os.listdir(dir1)
names2 = os.listdir(dir2)
if not dirdiff.comparedirs(dir1, dir2, names1, names2):
diffs.append('unique files at %s - %s' % (dir1, dir2))
print('Comparing contents')
common = intersect(names1, names2)
missed = common[:]
# compare contents of files in common
for name in common:
path1 = os.path.join(dir1, name)
path2 = os.path.join(dir2, name)
if os.path.isfile(path1) and os.path.isfile(path2):
missed.remove(name)
file1 = open(path1, 'rb')
file2 = open(path2, 'rb')
while True:
bytes1 = file1.read(blocksize)
bytes2 = file2.read(blocksize)
if (not bytes1) and (not bytes2):
if verbose: print(name, 'matches')
break
if bytes1 != bytes2:
diffs.append('files differ at %s - %s' % (path1, path2))
print(name, 'DIFFERS')
break
# recur to compare directories in common
for name in common:
path1 = os.path.join(dir1, name)
path2 = os.path.join(dir2, name)
if os.path.isdir(path1) and os.path.isdir(path2):
missed.remove(name)
comparetrees(path1, path2, diffs, verbose)
# same name but not both files or dirs?
for name in missed:
diffs.append('files missed at %s - %s: %s' % (dir1, dir2, name))
print(name, 'DIFFERS')
if __name__ == '__main__':
dir1, dir2 = dirdiff.getargs()
diffs = []
312 | Chapter 6: Complete System Programs

comparetrees(dir1, dir2, diffs, True) # changes diffs in-place
print('=' * 40) # walk, report diffs list
if not diffs:
print('No diffs found.')
else:
print('Diffs found:', len(diffs))
for diff in diffs: print('-', diff)
At each directory in the tree, this script simply runs the dirdiff tool to detect unique
names, and then compares names in common by intersecting directory lists. It uses
recursive function calls to traverse the tree and visits subdirectories only after compar-
ing all the files at each level so that the output is more coherent to read (the trace output
for subdirectories appears after that for files; it is not intermixed).
Notice the misses list, added in the third edition of this book; it’s very unlikely, but not
impossible, that the same name might be a file in one directory and a subdirectory in
the other. Also notice the blocksize variable; much like the tree copy script we saw
earlier, instead of blindly reading entire files into memory all at once, we limit each read
to grab up to 1 MB at a time, just in case any files in the directories are too big to be
loaded into available memory. Without this limit, I ran into MemoryError exceptions on
some machines with a prior version of this script that read both files all at once, like this:
bytes1 = open(path1, 'rb').read()
bytes2 = open(path2, 'rb').read()
if bytes1 == bytes2: ...
This code was simpler, but is less practical for very large files that can’t fit into your
available memory space (consider CD and DVD image files, for example). In the new
version’s loop, the file reads return what is left when there is less than 1 MB present or
remaining and return empty strings at end-of-file. Files match if all blocks read are the
same, and they reach end-of-file at the same time.
We’re also dealing in binary files and byte strings again to suppress Unicode decoding
and end-line translations for file content, because trees may contain arbitrary binary
and text files. The usual note about changing this to pass byte strings to os.listdir on
platforms where filenames may generate Unicode decoding errors applies here as well
(e.g. pass dir1.encode()). On some platforms, you may also want to detect and skip
certain kinds of special files in order to be fully general, but these were not in my trees,
so they are not in my script.
One minor change for the fourth edition of this book: os.listdir results are now gath-
ered just once per subdirectory and passed along, to avoid extra calls in dirdiff—not
a huge win, but every cycle counts on the pitifully underpowered netbook I used when
writing this edition.
Comparing Directory Trees | 313

Running the Script
Since we’ve already studied the tree-walking tools this script employs, let’s jump right
into a few example runs. When run on identical trees, status messages scroll during the
traversal, and a No diffs found. message appears at the end:
C:\...\PP4E\System\Filetools> diffall.py C:\temp\PP3E\Examples copytemp > diffs.txt
C:\...\PP4E\System\Filetools> type diffs.txt | more
--------------------
Comparing C:\temp\PP3E\Examples to copytemp
Directory lists are identical
Comparing contents
README-root.txt matches
--------------------
Comparing C:\temp\PP3E\Examples\PP3E to copytemp\PP3E
Directory lists are identical
Comparing contents
echoEnvironment.pyw matches
LaunchBrowser.pyw matches
Launcher.py matches
Launcher.pyc matches
...over 2,000 more lines omitted...
--------------------
Comparing C:\temp\PP3E\Examples\PP3E\TempParts to copytemp\PP3E\TempParts
Directory lists are identical
Comparing contents
109_0237.JPG matches
lawnlake1-jan-03.jpg matches
part-001.txt matches
part-002.html matches
========================================
No diffs found.
I usually run this with the verbose flag passed in as True, and redirect output to a file
(for big trees, it produces too much output to scroll through comfortably); use False
to watch fewer status messages fly by. To show how differences are reported, we need
to generate a few; for simplicity, I’ll manually change a few files scattered about one of
the trees, but you could also run a global search-and-replace script like the one we’ll
write later in this chapter. While we’re at it, let’s remove a few common files so that
directory uniqueness differences show up on the scope, too; the last two removal com-
mands in the following will generate one difference in the same directory in different
trees:
C:\...\PP4E\System\Filetools> notepad copytemp\PP3E\README-PP3E.txt
C:\...\PP4E\System\Filetools> notepad copytemp\PP3E\System\Filetools\commands.py
C:\...\PP4E\System\Filetools> notepad C:\temp\PP3E\Examples\PP3E\__init__.py
C:\...\PP4E\System\Filetools> del copytemp\PP3E\System\Filetools\cpall_visitor.py
C:\...\PP4E\System\Filetools> del copytemp\PP3E\Launcher.py
C:\...\PP4E\System\Filetools> del C:\temp\PP3E\Examples\PP3E\PyGadgets.py
Now, rerun the comparison walker to pick out differences and redirect its output report
to a file for easy inspection. The following lists just the parts of the output report that
314 | Chapter 6: Complete System Programs

identify differences. In typical use, I inspect the summary at the bottom of the report
first, and then search for the strings "DIFF" and "unique" in the report’s text if I need
more information about the differences summarized; this interface could be much more
user-friendly, of course, but it does the job for me:
C:\...\PP4E\System\Filetools> diffall.py C:\temp\PP3E\Examples copytemp > diff2.txt
C:\...\PP4E\System\Filetools> notepad diff2.txt
--------------------
Comparing C:\temp\PP3E\Examples to copytemp
Directory lists are identical
Comparing contents
README-root.txt matches
--------------------
Comparing C:\temp\PP3E\Examples\PP3E to copytemp\PP3E
Files unique to C:\temp\PP3E\Examples\PP3E
... Launcher.py
Files unique to copytemp\PP3E
... PyGadgets.py
Comparing contents
echoEnvironment.pyw matches
LaunchBrowser.pyw matches
Launcher.pyc matches
...more omitted...
PyGadgets_bar.pyw matches
README-PP3E.txt DIFFERS
todos.py matches
tounix.py matches
__init__.py DIFFERS
__init__.pyc matches
--------------------
Comparing C:\temp\PP3E\Examples\PP3E\System\Filetools to copytemp\PP3E\System\Fil...
Files unique to C:\temp\PP3E\Examples\PP3E\System\Filetools
... cpall_visitor.py
Comparing contents
commands.py DIFFERS
cpall.py matches
...more omitted...
--------------------
Comparing C:\temp\PP3E\Examples\PP3E\TempParts to copytemp\PP3E\TempParts
Directory lists are identical
Comparing contents
109_0237.JPG matches
lawnlake1-jan-03.jpg matches
part-001.txt matches
part-002.html matches
========================================
Diffs found: 5
- unique files at C:\temp\PP3E\Examples\PP3E - copytemp\PP3E
- files differ at C:\temp\PP3E\Examples\PP3E\README-PP3E.txt –
copytemp\PP3E\README-PP3E.txt
- files differ at C:\temp\PP3E\Examples\PP3E\__init__.py –
copytemp\PP3E\__init__.py
- unique files at C:\temp\PP3E\Examples\PP3E\System\Filetools –
copytemp\PP3E\System\Filetools
Comparing Directory Trees | 315

- files differ at C:\temp\PP3E\Examples\PP3E\System\Filetools\commands.py –
copytemp\PP3E\System\Filetools\commands.py
I added line breaks and tabs in a few of these output lines to make them fit on this page,
but the report is simple to understand. In a tree with 1,430 files and 185 directories,
we found five differences—the three files we changed by edits, and the two directories
we threw out of sync with the three removal commands.
Verifying Backups
So how does this script placate CD backup paranoia? To double-check my CD writer’s
work, I run a command such as the following. I can also use a command like this to
find out what has been changed since the last backup. Again, since the CD is “G:” on
my machine when plugged in, I provide a path rooted there; use a root such as /dev/
cdrom or /mnt/cdrom on Linux:
C:\...\PP4E\System\Filetools> python diffall.py Examples g:\PP3E\Examples > diff0226
C:\...\PP4E\System\Filetools> more diff0226
...output omitted...
The CD spins, the script compares, and a summary of differences appears at the end
of the report. For an example of a full difference report, see the file diff*.txt files in the
book’s examples distribution package. And to be really sure, I run the following global
comparison command to verify the entire book development tree backed up to a mem-
ory stick (which works just like a CD in terms of the filesystem):
C:\...\PP4E\System\Filetools> diffall.py F:\writing-backups\feb-26-10\dev
C:\Users\mark\Stuff\Books\4E\PP4E\dev > diff3.txt
C:\...\PP4E\System\Filetools> more diff3.txt
--------------------
Comparing F:\writing-backups\feb-26-10\dev to C:\Users\mark\Stuff\Books\4E\PP4E\dev
Directory lists are identical
Comparing contents
ch00.doc DIFFERS
ch01.doc matches
ch02.doc DIFFERS
ch03.doc matches
ch04.doc DIFFERS
ch05.doc matches
ch06.doc DIFFERS
...more output omitted...
--------------------
Comparing F:\writing-backups\feb-26-10\dev\Examples\PP4E\System\Filetools to C:\…
Files unique to C:\Users\mark\Stuff\Books\4E\PP4E\dev\Examples\PP4E\System\Filetools
... copytemp
... cpall.py
... diff2.txt
... diff3.txt
... diffall.py
... diffs.txt
... dirdiff.py
... dirdiff.pyc
316 | Chapter 6: Complete System Programs

Comparing contents
bigext-tree.py matches
bigpy-dir.py matches
...more output omitted...
========================================
Diffs found: 7
- files differ at F:\writing-backups\feb-26-10\dev\ch00.doc –
C:\Users\mark\Stuff\Books\4E\PP4E\dev\ch00.doc
- files differ at F:\writing-backups\feb-26-10\dev\ch02.doc –
C:\Users\mark\Stuff\Books\4E\PP4E\dev\ch02.doc
- files differ at F:\writing-backups\feb-26-10\dev\ch04.doc –
C:\Users\mark\Stuff\Books\4E\PP4E\dev\ch04.doc
- files differ at F:\writing-backups\feb-26-10\dev\ch06.doc –
C:\Users\mark\Stuff\Books\4E\PP4E\dev\ch06.doc
- files differ at F:\writing-backups\feb-26-10\dev\TOC.txt –
C:\Users\mark\Stuff\Books\4E\PP4E\dev\TOC.txt
- unique files at F:\writing-backups\feb-26-10\dev\Examples\PP4E\System\Filetools –
C:\Users\mark\Stuff\Books\4E\PP4E\dev\Examples\PP4E\System\Filetools
- files differ at F:\writing-backups\feb-26-10\dev\Examples\PP4E\Tools\visitor.py –
C:\Users\mark\Stuff\Books\4E\PP4E\dev\Examples\PP4E\Tools\visitor.py
This particular run indicates that I’ve added a few examples and changed some chapter
files since the last backup; if run immediately after a backup, nothing should show up
on diffall radar except for any files that cannot be copied in general. This global
comparison can take a few minutes. It performs byte-for-byte comparisons of all chap-
ter files and screenshots, the examples tree, and more, but it’s an accurate and complete
verification. Given that this book development tree contained many files, a more man-
ual verification procedure without Python’s help would be utterly impossible.
After writing this script, I also started using it to verify full automated backups of my
laptops onto an external hard-drive device. To do so, I run the cpall copy script we
wrote earlier in the preceding section of this chapter, and then the comparison script
developed here to check results and get a list of files that didn’t copy correctly. The last
time I did this, this procedure copied and compared 225,000 files and 15,000 directories
in 20 GB of space—not the sort of task that lends itself to manual labor!
Here are the magic incantations on my Windows laptop. f:\ is a partition on my ex-
ternal hard drive, and you shouldn’t be surprised if each of these commands runs for
half an hour or more on currently common hardware. A drag-and-drop copy takes at
least as long (assuming it works at all!):
C:\...\System\Filetools> cpall.py c:\ f:\ > f:\copy-log.txt
C:\...\System\Filetools> diffall.py f:\ c:\ > f:\diff-log.txt
Reporting Differences and Other Ideas
Finally, it’s worth noting that this script still only detects differences in the tree but does
not give any further details about individual file differences. In fact, it simply loads and
compares the binary contents of corresponding files with string comparisons. It’s a
simple yes/no result.
Comparing Directory Trees | 317

If and when I need more details about how two reported files actually differ, I either
edit the files or run the file-comparison command on the host platform (e.g., fc on
Windows/DOS, diff or cmp on Unix and Linux). That’s not a portable solution for this
last step; but for my purposes, just finding the differences in a 1,400-file tree was much
more critical than reporting which lines differ in files flagged in the report.
Of course, since we can always run shell commands in Python, this last step could be
automated by spawning a diff or fc command with os.popen as differences are en-
countered (or after the traversal, by scanning the report summary). The output of these
system calls could be displayed verbatim, or parsed for relevant parts.
We also might try to do a bit better here by opening true text files in text mode to ignore
line-terminator differences caused by transferring across platforms, but it’s not clear
that such differences should be ignored (what if the caller wants to know whether line-
end markers have been changed?). For example, after downloading a website with an
FTP script we’ll meet in Chapter 13, the diffall script detected a discrepancy between
the local copy of a file and the one at the remote server. To probe further, I simply ran
some interactive Python code:
>>> a = open('lp2e-updates.html', 'rb').read()
>>> b = open(r'C:\Mark\WEBSITE\public_html\lp2e-updates.html', 'rb').read()
>>> a == b
False
This verifies that there really is a binary difference in the downloaded and local versions
of the file; to see whether it’s because a Unix or DOS line end snuck into the file, try
again in text mode so that line ends are all mapped to the standard \n character:
>>> a = open('lp2e-updates.html', 'r').read()
>>> b = open(r'C:\Mark\WEBSITE\public_html\lp2e-updates.html', 'r').read()
>>> a == b
True
Sure enough; now, to find where the difference is, the following code checks character
by character until the first mismatch is found (in binary mode, so we retain the
difference):
>>> a = open('lp2e-updates.html', 'rb').read()
>>> b = open(r'C:\Mark\WEBSITE\public_html\lp2e-updates.html', 'rb').read()
>>> for (i, (ac, bc)) in enumerate(zip(a, b)):
... if ac != bc:
... print(i, repr(ac), repr(bc))
... break
...
37966 '\r' '\n'
This means that at byte offset 37,966, there is a \r in the downloaded file, but a \n in
the local copy. This line has a DOS line end in one and a Unix line end in the other. To
see more, print text around the mismatch:
318 | Chapter 6: Complete System Programs

>>> for (i, (ac, bc)) in enumerate(zip(a, b)):
... if ac != bc:
... print(i, repr(ac), repr(bc))
... print(repr(a[i-20:i+20]))
... print(repr(b[i-20:i+20]))
... break
...
37966 '\r' '\n'
're>\r\ndef min(*args):\r\n tmp = list(arg'
're>\r\ndef min(*args):\n tmp = list(args'
Apparently, I wound up with a Unix line end at one point in the local copy and a DOS
line end in the version I downloaded—the combined effect of the text mode used by
the download script itself (which translated \n to \r\n) and years of edits on both Linux
and Windows PDAs and laptops (I probably coded this change on Linux and copied
it to my local Windows copy in binary mode). Code such as this could be integrated
into the diffall script to make it more intelligent about text files and difference
reporting.
Because Python excels at processing files and strings, it’s even possible to go one step
further and code a Python equivalent of the fc and diff commands. In fact, much of
the work has already been done; the standard library module difflib could make this
task simple. See the Python library manual for details and usage examples.
We could also be smarter by avoiding the load and compare steps for files that differ
in size, and we might use a smaller block size to reduce the script’s memory require-
ments. For most trees, such optimizations are unnecessary; reading multimegabyte files
into strings is very fast in Python, and garbage collection reclaims the space as you go.
Since such extensions are beyond both this script’s scope and this chapter’s size limits,
though, they will have to await the attention of a curious reader (this book doesn’t have
formal exercises, but that almost sounds like one, doesn’t it?). For now, let’s move on
to explore ways to code one more common directory task: search.
Searching Directory Trees
Engineers love to change things. As I was writing this book, I found it almost irresisti-
ble to move and rename directories, variables, and shared modules in the book exam-
ples tree whenever I thought I’d stumbled onto a more coherent structure. That was
fine early on, but as the tree became more intertwined, this became a maintenance
nightmare. Things such as program directory paths and module names were hardcoded
all over the place—in package import statements, program startup calls, text notes,
configuration files, and more.
One way to repair these references, of course, is to edit every file in the directory by
hand, searching each for information that has changed. That’s so tedious as to be utterly
impossible in this book’s examples tree, though; the examples of the prior edition con-
tained 186 directories and 1,429 files! Clearly, I needed a way to automate updates after
Searching Directory Trees | 319

changes. There are a variety of solutions to such goals—from shell commands, to find
operations, to custom tree walkers, to general-purpose frameworks. In this and the next
section, we’ll explore each option in turn, just as I did while refining solutions to this
real-world dilemma.
Greps and Globs and Finds
If you work on Unix-like systems, you probably already know that there is a standard
way to search files for strings on such platforms—the command-line program grep and
its relatives list all lines in one or more files containing a string or string pattern.‖ Given
that shells expand (i.e., “glob”) filename patterns automatically, a command such as
the following will search a single directory’s Python files for a string named on the
command line (this uses the grep command installed with the Cygwin Unix-like system
for Windows that I described in the prior chapter):
C:\...\PP4E\System\Filetools> c:\cygwin\bin\grep.exe walk *.py
bigext-tree.py:for (thisDir, subsHere, filesHere) in os.walk(dirname):
bigpy-path.py: for (thisDir, subsHere, filesHere) in os.walk(srcdir):
bigpy-tree.py:for (thisDir, subsHere, filesHere) in os.walk(dirname):
As we’ve seen, we can often accomplish the same within a Python script by running
such a shell command with os.system or os.popen. And if we search its results manually,
we can also achieve similar results with the Python glob module we met in Chapter 4;
it expands a filename pattern into a list of matching filename strings much like a shell:
C:\...\PP4E\System\Filetools> python
>>> import os
>>> for line in os.popen(r'c:\cygwin\bin\grep.exe walk *.py'):
... print(line, end='')
...
bigext-tree.py:for (thisDir, subsHere, filesHere) in os.walk(dirname):
bigpy-path.py: for (thisDir, subsHere, filesHere) in os.walk(srcdir):
bigpy-tree.py:for (thisDir, subsHere, filesHere) in os.walk(dirname):
>>> from glob import glob
>>> for filename in glob('*.py'):
... if 'walk' in open(filename).read():
... print(filename)
...
bigext-tree.py
bigpy-path.py
bigpy-tree.py
Unfortunately, these tools are generally limited to a single directory. glob can visit
multiple directories given the right sort of pattern string, but it’s not a general directory
walker of the sort I need to maintain a large examples tree. On Unix-like systems, a
find shell command can go the extra mile to traverse an entire directory tree. For
‖In fact, the act of searching files often goes by the colloquial name “grepping” among developers who have
spent any substantial time in the Unix ghetto.
320 | Chapter 6: Complete System Programs

instance, the following Unix command line would pinpoint lines and files at and below
the current directory that mention the string popen:
find . -name "*.py" -print -exec fgrep popen {} \;
If you happen to have a Unix-like find command on every machine you will ever use,
this is one way to process directories.
Rolling Your Own find Module
But if you don’t happen to have a Unix find on all your computers, not to worry—it’s
easy to code a portable one in Python. Python itself used to have a find module in its
standard library, which I used frequently in the past. Although that module was re-
moved between the second and third editions of this book, the newer os.walk makes
writing your own simple. Rather than lamenting the demise of a module, I decided to
spend 10 minutes coding a custom equivalent.
Example 6-13 implements a find utility in Python, which collects all matching filenames
in a directory tree. Unlike glob.glob, its find.find automatically matches through an
entire tree. And unlike the tree walk structure of os.walk, we can treat find.find results
as a simple linear group.
Example 6-13. PP4E\Tools\find.py
#!/usr/bin/python
"""
################################################################################
Return all files matching a filename pattern at and below a root directory;
custom version of the now deprecated find module in the standard library:
import as "PP4E.Tools.find"; like original, but uses os.walk loop, has no
support for pruning subdirs, and is runnable as a top-level script;
find() is a generator that uses the os.walk() generator to yield just
matching filenames: use findlist() to force results list generation;
################################################################################
"""
import fnmatch, os
def find(pattern, startdir=os.curdir):
for (thisDir, subsHere, filesHere) in os.walk(startdir):
for name in subsHere + filesHere:
if fnmatch.fnmatch(name, pattern):
fullpath = os.path.join(thisDir, name)
yield fullpath
def findlist(pattern, startdir=os.curdir, dosort=False):
matches = list(find(pattern, startdir))
if dosort: matches.sort()
return matches
Searching Directory Trees | 321

if __name__ == '__main__':
import sys
namepattern, startdir = sys.argv[1], sys.argv[2]
for name in find(namepattern, startdir): print(name)
There’s not much to this file—it’s largely just a minor extension to os.walk—but calling
its find function provides the same utility as both the deprecated find standard library
module and the Unix utility of the same name. It’s also much more portable, and no-
ticeably easier than repeating all of this file’s code every time you need to perform a
find-type search. Because this file is instrumented to be both a script and a library, it
can also be both run as a command-line tool or called from other programs.
For instance, to process every Python file in the directory tree rooted one level up from
the current working directory, I simply run the following command line from a system
console window. Run this yourself to watch its progress; the script’s standard output
is piped into the more command to page it here, but it can be piped into any processing
program that reads its input from the standard input stream:
C:\...\PP4E\Tools> python find.py *.py .. | more
..\LaunchBrowser.py
..\Launcher.py
..\__init__.py
..\Preview\attachgui.py
..\Preview\customizegui.py
...more lines omitted...
For more control, run the following sort of Python code from a script or interactive
prompt. In this mode, you can apply any operation to the found files that the Python
language provides:
C:\...\PP4E\System\Filetools> python
>>> from PP4E.Tools import find # or just import find if in cwd
>>> for filename in find.find('*.py', '..'):
... if 'walk' in open(filename).read():
... print(filename)
...
..\Launcher.py
..\System\Filetools\bigext-tree.py
..\System\Filetools\bigpy-path.py
..\System\Filetools\bigpy-tree.py
..\Tools\cleanpyc.py
..\Tools\find.py
..\Tools\visitor.py
Notice how this avoids having to recode the nested loop structure required for
os.walk every time you want a list of matching file names; for many use cases, this seems
conceptually simpler. Also note that because this finder is a generator function, your
script doesn’t have to wait until all matching files have been found and collected;
os.walk yields results as it goes, and find.find yields matching files among that set.
Here’s a more complex example of our find module at work: the following system
command line lists all Python files in directory C:\temp\PP3E whose names begin with
322 | Chapter 6: Complete System Programs

the letter q or t. Note how find returns full directory paths that begin with the start
directory specification:
C:\...\PP4E\Tools> find.py [qx]*.py C:\temp\PP3E
C:\temp\PP3E\Examples\PP3E\Database\SQLscripts\querydb.py
C:\temp\PP3E\Examples\PP3E\Gui\Tools\queuetest-gui-class.py
C:\temp\PP3E\Examples\PP3E\Gui\Tools\queuetest-gui.py
C:\temp\PP3E\Examples\PP3E\Gui\Tour\quitter.py
C:\temp\PP3E\Examples\PP3E\Internet\Other\Grail\Question.py
C:\temp\PP3E\Examples\PP3E\Internet\Other\XML\xmlrpc.py
C:\temp\PP3E\Examples\PP3E\System\Threads\queuetest.py
And here’s some Python code that does the same find but also extracts base names and
file sizes for each file found:
C:\...\PP4E\Tools> python
>>> import os
>>> from find import find
>>> for name in find('[qx]*.py', r'C:\temp\PP3E'):
... print(os.path.basename(name), os.path.getsize(name))
...
querydb.py 635
queuetest-gui-class.py 1152
queuetest-gui.py 963
quitter.py 801
Question.py 817
xmlrpc.py 705
queuetest.py 1273
The fnmatch module
To achieve such code economy, the find module calls os.walk to walk the tree and
simply yields matching filenames along the way. New here, though, is the fnmatch
module—yet another Python standard library module that performs Unix-like pattern
matching against filenames. This module supports common operators in name pattern
strings: * to match any number of characters, ? to match any single character, and
[...] and [!...] to match any character inside the bracket pairs or not; other characters
match themselves. Unlike the re module, fnmatch supports only common Unix shell
matching operators, not full-blown regular expression patterns; we’ll see why this dis-
tinction matters in Chapter 19.
Interestingly, Python’s glob.glob function also uses the fnmatch module to match
names: it combines os.listdir and fnmatch to match in directories in much the same
way our find.find combines os.walk and fnmatch to match in trees (though os.walk
ultimately uses os.listdir as well). One ramification of all this is that you can pass
byte strings for both pattern and start-directory to find.find if you need to suppress
Unicode filename decoding, just as you can for os.walk and glob.glob; you’ll receive
byte strings for filenames in the result. See Chapter 4 for more details on Unicode
filenames.
Searching Directory Trees | 323
By comparison, find.find with just “*” for its name pattern is also roughly equivalent
to platform-specific directory tree listing shell commands such as dir /B /S on DOS
and Windows. Since all files match “*”, this just exhaustively generates all the file names
in a tree with a single traversal. Because we can usually run such shell commands in a
Python script with os.popen, the following do the same work, but the first is inherently
nonportable and must start up a separate program along the way:
>>> import os
>>> for line in os.popen('dir /B /S'): print(line, end='')
>>> from PP4E.Tools.find import find
>>> for name in find(pattern='*', startdir='.'): print(name)
Watch for this utility to show up in action later in this chapter and book, including an
arguably strong showing in the next section and a cameo appearance in the Grep dialog
of Chapter 11’s PyEdit text editor GUI, where it will serve a central role in a threaded
external files search tool. The standard library’s find module may be gone, but it need
not be forgotten.
In fact, you must pass a bytes pattern string for a bytes filename to
fnnmatch (or pass both as str), because the re pattern matching module
it uses does not allow the string types of subject and pattern to be mixed.
This rule is inherited by our find.find for directory and pattern. See
Chapter 19 for more on re.
Curiously, the fnmatch module in Python 3.1 also converts a bytes pat-
tern string to and from Unicode str in order to perform internal text
processing, using the Latin-1 encoding. This suffices for many contexts,
but may not be entirely sound for some encodings which do not map to
Latin-1 cleanly. sys.getfilesystemencoding might be a better encoding
choice in such contexts, as this reflects the underlying file system’s con-
straints (as we learned in Chapter 4, sys.getdefaultencoding reflects file
content, not names).
In the absence of bytes, os.walk assumes filenames follow the platform’s
convention and does not ignore decoding errors triggered by os.list
dir. In the “grep” utility of Chapter 11’s PyEdit, this picture is further
clouded by the fact that a str pattern string from a GUI would have to
be encoded to bytes using a potentially inappropriate encoding for some
files present. See fnmatch.py and os.py in Python’s library and the Py-
thon library manual for more details. Unicode can be a very subtle affair.
Cleaning Up Bytecode Files
The find module of the prior section isn’t quite the general string searcher we’re after,
but it’s an important first step—it collects files that we can then search in an automated
script. In fact, the act of collecting matching files in a tree is enough by itself to support
a wide variety of day-to-day system tasks.
324 | Chapter 6: Complete System Programs

For example, one of the other common tasks I perform on a regular basis is removing
all the bytecode files in a tree. Because these are not always portable across major Python
releases, it’s usually a good idea to ship programs without them and let Python create
new ones on first imports. Now that we’re expert os.walk users, we could cut out the
middleman and use it directly. Example 6-14 codes a portable and general command-
line tool, with support for arguments, exception processing, tracing, and list-only
mode.
Example 6-14. PP4E\Tools\cleanpyc.py
"""
delete all .pyc bytecode files in a directory tree: use the
command line arg as root if given, else current working dir
"""
import os, sys
findonly = False
rootdir = os.getcwd() if len(sys.argv) == 1 else sys.argv[1]
found = removed = 0
for (thisDirLevel, subsHere, filesHere) in os.walk(rootdir):
for filename in filesHere:
if filename.endswith('.pyc'):
fullname = os.path.join(thisDirLevel, filename)
print('=>', fullname)
if not findonly:
try:
os.remove(fullname)
removed += 1
except:
type, inst = sys.exc_info()[:2]
print('*'*4, 'Failed:', filename, type, inst)
found += 1
print('Found', found, 'files, removed', removed)
When run, this script walks a directory tree (the CWD by default, or else one passed
in on the command line), deleting any and all bytecode files along the way:
C:\...\Examples\PP4E> Tools\cleanpyc.py
=> C:\Users\mark\Stuff\Books\4E\PP4E\dev\Examples\PP4E\__init__.pyc
=> C:\Users\mark\Stuff\Books\4E\PP4E\dev\Examples\PP4E\Preview\initdata.pyc
=> C:\Users\mark\Stuff\Books\4E\PP4E\dev\Examples\PP4E\Preview\make_db_file.pyc
=> C:\Users\mark\Stuff\Books\4E\PP4E\dev\Examples\PP4E\Preview\manager.pyc
=> C:\Users\mark\Stuff\Books\4E\PP4E\dev\Examples\PP4E\Preview\person.pyc
...more lines here...
Found 24 files, removed 24
C:\...\PP4E\Tools> cleanpyc.py .
=> .\find.pyc
=> .\visitor.pyc
=> .\__init__.pyc
Found 3 files, removed 3
Searching Directory Trees | 325

This script works, but it’s a bit more manual and code-y than it needs to be. In fact,
now that we also know about find operations, writing scripts based upon them is almost
trivial when we just need to match filenames. Example 6-15, for instance, falls back on
spawning shell find commands if you have them.
Example 6-15. PP4E\Tools\cleanpyc-find-shell.py
"""
find and delete all "*.pyc" bytecode files at and below the directory
named on the command-line; assumes a nonportable Unix-like find command
"""
import os, sys
rundir = sys.argv[1]
if sys.platform[:3] == 'win':
findcmd = r'c:\cygwin\bin\find %s -name "*.pyc" -print' % rundir
else:
findcmd = 'find %s -name "*.pyc" -print' % rundir
print(findcmd)
count = 0
for fileline in os.popen(findcmd): # for all result lines
count += 1 # have \n at the end
print(fileline, end='')
os.remove(fileline.rstrip())
print('Removed %d .pyc files' % count)
When run, files returned by the shell command are removed:
C:\...\PP4E\Tools> cleanpyc-find-shell.py .
c:\cygwin\bin\find . -name "*.pyc" -print
./find.pyc
./visitor.pyc
./__init__.pyc
Removed 3 .pyc files
This script uses os.popen to collect the output of a Cygwin find program installed on
one of my Windows computers, or else the standard find tool on the Linux side. It’s
also completely nonportable to Windows machines that don’t have the Unix-like find
program installed, and that includes other computers of my own (not to mention those
throughout most of the world at large). As we’ve seen, spawning shell commands also
incurs performance penalties for starting a new program.
We can do much better on the portability and performance fronts and still retain code
simplicity, by applying the find tool we wrote in Python in the prior section. The new
script is shown in Example 6-16.
Example 6-16. PP4E\Tools\cleanpyc-find-py.py
"""
find and delete all "*.pyc" bytecode files at and below the directory
named on the command-line; this uses a Python-coded find utility, and
326 | Chapter 6: Complete System Programs

so is portable; run this to delete .pyc's from an old Python release;
"""
import os, sys, find # here, gets Tools.find
count = 0
for filename in find.find('*.pyc', sys.argv[1]):
count += 1
print(filename)
os.remove(filename)
print('Removed %d .pyc files' % count)
When run, all bytecode files in the tree rooted at the passed-in directory name are
removed as before; this time, though, our script works just about everywhere Python
does:
C:\...\PP4E\Tools> cleanpyc-find-py.py .
.\find.pyc
.\visitor.pyc
.\__init__.pyc
Removed 3 .pyc files
This works portably, and it avoids external program startup costs. But find is really
just half the story—it collects files matching a name pattern but doesn’t search their
content. Although extra code can add such searching to a find’s result, a more manual
approach can allow us to tap into the search process more directly. The next section
shows how.
A Python Tree Searcher
After experimenting with greps and globs and finds, in the end, to help ease the task
of performing global searches on all platforms I might ever use, I wound up coding a
task-specific Python script to do most of the work for me. Example 6-17 employs the
following standard Python tools that we met in the preceding chapters: os.walk to visit
files in a directory, os.path.splitext to skip over files with binary-type extensions, and
os.path.join to portably combine a directory path and filename.
Because it’s pure Python code, it can be run the same way on both Linux and Windows.
In fact, it should work on any computer where Python has been installed. Moreover,
because it uses direct system calls, it will likely be faster than approaches that rely on
underlying shell commands.
Example 6-17. PP4E\Tools\search_all.py
"""
################################################################################
Use: "python ...\Tools\search_all.py dir string".
Search all files at and below a named directory for a string; uses the
os.walk interface, rather than doing a find.find to collect names first;
similar to calling visitfile for each find.find result for "*" pattern;
Searching Directory Trees | 327

################################################################################
"""
import os, sys
listonly = False
textexts = ['.py', '.pyw', '.txt', '.c', '.h'] # ignore binary files
def searcher(startdir, searchkey):
global fcount, vcount
fcount = vcount = 0
for (thisDir, dirsHere, filesHere) in os.walk(startdir):
for fname in filesHere: # do non-dir files here
fpath = os.path.join(thisDir, fname) # fnames have no dirpath
visitfile(fpath, searchkey)
def visitfile(fpath, searchkey): # for each non-dir file
global fcount, vcount # search for string
print(vcount+1, '=>', fpath) # skip protected files
try:
if not listonly:
if os.path.splitext(fpath)[1] not in textexts:
print('Skipping', fpath)
elif searchkey in open(fpath).read():
input('%s has %s' % (fpath, searchkey))
fcount += 1
except:
print('Failed:', fpath, sys.exc_info()[0])
vcount += 1
if __name__ == '__main__':
searcher(sys.argv[1], sys.argv[2])
print('Found in %d files, visited %d' % (fcount, vcount))
Operationally, this script works roughly the same as calling its visitfile function for
every result generated by our find.find tool with a pattern of “*”; but because this
version is specific to searching content it can better tailored for its goal. Really, this
equivalence holds only because a “*” pattern invokes an exhaustive traversal in
find.find, and that’s all that this new script’s searcher function does. The finder is
good at selecting specific file types, but this script benefits from a more custom single
traversal.
When run standalone, the search key is passed on the command line; when imported,
clients call this module’s searcher function directly. For example, to search (that is,
grep) for all appearances of a string in the book examples tree, I run a command line
like this in a DOS or Unix shell:
C:\\PP4E> Tools\search_all.py . mimetypes
1 => .\LaunchBrowser.py
2 => .\Launcher.py
3 => .\Launch_PyDemos.pyw
4 => .\Launch_PyGadgets_bar.pyw
5 => .\__init__.py
6 => .\__init__.pyc
328 | Chapter 6: Complete System Programs

Skipping .\__init__.pyc
7 => .\Preview\attachgui.py
8 => .\Preview\bob.pkl
Skipping .\Preview\bob.pkl
...more lines omitted: pauses for Enter key press at matches...
Found in 2 files, visited 184
The script lists each file it checks as it goes, tells you which files it is skipping (names
that end in extensions not listed in the variable textexts that imply binary data), and
pauses for an Enter key press each time it announces a file containing the search string.
The search_all script works the same way when it is imported rather than run, but
there is no final statistics output line (fcount and vcount live in the module and so would
have to be imported to be inspected here):
C:\...\PP4E\dev\Examples\PP4E> python
>>> import Tools.search_all
>>> search_all.searcher(r'C:\temp\PP3E\Examples', 'mimetypes')
...more lines omitted: 8 pauses for Enter key press along the way...
>>> search_all.fcount, search_all.vcount # matches, files
(8, 1429)
However launched, this script tracks down all references to a string in an entire directory
tree: a name of a changed book examples file, object, or directory, for instance. It’s
exactly what I was looking for—or at least I thought so, until further deliberation drove
me to seek more complete and better structured solutions, the topic of the next section.
Be sure to also see the coverage of regular expressions in Chapter 19.
The search_all script here searches for a simple string in each file with
the in string membership expression, but it would be trivial to extend
it to search for a regular expression pattern match instead (roughly, just
replace in with a call to a regular expression object’s search method).
Of course, such a mutation will be much more trivial after we’ve learned
how.
Also notice the textexts list in Example 6-17, which attempts to list all
possible binary file types: it would be more general and robust to use
the mimetypes logic we will meet near the end of this chapter in order to
guess file content type from its name, but the skips list provides more
control and sufficed for the trees I used this script against.
Finally note that for simplicity many of the directory searches in this
chapter assume that text is encoded per the underlying platform’s Uni-
code default. They could open text in binary mode to avoid decoding
errors, but searches might then be inaccurate because of encoding
scheme differences in the raw encoded bytes. To see how to do better,
watch for the “grep” utility in Chapter 11’s PyEdit GUI, which will apply
an encoding name to all the files in a searched tree and ignore those text
or binary files that fail to decode.
Searching Directory Trees | 329

Visitor: Walking Directories “++”
Laziness is the mother of many a framework. Armed with the portable search_all script
from Example 6-17, I was able to better pinpoint files to be edited every time I changed
the book examples tree content or structure. At least initially, in one window I ran
search_all to pick out suspicious files and edited each along the way by hand in another
window.
Pretty soon, though, this became tedious, too. Manually typing filenames into editor
commands is no fun, especially when the number of files to edit is large. Since I occa-
sionally have better things to do than manually start dozens of text editor sessions, I
started looking for a way to automatically run an editor on each suspicious file.
Unfortunately, search_all simply prints results to the screen. Although that text could
be intercepted with os.popen and parsed by another program, a more direct approach
that spawns edit sessions during the search may be simpler. That would require major
changes to the tree search script as currently coded, though, and make it useful for just
one specific purpose. At this point, three thoughts came to mind:
Redundancy
After writing a few directory walking utilities, it became clear that I was rewriting
the same sort of code over and over again. Traversals could be even further sim-
plified by wrapping common details for reuse. Although the os.walk tool avoids
having to write recursive functions, its model tends to foster redundant operations
and code (e.g., directory name joins, tracing prints).
Extensibility
Past experience informed me that it would be better in the long run to add features
to a general directory searcher as external components, rather than changing the
original script itself. Because editing files was just one possible extension (what
about automating text replacements, too?), a more general, customizable, and re-
usable approach seemed the way to go. Although os.walk is straightforward to use,
its nested loop-based structure doesn’t quite lend itself to customization the way
a class can.
Encapsulation
Based on past experience, I also knew that it’s a generally good idea to insulate
programs from implementation details as much as possible. While os.walk hides
the details of recursive traversal, it still imposes a very specific interface on its cli-
ents, which is prone to change over time. Indeed it has—as I’ll explain further at
the end of this section, one of Python’s tree walkers was removed altogether in 3.X,
instantly breaking code that relied upon it. It would be better to hide such de-
pendencies behind a more neutral interface, so that clients won’t break as our needs
change.
Of course, if you’ve studied Python in any depth, you know that all these goals point
to using an object-oriented framework for traversals and searching. Example 6-18 is a
330 | Chapter 6: Complete System Programs

concrete realization of these goals. It exports a general FileVisitor class that mostly
just wraps os.walk for easier use and extension, as well as a generic SearchVisitor class
that generalizes the notion of directory searches.
By itself, SearchVisitor simply does what search_all did, but it also opens up the search
process to customization—bits of its behavior can be modified by overloading its
methods in subclasses. Moreover, its core search logic can be reused everywhere we
need to search. Simply define a subclass that adds extensions for a specific task. The
same goes for FileVisitor—by redefining its methods and using its attributes, we can
tap into tree search using OOP coding techniques. As is usual in programming, once
you repeat tactical tasks often enough, they tend to inspire this kind of strategic
thinking.
Example 6-18. PP4E\Tools\visitor.py
"""
####################################################################################
Test: "python ...\Tools\visitor.py dir testmask [string]". Uses classes and
subclasses to wrap some of the details of os.walk call usage to walk and search;
testmask is an integer bitmask with 1 bit per available self-test; see also:
visitor_*/.py subclasses use cases; frameworks should generally use__X pseudo
private names, but all names here are exported for use in subclasses and clients;
redefine reset to support multiple independent walks that require subclass updates;
####################################################################################
"""
import os, sys
class FileVisitor:
"""
Visits all nondirectory files below startDir (default '.');
override visit* methods to provide custom file/dir handlers;
context arg/attribute is optional subclass-specific state;
trace switch: 0 is silent, 1 is directories, 2 adds files
"""
def __init__(self, context=None, trace=2):
self.fcount = 0
self.dcount = 0
self.context = context
self.trace = trace
def run(self, startDir=os.curdir, reset=True):
if reset: self.reset()
for (thisDir, dirsHere, filesHere) in os.walk(startDir):
self.visitdir(thisDir)
for fname in filesHere: # for non-dir files
fpath = os.path.join(thisDir, fname) # fnames have no path
self.visitfile(fpath)
def reset(self): # to reuse walker
self.fcount = self.dcount = 0 # for independent walks
def visitdir(self, dirpath): # called for each dir
Visitor: Walking Directories “++” | 331

self.dcount += 1 # override or extend me
if self.trace > 0: print(dirpath, '...')
def visitfile(self, filepath): # called for each file
self.fcount += 1 # override or extend me
if self.trace > 1: print(self.fcount, '=>', filepath)
class SearchVisitor(FileVisitor):
"""
Search files at and below startDir for a string;
subclass: redefine visitmatch, extension lists, candidate as needed;
subclasses can use testexts to specify file types to search (but can
also redefine candidate to use mimetypes for text content: see ahead)
"""
skipexts = []
testexts = ['.txt', '.py', '.pyw', '.html', '.c', '.h'] # search these exts
#skipexts = ['.gif', '.jpg', '.pyc', '.o', '.a', '.exe'] # or skip these exts
def __init__(self, searchkey, trace=2):
FileVisitor.__init__(self, searchkey, trace)
self.scount = 0
def reset(self): # on independent walks
self.scount = 0
def candidate(self, fname): # redef for mimetypes
ext = os.path.splitext(fname)[1]
if self.testexts:
return ext in self.testexts # in test list
else: # or not in skip list
return ext not in self.skipexts
def visitfile(self, fname): # test for a match
FileVisitor.visitfile(self, fname)
if not self.candidate(fname):
if self.trace > 0: print('Skipping', fname)
else:
text = open(fname).read() # 'rb' if undecodable
if self.context in text: # or text.find() != −1
self.visitmatch(fname, text)
self.scount += 1
def visitmatch(self, fname, text): # process a match
print('%s has %s' % (fname, self.context)) # override me lower
if __name__ == '__main__':
# self-test logic
dolist = 1
dosearch = 2 # 3=do list and search
donext = 4 # when next test added
def selftest(testmask):
332 | Chapter 6: Complete System Programs

if testmask & dolist:
visitor = FileVisitor(trace=2)
visitor.run(sys.argv[2])
print('Visited %d files and %d dirs' % (visitor.fcount, visitor.dcount))
if testmask & dosearch:
visitor = SearchVisitor(sys.argv[3], trace=0)
visitor.run(sys.argv[2])
print('Found in %d files, visited %d' % (visitor.scount, visitor.fcount))
selftest(int(sys.argv[1])) # e.g., 3 = dolist | dosearch
This module primarily serves to export classes for external use, but it does something
useful when run standalone, too. If you invoke it as a script with a test mask of 1 and
a root directory name, it makes and runs a FileVisitor object and prints an exhaustive
listing of every file and directory at and below the root:
C:\...\PP4E\Tools> visitor.py 1 C:\temp\PP3E\Examples
C:\temp\PP3E\Examples ...
1 => C:\temp\PP3E\Examples\README-root.txt
C:\temp\PP3E\Examples\PP3E ...
2 => C:\temp\PP3E\Examples\PP3E\echoEnvironment.pyw
3 => C:\temp\PP3E\Examples\PP3E\LaunchBrowser.pyw
4 => C:\temp\PP3E\Examples\PP3E\Launcher.py
5 => C:\temp\PP3E\Examples\PP3E\Launcher.pyc
...more output omitted (pipe into more or a file)...
1424 => C:\temp\PP3E\Examples\PP3E\System\Threads\thread-count.py
1425 => C:\temp\PP3E\Examples\PP3E\System\Threads\thread1.py
C:\temp\PP3E\Examples\PP3E\TempParts ...
1426 => C:\temp\PP3E\Examples\PP3E\TempParts\109_0237.JPG
1427 => C:\temp\PP3E\Examples\PP3E\TempParts\lawnlake1-jan-03.jpg
1428 => C:\temp\PP3E\Examples\PP3E\TempParts\part-001.txt
1429 => C:\temp\PP3E\Examples\PP3E\TempParts\part-002.html
Visited 1429 files and 186 dirs
If you instead invoke this script with a 2 as its first command-line argument, it makes
and runs a SearchVisitor object using the third argument as the search key. This form
is similar to running the search_all.py script we met earlier, but it simply reports each
matching file without pausing:
C:\...\PP4E\Tools> visitor.py 2 C:\temp\PP3E\Examples mimetypes
C:\temp\PP3E\Examples\PP3E\extras\LosAlamosAdvancedClass\day1-system\data.txt ha
s mimetypes
C:\temp\PP3E\Examples\PP3E\Internet\Email\mailtools\mailParser.py has mimetypes
C:\temp\PP3E\Examples\PP3E\Internet\Email\mailtools\mailSender.py has mimetypes
C:\temp\PP3E\Examples\PP3E\Internet\Ftp\mirror\downloadflat.py has mimetypes
C:\temp\PP3E\Examples\PP3E\Internet\Ftp\mirror\downloadflat_modular.py has mimet
ypes
C:\temp\PP3E\Examples\PP3E\Internet\Ftp\mirror\ftptools.py has mimetypes
C:\temp\PP3E\Examples\PP3E\Internet\Ftp\mirror\uploadflat.py has mimetypes
C:\temp\PP3E\Examples\PP3E\System\Media\playfile.py has mimetypes
Found in 8 files, visited 1429
Visitor: Walking Directories “++” | 333

Technically, passing this script a first argument of 3 runs both a FileVisitor and a
SearchVisitor (two separate traversals are performed). The first argument is really used
as a bit mask to select one or more supported self-tests; if a test’s bit is on in the binary
value of the argument, the test will be run. Because 3 is 011 in binary, it selects both a
search (010) and a listing (001). In a more user-friendly system, we might want to be
more symbolic about that (e.g., check for -search and -list arguments), but bit masks
work just as well for this script’s scope.
As usual, this module can also be used interactively. The following is one way to de-
termine how many files and directories you have in specific directories; the last com-
mand walks over your entire drive (after a generally noticeable delay!). See also the
“biggest file” example at the start of this chapter for issues such as potential repeat visits
not handled by this walker:
C:\...\PP4E\Tools> python
>>> from visitor import FileVisitor
>>> V = FileVisitor(trace=0)
>>> V.run(r'C:\temp\PP3E\Examples')
>>> V.dcount, V.fcount
(186, 1429)
>>> V.run('..') # independent walk (reset counts)
>>> V.dcount, V.fcount
(19, 181)
>>> V.run('..', reset=False) # accumulative walk (keep counts)
>>> V.dcount, V.fcount
(38, 362)
>>> V = FileVisitor(trace=0) # new independent walker (own counts)
>>> V.run(r'C:\\') # entire drive: try '/' on Unix-en
>>> V.dcount, V.fcount
(24992, 198585)
Although the visitor module is useful by itself for listing and searching trees, it was
really designed to be extended. In the rest of this section, let’s quickly step through a
handful of visitor clients which add more specific tree operations, using normal OO
customization techniques.
Editing Files in Directory Trees (Visitor)
After genericizing tree traversals and searches, it’s easy to add automatic file editing in
a brand-new, separate component. Example 6-19 defines a new EditVisitor class that
simply customizes the visitmatch method of the SearchVisitor class to open a text
editor on the matched file. Yes, this is the complete program—it needs to do something
special only when visiting matched files, and so it needs to provide only that behavior.
The rest of the traversal and search logic is unchanged and inherited.
334 | Chapter 6: Complete System Programs

Example 6-19. PP4E\Tools\visitor_edit.py
"""
Use: "python ...\Tools\visitor_edit.py string rootdir?".
Add auto-editor startup to SearchVisitor in an external subclass component;
Automatically pops up an editor on each file containing string as it traverses;
can also use editor='edit' or 'notepad' on Windows; to use texteditor from
later in the book, try r'python Gui\TextEditor\textEditor.py'; could also
send a search command to go to the first match on start in some editors;
"""
import os, sys
from visitor import SearchVisitor
class EditVisitor(SearchVisitor):
"""
edit files at and below startDir having string
"""
editor = r'C:\cygwin\bin\vim-nox.exe' # ymmv!
def visitmatch(self, fpathname, text):
os.system('%s %s' % (self.editor, fpathname))
if __name__ == '__main__':
visitor = EditVisitor(sys.argv[1])
visitor.run('.' if len(sys.argv) < 3 else sys.argv[2])
print('Edited %d files, visited %d' % (visitor.scount, visitor.fcount))
When we make and run an EditVisitor, a text editor is started with the os.system
command-line spawn call, which usually blocks its caller until the spawned program
finishes. As coded, when run on my machines, each time this script finds a matched
file during the traversal, it starts up the vi text editor within the console window where
the script was started; exiting the editor resumes the tree walk.
Let’s find and edit some files. When run as a script, we pass this program the search
string as a command argument (here, the string mimetypes is the search key). The root
directory passed to the run method is either the second argument or “.” (the current
run directory) by default. Traversal status messages show up in the console, but each
matched file now automatically pops up in a text editor along the way. In the following,
the editor is started eight times—try this with an editor and tree of your own to get a
better feel for how it works:
C:\...\PP4E\Tools> visitor_edit.py mimetypes C:\temp\PP3E\Examples
C:\temp\PP3E\Examples ...
1 => C:\temp\PP3E\Examples\README-root.txt
C:\temp\PP3E\Examples\PP3E ...
2 => C:\temp\PP3E\Examples\PP3E\echoEnvironment.pyw
3 => C:\temp\PP3E\Examples\PP3E\LaunchBrowser.pyw
4 => C:\temp\PP3E\Examples\PP3E\Launcher.py
5 => C:\temp\PP3E\Examples\PP3E\Launcher.pyc
Skipping C:\temp\PP3E\Examples\PP3E\Launcher.pyc
...more output omitted...
1427 => C:\temp\PP3E\Examples\PP3E\TempParts\lawnlake1-jan-03.jpg
Visitor: Walking Directories “++” | 335

Skipping C:\temp\PP3E\Examples\PP3E\TempParts\lawnlake1-jan-03.jpg
1428 => C:\temp\PP3E\Examples\PP3E\TempParts\part-001.txt
1429 => C:\temp\PP3E\Examples\PP3E\TempParts\part-002.html
Edited 8 files, visited 1429
This, finally, is the exact tool I was looking for to simplify global book examples tree
maintenance. After major changes to things such as shared modules and file and di-
rectory names, I run this script on the examples root directory with an appropriate
search string and edit any files it pops up as needed. I still need to change files by hand
in the editor, but that’s often safer than blind global replacements.
Global Replacements in Directory Trees (Visitor)
But since I brought it up: given a general tree traversal class, it’s easy to code a global
search-and-replace subclass, too. The ReplaceVisitor class in Example 6-20 is a Search
Visitor subclass that customizes the visitfile method to globally replace any appear-
ances of one string with another, in all text files at and below a root directory. It also
collects the names of all files that were changed in a list just in case you wish to go
through and verify the automatic edits applied (a text editor could be automatically
popped up on each changed file, for instance).
Example 6-20. PP4E\Tools\visitor_replace.py
"""
Use: "python ...\Tools\visitor_replace.py rootdir fromStr toStr".
Does global search-and-replace in all files in a directory tree: replaces
fromStr with toStr in all text files; this is powerful but dangerous!!
visitor_edit.py runs an editor for you to verify and make changes, and so
is safer; use visitor_collect.py to simply collect matched files list;
listonly mode here is similar to both SearchVisitor and CollectVisitor;
"""
import sys
from visitor import SearchVisitor
class ReplaceVisitor(SearchVisitor):
"""
Change fromStr to toStr in files at and below startDir;
files changed available in obj.changed list after a run
"""
def __init__(self, fromStr, toStr, listOnly=False, trace=0):
self.changed = []
self.toStr = toStr
self.listOnly = listOnly
SearchVisitor.__init__(self, fromStr, trace)
def visitmatch(self, fname, text):
self.changed.append(fname)
if not self.listOnly:
fromStr, toStr = self.context, self.toStr
text = text.replace(fromStr, toStr)
open(fname, 'w').write(text)
336 | Chapter 6: Complete System Programs

if __name__ == '__main__':
listonly = input('List only?') == 'y'
visitor = ReplaceVisitor(sys.argv[2], sys.argv[3], listonly)
if listonly or input('Proceed with changes?') == 'y':
visitor.run(startDir=sys.argv[1])
action = 'Changed' if not listonly else 'Found'
print('Visited %d files' % visitor.fcount)
print(action, '%d files:' % len(visitor.changed))
for fname in visitor.changed: print(fname)
To run this script over a directory tree, run the following sort of command line with
appropriate “from” and “to” strings. On my shockingly underpowered netbook ma-
chine, doing this on a 1429-file tree and changing 101 files along the way takes roughly
three seconds of real clock time when the system isn’t particularly busy.
C:\...\PP4E\Tools> visitor_replace.py C:\temp\PP3E\Examples PP3E PP4E
List only?y
Visited 1429 files
Found 101 files:
C:\temp\PP3E\Examples\README-root.txt
C:\temp\PP3E\Examples\PP3E\echoEnvironment.pyw
C:\temp\PP3E\Examples\PP3E\Launcher.py
...more matching filenames omitted...
C:\...\PP4E\Tools> visitor_replace.py C:\temp\PP3E\Examples PP3E PP4E
List only?n
Proceed with changes?y
Visited 1429 files
Changed 101 files:
C:\temp\PP3E\Examples\README-root.txt
C:\temp\PP3E\Examples\PP3E\echoEnvironment.pyw
C:\temp\PP3E\Examples\PP3E\Launcher.py
...more changed filenames omitted...
C:\...\PP4E\Tools> visitor_replace.py C:\temp\PP3E\Examples PP3E PP4E
List only?n
Proceed with changes?y
Visited 1429 files
Changed 0 files:
Naturally, we can also check our work by running the visitor script (and
SearchVisitor superclass):
C:\...\PP4E\Tools> visitor.py 2 C:\temp\PP3E\Examples PP3E
Found in 0 files, visited 1429
C:\...\PP4E\Tools> visitor.py 2 C:\temp\PP3E\Examples PP4E
C:\temp\PP3E\Examples\README-root.txt has PP4E
C:\temp\PP3E\Examples\PP3E\echoEnvironment.pyw has PP4E
C:\temp\PP3E\Examples\PP3E\Launcher.py has PP4E
...more matching filenames omitted...
Found in 101 files, visited 1429
Visitor: Walking Directories “++” | 337

This is both wildly powerful and dangerous. If the string to be replaced can show up
in places you didn’t anticipate, you might just ruin an entire tree of files by running the
ReplaceVisitor object defined here. On the other hand, if the string is something very
specific, this object can obviate the need to manually edit suspicious files. For instance,
website addresses in HTML files are likely too specific to show up in other places by
chance.
Counting Source Code Lines (Visitor)
The two preceding visitor module clients were both search-oriented, but it’s just as
easy to extend the basic walker class for more specific goals. Example 6-21, for instance,
extends FileVisitor to count the number of lines in program source code files of various
types throughout an entire tree. The effect is much like calling the visitfile method
of this class for each filename returned by the find tool we wrote earlier in this chapter,
but the OO structure here is arguably more flexible and extensible.
Example 6-21. PP4E\Tools\visitor_sloc.py
"""
Count lines among all program source files in a tree named on the command
line, and report totals grouped by file types (extension). A simple SLOC
(source lines of code) metric: skip blank and comment lines if desired.
"""
import sys, pprint, os
from visitor import FileVisitor
class LinesByType(FileVisitor):
srcExts = [] # define in subclass
def __init__(self, trace=1):
FileVisitor.__init__(self, trace=trace)
self.srcLines = self.srcFiles = 0
self.extSums = {ext: dict(files=0, lines=0) for ext in self.srcExts}
def visitsource(self, fpath, ext):
if self.trace > 0: print(os.path.basename(fpath))
lines = len(open(fpath, 'rb').readlines())
self.srcFiles += 1
self.srcLines += lines
self.extSums[ext]['files'] += 1
self.extSums[ext]['lines'] += lines
def visitfile(self, filepath):
FileVisitor.visitfile(self, filepath)
for ext in self.srcExts:
if filepath.endswith(ext):
self.visitsource(filepath, ext)
break
class PyLines(LinesByType):
srcExts = ['.py', '.pyw'] # just python files
338 | Chapter 6: Complete System Programs

class SourceLines(LinesByType):
srcExts = ['.py', '.pyw', '.cgi', '.html', '.c', '.cxx', '.h', '.i']
if __name__ == '__main__':
walker = SourceLines()
walker.run(sys.argv[1])
print('Visited %d files and %d dirs' % (walker.fcount, walker.dcount))
print('-'*80)
print('Source files=>%d, lines=>%d' % (walker.srcFiles, walker.srcLines))
print('By Types:')
pprint.pprint(walker.extSums)
print('\nCheck sums:', end=' ')
print(sum(x['lines'] for x in walker.extSums.values()), end=' ')
print(sum(x['files'] for x in walker.extSums.values()))
print('\nPython only walk:')
walker = PyLines(trace=0)
walker.run(sys.argv[1])
pprint.pprint(walker.extSums)
When run as a script, we get trace messages during the walk (omitted here to save
space), and a report with line counts grouped by file type. Run this on trees of your
own to watch its progress; my tree has 907 source files and 48K source lines, including
783 files and 34K lines of “.py” Python code:
C:\...\PP4E\Tools> visitor_sloc.py C:\temp\PP3E\Examples
Visited 1429 files and 186 dirs
--------------------------------------------------------------------------------
Source files=>907, lines=>48047
By Types:
{'.c': {'files': 45, 'lines': 7370},
'.cgi': {'files': 5, 'lines': 122},
'.cxx': {'files': 4, 'lines': 2278},
'.h': {'files': 7, 'lines': 297},
'.html': {'files': 48, 'lines': 2830},
'.i': {'files': 4, 'lines': 49},
'.py': {'files': 783, 'lines': 34601},
'.pyw': {'files': 11, 'lines': 500}}
Check sums: 48047 907
Python only walk:
{'.py': {'files': 783, 'lines': 34601}, '.pyw': {'files': 11, 'lines': 500}}
Recoding Copies with Classes (Visitor)
Let’s peek at one more visitor use case. When I first wrote the cpall.py script earlier in
this chapter, I couldn’t see a way that the visitor class hierarchy we met earlier would
help. Two directories needed to be traversed in parallel (the original and the copy), and
visitor is based on walking just one tree with os.walk. There seemed no easy way to
keep track of where the script was in the copy directory.
Visitor: Walking Directories “++” | 339

The trick I eventually stumbled onto is not to keep track at all. Instead, the script in
Example 6-22 simply replaces the “from” directory path string with the “to” directory
path string, at the front of all directory names and pathnames passed in from os.walk.
The results of the string replacements are the paths to which the original files and
directories are to be copied.
Example 6-22. PP4E\Tools\visitor_cpall.py
"""
Use: "python ...\Tools\visitor_cpall.py fromDir toDir trace?"
Like System\Filetools\cpall.py, but with the visitor classes and os.walk;
does string replacement of fromDir with toDir at the front of all the names
that the walker passes in; assumes that the toDir does not exist initially;
"""
import os
from visitor import FileVisitor # visitor is in '.'
from PP4E.System.Filetools.cpall import copyfile # PP4E is in a dir on path
class CpallVisitor(FileVisitor):
def __init__(self, fromDir, toDir, trace=True):
self.fromDirLen = len(fromDir) + 1
self.toDir = toDir
FileVisitor.__init__(self, trace=trace)
def visitdir(self, dirpath):
toPath = os.path.join(self.toDir, dirpath[self.fromDirLen:])
if self.trace: print('d', dirpath, '=>', toPath)
os.mkdir(toPath)
self.dcount += 1
def visitfile(self, filepath):
toPath = os.path.join(self.toDir, filepath[self.fromDirLen:])
if self.trace: print('f', filepath, '=>', toPath)
copyfile(filepath, toPath)
self.fcount += 1
if __name__ == '__main__':
import sys, time
fromDir, toDir = sys.argv[1:3]
trace = len(sys.argv) > 3
print('Copying...')
start = time.clock()
walker = CpallVisitor(fromDir, toDir, trace)
walker.run(startDir=fromDir)
print('Copied', walker.fcount, 'files,', walker.dcount, 'directories', end=' ')
print('in', time.clock() - start, 'seconds')
340 | Chapter 6: Complete System Programs

This version accomplishes roughly the same goal as the original, but it has made a few
assumptions to keep the code simple. The “to” directory is assumed not to exist initially,
and exceptions are not ignored along the way. Here it is copying the book examples
tree from the prior edition again on Windows:
C:\...\PP4E\Tools> set PYTHONPATH
PYTHONPATH=C:\Users\Mark\Stuff\Books\4E\PP4E\dev\Examples
C:\...\PP4E\Tools> rmdir /S copytemp
copytemp, Are you sure (Y/N)? y
C:\...\PP4E\Tools> visitor_cpall.py C:\temp\PP3E\Examples copytemp
Copying...
Copied 1429 files, 186 directories in 11.1722033777 seconds
C:\...\PP4E\Tools> fc /B copytemp\PP3E\Launcher.py
C:\temp\PP3E\Examples\PP3E\Launcher.py
Comparing files COPYTEMP\PP3E\Launcher.py and C:\TEMP\PP3E\EXAMPLES\PP3E\LAUNCHER.PY
FC: no differences encountered
Despite the extra string slicing going on, this version seems to run just as fast as the
original (the actual difference can be chalked up to system load variations). For tracing
purposes, this version also prints all the “from” and “to” copy paths during the traversal
if you pass in a third argument on the command line:
C:\...\PP4E\Tools> rmdir /S copytemp
copytemp, Are you sure (Y/N)? y
C:\...\PP4E\Tools> visitor_cpall.py C:\temp\PP3E\Examples copytemp 1
Copying...
d C:\temp\PP3E\Examples => copytemp\
f C:\temp\PP3E\Examples\README-root.txt => copytemp\README-root.txt
d C:\temp\PP3E\Examples\PP3E => copytemp\PP3E
...more lines omitted: try this on your own for the full output...
Other Visitor Examples (External)
Although the visitor is widely applicable, we don’t have space to explore additional
subclasses in this book. For more example clients and use cases, see the following
examples in book’s examples distribution package described in the Preface:
•Tools\visitor_collect.py collects and/or prints files containing a search string
•Tools\visitor_poundbang.py replaces directory paths in “#!” lines at the top of Unix
scripts
•Tools\visitor_cleanpyc.py is a visitor-based recoding of our earlier bytecode cleanup
scripts
•Tools\visitor_bigpy.py is a visitor-based version of the “biggest file” example at the
start of this chapter
Visitor: Walking Directories “++” | 341

Most of these are almost as trivial as the visitor_edit.py code in Example 6-19, because
the visitor framework handles walking details automatically. The collector, for in-
stance, simply appends to a list as a search visitor detects matched files and allows the
default list of text filename extensions in the search visitor to be overridden per
instance—it’s roughly like a combination of find and grep on Unix:
>>> from visitor_collect import CollectVisitor
>>> V = CollectVisitor('mimetypes', testexts=['.py', '.pyw'], trace=0)
>>> V.run(r'C:\temp\PP3E\Examples')
>>> for name in V.matches: print(name) # .py and .pyw files with 'mimetypes'
...
C:\temp\PP3E\Examples\PP3E\Internet\Email\mailtools\mailParser.py
C:\temp\PP3E\Examples\PP3E\Internet\Email\mailtools\mailSender.py
C:\temp\PP3E\Examples\PP3E\Internet\Ftp\mirror\downloadflat.py
C:\temp\PP3E\Examples\PP3E\Internet\Ftp\mirror\downloadflat_modular.py
C:\temp\PP3E\Examples\PP3E\Internet\Ftp\mirror\ftptools.py
C:\temp\PP3E\Examples\PP3E\Internet\Ftp\mirror\uploadflat.py
C:\temp\PP3E\Examples\PP3E\System\Media\playfile.py
C:\...\PP4E\Tools> visitor_collect.py mimetypes C:\temp\PP3E\Examples # as script
The core logic of the biggest-file visitor is similarly straightforward, and harkens back
to chapter start:
class BigPy(FileVisitor):
def __init__(self, trace=0):
FileVisitor.__init__(self, context=[], trace=trace)
def visitfile(self, filepath):
FileVisitor.visitfile(self, filepath)
if filepath.endswith('.py'):
self.context.append((os.path.getsize(filepath), filepath))
And the bytecode-removal visitor brings us back full circle, showing an additional al-
ternative to those we met earlier in this chapter. It’s essentially the same code, but it
runs os.remove on “.pyc” file visits.
In the end, while the visitor classes are really just simple wrappers for os.walk, they
further automate walking chores and provide a general framework and alternative class-
based structure which may seem more natural to some than simple unstructured loops.
They’re also representative of how Python’s OOP support maps well to real-world
structures like file systems. Although os.walk works well for one-off scripts, the better
extensibility, reduced redundancy, and greater encapsulation possible with OOP can
be a major asset in real work as our needs change and evolve over time.
342 | Chapter 6: Complete System Programs

In fact, those needs have changed over time. Between the third and
fourth editions of this book, the original os.path.walk call was removed
in Python 3.X, and os.walk became the only automated way to perform
tree walks in the standard library. Examples from the prior edition that
used os.path.walk were effectively broken. By contrast, although the
visitor classes used this call, too, its clients did not. Because updating
the visitor classes to use os.walk internally did not alter those classes’
interfaces, visitor-based tools continued to work unchanged.
This seems a prime example of the benefits of OOP’s support for en-
capsulation. Although the future is never completely predictable, in
practice, user-defined tools like visitor tend to give you more control
over changes than standard library tools like os.walk. Trust me on that;
as someone who has had to update three Python books over the last 15
years, I can say with some certainty that Python change is a constant!
Playing Media Files
We have space for just one last, quick example in this chapter, so we’ll close with a bit
of fun. Did you notice how the file extensions for text and binary file types were hard-
coded in the directory search scripts of the prior two sections? That approach works
for the trees they were applied to, but it’s not necessarily complete or portable. It would
be better if we could deduce file type from file name automatically. That’s exactly what
Python’s mimetypes module can do for us. In this section, we’ll use it to build a script
that attempts to launch a file based upon its media type, and in the process develop
general tools for opening media portably with specific or generic players.
As we’ve seen, on Windows this task is trivial—the os.startfile call opens files per
the Windows registry, a system-wide mapping of file extension types to handler pro-
grams. On other platforms, we can either run specific media handlers per media type,
or fall back on a resident web browser to open the file generically using Python’s
webbrowser module. Example 6-23 puts these ideas into code.
Example 6-23. PP4E\System\Media\playfile.py
#!/usr/local/bin/python
"""
##################################################################################
Try to play an arbitrary media file. Allows for specific players instead of
always using general web browser scheme. May not work on your system as is;
audio files use filters and command lines on Unix, and filename associations
on Windows via the start command (i.e., whatever you have on your machine to
run .au files--an audio player, or perhaps a web browser). Configure and
extend as needed. playknownfile assumes you know what sort of media you wish
to open, and playfile tries to determine media type automatically using Python
mimetypes module; both try to launch a web browser with Python webbrowser module
as a last resort when mimetype or platform unknown.
##################################################################################
"""
Playing Media Files | 343

import os, sys, mimetypes, webbrowser
helpmsg = """
Sorry: can't find a media player for '%s' on your system!
Add an entry for your system to the media player dictionary
for this type of file in playfile.py, or play the file manually.
"""
def trace(*args): print(*args) # with spaces between
##################################################################################
# player techniques: generic and otherwise: extend me
##################################################################################
class MediaTool:
def __init__(self, runtext=''):
self.runtext = runtext
def run(self, mediafile, **options): # most ignore options
fullpath = os.path.abspath(mediafile) # cwd may be anything
self.open(fullpath, **options)
class Filter(MediaTool):
def open(self, mediafile, **ignored):
media = open(mediafile, 'rb')
player = os.popen(self.runtext, 'w') # spawn shell tool
player.write(media.read()) # send to its stdin
class Cmdline(MediaTool):
def open(self, mediafile, **ignored):
cmdline = self.runtext % mediafile # run any cmd line
os.system(cmdline) # use %s for filename
class Winstart(MediaTool): # use Windows registry
def open(self, mediafile, wait=False, **other): # or os.system('start file')
if not wait: # allow wait for curr media
os.startfile(mediafile)
else:
os.system('start /WAIT ' + mediafile)
class Webbrowser(MediaTool):
# file:// requires abs path
def open(self, mediafile, **options):
webbrowser.open_new('file://%s' % mediafile, **options)
##################################################################################
# media- and platform-specific policies: change me, or pass one in
##################################################################################
# map platform to player: change me!
audiotools = {
'sunos5': Filter('/usr/bin/audioplay'), # os.popen().write()
'linux2': Cmdline('cat %s > /dev/audio'), # on zaurus, at least
'sunos4': Filter('/usr/demo/SOUND/play'), # yes, this is that old!
344 | Chapter 6: Complete System Programs

'win32': Winstart() # startfile or system
#'win32': Cmdline('start %s')
}
videotools = {
'linux2': Cmdline('tkcVideo_c700 %s'), # zaurus pda
'win32': Winstart(), # avoid DOS pop up
}
imagetools = {
'linux2': Cmdline('zimager %s'), # zaurus pda
'win32': Winstart(),
}
texttools = {
'linux2': Cmdline('vi %s'), # zaurus pda
'win32': Cmdline('notepad %s') # or try PyEdit?
}
apptools = {
'win32': Winstart() # doc, xls, etc: use at your own risk!
}
# map mimetype of filenames to player tables
mimetable = {'audio': audiotools,
'video': videotools,
'image': imagetools,
'text': texttools, # not html text: browser
'application': apptools}
##################################################################################
# top-level interfaces
##################################################################################
def trywebbrowser(filename, helpmsg=helpmsg, **options):
"""
try to open a file in a web browser
last resort if unknown mimetype or platform, and for text/html
"""
trace('trying browser', filename)
try:
player = Webbrowser() # open in local browser
player.run(filename, **options)
except:
print(helpmsg % filename) # else nothing worked
def playknownfile(filename, playertable={}, **options):
"""
play media file of known type: uses platform-specific
player objects, or spawns a web browser if nothing for
this platform; accepts a media-specific player table
"""
if sys.platform in playertable:
playertable[sys.platform].run(filename, **options) # specific tool
Playing Media Files | 345

else:
trywebbrowser(filename, **options) # general scheme
def playfile(filename, mimetable=mimetable, **options):
"""
play media file of any type: uses mimetypes to guess media
type and map to platform-specific player tables; spawn web
browser if text/html, media type unknown, or has no table
"""
contenttype, encoding = mimetypes.guess_type(filename) # check name
if contenttype == None or encoding is not None: # can't guess
contenttype = '?/?' # poss .txt.gz
maintype, subtype = contenttype.split('/', 1) # 'image/jpeg'
if maintype == 'text' and subtype == 'html':
trywebbrowser(filename, **options) # special case
elif maintype in mimetable:
playknownfile(filename, mimetable[maintype], **options) # try table
else:
trywebbrowser(filename, **options) # other types
###############################################################################
# self-test code
###############################################################################
if __name__ == '__main__':
# media type known
playknownfile('sousa.au', audiotools, wait=True)
playknownfile('ora-pp3e.gif', imagetools, wait=True)
playknownfile('ora-lp4e.jpg', imagetools)
# media type guessed
input('Stop players and press Enter')
playfile('ora-lp4e.jpg') # image/jpeg
playfile('ora-pp3e.gif') # image/gif
playfile('priorcalendar.html') # text/html
playfile('lp4e-preface-preview.html') # text/html
playfile('lp-code-readme.txt') # text/plain
playfile('spam.doc') # app
playfile('spreadsheet.xls') # app
playfile('sousa.au', wait=True) # audio/basic
input('Done') # stay open if clicked
Although it’s generally possible to open most media files by passing their names to a
web browser these days, this module provides a simple framework for launching media
files with more specific tools, tailored by both media type and platform. A web browser
is used only as a fallback option, if more specific tools are not available. The net result
is an extendable media file player, which is as specific and portable as the customiza-
tions you provide for its tables.
We’ve seen the program launch tools employed by this script in prior chapters. The
script’s main new concepts have to do with the modules it uses: the webbrowser module
to open some files in a local web browser, as well as the Python mimetypes module to
346 | Chapter 6: Complete System Programs

determine media type from file name. Since these are the heart of this code’s matter,
let’s explore these briefly before we run the script.
The Python webbrowser Module
The standard library webbrowser module used by this example provides a portable in-
terface for launching web browsers from Python scripts. It attempts to locate a suitable
web browser on your local machine to open a given URL (file or web address) for
display. Its interface is straightforward:
>>> import webbrowser
>>> webbrowser.open_new('file://' + fullfilename) # use os.path.abspath()
This code will open the named file in a new web browser window using whatever
browser is found on the underlying computer, or raise an exception if it cannot. You
can tailor the browsers used on your platform, and the order in which they are attemp-
ted, by using the BROWSER environment variable and register function. By default,
webbrowser attempts to be automatically portable across platforms.
Use an argument string of the form “file://...” or “http://...” to open a file on the local
computer or web server, respectively. In fact, you can pass in any URL that the browser
understands. The following pops up Python’s home page in a new locally-running
browser window, for example:
>>> webbrowser.open_new('http://www.python.org')
Among other things, this is an easy way to display HTML documents as well as media
files, as demonstrated by this section’s example. For broader applicability, this module
can be used as both command-line script (Python’s -m module search path flag helps
here) and as importable tool:
C:\Users\mark\Stuff\Websites\public_html> python -m webbrowser about-pp.html
C:\Users\mark\Stuff\Websites\public_html> python -m webbrowser -n about-pp.html
C:\Users\mark\Stuff\Websites\public_html> python -m webbrowser -t about-pp.html
C:\Users\mark\Stuff\Websites\public_html> python
>>> import webbrowser
>>> webbrowser.open('about-pp.html') # reuse, new window, new tab
True
>>> webbrowser.open_new('about-pp.html') # file:// optional on Windows
True
>>> webbrowser.open_new_tab('about-pp.html')
True
In both modes, the difference between the three usage forms is that the first tries to
reuse an already-open browser window if possible, the second tries to open a new
window, and the third tries to open a new tab. In practice, though, their behavior is
totally dependent on what the browser selected on your platform supports, and even
on the platform in general. All three forms may behave the same.
Playing Media Files | 347

On Windows, for example, all three simply run os.startfile by default and thus create
a new tab in an existing window under Internet Explorer 8. This is also why I didn’t
need the “file://” full URL prefix in the preceding listing. Technically, Internet Explorer
is only run if this is what is registered on your computer for the file type being opened;
if not, that file type’s handler is opened instead. Some images, for example, may open
in a photo viewer instead. On other platforms, such as Unix and Mac OS X, browser
behavior differs, and non-URL file names might not be opened; use “file://” for
portability.
We’ll use this module again later in this book. For example, the PyMailGUI program
in Chapter 14 will employ it as a way to display HTML-formatted email messages and
attachments, as well as program help. See the Python library manual for more details.
In Chapters 13 and 15, we’ll also meet a related call, urllib.request.urlopen, which
fetches a web page’s text given a URL, but does not open it in a browser; it may be
parsed, saved, or otherwise used.
The Python mimetypes Module
To make this media player module even more useful, we also use the Python
mimetypes standard library module to automatically determine the media type from the
filename. We get back a type/subtype MIME content-type string if the type can be
determined or None if the guess failed:
>>> import mimetypes
>>> mimetypes.guess_type('spam.jpg')
('image/jpeg', None)
>>> mimetypes.guess_type('TheBrightSideOfLife.mp3')
('audio/mpeg', None)
>>> mimetypes.guess_type('lifeofbrian.mpg')
('video/mpeg', None)
>>> mimetypes.guess_type('lifeofbrian.xyz') # unknown type
(None, None)
Stripping off the first part of the content-type string gives the file’s general media type,
which we can use to select a generic player; the second part (subtype) can tell us if text
is plain or HTML:
>>> contype, encoding = mimetypes.guess_type('spam.jpg')
>>> contype.split('/')[0]
'image'
>>> mimetypes.guess_type('spam.txt') # subtype is 'plain'
('text/plain', None)
>>> mimetypes.guess_type('spam.html')
('text/html', None)
348 | Chapter 6: Complete System Programs

>>> mimetypes.guess_type('spam.html')[0].split('/')[1]
'html'
A subtle thing: the second item in the tuple returned from the mimetypes guess is an
encoding type we won’t use here for opening purposes. We still have to pay attention
to it, though—if it is not None, it means the file is compressed (gzip or compress), even
if we receive a media content type. For example, if the filename is something like
spam.gif.gz, it’s a compressed image that we don’t want to try to open directly:
>>> mimetypes.guess_type('spam.gz') # content unknown
(None, 'gzip')
>>> mimetypes.guess_type('spam.gif.gz') # don't play me!
('image/gif', 'gzip')
>>> mimetypes.guess_type('spam.zip') # archives
('application/zip', None)
>>> mimetypes.guess_type('spam.doc') # office app files
('application/msword', None)
If the filename you pass in contains a directory path, the path portion is ignored (only
the extension is used). This module is even smart enough to give us a filename extension
for a type—useful if we need to go the other way, and create a file name from a content
type:
>>> mimetypes.guess_type(r'C:\songs\sousa.au')
('audio/basic', None)
>>> mimetypes.guess_extension('audio/basic')
'.au'
Try more calls on your own for more details. We’ll use the mimetypes module again in
FTP examples in Chapter 13 to determine transfer type (text or binary), and in our
email examples in Chapters 13, 14, and 16 to send, save, and open mail attachments.
In Example 6-23, we use mimetypes to select a table of platform-specific player com-
mands for the media type of the file to be played. That is, we pick a player table for the
file’s media type, and then pick a command from the player table for the platform. At
both steps, we give up and run a web browser if there is nothing more specific to be
done.
Using mimetypes guesses for SearchVisitor
To use this module for directing our text file search scripts we wrote earlier in this
chapter, simply extract the first item in the content-type returned for a file’s name. For
instance, all in the following list are considered text (except “.pyw”, which we may
have to special-case if we must care):
>>> for ext in ['.txt', '.py', '.pyw', '.html', '.c', '.h', '.xml']:
... print(ext, mimetypes.guess_type('spam' + ext))
...
Playing Media Files | 349

.txt ('text/plain', None)
.py ('text/x-python', None)
.pyw (None, None)
.html ('text/html', None)
.c ('text/plain', None)
.h ('text/plain', None)
.xml ('text/xml', None)
We can add this technique to our earlier SearchVisitor class by redefining its candidate
selection method, in order to replace its default extension lists with mimetypes guesses—
yet more evidence of the power of OOP customization at work:
C:\...\PP4E\Tools> python
>>> import mimetypes
>>> from visitor import SearchVisitor # or PP4E.Tools.visitor if not .
>>>
>>> class SearchMimeVisitor(SearchVisitor):
... def candidate(self, fname):
... contype, encoding = mimetypes.guess_type(fname)
... return (contype and
... contype.split('/')[0] == 'text' and
... encoding == None)
...
>>> V = SearchMimeVisitor('mimetypes', trace=0) # search key
>>> V.run(r'C:\temp\PP3E\Examples') # root dir
C:\temp\PP3E\Examples\PP3E\extras\LosAlamosAdvancedClass\day1-system\data.txt ha
s mimetypes
C:\temp\PP3E\Examples\PP3E\Internet\Email\mailtools\mailParser.py has mimetypes
C:\temp\PP3E\Examples\PP3E\Internet\Email\mailtools\mailSender.py has mimetypes
C:\temp\PP3E\Examples\PP3E\Internet\Ftp\mirror\downloadflat.py has mimetypes
C:\temp\PP3E\Examples\PP3E\Internet\Ftp\mirror\downloadflat_modular.py has mimet
ypes
C:\temp\PP3E\Examples\PP3E\Internet\Ftp\mirror\ftptools.py has mimetypes
C:\temp\PP3E\Examples\PP3E\Internet\Ftp\mirror\uploadflat.py has mimetypes
C:\temp\PP3E\Examples\PP3E\System\Media\playfile.py has mimetypes
>>> V.scount, V.fcount, V.dcount
(8, 1429, 186)
Because this is not completely accurate, though (you may need to add logic to include
extensions like “.pyw” missed by the guess), and because it’s not even appropriate for
all search clients (some may want to search specific kinds of text only), this scheme was
not used for the original class. Using and tailoring it for your own searches is left as
optional exercise.
Running the Script
Now, when Example 6-23 is run from the command line, if all goes well its canned self-
test code at the end opens a number of audio, image, text, and other file types located
in the script’s directory, using either platform-specific players or a general web browser.
On my Windows 7 laptop, GIF and HTML files open in new IE browser tabs; JPEG
files in Windows Photo Viewer; plain text files in Notepad; DOC and XLS files in
Microsoft Word and Excel; and audio files in Windows Media Player.
350 | Chapter 6: Complete System Programs

Because the programs used and their behavior may vary widely from machine to ma-
chine, though, you’re best off studying this script’s code and running it on your own
computer and with your own test files to see what happens. As usual, you can also test
it interactively (use the package path like this one to import from a different directory,
assuming your module search path includes the PP4E root):
>>> from PP4E.System.Media.playfile import playfile
>>> playfile(r'C:\movies\mov10428.mpg') # video/mpeg
We’ll use the playfile module again as an imported library like this in Chapter 13 to
open media files downloaded by FTP. Again, you may want to tweak this script’s tables
for your players. This script also assumes the media file is located on the local machine
(even though the webbrowser module supports remote files with “http://” names), and
it does not currently allow different players for most different MIME subtypes (it spe-
cial-cases text to handle “plain” and “html” differently, but no others). In fact, this
script is really just something of a simple framework that was designed to be extended.
As always, hack on; this is Python, after all.
Automated Program Launchers (External)
Finally, some optional reading—in the examples distribution package for this book
(available at sites listed in the Preface) you can find additional system-related scripts
we do not have space to cover here:
•PP4E\Launcher.py—contains tools used by some GUI programs later in the book
to start Python programs without any environment configuration. Roughly, it sets
up both the system path and module import search paths as needed to run book
examples, which are inherited by spawned programs. By using this module to
search for files and configure environments automatically, users can avoid (or at
least postpone) having to learn the intricacies of manual environment configura-
tion before running programs. Though there is not much new in this example from
a system interfaces perspective, we’ll refer back to it later, when we explore GUI
programs that use its tools, as well as those of its launchmodes cousin, which we
wrote in Chapter 5.
•PP4E\Launch_PyDemos.pyw and PP4E\Launch_PyGadgets_bar.pyw—use
Launcher.py to start major GUI book examples without any environment config-
uration. Because all spawned processes inherit configurations performed by the
launcher, they all run with proper search path settings. When run directly, the
underlying PyDemos2.pyw and PyGadgets_bar.pyw scripts (which we’ll explore
briefly at the end of Chapter 10) instead rely on the configuration settings on the
underlying machine. In other words, Launcher effectively hides configuration de-
tails from the GUI interfaces by enclosing them in a configuration program layer.
•PP4E\LaunchBrowser.pyw—portably locates and starts an Internet web browser
program on the host machine in order to view a local file or remote web page. In
Automated Program Launchers (External) | 351

prior versions, it used tools in Launcher.py to search for a reasonable browser to
run. The original version of this example has now been largely superseded by the
standard library’s webbrowser module, which arose after this example had been
developed (reptilian minds think alike!). In this edition, LaunchBrowser simply par-
ses command-line arguments for backward compatibility and invokes the open
function in webbrowser. See this module’s help text, or PyGadgets and PyDemos in
Chapter 10, for example command-line usage.
That’s the end of our system tools exploration. In the next part of this book we leave
the realm of the system shell and move on to explore ways to add graphical user inter-
faces to our program. Later, we’ll do the same using web-based approaches. As we
continue, keep in mind that the system tools we’ve studied in this part of the book see
action in a wide variety of programs. For instance, we’ll put threads to work to spawn
long-running tasks in the GUI part, use both threads and processes when exploring
server implementations in the Internet part, and use files and file-related system calls
throughout the remainder of the book.
Whether your interfaces are command lines, multiwindow GUIs, or distributed client/
server websites, Python’s system interfaces toolbox is sure to play a important part in
your Python programming future.
352 | Chapter 6: Complete System Programs

PART III
GUI Programming
This part of the book shows you how to apply Python to build portable graphical user
interfaces, primarily with Python’s standard tkinter library. The following chapters
cover this topic in depth:
Chapter 7
This chapter outlines GUI options available to Python developers, and then
presents a brief tutorial that illustrates core tkinter coding concepts.
Chapter 8
This chapter begins a two-part tour of the tkinter library—its widget set and related
tools. This first tour chapter covers simpler library tools and widgets: pop-up win-
dows, various types of buttons, images, and so on.
Chapter 9
This chapter continues the library tour begun in the prior chapter. It presents the
rest of the tkinter widget library, including menus, text, canvases, scroll bars, grids,
and time-based events and animation.
Chapter 10
This chapter takes a look at GUI programming techniques: we’ll learn how to build
menus automatically from object templates, spawn GUIs as separate programs,
run long-running tasks in parallel with threads and queues, and more.
Chapter 11
This chapter pulls the earlier chapters’ ideas together to implement a collection of
user interfaces. It presents a number of larger GUIs—clocks, text editors, drawing
programs, image viewers, and so on—which also demonstrate general Python
programming-in-the-large concepts along the way.
As in the first part of this book, the material presented here is applicable to a wide
variety of domains and will be utilized again to build domain-specific user interfaces
in later chapters of this book. For instance, the PyMailGUI and PyCalc examples of
later chapters will assume that you’ve covered the basics here.

CHAPTER 7
Graphical User Interfaces
“Here’s Looking at You, Kid”
For most software systems, a graphical user interface (GUI) has become an expected
part of the package. Even if the GUI acronym is new to you, chances are that you are
already familiar with such interfaces—the windows, buttons, and menus that we use
to interact with software programs. In fact, most of what we do on computers today is
done with some sort of point-and-click graphical interface. From web browsers to sys-
tem tools, programs are routinely dressed up with a GUI component to make them
more flexible and easier to use.
In this part of the book, we will learn how to make Python scripts sprout such graphical
interfaces, too, by studying examples of programming with the tkinter m o d u l e , a p o r t -
able GUI library that is a standard part of the Python system and the toolkit most widely
used by Python programmers. As we’ll see, it’s easy to program user interfaces in Python
scripts thanks to both the simplicity of the language and the power of its GUI libraries.
As an added bonus, GUIs programmed in Python with tkinter are automatically port-
able to all major computer systems.
GUI Programming Topics
Because GUIs are a major area, I want to say a few more words about this part of the
book before we get started. To make them easier to absorb, GUI programming topics
are split over the next five chapters:
• This chapter begins with a quick tkinter tutorial to teach coding basics. Interfaces
are kept simple here on purpose, so you can master the fundamentals before mov-
ing on to the following chapter’s interfaces. On the other hand, this chapter covers
all the basics: event processing, the pack g e o m e t r y m a n a g e r , u s i n g i n h e r i t a n c e a n d
composition in GUIs, and more. As we’ll see, object-oriented programming (OOP)
isn’t required for tkinter, but it makes GUIs structured and reusable.
355

• Chapters 8 and 9 take you on a tour of the tkinter widget set.* Roughly, Chap-
ter 8 presents simple widgets and Chapter 9 covers more advanced widgets and
related tools. Most of the interface devices you’re accustomed to seeing—sliders,
menus, dialogs, images, and their kin—show up here. These two chapters are not
a fully complete tkinter reference (which could easily fill a large book by itself), but
they should be enough to help you get started coding substantial Python GUIs.
The examples in these chapters are focused on widgets and tkinter tools, but Py-
thon’s support for code reuse is also explored along the way.
•Chapter 10 covers more advanced GUI programming techniques. It includes an
exploration of techniques for automating common GUI tasks with Python. Al-
though tkinter is a full-featured library, a small amount of reusable Python code
can make its interfaces even more powerful and easier to use.
•Chapter 11 wraps up by presenting a handful of complete GUI programs that make
use of coding and widget techniques presented in the four preceding chapters.
We’ll learn how to implement text editors, image viewers, clocks, and more.
Because GUIs are actually cross-domain tools, other GUI examples will also show up
throughout the remainder of this book. For example, we’ll later see complete email
GUIs and calculators, as well as a basic FTP client GUI; additional examples such as
tree viewers and table browsers are available externally in the book examples package.
Chapter 11 gives a list of forward pointers to other tkinter examples in this text.
After we explore GUIs, in Part IV we’ll also learn how to build basic user interfaces
within a web browser using HTML and Python scripts that run on a server—a very
different model with advantages and tradeoffs all its own that are important to under-
stand. Newer technologies such as the RIAs described later in this chapter build on the
web browser model to offer even more interface choices.
For now, though, our focus here is on more traditional GUIs—known as “desktop”
applications to some, and as “standalone” GUIs to others. As we’ll see when we meet
FTP and email client GUIs in the Internet part of this book, though, such programs
often connect to a network to do their work as well.
* The term “widget set” refers to the objects used to build familiar point-and-click user interface devices—
push buttons, sliders, input fields, and so on. tkinter comes with Python classes that correspond to all the
widgets you’re accustomed to seeing in graphical displays. Besides widgets, tkinter also comes with tools for
other activities, such as scheduling events to occur, waiting for socket data to arrive, and so on.
356 | Chapter 7: Graphical User Interfaces

Running the Examples
One other point I’d like to make right away: most GUIs are dynamic and interactive
interfaces, and the best I can do here is show static screenshots representing selected
states in the interactions such programs implement. This really won’t do justice to most
examples. If you are not working along with the examples already, I encourage you to
run the GUI examples in this and later chapters on your own.
On Windows, the standard Python install comes with tkinter support built in, so all
these examples should work immediately. Mac OS X comes bundled with a tkinter-
aware Python as well. For other systems, Pythons with tkinter support are either pro-
vided with the system itself or are readily available (see the top-level
README-PP4E.txt file in the book examples distribution for more details). Getting
tkinter to work on your computer is worth whatever extra install details you may need
to absorb, though; experimenting with these programs is a great way to learn about
both GUI programming and Python itself.
Also see the description of book example portability in general in this book’s Preface.
Although Python and tkinter are both largely platform neutral, you may run into some
minor platform-specific issues if you try to run this book’s examples on platforms other
than that used to develop this book. Mac OS X, for example, might pose subtle differ-
ences in some of the examples’ operation. Be sure to watch this book’s website for
pointers and possible future patches for using the examples on other platforms.
Has Anyone Noticed That G-U-I Are the First Three Letters of “GUIDO”?
Python creator Guido van Rossum didn’t originally set out to build a GUI development
tool, but Python’s ease of use and rapid turnaround have made this one of its primary
roles. From an implementation perspective, GUIs in Python are really just instances of
C extensions, and extensibility was one of the main ideas behind Python. When a script
builds push buttons and menus, it ultimately talks to a C library; and when a script
responds to a user event, a C library ultimately talks back to Python. It’s really just an
example of what is possible when Python is used to script external libraries.
But from a practical point of view, GUIs are a critical part of modern systems and an
ideal domain for a tool like Python. As we’ll see, Python’s simple syntax and object-
oriented flavor blend well with the GUI model—it’s natural to represent each device
drawn on a screen as a Python class. Moreover, Python’s quick turnaround lets pro-
grammers experiment with alternative layouts and behavior rapidly, in ways not pos-
sible with traditional development techniques. In fact, you can usually make a change
to a Python-based GUI and observe its effects in a matter of seconds. Don’t try this with
C++!
“Here’s Looking at You, Kid” | 357

Python GUI Development Options
Before we start wading into the tkinter pond, let’s begin with some perspective on
Python GUI options in general. Because Python has proven to be such a good match
for GUI work, this domain has seen much activity over the years. In fact, although
tkinter is by most accounts still the most widely used GUI toolkit in the Python world,
there are a variety of ways to program user interfaces in Python today. Some are specific
to Windows or X Windows,† s o m e a r e c r o s s - p l a t f o r m s o l u t i o n s , a n d a l l h a v e f o l l o w i n g s
and strong points of their own. To be fair to all the alternatives, here is a brief inventory
of GUI toolkits available to Python programmers as I write these words:
tkinter
An open source GUI library and the continuing de facto standard for portable GUI
development in Python. Python scripts that use tkinter to build GUIs run portably
on Windows, X Windows (Unix and Linux), and Macintosh OS X, and they display
a native look-and-feel on each of these platforms today. tkinter makes it easy to
build simple and portable GUIs quickly. Moreover, it can be easily augmented with
Python code, as well as with larger extension packages such as Pmw ( a t h i r d - p a r t y
widget library); Tix (another widget library, and now a standard part of Python);
PIL (an image-processing extension); and ttk (Tk themed widgets, also now a
standard part of Python as of version 3.1). More on such extensions like these later
in this introduction.
The underlying Tk library used by tkinter is a standard in the open source world
at large and is also used by the Perl, Ruby, PHP, Common Lisp, and Tcl scripting
languages, giving it a user base that likely numbers in the millions. The Python
binding to Tk is enhanced by Python’s simple object model—Tk widgets become
customizable and embeddable objects, instead of string commands. tkinter takes
the form of a module package in Python 3.X, with nested modules that group some
of its tools by functionality (it was formerly known as module Tkinter in Python
2.X, but was renamed to follow naming conventions, and restructured to provide
a more hierarchical organization).
tkinter is mature, robust, widely used, and well documented. It includes roughly
25 basic widget types, plus various dialogs and other tools. Moreover, there is a
dedicated book on the subject, plus a large library of published tkinter and Tk
documentation. Perhaps most importantly, because it is based on a library
† In this book, “Windows” refers to the Microsoft Windows interface common on PCs, and “X Windows”
refers to the X11 interface most commonly found on Unix and Linux platforms. These two interfaces are
generally tied to the Microsoft and Unix (and Unix-like) platforms, respectively. It’s possible to run X
Windows on top of a Microsoft operating system and Windows emulators on Unix and Linux, but it’s not
common. As if to muddy the waters further, Mac OS X supports Python’s tkinter on both X Windows and
the native Aqua GUI system directly, in addition to platform-specific cocoa options (though it’s usually not
too misleading to lump OS X in with the “Unix-like” crowd).
358 | Chapter 7: Graphical User Interfaces

developed for scripting languages, tkinter is also a relatively lightweight toolkit,
and as such it meshes well with a scripting language like Python.
Because of such attributes, Python’s tkinter module ships with Python as a standard
library module and is the basis of Python’s standard IDLE integrated development
environment GUI. In fact, tkinter is the only GUI toolkit that is part of Python; all
others on this list are third-party extensions. The underlying Tk library is also
shipped with Python on some platforms (including Windows, Mac OS X, and most
Linux and Unix-like systems). You can be reasonably sure that tkinter will be
present when your script runs, and you can guarantee this if needed by freezing
your GUI into a self-contained binary executable with tools like PyInstaller and
py2exe (see the Web for details).
Although tkinter is easy to use, its text and canvas widgets are powerful enough to
implement web pages, three-dimensional visualization, and animation. In addi-
tion, a variety of systems aim to provide GUI builders for Python/tkinter today,
including GUI Builder (formerly part of the Komodo IDE and relative of SpecTCL),
Rapyd-Tk, xRope, and others (though this set has historically tended to change
much over time; see http://wiki.python.org/moin/GuiProgramming or search the
Web for updates). As we will see, though, tkinter is usually so easy to code that
GUI builders are not widely used. This is especially true once we leave the realm
of the static layouts that builders typically support.
wxPython
A Python interface for the open source wxWidgets (formerly called wxWindows)
library, which is a portable GUI class framework originally written to be used from
the C++ programming language. The wxPython system is an extension module
that wraps wxWidgets classes. This library is generally considered to excel at
building sophisticated interfaces and is probably the second most popular Python
GUI toolkit today, behind tkinter. GUIs coded in Python with wxPython are port-
able to Windows, Unix-like platforms, and Mac OS X.
Because wxPython is based on a C++ class library, most observers consider it to
be more complex than tkinter: it provides hundreds of classes, generally requires
an object-oriented coding style, and has a design that some find reminiscent of the
MFC class library on Windows. wxPython often expects programmers to write
more code, partly because it is a more functional and thus complex system, and
partly because it inherits this mindset from its underlying C++ library.
Moreover, some of wxPython’s documentation is oriented toward C++, though
this story has been improved recently with the publication of a book dedicated to
wxPython. By contrast, tkinter is covered by one book dedicated to it, large sections
of other Python books, and an even larger library of existing literature on the un-
derlying Tk toolkit. Since the world of Python books has been remarkably dynamic
over the years, though, you should investigate the accuracy of these observations
at the time that you read these words; some books fade, while new Python books
appear on a regular basis.
Python GUI Development Options | 359

On the other hand, in exchange for its added complexity, wxPython provides a
powerful toolkit. wxPython comes with a richer set of widgets out of the box than
tkinter, including trees and HTML viewers—things that may require extensions
such as Pmw, Tix, or ttk in tkinter. In addition, some prefer the appearance of the
interfaces it renders. BoaConstructor and wxDesigner, among other options, pro-
vide a GUI builder that generates wxPython code. Some wxWidgets tools also
support non-GUI Python work as well. For a quick look at wxPython widgets and
code, run the demo that comes with the system (see http://wxpython.org/, or search
the Web for links).
PyQt
A Python interface to the Qt toolkit (now from Nokia, formerly by Trolltech), and
perhaps the third most widely used GUI toolkit for Python today. PyQt is a full-
featured GUI library and runs portably today on Windows, Mac OS X, and Unix
and Linux. Like wxPython, Qt is generally more complex, yet more feature rich,
than tkinter; it contains hundreds of classes and thousands of functions and meth-
ods. Qt grew up on Linux but became portable to other systems over time; reflect-
ing this heritage, the PyQt and PyKDE extension packages provide access to KDE
development libraries (PyKDE requires PyQt). The BlackAdder and Qt Designer
systems provide GUI builders for PyQt.
Perhaps Qt’s most widely cited drawback in the past has been that it was not
completely open source for full commercial use. Today, Qt provides both GPL and
LGPL open source licensing, as well as commercial license options. The LGPL and
GPL versions are open source, but conform to GPL licensing constraints (GPL may
also impose requirements beyond those of the Python BSD-style license; you must,
for example, make your source code freely available to end users).
PyGTK
A Python interface to GTK, a portable GUI library originally used as the core of
the Gnome window system on Linux. The gnome-python and PyGTK extension
packages export Gnome and GTK toolkit calls. At this writing, PyGTK runs port-
ably on Windows and POSIX systems such as Linux and Mac OS X (according to
its documentation, it currently requires that an X server for Mac OS X has been
installed, though a native Mac version is in the works).
Jython
Jython (the system formerly known as JPython) is a Python implementation for
Java, which compiles Python source code to Java bytecode, and gives Python scripts
seamless access to Java class libraries on the local machine. Because of that, Java
GUI libraries such as swing and awt become another way to construct GUIs in
Python code run by the JPython system. Such solutions are obviously Java specific
and limited in portability to that of Java and its libraries. Furthermore, swing may
be one of the largest and most complex GUI option for Python work. A new pack-
age named jTkinter also provides a tkinter port to Jython using Java’s JNI; if
360 | Chapter 7: Graphical User Interfaces

installed, Python scripts may also use tkinter to build GUIs under Jython. Jython
also has Internet roles we’ll meet briefly in Chapter 12.
IronPython
In a very similar vein, the IronPython system—an implementation of the Python
language for the .NET environment and runtime engine, which, among other
things, compiles Python programs to .NET bytecode—also offers Python scripts
GUI construction options in the .NET framework. You write Python code, but use
C#/.NET components to construct interfaces, and applications at large.
IronPython code can be run on .NET on Windows, but also on Linux under the
Mono implementation of .NET, and in the Silverlight client-side RIA framework
for web browsers (discussed ahead).
PythonCard
An open source GUI builder and library built on top of the wxPython toolkit and
considered by some to be one of Python’s closest equivalents to the kind of GUI
builders familiar to Visual Basic developers. PythonCard describes itself as a GUI
construction kit for building cross-platform desktop applications on Windows,
Mac OS X, and Linux, using the Python language.
Dabo
An open source GUI builder also built on wxPython, and a bit more. Dabo is a
portable, three-tier, cross-platform desktop application development framework,
inspired by Visual FoxPro and written in Python. Its tiers support database access,
business logic, and user interface. Its open design is intended to eventually support
a variety of databases and multiple user interfaces (wxPython, tkinter, and even
HTML over HTTP).
Rich Internet Applications (RIAs)
Although web pages rendered with HTML are also a kind of user interface, they
have historically been too limited to include in the general GUI category. However,
some observers would extend this category today to include systems which allow
browser-based interfaces to be much more dynamic than traditional web pages
have allowed. Because such systems provide widget toolkits rendered by web
browsers, they can offer some of the same portability benefits as web pages in
general.
The going buzzword for this brave new breed of toolkits is rich Internet applica-
tions (RIAs). It includes AJAX and JavaScript-oriented frameworks for use on the
client, such as:
Flex
An open source framework from Adobe and part of the Flash platform
Silverlight
A Microsoft framework which is also usable on Linux with Mono’s Moonlight,
and can be accessed by Python code with the IronPython system described
above
Python GUI Development Options | 361

JavaFX
A Java platform for building RIAs which can run across a variety of connected
devices
pyjamas
An AJAX-based port of the Google Web Toolkit to Python, which comes with
a set of interface widgets and compiles Python code that uses those widgets
into JavaScript, to be run in a browser on a client
The HTML5 standard under development proposes to address this domain as well.
Web browsers ultimately are “desktop” GUI applications, too, but are more per-
vasive than GUI libraries, and can be generalized with RIA tools to render other
GUIs. While it’s possible to build a widget-based GUI with such frameworks, they
can also add overheads associated with networking in general and often imply a
substantially heavier software stack than traditional GUI toolkits. Indeed, in order
to morph browsers into general GUI platforms, RIAs may imply extra software
layers and dependencies, and even multiple programming languages. Because of
that, and because not everyone codes for the Web today (despite what you may
have heard), we won’t include them in our look at traditional standalone/desktop
GUIs in this part of the book.
See the Internet part for more on RIAs and user interfaces based on browsers, and
be sure to watch for news and trends on this front over time. The interactivity these
tools provide is also a key part of what some refer to as “Web 2.0” when viewed
more from the perspective of the Web than GUIs. Since we’re concerned with the
latter here (and since user interaction is user interaction regardless of what jargon
we use for it), we’ll postpone further enumeration of this topic until the next part
of the book.
Platform-specific options
Besides the portable toolkits like tkinter, wxPython, and PyQt, and platform-
agnostic approaches such as RIAs, most major platforms have nonportable options
for Python-coded GUIs as well. For instance, on Macintosh OS X, PyObjC provides
a Python binding to Apple’s Objective-C/Cocoa framework, which is the basis for
much Mac development. On Windows, the PyWin32 extensions package for Py-
thon includes wrappers for the C++ Microsoft Foundation Classes (MFC) frame-
work (a library that includes interface components), as well as Pythonwin, an MFC
sample program that implements a Python development GUI. Although .NET
technically runs on Linux, too, the IronPython system mentioned earlier offers
additional Windows-focused options.
See the websites of these toolkits for more details. There are other lesser-known GUI
toolkits for Python, and new ones are likely to emerge by the time you read this book
(in fact, IronPython was new in the third edition, and RIAs are new in the fourth).
Moreover, packages like those in this list are prone to mutate over time. For an up-to-
date list of available tools, search the Web or browse http://www.python.org and the
PyPI third-party packages index maintained there.
362 | Chapter 7: Graphical User Interfaces

tkinter Overview
Of all the prior section’s GUI options, though, tkinter is by far the de facto standard
way to implement portable user interfaces in Python today, and the focus of this part
of the book. The rationale for this approach was explained in Chapter 1; in short, we
elected to present one toolkit in satisfying depth instead of many toolkits in less-than-
useful fashion. Moreover, most of the tkinter programming concepts you learn here
will translate directly to any other GUI toolkit you choose to utilize.
tkinter Pragmatics
Perhaps more to the point, though, there are pragmatic reasons that the Python world
still gravitates to tkinter as its de facto standard portable GUI toolkit. Among them,
tkinter’s accessibility, portability, availability, documentation, and extensions have
made it the most widely used Python GUI solution for many years running:
Accessibility
tkinter is generally regarded as a lightweight toolkit and one of the simplest GUI
solutions for Python available today. Unlike larger frameworks, it is easy to get
started in tkinter right away, without first having to grasp a much larger class in-
teraction model. As we’ll see, programmers can create simple tkinter GUIs in a few
lines of Python code and scale up to writing industrial-strength GUIs gradually.
Although the tkinter API is basic, additional widgets can be coded in Python or
obtained in extension packages such as Pmw, Tix, and ttk.
Portability
A Python script that builds a GUI with tkinter will run without source code changes
on all major windowing platforms today: Microsoft Windows, X Windows (on
Unix and Linux), and the Macintosh OS X (and also ran on Mac classics). Further,
that same script will provide a native look-and-feel to its users on each of these
platforms. In fact, this feature became more apparent as Tk matured. A Python/
tkinter script today looks like a Windows program on Windows; on Unix and
Linux, it provides the same interaction but sports an appearance familiar to X
Windows users; and on the Mac, it looks like a Mac program should.
Availability
tkinter is a standard module in the Python library, shipped with the interpreter. If
you have Python, you have tkinter. Moreover, most Python installation packages
(including the standard Python self-installer for Windows, that provided on Mac
OS X, and many Linux distributions) come with tkinter support bundled. Because
of that, scripts written to use the tkinter module work immediately on most Python
interpreters, without any extra installation steps. tkinter is also generally better
supported than its alternatives today. Because the underlying Tk library is also used
by the Tcl and Perl programming languages (and others), it tends to receive more
development resources than other toolkits available.
tkinter Overview | 363

Naturally, other factors such as documentation and extensions are important when
using a GUI toolkit, too; let’s take a quick look at the story tkinter has to tell on these
fronts as well.
tkinter Documentation
This book explores tkinter fundamentals and most widgets tools, and it should be
enough to get started with substantial GUI development in Python. On the other hand,
it is not an exhaustive reference to the tkinter library or extensions to it. Happily, at
least one book dedicated to using tkinter in Python is now commercially available as I
write this paragraph, and others are on the way (search the Web for details). Besides
books, you can also find tkinter documentation online; a complete set of tkinter man-
uals is currently maintained on the Web at http://www.pythonware.com/library.
In addition, because the underlying Tk toolkit used by tkinter is also a de facto standard
in the open source scripting community at large, other documentation sources apply.
For instance, because Tk has also been adopted by the Tcl and Perl programming lan-
guages, Tk-oriented books and documentation written for both of these are directly
applicable to Python/tkinter as well (albeit, with some syntactic mapping).
Frankly, I learned tkinter by studying Tcl/Tk texts and references—just replace Tcl
strings with Python objects and you have additional reference libraries at your disposal
(see Table 7-2, the Tk-to-tkinter conversion guide, at the end of this chapter for help
reading Tk documentation). For instance, the book Tcl/Tk Pocket Reference (O’Reilly)
can serve as a nice supplement to the tkinter tutorial material in this part of the book.
Moreover, since Tk concepts are familiar to a large body of programmers, Tk support
is also readily available on the Net.
After you’ve learned the basics, examples can help, too. You can find tkinter demo
programs, besides those you’ll study in this book, at various locations around the Web.
Python itself includes a set of demo programs in the Demos\tkinter subdirectory of its
source distribution package. The IDLE development GUI mentioned in the next section
makes for an interesting code read as well.
tkinter Extensions
Because tkinter is so widely used, programmers also have access to precoded Python
extensions designed to work with or augment it. Some of these may not yet be available
for Python 3.X as I write this but are expected to be soon. For instance:
Pmw
Python Mega Widgets is an extension toolkit for building high-level compound
widgets in Python using the tkinter module. It extends the tkinter API with a col-
lection of more sophisticated widgets for advanced GUI development and a frame-
work for implementing some of your own. Among the precoded and extensible
megawidgets shipped with the package are notebooks, combo boxes, selection
364 | Chapter 7: Graphical User Interfaces

widgets, paned widgets, scrolled widgets, dialog windows, button boxes, balloon
help, and an interface to the Blt graph widget.
The interface to Pmw megawidgets is similar to that of basic tkinter widgets, so
Python scripts can freely mix Pmw megawidgets with standard tkinter widgets.
Moreover, Pmw is pure Python code, and so requires no C compiler or tools to
install. To view its widgets and the corresponding code you use to construct them,
run the demos\All.py script in the Pmw distribution package. You can find Pmw at
http://pmw.sourceforge.net.
Tix
Tix is a collection of more than 40 advanced widgets, originally written for
Tcl/Tk but now available for use in Python/tkinter programs. This package is now
a Python standard library module, called tkinter.tix. Like Tk, the underlying Tix
library is also shipped today with Python on Windows. In other words, on Win-
dows, if you install Python, you also have Tix as a preinstalled library of additional
widgets.
Tix includes many of the same devices as Pmw, including spin boxes, trees, tabbed
notebooks, balloon help pop ups, paned windows, and much more. See the Python
library manual’s entry for the Tix module for more details. For a quick look at its
widgets, as well as the Python source code used to program them, run the
tixwidgets.py demonstration program in the Demo\tix directory of the Python
source distribution (this directory is not installed by default on Windows and is
prone to change—you can generally find it after fetching and unpacking Python’s
source code from Python.org).
ttk
Tk themed widgets, ttk, is a relatively new widget set which attempts to separate
the code implementing a widget’s behavior from that implementing its appearance.
Widget classes handle state and callback invocation, whereas widget appearance
is managed separately by themes. Much like Tix, this extension began life sepa-
rately, but was very recently incorporated into Python’s standard library in Python
3.1, as module tkinter.ttk.
Also like Tix, this extension comes with advanced widget types, some of which are
not present in standard tkinter itself. Specifically, ttk comes with 17 widgets, 11 of
which are already present in tkinter and are meant as replacements for some of
tkinter’s standard widgets, and 6 of which are new—Combobox, Notebook, Pro-
gressbar, Separator, Sizegrip and Treeview. In a nutshell, scripts import from the
ttk module after tkinter in order to use its replacement widgets and configure style
objects possibly shared by multiple widgets, instead of configuring widgets
themselves.
As we’ll see in this chapter, it’s possible to provide a common look-and-feel for a
set of widgets with standard tkinter, by subclassing its widget classes using normal
OOP techniques (see “Customizing Widgets with Classes” on page 400). How-
ever, ttk offers additional style options and advanced widget types. For more details
tkinter Overview | 365

on ttk widgets, see the entry in the Python library manual or search the Web; this
book focuses on tkinter fundamentals, and tix and ttk are both too large to cover
in a useful fashion here.
PIL
The Python Imaging Library (PIL) is an open source extension package that adds
image-processing tools to Python. Among other things, it provides tools for image
thumbnails, transforms, and conversions, and it extends the basic tkinter image
object to add support for displaying many image file types. PIL, for instance, allows
tkinter GUIs to display JPEG, TIFF, and PNG images not supported by the base
tkinter toolkit itself (without extension, tkinter supports GIFs and a handful of
bitmap formats). See the end of Chapter 8 for more details and examples; we’ll use
PIL in this book in a number of image-related example scripts. PIL can be found
at http://www.pythonware.com or via a web search.
IDLE
The IDLE integrated Python development environment is both written in Python
with tkinter and shipped and installed with the Python package (if you have a recent
Python interpreter, you should have IDLE too; on Windows, click the Start button,
select the Programs menu, and click the Python entry to find it). IDLE provides
syntax-coloring text editors for Python code, point-and-click debugging, and more,
and is an example of tkinter’s utility.
Others
Many of the extensions that provide visualization tools for Python are based on
the tkinter library and its canvas widget. See the PyPI website and your favorite
web search engine for more tkinter extension examples.
If you plan to do any commercial-grade GUI development with tkinter, you’ll probably
want to explore extensions such as Pmw, PIL, Tix, and ttk after learning tkinter basics
in this text. They can save development time and add pizzazz to your GUIs. See the
Python-related websites mentioned earlier for up-to-date details and links.
tkinter Structure
From a more nuts-and-bolts perspective, tkinter is an integration system that implies
a somewhat unique program structure. We’ll see what this means in terms of code in
a moment, but here is a brief introduction to some of the terms and concepts at the
core of Python GUI programming.
Implementation structure
Strictly speaking, tkinter is simply the name of Python’s interface to Tk—a GUI library
originally written for use with the Tcl programming language and developed by Tcl’s
creator, John Ousterhout. Python’s tkinter module talks to Tk, and the Tk library in
turn interfaces with the underlying window system: Microsoft Windows, X Windows
366 | Chapter 7: Graphical User Interfaces

on Unix, or whatever GUI system your Python uses on your Macintosh. The portability
of tkinter actually stems from the underling Tk library it wraps.
Python’s tkinter adds a software layer on top of Tk that allows Python scripts to call
out to Tk to build and configure interfaces and routes control back to Python scripts
that handle user-generated events (e.g., mouse clicks). That is, GUI calls are internally
routed from Python script, to tkinter, to Tk; GUI events are routed from Tk, to tkinter,
and back to a Python script. In Chapter 20, we’ll know these transfers by their C inte-
gration terms, extending and embedding.
Technically, tkinter is today structured as a combination of the Python-coded
tkinter module package’s files and an extension module called _tkinter that is written
in C. _tkinter interfaces with the Tk library using extending tools and dispatches call-
backs back to Python objects using embedding tools; tkinter simply adds a class-based
interface on top of _tkinter. You should almost always import tkinter in your scripts,
though, not _tkinter; the latter is an implementation module meant for internal use
only (and was oddly named for that reason).
Programming structure
Luckily, Python programmers don’t normally need to care about all this integration
and call routing going on internally; they simply make widgets and register Python
functions to handle widget events. Because of the overall structure, though, event han-
dlers are usually known as callback handlers, because the GUI library “calls back” to
Python code when events occur.
In fact, we’ll find that Python/tkinter programs are entirely event driven: they build
displays and register handlers for events, and then do nothing but wait for events to
occur. During the wait, the Tk GUI library runs an event loop that watches for mouse
clicks, keyboard presses, and so on. All application program processing happens in the
registered callback handlers in response to events. Further, any information needed
across events must be stored in long-lived references such as global variables and class
instance attributes. The notion of a traditional linear program control flow doesn’t
really apply in the GUI domain; you need to think in terms of smaller chunks.
In Python, Tk also becomes object oriented simply because Python is object oriented:
the tkinter layer exports Tk’s API as Python classes. With tkinter, we can either use a
simple function-call approach to create widgets and interfaces, or apply object-oriented
techniques such as inheritance and composition to customize and extend the base set
of tkinter classes. Larger tkinter GUIs are generally constructed as trees of linked tkinter
widget objects and are often implemented as Python classes to provide structure and
retain state information between events. As we’ll see in this part of the book, a tkinter
GUI coded with classes almost by default becomes a reusable software component.
tkinter Overview | 367
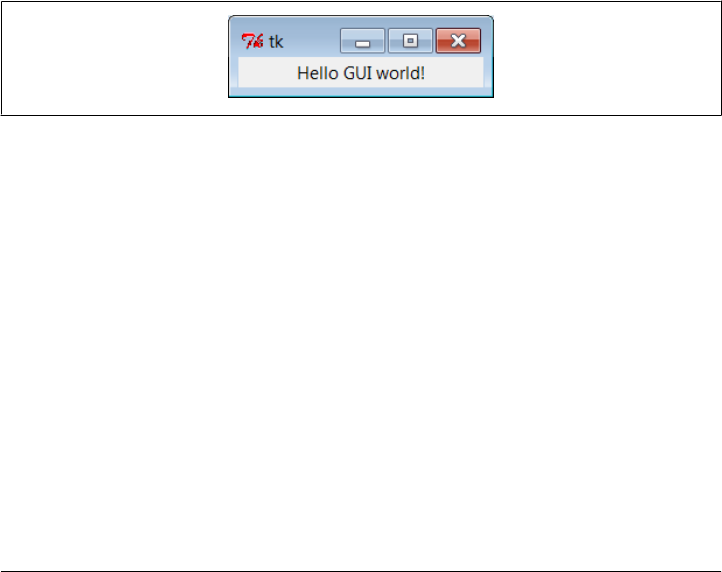
Climbing the GUI Learning Curve
On to the code; let’s start out by quickly stepping through a few small examples that
illustrate basic concepts and show the windows they create on the computer display.
The examples will become progressively more sophisticated as we move along, but let’s
get a handle on the fundamentals first.
“Hello World” in Four Lines (or Less)
The usual first example for GUI systems is to show how to display a “Hello World”
message in a window. As coded in Example 7-1, it’s just four lines in Python.
Example 7-1. PP4E\Gui\Intro\gui1.py
from tkinter import Label # get a widget object
widget = Label(None, text='Hello GUI world!') # make one
widget.pack() # arrange it
widget.mainloop() # start event loop
This is a complete Python tkinter GUI program. When this script is run, we get a simple
window with a label in the middle; it looks like Figure 7-1 on my Windows 7 laptop (I
stretched some windows in this book horizontally to reveal their window titles; your
platform’s window system may vary).
Figure 7-1. “Hello World” (gui1) on Windows
This isn’t much to write home about yet, but notice that this is a completely functional,
independent window on the computer’s display. It can be maximized to take up the
entire screen, minimized to hide it in the system bar, and resized. Click on the window’s
“X” box in the top right to kill the window and exit the program.
The script that builds this window is also fully portable. Run this script on your machine
to see how it renders. When this same file is run on Linux it produces a similar window,
but it behaves according to the underlying Linux window manager. Even on the same
operating system, the same Python code might yields a different look-and-feel for dif-
ferent window systems (for instance, under KDE and Gnome on Linux). The same
script file would look different still when run on Macintosh and other Unix-like window
managers. On all platforms, though, its basic functional behavior will be the same.
368 | Chapter 7: Graphical User Interfaces

tkinter Coding Basics
The gui1 script is a trivial example, but it illustrates steps common to most tkinter
programs. This Python code does the following:
1. Loads a widget class from the tkinter module
2. Makes an instance of the imported Label class
3. Packs (arranges) the new Label in its parent widget
4. Calls mainloop to bring up the window and start the tkinter event loop
The mainloop method called last puts the label on the screen and enters a tkinter wait
state, which watches for user-generated GUI events. Within the mainloop function,
tkinter internally monitors things such as the keyboard and mouse to detect user-
generated events. In fact, the tkinter mainloop function is similar in spirit to the fol-
lowing pseudo-Python code:
def mainloop():
while the main window has not been closed:
if an event has occurred:
run the associated event handler function
Because of this model, the mainloop call in Example 7-1 never returns to our script while
the GUI is displayed on-screen.‡ When we write larger scripts, the only way we can get
anything done after calling mainloop is to register callback handlers to respond to events.
This is called event-driven programming, and it is perhaps one of the most unusual
aspects of GUIs. GUI programs take the form of a set of event handlers that share saved
information rather than of a single main control flow. We’ll see how this looks in terms
of real code in later examples.
Note that for code in a script file, you really need to do steps 3 and 4 in the preceding
list to open this script’s GUI. To display a GUI’s window at all, you need to call main
loop; to display widgets within the window, they must be packed (or otherwise ar-
ranged) so that the tkinter geometry manager knows about them. In fact, if you call
either mainloop or pack without calling the other, your window won’t show up as ex-
pected: a mainloop without a pack shows an empty window, and a pack without a
mainloop in a script shows nothing since the script never enters an event wait state (try
it). The mainloop call is sometimes optional when you’re coding interactively, but you
shouldn’t rely on this in general.
Since the concepts illustrated by this simple script are at the core of most tkinter pro-
grams, let’s take a deeper look at some of them before moving on.
‡ Technically, the mainloop call returns to your script only after the tkinter event loop exits. This normally
happens when the GUI’s main window is closed, but it may also occur in response to explicit quit method
calls that terminate nested event loops but leave open the GUI at large. You’ll see why this matters in
Chapter 8.
Climbing the GUI Learning Curve | 369

Making Widgets
When widgets are constructed in tkinter, we can specify how they should be configured.
The gui1 script passes two arguments to the Label class constructor:
• The first is a parent-widget object, which we want the new label to be attached to.
Here, None means “attach the new Label to the default top-level window of this
program.” Later, we’ll pass real widgets in this position to attach our labels to other
container objects.
• The second is a configuration option for the Label, passed as a keyword argument:
the text option specifies a text string to appear as the label’s message. Most widget
constructors accept multiple keyword arguments for specifying a variety of options
(color, size, callback handlers, and so on). Most widget configuration options have
reasonable defaults per platform, though, and this accounts for much of tkinter’s
simplicity. You need to set most options only if you wish to do something custom.
As we’ll see, the parent-widget argument is the hook we use to build up complex GUIs
as widget trees. tkinter works on a “what-you-build-is-what-you-get” principle—we
construct widget object trees as models of what we want to see on the screen, and then
ask the tree to display itself by calling mainloop.
Geometry Managers
The pack widget method called by the gui1 script invokes the packer geometry man-
ager, one of three ways to control how widgets are arranged in a window. tkinter ge-
ometry managers simply arrange one or more widgets within a container (sometimes
called a parent or master). Both top-level windows and frames (a special kind of widget
we’ll meet later) can serve as containers, and containers may be nested inside other
containers to build hierarchical displays.
The packer geometry manager uses constraint option settings to automatically position
widgets in a window. Scripts supply higher-level instructions (e.g., “attach this widget
to the top of its container, and stretch it to fill its space vertically”), not absolute pixel
coordinates. Because such constraints are so abstract, the packer provides a powerful
and easy-to-use layout system. In fact, you don’t even have to specify constraints. If
you don’t pass any arguments to pack, you get default packing, which attaches the
widget to the top side of its container.
We’ll visit the packer repeatedly in this chapter and use it in many of the examples in
this book. In Chapter 9, we will also meet an alternative grid geometry manager—a
layout system that arranges widgets within a container in tabular form (i.e., by rows
and columns) and works well for input forms. A third alternative, called the placer
geometry manager system, is described in Tk documentation but not in this book; it’s
less popular than the pack and grid managers and can be difficult to use for larger GUIs
coded by hand.
370 | Chapter 7: Graphical User Interfaces

Running GUI Programs
Like all Python code, the module in Example 7-1 can be started in a number of ways—
by running it as a top-level program file:
C:\...\PP4E\Gui\Intro> python gui1.py
by importing it from a Python session or another module file:
>>> import gui1
by running it as a Unix executable if we add the special #! line at the top:
% gui1.py &
and in any other way Python programs can be launched on your platform. For instance,
the script can also be run by clicking on the file’s name in a Windows file explorer, and
its code can be typed interactively at the >>> prompt.§ It can even be run from a C
program by calling the appropriate embedding API function (see Chapter 20 for details
on C integration).
In other words, there are really no special rules to follow when launching GUI Python
code. The tkinter interface (and Tk itself) is linked into the Python interpreter. When
a Python program calls GUI functions, they’re simply passed to the embedded GUI
system behind the scenes. That makes it easy to write command-line tools that pop up
windows; they are run the same way as the purely text-based scripts we studied in the
prior part of this book.
Avoiding DOS consoles on Windows
In Chapters 3 and 6 we noted that if a program’s name ends in a .pyw extension rather
than a .py extension, the Windows Python port does not pop up a DOS console box
to serve as its standard streams when the file is launched by clicking its filename icon.
Now that we’ve finally started making windows of our own, that filename trick will
start to become even more useful.
If you just want to see the windows that your script makes no matter how it is launched,
be sure to name your GUI scripts with a .pyw if they might be run on Windows. For
instance, clicking on the file in Example 7-2 in a Windows explorer creates just the
window in Figure 7-1.
Example 7-2. PP4E\Gui\Intro\gui1.pyw
...same as gui1.py...
§ Tip: As suggested earlier, when typing tkinter GUI code interactively, you may or may not need to call
mainloop to display widgets. This is required in the current IDLE interface, but not from a simple interactive
session running in a system console window. In either case, control will return to the interactive prompt
when you kill the window you created. Note that if you create an explicit main-window widget by calling
Tk() and attach widgets to it (described later), you must call this again after killing the window; otherwise,
the application window will not exist.
Climbing the GUI Learning Curve | 371

You can also avoid the DOS pop up on Windows by running the program with the
pythonw.exe executable, not python.exe (in fact, .pyw files are simply registered to be
opened by pythonw). On Linux, the .pyw doesn’t hurt, but it isn’t necessary; there is no
notion of a streams pop up on Unix-like machines. On the other hand, if your GUI
scripts might run on Windows in the future, adding an extra “w” at the end of their
names now might save porting effort later. In this book, .py filenames are still sometimes
used to pop up console windows for viewing printed messages on Windows.
tkinter Coding Alternatives
As you might expect, there are a variety of ways to code the gui1 example. For instance,
if you want to make all your tkinter imports more explicit in your script, grab the whole
module and prefix all of its names with the module’s name, as in Example 7-3.
Example 7-3. PP4E\Gui\Intro\gui1b.py—import versus from
import tkinter
widget = tkinter.Label(None, text='Hello GUI world!')
widget.pack()
widget.mainloop()
That will probably get tedious in realistic examples, though—tkinter exports dozens
of widget classes and constants that show up all over Python GUI scripts. In fact, it is
usually easier to use a * to import everything from the tkinter module by name in one
shot. This is demonstrated in Example 7-4.
Example 7-4. PP4E\Gui\Intro\gui1c.py—roots, sides, pack in place
from tkinter import *
root = Tk()
Label(root, text='Hello GUI world!').pack(side=TOP)
root.mainloop()
The tkinter module goes out of its way to export only what we really need, so it’s one
of the few for which the * import form is relatively safe to apply.‖ The TOP constant in
the pack call here, for instance, is one of those many names exported by the tkinter
module. It’s simply a variable name (TOP="top") preassigned in constants, a module
automatically loaded by tkinter.
When widgets are packed, we can specify which side of their parent they should be
attached to—TOP, BOTTOM, LEFT, or RIGHT. If no side option is sent to pack (as in prior
examples), a widget is attached to its parent’s TOP by default. In general, larger tkinter
GUIs can be constructed as sets of rectangles, attached to the appropriate sides of other,
‖If you study the main tkinter file in the Python source library (currently, Lib\tkinter\__init__.py), you’ll notice
that top-level module names not meant for export start with a single underscore. Python never copies over
such names when a module is accessed with the * form of the from statement. The constants module is today
constants.py in the same module package directory, though this can change (and has) over time.
372 | Chapter 7: Graphical User Interfaces

enclosing rectangles. As we’ll see later, tkinter arranges widgets in a rectangle according
to both their packing order and their side attachment options. When widgets are grid-
ded, they are assigned row and column numbers instead. None of this will become very
meaningful, though, until we have more than one widget in a window, so let’s move on.
Notice that this version calls the pack method right away after creating the label, without
assigning it a variable. If we don’t need to save a widget, we can pack it in place like
this to eliminate a statement. We’ll use this form when a widget is attached to a larger
structure and never again referenced. This can be tricky if you assign the pack result,
though, but I’ll postpone an explanation of why until we’ve covered a few more basics.
We also use a Tk widget class instance, instead of None, as the parent here. Tk represents
the main (“root”) window of the program—the one that starts when the program does.
An automatically created Tk instance is also used as the default parent widget, both
when we don’t pass any parent to other widget calls and when we pass the parent as
None. In other words, widgets are simply attached to the main program window by
default. This script just makes this default behavior explicit by making and passing the
Tk object itself. In Chapter 8, we’ll see that Toplevel widgets are typically used to gen-
erate new pop-up windows that operate independently of the program’s main window.
In tkinter, some widget methods are exported as functions, and this lets us shave
Example 7-5 to just three lines of code.
Example 7-5. PP4E\Gui\Intro\gui1d.py—a minimal version
from tkinter import *
Label(text='Hello GUI world!').pack()
mainloop()
The tkinter mainloop can be called with or without a widget (i.e., as a function or
method). We didn’t pass Label a parent argument in this version, either: it simply
defaults to None when omitted (which in turn defaults to the automatically created Tk
object). But relying on that default is less useful once we start building larger displays.
Things such as labels are more typically attached to other widget containers.
Widget Resizing Basics
Top-level windows, such as the one built by all of the coding variants we have seen
thus far, can normally be resized by the user; simply drag out the window with your
mouse. Figure 7-2 shows how our window looks when it is expanded.
This isn’t very good—the label stays attached to the top of the parent window instead
of staying in the middle on expansion—but it’s easy to improve on this with a pair of
pack options, demonstrated in Example 7-6.
tkinter Coding Alternatives | 373
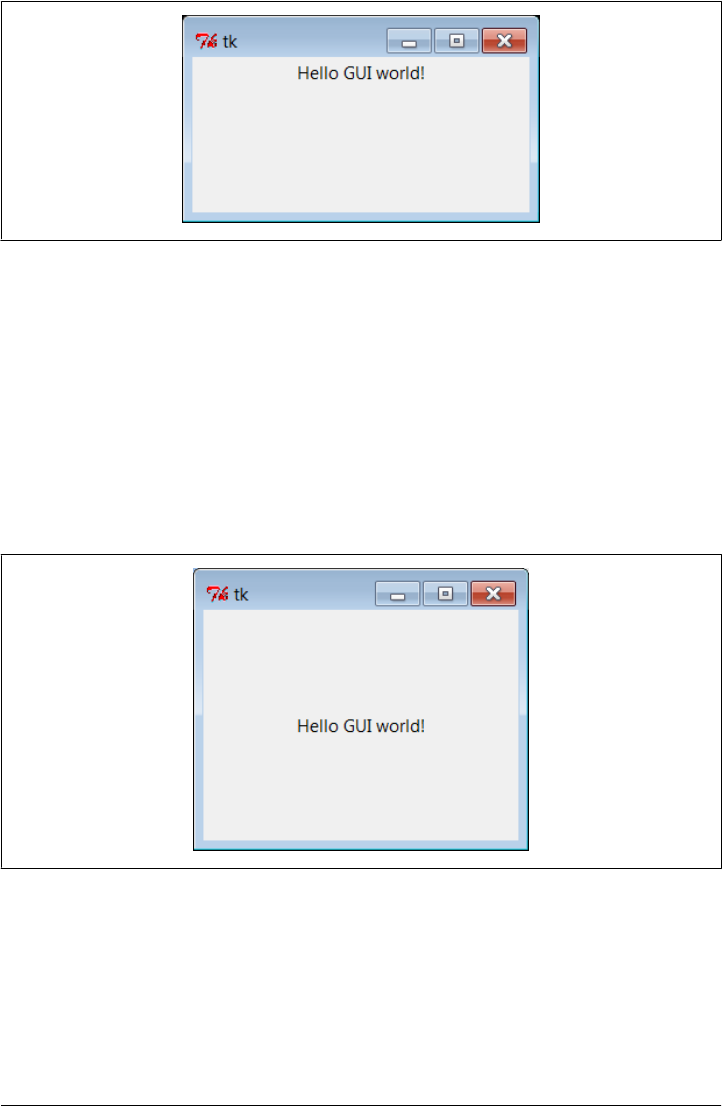
Example 7-6. PP4E\Gui\Intro\gui1e.py—expansion
from tkinter import *
Label(text='Hello GUI world!').pack(expand=YES, fill=BOTH)
mainloop()
When widgets are packed, we can specify whether a widget should expand to take up
all available space, and if so, how it should stretch to fill that space. By default, widgets
are not expanded when their parent is. But in this script, the names YES and BOTH (im-
ported from the tkinter module) specify that the label should grow along with its parent,
the main window. It does so in Figure 7-3.
Figure 7-3. gui1e with widget resizing
Technically, the packer geometry manager assigns a size to each widget in a display
based on what it contains (text string lengths, etc.). By default, a widget can occupy
only its allocated space and is no bigger than its assigned size. The expand and fill
options let us be more specific about such things:
Figure 7-2. Expanding gui1
374 | Chapter 7: Graphical User Interfaces

expand=YES option
Asks the packer to expand the allocated space for the widget in general into any
unclaimed space in the widget’s parent.
fill option
Can be used to stretch the widget to occupy all of its allocated space.
Combinations of these two options produce different layout and resizing effects, some
of which become meaningful only when there are multiple widgets in a window. For
example, using expand without fill centers the widget in the expanded space, and the
fill option can specify vertical stretching only (fill=Y), horizontal stretching only
(fill=X), or both (fill=BOTH). By providing these constraints and attachment sides for
all widgets in a GUI, along with packing order, we can control the layout in fairly precise
terms. In later chapters, we’ll find that the grid geometry manager uses a different
resizing protocol entirely, but it provides similar control when needed.
All of this can be confusing the first time you hear it, and we’ll return to this later. But
if you’re not sure what an expand and fill combination will do, simply try it out—this
is Python, after all. For now, remember that the combination of expand=YES and
fill=BOTH is perhaps the most common setting; it means “expand my space allocation
to occupy all available space on my side, and stretch me to fill the expanded space in
both directions.” For our “Hello World” example, the net result is that the label grows
as the window is expanded, and so is always centered.
Configuring Widget Options and Window Titles
So far, we’ve been telling tkinter what to display on our label by passing its text as a
keyword argument in label constructor calls. It turns out that there are two other ways
to specify widget configuration options. In Example 7-7, the text option of the label is
set after it is constructed, by assigning to the widget’s text key. Widget objects overload
(intercept) index operations such that options are also available as mapping keys, much
like a dictionary.
Example 7-7. PP4E\Gui\Intro\gui1f.py—option keys
from tkinter import *
widget = Label()
widget['text'] = 'Hello GUI world!'
widget.pack(side=TOP)
mainloop()
More commonly, widget options can be set after construction by calling the widget
config method, as in Example 7-8.
tkinter Coding Alternatives | 375
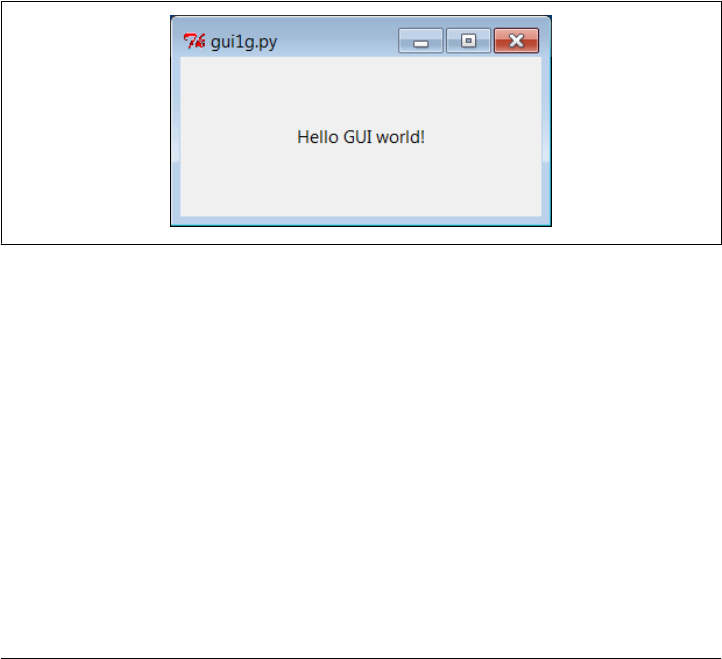
Example 7-8. PP4E\Gui\Intro\gui1g.py—config and titles
from tkinter import *
root = Tk()
widget = Label(root)
widget.config(text='Hello GUI world!')
widget.pack(side=TOP, expand=YES, fill=BOTH)
root.title('gui1g.py')
root.mainloop()
The config method (which can also be called by its synonym, configure) can be called
at any time after construction to change the appearance of a widget on the fly. For
instance, we could call this label’s config method again later in the script to change the
text that it displays; watch for such dynamic reconfigurations in later examples in this
part of the book.
Notice that this version also calls a root.title method; this call sets the label that
appears at the top of the window, as pictured in Figure 7-4. In general terms, top-level
windows like the Tk root here export window-manager interfaces—i.e., things that
have to do with the border around the window, not its contents.
Figure 7-4. gui1g with expansion and a window title
Just for fun, this version also centers the label upon resizes by setting the expand and
fill pack options. In fact, this version makes just about everything explicit and is more
representative of how labels are often coded in full-blown interfaces; their parents,
expansion policies, and attachments are usually spelled out rather than defaulted.
One More for Old Times’ Sake
Finally, if you are a minimalist and you’re nostalgic for old Python coding styles, you
can also program this “Hello World” example as in Example 7-9.
Example 7-9. PP4E\Gui\Intro\gui1-old.py—dictionary calls
from tkinter import *
Label(None, {'text': 'Hello GUI world!', Pack: {'side': 'top'}}).mainloop()
376 | Chapter 7: Graphical User Interfaces

This makes the window in just two lines, albeit arguably gruesome ones! This scheme
relies on an old coding style that was widely used until Python 1.3, which passed
configuration options in a dictionary instead of keyword arguments.# In this scheme,
packer options can be sent as values of the key Pack (a class in the tkinter module).
The dictionary call scheme still works and you may see it in old Python code, but it’s
probably best to not do this in code you type. Use keywords to pass options, and use
explicit pack method calls in your tkinter scripts instead. In fact, the only reason I didn’t
cut this example completely is that dictionaries can still be useful if you want to compute
and pass a set of options dynamically.
On the other hand, the func(*pargs, **kargs) syntax now also allows you to pass an
explicit dictionary of keyword arguments in its third argument slot:
options = {'text': 'Hello GUI world!'}
layout = {'side': 'top'}
Label(None, **options).pack(**layout) # keyword must be strings
Even in dynamic scenarios where widget options are determined at run time, there’s
no compelling reason to ever use the pre-1.3 tkinter dictionary call form.
Packing Widgets Without Saving Them
In gui1c.py (shown in Example 7-4), I started packing labels without assigning them to
names. This works, and it is an entirely valid coding style, but because it tends to
confuse beginners at first glance, I need to explain why it works in more detail here.
In tkinter, Python class objects correspond to real objects displayed on a screen; we
make the Python object to make a screen object, and we call the Python object’s meth-
ods to configure that screen object. Because of this correspondence, the lifetime of the
Python object must generally correspond to the lifetime of the corresponding object on
the screen.
Luckily, Python scripts don’t usually have to care about managing object lifetimes. In
fact, they do not normally need to maintain a reference to widget objects created along
the way at all unless they plan to reconfigure those objects later. For instance, it’s
common in tkinter programming to pack a widget immediately after creating it if no
further reference to the widget is required:
Label(text='hi').pack() # OK
This expression is evaluated left to right, as usual. It creates a new label and then im-
mediately calls the new object’s pack method to arrange it in the display. Notice,
though, that the Python Label object is temporary in this expression; because it is not
#In fact, Python’s pass-by-name keyword arguments were first introduced to help clean up tkinter calls such
as this one. Internally, keyword arguments really are passed as a dictionary (which can be collected with the
**name argument form in a def header), so the two schemes are similar in implementation. But they vary
widely in the number of characters you need to type and debug.
tkinter Coding Alternatives | 377

assigned to a name, it would normally be garbage collected (destroyed and reclaimed)
by Python immediately after running its pack method.
However, because tkinter emits Tk calls when objects are constructed, the label will be
drawn on the display as expected, even though we haven’t held onto the corresponding
Python object in our script. In fact, tkinter internally cross-links widget objects into a
long-lived tree used to represent the display, so the Label object made during this
statement actually is retained, even if not by our code.*
In other words, your scripts don’t generally have to care about widget object lifetimes,
and it’s OK to make widgets and pack them immediately in the same statement without
maintaining a reference to them explicitly in your code.
But that does not mean that it’s OK to say something like this:
widget = Label(text='hi').pack() # wrong!
...use widget...
This statement almost seems like it should assign a newly packed label to widget, but
it does not do this. In fact, it’s really a notorious tkinter beginner’s mistake. The widget
pack method packs the widget but does not return the widget thus packed. Really,
pack returns the Python object None; after such a statement, widget will be a reference
to None, and any further widget operations through that name will fail. For instance,
the following fails, too, for the same reason:
Label(text='hi').pack().mainloop() # wrong!
Since pack returns None, asking for its mainloop attribute generates an exception (as it
should). If you really want to both pack a widget and retain a reference to it, say this
instead:
widget = Label(text='hi') # OK too
widget.pack()
...use widget...
This form is a bit more verbose but is less tricky than packing a widget in the same
statement that creates it, and it allows you to hold onto the widget for later processing.
It’s probably more common in realistic scripts that perform more complex widget con-
figuration and layouts.
On the other hand, scripts that compose layouts often add some widgets once and for
all when they are created and never need to reconfigure them later; assigning to long-
lived names in such programs is pointless and unnecessary.
* Ex-Tcl programmers in the audience may be interested to know that, at least at the time I was writing this
footnote, Python not only builds the widget tree internally, but uses it to automatically generate widget
pathname strings coded manually in Tcl/Tk (e.g., .panel.row.cmd). Python uses the addresses of widget class
objects to fill in the path components and records pathnames in the widget tree. A label attached to a
container, for instance, might have an assigned name such as .8220096.8219408 inside tkinter. You don’t have
to care, though. Simply make and link widget objects by passing parents, and let Python manage pathname
details based on the object tree. See the end of this chapter for more on Tk/tkinter mappings.
378 | Chapter 7: Graphical User Interfaces
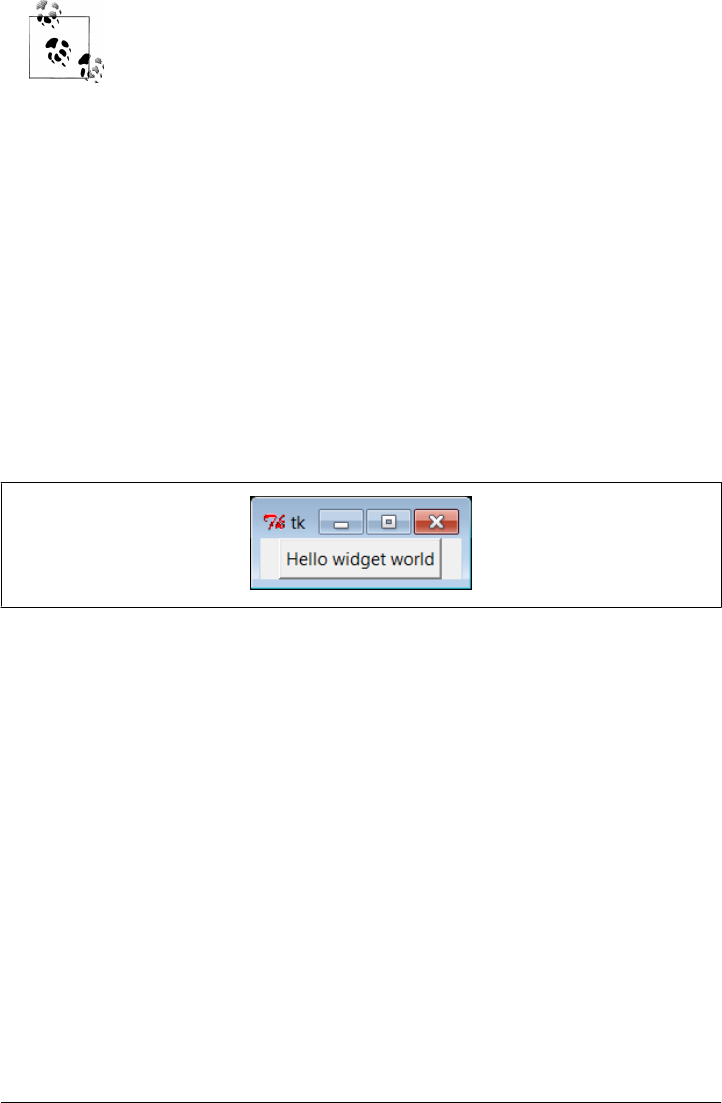
In Chapter 8, we’ll meet two exceptions to this rule. Scripts must man-
ually retain a reference to image objects because the underlying image
data is discarded if the Python image object is garbage collected. tkinter
variable class objects also temporarily unset an associated Tk variable if
reclaimed, but this is uncommon and less harmful.
Adding Buttons and Callbacks
So far, we’ve learned how to display messages in labels, and we’ve met tkinter core
concepts along the way. Labels are nice for teaching the basics, but user interfaces
usually need to do a bit more…like actually responding to users. To show how, the
program in Example 7-10 creates the window in Figure 7-5.
Example 7-10. PP4E\Gui\Intro\gui2.py
import sys
from tkinter import *
widget = Button(None, text='Hello widget world', command=sys.exit)
widget.pack()
widget.mainloop()
Figure 7-5. A button on the top
Here, instead of making a label, we create an instance of the tkinter Button class. It’s
attached to the default top level window as before on the default TOP packing side. But
the main thing to notice here is the button’s configuration arguments: we set an option
called command to the sys.exit function.
For buttons, the command option is the place where we specify a callback handler func-
tion to be run when the button is later pressed. In effect, we use command to register an
action for tkinter to call when a widget’s event occurs. The callback handler used here
isn’t very interesting: as we learned in Chapter 5, the built-in sys.exit function simply
shuts down the calling program. Here, that means that pressing this button makes the
window go away.
Just as for labels, there are other ways to code buttons. Example 7-11 is a version that
packs the button in place without assigning it to a name, attaches it to the LEFT side of
its parent window explicitly, and specifies root.quit as the callback handler—a stand-
ard Tk object method that shuts down the GUI and so ends the program. Technically,
quit ends the current mainloop event loop call, and thus the entire program here; when
Adding Buttons and Callbacks | 379
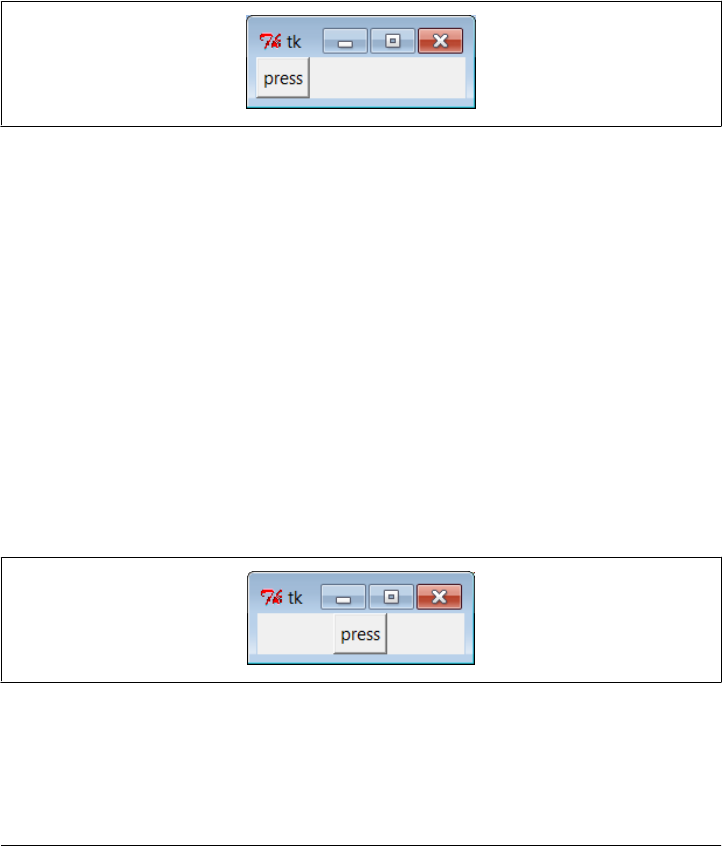
we start using multiple top-level windows in Chapter 8, we’ll find that quit usually
closes all windows, but its relative destroy erases just one window.
Example 7-11. PP4E\Gui\Intro\gui2b.py
from tkinter import *
root = Tk()
Button(root, text='press', command=root.quit).pack(side=LEFT)
root.mainloop()
This version produces the window in Figure 7-6. Because we didn’t tell the button to
expand into all available space, it does not do so.
Figure 7-6. A button on the left
In both of the last two examples, pressing the button makes the GUI program exit. In
older tkinter code, you may sometimes see the string exit assigned to the command option
to make the GUI go away when pressed. This exploits a tool in the underlying Tk library
and is less Pythonic than sys.exit or root.quit.
Widget Resizing Revisited: Expansion
Even with a GUI this simple, there are many ways to lay out its appearance with tkinter’s
constraint-based pack geometry manager. For example, to center the button in its win-
dow, add an expand=YES option to the button’s pack method call in Example 7-11. The
line of changed code looks like this:
Button(root, text='press', command=root.quit).pack(side=LEFT, expand=YES)
This makes the packer allocate all available space to the button but does not stretch
the button to fill that space. The result is the window captured in Figure 7-7.
Figure 7-7. pack(side=LEFT, expand=YES)
If you want the button to be given all available space and to stretch to fill all of its
assigned space horizontally, add expand=YES and fill=X keyword arguments to the
pack call. This will create the scene in Figure 7-8.
380 | Chapter 7: Graphical User Interfaces
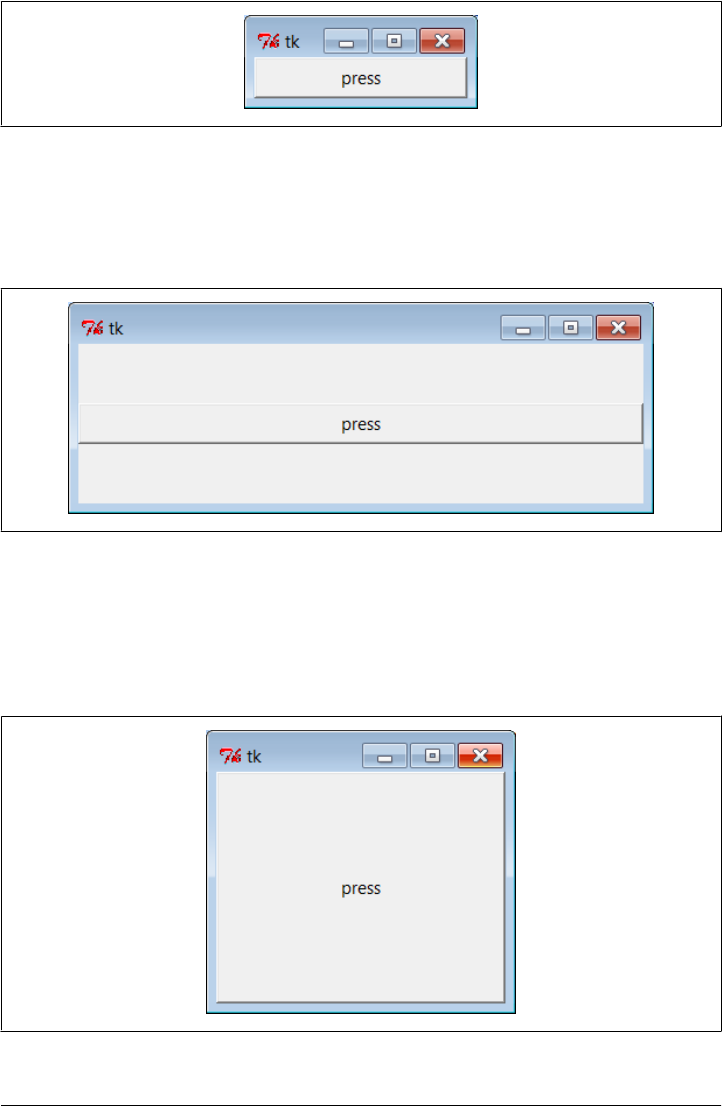
This makes the button fill the whole window initially (its allocation is expanded, and
it is stretched to fill that allocation). It also makes the button grow as the parent window
is resized. As shown in Figure 7-9, the button in this window does expand when its
parent expands, but only along the X horizontal axis.
Figure 7-9. Resizing with expand=YES, fill=X
To make the button grow in both directions, specify both expand=YES and fill=BOTH in
the pack call; now resizing the window makes the button grow in general, as shown in
Figure 7-10. In fact, for more fun, maximize this window to fill the entire screen; you’ll
get one very big tkinter button indeed.
Figure 7-10. Resizing with expand=YES, fill=BOTH
Figure 7-8. pack(side=LEFT, expand=YES, fill=X)
Adding Buttons and Callbacks | 381
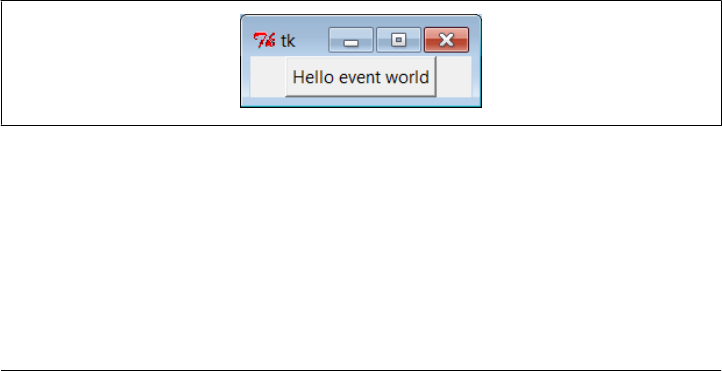
In more complex displays, such a button will expand only if all of the widgets it is
contained by are set to expand too. Here, the button’s only parent is the Tk root window
of the program, so parent expandability isn’t yet an issue; in later examples, we’ll need
to make enclosing Frame widgets expandable too. We will revisit the packer geometry
manager when we meet multiple-widget displays that use such devices later in this
tutorial, and again when we study the alternative grid call in Chapter 9.
Adding User-Defined Callback Handlers
In the simple button examples in the preceding section, the callback handler was simply
an existing function that killed the GUI program. It’s not much more work to register
callback handlers that do something a bit more useful. Example 7-12 defines a callback
handler of its own in Python.
Example 7-12. PP4E\Gui\Intro\gui3.py
import sys
from tkinter import *
def quit(): # a custom callback handler
print('Hello, I must be going...') # kill windows and process
sys.exit()
widget = Button(None, text='Hello event world', command=quit)
widget.pack()
widget.mainloop()
The window created by this script is shown in Figure 7-11. This script and its GUI are
almost identical to the last example. But here, the command option specifies a function
we’ve defined locally. When the button is pressed, tkinter calls the quit function in this
file to handle the event, passing it zero arguments. Inside quit, the print call statement
types a message on the program’s stdout stream, and the GUI process exits as before.
Figure 7-11. A button that runs a Python function
As usual, stdout is normally the window that the program was started from unless it’s
been redirected to a file. It’s a pop-up DOS console if you run this program by clicking
it on Windows; add an input call before sys.exit if you have trouble seeing the message
before the pop up disappears. Here’s what the printed output looks like back in
standard stream world when the button is pressed; it is generated by a Python function
called automatically by tkinter:
382 | Chapter 7: Graphical User Interfaces

C:\...\PP4E\Gui\Intro> python gui3.py
Hello, I must be going...
C:\...\PP4E\Gui\Intro>
Normally, such messages would be displayed in the GUI, but we haven’t gotten far
enough to know how just yet. Callback functions usually do more, of course (and may
even pop up new independent windows altogether), but this example illustrates the
basics.
In general, callback handlers can be any callable object: functions, anonymous func-
tions generated with lambda expressions, bound methods of class or type instances, or
class instances that inherit a __call__ operator overload method. For Button press call-
backs, callback handlers always receive no arguments (other than an automatic self,
for bound methods); any state information required by the callback handler must be
provided in other ways—as global variables, class instance attributes, extra arguments
provided by an indirection layer, and so on.
To make this a bit more concrete, let’s take a quick look at some other ways to code
the callback handler in this example.
Lambda Callback Handlers
Recall that the Python lambda expression generates a new, unnamed function object
when run. If we need extra data passed in to the handler function, we can register
lambda expressions to defer the call to the real handler function, and specify the extra
data it needs.
Later in this part of the book, we’ll see how this can be more useful, but to illustrate
the basic idea, Example 7-13 shows what Example 7-12 looks like when recoded to use
a lambda instead of a def.
Example 7-13. PP4E\Gui\Intro\gui3b.py
import sys
from tkinter import * # lambda generates a function
widget = Button(None, # but contains just an expression
text='Hello event world',
command=(lambda: print('Hello lambda world') or sys.exit()) )
widget.pack()
widget.mainloop()
This code is a bit tricky because lambdas can contain only an expression; to emulate
the original script, this version uses an or operator to force two expressions to be run
( print works as the first, because it’s a function call in Python 3.X—we don’t need to
resort to using sys.stdout directly).
Adding User-Defined Callback Handlers | 383

Deferring Calls with Lambdas and Object References
More typically, lambdas are used to provide an indirection layer that passes along extra
data to a callback handler (I omit pack and mainloop calls in the following snippets for
simplicity):
def handler(A, B): # would normally be called with no args
...use A and B...
X = 42
Button(text='ni', command=(lambda: handler(X, 'spam'))) # lambda adds arguments
Although tkinter invokes command callbacks with no arguments, such a lambda can be
used to provide an indirect anonymous function that wraps the real handler call and
passes along information that existed when the GUI was first constructed. The call to
the real handler is, in effect, deferred, so we can add the extra arguments it requires.
Here, the value of global variable X and string 'spam' will be passed to arguments A and
B, even though tkinter itself runs callbacks with no arguments. The net effect is that the
lambda serves to map a no-argument function call to one with arguments supplied by
the lambda.
If lambda syntax confuses you, remember that a lambda expression such as the one in
the preceding code can usually be coded as a simple def statement instead, nested or
otherwise. In the following code, the second function does exactly the same work as
the prior lambda—by referencing it in the button creation call, it effectively defers
invocation of the actual callback handler so that extra arguments can be passed:
def handler(A, B): # would normally be called with no args
...use A and B...
X = 42
def func(): # indirection layer to add arguments
handler(X, 'spam')
Button(text='ni', command=func)
To make the need for deferrals more obvious, notice what happens if you code a handler
call in the button creation call itself without a lambda or other intermediate function—
the callback runs immediately when the button is created, not when it is later clicked.
That’s why we need to wrap the call in an intermediate function to defer its invocation:
def handler(name):
print(name)
Button(command=handler('spam')) # BAD: runs the callback now!
Using either a lambda or a callable reference serves to defer callback invocation until
the event later occurs. For example, using a lambda to pass extra data with an inline
function definition that defers the call:
def handler(name):
print(name)
384 | Chapter 7: Graphical User Interfaces

Button(command=(lambda: handler('spam'))) # OK: wrap in a lambda to defer
is always equivalent to the longer, and to some observers less convenient, double-
function form:
def handler(name):
print(name)
def temp():
handler('spam')
Button(command=temp) # OK: refence but do not call
We need only the zero-argument lambda or the zero-argument callable reference,
though, not both—it makes no sense to code a lambda which simply calls a function if
no extra data must be passed in and only adds an extra pointless call:
def handler(name):
print(name)
def temp():
handler('spam')
Button(command=(lambda: temp())) # BAD: this adds a pointless call!
As we’ll see later, this includes references to other callables like bound methods and
callable instances which retain state in themselves—if they take zero arguments when
called, we can simply name them at widget construction time, and we don’t need to
wrap them in a superfluous lambda.
Callback Scope Issues
Although the prior section’s lambda and intermediate function techniques defer calls
and allow extra data to be passed in, they also raise some scoping issues that may seem
subtle at first glance. This is core language territory, but it comes up often in practice
in conjunction with GUI.
Arguments versus globals
For instance, notice that the handler function in the prior section’s initial code could
also refer to X directly, because it is a global variable (and would exist by the time the
code inside the handler is run). Because of that, we might make the handler a one-
argument function and pass in just the string 'spam' in the lambda:
def handler(A): # X is in my global scope, implicitly
...use global X and argument A...
X = 42
Button(text='ni', command=(lambda: handler('spam')))
Adding User-Defined Callback Handlers | 385

For that matter, A could be moved out to the global scope too, to remove the need for
lambda here entirely; we could register the handler itself and cut out the middleman.
Although simple in this trivial example, arguments are generally preferred to globals,
because they make external dependencies more explicit, and so make code easier to
understand and change. In fact, the same handler might be usable in other contexts, if
we don’t couple it to global variables’ values. While you’ll have to take it on faith until
we step up to larger examples with more complex state retention needs, avoiding glob-
als in callbacks and GUIs in general both makes them more reusable, and supports the
notion of multiple instances in the same program. It’s good programming practice, GUI
or not.
Passing in enclosing scope values with default arguments
More subtly, notice that if the button in this example was constructed inside a func-
tion rather than at the top level of the file, name X would no longer be global but would
be in the enclosing function’s local scope; it seems as if it would disappear after the
function exits and before the callback event occurs and runs the lambda’s code:
def handler(A, B):
...use A and B...
def makegui():
X = 42
Button(text='ni', command=(lambda: handler(X, 'spam'))) # remembers X
makegui()
mainloop() # makegui's scope is gone by this point
Luckily, Python’s enclosing scope reference model means that the value of X in the local
scope enclosing the lambda function is automatically retained, for use later when the
button press occurs. This usually works as we want today, and automatically handles
variable references in this role.
To make such enclosing scope usage explicit, though, default argument values can also
be used to remember the values of variables in the enclosing local scope, even after the
enclosing function returns. In the following code, for instance, the default argument
name X (on the left side of the X=X default) will remember object 42, because the variable
name X (on the right side of the X=X) is evaluated in the enclosing scope, and the gen-
erated function is later called without any arguments:
def handler(A, B): # older Pythons: defaults save state
...use A and B...
def makegui():
X = 42
Button(text='ni', command=(lambda X=X: handler(X, 'spam')))
Since default arguments are evaluated and saved when the lambda runs (not when the
function it creates is later called), they are a way to explicitly remember objects that
386 | Chapter 7: Graphical User Interfaces

must be accessed again later, during event processing. Because tkinter calls the lambda
function later with no arguments, all its defaults are used.
This was not an issue in the original version of this example because name X lived in
the global scope, and the code of the lambda will find it there when it is run. When
nested within a function, though, X may have disappeared after the enclosing function
exits.
Passing in enclosing scope values with automatic references
While they can make some external dependencies more explicit, defaults are not usually
required (since Python 2.2, at least) and are not used for this role in best practice code
today. Rather, lambdas simply defer the call to the actual handler and provide extra
handler arguments. Variables from the enclosing scope used by the lambda are auto-
matically retained, even after the enclosing function exits.
The prior code listing, for example, can today normally be coded as we did earlier—
name X in the handler will be automatically mapped to X in the enclosing scope, and so
effectively remember what X was when the button was made:
def makegui():
X = 42 # X is retained auto
Button(text='ni', command=(lambda: handler(X, 'spam'))) # no need for defaults
We’ll see this technique put to more concrete use later. When using classes to build
your GUI, for instance, the self argument is a local variable in methods, and is thus
automatically available in the bodies of lambda functions. There is no need to pass it
in explicitly with defaults:
class Gui:
def handler(self, A, B):
...use self, A and B...
def makegui(self):
X = 42
Button(text='ni', command=(lambda: self.handler(X, 'spam')))
Gui().makegui()
mainloop()
When using classes, though, instance attributes can provide extra state for use in call-
back handlers, and so provide an alternative to extra call arguments. We’ll see how in
a moment. First, though, we need to take a quick non-GUI diversion into a dark corner
of Python’s scope rules to understand why default arguments are still sometimes nec-
essary to pass values into nested lambda functions, especially in GUIs.
But you must still sometimes use defaults instead of enclosing scopes
Although you may still see defaults used to pass in enclosing scope references in some
older Python code, automatic enclosing scope references are generally preferred today.
In fact, it seems as though the newer nested scope lookup rules in Python automate
Adding User-Defined Callback Handlers | 387

and replace the previously manual task of passing in enclosing scope values with de-
faults altogether.
Well, almost. There is a catch. It turns out that within a lambda (or def), references to
names in the enclosing scope are actually resolved when the generated function is
called, not when it is created. Because of this, when the function is later called, such
name references will reflect the latest or final assignments made to the names anywhere
in the enclosing scope, which are not necessarily the values they held when the function
was made. This holds true even when the callback function is nested only in a module’s
global scope, not in an enclosing function; in either case, all enclosing scope references
are resolved at function call time, not at function creation time.
This is subtly different from default argument values, which are evaluated once when
the function is created, not when it is later called. Because of that, defaults can still be
useful for remembering the values of enclosing scope variables as they were when you
made the function. Unlike enclosing scope name references, defaults will not have a
different value if the variable later changes in the enclosing scope, between function
creation and call. (In fact, this is why mutable defaults like lists retain their state between
calls—they are created only once, when the function is made, and attached to the
function itself.)
This is normally a nonissue, because most enclosing scope references name a variable
that is assigned just once in the enclosing scope (the self argument in class methods,
for example). But this can lead to coding mistakes if not understood, especially if you
create functions within a loop; if those functions reference the loop variable, it will
evaluate to the value it was given on the last loop iteration in all the functions generated.
By contrast, if you use defaults instead, each function will remember the current value
of the loop variable, not the last.
Because of this difference, nested scope references are not always sufficient to remember
enclosing scope values, and defaults are sometimes still required today. Let’s see what
this means in terms of code. Consider the following nested function (this section’s code
snippets are saved in file defaults.py in the examples package, if you want to experiment
with them).
def simple():
spam = 'ni'
def action():
print(spam) # name maps to enclosing function
return action
act = simple() # make and return nested function
act() # then call it: prints 'ni'
This is the simple case for enclosing scope references, and it works the same way
whether the nested function is generated with a def or a lambda. But notice that this
still works if we assign the enclosing scope’s spam variable after the nested function is
created:
388 | Chapter 7: Graphical User Interfaces

def normal():
def action():
return spam # really, looked up when used
spam = 'ni'
return action
act = normal()
print(act()) # also prints 'ni'
As this implies, the enclosing scope name isn’t resolved when the nested function is
made—in fact, the name hasn’t even been assigned yet in this example. The name is
resolved when the nested function is called. The same holds true for lambdas:
def weird():
spam = 42
return (lambda: spam * 2) # remembers spam in enclosing scope
act = weird()
print(act()) # prints 84
So far, so good. The spam inside this nested lambda function remembers the value that
this variable had in the enclosing scope, even after the enclosing scope exits. This pat-
tern corresponds to a registered GUI callback handler run later on events. But once
again, the nested scope reference really isn’t being resolved when the lambda is run to
create the function; it’s being resolved when the generated function is later called. To
make that more apparent, look at this code:
def weird():
tmp = (lambda: spam * 2) # remembers spam
spam = 42 # even though not set till here
return tmp
act = weird()
print(act()) # prints 84
Here again, the nested function refers to a variable that hasn’t even been assigned yet
when that function is made. Really, enclosing scope references yield the latest setting
made in the enclosing scope, whenever the function is called. Watch what happens in
the following code:
def weird():
spam = 42
handler = (lambda: spam * 2) # func doesn't save 42 now
spam = 50
print(handler()) # prints 100: spam looked up now
spam = 60
print(handler()) # prints 120: spam looked up again now
weird()
Now, the reference to spam inside the lambda is different each time the generated func-
tion is called! In fact, it refers to what the variable was set to last in the enclosing scope
at the time the nested function is called, because it is resolved at function call time, not
at function creation time.
Adding User-Defined Callback Handlers | 389

In terms of GUIs, this becomes significant most often when you generate callback han-
dlers within loops and try to use enclosing scope references to remember extra data
created within the loops. If you’re going to make functions within a loop, you have to
apply the last example’s behavior to the loop variable:
def odd():
funcs = []
for c in 'abcdefg':
funcs.append((lambda: c)) # c will be looked up later
return funcs # does not remember current c
for func in odd():
print(func(), end=' ') # OOPS: print 7 g's, not a,b,c,... !
Here, the func list simulates registered GUI callback handlers associated with widgets.
This doesn’t work the way most people expect it to. The variable c within the nested
function will always be g here, the value that the variable was set to on the final iteration
of the loop in the enclosing scope. The net effect is that all seven generated lambda
functions wind up with the same extra state information when they are later called.
Analogous GUI code that adds information to lambda callback handlers will have sim-
ilar problems—all buttons created in a loop, for instance, may wind up doing the same
thing when clicked! To make this work, we still have to pass values into the nested
function with defaults in order to save the current value of the loop variable (not its
future value):
def odd():
funcs = []
for c in 'abcdefg':
funcs.append((lambda c=c: c)) # force to remember c now
return funcs # defaults eval now
for func in odd():
print(func(), end=' ') # OK: now prints a,b,c,...
This works now only because the default, unlike an external scope reference, is evalu-
ated at function creation time, not at function call time. It remembers the value that a
name in the enclosing scope had when the function was made, not the last assignment
made to that name anywhere in the enclosing scope. The same is true even if the func-
tion’s enclosing scope is a module, not another function; if we don’t use the default
argument in the following code, the loop variable will resolve to the same value in all
seven functions:
funcs = [] # enclosing scope is module
for c in 'abcdefg': # force to remember c now
funcs.append((lambda c=c: c)) # else prints 7 g's again
for func in funcs:
print(func(), end=' ') # OK: prints a,b,c,...
The moral of this story is that enclosing scope name references are a replacement for
passing values in with defaults, but only as long as the name in the enclosing scope will
390 | Chapter 7: Graphical User Interfaces

not change to a value you don’t expect after the nested function is created. You cannot
generally reference enclosing scope loop variables within a nested function, for exam-
ple, because they will change as the loop progresses. In most other cases, though, en-
closing scope variables will take on only one value in their scope and so can be used
freely.
We’ll see this phenomenon at work in later examples that construct larger GUIs. For
now, remember that enclosing scopes are not a complete replacement for defaults;
defaults are still required in some contexts to pass values into callback functions. Also
keep in mind that classes are often a better and simpler way to retain extra state for use
in callback handlers than are nested functions. Because state is explicit in classes, these
scope issues do not apply. The next two sections cover this in detail.
Bound Method Callback Handlers
Let’s get back to coding GUIs. Although functions and lambdas suffice in many cases,
bound methods of class instances work particularly well as callback handlers in GUIs—
they record both an instance to send the event to and an associated method to call. For
instance, Example 7-14 shows Examples 7-12 and 7-13 rewritten to register a bound
class method rather than a function or lambda result.
Example 7-14. PP4E\Gui\Intro\gui3c.py
import sys
from tkinter import *
class HelloClass:
def __init__(self):
widget = Button(None, text='Hello event world', command=self.quit)
widget.pack()
def quit(self):
print('Hello class method world') # self.quit is a bound method
sys.exit() # retains the self+quit pair
HelloClass()
mainloop()
On a button press, tkinter calls this class’s quit method with no arguments, as usual.
But really, it does receive one argument—the original self object—even though tkinter
doesn’t pass it explicitly. Because the self.quit bound method retains both self and
quit, it’s compatible with a simple function call; Python automatically passes the
self argument along to the method function. Conversely, registering an unbound in-
stance method that expects an argument, such as HelloClass.quit, won’t work, be-
cause there is no self object to pass along when the event later occurs.
Adding User-Defined Callback Handlers | 391

Later, we’ll see that class callback handler coding schemes provide a natural place to
remember information for use on events—simply assign the information to self
instance attributes:
class someGuiClass:
def __init__(self):
self.X = 42
self.Y = 'spam'
Button(text='Hi', command=self.handler)
def handler(self):
...use self.X, self.Y...
Because the event will be dispatched to this class’s method with a reference to the
original instance object, self gives access to attributes that retain original data. In effect,
the instance’s attributes retain state information to be used when events occur. Espe-
cially in larger GUIs, this is a much more flexible technique than global variables or
extra arguments added by lambdas.
Callable Class Object Callback Handlers
Because Python class instance objects can also be called if they inherit a __call__
method to intercept the operation, we can pass one of these to serve as a callback
handler too. Example 7-15 shows a class that provides the required function-like
interface.
Example 7-15. PP4E\Gui\Intro\gui3d.py
import sys
from tkinter import *
class HelloCallable:
def __init__(self): # __init__ run on object creation
self.msg = 'Hello __call__ world'
def __call__(self):
print(self.msg) # __call__ run later when called
sys.exit() # class object looks like a function
widget = Button(None, text='Hello event world', command=HelloCallable())
widget.pack()
widget.mainloop()
Here, the HelloCallable instance registered with command can be called like a normal
function; Python invokes its __call__ method to handle the call operation made in
tkinter on the button press. In effect, the general __call__ method replaces a specific
bound method in this case. Notice how self.msg is used to retain information for use
on events here; self is the original instance when the special __call__ method is au-
tomatically invoked.
All four gui3 variants create the same sort of GUI window (Figure 7-11), but print
different messages to stdout when their button is pressed:
392 | Chapter 7: Graphical User Interfaces

C:\...\PP4E\Gui\Intro> python gui3.py
Hello, I must be going...
C:\...\PP4E\Gui\Intro> python gui3b.py
Hello lambda world
C:\...\PP4E\Gui\Intro> python gui3c.py
Hello class method world
C:\...\PP4E\Gui\Intro> python gui3d.py
Hello __call__ world
There are good reasons for each callback coding scheme (function, lambda, class
method, callable class), but we need to move on to larger examples in order to uncover
them in less theoretical terms.
Other tkinter Callback Protocols
For future reference, also keep in mind that using command options to intercept user-
generated button press events is just one way to register callbacks in tkinter. In fact,
there are a variety of ways for tkinter scripts to catch events:
Button command options
As we’ve just seen, button press events are intercepted by providing a callable object
in widget command options. This is true of other kinds of button-like widgets we’ll
meet in Chapter 8 (e.g., radio and check buttons and scales).
Menu command options
In the upcoming tkinter tour chapters, we’ll also find that a command option is used
to specify callback handlers for menu selections.
Scroll bar protocols
Scroll bar widgets register handlers with command options, too, but they have a
unique event protocol that allows them to be cross-linked with the widget they are
meant to scroll (e.g., listboxes, text displays, and canvases): moving the scroll bar
automatically moves the widget, and vice versa.
General widget bind methods
A more general tkinter event bind method mechanism can be used to register call-
back handlers for lower-level interface events—key presses, mouse movement and
clicks, and so on. Unlike command callbacks, bind callbacks receive an event object
argument (an instance of the tkinter Event class) that gives context about the
event—subject widget, screen coordinates, and so on.
Window manager protocols
In addition, scripts can also intercept window manager events (e.g., window close
requests) by tapping into the window manager protocol method mechanism avail-
able on top-level window objects. Setting a handler for WM_DELETE_WINDOW, for in-
stance, takes over window close buttons.
Adding User-Defined Callback Handlers | 393

Scheduled event callbacks
Finally, tkinter scripts can also register callback handlers to be run in special con-
texts, such as timer expirations, input data arrival, and event-loop idle states.
Scripts can also pause for state-change events related to windows and special var-
iables. We’ll meet these event interfaces in more detail near the end of Chapter 9.
Binding Events
Of all the options listed in the prior section, bind is the most general, but also perhaps
the most complex. We’ll study it in more detail later, but to let you sample its flavor
now, Example 7-16 rewrites the prior section’s GUI again to use bind, not the
command keyword, to catch button presses.
Example 7-16. PP4E\Gui\Intro\gui3e.py
import sys
from tkinter import *
def hello(event):
print('Press twice to exit') # on single-left click
def quit(event): # on double-left click
print('Hello, I must be going...') # event gives widget, x/y, etc.
sys.exit()
widget = Button(None, text='Hello event world')
widget.pack()
widget.bind('<Button-1>', hello) # bind left mouse clicks
widget.bind('<Double-1>', quit) # bind double-left clicks
widget.mainloop()
In fact, this version doesn’t specify a command option for the button at all. Instead, it
binds lower-level callback handlers for both left mouse clicks (<Button-1>) and double-
left mouse clicks (<Double-1>) within the button’s display area. The bind method ac-
cepts a large set of such event identifiers in a variety of formats, which we’ll meet in
Chapter 8.
When run, this script makes the same window as before (see Figure 7-11). Clicking on
the button once prints a message but doesn’t exit; you need to double-click on the
button now to exit as before. Here is the output after clicking twice and double-clicking
once (a double-click fires the single-click callback first):
C:\...\PP4E\Gui\Intro> python gui3e.py
Press twice to exit
Press twice to exit
Press twice to exit
Hello, I must be going...
Although this script intercepts button clicks manually, the end result is roughly the
same; widget-specific protocols such as button command options are really just higher-
level interfaces to events you can also catch with bind.
394 | Chapter 7: Graphical User Interfaces
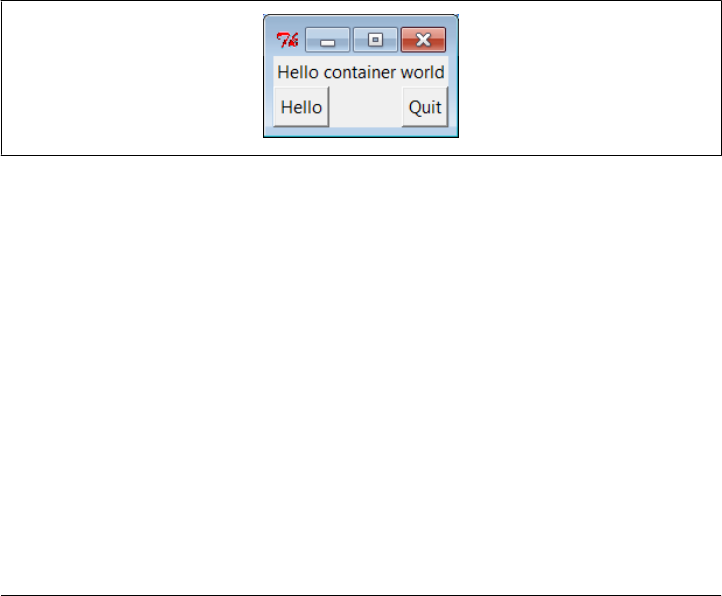
We’ll meet bind and all of the other tkinter event callback handler hooks again in more
detail later in this book. First, though, let’s focus on building GUIs that are larger than
a single button and explore a few other ways to use classes in GUI work.
Adding Multiple Widgets
It’s time to start building user interfaces with more than one widget. Example 7-17
makes the window shown in Figure 7-12.
Example 7-17. PP4E\Gui\Intro\gui4.py
from tkinter import *
def greeting():
print('Hello stdout world!...')
win = Frame()
win.pack()
Label(win, text='Hello container world').pack(side=TOP)
Button(win, text='Hello', command=greeting).pack(side=LEFT)
Button(win, text='Quit', command=win.quit).pack(side=RIGHT)
win.mainloop()
Figure 7-12. A multiple-widget window
This example makes a Frame widget (another tkinter class) and attaches three other
widget objects to it, a Label and two Buttons, by passing the Frame as their first argu-
ment. In tkinter terms, we say that the Frame becomes a parent to the other three
widgets. Both buttons on this display trigger callbacks:
• Pressing the Hello button triggers the greeting function defined within this file,
which prints to stdout again.
• Pressing the Quit button calls the standard tkinter quit method, inherited by win
from the Frame class (Frame.quit has the same effect as the Tk.quit we used earlier).
Here is the stdout text that shows up on Hello button presses, wherever this script’s
standard streams may be:
C:\...\PP4E\Gui\Intro> python gui4.py
Hello stdout world!...
Hello stdout world!...
Adding Multiple Widgets | 395
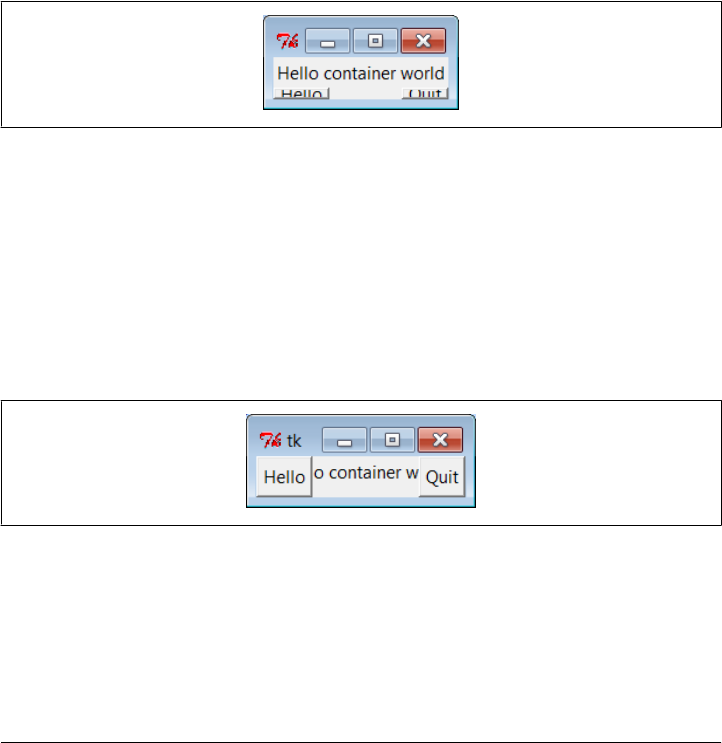
Hello stdout world!...
Hello stdout world!...
The notion of attaching widgets to containers turns out to be at the core of layouts in
tkinter. Before we go into more detail on that topic, though, let’s get small.
Widget Resizing Revisited: Clipping
Earlier, we saw how to make widgets expand along with their parent window, by pass-
ing expand and fill options to the pack geometry manager. Now that we have a window
with more than one widget, I can let you in on one of the more useful secrets in the
packer. As a rule, widgets packed first are clipped last when a window is shrunk. That
is, the order in which you pack items determines which items will be cut out of the
display if it is made too small. Widgets packed later are cut out first. For example,
Figure 7-13 shows what happens when the gui4 window is shrunk interactively.
Figure 7-13. gui4 gets small
Try reordering the label and button lines in the script and see what happens when the
window shrinks; the first one packed is always the last to go away. For instance, if the
label is packed last, Figure 7-14 shows that it is clipped first, even though it is attached
to the top: side attachments and packing order both impact the overall layout, but only
packing order matters when windows shrink. Here are the changed lines:
Button(win, text='Hello', command=greeting).pack(side=LEFT)
Button(win, text='Quit', command=win.quit).pack(side=RIGHT)
Label(win, text='Hello container world').pack(side=TOP)
Figure 7-14. Label packed last, clipped first
tkinter keeps track of the packing order internally to make this work. Scripts can plan
ahead for shrinkage by calling pack methods of more important widgets first. For in-
stance, on the upcoming tkinter tour, we’ll meet code that builds menus and toolbars
at the top and bottom of the window; to make sure these are lost last as a window is
shrunk, they are packed first, before the application components in the middle.
396 | Chapter 7: Graphical User Interfaces

Similarly, displays that include scroll bars normally pack them before the items they
scroll (e.g., text, lists) so that the scroll bars remain as the window shrinks.
Attaching Widgets to Frames
In larger terms, the critical innovation in this example is its use of frames: Frame widgets
are just containers for other widgets, and so give rise to the notion of GUIs as widget
hierarchies, or trees. Here, win serves as an enclosing window for the other three
widgets. In general, though, by attaching widgets to frames, and frames to other frames,
we can build up arbitrary GUI layouts. Simply divide the user interface into a set of
increasingly smaller rectangles, implement each as a tkinter Frame, and attach basic
widgets to the frame in the desired screen position.
In this script, when you specify win in the first argument to the Label and Button con-
structors, tkinter attaches them to the Frame (they become children of the win parent).
win itself is attached to the default top-level window, since we didn’t pass a parent to
the Frame constructor. When we ask win to run itself (by calling mainloop), tkinter draws
all the widgets in the tree we’ve built.
The three child widgets also provide pack options now: the side arguments tell which
part of the containing frame (i.e., win) to attach the new widget to. The label hooks
onto the top, and the buttons attach to the sides. TOP, LEFT, and RIGHT are all preassigned
string variables imported from tkinter. Arranging widgets is a bit subtler than simply
giving a side, though, but we need to take a quick detour into packer geometry man-
agement details to see why.
Layout: Packing Order and Side Attachments
When a widget tree is displayed, child widgets appear inside their parents and are
arranged according to their order of packing and their packing options. Because of this,
the order in which widgets are packed not only gives their clipping order, but also
determines how their side settings play out in the generated display.
Here’s how the packer’s layout system works:
1. The packer starts out with an available space cavity that includes the entire parent
container (e.g., the whole Frame or top-level window).
2. As each widget is packed on a side, that widget is given the entire requested side
in the remaining space cavity, and the space cavity is shrunk.
3. Later pack requests are given an entire side of what is left, after earlier pack requests
have shrunk the cavity.
4. After widgets are given cavity space, expand divides any space left, and fill and
anchor stretch and position widgets within their assigned space.
Adding Multiple Widgets | 397

For instance, if you recode the gui4 child widget creation logic like this:
Button(win, text='Hello', command=greeting).pack(side=LEFT)
Label(win, text='Hello container world').pack(side=TOP)
Button(win, text='Quit', command=win.quit).pack(side=RIGHT)
you will wind up with the very different display shown in Figure 7-15, even though
you’ve moved the label code only one line down in the source file (contrast with
Figure 7-12).
Figure 7-15. Packing the label second
Despite its side setting, the label does not get the entire top of the window now, and
you have to think in terms of shrinking cavities to understand why. Because the Hello
button is packed first, it is given the entire LEFT side of the Frame. Next, the label is given
the entire TOP side of what is left. Finally, the Quit button gets the RIGHT side of the
remainder—a rectangle to the right of the Hello button and under the label. When this
window shrinks, widgets are clipped in reverse order of their packing: the Quit button
disappears first, followed by the label.†
In the original version of this example (Figure 7-12), the label spans the entire top side
just because it is the first one packed, not because of its side option. In fact, if you look
at Figure 7-14 closely, you’ll see that it illustrates the same point—the label appeared
between the buttons, because they had already carved off the entire left and right sides.
The Packer’s Expand and Fill Revisited
Beyond the effects of packing order, the fill option we met earlier can be used to stretch
the widget to occupy all the space in the cavity side it has been given, and any cavity
space left after all packing is evenly allocated among widgets with the expand=YES we
saw before. For example, coding this way creates the window in Figure 7-16 (compare
this to Figure 7-15):
Button(win, text='Hello', command=greeting).pack(side=LEFT,fill=Y)
Label(win, text='Hello container world').pack(side=TOP)
Button(win, text='Quit', command=win.quit).pack(side=RIGHT, expand=YES, fill=X)
† Technically, the packing steps are just rerun again after a window resize. But since this means that there won’t
be enough space left for widgets packed last when the window shrinks, it is as if widgets packed first are
clipped last.
398 | Chapter 7: Graphical User Interfaces
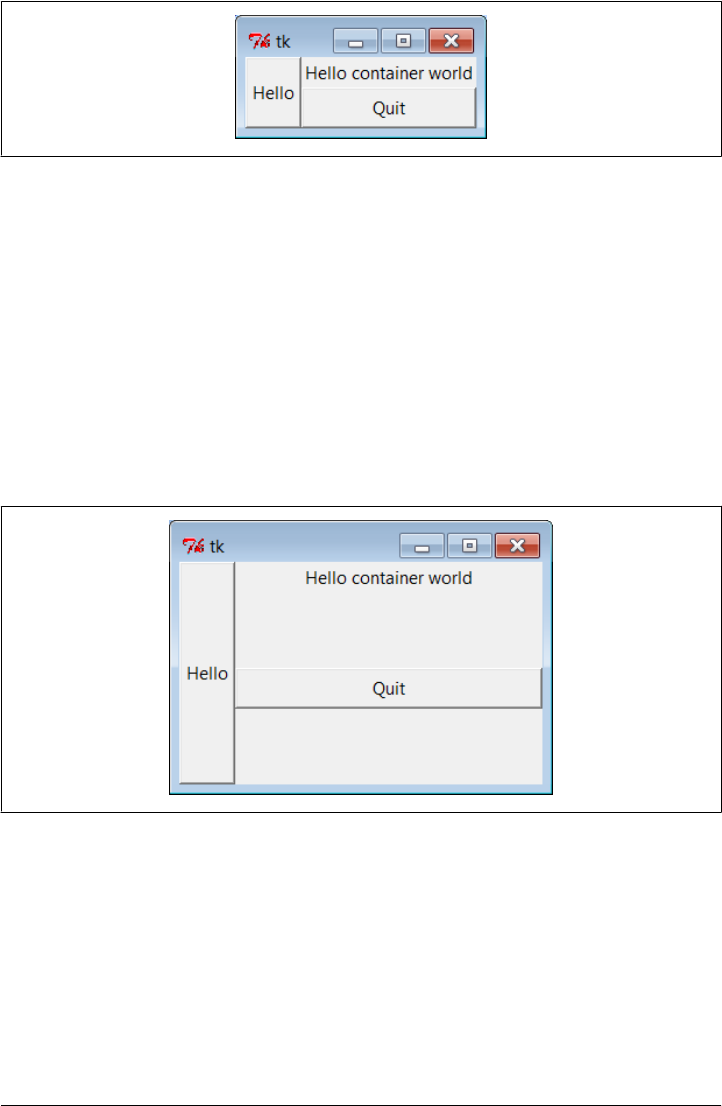
To make all of these grow along with their window, though, we also need to make the
container frame expandable; widgets expand beyond their initial packer arrangement
only if all of their parents expand, too. Here are the changes in gui4.py:
win = Frame()
win.pack(side=TOP, expand=YES, fill=BOTH)
Button(win, text='Hello', command=greeting).pack(side=LEFT, fill=Y)
Label(win, text='Hello container world').pack(side=TOP)
Button(win, text='Quit', command=win.quit).pack(side=RIGHT, expand=YES,fill=X)
When this code runs, the Frame is assigned the entire top side of its parent as before
(that is, the top parcel of the root window); but because it is now marked to expand
into unused space in its parent and to fill that space both ways, it and all of its attached
children expand along with the window. Figure 7-17 shows how.
Figure 7-17. gui4 gets big with an expandable frame
Using Anchor to Position Instead of Stretch
And as if that isn’t flexible enough, the packer also allows widgets to be positioned
within their allocated space with an anchor option, instead of filling that space with a
fill. The anchor option accepts tkinter constants identifying all eight points of the
compass (N, NE, NW, S, etc.) and CENTER as its value (e.g., anchor=NW). It instructs the packer
to position the widget at the desired position within its allocated space, if the space
allocated for the widget is larger than the space needed to display the widget.
Figure 7-16. Packing with expand and fill options
Adding Multiple Widgets | 399
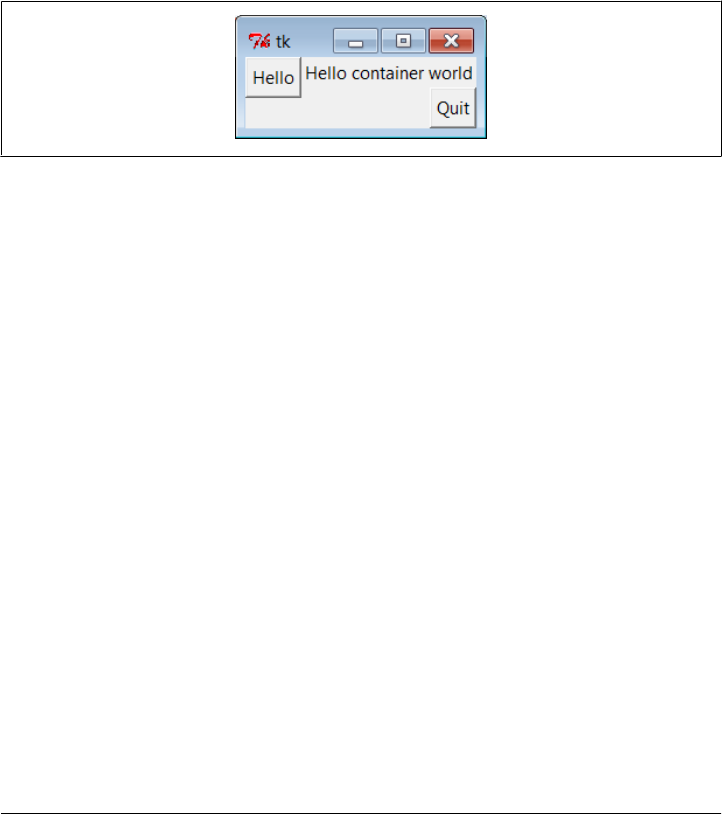
The default anchor is CENTER, so widgets show up in the middle of their space (the cavity
side they were given) unless they are positioned with anchor or stretched with fill. To
demonstrate, change gui4 to use this sort of code:
Button(win, text='Hello', command=greeting).pack(side=LEFT, anchor=N)
Label(win, text='Hello container world').pack(side=TOP)
Button(win, text='Quit', command=win.quit).pack(side=RIGHT)
The only thing new here is that the Hello button is anchored to the north side of its
space allocation. Because this button was packed first, it got the entire left side of the
parent frame. This is more space than is needed to show the button, so it shows up in
the middle of that side by default, as in Figure 7-15 (i.e., anchored to the center). Setting
the anchor to N moves it to the top of its side, as shown in Figure 7-18.
Figure 7-18. Anchoring a button to the north
Keep in mind that fill and anchor are applied after a widget has been allocated cavity
side space by its side, packing order, and expand extra space request. By playing with
packing orders, sides, fills, and anchors, you can generate lots of layout and clipping
effects, and you should take a few moments to experiment with alternatives if you
haven’t already. In the original version of this example, for instance, the label spans the
entire top side just because it is the first packed.
As we’ll see later, frames can be nested in other frames, too, in order to make more
complex layouts. In fact, because each parent container is a distinct space cavity, this
provides a sort of escape mechanism for the packer cavity algorithm: to better control
where a set of widgets show up, simply pack them within a nested subframe and attach
the frame as a package to a larger container. A row of push buttons, for example, might
be easier laid out in a frame of its own than if mixed with other widgets in the display
directly.
Finally, also keep in mind that the widget tree created by these examples is really an
implicit one; tkinter internally records the relationships implied by passed parent
widget arguments. In OOP terms, this is a composition relationship—the Frame contains
a Label and Buttons. Let’s look at inheritance relationships next.
Customizing Widgets with Classes
You don’t have to use OOP in tkinter scripts, but it can definitely help. As we just saw,
tkinter GUIs are built up as class-instance object trees. Here’s another way Python’s
400 | Chapter 7: Graphical User Interfaces
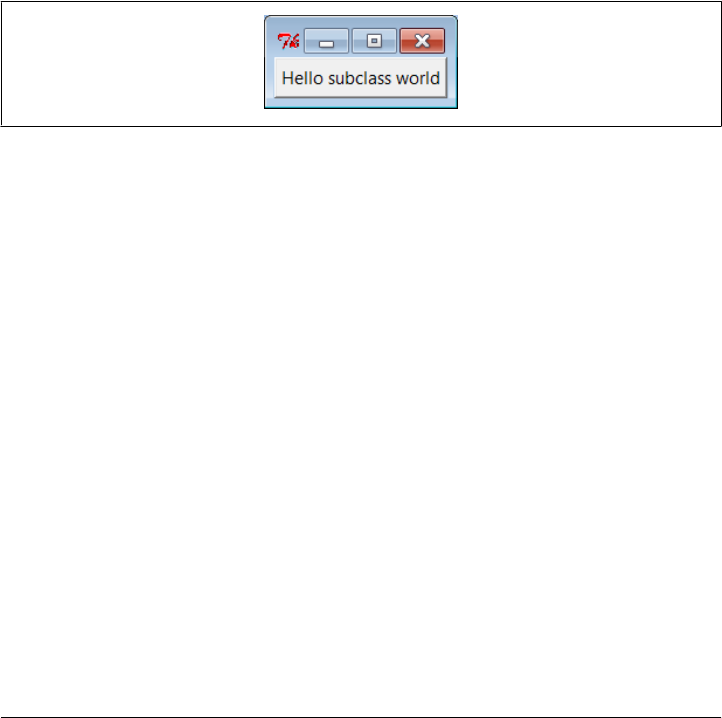
OOP features can be applied to GUI models: specializing widgets by inheritance.
Example 7-18 builds the window in Figure 7-19.
Example 7-18. PP4E\Gui\Intro\gui5.py
from tkinter import *
class HelloButton(Button):
def __init__(self, parent=None, **config): # add callback method
Button.__init__(self, parent, **config) # and pack myself
self.pack() # could config style too
self.config(command=self.callback)
def callback(self): # default press action
print('Goodbye world...') # replace in subclasses
self.quit()
if __name__ == '__main__':
HelloButton(text='Hello subclass world').mainloop()
Figure 7-19. A button subclass in action
This example isn’t anything special to look at: it just displays a single button that, when
pressed, prints a message and exits. But this time, it is a button widget we created on
our own. The HelloButton class inherits everything from the tkinter Button class, but
adds a callback method and constructor logic to set the command option to
self.callback, a bound method of the instance. When the button is pressed this time,
the new widget class’s callback method, not a simple function, is invoked.
The **config argument here is assigned unmatched keyword arguments in a dictionary,
so they can be passed along to the Button constructor. The **config in the Button
constructor call unpacks the dictionary back into keyword arguments (it’s actually
optional here, because of the old-style dictionary widget call form we met earlier, but
doesn’t hurt). We met the config widget method called in HelloButton’s constructor
earlier; it is just an alternative way to pass configuration options after the fact (instead
of passing constructor arguments).
Standardizing Behavior and Appearance
So what’s the point of subclassing widgets like this? In short, it allows sets of widgets
made from the customized classes to look and act the same. When coded well, we get
both “for free” from Python’s OOP model. This can be a powerful technique in larger
programs.
Customizing Widgets with Classes | 401

Common behavior
Example 7-18 standardizes behavior—it allows widgets to be configured by subclassing
instead of by passing in options. In fact, its HelloButton is a true button; we can pass
in configuration options such as its text as usual when one is made. But we can also
specify callback handlers by overriding the callback method in subclasses, as shown
in Example 7-19.
Example 7-19. PP4E\Gui\Intro\gui5b.py
from gui5 import HelloButton
class MyButton(HelloButton): # subclass HelloButton
def callback(self): # redefine press-handler method
print("Ignoring press!...")
if __name__ == '__main__':
MyButton(None, text='Hello subclass world').mainloop()
This script makes the same window; but instead of exiting, this MyButton button, when
pressed, prints to stdout and stays up. Here is its standard output after being pressed
a few times:
C:\...\PP4E\Gui\Intro> python gui5b.py
Ignoring press!...
Ignoring press!...
Ignoring press!...
Ignoring press!...
Whether it’s simpler to customize widgets by subclassing or passing in options is prob-
ably a matter of taste in this simple example. But the larger point to notice is that Tk
becomes truly object oriented in Python, just because Python is object oriented—we
can specialize widget classes using normal class-based and object-oriented techniques.
In fact this applies to both widget behavior and appearance.
Common appearance
For example, although we won’t study widget configuration options until the next
chapter, a similar customized button class could provide a standard look-and-feel
different from tkinter’s defaults for every instance created from it, and approach the
notions of “styles” or “themes” in some GUI toolkits:
class ThemedButton(Button): # config my style too
def __init__(self, parent=None, **configs): # used for each instance
Button.__init__(self, parent, **configs) # see chapter 8 for options
self.pack()
self.config(fg='red', bg='black', font=('courier', 12), relief=RAISED, bd=5)
B1 = ThemedButton(text='spam', command=onSpam) # normal button widget objects
B2 = ThemedButton(text='eggs') # but same appearance by inheritance
B2.pack(expand=YES, fill=BOTH)
402 | Chapter 7: Graphical User Interfaces

This code is something of a preview; see file gui5b-themed.py in the examples package
for a complete version, and watch for more on its widget configuration options in
Chapter 8. But it illustrates the application of common appearance by subclassing
widgets directly—every button created from its class looks the same, and will pick up
any future changes in its configurations automatically.
Widget subclasses are a programmer’s tool, of course, but we can also make such con-
figurations accessible to a GUI’s users. In larger programs later in the book (e.g., PyEdit,
PyClock, and PyMailGUI), we’ll sometimes achieve a similar effect by importing con-
figurations from modules and applying them to widgets as they are built. If such ex-
ternal settings are used by a customized widget subclass like our ThemedButton above,
they will again apply to all its instances and subclasses (for reference, the full version
of the following code is in file gui5b-themed-user.py):
from user_preferences import bcolor, bfont, bsize # get user settings
class ThemedButton(Button):
def __init__(self, parent=None, **configs):
Button.__init__(self, parent, **configs)
self.pack()
self.config(bg=bcolor, font=(bfont, bsize))
ThemedButton(text='spam', command=onSpam) # normal button widget objects
ThemedButton(text='eggs', command=onEggs) # all inherit user preferences
class MyButton(ThemedButton): # subclasses inherit prefs too
def __init__(self, parent=None, **configs):
ThemedButton.__init__(self, parent, **configs)
self.config(text='subclass')
MyButton(command=onSpam)
Again, more on widget configuration in the next chapter; the big picture to take away
here is that customizing widget classes with subclasses allows us to tailor both their
behavior and their appearance for an entire set of widgets. The next example provides
yet another way to arrange for specialization—as customizable and attachable widget
packages, usually known as components.
Reusable GUI Components with Classes
Larger GUI interfaces are often built up as subclasses of Frame, with callback handlers
implemented as methods. This structure gives us a natural place to store information
between events: instance attributes record state. It also allows us to both specialize
GUIs by overriding their methods in new subclasses and attach them to larger GUI
structures to reuse them as general components. For instance, a GUI text editor im-
plemented as a Frame subclass can be attached to and configured by any number of
other GUIs; if done well, we can plug such a text editor into any user interface that
needs text editing tools.
Reusable GUI Components with Classes | 403
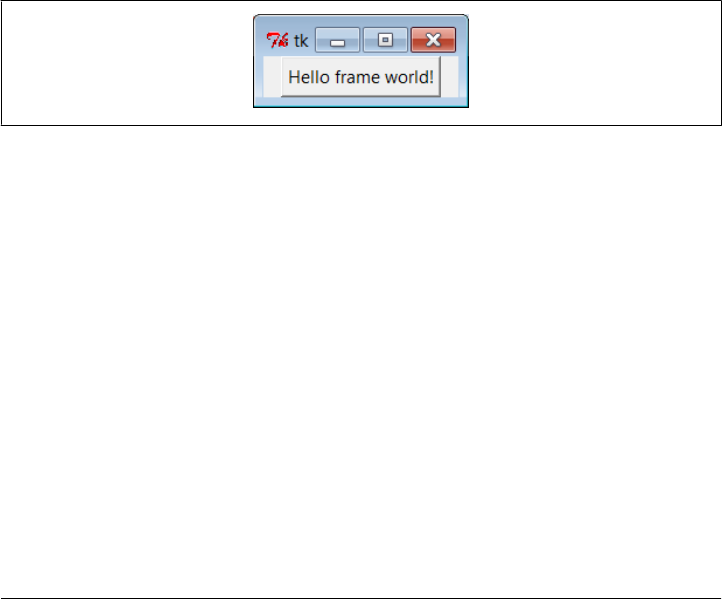
We’ll meet such a text editor component in Chapter 11. For now, Example 7-20 illus-
trates the concept in a simple way. The script gui6.py produces the window in
Figure 7-20.
Example 7-20. PP4E\Gui\Intro\gui6.py
from tkinter import *
class Hello(Frame): # an extended Frame
def __init__(self, parent=None):
Frame.__init__(self, parent) # do superclass init
self.pack()
self.data = 42
self.make_widgets() # attach widgets to self
def make_widgets(self):
widget = Button(self, text='Hello frame world!', command=self.message)
widget.pack(side=LEFT)
def message(self):
self.data += 1
print('Hello frame world %s!' % self.data)
if __name__ == '__main__': Hello().mainloop()
Figure 7-20. A custom Frame in action
This example pops up a single-button window. When pressed, the button triggers the
self.message bound method to print to stdout again. Here is the output after pressing
this button four times; notice how self.data (a simple counter here) retains its state
between presses:
C:\...\PP4E\Gui\Intro> python gui6.py
Hello frame world 43!
Hello frame world 44!
Hello frame world 45!
Hello frame world 46!
This may seem like a roundabout way to show a Button (we did it in fewer lines in
Examples 7-10, 7-11, and 7-12). But the Hello class provides an enclosing organiza-
tional structure for building GUIs. In the examples prior to the last section, we made
GUIs using a function-like approach: we called widget constructors as though they
were functions and hooked widgets together manually by passing in parents to widget
construction calls. There was no notion of an enclosing context, apart from the global
404 | Chapter 7: Graphical User Interfaces

scope of the module file containing the widget calls. This works for simple GUIs but
can make for brittle code when building up larger GUI structures.
But by subclassing Frame as we’ve done here, the class becomes an enclosing context
for the GUI:
• Widgets are added by attaching objects to self, an instance of a Frame container
subclass (e.g., Button).
• Callback handlers are registered as bound methods of self, and so are routed back
to code in the class (e.g., self.message).
• State information is retained between events by assigning to attributes of self,
visible to all callback methods in the class (e.g., self.data).
• It’s easy to make multiple copies of such a GUI component, even within the same
process, because each class instance is a distinct namespace.
• Classes naturally support customization by inheritance and by composition
attachment.
In a sense, entire GUIs become specialized Frame objects with extensions for an appli-
cation. Classes can also provide protocols for building widgets (e.g., the
make_widgets method here), handle standard configuration chores (like setting window
manager options), and so on. In short, Frame subclasses provide a simple way to or-
ganize collections of other widget-class objects.
Attaching Class Components
Perhaps more importantly, subclasses of Frame are true widgets: they can be further
extended and customized by subclassing and can be attached to enclosing widgets. For
instance, to attach the entire package of widgets that a class builds to something else,
simply create an instance of the class with a real parent widget passed in. To illustrate,
running the script in Example 7-21 creates the window shown in Figure 7-21.
Example 7-21. PP4E\Gui\Intro\gui6b.py
from sys import exit
from tkinter import * # get Tk widget classes
from gui6 import Hello # get the subframe class
parent = Frame(None) # make a container widget
parent.pack()
Hello(parent).pack(side=RIGHT) # attach Hello instead of running it
Button(parent, text='Attach', command=exit).pack(side=LEFT)
parent.mainloop()
Reusable GUI Components with Classes | 405

Figure 7-21. An attached class component on the right
This script just adds Hello’s button to the right side of parent—a container Frame. In
fact, the button on the right in this window represents an embedded component: its
button really represents an attached Python class object. Pressing the embedded class’s
button on the right prints a message as before; pressing the new button exits the GUI
by a sys.exit call:
C:\...\PP4E\Gui\Intro> python gui6b.py
Hello frame world 43!
Hello frame world 44!
Hello frame world 45!
Hello frame world 46!
In more complex GUIs, we might instead attach large Frame subclasses to other con-
tainer components and develop each independently. For instance, Example 7-22 is yet
another specialized Frame itself, but it attaches an instance of the original Hello class in
a more object-oriented fashion. When run as a top-level program, it creates a window
identical to the one shown in Figure 7-21.
Example 7-22. PP4E\Gui\Intro\gui6c.py
from tkinter import * # get Tk widget classes
from gui6 import Hello # get the subframe class
class HelloContainer(Frame):
def __init__(self, parent=None):
Frame.__init__(self, parent)
self.pack()
self.makeWidgets()
def makeWidgets(self):
Hello(self).pack(side=RIGHT) # attach a Hello to me
Button(self, text='Attach', command=self.quit).pack(side=LEFT)
if __name__ == '__main__': HelloContainer().mainloop()
This looks and works exactly like gui6b but registers the added button’s callback han-
dler as self.quit, which is just the standard quit widget method this class inherits from
Frame. The window this time represents two Python classes at work—the embedded
component’s widgets on the right (the original Hello button) and the container’s
widgets on the left.
Naturally, this is a simple example (we attached only a single button here, after all).
But in more practical user interfaces, the set of widget class objects attached in this way
406 | Chapter 7: Graphical User Interfaces
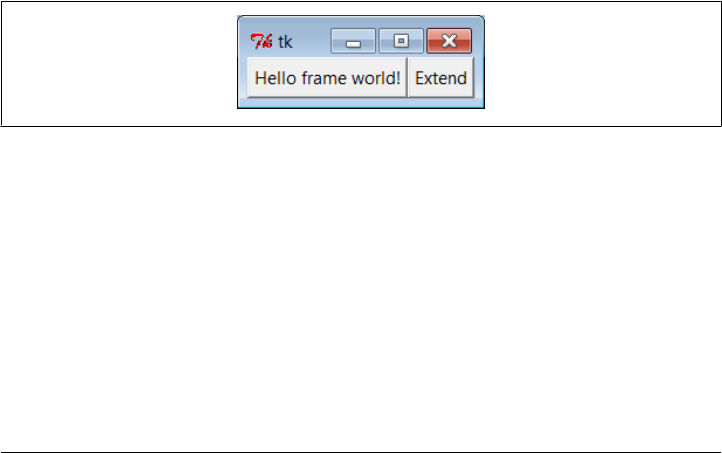
can be much larger. If you imagine replacing the Hello call in this script with a call to
attach an already coded and fully debugged calculator object, you’ll begin to better
understand the power of this paradigm. If we code all of our GUI components as classes,
they automatically become a library of reusable widgets, which we can combine in other
applications as often as we like.
Extending Class Components
When GUIs are built with classes, there are a variety of ways to reuse their code in other
displays. To extend Hello instead of attaching it, we just override some of its methods
in a new subclass (which itself becomes a specialized Frame widget). This technique is
shown in Example 7-23.
Example 7-23. PP4E\Gui\Intro\gui6d.py
from tkinter import *
from gui6 import Hello
class HelloExtender(Hello):
def make_widgets(self): # extend method here
Hello.make_widgets(self)
Button(self, text='Extend', command=self.quit).pack(side=RIGHT)
def message(self):
print('hello', self.data) # redefine method here
if __name__ == '__main__': HelloExtender().mainloop()
This subclass’s make_widgets method here first builds the superclass’s widgets and then
adds a second Extend button on the right, as shown in Figure 7-22.
Figure 7-22. A customized class’s widgets, on the left
Because it redefines the message method, pressing the original superclass’s button on
the left now prints a different string to stdout (when searching up from self, the
message attribute is found first in this subclass, not in the superclass):
C:\...\PP4E\Gui\Intro> python gui6d.py
hello 42
hello 42
hello 42
hello 42
But pressing the new Extend button on the right, which is added by this subclass, exits
immediately, since the quit method (inherited from Hello, which inherits it from
Reusable GUI Components with Classes | 407

Frame) is the added button’s callback handler. The net effect is that this class customizes
the original to add a new button and change message’s behavior.
Although this example is simple, it demonstrates a technique that can be powerful in
practice: to change a GUI’s behavior, we can write a new class that customizes its parts
rather than changing the existing GUI code in place. The main code need be debugged
only once and can be customized with subclasses as unique needs arise.
The moral of this story is that tkinter GUIs can be coded without ever writing a single
new class, but using classes to structure your GUI code makes it much more reusable
in the long run. If done well, you can both attach already debugged components to new
interfaces and specialize their behavior in new external subclasses as needed for custom
requirements. Either way, the initial upfront investment to use classes is bound to save
coding time in the end.
Standalone Container Classes
Before we move on, I want to point out that it’s possible to reap most of the class-based
component benefits previously mentioned by creating standalone classes not derived
from tkinter Frames o r o t h e r w i d g e t s . F o r i n s t a n c e , t h e c l a s s i n Example 7-24 generates
the window shown in Figure 7-23.
Example 7-24. PP4E\Gui\Intro\gui7.py
from tkinter import *
class HelloPackage: # not a widget subbclass
def __init__(self, parent=None):
self.top = Frame(parent) # embed a Frame
self.top.pack()
self.data = 0
self.make_widgets() # attach widgets to self.top
def make_widgets(self):
Button(self.top, text='Bye', command=self.top.quit).pack(side=LEFT)
Button(self.top, text='Hye', command=self.message).pack(side=RIGHT)
def message(self):
self.data += 1
print('Hello number', self.data)
if __name__ == '__main__': HelloPackage().top.mainloop()
Figure 7-23. A standalone class package in action
408 | Chapter 7: Graphical User Interfaces

When run, the Hye button here prints to stdout and the Bye button closes and exits
the GUI, much as before:
C:\...\PP4E\Gui\Intro> python gui7.py
Hello number 1
Hello number 2
Hello number 3
Hello number 4
Also as before, self.data retains state between events, and callbacks are routed to the
self.message method within this class. Unlike before, the HelloPackage class is not itself
a kind of Frame widget. In fact, it’s not a kind of anything—it serves only as a generator
of namespaces for storing away real widget objects and state. Because of that, widgets
are attached to a self.top (an embedded Frame), not to self. Moreover, all references
to the object as a widget must descend to the embedded frame, as in the top.main
loop call to start the GUI at the end of the script.
This makes for a bit more coding within the class, but it avoids potential name clashes
with both attributes added to self by the tkinter framework and existing tkinter widget
methods. For instance, if you define a config method in your class, it will hide the
config call exported by tkinter. With the standalone class package in this example, you
get only the methods and instance attributes that your class defines.
In practice, tkinter doesn’t use very many names, so this is not generally a big con-
cern.‡ It can happen, of course; but frankly, I’ve never seen a real tkinter name clash in
widget subclasses in some 18 years of Python coding. Moreover, using standalone
classes is not without other downsides. Although they can generally be attached and
subclassed as before, they are not quite plug-and-play compatible with real widget
objects. For instance, the configuration calls made in Example 7-21 for the Frame sub-
class fail in Example 7-25.
Example 7-25. PP4E\Gui\Intro\gui7b.py
from tkinter import *
from gui7 import HelloPackage # or get from gui7c--__getattr__ added
frm = Frame()
frm.pack()
Label(frm, text='hello').pack()
part = HelloPackage(frm)
‡ If you study the tkinter module’s source code (today, mostly in file __init__.py in Lib\tkinter), you’ll notice
that many of the attribute names it creates start with a single underscore to make them unique from yours;
others do not because they are potentially useful outside of the tkinter implementation (e.g., self.master,
self.children). Curiously, at this writing most of tkinter still does not use the Python “pseudoprivate
attributes” trick of prefixing attribute names with two leading underscores to automatically add the enclosing
class’s name and thus localize them to the creating class. If tkinter is ever rewritten to employ this feature,
name clashes will be much less likely in widget subclasses. Most of the attributes of widget classes, though,
are methods intended for use in client scripts; the single underscore names are accessible too, but are less
likely to clash with most names of your own.
Reusable GUI Components with Classes | 409
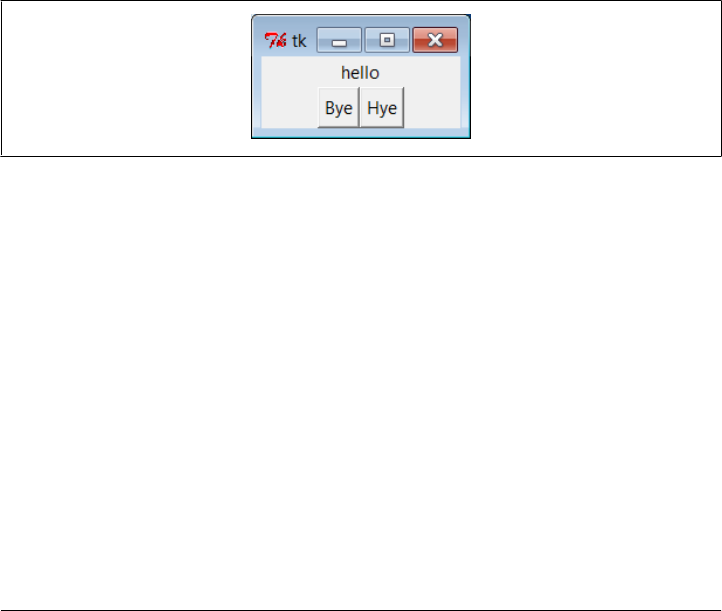
part.pack(side=RIGHT) # FAILS!--need part.top.pack(side=RIGHT)
frm.mainloop()
This won’t quite work, because part isn’t really a widget. To treat it as such, you must
descend to part.top before making GUI configurations and hope that the name top is
never changed by the class’s developer. In other words, it exposes some of the class’s
internals. The class could make this better by defining a method that always routes
unknown attribute fetches to the embedded Frame, as in Example 7-26.
Example 7-26. PP4E\Gui\Intro\gui7c.py
import gui7
from tkinter import *
class HelloPackage(gui7.HelloPackage):
def __getattr__(self, name):
return getattr(self.top, name) # pass off to a real widget
if __name__ == '__main__': HelloPackage().mainloop() # invokes __getattr__!
As is, this script simply creates Figure 7-23 again; changing Example 7-25 to import
this extended HelloPackage from gui7c, though, produces the correctly-working win-
dow in Figure 7-24.
Figure 7-24. A standalone class package in action
Routing attribute fetches to nested widgets works this way, but that then requires even
more extra coding in standalone package classes. As usual, though, the significance of
all these trade-offs varies per application.
The End of the Tutorial
In this chapter, we learned the core concepts of Python/tkinter programming and met
a handful of simple widget objects along the way—e.g., labels, buttons, frames, and
the packer geometry manager. We’ve seen enough to construct simple interfaces, but
we have really only scratched the surface of the tkinter widget set.
In the next two chapters, we will apply what we’ve learned here to study the rest of the
tkinter library, and we’ll learn how to use it to generate the kinds of interfaces you
expect to see in realistic GUI programs. As a preview and roadmap, Table 7-1 lists the
kinds of widgets we’ll meet there in roughly their order of appearance. Note that this
410 | Chapter 7: Graphical User Interfaces

table lists only widget classes; along the way, we will also meet a few additional widget-
related topics that don’t appear in this table.
Table 7-1. tkinter widget classes
Widget class Description
Label A simple message area
Button A simple labeled push-button widget
Frame A container for attaching and arranging other widget objects
Toplevel, Tk A new window managed by the window manager
Message A multiline label
Entry A simple single-line text-entry field
Checkbutton A two-state button widget, typically used for multiple-choice selections
Radiobutton A two-state button widget, typically used for single-choice selections
Scale A slider widget with scalable positions
PhotoImage An image object used for displaying full-color images on other widgets
BitmapImage An image object used for displaying bitmap images on other widgets
Menu A set of options associated with a Menubutton or top-level window
Menubutton A button that opens a Menu of selectable options and submenus
Scrollbar A control for scrolling other widgets (e.g., listbox, canvas, text)
Listbox A list of selection names
Text A multiline text browse/edit widget, with support for fonts, and so on
Canvas A graphic drawing area, which supports lines, circles, photos, text, and so on
We’ve already met Label, Button, and Frame in this chapter’s tutorial. To make the
remaining topics easier to absorb, they are split over the next two chapters: Chap-
ter 8 covers the first widgets in this table up to but not including Menu, and Chapter 9
presents widgets that are lower in this table.
Besides the widget classes in this table, there are additional classes and tools in the
tkinter library, many of which we’ll explore in the following two chapters as well:
Geometry management
pack, grid, place
tkinter linked variables
StringVar, IntVar, DoubleVar, BooleanVar
Advanced Tk widgets
Spinbox, LabelFrame, PanedWindow
Composite widgets
Dialog, ScrolledText, OptionMenu
The End of the Tutorial | 411

Scheduled callbacks
Widget after, wait, and update methods
Other tools
Standard dialogs, clipboard, bind and Event, widget configuration options, custom
and modal dialogs, animation techniques
Most tkinter widgets are familiar user interface devices. Some are remarkably rich in
functionality. For instance, the Text class implements a sophisticated multiline text
widget that supports fonts, colors, and special effects and is powerful enough to im-
plement a web browser’s page display. The similarly feature-rich Canvas class provides
extensive drawing tools powerful enough for visualization and other image-processing
applications. Beyond this, tkinter extensions such as the Pmw, Tix, and ttk packages
described at the start of this chapter add even richer widgets to a GUI programmer’s
toolbox.
Python/tkinter for Tcl/Tk Converts
At the start of this chapter, I mentioned that tkinter is Python’s interface to the Tk GUI
library, originally written for the Tcl language. To help readers migrating from Tcl to
Python and to summarize some of the main topics we met in this chapter, this section
contrasts Python’s Tk interface with Tcl’s. This mapping also helps make Tk references
written for other languages more useful to Python developers.
In general terms, Tcl’s command-string view of the world differs widely from Python’s
object-based approach to programming. In terms of Tk programming, though, the
syntactic differences are fairly small. Here are some of the main distinctions in Python’s
tkinter interface:
Creation
Widgets are created as class instance objects by calling a widget class.
Masters (parents)
Parents are previously created objects that are passed to widget-class constructors.
Widget options
Options are constructor or config keyword arguments or indexed keys.
Operations
Widget operations (actions) become tkinter widget class object methods.
Callbacks
Callback handlers are any callable objects: function, method, lambda, and so on.
Extension
Widgets are extended using Python class inheritance mechanisms.
Composition
Interfaces are constructed by attaching objects, not by concatenating names.
412 | Chapter 7: Graphical User Interfaces

Linked variables (next chapter)
Variables associated with widgets are tkinter class objects with methods.
In Python, widget creation commands (e.g., button) are Python class names that start
with an uppercase letter (e.g., Button), two-word widget operations (e.g., add command)
become a single method name with an underscore (e.g., add_command), and the “con-
figure” method can be abbreviated as “config,” as in Tcl. In Chapter 8, we will also see
that tkinter “variables” associated with widgets take the form of class instance objects
(e.g., StringVar, IntVar) with get and set methods, not simple Python or Tcl variable
names. Table 7-2 shows some of the primary language mappings in more concrete
terms.
Table 7-2. Tk-to-tkinter mappings
Operation Tcl/Tk Python/tkinter
Creation Frame .panel panel = Frame()
Masters button .panel.quit quit = Button(panel)
Options button .panel.go -fg black go = Button(panel, fg='black')
Configure .panel.go config -bg red go.config(bg='red') go['bg'] = ‘red’
Actions .popup invoke popup.invoke()
Packing pack .panel -side left -fill x panel.pack(side=LEFT, fill=X)
Some of these differences are more than just syntactic, of course. For instance, Python
builds an internal widget object tree based on parent arguments passed to widget con-
structors, without ever requiring concatenated widget pathname strings. Once you’ve
made a widget object, you can use it directly by object reference. Tcl coders can hide
some dotted pathnames by manually storing them in variables, but that’s not quite the
same as Python’s purely object-based model.
Once you’ve written a few Python/tkinter scripts, though, the coding distinctions in
the Python object world will probably seem trivial. At the same time, Python’s support
for object-oriented techniques adds an entirely new component to Tk development;
you get the same widgets, plus Python’s support for code structure and reuse.
Python/tkinter for Tcl/Tk Converts | 413

CHAPTER 8
A tkinter Tour, Part 1
“Widgets and Gadgets and GUIs, Oh My!”
This chapter is a continuation of our look at GUI programming in Python. The previous
chapter used simple widgets—buttons, labels, and the like—to demonstrate the fun-
damentals of Python/tkinter coding. That was simple by design: it’s easier to grasp the
big GUI picture if widget interface details don’t get in the way. But now that we’ve seen
the basics, this chapter and the next move on to present a tour of more advanced widget
objects and tools available in the tkinter library.
As we’ll find, this is where GUI scripting starts getting both practical and fun. In these
two chapters, we’ll meet classes that build the interface devices you expect to see in
real programs—e.g., sliders, check buttons, menus, scrolled lists, dialogs, graphics, and
so on. After these chapters, the last GUI chapter moves on to present larger GUIs that
utilize the coding techniques and the interfaces shown in all prior GUI chapters. In
these two chapters, though, examples are small and self-contained so that we can focus
on widget details.
This Chapter’s Topics
Technically, we’ve already used a handful of simple widgets in Chapter 7. So far we’ve
met Label, Button, Frame, and Tk, and studied pack geometry management concepts
along the way. Although all of these are basic, they represent tkinter interfaces in general
and can be workhorses in typical GUIs. Frame containers, for instance, are the basis of
hierarchical display layout.
In this and the following chapter, we’ll explore additional options for widgets we’ve
already seen and move beyond the basics to cover the rest of the tkinter widget set.
Here are some of the widgets and topics we’ll explore in this chapter:
•Toplevel and Tk widgets
•Message and Entry widgets
•Checkbutton, Radiobutton, and Scale widgets
415

• Images: PhotoImage and BitmapImage objects
• Widget and window configuration options
• Dialogs, both standard and custom
• Low-level event binding
• tkinter linked variable objects
• Using the Python Imaging Library (PIL) extension for other image types and
operations
After this chapter, Chapter 9 concludes the two-part tour by presenting the remainder
of the tkinter library’s tool set: menus, text, canvases, animation, and more.
To make this tour interesting, I’ll also introduce a few notions of component reuse
along the way. For instance, some later examples will be built using components written
for prior examples. Although these two tour chapters introduce widget interfaces, this
book is also about Python programming in general; as we’ll see, tkinter programming
in Python can be much more than simply drawing circles and arrows.
Configuring Widget Appearance
So far, all the buttons and labels in examples have been rendered with a default look-
and-feel that is standard for the underlying platform. With my machine’s color scheme,
that usually means that they’re gray on Windows. tkinter widgets can be made to look
arbitrarily different, though, using a handful of widget and packer options.
Because I generally can’t resist the temptation to customize widgets in examples, I want
to cover this topic early on the tour. Example 8-1 introduces some of the configuration
options available in tkinter.
Example 8-1. PP4E\Gui\Tour\config-label.py
from tkinter import *
root = Tk()
labelfont = ('times', 20, 'bold') # family, size, style
widget = Label(root, text='Hello config world')
widget.config(bg='black', fg='yellow') # yellow text on black label
widget.config(font=labelfont) # use a larger font
widget.config(height=3, width=20) # initial size: lines,chars
widget.pack(expand=YES, fill=BOTH)
root.mainloop()
Remember, we can call a widget’s config method to reset its options at any time, instead
of passing all of them to the object’s constructor. Here, we use it to set options that
produce the window in Figure 8-1.
This may not be completely obvious unless you run this script on a real computer (alas,
I can’t show it in color here), but the label’s text shows up in yellow on a black
416 | Chapter 8: A tkinter Tour, Part 1

background, and with a font that’s very different from what we’ve seen so far. In fact,
this script customizes the label in a number of ways:
Color
By setting the bg option of the label widget here, its background is displayed in
black; the fg option similarly changes the foreground (text) color of the widget to
yellow. These color options work on most tkinter widgets and accept either a sim-
ple color name (e.g., 'blue') or a hexadecimal string. Most of the color names you
are familiar with are supported (unless you happen to work for Crayola). You can
also pass a hexadecimal color identifier string to these options to be more specific;
they start with a # and name a color by its red, green, and blue saturations, with
an equal number of bits in the string for each. For instance, '#ff0000' specifies
eight bits per color and defines pure red; “f” means four “1” bits in hexadecimal.
We’ll come back to this hex form when we meet the color selection dialog later in
this chapter.
Size
The label is given a preset size in lines high and characters wide by setting its
height and width attributes. You can use this setting to make the widget larger than
the tkinter geometry manager would by default.
Font
This script specifies a custom font for the label’s text by setting the label’s font
attribute to a three-item tuple giving the font family, size, and style (here: Times,
20-point, and bold). Font style can be normal, bold, roman, italic, underline, over
strike, or combinations of these (e.g., “bold italic”). tkinter guarantees that Times,
Courier, and Helvetica font family names exist on all platforms, but others may
work, too (e.g., system gives the system font on Windows). Font settings like this
work on all widgets with text, such as labels, buttons, entry fields, listboxes, and
Text (the latter of which can even display more than one font at once with “tags”).
The font option still accepts older X-Windows-style font indicators—long strings
with dashes and stars—but the newer tuple font indicator form is more platform
independent.
Figure 8-1. A custom label appearance
Configuring Widget Appearance | 417

Layout and expansion
Finally, the label is made generally expandable and stretched by setting the pack
expand and fill options we met in the last chapter; the label grows as the window
does. If you maximize this window, its black background fills the whole screen and
the yellow message is centered in the middle; try it.
In this script, the net effect of all these settings is that this label looks radically different
from the ones we’ve been making so far. It no longer follows the Windows standard
look-and-feel, but such conformance isn’t always important. For reference, tkinter
provides additional ways to customize appearance that are not used by this script, but
which may appear in others:
Border and relief
A bd= N widget option can be used to set border width, and a relief= S option can
specify a border style; S can be FLAT, SUNKEN, RAISED, GROOVE, SOLID, or RIDGE—all
constants exported by the tkinter module.
Cursor
A cursor option can be given to change the appearance of the mouse pointer when
it moves over the widget. For instance, cursor='gumby' changes the pointer to a
Gumby figure (the green kind). Other common cursor names used in this book
include watch, pencil, cross, and hand2.
State
Some widgets also support the notion of a state, which impacts their appearance.
For example, a state=DISABLED option will generally stipple (gray out) a widget on
screen and make it unresponsive; NORMAL does not. Some widgets support a
READONLY state as well, which displays normally but is unresponsive to changes.
Padding
Extra space can be added around many widgets (e.g., buttons, labels, and text)
with the padx= N and pady= N options. Interestingly, you can set these options both
in pack calls (where it adds empty space around the widget in general) and in a
widget object itself (where it makes the widget larger).
To illustrate some of these extra settings, Example 8-2 configures the custom button
captured in Figure 8-2 and changes the mouse pointer when it is positioned above it.
Example 8-2. PP4E\Gui\Tour\config-button.py
from tkinter import *
widget = Button(text='Spam', padx=10, pady=10)
widget.pack(padx=20, pady=20)
widget.config(cursor='gumby')
widget.config(bd=8, relief=RAISED)
widget.config(bg='dark green', fg='white')
widget.config(font=('helvetica', 20, 'underline italic'))
mainloop()
418 | Chapter 8: A tkinter Tour, Part 1
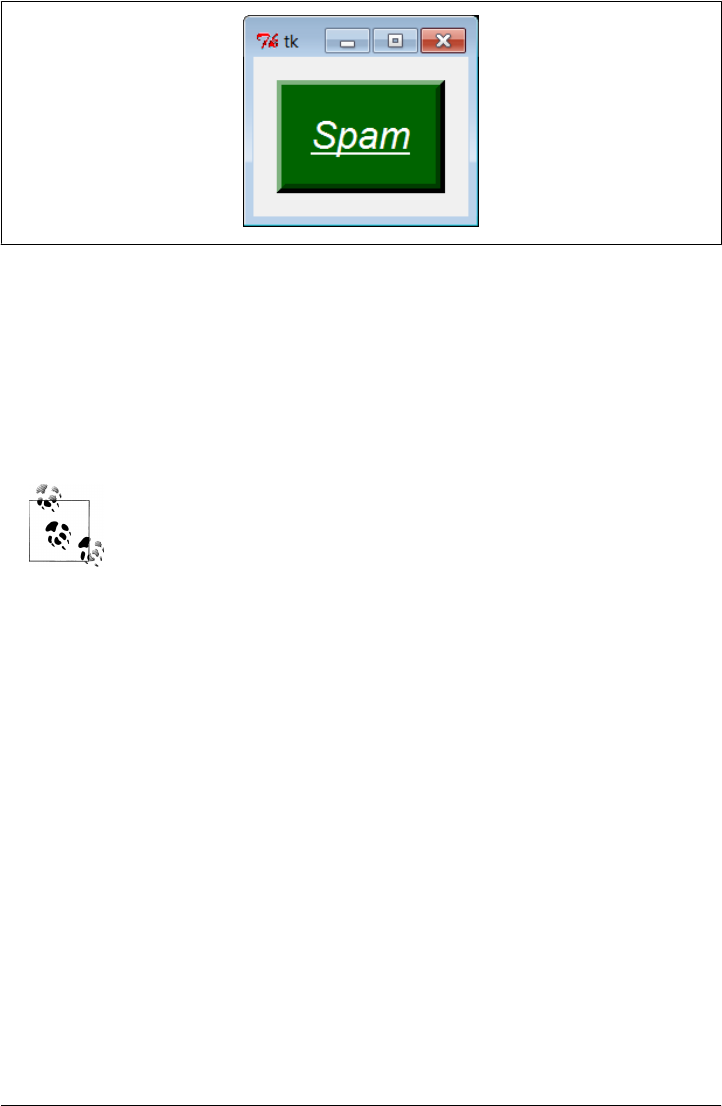
To see the effects generated by these two scripts’ settings, try out a few changes on your
computer. Most widgets can be given a custom appearance in the same way, and we’ll
see such options used repeatedly in this text. We’ll also meet operational configura-
tions, such as focus (for focusing input) and others. In fact, widgets can have dozens
of options; most have reasonable defaults that produce a native look-and-feel on each
windowing platform, and this is one reason for tkinter’s simplicity. But tkinter lets you
build more custom displays when you want to.
For more on ways to apply configuration options to provide common
look-and-feel for your widgets, refer back to “Customizing Widgets
with Classes” on page 400, especially its ThemedButton examples. Now
that you know more about configuration, its examples’ source code
should more readily show how configurations applied in widget sub-
classes are automatically inherited by all instances and subclasses. The
new ttk extension described in Chapter 7 also provides additional ways
to configure widgets with its notion of themes; see the preceding chapter
for more details and resources on ttk.
Top-Level Windows
tkinter GUIs always have an application root window, whether you get it by default or
create it explicitly by calling the Tk object constructor. This main root window is the
one that opens when your program runs, and it is where you generally pack your most
important and long-lived widgets. In addition, tkinter scripts can create any number
of independent windows, generated and popped up on demand, by creating Toplevel
widget objects.
Each Toplevel object created produces a new window on the display and automatically
adds it to the program’s GUI event-loop processing stream (you don’t need to call the
mainloop method of new windows to activate them). Example 8-3 builds a root and two
pop-up windows.
Figure 8-2. Config button at work
Top-Level Windows | 419
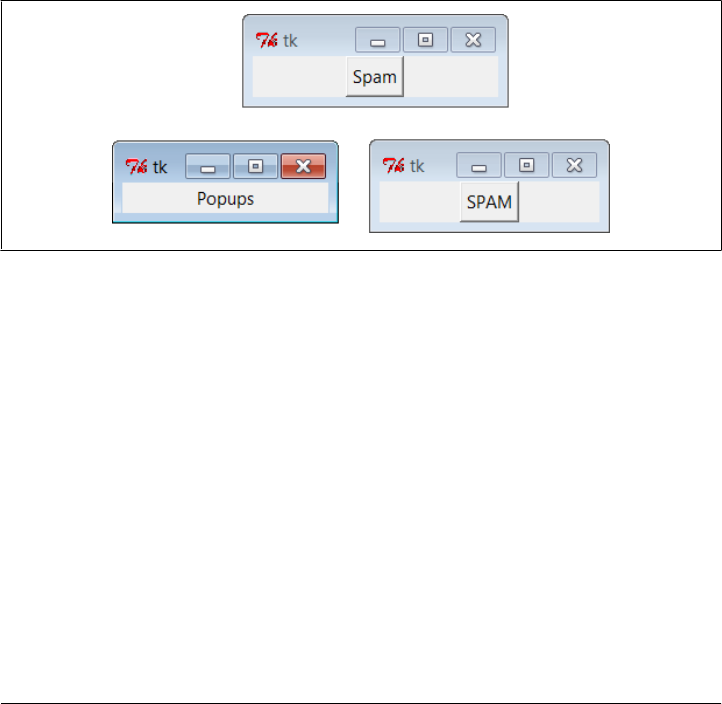
Example 8-3. PP4E\Gui\Tour\toplevel0.py
import sys
from tkinter import Toplevel, Button, Label
win1 = Toplevel() # two independent windows
win2 = Toplevel() # but part of same process
Button(win1, text='Spam', command=sys.exit).pack()
Button(win2, text='SPAM', command=sys.exit).pack()
Label(text='Popups').pack() # on default Tk() root window
win1.mainloop()
The toplevel0 script gets a root window by default (that’s what the Label is attached to,
since it doesn’t specify a real parent), but it also creates two standalone Toplevel win-
dows that appear and function independently of the root window, as seen in
Figure 8-3.
Figure 8-3. Two Toplevel windows and a root window
The two Toplevel windows on the right are full-fledged windows; they can be inde-
pendently iconified, maximized, and so on. Toplevels are typically used to implement
multiple-window displays and pop-up modal and nonmodal dialogs (more on dialogs
in the next section). They stay up until they are explicitly destroyed or until the appli-
cation that created them exits.
In fact, as coded here, pressing the X in the upper right corner of either of the
Toplevel windows kills that window only. On the other hand, the entire program and
all it remaining windows are closed if you press either of the created buttons or the
main window’s X (more on shutdown protocols in a moment).
It’s important to know that although Toplevels are independently active windows, they
are not separate processes; if your program exits, all of its windows are erased, including
all Toplevel windows it may have created. We’ll learn how to work around this rule
later by launching independent GUI programs.
420 | Chapter 8: A tkinter Tour, Part 1

Toplevel and Tk Widgets
A Toplevel is roughly like a Frame that is split off into its own window and has additional
methods that allow you to deal with top-level window properties. The Tk widget is
roughly like a Toplevel, but it is used to represent the application root window.
Toplevel windows have parents, but Tk windows do not—they are the true roots of the
widget hierarchies we build when making tkinter GUIs.
We got a Tk root for free in Example 8-3 because the Label had a default parent, des-
ignated by not having a widget in the first argument of its constructor call:
Label(text='Popups').pack() # on default Tk() root window
Passing None to a widget constructor’s first argument (or to its master keyword argu-
ment) has the same default-parent effect. In other scripts, we’ve made the Tk root more
explicit by creating it directly, like this:
root = Tk()
Label(root, text='Popups').pack() # on explicit Tk() root window
root.mainloop()
In fact, because tkinter GUIs are a hierarchy, by default you always get at least one Tk
root window, whether it is named explicitly, as here, or not. Though not typical, there
may be more than one Tk root if you make them manually, and a program ends if all
its Tk windows are closed. The first Tk top-level window created—whether explicitly
by your code, or automatically by Python when needed—is used as the default parent
window of widgets and other windows if no parent is provided.
You should generally use the Tk root window to display top-level information of some
sort. If you don’t attach widgets to the root, it may show up as an odd empty window
when you run your script (often because you used the default parent unintentionally
in your code by omitting a widget’s parent and didn’t pack widgets attached to it).
Technically, you can suppress the default root creation logic and make multiple root
windows with the Tk widget, as in Example 8-4.
Example 8-4. PP4E\Gui\Tour\toplevel1.py
import tkinter
from tkinter import Tk, Button
tkinter.NoDefaultRoot()
win1 = Tk() # two independent root windows
win2 = Tk()
Button(win1, text='Spam', command=win1.destroy).pack()
Button(win2, text='SPAM', command=win2.destroy).pack()
win1.mainloop()
When run, this script displays the two pop-up windows of the screenshot in Fig-
ure 8-3 only (there is no third root window). But it’s more common to use the Tk root
as a main window and create Toplevel widgets for an application’s pop-up windows.
Top-Level Windows | 421

Notice how this GUI’s windows use a window’s destroy method to close just one
window, instead of sys.exit to shut down the entire program; to see how this method
really does its work, let’s move on to window protocols.
Top-Level Window Protocols
Both Tk and Toplevel widgets export extra methods and features tailored for their top-
level role, as illustrated in Example 8-5.
Example 8-5. PP4E\Gui\Tour\toplevel2.py
"""
pop up three new windows, with style
destroy() kills one window, quit() kills all windows and app (ends mainloop);
top-level windows have title, icon, iconify/deiconify and protocol for wm events;
there always is an application root window, whether by default or created as an
explicit Tk() object; all top-level windows are containers, but they are never
packed/gridded; Toplevel is like Frame, but a new window, and can have a menu;
"""
from tkinter import *
root = Tk() # explicit root
trees = [('The Larch!', 'light blue'),
('The Pine!', 'light green'),
('The Giant Redwood!', 'red')]
for (tree, color) in trees:
win = Toplevel(root) # new window
win.title('Sing...') # set border
win.protocol('WM_DELETE_WINDOW', lambda:None) # ignore close
win.iconbitmap('py-blue-trans-out.ico') # not red Tk
msg = Button(win, text=tree, command=win.destroy) # kills one win
msg.pack(expand=YES, fill=BOTH)
msg.config(padx=10, pady=10, bd=10, relief=RAISED)
msg.config(bg='black', fg=color, font=('times', 30, 'bold italic'))
root.title('Lumberjack demo')
Label(root, text='Main window', width=30).pack()
Button(root, text='Quit All', command=root.quit).pack() # kills all app
root.mainloop()
This program adds widgets to the Tk root window, immediately pops up three
Toplevel windows with attached buttons, and uses special top-level protocols. When
run, it generates the scene captured in living black-and-white in Figure 8-4 (the buttons’
text shows up blue, green, and red on a color display).
422 | Chapter 8: A tkinter Tour, Part 1

Figure 8-4. Three Toplevel windows with configurations
There are a few operational details worth noticing here, all of which are more obvious
if you run this script on your machine:
Intercepting closes: protocol
Because the window manager close event has been intercepted by this script using
the top-level widget protocol method, pressing the X in the top-right corner doesn’t
do anything in the three Toplevel pop ups. The name string WM_DELETE_WINDOW
identifies the close operation. You can use this interface to disallow closes apart
from the widgets your script creates. The function created by this script’s
lambda:None does nothing but return None.
Killing one window (and its children): destroy
Pressing the big black buttons in any one of the three pop ups kills that pop up
only, because the pop up runs the widget destroy method. The other windows live
on, much as you would expect of a pop-up dialog window. Technically, this call
destroys the subject widget and any other widgets for which it is a parent. For
windows, this includes all their content. For simpler widgets, the widget is erased.
Because Toplevel windows have parents, too, their relationships might matter on
a destroy—destroying a window, even the automatic or first-made Tk root which
is used as the default parent, also destroys all its child windows. Since Tk root
windows have no parents, they are unaffected by destroys of other windows.
Moreover, destroying the last Tk root window remaining (or the only Tk root cre-
ated) effectively ends the program. Toplevel windows, however, are always de-
stroyed with their parents, and their destruction doesn’t impact other windows to
which they are not ancestors. This makes them ideal for pop-up dialogs. Techni-
cally, a Toplevel can be a child of any type of widget and will be destroyed with it,
though they are usually children of an automatic or explicit Tk.
Top-Level Windows | 423

Killing all windows: quit
To kill all the windows at once and end the GUI application (really, its active
mainloop call), the root window’s button runs the quit method instead. That is,
pressing the root window’s button ends the program. In general, the quit method
immediately ends the entire application and closes all its windows. It can be called
through any tkinter widget, not just through the top-level window; it’s also avail-
able on frames, buttons, and so on. See the discussion of the bind method and its
<Destroy> events later in this chapter for more on quit and destroy.
Window titles: title
As introduced in Chapter 7, top-level window widgets (Tk and Toplevel) have a
title method that lets you change the text displayed on the top border. Here, the
window title text is set to the string 'Sing...' in the pop-ups to override the default
'tk'.
Window icons: iconbitmap
The iconbitmap method changes a top-level window’s icon. It accepts an icon or
bitmap file and uses it for the window’s icon graphic when it is both minimized
and open. On Windows, pass in the name of a .ico file (this example uses one in
the current directory); it will replace the default red “Tk” icon that normally ap-
pears in the upper-lefthand corner of the window as well as in the Windows task-
bar. On other platforms, you may need to use other icon file conventions if the
icon calls in this book won’t work for you (or simply comment-out the calls alto-
gether if they cause scripts to fail); icons tend to be a platform-specific feature that
is dependent upon the underlying window manager.
Geometry management
Top-level windows are containers for other widgets, much like a standalone
Frame. Unlike frames, though, top-level window widgets are never themselves
packed (or gridded, or placed). To embed widgets, this script passes its windows
as parent arguments to label and button constructors.
It is also possible to fetch the maximum window size (the physical screen display
size, as a [width, height] tuple) with the maxsize() method, as well as set the initial
size of a window with the top-level geometry(" width x height + x + y ") method. It
is generally easier and more user-friendly to let tkinter (or your users) work out
window size for you, but display size may be used for tasks such as scaling images
(see the discussion on PyPhoto in Chapter 11 for an example).
In addition, top-level window widgets support other kinds of protocols that we will
utilize later on in this tour:
State
The iconify and withdraw top-level window object methods allow scripts to hide
and erase a window on the fly; deiconify redraws a hidden or erased window. The
state method queries or changes a window’s state; valid states passed in or re-
turned include iconic, withdrawn, zoomed (full screen on Windows: use geometry
424 | Chapter 8: A tkinter Tour, Part 1

elsewhere), and normal (large enough for window content). The methods lift and
lower raise and lower a window with respect to its siblings (lift is the Tk raise
command, but avoids a Python reserved word). See the alarm scripts near the end
of Chapter 9 for usage.
Menus
Each top-level window can have its own window menus too; both the Tk and the
Toplevel widgets have a menu option used to associate a horizontal menu bar of
pull-down option lists. This menu bar looks as it should on each platform on which
your scripts are run. We’ll explore menus early in Chapter 9.
Most top-level window-manager-related methods can also be named with a “wm_” at
the front; for instance, state and protocol can also be called wm_state and wm_protocol.
Notice that the script in Example 8-3 passes its Toplevel constructor calls an explicit
parent widget—the Tk root window (that is, Toplevel(root)). Toplevels can be asso-
ciated with a parent just as other widgets can, even though they are not visually em-
bedded in their parents. I coded the script this way to avoid what seems like an odd
feature; if coded instead like this:
win = Toplevel() # new window
and if no Tk root yet exists, this call actually generates a default Tk root window to serve
as the Toplevel’s parent, just like any other widget call without a parent argument. The
problem is that this makes the position of the following line crucial:
root = Tk() # explicit root
If this line shows up above the Toplevel calls, it creates the single root window as
expected. But if you move this line below the Toplevel calls, tkinter creates a default
Tk root window that is different from the one created by the script’s explicit Tk call. You
wind up with two Tk roots just as in Example 8-4. Move the Tk call below the
Toplevel calls and rerun it to see what I mean. You’ll get a fourth window that is com-
pletely empty! As a rule of thumb, to avoid such oddities, make your Tk root windows
early on and make them explicit.
All of the top-level protocol interfaces are available only on top-level window widgets,
but you can often access them by going through other widgets’ master attributes—links
to the widget parents. For example, to set the title of a window in which a frame is
contained, say something like this:
theframe.master.title('Spam demo') # master is the container window
Naturally, you should do so only if you’re sure that the frame will be used in only one
kind of window. General-purpose attachable components coded as classes, for in-
stance, should leave window property settings to their client applications.
Top-level widgets have additional tools, some of which we may not meet in this book.
For instance, under Unix window managers, you can also set the name used on the
window’s icon (iconname). Because some icon options may be useful when scripts run
Top-Level Windows | 425

on Unix only, see other Tk and tkinter resources for more details on this topic. For
now, the next scheduled stop on this tour explores one of the more common uses of
top-level windows.
Dialogs
Dialogs are windows popped up by a script to provide or request additional informa-
tion. They come in two flavors, modal and nonmodal:
Modal
These dialogs block the rest of the interface until the dialog window is dismissed;
users must reply to the dialog before the program continues.
Nonmodal
These dialogs can remain on-screen indefinitely without interfering with other
windows in the interface; they can usually accept inputs at any time.
Regardless of their modality, dialogs are generally implemented with the Toplevel win-
dow object we met in the prior section, whether you make the Toplevel or not. There
are essentially three ways to present pop-up dialogs to users with tkinter—by using
common dialog calls, by using the now-dated Dialog object, and by creating custom
dialog windows with Toplevels and other kinds of widgets. Let’s explore the basics of
all three schemes.
Standard (Common) Dialogs
Because standard dialog calls are simpler, let’s start here first. tkinter comes with a
collection of precoded dialog windows that implement many of the most common pop
ups programs generate—file selection dialogs, error and warning pop ups, and question
and answer prompts. They are called standard dialogs (and sometimes common dia-
logs) because they are part of the tkinter library, and they use platform-specific library
calls to look like they should on each platform. A tkinter file open dialog, for instance,
looks like any other on Windows.
All standard dialog calls are modal (they don’t return until the dialog box is dismissed
by the user), and they block the program’s main window while they are displayed.
Scripts can customize these dialogs’ windows by passing message text, titles, and the
like. Since they are so simple to use, let’s jump right into Example 8-6 (coded as
a .pyw file here to avoid a shell pop up when clicked in Windows).
Example 8-6. PP4E\Gui\Tour\dlg1.pyw
from tkinter import *
from tkinter.messagebox import *
def callback():
if askyesno('Verify', 'Do you really want to quit?'):
showwarning('Yes', 'Quit not yet implemented')
426 | Chapter 8: A tkinter Tour, Part 1
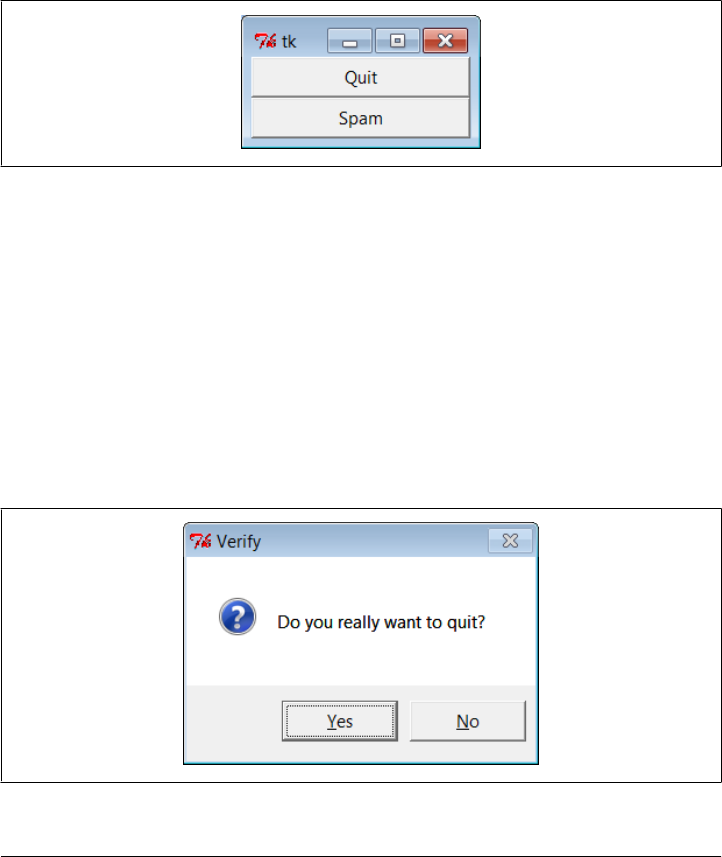
else:
showinfo('No', 'Quit has been cancelled')
errmsg = 'Sorry, no Spam allowed!'
Button(text='Quit', command=callback).pack(fill=X)
Button(text='Spam', command=(lambda: showerror('Spam', errmsg))).pack(fill=X)
mainloop()
A lambda anonymous function is used here to wrap the call to showerror so that it is
passed two hardcoded arguments (remember, button-press callbacks get no arguments
from tkinter itself). When run, this script creates the main window in Figure 8-5.
Figure 8-5. dlg1 main window: buttons to trigger pop ups
When you press this window’s Quit button, the dialog in Figure 8-6 is popped up by
calling the standard askyesno function in the tkinter package’s messagebox module. This
looks different on Unix and Macintosh systems, but it looks like you’d expect when
run on Windows (and in fact varies its appearance even across different versions and
configurations of Windows—using my default Window 7 setup, it looks slightly dif-
ferent than it did on Windows XP in the prior edition).
The dialog in Figure 8-6 blocks the program until the user clicks one of its buttons; if
the dialog’s Yes button is clicked (or the Enter key is pressed), the dialog call returns
with a true value and the script pops up the standard dialog in Figure 8-7 by calling
showwarning.
Figure 8-6. dlg1 askyesno dialog (Windows 7)
Dialogs | 427
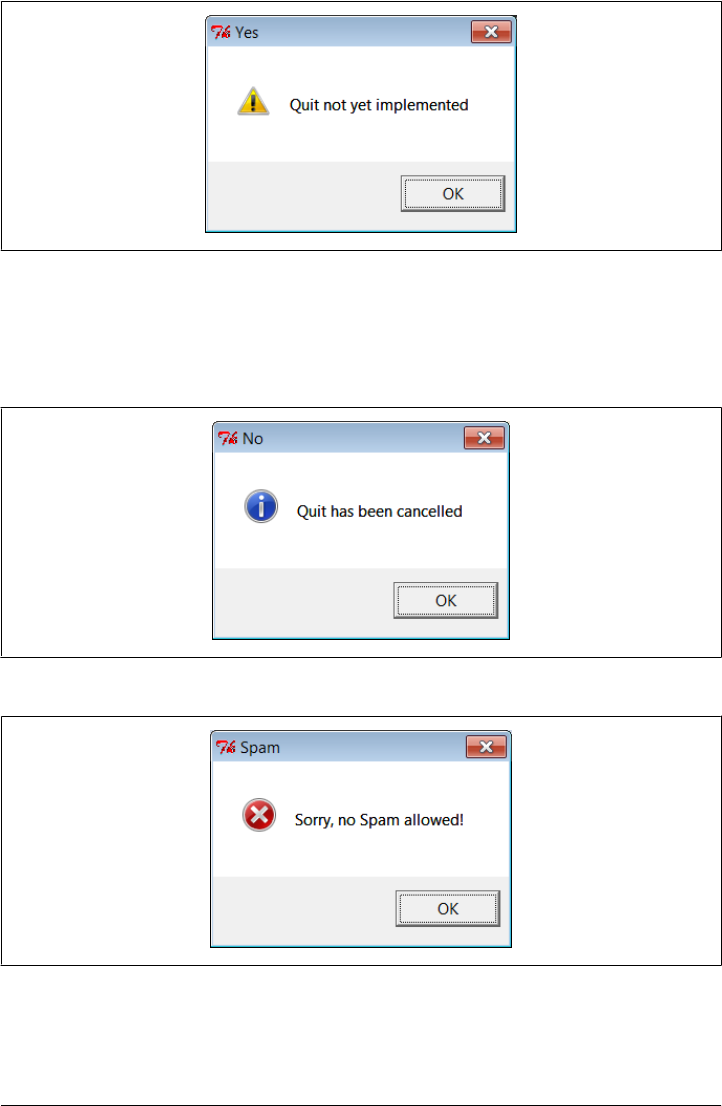
There is nothing the user can do with Figure 8-7’s dialog but press OK. If No is clicked
in Figure 8-6’s quit verification dialog, a showinfo call creates the pop up in Fig-
ure 8-8 instead. Finally, if the Spam button is clicked in the main window, the standard
dialog captured in Figure 8-9 is generated with the standard showerror call.
Figure 8-8. dlg1 showinfo dialog
Figure 8-9. dlg1 showerror dialog
All of this makes for a lot of window pop ups, of course, and you need to be careful not
to rely on these dialogs too much (it’s generally better to use input fields in long-lived
Figure 8-7. dlg1 showwarning dialog
428 | Chapter 8: A tkinter Tour, Part 1
windows than to distract the user with pop ups). But where appropriate, such pop ups
save coding time and provide a nice native look-and-feel.
A “smart” and reusable Quit button
Let’s put some of these canned dialogs to better use. Example 8-7 implements an at-
tachable Quit button that uses standard dialogs to verify the quit request. Because it’s
a class, it can be attached and reused in any application that needs a verifying Quit
button. Because it uses standard dialogs, it looks as it should on each GUI platform.
Example 8-7. PP4E\Gui\Tour\quitter.py
"""
a Quit button that verifies exit requests;
to reuse, attach an instance to other GUIs, and re-pack as desired
"""
from tkinter import * # get widget classes
from tkinter.messagebox import askokcancel # get canned std dialog
class Quitter(Frame): # subclass our GUI
def __init__(self, parent=None): # constructor method
Frame.__init__(self, parent)
self.pack()
widget = Button(self, text='Quit', command=self.quit)
widget.pack(side=LEFT, expand=YES, fill=BOTH)
def quit(self):
ans = askokcancel('Verify exit', "Really quit?")
if ans: Frame.quit(self)
if __name__ == '__main__': Quitter().mainloop()
This module is mostly meant to be used elsewhere, but it puts up the button it imple-
ments when run standalone. Figure 8-10 shows the Quit button itself in the upper left,
and the askokcancel verification dialog that pops up when Quit is pressed.
Figure 8-10. Quitter, with askokcancel dialog
Dialogs | 429

If you press OK here, Quitter runs the Frame quit method to end the GUI to which this
button is attached (really, the mainloop call). But to really understand how such a spring-
loaded button can be useful, we need to move on and study a client GUI in the next
section.
A dialog demo launcher bar
So far, we’ve seen a handful of standard dialogs, but there are quite a few more. Instead
of just throwing these up in dull screenshots, though, let’s write a Python demo script
to generate them on demand. Here’s one way to do it. First of all, in Example 8-8 we
write a module to define a table that maps a demo name to a standard dialog call (and
we use lambda to wrap the call if we need to pass extra arguments to the dialog
function).
Example 8-8. PP4E\Gui\Tour\dialogTable.py
# define a name:callback demos table
from tkinter.filedialog import askopenfilename # get standard dialogs
from tkinter.colorchooser import askcolor # they live in Lib\tkinter
from tkinter.messagebox import askquestion, showerror
from tkinter.simpledialog import askfloat
demos = {
'Open': askopenfilename,
'Color': askcolor,
'Query': lambda: askquestion('Warning', 'You typed "rm *"\nConfirm?'),
'Error': lambda: showerror('Error!', "He's dead, Jim"),
'Input': lambda: askfloat('Entry', 'Enter credit card number')
}
I put this table in a module so that it might be reused as the basis of other demo scripts
later (dialogs are more fun than printing to stdout). Next, we’ll write a Python script,
shown in Example 8-9, which simply generates buttons for all of this table’s entries—
use its keys as button labels and its values as button callback handlers.
Example 8-9. PP4E\Gui\Tour\demoDlg.py
"create a bar of simple buttons that launch dialog demos"
from tkinter import * # get base widget set
from dialogTable import demos # button callback handlers
from quitter import Quitter # attach a quit object to me
class Demo(Frame):
def __init__(self, parent=None, **options):
Frame.__init__(self, parent, **options)
self.pack()
Label(self, text="Basic demos").pack()
for (key, value) in demos.items():
Button(self, text=key, command=value).pack(side=TOP, fill=BOTH)
Quitter(self).pack(side=TOP, fill=BOTH)
430 | Chapter 8: A tkinter Tour, Part 1
if __name__ == '__main__': Demo().mainloop()
This script creates the window shown in Figure 8-11 when run as a standalone program;
it’s a bar of demo buttons that simply route control back to the values of the table in
the module dialogTable when pressed.
Figure 8-11. demoDlg main window
Notice that because this script is driven by the contents of the dialogTable module’s
dictionary, we can change the set of demo buttons displayed by changing just
dialogTable (we don’t need to change any executable code in demoDlg). Also note that
the Quit button here is an attached instance of the Quitter class of the prior section
whose frame is repacked to stretch like the other buttons as needed here—it’s at least
one bit of code that you never have to write again.
This script’s class also takes care to pass any **options constructor configuration key-
word arguments on to its Frame superclass. Though not used here, this allows callers
to pass in configuration options at creation time (Demo(o=v)), instead of configuring
after the fact (d.config(o=v)). This isn’t strictly required, but it makes the demo class
work just like a normal tkinter frame widget (which is what subclassing makes it, after
all). We’ll see how this can be used to good effect later.
We’ve already seen some of the dialogs triggered by this demo bar window’s other
buttons, so I’ll just step through the new ones here. Pressing the main window’s Query
button, for example, generates the standard pop up in Figure 8-12.
This askquestion dialog looks like the askyesno we saw earlier, but actually it returns
either string "yes" or "no" (askyesno and askokcancel return True or False instead—
trivial but true). Pressing the demo bar’s Input button generates the standard ask
float dialog box shown in Figure 8-13.
Dialogs | 431
This dialog automatically checks the input for valid floating-point syntax before it re-
turns, and it is representative of a collection of single-value input dialogs (askinteger
and askstring prompt for integer and string inputs, too). It returns the input as a
floating-point number object (not as a string) when the OK button or Enter key is
pressed, or the Python None object if the user clicks Cancel. Its two relatives return the
input as integer and string objects instead.
When the demo bar’s Open button is pressed, we get the standard file open dialog
made by calling askopenfilename and captured in Figure 8-14. This is Windows 7’s
look-and-feel; it can look radically different on Macs, Linux, and older versions of
Windows, but appropriately so.
A similar dialog for selecting a save-as filename is produced by calling asksaveasfile
name (see the Text widget section in Chapter 9 for a first example). Both file dialogs let
the user navigate through the filesystem to select a subject filename, which is returned
with its full directory pathname when Open is pressed; an empty string comes back if
Cancel is pressed instead. Both also have additional protocols not demonstrated by this
example:
• They can be passed a filetypes keyword argument—a set of name patterns used
to select files, which appear in the pull-down list near the bottom of the dialog.
Figure 8-12. demoDlg query, askquestion dialog
Figure 8-13. demoDlg input, askfloat dialog
432 | Chapter 8: A tkinter Tour, Part 1
• They can be passed an initialdir (start directory), initialfile (for “File name”),
title (for the dialog window), defaultextension (appended if the selection has
none), and parent (to appear as an embedded child instead of a pop-up dialog).
• They can be made to remember the last directory selected by using exported objects
instead of these function calls—a hook we’ll make use of in later longer-lived
examples.
Another common dialog call in the tkinter filedialog module, askdirectory, can be
used to pop up a dialog that allows users to choose a directory rather than a file. It
presents a tree view that users can navigate to pick the desired directory, and it accepts
keyword arguments including initialdir and title. The corresponding Directory ob-
ject remembers the last directory selected and starts there the next time the dialog is
shown.
We’ll use most of these interfaces later in the book, especially for the file dialogs in the
PyEdit example in Chapter 11, but feel free to flip ahead for more details now. The
directory selection dialog will show up in the PyPhoto example in Chapter 11 and the
PyMailGUI example in Chapter 14; again, skip ahead for code and screenshots.
Finally, the demo bar’s Color button triggers a standard askcolor call, which generates
the standard color selection dialog shown in Figure 8-15.
Figure 8-14. demoDlg open, askopenfilename dialog
Dialogs | 433
Figure 8-15. demoDlg color, askcolor dialog
If you press its OK button, it returns a data structure that identifies the selected color,
which can be used in all color contexts in tkinter. It includes RGB values and a hexa-
decimal color string (e.g., ((160, 160, 160), '#a0a0a0')). More on how this tuple can
be useful in a moment. If you press Cancel, the script gets back a tuple containing two
nones (Nones of the Python variety, that is).
Printing dialog results and passing callback data with lambdas
The dialog demo launcher bar displays standard dialogs and can be made to display
others by simply changing the dialogTable module it imports. As coded, though, it
really shows only dialogs; it would also be nice to see their return values so that we
know how to use them in scripts. Example 8-10 adds printing of standard dialog results
to the stdout standard output stream.
Example 8-10. PP4E\Gui\Tour\demoDlg-print.py
"""
similar, but show return values of dialog calls; the lambda saves data from
the local scope to be passed to the handler (button press handlers normally
get no arguments, and enclosing scope references don't work for loop variables)
and works just like a nested def statement: def func(key=key): self.printit(key)
"""
434 | Chapter 8: A tkinter Tour, Part 1

from tkinter import * # get base widget set
from dialogTable import demos # button callback handlers
from quitter import Quitter # attach a quit object to me
class Demo(Frame):
def __init__(self, parent=None):
Frame.__init__(self, parent)
self.pack()
Label(self, text="Basic demos").pack()
for key in demos:
func = (lambda key=key: self.printit(key))
Button(self, text=key, command=func).pack(side=TOP, fill=BOTH)
Quitter(self).pack(side=TOP, fill=BOTH)
def printit(self, name):
print(name, 'returns =>', demos[name]()) # fetch, call, print
if __name__ == '__main__': Demo().mainloop()
This script builds the same main button-bar window, but notice that the callback han-
dler is an anonymous function made with a lambda now, not a direct reference to dialog
calls in the imported dialogTable dictionary:
# use enclosing scope lookup
func = (lambda key=key: self.printit(key))
We talked about this in the prior chapter’s tutorial, but this is the first time we’ve
actually used lambda like this, so let’s get the facts straight. Because button-press call-
backs are run with no arguments, if we need to pass extra data to the handler, it must
be wrapped in an object that remembers that extra data and passes it along, by deferring
the call to the actual handler. Here, a button press runs the function generated by the
lambda, an indirect call layer that retains information from the enclosing scope. The
net effect is that the real handler, printit, receives an extra required name argument
giving the demo associated with the button pressed, even though this argument wasn’t
passed back from tkinter itself. In effect, the lambda remembers and passes on state
information.
Notice, though, that this lambda function’s body references both self and key in the
enclosing method’s local scope. In all recent Pythons, the reference to self just works
because of the enclosing function scope lookup rules, but we need to pass key in ex-
plicitly with a default argument or else it will be the same in all the generated lambda
functions—the value it has after the last loop iteration. As we learned in Chapter 7,
enclosing scope references are resolved when the nested function is called, but defaults
are resolved when the nested function is created. Because self won’t change after the
function is made, we can rely on the scope lookup rules for that name, but not for loop
variables like key.
Dialogs | 435

In earlier Pythons, default arguments were required to pass all values in from enclosing
scopes explicitly, using either of these two techniques:
# use simple defaults
func = (lambda self=self, name=key: self.printit(name))
# use a bound method default
func = (lambda handler=self.printit, name=key: handler(name))
Today, we can get away with the simpler enclosing -scope reference technique for
self, though we still need a default for the key loop variable (and you may still see the
default forms in older Python code).
Note that the parentheses around the lambdas are not required here; I add them as a
personal style preference just to set the lambda off from its surrounding code (your
mileage may vary). Also notice that the lambda does the same work as a nested def
statement here; in practice, though, the lambda could appear within the call to
Button itself because it is an expression and it need not be assigned to a name. The
following two forms are equivalent:
for (key, value) in demos.items():
func = (lambda key=key: self.printit(key)) # can be nested i Button()
for (key, value) in demos.items():
def func(key=key): self.printit(key) # but def statement cannot
You can also use a callable class object here that retains state as instance attributes (see
the tutorial’s __call__ example in Chapter 7 for hints). But as a rule of thumb, if you
want a lambda’s result to use any names from the enclosing scope when later called,
either simply name them and let Python save their values for future use, or pass them
in with defaults to save the values they have at lambda function creation time. The latter
scheme is required only if the variable used may change before the callback occurs.
When run, this script creates the same window (Figure 8-11) but also prints dialog
return values to standard output; here is the output after clicking all the demo buttons
in the main window and picking both Cancel/No and then OK/Yes buttons in each
dialog:
C:\...\PP4E\Gui\Tour> python demoDlg-print.py
Color returns => (None, None)
Color returns => ((128.5, 128.5, 255.99609375), '#8080ff')
Query returns => no
Query returns => yes
Input returns => None
Input returns => 3.14159
Open returns =>
Open returns => C:/Users/mark/Stuff/Books/4E/PP4E/dev/Examples/PP4E/Launcher.py
Error returns => ok
Now that I’ve shown you these dialog results, I want to next show you how one of them
can actually be useful.
436 | Chapter 8: A tkinter Tour, Part 1
Letting users select colors on the fly
The standard color selection dialog isn’t just another pretty face—scripts can pass the
hexadecimal color string it returns to the bg and fg widget color configuration options
we met earlier. That is, bg and fg accept both a color name (e.g., blue) and an ask
color hex RGB result string that starts with a # (e.g., the #8080ff in the last output line
of the prior section).
This adds another dimension of customization to tkinter GUIs: instead of hardcoding
colors in your GUI products, you can provide a button that pops up color selectors that
let users choose color preferences on the fly. Simply pass the color string to widget
config methods in callback handlers, as in Example 8-11.
Example 8-11. PP4E\Gui\Tour\setcolor.py
from tkinter import *
from tkinter.colorchooser import askcolor
def setBgColor():
(triple, hexstr) = askcolor()
if hexstr:
print(hexstr)
push.config(bg=hexstr)
root = Tk()
push = Button(root, text='Set Background Color', command=setBgColor)
push.config(height=3, font=('times', 20, 'bold'))
push.pack(expand=YES, fill=BOTH)
root.mainloop()
This script creates the window in Figure 8-16 when launched (its button’s background
is a sort of green, but you’ll have to trust me on this). Pressing the button pops up the
color selection dialog shown earlier; the color you pick in that dialog becomes the
background color of this button after you press OK.
Figure 8-16. setcolor main window
Dialogs | 437

Color strings are also printed to the stdout stream (the console window); run this on
your computer to experiment with available color settings:
C:\...\PP4E\Gui\Tour> python setcolor.py
#0080c0
#408080
#77d5df
Other standard dialog calls
We’ve seen most of the standard dialogs and we’ll use these pop ups in examples
throughout the rest of this book. But for more details on other calls and options avail-
able, either consult other tkinter documentation or browse the source code of the
modules used at the top of the dialogTable module in Example 8-8; all are simple
Python files installed in the tkinter subdirectory of the Python source library on your
machine (e.g., in C:\Python31\Lib on Windows). And keep this demo bar example filed
away for future reference; we’ll reuse it later in the tour for callback actions when we
meet other button-like widgets.
The Old-Style Dialog Module
In older Python code, you may see dialogs occasionally coded with the standard tkinter
dialog module. This is a bit dated now, and it uses an X Windows look-and-feel; but
just in case you run across such code in your Python maintenance excursions, Exam-
ple 8-12 gives you a feel for the interface.
Example 8-12. PP4E\Gui\Tour\dlg-old.py
from tkinter import *
from tkinter.dialog import Dialog
class OldDialogDemo(Frame):
def __init__(self, master=None):
Frame.__init__(self, master)
Pack.config(self) # same as self.pack()
Button(self, text='Pop1', command=self.dialog1).pack()
Button(self, text='Pop2', command=self.dialog2).pack()
def dialog1(self):
ans = Dialog(self,
title = 'Popup Fun!',
text = 'An example of a popup-dialog '
'box, using older "Dialog.py".',
bitmap = 'questhead',
default = 0, strings = ('Yes', 'No', 'Cancel'))
if ans.num == 0: self.dialog2()
def dialog2(self):
Dialog(self, title = 'HAL-9000',
text = "I'm afraid I can't let you do that, Dave...",
bitmap = 'hourglass',
438 | Chapter 8: A tkinter Tour, Part 1

default = 0, strings = ('spam', 'SPAM'))
if __name__ == '__main__': OldDialogDemo().mainloop()
If you supply Dialog a tuple of button labels and a message, you get back the index of
the button pressed (the leftmost is index zero). Dialog windows are modal: the rest of
the application’s windows are disabled until the Dialog receives a response from the
user. When you press the Pop2 button in the main window created by this script, the
second dialog pops up, as shown in Figure 8-17.
Figure 8-17. Old-style dialog
This is running on Windows, and as you can see, it is nothing like what you would
expect on that platform for a question dialog. In fact, this dialog generates an X Win-
dows look-and-feel, regardless of the underlying platform. Because of both Dialog’s
appearance and the extra complexity required to program it, you are probably better
off using the standard dialog calls of the prior section instead.
Custom Dialogs
The dialogs we’ve seen so far have a standard appearance and interaction. They are fine
for many purposes, but often we need something a bit more custom. For example,
forms that request multiple field inputs (e.g., name, age, shoe size) aren’t directly ad-
dressed by the common dialog library. We could pop up one single-input dialog in turn
for each requested field, but that isn’t exactly user friendly.
Custom dialogs support arbitrary interfaces, but they are also the most complicated to
program. Even so, there’s not much to it—simply create a pop-up window as a
Toplevel with attached widgets, and arrange a callback handler to fetch user inputs
entered in the dialog (if any) and to destroy the window. To make such a custom dialog
modal, we also need to wait for a reply by giving the window input focus, making other
windows inactive, and waiting for an event. Example 8-13 illustrates the basics.
Example 8-13. PP4E\Gui\Tour\dlg-custom.py
import sys
from tkinter import *
makemodal = (len(sys.argv) > 1)
Dialogs | 439
def dialog():
win = Toplevel() # make a new window
Label(win, text='Hard drive reformatted!').pack() # add a few widgets
Button(win, text='OK', command=win.destroy).pack() # set destroy callback
if makemodal:
win.focus_set() # take over input focus,
win.grab_set() # disable other windows while I'm open,
win.wait_window() # and wait here until win destroyed
print('dialog exit') # else returns right away
root = Tk()
Button(root, text='popup', command=dialog).pack()
root.mainloop()
This script is set up to create a pop-up dialog window in either modal or nonmodal
mode, depending on its makemodal global variable. If it is run with no command-line
arguments, it picks nonmodal style, captured in Figure 8-18.
Figure 8-18. Nonmodal custom dialogs at work
The window in the upper right is the root window here; pressing its “popup” button
creates a new pop-up dialog window. Because dialogs are nonmodal in this mode, the
root window remains active after a dialog is popped up. In fact, nonmodal dialogs never
block other windows, so you can keep pressing the root’s button to generate as many
copies of the pop-up window as will fit on your screen. Any or all of the pop ups can
be killed by pressing their OK buttons, without killing other windows in this display.
Making custom dialogs modal
Now, when the script is run with a command-line argument (e.g.,
python dlg-custom.py 1), it makes its pop ups modal instead. Because modal dialogs
grab all of the interface’s attention, the main window becomes inactive in this mode
until the pop up is killed; you can’t even click on it to reactivate it while the dialog is
440 | Chapter 8: A tkinter Tour, Part 1

open. Because of that, you can never make more than one copy of the pop up on-screen
at once, as shown in Figure 8-19.
Figure 8-19. A modal custom dialog at work
In fact, the call to the dialog function in this script doesn’t return until the dialog
window on the left is dismissed by pressing its OK button. The net effect is that modal
dialogs impose a function call–like model on an otherwise event-driven programming
model; user inputs can be processed right away, not in a callback handler triggered at
some arbitrary point in the future.
Forcing such a linear control flow on a GUI takes a bit of extra work, though. The secret
to locking other windows and waiting for a reply boils down to three lines of code,
which are a general pattern repeated in most custom modal dialogs.
win.focus_set()
Makes the window take over the application’s input focus, as if it had been clicked
with the mouse to make it the active window. This method is also known by the
synonym focus, and it’s also common to set the focus on an input widget within
the dialog (e.g., an Entry) rather than on the entire window.
win.grab_set()
Disables all other windows in the application until this one is destroyed. The user
cannot interact with other windows in the program while a grab is set.
win.wait_window()
Pauses the caller until the win widget is destroyed, but keeps the main event-
processing loop (mainloop) active during the pause. That means that the GUI at
large remains active during the wait; its windows redraw themselves if covered and
uncovered, for example. When the window is destroyed with the destroy method,
it is erased from the screen, the application grab is automatically released, and this
method call finally returns.
Because the script waits for a window destroy event, it must also arrange for a callback
handler to destroy the window in response to interaction with widgets in the dialog
window (the only window active). This example’s dialog is simply informational, so
its OK button calls the window’s destroy method. In user-input dialogs, we might
instead install an Enter key-press callback handler that fetches data typed into an
Entry widget and then calls destroy (see later in this chapter).
Dialogs | 441

Other ways to be modal
Modal dialogs are typically implemented by waiting for a newly created pop-up win-
dow’s destroy event, as in this example. But other schemes are viable too. For example,
it’s possible to create dialog windows ahead of time, and show and hide them as needed
with the top-level window’s deiconify and withdraw methods (see the alarm scripts
near the end of Chapter 9 for details). Given that window creation speed is generally
fast enough as to appear instantaneous today, this is much less common than making
and destroying a window from scratch on each interaction.
It’s also possible to implement a modal state by waiting for a tkinter variable to change
its value, instead of waiting for a window to be destroyed. See this chapter’s later dis-
cussion of tkinter variables (which are class objects, not normal Python variables) and
the wait_variable method discussed near the end of Chapter 9 for more details. This
scheme allows a long-lived dialog box’s callback handler to signal a state change to a
waiting main program, without having to destroy the dialog box.
Finally, if you call the mainloop method recursively, the call won’t return until the widget
quit method has been invoked. The quit method terminates a mainloop call, and so
normally ends a GUI program. But it will simply exit a recursive mainloop level if one
is active. Because of this, modal dialogs can also be written without wait method calls
if you are careful. For instance, Example 8-14 works the same way as the modal mode
of dlg-custom.
Example 8-14. PP4E\Gui\Tour\dlg-recursive.py
from tkinter import *
def dialog():
win = Toplevel() # make a new window
Label(win, text='Hard drive reformatted!').pack() # add a few widgets
Button(win, text='OK', command=win.quit).pack() # set quit callback
win.protocol('WM_DELETE_WINDOW', win.quit) # quit on wm close too!
win.focus_set() # take over input focus,
win.grab_set() # disable other windows while I'm open,
win.mainloop() # and start a nested event loop to wait
win.destroy()
print('dialog exit')
root = Tk()
Button(root, text='popup', command=dialog).pack()
root.mainloop()
If you go this route, be sure to call quit rather than destroy in dialog callback handlers
(destroy doesn’t terminate the mainloop level), and be sure to use protocol to make the
window border close button call quit too (or else it won’t end the recursive mainloop
level call and may generate odd error messages when your program finally exits). Be-
cause of this extra complexity, you’re probably better off using wait_window or
wait_variable, not recursive mainloop calls.
442 | Chapter 8: A tkinter Tour, Part 1

We’ll see how to build form-like dialogs with labels and input fields later in this chapter
when we meet Entry, and again when we study the grid manager in Chapter 9. For
more custom dialog examples, see ShellGui (Chapter 10), PyMailGUI (Chapter 14),
PyCalc (Chapter 19), and the nonmodal form.py (Chapter 12). Here, we’re moving on
to learn more about events that will prove to be useful currency at later tour
destinations.
Binding Events
We met the bind widget method in the prior chapter, when we used it to catch button
presses in the tutorial. Because bind is commonly used in conjunction with other widg-
ets (e.g., to catch return key presses for input boxes), we’re going to make a stop early
in the tour here as well. Example 8-15 illustrates more bind event protocols.
Example 8-15. PP4E\Gui\Tour\bind.py
from tkinter import *
def showPosEvent(event):
print('Widget=%s X=%s Y=%s' % (event.widget, event.x, event.y))
def showAllEvent(event):
print(event)
for attr in dir(event):
if not attr.startswith('__'):
print(attr, '=>', getattr(event, attr))
def onKeyPress(event):
print('Got key press:', event.char)
def onArrowKey(event):
print('Got up arrow key press')
def onReturnKey(event):
print('Got return key press')
def onLeftClick(event):
print('Got left mouse button click:', end=' ')
showPosEvent(event)
def onRightClick(event):
print('Got right mouse button click:', end=' ')
showPosEvent(event)
def onMiddleClick(event):
print('Got middle mouse button click:', end=' ')
showPosEvent(event)
showAllEvent(event)
def onLeftDrag(event):
print('Got left mouse button drag:', end=' ')
showPosEvent(event)
Binding Events | 443
def onDoubleLeftClick(event):
print('Got double left mouse click', end=' ')
showPosEvent(event)
tkroot.quit()
tkroot = Tk()
labelfont = ('courier', 20, 'bold') # family, size, style
widget = Label(tkroot, text='Hello bind world')
widget.config(bg='red', font=labelfont) # red background, large font
widget.config(height=5, width=20) # initial size: lines,chars
widget.pack(expand=YES, fill=BOTH)
widget.bind('<Button-1>', onLeftClick) # mouse button clicks
widget.bind('<Button-3>', onRightClick)
widget.bind('<Button-2>', onMiddleClick) # middle=both on some mice
widget.bind('<Double-1>', onDoubleLeftClick) # click left twice
widget.bind('<B1-Motion>', onLeftDrag) # click left and move
widget.bind('<KeyPress>', onKeyPress) # all keyboard presses
widget.bind('<Up>', onArrowKey) # arrow button pressed
widget.bind('<Return>', onReturnKey) # return/enter key pressed
widget.focus() # or bind keypress to tkroot
tkroot.title('Click Me')
tkroot.mainloop()
Most of this file consists of callback handler functions triggered when bound events
occur. As we learned in Chapter 7, this type of callback receives an event object argu-
ment that gives details about the event that fired. Technically, this argument is an
instance of the tkinter Event class, and its details are attributes; most of the callbacks
simply trace events by displaying relevant event attributes.
When run, this script makes the window shown in Figure 8-20; it’s mostly intended
just as a surface for clicking and pressing event triggers.
Figure 8-20. A bind window for the clicking
The black-and-white medium of the book you’re holding won’t really do justice to this
script. When run live, it uses the configuration options shown earlier to make the
444 | Chapter 8: A tkinter Tour, Part 1

window show up as black on red, with a large Courier font. You’ll have to take my
word for it (or run this on your own).
But the main point of this example is to demonstrate other kinds of event binding
protocols at work. We saw a script that intercepted left and double-left mouse clicks
with the widget bind method in Chapter 7, using event names <Button-1> and
<Double-1>; the script here demonstrates other kinds of events that are commonly
caught with bind:
<KeyPress>
To catch the press of a single key on the keyboard, register a handler for the
<KeyPress> event identifier; this is a lower-level way to input data in GUI programs
than the Entry widget covered in the next section. The key pressed is returned in
ASCII string form in the event object passed to the callback handler (event.char).
Other attributes in the event structure identify the key pressed in lower-level detail.
Key presses can be intercepted by the top-level root window widget or by a widget
that has been assigned keyboard focus with the focus method used by this script.
<B1-Motion>
This script also catches mouse motion while a button is held down: the registered
<B1-Motion> event handler is called every time the mouse is moved while the left
button is pressed and receives the current X/Y coordinates of the mouse pointer in
its event argument (event.x, event.y). Such information can be used to implement
object moves, drag-and-drop, pixel-level painting, and so on (e.g., see the PyDraw
examples in Chapter 11).
<Button-3>, <Button-2>
This script also catches right and middle mouse button clicks (known as buttons
3 and 2). To make the middle button 2 click work on a two-button mouse, try
clicking both buttons at the same time; if that doesn’t work, check your mouse
setting in your properties interface (the Control Panel on Windows).
<Return>, <Up>
To catch more specific kinds of key presses, this script registers for the Return/
Enter and up-arrow key press events; these events would otherwise be routed to
the general <KeyPress> handler and require event analysis.
Here is what shows up in the stdout output stream after a left click, right click, left click
and drag, a few key presses, a Return and up-arrow press, and a final double-left click
to exit. When you press the left mouse button and drag it around on the display, you’ll
get lots of drag event messages; one is printed for every move during the drag (and one
Python callback is run for each):
C:\...\PP4E\Gui\Tour> python bind.py
Got left mouse button click: Widget=.25763696 X=376 Y=53
Got right mouse button click: Widget=.25763696 X=36 Y=60
Got left mouse button click: Widget=.25763696 X=144 Y=43
Got left mouse button drag: Widget=.25763696 X=144 Y=45
Got left mouse button drag: Widget=.25763696 X=144 Y=47
Binding Events | 445

Got left mouse button drag: Widget=.25763696 X=145 Y=50
Got left mouse button drag: Widget=.25763696 X=146 Y=51
Got left mouse button drag: Widget=.25763696 X=149 Y=53
Got key press: s
Got key press: p
Got key press: a
Got key press: m
Got key press: 1
Got key press: -
Got key press: 2
Got key press: .
Got return key press
Got up arrow key press
Got left mouse button click: Widget=.25763696 X=300 Y=68
Got double left mouse click Widget=.25763696 X=300 Y=68
For mouse-related events, callbacks print the X and Y coordinates of the mouse pointer,
in the event object passed in. Coordinates are usually measured in pixels from the
upper-left corner (0,0), but are relative to the widget being clicked. Here’s what is
printed for a left, middle, and double-left click. Notice that the middle-click callback
dumps the entire argument—all of the Event object’s attributes (less internal names
that begin with “__” which includes the __doc__ string, and default operator overload-
ing methods inherited from the implied object superclass in Python 3.X). Different
event types set different event attributes; most key presses put something in char, for
instance:
C:\...\PP4E\Gui\Tour> python bind.py
Got left mouse button click: Widget=.25632624 X=6 Y=6
Got middle mouse button click: Widget=.25632624 X=212 Y=95
<tkinter.Event object at 0x018CA210>
char => ??
delta => 0
height => ??
keycode => ??
keysym => ??
keysym_num => ??
num => 2
send_event => False
serial => 17
state => 0
time => 549707945
type => 4
widget => .25632624
width => ??
x => 212
x_root => 311
y => 95
y_root => 221
Got left mouse button click: Widget=.25632624 X=400 Y=183
Got double left mouse click Widget=.25632624 X=400 Y=183
446 | Chapter 8: A tkinter Tour, Part 1

Other bind Events
Besides those illustrated in this example, a tkinter script can register to catch additional
kinds of bindable events. For example:
•<ButtonRelease> fires when a button is released (<ButtonPress> is run when the
button first goes down).
•<Motion> is triggered when a mouse pointer is moved.
•<Enter> and <Leave> handlers intercept mouse entry and exit in a window’s display
area (useful for automatically highlighting a widget).
•<Configure> is invoked when the window is resized, repositioned, and so on (e.g.,
the event object’s width and height give the new window size). We’ll make use of
this to resize the display on window resizes in the PyClock example of Chapter 11.
•<Destroy> is invoked when the window widget is destroyed (and differs from the
protocol mechanism for window manager close button presses). Since this inter-
acts with widget quit and destroy methods, I’ll say more about the event later in
this section.
•<FocusIn> and <FocusOut> are run as the widget gains and loses focus.
•<Map> and <Unmap> are run when a window is opened and iconified.
•<Escape>, <BackSpace>, and <Tab> catch other special key presses.
•<Down>, <Left>, and <Right> catch other arrow key presses.
This is not a complete list, and event names can be written with a somewhat sophisti-
cated syntax of their own. For instance:
•Modifiers can be added to event identifiers to make them even more specific; for
instance, <B1-Motion> means moving the mouse with the left button pressed, and
<KeyPress-a> refers to pressing the “a” key only.
•Synonyms can be used for some common event names; for instance, <Button
Press-1>, <Button-1>, and <1> mean a left mouse button press, and <KeyPress-a>
and <Key-a> mean the “a” key. All forms are case sensitive: use <Key-Escape>, not
<KEY-ESCAPE>.
•Virtual event identifiers can be defined within double bracket pairs (e.g., <<Paste
Text>>) to refer to a selection of one or more event sequences.
In the interest of space, though, we’ll defer to other Tk and tkinter reference sources
for an exhaustive list of details on this front. Alternatively, changing some of the settings
in the example script and rerunning can help clarify some event behavior, too; this is
Python, after all.
More on <Destroy> events and the quit and destroy methods
Before we move on, one event merits a few extra words: the <Destroy> event (whose
name is case significant) is run when a widget is being destroyed, as a result of both
Binding Events | 447

script method calls and window closures in general, including those at program exit.
If you bind this on a window, it will be triggered once for each widget in the window;
the callback’s event argument widget attribute gives the widget being destroyed, and
you can check this to detect a particular widget’s destruction. If you bind this on a
specific widget instead, it will be triggered once for that widget’s destruction only.
It’s important to know that a widget is in a “half dead” state (Tk’s terminology) when
this event is triggered—it still exists, but most operations on it fail. Because of that, the
<Destroy> event is not intended for GUI activity in general; for instance, checking a text
widget’s changed state or fetching its content in a <Destroy> handler can both fail with
exceptions. In addition, this event’s handler cannot cancel the destruction in general
and resume the GUI; if you wish to intercept and verify or suppress window closes
when a user clicks on a window’s X button, use WM_DELETE_WINDOW in top-level windows’
protocol methods as described earlier in this chapter.
You should also know that running a tkinter widget’s quit method does not trigger any
<Destroy> events on exit, and even leads to a fatal Python error on program exit in 3.X
if any <Destroy> event handlers are registered. Because of this, programs that bind this
event for non-GUI window exit actions should usually call destroy instead of quit to
close, and rely on the fact that a program exits when the last remaining or only Tk root
window (default or explicit) is destroyed as described earlier. This precludes using
quit for immediate shutdowns, though you can still run sys.exit for brute-force exits.
A script can also perform program exit actions in code run after the mainloop call re-
turns, but the GUI is gone completely at this point, and this code is not associated with
any particular widget. Watch for more on this event when we study the PyEdit example
program in Chapter 11; at the risk of spoiling the end of this story, we’ll find it unusable
for verifying changed text saves.
Message and Entry
The Message and Entry widgets allow for display and input of simple text. Both are
essentially functional subsets of the Text widget we’ll meet later; Text can do everything
Message and Entry can, but not vice versa.
Message
The Message widget is simply a place to display text. Although the standard showinfo
dialog we met earlier is perhaps a better way to display pop-up messages, Message splits
up long strings automatically and flexibly and can be embedded inside container widg-
ets any time you need to add some read-only text to a display. Moreover, this widget
sports more than a dozen configuration options that let you customize its appearance.
Example 8-16 and Figure 8-21 illustrate Message basics, and demonstrates how
Message reacts to horizontal stretching with fill and expand; see Chapter 7 for more
on resizing and Tk or tkinter references for other options Message supports.
448 | Chapter 8: A tkinter Tour, Part 1
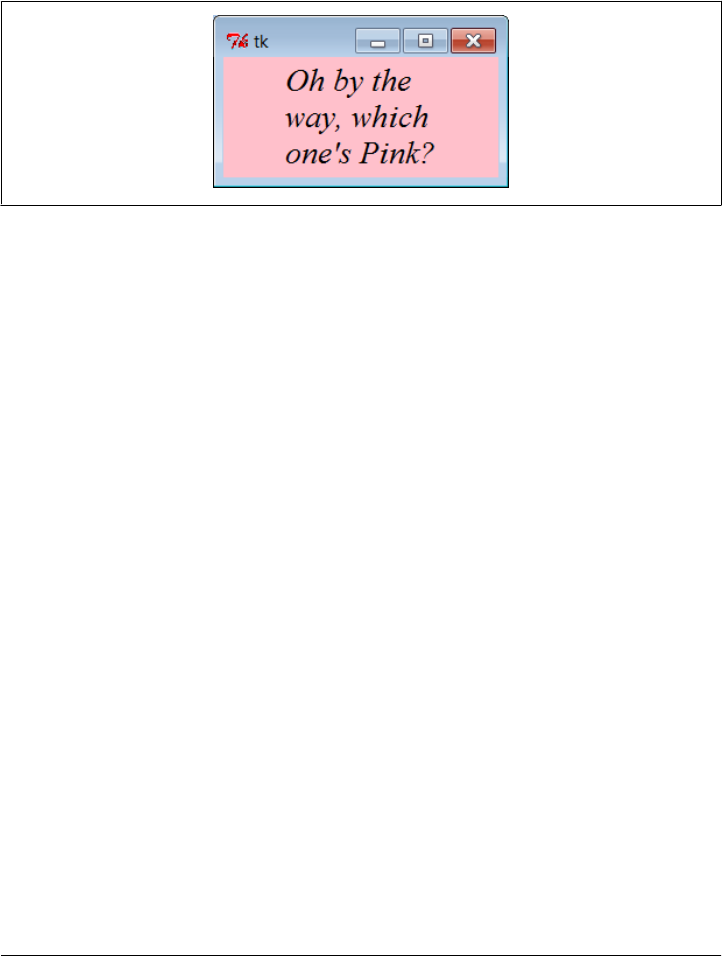
Example 8-16. PP4E\Gui\tour\message.py
from tkinter import *
msg = Message(text="Oh by the way, which one's Pink?")
msg.config(bg='pink', font=('times', 16, 'italic'))
msg.pack(fill=X, expand=YES)
mainloop()
Figure 8-21. A Message widget at work
Entry
The Entry widget is a simple, single-line text input field. It is typically used for input
fields in form-like dialogs and anywhere else you need the user to type a value into a
field of a larger display. Entry also supports advanced concepts such as scrolling, key
bindings for editing, and text selections, but it’s simple to use in practice. Exam-
ple 8-17 builds the input window shown in Figure 8-22.
Example 8-17. PP4E\Gui\tour\entry1.py
from tkinter import *
from quitter import Quitter
def fetch():
print('Input => "%s"' % ent.get()) # get text
root = Tk()
ent = Entry(root)
ent.insert(0, 'Type words here') # set text
ent.pack(side=TOP, fill=X) # grow horiz
ent.focus() # save a click
ent.bind('<Return>', (lambda event: fetch())) # on enter key
btn = Button(root, text='Fetch', command=fetch) # and on button
btn.pack(side=LEFT)
Quitter(root).pack(side=RIGHT)
root.mainloop()
Message and Entry | 449

Figure 8-22. entry1 caught in the act
On startup, the entry1 script fills the input field in this GUI with the text “Type words
here” by calling the widget’s insert method. Because both the Fetch button and the
Enter key are set to trigger the script’s fetch callback function, either user event gets
and displays the current text in the input field, using the widget’s get method:
C:\...\PP4E\Gui\Tour> python entry1.py
Input => "Type words here"
Input => "Have a cigar"
We met the <Return> event earlier when we studied bind; unlike button presses, these
lower-level callbacks get an event argument, so the script uses a lambda wrapper to
ignore it. This script also packs the entry field with fill=X to make it expand horizon-
tally with the window (try it out), and it calls the widget focus method to give the entry
field input focus when the window first appears. Manually setting the focus like this
saves the user from having to click the input field before typing. Our smart Quit button
we wrote earlier is attached here again as well (it verifies exit).
Programming Entry widgets
Generally speaking, the values typed into and displayed by Entry widgets are set and
fetched with either tied “variable” objects (described later in this chapter) or Entry
widget method calls such as this one:
ent.insert(0, 'some text') # set value
value = ent.get() # fetch value (a string)
The first parameter to the insert method gives the position where the text is to be
inserted. Here, “0” means the front because offsets start at zero, and integer 0 and string
'0' mean the same thing (tkinter method arguments are always converted to strings if
needed). If the Entry widget might already contain text, you also generally need to delete
its contents before setting it to a new value, or else new text will simply be added to
the text already present:
ent.delete(0, END) # first, delete from start to end
ent.insert(0, 'some text') # then set value
The name END here is a preassigned tkinter constant denoting the end of the widget;
we’ll revisit it in Chapter 9 when we meet the full-blown and multiple-line Text widget
(Entry’s more powerful cousin). Since the widget is empty after the deletion, this state-
ment sequence is equivalent to the prior one:
450 | Chapter 8: A tkinter Tour, Part 1

ent.delete('0', END) # delete from start to end
ent.insert(END, 'some text') # add at end of empty text
Either way, if you don’t delete the text first, new text that is inserted is simply added.
If you want to see how, try changing the fetch function in Example 8-17 to look like
this—an “x” is added at the beginning and end of the input field on each button or key
press:
def fetch():
print('Input => "%s"' % ent.get()) # get text
ent.insert(END, 'x') # to clear: ent.delete('0', END)
ent.insert(0, 'x') # new text simply added
In later examples, we’ll also see the Entry widget’s state='disabled' option, which
makes it read only, as well as its show='*' option, which makes it display each character
as a * (useful for password-type inputs). Try this out on your own by changing and
running this script for a quick look. Entry supports other options we’ll skip here, too;
see later examples and other resources for additional details.
Laying Out Input Forms
As mentioned, Entry widgets are often used to get field values in form-like displays.
We’re going to create such displays often in this book, but to show you how this works
in simpler terms, Example 8-18 combines labels, entries, and frames to achieve the
multiple-input display captured in Figure 8-23.
Example 8-18. PP4E\Gui\Tour\entry2.py
"""
use Entry widgets directly
lay out by rows with fixed-width labels: this and grid are best for forms
"""
from tkinter import *
from quitter import Quitter
fields = 'Name', 'Job', 'Pay'
def fetch(entries):
for entry in entries:
print('Input => "%s"' % entry.get()) # get text
def makeform(root, fields):
entries = []
for field in fields:
row = Frame(root) # make a new row
lab = Label(row, width=5, text=field) # add label, entry
ent = Entry(row)
row.pack(side=TOP, fill=X) # pack row on top
lab.pack(side=LEFT)
ent.pack(side=RIGHT, expand=YES, fill=X) # grow horizontal
entries.append(ent)
return entries
Message and Entry | 451
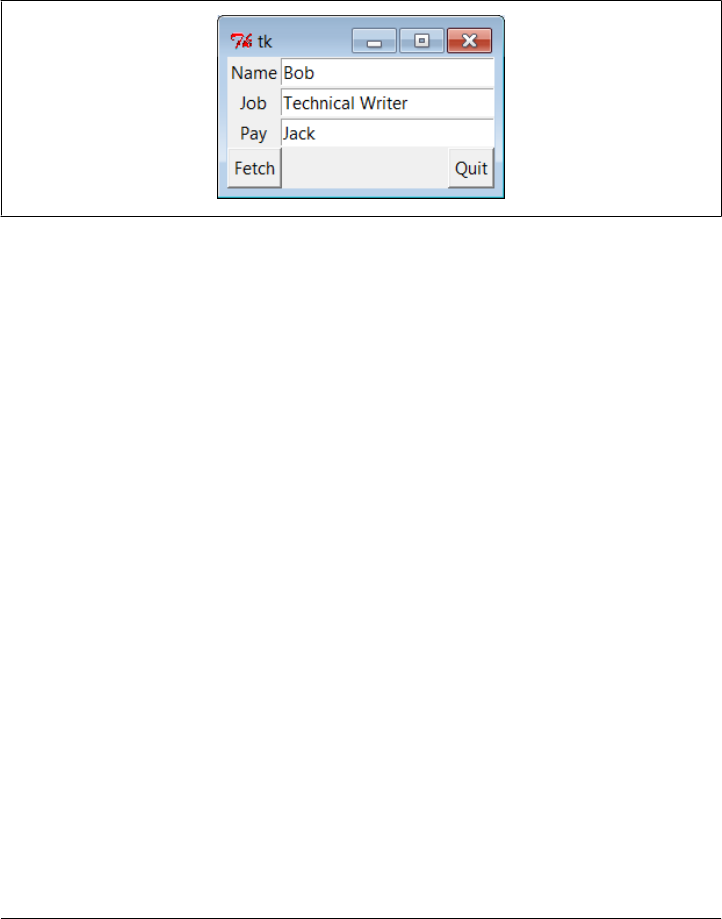
if __name__ == '__main__':
root = Tk()
ents = makeform(root, fields)
root.bind('<Return>', (lambda event: fetch(ents)))
Button(root, text='Fetch',
command= (lambda: fetch(ents))).pack(side=LEFT)
Quitter(root).pack(side=RIGHT)
root.mainloop()
Figure 8-23. entry2 (and entry3) form displays
The input fields here are just simple Entry widgets. The script builds an explicit list of
these widgets to be used to fetch their values later. Every time you press this window’s
Fetch button, it grabs the current values in all the input fields and prints them to the
standard output stream:
C:\...\PP4E\Gui\Tour> python entry2.py
Input => "Bob"
Input => "Technical Writer"
Input => "Jack"
You get the same field dump if you press the Enter key anytime this window has the
focus on your screen; this event has been bound to the whole root window this time,
not to a single input field.
Most of the art in form layout has to do with arranging widgets in a hierarchy. This
script builds each label/entry row as a new Frame attached to the window’s current
TOP; fixed-width labels are attached to the LEFT of their row, and entries to the RIGHT.
Because each row is a distinct Frame, its contents are insulated from other packing going
on in this window. The script also arranges for just the entry fields to grow vertically
on a resize, as in Figure 8-24.
Going modal again
Later on this tour, we’ll see how to make similar form layouts with the grid geometry
manager, where we arrange by row and column numbers instead of frames. But now
that we have a handle on form layout, let’s see how to apply the modal dialog techniques
we met earlier to a more complex input display.
452 | Chapter 8: A tkinter Tour, Part 1
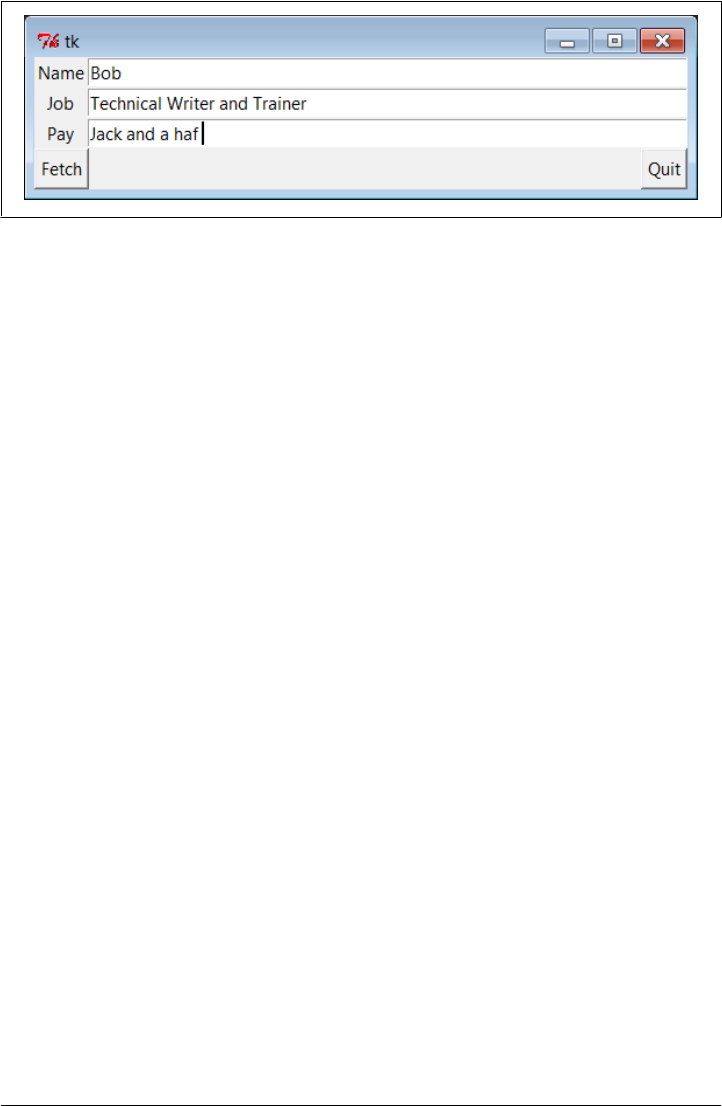
Example 8-19 uses the prior example’s makeform and fetch functions to generate a form
and prints its contents, much as before. Here, though, the input fields are attached to
a new Toplevel pop-up window created on demand, and an OK button is added to the
new window to trigger a window destroy event that erases the pop up. As we learned
earlier, the wait_window call pauses until the destroy happens.
Example 8-19. PP4E\Gui\Tour\entry2-modal.py
# make form dialog modal; must fetch before destroy with entries
from tkinter import *
from entry2 import makeform, fetch, fields
def show(entries, popup):
fetch(entries) # must fetch before window destroyed!
popup.destroy() # fails with msgs if stmt order is reversed
def ask():
popup = Toplevel() # show form in modal dialog window
ents = makeform(popup, fields)
Button(popup, text='OK', command=(lambda: show(ents, popup))).pack()
popup.grab_set()
popup.focus_set()
popup.wait_window() # wait for destroy here
root = Tk()
Button(root, text='Dialog', command=ask).pack()
root.mainloop()
When you run this code, pressing the button in this program’s main window creates
the blocking form input dialog in Figure 8-25, as expected.
But a subtle danger is lurking in this modal dialog code: because it fetches user inputs
from Entry widgets embedded in the popped-up display, it must fetch those inputs
before destroying the pop-up window in the OK press callback handler. It turns out
that a destroy call really does destroy all the child widgets of the window destroyed;
trying to fetch values from a destroyed Entry not only doesn’t work, but also generates
a traceback with error messages in the console window. Try reversing the statement
order in the show function to see for yourself.
Figure 8-24. entry2 (and entry3) expansion at work
Message and Entry | 453

To avoid this problem, we can either be careful to fetch before destroying, or use tkinter
variables, the subject of the next section.
tkinter “Variables” and Form Layout Alternatives
Entry widgets (among others) support the notion of an associated variable—changing
the associated variable changes the text displayed in the Entry, and changing the text
in the Entry changes the value of the variable. These aren’t normal Python variable
names, though. Variables tied to widgets are instances of variable classes in the tkinter
module library. These classes are named StringVar, IntVar, DoubleVar, and Boolean
Var; you pick one based on the context in which it is to be used. For example, a String
Var class instance can be associated with an Entry field, as demonstrated in
Example 8-20.
Example 8-20. PP4E\Gui\Tour\entry3.py
"""
use StringVar variables
lay out by columns: this might not align horizontally everywhere (see entry2)
"""
from tkinter import *
from quitter import Quitter
fields = 'Name', 'Job', 'Pay'
def fetch(variables):
for variable in variables:
print('Input => "%s"' % variable.get()) # get from var
Figure 8-25. entry2-modal (and entry3-modal) displays
454 | Chapter 8: A tkinter Tour, Part 1

def makeform(root, fields):
form = Frame(root) # make outer frame
left = Frame(form) # make two columns
rite = Frame(form)
form.pack(fill=X)
left.pack(side=LEFT)
rite.pack(side=RIGHT, expand=YES, fill=X) # grow horizontal
variables = []
for field in fields:
lab = Label(left, width=5, text=field) # add to columns
ent = Entry(rite)
lab.pack(side=TOP)
ent.pack(side=TOP, fill=X) # grow horizontal
var = StringVar()
ent.config(textvariable=var) # link field to var
var.set('enter here')
variables.append(var)
return variables
if __name__ == '__main__':
root = Tk()
vars = makeform(root, fields)
Button(root, text='Fetch', command=(lambda: fetch(vars))).pack(side=LEFT)
Quitter(root).pack(side=RIGHT)
root.bind('<Return>', (lambda event: fetch(vars)))
root.mainloop()
Except for the fact that this script initializes input fields with the string 'enter here',
it makes a window virtually identical in appearance and function to that created by the
script entry2 (see Figures 8-23 and 8-24). For illustration purposes, the window is laid
out differently—as a Frame containing two nested subframes used to build the left and
right columns of the form area—but the end result is the same when it is displayed on
screen (for some GUIs on some platforms, at least: see the note at the end of this section
for a discussion of why layout by rows instead of columns is generally preferred).
The main thing to notice here, though, is the use of StringVar variables. Instead of using
a list of Entry widgets to fetch input values, this version keeps a list of StringVar objects
that have been associated with the Entry widgets, like this:
ent = Entry(rite)
var = StringVar()
ent.config(textvariable=var) # link field to var
Once you’ve tied variables in this way, changing and fetching the variable’s value:
var.set('text here')
value = var.get()
Message and Entry | 455

will really change and fetch the corresponding display’s input field value.* The variable
object get method returns as a string for StringVar, an integer for IntVar, and a floating-
point number for DoubleVar.
Of course, we’ve already seen that it’s easy to set and fetch text in Entry fields directly,
without adding extra code to use variables. So, why the bother about variable objects?
For one thing, it clears up that nasty fetch-after-destroy peril we met in the prior section.
Because StringVars live on after the Entry widgets they are tied to have been destroyed,
it’s OK to fetch input values from them long after a modal dialog has been dismissed,
as shown in Example 8-21.
Example 8-21. PP4E\Gui\Tour\entry3-modal.py
# can fetch values after destroy with stringvars
from tkinter import *
from entry3 import makeform, fetch, fields
def show(variables, popup):
popup.destroy() # order doesn't matter here
fetch(variables) # variables live on after window destroyed
def ask():
popup = Toplevel() # show form in modal dialog window
vars = makeform(popup, fields)
Button(popup, text='OK', command=(lambda: show(vars, popup))).pack()
popup.grab_set()
popup.focus_set()
popup.wait_window() # wait for destroy here
root = Tk()
Button(root, text='Dialog', command=ask).pack()
root.mainloop()
This version is the same as the original (shown in Example 8-19 and Figure 8-25), but
show now destroys the pop up before inputs are fetched through StringVars in the list
created by makeform. In other words, variables are a bit more robust in some contexts
because they are not part of a real display tree. For example, they are also commonly
associated with check buttons, radio boxes, and scales in order to provide access to
current settings and link multiple widgets together. Almost coincidentally, that’s the
topic of the next section.
* Historic anecdote: In a now-defunct tkinter release shipped with Python 1.3, you could also set and fetch
variable values by calling them like functions, with and without an argument (e.g., var(value) and var()).
Today, you call variable set and get methods instead. For unknown reasons, the function call form stopped
working years ago, but you may still see it in older Python code (and in first editions of at least one O’Reilly
Python book). If a fix made in the name of aesthetics breaks working code, is it really a fix?
456 | Chapter 8: A tkinter Tour, Part 1

We laid out input forms two ways in this section: by row frames with
fixed-width labels (entry2), and by column frames (entry3). In Chap-
ter 9 we’ll see a third form technique: layouts using the grid geometry
manager. Of these, gridding, and the rows with fixed-width labels of
entry2 tend to work best across all platforms.
Laying out by column frames as in entry3 works only on platforms
where the height of each label exactly matches the height of each entry
field. Because the two are not associated directly, they might not line up
properly on some platforms. When I tried running some forms that
looked fine on Windows XP on a Linux machine, labels and their cor-
responding entries did not line up horizontally.
Even the simple window produced by entry3 looks slightly askew on
closer inspection. It only appears the same as entry2 on some platforms
because of the small number of inputs and size defaults. On my Win-
dows 7 netbook, the labels and entries start to become horizontally
mismatched if you add 3 or 4 additional inputs to entry3’s fields tuple.
If you care about portability, lay out your forms either with the packed
row frames and fixed/maximum-width labels of entry2, or by gridding
widgets by row and column numbers instead of packing them. We’ll see
more on such forms in the next chapter. And in Chapter 12, we’ll write
a form-construction tool that hides the layout details from its clients
altogether (including its use case client in Chapter 13).
Checkbutton, Radiobutton, and Scale
This section introduces three widget types: the Checkbutton (a multiple-choice input
widget), the Radiobutton (a single-choice device), and the Scale (sometimes known as
a “slider”). All are variations on a theme and are somewhat related to simple buttons,
so we’ll explore them as a group here. To make these widgets more fun to play with,
we’ll reuse the dialogTable module shown in Example 8-8 to provide callbacks for
widget selections (callbacks pop up dialog boxes). Along the way, we’ll also use the
tkinter variables we just met to communicate with these widgets’ state settings.
Checkbuttons
The Checkbutton and Radiobutton widgets are designed to be associated with tkinter
variables: clicking the button changes the value of the variable, and setting the variable
changes the state of the button to which it is linked. In fact, tkinter variables are central
to the operation of these widgets:
• A collection of Checkbuttons implements a multiple-choice interface by assigning
each button a variable of its own.
• A collection of Radiobuttons imposes a mutually exclusive single-choice model by
giving each button a unique value and the same tkinter variable.
Checkbutton, Radiobutton, and Scale | 457
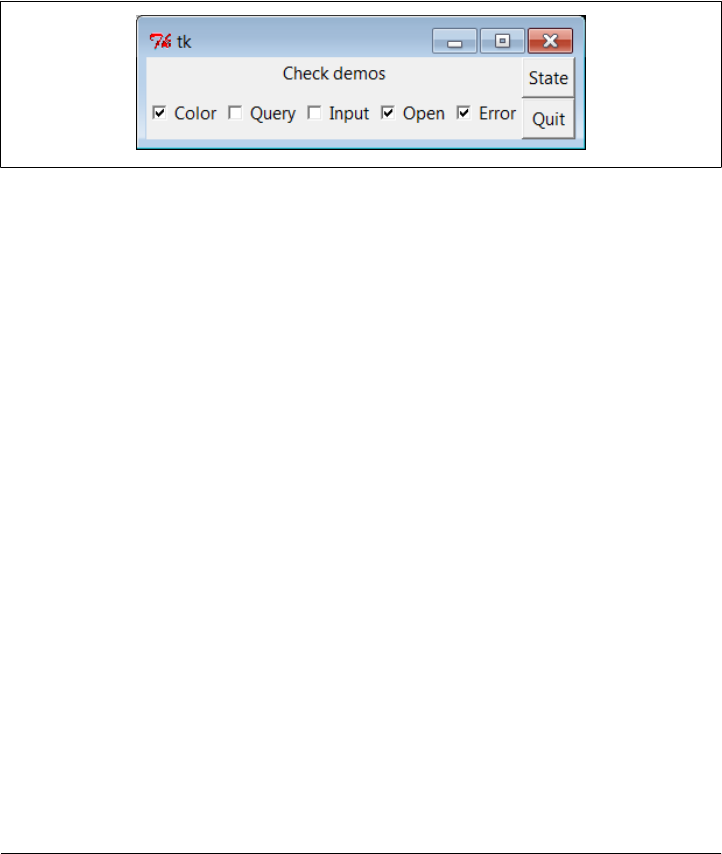
Both kinds of buttons provide both command a n d variable o p t i o n s . T h e command option
lets you register a callback to be run immediately on button-press events, much like
normal Button widgets. But by associating a tkinter variable with the variable option,
you can also fetch or change widget state at any time by fetching or changing the value
of the widget’s associated variable.
Since it’s a bit simpler, let’s start with the tkinter Checkbutton. Example 8-22 creates
the set of five captured in Figure 8-26. To make this more useful, it also adds a button
that dumps the current state of all Checkbuttons and attaches an instance of the verifying
Quitter button we built earlier in the tour.
Figure 8-26. demoCheck in action
Example 8-22. PP4E\Gui\Tour\demoCheck.py
"create a bar of check buttons that run dialog demos"
from tkinter import * # get base widget set
from dialogTable import demos # get canned dialogs
from quitter import Quitter # attach a quitter object to "me"
class Demo(Frame):
def __init__(self, parent=None, **options):
Frame.__init__(self, parent, **options)
self.pack()
self.tools()
Label(self, text="Check demos").pack()
self.vars = []
for key in demos:
var = IntVar()
Checkbutton(self,
text=key,
variable=var,
command=demos[key]).pack(side=LEFT)
self.vars.append(var)
def report(self):
for var in self.vars:
print(var.get(), end=' ') # current toggle settings: 1 or 0
print()
def tools(self):
frm = Frame(self)
frm.pack(side=RIGHT)
458 | Chapter 8: A tkinter Tour, Part 1

Button(frm, text='State', command=self.report).pack(fill=X)
Quitter(frm).pack(fill=X)
if __name__ == '__main__': Demo().mainloop()
In terms of program code, check buttons resemble normal buttons; they are even
packed within a container widget. Operationally, though, they are a bit different. As
you can probably tell from this figure (and can better tell by running this live), a check
button works as a toggle—pressing one changes its state from off to on (from deselected
to selected); or from on to off again. When a check button is selected, it has a checked
display, and its associated IntVar variable has a value of 1; when deselected, its display
is empty and its IntVar has a value of 0.
To simulate an enclosing application, the State button in this display triggers the script’s
report method to display the current values of all five toggles on the stdout stream.
Here is the output after a few clicks:
C:\...\PP4E\Gui\Tour> python demoCheck.py
0 0 0 0 0
1 0 0 0 0
1 0 1 0 0
1 0 1 1 0
1 0 0 1 0
1 0 0 1 1
Really, these are the values of the five tkinter variables associated with the
Checkbuttons with variable options, but they give the buttons’ values when queried.
This script associates IntVar variables with each Checkbutton in this display, since they
are 0 or 1 binary indicators. StringVars will work here, too, although their get methods
would return strings '0' or '1' (not integers) and their initial state would be an empty
string (not the integer 0).
This widget’s command option lets you register a callback to be run each time the button
is pressed. To illustrate, this script registers a standard dialog demo call as a handler
for each of the Checkbuttons—pressing a button changes the toggle’s state but also pops
up one of the dialog windows we visited earlier in this tour (regardless of its new state).
Interestingly, you can sometimes run the report method interactively, too—when
working as follows in a shell window, widgets pop up as lines are typed and are fully
active, even without calling mainloop (though this may not work in some interfaces like
IDLE if you must call mainloop to display your GUI):
C:\...\PP4E\Gui\Tour> python
>>> from demoCheck import Demo
>>> d = Demo()
>>> d.report()
0 0 0 0 0
>>> d.report()
1 0 0 0 0
>>> d.report()
1 0 0 1 1
Checkbutton, Radiobutton, and Scale | 459

Check buttons and variables
When I first studied check buttons, my initial reaction was: why do we need tkinter
variables here at all when we can register button-press callbacks? Linked variables may
seem superfluous at first glance, but they simplify some GUI chores. Instead of asking
you to accept this blindly, though, let me explain why.
Keep in mind that a Checkbutton’s command callback will be run on every press, whether
the press toggles the check button to a selected or a deselected state. Because of that,
if you want to run an action immediately when a check button is pressed, you will
generally want to check the button’s current value in the callback handler. Because
there is no check button “get” method for fetching values, you usually need to inter-
rogate an associated variable to see if the button is on or off.
Moreover, some GUIs simply let users set check buttons without running command call-
backs at all and fetch button settings at some later point in the program. In such a
scenario, variables serve to automatically keep track of button settings. The demo
Check script’s report method represents this latter approach.
Of course, you could manually keep track of each button’s state in press callback
handlers, too. Example 8-23 keeps its own list of state toggles and updates it manually
on command press callbacks.
Example 8-23. PP4E\Gui\Tour\demo-check-manual.py
# check buttons, the hard way (without variables)
from tkinter import *
states = [] # change object not name
def onPress(i): # keep track of states
states[i] = not states[i] # changes False->True, True->False
root = Tk()
for i in range(10):
chk = Checkbutton(root, text=str(i), command=(lambda i=i: onPress(i)) )
chk.pack(side=LEFT)
states.append(False)
root.mainloop()
print(states) # show all states on exit
The lambda here passes along the pressed button’s index in the states list. Otherwise,
we would need a separate callback function for each button. Here again, we need to
use a default argument to pass the loop variable into the lambda, or the loop variable
will be its value on the last loop iteration for all 10 of the generated functions (each
press would update the tenth item in the list; see Chapter 7 for background details on
this). When run, this script makes the 10–check button display in Figure 8-27.
460 | Chapter 8: A tkinter Tour, Part 1

Figure 8-27. Manual check button state window
Manually maintained state toggles are updated on every button press and are printed
when the GUI exits (technically, when the mainloop call returns); it’s a list of Boolean
state values, which could also be integers 1 or 0 if we cared to exactly imitate the
original:
C:\...\PP4E\Gui\Tour> python demo-check-manual.py
[False, False, True, False, True, False, False, False, True, False]
This works, and it isn’t too horribly difficult to manage manually. But linked tkinter
variables make this task noticeably easier, especially if you don’t need to process check
button states until some time in the future. This is illustrated in Example 8-24.
Example 8-24. PP4E\Gui\Tour\demo-check-auto.py
# check buttons, the easy way
from tkinter import *
root = Tk()
states = []
for i in range(10):
var = IntVar()
chk = Checkbutton(root, text=str(i), variable=var)
chk.pack(side=LEFT)
states.append(var)
root.mainloop() # let tkinter keep track
print([var.get() for var in states]) # show all states on exit (or map/lambda)
This looks and works the same way, but there is no command button-press callback
handler at all, because toggle state is tracked by tkinter automatically:
C:\...\PP4E\Gui\Tour> python demo-check-auto.py
[0, 0, 1, 1, 0, 0, 1, 0, 0, 1]
The point here is that you don’t necessarily have to link variables with check buttons,
but your GUI life will be simpler if you do. The list comprehension at the very end of
this script, by the way, is equivalent to the following unbound method and lambda/
bound-method map call forms:
print(list(map(IntVar.get, states)))
print(list(map(lambda var: var.get(), states)))
Though comprehensions are common in Python today, the form that seems clearest to
you may very well depend upon your shoe size…
Checkbutton, Radiobutton, and Scale | 461

Radio Buttons
Radio buttons are toggles too, but they are generally used in groups: just like the me-
chanical station selector pushbuttons on radios of times gone by, pressing one Radio
button widget in a group automatically deselects the one pressed last. In other words,
at most, only one can be selected at one time. In tkinter, associating all radio buttons
in a group with unique values and the same variable guarantees that, at most, only one
can ever be selected at a given time.
Like check buttons and normal buttons, radio buttons support a command option for
registering a callback to handle presses immediately. Like check buttons, radio buttons
also have a variable attribute for associating single-selection buttons in a group and
fetching the current selection at arbitrary times.
In addition, radio buttons have a value attribute that lets you tell tkinter what value
the button’s associated variable should have when the button is selected. Because more
than one radio button is associated with the same variable, you need to be explicit about
each button’s value (it’s not just a 1 or 0 toggle scenario). Example 8-25 demonstrates
radio button basics.
Example 8-25. PP4E\Gui\Tour\demoRadio.py
"create a group of radio buttons that launch dialog demos"
from tkinter import * # get base widget set
from dialogTable import demos # button callback handlers
from quitter import Quitter # attach a quit object to "me"
class Demo(Frame):
def __init__(self, parent=None, **options):
Frame.__init__(self, parent, **options)
self.pack()
Label(self, text="Radio demos").pack(side=TOP)
self.var = StringVar()
for key in demos:
Radiobutton(self, text=key,
command=self.onPress,
variable=self.var,
value=key).pack(anchor=NW)
self.var.set(key) # select last to start
Button(self, text='State', command=self.report).pack(fill=X)
Quitter(self).pack(fill=X)
def onPress(self):
pick = self.var.get()
print('you pressed', pick)
print('result:', demos[pick]())
def report(self):
print(self.var.get())
if __name__ == '__main__': Demo().mainloop()
462 | Chapter 8: A tkinter Tour, Part 1
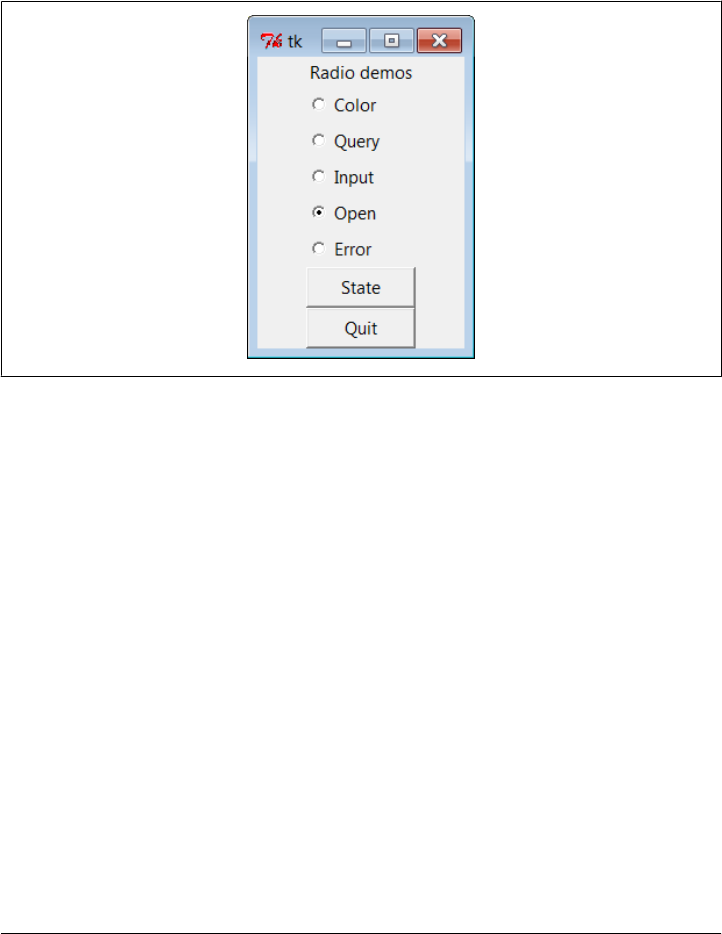
Figure 8-28 shows what this script generates when run. Pressing any of this window’s
radio buttons triggers its command handler, pops up one of the standard dialog boxes we
met earlier, and automatically deselects the button previously pressed. Like check but-
tons, radio buttons are packed; this script packs them to the top to arrange them ver-
tically, and then anchors each on the northwest corner of its allocated space so that
they align well.
Figure 8-28. demoRadio in action
Like the check button demo script, this one also puts up a State button to run the class’s
report method and to show the current radio state (the button selected). Unlike the
check button demo, this script also prints the return values of dialog demo calls that
are run as its buttons are pressed. Here is what the stdout stream looks like after a few
presses and state dumps; states are shown in bold:
C:\...\PP4E\Gui\Tour> python demoRadio.py
you pressed Input
result: 3.14
Input
you pressed Open
result: C:/PP4thEd/Examples/PP4E/Gui/Tour/demoRadio.py
Open
you pressed Query
result: yes
Query
Radio buttons and variables
So, why variables here? For one thing, radio buttons also have no “get” widget method
to fetch the selection in the future. More importantly, in radio button groups, the
value and variable settings turn out to be the whole basis of single-choice behavior. In
Checkbutton, Radiobutton, and Scale | 463
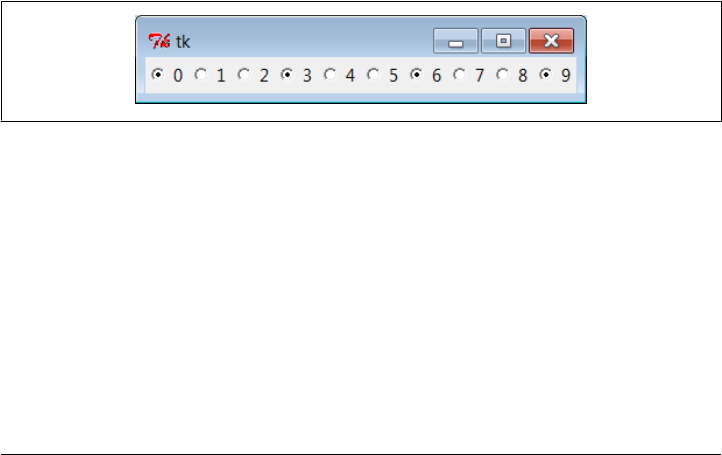
fact, to make radio buttons work normally at all, it’s crucial that they are all associated
with the same tkinter variable and have distinct value settings. To truly understand
why, though, you need to know a bit more about how radio buttons and variables do
their stuff.
We’ve already seen that changing a widget changes its associated tkinter variable, and
vice versa. But it’s also true that changing a variable in any way automatically changes
every widget it is associated with. In the world of radio buttons, pressing a button sets
a shared variable, which in turn impacts other buttons associated with that variable.
Assuming that all radio buttons have distinct values, this works as you expect it to
work. When a button press changes the shared variable to the pressed button’s value,
all other buttons are deselected, simply because the variable has been changed to a
value not their own.
This is true both when the user selects a button and changes the shared variable’s value
implicitly, but also when the variable’s value is set manually by a script. For instance,
when Example 8-25 sets the shared variable to the last of the demo’s names initially
(with self.var.set), it selects that demo’s button and deselects all the others in the
process; this way, only one is selected at first. If the variable was instead set to a string
that is not any demo’s name (e.g., ' '), all buttons would be deselected at startup.
This ripple effect is a bit subtle, but it might help to know that within a group of radio
buttons sharing the same variable, if you assign a set of buttons the same value, the
entire set will be selected if any one of them is pressed. Consider Example 8-26, which
creates Figure 8-29, for instance. All buttons start out deselected this time (by initial-
izing the shared variable to none of their values), but because radio buttons 0, 3, 6, and
9 have value 0 (the remainder of division by 3), all are selected if any are selected.
Figure 8-29. Radio buttons gone bad?
Example 8-26. PP4E\Gui\Tour\demo-radio-multi.py
# see what happens when some buttons have same value
from tkinter import *
root = Tk()
var = StringVar()
for i in range(10):
rad = Radiobutton(root, text=str(i), variable=var, value=str(i % 3))
rad.pack(side=LEFT)
var.set(' ') # deselect all initially
root.mainloop()
464 | Chapter 8: A tkinter Tour, Part 1

If you press 1, 4, or 7 now, all three of these are selected, and any existing selections
are cleared (they don’t have the value “1”). That’s not normally what you want—radio
buttons are usually a single-choice group (check buttons handle multiple-choice in-
puts). If you want them to work as expected, be sure to give each radio button the same
variable but a unique value across the entire group. In the demoRadio script, for instance,
the name of the demo provides a naturally unique value for each button.
Radio buttons without variables
Strictly speaking, we could get by without tkinter variables here, too. Example 8-27,
for instance, implements a single-selection model without variables, by manually se-
lecting and deselecting widgets in the group, in a callback handler of its own. On each
press event, it issues deselect calls for every widget object in the group and select for
the one pressed.
Example 8-27. PP4E\Gui\Tour\demo-radio-manual.py
"""
radio buttons, the hard way (without variables)
note that deselect for radio buttons simply sets the button's
associated value to a null string, so we either need to still
give buttons unique values, or use checkbuttons here instead;
"""
from tkinter import *
state = ''
buttons = []
def onPress(i):
global state
state = i
for btn in buttons:
btn.deselect()
buttons[i].select()
root = Tk()
for i in range(10):
rad = Radiobutton(root, text=str(i),
value=str(i), command=(lambda i=i: onPress(i)) )
rad.pack(side=LEFT)
buttons.append(rad)
onPress(0) # select first initially
root.mainloop()
print(state) # show state on exit
This works. It creates a 10-radio button window that looks just like the one in Fig-
ure 8-29 but implements a single-choice radio-style interface, with current state avail-
able in a global Python variable printed on script exit. By associating tkinter variables
and unique values, though, you can let tkinter do all this work for you, as shown in
Example 8-28.
Checkbutton, Radiobutton, and Scale | 465

Example 8-28. PP4E\Gui\Tour\demo-radio-auto.py
# radio buttons, the easy way
from tkinter import *
root = Tk() # IntVars work too
var = IntVar(0) # select 0 to start
for i in range(10):
rad = Radiobutton(root, text=str(i), value=i, variable=var)
rad.pack(side=LEFT)
root.mainloop()
print(var.get()) # show state on exit
This works the same way, but it is a lot less to type and debug. Notice that this script
associates the buttons with an IntVar, the integer type sibling of StringVar, and initi-
alizes it to zero (which is also its default); as long as button values are unique, integers
work fine for radio buttons too.
Hold onto your variables!
One minor word of caution: you should generally hold onto the tkinter variable object
used to link radio buttons for as long as the radio buttons are displayed. Assign it to a
module global variable, store it in a long-lived data structure, or save it as an attribute
of a long-lived class instance object as done by demoRadio. Just make sure you retain a
reference to it somehow. You normally will in order to fetch its state anyhow, so it’s
unlikely that you’ll ever care about what I’m about to tell you.
But in the current tkinter, variable classes have a __del__ destructor that automatically
unsets a generated Tk variable when the Python object is reclaimed (i.e., garbage col-
lected). The upshot is that all of your radio buttons may be deselected if the variable
object is collected, at least until the next press resets the Tk variable to a new value.
Example 8-29 shows one way to trigger this.
Example 8-29. PP4E\Gui\Tour\demo-radio-clear.py
# hold on to your radio variables (an obscure thing, indeed)
from tkinter import *
root = Tk()
def radio1(): # local vars are temporary
#global tmp # making it global fixes the problem
tmp = IntVar()
for i in range(10):
rad = Radiobutton(root, text=str(i), value=i, variable=tmp)
rad.pack(side=LEFT)
tmp.set(5) # select 6th button
radio1()
root.mainloop()
466 | Chapter 8: A tkinter Tour, Part 1

This should come up with button “5” selected initially, but it doesn’t. The variable
referenced by local tmp is reclaimed on function exit, the Tk variable is unset, and the 5
setting is lost (all buttons come up unselected). These radio buttons work fine, though,
once you start pressing them, because that resets the internal Tk variable. Uncomment-
ing the global statement here makes 5 start out set, as expected.
This phenomenon seems to have grown even worse in Python 3.X: not only is “5” not
selected initially, but moving the mouse cursor over the unselected buttons seems to
select many at random until one is pressed. (In 3.X we also need to initialize a String
Var shared by radio buttons as we did in this section’s earlier examples, or else its empty
string default selects all of them!)
Of course, this is an atypical example—as coded, there is no way to know which button
is pressed, because the variable isn’t saved (and command isn’t set). It makes little sense
to use a group of radio buttons at all if you cannot query its value later. In fact, this is
so obscure that I’ll just refer you to demo-radio-clear2.py in the book’s examples dis-
tribution for an example that works hard to trigger this oddity in other ways. You
probably won’t care, but you can’t say that I didn’t warn you if you ever do.
Scales (Sliders)
Scales (sometimes called “sliders”) are used to select among a range of numeric values.
Moving the scale’s position with mouse drags or clicks moves the widget’s value among
a range of integers and triggers Python callbacks if registered.
Like check buttons and radio buttons, scales have both a command option for registering
an event-driven callback handler to be run right away when the scale is moved, and a
variable option for associating a tkinter variable that allows the scale’s position to be
fetched and set at arbitrary times. You can process scale settings when they are made,
or let the user pick a setting for later use.
In addition, scales have a third processing option—get and set methods that scripts
may call to access scale values directly without associating variables. Because scale
command movement callbacks also get the current scale setting value as an argument, it’s
often enough just to provide a callback for this widget, without resorting to either linked
variables or get/set method calls.
To illustrate the basics, Example 8-30 makes two scales—one horizontal and one ver-
tical—and links them with an associated variable to keep them in sync.
Example 8-30. PP4E\Gui\Tour\demoScale.py
"create two linked scales used to launch dialog demos"
from tkinter import * # get base widget set
from dialogTable import demos # button callback handlers
from quitter import Quitter # attach a quit frame to me
Checkbutton, Radiobutton, and Scale | 467

class Demo(Frame):
def __init__(self, parent=None, **options):
Frame.__init__(self, parent, **options)
self.pack()
Label(self, text="Scale demos").pack()
self.var = IntVar()
Scale(self, label='Pick demo number',
command=self.onMove, # catch moves
variable=self.var, # reflects position
from_=0, to=len(demos)-1).pack()
Scale(self, label='Pick demo number',
command=self.onMove, # catch moves
variable=self.var, # reflects position
from_=0, to=len(demos)-1,
length=200, tickinterval=1,
showvalue=YES, orient='horizontal').pack()
Quitter(self).pack(side=RIGHT)
Button(self, text="Run demo", command=self.onRun).pack(side=LEFT)
Button(self, text="State", command=self.report).pack(side=RIGHT)
def onMove(self, value):
print('in onMove', value)
def onRun(self):
pos = self.var.get()
print('You picked', pos)
demo = list(demos.values())[pos] # map from position to value (3.X view)
print(demo()) # or demos[ list(demos.keys())[pos] ]()
def report(self):
print(self.var.get())
if __name__ == '__main__':
print(list(demos.keys()))
Demo().mainloop()
Besides value access and callback registration, scales have options tailored to the notion
of a range of selectable values, most of which are demonstrated in this example’s code:
• The label option provides text that appears along with the scale, length specifies
an initial size in pixels, and orient specifies an axis.
• The from_ and to options set the scale range’s minimum and maximum values (note
that from is a Python reserved word, but from_ is not).
• The tickinterval option sets the number of units between marks drawn at regular
intervals next to the scale (the default means no marks are drawn).
• The resolution option provides the number of units that the scale’s value jumps
on each drag or left mouse click event (defaults to 1).
• The showvalue option can be used to show or hide the scale’s current value next to
its slider bar (the default showvalue=YES means it is drawn).
468 | Chapter 8: A tkinter Tour, Part 1
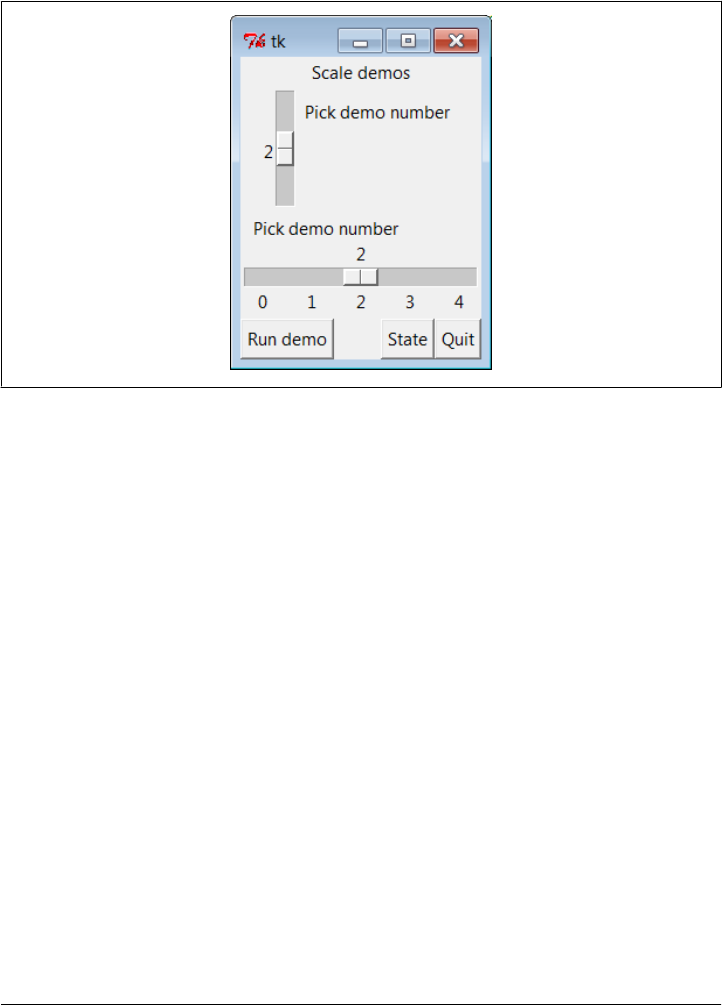
Note that scales are also packed in their container, just like other tkinter widgets. Let’s
see how these ideas translate in practice; Figure 8-30 shows the window you get if you
run this script live on Windows 7 (you get a similar one on Unix and Mac machines).
Figure 8-30. demoScale in action
For illustration purposes, this window’s State button shows the scales’ current values,
and “Run demo” runs a standard dialog call as before, using the integer value of the
scales to index the demos table. The script also registers a command handler that fires
every time either of the scales is moved and prints their new positions. Here is a set of
messages sent to stdout after a few moves, demo runs (italic), and state requests (bold):
C:\...\PP4E\Gui\Tour> python demoScale.py
['Color', 'Query', 'Input', 'Open', 'Error']
in onMove 0
in onMove 0
in onMove 1
1
in onMove 2
You picked 2
123.0
in onMove 3
3
You picked 3
C:/Users/mark/Stuff/Books/4E/PP4E/dev/Examples/PP4E/Launcher.py
Scales and variables
As you can probably tell, scales offer a variety of ways to process their selections: im-
mediately in move callbacks, or later by fetching current positions with variables or
scale method calls. In fact, tkinter variables aren’t needed to program scales at all—
Checkbutton, Radiobutton, and Scale | 469
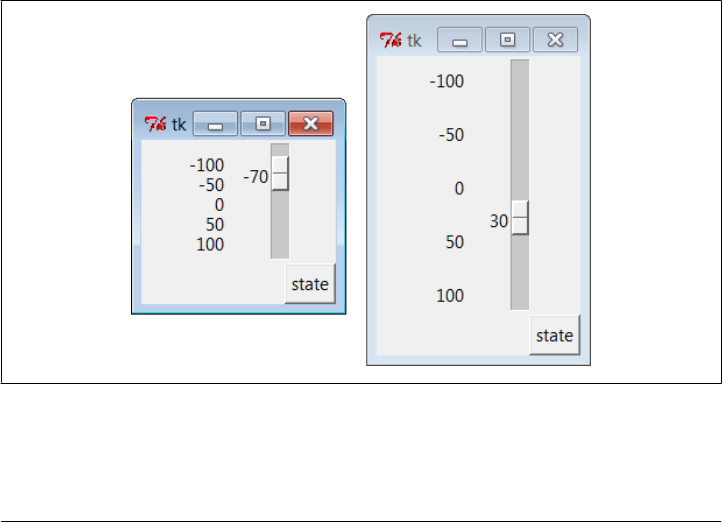
simply register movement callbacks or call the scale get method to fetch scale values
on demand, as in the simpler scale example in Example 8-31.
Example 8-31. PP4E\Gui\Tour\demo-scale-simple.py
from tkinter import *
root = Tk()
scl = Scale(root, from_=-100, to=100, tickinterval=50, resolution=10)
scl.pack(expand=YES, fill=Y)
def report():
print(scl.get())
Button(root, text='state', command=report).pack(side=RIGHT)
root.mainloop()
Figure 8-31 shows two instances of this program running on Windows—one stretched
and one not (the scales are packed to grow vertically on resizes). Its scale displays a
range from −100 to 100, uses the resolution option to adjust the current position up
or down by 10 on every move, and sets the tickinterval option to show values next to
the scale in increments of 50. When you press the State button in this script’s window,
it calls the scale’s get method to display the current setting, without variables or call-
backs of any kind:
C:\...\PP4E\Gui\Tour> python demo-scale-simple.py
0
60
-70
Figure 8-31. A simple scale without variables
Frankly, the only reason tkinter variables are used in the demoScale script at all is to
synchronize scales. To make the demo interesting, this script associates the same tkinter
470 | Chapter 8: A tkinter Tour, Part 1

variable object with both scales. As we learned in the last section, changing a widget
changes its variable, but changing a variable also changes all the widgets it is associated
with. In the world of sliders, moving the slide updates that variable, which in turn might
update other widgets associated with the same variable. Because this script links one
variable with two scales, it keeps them automatically in sync: moving one scale moves
the other, too, because the shared variable is changed in the process and so updates the
other scale as a side effect.
Linking scales like this may or may not be typical of your applications (and borders on
deep magic), but it’s a powerful tool once you get your mind around it. By linking
multiple widgets on a display with tkinter variables, you can keep them automatically
in sync, without making manual adjustments in callback handlers. On the other hand,
the synchronization could be implemented without a shared variable at all by calling
one scale’s set method from a move callback handler of the other. I’ll leave such a
manual mutation as a suggested exercise, though. One person’s deep magic might be
another’s useful hack.
Running GUI Code Three Ways
Now that we’ve built a handful of similar demo launcher programs, let’s write a few
top-level scripts to combine them. Because the demos were coded as both reusable
classes and scripts, they can be deployed as attached frame components, run in their
own top-level windows, and launched as standalone programs. All three options illus-
trate code reuse in action.
Attaching Frames
To illustrate hierarchical GUI composition on a grander scale than we’ve seen so far,
Example 8-32 arranges to show all four of the dialog launcher bar scripts of this chapter
in a single container. It reuses Examples 8-9, 8-22, 8-25, and 8-30.
Example 8-32. PP4E\Gui\Tour\demoAll-frm.py
"""
4 demo class components (subframes) on one window;
there are 5 Quitter buttons on this one window too, and each kills entire gui;
GUIs can be reused as frames in container, independent windows, or processes;
"""
from tkinter import *
from quitter import Quitter
demoModules = ['demoDlg', 'demoCheck', 'demoRadio', 'demoScale']
parts = []
def addComponents(root):
for demo in demoModules:
module = __import__(demo) # import by name string
part = module.Demo(root) # attach an instance
Running GUI Code Three Ways | 471
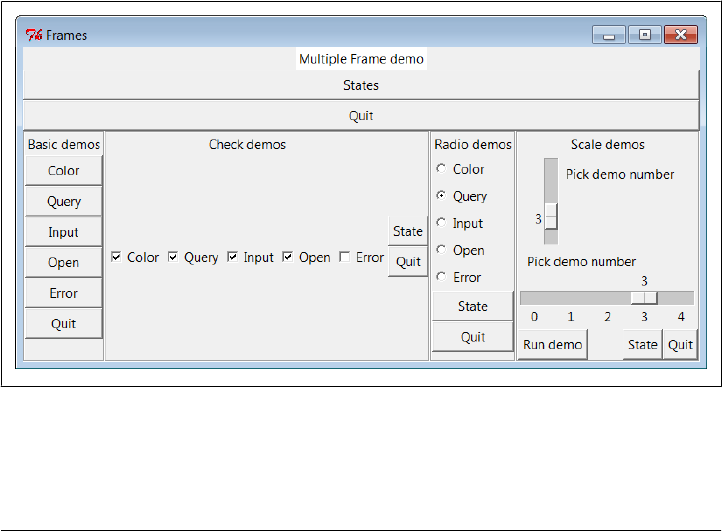
part.config(bd=2, relief=GROOVE) # or pass configs to Demo()
part.pack(side=LEFT, expand=YES, fill=BOTH) # grow, stretch with window
parts.append(part) # change list in-place
def dumpState():
for part in parts: # run demo report if any
print(part.__module__ + ':', end=' ')
if hasattr(part, 'report'):
part.report()
else:
print('none')
root = Tk() # make explicit root first
root.title('Frames')
Label(root, text='Multiple Frame demo', bg='white').pack()
Button(root, text='States', command=dumpState).pack(fill=X)
Quitter(root).pack(fill=X)
addComponents(root)
root.mainloop()
Because all four demo launcher bars are coded as frames which attach themselves to
parent container widgets, this is easier than you might think: simply pass the same
parent widget (here, the root window) to all four demo constructor calls, and repack
and configure the demo objects as desired. Figure 8-32 shows this script’s graphical
result—a single window embedding instances of all four of the dialog demo launcher
demos we saw earlier. As coded, all four embedded demos grow and stretch with the
window when resized (try taking out the expand=YES to keep their sizes more constant).
Figure 8-32. demoAll_frm: nested subframes
Naturally, this example is artificial, but it illustrates the power of composition when
applied to building larger GUI displays. If you pretend that each of the four attached
472 | Chapter 8: A tkinter Tour, Part 1

demo objects was something more useful, like a text editor, calculator, or clock, you’ll
better appreciate the point of this example.
Besides demo object frames, this composite window also contains no fewer than five
instances of the Quitter button we wrote earlier (all of which verify the request and any
one of which can end the GUI) and a States button to dump the current values of all
the embedded demo objects at once (it calls each object’s report method, if it has one).
Here is a sample of the sort of output that shows up in the stdout stream after interacting
with widgets on this display; States output is in bold:
C:\...\PP4E\Gui\Tour> python demoAll_frm.py
in onMove 0
in onMove 0
demoDlg: none
demoCheck: 0 0 0 0 0
demoRadio: Error
demoScale: 0
you pressed Input
result: 1.234
in onMove 1
demoDlg: none
demoCheck: 1 0 1 1 0
demoRadio: Input
demoScale: 1
you pressed Query
result: yes
in onMove 2
You picked 2
None
in onMove 3
You picked 3
C:/Users/mark/Stuff/Books/4E/PP4E/dev/Examples/PP4E/Launcher.py
3
Query
1 1 1 1 0
demoDlg: none
demoCheck: 1 1 1 1 0
demoRadio: Query
demoScale: 3
Importing by name string
The only substantially tricky part of this script is its use of Python’s built-in
__import__ function to import a module by a name string. Look at the following two
lines from the script’s addComponents function:
module = __import__(demo) # import module by name string
part = module.Demo(root) # attach an instance of its Demo
This is equivalent to saying something like this:
import 'demoDlg'
part = 'demoDlg'.Demo(root)
Running GUI Code Three Ways | 473

However, the preceding code is not legal Python syntax—the module name in import
statements and dot expressions must be a Python variable, not a string; moreover, in
an import the name is taken literally (not evaluated), and in dot syntax must evaluate
to the object (not its string name). To be generic, addComponents steps through a list of
name strings and relies on __import__ to import and return the module identified by
each string. In fact, the for loop containing these statements works as though all of
these statements were run:
import demoDlg, demoRadio, demoCheck, demoScale
part = demoDlg.Demo(root)
part = demoRadio.Demo(root)
part = demoCheck.Demo(root)
part = demoScale.Demo(root)
But because the script uses a list of name strings, it’s easier to change the set of demos
embedded—simply change the list, not the lines of executable code. Further, such data-
driven code tends to be more compact, less redundant, and easier to debug and main-
tain. Incidentally, modules can also be imported from name strings by dynamically
constructing and running import statements, like this:
for demo in demoModules:
exec('from %s import Demo' % demo) # make and run a from
part = eval('Demo')(root) # fetch known import name by string
The exec statement compiles and runs a Python statement string (here, a from to load
a module’s Demo class); it works here as if the statement string were pasted into the
source code where the exec statement appears. The following achieves the same effect
by running an import statement instead:
for demo in demoModules:
exec('import %s' % demo) # make and run an import
part = eval(demo).Demo(root) # fetch module variable by name too
Because it supports any sort of Python statement, these exec/eval techniques are more
general than the __import__ call, but can also be slower, since they must parse code
strings before running them.† However, that slowness may not matter in a GUI; users
tend to be significantly slower than parsers.
Configuring at construction time
One other alternative worth mentioning: notice how Example 8-32 configures and
repacks each attached demo frame for its role in this GUI:
def addComponents(root):
for demo in demoModules:
module = __import__(demo) # import by name string
part = module.Demo(root) # attach an instance
† As we’ll see later in this book, exec can also be dangerous if it is running code strings fetched from users or
network connections. That’s not an issue for the hardcoded strings used internally in this example.
474 | Chapter 8: A tkinter Tour, Part 1
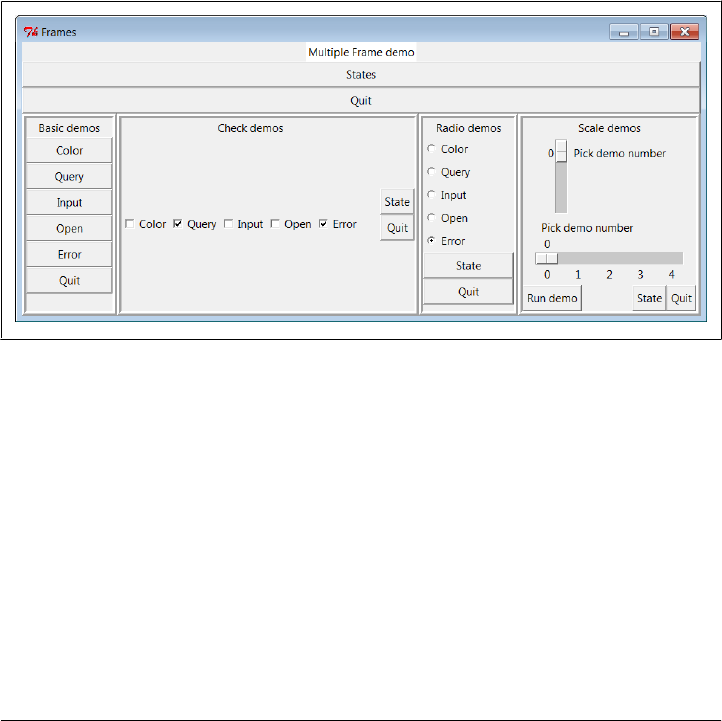
part.config(bd=2, relief=GROOVE) # or pass configs to Demo()
part.pack(side=LEFT, expand=YES, fill=BOTH) # grow, stretch with window
Because the demo classes use their **options arguments to support constructor argu-
ments, though, we could configure at creation time, too. For example, if we change
this code as follows, it produces the slightly different composite window captured in
Figure 8-33 (stretched a bit horizontally for illustration, too; you can run this as
demoAll-frm-ridge.py in the examples package):
def addComponents(root):
for demo in demoModules:
module = __import__(demo) # import by name string
part = module.Demo(root, bd=6, relief=RIDGE) # attach, config instance
part.pack(side=LEFT, expand=YES, fill=BOTH) # grow, stretch with window
Because the demo classes both subclass Frame and support the usual construction
argument protocols, they become true widgets—specialized tkinter frames that imple-
ment an attachable package of widgets and support flexible configuration techniques.
Figure 8-33. demoAll_frm: configure when constructed
As we saw in Chapter 7, attaching nested frames like this is really just one way to reuse
GUI code structured as classes. It’s just as easy to customize such interfaces by sub-
classing rather than embedding. Here, though, we’re more interested in deploying an
existing widget package than changing it, so attachment is the pattern we want. The
next two sections show two other ways to present such precoded widget packages to
users—in pop-up windows and as autonomous programs.
Running GUI Code Three Ways | 475

Independent Windows
Once you have a set of component classes coded as frames, any parent will work—
both other frames and brand-new, top-level windows. Example 8-33 attaches instances
of all four demo bar objects to their own independent Toplevel windows, instead of
the same container.
Example 8-33. PP4E\Gui\Tour\demoAll-win.py
"""
4 demo classes in independent top-level windows;
not processes: when one is quit all others go away, because all windows run in
the same process here; make Tk() first here, else we get blank default window
"""
from tkinter import *
demoModules = ['demoDlg', 'demoRadio', 'demoCheck', 'demoScale']
def makePopups(modnames):
demoObjects = []
for modname in modnames:
module = __import__(modname) # import by name string
window = Toplevel() # make a new window
demo = module.Demo(window) # parent is the new window
window.title(module.__name__)
demoObjects.append(demo)
return demoObjects
def allstates(demoObjects):
for obj in demoObjects:
if hasattr(obj, 'report'):
print(obj.__module__, end=' ')
obj.report()
root = Tk() # make explicit root first
root.title('Popups')
demos = makePopups(demoModules)
Label(root, text='Multiple Toplevel window demo', bg='white').pack()
Button(root, text='States', command=lambda: allstates(demos)).pack(fill=X)
root.mainloop()
We met the Toplevel class earlier; every instance generates a new window on your
screen. The net result is captured in Figure 8-34. Each demo runs in an independent
window of its own instead of being packed together in a single display.
476 | Chapter 8: A tkinter Tour, Part 1
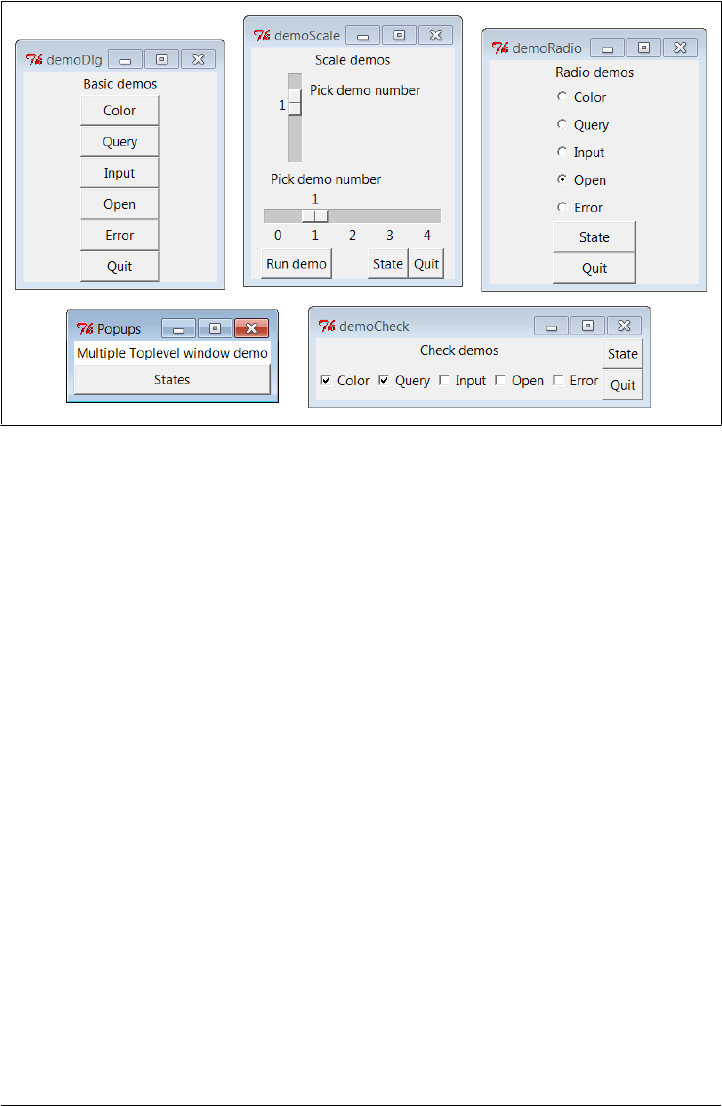
Figure 8-34. demoAll_win: new Toplevel windows
The main root window of this program appears in the lower left of this screenshot; it
provides a States button that runs the report method of each demo object, producing
this sort of stdout text:
C:\...\PP4E\Gui\Tour> python demoAll_win.py
in onMove 0
in onMove 0
in onMove 1
you pressed Open
result: C:/Users/mark/Stuff/Books/4E/PP4E/dev/Examples/PP4E/Launcher.py
demoRadio Open
demoCheck 1 1 0 0 0
demoScale 1
As we learned earlier in this chapter, Toplevel windows function independently, but
they are not really independent programs. Destroying just one of the demo windows
in Figure 8-34 by clicking the X button in its upper right corner closes just that window.
But quitting any of the windows shown in Figure 8-34—by a demo window’s Quit
buttons or the main window’s X—quits them all and ends the application, because all
run in the same program process. That’s OK in some applications, but not all. To go
truly rogue we need to spawn processes, as the next section shows.
Running GUI Code Three Ways | 477

Running Programs
To be more independent, Example 8-34 spawns each of the four demo launchers as
independent programs (processes), using the launchmodes module we wrote at the end
of Chapter 5. This works only because the demos were written as both importable
classes and runnable scripts. Launching them here makes all their names __main__ when
run, because they are separate, stand-alone programs; this in turn kicks off the main
loop call at the bottom of each of their files.
Example 8-34. PP4E\Gui\Tour\demoAll-prg.py
"""
4 demo classes run as independent program processes: command lines;
if one window is quit now, the others will live on; there is no simple way to
run all report calls here (though sockets and pipes could be used for IPC), and
some launch schemes may drop child program stdout and disconnect parent/child;
"""
from tkinter import *
from PP4E.launchmodes import PortableLauncher
demoModules = ['demoDlg', 'demoRadio', 'demoCheck', 'demoScale']
for demo in demoModules: # see Parallel System Tools
PortableLauncher(demo, demo + '.py')() # start as top-level programs
root = Tk()
root.title('Processes')
Label(root, text='Multiple program demo: command lines', bg='white').pack()
root.mainloop()
Make sure the PP4E directory’s container is on your module search path (e.g.,
PYTHONPATH) to run this; it imports an example module from a different directory.
As Figure 8-35 shows, the display generated by this script is similar to the prior one;
all four demos come up in windows of their own.
This time, though, these are truly independent programs: if any one of the five windows
here is quit, the others live on. The demos even outlive their parent, if the main window
is closed. On Windows, in fact, the shell window where this script is started becomes
active again when the main window is closed, even though the spawned demos con-
tinue running. We’re reusing the demo code as program, not module.
478 | Chapter 8: A tkinter Tour, Part 1
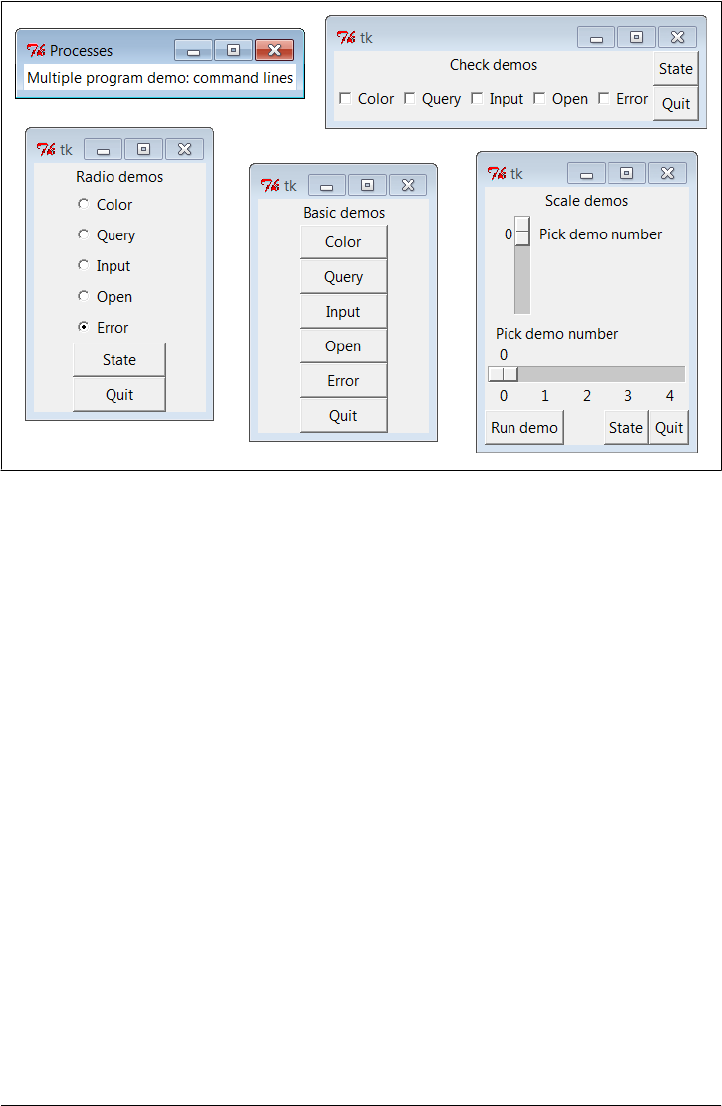
Figure 8-35. demoAll_prg: independent programs
Launching GUIs as programs other ways: multiprocessing
If you backtrack to Chapter 5 to study the portable launcher module used by Exam-
ple 8-34 to start programs, you’ll see that it works by using os.spawnv on Windows and
os.fork/exec on others. The net effect is that the GUI processes are effectively started
by launching command lines. These techniques work well, but as we learned in Chap-
ter 5, they are members of a larger set of program launching tools that also includes
os.popen, os.system, os.startfile, and the subprocess and multiprocessing modules;
these tools can vary subtly in how they handle shell window connections, parent
process exits, and more.
For example, the multiprocessing module we studied in Chapter 5 provides a similarly
portable way to run our GUIs as independent processes, as demonstrated in Exam-
ple 8-35. When run, it produces the exact same windows shown in Figure 8-35, except
that the label in the main window is different.
Example 8-35. PP4E\Gui\Tour\demoAll-prg-multi.py
"""
4 demo classes run as independent program processes: multiprocessing;
multiprocessing allows us to launch named functions with arguments,
but not lambdas, because they are not pickleable on Windows (Chapter 5);
multiprocessing also has its own IPC tools like pipes for communication;
"""
Running GUI Code Three Ways | 479

from tkinter import *
from multiprocessing import Process
demoModules = ['demoDlg', 'demoRadio', 'demoCheck', 'demoScale']
def runDemo(modname): # run in a new process
module = __import__(modname) # build gui from scratch
module.Demo().mainloop()
if __name__ == '__main__':
for modname in demoModules: # in __main__ only!
Process(target=runDemo, args=(modname,)).start()
root = Tk() # parent process GUI
root.title('Processes')
Label(root, text='Multiple program demo: multiprocessing', bg='white').pack()
root.mainloop()
Operationally, this version differs on Windows only in that:
• The child processes’ standard output shows up in the window where the script was
launched, including the outputs of both dialog demos themselves and all demo
windows’ State buttons.
• The script doesn’t truly exit if any children are still running: the shell where it is
launched is blocked if the main process’s window is closed while children are still
running, unless we set the child processes’ daemon flag to True before they start as
we saw in Chapter 5—in which case all child programs are automatically shut down
when their parent is (but parents may still outlive their children).
Also observe how we start a simple named function in the new Process. As we learned
in Chapter 5, the target must be pickleable on Windows (which essentially means im-
portable), so we cannot use lambdas to pass extra data in the way we typically could
in tkinter callbacks. The following coding alternatives both fail with errors on
Windows:
Process(target=(lambda: runDemo(modname))).start() # these both fail!
Process(target=(lambda: __import__(modname).Demo().mainloop())).start()
We won’t recode our GUI program launcher script with any of the other techniques
available, but feel free to experiment on your own using Chapter 5 as a resource. Al-
though not universally applicable, the whole point of tools like the PortableLauncher
class is to hide such details so we can largely forget them.
Cross-program communication
Spawning GUIs as programs is the ultimate in code independence, but it makes the
lines of communication between components more complex. For instance, because the
demos run as programs here, there is no easy way to run all their report methods from
the launching script’s window pictured in the upper right of Figure 8-35. In fact, the
480 | Chapter 8: A tkinter Tour, Part 1

States button is gone this time, and we only get PortableLauncher messages in stdout
as the demos start up in Example 8-34:
C:\...\PP4E\Gui\Tour> python demoAll_prg.py
demoDlg
demoRadio
demoCheck
demoScale
On some platforms, messages printed by the demo programs (including their own State
buttons) may show up in the original console window where this script is launched;
on Windows, the os.spawnv call used to start programs by launchmodes in Exam-
ple 8-34 completely disconnects the child program’s stdout stream from its parent, but
the multiprocessing scheme of Example 8-35 does not. Regardless, there is no direct
way to call all demos’ report methods at once—they are spawned programs in distinct
address spaces, not imported modules.
Of course, we could trigger report methods in the spawned programs with some of the
Inter-Process Communication (IPC) mechanisms we met in Chapter 5. For instance:
• The demos could be instrumented to catch a user signal, and could run their
report in response.
• The demos could also watch for request strings sent by the launching program to
show up in pipes or fifos; the demoAll launching program would essentially act as
a client, and the demo GUIs as servers that respond to client requests.
• Independent programs can also converse this same way over sockets, the general
IPC tool introduced in Chapter 5, which we’ll study in depth in Part IV. The main
window might send a report request and receive its result on the same socket (and
might even contact demos running remotely).
• If used, the multiprocessing module has IPC tools all its own, such as the object
pipes and queues we studied in Chapter 5, that could also be leveraged: demos
might listen on this type of pipe, too.
Given their event-driven nature, GUI-based programs like our demos also need to avoid
becoming stuck in wait states—they cannot be blocked while waiting for requests on
IPC devices like those above, or they won’t be responsive to users (and might not even
redraw themselves). Because of that, they may also have be augmented with threads,
timer-event callbacks, nonblocking input calls, or some combination of such techni-
ques to periodically check for incoming messages on pipes, fifos, or sockets. As we’ll
see, the tkinter after method call described near the end of the next chapter is ideal for
this: it allows us to register a callback to run periodically to check for incoming requests
on such IPC tools.
We’ll explore some of these options near the end of Chapter 10, after we’ve looked at
GUI threading topics. But since this is well beyond the scope of the current chapter’s
simple demo programs, I’ll leave such cross-program extensions up to more parallel-
minded readers for now.
Running GUI Code Three Ways | 481

Coding for reusability
A postscript: I coded the demo launcher bars deployed by the last four examples to
demonstrate all the different ways that their widgets can be used. They were not de-
veloped with general-purpose reusability in mind; in fact, they’re not really useful out-
side the context of introducing widgets in this book.
That was by design; most tkinter widgets are easy to use once you learn their interfaces,
and tkinter already provides lots of configuration flexibility by itself. But if I had it in
mind to code checkbutton and radiobutton classes to be reused as general library com-
ponents, they would have to be structured differently:
Extra widgets
They would not display anything but radio buttons and check buttons. As is, the
demos each embed State and Quit buttons for illustration, but there really should
be just one Quit per top-level window.
Geometry management
They would allow for different button arrangements and would not pack (or grid)
themselves at all. In a true general-purpose reuse scenario, it’s often better to leave
a component’s geometry management up to its caller.
Usage mode limitations
They would either have to export complex interfaces to support all possible tkinter
configuration options and modes, or make some limiting decisions that support
one common use only. For instance, these buttons can either run callbacks at press
time or provide their state later in the application.
Example 8-36 shows one way to code check button and radio button bars as library
components. It encapsulates the notion of associating tkinter variables and imposes a
common usage mode on callers—state fetches rather than press callbacks—to keep the
interface simple.
Example 8-36. PP4E\Gui\Tour\buttonbars.py
"""
check and radio button bar classes for apps that fetch state later;
pass a list of options, call state(), variable details automated
"""
from tkinter import *
class Checkbar(Frame):
def __init__(self, parent=None, picks=[], side=LEFT, anchor=W):
Frame.__init__(self, parent)
self.vars = []
for pick in picks:
var = IntVar()
chk = Checkbutton(self, text=pick, variable=var)
chk.pack(side=side, anchor=anchor, expand=YES)
self.vars.append(var)
def state(self):
482 | Chapter 8: A tkinter Tour, Part 1
return [var.get() for var in self.vars]
class Radiobar(Frame):
def __init__(self, parent=None, picks=[], side=LEFT, anchor=W):
Frame.__init__(self, parent)
self.var = StringVar()
self.var.set(picks[0])
for pick in picks:
rad = Radiobutton(self, text=pick, value=pick, variable=self.var)
rad.pack(side=side, anchor=anchor, expand=YES)
def state(self):
return self.var.get()
if __name__ == '__main__':
root = Tk()
lng = Checkbar(root, ['Python', 'C#', 'Java', 'C++'])
gui = Radiobar(root, ['win', 'x11', 'mac'], side=TOP, anchor=NW)
tgl = Checkbar(root, ['All'])
gui.pack(side=LEFT, fill=Y)
lng.pack(side=TOP, fill=X)
tgl.pack(side=LEFT)
lng.config(relief=GROOVE, bd=2)
gui.config(relief=RIDGE, bd=2)
def allstates():
print(gui.state(), lng.state(), tgl.state())
from quitter import Quitter
Quitter(root).pack(side=RIGHT)
Button(root, text='Peek', command=allstates).pack(side=RIGHT)
root.mainloop()
To reuse these classes in your scripts, import and call them with a list of the options
that you want to appear in a bar of check buttons or radio buttons. This module’s self-
test code at the bottom of the file gives further usage details. It generates Figure 8-36—
a top-level window that embeds two Checkbars, one Radiobar, a Quitter button to exit,
and a Peek button to show bar states—when this file is run as a program instead of
being imported.
Figure 8-36. buttonbars self-test window
Running GUI Code Three Ways | 483

Here’s the stdout text you get after pressing Peek—the results of these classes’ state
methods:
x11 [1, 0, 1, 1] [0]
win [1, 0, 0, 1] [1]
The two classes in this module demonstrate how easy it is to wrap tkinter interfaces to
make them easier to use; they completely abstract away many of the tricky parts of
radio button and check button bars. For instance, you can forget about linked variable
details completely if you use such higher-level classes instead—simply make objects
with option lists and call their state methods later. If you follow this path to its logical
conclusion, you might just wind up with a higher-level widget library on the order of
the Pmw package mentioned in Chapter 7.
On the other hand, these classes are still not universally applicable; if you need to run
actions when these buttons are pressed, for instance, you’ll need to use other high-level
interfaces. Luckily, Python/tkinter already provides plenty. Later in this book, we’ll
again use the widget combination and reuse techniques introduced in this section to
construct larger GUIs like text editors, email clients and calculators. For now, this first
chapter in the widget tour is about to make one last stop—the photo shop.
Images
In tkinter, graphical images are displayed by creating independent PhotoImage or
BitmapImage objects, and then attaching those image objects to other widgets via
image attribute settings. Buttons, labels, canvases, text, and menus can display images
by associating prebuilt image objects in this way. To illustrate, Example 8-37 throws a
picture up on a button.
Example 8-37. PP4E\Gui\Tour\imgButton.py
gifdir = "../gifs/"
from tkinter import *
win = Tk()
igm = PhotoImage(file=gifdir + "ora-pp.gif")
Button(win, image=igm).pack()
win.mainloop()
I could try to come up with a simpler example, but it would be tough—all this script
does is make a tkinter PhotoImage object for a GIF file stored in another directory, and
associate it with a Button widget’s image option. The result is captured in Figure 8-37.
484 | Chapter 8: A tkinter Tour, Part 1

Figure 8-37. imgButton in action
PhotoImage and its cousin, BitmapImage, essentially load graphics files and allow those
graphics to be attached to other kinds of widgets. To open a picture file, pass its name
to the file attribute of these image objects. Though simple, attaching images to buttons
this way has many uses; in Chapter 9, for instance, we’ll use this basic idea to implement
toolbar buttons at the bottom of a window.
Canvas widgets—general drawing surfaces covered in more detail in the next chapter—
can display pictures too. Though this is a bit of a preview for the upcoming chapter,
basic canvas usage is straightforward enough to demonstrate here; Example 8-38 ren-
ders Figure 8-38 (shrunk here for display):
Example 8-38. PP4E\Gui\Tour\imgCanvas.py
gifdir = "../gifs/"
from tkinter import *
win = Tk()
img = PhotoImage(file=gifdir + "ora-lp4e.gif")
can = Canvas(win)
can.pack(fill=BOTH)
can.create_image(2, 2, image=img, anchor=NW) # x, y coordinates
win.mainloop()
Buttons are automatically sized to fit an associated photo, but canvases are not (because
you can add objects to a canvas later, as we’ll see in Chapter 9). To make a canvas fit
the picture, size it according to the width and height methods of image objects, as in
Example 8-39. This version will make the canvas smaller or larger than its default size
as needed, lets you pass in a photo file’s name on the command line, and can be used
as a simple image viewer utility. The visual effect of this script is captured in Figure 8-39.
Images | 485
Example 8-39. PP4E\Gui\Tour\imgCanvas2.py
gifdir = "../gifs/"
from sys import argv
from tkinter import *
filename = argv[1] if len(argv) > 1 else 'ora-lp4e.gif' # name on cmdline?
win = Tk()
img = PhotoImage(file=gifdir + filename)
can = Canvas(win)
can.pack(fill=BOTH)
can.config(width=img.width(), height=img.height()) # size to img size
can.create_image(2, 2, image=img, anchor=NW)
win.mainloop()
Figure 8-38. An image on canvas
Figure 8-39. Sizing the canvas to match the photo
486 | Chapter 8: A tkinter Tour, Part 1

Run this script with other filenames to view other images (try this on your own):
C:\...\PP4E\Gui\Tour> imgCanvas2.py ora-ppr-german.gif
And that’s all there is to it. In Chapter 9, we’ll see images show up again in the items
of a Menu, in the buttons of a window’s toolbar, in other Canvas examples, and in the
image-friendly Text widget. In later chapters, we’ll find them in an image slideshow
(PyView), in a paint program (PyDraw), on clocks (PyClock), in a generalized photo
viewer (PyPhoto), and so on. It’s easy to add graphics to GUIs in Python/tkinter.
Once you start using photos in earnest, though, you’re likely to run into two tricky bits
that I want to warn you about here:
Supported file types
At present, the standard tkinter PhotoImage widget supports only GIF, PPM, and
PGM graphic file formats, and BitmapImage supports X Windows-style .xbm bitmap
files. This may be expanded in future releases, and you can convert photos in other
formats to these supported formats ahead of time, of course. But as we’ll see later
in this chapter, it’s easy to support additional image types with the PIL open source
extension toolkit and its PhotoImage replacement.
Hold on to your images!
Unlike all other tkinter widgets, an image is utterly lost if the corresponding Python
image object is garbage collected. That means you must retain an explicit reference
to image objects for as long as your program needs them (e.g., assign them to a
long-lived variable name, object attribute, or data structure component). Python
does not automatically keep a reference to the image, even if it is linked to other
GUI components for display. Moreover, image destructor methods erase the image
from memory. We saw earlier that tkinter variables can behave oddly when re-
claimed, too (they may be unset), but the effect is much worse and more likely to
happen with images. This may change in future Python releases, though there are
good reasons for not retaining big image files in memory indefinitely; for now,
though, images are a “use it or lose it” widget.
Fun with Buttons and Pictures
I tried to come up with an image demo for this section that was both fun and useful. I
settled for the fun part. Example 8-40 displays a button that changes its image at ran-
dom each time it is pressed.
Example 8-40. PP4E\Gui\Tour\buttonpics-func.py
from tkinter import * # get base widget set
from glob import glob # filename expansion list
import demoCheck # attach checkbutton demo to me
import random # pick a picture at random
gifdir = '../gifs/' # where to look for GIF files
Images | 487

def draw():
name, photo = random.choice(images)
lbl.config(text=name)
pix.config(image=photo)
root=Tk()
lbl = Label(root, text="none", bg='blue', fg='red')
pix = Button(root, text="Press me", command=draw, bg='white')
lbl.pack(fill=BOTH)
pix.pack(pady=10)
demoCheck.Demo(root, relief=SUNKEN, bd=2).pack(fill=BOTH)
files = glob(gifdir + "*.gif") # GIFs for now
images = [(x, PhotoImage(file=x)) for x in files] # load and hold
print(files)
root.mainloop()
This code uses a handful of built-in tools from the Python library:
• The Python glob module we first met in Chapter 4 gives a list of all files ending
in .gif in a directory; in other words, all GIF files stored there.
• The Python random module is used to select a random GIF from files in the directory:
random.choice picks and returns an item from a list at random.
• To change the image displayed (and the GIF file’s name in a label at the top of the
window), the script simply calls the widget config method with new option set-
tings; changing on the fly like this changes the widget’s display dynamically.
Just for fun, this script also attaches an instance of the demoCheck check button demo
bar from Example 8-22, which in turn attaches an instance of the Quitter button we
wrote earlier in Example 8-7. This is an artificial example, of course, but it again dem-
onstrates the power of component class attachment at work.
Notice how this script builds and holds on to all images in its images list. The list
comprehension here applies a PhotoImage constructor call to every .gif file in the photo
directory, producing a list of (filename, imageobject) tuples that is saved in a global
variable (a map call using a one-argument lambda function could do the same). Remem-
ber, this guarantees that image objects won’t be garbage collected as long as the pro-
gram is running. Figure 8-40 shows this script in action on Windows.
Although it may not be obvious in this grayscale book, the name of the GIF file being
displayed is shown in red text in the blue label at the top of this window. This program’s
window grows and shrinks automatically when larger and smaller GIF files are dis-
played; Figure 8-41 shows it randomly picking a taller photo globbed from the image
directory.
488 | Chapter 8: A tkinter Tour, Part 1
Figure 8-40. buttonpics in action
Figure 8-41. buttonpics showing a taller photo
Images | 489

And finally, Figure 8-42 captures this script’s GUI displaying one of the wider GIFs,
selected completely at random from the photo file directory.‡
Figure 8-42. buttonpics gets political
While we’re playing, let’s recode this script as a class in case we ever want to attach or
customize it later (it could happen, especially in more realistic programs). It’s mostly
a matter of indenting and adding self before global variable names, as shown in
Example 8-41.
Example 8-41. PP4E\Gui\Tour\buttonpics.py
from tkinter import * # get base widget set
from glob import glob # filename expansion list
import demoCheck # attach check button example to me
import random # pick a picture at random
gifdir = '../gifs/' # default dir to load GIF files
class ButtonPicsDemo(Frame):
def __init__(self, gifdir=gifdir, parent=None):
Frame.__init__(self, parent)
self.pack()
self.lbl = Label(self, text="none", bg='blue', fg='red')
self.pix = Button(self, text="Press me", command=self.draw, bg='white')
self.lbl.pack(fill=BOTH)
self.pix.pack(pady=10)
demoCheck.Demo(self, relief=SUNKEN, bd=2).pack(fill=BOTH)
files = glob(gifdir + "*.gif")
self.images = [(x, PhotoImage(file=x)) for x in files]
print(files)
def draw(self):
name, photo = random.choice(self.images)
‡ This particular image is not my creation; it appeared as a banner ad on developer-related websites such as
Slashdot when the book Learning Python was first published in 1999. It generated enough of a backlash from
Perl zealots that O’Reilly eventually pulled the ad altogether. Which may be why, of course, it later appeared
in this book.
490 | Chapter 8: A tkinter Tour, Part 1

self.lbl.config(text=name)
self.pix.config(image=photo)
if __name__ == '__main__': ButtonPicsDemo().mainloop()
This version works the same way as the original, but it can now be attached to any
other GUI where you would like to include such an unreasonably silly button.
Viewing and Processing Images with PIL
As mentioned earlier, Python tkinter scripts show images by associating independently
created image objects with real widget objects. At this writing, tkinter GUIs can display
photo image files in GIF, PPM, and PGM formats by creating a PhotoImage object, as
well as X11-style bitmap files (usually suffixed with an .xbm extension) by creating a
BitmapImage object.
This set of supported file formats is limited by the underlying Tk library, not by tkinter
itself, and may expand in the future (it has not in many years). But if you want to display
files in other formats today (e.g., the popular JPEG format), you can either convert your
files to one of the supported formats with an image-processing program or install the
PIL Python extension package mentioned at the start of Chapter 7.
PIL, the Python Imaging Library, is an open source system that supports nearly 30
graphics file formats (including GIF, JPEG, TIFF, PNG, and BMP). In addition to al-
lowing your scripts to display a much wider variety of image types than standard tkinter,
PIL also provides tools for image processing, including geometric transforms, thumb-
nail creation, format conversions, and much more.
PIL Basics
To use its tools, you must first fetch and install the PIL package: see http://www.py
thonware.com (or search for “PIL” on the web). Then, simply use special PhotoImage
and BitmapImage objects imported from the PIL ImageTk module to open files in other
graphic formats. These are compatible replacements for the standard tkinter classes of
the same name, and they may be used anywhere tkinter expects a PhotoImage or
BitmapImage object (i.e., in label, button, canvas, text, and menu object configurations).
That is, replace standard tkinter code such as this:
from tkinter import *
imgobj = PhotoImage(file=imgdir + "spam.gif")
Button(image=imgobj).pack()
Viewing and Processing Images with PIL | 491

with code of this form:
from tkinter import *
from PIL import ImageTk
photoimg = ImageTk.PhotoImage(file=imgdir + "spam.jpg")
Button(image=photoimg).pack()
or with the more verbose equivalent, which comes in handy if you will perform image
processing in addition to image display:
from tkinter import *
from PIL import Image, ImageTk
imageobj = Image.open(imgdir + "spam.jpeg")
photoimg = ImageTk.PhotoImage(imageobj)
Button(image=photoimg).pack()
In fact, to use PIL for image display, all you really need to do is install it and add a single
from statement to your code to get its replacement PhotoImage object after loading the
original from tkinter. The rest of your code remains unchanged but will be able to
display JPEG, PNG, and other image types:
from tkinter import *
from PIL.ImageTk import PhotoImage # <== add this line
imgobj = PhotoImage(file=imgdir + "spam.png")
Button(image=imgobj).pack()
PIL installation details vary per platform; on Windows, it is just a matter of down-
loading and running a self-installer. PIL code winds up in the Python install directory’s
Lib\site-packages; because this is automatically added to the module import search
path, no path configuration is required to use PIL. Simply run the installer and import
the PIL package’s modules. On other platforms, you might untar or unZIP a fetched
source code archive and add PIL directories to the front of your PYTHONPATH setting; see
the PIL system’s website for more details. (In fact, I am using a pre-release version of
PIL for Python 3.1 in this edition; it should be officially released by the time you read
these words.)
There is much more to PIL than we have space to cover here. For instance, it also
provides image conversion, resizing, and transformation tools, some of which can be
run as command-line programs that have nothing to do with GUIs directly. Especially
for tkinter-based programs that display or process images, PIL will likely become a
standard component in your software tool set.
See http://www.pythonware.com for more information, as well as online PIL and tkinter
documentation sets. To help get you started, though, we’ll close out this chapter with
a handful of real scripts that use PIL for image display and processing.
492 | Chapter 8: A tkinter Tour, Part 1

Displaying Other Image Types with PIL
In our earlier image examples, we attached widgets to buttons and canvases, but the
standard tkinter toolkit allows images to be added to a variety of widget types, including
simple labels, text, and menu entries. Example 8-42, for instance, uses unadorned
tkinter to display a single image by attaching it to a label, in the main application win-
dow. The example assumes that images are stored in an images subdirectory, and it
allows the image filename to be passed in as a command-line argument (it defaults to
spam.gif if no argument is passed). It also joins file and directory names more portably
with os.path.join, and it prints the image’s height and width in pixels to the standard
output stream, just to give extra information.
Example 8-42. PP4E\Gui\PIL\viewer-tk.py
"""
show one image with standard tkinter photo object;
as is this handles GIF files, but not JPEG images; image filename listed in
command line, or default; use a Canvas instead of Label for scrolling, etc.
"""
import os, sys
from tkinter import * # use standard tkinter photo object
# GIF works, but JPEG requires PIL
imgdir = 'images'
imgfile = 'london-2010.gif'
if len(sys.argv) > 1: # cmdline argument given?
imgfile = sys.argv[1]
imgpath = os.path.join(imgdir, imgfile)
win = Tk()
win.title(imgfile)
imgobj = PhotoImage(file=imgpath) # display photo on a Label
Label(win, image=imgobj).pack()
print(imgobj.width(), imgobj.height()) # show size in pixels before destroyed
win.mainloop()
Figure 8-43 captures this script’s display on Windows 7, showing the default GIF image
file. Run this from the system console with a filename as a command-line argument to
view other files in the images subdirectory (e.g., python viewer_tk.py filename.gif).
Viewing and Processing Images with PIL | 493

Figure 8-43. tkinter GIF display
Example 8-42 works, but only for image types supported by the base tkinter toolkit.
To display other image formats, such as JPEG, we need to install PIL and use its re-
placement PhotoImage object. In terms of code, it’s simply a matter of adding one import
statement, as illustrated in Example 8-43.
Example 8-43. PP4E\Gui\PIL\viewer-pil.py
"""
show one image with PIL photo replacement object
handles many more image types; install PIL first: placed in Lib\site-packages
"""
import os, sys
from tkinter import *
from PIL.ImageTk import PhotoImage # <== use PIL replacement class
# rest of code unchanged
imgdir = 'images'
imgfile = 'florida-2009-1.jpg' # does gif, jpg, png, tiff, etc.
if len(sys.argv) > 1:
imgfile = sys.argv[1]
imgpath = os.path.join(imgdir, imgfile)
win = Tk()
win.title(imgfile)
imgobj = PhotoImage(file=imgpath) # now JPEGs work!
Label(win, image=imgobj).pack()
494 | Chapter 8: A tkinter Tour, Part 1

win.mainloop()
print(imgobj.width(), imgobj.height()) # show size in pixels on exit
With PIL, our script is now able to display many image types, including the default
JPEG image defined in the script and captured in Figure 8-44. Again, run with a
command-line argument to view other photos.
Figure 8-44. tkinter+PIL JPEG display
Displaying all images in a directory
While we’re at it, it’s not much extra work to allow viewing all images in a directory,
using some of the directory path tools we met in the first part of this book.
Example 8-44, for instance, simply opens a new Toplevel pop-up window for each
image in a directory (given as a command-line argument or a default), taking care to
skip nonimage files by catching exceptions—error messages are both printed and dis-
played in the bad file’s pop-up window.
Example 8-44. PP4E\Gui\PIL\viewer-dir.py
"""
display all images in a directory in pop-up windows
GIFs work in basic tkinter, but JPEGs will be skipped without PIL
"""
Viewing and Processing Images with PIL | 495

import os, sys
from tkinter import *
from PIL.ImageTk import PhotoImage # <== required for JPEGs and others
imgdir = 'images'
if len(sys.argv) > 1: imgdir = sys.argv[1]
imgfiles = os.listdir(imgdir) # does not include directory prefix
main = Tk()
main.title('Viewer')
quit = Button(main, text='Quit all', command=main.quit, font=('courier', 25))
quit.pack()
savephotos = []
for imgfile in imgfiles:
imgpath = os.path.join(imgdir, imgfile)
win = Toplevel()
win.title(imgfile)
try:
imgobj = PhotoImage(file=imgpath)
Label(win, image=imgobj).pack()
print(imgpath, imgobj.width(), imgobj.height()) # size in pixels
savephotos.append(imgobj) # keep a reference
except:
errmsg = 'skipping %s\n%s' % (imgfile, sys.exc_info()[1])
Label(win, text=errmsg).pack()
main.mainloop()
Run this code on your own to see the windows it generates. If you do, you’ll get one
main window with a Quit button to kill all the windows at once, plus as many pop-up
image view windows as there are images in the directory. This is convenient for a quick
look, but not exactly the epitome of user friendliness for large directories! The sample
images directory used for testing, for instance, has 59 images, yielding 60 pop-up win-
dows; those created by your digital camera may have many more. To do better, let’s
move on to the next section.
Creating Image Thumbnails with PIL
As mentioned, PIL does more than display images in a GUI; it also comes with tools
for resizing, converting, and more. One of the many useful tools it provides is the ability
to generate small, “thumbnail” images from originals. Such thumbnails may be dis-
played in a web page or selection GUI to allow the user to open full-size images on
demand.
Example 8-45 is a concrete implementation of this idea—it generates thumbnail images
using PIL and displays them on buttons which open the corresponding original image
when clicked. The net effect is much like the file explorer GUIs that are now standard
on modern operating systems, but by coding this in Python, we’re able to control its
behavior and to reuse and customize its code in our own applications. In fact, we’ll
496 | Chapter 8: A tkinter Tour, Part 1

reuse the makeThumbs function here repeatedly in other examples. As usual, these are
some of the primary benefits inherent in open source software in general.
Example 8-45. PP4E\Gui\PIL\viewer_thumbs.py
"""
display all images in a directory as thumbnail image buttons that display
the full image when clicked; requires PIL for JPEGs and thumbnail image
creation; to do: add scrolling if too many thumbs for window!
"""
import os, sys, math
from tkinter import *
from PIL import Image # <== required for thumbs
from PIL.ImageTk import PhotoImage # <== required for JPEG display
def makeThumbs(imgdir, size=(100, 100), subdir='thumbs'):
"""
get thumbnail images for all images in a directory; for each image, create
and save a new thumb, or load and return an existing thumb; makes thumb
dir if needed; returns a list of (image filename, thumb image object);
caller can also run listdir on thumb dir to load; on bad file types may
raise IOError, or other; caveat: could also check file timestamps;
"""
thumbdir = os.path.join(imgdir, subdir)
if not os.path.exists(thumbdir):
os.mkdir(thumbdir)
thumbs = []
for imgfile in os.listdir(imgdir):
thumbpath = os.path.join(thumbdir, imgfile)
if os.path.exists(thumbpath):
thumbobj = Image.open(thumbpath) # use already created
thumbs.append((imgfile, thumbobj))
else:
print('making', thumbpath)
imgpath = os.path.join(imgdir, imgfile)
try:
imgobj = Image.open(imgpath) # make new thumb
imgobj.thumbnail(size, Image.ANTIALIAS) # best downsize filter
imgobj.save(thumbpath) # type via ext or passed
thumbs.append((imgfile, imgobj))
except: # not always IOError
print("Skipping: ", imgpath)
return thumbs
class ViewOne(Toplevel):
"""
open a single image in a pop-up window when created; photoimage
object must be saved: images are erased if object is reclaimed;
"""
def __init__(self, imgdir, imgfile):
Toplevel.__init__(self)
self.title(imgfile)
imgpath = os.path.join(imgdir, imgfile)
Viewing and Processing Images with PIL | 497

imgobj = PhotoImage(file=imgpath)
Label(self, image=imgobj).pack()
print(imgpath, imgobj.width(), imgobj.height()) # size in pixels
self.savephoto = imgobj # keep reference on me
def viewer(imgdir, kind=Toplevel, cols=None):
"""
make thumb links window for an image directory: one thumb button per image;
use kind=Tk to show in main app window, or Frame container (pack); imgfile
differs per loop: must save with a default; photoimage objs must be saved:
erased if reclaimed; packed row frames (versus grids, fixed-sizes, canvas);
"""
win = kind()
win.title('Viewer: ' + imgdir)
quit = Button(win, text='Quit', command=win.quit, bg='beige') # pack first
quit.pack(fill=X, side=BOTTOM) # so clip last
thumbs = makeThumbs(imgdir)
if not cols:
cols = int(math.ceil(math.sqrt(len(thumbs)))) # fixed or N x N
savephotos = []
while thumbs:
thumbsrow, thumbs = thumbs[:cols], thumbs[cols:]
row = Frame(win)
row.pack(fill=BOTH)
for (imgfile, imgobj) in thumbsrow:
photo = PhotoImage(imgobj)
link = Button(row, image=photo)
handler = lambda savefile=imgfile: ViewOne(imgdir, savefile)
link.config(command=handler)
link.pack(side=LEFT, expand=YES)
savephotos.append(photo)
return win, savephotos
if __name__ == '__main__':
imgdir = (len(sys.argv) > 1 and sys.argv[1]) or 'images'
main, save = viewer(imgdir, kind=Tk)
main.mainloop()
Notice how this code’s viewer must pass in the imgfile to the generated callback han-
dler with a default argument; because imgfile is a loop variable, all callbacks will have
its final loop iteration value if its current value is not saved this way (all buttons would
open the same image!). Also notice we keep a list of references to the photo image
objects; photos are erased when their object is garbage collected, even if they are cur-
rently being displayed. To avoid this, we generate references in a long-lived list.
Figure 8-45 shows the main thumbnail selection window generated by Example 8-45
when viewing the default images subdirectory in the examples source tree (resized here
for display). As in the previous examples, you can pass in an optional directory name
to run the viewer on a directory of your own (for instance, one copied from your digital
camera). Clicking a thumbnail button in the main window opens a corresponding im-
age in a pop-up window; Figure 8-46 captures one.
498 | Chapter 8: A tkinter Tour, Part 1
Figure 8-45. Simple thumbnail selection GUI, simple row frames
Figure 8-46. Thumbnail viewer pop-up image window
Viewing and Processing Images with PIL | 499

Much of Example 8-45’s code should be straightforward by now. It lays out thumbnail
buttons in row frames, much like prior examples (see the input forms layout alternatives
earlier in this chapter). Most of the PIL-specific code in this example is in the make
Thumbs function. It opens, creates, and saves the thumbnail image, unless one has al-
ready been saved (i.e., cached) to a local file. As coded, thumbnail images are saved in
the same image format as the original full-size photo.
We also use the PIL ANTIALIAS filter—the best quality for down-sampling (shrinking);
this does a better job on low-resolution GIFs. Thumbnail generation is essentially just
an in-place resize that preserves the original aspect ratio. Because there is more to this
story than we can cover here, though, I’ll defer to PIL and its documentation for more
details on that package’s API.
We’ll revisit thumbnail creation again briefly in the next chapter to create toolbar but-
tons. Before we move on, though, three variations on the thumbnail viewer are worth
quick consideration—the first underscores performance concepts and the others have
to do with improving on the arguably odd layout of Figure 8-45.
Performance: Saving thumbnail files
As is, the viewer saves the generated thumbnail image in a file, so it can be loaded
quickly the next time the script is run. This isn’t strictly required—Example 8-46, for
instance, customizes the thumbnail generation function to generate the thumbnail im-
ages in memory, but never save them.
There is no noticeable speed difference for very small image collections. If you run these
alternatives on larger image collections, though, you’ll notice that the original version
in Example 8-45 gains a big performance advantage by saving and loading the thumb-
nails to files. On one test with many large image files on my machine (some 320 images
from a digital camera memory stick and an admittedly underpowered laptop), the
original version opens the GUI in roughly just 5 seconds after its initial run to cache
thumbnails, compared to as much as 1 minute and 20 seconds for Example 8-46: a
factor of 16 slower. For thumbnails, loading from files is much quicker than
recalculation.
Example 8-46. PP4E\Gui\PIL\viewer-thumbs-nosave.py
"""
same, but make thumb images in memory without saving to or loading from files:
seems just as fast for small directories, but saving to files makes startup much
quicker for large image collections; saving may be needed in some apps (web pages)
"""
import os, sys
from PIL import Image
from tkinter import Tk
import viewer_thumbs
def makeThumbs(imgdir, size=(100, 100), subdir='thumbs'):
500 | Chapter 8: A tkinter Tour, Part 1

"""
create thumbs in memory but don't cache to files
"""
thumbs = []
for imgfile in os.listdir(imgdir):
imgpath = os.path.join(imgdir, imgfile)
try:
imgobj = Image.open(imgpath) # make new thumb
imgobj.thumbnail(size)
thumbs.append((imgfile, imgobj))
except:
print("Skipping: ", imgpath)
return thumbs
if __name__ == '__main__':
imgdir = (len(sys.argv) > 1 and sys.argv[1]) or 'images'
viewer_thumbs.makeThumbs = makeThumbs
main, save = viewer_thumbs.viewer(imgdir, kind=Tk)
main.mainloop()
Layout options: Gridding
The next variations on our viewer are purely cosmetic, but they illustrate tkinter layout
concepts. If you look at Figure 8-45 long enough, you’ll notice that its layout of thumb-
nails is not as uniform as it could be. Individual rows are fairly coherent because the
GUI is laid out by row frames, but columns can be misaligned badly due to differences
in image shape. Different packing options don’t seem to help (and can make matters
even more askew—try it), and arranging by column frames would just shift the problem
to another dimension. For larger collections, it could become difficult to locate and
open specific images.
With just a little extra work, we can achieve a more uniform layout by either laying out
the thumbnails in a grid, or using uniform fixed-size buttons. Example 8-47 positions
buttons in a row/column grid by using the tkinter grid geometry manager—a topic we
will explore in more detail in the next chapter, so like the canvas, you should consider
some of this code to be a preview and segue, too. In short, grid arranges its contents
by row and column; we’ll learn all about the stickiness of the Quit button here in
Chapter 9.
Example 8-47. PP4E\Gui\PIL\viewer-thumbs-grid.py
"""
same as viewer_thumbs, but uses the grid geometry manager to try to achieve
a more uniform layout; can generally achieve the same with frames and pack
if buttons are all fixed and uniform in size;
"""
import sys, math
from tkinter import *
from PIL.ImageTk import PhotoImage
from viewer_thumbs import makeThumbs, ViewOne
Viewing and Processing Images with PIL | 501

def viewer(imgdir, kind=Toplevel, cols=None):
"""
custom version that uses gridding
"""
win = kind()
win.title('Viewer: ' + imgdir)
thumbs = makeThumbs(imgdir)
if not cols:
cols = int(math.ceil(math.sqrt(len(thumbs)))) # fixed or N x N
rownum = 0
savephotos = []
while thumbs:
thumbsrow, thumbs = thumbs[:cols], thumbs[cols:]
colnum = 0
for (imgfile, imgobj) in thumbsrow:
photo = PhotoImage(imgobj)
link = Button(win, image=photo)
handler = lambda savefile=imgfile: ViewOne(imgdir, savefile)
link.config(command=handler)
link.grid(row=rownum, column=colnum)
savephotos.append(photo)
colnum += 1
rownum += 1
Button(win, text='Quit', command=win.quit).grid(columnspan=cols, stick=EW)
return win, savephotos
if __name__ == '__main__':
imgdir = (len(sys.argv) > 1 and sys.argv[1]) or 'images'
main, save = viewer(imgdir, kind=Tk)
main.mainloop()
Figure 8-47 displays the effect of gridding—our buttons line up in rows and columns
in a more uniform fashion than in Figure 8-45, because they are positioned by both row
and column, not just by rows. As we’ll see in the next chapter, gridding can help any
time our displays are two-dimensional by nature.
Layout options: Fixed-size buttons
Gridding helps—rows and columns align regularly now—but image shape still makes
this less than ideal. We can achieve a layout that is perhaps even more uniform than
gridding by giving each thumbnail button a fixed size. Buttons are sized to their images
(or text) by default, but we can always override this if needed. Example 8-48 does the
trick. It sets the height and width of each button to match the maximum dimension of
the thumbnail icon, so it is neither too thin nor too high. Assuming all thumbnails have
the same maximum dimension (something our thumb-maker ensures), this will achieve
the desired layout.
502 | Chapter 8: A tkinter Tour, Part 1

Example 8-48. PP4E\Gui\PIL\viewer-thumbs-fixed.py
"""
use fixed size for thumbnails, so align regularly; size taken from image
object, assume all same max; this is essentially what file selection GUIs do;
"""
import sys, math
from tkinter import *
from PIL.ImageTk import PhotoImage
from viewer_thumbs import makeThumbs, ViewOne
def viewer(imgdir, kind=Toplevel, cols=None):
"""
custom version that lays out with fixed-size buttons
"""
win = kind()
win.title('Viewer: ' + imgdir)
thumbs = makeThumbs(imgdir)
if not cols:
cols = int(math.ceil(math.sqrt(len(thumbs)))) # fixed or N x N
savephotos = []
while thumbs:
thumbsrow, thumbs = thumbs[:cols], thumbs[cols:]
row = Frame(win)
row.pack(fill=BOTH)
for (imgfile, imgobj) in thumbsrow:
size = max(imgobj.size) # width, height
photo = PhotoImage(imgobj)
link = Button(row, image=photo)
Figure 8-47. Gridded thumbnail selection GUI
Viewing and Processing Images with PIL | 503

handler = lambda savefile=imgfile: ViewOne(imgdir, savefile)
link.config(command=handler, width=size, height=size)
link.pack(side=LEFT, expand=YES)
savephotos.append(photo)
Button(win, text='Quit', command=win.quit, bg='beige').pack(fill=X)
return win, savephotos
if __name__ == '__main__':
imgdir = (len(sys.argv) > 1 and sys.argv[1]) or 'images'
main, save = viewer(imgdir, kind=Tk)
main.mainloop()
Figure 8-48 shows the results of applying a fixed size to our buttons; all are the same
size now, using a size taken from the images themselves. The effect is to display all
thumbnails as same-size tiles regardless of their shape, so they are easier to view. Nat-
urally, other layout schemes are possible as well; experiment with some of the config-
uration options in this code on your own to see their effect on the display.
Figure 8-48. Fixed-size thumbnail selection GUI, row frames
Scrolling and canvases (ahead)
The thumbnail viewer scripts presented in this section work well for reasonably sized
image directories, and you can use smaller thumbnail size settings for larger image
collections. Perhaps the biggest limitation of these programs, though, is that the
thumbnail windows they create will become too large to handle (or display at all) if the
image directory contains very many files.
504 | Chapter 8: A tkinter Tour, Part 1

Even with the sample images directory used for this book, we lost the Quit button at
the bottom of the display in the last two figures because there are too many thumbnail
images to show. To illustrate the difference, the original Example 8-45 packs the Quit
button first for this very reason—so it is clipped last, after all thumbnails, and thus
remains visible when there are many photos. We could do a similar thing for the other
versions, but we’d still lose thumbnails if there were too many. A directory from your
camera with many images might similarly produce a window too large to fit on your
computer’s screen.
To do better, we could arrange the thumbnails on a widget that supports scrolling. The
open source Pmw package includes a handy scrolled frame that may help. Moreover,
the standard tkinter Canvas widget gives us more control over image displays (including
placement by absolute pixel coordinates) and supports horizontal and vertical scrolling
of its content.
In fact, in the next chapter, we’ll code one final extension to our script which does just
that—it displays thumbnails in a scrolled canvas, and so it handles large collections
much better. Its thumbnail buttons are fixed-size as in our last example here, but are
positioned at computed coordinates. I’ll defer further details here, though, because
we’ll study that extension in conjunction with canvases in the next chapter. And in
Chapter 11, we’ll apply this technique to an even more full-featured image program
called PyPhoto.
To learn how these programs do their jobs, though, we need to move on to the next
chapter, and the second half of our widget tour.
Viewing and Processing Images with PIL | 505

CHAPTER 9
A tkinter Tour, Part 2
“On Today’s Menu: Spam, Spam, and Spam”
This chapter is the second in a two-part tour of the tkinter library. It picks up where
Chapter 8 left off and covers some of the more advanced widgets and tools in the tkinter
arsenal. Among the topics presented in this chapter:
•Menu, Menubutton, and OptionMenu widgets
• The Scrollbar widget: for scrolling text, lists, and canvases
• The Listbox widget: a list of multiple selections
• The Text widget: a general text display and editing tool
• The Canvas widget: a general graphical drawing tool
• The grid table-based geometry manager
• Time-based tools: after, update, wait, and threads
• Basic tkinter animation techniques
• Clipboards, erasing widgets and windows, and so on
By the time you’ve finished this chapter, you will have seen the bulk of the tkinter
library, and you will have all the information you need to compose larger, portable user
interfaces of your own. You’ll also be ready to tackle the larger GUI techniques and
more complete examples presented in Chapters 10 and 11. For now, let’s resume the
widget show.
Menus
Menus are the pull-down lists you’re accustomed to seeing at the top of a window (or
the entire display, if you’re accustomed to seeing them that way on a Macintosh). Move
the mouse cursor to the menu bar at the top and click on a name (e.g., File), and a list
of selectable options pops up under the name you clicked (e.g., Open, Save). The op-
tions within a menu might trigger actions, much like clicking on a button; they may
507

also open other “cascading” submenus that list more options, pop up dialog windows,
and so on. In tkinter, there are two kinds of menus you can add to your scripts: top-
level window menus and frame-based menus. The former option is better suited to
whole windows, but the latter also works as a nested component.
Top-Level Window Menus
In all recent Python releases (using Tk 8.0 and later), you can associate a horizontal
menu bar with a top-level window object (e.g., a Tk or Toplevel). On Windows and
Unix (X Windows), this menu bar is displayed along the top of the window; on some
Macintosh machines, this menu replaces the one shown at the top of the screen when
the window is selected. In other words, window menus look like you would expect on
whatever underlying platform your script runs upon.
This scheme is based on building trees of Menu w i d g e t o b j e c t s . S i m p l y a s s o c i a t e o n e t o p -
level Menu with the window, add other pull-down Menu objects as cascades of the top-
level Menu, and add entries to each of the pull-down objects. Menus are cross-linked with
the next higher level, by using parent widget arguments and the Menu widget’s
add_cascade method. It works like this:
1. Create a topmost Menu as the child of the window widget and configure the win-
dow’s menu attribute to be the new Menu.
2. For each pull-down object, make a new Menu as the child of the topmost Menu and
add the child as a cascade of the topmost Menu using add_cascade.
3. Add menu selections to each pull-down Menu f r o m s t e p 2 , u s i n g t h e command o p t i o n s
of add_command to register selection callback handlers.
4. Add a cascading submenu by making a new Menu a s t h e c h i l d o f t h e Menu t h e c a s c a d e
extends and using add_cascade to link the parent to the child.
The end result is a tree of Menu w i d g e t s w i t h a s s o c i a t e d command c a l l b a c k h a n d l e r s . T h i s
is probably simpler in code than in words, though. Example 9-1 makes a main menu
with two pull downs, File and Edit; the Edit pull down in turn has a nested submenu
of its own.
Example 9-1. PP4E\Gui\Tour\menu_win.py
# Tk8.0 style top-level window menus
from tkinter import * # get widget classes
from tkinter.messagebox import * # get standard dialogs
def notdone():
showerror('Not implemented', 'Not yet available')
def makemenu(win):
top = Menu(win) # win=top-level window
win.config(menu=top) # set its menu option
508 | Chapter 9: A tkinter Tour, Part 2

file = Menu(top)
file.add_command(label='New...', command=notdone, underline=0)
file.add_command(label='Open...', command=notdone, underline=0)
file.add_command(label='Quit', command=win.quit, underline=0)
top.add_cascade(label='File', menu=file, underline=0)
edit = Menu(top, tearoff=False)
edit.add_command(label='Cut', command=notdone, underline=0)
edit.add_command(label='Paste', command=notdone, underline=0)
edit.add_separator()
top.add_cascade(label='Edit', menu=edit, underline=0)
submenu = Menu(edit, tearoff=True)
submenu.add_command(label='Spam', command=win.quit, underline=0)
submenu.add_command(label='Eggs', command=notdone, underline=0)
edit.add_cascade(label='Stuff', menu=submenu, underline=0)
if __name__ == '__main__':
root = Tk() # or Toplevel()
root.title('menu_win') # set window-mgr info
makemenu(root) # associate a menu bar
msg = Label(root, text='Window menu basics') # add something below
msg.pack(expand=YES, fill=BOTH)
msg.config(relief=SUNKEN, width=40, height=7, bg='beige')
root.mainloop()
A lot of code in this file is devoted to setting callbacks and such, so it might help to
isolate the bits involved with the menu tree-building process. For the File menu, it’s
done like this:
top = Menu(win) # attach Menu to window
win.config(menu=top) # cross-link window to menu
file = Menu(top) # attach a Menu to top Menu
top.add_cascade(label='File', menu=file) # cross-link parent to child
Apart from building up the menu object tree, this script also demonstrates some of the
most common menu configuration options:
Separator lines
The script makes a separator in the Edit menu with add_separator; it’s just a line
used to set off groups of related entries.
Tear-offs
The script also disables menu tear-offs in the Edit pull down by passing a
tearoff=False widget option to Menu. Tear-offs are dashed lines that appear by
default at the top of tkinter menus and create a new window containing the menu’s
contents when clicked. They can be a convenient shortcut device (you can click
items in the tear-off window right away, without having to navigate through menu
trees), but they are not widely used on all platforms.
Keyboard shortcuts
The script uses the underline option to make a unique letter in a menu entry a
keyboard shortcut. It gives the offset of the shortcut letter in the entry’s label string.
Menus | 509
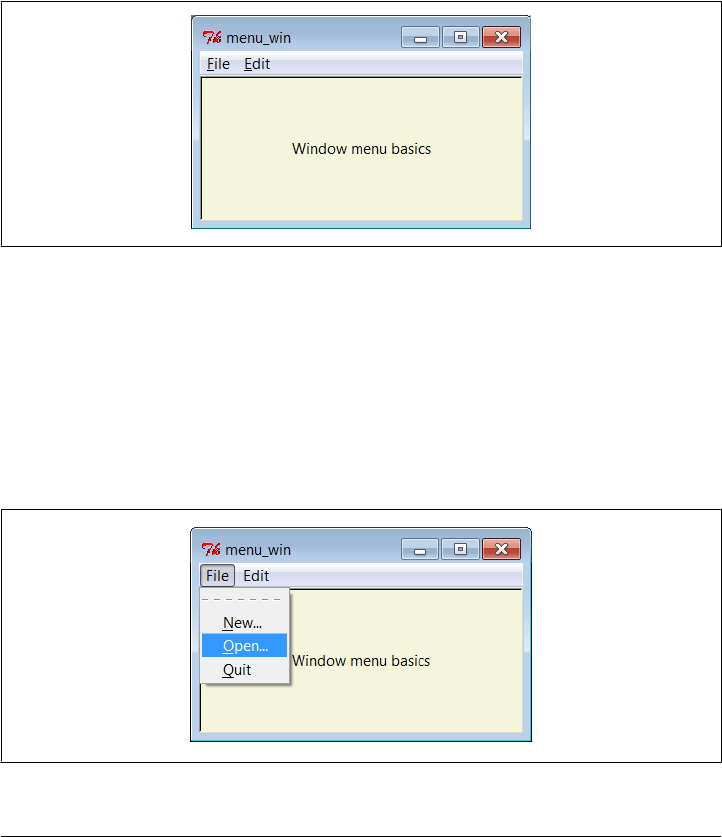
On Windows, for example, the Quit option in this script’s File menu can be se-
lected with the mouse but also by pressing Alt, then “f,” and then “q.” You don’t
strictly have to use underline—on Windows, the first letter of a pull-down name
is a shortcut automatically, and arrow and Enter keys can be used to select pull-
down items. But explicit keys can enhance usability in large menus; for instance,
the key sequence Alt-E-S-S runs the quit action in this script’s nested submenu.
Let’s see what this translates to in the realm of the pixel. Figure 9-1 shows the window
that first appears when this script is run on Windows 7 with my system settings; it looks
different, but similar, on Unix, Macintosh, and other Windows configurations.
Figure 9-1. menu_win: a top-level window menu bar
Figure 9-2 shows the scene when the File pull down is selected. Notice that Menu widgets
are linked, not packed (or gridded)—the geometry manager doesn’t really come into
play here. If you run this script, you’ll also notice that all of its menu entries either quit
the program immediately or pop up a “Not Implemented” standard error dialog. This
example is about menus, after all, but menu selection callback handlers generally do
more useful work in practice.
Figure 9-2. The File menu pull down
510 | Chapter 9: A tkinter Tour, Part 2
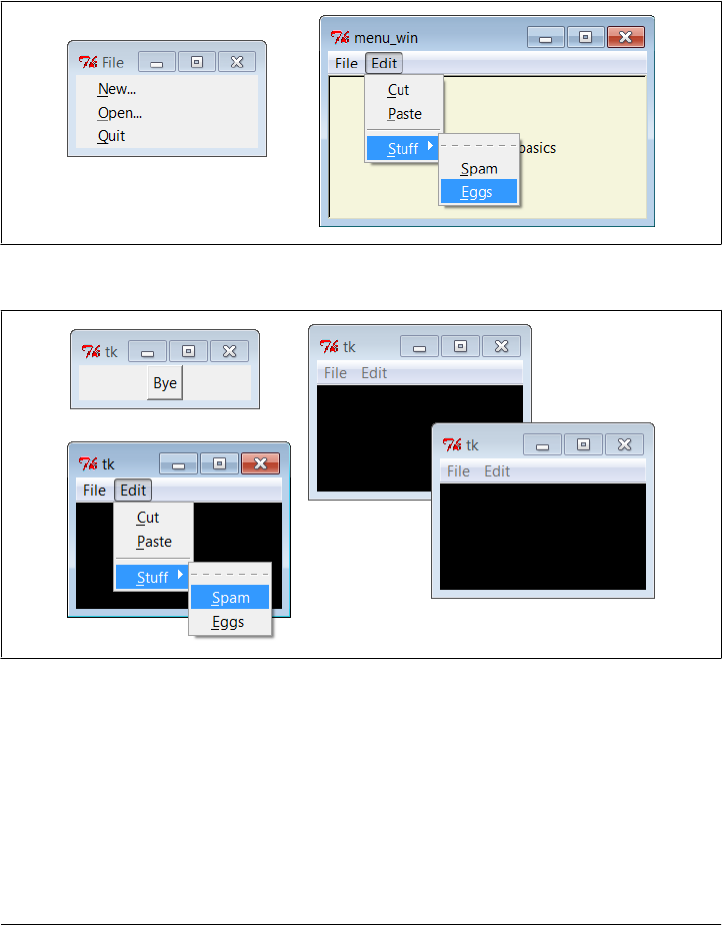
And finally, Figure 9-3 shows what happens after clicking the File menu’s tear-off line
and selecting the cascading submenu in the Edit pull down. Cascades can be nested as
deep as you like (though your users probably won’t be happy if this gets silly).
In tkinter, every top-level window can have a menu bar, including pop ups you create
with the Toplevel widget. Example 9-2 makes three pop-up windows with the same
menu bar as the one we just met; when run, it constructs the scene in Figure 9-4.
Figure 9-3. A File tear-off and Edit cascade
Figure 9-4. Multiple Toplevels with menus
Example 9-2. PP4E\Gui\Tour\menu_win-multi.py
from menu_win import makemenu # reuse menu maker function
from tkinter import *
root = Tk()
for i in range(3): # three pop-up windows with menus
win = Toplevel(root)
makemenu(win)
Menus | 511

Label(win, bg='black', height=5, width=25).pack(expand=YES, fill=BOTH)
Button(root, text="Bye", command=root.quit).pack()
root.mainloop()
Frame- and Menubutton-Based Menus
Although these are less commonly used for top-level windows, it’s also possible to
create a menu bar as a horizontal Frame. Before I show you how, though, let me explain
why you should care. Because this frame-based scheme doesn’t depend on top-level
window protocols, it can also be used to add menus as nested components of larger
displays. In other words, it’s not just for top-level windows. For example, Chap-
ter 11’s PyEdit text editor can be used both as a program and as an attachable compo-
nent. We’ll use window menus to implement PyEdit selections when PyEdit is run as
a standalone program, but we’ll use frame-based menus when PyEdit is embedded in
the PyMailGUI and PyView displays. Both schemes are worth knowing.
Frame-based menus require a few more lines of code, but they aren’t much more com-
plex than window menus. To make one, simply pack Menubutton widgets within a
Frame container, associate Menu widgets with the Menubuttons, and associate the Frame
with the top of a container window. Example 9-3 creates the same menu as Exam-
ple 9-2, but using the frame-based approach.
Example 9-3. PP4E\Gui\Tour\menu_frm.py
# Frame-based menus: for top-levels and components
from tkinter import * # get widget classes
from tkinter.messagebox import * # get standard dialogs
def notdone():
showerror('Not implemented', 'Not yet available')
def makemenu(parent):
menubar = Frame(parent) # relief=RAISED, bd=2...
menubar.pack(side=TOP, fill=X)
fbutton = Menubutton(menubar, text='File', underline=0)
fbutton.pack(side=LEFT)
file = Menu(fbutton)
file.add_command(label='New...', command=notdone, underline=0)
file.add_command(label='Open...', command=notdone, underline=0)
file.add_command(label='Quit', command=parent.quit, underline=0)
fbutton.config(menu=file)
ebutton = Menubutton(menubar, text='Edit', underline=0)
ebutton.pack(side=LEFT)
edit = Menu(ebutton, tearoff=False)
edit.add_command(label='Cut', command=notdone, underline=0)
edit.add_command(label='Paste', command=notdone, underline=0)
edit.add_separator()
ebutton.config(menu=edit)
512 | Chapter 9: A tkinter Tour, Part 2
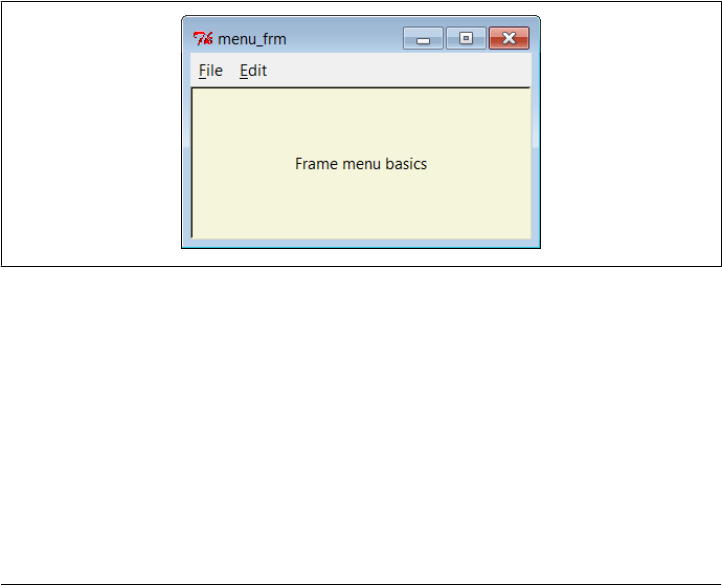
submenu = Menu(edit, tearoff=True)
submenu.add_command(label='Spam', command=parent.quit, underline=0)
submenu.add_command(label='Eggs', command=notdone, underline=0)
edit.add_cascade(label='Stuff', menu=submenu, underline=0)
return menubar
if __name__ == '__main__':
root = Tk() # or TopLevel or Frame
root.title('menu_frm') # set window-mgr info
makemenu(root) # associate a menu bar
msg = Label(root, text='Frame menu basics') # add something below
msg.pack(expand=YES, fill=BOTH)
msg.config(relief=SUNKEN, width=40, height=7, bg='beige')
root.mainloop()
Again, let’s isolate the linkage logic here to avoid getting distracted by other details.
For the File menu case, here is what this boils down to:
menubar = Frame(parent) # make a Frame for the menubar
fbutton = Menubutton(menubar, text='File') # attach a Menubutton to Frame
file = Menu(fbutton) # attach a Menu to Menubutton
fbutton.config(menu=file) # crosslink button to menu
There is an extra Menubutton widget in this scheme, but it’s not much more complex
than making top-level window menus. Figures 9-5 and 9-6 show this script in action
on Windows.
Figure 9-5. menu_frm: Frame and Menubutton menu bar
The menu widgets in this script provide a default set of event bindings that automati-
cally pop up menus when selected with a mouse. This doesn’t look or behave exactly
like the top-level window menu scheme shown earlier, but it is close, can be configured
in any way that frames can (i.e., with colors and borders), and will look similar on every
platform (though this may or may not be a feature in all contexts).
The biggest advantage of frame-based menu bars, though, is that they can also be at-
tached as nested components in larger displays. Example 9-4 and its resulting interface
(Figure 9-7) show how—both menu bars are completely functional in the same single
window.
Menus | 513
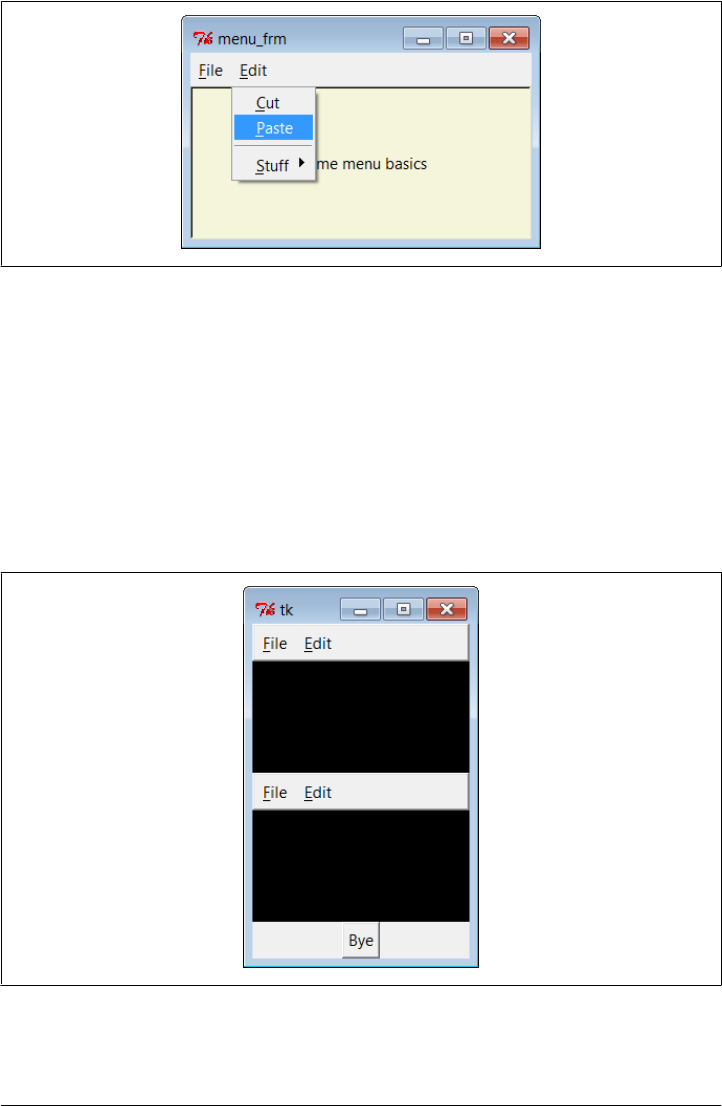
Example 9-4. PP4E\Gui\Tour\menu_frm-multi.py
from menu_frm import makemenu # can't use menu_win here--one window
from tkinter import * # but can attach frame menus to windows
root = Tk()
for i in range(2): # 2 menus nested in one window
mnu = makemenu(root)
mnu.config(bd=2, relief=RAISED)
Label(root, bg='black', height=5, width=25).pack(expand=YES, fill=BOTH)
Button(root, text="Bye", command=root.quit).pack()
root.mainloop()
Figure 9-7. Multiple Frame menus on one window
Figure 9-6. With the Edit menu selected
514 | Chapter 9: A tkinter Tour, Part 2

Because they are not tied to the enclosing window, frame-based menus can also be used
as part of another attachable component’s widget package. For example, the menu-
embedding behavior in Example 9-5 works even if the menu’s parent is another
Frame container and not the top-level window; this script is similar to the prior, but
creates three fully functional menu bars attached to frames nested in a window.
Example 9-5. PP4E\Gui\Tour\menu_frm-multi2.py
from menu_frm import makemenu # can't use menu_win here--root=Frame
from tkinter import *
root = Tk()
for i in range(3): # three menus nested in the containers
frm = Frame()
mnu = makemenu(frm)
mnu.config(bd=2, relief=RAISED)
frm.pack(expand=YES, fill=BOTH)
Label(frm, bg='black', height=5, width=25).pack(expand=YES, fill=BOTH)
Button(root, text="Bye", command=root.quit).pack()
root.mainloop()
Using Menubuttons and Optionmenus
In fact, menus based on Menubutton are even more general than Example 9-3 implies—
they can actually show up anywhere on a display that normal buttons can, not just
within a menu bar Frame. Example 9-6 makes a Menubutton pull-down list that simply
shows up by itself, attached to the root window; Figure 9-8 shows the GUI it produces.
Example 9-6. PP4E\Gui\Tour\mbutton.py
from tkinter import *
root = Tk()
mbutton = Menubutton(root, text='Food') # the pull-down stands alone
picks = Menu(mbutton)
mbutton.config(menu=picks)
picks.add_command(label='spam', command=root.quit)
picks.add_command(label='eggs', command=root.quit)
picks.add_command(label='bacon', command=root.quit)
mbutton.pack()
mbutton.config(bg='white', bd=4, relief=RAISED)
root.mainloop()
The related tkinter Optionmenu widget displays an item selected from a pull-down menu.
It’s roughly like a Menubutton plus a display label, and it displays a menu of choices
when clicked, but you must link tkinter variables (described in Chapter 8) to fetch the
choice after the fact instead of registering callbacks, and menu entries are passed as
arguments in the widget constructor call after the variable.
Example 9-7 illustrates typical Optionmenu usage and builds the interface captured in
Figure 9-9. Clicking on either of the first two buttons opens a pull-down menu of
Menus | 515
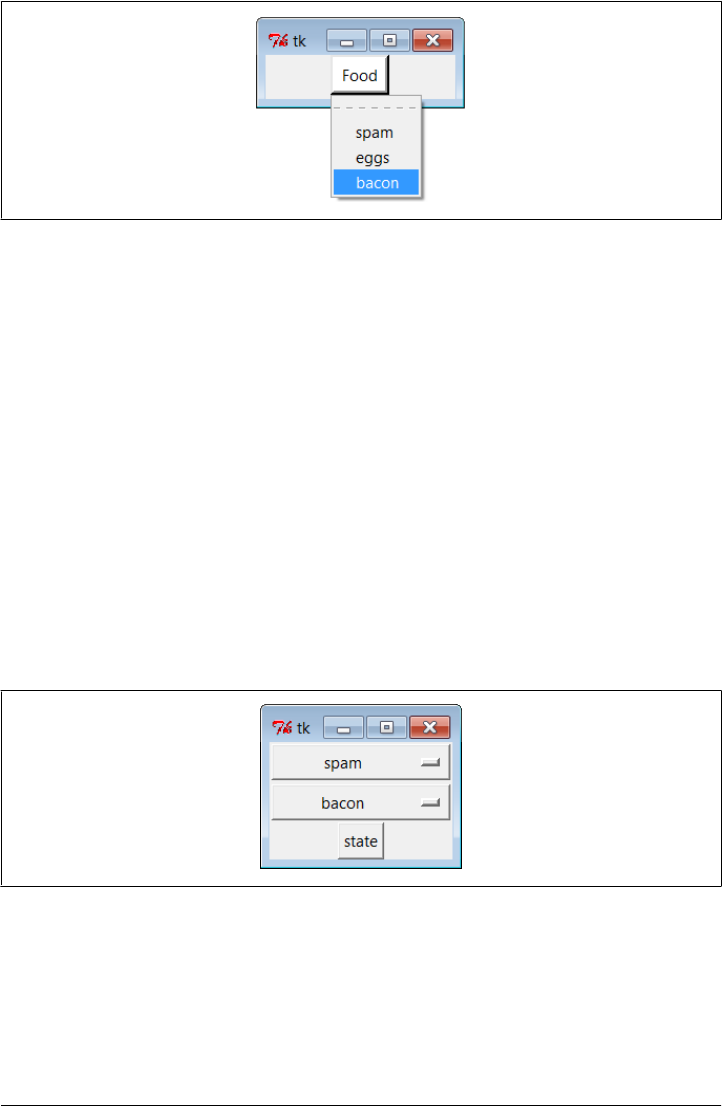
options; clicking on the third “state” button fetches and prints the current values dis-
played in the first two.
Example 9-7. PP4E\Gui\Tour\optionmenu.py
from tkinter import *
root = Tk()
var1 = StringVar()
var2 = StringVar()
opt1 = OptionMenu(root, var1, 'spam', 'eggs', 'toast') # like Menubutton
opt2 = OptionMenu(root, var2, 'ham', 'bacon', 'sausage') # but shows choice
opt1.pack(fill=X)
opt2.pack(fill=X)
var1.set('spam')
var2.set('ham')
def state(): print(var1.get(), var2.get()) # linked variables
Button(root, command=state, text='state').pack()
root.mainloop()
Figure 9-9. An Optionmenu at work
There are other menu-related topics that we’ll skip here in the interest of space. For
instance, scripts can add entries to system menus and can generate pop-up menus
(posted in response to events, without an associated button). Refer to Tk and tkinter
resources for more details on this front.
Figure 9-8. A Menubutton all by itself
516 | Chapter 9: A tkinter Tour, Part 2

In addition to simple selections and cascades, menus can also contain disabled entries,
check button and radio button selections, and bitmap and photo images. The next
section demonstrates how some of these special menu entries are programmed.
Windows with Both Menus and Toolbars
Besides showing a menu at the top, it is common for windows to display a row of
buttons at the bottom. This bottom button row is usually called a toolbar, and it often
contains shortcuts to items also available in the menus at the top. It’s easy to add a
toolbar to windows in tkinter—simply pack buttons (and other kinds of widgets) into
a frame, pack the frame on the bottom of the window, and set it to expand horizontally
only. This is really just hierarchical GUI layout at work again, but make sure to pack
toolbars (and frame-based menu bars) early so that other widgets in the middle of the
display are clipped first when the window shrinks; you usually want your tool and menu
bars to outlive other widgets.
Example 9-8 shows one way to go about adding a toolbar to a window. It also dem-
onstrates how to add photo images in menu entries (set the image attribute to a Photo
Image object) and how to disable entries and give them a grayed-out appearance (call
the menu entryconfig method with the index of the item to disable, starting from 1).
Notice that PhotoImage objects are saved as a list; remember, unlike other widgets, these
go away if you don’t hold on to them (see Chapter 8 if you need a refresher).
Example 9-8. PP4E\Gui\Tour\menuDemo.py
#!/usr/local/bin/python
"""
Tk8.0 style main window menus
menu/tool bars packed before middle, fill=X (pack first=clip last);
adds photo menu entries; see also: add_checkbutton, add_radiobutton
"""
from tkinter import * # get widget classes
from tkinter.messagebox import * # get standard dialogs
class NewMenuDemo(Frame): # an extended frame
def __init__(self, parent=None): # attach to top-level?
Frame.__init__(self, parent) # do superclass init
self.pack(expand=YES, fill=BOTH)
self.createWidgets() # attach frames/widgets
self.master.title("Toolbars and Menus") # set window-manager info
self.master.iconname("tkpython") # label when iconified
def createWidgets(self):
self.makeMenuBar()
self.makeToolBar()
L = Label(self, text='Menu and Toolbar Demo')
L.config(relief=SUNKEN, width=40, height=10, bg='white')
L.pack(expand=YES, fill=BOTH)
Menus | 517

def makeToolBar(self):
toolbar = Frame(self, cursor='hand2', relief=SUNKEN, bd=2)
toolbar.pack(side=BOTTOM, fill=X)
Button(toolbar, text='Quit', command=self.quit ).pack(side=RIGHT)
Button(toolbar, text='Hello', command=self.greeting).pack(side=LEFT)
def makeMenuBar(self):
self.menubar = Menu(self.master)
self.master.config(menu=self.menubar) # master=top-level window
self.fileMenu()
self.editMenu()
self.imageMenu()
def fileMenu(self):
pulldown = Menu(self.menubar)
pulldown.add_command(label='Open...', command=self.notdone)
pulldown.add_command(label='Quit', command=self.quit)
self.menubar.add_cascade(label='File', underline=0, menu=pulldown)
def editMenu(self):
pulldown = Menu(self.menubar)
pulldown.add_command(label='Paste', command=self.notdone)
pulldown.add_command(label='Spam', command=self.greeting)
pulldown.add_separator()
pulldown.add_command(label='Delete', command=self.greeting)
pulldown.entryconfig(4, state=DISABLED)
self.menubar.add_cascade(label='Edit', underline=0, menu=pulldown)
def imageMenu(self):
photoFiles = ('ora-lp4e.gif', 'pythonPowered.gif', 'python_conf_ora.gif')
pulldown = Menu(self.menubar)
self.photoObjs = []
for file in photoFiles:
img = PhotoImage(file='../gifs/' + file)
pulldown.add_command(image=img, command=self.notdone)
self.photoObjs.append(img) # keep a reference
self.menubar.add_cascade(label='Image', underline=0, menu=pulldown)
def greeting(self):
showinfo('greeting', 'Greetings')
def notdone(self):
showerror('Not implemented', 'Not yet available')
def quit(self):
if askyesno('Verify quit', 'Are you sure you want to quit?'):
Frame.quit(self)
if __name__ == '__main__': NewMenuDemo().mainloop() # if I'm run as a script
When run, this script generates the scene in Figure 9-10 at first. Figure 9-11 shows this
window after being stretched a bit, with its Image menu torn off and its Edit menu
selected. The toolbar at the bottom grows horizontally with the window but not ver-
tically. For emphasis, this script also sets the cursor to change to a hand when moved
over the toolbar at the bottom. Run this on your own to get a better feel for its behavior.
518 | Chapter 9: A tkinter Tour, Part 2
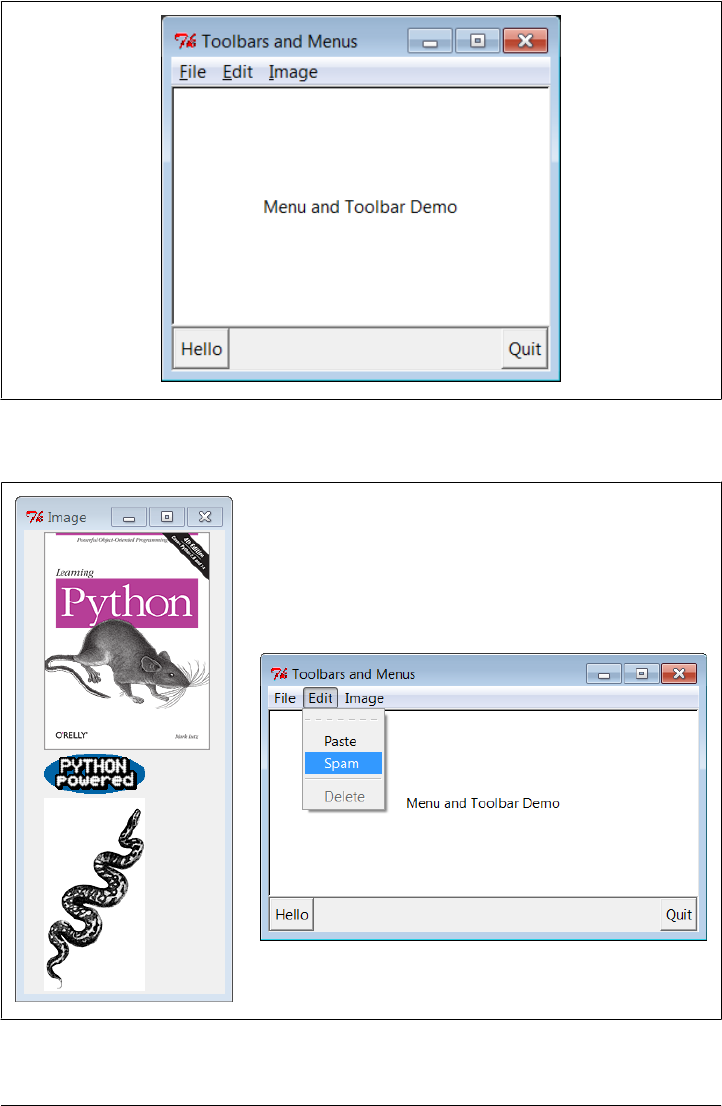
Figure 9-10. menuDemo: menus and toolbars
Figure 9-11. Images and tear-offs on the job
Menus | 519

Using images in toolbars, too
As shown in Figure 9-11, it’s easy to use images for menu items. Although not used in
Example 9-8, toolbar items can be pictures too, just like the Image menu’s items—
simply associate small images with toolbar frame buttons, just as we did in the image
button examples we wrote in the last part of Chapter 8. If you create toolbar images
manually ahead of time, it’s simple to associate them with buttons as we’ve learned. In
fact, it’s not much more work to build them dynamically—the PIL-based thumbnail
image construction skills we developed in the prior chapter might come in handy in
this context as well.
To illustrate, make sure you’ve installed the PIL extension, and replace the toolbar
construction method of Example 9-8 with the following (I’ve done this in file menu-
Demo2.py in the examples distribution so you can run and experiment on your own):
# resize toolbar images on the fly with PIL
def makeToolBar(self, size=(40, 40)):
from PIL.ImageTk import PhotoImage, Image # if jpegs or make new thumbs
imgdir = r'../PIL/images/'
toolbar = Frame(self, cursor='hand2', relief=SUNKEN, bd=2)
toolbar.pack(side=BOTTOM, fill=X)
photos = 'ora-lp4e-big.jpg', 'PythonPoweredAnim.gif', 'python_conf_ora.gif'
self.toolPhotoObjs = []
for file in photos:
imgobj = Image.open(imgdir + file) # make new thumb
imgobj.thumbnail(size, Image.ANTIALIAS) # best downsize filter
img = PhotoImage(imgobj)
btn = Button(toolbar, image=img, command=self.greeting)
btn.config(relief=RAISED, bd=2)
btn.config(width=size[0], height=size[1])
btn.pack(side=LEFT)
self.toolPhotoObjs.append((img, imgobj)) # keep a reference
Button(toolbar, text='Quit', command=self.quit).pack(side=RIGHT, fill=Y)
When run, this alternative creates the window captured in Figure 9-12—the three im-
age options available in the Image menu at the top of the window are now also buttons
in the toolbar at the bottom, along with a simple text button for quitting on the right.
As before, the cursor becomes a hand over the toolbar.
You don’t need PIL at all if you’re willing to use GIF or supported bitmap images that
you create by hand manually—simply load by filename using the standard tkinter
photo object, as shown by the following alternative coding for the toolbar construction
method (this is file menuDemo3.py in the examples distribution if you’re keeping
scope):
# use unresized gifs with standard tkinter
def makeToolBar(self, size=(30, 30)):
imgdir = r'../gifs/'
toolbar = Frame(self, cursor='hand2', relief=SUNKEN, bd=2)
toolbar.pack(side=BOTTOM, fill=X)
520 | Chapter 9: A tkinter Tour, Part 2
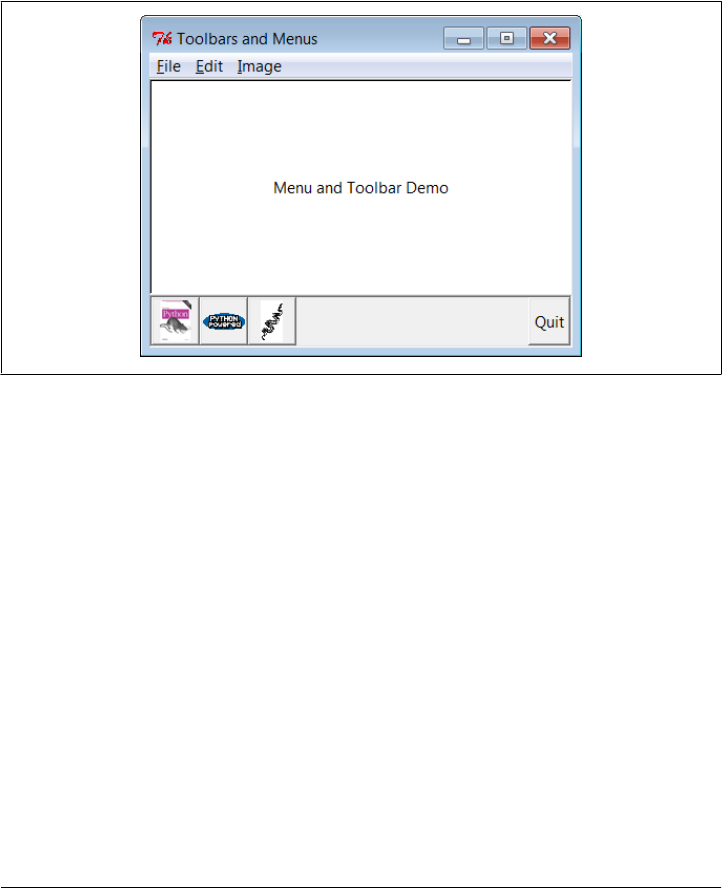
photos = 'ora-lp4e.gif', 'pythonPowered.gif', 'python_conf_ora.gif'
self.toolPhotoObjs = []
for file in photos:
img = PhotoImage(file=imgdir + file)
btn = Button(toolbar, image=img, command=self.greeting)
btn.config(bd=5, relief=RIDGE)
btn.config(width=size[0], height=size[1])
btn.pack(side=LEFT)
self.toolPhotoObjs.append(img) # keep a reference
Button(toolbar, text='Quit', command=self.quit).pack(side=RIGHT, fill=Y)
Figure 9-12. menuDemo2: images in the toolbar with PIL
When run, this alternative uses GIF images, and renders the window grabbed in Fig-
ure 9-13. Depending on your user’s preferences, you might want to resize the GIF
images used here for this role with other tools; we only get part of unresized photos in
the fixed-width buttons, which may or may not be enough.
As is, this is something of a first cut solution to toolbar image buttons. There are many
ways to configure such image buttons. Since we’re going to see PIL in action again later
in this chapter when we explore canvases, though, we’ll leave further extensions in the
suggested exercise column.
Automating menu construction
Menus are a powerful tkinter interface device. If you’re like me, though, the examples
in this section probably seem like a lot of work. Menu construction can be both code
intensive and error prone if done by calling tkinter methods directly. A better approach
might automatically build and link up menus from a higher-level description of their
contents. In fact, in Chapter 10, we’ll meet a tool called GuiMixin that automates the
menu construction process, given a data structure that contains all menus desired. As
Menus | 521

an added bonus, it supports both window and frame-style menus, so it can be used by
both standalone programs and nested components. Although it’s important to know
the underlying calls used to make menus, you don’t necessarily have to remember them
for long.
Listboxes and Scrollbars
Let’s rejoin our widget tour. Listbox widgets allow you to display a list of items for
selection, and Scrollbars are designed for navigating through the contents of other
widgets. Because it is common to use these widgets together, we’ll study them both at
once. Example 9-9 builds both a Listbox and a Scrollbar, as a packaged set.
Example 9-9. PP4E\Gui\Tour\scrolledlist.py
"a simple customizable scrolled listbox component"
from tkinter import *
class ScrolledList(Frame):
def __init__(self, options, parent=None):
Frame.__init__(self, parent)
self.pack(expand=YES, fill=BOTH) # make me expandable
self.makeWidgets(options)
def handleList(self, event):
index = self.listbox.curselection() # on list double-click
label = self.listbox.get(index) # fetch selection text
self.runCommand(label) # and call action here
# or get(ACTIVE)
def makeWidgets(self, options):
sbar = Scrollbar(self)
Figure 9-13. menuDemo3: unresized GIF images in the toolbar
522 | Chapter 9: A tkinter Tour, Part 2
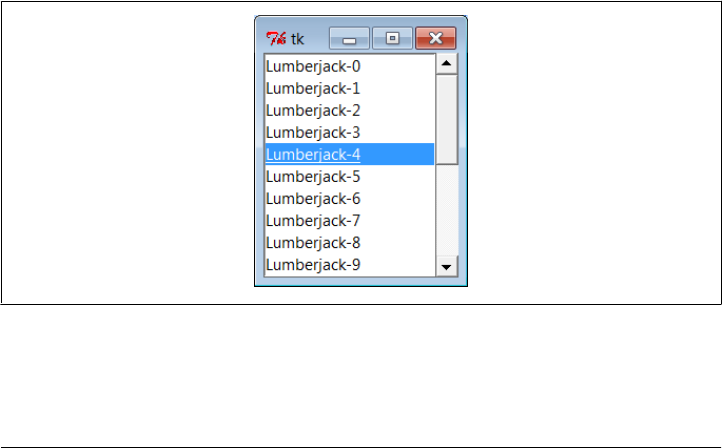
list = Listbox(self, relief=SUNKEN)
sbar.config(command=list.yview) # xlink sbar and list
list.config(yscrollcommand=sbar.set) # move one moves other
sbar.pack(side=RIGHT, fill=Y) # pack first=clip last
list.pack(side=LEFT, expand=YES, fill=BOTH) # list clipped first
pos = 0
for label in options: # add to listbox
list.insert(pos, label) # or insert(END,label)
pos += 1 # or enumerate(options)
#list.config(selectmode=SINGLE, setgrid=1) # select,resize modes
list.bind('<Double-1>', self.handleList) # set event handler
self.listbox = list
def runCommand(self, selection): # redefine me lower
print('You selected:', selection)
if __name__ == '__main__':
options = (('Lumberjack-%s' % x) for x in range(20)) # or map/lambda, [...]
ScrolledList(options).mainloop()
This module can be run standalone to experiment with these widgets, but it is also
designed to be useful as a library object. By passing in different selection lists to the
options argument and redefining the runCommand method in a subclass, the Scrolled
List component class defined here can be reused anytime you need to display a scrol-
lable list. In fact, we’ll be reusing it this way in Chapter 11’s PyEdit program. With just
a little forethought, it’s easy to extend the tkinter library with Python classes this way.
When run standalone, this script generates the window in Figure 9-14, shown here
with Windows 7 look-and-feel. It’s a Frame, with a Listbox on its left containing 20
generated entries (the fifth has been clicked), along with an associated Scrollbar on its
right for moving through the list. If you move the scroll, the list moves, and vice versa.
Figure 9-14. scrolledlist at the top
Listboxes and Scrollbars | 523

Programming Listboxes
Listboxes are straightforward to use, but they are populated and processed in somewhat
unique ways compared to the widgets we’ve seen so far. Many listbox calls accept a
passed-in index to refer to an entry in the list. Indexes start at integer 0 and grow higher,
but tkinter also accepts special name strings in place of integer offsets: end to refer to
the end of the list, active to denote the line selected, and more. This generally yields
more than one way to code listbox calls.
For instance, this script adds items to the listbox in this window by calling its insert
method, with successive offsets (starting at zero—something the enumerate built-in
could automate for us):
list.insert(pos, label)
pos += 1
But you can also fill a list by simply adding items at the end without keeping a position
counter at all, with either of these statements:
list.insert('end', label) # add at end: no need to count positions
list.insert(END, label) # END is preset to 'end' inside tkinter
The listbox widget doesn’t have anything like the command option we use to register
callback handlers for button presses, so you either need to fetch listbox selections while
processing other widgets’ events (e.g., a button press elsewhere in the GUI) or tap into
other event protocols to process user selections. To fetch a selected value, this script
binds the <Double-1> left mouse button double-click event to a callback handler method
with bind (seen earlier on this tour).
In the double-click handler, this script grabs the selected item out of the listbox with
this pair of listbox method calls:
index = self.listbox.curselection() # get selection index
label = self.listbox.get(index) # fetch text by its index
Here, too, you can code this differently. Either of the following lines has the same effect;
they get the contents of the line at index 'active'—the one selected:
label = self.listbox.get('active') # fetch from active index
label = self.listbox.get(ACTIVE) # ACTIVE='active' in tkinter
For illustration purposes, the class’s default runCommand method prints the value selec-
ted each time you double-click an entry in the list—as fetched by this script, it comes
back as a string reflecting the text in the selected entry:
C:\...\PP4E\Gui\Tour> python scrolledlist.py
You selected: Lumberjack-2
You selected: Lumberjack-19
You selected: Lumberjack-4
You selected: Lumberjack-12
Listboxes can also be useful input devices even without attached scroll bars; they accept
color, font, and relief configuration options. They also support both single and multiple
524 | Chapter 9: A tkinter Tour, Part 2

selection modes. The default mode allows only a single item to be selected, but the
selectmode argument supports four settings: SINGLE, BROWSE, MULTIPLE, and EXTENDED
(the default is BROWSE). Of these, the first two are single selection modes, and the last
two allow multiple items to be selected.
These modes vary in subtle ways. For instance, BROWSE is like SINGLE, but it also allows
the selection to be dragged. Clicking an item in MULTIPLE mode toggles its state without
affecting other selected items. And the EXTENDED mode allows for multiple selections
and works like the Windows file explorer GUI—you select one item with a simple click,
multiple items with a Ctrl-click combination, and ranges of items with Shift-clicks.
Multiple selections can be programmed with code of this sort:
listbox = Listbox(window, bg='white', font=('courier', fontsz))
listbox.config(selectmode=EXTENDED)
listbox.bind('<Double-1>', (lambda event: onDoubleClick()))
# onDoubeClick: get messages selected in listbox
selections = listbox.curselection() # tuple of digit strs, 0..N-1
selections = [int(x)+1 for x in selections] # convert to ints, make 1..N
When multiple selections are enabled, the curselection method returns a list of digit
strings giving the relative numbers of the items selected, or it returns an empty tuple if
none is selected. Really, this method always returns a tuple of digit strings, even in
single selection mode (we don’t care in Example 9-9, because the get method does the
right thing for a one-item tuple, when fetching a value out of the listbox).
You can experiment with the selection alternatives on your own by uncommenting the
selectmode setting in Example 9-9 and changing its value. You may get an error on
double-clicks in multiple selection modes, though, because the get method will be
passed a tuple of more than one selection index (print it out to see for yourself). We’ll
see multiple selections in action in the PyMailGUI example later in this book (Chap-
ter 14), so I’ll pass on further examples here.
Programming Scroll Bars
Perhaps the deepest magic in the Example 9-9 script, though, boils down to two lines
of code:
sbar.config(command=list.yview) # call list.yview when I move
list.config(yscrollcommand=sbar.set) # call sbar.set when I move
The scroll bar and listbox are effectively cross-linked to each other through these con-
figuration options; their values simply refer to bound widget methods of the other. By
linking like this, tkinter automatically keeps the two widgets in sync with each other
as they move. Here’s how this works:
• Moving a scroll bar invokes the callback handler registered with its command option.
Here, list.yview refers to a built-in listbox method that adjusts the listbox display
proportionally, based on arguments passed to the handler.
Listboxes and Scrollbars | 525
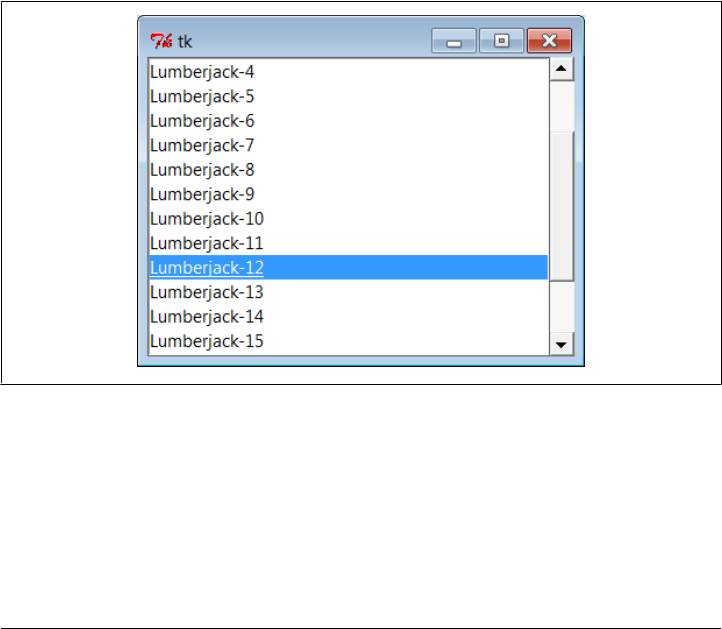
• Moving a listbox vertically invokes the callback handler registered with its yscroll
command option. In this script, the sbar.set built-in method adjusts a scroll bar
proportionally.
In other words, moving one automatically moves the other. It turns out that every
scrollable object in tkinter—Listbox, Entry, Text, and Canvas—has built-in yview and
xview methods to process incoming vertical and horizontal scroll callbacks, as well as
yscrollcommand and xscrollcommand options for specifying an associated scroll bar’s
callback handler to invoke. All scroll bars have a command option, to name an associated
widget’s handler to be called on moves. Internally, tkinter passes information to all of
these methods, and that information specifies their new position (e.g., “go 10 percent
down from the top”), but your scripts usually need never deal with that level of detail.
Because the scroll bar and listbox have been cross-linked in their option settings, mov-
ing the scroll bar automatically moves the list, and moving the list automatically moves
the scroll bar. To move the scroll bar, either drag the solid part or click on its arrows
or empty areas. To move the list, click on the list and either use your arrow keys or
move the mouse pointer above or below the listbox without releasing the mouse button.
In all cases, the list and scroll bar move in unison. Figure 9-15 shows the scene after
expanding the window and moving down a few entries in the list, one way or another.
Figure 9-15. scrolledlist in the middle
Packing Scroll Bars
Finally, remember that widgets packed last are always clipped first when a window is
shrunk. Because of that, it’s important to pack scroll bars in a display as soon as possible
so that they are the last to go when the window becomes too small for everything. You
can generally make do with less than complete listbox text, but the scroll bar is crucial
526 | Chapter 9: A tkinter Tour, Part 2

for navigating through the list. As Figure 9-16 shows, shrinking this script’s window
cuts out part of the list but retains the scroll bar.
Figure 9-16. scrolledlist gets small
At the same time, you don’t generally want a scroll bar to expand with a window, so
be sure to pack it with just a fill=Y (or fill=X for a horizontal scroll) and not an
expand=YES. Expanding this example’s window in Figure 9-15, for instance, made the
listbox grow along with the window, but it kept the scroll bar attached to the right and
kept it the same size.
We’ll see both scroll bars and listboxes repeatedly in later examples in this and later
chapters (flip ahead to examples for PyEdit, PyMailGUI, PyForm, PyTree, and ShellGui
for more). And although the example script in this section captures the fundamentals,
I should point out that there is more to both scroll bars and listboxes than meets the
eye here.
For example, it’s just as easy to add horizontal scroll bars to scrollable widgets. They
are programmed almost exactly like the vertical one implemented here, but callback
handler names start with “x,” not “y” (e.g., xscrollcommand), and an
orient='horizontal' configuration option is set for the scroll bar object. To add both
vertical and horizontal scrolls and to crosslink their motions, you would use the fol-
lowing sort of code:
window = Frame(self)
vscroll = Scrollbar(window)
hscroll = Scrollbar(window, orient='horizontal')
listbox = Listbox(window)
# move listbox when scroll moved
vscroll.config(command=listbox.yview, relief=SUNKEN)
hscroll.config(command=listbox.xview, relief=SUNKEN)
# move scroll when listbox moved
listbox.config(yscrollcommand=vscroll.set, relief=SUNKEN)
listbox.config(xscrollcommand=hscroll.set)
See the image viewer canvas later in this chapter, as well as the PyEdit, PyTree, and
PyMailGUI programs later in this book, for examples of horizontal scroll bars at work.
Scroll bars see more kinds of GUI action too—they can be associated with other kinds
of widgets in the tkinter library. For instance, it is common to attach one to the Text
Listboxes and Scrollbars | 527

widget. Not entirely by coincidence, this brings us to the next point of interest on our
widget tour.
Text
It’s been said that tkinter’s strongest points may be its Text and Canvas widgets. Both
provide a remarkable amount of functionality. For instance, the tkinter Text widget
was powerful enough to implement the web pages of Grail, an experimental web
browser coded in Python; Text supports complex font-style settings, embedded images,
unlimited undo and redo, and much more. The tkinter Canvas widget, a general-purpose
drawing device, allows for efficient free-form graphics and has been the basis of so-
phisticated image-processing and visualization applications.
In Chapter 11, we’ll put these two widgets to use to implement text editors (PyEdit),
paint programs (PyDraw), clock GUIs (PyClock), and image programs (PyPhoto and
PyView). For the purposes of this tour chapter, though, let’s start out using these
widgets in simpler ways. Example 9-10 implements a simple scrolled-text display,
which knows how to fill its display with a text string or file.
Example 9-10. PP4E\Gui\Tour\scrolledtext.py
"a simple text or file viewer component"
print('PP4E scrolledtext')
from tkinter import *
class ScrolledText(Frame):
def __init__(self, parent=None, text='', file=None):
Frame.__init__(self, parent)
self.pack(expand=YES, fill=BOTH) # make me expandable
self.makewidgets()
self.settext(text, file)
def makewidgets(self):
sbar = Scrollbar(self)
text = Text(self, relief=SUNKEN)
sbar.config(command=text.yview) # xlink sbar and text
text.config(yscrollcommand=sbar.set) # move one moves other
sbar.pack(side=RIGHT, fill=Y) # pack first=clip last
text.pack(side=LEFT, expand=YES, fill=BOTH) # text clipped first
self.text = text
def settext(self, text='', file=None):
if file:
text = open(file, 'r').read()
self.text.delete('1.0', END) # delete current text
self.text.insert('1.0', text) # add at line 1, col 0
self.text.mark_set(INSERT, '1.0') # set insert cursor
self.text.focus() # save user a click
def gettext(self): # returns a string
528 | Chapter 9: A tkinter Tour, Part 2
return self.text.get('1.0', END+'-1c') # first through last
if __name__ == '__main__':
root = Tk()
if len(sys.argv) > 1:
st = ScrolledText(file=sys.argv[1]) # filename on cmdline
else:
st = ScrolledText(text='Words\ngo here') # or not: two lines
def show(event):
print(repr(st.gettext())) # show as raw string
root.bind('<Key-Escape>', show) # esc = dump text
root.mainloop()
Like the ScrolledList in Example 9-9, the ScrolledText object in this file is designed
to be a reusable component which we’ll also put to work in later examples, but it can
also be run standalone to display text file contents. Also like the last section, this script
is careful to pack the scroll bar first so that it is cut out of the display last as the window
shrinks and arranges for the embedded Text object to expand in both directions as the
window grows. When run with a filename argument, this script makes the window
shown in Figure 9-17; it embeds a Text widget on the left and a cross-linked Scroll
bar on the right.
Figure 9-17. scrolledtext in action
Just for fun, I populated the text file displayed in the window with the following code
and command lines (and not just because I used to live near an infamous hotel in
Colorado):
C:\...\PP4E\Gui\Tour> type makefile.py
f = open('jack.txt', 'w')
Text | 529

for i in range(250):
f.write('%03d) All work and no play makes Jack a dull boy.\n' % i)
f.close()
C:\...\PP4E\Gui\Tour> python makefile.py
C:\...\PP4E\Gui\Tour> python scrolledtext.py jack.txt
PP4E scrolledtext
To view a file, pass its name on the command line—its text is automatically displayed
in the new window. By default, it is shown in a font that may vary per platform (and
might not be fixed-width on some), but we’ll pass a font option to the Text widget in
the next example to change that. Pressing the Escape key fetches and displays the full
text content of the widget as a single string (more on this in a moment).
Notice the PP4E scrolledtext message printed when this script runs. Because there is
also a scrolledtext.py file in the standard Python distribution (in module
tkinter.scrolledtext) with a very different implementation and interface, the one here
identifies itself when run or imported, so you can tell which one you’ve got. If the
standard library’s alternative ever goes away, import the class listed to get a simple text
browser, and adjust any text widget configuration calls to include a .text qualifier level
(e.g., x.text.config instead of x.config; the library version subclasses Text directly,
not Frame).
Programming the Text Widget
To understand how this script works at all, though, we have to detour into a few
Text widget details here. Earlier we met the Entry and Message widgets, which address
a subset of the Text widget’s uses. The Text widget is much richer in both features and
interfaces—it supports both input and display of multiple lines of text, editing opera-
tions for both programs and interactive users, multiple fonts and colors, and much
more. Text objects are created, configured, and packed just like any other widget, but
they have properties all their own.
Text is a Python string
Although the Text widget is a powerful tool, its interface seems to boil down to two
core concepts. First, the content of a Text widget is represented as a string in Python
scripts, and multiple lines are separated with the normal \n line terminator. The string
'Words\ngo here', for instance, represents two lines when stored in or fetched from a
Text widget; it would normally have a trailing \n also, but it doesn’t have to.
To help illustrate this point, this script binds the Escape key press to fetch and print
the entire contents of the Text widget it embeds:
C:\...\PP4E\Gui\Tour> python scrolledtext.py
PP4E scrolledtext
'Words\ngo here'
'Always look\non the bright\nside of life\n'
530 | Chapter 9: A tkinter Tour, Part 2

When run with arguments, the script stores a file’s contents in the Text widget. When
run without arguments, the script stuffs a simple literal string into the widget, displayed
by the first Escape press output here (recall that \n is the escape sequence for the line-
end character). The second output here happens after editing the window’s text, when
pressing Escape in the shrunken window captured in Figure 9-18. By default, Text
widget text is fully editable using the usual edit operations for your platform.
Figure 9-18. scrolledtext gets a positive outlook
String positions
The second key to understanding Text code has to do with the ways you specify a
position in the text string. Like the listbox, Text widgets allow you to specify such a
position in a variety of ways. In Text, methods that expect a position to be passed in
will accept an index, a mark, or a tag reference. Moreover, some special operations are
invoked with predefined marks and tags—the insert cursor is mark INSERT, and the
current selection is tag SEL. Since they are fundamental to Text and the source of much
of its expressive power, let’s take a closer look at these settings.
Because it is a multiple-line widget, Text indexes identify both a line and a
column. For instance, consider the interfaces of the basic insert, delete, and fetch text
operations used by this script:
self.text.insert('1.0', text) # insert text at the start
self.text.delete('1.0', END) # delete all current text
return self.text.get('1.0', END+'-1c') # fetch first through last
In all of these, the first argument is an absolute index that refers to the start of the text
string: string '1.0' means row 1, column 0 (rows are numbered from 1 and columns
from 0, though '0.0' is accepted as a reference to the start of the text, too). An index
'2.1' refers to the second character in the second row.
Like the listbox, text indexes can also be symbolic names: the END in the preceding
delete call refers to the position just past the last character in the text string (it’s a
tkinter variable preset to string 'end'). Similarly, the symbolic index INSERT (really,
string 'insert') refers to the position immediately after the insert cursor—the place
where characters would appear if typed at the keyboard. Symbolic names such as
INSERT can also be called marks, described in a moment.
Text indexes.
Text | 531

For added precision, you can add simple arithmetic extensions to index strings. The
index expression END+'-1c' in the get call in the previous example, for instance, is really
the string 'end-1c' and refers to one character back from END. Because END points to
just beyond the last character in the text string, this expression refers to the last char-
acter itself. The −1c extension effectively strips the trailing \n that this widget adds to
its contents (and which may add a blank line if saved in a file).
Similar index string extensions let you name characters ahead (+1c), name lines ahead
and behind (+2l, −2l), and specify things such as line ends and word starts around an
index (lineend, wordstart). Indexes show up in most Text widget calls.
Besides row/column identifier strings, you can also pass positions as names
of marks—symbolic names for a position between two characters. Unlike absolute row/
column positions, marks are virtual locations that move as new text is inserted or de-
leted (by your script or your user). A mark always refers to its original location, even if
that location shifts to a different row and column over time.
To create a mark, call the Text object’s mark_set method with a string name and an
index to give its logical location. For instance, this script sets the insert cursor at the
start of the text initially, with a call like the first one here:
self.text.mark_set(INSERT, '1.0') # set insert cursor to start
self.text.mark_set('linetwo', '2.0') # mark current line 2
The name INSERT is a predefined special mark that identifies the insert cursor position;
setting it changes the insert cursor’s location. To make a mark of your own, simply
provide a unique name as in the second call here and use it anywhere you need to specify
a text position. The mark_unset call deletes marks by name.
In addition to absolute indexes and symbolic mark names, the Text widget
supports the notion of tags—symbolic names associated with one or more substrings
within the Text widget’s string. Tags can be used for many things, but they also serve
to represent a position anywhere you need one: tagged items are named by their be-
ginning and ending indexes, which can be later passed to position-based calls.
For example, tkinter provides a built-in tag name, SEL—a tkinter name preassigned to
string 'sel'—which automatically refers to currently selected text. To fetch the text
selected (highlighted) with a mouse, run either of these calls:
text = self.text.get(SEL_FIRST, SEL_LAST) # use tags for from/to indexes
text = self.text.get('sel.first', 'sel.last') # strings and constants work
The names SEL_FIRST and SEL_LAST are just preassigned variables in the tkinter module
that refer to the strings used in the second line here. The text get method expects two
indexes; to fetch text names by a tag, add .first and .last to the tag’s name to get its
start and end indexes.
To tag a substring, call the Text widget’s tag_add method with a tag name string and
start and stop positions (text can also be tagged as added in insert calls). To remove
a tag from all characters in a range of text, call tag_remove:
Text marks.
Text tags.
532 | Chapter 9: A tkinter Tour, Part 2

self.text.tag_add('alltext', '1.0', END) # tag all text in the widget
self.text.tag_add(SEL, index1, index2) # select from index1 up to index2
self.text.tag_remove(SEL, '1.0', END) # remove selection from all text
The first line here creates a new tag that names all text in the widget—from start through
end positions. The second line adds a range of characters to the built-in SEL selection
tag—they are automatically highlighted, because this tag is predefined to configure its
members that way. The third line removes all characters in the text string from the
SEL tag (all selections are unselected). Note that the tag_remove call just untags text
within the named range; to really delete a tag completely, call tag_delete instead. Also
keep in mind that these calls apply to tags themselves; to delete actual text use the
delete method shown earlier.
You can map indexes to tags dynamically, too. For example, the text search method
returns the row.column index of the first occurrence of a string between start and stop
positions. To automatically select the text thus found, simply add its index to the built-
in SEL tag:
where = self.text.search(target, INSERT, END) # search from insert cursor
pastit = where + ('+%dc' % len(target)) # index beyond string found
self.text.tag_add(SEL, where, pastit) # tag and select found string
self.text.focus() # select text widget itself
If you want only one string to be selected, be sure to first run the tag_remove call listed
earlier—this code adds a selection in addition to any selections that already exist (it
may generate multiple selections in the display). In general, you can add any number
of substrings to a tag to process them as a group.
To summarize: indexes, marks, and tag locations can be used anytime you need a text
position. For instance, the text see method scrolls the display to make a position visible;
it accepts all three kinds of position specifiers:
self.text.see('1.0') # scroll display to top
self.text.see(INSERT) # scroll display to insert cursor mark
self.text.see(SEL_FIRST) # scroll display to selection tag
Text tags can also be used in broader ways for formatting and event bindings, but I’ll
defer those details until the end of this section.
Adding Text-Editing Operations
Example 9-11 puts some of these concepts to work. It extends Example 9-10 to add
support for four common text-editing operations—file save, text cut and paste, and
string find searching—by subclassing ScrolledText to provide additional buttons and
methods. The Text widget comes with a set of default keyboard bindings that perform
some common editing operations, too, but they might not be what is expected on every
platform; it’s more common and user friendly to provide GUI interfaces to editing
operations in a GUI text editor.
Text | 533

Example 9-11. PP4E\Gui\Tour\simpleedit.py
"""
add common edit tools to ScrolledText by inheritance;
composition (embedding) would work just as well here;
this is not robust!--see PyEdit for a feature superset;
"""
from tkinter import *
from tkinter.simpledialog import askstring
from tkinter.filedialog import asksaveasfilename
from quitter import Quitter
from scrolledtext import ScrolledText # here, not Python's
class SimpleEditor(ScrolledText): # see PyEdit for more
def __init__(self, parent=None, file=None):
frm = Frame(parent)
frm.pack(fill=X)
Button(frm, text='Save', command=self.onSave).pack(side=LEFT)
Button(frm, text='Cut', command=self.onCut).pack(side=LEFT)
Button(frm, text='Paste', command=self.onPaste).pack(side=LEFT)
Button(frm, text='Find', command=self.onFind).pack(side=LEFT)
Quitter(frm).pack(side=LEFT)
ScrolledText.__init__(self, parent, file=file)
self.text.config(font=('courier', 9, 'normal'))
def onSave(self):
filename = asksaveasfilename()
if filename:
alltext = self.gettext() # first through last
open(filename, 'w').write(alltext) # store text in file
def onCut(self):
text = self.text.get(SEL_FIRST, SEL_LAST) # error if no select
self.text.delete(SEL_FIRST, SEL_LAST) # should wrap in try
self.clipboard_clear()
self.clipboard_append(text)
def onPaste(self): # add clipboard text
try:
text = self.selection_get(selection='CLIPBOARD')
self.text.insert(INSERT, text)
except TclError:
pass # not to be pasted
def onFind(self):
target = askstring('SimpleEditor', 'Search String?')
if target:
where = self.text.search(target, INSERT, END) # from insert cursor
if where: # returns an index
print(where)
pastit = where + ('+%dc' % len(target)) # index past target
#self.text.tag_remove(SEL, '1.0', END) # remove selection
self.text.tag_add(SEL, where, pastit) # select found target
self.text.mark_set(INSERT, pastit) # set insert mark
self.text.see(INSERT) # scroll display
534 | Chapter 9: A tkinter Tour, Part 2
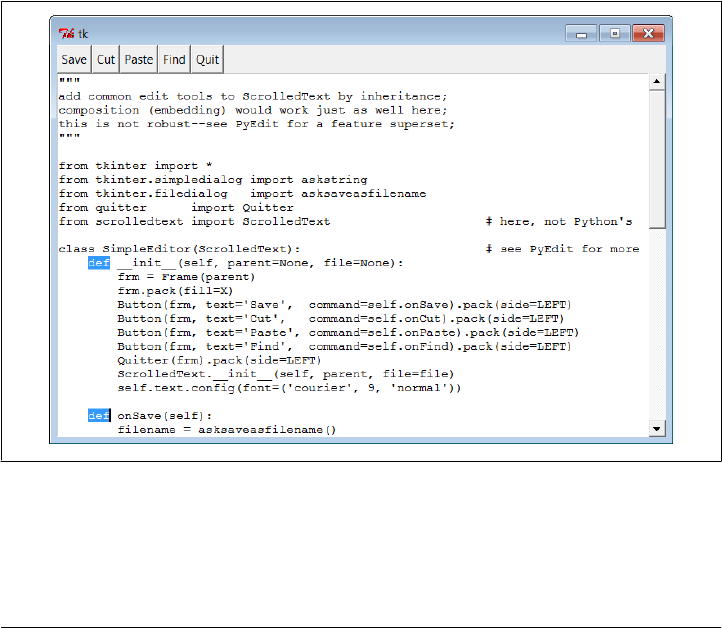
self.text.focus() # select text widget
if __name__ == '__main__':
if len(sys.argv) > 1:
SimpleEditor(file=sys.argv[1]).mainloop() # filename on command line
else:
SimpleEditor().mainloop() # or not: start empty
This, too, was written with one eye toward reuse—the SimpleEditor class it defines
could be attached or subclassed by other GUI code. As I’ll explain at the end of this
section, though, it’s not yet as robust as a general-purpose library tool should be. Still,
it implements a functional text editor in a small amount of portable code. When run
standalone, it brings up the window in Figure 9-19 (shown editing itself and running
on Windows); index positions are printed on stdout after each successful find
operation—here, for two “def” finds, with prior selection removal logic commented-
out in the script (uncomment this line in the script to get single-selection behavior for
finds):
C:\...\PP4E\Gui\Tour> python simpleedit.py simpleedit.py
PP4E scrolledtext
14.4
25.4
Figure 9-19. simpleedit in action
The save operation pops up the common save dialog that is available in tkinter and is
tailored to look native on each platform. Figure 9-20 shows this dialog in action on
Windows 7. Find operations also pop up a standard dialog box to input a search string
Text | 535
(Figure 9-21); in a full-blown editor, you might want to save this string away to repeat
the find again (we will, in Chapter 11’s more full-featured PyEdit example). Quit op-
erations reuse the verifying Quit button component we coded in Chapter 8 yet again;
code reuse means never having to say you’re quitting without warning…
Figure 9-20. Save pop-up dialog on Windows
Figure 9-21. Find pop-up dialog
Using the clipboard
Besides Text widget operations, Example 9-11 applies the tkinter clipboard interfaces
in its cut-and-paste functions. Together, these operations allow you to move text within
a file (cut in one place, paste in another). The clipboard they use is just a place to store
data temporarily—deleted text is placed on the clipboard on a cut, and text is inserted
from the clipboard on a paste. If we restrict our focus to this program alone, there really
536 | Chapter 9: A tkinter Tour, Part 2

is no reason that the text string cut couldn’t simply be stored in a Python instance
variable. But the clipboard is actually a much larger concept.
The clipboard used by this script is an interface to a system-wide storage space, shared
by all programs on your computer. Because of that, it can be used to transfer data
between applications, even ones that know nothing of tkinter. For instance, text cut or
copied in a Microsoft Word session can be pasted in a SimpleEditor window, and text
cut in SimpleEditor can be pasted in a Microsoft Notepad window (try it). By using the
clipboard for cut and paste, SimpleEditor automatically integrates with the window
system at large. Moreover, the clipboard is not just for the Text widget—it can also be
used to cut and paste graphical objects in the Canvas widget (discussed next).
As used in the script of Example 9-11, the basic tkinter clipboard interface looks like
this:
self.clipboard_clear() # clear the clipboard
self.clipboard_append(text) # store a text string on it
text = self.selection_get(selection='CLIPBOARD') # fetch contents, if any
All of these calls are available as methods inherited by all tkinter widget objects because
they are global in nature. The CLIPBOARD selection used by this script is available on all
platforms (a PRIMARY selection is also available, but it is only generally useful on X
Windows, so we’ll ignore it here). Notice that the clipboard selection_get call throws
a TclError exception if it fails; this script simply ignores it and abandons a paste request,
but we’ll do better later.
Composition versus inheritance
As coded, SimpleEditor uses inheritance to extend ScrolledText with extra buttons and
callback methods. As we’ve seen, it’s also reasonable to attach (embed) GUI objects
coded as components, such as ScrolledText. The attachment model is usually called
composition; some people find it simpler to understand and less prone to name clashes
than extension by inheritance.
To give you an idea of the differences between these two approaches, the following
sketches the sort of code you would write to attach ScrolledText to SimpleEditor with
changed lines in bold font (see the file simpleedit2.py in the book’s examples distribu-
tion for a complete composition implementation). It’s mostly a matter of passing in the
right parents and adding an extra st attribute name anytime you need to get to the
Text widget’s methods:
class SimpleEditor(Frame):
def __init__(self, parent=None, file=None):
Frame.__init__(self, parent)
self.pack()
frm = Frame(self)
frm.pack(fill=X)
Button(frm, text='Save', command=self.onSave).pack(side=LEFT)
...more...
Text | 537

Quitter(frm).pack(side=LEFT)
self.st = ScrolledText(self, file=file) # attach, not subclass
self.st.text.config(font=('courier', 9, 'normal'))
def onSave(self):
filename = asksaveasfilename()
if filename:
alltext = self.st.gettext() # go through attribute
open(filename, 'w').write(alltext)
def onCut(self):
text = self.st.text.get(SEL_FIRST, SEL_LAST)
self.st.text.delete(SEL_FIRST, SEL_LAST)
...more...
This code doesn’t need to subclass Frame necessarily (it could add widgets to the passed-
in parent directly), but being a frame allows the full package here to be embedded and
configured as well. The window looks identical when such code is run. I’ll let you be
the judge of whether composition or inheritance is better here. If you code your Python
GUI classes right, they will work under either regime.
It’s called “Simple” for a reason: PyEdit (ahead)
Finally, before you change your system registry to make SimpleEditor your default text
file viewer, I should mention that although it shows the basics, it’s something of a
stripped-down version (really, a prototype) of the PyEdit example we’ll meet in Chap-
ter 11. In fact, you may wish to study that example now if you’re looking for more
complete tkinter text-processing code in general. There, we’ll also use more advanced
text operations, such as the undo/redo interface, case-insensitive searches, external files
search, and more. Because the Text widget is so powerful, it’s difficult to demonstrate
more of its features without the volume of code that is already listed in the PyEdit
program.
I should also point out that SimpleEditor not only is limited in function, but also is just
plain careless—many boundary cases go unchecked and trigger uncaught exceptions
that don’t kill the GUI, but are not handled or reported well. Even errors that are caught
are not reported to the user (e.g., a paste with nothing to be pasted). Be sure to see the
PyEdit example for a more robust and complete implementation of the operations
introduced in SimpleEditor.
Unicode and the Text Widget
I told you earlier that text content in the Text widget is always a string. Technically,
though, there are two string types in Python 3.X: str for Unicode text, and bytes for
byte strings. Moreover, text can be represented in a variety of Unicode encodings when
stored on files. It turns out that both these factors can impact programs that wish to
use Text well in Python 3.X.
538 | Chapter 9: A tkinter Tour, Part 2

In short, tkinter’s Text and other text-related widgets such as Entry support display of
International character sets for both str and bytes, but we must pass decoded Unicode
str to support the broadest range of character types. In this section, we decompose the
text story in tkinter in general to show why.
String types in the Text widget
You may or may not have noticed, but all our examples so far have been representing
content as str strings—either hardcoded in scripts, or fetched and saved using simple
text-mode files which assume the platform default encoding. Technically, though, the
Text widget allows us to insert both str and bytes:
>>> from tkinter import Text
>>> T = Text()
>>> T.insert('1.0', 'spam') # insert a str
>>> T.insert('end', b'eggs') # insert a bytes
>>> T.pack() # "spameggs" appears in text widget now
>>> T.get('1.0', 'end') # fetch content
'spameggs\n'
Inserting text as bytes might be useful for viewing arbitrary kinds of Unicode text,
especially if the encoding name is unknown. For example, text fetched over the Internet
(e.g., attached to an email or fetched by FTP) could be in any Unicode encoding; storing
it in binary-mode files and displaying it as bytes in a Text widget may at least seem to
side-step the encoding in our scripts.
Unfortunately, though, the Text widget returns its content as str strings, regardless of
whether it was inserted as str or bytes—we get back already-decoded Unicode text
strings either way:
>>> T = Text()
>>> T.insert('1.0', 'Textfileline1\n')
>>> T.insert('end', 'Textfileline2\n') # content is str for str
>>> T.get('1.0', 'end') # pack() is irrelevent to get()
'Textfileline1\nTextfileline2\n\n'
>>> T = Text()
>>> T.insert('1.0', b'Bytesfileline1\r\n') # content is str for bytes too!
>>> T.insert('end', b'Bytesfileline2\r\n') # and \r displays as a space
>>> T.get('1.0', 'end')
'Bytesfileline1\r\nBytesfileline2\r\n\n'
In fact, we get back str for content even if we insert both str and bytes, with a single
\n added at the end for good measure, as the first example in this section shows; here’s
a more comprehensive illustration:
>>> T = Text()
>>> T.insert('1.0', 'Textfileline1\n')
>>> T.insert('end', 'Textfileline2\n') # content is str for both
>>> T.insert('1.0', b'Bytesfileline1\r\n') # one \n added for either type
>>> T.insert('end', b'Bytesfileline2\r\n') # pack() displays as 4 lines
>>> T.get('1.0', 'end')
'Bytesfileline1\r\nTextfileline1\nTextfileline2\nBytesfileline2\r\n\n'
Text | 539

>>>
>>> print(T.get('1.0', 'end'))
Bytesfileline1
Textfileline1
Textfileline2
Bytesfileline2
This makes it easy to perform text processing on content after it is fetched: we may
conduct it in terms of str, regardless of which type of string was inserted. However,
this also makes it difficult to treat text data generically from a Unicode perspective: we
cannot save the returned str content to a binary mode file as is, because binary mode
files expect bytes. We must either encode to bytes manually first or open the file in text
mode and rely on it to encode the str. In either case we must know the Unicode en-
coding name to apply, assume the platform default suffices, fall back on guesses and
hope one works, or ask the user.
In other words, although tkinter allows us to insert and view some text of unknown
encoding as bytes, the fact that it’s returned as str strings means we generally need to
know how to encode it anyhow on saves, to satisfy Python 3.X file interfaces. Moreover,
because bytes inserted into Text widgets must also be decodable according to the limi-
ted Unicode policies of the underlying Tk library, we’re generally better off decoding
text to str ourselves if we wish to support Unicode broadly. To truly understand why
that’s true, we need to take a brief excursion through the Land of Unicode.
Unicode text in strings
The reason for all this extra complexity, of course, is that in a world with Unicode, we
cannot really think of “text” anymore without also asking “which kind.” Text in general
can be encoded in a wide variety of Unicode encoding schemes. In Python, this is always
a factor for str and pertains to bytes when it contains encoded text. Python’s str Uni-
code strings are simply strings once they are created, but you have to take encodings
into consideration when transferring them to and from files and when passing them to
libraries that impose constraints on text encodings.
We won’t cover Unicode encodings it in depth here (see Learning Python for back-
ground details, as well as the brief look at implications for files in Chapter 4), but a
quick review is in order to illustrate how this relates to Text widgets. First of all, keep
in mind that ASCII text data normally just works in most contexts, because it is a subset
of most Unicode encoding schemes. Data outside the ASCII 7-bit range, though, may
be represented differently as bytes in different encoding schemes.
For instance, the following must decode a Latin-1 bytes string using the Latin-1 en-
coding—using the platform default or an explicitly named encoding that doesn’t match
the bytes will fail:
>>> b = b'A\xc4B\xe4C' # these bytes are latin-1 format text
>>> b
b'A\xc4B\xe4C'
540 | Chapter 9: A tkinter Tour, Part 2

>>> s = b.decode('utf8')
UnicodeDecodeError: 'utf8' codec can't decode bytes in position 1-2: invalid dat...
>>> s = b.decode()
UnicodeDecodeError: 'utf8' codec can't decode bytes in position 1-2: invalid dat...
>>> s = b.decode('latin1')
>>> s
'AÄBäC'
Once you’ve decoded to a Unicode string, you can “convert” it to a variety of different
encoding schemes. Really, this simply translates to alternative binary encoding formats,
from which we can decode again later; a Unicode string has no Unicode type per se,
only encoded binary data does:
>>> s.encode('latin-1')
b'A\xc4B\xe4C'
>>> s.encode('utf-8')
b'A\xc3\x84B\xc3\xa4C'
>>> s.encode('utf-16')
b'\xff\xfeA\x00\xc4\x00B\x00\xe4\x00C\x00'
>>> s.encode('ascii')
UnicodeEncodeError: 'ascii' codec can't encode character '\xc4' in position 1: o...
Notice the last test here: the string you encode to must be compatible with the scheme
you choose, or you’ll get an exception; here, ASCII is too narrow to represent characters
decoded from Latin-1 bytes. Even though you can convert to different (compatible)
representations’ bytes, you must generally know what the encoded format is in order
to decode back to a string:
>>> s.encode('utf-16').decode('utf-16')
'AÄBäC'
>>> s.encode('latin-1').decode('latin-1')
'AÄBäC'
>>> s.encode('latin-1').decode('utf-8')
UnicodeDecodeError: 'utf8' codec can't decode bytes in position 1-2: invalid dat...
>>> s.encode('utf-8').decode('latin-1')
UnicodeEncodeError: 'charmap' codec can't encode character '\xc3' in position 2:...
Note the last test here again. Technically, encoding Unicode code points (characters)
to UTF-8 bytes and then decoding back again per the Latin-1 format does not raise an
error, but trying to print the result does: it’s scrambled garbage. To maintain fidelity,
you must generally know what format encoded bytes are in:
>>> s
'AÄBäC'
>>> x = s.encode('utf-8').decode('utf-8') # OK if encoding matches data
>>> x
'AÄBäC'
>>> x = s.encode('latin-1').decode('latin-1') # any compatible encoding works
Text | 541

>>> x
'AÄBäC'
>>> x = s.encode('utf-8').decode('latin-1') # decoding works, result is garbage
>>> x
UnicodeEncodeError: 'charmap' codec can't encode character '\xc3' in position 2:...
>>> len(s), len(x) # no longer the same string
(5, 7)
>>> s.encode('utf-8') # no longer same code points
b'A\xc3\x84B\xc3\xa4C'
>>> x.encode('utf-8')
b'A\xc3\x83\xc2\x84B\xc3\x83\xc2\xa4C'
>>> s.encode('latin-1')
b'A\xc4B\xe4C'
>>> x.encode('latin-1')
b'A\xc3\x84B\xc3\xa4C'
Curiously, the original string may still be there after a mismatch like this—if we encode
the scrambled bytes back to Latin-1 again (as 8-bit characters) and then decode prop-
erly, we might restore the original (in some contexts this can constitute a sort of second
chance if data is decoded wrong initially):
>>> s
'AÄBäC'
>>> s.encode('utf-8').decode('latin-1')
UnicodeEncodeError: 'charmap' codec can't encode character '\xc3' in position 2:...
>>> s.encode('utf-8').decode('latin-1').encode('latin-1')
b'A\xc3\x84B\xc3\xa4C'
>>> s.encode('utf-8').decode('latin-1').encode('latin-1').decode('utf-8')
'AÄBäC'
>>> s.encode('utf-8').decode('latin-1').encode('latin-1').decode('utf-8') == s
True
On the other hand, we can use a different encoding name to decode, as long as it’s
compatible with the format of the data; ASCII, UTF-8, and Latin-1, for instance, all
format ASCII text the same way:
>>> 'spam'.encode('utf8').decode('latin1')
'spam'
>>> 'spam'.encode('latin1').decode('ascii')
'spam'
It’s important to remember that a string’s decoded value doesn’t depend on the en-
coding it came from—once decoded, a string has no notion of encoding and is simply
a sequence of Unicode characters (“code points”). Hence, we really only need to care
about encodings at the point of transfer to and from files:
>>> s
'AÄBäC'
>>> s.encode('utf-16').decode('utf-16') == s.encode('latin-1').decode('latin-1')
True
542 | Chapter 9: A tkinter Tour, Part 2

Unicode text in files
Now, the same rules apply to text files, because Unicode strings are stored in files as
encoded bytes. When writing, we can encode in any format that accommodates the
string’s characters. When reading, though, we generally must know what that encoding
is or provide one that formats characters the same way:
>>> open('ldata', 'w', encoding='latin-1').write(s) # store in latin-1 format
5
>>> open('udata', 'w', encoding='utf-8').write(s) # store in utf-8 format
5
>>> open('ldata', 'r', encoding='latin-1').read() # OK if correct name given
'AÄBäC'
>>> open('udata', 'r', encoding='utf-8').read()
'AÄBäC'
>>> open('ldata', 'r').read() # else, may not work
'AÄBäC'
>>> open('udata', 'r').read()
UnicodeEncodeError: 'charmap' codec can't encode characters in position 2-3: cha...
>>> open('ldata', 'r', encoding='utf-8').read()
UnicodeDecodeError: 'utf8' codec can't decode bytes in position 1-2: invalid dat...
>>> open('udata', 'r', encoding='latin-1').read()
UnicodeEncodeError: 'charmap' codec can't encode character '\xc3' in position 2:...
By contrast, binary mode files don’t attempt to decode into a Unicode string; they
happily read whatever is present, whether the data was written to the file in text mode
with automatically encoded str strings (as in the preceding interaction) or in binary
mode with manually encoded bytes strings:
>>> open('ldata', 'rb').read()
b'A\xc4B\xe4C'
>>> open('udata', 'rb').read()
b'A\xc3\x84B\xc3\xa4C'
>>> open('sdata', 'wb').write( s.encode('utf-16') ) # return value: 12
>>> open('sdata', 'rb').read()
b'\xff\xfeA\x00\xc4\x00B\x00\xe4\x00C\x00'
Unicode and the Text widget
The application of all this to tkinter Text displays is straightforward: if we open in binary
mode to read bytes, we don’t need to be concerned about encodings in our own code—
tkinter interprets the data as expected, at least for these two encodings:
>>> from tkinter import Text
>>> t = Text()
>>> t.insert('1.0', open('ldata', 'rb').read())
>>> t.pack() # string appears in GUI OK
>>> t.get('1.0', 'end')
'AÄBäC\n'
>>>
Text | 543

>>> t = Text()
>>> t.insert('1.0', open('udata', 'rb').read())
>>> t.pack() # string appears in GUI OK
>>> t.get('1.0', 'end')
'AÄBäC\n'
It works the same if we pass a str fetched in text mode, but we then need to know the
encoding type on the Python side of the fence—reads will fail if the encoding type
doesn’t match the stored data:
>>> t = Text()
>>> t.insert('1.0', open('ldata', 'r', encoding='latin-1').read())
>>> t.pack()
>>> t.get('1.0', 'end')
'AÄBäC\n'
>>>
>>> t = Text()
>>> t.insert('1.0', open('udata', 'r', encoding='utf-8').read())
>>> t.pack()
>>> t.get('1.0', 'end')
'AÄBäC\n'
Either way, though, the fetched content is always a Unicode str, so binary mode really
only addresses loads: we still need to know an encoding to store, whether we write in
text mode directly or write in binary mode after manual encoding:
>>> c = t.get('1.0', 'end')
>>> c # content is str
'AÄBäC\n'
>>> open('cdata', 'wb').write(c) # binary mode needs bytes
TypeError: must be bytes or buffer, not str
>>> open('cdata', 'w', encoding='latin-1').write(c) # each write returns 6
>>> open('cdata', 'rb').read()
b'A\xc4B\xe4C\r\n'
>>> open('cdata', 'w', encoding='utf-8').write(c) # different bytes on files
>>> open('cdata', 'rb').read()
b'A\xc3\x84B\xc3\xa4C\r\n'
>>> open('cdata', 'w', encoding='utf-16').write(c)
>>> open('cdata', 'rb').read()
b'\xff\xfeA\x00\xc4\x00B\x00\xe4\x00C\x00\r\x00\n\x00'
>>> open('cdata', 'wb').write( c.encode('latin-1') ) # manual encoding first
>>> open('cdata', 'rb').read() # same but no \r on Win
b'A\xc4B\xe4C\n'
>>> open('cdata', 'w', encoding='ascii').write(c) # still must be compatible
UnicodeEncodeError: 'ascii' codec can't encode character '\xc4' in position 1: o
Notice the last test here: like manual encoding, file writes can still fail if the data cannot
be encoded in the target scheme. Because of that, programs may need to recover from
544 | Chapter 9: A tkinter Tour, Part 2

exceptions or try alternative schemes; this is especially true on platforms where ASCII
may be the default platform encoding.
The problem with treating text as bytes
The prior sections’ rules may seem complex, but they boil down to the following:
• Unless strings always use the platform default, we need to know encoding types
to read or write in text mode and to manually decode or encode for binary mode.
• We can use almost any encoding to write new files as long as it can handle the
string’s characters, but must provide one that is compatible with the existing data’s
binary format on reads.
• We don’t need to know the encoding mode to read text as bytes in binary mode
for display, but the str content returned by the Text widget still requires us to
encode to write on saves.
So why not always load text files in binary mode to display them in a tkinter Text widget?
While binary mode input files seem to side-step encoding issues for display, passing
text to tkinter as bytes instead of str really just delegates the encoding issue to the Tk
library, which imposes constraints of its own.
More specifically, opening input files in binary mode to read bytes may seem to support
viewing arbitrary types of text, but it has two potential downsides:
• It shifts the burden of deciding encoding type from our script to the Tk GUI library.
The library must still determine how to render those bytes and may not support
all encodings possible.
• It allows opening and viewing data that is not text in nature, thereby defeating
some of the purpose of the validity checks performed by text decoding.
The first point is probably the most crucial here. In experiments I’ve run on Windows,
Tk seems to correctly handle raw bytes strings encoded in ASCII, UTF-8 and Latin-1
format, but not UTF-16 or others such as CP500. By contrast, these all render correctly
if decoded in Python to str before being passed on to Tk. In programs intended for the
world at large, this wider support is crucial today. If you’re able to know or ask for
encodings, you’re better off using str both for display and saves.
To some degree, regardless of whether you pass in str or bytes, tkinter GUIs are subject
to the constraints imposed by the underlying Tk library and the Tcl language it uses
internally, as well as any imposed by the techniques Python’s tkinter uses to interface
with Tk. For example:
• Tcl, the internal implementation language of the Tk library, stores strings internally
in UTF-8 format, and decrees that strings passed in to and returned from its C API
be in this format.
Text | 545

• Tcl attempts to convert byte strings to its internal UTF-8 format, and generally
supports translation using the platform and locale encodings in the local operating
system with Latin-1 as a fallback.
• Python’s tkinter passes bytes strings to Tcl directly, but copies Python str Unicode
strings to and from Tcl Unicode string objects.
• Tk inherits all of Tcl’s Unicode policies, but adds additional font selection policies
for display.
In other words, GUIs that display text in tkinter are somewhat at the mercy of multiple
layers of software, above and beyond the Python language itself. In general, though,
Unicode is broadly supported by Tk’s Text widget for Python str, but not for Python
bytes. As you can probably tell, though, this story quickly becomes very low-level and
detailed, so we won’t explore it further in this book; see the Web and other resources
for more on tkinter, Tk, and Tcl, and the interfaces between them.
Other binary mode considerations
Even in contexts where it’s sufficient, using binary mode files to finesse encodings for
display is more complicated than you might think. We always need to be careful to
write output in binary mode, too, so what we read is what we later write—if we read
in binary mode, content end-lines will be \r\n on Windows, and we don’t want text-
mode files to expand this to \r\r\n. Moreover, there’s another difference in tkinter for
str and bytes. A str read from a text-mode file appears in the GUI as you expect, and
end-lines are mapped on Windows as usual:
C:\...\PP4E\Gui\Tour> python
>>> from tkinter import *
>>> T = Text() # str from text-mode file
>>> T.insert('1.0', open('jack.txt').read()) # platform default encoding
>>> T.pack() # appears in GUI normally
>>> T.get('1.0', 'end')[:75]
'000) All work and no play makes Jack a dull boy.\n001) All work and no pla'
If you pass in a bytes obtained from a binary-mode file, however, it’s odd in the GUI
on Windows—there’s an extra space at the end of each line, which reflects the \r that
is not stripped by binary mode files:
C:\...\PP4E\Gui\Tour> python
>>> from tkinter import *
>>> T = Text() # bytes from binary-mode
>>> T.insert('1.0', open('jack.txt', 'rb').read()) # no decoding occurs
>>> T.pack() # lines have space at end!
>>> T.get('1.0', 'end')[:75]
'000) All work and no play makes Jack a dull boy.\r\n001) All work and no pl'
To use bytes to allow for arbitrary text but make the text appear as expected by users,
we also have to strip the \r characters at line end manually. This assumes that a \r\n
combination doesn’t mean something special in the text’s encoding scheme, though
data in which this sequence does not mean end-of-line will likely have other issues when
546 | Chapter 9: A tkinter Tour, Part 2

displayed. The following avoids the extra end-of-line spaces—we open for input in
binary mode for undecoded bytes, but drop \r:
C:\...\PP4E\Gui\Tour> python
>>> from tkinter import * # use bytes, strip \r if any
>>> T = Text()
>>> data = open('jack.txt', 'rb').read()
>>> data = data.replace(b'\r\n', b'\n')
>>> T.insert('1.0', data)
>>> T.pack()
>>> T.get('1.0', 'end')[:75]
'000) All work and no play makes Jack a dull boy.\n001) All work and no pla'
To save content later, we can either add the \r characters back on Windows only,
manually encode to bytes, and save in binary mode; or we can open in text mode to
make the file object restore the \r if needed and encode for us, and write the str content
string directly. The second of these is probably simpler, as we don’t need to care about
platform differences.
Either way, though, we still face an encoding step—we can either rely on the platform
default encoding or obtain an encoding name from user interfaces. In the following,
for example, the text-mode file converts end-lines and encodes to bytes internally using
the platform default. If we care about supporting arbitrary Unicode types or run on a
platform whose default does not accommodate characters displayed, we would need
to pass in an explicit encoding argument (the Python slice operation here has the same
effect as fetching through Tk’s “end-1c” position specification):
...continuing prior listing...
>>> content = T.get('1.0', 'end')[:-1] # drop added \n at end
>>> open('copyjack.txt', 'w').write(content) # use platform default
12500 # text mode adds \n on Win
>>> ^Z
C:\...\PP4E\Gui\Tour> fc jack.txt copyjack.txt
Comparing files jack.txt and COPYJACK.TXT
FC: no differences encountered
Supporting Unicode in PyEdit (ahead)
We’ll see a use case of accommodating the Text widget’s Unicode behavior in the larger
PyEdit example of Chapter 11. Really, supporting Unicode just means supporting
arbitrary Unicode encodings in text files on opens and saves; once in memory, text
processing can always be performed in terms of str, since that’s how tkinter returns
content. To support Unicode, PyEdit will open both input and output files in text mode
with explicit encodings whenever possible, and fall back on opening input files in binary
mode only as a last resort. This avoids relying on the limited Unicode support Tk
provides for display of raw byte strings.
To make this policy work, PyEdit will accept encoding names from a wide variety of
sources and allow the user to configure which to attempt. Encodings may be obtained
from user dialog inputs, configuration file settings, the platform default, the prior
Text | 547

open’s encoding on saves, and even internal program values (parsed from email head-
ers, for instance). These sources are attempted until the first that succeeds, though it
may also be desirable to limit encoding attempts to just one such source in some
contexts.
Watch for this code in Chapter 14. Frankly, PyEdit in this edition originally read and
wrote files in text mode with platform default encodings. I didn’t consider the impli-
cations of Unicode on PyEdit until the PyMailGUI example’s Internet world raised the
specter of arbitrary text encodings. If it seems that strings are a lot more complicated
than they used to be, it’s probably only because your scope has been too narrow.
Advanced Text and Tag Operations
But enough about the idiosyncrasies of Unicode text—let’s get back to coding GUIs.
Besides the position specification roles we’ve seen so far, the Text widget’s text tags can
also be used to apply formatting and behavior to all characters in a substring and all
substrings added to a tag. In fact, this is where much of the power of the Text widget lies:
• Tags have formatting attributes for setting color, font, tabs, and line spacing and
justification; to apply these to many parts of the text at once, associate them with
a tag and apply formatting to the tag with the tag_config method, much like the
general config widget we’ve been using.
• Tags can also have associated event bindings, which let you implement things such
as hyperlinks in a Text widget: clicking the text triggers its tag’s event handler. Tag
bindings are set with a tag_bind method, much like the general widget bind method
we’ve already met.
With tags, it’s possible to display multiple configurations within the same Text widget;
for instance, you can apply one font to the Text widget at large and other fonts to tagged
text. In addition, the Text widget allows you to embed other widgets at an index (they
are treated like a single character), as well as images.
Example 9-12 illustrates the basics of all these advanced tools at once and draws the
interface captured in Figure 9-22. This script applies formatting and event bindings to
three tagged substrings, displays text in two different font and color schemes, and em-
beds an image and a button. Double-clicking any of the tagged substrings (or the em-
bedded button) with a mouse triggers an event that prints a “Got tag event” message
to stdout.
Example 9-12. PP4E\Gui\Tour\texttags.py
"demo advanced tag and text interfaces"
from tkinter import *
root = Tk()
def hello(event): print('Got tag event')
# make and config a Text
548 | Chapter 9: A tkinter Tour, Part 2
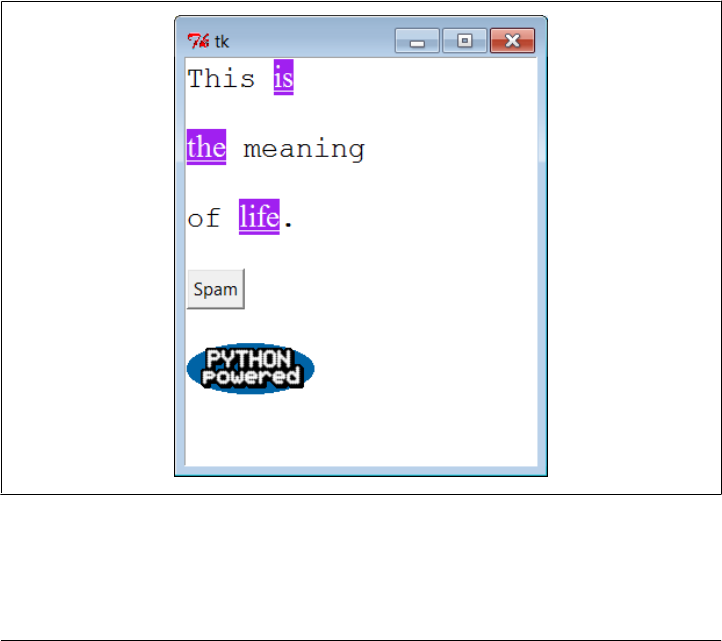
text = Text()
text.config(font=('courier', 15, 'normal')) # set font for all
text.config(width=20, height=12)
text.pack(expand=YES, fill=BOTH)
text.insert(END, 'This is\n\nthe meaning\n\nof life.\n\n') # insert six lines
# embed windows and photos
btn = Button(text, text='Spam', command=lambda: hello(0)) # embed a button
btn.pack()
text.window_create(END, window=btn) # embed a photo
text.insert(END, '\n\n')
img = PhotoImage(file='../gifs/PythonPowered.gif')
text.image_create(END, image=img)
# apply tags to substrings
text.tag_add('demo', '1.5', '1.7') # tag 'is'
text.tag_add('demo', '3.0', '3.3') # tag 'the'
text.tag_add('demo', '5.3', '5.7') # tag 'life'
text.tag_config('demo', background='purple') # change colors in tag
text.tag_config('demo', foreground='white') # not called bg/fg here
text.tag_config('demo', font=('times', 16, 'underline')) # change font in tag
text.tag_bind('demo', '<Double-1>', hello) # bind events in tag
root.mainloop()
Figure 9-22. Text tags in action
Such embedding and tag tools could ultimately be used to render a web page. In fact,
Python’s standard html.parser HTML parser module can help automate web page GUI
Text | 549

construction. As you can probably tell, though, the Text widget offers more GUI pro-
gramming options than we have space to list here. For more details on tag and text
options, consult other Tk and tkinter references. Right now, art class is about to begin.
Canvas
When it comes to graphics, the tkinter Canvas widget is the most free-form device in
the library. It’s a place to draw shapes, move objects dynamically, and place other kinds
of widgets. The canvas is based on a structured graphic object model: everything drawn
on a canvas can be processed as an object. You can get down to the pixel-by-pixel level
in a canvas, but you can also deal in terms of larger objects such as shapes, photos, and
embedded widgets. The net result makes the canvas powerful enough to support
everything from simple paint programs to full-scale visualization and animation.
Basic Canvas Operations
Canvases are ubiquitous in much nontrivial GUI work, and we’ll see larger canvas
examples show up later in this book under the names PyDraw, PyPhoto, PyView,
PyClock, and PyTree. For now, let’s jump right into an example that illustrates the
basics. Example 9-13 runs most of the major canvas drawing methods.
Example 9-13. PP4E\Gui\Tour\canvas1.py
"demo all basic canvas interfaces"
from tkinter import *
canvas = Canvas(width=525, height=300, bg='white') # 0,0 is top left corner
canvas.pack(expand=YES, fill=BOTH) # increases down, right
canvas.create_line(100, 100, 200, 200) # fromX, fromY, toX, toY
canvas.create_line(100, 200, 200, 300) # draw shapes
for i in range(1, 20, 2):
canvas.create_line(0, i, 50, i)
canvas.create_oval(10, 10, 200, 200, width=2, fill='blue')
canvas.create_arc(200, 200, 300, 100)
canvas.create_rectangle(200, 200, 300, 300, width=5, fill='red')
canvas.create_line(0, 300, 150, 150, width=10, fill='green')
photo=PhotoImage(file='../gifs/ora-lp4e.gif')
canvas.create_image(325, 25, image=photo, anchor=NW) # embed a photo
widget = Label(canvas, text='Spam', fg='white', bg='black')
widget.pack()
canvas.create_window(100, 100, window=widget) # embed a widget
canvas.create_text(100, 280, text='Ham') # draw some text
mainloop()
550 | Chapter 9: A tkinter Tour, Part 2
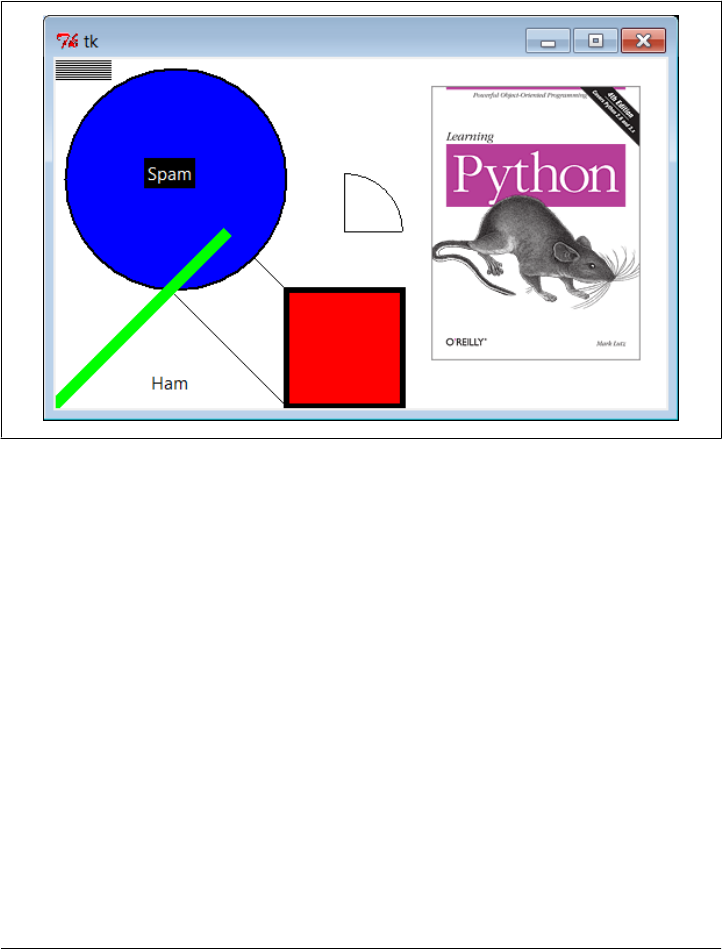
When run, this script draws the window captured in Figure 9-23. We saw how to place
a photo on canvas and size a canvas for a photo earlier on this tour (see “Im-
ages” on page 484). This script also draws shapes, text, and even an embedded Label
widget. Its window gets by on looks alone; in a moment, we’ll learn how to add event
callbacks that let users interact with drawn items.
Figure 9-23. canvas1 hardcoded object sketches
Programming the Canvas Widget
Canvases are easy to use, but they rely on a coordinate system, define unique drawing
methods, and name objects by identifier or tag. This section introduces these core
canvas concepts.
Coordinates
All items drawn on a canvas are distinct objects, but they are not really widgets. If you
study the canvas1 script closely, you’ll notice that canvases are created and packed (or
gridded or placed) within their parent container just like any other widget in tkinter.
But the items drawn on a canvas are not. Shapes, images, and so on, are positioned and
moved on the canvas by coordinates, identifiers, and tags. Of these, coordinates are
the most fundamental part of the canvas model.
Canvases define an (X,Y) coordinate system for their drawing area; x means the hori-
zontal scale, y means vertical. By default, coordinates are measured in screen pixels
(dots), the upper-left corner of the canvas has coordinates (0,0), and x and y coordinates
Canvas | 551

increase to the right and down, respectively. To draw and embed objects within a can-
vas, you supply one or more (X,Y) coordinate pairs to give absolute canvas locations.
This is different from the constraints we’ve used to pack widgets thus far, but it allows
very fine-grained control over graphical layouts, and it supports more free-form inter-
face techniques such as animation.*
Object construction
The canvas allows you to draw and display common shapes such as lines, ovals, rec-
tangles, arcs, and polygons. In addition, you can embed text, images, and other kinds
of tkinter widgets such as labels and buttons. The canvas1 script demonstrates all the
basic graphic object constructor calls; to each, you pass one or more sets of (X,Y) co-
ordinates to give the new object’s location, start point and endpoint, or diagonally
opposite corners of a bounding box that encloses the shape:
id = canvas.create_line(fromX, fromY, toX, toY) # line start, stop
id = canvas.create_oval(fromX, fromY, toX, toY) # two opposite box corners
id = canvas.create_arc( fromX, fromY, toX, toY) # two opposite oval corners
id = canvas.create_rectangle(fromX, fromY, toX, toY) # two opposite corners
Other drawing calls specify just one (X,Y) pair, to give the location of the object’s upper-
left corner:
id = canvas.create_image(250, 0, image=photo, anchor=NW) # embed a photo
id = canvas.create_window(100, 100, window=widget) # embed a widget
id = canvas.create_text(100, 280, text='Ham') # draw some text
The canvas also provides a create_polygon method that accepts an arbitrary set of
coordinate arguments defining the endpoints of connected lines; it’s useful for drawing
more arbitrary kinds of shapes composed of straight lines.
In addition to coordinates, most of these drawing calls let you specify common con-
figuration options, such as outline width, fill color, outline color, and so on. Indi-
vidual object types have unique configuration options all their own, too; for instance,
lines may specify the shape of an optional arrow, and text, widgets, and images may
be anchored to a point of the compass (this looks like the packer’s anchor, but really it
gives a point on the object that is positioned at the [X,Y] coordinates given in the
create call; NW puts the upper-left corner at [X,Y]).
Perhaps the most important thing to notice here, though, is that tkinter does most of
the “grunt” work for you—when drawing graphics, you provide coordinates, and
shapes are automatically plotted and rendered in the pixel world. If you’ve ever done
any lower-level graphics work, you’ll appreciate the difference.
* Animation techniques are covered at the end of this tour. As a use case example, because you can embed
other widgets in a canvas’s drawing area, their coordinate system also makes them ideal for implementing
GUIs that let users design other GUIs by dragging embedded widgets around on the canvas—a useful canvas
application we would explore in this book if I had a few hundred pages to spare.
552 | Chapter 9: A tkinter Tour, Part 2

Object identifiers and operations
Although not used by the canvas1 script, every object you put on a canvas has an iden-
tifier, returned by the create_ method that draws or embeds the object (what was coded
as id in the last section’s examples). This identifier can later be passed to other methods
that move the object to new coordinates, set its configuration options, delete it from
the canvas, raise or lower it among other overlapping objects, and so on.
For instance, the canvas move method accepts both an object identifier and X and Y
offsets (not coordinates), and it moves the named object by the offsets given:
canvas.move(objectIdOrTag, offsetX, offsetY) # move object(s) by offset
If this happens to move the object off-screen, it is simply clipped (not shown). Other
common canvas operations process objects, too:
canvas.delete(objectIdOrTag) # delete object(s) from canvas
canvas.tkraise(objectIdOrTag) # raise object(s) to front
canvas.lower(objectIdOrTag) # lower object(s) below others
canvas.itemconfig(objectIdOrTag, fill='red') # fill object(s) with red color
Notice the tkraise name—raise by itself is a reserved word in Python. Also note that
the itemconfig method is used to configure objects drawn on a canvas after they have
been created; use config to set configuration options for the canvas itself. Probably the
best thing to notice here, though, is that because tkinter is based on structured objects,
you can process a graphic object all at once; there is no need to erase and redraw each
pixel manually to implement a move or a raise.
Canvas object tags
But canvases offer even more power than suggested so far. In addition to object iden-
tifiers, you can also perform canvas operations on entire sets of objects at once, by
associating them all with a tag, a name that you make up and apply to objects on the
display. Tagging objects in a Canvas is at least similar in spirit to tagging substrings in
the Text widget we studied in the prior section. In general terms, canvas operation
methods accept either a single object’s identifier or a tag name.
For example, you can move an entire set of drawn objects by associating all with the
same tag and passing the tag name to the canvas move method. In fact, this is why
move takes offsets, not coordinates—when given a tag, each object associated with the
tag is moved by the same (X,Y) offsets; absolute coordinates would make all the tagged
objects appear on top of each other instead.
To associate an object with a tag, either specify the tag name in the object drawing call’s
tag option or call the addtag_withtag(tag, objectIdOrTag) canvas method (or its rel-
atives). For instance:
canvas.create_oval(x1, y1, x2, y2, fill='red', tag='bubbles')
canvas.create_oval(x3, y3, x4, y4, fill='red', tag='bubbles')
objectId = canvas.create_oval(x5, y5, x6, y6, fill='red')
Canvas | 553

canvas.addtag_withtag('bubbles', objectId)
canvas.move('bubbles', diffx, diffy)
This makes three ovals and moves them at the same time by associating them all with
the same tag name. Many objects can have the same tag, many tags can refer to the
same object, and each tag can be individually configured and processed.
As in Text, Canvas widgets have predefined tag names too: the tag all refers to all objects
on the canvas, and current refers to whatever object is under the mouse cursor. Besides
asking for an object under the mouse, you can also search for objects with the find_
canvas methods: canvas.find_closest(X,Y), for instance, returns a tuple whose first
item is the identifier of the closest object to the supplied coordinates—handy after
you’ve received coordinates in a general mouse-click event callback.
We’ll revisit the notion of canvas tags by example later in this chapter (see the animation
scripts near the end if you need more details right away). As usual, canvases support
additional operations and options that we don’t have space to cover in a finite text like
this (e.g., the canvas postscript method lets you save the canvas in a PostScript file).
See later examples in this book, such as PyDraw, for more details, and consult other
Tk or tkinter references for an exhaustive list of canvas object options.
Scrolling Canvases
One canvas-related operation is so common, though, that it does merit a look here. As
demonstrated in Example 9-14, scroll bars can be cross-linked with a canvas using the
same protocols we used to add them to listboxes and text earlier, but with a few unique
requirements.
Example 9-14. PP4E\Gui\Tour\scrolledcanvas.py
"a simple vertically-scrollable canvas component and demo"
from tkinter import *
class ScrolledCanvas(Frame):
def __init__(self, parent=None, color='brown'):
Frame.__init__(self, parent)
self.pack(expand=YES, fill=BOTH) # make me expandable
canv = Canvas(self, bg=color, relief=SUNKEN)
canv.config(width=300, height=200) # display area size
canv.config(scrollregion=(0, 0, 300, 1000)) # canvas size corners
canv.config(highlightthickness=0) # no pixels to border
sbar = Scrollbar(self)
sbar.config(command=canv.yview) # xlink sbar and canv
canv.config(yscrollcommand=sbar.set) # move one moves other
sbar.pack(side=RIGHT, fill=Y) # pack first=clip last
canv.pack(side=LEFT, expand=YES, fill=BOTH) # canv clipped first
self.fillContent(canv)
canv.bind('<Double-1>', self.onDoubleClick) # set event handler
554 | Chapter 9: A tkinter Tour, Part 2
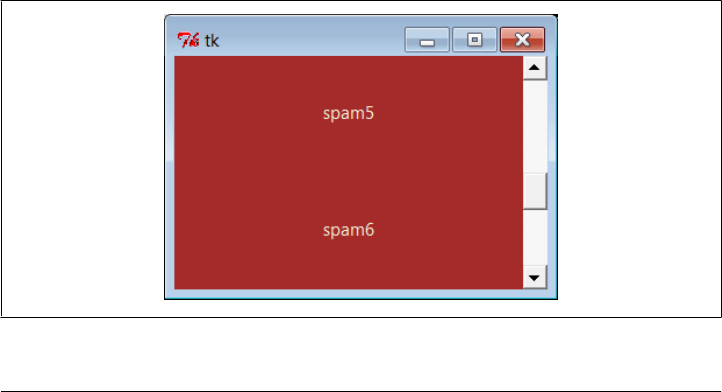
self.canvas = canv
def fillContent(self, canv): # override me below
for i in range(10):
canv.create_text(150, 50+(i*100), text='spam'+str(i), fill='beige')
def onDoubleClick(self, event): # override me below
print(event.x, event.y)
print(self.canvas.canvasx(event.x), self.canvas.canvasy(event.y))
if __name__ == '__main__': ScrolledCanvas().mainloop()
This script makes the window in Figure 9-24. It is similar to prior scroll examples, but
scrolled canvases introduce two new kinks in the scrolling model:
Scrollable versus viewable sizes
You can specify the size of the displayed view window, but you must specify the
size of the scrollable canvas at large. The size of the view window is what is dis-
played, and it can be changed by the user by resizing. The size of the scrollable
canvas will generally be larger—it includes the entire content, of which only part
is displayed in the view window. Scrolling moves the view window over the scrol-
lable size canvas.
Viewable to absolute coordinate mapping
In addition, you may need to map between event view area coordinates and overall
canvas coordinates if the canvas is larger than its view area. In a scrolling scenario,
the canvas will almost always be larger than the part displayed, so mapping is often
needed when canvases are scrolled. In some applications, this mapping is not re-
quired, because widgets embedded in the canvas respond to users directly (e.g.,
buttons in the PyPhoto example in Chapter 11). If the user interacts with the canvas
directly, though (e.g., in a drawing program), mapping from view coordinates to
scrollable size coordinates may be necessary.
Figure 9-24. scrolledcanvas live
Canvas | 555

Sizes are given as configuration options. To specify a view area size, use canvas width
and height options. To specify an overall canvas size, give the (X,Y) coordinates of the
upper-left and lower-right corners of the canvas in a four-item tuple passed to the
scrollregion option. If no view area size is given, a default size is used. If no
scrollregion is given, it defaults to the view area size; this makes the scroll bar useless,
since the view is assumed to hold the entire canvas.
Mapping coordinates is a bit subtler. If the scrollable view area associated with a canvas
is smaller than the canvas at large, the (X,Y) coordinates returned in event objects are
view area coordinates, not overall canvas coordinates. You’ll generally want to scale
the event coordinates to canvas coordinates, by passing them to the canvasx and
canvasy canvas methods before using them to process objects.
For example, if you run the scrolled canvas script and watch the messages printed on
mouse double-clicks, you’ll notice that the event coordinates are always relative to the
displayed view window, not to the overall canvas:
C:\...\PP4E\Gui\Tour> python scrolledcanvas.py
2 0 event x,y when scrolled to top of canvas
2.0 0.0 canvas x,y -same, as long as no border pixels
150 106
150.0 106.0
299 197
299.0 197.0
3 2 event x,y when scrolled to bottom of canvas
3.0 802.0 canvas x,y -y differs radically
296 192
296.0 992.0
152 97 when scrolled to a midpoint in the canvas
152.0 599.0
16 187
16.0 689.0
Here, the mapped canvas X is always the same as the canvas X because the display area
and canvas are both set at 300 pixels wide (it would be off by 2 pixels due to automatic
borders if not for the script’s highlightthickness setting). But notice that the mapped
Y is wildly different from the event Y if you click after a vertical scroll. Without scaling,
the event’s Y incorrectly points to a spot much higher in the canvas.
Many of this book’s canvas examples need no such scaling—(0,0) always maps to the
upper-left corner of the canvas display in which a mouse click occurs—but just because
canvases are not scrolled. See the next section for a canvas with both horizontal and
vertical scrolls; the PyTree program later in this book is similar, but it also uses dy-
namically changed scrollable region sizes when new trees are viewed.
As a rule of thumb, if your canvases scroll, be sure to scale event coordinates to true
canvas coordinates in callback handlers that care about positions. Some handlers might
not care whether events are bound to individual drawn objects or embedded widgets
instead of the canvas at large, but we need to move on to the next two sections to see
how.
556 | Chapter 9: A tkinter Tour, Part 2

Scrollable Canvases and Image Thumbnails
At the end of Chapter 8, we looked at a collection of scripts that display thumbnail
image links for all photos in a directory. There, we noted that scrolling is a major
requirement for large photo collections. Now that we know about canvases and scroll-
bars, we can finally put them to work to implement this much-needed extension, and
conclude the image viewer story we began in Chapter 8 (well, almost).
Example 9-15 is a mutation of the last chapter’s code, which displays thumbnails in a
scrollable canvas. See the prior chapter for more details on its operation, including
the ImageTk module imported from the required Python Imaging Library (PIL) third-
party extension (needed for thumbnails and JPEG images).
In fact, to fully understand Example 9-15, you must also refer to Example 8-45, since
we’re reusing that module’s thumbnail creator and photo viewer tools. Here, we are
just adding a canvas, positioning the fixed-size thumbnail buttons at absolute coordi-
nates in the canvas, and computing the scrollable size using concepts outlined in the
prior section. Both horizontal and vertical scrollbars allow us to move through the
canvas of image buttons freely, regardless of how many there may be.
Example 9-15. PP4E\Gui\PIL\viewer_thumbs_scrolled.py
"""
image viewer extension: uses fixed-size thumbnail buttons for uniform layout, and
adds scrolling for large image sets by displaying thumbs in a canvas widget with
scroll bars; requires PIL to view image formats such as JPEG, and reuses thumbs
maker and single photo viewer in viewer_thumbs.py; caveat/to do: this could also
scroll popped-up images that are too large for the screen, and are cropped on
Windows as is; see PyPhoto later in Chapter 11 for a much more complete version;
"""
import sys, math
from tkinter import *
from PIL.ImageTk import PhotoImage
from viewer_thumbs import makeThumbs, ViewOne
def viewer(imgdir, kind=Toplevel, numcols=None, height=300, width=300):
"""
use fixed-size buttons, scrollable canvas;
sets scrollable (full) size, and places thumbs at absolute x,y
coordinates in canvas; caveat: assumes all thumbs are same size
"""
win = kind()
win.title('Simple viewer: ' + imgdir)
quit = Button(win, text='Quit', command=win.quit, bg='beige')
quit.pack(side=BOTTOM, fill=X)
canvas = Canvas(win, borderwidth=0)
vbar = Scrollbar(win)
hbar = Scrollbar(win, orient='horizontal')
vbar.pack(side=RIGHT, fill=Y) # pack canvas after bars
Canvas | 557

hbar.pack(side=BOTTOM, fill=X) # so clipped first
canvas.pack(side=TOP, fill=BOTH, expand=YES)
vbar.config(command=canvas.yview) # call on scroll move
hbar.config(command=canvas.xview)
canvas.config(yscrollcommand=vbar.set) # call on canvas move
canvas.config(xscrollcommand=hbar.set)
canvas.config(height=height, width=width) # init viewable area size
# changes if user resizes
thumbs = makeThumbs(imgdir) # [(imgfile, imgobj)]
numthumbs = len(thumbs)
if not numcols:
numcols = int(math.ceil(math.sqrt(numthumbs))) # fixed or N x N
numrows = int(math.ceil(numthumbs / numcols)) # 3.x true div
linksize = max(thumbs[0][1].size) # (width, height)
fullsize = (0, 0, # upper left X,Y
(linksize * numcols), (linksize * numrows) ) # lower right X,Y
canvas.config(scrollregion=fullsize) # scrollable area size
rowpos = 0
savephotos = []
while thumbs:
thumbsrow, thumbs = thumbs[:numcols], thumbs[numcols:]
colpos = 0
for (imgfile, imgobj) in thumbsrow:
photo = PhotoImage(imgobj)
link = Button(canvas, image=photo)
handler = lambda savefile=imgfile: ViewOne(imgdir, savefile)
link.config(command=handler, width=linksize, height=linksize)
link.pack(side=LEFT, expand=YES)
canvas.create_window(colpos, rowpos, anchor=NW,
window=link, width=linksize, height=linksize)
colpos += linksize
savephotos.append(photo)
rowpos += linksize
return win, savephotos
if __name__ == '__main__':
imgdir = 'images' if len(sys.argv) < 2 else sys.argv[1]
main, save = viewer(imgdir, kind=Tk)
main.mainloop()
To see this program in action, make sure you’ve installed the PIL extension described
near the end of Chapter 8 and launch the script from a command line, passing the name
of the image directory to be viewed as a command-line argument:
...\PP4E\Gui\PIL> viewer_thumbs_scrolled.py C:\Users\mark\temp\101MSDCF
As before, clicking on a thumbnail image opens the corresponding image at its full size
in a new pop-up window. Figure 9-25 shows the viewer at work on a large directory
copied from my digital camera; the initial run must create and cache thumbnails, but
later runs start quickly.
558 | Chapter 9: A tkinter Tour, Part 2
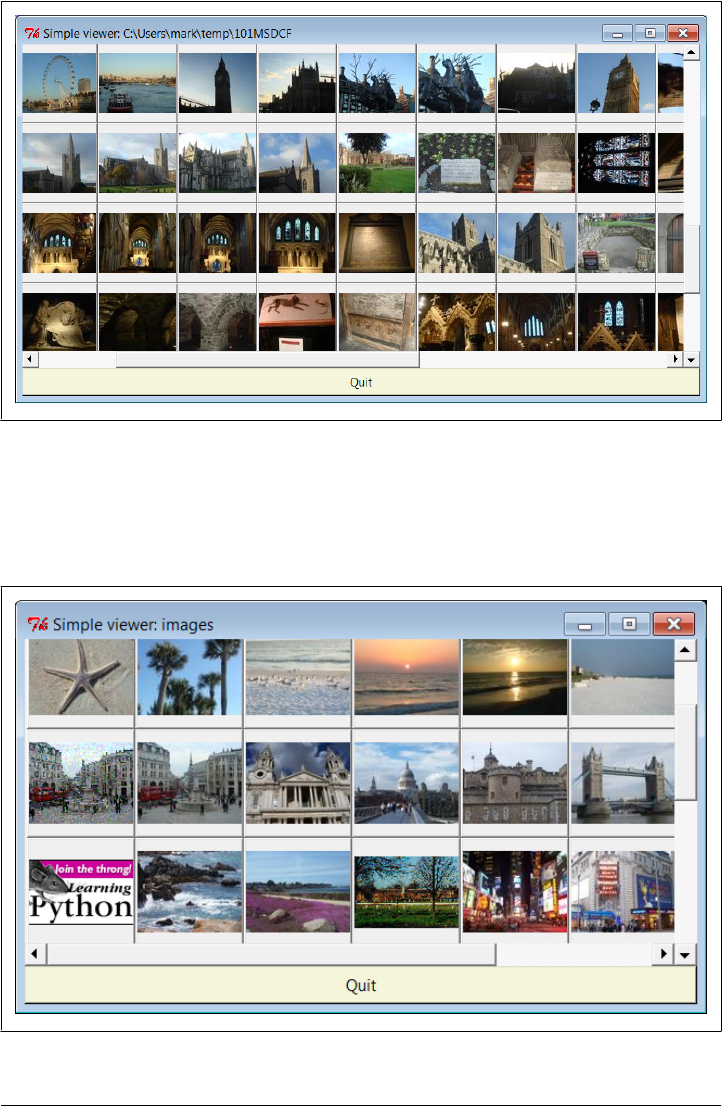
Figure 9-25. Scrolled thumbnail image viewer
Or simply run the script as is from a command line, by clicking its file icon, or within
IDLE—without command-line arguments, it displays the contents of the default sam-
ple images subdirectory in the book’s source code tree, as captured in Figure 9-26.
Figure 9-26. Displaying the default images directory
Canvas | 559

Scrolling images too: PyPhoto (ahead)
Despite its evolutionary twists, the scrollable thumbnail viewer in Example 9-15 still
has one major limitation remaining: images that are larger than the physical screen are
simply truncated on Windows when popped up. This becomes glaringly obvious when
opening large photos copied from a digital camera like those in Figure 9-25. Moreover,
there is no way to resize images once opened, to open other directories, and so on. It’s
a fairly simplistic demonstration of canvas programming.
In Chapter 11, we’ll learn how to do better when we meet the PyPhoto example pro-
gram. PyPhoto will scroll the full size of images as well. In addition, it has tools for a
variety of resizing effects, and it supports saving images to files and opening other image
directories on the fly. At its core, though, PyPhoto will reuse the techniques of our
simple browser here, as well as the thumbnail generation code we wrote in the prior
chapter; much like our simple text editor earlier in the chapter, the code here is essen-
tially a prototype for the more complete PyPhoto program we’ll put together later in
Chapter 11. Stay tuned for the thrilling conclusion of the PyPhoto story (or flip ahead
now if the suspense is too much to bear).
For the purposes of this chapter, notice how in Example 9-15 the thumbnail viewer’s
actions are associated with embedded button widgets, not with the canvas itself. In
fact, the canvas isn’t much but a display device. To see how to enrich it with events of
its own, let’s move on to the next section.
Using Canvas Events
Like Text and Listbox, there is no notion of a single command callback for Canvas. Instead,
canvas programs generally use other widgets (as we did with Example 9-15’s thumbnail
buttons) or the lower-level bind call to set up handlers for mouse clicks, key presses,
and the like (as we did for Example 9-14’s scrolling canvas). Example 9-16 takes the
latter approach further, showing how to bind additional events for the canvas itself, in
order to implement a few of the more common canvas drawing operations.
Example 9-16. PP4E\Gui\Tour\canvasDraw.py
"""
draw elastic shapes on a canvas on drag, move on right click;
see canvasDraw_tags*.py for extensions with tags and animation
"""
from tkinter import *
trace = False
class CanvasEventsDemo:
def __init__(self, parent=None):
canvas = Canvas(width=300, height=300, bg='beige')
canvas.pack()
canvas.bind('<ButtonPress-1>', self.onStart) # click
canvas.bind('<B1-Motion>', self.onGrow) # and drag
560 | Chapter 9: A tkinter Tour, Part 2

canvas.bind('<Double-1>', self.onClear) # delete all
canvas.bind('<ButtonPress-3>', self.onMove) # move latest
self.canvas = canvas
self.drawn = None
self.kinds = [canvas.create_oval, canvas.create_rectangle]
def onStart(self, event):
self.shape = self.kinds[0]
self.kinds = self.kinds[1:] + self.kinds[:1] # start dragout
self.start = event
self.drawn = None
def onGrow(self, event): # delete and redraw
canvas = event.widget
if self.drawn: canvas.delete(self.drawn)
objectId = self.shape(self.start.x, self.start.y, event.x, event.y)
if trace: print(objectId)
self.drawn = objectId
def onClear(self, event):
event.widget.delete('all') # use tag all
def onMove(self, event):
if self.drawn: # move to click spot
if trace: print(self.drawn)
canvas = event.widget
diffX, diffY = (event.x - self.start.x), (event.y - self.start.y)
canvas.move(self.drawn, diffX, diffY)
self.start = event
if __name__ == '__main__':
CanvasEventsDemo()
mainloop()
This script intercepts and processes three mouse-controlled actions:
Clearing the canvas
To erase everything on the canvas, the script binds the double left-click event to
run the canvas’s delete method with the all tag—again, a built-in tag that asso-
ciates every object on the screen. Notice that the Canvas widget clicked is available
in the event object passed in to the callback handler (it’s also available as
self.canvas).
Dragging out object shapes
Pressing the left mouse button and dragging (moving it while the button is still
pressed) creates a rectangle or oval shape as you drag. This is often called dragging
out an object—the shape grows and shrinks in an elastic rubber-band fashion as
you drag the mouse and winds up with a final size and location given by the point
where you release the mouse button.
To make this work in tkinter, all you need to do is delete the old shape and draw
another as each drag event fires; both delete and draw operations are fast enough
to achieve the elastic drag-out effect. Of course, to draw a shape to the current
Canvas | 561
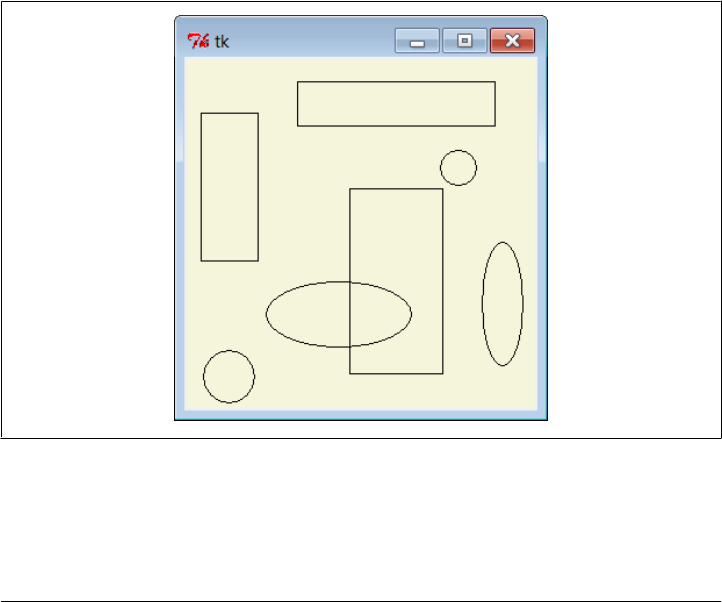
mouse location, you need a starting point; to delete before a redraw, you also must
remember the last drawn object’s identifier. Two events come into play: the initial
button press event saves the start coordinates (really, the initial press event object,
which contains the start coordinates), and mouse movement events erase and re-
draw from the start coordinates to the new mouse coordinates and save the new
object ID for the next event’s erase.
Object moves
When you click the right mouse button (button 3), the script moves the most
recently drawn object to the spot you clicked in a single step. The event argument
gives the (X,Y) coordinates of the spot clicked, and we subtract the saved starting
coordinates of the last drawn object to get the (X,Y) offsets to pass to the canvas
move method (again, move does not take positions). Remember to scale event coor-
dinates first if your canvas is scrolled.
The net result creates a window like that shown in Figure 9-27 after user interaction.
As you drag out objects, the script alternates between ovals and rectangles; set the
script’s trace global to watch object identifiers scroll on stdout as new objects are drawn
during a drag. This screenshot was taken after a few object drag-outs and moves, but
you’d never tell from looking at it; run this example on your own computer to get a
better feel for the operations it supports.
Figure 9-27. canvasDraw after a few drags and moves
562 | Chapter 9: A tkinter Tour, Part 2
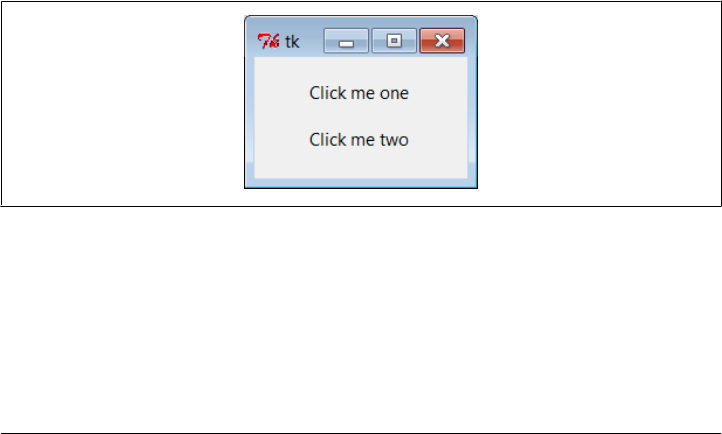
Binding events on specific items
Much like we did for the Text widget, it is also possible to bind events for one or more
specific objects drawn on a Canvas with its tag_bind method. This call accepts either a
tag name string or an object ID in its first argument. For instance, you can register a
different callback handler for mouse clicks on every drawn item or on any in a group
of drawn and tagged items, rather than for the entire canvas at large. Example 9-17
binds a double-click handler on both the canvas itself and on two specific text items
within it, to illustrate the interfaces. It generates Figure 9-28 when run.
Example 9-17. PP4E\Gui\Tour\canvas-bind.py
# bind events on both canvas and its items
from tkinter import *
def onCanvasClick(event):
print('Got canvas click', event.x, event.y, event.widget)
def onObjectClick(event):
print('Got object click', event.x, event.y, event.widget, end=' ')
print(event.widget.find_closest(event.x, event.y)) # find text object's ID
root = Tk()
canv = Canvas(root, width=100, height=100)
obj1 = canv.create_text(50, 30, text='Click me one')
obj2 = canv.create_text(50, 70, text='Click me two')
canv.bind('<Double-1>', onCanvasClick) # bind to whole canvas
canv.tag_bind(obj1, '<Double-1>', onObjectClick) # bind to drawn item
canv.tag_bind(obj2, '<Double-1>', onObjectClick) # a tag works here too
canv.pack()
root.mainloop()
Figure 9-28. Canvas-bind window
Object IDs are passed to tag_bind here, but a tag name string would work too, and
would allow you to associate multiple canvas objects as a group for event purposes.
When you click outside the text items in this script’s window, the canvas event handler
fires; when either text item is clicked, both the canvas and the text object handlers fire.
Here is the stdout result after clicking on the canvas twice and on each text item once;
Canvas | 563

the script uses the canvas find_closest method to fetch the object ID of the particular
text item clicked (the one closest to the click spot):
C:\...\PP4E\Gui\Tour> python canvas-bind.py
Got canvas click 3 6 .8217952 canvas clicks
Got canvas click 46 52 .8217952
Got object click 51 33 .8217952 (1,) first text click
Got canvas click 51 33 .8217952
Got object click 55 69 .8217952 (2,) second text click
Got canvas click 55 69 .8217952
We’ll revisit the notion of events bound to canvases in the PyDraw example in Chap-
ter 11, where we’ll use them to implement a feature-rich paint and motion program.
We’ll also return to the canvasDraw script later in this chapter, to add tag-based moves
and simple animation with time-based tools, so keep this page bookmarked for refer-
ence. First, though, let’s follow a promising side road to explore another way to lay out
widgets within windows—the gridding layout model.
Grids
So far, we’ve mostly been arranging widgets in displays by calling their pack methods—
an interface to the packer geometry manager in tkinter. We’ve also used absolute co-
ordinates in canvases, which are a kind of layout scheme, too, but not a high-level
managed one like the packer. This section introduces grid, the most commonly used
alternative to the packer. We previewed this alternative in Chapter 8 when discussing
input forms and arranging image thumbnails. Here, we’ll study gridding in its full form.
As we learned earlier, tkinter geometry managers work by arranging child widgets
within a parent container widget (parents are typically Frames or top-level windows).
When we ask a widget to pack or grid itself, we’re really asking its parent to place it
among its siblings. With pack, we provide constraints or sides and let the geometry
manager lay out widgets appropriately. With grid, we arrange widgets in rows and
columns in their parent, as though the parent container widget was a table.
Gridding is an entirely distinct geometry management system in tkinter. In fact, at this
writing, pack and grid are mutually exclusive for widgets that have the same parent—
within a given parent container, we can either pack widgets or grid them, but we cannot
do both. That makes sense, if you realize that geometry managers do their jobs as
parents, and a widget can be arranged by only one geometry manager.
Why Grids?
At least within one container, though, that means you must pick either grid or pack
and stick with it. So why grid, then? In general, grid is handy for displays in which
otherwise unrelated widgets must line up horizontally. This includes both tabular dis-
plays and form-like displays; arranging input fields in row/column grid fashion can be
at least as easy as laying out the display with nested frames.
564 | Chapter 9: A tkinter Tour, Part 2

As mentioned in the preceding chapter, input forms are generally best arranged either
as grids or as row frames with fixed-width labels, so that labels and entry fields line up
horizontally as expected on all platforms (as we learned, column frames don’t work
reliably, because they may misalign rows). Although grids and row frames are roughly
the same amount of work, grids are useful if calculating maximum label width is in-
convenient. Moreover, grids also apply to tables more complex than forms.
As we’ll see, though, for input forms, grid doesn’t offer substantial code or complexity
savings compared to equivalent packer solutions, especially when things like resizabil-
ity are added to the GUI picture. In other words, the choice between the two layout
schemes is often largely one of style, not technology.
Grid Basics: Input Forms Revisited
Let’s start off with the basics; Example 9-18 lays out a table of Labels and Entry fields—
widgets we’ve already met. Here, though, they are arrayed on a grid.
Example 9-18. PP4E\Gui\Tour\Grid\grid1.py
from tkinter import *
colors = ['red', 'green', 'orange', 'white', 'yellow', 'blue']
r = 0
for c in colors:
Label(text=c, relief=RIDGE, width=25).grid(row=r, column=0)
Entry(bg=c, relief=SUNKEN, width=50).grid(row=r, column=1)
r += 1
mainloop()
Gridding assigns widgets to row and column numbers, which both begin at number 0;
tkinter uses these coordinates, along with widget size in general, to lay out the con-
tainer’s display automatically. This is similar to the packer, except that rows and col-
umns replace the packer’s notion of sides and packing order.
When run, this script creates the window shown in Figure 9-29, pictured with data
typed into a few of the input fields. Once again, this book won’t do justice to the colors
displayed on the right, so you’ll have to stretch your imagination a little (or run this
script on a computer of your own).
Despite its colors, this is really just a classic input form layout again, of the same kind
we met in the prior chapter. Labels on the left describe data to type into entry fields on
the right. Here, though, we achieve the layout with gridding instead of packed frames.
Just for fun, this script displays color names on the left and the entry field of the cor-
responding color on the right. It achieves its table-like layout with these lines:
Label(...).grid(row=r, column=0)
Entry(...).grid(row=r, column=1)
Grids | 565
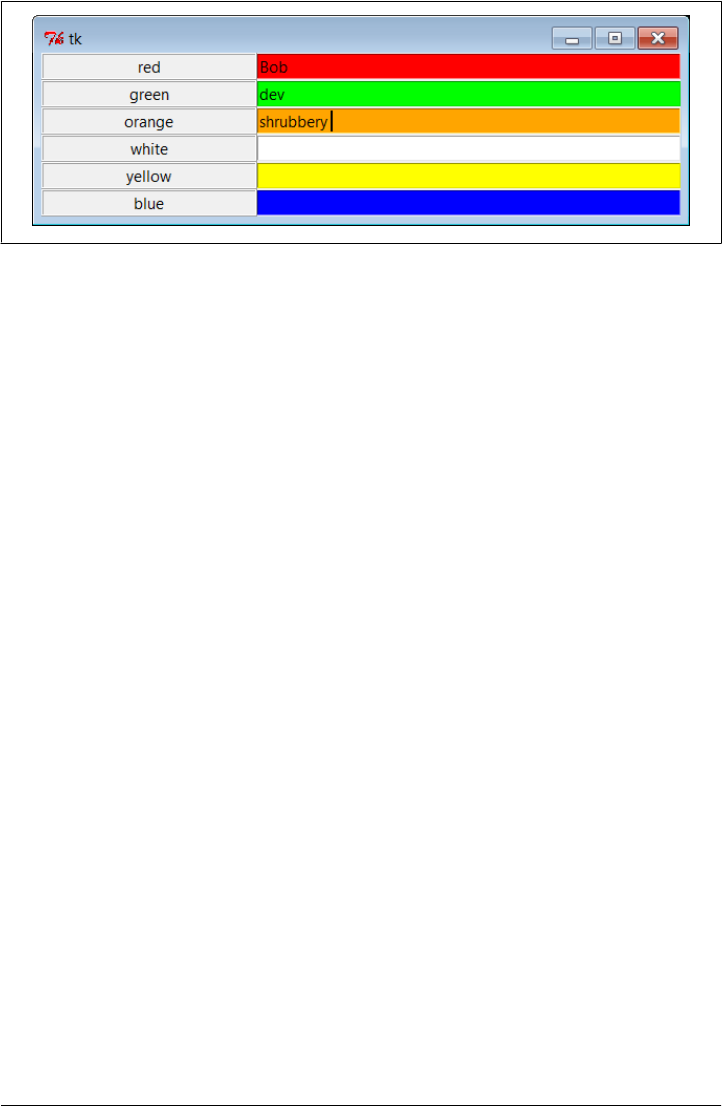
From the perspective of the container window, the label is gridded to column 0 in the
current row number (a counter that starts at 0) and the entry is placed in column 1.
The upshot is that the grid system lays out all the labels and entries in a two-dimensional
table automatically, with both evenly sized rows and evenly sized columns large enough
to hold the largest item in each column.
That is, because widgets are arranged by both row and column when gridded, they align
properly in both dimensions. Although packed row frames can achieve the same effect
if labels are fixed width (as we learned in Chapter 8), grids directly reflect the structure
of tabular displays; this includes input forms, as well as larger tables in general. The
next section illustrates this difference in code.
Comparing grid and pack
Time for some compare-and-contrast: Example 9-19 implements the same sort of
colorized input form with both grid and pack, to make it easy to see the differences
between the two approaches.
Example 9-19. PP4E\Gui\Tour\Grid\grid2.py
"""
add equivalent pack window using row frames and fixed-width labels;
Labels and Entrys in packed column frames may not line up horizontally;
same length code, though enumerate built-in could trim 2 lines off grid;
"""
from tkinter import *
colors = ['red', 'green', 'orange', 'white', 'yellow', 'blue']
def gridbox(parent):
"grid by row/column numbers"
row = 0
for color in colors:
lab = Label(parent, text=color, relief=RIDGE, width=25)
ent = Entry(parent, bg=color, relief=SUNKEN, width=50)
lab.grid(row=row, column=0)
ent.grid(row=row, column=1)
Figure 9-29. The grid geometry manager in pseudoliving color
566 | Chapter 9: A tkinter Tour, Part 2

ent.insert(0, 'grid')
row += 1
def packbox(parent):
"row frames with fixed-width labels"
for color in colors:
row = Frame(parent)
lab = Label(row, text=color, relief=RIDGE, width=25)
ent = Entry(row, bg=color, relief=SUNKEN, width=50)
row.pack(side=TOP)
lab.pack(side=LEFT)
ent.pack(side=RIGHT)
ent.insert(0, 'pack')
if __name__ == '__main__':
root = Tk()
gridbox(Toplevel())
packbox(Toplevel())
Button(root, text='Quit', command=root.quit).pack()
mainloop()
The pack version here uses row frames with fixed-width labels (again, column frames
can skew rows). The basic label and entry widgets are created the same way by these
two functions, but they are arranged in very different ways:
• With pack, we use side options to attach labels and rows on the left and right, and
create a Frame for each row (itself attached to the parent’s current top).
• With grid, we instead assign each widget a row and column position in the implied
tabular grid of the parent, using options of the same name.
As we’ve learned, with pack, the packing order can matter, too: a widget gets an entire
side of the remaining space (mostly irrelevant here), and items packed first are clipped
last (labels and topmost rows disappear last here). The grid alternative achieves the
same clipping effect by virtue of grid behavior. Running the script makes the windows
in Figure 9-30—one window for each scheme.
If you study this example closely, you’ll find that the difference in the amount of code
required for each layout scheme is roughly a wash, at least in this simple form. The
pack scheme must create a Frame per row, but the grid scheme must keep track of the
current row number.
In fact, both schemes require the same number of code lines as shown, though to be
fair we could shave one line from each by packing or gridding the label immediately,
and could shave two more lines from the grid layout by using the built-in enumerate
function to avoid manual counting. Here’s a minimalist’s version of the grid box func-
tion for reference:
def gridbox(parent):
for (row, color) in enumerate(colors):
Label(parent, text=color, relief=RIDGE, width=25).grid(row=row, column=0)
ent = Entry(parent, bg=color, relief=SUNKEN, width=50)
Grids | 567
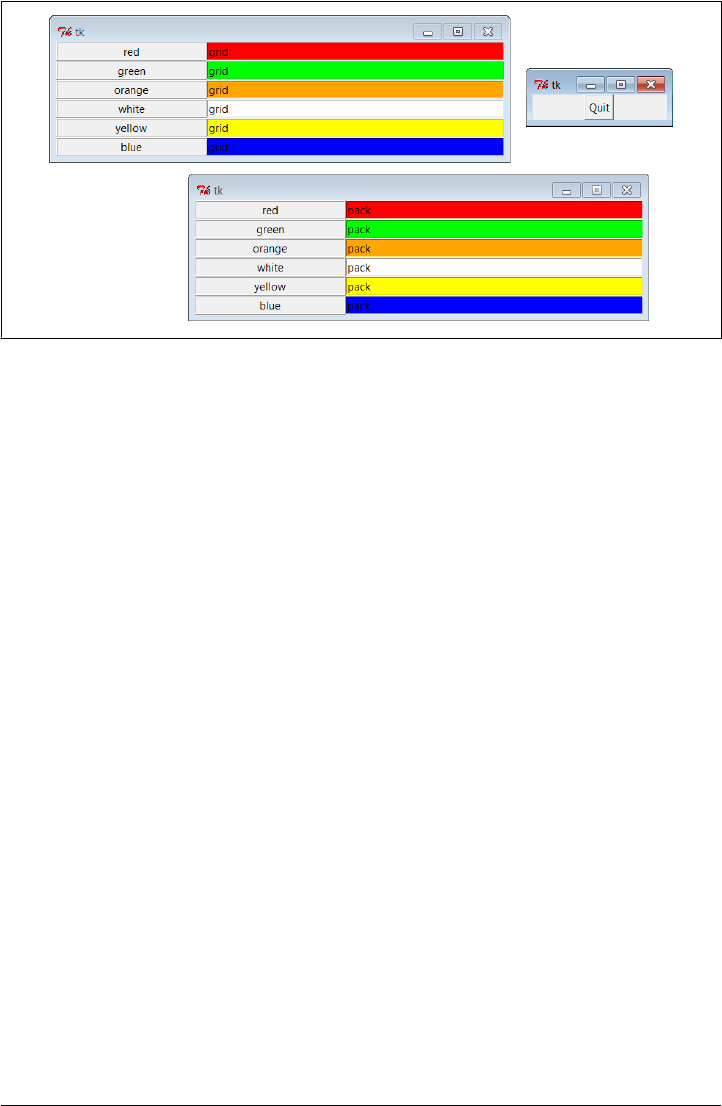
ent.grid(row=row, column=1)
ent.insert(0, 'grid')
We’ll leave further code compaction to the more serious sports fans in the audience
(this code isn’t too horrific, but making your code concise in general is not always in
your coworkers’ best interest!). Irrespective of coding tricks, the complexity of packing
and gridding here seems similar. As we’ll see later, though, gridding can require more
code when widget resizing is factored into the mix.
Combining grid and pack
Notice that the prior section’s Example 9-19 passes a brand-new Toplevel to each form
constructor function so that the grid and pack versions wind up in distinct top-level
windows. Because the two geometry managers are mutually exclusive within a given
parent container, we have to be careful not to mix them improperly. For instance,
Example 9-20 is able to put both the packed and the gridded widgets on the same
window, but only by isolating each in its own Frame container widget.
Example 9-20. PP4E\Gui\Tour\Grid\grid2-same.py
"""
build pack and grid forms on different frames in same window;
can't grid and pack in same parent container (e.g., root window)
but can mix in same window if done in different parent frames;
"""
from tkinter import *
from grid2 import gridbox, packbox
root = Tk()
Label(root, text='Grid:').pack()
Figure 9-30. Equivalent grid and pack windows
568 | Chapter 9: A tkinter Tour, Part 2
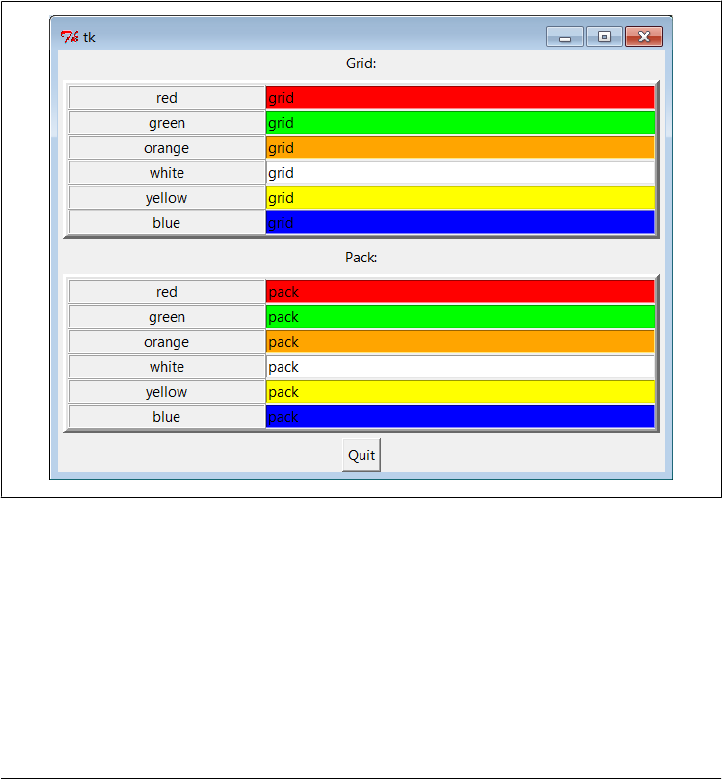
frm = Frame(root, bd=5, relief=RAISED)
frm.pack(padx=5, pady=5)
gridbox(frm)
Label(root, text='Pack:').pack()
frm = Frame(root, bd=5, relief=RAISED)
frm.pack(padx=5, pady=5)
packbox(frm)
Button(root, text='Quit', command=root.quit).pack()
mainloop()
When this runs we get a composite window with two forms that look identical (Fig-
ure 9-31), but the two nested frames are actually controlled by completely different
geometry managers.
Figure 9-31. grid and pack in the same window
On the other hand, the sort of code in Example 9-21 fails badly, because it attempts to
use pack and grid within the same parent—only one geometry manager can be used
on any one parent.
Example 9-21. PP4E\Gui\Tour\Grid\grid2-fails.py
"""
FAILS-- can't grid and pack in same parent container (here, root window)
"""
Grids | 569

from tkinter import *
from grid2 import gridbox, packbox
root = Tk()
gridbox(root)
packbox(root)
Button(root, text='Quit', command=root.quit).pack()
mainloop()
This script passes the same parent (the top-level window) to each function in an effort
to make both forms appear in one window. It also utterly hangs the Python process on
my machine, without ever showing any windows at all (on some versions of Windows,
I’ve had to resort to Ctrl-Alt-Delete to kill it; on others, the Command Prompt shell
window must sometimes be restarted altogether).
Geometry manager combinations can be subtle until you get the hang of this. To make
this example work, for instance, we simply need to isolate the grid box in a parent
container all its own to keep it away from the packing going on in the root window—
as in the following bold alternative code:
root = Tk()
frm = Frame(root)
frm.pack() # this works
gridbox(frm) # gridbox must have its own parent in which to grid
packbox(root)
Button(root, text='Quit', command=root.quit).pack()
mainloop()
Again, today you must either pack or grid within one parent, but not both. It’s possible
that this restriction may be lifted in the future, but it’s been a long-lived constraint, and
it seems unlikely to be removed, given the disparity in the two window manager
schemes; try your Python to be sure.
Making Gridded Widgets Expandable
And now, some practical bits: the grids we’ve seen so far are fixed in size; they do not
grow when the enclosing window is resized by a user. Example 9-22 implements an
unreasonably patriotic input form with both grid and pack again, but adds the config-
uration steps needed to make all widgets in both windows expand along with their
window on a resize.
Example 9-22. PP4E\Gui\Tour\Grid\grid3.py
"add a label on the top and form resizing"
from tkinter import *
colors = ['red', 'white', 'blue']
def gridbox(root):
Label(root, text='Grid').grid(columnspan=2)
570 | Chapter 9: A tkinter Tour, Part 2
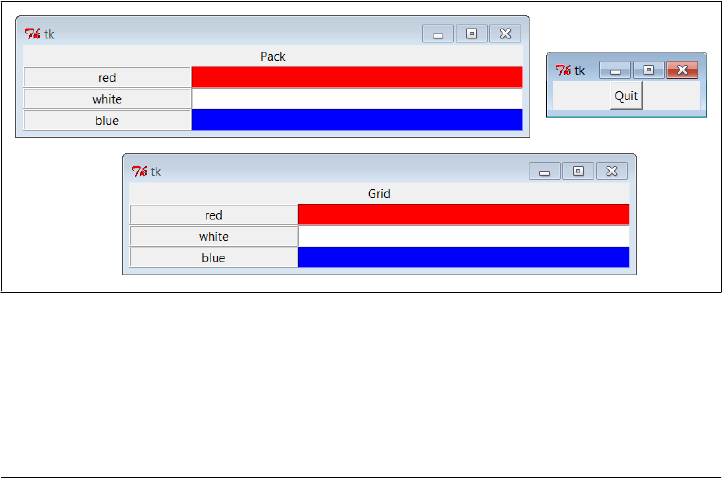
row = 1
for color in colors:
lab = Label(root, text=color, relief=RIDGE, width=25)
ent = Entry(root, bg=color, relief=SUNKEN, width=50)
lab.grid(row=row, column=0, sticky=NSEW)
ent.grid(row=row, column=1, sticky=NSEW)
root.rowconfigure(row, weight=1)
row += 1
root.columnconfigure(0, weight=1)
root.columnconfigure(1, weight=1)
def packbox(root):
Label(root, text='Pack').pack()
for color in colors:
row = Frame(root)
lab = Label(row, text=color, relief=RIDGE, width=25)
ent = Entry(row, bg=color, relief=SUNKEN, width=50)
row.pack(side=TOP, expand=YES, fill=BOTH)
lab.pack(side=LEFT, expand=YES, fill=BOTH)
ent.pack(side=RIGHT, expand=YES, fill=BOTH)
root = Tk()
gridbox(Toplevel(root))
packbox(Toplevel(root))
Button(root, text='Quit', command=root.quit).pack()
mainloop()
When run, this script makes the scene in Figure 9-32. It builds distinct pack and grid
windows again, with entry fields on the right colored red, white, and blue (or for readers
not working along on a computer, gray, white, and a marginally darker gray).
Figure 9-32. grid and pack windows before resizing
This time, though, resizing both windows with mouse drags makes all their embedded
labels and entry fields expand along with the parent window, as we see in Fig-
ure 9-33 (with text typed into the form).
Grids | 571
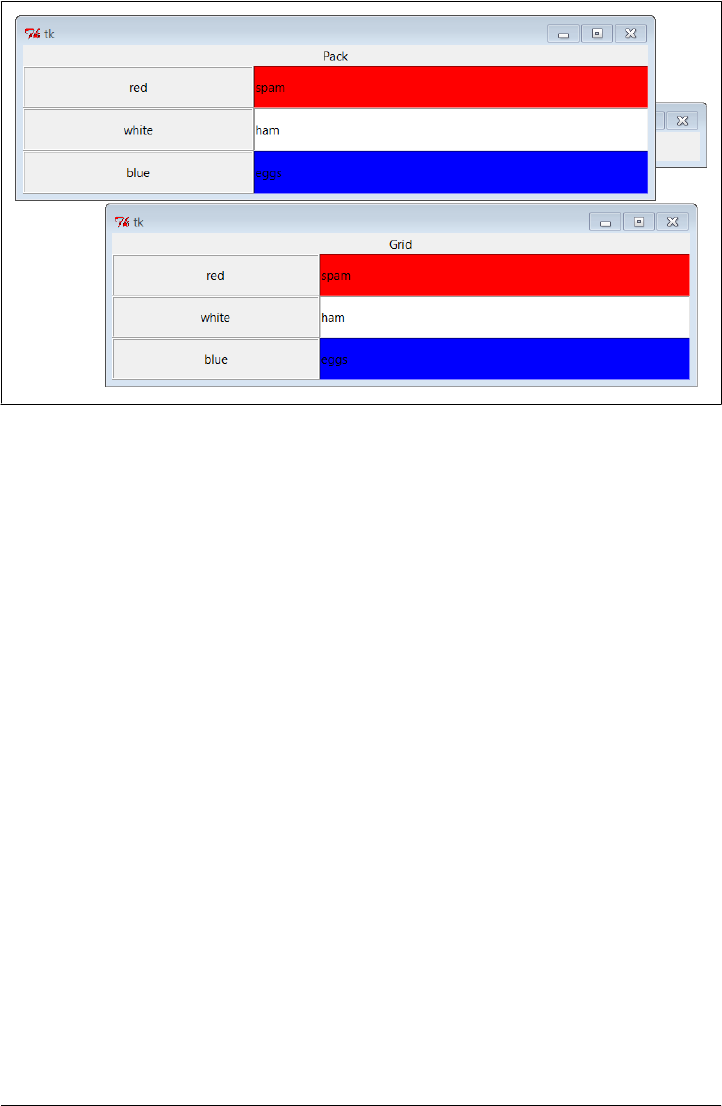
Figure 9-33. grid and pack windows resized
As coded, shrinking the pack window clips items packed last; shrinking the grid win-
dow shrinks all labels and entries together unlike grid2’s default behavior (try this on
your own).
Resizing in grids
Now that I’ve shown you what these windows do, I need to explain how they do it.
We learned in Chapter 7 how to make widgets expand with pack: we use expand and
fill options to increase space allocations and stretch into them, respectively. To make
expansion work for widgets arranged by grid, we need to use different protocols. Rows
and columns must be marked with a weight to make them expandable, and widgets
must also be made sticky so that they are stretched within their allocated grid cell:
Heavy rows and columns
With pack, we make each row expandable by making the corresponding Frame
expandable, with expand=YES and fill=BOTH. Gridders must be a bit more specific:
to get full expandability, call the grid container’s rowconfigure method for each
row and its columnconfigure for each column. To both methods, pass a weight
option with a value greater than zero to enable rows and columns to expand.
Weight defaults to zero (which means no expansion), and the grid container in this
script is just the top-level window. Using different weights for different rows and
columns makes them grow at proportionally different rates.
Sticky widgets
With pack, we use fill options to stretch widgets to fill their allocated space hor-
izontally or vertically, and anchor options to position widgets within their allocated
572 | Chapter 9: A tkinter Tour, Part 2

space. With grid, the sticky option serves the roles of both fill and anchor in the
packer. Gridded widgets can optionally be made sticky on one side of their allo-
cated cell space (such as anchor) or on more than one side to make them stretch
(such as fill). Widgets can be made sticky in four directions—N, S, E, and W, and
concatenations of these letters specify multiple-side stickiness. For instance, a
sticky setting of W left justifies the widget in its allocated space (such as a packer
anchor=W), and NS stretches the widget vertically within its allocated space (such as
a packer fill=Y).
Widget stickiness hasn’t been useful in examples thus far because the layouts were
regularly sized (widgets were no smaller than their allocated grid cell space), and
resizes weren’t supported at all. Here, though, Example 9-22 specifies NSEW stick-
iness to make widgets stretch in all directions with their allocated cells.
Different combinations of row and column weights and sticky settings generate differ-
ent resize effects. For instance, deleting the columnconfig lines in the grid3 script makes
the display expand vertically but not horizontally. Try changing some of these settings
yourself to see the sorts of effects they produce.
Spanning columns and rows
There is one other big difference in how the grid3 script configures its windows. Both
the grid and the pack windows display a label on the top that spans the entire window.
For the packer scheme, we simply make a label attached to the top of the window at
large (remember, side defaults to TOP):
Label(root, text='Pack').pack()
Because this label is attached to the window’s top before any row frames are, it appears
across the entire window top as expected. But laying out such a label takes a bit more
work in the rigid world of grids; the first line of the grid implementation function does
it like this:
Label(root, text='Grid').grid(columnspan=2)
To make a widget span across multiple columns, we pass grid a columnspan option with
a spanned-column count. Here, it just specifies that the label at the top of the window
should stretch over the entire window—across both the label and the entry columns.
To make a widget span across multiple rows, pass a rowspan option instead. The regular
layouts of grids can be either an asset or a liability, depending on how regular your user
interface will be; these two span settings let you specify exceptions to the rule when
needed.
So which geometry manager comes out on top here? When resizing is factored in, as
in the script in Example 9-22, gridding actually becomes slightly more complex; in fact,
gridding requires three extra lines of code. On the other hand, enumerate could again
make the race close, grid is still convenient for simple forms, and your grids and packs
may vary.
Grids | 573
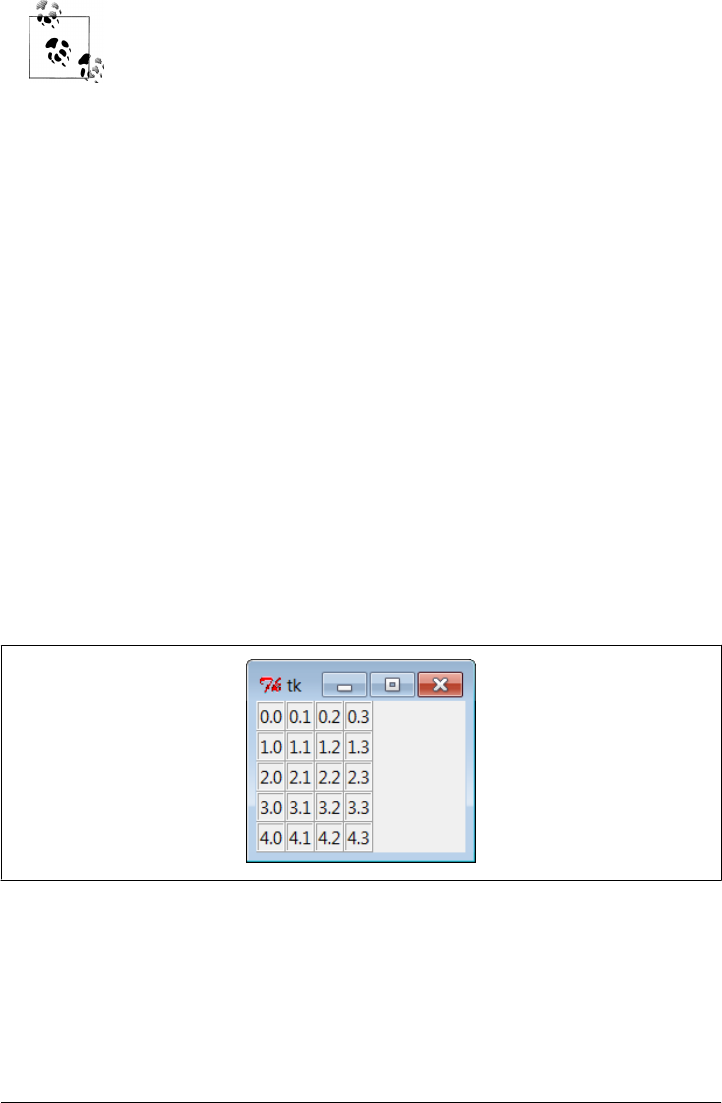
For more on input form layout, stay tuned for the form builder utilities
we’ll code near the end of Chapter 12 and use again in Chapter 13, when
developing a file transfer and FTP client user interface. As we’ll see,
doing forms well once allows us to skip the details later. We’ll also use
more custom form layout code in the PyEdit program’s change dialog
in Chapter 11, and the PyMailGUI example’s email header fields in
Chapter 14.
Laying Out Larger Tables with grid
So far, we’ve been building two-column arrays of labels and input fields. That’s typical
of input forms, but the tkinter grid manager is capable of configuring much grander
matrixes. For instance, Example 9-23 builds a five-row by four-column array of labels,
where each label simply displays its row and column number (row.col). When run, the
window in Figure 9-34 appears on-screen.
Example 9-23. PP4E\Gui\Tour\Grid\grid4.py
# simple 2D table, in default Tk root window
from tkinter import *
for i in range(5):
for j in range(4):
lab = Label(text='%d.%d' % (i, j), relief=RIDGE)
lab.grid(row=i, column=j, sticky=NSEW)
mainloop()
Figure 9-34. A 5 × 4 array of coordinate labels
If you think this is starting to look like it might be a way to program spreadsheets, you
may be on to something. Example 9-24 takes this idea a bit further and adds a button
that prints the table’s current input field values to the stdout stream (usually, to the
console window).
574 | Chapter 9: A tkinter Tour, Part 2

Example 9-24. PP4E\Gui\Tour\Grid\grid5.py
# 2D table of input fields, default Tk root window
from tkinter import *
rows = []
for i in range(5):
cols = []
for j in range(4):
ent = Entry(relief=RIDGE)
ent.grid(row=i, column=j, sticky=NSEW)
ent.insert(END, '%d.%d' % (i, j))
cols.append(ent)
rows.append(cols)
def onPress():
for row in rows:
for col in row:
print(col.get(), end=' ')
print()
Button(text='Fetch', command=onPress).grid()
mainloop()
When run, this script creates the window in Figure 9-35 and saves away all the grid’s
entry field widgets in a two-dimensional list of lists. When its Fetch button is pressed,
the script steps through the saved list of lists of entry widgets, to fetch and display all
the current values in the grid. Here is the output of two Fetch presses—one before I
made input field changes, and one after:
C:\...\PP4E\Gui\Tour\Grid> python grid5.py
0.0 0.1 0.2 0.3
1.0 1.1 1.2 1.3
2.0 2.1 2.2 2.3
3.0 3.1 3.2 3.3
4.0 4.1 4.2 4.3
0.0 0.1 0.2 42
1.0 1.1 1.2 43
2.0 2.1 2.2 44
3.0 3.1 3.2 45
4.0 4.1 4.2 46
Now that we know how to build and step through arrays of input fields, let’s add a few
more useful buttons. Example 9-25 adds another row to display column sums and adds
buttons to clear all fields to zero and calculate column sums.
Example 9-25. PP4E\Gui\Tour\Grid\grid5b.py
# add column sums, clearing
from tkinter import *
numrow, numcol = 5, 4
Grids | 575
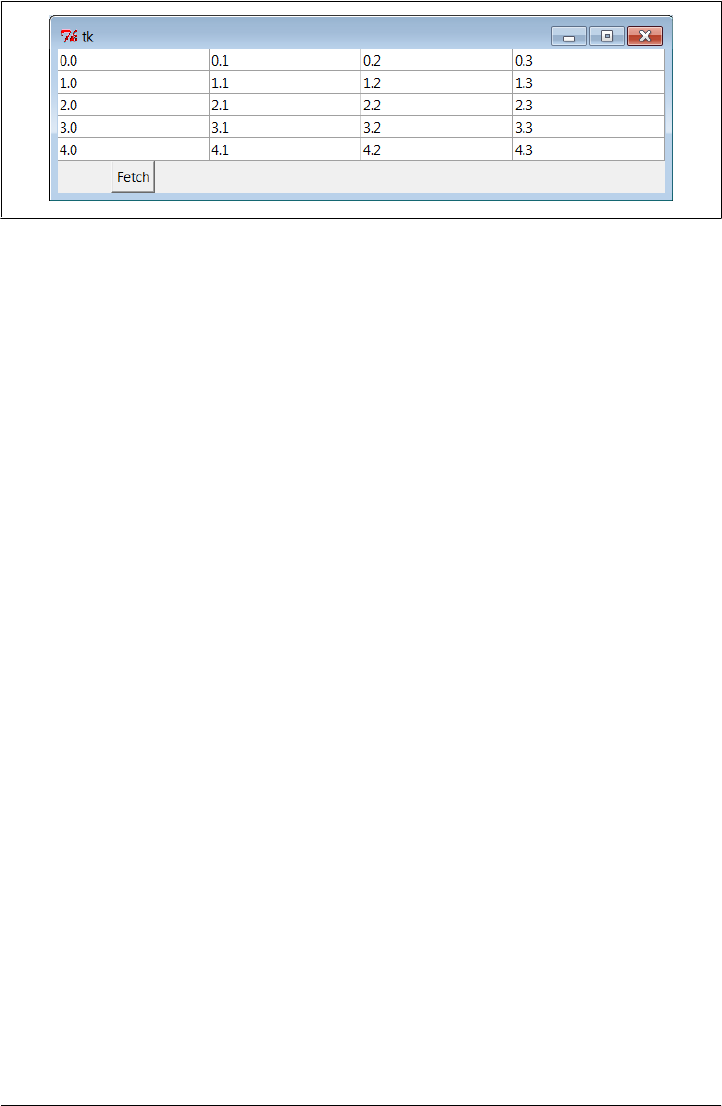
rows = []
for i in range(numrow):
cols = []
for j in range(numcol):
ent = Entry(relief=RIDGE)
ent.grid(row=i, column=j, sticky=NSEW)
ent.insert(END, '%d.%d' % (i, j))
cols.append(ent)
rows.append(cols)
sums = []
for i in range(numcol):
lab = Label(text='?', relief=SUNKEN)
lab.grid(row=numrow, column=i, sticky=NSEW)
sums.append(lab)
def onPrint():
for row in rows:
for col in row:
print(col.get(), end=' ')
print()
print()
def onSum():
tots = [0] * numcol
for i in range(numcol):
for j in range(numrow):
tots[i] += eval(rows[j][i].get()) # sum column
for i in range(numcol):
sums[i].config(text=str(tots[i])) # display in GUI
def onClear():
for row in rows:
for col in row:
col.delete('0', END)
col.insert(END, '0.0')
for sum in sums:
sum.config(text='?')
import sys
Button(text='Sum', command=onSum).grid(row=numrow+1, column=0)
Button(text='Print', command=onPrint).grid(row=numrow+1, column=1)
Figure 9-35. A larger grid of input fields
576 | Chapter 9: A tkinter Tour, Part 2

Button(text='Clear', command=onClear).grid(row=numrow+1, column=2)
Button(text='Quit', command=sys.exit).grid(row=numrow+1, column=3)
mainloop()
Figure 9-36 shows this script at work summing up four columns of numbers; to get a
different-size table, change the numrow and numcol variables at the top of the script.
Figure 9-36. Adding column sums
And finally, Example 9-26 is one last extension that is coded as a class for reusability,
and it adds a button to load the table’s data from a file. Data files are assumed to be
coded as one line per row, with whitespace (spaces or tabs) between each column within
a row line. Loading a file of data automatically resizes the table GUI to accommodate
the number of columns in the table based upon the file’s content.
Example 9-26. PP4E\Gui\Tour\Grid\grid5c.py
# recode as an embeddable class
from tkinter import *
from tkinter.filedialog import askopenfilename
from PP4E.Gui.Tour.quitter import Quitter # reuse, pack, and grid
class SumGrid(Frame):
def __init__(self, parent=None, numrow=5, numcol=5):
Frame.__init__(self, parent)
self.numrow = numrow # I am a frame container
self.numcol = numcol # caller packs or grids me
self.makeWidgets(numrow, numcol) # else only usable one way
def makeWidgets(self, numrow, numcol):
self.rows = []
for i in range(numrow):
cols = []
for j in range(numcol):
ent = Entry(self, relief=RIDGE)
ent.grid(row=i+1, column=j, sticky=NSEW)
ent.insert(END, '%d.%d' % (i, j))
cols.append(ent)
self.rows.append(cols)
Grids | 577

self.sums = []
for i in range(numcol):
lab = Label(self, text='?', relief=SUNKEN)
lab.grid(row=numrow+1, column=i, sticky=NSEW)
self.sums.append(lab)
Button(self, text='Sum', command=self.onSum).grid(row=0, column=0)
Button(self, text='Print', command=self.onPrint).grid(row=0, column=1)
Button(self, text='Clear', command=self.onClear).grid(row=0, column=2)
Button(self, text='Load', command=self.onLoad).grid(row=0, column=3)
Quitter(self).grid(row=0, column=4) # fails: Quitter(self).pack()
def onPrint(self):
for row in self.rows:
for col in row:
print(col.get(), end=' ')
print()
print()
def onSum(self):
tots = [0] * self.numcol
for i in range(self.numcol):
for j in range(self.numrow):
tots[i] += eval(self.rows[j][i].get()) # sum current data
for i in range(self.numcol):
self.sums[i].config(text=str(tots[i]))
def onClear(self):
for row in self.rows:
for col in row:
col.delete('0', END) # delete content
col.insert(END, '0.0') # preserve display
for sum in self.sums:
sum.config(text='?')
def onLoad(self):
file = askopenfilename()
if file:
for row in self.rows:
for col in row: col.grid_forget() # erase current gui
for sum in self.sums:
sum.grid_forget()
filelines = open(file, 'r').readlines() # load file data
self.numrow = len(filelines) # resize to data
self.numcol = len(filelines[0].split())
self.makeWidgets(self.numrow, self.numcol)
for (row, line) in enumerate(filelines): # load into gui
fields = line.split()
for col in range(self.numcol):
self.rows[row][col].delete('0', END)
self.rows[row][col].insert(END, fields[col])
578 | Chapter 9: A tkinter Tour, Part 2

if __name__ == '__main__':
import sys
root = Tk()
root.title('Summer Grid')
if len(sys.argv) != 3:
SumGrid(root).pack() # .grid() works here too
else:
rows, cols = eval(sys.argv[1]), eval(sys.argv[2])
SumGrid(root, rows, cols).pack()
mainloop()
Notice that this module’s SumGrid class is careful not to either grid or pack itself. In
order to be attachable to containers where other widgets are being gridded or packed,
it leaves its own geometry management ambiguous and requires callers to pack or grid
its instances. It’s OK for containers to pick either scheme for their own children because
they effectively seal off the pack-or-grid choice. But attachable component classes that
aim to be reused under both geometry managers cannot manage themselves because
they cannot predict their parent’s policy.
This is a fairly long example that doesn’t say much else about gridding or widgets in
general, so I’ll leave most of it as suggested reading and just show what it does. Fig-
ure 9-37 shows the initial window created by this script after changing the last column
and requesting a sum; make sure the directory containing the PP4E examples root is
on your module search path (e.g., PYTHONPATH) for the package import.
By default, the class makes the 5 × 5 grid here, but we can pass in other dimensions to
both the class constructor and the script’s command line. When you press the Load
button, you get the standard file selection dialog we met earlier on this tour
(Figure 9-38).
The datafile grid-data1.txt contains seven rows and six columns of data:
C:\...\PP4E\Gui\Tour\Grid> type grid5-data1.txt
1 2 3 4 5 6
1 2 3 4 5 6
1 2 3 4 5 6
1 2 3 4 5 6
1 2 3 4 5 6
1 2 3 4 5 6
1 2 3 4 5 6
Loading this file’s data into our GUI makes the dimensions of the grid change accord-
ingly—the class simply reruns its widget construction logic after erasing all the old entry
widgets with the grid_forget method. The grid_forget method unmaps gridded widg-
ets and so effectively erases them from the display. Also watch for the pack_forget
widget and window withdraw methods used in the after event “alarm” examples of the
next section for other ways to erase and redraw GUI components.
Once the GUI is erased and redrawn for the new data, Figure 9-39 captures the scene
after the file Load and a new Sum have been requested by the user in the GUI.
Grids | 579

Figure 9-39. Data file loaded, displayed, and summed
Figure 9-37. Adding datafile loads
Figure 9-38. Opening a data file for SumGrid
580 | Chapter 9: A tkinter Tour, Part 2
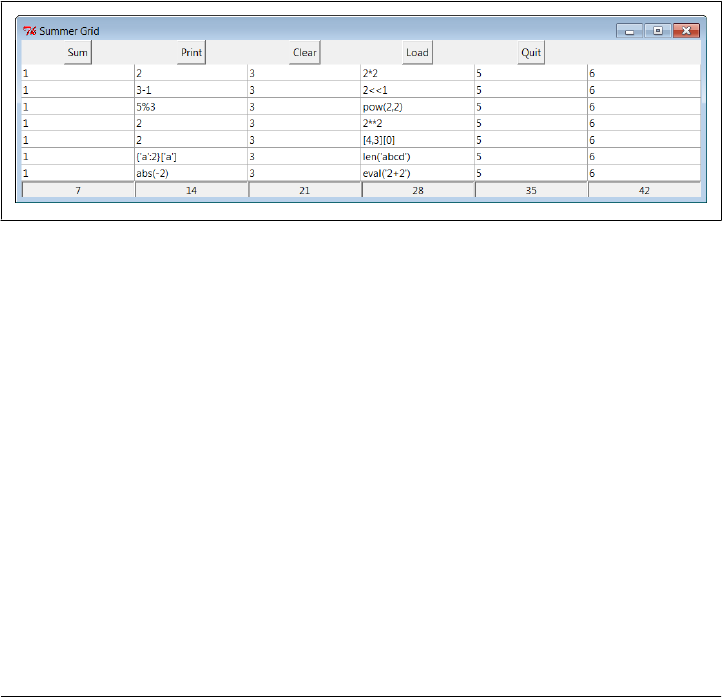
The grid5-data2.txt datafile has the same dimensions but contains expressions in two
of its columns, not just simple numbers. Because this script converts input field values
with the Python eval built-in function, any Python syntax will work in this table’s fields,
as long as it can be parsed and evaluated within the scope of the onSum method:
C:\...\PP4E\Gui\Tour\Grid> type grid5-data2.txt
1 2 3 2*2 5 6
1 3-1 3 2<<1 5 6
1 5%3 3 pow(2,2) 5 6
1 2 3 2**2 5 6
1 2 3 [4,3][0] 5 6
1 {'a':2}['a'] 3 len('abcd') 5 6
1 abs(-2) 3 eval('2+2') 5 6
Summing these fields runs the Python code they contain, as seen in Figure 9-40. This
can be a powerful feature; imagine a full-blown spreadsheet grid, for instance—field
values could be Python code “snippets” that compute values on the fly, call functions
in modules, and even download current stock quotes over the Internet with tools we’ll
meet in the next part of this book.
Figure 9-40. Python expressions in the data and table
It’s also a potentially dangerous tool—a field might just contain an expression that
erases your hard drive!† If you’re not sure what expressions may do, either don’t use
eval (convert with more limited built-in functions like int and float instead) or make
sure your Python is running in a process with restricted access permissions for system
components you don’t want to expose to the code you run.
Of course, this still is nowhere near a true spreadsheet program. There are fixed column
sums and file loads, for instance, but individual cells cannot contain formulas based
† I debated showing this, but since understanding a danger is a big part of avoiding it—if the Python process
had permission to delete files, passing the code string __import__('os').system('rm –rf *') to eval on Unix
would delete all files at and below the current directory by running a shell command (and 'rmdir /S /Q .'
would have a similar effect on Windows). Don’t do this! To see how this works in a less devious and potentially
useful way, type __import__('math').pi into one of the GUI table’s cells—on Sum, the cell evaluates to pi
(3.14159). Passing "__import__('os').system('dir')" to eval interactively proves the point safely as well.
All of this also applies to the exec built-in—eval runs expression strings and exec statements, but expressions
are statements (though not vice versa). A typical user of most GUIs is unlikely to type this kind of code
accidentally, of course, especially if that user is always you, but be careful out there!
Grids | 581

upon other cells. In the interest of space, further mutations toward that goal are left as
exercises.
I should also point out that there is more to gridding than we have time to present fully
here. For instance, by creating subframes that have grids of their own, we can build up
more sophisticated layouts as component hierarchies in much the same way as nested
frames arranged with the packer. For now, let’s move on to one last widget survey topic.
Time Tools, Threads, and Animation
The last stop on our widget tour is perhaps the most unique. tkinter also comes with
a handful of tools that have to do with the event-driven programming model, not
graphics displayed on a computer screen.
Some GUI applications need to perform background activities periodically. For exam-
ple, to “blink” a widget’s appearance, we’d like to register a callback handler to be
invoked at regular time intervals. Similarly, it’s not a good idea to let a long-running
file operation block other activity in a GUI; if the event loop could be forced to update
periodically, the GUI could remain responsive. tkinter comes with tools for both sched-
uling such delayed actions and forcing screen updates:
widget.after(milliseconds, function, *args)
This tool schedules the function to be called once by the GUI’s event processing
system after a number of milliseconds. This form of the call does not pause the
program—the callback function is scheduled to be run later from the normal
tkinter event loop, but the calling program continues normally, and the GUI re-
mains active while the function call is pending. As also discussed in Chapter 5,
unlike the threading module’s Timer object, widget.after events are dispatched in
the main GUI thread and so can freely update the GUI.
The function event handler argument can be any callable Python object: a function,
bound method, lambda and so on. The milliseconds timer duration argument is
an integer which can be used to specify both fractions and multiples of a second;
its value divided by 1,000 gives equivalent seconds. Any args arguments are passed
by position to function when it is later called.
In practice, a lambda can be used in place of individually-listed arguments to make
the association of arguments to function explicit, but that is not required. When
the function is a method, object state information (attributes) might also provide
its data instead of listed arguments. The after method returns an ID that can be
passed to after_cancel to cancel the callback. Since this method is so commonly
used, I’ll say more about it by example in a moment.
widget.after(milliseconds)
This tool pauses the calling program for a number of milliseconds—for example,
an argument of 5,000 pauses the caller for 5 seconds. This is essentially equivalent
to Python’s library function time.sleep(seconds), and both calls can be used to
582 | Chapter 9: A tkinter Tour, Part 2

add a delay in time-sensitive displays (e.g., animation programs such as PyDraw
and the simpler examples ahead).
widget.after_idle(function, *args)
This tool schedules the function to be called once when there are no more pending
events to process. That is, function becomes an idle handler, which is invoked
when the GUI isn’t busy doing anything else.
widget.after_cancel(id)
This tool cancels a pending after callback event before it occurs; id is the return
value of an after event scheduling call.
widget.update()
This tool forces tkinter to process all pending events in the event queue, including
geometry resizing and widget updates and redraws. You can call this periodically
from a long-running callback handler to refresh the screen and perform any updates
to it that your handler has already requested. If you don’t, your updates may not
appear on-screen until your callback handler exits. In fact, your display may hang
completely during long-running handlers if not manually updated (and handlers
are not run in threads, as described in the next section); the window won’t even
redraw itself until the handler returns if covered and uncovered by another.
For instance, programs that animate by repeatedly moving an object and pausing
must call for an update before the end of the animation or only the final object
position will appear on-screen; worse, the GUI will be completely inactive until
the animation callback returns (see the simple animation examples later in this
chapter, as well as PyDraw in Chapter 11).
widget.update_idletasks()
This tool processes any pending idle events. This may sometimes be safer than
after, which has the potential to set up race (looping) conditions in some scenarios.
Tk widgets use idle events to display themselves.
_tkinter.createfilehandler(file, mask, function)
This tool schedules the function to be called when a file’s status changes. The
function may be invoked when the file has data for reading, is available for writing,
or triggers an exception. The file argument is a Python file or socket object (tech-
nically, anything with a fileno() method) or an integer file descriptor; mask is
tkinter.READABLE or tkinter.WRITABLE to specify the mode; and the callback
function takes two arguments—the file ready to converse and a mask. File handlers
are often used to process pipes or sockets, since normal input/output requests can
block the caller.
Because this call is not available on Windows, it won’t be used in this book. Since
it’s currently a Unix-only alternative, portable GUIs may be better off using
after timer loops to poll for data and spawning threads to read data and place it
on queues if needed—see Chapter 10 for more details. Threads are a much more
general solution to nonblocking data transfers.
Time Tools, Threads, and Animation | 583

widget.wait_variable(var)
widget.wait_window(win)
widget.wait_visibility(win)
These tools pause the caller until a tkinter variable changes its value, a window is
destroyed, or a window becomes visible. All of these enter a local event loop, such
that the application’s mainloop continues to handle events. Note that var is a tkinter
variable object (discussed earlier), not a simple Python variable. To use for modal
dialogs, first call widget.focus() (to set input focus) and widget.grab() (to make
a window be the only one active).
Although we’ll put some of these to work in examples, we won’t go into exhaustive
details on all of these tools here; see other Tk and tkinter documentation for more
information.
Using Threads with tkinter GUIs
Keep in mind that for many programs, Python’s thread support that we discussed in
Chapter 5 can serve some of the same roles as the tkinter tools listed in the preceding
section and can even make use of them. For instance, to avoid blocking a GUI (and its
users) during a long-running file or socket transfer, the transfer can simply be run in a
spawned thread, while the rest of the program continues to run normally. Similarly,
GUIs that must watch for inputs on pipes or sockets can do so in spawned threads or
after callbacks, or some combination thereof, without blocking the GUI itself.
If you do use threads in tkinter programs, however, you need to remember that only
the main thread (the one that built the GUI and started the mainloop) should generally
make GUI calls. At the least, multiple threads should not attempt to update the GUI
at the same time. For example, the update method described in the preceding section
has historically caused problems in threaded GUIs—if a spawned thread calls this
method (or calls a method that does), it can sometimes trigger very strange and even
spectacular program crashes.
In fact, for a simple and more vivid example of the lack of thread safety in tkinter GUIs,
see and run the following files in the book examples distribution package:
...\PP4E\Gui\Tour\threads-demoAll-frm.py
...\PP4E\Gui\Tour threads-demoAll-win.py
These scripts are takeoffs of the prior chapter’s Examples 8-32 and 8-33, which run the
construction of four GUI demo components in parallel threads. They also both crash
horrifically on Windows and require forced shutdown of the program. While some
GUI operations appear to be safe to perform in parallel threads (e.g., see the canvas
moves in Example 9-32), thread safety is not guaranteed by tkinter in general. (For
further proof of tkinter’s lack of thread safety, see the discussion of threaded update
loops in the next chapter, just after Example 10-28; a thread there that attempts to pop
up a new window also makes the GUI fail resoundingly.)
584 | Chapter 9: A tkinter Tour, Part 2

This GUI thread story is prone to change over time, but it imposes a few structural
constraints on programs. For example, because spawned threads cannot usually per-
form GUI processing, they must generally communicate with the main thread using
global variables or shared mutable objects such as queues, as required by the applica-
tion. A spawned thread which watches a socket for data, for instance, might simply set
global variables or append to shared queues, which in turn triggers GUI changes in the
main thread’s periodic after event callbacks. The main thread’s timer events process
the spawned thread’s results.
Although some GUI operations or toolkits may support multiple threads better than
others, GUI programs are generally best structured as a main GUI thread and non-GUI
“worker” threads this way, both to avoid potential collisions and to finesse the thread
safety issue altogether. The PyMailGUI example later in the book, for instance, will
collect and dispatch callbacks produced by threads and stored on a queue.
Also remember that irrespective of thread safety of the GUI itself, threaded GUI pro-
grams must follow the same principles of threaded programs in general—as we learned
in Chapter 5, such programs must still synchronize access to mutable state shared
between threads, if it may be changed by threads running in parallel. Although a
producer/consumer thread model based upon queues can alleviate many thread issues
for the GUI itself, a program that spawns non-GUI threads to update shared informa-
tion used by the GUI thread may still need to use thread locks to avoid concurrent
update issues.
We’ll explore GUI threading in more detail in Chapter 10, and we’ll meet more realistic
threaded GUI programs in Part IV, especially in Chapter 14’s PyMailGUI. The latter,
for instance, runs long-running tasks in threads to avoid blocking the GUI, but both
restricts GUI updates to the main thread and uses locks to prevent overlap of operations
that may change shared caches.
Using the after Method
Of all the event tools in the preceding list, the after method may be the most interesting.
It allows scripts to schedule a callback handler to be run at some time in the future.
Though a simple device, we’ll use this often in later examples in this book. For instance,
in Chapter 11, we’ll meet a clock program that uses after to wake up 10 times per
second and check for a new time, and we’ll see an image slideshow program that uses
after to schedule the next photo display (see PyClock and PyView). To illustrate the
basics of scheduled callbacks, Example 9-27 does something a bit different.
Example 9-27. PP4E\Gui\Tour\alarm.py
# flash and beep every second using after() callback loop
from tkinter import *
class Alarm(Frame):
Time Tools, Threads, and Animation | 585
def __init__(self, msecs=1000): # default = 1 second
Frame.__init__(self)
self.msecs = msecs
self.pack()
stopper = Button(self, text='Stop the beeps!', command=self.quit)
stopper.pack()
stopper.config(bg='navy', fg='white', bd=8)
self.stopper = stopper
self.repeater()
def repeater(self): # on every N millisecs
self.bell() # beep now
self.stopper.flash() # flash button now
self.after(self.msecs, self.repeater) # reschedule handler
if __name__ == '__main__': Alarm(msecs=1000).mainloop()
This script builds the window in Figure 9-41 and periodically calls both the button
widget’s flash method to make the button flash momentarily (it alternates colors
quickly) and the tkinter bell method to call your system’s sound interface. The
repeater method beeps and flashes once and schedules a callback to be invoked after
a specific amount of time with the after method.
Figure 9-41. Stop the beeps!
But after doesn’t pause the caller: callbacks are scheduled to occur in the background,
while the program performs other processing—technically, as soon as the Tk event
loop is able to notice the time rollover. To make this work, repeater calls after each
time through, to reschedule the callback. Delayed events are one-shot callbacks; to
repeat the event as a loop, we need to reschedule it anew.
The net effect is that when this script runs, it starts beeping and flashing once its one-
button window pops up. And it keeps beeping and flashing. And beeping. And flashing.
Other activities and GUI operations don’t affect it. Even if the window is iconified, the
beeping continues, because tkinter timer events fire in the background. You need to
kill the window or press the button to stop the alarm. By changing the msecs delay, you
can make this beep as fast or as slow as your system allows (some platforms can’t beep
as fast as others…). This may or may not be the best demo to launch in a crowded office,
but at least you’ve been warned.
586 | Chapter 9: A tkinter Tour, Part 2

Hiding and redrawing widgets and windows
The button flash method flashes the widget, but it’s easy to dynamically change other
appearance options of widgets, such as buttons, labels, and text, with the widget
config method. For instance, you can also achieve a flash-like effect by manually re-
versing foreground and background colors with the widget config method in scheduled
after callbacks. Largely for fun, Example 9-28 specializes the alarm to go a step further.
Example 9-28. PP4E\Gui\Tour\alarm-hide.py
# customize to erase or show button on after() timer callbacks
from tkinter import *
import alarm
class Alarm(alarm.Alarm): # change alarm callback
def __init__(self, msecs=1000): # default = 1 second
self.shown = False
alarm.Alarm.__init__(self, msecs)
def repeater(self): # on every N millisecs
self.bell() # beep now
if self.shown:
self.stopper.pack_forget() # hide or erase button now
else: # or reverse colors, flash...
self.stopper.pack()
self.shown = not self.shown # toggle state for next time
self.after(self.msecs, self.repeater) # reschedule handler
if __name__ == '__main__': Alarm(msecs=500).mainloop()
When this script is run, the same window appears, but the button is erased or redrawn
on alternating timer events. The widget pack_forget method erases (unmaps) a drawn
widget and pack makes it show up again; grid_forget and grid similarly hide and show
widgets in a grid. The pack_forget method is useful for dynamically drawing and
changing a running GUI. For instance, you can be selective about which components
are displayed, and you can build widgets ahead of time and show them only as needed.
Here, it just means that users must press the button while it’s displayed, or else the
noise keeps going.
Example 9-29 goes even further. There are a handful of methods for hiding and un-
hiding entire top-level windows:
• To hide and unhide the entire window instead of just one widget within it, use
the top-level window widget withdraw and deiconify methods. The withdraw
method, demonstrated in Example 9-29, completely erases the window and its icon
(use iconify if you want the window’s icon to appear during a hide).
• The lift method raises a window above all its siblings or relative to another you
pass in. This method is also known as tkraise, but not raise—its name in Tk—
because raise is a reserved word in Python.
Time Tools, Threads, and Animation | 587

• The state method returns or changes the window’s current state—it accepts
normal, iconic, zoomed (full screen), or withdrawn.
Experiment with these methods on your own to see how they differ. They are also useful
to pop up prebuilt dialog windows dynamically, but are perhaps less practical here.
Example 9-29. PP4E\Gui\Tour\alarm-withdraw.py
# same, but hide or show entire window on after() timer callbacks
from tkinter import *
import alarm
class Alarm(alarm.Alarm):
def repeater(self): # on every N millisecs
self.bell() # beep now
if self.master.state() == 'normal': # is window displayed?
self.master.withdraw() # hide entire window, no icon
else: # iconify shrinks to an icon
self.master.deiconify() # else redraw entire window
self.master.lift() # and raise above others
self.after(self.msecs, self.repeater) # reschedule handler
if __name__ == '__main__': Alarm().mainloop() # master = default Tk root
This works the same, but the entire window appears or disappears on beeps—you have
to press it when it’s shown. You could add lots of other effects to the alarm, and their
timer-based callbacks technique is widely applicable. Whether your buttons and win-
dows should flash and disappear, though, probably depends less on tkinter technology
than on your users’ patience.
Simple Animation Techniques
Apart from the direct shape moves of the canvasDraw example we met earlier in this
chapter, all of the GUIs presented so far in this part of the book have been fairly static.
This last section shows you how to change that, by adding simple shape movement
animations to the canvas drawing example listed in Example 9-16.
It also demonstrates and expands on the notion of canvas tags—the move operations
performed here move all canvas objects associated with a tag at once. All oval shapes
move if you press “o,” and all rectangles move if you press “r”; as mentioned earlier,
canvas operation methods accept both object IDs and tag names.
But the main goal here is to illustrate simple animation techniques using the time-based
tools described earlier in this section. There are three basic ways to move objects around
a canvas:
• By loops that use time.sleep to pause for fractions of a second between multiple
move operations, along with manual update calls. The script moves, sleeps, moves
a bit more, and so on. A time.sleep call pauses the caller and so fails to return
588 | Chapter 9: A tkinter Tour, Part 2

control to the GUI event loop—any new requests that arrive during a move are
deferred. Because of that, canvas.update must be called to redraw the screen after
each move, or else updates don’t appear until the entire movement loop callback
finishes and returns. This is a classic long-running callback scenario; without man-
ual update calls, no new GUI events are handled until the callback returns in this
scheme (including both new user requests and basic window redraws).
• By using the widget.after method to schedule multiple move operations to occur
every few milliseconds. Because this approach is based upon scheduled events dis-
patched by tkinter to your handlers, it allows multiple moves to occur in parallel
and doesn’t require canvas.update calls. You rely on the event loop to run moves,
so there’s no reason for sleep pauses, and the GUI is not blocked while moves are
in progress.
• By using threads to run multiple copies of the time.sleep pausing loops of the first
approach. Because threads run in parallel, a sleep in any thread blocks neither the
GUI nor other motion threads. As described earlier, GUIs should not be updated
from spawned threads in general, but some canvas calls such as move seem to be
thread-safe today in the current tkinter implementation.
Of these three schemes, the first yields the smoothest animations but makes other
operations sluggish during movement, the second seems to yield slower motion than
the others but is safer than using threads in general, and the second and third allow
multiple objects to be in motion at the same time.
Using time.sleep loops
The next three sections demonstrate the code structure of all three approaches in turn,
with new subclasses of the canvasDraw example we met in Example 9-16 earlier in this
chapter. Refer back to that example for its other event bindings and basic draw, move,
and clear operations; here, we customize its object creators for tags and add new event
bindings and actions. Example 9-30 illustrates the first approach.
Example 9-30. PP4E\Gui\Tour\canvasDraw_tags.py
"""
add tagged moves with time.sleep (not widget.after or threads);
time.sleep does not block the GUI event loop while pausing, but screen not redrawn
until callback returns or widget.update call; currently running onMove callback has
exclusive attention until it returns: others pause if press 'r' or 'o' during move;
"""
from tkinter import *
import canvasDraw, time
class CanvasEventsDemo(canvasDraw.CanvasEventsDemo):
def __init__(self, parent=None):
canvasDraw.CanvasEventsDemo.__init__(self, parent)
self.canvas.create_text(100, 10, text='Press o and r to move shapes')
self.canvas.master.bind('<KeyPress-o>', self.onMoveOvals)
Time Tools, Threads, and Animation | 589

self.canvas.master.bind('<KeyPress-r>', self.onMoveRectangles)
self.kinds = self.create_oval_tagged, self.create_rectangle_tagged
def create_oval_tagged(self, x1, y1, x2, y2):
objectId = self.canvas.create_oval(x1, y1, x2, y2)
self.canvas.itemconfig(objectId, tag='ovals', fill='blue')
return objectId
def create_rectangle_tagged(self, x1, y1, x2, y2):
objectId = self.canvas.create_rectangle(x1, y1, x2, y2)
self.canvas.itemconfig(objectId, tag='rectangles', fill='red')
return objectId
def onMoveOvals(self, event):
print('moving ovals')
self.moveInSquares(tag='ovals') # move all tagged ovals
def onMoveRectangles(self, event):
print('moving rectangles')
self.moveInSquares(tag='rectangles')
def moveInSquares(self, tag): # 5 reps of 4 times per sec
for i in range(5):
for (diffx, diffy) in [(+20, 0), (0, +20), (−20, 0), (0, −20)]:
self.canvas.move(tag, diffx, diffy)
self.canvas.update() # force screen redraw/update
time.sleep(0.25) # pause, but don't block GUI
if __name__ == '__main__':
CanvasEventsDemo()
mainloop()
All three of the scripts in this section create a window of blue ovals and red rectangles
as you drag new shapes out with the left mouse button. The drag-out implementation
itself is inherited from the superclass. A right-mouse-button click still moves a single
shape immediately, and a double-left click still clears the canvas, too—other operations
inherited from the original superclass. In fact, all this new script really does is change
the object creation calls to add tags and colors to drawn objects here, add a text field
at the top of the canvas, and add bindings and callbacks for motion requests. Fig-
ure 9-42 shows what this subclass’s window looks like after dragging out a few shapes
to be animated.
The “o” and “r” keys are set up to start animation of all the ovals and rectangles you’ve
drawn, respectively. Pressing “o,” for example, makes all the blue ovals start moving
synchronously. Objects are animated to mark out five squares around their location
and to move four times per second. New objects drawn while others are in motion start
to move, too, because they are tagged. You need to run these live to get a feel for the
simple animations they implement, of course. (You could try moving this book back
and forth and up and down, but it’s not quite the same, and might look silly in public
places.)
590 | Chapter 9: A tkinter Tour, Part 2
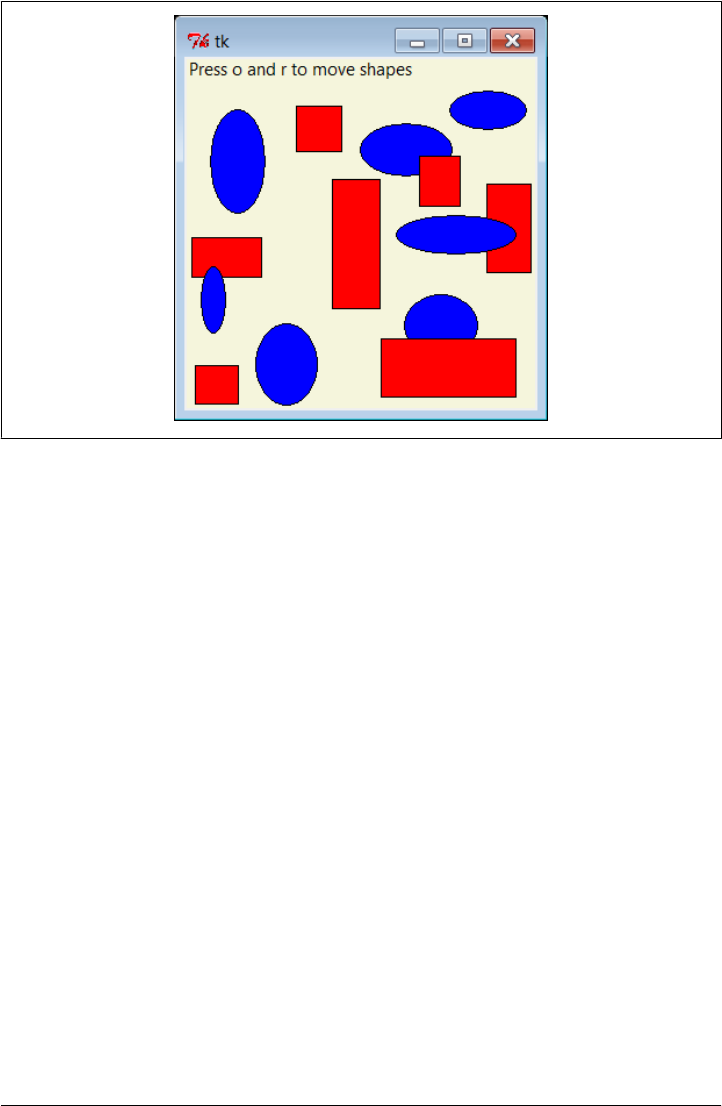
Figure 9-42. Drag-out objects ready to be animated
Using widget.after events
The main drawback of this first approach is that only one animation can be going at
once: if you press “r” or “o” while a move is in progress, the new request puts the prior
movement on hold until it finishes because each move callback handler assumes the
only thread of control while it runs. That is, only one time.sleep loop callback can be
running at a time, and a new one started by an update call is effectively a recursive call
which pauses another loop already in progress.
Screen updates are a bit sluggish while moves are in progress, too, because they happen
only as often as manual update calls are made (try a drag-out or a cover/uncover of the
window during a move to see for yourself). In fact, uncommenting the canvas update
call in Example 9-30 makes the GUI completely unresponsive during the move—it
won’t redraw itself if covered, doesn’t respond to new user requests, and doesn’t show
any of its progress (you only get to see the final state). This effectively simulates the
impact of long-running operations on GUIs in general.
Example 9-31 specializes just the moveInSquares method of the prior example to remove
all such limitations—by using after timer callback loops, it schedules moves without
potential pauses. It also reflects the most common (and likely best) way that tkinter
GUIs handle time-based events at large. By breaking tasks into parts this way instead
of running them all at once, they are naturally both distributed over time and
overlapped.
Time Tools, Threads, and Animation | 591

Example 9-31. PP4E\Gui\Tour\canvasDraw_tags_after.py
"""
similar, but with widget.after() scheduled events, not time.sleep loops;
because these are scheduled events, this allows both ovals and rectangles
to be moving at the _same_ time and does not require update calls to refresh
the GUI; the motion gets wild if you press 'o' or 'r' while move in progress:
multiple move updates start firing around the same time;
"""
from tkinter import *
import canvasDraw_tags
class CanvasEventsDemo(canvasDraw_tags.CanvasEventsDemo):
def moveEm(self, tag, moremoves):
(diffx, diffy), moremoves = moremoves[0], moremoves[1:]
self.canvas.move(tag, diffx, diffy)
if moremoves:
self.canvas.after(250, self.moveEm, tag, moremoves)
def moveInSquares(self, tag):
allmoves = [(+20, 0), (0, +20), (−20, 0), (0, −20)] * 5
self.moveEm(tag, allmoves)
if __name__ == '__main__':
CanvasEventsDemo()
mainloop()
This version inherits the drawing customizations of the prior, but lets you make both
ovals and rectangles move at the same time—drag out a few ovals and rectangles, and
then press “o” and then “r” right away to make this go. In fact, try pressing both keys
a few times; the more you press, the more the objects move, because multiple scheduled
events are firing and moving objects from wherever they happen to be positioned. If
you drag out a new shape during a move, it starts moving immediately as before.
Using multiple time.sleep loop threads
Running animations in threads can sometimes achieve the same effect. As discussed
earlier, it can be dangerous to update the screen from a spawned thread in general, but
it works in this example (on the test platform used, at least). Example 9-32 runs each
animation task as an independent and parallel thread. That is, each time you press the
“o” or “r” key to start an animation, a new thread is spawned to do the work.
Example 9-32. PP4E\Gui\Tour\canvasDraw_tags_thread.py
"""
similar, but run time.sleep loops in parallel with threads, not after() events
or single active time.sleep loop; because threads run in parallel, this also
allows ovals and rectangles to be moving at the _same_ time and does not require
update calls to refresh the GUI: in fact, calling .update() once made this crash
badly, though some canvas calls must be thread safe or this wouldn't work at all;
"""
592 | Chapter 9: A tkinter Tour, Part 2

from tkinter import *
import canvasDraw_tags
import _thread, time
class CanvasEventsDemo(canvasDraw_tags.CanvasEventsDemo):
def moveEm(self, tag):
for i in range(5):
for (diffx, diffy) in [(+20, 0), (0, +20), (−20, 0), (0, −20)]:
self.canvas.move(tag, diffx, diffy)
time.sleep(0.25) # pause this thread only
def moveInSquares(self, tag):
_thread.start_new_thread(self.moveEm, (tag,))
if __name__ == '__main__':
CanvasEventsDemo()
mainloop()
This version lets you move shapes at the same time, just like Example 9-31, but this
time it’s a reflection of threads running in parallel. In fact, this uses the same scheme
as the first time.sleep version. Here, though, there is more than one active thread of
control, so move handlers can overlap in time—time.sleep blocks only the calling
thread, not the program at large.
This example works on Windows today, but it failed on Linux at one point in this
book’s lifetime—the screen was not updated as threads changed it, so you couldn’t see
any changes until later GUI events. The usual rule of thumb about avoiding GUI up-
dates in spawned threads laid out earlier still holds true. It is usually safer to have your
threads do number crunching only and let the main thread (the one that built the GUI)
handle any screen updates. Even under this model, though, the main thread can still
use after event loops like that of Example 9-31 to watch for results from worker threads
to appear without being blocked while waiting (more on this in the next section and
chapter).
Parts of this story are implementation details prone to change over time, and it’s not
impossible that GUI updates in threads may be better supported by tkinter in the future,
so be sure to explore the state of threading in future releases for more details.
Other Animation Topics
We’ll revisit animation in Chapter 11’s PyDraw example; there, all three of the tech-
niques we just met—sleeps, timers, and threads—will be resurrected to move shapes,
text, and photos to arbitrary spots on a canvas marked with a mouse click. And although
the canvas widget’s absolute coordinate system makes it the workhorse of most non-
trivial animations, tkinter animation in general is limited mostly by your imagination.
In closing, here are a few more words on the topic to hint at the possibilities.
Time Tools, Threads, and Animation | 593

Other animation effects
Besides canvas-based animations, widget configuration tools support a variety of ani-
mation effects. For example, as we saw in the flashing and hiding alarm scripts earlier
(see Example 9-28), it is also easy to change the appearance of other kinds of widgets
dynamically with after timer-event loops. With timer-based loops, you can periodi-
cally flash widgets, completely erase and redraw widgets and windows on the fly, re-
verse or change widget colors, and so on. See “For a Good Time…” on page 51 for
another example in this category which changes fonts and colors on the fly (albeit, with
questionable ergonomic intentions).
Threads and animation
Techniques for running long-running tasks in parallel threads become more important
if animations must remain active while your program waits. For instance, imagine a
program that spends minutes downloading data from a network, calculating the output
of a numeric model, or performing other long-running tasks. If such a program’s GUI
must display an animation or otherwise show progress while waiting for the task, it can
do so by either altering a widget’s appearance or by moving objects in a canvas peri-
odically—simply use the after method to wake up intermittently to modify the GUI
as we’ve seen. A progress bar or counter, for instance, may be updated during after
timer-event handling.
In addition, though, the long-running task itself will likely have to be run in a spawned
parallel thread so that your GUI remains active and performs the animation during the
wait. Otherwise, no GUI updates will occur until the task returns control to the GUI.
During after timer-event processing, the main GUI thread might check variables or
objects set by the long-running task’s thread to determine completion or progress.
Especially if more than one long-running task may be active at the same time, the
spawned thread might also communicate with the GUI thread by storing information
in a Python Queue object, to be picked up and handled by the GUI during after events.
For generality, the Queue might even contain function objects that are run by the GUI
to update the display.
Again, we’ll study such threaded GUI programming and communication techniques
in Chapter 10, and employ them in the PyMailGUI example later in the book. For now,
keep in mind that spawning computational tasks in threads can allow the GUI itself to
both perform animations and remain active in general during wait states.
Graphics and gaming toolkits
Unless you stopped playing video games shortly after the ascent of Pong, you probably
also know that the sorts of movement and animation techniques shown in this chapter
and book are suitable for some simple game-like programs, but not all. For more de-
manding tasks, Python also has additional graphics and gaming support we haven’t
studied here.
594 | Chapter 9: A tkinter Tour, Part 2

For more advanced 3-D animation needs, also see the support in the PIL extension
package for common animation and movie file formats such as FLI and MPEG. Other
third-party toolkits such as OpenGL, Blender, PyGame, Maya, and VPython provide
even higher-level graphics and animation toolkits. The PyOpenGL system also offers
Tk support for GUIs. See the PyPI websites for links or search the Web.
If you’re interest in gaming specifically, PyGame and other packages support game
development in Python, and other books and web resources focus on this topic. Al-
though Python is not widely used as the sole implementation language of graphics-
intensive game programs, it is used as both a prototyping and a scripting language for
such products.‡ When integrated with 3D graphics libraries, it can serve even broader
roles. See http://www.python.org for links to available extensions in this domain.
The End of the Tour
And that’s a wrap for our tour of the tkinter library. You've now seen all the core widgets
and tools previewed in Chapter 7 (flip back for a summary of territory covered on this
tour). For more details, watch for all of the tools introduced here to appear again in the
advanced GUI techniques in Chapter 10, the larger GUI examples in Chapter 11, and
the remainder of the book at large. To some extent, the last few chapters have laid the
groundwork needed to step up to the larger programs that follow.
Other Widgets and Options
I should point out, though, that this story is still not quite complete. Although we’ve
covered the entire basic tkinter widget arsenal and mastered GUI fundamentals along
the way, we’ve skipped a handful of newer and more advanced widgets introduced to
tkinter recently:
Spinbox
An Entry used to select among a set or range of values
LabelFrame
A Frame with a border and title around a group of items
PanedWindow
A geometry manager widget containing multiple widgets that can be resized by
moving separator lines with the mouse
‡ Perhaps most prominently today, the popular Eve Online game uses Python for scripting and much of the
functionality—both on the server and the client. It uses the Stackless Python implementation to boost
massively parallel multitasking responsiveness. Other notable game companies using Python include the
makers of Civilization IV, and the now-defunct Origin Systems (at last report, its game Ultima Online II was
to use Python for scripting its animation).
The End of the Tour | 595

Moreover, we haven’t even mentioned any of the higher-level widgets available in the
popular Pmw, Tix, or ttk extension packages for tkinter (described in Chapter 7) or
any other third-party packages in general. For instance:
• Tix and ttk both provide additional widget options outlined in Chapter 7, which
are now part of Python’s standard library.
• The third-party domain tends to change over time, but has hosted tree widgets,
HTML viewers, font selection dialogs, tables, and much more for tkinter, and in-
cludes the Pmw megawidget set.
• Many tkinter programs such as Python’s standard IDLE development GUI include
font dialogs, tree widgets, and more that you may be able to use in your own
applications.
Because such extensions are too complex for us to cover in a useful fashion here,
though, we’ll defer to other resources in the interest of space. To sample richer options
for your GUI scripts, be sure to consult tkinter, Tk, Tix, ttk, and Pmw documentation
for more details on additional widgets, and visit the PyPI website at http://python.org/
or search the Web for other third-party tkinter extensions.
I should also mention that there are more widget configuration options than we have
met on this tour. Consult Tk and tkinter resources for options not listed explicitly here.
Although other tkinter tools are analogous to those presented here, the space I have for
illustrating additional widgets and options in this book is limited by both my publisher
and the finite nature of trees.
596 | Chapter 9: A tkinter Tour, Part 2

CHAPTER 10
GUI Coding Techniques
“Building a Better Mousetrap”
This chapter continues our look at building GUIs with Python and the tkinter library
by presenting a collection of more advanced GUI programming patterns and techni-
ques. In the preceding three chapters, we explored all the fundamentals of tkinter itself.
Here, our goal is to put them to work to add higher-level structures that will be useful
in larger programs. That is, our focus shifts here to writing code of our own which
implements utility above and beyond the basic tkinter toolkit—utility that we’ll ac-
tually find useful in more complete examples later in the book.
Some of the techniques we will be studying in this chapter are as follows:
• Providing common GUI operations in “mixin” classes
• Building menus and toolbars from data structure templates
• Adding GUI interfaces to command-line tools
• Redirecting input and output streams to GUI widgets
• Reloading GUI callback handlers on the fly
• Wrapping up and automating top-level window interfaces
• Using threads and queues to avoiding blocking in GUIs
• Popping up GUI windows on demand from non-GUI programs
• Adding GUIs as separate programs with sockets and pipes
As with other chapters in this book, this chapter has a dual agenda—not only will we
be studying GUI programming, but we’ll also be learning more about general Python
development concepts such as object-oriented programming (OOP) and code reuse.
As we’ll see, by coding GUI tools in Python, it’s easy to apply them in a wide variety
of contexts and programs.
As a segue to the next chapter, this one also closes with a look at the PyDemos and
PyGadgets launcher toolbars—GUIs used to start larger GUI examples. Although most
597

of their code is external to this book, we’ll explore enough of their structure to help
you study them in the examples distribution package.
Two notes before we begin: first, be sure to read the code listings in this chapter for
details we won’t present in the narrative. Second, although small examples that apply
in this chapter’s techniques will show up along the way, more realistic application will
have to await more realistic programs. We’ll put these techniques to use in the larger
examples in the next chapter and throughout the rest of the book. In fact, we’ll be
reusing the modules we develop here often, as tools in other programs in this book;
reusable software wants to be reused. First, though, let’s do what our species does best
and build some tools.
GuiMixin: Common Tool Mixin Classes
If you read the last three chapters, you probably noticed that the code used to construct
nontrivial GUIs can become long if we make each widget by hand. Not only do we have
to link up all the widgets manually, but we also need to remember and then set dozens
of options. If we stick to this strategy, GUI programming often becomes an exercise in
typing, or at least in cut-and-paste text editor operations.
Widget Builder Functions
Instead of performing each step by hand, a better idea is to wrap or automate as much
of the GUI construction process as possible. One approach is to code functions that
provide typical widget configurations, and automate the construction process for cases
to which they apply. For instance, we could define a button function to handle con-
figuration and packing details and support most of the buttons we draw. Exam-
ple 10-1 provides a handful of such widget builder calls.
Example 10-1. PP4E\Gui\Tools\widgets.py
"""
###############################################################################
wrap up widget construction in functions for easier use, based upon some
assumptions (e.g., expansion); use **extras fkw args for width, font/color,
etc., and repack result manually later to override defaults if needed;
###############################################################################
"""
from tkinter import *
def frame(root, side=TOP, **extras):
widget = Frame(root)
widget.pack(side=side, expand=YES, fill=BOTH)
if extras: widget.config(**extras)
return widget
598 | Chapter 10: GUI Coding Techniques

def label(root, side, text, **extras):
widget = Label(root, text=text, relief=RIDGE) # default config
widget.pack(side=side, expand=YES, fill=BOTH) # pack automatically
if extras: widget.config(**extras) # apply any extras
return widget
def button(root, side, text, command, **extras):
widget = Button(root, text=text, command=command)
widget.pack(side=side, expand=YES, fill=BOTH)
if extras: widget.config(**extras)
return widget
def entry(root, side, linkvar, **extras):
widget = Entry(root, relief=SUNKEN, textvariable=linkvar)
widget.pack(side=side, expand=YES, fill=BOTH)
if extras: widget.config(**extras)
return widget
if __name__ == '__main__':
app = Tk()
frm = frame(app, TOP) # much less code required here!
label(frm, LEFT, 'SPAM')
button(frm, BOTTOM, 'Press', lambda: print('Pushed'))
mainloop()
This module makes some assumptions about its clients’ use cases, which allows it to
automate typical construction chores such as packing. The net effect is to reduce the
amount of code required of its importers. When run as a script, Example 10-1 creates
a simple window with a ridged label on the left and a button on the right that prints a
message when pressed, both of which expand along with the window. Run this on your
own for a look; its window isn’t really anything new for us, and its code is meant more
as library than script—as we’ll see when we make use of it later in Chapter 19’s PyCalc.
This function-based approach can cut down on the amount of code required. As func-
tions, though, its tools don’t lend themselves to customization in the broader OOP
sense. Moreover, because they are not methods, they do not have access to the state of
an object representing the GUI.
Mixin Utility Classes
Alternatively, we can implement common methods in a class and inherit them every-
where they are needed. Such classes are commonly called mixin classes because their
methods are “mixed in” with other classes. Mixins serve to package generally useful
tools as methods. The concept is almost like importing a module, but mixin classes can
access the subject instance, self, to utilize both per-instance state and inherited meth-
ods. The script in Example 10-2 shows how.
GuiMixin: Common Tool Mixin Classes | 599

Example 10-2. PP4E\Gui\Tools\guimixin.py
"""
###############################################################################
a "mixin" class for other frames: common methods for canned dialogs,
spawning programs, simple text viewers, etc; this class must be mixed
with a Frame (or a subclass derived from Frame) for its quit method
###############################################################################
"""
from tkinter import *
from tkinter.messagebox import *
from tkinter.filedialog import *
from PP4E.Gui.Tour.scrolledtext import ScrolledText # or tkinter.scrolledtext
from PP4E.launchmodes import PortableLauncher, System # or use multiprocessing
class GuiMixin:
def infobox(self, title, text, *args): # use standard dialogs
return showinfo(title, text) # *args for bkwd compat
def errorbox(self, text):
showerror('Error!', text)
def question(self, title, text, *args):
return askyesno(title, text) # return True or False
def notdone(self):
showerror('Not implemented', 'Option not available')
def quit(self):
ans = self.question('Verify quit', 'Are you sure you want to quit?')
if ans:
Frame.quit(self) # quit not recursive!
def help(self):
self.infobox('RTFM', 'See figure 1...') # override this better
def selectOpenFile(self, file="", dir="."): # use standard dialogs
return askopenfilename(initialdir=dir, initialfile=file)
def selectSaveFile(self, file="", dir="."):
return asksaveasfilename(initialfile=file, initialdir=dir)
def clone(self, args=()): # optional constructor args
new = Toplevel() # make new in-process version of me
myclass = self.__class__ # instance's (lowest) class object
myclass(new, *args) # attach/run instance to new window
def spawn(self, pycmdline, wait=False):
if not wait: # start new process
PortableLauncher(pycmdline, pycmdline)() # run Python progam
else:
System(pycmdline, pycmdline)() # wait for it to exit
def browser(self, filename):
new = Toplevel() # make new window
600 | Chapter 10: GUI Coding Techniques

view = ScrolledText(new, file=filename) # Text with Scrollbar
view.text.config(height=30, width=85) # config Text in Frame
view.text.config(font=('courier', 10, 'normal')) # use fixed-width font
new.title("Text Viewer") # set window mgr attrs
new.iconname("browser") # file text added auto
"""
def browser(self, filename): # if tkinter.scrolledtext
new = Toplevel() # included for reference
text = ScrolledText(new, height=30, width=85)
text.config(font=('courier', 10, 'normal'))
text.pack(expand=YES, fill=BOTH)
new.title("Text Viewer")
new.iconname("browser")
text.insert('0.0', open(filename, 'r').read() )
"""
if __name__ == '__main__':
class TestMixin(GuiMixin, Frame): # standalone test
def __init__(self, parent=None):
Frame.__init__(self, parent)
self.pack()
Button(self, text='quit', command=self.quit).pack(fill=X)
Button(self, text='help', command=self.help).pack(fill=X)
Button(self, text='clone', command=self.clone).pack(fill=X)
Button(self, text='spawn', command=self.other).pack(fill=X)
def other(self):
self.spawn('guimixin.py') # spawn self as separate process
TestMixin().mainloop()
Although Example 10-2 is geared toward GUIs, it’s really about design concepts. The
GuiMixin class implements common operations with standard interfaces that are im-
mune to changes in implementation. In fact, the implementations of some of this class’s
methods did change—between the first and second editions of this book, old-style
Dialog calls were replaced with the new Tk standard dialog calls; in the fourth edition,
the file browser was updated to use a different scrolled text class. Because this class’s
interface hides such details, its clients did not have to be changed to use the new
techniques.
As is, GuiMixin provides methods for common dialogs, window cloning, program
spawning, text file browsing, and so on. We can add more methods to such a mixin
later if we find ourselves coding the same methods repeatedly; they will all become
available immediately everywhere this class is imported and mixed. Moreover, Gui
Mixin’s methods can be inherited and used as is, or they can be redefined in subclasses.
Such are the natural advantages of classes over functions.
GuiMixin: Common Tool Mixin Classes | 601

There are a few details worth highlighting here:
• The quit method serves some of the same purpose as the reusable Quitter button
we used in earlier chapters. Because mixin classes can define a large library of
reusable methods, they can be a more powerful way to package reusable compo-
nents than individual classes. If the mixin is packaged well, we can get a lot more
from it than a single button’s callback.
• The clone method makes a new in-process copy, in a new top-level window, of the
most specific class that mixes in a GuiMixin (self.__class__ is the class object that
the instance was created from). Assuming that the class requires no constructor
arguments other than a parent container, this opens a new independent copy of
the window (pass in any extra constructor arguments required).
• The browser method opens the ScrolledText object we wrote in Chapter 9 in a new
window and fills it with the text of a file to be viewed. As noted in the preceding
chapter, there is also a ScrolledText widget in standard library module
tkinter.scrolledtext, but its interface differs, it does not load a file automatically,
and it is prone to becoming deprecated (though it hasn’t over many years). For
reference, its alternative code is included.
• The spawn method launches a Python program command line as a new independent
process and waits for it to end or not (depending on the default False wait
argument—GUIs usually shouldn’t wait). This method is simple, though, because
we wrapped launching details in the launchmodes module presented at the end of
Chapter 5. GuiMixin both fosters and practices good code reuse habits.
The GuiMixin class is meant to be a library of reusable tool methods and is essentially
useless by itself. In fact, it must generally be mixed with a Frame-based class to be used:
quit assumes it’s mixed with a Frame, and clone assumes it’s mixed with a widget class.
To satisfy such constraints, this module’s self-test code at the bottom combines Gui
Mixin with a Frame widget.
Figure 10-1 shows the scene created by the module’s self-test after pressing “clone” and
“spawn” once each, and then “help” in one of the three copies. Because they are separate
processes, windows started with “spawn” keep running after other windows are closed
and do not impact other windows when closed themselves; a “clone” window is in-
process instead—it is closed with others, but its “X” destroys just itself. Make sure your
PYTHONPATH includes the PP4E directory’s container for the cross-directory pack-
age imports in this example and later examples which use it.
We’ll see GuiMixin show up again as a mixin in later examples; that’s the whole point
of code reuse, after all. Although functions are often useful, classes support inheritance
and access to instance state, and provide an extra organizational structure—features
that are especially useful given the coding requirements of GUIs. For instance, many
of GuiMixin’s methods could be replaced with simple functions, but clone and quit
could not. The next section carries these talents of mixin classes even further.
602 | Chapter 10: GUI Coding Techniques
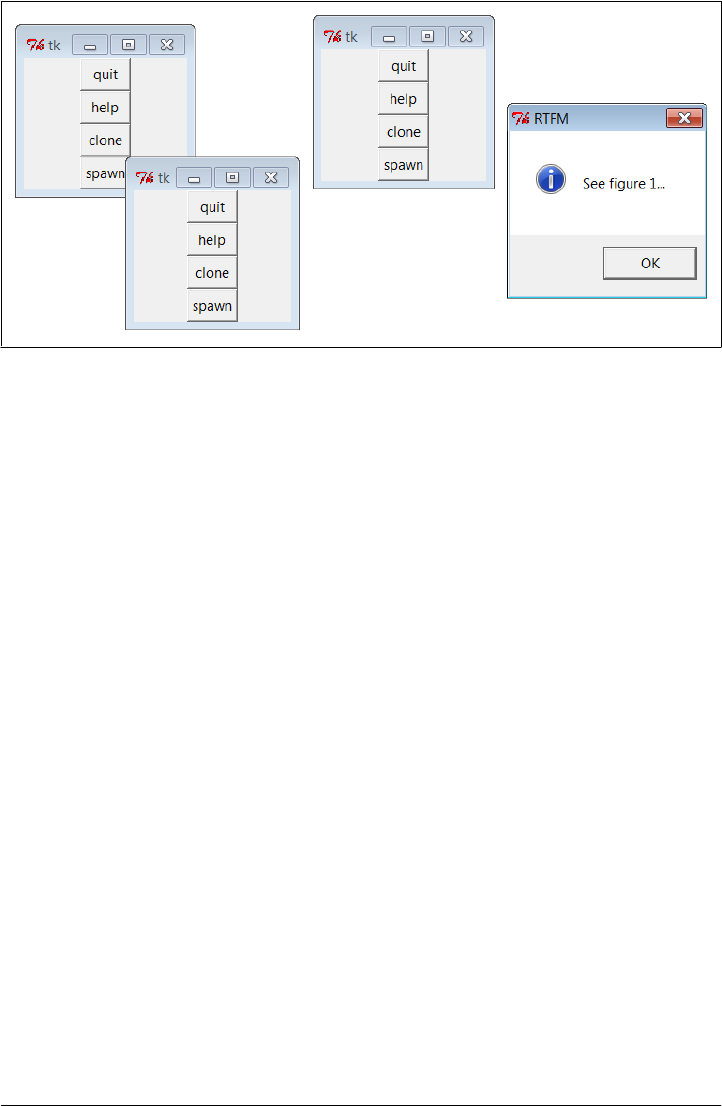
GuiMaker: Automating Menus and Toolbars
The last section’s mixin class makes common tasks simpler, but it still doesn’t address
the complexity of linking up widgets such as menus and toolbars. Of course, if we had
access to a GUI layout tool that generates Python code, this would not be an issue, at
least for some of the more static interfaces we may require. We’d design our widgets
interactively, press a button, and fill in the callback handler blanks.
Especially for a relatively simple toolkit like tkinter, though, a programming-based
approach can often work just as well. We’d like to be able to inherit something that
does all the grunt work of construction for us, given a template for the menus and
toolbars in a window. Here’s one way it can be done—using trees of simple objects.
The class in Example 10-3 interprets data structure representations of menus and tool-
bars and builds all the widgets automatically.
Example 10-3. PP4E\Gui\Tools\guimaker.py
"""
###############################################################################
An extended Frame that makes window menus and toolbars automatically.
Use GuiMakerFrameMenu for embedded components (makes frame-based menus).
Use GuiMakerWindowMenu for top-level windows (makes Tk8.0 window menus).
See the self-test code (and PyEdit) for an example layout tree format.
###############################################################################
"""
import sys
from tkinter import * # widget classes
from tkinter.messagebox import showinfo
class GuiMaker(Frame):
menuBar = [] # class defaults
Figure 10-1. GuiMixin self-test code in action
GuiMaker: Automating Menus and Toolbars | 603

toolBar = [] # change per instance in subclasses
helpButton = True # set these in start() if need self
def __init__(self, parent=None):
Frame.__init__(self, parent)
self.pack(expand=YES, fill=BOTH) # make frame stretchable
self.start() # for subclass: set menu/toolBar
self.makeMenuBar() # done here: build menu bar
self.makeToolBar() # done here: build toolbar
self.makeWidgets() # for subclass: add middle part
def makeMenuBar(self):
"""
make menu bar at the top (Tk8.0 menus below)
expand=no, fill=x so same width on resize
"""
menubar = Frame(self, relief=RAISED, bd=2)
menubar.pack(side=TOP, fill=X)
for (name, key, items) in self.menuBar:
mbutton = Menubutton(menubar, text=name, underline=key)
mbutton.pack(side=LEFT)
pulldown = Menu(mbutton)
self.addMenuItems(pulldown, items)
mbutton.config(menu=pulldown)
if self.helpButton:
Button(menubar, text = 'Help',
cursor = 'gumby',
relief = FLAT,
command = self.help).pack(side=RIGHT)
def addMenuItems(self, menu, items):
for item in items: # scan nested items list
if item == 'separator': # string: add separator
menu.add_separator({})
elif type(item) == list: # list: disabled item list
for num in item:
menu.entryconfig(num, state=DISABLED)
elif type(item[2]) != list:
menu.add_command(label = item[0], # command:
underline = item[1], # add command
command = item[2]) # cmd=callable
else:
pullover = Menu(menu)
self.addMenuItems(pullover, item[2]) # sublist:
menu.add_cascade(label = item[0], # make submenu
underline = item[1], # add cascade
menu = pullover)
def makeToolBar(self):
"""
make button bar at bottom, if any
expand=no, fill=x so same width on resize
this could support images too: see Chapter 9,
604 | Chapter 10: GUI Coding Techniques

would need prebuilt gifs or PIL for thumbnails
"""
if self.toolBar:
toolbar = Frame(self, cursor='hand2', relief=SUNKEN, bd=2)
toolbar.pack(side=BOTTOM, fill=X)
for (name, action, where) in self.toolBar:
Button(toolbar, text=name, command=action).pack(where)
def makeWidgets(self):
"""
make 'middle' part last, so menu/toolbar
is always on top/bottom and clipped last;
override this default, pack middle any side;
for grid: grid middle part in a packed frame
"""
name = Label(self,
width=40, height=10,
relief=SUNKEN, bg='white',
text = self.__class__.__name__,
cursor = 'crosshair')
name.pack(expand=YES, fill=BOTH, side=TOP)
def help(self):
"override me in subclass"
showinfo('Help', 'Sorry, no help for ' + self.__class__.__name__)
def start(self):
"override me in subclass: set menu/toolbar with self"
pass
###############################################################################
# Customize for Tk 8.0 main window menu bar, instead of a frame
###############################################################################
GuiMakerFrameMenu = GuiMaker # use this for embedded component menus
class GuiMakerWindowMenu(GuiMaker): # use this for top-level window menus
def makeMenuBar(self):
menubar = Menu(self.master)
self.master.config(menu=menubar)
for (name, key, items) in self.menuBar:
pulldown = Menu(menubar)
self.addMenuItems(pulldown, items)
menubar.add_cascade(label=name, underline=key, menu=pulldown)
if self.helpButton:
if sys.platform[:3] == 'win':
menubar.add_command(label='Help', command=self.help)
else:
pulldown = Menu(menubar) # Linux needs real pull down
pulldown.add_command(label='About', command=self.help)
menubar.add_cascade(label='Help', menu=pulldown)
GuiMaker: Automating Menus and Toolbars | 605

###############################################################################
# Self-test when file run standalone: 'python guimaker.py'
###############################################################################
if __name__ == '__main__':
from guimixin import GuiMixin # mix in a help method
menuBar = [
('File', 0,
[('Open', 0, lambda:0), # lambda:0 is a no-op
('Quit', 0, sys.exit)]), # use sys, no self here
('Edit', 0,
[('Cut', 0, lambda:0),
('Paste', 0, lambda:0)]) ]
toolBar = [('Quit', sys.exit, {'side': LEFT})]
class TestAppFrameMenu(GuiMixin, GuiMakerFrameMenu):
def start(self):
self.menuBar = menuBar
self.toolBar = toolBar
class TestAppWindowMenu(GuiMixin, GuiMakerWindowMenu):
def start(self):
self.menuBar = menuBar
self.toolBar = toolBar
class TestAppWindowMenuBasic(GuiMakerWindowMenu):
def start(self):
self.menuBar = menuBar
self.toolBar = toolBar # guimaker help, not guimixin
root = Tk()
TestAppFrameMenu(Toplevel())
TestAppWindowMenu(Toplevel())
TestAppWindowMenuBasic(root)
root.mainloop()
To make sense of this module, you have to be familiar with the menu fundamentals
introduced in Chapter 9. If you are, though, it’s straightforward—the GuiMaker class
simply traverses the menu and toolbar structures and builds menu and toolbar widgets
along the way. This module’s self-test code includes a simple example of the data
structures used to lay out menus and toolbars:
Menu bar templates
Lists and nested sublists of (label, underline, handler) triples. If a handler is a
sublist rather than a function or method, it is assumed to be a cascading submenu.
Toolbar templates
List of (label, handler, pack-options) triples. pack-options is coded as a dictionary
of options passed on to the widget pack method; we can code these as {'k':v}
literals, or with the dict(k=v) call’s keyword syntax. pack accepts a dictionary ar-
gument, but we could also transform the dictionary into individual keyword
606 | Chapter 10: GUI Coding Techniques

arguments by using Python’s func(**kargs) call syntax. As is, labels are assumed
to be text, but images could be supported too (see the note under “BigGui: A Client
Demo Program” on page 609).
For variety, the mouse cursor changes based upon its location: a hand in the toolbar,
crosshairs in the default middle part, and something else over Help buttons of frame-
based menus (customize as desired).
Subclass Protocols
In addition to menu and toolbar layouts, clients of this class can also tap into and
customize the method and geometry protocols the class implements:
Template attributes
Clients of this class are expected to set menuBar and toolBar attributes somewhere
in the inheritance chain by the time the start method has finished.
Initialization
The start method can be overridden to construct menu and toolbar templates
dynamically, since self is available when it is called; start is also where general
initializations should be performed—GuiMixin’s __init__ constructor must be run,
not overridden.
Adding widgets
The makeWidgets method can be redefined to construct the middle part of the win-
dow—the application portion between the menu bar and the toolbar. By default,
makeWidgets adds a label in the middle with the name of the most specific class,
but this method is expected to be specialized.
Packing protocol
In a specialized makeWidgets method, clients may attach their middle portion’s
widgets to any side of self (a Frame) since the menu and toolbars have already
claimed the container’s top and bottom by the time makeWidgets is run. The middle
part does not need to be a nested frame if its parts are packed. The menu and
toolbars are also automatically packed first so that they are clipped last if the win-
dow shrinks.
Gridding protocol
The middle part can contain a grid layout, as long as it is gridded in a nested
Frame that is itself packed within the self parent. (Remember that each container
level may use grid or pack, not both, and that self is a Frame with already packed
bars by the time makeWidgets is called.) Because the GuiMaker Frame packs itself
within its parent, it is not directly embeddable in a container with widgets arranged
in a grid, for similar reasons; add an intermediate gridded Frame to use it in this
context.
GuiMaker: Automating Menus and Toolbars | 607

GuiMaker Classes
In return for conforming to GuiMaker protocols and templates, client subclasses get a
Frame that knows how to automatically build up its own menus and toolbars from
template data structures. If you read the preceding chapter’s menu examples, you
probably know that this is a big win in terms of reduced coding requirements. Gui
Maker is also clever enough to export interfaces for both menu styles that we met in
Chapter 9:
GuiMakerWindowMenu
Implements Tk 8.0-style top-level window menus, useful for menus associated
with standalone programs and pop ups.
GuiMakerFrameMenu
Implements alternative Frame/Menubutton-based menus, useful for menus on ob-
jects embedded as components of a larger GUI.
Both classes build toolbars, export the same protocols, and expect to find the same
template structures; they differ only in the way they process menu templates. In fact,
one is simply a subclass of the other with a specialized menu maker method—only top-
level menu processing differs between the two styles (a Menu with Menu cascades rather
than a Frame with Menubuttons).
GuiMaker Self-Test
Like GuiMixin, when we run Example 10-3 as a top-level program, we trigger the self-
test logic at the bottom of its file; Figure 10-2 shows the windows we get. Three windows
come up, representing each of the self-test code’s TestApp c l a s s e s . A l l t h r e e h a v e a m e n u
and toolbar with the options specified in the template data structures created in the
self-test code: File and Edit menu pull downs, plus a Quit toolbar button and a standard
Help menu button. In the screenshot, one window’s File menu has been torn off and
the Edit menu of another is being pulled down; the lower window was resized for effect.
GuiMaker can be mixed in with other superclasses, but it’s primarily intended to serve
the same extending and embedding roles as a tkinter Frame widget c l as s ( w hi c h m a ke s
sense, given that it’s really just a customized Frame w it h ex t r a c o n s t ru c t i on p ro to c o l s) .
In fact, its self-test combines a GuiMaker frame with the prior section’s GuiMixin tools
package class.
Because of the superclass relationships coded, two of the three windows get their
help callback handler from GuiMixin; TestAppWindowMenuBasic gets GuiMaker’s instead.
Notice that the order in which these two classes are mixed can be important: because
both GuiMixin a n d Frame d e f i n e a quit m e t h o d , w e n e e d t o l i s t t h e c l a s s f r o m w h i c h w e
want to get it first in the mixed class’s header line due to the left-to-right search rule of
multiple inheritance. To select GuiMixin’s methods, it should usually be listed before a
superclass derived from real widgets.
608 | Chapter 10: GUI Coding Techniques

We’ll put GuiMaker to more practical use in instances such as the PyEdit example in
Chapter 11. The next section shows another way to use GuiMaker’s templates to build
up a sophisticated interface, and serves as another test of its functionality.
BigGui: A Client Demo Program
Let’s look at a program that makes better use of the two automation classes we just
wrote. In the module in Example 10-4, the Hello class inherits from both GuiMixin and
GuiMaker. GuiMaker provides the link to the Frame widget, plus the menu/toolbar con-
struction logic. GuiMixin provides extra common-behavior methods. Really, Hello is
another kind of extended Frame widget because it is derived from GuiMaker. To get a
menu and toolbar for free, it simply follows the protocols defined by GuiMaker—it sets
the menuBar and toolBar attributes in its start method, and overrides makeWidgets to
put a custom label in the middle.
Example 10-4. PP4E\Gui\Tools\big_gui.py
"""
GUI demo implementation - combines maker, mixin, and this
"""
import sys, os
from tkinter import * # widget classes
from PP4E.Gui.Tools.guimixin import * # mix-in methods: quit, spawn, etc.
from PP4E.Gui.Tools.guimaker import * # frame, plus menu/toolbar builder
Figure 10-2. GuiMaker self-test at work
GuiMaker: Automating Menus and Toolbars | 609

class Hello(GuiMixin, GuiMakerWindowMenu): # or GuiMakerFrameMenu
def start(self):
self.hellos = 0
self.master.title("GuiMaker Demo")
self.master.iconname("GuiMaker")
def spawnme(): self.spawn('big_gui.py') # defer call vs lambda
self.menuBar = [ # a tree: 3 pull downs
('File', 0, # (pull-down)
[('New...', 0, spawnme),
('Open...', 0, self.fileOpen), # [menu items list]
('Quit', 0, self.quit)] # label,underline,action
),
('Edit', 0,
[('Cut', −1, self.notdone), # no underline|action
('Paste', −1, self.notdone), # lambda:0 works too
'separator', # add a separator
('Stuff', −1,
[('Clone', −1, self.clone), # cascaded submenu
('More', −1, self.more)]
),
('Delete', −1, lambda:0),
[5]] # disable 'delete'
),
('Play', 0,
[('Hello', 0, self.greeting),
('Popup...', 0, self.dialog),
('Demos', 0,
[('Toplevels', 0,
lambda: self.spawn(r'..\Tour\toplevel2.py')),
('Frames', 0,
lambda: self.spawn(r'..\Tour\demoAll-frm-ridge.py')),
('Images', 0,
lambda: self.spawn(r'..\Tour\buttonpics.py')),
('Alarm', 0,
lambda: self.spawn(r'..\Tour\alarm.py', wait=False)),
('Other...', −1, self.pickDemo)]
)]
)]
self.toolBar = [ # add 3 buttons
('Quit', self.quit, dict(side=RIGHT)), # or {'side': RIGHT}
('Hello', self.greeting, dict(side=LEFT)),
('Popup', self.dialog, dict(side=LEFT, expand=YES)) ]
def makeWidgets(self): # override default
middle = Label(self, text='Hello maker world!', # middle of window
width=40, height=10,
relief=SUNKEN, cursor='pencil', bg='white')
middle.pack(expand=YES, fill=BOTH)
def greeting(self):
self.hellos += 1
610 | Chapter 10: GUI Coding Techniques

if self.hellos % 3:
print("hi")
else:
self.infobox("Three", 'HELLO!') # on every third press
def dialog(self):
button = self.question('OOPS!',
'You typed "rm*" ... continue?', # old style
'questhead', ('yes', 'no')) # args ignored
[lambda: None, self.quit][button]()
def fileOpen(self):
pick = self.selectOpenFile(file='big_gui.py')
if pick:
self.browser(pick) # browse my source file, or other
def more(self):
new = Toplevel()
Label(new, text='A new non-modal window').pack()
Button(new, text='Quit', command=self.quit).pack(side=LEFT)
Button(new, text='More', command=self.more).pack(side=RIGHT)
def pickDemo(self):
pick = self.selectOpenFile(dir='..')
if pick:
self.spawn(pick) # spawn any Python program
if __name__ == '__main__': Hello().mainloop() # make one, run one
This script lays out a fairly large menu and toolbar structure, and also adds callback
methods of its own that print stdout messages, pop up text file browsers and new
windows, and run other programs. Many of the callbacks don’t do much more than
run the notDone method inherited from GuiMixin, though; this code is intended mostly
as a GuiMaker and GuiMixin demo.
When big_gui is run as a top-level program, it creates a window with four menu pull
downs on top and a three-button toolbar on the bottom, shown in Figure 10-3 along
with some of the pop-up windows its callbacks create. The menus have separators,
disabled entries, and cascading submenus, all as defined by the menuBar template used
by GuiMaker, and Quit invokes the verifying dialog inherited from GuiMixin—some of
the many tools we’re getting for free here.
Figure 10-4 shows this script’s window again, after its Play pull down has been used to
launch three independently running demos that we wrote in Chapters 8 and 9. These
demos are ultimately started by using the portable launcher tools we wrote in Chap-
ter 5, and acquired from the GuiMixin class. If you want to run other demos on your
computer, select the Play menu’s Other option to pop up a standard file selection dialog
instead and navigate to the desired program’s file. One note: I copied the icon bitmap
used by the top-levels demo in the Play menu to this script’s directory; later, we’ll write
tools that attempt to locate one automatically.
GuiMaker: Automating Menus and Toolbars | 611
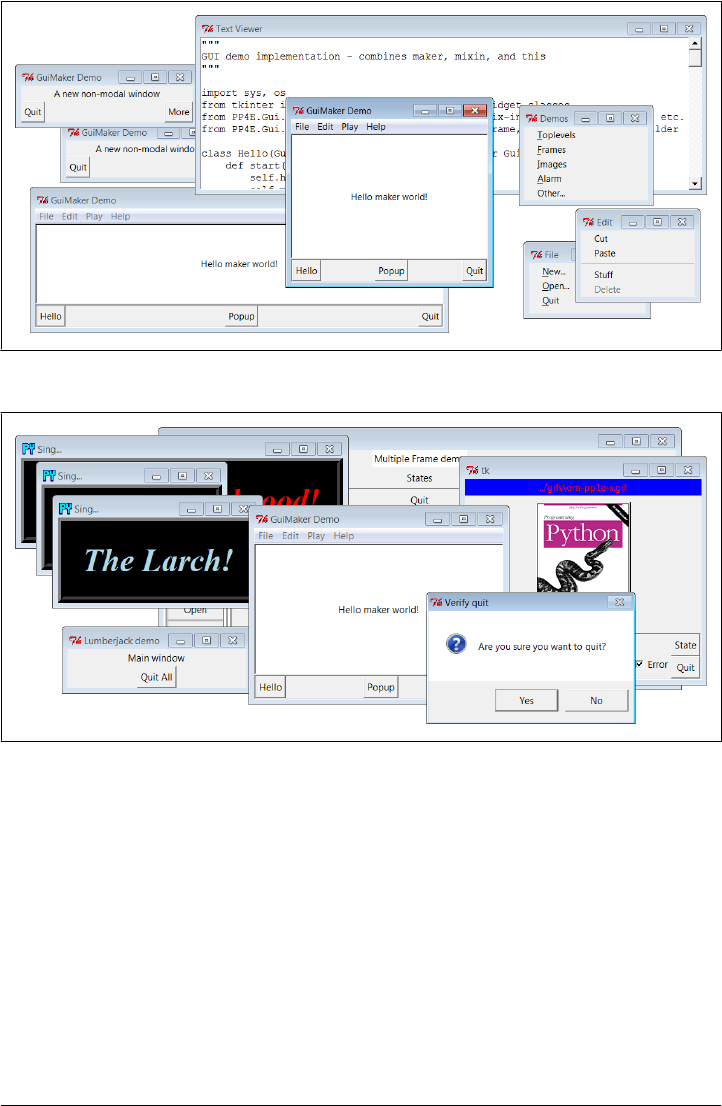
Finally, I should note that GuiMaker could be redesigned to use trees of embedded class
instances that know how to apply themselves to the tkinter widget tree being con-
structed, instead of branching on the types of items in template data structures. In the
interest of space, though, we’ll banish that extension to the land of suggested exercises
in this edition.
Figure 10-3. big_gui with various pop ups
Figure 10-4. big_gui with spawned demos
612 | Chapter 10: GUI Coding Techniques

Speaking of suggested enhancements, in Chapter 9, I showed you a first-
cut way to use images instead of text for buttons in toolbars at the bot-
tom of windows. Adding this option to the GUI maker class as a subclass
which redefines its toolbar construction method would be both a great
way to experiment with the code and a useful utility. If I added every
cool feature imaginable, though, this book could easily become big
enough to be gravitationally significant…
ShellGui: GUIs for Command-Line Tools
Demos are fun, but to better show how things like the GuiMixin class can be of practical
use, we need a more realistic application. Here’s one: suppose you’ve written a set of
command-line system administration scripts, along the lines of those we studied in
Part II. As we saw, such scripts work well from a command line, but require you to
remember all their options each time they are run; if you’re like me, this usually implies
having to pore over the source code after a period of nonuse.
Instead of requiring users of such tools (including yourself) to type cryptic commands
at a shell, why not also provide an easy-to-use tkinter GUI interface for running such
programs? Such a GUI can prompt for command-line inputs, instead of expecting users
to remember them. While we’re at it, why not generalize the whole notion of running
command-line tools from a GUI, to make it easy to support future tools too?
A Generic Shell-Tools Display
Examples 10-5 through 10-11—seven files, spanning two command-line scripts, one
GUI utility module, two GUI dialogs, and a main GUI and its options specification
module—comprise a concrete implementation of these artificially rhetorical musings.
Because I want this to be a general-purpose tool that can run any command-line pro-
gram, its design is factored into modules that become more application-specific as we
go lower in the software hierarchy. At the top, things are about as generic as they can
be, as shown in Example 10-5.
Example 10-5. PP4E\Gui\ShellGui\shellgui.py
#!/usr/local/bin/python
"""
################################################################################
tools launcher; uses guimaker templates, guimixin std quit dialog;
I am just a class library: run mytools script to display the GUI;
################################################################################
"""
from tkinter import * # get widgets
from PP4E.Gui.Tools.guimixin import GuiMixin # get quit, not done
from PP4E.Gui.Tools.guimaker import * # menu/toolbar builder
class ShellGui(GuiMixin, GuiMakerWindowMenu): # a frame + maker + mixins
ShellGui: GUIs for Command-Line Tools | 613

def start(self): # use GuiMaker if component
self.setMenuBar()
self.setToolBar()
self.master.title("Shell Tools Listbox")
self.master.iconname("Shell Tools")
def handleList(self, event): # on listbox double-click
label = self.listbox.get(ACTIVE) # fetch selection text
self.runCommand(label) # and call action here
def makeWidgets(self): # add listbox in middle
sbar = Scrollbar(self) # cross link sbar, list
list = Listbox(self, bg='white') # or use Tour.ScrolledList
sbar.config(command=list.yview)
list.config(yscrollcommand=sbar.set)
sbar.pack(side=RIGHT, fill=Y) # pack 1st=clip last
list.pack(side=LEFT, expand=YES, fill=BOTH) # list clipped first
for (label, action) in self.fetchCommands(): # add to listbox
list.insert(END, label) # and menu/toolbars
list.bind('<Double-1>', self.handleList) # set event handler
self.listbox = list
def forToolBar(self, label): # put on toolbar?
return True # default = all
def setToolBar(self):
self.toolBar = []
for (label, action) in self.fetchCommands():
if self.forToolBar(label):
self.toolBar.append((label, action, dict(side=LEFT)))
self.toolBar.append(('Quit', self.quit, dict(side=RIGHT)))
def setMenuBar(self):
toolEntries = []
self.menuBar = [
('File', 0, [('Quit', −1, self.quit)]), # pull-down name
('Tools', 0, toolEntries) # menu items list
] # label,underline,action
for (label, action) in self.fetchCommands():
toolEntries.append((label, −1, action)) # add app items to menu
################################################################################
# delegate to template type-specific subclasses
# which delegate to app tool-set-specific subclasses
################################################################################
class ListMenuGui(ShellGui):
def fetchCommands(self): # subclass: set 'myMenu'
return self.myMenu # list of (label, callback)
def runCommand(self, cmd):
for (label, action) in self.myMenu:
if label == cmd: action()
class DictMenuGui(ShellGui):
def fetchCommands(self):
614 | Chapter 10: GUI Coding Techniques

return self.myMenu.items()
def runCommand(self, cmd):
self.myMenu[cmd]()
The ShellGui class in this module knows how to use the GuiMaker and GuiMixin inter-
faces to construct a selection window that displays tool names in menus, a scrolled list,
and a toolbar. It also provides a forToolBar method that you can override and that
allows subclasses to specify which tools should and should not be added to the win-
dow’s toolbar (the toolbar can become crowded in a hurry). However, it is deliberately
ignorant about both the names of tools that should be displayed in those places and
about the actions to be run when tool names are selected.
Instead, ShellGui relies on the ListMenuGui and DictMenuGui subclasses in this file to
provide a list of tool names from a fetchCommands method and dispatch actions by name
in a runCommand method. These two subclasses really just serve to interface to
application-specific tool sets laid out as lists or dictionaries, though; they are still naïve
about what tool names really go up on the GUI. That’s by design, too—because the
tool sets displayed are defined by lower subclasses, we can use ShellGui to display a
variety of different tool sets.
Application-Specific Tool Set Classes
To get to the actual tool sets, we need to go one level down. The module in Exam-
ple 10-6 defines subclasses of the two type-specific ShellGui classes, to provide sets of
available tools in both list and dictionary formats (you would normally need only one,
but this module is meant for illustration). This is also the module that is actually run
to kick off the GUI—the shellgui module is a class library only.
Example 10-6. PP4E\Gui\ShellGui\mytools.py
#!/usr/local/bin/python
"""
################################################################################
provide type-specific option sets for application
################################################################################
"""
from shellgui import * # type-specific option gui
from packdlg import runPackDialog # dialogs for data entry
from unpkdlg import runUnpackDialog # they both run app classes
class TextPak1(ListMenuGui):
def __init__(self):
self.myMenu = [('Pack ', runPackDialog), # simple functions
('Unpack', runUnpackDialog), # use same width here
('Mtool ', self.notdone)] # method from guimixin
ListMenuGui.__init__(self)
def forToolBar(self, label):
return label in {'Pack ', 'Unpack'} # 3.x set syntax
ShellGui: GUIs for Command-Line Tools | 615
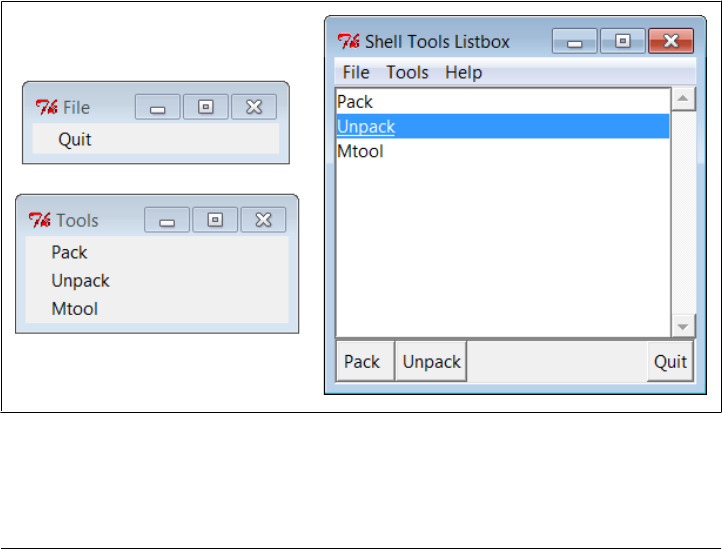
class TextPak2(DictMenuGui):
def __init__(self):
self.myMenu = {'Pack ': runPackDialog, # or use input here...
'Unpack': runUnpackDialog, # instead of in dialogs
'Mtool ': self.notdone}
DictMenuGui.__init__(self)
if __name__ == '__main__': # self-test code...
from sys import argv # 'menugui.py list|^'
if len(argv) > 1 and argv[1] == 'list':
print('list test')
TextPak1().mainloop()
else:
print('dict test')
TextPak2().mainloop()
The classes in this module are specific to a particular tool set; to display a different set
of tool names, simply code and run a new subclass. By separating out application logic
into distinct subclasses and modules like this, software can become widely reusable.
Figure 10-5 shows the main ShellGui window created when the mytools script is run
with its list-based menu layout class on Windows 7, along with menu tear-offs so that
you can see what they contain. This window’s menu and toolbar are built by Gui
Maker, and its Quit and Help buttons and menu selections trigger quit and help methods
inherited from GuiMixin through the ShellGui module’s superclasses. Are you starting
to see why this book preaches code reuse so often?
Figure 10-5. mytools items in a ShellGui window
616 | Chapter 10: GUI Coding Techniques

Adding GUI Frontends to Command Lines
So far, we’ve coded a general shell tools class library, as well as an application-specific
tool set module that names callback handlers in its option menus. To complete the
picture, we still need to define the callback handlers run by the GUI, as well as the
scripts they ultimately invoke.
Non-GUI scripts
To test the shell GUI’s ability to run command-line scripts, we need a few command-
line scripts, of course. At the bottom of the hierarchy, the following two scripts make
use of system tools and techniques from Part II to implement a simple text file archive
utility. The first, Example 10-7, simply concatenates the contents of multiple text files
into a single file, with predefined separator lines between them.
Example 10-7. PP4E\Gui\ShellGui\packer.py
# pack text files into a single file with separator lines (simple archive)
import sys, glob
marker = ':' * 20 + 'textpak=>' # hopefully unique separator
def pack(ofile, ifiles):
output = open(ofile, 'w')
for name in ifiles:
print('packing:', name)
input = open(name, 'r').read() # open the next input file
if input[-1] != '\n': input += '\n' # make sure it has endline
output.write(marker + name + '\n') # write a separator line
output.write(input) # and write the file's contents
if __name__ == '__main__':
ifiles = []
for patt in sys.argv[2:]:
ifiles += glob.glob(patt) # not globbed auto on Windows
pack(sys.argv[1], ifiles) # pack files listed on cmdline
The second script, Example 10-8, scans archive files created by the first, to unpack into
individual files again.
Example 10-8. PP4E\Gui\ShellGui\unpacker.py
# unpack files created by packer.py (simple textfile archive)
import sys
from packer import marker # use common separator key
mlen = len(marker) # filenames after markers
def unpack(ifile, prefix='new-'):
for line in open(ifile): # for all input lines
if line[:mlen] != marker:
output.write(line) # write real lines
ShellGui: GUIs for Command-Line Tools | 617

else:
name = prefix + line[mlen:-1] # or make new output
print('creating:', name)
output = open(name, 'w')
if __name__ == '__main__': unpack(sys.argv[1])
These scripts are fairly basic, and this GUI part of the book assumes you’ve already
scanned the system tools chapters, so we won’t go into their code in depth. Variants
of these scripts appeared in the first edition of this book in 1996; I actually used them
early on in my Python career to bundle files before I could rely on tools like tar and zip
to be present on all the machines I used (and before Python grew tar and zip support
modules in its standard library). Their operation is straightforward—consider these
three text files:
C:\...\PP4E\Gui\ShellGui> type spam.txt
spam
Spam
SPAM
C:\...\PP4E\Gui\ShellGui> type eggs.txt
eggs
C:\...\PP4E\Gui\ShellGui> type ham.txt
h
a
m
When run from the command line, the packer script combines them into a single text
file, and the unpacker extracts them from there; the packer must take care to glob
(expand) filename patterns, because this isn’t done by default in Windows:
C:\...\PP4E\Gui\ShellGui> packer.py packed.txt *.txt
packing: eggs.txt
packing: ham.txt
packing: spam.txt
C:\...\PP4E\Gui\ShellGui> unpacker.py packed.txt
creating: new-eggs.txt
creating: new-ham.txt
creating: new-spam.txt
The result files have a unique name by default (with an added prefix to avoid accidental
overwrites, especially during testing), but you otherwise get back what you packed:
C:\...\PP4E\Gui\ShellGui> type new-spam.txt
spam
Spam
SPAM
C:\...\PP4E\Gui\ShellGui> type packed.txt
::::::::::::::::::::textpak=>eggs.txt
eggs
::::::::::::::::::::textpak=>ham.txt
618 | Chapter 10: GUI Coding Techniques

h
a
m
::::::::::::::::::::textpak=>spam.txt
spam
Spam
SPAM
These scripts don’t do anything about binary files, compression, or the like, but they
serve to illustrate command-line scripts that require arguments when run. Although
they can be launched with shell commands as above (and hence Python tools like
os.popen and subprocess), their logic is also packaged to be imported and called. For
running them from a GUI, we’ll use the latter direct call interface.
GUI input dialogs
One final piece remains. As is, the packing and unpacking scripts function well as
command-line tools. The callback actions named in Example 10-6’s mytools.py GUI,
though, are expected to do something GUI-oriented. Because the original file packing
and unpacking scripts live in the world of text-based streams and shells, we need to
code wrappers that accept input parameters from more GUI-minded users. In partic-
ular, we need dialogs that prompt for the command-line arguments required.
First, the module in Example 10-9 and its client script in Example 10-10 use the custom
modal dialog techniques we studied in Chapter 8 to pop up an input display to collect
pack script parameters. The code in Example 10-9 was split off to a separate module
because it’s generally useful, In fact, we will reuse it, in both the unpack dialog and
again in PyEdit in Chapter 11.
This is yet another way to automate GUI construction—using it to build a form’s rows
trades 7 or more lines of code per row (6 without a linked variable or browse button)
for just 1. We’ll see another even more automatic form building approach in Chap-
ter 12’s form.py. The utility here, though, is sufficient to shave dozens of lines of code
for nontrivial forms.
Example 10-9. PP4E\Gui\ShellGui\formrows.py
""""
create a label+entry row frame, with optional file open browse button;
this is a separate module because it can save code in other programs too;
caller (or callbacks here): retain returned linked var while row is in use;
"""
from tkinter import * # widgets and presets
from tkinter.filedialog import askopenfilename # file selector dialog
def makeFormRow(parent, label, width=15, browse=True, extend=False):
var = StringVar()
row = Frame(parent)
lab = Label(row, text=label + '?', relief=RIDGE, width=width)
ent = Entry(row, relief=SUNKEN, textvariable=var)
ShellGui: GUIs for Command-Line Tools | 619

row.pack(fill=X) # uses packed row frames
lab.pack(side=LEFT) # and fixed-width labels
ent.pack(side=LEFT, expand=YES, fill=X) # or use grid(row, col)
if browse:
btn = Button(row, text='browse...')
btn.pack(side=RIGHT)
if not extend:
btn.config(command=
lambda: var.set(askopenfilename() or var.get()) )
else:
btn.config(command=
lambda: var.set(var.get() + ' ' + askopenfilename()) )
return var
Next, Example 10-10’s runPackDialog function is the actual callback handler invoked
when tool names are selected in the main ShellGui window. It uses the form row builder
module of Example 10-9 and applies the custom modal dialog techniques we studied
earlier.
Example 10-10. PP4E\Gui\ShellGui\packdlg.py
# popup a GUI dialog for packer script arguments, and run it
from glob import glob # filename expansion
from tkinter import * # GUI widget stuff
from packer import pack # use pack script/module
from formrows import makeFormRow # use form builder tool
def packDialog(): # a new top-level window
win = Toplevel() # with 2 row frames + ok button
win.title('Enter Pack Parameters')
var1 = makeFormRow(win, label='Output file')
var2 = makeFormRow(win, label='Files to pack', extend=True)
Button(win, text='OK', command=win.destroy).pack()
win.grab_set()
win.focus_set() # go modal: mouse grab, keyboard focus, wait
win.wait_window() # wait till destroy; else returns now
return var1.get(), var2.get() # fetch linked var values
def runPackDialog():
output, patterns = packDialog() # pop-up GUI dialog
if output != "" and patterns != "": # till ok or wm-destroy
patterns = patterns.split() # do non-GUI part now
filenames = []
for sublist in map(glob, patterns): # do expansion manually
filenames += sublist # Unix shells do this auto
print('Packer:', output, filenames)
pack(ofile=output, ifiles=filenames) # should show msgs in GUI too
if __name__ == '__main__':
root = Tk()
Button(root, text='popup', command=runPackDialog).pack(fill=X)
Button(root, text='bye', command=root.quit).pack(fill=X)
root.mainloop()
620 | Chapter 10: GUI Coding Techniques
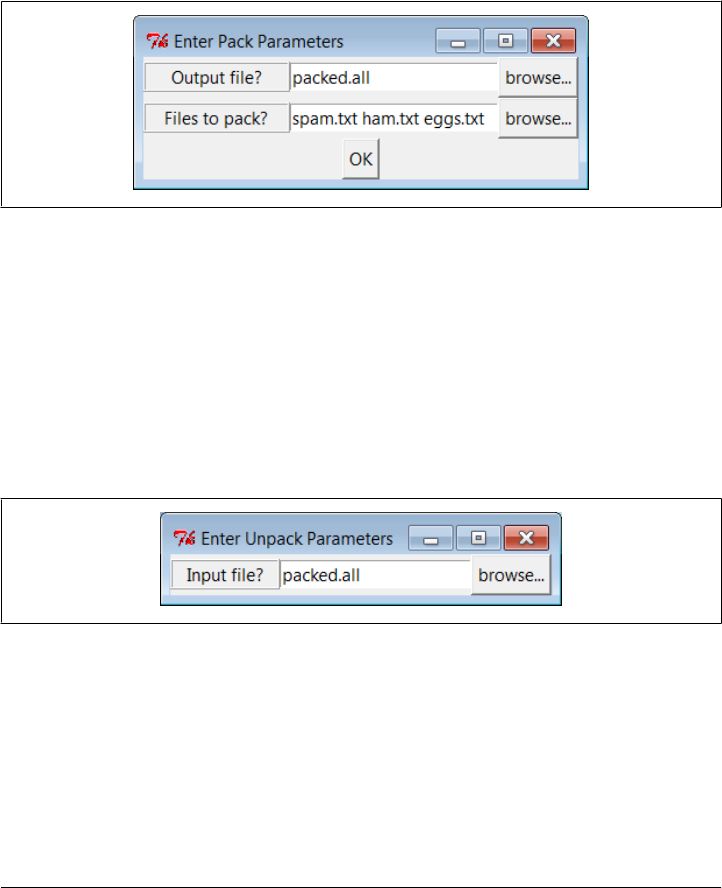
When run standalone, the “popup” button of script in Example 10-10 creates the input
form shown in Figure 10-6; this is also what we get when its main function is launched
by the mytools.py shell tools GUI. Users may either type input and output filenames
into the entry fields or press the “browse” buttons to pop up standard file selection
dialogs. They can also enter filename patterns—the manual glob call in this script ex-
pands filename patterns to match names and filters out nonexistent input filenames.
Again, the Unix command line does this pattern expansion automatically when running
the packer from a shell, but Windows does not.
Figure 10-6. The packdlg input form
When the form is filled in and submitted with its OK button, parameters are finally
passed along to the main function of the non-GUI packer script listed earlier to perform
file concatenations.
The GUI interface to the unpacking script is simpler because there is only one input
field—the name of the packed file to scan. We also get to reuse the form row builder
module developed for the packer’s dialog, because this task is so similar. The script in
Example 10-11 (and its main function run by the mytools.py shell tool GUI’s selections)
generates the input form window shown in Figure 10-7.
Figure 10-7. The unpkdlg input form
Example 10-11. PP4E\Gui\ShellGui\unpkdlg.py
# popup a GUI dialog for unpacker script arguments, and run it
from tkinter import * # widget classes
from unpacker import unpack # use unpack script/module
from formrows import makeFormRow # form fields builder
def unpackDialog():
ShellGui: GUIs for Command-Line Tools | 621

win = Toplevel()
win.title('Enter Unpack Parameters')
var = makeFormRow(win, label='Input file', width=11)
win.bind('<Key-Return>', lambda event: win.destroy())
win.grab_set()
win.focus_set() # make myself modal
win.wait_window() # till I'm destroyed on return
return var.get() # or closed by wm action
def runUnpackDialog():
input = unpackDialog() # get input from GUI
if input != '': # do non-GUI file stuff
print('Unpacker:', input) # run with input from dialog
unpack(ifile=input, prefix='')
if __name__ == "__main__":
Button(None, text='popup', command=runUnpackDialog).pack()
mainloop()
The “browse” button in Figure 10-7 pops up a file selection dialog just as the packdlg
form did. Instead of an OK button, this dialog binds the Enter key-press event to kill
the window and end the modal wait state pause; on submission, the name of the packed
file is passed to the main function of the unpacker script shown earlier to perform the
actual file scan process.
Room for improvement
All of this works as advertised—by making command-line tools available in graphical
form like this, they become much more attractive to users accustomed to the GUI way
of life. We’ve effectively added a simple GUI front-end to command-line tools. Still,
two aspects of this design seem prime for improvement.
First, both of the input dialogs use common code to build the rows of their input forms,
but it’s tailored to this specific use case; we might be able to simplify the dialogs further
by importing a more generic form-builder module instead. We met general form builder
code in Chapters 8 and 9, and we’ll meet more later—see the form.py module in Chap-
ter 12 for pointers on further genericizing form construction.
Second, at the point where the user submits input data in either form dialog, we’ve lost
the GUI trail—the GUI is blocked, and messages are routed back to the console. The
GUI is technically blocked and will not update itself while the pack and unpack utilities
run; although these operations are fast enough for my files as to be negligible, we would
probably want to spawn these calls off in threads for very large files to keep the main
GUI thread active (more on threads later in this chapter).
The console issue is more blatant: packer and unpacker messages still show up in the
stdout console window, not in the GUI (all the filenames here include full directory
paths if you select them with the GUI’s Browse buttons, courtesy of the standard Open
dialog):
622 | Chapter 10: GUI Coding Techniques

C:\...\PP4E\Gui\ShellGui\temp> python ..\mytools.py list
PP4E scrolledtext
list test
Packer: packed.all ['spam.txt', 'ham.txt', 'eggs.txt']
packing: spam.txt
packing: ham.txt
packing: eggs.txt
Unpacker: packed.all
creating: spam.txt
creating: ham.txt
creating: eggs.txt
This may be less than ideal for a GUI’s users; they may not expect (or even be able to
find) the command-line console. We can do better here, by redirecting stdout to an
object that throws text up in a GUI window as it is received. You’ll have to read the
next section to see how.
GuiStreams: Redirecting Streams to Widgets
On to our next GUI coding technique: in response to the challenge posed at the end of
the last section, the script in Example 10-12 arranges to map input and output sources
to pop-up windows in a GUI application, much as we did with strings in the stream
redirection topics in Chapter 3. Although this module is really just a first-cut prototype
and needs improvement itself (e.g., each input line request pops up a new input
dialog—not exactly award winning ergonomics!), it demonstrates the concepts in
general.
Example 10-12’s GuiOutput and GuiInput objects define methods that allow them to
masquerade as files in any interface that expects a real file. As we learned earlier in
Chapter 3, this includes both the print and input built-in functions for accessing
standard streams, as well as explicit calls to the read and write methods of file objects.
The two top-level interfaces in this module handle common use cases:
• The redirectedGuiFunc function uses this plug-and-play file compatibility to run a
function with its standard input and output streams mapped completely to pop-
up windows rather than to the console window (or wherever streams would oth-
erwise be mapped in the system shell).
• The redirectedGuiShellCmd function similarly routes the output of a spawned shell
command line to a pop-up window. It can be used to display the output of any
program in a GUI—including that printed by a Python program.
The module’s GuiInput and GuiOutput classes can also be used or customized directly
by clients that need to match a more direct file method interface or need more fine-
grained control over the process.
GuiStreams: Redirecting Streams to Widgets | 623

Example 10-12. PP4E\Gui\Tools\guiStreams.py
"""
###############################################################################
first-cut implementation of file-like classes that can be used to redirect
input and output streams to GUI displays; as is, input comes from a common
dialog pop-up (a single output+input interface or a persistent Entry field
for input would be better); this also does not properly span lines for read
requests with a byte count > len(line); could also add __iter__/__next__ to
GuiInput to support line iteration like files but would be too many popups;
###############################################################################
"""
from tkinter import *
from tkinter.simpledialog import askstring
from tkinter.scrolledtext import ScrolledText # or PP4E.Gui.Tour.scrolledtext
class GuiOutput:
font = ('courier', 9, 'normal') # in class for all, self for one
def __init__(self, parent=None):
self.text = None
if parent: self.popupnow(parent) # pop up now or on first write
def popupnow(self, parent=None): # in parent now, Toplevel later
if self.text: return
self.text = ScrolledText(parent or Toplevel())
self.text.config(font=self.font)
self.text.pack()
def write(self, text):
self.popupnow()
self.text.insert(END, str(text))
self.text.see(END)
self.text.update() # update gui after each line
def writelines(self, lines): # lines already have '\n'
for line in lines: self.write(line) # or map(self.write, lines)
class GuiInput:
def __init__(self):
self.buff = ''
def inputLine(self):
line = askstring('GuiInput', 'Enter input line + <crlf> (cancel=eof)')
if line == None:
return '' # pop-up dialog for each line
else: # cancel button means eof
return line + '\n' # else add end-line marker
def read(self, bytes=None):
if not self.buff:
self.buff = self.inputLine()
if bytes: # read by byte count
text = self.buff[:bytes] # doesn't span lines
self.buff = self.buff[bytes:]
else:
624 | Chapter 10: GUI Coding Techniques

text = '' # read all till eof
line = self.buff
while line:
text = text + line
line = self.inputLine() # until cancel=eof=''
return text
def readline(self):
text = self.buff or self.inputLine() # emulate file read methods
self.buff = ''
return text
def readlines(self):
lines = [] # read all lines
while True:
next = self.readline()
if not next: break
lines.append(next)
return lines
def redirectedGuiFunc(func, *pargs, **kargs):
import sys
saveStreams = sys.stdin, sys.stdout # map func streams to pop ups
sys.stdin = GuiInput() # pops up dialog as needed
sys.stdout = GuiOutput() # new output window per call
sys.stderr = sys.stdout
result = func(*pargs, **kargs) # this is a blocking call
sys.stdin, sys.stdout = saveStreams
return result
def redirectedGuiShellCmd(command):
import os
input = os.popen(command, 'r')
output = GuiOutput()
def reader(input, output): # show a shell command's
while True: # standard output in a new
line = input.readline() # pop-up text box widget;
if not line: break # the readline call may block
output.write(line)
reader(input, output)
if __name__ == '__main__': # self test when run
def makeUpper(): # use standard streams
while True:
try:
line = input('Line? ')
except:
break
print(line.upper())
print('end of file')
def makeLower(input, output): # use explicit files
while True:
line = input.readline()
if not line: break
GuiStreams: Redirecting Streams to Widgets | 625
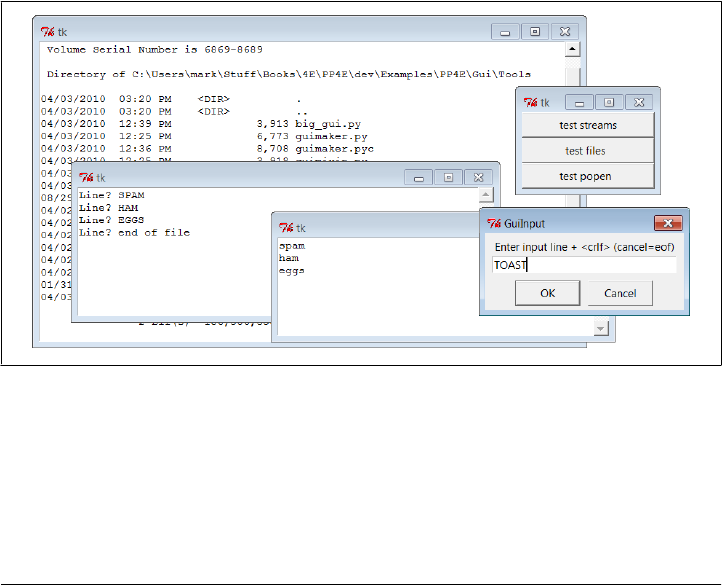
output.write(line.lower())
print('end of file')
root = Tk()
Button(root, text='test streams',
command=lambda: redirectedGuiFunc(makeUpper)).pack(fill=X)
Button(root, text='test files ',
command=lambda: makeLower(GuiInput(), GuiOutput()) ).pack(fill=X)
Button(root, text='test popen ',
command=lambda: redirectedGuiShellCmd('dir *')).pack(fill=X)
root.mainloop()
As coded here, GuiOutput attaches a ScrolledText (Python’s standard library flavor) to
either a passed-in parent container or a new top-level window popped up to serve as
the container on the first write call. GuiInput pops up a new standard input dialog every
time a read request requires a new line of input. Neither one of these policies is ideal
for all scenarios (input would be better mapped to a more long-lived widget), but they
prove the general point intended.
Figure 10-8 shows the scene generated by this script’s self-test code, after capturing the
output of a Windows shell dir listing command (on the left) and two interactive loop
tests (the one with “Line?” prompts and uppercase letters represents the makeUpper
streams redirection test). An input dialog has just popped up for a new makeLower files
interface test.
Figure 10-8. guiStreams routing streams to pop-up windows
This scene may not be spectacular to look at, but it reflects file and stream input and
output operations being automatically mapped to GUI devices—as we’ll see in a mo-
ment, this accomplishes most of the solution to the prior section’s closing challenge.
Before we move on, we should note that this module’s calls to a redirected function as
well as its loop that reads from a spawned shell command are potentially blocking—
626 | Chapter 10: GUI Coding Techniques

they won’t return to the GUI’s event loop until the function or shell command exits.
Although GuiOutput takes care to call tkinter’s update method to update the display
after each line is written, this module has no control in general over the duration of
functions or shell commands it runs.
In redirectedGuiShellCmd, for example, the call to input.readline will pause until an
output line is received from the spawned program, rendering the GUI unresponsive.
Because the output object runs an update call, the display is still updated during the
program’s execution (an update call enters the Tk event loop momentarily), but only
as often as lines are received from the spawned program. In addition, because of this
function’s loop, the GUI is committed to the shell command in general until it exits.
Calls to a redirected function in redirectedGuiFunc are similarly blocking in general;
moreover, during the call’s duration the display is updated only as often as the function
issues output requests. In other words, this blocking model is simplistic and might be
an issue in a larger GUI. We’ll revisit this later in the chapter when we meet threads.
For now, the code suits our present purpose.
Using Redirection for the Packing Scripts
Now, finally, to use such redirection tools to map command-line script output back to
a GUI, we simply run calls and command lines with the two redirected functions in
this module. Example 10-13 shows one way to wrap the packing operation dialog of
the shell GUI section’s Example 10-10 to force its printed output to appear in a pop-
up window when generated, instead of in the console.
Example 10-13. PP4E\Gui\ShellGui\packdlg-redirect.py
# wrap command-line script in GUI redirection tool to pop up its output
from tkinter import *
from packdlg import runPackDialog
from PP4E.Gui.Tools.guiStreams import redirectedGuiFunc
def runPackDialog_Wrapped(): # callback to run in mytools.py
redirectedGuiFunc(runPackDialog) # wrap entire callback handler
if __name__ == '__main__':
root = Tk()
Button(root, text='pop', command=runPackDialog_Wrapped).pack(fill=X)
root.mainloop()
You can run this script directly to test its effect, without bringing up the ShellGui
window. Figure 10-9 shows the resulting stdout window after the pack input dialog is
dismissed. This window pops up as soon as script output is generated, and it is a bit
more GUI user friendly than hunting for messages in a console. You can similarly code
the unpack parameters dialog to route its output to a pop-up. Simply change
GuiStreams: Redirecting Streams to Widgets | 627
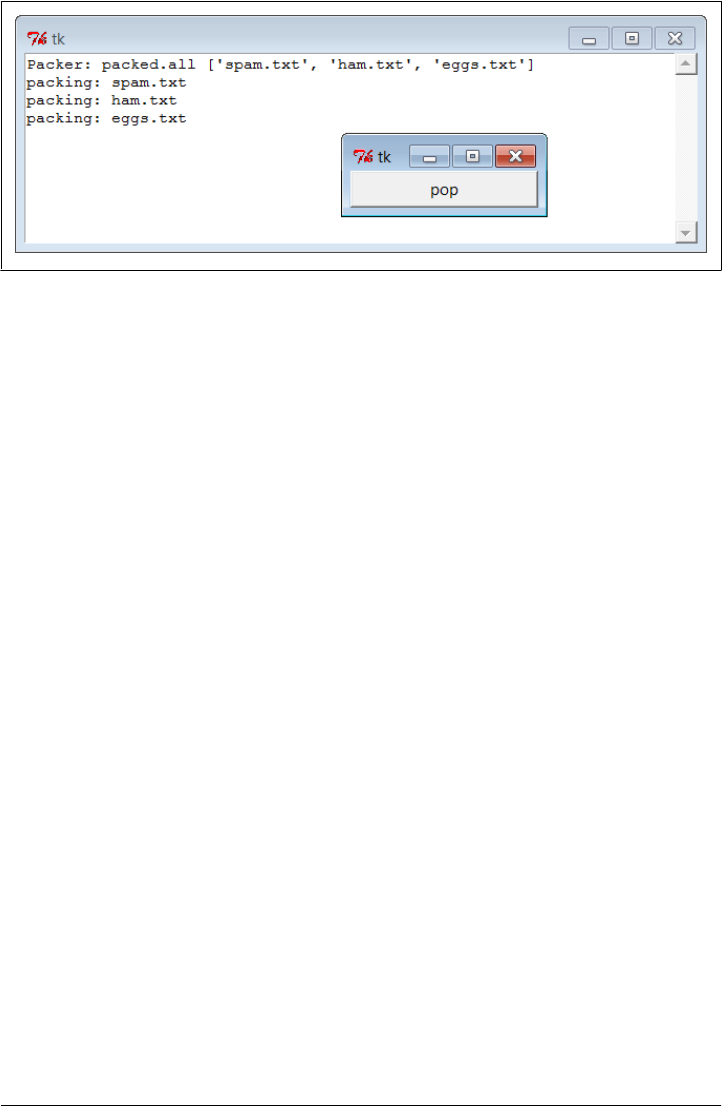
mytools.py in Example 10-6 to register code like the function wrapper here as its call-
back handlers.
In fact, you can use this technique to route the output of any function call or command
line to a pop-up window; as usual, the notion of compatible object interfaces is at the
heart of much of Python code’s flexibility.
Reloading Callback Handlers Dynamically
Our next GUI programming technique is all about changing a GUI while it is running—
the ultimate in customization. The Python imp.reload function lets you dynamically
change and reload a program’s modules without stopping the program. For instance,
you can bring up a text editor window to change the source code of selected parts of a
system while it is running and see those changes show up immediately after reloading
the changed module.
This is a powerful feature, especially for developing programs that take a long time to
restart. Programs that connect to databases or network servers, initialize large objects,
implement long-running services, or travel through a long series of steps to retrigger a
callback are prime candidates for reload. It can shave substantial time from the devel-
opment cycle and make systems more flexible.
The catch for GUIs, though, is that because callback handlers are registered as object
references rather than module and object names, reloads of callback handler functions
are ineffective after the callback has been registered. The Python imp.reload operation
works by changing a module object’s contents in place. Because tkinter stores a pointer
to the registered handler object directly, though, it is oblivious to any reloads of the
module that the handler came from. That is, tkinter will still reference a module’s old
objects even after the module is reloaded and changed.
This is a subtle thing, but you really only need to remember that you must do something
special to reload callback handler functions dynamically. Not only do you need to
Figure 10-9. Routing script outputs to GUI pop ups
628 | Chapter 10: GUI Coding Techniques

explicitly request reloading of the modules that you change, but you must also generally
provide an indirection layer that routes callbacks from registered objects to modules
so that reloads have impact.
For example, the script in Example 10-14 goes the extra mile to indirectly dispatch
callbacks to functions in an explicitly reloaded module. The callback handlers regis-
tered with tkinter are method objects that do nothing but reload and dispatch again.
Because the true callback handler functions are fetched through a module object, re-
loading that module makes the latest versions of the functions accessible.
Example 10-14. PP4E\Gui\Tools\rad.py
# reload callback handlers dynamically
from tkinter import *
import radactions # get initial callback handlers
from imp import reload # moved to a module in Python 3.X
class Hello(Frame):
def __init__(self, master=None):
Frame.__init__(self, master)
self.pack()
self.make_widgets()
def make_widgets(self):
Button(self, text='message1', command=self.message1).pack(side=LEFT)
Button(self, text='message2', command=self.message2).pack(side=RIGHT)
def message1(self):
reload(radactions) # need to reload actions module before calling
radactions.message1() # now new version triggered by pressing button
def message2(self):
reload(radactions) # changes to radactions.py picked up by reload
radactions.message2(self) # call the most recent version; pass self
def method1(self):
print('exposed method...') # called from radactions function
Hello().mainloop()
When run, this script makes a two-button window that triggers the message1 and
message2 methods. Example 10-15 contains the actual callback handler code. Its func-
tions receive a self argument that gives access back to the Hello class object, as though
these were real methods. You can change this file any number of times while the rad
script’s GUI is active; each time you do so, you’ll change the behavior of the GUI when
a button press occurs.
Example 10-15. PP4E\Gui\Tools\radactions.py
# callback handlers: reloaded each time triggered
def message1(): # change me
Reloading Callback Handlers Dynamically | 629

print('spamSpamSPAM') # or could build a dialog...
def message2(self):
print('Ni! Ni!') # change me
self.method1() # access the 'Hello' instance...
Try running rad and editing the messages printed by radactions in another window;
you should see your new messages printed in the stdout console window each time the
GUI’s buttons are pressed. This example is deliberately simple to illustrate the concept,
but the actions reloaded like this in practice might build pop-up dialogs, new top-level
windows, and so on. Reloading the code that creates such windows would also let us
dynamically change their appearances.
There are other ways to change a GUI while it’s running. For instance, we saw in
Chapter 9 that appearances can be altered at any time by calling the widget config
method, and widgets can be added and deleted from a display dynamically with meth-
ods such as pack_forget and pack (and their grid manager relatives). Furthermore,
passing a new command=action option setting to a widget’s config method might reset
a callback handler to a new action object on the fly; with enough support code, this
may be a viable alternative to the indirection scheme used earlier to make reloads more
effective in GUIs.
Of course, not all GUIs need to be so dynamic. Imagine a game which allows character
modification, though—dynamic reloads in such a system can greatly enhance their
utility. (I’ll leave the task of extending this example with a massively multiplayer online
role-playing game server as suggested exercise.)
Wrapping Up Top-Level Window Interfaces
Top-level window interfaces were introduced in Chapter 8. This section picks up where
that introduction left off and wraps up those interfaces in classes that automate much
of the work of building top-level windows—setting titles, finding and displaying win-
dow icons, issuing proper close actions based on a window’s role, intercepting window
manager close button clicks, and so on.
Example 10-16 provides wrapper classes for the most common window types—a main
application window, a transient pop-up window, and an embedded GUI component
window. These window types vary slightly in terms of their close operations, but most
inherit common functionality related to window borders: icons, titles, and close but-
tons. By creating, mixing in, or subclassing the class for the type of window you wish
to make, you’ll get all its setup logic for free.
Example 10-16. PP4E\Gui\Tools\windows.py
"""
###############################################################################
Classes that encapsulate top-level interfaces.
Allows same GUI to be main, pop-up, or attached; content classes may inherit
630 | Chapter 10: GUI Coding Techniques

from these directly, or be mixed together with them per usage mode; may also
be called directly without a subclass; designed to be mixed in after (further
to the right than) app-specific classes: else, subclass gets methods here
(destroy, okayToQuit), instead of from app-specific classes--can't redefine.
###############################################################################
"""
import os, glob
from tkinter import Tk, Toplevel, Frame, YES, BOTH, RIDGE
from tkinter.messagebox import showinfo, askyesno
class _window:
"""
mixin shared by main and pop-up windows
"""
foundicon = None # shared by all inst
iconpatt = '*.ico' # may be reset
iconmine = 'py.ico'
def configBorders(self, app, kind, iconfile):
if not iconfile: # no icon passed?
iconfile = self.findIcon() # try curr,tool dirs
title = app
if kind: title += ' - ' + kind
self.title(title) # on window border
self.iconname(app) # when minimized
if iconfile:
try:
self.iconbitmap(iconfile) # window icon image
except: # bad py or platform
pass
self.protocol('WM_DELETE_WINDOW', self.quit) # don't close silent
def findIcon(self):
if _window.foundicon: # already found one?
return _window.foundicon
iconfile = None # try curr dir first
iconshere = glob.glob(self.iconpatt) # assume just one
if iconshere: # del icon for red Tk
iconfile = iconshere[0]
else: # try tools dir icon
mymod = __import__(__name__) # import self for dir
path = __name__.split('.') # poss a package path
for mod in path[1:]: # follow path to end
mymod = getattr(mymod, mod) # only have leftmost
mydir = os.path.dirname(mymod.__file__)
myicon = os.path.join(mydir, self.iconmine) # use myicon, not tk
if os.path.exists(myicon): iconfile = myicon
_window.foundicon = iconfile # don't search again
return iconfile
class MainWindow(Tk, _window):
"""
when run in main top-level window
"""
Wrapping Up Top-Level Window Interfaces | 631

def __init__(self, app, kind='', iconfile=None):
Tk.__init__(self)
self.__app = app
self.configBorders(app, kind, iconfile)
def quit(self):
if self.okayToQuit(): # threads running?
if askyesno(self.__app, 'Verify Quit Program?'):
self.destroy() # quit whole app
else:
showinfo(self.__app, 'Quit not allowed') # or in okayToQuit?
def destroy(self): # exit app silently
Tk.quit(self) # redef if exit ops
def okayToQuit(self): # redef me if used
return True # e.g., thread busy
class PopupWindow(Toplevel, _window):
"""
when run in secondary pop-up window
"""
def __init__(self, app, kind='', iconfile=None):
Toplevel.__init__(self)
self.__app = app
self.configBorders(app, kind, iconfile)
def quit(self): # redef me to change
if askyesno(self.__app, 'Verify Quit Window?'): # or call destroy
self.destroy() # quit this window
def destroy(self): # close win silently
Toplevel.destroy(self) # redef for close ops
class QuietPopupWindow(PopupWindow):
def quit(self):
self.destroy() # don't verify close
class ComponentWindow(Frame):
"""
when attached to another display
"""
def __init__(self, parent): # if not a frame
Frame.__init__(self, parent) # provide container
self.pack(expand=YES, fill=BOTH)
self.config(relief=RIDGE, border=2) # reconfig to change
def quit(self):
showinfo('Quit', 'Not supported in attachment mode')
# destroy from Frame: erase frame silent # redef for close ops
So why not just set an application’s icon and title by calling protocol methods directly?
For one thing, those are the sorts of details that are easy to forget (you will probably
wind up cutting and pasting code much of the time). For another, these classes add
632 | Chapter 10: GUI Coding Techniques

higher-level functionality that we might otherwise have to code redundantly. Among
other things, the classes arrange for automatic quit verification dialog pop ups and icon
file searching. For instance, the window classes always search the current working
directory and the directory containing this module for a window icon file, once per
process.
By using classes that encapsulate—that is, hide—such details, we inherit powerful tools
without having to think about their implementation again in the future. Moreover, by
using such classes, we’ll give our applications a standard look-and-feel and behavior.
And if we ever need to change that appearance or behavior, we have to change code in
only one place, not in every window we implement.
To test this utility module, Example 10-17 exercises its classes in a variety of modes—
as mix-in classes, as superclasses, and as calls from nonclass code.
Example 10-17. PP4E\Gui\Tools\windows-test.py
# must import windows to test, else __name__ is __main__ in findIcon
from tkinter import Button, mainloop
from windows import MainWindow, PopupWindow, ComponentWindow
def _selftest():
# mixin usage
class content:
"same code used as a Tk, Toplevel, and Frame"
def __init__(self):
Button(self, text='Larch', command=self.quit).pack()
Button(self, text='Sing ', command=self.destroy).pack()
class contentmix(MainWindow, content):
def __init__(self):
MainWindow.__init__(self, 'mixin', 'Main')
content.__init__(self)
contentmix()
class contentmix(PopupWindow, content):
def __init__(self):
PopupWindow.__init__(self, 'mixin', 'Popup')
content.__init__(self)
prev = contentmix()
class contentmix(ComponentWindow, content):
def __init__(self): # nested frame
ComponentWindow.__init__(self, prev) # on prior window
content.__init__(self) # Sing erases frame
contentmix()
# subclass usage
class contentsub(PopupWindow):
def __init__(self):
PopupWindow.__init__(self, 'popup', 'subclass')
Wrapping Up Top-Level Window Interfaces | 633
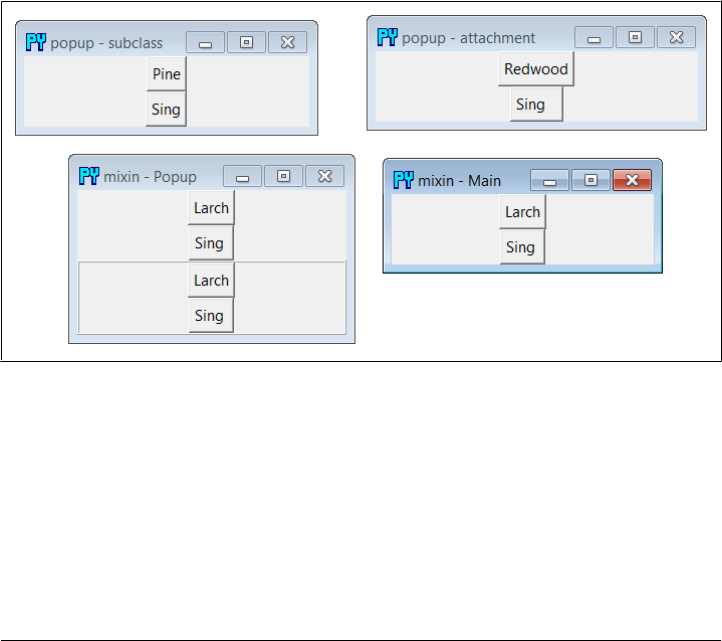
Button(self, text='Pine', command=self.quit).pack()
Button(self, text='Sing', command=self.destroy).pack()
contentsub()
# non-class usage
win = PopupWindow('popup', 'attachment')
Button(win, text='Redwood', command=win.quit).pack()
Button(win, text='Sing ', command=win.destroy).pack()
mainloop()
if __name__ == '__main__':
_selftest()
When run, the test generates the window in Figure 10-10. All generated windows get
a blue “PY” icon automatically, and intercept and verify the window manager’s upper
right corner “X” close button, thanks to the search and configuration logic they inherit
from the window module’s classes. Some of the buttons on the test windows close just
the enclosing window, some close the entire application, some erase an attached win-
dow, and others pop up a quit verification dialog. Run this on your own to see what
the examples’ buttons do, so you can correlate with the test code; quit actions are
tailored to make sense for the type of window being run.
Figure 10-10. windows-test display
We’ll use these window protocol wrappers in the next chapter’s PyClock example, and
then again later in Chapter 14 where they’ll come in handy to reduce the complexity
of the PyMailGUI program. Part of the benefit of doing OOP in Python now is that we
can forget the details later.
634 | Chapter 10: GUI Coding Techniques

GUIs, Threads, and Queues
In Chapter 5, we learned about threads and the queue mechanism that threads typically
use to communicate with one another. We also described the application of those ideas
to GUIs in the abstract. In Chapter 9, we specialized some of these topics to the tkinter
GUI toolkit we’re using in this book and expanded on the threaded GUI model in
general, including thread safety (or lack thereof) and the roles of queues and locks.
Now that we’ve become fully functional GUI programmers, we can finally see what
these ideas translate to in terms of code. If you skipped the related material in Chap-
ter 5 or Chapter 9, you should probably go back and take a look first; we won’t be
repeating the thread or queue background material in its entirety here.
The application to GUIs, however, is straightforward. Recall that long-running oper-
ations must generally be run in parallel threads, to avoid blocking the GUI from up-
dating itself or responding to new user requests. Long-running operations can include
time-intensive function calls, downloads from servers, blocking input/output calls, and
any task which might insert a noticeable delay. In our packing and unpacking examples
earlier in this chapter, for instance, we noted that the calls to run the actual file pro-
cessing should generally run in threads so that the main GUI thread is not blocked until
they finish.
In the general case, if a GUI waits for anything to finish, it will be completely unre-
sponsive during the wait—it can’t be resized, it can’t be minimized, and it won’t even
redraw itself if it is covered and uncovered by other windows. To avoid being blocked
this way, the GUI must run long-running tasks in parallel, usually with threads that
can share program state. That way, the main GUI thread is freed up to update the
display and respond to new user interactions while threads do other work. As we’ve
also seen, the tkinter update call can help in some contexts, but it only refreshes the
display when it can be called; threads fully parallelize long-running operations and offer
a more general solution.
However, because, as we learned in Chapter 9, only the main thread should generally
update a GUI’s display, threads you start to handle long-running tasks should not
update the display with results themselves. Rather, they should place data on a queue
(or other mechanism), to be picked up and displayed by the main GUI thread. To make
this work, the main thread typically runs a timer-based loop that periodically checks
the queue for new results to be displayed. Spawned threads produce and queue data
but know nothing about the GUI; the main GUI thread consumes and displays results
but does not generate them.
Because of its division of labor, we usually call this a producer/consumer model—task
threads produce data which the GUI thread consumes. The long-running task threads
are also sometimes called workers, because they handle the work of producing results
behind the scenes, for the GUI to present to a user. In some sense, the GUI is also a
client to worker thread servers, though that terminology is usually reserved for more
GUIs, Threads, and Queues | 635

specific process-based roles; servers provide data sources which are longer-lived and
more loosely coupled (though a GUI can also display data from independent servers).
Whatever we call it, this model both avoids blocking the GUI while tasks run and avoids
potentially parallel updates to the GUI itself.
As a more concrete example, suppose your GUI needs to display telemetry data sent in
real time from a satellite over sockets (an IPC tool introduced in Chapter 5). Your
program has to be responsive enough to not lose incoming data, but it also cannot get
stuck waiting for or processing that data. To achieve both goals, spawn threads that
fetch the incoming data and throw it on a queue, to be picked up and displayed peri-
odically by the main GUI thread. With such a separation of labor, the GUI isn’t blocked
by the satellite, nor vice versa—the GUI itself will run independently of the data
streams, but because the data stream threads can run at full speed, they’ll be able to
pick up incoming data as fast as it’s sent. GUI event loops are not generally responsive
enough to handle real-time inputs. Without the data stream threads, we might lose
incoming telemetry; with them, we’ll receive data as it is sent and display it as soon as
the GUI’s event loop gets around to picking it up off the queue—plenty fast for the real
human user to see. If no data is sent, only the spawned threads wait, not the GUI itself.
In other scenarios, threads are required just so that the GUI remains active during long-
running tasks. While downloading a reply from a web server, for example, your GUI
must be able to redraw itself if covered or resized. Because of that, the download call
cannot be a simple function call; it must run in parallel with the rest of your program—
typically, as a thread. When the result is fetched, the thread must notify the GUI that
data is ready to be displayed; by placing the result on a queue, the notification is
simple—the main GUI thread will find it the next time it checks the queue in its timer
callback function. For example, we’ll use threads and queues this way in the PyMailGUI
program in Chapter 14, to allow multiple overlapping mail transfers to occur without
blocking the GUI itself.
Placing Data on Queues
Whether your GUIs interface with satellites, websites, or something else, this thread-
based model turns out to be fairly simple in terms of code. Example 10-18 is the GUI
equivalent of the queue-based threaded program we met earlier in Chapter 5 (compare
this with Example 5-14). In the context of a GUI, the consumer thread becomes the
GUI itself, and producer threads add data to be displayed to the shared queue as it is
produced. The main GUI thread uses the tkinter after method to check the queue for
results instead of an explicit loop.
Example 10-18. PP4E\Gui\Tools\queuetest-gui.py
# GUI that displays data produced and queued by worker threads
import _thread, queue, time
dataQueue = queue.Queue() # infinite size
636 | Chapter 10: GUI Coding Techniques

def producer(id):
for i in range(5):
time.sleep(0.1)
print('put')
dataQueue.put('[producer id=%d, count=%d]' % (id, i))
def consumer(root):
try:
print('get')
data = dataQueue.get(block=False)
except queue.Empty:
pass
else:
root.insert('end', 'consumer got => %s\n' % str(data))
root.see('end')
root.after(250, lambda: consumer(root)) # 4 times per sec
def makethreads():
for i in range(4):
_thread.start_new_thread(producer, (i,))
if __name__ == '__main__':
# main GUI thread: spawn batch of worker threads on each mouse click
from tkinter.scrolledtext import ScrolledText
root = ScrolledText()
root.pack()
root.bind('<Button-1>', lambda event: makethreads())
consumer(root) # start queue check loop in main thread
root.mainloop() # pop-up window, enter tk event loop
Observe how we fetch one queued data item per timer event here. This is on purpose;
although we could loop through all the data items queued on each timer event, this
might block the GUI indefinitely in pathological cases where many items are queued
quickly (imagine a fast telemetry interface suddenly queueing hundreds or thousands
of results all at once). Processing one item at a time ensures that the GUI will return to
its event loop to update the display and process new user inputs without becoming
blocked. The downside of this approach is that it may take awhile to work through
very many items placed on the queue. Hybrid schemes, such as dispatching at most N
queued items per timer event callback, might be useful in some such scenarios; we’ll
see an example like this later in this section (Example 10-20).
When this script is run, the main GUI thread displays the data it grabs off the queue
in the ScrolledText window captured in Figure 10-11. A new batch of four producer
threads is started each time you left-click in the window, and threads issue “get” and
“put” messages to the standard output stream (which isn’t synchronized in this exam-
ple—printed messages might overlap occasionally on some platforms, including Win-
dows). The producer threads issue sleep calls to simulate long-running tasks such as
downloading mail, fetching a query result, or waiting for input to show up on a socket
(more on sockets later in this chapter). I left-clicked multiple times to encourage thread
overlap in Figure 10-11.
GUIs, Threads, and Queues | 637
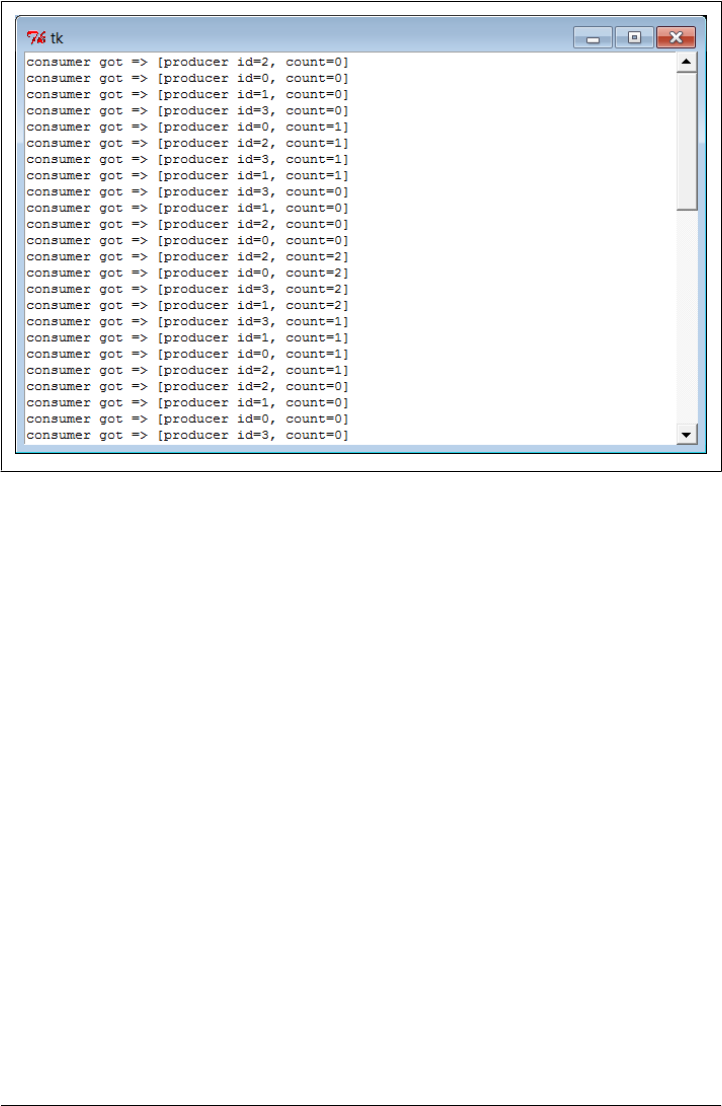
Recoding with classes and bound methods
Example 10-19 takes the model one small step further and migrates it to a class to allow
for future customization and reuse. Its operation, window, and output are the same as
the prior non-object-oriented version, but the queue is checked more often, and there
are no standard output prints. Notice how we use bound methods for button callbacks
and thread actions here; because bound methods retain both instance and method, the
threaded action has access to state information, including the shared queue. This allows
us to move the queue and the window itself from the prior version’s global variables to
instance object state.
Example 10-19. PP4E\Gui\Tools\queuetest-gui-class.py
# GUI that displays data produced and queued by worker threads (class-based)
import threading, queue, time
from tkinter.scrolledtext import ScrolledText # or PP4E.Gui.Tour.scrolledtext
class ThreadGui(ScrolledText):
threadsPerClick = 4
def __init__(self, parent=None):
ScrolledText.__init__(self, parent)
self.pack()
self.dataQueue = queue.Queue() # infinite size
self.bind('<Button-1>', self.makethreads) # on left mouse click
self.consumer() # queue loop in main thread
Figure 10-11. Display updated by main GUI thread
638 | Chapter 10: GUI Coding Techniques

def producer(self, id):
for i in range(5):
time.sleep(0.1)
self.dataQueue.put('[producer id=%d, count=%d]' % (id, i))
def consumer(self):
try:
data = self.dataQueue.get(block=False)
except queue.Empty:
pass
else:
self.insert('end', 'consumer got => %s\n' % str(data))
self.see('end')
self.after(100, self.consumer) # 10 times per sec
def makethreads(self, event):
for i in range(self.threadsPerClick):
threading.Thread(target=self.producer, args=(i,)).start()
if __name__ == '__main__':
root = ThreadGui() # in main thread: make GUI, run timer loop
root.mainloop() # pop-up window, enter tk event loop
Watch for this thread, timer loop, and shared queue technique to resurface later in this
chapter, as well as in Chapter 11’s more realistic PyEdit program example. In PyEdit,
we’ll use it to run external file searches in threads, so they avoid blocking the GUI and
may overlap in time. We’ll also revisit the classic producer/consumer thread queue
model in a more realistic scenario later in this chapter, as a way to avoid blocking a
GUI that must read an input stream—the output of another program.
Thread exits in GUIs
Example 10-19 also uses Python’s threading module instead of _thread. This would
normally mean that, unlike the prior version, the program would not exit if any pro-
ducer threads are still running, unless they are made daemons manually by setting their
daemon flag to True. Remember that under threading, programs exit when only dae-
monic threads remain; the producer threads here inherit a False daemon value from
the thread that creates them, which prevents program exit while they run.
However, in this example the spawned threads finish too quickly to noticeably defer
program exit. Change this script’s time.sleep call to 2.0 seconds to simulate longer-
lived worker threads and witness this effect in action—closing the window after a left-
click erases the window, but the program itself then does not exit for roughly 10 seconds
(e.g., its shell window is paused). If you do the same to the prior _thread version, or
set this version’s threads’ daemon flags to True, the program exits immediately instead.
In more realistic GUIs, you’ll want to analyze exit policies in the context of running
threads, and code accordingly; both nondaemonic threading threads and thread locks
in general can be used to defer exits if needed. Conversely, a perpetually running
GUIs, Threads, and Queues | 639

threading thread might preclude a desired shutdown if nondaemonic. See Chapter 5
for more on program exits and daemonic threads (and other scary topics!).
Placing Callbacks on Queues
In the prior section’s examples, the data placed on the queue is always a string. That’s
sufficient for simple applications where there is just one type of producer. If you may
have many different kinds of threads producing many different types of results running
at once, though, this can become difficult to manage. You’ll probably have to insert
and parse out some sort of type or action information in the string so that the GUI
knows how to process it.
Imagine an email client, for instance, where multiple sends and receives may overlap
in time; if all threads share the same single queue, the information they place on it must
somehow designate the sort of event it represents—a downloaded mail to display, a
progress indicator update, a successful send completion, and so on. This isn’t entirely
hypothetical: we’ll confront this exact issue in Chapter 14’s PyMailGUI.
Luckily, queues support much more than just strings—any type of Python object can
be placed on a queue. Perhaps the most general of these is a callable object: by placing
a function or other callable object on the queue, a producer thread can tell the GUI
how to handle the message in a very direct way. The GUI simply calls the objects it
pulls off the queue. Since threads all run within the same process and memory space,
any type of callable object works on a queue—simple functions, lambdas, and even
bound methods that combine a function with an implied subject object that gives access
to state information and methods. Any updates performed by the callback object up-
date state shared across the entire process.
Because Python makes it easy to handle functions and their argument lists in generic
fashion, this turns out to be easier than it might sound. Example 10-20, for instance,
shows one way to throw callbacks on a queue that we’ll be using in Chapter 14 for
PyMailGUI. This module comes with a handful of tools. Its ThreadCounter class can be
used as a shared counter and Boolean flag (for example, to manage operation overlap).
The real meat here, though, is the queue interface functions—in short, they allow cli-
ents to launch threads which queue their exit actions, to be dispatched in the main
thread by a timer loop.
In some ways this example is just a variation on those of the prior section—we still run
a timer loop here to pull items off the queue in the main thread. For both responsiveness
and efficiency, this timer loop pulls at most N items on each timer event, not just one
(which may take too long or incur overheads for a short timer delay), and not all queued
(which may block indefinitely when many items are produced quickly). We’ll leverage
this per-event batching feature to work through many progress updates in PyMailGUI
without having to devote CPU resources to quick timer events that are normally
unnecessary.
640 | Chapter 10: GUI Coding Techniques

The main difference to notice here, though, is that we call the object pulled off the
queue, and the producer threads have been generalized to place a success or failure
callback on the queue in response to exits and exceptions. Moreover, the actions that
run in producer threads receive a progress status function which, when called, simply
adds a progress indicator callback to the queue to be dispatched by the main thread.
We can use this, for example, to show progress in the GUI during network downloads.
Example 10-20. PP4E\Gui\Tools\threadtools.py
"""
#################################################################################
System-wide thread interface utilities for GUIs.
Implements a single thread callback queue and checker timer loop shared by
all the windows in a program; worker threads queue their exit and progress
actions to be run in the main thread; this doesn't block the GUI - it just
spawns operations and manages and dispatches exits and progress; worker
threads can overlap freely with the main thread, and with other workers.
Using a queue of callback functions and arguments is more useful than a
simple data queue if there can be many kinds of threads running at the
same time - each kind may have different implied exit actions.
Because GUI API is not completely thread-safe, instead of calling GUI
update callbacks directly after thread main action, place them on a shared
queue, to be run from a timer loop in the main thread, not a child thread;
this also makes GUI update points less random and unpredictable; requires
threads to be split into main action, exit actions, and progress action.
Assumes threaded action raises an exception on failure, and has a 'progress'
callback argument if it supports progress updates; also assumes callbacks
are either short-lived or update as they run, and that queue will contain
callback functions (or other callables) for use in a GUI app - requires a
widget in order to schedule and catch 'after' event loop callbacks; to use
this model in non-GUI contexts, could use simple thread timer instead.
#################################################################################
"""
# run even if no threads # in standard lib now
try: # raise ImportError to
import _thread as thread # run with GUI blocking
except ImportError: # if threads not available
import _dummy_thread as thread # same interface, no threads
# shared cross-process queue
# named in shared global scope, lives in shared object memory
import queue, sys
threadQueue = queue.Queue(maxsize=0) # infinite size
#################################################################################
# IN MAIN THREAD - periodically check thread completions queue; run implied GUI
# actions on queue in this main GUI thread; one consumer (GUI), and multiple
# producers (load, del, send); a simple list may suffice too: list.append and
GUIs, Threads, and Queues | 641

# pop atomic?; 4E: runs at most N actions per timer event: looping through all
# queued callbacks on each timer event may block GUI indefinitely, but running
# only one can take a long time or consume CPU for timer events (e.g., progress);
# assumes callback is either short-lived or updates display as it runs: after a
# callback run, the code here reschedules and returns to event loop and updates;
# because this perpetual loop runs in main thread, does not stop program exit;
#################################################################################
def threadChecker(widget, delayMsecs=100, perEvent=1): # 10x/sec, 1/timer
for i in range(perEvent): # pass to set speed
try:
(callback, args) = threadQueue.get(block=False) # run <= N callbacks
except queue.Empty:
break # anything ready?
else:
callback(*args) # run callback here
widget.after(delayMsecs, # reset timer event
lambda: threadChecker(widget, delayMsecs, perEvent)) # back to event loop
#################################################################################
# IN A NEW THREAD - run action, manage thread queue puts for exits and progress;
# run action with args now, later run on* calls with context; calls added to
# queue here are dispatched in main thread only, to avoid parallel GUI updates;
# allows action to be fully ignorant of use in a thread here; avoids running
# callbacks in thread directly: may update GUI in thread, since passed func in
# shared memory called in thread; progress callback just adds callback to queue
# with passed args; don't update in-progress counters here: not finished till
# exit actions taken off queue and dispatched in main thread by threadChecker;
#################################################################################
def threaded(action, args, context, onExit, onFail, onProgress):
try:
if not onProgress: # wait for action in this thread
action(*args) # assume raises exception if fails
else:
def progress(*any):
threadQueue.put((onProgress, any + context))
action(progress=progress, *args)
except:
threadQueue.put((onFail, (sys.exc_info(), ) + context))
else:
threadQueue.put((onExit, context))
def startThread(action, args, context, onExit, onFail, onProgress=None):
thread.start_new_thread(
threaded, (action, args, context, onExit, onFail, onProgress))
#################################################################################
# a thread-safe counter or flag: useful to avoid operation overlap if threads
# update other shared state beyond that managed by the thread callback queue
#################################################################################
642 | Chapter 10: GUI Coding Techniques

class ThreadCounter:
def __init__(self):
self.count = 0
self.mutex = thread.allocate_lock() # or use Threading.semaphore
def incr(self):
self.mutex.acquire() # or with self.mutex:
self.count += 1
self.mutex.release()
def decr(self):
self.mutex.acquire()
self.count -= 1
self.mutex.release()
def __len__(self): return self.count # True/False if used as a flag
#################################################################################
# self-test code: split thread action into main, exits, progress
#################################################################################
if __name__ == '__main__': # self-test code when run
import time # or PP4E.Gui.Tour.scrolledtext
from tkinter.scrolledtext import ScrolledText
def onEvent(i): # code that spawns thread
myname = 'thread-%s' % i
startThread(
action = threadaction,
args = (i, 3),
context = (myname,),
onExit = threadexit,
onFail = threadfail,
onProgress = threadprogress)
# thread's main action
def threadaction(id, reps, progress): # what the thread does
for i in range(reps):
time.sleep(1)
if progress: progress(i) # progress callback: queued
if id % 2 == 1: raise Exception # odd numbered: fail
# thread exit/progress callbacks: dispatched off queue in main thread
def threadexit(myname):
text.insert('end', '%s\texit\n' % myname)
text.see('end')
def threadfail(exc_info, myname):
text.insert('end', '%s\tfail\t%s\n' % (myname, exc_info[0]))
text.see('end')
def threadprogress(count, myname):
text.insert('end', '%s\tprog\t%s\n' % (myname, count))
text.see('end')
text.update() # works here: run in main thread
# make enclosing GUI and start timer loop in main thread
GUIs, Threads, and Queues | 643

# spawn batch of worker threads on each mouse click: may overlap
text = ScrolledText()
text.pack()
threadChecker(text) # start thread loop in main thread
text.bind('<Button-1>', # 3.x need list for map, range ok
lambda event: list(map(onEvent, range(6))) )
text.mainloop() # pop-up window, enter tk event loop
This module’s comments describe its implementation, and its self-test code demon-
strates how this interface is used. Notice how a thread’s behavior is split into main
action, exit actions, and optional progress action—the main action runs in the new
thread, but the others are queued to be dispatched in the main thread. That is, to use
this module, you will essentially break a modal operation into thread and post-thread
steps, with an optional progress call. Generally, only the thread step should be long
running.
When Example 10-20 is run standalone, on each button click in a ScrolledTest, it starts
up six threads, all running the threadaction function. As this threaded function runs,
calls to the passed-in progress function place a callback on the queue, which invokes
threadprogress in the main thread. When the threaded function exits, the interface
layer will place a callback on the queue that will invoke either threadexit or thread
fail in the main thread, depending upon whether the threaded function raised an ex-
ception. Because all the callbacks placed on the queue are pulled off and run in the
main thread’s timer loop, this guarantees that GUI updates occur in the main thread
only and won’t overlap in parallel.
Figure 10-12 shows part of the output generated after clicking the example’s window.
Its exit, failure, and progress messages are produced by callbacks added to the queue
by spawned threads and invoked from the timer loop running in the main thread.
Study this code for more details and try to trace through the self-test code. This is a bit
complex, and you may have to make more than one pass over this code to make sense
of its juggling act. Once you get the hang of this paradigm, though, it provides a general
scheme for handling heterogeneous overlapping threads in a uniform way. PyMailGUI,
for example, will do very much the same as onEvent in the self-test code here, whenever
it needs to start a mail transfer.
Passing bound method callbacks on queues
Technically, to make this even more flexible, PyMailGUI in Chapter 14 will queue
bound methods with this module—callable objects that, as mentioned, pair a method
function with an instance that gives access to state information and other methods. In
this mode, the thread manager module’s client code takes a form that looks more like
Example 10-21: a revision of the prior example’s self-test using classes and methods.
644 | Chapter 10: GUI Coding Techniques
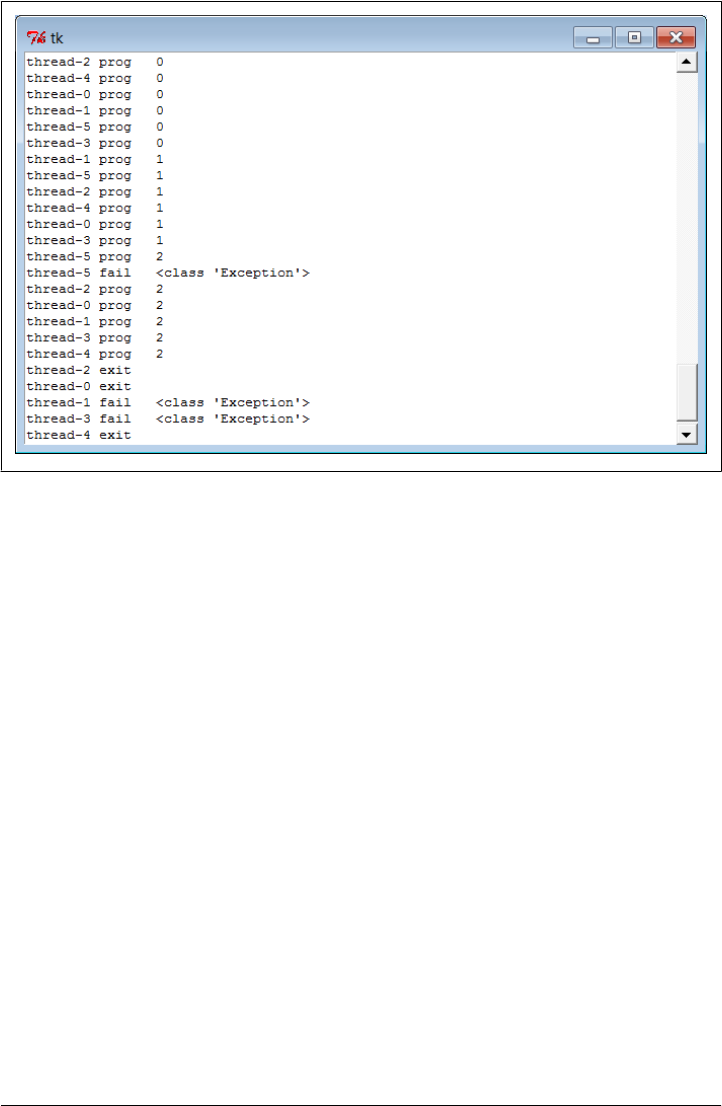
Example 10-21. PP4E\Gui\Tools\threadtools-test-classes.py
# tests thread callback queue, but uses class bound methods for action and callbacks
import time
from threadtools import threadChecker, startThread
from tkinter.scrolledtext import ScrolledText
class MyGUI:
def __init__(self, reps=3):
self.reps = reps # uses default Tk root
self.text = ScrolledText() # save widget as state
self.text.pack()
threadChecker(self.text) # start thread check loop
self.text.bind('<Button-1>', # 3.x need list for map, range ok
lambda event: list(map(self.onEvent, range(6))) )
def onEvent(self, i): # code that spawns thread
myname = 'thread-%s' % i
startThread(
action = self.threadaction,
args = (i, ),
context = (myname,),
onExit = self.threadexit,
onFail = self.threadfail,
onProgress = self.threadprogress)
# thread's main action
def threadaction(self, id, progress): # what the thread does
Figure 10-12. Messages from queued callbacks
GUIs, Threads, and Queues | 645

for i in range(self.reps): # access to object state here
time.sleep(1)
if progress: progress(i) # progress callback: queued
if id % 2 == 1: raise Exception # odd numbered: fail
# thread callbacks: dispatched off queue in main thread
def threadexit(self, myname):
self.text.insert('end', '%s\texit\n' % myname)
self.text.see('end')
def threadfail(self, exc_info, myname): # have access to self state
self.text.insert('end', '%s\tfail\t%s\n' % (myname, exc_info[0]))
self.text.see('end')
def threadprogress(self, count, myname):
self.text.insert('end', '%s\tprog\t%s\n' % (myname, count))
self.text.see('end')
self.text.update() # works here: run in main thread
if __name__ == '__main__': MyGUI().text.mainloop()
This code both queues bound methods as thread exit and progress actions and runs
bound methods as the thread’s main action itself. As we learned in Chapter 5, because
threads all run in the same process and memory space, bound methods reference the
original in-process instance object, not a copy of it. This allows them to update the GUI
and other implementation state directly. Furthermore, because bound methods are
normal objects which pass for callables interchangeably with simple functions, using
them both on queues and in threads this way just works. To many, this broadly shared
state of threads is one of their primary advantages over processes.
Watch for the more realistic application of this module in Chapter 14’s PyMailGUI,
where it will serve as the core thread exit and progress dispatch engine. There, we’ll
also run bound methods as thread actions, too, allowing both threads and their queued
actions to access shared mutable object state of the GUI. As we’ll see, queued action
updates are automatically made thread-safe by this module’s protocol, because they
run in the main thread only. Other state updates to shared objects performed in
spawned threads, though, may still have to be synchronized separately if they might
overlap with other threads, and are made outside the scope of the callback queue. A
direct update to a mail cache, for instance, might lock out other operations until
finished.
More Ways to Add GUIs to Non-GUI Code
Sometimes, GUIs pop up quite unexpectedly. Perhaps you haven’t learned GUI pro-
gramming yet; or perhaps you’re just pining for non-event-driven days past. But for
whatever reason, you may have written a program to interact with a user in an inter-
active console, only to decide later that interaction in a real GUI would be much nicer.
What to do?
646 | Chapter 10: GUI Coding Techniques

Probably the real answer to converting a non-GUI program is to truly convert it—
restructure it to initialize widgets on startup, call mainloop once to start event processing
and display the main window, and move all program logic into callback functions trig-
gered by user actions. Your original program’s actions become event handlers, and your
original main flow of control becomes a program that builds a main window, calls the
GUI’s event loop once, and waits.
This is the traditional way to structure a GUI program, and it makes for a coherent user
experience; windows pop up on request, instead of showing up at seemingly random
times. Until you’re ready to bite the bullet and perform such a structural conversion,
though, there are other possibilities. For example, in the ShellGui section earlier in this
chapter, we saw how to add windows to file packing scripts to collect inputs (Exam-
ple 10-5 and beyond); later, we also saw how to redirect such scripts’ outputs to GUIs
with the GuiOutput class (Example 10-13). This approach works if the non-GUI oper-
ation we’re wrapping up in a GUI is a single operation; for more dynamic user inter-
action, other techniques might be needed.
It’s possible, for instance, to launch GUI windows from a non-GUI main program, by
calling the tkinter mainloop each time a window must be displayed. It’s also possible to
take a more grandiose approach and add a completely separate program for the GUI
portion of your application. To wrap up our survey of GUI programming techniques,
let’s briefly explore each scheme.
Popping Up GUI Windows on Demand
If you just want to add a simple GUI user interaction to an existing non-GUI script
(e.g., to select files to open or save), it is possible to do so by configuring widgets and
calling mainloop from the non-GUI main program when you need to interact with the
user. This essentially makes the program GUI-capable, but without a persistent main
window. The trick is that mainloop doesn’t return until the GUI main window is closed
by the user (or quit method calls), so you cannot retrieve user inputs from the destroyed
window’s widgets after mainloop returns. To work around this, all you have to do is be
sure to save user inputs in a Python object: the object lives on after the GUI is destroyed.
Example 10-22 shows one way to code this idea in Python.
Example 10-22. PP4E\Gui\Tools\mainloopdemo.py
"""
demo running two distinct mainloop calls; each returns after the main window is
closed; save user results on Python object: GUI is gone; GUIs normally configure
widgets and then run just one mainloop, and have all their logic in callbacks; this
demo uses mainloop calls to implement two modal user interactions from a non-GUI
main program; it shows one way to add a GUI component to an existing non-GUI script,
without restructuring code;
"""
from tkinter import *
from tkinter.filedialog import askopenfilename, asksaveasfilename
More Ways to Add GUIs to Non-GUI Code | 647

class Demo(Frame):
def __init__(self,parent=None):
Frame.__init__(self,parent)
self.pack()
Label(self, text ="Basic demos").pack()
Button(self, text='open', command=self.openfile).pack(fill=BOTH)
Button(self, text='save', command=self.savefile).pack(fill=BOTH)
self.open_name = self.save_name = ""
def openfile(self): # save user results
self.open_name = askopenfilename() # use dialog options here
def savefile(self):
self.save_name = asksaveasfilename(initialdir='C:\\Python31')
if __name__ == "__main__":
# display window once
print('popup1...')
mydialog = Demo() # attaches Frame to default Tk()
mydialog.mainloop() # display; returns after windows closed
print(mydialog.open_name) # names still on object, though GUI gone
print(mydialog.save_name)
# Non GUI section of the program uses mydialog here
# display window again
print('popup2...')
mydialog = Demo() # re-create widgets again
mydialog.mainloop() # window pops up again
print(mydialog.open_name) # new values on the object again
print(mydialog.save_name)
# Non GUI section of the program uses mydialog again
print('ending...')
This program twice builds and displays a simple two-button main window that
launches file selection dialogs, shown in Figure 10-13. Its output, printed as the GUI
windows are closed, looks like this:
C:\...\PP4E\Gui\Tools> mainloopdemo.py
popup1...
C:/Users/mark/Stuff/Books/4E/PP4E/dev/Examples/PP4E/Gui/Tools/widgets.py
C:/Python31/python.exe
popup2...
C:/Users/mark/Stuff/Books/4E/PP4E/dev/Examples/PP4E/Gui/Tools/guimixin.py
C:/Python31/Lib/tkinter/__init__.py
ending...
Notice how this program calls mainloop twice, to implement two modal user interac-
tions from an otherwise non-GUI script. It’s OK to call mainloop more than once, but
this script takes care to re-create the GUI’s widgets before each call because they are
destroyed when the previous mainloop call exits (widgets are destroyed internally inside
Tk, even though the corresponding Python widget object still exists). Again, this can
make for an odd user experience compared to a traditional GUI program structure—
windows seem to pop up from nowhere—but it’s a quick way to put a GUI face on a
script without reworking its code.
648 | Chapter 10: GUI Coding Techniques

Note that this is different from using nested (recursive) mainloop calls to implement
modal dialogs, as we did in Chapter 8. In that mode, the nested mainloop call returns
when the dialog’s quit method is called, but we return to the enclosing mainloop layer
and remain in the realm of event-driven programming. Example 10-22 instead runs
mainloop two different times, stepping into and out of the event-driven model twice.
Finally, note that this scheme works only if you don’t have to run any non-GUI code
while the GUI is open, because your script’s mainline code is inactive and blocked while
mainloop runs. You cannot, for example, apply this technique to use utilities like those
in the guiStreams module we met earlier in this chapter to route user interaction from
non-GUI code to GUI windows. The GuiInput and GuiOutput classes in that example
assume that there is a mainloop call running somewhere (they’re GUI-based, after all).
But once you call mainloop to pop up these windows, you can’t return to your non-GUI
code to interact with the user or the GUI until the GUI is closed and the mainloop call
returns. The net effect is that these classes can be used only in the context of a fully
GUI program.
But really, this is an artificial way to use tkinter. Example 10-22 works only because
the GUI can interact with the user independently, while the mainloop call runs; the
script is able to surrender control to the tkinter mainloop call and wait for results. That
scheme won’t work if you must run any non-GUI code while the GUI is open. Because
of such constraints, you will generally need a main-window-plus-callbacks model in
most GUI programs—callback code runs in response to user interaction while the GUI
remains open. That way, your code can run while GUI windows are active. For an
example, see earlier in this chapter for the way the non-GUI packer and unpacker scripts
were run from a GUI so that their results appear in a GUI; technically, these scripts are
run in a GUI callback handler so that their output can be routed to a widget.
Adding a GUI As a Separate Program: Sockets (A Second Look)
As mentioned earlier, it’s also possible to spawn the GUI part of your application as a
completely separate program. This is a more advanced technique, but it can make
integration simple for some applications because of the loose coupling it implies. It can,
for instance, help with the guiStreams issues of the prior section, as long as inputs and
outputs are communicated to the GUI over Inter-Process Communication (IPC)
Figure 10-13. GUI window popped up by non-GUI main program
More Ways to Add GUIs to Non-GUI Code | 649

mechanisms, and the widget after method (or similar) is used by the GUI program to
detect incoming output to be displayed. The non-GUI script would not be blocked by
a mainloop call.
For example, the GUI could be spawned by the non-GUI script as a separate program,
where user interaction results can be communicated from the spawned GUI to the script
using pipes, sockets, files, or other IPC mechanisms we met in Chapter 5. The advantage
to this approach is that it provides a separation of GUI and non-GUI code—the non-
GUI script would have to be modified only to spawn and wait for user results to appear
from the separate GUI program, but could otherwise be used as is. Moreover, the non-
GUI script would not be blocked while an in-process mainloop call runs (only the GUI
process would run a mainloop), and the GUI program could persist after the point at
which user inputs are required by the script, leading to fewer pop-up windows.
In other scenarios, the GUI may spawn the non-GUI script instead, and listen for its
feedback on an IPC device connected to the script’s output stream. In even more com-
plex arrangements, the GUI and non-GUI script may converse back and forth over
bidirectional connections.
Examples 10-23, 10-24, and 10-25 provide a simple example of these techniques in
action: a non-GUI script sending output to a GUI. They represent non-GUI and GUI
programs that communicate over sockets—the IPC and networking device we met
briefly in Chapter 5 and will explore in depth in the next part of the book. The important
point to notice as we study these files is the way the programs are linked: when the
non-GUI script prints to its standard output, the printed text is sent over a socket
connection to the GUI program. Other than the import and call to the socket redirection
code, the non-GUI program knows nothing at all about GUIs or sockets, and the GUI
program knows nothing about the program whose output it displays. Because this
model does not require existing scripts to be entirely rewritten to support a GUI, it is
ideal for scripts that otherwise run on the world of shells and command lines.
In terms of code, we first need some IPC linkage in between the script and the GUI.
Example 10-23 encapsulates the client-side socket connection used by non-GUI code
for reuse. As is, it’s a partial work in progress (notice the ... ellipses operator in its last
few functions—Python’s notion of “To be decided,” and equivalent to a pass in this
context). Because sockets are covered in full in Chapter 12, we’ll defer other stream
redirection modes until then, when we’ll also flesh out the rest of this module. The
version of this module here implements just the client-side connection of the standard
output stream to a socket—perfect for a GUI that wants to intercept a non-GUI script’s
printed text.
Example 10-23. PP4E\Gui\Tools\socket_stream_redirect0.py
"""
[partial] Tools for connecting streams of non-GUI programs to sockets
that a GUI (or other) can use to interact with the non-GUI program;
see Chapter 12 and PP4E\Sockets\Internet for a more complete treatment
"""
650 | Chapter 10: GUI Coding Techniques

import sys
from socket import *
port = 50008
host = 'localhost'
def redirectOut(port=port, host=host):
"""
connect caller's standard output stream to a socket for GUI to listen;
start caller after listener started, else connect fails before accept
"""
sock = socket(AF_INET, SOCK_STREAM)
sock.connect((host, port)) # caller operates in client mode
file = sock.makefile('w') # file interface: text, bufferred
sys.stdout = file # make prints go to sock.send
def redirectIn(port=port, host=host): ... # see Chapter 12
def redirectBothAsClient(port=port, host=host): ... # see Chapter 12
def redirectBothAsServer(port=port, host=host): ... # see Chapter 12
Next, Example 10-24 uses Example 10-23 to redirect its prints to a socket on which a
GUI server program may listen; this requires just two lines of code at the top of the
script, and is done selectively based upon the value of a command-line argument (with-
out the argument, the script runs in fully non-GUI mode):
Example 10-24. PP4E\Gui\Tools\socket-nongui.py
# non-GUI side: connect stream to socket and proceed normally
import time, sys
if len(sys.argv) > 1: # link to gui only if requested
from socket_stream_redirect0 import * # connect my sys.stdout to socket
redirectOut() # GUI must be started first as is
# non-GUI code
while True: # print data to stdout:
print(time.asctime()) # sent to GUI process via socket
sys.stdout.flush() # must flush to send: buffered!
time.sleep(2.0) # no unbuffered mode, -u irrelevant
And finally, the GUI part of this exchange is the program in Example 10-25. This script
implements a GUI to display the text printed by the non-GUI program, but it knows
nothing of that other program’s logic. For the display, the GUI program prints to the
stream redirection object we met earlier in this chapter (Example 10-12); because this
program runs a GUI mainloop call, this all just works.
We’re also running a timer loop here to detect incoming data on the socket as it arrives,
instead of waiting for the non-GUI program to run to completion. Because the socket
is set to be nonblocking, input calls don’t wait for data to appear, and hence, do not
block the GUI.
More Ways to Add GUIs to Non-GUI Code | 651

Example 10-25. PP4E\Gui\Tools\socket-gui.py
# GUI server side: read and display non-GUI script's output
import sys, os
from socket import * # including socket.error
from tkinter import Tk
from PP4E.launchmodes import PortableLauncher
from PP4E.Gui.Tools.guiStreams import GuiOutput
myport = 50008
sockobj = socket(AF_INET, SOCK_STREAM) # GUI is server, script is client
sockobj.bind(('', myport)) # config server before client
sockobj.listen(5)
print('starting')
PortableLauncher('nongui', 'socket-nongui.py -gui')() # spawn non-GUI script
print('accepting')
conn, addr = sockobj.accept() # wait for client to connect
conn.setblocking(False) # use nonblocking socket (False=0)
print('accepted')
def checkdata():
try:
message = conn.recv(1024) # don't block for input
#output.write(message + '\n') # could do sys.stdout=output too
print(message, file=output) # if ready, show text in GUI window
except error: # raises socket.error if not ready
print('no data') # print to sys.stdout
root.after(1000, checkdata) # check once per second
root = Tk()
output = GuiOutput(root) # socket text is displayed on this
checkdata()
root.mainloop()
Start Example 10-25’s file to launch this example. When both the GUI and the non-
GUI processes are running, the GUI picks up a new message over the socket roughly
once every two seconds and displays it in the window shown in Figure 10-14. The GUI’s
timer loop checks for data once per second, but the non-GUI script sends a message
every two seconds only due to its time.sleep calls. The printed output in the terminal
windows is as follows—“no data” messages and lines in the GUI alternate each second:
C:\...\PP4E\Gui\Tools> socket-gui.py
starting
nongui
accepting
accepted
no data
no data
no data
no data
...more...
652 | Chapter 10: GUI Coding Techniques

Notice how we’re displaying bytes strings in Figure 10-14—even though the non-GUI
script prints text, the GUI script reads it with the raw socket interface, and sockets deal
in binary byte strings in Python 3.X.
Run this example by yourself for a closer look. In high-level terms, the GUI script
spawns the non-GUI script and displays a pop-up window that shows the text printed
by the non-GUI script (the date and time). The non-GUI script can keep running linear,
procedural code to produce data, because only the GUI script’s process runs an event-
driven mainloop call.
Moreover, unlike our earlier stream redirection explorations which simply connected
the script’s streams to GUI objects running in the same process, this decoupled two-
process approach prevents the GUI from being blocked while waiting for the script to
produce output; the GUI process remains fully and independently active, and simply
picks up new results as they appear (more on this in the next section). This model is
similar in spirit to our earlier thread queue examples, but the actors here are separate
programs linked by a socket, not in-process function calls.
Although we aren’t going to get into enough socket details in this chapter to fully
explain this script’s code, there are a few fine points worth underscoring here:
• This example should probably be augmented to detect and handle an end-of-file
signal from the spawned program, and then terminate its timer loop.
• The non-GUI script could also start the GUI instead, but in the socket world, the
server’s end (the GUI) must be configured to accept connections before the client
Figure 10-14. Messages printed to a GUI from a non-GUI program (socket)
More Ways to Add GUIs to Non-GUI Code | 653

(the non-GUI) can connect. One way or another, the GUI has to start before the
non-GUI connects to it or the non-GUI script will be denied a connection and
will fail.
• Because of the buffered text nature of the socket.makefile objects used for streams
here, the client program is required to flush its printed output with
sys.stdout.flush to send data to the GUI—without this call, the GUI receives and
displays nothing. As we’ll learn in Chapter 12, this isn’t required for command
pipes, but it is when streams are reset to wrapped sockets as done here. These
wrappers don’t support unbuffered modes in Python 3.X, and there is no equivalent
to the -u flag in this context (more on -u and command pipes in the next section).
Stay tuned for much more on this example and topic in Chapter 12. Its socket client/
server model works well and is a general approach to connecting GUI and non-GUI
code, but there are other coding alternatives worth exploring in the next section before
we move on.
Adding a GUI As a Separate Program: Command Pipes
The net effect of the two programs of the preceding section is similar to a GUI program
reading the output of a shell command over a pipe file with os.popen (or the
subprocess.Popen interface upon which it is based). As we’ll see later, though, sockets
also support independent servers, and can link programs running on remote machines
across a network—a much larger idea we’ll be exploring in Chapter 12.
Perhaps subtler and more significant for our GUI exploration here is the fact that with-
out an after timer loop and nonblocking input sources of the sort used in the prior
section, the GUI may become stuck and unresponsive while waiting for data from the
non-GUI program and may not be able to handle more than one data stream.
For instance, consider the guiStreams call we wrote in Example 10-12 to redirect the
output of a shell command spawned with os.popen to a GUI window. We could use
this with simplistic code like that in Example 10-26 to capture the output of a spawned
Python program and display it in a separately running GUI program’s window. This is
as concise as it is because it relies on the read/write loop and GuiOutput class in Exam-
ple 10-12 to both manage the GUI and read the pipe; it’s essentially the same as one of
the options in that example’s self-test code, but we read the printed output of a Python
program here.
Example 10-26. PP4E\Gui\Tools\pipe-gui1.py
# GUI reader side: route spawned program standard output to a GUI window
from PP4E.Gui.Tools.guiStreams import redirectedGuiShellCmd # uses GuiOutput
redirectedGuiShellCmd('python -u pipe-nongui.py') # -u: unbuffered
654 | Chapter 10: GUI Coding Techniques

Notice the -u Python command-line flag used here: it forces the spawned program’s
standard streams to be unbuffered, so we get printed text immediately as it is produced,
instead of waiting for the spawned program to completely finish.
We talked about this option in Chapter 5, when discussing deadlocks and pipes. Recall
that print writes to sys.stdout, which is normally buffered when connected to a pipe
this way. If we don’t use the -u flag here and the spawned program doesn’t manually
call sys.stdout.flush, we won’t see any output in the GUI until the spawned program
exits or until its buffers fill up. If the spawned program is a perpetual loop that does
not exit, we may be waiting a long time for output to appear on the pipe, and hence,
in the GUI.
This approach makes the non-GUI code in Example 10-27 much simpler: it just writes
to standard output as usual, and it need not be concerned with creating a socket in-
terface. Compare this with its socket-based equivalent in Example 10-24—the loop is
the same, but we don’t need to connect to sockets first (the spawning parent reads the
normal output stream), and don’t need to manually flush output as it’s produced (the
-u flag in the spawning parent prevents buffering).
Example 10-27. PP4E\Gui\Tools\pipe-nongui.py
# non-GUI side: proceed normally, no need for special code
import time
while True: # non-GUI code
print(time.asctime()) # sends to GUI process
time.sleep(2.0) # no need to flush here
Start the GUI script in Example 10-26: it launches the non-GUI program automatically,
reads its output as it is created, and produces the window in Figure 10-15—it’s similar
to the socket-based example’s result in Figure 10-14, but displays the str text strings
we get from reading pipes, not the byte strings of sockets.
This works, but the GUI is odd—we never call mainloop ourselves, and we get a default
empty top-level window. In fact, it apparently works at all only because the tkinter
update call issued within the redirect function enters the Tk event loop momentarily to
process pending events. To do better, Example 10-28 creates an enclosing GUI and
kicks off an event loop manually by the time the shell command is spawned; when run,
it produces the same output window (Figure 10-15).
Example 10-28. PP4E\Gui\Tools\pipe-gui2.py
# GUI reader side: like pipes-gui1, but make root window and mainloop explicit
from tkinter import *
from PP4E.Gui.Tools.guiStreams import redirectedGuiShellCmd
def launch():
redirectedGuiShellCmd('python -u pipe-nongui.py')
More Ways to Add GUIs to Non-GUI Code | 655
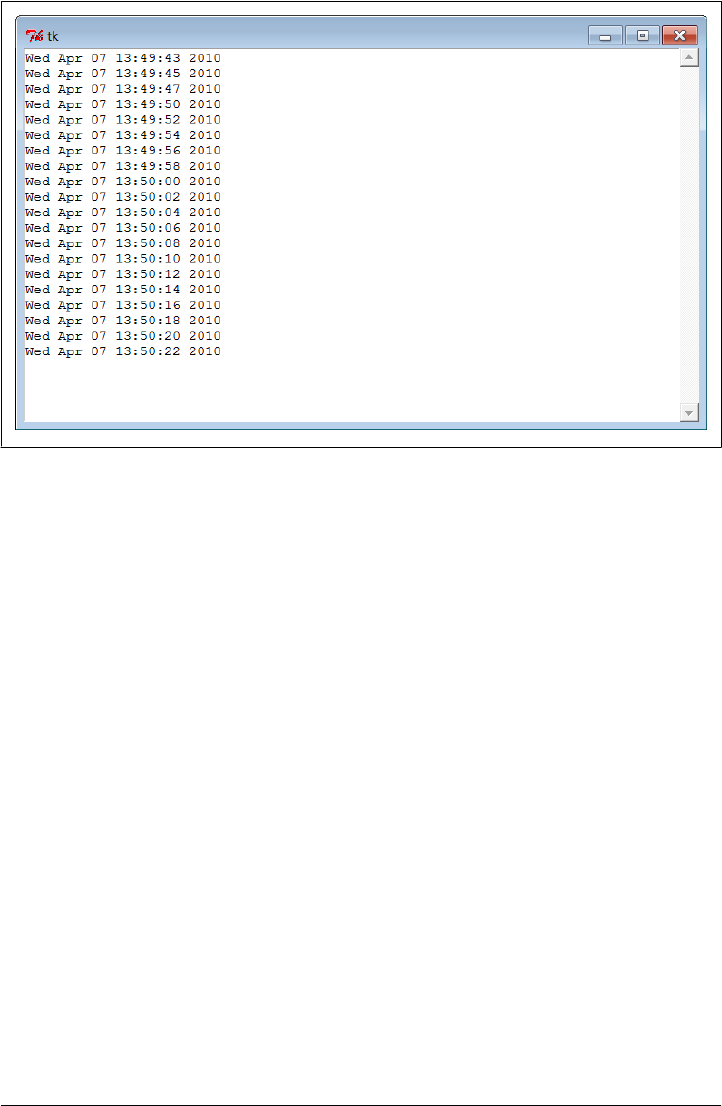
window = Tk()
Button(window, text='GO!', command=launch).pack()
window.mainloop()
The -u unbuffered flag is crucial here again—without it, you won’t see the text output
window. The GUI will be blocked in the initial pipe input call indefinitely because the
spawned program’s standard output will be queued up in an in-memory buffer.
On the other hand, this -u unbuffered flag doesn’t prevent blocking in the prior sec-
tion’s socket scheme, because that example resets streams to other objects after the
spawned program starts; more on this in Chapter 12. Also remember that the buffering
argument in os.popen (and subprocess.Popen) controls buffering in the caller, not in the
spawned program; -u pertains to the latter.
The specter of blocking input calls
Either way we code them, however, when the GUIs of Example 10-26 and Exam-
ple 10-28 are run they become unresponsive for two seconds at a time while they read
data from the os.popen pipe. In fact, they are just plain sluggish—window moves, re-
sizes, redraws, raises, and so on, are delayed for up to two seconds, until the non-GUI
program sends data to the GUI to make the pipe read call return. Perhaps worse, if you
press the “GO!” button twice in the second version of the GUI, only one window
updates itself every two seconds, because the GUI is stuck in the second button press
callback—it never exits the loop that reads from the pipe until the spawned non-GUI
Figure 10-15. Messages printed to a GUI from a non-GUI program (command pipe)
656 | Chapter 10: GUI Coding Techniques

program exits. Exits are not necessarily graceful either (you get multiple error messages
in the terminal window).
Because of such constraints, to avoid blocked states, a separately running GUI cannot
generally read data directly if its appearance may be delayed. For instance, in the socket-
based scripts of the prior section (Example 10-25), the after timer loop allows the GUI
to poll for data instead of waiting, and display it as it arrives. Because it doesn’t wait
for the data to show up, its GUI remains active in between outputs.
Of course, the real issue here is that the read/write loop in the guiStreams utility function
used is too simplistic; issuing a read call within a GUI is generally prone to blocking.
There are a variety of ways we might try to avoid this.
Updating GUIs within threads…and other nonsolutions
One candidate fix is to try to run the redirection loop call in a thread—for example, by
changing the launch function in Example 10-28 as follows (this is from file pipe-gui2-
thread.py on the examples distribution):
def launch():
import _thread
_thread.start_new_thread(redirectedGuiShellCmd, ('python -u pipe-nongui.py',))
But then we would be updating the GUI from a spawned thread, which, as we’ve
learned, is a generally bad idea. Parallel updates can wreak havoc in GUIs.
If fact, with this change the GUI fails spectacularly—it hangs immediately on the first
“GO!” button press on my Windows 7 laptop, becomes unresponsive, and must be
forcibly closed. This happens before (or perhaps during) the creation of the new pop-
up scrolled-text window. When this example was run on Windows XP for the prior
edition of this book, it also hung on the first “GO!” press occasionally and always hung
eventually if you pressed the button enough times; the process had to be forcibly killed.
Direct GUI updates in threads are not a viable solution.
Alternatively, we could try to use the Python select.select call (described in Chap-
ter 12) to implement polling for data on the input pipe; unfortunately, select works
only on sockets in Windows today (it also works on pipes and other file descriptors in
Unix).
In other contexts, a separately spawned GUI might also use signals to inform the non-
GUI program when points of interaction arise, and vice versa (the Python signal mod-
ule and os.kill call were introduced in Chapter 5). The downside with this approach
is that it still requires changes to the non-GUI program to handle the signals.
Named pipes (the fifo files introduced in Chapter 5) are sometimes an alternative to
the socket calls of the original Examples 10-23 through 10-25, but sockets work on
standard Windows Python, and fifos do not (os.mkfifo is not available in Windows in
Python 3.1, though it is in Cygwin Python). Even where they do work, we would still
need an after timer loop in the GUI to avoid blocking.
More Ways to Add GUIs to Non-GUI Code | 657

We might also use tkinter’s createfilehandler to register a callback to be run when
input shows up on the input pipe:
def callback(file, mask):
...read from file here...
import _tkinter, tkinter
_tkinter.createfilehandler(file, tkinter.READABLE, callback)
The file handler creation call is also available within tkinter and as a method of a Tk
instance object. Unfortunately again, as noted near the end of Chapter 9, this call is
not available on Windows and is a Unix-only alternative.
Avoiding blocking input calls with non-GUI threads
As a far more general solution to the blocking input delays of the prior section, the GUI
process might instead spawn a thread that reads the socket or pipe and places the data
on a queue. In fact, the thread techniques we met earlier in this chapter could be used
directly in such a role. This way, the GUI is not blocked while the thread waits for data
to show up, and the thread does not attempt to update the GUI itself. Moreover, more
than one data stream or long-running activity can overlap in time.
Example 10-29 shows how. The main trick this script employs is to split up the input
and output parts of the original redirectedGuiShellCmd of the guiStreams module we
met earlier in Example 10-12. By so doing, the input portion can be spawned off in a
parallel thread and not block the GUI. The main GUI thread uses an after timer loop
as usual, to watch for data to be added by the reader thread to a shared queue. Because
the main thread doesn’t read program output itself, it does not get stuck in wait states.
Example 10-29. PP4E\Gui\Tools\pipe_gui3.py
"""
read command pipe in a thread and place output on a queue checked in timer loop;
allows script to display program's output without being blocked between its outputs;
spawned programs need not connect or flush, but this approaches complexity of sockets
"""
import _thread as thread, queue, os
from tkinter import Tk
from PP4E.Gui.Tools.guiStreams import GuiOutput
stdoutQueue = queue.Queue() # infinite size
def producer(input):
while True:
line = input.readline() # OK to block: child thread
stdoutQueue.put(line) # empty at end-of-file
if not line: break
def consumer(output, root, term='<end>'):
try:
line = stdoutQueue.get(block=False) # main thread: check queue
except queue.Empty: # 4 times/sec, OK if empty
658 | Chapter 10: GUI Coding Techniques

pass
else:
if not line: # stop loop at end-of-file
output.write(term) # else display next line
return
output.write(line)
root.after(250, lambda: consumer(output, root, term))
def redirectedGuiShellCmd(command, root):
input = os.popen(command, 'r') # start non-GUI program
output = GuiOutput(root)
thread.start_new_thread(producer, (input,)) # start reader thread
consumer(output, root)
if __name__ == '__main__':
win = Tk()
redirectedGuiShellCmd('python -u pipe-nongui.py', win)
win.mainloop()
As usual, we use a queue here to avoid updating the GUI except in the main thread.
Note that we didn’t need a thread or queue in the prior section’s socket example, just
because we’re able to poll a socket to see whether it has data without blocking; an
after timer loop was enough. For a shell-command pipe, though, a thread is an easy
way to avoid blocking.
When run, this program’s self-test code creates a ScrolledText window that displays
the current date and time sent from the pipes-nongui.py script in Example 10-27. In
fact, its window is identical to that of the prior versions (see Figure 10-15). The window
is updated with a new line every two seconds because that’s how often the spawned
pipes-nongui script prints a message to stdout.
Note how the producer thread calls readline() to load just one line at a time. We can’t
use input calls that consume the entire stream all at once (e.g., read(), readlines()),
because such calls would not return until the program exits and sends end-of-file. The
read(N) call would work to grab one piece of the output as well, but we assume that
the output stream is text here. Also notice that the -u unbuffered stream flag is used
here again, to get output as it is produced; without it, output won’t show up in the GUI
at all because it is buffered in the spawned program (try it yourself).
Sockets and pipes: Compare and contrast
Let’s see how we’ve done. This script is similar in spirit to what we did in Exam-
ple 10-28. Because of the way its code is structured, though, Example 10-29 has a major
advantage: because input calls are spawned off in a thread this time, the GUI is com-
pletely responsive. Window moves, resizes, and so forth, happen immediately because
the GUI is not blocked while waiting for the next output from the non-GUI program.
The combination of a pipe, thread, and queue works wonders here—the GUI need not
wait for the spawned program, and the spawned thread need not update the GUI itself.
More Ways to Add GUIs to Non-GUI Code | 659

Although it is more complex and requires thread support, Example 10-29’s lack of
blocking makes this redirectedGuiShellCmd much more generally useful than the orig-
inal pipe version we coded. Compared to the sockets of the prior section, though, this
solution is a bit of a mixed bag:
• Because this GUI reads the spawned program’s standard output, no changes are
required in the non-GUI program. Unlike the socket-based example in the prior
section, the non-GUI program here needs no knowledge of the GUI that will display
its results—it need not connect to a socket and need not flush its input stream, as
required for the earlier socket-based option.
• Although it requires no changes to the programs whose output is displayed, the
GUI code’s complexity begins to approach that of the socket-based alternative,
especially if you strip away the boilerplate code required for all socket programs.
• It does not directly support running the GUI and non-GUI programs separately,
or on remote machines. As we’ll see in Chapter 12, sockets allow data to be passed
between programs running on the same machine or across networks.
• Sockets apply to more use cases than displaying a program’s output stream. If the
GUI must do more than display another program’s output, sockets become a more
general solution—as we’ll also learn later, because sockets are bidirectional data
streams, they allow data to be passed back and forth between two programs in
more arbitrary ways.
Other uses for threaded pipe GUIs
Despite its tradeoffs, the thread/queue/pipe-based approach for GUIs has fairly wide
applicability. To illustrate, here’s another quick usage example. The following runs a
simple script normally from a shell/terminal window; it prints one successively longer
output line every two seconds:
C:\...\PP4E\Gui\Tools> type spams.py
import time
for i in range(1, 10, 2):
time.sleep(2) # print to standard output
print('spam' * i) # nothing GUI about this, eh?
C:\...\PP4E\Gui\Tools> python spams.py
spam
spamspamspam
spamspamspamspamspam
spamspamspamspamspamspamspam
spamspamspamspamspamspamspamspamspam
Let’s wrap this up in a GUI, with code typed at the interactive prompt for variety. The
following imports the new GUI redirection function as a library component and uses
it to create a window that displays the script’s five lines, appearing every two seconds
just as in the terminal window, followed by a final line containing <end> reflecting the
spawned program’s exit. The resulting output window is captured in Figure 10-16:
660 | Chapter 10: GUI Coding Techniques

C:\...\PP4E\Gui\Tools> python
>>> from tkinter import Tk
>>> from pipe_gui3 import redirectedGuiShellCmd
>>> root = Tk()
>>> redirectedGuiShellCmd('python -u spams.py', root)
Figure 10-16. Command pipe GUI displaying another program’s output
If the spawned program exits, Example 10-29’s producer thread detects end-of-file on
the pipe and puts a final empty line in the queue; in response the consumer loop displays
an <end> line in the GUI by default when it detects this condition. In this case, program
exit is normal and silent; in other cases, we may need to add shutdown logic to suppress
error messages. Note that here again, the sleep call in the spawned program simulates
a long-running task, and we really need the -u unbuffered streams flag—without it, no
output appears in the GUI for eight seconds, until the spawned program is completely
finished. With it, the GUI receives and displays each line as it is printed, one every two
seconds.
This is also, finally, the sort of code you could use to display the output of a non-GUI
program in a GUI, without sockets, changes in the original program, or blocking the
GUI. Of course, in many cases, if you have to work this hard to add a GUI anyhow,
you might as well just make your script a traditional GUI program with a main window
and event loop. Furthermore, the GUIs we’ve coded in this section are limited to dis-
playing another program’s output; sometimes the GUI may have to do more. For many
programs, though, the general separation of display and program logic provided by the
spawned GUI model can be an advantage—it’s easier to understand both parts if they
are not mixed together.
We’ll learn more about sockets in the next part of the book, so you should consider
parts of this discussion something of a preview. As we’ll see, things start to become
more and more interesting when we start combining GUIs, threads, and network
sockets.
Before we do, though, the next chapter rounds out the purely GUI part of this book by
applying the widgets and techniques we’ve learned in more realistically scaled pro-
grams. And before that, the next section wraps up here with a preview of some of the
More Ways to Add GUIs to Non-GUI Code | 661

larger GUI examples coming up, with a quick look at scripts that launch them auto-
matically, and allow you to sample some of what is possible with Python and tkinter.
The PyDemos and PyGadgets Launchers
To close out this chapter, let’s explore the implementations of the two GUIs used to
run major book examples. The following GUIs, PyDemos and PyGadgets, are simply
GUIs for launching other GUI programs. In fact, we’ve now come to the end of the
demo launcher story—both of the new programs here interact with modules that we
met earlier in Part II:
launchmodes.py
Starts independent Python programs portably.
Launcher.py
Finds programs, and ultimately runs both PyDemos and PyGadgets when used by
the self-configuring top-level launcher scripts.
LaunchBrowser.pyw
Spawns web browsers portably to open local or remote pages.
See Part II (especially the ends of Chapter 5 and Chapter 6) for links to the code for
these modules. The programs introduced here add the GUI components to the
program-launching system—they simply provide easy-to-use pushbuttons that spawn
most of the larger examples in this text when pressed.
Both of these scripts also assume that they will be run with the current working directory
set to their directory (they hardcode paths to other programs relative to that). Either
click on their names in a file explorer or run them from a command-line shell after a
cd to the top-level PP4E examples root directory. These scripts could allow invocations
from other directories by prepending an environment variable’s value to program script
paths, but they were really designed to be run only out of the PP4E root.
Because these demo launchers are long programs, in the interest of space and time only
their crucial and representative parts are listed in this book; as usual, see the examples
package distribution for the portions omitted here.
PyDemos Launcher Bar (Mostly External)
The PyDemos script constructs a bar of buttons that run programs in demonstration
mode, not for day-to-day use. I use PyDemos to show off Python programs—it’s much
easier to press its buttons than to run command lines or fish through a file explorer
GUI to find scripts.
You can use PyDemos (and PyGadgets) to start and interact with examples presented
in this book—all of the buttons on this GUI represent examples we will meet in later
chapters. Unlike when using the Launch_PyDemos and Launch_PyGadgets_bar scripts
662 | Chapter 10: GUI Coding Techniques
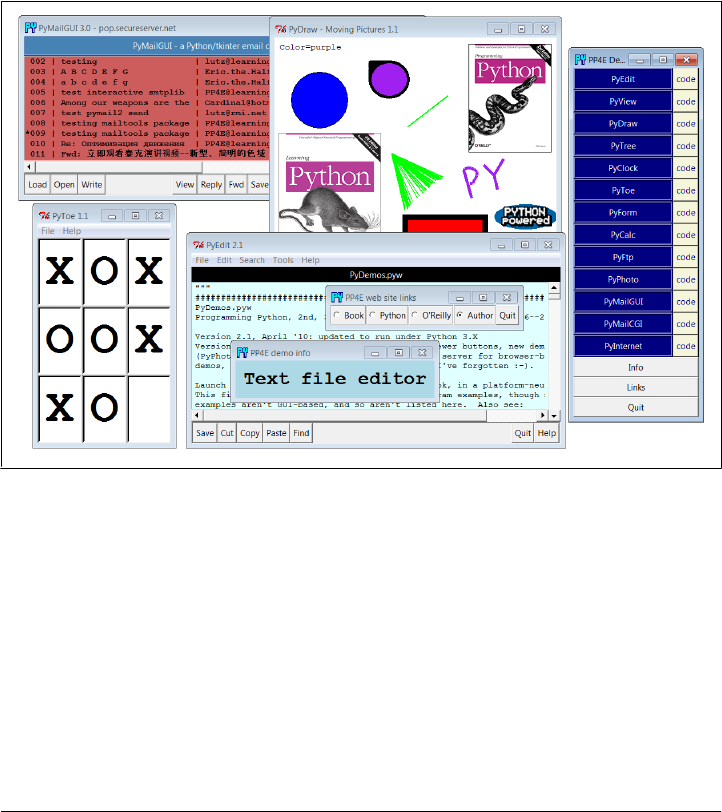
at the top of the examples package, though, make sure your PYTHONPATH system variable
is set to include the directory containing the PP4E examples root directory if you wish
to run the scripts here directly; they don’t attempt to automatically configure your
system or module import search paths.
To make this launcher bar even easier to run, drag it out to your desktop to generate a
clickable Windows shortcut (do something similar on other systems). Since this script
hardcodes command lines for running programs elsewhere in the examples tree, it is
also useful as an index to major book examples. Figure 10-17 shows what PyDemos
looks like when run on Windows, along with some of the demos it launches—PyDemos
is the vertical button bar on the right; it looks slightly different but works the same on
Linux.
Figure 10-17. PyDemos with its pop ups and a few demos
The source code that constructs this scene is listed in Example 10-30 (its first page may
differ slightly from that shown being edited in Figure 10-17 due to last minute tweaks
which engineers can’t seem to avoid). Because PyDemos doesn’t present much that’s
new in terms of GUI interface programming, though, much of it has been removed
here; again, see the examples package for the remainder.
In short, its demoButton function simply attaches a new button to the main window,
spring-loaded to spawn a Python program when pressed. To start programs, PyDemos
calls an instance of the launchmodes.PortableLauncher object we met at the end of
Chapter 5—its role as a tkinter callback handler here is why a function-call operation
is used to kick off the launched program.
The PyDemos and PyGadgets Launchers | 663

As pictured in Figure 10-17, PyDemos also constructs two pop-up windows when but-
tons at the bottom of the main window are pressed—an Info pop up giving a short
description of the last demo spawned, and a Links pop up containing radio buttons
that open a local web browser on book-related sites when pressed:
• The Info pop up displays a simple message line and changes its font every second
to draw attention to itself; since this can be a bit distracting, the pop up starts out
iconified (click the Info button to see or hide it).
• The Links pop up’s radio buttons are much like hyperlinks in a web page, but this
GUI isn’t a browser: when the Links pop up is pressed, the portable Launch
Browser script mentioned in Part II is used to find and start a web browser used to
connect to the relevant site, assuming you have an Internet connection. This in
turn uses Python’s webbrowser modules today.
• The windows module we coded earlier in this chapter (Example 10-16) is used to
give this GUI’s windows a blue “PY” icon, instead of the standard red “Tk.”
The PyDemos GUI also comes with “code” buttons to the right of each demo’s button,
which open the source files that implement the associated example. These files open
in pop-up versions of the PyEdit text editor that we’ll meet in Chapter 11. Fig-
ure 10-18 captures some of these code viewer windows in action, resized slightly for
display here.
For the web-based examples opened by the last two demo buttons in the launcher, this
GUI also attempts to spawn a locally running web server for web-based demos not
shown running here (we’ll meet the server in Chapter 15). For this edition, the web
servers are spawned only when the corresponding web demo button is first selected
(not on PyDemos startup), and the web servers generate a pop-up command prompt
window on Windows to monitor server status.
PyDemos runs on Windows, Macs, and Linux, but that’s largely due to the inherent
portability of both Python and tkinter. For more details, consult the source, which is
shown in part in Example 10-30.
Example 10-30. PP4E\PyDemos.pyw (external)
"""
################################################################################
PyDemos.pyw
Programming Python, 2nd, 3rd, and 4th Editions (PP4E), 2001--2006--2010
Version 2.1 (4E), April '10: updated to run under Python 3.X, and spawn
local web servers for web demos only on first demo button selection.
Version 2.0 (3E), March '06: add source-code file viewer buttons; add new
Demos (PyPhoto, PyMailGUI); spawn locally running web servers for the
browser-based Demos; add window icons; and probably more I've forgotten.
Launch major Python+Tk GUI examples from the book, in a platform-neutral way.
This file also serves as an index to major program examples, though many book
664 | Chapter 10: GUI Coding Techniques
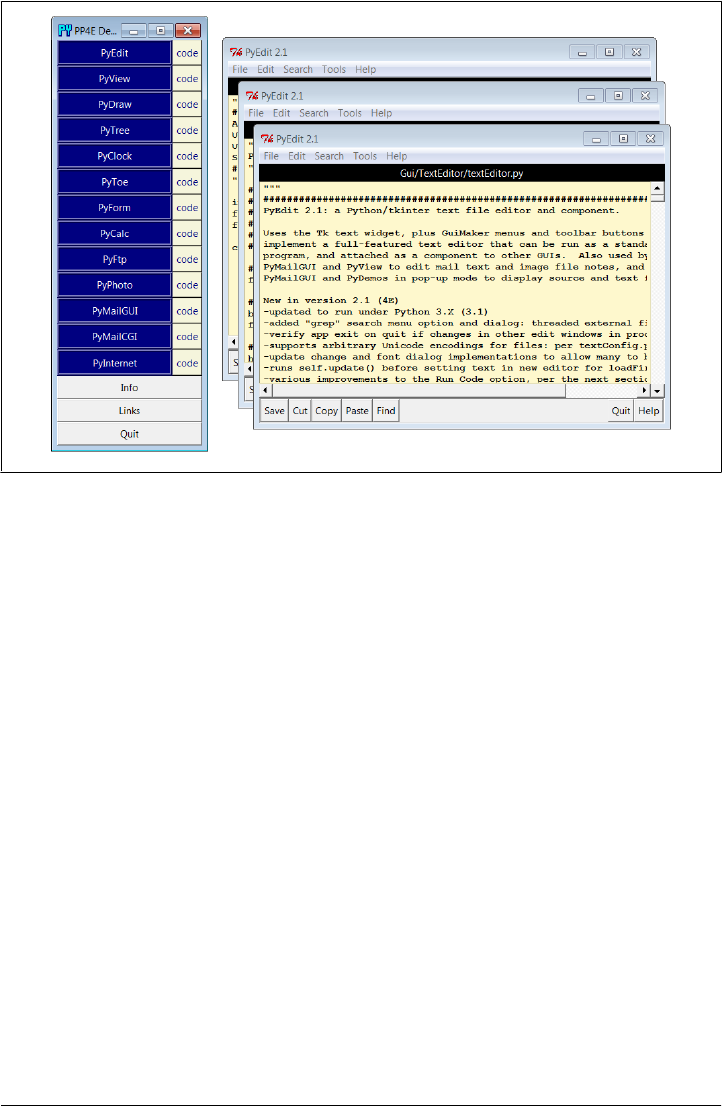
examples aren't GUI-based, and so aren't listed here. Also see:
- PyGadgets.py, a simpler script for starting programs in non-demo mode
that you wish to use on a regular basis
- PyGadgets_bar.pyw, which creates a button bar for starting all PyGadgets
programs on demand, not all at once
- Launcher.py for starting programs without environment settings--finds
Python, sets PYTHONPATH, etc.
- Launch_*.pyw for starting PyDemos and PyGadgets with Launcher.py--run these
for a quick look
- LaunchBrowser.pyw for running example web pages with an automatically
located web browser
- README-PP4E.txt, for general examples information
Caveat: this program tries to start a locally running web server and web
Browser automatically, for web-based demos, but does not kill the server.
################################################################################
"""
...code omitted: see examples package...
################################################################################
# start building main GUI windows
################################################################################
from PP4E.Gui.Tools.windows import MainWindow # a Tk with icon, title, quit
from PP4E.Gui.Tools.windows import PopupWindow # same but Toplevel, diff quit
Root = MainWindow('PP4E Demos 2.1')
Figure 10-18. PyDemos with its “code” source code viewer pop-ups
The PyDemos and PyGadgets Launchers | 665

# build message window
Stat = PopupWindow('PP4E demo info')
Stat.protocol('WM_DELETE_WINDOW', lambda:0) # ignore wm delete
Info = Label(Stat, text = 'Select demo',
font=('courier', 20, 'italic'), padx=12, pady=12, bg='lightblue')
Info.pack(expand=YES, fill=BOTH)
################################################################################
# add launcher buttons with callback objects
################################################################################
from PP4E.Gui.TextEditor.textEditor import TextEditorMainPopup
# demo launcher class
class Launcher(launchmodes.PortableLauncher): # use wrapped launcher class
def announce(self, text): # customize to set GUI label
Info.config(text=text)
def viewer(sources):
for filename in sources:
TextEditorMainPopup(Root, filename, # as pop up in this process
loadEncode='utf-8') # else PyEdit may ask each!
def demoButton(name, what, doit, code):
"""
add buttons that runs doit command-line, and open all files in code;
doit button retains state in an object, code in an enclosing scope;
"""
rowfrm = Frame(Root)
rowfrm.pack(side=TOP, expand=YES, fill=BOTH)
b = Button(rowfrm, bg='navy', fg='white', relief=RIDGE, border=4)
b.config(text=name, width=20, command=Launcher(what, doit))
b.pack(side=LEFT, expand=YES, fill=BOTH)
b = Button(rowfrm, bg='beige', fg='navy')
b.config(text='code', command=(lambda: viewer(code)))
b.pack(side=LEFT, fill=BOTH)
################################################################################
# tkinter GUI demos - some use network connections
################################################################################
demoButton(name='PyEdit',
what='Text file editor', # edit myself
doit='Gui/TextEditor/textEditor.py PyDemos.pyw', # assume in cwd
code=['launchmodes.py',
'Tools/find.py',
'Gui/Tour/scrolledlist.py', # show in PyEdit viewer
'Gui/ShellGui/formrows.py', # last = top of stacking
'Gui/Tools/guimaker.py',
'Gui/TextEditor/textConfig.py',
'Gui/TextEditor/textEditor.py'])
666 | Chapter 10: GUI Coding Techniques

demoButton(name='PyView',
what='Image slideshow, plus note editor',
doit='Gui/SlideShow/slideShowPlus.py Gui/gifs',
code=['Gui/Texteditor/textEditor.py',
'Gui/SlideShow/slideShow.py',
'Gui/SlideShow/slideShowPlus.py'])
...code omitted: see examples package...
################################################################################
# toggle info message box font once a second
################################################################################
def refreshMe(info, ncall):
slant = ['normal', 'italic', 'bold', 'bold italic'][ncall % 4]
info.config(font=('courier', 20, slant))
Root.after(1000, (lambda: refreshMe(info, ncall+1)) )
################################################################################
# unhide/hide status box on info clicks
################################################################################
Stat.iconify()
def onInfo():
if Stat.state() == 'iconic':
Stat.deiconify()
else:
Stat.iconify() # was 'normal'
################################################################################
# finish building main GUI, start event loop
################################################################################
def onLinks():
...code omitted: see examples package...
Button(Root, text='Info', command=onInfo).pack(side=TOP, fill=X)
Button(Root, text='Links', command=onLinks).pack(side=TOP, fill=X)
Button(Root, text='Quit', command=Root.quit).pack(side=BOTTOM, fill=X)
refreshMe(Info, 0) # start toggling
Root.mainloop()
PyGadgets Launcher Bar
The PyGadgets script runs some of the same programs as PyDemos, but for real, prac-
tical use, not as demonstrations. Both scripts use launchmodes to spawn other programs,
and display bars of launcher buttons, but PyGadgets is a bit simpler because its task is
more focused. PyGadgets also supports two spawning modes—it can either start a
canned list of programs immediately and all at once, or display a GUI for running each
program on demand. Figure 10-19 shows the launch bar GUI made in on-demand mode
when it first starts; PyDemos and PyGadgets can be run at the same time, and both
grow with their window if resized (try it on your own to see how).
The PyDemos and PyGadgets Launchers | 667
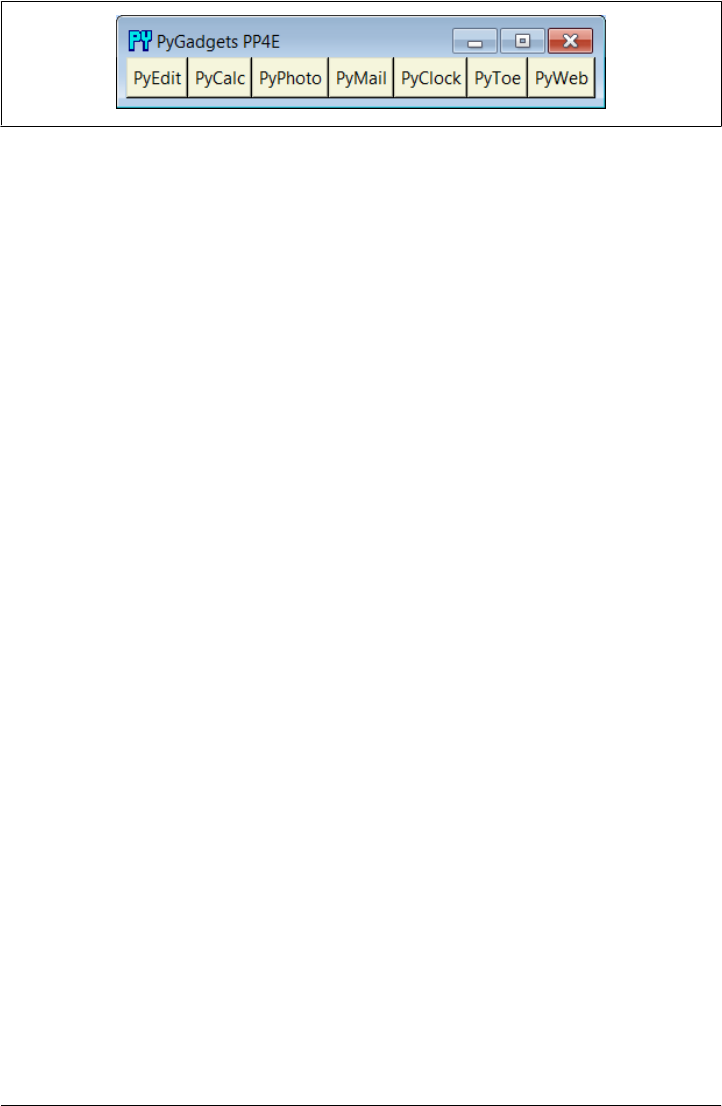
Figure 10-19. PyGadgets launcher bar
Because of its different role, PyGadgets takes a more data-driven approach to building
the GUI: it stores program names in a list and steps through it as needed instead of
using a sequence of precoded demoButton calls. The set of buttons on the launcher bar
GUI in Figure 10-19, for example, depends entirely upon the contents of the programs
list.
The source code behind this GUI is listed in Example 10-31. It’s not much because it
relies on other modules we wrote earlier to work most of its magic: launchmodes for
program spawns, windows for window icons and quits, and LaunchBrowser for web
browser starts. PyGadgets gets a clickable shortcut on my desktop and is usually open
on my machines. I use to gain quick access to Python tools that I use on a daily basis—
text editors, calculators, email and photo tools, and so on—all of which we’ll meet in
upcoming chapters.
To customize PyGadgets for your own use, simply import and call its functions with
program command-line lists of your own or change the mytools list of spawnable pro-
grams near the end of this file. This is Python, after all.
Example 10-31. PP4E\PyGadgets.py
"""
##############################################################################
Start various examples; run me at start time to make them always available.
This file is meant for starting programs you actually wish to use; see
PyDemos for starting Python/Tk demos and more details on program start
options. Windows usage note: this is a '.py' to show messages in a console
window when run or clicked (including a 10 second pause to make sure it's
visible while gadgets start if clicked). To avoid Windows console pop up,
run with the 'pythonw' program (not 'python'), rename to '.pyw' suffix,
mark with 'run minimized' window property, or spawn elsewhere (see PyDemos).
##############################################################################
"""
import sys, time, os, time
from tkinter import *
from launchmodes import PortableLauncher # reuse program start class
from Gui.Tools.windows import MainWindow # reuse window tools: icon, quit
def runImmediate(mytools):
"""
launch gadget programs immediately
"""
print('Starting Python/Tk gadgets...') # msgs to stdout (poss temp)
668 | Chapter 10: GUI Coding Techniques

for (name, commandLine) in mytools:
PortableLauncher(name, commandLine)() # call now to start now
print('One moment please...')
if sys.platform[:3] == 'win': # windows: keep console 10 secs
for i in range(10):
time.sleep(1); print('.' * 5 * (i+1))
def runLauncher(mytools):
"""
pop up a simple launcher bar for later use
"""
root = MainWindow('PyGadgets PP4E') # or root = Tk() if prefer
for (name, commandLine) in mytools:
b = Button(root, text=name, fg='black', bg='beige', border=2,
command=PortableLauncher(name, commandLine))
b.pack(side=LEFT, expand=YES, fill=BOTH)
root.mainloop()
mytools = [
('PyEdit', 'Gui/TextEditor/textEditor.py'),
('PyCalc', 'Lang/Calculator/calculator.py'),
('PyPhoto', 'Gui/PIL/pyphoto1.py Gui/PIL/images'),
('PyMail', 'Internet/Email/PyMailGui/PyMailGui.py'),
('PyClock', 'Gui/Clock/clock.py -size 175 -bg white'
' -picture Gui/gifs/pythonPowered.gif'),
('PyToe', 'Ai/TicTacToe/tictactoe.py'
' -mode Minimax -fg white -bg navy'),
('PyWeb', 'LaunchBrowser.pyw'
' -live index.html learning-python.com')]
#' -live PyInternetDemos.html localhost:80')]
#' -file')] # PyInternetDemos assumes local server started
if __name__ == '__main__':
prestart, toolbar = True, False
if prestart:
runImmediate(mytools)
if toolbar:
runLauncher(mytools)
By default, PyGadgets starts programs immediately when it is run. To run PyGadgets
in launcher bar mode instead, Example 10-32 simply imports and calls the appropriate
function with an imported program list. Because it is a .pyw file, you see only the
launcher bar GUI it constructs initially, not a DOS console streams window—nice for
regular use, but not if you want to see error messages (use a .py).
Example 10-32. PP4E\PyGadgets_bar.pyw
"""
run a PyGadgets toolbar only, instead of starting all the gadgets immediately;
filename avoids DOS pop up on Windows: rename to '.py' to see console messages;
"""
import PyGadgets
PyGadgets.runLauncher(PyGadgets.mytools)
The PyDemos and PyGadgets Launchers | 669
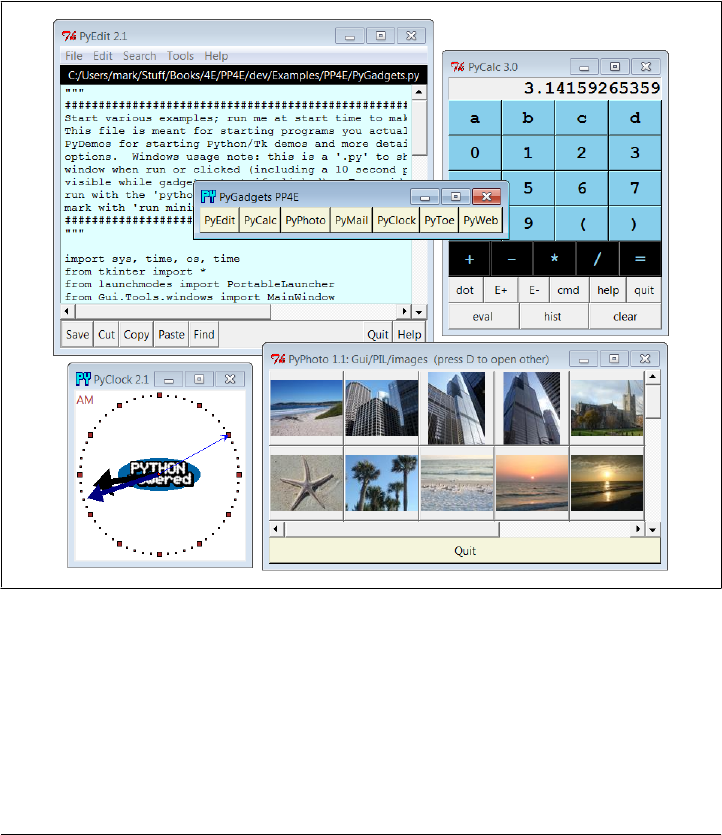
This script is the file my desktop shortcut invokes, because I prefer to run gadget GUIs
on demand. On many platforms, you can drag this out as a shortcut on your desktop
for easy access this way. You can also run a script like this at your system’s startup to
make it always available (and to save a mouse click). For instance, on Windows, such
a script might be automatically started by adding it to your Startup folder, and on Unix
and its kin you can automatically start such a script by spawning it with a command
line in your system startup scripts after X Windows has been started.
Whether run via a shortcut, a file explorer click, a typed command line, or other means,
the PyGadgets launcher bar near the center of Figure 10-20 appears.
Figure 10-20. PyGadgets launcher bar with gadgets
Of course, the whole point of PyGadgets is to spawn other programs. Pressing on its
launcher bar’s buttons starts programs like those shown in the rest of Figure 10-20, but
if you want to know more about those, you’ll have to turn the page and move on to the
next chapter.
670 | Chapter 10: GUI Coding Techniques

CHAPTER 11
Complete GUI Programs
“Python, Open Source, and Camaros”
This chapter concludes our look at building GUIs with Python and its standard tkinter
library, by presenting a collection of realistic GUI programs. In the preceding four
chapters, we met all the basics of tkinter programming. We toured the core set of
widgets—Python classes that generate devices on a computer screen and respond to
user events—and we studied a handful of advanced GUI programming techniques,
including automation tools, redirection with sockets and pipes, and threading. Here,
our focus is on putting those widgets and techniques together to create more useful
GUIs. We’ll study:
PyEdit
A text editor program
PyPhoto
A thumbnail photo viewer
PyView
An image slideshow
PyDraw
A painting program
PyClock
A graphical clock
PyToe
A simple tic-tac-toe game, just for fun*
* All of the larger examples in this book have Py a t t h e s t a r t o f t h e i r n a m e s . T h i s i s b y c o n v e n t i o n i n t h e P y t h o n
world. If you shop around at http://www.python.org, you’ll find other free software that follows this pattern
too: PyOpenGL (a Python interface to the OpenGL graphics library), PyGame (a Python game development
kit), and many more. I’m not sure who started this pattern, but it has turned out to be a more or less subtle
way to advertise programming language preferences to the rest of the open source world. Pythonistas are
nothing if not PySubtle.
671

As in Part II’s Chapter 6, I’ve pulled the examples in this chapter from my own library
of Python programs that I really use. For instance, the text editor and clock GUIs that
we’ll meet here are day-to-day workhorses on my machines. Because they are written
in Python and tkinter, they work unchanged on my Windows and Linux machines,
and they should work on Macs too.
Since these are pure Python scripts, their future evolution is entirely up to their users—
once you get a handle on tkinter interfaces, changing or augmenting the behavior of
such programs by editing their Python code is a snap. Although some of these examples
are similar to commercially available programs (e.g., PyEdit is reminiscent of the Win-
dows Notepad accessory), the portability and almost infinite configurability of Python
scripts can be a decided advantage.
Examples in Other Chapters
Later in the book, we’ll meet other tkinter GUI programs that put a good face on specific
application domains. For instance, the following larger GUI examples show up in later
chapters also:
PyMailGUI
A comprehensive email client (Chapter 14)
PyForm
A (mostly external) persistent object table viewer (Chapter 17)
PyTree
A (mostly external) tree data structure viewer (Chapter 18 and Chapter 19)
PyCalc
A customizable calculator widget (Chapter 19)
Smaller examples, including FTP and file-transfer GUIs, pop up in the Internet part as
well. Most of these programs see regular action on my desktop, too. Because GUI
libraries are general-purpose tools, there are very few domains that cannot benefit from
an easy-to-use, easy-to-program, and widely portable user interface coded in Python
and tkinter.
Beyond the examples in this book, you can also find higher-level GUI toolkits for Py-
thon, such as the Pmw, Tix, and ttk packages introduced in Chapter 7. Some such
systems build upon tkinter to provide compound components such as notebook tabbed
widgets, tree views, and balloon pop-up help.
In the next part of the book, we’ll also explore programs that build user interfaces in
web browsers, instead of tkinter—a very different way of approaching the user interface
experience. Although web browser interfaces have been historically limited in func-
tionality and slowed by network latency, when combined with the rich Internet appli-
cation (RIA) toolkits mentioned at the start of Chapter 7, browser-based GUIs today
672 | Chapter 11: Complete GUI Programs

can sometimes approach the utility of traditional GUIs, albeit at substantial cost in
software complexity and dependencies.
Especially for highly interactive and nontrivial interfaces, though, standalone/desktop
tkinter GUIs can be an indispensable feature of almost any Python program you write.
The programs in this chapter underscore just how far Python and tkinter can take you.
This Chapter’s Strategy
As for all case-study chapters in this text, this one is largely a learn-by-example exercise;
most of the programs here are listed with minimal details. Along the way, I’ll highlight
salient points and underscore new tkinter features that examples introduce, but I’ll also
assume that you will study the listed source code and its comments for more informa-
tion. Once we reach the level of complexity demonstrated by programs here, Python’s
readability becomes a substantial advantage for programmers (and writers of books).
All of this book’s GUI examples are available in source code form in the book’s exam-
ples distribution described in the Preface. Because I’ve already shown the interfaces
these scripts employ, this section consists mostly of screenshots, program listings, and
a few brief words describing some of the most important aspects of these programs. In
other words, this is a self-study section: read the source, run the examples on your own
computer, and refer to the previous chapters for further details on the code listed here.
Some of these programs may also be accompanied in the book examples distribution
by alternative or experimental implementations not listed here; see the distribution for
extra code examples.
Finally, I want to remind you that all of the larger programs listed in the previous
sections can be run from the PyDemos and PyGadgets launcher bar GUIs that we met
at the end of Chapter 10. Although I will try hard to capture some of their behavior in
screenshots here, GUIs are event-driven systems by nature, and there is nothing quite
like running one live to sample the flavor of its user interactions. Because of that, the
launcher bars are really a supplement to the material in this chapter. They should run
on most platforms and are designed to be easy to start (see the top-level README-
PP4E.txt file for hints). You should go there and start clicking things immediately if
you haven’t done so already.
Open Source Software and Camaros
Some of the GUI programs in this chapter, as well as the rest of the book, are analogous
to utilities found on commonly used operating systems like Windows. For instance,
we’ll meet calculators, text editors, image viewers, clocks, email clients, and more.
Unlike most utilities, though, these programs are portable—because they are written
in Python with tkinter, they will work on all major platforms (Windows, Unix/Linux,
and Macs). Perhaps more important, because their source code is available, they can
be scripted—you can change their appearance or function however you like, just by
writing or modifying a little Python code.
“Python, Open Source, and Camaros” | 673

An analogy might help underscore the importance of scriptability. There are still a few
of us who remember a time when it was completely normal for car owners to work on
and repair their own automobiles. I still fondly remember huddling with friends under
the hood of a 1970 Camaro in my youth, tweaking and customizing its engine. With a
little work, we could make it as fast, flashy, and loud as we liked. Moreover, a break-
down in one of those older cars wasn’t necessarily the end of the world. There was at
least some chance that I could get the car going again on my own.
That’s not quite true today. With the introduction of electronic controls and diaboli-
cally cramped engine compartments, car owners are usually better off taking their cars
back to the dealer or another repair professional for all but the simplest kinds of
changes. By and large, cars are no longer user-maintainable products. And if I have a
breakdown in my shiny new ride, I’m probably going to be completely stuck until an
authorized repair person can get around to towing and fixing it.
I like to think of the closed and open software models in the same terms. When I use
Microsoft-provided programs such as Notepad and Outlook, I’m stuck with the feature
set that a large company dictates, as well as any bugs that it may harbor. But with
programmable tools such as PyEdit and PyMailGUI, I can still get under the hood. I
can add features, customize the system, and work my way out of any lurking bugs. And
I can do so long before the next Microsoft patch or release is available. I’m no longer
dependent on a self-interested company to support—or even to continue producing—
the tools I use.
Of course, I’m still dependent on Python and whatever changes it may dictate over time
(and after updating two 1,000+ page books for Python 3.X, I can say with some con-
fidence that this dependency isn’t always completely trivial). Having all the source code
for every layer of the tools you depend on, though, is still a powerful last resort, and a
major net win. As an added bonus, it fosters robustness by providing a built-in group
of people to test and hone the system.
At the end of the day, open source software and Python are as much about freedom as
they are about cost. Users, not an arbitrarily far-removed company, have the final say.
Not everyone wants to work on his own car, of course. On the other hand, software
tends to fail much more often than cars, and Python scripting is generally less greasy
than auto mechanics.
PyEdit: A Text Editor Program/Object
In the last few decades, I’ve typed text into a lot of programs. Most were closed systems
(I had to live with whatever decisions their designers made), and many ran on only one
platform. The PyEdit program presented in this section does better on both counts:
according to its own Tools/Info option, PyEdit implements a full-featured, graphical
text editor program in a total of 1,133 new lines of portable Python code, including
whitespace and comments, divided between 1,088 lines in the main file and 45 lines of
configuration module settings (at release, at least—final sizes may vary slightly in future
revisions). Despite its relatively modest size, by systems programming standards,
674 | Chapter 11: Complete GUI Programs

PyEdit is sufficiently powerful and robust to have served as the primary tool for coding
most of the examples in this book.
PyEdit supports all the usual mouse and keyboard text-editing operations: cut and
paste, search and replace, open and save, undo and redo, and so on. But really, PyEdit
is a bit more than just another text editor—it is designed to be used as both a program
and a library component, and it can be run in a variety of roles:
Standalone mode
As a standalone text-editor program, with or without the name of a file to be edited
passed in on the command line. In this mode, PyEdit is roughly like other text-
editing utility programs (e.g., Notepad on Windows), but it also provides advanced
functions such as running Python program code being edited, changing fonts and
colors, “grep” threaded external file search, a multiple window interface, and so
on. More important, because it is coded in Python, PyEdit is easy to customize,
and it runs portably on Windows, X Windows, and Macintosh.
Pop-up mode
Within a new pop-up window, allowing an arbitrary number of copies to appear
as pop ups at once in a program. Because state information is stored in class in-
stance attributes, each PyEdit object created operates independently. In this mode
and the next, PyEdit serves as a library object for use in other scripts, not as a canned
application. For example, Chapter 14’s PyMailGUI employs PyEdit in pop-up
mode to view email attachments and raw text, and both PyMailGUI and the pre-
ceding chapter’s PyDemos display source code files this way.
Embedded mode
As an attached component, to provide a text-editing widget for other GUIs. When
attached, PyEdit uses a frame-based menu and can optionally disable some of its
menu options for an embedded role. For instance, PyView (later in this chapter)
uses PyEdit in embedded mode this way to serve as a note editor for photos, and
PyMailGUI (in Chapter 14) attaches it to get an email text editor for free.
While such mixed-mode behavior may sound complicated to implement, most of
PyEdit’s modes are a natural byproduct of coding GUIs with the class-based techniques
we’ve seen in the last four chapters.
Running PyEdit
PyEdit sports lots of features, and the best way to learn how it works is to test-drive it
for yourself—you can run it by starting the main file textEditor.py, by running files
textEditorNoConsole.pyw or pyedit.pyw to suppress a console window on Windows,
or from the PyDemos and PyGadgets launcher bars described at the end of Chap-
ter 10 (the launchers themselves live in the top level of the book examples directory
tree). To give you a sampling of PyEdit’s interfaces, Figure 11-1 shows the main
PyEdit: A Text Editor Program/Object | 675
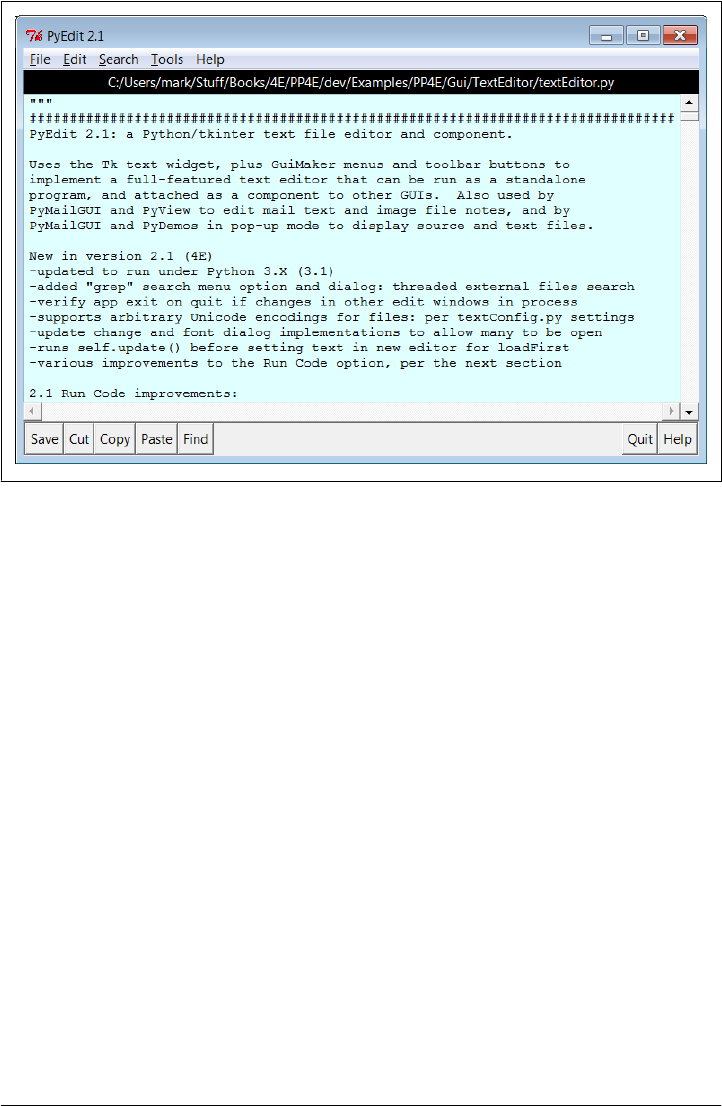
window’s default appearance running in Windows 7, after opening PyEdit’s own source
code file.
The main part of this window is a Text widget object, and if you read Chapter 9’s
coverage of this widget, PyEdit text-editing operations will be familiar. It uses text
marks, tags, and indexes, and it implements cut-and-paste operations with the system
clipboard so that PyEdit can paste data to and from other applications, even after an
application of origin is closed. Both vertical and horizontal scroll bars are cross-linked
to the Text widget, to support movement through arbitrary files.
Menus and toolbars
If PyEdit’s menu and toolbars look familiar, they should—PyEdit builds the main win-
dow with minimal code and appropriate clipping and expansion policies by mixing in
the GuiMaker class we coded in the prior chapter (Example 10-3). The toolbar at the
bottom contains shortcut buttons for operations I tend to use most often; if my pref-
erences don’t match yours, simply change the toolbar list in the source code to show
the buttons you want (this is Python, after all).
As usual for tkinter menus, shortcut key combinations can be used to invoke menu
options quickly, too—press Alt plus all the underlined keys of entries along the path
to the desired action. Menus can also be torn off at their dashed line to provide quick
access to menu options in new top-level windows (handy for options without toolbar
buttons).
Figure 11-1. PyEdit main window, editing itself
676 | Chapter 11: Complete GUI Programs
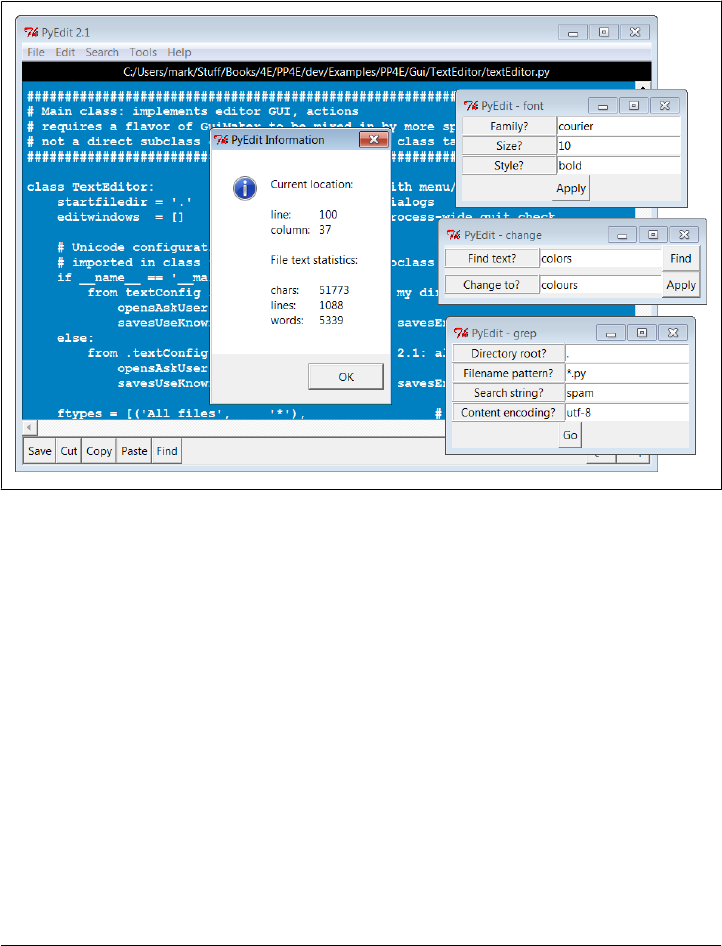
Dialogs
PyEdit pops up a variety of modal and nonmodal dialogs, both standard and custom.
Figure 11-2 shows the custom and nonmodal change, font, and grep dialogs, along with
a standard dialog used to display file statistics (the final line count may vary, as I tend
to tweak code and comments right up until final draft).
Figure 11-2. PyEdit with colors, a font, and a few pop ups
The main window in Figure 11-2 has been given new foreground and background colors
(with the standard color selection dialog), and a new text font has been selected from
either the font dialog or a canned list in the script that users can change to suit their
preferences (this is Python, after all). Other toolbar and menu operations generally use
popped-up standard dialogs, with a few new twists. For instance, the standard file open
and save selection dialogs in PyEdit use object-based interfaces to remember the last
directory visited, so you don’t have to navigate there every time.
Running program code
One of the more unique features of PyEdit is that it can actually run Python program
code that you are editing. This isn’t as hard as it may sound either—because Python
provides built-ins for compiling and running code strings and for launching programs,
PyEdit simply has to make the right calls for this to work. For example, it’s easy to code
a simple-minded Python interpreter in Python, using code like the following (see file
PyEdit: A Text Editor Program/Object | 677

simpleShell.py in the PyEdit’s directory if you wish to experiment with this), though
you need a bit more to handle multiple-line statements and expression result displays:
# read and run Python statement strings: like PyEdit's run code menu option
namespace = {}
while True:
try:
line = input('>>> ') # single-line statements only
except EOFError:
break
else:
exec(line, namespace) # or eval() and print result
Depending on the user’s preference, PyEdit either does something similar to this to run
code fetched from the text widget or uses the launchmodes module we wrote at the end
of Chapter 5 to run the code’s file as an independent program. There are a variety of
options in both schemes that you can customize as you like (this is Python, after all).
See the onRunCode method for details or simply edit and run some Python code in PyEdit
on your own to experiment. When edited code is run in nonfile mode, you can view
its printed output in PyEdit’s console window. As we footnoted about eval and exec
in Chapter 9, also make sure you trust the source of code you run this way; it has all
permissions that the Python process does.
Multiple windows
PyEdit not only pops up multiple special-purpose windows, it also allows multiple edit
windows to be open concurrently, in either the same process or as independent pro-
grams. For illustration, Figure 11-3 shows three independently started instances of
PyEdit, resized and running with a variety of color schemes and fonts. Since these are
separate programs, closing any of these does not close the others. This figure also cap-
tures PyEdit torn-off menus at the bottom and the PyEdit help pop up on the right. The
edit windows’ backgrounds are shades of green, red, and blue; use the Tools menu’s
Pick options to set colors as you like.
Since these three PyEdit sessions are editing Python source-coded text, you can run
their contents with the Run Code option in the Tools pull-down menu. Code run from
files is spawned independently; the standard streams of code run not from a file (i.e.,
fetched from the text widget itself) are mapped to the PyEdit session’s console window.
This isn’t an IDE by any means; it’s just something I added because I found it to be
useful. It’s nice to run code you’re editing without fishing through directories.
To run multiple edit windows in the same process, use the Tools menu’s Clone option
to open a new empty window without erasing the content of another. Figure 11-4 shows
the single-process scene with a window and its clone, along with pop-ups related to
the Search menu’s Grep option, described in the next section—a tool that walks di-
rectory trees in parallel threads, collecting files of matching names that contain a search
string, and opening them on request. In Figure 11-4, Grep has produced an input dialog,
678 | Chapter 11: Complete GUI Programs
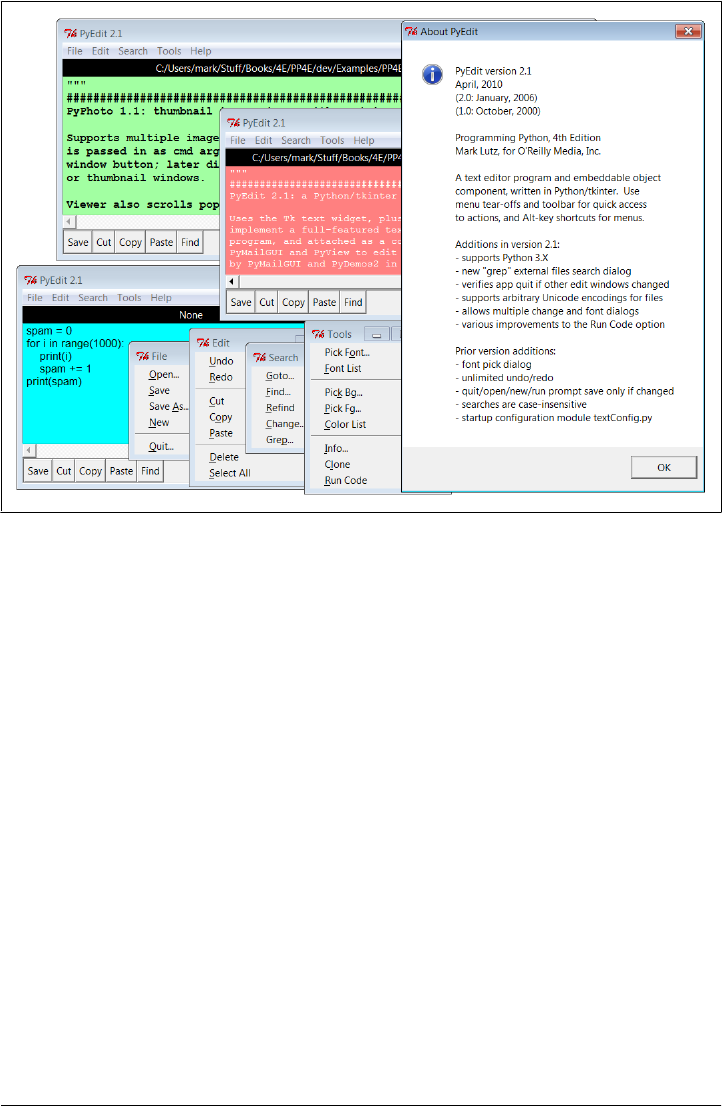
a matches list, and a new PyEdit window positioned at a match after a double-click in
the list box.
Another pop up appears while a Grep search is in progress, but the GUI remains fully
active; in fact, you can launch new Greps while others are in progress. Notice how the
Grep dialog also allows input of a Unicode encoding, used to decode file content in all
text files visited during the tree search; I’ll describe how this works in the changes
section ahead, but in most cases, you can accept the prefilled platform default encoding.
For more fun, use this dialog to run a Grep in directory C:\Python31 for all *.py files
that contain string %—a quick look at how common the original string formatting ex-
pression is, even in Python 3.1’s own library code. Though not all % are related to string
formatting, most appear to be. Per a message printed to standard output on Grep thread
exit, the string '%' (which includes substitution targets) occurs 6,050 times, and the
string ' % ' (with surrounding spaces to better narrow in on operator appearances)
appears 3,741 times, including 130 in the installed PIL extension—not exactly an ob-
scure language tool! Here are the messages printed to standard output during this
search; matches appear in a list box window:
...errors may vary per encoding type...
Unicode error in: C:\Python31\Lib\lib2to3\tests\data\different_encoding.py
Unicode error in: C:\Python31\Lib\test\test_doctest2.py
Unicode error in: C:\Python31\Lib\test\test_tokenize.py
Matches for % : 3741
Figure 11-3. Multiple PyEdit sessions at work
PyEdit: A Text Editor Program/Object | 679
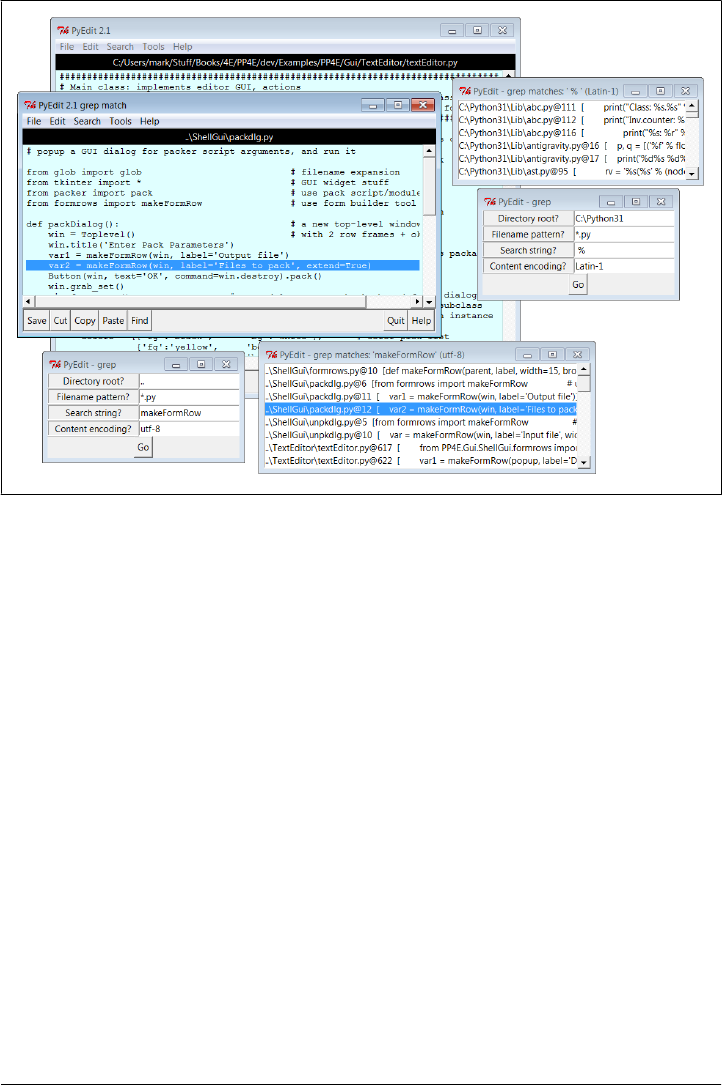
PyEdit generates additional pop-up windows—including transient Goto and Find di-
alogs, color selection dialogs, dialogs that appear to collect arguments and modes for
Run Code, and dialogs that prompt for entry of Unicode encoding names on file Open
and Save if PyEdit is configured to ask (more on this ahead). In the interest of space,
I’ll leave most other such behavior for you to witness live.
Prominently new in this edition, though, and subject to user configurations, PyEdit
may ask for a file’s Unicode encoding name when opening a file, saving a new file begun
from scratch, or running a Save As operation. For example, Figure 11-5 captures the
scene after I’ve opened a file encoded in a Chinese character set scheme and pressed
Open again to open a new file encoded in a Russian encoding. The encoding name
input dialog shown in the figure appears immediately after the standard file selection
dialog is dismissed, and it is prefilled with the default encoding choice configured (an
explicit setting or the platform’s default). The displayed default can be accepted in most
cases, unless you know the file’s encoding differs.
In general, PyEdit supports any Unicode character set that Python and tkinter do, for
opens, display, and saves. The text in Figure 11-5, for instance, was encoding in a
specific Chinese encoding in the file it came from (“gb2321” for file email-part--
gb2312). An alternative UTF-8 encoding of this text is available in the same directory
(file email-part--gb2312--utf8) which works per the default Windows encoding in
PyEdit and Notepad, but the specific Chinese encoding file requires the explicitly
Figure 11-4. Multiple PyEdit windows in a single process
680 | Chapter 11: Complete GUI Programs
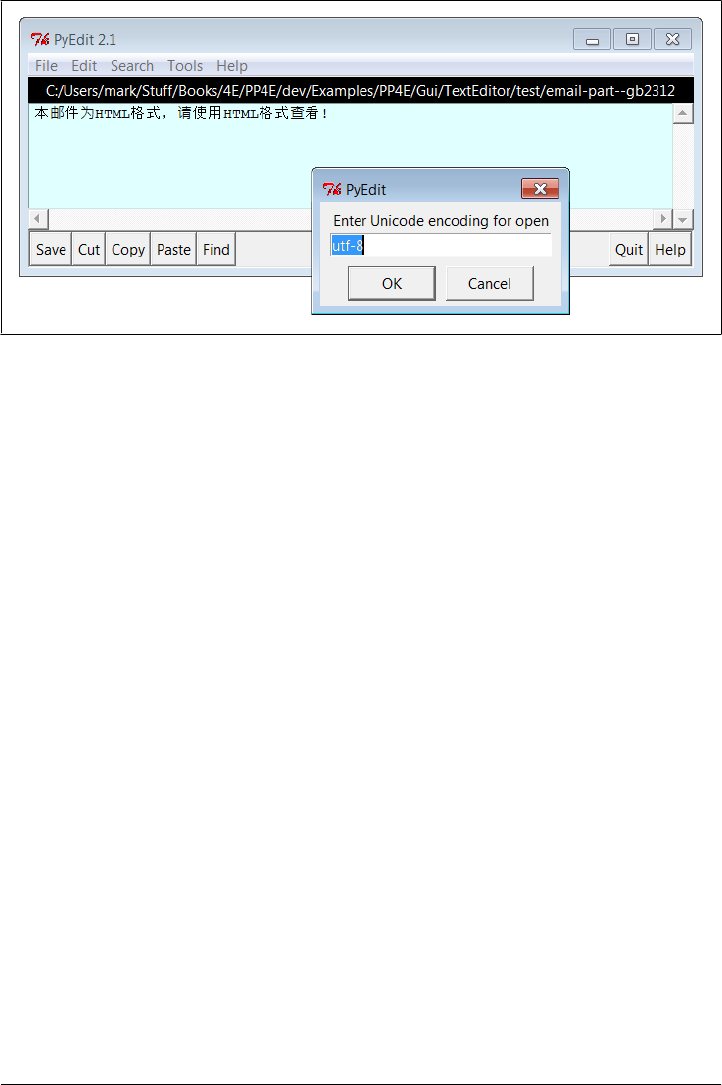
entered encoding name to display properly in PyEdit (and won’t display correctly at all
in Notepad).
After I enter the encoding name for the selected file (“koi8-r” for the file selected to
open) in the input dialog of Figure 11-5, PyEdit decodes and pops up the text in its
display. Figure 11-6 show the scene after this file has been opened and I’ve selected the
Save As option in this window—immediately after a file selection dialog is dismissed,
another encoding input dialog is presented for the new file, prefilled with the known
encoding from the last Open or Save. As configured, Save reuses the known encoding
automatically to write to the file again, but SaveAs always asks to allow for a new one,
before trying defaults. Again, I’ll say more on the Unicode/Internationalization policies
of PyEdit in the next section, when we discuss version 2.1 changes; in short, because
user preferences can’t be predicted, a variety of policies may be selected by
configuration.
Finally, when it’s time to shut down for the day, PyEdit does what it can to avoid losing
changes not saved. When a Quit is requested for any edit window, PyEdit checks for
changes and verifies the operation in a dialog if the window’s text has been modified
and not saved. Because there may be multiple edit windows in the same process, when
a Quit is requested in a main window, PyEdit also checks for changes in all other win-
dows still open, and verifies exit if any have been altered—otherwise the Quit would
close every window silently. Quits in pop-up edit windows destroy that window only,
so no cross-process check is made. If no changes have been made, Quit requests in the
GUI close windows and programs silently. Other operations verify changes in similar
ways.
Figure 11-5. PyEdit displaying Chinese text and prompting for encoding on Open
PyEdit: A Text Editor Program/Object | 681
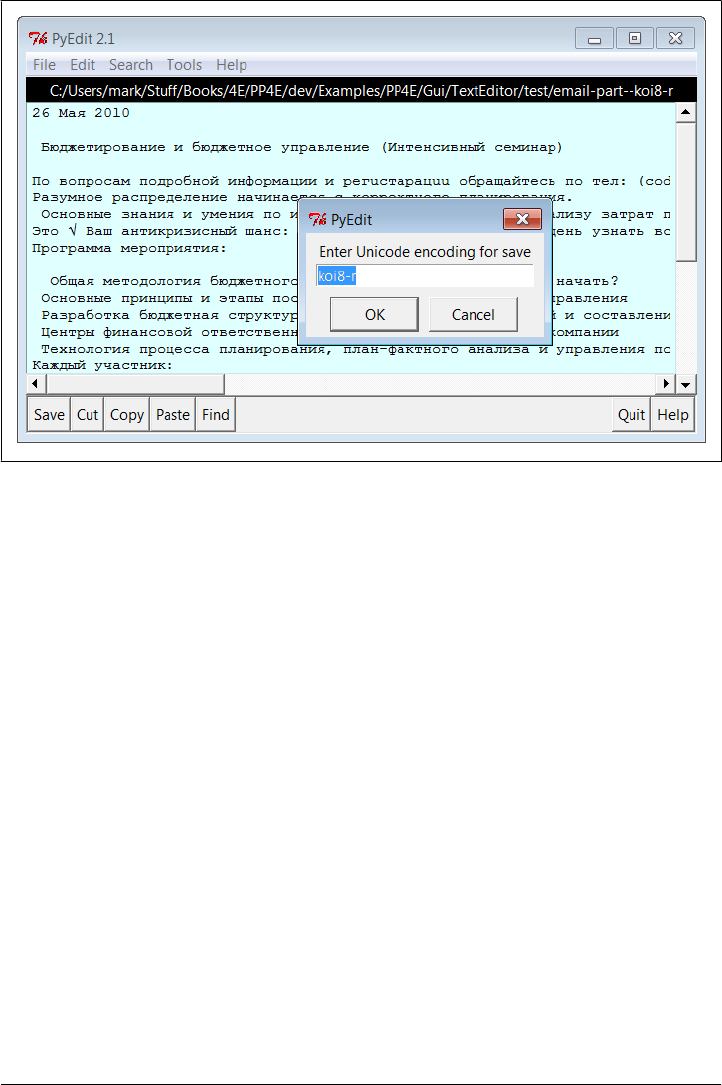
Other PyEdit examples and screenshots in this book
For other screenshots showing PyEdit in action, see the coverage of the following client
programs:
• PyDemos in Chapter 10 deploys PyEdit pop-ups to show source-code files.
• PyView later in this chapter embeds PyEdit to display image note files.
• PyMailGUI in Chapter 14 uses PyEdit to display email text, text attachments, and
source.
The last of these especially makes heavy use of PyEdit’s functionality and includes
screenshots showing PyEdit displaying additional Unicode text with Internationalized
character sets. In this role, the text is either parsed from messages or loaded from tem-
porary files, with encodings determined by mail headers.
PyEdit Changes in Version 2.0 (Third Edition)
I’ve updated this example in both the third and fourth editions of this book. Because
this chapter is intended to reflect realistic programming practice, and because this ex-
ample reflects that way that software evolves over time, this section and the one fol-
lowing it provide a quick rundown of some of the major changes made along the way
to help you study the code.
Figure 11-6. PyEdit displaying Russian text and prompting for encoding on Save As
682 | Chapter 11: Complete GUI Programs

Since the current version inherits all the enhancements of the one preceding it, let’s
begin with the previous version’s additions. In the third edition, PyEdit was enhanced
with:
• A simple font specification dialog
• Unlimited undo and redo of editing operations
• File modified tests whenever content might be erased or changed
• A user configurations module
Here are some quick notes about these extensions.
Font dialog
For the third edition of the book, PyEdit grew a font input dialog—a simple, three-entry,
nonmodal dialog where you can type the font family, size, and style, instead of picking
them from a list of preset options. Though functional, you can find more sophisticated
tkinter font selection dialogs in both the public domain and within the implementation
of Python’s standard IDLE development GUI (as mentioned earlier, it is itself a Python/
tkinter program).
Undo, redo, and modified tests
Also new in the third edition, PyEdit supports unlimited edit undo and redo, as well as
an accurate modified check before quit, open, run, and new actions to prompt for saves.
It now verifies exits or overwrites only if text has been changed, instead of always asking
naïvely. The underlying Tk 8.4 (or later) library provides an API, which makes both
these enhancements simple—Tk keeps undo and redo stacks automatically. They are
enabled with the Text widget’s undo configuration option and are accessed with the
widget methods edit_undo and edit_redo. Similarly, edit_reset clears the stacks (e.g.,
after a new file open), and edit_modified checks or sets the automatic text modified flag.
It’s also possible to undo cuts and pastes right after you’ve done them (simply paste
back from the clipboard or cut the pasted and selected text), but the new undo/redo
operations are more complete and simpler to use. Undo was a suggested exercise in the
second edition of this book, but it has been made almost trivial by the new Tk API.
Configuration module
For usability, the third edition’s version of PyEdit also allows users to set startup con-
figuration options by assigning variables in a module, textConfig.py. If present on the
module search path when PyEdit is imported or run, these assignments give initial
values for font, colors, text window size, and search case sensitivity. Fonts and colors
can be changed interactively in the menus and windows can be freely resized, so this
is largely just a convenience. Also note that this module’s settings will be inherited by
all instances of PyEdit if it is importable in the client program—even when it is a pop-
up window or an embedded component of another application. Client applications
PyEdit: A Text Editor Program/Object | 683

may define their own version or configure this file on the module search path per their
needs.
PyEdit Changes in Version 2.1 (Fourth Edition)
Besides the updates described in the prior section, the following additional enhance-
ments were made for this current fourth edition of this book:
• PyEdit has been ported to run under Python 3.1, and its tkinter library.
• The nonmodal change and font dialogs were fixed to work better if multiple in-
stance windows are open: they now use per-dialog state.
• A Quit request in main windows now verifies program exit if any other edit win-
dows in the process have changed content, instead of exiting silently.
• There’s a new Grep menu option and dialog for searching external files; searches
are run in threads to avoid blocking the GUI and to allow multiple searches to
overlap in time and support Unicode text.
• There was a minor fix for initial positioning when text is inserted initially into a
newly created editor, reflecting a change in underlying libraries.
• The Run Code option for files now uses the base file name instead of the full di-
rectory path after a chdir to better support relative paths; allows for command-line
arguments to code run from files; and inherits a patch made in Chapter 5’s
launchmodes which converts / to \ in script paths. In addition, this option always
now runs an update between pop-up dialogs to ensure proper display.
• Perhaps most prominently, PyEdit now processes files in such a way as to support
display and editing of text with arbitrary Unicode encodings, to the extent allowed
by the underlying Tk GUI library for Unicode strings. Specifically, Unicode is taken
into account when opening and saving files; when displaying text in the GUI; and
when searching files in directories.
The following sections provide additional implementation notes on these changes.
Modal dialog state fix
The change dialog in the prior version saved its entry widgets on the text editor object,
which meant that the most recent change dialog’s fields were used for every change
dialog open. This could even lead to program aborts for finds in an older change dialog
window if newer ones had been closed, since the closed window’s widgets had been
destroyed—an unanticipated usage mode, which has been present since at least the
second edition, and which I’d like to chalk up to operator error, but which was really
a lesson in state retention! The same phenomenon existed in the font dialog—its most
recently opened instance stole the show, though its brute force exception handler pre-
vented program aborts (it issued error pop ups instead). To fix, the change and font
684 | Chapter 11: Complete GUI Programs

dialogs now send per-dialog-window input fields as arguments to their callbacks. We
could instead allow just one of each dialog to be open, but that’s less functional.
Cross-process change tests on Quit
Though not quite as grievous, PyEdit also used to ignore changes in other open edit
windows on Quit in main windows. As a policy, on a Quit in the GUI, pop-up edit
windows destroy themselves only, but main edit windows run a tkinter quit to end the
entire program. Although all windows verify closes if their own content has changed,
other edit windows were ignored in the prior version—quitting a main window could
lose changes in other windows closed on program exit.
To do better, this version keeps a list of all open managed edit windows in the process;
on Quit in main windows it checks them all for changes, and verifies exit if any have
changed. This scheme isn’t foolproof (it doesn’t address quits run on widgets outside
PyEdit’s scope), but it is an improvement. A more ultimate solution probably involves
redefining or intercepting tkinter’s own quit method. To avoid getting too detailed
here, I’ll defer more on this topic until later in this section (see the <Destroy> event
coverage ahead); also see the relevant comments near the end of PyEdit’s source file for
implementation notes.
New Grep dialog: Threaded and Unicode-aware file tree search
In addition, there is a new Grep option in the Search pull-down menu, which imple-
ments an external file search tool. This tool scans an entire directory tree for files whose
names match a pattern, and which contain a given search string. Names of matches are
popped up in a new nonmodal scrolled list window, with lines that identify all matches
by filename, line number, and line content. Clicking on a list item opens the matched
file in a new nonmodal and in-process PyEdit pop-up edit window and automatically
moves to and selects the line of the match. This achieves its goal by reusing much code
we wrote earlier:
• The find utility we wrote in Chapter 6 to do its tree walking
• The scrolled list utility we coded in Chapter 9 for displaying matches
• The form row builder we wrote in Chapter 10 for the nonmodal input dialog
• The existing PyEdit pop-up window mode logic to display matched files on request
• The existing PyEdit go-to callback and logic to move to the matched line in a file
To avoid blocking the GUI while files are searched during tree
walks, Grep runs searches in parallel threads. This also allows multiple greps to be
running at once and to overlap in time arbitrarily (especially useful if you grep in larger
trees, such as Python’s own library or full source trees). The standard threads, queues,
and after timer loops technique we learned in Chapter 10 is applied here—non-GUI
producer threads find matches and place them on a queue to be detected by a timer
loop in the main GUI thread.
Grep threading model.
PyEdit: A Text Editor Program/Object | 685

As coded, a timer loop is run only when a grep is in progress, and each grep uses its
own thread, timer loop, and queue. There may be multiple threads and loops running,
and there may be other unrelated threads, queues, and timer loops in the process. For
instance, an attached PyEdit component in Chapter 14’s PyMailGUI program can run
grep threads and loops of its own, while PyMailGUI runs its own email-related threads
and queue checker. Each loop’s handler is dispatched independently from the tkinter
event stream processor. Because of the simpler structure here, the general thread
tools callback queue of Chapter 10 is not used here. For more notes on grep thread
implementation see the source code ahead, and compare to file _unthreaded-
textEditor.py in the examples package, a nonthreaded version of PyEdit.
If you study the Grep option’s code, you’ll notice that it also allows
input of a tree-wide Unicode encoding, and catches and skips any Unicode decoding
error exceptions generated both when processing file content and walking the tree’s
filenames. As we learned in Chapters 4 and 6, files opened in text mode in Python 3.X
must be decodable per a provided or platform default Unicode encoding. This is par-
ticular problematic for Grep, as directory trees may contain files of arbitrarily mixed
encoding types.
In fact, it’s common on Windows to have files with content in ASCII, UTF-8, and
UTF-16 form mixed in the same tree (Notepad’s “ANSI,” “Utf-8,” and “Unicode”),
and even others in trees that contain content obtained from the Web or email. Opening
all these with UTF-8 would trigger exceptions in Python 3.X, and opening all these in
binary mode yields encoded text that will likely fail to match a search key string. Tech-
nically, to compare at all, we’d still have to decode the bytes read to text or encode the
search key string to bytes, and the two would only match if the encodings used both
succeed and agree.
To allow for mixed encoding trees, the Grep dialog opens in text mode and allows an
encoding name to be input and used to decode file content for all files in the tree
searched. This encoding name is prefilled with the platform content default for con-
venience, as this will often suffice. To search trees of mixed file types, users may run
multiple Greps with different encoding names. The names of files searched might fail
to decode as well, but this is largely ignored in the current release: they are assumed to
satisfy the platform filename convention, and end the search if they don’t (see Chapters
4 and 6 for more on filename encoding issues in Python itself, as well as the find walker
reused here).
In addition, Grep must take care to catch and recover from encoding errors, since some
files with matching names that it searches might still not be decodable per the input
encoding, and in fact might not be text files at all. For example, searches in
Python 3.1’s standard library (like the example Grep for % described earlier) run into a
handful of files which do not decode properly on my Windows machine and would
otherwise crash PyEdit. Binary files which happen to match the filename patterns would
fare even worse.
Grep Unicode model.
686 | Chapter 11: Complete GUI Programs

In general, programs can avoid Unicode encoding errors by either catching exceptions
or opening files in binary mode; since Grep might not be able to interpret some of the
files it visits as text at all, it takes the former approach. Really, opening even text files
in binary mode to read raw byte strings in 3.X mimics the behavior of text files in 2.X,
and underscores why forcing programs to deal with Unicode is sometimes a good
thing—binary mode avoids decoding exceptions, but probably shouldn’t, because the
still-encoded text might not work as expected. In this case, it might yield invalid com-
parison results.
For more details on Grep’s Unicode support, and a set of open issues and options
surrounding it, see the source code listed ahead. For a suggested enhancement, see also
the re pattern matching module in Chapter 19—a tool we could use to search for
patterns instead of specific strings.
Update for initial positioning
Also in this version, text editor updates itself before inserting text into its text widget
at construction time when it is passed an initial file name in its loadFirst argument.
Sometime after the third edition and Python 2.5, either Tk or tkinter changed such that
inserting text before an update call caused the scroll position to be off by one—the text
editor started with line 2 at its top in this mode instead of line 1. This also occurs in
the third edition’s version of this example under Python 2.6, but not 2.5; adding an
update correctly positions at line 1 initially. Obscure but true in the real world of library
dependencies!†
Clients of the classes here should also update before manually inserting text into a newly
created (or packed) text editor object for accurate positioning; PyView later in this
chapter as well as PyMailGUI in Chapter 14 now do. PyEdit doesn’t update itself on
every construction, because it may be created early by, or even hidden in, an enclosing
GUI (for instance, this would show a half-complete window in PyView). Moreover,
PyEdit could automatically update itself at the start of setAllText instead of requiring
this step of clients, but forced update is required only once initially after being packed
(not before each text insertion), and this too might be an undesirable side effect in some
conceivable use cases. As a rule of thumb, adding unrelated operations to methods this
way tends to limit their scope.
Improvements for running code
The Run Code option in the Tools menu was fixed in three ways that make it more
useful for running code being edited from its external file, rather than in-process:
† Interestingly, Python’s own IDLE text editor in Python 3.1 suffers from two of the same bugs described here
and resolved in this edition’s PyEdit—in 3.1, IDLE positions at line 2 instead of line 1 on file opens, and its
external files search (similar to PyEdit’s Grep) crashes on 3.X Unicode decoding errors when scanning the
Python standard library, causing IDLE to exit altogether. Insert snarky comment about the shoemaker’s
children having no shoes here…
PyEdit: A Text Editor Program/Object | 687

1. After changing to the file’s directory in order to make any relative filenames in its
code accurate, PyEdit now strips off any directory path prefix in the file’s name
before launching it, because its original directory path may no longer be valid if it
is relative instead of absolute. For instance, paths of files opened manually are
absolute, but file paths in PyDemos’s Code pop ups are all relative to the example
package root and would fail after a chdir.
2. PyEdit now correctly uses launcher tools that support command-line arguments
for file mode on Windows.
3. PyEdit inherits a fix in the underlying launchmodes module that changes forward
slashes in script path names to backslashes (though this was later made a moot
point by stripping relative path prefixes). PyEdit gets by with forward slashes on
Windows because open allows them, but some Windows launch tools do not.
Additionally, for both code run from files and code run in memory, this version adds
an update call between pop-up dialogs to ensure that later dialogs appear in all cases
(the second occasionally failed to pop up in rare contexts). Even with these fixes, Run
Code is useful but still not fully robust. For example, if the edited code is not run from
a file, it is run in-process and not spawned off in a thread, and so may block the GUI.
It’s also not clear how best to handle import paths and directories for files run in nonfile
mode, or whether this mode is worth retaining in general. Improve as desired.
Unicode (Internationalized) text support
Finally, because Python 3.X now fully supports Unicode text, this version of PyEdit
does, too—it allows text of arbitrary Unicode encodings and character sets to be opened
and saved in files, viewed and edited in its GUI, and searched by its directory search
utility. This support is reflected in PyMailGUI’s user interface in a variety of ways:
• Opens must ask the user for an encoding (suggesting the platform default) if one
is not provided by the client application or configuration
• Saves of new files must ask for an encoding if one is not provided by configuration
• Display and edit must rely on the GUI toolkit’s own support for Unicode text
• Grep directory searches must allow for input of an encoding to apply to all files in
the tree and skip files that fail to decode, as described earlier
The net result is to support Internationalized text which may differ from the platform’s
default encoding. This is particularly useful for text files fetched over the Internet by
email or FTP. Chapter 14’s PyMailGUI, for example, uses an embedded PyEdit object
to view text attachments of arbitrary origin and encoding. The Grep utility’s Unicode
support was described earlier; the remainder of this model essentially reduces to file
opens and saves, as the next section describes.
Because strings are always Unicode code-point strings once
they are created in memory, Unicode support really means supporting arbitrary en-
codings for text files when they are read and written. Recall that text can be stored in
Unicode file and display model.
688 | Chapter 11: Complete GUI Programs

files in a variety of Unicode encoding format schemes; strings are decoded from these
formats when read and encoded to them when written. Unless text is always stored in
files using the platform’s default encoding, we need to know which encoding to use,
both to load and to save.
To make this work, PyEdit uses the approaches described in detail in Chapter 9, which
we won’t repeat in full here. In brief, though, tkinter’s Text widget accepts content as
either str and bytes and always returns it as str. PyEdit maps this interface to and from
Python file objects as follows:
Input files (Open)
Decoding from file bytes to strings in general requires the name of an encoding
type that is compatible with data in the file, and fails if the two do not agree (e.g.,
decoding 8-bit data to ASCII). In some cases, the Unicode type of the text file to
be opened may be unknown.
To load, PyEdit first tries to open input files in text mode to read str strings, using
an encoding obtained from a variety of sources—a method argument for a known
type (e.g., from headers of email attachments or source files opened by demos), a
user dialog reply, a configuration module setting, and the platform default. When-
ever prompting users for an open encoding, the dialog is prefilled with the first
choice implied by the configuration file, as a default and suggestion.
If all these encoding sources fail to decode, the file is opened in binary mode to
read text as bytes without an encoding name, effectively delegating encoding issues
to the Tk GUI library; in this case, any \r\n end-lines are manually converted to
\n on Windows so they correctly display and save later. Binary mode is used only
as a last resort, to avoid relying on Tk’s policies and limited character set support
for raw bytes.
Text Processing
The tkinter Text widget returns its content on request as str strings, regardless of
whether str or bytes were inserted. Because of that, all text processing of content
fetched from the GUI is conducted in terms of str Unicode strings here.
Output files (Save, Save As)
Encoding from strings to file bytes is generally more flexible than decoding and
need not use the same encoding from which the string was decoded, but can also
fail if the chosen scheme is too narrow to handle the string’s content (e.g., encoding
8-bit text to ASCII).
To save, PyEdit opens output files in text mode to perform end-line mappings and
Unicode encoding of str content. An encoding name is again fetched from one of
a variety of sources—the same encoding used when the file was first opened or
saved (if any), a user dialog reply, a configuration module setting, and the platform
default. Unlike opens, save dialogs that prompt for encodings are prefilled with
the known encoding if there is one as a suggestion; otherwise, the dialog is prefilled
with the next configured choice as a default, as for opens.
PyEdit: A Text Editor Program/Object | 689

The user input dialog on opens and saves is the only GUI implication of these policies;
other options are selected in configuration module assignments. Since it’s impossible
to predict all possible use case scenarios, PyEdit takes a liberal approach: it supports
all conceivable modes, and allows the way it obtains file encodings to be heavily tailored
by users in the package’s own textConfig module. It attempts one encoding name
source after another, if enabled in textConfig, until it finds an encoding that works.
This aims to provide maximum flexibility in the face of an uncertain Unicode world.
For example, subject to settings in the configuration file, saves reuse the encoding used
for the file when it was opened or initially saved, if known. Both new files begun from
scratch (with New or manual text inserts) and files opened in binary mode as a last
resort have no known encoding until saved, but files previously opened as text do. Also
subject to configuration file settings, we may prompt users for an encoding on Save As
(and possibly Save) because they may have a preference for new files they create. We
also may prompt when opening an existing file, because this requires its current en-
coding; although the user may not always know what this is (e.g., files fetched over the
Internet), the user may wish to provide it in others. Rather than choosing a course of
action in such cases, we rely on user configuration.
All of this is really relevant only to PyEdit clients that request an initial file load or allow
files to be opened and saved in the GUI. Because content can be inserted as str or
bytes, clients can always open and read input files themselves prior to creating a text
editor object and insert the text manually for viewing. Moreover, clients can fetch con-
tent manually and save in any fashion preferred. Such a manual approach might prove
useful if PyEdit’s polices are undesirable for a given context. Since the Text widget
always returns content as a str, the rest of this program is unaffected by the data type
of text inserted.
Keep in mind that these policies are still subject to the Unicode support and constraints
of the underlying Tk GUI toolkit, as well as Python’s tkinter interface to it. Although
PyEdit allows text to be loaded and saved in arbitrary Unicode encodings, it cannot
guarantee that the GUI library will display such text as you wish. That is, even if we
get the Unicode story right on the Python side of the fence, we’re still at the mercy of
other software layers which are beyond the scope of this book. Tk seems to be robust
across a wide range of character sets if we pass it already decoded Python str Unicode
strings (see the Internationalization support in Chapter 14’s PyMailGUI for samples),
but your mileage might vary.
Also keep in mind that the Unicode policies adopted in PyEdit
reflect the use cases of its sole current user, and have not been broadly tested for ergo-
nomics and generality; as a book example, this doesn’t enjoy the built-in test environ-
ment of open source projects. Other schemes and source orderings might work well,
too, and it’s impossible to guess the preferences of every user in every context. For
instance:
Unicode options and choices.
690 | Chapter 11: Complete GUI Programs

• It’s not clear if user prompts should be attempted before configuration settings, or
vice-versa.
• Perhaps we also should always ask the user for an encoding as a last resort, irre-
spective of configuration settings.
• For saves, we could also try to guess an encoding to apply to the str content (e.g.,
try UTF-8, Latin-1, and other common types), but our guess may not be what the
user has in mind.
• It’s likely that users will wish to save a file in the same encoding with which it was
first opened, or initially saved if started from scratch. PyEdit provides support to
do so, or else the GUI might ask for a given file’s encoding more than once. How-
ever, because some users might also want to use Save again to overwrite the same
file with a different encoding, this can be disabled in the configuration module.
The latter role might sound like a Save As, but the next bullet explains why it may
not.
• Similarly, it’s not obvious if Save As should also reuse the encoding used when the
file was first opened or initially saved or ask for a new one—is this a new file entirely,
or a copy of the prior text with its known encoding under a new name? Because of
such ambiguities, we allow the known-encoding memory feature to be disabled for
Save As, or for both Save and Save As in the configuration module. As shipped, it
is enabled for Save only, not Save As. In all cases, save encoding prompt dialogs
are prefilled with a known encoding name as a default.
• The ordering of choice seems debatable in general. For instance, perhaps Save As
should fall back on the known encoding if not asking the user; as is, if configured
to not ask and not use a known encoding, this operation will fall back on saving
per an encoding in the configuration file or the platform default (e.g., UTF-8),
which may be less than ideal for email parts of known encodings.
And so on. Because such user interface choices require wider use to resolve well, the
general and partly heuristic policy here is to support every option for illustration pur-
poses in this book, and rely on user configuration settings to resolve choices. In practice,
though, such wide flexibility may turn out to be overkill; most users probably just
require one of the policies supported here.
It may also prove better to allow Unicode policies to be selected in the GUI itself, instead
of coded in a configuration module. For instance, perhaps every Open, Save, and Save
As should allow a Unicode encoding selection, which defaults to the last known en-
coding, if any. Implementing this as a pull-down encoding list or entry field in the Save
and Open dialogs would avoid an extra pop up and achieve much the same flexibility.
In PyEdit’s current implementation, enabling user prompts in the configuration file for
both opens and saves will have much the same effect, and at least based upon use cases
I’ve encountered to date, that is probably the best policy to adopt for most contexts.
PyEdit: A Text Editor Program/Object | 691

Hence, as shipped:
• Open uses a passed-in encoding, if any, or else prompts for an encoding name first
• Save reuses a known encoding if it has one, and otherwise prompts for new file saves
• Save As always prompts for an encoding name first for the new file
• Grep allows an encoding to be input in its dialog to apply to the full tree searched
On the other hand, because the platform default will probably work silently without
extra GUI complexity for the vast majority of users anyhow, the textConfig setting can
prevent the pop ups altogether and fall back on an explicit encoding or platform default.
Ultimately, structuring encoding selection well requires the sort of broad user experi-
ence and feedback which is outside this book’s scope, not the guesses of a single de-
veloper. As always, feel free to tailor as you like.
See the test subdirectory in the examples for a few Unicode text files to experiment
with opening and saving, in conjunction with textConfig changes. As suggested when
we saw Figures 11-5 and 11-6, this directory contains files that use International char-
acter sets, saved in different encodings. For instance, file email-part--koi8-r there is
formatted per the Russian encoding koi8-r, and email-part--koi8-r--utf8 is the same file
saved in UTF-8 encoding format; the latter works well in Notepad on Windows, but
the former will only display properly when giving an explicit encoding name to PyEdit.
Better yet, make a few Unicode files yourself, by changing textConfig to hardcode
encodings or always ask for encodings—thanks largely to Python 3.X’s Unicode sup-
port, PyEdit allows you to save and load in whatever encoding you wish.
More on Quit checks: The <Destroy> event revisited
Before we get to the code, one of version 2.1’s changes merits a few additional words,
because it illustrates the fundamentals of tkinter window closure in a realistic context.
We learned in Chapter 8 that tkinter also has a <Destroy> event for the bind method
which is run when windows and widgets are destroyed. Although we could bind this
event on PyEdit windows or their text widgets to catch destroys on program exit, this
won’t quite help with the use case here. Scripts cannot generally do anything GUI-
related in this event’s callback, because the GUI is being torn down. In particular, both
testing a text widget for modifications and fetching its content in a <Destroy> handler
can fail with an exception. Popping up a save verification dialog at this point may act
oddly, too: it only shows up after some of the window’s widgets may have already been
erased (including the text widget whose contents the user may wish to inspect and
save!), and it might sometimes refuse to go away altogether.
As also mentioned in Chapter 8, running a quit method call does not trigger any
<Destroy> events, but does trigger a fatal Python error message on exit. To use destroy
events at all, PyEdit would have to be redesigned to close windows on Quit requests
with the destroy method only, and rely on the Tk root window destruction protocol for
exits; immediate shutdowns would be unsupported, or require tools such as
692 | Chapter 11: Complete GUI Programs

sys.exit. Since <Destroy> doesn’t allow GUI operations anyhow, this change is un-
warranted. Code after mainloop won’t help here either, because mainloop is called out-
side PyEdit’s code, and this is far too late to detect text changes and save in any event
(pun nearly accidental).
In other words, <Destroy> won’t help—it doesn’t support the goal of verifying saves on
window closes, and it doesn’t address the issue of quit and destroy calls run for widgets
outside the scope of PyEdit window classes. Because of such complications, PyEdit
instead relies on checking for changes in each individual window before closed, and
for changes in its cross-process window list before quits in any of its main windows.
Applications that follow its expected window model check for changes automatically.
Applications that embed a PyEdit as a component of a larger GUI, or use it in other
ways that are outside PyEdit’s control, are responsible for testing for edit changes on
closes if they should be saved, before the PyEdit object or its widgets are destroyed.
To experiment with the <Destroy> event’s behavior yourself, see file destroyer.py in the
book examples package; it simulates what PyEdit would need to do on <Destroy>. Here
is the crucial subset of its code, with comments that explain behavior:
def onDeleteRequest():
print('Got wm delete') # on window X: can cancel destroy
root.destroy() # triggers <Destroy>
def doRootDestroy(event):
print('Got event <destroy>') # called for each widget in root
if event.widget == text:
print('for text')
print(text.edit_modified()) # <= Tcl error: invalid widget
ans = askyesno('Save stuff?', 'Save?') # <= may behave badly
if ans: print(text.get('1.0', END+'-1c')) # <= Tcl error: invalid widget
root = Tk()
text = Text(root, undo=1, autoseparators=1)
text.pack()
root.bind('<Destroy>', doRootDestroy) # for root and children
root.protocol('WM_DELETE_WINDOW', onDeleteRequest) # on window X button
Button(root, text='Destroy', command=root.destroy).pack() # triggers <Destroy>
Button(root, text='Quit', command=root.quit).pack() # <= fatal Python error,
mainloop() # no <Destroy> on quit()
See the code listings in the next section for more on all of the above. Also be sure to see
the mail file’s documentation string for a list of suggested enhancements and open
issues (noted under “TBD”). PyEdit is largely designed to work according to my pref-
erences, but it’s open to customization for yours.
PyEdit Source Code
The PyEdit program consists of only a small configuration module and one main source
file, which is just over 1,000 lines long—a .py that can be either run or imported. For
PyEdit: A Text Editor Program/Object | 693

use on Windows, there is also a one-line .pyw file that just executes the .py file’s contents
with an execfile('textEditor.py') call. The .pyw suffix avoids the DOS console
streams window pop up when launched by clicking on Windows.
Today, .pyw files can be both imported and run, like normal .py files (they can also be
double-clicked, and launched by Python tools such as os.system and os.startfile), so
we don’t really need a separate file to support both import and console-less run modes.
I retained the .py, though, in order to see printed text during development and to use
PyEdit as a simple IDE—when the run code option is selected, in nonfile mode, printed
output from code being edited shows up in PyEdit’s DOS console window in Windows.
Clients will normally import the .py file.
User configurations file
On to the code. First, PyEdit’s user configuration module is listed in Example 11-1.
This is mostly a convenience, for providing an initial look-and-feel other than the de-
fault. PyEdit is coded to work even if this module is missing or contains syntax errors.
This file is primarily intended for when PyEdit is the top-level script run (in which case
the file is imported from the current directory), but you can also define your own version
of this file elsewhere on your module import search path to customize PyEdit.
See textEditor.py ahead for more on how this module’s settings are loaded. Its contents
are loaded by two different imports—one import for cosmetic settings assumes this
module itself (not its package) is on the module search path and skips it if not found,
and the other import for Unicode settings always locates this file regardless of launch
modes. Here’s what this division of configuration labor means for clients:
• Because the first import for cosmetic settings is relative to the module search path,
not to the main file’s package, a new textConfig.py can be defined in each client
application’s home directory to customize PyEdit windows per client.
• Conversely, Unicode settings here are always loaded from this file using package
relative imports if needed, because they are more critical and unlikely to vary. The
package relative import used for this is equivalent to a full package import from
the PP4E root, but not dependent upon directory structure.
Like much of the heuristic Unicode interface described earlier, this import model is
somewhat preliminary, and may require revision if actual usage patterns warrant.
Example 11-1. PP4E\Gui\TextEditor\textConfig.py
"""
PyEdit (textEditor.py) user startup configuration module;
"""
#----------------------------------------------------------------------------------
# General configurations
# comment-out any setting in this section to accept Tk or program defaults;
# can also change font/colors from GUI menus, and resize window when open;
# imported via search path: can define per client app, skipped if not on the path;
694 | Chapter 11: Complete GUI Programs

#----------------------------------------------------------------------------------
# initial font # family, size, style
font = ('courier', 9, 'normal') # e.g., style: 'bold italic'
# initial color # default=white, black
bg = 'lightcyan' # colorname or RGB hexstr
fg = 'black' # e.g., 'powder blue', '#690f96'
# initial size
height = 20 # Tk default: 24 lines
width = 80 # Tk default: 80 characters
# search case-insensitive
caseinsens = True # default=1/True (on)
#----------------------------------------------------------------------------------
# 2.1: Unicode encoding behavior and names for file opens and saves;
# attempts the cases listed below in the order shown, until the first one
# that works; set all variables to false/empty/0 to use your platform's default
# (which is 'utf-8' on Windows, or 'ascii' or 'latin-1' on others like Unix);
# savesUseKnownEncoding: 0=No, 1=Yes for Save only, 2=Yes for Save and SaveAs;
# imported from this file always: sys.path if main, else package relative;
#----------------------------------------------------------------------------------
# 1) tries internally known type first (e.g., email charset)
opensAskUser = True # 2) if True, try user input next (prefill with defaults)
opensEncoding = '' # 3) if nonempty, try this encoding next: 'latin-1', 'cp500'
# 4) tries sys.getdefaultencoding() platform default next
# 5) uses binary mode bytes and Tk policy as the last resort
savesUseKnownEncoding = 1 # 1) if > 0, try known encoding from last open or save
savesAskUser = True # 2) if True, try user input next (prefill with known?)
savesEncoding = '' # 3) if nonempty, try this encoding next: 'utf-8', etc
# 4) tries sys.getdefaultencoding() as a last resort
Windows (and other) launch files
Next, Example 11-2 gives the .pyw launching file used to suppress a DOS pop up on
Windows when run in some modes (for instance, when double-clicked), but still allow
for a console when the .py file is run directly (to see the output of edited code run in
nonfile mode, for example). Clicking this directly is similar to the behavior when PyEdit
is run from the PyDemos or PyGadgets demo launcher bars.
Example 11-2. PP4E\Gui\TextEditor\textEditorNoConsole.pyw
"""
run without a DOS pop up on Windows; could use just a .pyw for both
imports and launch, but .py file retained for seeing any printed text
"""
exec(open('textEditor.py').read()) # as if pasted here (or textEditor.main())
PyEdit: A Text Editor Program/Object | 695

Example 11-2 serves its purpose, but later in this book update project, I grew tired of
using Notepad to view text files from command lines run in arbitrary places and wrote
the script in Example 11-3 to launch PyEdit in a more general and automated fashion.
This script disables the DOS pop up, like Example 11-2, when clicked or run via a
desktop shortcut on Windows, but also takes care to configure the module search path
on machines where I haven’t used Control Panel to do so, and allows for other launch-
ing scenarios where the current working directory may not be the same as the script’s
directory.
Example 11-3. PP4E\Gui\TextEditor\pyedit.pyw
#!/usr/bin/python
"""
convenience script to launch pyedit from arbitrary places with the import path set
as required; sys.path for imports and open() must be relative to the known top-level
script's dir, not cwd -- cwd is script's dir if run by shortcut or icon click, but may
be anything if run from command-line typed into a shell console window: use argv path;
this is a .pyw to suppress console pop-up on Windows; add this script's dir to your
system PATH to run from command-lines; works on Unix too: / and \ handled portably;
"""
import sys, os
mydir = os.path.dirname(sys.argv[0]) # use my dir for open, path
sys.path.insert(1, os.sep.join([mydir] + ['..']*3)) # imports: PP4E root, 3 up
exec(open(os.path.join(mydir, 'textEditor.py')).read())
To run this from a command line in a console window, it simply has to be on your
system path—the action taken by the first line in the following could be performed just
once in Control Panel on Windows:
C:\...\PP4E\Internet\Web> set PATH=%PATH%;C:\...\PP4E\Gui\TextEditor
C:\...\PP4E\Internet\Web> pyedit.pyw test-cookies.py
This script works on Unix, too, and is unnecessary if you set your PYTHONPATH and
PATH system variables (you could then just run textEditor.py directly), but I don’t do
so on all the machines I use. For more fun, try registering this script to open “.txt” files
automatically on your computer when their icons are clicked or their names are typed
alone on a command line (if you can bear to part with Notepad, that is).
Main implementation file
And finally, the module in Example 11-4 is PyEdit’s implementation. This file may run
directly as a top-level script, or it can be imported from other applications. Its code is
organized by the GUI’s main menu options. The main classes used to start and embed
a PyEdit object appear at the end of this file. Study this listing while you experiment
with PyEdit, to learn about its features and techniques.
696 | Chapter 11: Complete GUI Programs

Example 11-4. PP4E\Gui\TextEditor\textEditor.py
"""
################################################################################
PyEdit 2.1: a Python/tkinter text file editor and component.
Uses the Tk text widget, plus GuiMaker menus and toolbar buttons to
implement a full-featured text editor that can be run as a standalone
program, and attached as a component to other GUIs. Also used by
PyMailGUI and PyView to edit mail text and image file notes, and by
PyMailGUI and PyDemos in pop-up mode to display source and text files.
New in version 2.1 (4E)
-updated to run under Python 3.X (3.1)
-added "grep" search menu option and dialog: threaded external files search
-verify app exit on quit if changes in other edit windows in process
-supports arbitrary Unicode encodings for files: per textConfig.py settings
-update change and font dialog implementations to allow many to be open
-runs self.update() before setting text in new editor for loadFirst
-various improvements to the Run Code option, per the next section
2.1 Run Code improvements:
-use base name after chdir to run code file, not possibly relative path
-use launch modes that support arguments for run code file mode on Windows
-run code inherits launchmodes backslash conversion (no longer required)
New in version 2.0 (3E)
-added simple font components input dialog
-use Tk 8.4 undo stack API to add undo/redo text modifications
-now verifies on quit, open, new, run, only if text modified and unsaved
-searches are case-insensitive now by default
-configuration module for initial font/color/size/searchcase
TBD (and suggested exercises):
-could also allow search case choice in GUI (not just config file)
-could use re patterns for searches and greps (see text chapter)
-could experiment with syntax-directed text colorization (see IDLE, others)
-could try to verify app exit for quit() in non-managed windows too?
-could queue each result as found in grep dialog thread to avoid delay
-could use images in toolbar buttons (per examples of this in Chapter 9)
-could scan line to map Tk insert position column to account for tabs on Info
-could experiment with "grep" tbd Unicode issues (see notes in the code);
################################################################################
"""
Version = '2.1'
import sys, os # platform, args, run tools
from tkinter import * # base widgets, constants
from tkinter.filedialog import Open, SaveAs # standard dialogs
from tkinter.messagebox import showinfo, showerror, askyesno
from tkinter.simpledialog import askstring, askinteger
from tkinter.colorchooser import askcolor
from PP4E.Gui.Tools.guimaker import * # Frame + menu/toolbar builders
# general configurations
try:
PyEdit: A Text Editor Program/Object | 697

import textConfig # startup font and colors
configs = textConfig.__dict__ # work if not on the path or bad
except: # define in client app directory
configs = {}
helptext = """PyEdit version %s
April, 2010
(2.0: January, 2006)
(1.0: October, 2000)
Programming Python, 4th Edition
Mark Lutz, for O'Reilly Media, Inc.
A text editor program and embeddable object
component, written in Python/tkinter. Use
menu tear-offs and toolbar for quick access
to actions, and Alt-key shortcuts for menus.
Additions in version %s:
- supports Python 3.X
- new "grep" external files search dialog
- verifies app quit if other edit windows changed
- supports arbitrary Unicode encodings for files
- allows multiple change and font dialogs
- various improvements to the Run Code option
Prior version additions:
- font pick dialog
- unlimited undo/redo
- quit/open/new/run prompt save only if changed
- searches are case-insensitive
- startup configuration module textConfig.py
"""
START = '1.0' # index of first char: row=1,col=0
SEL_FIRST = SEL + '.first' # map sel tag to index
SEL_LAST = SEL + '.last' # same as 'sel.last'
FontScale = 0 # use bigger font on Linux
if sys.platform[:3] != 'win': # and other non-Windows boxes
FontScale = 3
################################################################################
# Main class: implements editor GUI, actions
# requires a flavor of GuiMaker to be mixed in by more specific subclasses;
# not a direct subclass of GuiMaker because that class takes multiple forms.
################################################################################
class TextEditor: # mix with menu/toolbar Frame class
startfiledir = '.' # for dialogs
editwindows = [] # for process-wide quit check
# Unicode configurations
# imported in class to allow overrides in subclass or self
698 | Chapter 11: Complete GUI Programs

if __name__ == '__main__':
from textConfig import ( # my dir is on the path
opensAskUser, opensEncoding,
savesUseKnownEncoding, savesAskUser, savesEncoding)
else:
from .textConfig import ( # 2.1: always from this package
opensAskUser, opensEncoding,
savesUseKnownEncoding, savesAskUser, savesEncoding)
ftypes = [('All files', '*'), # for file open dialog
('Text files', '.txt'), # customize in subclass
('Python files', '.py')] # or set in each instance
colors = [{'fg':'black', 'bg':'white'}, # color pick list
{'fg':'yellow', 'bg':'black'}, # first item is default
{'fg':'white', 'bg':'blue'}, # tailor me as desired
{'fg':'black', 'bg':'beige'}, # or do PickBg/Fg chooser
{'fg':'yellow', 'bg':'purple'},
{'fg':'black', 'bg':'brown'},
{'fg':'lightgreen', 'bg':'darkgreen'},
{'fg':'darkblue', 'bg':'orange'},
{'fg':'orange', 'bg':'darkblue'}]
fonts = [('courier', 9+FontScale, 'normal'), # platform-neutral fonts
('courier', 12+FontScale, 'normal'), # (family, size, style)
('courier', 10+FontScale, 'bold'), # or pop up a listbox
('courier', 10+FontScale, 'italic'), # make bigger on Linux
('times', 10+FontScale, 'normal'), # use 'bold italic' for 2
('helvetica', 10+FontScale, 'normal'), # also 'underline', etc.
('ariel', 10+FontScale, 'normal'),
('system', 10+FontScale, 'normal'),
('courier', 20+FontScale, 'normal')]
def __init__(self, loadFirst='', loadEncode=''):
if not isinstance(self, GuiMaker):
raise TypeError('TextEditor needs a GuiMaker mixin')
self.setFileName(None)
self.lastfind = None
self.openDialog = None
self.saveDialog = None
self.knownEncoding = None # 2.1 Unicode: till Open or Save
self.text.focus() # else must click in text
if loadFirst:
self.update() # 2.1: else @ line 2; see book
self.onOpen(loadFirst, loadEncode)
def start(self): # run by GuiMaker.__init__
self.menuBar = [ # configure menu/toolbar
('File', 0, # a GuiMaker menu def tree
[('Open...', 0, self.onOpen), # build in method for self
('Save', 0, self.onSave), # label, shortcut, callback
('Save As...', 5, self.onSaveAs),
('New', 0, self.onNew),
'separator',
('Quit...', 0, self.onQuit)]
PyEdit: A Text Editor Program/Object | 699

),
('Edit', 0,
[('Undo', 0, self.onUndo),
('Redo', 0, self.onRedo),
'separator',
('Cut', 0, self.onCut),
('Copy', 1, self.onCopy),
('Paste', 0, self.onPaste),
'separator',
('Delete', 0, self.onDelete),
('Select All', 0, self.onSelectAll)]
),
('Search', 0,
[('Goto...', 0, self.onGoto),
('Find...', 0, self.onFind),
('Refind', 0, self.onRefind),
('Change...', 0, self.onChange),
('Grep...', 3, self.onGrep)]
),
('Tools', 0,
[('Pick Font...', 6, self.onPickFont),
('Font List', 0, self.onFontList),
'separator',
('Pick Bg...', 3, self.onPickBg),
('Pick Fg...', 0, self.onPickFg),
('Color List', 0, self.onColorList),
'separator',
('Info...', 0, self.onInfo),
('Clone', 1, self.onClone),
('Run Code', 0, self.onRunCode)]
)]
self.toolBar = [
('Save', self.onSave, {'side': LEFT}),
('Cut', self.onCut, {'side': LEFT}),
('Copy', self.onCopy, {'side': LEFT}),
('Paste', self.onPaste, {'side': LEFT}),
('Find', self.onRefind, {'side': LEFT}),
('Help', self.help, {'side': RIGHT}),
('Quit', self.onQuit, {'side': RIGHT})]
def makeWidgets(self): # run by GuiMaker.__init__
name = Label(self, bg='black', fg='white') # add below menu, above tool
name.pack(side=TOP, fill=X) # menu/toolbars are packed
# GuiMaker frame packs itself
vbar = Scrollbar(self)
hbar = Scrollbar(self, orient='horizontal')
text = Text(self, padx=5, wrap='none') # disable line wrapping
text.config(undo=1, autoseparators=1) # 2.0, default is 0, 1
vbar.pack(side=RIGHT, fill=Y)
hbar.pack(side=BOTTOM, fill=X) # pack text last
text.pack(side=TOP, fill=BOTH, expand=YES) # else sbars clipped
text.config(yscrollcommand=vbar.set) # call vbar.set on text move
text.config(xscrollcommand=hbar.set)
700 | Chapter 11: Complete GUI Programs

vbar.config(command=text.yview) # call text.yview on scroll move
hbar.config(command=text.xview) # or hbar['command']=text.xview
# 2.0: apply user configs or defaults
startfont = configs.get('font', self.fonts[0])
startbg = configs.get('bg', self.colors[0]['bg'])
startfg = configs.get('fg', self.colors[0]['fg'])
text.config(font=startfont, bg=startbg, fg=startfg)
if 'height' in configs: text.config(height=configs['height'])
if 'width' in configs: text.config(width =configs['width'])
self.text = text
self.filelabel = name
############################################################################
# File menu commands
############################################################################
def my_askopenfilename(self): # objects remember last result dir/file
if not self.openDialog:
self.openDialog = Open(initialdir=self.startfiledir,
filetypes=self.ftypes)
return self.openDialog.show()
def my_asksaveasfilename(self): # objects remember last result dir/file
if not self.saveDialog:
self.saveDialog = SaveAs(initialdir=self.startfiledir,
filetypes=self.ftypes)
return self.saveDialog.show()
def onOpen(self, loadFirst='', loadEncode=''):
"""
2.1: total rewrite for Unicode support; open in text mode with
an encoding passed in, input from the user, in textconfig, or
platform default, or open as binary bytes for arbitrary Unicode
encodings as last resort and drop \r in Windows end-lines if
present so text displays normally; content fetches are returned
as str, so need to encode on saves: keep encoding used here;
tests if file is okay ahead of time to try to avoid opens;
we could also load and manually decode bytes to str to avoid
multiple open attempts, but this is unlikely to try all cases;
encoding behavior is configurable in the local textConfig.py:
1) tries known type first if passed in by client (email charsets)
2) if opensAskUser True, try user input next (prefill wih defaults)
3) if opensEncoding nonempty, try this encoding next: 'latin-1', etc.
4) tries sys.getdefaultencoding() platform default next
5) uses binary mode bytes and Tk policy as the last resort
"""
if self.text_edit_modified(): # 2.0
if not askyesno('PyEdit', 'Text has changed: discard changes?'):
return
PyEdit: A Text Editor Program/Object | 701

file = loadFirst or self.my_askopenfilename()
if not file:
return
if not os.path.isfile(file):
showerror('PyEdit', 'Could not open file ' + file)
return
# try known encoding if passed and accurate (e.g., email)
text = None # empty file = '' = False: test for None!
if loadEncode:
try:
text = open(file, 'r', encoding=loadEncode).read()
self.knownEncoding = loadEncode
except (UnicodeError, LookupError, IOError): # lookup: bad name
pass
# try user input, prefill with next choice as default
if text == None and self.opensAskUser:
self.update() # else dialog doesn't appear in rare cases
askuser = askstring('PyEdit', 'Enter Unicode encoding for open',
initialvalue=(self.opensEncoding or
sys.getdefaultencoding() or ''))
if askuser:
try:
text = open(file, 'r', encoding=askuser).read()
self.knownEncoding = askuser
except (UnicodeError, LookupError, IOError):
pass
# try config file (or before ask user?)
if text == None and self.opensEncoding:
try:
text = open(file, 'r', encoding=self.opensEncoding).read()
self.knownEncoding = self.opensEncoding
except (UnicodeError, LookupError, IOError):
pass
# try platform default (utf-8 on windows; try utf8 always?)
if text == None:
try:
text = open(file, 'r', encoding=sys.getdefaultencoding()).read()
self.knownEncoding = sys.getdefaultencoding()
except (UnicodeError, LookupError, IOError):
pass
# last resort: use binary bytes and rely on Tk to decode
if text == None:
try:
text = open(file, 'rb').read() # bytes for Unicode
text = text.replace(b'\r\n', b'\n') # for display, saves
self.knownEncoding = None
except IOError:
pass
702 | Chapter 11: Complete GUI Programs

if text == None:
showerror('PyEdit', 'Could not decode and open file ' + file)
else:
self.setAllText(text)
self.setFileName(file)
self.text.edit_reset() # 2.0: clear undo/redo stks
self.text.edit_modified(0) # 2.0: clear modified flag
def onSave(self):
self.onSaveAs(self.currfile) # may be None
def onSaveAs(self, forcefile=None):
"""
2.1: total rewrite for Unicode support: Text content is always
returned as a str, so we must deal with encodings to save to
a file here, regardless of open mode of the output file (binary
requires bytes, and text must encode); tries the encoding used
when opened or saved (if known), user input, config file setting,
and platform default last; most users can use platform default;
retains successful encoding name here for next save, because this
may be the first Save after New or a manual text insertion; Save
and SaveAs may both use last known encoding, per config file (it
probably should be used for Save, but SaveAs usage is unclear);
gui prompts are prefilled with the known encoding if there is one;
does manual text.encode() to avoid creating file; text mode files
perform platform specific end-line conversion: Windows \r dropped
if present on open by text mode (auto) and binary mode (manually);
if manual content inserts, must delete \r else duplicates here;
knownEncoding=None before first Open or Save, after New, if binary Open;
encoding behavior is configurable in the local textConfig.py:
1) if savesUseKnownEncoding > 0, try encoding from last open or save
2) if savesAskUser True, try user input next (prefill with known?)
3) if savesEncoding nonempty, try this encoding next: 'utf-8', etc
4) tries sys.getdefaultencoding() as a last resort
"""
filename = forcefile or self.my_asksaveasfilename()
if not filename:
return
text = self.getAllText() # 2.1: a str string, with \n eolns,
encpick = None # even if read/inserted as bytes
# try known encoding at latest Open or Save, if any
if self.knownEncoding and ( # enc known?
(forcefile and self.savesUseKnownEncoding >= 1) or # on Save?
(not forcefile and self.savesUseKnownEncoding >= 2)): # on SaveAs?
try:
text.encode(self.knownEncoding)
encpick = self.knownEncoding
except UnicodeError:
pass
PyEdit: A Text Editor Program/Object | 703

# try user input, prefill with known type, else next choice
if not encpick and self.savesAskUser:
self.update() # else dialog doesn't appear in rare cases
askuser = askstring('PyEdit', 'Enter Unicode encoding for save',
initialvalue=(self.knownEncoding or
self.savesEncoding or
sys.getdefaultencoding() or ''))
if askuser:
try:
text.encode(askuser)
encpick = askuser
except (UnicodeError, LookupError): # LookupError: bad name
pass # UnicodeError: can't encode
# try config file
if not encpick and self.savesEncoding:
try:
text.encode(self.savesEncoding)
encpick = self.savesEncoding
except (UnicodeError, LookupError):
pass
# try platform default (utf8 on windows)
if not encpick:
try:
text.encode(sys.getdefaultencoding())
encpick = sys.getdefaultencoding()
except (UnicodeError, LookupError):
pass
# open in text mode for endlines + encoding
if not encpick:
showerror('PyEdit', 'Could not encode for file ' + filename)
else:
try:
file = open(filename, 'w', encoding=encpick)
file.write(text)
file.close()
except:
showerror('PyEdit', 'Could not write file ' + filename)
else:
self.setFileName(filename) # may be newly created
self.text.edit_modified(0) # 2.0: clear modified flag
self.knownEncoding = encpick # 2.1: keep enc for next save
# don't clear undo/redo stks!
def onNew(self):
"""
start editing a new file from scratch in current window;
see onClone to pop-up a new independent edit window instead;
"""
if self.text_edit_modified(): # 2.0
if not askyesno('PyEdit', 'Text has changed: discard changes?'):
return
self.setFileName(None)
704 | Chapter 11: Complete GUI Programs

self.clearAllText()
self.text.edit_reset() # 2.0: clear undo/redo stks
self.text.edit_modified(0) # 2.0: clear modified flag
self.knownEncoding = None # 2.1: Unicode type unknown
def onQuit(self):
"""
on Quit menu/toolbar select and wm border X button in toplevel windows;
2.1: don't exit app if others changed; 2.0: don't ask if self unchanged;
moved to the top-level window classes at the end since may vary per usage:
a Quit in GUI might quit() to exit, destroy() just one Toplevel, Tk, or
edit frame, or not be provided at all when run as an attached component;
check self for changes, and if might quit(), main windows should check
other windows in the process-wide list to see if they have changed too;
"""
assert False, 'onQuit must be defined in window-specific sublass'
def text_edit_modified(self):
"""
2.1: this now works! seems to have been a bool result type issue in tkinter;
2.0: self.text.edit_modified() broken in Python 2.4: do manually for now;
"""
return self.text.edit_modified()
#return self.tk.call((self.text._w, 'edit') + ('modified', None))
############################################################################
# Edit menu commands
############################################################################
def onUndo(self): # 2.0
try: # tk8.4 keeps undo/redo stacks
self.text.edit_undo() # exception if stacks empty
except TclError: # menu tear-offs for quick undo
showinfo('PyEdit', 'Nothing to undo')
def onRedo(self): # 2.0: redo an undone
try:
self.text.edit_redo()
except TclError:
showinfo('PyEdit', 'Nothing to redo')
def onCopy(self): # get text selected by mouse, etc.
if not self.text.tag_ranges(SEL): # save in cross-app clipboard
showerror('PyEdit', 'No text selected')
else:
text = self.text.get(SEL_FIRST, SEL_LAST)
self.clipboard_clear()
self.clipboard_append(text)
def onDelete(self): # delete selected text, no save
if not self.text.tag_ranges(SEL):
showerror('PyEdit', 'No text selected')
else:
self.text.delete(SEL_FIRST, SEL_LAST)
PyEdit: A Text Editor Program/Object | 705

def onCut(self):
if not self.text.tag_ranges(SEL):
showerror('PyEdit', 'No text selected')
else:
self.onCopy() # save and delete selected text
self.onDelete()
def onPaste(self):
try:
text = self.selection_get(selection='CLIPBOARD')
except TclError:
showerror('PyEdit', 'Nothing to paste')
return
self.text.insert(INSERT, text) # add at current insert cursor
self.text.tag_remove(SEL, '1.0', END)
self.text.tag_add(SEL, INSERT+'-%dc' % len(text), INSERT)
self.text.see(INSERT) # select it, so it can be cut
def onSelectAll(self):
self.text.tag_add(SEL, '1.0', END+'-1c') # select entire text
self.text.mark_set(INSERT, '1.0') # move insert point to top
self.text.see(INSERT) # scroll to top
############################################################################
# Search menu commands
############################################################################
def onGoto(self, forceline=None):
line = forceline or askinteger('PyEdit', 'Enter line number')
self.text.update()
self.text.focus()
if line is not None:
maxindex = self.text.index(END+'-1c')
maxline = int(maxindex.split('.')[0])
if line > 0 and line <= maxline:
self.text.mark_set(INSERT, '%d.0' % line) # goto line
self.text.tag_remove(SEL, '1.0', END) # delete selects
self.text.tag_add(SEL, INSERT, 'insert + 1l') # select line
self.text.see(INSERT) # scroll to line
else:
showerror('PyEdit', 'Bad line number')
def onFind(self, lastkey=None):
key = lastkey or askstring('PyEdit', 'Enter search string')
self.text.update()
self.text.focus()
self.lastfind = key
if key: # 2.0: nocase
nocase = configs.get('caseinsens', True) # 2.0: config
where = self.text.search(key, INSERT, END, nocase=nocase)
if not where: # don't wrap
showerror('PyEdit', 'String not found')
else:
706 | Chapter 11: Complete GUI Programs

pastkey = where + '+%dc' % len(key) # index past key
self.text.tag_remove(SEL, '1.0', END) # remove any sel
self.text.tag_add(SEL, where, pastkey) # select key
self.text.mark_set(INSERT, pastkey) # for next find
self.text.see(where) # scroll display
def onRefind(self):
self.onFind(self.lastfind)
def onChange(self):
"""
non-modal find/change dialog
2.1: pass per-dialog inputs to callbacks, may be > 1 change dialog open
"""
new = Toplevel(self)
new.title('PyEdit - change')
Label(new, text='Find text?', relief=RIDGE, width=15).grid(row=0, column=0)
Label(new, text='Change to?', relief=RIDGE, width=15).grid(row=1, column=0)
entry1 = Entry(new)
entry2 = Entry(new)
entry1.grid(row=0, column=1, sticky=EW)
entry2.grid(row=1, column=1, sticky=EW)
def onFind(): # use my entry in enclosing scope
self.onFind(entry1.get()) # runs normal find dialog callback
def onApply():
self.onDoChange(entry1.get(), entry2.get())
Button(new, text='Find', command=onFind ).grid(row=0, column=2, sticky=EW)
Button(new, text='Apply', command=onApply).grid(row=1, column=2, sticky=EW)
new.columnconfigure(1, weight=1) # expandable entries
def onDoChange(self, findtext, changeto):
# on Apply in change dialog: change and refind
if self.text.tag_ranges(SEL): # must find first
self.text.delete(SEL_FIRST, SEL_LAST)
self.text.insert(INSERT, changeto) # deletes if empty
self.text.see(INSERT)
self.onFind(findtext) # goto next appear
self.text.update() # force refresh
def onGrep(self):
"""
new in version 2.1: threaded external file search;
search matched filenames in directory tree for string;
listbox clicks open matched file at line of occurrence;
search is threaded so the GUI remains active and is not
blocked, and to allow multiple greps to overlap in time;
could use threadtools, but avoid loop in no active grep;
grep Unicode policy: text files content in the searched tree
might be in any Unicode encoding: we don't ask about each (as
we do for opens), but allow the encoding used for the entire
PyEdit: A Text Editor Program/Object | 707

tree to be input, preset it to the platform filesystem or
text default, and skip files that fail to decode; in worst
cases, users may need to run grep N times if N encodings might
exist; else opens may raise exceptions, and opening in binary
mode might fail to match encoded text against search string;
TBD: better to issue an error if any file fails to decode?
but utf-16 2-bytes/char format created in Notepad may decode
without error per utf-8, and search strings won't be found;
TBD: could allow input of multiple encoding names, split on
comma, try each one for every file, without open loadEncode?
"""
from PP4E.Gui.ShellGui.formrows import makeFormRow
# nonmodal dialog: get dirnname, filenamepatt, grepkey
popup = Toplevel()
popup.title('PyEdit - grep')
var1 = makeFormRow(popup, label='Directory root', width=18, browse=False)
var2 = makeFormRow(popup, label='Filename pattern', width=18, browse=False)
var3 = makeFormRow(popup, label='Search string', width=18, browse=False)
var4 = makeFormRow(popup, label='Content encoding', width=18, browse=False)
var1.set('.') # current dir
var2.set('*.py') # initial values
var4.set(sys.getdefaultencoding()) # for file content, not filenames
cb = lambda: self.onDoGrep(var1.get(), var2.get(), var3.get(), var4.get())
Button(popup, text='Go',command=cb).pack()
def onDoGrep(self, dirname, filenamepatt, grepkey, encoding):
"""
on Go in grep dialog: populate scrolled list with matches
tbd: should producer thread be daemon so it dies with app?
"""
import threading, queue
# make non-modal un-closeable dialog
mypopup = Tk()
mypopup.title('PyEdit - grepping')
status = Label(mypopup, text='Grep thread searching for: %r...' % grepkey)
status.pack(padx=20, pady=20)
mypopup.protocol('WM_DELETE_WINDOW', lambda: None) # ignore X close
# start producer thread, consumer loop
myqueue = queue.Queue()
threadargs = (filenamepatt, dirname, grepkey, encoding, myqueue)
threading.Thread(target=self.grepThreadProducer, args=threadargs).start()
self.grepThreadConsumer(grepkey, encoding, myqueue, mypopup)
def grepThreadProducer(self, filenamepatt, dirname, grepkey, encoding, myqueue):
"""
in a non-GUI parallel thread: queue find.find results list;
could also queue matches as found, but need to keep window;
file content and file names may both fail to decode here;
TBD: could pass encoded bytes to find() to avoid filename
decoding excs in os.walk/listdir, but which encoding to use:
708 | Chapter 11: Complete GUI Programs

sys.getfilesystemencoding() if not None? see also Chapter6
footnote issue: 3.1 fnmatch always converts bytes per Latin-1;
"""
from PP4E.Tools.find import find
matches = []
try:
for filepath in find(pattern=filenamepatt, startdir=dirname):
try:
textfile = open(filepath, encoding=encoding)
for (linenum, linestr) in enumerate(textfile):
if grepkey in linestr:
msg = '%s@%d [%s]' % (filepath, linenum + 1, linestr)
matches.append(msg)
except UnicodeError as X:
print('Unicode error in:', filepath, X) # eg: decode, bom
except IOError as X:
print('IO error in:', filepath, X) # eg: permission
finally:
myqueue.put(matches) # stop consumer loop on find excs: filenames?
def grepThreadConsumer(self, grepkey, encoding, myqueue, mypopup):
"""
in the main GUI thread: watch queue for results or [];
there may be multiple active grep threads/loops/queues;
there may be other types of threads/checkers in process,
especially when PyEdit is attached component (PyMailGUI);
"""
import queue
try:
matches = myqueue.get(block=False)
except queue.Empty:
myargs = (grepkey, encoding, myqueue, mypopup)
self.after(250, self.grepThreadConsumer, *myargs)
else:
mypopup.destroy() # close status
self.update() # erase it now
if not matches:
showinfo('PyEdit', 'Grep found no matches for: %r' % grepkey)
else:
self.grepMatchesList(matches, grepkey, encoding)
def grepMatchesList(self, matches, grepkey, encoding):
"""
populate list after successful matches;
we already know Unicode encoding from the search: use
it here when filename clicked, so open doesn't ask user;
"""
from PP4E.Gui.Tour.scrolledlist import ScrolledList
print('Matches for %s: %s' % (grepkey, len(matches)))
# catch list double-click
class ScrolledFilenames(ScrolledList):
def runCommand(self, selection):
file, line = selection.split(' [', 1)[0].split('@')
editor = TextEditorMainPopup(
PyEdit: A Text Editor Program/Object | 709

loadFirst=file, winTitle=' grep match', loadEncode=encoding)
editor.onGoto(int(line))
editor.text.focus_force() # no, really
# new non-modal widnow
popup = Tk()
popup.title('PyEdit - grep matches: %r (%s)' % (grepkey, encoding))
ScrolledFilenames(parent=popup, options=matches)
############################################################################
# Tools menu commands
############################################################################
def onFontList(self):
self.fonts.append(self.fonts[0]) # pick next font in list
del self.fonts[0] # resizes the text area
self.text.config(font=self.fonts[0])
def onColorList(self):
self.colors.append(self.colors[0]) # pick next color in list
del self.colors[0] # move current to end
self.text.config(fg=self.colors[0]['fg'], bg=self.colors[0]['bg'])
def onPickFg(self):
self.pickColor('fg') # added on 10/02/00
def onPickBg(self): # select arbitrary color
self.pickColor('bg') # in standard color dialog
def pickColor(self, part): # this is too easy
(triple, hexstr) = askcolor()
if hexstr:
self.text.config(**{part: hexstr})
def onInfo(self):
"""
pop-up dialog giving text statistics and cursor location;
caveat (2.1): Tk insert position column counts a tab as one
character: translate to next multiple of 8 to match visual?
"""
text = self.getAllText() # added on 5/3/00 in 15 mins
bytes = len(text) # words uses a simple guess:
lines = len(text.split('\n')) # any separated by whitespace
words = len(text.split()) # 3.x: bytes is really chars
index = self.text.index(INSERT) # str is unicode code points
where = tuple(index.split('.'))
showinfo('PyEdit Information',
'Current location:\n\n' +
'line:\t%s\ncolumn:\t%s\n\n' % where +
'File text statistics:\n\n' +
'chars:\t%d\nlines:\t%d\nwords:\t%d\n' % (bytes, lines, words))
def onClone(self, makewindow=True):
"""
710 | Chapter 11: Complete GUI Programs

open a new edit window without changing one already open (onNew);
inherits quit and other behavior of the window that it clones;
2.1: subclass must redefine/replace this if makes its own popup,
else this creates a bogus extra window here which will be empty;
"""
if not makewindow:
new = None # assume class makes its own window
else:
new = Toplevel() # a new edit window in same process
myclass = self.__class__ # instance's (lowest) class object
myclass(new) # attach/run instance of my class
def onRunCode(self, parallelmode=True):
"""
run Python code being edited--not an IDE, but handy;
tries to run in file's dir, not cwd (may be PP4E root);
inputs and adds command-line arguments for script files;
code's stdin/out/err = editor's start window, if any:
run with a console window to see code's print outputs;
but parallelmode uses start to open a DOS box for I/O;
module search path will include '.' dir where started;
in non-file mode, code's Tk root may be PyEdit's window;
subprocess or multiprocessing modules may work here too;
2.1: fixed to use base file name after chdir, not path;
2.1: use StartArgs to allow args in file mode on Windows;
2.1: run an update() after 1st dialog else 2nd dialog
sometimes does not appear in rare cases;
"""
def askcmdargs():
return askstring('PyEdit', 'Commandline arguments?') or ''
from PP4E.launchmodes import System, Start, StartArgs, Fork
filemode = False
thefile = str(self.getFileName())
if os.path.exists(thefile):
filemode = askyesno('PyEdit', 'Run from file?')
self.update() # 2.1: run update()
if not filemode: # run text string
cmdargs = askcmdargs()
namespace = {'__name__': '__main__'} # run as top-level
sys.argv = [thefile] + cmdargs.split() # could use threads
exec(self.getAllText() + '\n', namespace) # exceptions ignored
elif self.text_edit_modified(): # 2.0: changed test
showerror('PyEdit', 'Text changed: you must save before run')
else:
cmdargs = askcmdargs()
mycwd = os.getcwd() # cwd may be root
dirname, filename = os.path.split(thefile) # get dir, base
os.chdir(dirname or mycwd) # cd for filenames
thecmd = filename + ' ' + cmdargs # 2.1: not theFile
if not parallelmode: # run as file
System(thecmd, thecmd)() # block editor
else:
PyEdit: A Text Editor Program/Object | 711

if sys.platform[:3] == 'win': # spawn in parallel
run = StartArgs if cmdargs else Start # 2.1: support args
run(thecmd, thecmd)() # or always Spawn
else:
Fork(thecmd, thecmd)() # spawn in parallel
os.chdir(mycwd) # go back to my dir
def onPickFont(self):
"""
2.0 non-modal font spec dialog
2.1: pass per-dialog inputs to callback, may be > 1 font dialog open
"""
from PP4E.Gui.ShellGui.formrows import makeFormRow
popup = Toplevel(self)
popup.title('PyEdit - font')
var1 = makeFormRow(popup, label='Family', browse=False)
var2 = makeFormRow(popup, label='Size', browse=False)
var3 = makeFormRow(popup, label='Style', browse=False)
var1.set('courier')
var2.set('12') # suggested vals
var3.set('bold italic') # see pick list for valid inputs
Button(popup, text='Apply', command=
lambda: self.onDoFont(var1.get(), var2.get(), var3.get())).pack()
def onDoFont(self, family, size, style):
try:
self.text.config(font=(family, int(size), style))
except:
showerror('PyEdit', 'Bad font specification')
############################################################################
# Utilities, useful outside this class
############################################################################
def isEmpty(self):
return not self.getAllText()
def getAllText(self):
return self.text.get('1.0', END+'-1c') # extract text as str string
def setAllText(self, text):
"""
caller: call self.update() first if just packed, else the
initial position may be at line 2, not line 1 (2.1; Tk bug?)
"""
self.text.delete('1.0', END) # store text string in widget
self.text.insert(END, text) # or '1.0'; text=bytes or str
self.text.mark_set(INSERT, '1.0') # move insert point to top
self.text.see(INSERT) # scroll to top, insert set
def clearAllText(self):
self.text.delete('1.0', END) # clear text in widget
def getFileName(self):
return self.currfile
def setFileName(self, name): # see also: onGoto(linenum)
712 | Chapter 11: Complete GUI Programs

self.currfile = name # for save
self.filelabel.config(text=str(name))
def setKnownEncoding(self, encoding='utf-8'): # 2.1: for saves if inserted
self.knownEncoding = encoding # else saves use config, ask?
def setBg(self, color):
self.text.config(bg=color) # to set manually from code
def setFg(self, color):
self.text.config(fg=color) # 'black', hexstring
def setFont(self, font):
self.text.config(font=font) # ('family', size, 'style')
def setHeight(self, lines): # default = 24h x 80w
self.text.config(height=lines) # may also be from textCongif.py
def setWidth(self, chars):
self.text.config(width=chars)
def clearModified(self):
self.text.edit_modified(0) # clear modified flag
def isModified(self):
return self.text_edit_modified() # changed since last reset?
def help(self):
showinfo('About PyEdit', helptext % ((Version,)*2))
################################################################################
# Ready-to-use editor classes
# mixes in a GuiMaker Frame subclass which builds menu and toolbars
#
# these classes are common use cases, but other configurations are possible;
# call TextEditorMain().mainloop() to start PyEdit as a standalone program;
# redefine/extend onQuit in a subclass to catch exit or destroy (see PyView);
# caveat: could use windows.py for icons, but quit protocol is custom here.
################################################################################
#-------------------------------------------------------------------------------
# 2.1: on quit(), don't silently exit entire app if any other changed edit
# windows are open in the process - changes would be lost because all other
# windows are closed too, including multiple Tk editor parents; uses a list
# to keep track of all PyEdit window instances open in process; this may be
# too broad (if we destroy() instead of quit(), need only check children
# of parent being destroyed), but better to err on side of being too inclusive;
# onQuit moved here because varies per window type and is not present for all;
#
# assumes a TextEditorMainPopup is never a parent to other editor windows -
# Toplevel children are destroyed with their parents; this does not address
# closes outside the scope of PyEdit classes here (tkinter quit is available
# on every widget, and any widget type may be a Toplevel parent!); client is
# responsible for checking for editor content changes in all uncovered cases;
# note that tkinter's <Destroy> bind event won't help here, because its callback
# cannot run GUI operations such as text change tests and fetches - see the
# book and destroyer.py for more details on this event;
#-------------------------------------------------------------------------------
PyEdit: A Text Editor Program/Object | 713

###################################
# when text editor owns the window
###################################
class TextEditorMain(TextEditor, GuiMakerWindowMenu):
"""
main PyEdit windows that quit() to exit app on a Quit in GUI, and build
a menu on a window; parent may be default Tk, explicit Tk, or Toplevel:
parent must be a window, and probably should be a Tk so this isn't silently
destroyed and closed with a parent; all main PyEdit windows check all other
PyEdit windows open in the process for changes on a Quit in the GUI, since
a quit() here will exit the entire app; the editor's frame need not occupy
entire window (may have other parts: see PyView), but its Quit ends program;
onQuit is run for Quit in toolbar or File menu, as well as window border X;
"""
def __init__(self, parent=None, loadFirst='', loadEncode=''):
# editor fills whole parent window
GuiMaker.__init__(self, parent) # use main window menus
TextEditor.__init__(self, loadFirst, loadEncode) # GuiMaker frame packs self
self.master.title('PyEdit ' + Version) # title, wm X if standalone
self.master.iconname('PyEdit')
self.master.protocol('WM_DELETE_WINDOW', self.onQuit)
TextEditor.editwindows.append(self)
def onQuit(self): # on a Quit request in the GUI
close = not self.text_edit_modified() # check self, ask?, check others
if not close:
close = askyesno('PyEdit', 'Text changed: quit and discard changes?')
if close:
windows = TextEditor.editwindows
changed = [w for w in windows if w != self and w.text_edit_modified()]
if not changed:
GuiMaker.quit(self) # quit ends entire app regardless of widget type
else:
numchange = len(changed)
verify = '%s other edit window%s changed: quit and discard anyhow?'
verify = verify % (numchange, 's' if numchange > 1 else '')
if askyesno('PyEdit', verify):
GuiMaker.quit(self)
class TextEditorMainPopup(TextEditor, GuiMakerWindowMenu):
"""
popup PyEdit windows that destroy() to close only self on a Quit in GUI,
and build a menu on a window; makes own Toplevel parent, which is child
to default Tk (for None) or other passed-in window or widget (e.g., a frame);
adds to list so will be checked for changes if any PyEdit main window quits;
if any PyEdit main windows will be created, parent of this should also be a
PyEdit main window's parent so this is not closed silently while being tracked;
onQuit is run for Quit in toolbar or File menu, as well as window border X;
"""
def __init__(self, parent=None, loadFirst='', winTitle='', loadEncode=''):
# create own window
self.popup = Toplevel(parent)
714 | Chapter 11: Complete GUI Programs

GuiMaker.__init__(self, self.popup) # use main window menus
TextEditor.__init__(self, loadFirst, loadEncode) # a frame in a new popup
assert self.master == self.popup
self.popup.title('PyEdit ' + Version + winTitle)
self.popup.iconname('PyEdit')
self.popup.protocol('WM_DELETE_WINDOW', self.onQuit)
TextEditor.editwindows.append(self)
def onQuit(self):
close = not self.text_edit_modified()
if not close:
close = askyesno('PyEdit', 'Text changed: quit and discard changes?')
if close:
self.popup.destroy() # kill this window only
TextEditor.editwindows.remove(self) # (plus any child windows)
def onClone(self):
TextEditor.onClone(self, makewindow=False) # I make my own pop-up
#########################################
# when editor embedded in another window
#########################################
class TextEditorComponent(TextEditor, GuiMakerFrameMenu):
"""
attached PyEdit component frames with full menu/toolbar options,
which run a destroy() on a Quit in the GUI to erase self only;
a Quit in the GUI verifies if any changes in self (only) here;
does not intercept window manager border X: doesn't own window;
does not add self to changes tracking list: part of larger app;
"""
def __init__(self, parent=None, loadFirst='', loadEncode=''):
# use Frame-based menus
GuiMaker.__init__(self, parent) # all menus, buttons on
TextEditor.__init__(self, loadFirst, loadEncode) # GuiMaker must init 1st
def onQuit(self):
close = not self.text_edit_modified()
if not close:
close = askyesno('PyEdit', 'Text changed: quit and discard changes?')
if close:
self.destroy() # erase self Frame but do not quit enclosing app
class TextEditorComponentMinimal(TextEditor, GuiMakerFrameMenu):
"""
attached PyEdit component frames without Quit and File menu options;
on startup, removes Quit from toolbar, and either deletes File menu
or disables all its items (possibly hackish, but sufficient); menu and
toolbar structures are per-instance data: changes do not impact others;
Quit in GUI never occurs, because it is removed from available options;
"""
def __init__(self, parent=None, loadFirst='', deleteFile=True, loadEncode=''):
self.deleteFile = deleteFile
GuiMaker.__init__(self, parent) # GuiMaker frame packs self
PyEdit: A Text Editor Program/Object | 715

TextEditor.__init__(self, loadFirst, loadEncode) # TextEditor adds middle
def start(self):
TextEditor.start(self) # GuiMaker start call
for i in range(len(self.toolBar)): # delete quit in toolbar
if self.toolBar[i][0] == 'Quit': # delete file menu items,
del self.toolBar[i] # or just disable file
break
if self.deleteFile:
for i in range(len(self.menuBar)):
if self.menuBar[i][0] == 'File':
del self.menuBar[i]
break
else:
for (name, key, items) in self.menuBar:
if name == 'File':
items.append([1,2,3,4,6])
################################################################################
# standalone program run
################################################################################
def testPopup():
# see PyView and PyMail for component tests
root = Tk()
TextEditorMainPopup(root)
TextEditorMainPopup(root)
Button(root, text='More', command=TextEditorMainPopup).pack(fill=X)
Button(root, text='Quit', command=root.quit).pack(fill=X)
root.mainloop()
def main(): # may be typed or clicked
try: # or associated on Windows
fname = sys.argv[1] # arg = optional filename
except IndexError: # build in default Tk root
fname = None
TextEditorMain(loadFirst=fname).pack(expand=YES, fill=BOTH) # pack optional
mainloop()
if __name__ == '__main__': # when run as a script
#testPopup()
main() # run .pyw for no DOS box
PyPhoto: An Image Viewer and Resizer
In Chapter 9, we wrote a simple thumbnail image viewer that scrolled its thumbnails
in a canvas. That program in turn built on techniques and code we developed at the
end of Chapter 8 to handle images. In both places, I promised that we’d eventually
meet a more full-featured extension of the ideas we deployed.
In this section, we finally wrap up the thumbnail images thread by studying PyPhoto—
an enhanced image viewing and resizing program. PyPhoto’s basic operation is
716 | Chapter 11: Complete GUI Programs

straightforward: given a directory of image files, PyPhoto displays their thumbnails in
a scrollable canvas. When a thumbnail is selected, the corresponding image is displayed
full size in a pop-up window.
Unlike our prior viewers, though, PyPhoto is clever enough to scroll (rather than crop)
images too large for the physical display. Moreover, PyPhoto introduces the notion of
image resizing—it supports mouse and keyboard events that resize the image to one of
the display’s dimensions and zoom the image in and out. Once images are opened, the
resizing logic allows images to be grown or shrunk arbitrarily, which is especially handy
for images produced by a digital camera that may be too large to view all at once.
As added touches, PyPhoto also allows the image to be saved in a file (possibly after
being resized), and it allows image directories to be selected and opened in the GUI
itself, instead of just as command-line arguments.
Put together, PyPhoto’s features make it an image-processing program, albeit one with
a currently small set of processing tools. I encourage you to experiment with adding
new features of your own; once you get the hang of the Python Imaging Library (PIL)
API, the object-oriented nature of PyPhoto makes adding new tools remarkably simple.
Running PyPhoto
In order to run PyPhoto, you’ll need to fetch and install the PIL extension package
described in Chapter 8. PyPhoto inherits much of its functionality from PIL—PIL is
used to support extra image types beyond those handled by standard tkinter (e.g., JPEG
images) and to perform image-processing operations such as resizes, thumbnail crea-
tion, and saves. PIL is open source like Python, but it is not presently part of the Python
standard library. Search the Web for PIL’s location (http://www.pythonware.com is
currently a safe bet). Also check the Extensions directory of the examples distribution
package for a PIL self-installer.
The best way to get a feel for PyPhoto is to run it live on your own machine to see how
images are scrolled and resized. Here, we’ll present a few screenshots to give the general
flavor of the interaction. You can start PyPhoto by clicking its icon, or you can start it
from the command line. When run directly, it opens the images subdirectory in its
source directory, which contains a handful of photos. When you run it from the com-
mand line, you can pass in an initial image directory name as a command-line argument.
Figure 11-7 captures the main thumbnail window when run directly.
Internally, PyPhoto is loading or creating thumbnail images before this window ap-
pears, using tools coded in Chapter 8. Startup may take a few seconds the first time
you open a directory, but it is quick thereafter—PyPhoto caches thumbnails in a local
subdirectory so that it can skip the generation step the next time the directory is opened.
Technically, there are three different ways PyPhoto may start up: viewing an explicit
directory listed on the command line; viewing the default images directory when no
command-line argument is given and when images is present where the program is run;
PyPhoto: An Image Viewer and Resizer | 717
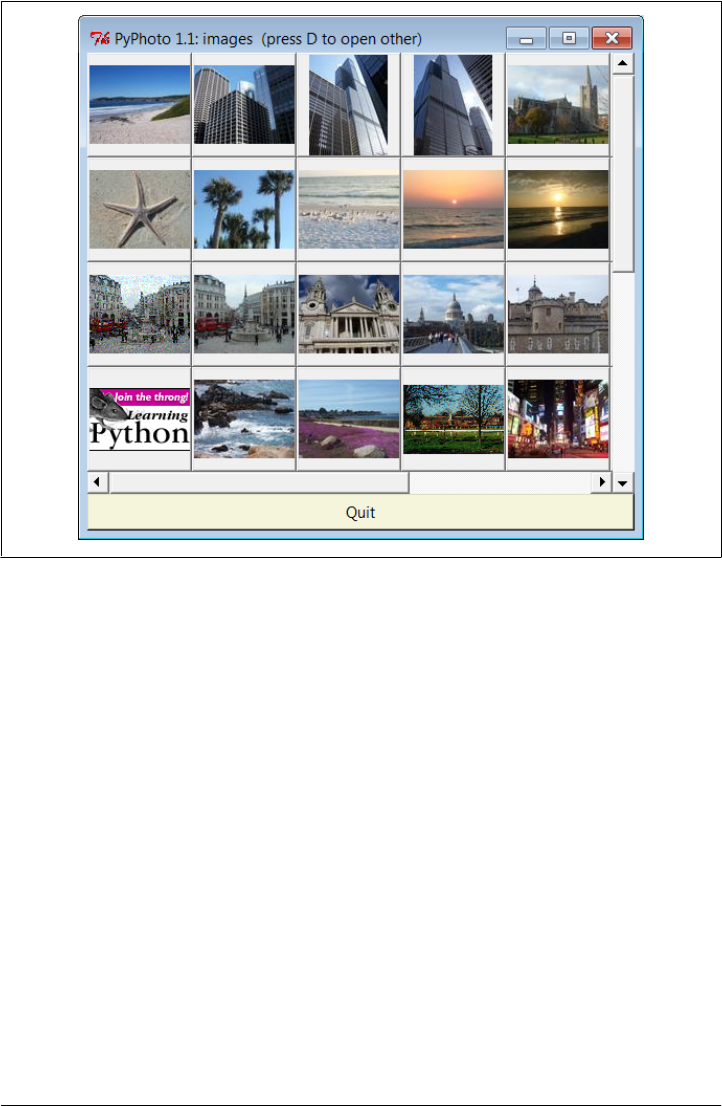
or displaying a simple one-button window that allows you to select directories to open
on demand, when no initial directory is given or present (see the code’s __main__ logic).
PyPhoto also lets you open additional folders in new thumbnail windows, by pressing
the D key on your keyboard in either a thumbnail or an image window. Figure 11-8,
for instance, captures the pop-up window produced in Windows 7 to select a new image
folder, and Figure 11-9 shows the result when I select a directory copied from one of
my digital camera cards—this is a second PyPhoto thumbnail window on the display.
Figure 11-8 is also opened by the one-button window if no initial directory is available.
When a thumbnail is selected, the image is displayed in a canvas, in a new pop-up
window. If it’s too large for the display, you can scroll through its full size with the
window’s scroll bars. Figure 11-10 captures one image after its thumbnail is clicked,
and Figure 11-11 shows the Save As dialog issued when the S key is pressed in the image
window; be sure to type the desired filename extension (e.g., .jpg) in this Save As dialog,
because PIL uses it to know how to save the image to the file. In general, any number
of PyPhoto thumbnail and image windows can be open at once, and each image can
be saved independently.
Beyond the screenshots already shown, this system’s interaction is difficult to capture
in a static medium such as this book—you’re better off test-driving the program live.
Figure 11-7. PyPhoto main window, default directory
718 | Chapter 11: Complete GUI Programs
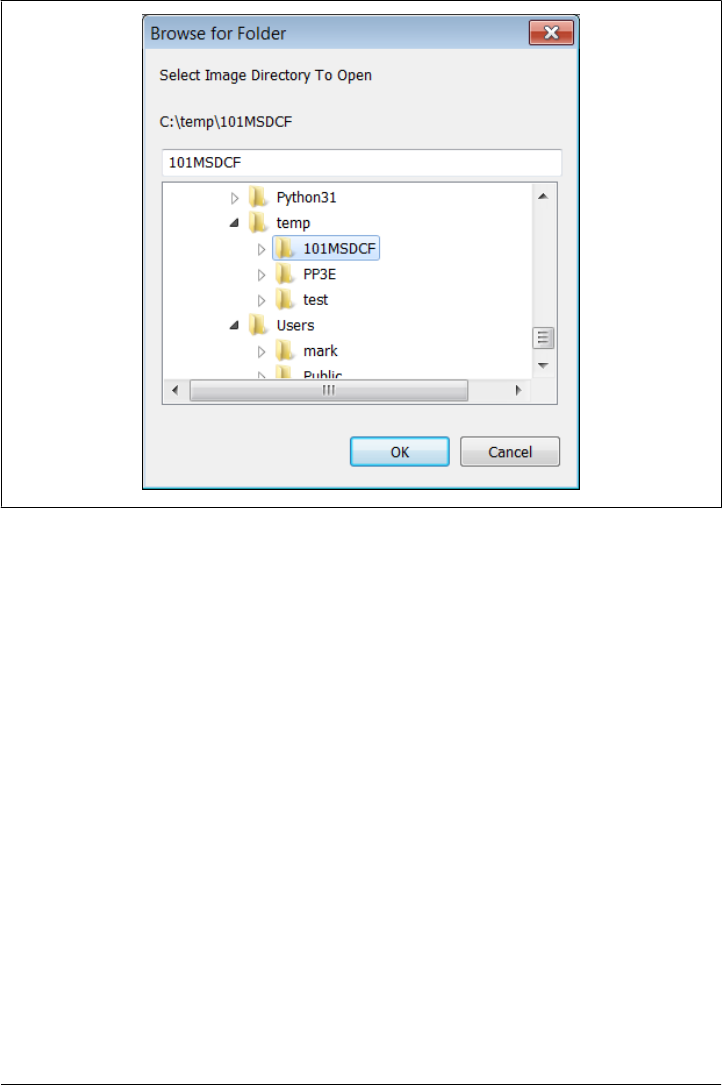
For example, clicking the left and right mouse buttons will resize the image to the
display’s height and width dimensions, respectively, and pressing the I and O keys will
zoom the image in and out in 10 percent increments. Both resizing schemes allow you
to shrink an image too large to see all at once, as well as expand small photos. They
also preserve the original aspect ratio of the photo, by changing its height and width
proportionally, while blindly resizing to the display’s dimensions would not (height or
width may be stretched).
Once resized, images may be saved in files at their current size. PyPhoto is also smart
enough to make windows full size on Windows, if an image is larger than the display.
PyPhoto Source Code
Because PyPhoto simply extends and reuses techniques and code we met earlier in the
book, we’ll omit a detailed discussion of its code here. For background, see the dis-
cussion of image processing and PIL in Chapter 8 and the coverage of the canvas widget
in Chapter 9.
In short, PyPhoto uses canvases in two ways: for thumbnail collections and for opened
images. For thumbnails, the same sort of canvas layout code as the earlier thumbnails
viewer in Example 9-15 is employed. For images, a canvas is used as well, but the
Figure 11-8. PyPhoto open directory dialog (the D key)
PyPhoto: An Image Viewer and Resizer | 719
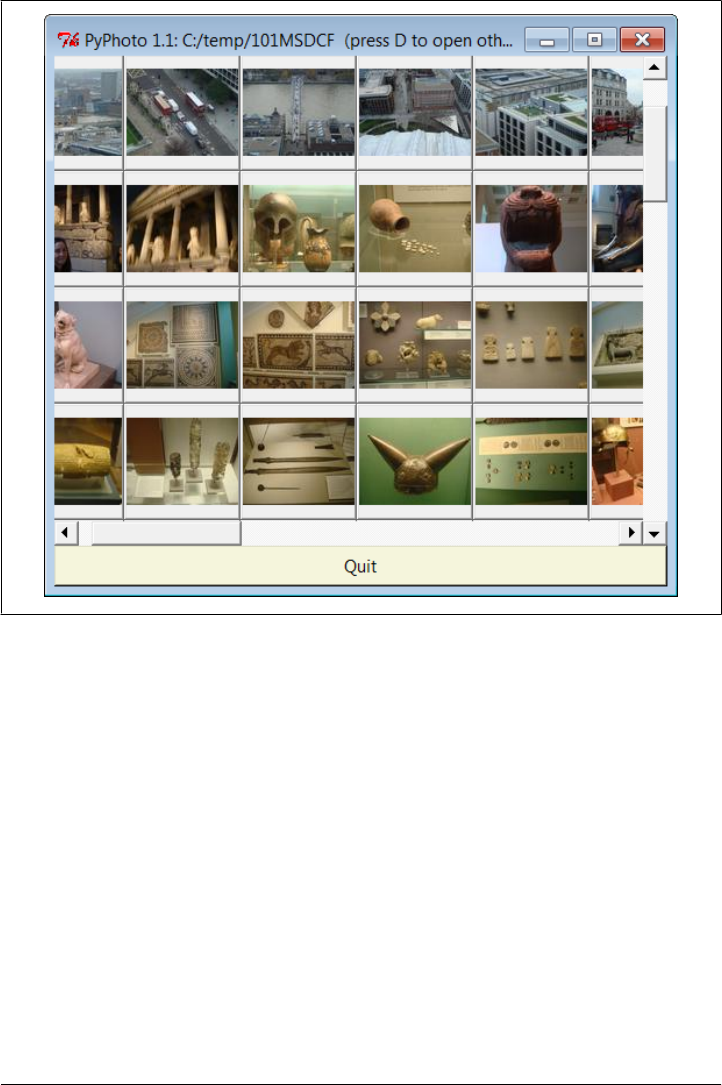
canvas’s scrollable (full) size is the image size, and the viewable area size is the minimum
of the physical screen size or the size of the image itself. The physical screen size is
available from the maxsize() method of Toplevel windows. The net effect is that selec-
ted images may be scrolled now, too, which comes in handy if they are too big for your
display (a common case for pictures snapped with newer digital cameras).
In addition, PyPhoto binds keyboard and mouse events to implement resizing and zoom
operations. With PIL, this is simple—we save the original PIL image, run its resize
method with the new image size, and redraw the image in the canvas. PyPhoto also
makes use of file open and save dialog objects, to remember the last directory visited.
PIL supports additional operations, which we could add as new events, but resizing is
sufficient for a viewer. PyPhoto does not currently use threads, to avoid becoming
blocked for long-running tasks (opening a large directory the first time, for instance).
Such enhancements are left as suggested exercises.
Figure 11-9. PyPhoto thumbnail window, other directory
720 | Chapter 11: Complete GUI Programs
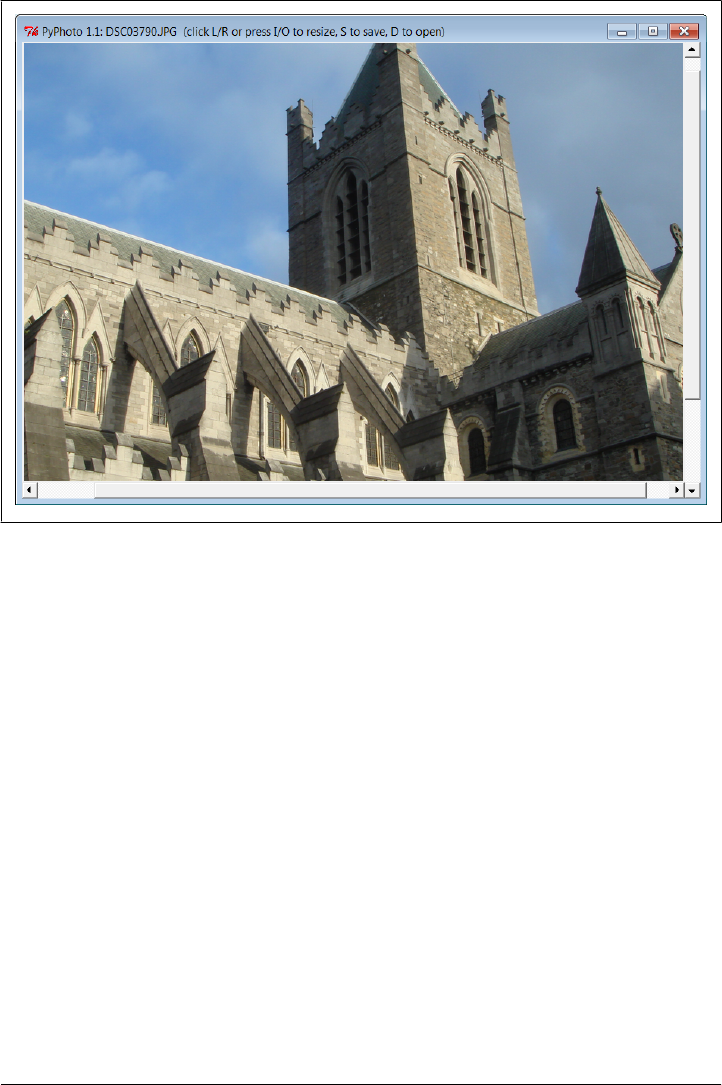
PyPhoto is implemented as the single file of Example 11-5, though it gets some utility
for free by reusing the thumbnail generation function of the viewer_thumbs module that
we originally wrote near the end of Chapter 8 in Example 8-45. To spare you from
having to flip back and forth too much, here’s a copy of the code of the thumbs function
imported and used here:
# imported from Chapter 8...
def makeThumbs(imgdir, size=(100, 100), subdir='thumbs'):
# returns a list of (image filename, thumb image object);
thumbdir = os.path.join(imgdir, subdir)
if not os.path.exists(thumbdir):
os.mkdir(thumbdir)
thumbs = []
for imgfile in os.listdir(imgdir):
thumbpath = os.path.join(thumbdir, imgfile)
if os.path.exists(thumbpath):
thumbobj = Image.open(thumbpath) # use already created
thumbs.append((imgfile, thumbobj))
else:
print('making', thumbpath)
imgpath = os.path.join(imgdir, imgfile)
try:
Figure 11-10. PyPhoto image view window
PyPhoto: An Image Viewer and Resizer | 721
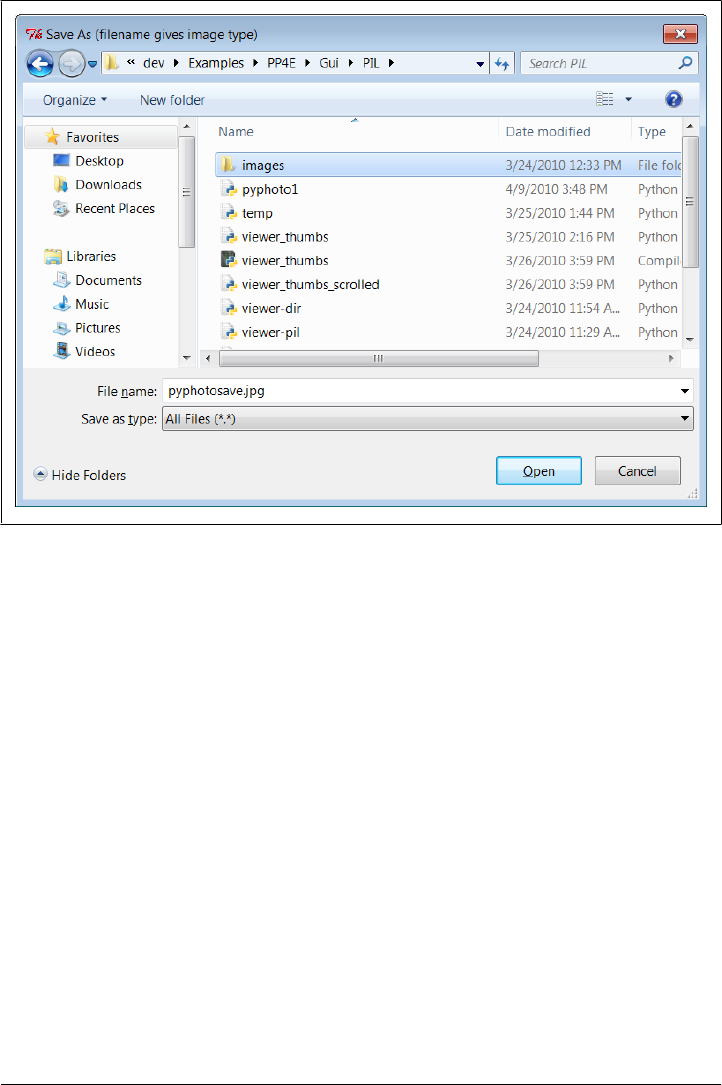
imgobj = Image.open(imgpath) # make new thumb
imgobj.thumbnail(size, Image.ANTIALIAS) # best downsize filter
imgobj.save(thumbpath) # type via ext or passed
thumbs.append((imgfile, imgobj))
except: # not always IOError
print("Skipping: ", imgpath)
return thumbs
Some of this example’s thumbnail selection window code is also very similar to our
earlier limited scrolled-thumbnails example in Chapter 9, but it is repeated in this file
instead of imported, to allow for future evolution (Chapter 9’s functional subset is now
officially demoted to prototype).
As you study this file, pay particular attention to the way it factors code into reused
functions and methods, to avoid redundancy; if we ever need to change the way zoom-
ing works, for example, we have just one method to change, not two. Also notice its
ScrolledCanvas class—a reusable component that handles the work of linking scroll
bars and canvases.
Figure 11-11. PyPhoto Save As dialog (the S key; include an extension)
722 | Chapter 11: Complete GUI Programs

Example 11-5. PP4E\Gui\PIL\pyphoto1.py
"""
############################################################################
PyPhoto 1.1: thumbnail image viewer with resizing and saves.
Supports multiple image directory thumb windows - the initial img dir
is passed in as cmd arg, uses "images" default, or is selected via main
window button; later directories are opened by pressing "D" in image view
or thumbnail windows.
Viewer also scrolls popped-up images that are too large for the screen;
still to do: (1) rearrange thumbnails when window resized, based on current
window size; (2) [DONE] option to resize images to fit current window size?
(3) avoid scrolls if image size is less than window max size: use Label
if imgwide <= scrwide and imghigh <= scrhigh?
New in 1.1: updated to run in Python 3.1 and latest PIL;
New in 1.0: now does a form of (2) above: image is resized to one of the
display's dimensions if clicked, and zoomed in or out in 10% increments
on key presses; generalize me; caveat: seems to lose quality, pixels
after many resizes (this is probably a limitation of PIL)
The following scaler adapted from PIL's thumbnail code is similar to the
screen height scaler here, but only shrinks:
x, y = imgwide, imghigh
if x > scrwide: y = max(y * scrwide // x, 1); x = scrwide
if y > scrhigh: x = max(x * scrhigh // y, 1); y = scrhigh
############################################################################
"""
import sys, math, os
from tkinter import *
from tkinter.filedialog import SaveAs, Directory
from PIL import Image # PIL Image: also in tkinter
from PIL.ImageTk import PhotoImage # PIL photo widget replacement
from viewer_thumbs import makeThumbs # developed earlier in book
# remember last dirs across all windows
saveDialog = SaveAs(title='Save As (filename gives image type)')
openDialog = Directory(title='Select Image Directory To Open')
trace = print # or lambda *x: None
appname = 'PyPhoto 1.1: '
class ScrolledCanvas(Canvas):
"""
a canvas in a container that automatically makes
vertical and horizontal scroll bars for itself
"""
def __init__(self, container):
Canvas.__init__(self, container)
self.config(borderwidth=0)
PyPhoto: An Image Viewer and Resizer | 723

vbar = Scrollbar(container)
hbar = Scrollbar(container, orient='horizontal')
vbar.pack(side=RIGHT, fill=Y) # pack canvas after bars
hbar.pack(side=BOTTOM, fill=X) # so clipped first
self.pack(side=TOP, fill=BOTH, expand=YES)
vbar.config(command=self.yview) # call on scroll move
hbar.config(command=self.xview)
self.config(yscrollcommand=vbar.set) # call on canvas move
self.config(xscrollcommand=hbar.set)
class ViewOne(Toplevel):
"""
open a single image in a pop-up window when created;
a class because photoimage obj must be saved, else
erased if reclaimed; scroll if too big for display;
on mouse clicks, resizes to window's height or width:
stretches or shrinks; on I/O keypress, zooms in/out;
both resizing schemes maintain original aspect ratio;
code is factored to avoid redundancy here as possible;
"""
def __init__(self, imgdir, imgfile, forcesize=()):
Toplevel.__init__(self)
helptxt = '(click L/R or press I/O to resize, S to save, D to open)'
self.title(appname + imgfile + ' ' + helptxt)
imgpath = os.path.join(imgdir, imgfile)
imgpil = Image.open(imgpath)
self.canvas = ScrolledCanvas(self)
self.drawImage(imgpil, forcesize)
self.canvas.bind('<Button-1>', self.onSizeToDisplayHeight)
self.canvas.bind('<Button-3>', self.onSizeToDisplayWidth)
self.bind('<KeyPress-i>', self.onZoomIn)
self.bind('<KeyPress-o>', self.onZoomOut)
self.bind('<KeyPress-s>', self.onSaveImage)
self.bind('<KeyPress-d>', onDirectoryOpen)
self.focus()
def drawImage(self, imgpil, forcesize=()):
imgtk = PhotoImage(image=imgpil) # not file=imgpath
scrwide, scrhigh = forcesize or self.maxsize() # wm screen size x,y
imgwide = imgtk.width() # size in pixels
imghigh = imgtk.height() # same as imgpil.size
fullsize = (0, 0, imgwide, imghigh) # scrollable
viewwide = min(imgwide, scrwide) # viewable
viewhigh = min(imghigh, scrhigh)
canvas = self.canvas
canvas.delete('all') # clear prior photo
canvas.config(height=viewhigh, width=viewwide) # viewable window size
canvas.config(scrollregion=fullsize) # scrollable area size
canvas.create_image(0, 0, image=imgtk, anchor=NW)
724 | Chapter 11: Complete GUI Programs

if imgwide <= scrwide and imghigh <= scrhigh: # too big for display?
self.state('normal') # no: win size per img
elif sys.platform[:3] == 'win': # do windows fullscreen
self.state('zoomed') # others use geometry()
self.saveimage = imgpil
self.savephoto = imgtk # keep reference on me
trace((scrwide, scrhigh), imgpil.size)
def sizeToDisplaySide(self, scaler):
# resize to fill one side of the display
imgpil = self.saveimage
scrwide, scrhigh = self.maxsize() # wm screen size x,y
imgwide, imghigh = imgpil.size # img size in pixels
newwide, newhigh = scaler(scrwide, scrhigh, imgwide, imghigh)
if (newwide * newhigh < imgwide * imghigh):
filter = Image.ANTIALIAS # shrink: antialias
else: # grow: bicub sharper
filter = Image.BICUBIC
imgnew = imgpil.resize((newwide, newhigh), filter)
self.drawImage(imgnew)
def onSizeToDisplayHeight(self, event):
def scaleHigh(scrwide, scrhigh, imgwide, imghigh):
newhigh = scrhigh
newwide = int(scrhigh * (imgwide / imghigh)) # 3.x true div
return (newwide, newhigh) # proportional
self.sizeToDisplaySide(scaleHigh)
def onSizeToDisplayWidth(self, event):
def scaleWide(scrwide, scrhigh, imgwide, imghigh):
newwide = scrwide
newhigh = int(scrwide * (imghigh / imgwide)) # 3.x true div
return (newwide, newhigh)
self.sizeToDisplaySide(scaleWide)
def zoom(self, factor):
# zoom in or out in increments
imgpil = self.saveimage
wide, high = imgpil.size
if factor < 1.0: # antialias best if shrink
filter = Image.ANTIALIAS # also nearest, bilinear
else:
filter = Image.BICUBIC
new = imgpil.resize((int(wide * factor), int(high * factor)), filter)
self.drawImage(new)
def onZoomIn(self, event, incr=.10):
self.zoom(1.0 + incr)
def onZoomOut(self, event, decr=.10):
self.zoom(1.0 - decr)
def onSaveImage(self, event):
# save current image state to file
filename = saveDialog.show()
PyPhoto: An Image Viewer and Resizer | 725

if filename:
self.saveimage.save(filename)
def onDirectoryOpen(event):
"""
open a new image directory in new pop up
available in both thumb and img windows
"""
dirname = openDialog.show()
if dirname:
viewThumbs(dirname, kind=Toplevel)
def viewThumbs(imgdir, kind=Toplevel, numcols=None, height=400, width=500):
"""
make main or pop-up thumbnail buttons window;
uses fixed-size buttons, scrollable canvas;
sets scrollable (full) size, and places
thumbs at abs x,y coordinates in canvas;
no longer assumes all thumbs are same size:
gets max of all (x,y), some may be smaller;
"""
win = kind()
helptxt = '(press D to open other)'
win.title(appname + imgdir + ' ' + helptxt)
quit = Button(win, text='Quit', command=win.quit, bg='beige')
quit.pack(side=BOTTOM, fill=X)
canvas = ScrolledCanvas(win)
canvas.config(height=height, width=width) # init viewable window size
# changes if user resizes
thumbs = makeThumbs(imgdir) # [(imgfile, imgobj)]
numthumbs = len(thumbs)
if not numcols:
numcols = int(math.ceil(math.sqrt(numthumbs))) # fixed or N x N
numrows = int(math.ceil(numthumbs / numcols)) # 3.x true div
# max w|h: thumb=(name, obj), thumb.size=(width, height)
linksize = max(max(thumb[1].size) for thumb in thumbs)
trace(linksize)
fullsize = (0, 0, # upper left X,Y
(linksize * numcols), (linksize * numrows) ) # lower right X,Y
canvas.config(scrollregion=fullsize) # scrollable area size
rowpos = 0
savephotos = []
while thumbs:
thumbsrow, thumbs = thumbs[:numcols], thumbs[numcols:]
colpos = 0
for (imgfile, imgobj) in thumbsrow:
photo = PhotoImage(imgobj)
link = Button(canvas, image=photo)
def handler(savefile=imgfile):
ViewOne(imgdir, savefile)
link.config(command=handler, width=linksize, height=linksize)
726 | Chapter 11: Complete GUI Programs

link.pack(side=LEFT, expand=YES)
canvas.create_window(colpos, rowpos, anchor=NW,
window=link, width=linksize, height=linksize)
colpos += linksize
savephotos.append(photo)
rowpos += linksize
win.bind('<KeyPress-d>', onDirectoryOpen)
win.savephotos = savephotos
return win
if __name__ == '__main__':
"""
open dir = default or cmdline arg
else show simple window to select
"""
imgdir = 'images'
if len(sys.argv) > 1: imgdir = sys.argv[1]
if os.path.exists(imgdir):
mainwin = viewThumbs(imgdir, kind=Tk)
else:
mainwin = Tk()
mainwin.title(appname + 'Open')
handler = lambda: onDirectoryOpen(None)
Button(mainwin, text='Open Image Directory', command=handler).pack()
mainwin.mainloop()
PyView: An Image and Notes Slideshow
A picture may be worth a thousand words, but it takes considerably fewer to display
one with Python. The next program, PyView, implements a simple photo slideshow
program in portable Python/tkinter code. It doesn’t have any image-processing abilities
such as PyPhoto’s resizing, but it does provide different tools, such as image note files,
and it can be run without the optional PIL extension.
Running PyView
PyView pulls together many of the topics we studied in Chapter 9: it uses after events
to sequence a slideshow, displays image objects in an automatically sized canvas, and
so on. Its main window displays a photo on a canvas; users can either open and view
a photo directly or start a slideshow mode that picks and displays a random photo from
a directory at regular intervals specified with a scale widget.
By default, PyView slideshows show images in the book’s image file directory (though
the Open button allows you to load images in arbitrary directories). To view other sets
of photos, either pass a directory name in as a first command-line argument or change
the default directory name in the script itself. I can’t show you a slideshow in action
here, but I can show you the main window in general. Figure 11-12 shows the main
PyView: An Image and Notes Slideshow | 727
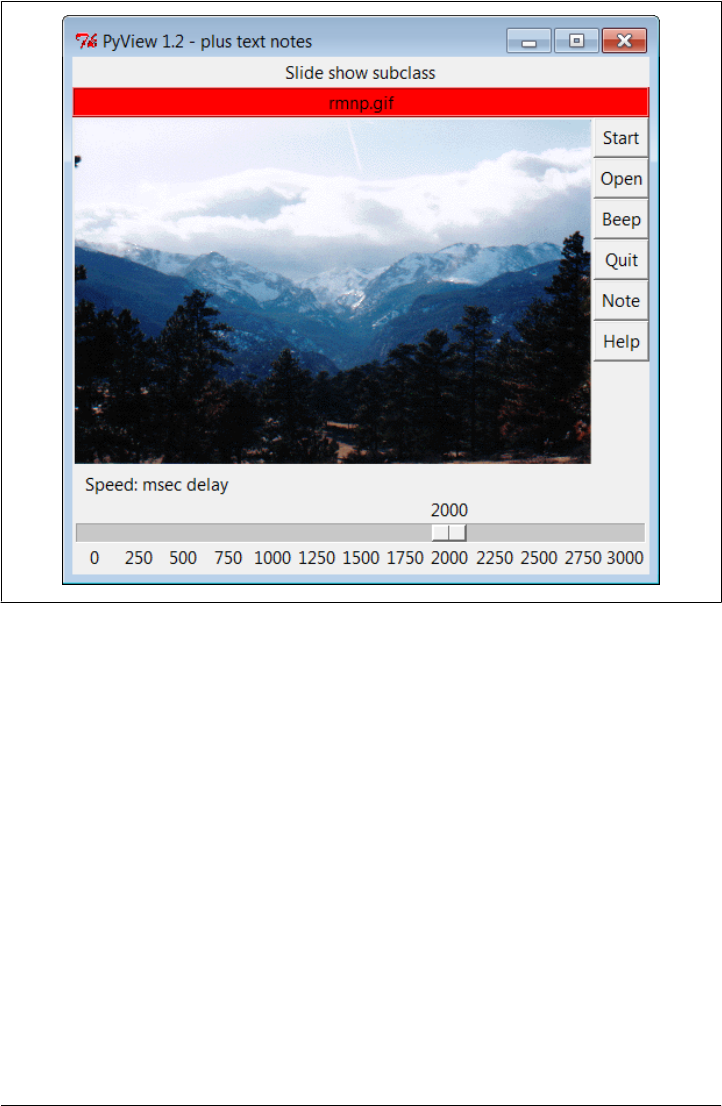
PyView window’s default display on Windows 7, created by running the slideShow-
Plus.py script we’ll see in Example 11-6 ahead.
Though it’s not obvious as rendered in this book, the black-on-red label at the top gives
the pathname of the photo file displayed. For a good time, move the slider at the bottom
all the way over to “0” to specify no delay between photo changes, and then click Start
to begin a very fast slideshow. If your computer is at least as fast as mine, photos flip
by much too fast to be useful for anything but subliminal advertising. Slideshow photos
are loaded on startup to retain references to them (remember, you must hold on to
image objects). But the speed with which large GIFs can be thrown up in a window in
Python is impressive, if not downright exhilarating.
The GUI’s Start button changes to a Stop button during a slideshow (its text attribute
is reset with the widget config method). Figure 11-13 shows the scene after pressing
Stop at an opportune moment.
In addition, each photo can have an associated “notes” text file that is automatically
opened along with the image. You can use this feature to record basic information about
the photo. Press the Note button to open an additional set of widgets that let you view
Figure 11-12. PyView without notes
728 | Chapter 11: Complete GUI Programs
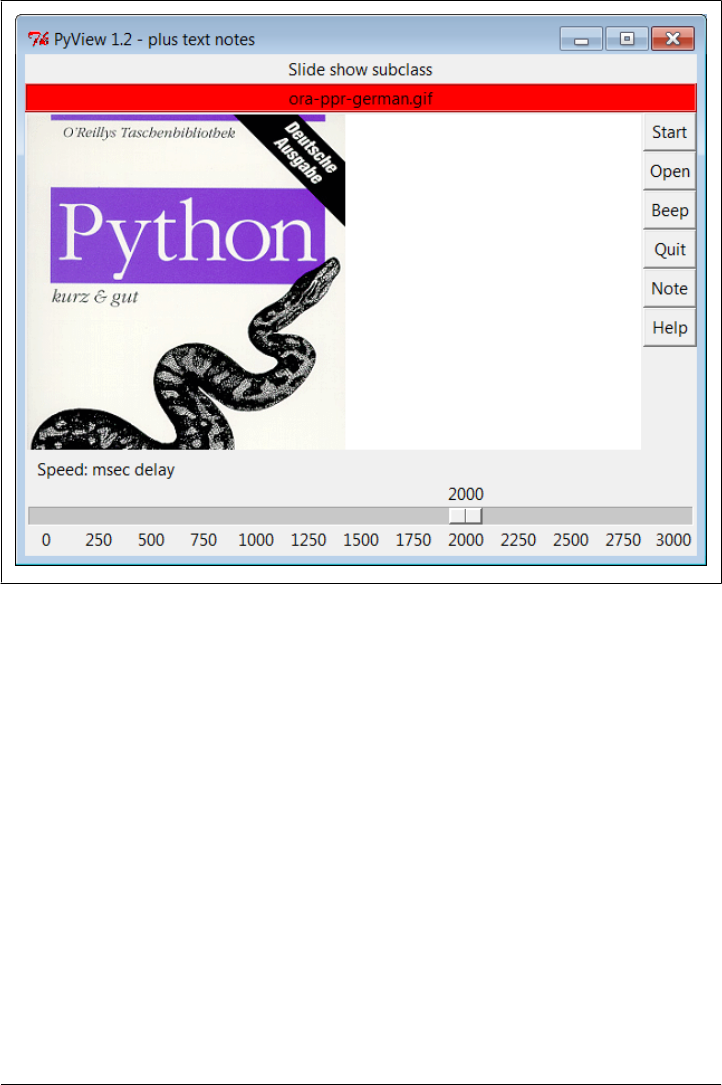
and change the note file associated with the currently displayed photo. This additional
set of widgets should look familiar—the PyEdit text editor from earlier in this chapter
is attached to PyView in a variety of selectable modes to serve as a display and editing
widget for photo notes. Figure 11-14 shows PyView with the attached PyEdit note-
editing component opened (I resized the window a bit interactively for presentation
here).
Embedding PyEdit in PyView
This makes for a very big window, usually best viewed maximized (taking up the entire
screen). The main thing to notice, though, is the lower-right corner of this display,
above the scale—it’s simply an attached PyEdit object, running the very same code
listed in the earlier section. Because PyEdit is implemented as a GUI class, it can be
reused like this in any GUI that needs a text-editing interface.
When embedded this way, PyEdit is a nested frame attached to a slideshow frame. Its
menus are based on a frame (it doesn’t own the window at large), text content is stored
and fetched directly by the enclosing program, and some standalone options are
Figure 11-13. PyView after stopping a slideshow
PyView: An Image and Notes Slideshow | 729
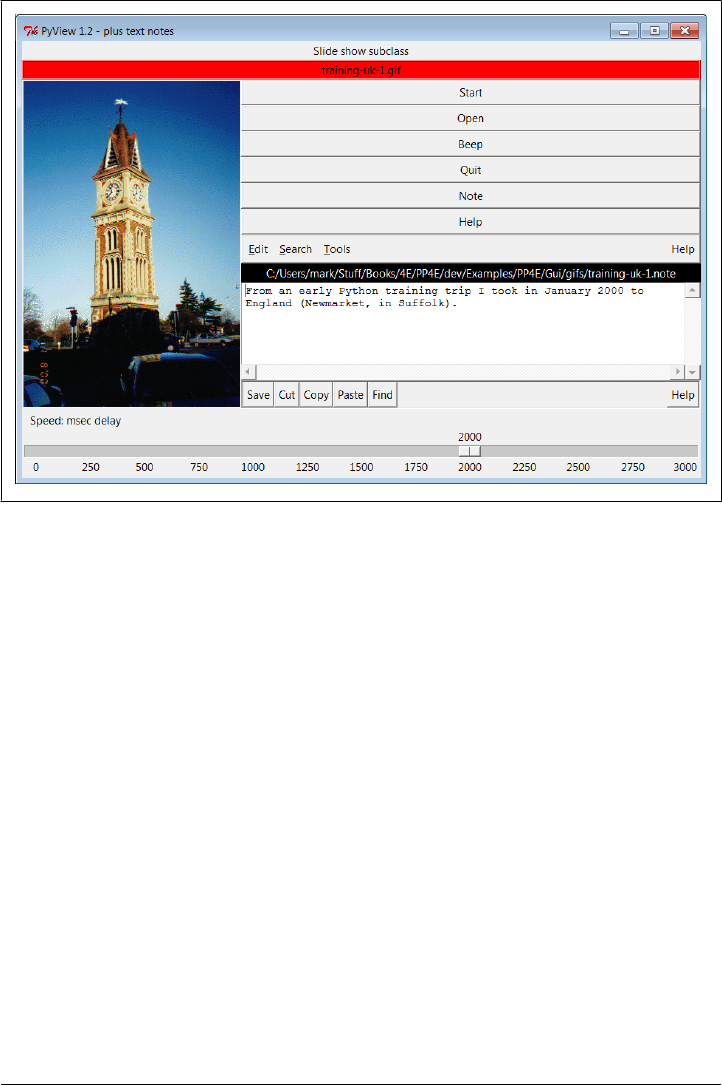
omitted (e.g., the File pull down menu and Quit button are gone). On the other hand,
you get all of the rest of PyEdit’s functionality, including cut and paste, search and
replace, grep to search external files, colors and fonts, undo and redo, and so on. Even
the Clone option works here to open a new edit window, albeit making a frame-based
menu without a Quit or File pull down, and which doesn’t test for changes on exit—
a usage mode that could be tightened up with a new PyEdit top-level component class
if desired.
For variety, if you pass a third command-line argument to PyView after the image
directory name, it uses it as an index into a list of PyEdit top-level mode classes. An
argument of 0 uses the main window mode, which places the note editor below the
image and a window menu at top (its Frame is packed into the window’s remaining
space, not the slide show frame); 1 pops up the note editor as a separate, independent
Toplevel window (disabled when notes are turned off); 2 and 3 run PyEdit as an em-
bedded component nested in the slide show frame, with Frame menus (2 includes all
menu options which may or may not be appropriate in this role, and 3 is the default
limited options mode).
Figure 11-15 captures option 0, PyEdit’s main window mode; there are really two in-
dependent frames on the window here—a slideshow on top and a text editor on bot-
tom. The disadvantage of this over nested component or pop-up window modes is that
Figure 11-14. PyView with notes
730 | Chapter 11: Complete GUI Programs
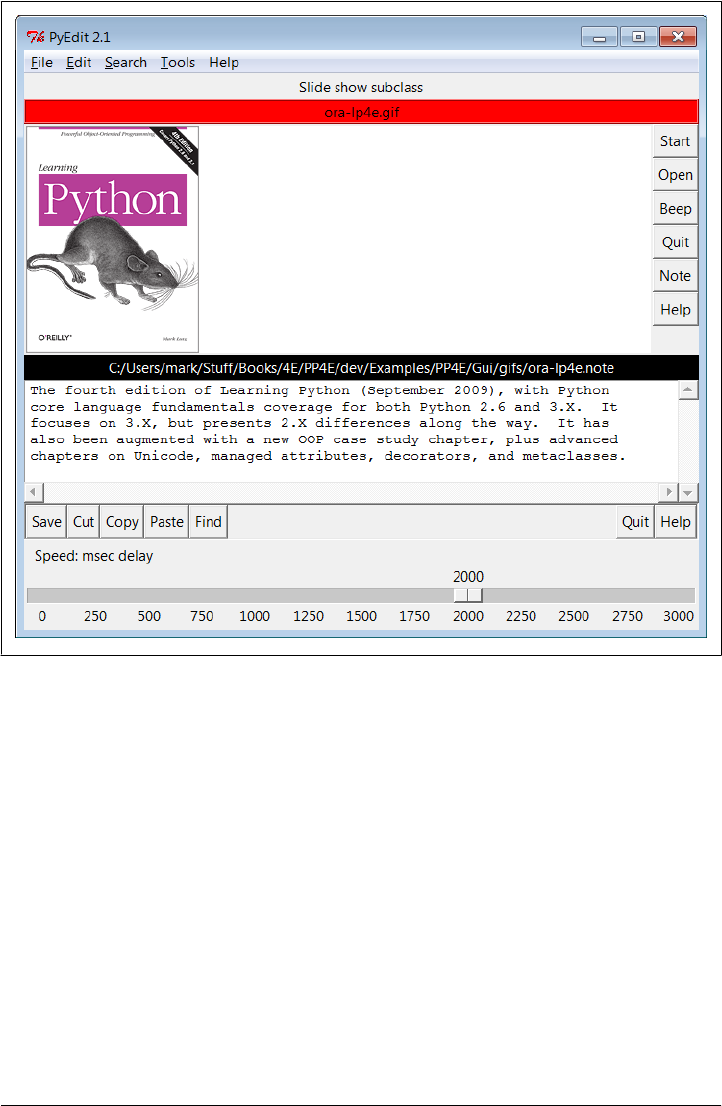
PyEdit really does assume control of the program’s window (including its title and
window manager close button), and packing the note editor at the bottom means it
might not appear for tall images. Run this on your own to sample the other PyEdit
flavors, with a command line of this form:
C:\...\PP4E\Gui\SlideShow> slideShowPlus.py ../gifs 0
The note file viewer appears only if you press the Note button, and it is erased if you
press it again—PyView uses the widget pack and pack_forget methods introduced near
the end of Chapter 9 to show and hide the note viewer frame. The window automati-
cally expands to accommodate the note viewer when it is packed and displayed. Note
that it’s important that the note editor be repacked with expand=YES and fill=BOTH when
it’s unhidden, or else it won’t expand in some modes; PyEdit’s frame packs itself this
way in GuiMaker when first made, but pack_forget appears to, well…forget.
It is also possible to open the note file in a PyEdit pop-up window, but PyView embeds
the editor by default to retain a direct visual association and avoid issues if the pop up
Figure 11-15. PyView other PyEdit notes
PyView: An Image and Notes Slideshow | 731

is destroyed independently. As is, this program must wrap the PyEdit classes with its
WrapEditor in order to catch independent destroys of the PyEdit frame when it is run
in either pop-up window or full-option component modes—the note editor can no
longer be accessed or repacked once it’s destroyed. This isn’t an issue in main window
mode (Quit ends the program) or the default minimal component mode (the editor has
no Quit). Watch for PyEdit to show up embedded as a component like this within
another GUI when we meet PyMailGUI in Chapter 14.
A caveat here: out of the box, PyView supports as many photo formats as tkinter’s
PhotoImage object does; that’s why it looks for GIF files by default. You can improve
this by installing the PIL extension to view JPEGs (and many others). But because PIL
is an optional extension today, it’s not incorporated into this PyView release. See the
end of Chapter 8 for more on PIL and image formats.
PyView Source Code
Because the PyView program was implemented in stages, you need to study the union
of two files and classes to understand how it truly works. One file implements a class
that provides core slideshow functionality; the other implements a class that extends
the original class, to add additional features on top of the core behavior. Let’s start with
the extension class: Example 11-6 adds a set of features to an imported slideshow base
class—note editing, a delay scale and file label, and so on. This is the file that is actually
run to start PyView.
Example 11-6. PP4E\Gui\SlideShow\slideShowPlus.py
"""
#############################################################################
PyView 1.2: an image slide show with associated text notes.
SlideShow subclass which adds note files with an attached PyEdit object,
a scale for setting the slideshow delay interval, and a label that gives
the name of the image file currently being displayed;
Version 1.2 is a Python 3.x port, but also improves repacking note for
expansion when it's unhidden, catches note destroys in a subclass to avoid
exceptions when popup window or full component editor has been closed,
and runs update() before inserting text into newly packed note so it is
positioned correctly at line 1 (see the book's coverage of PyEdit updates).
#############################################################################
"""
import os
from tkinter import *
from PP4E.Gui.TextEditor.textEditor import *
from slideShow import SlideShow
#from slideShow_threads import SlideShow
Size = (300, 550) # 1.2: start shorter here, (h, w)
class SlideShowPlus(SlideShow):
732 | Chapter 11: Complete GUI Programs

def __init__(self, parent, picdir, editclass, msecs=2000, size=Size):
self.msecs = msecs
self.editclass = editclass
SlideShow.__init__(self, parent, picdir, msecs, size)
def makeWidgets(self):
self.name = Label(self, text='None', bg='red', relief=RIDGE)
self.name.pack(fill=X)
SlideShow.makeWidgets(self)
Button(self, text='Note', command=self.onNote).pack(fill=X)
Button(self, text='Help', command=self.onHelp).pack(fill=X)
s = Scale(label='Speed: msec delay', command=self.onScale,
from_=0, to=3000, resolution=50, showvalue=YES,
length=400, tickinterval=250, orient='horizontal')
s.pack(side=BOTTOM, fill=X)
s.set(self.msecs)
# 1.2: need to know if editor destroyed, in popup or full component modes
self.editorGone = False
class WrapEditor(self.editclass): # extend PyEdit class to catch Quit
def onQuit(editor): # editor is PyEdit instance arg subject
self.editorGone = True # self is slide show in enclosing scope
self.editorUp = False
self.editclass.onQuit(editor) # avoid recursion
# attach editor frame to window or slideshow frame
if issubclass(WrapEditor, TextEditorMain): # make editor now
self.editor = WrapEditor(self.master) # need root for menu
else:
self.editor = WrapEditor(self) # embedded or pop-up
self.editor.pack_forget() # hide editor initially
self.editorUp = self.image = None
def onStart(self):
SlideShow.onStart(self)
self.config(cursor='watch')
def onStop(self):
SlideShow.onStop(self)
self.config(cursor='hand2')
def onOpen(self):
SlideShow.onOpen(self)
if self.image:
self.name.config(text=os.path.split(self.image[0])[1])
self.config(cursor='crosshair')
self.switchNote()
def quit(self):
self.saveNote()
SlideShow.quit(self)
def drawNext(self):
SlideShow.drawNext(self)
if self.image:
PyView: An Image and Notes Slideshow | 733

self.name.config(text=os.path.split(self.image[0])[1])
self.loadNote()
def onScale(self, value):
self.msecs = int(value)
def onNote(self):
if self.editorGone: # 1.2: has been destroyed
return # don't rebuild: assume unwanted
if self.editorUp:
#self.saveNote() # if editor already open
self.editor.pack_forget() # save text?, hide editor
self.editorUp = False
else:
# 1.2: repack for expansion again, else won't expand now
# 1.2: update between pack and insert, else @ line 2 initially
self.editor.pack(side=TOP, expand=YES, fill=BOTH)
self.editorUp = True # else unhide/pack editor
self.update() # see Pyedit: same as loadFirst issue
self.loadNote() # and load image note text
def switchNote(self):
if self.editorUp:
self.saveNote() # save current image's note
self.loadNote() # load note for new image
def saveNote(self):
if self.editorUp:
currfile = self.editor.getFileName() # or self.editor.onSave()
currtext = self.editor.getAllText() # but text may be empty
if currfile and currtext:
try:
open(currfile, 'w').write(currtext)
except:
pass # failure may be normal if run off a cd
def loadNote(self):
if self.image and self.editorUp:
root, ext = os.path.splitext(self.image[0])
notefile = root + '.note'
self.editor.setFileName(notefile)
try:
self.editor.setAllText(open(notefile).read())
except:
self.editor.clearAllText() # might not have a note
def onHelp(self):
showinfo('About PyView',
'PyView version 1.2\nMay, 2010\n(1.1 July, 1999)\n'
'An image slide show\nProgramming Python 4E')
if __name__ == '__main__':
import sys
picdir = '../gifs'
if len(sys.argv) >= 2:
734 | Chapter 11: Complete GUI Programs

picdir = sys.argv[1]
editstyle = TextEditorComponentMinimal
if len(sys.argv) == 3:
try:
editstyle = [TextEditorMain,
TextEditorMainPopup,
TextEditorComponent,
TextEditorComponentMinimal][int(sys.argv[2])]
except: pass
root = Tk()
root.title('PyView 1.2 - plus text notes')
Label(root, text="Slide show subclass").pack()
SlideShowPlus(parent=root, picdir=picdir, editclass=editstyle)
root.mainloop()
The core functionality extended by SlideShowPlus lives in Example 11-7. This was the
initial slideshow implementation; it opens images, displays photos, and cycles through
a slideshow. You can run it by itself, but you won’t get advanced features such as notes
and sliders added by the SlideShowPlus subclass.
Example 11-7. PP4E\Gui\SlideShow\slideShow.py
"""
######################################################################
SlideShow: a simple photo image slideshow in Python/tkinter;
the base feature set coded here can be extended in subclasses;
######################################################################
"""
from tkinter import *
from glob import glob
from tkinter.messagebox import askyesno
from tkinter.filedialog import askopenfilename
import random
Size = (450, 450) # canvas height, width at startup and slideshow start
imageTypes = [('Gif files', '.gif'), # for file open dialog
('Ppm files', '.ppm'), # plus jpg with a Tk patch,
('Pgm files', '.pgm'), # plus bitmaps with BitmapImage
('All files', '*')]
class SlideShow(Frame):
def __init__(self, parent=None, picdir='.', msecs=3000, size=Size, **args):
Frame.__init__(self, parent, **args)
self.size = size
self.makeWidgets()
self.pack(expand=YES, fill=BOTH)
self.opens = picdir
files = []
for label, ext in imageTypes[:-1]:
files = files + glob('%s/*%s' % (picdir, ext))
self.images = [(x, PhotoImage(file=x)) for x in files]
self.msecs = msecs
PyView: An Image and Notes Slideshow | 735

self.beep = True
self.drawn = None
def makeWidgets(self):
height, width = self.size
self.canvas = Canvas(self, bg='white', height=height, width=width)
self.canvas.pack(side=LEFT, fill=BOTH, expand=YES)
self.onoff = Button(self, text='Start', command=self.onStart)
self.onoff.pack(fill=X)
Button(self, text='Open', command=self.onOpen).pack(fill=X)
Button(self, text='Beep', command=self.onBeep).pack(fill=X)
Button(self, text='Quit', command=self.onQuit).pack(fill=X)
def onStart(self):
self.loop = True
self.onoff.config(text='Stop', command=self.onStop)
self.canvas.config(height=self.size[0], width=self.size[1])
self.onTimer()
def onStop(self):
self.loop = False
self.onoff.config(text='Start', command=self.onStart)
def onOpen(self):
self.onStop()
name = askopenfilename(initialdir=self.opens, filetypes=imageTypes)
if name:
if self.drawn: self.canvas.delete(self.drawn)
img = PhotoImage(file=name)
self.canvas.config(height=img.height(), width=img.width())
self.drawn = self.canvas.create_image(2, 2, image=img, anchor=NW)
self.image = name, img
def onQuit(self):
self.onStop()
self.update()
if askyesno('PyView', 'Really quit now?'):
self.quit()
def onBeep(self):
self.beep = not self.beep # toggle, or use ^ 1
def onTimer(self):
if self.loop:
self.drawNext()
self.after(self.msecs, self.onTimer)
def drawNext(self):
if self.drawn: self.canvas.delete(self.drawn)
name, img = random.choice(self.images)
self.drawn = self.canvas.create_image(2, 2, image=img, anchor=NW)
self.image = name, img
if self.beep: self.bell()
self.canvas.update()
736 | Chapter 11: Complete GUI Programs
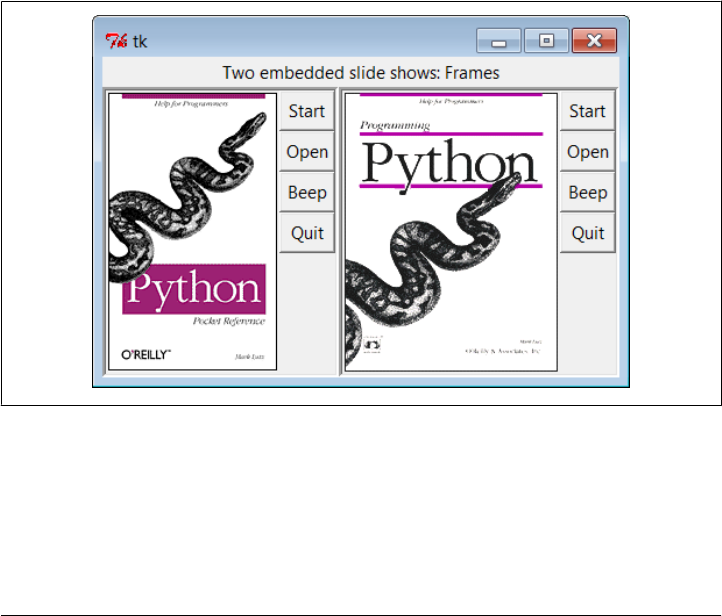
if __name__ == '__main__':
import sys
if len(sys.argv) == 2:
picdir = sys.argv[1]
else:
picdir = '../gifs'
root = Tk()
root.title('PyView 1.2')
root.iconname('PyView')
Label(root, text="Python Slide Show Viewer").pack()
SlideShow(root, picdir=picdir, bd=3, relief=SUNKEN)
root.mainloop()
To give you a better idea of what this core base class implements, Figure 11-16 shows
what it looks like if run by itself—actually, two copies run by themselves by a script
called slideShow_frames, which is in this book’s examples distribution, and whose main
code looks like this:
root = Tk()
Label(root, text="Two embedded slide shows: Frames").pack()
SlideShow(parent=root, picdir=picdir, bd=3, relief=SUNKEN).pack(side=LEFT)
SlideShow(parent=root, picdir=picdir, bd=3, relief=SUNKEN).pack(side=RIGHT)
root.mainloop()
Figure 11-16. Two attached SlideShow objects
The simple slideShow_frames scripts attach two instances of SlideShow to a single win-
dow—a feat possible only because state information is recorded in class instance var-
iables, not in globals. The slideShow_toplevels script (also in the book’s examples
distribution) attaches two SlideShows to two top-level pop-up windows instead. In both
PyView: An Image and Notes Slideshow | 737

cases, the slideshows run independently but are based on after events fired from the
same single event loop in a single process.
PyDraw: Painting and Moving Graphics
Chapter 9 introduced simple tkinter animation techniques (see the tour’s canvasDraw
variants). The PyDraw program listed here builds upon those ideas to implement a
more feature-rich painting program in Python. It adds new trails and scribble drawing
modes, object and background color fills, embedded photos, and more. In addition, it
implements object movement and animation techniques—drawn objects may be
moved around the canvas by clicking and dragging, and any drawn object can be grad-
ually moved across the screen to a target location clicked with the mouse.
Running PyDraw
PyDraw is essentially a tkinter canvas with keyboard and mouse event bindings to allow
users to perform common drawing operations. This isn’t a professional-grade paint
program, but it’s fun to play with. In fact, you really should—it is impossible to capture
things such as object motion in this book. Start PyDraw from the launcher bars (or run
the file movingpics.py from Example 11-8 directly). Press the ? key to view a help mes-
sage giving available commands (or read the help string in the code listings).
Figure 11-17 shows PyDraw after a few objects have been drawn on the canvas. To
move any object shown here, either click it with the middle mouse button and drag to
move it with the mouse cursor, or middle-click the object, and then right-click in the
spot you want it to move toward. In the latter case, PyDraw performs an animated
(gradual) movement of the object to the target spot. Try this on the picture shown near
the top of the figure—it will slowly move across your display.
Press “p” to insert photos, and use left-button drags to draw shapes. (Note to Windows
users: middle-click is often either both mouse buttons at once or a scroll wheel, but
you may need to configure this in your control panel.) In addition to mouse events,
there are 17 key-press commands for tailoring sketches that I won’t cover here. It takes
a while to get the hang of what all the keyboard and mouse commands do, but once
you’ve mastered the bindings, you too can begin generating senseless electronic artwork
such as that in Figure 11-18.
PyDraw Source Code
Like PyEdit, PyDraw lives in a single file. Two extensions that customize motion im-
plementations are listed following the main module shown in Example 11-8.
738 | Chapter 11: Complete GUI Programs
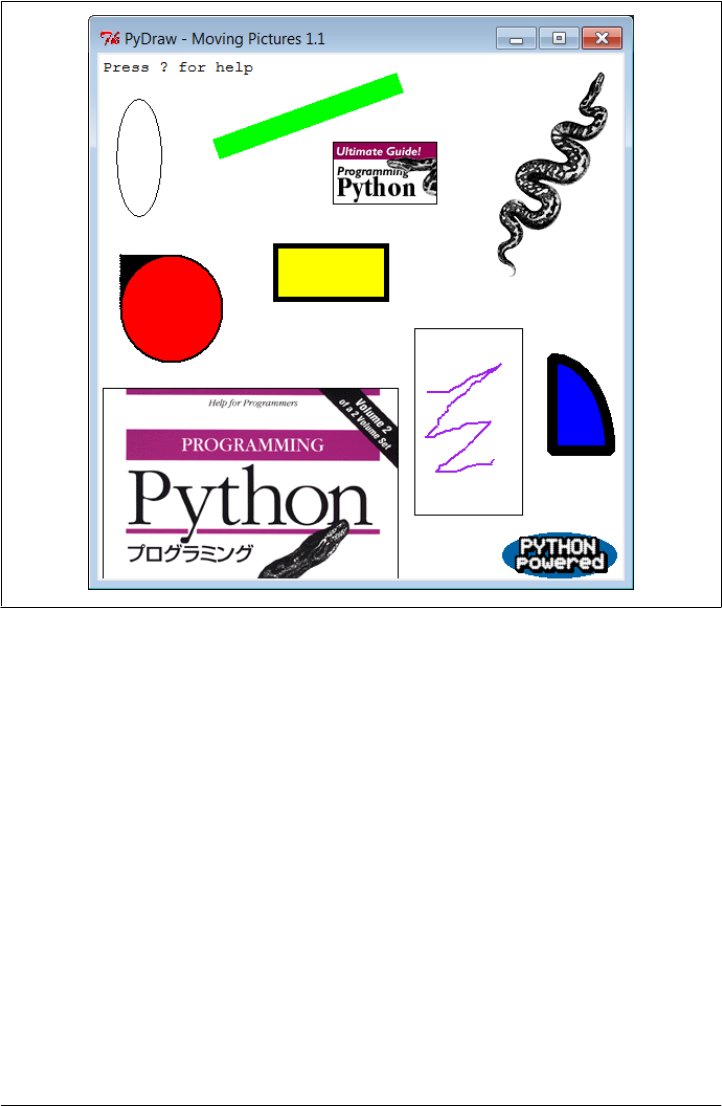
Example 11-8. PP4E\Gui\MovingPics\movingpics.py
"""
##############################################################################
PyDraw 1.1: simple canvas paint program and object mover/animator.
Uses time.sleep loops to implement object move loops, such that only
one move can be in progress at once; this is smooth and fast, but see
the widget.after and thread-based subclasses here for other techniques.
Version 1.1 has been updated to run under Python 3.X (2.X not supported)
##############################################################################
"""
helpstr = """--PyDraw version 1.1--
Mouse commands:
Left = Set target spot
Left+Move = Draw new object
Double Left = Clear all objects
Right = Move current object
Middle = Select closest object
Middle+Move = Drag current object
Figure 11-17. PyDraw with draw objects ready to be moved
PyDraw: Painting and Moving Graphics | 739
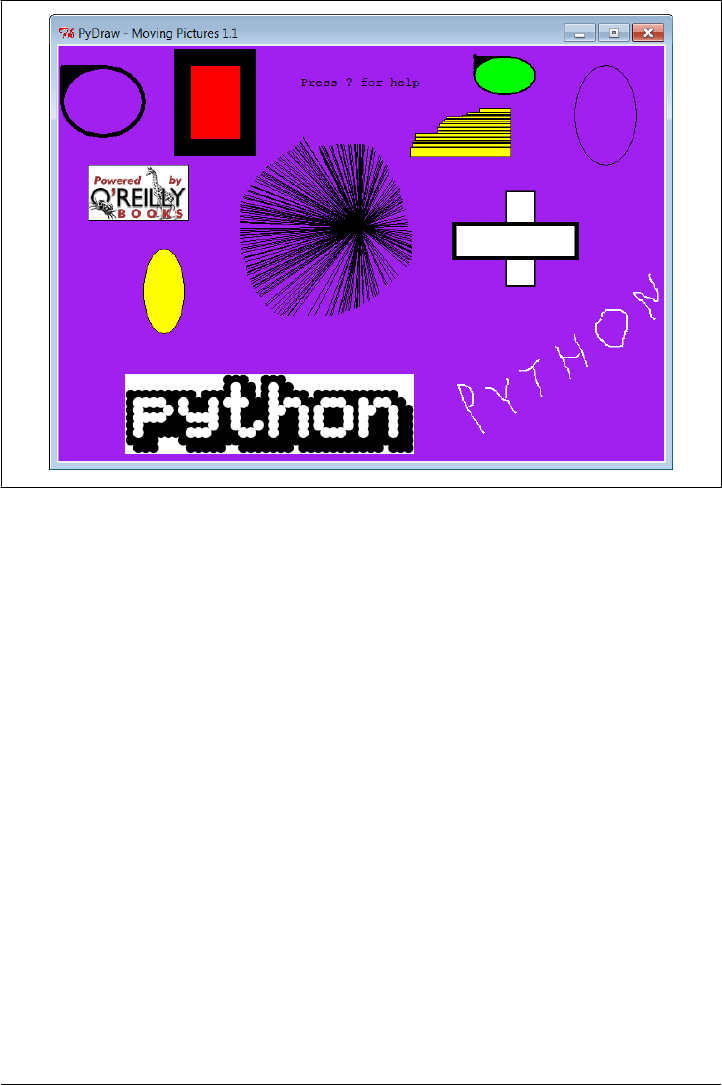
Keyboard commands:
w=Pick border width c=Pick color
u=Pick move unit s=Pick move delay
o=Draw ovals r=Draw rectangles
l=Draw lines a=Draw arcs
d=Delete object 1=Raise object
2=Lower object f=Fill object
b=Fill background p=Add photo
z=Save postscript x=Pick pen modes
?=Help other=clear text
"""
import time, sys
from tkinter import *
from tkinter.filedialog import *
from tkinter.messagebox import *
PicDir = '../gifs'
if sys.platform[:3] == 'win':
HelpFont = ('courier', 9, 'normal')
else:
HelpFont = ('courier', 12, 'normal')
pickDelays = [0.01, 0.025, 0.05, 0.10, 0.25, 0.0, 0.001, 0.005]
pickUnits = [1, 2, 4, 6, 8, 10, 12]
pickWidths = [1, 2, 5, 10, 20]
pickFills = [None,'white','blue','red','black','yellow','green','purple']
Figure 11-18. PyDraw after substantial play
740 | Chapter 11: Complete GUI Programs

pickPens = ['elastic', 'scribble', 'trails']
class MovingPics:
def __init__(self, parent=None):
canvas = Canvas(parent, width=500, height=500, bg= 'white')
canvas.pack(expand=YES, fill=BOTH)
canvas.bind('<ButtonPress-1>', self.onStart)
canvas.bind('<B1-Motion>', self.onGrow)
canvas.bind('<Double-1>', self.onClear)
canvas.bind('<ButtonPress-3>', self.onMove)
canvas.bind('<Button-2>', self.onSelect)
canvas.bind('<B2-Motion>', self.onDrag)
parent.bind('<KeyPress>', self.onOptions)
self.createMethod = Canvas.create_oval
self.canvas = canvas
self.moving = []
self.images = []
self.object = None
self.where = None
self.scribbleMode = 0
parent.title('PyDraw - Moving Pictures 1.1')
parent.protocol('WM_DELETE_WINDOW', self.onQuit)
self.realquit = parent.quit
self.textInfo = self.canvas.create_text(
5, 5, anchor=NW,
font=HelpFont,
text='Press ? for help')
def onStart(self, event):
self.where = event
self.object = None
def onGrow(self, event):
canvas = event.widget
if self.object and pickPens[0] == 'elastic':
canvas.delete(self.object)
self.object = self.createMethod(canvas,
self.where.x, self.where.y, # start
event.x, event.y, # stop
fill=pickFills[0], width=pickWidths[0])
if pickPens[0] == 'scribble':
self.where = event # from here next time
def onClear(self, event):
if self.moving: return # ok if moving but confusing
event.widget.delete('all') # use all tag
self.images = []
self.textInfo = self.canvas.create_text(
5, 5, anchor=NW,
font=HelpFont,
text='Press ? for help')
def plotMoves(self, event):
diffX = event.x - self.where.x # plan animated moves
diffY = event.y - self.where.y # horizontal then vertical
PyDraw: Painting and Moving Graphics | 741

reptX = abs(diffX) // pickUnits[0] # incr per move, number moves
reptY = abs(diffY) // pickUnits[0] # from last to event click
incrX = pickUnits[0] * ((diffX > 0) or −1) # 3.x // trunc div required
incrY = pickUnits[0] * ((diffY > 0) or −1)
return incrX, reptX, incrY, reptY
def onMove(self, event):
traceEvent('onMove', event, 0) # move current object to click
object = self.object # ignore some ops during mv
if object and object not in self.moving:
msecs = int(pickDelays[0] * 1000)
parms = 'Delay=%d msec, Units=%d' % (msecs, pickUnits[0])
self.setTextInfo(parms)
self.moving.append(object)
canvas = event.widget
incrX, reptX, incrY, reptY = self.plotMoves(event)
for i in range(reptX):
canvas.move(object, incrX, 0)
canvas.update()
time.sleep(pickDelays[0])
for i in range(reptY):
canvas.move(object, 0, incrY)
canvas.update() # update runs other ops
time.sleep(pickDelays[0]) # sleep until next move
self.moving.remove(object)
if self.object == object: self.where = event
def onSelect(self, event):
self.where = event
self.object = self.canvas.find_closest(event.x, event.y)[0] # tuple
def onDrag(self, event):
diffX = event.x - self.where.x # OK if object in moving
diffY = event.y - self.where.y # throws it off course
self.canvas.move(self.object, diffX, diffY)
self.where = event
def onOptions(self, event):
keymap = {
'w': lambda self: self.changeOption(pickWidths, 'Pen Width'),
'c': lambda self: self.changeOption(pickFills, 'Color'),
'u': lambda self: self.changeOption(pickUnits, 'Move Unit'),
's': lambda self: self.changeOption(pickDelays, 'Move Delay'),
'x': lambda self: self.changeOption(pickPens, 'Pen Mode'),
'o': lambda self: self.changeDraw(Canvas.create_oval, 'Oval'),
'r': lambda self: self.changeDraw(Canvas.create_rectangle, 'Rect'),
'l': lambda self: self.changeDraw(Canvas.create_line, 'Line'),
'a': lambda self: self.changeDraw(Canvas.create_arc, 'Arc'),
'd': MovingPics.deleteObject,
'1': MovingPics.raiseObject,
'2': MovingPics.lowerObject, # if only 1 call pattern
'f': MovingPics.fillObject, # use unbound method objects
'b': MovingPics.fillBackground, # else lambda passed self
'p': MovingPics.addPhotoItem,
'z': MovingPics.savePostscript,
742 | Chapter 11: Complete GUI Programs

'?': MovingPics.help}
try:
keymap[event.char](self)
except KeyError:
self.setTextInfo('Press ? for help')
def changeDraw(self, method, name):
self.createMethod = method # unbound Canvas method
self.setTextInfo('Draw Object=' + name)
def changeOption(self, list, name):
list.append(list[0])
del list[0]
self.setTextInfo('%s=%s' % (name, list[0]))
def deleteObject(self):
if self.object != self.textInfo: # ok if object in moving
self.canvas.delete(self.object) # erases but move goes on
self.object = None
def raiseObject(self):
if self.object: # ok if moving
self.canvas.tkraise(self.object) # raises while moving
def lowerObject(self):
if self.object:
self.canvas.lower(self.object)
def fillObject(self):
if self.object:
type = self.canvas.type(self.object)
if type == 'image':
pass
elif type == 'text':
self.canvas.itemconfig(self.object, fill=pickFills[0])
else:
self.canvas.itemconfig(self.object,
fill=pickFills[0], width=pickWidths[0])
def fillBackground(self):
self.canvas.config(bg=pickFills[0])
def addPhotoItem(self):
if not self.where: return
filetypes=[('Gif files', '.gif'), ('All files', '*')]
file = askopenfilename(initialdir=PicDir, filetypes=filetypes)
if file:
image = PhotoImage(file=file) # load image
self.images.append(image) # keep reference
self.object = self.canvas.create_image( # add to canvas
self.where.x, self.where.y, # at last spot
image=image, anchor=NW)
def savePostscript(self):
file = asksaveasfilename()
PyDraw: Painting and Moving Graphics | 743

if file:
self.canvas.postscript(file=file) # save canvas to file
def help(self):
self.setTextInfo(helpstr)
#showinfo('PyDraw', helpstr)
def setTextInfo(self, text):
self.canvas.dchars(self.textInfo, 0, END)
self.canvas.insert(self.textInfo, 0, text)
self.canvas.tkraise(self.textInfo)
def onQuit(self):
if self.moving:
self.setTextInfo("Can't quit while move in progress")
else:
self.realquit() # std wm delete: err msg if move in progress
def traceEvent(label, event, fullTrace=True):
print(label)
if fullTrace:
for atrr in dir(event):
if attr[:2] != '__':
print(attr, '=>', getattr(event, attr))
if __name__ == '__main__':
from sys import argv # when this file is executed
if len(argv) == 2: PicDir = argv[1] # '..' fails if run elsewhere
root = Tk() # make, run a MovingPics object
MovingPics(root)
root.mainloop()
As is, only one object can be in motion at a time—requesting an object move while one
is already in motion pauses the original till the new move is finished. Just as in Chap-
ter 9’s canvasDraw examples, though, we can add support for moving more than one
object at the same time with either after scheduled callback events or threads.
Example 11-9 shows a MovingPics subclass that codes the necessary customizations to
do parallel moves with after events. It allows any number of objects in the canvas,
including pictures, to be moving independently at once. Run this file directly to see the
difference; I could try to capture the notion of multiple objects in motion with a screen-
shot, but I would almost certainly fail.
Example 11-9. PP4E\Gui\MovingPics\movingpics_after.py
"""
PyDraw-after: simple canvas paint program and object mover/animator
use widget.after scheduled events to implement object move loops, such
that more than one can be in motion at once without having to use threads;
this does moves in parallel, but seems to be slower than time.sleep version;
see also canvasDraw in Tour: builds and passes the incX/incY list at once:
here, would be allmoves = ([(incrX, 0)] * reptX) + ([(0, incrY)] * reptY)
"""
744 | Chapter 11: Complete GUI Programs

from movingpics import *
class MovingPicsAfter(MovingPics):
def doMoves(self, delay, objectId, incrX, reptX, incrY, reptY):
if reptX:
self.canvas.move(objectId, incrX, 0)
reptX -= 1
else:
self.canvas.move(objectId, 0, incrY)
reptY -= 1
if not (reptX or reptY):
self.moving.remove(objectId)
else:
self.canvas.after(delay,
self.doMoves, delay, objectId, incrX, reptX, incrY, reptY)
def onMove(self, event):
traceEvent('onMove', event, 0)
object = self.object # move cur obj to click spot
if object:
msecs = int(pickDelays[0] * 1000)
parms = 'Delay=%d msec, Units=%d' % (msecs, pickUnits[0])
self.setTextInfo(parms)
self.moving.append(object)
incrX, reptX, incrY, reptY = self.plotMoves(event)
self.doMoves(msecs, object, incrX, reptX, incrY, reptY)
self.where = event
if __name__ == '__main__':
from sys import argv # when this file is executed
if len(argv) == 2:
import movingpics # not this module's global
movingpics.PicDir = argv[1] # and from* doesn't link names
root = Tk()
MovingPicsAfter(root)
root.mainloop()
To appreciate its operation, open this script’s window full screen and create some ob-
jects in its canvas by pressing “p” after an initial click to insert pictures, dragging out
shapes, and so on. Now, while one or more moves are in progress, you can start another
by middle-clicking on another object and right-clicking on the spot to which you want
it to move. It starts its journey immediately, even if other objects are in motion. Each
object’s scheduled after events are added to the same event loop queue and dispatched
by tkinter as soon as possible after a timer expiration.
If you run this subclass module directly, you might notice that movement isn’t quite
as fast or as smooth as in the original (depending on your machine, and the many layers
of software under Python), but multiple moves can overlap in time.
Example 11-10 shows how to achieve such parallelism with threads. This process
works, but as we learned in Chapters 9 and 10, updating GUIs in spawned threads is
generally a dangerous affair. On one of my machines, the movement that this script
implements with threads was a bit jerkier than the original version—perhaps a
PyDraw: Painting and Moving Graphics | 745

reflection of the overhead incurred for switching the interpreter (and CPU) between
multiple threads—but again, this can vary.
Example 11-10. PP4E\Gui\MovingPics\movingpics_threads.py
"""
PyDraw-threads: use threads to move objects; works okay on Windows
provided that canvas.update() not called by threads (else exits with
fatal errors, some objs start moving immediately after drawn, etc.);
at least some canvas method calls must be thread safe in tkinter;
this is less smooth than time.sleep, and is dangerous in general:
threads are best coded to update global vars, not change GUI;
"""
import _thread as thread, time, sys, random
from tkinter import Tk, mainloop
from movingpics import MovingPics, pickUnits, pickDelays
class MovingPicsThreaded(MovingPics):
def __init__(self, parent=None):
MovingPics.__init__(self, parent)
self.mutex = thread.allocate_lock()
import sys
#sys.setcheckinterval(0) # switch after each vm op: doesn't help
def onMove(self, event):
object = self.object
if object and object not in self.moving:
msecs = int(pickDelays[0] * 1000)
parms = 'Delay=%d msec, Units=%d' % (msecs, pickUnits[0])
self.setTextInfo(parms)
#self.mutex.acquire()
self.moving.append(object)
#self.mutex.release()
thread.start_new_thread(self.doMove, (object, event))
def doMove(self, object, event):
canvas = event.widget
incrX, reptX, incrY, reptY = self.plotMoves(event)
for i in range(reptX):
canvas.move(object, incrX, 0)
# canvas.update()
time.sleep(pickDelays[0]) # this can change
for i in range(reptY):
canvas.move(object, 0, incrY)
# canvas.update() # update runs other ops
time.sleep(pickDelays[0]) # sleep until next move
#self.mutex.acquire()
self.moving.remove(object)
if self.object == object: self.where = event
#self.mutex.release()
if __name__ == '__main__':
root = Tk()
746 | Chapter 11: Complete GUI Programs

MovingPicsThreaded(root)
mainloop()
PyClock: An Analog/Digital Clock Widget
One of the first things I always look for when exploring a new computer interface is a
clock. Because I spend so much time glued to computers, it’s essentially impossible for
me to keep track of the time unless it is right there on the screen in front of me (and
even then, it’s iffy). The next program, PyClock, implements such a clock widget in
Python. It’s not substantially different from the clock programs that you may be used
to seeing on the X Window System. Because it is coded in Python, though, this one is
both easily customized and fully portable among Windows, the X Window System,
and Macs, like all the code in this chapter. In addition to advanced GUI techniques,
this example demonstrates Python math and time module tools.
A Quick Geometry Lesson
Before I show you PyClock, though, let me provide a little background and a confession.
Quick—how do you plot points on a circle? This, along with time formats and events,
turns out to be a core concept in clock widget programs. To draw an analog clock face
on a canvas widget, you essentially need to be able to sketch a circle—the clock face
itself is composed of points on a circle, and the second, minute, and hour hands of the
clock are really just lines from a circle’s center out to a point on the circle. Digital clocks
are simpler to draw, but not much to look at.
Now the confession: when I started writing PyClock, I couldn’t answer the last para-
graph’s opening question. I had utterly forgotten the math needed to sketch out points
on a circle (as had most of the professional software developers I queried about this
magic formula). It happens. After going unused for a few decades, such knowledge
tends to be garbage collected. I finally was able to dust off a few neurons long enough
to code the plotting math needed, but it wasn’t my finest intellectual hour.‡
If you are in the same boat, I don’t have space to teach geometry in depth here, but I
can show you one way to code the point-plotting formulas in Python in simple terms.
Before tackling the more complex task of implementing a clock, I wrote the plotter
Gui script shown in Example 11-11 to focus on just the circle-plotting logic.
Its point function is where the circle logic lives—it plots the (X,Y) coordinates of a point
on the circle, given the relative point number, the total number of points to be placed
on the circle, and the circle’s radius (the distance from the circle’s center to the points
drawn upon it). It first calculates the point’s angle from the top by dividing 360 by the
‡ Lest that make software engineers seem too doltish, I should also note that I have been called on repeatedly
to teach Python programming to physicists, all of whom had mathematical training well in advance of my
own, and many of whom were still happily abusing FORTRAN common blocks and go-tos. Specialization
in modern society can make novices of us all.
PyClock: An Analog/Digital Clock Widget | 747

number of points to be plotted, and then multiplying by the point number; in case
you’ve forgotten too, it’s 360 degrees around the whole circle (e.g., if you plot 4 points
on a circle, each is 90 degrees from the last, or 360/4). Python’s standard math module
gives all the required constants and functions from that point forward—pi, sine, and
cosine. The math is really not too obscure if you study this long enough (in conjunction
with your old geometry text if necessary). There are alternative ways to code the number
crunching, but I’ll skip the details here (see the examples package for hints).
Even if you don’t care about the math, though, check out Example 11-11’s circle
function. Given the (X,Y) coordinates of a point on the circle returned by point, it draws
a line from the circle’s center out to the point and a small rectangle around the point
itself—not unlike the hands and points of an analog clock. Canvas tags are used to
associate drawn objects for deletion before each plot.
Example 11-11. PP4E\Gui\Clock\plotterGui.py
# plot circles on a canvas
import math, sys
from tkinter import *
def point(tick, range, radius):
angle = tick * (360.0 / range)
radiansPerDegree = math.pi / 180
pointX = int( round( radius * math.sin(angle * radiansPerDegree) ))
pointY = int( round( radius * math.cos(angle * radiansPerDegree) ))
return (pointX, pointY)
def circle(points, radius, centerX, centerY, slow=0):
canvas.delete('lines')
canvas.delete('points')
for i in range(points):
x, y = point(i+1, points, radius-4)
scaledX, scaledY = (x + centerX), (centerY - y)
canvas.create_line(centerX, centerY, scaledX, scaledY, tag='lines')
canvas.create_rectangle(scaledX-2, scaledY-2,
scaledX+2, scaledY+2,
fill='red', tag='points')
if slow: canvas.update()
def plotter(): # 3.x // trunc div
circle(scaleVar.get(), (Width // 2), originX, originY, checkVar.get())
def makewidgets():
global canvas, scaleVar, checkVar
canvas = Canvas(width=Width, height=Width)
canvas.pack(side=TOP)
scaleVar = IntVar()
checkVar = IntVar()
scale = Scale(label='Points on circle', variable=scaleVar, from_=1, to=360)
scale.pack(side=LEFT)
Checkbutton(text='Slow mode', variable=checkVar).pack(side=LEFT)
Button(text='Plot', command=plotter).pack(side=LEFT, padx=50)
748 | Chapter 11: Complete GUI Programs

if __name__ == '__main__':
Width = 500 # default width, height
if len(sys.argv) == 2: Width = int(sys.argv[1]) # width cmdline arg?
originX = originY = Width // 2 # same as circle radius
makewidgets() # on default Tk root
mainloop() # need 3.x // trunc div
The circle defaults to 500 pixels wide unless you pass a width on the command line.
Given a number of points on a circle, this script marks out the circle in clockwise order
every time you press Plot, by drawing lines out from the center to small rectangles at
points on the circle’s shape. Move the slider to plot a different number of points and
click the checkbox to make the drawing happen slow enough to notice the clockwise
order in which lines and points are drawn (this forces the script to update the display
after each line is drawn). Figure 11-19 shows the result for plotting 120 points with the
circle width set to 400 on the command line; if you ask for 60 and 12 points on the
circle, the relationship to clock faces and hands starts becoming clearer.
Figure 11-19. plotterGui in action
PyClock: An Analog/Digital Clock Widget | 749

For more help, this book’s examples distribution also includes text-based versions of
this plotting script that print circle point coordinates to the stdout stream for review,
instead of rendering them in a GUI. See the plotterText.py scripts in the clock’s
directory. Here is the sort of output they produce when plotting 4 and 12 points on a
circle that is 400 points wide and high; the output format is simply:
pointnumber : angle = (Xcoordinate, Ycoordinate)
and assumes that the circle is centered at coordinate (0,0):
----------
1 : 90.0 = (200, 0)
2 : 180.0 = (0, −200)
3 : 270.0 = (−200, 0)
4 : 360.0 = (0, 200)
----------
1 : 30.0 = (100, 173)
2 : 60.0 = (173, 100)
3 : 90.0 = (200, 0)
4 : 120.0 = (173, −100)
5 : 150.0 = (100, −173)
6 : 180.0 = (0, −200)
7 : 210.0 = (−100, −173)
8 : 240.0 = (−173, −100)
9 : 270.0 = (−200, 0)
10 : 300.0 = (−173, 100)
11 : 330.0 = (−100, 173)
12 : 360.0 = (0, 200)
----------
Numeric Python Tools
If you do enough number crunching to have followed this section’s abbreviated geom-
etry lesson, you will probably also be interested in exploring the NumPy numeric pro-
gramming extension for Python. It adds things such as vector objects and advanced
mathematical operations, effectively turning Python into a scientific/numeric program-
ming tool that supports efficient numerical array computations, and it has been com-
pared to MatLab. NumPy has been used effectively by many organizations, including
Lawrence Livermore and Los Alamos National Labs—in many cases, allowing Python
with NumPy to replace legacy FORTRAN code.
NumPy must be fetched and installed separately; see Python’s website for links. On the
web, you’ll also find related numeric tools (e.g., SciPy), as well as visualization and 3-
D animation tools (e.g., PyOpenGL, Blender, Maya, vtk, and VPython). At this writing,
NumPy (like the many numeric packages that depend upon it) is officially available for
Python 2.X only, but a version that supports both versions 2.X and 3.X is in early
development release form. Besides the math module, Python itself also has a built-in
complex number type for engineering work, a fixed-precision decimal type added in
release 2.4, and a rational fraction type added in 2.6 and 3.0. See the library manual
and Python language fundamentals books such as Learning Python for details.
750 | Chapter 11: Complete GUI Programs

To understand how these points are mapped to a canvas, you first need to know that
the width and height of a circle are always the same—the radius × 2. Because tkinter
canvas (X,Y) coordinates start at (0,0) in the upper-left corner, the plotter GUI must
offset the circle’s center point to coordinates (width/2, width/2)—the origin point from
which lines are drawn. For instance, in a 400 × 400 circle, the canvas center is (200,200).
A line to the 90-degree angle point on the right side of the circle runs from (200,200)
to (400,200)—the result of adding the (200,0) point coordinates plotted for the radius
and angle. A line to the bottom at 180 degrees runs from (200,200) to (200,400) after
factoring in the (0,-200) point plotted.
This point-plotting algorithm used by plotterGui, along with a few scaling constants,
is at the heart of the PyClock analog display. If this still seems a bit much, I suggest you
focus on the PyClock script’s digital display implementation first; the analog geometry
plots are really just extensions of underlying timing mechanisms used for both display
modes. In fact, the clock itself is structured as a generic Frame object that embeds digital
and analog display objects and dispatches time change and resize events to both in the
same way. The analog display is an attached Canvas that knows how to draw circles,
but the digital object is simply an attached Frame with labels to show time components.
Running PyClock
Apart from the circle geometry bit, the rest of PyClock is straightforward. It simply
draws a clock face to represent the current time and uses widget after methods to wake
itself up 10 times per second to check whether the system time has rolled over to the
next second. On second rollovers, the analog second, minute, and hour hands are re-
drawn to reflect the new time (or the text of the digital display’s labels is changed). In
terms of GUI construction, the analog display is etched out on a canvas, redrawn
whenever the window is resized, and changes to a digital format upon request.
PyClock also puts Python’s standard time module into service to fetch and convert
system time information as needed for a clock. In brief, the onTimer method gets system
time with time.time, a built-in tool that returns a floating-point number giving seconds
since the epoch—the point from which your computer counts time. The time.local
time call is then used to convert epoch time into a tuple that contains hour, minute,
and second values; see the script and Python library manual for additional details.
Checking the system time 10 times per second may seem intense, but it guarantees that
the second hand ticks when it should, without jerks or skips (after events aren’t pre-
cisely timed). It is not a significant CPU drain on systems I use. On Linux and Windows,
PyClock uses negligible processor resources—what it does use is spent largely on screen
updates in analog display mode, not on after events.§
§ The PyDemos script of the preceding chapter, for instance, launches seven clocks that run in the same process,
and all update smoothly on my (relatively slow) Windows 7 netbook laptop. They together consume a low
single-digit percentage of the CPU’s bandwidth, and often less than the Task Manager.
PyClock: An Analog/Digital Clock Widget | 751
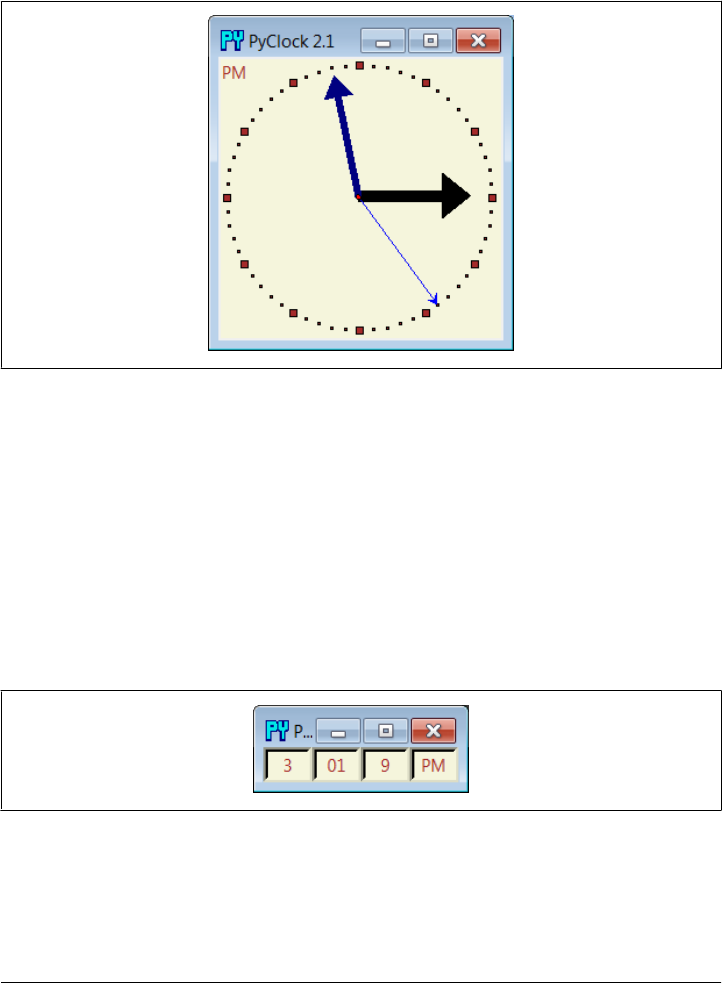
To minimize screen updates, PyClock redraws only clock hands on second rollovers;
points on the clock’s circle are redrawn only at startup and on window resizes. Fig-
ure 11-20 shows the default initial PyClock display format you get when the file
clock.py is run directly.
Figure 11-20. PyClock default analog display
The clock hand lines are given arrows at their endpoints with the canvas line object’s
arrow and arrowshape options. The arrow option can be first, last, none, or both; the
arrowshape option takes a tuple giving the length of the arrow touching the line, its
overall length, and its width.
Like PyView, PyClock also uses the widget pack_forget and pack methods to dynami-
cally erase and redraw portions of the display on demand (i.e., in response to bound
events). Clicking on the clock with a left mouse button changes its display to digital by
erasing the analog widgets and drawing the digital interface; you get the simpler display
captured in Figure 11-21.
Figure 11-21. PyClock goes digital
This digital display form is useful if you want to conserve real estate on your computer
screen and minimize PyClock CPU utilization (it incurs very little screen update over-
head). Left-clicking on the clock again changes back to the analog display. The analog
752 | Chapter 11: Complete GUI Programs
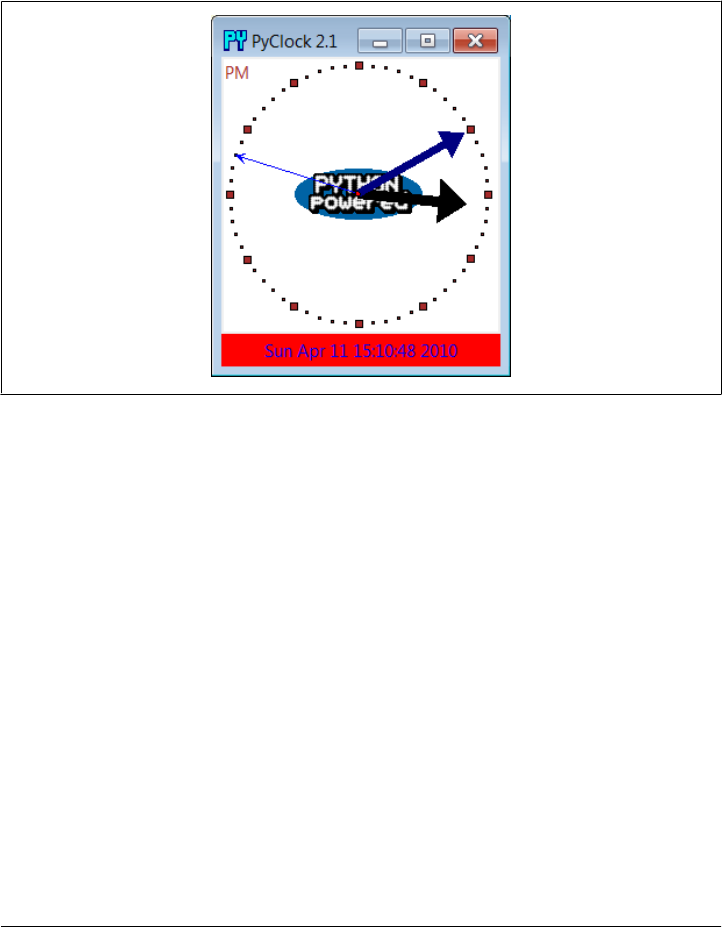
and digital displays are both constructed when the script starts, but only one is ever
packed at any given time.
A right mouse click on the clock in either display mode shows or hides an attached
label that gives the current date in simple text form. Figure 11-22 shows a PyClock
running with an analog display, a clicked-on date label, and a centered photo image
object (this is clock style started by the PyGadgets launcher):
Figure 11-22. PyClock extended display with an image
The image in the middle of Figure 11-22 is added by passing in a configuration object
with appropriate settings to the PyClock object constructor. In fact, almost everything
about this display can be customized with attributes in PyClock configuration
objects—hand colors, clock tick colors, center photos, and initial size.
Because PyClock’s analog display is based upon a manually sketched figure on a canvas,
it has to process window resize events itself: whenever the window shrinks or expands,
the clock face has to be redrawn and scaled for the new window size. To catch screen
resizes, the script registers for the <Configure> event with bind; surprisingly, this isn’t
a top-level window manager event like the Close button. As you expand a PyClock, the
clock face gets bigger with the window—try expanding, shrinking, and maximizing the
clock window on your computer. Because the clock face is plotted in a square coordi-
nate system, PyClock always expands in equal horizontal and vertical proportions,
though; if you simply make the window only wider or taller, the clock is unchanged.
Added in the third edition of this book is a countdown timer feature: press the “s” or
“m” key to pop up a simple dialog for entering the number of seconds or minutes for
the countdown, respectively. Once the countdown expires, the pop up in
Figure 11-23 appears and fills the entire screen on Windows. I sometimes use this in
PyClock: An Analog/Digital Clock Widget | 753
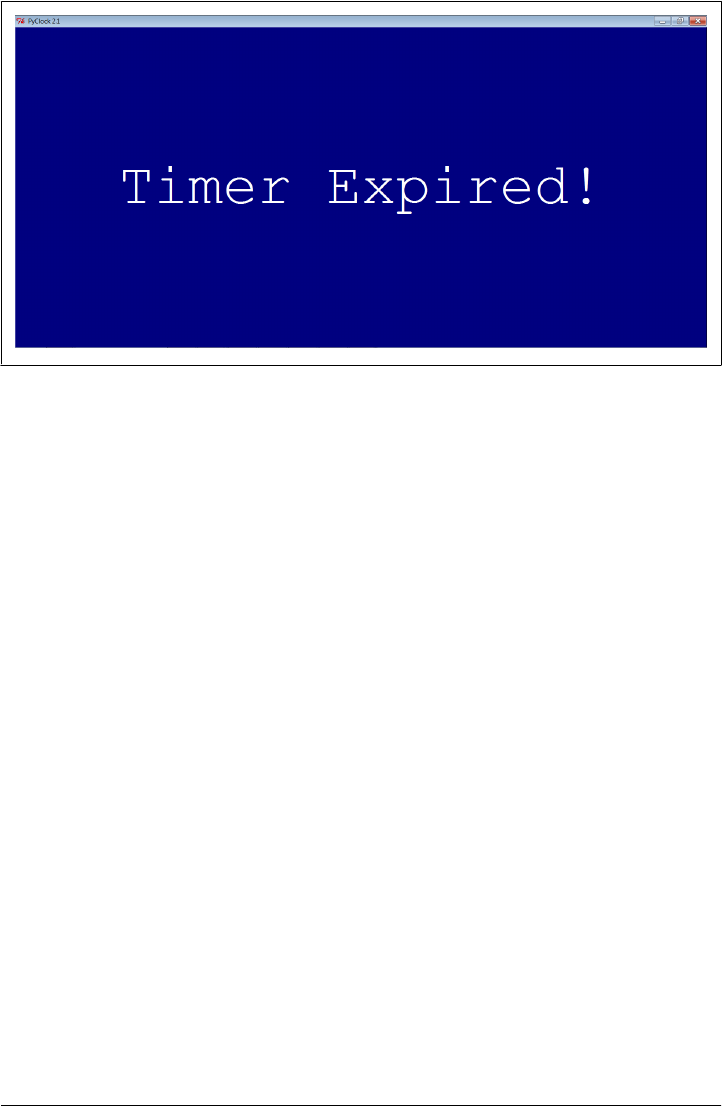
classes I teach to remind myself and my students when it’s time to move on (the effect
is more striking when this pop up is projected onto an entire wall!).
Finally, like PyEdit, PyClock can be run either standalone or attached to and embedded
in other GUIs that need to display the current time. When standalone, the windows
module from the preceding chapter (Example 10-16) is reused here to get a window
icon, title, and quit pop up for free. To make it easy to start preconfigured clocks, a
utility module called clockStyles provides a set of clock configuration objects you can
import, subclass to extend, and pass to the clock constructor; Figure 11-24 shows a
few of the preconfigured clock styles and sizes in action, ticking away in sync.
Run clockstyles.py (or select PyClock from PyDemos, which does the same) to recreate
this timely scene on your computer. Each of these clocks uses after events to check for
system-time rollover 10 times per second. When run as top-level windows in the same
process, all receive a timer event from the same event loop. When started as independ-
ent programs, each has an event loop of its own. Either way, their second hands sweep
in unison each second.
PyClock Source Code
All of the PyClock source code lives in one file, except for the precoded configuration
style objects. If you study the code at the bottom of the file shown in Example 11-12,
you’ll notice that you can either make a clock object with a configuration object passed
in or specify configuration options by command-line arguments such as the following
(in which case, the script simply builds a configuration object for you):
C:\...\PP4E\Gui\Clock> clock.py -bg gold -sh brown -size 300
Figure 11-23. PyClock countdown timer expired
754 | Chapter 11: Complete GUI Programs
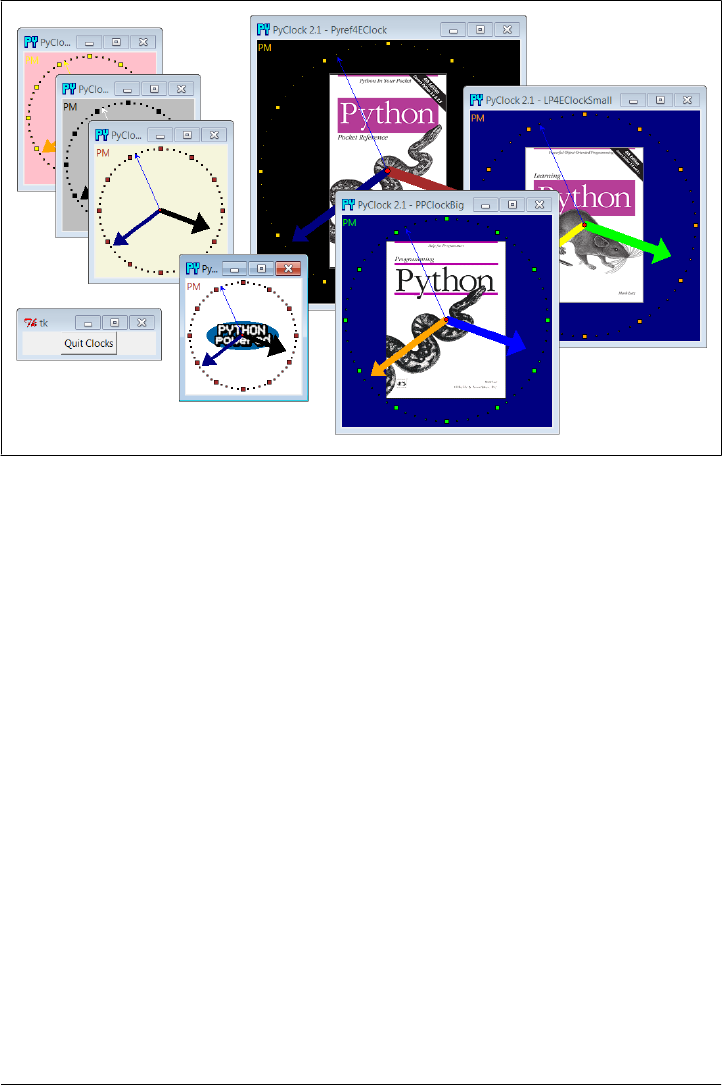
More generally, you can run this file directly to start a clock with or without arguments,
import and make its objects with configuration objects to get a more custom display,
or import and attach its objects to other GUIs. For instance, PyGadgets in Chap-
ter 10 runs this file with command-line options to tailor the display.
Example 11-12. PP4E\Gui\Clock\clock.py
"""
###############################################################################
PyClock 2.1: a clock GUI in Python/tkinter.
With both analog and digital display modes, a pop-up date label, clock face
images, general resizing, etc. May be run both standalone, or embedded
(attached) in other GUIs that need a clock.
New in 2.0: s/m keys set seconds/minutes timer for pop-up msg; window icon.
New in 2.1: updated to run under Python 3.X (2.X no longer supported)
###############################################################################
"""
from tkinter import *
from tkinter.simpledialog import askinteger
import math, time, sys
###############################################################################
# Option configuration classes
###############################################################################
Figure 11-24. A few canned clock styles: clockstyles.py
PyClock: An Analog/Digital Clock Widget | 755

class ClockConfig:
# defaults--override in instance or subclass
size = 200 # width=height
bg, fg = 'beige', 'brown' # face, tick colors
hh, mh, sh, cog = 'black', 'navy', 'blue', 'red' # clock hands, center
picture = None # face photo file
class PhotoClockConfig(ClockConfig):
# sample configuration
size = 320
picture = '../gifs/ora-pp.gif'
bg, hh, mh = 'white', 'blue', 'orange'
###############################################################################
# Digital display object
###############################################################################
class DigitalDisplay(Frame):
def __init__(self, parent, cfg):
Frame.__init__(self, parent)
self.hour = Label(self)
self.mins = Label(self)
self.secs = Label(self)
self.ampm = Label(self)
for label in self.hour, self.mins, self.secs, self.ampm:
label.config(bd=4, relief=SUNKEN, bg=cfg.bg, fg=cfg.fg)
label.pack(side=LEFT) # TBD: could expand, and scale font on resize
def onUpdate(self, hour, mins, secs, ampm, cfg):
mins = str(mins).zfill(2) # or '%02d' % x
self.hour.config(text=str(hour), width=4)
self.mins.config(text=str(mins), width=4)
self.secs.config(text=str(secs), width=4)
self.ampm.config(text=str(ampm), width=4)
def onResize(self, newWidth, newHeight, cfg):
pass # nothing to redraw here
###############################################################################
# Analog display object
###############################################################################
class AnalogDisplay(Canvas):
def __init__(self, parent, cfg):
Canvas.__init__(self, parent,
width=cfg.size, height=cfg.size, bg=cfg.bg)
self.drawClockface(cfg)
self.hourHand = self.minsHand = self.secsHand = self.cog = None
def drawClockface(self, cfg): # on start and resize
if cfg.picture: # draw ovals, picture
756 | Chapter 11: Complete GUI Programs

try:
self.image = PhotoImage(file=cfg.picture) # bkground
except:
self.image = BitmapImage(file=cfg.picture) # save ref
imgx = (cfg.size - self.image.width()) // 2 # center it
imgy = (cfg.size - self.image.height()) // 2 # 3.x // div
self.create_image(imgx+1, imgy+1, anchor=NW, image=self.image)
originX = originY = radius = cfg.size // 2 # 3.x // div
for i in range(60):
x, y = self.point(i, 60, radius-6, originX, originY)
self.create_rectangle(x-1, y-1, x+1, y+1, fill=cfg.fg) # mins
for i in range(12):
x, y = self.point(i, 12, radius-6, originX, originY)
self.create_rectangle(x-3, y-3, x+3, y+3, fill=cfg.fg) # hours
self.ampm = self.create_text(3, 3, anchor=NW, fill=cfg.fg)
def point(self, tick, units, radius, originX, originY):
angle = tick * (360.0 / units)
radiansPerDegree = math.pi / 180
pointX = int( round( radius * math.sin(angle * radiansPerDegree) ))
pointY = int( round( radius * math.cos(angle * radiansPerDegree) ))
return (pointX + originX+1), (originY+1 - pointY)
def onUpdate(self, hour, mins, secs, ampm, cfg): # on timer callback
if self.cog: # redraw hands, cog
self.delete(self.cog)
self.delete(self.hourHand)
self.delete(self.minsHand)
self.delete(self.secsHand)
originX = originY = radius = cfg.size // 2 # 3.x div
hour = hour + (mins / 60.0)
hx, hy = self.point(hour, 12, (radius * .80), originX, originY)
mx, my = self.point(mins, 60, (radius * .90), originX, originY)
sx, sy = self.point(secs, 60, (radius * .95), originX, originY)
self.hourHand = self.create_line(originX, originY, hx, hy,
width=(cfg.size * .04),
arrow='last', arrowshape=(25,25,15), fill=cfg.hh)
self.minsHand = self.create_line(originX, originY, mx, my,
width=(cfg.size * .03),
arrow='last', arrowshape=(20,20,10), fill=cfg.mh)
self.secsHand = self.create_line(originX, originY, sx, sy,
width=1,
arrow='last', arrowshape=(5,10,5), fill=cfg.sh)
cogsz = cfg.size * .01
self.cog = self.create_oval(originX-cogsz, originY+cogsz,
originX+cogsz, originY-cogsz, fill=cfg.cog)
self.dchars(self.ampm, 0, END)
self.insert(self.ampm, END, ampm)
def onResize(self, newWidth, newHeight, cfg):
newSize = min(newWidth, newHeight)
#print('analog onResize', cfg.size+4, newSize)
if newSize != cfg.size+4:
cfg.size = newSize-4
self.delete('all')
PyClock: An Analog/Digital Clock Widget | 757

self.drawClockface(cfg) # onUpdate called next
###############################################################################
# Clock composite object
###############################################################################
ChecksPerSec = 10 # second change timer
class Clock(Frame):
def __init__(self, config=ClockConfig, parent=None):
Frame.__init__(self, parent)
self.cfg = config
self.makeWidgets(parent) # children are packed but
self.labelOn = 0 # clients pack or grid me
self.display = self.digitalDisplay
self.lastSec = self.lastMin = −1
self.countdownSeconds = 0
self.onSwitchMode(None)
self.onTimer()
def makeWidgets(self, parent):
self.digitalDisplay = DigitalDisplay(self, self.cfg)
self.analogDisplay = AnalogDisplay(self, self.cfg)
self.dateLabel = Label(self, bd=3, bg='red', fg='blue')
parent.bind('<ButtonPress-1>', self.onSwitchMode)
parent.bind('<ButtonPress-3>', self.onToggleLabel)
parent.bind('<Configure>', self.onResize)
parent.bind('<KeyPress-s>', self.onCountdownSec)
parent.bind('<KeyPress-m>', self.onCountdownMin)
def onSwitchMode(self, event):
self.display.pack_forget()
if self.display == self.analogDisplay:
self.display = self.digitalDisplay
else:
self.display = self.analogDisplay
self.display.pack(side=TOP, expand=YES, fill=BOTH)
def onToggleLabel(self, event):
self.labelOn += 1
if self.labelOn % 2:
self.dateLabel.pack(side=BOTTOM, fill=X)
else:
self.dateLabel.pack_forget()
self.update()
def onResize(self, event):
if event.widget == self.display:
self.display.onResize(event.width, event.height, self.cfg)
def onTimer(self):
secsSinceEpoch = time.time()
timeTuple = time.localtime(secsSinceEpoch)
hour, min, sec = timeTuple[3:6]
758 | Chapter 11: Complete GUI Programs

if sec != self.lastSec:
self.lastSec = sec
ampm = ((hour >= 12) and 'PM') or 'AM' # 0...23
hour = (hour % 12) or 12 # 12..11
self.display.onUpdate(hour, min, sec, ampm, self.cfg)
self.dateLabel.config(text=time.ctime(secsSinceEpoch))
self.countdownSeconds -= 1
if self.countdownSeconds == 0:
self.onCountdownExpire() # countdown timer
self.after(1000 // ChecksPerSec, self.onTimer) # run N times per second
# 3.x // trunc int div
def onCountdownSec(self, event):
secs = askinteger('Countdown', 'Seconds?')
if secs: self.countdownSeconds = secs
def onCountdownMin(self, event):
secs = askinteger('Countdown', 'Minutes')
if secs: self.countdownSeconds = secs * 60
def onCountdownExpire(self):
# caveat: only one active, no progress indicator
win = Toplevel()
msg = Button(win, text='Timer Expired!', command=win.destroy)
msg.config(font=('courier', 80, 'normal'), fg='white', bg='navy')
msg.config(padx=10, pady=10)
msg.pack(expand=YES, fill=BOTH)
win.lift() # raise above siblings
if sys.platform[:3] == 'win': # full screen on Windows
win.state('zoomed')
###############################################################################
# Standalone clocks
###############################################################################
appname = 'PyClock 2.1'
# use new custom Tk, Toplevel for icons, etc.
from PP4E.Gui.Tools.windows import PopupWindow, MainWindow
class ClockPopup(PopupWindow):
def __init__(self, config=ClockConfig, name=''):
PopupWindow.__init__(self, appname, name)
clock = Clock(config, self)
clock.pack(expand=YES, fill=BOTH)
class ClockMain(MainWindow):
def __init__(self, config=ClockConfig, name=''):
MainWindow.__init__(self, appname, name)
clock = Clock(config, self)
clock.pack(expand=YES, fill=BOTH)
# b/w compat: manual window borders, passed-in parent
PyClock: An Analog/Digital Clock Widget | 759

class ClockWindow(Clock):
def __init__(self, config=ClockConfig, parent=None, name=''):
Clock.__init__(self, config, parent)
self.pack(expand=YES, fill=BOTH)
title = appname
if name: title = appname + ' - ' + name
self.master.title(title) # master=parent or default
self.master.protocol('WM_DELETE_WINDOW', self.quit)
###############################################################################
# Program run
###############################################################################
if __name__ == '__main__':
def getOptions(config, argv):
for attr in dir(ClockConfig): # fill default config obj,
try: # from "-attr val" cmd args
ix = argv.index('-' + attr) # will skip __x__ internals
except:
continue
else:
if ix in range(1, len(argv)-1):
if type(getattr(ClockConfig, attr)) == int:
setattr(config, attr, int(argv[ix+1]))
else:
setattr(config, attr, argv[ix+1])
#config = PhotoClockConfig()
config = ClockConfig()
if len(sys.argv) >= 2:
getOptions(config, sys.argv) # clock.py -size n -bg 'blue'...
#myclock = ClockWindow(config, Tk()) # parent is Tk root if standalone
#myclock = ClockPopup(ClockConfig(), 'popup')
myclock = ClockMain(config)
myclock.mainloop()
And finally, Example 11-13 shows the module that is actually run from the PyDemos
launcher script—it predefines a handful of clock styles and runs seven of them at once,
attached to new top-level windows for a demo effect (though one clock per screen is
usually enough in practice, even for me!).
Example 11-13. PP4E\Gui\Clock\clockStyles.py
# precoded clock configuration styles
from clock import *
from tkinter import mainloop
gifdir = '../gifs/'
if __name__ == '__main__':
from sys import argv
if len(argv) > 1:
gifdir = argv[1] + '/'
760 | Chapter 11: Complete GUI Programs

class PPClockBig(PhotoClockConfig):
picture, bg, fg = gifdir + 'ora-pp.gif', 'navy', 'green'
class PPClockSmall(ClockConfig):
size = 175
picture = gifdir + 'ora-pp.gif'
bg, fg, hh, mh = 'white', 'red', 'blue', 'orange'
class GilliganClock(ClockConfig):
size = 550
picture = gifdir + 'gilligan.gif'
bg, fg, hh, mh = 'black', 'white', 'green', 'yellow'
class LP4EClock(GilliganClock):
size = 700
picture = gifdir + 'ora-lp4e.gif'
bg = 'navy'
class LP4EClockSmall(LP4EClock):
size, fg = 350, 'orange'
class Pyref4EClock(ClockConfig):
size, picture = 400, gifdir + 'ora-pyref4e.gif'
bg, fg, hh = 'black', 'gold', 'brown'
class GreyClock(ClockConfig):
bg, fg, hh, mh, sh = 'grey', 'black', 'black', 'black', 'white'
class PinkClock(ClockConfig):
bg, fg, hh, mh, sh = 'pink', 'yellow', 'purple', 'orange', 'yellow'
class PythonPoweredClock(ClockConfig):
bg, size, picture = 'white', 175, gifdir + 'pythonPowered.gif'
if __name__ == '__main__':
root = Tk()
for configClass in [
ClockConfig,
PPClockBig,
#PPClockSmall,
LP4EClockSmall,
#GilliganClock,
Pyref4EClock,
GreyClock,
PinkClock,
PythonPoweredClock
]:
ClockPopup(configClass, configClass.__name__)
Button(root, text='Quit Clocks', command=root.quit).pack()
root.mainloop()
Running this script creates the multiple clock display of Figure 11-24. Its configurations
support numerous options; judging from the seven clocks on the display, though, it’s
time to move on to our last example.
PyClock: An Analog/Digital Clock Widget | 761

PyToe: A Tic-Tac-Toe Game Widget
Finally, a bit of fun to close out this chapter. Our last example, PyToe, implements an
artificially intelligent tic-tac-toe (sometimes called “naughts and crosses”) game-
playing program in Python. Most readers are probably familiar with this simple game,
so I won’t dwell on its details. In short, players take turns marking board positions, in
an attempt to occupy an entire row, column, or diagonal. The first player to fill such a
pattern wins.
In PyToe, board positions are marked with mouse clicks, and one of the players is a
Python program. The game board itself is displayed with a simple tkinter GUI; by
default, PyToe builds a 3 × 3 game board (the standard tic-tac-toe setup), but it can be
configured to build and play an arbitrary N × N game.
When it comes time for the computer to select a move, artificial intelligence (AI) algo-
rithms are used to score potential moves and search a tree of candidate moves and
countermoves. This is a fairly simple problem as gaming programs go, and the heuristics
used to pick moves are not perfect. Still, PyToe is usually smart enough to spot wins a
few moves in advance of the user.
Running PyToe
PyToe’s GUI is implemented as a frame of expandable packed labels, with mouse-click
bindings on the labels to catch user moves. The label’s text is configured with the
player’s mark after each move, computer or user. The GuiMaker class we coded earlier
in the prior chapter (Example 10-3) is also reused here again to add a simple menu bar
at the top (but no toolbar is drawn at the bottom, because PyToe leaves its format
descriptor empty). By default, the user’s mark is “X” and PyToe’s is “O.” Fig-
ure 11-25 shows PyToe run from PyGadgets with its status pop-up dialog, on the verge
of beating me one of two ways.
Figure 11-26 shows PyToe’s help pop-up dialog, which lists its command-line config-
uration options. You can specify colors and font sizes for board labels, the player who
moves first, the mark of the user (“X” or “O”), the board size (to override the 3 × 3
default), and the move selection strategy for the computer (e.g., “Minimax” performs
a move tree search to spot wins and losses, and “Expert1” and “Expert2” use static
scoring heuristics functions).
The AI gaming techniques used in PyToe are CPU intensive, and some computer move
selection schemes take longer than others, but their speed varies mostly with the speed
of your computer. Move selection delays are fractions of a second long on my machine
for a 3 × 3 game board, for all “-mode” move-selection strategy options.
Figure 11-27 shows an alternative PyToe configuration (shown running its top-level
script directly with no arguments), just after it beat me. Despite the scenes captured
for this book, under some move selection options, I do still win once in a while. In
762 | Chapter 11: Complete GUI Programs
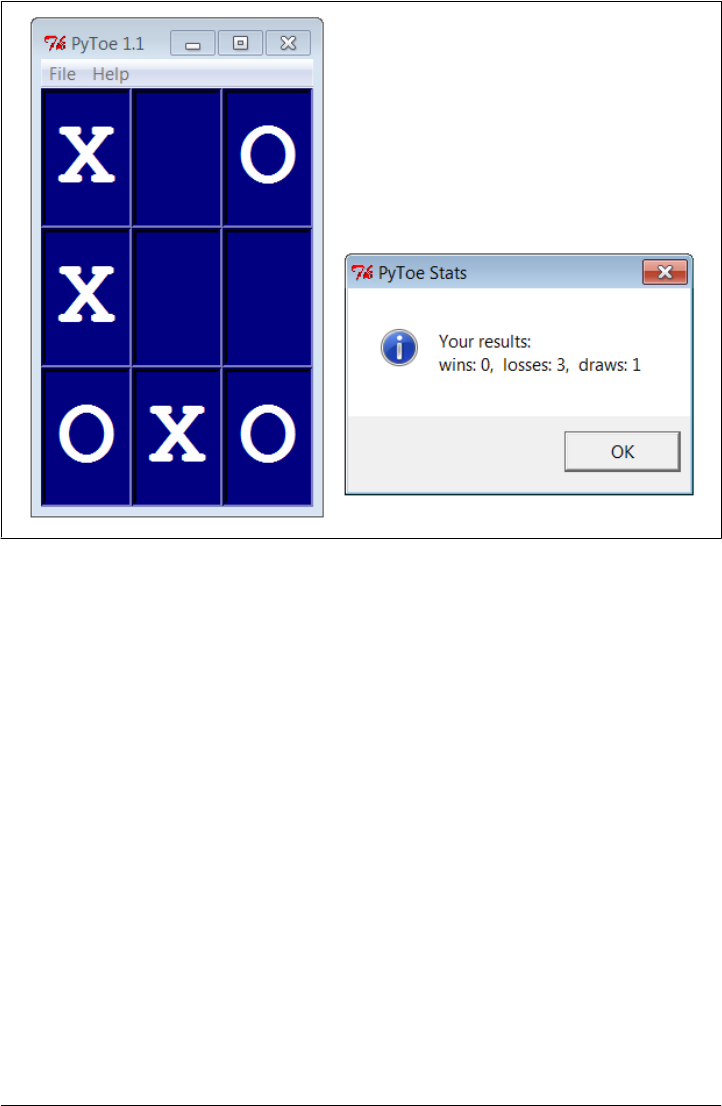
larger boards and more complex games, PyToe’s move selection algorithms become
even more useful.
PyToe Source Code (External)
PyToe is a big system that assumes some AI background knowledge and doesn’t really
demonstrate anything new in terms of GUIs. Moreover, it was written for Python 2.X
over a decade ago, and though ported to 3.X for this edition, some of it might be better
recoded from scratch today. Partly because of that, but mostly because I have a page
limit for this book, I’m going to refer you to the book’s examples distribution package
for its source code instead of listing it here. Please see these two files in the examples
distribution for PyToe implementation details:
PP4E\Ai\TicTacToe\tictactoe.py
A top-level wrapper script
PP4E\Ai\TicTacToe\tictactoe_lists.py
The meat of the implementation
Figure 11-25. PyToe thinking its way to a win
PyToe: A Tic-Tac-Toe Game Widget | 763
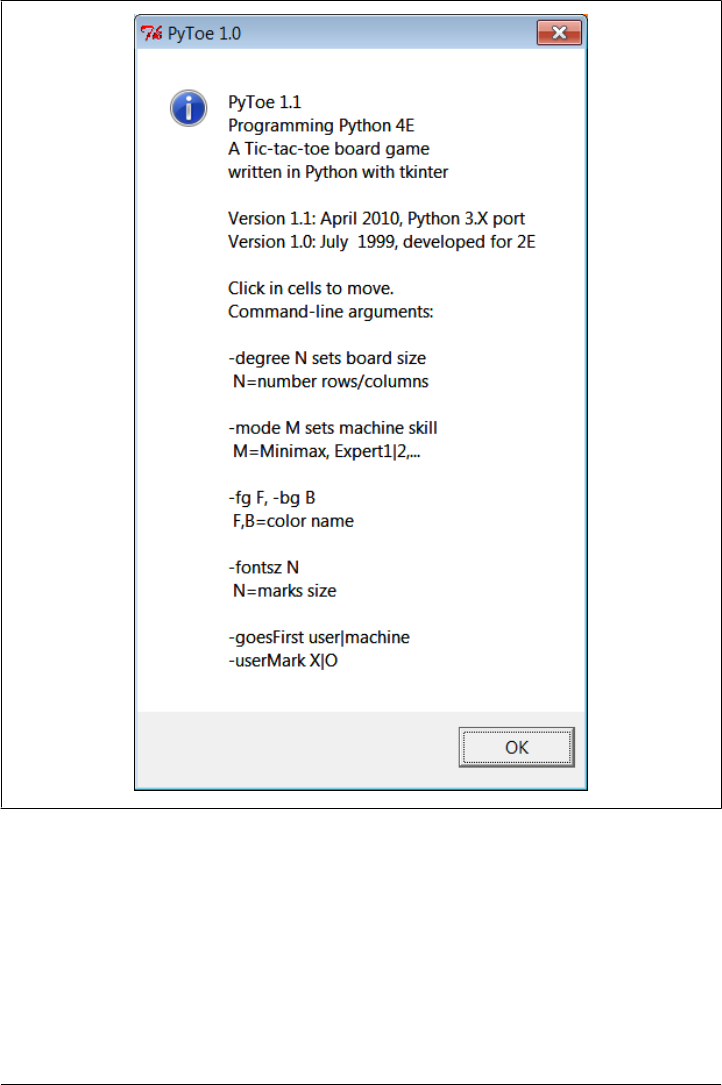
If you do look, though, probably the best hint I can give you is that the data structure
used to represent board state is the crux of the matter. That is, if you understand the
way boards are modeled, the rest of the code comes naturally.
For instance, the lists-based variant uses a list-of-lists to represent the board’s state,
along with a simple dictionary of entry widgets for the GUI indexed by board coordi-
nates. Clearing the board after a game is simply a matter of clearing the underlying data
structures, as shown in this code excerpt from the examples named earlier:
Figure 11-26. PyToe help pop up with options info
764 | Chapter 11: Complete GUI Programs
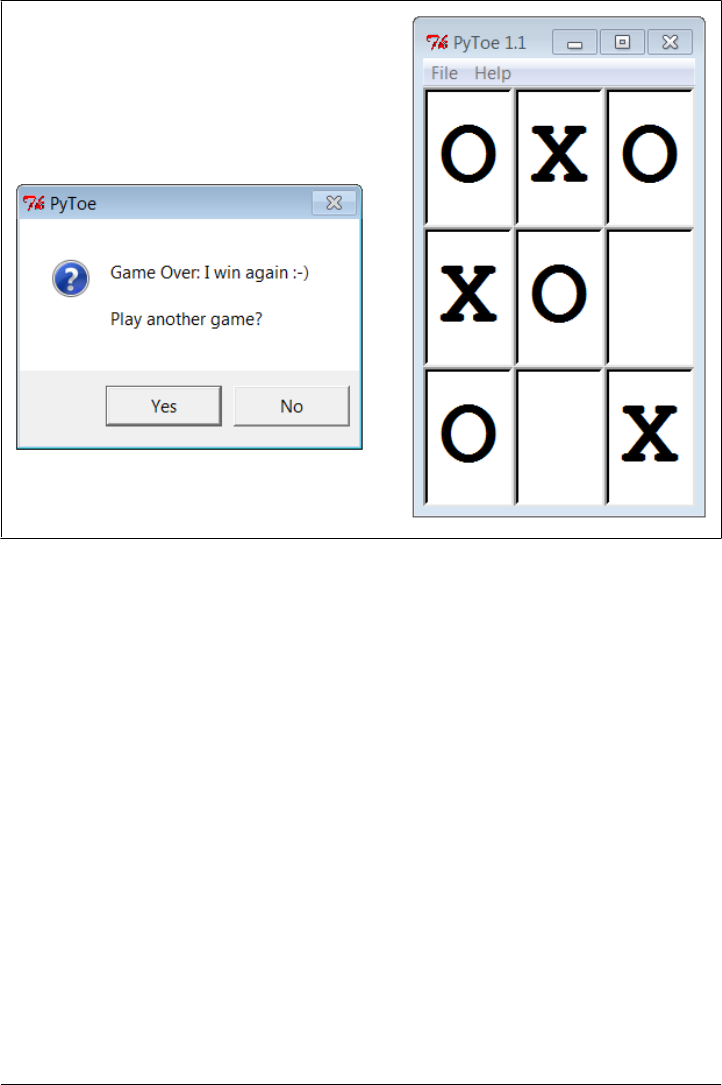
def clearBoard(self):
for row, col in self.label.keys():
self.board[row][col] = Empty
self.label[(row, col)].config(text=' ')
Similarly, picking a move, at least in random mode, is simply a matter of picking a
nonempty slot in the board array and storing the machine’s mark there and in the GUI
(degree is the board’s size):
def machineMove(self):
row, col = self.pickMove()
self.board[row][col] = self.machineMark
self.label[(row, col)].config(text=self.machineMark)
def pickMove(self):
empties = []
for row in self.degree:
for col in self.degree:
if self.board[row][col] == Empty:
empties.append((row, col))
return random.choice(empties)
Finally, checking for an end-of-game state boils down to inspecting rows, columns, and
diagonals in the two-dimensional list-of-lists board in this scheme:
Figure 11-27. An alternative layout
PyToe: A Tic-Tac-Toe Game Widget | 765

def checkDraw(self, board=None):
board = board or self.board
for row in board:
if Empty in row:
return 0
return 1 # none empty: draw or win
def checkWin(self, mark, board=None):
board = board or self.board
for row in board:
if row.count(mark) == self.degree: # check across
return 1
for col in range(self.degree):
for row in board: # check down
if row[col] != mark:
break
else:
return 1
for row in range(self.degree): # check diag1
col = row # row == col
if board[row][col] != mark: break
else:
return 1
for row in range(self.degree): # check diag2
col = (self.degree-1) - row # row+col = degree-1
if board[row][col] != mark: break
else:
return 1
def checkFinish(self):
if self.checkWin(self.userMark):
outcome = "You've won!"
elif self.checkWin(self.machineMark):
outcome = 'I win again :-)'
elif self.checkDraw():
outcome = 'Looks like a draw'
Other move-selection code mostly just performs other kinds of analysis on the board
data structure or generates new board states to search a tree of moves and
countermoves.
You’ll also find relatives of these files in the same directory that implements alternative
search and move-scoring schemes, different board representations, and so on. For ad-
ditional background on game scoring and searches in general, consult an AI text. It’s
fun stuff, but it’s too specialized to cover well in this book.
Where to Go from Here
This concludes the GUI section of this book, but this is not an end to the book’s GUI
coverage. If you want to learn more about GUIs, be sure to see the tkinter examples
that appear later in this book and are described at the start of this chapter. PyMailGUI,
PyCalc, and the mostly external PyForm and PyTree provide additional GUI case
766 | Chapter 11: Complete GUI Programs

studies. In the next section of this book, we’ll also learn how to build user interfaces
that run in web browsers—a very different concept, but another option for interface
design.
Keep in mind, too, that even if you don’t see a GUI example in this book that looks
very close to one you need to program, you’ve already met all the building blocks.
Constructing larger GUIs for your application is really just a matter of laying out hier-
archical composites of the widgets presented in this part of the text.
For instance, a complex display might be composed as a collection of radio buttons,
listboxes, scales, text fields, menus, and so on—all arranged in frames or grids to ach-
ieve the desired appearance. Pop-up top-level windows, as well as independently run
GUI programs linked with Inter-Process Communication (IPC) mechanisms, such as
pipes, signals, and sockets, can further supplement a complex graphical interface.
Moreover, you can implement larger GUI components as Python classes and attach or
extend them anywhere you need a similar interface device; see PyEdit’s role in PyView
and PyMailGUI for a prime example. With a little creativity, tkinter’s widget set and
Python support a virtually unlimited number of layouts.
Beyond this book, see the tkinter documentation overview in Chapter 7, the books
department at Python’s website at http://www.python.org, and the Web at large. Finally,
if you catch the tkinter bug, I want to again recommend downloading and experiment-
ing with the packages introduced in Chapter 7—especially Pmw, PIL, Tix, and ttk (Tix
and ttk are a standard part of Python today). Such extensions add additional tools to
the tkinter arsenal that can make your GUIs more sophisticated, with minimal coding.
Where to Go from Here | 767

PART IV
Internet Programming
This part of the book explores Python’s role as a language for programming Internet-
based applications, and its library tools that support this role. Along the way, system
and GUI tools presented earlier in the book are put to use as well. Because this is a
popular Python domain, chapters here cover all fronts:
Chapter 12
This chapter introduces Internet concepts and options, presents Python low-level
network tools such as sockets, and covers client and server basics.
Chapter 13
This chapter shows you how your scripts can use Python to access common client-
side network protocols like FTP, email, HTTP, and more.
Chapter 14
This chapter uses the client-side email tools covered in the prior chapter, as well
as the GUI techniques of the prior part, to implement a full-featured email client.
Chapter 15
This chapter introduces the basics of Python server-side Common Gateway Inter-
face (CGI) scripts—a kind of program used to implement interactive websites.
Chapter 16
This chapter demonstrates Python website techniques by implementing a web-
based email tool on a server, in part to compare and contrast with Chapter 14’s
nonweb approach.
Although they are outside this book’s scope, Chapter 12 also provides brief overviews
of more advanced Python Internet tools best covered in follow-up resources, such as
Jython, Django, App Engine, Zope, PSP, pyjamas, and HTMLgen. Here, you’ll learn
the fundamentals needed to use such tools when you’re ready to step up.
Along the way, we’ll also put general programming concepts such as object-oriented
programming (OOP) and code refactoring and reuse to work here. As we’ll see, Python,
GUIs, and networking are a powerful combination.

CHAPTER 12
Network Scripting
“Tune In, Log On, and Drop Out”
Over the 15 years since this book was first published, the Internet has virtually exploded
onto the mainstream stage. It has rapidly grown from a simple communication device
used primarily by academics and researchers into a medium that is now nearly as per-
vasive as the television and telephone. Social observers have likened the Internet’s cul-
tural impact to that of the printing press, and technical observers have suggested that
all new software development of interest occurs only on the Internet. Naturally, time
will be the final arbiter for such claims, but there is little doubt that the Internet is a
major force in society and one of the main application contexts for modern software
systems.
The Internet also happens to be one of the primary application domains for the Python
programming language. In the decade and a half since the first edition of this book was
written, the Internet’s growth has strongly influenced Python’s tool set and roles. Given
Python and a computer with a socket-based Internet connection today, we can write
Python scripts to read and send email around the world, fetch web pages from remote
sites, transfer files by FTP, program interactive websites, parse HTML and XML files,
and much more, simply by using the Internet modules that ship with Python as standard
tools.
In fact, companies all over the world do: Google, YouTube, Walt Disney, Hewlett-
Packard, JPL, and many others rely on Python’s standard tools to power their websites.
For example, the Google search engine—widely credited with making the Web
usable—makes extensive use of Python code. The YouTube video server site is largely
implemented in Python. And the BitTorrent peer-to-peer file transfer system—written
in Python and downloaded by tens of millions of users—leverages Python’s networking
skills to share files among clients and remove some server bottlenecks.
Many also build and manage their sites with larger Python-based toolkits. For instance,
the Zope web application server was an early entrant to the domain and is itself written
and customizable in Python. Others build sites with the Plone content management
771

system, which is built upon Zope and delegates site content to its users. Still others use
Python to script Java web applications with Jython (formerly known as JPython)—a
system that compiles Python programs to Java bytecode, exports Java libraries for use
in Python scripts, and allows Python code to serve as web applets downloaded and run
in a browser.
In more recent years, new techniques and systems have risen to prominence in the Web
sphere. For example, XML-RPC and SOAP interfaces for Python have enabled web
service programming; frameworks such as Google App Engine, Django, and Turbo-
Gears have emerged as powerful tools for constructing websites; the XML package in
Python’s standard library, as well as third-party extensions, provides a suite of XML
processing tools; and the IronPython implementation provides seamless .NET/Mono
integration for Python code in much the same way Jython leverages Java libraries.
As the Internet has grown, so too has Python’s role as an Internet tool. Python has
proven to be well suited to Internet scripting for some of the very same reasons that
make it ideal in other domains. Its modular design and rapid turnaround mix well with
the intense demands of Internet development. In this part of the book, we’ll find that
Python does more than simply support Internet scripting; it also fosters qualities such
as productivity and maintainability that are essential to Internet projects of all shapes
and sizes.
Internet Scripting Topics
Internet programming entails many topics, so to make the presentation easier to digest,
I’ve split this subject over the next five chapters of this book. Here’s this part’s chapter
rundown:
• This chapter introduces Internet fundamentals and explores sockets, the underly-
ing communications mechanism of the Internet. We met sockets briefly as IPC
tools in Chapter 5 and again in a GUI use case in Chapter 10, but here we will study
them in the depth afforded by their broader networking roles.
•Chapter 13 covers the fundamentals of client-side scripting and Internet protocols.
Here, we’ll explore Python’s standard support for FTP, email, HTTP, NNTP, and
more.
•Chapter 14 presents a larger client-side case study: PyMailGUI, a full-featured
email client.
•Chapter 15 discusses the fundamentals of server-side scripting and website con-
struction. We’ll study basic CGI scripting techniques and concepts that underlie
most of what happens in the Web.
•Chapter 16 presents a larger server-side case study: PyMailCGI, a full-featured
webmail site.
Each chapter assumes you’ve read the previous one, but you can generally skip around,
especially if you have prior experience in the Internet domain. Since these chapters
772 | Chapter 12: Network Scripting

represent a substantial portion of this book at large, the following sections go into a
few more details about what we’ll be studying.
What we will cover
In conceptual terms, the Internet can roughly be thought of as being composed of
multiple functional layers:
Low-level networking layers
Mechanisms such as the TCP/IP transport mechanism, which deal with transfer-
ring bytes between machines, but don’t care what they mean
Sockets
The programmer’s interface to the network, which runs on top of physical net-
working layers like TCP/IP and supports flexible client/server models in both IPC
and networked modes
Higher-level protocols
Structured Internet communication schemes such as FTP and email, which run on
top of sockets and define message formats and standard addresses
Server-side web scripting
Application models such as CGI, which define the structure of communication
between web browsers and web servers, also run on top of sockets, and support
the notion of web-based programs
Higher-level frameworks and tools
Third-party systems such as Django, App Engine, Jython, and pyjamas, which
leverage sockets and communication protocols, too, but address specific techni-
ques or larger problem domains
This book covers the middle three tiers in this list—sockets, the Internet protocols that
run on them, and the CGI model of web-based conversations. What we learn here will
also apply to more specific toolkits in the last tier above, because they are all ultimately
based upon the same Internet and web fundamentals.
More specifically, in this and the next chapter, our main focus is on programming the
second and third layers: sockets and higher-level Internet protocols. We’ll start this
chapter at the bottom, learning about the socket model of network programming.
Sockets aren’t strictly tied to Internet scripting, as we saw in Chapter 5’s IPC examples,
but they are presented in full here because this is one of their primary roles. As we’ll
see, most of what happens on the Internet happens through sockets, whether you notice
or not.
After introducing sockets, the next two chapters make their way up to Python’s client-
side interfaces to higher-level protocols—things like email and FTP transfers, which
run on top of sockets. It turns out that a lot can be done with Python on the client alone,
and Chapters 13 and 14 will sample the flavor of Python client-side scripting. Finally,
the last two chapters in this part of the book then move on to present server-side
“Tune In, Log On, and Drop Out” | 773

scripting—programs that run on a server computer and are usually invoked by a web
browser.
What we won’t cover
Now that I’ve told you what we will cover in this book, I also want to be clear about
what we won’t cover. Like tkinter, the Internet is a vast topic, and this part of the book
is mostly an introduction to its core concepts and an exploration of representative tasks.
Because there are so many Internet-related modules and extensions, this book does not
attempt to serve as an exhaustive survey of the domain. Even in just Python’s own tool
set, there are simply too many Internet modules to include each in this text in any sort
of useful fashion.
Moreover, higher-level tools like Django, Jython, and App Engine are very large systems
in their own right, and they are best dealt with in more focused documents. Because
dedicated books on such topics are now available, we’ll merely scratch their surfaces
here with a brief survey later in this chapter. This book also says almost nothing about
lower-level networking layers such as TCP/IP. If you’re curious about what happens
on the Internet at the bit-and-wire level, consult a good networking text for more
details.
In other words, this part is not meant to be an exhaustive reference to Internet and web
programming with Python—a topic which has evolved between prior editions of this
book, and will undoubtedly continue to do so after this one is published. Instead, the
goal of this part of the book is to serve as a tutorial introduction to the domain to help
you get started, and to provide context and examples which will help you understand
the documentation for tools you may wish to explore after mastering the fundamentals
here.
Other themes in this part of the book
Like the prior parts of the book, this one has other agendas, too. Along the way, this
part will also put to work many of the operating-system and GUI interfaces we studied
in Parts II and III (e.g., processes, threads, signals, and tkinter). We’ll also get to see
the Python language applied in realistically scaled programs, and we’ll investigate some
of the design choices and challenges that the Internet presents.
That last statement merits a few more words. Internet scripting, like GUIs, is one of
the “sexier” application domains for Python. As in GUI work, there is an intangible but
instant gratification in seeing a Python Internet program ship information all over the
world. On the other hand, by its very nature, network programming can impose speed
overheads and user interface limitations. Though it may not be a fashionable stance
these days, some applications are still better off not being deployed on the Web.
A traditional “desktop” GUI like those of Part III, for example, can combine the feature-
richness and responsiveness of client-side libraries with the power of network access.
On the other hand, web-based applications offer compelling benefits in portability and
774 | Chapter 12: Network Scripting

administration. In this part of the book, we will take an honest look at the Net’s trade-
offs as they arise and explore examples which illustrate the advantages of both web and
nonweb architectures. In fact, the larger PyMailGUI and PyMailCGI examples we’ll
explore are intended in part to serve this purpose.
The Internet is also considered by many to be something of an ultimate proof of concept
for open source tools. Indeed, much of the Net runs on top of a large number of such
tools, such as Python, Perl, the Apache web server, the sendmail program, MySQL, and
Linux.* Moreover, new tools and technologies for programming the Web sometimes
seem to appear faster than developers can absorb them.
The good news is that Python’s integration focus makes it a natural in such a hetero-
geneous world. Today, Python programs can be installed as client-side and server-side
tools; used as applets and servlets in Java applications; mixed into distributed object
systems like CORBA, SOAP, and XML-RPC; integrated into AJAX-based applications;
and much more. In more general terms, the rationale for using Python in the Internet
domain is exactly the same as in any other—Python’s emphasis on quality, productiv-
ity, portability, and integration makes it ideal for writing Internet programs that are
open, maintainable, and delivered according to the ever-shrinking schedules in this
field.
Running Examples in This Part of the Book
Internet scripts generally imply execution contexts that earlier examples in this book
have not. That is, it usually takes a bit more to run programs that talk over networks.
Here are a few pragmatic notes about this part’s examples, up front:
• You don’t need to download extra packages to run examples in this part of the
book. All of the examples we’ll see are based on the standard set of Internet-related
modules that come with Python and are installed in Python’s library directory.
• You don’t need a state-of-the-art network link or an account on a web server to
run the socket and client-side examples in this part. Although some socket exam-
ples will be shown running remotely, most can be run on a single local machine.
Client-side examples that demonstrate protocol like FTP require only basic Inter-
net access, and email examples expect just POP and SMTP capable servers.
• You don’t need an account on a web server machine to run the server-side scripts
in later chapters; they can be run by any web browser. You may need such an
account to change these scripts if you store them remotely, but not if you use a
locally running web server as we will in this book.
* There is even a common acronym for this today: LAMP, for the Linux operating system, the Apache web
server, the MySQL database system, and the Python, Perl, and PHP scripting languages. It’s possible, and
even very common, to put together an entire enterprise-level web server with open source tools. Python users
would probably also like to include systems like Zope, Django, Webware, and CherryPy in this list, but the
resulting acronym might be a bit of a stretch.
“Tune In, Log On, and Drop Out” | 775

We’ll discuss configuration details as we move along, but in short, when a Python script
opens an Internet connection (with the socket module or one of the Internet protocol
modules), Python will happily use whatever Internet link exists on your machine, be
that a dedicated T1 line, a DSL line, or a simple modem. For instance, opening a socket
on a Windows PC automatically initiates processing to create a connection to your
Internet provider if needed.
Moreover, as long as your platform supports sockets, you probably can run many of
the examples here even if you have no Internet connection at all. As we’ll see, a machine
name localhost or "" (an empty string) usually means the local computer itself. This
allows you to test both the client and the server sides of a dialog on the same computer
without connecting to the Net. For example, you can run both socket-based clients and
servers locally on a Windows PC without ever going out to the Net. In other words,
you can likely run the programs here whether you have a way to connect to the Internet
or not.
Some later examples assume that a particular kind of server is running on a server
machine (e.g., FTP, POP, SMTP), but client-side scripts themselves work on any
Internet-aware machine with Python installed. Server-side examples in Chapters 15
and 16 require more: to develop CGI scripts, you’ll need to either have a web server
account or run a web server program locally on your own computer (which is easier
than you may think—we’ll learn how to code a simple one in Python in Chapter 15).
Advanced third-party systems like Jython and Zope must be downloaded separately,
of course; we’ll peek at some of these briefly in this chapter but defer to their own
documentation for more details.
In the Beginning There Was Grail
Besides creating the Python language, Guido van Rossum also wrote a World Wide
Web browser in Python years ago, named (appropriately enough) Grail. Grail was
partly developed as a demonstration of Python’s capabilities. It allows users to browse
the Web much like Firefox or Internet Explorer, but it can also be programmed with
Grail applets—Python/tkinter programs downloaded from a server when accessed and
run on the client by the browser. Grail applets work much like Java applets in more
widespread browsers (more on applets in the next section).
Though it was updated to run under recent Python releases as I was finishing this
edition, Grail is no longer under active development today, and it is mostly used for
research purposes (indeed, the Netscape browser was counted among its contempo-
raries). Nevertheless, Python still reaps the benefits of the Grail project, in the form of
a rich set of Internet tools. To write a full-featured web browser, you need to support
a wide variety of Internet protocols, and Guido packaged support for all of these as
standard library modules that were eventually shipped with the Python language.
Because of this legacy, Python now includes standard support for Usenet news (NNTP),
email processing (POP, SMTP, IMAP), file transfers (FTP), web pages and interactions
(HTTP, URLs, HTML, CGI), and other commonly used protocols such as Telnet.
776 | Chapter 12: Network Scripting

Python scripts can connect to all of these Internet components by simply importing the
associated library module.
Since Grail, additional tools have been added to Python’s library for parsing XML files,
OpenSSL secure sockets, and more. But much of Python’s Internet support can be
traced back to the Grail browser—another example of Python’s support for code reuse
at work. At this writing, you can still find the Grail by searching for “Grail web browser”
at your favorite web search engine.
Python Internet Development Options
Although many are outside our scope here, there are a variety of ways that Python
programmers script the Web. Just as we did for GUIs, I want to begin with a quick
overview of some of the more popular tools in this domain before we jump into the
fundamentals.
Networking tools
As we’ll see in this chapter, Python comes with tools the support basic networking,
as well as implementation of custom types of network servers. This includes sock-
ets, but also the select call for asynchronous servers, as well as higher-order and
pre-coded socket server classes. Standard library modules socket, select, and
socketserver support all these roles.
Client-side protocol tools
As we’ll see in the next chapter, Python’s Internet arsenal also includes canned
support for the client side of most standard Internet protocols—scripts can easily
make use of FTP, email, HTTP, Telnet, and more. Especially when wedded to
desktop GUIs of the sort we met in the preceding part of this book, these tools
open the door to full-featured and highly responsive Web-aware applications.
Server-side CGI scripting
Perhaps the simplest way to implement interactive website behavior, CGI script-
ing is an application model for running scripts on servers to process form data, take
action based upon it, and produce reply pages. We’ll use it later in this part of the
book. It’s supported by Python’s standard library directly, is the basis for much of
what happens on the Web, and suffices for simpler site development tasks. Raw
CGI scripting doesn’t by itself address issues such as cross-page state retention and
concurrent updates, but CGI scripts that use devices like cookies and database
systems often can.
Web frameworks and clouds
For more demanding Web work, frameworks can automate many of the low-level
details and provide more structured and powerful techniques for dynamic site im-
plementation. Beyond basic CGI scripts, the Python world is flush with third-party
web frameworks such as Django—a high-level framework that encourages rapid
development and clean, pragmatic design and includes a dynamic database access
Python Internet Development Options | 777

API and its own server-side templating language; Google App Engine—a “cloud
computing” framework that provides enterprise-level tools for use in Python scripts
and allows sites to leverage the capacity of Google’s Web infrastructure; and Turbo
Gears—an integrated collection of tools including a JavaScript library, a template
system, CherryPy for web interaction, and SQLObject for accessing databases us-
ing Python’s class model.
Also in the framework category are Zope—an open source web application server
and toolkit, written in and customizable with Python, in which websites are im-
plemented using a fundamentally object-oriented model; Plone—a Zope-based
website builder which provides a workflow model (called a content management
system) that allows content producers to add their content to a site; and other
popular systems for website construction, including pylons, web2py, CherryPy, and
Webware.
Many of these frameworks are based upon the now widespread MVC (model-view-
controller) structure, and most provide state retention solutions that wrap database
storage. Some make use of the ORM (object relational mapping) model we’ll meet
in the next part of the book, which superimposes Python’s classes onto relational
database tables, and Zope stores objects in your site in the ZODB object-oriented
database we’ll study in the next part as well.
Rich Internet Applications (revisited)
Discussed at the start of Chapter 7, newer and emerging “rich Internet application”
(RIA) systems such as Flex, Silverlight, JavaFX, and pyjamas allow user interfaces
implemented in web browsers to be much more dynamic and functional than
HTML has traditionally allowed. These are client-side solutions, based generally
upon AJAX and JavaScript, which provide widget sets that rival those of traditional
“desktop” GUIs and provide for asynchronous communication with web servers.
According to some observers, such interactivity is a major component of the “Web
2.0” model.
Ultimately, the web browser is a “desktop” GUI application, too, albeit one which
is very widely available and which can be generalized with RIA techniques to serve
as a platform for rendering other GUIs, using software layers that do not rely on a
particular GUI library. In effect, RIAs turn web browsers into extendable GUIs.
At least that’s their goal today. Compared to traditional GUIs, RIAs gain some
portability and deployment simplicity, in exchange for decreased performance and
increased software stack complexity. Moreover, much as in the GUI realm, there
are already competing RIA toolkits today which may add dependencies and impact
portability. Unless a pervasive frontrunner appears, using a RIA application may
require an install step, not unlike desktop applications.
Stay tuned, though; like the Web at large, the RIA story is still a work in progress.
The emerging HTML5 standard, for instance, while likely not to become prevalent
for some years to come, may obviate the need for RIA browser plug-ins eventually.
778 | Chapter 12: Network Scripting

Web services: XML-RPC, SOAP
XML-RPC is a technology that provides remote procedural calls to components
over networks. It routes requests over the HTTP protocol and ships data back and
forth packaged as XML text. To clients, web servers appear to be simple functions;
when function calls are issued, passed data is encoded as XML and shipped to
remote servers using the Web’s HTTP transport mechanism. The net effect is to
simplify the interface to web servers in client-side programs.
More broadly, XML-RPC fosters the notion of web services—reusable software
components that run on the Web—and is supported by Python’s xmlrpc.client
module, which handles the client side of this protocol, and xmlrcp.server, which
provides tools for the server side. SOAP is a similar but generally heavier web serv-
ices protocol, available to Python in the third-party SOAPy and ZSI packages,
among others.
CORBA ORBs
An earlier but comparable technology, CORBA is an architecture for distributed
programming, in which components communicate across a network by routing
calls through an Object Request Broker (ORB). Python support for CORBA is
available in the third-party OmniORB package, as well as the (still available though
not recently maintained) ILU system.
Java and .NET: Jython and IronPython
We also met Jython and IronPython briefly at the start of Chapter 7, in the context
of GUIs. By compiling Python script to Java bytecode, Jython also allows Python
scripts to be used in any context that Java programs can. This includes web-
oriented roles, such as applets stored on the server but run on the client when
referenced within web pages. The IronPython system also mentioned in Chap-
ter 7 similarly offers Web-focused options, including access to the Silverlight RIA
framework and its Moonlight implementation in the Mono system for Linux.
Screen scraping: XML and HTML parsing tools
Though not technically tied to the Internet, XML text often appears in such roles.
Because of its other roles, though, we’ll study Python’s basic XML parsing support,
as well as third-party extensions to it, in the next part of this book, when we explore
Python’s text processing toolkit. As we’ll see, Python’s xml package comes with
support for DOM, SAX, and ElementTree style XML parsing, and the open source
domain provides extensions for XPath and much more. Python’s html.parser li-
brary module also provides a HTML-specific parser, with a model not unlike that
of XML’s SAX technique. Such tools can be used in screen scraping roles, to extract
content of web pages fetched with urllib.request tools.
Windows COM and DCOM
The PyWin32 package allows Python scripts to communicate via COM on Win-
dows to perform feats such as editing Word documents and populating Excel
spreadsheets (additional tools support Excel document processing). Though not
related to the Internet itself (and being arguably upstaged by .NET in recent years),
Python Internet Development Options | 779

the distributed extension to COM, DCOM, offers additional options for distrib-
uting applications over networks.
Other tools
Other tools serve more specific roles. Among this crowd are mod_python—a system
which optimizes the execution of Python server-scripts in the Apache web
server; Twisted—an asynchronous, event-driven, networking framework written
in Python, with support for a large number of network protocols and with precoded
implementations of common network servers; HTMLgen—a lightweight tool that
allows HTML code to be generated from a tree of Python objects that describes a
web page; and Python Server Pages (PSP)—a server-side templating technology
that embeds Python code inside HTML, runs it with request context to render part
of a reply page, and is strongly reminiscent of PHP, ASP, and JSP.
As you might expect given the prominence of the Web, there are more Internet tools
for Python than we have space to discuss here. For more on this front, see the PyPI
website at http://python.org/, or visit your favorite web search engine (some of which
are implemented using Python’s Internet tools themselves).
Again, the goal of this book is to cover the fundamentals in an in-depth way, so that
you’ll have the context needed to use tools like some of those above well, when you’re
ready to graduate to more comprehensive solutions. As we’ll see, the basic model of
CGI scripting we’ll meet here illustrates the mechanisms underlying all web develop-
ment, whether it’s implemented by bare-bones scripts, or advanced frameworks.
Because we must walk before we can run well, though, let’s start at the bottom here,
and get a handle on what the Internet really is. The Internet today rests upon a rich
software stack; while tools can hide some of its complexity, programming it skillfully
still requires knowledge of all its layers. As we’ll see, deploying Python on the Web,
especially with higher-order web frameworks like those listed above, is only possible
because we truly are “surfing on the shoulders of giants.”
Plumbing the Internet
Unless you’ve been living in a cave for the last decade or two, you are probably already
familiar with the Internet, at least from a user’s perspective. Functionally, we use it as
a communication and information medium, by exchanging email, browsing web pages,
transferring files, and so on. Technically, the Internet consists of many layers of ab-
straction and devices—from the actual wires used to send bits across the world to the
web browser that grabs and renders those bits into text, graphics, and audio on your
computer.
In this book, we are primarily concerned with the programmer’s interface to the Inter-
net. This, too, consists of multiple layers: sockets, which are programmable interfaces
to the low-level connections between machines, and standard protocols, which add
780 | Chapter 12: Network Scripting

structure to discussions carried out over sockets. Let’s briefly look at each of these layers
in the abstract before jumping into programming details.
The Socket Layer
In simple terms, sockets are a programmable interface to connections between pro-
grams, possibly running on different computers of a network. They allow data format-
ted as byte strings to be passed between processes and machines. Sockets also form the
basis and low-level “plumbing” of the Internet itself: all of the familiar higher-level Net
protocols, like FTP, web pages, and email, ultimately occur over sockets. Sockets are
also sometimes called communications endpoints because they are the portals through
which programs send and receive bytes during a conversation.
Although often used for network conversations, sockets may also be used as a com-
munication mechanism between programs running on the same computer, taking the
form of a general Inter-Process Communication (IPC) mechanism. We saw this socket
usage mode briefly in Chapter 5. Unlike some IPC devices, sockets are bidirectional
data streams: programs may both send and receive data through them.
To programmers, sockets take the form of a handful of calls available in a library. These
socket calls know how to send bytes between machines, using lower-level operations
such as the TCP network transmission control protocol. At the bottom, TCP knows
how to transfer bytes, but it doesn’t care what those bytes mean. For the purposes of
this text, we will generally ignore how bytes sent to sockets are physically transferred.
To understand sockets fully, though, we need to know a bit about how computers are
named.
Machine identifiers
Suppose for just a moment that you wish to have a telephone conversation with some-
one halfway across the world. In the real world, you would probably need either that
person’s telephone number or a directory that you could use to look up the number
from her name (e.g., a telephone book). The same is true on the Internet: before a script
can have a conversation with another computer somewhere in cyberspace, it must first
know that other computer’s number or name.
Luckily, the Internet defines standard ways to name both a remote machine and a
service provided by that machine. Within a script, the computer program to be con-
tacted through a socket is identified by supplying a pair of values—the machine name
and a specific port number on that machine:
Machine names
A machine name may take the form of either a string of numbers separated by dots,
called an IP address (e.g., 166.93.218.100), or a more legible form known as a
domain name (e.g., starship.python.net). Domain names are automatically mapped
into their dotted numeric address equivalent when used, by something called a
Plumbing the Internet | 781

domain name server—a program on the Net that serves the same purpose as your
local telephone directory assistance service. As a special case, the machine name
localhost, and its equivalent IP address 127.0.0.1, always mean the same local
machine; this allows us to refer to servers running locally on the same computer
as its clients.
Port numbers
A port number is an agreed-upon numeric identifier for a given conversation. Be-
cause computers on the Net support a variety of services, port numbers are used
to name a particular conversation on a given machine. For two machines to talk
over the Net, both must associate sockets with the same machine name and port
number when initiating network connections. As we’ll see, Internet protocols such
as email and the Web have standard reserved port numbers for their connections,
so clients can request a service regardless of the machine providing it. Port number
80, for example, usually provides web pages on any web server machine.
The combination of a machine name and a port number uniquely identifies every dialog
on the Net. For instance, an ISP’s computer may provide many kinds of services for
customers—web pages, Telnet, FTP transfers, email, and so on. Each service on the
machine is assigned a unique port number to which requests may be sent. To get web
pages from a web server, programs need to specify both the web server’s Internet Pro-
tocol (IP) or domain name and the port number on which the server listens for web
page requests.
If this sounds a bit strange, it may help to think of it in old-fashioned terms. To have a
telephone conversation with someone within a company, for example, you usually need
to dial both the company’s phone number and the extension of the person you want
to reach. If you don’t know the company’s number, you can probably find it by looking
up the company’s name in a phone book. It’s almost the same on the Net—machine
names identify a collection of services (like a company), port numbers identify an in-
dividual service within a particular machine (like an extension), and domain names are
mapped to IP numbers by domain name servers (like a phone book).
When programs use sockets to communicate in specialized ways with another machine
(or with other processes on the same machine), they need to avoid using a port number
reserved by a standard protocol—numbers in the range of 0 to 1023—but we first need
to discuss protocols to understand why.
The Protocol Layer
Although sockets form the backbone of the Internet, much of the activity that happens
on the Net is programmed with protocols,† which are higher-level message models that
† Some books also use the term protocol to refer to lower-level transport schemes such as TCP. In this book,
we use protocol to refer to higher-level structures built on top of sockets; see a networking text if you are
curious about what happens at lower levels.
782 | Chapter 12: Network Scripting

run on top of sockets. In short, the standard Internet protocols define a structured way
to talk over sockets. They generally standardize both message formats and socket port
numbers:
•Message formats provide structure for the bytes exchanged over sockets during
conversations.
•Port numbers are reserved numeric identifiers for the underlying sockets over which
messages are exchanged.
Raw sockets are still commonly used in many systems, but it is perhaps more common
(and generally easier) to communicate with one of the standard higher-level Internet
protocols. As we’ll see, Python provides support for standard protocols, which auto-
mates most of the socket and message formatting details.
Port number rules
Technically speaking, socket port numbers can be any 16-bit integer value between 0
and 65,535. However, to make it easier for programs to locate the standard protocols,
port numbers in the range of 0 to 1023 are reserved and preassigned to the standard
higher-level protocols. Table 12-1 lists the ports reserved for many of the standard
protocols; each gets one or more preassigned numbers from the reserved range.
Table 12-1. Port numbers reserved for common protocols
Protocol Common function Port number Python module
HTTP Web pages 80 http.client, http.server
NNTP Usenet news 119 nntplib
FTP data default File transfers 20 ftplib
FTP control File transfers 21 ftplib
SMTP Sending email 25 smtplib
POP3 Fetching email 110 poplib
IMAP4 Fetching email 143 imaplib
Finger Informational 79 n/a
SSH Command lines 22 n/a: third party
Telnet Command lines 23 telnetlib
Clients and servers
To socket programmers, the standard protocols mean that port numbers 0 to 1023 are
off-limits to scripts, unless they really mean to use one of the higher-level protocols.
This is both by standard and by common sense. A Telnet program, for instance, can
start a dialog with any Telnet-capable machine by connecting to its port, 23; without
preassigned port numbers, each server might install Telnet on a different port. Similarly,
websites listen for page requests from browsers on port 80 by standard; if they did not,
Plumbing the Internet | 783

you might have to know and type the HTTP port number of every site you visit while
surfing the Net.
By defining standard port numbers for services, the Net naturally gives rise to a client/
server architecture. On one side of a conversation, machines that support standard
protocols perpetually run a set of programs that listen for connection requests on the
reserved ports. On the other end of a dialog, other machines contact those programs
to use the services they export.
We usually call the perpetually running listener program a server and the connecting
program a client. Let’s use the familiar web browsing model as an example. As shown
in Table 12-1, the HTTP protocol used by the Web allows clients and servers to talk
over sockets on port 80:
Server
A machine that hosts websites usually runs a web server program that constantly
listens for incoming connection requests, on a socket bound to port 80. Often, the
server itself does nothing but watch for requests on its port perpetually; handling
requests is delegated to spawned processes or threads.
Clients
Programs that wish to talk to this server specify the server machine’s name and
port 80 to initiate a connection. For web servers, typical clients are web browsers
like Firefox, Internet Explorer, or Chrome, but any script can open a client-side
connection on port 80 to fetch web pages from the server. The server’s machine
name can also be simply “localhost” if it’s the same as the client’s.
In general, many clients may connect to a server over sockets, whether it implements
a standard protocol or something more specific to a given application. And in some
applications, the notion of client and server is blurred—programs can also pass bytes
between each other more as peers than as master and subordinate. An agent in a peer-
to-peer file transfer system, for instance, may at various times be both client and server
for parts of files transferred.
For the purposes of this book, though, we usually call programs that listen on sockets
servers, and those that connect clients. We also sometimes call the machines that these
programs run on server and client (e.g., a computer on which a web server program
runs may be called a web server machine, too), but this has more to do with the physical
than the functional.
Protocol structures
Functionally, protocols may accomplish a familiar task, like reading email or posting
a Usenet newsgroup message, but they ultimately consist of message bytes sent over
sockets. The structure of those message bytes varies from protocol to protocol, is hidden
by the Python library, and is mostly beyond the scope of this book, but a few general
words may help demystify the protocol layer.
784 | Chapter 12: Network Scripting

Some protocols may define the contents of messages sent over sockets; others may
specify the sequence of control messages exchanged during conversations. By defining
regular patterns of communication, protocols make communication more robust. They
can also minimize deadlock conditions—machines waiting for messages that never
arrive.
For example, the FTP protocol prevents deadlock by conversing over two sockets: one
for control messages only and one to transfer file data. An FTP server listens for control
messages (e.g., “send me a file”) on one port, and transfers file data over another. FTP
clients open socket connections to the server machine’s control port, send requests,
and send or receive file data over a socket connected to a data port on the server ma-
chine. FTP also defines standard message structures passed between client and server.
The control message used to request a file, for instance, must follow a standard format.
Python’s Internet Library Modules
If all of this sounds horribly complex, cheer up: Python’s standard protocol modules
handle all the details. For example, the Python library’s ftplib module manages all the
socket and message-level handshaking implied by the FTP protocol. Scripts that import
ftplib have access to a much higher-level interface for FTPing files and can be largely
ignorant of both the underlying FTP protocol and the sockets over which it runs.‡
In fact, each supported protocol is represented in Python’s standard library by either a
module package of the same name as the protocol or by a module file with a name of
the form xxxlib.py, where xxx is replaced by the protocol’s name. The last column in
Table 12-1 gives the module name for some standard protocol modules. For instance,
FTP is supported by the module file ftplib.py and HTTP by package http.*. Moreover,
within the protocol modules, the top-level interface object is often the name of the
protocol. So, for instance, to start an FTP session in a Python script, you run import
ftplib and pass appropriate parameters in a call to ftplib.FTP; for Telnet, create a
telnetlib.Telnet instance.
In addition to the protocol implementation modules in Table 12-1, Python’s standard
library also contains modules for fetching replies from web servers for a web page
request (urllib.request), parsing and handling data once it has been transferred over
sockets or protocols (html.parser, the email.* and xml.* packages), and more.
Table 12-2 lists some of the more commonly used modules in this category.
‡ Since Python is an open source system, you can read the source code of the ftplib module if you are curious
about how the underlying protocol actually works. See the ftplib.py file in the standard source library directory
in your machine. Its code is complex (since it must format messages and manage two sockets), but with the
other standard Internet protocol modules, it is a good example of low-level socket programming.
Plumbing the Internet | 785

Table 12-2. Common Internet-related standard modules
Python modules Utility
socket, ssl Network and IPC communications support (TCP/IP, UDP, etc.), plus SSL secure sockets
wrapper
cgi Server-side CGI script support: parse input stream, escape HTML text, and so on
urllib.request Fetch web pages from their addresses (URLs)
urllib.parse Parse URL string into components, escape URL text
http.client, ftplib,
nntplib
HTTP (web), FTP (file transfer), and NNTP (news) client protocol modules
http.cookies,
http.cookiejar
HTTP cookies support (data stored on clients by website request, server- and client-side
support)
poplib, imaplib, smtplib POP, IMAP (mail fetch), and SMTP (mail send) protocol modules
telnetlib Telnet protocol module
html.parser, xml.* Parse web page contents (HTML and XML documents)
xdrlib, socket Encode binary data portably for transmission
struct, pickle Encode Python objects as packed binary data or serialized byte strings for transmission
email.* Parse and compose email messages with headers, attachments, and encodings
mailbox Process on disk mailboxes and their messages
mimetypes Guess file content types from names and extensions from types
uu, binhex, base64,
binascii, quopri, email.*
Encode and decode binary (or other) data transmitted as text (automatic in email
package)
socketserver Framework for general Net servers
http.server Basic HTTP server implementation, with request handlers for simple and CGI-aware servers
We will meet many of the modules in this table in the next few chapters of this book,
but not all of them. Moreover, there are additional Internet modules in Python not
shown here. The modules demonstrated in this book will be representative, but as
always, be sure to see Python’s standard Library Reference Manual for more complete
and up-to-date lists and details.
More on Protocol Standards
If you want the full story on protocols and ports, at this writing you can find a com-
prehensive list of all ports reserved for protocols or registered as used by various com-
mon systems by searching the web pages maintained by the Internet Engineering Task
Force (IETF) and the Internet Assigned Numbers Authority (IANA). The IETF is the
organization responsible for maintaining web protocols and standards. The IANA is
the central coordinator for the assignment of unique parameter values for Internet pro-
tocols. Another standards body, the W3 (for WWW), also maintains relevant docu-
ments. See these web pages for more details:
786 | Chapter 12: Network Scripting

http://www.ietf.org
http://www.iana.org/numbers.html
http://www.iana.org/assignments/port-numbers
http://www.w3.org
It’s not impossible that more recent repositories for standard protocol specifications
will arise during this book’s shelf life, but the IETF website will likely be the main
authority for some time to come. If you do look, though, be warned that the details are,
well, detailed. Because Python’s protocol modules hide most of the socket and mes-
saging complexity documented in the protocol standards, you usually don’t need to
memorize these documents to get web work done with Python.
Socket Programming
Now that we’ve seen how sockets figure into the Internet picture, let’s move on to
explore the tools that Python provides for programming sockets with Python scripts.
This section shows you how to use the Python socket interface to perform low-level
network communications. In later chapters, we will instead use one of the higher-level
protocol modules that hide underlying sockets. Python’s socket interfaces can be used
directly, though, to implement custom network dialogs and to access standard proto-
cols manually.
As previewed in Chapter 5, the basic socket interface in Python is the standard library’s
socket module. Like the os POSIX module, Python’s socket module is just a thin wrap-
per (interface layer) over the underlying C library’s socket calls. Like Python files, it’s
also object-based—methods of a socket object implemented by this module call out to
the corresponding C library’s operations after data conversions. For instance, the C
library’s send and recv function calls become methods of socket objects in Python.
Python’s socket module supports socket programming on any machine that supports
BSD-style sockets—Windows, Macs, Linux, Unix, and so on—and so provides a port-
able socket interface. In addition, this module supports all commonly used socket
types—TCP/IP, UDP, datagram, and Unix domain—and can be used as both a network
interface API and a general IPC mechanism between processes running on the same
machine.
From a functional perspective, sockets are a programmer’s device for transferring bytes
between programs, possibly running on different computers. Although sockets them-
selves transfer only byte strings, we can also transfer Python objects through them by
using Python’s pickle module. Because this module converts Python objects such as
lists, dictionaries, and class instances to and from byte strings, it provides the extra step
needed to ship higher-level objects through sockets when required.
Socket Programming | 787

Python’s struct module can also be used to format Python objects as packed binary
data byte strings for transmission, but is generally limited in scope to objects that map
to types in the C programming language. The pickle module supports transmission of
larger object, such as dictionaries and class instances. For other tasks, including most
standard Internet protocols, simpler formatted byte strings suffice. We’ll learn more
about pickle later in this chapter and book.
Beyond basic data communication tasks, the socket module also includes a variety of
more advanced tools. For instance, it has calls for the following and more:
• Converting bytes to a standard network ordering (ntohl, htonl)
• Querying machine name and address (gethostname, gethostbyname)
• Wrapping socket objects in a file object interface (sockobj.makefile)
• Making socket calls nonblocking (sockobj.setblocking)
• Setting socket timeouts (sockobj.settimeout)
Provided your Python was compiled with Secure Sockets Layer (SSL) support, the
ssl standard library module also supports encrypted transfers with its
ssl.wrap_socket call. This call wraps a socket object in SSL logic, which is used in turn
by other standard library modules to support the HTTPS secure website protocol
(http.client and urllib.request), secure email transfers (poplib and smtplib), and
more. We’ll meet some of these other modules later in this part of the book, but we
won’t study all of the socket module’s advanced features in this text; see the Python
library manual for usage details omitted here.
Socket Basics
Although we won’t get into advanced socket use in this chapter, basic socket transfers
are remarkably easy to code in Python. To create a connection between machines,
Python programs import the socket module, create a socket object, and call the object’s
methods to establish connections and send and receive data.
Sockets are inherently bidirectional in nature, and socket object methods map directly
to socket calls in the C library. For example, the script in Example 12-1 implements a
program that simply listens for a connection on a socket and echoes back over a socket
whatever it receives through that socket, adding Echo=> string prefixes.
Example 12-1. PP4E\Internet\Sockets\echo-server.py
"""
Server side: open a TCP/IP socket on a port, listen for a message from
a client, and send an echo reply; this is a simple one-shot listen/reply
conversation per client, but it goes into an infinite loop to listen for
more clients as long as this server script runs; the client may run on
a remote machine, or on same computer if it uses 'localhost' for server
"""
788 | Chapter 12: Network Scripting

from socket import * # get socket constructor and constants
myHost = '' # '' = all available interfaces on host
myPort = 50007 # listen on a non-reserved port number
sockobj = socket(AF_INET, SOCK_STREAM) # make a TCP socket object
sockobj.bind((myHost, myPort)) # bind it to server port number
sockobj.listen(5) # listen, allow 5 pending connects
while True: # listen until process killed
connection, address = sockobj.accept() # wait for next client connect
print('Server connected by', address) # connection is a new socket
while True:
data = connection.recv(1024) # read next line on client socket
if not data: break # send a reply line to the client
connection.send(b'Echo=>' + data) # until eof when socket closed
connection.close()
As mentioned earlier, we usually call programs like this that listen for incoming con-
nections servers because they provide a service that can be accessed at a given machine
and port on the Internet. Programs that connect to such a server to access its service
are generally called clients. Example 12-2 shows a simple client implemented in Python.
Example 12-2. PP4E\Internet\Sockets\echo-client.py
"""
Client side: use sockets to send data to the server, and print server's
reply to each message line; 'localhost' means that the server is running
on the same machine as the client, which lets us test client and server
on one machine; to test over the Internet, run a server on a remote
machine, and set serverHost or argv[1] to machine's domain name or IP addr;
Python sockets are a portable BSD socket interface, with object methods
for the standard socket calls available in the system's C library;
"""
import sys
from socket import * # portable socket interface plus constants
serverHost = 'localhost' # server name, or: 'starship.python.net'
serverPort = 50007 # non-reserved port used by the server
message = [b'Hello network world'] # default text to send to server
# requires bytes: b'' or str,encode()
if len(sys.argv) > 1:
serverHost = sys.argv[1] # server from cmd line arg 1
if len(sys.argv) > 2: # text from cmd line args 2..n
message = (x.encode() for x in sys.argv[2:])
sockobj = socket(AF_INET, SOCK_STREAM) # make a TCP/IP socket object
sockobj.connect((serverHost, serverPort)) # connect to server machine + port
for line in message:
sockobj.send(line) # send line to server over socket
data = sockobj.recv(1024) # receive line from server: up to 1k
print('Client received:', data) # bytes are quoted, was `x`, repr(x)
sockobj.close() # close socket to send eof to server
Socket Programming | 789

Server socket calls
Before we see these programs in action, let’s take a minute to explain how this client
and server do their stuff. Both are fairly simple examples of socket scripts, but they
illustrate the common call patterns of most socket-based programs. In fact, this is boil-
erplate code: most connected socket programs generally make the same socket calls
that our two scripts do, so let’s step through the important points of these scripts line
by line.
Programs such as Example 12-1 that provide services for other programs with sockets
generally start out by following this sequence of calls:
sockobj = socket(AF_INET, SOCK_STREAM)
Uses the Python socket module to create a TCP socket object. The names
AF_INET and SOCK_STREAM are preassigned variables defined by and imported from
the socket module; using them in combination means “create a TCP/IP socket,”
the standard communication device for the Internet. More specifically, AF_INET
means the IP address protocol, and SOCK_STREAM means the TCP transfer protocol.
The AF_INET/SOCK_STREAM combination is the default because it is so common, but
it’s typical to make this explicit.
If you use other names in this call, you can instead create things like UDP connec-
tionless sockets (use SOCK_DGRAM second) and Unix domain sockets on the local
machine (use AF_UNIX first), but we won’t do so in this book. See the Python library
manual for details on these and other socket module options. Using other socket
types is mostly a matter of using different forms of boilerplate code.
sockobj.bind((myHost, myPort))
Associates the socket object with an address—for IP addresses, we pass a server
machine name and port number on that machine. This is where the server identifies
the machine and port associated with the socket. In server programs, the hostname
is typically an empty string (“”), which means the machine that the script runs on
(formally, all available local and remote interfaces on the machine), and the port
is a number outside the range 0 to 1023 (which is reserved for standard protocols,
described earlier).
Note that each unique socket dialog you support must have its own port number;
if you try to open a socket on a port already in use, Python will raise an exception.
Also notice the nested parentheses in this call—for the AF_INET address protocol
socket here, we pass the host/port socket address to bind as a two-item tuple object
(pass a string for AF_UNIX). Technically, bind takes a tuple of values appropriate for
the type of socket created.
sockobj.listen(5)
Starts listening for incoming client connections and allows for a backlog of up to
five pending requests. The value passed sets the number of incoming client requests
queued by the operating system before new requests are denied (which happens
only if a server isn’t fast enough to process requests before the queues fill up). A
790 | Chapter 12: Network Scripting

value of 5 is usually enough for most socket-based programs; the value must be at
least 1.
At this point, the server is ready to accept connection requests from client programs
running on remote machines (or the same machine) and falls into an infinite loop—
while True (or the equivalent while 1 for older Pythons and ex-C programmers)—
waiting for them to arrive:
connection, address = sockobj.accept()
Waits for the next client connection request to occur; when it does, the accept call
returns a brand-new socket object over which data can be transferred from and to
the connected client. Connections are accepted on sockobj, but communication
with a client happens on connection, the new socket. This call actually returns a
two-item tuple—address is the connecting client’s Internet address. We can call
accept more than one time, to service multiple client connections; that’s why each
call returns a new, distinct socket for talking to a particular client.
Once we have a client connection, we fall into another loop to receive data from the
client in blocks of up to 1,024 bytes at a time, and echo each block back to the client:
data = connection.recv(1024)
Reads at most 1,024 more bytes of the next message sent from a client (i.e., coming
across the network or IPC connection), and returns it to the script as a byte string.
We get back an empty byte string when the client has finished—end-of-file is trig-
gered when the client closes its end of the socket.
connection.send(b'Echo=>' + data)
Sends the latest byte string data block back to the client program, prepending the
string 'Echo=>' to it first. The client program can then recv what we send here—
the next reply line. Technically this call sends as much data as possible, and returns
the number of bytes actually sent. To be fully robust, some programs may need to
resend unsent portions or use connection.sendall to force all bytes to be sent.
connection.close()
Shuts down the connection with this particular client.
Transferring byte strings and objects
So far we’ve seen calls used to transfer data in a server, but what is it that is actually
shipped through a socket? As we learned in Chapter 5, sockets by themselves always
deal in binary byte strings, not text. To your scripts, this means you must send and will
receive bytes strings, not str, though you can convert to and from text as needed with
bytes.decode and str.encode methods. In our scripts, we use b'...' bytes literals to
satisfy socket data requirements. In other contexts, tools such as the struct and
pickle modules return the byte strings we need automatically, so no extra steps are
needed.
Socket Programming | 791

For example, although the socket model is limited to transferring byte strings, you can
send and receive nearly arbitrary Python objects with the standard library pickle object
serialization module. Its dumps and loads calls convert Python objects to and from byte
strings, ready for direct socket transfer:
>>> import pickle
>>> x = pickle.dumps([99, 100]) # on sending end... convert to byte strings
>>> x # string passed to send, returned by recv
b'\x80\x03]q\x00(KcKde.'
>>> pickle.loads(x) # on receiving end... convert back to object
[99, 100]
For simpler types that correspond to those in the C language, the struct module pro-
vides the byte-string conversion we need as well:
>>> import struct
>>> x = struct.pack('>ii', 99, 100) # convert simpler types for transmission
>>> x
b'\x00\x00\x00c\x00\x00\x00d'
>>> struct.unpack('>ii', x)
(99, 100)
When converted this way, Python native objects become candidates for socket-based
transfers. See Chapter 4 for more on struct. We previewed pickle and object seriali-
zation in Chapter 1, but we’ll learn more about it and its few pickleability constraints
when we explore data persistence in Chapter 17.
In fact there are a variety of ways to extend the basic socket transfer model. For instance,
much like os.fdopen and open for the file descriptors we studied in Chapter 4, the
socket.makefile method allows you to wrap sockets in text-mode file objects that han-
dle text encodings for you automatically. This call also allows you to specify nondefault
Unicode encodings and end-line behaviors in text mode with extra arguments in 3.X
just like the open built-in function. Because its result mimics file interfaces, the
socket.makefile call additionally allows the pickle module’s file-based calls to transfer
objects over sockets implicitly. We’ll see more on socket file wrappers later in this
chapter.
For our simpler scripts here, hardcoded byte strings and direct socket calls do the job.
After talking with a given connected client, the server in Example 12-1 goes back to its
infinite loop and waits for the next client connection request. Let’s move on to see what
happened on the other side of the fence.
Client socket calls
The actual socket-related calls in client programs like the one shown in Exam-
ple 12-2 are even simpler; in fact, half of that script is preparation logic. The main thing
to keep in mind is that the client and server must specify the same port number when
opening their sockets and the client must identify the machine on which the server is
792 | Chapter 12: Network Scripting

running; in our scripts, server and client agree to use port number 50007 for their
conversation, outside the standard protocol range. Here are the client’s socket calls:
sockobj = socket(AF_INET, SOCK_STREAM)
Creates a Python socket object in the client program, just like the server.
sockobj.connect((serverHost, serverPort))
Opens a connection to the machine and port on which the server program is lis-
tening for client connections. This is where the client specifies the string name of
the service to be contacted. In the client, we can either specify the name of the
remote machine as a domain name (e.g., starship.python.net) or numeric IP ad-
dress. We can also give the server name as localhost (or the equivalent IP address
127.0.0.1) to specify that the server program is running on the same machine as
the client; that comes in handy for debugging servers without having to connect
to the Net. And again, the client’s port number must match the server’s exactly.
Note the nested parentheses again—just as in server bind calls, we really pass the
server’s host/port address to connect in a tuple object.
Once the client establishes a connection to the server, it falls into a loop, sending a
message one line at a time and printing whatever the server sends back after each line
is sent:
sockobj.send(line)
Transfers the next byte-string message line to the server over the socket. Notice
that the default list of lines contains bytes strings (b'...'). Just as on the server,
data passed through the socket must be a byte string, though it can be the result
of a manual str.encode encoding call or an object conversion with pickle or
struct if desired. When lines to be sent are given as command-line arguments
instead, they must be converted from str to bytes; the client arranges this by en-
coding in a generator expression (a call map(str.encode, sys.argv[2:]) would have
the same effect).
data = sockobj.recv(1024)
Reads the next reply line sent by the server program. Technically, this reads up to
1,024 bytes of the next reply message and returns it as a byte string.
sockobj.close()
Closes the connection with the server, sending it the end-of-file signal.
And that’s it. The server exchanges one or more lines of text with each client that
connects. The operating system takes care of locating remote machines, routing bytes
sent between programs and possibly across the Internet, and (with TCP) making sure
that our messages arrive intact. That involves a lot of processing, too—our strings may
ultimately travel around the world, crossing phone wires, satellite links, and more along
the way. But we can be happily ignorant of what goes on beneath the socket call layer
when programming in Python.
Socket Programming | 793

Running Socket Programs Locally
Let’s put this client and server to work. There are two ways to run these scripts—on
either the same machine or two different machines. To run the client and the server on
the same machine, bring up two command-line consoles on your computer, start the
server program in one, and run the client repeatedly in the other. The server keeps
running and responds to requests made each time you run the client script in the other
window.
For instance, here is the text that shows up in the MS-DOS console window where I’ve
started the server script:
C:\...\PP4E\Internet\Sockets> python echo-server.py
Server connected by ('127.0.0.1', 57666)
Server connected by ('127.0.0.1', 57667)
Server connected by ('127.0.0.1', 57668)
The output here gives the address (machine IP name and port number) of each con-
necting client. Like most servers, this one runs perpetually, listening for client connec-
tion requests. This server receives three, but I have to show you the client window’s
text for you to understand what this means:
C:\...\PP4E\Internet\Sockets> python echo-client.py
Client received: b'Echo=>Hello network world'
C:\...\PP4E\Internet\Sockets> python echo-client.py localhost spam Spam SPAM
Client received: b'Echo=>spam'
Client received: b'Echo=>Spam'
Client received: b'Echo=>SPAM'
C:\...\PP4E\Internet\Sockets> python echo-client.py localhost Shrubbery
Client received: b'Echo=>Shrubbery'
Here, I ran the client script three times, while the server script kept running in the other
window. Each client connected to the server, sent it a message of one or more lines of
text, and read back the server’s reply—an echo of each line of text sent from the client.
And each time a client is run, a new connection message shows up in the server’s
window (that’s why we got three). Because the server’s coded as an infinite loop, you
may need to kill it with Task Manager on Windows when you’re done testing, because
a Ctrl-C in the server’s console window is ignored; other platforms may fare better.
It’s important to notice that client and server are running on the same machine here (a
Windows PC). The server and client agree on the port number, but they use the machine
names "" and localhost, respectively, to refer to the computer on which they are run-
ning. In fact, there is no Internet connection to speak of. This is just IPC, of the sort
we saw in Chapter 5: sockets also work well as cross-program communications tools
on a single machine.
794 | Chapter 12: Network Scripting

Running Socket Programs Remotely
To make these scripts talk over the Internet rather than on a single machine and sample
the broader scope of sockets, we have to do some extra work to run the server on a
different computer. First, upload the server’s source file to a remote machine where
you have an account and a Python. Here’s how I do it with FTP to a site that hosts a
domain name of my own, learning-python.com; most informational lines in the fol-
lowing have been removed, your server name and upload interface details will vary,
and there are other ways to copy files to a computer (e.g., FTP client GUIs, email, web
page post forms, and so on—see “Tips on Using Remote Servers” on page 798 for
hints on accessing remote servers):
C:\...\PP4E\Internet\Sockets> ftp learning-python.com
Connected to learning-python.com.
User (learning-python.com:(none)): xxxxxxxx
Password: yyyyyyyy
ftp> mkdir scripts
ftp> cd scripts
ftp> put echo-server.py
ftp> quit
Once you have the server program loaded on the other computer, you need to run it
there. Connect to that computer and start the server program. I usually Telnet or SSH
into my server machine and start the server program as a perpetually running process
from the command line. The & syntax in Unix/Linux shells can be used to run the server
script in the background; we could also make the server directly executable with a #!
line and a chmod command (see Chapter 3 for details).
Here is the text that shows up in a window on my PC that is running a SSH session
with the free PuTTY client, connected to the Linux server where my account is hosted
(again, less a few deleted informational lines):
login as: xxxxxxxx
XXXXXXXX@learning-python.com's password: yyyyyyyy
Last login: Fri Apr 23 07:46:33 2010 from 72.236.109.185
[...]$ cd scripts
[...]$ python echo-server.py &
[1] 23016
Now that the server is listening for connections on the Net, run the client on your local
computer multiple times again. This time, the client runs on a different machine than
the server, so we pass in the server’s domain or IP name as a client command-line
argument. The server still uses a machine name of "" because it always listens on what-
ever machine it runs on. Here is what shows up in the remote learning-python.com
server’s SSH window on my PC:
[...]$ Server connected by ('72.236.109.185', 57697)
Server connected by ('72.236.109.185', 57698)
Server connected by ('72.236.109.185', 57699)
Server connected by ('72.236.109.185', 57700)
Socket Programming | 795

And here is what appears in the Windows console window where I run the client. A
“connected by” message appears in the server SSH window each time the client script
is run in the client window:
C:\...\PP4E\Internet\Sockets> python echo-client.py learning-python.com
Client received: b'Echo=>Hello network world'
C:\...\PP4E\Internet\Sockets> python echo-client.py learning-python.com ni Ni NI
Client received: b'Echo=>ni'
Client received: b'Echo=>Ni'
Client received: b'Echo=>NI'
C:\...\PP4E\Internet\Sockets> python echo-client.py learning-python.com Shrubbery
Client received: b'Echo=>Shrubbery'
The ping command can be used to get an IP address for a machine’s domain name;
either machine name form can be used to connect in the client:
C:\...\PP4E\Internet\Sockets> ping learning-python.com
Pinging learning-python.com [97.74.215.115] with 32 bytes of data:
Reply from 97.74.215.115: bytes=32 time=94ms TTL=47
Ctrl-C
C:\...\PP4E\Internet\Sockets> python echo-client.py 97.74.215.115 Brave Sir Robin
Client received: b'Echo=>Brave'
Client received: b'Echo=>Sir'
Client received: b'Echo=>Robin'
This output is perhaps a bit understated—a lot is happening under the hood. The client,
running on my Windows laptop, connects with and talks to the server program running
on a Linux machine perhaps thousands of miles away. It all happens about as fast as
when client and server both run on the laptop, and it uses the same library calls; only
the server name passed to clients differs.
Though simple, this illustrates one of the major advantages of using sockets for cross-
program communication: they naturally support running the conversing programs on
different machines, with little or no change to the scripts themselves. In the process,
sockets make it easy to decouple and distribute parts of a system over a network when
needed.
Socket pragmatics
Before we move on, there are three practical usage details you should know. First, you
can run the client and server like this on any two Internet-aware machines where Python
is installed. Of course, to run the client and server on different computers, you need
both a live Internet connection and access to another machine on which to run the
server.
This need not be an expensive proposition, though; when sockets are opened, Python
is happy to initiate and use whatever connectivity you have, be it a dedicated T1 line,
wireless router, cable modem, or dial-up account. Moreover, if you don’t have a server
796 | Chapter 12: Network Scripting

account of your own like the one I’m using on learning-python.com, simply run client
and server examples on the same machine, localhost, as shown earlier; all you need
then is a computer that allows sockets, and most do.
Second, the socket module generally raises exceptions if you ask for something invalid.
For instance, trying to connect to a nonexistent server (or unreachable servers, if you
have no Internet link) fails:
C:\...\PP4E\Internet\Sockets> python echo-client.py www.nonesuch.com hello
Traceback (most recent call last):
File "echo-client.py", line 24, in <module>
sockobj.connect((serverHost, serverPort)) # connect to server machine...
socket.error: [Errno 10060] A connection attempt failed because the connected
party did not properly respond after a period of time, or established connection
failed because connected host has failed to respond
Finally, also be sure to kill the server process before restarting it again, or else the port
number will still be in use, and you’ll get another exception; on my remote server
machine:
[...]$ ps -x
PID TTY STAT TIME COMMAND
5378 pts/0 S 0:00 python echo-server.py
22017 pts/0 Ss 0:00 -bash
26805 pts/0 R+ 0:00 ps –x
[...]$ python echo-server.py
Traceback (most recent call last):
File "echo-server.py", line 14, in <module>
sockobj.bind((myHost, myPort)) # bind it to server port number
socket.error: [Errno 10048] Only one usage of each socket address (protocol/
network address/port) is normally permitted
A series of Ctrl-Cs will kill the server on Linux (be sure to type fg to bring it to the
foreground first if started with an &):
[...]$ fg
python echo-server.py
Traceback (most recent call last):
File "echo-server.py", line 18, in <module>
connection, address = sockobj.accept() # wait for next client connect
KeyboardInterrupt
As mentioned earlier, a Ctrl-C kill key combination won’t kill the server on my Win-
dows 7 machine, however. To kill the perpetually running server process running lo-
cally on Windows, you may need to start Task Manager (e.g., using a Ctrl-Alt-Delete
key combination), and then end the Python task by selecting it in the process listbox
that appears. Closing the window in which the server is running will also suffice on
Windows, but you’ll lose that window’s command history. You can also usually kill a
server on Linux with a kill −9 pid shell command if it is running in another window
or in the background, but Ctrl-C requires less typing.
Socket Programming | 797

Tips on Using Remote Servers
Some of this chapter’s examples run server code on a remote computer. Though you
can also run the examples locally on localhost, remote execution better captures the
flexibility and power of sockets. To run remotely, you’ll need access to an Internet
accessible computer with Python, where you can upload and run scripts. You’ll also
need to be able to access the remote server from your PC. To help with this last step,
here are a few hints for readers new to using remote servers.
To transfer scripts to a remote machine, the FTP command is standard on Windows
machines and most others. On Windows, simply type it in a console window to connect
to an FTP server or start your favorite FTP client GUI program; on Linux, type the FTP
command in an xterm window. You’ll need to supply your account name and password
to connect to a nonanonymous FTP site. For anonymous FTP, use “anonymous” for
the username and your email address for the password.
To run scripts remotely from a command line, Telnet is a standard command on some
Unix-like machines, too. On Windows, it’s often run as a client GUI. For some server
machines, you’ll need to use SSH secure shell rather than Telnet to access a shell
prompt. There are a variety of SSH utilities available on the Web, including PuTTY,
used for this book. Python itself comes with a telnetlib telnet module, and a web
search will reveals current SSH options for Python scripts, including ssh.py, para-
miko, Twisted, Pexpect, and even subprocess.Popen.
Spawning Clients in Parallel
So far, we’ve run a server locally and remotely, and run individual clients manually,
one after another. Realistic servers are generally intended to handle many clients, of
course, and possibly at the same time. To see how our echo server handles the load,
let’s fire up eight copies of the client script in parallel using the script in Exam-
ple 12-3; see the end of Chapter 5 for details on the launchmodes module used here to
spawn clients and alternatives such as the multiprocessing and subprocess modules.
Example 12-3. PP4E\Internet\Sockets\testecho.py
import sys
from PP4E.launchmodes import QuietPortableLauncher
numclients = 8
def start(cmdline):
QuietPortableLauncher(cmdline, cmdline)()
# start('echo-server.py') # spawn server locally if not yet started
args = ' '.join(sys.argv[1:]) # pass server name if running remotely
for i in range(numclients):
start('echo-client.py %s' % args) # spawn 8? clients to test the server
798 | Chapter 12: Network Scripting

To run this script, pass no arguments to talk to a server listening on port 50007 on the
local machine; pass a real machine name to talk to a server running remotely. Three
console windows come into play in this scheme—the client, a local server, and a remote
server. On Windows, the clients’ output is discarded when spawned from this script,
but it would be similar to what we’ve already seen. Here’s the client window
interaction—8 clients are spawned locally to talk to both a local and a remote server:
C:\...\PP4E\Internet\Sockets> set PYTHONPATH=C:\...\dev\Examples
C:\...\PP4E\Internet\Sockets> python testecho.py
C:\...\PP4E\Internet\Sockets> python testecho.py learning-python.com
If the spawned clients connect to a server run locally (the first run of the script on the
client), connection messages show up in the server’s window on the local machine:
C:\...\PP4E\Internet\Sockets> python echo-server.py
Server connected by ('127.0.0.1', 57721)
Server connected by ('127.0.0.1', 57722)
Server connected by ('127.0.0.1', 57723)
Server connected by ('127.0.0.1', 57724)
Server connected by ('127.0.0.1', 57725)
Server connected by ('127.0.0.1', 57726)
Server connected by ('127.0.0.1', 57727)
Server connected by ('127.0.0.1', 57728)
If the server is running remotely, the client connection messages instead appear in the
window displaying the SSH (or other) connection to the remote computer, here,
learning-python.com:
[...]$ python echo-server.py
Server connected by ('72.236.109.185', 57729)
Server connected by ('72.236.109.185', 57730)
Server connected by ('72.236.109.185', 57731)
Server connected by ('72.236.109.185', 57732)
Server connected by ('72.236.109.185', 57733)
Server connected by ('72.236.109.185', 57734)
Server connected by ('72.236.109.185', 57735)
Server connected by ('72.236.109.185', 57736)
Preview: Denied client connections
The net effect is that our echo server converses with multiple clients, whether running
locally or remotely. Keep in mind, however, that this works for our simple scripts only
because the server doesn’t take a long time to respond to each client’s requests—it can
get back to the top of the server script’s outer while loop in time to process the next
incoming client. If it could not, we would probably need to change the server to handle
each client in parallel, or some might be denied a connection.
Technically, client connections would fail after 5 clients are already waiting for the
server’s attention, as specified in the server’s listen call. To prove this to yourself, add
a time.sleep call somewhere inside the echo server’s main loop in Example 12-1 after
Socket Programming | 799

a connection is accepted, to simulate a long-running task (this is from file echo-server-
sleep.py in the examples package if you wish to experiment):
while True: # listen until process killed
connection, address = sockobj.accept() # wait for next client connect
while True:
data = connection.recv(1024) # read next line on client socket
time.sleep(3) # take time to process request
...
If you then run this server and the testecho clients script, you’ll notice that not all 8
clients wind up receiving a connection, because the server is too busy to empty its
pending-connections queue in time. Only 6 clients are served when I run this on Win-
dows—one accepted initially, and 5 in the pending-requests listen queue. The other
two clients are denied connections and fail.
The following shows the server and client messages produced when the server is stalled
this way, including the error messages that the two denied clients receive. To see the
clients’ messages on Windows, you can change testecho to use the StartArgs launcher
with a /B switch at the front of the command line to route messages to the persistent
console window (see file testecho-messages.py in the examples package):
C:\...\PP4E\dev\Examples\PP4E\Internet\Sockets> echo-server-sleep.py
Server connected by ('127.0.0.1', 59625)
Server connected by ('127.0.0.1', 59626)
Server connected by ('127.0.0.1', 59627)
Server connected by ('127.0.0.1', 59628)
Server connected by ('127.0.0.1', 59629)
Server connected by ('127.0.0.1', 59630)
C:\...\PP4E\dev\Examples\PP4E\Internet\Sockets> testecho-messages.py
/B echo-client.py
/B echo-client.py
/B echo-client.py
/B echo-client.py
/B echo-client.py
/B echo-client.py
/B echo-client.py
/B echo-client.py
Client received: b'Echo=>Hello network world'
Traceback (most recent call last):
File "C:\...\PP4E\Internet\Sockets\echo-client.py", line 24, in <module>
sockobj.connect((serverHost, serverPort)) # connect to server machine...
socket.error: [Errno 10061] No connection could be made because the target
machine actively refused it
Traceback (most recent call last):
File "C:\...\PP4E\Internet\Sockets\echo-client.py", line 24, in <module>
sockobj.connect((serverHost, serverPort)) # connect to server machine...
socket.error: [Errno 10061] No connection could be made because the target
machine actively refused it
800 | Chapter 12: Network Scripting

Client received: b'Echo=>Hello network world'
Client received: b'Echo=>Hello network world'
Client received: b'Echo=>Hello network world'
Client received: b'Echo=>Hello network world'
Client received: b'Echo=>Hello network world'
As you can see, with such a sleepy server, 8 clients are spawned, but only 6 receive
service, and 2 fail with exceptions. Unless clients require very little of the server’s at-
tention, to handle multiple requests overlapping in time we need to somehow service
clients in parallel. We’ll see how servers can handle multiple clients more robustly in
a moment; first, though, let’s experiment with some special ports.
Talking to Reserved Ports
It’s also important to know that this client and server engage in a proprietary sort of
discussion, and so use the port number 50007 outside the range reserved for standard
protocols (0 to 1023). There’s nothing preventing a client from opening a socket on
one of these special ports, however. For instance, the following client-side code con-
nects to programs listening on the standard email, FTP, and HTTP web server ports
on three different server machines:
C:\...\PP4E\Internet\Sockets> python
>>> from socket import *
>>> sock = socket(AF_INET, SOCK_STREAM)
>>> sock.connect(('pop.secureserver.net', 110)) # talk to POP email server
>>> print(sock.recv(70))
b'+OK <14654.1272040794@p3pop01-09.prod.phx3.gdg>\r\n'
>>> sock.close()
>>> sock = socket(AF_INET, SOCK_STREAM)
>>> sock.connect(('learning-python.com', 21)) # talk to FTP server
>>> print(sock.recv(70))
b'220---------- Welcome to Pure-FTPd [privsep] [TLS] ----------\r\n220-You'
>>> sock.close()
>>> sock = socket(AF_INET, SOCK_STREAM)
>>> sock.connect(('www.python.net', 80)) # talk to Python's HTTP server
>>> sock.send(b'GET /\r\n') # fetch root page reply
7
>>> sock.recv(70)
b'<!DOCTYPE html PUBLIC "-//W3C//DTD XHTML 1.0 Strict//EN"\r\n "http://'
>>> sock.recv(70)
b'www.w3.org/TR/xhtml1/DTD/xhtml1-strict.dtd">\r\n<html xmlns="http://www.'
If we know how to interpret the output returned by these ports’ servers, we could use
raw sockets like this to fetch email, transfer files, and grab web pages and invoke server-
side scripts. Fortunately, though, we don’t have to worry about all the underlying de-
tails—Python’s poplib, ftplib, and http.client and urllib.request modules provide
higher-level interfaces for talking to servers on these ports. Other Python protocol
Socket Programming | 801

modules do the same for other standard ports (e.g., NNTP, Telnet, and so on). We’ll
meet some of these client-side protocol modules in the next chapter.§
Binding reserved port servers
Speaking of reserved ports, it’s all right to open client-side connections on reserved
ports as in the prior section, but you can’t install your own server-side scripts for these
ports unless you have special permission. On the server I use to host learning-
python.com, for instance, the web server port 80 is off limits (presumably, unless I shell
out for a virtual or dedicated hosting account):
[...]$ python
>>> from socket import *
>>> sock = socket(AF_INET, SOCK_STREAM) # try to bind web port on general server
>>> sock.bind(('', 80)) # learning-python.com is a shared machine
Traceback (most recent call last):
File "<stdin>", line 1, in
File "<string>", line 1, in bind
socket.error: (13, 'Permission denied')
Even if run by a user with the required permission, you’ll get the different exception
we saw earlier if the port is already being used by a real web server. On computers being
used as general servers, these ports really are reserved. This is one reason we’ll run a
web server of our own locally for testing when we start writing server-side scripts later
in this book—the above code works on a Windows PC, which allows us to experiment
with websites locally, on a self-contained machine:
C:\...\PP4E\Internet\Sockets> python
>>> from socket import *
>>> sock = socket(AF_INET, SOCK_STREAM) # can bind port 80 on Windows
>>> sock.bind(('', 80)) # allows running server on localhost
>>>
We’ll learn more about installing web servers later in Chapter 15. For the purposes of
this chapter, we need to get realistic about how our socket servers handle their clients.
Handling Multiple Clients
The echo client and server programs shown previously serve to illustrate socket funda-
mentals. But the server model used suffers from a fairly major flaw. As described earlier,
if multiple clients try to connect to the server, and it takes a long time to process a given
client’s request, the server will fail. More accurately, if the cost of handling a given
§ You might be interested to know that the last part of this example, talking to port 80, is exactly what your
web browser does as you surf the Web: followed links direct it to download web pages over this port. In fact,
this lowly port is the primary basis of the Web. In Chapter 15, we will meet an entire application environment
based upon sending formatted data over port 80—CGI server-side scripting. At the bottom, though, the Web
is just bytes over sockets, with a user interface. The wizard behind the curtain is not as impressive as he may
seem!
802 | Chapter 12: Network Scripting

request prevents the server from returning to the code that checks for new clients in a
timely manner, it won’t be able to keep up with all the requests, and some clients will
eventually be denied connections.
In real-world client/server programs, it’s far more typical to code a server so as to avoid
blocking new requests while handling a current client’s request. Perhaps the easiest
way to do so is to service each client’s request in parallel—in a new process, in a new
thread, or by manually switching (multiplexing) between clients in an event loop. This
isn’t a socket issue per se, and we already learned how to start processes and threads
in Chapter 5. But since these schemes are so typical of socket server programming, let’s
explore all three ways to handle client requests in parallel here.
Forking Servers
The script in Example 12-4 works like the original echo server, but instead forks a new
process to handle each new client connection. Because the handleClient function runs
in a new process, the dispatcher function can immediately resume its main loop in
order to detect and service a new incoming request.
Example 12-4. PP4E\Internet\Sockets\fork-server.py
"""
Server side: open a socket on a port, listen for a message from a client,
and send an echo reply; forks a process to handle each client connection;
child processes share parent's socket descriptors; fork is less portable
than threads--not yet on Windows, unless Cygwin or similar installed;
"""
import os, time, sys
from socket import * # get socket constructor and constants
myHost = '' # server machine, '' means local host
myPort = 50007 # listen on a non-reserved port number
sockobj = socket(AF_INET, SOCK_STREAM) # make a TCP socket object
sockobj.bind((myHost, myPort)) # bind it to server port number
sockobj.listen(5) # allow 5 pending connects
def now(): # current time on server
return time.ctime(time.time())
activeChildren = []
def reapChildren(): # reap any dead child processes
while activeChildren: # else may fill up system table
pid, stat = os.waitpid(0, os.WNOHANG) # don't hang if no child exited
if not pid: break
activeChildren.remove(pid)
def handleClient(connection): # child process: reply, exit
time.sleep(5) # simulate a blocking activity
while True: # read, write a client socket
data = connection.recv(1024) # till eof when socket closed
if not data: break
Handling Multiple Clients | 803

reply = 'Echo=>%s at %s' % (data, now())
connection.send(reply.encode())
connection.close()
os._exit(0)
def dispatcher(): # listen until process killed
while True: # wait for next connection,
connection, address = sockobj.accept() # pass to process for service
print('Server connected by', address, end=' ')
print('at', now())
reapChildren() # clean up exited children now
childPid = os.fork() # copy this process
if childPid == 0: # if in child process: handle
handleClient(connection)
else: # else: go accept next connect
activeChildren.append(childPid) # add to active child pid list
dispatcher()
Running the forking server
Parts of this script are a bit tricky, and most of its library calls work only on Unix-like
platforms. Crucially, it runs on Cygwin Python on Windows, but not standard Win-
dows Python. Before we get into too many forking details, though, let’s focus on how
this server arranges to handle multiple client requests.
First, notice that to simulate a long-running operation (e.g., database updates, other
network traffic), this server adds a five-second time.sleep delay in its client handler
function, handleClient. After the delay, the original echo reply action is performed.
That means that when we run a server and clients this time, clients won’t receive the
echo reply until five seconds after they’ve sent their requests to the server.
To help keep track of requests and replies, the server prints its system time each time
a client connect request is received, and adds its system time to the reply. Clients print
the reply time sent back from the server, not their own—clocks on the server and client
may differ radically, so to compare apples to apples, all times are server times. Because
of the simulated delays, we also must usually start each client in its own console window
on Windows (clients will hang in a blocked state while waiting for their reply).
But the grander story here is that this script runs one main parent process on the server
machine, which does nothing but watch for connections (in dispatcher), plus one child
process per active client connection, running in parallel with both the main parent
process and the other client processes (in handleClient). In principle, the server can
handle any number of clients without bogging down.
To test, let’s first start the server remotely in a SSH or Telnet window, and start three
clients locally in three distinct console windows. As we’ll see in a moment, this server
can also be run under Cygwin locally if you have Cygwin but don’t have a remote server
account like the one on learning-python.com used here:
804 | Chapter 12: Network Scripting

[server window (SSH or Telnet)]
[...]$ uname -p -o
i686 GNU/Linux
[...]$ python fork-server.py
Server connected by ('72.236.109.185', 58395) at Sat Apr 24 06:46:45 2010
Server connected by ('72.236.109.185', 58396) at Sat Apr 24 06:46:49 2010
Server connected by ('72.236.109.185', 58397) at Sat Apr 24 06:46:51 2010
[client window 1]
C:\...\PP4E\Internet\Sockets> python echo-client.py learning-python.com
Client received: b"Echo=>b'Hello network world' at Sat Apr 24 06:46:50 2010"
[client window 2]
C:\...\PP4E\Internet\Sockets> python echo-client.py learning-python.com Bruce
Client received: b"Echo=>b'Bruce' at Sat Apr 24 06:46:54 2010"
[client window 3]
C:\...\Sockets> python echo-client.py learning-python.com The Meaning of Life
Client received: b"Echo=>b'The' at Sat Apr 24 06:46:56 2010"
Client received: b"Echo=>b'Meaning' at Sat Apr 24 06:46:56 2010"
Client received: b"Echo=>b'of' at Sat Apr 24 06:46:56 2010"
Client received: b"Echo=>b'Life' at Sat Apr 24 06:46:57 2010"
Again, all times here are on the server machine. This may be a little confusing because
four windows are involved. In plain English, the test proceeds as follows:
1. The server starts running remotely.
2. All three clients are started and connect to the server a few seconds apart.
3. On the server, the client requests trigger three forked child processes, which all
immediately go to sleep for five seconds (to simulate being busy doing something
useful).
4. Each client waits until the server replies, which happens five seconds after their
initial requests.
In other words, clients are serviced at the same time by forked processes, while the main
parent process continues listening for new client requests. If clients were not handled
in parallel like this, no client could connect until the currently connected client’s five-
second delay expired.
In a more realistic application, that delay could be fatal if many clients were trying to
connect at once—the server would be stuck in the action we’re simulating with
time.sleep, and not get back to the main loop to accept new client requests. With
process forks per request, clients can be serviced in parallel.
Notice that we’re using the same client script here (echo-client.py, from Exam-
ple 12-2), just a different server; clients simply send and receive data to a machine and
port and don’t care how their requests are handled on the server. The result displayed
shows a byte string within a byte string, because the client sends one to the server and
the server sends one back; because the server uses string formatting and manual
Handling Multiple Clients | 805

encoding instead of byte string concatenation, the client’s message is shown as byte
string explicitly here.
Other run modes: Local servers with Cygwin and remote clients
Also note that the server is running remotely on a Linux machine in the preceding
section. As we learned in Chapter 5, the fork call is not supported on Windows in
standard Python at the time this book was written. It does run on Cygwin Python,
though, which allows us to start this server locally on localhost, on the same machine
as its clients:
[Cygwin shell window]
[C:\...\PP4E\Internet\Socekts]$ python fork-server.py
Server connected by ('127.0.0.1', 58258) at Sat Apr 24 07:50:15 2010
Server connected by ('127.0.0.1', 58259) at Sat Apr 24 07:50:17 2010
[Windows console, same machine]
C:\...\PP4E\Internet\Sockets> python echo-client.py localhost bright side of life
Client received: b"Echo=>b'bright' at Sat Apr 24 07:50:20 2010"
Client received: b"Echo=>b'side' at Sat Apr 24 07:50:20 2010"
Client received: b"Echo=>b'of' at Sat Apr 24 07:50:20 2010"
Client received: b"Echo=>b'life' at Sat Apr 24 07:50:20 2010"
[Windows console, same machine]
C:\...\PP4E\Internet\Sockets> python echo-client.py
Client received: b"Echo=>b'Hello network world' at Sat Apr 24 07:50:22 2010"
We can also run this test on the remote Linux server entirely, with two SSH or Telnet
windows. It works about the same as when clients are started locally, in a DOS console
window, but here “local” actually means a remote machine you’re using locally. Just
for fun, let’s also contact the remote server from a locally running client to show how
the server is also available to the Internet at large—when servers are coded with sockets
and forks this way, clients can connect from arbitrary machines, and can overlap arbi-
trarily in time:
[one SSH (or Telnet) window]
[...]$ python fork-server.py
Server connected by ('127.0.0.1', 55743) at Sat Apr 24 07:15:14 2010
Server connected by ('127.0.0.1', 55854) at Sat Apr 24 07:15:26 2010
Server connected by ('127.0.0.1', 55950) at Sat Apr 24 07:15:36 2010
Server connected by ('72.236.109.185', 58414) at Sat Apr 24 07:19:50 2010
[another SSH window, same machine]
[...]$ python echo-client.py
Client received: b"Echo=>b'Hello network world' at Sat Apr 24 07:15:19 2010"
[...]$ python echo-client.py localhost niNiNI!
Client received: b"Echo=>b'niNiNI!' at Sat Apr 24 07:15:31 2010"
[...]$ python echo-client.py localhost Say no more!
Client received: b"Echo=>b'Say' at Sat Apr 24 07:15:41 2010"
Client received: b"Echo=>b'no' at Sat Apr 24 07:15:41 2010"
Client received: b"Echo=>b'more!' at Sat Apr 24 07:15:41 2010"
[Windows console, local machine]
806 | Chapter 12: Network Scripting

C:\...\Internet\Sockets> python echo-client.py learning-python.com Blue, no yellow!
Client received: b"Echo=>b'Blue,' at Sat Apr 24 07:19:55 2010"
Client received: b"Echo=>b'no' at Sat Apr 24 07:19:55 2010"
Client received: b"Echo=>b'yellow!' at Sat Apr 24 07:19:55 2010"
Now that we have a handle on the basic model, let’s move on to the tricky bits. This
server script is fairly straightforward as forking code goes, but a few words about the
library tools it employs are in order.
Forked processes and sockets
We met os.fork in Chapter 5, but recall that forked processes are essentially a copy of
the process that forks them, and so they inherit file and socket descriptors from their
parent process. As a result, the new child process that runs the handleClient function
has access to the connection socket created in the parent process. Really, this is why
the child process works at all—when conversing on the connected socket, it’s using
the same socket that parent’s accept call returns. Programs know they are in a forked
child process if the fork call returns 0; otherwise, the original parent process gets back
the new child’s ID.
Exiting from children
In earlier fork examples, child processes usually call one of the exec variants to start a
new program in the child process. Here, instead, the child process simply calls a func-
tion in the same program and exits with os._exit. It’s imperative to call os._exit here—
if we did not, each child would live on after handleClient returns, and compete for
accepting new client requests.
In fact, without the exit call, we’d wind up with as many perpetual server processes as
requests served—remove the exit call and do a ps shell command after running a few
clients, and you’ll see what I mean. With the call, only the single parent process listens
for new requests. os._exit is like sys.exit, but it exits the calling process immediately
without cleanup actions. It’s normally used only in child processes, and sys.exit is
used everywhere else.
Killing the zombies: Don’t fear the reaper!
Note, however, that it’s not quite enough to make sure that child processes exit and
die. On systems like Linux, though not on Cygwin, parents must also be sure to issue
a wait system call to remove the entries for dead child processes from the system’s
process table. If we don’t do this, the child processes will no longer run, but they will
consume an entry in the system process table. For long-running servers, these bogus
entries may become problematic.
It’s common to call such dead-but-listed child processes zombies: they continue to use
system resources even though they’ve already passed over to the great operating system
beyond. To clean up after child processes are gone, this server keeps a list,
Handling Multiple Clients | 807

activeChildren, of the process IDs of all child processes it spawns. Whenever a new
incoming client request is received, the server runs its reapChildren to issue a wait for
any dead children by issuing the standard Python os.waitpid(0,os.WNOHANG) call.
The os.waitpid call attempts to wait for a child process to exit and returns its process
ID and exit status. With a 0 for its first argument, it waits for any child process. With
the WNOHANG p a r a m e t e r f o r i t s s e c o n d , i t d o e s n o t h i n g i f n o c h i l d p r o c e s s h a s e x i t e d ( i . e . ,
it does not block or pause the caller). The net effect is that this call simply asks the
operating system for the process ID of any child that has exited. If any have, the process
ID returned is removed both from the system process table and from this script’s
activeChildren list.
To see why all this complexity is needed, comment out the reapChildren call in this
script, run it on a platform where this is an issue, and then run a few clients. On my
Linux server, a ps -f full process listing command shows that all the dead child pro-
cesses stay in the system process table (show as <defunct>):
[...]$ ps –f
UID PID PPID C STIME TTY TIME CMD
5693094 9990 30778 0 04:34 pts/0 00:00:00 python fork-server.py
5693094 10844 9990 0 04:35 pts/0 00:00:00 [python] <defunct>
5693094 10869 9990 0 04:35 pts/0 00:00:00 [python] <defunct>
5693094 11130 9990 0 04:36 pts/0 00:00:00 [python] <defunct>
5693094 11151 9990 0 04:36 pts/0 00:00:00 [python] <defunct>
5693094 11482 30778 0 04:36 pts/0 00:00:00 ps -f
5693094 30778 30772 0 04:23 pts/0 00:00:00 -bash
When the reapChildren c o m m a n d i s r e a c t i v a t e d , d e a d c h i l d z o m b i e e n t r i e s a r e c l e a n e d
up each time the server gets a new client connection request, by calling the Python
os.waitpid f u n c t i o n . A f e w z o m b i e s m a y a c c u m u l a t e i f t h e s e r v e r i s h e a v i l y l o a d e d , b u t
they will remain only until the next client connection is received (you get only as many
zombies as processes served in parallel since the last accept):
[...]$ python fork-server.py &
[1] 20515
[...]$ ps -f
UID PID PPID C STIME TTY TIME CMD
5693094 20515 30778 0 04:43 pts/0 00:00:00 python fork-server.py
5693094 20777 30778 0 04:43 pts/0 00:00:00 ps -f
5693094 30778 30772 0 04:23 pts/0 00:00:00 -bash
[...]$
Server connected by ('72.236.109.185', 58672) at Sun Apr 25 04:43:51 2010
Server connected by ('72.236.109.185', 58673) at Sun Apr 25 04:43:54 2010
[...]$ ps -f
UID PID PPID C STIME TTY TIME CMD
5693094 20515 30778 0 04:43 pts/0 00:00:00 python fork-server.py
5693094 21339 20515 0 04:43 pts/0 00:00:00 [python] <defunct>
5693094 21398 20515 0 04:43 pts/0 00:00:00 [python] <defunct>
5693094 21573 30778 0 04:44 pts/0 00:00:00 ps -f
5693094 30778 30772 0 04:23 pts/0 00:00:00 -bash
[...]$
Server connected by ('72.236.109.185', 58674) at Sun Apr 25 04:44:07 2010
808 | Chapter 12: Network Scripting

[...]$ ps -f
UID PID PPID C STIME TTY TIME CMD
5693094 20515 30778 0 04:43 pts/0 00:00:00 python fork-server.py
5693094 21646 20515 0 04:44 pts/0 00:00:00 [python] <defunct>
5693094 21813 30778 0 04:44 pts/0 00:00:00 ps -f
5693094 30778 30772 0 04:23 pts/0 00:00:00 -bash
In fact, if you type fast enough, you can actually see a child process morph from a real
running program into a zombie. Here, for example, a child spawned to handle a new
request changes to <defunct> on exit. Its connection cleans up lingering zombies, and
its own process entry will be removed completely when the next request is received:
[...]$
Server connected by ('72.236.109.185', 58676) at Sun Apr 25 04:48:22 2010
[...] ps -f
UID PID PPID C STIME TTY TIME CMD
5693094 20515 30778 0 04:43 pts/0 00:00:00 python fork-server.py
5693094 27120 20515 0 04:48 pts/0 00:00:00 python fork-server.py
5693094 27174 30778 0 04:48 pts/0 00:00:00 ps -f
5693094 30778 30772 0 04:23 pts/0 00:00:00 -bash
[...]$ ps -f
UID PID PPID C STIME TTY TIME CMD
5693094 20515 30778 0 04:43 pts/0 00:00:00 python fork-server.py
5693094 27120 20515 0 04:48 pts/0 00:00:00 [python] <defunct>
5693094 27234 30778 0 04:48 pts/0 00:00:00 ps -f
5693094 30778 30772 0 04:23 pts/0 00:00:00 -bash
Preventing zombies with signal handlers on Linux
On some systems, it’s also possible to clean up zombie child processes by resetting the
signal handler for the SIGCHLD signal delivered to a parent process by the operating
system when a child process stops or exits. If a Python script assigns the SIG_IGN (ignore)
action as the SIGCHLD signal handler, zombies will be removed automatically and im-
mediately by the operating system as child processes exit; the parent need not issue
wait calls to clean up after them. Because of that, this scheme is a simpler alternative
to manually reaping zombies on platforms where it is supported.
If you’ve already read Chapter 5, you know that Python’s standard signal module lets
scripts install handlers for signals—software-generated events. By way of review, here
is a brief bit of background to show how this pans out for zombies. The program in
Example 12-5 installs a Python-coded signal handler function to respond to whatever
signal number you type on the command line.
Example 12-5. PP4E\Internet\Sockets\signal-demo.py
"""
Demo Python's signal module; pass signal number as a command-line arg, and use
a "kill -N pid" shell command to send this process a signal; on my Linux machine,
SIGUSR1=10, SIGUSR2=12, SIGCHLD=17, and SIGCHLD handler stays in effect even if
not restored: all other handlers are restored by Python after caught, but SIGCHLD
behavior is left to the platform's implementation; signal works on Windows too,
but defines only a few signal types; signals are not very portable in general;
Handling Multiple Clients | 809

"""
import sys, signal, time
def now():
return time.asctime()
def onSignal(signum, stackframe): # Python signal handler
print('Got signal', signum, 'at', now()) # most handlers stay in effect
if signum == signal.SIGCHLD: # but sigchld handler is not
print('sigchld caught')
#signal.signal(signal.SIGCHLD, onSignal)
signum = int(sys.argv[1])
signal.signal(signum, onSignal) # install signal handler
while True: signal.pause() # sleep waiting for signals
To run this script, simply put it in the background and send it signals by typing the
kill -signal-number process-id shell command line; this is the shell’s equivalent of
Python’s os.kill function available on Unix-like platforms only. Process IDs are listed
in the PID column of ps command results. Here is this script in action catching signal
numbers 10 (reserved for general use) and 9 (the unavoidable terminate signal):
[...]$ python signal-demo.py 10 &
[1] 10141
[...]$ ps -f
UID PID PPID C STIME TTY TIME CMD
5693094 10141 30778 0 05:00 pts/0 00:00:00 python signal-demo.py 10
5693094 10228 30778 0 05:00 pts/0 00:00:00 ps -f
5693094 30778 30772 0 04:23 pts/0 00:00:00 -bash
[...]$ kill −10 10141
Got signal 10 at Sun Apr 25 05:00:31 2010
[...]$ kill −10 10141
Got signal 10 at Sun Apr 25 05:00:34 2010
[...]$ kill −9 10141
[1]+ Killed python signal-demo.py 10
And in the following the script catches signal 17, which happens to be SIGCHLD on my
Linux server. Signal numbers vary from machine to machine, so you should normally
use their names, not their numbers. SIGCHLD behavior may vary per platform as well.
On my Cygwin install, for example, signal 10 can have different meaning, and signal
20 is SIGCHLD—on Cygwin, the script works as shown on Linux here for signal 10,
but generates an exception if it tries to install on handler for signal 17 (and Cygwin
doesn’t require reaping in any event). See the signal module’s library manual entry for
more details:
[...]$ python signal-demo.py 17 &
[1] 11592
[...]$ ps -f
UID PID PPID C STIME TTY TIME CMD
810 | Chapter 12: Network Scripting

5693094 11592 30778 0 05:00 pts/0 00:00:00 python signal-demo.py 17
5693094 11728 30778 0 05:01 pts/0 00:00:00 ps -f
5693094 30778 30772 0 04:23 pts/0 00:00:00 -bash
[...]$ kill −17 11592
Got signal 17 at Sun Apr 25 05:01:28 2010
sigchld caught
[...]$ kill −17 11592
Got signal 17 at Sun Apr 25 05:01:35 2010
sigchld caught
[...]$ kill −9 11592
[1]+ Killed python signal-demo.py 17
Now, to apply all of this signal knowledge to killing zombies, simply set the SIGCHLD
signal handler to the SIG_IGN ignore handler action; on systems where this assignment
is supported, child processes will be cleaned up when they exit. The forking server
variant shown in Example 12-6 uses this trick to manage its children.
Example 12-6. PP4E\Internet\Sockets\fork-server-signal.py
"""
Same as fork-server.py, but use the Python signal module to avoid keeping
child zombie processes after they terminate, instead of an explicit reaper
loop before each new connection; SIG_IGN means ignore, and may not work with
SIG_CHLD child exit signal on all platforms; see Linux documentation for more
about the restartability of a socket.accept call interrupted with a signal;
"""
import os, time, sys, signal, signal
from socket import * # get socket constructor and constants
myHost = '' # server machine, '' means local host
myPort = 50007 # listen on a non-reserved port number
sockobj = socket(AF_INET, SOCK_STREAM) # make a TCP socket object
sockobj.bind((myHost, myPort)) # bind it to server port number
sockobj.listen(5) # up to 5 pending connects
signal.signal(signal.SIGCHLD, signal.SIG_IGN) # avoid child zombie processes
def now(): # time on server machine
return time.ctime(time.time())
def handleClient(connection): # child process replies, exits
time.sleep(5) # simulate a blocking activity
while True: # read, write a client socket
data = connection.recv(1024)
if not data: break
reply = 'Echo=>%s at %s' % (data, now())
connection.send(reply.encode())
connection.close()
os._exit(0)
def dispatcher(): # listen until process killed
while True: # wait for next connection,
Handling Multiple Clients | 811

connection, address = sockobj.accept() # pass to process for service
print('Server connected by', address, end=' ')
print('at', now())
childPid = os.fork() # copy this process
if childPid == 0: # if in child process: handle
handleClient(connection) # else: go accept next connect
dispatcher()
Where applicable, this technique is:
•Much simpler; we don’t need to manually track or reap child processes.
• More accurate; it leaves no zombies temporarily between client requests.
In fact, only one line is dedicated to handling zombies here: the signal.signal call near
the top, to set the handler. Unfortunately, this version is also even less portable than
using os.fork in the first place, because signals may work slightly differently from plat-
form to platform, even among Unix variants. For instance, some Unix platforms may
not allow SIG_IGN to be used as the SIGCHLD action at all. On Linux systems, though,
this simpler forking server variant works like a charm:
[...]$ python fork-server-signal.py &
[1] 3837
Server connected by ('72.236.109.185', 58817) at Sun Apr 25 08:11:12 2010
[...] ps -f
UID PID PPID C STIME TTY TIME CMD
5693094 3837 30778 0 08:10 pts/0 00:00:00 python fork-server-signal.py
5693094 4378 3837 0 08:11 pts/0 00:00:00 python fork-server-signal.py
5693094 4413 30778 0 08:11 pts/0 00:00:00 ps -f
5693094 30778 30772 0 04:23 pts/0 00:00:00 -bash
[...]$ ps -f
UID PID PPID C STIME TTY TIME CMD
5693094 3837 30778 0 08:10 pts/0 00:00:00 python fork-server-signal.py
5693094 4584 30778 0 08:11 pts/0 00:00:00 ps -f
5693094 30778 30772 0 04:23 pts/0 00:00:00 –bash
Notice how in this version the child process’s entry goes away as soon as it exits, even
before a new client request is received; no “defunct” zombie ever appears. More dra-
matically, if we now start up the script we wrote earlier that spawns eight clients in
parallel (testecho.py) to talk to this server remotely, all appear on the server while run-
ning, but are removed immediately as they exit:
[client window]
C:\...\PP4E\Internet\Sockets> testecho.py learning-python.com
[server window]
[...]$
Server connected by ('72.236.109.185', 58829) at Sun Apr 25 08:16:34 2010
Server connected by ('72.236.109.185', 58830) at Sun Apr 25 08:16:34 2010
Server connected by ('72.236.109.185', 58831) at Sun Apr 25 08:16:34 2010
Server connected by ('72.236.109.185', 58832) at Sun Apr 25 08:16:34 2010
812 | Chapter 12: Network Scripting

Server connected by ('72.236.109.185', 58833) at Sun Apr 25 08:16:34 2010
Server connected by ('72.236.109.185', 58834) at Sun Apr 25 08:16:34 2010
Server connected by ('72.236.109.185', 58835) at Sun Apr 25 08:16:34 2010
Server connected by ('72.236.109.185', 58836) at Sun Apr 25 08:16:34 2010
[...]$ ps -f
UID PID PPID C STIME TTY TIME CMD
5693094 3837 30778 0 08:10 pts/0 00:00:00 python fork-server-signal.py
5693094 9666 3837 0 08:16 pts/0 00:00:00 python fork-server-signal.py
5693094 9667 3837 0 08:16 pts/0 00:00:00 python fork-server-signal.py
5693094 9668 3837 0 08:16 pts/0 00:00:00 python fork-server-signal.py
5693094 9670 3837 0 08:16 pts/0 00:00:00 python fork-server-signal.py
5693094 9674 3837 0 08:16 pts/0 00:00:00 python fork-server-signal.py
5693094 9678 3837 0 08:16 pts/0 00:00:00 python fork-server-signal.py
5693094 9681 3837 0 08:16 pts/0 00:00:00 python fork-server-signal.py
5693094 9682 3837 0 08:16 pts/0 00:00:00 python fork-server-signal.py
5693094 9722 30778 0 08:16 pts/0 00:00:00 ps -f
5693094 30778 30772 0 04:23 pts/0 00:00:00 -bash
[...]$ ps -f
UID PID PPID C STIME TTY TIME CMD
5693094 3837 30778 0 08:10 pts/0 00:00:00 python fork-server-signal.py
5693094 10045 30778 0 08:16 pts/0 00:00:00 ps -f
5693094 30778 30772 0 04:23 pts/0 00:00:00 –bash
And now that I’ve shown you how to use signal handling to reap children automatically
on Linux, I should underscore that this technique is not universally supported across
all flavors of Unix. If you care about portability, manually reaping children as we did
in Example 12-4 may still be desirable.
Why multiprocessing doesn’t help with socket server portability
In Chapter 5, we learned about Python’s new multiprocessing module. As we saw, it
provides a way to start function calls in new processes that is more portable than the
os.fork call used in this section’s server code, and it runs processes instead of threads
to work around the thread GIL in some scenarios. In particular, multiprocessing works
on standard Windows Python too, unlike direct os.fork calls.
I experimented with a server variant based upon this module to see if its portability
might help for socket servers. Its full source code is in the examples package in file
multi-server.py, but here are its important bits that differ:
...rest unchanged from fork-server.py...
from multiprocessing import Process
def handleClient(connection):
print('Child:', os.getpid()) # child process: reply, exit
time.sleep(5) # simulate a blocking activity
while True: # read, write a client socket
data = connection.recv(1024) # till eof when socket closed
...rest unchanged...
def dispatcher(): # listen until process killed
Handling Multiple Clients | 813

while True: # wait for next connection,
connection, address = sockobj.accept() # pass to process for service
print('Server connected by', address, end=' ')
print('at', now())
Process(target=handleClient, args=(connection,)).start()
if __name__ == '__main__':
print('Parent:', os.getpid())
sockobj = socket(AF_INET, SOCK_STREAM) # make a TCP socket object
sockobj.bind((myHost, myPort)) # bind it to server port number
sockobj.listen(5) # allow 5 pending connects
dispatcher()
This server variant is noticeably simpler too. Like the forking server it’s derived from,
this server works fine under Cygwin Python on Windows running as localhost, and
would probably work on other Unix-like platforms as well, because multiprocessing
forks a process on such systems, and file and socket descriptors are inherited by child
processes as usual. Hence, the child process uses the same connected socket as the
parent. Here’s the scene in a Cygwin server window and two Windows client windows:
[server window]
[C:\...\PP4E\Internet\Sockets]$ python multi-server.py
Parent: 8388
Server connected by ('127.0.0.1', 58271) at Sat Apr 24 08:13:27 2010
Child: 8144
Server connected by ('127.0.0.1', 58272) at Sat Apr 24 08:13:29 2010
Child: 8036
[two client windows]
C:\...\PP4E\Internet\Sockets> python echo-client.py
Client received: b"Echo=>b'Hello network world' at Sat Apr 24 08:13:33 2010"
C:\...\PP4E\Internet\Sockets> python echo-client.py localhost Brave Sir Robin
Client received: b"Echo=>b'Brave' at Sat Apr 24 08:13:35 2010"
Client received: b"Echo=>b'Sir' at Sat Apr 24 08:13:35 2010"
Client received: b"Echo=>b'Robin' at Sat Apr 24 08:13:35 2010"
However, this server does not work on standard Windows Python—the whole point
of trying to use multiprocessing in this context—because open sockets are not correctly
pickled when passed as arguments into the new process. Here’s what occurs in the
server windows on Windows 7 with Python 3.1:
C:\...\PP4E\Internet\Sockets> python multi-server.py
Parent: 9140
Server connected by ('127.0.0.1', 58276) at Sat Apr 24 08:17:41 2010
Child: 9628
Process Process-1:
Traceback (most recent call last):
File "C:\Python31\lib\multiprocessing\process.py", line 233, in _bootstrap
self.run()
File "C:\Python31\lib\multiprocessing\process.py", line 88, in run
self._target(*self._args, **self._kwargs)
File "C:\...\PP4E\Internet\Sockets\multi-server.py", line 38, in handleClient
data = connection.recv(1024) # till eof when socket closed
814 | Chapter 12: Network Scripting

socket.error: [Errno 10038] An operation was attempted on something that is not
a socket
Recall from Chapter 5 that on Windows multiprocessing passes context to a new
Python interpreter process by pickling it, and that Process arguments must all be
pickleable for Windows. Sockets in Python 3.1 don’t trigger errors when pickled thanks
to the class they are an instance of, but they are not really pickled correctly:
>>> from pickle import *
>>> from socket import *
>>> s = socket()
>>> x = dumps(s)
>>> s
<socket.socket object, fd=180, family=2, type=1, proto=0>
>>> loads(x)
<socket.socket object, fd=-1, family=0, type=0, proto=0>
>>> x
b'\x80\x03csocket\nsocket\nq\x00)\x81q\x01N}q\x02(X\x08\x00\x00\x00_io_refsq\x03
K\x00X\x07\x00\x00\x00_closedq\x04\x89u\x86q\x05b.'
As we saw in Chapter 5, multiprocessing has other IPC tools such as its own pipes and
queues that might be used instead of sockets to work around this issue, but clients
would then have to use them, too—the resulting server would not be as broadly ac-
cessible as one based upon general Internet sockets.
Even if multiprocessing did work on Windows, though, its need to start a new Python
interpreter would likely make it much slower than the more traditional technique of
spawning threads to talk to clients. Coincidentally, that brings us to our next topic.
Threading Servers
The forking model just described works well on Unix-like platforms in general, but it
suffers from some potentially significant limitations:
Performance
On some machines, starting a new process can be fairly expensive in terms of time
and space resources.
Portability
Forking processes is a Unix technique; as we’ve learned, the os.fork call currently
doesn’t work on non-Unix platforms such as Windows under standard Python. As
we’ve also learned, forks can be used in the Cygwin version of Python on Windows,
but they may be inefficient and not exactly the same as Unix forks. And as we just
discovered, multiprocessing won’t help on Windows, because connected sockets
are not pickleable across process boundaries.
Complexity
If you think that forking servers can be complicated, you’re not alone. As we just
saw, forking also brings with it all the shenanigans of managing and reaping zom-
bies—cleaning up after child processes that live shorter lives than their parents.
Handling Multiple Clients | 815

If you read Chapter 5, you know that one solution to all of these dilemmas is to use
threads rather than processes. Threads run in parallel and share global (i.e., module
and interpreter) memory.
Because threads all run in the same process and memory space, they automatically share
sockets passed between them, similar in spirit to the way that child processes inherit
socket descriptors. Unlike processes, though, threads are usually less expensive to start,
and work on both Unix-like machines and Windows under standard Python today.
Furthermore, many (though not all) see threads as simpler to program—child threads
die silently on exit, without leaving behind zombies to haunt the server.
To illustrate, Example 12-7 is another mutation of the echo server that handles client
requests in parallel by running them in threads rather than in processes.
Example 12-7. PP4E\Internet\Sockets\thread-server.py
"""
Server side: open a socket on a port, listen for a message from a client,
and send an echo reply; echoes lines until eof when client closes socket;
spawns a thread to handle each client connection; threads share global
memory space with main thread; this is more portable than fork: threads
work on standard Windows systems, but process forks do not;
"""
import time, _thread as thread # or use threading.Thread().start()
from socket import * # get socket constructor and constants
myHost = '' # server machine, '' means local host
myPort = 50007 # listen on a non-reserved port number
sockobj = socket(AF_INET, SOCK_STREAM) # make a TCP socket object
sockobj.bind((myHost, myPort)) # bind it to server port number
sockobj.listen(5) # allow up to 5 pending connects
def now():
return time.ctime(time.time()) # current time on the server
def handleClient(connection): # in spawned thread: reply
time.sleep(5) # simulate a blocking activity
while True: # read, write a client socket
data = connection.recv(1024)
if not data: break
reply = 'Echo=>%s at %s' % (data, now())
connection.send(reply.encode())
connection.close()
def dispatcher(): # listen until process killed
while True: # wait for next connection,
connection, address = sockobj.accept() # pass to thread for service
print('Server connected by', address, end=' ')
print('at', now())
thread.start_new_thread(handleClient, (connection,))
dispatcher()
816 | Chapter 12: Network Scripting

This dispatcher delegates each incoming client connection request to a newly spawned
thread running the handleClient function. As a result, this server can process multiple
clients at once, and the main dispatcher loop can get quickly back to the top to check
for newly arrived requests. The net effect is that new clients won’t be denied service
due to a busy server.
Functionally, this version is similar to the fork solution (clients are handled in parallel),
but it will work on any machine that supports threads, including Windows and Linux.
Let’s test it on both. First, start the server on a Linux machine and run clients on both
Linux and Windows:
[window 1: thread-based server process, server keeps accepting
client connections while threads are servicing prior requests]
[...]$ python thread-server.py
Server connected by ('127.0.0.1', 37335) at Sun Apr 25 08:59:05 2010
Server connected by ('72.236.109.185', 58866) at Sun Apr 25 08:59:54 2010
Server connected by ('72.236.109.185', 58867) at Sun Apr 25 08:59:56 2010
Server connected by ('72.236.109.185', 58868) at Sun Apr 25 08:59:58 2010
[window 2: client, but on same remote server machine]
[...]$ python echo-client.py
Client received: b"Echo=>b'Hello network world' at Sun Apr 25 08:59:10 2010"
[windows 3-5: local clients, PC]
C:\...\PP4E\Internet\Sockets> python echo-client.py learning-python.com
Client received: b"Echo=>b'Hello network world' at Sun Apr 25 08:59:59 2010"
C:\...\PP4E\Internet\Sockets> python echo-client.py learning-python.com Bruce
Client received: b"Echo=>b'Bruce' at Sun Apr 25 09:00:01 2010"
C:\...\Sockets> python echo-client.py learning-python.com The Meaning of life
Client received: b"Echo=>b'The' at Sun Apr 25 09:00:03 2010"
Client received: b"Echo=>b'Meaning' at Sun Apr 25 09:00:03 2010"
Client received: b"Echo=>b'of' at Sun Apr 25 09:00:03 2010"
Client received: b"Echo=>b'life' at Sun Apr 25 09:00:03 2010"
Because this server uses threads rather than forked processes, we can run it portably
on both Linux and a Windows PC. Here it is at work again, running on the same local
Windows PC as its clients; again, the main point to notice is that new clients are ac-
cepted while prior clients are being processed in parallel with other clients and the main
thread (in the five-second sleep delay):
[window 1: server, on local PC]
C:\...\PP4E\Internet\Sockets> python thread-server.py
Server connected by ('127.0.0.1', 58987) at Sun Apr 25 12:41:46 2010
Server connected by ('127.0.0.1', 58988) at Sun Apr 25 12:41:47 2010
Server connected by ('127.0.0.1', 58989) at Sun Apr 25 12:41:49 2010
[windows 2-4: clients, on local PC]
C:\...\PP4E\Internet\Sockets> python echo-client.py
Client received: b"Echo=>b'Hello network world' at Sun Apr 25 12:41:51 2010"
C:\...\PP4E\Internet\Sockets> python echo-client.py localhost Brian
Handling Multiple Clients | 817

Client received: b"Echo=>b'Brian' at Sun Apr 25 12:41:52 2010"
C:\...\PP4E\Internet\Sockets> python echo-client.py localhost Bright side of life
Client received: b"Echo=>b'Bright' at Sun Apr 25 12:41:54 2010"
Client received: b"Echo=>b'side' at Sun Apr 25 12:41:54 2010"
Client received: b"Echo=>b'of' at Sun Apr 25 12:41:54 2010"
Client received: b"Echo=>b'life' at Sun Apr 25 12:41:54 2010"
Remember that a thread silently exits when the function it is running returns; unlike
the process fork version, we don’t call anything like os._exit in the client handler func-
tion (and we shouldn’t—it may kill all threads in the process, including the main loop
watching for new connections!). Because of this, the thread version is not only more
portable, but also simpler.
Standard Library Server Classes
Now that I’ve shown you how to write forking and threading servers to process clients
without blocking incoming requests, I should also tell you that there are standard tools
in the Python standard library to make this process even easier. In particular, the
socketserver module defines classes that implement all flavors of forking and threading
servers that you are likely to be interested in.
Like the manually-coded servers we’ve just studied, this module’s primary classes im-
plement servers which process clients in parallel (a.k.a. asynchronously) to avoid de-
nying service to new requests during long-running transactions. Their net effect is to
automate the top-levels of common server code. To use this module, simply create the
desired kind of imported server object, passing in a handler object with a callback
method of your own, as demonstrated in the threaded TCP server of Example 12-8.
Example 12-8. PP4E\Internet\Sockets\class-server.py
"""
Server side: open a socket on a port, listen for a message from a client, and
send an echo reply; this version uses the standard library module socketserver to
do its work; socketserver provides TCPServer, ThreadingTCPServer, ForkingTCPServer,
UDP variants of these, and more, and routes each client connect request to a new
instance of a passed-in request handler object's handle method; socketserver also
supports Unix domain sockets, but only on Unixen; see the Python library manual.
"""
import socketserver, time # get socket server, handler objects
myHost = '' # server machine, '' means local host
myPort = 50007 # listen on a non-reserved port number
def now():
return time.ctime(time.time())
class MyClientHandler(socketserver.BaseRequestHandler):
def handle(self): # on each client connect
print(self.client_address, now()) # show this client's address
time.sleep(5) # simulate a blocking activity
while True: # self.request is client socket
818 | Chapter 12: Network Scripting

data = self.request.recv(1024) # read, write a client socket
if not data: break
reply = 'Echo=>%s at %s' % (data, now())
self.request.send(reply.encode())
self.request.close()
# make a threaded server, listen/handle clients forever
myaddr = (myHost, myPort)
server = socketserver.ThreadingTCPServer(myaddr, MyClientHandler)
server.serve_forever()
This server works the same as the threading server we wrote by hand in the previous
section, but instead focuses on service implementation (the customized handle
method), not on threading details. It is run the same way, too—here it is processing
three clients started by hand, plus eight spawned by the testecho script shown we wrote
in Example 12-3:
[window 1: server, serverHost='localhost' in echo-client.py]
C:\...\PP4E\Internet\Sockets> python class-server.py
('127.0.0.1', 59036) Sun Apr 25 13:50:23 2010
('127.0.0.1', 59037) Sun Apr 25 13:50:25 2010
('127.0.0.1', 59038) Sun Apr 25 13:50:26 2010
('127.0.0.1', 59039) Sun Apr 25 13:51:05 2010
('127.0.0.1', 59040) Sun Apr 25 13:51:05 2010
('127.0.0.1', 59041) Sun Apr 25 13:51:06 2010
('127.0.0.1', 59042) Sun Apr 25 13:51:06 2010
('127.0.0.1', 59043) Sun Apr 25 13:51:06 2010
('127.0.0.1', 59044) Sun Apr 25 13:51:06 2010
('127.0.0.1', 59045) Sun Apr 25 13:51:06 2010
('127.0.0.1', 59046) Sun Apr 25 13:51:06 2010
[windows 2-4: client, same machine]
C:\...\PP4E\Internet\Sockets> python echo-client.py
Client received: b"Echo=>b'Hello network world' at Sun Apr 25 13:50:28 2010"
C:\...\PP4E\Internet\Sockets> python echo-client.py localhost Arthur
Client received: b"Echo=>b'Arthur' at Sun Apr 25 13:50:30 2010"
C:\...\PP4E\Internet\Sockets> python echo-client.py localhost Brave Sir Robin
Client received: b"Echo=>b'Brave' at Sun Apr 25 13:50:31 2010"
Client received: b"Echo=>b'Sir' at Sun Apr 25 13:50:31 2010"
Client received: b"Echo=>b'Robin' at Sun Apr 25 13:50:31 2010"
C:\...\PP4E\Internet\Sockets> python testecho.py
To build a forking server instead, just use the class name ForkingTCPServer when cre-
ating the server object. The socketserver module has more power than shown by this
example; it also supports nonparallel (a.k.a. serial or synchronous) servers, UDP and
Unix domain sockets, and Ctrl-C server interrupts on Windows. See Python’s library
manual for more details.
For more advanced server needs, Python also comes with standard library tools that
use those shown here, and allow you to implement in just a few lines of Python code a
Handling Multiple Clients | 819

simple but fully-functional HTTP (web) server that knows how to run server-side CGI
scripts. We’ll explore those larger server tools in Chapter 15.
Multiplexing Servers with select
So far we’ve seen how to handle multiple clients at once with both forked processes
and spawned threads, and we’ve looked at a library class that encapsulates both
schemes. Under both approaches, all client handlers seem to run in parallel with one
another and with the main dispatch loop that continues watching for new incoming
requests. Because all of these tasks run in parallel (i.e., at the same time), the server
doesn’t get blocked when accepting new requests or when processing a long-running
client handler.
Technically, though, threads and processes don’t really run in parallel, unless you’re
lucky enough to have a machine with many CPUs. Instead, your operating system
performs a juggling act—it divides the computer’s processing power among all active
tasks. It runs part of one, then part of another, and so on. All the tasks appear to run
in parallel, but only because the operating system switches focus between tasks so fast
that you don’t usually notice. This process of switching between tasks is sometimes
called time-slicing when done by an operating system; it is more generally known as
multiplexing.
When we spawn threads and processes, we rely on the operating system to juggle the
active tasks so that none are starved of computing resources, especially the main server
dispatcher loop. However, there’s no reason that a Python script can’t do so as well.
For instance, a script might divide tasks into multiple steps—run a step of one task,
then one of another, and so on, until all are completed. The script need only know how
to divide its attention among the multiple active tasks to multiplex on its own.
Servers can apply this technique to yield yet another way to handle multiple clients at
once, a way that requires neither threads nor forks. By multiplexing client connections
and the main dispatcher with the select system call, a single event loop can process
multiple clients and accept new ones in parallel (or at least close enough to avoid stall-
ing). Such servers are sometimes called asynchronous, because they service clients in
spurts, as each becomes ready to communicate. In asynchronous servers, a single main
loop run in a single process and thread decides which clients should get a bit of attention
each time through. Client requests and the main dispatcher loop are each given a small
slice of the server’s attention if they are ready to converse.
Most of the magic behind this server structure is the operating system select call,
available in Python’s standard select module on all major platforms. Roughly,
select is asked to monitor a list of input sources, output sources, and exceptional
condition sources and tells us which sources are ready for processing. It can be made
to simply poll all the sources to see which are ready; wait for a maximum time period
for sources to become ready; or wait indefinitely until one or more sources are ready
for processing.
820 | Chapter 12: Network Scripting

However used, select lets us direct attention to sockets ready to communicate, so as
to avoid blocking on calls to ones that are not. That is, when the sources passed to
select are sockets, we can be sure that socket calls like accept, recv, and send will not
block (pause) the server when applied to objects returned by select. Because of that,
a single-loop server that uses select need not get stuck communicating with one client
or waiting for new ones while other clients are starved for the server’s attention.
Because this type of server does not need to start threads or processes, it can be efficient
when transactions with clients are relatively short-lived. However, it also requires that
these transactions be quick; if they are not, it still runs the risk of becoming bogged
down waiting for a dialog with a particular client to end, unless augmented with threads
or forks for long-running transactions.‖
A select-based echo server
Let’s see how all of this translates into code. The script in Example 12-9 implements
another echo server, one that can handle multiple clients without ever starting new
processes or threads.
Example 12-9. PP4E\Internet\Sockets\select-server.py
"""
Server: handle multiple clients in parallel with select. use the select
module to manually multiplex among a set of sockets: main sockets which
accept new client connections, and input sockets connected to accepted
clients; select can take an optional 4th arg--0 to poll, n.m to wait n.m
seconds, or omitted to wait till any socket is ready for processing.
"""
import sys, time
from select import select
from socket import socket, AF_INET, SOCK_STREAM
def now(): return time.ctime(time.time())
myHost = '' # server machine, '' means local host
myPort = 50007 # listen on a non-reserved port number
if len(sys.argv) == 3: # allow host/port as cmdline args too
myHost, myPort = sys.argv[1:]
numPortSocks = 2 # number of ports for client connects
# make main sockets for accepting new client requests
mainsocks, readsocks, writesocks = [], [], []
for i in range(numPortSocks):
portsock = socket(AF_INET, SOCK_STREAM) # make a TCP/IP socket object
‖Confusingly, select-based servers are often called asynchronous, to describe their multiplexing of short-lived
transactions. Really, though, the classic forking and threading servers we met earlier are asynchronous, too,
as they do not wait for completion of a given client’s request. There is a clearer distinction between serial and
parallel servers—the former process one transaction at a time and the latter do not—and “synchronous” and
“asynchronous” are essentially synonyms for “serial” and “parallel.” By this definition, forking, threading,
and select loops are three alternative ways to implement parallel, asynchronous servers.
Handling Multiple Clients | 821

portsock.bind((myHost, myPort)) # bind it to server port number
portsock.listen(5) # listen, allow 5 pending connects
mainsocks.append(portsock) # add to main list to identify
readsocks.append(portsock) # add to select inputs list
myPort += 1 # bind on consecutive ports
# event loop: listen and multiplex until server process killed
print('select-server loop starting')
while True:
#print(readsocks)
readables, writeables, exceptions = select(readsocks, writesocks, [])
for sockobj in readables:
if sockobj in mainsocks: # for ready input sockets
# port socket: accept new client
newsock, address = sockobj.accept() # accept should not block
print('Connect:', address, id(newsock)) # newsock is a new socket
readsocks.append(newsock) # add to select list, wait
else:
# client socket: read next line
data = sockobj.recv(1024) # recv should not block
print('\tgot', data, 'on', id(sockobj))
if not data: # if closed by the clients
sockobj.close() # close here and remv from
readsocks.remove(sockobj) # del list else reselected
else:
# this may block: should really select for writes too
reply = 'Echo=>%s at %s' % (data, now())
sockobj.send(reply.encode())
The bulk of this script is its while event loop at the end that calls select to find out
which sockets are ready for processing; these include both main port sockets on which
clients can connect and open client connections. It then loops over all such ready sock-
ets, accepting connections on main port sockets and reading and echoing input on any
client sockets ready for input. Both the accept and recv calls in this code are guaranteed
to not block the server process after select returns; as a result, this server can quickly
get back to the top of the loop to process newly arrived client requests and already
connected clients’ inputs. The net effect is that all new requests and clients are serviced
in pseudoparallel fashion.
To make this process work, the server appends the connected socket for each client to
the readables list passed to select, and simply waits for the socket to show up in the
selected inputs list. For illustration purposes, this server also listens for new clients on
more than one port—on ports 50007 and 50008, in our examples. Because these main
port sockets are also interrogated with select, connection requests on either port can
be accepted without blocking either already connected clients or new connection re-
quests appearing on the other port. The select call returns whatever sockets in
readables are ready for processing—both main port sockets and sockets connected to
clients currently being processed.
822 | Chapter 12: Network Scripting

Running the select server
Let’s run this script locally to see how it does its stuff (the client and server can also be
run on different machines, as in prior socket examples). First, we’ll assume we’ve al-
ready started this server script on the local machine in one window, and run a few
clients to talk to it. The following listing gives the interaction in two such client console
windows running on Windows. The first client simply runs the echo-client script twice
to contact the server, and the second also kicks off the testecho script to spawn eight
echo-client programs running in parallel.
As before, the server simply echoes back whatever text that client sends, though without
a sleep pause here (more on this in a moment). Notice how the second client window
really runs a script called echo-client-50008 so as to connect to the second port socket
in the server; it’s the same as echo-client, with a different hardcoded port number;
alas, the original script wasn’t designed to input a port number:
[client window 1]
C:\...\PP4E\Internet\Sockets> python echo-client.py
Client received: b"Echo=>b'Hello network world' at Sun Apr 25 14:51:21 2010"
C:\...\PP4E\Internet\Sockets> python echo-client.py
Client received: b"Echo=>b'Hello network world' at Sun Apr 25 14:51:27 2010"
[client window 2]
C:\...\PP4E\Internet\Sockets> python echo-client-5008.py localhost Sir Galahad
Client received: b"Echo=>b'Sir' at Sun Apr 25 14:51:22 2010"
Client received: b"Echo=>b'Galahad' at Sun Apr 25 14:51:22 2010"
C:\...\PP4E\Internet\Sockets> python testecho.py
The next listing is the sort of output that show up in the window where the server has
been started. The first three connections come from echo-client runs; the rest is the
result of the eight programs spawned by testecho in the second client window. We can
run this server on Windows, too, because select is available on this platform. Correlate
this output with the server’s code to see how it runs.
Notice that for testecho, new client connections and client inputs are multiplexed to-
gether. If you study the output closely, you’ll see that they overlap in time, because all
activity is dispatched by the single event loop in the server. In fact, the trace output on
the server will probably look a bit different nearly every time it runs. Clients and new
connections are interleaved almost at random due to timing differences on the host
machines. This happens in the earlier forking and treading servers, too, but the oper-
ating system automatically switches between the execution paths of the dispatcher loop
and client transactions.
Also note that the server gets an empty string when the client has closed its socket. We
take care to close and delete these sockets at the server right away, or else they would
be needlessly reselected again and again, each time through the main loop:
[server window]
C:\...\PP4E\Internet\Sockets> python select-server.py
Handling Multiple Clients | 823

C:\Users\mark\Stuff\Books\4E\PP4E\dev\Examples\PP4E\Internet\Sockets>python sele
ct-server.py
select-server loop starting
Connect: ('127.0.0.1', 59080) 21339352
got b'Hello network world' on 21339352
got b'' on 21339352
Connect: ('127.0.0.1', 59081) 21338128
got b'Sir' on 21338128
got b'Galahad' on 21338128
got b'' on 21338128
Connect: ('127.0.0.1', 59082) 21339352
got b'Hello network world' on 21339352
got b'' on 21339352
[testecho results]
Connect: ('127.0.0.1', 59083) 21338128
got b'Hello network world' on 21338128
got b'' on 21338128
Connect: ('127.0.0.1', 59084) 21339352
got b'Hello network world' on 21339352
got b'' on 21339352
Connect: ('127.0.0.1', 59085) 21338128
got b'Hello network world' on 21338128
got b'' on 21338128
Connect: ('127.0.0.1', 59086) 21339352
got b'Hello network world' on 21339352
got b'' on 21339352
Connect: ('127.0.0.1', 59087) 21338128
got b'Hello network world' on 21338128
got b'' on 21338128
Connect: ('127.0.0.1', 59088) 21339352
Connect: ('127.0.0.1', 59089) 21338128
got b'Hello network world' on 21339352
got b'Hello network world' on 21338128
Connect: ('127.0.0.1', 59090) 21338056
got b'' on 21339352
got b'' on 21338128
got b'Hello network world' on 21338056
got b'' on 21338056
Besides this more verbose output, there’s another subtle but crucial difference to
notice—a time.sleep call to simulate a long-running task doesn’t make sense in the
server here. Because all clients are handled by the same single loop, sleeping would
pause everything, and defeat the whole point of a multiplexing server. Again, manual
multiplexing servers like this one work well when transactions are short, but also gen-
erally require them to either be so, or be handled specially.
Before we move on, here are a few additional notes and options:
select call details
Formally, select is called with three lists of selectable objects (input sources, out-
put sources, and exceptional condition sources), plus an optional timeout. The
timeout argument may be a real wait expiration value in seconds (use floating-point
824 | Chapter 12: Network Scripting

numbers to express fractions of a second), a zero value to mean simply poll and
return immediately, or omitted to mean wait until at least one object is ready (as
done in our server script). The call returns a triple of ready objects—subsets of the
first three arguments—any or all of which may be empty if the timeout expired
before sources became ready.
select portability
Like threading, but unlike forking, this server works in standard Windows Python,
too. Technically, the select call works only for sockets on Windows, but also
works for things like files and pipes on Unix and Macintosh. For servers running
over the Internet, of course, the primary devices we are interested in are sockets.
Nonblocking sockets
select lets us be sure that socket calls like accept and recv won’t block (pause) the
caller, but it’s also possible to make Python sockets nonblocking in general. Call
the setblocking method of socket objects to set the socket to blocking or non-
blocking mode. For example, given a call like sock.setblocking(flag), the socket
sock is set to nonblocking mode if the flag is zero and to blocking mode otherwise.
All sockets start out in blocking mode initially, so socket calls may always make
the caller wait.
However, when in nonblocking mode, a socket.error exception is raised if a
recv socket call doesn’t find any data, or if a send call can’t immediately transfer
data. A script can catch this exception to determine whether the socket is ready for
processing. In blocking mode, these calls always block until they can proceed. Of
course, there may be much more to processing client requests than data transfers
(requests may also require long-running computations), so nonblocking sockets
don’t guarantee that servers won’t stall in general. They are simply another way to
code multiplexing servers. Like select, they are better suited when client requests
can be serviced quickly.
The asyncore module framework
If you’re interested in using select, you will probably also be interested in checking
out the asyncore.py module in the standard Python library. It implements a class-
based callback model, where input and output callbacks are dispatched to class
methods by a precoded select event loop. As such, it allows servers to be con-
structed without threads or forks, and it is a select-based alternative to the sock
etserver module’s threading and forking module we met in the prior sections. As
for this type of server in general, asyncore is best when transactions are short—
what it describes as “I/O bound” instead of “CPU bound” programs, the latter of
which still require threads or forks. See the Python library manual for details and
a usage example.
Twisted
For other server options, see also the open source Twisted system (http://twisted
matrix.com). Twisted is an asynchronous networking framework written in Python
that supports TCP, UDP, multicast, SSL/TLS, serial communication, and more. It
Handling Multiple Clients | 825

supports both clients and servers and includes implementations of a number of
commonly used network services such as a web server, an IRC chat server, a mail
server, a relational database interface, and an object broker.
Although Twisted supports processes and threads for longer-running actions, it
also uses an asynchronous, event-driven model to handle clients, which is similar
to the event loop of GUI libraries like tkinter. It abstracts an event loop, which
multiplexes among open socket connections, automates many of the details in-
herent in an asynchronous server, and provides an event-driven framework for
scripts to use to accomplish application tasks. Twisted’s internal event engine is
similar in spirit to our select-based server and the asyncore module, but it is re-
garded as much more advanced. Twisted is a third-party system, not a standard
library tool; see its website and documentation for more details.
Summary: Choosing a Server Scheme
So when should you use select to build a server, instead of threads or forks? Needs
vary per application, of course, but as mentioned, servers based on the select call
generally perform very well when client transactions are relatively short and are not
CPU-bound. If they are not short, threads or forks may be a better way to split pro-
cessing among multiple clients. Threads and forks are especially useful if clients require
long-running processing above and beyond the socket calls used to pass data. However,
combinations are possible too—nothing is stopping a select-based polling loop from
using threads, too.
It’s important to remember that schemes based on select (and nonblocking sockets)
are not completely immune to blocking. In Example 12-9, for instance, the send call
that echoes text back to a client might block, too, and hence stall the entire server. We
could work around that blocking potential by using select to make sure that the output
operation is ready before we attempt it (e.g., use the writesocks list and add another
loop to send replies to ready output sockets), albeit at a noticeable cost in program
clarity.
In general, though, if we cannot split up the processing of a client’s request in such a
way that it can be multiplexed with other requests and not block the server’s main loop,
select may not be the best way to construct a server by itself. While some network
servers can satisfy this constraint, many cannot.
Moreover, select also seems more complex than spawning either processes or threads,
because we need to manually transfer control among all tasks (for instance, compare
the threaded and select versions of our echo server, even without write selects). As
usual, though, the degree of that complexity varies per application. The asyncore
standard library module mentioned earlier simplifies some of the tasks of implementing
a select-based event-loop socket server, and Twisted offers additional hybrid
solutions.
826 | Chapter 12: Network Scripting

Making Sockets Look Like Files and Streams
So far in this chapter, we’ve focused on the role of sockets in the classic client/server
networking model. That’s one of their primary roles, but they have other common use
cases as well.
In Chapter 5, for instance, we saw sockets as a basic IPC device between processes and
threads on a single machine. And in Chapter 10’s exploration of linking non-GUI scripts
to GUIs, we wrote a utility module (Example 10-23) which connected a caller’s standard
output stream to a socket, on which a GUI could listen for output to be displayed.
There, I promised that we’d flesh out that module with additional transfer modes once
we had a chance to explore sockets in more depth. Now that we have, this section takes
a brief detour from the world of remote network servers to tell the rest of this story.
Although some programs can be written or rewritten to converse over sockets explicitly,
this isn’t always an option; it may be too expensive an effort for existing scripts, and
might preclude desirable nonsocket usage modes for others. In some cases, it’s better
to allow a script to use standard stream tools such as the print and input built-in
functions and sys module file calls (e.g., sys.stdout.write), and connect them to sock-
ets only when needed.
Because such stream tools are designed to operate on text-mode files, though, probably
the biggest trick here is fooling them into operating on the inherently binary mode and
very different method interface of sockets. Luckily, sockets come with a method that
achieves all the forgery we need.
The socket object makefile method comes in handy anytime you wish to process a
socket with normal file object methods or need to pass a socket to an existing interface
or program that expects a file. The socket wrapper object returned allows your scripts
to transfer data over the underlying socket with read and write calls, rather than recv
and send. Since input and print built-in functions use the former methods set, they will
happily interact with sockets wrapped by this call, too.
The makefile method also allows us to treat normally binary socket data as text instead
of byte strings, and has additional arguments such as encoding that let us specify non-
default Unicode encodings for the transferred text—much like the built-in open and
os.fdopen calls we met in Chapter 4 do for file descriptors. Although text can always
be encoded and decoded with manual calls after binary mode socket transfers, make
file shifts the burden of text encodings from your code to the file wrapper object.
This equivalence to files comes in handy any time we want to use software that supports
file interfaces. For example, the Python pickle module’s load and dump methods expect
an object with a file-like interface (e.g., read and write methods), but they don’t require
a physical file. Passing a TCP/IP socket wrapped with the makefile call to the pickler
allows us to ship serialized Python objects over the Internet, without having to pickle
to byte strings ourselves and call raw socket methods manually. This is an alternative
to using the pickle module’s string-based calls (dumps, loads) with socket send and
Making Sockets Look Like Files and Streams | 827

recv calls, and might offer more flexibility for software that must support a variety of
transport mechanisms. See Chapter 17 for more details on object serialization
interfaces.
More generally, any component that expects a file-like method protocol will gladly
accept a socket wrapped with a socket object makefile call. Such interfaces will also
accept strings wrapped with the built-in io.StringIO class, and any other sort of object
that supports the same kinds of method calls as built-in file objects. As always in Python,
we code to protocols—object interfaces—not to specific datatypes.
A Stream Redirection Utility
To illustrate the makefile method’s operation, Example 12-10 implements a variety of
redirection schemes, which redirect the caller’s streams to a socket that can be used by
another process for communication. The first of its functions connects output, and is
what we used in Chapter 10; the others connect input, and both input and output in
three different modes.
Naturally, the wrapper object returned by socket.makefile can also be used with direct
file interface read and write method calls and independently of standard streams. This
example uses those methods, too, albeit in most cases indirectly and implicitly through
the print and input stream access built-ins, and reflects a common use case for the tool.
Example 12-10. PP4E\Internet\Sockets\socket_stream_redirect.py
"""
###############################################################################
Tools for connecting standard streams of non-GUI programs to sockets that
a GUI (or other) program can use to interact with the non-GUI program.
###############################################################################
"""
import sys
from socket import *
port = 50008 # pass in different port if multiple dialogs on machine
host = 'localhost' # pass in different host to connect to remote listeners
def initListenerSocket(port=port):
"""
initialize connected socket for callers that listen in server mode
"""
sock = socket(AF_INET, SOCK_STREAM)
sock.bind(('', port)) # listen on this port number
sock.listen(5) # set pending queue length
conn, addr = sock.accept() # wait for client to connect
return conn # return connected socket
def redirectOut(port=port, host=host):
"""
connect caller's standard output stream to a socket for GUI to listen
start caller after listener started, else connect fails before accept
828 | Chapter 12: Network Scripting

"""
sock = socket(AF_INET, SOCK_STREAM)
sock.connect((host, port)) # caller operates in client mode
file = sock.makefile('w') # file interface: text, buffered
sys.stdout = file # make prints go to sock.send
return sock # if caller needs to access it raw
def redirectIn(port=port, host=host):
"""
connect caller's standard input stream to a socket for GUI to provide
"""
sock = socket(AF_INET, SOCK_STREAM)
sock.connect((host, port))
file = sock.makefile('r') # file interface wrapper
sys.stdin = file # make input come from sock.recv
return sock # return value can be ignored
def redirectBothAsClient(port=port, host=host):
"""
connect caller's standard input and output stream to same socket
in this mode, caller is client to a server: sends msg, receives reply
"""
sock = socket(AF_INET, SOCK_STREAM)
sock.connect((host, port)) # or open in 'rw' mode
ofile = sock.makefile('w') # file interface: text, buffered
ifile = sock.makefile('r') # two file objects wrap same socket
sys.stdout = ofile # make prints go to sock.send
sys.stdin = ifile # make input come from sock.recv
return sock
def redirectBothAsServer(port=port, host=host):
"""
connect caller's standard input and output stream to same socket
in this mode, caller is server to a client: receives msg, send reply
"""
sock = socket(AF_INET, SOCK_STREAM)
sock.bind((host, port)) # caller is listener here
sock.listen(5)
conn, addr = sock.accept()
ofile = conn.makefile('w') # file interface wrapper
ifile = conn.makefile('r') # two file objects wrap same socket
sys.stdout = ofile # make prints go to sock.send
sys.stdin = ifile # make input come from sock.recv
return conn
To test, the script in Example 12-11 defines five sets of client/server functions. It runs
the client’s code in process, but deploys the Python multiprocessing module we met
in Chapter 5 to portably spawn the server function’s side of the dialog in a separate
process. In the end, the client and server test functions run in different processes, but
converse over a socket that is connected to standard streams within the test script’s
process.
Making Sockets Look Like Files and Streams | 829

Example 12-11. PP4E\Internet\Sockets\test-socket_stream_redirect.py
"""
###############################################################################
test the socket_stream_redirection.py modes
###############################################################################
"""
import sys, os, multiprocessing
from socket_stream_redirect import *
###############################################################################
# redirected client output
###############################################################################
def server1():
mypid = os.getpid()
conn = initListenerSocket() # block till client connect
file = conn.makefile('r')
for i in range(3): # read/recv client's prints
data = file.readline().rstrip() # block till data ready
print('server %s got [%s]' % (mypid, data)) # print normally to terminal
def client1():
mypid = os.getpid()
redirectOut()
for i in range(3):
print('client %s: %s' % (mypid, i)) # print to socket
sys.stdout.flush() # else buffered till exits!
###############################################################################
# redirected client input
###############################################################################
def server2():
mypid = os.getpid() # raw socket not buffered
conn = initListenerSocket() # send to client's input
for i in range(3):
conn.send(('server %s: %s\n' % (mypid, i)).encode())
def client2():
mypid = os.getpid()
redirectIn()
for i in range(3):
data = input() # input from socket
print('client %s got [%s]' % (mypid, data)) # print normally to terminal
###############################################################################
# redirect client input + output, client is socket client
###############################################################################
def server3():
mypid = os.getpid()
conn = initListenerSocket() # wait for client connect
file = conn.makefile('r') # recv print(), send input()
for i in range(3): # readline blocks till data
830 | Chapter 12: Network Scripting

data = file.readline().rstrip()
conn.send(('server %s got [%s]\n' % (mypid, data)).encode())
def client3():
mypid = os.getpid()
redirectBothAsClient()
for i in range(3):
print('client %s: %s' % (mypid, i)) # print to socket
data = input() # input from socket: flushes!
sys.stderr.write('client %s got [%s]\n' % (mypid, data)) # not redirected
###############################################################################
# redirect client input + output, client is socket server
###############################################################################
def server4():
mypid = os.getpid()
sock = socket(AF_INET, SOCK_STREAM)
sock.connect((host, port))
file = sock.makefile('r')
for i in range(3):
sock.send(('server %s: %s\n' % (mypid, i)).encode()) # send to input()
data = file.readline().rstrip() # recv from print()
print('server %s got [%s]' % (mypid, data)) # result to terminal
def client4():
mypid = os.getpid()
redirectBothAsServer() # I'm actually the socket server in this mode
for i in range(3):
data = input() # input from socket: flushes!
print('client %s got [%s]' % (mypid, data)) # print to socket
sys.stdout.flush() # else last buffered till exit!
###############################################################################
# redirect client input + output, client is socket client, server xfers first
###############################################################################
def server5():
mypid = os.getpid() # test 4, but server accepts
conn = initListenerSocket() # wait for client connect
file = conn.makefile('r') # send input(), recv print()
for i in range(3):
conn.send(('server %s: %s\n' % (mypid, i)).encode())
data = file.readline().rstrip()
print('server %s got [%s]' % (mypid, data))
def client5():
mypid = os.getpid()
s = redirectBothAsClient() # I'm the socket client in this mode
for i in range(3):
data = input() # input from socket: flushes!
print('client %s got [%s]' % (mypid, data)) # print to socket
sys.stdout.flush() # else last buffered till exit!
###############################################################################
Making Sockets Look Like Files and Streams | 831

# test by number on command-line
###############################################################################
if __name__ == '__main__':
server = eval('server' + sys.argv[1])
client = eval('client' + sys.argv[1]) # client in this process
multiprocessing.Process(target=server).start() # server in new process
client() # reset streams in client
#import time; time.sleep(5) # test effect of exit flush
Run the test script with a client and server number on the command line to test the
module’s tools; messages display process ID numbers, and those within square brackets
reflect a transfer across streams connected to sockets (twice, when nested):
C:\...\PP4E\Internet\Sockets> test-socket_stream_redirect.py 1
server 3844 got [client 1112: 0]
server 3844 got [client 1112: 1]
server 3844 got [client 1112: 2]
C:\...\PP4E\Internet\Sockets> test-socket_stream_redirect.py 2
client 5188 got [server 2020: 0]
client 5188 got [server 2020: 1]
client 5188 got [server 2020: 2]
C:\...\PP4E\Internet\Sockets> test-socket_stream_redirect.py 3
client 7796 got [server 2780 got [client 7796: 0]]
client 7796 got [server 2780 got [client 7796: 1]]
client 7796 got [server 2780 got [client 7796: 2]]
C:\...\PP4E\Internet\Sockets> test-socket_stream_redirect.py 4
server 4288 got [client 3852 got [server 4288: 0]]
server 4288 got [client 3852 got [server 4288: 1]]
server 4288 got [client 3852 got [server 4288: 2]]
C:\...\PP4E\Internet\Sockets> test-socket_stream_redirect.py 5
server 6040 got [client 7728 got [server 6040: 0]]
server 6040 got [client 7728 got [server 6040: 1]]
server 6040 got [client 7728 got [server 6040: 2]]
If you correlate this script’s output with its code to see how messages are passed be-
tween client and server, you’ll find that print and input calls in client functions are
ultimately routed over sockets to another process. To the client functions, the socket
linkage is largely invisible.
Text-mode files and buffered output streams
Before we move on, there are two remarkably subtle aspects of the example’s code
worth highlighting:
Binary to text translations
Raw sockets transfer binary byte strings, but by opening the wrapper files in text
mode, their content is automatically translated to text strings on input and output.
Text-mode file wrappers are required if accessed through standard stream tools
832 | Chapter 12: Network Scripting

such as the print built-in that writes text strings (as we’ve learned, binary mode
files require byte strings instead). When dealing with the raw socket directly,
though, text must still be manually encoded to byte strings, as shown in most of
Example 12-11’s tests.
Buffered streams, program output, and deadlock
As we learned in Chapters 5 and 10, standard streams are normally buffered, and
printed text may need to be flushed so that it appears on a socket connected to a
process’s output stream. Indeed, some of this example’s tests require explicit or
implicit flush calls to work properly at all; otherwise their output is either incom-
plete or absent altogether until program exit. In pathological cases, this can lead
to deadlock, with a process waiting for output from another that never appears. In
other configurations, we may also get socket errors in a reader if a writer exits too
soon, especially in two-way dialogs.
For example, if client1 and client4 did not flush periodically as they do, the only
reason that they would work is because output streams are automatically flushed
when their process exits. Without manual flushes, client1 transfers no data until
process exit (at which point all its output is sent at once in a single message), and
client4’s data is incomplete till exit (its last printed message is delayed).
Even more subtly, both client3 and client4 rely on the fact that the input built-
in first automatically flushes sys.stdout internally for its prompt option, thereby
sending data from preceding print calls. Without this implicit flush (or the addition
of manual flushes), client3 would experience deadlock immediately, as would
client4 if its manual flush call was removed (even with input’s flush, removing
client4’s manual flush causes its final print message to not be transferred until
process exit). client5 has this same behavior as client4, because it simply swaps
which process binds and accepts and which connects.
In the general case, if we wish to read a program’s output as it is produced, instead
of all at once when it exits or as its buffers fill, the program must either call
sys.stdout.flush periodically, or be run with unbuffered streams by using
Python’s -u command-line argument of Chapter 5 if applicable.
Although we can open socket wrapper files in unbuffered mode with a second
makefile argument of zero (like normal open), this does not allow the wrapper to
run in the text mode required for print and desired for input. In fact, attempting
to make a socket wrapper file both text mode and unbuffered this way fails with
an exception, because Python 3.X no longer supports unbuffered mode for text
files (it is allowed for binary mode only today). In other words, because print
requires text mode, buffered mode is also implied for output stream files. More-
over, attempting to open a socket file wrapper in line-buffered mode appears to not
be supported in Python 3.X (more on this ahead).
While some buffering behavior may be library and platform dependent, manual
flush calls or direct socket access might sometimes still be required. Note that
sockets can also be made nonblocking with the setblocking(0) method, but this
Making Sockets Look Like Files and Streams | 833

only avoids wait states for transfer calls and does not address the data producer’s
failure to send buffered output.
Stream requirements
To make some of this more concrete, Example 12-12 illustrates how some of these
complexities apply to redirected standard streams, by attempting to connect them to
both text and binary mode files produced by open and accessing them with print and
input built-ins much as redirected script might.
Example 12-12. PP4E\Internet\Sockets\test-stream-modes.py
"""
test effect of connecting standard streams to text and binary mode files
same holds true for socket.makefile: print requires text mode, but text
mode precludes unbuffered mode -- use -u or sys.stdout.flush() calls
"""
import sys
def reader(F):
tmp, sys.stdin = sys.stdin, F
line = input()
print(line)
sys.stdin = tmp
reader( open('test-stream-modes.py') ) # works: input() returns text
reader( open('test-stream-modes.py', 'rb') ) # works: but input() returns bytes
def writer(F):
tmp, sys.stdout = sys.stdout, F
print(99, 'spam')
sys.stdout = tmp
writer( open('temp', 'w') ) # works: print() passes text str to .write()
print(open('temp').read())
writer( open('temp', 'wb') ) # FAILS on print: binary mode requires bytes
writer( open('temp', 'w', 0) ) # FAILS on open: text must be unbuffered
When run, the last two lines in this script both fail—the second to last fails because
print passes text strings to a binary-mode file (never allowed for files in general), and
the last fails because we cannot open text-mode files in unbuffered mode in Python 3.X
(text mode implies Unicode encodings). Here are the errors we get when this script is
run: the first run uses the script as shown, and the second shows what happens if the
second to last line is commented out (I edited the exception text slightly for
presentation):
C:\...\PP4E\Internet\Sockets> test-stream-modes.py
"""
b'"""\r'
99 spam
834 | Chapter 12: Network Scripting

Traceback (most recent call last):
File "C:\...\PP4E\Internet\Sockets\test-stream-modes.py", line 26, in <module>
writer( open('temp', 'wb') ) # FAILS on print: binary mode...
File "C:\...\PP4E\Internet\Sockets\test-stream-modes.py", line 20, in writer
print(99, 'spam')
TypeError: must be bytes or buffer, not str
C:\...\PP4E\Internet\Sockets> test-streams-binary.py
"""
b'"""\r'
99 spam
Traceback (most recent call last):
File "C:\...\PP4E\Internet\Sockets\test-stream-modes.py", line 27, in <module>
writer( open('temp', 'w', 0) ) # FAILS on open: text must be...
ValueError: can't have unbuffered text I/O
The same rules apply to socket wrapper file objects created with a socket’s makefile
method—they must be opened in text mode for print and should be opened in text
mode for input if we wish to receive text strings, but text mode prevents us from using
fully unbuffered file mode altogether:
>>> from socket import *
>>> s = socket() # defaults to tcp/ip (AF_INET, SOCK_STREAM)
>>> s.makefile('w', 0) # this used to work in Python 2.X
Traceback (most recent call last):
File "C:\Python31\lib\socket.py", line 151, in makefile
ValueError: unbuffered streams must be binary
Line buffering
Text-mode socket wrappers also accept a buffering-mode argument of 1 to specify line-
buffering instead of the default full buffering:
>>> from socket import *
>>> s = socket()
>>> f = s.makefile('w', 1) # same as buffering=1, but acts as fully buffered!
This appears to be no different than full buffering, and still requires the resulting file
to be flushed manually to transfer lines as they are produced. Consider the simple socket
server and client scripts in Examples 12-13 and 12-14. The server simply reads three
messages using the raw socket interface.
Example 12-13. PP4E\Internet\Sockets\socket-unbuff-server.py
from socket import * # read three messages over a raw socket
sock = socket()
sock.bind(('', 60000))
sock.listen(5)
print('accepting...')
conn, id = sock.accept() # blocks till client connect
for i in range(3):
print('receiving...')
Making Sockets Look Like Files and Streams | 835

msg = conn.recv(1024) # blocks till data received
print(msg) # gets all print lines at once unless flushed
The client in Example 12-14 sends three messages; the first two over a socket wrapper
file, and the last using the raw socket; the manual flush calls in this are commented out
but retained so you can experiment with turning them on, and sleep calls make the
server wait for data.
Example 12-14. PP4\Internet\Sockets\socket-unbuff-client.py
import time # send three msgs over wrapped and raw socket
from socket import *
sock = socket() # default=AF_INET, SOCK_STREAM (tcp/ip)
sock.connect(('localhost', 60000))
file = sock.makefile('w', buffering=1) # default=full buff, 0=error, 1 not linebuff!
print('sending data1')
file.write('spam\n')
time.sleep(5) # must follow with flush() to truly send now
#file.flush() # uncomment flush lines to see the difference
print('sending data2')
print('eggs', file=file) # adding more file prints does not flush buffer either
time.sleep(5)
#file.flush() # output appears at server recv only upon flush or exit
print('sending data3')
sock.send(b'ham\n') # low-level byte string interface sends immediately
time.sleep(5) # received first if don't flush other two!
Run the server in one window first and the client in another (or run the server first in
the background in Unix-like platforms). The output in the server window follows—
the messages sent with the socket wrapper are deferred until program exit, but the raw
socket call transfers data immediately:
C:\...\PP4E\Internet\Sockets> socket-unbuff-server.py
accepting...
receiving...
b'ham\n'
receiving...
b'spam\r\neggs\r\n'
receiving...
b''
The client window simply displays “sending” lines 5 seconds apart; its third message
appears at the server in 10 seconds, but the first and second messages it sends using
the wrapper file are deferred until exit (for 15 seconds) because the socket wrapper is
still fully buffered. If the manual flush calls in the client are uncommented, each of the
three sent messages is delivered in serial, 5 seconds apart (the third appears immediately
after the second):
836 | Chapter 12: Network Scripting

C:\...\PP4E\Internet\Sockets> socket-unbuff-server.py
accepting...
receiving...
b'spam\r\n'
receiving...
b'eggs\r\n'
receiving...
b'ham\n'
In other words, even when line buffering is requested, socket wrapper file writes (and
by association, prints) are buffered until the program exits, manual flushes are reques-
ted, or the buffer becomes full.
Solutions
The short story here is this: to avoid delayed outputs or deadlock, scripts that might
send data to waiting programs by printing to wrapped sockets (or for that matter, by
using print or sys.stdout.write in general) should do one of the following:
• Call sys.stdout.flush periodically to flush their printed output so it becomes
available as produced, as shown in Example 12-11.
• Be run with the -u Python command-line flag, if possible, to force the output stream
to be unbuffered. This works for unmodified programs spawned by pipe tools such
as os.popen. It will not help with the use case here, though, because we manually
reset the stream files to buffered text socket wrappers after a process starts. To
prove this, uncomment Example 12-11’s manual flush calls and the sleep call at its
end, and run with -u: the first test’s output is still delayed for 5 seconds.
• Use threads to read from sockets to avoid blocking, especially if the receiving pro-
gram is a GUI and it cannot depend upon the client to flush. See Chapter 10 for
pointers. This doesn’t really fix the problem—the spawned reader thread may be
blocked or deadlocked, too—but at least the GUI remains active during waits.
• Implement their own custom socket wrapper objects which intercept text write
calls, encode to binary, and route to a socket with send calls; socket.makefile is
really just a convenience tool, and we can always code a wrapper of our own for
more specific roles. For hints, see Chapter 10’s GuiOutput class, the stream redi-
rection class in Chapter 3, and the classes of the io standard library module (upon
which Python’s input/output tools are based, and which you can mix in custom
ways).
• Skip print altogether and communicate directly with the native interfaces of IPC
devices, such as socket objects’ raw send and recv methods—these transfer data
immediately and do not buffer data as file methods can. We can either transfer
simple byte strings this way or use the pickle module’s dumps and loads tools to
convert Python objects to and from byte strings for such direct socket transfer
(more on pickle in Chapter 17).
Making Sockets Look Like Files and Streams | 837

The latter option may be more direct (and the redirection utility module also returns
the raw socket in support of such usage), but it isn’t viable in all scenarios, especially
for existing or multimode scripts. In many cases, it may be most straightforward to use
manual flush calls in shell-oriented programs whose streams might be linked to other
programs through sockets.
Buffering in other contexts: Command pipes revisited
Also keep in mind that buffered streams and deadlock are general issues that go beyond
socket wrapper files. We explored this topic in Chapter 5; as a quick review, the non-
socket Example 12-15 does not fully buffer its output when it is connected to a terminal
(output is only line buffered when run from a shell command prompt), but does if
connected to something else (including a socket or pipe).
Example 12-15. PP4E\Internet\Sockets\pipe-unbuff-writer.py
# output line buffered (unbuffered) if stdout is a terminal, buffered by default for
# other devices: use -u or sys.stdout.flush() to avoid delayed output on pipe/socket
import time, sys
for i in range(5):
print(time.asctime()) # print transfers per stream buffering
sys.stdout.write('spam\n') # ditto for direct stream file access
time.sleep(2) # unles sys.stdout reset to other file
Although text-mode files are required for Python 3.X’s print in general, the -u flag still
works in 3.X to suppress full output stream buffering. In Example 12-16, using this flag
makes the spawned script’s printed output appear every 2 seconds, as it is produced.
Not using this flag defers all output for 10 seconds, until the spawned script exits, unless
the spawned script calls sys.stdout.flush on each iteration.
Example 12-16. PP4E\Internet\Sockets\pipe-unbuff-reader.py
# no output for 10 seconds unless Python -u flag used or sys.stdout.flush()
# but writer's output appears here every 2 seconds when either option is used
import os
for line in os.popen('python -u pipe-unbuff-writer.py'): # iterator reads lines
print(line, end='') # blocks without -u!
Following is the reader script’s output; unlike the socket examples, it spawns the writer
automatically, so we don’t need separate windows to test. Recall from Chapter 5 that
os.popen also accepts a buffering argument much like socket.makefile, but it does not
apply to the spawned program’s stream, and so would not prevent output buffering in
this case.
C:\...\PP4E\Internet\Sockets> pipe-unbuff-reader.py
Wed Apr 07 09:32:28 2010
spam
Wed Apr 07 09:32:30 2010
spam
838 | Chapter 12: Network Scripting

Wed Apr 07 09:32:32 2010
spam
Wed Apr 07 09:32:34 2010
spam
Wed Apr 07 09:32:36 2010
spam
The net effect is that -u still works around the steam buffering issue for connected
programs in 3.X, as long as you don’t reset the streams to other objects in the spawned
program as we did for socket redirection in Example 12-11. For socket redirections,
manual flush calls or replacement socket wrappers may be required.
Sockets versus command pipes
So why use sockets in this redirection role at all? In short, for server independence and
networked use cases. Notice how for command pipes it’s not clear who should be called
“server” and “client,” since neither script runs perpetually. In fact, this is one of the
major downsides of using command pipes like this instead of sockets—because the
programs require a direct spawning relationship, command pipes do not support longer-
lived or remotely running servers the way that sockets do.
With sockets, we can start client and server independently, and the server may continue
running perpetually to serve multiple clients (albeit with some changes to our utility
module’s listener initialization code). Moreover, passing in remote machine names to
our socket redirection tools would allow a client to connect to a server running on a
completely different machine. As we learned in Chapter 5, named pipes (fifos) accessed
with the open call support stronger independence of client and server, too, but unlike
sockets, they are usually limited to the local machine, and are not supported on all
platforms.
Experiment with this code on your own for more insight. Also try changing Exam-
ple 12-11 to run the client function in a spawned process instead of or in addition to
the server, with and without flush calls and time.sleep calls to defer exits; the spawning
structure might have some impact on the soundness of a given socket dialog structure
as well, which we’ll finesse here in the interest of space.
Despite the care that must be taken with text encodings and stream buffering, the utility
provided by Example 12-10 is still arguably impressive—prints and input calls are
routed over network or local-machine socket connections in a largely automatic fash-
ion, and with minimal changes to the nonsocket code that uses the module. In many
cases, the technique can extend a script’s applicability.
In the next section, we’ll use the makefile method again to wrap the socket in a file-
like object, so that it can be read by lines using normal text-file method calls and tech-
niques. This isn’t strictly required in the example—we could read lines as byte strings
with the socket recv call, too. In general, though, the makefile method comes in handy
any time you wish to treat sockets as though they were simple files. To see this at work,
let’s move on.
Making Sockets Look Like Files and Streams | 839

A Simple Python File Server
It’s time for something realistic. Let’s conclude this chapter by putting some of the
socket ideas we’ve studied to work doing something a bit more useful than echoing
text back and forth. Example 12-17 implements both the server-side and the client-side
logic needed to ship a requested file from server to client machines over a raw socket.
In effect, this script implements a simple file download system. One instance of the
script is run on the machine where downloadable files live (the server), and another on
the machines you wish to copy files to (the clients). Command-line arguments tell the
script which flavor to run and optionally name the server machine and port number
over which conversations are to occur. A server instance can respond to any number
of client file requests at the port on which it listens, because it serves each in a thread.
Example 12-17. PP4E\Internet\Sockets\getfile.py
"""
#############################################################################
implement client and server-side logic to transfer an arbitrary file from
server to client over a socket; uses a simple control-info protocol rather
than separate sockets for control and data (as in ftp), dispatches each
client request to a handler thread, and loops to transfer the entire file
by blocks; see ftplib examples for a higher-level transport scheme;
#############################################################################
"""
import sys, os, time, _thread as thread
from socket import *
blksz = 1024
defaultHost = 'localhost'
defaultPort = 50001
helptext = """
Usage...
server=> getfile.py -mode server [-port nnn] [-host hhh|localhost]
client=> getfile.py [-mode client] -file fff [-port nnn] [-host hhh|localhost]
"""
def now():
return time.asctime()
def parsecommandline():
dict = {} # put in dictionary for easy lookup
args = sys.argv[1:] # skip program name at front of args
while len(args) >= 2: # example: dict['-mode'] = 'server'
dict[args[0]] = args[1]
args = args[2:]
return dict
def client(host, port, filename):
sock = socket(AF_INET, SOCK_STREAM)
sock.connect((host, port))
840 | Chapter 12: Network Scripting

sock.send((filename + '\n').encode()) # send remote name with dir: bytes
dropdir = os.path.split(filename)[1] # filename at end of dir path
file = open(dropdir, 'wb') # create local file in cwd
while True:
data = sock.recv(blksz) # get up to 1K at a time
if not data: break # till closed on server side
file.write(data) # store data in local file
sock.close()
file.close()
print('Client got', filename, 'at', now())
def serverthread(clientsock):
sockfile = clientsock.makefile('r') # wrap socket in dup file obj
filename = sockfile.readline()[:-1] # get filename up to end-line
try:
file = open(filename, 'rb')
while True:
bytes = file.read(blksz) # read/send 1K at a time
if not bytes: break # until file totally sent
sent = clientsock.send(bytes)
assert sent == len(bytes)
except:
print('Error downloading file on server:', filename)
clientsock.close()
def server(host, port):
serversock = socket(AF_INET, SOCK_STREAM) # listen on TCP/IP socket
serversock.bind((host, port)) # serve clients in threads
serversock.listen(5)
while True:
clientsock, clientaddr = serversock.accept()
print('Server connected by', clientaddr, 'at', now())
thread.start_new_thread(serverthread, (clientsock,))
def main(args):
host = args.get('-host', defaultHost) # use args or defaults
port = int(args.get('-port', defaultPort)) # is a string in argv
if args.get('-mode') == 'server': # None if no -mode: client
if host == 'localhost': host = '' # else fails remotely
server(host, port)
elif args.get('-file'): # client mode needs -file
client(host, port, args['-file'])
else:
print(helptext)
if __name__ == '__main__':
args = parsecommandline()
main(args)
This script isn’t much different from the examples we saw earlier. Depending on the
command-line arguments passed, it invokes one of two functions:
• The server function farms out each incoming client request to a thread that trans-
fers the requested file’s bytes.
A Simple Python File Server | 841

• The client function sends the server a file’s name and stores all the bytes it gets
back in a local file of the same name.
The most novel feature here is the protocol between client and server: the client starts
the conversation by shipping a filename string up to the server, terminated with an end-
of-line character, and including the file’s directory path in the server. At the server, a
spawned thread extracts the requested file’s name by reading the client socket, and
opens and transfers the requested file back to the client, one chunk of bytes at a time.
Running the File Server and Clients
Since the server uses threads to process clients, we can test both client and server on
the same Windows machine. First, let’s start a server instance and execute two client
instances on the same machine while the server runs:
[server window, localhost]
C:\...\Internet\Sockets> python getfile.py -mode server
Server connected by ('127.0.0.1', 59134) at Sun Apr 25 16:26:50 2010
Server connected by ('127.0.0.1', 59135) at Sun Apr 25 16:27:21 2010
[client window, localhost]
C:\...\Internet\Sockets> dir /B *.gif *.txt
File Not Found
C:\...\Internet\Sockets> python getfile.py -file testdir\ora-lp4e.gif
Client got testdir\ora-lp4e.gif at Sun Apr 25 16:26:50 2010
C:\...\Internet\Sockets> python getfile.py -file testdir\textfile.txt -port 50001
Client got testdir\textfile.txt at Sun Apr 25 16:27:21 2010
Clients run in the directory where you want the downloaded file to appear—the client
instance code strips the server directory path when making the local file’s name. Here
the “download” simply copies the requested files up to the local parent directory (the
DOS fc command compares file contents):
C:\...\Internet\Sockets> dir /B *.gif *.txt
ora-lp4e.gif
textfile.txt
C:\...\Internet\Sockets> fc /B ora-lp4e.gif testdir/ora-lp4e.gif
FC: no differences encountered
C:\...\Internet\Sockets> fc textfile.txt testdir\textfile.txt
FC: no differences encountered
As usual, we can run server and clients on different machines as well. For instance, here
are the sort of commands we would use to launch the server remotely and fetch files
from it locally; run this on your own to see the client and server outputs:
[remote server window]
[...]$ python getfile.py -mode server
842 | Chapter 12: Network Scripting

[client window: requested file downloaded in a thread on server]
C:\...\Internet\Sockets> python getfile.py –mode client
-host learning-python.com
-port 50001 -file python.exe
C:\...\Internet\Sockets> python getfile.py
-host learning-python.com -file index.html
One subtle security point here: the server instance code is happy to send any server-
side file whose pathname is sent from a client, as long as the server is run with a user-
name that has read access to the requested file. If you care about keeping some of your
server-side files private, you should add logic to suppress downloads of restricted files.
I’ll leave this as a suggested exercise here, but we will implement such filename checks
in a different getfile download tool later in this book.#
Adding a User-Interface Frontend
After all the GUI commotion in the prior part of this book, you might have noticed that
we have been living in the realm of the command line for this entire chapter—our socket
clients and servers have been started from simple DOS or Linux shells. Nothing is
stopping us from adding a nice point-and-click user interface to some of these scripts,
though; GUI and network scripting are not mutually exclusive techniques. In fact, they
can be arguably “sexy” when used together well.
For instance, it would be easy to implement a simple tkinter GUI frontend to the client-
side portion of the getfile script we just met. Such a tool, run on the client machine,
may simply pop up a window with Entry widgets for typing the desired filename, server,
and so on. Once download parameters have been input, the user interface could either
import and call the getfile.client function with appropriate option arguments, or
build and run the implied getfile.py command line using tools such as os.system,
os.popen, subprocess, and so on.
Using row frames and command lines
To help make all of this more concrete, let’s very quickly explore a few simple scripts
that add a tkinter frontend to the getfile client-side program. All of these examples
assume that you are running a server instance of getfile; they merely add a GUI for
the client side of the conversation, to fetch a file from the server. The first, in Exam-
ple 12-18, uses form construction techniques we met in Chapters 8 and 9 to create a
dialog for inputting server, port, and filename information, and simply constructs the
#We’ll see three more getfile programs before we leave Internet scripting. The next chapter’s getfile.py fetches
a file with the higher-level FTP interface instead of using raw socket calls, and its http-getfile scripts fetch files
over the HTTP protocol. Later, Chapter 15 presents a server-side getfile.py CGI script that transfers file
contents over the HTTP port in response to a request made in a web browser client (files are sent as the output
of a CGI script). All four of the download schemes presented in this text ultimately use sockets, but only the
version here makes that use explicit.
A Simple Python File Server | 843
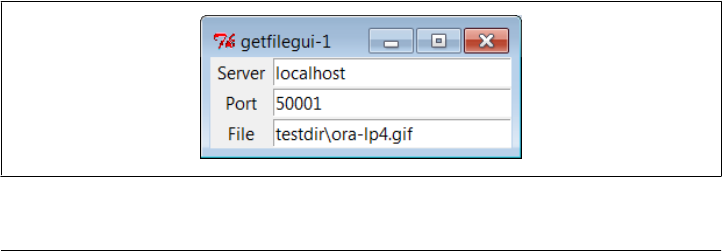
corresponding getfile command line and runs it with the os.system call we studied in
Part II.
Example 12-18. PP4E\Internet\Sockets\getfilegui-1.py
"""
launch getfile script client from simple tkinter GUI;
could also use os.fork+exec, os.spawnv (see Launcher);
windows: replace 'python' with 'start' if not on path;
"""
import sys, os
from tkinter import *
from tkinter.messagebox import showinfo
def onReturnKey():
cmdline = ('python getfile.py -mode client -file %s -port %s -host %s' %
(content['File'].get(),
content['Port'].get(),
content['Server'].get()))
os.system(cmdline)
showinfo('getfilegui-1', 'Download complete')
box = Tk()
labels = ['Server', 'Port', 'File']
content = {}
for label in labels:
row = Frame(box)
row.pack(fill=X)
Label(row, text=label, width=6).pack(side=LEFT)
entry = Entry(row)
entry.pack(side=RIGHT, expand=YES, fill=X)
content[label] = entry
box.title('getfilegui-1')
box.bind('<Return>', (lambda event: onReturnKey()))
mainloop()
When run, this script creates the input form shown in Figure 12-1. Pressing the Enter
key (<Return>) runs a client-side instance of the getfile program; when the generated
getfile command line is finished, we get the verification pop up displayed in
Figure 12-2.
Figure 12-1. getfilegui-1 in action
844 | Chapter 12: Network Scripting

Figure 12-2. getfilegui-1 verification pop up
Using grids and function calls
The first user-interface script (Example 12-18) uses the pack geometry manager and
row Frames with fixed-width labels to lay out the input form and runs the getfile client
as a standalone program. As we learned in Chapter 9, it’s arguably just as easy to use
the grid manager for layout and to import and call the client-side logic function instead
of running a program. The script in Example 12-19 shows how.
Example 12-19. PP4E\Internet\Sockets\getfilegui-2.py
"""
same, but with grids and import+call, not packs and cmdline;
direct function calls are usually faster than running files;
"""
import getfile
from tkinter import *
from tkinter.messagebox import showinfo
def onSubmit():
getfile.client(content['Server'].get(),
int(content['Port'].get()),
content['File'].get())
showinfo('getfilegui-2', 'Download complete')
box = Tk()
labels = ['Server', 'Port', 'File']
rownum = 0
content = {}
for label in labels:
Label(box, text=label).grid(column=0, row=rownum)
entry = Entry(box)
entry.grid(column=1, row=rownum, sticky=E+W)
content[label] = entry
rownum += 1
box.columnconfigure(0, weight=0) # make expandable
A Simple Python File Server | 845
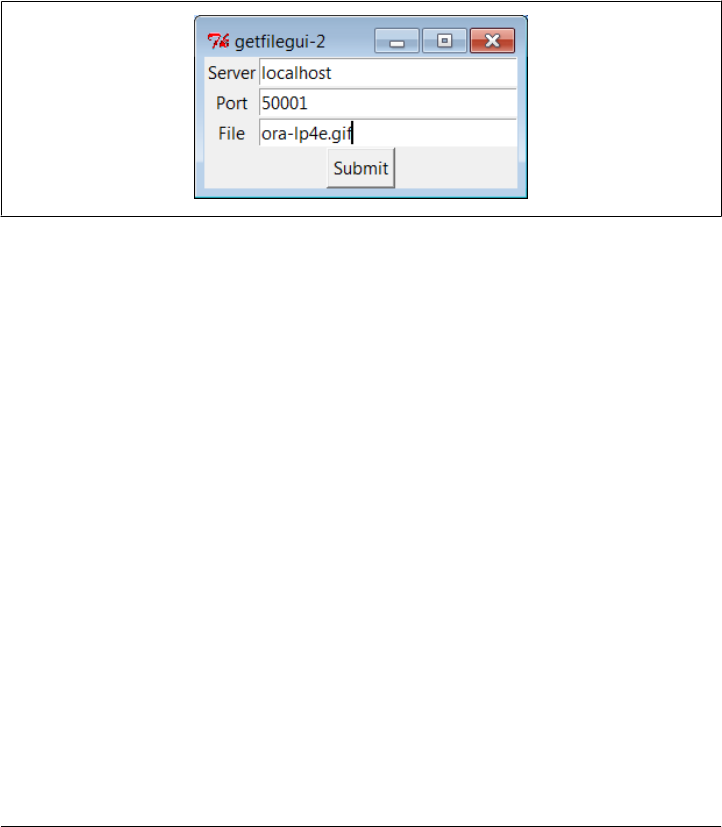
box.columnconfigure(1, weight=1)
Button(text='Submit', command=onSubmit).grid(row=rownum, column=0, columnspan=2)
box.title('getfilegui-2')
box.bind('<Return>', (lambda event: onSubmit()))
mainloop()
This version makes a similar window (Figure 12-3), but adds a button at the bottom
that does the same thing as an Enter key press—it runs the getfile client procedure.
Generally speaking, importing and calling functions (as done here) is faster than run-
ning command lines, especially if done more than once. The getfile script is set up to
work either way—as program or function library.
Figure 12-3. getfilegui-2 in action
Using a reusable form-layout class
If you’re like me, though, writing all the GUI form layout code in those two scripts can
seem a bit tedious, whether you use packing or grids. In fact, it became so tedious to
me that I decided to write a general-purpose form-layout class, shown in Exam-
ple 12-20, which handles most of the GUI layout grunt work.
Example 12-20. PP4E\Internet\Sockets\form.py
"""
##################################################################
a reusable form class, used by getfilegui (and others)
##################################################################
"""
from tkinter import *
entrysize = 40
class Form: # add non-modal form box
def __init__(self, labels, parent=None): # pass field labels list
labelsize = max(len(x) for x in labels) + 2
box = Frame(parent) # box has rows, buttons
box.pack(expand=YES, fill=X) # rows has row frames
rows = Frame(box, bd=2, relief=GROOVE) # go=button or return key
rows.pack(side=TOP, expand=YES, fill=X) # runs onSubmit method
self.content = {}
846 | Chapter 12: Network Scripting

for label in labels:
row = Frame(rows)
row.pack(fill=X)
Label(row, text=label, width=labelsize).pack(side=LEFT)
entry = Entry(row, width=entrysize)
entry.pack(side=RIGHT, expand=YES, fill=X)
self.content[label] = entry
Button(box, text='Cancel', command=self.onCancel).pack(side=RIGHT)
Button(box, text='Submit', command=self.onSubmit).pack(side=RIGHT)
box.master.bind('<Return>', (lambda event: self.onSubmit()))
def onSubmit(self): # override this
for key in self.content: # user inputs in
print(key, '\t=>\t', self.content[key].get()) # self.content[k]
def onCancel(self): # override if need
Tk().quit() # default is exit
class DynamicForm(Form):
def __init__(self, labels=None):
labels = input('Enter field names: ').split()
Form.__init__(self, labels)
def onSubmit(self):
print('Field values...')
Form.onSubmit(self)
self.onCancel()
if __name__ == '__main__':
import sys
if len(sys.argv) == 1:
Form(['Name', 'Age', 'Job']) # precoded fields, stay after submit
else:
DynamicForm() # input fields, go away after submit
mainloop()
Compare the approach of this module with that of the form row builder function we
wrote in Chapter 10’s Example 10-9. While that example much reduced the amount
of code required, the module here is a noticeably more complete and automatic
scheme—it builds the entire form given a set of label names, and provides a dictionary
with every field’s entry widget ready to be fetched.
Running this module standalone triggers its self-test code at the bottom. Without ar-
guments (and when double-clicked in a Windows file explorer), the self-test generates
a form with canned input fields captured in Figure 12-4, and displays the fields’ values
on Enter key presses or Submit button clicks:
C:\...\PP4E\Internet\Sockets> python form.py
Age => 40
Name => Bob
Job => Educator, Entertainer
With a command-line argument, the form class module’s self-test code prompts for an
arbitrary set of field names for the form; fields can be constructed as dynamically as we
A Simple Python File Server | 847
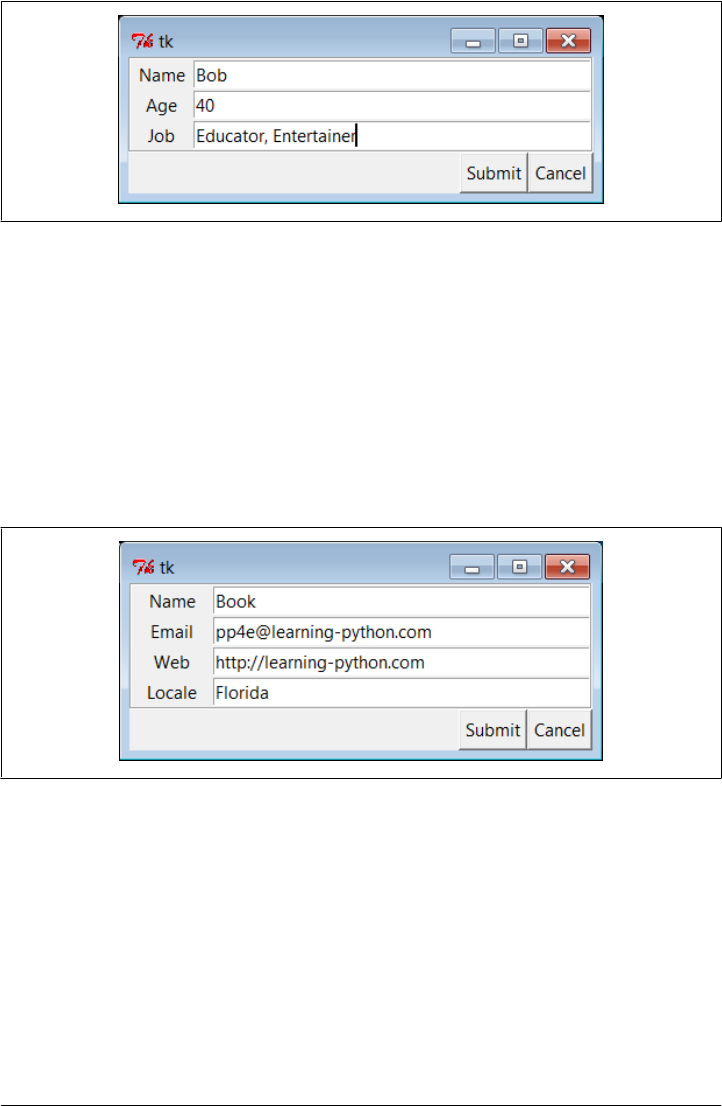
like. Figure 12-5 shows the input form constructed in response to the following console
interaction. Field names could be accepted on the command line, too, but the input
built-in function works just as well for simple tests like this. In this mode, the GUI goes
away after the first submit, because DynamicForm.onSubmit says so:
C:\...\PP4E\Internet\Sockets> python form.py -
Enter field names: Name Email Web Locale
Field values...
Locale => Florida
Web => http://learning-python.com
Name => Book
Email => pp4e@learning-python.com
Figure 12-5. Form test, dynamic fields
And last but not least, Example 12-21 shows the getfile user interface again, this time
constructed with the reusable form layout class. We need to fill in only the form labels
list and provide an onSubmit callback method of our own. All of the work needed to
construct the form comes “for free,” from the imported and widely reusable Form
superclass.
Example 12-21. PP4E\Internet\Sockets\getfilegui.py
"""
launch getfile client with a reusable GUI form class;
os.chdir to target local dir if input (getfile stores in cwd);
Figure 12-4. Form test, canned fields
848 | Chapter 12: Network Scripting
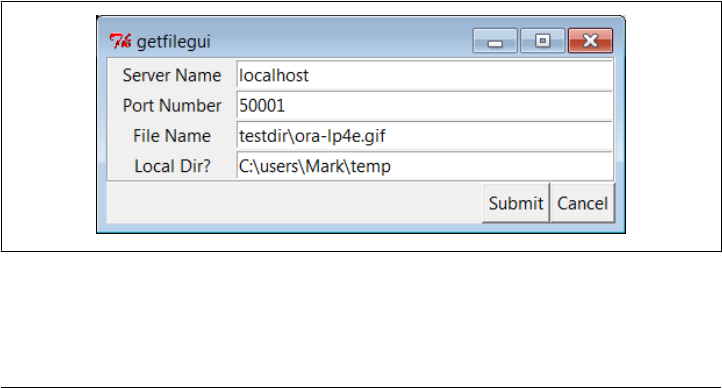
to do: use threads, show download status and getfile prints;
"""
from form import Form
from tkinter import Tk, mainloop
from tkinter.messagebox import showinfo
import getfile, os
class GetfileForm(Form):
def __init__(self, oneshot=False):
root = Tk()
root.title('getfilegui')
labels = ['Server Name', 'Port Number', 'File Name', 'Local Dir?']
Form.__init__(self, labels, root)
self.oneshot = oneshot
def onSubmit(self):
Form.onSubmit(self)
localdir = self.content['Local Dir?'].get()
portnumber = self.content['Port Number'].get()
servername = self.content['Server Name'].get()
filename = self.content['File Name'].get()
if localdir:
os.chdir(localdir)
portnumber = int(portnumber)
getfile.client(servername, portnumber, filename)
showinfo('getfilegui', 'Download complete')
if self.oneshot: Tk().quit() # else stay in last localdir
if __name__ == '__main__':
GetfileForm()
mainloop()
The form layout class imported here can be used by any program that needs to input
form-like data; when used in this script, we get a user interface like that shown in
Figure 12-6 under Windows 7 (and similar on other versions and platforms).
Figure 12-6. getfilegui in action
Pressing this form’s Submit button or the Enter key makes the getfilegui script call
the imported getfile.client client-side function as before. This time, though, we also
A Simple Python File Server | 849

first change to the local directory typed into the form so that the fetched file is stored
there (getfile stores in the current working directory, whatever that may be when it is
called). Here are the messages printed in the client’s console, along with a check on the
file transfer; the server is still running above testdir, but the client stores the file else-
where after it’s fetched on the socket:
C:\...\Internet\Sockets> getfilegui.py
Local Dir? => C:\users\Mark\temp
File Name => testdir\ora-lp4e.gif
Server Name => localhost
Port Number => 50001
Client got testdir\ora-lp4e.gif at Sun Apr 25 17:22:39 2010
C:\...\Internet\Sockets> fc /B C:\Users\mark\temp\ora-lp4e.gif testdir\ora-lp4e.gif
FC: no differences encountered
As usual, we can use this interface to connect to servers running locally on the same
machine (as done here), or remotely on a different computer. Use a different server
name and file paths if you’re running the server on a remote machine; the magic of
sockets make this all “just work” in either local or remote modes.
One caveat worth pointing out here: the GUI is essentially dead while the download is
in progress (even screen redraws aren’t handled—try covering and uncovering the
window and you’ll see what I mean). We could make this better by running the down-
load in a thread, but since we’ll see how to do that in the next chapter when we explore
the FTP protocol, you should consider this problem a preview.
In closing, a few final notes: first, I should point out that the scripts in this chapter use
tkinter techniques we’ve seen before and won’t go into here in the interest of space; be
sure to see the GUI chapters in this book for implementation hints.
Keep in mind, too, that these interfaces just add a GUI on top of the existing script to
reuse its code; any command-line tool can be easily GUI-ified in this way to make it
more appealing and user friendly. In Chapter 14, for example, we’ll meet a more useful
client-side tkinter user interface for reading and sending email over sockets (PyMail-
GUI), which largely just adds a GUI to mail-processing tools. Generally speaking, GUIs
can often be added as almost an afterthought to a program. Although the degree of
user-interface and core logic separation varies per program, keeping the two distinct
makes it easier to focus on each.
And finally, now that I’ve shown you how to build user interfaces on top of this chap-
ter’s getfile, I should also say that they aren’t really as useful as they might seem. In
particular, getfile clients can talk only to machines that are running a getfile server.
In the next chapter, we’ll discover another way to download files—FTP—which also
runs on sockets but provides a higher-level interface and is available as a standard
service on many machines on the Net. We don’t generally need to start up a custom
server to transfer files over FTP, the way we do with getfile. In fact, the user-interface
scripts in this chapter could be easily changed to fetch the desired file with Python’s
850 | Chapter 12: Network Scripting

FTP tools, instead of the getfile module. But instead of spilling all the beans here, I’ll
just say, “Read on.”
Using Serial Ports
Sockets, the main subject of this chapter, are the programmer’s interface to network
connections in Python scripts. As we’ve seen, they let us write scripts that converse
with computers arbitrarily located on a network, and they form the backbone of the
Internet and the Web.
If you’re looking for a lower-level way to communicate with devices in general, though,
you may also be interested in the topic of Python’s serial port interfaces. This isn’t quite
related to Internet scripting, but it’s similar enough in spirit and is discussed often
enough on the Net to merit a few words here.
In brief, scripts can use serial port interfaces to engage in low-level communication with
things like mice, modems, and a wide variety of serial devices and hardware. Serial port
interfaces are also used to communicate with devices connected over infrared ports
(e.g., hand-held computers and remote modems). Such interfaces let scripts tap into
raw data streams and implement device protocols of their own. Other Python tools
such as the ctypes and struct modules may provide additional tools for creating and
extracting the packed binary data these ports transfer.
At this writing, there are a variety of ways to send and receive data over serial ports in
Python scripts. Notable among these options is an open source extension package
known as pySerial, which allows Python scripts to control serial ports on both Windows
and Linux, as well as BSD Unix, Jython (for Java), and IronPython (for .Net and Mono).
Unfortunately, there is not enough space to cover this or any other serial port option
in any sort of detail in this text. As always, see your favorite web search engine for up-
to-date details on this front.
A Simple Python File Server | 851

CHAPTER 13
Client-Side Scripting
“Socket to Me!”
The preceding chapter introduced Internet fundamentals and explored sockets—the
underlying communications mechanism over which bytes flow on the Net. In this
chapter, we climb the encapsulation hierarchy one level and shift our focus to Python
tools that support the client-side interfaces of common Internet protocols.
We talked about the Internet’s higher-level protocols in the abstract at the start of the
preceding chapter, and you should probably review that material if you skipped over
it the first time around. In short, protocols define the structure of the conversations
that take place to accomplish most of the Internet tasks we’re all familiar with—reading
email, transferring files by FTP, fetching web pages, and so on.
At the most basic level, all of these protocol dialogs happen over sockets using fixed
and standard message structures and ports, so in some sense this chapter builds upon
the last. But as we’ll see, Python’s protocol modules hide most of the underlying
details—scripts generally need to deal only with simple objects and methods, and Py-
thon automates the socket and messaging logic required by the protocol.
In this chapter, we’ll concentrate on the FTP and email protocol modules in Python,
and we’ll peek at a few others along the way (NNTP news, HTTP web pages, and so
on). Because it is so prevalent, we will especially focus on email in much of this chapter,
as well as in the two to follow—we’ll use tools and techniques introduced here in the
larger PyMailGUI and PyMailCGI client and server-side programs of Chapters
14 and 16.
All of the tools employed in examples here are in the standard Python library and come
with the Python system. All of the examples here are also designed to run on the client
side of a network connection—these scripts connect to an already running server to
request interaction and can be run from a basic PC or other client device (they require
only a server to converse with). And as usual, all the code here is also designed to teach
us something about Python programming in general—we’ll refactor FTP examples and
package email code to show object-oriented programming (OOP) in action.
853

In the next chapter, we’ll look at a complete client-side program example before moving
on to explore scripts designed to be run on the server side instead. Python programs
can also produce pages on a web server, and there is support in the Python world for
implementing the server side of things like HTTP, email, and FTP. For now, let’s focus
on the client.*
FTP: Transferring Files over the Net
As we saw in the preceding chapter, sockets see plenty of action on the Net. For in-
stance, the last chapter’s getfile example allowed us to transfer entire files between
machines. In practice, though, higher-level protocols are behind much of what happens
on the Net. Protocols run on top of sockets, but they hide much of the complexity of
the network scripting examples of the prior chapter.
FTP—the File Transfer Protocol—is one of the more commonly used Internet proto-
cols. It defines a higher-level conversation model that is based on exchanging command
strings and file contents over sockets. By using FTP, we can accomplish the same task
as the prior chapter’s getfile script, but the interface is simpler, standard and more
general—FTP lets us ask for files from any server machine that supports FTP, without
requiring that it run our custom getfile script. FTP also supports more advanced op-
erations such as uploading files to the server, getting remote directory listings, and
more.
Really, FTP runs on top of two sockets: one for passing control commands between
client and server (port 21), and another for transferring bytes. By using a two-socket
model, FTP avoids the possibility of deadlocks (i.e., transfers on the data socket do not
block dialogs on the control socket). Ultimately, though, Python’s ftplib support
module allows us to upload and download files at a remote server machine by FTP,
without dealing in raw socket calls or FTP protocol details.
Transferring Files with ftplib
Because the Python FTP interface is so easy to use, let’s jump right into a realistic
example. The script in Example 13-1 automatically fetches (a.k.a. “downloads”) and
* There is also support in the Python world for other technologies that some might classify as “client-side
scripting,” too, such as Jython/Java applets; XML-RPC and SOAP web services; and Rich Internet Application
tools like Flex, Silverlight, pyjamas, and AJAX. These were all introduced early in Chapter 12. Such tools are
generally bound up with the notion of web-based interactions—they either extend the functionality of a web
browser running on a client machine, or simplify web server access in clients. We’ll study browser-based
techniques in Chapters 15 and 16; here, client-side scripting means the client side of common Internet
protocols such as FTP and email, independent of the Web or web browsers. At the bottom, web browsers
are really just desktop GUI applications that make use of client-side protocols, including those we’ll study
here, such as HTTP and FTP. See Chapter 12 as well as the end of this chapter for more on other client-side
techniques.
854 | Chapter 13: Client-Side Scripting

opens a remote file with Python. More specifically, this Python script does the
following:
1. Downloads an image file (by default) from a remote FTP site
2. Opens the downloaded file with a utility we wrote in Example 6-23, in Chapter 6
The download portion will run on any machine with Python and an Internet connec-
tion, though you’ll probably want to change the script’s settings so it accesses a server
and file of your own. The opening part works if your playfile.py supports your platform;
see Chapter 6 for details, and change as needed.
Example 13-1. PP4E\Internet\Ftp\getone.py
#!/usr/local/bin/python
"""
A Python script to download and play a media file by FTP. Uses ftplib, the ftp
protocol handler which uses sockets. Ftp runs on 2 sockets (one for data, one
for control--on ports 20 and 21) and imposes message text formats, but Python's
ftplib module hides most of this protocol's details. Change for your site/file.
"""
import os, sys
from getpass import getpass # hidden password input
from ftplib import FTP # socket-based FTP tools
nonpassive = False # force active mode FTP for server?
filename = 'monkeys.jpg' # file to be downloaded
dirname = '.' # remote directory to fetch from
sitename = 'ftp.rmi.net' # FTP site to contact
userinfo = ('lutz', getpass('Pswd?')) # use () for anonymous
if len(sys.argv) > 1: filename = sys.argv[1] # filename on command line?
print('Connecting...')
connection = FTP(sitename) # connect to FTP site
connection.login(*userinfo) # default is anonymous login
connection.cwd(dirname) # xfer 1k at a time to localfile
if nonpassive: # force active FTP if server requires
connection.set_pasv(False)
print('Downloading...')
localfile = open(filename, 'wb') # local file to store download
connection.retrbinary('RETR ' + filename, localfile.write, 1024)
connection.quit()
localfile.close()
if input('Open file?') in ['Y', 'y']:
from PP4E.System.Media.playfile import playfile
playfile(filename)
Most of the FTP protocol details are encapsulated by the Python ftplib module im-
ported here. This script uses some of the simplest interfaces in ftplib (we’ll see others
later in this chapter), but they are representative of the module in general.
Transferring Files with ftplib | 855

To open a connection to a remote (or local) FTP server, create an instance of the
ftplib.FTP object, passing in the string name (domain or IP style) of the machine you
wish to connect to:
connection = FTP(sitename) # connect to ftp site
Assuming this call doesn’t throw an exception, the resulting FTP object exports meth-
ods that correspond to the usual FTP operations. In fact, Python scripts act much like
typical FTP client programs—just replace commands you would normally type or select
with method calls:
connection.login(*userinfo) # default is anonymous login
connection.cwd(dirname) # xfer 1k at a time to localfile
Once connected, we log in and change to the remote directory from which we want to
fetch a file. The login method allows us to pass in a username and password as addi-
tional optional arguments to specify an account login; by default, it performs anony-
mous FTP. Notice the use of the nonpassive flag in this script:
if nonpassive: # force active FTP if server requires
connection.set_pasv(False)
If this flag is set to True, the script will transfer the file in active FTP mode rather than
the default passive mode. We’ll finesse the details of the difference here (it has to do
with which end of the dialog chooses port numbers for the transfer), but if you have
trouble doing transfers with any of the FTP scripts in this chapter, try using active mode
as a first step. In Python 2.1 and later, passive FTP mode is on by default. Now, open
a local file to receive the file’s content, and fetch the file:
localfile = open(filename, 'wb')
connection.retrbinary('RETR ' + filename, localfile.write, 1024)
Once we’re in the target remote directory, we simply call the retrbinary method to
download the target server file in binary mode. The retrbinary call will take a while to
complete, since it must download a big file. It gets three arguments:
• An FTP command string; here, the string RETR filename, which is the standard
format for FTP retrievals.
• A function or method to which Python passes each chunk of the downloaded file’s
bytes; here, the write method of a newly created and opened local file.
• A size for those chunks of bytes; here, 1,024 bytes are downloaded at a time, but
the default is reasonable if this argument is omitted.
Because this script creates a local file named localfile of the same name as the remote
file being fetched, and passes its write method to the FTP retrieval method, the remote
file’s contents will automatically appear in a local, client-side file after the download is
finished.
Observe how this file is opened in wb binary output mode. If this script is run on Win-
dows we want to avoid automatically expanding any \n bytes into \r\n byte sequences;
856 | Chapter 13: Client-Side Scripting

as we saw in Chapter 4, this happens automatically on Windows when writing files
opened in w text mode. We also want to avoid Unicode issues in Python 3.X—as we
also saw in Chapter 4, strings are encoded when written in text mode and this isn’t
appropriate for binary data such as images. A text-mode file would also not allow for
the bytes strings passed to write by the FTP library’s retrbinary in any event, so rb is
effectively required here (more on output file modes later).
Finally, we call the FTP quit method to break the connection with the server and man-
ually close the local file to force it to be complete before it is further processed (it’s not
impossible that parts of the file are still held in buffers before the close call):
connection.quit()
localfile.close()
And that’s all there is to it—all the FTP, socket, and networking details are hidden
behind the ftplib interface module. Here is this script in action on a Windows 7 ma-
chine; after the download, the image file pops up in a Windows picture viewer on my
laptop, as captured in Figure 13-1. Change the server and file assignments in this script
to test on your own, and be sure your PYTHONPATH environment variable includes the
PP4E root’s container, as we’re importing across directories on the examples tree here:
C:\...\PP4E\Internet\Ftp> python getone.py
Pswd?
Connecting...
Downloading...
Open file?y
Notice how the standard Python getpass.getpass is used to ask for an FTP password.
Like the input built-in function, this call prompts for and reads a line of text from the
console user; unlike input, getpass does not echo typed characters on the screen at all
(see the moreplus stream redirection example of Chapter 3 for related tools). This is
handy for protecting things like passwords from potentially prying eyes. Be careful,
though—after issuing a warning, the IDLE GUI echoes the password anyhow!
The main thing to notice is that this otherwise typical Python script fetches information
from an arbitrarily remote FTP site and machine. Given an Internet link, any informa-
tion published by an FTP server on the Net can be fetched by and incorporated into
Python scripts using interfaces such as these.
Using urllib to Download Files
In fact, FTP is just one way to transfer information across the Net, and there are more
general tools in the Python library to accomplish the prior script’s download. Perhaps
the most straightforward is the Python urllib.request module: given an Internet ad-
dress string—a URL, or Universal Resource Locator—this module opens a connection
to the specified server and returns a file-like object ready to be read with normal file
object method calls (e.g., read, readline).
Transferring Files with ftplib | 857
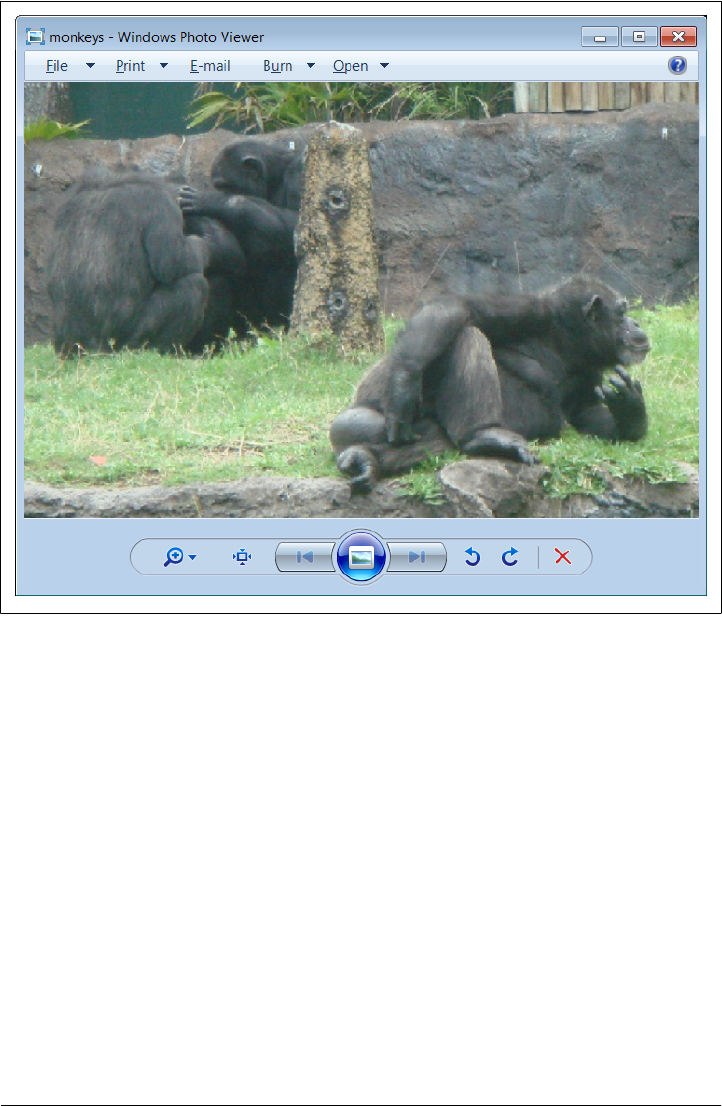
We can use such a higher-level interface to download anything with an address on the
Web—files published by FTP sites (using URLs that start with ftp://); web pages and
output of scripts that live on remote servers (using http:// URLs); and even local files
(using file:// URLs). For instance, the script in Example 13-2 does the same as the one
in Example 13-1, but it uses the general urllib.request module to fetch the source
distribution file, instead of the protocol-specific ftplib.
Example 13-2. PP4E\Internet\Ftp\getone-urllib.py
#!/usr/local/bin/python
"""
A Python script to download a file by FTP by its URL string; use higher-level
urllib instead of ftplib to fetch file; urllib supports FTP, HTTP, client-side
HTTPS, and local files, and handles proxies, redirects, cookies, and more;
urllib also allows downloads of html pages, images, text, etc.; see also
Python html/xml parsers for web pages fetched by urllib in Chapter 19;
"""
import os, getpass
from urllib.request import urlopen # socket-based web tools
Figure 13-1. Image file downloaded by FTP and opened locally
858 | Chapter 13: Client-Side Scripting

filename = 'monkeys.jpg' # remote/local filename
password = getpass.getpass('Pswd?')
remoteaddr = 'ftp://lutz:%s@ftp.rmi.net/%s;type=i' % (password, filename)
print('Downloading', remoteaddr)
# this works too:
# urllib.request.urlretrieve(remoteaddr, filename)
remotefile = urlopen(remoteaddr) # returns input file-like object
localfile = open(filename, 'wb') # where to store data locally
localfile.write(remotefile.read())
localfile.close()
remotefile.close()
Note how we use a binary mode output file again; urllib fetches return byte strings,
even for HTTP web pages. Don’t sweat the details of the URL string used here; it is
fairly complex, and we’ll explain its structure and that of URLs in general in Chap-
ter 15. We’ll also use urllib again in this and later chapters to fetch web pages, format
generated URL strings, and get the output of remote scripts on the Web.
Technically speaking, urllib.request supports a variety of Internet protocols (HTTP,
FTP, and local files). Unlike ftplib, urllib.request is generally used for reading remote
objects, not for writing or uploading them (though the HTTP and FTP protocols sup-
port file uploads too). As with ftplib, retrievals must generally be run in threads if
blocking is a concern. But the basic interface shown in this script is straightforward.
The call:
remotefile = urllib.request.urlopen(remoteaddr) # returns input file-like object
contacts the server named in the remoteaddr URL string and returns a file-like object
connected to its download stream (here, an FTP-based socket). Calling this file’s
read method pulls down the file’s contents, which are written to a local client-side file.
An even simpler interface:
urllib.request.urlretrieve(remoteaddr, filename)
also does the work of opening a local file and writing the downloaded bytes into it—
things we do manually in the script as coded. This comes in handy if we want to down-
load a file, but it is less useful if we want to process its data immediately.
Either way, the end result is the same: the desired server file shows up on the client
machine. The output is similar to the original version, but we don’t try to automatically
open this time (I’ve changed the password in the URL here to protect the innocent):
C:\...\PP4E\Internet\Ftp> getone-urllib.py
Pswd?
Downloading ftp://lutz:xxxxxx@ftp.rmi.net/monkeys.jpg;type=i
C:\...\PP4E\Internet\Ftp> fc monkeys.jpg test\monkeys.jpg
FC: no differences encountered
C:\...\PP4E\Internet\Ftp> start monkeys.jpg
Transferring Files with ftplib | 859

For more urllib download examples, see the section on HTTP later in this chapter,
and the server-side examples in Chapter 15. As we’ll see in Chapter 15, in bigger terms,
tools like the urllib.request urlopen function allow scripts to both download remote
files and invoke programs that are located on a remote server machine, and so serves
as a useful tool for testing and using web sites in Python scripts. In Chapter 15, we’ll
also see that urllib.parse includes tools for formatting (escaping) URL strings for safe
transmission.
FTP get and put Utilities
When I present the ftplib interfaces in Python classes, students often ask why pro-
grammers need to supply the RETR string in the retrieval method. It’s a good
question—the RETR string is the name of the download command in the FTP protocol,
but ftplib is supposed to encapsulate that protocol. As we’ll see in a moment, we have
to supply an arguably odd STOR string for uploads as well. It’s boilerplate code that
you accept on faith once you see it, but that begs the question. You could propose a
patch to ftplib, but that’s not really a good answer for beginning Python students, and
it may break existing code (the interface is as it is for a reason).
Perhaps a better answer is that Python makes it easy to extend the standard library
modules with higher-level interfaces of our own—with just a few lines of reusable code,
we can make the FTP interface look any way we want in Python. For instance, we could,
once and for all, write utility modules that wrap the ftplib interfaces to hide the RETR
string. If we place these utility modules in a directory on PYTHONPATH, they become just
as accessible as ftplib itself, automatically reusable in any Python script we write in
the future. Besides removing the RETR string requirement, a wrapper module could
also make assumptions that simplify FTP operations into single function calls.
For instance, given a module that encapsulates and simplifies ftplib, our Python fetch-
and-play script could be further reduced to the script shown in Example 13-3—essen-
tially just two function calls plus a password prompt, but with a net effect exactly like
Example 13-1 when run.
Example 13-3. PP4E\Internet\Ftp\getone-modular.py
#!/usr/local/bin/python
"""
A Python script to download and play a media file by FTP.
Uses getfile.py, a utility module which encapsulates FTP step.
"""
import getfile
from getpass import getpass
filename = 'monkeys.jpg'
# fetch with utility
getfile.getfile(file=filename,
site='ftp.rmi.net',
860 | Chapter 13: Client-Side Scripting

dir ='.',
user=('lutz', getpass('Pswd?')),
refetch=True)
# rest is the same
if input('Open file?') in ['Y', 'y']:
from PP4E.System.Media.playfile import playfile
playfile(filename)
Besides having a much smaller line count, the meat of this script has been split off into
a file for reuse elsewhere. If you ever need to download a file again, simply import an
existing function instead of copying code with cut-and-paste editing. Changes in down-
load operations would need to be made in only one file, not everywhere we’ve copied
boilerplate code; getfile.getfile could even be changed to use urllib rather than
ftplib without affecting any of its clients. It’s good engineering.
Download utility
So just how would we go about writing such an FTP interface wrapper (he asks, rhet-
orically)? Given the ftplib library module, wrapping downloads of a particular file in
a particular directory is straightforward. Connected FTP objects support two download
methods:
retrbinary
This method downloads the requested file in binary mode, sending its bytes in
chunks to a supplied function, without line-feed mapping. Typically, the supplied
function is a write method of an open local file object, such that the bytes are placed
in the local file on the client.
retrlines
This method downloads the requested file in ASCII text mode, sending each line
of text to a supplied function with all end-of-line characters stripped. Typically,
the supplied function adds a \n newline (mapped appropriately for the client ma-
chine), and writes the line to a local file.
We will meet the retrlines method in a later example; the getfile utility module in
Example 13-4 always transfers in binary mode with retrbinary. That is, files are down-
loaded exactly as they were on the server, byte for byte, with the server’s line-feed
conventions in text files (you may need to convert line feeds after downloads if they
look odd in your text editor—see your editor or system shell commands for pointers,
or write a Python script that opens and writes the text as needed).
Example 13-4. PP4E\Internet\Ftp\getfile.py
#!/usr/local/bin/python
"""
Fetch an arbitrary file by FTP. Anonymous FTP unless you pass a
user=(name, pswd) tuple. Self-test FTPs a test file and site.
"""
Transferring Files with ftplib | 861

from ftplib import FTP # socket-based FTP tools
from os.path import exists # file existence test
def getfile(file, site, dir, user=(), *, verbose=True, refetch=False):
"""
fetch a file by ftp from a site/directory
anonymous or real login, binary transfer
"""
if exists(file) and not refetch:
if verbose: print(file, 'already fetched')
else:
if verbose: print('Downloading', file)
local = open(file, 'wb') # local file of same name
try:
remote = FTP(site) # connect to FTP site
remote.login(*user) # anonymous=() or (name, pswd)
remote.cwd(dir)
remote.retrbinary('RETR ' + file, local.write, 1024)
remote.quit()
finally:
local.close() # close file no matter what
if verbose: print('Download done.') # caller handles exceptions
if __name__ == '__main__':
from getpass import getpass
file = 'monkeys.jpg'
dir = '.'
site = 'ftp.rmi.net'
user = ('lutz', getpass('Pswd?'))
getfile(file, site, dir, user)
This module is mostly just a repackaging of the FTP code we used to fetch the image
file earlier, to make it simpler and reusable. Because it is a callable function, the exported
getfile.getfile here tries to be as robust and generally useful as possible, but even a
function this small implies some design decisions. Here are a few usage notes:
FTP mode
The getfile function in this script runs in anonymous FTP mode by default, but
a two-item tuple containing a username and password string may be passed to the
user argument in order to log in to the remote server in nonanonymous mode. To
use anonymous FTP, either don’t pass the user argument or pass it an empty tuple,
(). The FTP object login method allows two optional arguments to denote a user-
name and password, and the function(*args) call syntax in Example 13-4 sends
it whatever argument tuple you pass to user as individual arguments.
Processing modes
If passed, the last two arguments (verbose, refetch) allow us to turn off status
messages printed to the stdout stream (perhaps undesirable in a GUI context) and
to force downloads to happen even if the file already exists locally (the download
overwrites the existing local file).
862 | Chapter 13: Client-Side Scripting

These two arguments are coded as Python 3.X default keyword-only arguments, so
if used they must be passed by name, not position. The user argument instead can
be passed either way, if it is passed at all. Keyword-only arguments here prevent
passed verbose or refetch values from being incorrectly matched against the user
argument if the user value is actually omitted in a call.
Exception protocol
The caller is expected to handle exceptions; this function wraps downloads in a
try/finally statement to guarantee that the local output file is closed, but it lets
exceptions propagate. If used in a GUI or run from a thread, for instance, excep-
tions may require special handling unknown in this file.
Self-test
If run standalone, this file downloads an image file again from my website as a self-
test (configure for your server and file as desired), but the function will normally
be passed FTP filenames, site names, and directory names as well.
File mode
As in earlier examples, this script is careful to open the local output file in wb binary
mode to suppress end-line mapping and conform to Python 3.X’s Unicode string
model. As we learned in Chapter 4, it’s not impossible that true binary datafiles
may have bytes whose value is equal to a \n line-feed character; opening in w text
mode instead would make these bytes automatically expand to a \r\n two-byte
sequence when written locally on Windows. This is only an issue when run on
Windows; mode w doesn’t change end-lines elsewhere.
As we also learned in Chapter 4, though, binary mode is required to suppress the
automatic Unicode translations performed for text in Python 3.X. Without binary
mode, Python would attempt to encode fetched data when written per a default
or passed Unicode encoding scheme, which might fail for some types of fetched
text and would normally fail for truly binary data such as images and audio.
Because retrbinary writes bytes strings in 3.X, we really cannot open the output
file in text mode anyhow, or write will raise exceptions. Recall that in 3.X text-
mode files require str strings, and binary mode files expect bytes. Since
retrbinary writes bytes and retrlines writes str, they implicitly require binary
and text-mode output files, respectively. This constraint is irrespective of end-line
or Unicode issues, but it effectively accomplishes those goals as well.
As we’ll see in later examples, text-mode retrievals have additional encoding re-
quirements; in fact, ftplib will turn out to be a good example of the impacts of
Python 3.X’s Unicode string model on real-world code. By always using binary
mode in the script here, we sidestep the issue altogether.
Directory model
This function currently uses the same filename to identify both the remote file and
the local file where the download should be stored. As such, it should be run in
the directory where you want the file to show up; use os.chdir to move to direc-
tories if needed. (We could instead assume filename is the local file’s name, and
Transferring Files with ftplib | 863

strip the local directory with os.path.split to get the remote name, or accept two
distinct filename arguments—local and remote.)
Also notice that, despite its name, this module is very different from the getfile.py script
we studied at the end of the sockets material in the preceding chapter. The socket-based
getfile implemented custom client and server-side logic to download a server file to a
client machine over raw sockets.
The new getfile here is a client-side tool only. Instead of raw sockets, it uses the
standard FTP protocol to request a file from a server; all socket-level details are hidden
in the simpler ftplib module’s implementation of the FTP client protocol. Further-
more, the server here is a perpetually running program on the server machine, which
listens for and responds to FTP requests on a socket, on the dedicated FTP port (number
21). The net functional effect is that this script requires an FTP server to be running on
the machine where the desired file lives, but such a server is much more likely to be
available.
Upload utility
While we’re at it, let’s write a script to upload a single file by FTP to a remote machine.
The upload interfaces in the FTP module are symmetric with the download interfaces.
Given a connected FTP object, its:
•storbinary method can be used to upload bytes from an open local file object
•storlines method can be used to upload text in ASCII mode from an open local
file object
Unlike the download interfaces, both of these methods are passed a file object as a
whole, not a file object method (or other function). We will meet the storlines method
in a later example. The utility module in Example 13-5 uses storbinary such that the
file whose name is passed in is always uploaded verbatim—in binary mode, without
Unicode encodings or line-feed translations for the target machine’s conventions. If
this script uploads a text file, it will arrive exactly as stored on the machine it came
from, with client line-feed markers and existing Unicode encoding.
Example 13-5. PP4E\Internet\Ftp\putfile.py
#!/usr/local/bin/python
"""
Store an arbitrary file by FTP in binary mode. Uses anonymous
ftp unless you pass in a user=(name, pswd) tuple of arguments.
"""
import ftplib # socket-based FTP tools
def putfile(file, site, dir, user=(), *, verbose=True):
"""
store a file by ftp to a site/directory
anonymous or real login, binary transfer
864 | Chapter 13: Client-Side Scripting

"""
if verbose: print('Uploading', file)
local = open(file, 'rb') # local file of same name
remote = ftplib.FTP(site) # connect to FTP site
remote.login(*user) # anonymous or real login
remote.cwd(dir)
remote.storbinary('STOR ' + file, local, 1024)
remote.quit()
local.close()
if verbose: print('Upload done.')
if __name__ == '__main__':
site = 'ftp.rmi.net'
dir = '.'
import sys, getpass
pswd = getpass.getpass(site + ' pswd?') # filename on cmdline
putfile(sys.argv[1], site, dir, user=('lutz', pswd)) # nonanonymous login
Notice that for portability, the local file is opened in rb binary input mode this time to
suppress automatic line-feed character conversions. If this is binary information, we
don’t want any bytes that happen to have the value of the \r carriage-return character
to mysteriously go away during the transfer when run on a Windows client. We also
want to suppress Unicode encodings for nontext files, and we want reads to produce
the bytes strings expected by the storbinary upload operation (more on input file
modes later).
This script uploads a file you name on the command line as a self-test, but you will
normally pass in real remote filename, site name, and directory name strings. Also like
the download utility, you may pass a (username, password) tuple to the user argument
to trigger nonanonymous FTP mode (anonymous FTP is the default).
Playing the Monty Python theme song
It’s time for a bit of fun. To test, let’s use these scripts to transfer a copy of the Monty
Python theme song audio file I have at my website. First, let’s write a module that
downloads and plays the sample file, as shown in Example 13-6.
Example 13-6. PP4E\Internet\Ftp\sousa.py
#!/usr/local/bin/python
"""
Usage: sousa.py. Fetch and play the Monty Python theme song.
This will not work on your system as is: it requires a machine with Internet access
and an FTP server account you can access, and uses audio filters on Unix and your
.au player on Windows. Configure this and playfile.py as needed for your platform.
"""
from getpass import getpass
from PP4E.Internet.Ftp.getfile import getfile
from PP4E.System.Media.playfile import playfile
file = 'sousa.au' # default file coordinates
Transferring Files with ftplib | 865

site = 'ftp.rmi.net' # Monty Python theme song
dir = '.'
user = ('lutz', getpass('Pswd?'))
getfile(file, site, dir, user) # fetch audio file by FTP
playfile(file) # send it to audio player
# import os
# os.system('getone.py sousa.au') # equivalent command line
There’s not much to this script, because it really just combines two tools we’ve already
coded. We’re reusing Example 13-4’s getfile to download, and Chapter 6’s play
file module (Example 6-23) to play the audio sample after it is downloaded (turn back
to that example for more details on the player part of the task). Also notice the last two
lines in this file—we can achieve the same effect by passing in the audio filename as a
command-line argument to our original script, but it’s less direct.
As is, this script assumes my FTP server account; configure as desired (alas, this file
used to be at the ftp.python.org anonymous FTP site, but that site went dark for security
reasons between editions of this book). Once configured, this script will run on any
machine with Python, an Internet link, and a recognizable audio player; it works on
my Windows laptop with a broadband Internet connection, and it plays the music clip
in Windows Media Player (and if I could insert an audio file hyperlink here to show
what it sounds like, I would…):
C:\...\PP4E\Internet\Ftp> sousa.py
Pswd?
Downloading sousa.au
Download done.
C:\...\PP4E\Internet\Ftp> sousa.py
Pswd?
sousa.au already fetched
The getfile and putfile modules themselves can be used to move the sample file
around too. Both can either be imported by clients that wish to use their functions, or
run as top-level programs to trigger self-tests and command-line usage. For variety, let’s
run these scripts from a command line and the interactive prompt to see how they work.
When run standalone, the filename is passed in the command line to putfile and both
use password input and default site settings:
C:\...\PP4E\Internet\Ftp> putfile.py sousa.py
ftp.rmi.net pswd?
Uploading sousa.py
Upload done.
When imported, parameters are passed explicitly to functions:
C:\...\PP4E\Internet\Ftp> python
>>> from getfile import getfile
>>> getfile(file='sousa.au', site='ftp.rmi.net', dir='.', user=('lutz', 'XXX'))
sousa.au already fetched
866 | Chapter 13: Client-Side Scripting

C:\...\PP4E\Internet\Ftp> del sousa.au
C:\...\PP4E\Internet\Ftp> python
>>> from getfile import getfile
>>> getfile(file='sousa.au', site='ftp.rmi.net', dir='.', user=('lutz', 'XXX'))
Downloading sousa.au
Download done.
>>> from PP4E.System.Media.playfile import playfile
>>> playfile('sousa.au')
Although Python’s ftplib already automates the underlying socket and message for-
matting chores of FTP, tools of our own like these can make the process even simpler.
Adding a User Interface
If you read the preceding chapter, you’ll recall that it concluded with a quick look at
scripts that added a user interface to a socket-based getfile script—one that transferred
files over a proprietary socket dialog, instead of over FTP. At the end of that presenta-
tion, I mentioned that FTP is a much more generally useful way to move files around
because FTP servers are so widely available on the Net. For illustration purposes,
Example 13-7 shows a simple mutation of the prior chapter’s user interface, imple-
mented as a new subclass of the preceding chapter’s general form builder, form.py of
Example 12-20.
Example 13-7. PP4E\Internet\Ftp\getfilegui.py
"""
#################################################################################
launch FTP getfile function with a reusable form GUI class; uses os.chdir to
goto target local dir (getfile currently assumes that filename has no local
directory path prefix); runs getfile.getfile in thread to allow more than one
to be running at once and avoid blocking GUI during downloads; this differs
from socket-based getfilegui, but reuses Form GUI builder tool; supports both
user and anonymous FTP as currently coded;
caveats: the password field is not displayed as stars here, errors are printed
to the console instead of shown in the GUI (threads can't generally update the
GUI on Windows), this isn't 100% thread safe (there is a slight delay between
os.chdir here and opening the local output file in getfile) and we could
display both a save-as popup for picking the local dir, and a remote directory
listing for picking the file to get; suggested exercises: improve me;
#################################################################################
"""
from tkinter import Tk, mainloop
from tkinter.messagebox import showinfo
import getfile, os, sys, _thread # FTP getfile here, not socket
from PP4E.Internet.Sockets.form import Form # reuse form tool in socket dir
class FtpForm(Form):
def __init__(self):
root = Tk()
Transferring Files with ftplib | 867

root.title(self.title)
labels = ['Server Name', 'Remote Dir', 'File Name',
'Local Dir', 'User Name?', 'Password?']
Form.__init__(self, labels, root)
self.mutex = _thread.allocate_lock()
self.threads = 0
def transfer(self, filename, servername, remotedir, userinfo):
try:
self.do_transfer(filename, servername, remotedir, userinfo)
print('%s of "%s" successful' % (self.mode, filename))
except:
print('%s of "%s" has failed:' % (self.mode, filename), end=' ')
print(sys.exc_info()[0], sys.exc_info()[1])
self.mutex.acquire()
self.threads -= 1
self.mutex.release()
def onSubmit(self):
Form.onSubmit(self)
localdir = self.content['Local Dir'].get()
remotedir = self.content['Remote Dir'].get()
servername = self.content['Server Name'].get()
filename = self.content['File Name'].get()
username = self.content['User Name?'].get()
password = self.content['Password?'].get()
userinfo = ()
if username and password:
userinfo = (username, password)
if localdir:
os.chdir(localdir)
self.mutex.acquire()
self.threads += 1
self.mutex.release()
ftpargs = (filename, servername, remotedir, userinfo)
_thread.start_new_thread(self.transfer, ftpargs)
showinfo(self.title, '%s of "%s" started' % (self.mode, filename))
def onCancel(self):
if self.threads == 0:
Tk().quit()
else:
showinfo(self.title,
'Cannot exit: %d threads running' % self.threads)
class FtpGetfileForm(FtpForm):
title = 'FtpGetfileGui'
mode = 'Download'
def do_transfer(self, filename, servername, remotedir, userinfo):
getfile.getfile(
filename, servername, remotedir, userinfo, verbose=False, refetch=True)
if __name__ == '__main__':
FtpGetfileForm()
mainloop()
868 | Chapter 13: Client-Side Scripting
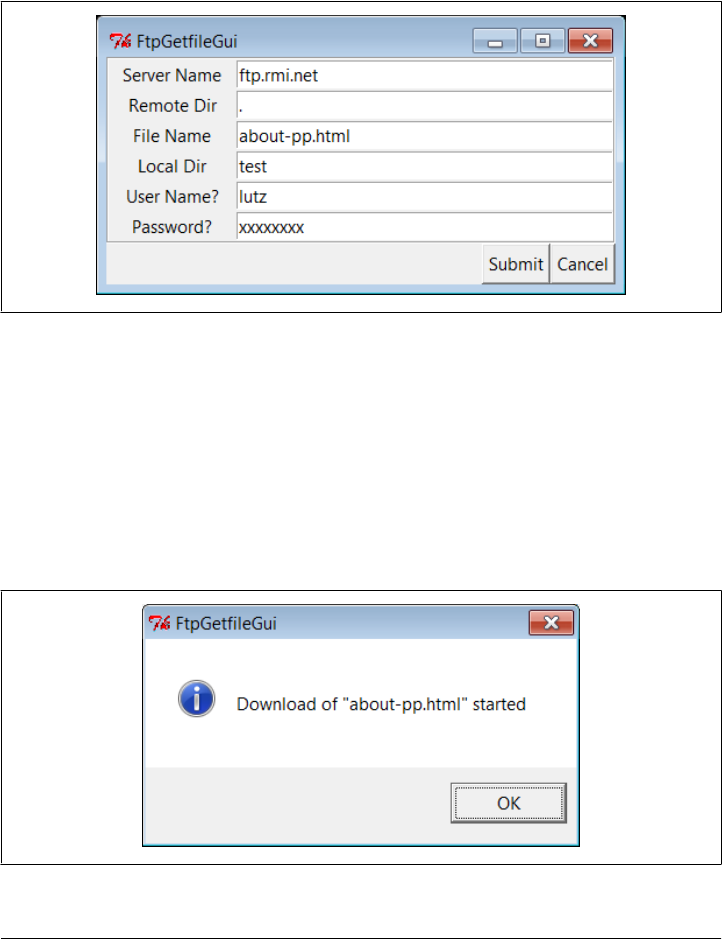
If you flip back to the end of the preceding chapter, you’ll find that this version is similar
in structure to its counterpart there; in fact, it has the same name (and is distinct only
because it lives in a different directory). The class here, though, knows how to use the
FTP-based getfile module from earlier in this chapter instead of the socket-based
getfile module we met a chapter ago. When run, this version also implements more
input fields, as in Figure 13-2, shown on Windows 7.
Figure 13-2. FTP getfile input form
Notice that a full absolute file path can be entered for the local directory here. If not,
the script assumes the current working directory, which changes after each download
and can vary depending on where the GUI is launched (e.g., the current directory differs
when this script is run by the PyDemos program at the top of the examples tree). When
we click this GUI’s Submit button (or press the Enter key), the script simply passes the
form’s input field values as arguments to the getfile.getfile FTP utility function of
Example 13-4 earlier in this section. It also posts a pop up to tell us the download has
begun (Figure 13-3).
Figure 13-3. FTP getfile info pop up
Transferring Files with ftplib | 869

As currently coded, further download status messages, including any FTP error mes-
sages, show up in the console window; here are the messages for successful downloads
as well as one that fails (with added blank lines for readability):
C:\...\PP4E\Internet\Ftp> getfilegui.py
Server Name => ftp.rmi.net
User Name? => lutz
Local Dir => test
File Name => about-pp.html
Password? => xxxxxxxx
Remote Dir => .
Download of "about-pp.html" successful
Server Name => ftp.rmi.net
User Name? => lutz
Local Dir => C:\temp
File Name => ora-lp4e-big.jpg
Password? => xxxxxxxx
Remote Dir => .
Download of "ora-lp4e-big.jpg" successful
Server Name => ftp.rmi.net
User Name? => lutz
Local Dir => C:\temp
File Name => ora-lp4e.jpg
Password? => xxxxxxxx
Remote Dir => .
Download of "ora-lp4e.jpg" has failed: <class 'ftplib.error_perm'>
550 ora-lp4e.jpg: No such file or directory
Given a username and password, the downloader logs into the specified account. To
do anonymous FTP instead, leave the username and password fields blank.
Now, to illustrate the threading capabilities of this GUI, start a download of a large file,
then start another download while this one is in progress. The GUI stays active while
downloads are underway, so we simply change the input fields and press Submit again.
This second download starts and runs in parallel with the first, because each download
is run in a thread, and more than one Internet connection can be active at once. In fact,
the GUI itself stays active during downloads only because downloads are run in threads;
if they were not, even screen redraws wouldn’t happen until a download finished.
We discussed threads in Chapter 5, and their application to GUIs in Chapters 9 and
10, but this script illustrates some practical thread concerns:
• This program takes care to not do anything GUI-related in a download thread. As
we’ve learned, only the thread that makes GUIs can generally process them.
• To avoid killing spawned download threads on some platforms, the GUI must also
be careful not to exit while any downloads are in progress. It keeps track of the
number of in-progress threads, and just displays a pop up if we try to kill the GUI
by pressing the Cancel button while both of these downloads are in progress.
870 | Chapter 13: Client-Side Scripting

We learned about ways to work around the no-GUI rule for threads in Chapter 10, and
we will apply such techniques when we explore the PyMailGUI example in the next
chapter. To be portable, though, we can’t really close the GUI until the active-thread
count falls to zero; the exit model of the threading module of Chapter 5 can be used
to achieve the same effect. Here is the sort of output that appears in the console window
when two downloads overlap in time:
C:\...\PP4E\Internet\Ftp> python getfilegui.py
Server Name => ftp.rmi.net
User Name? => lutz
Local Dir => C:\temp
File Name => spain08.JPG
Password? => xxxxxxxx
Remote Dir => .
Server Name => ftp.rmi.net
User Name? => lutz
Local Dir => C:\temp
File Name => index.html
Password? => xxxxxxxx
Remote Dir => .
Download of "index.html" successful
Download of "spain08.JPG" successful
This example isn’t much more useful than a command line-based tool, of course, but
it can be easily modified by changing its Python code, and it provides enough of a GUI
to qualify as a simple, first-cut FTP user interface. Moreover, because this GUI runs
downloads in Python threads, more than one can be run at the same time from this
GUI without having to start or restart a different FTP client tool.
While we’re in a GUI mood, let’s add a simple interface to the putfile utility, too. The
script in Example 13-8 creates a dialog that starts uploads in threads, using core FTP
logic imported from Example 13-5. It’s almost the same as the getfile GUI we just
wrote, so there’s not much new to say. In fact, because get and put operations are so
similar from an interface perspective, most of the get form’s logic was deliberately
factored out into a single generic class (FtpForm), so changes need be made in only a
single place. That is, the put GUI here is mostly just a reuse of the get GUI, with distinct
output labels and transfer methods. It’s in a file by itself, though, to make it easy to
launch as a standalone program.
Example 13-8. PP4E\Internet\Ftp\putfilegui.py
"""
###############################################################
launch FTP putfile function with a reusable form GUI class;
see getfilegui for notes: most of the same caveats apply;
the get and put forms have been factored into a single
class such that changes need be made in only one place;
###############################################################
"""
Transferring Files with ftplib | 871
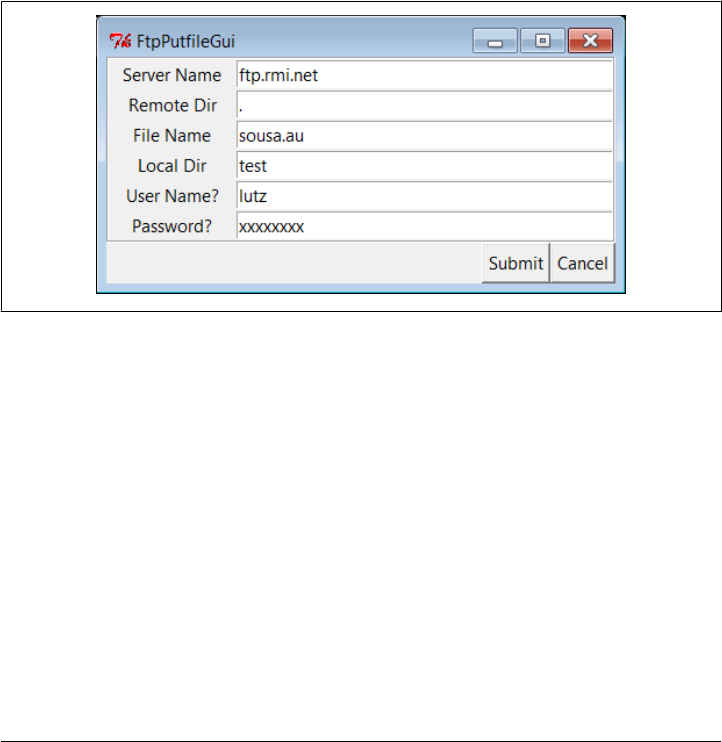
from tkinter import mainloop
import putfile, getfilegui
class FtpPutfileForm(getfilegui.FtpForm):
title = 'FtpPutfileGui'
mode = 'Upload'
def do_transfer(self, filename, servername, remotedir, userinfo):
putfile.putfile(filename, servername, remotedir, userinfo, verbose=False)
if __name__ == '__main__':
FtpPutfileForm()
mainloop()
Running this script looks much like running the download GUI, because it’s almost
entirely the same code at work. Let’s upload some files from the client machine to the
server; Figure 13-4 shows the state of the GUI while starting one.
Figure 13-4. FTP putfile input form
And here is the console window output we get when uploading two files in serial fash-
ion; here again, uploads run in parallel threads, so if we start a new upload before one
in progress is finished, they overlap in time:
C:\...\PP4E\Internet\Ftp\test> ..\putfilegui.py
Server Name => ftp.rmi.net
User Name? => lutz
Local Dir => .
File Name => sousa.au
Password? => xxxxxxxx
Remote Dir => .
Upload of "sousa.au" successful
Server Name => ftp.rmi.net
User Name? => lutz
Local Dir => .
File Name => about-pp.html
872 | Chapter 13: Client-Side Scripting

Password? => xxxxxxxx
Remote Dir => .
Upload of "about-pp.html" successful
Finally, we can bundle up both GUIs in a single launcher script that knows how to start
the get and put interfaces, regardless of which directory we are in when the script is
started, and independent of the platform on which it runs. Example 13-9 shows this
process.
Example 13-9. PP4E\Internet\Ftp\PyFtpGui.pyw
"""
spawn FTP get and put GUIs no matter what directory I'm run from; os.getcwd is not
necessarily the place this script lives; could also hardcode path from $PP4EHOME,
or guessLocation; could also do: [from PP4E.launchmodes import PortableLauncher,
PortableLauncher('getfilegui', '%s/getfilegui.py' % mydir)()], but need the DOS
console pop up on Windows to view status messages which describe transfers made;
"""
import os, sys
print('Running in: ', os.getcwd())
# PP3E
# from PP4E.Launcher import findFirst
# mydir = os.path.split(findFirst(os.curdir, 'PyFtpGui.pyw'))[0]
# PP4E
from PP4E.Tools.find import findlist
mydir = os.path.dirname(findlist('PyFtpGui.pyw', startdir=os.curdir)[0])
if sys.platform[:3] == 'win':
os.system('start %s\getfilegui.py' % mydir)
os.system('start %s\putfilegui.py' % mydir)
else:
os.system('python %s/getfilegui.py &' % mydir)
os.system('python %s/putfilegui.py &' % mydir)
Notice that we’re reusing the find utility from Chapter 6’s Example 6-13 again here—
this time to locate the home directory of the script in order to build command lines.
When run by launchers in the examples root directory or command lines elsewhere in
general, the current working directory may not always be this script’s container. In the
prior edition, this script used a tool in the Launcher module instead to search for its
own directory (see the examples distribution for that equivalent).
When this script is started, both the get and put GUIs appear as distinct, independently
run programs; alternatively, we might attach both forms to a single interface. We could
get much fancier than these two interfaces, of course. For instance, we could pop up
local file selection dialogs, and we could display widgets that give the status of down-
loads and uploads in progress. We could even list files available at the remote site in a
selectable listbox by requesting remote directory listings over the FTP connection. To
learn how to add features like that, though, we need to move on to the next section.
Transferring Files with ftplib | 873

Transferring Directories with ftplib
Once upon a time, I used Telnet to manage my website at my Internet Service Provider
(ISP). I logged in to the web server in a shell window, and performed all my edits directly
on the remote machine. There was only one copy of a site’s files—on the machine that
hosted it. Moreover, content updates could be performed from any machine that ran
a Telnet client—ideal for people with travel-based careers.†
Of course, times have changed. Like most personal websites, today mine are maintained
on my laptop and I transfer their files to and from my ISP as needed. Often, this is a
simple matter of one or two files, and it can be accomplished with a command-line FTP
client. Sometimes, though, I need an easy way to transfer the entire site. Maybe I need
to download to detect files that have become out of sync. Occasionally, the changes
are so involved that it’s easier to upload the entire site in a single step.
Although there are a variety of ways to approach this task (including options in site-
builder tools), Python can help here, too: writing Python scripts to automate the upload
and download tasks associated with maintaining my website on my laptop provides a
portable and mobile solution. Because Python FTP scripts will work on any machine
with sockets, they can be run on my laptop and on nearly any other computer where
Python is installed. Furthermore, the same scripts used to transfer page files to and
from my PC can be used to copy my site to another web server as a backup copy, should
my ISP experience an outage. The effect is sometimes called a mirror—a copy of a
remote site.
Downloading Site Directories
The following two scripts address these needs. The first, downloadflat.py, automatically
downloads (i.e., copies) by FTP all the files in a directory at a remote site to a directory
on the local machine. I keep the main copy of my website files on my PC these days,
but I use this script in two ways:
• To download my website to client machines where I want to make edits, I fetch
the contents of my web directory of my account on my ISP’s machine.
• To mirror my site to my account on another server, I run this script periodically
on the target machine if it supports Telnet or SSH secure shell; if it does not, I
simply download to one machine and upload from there to the target server.
† No, really. The second edition of this book included a tale of woe here about how my ISP forced its users to
wean themselves off Telnet access. This seems like a small issue today. Common practice on the Internet has
come far in a short time. One of my sites has even grown too complex for manual edits (except, of course,
to work around bugs in the site-builder tool). Come to think of it, so has Python’s presence on the Web.
When I first found Python in 1992, it was a set of encoded email messages, which users decoded and
concatenated and hoped the result worked. Yes, yes, I know—gee, Grandpa, tell us more…
874 | Chapter 13: Client-Side Scripting

More generally, this script (shown in Example 13-10) will download a directory full of
files to any machine with Python and sockets, from any machine running an FTP server.
Example 13-10. PP4E\Internet\Ftp\Mirror\downloadflat.py
#!/bin/env python
"""
###############################################################################
use FTP to copy (download) all files from a single directory at a remote
site to a directory on the local machine; run me periodically to mirror
a flat FTP site directory to your ISP account; set user to 'anonymous'
to do anonymous FTP; we could use try to skip file failures, but the FTP
connection is likely closed if any files fail; we could also try to
reconnect with a new FTP instance before each transfer: connects once now;
if failures, try setting nonpassive for active FTP, or disable firewalls;
this also depends on a working FTP server, and possibly its load policies.
###############################################################################
"""
import os, sys, ftplib
from getpass import getpass
from mimetypes import guess_type
nonpassive = False # passive FTP on by default in 2.1+
remotesite = 'home.rmi.net' # download from this site
remotedir = '.' # and this dir (e.g., public_html)
remoteuser = 'lutz'
remotepass = getpass('Password for %s on %s: ' % (remoteuser, remotesite))
localdir = (len(sys.argv) > 1 and sys.argv[1]) or '.'
cleanall = input('Clean local directory first? ')[:1] in ['y', 'Y']
print('connecting...')
connection = ftplib.FTP(remotesite) # connect to FTP site
connection.login(remoteuser, remotepass) # login as user/password
connection.cwd(remotedir) # cd to directory to copy
if nonpassive: # force active mode FTP
connection.set_pasv(False) # most servers do passive
if cleanall:
for localname in os.listdir(localdir): # try to delete all locals
try: # first, to remove old files
print('deleting local', localname) # os.listdir omits . and ..
os.remove(os.path.join(localdir, localname))
except:
print('cannot delete local', localname)
count = 0 # download all remote files
remotefiles = connection.nlst() # nlst() gives files list
# dir() gives full details
for remotename in remotefiles:
if remotename in ('.', '..'): continue # some servers include . and ..
mimetype, encoding = guess_type(remotename) # e.g., ('text/plain', 'gzip')
mimetype = mimetype or '?/?' # may be (None, None)
maintype = mimetype.split('/')[0] # .jpg ('image/jpeg', None')
Transferring Directories with ftplib | 875

localpath = os.path.join(localdir, remotename)
print('downloading', remotename, 'to', localpath, end=' ')
print('as', maintype, encoding or '')
if maintype == 'text' and encoding == None:
# use ascii mode xfer and text file
# use encoding compatible wth ftplib's
localfile = open(localpath, 'w', encoding=connection.encoding)
callback = lambda line: localfile.write(line + '\n')
connection.retrlines('RETR ' + remotename, callback)
else:
# use binary mode xfer and bytes file
localfile = open(localpath, 'wb')
connection.retrbinary('RETR ' + remotename, localfile.write)
localfile.close()
count += 1
connection.quit()
print('Done:', count, 'files downloaded.')
There’s not much that is new to speak of in this script, compared to other FTP examples
we’ve seen thus far. We open a connection with the remote FTP server, log in with a
username and password for the desired account (this script never uses anonymous
FTP), and go to the desired remote directory. New here, though, are loops to iterate
over all the files in local and remote directories, text-based retrievals, and file deletions:
Deleting all local files
This script has a cleanall option, enabled by an interactive prompt. If selected,
the script first deletes all the files in the local directory before downloading, to make
sure there are no extra files that aren’t also on the server (there may be junk here
from a prior download). To delete local files, the script calls os.listdir to get a list
of filenames in the directory, and os.remove to delete each; see Chapter 4 (or the
Python library manual) for more details if you’ve forgotten what these calls do.
Notice the use of os.path.join to concatenate a directory path and filename ac-
cording to the host platform’s conventions; os.listdir returns filenames without
their directory paths, and this script is not necessarily run in the local directory
where downloads will be placed. The local directory defaults to the current direc-
tory (“.”), but can be set differently with a command-line argument to the script.
Fetching all remote files
To grab all the files in a remote directory, we first need a list of their names. The
FTP object’s nlst method is the remote equivalent of os.listdir: nlst returns a
list of the string names of all files in the current remote directory. Once we have
this list, we simply step through it in a loop, running FTP retrieval commands for
each filename in turn (more on this in a minute).
The nlst method is, more or less, like requesting a directory listing with an ls
command in typical interactive FTP programs, but Python automatically splits up
876 | Chapter 13: Client-Side Scripting

the listing’s text into a list of filenames. We can pass it a remote directory to be
listed; by default it lists the current server directory. A related FTP method, dir,
returns the list of line strings produced by an FTP LIST command; its result is like
typing a dir command in an FTP session, and its lines contain complete file infor-
mation, unlike nlst. If you need to know more about all the remote files, parse the
result of a dir method call (we’ll see how in a later example).
Notice how we skip “.” and “..” current and parent directory indicators if present
in remote directory listings; unlike os.listdir, some (but not all) servers include
these, so we need to either skip these or catch the exceptions they may trigger (more
on this later when we start using dir, too).
Selecting transfer modes with mimetypes
We discussed output file modes for FTP earlier, but now that we’ve started trans-
ferring text, too, I can fill in the rest of this story. To handle Unicode encodings
and to keep line-ends in sync with the machines that my web files live on, this script
distinguishes between binary and text file transfers. It uses the Python mimetypes
module to choose between text and binary transfer modes for each file.
We met mimetypes in Chapter 6 near Example 6-23, where we used it to play media
files (see the examples and description there for an introduction). Here, mime
types is used to decide whether a file is text or binary by guessing from its filename
extension. For instance, HTML web pages and simple text files are transferred as
text with automatic line-end mappings, and images and tar archives are transferred
in raw binary mode.
Downloading: text versus binary
For binary files data is pulled down with the retrbinary method we met earlier,
and stored in a local file with binary open mode of wb. This file open mode is
required to allow for the bytes strings passed to the write method by retrbinary,
but it also suppresses line-end byte mapping and Unicode encodings in the process.
Again, text mode requires encodable text in Python 3.X, and this fails for binary
data like images. This script may also be run on Windows or Unix-like platforms,
and we don’t want a \n byte embedded in an image to get expanded to \r\n on
Windows. We don’t use a chunk-size third argument for binary transfers here,
though—it defaults to a reasonable size if omitted.
For text files, the script instead uses the retrlines method, passing in a function
to be called for each line in the text file downloaded. The text line handler function
receives lines in str string form, and mostly just writes the line to a local text file.
But notice that the handler function created by the lambda here also adds a \n line-
end character to the end of the line it is passed. Python’s retrlines method strips
all line-feed characters from lines to sidestep platform differences. By adding a
\n, the script ensures the proper line-end marker character sequence for the local
platform on which this script runs when written to the file (\n or \r\n).
For this auto-mapping of the \n in the script to work, of course, we must also open
text output files in w text mode, not in wb—the mapping from \n to \r\n on
Transferring Directories with ftplib | 877

Windows happens when data is written to the file. As discussed earlier, text mode
also means that the file’s write method will allow for the str string passed in by
retrlines, and that text will be encoded per Unicode when written.
Subtly, though, we also explicitly use the FTP connection object’s Unicode encod-
ing scheme for our text output file in open, instead of the default. Without this
encoding option, the script aborted with a UnicodeEncodeError exception for some
files in my site. In retrlines, the FTP object itself reads the remote file data over a
socket with a text-mode file wrapper and an explicit encoding scheme for decoding;
since the FTP object can do no better than this encoding anyhow, we use its en-
coding for our output file as well.
By default, FTP objects use the latin1 scheme for decoding text fetched (as well
as for encoding text sent), but this can be specialized by assigning to their
encoding attribute. Our script’s local text output file will inherit whatever encoding
ftplib uses and so be compatible with the encoded text data that it produces and
passes.
We could try to also catch Unicode exceptions for files outside the Unicode en-
coding used by the FTP object, but exceptions leave the FTP object in an unre-
coverable state in tests I’ve run in Python 3.1. Alternatively, we could use wb binary
mode for the local text output file and manually encode line strings with
line.encode, or simply use retrbinary and binary mode files in all cases, but both
of these would fail to map end-lines portably—the whole point of making text
distinct in this context.
All of this is simpler in action than in words. Here is the command I use to download
my entire book support website from my ISP server account to my Windows laptop
PC, in a single step:
C:\...\PP4E\Internet\Ftp\Mirror> downloadflat.py test
Password for lutz on home.rmi.net:
Clean local directory first? y
connecting...
deleting local 2004-longmont-classes.html
deleting local 2005-longmont-classes.html
deleting local 2006-longmont-classes.html
deleting local about-hopl.html
deleting local about-lp.html
deleting local about-lp2e.html
deleting local about-pp-japan.html
...lines omitted...
downloading 2004-longmont-classes.html to test\2004-longmont-classes.html as text
downloading 2005-longmont-classes.html to test\2005-longmont-classes.html as text
downloading 2006-longmont-classes.html to test\2006-longmont-classes.html as text
downloading about-hopl.html to test\about-hopl.html as text
downloading about-lp.html to test\about-lp.html as text
downloading about-lp2e.html to test\about-lp2e.html as text
downloading about-pp-japan.html to test\about-pp-japan.html as text
878 | Chapter 13: Client-Side Scripting

...lines omitted...
downloading ora-pyref4e.gif to test\ora-pyref4e.gif as image
downloading ora-lp4e-big.jpg to test\ora-lp4e-big.jpg as image
downloading ora-lp4e.gif to test\ora-lp4e.gif as image
downloading pyref4e-updates.html to test\pyref4e-updates.html as text
downloading lp4e-updates.html to test\lp4e-updates.html as text
downloading lp4e-examples.html to test\lp4e-examples.html as text
downloading LP4E-examples.zip to test\LP4E-examples.zip as application
Done: 297 files downloaded.
This may take a few moments to complete, depending on your site’s size and your
connection speed (it’s bound by network speed constraints, and it usually takes roughly
two to three minutes for my site on my current laptop and wireless broadband con-
nection). It is much more accurate and easier than downloading files by hand, though.
The script simply iterates over all the remote files returned by the nlst method, and
downloads each with the FTP protocol (i.e., over sockets) in turn. It uses text transfer
mode for names that imply text data, and binary mode for others.
With the script running this way, I make sure the initial assignments in it reflect the
machines involved, and then run the script from the local directory where I want
the site copy to be stored. Because the target download directory is often not where the
script lives, I may need to give Python the full path to the script file. When run on a
server in a Telnet or SSH session window, for instance, the execution and script direc-
tory paths are different, but the script works the same way.
If you elect to delete local files in the download directory, you may also see a batch of
“deleting local…” messages scroll by on the screen before any “downloading…” lines
appear: this automatically cleans out any garbage lingering from a prior download. And
if you botch the input of the remote site password, a Python exception is raised; I
sometimes need to run it again (and type more slowly):
C:\...\PP4E\Internet\Ftp\Mirror> downloadflat.py test
Password for lutz on home.rmi.net:
Clean local directory first?
connecting...
Traceback (most recent call last):
File "C:\...\PP4E\Internet\Ftp\Mirror\downloadflat.py", line 29, in <module>
connection.login(remoteuser, remotepass) # login as user/password
File "C:\Python31\lib\ftplib.py", line 375, in login
if resp[0] == '3': resp = self.sendcmd('PASS ' + passwd)
File "C:\Python31\lib\ftplib.py", line 245, in sendcmd
return self.getresp()
File "C:\Python31\lib\ftplib.py", line 220, in getresp
raise error_perm(resp)
ftplib.error_perm: 530 Login incorrect.
It’s worth noting that this script is at least partially configured by assignments near the
top of the file. In addition, the password and deletion options are given by interactive
inputs, and one command-line argument is allowed—the local directory name to store
Transferring Directories with ftplib | 879

the downloaded files (it defaults to “.”, the directory where the script is run).
Command-line arguments could be employed to universally configure all the other
download parameters and options, too, but because of Python’s simplicity and lack of
compile/link steps, changing settings in the text of Python scripts is usually just as easy
as typing words on a command line.
To check for version skew after a batch of downloads and uploads, you
can run the diffall script we wrote in Chapter 6, Example 6-12. For
instance, I find files that have diverged over time due to updates on
multiple platforms by comparing the download to a local copy of my
website using a shell command line such as C:\...\PP4E\Internet
\Ftp> ..\..\System\Filetools\diffall.py Mirror\test C:\...\Web
sites\public_html. See Chapter 6 for more details on this tool, and file
diffall.out.txt in the diffs subdirectory of the examples distribution for a
sample run; its text file differences stem from either final line newline
characters or newline differences reflecting binary transfers that Win-
dows fc commands and FTP servers do not notice.
Uploading Site Directories
Uploading a full directory is symmetric to downloading: it’s mostly a matter of swap-
ping the local and remote machines and operations in the program we just met. The
script in Example 13-11 uses FTP to copy all files in a directory on the local machine
on which it runs up to a directory on a remote machine.
I really use this script, too, most often to upload all of the files maintained on my laptop
PC to my ISP account in one fell swoop. I also sometimes use it to copy my site from
my PC to a mirror machine or from the mirror machine back to my ISP. Because this
script runs on any computer with Python and sockets, it happily transfers a directory
from any machine on the Net to any machine running an FTP server. Simply change
the initial setting in this module as appropriate for the transfer you have in mind.
Example 13-11. PP4E\Internet\Ftp\Mirror\uploadflat.py
#!/bin/env python
"""
##############################################################################
use FTP to upload all files from one local dir to a remote site/directory;
e.g., run me to copy a web/FTP site's files from your PC to your ISP;
assumes a flat directory upload: uploadall.py does nested directories.
see downloadflat.py comments for more notes: this script is symmetric.
##############################################################################
"""
import os, sys, ftplib
from getpass import getpass
from mimetypes import guess_type
880 | Chapter 13: Client-Side Scripting

nonpassive = False # passive FTP by default
remotesite = 'learning-python.com' # upload to this site
remotedir = 'books' # from machine running on
remoteuser = 'lutz'
remotepass = getpass('Password for %s on %s: ' % (remoteuser, remotesite))
localdir = (len(sys.argv) > 1 and sys.argv[1]) or '.'
cleanall = input('Clean remote directory first? ')[:1] in ['y', 'Y']
print('connecting...')
connection = ftplib.FTP(remotesite) # connect to FTP site
connection.login(remoteuser, remotepass) # log in as user/password
connection.cwd(remotedir) # cd to directory to copy
if nonpassive: # force active mode FTP
connection.set_pasv(False) # most servers do passive
if cleanall:
for remotename in connection.nlst(): # try to delete all remotes
try: # first, to remove old files
print('deleting remote', remotename)
connection.delete(remotename) # skips . and .. if attempted
except:
print('cannot delete remote', remotename)
count = 0 # upload all local files
localfiles = os.listdir(localdir) # listdir() strips dir path
# any failure ends script
for localname in localfiles:
mimetype, encoding = guess_type(localname) # e.g., ('text/plain', 'gzip')
mimetype = mimetype or '?/?' # may be (None, None)
maintype = mimetype.split('/')[0] # .jpg ('image/jpeg', None')
localpath = os.path.join(localdir, localname)
print('uploading', localpath, 'to', localname, end=' ')
print('as', maintype, encoding or '')
if maintype == 'text' and encoding == None:
# use ascii mode xfer and bytes file
# need rb mode for ftplib's crlf logic
localfile = open(localpath, 'rb')
connection.storlines('STOR ' + localname, localfile)
else:
# use binary mode xfer and bytes file
localfile = open(localpath, 'rb')
connection.storbinary('STOR ' + localname, localfile)
localfile.close()
count += 1
connection.quit()
print('Done:', count, 'files uploaded.')
Transferring Directories with ftplib | 881

Similar to the mirror download script, this program illustrates a handful of new FTP
interfaces and a set of FTP scripting techniques:
Deleting all remote files
Just like the mirror script, the upload begins by asking whether we want to delete
all the files in the remote target directory before copying any files there. This
cleanall option is useful if we’ve deleted files in the local copy of the directory in
the client—the deleted files would remain on the server-side copy unless we delete
all files there first.
To implement the remote cleanup, this script simply gets a listing of all the files in
the remote directory with the FTP nlst method, and deletes each in turn with
the FTP delete method. Assuming we have delete permission, the directory will
be emptied (file permissions depend on the account we logged into when con-
necting to the server). We’ve already moved to the target remote directory when
deletions occur, so no directory paths need to be prepended to filenames here. Note
that nlst may raise an exception for some servers if the remote directory is empty;
we don’t catch the exception here, but you can simply not select a cleaning if one
fails for you. We do catch deletion exceptions, because directory names like “.”
and “..” may be returned in the listing by some servers.
Storing all local files
To apply the upload operation to each file in the local directory, we get a list of
local filenames with the standard os.listdir call, and take care to prepend the
local source directory path to each filename with the os.path.join call. Recall that
os.listdir returns filenames without directory paths, and the source directory may
not be the same as the script’s execution directory if passed on the command line.
Uploading: Text versus binary
This script may also be run on both Windows and Unix-like clients, so we need to
handle text files specially. Like the mirror download, this script picks text or binary
transfer modes by using Python’s mimetypes module to guess a file’s type from its
filename extension; HTML and text files are moved in FTP text mode, for instance.
We already met the storbinary FTP object method used to upload files in binary
mode—an exact, byte-for-byte copy appears at the remote site.
Text-mode transfers work almost identically: the storlines method accepts an FTP
command string and a local file (or file-like) object, and simply copies each line
read from the local file to a same-named file on the remote machine.
Notice, though, that the local text input file must be opened in rb binary mode in
Python3.X. Text input files are normally opened in r text mode to perform Unicode
decoding and to convert any \r\n end-of-line sequences on Windows to the \n
platform-neutral character as lines are read. However, ftplib in Python 3.1 requires
that the text file be opened in rb binary mode, because it converts all end-lines to
the \r\n sequence for transmission; to do so, it must read lines as raw bytes with
readlines and perform bytes string processing, which implies binary mode files.
882 | Chapter 13: Client-Side Scripting

This ftplib string processing worked with text-mode files in Python 2.X, but only
because there was no separate bytes type; \n was expanded to \r\n. Opening the
local file in binary mode for ftplib to read also means no Unicode decoding will
occur: the text is sent over sockets as a byte string in already encoded form. All of
which is, of course, a prime lesson on the impacts of Unicode encodings; consult
the module ftplib.py in the Python source library directory for more details.
For binary mode transfers, things are simpler—we open the local file in rb binary
mode to suppress Unicode decoding and automatic mapping everywhere, and re-
turn the bytes strings expected by ftplib on read. Binary data is not Unicode text,
and we don’t want bytes in an audio file that happen to have the same value as
\r to magically disappear when read on Windows.
As for the mirror download script, this program simply iterates over all files to be
transferred (files in the local directory listing this time), and transfers each in turn—in
either text or binary mode, depending on the files’ names. Here is the command I use
to upload my entire website from my laptop Windows PC to a remote Linux server at
my ISP, in a single step:
C:\...\PP4E\Internet\Ftp\Mirror> uploadflat.py test
Password for lutz on learning-python.com:
Clean remote directory first? y
connecting...
deleting remote .
cannot delete remote .
deleting remote ..
cannot delete remote ..
deleting remote 2004-longmont-classes.html
deleting remote 2005-longmont-classes.html
deleting remote 2006-longmont-classes.html
deleting remote about-lp1e.html
deleting remote about-lp2e.html
deleting remote about-lp3e.html
deleting remote about-lp4e.html
...lines omitted...
uploading test\2004-longmont-classes.html to 2004-longmont-classes.html as text
uploading test\2005-longmont-classes.html to 2005-longmont-classes.html as text
uploading test\2006-longmont-classes.html to 2006-longmont-classes.html as text
uploading test\about-lp1e.html to about-lp1e.html as text
uploading test\about-lp2e.html to about-lp2e.html as text
uploading test\about-lp3e.html to about-lp3e.html as text
uploading test\about-lp4e.html to about-lp4e.html as text
uploading test\about-pp-japan.html to about-pp-japan.html as text
...lines omitted...
uploading test\whatsnew.html to whatsnew.html as text
uploading test\whatsold.html to whatsold.html as text
uploading test\wxPython.doc.tgz to wxPython.doc.tgz as application gzip
uploading test\xlate-lp.html to xlate-lp.html as text
Transferring Directories with ftplib | 883

uploading test\zaurus0.jpg to zaurus0.jpg as image
uploading test\zaurus1.jpg to zaurus1.jpg as image
uploading test\zaurus2.jpg to zaurus2.jpg as image
uploading test\zoo-jan-03.jpg to zoo-jan-03.jpg as image
uploading test\zopeoutline.htm to zopeoutline.htm as text
Done: 297 files uploaded.
For my site and on my current laptop and wireless broadband connection, this process
typically takes six minutes, depending on server load. As with the download script, I
often run this command from the local directory where my web files are kept, and I
pass Python the full path to the script. When I run this on a Linux server, it works in
the same way, but the paths to the script and my web files directory differ.‡
Refactoring Uploads and Downloads for Reuse
The directory upload and download scripts of the prior two sections work as advertised
and, apart from the mimetypes logic, were the only FTP examples that were included in
the second edition of this book. If you look at these two scripts long enough, though,
their similarities will pop out at you eventually. In fact, they are largely the same—they
use identical code to configure transfer parameters, connect to the FTP server, and
determine file type. The exact details have been lost to time, but some of this code was
certainly copied from one file to the other.
Although such redundancy isn’t a cause for alarm if we never plan on changing these
scripts, it can be a killer in software projects in general. When you have two copies of
identical bits of code, not only is there a danger of them becoming out of sync over time
(you’ll lose uniformity in user interface and behavior), but you also effectively double
your effort when it comes time to change code that appears in both places. Unless you’re
a big fan of extra work, it pays to avoid redundancy wherever possible.
This redundancy is especially glaring when we look at the complex code that uses
mimetypes to determine file types. Repeating magic like this in more than one place is
almost always a bad idea—not only do we have to remember how it works every time
we need the same utility, but it is a recipe for errors.
Refactoring with functions
As originally coded, our download and upload scripts comprise top-level script code
that relies on global variables. Such a structure is difficult to reuse—code runs imme-
diately on imports, and it’s difficult to generalize for varying contexts. Worse, it’s dif-
ficult to maintain—when you program by cut-and-paste of existing code, you increase
the cost of future changes every time you click the Paste button.
‡ Usage note: These scripts are highly dependent on the FTP server functioning properly. For a while, the
upload script occasionally had timeout errors when running over my current broadband connection. These
errors went away later, when my ISP fixed or reconfigured their server. If you have failures, try running against
a different server; connecting and disconnecting around each transfer may or may not help (some servers
limit their number of connections).
884 | Chapter 13: Client-Side Scripting

To demonstrate how we might do better, Example 13-12 shows one way to refactor
(reorganize) the download script. By wrapping its parts in functions, they become re-
usable in other modules, including our upload program.
Example 13-12. PP4E\Internet\Ftp\Mirror\downloadflat_modular.py
#!/bin/env python
"""
##############################################################################
use FTP to copy (download) all files from a remote site and directory
to a directory on the local machine; this version works the same, but has
been refactored to wrap up its code in functions that can be reused by the
uploader, and possibly other programs in the future - else code redundancy,
which may make the two diverge over time, and can double maintenance costs.
##############################################################################
"""
import os, sys, ftplib
from getpass import getpass
from mimetypes import guess_type, add_type
defaultSite = 'home.rmi.net'
defaultRdir = '.'
defaultUser = 'lutz'
def configTransfer(site=defaultSite, rdir=defaultRdir, user=defaultUser):
"""
get upload or download parameters
uses a class due to the large number
"""
class cf: pass
cf.nonpassive = False # passive FTP on by default in 2.1+
cf.remotesite = site # transfer to/from this site
cf.remotedir = rdir # and this dir ('.' means acct root)
cf.remoteuser = user
cf.localdir = (len(sys.argv) > 1 and sys.argv[1]) or '.'
cf.cleanall = input('Clean target directory first? ')[:1] in ['y','Y']
cf.remotepass = getpass(
'Password for %s on %s:' % (cf.remoteuser, cf.remotesite))
return cf
def isTextKind(remotename, trace=True):
"""
use mimetype to guess if filename means text or binary
for 'f.html, guess is ('text/html', None): text
for 'f.jpeg' guess is ('image/jpeg', None): binary
for 'f.txt.gz' guess is ('text/plain', 'gzip'): binary
for unknowns, guess may be (None, None): binary
mimetype can also guess name from type: see PyMailGUI
"""
add_type('text/x-python-win', '.pyw') # not in tables
mimetype, encoding = guess_type(remotename, strict=False) # allow extras
mimetype = mimetype or '?/?' # type unknown?
maintype = mimetype.split('/')[0] # get first part
if trace: print(maintype, encoding or '')
Transferring Directories with ftplib | 885

return maintype == 'text' and encoding == None # not compressed
def connectFtp(cf):
print('connecting...')
connection = ftplib.FTP(cf.remotesite) # connect to FTP site
connection.login(cf.remoteuser, cf.remotepass) # log in as user/password
connection.cwd(cf.remotedir) # cd to directory to xfer
if cf.nonpassive: # force active mode FTP
connection.set_pasv(False) # most servers do passive
return connection
def cleanLocals(cf):
"""
try to delete all locals files first to remove garbage
"""
if cf.cleanall:
for localname in os.listdir(cf.localdir): # local dirlisting
try: # local file delete
print('deleting local', localname)
os.remove(os.path.join(cf.localdir, localname))
except:
print('cannot delete local', localname)
def downloadAll(cf, connection):
"""
download all files from remote site/dir per cf config
ftp nlst() gives files list, dir() gives full details
"""
remotefiles = connection.nlst() # nlst is remote listing
for remotename in remotefiles:
if remotename in ('.', '..'): continue
localpath = os.path.join(cf.localdir, remotename)
print('downloading', remotename, 'to', localpath, 'as', end=' ')
if isTextKind(remotename):
# use text mode xfer
localfile = open(localpath, 'w', encoding=connection.encoding)
def callback(line): localfile.write(line + '\n')
connection.retrlines('RETR ' + remotename, callback)
else:
# use binary mode xfer
localfile = open(localpath, 'wb')
connection.retrbinary('RETR ' + remotename, localfile.write)
localfile.close()
connection.quit()
print('Done:', len(remotefiles), 'files downloaded.')
if __name__ == '__main__':
cf = configTransfer()
conn = connectFtp(cf)
cleanLocals(cf) # don't delete if can't connect
downloadAll(cf, conn)
Compare this version with the original. This script, and every other in this section, runs
the same as the original flat download and upload programs. Although we haven’t
886 | Chapter 13: Client-Side Scripting

changed its behavior, though, we’ve modified the script’s software structure radically—
its code is now a set of tools that can be imported and reused in other programs.
The refactored upload program in Example 13-13, for instance, is now noticeably sim-
pler, and the code it shares with the download script only needs to be changed in one
place if it ever requires improvement.
Example 13-13. PP4E\Internet\Ftp\Mirror\uploadflat_modular.py
#!/bin/env python
"""
##############################################################################
use FTP to upload all files from a local dir to a remote site/directory;
this version reuses downloader's functions, to avoid code redundancy;
##############################################################################
"""
import os
from downloadflat_modular import configTransfer, connectFtp, isTextKind
def cleanRemotes(cf, connection):
"""
try to delete all remote files first to remove garbage
"""
if cf.cleanall:
for remotename in connection.nlst(): # remote dir listing
try: # remote file delete
print('deleting remote', remotename) # skips . and .. exc
connection.delete(remotename)
except:
print('cannot delete remote', remotename)
def uploadAll(cf, connection):
"""
upload all files to remote site/dir per cf config
listdir() strips dir path, any failure ends script
"""
localfiles = os.listdir(cf.localdir) # listdir is local listing
for localname in localfiles:
localpath = os.path.join(cf.localdir, localname)
print('uploading', localpath, 'to', localname, 'as', end=' ')
if isTextKind(localname):
# use text mode xfer
localfile = open(localpath, 'rb')
connection.storlines('STOR ' + localname, localfile)
else:
# use binary mode xfer
localfile = open(localpath, 'rb')
connection.storbinary('STOR ' + localname, localfile)
localfile.close()
connection.quit()
print('Done:', len(localfiles), 'files uploaded.')
if __name__ == '__main__':
cf = configTransfer(site='learning-python.com', rdir='books', user='lutz')
Transferring Directories with ftplib | 887

conn = connectFtp(cf)
cleanRemotes(cf, conn)
uploadAll(cf, conn)
Not only is the upload script simpler now because it reuses common code, but it will
also inherit any changes made in the download module. For instance, the isTextKind
function was later augmented with code that adds the .pyw extension to mimetypes
tables (this file type is not recognized by default); because it is a shared function, the
change is automatically picked up in the upload program, too.
This script and the one it imports achieve the same goals as the originals, but changing
them for easier code maintenance is a big deal in the real world of software development.
The following, for example, downloads the site from one server and uploads to another:
C:\...\PP4E\Internet\Ftp\Mirror> python downloadflat_modular.py test
Clean target directory first?
Password for lutz on home.rmi.net:
connecting...
downloading 2004-longmont-classes.html to test\2004-longmont-classes.html as text
...lines omitted...
downloading relo-feb010-index.html to test\relo-feb010-index.html as text
Done: 297 files downloaded.
C:\...\PP4E\Internet\Ftp\Mirror> python uploadflat_modular.py test
Clean target directory first?
Password for lutz on learning-python.com:
connecting...
uploading test\2004-longmont-classes.html to 2004-longmont-classes.html as text
...lines omitted...
uploading test\zopeoutline.htm to zopeoutline.htm as text
Done: 297 files uploaded.
Refactoring with classes
The function-based approach of the last two examples addresses the redundancy issue,
but they are perhaps clumsier than they need to be. For instance, their cf configuration
options object provides a namespace that replaces global variables and breaks cross-
file dependencies. Once we start making objects to model namespaces, though, Py-
thon’s OOP support tends to be a more natural structure for our code. As one last twist,
Example 13-14 refactors the FTP code one more time in order to leverage Python’s class
feature.
Example 13-14. PP4E\Internet\Ftp\Mirror\ftptools.py
#!/bin/env python
"""
##############################################################################
use FTP to download or upload all files in a single directory from/to a
remote site and directory; this version has been refactored to use classes
and OOP for namespace and a natural structure; we could also structure this
as a download superclass, and an upload subclass which redefines the clean
and transfer methods, but then there is no easy way for another client to
888 | Chapter 13: Client-Side Scripting

invoke both an upload and download; for the uploadall variant and possibly
others, also make single file upload/download code in orig loops methods;
##############################################################################
"""
import os, sys, ftplib
from getpass import getpass
from mimetypes import guess_type, add_type
# defaults for all clients
dfltSite = 'home.rmi.net'
dfltRdir = '.'
dfltUser = 'lutz'
class FtpTools:
# allow these 3 to be redefined
def getlocaldir(self):
return (len(sys.argv) > 1 and sys.argv[1]) or '.'
def getcleanall(self):
return input('Clean target dir first?')[:1] in ['y','Y']
def getpassword(self):
return getpass(
'Password for %s on %s:' % (self.remoteuser, self.remotesite))
def configTransfer(self, site=dfltSite, rdir=dfltRdir, user=dfltUser):
"""
get upload or download parameters
from module defaults, args, inputs, cmdline
anonymous ftp: user='anonymous' pass=emailaddr
"""
self.nonpassive = False # passive FTP on by default in 2.1+
self.remotesite = site # transfer to/from this site
self.remotedir = rdir # and this dir ('.' means acct root)
self.remoteuser = user
self.localdir = self.getlocaldir()
self.cleanall = self.getcleanall()
self.remotepass = self.getpassword()
def isTextKind(self, remotename, trace=True):
"""
use mimetypes to guess if filename means text or binary
for 'f.html, guess is ('text/html', None): text
for 'f.jpeg' guess is ('image/jpeg', None): binary
for 'f.txt.gz' guess is ('text/plain', 'gzip'): binary
for unknowns, guess may be (None, None): binary
mimetypes can also guess name from type: see PyMailGUI
"""
add_type('text/x-python-win', '.pyw') # not in tables
mimetype, encoding = guess_type(remotename, strict=False)# allow extras
mimetype = mimetype or '?/?' # type unknown?
maintype = mimetype.split('/')[0] # get 1st part
if trace: print(maintype, encoding or '')
Transferring Directories with ftplib | 889

return maintype == 'text' and encoding == None # not compressed
def connectFtp(self):
print('connecting...')
connection = ftplib.FTP(self.remotesite) # connect to FTP site
connection.login(self.remoteuser, self.remotepass) # log in as user/pswd
connection.cwd(self.remotedir) # cd to dir to xfer
if self.nonpassive: # force active mode
connection.set_pasv(False) # most do passive
self.connection = connection
def cleanLocals(self):
"""
try to delete all local files first to remove garbage
"""
if self.cleanall:
for localname in os.listdir(self.localdir): # local dirlisting
try: # local file delete
print('deleting local', localname)
os.remove(os.path.join(self.localdir, localname))
except:
print('cannot delete local', localname)
def cleanRemotes(self):
"""
try to delete all remote files first to remove garbage
"""
if self.cleanall:
for remotename in self.connection.nlst(): # remote dir listing
try: # remote file delete
print('deleting remote', remotename)
self.connection.delete(remotename)
except:
print('cannot delete remote', remotename)
def downloadOne(self, remotename, localpath):
"""
download one file by FTP in text or binary mode
local name need not be same as remote name
"""
if self.isTextKind(remotename):
localfile = open(localpath, 'w', encoding=self.connection.encoding)
def callback(line): localfile.write(line + '\n')
self.connection.retrlines('RETR ' + remotename, callback)
else:
localfile = open(localpath, 'wb')
self.connection.retrbinary('RETR ' + remotename, localfile.write)
localfile.close()
def uploadOne(self, localname, localpath, remotename):
"""
upload one file by FTP in text or binary mode
remote name need not be same as local name
"""
if self.isTextKind(localname):
890 | Chapter 13: Client-Side Scripting

localfile = open(localpath, 'rb')
self.connection.storlines('STOR ' + remotename, localfile)
else:
localfile = open(localpath, 'rb')
self.connection.storbinary('STOR ' + remotename, localfile)
localfile.close()
def downloadDir(self):
"""
download all files from remote site/dir per config
ftp nlst() gives files list, dir() gives full details
"""
remotefiles = self.connection.nlst() # nlst is remote listing
for remotename in remotefiles:
if remotename in ('.', '..'): continue
localpath = os.path.join(self.localdir, remotename)
print('downloading', remotename, 'to', localpath, 'as', end=' ')
self.downloadOne(remotename, localpath)
print('Done:', len(remotefiles), 'files downloaded.')
def uploadDir(self):
"""
upload all files to remote site/dir per config
listdir() strips dir path, any failure ends script
"""
localfiles = os.listdir(self.localdir) # listdir is local listing
for localname in localfiles:
localpath = os.path.join(self.localdir, localname)
print('uploading', localpath, 'to', localname, 'as', end=' ')
self.uploadOne(localname, localpath, localname)
print('Done:', len(localfiles), 'files uploaded.')
def run(self, cleanTarget=lambda:None, transferAct=lambda:None):
"""
run a complete FTP session
default clean and transfer are no-ops
don't delete if can't connect to server
"""
self.connectFtp()
cleanTarget()
transferAct()
self.connection.quit()
if __name__ == '__main__':
ftp = FtpTools()
xfermode = 'download'
if len(sys.argv) > 1:
xfermode = sys.argv.pop(1) # get+del 2nd arg
if xfermode == 'download':
ftp.configTransfer()
ftp.run(cleanTarget=ftp.cleanLocals, transferAct=ftp.downloadDir)
elif xfermode == 'upload':
ftp.configTransfer(site='learning-python.com', rdir='books', user='lutz')
ftp.run(cleanTarget=ftp.cleanRemotes, transferAct=ftp.uploadDir)
Transferring Directories with ftplib | 891

else:
print('Usage: ftptools.py ["download" | "upload"] [localdir]')
In fact, this last mutation combines uploads and downloads into a single file, because
they are so closely related. As before, common code is factored into methods to avoid
redundancy. New here, the instance object itself becomes a natural namespace for
storing configuration options (they become self attributes). Study this example’s code
for more details of the restructuring applied.
Again, this revision runs the same as our original site download and upload scripts; see
its self-test code at the end for usage details, and pass in a command-line argument to
specify “download” or “upload.” We haven’t changed what it does, we’ve refactored
it for maintainability and reuse:
C:\...\PP4E\Internet\Ftp\Mirror> ftptools.py download test
Clean target dir first?
Password for lutz on home.rmi.net:
connecting...
downloading 2004-longmont-classes.html to test\2004-longmont-classes.html as text
...lines omitted...
downloading relo-feb010-index.html to test\relo-feb010-index.html as text
Done: 297 files downloaded.
C:\...\PP4E\Internet\Ftp\Mirror> ftptools.py upload test
Clean target dir first?
Password for lutz on learning-python.com:
connecting...
uploading test\2004-longmont-classes.html to 2004-longmont-classes.html as text
...lines omitted...
uploading test\zopeoutline.htm to zopeoutline.htm as text
Done: 297 files uploaded.
Although this file can still be run as a command-line script like this, its class is really
now a package of FTP tools that can be mixed into other programs and reused. By
wrapping its code in a class, it can be easily customized by redefining its methods—its
configuration calls, such as getlocaldir, for example, may be redefined in subclasses
for custom scenarios.
Perhaps most importantly, using classes optimizes code reusability. Clients of this file
can both upload and download directories by simply subclassing or embedding an
instance of this class and calling its methods. To see one example of how, let’s move
on to the next section.
Transferring Directory Trees with ftplib
Perhaps the biggest limitation of the website download and upload scripts we just met
is that they assume the site directory is flat (hence their names). That is, the preceding
scripts transfer simple files only, and none of them handle nested subdirectories within
the web directory to be transferred.
892 | Chapter 13: Client-Side Scripting

For my purposes, that’s often a reasonable constraint. I avoid nested subdirectories to
keep things simple, and I store my book support home website as a simple directory of
files. For other sites, though, including one I keep at another machine, site transfer
scripts are easier to use if they also automatically transfer subdirectories along the way.
Uploading Local Trees
It turns out that supporting directories on uploads is fairly simple—we need to add
only a bit of recursion and remote directory creation calls. The upload script in Exam-
ple 13-15 extends the class-based version we just saw in Example 13-14, to handle
uploading all subdirectories nested within the transferred directory. Furthermore, it
recursively transfers subdirectories within subdirectories—the entire directory tree
contained within the top-level transfer directory is uploaded to the target directory at
the remote server.
In terms of its code structure, Example 13-15 is just a customization of the FtpTools
class of the prior section—really, we’re just adding a method for recursive uploads, by
subclassing. As one consequence, we get tools such as parameter configuration, content
type testing, and connection and upload code for free here; with OOP, some of the
work is done before we start.
Example 13-15. PP4E\Internet\Ftp\Mirror\uploadall.py
#!/bin/env python
"""
############################################################################
extend the FtpTools class to upload all files and subdirectories from a
local dir tree to a remote site/dir; supports nested dirs too, but not
the cleanall option (that requires parsing FTP listings to detect remote
dirs: see cleanall.py); to upload subdirectories, uses os.path.isdir(path)
to see if a local file is really a directory, FTP().mkd(path) to make dirs
on the remote machine (wrapped in a try in case it already exists there),
and recursion to upload all files/dirs inside the nested subdirectory.
############################################################################
"""
import os, ftptools
class UploadAll(ftptools.FtpTools):
"""
upload an entire tree of subdirectories
assumes top remote directory exists
"""
def __init__(self):
self.fcount = self.dcount = 0
def getcleanall(self):
return False # don't even ask
def uploadDir(self, localdir):
"""
Transferring Directory Trees with ftplib | 893

for each directory in an entire tree
upload simple files, recur into subdirectories
"""
localfiles = os.listdir(localdir)
for localname in localfiles:
localpath = os.path.join(localdir, localname)
print('uploading', localpath, 'to', localname, end=' ')
if not os.path.isdir(localpath):
self.uploadOne(localname, localpath, localname)
self.fcount += 1
else:
try:
self.connection.mkd(localname)
print('directory created')
except:
print('directory not created')
self.connection.cwd(localname) # change remote dir
self.uploadDir(localpath) # upload local subdir
self.connection.cwd('..') # change back up
self.dcount += 1
print('directory exited')
if __name__ == '__main__':
ftp = UploadAll()
ftp.configTransfer(site='learning-python.com', rdir='training', user='lutz')
ftp.run(transferAct = lambda: ftp.uploadDir(ftp.localdir))
print('Done:', ftp.fcount, 'files and', ftp.dcount, 'directories uploaded.')
Like the flat upload script, this one can be run on any machine with Python and sockets
and upload to any machine running an FTP server; I run it both on my laptop PC and
on other servers by Telnet or SSH to upload sites to my ISP.
The crux of the matter in this script is the os.path.isdir test near the top; if this test
detects a directory in the current local directory, we create an identically named direc-
tory on the remote machine with connection.mkd and descend into it with
connection.cwd, and recur into the subdirectory on the local machine (we have to use
recursive calls here, because the shape and depth of the tree are arbitrary). Like all FTP
object methods, mkd and cwd methods issue FTP commands to the remote server. When
we exit a local subdirectory, we run a remote cwd('..') to climb to the remote parent
directory and continue; the recursive call level’s return restores the prior directory on
the local machine. The rest of the script is roughly the same as the original.
In the interest of space, I’ll leave studying this variant in more depth as a suggested
exercise. For more context, try changing this script so as not to assume that the top-
level remote directory already exists. As usual in software, there are a variety of imple-
mentation and operation options here.
Here is the sort of output displayed on the console when the upload-all script is run,
uploading a site with multiple subdirectory levels which I maintain with site builder
tools. It’s similar to the flat upload (which you might expect, given that it is reusing
894 | Chapter 13: Client-Side Scripting

much of the same code by inheritance), but notice that it traverses and uploads nested
subdirectories along the way:
C:\...\PP4E\Internet\Ftp\Mirror> uploadall.py Website-Training
Password for lutz on learning-python.com:
connecting...
uploading Website-Training\2009-public-classes.htm to 2009-public-classes.htm text
uploading Website-Training\2010-public-classes.html to 2010-public-classes.html text
uploading Website-Training\about.html to about.html text
uploading Website-Training\books to books directory created
uploading Website-Training\books\index.htm to index.htm text
uploading Website-Training\books\index.html to index.html text
uploading Website-Training\books\_vti_cnf to _vti_cnf directory created
uploading Website-Training\books\_vti_cnf\index.htm to index.htm text
uploading Website-Training\books\_vti_cnf\index.html to index.html text
directory exited
directory exited
uploading Website-Training\calendar.html to calendar.html text
uploading Website-Training\contacts.html to contacts.html text
uploading Website-Training\estes-nov06.htm to estes-nov06.htm text
uploading Website-Training\formalbio.html to formalbio.html text
uploading Website-Training\fulloutline.html to fulloutline.html text
...lines omitted...
uploading Website-Training\_vti_pvt\writeto.cnf to writeto.cnf ?
uploading Website-Training\_vti_pvt\_vti_cnf to _vti_cnf directory created
uploading Website-Training\_vti_pvt\_vti_cnf\_x_todo.htm to _x_todo.htm text
uploading Website-Training\_vti_pvt\_vti_cnf\_x_todoh.htm to _x_todoh.htm text
directory exited
uploading Website-Training\_vti_pvt\_x_todo.htm to _x_todo.htm text
uploading Website-Training\_vti_pvt\_x_todoh.htm to _x_todoh.htm text
directory exited
Done: 366 files and 18 directories uploaded.
As is, the script of Example 13-15 handles only directory tree uploads; recursive uploads
are generally more useful than recursive downloads if you maintain your websites on
your local PC and upload to a server periodically, as I do. To also download (mirror) a
website that has subdirectories, a script must parse the output of a remote listing com-
mand to detect remote directories. For the same reason, the recursive upload script was
not coded to support the remote directory tree cleanup option of the original—such a
feature would require parsing remote listings as well. The next section shows how.
Deleting Remote Trees
One last example of code reuse at work: when I initially tested the prior section’s
upload-all script, it contained a bug that caused it to fall into an infinite recursion loop,
and keep copying the full site into new subdirectories, over and over, until the FTP
server kicked me off (not an intended feature of the program!). In fact, the upload got
13 levels deep before being killed by the server; it effectively locked my site until the
mess could be repaired.
Transferring Directory Trees with ftplib | 895

To get rid of all the files accidentally uploaded, I quickly wrote the script in Exam-
ple 13-16 in emergency (really, panic) mode; it deletes all files and nested subdirectories
in an entire remote tree. Luckily, this was very easy to do given all the reuse that
Example 13-16 inherits from the FtpTools superclass. Here, we just have to define the
extension for recursive remote deletions. Even in tactical mode like this, OOP can be
a decided advantage.
Example 13-16. PP4E\Internet\Ftp\Mirror\cleanall.py
#!/bin/env python
"""
##############################################################################
extend the FtpTools class to delete files and subdirectories from a remote
directory tree; supports nested directories too; depends on the dir()
command output format, which may vary on some servers! - see Python's
Tools\Scripts\ftpmirror.py for hints; extend me for remote tree downloads;
##############################################################################
"""
from ftptools import FtpTools
class CleanAll(FtpTools):
"""
delete an entire remote tree of subdirectories
"""
def __init__(self):
self.fcount = self.dcount = 0
def getlocaldir(self):
return None # irrelevent here
def getcleanall(self):
return True # implied here
def cleanDir(self):
"""
for each item in current remote directory,
del simple files, recur into and then del subdirectories
the dir() ftp call passes each line to a func or method
"""
lines = [] # each level has own lines
self.connection.dir(lines.append) # list current remote dir
for line in lines:
parsed = line.split() # split on whitespace
permiss = parsed[0] # assume 'drw... ... filename'
fname = parsed[-1]
if fname in ('.', '..'): # some include cwd and parent
continue
elif permiss[0] != 'd': # simple file: delete
print('file', fname)
self.connection.delete(fname)
self.fcount += 1
else: # directory: recur, del
print('directory', fname)
896 | Chapter 13: Client-Side Scripting

self.connection.cwd(fname) # chdir into remote dir
self.cleanDir() # clean subdirectory
self.connection.cwd('..') # chdir remote back up
self.connection.rmd(fname) # delete empty remote dir
self.dcount += 1
print('directory exited')
if __name__ == '__main__':
ftp = CleanAll()
ftp.configTransfer(site='learning-python.com', rdir='training', user='lutz')
ftp.run(cleanTarget=ftp.cleanDir)
print('Done:', ftp.fcount, 'files and', ftp.dcount, 'directories cleaned.')
Besides again being recursive in order to handle arbitrarily shaped trees, the main trick
employed here is to parse the output of a remote directory listing. The FTP nlst call
used earlier gives us a simple list of filenames; here, we use dir to also get file detail
lines like these:
C:\...\PP4E\Internet\Ftp> ftp learning-python.com
ftp> cd training
ftp> dir
drwxr-xr-x 11 5693094 450 4096 May 4 11:06 .
drwx---r-x 19 5693094 450 8192 May 4 10:59 ..
-rw----r-- 1 5693094 450 15825 May 4 11:02 2009-public-classes.htm
-rw----r-- 1 5693094 450 18084 May 4 11:02 2010-public-classes.html
drwx---r-x 3 5693094 450 4096 May 4 11:02 books
-rw----r-- 1 5693094 450 3783 May 4 11:02 calendar-save-aug09.html
-rw----r-- 1 5693094 450 3923 May 4 11:02 calendar.html
drwx---r-x 2 5693094 450 4096 May 4 11:02 images
-rw----r-- 1 5693094 450 6143 May 4 11:02 index.html
...lines omitted...
This output format is potentially server-specific, so check this on your own server before
relying on this script. For this Unix ISP, if the first character of the first item on the line
is character “d”, the filename at the end of the line names a remote directory. To parse,
the script simply splits on whitespace to extract parts of a line.
Notice how this script, like others before it, must skip the symbolic “.” and “..” current
and parent directory names in listings to work properly for this server. Oddly this can
vary per server as well; one of the servers I used for this book’s examples, for instance,
does not include these special names in listings. We can verify by running ftplib at the
interactive prompt, as though it were a portable FTP client interface:
C:\...\PP4E\Internet\Ftp> python
>>> from ftplib import FTP
>>> f = FTP('ftp.rmi.net')
>>> f.login('lutz', 'xxxxxxxx') # output lines omitted
>>> for x in f.nlst()[:3]: print(x) # no . or .. in listings
...
2004-longmont-classes.html
2005-longmont-classes.html
2006-longmont-classes.html
>>> L = []
Transferring Directory Trees with ftplib | 897

>>> f.dir(L.append) # ditto for detailed list
>>> for x in L[:3]: print(x)
...
-rw-r--r-- 1 ftp ftp 8173 Mar 19 2006 2004-longmont-classes.html
-rw-r--r-- 1 ftp ftp 9739 Mar 19 2006 2005-longmont-classes.html
-rw-r--r-- 1 ftp ftp 805 Jul 8 2006 2006-longmont-classes.html
On the other hand, the server I’m using in this section does include the special dot
names; to be robust, our scripts must skip over these names in remote directory listings
just in case they’re run against a server that includes them (here, the test is required to
avoid falling into an infinite recursive loop!). We don’t need to care about local directory
listings because Python’s os.listdir never includes “.” or “..” in its result, but things
are not quite so consistent in the “Wild West” that is the Internet today:
>>> f = FTP('learning-python.com')
>>> f.login('lutz', 'xxxxxxxx') # output lines omitted
>>> for x in f.nlst()[:5]: print(x) # includes . and .. here
...
.
..
.hcc.thumbs
2009-public-classes.htm
2010-public-classes.html
>>> L = []
>>> f.dir(L.append) # ditto for detailed list
>>> for x in L[:5]: print(x)
...
drwx---r-x 19 5693094 450 8192 May 4 10:59 .
drwx---r-x 19 5693094 450 8192 May 4 10:59 ..
drwx------ 2 5693094 450 4096 Feb 18 05:38 .hcc.thumbs
-rw----r-- 1 5693094 450 15824 May 1 14:39 2009-public-classes.htm
-rw----r-- 1 5693094 450 18083 May 4 09:05 2010-public-classes.html
The output of our clean-all script in action follows; it shows up in the system console
window where the script is run. You might be able to achieve the same effect with a
“rm –rf” Unix shell command in a SSH or Telnet window on some servers, but the
Python script runs on the client and requires no other remote access than basic FTP on
the client:
C:\PP4E\Internet\Ftp\Mirror> cleanall.py
Password for lutz on learning-python.com:
connecting...
file 2009-public-classes.htm
file 2010-public-classes.html
file Learning-Python-interview.doc
file Python-registration-form-010.pdf
file PythonPoweredSmall.gif
directory _derived
file 2009-public-classes.htm_cmp_DeepBlue100_vbtn.gif
file 2009-public-classes.htm_cmp_DeepBlue100_vbtn_p.gif
file 2010-public-classes.html_cmp_DeepBlue100_vbtn_p.gif
file 2010-public-classes.html_cmp_deepblue100_vbtn.gif
directory _vti_cnf
898 | Chapter 13: Client-Side Scripting

file 2009-public-classes.htm_cmp_DeepBlue100_vbtn.gif
file 2009-public-classes.htm_cmp_DeepBlue100_vbtn_p.gif
file 2010-public-classes.html_cmp_DeepBlue100_vbtn_p.gif
file 2010-public-classes.html_cmp_deepblue100_vbtn.gif
directory exited
directory exited
...lines omitted...
file priorclients.html
file public_classes.htm
file python_conf_ora.gif
file topics.html
Done: 366 files and 18 directories cleaned.
Downloading Remote Trees
It is possible to extend this remote tree-cleaner to also download a remote tree with
subdirectories: rather than deleting, as you walk the remote tree simply create a local
directory to match a remote one, and download nondirectory files. We’ll leave this final
step as a suggested exercise, though, partly because its dependence on the format pro-
duced by server directory listings makes it complex to be robust and partly because this
use case is less common for me—in practice, I am more likely to maintain a site on my
PC and upload to the server than to download a tree.
If you do wish to experiment with a recursive download, though, be sure to consult the
script Tools\Scripts\ftpmirror.py in Python’s install or source tree for hints. That script
attempts to download a remote directory tree by FTP, and allows for various directory
listing formats which we’ll skip here in the interest of space. For our purposes, it’s time
to move on to the next protocol on our tour—Internet email.
Processing Internet Email
Some of the other most common, higher-level Internet protocols have to do with read-
ing and sending email messages: POP and IMAP for fetching email from servers, SMTP
for sending new messages, and other formalisms such as RFC822 for specifying email
message content and format. You don’t normally need to know about such acronyms
when using common email tools, but internally, programs like Microsoft Outlook and
webmail systems generally talk to POP and SMTP servers to do your bidding.
Like FTP, email ultimately consists of formatted commands and byte streams shipped
over sockets and ports (port 110 for POP; 25 for SMTP). Regardless of the nature of its
content and attachments, an email message is little more than a string of bytes sent and
received through sockets. But also like FTP, Python has standard library modules to
simplify all aspects of email processing:
Processing Internet Email | 899

•poplib and imaplib for fetching email
•smtplib for sending email
• The email module package for parsing email and constructing email
These modules are related: for nontrivial messages, we typically use email to parse mail
text which has been fetched with poplib and use email to compose mail text to be sent
with smtplib. The email package also handles tasks such as address parsing, date and
time formatting, attachment formatting and extraction, and encoding and decoding of
email content (e,g, uuencode, Base64). Additional modules handle more specific tasks
(e.g., mimetypes to map filenames to and from content types).
In the next few sections, we explore the POP and SMTP interfaces for fetching and
sending email from and to servers, and the email package interfaces for parsing and
composing email message text. Other email interfaces in Python are analogous and are
documented in the Python library reference manual.§
Unicode in Python 3.X and Email Tools
In the prior sections of this chapter, we studied how Unicode encodings can impact
scripts using Python’s ftplib FTP tools in some depth, because it illustrates the impli-
cations of Python 3.X’s Unicode string model for real-world programming. In short:
• All binary mode transfers should open local output and input files in binary mode
(modes wb and rb).
• Text-mode downloads should open local output files in text mode with explicit
encoding names (mode w, with an encoding argument that defaults to latin1 within
ftplib itself).
• Text-mode uploads should open local input files in binary mode (mode rb).
The prior sections describe why these rules are in force. The last two points here differ
for scripts written originally for Python 2.X. As you might expect, given that the un-
derlying sockets transfer byte strings today, the email story is somewhat convoluted for
Unicode in Python 3.X as well. As a brief preview:
Fetching
The poplib module returns fetched email text in bytes string form. Command text
sent to the server is encoded per UTF8 internally, but replies are returned as raw
binary bytes and not decoded into str text.
§ IMAP, or Internet Message Access Protocol, was designed as an alternative to POP, but it is still not as widely
available today, and so it is not presented in this text. For instance, major commercial providers used for this
book’s examples provide only POP (or web-based) access to email. See the Python library manual for IMAP
server interface details. Python used to have a RFC822 module as well, but it’s been subsumed by the
email package in 3.X.
900 | Chapter 13: Client-Side Scripting

Sending
The smtplib module accepts email content to send as str strings. Internally, mes-
sage text passed in str form is encoded to binary bytes for transmission using the
ascii encoding scheme. Passing an already encoded bytes string to the send call
may allow more explicit control.
Composing
The email package produces Unicode str strings containing plain text when gen-
erating full email text for sending with smtplib and accepts optional encoding
specifications for messages and their parts, which it applies according to email
standard rules. Message headers may also be encoded per email, MIME, and Uni-
code conventions.
Parsing
The email package in 3.1 currently requires raw email byte strings of the type
fetched with poplib to be decoded into Unicode str strings as appropriate before
it can be passed in to be parsed into a message object. This pre-parse decoding
might be done by a default, user preference, mail headers inspection, or intelligent
guess. Because this requirement raises difficult issues for package clients, it may be
dropped in a future version of email and Python.
Navigating
The email package returns most message components as str strings, though parts
content decoded by Base64 and other email encoding schemes may be returned as
bytes strings, parts fetched without such decoding may be str or bytes, and some
str string parts are internally encoded to bytes with scheme raw-unicode-escape
before processing. Message headers may be decoded by the package on request as
well.
If you’re migrating email scripts (or your mindset) from 2.X, you’ll need to treat email
text fetched from a server as byte strings, and encode it before passing it along for
parsing; scripts that send or compose email are generally unaffected (and this may be
the majority of Python email-aware scripts), though content may have to be treated
specially if it may be returned as byte strings.
This is the story in Python 3.1, which is of course prone to change over time. We’ll see
how these email constraints translate into code as we move along in this section. Suffice
it to say, the text on the Internet is not as simple as it used to be, though it probably
shouldn’t have been anyhow.
POP: Fetching Email
I confess: up until just before 2000, I took a lowest-common-denominator approach
to email. I preferred to check my messages by Telnetting to my ISP and using a simple
command-line email interface. Of course, that’s not ideal for mail with attachments,
pictures, and the like, but its portability was staggering—because Telnet runs on almost
POP: Fetching Email | 901

any machine with a network link, I was able to check my mail quickly and easily from
anywhere on the planet. Given that I make my living traveling around the world teach-
ing Python classes, this wild accessibility was a big win.
As with website maintenance, times have changed on this front. Somewhere along the
way, most ISPs began offering web-based email access with similar portability and
dropped Telnet altogether. When my ISP took away Telnet access, however, they also
took away one of my main email access methods. Luckily, Python came to the rescue
again—by writing email access scripts in Python, I could still read and send email from
any machine in the world that has Python and an Internet connection. Python can be
as portable a solution as Telnet, but much more powerful.
Moreover, I can still use these scripts as an alternative to tools suggested by the ISP.
Besides my not being fond of delegating control to commercial products of large com-
panies, closed email tools impose choices on users that are not always ideal and may
sometimes fail altogether. In many ways, the motivation for coding Python email scripts
is the same as it was for the larger GUIs in Chapter 11: the scriptability of Python
programs can be a decided advantage.
For example, Microsoft Outlook historically and by default has preferred to download
mail to your PC and delete it from the mail server as soon as you access it. This keeps
your email box small (and your ISP happy), but it isn’t exactly friendly to people who
travel and use multiple machines along the way—once accessed, you cannot get to a
prior email from any machine except the one to which it was initially downloaded.
Worse, the web-based email interfaces offered by my ISPs have at times gone offline
completely, leaving me cut off from email (and usually at the worst possible time).
The next two scripts represent one first-cut solution to such portability and reliability
constraints (we’ll see others in this and later chapters). The first, popmail.py, is a simple
mail reader tool, which downloads and prints the contents of each email in an email
account. This script is admittedly primitive, but it lets you read your email on any
machine with Python and sockets; moreover, it leaves your email intact on the server,
and isn’t susceptible to webmail outages. The second, smtpmail.py, is a one-shot script
for writing and sending a new email message that is as portable as Python itself.
Later in this chapter, we’ll implement an interactive console-based email client (py-
mail), and later in this book we’ll code a full-blown GUI email tool (PyMailGUI) and
a web-based email program of our own (PyMailCGI). For now, we’ll start with the
basics.
Mail Configuration Module
Before we get to the scripts, let’s first take a look at a common module they import and
use. The module in Example 13-17 is used to configure email parameters appropriately
for a particular user. It’s simply a collection of assignments to variables used by mail
programs that appear in this book; each major mail client has its own version, to allow
902 | Chapter 13: Client-Side Scripting

content to vary. Isolating these configuration settings in this single module makes it
easy to configure the book’s email programs for a particular user, without having to
edit actual program logic code.
If you want to use any of this book’s email programs to do mail processing of your own,
be sure to change its assignments to reflect your servers, account usernames, and so on
(as shown, they refer to email accounts used for developing this book). Not all scripts
use all of these settings; we’ll revisit this module in later examples to explain more of
them.
Note that some ISPs may require that you be connected directly to their systems in
order to use their SMTP servers to send mail. For example, when connected directly
by dial-up in the past, I could use my ISP’s server directly, but when connected via
broadband, I had to route requests through a cable Internet provider. You may need
to adjust these settings to match your configuration; see your ISP to obtain the required
POP and SMTP servers. Also, some SMTP servers check domain name validity in ad-
dresses, and may require an authenticating login step—see the SMTP section later in
this chapter for interface details.
Example 13-17. PP4E\Internet\Email\mailconfig.py
"""
user configuration settings for various email programs (pymail/mailtools version);
email scripts get their server names and other email config options from this
module: change me to reflect your server names and mail preferences;
"""
#------------------------------------------------------------------------------
# (required for load, delete: all) POP3 email server machine, user
#------------------------------------------------------------------------------
popservername = 'pop.secureserver.net'
popusername = 'PP4E@learning-python.com'
#------------------------------------------------------------------------------
# (required for send: all) SMTP email server machine name
# see Python smtpd module for a SMTP server class to run locally;
#------------------------------------------------------------------------------
smtpservername = 'smtpout.secureserver.net'
#------------------------------------------------------------------------------
# (optional: all) personal information used by clients to fill in mail if set;
# signature -- can be a triple-quoted block, ignored if empty string;
# address -- used for initial value of "From" field if not empty,
# no longer tries to guess From for replies: this had varying success;
#------------------------------------------------------------------------------
myaddress = 'PP4E@learning-python.com'
mysignature = ('Thanks,\n'
'--Mark Lutz (http://learning-python.com, http://rmi.net/~lutz)')
POP: Fetching Email | 903

#------------------------------------------------------------------------------
# (optional: mailtools) may be required for send; SMTP user/password if
# authenticated; set user to None or '' if no login/authentication is
# required; set pswd to name of a file holding your SMTP password, or
# an empty string to force programs to ask (in a console, or GUI);
#------------------------------------------------------------------------------
smtpuser = None # per your ISP
smtppasswdfile = '' # set to '' to be asked
#------------------------------------------------------------------------------
# (optional: mailtools) name of local one-line text file with your pop
# password; if empty or file cannot be read, pswd is requested when first
# connecting; pswd not encrypted: leave this empty on shared machines;
#------------------------------------------------------------------------------
poppasswdfile = r'c:\temp\pymailgui.txt' # set to '' to be asked
#------------------------------------------------------------------------------
# (required: mailtools) local file where sent messages are saved by some clients;
#------------------------------------------------------------------------------
sentmailfile = r'.\sentmail.txt' # . means in current working dir
#------------------------------------------------------------------------------
# (required: pymail, pymail2) local file where pymail saves pop mail on request;
#------------------------------------------------------------------------------
savemailfile = r'c:\temp\savemail.txt' # not used in PyMailGUI: dialog
#------------------------------------------------------------------------------
# (required: pymail, mailtools) fetchEncoding is the Unicode encoding used to
# decode fetched full message bytes, and to encode and decode message text if
# stored in text-mode save files; see Chapter 13 for details: this is a limited
# and temporary approach to Unicode encodings until a new bytes-friendly email
# package is developed; headersEncodeTo is for sent headers: see chapter13;
#------------------------------------------------------------------------------
fetchEncoding = 'utf8' # 4E: how to decode and store message text (or latin1?)
headersEncodeTo = None # 4E: how to encode non-ASCII headers sent (None=utf8)
#------------------------------------------------------------------------------
# (optional: mailtools) the maximum number of mail headers or messages to
# download on each load request; given this setting N, mailtools fetches at
# most N of the most recently arrived mails; older mails outside this set are
# not fetched from the server, but are returned as empty/dummy emails; if this
# is assigned to None (or 0), loads will have no such limit; use this if you
# have very many mails in your inbox, and your Internet or mail server speed
# makes full loads too slow to be practical; some clients also load only
# newly-arrived emails, but this setting is independent of that feature;
#------------------------------------------------------------------------------
fetchlimit = 25 # 4E: maximum number headers/emails to fetch on loads
904 | Chapter 13: Client-Side Scripting

POP Mail Reader Script
On to reading email in Python: the script in Example 13-18 employs Python’s standard
poplib module, an implementation of the client-side interface to POP—the Post Office
Protocol. POP is a well-defined and widely available way to fetch email from servers
over sockets. This script connects to a POP server to implement a simple yet portable
email download and display tool.
Example 13-18. PP4E\Internet\Email\popmail.py
#!/usr/local/bin/python
"""
##############################################################################
use the Python POP3 mail interface module to view your POP email account
messages; this is just a simple listing--see pymail.py for a client with
more user interaction features, and smtpmail.py for a script which sends
mail; POP is used to retrieve mail, and runs on a socket using port number
110 on the server machine, but Python's poplib hides all protocol details;
to send mail, use the smtplib module (or os.popen('mail...')). see also:
imaplib module for IMAP alternative, PyMailGUI/PyMailCGI for more features;
##############################################################################
"""
import poplib, getpass, sys, mailconfig
mailserver = mailconfig.popservername # ex: 'pop.rmi.net'
mailuser = mailconfig.popusername # ex: 'lutz'
mailpasswd = getpass.getpass('Password for %s?' % mailserver)
print('Connecting...')
server = poplib.POP3(mailserver)
server.user(mailuser) # connect, log in to mail server
server.pass_(mailpasswd) # pass is a reserved word
try:
print(server.getwelcome()) # print returned greeting message
msgCount, msgBytes = server.stat()
print('There are', msgCount, 'mail messages in', msgBytes, 'bytes')
print(server.list())
print('-' * 80)
input('[Press Enter key]')
for i in range(msgCount):
hdr, message, octets = server.retr(i+1) # octets is byte count
for line in message: print(line.decode()) # retrieve, print all mail
print('-' * 80) # mail text is bytes in 3.x
if i < msgCount - 1:
input('[Press Enter key]') # mail box locked till quit
finally: # make sure we unlock mbox
server.quit() # else locked till timeout
print('Bye.')
POP: Fetching Email | 905

Though primitive, this script illustrates the basics of reading email in Python. To es-
tablish a connection to an email server, we start by making an instance of the pop
lib.POP3 object, passing in the email server machine’s name as a string:
server = poplib.POP3(mailserver)
If this call doesn’t raise an exception, we’re connected (by socket) to the POP server
listening on POP port number 110 at the machine where our email account lives.
The next thing we need to do before fetching messages is tell the server our username
and password; notice that the password method is called pass_. Without the trailing
underscore, pass would name a reserved word and trigger a syntax error:
server.user(mailuser) # connect, log in to mail server
server.pass_(mailpasswd) # pass is a reserved word
To keep things simple and relatively secure, this script always asks for the account
password interactively; the getpass module we met in the FTP section of this chapter
is used to input but not display a password string typed by the user.
Once we’ve told the server our username and password, we’re free to fetch mailbox
information with the stat method (number messages, total bytes among all messages)
and fetch the full text of a particular message with the retr method (pass the message
number—they start at 1). The full text includes all headers, followed by a blank line,
followed by the mail’s text and any attached parts. The retr call sends back a tuple that
includes a list of line strings representing the content of the mail:
msgCount, msgBytes = server.stat()
hdr, message, octets = server.retr(i+1) # octets is byte count
We close the email server connection by calling the POP object’s quit method:
server.quit() # else locked till timeout
Notice that this call appears inside the finally clause of a try statement that wraps the
bulk of the script. To minimize complications associated with changes, POP servers
lock your email inbox between the time you first connect and the time you close your
connection (or until an arbitrary, system-defined timeout expires). Because the POP
quit method also unlocks the mailbox, it’s crucial that we do this before exiting,
whether an exception is raised during email processing or not. By wrapping the action
in a try/finally statement, we guarantee that the script calls quit on exit to unlock the
mailbox to make it accessible to other processes (e.g., delivery of incoming email).
Fetching Messages
Here is the popmail script of Example 13-18 in action, displaying two messages in my
account’s mailbox on machine pop.secureserver.net—the domain name of the mail
server machine used by the ISP hosting my learning-python.com domain name, as
configured in the module mailconfig. To keep this output reasonably sized, I’ve omitted
or truncated a few irrelevant message header lines here, including most of the
906 | Chapter 13: Client-Side Scripting

Received: headers that chronicle an email’s journey; run this on your own to see all the
gory details of raw email text:
C:\...\PP4E\Internet\Email> popmail.py
Password for pop.secureserver.net?
Connecting...
b'+OK <1314.1273085900@p3pop01-02.prod.phx3.gdg>'
There are 2 mail messages in 3268 bytes
(b'+OK ', [b'1 1860', b'2 1408'], 16)
--------------------------------------------------------------------------------
[Press Enter key]
Received: (qmail 7690 invoked from network); 5 May 2010 15:29:43 −0000
X-IronPort-Anti-Spam-Result: AskCAG4r4UvRVllAlGdsb2JhbACDF44FjCkVAQEBAQkLCAkRAx+
Received: from 72.236.109.185 by webmail.earthlink.net with HTTP; Wed, 5 May 201
Message-ID: <27293081.1273073376592.JavaMail.root@mswamui-thinleaf.atl.sa.earthl
Date: Wed, 5 May 2010 11:29:36 −0400 (EDT)
From: lutz@rmi.net
Reply-To: lutz@rmi.net
To: pp4e@learning-python.com
Subject: I'm a Lumberjack, and I'm Okay
Mime-Version: 1.0
Content-Type: text/plain; charset=UTF-8
Content-Transfer-Encoding: 7bit
X-Mailer: EarthLink Zoo Mail 1.0
X-ELNK-Trace: 309f369105a89a174e761f5d55cab8bca866e5da7af650083cf64d888edc8b5a35
X-Originating-IP: 209.86.224.51
X-Nonspam: None
I cut down trees, I skip and jump,
I like to press wild flowers...
--------------------------------------------------------------------------------
[Press Enter key]
Received: (qmail 17482 invoked from network); 5 May 2010 15:33:47 −0000
X-IronPort-Anti-Spam-Result: AlIBAIss4UthSoc7mWdsb2JhbACDF44FjD4BAQEBAQYNCgcRIq1
Received: (qmail 4009 invoked by uid 99); 5 May 2010 15:33:47 −0000
Content-Transfer-Encoding: quoted-printable
Content-Type: text/plain; charset="utf-8"
X-Originating-IP: 72.236.109.185
User-Agent: Web-Based Email 5.2.13
Message-Id: <20100505083347.deec9532fd532622acfef00cad639f45.0371a89d29.wbe@emai
From: lutz@learning-python.com
To: PP4E@learning-python.com
Cc: lutz@learning-python.com
Subject: testing
Date: Wed, 05 May 2010 08:33:47 −0700
Mime-Version: 1.0
X-Nonspam: None
Testing Python mail tools.
--------------------------------------------------------------------------------
Bye.
POP: Fetching Email | 907

This user interface is about as simple as it could be—after connecting to the server, it
prints the complete and raw full text of one message at a time, pausing between each
until you press the Enter key. The input built-in is called to wait for the key press
between message displays. The pause keeps messages from scrolling off the screen too
fast; to make them visually distinct, emails are also separated by lines of dashes.
We could make the display fancier (e.g., we can use the email p a c k a g e t o p a r s e h e a d e r s ,
bodies, and attachments—watch for examples in this and later chapters), but here we
simply display the whole message that was sent. This works well for simple mails like
these two, but it can be inconvenient for larger messages with attachments; we’ll im-
prove on this in later clients.
This book won’t cover the full of set of headers that may appear in emails, but we’ll
make use of some along the way. For example, the X-Mailer header line, if present,
typically identifies the sending program; we’ll use it later to identify Python-coded email
senders we write. The more common headers such as From a n d Subject a r e m o r e c r u c i a l
to a message. In fact, a variety of extra header lines can be sent in a message’s text. The
Received headers, for example, trace the machines that a message passed through on
its way to the target mailbox.
Because popmail prints the entire raw text of a message, you see all headers here, but
you usually see only a few by default in end-user-oriented mail GUIs such as Outlook
and webmail pages. The raw text here also makes apparent the email structure we noted
earlier: an email in general consists of a set of headers like those here, followed by a
blank line, which is followed by the mail’s main text, though as we’ll see later, they can
be more complex if there are alternative parts or attachments.
The script in Example 13-18 never deletes mail from the server. Mail is simply retrieved
and printed and will be shown again the next time you run the script (barring deletion
in another tool, of course). To really remove mail permanently, we need to call other
methods (e.g., server.dele(msgnum)), but such a capability is best deferred until we
develop more interactive mail tools.
Notice how the reader script decodes each mail content line with line.decode into a
str string for display; as mentioned earlier, poplib returns content as bytes strings in
3.X. In fact, if we change the script to not decode, this becomes more obvious in its
output:
[Press Enter key]
...assorted lines omitted...
b'Date: Wed, 5 May 2010 11:29:36 −0400 (EDT)'
b'From: lutz@rmi.net'
b'Reply-To: lutz@rmi.net'
b'To: pp4e@learning-python.com'
b"Subject: I'm a Lumberjack, and I'm Okay"
b'Mime-Version: 1.0'
b'Content-Type: text/plain; charset=UTF-8'
b'Content-Transfer-Encoding: 7bit'
b'X-Mailer: EarthLink Zoo Mail 1.0'
908 | Chapter 13: Client-Side Scripting

b''
b'I cut down trees, I skip and jump,'
b'I like to press wild flowers...'
b''
As we’ll see later, we’ll need to decode similarly in order to parse this text with email
tools. The next section exposes the bytes-based interface as well.
Fetching Email at the Interactive Prompt
If you don’t mind typing code and reading POP server messages, it’s possible to use the
Python interactive prompt as a simple email client, too. The following session uses two
additional interfaces we’ll apply in later examples:
conn.list()
Returns a list of “message-number message-size” strings.
conn.top( N , 0)
Retrieves just the header text portion of message number N.
The top call also returns a tuple that includes the list of line strings sent back; its second
argument tells the server how many additional lines after the headers to send, if any. If
all you need are header details, top can be much quicker than the full text fetch of
retr, provided your mail server implements the TOP command (most do):
C:\...\PP4E\Internet\Email> python
>>> from poplib import POP3
>>> conn = POP3('pop.secureserver.net') # connect to server
>>> conn.user('PP4E@learning-python.com') # log in to account
b'+OK '
>>> conn.pass_('xxxxxxxx')
b'+OK '
>>> conn.stat() # num mails, num bytes
(2, 3268)
>>> conn.list()
(b'+OK ', [b'1 1860', b'2 1408'], 16)
>>> conn.top(1, 0)
(b'+OK 1860 octets ', [b'Received: (qmail 7690 invoked from network); 5 May 2010
...lines omitted...
b'X-Originating-IP: 209.86.224.51', b'X-Nonspam: None', b'', b''], 1827)
>>> conn.retr(1)
(b'+OK 1860 octets ', [b'Received: (qmail 7690 invoked from network); 5 May 2010
...lines omitted...
b'X-Originating-IP: 209.86.224.51', b'X-Nonspam: None', b'',
b'I cut down trees, I skip and jump,', b'I like to press wild flowers...',
b'', b''], 1898)
>>> conn.quit()
b'+OK '
POP: Fetching Email | 909

Printing the full text of a message at the interactive prompt is easy once it’s fetched:
simply decode each line to a normal string as it is printed, like our pop mail script did,
or concatenate the line strings returned by retr or top adding a newline between; any
of the following will suffice for an open POP server object:
>>> info, msg, oct = connection.retr(1) # fetch first email in mailbox
>>> for x in msg: print(x.decode()) # four ways to display message lines
>>> print(b'\n'.join(msg).decode())
>>> x = [print(x.decode()) for x in msg]
>>> x = list(map(print, map(bytes.decode, msg)))
Parsing email text to extract headers and components is more complex, especially for
mails with attached and possibly encoded parts, such as images. As we’ll see later in
this chapter, the standard library’s email package can parse the mail’s full or headers
text after it has been fetched with poplib (or imaplib).
See the Python library manual for details on other POP module tools. As of Python 2.4,
there is also a POP3_SSL class in the poplib module that connects to the server over an
SSL-encrypted socket on port 995 by default (the standard port for POP over SSL). It
provides an identical interface, but it uses secure sockets for the conversation where
supported by servers.
SMTP: Sending Email
There is a proverb in hackerdom that states that every useful computer program even-
tually grows complex enough to send email. Whether such wisdom rings true or not
in practice, the ability to automatically initiate email from within a program is a pow-
erful tool.
For instance, test systems can automatically email failure reports, user interface pro-
grams can ship purchase orders to suppliers by email, and so on. Moreover, a portable
Python mail script could be used to send messages from any computer in the world
with Python and an Internet connection that supports standard email protocols. Free-
dom from dependence on mail programs like Outlook is an attractive feature if you
happen to make your living traveling around teaching Python on all sorts of computers.
Luckily, sending email from within a Python script is just as easy as reading it. In fact,
there are at least four ways to do so:
Calling os.popen to launch a command-line mail program
On some systems, you can send email from a script with a call of the form:
os.popen('mail -s "xxx" a@b.c', 'w').write(text)
As we saw earlier in the book, the popen tool runs the command-line string passed
to its first argument, and returns a file-like object connected to it. If we use an open
mode of w, we are connected to the command’s standard input stream—here, we
write the text of the new mail message to the standard Unix mail command-line
910 | Chapter 13: Client-Side Scripting

program. The net effect is as if we had run mail interactively, but it happens inside
a running Python script.
Running the sendmail program
The open source sendmail program offers another way to initiate mail from a pro-
gram. Assuming it is installed and configured on your system, you can launch it
using Python tools like the os.popen call of the previous paragraph.
Using the standard smtplib Python module
Python’s standard library comes with support for the client-side interface to
SMTP—the Simple Mail Transfer Protocol—a higher-level Internet standard for
sending mail over sockets. Like the poplib module we met in the previous section,
smtplib hides all the socket and protocol details and can be used to send mail on
any machine with Python and a suitable socket-based Internet link.
Fetching and using third-party packages and tools
Other tools in the open source library provide higher-level mail handling packages
for Python; most build upon one of the prior three techniques.
Of these four options, smtplib is by far the most portable and direct. Using os.popen
to spawn a mail program usually works on Unix-like platforms only, not on Windows
(it assumes a command-line mail program), and requires spawning one or more pro-
cesses along the way. And although the sendmail program is powerful, it is also some-
what Unix-biased, complex, and may not be installed even on all Unix-like machines.
By contrast, the smtplib module works on any machine that has Python and an Internet
link that supports SMTP access, including Unix, Linux, Mac, and Windows. It sends
mail over sockets in-process, instead of starting other programs to do the work. More-
over, SMTP affords us much control over the formatting and routing of email.
SMTP Mail Sender Script
Since SMTP is arguably the best option for sending mail from a Python script, let’s
explore a simple mailing program that illustrates its interfaces. The Python script shown
in Example 13-19 is intended to be used from an interactive command line; it reads a
new mail message from the user and sends the new mail by SMTP using Python’s
smtplib module.
Example 13-19. PP4E\Internet\Email\smtpmail.py
#!/usr/local/bin/python
"""
###########################################################################
use the Python SMTP mail interface module to send email messages; this
is just a simple one-shot send script--see pymail, PyMailGUI, and
PyMailCGI for clients with more user interaction features; also see
popmail.py for a script that retrieves mail, and the mailtools pkg
for attachments and formatting with the standard library email package;
###########################################################################
"""
SMTP: Sending Email | 911

import smtplib, sys, email.utils, mailconfig
mailserver = mailconfig.smtpservername # ex: smtp.rmi.net
From = input('From? ').strip() # or import from mailconfig
To = input('To? ').strip() # ex: python-list@python.org
Tos = To.split(';') # allow a list of recipients
Subj = input('Subj? ').strip()
Date = email.utils.formatdate() # curr datetime, rfc2822
# standard headers, followed by blank line, followed by text
text = ('From: %s\nTo: %s\nDate: %s\nSubject: %s\n\n' % (From, To, Date, Subj))
print('Type message text, end with line=[Ctrl+d (Unix), Ctrl+z (Windows)]')
while True:
line = sys.stdin.readline()
if not line:
break # exit on ctrl-d/z
#if line[:4] == 'From':
# line = '>' + line # servers may escape
text += line
print('Connecting...')
server = smtplib.SMTP(mailserver) # connect, no log-in step
failed = server.sendmail(From, Tos, text)
server.quit()
if failed: # smtplib may raise exceptions
print('Failed recipients:', failed) # too, but let them pass here
else:
print('No errors.')
print('Bye.')
Most of this script is user interface—it inputs the sender’s address (From), one or more
recipient addresses (To, separated by “;” if more than one), and a subject line. The
sending date is picked up from Python’s standard time module, standard header lines
are formatted, and the while loop reads message lines until the user types the end-of-
file character (Ctrl-Z on Windows, Ctrl-D on Linux).
To be robust, be sure to add a blank line between the header lines and the body in the
message’s text; it’s required by the SMTP protocol and some SMTP servers enforce
this. Our script conforms by inserting an empty line with \n\n at the end of the string
format expression—one \n to terminate the current line and another for a blank line;
smtplib expands \n to Internet-style \r\n internally prior to transmission, so the short
form is fine here. Later in this chapter, we’ll format our messages with the Python
email package, which handles such details for us automatically.
The rest of the script is where all the SMTP magic occurs: to send a mail by SMTP,
simply run these two sorts of calls:
server = smtplib.SMTP(mailserver)
Make an instance of the SMTP object, passing in the name of the SMTP server that
will dispatch the message first. If this doesn’t throw an exception, you’re connected
912 | Chapter 13: Client-Side Scripting

to the SMTP server via a socket when the call returns. Technically, the connect
method establishes connection to a server, but the SMTP object calls this method
automatically if the mail server name is passed in this way.
failed = server.sendmail(From, Tos, text)
Call the SMTP object’s sendmail method, passing in the sender address, one or
more recipient addresses, and the raw text of the message itself with as many
standard mail header lines as you care to provide.
When you’re done, be sure to call the object’s quit method to disconnect from the
server and finalize the transaction. Notice that, on failure, the sendmail method may
either raise an exception or return a list of the recipient addresses that failed; the script
handles the latter case itself but lets exceptions kill the script with a Python error
message.
Subtly, calling the server object’s quit method after sendmail raises an exception may
or may not work as expected—quit can actually hang until a server timeout if the send
fails internally and leaves the interface in an unexpected state. For instance, this can
occur on Unicode encoding errors when translating the outgoing mail to bytes per the
ASCII scheme (the rset reset request hangs in this case, too). An alternative close
method simply closes the client’s sockets without attempting to send a quit command
to the server; quit calls close internally as a last step (assuming the quit command can
be sent!).
For advanced usage, SMTP objects provide additional calls not used in this example:
•server.login(user, password) provides an interface to SMTP servers that require
and support authentication; watch for this call to appear as an option in the mail
tools package example later in this chapter.
•server.starttls([keyfile[, certfile]]) puts the SMTP connection in Transport
Layer Security (TLS) mode; all commands will be encrypted using the Python
ssl module’s socket wrapper SSL support, and they assume the server supports
this mode.
See the Python library manual for more on these and other calls not covered here.
Sending Messages
Let’s ship a few messages across the world. The smtpmail script is a one-shot tool: each
run allows you to send a single new mail message. Like most of the client-side tools in
this chapter, it can be run from any computer with Python and an Internet link that
supports SMTP (most do, though some public access machines may restrict users to
HTTP [Web] access only or require special server SMTP configuration). Here it is run-
ning on Windows:
C:\...\PP4E\Internet\Email> smtpmail.py
From? Eric.the.Half.a.Bee@yahoo.com
To? PP4E@learning-python.com
SMTP: Sending Email | 913

Subj? A B C D E F G
Type message text, end with line=[Ctrl+d (Unix), Ctrl+z (Windows)]
Fiddle de dum, Fiddle de dee,
Eric the half a bee.
^Z
Connecting...
No errors.
Bye.
This mail is sent to the book’s email account address (PP4E@learning-python.com), so
it ultimately shows up in the inbox at my ISP, but only after being routed through an
arbitrary number of machines on the Net, and across arbitrarily distant network links.
It’s complex at the bottom, but usually, the Internet “just works.”
Notice the From address, though—it’s completely fictitious (as far as I know, at least).
It turns out that we can usually provide any From address we like because SMTP doesn’t
check its validity (only its general format is checked). Furthermore, unlike POP, there
is usually no notion of a username or password in SMTP, so the sender is more difficult
to determine. We need only pass email to any machine with a server listening on the
SMTP port, and we don’t need an account or login on that machine. Here,
the name Eric.the.Half.a.Bee@yahoo.com works just fine as the sender;
Marketing.Geek.From.Hell@spam.com might work just as well.
In fact, I didn’t import a From email address from the mailconfig.py module on purpose,
because I wanted to be able to demonstrate this behavior; it’s the basis of some of those
annoying junk emails that show up in your mailbox without a real sender’s address.‖
Marketers infected with e-millionaire mania will email advertising to all addresses on
a list without providing a real From address, to cover their tracks.
Normally, of course, you should use the same To address in the message and the SMTP
call and provide your real email address as the From value (that’s the only way people
will be able to reply to your message). Moreover, apart from teasing your significant
other, sending phony addresses is often just plain bad Internet citizenship. Let’s run
the script again to ship off another mail with more politically correct coordinates:
C:\...\PP4E\Internet\Email> smtpmail.py
From? PP4E@learning-python.com
To? PP4E@learning-python.com
Subj? testing smtpmail
Type message text, end with line=[Ctrl+d (Unix), Ctrl+z (Windows)]
Lovely Spam! Wonderful Spam!
^Z
Connecting...
No errors.
Bye.
‖We all know by now that such junk mail is usually referred to as spam, but not everyone knows that this
name is a reference to a Monty Python skit in which a restaurant’s customers find it difficult to hear the
reading of menu options over a group of Vikings singing an increasingly loud chorus of “spam, spam, spam…”.
Hence the tie-in to junk email. Spam is used in Python program examples as a sort of generic variable name,
though it also pays homage to the skit.
914 | Chapter 13: Client-Side Scripting

Verifying receipt
At this point, we could run whatever email tool we normally use to access our mailbox
to verify the results of these two send operations; the two new emails should show up
in our mailbox regardless of which mail client is used to view them. Since we’ve already
written a Python script for reading mail, though, let’s put it to use as a verification
tool—running the popmail script from the last section reveals our two new messages at
the end of the mail list (again parts of the output have been trimmed to conserve space
and protect the innocent here):
C:\...\PP4E\Internet\Email> popmail.py
Password for pop.secureserver.net?
Connecting...
b'+OK <29464.1273155506@pop08.mesa1.secureserver.net>'
There are 4 mail messages in 5326 bytes
(b'+OK ', [b'1 1860', b'2 1408', b'3 1049', b'4 1009'], 32)
--------------------------------------------------------------------------------
[Press Enter key]
...first two mails omitted...
Received: (qmail 25683 invoked from network); 6 May 2010 14:12:07 −0000
Received: from unknown (HELO p3pismtp01-018.prod.phx3.secureserver.net) ([10.6.1
(envelope-sender <Eric.the.Half.a.Bee@yahoo.com>)
by p3plsmtp06-04.prod.phx3.secureserver.net (qmail-1.03) with SMTP
for <PP4E@learning-python.com>; 6 May 2010 14:12:07 −0000
...more deleted...
Received: from [66.194.109.3] by smtp.mailmt.com (ArGoSoft Mail Server .NET v.1.
for <PP4E@learning-python.com>; Thu, 06 May 2010 10:12:12 −0400
From: Eric.the.Half.a.Bee@yahoo.com
To: PP4E@learning-python.com
Date: Thu, 06 May 2010 14:11:07 −0000
Subject: A B C D E F G
Message-ID: <jdlohzf0j8dp8z4x06052010101212@SMTP>
X-FromIP: 66.194.109.3
X-Nonspam: None
Fiddle de dum, Fiddle de dee,
Eric the half a bee.
--------------------------------------------------------------------------------
[Press Enter key]
Received: (qmail 4634 invoked from network); 6 May 2010 14:16:57 −0000
Received: from unknown (HELO p3pismtp01-025.prod.phx3.secureserver.net) ([10.6.1
(envelope-sender <PP4E@learning-python.com>)
by p3plsmtp06-05.prod.phx3.secureserver.net (qmail-1.03) with SMTP
for <PP4E@learning-python.com>; 6 May 2010 14:16:57 −0000
...more deleted...
Received: from [66.194.109.3] by smtp.mailmt.com (ArGoSoft Mail Server .NET v.1.
for <PP4E@learning-python.com>; Thu, 06 May 2010 10:17:03 −0400
From: PP4E@learning-python.com
To: PP4E@learning-python.com
Date: Thu, 06 May 2010 14:16:31 −0000
SMTP: Sending Email | 915

Subject: testing smtpmail
Message-ID: <8fad1n462667fik006052010101703@SMTP>
X-FromIP: 66.194.109.3
X-Nonspam: None
Lovely Spam! Wonderful Spam!
--------------------------------------------------------------------------------
Bye.
Notice how the fields we input to our script show up as headers and text in the email’s
raw text delivered to the recipient. Technically, some ISPs test to make sure that at least
the domain of the email sender’s address (the part after “@”) is a real, valid domain
name, and disallow delivery if not. As mentioned earlier, some servers also require that
SMTP senders have a direct connection to their network and may require an authen-
tication call with username and password (described near the end of the preceding
section). In the second edition of the book, I used an ISP that let me get away with more
nonsense, but this may vary per server; the rules have tightened since then to limit spam.
Manipulating both From and To
The first mail listed at the end of the preceding section was the one we sent with a
fictitious sender address; the second was the more legitimate message. Like sender
addresses, header lines are a bit arbitrary under SMTP. Our smtpmail script automati-
cally adds From and To header lines in the message’s text with the same addresses that
are passed to the SMTP interface, but only as a polite convention. Sometimes, though,
you can’t tell who a mail was sent to, either—to obscure the target audience or to
support legitimate email lists, senders may manipulate the contents of both these head-
ers in the message’s text.
For example, if we change smtpmail to not automatically generate a “To:” header line
with the same address(es) sent to the SMTP interface call:
text = ('From: %s\nDate: %s\nSubject: %s\n' % (From, Date, Subj))
we can then manually type a “To:” header that differs from the address we’re really
sending to—the “To” address list passed into the smtplib send call gives the true re-
cipients, but the “To:” header line in the text of the message is what most mail clients
will display (see smtpmail-noTo.py in the examples package for the code needed to
support such anonymous behavior, and be sure to type a blank line after “To:”):
C:\...\PP4E\Internet\Email> smtpmail-noTo.py
From? Eric.the.Half.a.Bee@aol.com
To? PP4E@learning-python.com
Subj? a b c d e f g
Type message text, end with line=(ctrl + D or Z)
To: nobody.in.particular@marketing.com
Spam; Spam and eggs; Spam, spam, and spam.
^Z
916 | Chapter 13: Client-Side Scripting
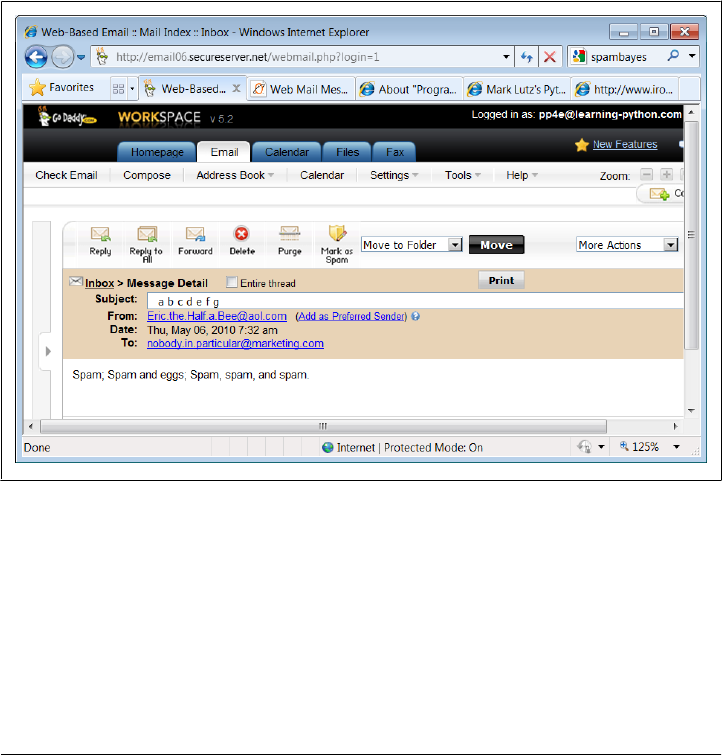
Connecting...
No errors.
Bye.
In some ways, the From and To addresses in send method calls and message header
lines are similar to addresses on envelopes and letters in envelopes, respectively. The
former is used for routing, but the latter is what the reader sees. Here, From is fictitious
in both places. Moreover, I gave the real To address for the account on the server, but
then gave a fictitious name in the manually typed “To:” header line—the first address
is where it really goes and the second appears in mail clients. If your mail tool picks out
the “To:” line, such mails will look odd when viewed.
For instance, when the mail we just sent shows up in my mailbox at learning-
python.com, it’s difficult to tell much about its origin or destination in the webmail
interface my ISP provides, as captured in Figure 13-5.
Figure 13-5. Anonymous mail in a web-mail client (see also ahead: PyMailGUI)
Furthermore, this email’s raw text won’t help unless we look closely at the “Received:”
headers added by the machines it has been routed through:
C:\...\PP4E\Internet\Email> popmail.py
Password for pop.secureserver.net?
Connecting...
b'+OK <4802.1273156821@p3plpop03-03.prod.phx3.secureserver.net>'
There are 5 mail messages in 6364 bytes
(b'+OK ', [b'1 1860', b'2 1408', b'3 1049', b'4 1009', b'5 1038'], 40)
SMTP: Sending Email | 917

--------------------------------------------------------------------------------
[Press Enter key]
...first three mails omitted...
Received: (qmail 30325 invoked from network); 6 May 2010 14:33:45 −0000
Received: from unknown (HELO p3pismtp01-004.prod.phx3.secureserver.net) ([10.6.1
(envelope-sender <Eric.the.Half.a.Bee@aol.com>)
by p3plsmtp06-03.prod.phx3.secureserver.net (qmail-1.03) with SMTP
for <PP4E@learning-python.com>; 6 May 2010 14:33:45 −0000
...more deleted...
Received: from [66.194.109.3] by smtp.mailmt.com (ArGoSoft Mail Server .NET v.1.
for <PP4E@learning-python.com>; Thu, 06 May 2010 10:33:16 −0400
From: Eric.the.Half.a.Bee@aol.com
Date: Thu, 06 May 2010 14:32:32 −0000
Subject: a b c d e f g
To: nobody.in.particular@marketing.com
Message-ID: <66koqg66e0q1c8hl06052010103316@SMTP>
X-FromIP: 66.194.109.3
X-Nonspam: None
Spam; Spam and eggs; Spam, spam, and spam.
--------------------------------------------------------------------------------
Bye.
Once again, though, don’t do this unless you have good cause. This demonstration is
intended only to help you understand how mail headers factor into email processing.
To write an automatic spam filter that deletes incoming junk mail, for instance, you
need to know some of the telltale signs to look for in a message’s text. Spamming
techniques have grown much more sophisticated than simply forging sender and re-
cipient names, of course (you’ll find much more on the subject on the Web at large and
in the SpamBayes mail filter written in Python), but it’s one common trick.
On the other hand, such To address juggling may also be useful in the context of le-
gitimate mailing lists—the name of the list appears in the “To:” header when the mes-
sage is viewed, not the potentially many individual recipients named in the send-mail
call. As the next section’s example demonstrates, a mail client can simply send a mail
to all on the list but insert the general list name in the “To:” header.
But in other contexts, sending email with bogus “From:” and “To:” lines is equivalent
to making anonymous phone calls. Most mailers won’t even let you change the From
line, and they don’t distinguish between the To address and header line. When you
program mail scripts of your own, though, SMTP is wide open in this regard. So be
good out there, OK?
918 | Chapter 13: Client-Side Scripting

Does Anybody Really Know What Time It Is?
In the prior version of the smtpmail script of Example 13-19, a simple date format was
used for the Date email header that didn’t quite follow the SMTP date formatting
standard:
>>> import time
>>> time.asctime()
'Wed May 05 17:52:05 2010'
Most servers don’t care and will let any sort of date text appear in date header lines, or
even add one if needed. Clients are often similarly forgiving, but not always; one of my
ISP webmail programs shows dates correctly anyhow, but another leaves such ill-
formed dates blank in mail displays. If you want to be more in line with the standard,
you could format the date header with code like this (the result can be parsed with
standard tools such as the time.strptime call):
import time
gmt = time.gmtime(time.time())
fmt = '%a, %d %b %Y %H:%M:%S GMT'
str = time.strftime(fmt, gmt)
hdr = 'Date: ' + str
print(hdr)
The hdr variable’s value looks like this when this code is run:
Date: Wed, 05 May 2010 21:49:32 GMT
The time.strftime call allows arbitrary date and time formatting; time.asctime is just
one standard format. Better yet, do what smtpmail does now—in the newer email pack-
age (described in this chapter), an email.utils call can be used to properly format date
and time automatically. The smtpmail script uses the first of the following format
alternatives:
>>> import email.utils
>>> email.utils.formatdate()
'Wed, 05 May 2010 21:54:28 −0000'
>>> email.utils.formatdate(localtime=True)
'Wed, 05 May 2010 17:54:52 −0400'
>>> email.utils.formatdate(usegmt=True)
'Wed, 05 May 2010 21:55:22 GMT'
See the pymail and mailtools examples in this chapter for additional usage examples;
the latter is reused by the larger PyMailGUI and PyMailCGI email clients later in this
book.
Sending Email at the Interactive Prompt
So where are we in the Internet abstraction model now? With all this email fetching
and sending going on, it’s easy to lose the forest for the trees. Keep in mind that because
mail is transferred over sockets (remember sockets?), they are at the root of all this
activity. All email read and written ultimately consists of formatted bytes shipped over
SMTP: Sending Email | 919

sockets between computers on the Net. As we’ve seen, though, the POP and SMTP
interfaces in Python hide all the details. Moreover, the scripts we’ve begun writing even
hide the Python interfaces and provide higher-level interactive tools.
Both the popmail and smtpmail scripts provide portable email tools but aren’t quite what
we’d expect in terms of usability these days. Later in this chapter, we’ll use what we’ve
seen thus far to implement a more interactive, console-based mail tool. In the next
chapter, we’ll also code a tkinter email GUI, and then we’ll go on to build a web-based
interface in a later chapter. All of these tools, though, vary primarily in terms of user
interface only; each ultimately employs the Python mail transfer modules we’ve met
here to transfer mail message text over the Internet with sockets.
Before we move on, one more SMTP note: just as for reading mail, we can use the
Python interactive prompt as our email sending client, too, if we type calls manually.
The following, for example, sends a message through my ISP’s SMTP server to two
recipient addresses assumed to be part of a mail list:
C:\...\PP4E\Internet\Email> python
>>> from smtplib import SMTP
>>> conn = SMTP('smtpout.secureserver.net')
>>> conn.sendmail(
... 'PP4E@learning-python.com', # true sender
... ['lutz@rmi.net', 'PP4E@learning-python.com'], # true recipients
... """From: PP4E@learning-python.com
... To: maillist
... Subject: test interactive smtplib
...
... testing 1 2 3...
... """)
{}
>>> conn.quit() # quit() required, Date added
(221, b'Closing connection. Good bye.')
We’ll verify receipt of this message in a later email client program; the “To” recipient
shows up as “maillist” in email clients—a completely valid use case for header manip-
ulation. In fact, you can achieve the same effect with the smtpmail-noTo script by sep-
arating recipient addresses at the “To?” prompt with a semicolon (e.g. lutz@rmi.net;
PP4E@learning-python.com) and typing the email list’s name in the “To:” header line.
Mail clients that support mailing lists automate such steps.
Sending mail interactively this way is a bit tricky to get right, though—header lines are
governed by standards: the blank line after the subject line is required and significant,
for instance, and Date is omitted altogether (one is added for us). Furthermore, mail
formatting gets much more complex as we start writing messages with attachments. In
practice, the email package in the standard library is generally used to construct emails,
before shipping them off with smtplib. The package lets us build mails by assigning
headers and attaching and possibly encoding parts, and creates a correctly formatted
mail text. To learn how, let’s move on to the next section.
920 | Chapter 13: Client-Side Scripting

email: Parsing and Composing Mail Content
The second edition of this book used a handful of standard library modules (rfc822,
StringIO, and more) to parse the contents of messages, and simple text processing to
compose them. Additionally, that edition included a section on extracting and decoding
attached parts of a message using modules such as mhlib, mimetools, and base64.
In the third edition, those tools were still available, but were, frankly, a bit clumsy and
error-prone. Parsing attachments from messages, for example, was tricky, and com-
posing even basic messages was tedious (in fact, an early printing of the prior edition
contained a potential bug, because it omitted one \n character in a string formatting
operation). Adding attachments to sent messages wasn’t even attempted, due to the
complexity of the formatting involved. Most of these tools are gone completely in Py-
thon 3.X as I write this fourth edition, partly because of their complexity, and partly
because they’ve been made obsolete.
Luckily, things are much simpler today. After the second edition, Python sprouted a
new email package—a powerful collection of tools that automate most of the work
behind parsing and composing email messages. This module gives us an object-based
message interface and handles all the textual message structure details, both analyzing
and creating it. Not only does this eliminate a whole class of potential bugs, it also
promotes more advanced mail processing.
Things like attachments, for instance, become accessible to mere mortals (and authors
with limited book real estate). In fact, an entire original section on manual attachment
parsing and decoding was deleted in the third edition—it’s essentially automatic with
email. The new package parses and constructs headers and attachments; generates
correct email text; decodes and encodes Base64, quoted-printable, and uuencoded
data; and much more.
We won’t cover the email package in its entirety in this book; it is well documented in
Python’s library manual. Our goal here is to explore some example usage code, which
you can study in conjunction with the manuals. But to help get you started, let’s begin
with a quick overview. In a nutshell, the email package is based around the Message
object it provides:
Parsing mail
A mail’s full text, fetched from poplib or imaplib, is parsed into a new Message
object, with an API for accessing its components. In the object, mail headers be-
come dictionary-like keys, and components become a “payload” that can be
walked with a generator interface (more on payloads in a moment).
Creating mail
New mails are composed by creating a new Message object, using an API to attach
headers and parts, and asking the object for its print representation—a correctly
formatted mail message text, ready to be passed to the smtplib module for delivery.
Headers are added by key assignment and attachments by method calls.
email: Parsing and Composing Mail Content | 921

In other words, the Message object is used both for accessing existing messages and for
creating new ones from scratch. In both cases, email can automatically handle details
like content encodings (e.g., attached binary images can be treated as text with Base64
encoding and decoding), content types, and more.
Message Objects
Since the email module’s Message object is at the heart of its API, you need a cursory
understanding of its form to get started. In short, it is designed to reflect the structure
of a formatted email message. Each Message consists of three main pieces of
information:
Type
A content type (plain text, HTML text, JPEG image, and so on), encoded as a
MIME main type and a subtype. For instance, “text/html” means the main type is
text and the subtype is HTML (a web page); “image/jpeg” means a JPEG photo.
A “multipart/mixed” type means there are nested parts within the message.
Headers
A dictionary-like mapping interface, with one key per mail header (From, To, and
so on). This interface supports almost all of the usual dictionary operations, and
headers may be fetched or set by normal key indexing.
Content
A “payload,” which represents the mail’s content. This can be either a string
(bytes or str) for simple messages, or a list of additional Message objects for
multipart container messages with attached or alternative parts. For some oddball
types, the payload may be a Python None object.
The MIME type of a Message is key to understanding its content. For example, mails
with attached images may have a main top-level Message (type multipart/mixed), with
three more Message objects in its payload—one for its main text (type text/plain),
followed by two of type image for the photos (type image/jpeg). The photo parts may
be encoded for transmission as text with Base64 or another scheme; the encoding type,
as well as the original image filename, are specified in the part’s headers.
Similarly, mails that include both simple text and an HTML alternative will have two
nested Message objects in their payload, of type plain text (text/plain) and HTML text
(text/html), along with a main root Message of type multipart/alternative. Your mail
client decides which part to display, often based on your preferences.
Simpler messages may have just a root Message of type text/plain or text/html, repre-
senting the entire message body. The payload for such mails is a simple string. They
may also have no explicitly given type at all, which generally defaults to text/plain.
Some single-part messages are text/html, with no text/plain alternative—they require
a web browser or other HTML viewer (or a very keen-eyed user).
922 | Chapter 13: Client-Side Scripting

Other combinations are possible, including some types that are not commonly seen in
practice, such as message/delivery status. Most messages have a main text part, though
it is not required, and may be nested in a multipart or other construct.
In all cases, an email message is a simple, linear string, but these message structures are
automatically detected when mail text is parsed and are created by your method calls
when new messages are composed. For instance, when creating messages, the message
attach method adds parts for multipart mails, and set_payload sets the entire payload
to a string for simple mails.
Message objects also have assorted properties (e.g., the filename of an attachment), and
they provide a convenient walk generator method, which returns the next Message in
the payload each time through in a for loop or other iteration context. Because the
walker yields the root Message object first (i.e., self), single-part messages don’t have
to be handled as a special case; a nonmultipart message is effectively a Message with a
single item in its payload—itself.
Ultimately, the Message object structure closely mirrors the way mails are formatted as
text. Special header lines in the mail’s text give its type (e.g., plain text or multipart),
as well as the separator used between the content of nested parts. Since the underlying
textual details are automated by the email package—both when parsing and when
composing—we won’t go into further formatting details here.
If you are interested in seeing how this translates to real emails, a great way to learn
mail structure is by inspecting the full raw text of messages displayed by email clients
you already use, as we’ll see with some we meet in this book. In fact, we’ve already seen
a few—see the raw text printed by our earlier POP email scripts for simple mail text
examples. For more on the Message object, and email in general, consult the email
package’s entry in Python’s library manual. We’re skipping details such as its available
encoders and MIME object classes here in the interest of space.
Beyond the email package, the Python library includes other tools for mail-related pro-
cessing. For instance, mimetypes maps a filename to and from a MIME type:
mimetypes.guess_type(filename)
Maps a filename to a MIME type. Name spam.txt maps to text/plan.
mimetypes.guess_extension(contype)
Maps a MIME type to a filename extension. Type text/html maps to .html.
We also used the mimetypes module earlier in this chapter to guess FTP transfer modes
from filenames (see Example 13-10), as well as in Chapter 6, where we used it to guess
a media player for a filename (see the examples there, including playfile.py, Exam-
ple 6-23). For email, these can come in handy when attaching files to a new message
(guess_type) and saving parsed attachments that do not provide a filename
(guess_extension). In fact, this module’s source code is a fairly complete reference to
MIME types. See the library manual for more on these tools.
email: Parsing and Composing Mail Content | 923

Basic email Package Interfaces in Action
Although we can’t provide an exhaustive reference here, let’s step through a simple
interactive session to illustrate the fundamentals of email processing. To compose the
full text of a message—to be delivered with smtplib, for instance—make a Message,
assign headers to its keys, and set its payload to the message body. Converting to a
string yields the mail text. This process is substantially simpler and less error-prone
than the manual text operations we used earlier in Example 13-19 to build mail as
strings:
>>> from email.message import Message
>>> m = Message()
>>> m['from'] = 'Jane Doe <jane@doe.com>'
>>> m['to'] = 'PP4E@learning-python.com'
>>> m.set_payload('The owls are not what they seem...')
>>>
>>> s = str(m)
>>> print(s)
from: Jane Doe <jane@doe.com>
to: PP4E@learning-python.com
The owls are not what they seem...
Parsing a message’s text—like the kind you obtain with poplib—is similarly simple,
and essentially the inverse: we get back a Message object from the text, with keys for
headers and a payload for the body:
>>> s # same as in prior interaction
'from: Jane Doe <jane@doe.com>\nto: PP4E@learning-python.com\n\nThe owls are not...'
>>> from email.parser import Parser
>>> x = Parser().parsestr(s)
>>> x
<email.message.Message object at 0x015EA9F0>
>>>
>>> x['From']
'Jane Doe <jane@doe.com>'
>>> x.get_payload()
'The owls are not what they seem...'
>>> x.items()
[('from', 'Jane Doe <jane@doe.com>'), ('to', 'PP4E@learning-python.com')]
So far this isn’t much different from the older and now-defunct rfc822 module, but as
we’ll see in a moment, things get more interesting when there is more than one part.
For simple messages like this one, the message walk generator treats it as a single-part
mail, of type plain text:
>>> for part in x.walk():
... print(x.get_content_type())
... print(x.get_payload())
...
text/plain
The owls are not what they seem...
924 | Chapter 13: Client-Side Scripting

Handling multipart messages
Making a mail with attachments is a little more work, but not much: we just make a
root Message and attach nested Message objects created from the MIME type object that
corresponds to the type of data we’re attaching. The MIMEText class, for instance, is a
subclass of Message, which is tailored for text parts, and knows how to generate the
right types of header information when printed. MIMEImage and MIMEAudio similarly cus-
tomize Message for images and audio, and also know how to apply Base64 and other
MIME encodings to binary data. The root message is where we store the main headers
of the mail, and we attach parts here, instead of setting the entire payload—the payload
is a list now, not a string. MIMEMultipart is a Message that provides the extra header
protocol we need for the root:
>>> from email.mime.multipart import MIMEMultipart # Message subclasses
>>> from email.mime.text import MIMEText # with extra headers+logic
>>>
>>> top = MIMEMultipart() # root Message object
>>> top['from'] = 'Art <arthur@camelot.org>' # subtype default=mixed
>>> top['to'] = 'PP4E@learning-python.com'
>>>
>>> sub1 = MIMEText('nice red uniforms...\n') # part Message attachments
>>> sub2 = MIMEText(open('data.txt').read())
>>> sub2.add_header('Content-Disposition', 'attachment', filename='data.txt')
>>> top.attach(sub1)
>>> top.attach(sub2)
When we ask for the text, a correctly formatted full mail text is returned, separators
and all, ready to be sent with smtplib—quite a trick, if you’ve ever tried this by hand:
>>> text = top.as_string() # or do: str(top) or print(top)
>>> print(text)
Content-Type: multipart/mixed; boundary="===============1574823535=="
MIME-Version: 1.0
from: Art <arthur@camelot.org>
to: PP4E@learning-python.com
--===============1574823535==
Content-Type: text/plain; charset="us-ascii"
MIME-Version: 1.0
Content-Transfer-Encoding: 7bit
nice red uniforms...
--===============1574823535==
Content-Type: text/plain; charset="us-ascii"
MIME-Version: 1.0
Content-Transfer-Encoding: 7bit
Content-Disposition: attachment; filename="data.txt"
line1
line2
line3
--===============1574823535==--
email: Parsing and Composing Mail Content | 925

If we are sent this message and retrieve it via poplib, parsing its full text yields a
Message object just like the one we built to send. The message walk generator allows us
to step through each part, fetching their types and payloads:
>>> text # same as in prior interaction
'Content-Type: multipart/mixed; boundary="===============1574823535=="\nMIME-Ver...'
>>> from email.parser import Parser
>>> msg = Parser().parsestr(text)
>>> msg['from']
'Art <arthur@camelot.org>'
>>> for part in msg.walk():
... print(part.get_content_type())
... print(part.get_payload())
... print()
...
multipart/mixed
[<email.message.Message object at 0x015EC610>,
<email.message.Message object at0x015EC630>]
text/plain
nice red uniforms...
text/plain
line1
line2
line3
Multipart alternative messages (with text and HTML renditions of the same message)
can be composed and parsed in similar fashion. Because email clients are able to parse
and compose messages with a simple object-based API, they are freed to focus on user-
interface instead of text processing.
Unicode, Internationalization, and the Python 3.1 email Package
Now that I’ve shown you how “cool” the email package is, I unfortunately need to let
you know that it’s not completely operational in Python 3.1. The email package works
as shown for simple messages, but is severely impacted by Python 3.X’s Unicode/bytes
string dichotomy in a number of ways.
In short, the email package in Python 3.1 is still somewhat coded to operate in the realm
of 2.X str text strings. Because these have become Unicode in 3.X, and because some
tools that email uses are now oriented toward bytes strings, which do not mix freely
with str, a variety of conflicts crop up and cause issues for programs that depend upon
this module.
At this writing, a new version of email is being developed which will handle bytes and
Unicode encodings better, but the going consensus is that it won’t be folded back into
Python until release 3.3 or later, long after this book’s release. Although a few patches
926 | Chapter 13: Client-Side Scripting

might make their way into 3.2, the current sense is that fully addressing the package’s
problems appears to require a full redesign.
To be fair, it’s a substantial problem. Email has historically been oriented toward single-
byte ASCII text, and generalizing it for Unicode is difficult to do well. In fact, the same
holds true for most of the Internet today—as discussed elsewhere in this chapter, FTP,
POP, SMTP, and even webpage bytes fetched over HTTP pose the same sorts of issues.
Interpreting the bytes shipped over networks as text is easy if the mapping is one-to-
one, but allowing for arbitrary Unicode encoding in that text opens a Pandora’s box of
dilemmas. The extra complexity is necessary today, but, as email attests, can be a
daunting task.
Frankly, I considered not releasing this edition of this book until this package’s issues
could be resolved, but I decided to go forward because a new email package may be
years away (two Python releases, by all accounts). Moreover, the issues serve as a case
study of the types of problems you’ll run into in the real world of large-scale software
development. Things change over time, and program code is no exception.
Instead, this book’s examples provide new Unicode and Internationalization support
but adopt policies to work around issues where possible. Programs in books are meant
to be educational, after all, not commercially viable. Given the state of the email package
that the examples depend on, though, the solutions used here might not be completely
universal, and there may be additional Unicode issues lurking. To address the future,
watch this book’s website (described in the Preface) for updated notes and code ex-
amples if/when the anticipated new email package appears. Here, we’ll work with what
we have.
The good news is that we’ll be able to make use of email in its current form to build
fairly sophisticated and full-featured email clients in this book anyhow. It still offers an
amazing number of tools, including MIME encoding and decoding, message formatting
and parsing, Internationalized headers extraction and construction, and more. The bad
news is that this will require a handful of obscure workarounds and may need to be
changed in the future, though few software projects are exempt from such realities.
Because email’s limitations have implications for later email code in this book, I’m
going to quickly run through them in this section. Some of this can be safely saved for
later reference, but parts of later examples may be difficult to understand if you don’t
have this background. The upside is that exploring the package’s limitations here also
serves as a vehicle for digging a bit deeper into the email package’s interfaces in general.
Parser decoding requirement
The first Unicode issue in Python3.1’s email package is nearly a showstopper in some
contexts: the bytes strings of the sort produced by poplib for mail fetches must be
decoded to str prior to parsing with email. Unfortunately, because there may not be
enough information to know how to decode the message bytes per Unicode, some
clients of this package may need to be generalized to detect whole-message encodings
email: Parsing and Composing Mail Content | 927

prior to parsing; in worst cases other than email that may mandate mixed data types,
the current package cannot be used at all. Here’s the issue live:
>>> text # from prior example in his section
'Content-Type: multipart/mixed; boundary="===============1574823535=="\nMIME-Ver...'
>>> btext = text.encode()
>>> btext
b'Content-Type: multipart/mixed; boundary="===============1574823535=="\nMIME-Ve...'
>>> msg = Parser().parsestr(text) # email parser expects Unicode str
>>> msg = Parser().parsestr(btext) # but poplib fetches email as bytes!
Traceback (most recent call last):
File "<stdin>", line 1, in <module>
File "C:\Python31\lib\email\parser.py", line 82, in parsestr
return self.parse(StringIO(text), headersonly=headersonly)
TypeError: initial_value must be str or None, not bytes
>>> msg = Parser().parsestr(btext.decode()) # okay per default
>>> msg = Parser().parsestr(btext.decode('utf8')) # ascii encoded (default)
>>> msg = Parser().parsestr(btext.decode('latin1')) # ascii is same in all 3
>>> msg = Parser().parsestr(btext.decode('ascii'))
This is less than ideal, as a bytes-based email would be able to handle message encod-
ings more directly. As mentioned, though, the email package is not really fully func-
tional in Python 3.1, because of its legacy str focus, and the sharp distinction that
Python 3.X makes between Unicode text and byte strings. In this case, its parser should
accept bytes and not expect clients to know how to decode.
Because of that, this book’s email clients take simplistic approaches to decoding fetched
message bytes to be parsed by email. Specifically, full-text decoding will try a user-
configurable encoding name, then fall back on trying common types as a heuristic, and
finally attempt to decode just message headers.
This will suffice for the examples shown but may need to be enhanced for broader
applicability. In some cases, encoding may have to be determined by other schemes
such as inspecting email headers (if present at all), guessing from bytes structure
analysis, or dynamic user feedback. Adding such enhancements in a robust fashion is
likely too complex to attempt in a book’s example code, and it is better performed in
common standard library tools in any event.
Really, robust decoding of mail text may not be possible today at all, if it requires
headers inspections—we can’t inspect a message’s encoding information headers un-
less we parse the message, but we can’t parse a message with 3.1’s email package unless
we already know the encoding. That is, scripts may need to parse in order to decode,
but they need to decode in order to parse! The byte strings of poplib and Unicode strings
of email in 3.1 are fundamentally at odds. Even within its own libraries, Python 3.X’s
changes have created a chicken-and-egg dependency problem that still exists nearly
two years after 3.0’s release.
928 | Chapter 13: Client-Side Scripting

Short of writing our own email parser, or pursuing other similarly complex approaches,
the best bet today for fetched messages seems to be decoding per user preferences and
defaults, and that’s how we’ll proceed in this edition. The PyMailGUI client of Chap-
ter 14, for instance, will allow Unicode encodings for full mail text to be set on a per-
session basis.
The real issue, of course, is that email in general is inherently complicated by the pres-
ence of arbitrary text encodings. Besides full mail text, we also must consider Unicode
encoding issues for the text components of a message once it’s parsed—both its text
parts and its message headers. To see why, let’s move on.
Related Issue for CGI scripts: I should also note that the full text decoding
issue may not be as large a factor for email as it is for some other
email package clients. Because the original email standards call for
ASCII text and require binary data to be MIME encoded, most emails
are likely to decode properly according to a 7- or 8-bit encoding such as
Latin-1.
As we’ll see in Chapter 15, though, a more insurmountable and related
issue looms for server-side scripts that support CGI file uploads on the
Web—because Python’s CGI module also uses the email package to
parse multipart form data; because this package requires data to be de-
coded to str for parsing; and because such data might have mixed text
and binary data (included raw binary data that is not MIME-encoded,
text of any encoding, and even arbitrary combinations of these), these
uploads fail in Python 3.1 if any binary or incompatible text files are
included. The cgi module triggers Unicode decoding or type errors in-
ternally, before the Python script has a chance to intervene.
CGI uploads worked in Python 2.X, because the str type represented
both possibly encoded text and binary data. Saving this type’s content
to a binary mode file as a string of bytes in 2.X sufficed for both arbitrary
text and binary data such as images. Email parsing worked in 2.X for
the same reason. For better or worse, the 3.X str/bytes dichotomy
makes this generality impossible.
In other words, although we can generally work around the email
parser’s str requirement for fetched emails by decoding per an 8-bit
encoding, it’s much more malignant for web scripting today. Watch for
more details on this in Chapter 15, and stay tuned for a future fix, which
may have materialized by the time you read these words.
Text payload encodings: Handling mixed type results
Our next email Unicode issue seems to fly in the face of Python’s generic programming
model: the data types of message payload objects may differ, depending on how they
are fetched. Especially for programs that walk and process payloads of mail parts
generically, this complicates code.
email: Parsing and Composing Mail Content | 929

Specifically, the Message object’s get_payload method we used earlier accepts an op-
tional decode argument to control automatic email-style MIME decoding (e.g., Base64,
uuencode, quoted-printable). If this argument is passed in as 1 (or equivalently, True),
the payload’s data is MIME-decoded when fetched, if required. Because this argument
is so useful for complex messages with arbitrary parts, it will normally be passed as true
in all cases. Binary parts are normally MIME-encoded, but even text parts might also
be present in Base64 or another MIME form if their bytes fall outside email standards.
Some types of Unicode text, for example, require MIME encoding.
The upshot is that get_payload normally returns str strings for str text parts, but re-
turns bytes strings if its decode argument is true—even if the message part is known to
be text by nature. If this argument is not used, the payload’s type depends upon how
it was set: str or bytes. Because Python 3.X does not allow str and bytes to be mixed
freely, clients that need to use the result in text processing or store it in files need to
accommodate the difference. Let’s run some code to illustrate:
>>> from email.message import Message
>>> m = Message()
>>> m['From'] = 'Lancelot'
>>> m.set_payload('Line?...')
>>> m['From']
'Lancelot'
>>> m.get_payload() # str, if payload is str
'Line?...'
>>> m.get_payload(decode=1) # bytes, if MIME decode (same as decode=True)
b'Line?...'
The combination of these different return types and Python 3.X’s strict str/bytes di-
chotomy can cause problems in code that processes the result unless they decode
carefully:
>>> m.get_payload(decode=True) + 'spam' # can't mix in 3.X!
TypeError: can't concat bytes to str
>>> m.get_payload(decode=True).decode() + 'spam' # convert if required
'Line?...spam'
To make sense of these examples, it may help to remember that there are two different
concepts of “encoding” for email text:
•Email-style MIME encodings such as Base64, uuencode, and quoted-printable,
which are applied to binary and otherwise unusual content to make them accept-
able for transmission in email text
•Unicode text encodings for strings in general, which apply to message text as well
as its parts, and may be required after MIME encoding for text message parts
The email package handles email-style MIME encodings automatically when we pass
decode=1 to fetch parsed payloads, or generate text for messages that have nonprintable
parts, but scripts still need to take Unicode encodings into consideration because of
930 | Chapter 13: Client-Side Scripting

Python 3.X’s sharp string types differentiation. For example, the first decode in the
following refers to MIME, and the second to Unicode:
m.get_payload(decode=True).decode() # to bytes via MIME, then to str via Unicode
Even without the MIME decode argument, the payload type may also differ if it is stored
in different forms:
>>> m = Message(); m.set_payload('spam'); m.get_payload() # fetched as stored
'spam'
>>> m = Message(); m.set_payload(b'spam'); m.get_payload()
b'spam'
Moreover, the same hold true for the text-specific MIME subclass (though as we’ll see
later in this section, we cannot pass a bytes to its constructor to force a binary payload):
>>> from email.mime.text import MIMEText
>>> m = MIMEText('Line...?')
>>> m['From'] = 'Lancelot'
>>> m['From']
'Lancelot'
>>> m.get_payload()
'Line...?'
>>> m.get_payload(decode=1)
b'Line...?'
Unfortunately, the fact that payloads might be either str or bytes today not only flies
in the face of Python’s type-neutral mindset, it can complicate your code—scripts may
need to convert in contexts that require one or the other type. For instance, GUI libraries
might allow both, but file saves and web page content generation may be less flexible.
In our example programs, we’ll process payloads as bytes whenever possible, but de-
code to str text in cases where required using the encoding information available in
the header API described in the next section.
Text payload encodings: Using header information to decode
More profoundly, text in email can be even richer than implied so far—in principle,
text payloads of a single message may be encoded in a variety of different Unicode
schemes (e.g., three HTML webpage file attachments, all in different Unicode encod-
ings, and possibly different than the full message text’s encoding). Although treating
such text as binary byte strings can sometimes finesse encoding issues, saving such parts
in text-mode files for opening must respect the original encoding types. Further, any
text processing performed on such parts will be similarly type-specific.
Luckily, the email package both adds character-set headers when generating message
text and retains character-set information for parts if it is present when parsing message
text. For instance, adding non-ASCII text attachments simply requires passing in an
encoding name—the appropriate message headers are added automatically on text
generation, and the character set is available directly via the get_content_charset
method:
email: Parsing and Composing Mail Content | 931

>>> s = b'A\xe4B'
>>> s.decode('latin1')
'AäB'
>>> from email.message import Message
>>> m = Message()
>>> m.set_payload(b'A\xe4B', charset='latin1') # or 'latin-1': see ahead
>>> t = m.as_string()
>>> print(t)
MIME-Version: 1.0
Content-Type: text/plain; charset="latin1"
Content-Transfer-Encoding: base64
QeRC
>>> m.get_content_charset()
'latin1'
Notice how email automatically applies Base64 MIME encoding to non-ASCII text
parts on generation, to conform to email standards. The same is true for the more
specific MIME text subclass of Message:
>>> from email.mime.text import MIMEText
>>> m = MIMEText(b'A\xe4B', _charset='latin1')
>>> t = m.as_string()
>>> print(t)
Content-Type: text/plain; charset="latin1"
MIME-Version: 1.0
Content-Transfer-Encoding: base64
QeRC
>>> m.get_content_charset()
'latin1'
Now, if we parse this message’s text string with email, we get back a new Message whose
text payload is the Base64 MIME-encoded text used to represent the non-ASCII Uni-
code string. Requesting MIME decoding for the payload with decode=1 returns the byte
string we originally attached:
>>> from email.parser import Parser
>>> q = Parser().parsestr(t)
>>> q
<email.message.Message object at 0x019ECA50>
>>> q.get_content_type()
'text/plain'
>>> q._payload
'QeRC\n'
>>> q.get_payload()
'QeRC\n'
>>> q.get_payload(decode=1)
b'A\xe4B'
However, running Unicode decoding on this byte string to convert to text fails if we
attempt to use the platform default on Windows (UTF8). To be more accurate, and
932 | Chapter 13: Client-Side Scripting

support a wide variety of text types, we need to use the character-set information saved
by the parser and attached to the Message object. This is especially important if we need
to save the data to a file—we either have to store as bytes in binary mode files, or specify
the correct (or at least a compatible) Unicode encoding in order to use such strings for
text-mode files. Decoding manually works the same way:
>>> q.get_payload(decode=1).decode()
UnicodeDecodeError: 'utf8' codec can't decode bytes in position 1-2: unexpected
>>> q.get_content_charset()
'latin1'
>>> q.get_payload(decode=1).decode('latin1') # known type
'AäB'
>>> q.get_payload(decode=1).decode(q.get_content_charset()) # allow any type
'AäB'
In fact, all the header details are available on Message objects, if we know where to look.
The character set can also be absent entirely, in which case it’s returned as None; clients
need to define policies for such ambiguous text (they might try common types, guess,
or treat the data as a raw byte string):
>>> q['content-type'] # mapping interface
'text/plain; charset="latin1"'
>>> q.items()
[('Content-Type', 'text/plain; charset="latin1"'), ('MIME-Version', '1.0'),
('Content-Transfer-Encoding', 'base64')]
>> q.get_params(header='Content-Type') # param interface
[('text/plain', ''), ('charset', 'latin1')]
>>> q.get_param('charset', header='Content-Type')
'latin1'
>>> charset = q.get_content_charset() # might be missing
>>> if charset:
... print(q.get_payload(decode=1).decode(charset))
...
AäB
This handles encodings for message text parts in parsed emails. For composing new
emails, we still must apply session-wide user settings or allow the user to specify an
encoding for each part interactively. In some of this book’s email clients, payload con-
versions are performed as needed—using encoding information in message headers
after parsing and provided by users during mail composition.
Message header encodings: email package support
On a related note, the email package also provides support for encoding and decoding
message headers themselves (e.g., From, Subject) per email standards when they are
not simple text. Such headers are often called Internationalized (or i18n) headers, be-
cause they support inclusion of non-ASCII character set text in emails. This term is also
sometimes used to refer to encoded text of message payloads; unlike message headers,
email: Parsing and Composing Mail Content | 933

though, message payload encoding is used for both international Unicode text and truly
binary data such as images (as we’ll see in the next section).
Like mail payload parts, i18n headers are encoded specially for email, and may also be
encoded per Unicode. For instance, here’s how to decode an encoded subject line from
an arguably spammish email that just showed up in my inbox; its =?UTF-8?Q? preamble
declares that the data following it is UTF-8 encoded Unicode text, which is also MIME-
encoded per quoted-printable for transmission in email (in short, unlike the prior sec-
tion’s part payloads, which declare their encodings in separate header lines, headers
themselves may declare their Unicode and MIME encodings by embedding them in
their own content this way):
>>> rawheader = '=?UTF-8?Q?Introducing=20Top=20Values=3A=20A=20Special=20Selecti
on=20of=20Great=20Money=20Savers?='
>>> from email.header import decode_header # decode per email+MIME
>>> decode_header(rawheader)
[(b'Introducing Top Values: A Special Selection of Great Money Savers', 'utf-8')]
>>> bin, enc = decode_header(rawheader)[0] # and decode per Unicode
>>> bin, enc
(b'Introducing Top Values: A Special Selection of Great Money Savers', 'utf-8')
>>> bin.decode(enc)
'Introducing Top Values: A Special Selection of Great Money Savers'
Subtly, the email package can return multiple parts if there are encoded substrings in
the header, and each must be decoded individually and joined to produce decoded
header text. Even more subtly, in 3.1, this package returns all bytes when any substring
(or the entire header) is encoded but returns str for a fully unencoded header, and
uncoded substrings returned as bytes are encoded per “raw-unicode-escape” in the
package—an encoding scheme useful to convert str to bytes when no encoding type
applies:
>>> from email.header import decode_header
>>> S1 = 'Man where did you get that assistant?'
>>> S2 = '=?utf-8?q?Man_where_did_you_get_that_assistant=3F?='
>>> S3 = 'Man where did you get that =?UTF-8?Q?assistant=3F?='
# str: don't decode()
>>> decode_header(S1)
[('Man where did you get that assistant?', None)]
# bytes: do decode()
>>> decode_header(S2)
[(b'Man where did you get that assistant?', 'utf-8')]
# bytes: do decode() using raw-unicode-escape applied in package
>>> decode_header(S3)
[(b'Man where did you get that', None), (b'assistant?', 'utf-8')]
# join decoded parts if more than one
934 | Chapter 13: Client-Side Scripting

>>> parts = decode_header(S3)
>>> ' '.join(abytes.decode('raw-unicode-escape' if enc == None else enc)
... for (abytes, enc) in parts)
'Man where did you get that assistant?'
We’ll use logic similar to the last step here in the mailtools package ahead, but also
retain str substrings intact without attempting to decode.
Late-breaking news: As I write this in mid-2010, it seems possible that
this mixed type, nonpolymorphic, and frankly, non-Pythonic API be-
havior may be addressed in a future Python release. In response to a rant
posted on the Python developers list by a book author whose work you
might be familiar with, there is presently a vigorous discussion of the
topic there. Among other ideas is a proposal for a bytes-like type which
carries with it an explicit Unicode encoding; this may make it possible
to treat some text cases in a more generic fashion. While it’s impossible
to foresee the outcome of such proposals, it’s good to see that the issues
are being actively explored. Stay tuned to this book’s website for further
developments in the Python 3.X library API and Unicode stories.
Message address header encodings and parsing, and header creation
One wrinkle pertaining to the prior section: for message headers that contain email
addresses (e.g., From), the name component of the name/address pair might be encoded
this way as well. Because the email package’s header parser expects encoded substrings
to be followed by whitespace or the end of string, we cannot ask it to decode a complete
address-related header—quotes around name components will fail.
To support such Internationalized address headers, we must also parse out the first
part of the email address and then decode. First of all, we need to extract the name and
address parts of an email address using email package tools:
>>> from email.utils import parseaddr, formataddr
>>> p = parseaddr('"Smith, Bob" <bob@bob.com>') # split into name/addr pair
>>> p # unencoded addr
('Smith, Bob', 'bob@bob.com')
>>> formataddr(p)
'"Smith, Bob" <bob@bob.com>'
>>> parseaddr('Bob Smith <bob@bob.com>') # unquoted name part
('Bob Smith', 'bob@bob.com')
>>> formataddr(parseaddr('Bob Smith <bob@bob.com>'))
'Bob Smith <bob@bob.com>'
>>> parseaddr('bob@bob.com') # simple, no name
('', 'bob@bob.com')
>>> formataddr(parseaddr('bob@bob.com'))
'bob@bob.com'
Fields with multiple addresses (e.g., To) separate individual addresses by commas.
Since email names might embed commas, too, blindly splitting on commas to run each
email: Parsing and Composing Mail Content | 935

though parsing won’t always work. Instead, another utility can be used to parse each
address individually: getaddresses ignores commas in names when spitting apart sep-
arate addresses, and parseaddr does, too, because it simply returns the first pair in the
getaddresses result (some line breaks were added to the following for legibility):
>>> from email.utils import getaddresses
>>> multi = '"Smith, Bob" <bob@bob.com>, Bob Smith <bob@bob.com>, bob@bob.com,
"Bob" <bob@bob.com>'
>>> getaddresses([multi])
[('Smith, Bob', 'bob@bob.com'), ('Bob Smith', 'bob@bob.com'), ('', 'bob@bob.com'),
('Bob', 'bob@bob.com')]
>>> [formataddr(pair) for pair in getaddresses([multi])]
['"Smith, Bob" <bob@bob.com>', 'Bob Smith <bob@bob.com>', 'bob@bob.com',
'Bob <bob@bob.com>']
>>> ', '.join([formataddr(pair) for pair in getaddresses([multi])])
'"Smith, Bob" <bob@bob.com>, Bob Smith <bob@bob.com>, bob@bob.com,
Bob <bob@bob.com>'
>>> getaddresses(['bob@bob.com']) # handles single address cases too
('', 'bob@bob.com')]
Now, decoding email addresses is really just an extra step before and after the normal
header decoding logic we saw earlier:
>>> rawfromheader = '"=?UTF-8?Q?Walmart?=" <newsletters@walmart.com>'
>>> from email.utils import parseaddr, formataddr
>>> from email.header import decode_header
>>> name, addr = parseaddr(rawfromheader) # split into name/addr parts
>>> name, addr
('=?UTF-8?Q?Walmart?=', 'newsletters@walmart.com')
>>> abytes, aenc = decode_header(name)[0] # do email+MIME decoding
>>> abytes, aenc
(b'Walmart', 'utf-8')
>>> name = abytes.decode(aenc) # do Unicode decoding
>>> name
'Walmart'
>>> formataddr((name, addr)) # put parts back together
'Walmart <newsletters@walmart.com>'
Although From headers will typically have just one address, to be fully robust we need
to apply this to every address in headers, such as To, Cc, and Bcc. Again, the multiad-
dress getaddresses utility avoids comma clashes between names and address separa-
tors; since it also handles the single address case, it suffices for From headers as well:
>>> rawfromheader = '"=?UTF-8?Q?Walmart?=" <newsletters@walmart.com>'
>>> rawtoheader = rawfromheader + ', ' + rawfromheader
>>> rawtoheader
936 | Chapter 13: Client-Side Scripting

'"=?UTF-8?Q?Walmart?=" <newsletters@walmart.com>, "=?UTF-8?Q?Walmart?=" <newslet
ters@walmart.com>'
>>> pairs = getaddresses([rawtoheader])
>>> pairs
[('=?UTF-8?Q?Walmart?=', 'newsletters@walmart.com'), ('=?UTF-8?Q?Walmart?=', 'ne
wsletters@walmart.com')]
>>> addrs = []
>>> for name, addr in pairs:
... abytes, aenc = decode_header(name)[0] # email+MIME
... name = abytes.decode(aenc) # Unicode
... addrs.append(formataddr((name, addr))) # one or more addrs
...
>>> ', '.join(addrs)
'Walmart <newsletters@walmart.com>, Walmart <newsletters@walmart.com>'
These tools are generally forgiving for unencoded content and return them intact. To
be robust, though, the last portion of code here should also allow for multiple parts
returned by decode_header (for encoded substrings), None encoding values for parts (for
unencoded substrings), and str substring values instead of bytes (for fully unencoded
names).
Decoding this way applies both MIME and Unicode decoding steps to fetched mails.
Creating properly encoded headers for inclusion in new mails composed and sent is
similarly straightforward:
>>> from email.header import make_header
>>> hdr = make_header([(b'A\xc4B\xe4C', 'latin-1')])
>>> print(hdr)
AÄBäC
>>> print(hdr.encode())
=?iso-8859-1?q?A=C4B=E4C?=
>>> decode_header(hdr.encode())
[(b'A\xc4B\xe4C', 'iso-8859-1')]
This can be applied to entire headers such as Subject, as well as the name component
of each email address in an address-related header line such as From and To (use
getaddresses to split into individual addresses first if needed). The header object pro-
vides an alternative interface; both techniques handle additional details, such as line
lengths, for which we’ll defer to Python manuals:
>>> from email.header import Header
>>> h = Header(b'A\xe4B\xc4X', charset='latin-1')
>>> h.encode()
'=?iso-8859-1?q?A=E4B=C4X?='
>>>
>>> h = Header('spam', charset='ascii') # same as Header('spam')
>>> h.encode()
'spam'
The mailtools package ahead and its PyMailGUI client of Chapter 14 will use these
interfaces to automatically decode message headers in fetched mails per their content
for display, and to encode headers sent that are not in ASCII format. That latter also
email: Parsing and Composing Mail Content | 937

applies to the name component of email addresses, and assumes that SMTP servers will
allow these to pass. This may encroach on some SMTP server issues which we don’t
have space to address in this book. See the Web for more on SMTP headers handling.
For more on headers decoding, see also file _test-i18n-headers.py in the examples pack-
age; it decodes additional subject and address-related headers using mailtools
methods, and displays them in a tkinter Text widget—a foretaste of how these will be
displayed in PyMailGUI.
Workaround: Message text generation for binary attachment payloads is broken
Our last two email Unicode issues are outright bugs which we must work around today,
though they will almost certainly be fixed in a future Python release. The first breaks
message text generation for all but trivial messages—the email package today no longer
supports generation of full mail text for messages that contain any binary parts, such
as images or audio files. Without coding workarounds, only simple emails that consist
entirely of text parts can be composed and generated in Python 3.1’s email package;
any MIME-encoded binary part causes mail text generation to fail.
This is a bit tricky to understand without poring over email’s source code (which,
thankfully, we can in the land of open source), but to demonstrate the issue, first notice
how simple text payloads are rendered as full message text when printed as we’ve
already seen:
C:\...\PP4E\Internet\Email> python
>>> from email.message import Message # generic message object
>>> m = Message()
>>> m['From'] = 'bob@bob.com'
>>> m.set_payload(open('text.txt').read()) # payload is str text
>>> print(m) # print uses as_string()
From: bob@bob.com
spam
Spam
SPAM!
As we’ve also seen, for convenience, the email package also provides subclasses of the
Message object, tailored to add message headers that provide the extra descriptive details
used by email clients to know how to process the data:
>>> from email.mime.text import MIMEText # Message subclass with headers
>>> text = open('text.txt').read()
>>> m = MIMEText(text) # payload is str text
>>> m['From'] = 'bob@bob.com'
>>> print(m)
Content-Type: text/plain; charset="us-ascii"
MIME-Version: 1.0
Content-Transfer-Encoding: 7bit
From: bob@bob.com
938 | Chapter 13: Client-Side Scripting

spam
Spam
SPAM!
This works for text, but watch what happens when we try to render a message part
with truly binary data, such as an image that could not be decoded as Unicode text:
>>> from email.message import Message # generic Message object
>>> m = Message()
>>> m['From'] = 'bob@bob.com'
>>> bytes = open('monkeys.jpg', 'rb').read() # read binary bytes (not Unicode)
>>> m.set_payload(bytes) # we set the payload to bytes
>>> print(m)
Traceback (most recent call last):
...lines omitted...
File "C:\Python31\lib\email\generator.py", line 155, in _handle_text
raise TypeError('string payload expected: %s' % type(payload))
TypeError: string payload expected: <class 'bytes'>
>>> m.get_payload()[:20]
b'\xff\xd8\xff\xe0\x00\x10JFIF\x00\x01\x01\x01\x00x\x00x\x00\x00'
The problem here is that the email package’s text generator assumes that the message’s
payload data is a Base64 (or similar) encoded str text string by generation time, not
bytes. Really, the error is probably our fault in this case, because we set the payload to
raw bytes manually. We should use the MIMEImage MIME subclass tailored for images;
if we do, the email package internally performs Base64 MIME email encoding on the
data when the message object is created. Unfortunately, it still leaves it as bytes, not
str, despite the fact the whole point of Base64 is to change binary data to text (though
the exact Unicode flavor this text should take may be unclear). This leads to additional
failures in Python 3.1:
>>> from email.mime.image import MIMEImage # Message sublcass with hdrs+base64
>>> bytes = open('monkeys.jpg', 'rb').read() # read binary bytes again
>>> m = MIMEImage(bytes) # MIME class does Base64 on data
>>> print(m)
Traceback (most recent call last):
...lines omitted...
File "C:\Python31\lib\email\generator.py", line 155, in _handle_text
raise TypeError('string payload expected: %s' % type(payload))
TypeError: string payload expected: <class 'bytes'>
>>> m.get_payload()[:40] # this is already Base64 text
b'/9j/4AAQSkZJRgABAQEAeAB4AAD/2wBDAAIBAQIB'
>>> m.get_payload()[:40].decode('ascii') # but it's still bytes internally!
'/9j/4AAQSkZJRgABAQEAeAB4AAD/2wBDAAIBAQIB'
In other words, not only does the Python 3.1 email package not fully support the Python
3.X Unicode/bytes dichotomy, it was actually broken by it. Luckily, there’s a work-
around for this case.
To address this specific issue, I opted to create a custom encoding function for binary
MIME attachments, and pass it in to the email package’s MIME message object
email: Parsing and Composing Mail Content | 939

subclasses for all binary data types. This custom function is coded in the upcoming
mailtools package of this chapter (Example 13-23). Because it is used by email to en-
code from bytes to text at initialization time, it is able to decode to ASCII text per
Unicode as an extra step, after running the original call to perform Base64 encoding
and arrange content-encoding headers. The fact that email does not do this extra Uni-
code decoding step itself is a genuine bug in that package (albeit, one introduced by
changes elsewhere in Python standard libraries), but the workaround does its job:
# in mailtools.mailSender module ahead in this chapter...
def fix_encode_base64(msgobj):
from email.encoders import encode_base64
encode_base64(msgobj) # what email does normally: leaves bytes
bytes = msgobj.get_payload() # bytes fails in email pkg on text gen
text = bytes.decode('ascii') # decode to unicode str so text gen works
...line splitting logic omitted...
msgobj.set_payload('\n'.join(lines))
>>> from email.mime.image import MIMEImage
>>> from mailtools.mailSender import fix_encode_base64 # use custom workaround
>>> bytes = open('monkeys.jpg', 'rb').read()
>>> m = MIMEImage(bytes, _encoder=fix_encode_base64) # convert to ascii str
>>> print(m.as_string()[:500])
Content-Type: image/jpeg
MIME-Version: 1.0
Content-Transfer-Encoding: base64
/9j/4AAQSkZJRgABAQEAeAB4AAD/2wBDAAIBAQIBAQICAgICAgICAwUDAwMDAwYEBAMFBwYHBwcG
BwcICQsJCAgKCAcHCg0KCgsMDAwMBwkODw0MDgsMDAz/2wBDAQICAgMDAwYDAwYMCAcIDAwMDAwM
DAwMDAwMDAwMDAwMDAwMDAwMDAwMDAwMDAwMDAwMDAwMDAwMDAwMDAwMDAz/wAARCAHoAvQDASIA
AhEBAxEB/8QAHwAAAQUBAQEBAQEAAAAAAAAAAAECAwQFBgcICQoL/8QAtRAAAgEDAwIEAwUFBAQA
AAF9AQIDAAQRBRIhMUEGE1FhByJxFDKBkaEII0KxwRVS0fAkM2JyggkKFhcYGRolJicoKSo0NTY3
ODk6Q0RFRkdISUpTVFVWV1hZWmNkZWZnaGlqc
>>> print(m) # to print the entire message: very long
Another possible workaround involves defining a custom MIMEImage class that is like
the original but does not attempt to perform Base64 ending on creation; that way, we
could encode and translate to str before message object creation, but still make use of
the original class’s header-generation logic. If you take this route, though, you’ll find
that it requires repeating (really, cutting and pasting) far too much of the original logic
to be reasonable—this repeated code would have to mirror any future email changes:
>>> from email.mime.nonmultipart import MIMENonMultipart
>>> class MyImage(MIMENonMultipart):
... def __init__(self, imagedata, subtype):
... MIMENonMultipart.__init__(self, 'image', subtype)
... self.set_payload(_imagedata)
...repeat all the base64 logic here, with an extra ASCII Unicode decode...
>>> m = MyImage(text_from_bytes)
Interestingly, this regression in email actually reflects an unrelated change in Python’s
base64 module made in 2007, which was completely benign until the Python 3.X bytes/
940 | Chapter 13: Client-Side Scripting
str differentiation came online. Prior to that, the email encoder worked in Python 2.X,
because bytes was really str. In 3.X, though, because base64 returns bytes, the normal
mail encoder in email also leaves the payload as bytes, even though it’s been encoded
to Base64 text form. This in turn breaks email text generation, because it assumes the
payload is text in this case, and requires it to be str. As is common in large-scale
software systems, the effects of some 3.X changes may have been difficult to anticipate
or accommodate in full.
By contrast, parsing binary attachments (as opposed to generating text for them) works
fine in 3.X, because the parsed message payload is saved in message objects as a Base64-
encoded str string, not bytes, and is converted to bytes only when fetched. This bug
seems likely to also go away in a future Python and email package (perhaps even as a
simple patch in Python 3.2), but it’s more serious than the other Unicode decoding
issues described here, because it prevents mail composition for all but trivial mails.
The flexibility afforded by the package and the Python language allows such a work-
around to be developed external to the package, rather than hacking the package’s code
directly. With open source and forgiving APIs, you rarely are truly stuck.
Late-breaking news: This section’s bug is scheduled to be fixed in Python
3.2, making our workaround here unnecessary in this and later Python
releases. This is per communications with members of Python’s email
special interest group (on the “email-sig” mailing list).
Regrettably, this fix didn’t appear until after this chapter and its exam-
ples had been written. I’d like to remove the workaround and its de-
scription entirely, but this book is based on Python 3.1, both before and
after the fix was incorporated.
So that it works under Python 3.2 alpha, too, though, the workaround
code ahead was specialized just before publication to check for bytes
prior to decoding. Moreover, the workaround still must manually split
lines in Base64 data, because 3.2 still does not.
Workaround: Message composition for non-ASCII text parts is broken
Our final email Unicode issue is as severe as the prior one: changes like that of the prior
section introduced yet another regression for mail composition. In short, it’s impossible
to make text message parts today without specializing for different Unicode encodings.
Some types of text are automatically MIME-encoded for transmission. Unfortunately,
because of the str/bytes split, the MIME text message class in email now requires
different string object types for different Unicode encodings. The net effect is that you
now have to know how the email package will process your text data when making a
text message object, or repeat most of its logic redundantly.
For example, to properly generate Unicode encoding headers and apply required MIME
encodings, here’s how we must proceed today for common Unicode text types:
email: Parsing and Composing Mail Content | 941

>>> m = MIMEText('abc', _charset='ascii') # pass text for ascii
>>> print(m)
MIME-Version: 1.0
Content-Type: text/plain; charset="us-ascii"
Content-Transfer-Encoding: 7bit
abc
>>> m = MIMEText('abc', _charset='latin-1') # pass text for latin-1
>>> print(m) # but not for 'latin1': ahead
MIME-Version: 1.0
Content-Type: text/plain; charset="iso-8859-1"
Content-Transfer-Encoding: quoted-printable
abc
>>> m = MIMEText(b'abc', _charset='utf-8') # pass bytes for utf8
>>> print(m)
Content-Type: text/plain; charset="utf-8"
MIME-Version: 1.0
Content-Transfer-Encoding: base64
YWJj
This works, but if you look closely, you’ll notice that we must pass str to the first two,
but bytes to the third. That requires that we special-case code for Unicode types based
upon the package’s internal operation. Types other than those expected for a Unicode
encoding don’t work at all, because of newly invalid str/bytes combinations that occur
inside the email package in 3.1:
>>> m = MIMEText('abc', _charset='ascii')
>>> m = MIMEText(b'abc', _charset='ascii') # bug: assumes 2.X str
Traceback (most recent call last):
...lines omitted...
File "C:\Python31\lib\email\encoders.py", line 60, in encode_7or8bit
orig.encode('ascii')
AttributeError: 'bytes' object has no attribute 'encode'
>>> m = MIMEText('abc', _charset='latin-1')
>>> m = MIMEText(b'abc', _charset='latin-1') # bug: qp uses str
Traceback (most recent call last):
...lines omitted...
File "C:\Python31\lib\email\quoprimime.py", line 176, in body_encode
if line.endswith(CRLF):
TypeError: expected an object with the buffer interface
>>> m = MIMEText(b'abc', _charset='utf-8')
>>> m = MIMEText('abc', _charset='utf-8') # bug: base64 uses bytes
Traceback (most recent call last):
...lines omitted...
File "C:\Python31\lib\email\base64mime.py", line 94, in body_encode
enc = b2a_base64(s[i:i + max_unencoded]).decode("ascii")
TypeError: must be bytes or buffer, not str
Moreover, the email package is pickier about encoding name synonyms than Python
and most other tools are: “latin-1” is detected as a quoted-printable MIME type, but
942 | Chapter 13: Client-Side Scripting

“latin1” is unknown and so defaults to Base64 MIME. In fact, this is why Base64 was
used for the “latin1” Unicode type earlier in this section—an encoding choice that is
irrelevant to any recipient that understands the “latin1” synonym, including Python
itself. Unfortunately, that means that we also need to pass in a different string type if
we use a synonym the package doesn’t understand today:
>>> m = MIMEText('abc', _charset='latin-1') # str for 'latin-1'
>>> print(m)
MIME-Version: 1.0
Content-Type: text/plain; charset="iso-8859-1"
Content-Transfer-Encoding: quoted-printable
abc
>>> m = MIMEText('abc', _charset='latin1')
Traceback (most recent call last):
...lines omitted...
File "C:\Python31\lib\email\base64mime.py", line 94, in body_encode
enc = b2a_base64(s[i:i + max_unencoded]).decode("ascii")
TypeError: must be bytes or buffer, not str
>>> m = MIMEText(b'abc', _charset='latin1') # bytes for 'latin1'!
>>> print(m)
Content-Type: text/plain; charset="latin1"
MIME-Version: 1.0
Content-Transfer-Encoding: base64
YWJj
There are ways to add aliases and new encoding types in the email package, but they’re
not supported out of the box. Programs that care about being robust would have to
cross-check the user’s spelling, which may be valid for Python itself, against that ex-
pected by email. This also holds true if your data is not ASCII in general—you’ll have
to first decode to text in order to use the expected “latin-1” name because its quoted-
printable MIME encoding expects str, even though bytes are required if “latin1”
triggers the default Base64 MIME:
>>> m = MIMEText(b'A\xe4B', _charset='latin1')
>>> print(m)
Content-Type: text/plain; charset="latin1"
MIME-Version: 1.0
Content-Transfer-Encoding: base64
QeRC
>>> m = MIMEText(b'A\xe4B', _charset='latin-1')
Traceback (most recent call last):
...lines omitted...
File "C:\Python31\lib\email\quoprimime.py", line 176, in body_encode
if line.endswith(CRLF):
TypeError: expected an object with the buffer interface
>>> m = MIMEText(b'A\xe4B'.decode('latin1'), _charset='latin-1')
>>> print(m)
email: Parsing and Composing Mail Content | 943

MIME-Version: 1.0
Content-Type: text/plain; charset="iso-8859-1"
Content-Transfer-Encoding: quoted-printable
A=E4B
In fact, the text message object doesn’t check to see that the data you’re MIME-
encoding is valid per Unicode in general—we can send invalid UTF text but the receiver
may have trouble decoding it:
>>> m = MIMEText(b'A\xe4B', _charset='utf-8')
>>> print(m)
Content-Type: text/plain; charset="utf-8"
MIME-Version: 1.0
Content-Transfer-Encoding: base64
QeRC
>>> b'A\xe4B'.decode('utf8')
UnicodeDecodeError: 'utf8' codec can't decode bytes in position 1-2: unexpected...
>>> import base64
>>> base64.b64decode(b'QeRC')
b'A\xe4B'
>>> base64.b64decode(b'QeRC').decode('utf')
UnicodeDecodeError: 'utf8' codec can't decode bytes in position 1-2: unexpected...
So what to do if we need to attach message text to composed messages if the text’s
datatype requirement is indirectly dictated by its Unicode encoding name? The generic
Message superclass doesn’t help here directly if we specify an encoding, as it exhibits
the same encoding-specific behavior:
>>> m = Message()
>>> m.set_payload('spam', charset='us-ascii')
>>> print(m)
MIME-Version: 1.0
Content-Type: text/plain; charset="us-ascii"
Content-Transfer-Encoding: 7bit
spam
>>> m = Message()
>>> m.set_payload(b'spam', charset='us-ascii')
AttributeError: 'bytes' object has no attribute 'encode'
>>> m.set_payload('spam', charset='utf-8')
TypeError: must be bytes or buffer, not str
Although we could try to work around these issues by repeating much of the code that
email runs, the redundancy would make us hopelessly tied to its current implementa-
tion and dependent upon its future changes. The following, for example, parrots the
steps that email runs internally to create a text message object for ASCII encoding text;
unlike the MIMEText class, this approach allows all data to be read from files as binary
byte strings, even if it’s simple ASCII:
944 | Chapter 13: Client-Side Scripting

>>> m = Message()
>>> m.add_header('Content-Type', 'text/plain')
>>> m['MIME-Version'] = '1.0'
>>> m.set_param('charset', 'us-ascii')
>>> m.add_header('Content-Transfer-Encoding', '7bit')
>>> data = b'spam'
>>> m.set_payload(data.decode('ascii')) # data read as bytes here
>>> print(m)
MIME-Version: 1.0
Content-Type: text/plain; charset="us-ascii"
Content-Transfer-Encoding: 7bit
spam
>>> print(MIMEText('spam', _charset='ascii')) # same, but type-specific
MIME-Version: 1.0
Content-Type: text/plain; charset="us-ascii"
Content-Transfer-Encoding: 7bit
spam
To do the same for other kinds of text that require MIME encoding, just insert an extra
encoding step; although we’re concerned with text parts here, a similar imitative ap-
proach could address the binary parts text generation bug we met earlier:
>>> m = Message()
>>> m.add_header('Content-Type', 'text/plain')
>>> m['MIME-Version'] = '1.0'
>>> m.set_param('charset', 'utf-8')
>>> m.add_header('Content-Transfer-Encoding', 'base64')
>>> data = b'spam'
>>> from binascii import b2a_base64 # add MIME encode if needed
>>> data = b2a_base64(data) # data read as bytes here too
>>> m.set_payload(data.decode('ascii'))
>>> print(m)
MIME-Version: 1.0
Content-Type: text/plain; charset="utf-8"
Content-Transfer-Encoding: base64
c3BhbQ==
>>> print(MIMEText(b'spam', _charset='utf-8')) # same, but type-specific
Content-Type: text/plain; charset="utf-8"
MIME-Version: 1.0
Content-Transfer-Encoding: base64
c3BhbQ==
This works, but besides the redundancy and dependency it creates, to use this approach
broadly we’d also have to generalize to account for all the various kinds of Unicode
encodings and MIME encodings possible, like the email package already does inter-
nally. We might also have to support encoding name synonyms to be flexible, adding
further redundancy. In other words, this requires additional work, and in the end, we’d
still have to specialize our code for different Unicode types.
email: Parsing and Composing Mail Content | 945

Any way we go, some dependence on the current implementation seems unavoidable
today. It seems the best we can do here, apart from hoping for an improved email
package in a few years’ time, is to specialize text message construction calls by Unicode
type, and assume both that encoding names match those expected by the package and
that message data is valid for the Unicode type selected. Here is the sort of arguably
magic code that the upcoming mailtools package (again in Example 13-23) will apply
to choose text types:
>>> from email.charset import Charset, BASE64, QP
>>> for e in ('us-ascii', 'latin-1', 'utf8', 'latin1', 'ascii'):
... cset = Charset(e)
... benc = cset.body_encoding
... if benc in (None, QP):
... print(e, benc, 'text') # read/fetch data as str
... else:
... print(e, benc, 'binary') # read/fetch data as bytes
...
us-ascii None text
latin-1 1 text
utf8 2 binary
latin1 2 binary
ascii None text
We’ll proceed this way in this book, with the major caveat that this is almost certainly
likely to require changes in the future because of its strong coupling with the current
email implementation.
Late-breaking news: Like the prior section, it now appears that this sec-
tion’s bug will also be fixed in Python 3.2, making the workaround here
unnecessary in this and later Python releases. The nature of the fix is
unknown, though, and we still need the fix for the version of Python
current when this chapter was written. As of just before publication, the
alpha release of 3.2 is still somewhat type specific on this issue, but now
accepts either str or bytes for text that triggers Base64 encodings, in-
stead of just bytes.
Summary: Solutions and workarounds
The email package in Python 3.1 provides powerful tools for parsing and composing
mails, and can be used as the basis for full-featured mail clients like those in this book
with just a few workarounds. As you can see, though, it is less than fully functional
today. Because of that, further specializing code to its current API is perhaps a tempo-
rary solution. Short of writing our own email parser and composer (not a practical
option in a finitely-sized book!), some compromises are in order here. Moreover, the
inherent complexity of Unicode support in email places some limits on how much we
can pursue this thread in this book.
946 | Chapter 13: Client-Side Scripting

In this edition, we will support Unicode encodings of text parts and headers in messages
composed, and respect the Unicode encodings in text parts and mail headers of mes-
sages fetched. To make this work with the partially crippled email package in
Python 3.1, though, we’ll apply the following Unicode policies in various email clients
in this book:
• Use user preferences and defaults for the preparse decoding of full mail text fetched
and encoding of text payloads sent.
• Use header information, if available, to decode the bytes payloads returned by
get_payload when text parts must be treated as str text, but use binary mode files
to finesse the issue in other contexts.
• Use formats prescribed by email standard to decode and encode message headers
such as From and Subject if they are not simple text.
• Apply the fix described to work around the message text generation issue for binary
parts.
• Special-case construction of text message objects according to Unicode types and
email behavior.
These are not necessarily complete solutions. For example, some of this edition’s email
clients allow for Unicode encodings for both text attachments and mail headers, but
they do nothing about encoding the full text of messages sent beyond the policies in-
herited from smtplib and implement policies that might be inconvenient in some use
cases. But as we’ll see, despite their limitations, our email clients will still be able to
handle complex email tasks and a very large set of emails.
Again, since this story is in flux in Python today, watch this book’s website for updates
that may improve or be required of code that uses email in the future. A future email
may handle Unicode encodings more accurately. Like Python 3.X, though, backward
compatibility may be sacrificed in the process and require updates to this book’s code.
For more on this issue, see the Web as well as up-to-date Python release notes.
Although this quick tour captures the basic flavor of the interface, we need to step up
to larger examples to see more of the email package’s power. The next section takes us
on the first of those steps.
A Console-Based Email Client
Let’s put together what we’ve learned about fetching, sending, parsing, and composing
email in a simple but functional command-line console email tool. The script in Ex-
ample 13-20 implements an interactive email session—users may type commands to
read, send, and delete email messages. It uses poplib and smtplib to fetch and send,
and uses the email package directly to parse and compose.
A Console-Based Email Client | 947

Example 13-20. PP4E\Internet\Email\pymail.py
#!/usr/local/bin/python
"""
##########################################################################
pymail - a simple console email interface client in Python; uses Python
poplib module to view POP email messages, smtplib to send new mails, and
the email package to extract mail headers and payload and compose mails;
##########################################################################
"""
import poplib, smtplib, email.utils, mailconfig
from email.parser import Parser
from email.message import Message
fetchEncoding = mailconfig.fetchEncoding
def decodeToUnicode(messageBytes, fetchEncoding=fetchEncoding):
"""
4E, Py3.1: decode fetched bytes to str Unicode string for display or parsing;
use global setting (or by platform default, hdrs inspection, intelligent guess);
in Python 3.2/3.3, this step may not be required: if so, return message intact;
"""
return [line.decode(fetchEncoding) for line in messageBytes]
def splitaddrs(field):
"""
4E: split address list on commas, allowing for commas in name parts
"""
pairs = email.utils.getaddresses([field]) # [(name,addr)]
return [email.utils.formataddr(pair) for pair in pairs] # [name <addr>]
def inputmessage():
import sys
From = input('From? ').strip()
To = input('To? ').strip() # datetime hdr may be set auto
To = splitaddrs(To) # possible many, name+<addr> okay
Subj = input('Subj? ').strip() # don't split blindly on ',' or ';'
print('Type message text, end with line="."')
text = ''
while True:
line = sys.stdin.readline()
if line == '.\n': break
text += line
return From, To, Subj, text
def sendmessage():
From, To, Subj, text = inputmessage()
msg = Message()
msg['From'] = From
msg['To'] = ', '.join(To) # join for hdr, not send
msg['Subject'] = Subj
msg['Date'] = email.utils.formatdate() # curr datetime, rfc2822
msg.set_payload(text)
server = smtplib.SMTP(mailconfig.smtpservername)
try:
failed = server.sendmail(From, To, str(msg)) # may also raise exc
948 | Chapter 13: Client-Side Scripting

except:
print('Error - send failed')
else:
if failed: print('Failed:', failed)
def connect(servername, user, passwd):
print('Connecting...')
server = poplib.POP3(servername)
server.user(user) # connect, log in to mail server
server.pass_(passwd) # pass is a reserved word
print(server.getwelcome()) # print returned greeting message
return server
def loadmessages(servername, user, passwd, loadfrom=1):
server = connect(servername, user, passwd)
try:
print(server.list())
(msgCount, msgBytes) = server.stat()
print('There are', msgCount, 'mail messages in', msgBytes, 'bytes')
print('Retrieving...')
msgList = [] # fetch mail now
for i in range(loadfrom, msgCount+1): # empty if low >= high
(hdr, message, octets) = server.retr(i) # save text on list
message = decodeToUnicode(message) # 4E, Py3.1: bytes to str
msgList.append('\n'.join(message)) # leave mail on server
finally:
server.quit() # unlock the mail box
assert len(msgList) == (msgCount - loadfrom) + 1 # msg nums start at 1
return msgList
def deletemessages(servername, user, passwd, toDelete, verify=True):
print('To be deleted:', toDelete)
if verify and input('Delete?')[:1] not in ['y', 'Y']:
print('Delete cancelled.')
else:
server = connect(servername, user, passwd)
try:
print('Deleting messages from server...')
for msgnum in toDelete: # reconnect to delete mail
server.dele(msgnum) # mbox locked until quit()
finally:
server.quit()
def showindex(msgList):
count = 0 # show some mail headers
for msgtext in msgList:
msghdrs = Parser().parsestr(msgtext, headersonly=True) # expects str in 3.1
count += 1
print('%d:\t%d bytes' % (count, len(msgtext)))
for hdr in ('From', 'To', 'Date', 'Subject'):
try:
print('\t%-8s=>%s' % (hdr, msghdrs[hdr]))
except KeyError:
print('\t%-8s=>(unknown)' % hdr)
if count % 5 == 0:
A Console-Based Email Client | 949

input('[Press Enter key]') # pause after each 5
def showmessage(i, msgList):
if 1 <= i <= len(msgList):
#print(msgList[i-1]) # old: prints entire mail--hdrs+text
print('-' * 79)
msg = Parser().parsestr(msgList[i-1]) # expects str in 3.1
content = msg.get_payload() # prints payload: string, or [Messages]
if isinstance(content, str): # keep just one end-line at end
content = content.rstrip() + '\n'
print(content)
print('-' * 79) # to get text only, see email.parsers
else:
print('Bad message number')
def savemessage(i, mailfile, msgList):
if 1 <= i <= len(msgList):
savefile = open(mailfile, 'a', encoding=mailconfig.fetchEncoding) # 4E
savefile.write('\n' + msgList[i-1] + '-'*80 + '\n')
else:
print('Bad message number')
def msgnum(command):
try:
return int(command.split()[1])
except:
return −1 # assume this is bad
helptext = """
Available commands:
i - index display
l n? - list all messages (or just message n)
d n? - mark all messages for deletion (or just message n)
s n? - save all messages to a file (or just message n)
m - compose and send a new mail message
q - quit pymail
? - display this help text
"""
def interact(msgList, mailfile):
showindex(msgList)
toDelete = []
while True:
try:
command = input('[Pymail] Action? (i, l, d, s, m, q, ?) ')
except EOFError:
command = 'q'
if not command: command = '*'
# quit
if command == 'q':
break
# index
elif command[0] == 'i':
950 | Chapter 13: Client-Side Scripting

showindex(msgList)
# list
elif command[0] == 'l':
if len(command) == 1:
for i in range(1, len(msgList)+1):
showmessage(i, msgList)
else:
showmessage(msgnum(command), msgList)
# save
elif command[0] == 's':
if len(command) == 1:
for i in range(1, len(msgList)+1):
savemessage(i, mailfile, msgList)
else:
savemessage(msgnum(command), mailfile, msgList)
# delete
elif command[0] == 'd':
if len(command) == 1: # delete all later
toDelete = list(range(1, len(msgList)+1)) # 3.x requires list
else:
delnum = msgnum(command)
if (1 <= delnum <= len(msgList)) and (delnum not in toDelete):
toDelete.append(delnum)
else:
print('Bad message number')
# mail
elif command[0] == 'm': # send a new mail via SMTP
sendmessage()
#execfile('smtpmail.py', {}) # alt: run file in own namespace
elif command[0] == '?':
print(helptext)
else:
print('What? -- type "?" for commands help')
return toDelete
if __name__ == '__main__':
import getpass, mailconfig
mailserver = mailconfig.popservername # ex: 'pop.rmi.net'
mailuser = mailconfig.popusername # ex: 'lutz'
mailfile = mailconfig.savemailfile # ex: r'c:\stuff\savemail'
mailpswd = getpass.getpass('Password for %s?' % mailserver)
print('[Pymail email client]')
msgList = loadmessages(mailserver, mailuser, mailpswd) # load all
toDelete = interact(msgList, mailfile)
if toDelete: deletemessages(mailserver, mailuser, mailpswd, toDelete)
print('Bye.')
A Console-Based Email Client | 951

There isn’t much new here—just a combination of user-interface logic and tools we’ve
already met, plus a handful of new techniques:
Loads
This client loads all email from the server into an in-memory Python list only once,
on startup; you must exit and restart to reload newly arrived email.
Saves
On demand, pymail saves the raw text of a selected message into a local file, whose
name you place in the mailconfig module of Example 13-17.
Deletions
We finally support on-request deletion of mail from the server here: in pymail, mails
are selected for deletion by number, but are still only physically removed from your
server on exit, and then only if you verify the operation. By deleting only on exit,
we avoid changing mail message numbers during a session—under POP, deleting
a mail not at the end of the list decrements the number assigned to all mails fol-
lowing the one deleted. Since mail is cached in memory by pymail, future operations
on the numbered messages in memory can be applied to the wrong mail if deletions
were done immediately.#
Parsing and composing messages
pymail now displays just the payload of a message on listing commands, not the
entire raw text, and the mail index listing only displays selected headers parsed out
of each message. Python’s email package is used to extract headers and content
from a message, as shown in the prior section. Similarly, we use email to compose
a message and ask for its string to ship as a mail.
By now, I expect that you know enough to read this script for a deeper look, so instead
of saying more about its design here, let’s jump into an interactive pymail session to see
how it works.
Running the pymail Console Client
Let’s start up pymail to read and delete email at our mail server and send new messages.
pymail runs on any machine with Python and sockets, fetches mail from any email server
with a POP interface on which you have an account, and sends mail via the SMTP server
you’ve named in the mailconfig module we wrote earlier (Example 13-17).
Here it is in action running on my Windows laptop machine; its operation is identical
on other machines thanks to the portability of both Python and its standard library.
#There will be more on POP message numbers when we study mailtools later in this chapter. Interestingly,
the list of message numbers to be deleted need not be sorted; they remain valid for the duration of the delete
connection, so deletions earlier in the list don’t change numbers of messages later in the list while you are
still connected to the POP server. We’ll also see that some subtle issues may arise if mails in the server inbox
are deleted without pymail’s knowledge (e.g., by your ISP or another email client); although very rare, suffice
it to say for now that deletions in this script are not guaranteed to be accurate.
952 | Chapter 13: Client-Side Scripting

First, we start the script, supply a POP password (remember, SMTP servers usually
require no password), and wait for the pymail email list index to appear; as is, this
version loads the full text of all mails in the inbox on startup:
C:\...\PP4E\Internet\Email> pymail.py
Password for pop.secureserver.net?
[Pymail email client]
Connecting...
b'+OK <8927.1273263898@p3pop01-10.prod.phx3.gdg>'
(b'+OK ', [b'1 1860', b'2 1408', b'3 1049', b'4 1009', b'5 1038', b'6 957'], 47)
There are 6 mail messages in 7321 bytes
Retrieving...
1: 1861 bytes
From =>lutz@rmi.net
To =>pp4e@learning-python.com
Date =>Wed, 5 May 2010 11:29:36 −0400 (EDT)
Subject =>I'm a Lumberjack, and I'm Okay
2: 1409 bytes
From =>lutz@learning-python.com
To =>PP4E@learning-python.com
Date =>Wed, 05 May 2010 08:33:47 −0700
Subject =>testing
3: 1050 bytes
From =>Eric.the.Half.a.Bee@yahoo.com
To =>PP4E@learning-python.com
Date =>Thu, 06 May 2010 14:11:07 −0000
Subject =>A B C D E F G
4: 1010 bytes
From =>PP4E@learning-python.com
To =>PP4E@learning-python.com
Date =>Thu, 06 May 2010 14:16:31 −0000
Subject =>testing smtpmail
5: 1039 bytes
From =>Eric.the.Half.a.Bee@aol.com
To =>nobody.in.particular@marketing.com
Date =>Thu, 06 May 2010 14:32:32 −0000
Subject =>a b c d e f g
[Press Enter key]
6: 958 bytes
From =>PP4E@learning-python.com
To =>maillist
Date =>Thu, 06 May 2010 10:58:40 −0400
Subject =>test interactive smtplib
[Pymail] Action? (i, l, d, s, m, q, ?) l 6
-------------------------------------------------------------------------------
testing 1 2 3...
-------------------------------------------------------------------------------
[Pymail] Action? (i, l, d, s, m, q, ?) l 3
-------------------------------------------------------------------------------
Fiddle de dum, Fiddle de dee,
Eric the half a bee.
-------------------------------------------------------------------------------
[Pymail] Action? (i, l, d, s, m, q, ?)
A Console-Based Email Client | 953

Once pymail downloads your email to a Python list on the local client machine, you
type command letters to process it. The l command lists (prints) the contents of a given
mail number; here, we just used it to list two emails we sent in the preceding section,
with the smtpmail script, and interactively.
pymail also lets us get command help, delete messages (deletions actually occur at the
server on exit from the program), and save messages away in a local text file whose
name is listed in the mailconfig module we saw earlier:
[Pymail] Action? (i, l, d, s, m, q, ?) ?
Available commands:
i - index display
l n? - list all messages (or just message n)
d n? - mark all messages for deletion (or just message n)
s n? - save all messages to a file (or just message n)
m - compose and send a new mail message
q - quit pymail
? - display this help text
[Pymail] Action? (i, l, d, s, m, q, ?) s 4
[Pymail] Action? (i, l, d, s, m, q, ?) d 4
Now, let’s pick the m mail compose option—pymail inputs the mail parts, builds mail
text with email, and ships it off with smtplib. You can separate recipients with a comma,
and use either simple “addr” or full “name <addr>” address pairs if desired. Because
the mail is sent by SMTP, you can use arbitrary From addresses here; but again, you
generally shouldn’t do that (unless, of course, you’re trying to come up with interesting
examples for a book):
[Pymail] Action? (i, l, d, s, m, q, ?) m
From? Cardinal@hotmail.com
To? PP4E@learning-python.com
Subj? Among our weapons are these
Type message text, end with line="."
Nobody Expects the Spanish Inquisition!
.
[Pymail] Action? (i, l, d, s, m, q, ?) q
To be deleted: [4]
Delete?y
Connecting...
b'+OK <16872.1273264370@p3pop01-17.prod.phx3.secureserver.net>'
Deleting messages from server...
Bye.
As mentioned, deletions really happen only on exit. When we quit pymail with the q
command, it tells us which messages are queued for deletion, and verifies the request.
Once verified, pymail finally contacts the mail server again and issues POP calls to delete
the selected mail messages. Because deletions change message numbers in the server’s
inbox, postponing deletion until exit simplifies the handling of already loaded email
(we’ll improve on this in the PyMailGUI client of the next chapter).
954 | Chapter 13: Client-Side Scripting

Because pymail downloads mail from your server into a local Python list only once at
startup, though, we need to start pymail again to refetch mail from the server if we want
to see the result of the mail we sent and the deletion we made. Here, our new mail
shows up at the end as new number 6, and the original mail assigned number 4 in the
prior session is gone:
C:\...\PP4E\Internet\Email> pymail.py
Password for pop.secureserver.net?
[Pymail email client]
Connecting...
b'+OK <11563.1273264637@p3pop01-26.prod.phx3.secureserver.net>'
(b'+OK ', [b'1 1860', b'2 1408', b'3 1049', b'4 1038', b'5 957', b'6 1037'], 47)
There are 6 mail messages in 7349 bytes
Retrieving...
1: 1861 bytes
From =>lutz@rmi.net
To =>pp4e@learning-python.com
Date =>Wed, 5 May 2010 11:29:36 −0400 (EDT)
Subject =>I'm a Lumberjack, and I'm Okay
2: 1409 bytes
From =>lutz@learning-python.com
To =>PP4E@learning-python.com
Date =>Wed, 05 May 2010 08:33:47 −0700
Subject =>testing
3: 1050 bytes
From =>Eric.the.Half.a.Bee@yahoo.com
To =>PP4E@learning-python.com
Date =>Thu, 06 May 2010 14:11:07 −0000
Subject =>A B C D E F G
4: 1039 bytes
From =>Eric.the.Half.a.Bee@aol.com
To =>nobody.in.particular@marketing.com
Date =>Thu, 06 May 2010 14:32:32 −0000
Subject =>a b c d e f g
5: 958 bytes
From =>PP4E@learning-python.com
To =>maillist
Date =>Thu, 06 May 2010 10:58:40 −0400
Subject =>test interactive smtplib
[Press Enter key]
6: 1038 bytes
From =>Cardinal@hotmail.com
To =>PP4E@learning-python.com
Date =>Fri, 07 May 2010 20:32:38 −0000
Subject =>Among our weapons are these
[Pymail] Action? (i, l, d, s, m, q, ?) l 6
-------------------------------------------------------------------------------
Nobody Expects the Spanish Inquisition!
-------------------------------------------------------------------------------
[Pymail] Action? (i, l, d, s, m, q, ?) q
Bye.
A Console-Based Email Client | 955

Though not shown in this session, you can also send to multiple recipients, and include
full name and address pairs in your email addresses. This works just because the script
employs email utilities described earlier to split up addresses and fully parse to allow
commas as both separators and name characters. The following, for example, would
send to two and three recipients, respectively, using mostly full address formats:
[Pymail] Action? (i, l, d, s, m, q, ?) m
From? "moi 1" <pp4e@learning-python.com>
To? "pp 4e" <pp4e@learning-python.com>, "lu,tz" <lutz@learning-python.com>
[Pymail] Action? (i, l, d, s, m, q, ?) m
From? The Book <pp4e@learning-python.com>
To? "pp 4e" <pp4e@learning-python.com>, "lu,tz" <lutz@learning-python.com>,
lutz@rmi.net
Finally, if you are running this live, you will also find the mail save file on your machine,
containing the one message we asked to be saved in the prior session; it’s simply the
raw text of saved emails, with separator lines. This is both human and machine-
readable—in principle, another script could load saved mail from this file into a Python
list by calling the string object’s split method on the file’s text with the separator line
as a delimiter. As shown in this book, it shows up in file C:\temp\savemail.txt, but you
can configure this as you like in the mailconfig module.
The mailtools Utility Package
The email package used by the pymail example of the prior section is a collection of
powerful tools—in fact, perhaps too powerful to remember completely. At the mini-
mum, some reusable boilerplate code for common use cases can help insulate you from
some of its details; by isolating module usage, such code can also ease the migration to
possible future email changes. To simplify email interfacing for more complex mail
clients, and to further demonstrate the use of standard library email tools, I developed
the custom utility modules listed in this section—a package called mailtools.
mailtools is a Python modules package: a directory of code, with one module per tool
class, and an initialization module run when the directory is first imported. This pack-
age’s modules are essentially just a wrapper layer above the standard library’s email
package, as well as its poplib and smtplib modules. They make some assumptions about
the way email is to be used, but they are reasonable and allow us to forget some of the
underlying complexity of the standard library tools employed.
In a nutshell, the mailtools package provides three classes—to fetch, send, and parse
email messages. These classes can be used as superclasses in order to mix in their meth-
ods to an application-specific class, or as standalone or embedded objects that export
their methods for direct calls. We’ll see these classes deployed both ways in this text.
As a simple example of this package’s tools in action, its selftest.py module serves as
a self-test script. When run, it sends a message from you, to you, which includes the
selftest.py file as an attachment. It also fetches and displays some mail headers and
956 | Chapter 13: Client-Side Scripting

parsed and unparsed content. These interfaces, along with some user-interface magic,
will lead us to full-blown email clients and websites in later chapters.
Two design notes worth mentioning up front: First, none of the code in this package
knows anything about the user interface it will be used in (console, GUI, web, or other)
or does anything about things like threads; it is just a toolkit. As we’ll see, its clients
are responsible for deciding how it will be deployed. By focusing on just email pro-
cessing here, we simplify the code, as well as the programs that will use it.
Second, each of the main modules in this package illustrate Unicode issues that con-
front Python 3.X code, especially when using the 3.1 Python email package:
• The sender must address encodings for the main message text, attachment input
files, saved-mail output files, and message headers.
• The fetcher must resolve full mail text encodings when new mails are fetched.
• The parser must deal with encodings in text part payloads of parsed messages, as
well as those in message headers.
In addition, the sender must provide workarounds for the binary parts generation and
text part creation issues in email described earlier in this chapter. Since these highlight
Unicode factors in general, and might not be solved as broadly as they might be due to
limitations of the current Python email package, I’ll elaborate on each of these choices
along the way.
The next few sections list mailtools source code. Together, its files consist of roughly
1,050 lines of code, including whitespace and comments. We won’t cover all of this
package’s code in depth—study its listings for more details, and see its self-test module
for a usage example. Also, for more context and examples, watch for the three clients
that will use this package—the modified pymail2.py following this listing, the
PyMailGUI client in Chapter 14, and the PyMailCGI server in Chapter 16. By sharing
and reusing this module, all three systems inherit all its utility, as well as any future
enhancements.
Initialization File
The module in Example 13-21 implements the initialization logic of the mailtools
package; as usual, its code is run automatically the first time a script imports through
the package’s directory. Notice how this file collects the contents of all the nested
modules into the directory’s namespace with from * statements—because mailtools
began life as a single .py file, this provides backward compatibility for existing clients.
We also must use package-relative import syntax here (from .module), because Python
3.X no longer includes the package’s own directory on the module import search path
(only the package’s container is on the path). Since this is the root module, global
comments appear here as well.
The mailtools Utility Package | 957

Example 13-21. PP4E\Internet\Email\mailtools\__init__.py
"""
##################################################################################
mailtools package: interface to mail server transfers, used by pymail2, PyMailGUI,
and PyMailCGI; does loads, sends, parsing, composing, and deleting, with part
attachments, encodings (of both the email and Unicdode kind), etc.; the parser,
fetcher, and sender classes here are designed to be mixed-in to subclasses which
use their methods, or used as embedded or standalone objects;
this package also includes convenience subclasses for silent mode, and more;
loads all mail text if pop server doesn't do top; doesn't handle threads or UI
here, and allows askPassword to differ per subclass; progress callback funcs get
status; all calls raise exceptions on error--client must handle in GUI/other;
this changed from file to package: nested modules imported here for bw compat;
4E: need to use package-relative import syntax throughout, because in Py 3.X
package dir in no longer on module import search path if package is imported
elsewhere (from another directory which uses this package); also performs
Unicode decoding on mail text when fetched (see mailFetcher), as well as for
some text part payloads which might have been email-encoded (see mailParser);
TBD: in saveparts, should file be opened in text mode for text/ contypes?
TBD: in walkNamedParts, should we skip oddballs like message/delivery-status?
TBD: Unicode support has not been tested exhaustively: see Chapter 13 for more
on the Py3.1 email package and its limitations, and the policies used here;
##################################################################################
"""
# collect contents of all modules here, when package dir imported directly
from .mailFetcher import *
from .mailSender import * # 4E: package-relative
from .mailParser import *
# export nested modules here, when from mailtools import *
__all__ = 'mailFetcher', 'mailSender', 'mailParser'
# self-test code is in selftest.py to allow mailconfig's path
# to be set before running thr nested module imports above
MailTool Class
Example 13-22 contains common superclasses for the other classes in the package. This
is in part meant for future expansion. At present, these are used only to enable or disable
trace message output (some clients, such as web-based programs, may not want text
to be printed to the output stream). Subclasses mix in the silent variant to turn off
output.
958 | Chapter 13: Client-Side Scripting

Example 13-22. PP4E\Internet\Email\mailtools\mailTool.py
"""
###############################################################################
common superclasses: used to turn trace massages on/off
###############################################################################
"""
class MailTool: # superclass for all mail tools
def trace(self, message): # redef me to disable or log to file
print(message)
class SilentMailTool: # to mixin instead of subclassing
def trace(self, message):
pass
MailSender Class
The class used to compose and send messages is coded in Example 13-23. This module
provides a convenient interface that combines standard library tools we’ve already met
in this chapter—the email package to compose messages with attachments and en-
codings, and the smtplib module to send the resulting email text. Attachments are
passed in as a list of filenames—MIME types and any required encodings are deter-
mined automatically with the module mimetypes. Moreover, date and time strings are
automated with an email.utils call, and non-ASCII headers are encoded per email,
MIME, and Unicode standards. Study this file’s code and comments for more on its
operation.
Unicode issues for attachments, save files, and headers
This is also where we open and add attachment files, generate message text, and save
sent messages to a local file. Most attachment files are opened in binary mode, but as
we’ve seen, some text attachments must be opened in text mode because the current
email package requires them to be str strings when message objects are created. As we
also saw earlier, the email package requires attachments to be str text when mail text
is later generated, possibly as the result of MIME encoding.
To satisfy these constraints with the Python 3.1 email package, we must apply the two
fixes described earlier— part file open calls select between text or binary mode (and
thus read str or bytes) based upon the way email will process the data, and MIME
encoding calls for binary data are augmented to decode the result to ASCII text. The
latter of these also splits the Base64 text into lines here for binary parts (unlike email),
because it is otherwise sent as one long line, which may work in some contexts, but
causes problems in some text editors if the raw text is viewed.
Beyond these fixes, clients may optionally provide the names of the Unicode encoding
scheme associated with the main text part and each text attachment part. In Chap-
ter 14’s PyMailGUI, this is controlled in the mailconfig user settings module, with
UTF-8 used as a fallback default whenever user settings fail to encode a text part. We
The mailtools Utility Package | 959

could in principle also catch part file decoding errors and return an error indicator string
(as we do for received mails in the mail fetcher ahead), but sending an invalid attach-
ment is much more grievous than displaying one. Instead, the send request fails entirely
on errors.
Finally, there is also new support for encoding non-ASCII headers (both full headers
and names of email addresses) per a client-selectable encoding that defaults to UTF-8,
and the sent message save file is opened in the same mailconfig Unicode encoding mode
used to decode messages when they are fetched.
The latter policy for sent mail saves is used because the sent file may be opened to fetch
full mail text in this encoding later by clients which apply this encoding scheme. This
is intended to mirror the way that clients such as PyMailGUI save full message text in
local files to be opened and parsed later. It might fail if the mail fetcher resorted to
guessing a different and incompatible encoding, and it assumes that no message gives
rise to incompatibly encoded data in the file across multiple sessions. We could instead
keep one save file per encoding, but encodings for full message text probably will not
vary; ASCII was the original standard for full mail text, so 7- or 8-bit text is likely.
Example 13-23. PP4E\Internet\Email\mailtools\mailSender.py
"""
###############################################################################
send messages, add attachments (see __init__ for docs, test)
###############################################################################
"""
import mailconfig # client's mailconfig
import smtplib, os, mimetypes # mime: name to type
import email.utils, email.encoders # date string, base64
from .mailTool import MailTool, SilentMailTool # 4E: package-relative
from email.message import Message # general message, obj->text
from email.mime.multipart import MIMEMultipart # type-specific messages
from email.mime.audio import MIMEAudio # format/encode attachments
from email.mime.image import MIMEImage
from email.mime.text import MIMEText
from email.mime.base import MIMEBase
from email.mime.application import MIMEApplication # 4E: use new app class
def fix_encode_base64(msgobj):
"""
4E: workaround for a genuine bug in Python 3.1 email package that prevents
mail text generation for binary parts encoded with base64 or other email
encodings; the normal email.encoder run by the constructor leaves payload
as bytes, even though it's encoded to base64 text form; this breaks email
text generation which assumes this is text and requires it to be str; net
effect is that only simple text part emails can be composed in Py 3.1 email
package as is - any MIME-encoded binary part cause mail text generation to
fail; this bug seems likely to go away in a future Python and email package,
in which case this should become a no-op; see Chapter 13 for more details;
960 | Chapter 13: Client-Side Scripting

"""
linelen = 76 # per MIME standards
from email.encoders import encode_base64
encode_base64(msgobj) # what email does normally: leaves bytes
text = msgobj.get_payload() # bytes fails in email pkg on text gen
if isinstance(text, bytes): # payload is bytes in 3.1, str in 3.2 alpha
text = text.decode('ascii') # decode to unicode str so text gen works
lines = [] # split into lines, else 1 massive line
text = text.replace('\n', '') # no \n present in 3.1, but futureproof me!
while text:
line, text = text[:linelen], text[linelen:]
lines.append(line)
msgobj.set_payload('\n'.join(lines))
def fix_text_required(encodingname):
"""
4E: workaround for str/bytes combination errors in email package; MIMEText
requires different types for different Unicode encodings in Python 3.1, due
to the different ways it MIME-encodes some types of text; see Chapter 13;
the only other alternative is using generic Message and repeating much code;
"""
from email.charset import Charset, BASE64, QP
charset = Charset(encodingname) # how email knows what to do for encoding
bodyenc = charset.body_encoding # utf8, others require bytes input data
return bodyenc in (None, QP) # ascii, latin1, others require str
class MailSender(MailTool):
"""
send mail: format a message, interface with an SMTP server;
works on any machine with Python+Inet, doesn't use cmdline mail;
a nonauthenticating client: see MailSenderAuth if login required;
4E: tracesize is num chars of msg text traced: 0=none, big=all;
4E: supports Unicode encodings for main text and text parts;
4E: supports header encoding, both full headers and email names;
"""
def __init__(self, smtpserver=None, tracesize=256):
self.smtpServerName = smtpserver or mailconfig.smtpservername
self.tracesize = tracesize
def sendMessage(self, From, To, Subj, extrahdrs, bodytext, attaches,
saveMailSeparator=(('=' * 80) + 'PY\n'),
bodytextEncoding='us-ascii',
attachesEncodings=None):
"""
format and send mail: blocks caller, thread me in a GUI;
bodytext is main text part, attaches is list of filenames,
extrahdrs is list of (name, value) tuples to be added;
raises uncaught exception if send fails for any reason;
saves sent message text in a local file if successful;
The mailtools Utility Package | 961

assumes that To, Cc, Bcc hdr values are lists of 1 or more already
decoded addresses (possibly in full name+<addr> format); client
must parse to split these on delimiters, or use multiline input;
note that SMTP allows full name+<addr> format in recipients;
4E: Bcc addrs now used for send/envelope, but header is dropped;
4E: duplicate recipients removed, else will get >1 copies of mail;
caveat: no support for multipart/alternative mails, just /mixed;
"""
# 4E: assume main body text is already in desired encoding;
# clients can decode to user pick, default, or utf8 fallback;
# either way, email needs either str xor bytes specifically;
if fix_text_required(bodytextEncoding):
if not isinstance(bodytext, str):
bodytext = bodytext.decode(bodytextEncoding)
else:
if not isinstance(bodytext, bytes):
bodytext = bodytext.encode(bodytextEncoding)
# make message root
if not attaches:
msg = Message()
msg.set_payload(bodytext, charset=bodytextEncoding)
else:
msg = MIMEMultipart()
self.addAttachments(msg, bodytext, attaches,
bodytextEncoding, attachesEncodings)
# 4E: non-ASCII hdrs encoded on sends; encode just name in address,
# else smtp may drop the message completely; encodes all envelope
# To names (but not addr) also, and assumes servers will allow;
# msg.as_string retains any line breaks added by encoding headers;
hdrenc = mailconfig.headersEncodeTo or 'utf-8' # default=utf8
Subj = self.encodeHeader(Subj, hdrenc) # full header
From = self.encodeAddrHeader(From, hdrenc) # email names
To = [self.encodeAddrHeader(T, hdrenc) for T in To] # each recip
Tos = ', '.join(To) # hdr+envelope
# add headers to root
msg['From'] = From
msg['To'] = Tos # poss many: addr list
msg['Subject'] = Subj # servers reject ';' sept
msg['Date'] = email.utils.formatdate() # curr datetime, rfc2822 utc
recip = To
for name, value in extrahdrs: # Cc, Bcc, X-Mailer, etc.
if value:
if name.lower() not in ['cc', 'bcc']:
value = self.encodeHeader(value, hdrenc)
msg[name] = value
else:
value = [self.encodeAddrHeader(V, hdrenc) for V in value]
recip += value # some servers reject ['']
962 | Chapter 13: Client-Side Scripting

if name.lower() != 'bcc': # 4E: bcc gets mail, no hdr
msg[name] = ', '.join(value) # add commas between cc
recip = list(set(recip)) # 4E: remove duplicates
fullText = msg.as_string() # generate formatted msg
# sendmail call raises except if all Tos failed,
# or returns failed Tos dict for any that failed
self.trace('Sending to...' + str(recip))
self.trace(fullText[:self.tracesize]) # SMTP calls connect
server = smtplib.SMTP(self.smtpServerName) # this may fail too
self.getPassword() # if srvr requires
self.authenticateServer(server) # login in subclass
try:
failed = server.sendmail(From, recip, fullText) # except or dict
except:
server.close() # 4E: quit may hang!
raise # reraise except
else:
server.quit() # connect + send OK
self.saveSentMessage(fullText, saveMailSeparator) # 4E: do this first
if failed:
class SomeAddrsFailed(Exception): pass
raise SomeAddrsFailed('Failed addrs:%s\n' % failed)
self.trace('Send exit')
def addAttachments(self, mainmsg, bodytext, attaches,
bodytextEncoding, attachesEncodings):
"""
format a multipart message with attachments;
use Unicode encodings for text parts if passed;
"""
# add main text/plain part
msg = MIMEText(bodytext, _charset=bodytextEncoding)
mainmsg.attach(msg)
# add attachment parts
encodings = attachesEncodings or (['us-ascii'] * len(attaches))
for (filename, fileencode) in zip(attaches, encodings):
# filename may be absolute or relative
if not os.path.isfile(filename): # skip dirs, etc.
continue
# guess content type from file extension, ignore encoding
contype, encoding = mimetypes.guess_type(filename)
if contype is None or encoding is not None: # no guess, compressed?
contype = 'application/octet-stream' # use generic default
self.trace('Adding ' + contype)
# build sub-Message of appropriate kind
maintype, subtype = contype.split('/', 1)
if maintype == 'text': # 4E: text needs encoding
if fix_text_required(fileencode): # requires str or bytes
data = open(filename, 'r', encoding=fileencode)
The mailtools Utility Package | 963

else:
data = open(filename, 'rb')
msg = MIMEText(data.read(), _subtype=subtype, _charset=fileencode)
data.close()
elif maintype == 'image':
data = open(filename, 'rb') # 4E: use fix for binaries
msg = MIMEImage(
data.read(), _subtype=subtype, _encoder=fix_encode_base64)
data.close()
elif maintype == 'audio':
data = open(filename, 'rb')
msg = MIMEAudio(
data.read(), _subtype=subtype, _encoder=fix_encode_base64)
data.close()
elif maintype == 'application': # new in 4E
data = open(filename, 'rb')
msg = MIMEApplication(
data.read(), _subtype=subtype, _encoder=fix_encode_base64)
data.close()
else:
data = open(filename, 'rb') # application/* could
msg = MIMEBase(maintype, subtype) # use this code too
msg.set_payload(data.read())
data.close() # make generic type
fix_encode_base64(msg) # was broken here too!
#email.encoders.encode_base64(msg) # encode using base64
# set filename and attach to container
basename = os.path.basename(filename)
msg.add_header('Content-Disposition',
'attachment', filename=basename)
mainmsg.attach(msg)
# text outside mime structure, seen by non-MIME mail readers
mainmsg.preamble = 'A multi-part MIME format message.\n'
mainmsg.epilogue = '' # make sure message ends with a newline
def saveSentMessage(self, fullText, saveMailSeparator):
"""
append sent message to local file if send worked for any;
client: pass separator used for your application, splits;
caveat: user may change the file at same time (unlikely);
"""
try:
sentfile = open(mailconfig.sentmailfile, 'a',
encoding=mailconfig.fetchEncoding) # 4E
if fullText[-1] != '\n': fullText += '\n'
sentfile.write(saveMailSeparator)
sentfile.write(fullText)
sentfile.close()
except:
964 | Chapter 13: Client-Side Scripting

self.trace('Could not save sent message') # not a show-stopper
def encodeHeader(self, headertext, unicodeencoding='utf-8'):
"""
4E: encode composed non-ascii message headers content per both email
and Unicode standards, according to an optional user setting or UTF-8;
header.encode adds line breaks in header string automatically if needed;
"""
try:
headertext.encode('ascii')
except:
try:
hdrobj = email.header.make_header([(headertext, unicodeencoding)])
headertext = hdrobj.encode()
except:
pass # auto splits into multiple cont lines if needed
return headertext # smtplib may fail if it won't encode to ascii
def encodeAddrHeader(self, headertext, unicodeencoding='utf-8'):
"""
4E: try to encode non-ASCII names in email addresess per email, MIME,
and Unicode standards; if this fails drop name and use just addr part;
if cannot even get addresses, try to decode as a whole, else smtplib
may run into errors when it tries to encode the entire mail as ASCII;
utf-8 default should work for most, as it formats code points broadly;
inserts newlines if too long or hdr.encode split names to multiple lines,
but this may not catch some lines longer than the cutoff (improve me);
as used, Message.as_string formatter won't try to break lines further;
see also decodeAddrHeader in mailParser module for the inverse of this;
"""
try:
pairs = email.utils.getaddresses([headertext]) # split addrs + parts
encoded = []
for name, addr in pairs:
try:
name.encode('ascii') # use as is if okay as ascii
except UnicodeError: # else try to encode name part
try:
uni = name.encode(unicodeencoding)
hdr = email.header.make_header([(uni, unicodeencoding)])
name = hdr.encode()
except:
name = None # drop name, use address part only
joined = email.utils.formataddr((name, addr)) # quote name if need
encoded.append(joined)
fullhdr = ', '.join(encoded)
if len(fullhdr) > 72 or '\n' in fullhdr: # not one short line?
fullhdr = ',\n '.join(encoded) # try multiple lines
return fullhdr
except:
return self.encodeHeader(headertext)
def authenticateServer(self, server):
The mailtools Utility Package | 965

pass # no login required for this server/class
def getPassword(self):
pass # no login required for this server/class
################################################################################
# specialized subclasses
################################################################################
class MailSenderAuth(MailSender):
"""
use for servers that require login authorization;
client: choose MailSender or MailSenderAuth super
class based on mailconfig.smtpuser setting (None?)
"""
smtpPassword = None # 4E: on class, not self, shared by poss N instances
def __init__(self, smtpserver=None, smtpuser=None):
MailSender.__init__(self, smtpserver)
self.smtpUser = smtpuser or mailconfig.smtpuser
#self.smtpPassword = None # 4E: makes PyMailGUI ask for each send!
def authenticateServer(self, server):
server.login(self.smtpUser, self.smtpPassword)
def getPassword(self):
"""
get SMTP auth password if not yet known;
may be called by superclass auto, or client manual:
not needed until send, but don't run in GUI thread;
get from client-side file or subclass method
"""
if not self.smtpPassword:
try:
localfile = open(mailconfig.smtppasswdfile)
MailSenderAuth.smtpPassword = localfile.readline()[:-1] # 4E
self.trace('local file password' + repr(self.smtpPassword))
except:
MailSenderAuth.smtpPassword = self.askSmtpPassword() # 4E
def askSmtpPassword(self):
assert False, 'Subclass must define method'
class MailSenderAuthConsole(MailSenderAuth):
def askSmtpPassword(self):
import getpass
prompt = 'Password for %s on %s?' % (self.smtpUser, self.smtpServerName)
return getpass.getpass(prompt)
class SilentMailSender(SilentMailTool, MailSender):
pass # replaces trace
966 | Chapter 13: Client-Side Scripting

MailFetcher Class
The class defined in Example 13-24 does the work of interfacing with a POP email
server—loading, deleting, and synchronizing. This class merits a few additional words
of explanation.
General usage
This module deals strictly in email text; parsing email after it has been fetched is dele-
gated to a different module in the package. Moreover, this module doesn’t cache already
loaded information; clients must add their own mail-retention tools if desired. Clients
must also provide password input methods or pass one in, if they cannot use the console
input subclass here (e.g., GUIs and web-based programs).
The loading and deleting tasks use the standard library poplib module in ways we saw
earlier in this chapter, but notice that there are interfaces for fetching just message
header text with the TOP action in POP if the mail server supports it. This can save
substantial time if clients need to fetch only basic details for an email index. In addition,
the header and full-text fetchers are equipped to load just mails newer than a particular
number (useful once an initial load is run), and to restrict fetches to a fixed-sized set of
the mostly recently arrived emails (useful for large inboxes with slow Internet access
or servers).
This module also supports the notion of progress indicators—for methods that perform
multiple downloads or deletions, callers may pass in a function that will be called as
each mail is processed. This function will receive the current and total step numbers.
It’s left up to the caller to render this in a GUI, console, or other user interface.
Unicode decoding for full mail text on fetches
Additionally, this module is where we apply the session-wide message bytes Unicode
decoding policy required for parsing, as discussed earlier in this chapter. This decoding
uses an encoding name user setting in the mailconfig module, followed by heuristics.
Because this decoding is performed immediately when a mail is fetched, all clients of
this package can assume message text is str Unicode strings—including any later pars-
ing, display, or save operations. In addition to the mailconfig setting, we also apply a
few guesses with common encoding types, though it’s not impossible that this may lead
to problems if mails decoded by guessing cannot be written to mail save fails using the
mailconfig setting.
As described, this session-wide approach to encodings is not ideal, but it can be adjusted
per client session and reflects the current limitations of email in Python 3.1—its parser
requires already decoded Unicode strings, but fetches return bytes. If this decoding
fails, as a last resort we attempt to decode headers only, as either ASCII (or other com-
mon format) text or the platform default, and insert an error message in the email
body—a heuristic that attempts to avoid killing clients with exceptions if possible (see
The mailtools Utility Package | 967

file _test-decoding.py in the examples package for a test of this logic). In practice, an 8-
bit Unicode encoding such as Latin-1 will probably suffice in most cases, because ASCII
was the original requirement of email standards.
In principle, we could try to search for encoding information in message headers if it’s
present, by parsing mails partially ourselves. We might then take a per-message instead
of per-session approach to decoding full text, and associate an encoding type with each
mail for later processing such as saves, though this raises further complications, as a
save file can have just one (compatible) encoding, not one per message. Moreover,
character sets in email headers may refer to individual components, not the entire
email’s text. Since most mails will conform to 7- or 8-bit standards, and since a future
email release will likely address this issue, extra complexity is probably not warranted
for this case in this book.
Also keep in mind that the Unicode decoding performed here is for the entire mail text
fetched from a server. Really, this is just one part of the email encoding story in the
Unicode-aware world of today. In addition:
• Payloads of parsed message parts may still be returned as bytes and require special
handling or further Unicode decoding (see the parser module ahead).
• Text parts and attachments in composed mails impose encoding choices as well
(see the sender module earlier).
• Message headers have their own encoding conventions, and may be both MIME
and Unicode encoded if Internationalized (see both the parser and sender
modules).
Inbox synchronization tools
When you start studying this example, you’ll also notice that Example 13-24 devotes
substantial code to detecting synchronization errors between an email list held by a
client and the current state of the inbox at the POP email server. Normally, POP assigns
relative message numbers to email in the inbox, and only adds newly arrived emails to
the end of the inbox. As a result, relative message numbers from an earlier fetch may
usually be used to delete and fetch in the future.
However, although rare, it is not impossible for the server’s inbox to change in ways
that invalidate previously fetched message numbers. For instance, emails may be de-
leted in another client, and the server itself may move mails from the inbox to an un-
deliverable state on download errors (this may vary per ISP). In both cases, email may
be removed from the middle of the inbox, throwing some prior relative message num-
bers out of sync with the server.
This situation can result in fetching the wrong message in an email client—users receive
a different message than the one they thought they had selected. Worse, this can make
deletions inaccurate—if a mail client uses a relative message number in a delete request,
the wrong mail may be deleted if the inbox has changed since the index was fetched.
968 | Chapter 13: Client-Side Scripting

To assist clients, Example 13-24 includes tools, which match message headers on de-
letions to ensure accuracy and perform general inbox synchronization tests on demand.
These tools are useful only to clients that retain the fetched email list as state informa-
tion. We’ll use these in the PyMailGUI client in Chapter 14. There, deletions use the
safe interface, and loads run the on-demand synchronization test; on detection of syn-
chronization errors, the inbox index is automatically reloaded. For now, see Exam-
ple 13-24 source code and comments for more details.
Note that the synchronization tests try a variety of matching techniques, but require
the complete headers text and, in the worst case, must parse headers and match many
header fields. In many cases, the single previously fetched message-id header field
would be sufficient for matching against messages in the server’s inbox. However, be-
cause this field is optional and can be forged to have any value, it might not always be
a reliable way to identify messages. In other words, a same-valued message-id may not
suffice to guarantee a match, although it can be used to identify a mismatch; in Exam-
ple 13-24, the message-id is used to rule out a match if either message has one, and they
differ in value. This test is performed before falling back on slower parsing and multiple
header matches.
Example 13-24. PP4E\Internet\Email\mailtools\mailFetcher.py
"""
###############################################################################
retrieve, delete, match mail from a POP server (see __init__ for docs, test)
###############################################################################
"""
import poplib, mailconfig, sys # client's mailconfig on sys.path
print('user:', mailconfig.popusername) # script dir, pythonpath, changes
from .mailParser import MailParser # for headers matching (4E: .)
from .mailTool import MailTool, SilentMailTool # trace control supers (4E: .)
# index/server msgnum out of synch tests
class DeleteSynchError(Exception): pass # msg out of synch in del
class TopNotSupported(Exception): pass # can't run synch test
class MessageSynchError(Exception): pass # index list out of sync
class MailFetcher(MailTool):
"""
fetch mail: connect, fetch headers+mails, delete mails
works on any machine with Python+Inet; subclass me to cache
implemented with the POP protocol; IMAP requires new class;
4E: handles decoding of full mail text on fetch for parser;
"""
def __init__(self, popserver=None, popuser=None, poppswd=None, hastop=True):
self.popServer = popserver or mailconfig.popservername
self.popUser = popuser or mailconfig.popusername
self.srvrHasTop = hastop
self.popPassword = poppswd # ask later if None
The mailtools Utility Package | 969

def connect(self):
self.trace('Connecting...')
self.getPassword() # file, GUI, or console
server = poplib.POP3(self.popServer)
server.user(self.popUser) # connect,login POP server
server.pass_(self.popPassword) # pass is a reserved word
self.trace(server.getwelcome()) # print returned greeting
return server
# use setting in client's mailconfig on import search path;
# to tailor, this can be changed in class or per instance;
fetchEncoding = mailconfig.fetchEncoding
def decodeFullText(self, messageBytes):
"""
4E, Py3.1: decode full fetched mail text bytes to str Unicode string;
done at fetch, for later display or parsing (full mail text is always
Unicode thereafter); decode with per-class or per-instance setting, or
common types; could also try headers inspection, or intelligent guess
from structure; in Python 3.2/3.3, this step may not be required: if so,
change to return message line list intact; for more details see Chapter 13;
an 8-bit encoding such as latin-1 will likely suffice for most emails, as
ASCII is the original standard; this method applies to entire/full message
text, which is really just one part of the email encoding story: Message
payloads and Message headers may also be encoded per email, MIME, and
Unicode standards; see Chapter 13 and mailParser and mailSender for more;
"""
text = None
kinds = [self.fetchEncoding] # try user setting first
kinds += ['ascii', 'latin1', 'utf8'] # then try common types
kinds += [sys.getdefaultencoding()] # and platform dflt (may differ)
for kind in kinds: # may cause mail saves to fail
try:
text = [line.decode(kind) for line in messageBytes]
break
except (UnicodeError, LookupError): # LookupError: bad name
pass
if text == None:
# try returning headers + error msg, else except may kill client;
# still try to decode headers per ascii, other, platform default;
blankline = messageBytes.index(b'')
hdrsonly = messageBytes[:blankline]
commons = ['ascii', 'latin1', 'utf8']
for common in commons:
try:
text = [line.decode(common) for line in hdrsonly]
break
except UnicodeError:
pass
else: # none worked
try:
text = [line.decode() for line in hdrsonly] # platform dflt?
970 | Chapter 13: Client-Side Scripting

except UnicodeError:
text = ['From: (sender of unknown Unicode format headers)']
text += ['', '--Sorry: mailtools cannot decode this mail content!--']
return text
def downloadMessage(self, msgnum):
"""
load full raw text of one mail msg, given its
POP relative msgnum; caller must parse content
"""
self.trace('load ' + str(msgnum))
server = self.connect()
try:
resp, msglines, respsz = server.retr(msgnum)
finally:
server.quit()
msglines = self.decodeFullText(msglines) # raw bytes to Unicode str
return '\n'.join(msglines) # concat lines for parsing
def downloadAllHeaders(self, progress=None, loadfrom=1):
"""
get sizes, raw header text only, for all or new msgs
begins loading headers from message number loadfrom
use loadfrom to load newly arrived mails only
use downloadMessage to get a full msg text later
progress is a function called with (count, total);
returns: [headers text], [mail sizes], loadedfull?
4E: add mailconfig.fetchlimit to support large email
inboxes: if not None, only fetches that many headers,
and returns others as dummy/empty mail; else inboxes
like one of mine (4K emails) are not practical to use;
4E: pass loadfrom along to downloadAllMsgs (a buglet);
"""
if not self.srvrHasTop: # not all servers support TOP
# naively load full msg text
return self.downloadAllMsgs(progress, loadfrom)
else:
self.trace('loading headers')
fetchlimit = mailconfig.fetchlimit
server = self.connect() # mbox now locked until quit
try:
resp, msginfos, respsz = server.list() # 'num size' lines list
msgCount = len(msginfos) # alt to srvr.stat[0]
msginfos = msginfos[loadfrom-1:] # drop already loadeds
allsizes = [int(x.split()[1]) for x in msginfos]
allhdrs = []
for msgnum in range(loadfrom, msgCount+1): # poss empty
if progress: progress(msgnum, msgCount) # run callback
if fetchlimit and (msgnum <= msgCount - fetchlimit):
# skip, add dummy hdrs
hdrtext = 'Subject: --mail skipped--\n\n'
allhdrs.append(hdrtext)
else:
# fetch, retr hdrs only
The mailtools Utility Package | 971

resp, hdrlines, respsz = server.top(msgnum, 0)
hdrlines = self.decodeFullText(hdrlines)
allhdrs.append('\n'.join(hdrlines))
finally:
server.quit() # make sure unlock mbox
assert len(allhdrs) == len(allsizes)
self.trace('load headers exit')
return allhdrs, allsizes, False
def downloadAllMessages(self, progress=None, loadfrom=1):
"""
load full message text for all msgs from loadfrom..N,
despite any caching that may be being done in the caller;
much slower than downloadAllHeaders, if just need hdrs;
4E: support mailconfig.fetchlimit: see downloadAllHeaders;
could use server.list() to get sizes of skipped emails here
too, but clients probably don't care about these anyhow;
"""
self.trace('loading full messages')
fetchlimit = mailconfig.fetchlimit
server = self.connect()
try:
(msgCount, msgBytes) = server.stat() # inbox on server
allmsgs = []
allsizes = []
for i in range(loadfrom, msgCount+1): # empty if low >= high
if progress: progress(i, msgCount)
if fetchlimit and (i <= msgCount - fetchlimit):
# skip, add dummy mail
mailtext = 'Subject: --mail skipped--\n\nMail skipped.\n'
allmsgs.append(mailtext)
allsizes.append(len(mailtext))
else:
# fetch, retr full mail
(resp, message, respsz) = server.retr(i) # save text on list
message = self.decodeFullText(message)
allmsgs.append('\n'.join(message)) # leave mail on server
allsizes.append(respsz) # diff from len(msg)
finally:
server.quit() # unlock the mail box
assert len(allmsgs) == (msgCount - loadfrom) + 1 # msg nums start at 1
#assert sum(allsizes) == msgBytes # not if loadfrom > 1
return allmsgs, allsizes, True # not if fetchlimit
def deleteMessages(self, msgnums, progress=None):
"""
delete multiple msgs off server; assumes email inbox
unchanged since msgnums were last determined/loaded;
use if msg headers not available as state information;
fast, but poss dangerous: see deleteMessagesSafely
"""
self.trace('deleting mails')
server = self.connect()
try:
972 | Chapter 13: Client-Side Scripting

for (ix, msgnum) in enumerate(msgnums): # don't reconnect for each
if progress: progress(ix+1, len(msgnums))
server.dele(msgnum)
finally: # changes msgnums: reload
server.quit()
def deleteMessagesSafely(self, msgnums, synchHeaders, progress=None):
"""
delete multiple msgs off server, but use TOP fetches to
check for a match on each msg's header part before deleting;
assumes the email server supports the TOP interface of POP,
else raises TopNotSupported - client may call deleteMessages;
use if the mail server might change the inbox since the email
index was last fetched, thereby changing POP relative message
numbers; this can happen if email is deleted in a different
client; some ISPs may also move a mail from inbox to the
undeliverable box in response to a failed download;
synchHeaders must be a list of already loaded mail hdrs text,
corresponding to selected msgnums (requires state); raises
exception if any out of synch with the email server; inbox is
locked until quit, so it should not change between TOP check
and actual delete: synch check must occur here, not in caller;
may be enough to call checkSynchError+deleteMessages, but check
each msg here in case deletes and inserts in middle of inbox;
"""
if not self.srvrHasTop:
raise TopNotSupported('Safe delete cancelled')
self.trace('deleting mails safely')
errmsg = 'Message %s out of synch with server.\n'
errmsg += 'Delete terminated at this message.\n'
errmsg += 'Mail client may require restart or reload.'
server = self.connect() # locks inbox till quit
try: # don't reconnect for each
(msgCount, msgBytes) = server.stat() # inbox size on server
for (ix, msgnum) in enumerate(msgnums):
if progress: progress(ix+1, len(msgnums))
if msgnum > msgCount: # msgs deleted
raise DeleteSynchError(errmsg % msgnum)
resp, hdrlines, respsz = server.top(msgnum, 0) # hdrs only
hdrlines = self.decodeFullText(hdrlines)
msghdrs = '\n'.join(hdrlines)
if not self.headersMatch(msghdrs, synchHeaders[msgnum-1]):
raise DeleteSynchError(errmsg % msgnum)
else:
server.dele(msgnum) # safe to delete this msg
finally: # changes msgnums: reload
server.quit() # unlock inbox on way out
def checkSynchError(self, synchHeaders):
"""
check to see if already loaded hdrs text in synchHeaders
The mailtools Utility Package | 973

list matches what is on the server, using the TOP command in
POP to fetch headers text; use if inbox can change due to
deletes in other client, or automatic action by email server;
raises except if out of synch, or error while talking to server;
for speed, only checks last in last: this catches inbox deletes,
but assumes server won't insert before last (true for incoming
mails); check inbox size first: smaller if just deletes; else
top will differ if deletes and newly arrived messages added at
end; result valid only when run: inbox may change after return;
"""
self.trace('synch check')
errormsg = 'Message index out of synch with mail server.\n'
errormsg += 'Mail client may require restart or reload.'
server = self.connect()
try:
lastmsgnum = len(synchHeaders) # 1..N
(msgCount, msgBytes) = server.stat() # inbox size
if lastmsgnum > msgCount: # fewer now?
raise MessageSynchError(errormsg) # none to cmp
if self.srvrHasTop:
resp, hdrlines, respsz = server.top(lastmsgnum, 0) # hdrs only
hdrlines = self.decodeFullText(hdrlines)
lastmsghdrs = '\n'.join(hdrlines)
if not self.headersMatch(lastmsghdrs, synchHeaders[-1]):
raise MessageSynchError(errormsg)
finally:
server.quit()
def headersMatch(self, hdrtext1, hdrtext2):
""""
may not be as simple as a string compare: some servers add
a "Status:" header that changes over time; on one ISP, it
begins as "Status: U" (unread), and changes to "Status: RO"
(read, old) after fetched once - throws off synch tests if
new when index fetched, but have been fetched once before
delete or last-message check; "Message-id:" line is unique
per message in theory, but optional, and can be anything if
forged; match more common: try first; parsing costly: try last
"""
# try match by simple string compare
if hdrtext1 == hdrtext2:
self.trace('Same headers text')
return True
# try match without status lines
split1 = hdrtext1.splitlines() # s.split('\n'), but no final ''
split2 = hdrtext2.splitlines()
strip1 = [line for line in split1 if not line.startswith('Status:')]
strip2 = [line for line in split2 if not line.startswith('Status:')]
if strip1 == strip2:
self.trace('Same without Status')
return True
# try mismatch by message-id headers if either has one
974 | Chapter 13: Client-Side Scripting

msgid1 = [line for line in split1 if line[:11].lower() == 'message-id:']
msgid2 = [line for line in split2 if line[:11].lower() == 'message-id:']
if (msgid1 or msgid2) and (msgid1 != msgid2):
self.trace('Different Message-Id')
return False
# try full hdr parse and common headers if msgid missing or trash
tryheaders = ('From', 'To', 'Subject', 'Date')
tryheaders += ('Cc', 'Return-Path', 'Received')
msg1 = MailParser().parseHeaders(hdrtext1)
msg2 = MailParser().parseHeaders(hdrtext2)
for hdr in tryheaders: # poss multiple Received
if msg1.get_all(hdr) != msg2.get_all(hdr): # case insens, dflt None
self.trace('Diff common headers')
return False
# all common hdrs match and don't have a diff message-id
self.trace('Same common headers')
return True
def getPassword(self):
"""
get POP password if not yet known
not required until go to server
from client-side file or subclass method
"""
if not self.popPassword:
try:
localfile = open(mailconfig.poppasswdfile)
self.popPassword = localfile.readline()[:-1]
self.trace('local file password' + repr(self.popPassword))
except:
self.popPassword = self.askPopPassword()
def askPopPassword(self):
assert False, 'Subclass must define method'
################################################################################
# specialized subclasses
################################################################################
class MailFetcherConsole(MailFetcher):
def askPopPassword(self):
import getpass
prompt = 'Password for %s on %s?' % (self.popUser, self.popServer)
return getpass.getpass(prompt)
class SilentMailFetcher(SilentMailTool, MailFetcher):
pass # replaces trace
The mailtools Utility Package | 975

MailParser Class
Example 13-25 implements the last major class in the mailtools package—given the
(already decoded) text of an email message, its tools parse the mail’s content into a
message object, with headers and decoded parts. This module is largely just a wrapper
around the standard library’s email package, but it adds convenience tools—finding
the main text part of a message, filename generation for message parts, saving attached
parts to files, decoding headers, splitting address lists, and so on. See the code for more
information. Also notice the parts walker here: by coding its search logic in one place
as a generator function, we guarantee that all its three clients here, as well as any others
elsewhere, implement the same traversal.
Unicode decoding for text part payloads and message headers
This module also provides support for decoding message headers per email standards
(both full headers and names in address headers), and handles decoding per text part
encodings. Headers are decoded according to their content, using tools in the email
package; the headers themselves give their MIME and Unicode encodings, so no user
intervention is required. For client convenience, we also perform Unicode decoding for
main text parts to convert them from bytes to str here if needed.
The latter main-text decoding merits elaboration. As discussed earlier in this chapter,
Message objects (main or attached) may return their payloads as bytes if we fetch with
a decode=1 argument, or if they are bytes to begin with; in other cases, payloads may
be returned as str. We generally need to decode bytes in order to treat payloads as text.
In mailtools itself, str text part payloads are automatically encoded to bytes by
decode=1 and then saved to binary-mode files to finesse encoding issues, but main-text
payloads are decoded to str if they are bytes. This main-text decoding is performed
per the encoding name in the part’s message header (if present and correct), the plat-
form default, or a guess. As we learned in Chapter 9, while GUIs may allow bytes for
display, str text generally provides broader Unicode support; furthermore, str is
sometimes needed for later processing such as line wrapping and webpage generation.
Since this package can’t predict the role of other part payloads besides the main text,
clients are responsible for decoding and encoding as necessary. For instance, other text
parts which are saved in binary mode here may require that message headers be
consulted later to extract Unicode encoding names for better display. For example,
Chapter 14’s PyMailGUI will proceed this way to open text parts on demand, passing
message header encoding information on to PyEdit for decoding as text is loaded.
Some of the to-text conversions performed here are potentially partial solutions (some
parts may lack the required headers and fail per the platform defaults) and may need
to be improved; since this seems likely to be addressed in a future release of Python’s
email package, we’ll settle for our assumptions here.
976 | Chapter 13: Client-Side Scripting

Example 13-25. PP4E\Internet\Email\mailtools\mailParser.py
"""
###############################################################################
parsing and attachment extract, analyse, save (see __init__ for docs, test)
###############################################################################
"""
import os, mimetypes, sys # mime: map type to name
import email.parser # parse text to Message object
import email.header # 4E: headers decode/encode
import email.utils # 4E: addr header parse/decode
from email.message import Message # Message may be traversed
from .mailTool import MailTool # 4E: package-relative
class MailParser(MailTool):
"""
methods for parsing message text, attachments
subtle thing: Message object payloads are either a simple
string for non-multipart messages, or a list of Message
objects if multipart (possibly nested); we don't need to
distinguish between the two cases here, because the Message
walk generator always returns self first, and so works fine
on non-multipart messages too (a single object is walked);
for simple messages, the message body is always considered
here to be the sole part of the mail; for multipart messages,
the parts list includes the main message text, as well as all
attachments; this allows simple messages not of type text to
be handled like attachments in a UI (e.g., saved, opened);
Message payload may also be None for some oddball part types;
4E note: in Py 3.1, text part payloads are returned as bytes
for decode=1, and might be str otherwise; in mailtools, text
is stored as bytes for file saves, but main-text bytes payloads
are decoded to Unicode str per mail header info or platform
default+guess; clients may need to convert other payloads:
PyMailGUI uses headers to decode parts saved to binary files;
4E supports fetched message header auto-decoding per its own
content, both for general headers such as Subject, as well as
for names in address header such as From and To; client must
request this after parse, before display: parser doesn't decode;
"""
def walkNamedParts(self, message):
"""
generator to avoid repeating part naming logic;
skips multipart headers, makes part filenames;
message is already parsed email.message.Message object;
doesn't skip oddball types: payload may be None, must
handle in part saves; some others may warrant skips too;
"""
for (ix, part) in enumerate(message.walk()): # walk includes message
fulltype = part.get_content_type() # ix includes parts skipped
The mailtools Utility Package | 977

maintype = part.get_content_maintype()
if maintype == 'multipart': # multipart/*: container
continue
elif fulltype == 'message/rfc822': # 4E: skip message/rfc822
continue # skip all message/* too?
else:
filename, contype = self.partName(part, ix)
yield (filename, contype, part)
def partName(self, part, ix):
"""
extract filename and content type from message part;
filename: tries Content-Disposition, then Content-Type
name param, or generates one based on mimetype guess;
"""
filename = part.get_filename() # filename in msg hdrs?
contype = part.get_content_type() # lowercase maintype/subtype
if not filename:
filename = part.get_param('name') # try content-type name
if not filename:
if contype == 'text/plain': # hardcode plain text ext
ext = '.txt' # else guesses .ksh!
else:
ext = mimetypes.guess_extension(contype)
if not ext: ext = '.bin' # use a generic default
filename = 'part-%03d%s' % (ix, ext)
return (filename, contype)
def saveParts(self, savedir, message):
"""
store all parts of a message as files in a local directory;
returns [('maintype/subtype', 'filename')] list for use by
callers, but does not open any parts or attachments here;
get_payload decodes base64, quoted-printable, uuencoded data;
mail parser may give us a None payload for oddball types we
probably should skip over: convert to str here to be safe;
"""
if not os.path.exists(savedir):
os.mkdir(savedir)
partfiles = []
for (filename, contype, part) in self.walkNamedParts(message):
fullname = os.path.join(savedir, filename)
fileobj = open(fullname, 'wb') # use binary mode
content = part.get_payload(decode=1) # decode base64,qp,uu
if not isinstance(content, bytes): # 4E: need bytes for rb
content = b'(no content)' # decode=1 returns bytes,
fileobj.write(content) # but some payloads None
fileobj.close() # 4E: not str(content)
partfiles.append((contype, fullname)) # for caller to open
return partfiles
def saveOnePart(self, savedir, partname, message):
"""
ditto, but find and save just one part by name
"""
978 | Chapter 13: Client-Side Scripting

if not os.path.exists(savedir):
os.mkdir(savedir)
fullname = os.path.join(savedir, partname)
(contype, content) = self.findOnePart(partname, message)
if not isinstance(content, bytes): # 4E: need bytes for rb
content = b'(no content)' # decode=1 returns bytes,
open(fullname, 'wb').write(content) # but some payloads None
return (contype, fullname) # 4E: not str(content)
def partsList(self, message):
""""
return a list of filenames for all parts of an
already parsed message, using same filename logic
as saveParts, but do not store the part files here
"""
validParts = self.walkNamedParts(message)
return [filename for (filename, contype, part) in validParts]
def findOnePart(self, partname, message):
"""
find and return part's content, given its name;
intended to be used in conjunction with partsList;
we could also mimetypes.guess_type(partname) here;
we could also avoid this search by saving in dict;
4E: content may be str or bytes--convert as needed;
"""
for (filename, contype, part) in self.walkNamedParts(message):
if filename == partname:
content = part.get_payload(decode=1) # does base64,qp,uu
return (contype, content) # may be bytes text
def decodedPayload(self, part, asStr=True):
"""
4E: decode text part bytes to Unicode str for display, line wrap,
etc.; part is a Message; (decode=1) undoes MIME email encodings
(base64, uuencode, qp), bytes.decode() performs additional Unicode
text string decodings; tries charset encoding name in message
headers first (if present, and accurate), then tries platform
defaults and a few guesses before giving up with error string;
"""
payload = part.get_payload(decode=1) # payload may be bytes
if asStr and isinstance(payload, bytes): # decode=1 returns bytes
tries = []
enchdr = part.get_content_charset() # try msg headers first!
if enchdr:
tries += [enchdr] # try headers first
tries += [sys.getdefaultencoding()] # same as bytes.decode()
tries += ['latin1', 'utf8'] # try 8-bit, incl ascii
for trie in tries: # try utf8 (windows dflt)
try:
payload = payload.decode(trie) # give it a shot, eh?
break
except (UnicodeError, LookupError): # lookuperr: bad name
pass
else:
The mailtools Utility Package | 979

payload = '--Sorry: cannot decode Unicode text--'
return payload
def findMainText(self, message, asStr=True):
"""
for text-oriented clients, return first text part's str;
for the payload of a simple message, or all parts of
a multipart message, looks for text/plain, then text/html,
then text/*, before deducing that there is no text to
display; this is a heuristic, but covers most simple,
multipart/alternative, and multipart/mixed messages;
content-type defaults to text/plain if not in simple msg;
handles message nesting at top level by walking instead
of list scans; if non-multipart but type is text/html,
returns the HTML as the text with an HTML type: caller
may open in web browser, extract plain text, etc; if
nonmultipart and not text, there is no text to display:
save/open message content in UI; caveat: does not try
to concatenate multiple inline text/plain parts if any;
4E: text payloads may be bytes--decodes to str here;
4E: asStr=False to get raw bytes for HTML file saves;
"""
# try to find a plain text
for part in message.walk(): # walk visits message
type = part.get_content_type() # if nonmultipart
if type == 'text/plain': # may be base64,qp,uu
return type, self.decodedPayload(part, asStr) # bytes to str too?
# try to find an HTML part
for part in message.walk():
type = part.get_content_type() # caller renders html
if type == 'text/html':
return type, self.decodedPayload(part, asStr)
# try any other text type, including XML
for part in message.walk():
if part.get_content_maintype() == 'text':
return part.get_content_type(), self.decodedPayload(part, asStr)
# punt: could use first part, but it's not marked as text
failtext = '[No text to display]' if asStr else b'[No text to display]'
return 'text/plain', failtext
def decodeHeader(self, rawheader):
"""
4E: decode existing i18n message header text per both email and Unicode
standards, according to its content; return as is if unencoded or fails;
client must call this to display: parsed Message object does not decode;
i18n header example: '=?UTF-8?Q?Introducing=20Top=20Values=20..Savers?=';
i18n header example: 'Man where did you get that =?UTF-8?Q?assistant=3F?=';
decode_header handles any line breaks in header string automatically, may
return multiple parts if any substrings of hdr are encoded, and returns all
980 | Chapter 13: Client-Side Scripting

bytes in parts list if any encodings found (with unencoded parts encoded as
raw-unicode-escape and enc=None) but returns a single part with enc=None
that is str instead of bytes in Py3.1 if the entire header is unencoded
(must handle mixed types here); see Chapter 13 for more details/examples;
the following first attempt code was okay unless any encoded substrings, or
enc was returned as None (raised except which returned rawheader unchanged):
hdr, enc = email.header.decode_header(rawheader)[0]
return hdr.decode(enc) # fails if enc=None: no encoding or encoded substrs
"""
try:
parts = email.header.decode_header(rawheader)
decoded = []
for (part, enc) in parts: # for all substrings
if enc == None: # part unencoded?
if not isinstance(part, bytes): # str: full hdr unencoded
decoded += [part] # else do unicode decode
else:
decoded += [part.decode('raw-unicode-escape')]
else:
decoded += [part.decode(enc)]
return ' '.join(decoded)
except:
return rawheader # punt!
def decodeAddrHeader(self, rawheader):
"""
4E: decode existing i18n address header text per email and Unicode,
according to its content; must parse out first part of email address
to get i18n part: '"=?UTF-8?Q?Walmart?=" <newsletters@walmart.com>';
From will probably have just 1 addr, but To, Cc, Bcc may have many;
decodeHeader handles nested encoded substrings within an entire hdr,
but we can't simply call it for entire hdr here because it fails if
encoded name substring ends in " quote instead of whitespace or endstr;
see also encodeAddrHeader in mailSender module for the inverse of this;
the following first attempt code failed to handle encoded substrings in
name, and raised exc for unencoded bytes parts if any encoded substrings;
namebytes, nameenc = email.header.decode_header(name)[0] (do email+MIME)
if nameenc: name = namebytes.decode(nameenc) (do Unicode?)
"""
try:
pairs = email.utils.getaddresses([rawheader]) # split addrs and parts
decoded = [] # handles name commas
for (name, addr) in pairs:
try:
name = self.decodeHeader(name) # email+MIME+Uni
except:
name = None # but uses encooded name if exc in decodeHeader
joined = email.utils.formataddr((name, addr)) # join parts
decoded.append(joined)
return ', '.join(decoded) # >= 1 addrs
except:
return self.decodeHeader(rawheader) # try decoding entire string
The mailtools Utility Package | 981

def splitAddresses(self, field):
"""
4E: use comma separator for multiple addrs in the UI, and
getaddresses to split correctly and allow for comma in the
name parts of addresses; used by PyMailGUI to split To, Cc,
Bcc as needed for user inputs and copied headers; returns
empty list if field is empty, or any exception occurs;
"""
try:
pairs = email.utils.getaddresses([field]) # [(name,addr)]
return [email.utils.formataddr(pair) for pair in pairs] # [name <addr>]
except:
return '' # syntax error in user-entered field?, etc.
# returned when parses fail
errorMessage = Message()
errorMessage.set_payload('[Unable to parse message - format error]')
def parseHeaders(self, mailtext):
"""
parse headers only, return root email.message.Message object
stops after headers parsed, even if nothing else follows (top)
email.message.Message object is a mapping for mail header fields
payload of message object is None, not raw body text
"""
try:
return email.parser.Parser().parsestr(mailtext, headersonly=True)
except:
return self.errorMessage
def parseMessage(self, fulltext):
"""
parse entire message, return root email.message.Message object
payload of message object is a string if not is_multipart()
payload of message object is more Messages if multiple parts
the call here same as calling email.message_from_string()
"""
try:
return email.parser.Parser().parsestr(fulltext) # may fail!
except:
return self.errorMessage # or let call handle? can check return
def parseMessageRaw(self, fulltext):
"""
parse headers only, return root email.message.Message object
stops after headers parsed, for efficiency (not yet used here)
payload of message object is raw text of mail after headers
"""
try:
return email.parser.HeaderParser().parsestr(fulltext)
except:
return self.errorMessage
982 | Chapter 13: Client-Side Scripting

Self-Test Script
The last file in the mailtools package, Example 13-26, lists the self-test code for the
package. This code is a separate script file, in order to allow for import search path
manipulation—it emulates a real client, which is assumed to have a mailconfig.py
module in its own source directory (this module can vary per client).
Example 13-26. PP4E\Internet\Email\mailtools\selftest.py
"""
###############################################################################
self-test when this file is run as a program
###############################################################################
"""
#
# mailconfig normally comes from the client's source directory or
# sys.path; for testing, get it from Email directory one level up
#
import sys
sys.path.append('..')
import mailconfig
print('config:', mailconfig.__file__)
# get these from __init__
from mailtools import (MailFetcherConsole,
MailSender, MailSenderAuthConsole,
MailParser)
if not mailconfig.smtpuser:
sender = MailSender(tracesize=5000)
else:
sender = MailSenderAuthConsole(tracesize=5000)
sender.sendMessage(From = mailconfig.myaddress,
To = [mailconfig.myaddress],
Subj = 'testing mailtools package',
extrahdrs = [('X-Mailer', 'mailtools')],
bodytext = 'Here is my source code\n',
attaches = ['selftest.py'],
)
# bodytextEncoding='utf-8', # other tests to try
# attachesEncodings=['latin-1'], # inspect text headers
# attaches=['monkeys.jpg']) # verify Base64 encoded
# to='i18n adddr list...', # test mime/unicode headers
# change mailconfig to test fetchlimit
fetcher = MailFetcherConsole()
def status(*args): print(args)
hdrs, sizes, loadedall = fetcher.downloadAllHeaders(status)
for num, hdr in enumerate(hdrs[:5]):
print(hdr)
The mailtools Utility Package | 983

if input('load mail?') in ['y', 'Y']:
print(fetcher.downloadMessage(num+1).rstrip(), '\n', '-'*70)
last5 = len(hdrs)-4
msgs, sizes, loadedall = fetcher.downloadAllMessages(status, loadfrom=last5)
for msg in msgs:
print(msg[:200], '\n', '-'*70)
parser = MailParser()
for i in [0]: # try [0 , len(msgs)]
fulltext = msgs[i]
message = parser.parseMessage(fulltext)
ctype, maintext = parser.findMainText(message)
print('Parsed:', message['Subject'])
print(maintext)
input('Press Enter to exit') # pause if clicked on Windows
Running the self-test
Here’s a run of the self-test script; it generates a lot of output, most of which has been
deleted here for presentation in this book—as usual, run this on your own for further
details:
C:\...\PP4E\Internet\Email\mailtools> selftest.py
config: ..\mailconfig.py
user: PP4E@learning-python.com
Adding text/x-python
Sending to...['PP4E@learning-python.com']
Content-Type: multipart/mixed; boundary="===============0085314748=="
MIME-Version: 1.0
From: PP4E@learning-python.com
To: PP4E@learning-python.com
Subject: testing mailtools package
Date: Sat, 08 May 2010 19:26:22 −0000
X-Mailer: mailtools
A multi-part MIME format message.
--===============0085314748==
Content-Type: text/plain; charset="us-ascii"
MIME-Version: 1.0
Content-Transfer-Encoding: 7bit
Here is my source code
--===============0085314748==
Content-Type: text/x-python; charset="us-ascii"
MIME-Version: 1.0
Content-Transfer-Encoding: 7bit
Content-Disposition: attachment; filename="selftest.py"
"""
###############################################################################
self-test when this file is run as a program
###############################################################################
984 | Chapter 13: Client-Side Scripting

"""
...more lines omitted...
print(maintext)
input('Press Enter to exit') # pause if clicked on Windows
--===============0085314748==--
Send exit
loading headers
Connecting...
Password for PP4E@learning-python.com on pop.secureserver.net?
b'+OK <28121.1273346862@p3pop01-07.prod.phx3.gdg>'
(1, 7)
(2, 7)
(3, 7)
(4, 7)
(5, 7)
(6, 7)
(7, 7)
load headers exit
Received: (qmail 7690 invoked from network); 5 May 2010 15:29:43 −0000
Received: from unknown (HELO p3pismtp01-026.prod.phx3.secureserver.net) ([10.6.1
...more lines omitted...
load mail?y
load 1
Connecting...
b'+OK <29205.1273346957@p3pop01-10.prod.phx3.gdg>'
Received: (qmail 7690 invoked from network); 5 May 2010 15:29:43 −0000
Received: from unknown (HELO p3pismtp01-026.prod.phx3.secureserver.net) ([10.6.1
...more lines omitted...
load mail?
loading full messages
Connecting...
b'+OK <31655.1273347055@p3pop01-25.prod.phx3.secureserver.net>'
(3, 7)
(4, 7)
(5, 7)
(6, 7)
(7, 7)
Received: (qmail 25683 invoked from network); 6 May 2010 14:12:07 −0000
Received: from unknown (HELO p3pismtp01-018.prod.phx3.secureserver.net) ([10.6.1
...more lines omitted...
Parsed: A B C D E F G
Fiddle de dum, Fiddle de dee,
Eric the half a bee.
Press Enter to exit
The mailtools Utility Package | 985

Updating the pymail Console Client
As a final email example in this chapter, and to give a better use case for the mail
tools module package of the preceding sections, Example 13-27 provides an updated
version of the pymail program we met earlier (Example 13-20). It uses our mailtools
package to access email, instead of interfacing with Python’s email package directly.
Compare its code to the original pymail in this chapter to see how mailtools is employed
here. You’ll find that its mail download and send logic is substantially simpler.
Example 13-27. PP4E\Internet\Email\pymail2.py
#!/usr/local/bin/python
"""
################################################################################
pymail2 - simple console email interface client in Python; this version uses
the mailtools package, which in turn uses poplib, smtplib, and the email package
for parsing and composing emails; displays first text part of mails, not the
entire full text; fetches just mail headers initially, using the TOP command;
fetches full text of just email selected to be displayed; caches already
fetched mails; caveat: no way to refresh index; uses standalone mailtools
objects - they can also be used as superclasses;
################################################################################
"""
import mailconfig, mailtools
from pymail import inputmessage
mailcache = {}
def fetchmessage(i):
try:
fulltext = mailcache[i]
except KeyError:
fulltext = fetcher.downloadMessage(i)
mailcache[i] = fulltext
return fulltext
def sendmessage():
From, To, Subj, text = inputmessage()
sender.sendMessage(From, To, Subj, [], text, attaches=None)
def deletemessages(toDelete, verify=True):
print('To be deleted:', toDelete)
if verify and input('Delete?')[:1] not in ['y', 'Y']:
print('Delete cancelled.')
else:
print('Deleting messages from server...')
fetcher.deleteMessages(toDelete)
def showindex(msgList, msgSizes, chunk=5):
count = 0
for (msg, size) in zip(msgList, msgSizes): # email.message.Message, int
count += 1 # 3.x iter ok here
print('%d:\t%d bytes' % (count, size))
for hdr in ('From', 'To', 'Date', 'Subject'):
986 | Chapter 13: Client-Side Scripting

print('\t%-8s=>%s' % (hdr, msg.get(hdr, '(unknown)')))
if count % chunk == 0:
input('[Press Enter key]') # pause after each chunk
def showmessage(i, msgList):
if 1 <= i <= len(msgList):
fulltext = fetchmessage(i)
message = parser.parseMessage(fulltext)
ctype, maintext = parser.findMainText(message)
print('-' * 79)
print(maintext.rstrip() + '\n') # main text part, not entire mail
print('-' * 79) # and not any attachments after
else:
print('Bad message number')
def savemessage(i, mailfile, msgList):
if 1 <= i <= len(msgList):
fulltext = fetchmessage(i)
savefile = open(mailfile, 'a', encoding=mailconfig.fetchEncoding) # 4E
savefile.write('\n' + fulltext + '-'*80 + '\n')
else:
print('Bad message number')
def msgnum(command):
try:
return int(command.split()[1])
except:
return −1 # assume this is bad
helptext = """
Available commands:
i - index display
l n? - list all messages (or just message n)
d n? - mark all messages for deletion (or just message n)
s n? - save all messages to a file (or just message n)
m - compose and send a new mail message
q - quit pymail
? - display this help text
"""
def interact(msgList, msgSizes, mailfile):
showindex(msgList, msgSizes)
toDelete = []
while True:
try:
command = input('[Pymail] Action? (i, l, d, s, m, q, ?) ')
except EOFError:
command = 'q'
if not command: command = '*'
if command == 'q': # quit
break
elif command[0] == 'i': # index
showindex(msgList, msgSizes)
The mailtools Utility Package | 987

elif command[0] == 'l': # list
if len(command) == 1:
for i in range(1, len(msgList)+1):
showmessage(i, msgList)
else:
showmessage(msgnum(command), msgList)
elif command[0] == 's': # save
if len(command) == 1:
for i in range(1, len(msgList)+1):
savemessage(i, mailfile, msgList)
else:
savemessage(msgnum(command), mailfile, msgList)
elif command[0] == 'd': # mark for deletion later
if len(command) == 1: # 3.x needs list(): iter
toDelete = list(range(1, len(msgList)+1))
else:
delnum = msgnum(command)
if (1 <= delnum <= len(msgList)) and (delnum not in toDelete):
toDelete.append(delnum)
else:
print('Bad message number')
elif command[0] == 'm': # send a new mail via SMTP
try:
sendmessage()
except:
print('Error - mail not sent')
elif command[0] == '?':
print(helptext)
else:
print('What? -- type "?" for commands help')
return toDelete
def main():
global parser, sender, fetcher
mailserver = mailconfig.popservername
mailuser = mailconfig.popusername
mailfile = mailconfig.savemailfile
parser = mailtools.MailParser()
sender = mailtools.MailSender()
fetcher = mailtools.MailFetcherConsole(mailserver, mailuser)
def progress(i, max):
print(i, 'of', max)
hdrsList, msgSizes, ignore = fetcher.downloadAllHeaders(progress)
msgList = [parser.parseHeaders(hdrtext) for hdrtext in hdrsList]
print('[Pymail email client]')
toDelete = interact(msgList, msgSizes, mailfile)
988 | Chapter 13: Client-Side Scripting

if toDelete: deletemessages(toDelete)
if __name__ == '__main__': main()
Running the pymail2 console client
This program is used interactively, the same as the original. In fact, the output is nearly
identical, so we won’t go into further details. Here’s a quick look at this script in action;
run this on your own machine to see it firsthand:
C:\...\PP4E\Internet\Email> pymail2.py
user: PP4E@learning-python.com
loading headers
Connecting...
Password for PP4E@learning-python.com on pop.secureserver.net?
b'+OK <24460.1273347818@pop15.prod.mesa1.secureserver.net>'
1 of 7
2 of 7
3 of 7
4 of 7
5 of 7
6 of 7
7 of 7
load headers exit
[Pymail email client]
1: 1860 bytes
From =>lutz@rmi.net
To =>pp4e@learning-python.com
Date =>Wed, 5 May 2010 11:29:36 −0400 (EDT)
Subject =>I'm a Lumberjack, and I'm Okay
2: 1408 bytes
From =>lutz@learning-python.com
To =>PP4E@learning-python.com
Date =>Wed, 05 May 2010 08:33:47 −0700
Subject =>testing
3: 1049 bytes
From =>Eric.the.Half.a.Bee@yahoo.com
To =>PP4E@learning-python.com
Date =>Thu, 06 May 2010 14:11:07 −0000
Subject =>A B C D E F G
4: 1038 bytes
From =>Eric.the.Half.a.Bee@aol.com
To =>nobody.in.particular@marketing.com
Date =>Thu, 06 May 2010 14:32:32 −0000
Subject =>a b c d e f g
5: 957 bytes
From =>PP4E@learning-python.com
To =>maillist
Date =>Thu, 06 May 2010 10:58:40 −0400
Subject =>test interactive smtplib
[Press Enter key]
6: 1037 bytes
From =>Cardinal@hotmail.com
To =>PP4E@learning-python.com
Date =>Fri, 07 May 2010 20:32:38 −0000
The mailtools Utility Package | 989

Subject =>Among our weapons are these
7: 3248 bytes
From =>PP4E@learning-python.com
To =>PP4E@learning-python.com
Date =>Sat, 08 May 2010 19:26:22 −0000
Subject =>testing mailtools package
[Pymail] Action? (i, l, d, s, m, q, ?) l 7
load 7
Connecting...
b'+OK <20110.1273347827@pop07.prod.mesa1.secureserver.net>'
-------------------------------------------------------------------------------
Here is my source code
-------------------------------------------------------------------------------
[Pymail] Action? (i, l, d, s, m, q, ?) d 7
[Pymail] Action? (i, l, d, s, m, q, ?) m
From? lutz@rmi.net
To? PP4E@learning-python.com
Subj? test pymail2 send
Type message text, end with line="."
Run away! Run away!
.
Sending to...['PP4E@learning-python.com']
From: lutz@rmi.net
To: PP4E@learning-python.com
Subject: test pymail2 send
Date: Sat, 08 May 2010 19:44:25 −0000
Run away! Run away!
Send exit
[Pymail] Action? (i, l, d, s, m, q, ?) q
To be deleted: [7]
Delete?y
Deleting messages from server...
deleting mails
Connecting...
b'+OK <11553.1273347873@pop17.prod.mesa1.secureserver.net>'
The messages in our mailbox have quite a few origins now—ISP webmail clients, basic
SMTP scripts, the Python interactive command line, mailtools self-test code, and two
console-based email clients; in later chapters, we’ll add even more. All their mails look
the same to our script; here’s a verification of the email we just sent (the second fetch
finds it already in-cache):
C:\...\PP4E\Internet\Email> pymail2.py
user: PP4E@learning-python.com
loading headers
Connecting...
...more lines omitted...
[Press Enter key]
6: 1037 bytes
From =>Cardinal@hotmail.com
To =>PP4E@learning-python.com
990 | Chapter 13: Client-Side Scripting

Date =>Fri, 07 May 2010 20:32:38 −0000
Subject =>Among our weapons are these
7: 984 bytes
From =>lutz@rmi.net
To =>PP4E@learning-python.com
Date =>Sat, 08 May 2010 19:44:25 −0000
Subject =>test pymail2 send
[Pymail] Action? (i, l, d, s, m, q, ?) l 7
load 7
Connecting...
b'+OK <31456.1273348189@p3pop01-03.prod.phx3.gdg>'
-------------------------------------------------------------------------------
Run away! Run away!
-------------------------------------------------------------------------------
[Pymail] Action? (i, l, d, s, m, q, ?) l 7
-------------------------------------------------------------------------------
Run away! Run away!
-------------------------------------------------------------------------------
[Pymail] Action? (i, l, d, s, m, q, ?) q
Study pymail2’s code for more insights. As you’ll see, this version eliminates some
complexities, such as the manual formatting of composed mail message text. It also
does a better job of displaying a mail’s text—instead of blindly listing the full mail text
(attachments and all), it uses mailtools to fetch the first text part of the message. The
messages we’re using are too simple to show the difference, but for a mail with attach-
ments, this new version will be more focused about what it displays.
Moreover, because the interface to mail is encapsulated in the mailtools package’s
modules, if it ever must change, it will only need to be changed in that module, re-
gardless of how many mail clients use its tools. And because the code in mailtools is
shared, if we know it works for one client, we can be sure it will work in another; there
is no need to debug new code.
On the other hand, pymail2 doesn’t really leverage much of the power of either mail
tools or the underlying email package it uses. For example, things like attachments,
Internationalized headers, and inbox synchronization are not handled at all, and print-
ing of some decoded main text may contain character sets incompatible with the con-
sole terminal interface. To see the full scope of the email package, we need to explore
a larger email system, such as PyMailGUI or PyMailCGI. The first of these is the topic
of the next chapter, and the second appears in Chapter 16. First, though, let’s quickly
survey a handful of additional client-side protocol tools.
NNTP: Accessing Newsgroups
So far in this chapter, we have focused on Python’s FTP and email processing tools and
have met a handful of client-side scripting modules along the way: ftplib, poplib,
smtplib, email, mimetypes, urllib, and so on. This set is representative of Python’s
NNTP: Accessing Newsgroups | 991

client-side library tools for transferring and processing information over the Internet,
but it’s not at all complete.
A more or less comprehensive list of Python’s Internet-related modules appears at the
start of the previous chapter. Among other things, Python also includes client-side
support libraries for Internet news, Telnet, HTTP, XML-RPC, and other standard pro-
tocols. Most of these are analogous to modules we’ve already met—they provide an
object-based interface that automates the underlying sockets and message structures.
For instance, Python’s nntplib module supports the client-side interface to NNTP—
the Network News Transfer Protocol—which is used for reading and posting articles
to Usenet newsgroups on the Internet. Like other protocols, NNTP runs on top of
sockets and merely defines a standard message protocol; like other modules, nntplib
hides most of the protocol details and presents an object-based interface to Python
scripts.
We won’t get into full protocol details here, but in brief, NNTP servers store a range
of articles on the server machine, usually in a flat-file database. If you have the domain
or IP name of a server machine that runs an NNTP server program listening on the
NNTP port, you can write scripts that fetch or post articles from any machine that has
Python and an Internet connection. For instance, the script in Example 13-28 by default
fetches and displays the last 10 articles from Python’s Internet newsgroup,
comp.lang.python, from the news.rmi.net NNTP server at one of my ISPs.
Example 13-28. PP4E\Internet\Other\readnews.py
"""
fetch and print usenet newsgroup posting from comp.lang.python via the
nntplib module, which really runs on top of sockets; nntplib also supports
posting new messages, etc.; note: posts not deleted after they are read;
"""
listonly = False
showhdrs = ['From', 'Subject', 'Date', 'Newsgroups', 'Lines']
try:
import sys
servername, groupname, showcount = sys.argv[1:]
showcount = int(showcount)
except:
servername = nntpconfig.servername # assign this to your server
groupname = 'comp.lang.python' # cmd line args or defaults
showcount = 10 # show last showcount posts
# connect to nntp server
print('Connecting to', servername, 'for', groupname)
from nntplib import NNTP
connection = NNTP(servername)
(reply, count, first, last, name) = connection.group(groupname)
print('%s has %s articles: %s-%s' % (name, count, first, last))
# get request headers only
fetchfrom = str(int(last) - (showcount-1))
992 | Chapter 13: Client-Side Scripting

(reply, subjects) = connection.xhdr('subject', (fetchfrom + '-' + last))
# show headers, get message hdr+body
for (id, subj) in subjects: # [-showcount:] if fetch all hdrs
print('Article %s [%s]' % (id, subj))
if not listonly and input('=> Display?') in ['y', 'Y']:
reply, num, tid, list = connection.head(id)
for line in list:
for prefix in showhdrs:
if line[:len(prefix)] == prefix:
print(line[:80])
break
if input('=> Show body?') in ['y', 'Y']:
reply, num, tid, list = connection.body(id)
for line in list:
print(line[:80])
print()
print(connection.quit())
As for FTP and email tools, the script creates an NNTP object and calls its methods to
fetch newsgroup information and articles’ header and body text. The xhdr method, for
example, loads selected headers from a range of messages.
For NNTP servers that require authentication, you may also have to pass a username,
a password, and possibly a reader-mode flag to the NNTP call. See the Python Library
manual for more on other NNTP parameters and object methods.
In the interest of space and time, I’ll omit this script’s outputs here. When run, it
connects to the server and displays each article’s subject line, pausing to ask whether
it should fetch and show the article’s header information lines (headers listed in the
variable showhdrs only) and body text. We can also pass this script an explicit server
name, newsgroup, and display count on the command line to apply it in different ways.
With a little more work, we could turn this script into a full-blown news interface. For
instance, new articles could be posted from within a Python script with code of this
form (assuming the local file already contains proper NNTP header lines):
# to post, say this (but only if you really want to post!)
connection = NNTP(servername)
localfile = open('filename') # file has proper headers
connection.post(localfile) # send text to newsgroup
connection.quit()
We might also add a tkinter-based GUI frontend to this script to make it more usable,
but we’ll leave such an extension on the suggested exercise heap (see also the PyMail-
GUI interface’s suggested extensions at the end of the next chapter—email and news
messages have a similar structure).
NNTP: Accessing Newsgroups | 993

HTTP: Accessing Websites
Python’s standard library (the modules that are installed with the interpreter) also in-
cludes client-side support for HTTP—the Hypertext Transfer Protocol—a message
structure and port standard used to transfer information on the World Wide Web. In
short, this is the protocol that your web browser (e.g., Internet Explorer, Firefox,
Chrome, or Safari) uses to fetch web pages and run applications on remote servers as
you surf the Web. Essentially, it’s just bytes sent over port 80.
To really understand HTTP-style transfers, you need to know some of the server-side
scripting topics covered in Chapter 15 (e.g., script invocations and Internet address
schemes), so this section may be less useful to readers with no such background.
Luckily, though, the basic HTTP interfaces in Python are simple enough for a cursory
understanding even at this point in the book, so let’s take a brief look here.
Python’s standard http.client module automates much of the protocol defined by
HTTP and allows scripts to fetch web pages as clients much like web browsers; as we’ll
see in Chapter 15, http.server also allows us to implement web servers to handle the
other side of the dialog. For instance, the script in Example 13-29 can be used to grab
any file from any server machine running an HTTP web server program. As usual, the
file (and descriptive header lines) is ultimately transferred as formatted messages over
a standard socket port, but most of the complexity is hidden by the http.client module
(see our raw socket dialog with a port 80 HTTP server in Chapter 12 for a comparison).
Example 13-29. PP4E\Internet\Other\http-getfile.py
"""
fetch a file from an HTTP (web) server over sockets via http.client; the filename
parameter may have a full directory path, and may name a CGI script with ? query
parameters on the end to invoke a remote program; fetched file data or remote
program output could be saved to a local file to mimic FTP, or parsed with str.find
or html.parser module; also: http.client request(method, url, body=None, hdrs={});
"""
import sys, http.client
showlines = 6
try:
servername, filename = sys.argv[1:] # cmdline args?
except:
servername, filename = 'learning-python.com', '/index.html'
print(servername, filename)
server = http.client.HTTPConnection(servername) # connect to http site/server
server.putrequest('GET', filename) # send request and headers
server.putheader('Accept', 'text/html') # POST requests work here too
server.endheaders() # as do CGI script filenames
reply = server.getresponse() # read reply headers + data
if reply.status != 200: # 200 means success
print('Error sending request', reply.status, reply.reason)
else:
994 | Chapter 13: Client-Side Scripting

data = reply.readlines() # file obj for data received
reply.close() # show lines with eoln at end
for line in data[:showlines]: # to save, write data to file
print(line) # line already has \n, but bytes
Desired server names and filenames can be passed on the command line to override
hardcoded defaults in the script. You need to know something of the HTTP protocol
to make the most sense of this code, but it’s fairly straightforward to decipher. When
run on the client, this script makes an HTTP object to connect to the server, sends it a
GET request along with acceptable reply types, and then reads the server’s reply. Much
like raw email message text, the HTTP server’s reply usually begins with a set of
descriptive header lines, followed by the contents of the requested file. The HTTP
object’s getfile method gives us a file object from which we can read the downloaded
data.
Let’s fetch a few files with this script. Like all Python client-side scripts, this one works
on any machine with Python and an Internet connection (here it runs on a Windows
client). Assuming that all goes well, the first few lines of the downloaded file are printed;
in a more realistic application, the text we fetch would probably be saved to a local file,
parsed with Python’s html.parser module (introduced in Chapter 19), and so on.
Without arguments, the script simply fetches the HTML index page at http://learning
-python.com, a domain name I host at a commercial service provider:
C:\...\PP4E\Internet\Other> http-getfile.py
learning-python.com /index.html
b'<HTML>\n'
b' \n'
b'<HEAD>\n'
b"<TITLE>Mark Lutz's Python Training Services</TITLE>\n"
b'<!--mstheme--><link rel="stylesheet" type="text/css" href="_themes/blends/blen...'
b'</HEAD>\n'
Notice that in Python 3.X the fetched data comes back as bytes strings again, not str;
since the Python html.parser HTML parse we’ll meet in Chapter 19 expects str text
strings instead of bytes, you’ll likely need to resolve a Unicode encoding choice here
in order to parse, much the same as we did for email message text earlier in this chapter.
As there, we might decode from bytes to str per a default, user preferences or selections,
headers inspection, or byte structure analysis. Because sockets send raw bytes, we con-
front this choice point whenever data shipped over them is text in nature; unless that
text’s type is known or always simple in form, Unicode implies extra steps.
We can also list a server and file to be fetched on the command line, if we want to be
more specific. In the following code, we use the script to fetch files from two different
websites by listing their names on the command lines (I’ve truncated some of these
lines so they fit in this book). Notice that the filename argument can include an arbitrary
remote directory path to the desired file, as in the last fetch here:
C:\...\PP4E\Internet\Other> http-getfile.py www.python.org /index.html
www.python.org /index.html
b'<!DOCTYPE html PUBLIC "-//W3C//DTD XHTML 1.0 Transitional//EN" "http://www.w3....'
HTTP: Accessing Websites | 995

b'\n'
b'\n'
b'<html xmlns="http://www.w3.org/1999/xhtml" xml:lang="en" lang="en">\n'
b'\n'
b'<head>\n'
C:\...\PP4E\Internet\Other> http-getfile.py www.python.org index.html
www.python.org index.html
Error sending request 400 Bad Request
C:\...\PP4E\Internet\Other> http-getfile.py www.rmi.net /~lutz
www.rmi.net /~lutz
Error sending request 301 Moved Permanently
C:\...\PP4E\Internet\Other> http-getfile.py www.rmi.net /~lutz/index.html
www.rmi.net /~lutz/index.html
b'<HTML>\n'
b'\n'
b'<HEAD>\n'
b"<TITLE>Mark Lutz's Book Support Site</TITLE>\n"
b'</HEAD>\n'
b'<BODY BGCOLOR="#f1f1ff">\n'
Notice the second and third attempts in this code: if the request fails, the script receives
and displays an HTTP error code from the server (we forgot the leading slash on the
second, and the “index.html” on the third—required for this server and interface). With
the raw HTTP interfaces, we need to be precise about what we want.
Technically, the string we call filename in the script can refer to either a simple static
web page file or a server-side program that generates HTML as its output. Those server-
side programs are usually called CGI scripts—the topic of Chapters 15 and 16. For
now, keep in mind that when filename refers to a script, this program can be used to
invoke another program that resides on a remote server machine. In that case, we can
also specify parameters (called a query string) to be passed to the remote program after
a ?.
Here, for instance, we pass a language=Python parameter to a CGI script we will meet
in Chapter 15 (to make this work, we also need to first spawn a locally running HTTP
web server coded in Python using a script we first met in Chapter 1 and will revisit in
Chapter 15):
In a different window
C:\...\PP4E\Internet\Web> webserver.py
webdir ".", port 80
C:\...\PP4E\Internet\Other> http-getfile.py localhost
/cgi-bin/languages.py?language=Python
localhost /cgi-bin/languages.py?language=Python
b'<TITLE>Languages</TITLE>\n'
b'<H1>Syntax</H1><HR>\n'
b'<H3>Python</H3><P><PRE>\n'
b" print('Hello World') \n"
996 | Chapter 13: Client-Side Scripting

b'</PRE></P><BR>\n'
b'<HR>\n'
This book has much more to say later about HTML, CGI scripts, and the meaning of
the HTTP GET request used in Example 13-29 (along with POST, one of two way to
format information sent to an HTTP server), so we’ll skip additional details here.
Suffice it to say, though, that we could use the HTTP interfaces to write our own web
browsers and build scripts that use websites as though they were subroutines. By send-
ing parameters to remote programs and parsing their results, websites can take on the
role of simple in-process functions (albeit, much more slowly and indirectly).
The urllib Package Revisited
The http.client module we just met provides low-level control for HTTP clients.
When dealing with items available on the Web, though, it’s often easier to code down-
loads with Python’s standard urllib.request module, introduced in the FTP section
earlier in this chapter. Since this module is another way to talk HTTP, let’s expand on
its interfaces here.
Recall that given a URL, urllib.request either downloads the requested object over
the Net to a local file or gives us a file-like object from which we can read the requested
object’s contents. As a result, the script in Example 13-30 does the same work as the
http.client script we just wrote but requires noticeably less code.
Example 13-30. PP4E\Internet\Other\http-getfile-urllib1.py
"""
fetch a file from an HTTP (web) server over sockets via urllib; urllib supports
HTTP, FTP, files, and HTTPS via URL address strings; for HTTP, the URL can name
a file or trigger a remote CGI script; see also the urllib example in the FTP
section, and the CGI script invocation in a later chapter; files can be fetched
over the net with Python in many ways that vary in code and server requirements:
over sockets, FTP, HTTP, urllib, and CGI outputs; caveat: should run filename
through urllib.parse.quote to escape properly unless hardcoded--see later chapters;
"""
import sys
from urllib.request import urlopen
showlines = 6
try:
servername, filename = sys.argv[1:] # cmdline args?
except:
servername, filename = 'learning-python.com', '/index.html'
remoteaddr = 'http://%s%s' % (servername, filename) # can name a CGI script too
print(remoteaddr)
remotefile = urlopen(remoteaddr) # returns input file object
remotedata = remotefile.readlines() # read data directly here
remotefile.close()
for line in remotedata[:showlines]: print(line) # bytes with embedded \n
The urllib Package Revisited | 997

Almost all HTTP transfer details are hidden behind the urllib.request interface here.
This version works in almost the same way as the http.client version we wrote first,
but it builds and submits an Internet URL address to get its work done (the constructed
URL is printed as the script’s first output line). As we saw in the FTP section of this
chapter, the urllib.request function urlopen returns a file-like object from which we
can read the remote data. But because the constructed URLs begin with “http://” here,
the urllib.request module automatically employs the lower-level HTTP interfaces to
download the requested file instead of FTP:
C:\...\PP4E\Internet\Other> http-getfile-urllib1.py
http://learning-python.com/index.html
b'<HTML>\n'
b' \n'
b'<HEAD>\n'
b"<TITLE>Mark Lutz's Python Training Services</TITLE>\n"
b'<!--mstheme--><link rel="stylesheet" type="text/css" href="_themes/blends/blen...'
b'</HEAD>\n'
C:\...\PP4E\Internet\Other> http-getfile-urllib1.py www.python.org /index
http://www.python.org/index
b'<!DOCTYPE html PUBLIC "-//W3C//DTD XHTML 1.0 Transitional//EN" "http://www.w3....'
b'\n'
b'\n'
b'<html xmlns="http://www.w3.org/1999/xhtml" xml:lang="en" lang="en">\n'
b'\n'
b'<head>\n'
C:\...\PP4E\Internet\Other> http-getfile-urllib1.py www.rmi.net /~lutz
http://www.rmi.net/~lutz
b'<HTML>\n'
b'\n'
b'<HEAD>\n'
b"<TITLE>Mark Lutz's Book Support Site</TITLE>\n"
b'</HEAD>\n'
b'<BODY BGCOLOR="#f1f1ff">\n'
C:\...\PP4E\Internet\Other> http-getfile-urllib1.py
localhost /cgi-bin/languages.py?language=Java
http://localhost/cgi-bin/languages.py?language=Java
b'<TITLE>Languages</TITLE>\n'
b'<H1>Syntax</H1><HR>\n'
b'<H3>Java</H3><P><PRE>\n'
b' System.out.println("Hello World"); \n'
b'</PRE></P><BR>\n'
b'<HR>\n'
As before, the filename argument can name a simple file or a program invocation with
optional parameters at the end, as in the last run here. If you read this output carefully,
you’ll notice that this script still works if you leave the “index.html” off the end of a
site’s root filename (in the third command line); unlike the raw HTTP version of the
preceding section, the URL-based interface is smart enough to do the right thing.
998 | Chapter 13: Client-Side Scripting

Other urllib Interfaces
One last mutation: the following urllib.request downloader script uses the slightly
higher-level urlretrieve interface in that module to automatically save the downloaded
file or script output to a local file on the client machine. This interface is handy if we
really mean to store the fetched data (e.g., to mimic the FTP protocol). If we plan on
processing the downloaded data immediately, though, this form may be less convenient
than the version we just met: we need to open and read the saved file. Moreover, we
need to provide an extra protocol for specifying or extracting a local filename, as in
Example 13-31.
Example 13-31. PP4E\Internet\Other\http-getfile-urllib2.py
"""
fetch a file from an HTTP (web) server over sockets via urlllib; this version
uses an interface that saves the fetched data to a local binary-mode file; the
local filename is either passed in as a cmdline arg or stripped from the URL with
urllib.parse: the filename argument may have a directory path at the front and query
parameters at end, so os.path.split is not enough (only splits off directory path);
caveat: should urllib.parse.quote filename unless known ok--see later chapters;
"""
import sys, os, urllib.request, urllib.parse
showlines = 6
try:
servername, filename = sys.argv[1:3] # first 2 cmdline args?
except:
servername, filename = 'learning-python.com', '/index.html'
remoteaddr = 'http://%s%s' % (servername, filename) # any address on the Net
if len(sys.argv) == 4: # get result filename
localname = sys.argv[3]
else:
(scheme, server, path, parms, query, frag) = urllib.parse.urlparse(remoteaddr)
localname = os.path.split(path)[1]
print(remoteaddr, localname)
urllib.request.urlretrieve(remoteaddr, localname) # can be file or script
remotedata = open(localname, 'rb').readlines() # saved to local file
for line in remotedata[:showlines]: print(line) # file is bytes/binary
Let’s run this last variant from a command line. Its basic operation is the same as the
last two versions: like the prior one, it builds a URL, and like both of the last two, we
can list an explicit target server and file path on the command line:
C:\...\PP4E\Internet\Other> http-getfile-urllib2.py
http://learning-python.com/index.html index.html
b'<HTML>\n'
b' \n'
b'<HEAD>\n'
b"<TITLE>Mark Lutz's Python Training Services</TITLE>\n"
b'<!--mstheme--><link rel="stylesheet" type="text/css" href="_themes/blends/blen...'
b'</HEAD>\n'
The urllib Package Revisited | 999

C:\...\PP4E\Internet\Other> http-getfile-urllib2.py www.python.org /index.html
http://www.python.org/index.html index.html
b'<!DOCTYPE html PUBLIC "-//W3C//DTD XHTML 1.0 Transitional//EN" "http://www.w3....'
b'\n'
b'\n'
b'<html xmlns="http://www.w3.org/1999/xhtml" xml:lang="en" lang="en">\n'
b'\n'
b'<head>\n'
Because this version uses a urllib.request interface that automatically saves the down-
loaded data in a local file, it’s similar to FTP downloads in spirit. But this script must
also somehow come up with a local filename for storing the data. You can either let the
script strip and use the base filename from the constructed URL, or explicitly pass a
local filename as a last command-line argument. In the prior run, for instance, the
downloaded web page is stored in the local file index.html in the current working
directory—the base filename stripped from the URL (the script prints the URL and
local filename as its first output line). In the next run, the local filename is passed
explicitly as py-index.html:
C:\...\PP4E\Internet\Other> http-getfile-urllib2.py
www.python.org /index.html py-index.html
http://www.python.org/index.html py-index.html
b'<!DOCTYPE html PUBLIC "-//W3C//DTD XHTML 1.0 Transitional//EN" "http://www.w3....'
b'\n'
b'\n'
b'<html xmlns="http://www.w3.org/1999/xhtml" xml:lang="en" lang="en">\n'
b'\n'
b'<head>\n'
C:\...\PP4E\Internet\Other> http-getfile-urllib2.py www.rmi.net /~lutz books.html
http://www.rmi.net/~lutz books.html
b'<HTML>\n'
b'\n'
b'<HEAD>\n'
b"<TITLE>Mark Lutz's Book Support Site</TITLE>\n"
b'</HEAD>\n'
b'<BODY BGCOLOR="#f1f1ff">\n'
C:\...\PP4E\Internet\Other> http-getfile-urllib2.py www.rmi.net /~lutz/about-pp.html
http://www.rmi.net/~lutz/about-pp.html about-pp.html
b'<HTML>\n'
b'\n'
b'<HEAD>\n'
b'<TITLE>About "Programming Python"</TITLE>\n'
b'</HEAD>\n'
b'\n'
Invoking programs and escaping text
The next listing shows this script being used to trigger a remote program. As before, if
you don’t give the local filename explicitly, the script strips the base filename out of
the filename argument. That’s not always easy or appropriate for program
1000 | Chapter 13: Client-Side Scripting

invocations—the filename can contain both a remote directory path at the front and
query parameters at the end for a remote program invocation.
Given a script invocation URL and no explicit output filename, the script extracts the
base filename in the middle by using first the standard urllib.parse module to pull out
the file path, and then os.path.split to strip off the directory path. However, the re-
sulting filename is a remote script’s name, and it may or may not be an appropriate
place to store the data locally. In the first run that follows, for example, the script’s
output goes in a local file called languages.py, the script name in the middle of the URL;
in the second, we instead name the output CxxSyntax.html explicitly to suppress file-
name extraction:
C:\...\PP4E\Internet\Other> python http-getfile-urllib2.py localhost
/cgi-bin/languages.py?language=Scheme
http://localhost/cgi-bin/languages.py?language=Scheme languages.py
b'<TITLE>Languages</TITLE>\n'
b'<H1>Syntax</H1><HR>\n'
b'<H3>Scheme</H3><P><PRE>\n'
b' (display "Hello World") (newline) \n'
b'</PRE></P><BR>\n'
b'<HR>\n'
C:\...\PP4E\Internet\Other> python http-getfile-urllib2.py localhost
/cgi-bin/languages.py?language=C++ CxxSyntax.html
http://localhost/cgi-bin/languages.py?language=C++ CxxSyntax.html
b'<TITLE>Languages</TITLE>\n'
b'<H1>Syntax</H1><HR>\n'
b'<H3>C </H3><P><PRE>\n'
b"Sorry--I don't know that language\n"
b'</PRE></P><BR>\n'
b'<HR>\n'
The remote script returns a not-found message when passed “C++” in the last com-
mand here. It turns out that “+” is a special character in URL strings (meaning a space),
and to be robust, both of the urllib scripts we’ve just written should really run the
filename string through something called urllib.parse.quote, a tool that escapes spe-
cial characters for transmission. We will talk about this in depth in Chapter 15, so
consider this a preview for now. But to make this invocation work, we need to use
special sequences in the constructed URL. Here’s how to do it by hand:
C:\...\PP4E\Internet\Other> python http-getfile-urllib2.py localhost
/cgi-bin/languages.py?language=C%2b%2b CxxSyntax.html
http://localhost/cgi-bin/languages.py?language=C%2b%2b CxxSyntax.html
b'<TITLE>Languages</TITLE>\n'
b'<H1>Syntax</H1><HR>\n'
b'<H3>C++</H3><P><PRE>\n'
b' cout << "Hello World" << endl; \n'
b'</PRE></P><BR>\n'
b'<HR>\n'
The odd %2b strings in this command line are not entirely magical: the escaping required
for URLs can be seen by running standard Python tools manually—this is what these
The urllib Package Revisited | 1001

scripts should do automatically to be able to handle all possible cases well;
urllib.parse.unquote can undo these escapes if needed:
C:\...\PP4E\Internet\Other> python
>>> import urllib.parse
>>> urllib.parse.quote('C++')
'c%2B%2B'
Again, don’t work too hard at understanding these last few commands; we will revisit
URLs and URL escapes in Chapter 15, while exploring server-side scripting in Python.
I will also explain there why the C++ result came back with other oddities like
<<—HTML escapes for <<, generated by the tool cgi.escape in the script on the
server that produces the reply, and usually undone by HTML parsers including Py-
thon’s html.parser module we’ll meet in Chapter 19:
>>> import cgi
>>> cgi.escape('<<')
'<<'
Also in Chapter 15, we’ll meet urllib support for proxies, and its support for client-
side cookies. We’ll discuss the related HTTPS concept in Chapter 16—HTTP trans-
missions over secure sockets, supported by urllib.request on the client side if SSL
support is compiled into your Python. For now, it’s time to wrap up our look at the
Web, and the Internet at large, from the client side of the fence.
Other Client-Side Scripting Options
In this chapter, we focused on client-side interfaces to standard protocols that run over
sockets, but as suggested in an earlier footnote, client-side programming can take other
forms, too. We outlined many of these at the start of Chapter 12—web service protocols
(including SOAP and XML-RPC); Rich Internet Application toolkits (including Flex,
Silverlight, and pyjamas); cross-language framework integration (including Java
and .NET); and more.
As mentioned, most of these serve to extend the functionality of web browsers, and so
ultimately run on top of the HTTP protocol we explored in this chapter. For instance:
• The Jython system, a compiler that supports Python-coded Java applets—general-
purpose programs downloaded from a server and run locally on the client when
accessed or referenced by a URL, which extend the functionality of web browsers
and interactions.
• Similarly, RIAs provide AJAX communication and widget toolkits that allow Java-
Script to implement user interaction within web browsers, which is more dynamic
and rich than HTML and web browsers otherwise support.
• In Chapter 19, we’ll also study Python’s support for XML—structured text that is
used as the data transfer medium of client/server dialogs in web service protocols
such as XML-RPC, which transfer XML-encoded objects over HTTP, and are
1002 | Chapter 13: Client-Side Scripting

supported by Python’s xmlrpc standard library package. Such protocols can sim-
plify the interface to web servers in their clients.
In deference to time and space, though, we won’t go into further details on these and
other client-side tools here. If you are interested in using Python to script clients, you
should take a few minutes to become familiar with the list of Internet tools documented
in the Python library reference manual. All work on similar principles but have slightly
distinct interfaces.
In Chapter 15, we’ll hop the fence to the other side of the Internet world and explore
scripts that run on server machines. Such programs give rise to the grander notion of
applications that live entirely on the Web and are launched by web browsers. As we
take this leap in structure, keep in mind that the tools we met in this and the preceding
chapter are often sufficient to implement all the distributed processing that many ap-
plications require, and they can work in harmony with scripts that run on a server. To
completely understand the Web worldview, though, we need to explore the server
realm, too.
Before we get there, though, the next chapter puts concepts we’ve learned here to work
by presenting a complete client-side program—a full-blown mail client GUI, which ties
together many of the tools we’ve learned and coded. In fact, much of the email work
we’ve done in this chapter was designed to lay the groundwork we’ll need to tackle the
realistically scaled PyMailGUI example of the next chapter. Really, much of this book
so far has served to build up skills required to equip us for this task: as we’ll see,
PyMailGUI combines system tools, GUIs, and client-side Internet protocols to produce
a useful system that does real work. As an added bonus, this example will help us
understand the trade-offs between the client solutions we’ve met here and the server-
side solutions we’ll study later in this part of the book.
Other Client-Side Scripting Options | 1003

CHAPTER 14
The PyMailGUI Client
“Use the Source, Luke”
The preceding chapter introduced Python’s client-side Internet protocols tool set—the
standard library modules available for email, FTP, network news, HTTP, and more,
from within a Python script. This chapter picks up where the last one left off and
presents a complete client-side example—PyMailGUI, a Python program that sends,
receives, composes, and parses Internet email messages.
Although the end result is a working program that you can actually use for your email,
this chapter also has a few additional agendas worth noting before we get started:
Client-side scripting
PyMailGUI implements a full-featured desktop GUI that runs on your machine
and communicates with your mail servers when necessary. As such, it is a network
client program that further illustrates some of the preceding chapter’s topics, and
it will help us contrast server-side solutions introduced in the next chapter.
Code reuse
Additionally, PyMailGUI ties together a number of the utility modules we’ve been
writing in the book so far, and it demonstrates the power of code reuse in the
process—it uses a thread module to allow mail transfers to overlap in time, a set
of mail modules to process message content and route it across networks, a window
protocol module to handle icons, a text editor component, and so on. Moreover,
it inherits the power of tools in the Python standard library, such as the email
package; message construction and parsing, for example, is nearly trivial here.
Programming in the large
And finally, this chapter serves to illustrate realistic and large-scale software de-
velopment in action. Because PyMailGUI is a relatively large and complete pro-
gram, it shows by example some of the code structuring techniques that prove
useful once we leave the realm of the small and artificial. For instance, object-
oriented programming and modular design work well here to divide the system in
smaller, self-contained units.
1005

Ultimately, though, PyMailGUI serves to illustrate just how far the combination of
GUIs, networking, and Python can take us. Like all Python programs, this system is
scriptable—once you’ve learned its general structure, you can easily change it to work
as you like, by modifying its source code. And like all Python programs, this one is
portable—you can run it on any system with Python and a network connection, without
having to change its code. Such advantages become automatic when your software is
coded in an open source, portable, and readable language like Python.
Source Code Modules and Size
This chapter is something of a self-study exercise. Because PyMailGUI is fairly large
and mostly applies concepts we’ve already learned, we won’t go into much detail about
its actual code. Instead, it is listed for you to read on your own. I encourage you to
study the source and comments and to run this program live to get a feel for its oper-
ation; example save-mail files are included so you can even experiment offline.
As you study and run this program, you’ll also want to refer back to the modules we
introduced earlier in the book and are reusing here, to gain a full understanding of the
system. For reference, here are the major examples that will see new action in this
chapter:
Example 13-21: PP4E.Internet.Email.mailtools (package)
Server sends and receives, parsing, construction (Client-side scripting chapter)
Example 10-20: PP4E.Gui.Tools.threadtools.py
Thread queue management for GUI callbacks (GUI tools chapter)
Example 10-16: PP4E.Gui.Tools.windows.py
Border configuration for top-level window (GUI tools chapter)
Example 11-4: PP4E.Gui.TextEditor.textEditor.py
Text widget used in mail view windows, and in some pop ups (GUI examples
chapter)
Some of these modules in turn use additional examples we coded earlier but that are
not imported by PyMailGUI itself (textEditor, for instance, uses guimaker to create its
windows and toolbar). Naturally, we’ll also be coding new modules here. The following
new modules are intended to be potentially useful in other programs:
popuputil.py
Various pop-up windows, written for general use
messagecache.py
A cache manager that keeps track of mail already loaded
wraplines.py
A utility for wrapping long lines of messages
mailconfig.py
User configuration parameters—server names, fonts, and so on (augmented here)
1006 | Chapter 14: The PyMailGUI Client

html2text.py
A rudimentary parser for extracting plain text from HTML-based emails
Finally, the following are the new major modules coded in this chapter which are spe-
cific to the PyMailGUI program. In total, PyMailGUI itself consists of the ten modules
in this and the preceding lists, along with a handful of less prominent source files we’ll
see in this chapter:
SharedNames.py
Program-wide globals used by multiple files
ViewWindows.py
The implementation of View, Write, Reply, and Forward message view windows
ListWindows.py
The implementation of mail-server and local-file message list windows
PyMailGuiHelp.py
User-oriented help text, opened by the main window’s bar button
PyMailGui.py
The main, top-level file of the program, run to launch the main window
Code size
As a realistically scaled system, PyMailGUI’s size is also instructive. All told, PyMailGUI
is composed of 18 new files: the 10 new Python modules in the two preceding lists,
plus an HTML help file, a small configuration file for PyEdit pop ups, a currently unused
package initialization file, and 5 short Python files in a subdirectory used for alternate
account configuration.
Together, it contains some 2,400 new lines of program source code in 16 Python files
(including comments and whitespace), plus roughly 1,700 lines of help text in one
Python and one HTML file (in two flavors). This 4,100 new line total doesn’t include
the four other book examples listed in the previous section that are reused in PyMail-
GUI. The reused examples themselves constitute 2,600 additional lines of Python pro-
gram code—roughly 1,000 lines each for PyEdit and mailtools alone. That brings the
grand total to 6,700 lines: 4,100 new + 2,600 reused. Of this total, 5,000 lines is in
program code files (2,400 of which are new here) and 1,700 lines is help text.*
I obtained these lines counts with PyEdit’s Info pop up, and opened the files with the
code button in the PyDemos entry for this program (the Source button in PyMailGUI’s
* And remember: you would have to multiply these line counts by a factor of four or more to get the equivalent
in a language like C or C++. If you’ve done much programming, you probably recognize that the fact that
we can implement a fairly full-featured mail processing program in roughly 5,000 total lines of program code
speaks volumes about the power of the Python language and its libraries. For comparison, the original 1.0
version of this program from the second edition of this book was just 745 total lines in 3 new modules, but
it also was very limited—it did not support PyMailGUI 2.X’s attachments, thread overlap, local mail files,
and so on, and did not have the Internationalization support or other features of this edition’s PyMailGUI 3.X.
“Use the Source, Luke” | 1007

own text-based help window does similar work). For the break down by individual
files, see the Excel spreadsheet file linecounts.xls in the media subdirectory of PyMail-
GUI; this file is also used to test attachment sends and receives, and so appears near
the end of the emails in file SavedEmail\version30-4E if opened in the GUI (we’ll see
how to open mail save files in a moment).
Watch for the changes section ahead for size comparisons to prior versions. Also see
the SLOC counter script in Chapter 6 for an alternative way to count source lines that
is less manual, but can’t include all related files in a single run and doesn’t discriminate
between program code and help text.
Code Structure
As these statistics probably suggest, this is the largest example we’ll see in this book,
but you shouldn’t be deterred by its size. Because it uses modular and OOP techniques,
the code is simpler than you may think:
• Python’s modules allow us to divide the system into files that have a cohesive
purpose, with minimal coupling between them—code is easier to locate and un-
derstand if your modules have a logical, self-contained structure.
• Python’s OOP support allows us to factor code for reuse and avoid redundancy—
as you’ll see, code is customized, not repeated, and the classes we will code reflect
the actual components of the GUI to make them easy to follow.
For instance, the implementation of mail list windows is easy to read and change, be-
cause it has been factored into a common shared superclass, which is customized by
subclasses for mail-server and save-file lists; since these are mostly just variations on a
theme, most of the code appears in just one place. Similarly, the code that implements
the message view window is a superclass shared by write, reply, and forward compo-
sition windows; subclasses simply tailor it for writing rather than viewing.
Although we’ll deploy these techniques in the context of a mail processing program
here, such techniques will apply to any nontrivial program you’ll write in Python.
To help get you started, the PyMailGuiHelp.py m o d u l e l i s t e d i n p a r t n e a r t h e e n d o f t h i s
chapter includes a help text string that describes how this program is used, as well as
its major features. You can also view this help live in both text and HTML form when
the program is run. Experimenting with the system, while referring to its code, is prob-
ably the best and quickest way to uncover its secrets.
Why PyMailGUI?
Before we start digging into the code of this relatively large system, some context is in
order. PyMailGUI is a Python program that implements a client-side email processing
user interface with the standard tkinter GUI toolkit. It is presented both as an instance
1008 | Chapter 14: The PyMailGUI Client

of Python Internet scripting and as a realistically scaled example that ties together other
tools we’ve already seen, such as threads and tkinter GUIs.
Like the pymail console-based program we wrote in Chapter 13, PyMailGUI runs en-
tirely on your local computer. Your email is fetched from and sent to remote mail servers
over sockets, but the program and its user interface run locally. As a result, PyMailGUI
is called an email client: like pymail, it employs Python’s client-side tools to talk to mail
servers from the local machine. Unlike pymail, though, PyMailGUI is a full-featured
user interface: email operations are performed with point-and-click operations and
advanced mail processing such as attachments, save files, and Internationalization is
supported.
Like many examples presented in this text, PyMailGUI is a practical, useful program.
In fact, I run it on all kinds of machines to check my email while traveling around the
world teaching Python classes. Although PyMailGUI won’t put Microsoft Outlook out
of business anytime soon, it has two key pragmatic features alluded to earlier that have
nothing to do with email itself—portability and scriptability, which are attractive fea-
tures in their own right and merit a few additional words here:
It’s portable
PyMailGUI runs on any machine with sockets and a Python with tkinter installed.
Because email is transferred with the Python libraries, any Internet connection that
supports Post Office Protocol (POP) and Simple Mail Transfer Protocol (SMTP)
access will do. Moreover, because the user interface is coded with tkinter, PyMail-
GUI should work, unchanged, on Windows, the X Window System (Unix, Linux),
and the Macintosh (classic and OS X), as long as Python 3.X runs there too.
Microsoft Outlook may be a more feature-rich package, but it has to be run on
Windows, and more specifically, on a single Windows machine. Because it gener-
ally deletes email from a server as it is downloaded by default and stores it on the
client, you cannot run Outlook on multiple machines without spreading your email
across all those machines. By contrast, PyMailGUI saves and deletes email only on
request, and so it is a bit friendlier to people who check their email in an ad hoc
fashion on arbitrary computers (like me).
It’s scriptable
PyMailGUI can become anything you want it to be because it is fully programma-
ble. In fact, this is the real killer feature of PyMailGUI and of open source software
like Python in general—because you have full access to PyMailGUI’s source code,
you are in complete control of where it evolves from here. You have nowhere near
as much control over commercial, closed products like Outlook; you generally get
whatever a large company decided you need, along with whatever bugs that com-
pany might have introduced.
As a Python script, PyMailGUI is a much more flexible tool. For instance, we can
change its layout, disable features, and add completely new functionality quickly
by changing its Python source code. Don’t like the mail-list display? Change a few
“Use the Source, Luke” | 1009

lines of code to customize it. Want to save and delete your mail automatically as
it is loaded? Add some more code and buttons. Tired of seeing junk mail? Add a
few lines of text processing code to the load function to filter spam. These are just
a few examples. The point is that because PyMailGUI is written in a high-level,
easy-to-maintain scripting language, such customizations are relatively simple, and
might even be fun.
At the end of the day, because of such features, this is a realistic Python program that
I actually use—both as a primary email tool and as a fallback option when my ISP’s
webmail system goes down (which, as I mentioned in the prior chapter, has a way of
happening at the worst possible times).† Python scripting is an enabling skill to have.
Running PyMailGUI
Of course, to script PyMailGUI on your own, you’ll need to be able to run it. PyMailGUI
requires only a computer with some sort of Internet connectivity (a PC with a broad-
band or dial-up account will do) and an installed Python with the tkinter extension
enabled. The Windows port of Python has this capability, so Windows PC users should
be able to run this program immediately by clicking its icon.
Two notes on running the system: first, you’ll want to change the file mailconfig.py in
the program’s source directory to reflect your account’s parameters, if you wish to send
or receive mail from a live server; more on this as we interact with the system ahead.
Second, you can still experiment with the system without a live Internet connection—
for a quick look at message view windows, use the main window’s Open buttons to
open saved-mail files included in the program’s SavedMail subdirectory. The PyDemos
launcher script at the top of the book’s examples directory, for example, forces Py-
MailGUI to open saved-mail files by passing filenames on the command line. Although
you’ll probably want to connect to your email servers eventually, viewing saved mails
offline is enough to sample the system’s flavor and does not require any configuration
file changes.
Presentation Strategy
PyMailGUI is easily the largest program in this book, but it doesn’t introduce many
library interfaces that we haven’t already seen in this book. For instance:
• The PyMailGUI interface is built with Python’s tkinter, using the familiar listboxes,
buttons, and text widgets we met earlier.
• Python’s email package is applied to pull-out headers, text, and attachments of
messages, and to compose the same.
† In fact, my ISP’s webmail send system went down the very day I had to submit the third edition of this book
to my publisher! No worries—I fired up PyMailGUI and used it to send the book as attachment files through
a different server. In a sense, this book submitted itself.
1010 | Chapter 14: The PyMailGUI Client

• Python’s POP and SMTP library modules are used to fetch, send, and delete mail
over sockets.
• Python threads, if installed in your Python interpreter, are put to work to avoid
blocking during potentially overlapping, long-running mail operations.
We’re also going to reuse the PyEdit TextEditor object we wrote in Chapter 11 to view
and compose messages and to pop up raw text, attachments, and source; the mail
tools package’s tools we wrote in Chapter 13 to load, send, and delete mail with a
server; and the mailconfig module strategy introduced in Chapter 13 to support end-
user settings. PyMailGUI is largely an exercise in combining existing tools.
On the other hand, because this program is so long, we won’t exhaustively document
all of its code. Instead, we’ll begin with a quick look at how PyMailGUI has evolved,
and then move on to describing how it works today from an end user’s perspective—
a brief demo of its windows in action. After that, we’ll list the system’s new source code
modules without many additional comments, for further study.
Like most of the longer case studies in this book, this section assumes that you already
know enough Python to make sense of the code on your own. If you’ve been reading
this book linearly, you should also know enough about tkinter, threads, and mail in-
terfaces to understand the library tools applied here. If you get stuck, you may wish to
brush up on the presentation of these topics earlier in the book.
Major PyMailGUI Changes
Like the PyEdit text editor of Chapter 11, PyMailGUI serves as a good example of
software evolution in action. Because its revisions help document this system’s func-
tionality, and because this example is as much about software engineering as about
Python itself, let’s take a quick look at its recent changes.
New in Version 2.1 and 2.0 (Third Edition)
The 2.1 version of PyMailGUI presented in the third edition of the book in early 2006
is still largely present and current in this fourth edition in 2010. Version 2.1 added a
handful of enhancements to version 2.0, and version 2.0 was a complete rewrite of the
1.0 version of the second edition with a radically expanded feature set.
In fact, the second edition’s version 1.0 of this program written in early 2000 was only
some 685 total program lines long (515 lines for the GUI main script and 170 lines in
an email utilities module), not counting related examples reused, and just 60 lines in
its help text module. Version 1.0 was really something of a prototype (if not toy), written
mostly to serve as a short book example.
Although it did not yet support Internationalized mail content or other 3.0 extensions,
in the third edition, PyMailGUI 2.1 became a much more realistic and feature-rich
program that could be used for day-to-day email processing. It grew by nearly a factor
Major PyMailGUI Changes | 1011

of three to be 1,800 new program source lines (plus 1,700 program lines in related
modules reused, and 500 additional lines of help text). By comparison, version 3.0 by
itself grew only by some 30% to be 2,400 new program source lines as described earlier
(plus 2,500 lines in related modules, and 1,700 lines of help text). Statistically minded
readers: consult file linecounts-prior-version.xls in PyMailGUI’s media subdirectory for
a line counts breakdown for version 2.1 by file.
In version 2.1, among PyMailGUI’s new weapons were (and still are) these:
• MIME multipart mails with attachments may be both viewed and composed.
• Mail transfers are no longer blocking, and may overlap in time.
• Mail may be saved and processed offline from a local file.
• Message parts may now be opened automatically within the GUI.
• Multiple messages may be selected for processing in list windows.
• Initial downloads fetch mail headers only; full mails are fetched on request.
• View window headers and list window columns are configurable.
• Deletions are performed immediately, not delayed until program exit.
• Most server transfers report their progress in the GUI.
• Long lines are intelligently wrapped in viewed and quoted text.
• Fonts and colors in list and view windows may be configured by the user.
• Authenticating SMTP mail-send servers that require login are supported.
• Sent messages are saved in a local file, which may be opened in the GUI.
• View windows intelligently pick a main text part to be displayed.
• Already fetched mail headers and full mails are cached for speed.
• Date strings and addresses in composed mails are formatted properly.
• View windows now have quick-access buttons for attachments/parts (2.1).
• Inbox out-of-sync errors are detected on deletes, and on index and mail loads (2.1).
• Save-mail file loads and deletes are threaded, to avoid pauses for large files (2.1).
The last three items on this list were added in version 2.1; the rest were part of the 2.0
rewrite. Some of these changes were made simple by growth in standard library tools
(e.g., support for attachments is straightforward with the new email package), but most
represented changes in PyMailGUI itself. There were also a few genuine fixes: addresses
were parsed more accurately, and date and time formats in sent mails became standards
conforming, because these tasks used new tools in the email package.
New in Version 3.0 (Fourth Edition)
PyMailGUI version 3.0, presented in this fourth edition of this book, inherits all of 2.1’s
upgrades described in the prior section and adds many of its own. Changes are perhaps
less dramatic in version 3.0, though some address important usability issues, and they
1012 | Chapter 14: The PyMailGUI Client

seem collectively sufficient to justify assigning this version a new major release number.
Here’s a summary of what’s new this time around:
Python 3.X port
The code was updated to run under Python 3.X only; Python 2.X is no longer
supported without code changes. Although some of the task of porting to Python
3.X requires only minor coding changes, other idiomatic implications are more far
reaching. Python 3.X’s new Unicode focus, for example, motivated much of the
Internationalization support in this version of PyMailGUI (discussed ahead).
Layout improvements
View window forms are laid out with gridding instead of packed column frames,
for better appearance and platform neutrality of email headers (see Chapter 9 for
more details on form layout). In addition, list window toolbars are now arranged
with expanding separators for clarity; this effectively groups buttons by their roles
and scope. List windows are also larger when initially opened to show more.
Text editor fix for Tk change
Both the embedded text editor and some text editor instances popped up on de-
mand are now forcibly updated before new text is inserted, for accurate initial
positioning at line 1. See PyEdit in Chapter 11 for more on this requirement; it
stems from a recent change (bug?) in either Tk or tkinter.
Text editor upgrades inherited
Because the PyEdit program is reused in multiple roles here, this version of Py-
MailGUI also acquires all its latest fixes by proxy. Most prominently, these include
a new Grep external files search dialog and support for displaying, opening, and
saving Unicode text. See Chapter 11 for details.
Workaround for Python 3.1 bug on traceback prints
In the obscure-but-all-too-typical category: the common function in
SharedNames.py that prints traceback details had to be changed to work correctly
under Python 3.X. The traceback module’s print_tb function can no longer print
a stack trace to sys.stdout if the calling program is spawned from another on
Windows; it still can as before if the caller was run normally from a shell prompt.
Since this function is called from the main thread on worker thread exceptions, if
allowed to fail any printed error kills the GUI entirely when it is spawned from the
gadget or demo launchers.
To work around this, the function now catches exceptions when print_tb is called
and in response runs it again with a real file instead of sys.stdout. This appears to
be a Python 3.X regression, as the same code worked correctly in both contexts in
Python 2.5 and 2.6. Unlike some similar issues, it has nothing to do with printing
Unicode, as stack traces are all ASCII text. Even more baffling, directly printing to
stdout in the same function works fine. Hey, if it were easy, they wouldn’t call it
“work.”
Major PyMailGUI Changes | 1013

Bcc addresses added to envelope but header omitted
Minor change: addresses entered in the user-selectable Bcc header line of edit win-
dows are included in the recipients list (the “envelope”), but the Bcc header line
itself is no longer included in the message text sent. Otherwise, Bcc recipients might
be seen by some email readers and clients (including PyMailGUI), which defeats
most of this header’s purpose.
Avoiding parallel fetches of the same mail
PyMailGUI loads only mail headers initially, and fetches a mail’s full text later when
needed for viewing and other operations, allowing multiple fetches to overlap in
time (they are run in parallel threads). Though unlikely, it was not impossible for
a user to trigger a new fetch for a mail that was currently being fetched, by selecting
the mail again during its download (clicking its list entry twice quickly sufficed to
kick this off). Although the message cache updates performed in the parallel fetch
threads appeared to be thread safe, this behavior seemed odd and wasted time.
To do better, this version now keeps track of all fetches in progress in the main
thread, to avoid this overlap potential entirely—a message fetch in progress disa-
bles all new fetch requests that it is a part of, until its fetch completes. Multiple
overlapping fetches are still allowed, as long as their targets do not intersect. A set
is used to detect nondisjoint fetch requests. Mails already fetched and cached are
not subject to this check and can always be selected irrespective of any fetches in
progress.
Multiple recipients separated in GUI by commas, not semicolons
In the prior edition, “;” was used as the recipient character, and addresses were
naively split on “;” on a send. This attempted to avoid conflicts with “,” commonly
used in email names. Replies dropped the name part if it contained a “;” when
extracting a To address, but it was not impossible that clashes could still arise if a
“;” appeared both as the separator and in manually typed address’s name.
To improve, this edition uses “,” as the recipient separator, and fully parses email
address lists with the email package’s getaddresses and parseaddr tools, instead of
splitting naively. Because these tools fully parse the list’s content, “,” characters
embedded in email address name parts are not mistakenly takes as address sepa-
rators, and so do not clash. Servers and clients generally expect “,” separators, too,
so this works naturally.
With this fix, commas can appear both as address separators as well as embedded
in address name components. For replies, this is handled automatically: the To
field is prefilled with the From in the original message. For sends, the split happens
automatically in email tools for To, Cc, and Bcc headers fields (the latter two are
ignored if they contain just the initial “?” when sent).
HTML help display
Help can now be displayed in text form in a GUI window, in HTML form in a
locally running web browser, or both. User settings in the mailconfig module select
which form or forms to display. The HTML version is new; it uses a simple
1014 | Chapter 14: The PyMailGUI Client

translation of the help text with added links to sections and external sites and
Python’s webbrowser module, discussed earlier in this book, to open a browser. The
text help display is now redundant, but it is retained because the HTML display
currently lacks its ability to open source file viewers.
Thread callback queue speedup
The global thread queue dispatches GUI update callbacks much faster now—up
to 100 times per second, instead of the prior 10. This is due both to checking more
frequently (20 timer events per second versus 10) and to dispatching more callbacks
per timer event (5 versus the prior 1). Depending on the interleaving of queue puts
and gets, this speeds up initial loads for larger mailboxes by as much as an order
of magnitude (factor of 10), at some potential minor cost in CPU utilization. On
my Windows 7 laptop, though, PyMailGUI still shows 0% CPU utilization in Task
Manager when idle.
I bumped up the queue’s speed to support an email account having 4,800 inbox
messages (actually, even more by the time I got around to taking screenshots for
this chapter). Without the speedup, initial header loads for this account took 8
minutes to work through the 4,800 progress callbacks (4800 ÷ 10 ÷ 60), even
though most reflected messages skipped immediately by the new mail fetch limits
(see the next item). With the speedup, the initial load takes just 48 seconds—
perhaps not ideal still, but this initial headers load is normally performed only once
per session, and this policy strikes a balance between CPU resources and respon-
siveness. This email account is an arguably pathological case, of course, but most
initial loads benefit from the faster speed.
See Chapter 10’s threadtools for most of this change’s code, as well as additional
background details. We could alternatively loop through all queued events on each
timer event, but this may block the GUI indefinitely if updates are queued quickly.
Mail fetch limits
Since 2.1, PyMailGUI loads only mail headers initially, not full mail text, and only
loads newly arrived headers thereafter. Depending on your Internet and server
speeds, though, this may still be impractical for very large inboxes (as mentioned,
one of mine currently has some 4,800 emails). To support such cases, a new mail
config setting can be used to limit the number of headers (or full mails if TOP is
unsupported) fetched on loads.
Given this setting N, PyMailGUI fetches at most N of the most recently arrived
mails. Older mails outside this set are not fetched from the server, but are displayed
as empty/dummy emails which are mostly inoperative (though they can generally
still be fetched on demand).
This feature is inherited from mailtools code in Chapter 13; see the mailconfig
module ahead for the user setting associated with it. Note that even with this fix,
because the threadtools queue system used here dispatches GUI events such as
progress updates only up to 100 times per second, a 4,800 mail inbox still takes
Major PyMailGUI Changes | 1015

48 seconds to complete an initially header load. The queue should either run faster
still, or I should delete an email once in a while!
HTML main text extraction (prototype)
PyMailGUI is still somewhat plain-text biased, despite the emergence of HTML
emails in recent years. When the main (or only) text part of a mail is HTML, it is
displayed in a popped-up web browser. In the prior version, though, its HTML
text was still displayed in a PyEdit text editor component and was still quoted for
the main text of replies and forwards.
Because most people are not HTML parsers, this edition’s version attempts to do
better by extracting plain text from the part’s HTML with a simple HTML parsing
step. The extracted plain text is then displayed in the mail view window and used
as original text in replies and forwards.
This HTML parser is at best a prototype and is largely included to provide a first
step that you can tailor for your tastes and needs, but any result it produces is better
than showing raw HTML. If this fails to render the plain text well, users can still
fall back on viewing in the web browser and cutting and pasting from there into
replies and forwards. See also the note about open source alternatives by this
parser’s source code later in this chapter; this is an already explored problem
domain.
Reply copies all original recipients by default
In this version, replies are really reply-to-all by default—they automatically prefill
the Cc header in the replies composition window with all the original recipients of
the message. To do so, replies extract all addresses among both the original To and
Cc headers, and remove duplicates as well as the new sender’s address by using set
operations. The net effect is to copy all other recipients on the reply. This is in
addition to replying to the sender by initializing To with the original sender’s
address.
This feature is intended to reflect common usage: email circulated among groups.
Since it might not always be desirable, though, it can be disabled in mailconfig so
that replies initialize just To headers to reply to the original sender only. If enabled,
users may need to delete the Cc prefill if not wanted; if disabled, users may need
to insert Cc addresses manually instead. Both cases seem equally likely. Moreover,
it’s not impossible that the original recipients include mail list names, aliases, or
spurious addresses that will be either incorrect or irrelevant when the reply is sent.
Like the Bcc prefill described in the next item, the reply’s Cc initialization can be
edited prior to sends if needed, and disabled entirely if preferred. Also see the
suggested enhancements for this feature at the end of this chapter—allowing this
to be enabled or disabled in the GUI per message might be a better approach.
Other upgrades: Bcc prefills, “Re” and “Fwd” case, list size, duplicate recipients
In addition, there have been smaller enhancements throughout. Among them: Bcc
headers in edit windows are now prefilled with the sender’s address as a conven-
ience (a common role for this header); Reply and Forward now ignore case when
1016 | Chapter 14: The PyMailGUI Client

determining if adding a “Re:” or “Fwd:” to the subject would be redundant; mail
list window width and height may now be configured in mailconfig; duplicates are
removed from the recipient address list in mailtools on sends to avoid sending
anyone multiple copies of the same mail (e.g., if an address appears in both To and
Cc); and other minor improvements which I won’t cover here. Look for “3.0” and
“4E” in program comments here and in the underlying mailtools package of
Chapter 13 to see other specific code changes.
Unicode (Internationalization) support
I’ve saved the most significant PyMailGUI 3.0 upgrade for last: it now supports
Unicode encoding of fetched, saved, and sent mails, to the extent allowed by the
Python 3.1 email package. Both text parts of messages and message headers are
decoded when displayed and encoded when sent. Since this is too large a change
to explain in this format, the next section elaborates.
Version 3.0 Unicode support policies
The last item on the preceding list is probably the most substantial. Per Chapter 13, a
user-configurable setting in the mailconfig module is used on a session-wide basis to
decode full message bytes into Unicode strings when fetched, and to encode and decode
mail messages stored in text-mode save files.
More visibly, when composing, the main text and attached text parts of composed mails
may be given explicit Unicode encodings in mailconfig or via user input; when viewing,
message header information of parsed emails is used to determine the Unicode types
of both the main mail text as well as text parts opened on demand. In addition, Inter-
nationalized mail headers (e.g., Subject, To, and From) are decoded per email, MIME,
and Unicode standards when displayed according to their own content, and are auto-
matically encoded if non-ASCII when sent.
Other Unicode policies (and fixes) of Chapter 13’s mailtools package are inherited
here, too; see the prior chapter for more details. In summation, here is how all these
policies play out in terms of user interfaces:
Fetched emails
When fetching mails, a session-wide user setting is used to decode full message
bytes to Unicode strings, as required by Python’s current email parser; if this fails,
a handful of guesses are applied. Most mail text will likely be 7 or 8 bit in nature,
since original email standards required ASCII.
Composed text parts
When sending new mails, user settings are used to determine Unicode type for the
main text part and any text attachment parts. If these are not set in mailconfig, the
user will instead be asked for encoding names in the GUI for each text part. These
are ultimately used to add character set headers, and to invoke MIME encoding.
In all cases, the program falls back on UTF-8 if the user’s encoding setting or input
does not work for the text being sent—for instance, if the user has chosen ASCII
Major PyMailGUI Changes | 1017

for the main text of a reply to or forward of a non-ASCII message or for non-ASCII
attachments.
Composed headers
When sending new mails, if header lines or the name component of an email address
in address-related lines do not encode properly as ASCII text, we first encode the
header per email Internationalization standard. This is done per UTF-8 by default,
but a mailconfig setting can request a different encoding. In email address pairs,
names which cannot be encoded are dropped, and only the email address is used.
It is assumed that servers will respect the encoded names in email addresses.
Displayed text parts
When viewing fetched mail, Unicode encoding names in message headers are used
to decode whenever possible. The main-text part is decoded into str Unicode text
per header information prior to inserting it into a PyEdit component. The content
of all other text parts, as well as all binary parts, is saved in bytes form in binary-
mode files, from where the part may be opened later in the GUI on demand. When
such on-demand text parts are opened, they are displayed in PyEdit pop-up win-
dows by passing to PyEdit the name of the part’s binary-mode file, as well as the
part’s encoding name obtained from part message headers.
If the encoding name in a text part’s header is absent or fails to decode, encoding
guesses are tried for main-text parts, and PyEdit’s separate Unicode policies are
applied to text parts opened on demand (see Chapter 11—it may prompt for an
encoding if not known). In addition to these rules, HTML text parts are saved in
binary mode and opened in a web browser, relying on the browser’s own character
set support; this may in turn use tags in the HTML itself, guesses, or user encoding
selections.
Displayed headers
When viewing email, message headers are automatically decoded per email stand-
ards. This includes both full headers such as Subject, as well as the name compo-
nents of all email address fields in address-related headers such as From, To, and
Cc, and allows these components to be completely encoded or contain encoded
substrings. Because their content gives their MIME and Unicode encodings, no
user interaction is required to decode headers.
In other words, PyMailGUI now supports Internationalized message display and com-
position for both payloads and headers. For broadest utility, this support is distributed
across multiple packages and examples. For example, Unicode decoding of full message
text on fetches actually occurs deep in the imported mailtool package classes. Because
of this, full (unparsed) message text is always Unicode str here. Similarly, headers are
decoded for display here using tools implemented in mailtools, but headers encoding
is both initiated and performed within mailtools itself on sends.
Full text decoding illustrates the types of choices required. It is done according to the
fetchEncoding variable in the mailconfig module. This user setting is used across an
1018 | Chapter 14: The PyMailGUI Client

entire PyMailGUI session to decode fetched message bytes to the required str text prior
to parsing, and to save and load full message text to save files. Users may set this variable
to a Unicode encoding name string which works for their mails’ encodings; “latin-1”,
“utf-8”, and “ascii” are reasonable guesses for most emails, as email standards originally
called for ASCII (though “latin-1” was required to decode some old mail save files
generated by the prior version). If decoding with this encoding name fails, other com-
mon encodings are attempted, and as a last resort the message is still displayed if its
headers can be decoded, but its body is changed to an error message; to view such
unlikely mails, try running PyMailGUI again with a different encoding.
In the negatives column, nothing is done about the Unicode format for the full text of
sent mails, apart from that inherited from Python’s libraries (as we learned in Chap-
ter 13, smtplib attempts to encode per ASCII when messages are sent, which is one
reason that header encoding is required). And while mail content character sets are
fully supported, the GUI itself still uses English for its labels and buttons.
As explained in Chapter 13, this program’s Unicode polices are a broad but partial
solution, because the email package in Python 3.1, upon which PyMailGUI utterly relies
for correct operation, is in a state of flux for some use cases. An updated version which
handles the Python 3.X str/bytes distinctions more accurately and completely is likely
to appear in the future; watch this book’s updates page (see the Preface) for future
changes and improvements to this program’s Unicode policies. Hopefully, the current
email package underlying PyMailGUI 3.0 will be available for some time to come.
Although there is still room for improvement (see the list at the end of this chapter),
the PyMailGUI program is able to provide a full-featured email interface, represents
the most substantial example in this book, and serves to demonstrate a realistic appli-
cation of the Python language and software engineering at large. As its users often attest,
Python may be fun to work with, but it’s also useful for writing practical and nontrivial
software. This example, more than any other in this book, testifies the same. The next
section shows how.
A PyMailGUI Demo
PyMailGUI is a multiwindow interface. It consists of the following:
• A main mail-server list window opened initially, for online mail processing
• One or more mail save-file list windows for offline mail processing
• One or more mail-view windows for viewing and editing messages
• PyEdit windows for displaying raw mail text, extracted text parts, and the system’s
source code
• Nonblocking busy state pop-up dialogs
• Assorted pop-up dialogs for opened message parts, help, and more
A PyMailGUI Demo | 1019

Operationally, PyMailGUI runs as a set of parallel threads, which may overlap in time:
one for each active server transfer, and one for each active offline save file load or
deletion. PyMailGUI supports mail save files, automatic saves of sent messages, con-
figurable fonts and colors, viewing and adding attachments, main message text extrac-
tion, plain text conversion for HTML, and much more.
To make this case study easier to understand, let’s begin by seeing what PyMailGUI
actually does—its user interaction and email processing functionality—before jumping
into the Python code that implements that behavior. As you read this part, feel free to
jump ahead to the code listings that appear after the screenshots, but be sure to read
this section, too; this, along with the prior discussion of version changes, is where some
subtleties of PyMailGUI’s design are explained. After this section, you are invited to
study the system’s Python source code listings on your own for a better and more
complete explanation than can be crafted in English.
Getting Started
OK, it’s time to take the system out for a test drive. I’m going to run the following demo
on my Windows 7 laptop. It may look slightly different on different platforms (includ-
ing other versions of Windows) thanks to the GUI toolkit’s native-look-and-feel sup-
port, but the basic functionality will be similar.
PyMailGUI is a Python/tkinter program, run by executing its top-level script file,
PyMailGui.py. Like other Python programs, PyMailGUI can be started from the system
command line, by clicking on its filename icon in a file explorer interface, or by pressing
its button in the PyDemos or PyGadgets launcher bar. However it is started, the first
window PyMailGUI presents is captured in Figure 14-1, shown after running a Load
to fetch mail headers from my ISP’s email server. Notice the “PY” window icon: this is
the handiwork of window protocol tools we wrote earlier in this book. Also notice the
non-ASCII subject lines here; I’ll talk about Internationalization features later.
This is the PyMailGUI main window—every operation starts here. It consists of:
• A help button (the bar at the top)
• A clickable email list area for fetched emails (the middle section)
• A button bar at the bottom for processing messages selected in the list area
In normal operation, users load their email, select an email from the list area by clicking
on it, and press a button at the bottom to process it. No mail messages are shown
initially; we need to first load them with the Load button—a simple password input
dialog is displayed, a busy dialog appears that counts down message headers being
downloaded to give a status indication, and the index is filled with messages ready to
be selected.
1020 | Chapter 14: The PyMailGUI Client
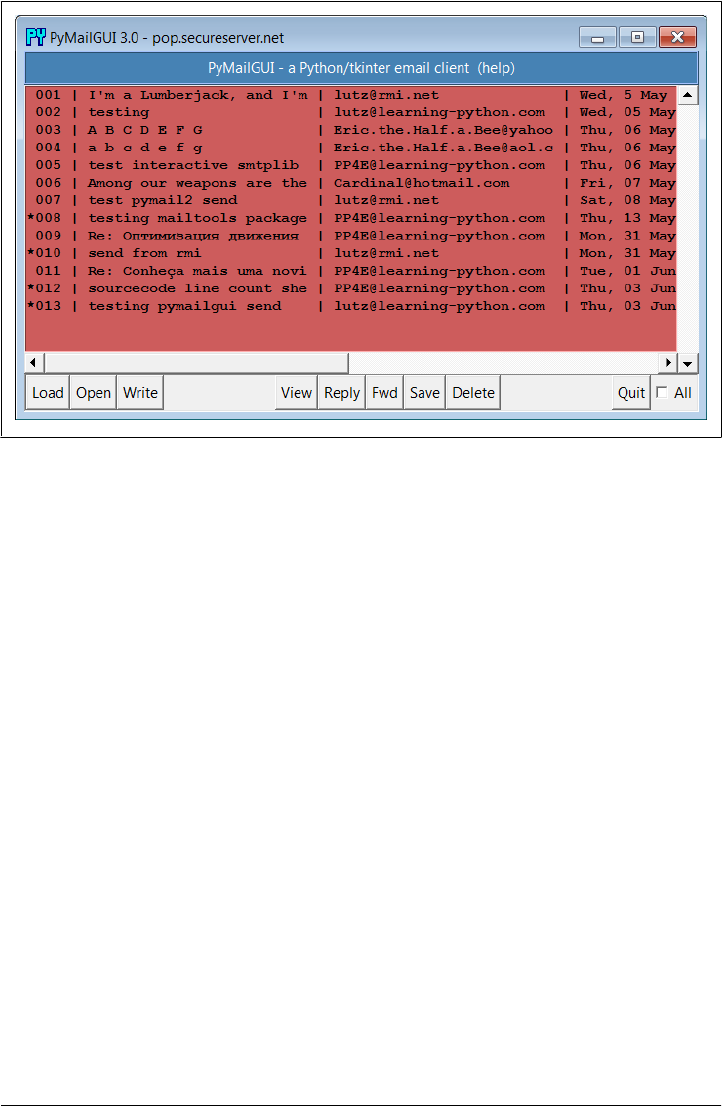
PyMailGUI’s list windows, such as the one in Figure 14-1, display mail header details
in fixed-width columns, up to a maximum size. Mails with attachments are prefixed
with a “*” in mail index list windows, and fonts and colors in PyMailGUI windows like
this one can be customized by the user in the mailconfig configuration file. You can’t
tell in this black-and-white book, but most of the mail index lists we’ll see are configured
to be Indian red, view windows are light blue, pop-up PyEdit windows are beige instead
of PyEdit’s normal light cyan, and help is steel blue. You can change most of these as
you like, and PyEdit pop-up window appearance can be altered in the GUI itself (see
Example 8-11 for help with color definition strings, and watch for alternative config-
uration examples ahead).
List windows allow multiple messages to be selected at once—the action selected at
the bottom of the window is applied to all selected mails. For instance, to view many
mails, select them all and press View; each will be fetched (if needed) and displayed in
its own view window. Use the All check button in the bottom right corner to select or
deselect every mail in the list, and Ctrl-Click and Shift-Click combinations to select
more than one (the standard Windows multiple selection operations apply—try it).
Before we go any further, though, let’s press the help bar at the top of the list window
in Figure 14-1 to see what sort of help is available; Figure 14-2 shows the text-based
help window pop up that appears—one of two help flavors available.
The main part of this window is simply a block of text in a scrolled-text widget, along
with two buttons at the bottom. The entire help text is coded as a single triple-quoted
string in the Python program. As we’ll see in a moment, a fancier option which opens
Figure 14-1. PyMailGUI main server list window
A PyMailGUI Demo | 1021
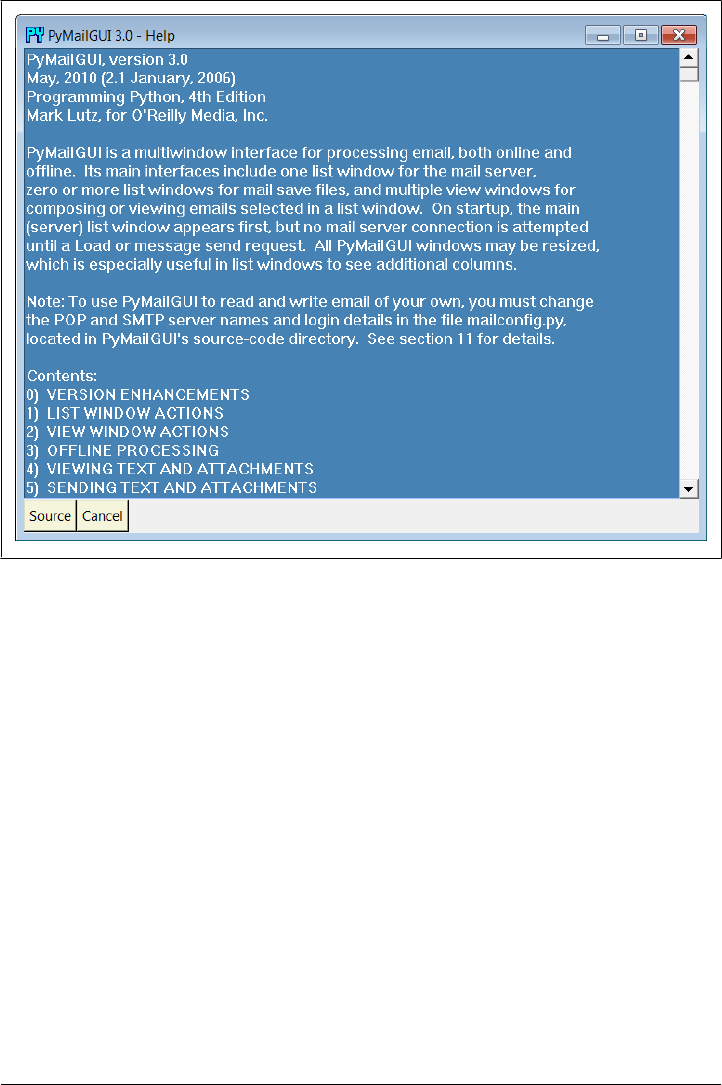
an HTML rendition of this text in a spawned web browser is also available, but simple
text is sufficient for many people’s tastes.‡ The Cancel button makes this nonmodal
(i.e., nonblocking) window go away. More interestingly, the Source button pops up
PyEdit text editor viewer windows for all the source files of PyMailGUI’s implementa-
tion; Figure 14-3 captures one of these (there are many; this is intended as a demon-
stration, not as a development environment). Not every program shows you its source
code, but PyMailGUI follows Python’s open source motif.
New in this edition, help is also displayed in HTML form in a web browser, in addition
to or instead of the scrolled text display just shown. Choosing help in text, HTML, or
both is controlled by a setting in the mailconfig module. The HTML flavor uses the
Python webbrowser module to pop up the HTML file in a browser on the local machine,
Figure 14-2. PyMailGUI text help pop up
‡ Actually, the help display started life even less fancy: it originally displayed help text in a standard information
pop up common dialog, generated by the tkinter showinfo call used earlier in the book. This worked fine on
Windows (at least with a small amount of help text), but it failed on Linux because of a default line-length
limit in information pop-up boxes; lines were broken so badly as to be illegible. Over the years, common
dialogs were replaced by scrolled text, which has now been largely replaced by HTML; I suppose the next
edition will require a holographic help interface…
1022 | Chapter 14: The PyMailGUI Client
and currently lacks the source-file opening button of the text display version (one reason
you may wish to display the text viewer, too). HTML help is captured in Figure 14-4.
When a message is selected for viewing in the mail list window by a mouse click and
View press, PyMailGUI downloads its full text (if it has not yet been downloaded in
this session), and a formatted email viewer window appears, as captured in Fig-
ure 14-5 for an existing message in my account’s inbox.
View windows are built in response to actions in list windows and take the following
form:
• The top portion consists of action buttons (Part to list all message parts, Split to
save and open parts using a selected directory, and Cancel to close this nonmodal
window), along with a section for displaying email header lines (From, To, and
so on).
• In the middle, a row of quick-access buttons for opening message parts, including
attachments, appears. When clicked, PyMailGUI opens known and generally safe
parts according to their type. Media types may open in a web browser or image
viewer, text parts in PyEdit, HTML in a web browser, Windows document types
per the Windows Registry, and so on.
Figure 14-3. PyMailGUI text help source code viewer window
A PyMailGUI Demo | 1023
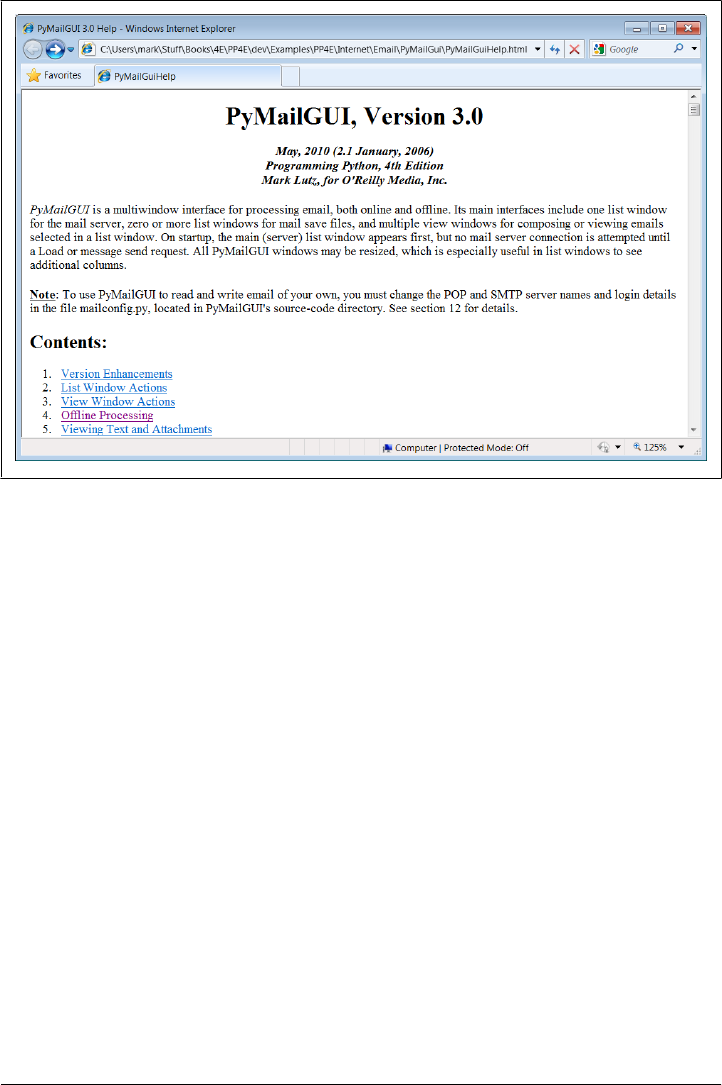
• The bulk of this window (its entire lower portion) is just another reuse of the
TextEditor class object of the PyEdit program we wrote in Chapter 11—PyMailGUI
simply attaches an instance of TextEditor to every view and compose window in
order to get a full-featured text editor component for free. In fact, much on the
window shown in Figure 14-5 is implemented by TextEditor, not by PyMailGUI.
Reusing PyEdit’s class this way means that all of its tools are at our disposal for email
text—cut and paste, find and goto, saving a copy of the text to a file, and so on. For
instance, the PyEdit Save button at the bottom left of Figure 14-5 can be used to save
just the main text of the mail (as we’ll see later, clicking the leftmost part button in the
middle of the screen affords similar utility, and you can also save the entire message
from a list window). To make this reuse even more concrete, if we pick the Tools menu
of the text portion of this window and select its Info entry, we get the standard PyEdit
TextEditor object’s text statistics box shown in Figure 14-6—the same pop up we’d
get in the standalone PyEdit text editor and in the PyView image view programs we
wrote in Chapter 11.
In fact, this is the third reuse of TextEditor in this book: PyEdit, PyView, and now
PyMailGUI all present the same text-editing interface to users, simply because they all
use the same TextEditor object and code. PyMailGUI uses it in multiple roles—it both
attaches instances of this class for mail viewing and composition, and pops up instances
in independent windows for some text mail parts, raw message text display, and Python
Figure 14-4. PyMailGUI HTML help display (new in 3.0)
1024 | Chapter 14: The PyMailGUI Client
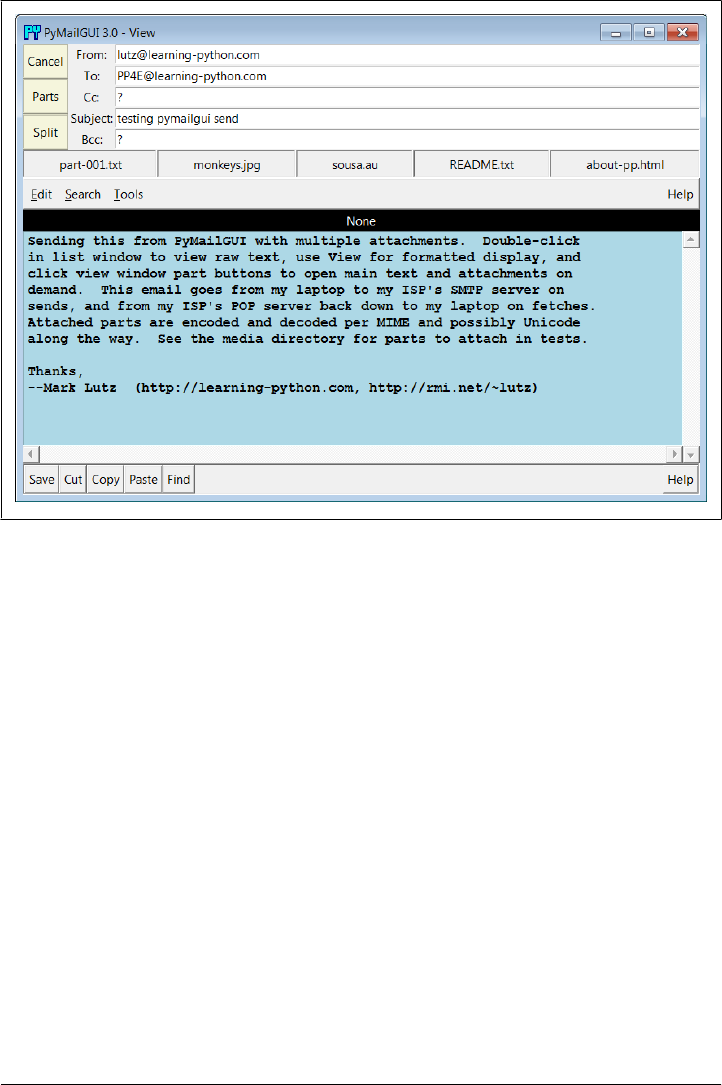
source-code viewing (we saw the latter in Figure 14-3). For mail view components,
PyMailGUI customizes PyEdit text fonts and colors per its own configuration module;
for pop ups, user preferences in a local textConfig module are applied.
To display email, PyMailGUI inserts its text into an attached TextEditor object; to
compose email, PyMailGUI presents a TextEditor and later fetches all its text to ship
over the Net. Besides the obvious simplification here, this code reuse makes it easy to
pick up improvements and fixes—any changes in the TextEditor object are automati-
cally inherited by PyMailGUI, PyView, and PyEdit.
In the third edition’s version, for instance, PyMailGUI supports edit undo and redo,
just because PyEdit had gained that feature. And in this fourth edition, all PyEdit im-
porters also inherit its new Grep file search, as well as its new support for viewing and
editing text of arbitrary Unicode encodings—especially useful for text parts in emails
of arbitrary origin like those displayed here (see Chapter 11 for more about PyEdit’s
evolution).
Loading Mail
Next, let’s go back to the PyMailGUI main server list window, and click the Load button
to retrieve incoming email over the POP protocol. PyMailGUI’s load function gets
Figure 14-5. PyMailGUI view window
A PyMailGUI Demo | 1025
account parameters from the mailconfig module listed later in this chapter, so be sure
to change this file to reflect your email account parameters (i.e., server names and
usernames) if you wish to use PyMailGUI to read your own email. Unless you can guess
the book’s email account password, the presets in this file won’t work for you.
The account password parameter merits a few extra words. In PyMailGUI, it may come
from one of two places:
Local file
If you put the name of a local file containing the password in the mailconfig mod-
ule, PyMailGUI loads the password from that file as needed.
Pop up dialog
If you don’t put a password filename in mailconfig (or if PyMailGUI can’t load it
from the file for whatever reason), PyMailGUI will instead ask you for your pass-
word anytime it is needed.
Figure 14-7 shows the password input prompt you get if you haven’t stored your pass-
word in a local file. Note that the password you type is not shown—a show='*' option
for the Entry field used in this pop up tells tkinter to echo typed characters as stars (this
option is similar in spirit to both the getpass console input module we met earlier in
the prior chapter and an HTML type=password option we’ll meet in a later chapter).
Once entered, the password lives only in memory on your machine; PyMailGUI itself
doesn’t store it anywhere in a permanent way.
Figure 14-6. PyMailGUI attached PyEdit info box
1026 | Chapter 14: The PyMailGUI Client

Also notice that the local file password option requires you to store your password
unencrypted in a file on the local client computer. This is convenient (you don’t need
to retype a password every time you check email), but it is not generally a good idea on
a machine you share with others, of course; leave this setting blank in mailconfig if you
prefer to always enter your password in a pop up.
Once PyMailGUI fetches your mail parameters and somehow obtains your password,
it will next attempt to pull down just the header text of all your incoming email from
your inbox on your POP email server. On subsequent loads, only newly arrived mails
are loaded, if any. To support obscenely large inboxes (like one of mine), the program
is also now clever enough to skip fetching headers for all but the last batch of messages,
whose size you can configure in mailconfig—they show up early in the mail list with
subject line “--mail skipped--”; see the 3.0 changes overview earlier for more details.
To save time, PyMailGUI fetches message header text only to populate the list window.
The full text of messages is fetched later only when a message is selected for viewing or
processing, and then only if the full text has not yet been fetched during this session.
PyMailGUI reuses the load-mail tools in the mailtools module of Chapter 13 to fetch
message header text, which in turn uses Python’s standard poplib module to retrieve
your email.
Threading Model
Now that we’re downloading mails, I need to explain the juggling act that PyMailGUI
performs to avoid becoming blocked and support operations that overlap in time. Ul-
timately, mail fetches run over sockets on relatively slow networks. While the download
is in progress, the rest of the GUI remains active—you may compose and send other
mails at the same time, for instance. To show its progress, the nonblocking dialog of
Figure 14-8 is displayed when the mail index is being fetched.
In general, all server transfers display such dialogs. Figure 14-9 shows the busy dialog
displayed while a full text download of five selected and uncached (not yet fetched)
mails is in progress, in response to a View action. After this download finishes, all five
pop up in individual view windows.
Such server transfers, and other long-running operations, are run in threads to avoid
blocking the GUI. They do not disable other actions from running in parallel, as long
as those actions would not conflict with a currently running thread. Multiple mail sends
and disjoint fetches can overlap in time, for instance, and can run in parallel with the
Figure 14-7. PyMailGUI password input dialog
A PyMailGUI Demo | 1027
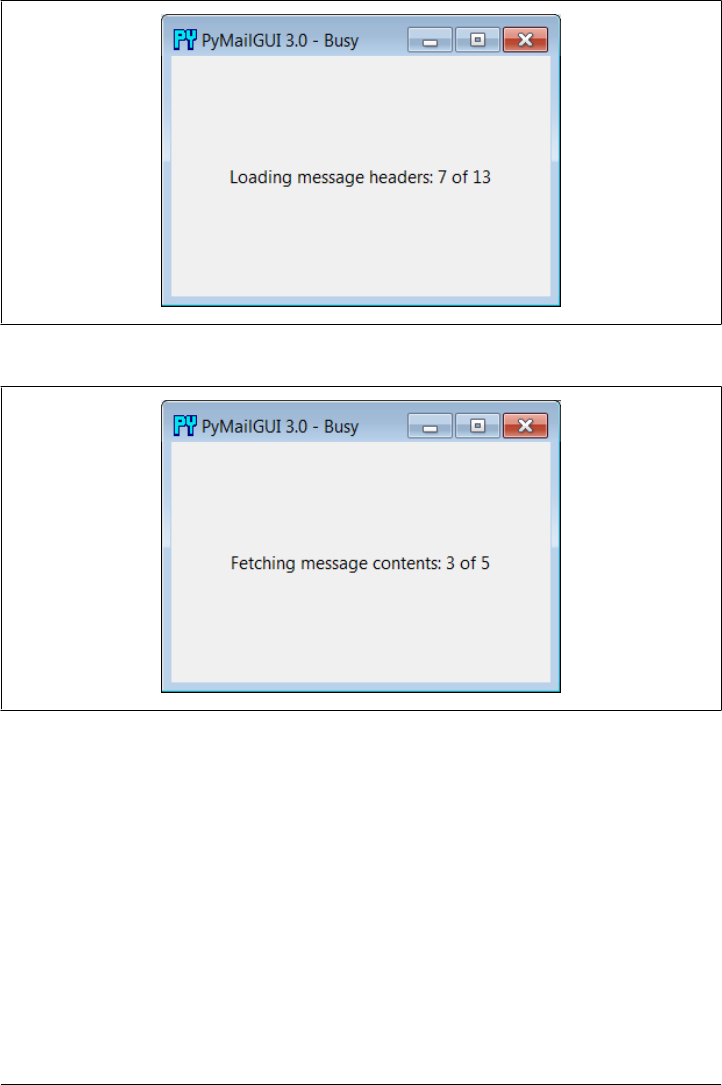
GUI itself—the GUI responds to moves, redraws, and resizes during the transfers.
Other transfers such as mail deletes must run all by themselves and disable other trans-
fers until they are finished; deletes update the inbox and internal caches too radically
to support other parallel operations.
On systems without threads, PyMailGUI instead goes into a blocked state during such
long-running operations (it essentially stubs out the thread-spawn operation to perform
a simple function call). Because the GUI is essentially dead without threads, covering
and uncovering the GUI during a mail load on such platforms will erase or otherwise
distort its contents. Threads are enabled by default on most platforms that run Python
(including Windows), so you probably won’t see such oddness on your machine.
Figure 14-8. Nonblocking progress indicator: Load
Figure 14-9. Nonblocking progress indicator: View
1028 | Chapter 14: The PyMailGUI Client

Threading model implementation
On nearly every platform, though, long-running tasks like mail fetches and sends are
spawned off as parallel threads, so that the GUI remains active during the transfer—it
continues updating itself and responding to new user requests, while transfers occur
in the background. While that’s true of threading in most GUIs, here are two notes
regarding PyMailGUI’s specific implementation and threading model:
GUI updates: exit callback queue
As we learned earlier in this book, only the main thread that creates windows
should generally update them. See Chapter 9 for more on this; tkinter doesn’t
support parallel GUI changes. As a result, PyMailGUI takes care to not do anything
related to the user interface within threads that load, send, or delete email. Instead,
the main GUI thread continues responding to user interface events and updates,
and uses a timer-based event to watch a queue for exit callbacks to be added by
worker threads, using the thread tools we implemented earlier in Chapter 10
(Example 10-20). Upon receipt, the main GUI thread pulls the callback off the
queue and invokes it to modify the GUI in the main thread.
Such queued exit callbacks can display a fetched email message, update the mail
index list, change a progress indicator, report an error, or close an email compo-
sition window—all are scheduled by worker threads on the queue but performed
in the main GUI thread. This scheme makes the callback update actions automat-
ically thread safe: since they are run by one thread only, such GUI updates cannot
overlap in time.
To make this easy, PyMailGUI stores bound method objects on the thread queue,
which combine both the function to be called and the GUI object itself. Since
threads all run in the same process and memory space, the GUI object queued gives
access to all GUI state needed for exit updates, including displayed widget objects.
PyMailGUI also runs bound methods as thread actions to allow threads to update
state in general, too, subject to the next paragraph’s rules.
Other state updates: operation overlap locks
Although the queued GUI update callback scheme just described effectively re-
stricts GUI updates to the single main thread, it’s not enough to guarantee thread
safety in general. Because some spawned threads update shared object state used
by other threads (e.g., mail caches), PyMailGUI also uses thread locks to prevent
operations from overlapping in time if they could lead to state collisions. This
includes both operations that update shared objects in memory (e.g., loading mail
headers and content into caches), as well as operations that may update POP mes-
sage numbers of loaded email (e.g., deletions).
Where thread overlap might be an issue, the GUI tests the state of thread locks,
and pops up a message when an operation is not currently allowed. See the source
code and this program’s help text for specific cases where this rule is applied.
A PyMailGUI Demo | 1029
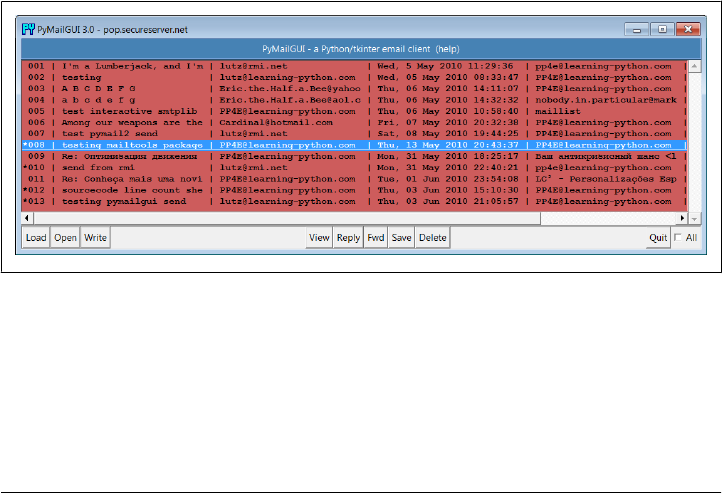
Operations such as individual sends and views that are largely independent can
overlap broadly, but deletions and mail header fetches cannot.
In addition, some potentially long-running save-mail operations are threaded to
avoid blocking the GUI, and this edition uses a set object to prevent fetch threads
for requests that include a message whose fetch is in progress in order to avoid
redundant work (see the 3.0 changes review earlier).
For more on why such things matter in general, be sure to see the discussion of threads
in GUIs in Chapters 5, 9, and 10. PyMailGUI is really just a concrete realization of
concepts we’ve explored earlier.
Load Server Interface
Let’s return to loading our email: because the load operation is really a socket operation,
PyMailGUI automatically connects to your email server using whatever connectivity
exists on the machine on which it is run. For instance, if you connect to the Net over
a modem and you’re not already connected, Windows automatically pops up the
standard connection dialog. On the broadband connections that most of us use today,
the interface to your email server is normally automatic.
After PyMailGUI finishes loading your email, it populates the main window’s scrolled
listbox with all of the messages on your email server and automatically scrolls to the
most recently received message. Figure 14-10 shows what the main window looks like
after selecting a message with a click and resizing—the text area in the middle grows
and shrinks with the window, revealing more header columns as it grows.
Figure 14-10. PyMailGUI main window resized
Technically, the Load button fetches all your mail’s header text the first time it is
pressed, but it fetches only newly arrived email headers on later presses. PyMailGUI
keeps track of the last email loaded, and requests only higher email numbers on later
loads. Already loaded mail is kept in memory, in a Python list, to avoid the cost of
downloading it again. PyMailGUI does not delete email from your server when it is
1030 | Chapter 14: The PyMailGUI Client
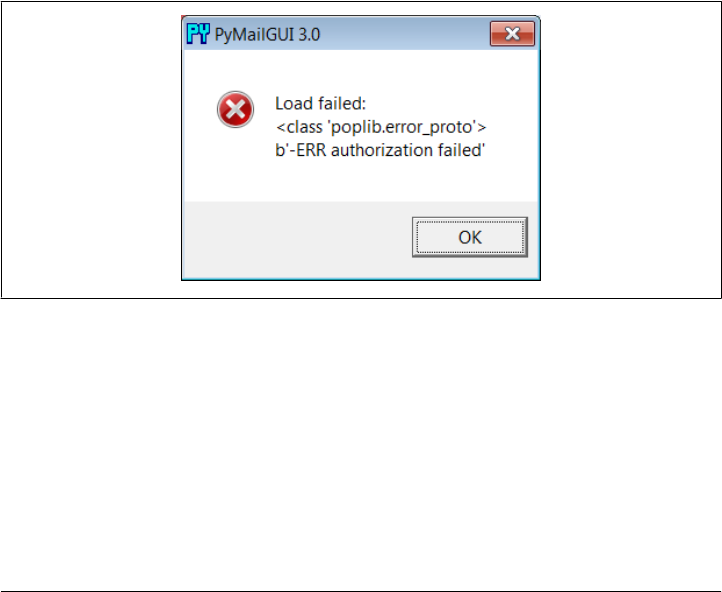
loaded; if you really want to not see an email on a later load, you must explicitly
delete it.
Entries in the main list show just enough to give the user an idea of what the message
contains—each entry gives the concatenation of portions of the message’s Subject,
From, Date, To, and other header lines, separated by | characters and prefixed with
the message’s POP number (e.g., there are 13 emails in this list). Columns are aligned
by determining the maximum size needed for any entry, up to a fixed maximum, and
the set of headers displayed can be configured in the mailconfig module. Use the hor-
izontal scroll or expand the window to see additional header details such as message
size and mailer.
As we’ve seen, a lot of magic happens when downloading email—the client (the ma-
chine on which PyMailGUI runs) must connect to the server (your email account ma-
chine) over a socket and transfer bytes over arbitrary Internet links. If things go wrong,
PyMailGUI pops up standard error dialog boxes to let you know what happened. For
example, if you type an incorrect username or password for your account (in the mail
config module or in the password pop up), you’ll receive the message in Fig-
ure 14-11. The details displayed here are just the Python exception type and exception
data. Additional details, including a stack trace, show up in standard output (the con-
sole window) on errors.
Figure 14-11. PyMailGUI invalid password error box
Offline Processing with Save and Open
We’ve seen how to fetch and view emails from a server, but PyMailGUI can also be
used in completely offline mode. To save mails in a local file for offline processing,
select the desired messages in any mail list window and press the Save action button;
as usual, any number of messages may be selected for saving together as a set. A
standard file-selection dialog appears, like that in Figure 14-12, and the mails are saved
to the end of the chosen text file.
A PyMailGUI Demo | 1031
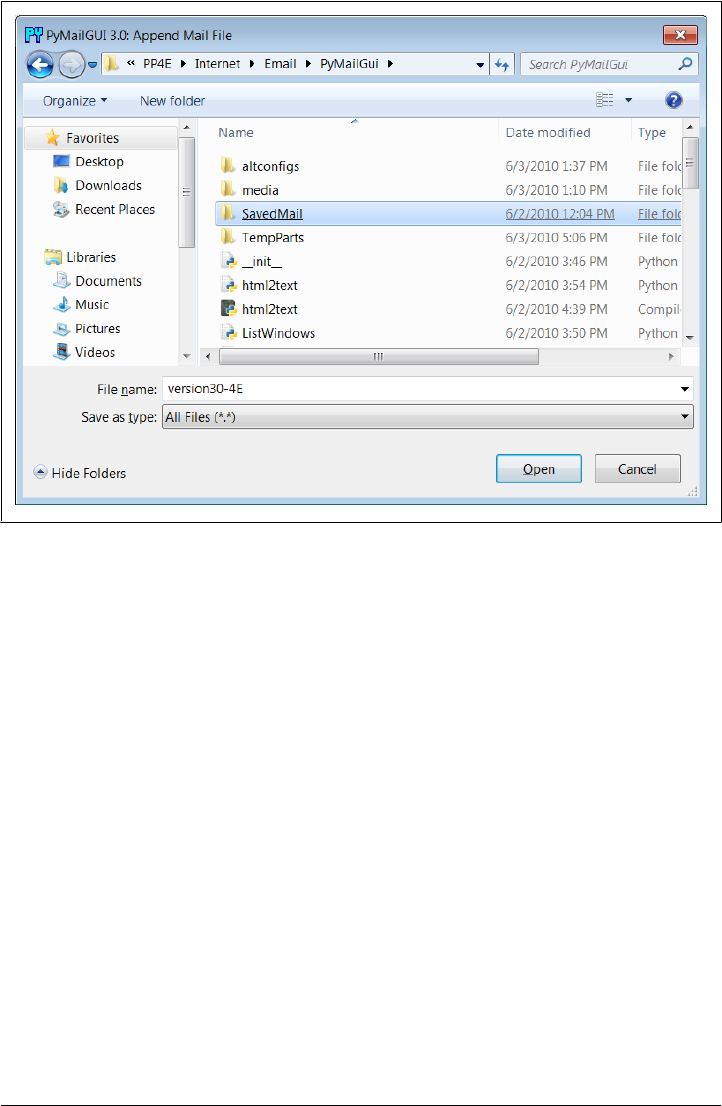
Figure 14-12. Save mail selection dialog
To view saved emails later, select the Open action at the bottom of any list window
and pick your save file in the selection dialog. A new mail index list window appears
for the save file and it is filled with your saved messages eventually—there may be a
slight delay for large save files, because of the work involved. PyMailGUI runs file loads
and deletions in threads to avoid blocking the rest of the GUI; these threads can overlap
with operations on other open save-mail files, server transfer threads, and the GUI at
large.
While a mail save file is being loaded in a parallel thread, its window title is set to
“Loading…” as a status indication; the rest of the GUI remains active during the load
(you can fetch and delete server messages, view mails in other files, write new messages,
and so on). The window title changes to the loaded file’s name after the load is finished.
Once filled, a message index appears in the save file’s window, like the one captured
in Figure 14-13 (this window also has three mails selected for processing).
In general, there can be one server mail list window and any number of save-mail file
list windows open at any time. Save-mail file list windows like that in Figure 14-13 can
be opened at any time, even before fetching any mail from the server. They are identical
to the server’s inbox list window, but there is no help bar, the Load action button is
omitted since this is not a server view, and all other action buttons are mapped to the
save file, not to the server.
1032 | Chapter 14: The PyMailGUI Client
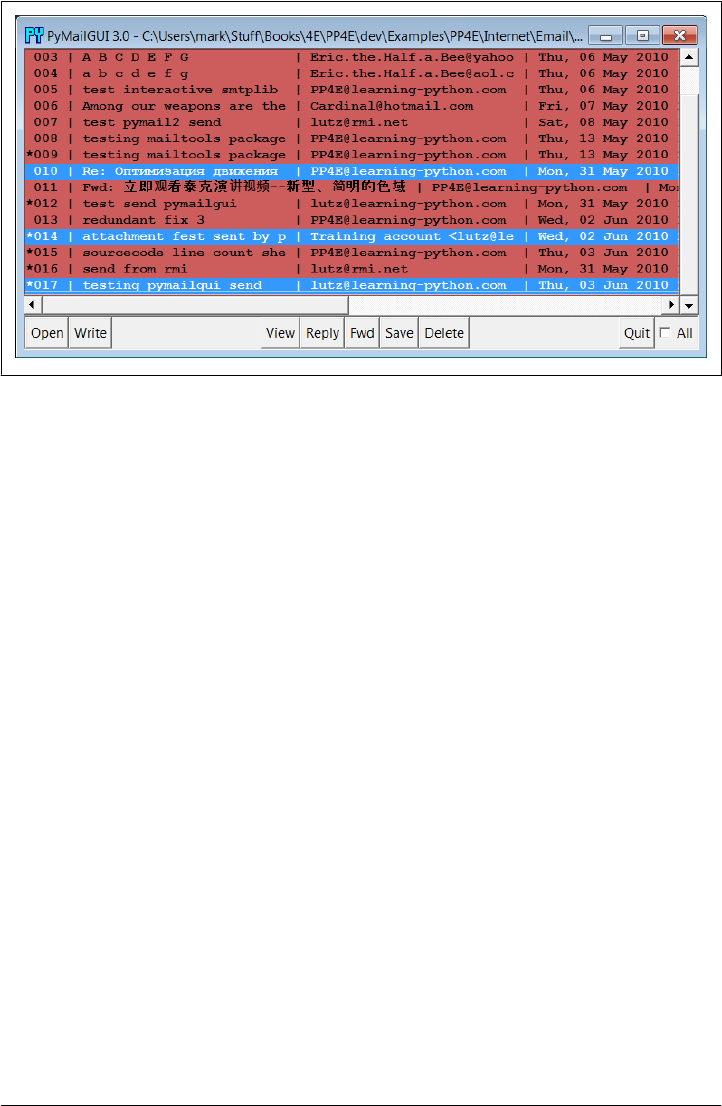
For example, View opens the selected message in a normal mail view window identical
to that in Figure 14-5, but the mail originates from the local file. Similarly, Delete re-
moves the message from the save file, instead of from the server’s inbox. Deletions from
save-mail files are also run in a thread, to avoid blocking the rest of the GUI—the
window title changes to “Deleting…” during the delete as a status indicator. Status
indicators for loads and deletions in the server inbox window use pop ups instead,
because the wait is longer and there is progress to display (see Figure 14-8).
Technically, saves always append raw message text to the chosen file; the file is opened
in 'a' mode to append text, which creates the file if it’s new and writes at its end. The
Save and Open operations are also smart enough to remember the last directory you
selected; their file dialogs begin navigation there the next time you press Save or Open.
You can also save mails from a saved file’s window—use Save and Delete to move mails
from file to file. In addition, saving to a file whose window is open for viewing auto-
matically updates that file’s list window in the GUI. This is also true for the automat-
ically written sent-mail save file, described in the next section.
Sending Email and Attachments
Once we’ve loaded email from the server or opened a local save file, we can process
our messages with the action buttons at the bottom of list windows. We can also send
new emails at any time, even before a load or open. Pressing the Write button in any
list window (server or file) generates a mail composition window; one has been cap-
tured in Figure 14-14.
Figure 14-13. List window for mail save file, multiple selections
A PyMailGUI Demo | 1033

Figure 14-14. PyMailGUI write-mail compose window
This window is much like the message view window we saw in Figure 14-5, except
there are no quick-access part buttons in the middle (this window is a new mail). It has
fields for entering header line detail, action buttons for sending the email and managing
attachment files added to it when sent, and an attached TextEditor object component
for writing and editing the main text of the new email.
The PyEdit text editor component at the bottom has no File menu in this role, but it
does have a Save button—useful for saving a draft of your mail’s text in a file. You can
cut and paste this temporary copy into a composition window later if needed to begin
composing again from scratch. PyEdit’s separate Unicode policies apply to mail text
drafts saved this way (it may ask for an encoding—see Chapter 11).
For write operations, PyMailGUI automatically fills the From line and inserts a signa-
ture text line (the last two lines shown), from your mailconfig module settings. You
can change these to any text you like in the GUI, but the defaults are filled in auto-
matically from your mailconfig. When the mail is sent, an email.utils call handles
date and time formatting in the mailtools module in Chapter 13.
There is also a new set of action buttons in the upper left here: Cancel closes the window
(if verified), and Send delivers the mail—when you press the Send button, the text you
typed into the body of this window is mailed to all the addresses you typed into the To,
Cc, and Bcc lines, after removing duplicates, and using Python’s smtplib module. Py-
MailGUI adds the header fields you type as mail header lines in the sent message
(exception: Bcc recipients receive the mail, but no header line is generated).
To send to more than one address, separate them with a comma character in header
fields, and feel free to use full “name” <address> pairs for recipients. In this mail, I fill
in the To header with my own email address in order to send the message to myself for
1034 | Chapter 14: The PyMailGUI Client
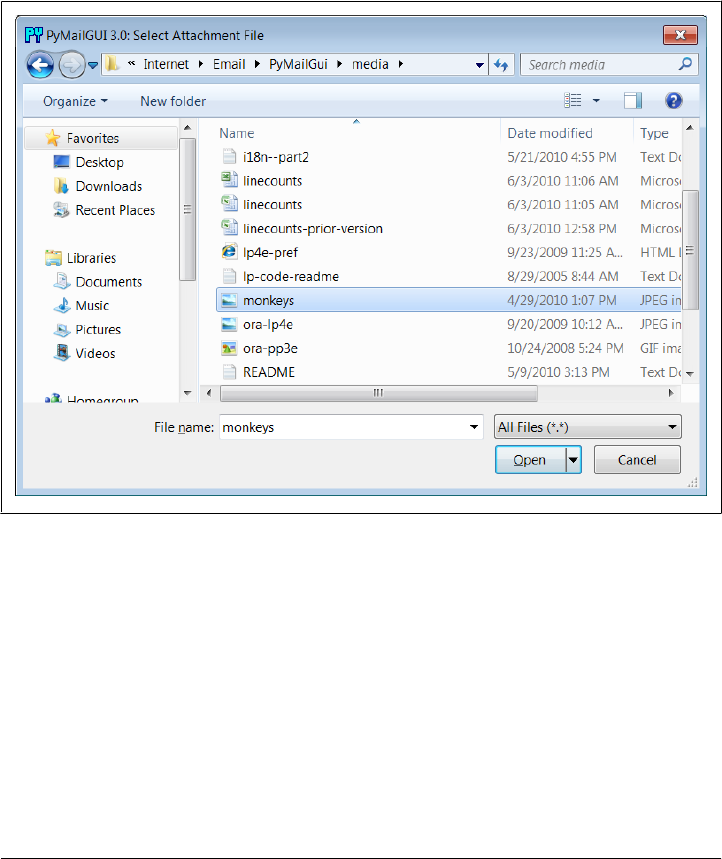
illustration purposes. New in this version, PyMailGUI also prefills the Bcc header with
the sender’s own address if this header is enabled in mailconfig; this prefill sends a copy
to the sender (in addition to that written to the sent-mail file), but it can be deleted if
unwanted.
Also in compose windows, the Attach button issues a file selection dialog for attaching
a file to your message, as in Figure 14-15. The Parts button pops up a dialog displaying
files already attached, like that in Figure 14-16. When your message is sent, the text in
the edit portion of the window is sent as the main message text, and any attached part
files are sent as attachments properly encoded according to their type.
Figure 14-15. Attachment file dialog for Attach
As we’ve seen, smtplib ultimately sends bytes to a server over a socket. Since this can
be a long-running operation, PyMailGUI delegates this operation to a spawned thread,
too. While the send thread runs, a nonblocking wait window appears and the entire
GUI stays alive; redraw and move events are handled in the main program thread while
the send thread talks to the SMTP server, and the user may perform other tasks in
parallel, including other views and sends.
You’ll get an error pop up if Python cannot send a message to any of the target recipients
for any reason, and the mail composition window will pop up so that you can try again
or save its text for later use. If you don’t get an error pop up, everything worked cor-
rectly, and your mail will show up in the recipients’ mailboxes on their email servers.
A PyMailGUI Demo | 1035
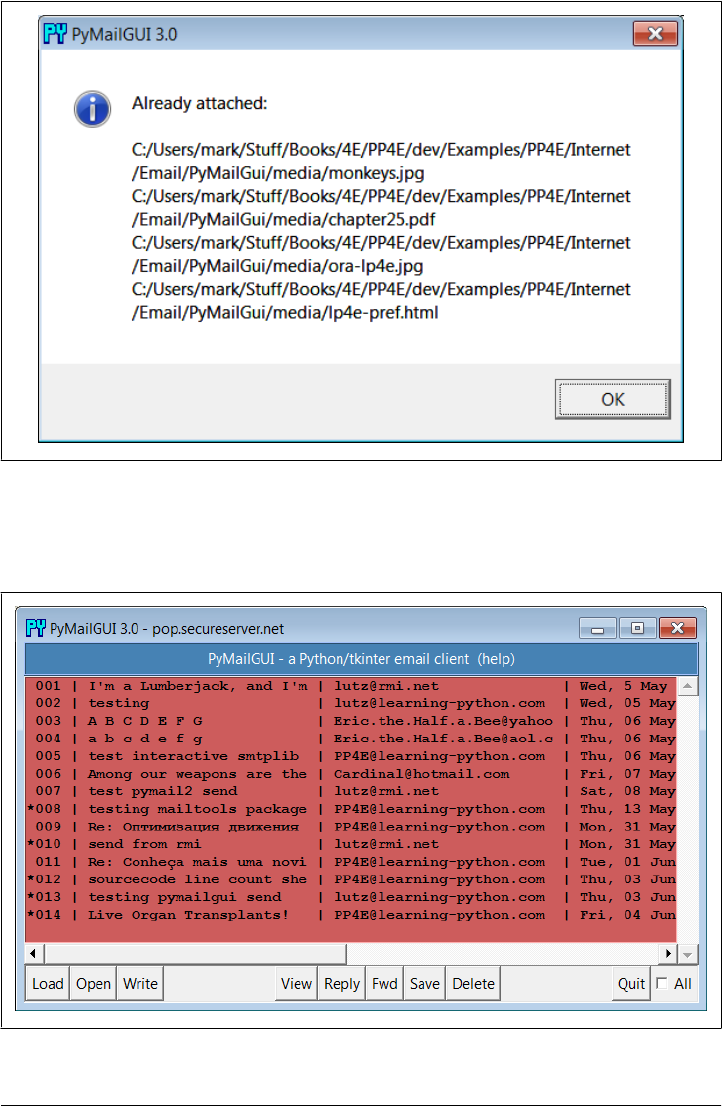
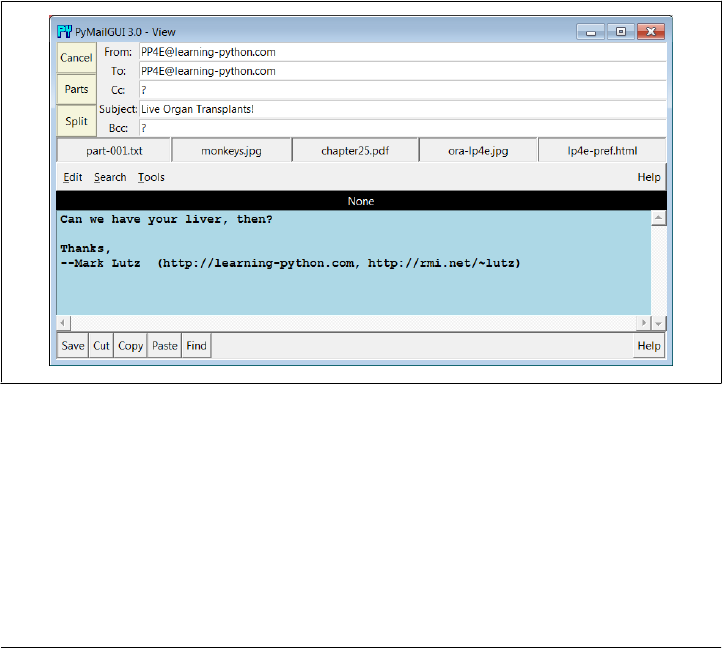
If you look back to the last main window shot, you’ll notice that there is only one new
email now—PyMailGUI is smart enough to download only the one new message’s
header text and tack it onto the end of the loaded email list. Mail send operations
automatically save sent mails in a save file that you name in your configuration module;
use Open to view sent messages in offline mode and Delete to clean up the sent mail
file if it grows too large (you can also save from the sent-mail file to another file to copy
mails into other save files per category).
Viewing Email and Attachments
Now let’s view the mail message that was sent and received. PyMailGUI lets us view
email in formatted or raw mode. First, highlight (single-click) the mail you want to see
in the main window, and press the View button. After the full message text is down-
loaded (unless it is already cached), a formatted mail viewer window like that shown
in Figure 14-18 appears. If multiple messages are selected, the View button will down-
load all that are not already cached (i.e., that have not already been fetched) and will
pop up a view window for each selected. Like all long-running operations, full message
downloads are run in parallel threads to avoid blocking.
Figure 14-18. PyMailGUI view incoming mail window
Python’s email module is used to parse out header lines from the raw text of the email
message; their text is placed in the fields in the top right of the window. The message’s
main text is fetched from its body and stuffed into a new TextEditor object for display
at the window bottom. PyMailGUI uses heuristics to extract the main text of the mes-
sage to display, if there is one; it does not blindly show the entire raw text of the mail.
HTML-only mail is handled specially, but I’ll defer details on this until later in this
demo.
A PyMailGUI Demo | 1037
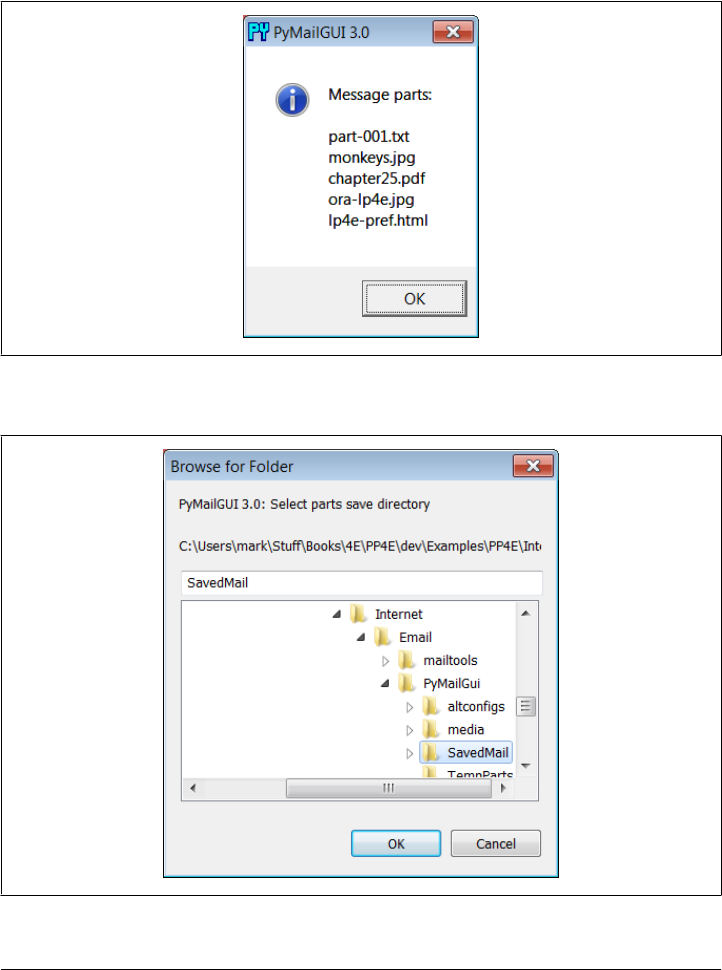
Any other parts of the message attached are displayed and opened with quick-access
buttons in the middle. They are also listed by the Parts pop up dialog, and they can be
saved and opened all at once with Split. Figure 14-19 shows this window’s Parts list
pop up, and Figure 14-20 displays this window’s Split dialog in action.
Figure 14-19. Parts dialog listing all message parts
Figure 14-20. Split dialog selection
1038 | Chapter 14: The PyMailGUI Client
When the Split dialog in Figure 14-20 is submitted, all message parts are saved to the
directory you select, and known parts are automatically opened. Individual parts are
also automatically opened by the row of quick-access buttons labeled with the part’s
filename in the middle of the view window, after being saved to a temporary directory;
this is usually more convenient, especially when there are many attachments.
For instance, Figure 14-21 shows the two image parts attached to the mail we sent open
on my Windows laptop, in a standard image viewer on that platform; other platforms
may open this in a web browser instead. Click the image filenames’ quick-access but-
tons just below the message headers in Figure 14-18 to view them immediately, or run
Split to open all parts at once.
Figure 14-21. PyMailGUI opening image parts in a viewer or browser
By this point, the photo attachments displayed in Figure 14-21 have really gotten
around: they have been MIME encoded, attached, and sent, and then fetched, parsed,
and MIME decoded. Along the way, they have moved through multiple machines—
from the client, to the SMTP server, to the POP server, and back to the client, crossing
arbitrary distances along the way.
In terms of user interaction, we attached the images to the email in Figure 14-14 using
the dialog in Figure 14-15 before we sent the email. To access them later, we selected
the email for viewing in Figure 14-17 and clicked on their quick-access button in Fig-
ure 14-18. PyMailGUI encoded the photos in Base64 form, inserted them in the email’s
text, and later extracted and decoded it to get the original photos. With Python email
tools, and our own code that rides above them, this all just works as expected.
Notice how in Figures 14-18 and 14-19 the main message text counts as a mail part,
too—when selected, it opens in a PyEdit window, like that captured in Figure 14-22,
A PyMailGUI Demo | 1039
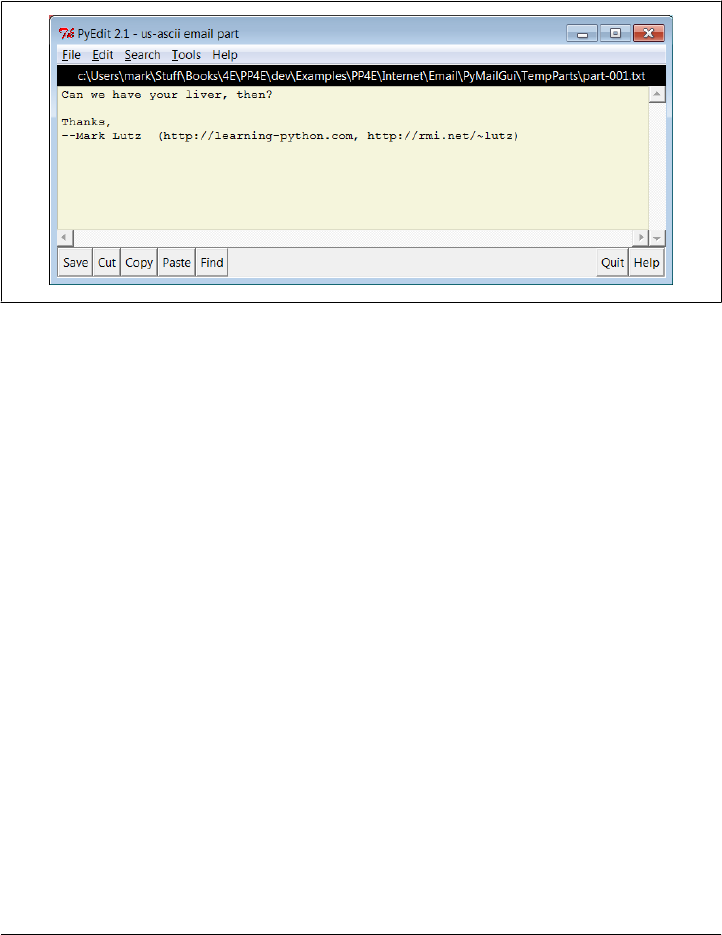
from which it can be processed and saved (you can also save the main mail text with
the Save button in the View window itself). The main part is included, because not all
mails have a text part. For messages that have only HTML for their main text part,
PyMailGUI displays plain text extracted from its HTML text in its own window, and
opens a web browser to view the mail with its HTML formatting. Again, I’ll say more
on HTML-only mails later.
Figure 14-22. Main text part opened in PyEdit
Besides images and plain text, PyMailGUI also opens HTML and XML attachments in
a web browser and uses the Windows Registry to open well-known Windows docu-
ment types. For example, .doc and .docx, .xls and .xlsx, and .pdf files usually open,
respectively, in Word, Excel, and Adobe Reader. Figure 14-23 captures the response
to the lp4e-pref.html quick-access part button in Figure 14-18 on my Windows laptop.
If you inspect this screenshot closely, or run live for a better look, you’ll notice that the
HTML attachment is displayed in both a web browser and a PyEdit window; the latter
can be disabled in mailconfig, but is on by default to give an indication of the HTML’s
encoding.
The quick-access buttons in the middle of the Figure 14-18 view window are a more
direct way to open parts than Split—you don’t need to select a save directory, and you
can open just the part you want to view. The Split button, though, allows all parts to
be opened in a single step, allows you to choose where to save parts, and supports an
arbitrary number of parts. Files that cannot be opened automatically because of their
type can be inspected in the local save directory, after both Split and quick-access but-
ton selections (pop up dialogs name the directory to use for this).
After a fixed maximum number of parts, the quick-access row ends with a button
labeled “...”, which simply runs Split to save and open additional parts when selected.
Figure 14-24 captures one such message in the GUI; this message is available in
SavedMail file version30-4E if you want to view it offline—a relatively complex mail,
with 11 total parts of mixed types.
1040 | Chapter 14: The PyMailGUI Client
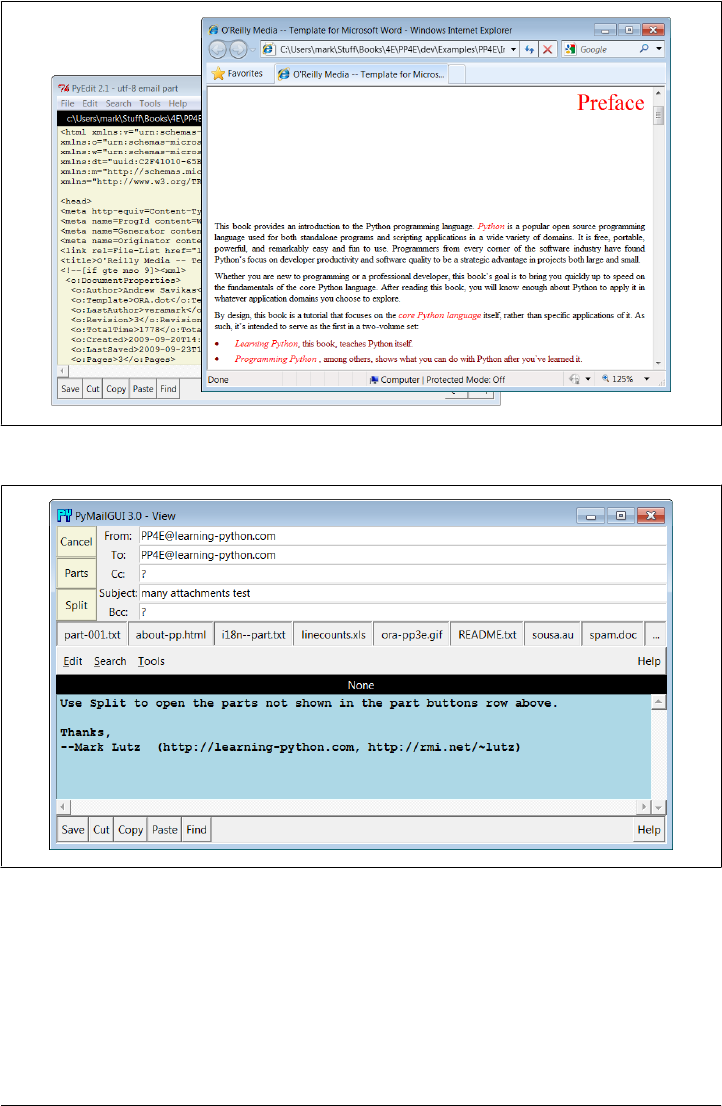
Figure 14-24. View window for a mail with many parts
Like much of PyMailGUI’s behavior, the maximum number of part buttons to display
in view windows can be configured in the mailconfig.py user settings module. That
setting specified eight buttons in Figure 14-24. Figure 14-25 shows what the same mail
looks like when the part buttons setting has been changed to a maximum of five. The
setting can be higher than eight, but at some point the buttons may become unreadable
(use Split instead).
Figure 14-23. Attached HTML part opened in a web browser
A PyMailGUI Demo | 1041
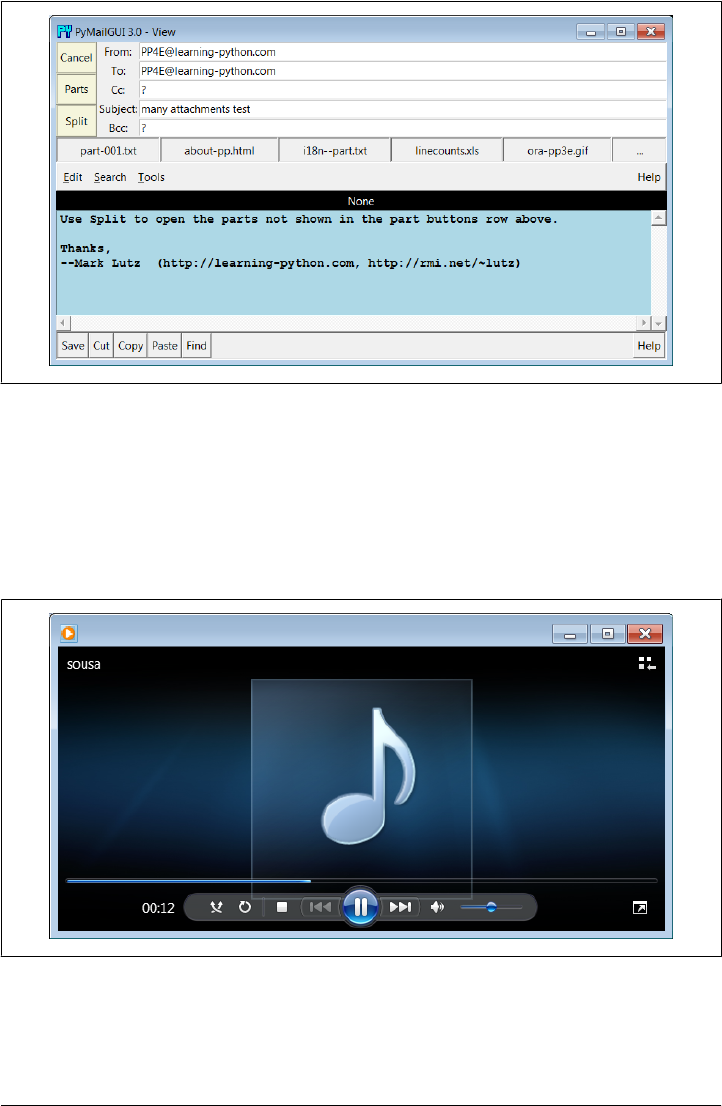
Figure 14-25. View window with part buttons setting decreased
As a sample of other attachments’ behavior, Figures 14-26 and 14-27 show what hap-
pens when the sousa.au and chapter25.pdf buttons in Figures 14-24 and 14-18 are
pressed on my Windows laptop. The results vary per machine; the audio file opens in
Windows Media Player, MP3 files open in iTunes instead, and some platforms may
open such files directly in a web browser.
Figure 14-26. An audio part opened by PyMailGUI
Besides the nicely formatted view window, PyMailGUI also lets us see the raw text of
a mail message. Double-click on a message’s entry in the main window’s list to bring
1042 | Chapter 14: The PyMailGUI Client

up a simple unformatted display of the mail’s raw text (its full text is downloaded in a
thread if it hasn’t yet been fetched and cached). Part of the raw version of the mail I
sent to myself in Figure 14-18 is shown in Figure 14-28; in this edition, raw text is
displayed in a PyEdit pop-up window (its prior scrolled-text display is still present as
an option, but PyEdit adds tools such as searching, saves, and so on).
This raw text display can be useful to see special mail headers not shown in the for-
matted view. For instance, the optional X-Mailer header in the raw text display iden-
tifies the program that transmitted a message; PyMailGUI adds it automatically, along
with standard headers like From and To. Other headers are added as the mail is trans-
mitted: the Received headers name machines that the message was routed through on
its way to our email server, and Content-Type is added and parsed by Python’s email
package in response to calls from PyMailGUI.
And really, the raw text form is all there is to an email message—it’s what is transferred
from machine to machine when mail is sent. The nicely formatted display of the GUI’s
view windows simply parses out and decodes components from the mail’s raw text
with standard Python tools, and places them in the associated fields of the display.
Notice the Base64 encoding text of the image file at the end of Figure 14-28, for ex-
ample; it’s created when sent, transferred over the Internet, and decoded when fetched
to recreate the image’s original bytes. Quite a feat, but largely automatic with the code
and libraries invoked.
Email Replies and Forwards and Recipient Options
In addition to reading and writing email, PyMailGUI also lets users forward and reply
to incoming email sent from others. These are both just composition operations, but
they quote the original text and prefill header lines as appropriate. To reply to an email,
select its entry in the main window’s list and click the Reply button. If I reply to the
Figure 14-27. A PDF part opened in PyMailGUI
A PyMailGUI Demo | 1043
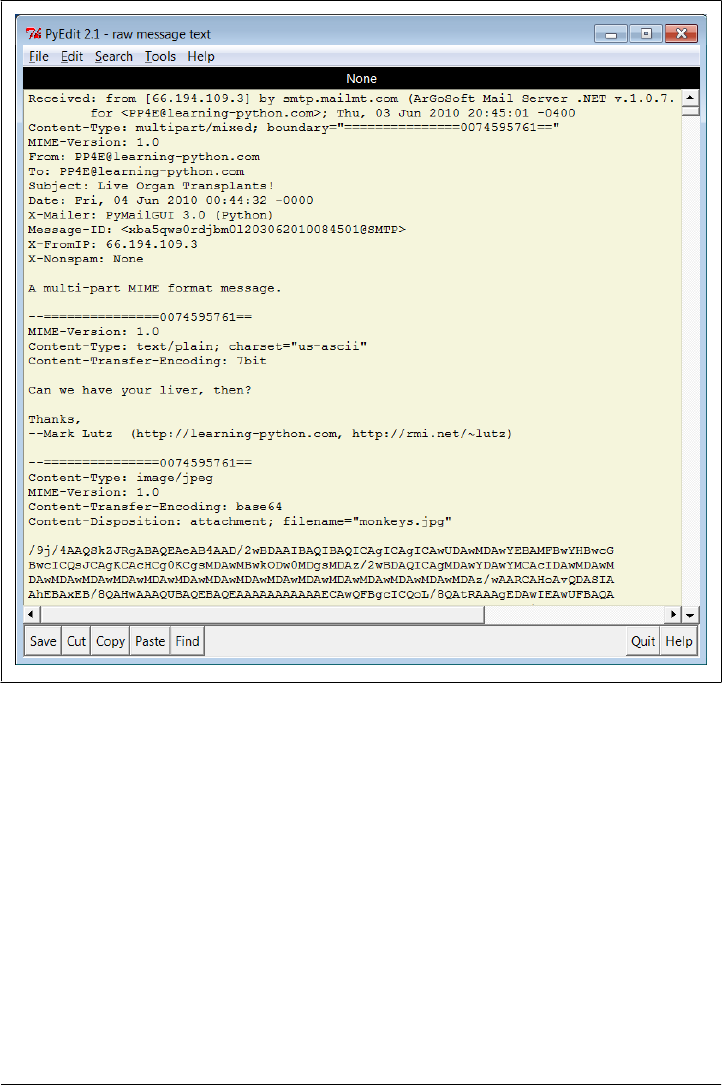
mail I just sent to myself (arguably narcissistic, but demonstrative), the mail composi-
tion window shown in Figure 14-29 appears.
This window is identical in format to the one we saw for the Write operation, except
that PyMailGUI fills in some parts automatically. In fact, the only thing I’ve added in
this window is the first line in the text editor part; the rest is filled in by PyMailGUI:
• The From line is set to your email address in your mailconfig module.
• The To line is initialized to the original message’s From address (we’re replying to
the original sender, after all).
• The Subject line is set to the original message’s subject line, prepended with a “Re:”,
the standard follow-up subject line form (unless it already has one, in uppercase
or lowercase).
Figure 14-28. PyMailGUI raw mail text view window (PyEdit)
1044 | Chapter 14: The PyMailGUI Client
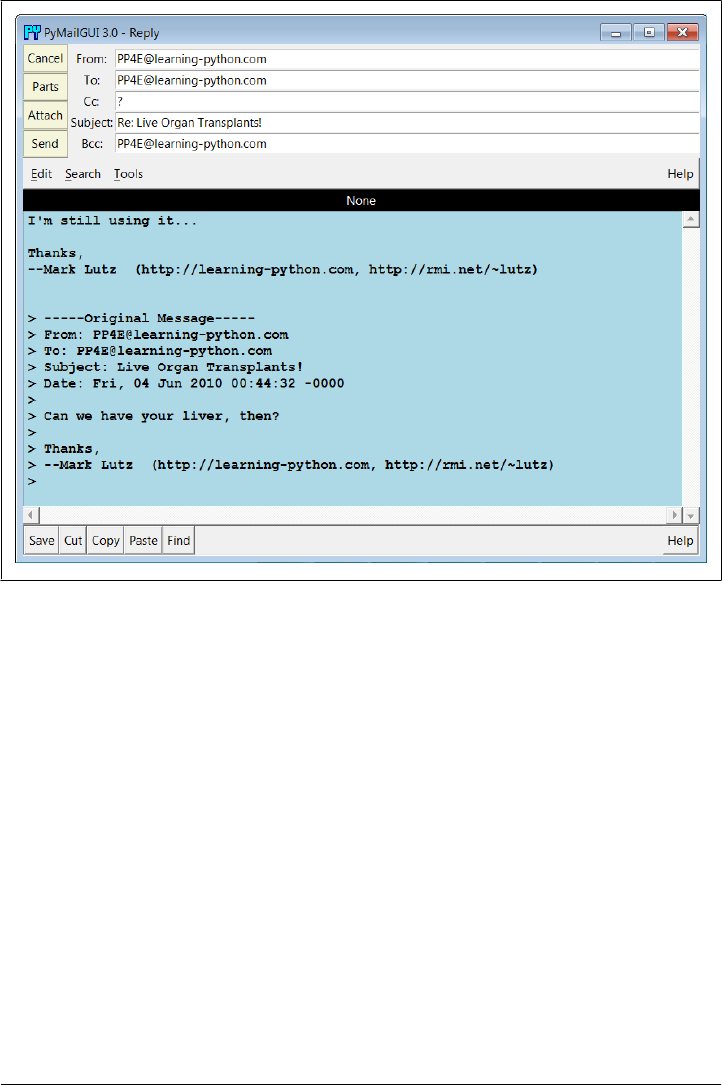
• The optional Bcc line, if enabled in the mailconfig module, is prefilled with the
sender’s address, too, since it’s often used this way to retain a copy (new in this
version).
• The body of the reply is initialized with the signature line in mailconfig, along with
the original message’s text. The original message text is quoted with > characters
and is prepended with a few header lines extracted from the original message to
give some context.
• Not shown in this example and new in this version, too, the Cc header in replies
is also prefilled with all the original recipients of the message, by extracting ad-
dresses among the original To and Cc headers, removing duplicates, and removing
your address from the result. In other words, Reply really is Reply-to-All by
default—it replies to the sender and copies all other recipients as a group. Since
the latter isn’t always desirable, it can be disabled in mailconfig so that replies only
initialize To with the original sender. You can also simply delete the Cc prefill if
not wanted, but you may have to add addresses to Cc manually if this feature is
disabled. We’ll see reply Cc prefills at work later.
Figure 14-29. PyMailGUI reply compose window
A PyMailGUI Demo | 1045

Luckily, all of this is much easier than it may sound. Python’s standard email module
extracts all of the original message’s header lines, and a single string replace method
call does the work of adding the > quotes to the original message body. I simply type
what I wish to say in reply (the initial paragraph in the mail’s text area) and press the
Send button to route the reply message to the mailbox on my mail server again. Phys-
ically sending the reply works the same as sending a brand-new message—the mail is
routed to your SMTP server in a spawned send-mail thread, and the send-mail wait
pop up appears while the thread runs.
Forwarding a message is similar to replying: select the message in the main window,
press the Fwd button, and fill in the fields and text area of the popped-up composition
window. Figure 14-30 shows the window created to forward the mail we originally
wrote and received after a bit of editing.
Figure 14-30. PyMailGUI forward compose window
Much like replies, forwards fill From with the sender’s address in mailconfig; the orig-
inal text is automatically quoted in the message body again; Bcc is preset initially the
same as From; and the subject line is preset to the original message’s subject prepended
with the string “Fwd:”. All these lines can be changed manually before sending if you
wish to tailor. I always have to fill in the To line manually, though, because a forward
is not a direct reply—it doesn’t necessarily go back to the original sender. Further, the
1046 | Chapter 14: The PyMailGUI Client
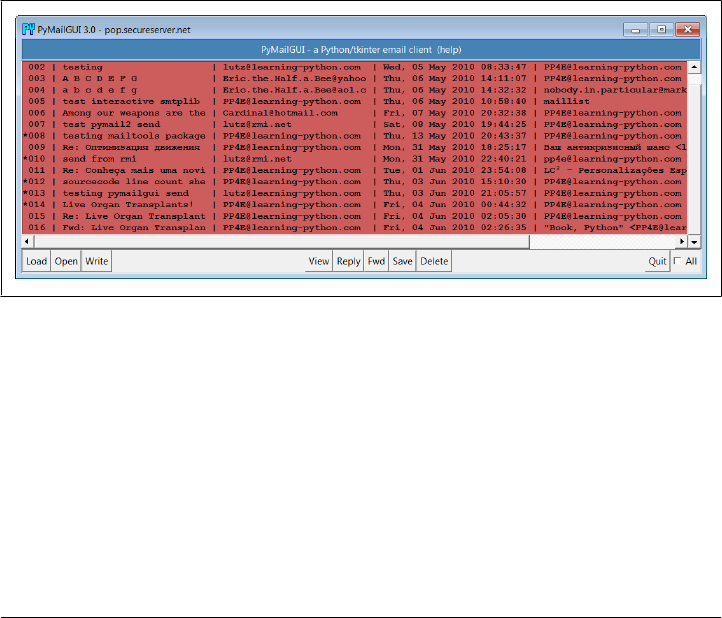
Cc prefill of original recipients done by Reply isn’t performed for forwards, because
they are not a continuation of group discussions.
Notice that I’m forwarding this message to three different addresses (two in the To,
and one manually entered in the Bcc). I’m also using full “name <address>” formats
for email addresses. Multiple recipient addresses are separated with a comma (,) in the
To, Cc, and Bcc header fields, and PyMailGUI is happy to use the full address form
anywhere you type an address, including your own in mailconfig. As demonstrated by
the first To recipient in Figure 14-30, commas in address names don’t clash with those
that separate recipients, because address lines are parsed fully in this version. When
we’re ready, the Send button in this window fires the forwarded message off to all
addresses listed in these headers, after removing any duplicates to avoid sending the
same recipient the same mail more than once.
I’ve now written a new message, replied to it, and forwarded it. The reply and forward
were sent to my email address, too; if we press the main window’s Load button again,
the reply and forward messages should show up in the main window’s list. In Fig-
ure 14-31, they appear as messages 15 and 16 (the order they appear in may depend
on timing issues at your server, and I’ve stretched this horizontally in the GUI to try to
reveal the To header of the last of these).
Figure 14-31. PyMailGUI mail list after sends and load
Keep in mind that PyMailGUI runs on the local computer, but the messages you see in
the main window’s list actually live in a mailbox on your email server machine. Every
time we press Load, PyMailGUI downloads but does not delete newly arrived emails’
headers from the server to your computer. The three messages we just wrote (14
through 16) will also appear in any other email program you use on your account (e.g.,
in Outlook or in a webmail interface). PyMailGUI does not automatically delete mes-
sages as they are downloaded, but simply stores them in your computer’s memory for
processing. If we now select message 16 and press View, we see the forward message
we sent, as in Figure 14-32.
A PyMailGUI Demo | 1047
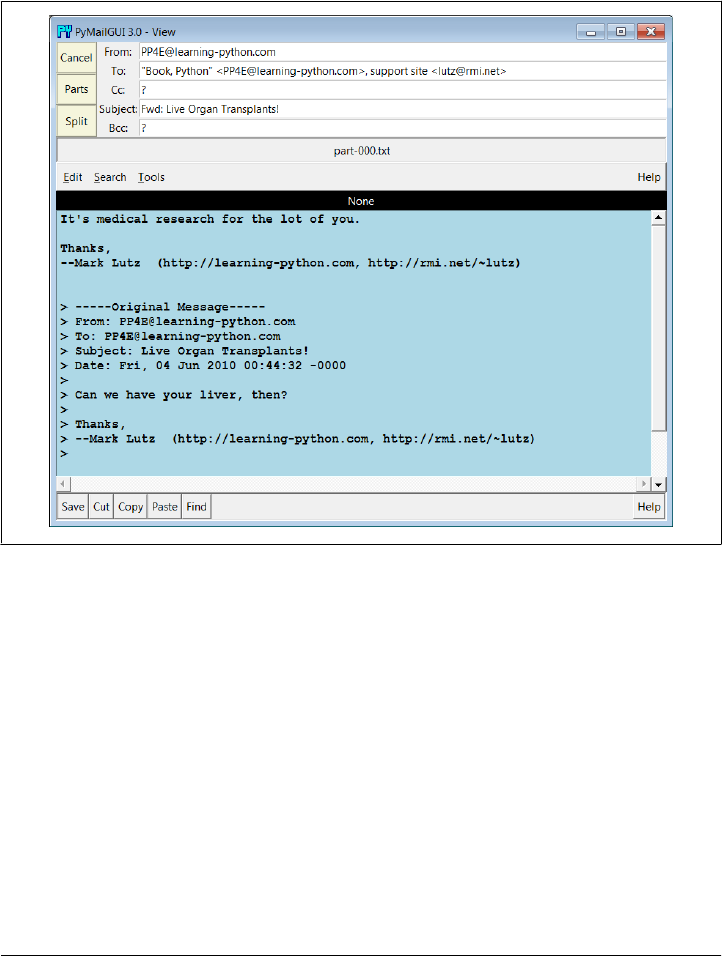
This message went from my machine to a remote email server and was downloaded
from there into a Python list from which it is displayed. In fact, it went to three different
email accounts I have (the other two appear later in this demo—see Figure 14-45). The
third recipient doesn’t appear in Figure 14-32 here because it was a Bcc blind-copy—
it receives the message, but no header line is added to the mail itself.
Figure 14-32. PyMailGUI view forwarded mail
Figure 14-33 shows what the forward message’s raw text looks like; again, double-click
on a main window’s entry to display this form. The formatted display in Fig-
ure 14-32 simply extracts bits and pieces out of the text shown in the raw display form.
One last pointer on replies and forwards: as mentioned, replies in this version reply to
all original recipients, assuming that more than one means that this is a continuation
of a group discussion. To illustrate, Figure 14-34 shows an original message on top, a
forward of it on the lower left, and a reply to it on the lower right. The Cc header in
the reply has been automatically prefilled with all the original recipients, less any du-
plicates and the new sender’s address; the Bcc (enabled here) has also been prefilled
with the sender in both. These are just initial settings which can be edited and removed
prior to sends. Moreover, the Cc prefill for replies can be disabled entirely in the con-
figuration file. Without it, though, you may have to manually cut-and-paste to insert
1048 | Chapter 14: The PyMailGUI Client
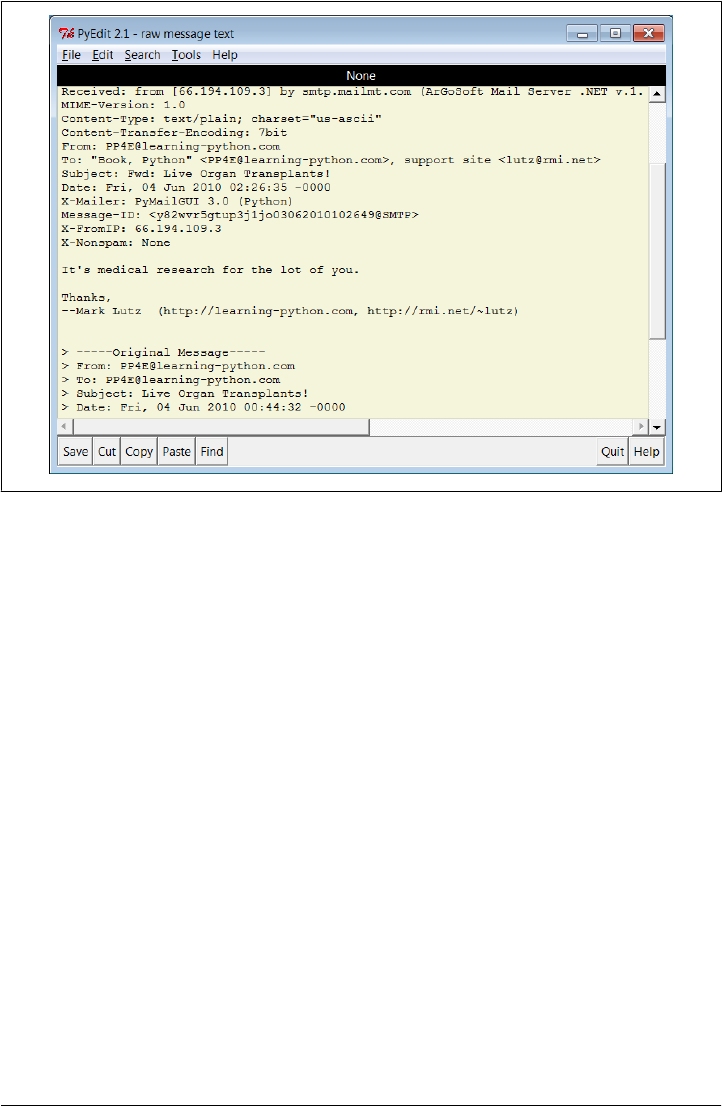
addresses in group mail scenarios. Open this version’s mail save file to view this mail’s
behavior live, and see the suggested enhancements later for more ideas.
Deleting Email
So far, we’ve covered every action button on list windows except for Delete and the All
checkbox. The All checkbox simply toggles from selecting all messages at once or de-
selecting all (View, Delete, Reply, Fwd, and Save action buttons apply to all currently
selected messages). PyMailGUI also lets us delete messages from the server perma-
nently, so that we won’t see them the next time we access our inbox.
Delete operations are kicked off the same way as Views and Saves; just press the Delete
button instead. In typical operation, I eventually delete email I’m not interested in, and
save and delete emails that are important. We met Save earlier in this demo.
Like View, Save, and other operations, Delete can be applied to one or more messages.
Deletes happen immediately, and like all server transfers, they are run in a nonblocking
thread but are performed only if you verify the operation in a pop up, such as the one
shown in Figure 14-35. During the delete, a progress dialog like those in Figures 14-8
and 14-9 provide status.
Figure 14-33. PyMailGUI view forwarded mail, raw
A PyMailGUI Demo | 1049
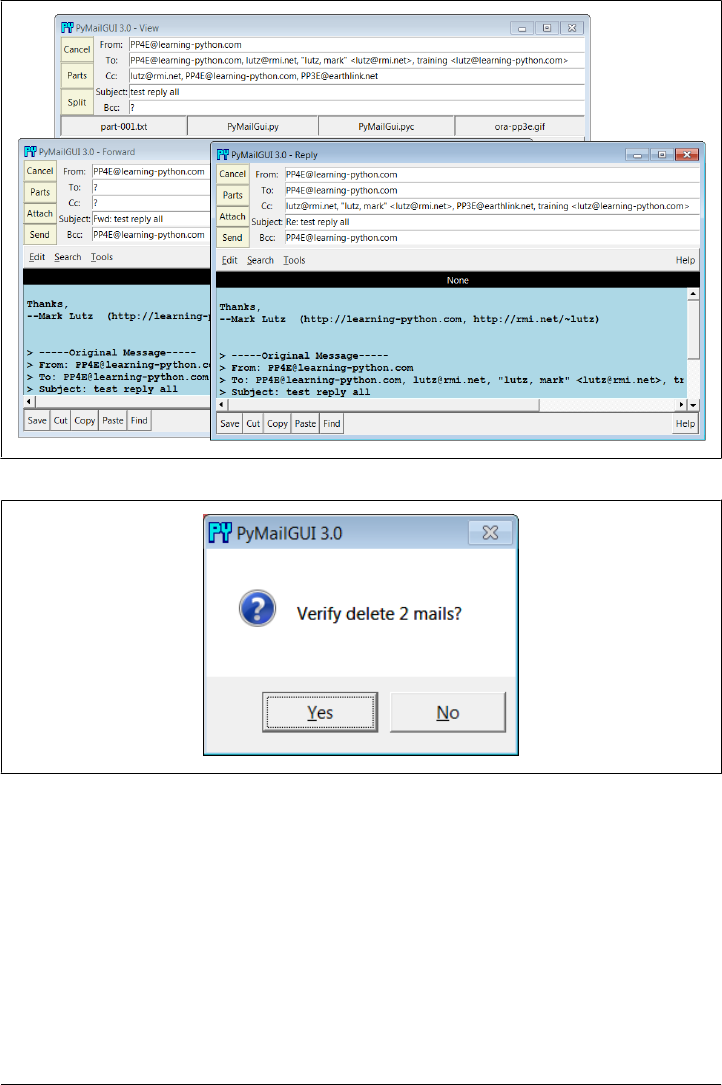
Figure 14-35. PyMailGUI delete verification on quit
By design, no mail is ever removed automatically: you will see the same messages the
next time PyMailGUI runs. It deletes mail from your server only when you ask it to,
and then only if verified in the last pop up shown (this is your last chance to prevent
permanent mail removal). After the deletions are performed, the mail index is updated,
and the GUI session continues.
Deletions disable mail loads and other deletes while running and cannot be run in
parallel with loads or other deletes already in progress because they may change POP
message numbers and thus modify the mail index list (they may also modify the email
Figure 14-34. Reply-to-all Cc prefills
1050 | Chapter 14: The PyMailGUI Client

cache). Messages may still be composed during a deletion, however, and offline save
files may be processed.
POP Message Numbers and Synchronization
By now, we’ve seen all the basic functionality of PyMailGUI—enough to get you started
sending and receiving simple but typical text-based messages. In the rest of this demo,
we’re going to turn our attention to some of the deeper concepts in this system, in-
cluding inbox synchronization, HTML mails, Internationalization, and multiple ac-
count configuration. Since the first of these is related to the preceding section’s tour of
mail deletions, let’s begin here.
Though they might seem simple from an end-user perspective, it turns out that deletions
are complicated by POP’s message-numbering scheme. We learned about the potential
for synchronization errors between the server’s inbox and the fetched email list in
Chapter 13, when studying the mailtools package PyMailGUI uses (near Exam-
ple 13-24). In brief, POP assigns each message a relative sequential number, starting
from one, and these numbers are passed to the server to fetch and delete messages. The
server’s inbox is normally locked while a connection is held so that a series of deletions
can be run as an atomic operation; no other inbox changes occur until the connection
is closed.
However, message number changes also have some implications for the GUI itself. It’s
never an issue if new mail arrives while we’re displaying the result of a prior download—
the new mail is assigned higher numbers, beyond what is displayed on the client. But
if we delete a message in the middle of a mailbox after the index has been loaded from
the mail server, the numbers of all messages after the one deleted change (they are
decremented by one). As a result, some message numbers might no longer be valid if
deletions are made while viewing previously loaded email.
To work around this, PyMailGUI adjusts all the displayed numbers after a Delete by
simply removing the entries for deleted mails from its index list and mail cache. How-
ever, this adjustment is not enough to keep the GUI in sync with the server’s inbox if
the inbox is modified at a position other than after the end, by deletions in another
email client (even in another PyMailGUI session), or by deletions performed by the
mail server itself (e.g., messages determined to be undeliverable and automatically re-
moved from the inbox). Such modifications outside PyMailGUI’s scope are uncom-
mon, but not impossible.
To handle these cases, PyMailGUI uses the safe deletion and synchronization tests in
mailtools. That module uses mail header matching to detect mail list and server inbox
synchronization errors. For instance, if another email client has deleted a message prior
to the one to be deleted by PyMailGUI, mailtools catches the problem and cancels the
deletion, and an error pop up like the one in Figure 14-36 is displayed.
A PyMailGUI Demo | 1051
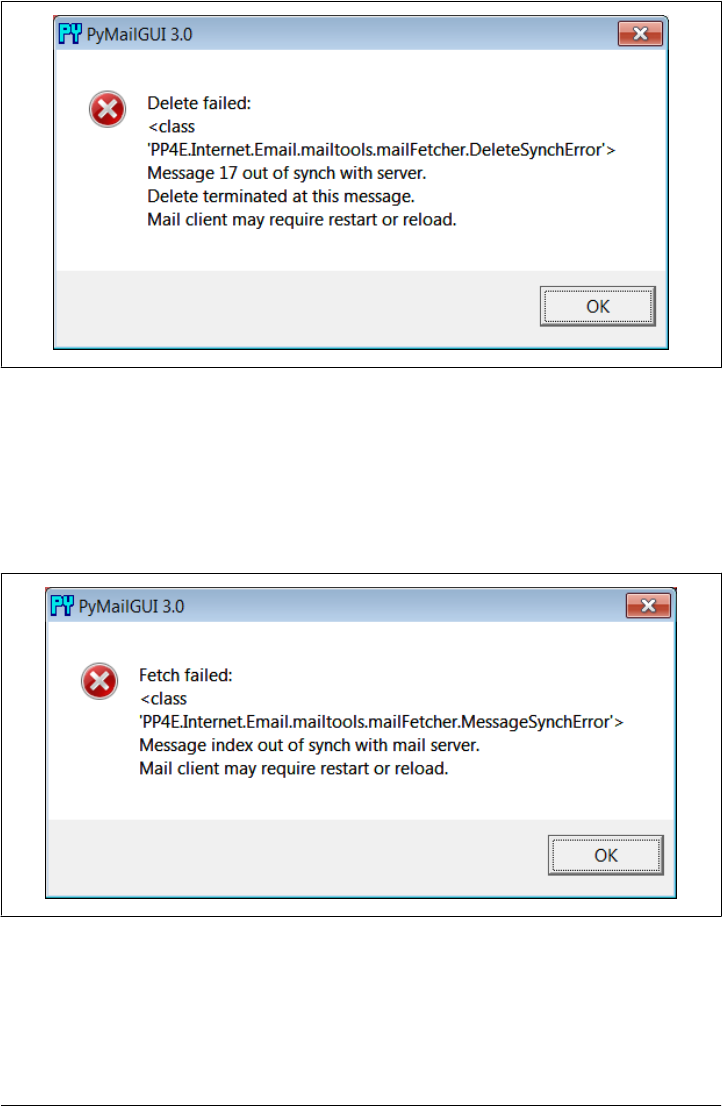
Figure 14-36. Safe deletion test detection of inbox difference
Similarly, both index list loads and individual message fetches run a synchronization
test in mailtools, as well. Figure 14-37 captures the error generated on a fetch if a
message has been deleted in another client since we last loaded the server index win-
dow. The same error is issued when this occurs during a load operation, but the first
line reads “Load failed.”
Figure 14-37. Synchronization error after delete in another client
1052 | Chapter 14: The PyMailGUI Client

In both synchronization error cases, the mail list is automatically reloaded with the new
inbox content by PyMailGUI immediately after the error pop up is dismissed. This
scheme ensures that PyMailGUI won’t delete or display the wrong message, in the rare
case that the server’s inbox is changed without its knowledge. See mailtools in Chap-
ter 13 for more on synchronization tests; these errors are detected and raised in mail
tools, but triggered by calls made in the mail cache manager here.
Handling HTML Content in Email
Up to this point, we’ve seen PyMailGUI’s basic operation in the context of plain-text
emails. We’ve also seen it handling HTML part attachments, but not the main text of
HTML messages. Today, of course, HTML is common for mail content too. Because
the PyEdit mail display deployed by PyMailGUI uses a tkinter Text widget oriented
toward plain text, HTML content is handled specially:
• For text/HTML alternative mails, PyMailGUI displays the plain text part in its view
window and includes a button for opening the HTML rendition in a web browser
on demand.
• For HTML-only mails, the main text area shows plain text extracted from the
HTML by a simple parser (not the raw HTML), and the HTML is also displayed
in a web browser automatically.
In all cases, the web browser’s display of International character set content in the
HTML depends upon encoding information in tags in the HTML, guesses, or user
feedback. Well-formed HTML parts already have “<meta>” tags in their “<head>”
sections which give the HTML’s encoding, but they may be absent or incorrect. We’ll
learn more about Internationalization support in the next section.
Figure 14-38 gives the scene when a text/HTML alternative mail is viewed, and Fig-
ure 14-39 shows what happens when an HTML-only email is viewed. The web browser
in Figure 14-38 was opened by clicking the HTML part’s button; this is no different
than the HTML attachment example we saw earlier.
For HTML-only messages, though, behavior is new here: the view window on the left
in Figure 14-39 reflects the results of extracting plain text from the HTML shown in
the popped-up web browser behind it. The HTML parser used for this is something of
a first-cut prototype, but any result it can give is an improvement on displaying raw
HTML in the view window for HTML-only mails. For simpler HTML mails of the sort
sent by individuals instead of those sent by mass-mailing companies (like those shown
here), the results are generally good in tests run to date, though time will tell how this
prototype parser fares in today’s unforgiving HTML jungle of nonstandard and non-
conforming code—improve as desired.
A PyMailGUI Demo | 1053
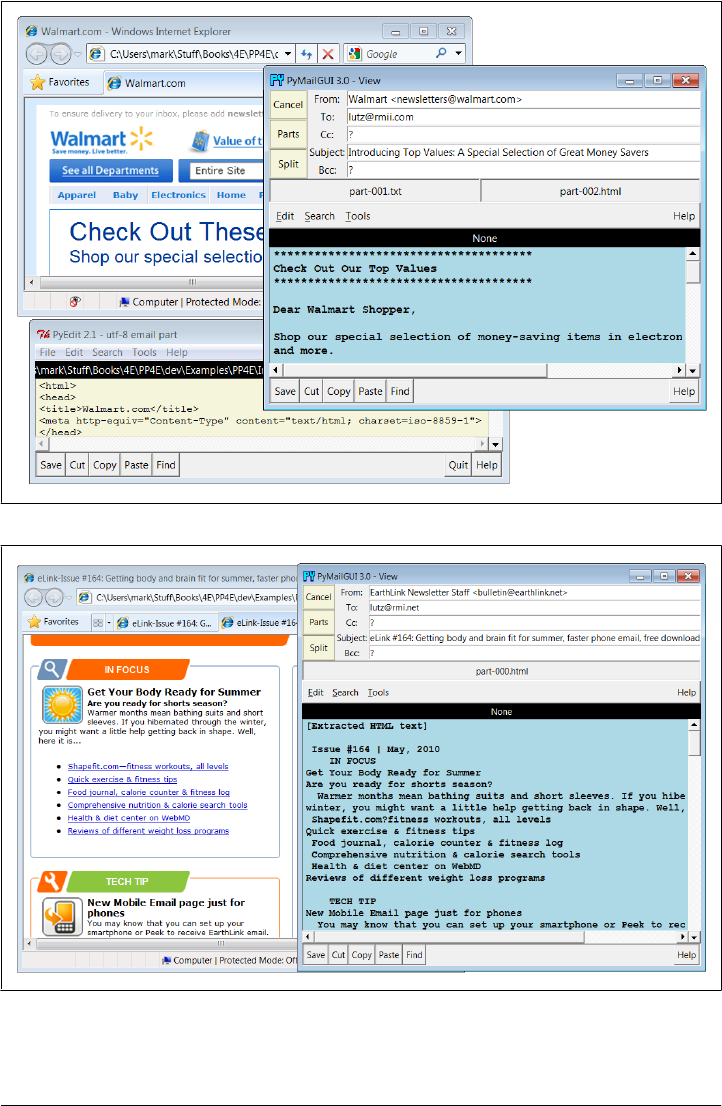
Figure 14-39. Viewing HTML-only mails
Figure 14-38. Viewing text/HTML alternative mails
1054 | Chapter 14: The PyMailGUI Client

One caveat here: PyMailGUI can today display HTML in a web browser and extract
plain text from it, but it cannot display HTML directly in its own window and has no
support for editing it specially. These are enhancements that will have to await further
attention by other programmers who may find them useful.
Mail Content Internationalization Support
Our next advanced feature is something of an inevitable consequence of the Internet’s
success. As described earlier when summarizing version 3.0 changes, PyMailGUI fully
supports International character sets in mail content—both text part payloads and
email headers are decoded for display and encoded when sent, according to email,
MIME, and Unicode standards. This may be the most significant change in this version
of the program. Regrettably, capturing this in screenshots is a bit of a challenge and
you can get a better feel for how this pans out by running an Open on the following
included mail save file, viewing its messages in formatted and raw modes, starting
replies and forwards for them, and so on:
C:\...\PP4E\Internet\Email\PyMailGui\SavedMail\i18n-4E
To sample the flavor of this support here, Figure 14-40 shows the scene when this file
is opened, shown for variety here with one of the alternate account configurations
described the next section. This figure’s index list window and mail view windows
capture Russian and Chinese language messages sent to my email account (these were
unsolicited email of no particular significance, but suffice as reasonable test cases).
Notice how both message headers and text payload parts are decoded for display in
both the mail list window and the mail view windows.
Figure 14-41 shows portions of the raw text of the two fetched messages, obtained by
double-clicking their list entries (you can open these mails from the save file listed earlier
if you have trouble seeing their details as shown in this book). Notice how the body
text is encoded per both MIME and Unicode conventions—the headers at the top and
text at the bottom of these windows show the actual Base64 and quoted-printable
strings that must be decoded to achieve the nicely displayed output in Figure 14-40.
For the text parts, the information in the part’s header describes its content’s encoding
schemes. For instance, charset="gb2312" in the content type header identifies a Chinese
Unicode character set, and the transfer encoding header gives the part’s MIME encod-
ing type (e.g. base64).
The headers are encoded per i18n standards here as well—their content self-describes
their MIME and Unicode encodings. For example, the header prefix =?koi8-r?B means
Russian text, Base64 encoded. PyMailGUI is clever enough to decode both full headers
and the name fields of addresses for display, whether they are completely encoded (as
shown here) or contain just encoded substrings (as shown by other saved mails in the
version30-4E file in this example’s SavedMail directory).
A PyMailGUI Demo | 1055
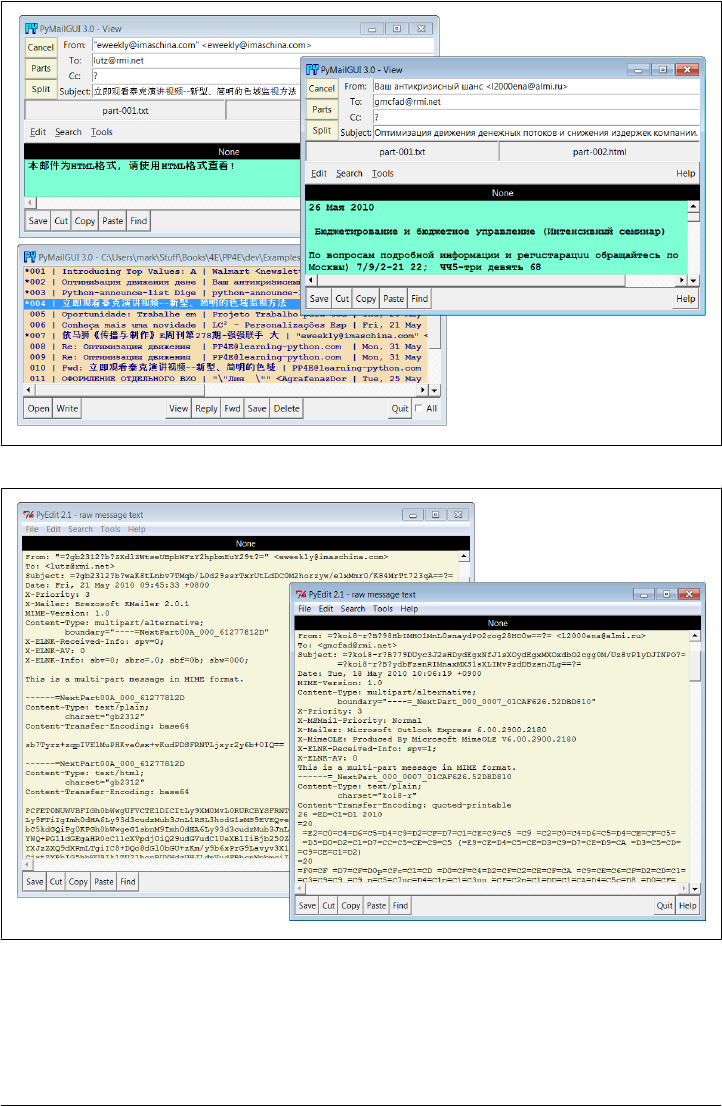
Figure 14-41. Raw text of fetched Internationalized mails, headers and body encoded
As additional context, Figure 14-42 shows how these messages’ main parts appear when
opened via their part buttons. Their content is saved as raw post-MIME bytes in binary
mode, but the PyEdit pop ups decode according to passed-in encoding names obtained
Figure 14-40. Internationalization support, headers and body decoded for display
1056 | Chapter 14: The PyMailGUI Client
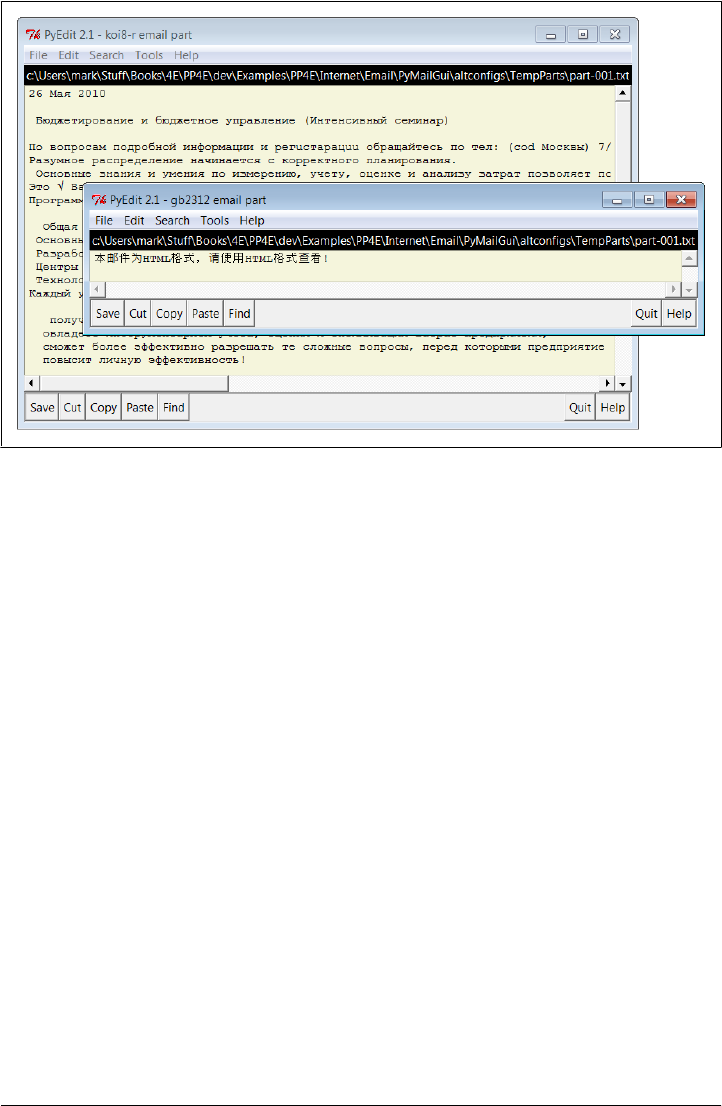
from the raw message headers. As we learned in Chapters 9 and 11, the underlying
tkinter toolkit generally renders decoded str better than raw bytes.
So far, we’ve displayed Internationalized emails, but PyMailGUI allows us to send them
as well, and handles any encoding tasks implied by the text content. Figure 14-43 shows
the result of running replies and forwards to the Russian language email, with the To
address changed to protect the innocent. Headers in the view window were decoded
for display, encoded when sent, and decoded back again for display; text parts in the
mail body were similarly decoded, encoded, and re-decoded along the way and headers
are also decoded within the “>” quoted original text inserted at the end of the message.
And finally, Figure 14-44 shows a portion of the raw text of the Russian language reply
message that appears in the lower right of the formatted view of Figure 14-43. Again,
double-click to see these details live. Notice how both headers and body text have been
encoded per email and MIME standards.
As configured, the body text is always MIME encoded to UTF-8 when sent if it fails to
encode as ASCII, the default setting in the mailconfig module. Other defaults can be
used if desired and will be encoded appropriately for sends; in fact, text that won’t work
in the full text of email is MIME encoded the same way as binary parts such as images.
This is also true for non-Internationalized character sets—the text part of a message
written in English with any non-ASCII quotes, for example, will be UTF-8 and Base64
encoded in the same way as the message in Figure 14-44, and assume that the recipient’s
email reader will decode (any reasonable modern email client will). This allows non-
ASCII text to be embedded in the full email text sent.
Figure 14-42. Main text parts of Internationalized mails, decoded in PyEdit pop-ups
A PyMailGUI Demo | 1057
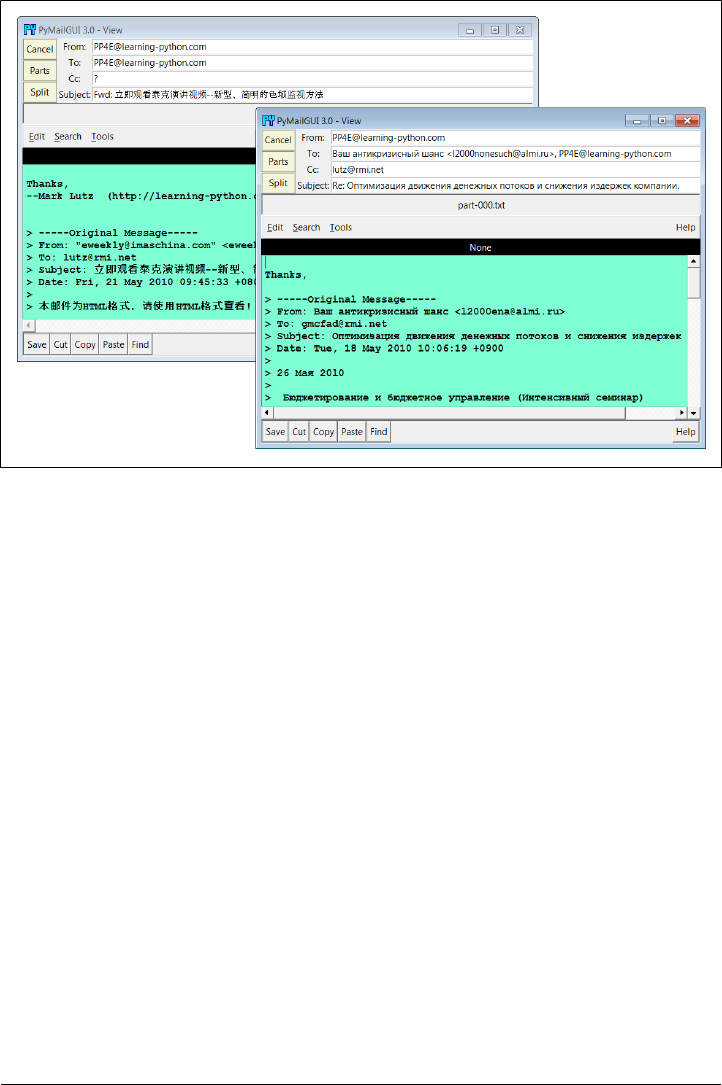
Message headers are similarly encoded per UTF-8 if they are non-ASCII when sent, so
they will work in the full email text. In fact, if you study this closely you’ll find that the
Subject here was originally encoded per a Russian Unicode scheme but is UTF-8 now—
its new representation yields the same characters (code points) when decoded for
display.
In short, although the GUI itself is still in English (its labels and the like), the content
of emails displayed and sent support arbitrary character sets. Decoding for display is
done per content where possible, using message headers for text payloads and content
for headers. Encoding for sends is performed according to user settings and policies,
using user settings or inputs, or a UTF-8 default. Required MIME and email header
encodings are implemented in a largely automatic fashion by the underlying email
package.
Not shown here are the pop-up dialogs that may be issued to prompt for text part
encoding preferences on sends if so configured in mailconfig, and PyEdit’s similar
prompts under certain user configurations. Some of these user configurations are meant
for illustration and generality; the presets seem to work well for most scenarios I’ve run
into, but your International mileage may vary. For more details, experiment with the
file’s messages on your own and see the system’s source code.
Figure 14-43. Result of reply and forward with International character sets, re-decoded
1058 | Chapter 14: The PyMailGUI Client
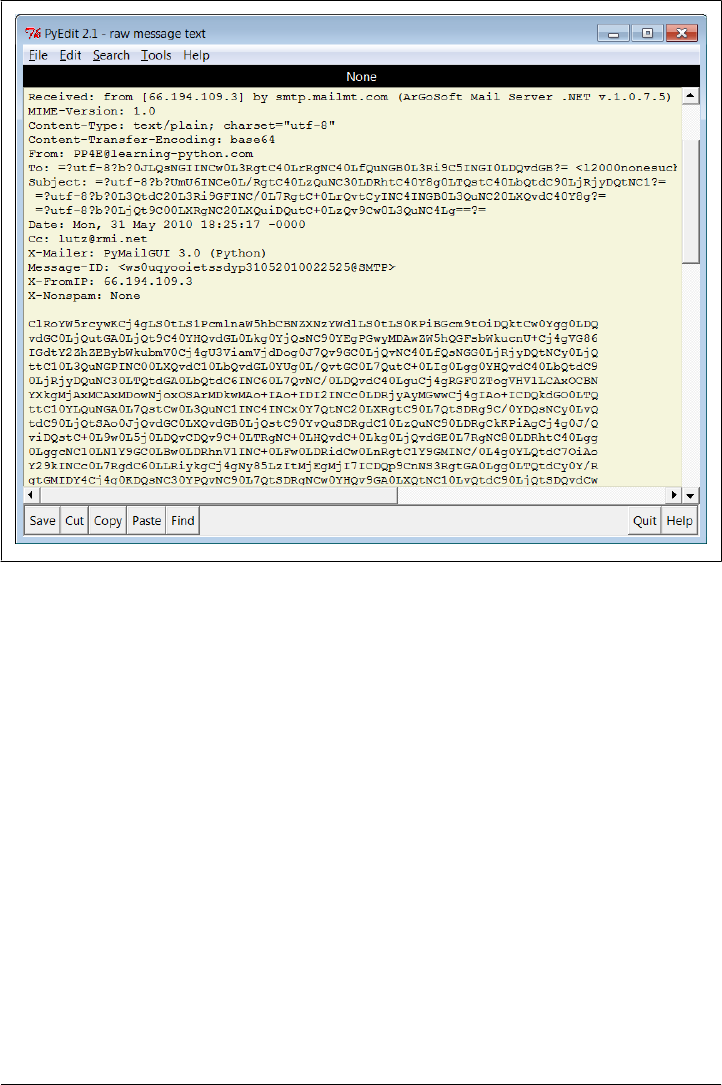
Alternative Configurations and Accounts
So far, we’ve mostly seen PyMailGUI being run on an email account I created for this
book’s examples, but it’s easy to tailor its mailconfig module for different accounts, as
well as different visual effects. For example, Figure 14-45 captures the scene with Py-
MailGUI being run on three different email accounts I use for books and training. All
three instances are run in independent processes here. Each main list window is dis-
playing a different email account’s messages, and each customizes appearance or be-
havior in some fashion. The message view window at the top, opened from the server
list window in the lower left also applies custom color and displayed headers schemes.
You can always change mailconfigs in-place for a specific account if you use just one,
but we’ll later see how the altconfigs subdirectory applies one possible solution to
allow configuring for multiple accounts such as these, completely external to the orig-
inal source code. The altconfigs option renders the windows in Figure 14-45, and
suffices as my launching interface; see its code ahead.
Figure 14-44. Raw text of sent Russian reply, headers and body re-encoded
A PyMailGUI Demo | 1059
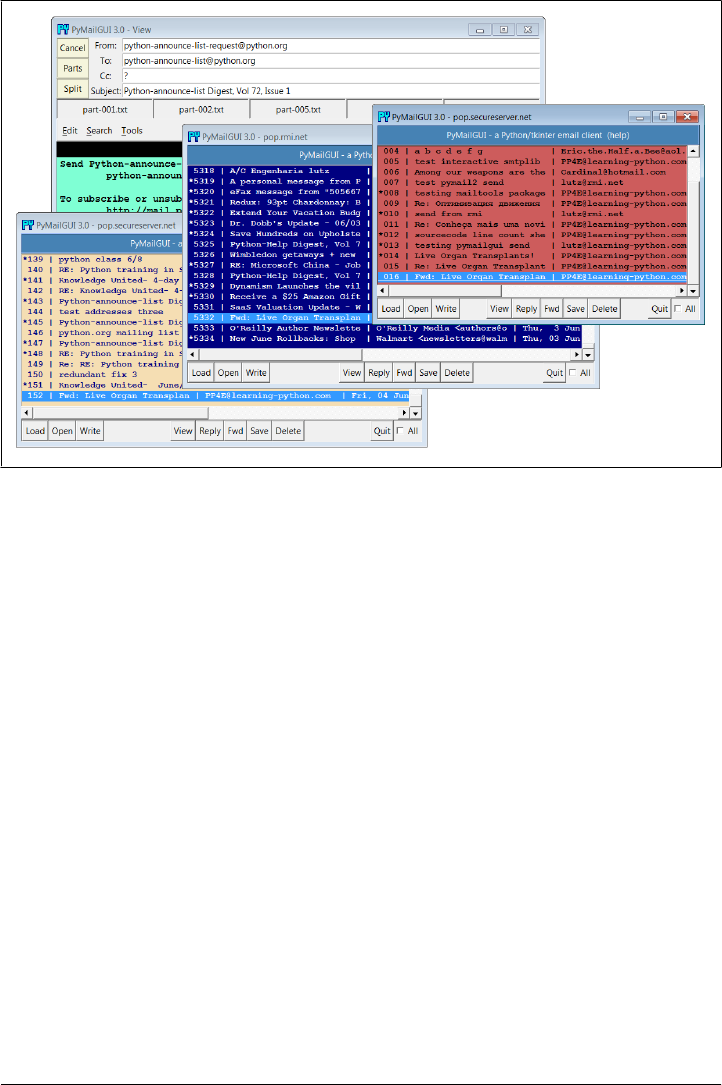
Multiple Windows and Status Messages
Finally, PyMailGUI is really meant to be a multiple-window interface—a detail that
most of the earlier screenshots haven’t really done justice to. For example, Fig-
ure 14-46 shows PyMailGUI with the main server list window, two save-file list win-
dows, two message view windows, and help. All these windows are nonmodal; that is,
they are all active and independent, and do not block other windows from being se-
lected, even though they are all running a single PyMailGUI process.
In general, you can have any number of mail view or compose windows up at once,
and cut and paste between them. This matters, because PyMailGUI must take care to
make sure that each window has a distinct text-editor object. If the text-editor object
were a global, or used globals internally, you’d likely see the same text in each window
(and the Send operations might wind up sending text from another window). To avoid
this, PyMailGUI creates and attaches a new TextEditor instance to each view and com-
pose window it creates, and associates the new editor with the Send button’s callback
handler to make sure we get the right text. This is just the usual OOP state retention,
but it acquires a tangible benefit here.
Though not GUI-related, PyMailGUI also prints a variety of status messages as it runs,
but you see them only if you launch the program from the system command-line console
window (e.g., a DOS box on Windows or an xterm on Linux) or by double-clicking on
its filename icon (its main script is a .py, not a .pyw). On Windows, you won’t see these
Figure 14-45. Alternative accounts and configurations
1060 | Chapter 14: The PyMailGUI Client
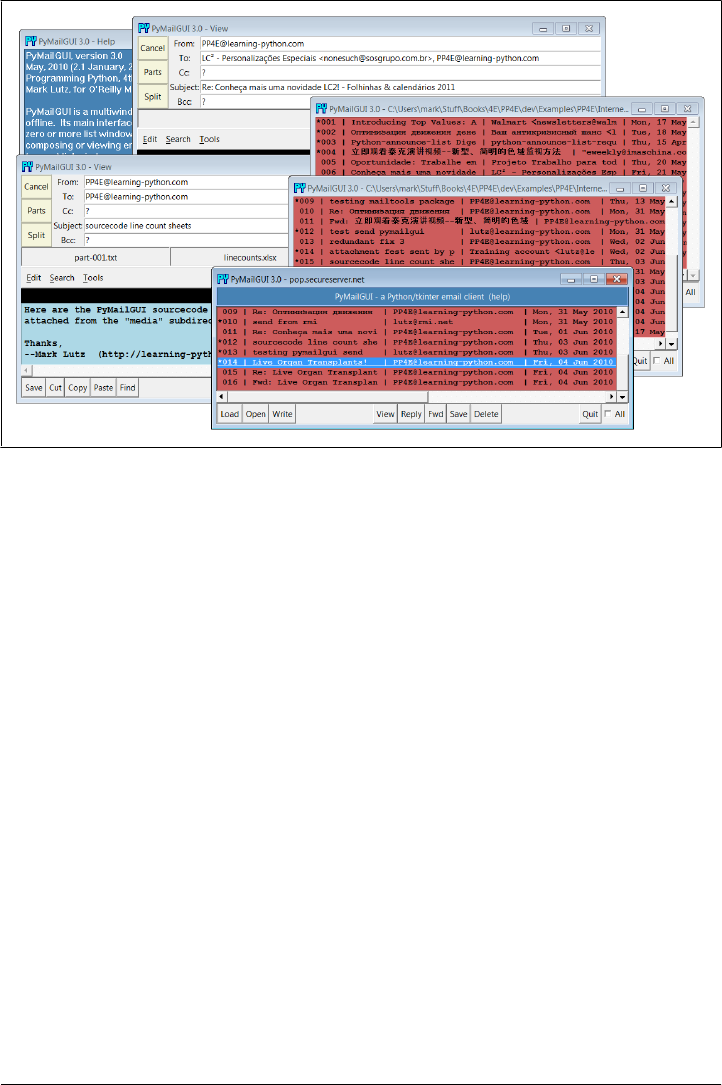
messages when PyMailGUI is started from another program, such as the PyDemos or
PyGadgets launcher bar GUIs. These status messages print server information; show
mail loading status; and trace the load, store, and delete threads that are spawned along
the way. If you want PyMailGUI to be more verbose, launch it from a command line
and watch:
C:\...\PP4E\Internet\Email\PyMailGui> PyMailGui.py
user: PP4E@learning-python.com
loading headers
Connecting...
b'+OK <24715.1275632750@pop05.mesa1.secureserver.net>'
load headers exit
synch check
Connecting...
b'+OK <26056.1275632770@pop19.prod.mesa1.secureserver.net>'
Same headers text
loading headers
Connecting...
b'+OK <18798.1275632771@pop04.mesa1.secureserver.net>'
load headers exit
synch check
Connecting...
b'+OK <28403.1275632790@pop19.prod.mesa1.secureserver.net>'
Same headers text
load 16
Connecting...
b'+OK <28472.1275632791@pop19.prod.mesa1.secureserver.net>'
Sending to...['lutz@rmi.net', 'PP4E@learning-python.com']
Figure 14-46. PyMailGUI multiple windows and text editors
A PyMailGUI Demo | 1061

MIME-Version: 1.0
Content-Type: text/plain; charset="us-ascii"
Content-Transfer-Encoding: 7bit
From: PP4E@learning-python.com
To: lutz@rmi.net
Subject: Already got one...
Date: Fri, 04 Jun 2010 06:30:26 −0000
X-Mailer: PyMailGUI 3.0 (Python)
> -----Origin
Send exit
You can also double-click on the PyMailGui.py filename in your file explorer GUI and
monitor the popped-up DOS console box on Windows. Console messages are mostly
intended for debugging, but they can be used to help understand the system’s operation
as well.
For more details on using PyMailGUI, see its help display (press the help bar at the top
of its main server list windows), or read the help string in the module PyMailGui
Help.py, described in the next section.
PyMailGUI Implementation
Last but not least, we get to the code. PyMailGUI consists of the new modules listed
near the start of this chapter, along with a handful of peripheral files described there.
The source code for these modules is listed in this section. Before we get started, here
are two quick reminders to help you study:
Code reuse
Besides the code here, PyMailGUI also gets a lot of mileage out of reusing modules
we wrote earlier and won’t repeat here: mailtools for mail loads, composition,
parsing, and delete operations; threadtools for managing server and local file ac-
cess threads; the GUI section’s TextEditor for displaying and editing mail message
text; and so on. See the example numbers list earlier in this chapter.
In addition, standard Python modules and packages such as poplib, smtplib, and
email hide most of the details of pushing bytes around the Net and extracting and
building message components. As usual, the tkinter standard library module also
implements GUI components in a portable fashion.
Code structure
As mentioned earlier, PyMailGUI applies code factoring and OOP to leverage code
reuse. For instance, list view windows are implemented as a common superclass
that codes most actions, along with one subclass for the server inbox list window
and one for local save-file list windows. The subclasses customize the common
superclass for their specific mail media.
This design reflects the operation of the GUI itself—server list windows load mail
over POP, and save-file list windows load from local files. The basic operation of
1062 | Chapter 14: The PyMailGUI Client

list window layout and actions, though, is similar for both and is shared in the
common superclass to avoid redundancy and simplify the code. Message view
windows are similarly factored: a common view window superclass is reused and
customized for write, reply, and forward view windows.
To make the code easier to follow, it is divided into two main modules that reflect
the structure of the GUI—one for the implementation of list window actions and
one for view window actions. If you are looking for the implementation of a button
that appears in a mail view or edit window, for instance, see the view window
module and search for a method whose name begins with the word on—the con-
vention used for callback handler methods. A specific button’s text can also be
located in name/callback tables used to build the windows. Actions initiated on
list windows are coded in the list window module instead.
In addition, the message cache is split off into an object and module of its own,
and potentially reusable tools are coded in importable modules (e.g., line wrapping
and utility pop ups). PyMailGUI also includes a main module that defines startup
window classes, a simple HTML to plain-text parser, a module that contains the
help text as a string, the mailconfig user settings module (a version specific to
PyMailGUI is used here), and a small handful of related files.
The following subsections present each of PyMailGUI’s source code files for you to
study. As you read, refer back to the demo earlier in this chapter and run the program
live to map its behavior back to its code.
One accounting note up-front: the only one of PyMailGUI’s 18 new source files not
listed in this section is its __init__.py package initialization file. This file is mostly
empty except for a comment string and is unused in the system today. It exists only for
future expansion, in case PyMailGUI is ever used as a package in the future—some of
its modules may be useful in other programs. As is, though, same-directory internal
imports here are not package-relative, so they assume this system is either run as a top-
level program (to import from “.”) or is listed on sys.path directly (to use absolute
imports). In Python 3.X, a package’s directory is not included on sys.path automati-
cally, so future use as a package would require changes to internal imports (e.g., moving
the main script up one level and using from . import module throughout). See resources
such as the book Learning Python for more on packages and package imports.
PyMailGUI: The Main Module
Example 14-1 defines the file run to start PyMailGUI. It implements top-level list win-
dows in the system—combinations of PyMailGUI’s application logic and the window
protocol superclasses we wrote earlier in the text. The latter of these define window
titles, icons, and close behavior.
The main internal, nonuser documentation is also in this module, as well as command-
line logic—the program accepts the names of one or more save-mail files on the
PyMailGUI Implementation | 1063

command line, and automatically opens them when the GUI starts up. This is used by
the PyDemos launcher of Chapter 10, for example.
Example 14-1. PP4E\Internet\Email\PyMailGui\PyMailGui.py
"""
##################################################################################
PyMailGui 3.0 - A Python/tkinter email client.
A client-side tkinter-based GUI interface for sending and receiving email.
See the help string in PyMailGuiHelp.py for usage details, and a list of
enhancements in this version.
Version 2.0 was a major, complete rewrite. The changes from 2.0 (July '05)
to 2.1 (Jan '06) were quick-access part buttons on View windows, threaded
loads and deletes of local save-mail files, and checks for and recovery from
message numbers out-of-synch with mail server inbox on deletes, index loads,
and message loads.
Version 3.0 (4E) is a port to Python 3.X; uses grids instead of packed column
frames for better form layout of headers in view windows; runs update() after
inserting into a new text editor for accurate line positioning (see PyEdit
loadFirst changes in Chapter 11); provides an HTML-based version of its help
text; extracts plain-text from HTML main/only parts for display and quoting;
supports separators in toolbars; addresses both message content and header
Unicode/I18N encodings for fetched, sent, and saved mails (see Ch13 and Ch14);
and much more (see Ch14 for the full rundown on 3.0 upgrades); fetched message
decoding happens deep in the mailtools package, on mail cache load operations
here; mailtools also fixes a few email package bugs (see Ch13);
This file implements the top-level windows and interface. PyMailGui uses a
number of modules that know nothing about this GUI, but perform related tasks,
some of which are developed in other sections of the book. The mailconfig
module is expanded for this program.
==Modules defined elsewhere and reused here:==
mailtools (package)
client-side scripting chapter
server sends and receives, parsing, construction (Example 13-21+)
threadtools.py
GUI tools chapter
thread queue manangement for GUI callbacks (Example 10-20)
windows.py
GUI tools chapter
border configuration for top-level windows (Example 10-16)
textEditor.py
GUI programs chapter
text widget used in mail view windows, some pop ups (Example 11-4)
==Generally useful modules defined here:==
popuputil.py
help and busy windows, for general use
messagecache.py
1064 | Chapter 14: The PyMailGUI Client

a cache that keeps track of mail already loaded
wraplines.py
utility for wrapping long lines of messages
html2text.py
rudimentary HTML parser for extracting plain text
mailconfig.py
user configuration parameters: server names, fonts, etc.
==Program-specific modules defined here:==
SharedNames.py
objects shared between window classes and main file
ViewWindows.py
implementation of view, write, reply, forward windows
ListWindows.py
implementation of mail-server and local-file list windows
PyMailGuiHelp.py (see also PyMailGuiHelp.html)
user-visible help text, opened by main window bar
PyMailGui.py
main, top-level file (run this), with main window types
##################################################################################
"""
import mailconfig, sys
from SharedNames import appname, windows
from ListWindows import PyMailServer, PyMailFile
###############################################################################
# top-level window classes
#
# View, Write, Reply, Forward, Help, BusyBox all inherit from PopupWindow
# directly: only usage; askpassword calls PopupWindow and attaches; the
# order matters here!--PyMail classes redef some method defaults in the
# Window classes, like destroy and okayToExit: must be leftmost; to use
# PyMailFileWindow standalone, imitate logic in PyMailCommon.onOpenMailFile;
###############################################################################
# uses icon file in cwd or default in tools dir
srvrname = mailconfig.popservername or 'Server'
class PyMailServerWindow(PyMailServer, windows.MainWindow):
"a Tk, with extra protocol and mixed-in methods"
def __init__(self):
windows.MainWindow.__init__(self, appname, srvrname)
PyMailServer.__init__(self)
class PyMailServerPopup(PyMailServer, windows.PopupWindow):
"a Toplevel, with extra protocol and mixed-in methods"
def __init__(self):
windows.PopupWindow.__init__(self, appname, srvrnane)
PyMailServer.__init__(self)
class PyMailServerComponent(PyMailServer, windows.ComponentWindow):
"a Frame, with extra protocol and mixed-in methods"
PyMailGUI Implementation | 1065

def __init__(self):
windows.ComponentWindow.__init__(self)
PyMailServer.__init__(self)
class PyMailFileWindow(PyMailFile, windows.PopupWindow):
"a Toplevel, with extra protocol and mixed-in methods"
def __init__(self, filename):
windows.PopupWindow.__init__(self, appname, filename)
PyMailFile.__init__(self, filename)
###############################################################################
# when run as a top-level program: create main mail-server list window
###############################################################################
if __name__ == '__main__':
rootwin = PyMailServerWindow() # open server window
if len(sys.argv) > 1: # 3.0: fix to add len()
for savename in sys.argv[1:]:
rootwin.onOpenMailFile(savename) # open save file windows (demo)
rootwin.lift() # save files loaded in threads
rootwin.mainloop()
SharedNames: Program-Wide Globals
The module in Example 14-2 implements a shared, system-wide namespace that col-
lects resources used in most modules in the system and defines global objects that span
files. This allows other files to avoid redundantly repeating common imports and en-
capsulates the locations of package imports; it is the only file that must be updated if
paths change in the future. Using globals can make programs more difficult to under-
stand in general (the source of some names is not as clear), but it is reasonable if all
such names are collected in a single expected module such as this one, because there
is only one place to search for unknown names.
Example 14-2. PP4E\Internet\Email\PyMailGui\SharedNames.py
"""
##############################################################################
objects shared by all window classes and main file: program-wide globals
##############################################################################
"""
# used in all window, icon titles
appname = 'PyMailGUI 3.0'
# used for list save, open, delete; also for sent messages file
saveMailSeparator = 'PyMailGUI' + ('-'*60) + 'PyMailGUI\n'
# currently viewed mail save files; also for sent-mail file
openSaveFiles = {} # 1 window per file,{name:win}
# standard library services
import sys, os, email.utils, email.message, webbrowser, mimetypes
1066 | Chapter 14: The PyMailGUI Client

from tkinter import *
from tkinter.simpledialog import askstring
from tkinter.filedialog import SaveAs, Open, Directory
from tkinter.messagebox import showinfo, showerror, askyesno
# reuse book examples
from PP4E.Gui.Tools import windows # window border, exit protocols
from PP4E.Gui.Tools import threadtools # thread callback queue checker
from PP4E.Internet.Email import mailtools # load,send,parse,build utilities
from PP4E.Gui.TextEditor import textEditor # component and pop up
# modules defined here
import mailconfig # user params: servers, fonts, etc.
import popuputil # help, busy, passwd pop-up windows
import wraplines # wrap long message lines
import messagecache # remember already loaded mail
import html2text # simplistic html->plaintext extract
import PyMailGuiHelp # user documentation
def printStack(exc_info):
"""
debugging: show exception and stack traceback on stdout;
3.0: change to print stack trace to a real log file if print
to sys.stdout fails: it does when launched from another program
on Windows; without this workaround, PMailGUI aborts and exits
altogether, as this is called from the main thread on spawned
thread failures; likely a Python 3.1 bug: it doesn't occur in
2.5 or 2.6, and the traceback object works fine if print to file;
oddly, the print() calls here work (but go nowhere) if spawned;
"""
print(exc_info[0])
print(exc_info[1])
import traceback
try:
traceback.print_tb(exc_info[2], file=sys.stdout) # ok unless spawned!
except:
log = open('_pymailerrlog.txt', 'a') # use a real file
log.write('-'*80) # else gui may exit
traceback.print_tb(exc_info[2], file=log) # in 3.X, not 2.5/6
# thread busy counters for threads run by this GUI
# sendingBusy shared by all send windows, used by main window quit
loadingHdrsBusy = threadtools.ThreadCounter() # only 1
deletingBusy = threadtools.ThreadCounter() # only 1
loadingMsgsBusy = threadtools.ThreadCounter() # poss many
sendingBusy = threadtools.ThreadCounter() # poss many
ListWindows: Message List Windows
The code in Example 14-3 implements mail index list windows—for the server inbox
window and for one or more local save-mail file windows. These two types of windows
look and behave largely the same, and in fact share most of their code in common in a
PyMailGUI Implementation | 1067

superclass. The window subclasses mostly just customize the superclass to map mail
Load and Delete calls to the server or a local file.
List windows are created on program startup (the initial server window, and possible
save-file windows for command-line options), as well as in response to Open button
actions in existing list windows (for opening new save-file list windows). See the Open
button’s callback in this example for initiation code.
Notice that the basic mail processing operations in the mailtools package from Chap-
ter 13 are mixed into PyMailGUI in a variety of ways. The list window classes in
Example 14-3 inherit from the mailtools mail parser class, but the server list window
class embeds an instance of the message cache object, which in turn inherits from the
mailtools mail fetcher. The mailtools mail sender class is inherited by message view
write windows, not list windows; view windows also inherit from the mail parser.
This is a fairly large file; in principle it could be split into three files, one for each class,
but these classes are so closely related that it is handy to have their code in a single file
for edits. Really, this is one class, with two minor extensions.
Example 14-3. PP4E\Internet\Email\PyMailGui\ListWindows.py
"""
###############################################################################
Implementation of mail-server and save-file message list main windows:
one class per kind. Code is factored here for reuse: server and file
list windows are customized versions of the PyMailCommon list window class;
the server window maps actions to mail transferred from a server, and the
file window applies actions to a local file.
List windows create View, Write, Reply, and Forward windows on user actions.
The server list window is the main window opened on program startup by the
top-level file; file list windows are opened on demand via server and file
list window "Open". Msgnums may be temporarily out of sync with server if
POP inbox changes (triggers full reload here).
Changes here in 2.1:
-now checks on deletes and loads to see if msg nums in sync with server
-added up to N attachment direct-access buttons on view windows
-threaded save-mail file loads, to avoid N-second pause for big files
-also threads save-mail file deletes so file write doesn't pause GUI
TBD:
-save-mail file saves still not threaded: may pause GUI briefly, but
uncommon - unlike load and delete, save/send only appends the local file.
-implementation of local save-mail files as text files with separators
is mostly a prototype: it loads all full mails into memory, and so limits
the practical size of these files; better alternative: use 2 DBM keyed
access files for hdrs and fulltext, plus a list to map keys to position;
in this scheme save-mail files become directories, no longer readable.
###############################################################################
"""
from SharedNames import * # program-wide global objects
1068 | Chapter 14: The PyMailGUI Client

from ViewWindows import ViewWindow, WriteWindow, ReplyWindow, ForwardWindow
###############################################################################
# main frame - general structure for both file and server message lists
###############################################################################
class PyMailCommon(mailtools.MailParser):
"""
an abstract widget package, with main mail listbox;
mixed in with a Tk, Toplevel, or Frame by top-level window classes;
must be customized in mode-specific subclass with actions() and other;
creates view and write windows on demand: they serve as MailSenders;
"""
# class attrs shared by all list windows
threadLoopStarted = False # started by first window
queueChecksPerSecond = 20 # tweak if CPU use too high
queueDelay = 1000 // queueChecksPerSecond # min msecs between timer events
queueBatch = 5 # max callbacks per timer event
# all windows use same dialogs: remember last dirs
openDialog = Open(title=appname + ': Open Mail File')
saveDialog = SaveAs(title=appname + ': Append Mail File')
# 3.0: avoid downloading (fetching) same message in parallel
beingFetched = set()
def __init__(self):
self.makeWidgets() # draw my contents: list,tools
if not PyMailCommon.threadLoopStarted:
# start thread exit check loop
# a timer event loop that dispatches queued GUI callbacks;
# just one loop for all windows: server,file,views can all thread;
# self is a Tk, Toplevel,or Frame: any widget type will suffice;
# 3.0/4E: added queue delay/batch for progress speedup: ~100x/sec;
PyMailCommon.threadLoopStarted = True
threadtools.threadChecker(self, self.queueDelay, self.queueBatch)
def makeWidgets(self):
# add all/none checkbtn at bottom
tools = Frame(self, relief=SUNKEN, bd=2, cursor='hand2') # 3.0: configs
tools.pack(side=BOTTOM, fill=X)
self.allModeVar = IntVar()
chk = Checkbutton(tools, text="All")
chk.config(variable=self.allModeVar, command=self.onCheckAll)
chk.pack(side=RIGHT)
# add main buttons at bottom toolbar
for (title, callback) in self.actions():
if not callback:
sep = Label(tools, text=title) # 3.0: separator
sep.pack(side=LEFT, expand=YES, fill=BOTH) # expands with window
PyMailGUI Implementation | 1069

else:
Button(tools, text=title, command=callback).pack(side=LEFT)
# add multiselect listbox with scrollbars
listwide = mailconfig.listWidth or 74 # 3.0: config start size
listhigh = mailconfig.listHeight or 15 # wide=chars, high=lines
mails = Frame(self)
vscroll = Scrollbar(mails)
hscroll = Scrollbar(mails, orient='horizontal')
fontsz = (sys.platform[:3] == 'win' and 8) or 10 # defaults
listbg = mailconfig.listbg or 'white'
listfg = mailconfig.listfg or 'black'
listfont = mailconfig.listfont or ('courier', fontsz, 'normal')
listbox = Listbox(mails, bg=listbg, fg=listfg, font=listfont)
listbox.config(selectmode=EXTENDED)
listbox.config(width=listwide, height=listhigh) # 3.0: init wider
listbox.bind('<Double-1>', (lambda event: self.onViewRawMail()))
# crosslink listbox and scrollbars
vscroll.config(command=listbox.yview, relief=SUNKEN)
hscroll.config(command=listbox.xview, relief=SUNKEN)
listbox.config(yscrollcommand=vscroll.set, relief=SUNKEN)
listbox.config(xscrollcommand=hscroll.set)
# pack last = clip first
mails.pack(side=TOP, expand=YES, fill=BOTH)
vscroll.pack(side=RIGHT, fill=BOTH)
hscroll.pack(side=BOTTOM, fill=BOTH)
listbox.pack(side=LEFT, expand=YES, fill=BOTH)
self.listBox = listbox
#################
# event handlers
#################
def onCheckAll(self):
# all or none click
if self.allModeVar.get():
self.listBox.select_set(0, END)
else:
self.listBox.select_clear(0, END)
def onViewRawMail(self):
# possibly threaded: view selected messages - raw text headers, body
msgnums = self.verifySelectedMsgs()
if msgnums:
self.getMessages(msgnums, after=lambda: self.contViewRaw(msgnums))
def contViewRaw(self, msgnums, pyedit=True): # do we need full TextEditor?
for msgnum in msgnums: # could be a nested def
fulltext = self.getMessage(msgnum) # fulltext is Unicode decoded
if not pyedit:
# display in a scrolledtext
from tkinter.scrolledtext import ScrolledText
window = windows.QuietPopupWindow(appname, 'raw message viewer')
1070 | Chapter 14: The PyMailGUI Client

browser = ScrolledText(window)
browser.insert('0.0', fulltext)
browser.pack(expand=YES, fill=BOTH)
else:
# 3.0/4E: more useful PyEdit text editor
wintitle = ' - raw message text'
browser = textEditor.TextEditorMainPopup(self, winTitle=wintitle)
browser.update()
browser.setAllText(fulltext)
browser.clearModified()
def onViewFormatMail(self):
"""
possibly threaded: view selected messages - pop up formatted display
not threaded if in savefile list, or messages are already loaded
the after action runs only if getMessages prefetch allowed and worked
"""
msgnums = self.verifySelectedMsgs()
if msgnums:
self.getMessages(msgnums, after=lambda: self.contViewFmt(msgnums))
def contViewFmt(self, msgnums):
"""
finish View: extract main text, popup view window(s) to display;
extracts plain text from html text if required, wraps text lines;
html mails: show extracted text, then save in temp file and open
in web browser; part can also be opened manually from view window
Split or part button; if non-multipart, other: part must be opened
manually with Split or part button; verify html open per mailconfig;
3.0: for html-only mails, main text is str here, but save its raw
bytes in binary mode to finesse encodings; worth the effort because
many mails are just html today; this first tried N encoding guesses
(utf-8, latin-1, platform dflt), but now gets and saves raw bytes to
minimize any fidelity loss; if a part is later opened on demand, it
is saved in a binary file as raw bytes in the same way;
caveat: the spawned web browser won't have any original email headers:
it may still have to guess or be told the encoding, unless the html
already has its own encoding headers (these take the form of <meta>
html tags within <head> sections if present; none are inserted in the
html here, as some well-formed html parts have them); IE seems to
handle most html part files anyhow; always encoding html parts to
utf-8 may suffice too: this encoding can handle most types of text;
"""
for msgnum in msgnums:
fulltext = self.getMessage(msgnum) # 3.0: str for parser
message = self.parseMessage(fulltext)
type, content = self.findMainText(message) # 3.0: Unicode decoded
if type in ['text/html', 'text/xml']: # 3.0: get plain text
content = html2text.html2text(content)
content = wraplines.wrapText1(content, mailconfig.wrapsz)
ViewWindow(headermap = message,
showtext = content,
origmessage = message) # 3.0: decodes headers
PyMailGUI Implementation | 1071

# non-multipart, content-type text/HTML (rude but true!)
if type == 'text/html':
if ((not mailconfig.verifyHTMLTextOpen) or
askyesno(appname, 'Open message text in browser?')):
# 3.0: get post mime decode, pre unicode decode bytes
type, asbytes = self.findMainText(message, asStr=False)
try:
from tempfile import gettempdir # or a Tk HTML viewer?
tempname = os.path.join(gettempdir(), 'pymailgui.html')
tmp = open(tempname, 'wb') # already encoded
tmp.write(asbytes)
webbrowser.open_new('file://' + tempname)
except:
showerror(appname, 'Cannot open in browser')
def onWriteMail(self):
"""
compose a new email from scratch, without fetching others;
nothing to quote here, but adds sig, and prefills Bcc with the
sender's address if this optional header enabled in mailconfig;
From may be i18N encoded in mailconfig: view window will decode;
"""
starttext = '\n' # use auto signature text
if mailconfig.mysignature:
starttext += '%s\n' % mailconfig.mysignature
From = mailconfig.myaddress
WriteWindow(starttext = starttext,
headermap = dict(From=From, Bcc=From)) # 3.0: prefill bcc
def onReplyMail(self):
# possibly threaded: reply to selected emails
msgnums = self.verifySelectedMsgs()
if msgnums:
self.getMessages(msgnums, after=lambda: self.contReply(msgnums))
def contReply(self, msgnums):
"""
finish Reply: drop attachments, quote with '>', add signature;
presets initial to/from values from mail or config module;
don't use original To for From: may be many or a listname;
To keeps name+<addr> format even if ',' separator in name;
Uses original From for To, ignores reply-to header is any;
3.0: replies also copy to all original recipients by default;
3.0: now uses getaddresses/parseaddr full parsing to separate
addrs on commas, and handle any commas that appear nested in
email name parts; multiple addresses are separated by comma
in GUI, we copy comma separators when displaying headers, and
we use getaddresses to split addrs as needed; ',' is required
by servers for separator; no longer uses parseaddr to get 1st
name/addr pair of getaddresses result: use full From for To;
3.0: we decode the Subject header here because we need its text,
1072 | Chapter 14: The PyMailGUI Client

but the view window superclass of edit windows performs decoding
on all displayed headers (the extra Subject decode is a no-op);
on sends, all non-ASCII hdrs and hdr email names are in decoded
form in the GUI, but are encoded within the mailtools package;
quoteOrigText also decodes the initial headers it inserts into
the quoted text block, and index lists decode for display;
"""
for msgnum in msgnums:
fulltext = self.getMessage(msgnum)
message = self.parseMessage(fulltext) # may fail: error obj
maintext = self.formatQuotedMainText(message) # same as forward
# from and to are decoded by view window
From = mailconfig.myaddress # not original To
To = message.get('From', '') # 3.0: ',' sept
Cc = self.replyCopyTo(message) # 3.0: cc all recipients?
Subj = message.get('Subject', '(no subject)')
Subj = self.decodeHeader(Subj) # deocde for str
if Subj[:4].lower() != 're: ': # 3.0: unify case
Subj = 'Re: ' + Subj
ReplyWindow(starttext = maintext,
headermap =
dict(From=From, To=To, Cc=Cc, Subject=Subj, Bcc=From))
def onFwdMail(self):
# possibly threaded: forward selected emails
msgnums = self.verifySelectedMsgs()
if msgnums:
self.getMessages(msgnums, after=lambda: self.contFwd(msgnums))
def contFwd(self, msgnums):
"""
finish Forward: drop attachments, quote with '>', add signature;
see notes about headers decoding in the Reply action methods;
view window superclass will decode the From header we pass here;
"""
for msgnum in msgnums:
fulltext = self.getMessage(msgnum)
message = self.parseMessage(fulltext)
maintext = self.formatQuotedMainText(message) # same as reply
# initial From value from config, not mail
From = mailconfig.myaddress # encoded or not
Subj = message.get('Subject', '(no subject)')
Subj = self.decodeHeader(Subj) # 3.0: send encodes
if Subj[:5].lower() != 'fwd: ': # 3.0: unify case
Subj = 'Fwd: ' + Subj
ForwardWindow(starttext = maintext,
headermap = dict(From=From, Subject=Subj, Bcc=From))
def onSaveMailFile(self):
"""
save selected emails to file for offline viewing;
disabled if target file load/delete is in progress;
disabled by getMessages if self is a busy file too;
PyMailGUI Implementation | 1073

contSave not threaded: disables all other actions;
"""
msgnums = self.selectedMsgs()
if not msgnums:
showerror(appname, 'No message selected')
else:
# caveat: dialog warns about replacing file
filename = self.saveDialog.show() # shared class attr
if filename: # don't verify num msgs
filename = os.path.abspath(filename) # normalize / to \
self.getMessages(msgnums,
after=lambda: self.contSave(msgnums, filename))
def contSave(self, msgnums, filename):
# test busy now, after poss srvr msgs load
if (filename in openSaveFiles.keys() and # viewing this file?
openSaveFiles[filename].openFileBusy): # load/del occurring?
showerror(appname, 'Target file busy - cannot save')
else:
try: # caveat:not threaded
fulltextlist = [] # 3.0: use encoding
mailfile = open(filename, 'a', encoding=mailconfig.fetchEncoding)
for msgnum in msgnums: # < 1sec for N megs
fulltext = self.getMessage(msgnum) # but poss many msgs
if fulltext[-1] != '\n': fulltext += '\n'
mailfile.write(saveMailSeparator)
mailfile.write(fulltext)
fulltextlist.append(fulltext)
mailfile.close()
except:
showerror(appname, 'Error during save')
printStack(sys.exc_info())
else: # why .keys(): EIBTI
if filename in openSaveFiles.keys(): # viewing this file?
window = openSaveFiles[filename] # update list, raise
window.addSavedMails(fulltextlist) # avoid file reload
#window.loadMailFileThread() # this was very slow
def onOpenMailFile(self, filename=None):
# process saved mail offline
filename = filename or self.openDialog.show() # shared class attr
if filename:
filename = os.path.abspath(filename) # match on full name
if filename in openSaveFiles.keys(): # only 1 win per file
openSaveFiles[filename].lift() # raise file's window
showinfo(appname, 'File already open') # else deletes odd
else:
from PyMailGui import PyMailFileWindow # avoid duplicate win
popup = PyMailFileWindow(filename) # new list window
openSaveFiles[filename] = popup # removed in quit
popup.loadMailFileThread() # try load in thread
def onDeleteMail(self):
# delete selected mails from server or file
msgnums = self.selectedMsgs() # subclass: fillIndex
1074 | Chapter 14: The PyMailGUI Client

if not msgnums: # always verify here
showerror(appname, 'No message selected')
else:
if askyesno(appname, 'Verify delete %d mails?' % len(msgnums)):
self.doDelete(msgnums)
##################
# utility methods
##################
def selectedMsgs(self):
# get messages selected in main listbox
selections = self.listBox.curselection() # tuple of digit strs, 0..N-1
return [int(x)+1 for x in selections] # convert to ints, make 1..N
warningLimit = 15
def verifySelectedMsgs(self):
msgnums = self.selectedMsgs()
if not msgnums:
showerror(appname, 'No message selected')
else:
numselects = len(msgnums)
if numselects > self.warningLimit:
if not askyesno(appname, 'Open %d selections?' % numselects):
msgnums = []
return msgnums
def fillIndex(self, maxhdrsize=25):
"""
fill all of main listbox from message header mappings;
3.0: decode headers per email/mime/unicode here if encoded;
3.0: caveat: large chinese characters can break '|' alignment;
"""
hdrmaps = self.headersMaps() # may be empty
showhdrs = ('Subject', 'From', 'Date', 'To') # default hdrs to show
if hasattr(mailconfig, 'listheaders'): # mailconfig customizes
showhdrs = mailconfig.listheaders or showhdrs
addrhdrs = ('From', 'To', 'Cc', 'Bcc') # 3.0: decode i18n specially
# compute max field sizes <= hdrsize
maxsize = {}
for key in showhdrs:
allLens = [] # too big for a list comp!
for msg in hdrmaps:
keyval = msg.get(key, ' ')
if key not in addrhdrs:
allLens.append(len(self.decodeHeader(keyval)))
else:
allLens.append(len(self.decodeAddrHeader(keyval)))
if not allLens: allLens = [1]
maxsize[key] = min(maxhdrsize, max(allLens))
# populate listbox with fixed-width left-justified fields
self.listBox.delete(0, END) # show multiparts with *
for (ix, msg) in enumerate(hdrmaps): # via content-type hdr
PyMailGUI Implementation | 1075

msgtype = msg.get_content_maintype() # no is_multipart yet
msgline = (msgtype == 'multipart' and '*') or ' '
msgline += '%03d' % (ix+1)
for key in showhdrs:
mysize = maxsize[key]
if key not in addrhdrs:
keytext = self.decodeHeader(msg.get(key, ' '))
else:
keytext = self.decodeAddrHeader(msg.get(key, ' '))
msgline += ' | %-*s' % (mysize, keytext[:mysize])
msgline += '| %.1fK' % (self.mailSize(ix+1) / 1024) # 3.0: .0 optional
self.listBox.insert(END, msgline)
self.listBox.see(END) # show most recent mail=last line
def replyCopyTo(self, message):
"""
3.0: replies copy all original recipients, by prefilling
Cc header with all addreses in original To and Cc after
removing duplicates and new sender; could decode i18n addrs
here, but the view window will decode to display (and send
will reencode) and the unique set filtering here will work
either way, though a sender's i18n address is assumed to be
in encoded form in mailconfig (else it is not removed here);
empty To or Cc headers are okay: split returns empty lists;
"""
if not mailconfig.repliesCopyToAll:
# reply to sender only
Cc = ''
else:
# copy all original recipients (3.0)
allRecipients = (self.splitAddresses(message.get('To', '')) +
self.splitAddresses(message.get('Cc', '')))
uniqueOthers = set(allRecipients) - set([mailconfig.myaddress])
Cc = ', '.join(uniqueOthers)
return Cc or '?'
def formatQuotedMainText(self, message):
"""
3.0: factor out common code shared by Reply and Forward:
fetch decoded text, extract text if html, line wrap, add > quote
"""
type, maintext = self.findMainText(message) # 3.0: decoded str
if type in ['text/html', 'text/xml']: # 3.0: get plain text
maintext = html2text.html2text(maintext)
maintext = wraplines.wrapText1(maintext, mailconfig.wrapsz-2) # 2 = '> '
maintext = self.quoteOrigText(maintext, message) # add hdrs, >
if mailconfig.mysignature:
maintext = ('\n%s\n' % mailconfig.mysignature) + maintext
return maintext
def quoteOrigText(self, maintext, message):
"""
3.0: we need to decode any i18n (internationalizd) headers here too,
or they show up in email+MIME encoded form in the quoted text block;
decodeAddrHeader works on one addr or all in a comma-separated list;
1076 | Chapter 14: The PyMailGUI Client

this may trigger full text encoding on sends, but the main text is
also already in fully decoded form: could be in any Unicode scheme;
"""
quoted = '\n-----Original Message-----\n'
for hdr in ('From', 'To', 'Subject', 'Date'):
rawhdr = message.get(hdr, '?')
if hdr not in ('From', 'To'):
dechdr = self.decodeHeader(rawhdr) # full value
else:
dechdr = self.decodeAddrHeader(rawhdr) # name parts only
quoted += '%s: %s\n' % (hdr, dechdr)
quoted += '\n' + maintext
quoted = '\n' + quoted.replace('\n', '\n> ')
return quoted
########################
# subclass requirements
########################
def getMessages(self, msgnums, after): # used by view,save,reply,fwd
after() # redef if cache, thread test
# plus okayToQuit?, any unique actions
def getMessage(self, msgnum): assert False # used by many: full mail text
def headersMaps(self): assert False # fillIndex: hdr mappings list
def mailSize(self, msgnum): assert False # fillIndex: size of msgnum
def doDelete(self): assert False # onDeleteMail: delete button
###############################################################################
# main window - when viewing messages in local save file (or sent-mail file)
###############################################################################
class PyMailFile(PyMailCommon):
"""
customize PyMailCommon for viewing saved-mail file offline;
mixed with a Tk, Toplevel, or Frame, adds main mail listbox;
maps load, fetch, delete actions to local text file storage;
file opens and deletes here run in threads for large files;
save and send not threaded, because only append to file; save
is disabled if source or target file busy with load/delete;
save disables load, delete, save just because it is not run
in a thread (blocks GUI);
TBD: may need thread and O/S file locks if saves ever do run in
threads: saves could disable other threads with openFileBusy, but
file may not be open in GUI; file locks not sufficient, because
GUI updated too; TBD: appends to sent-mail file may require O/S
locks: as is, user gets error pop up if sent during load/del;
3.0: mail save files are now Unicode text, encoded per an encoding
name setting in the mailconfig module; this may not support worst
case scenarios of unusual or mixed encodings, but most full mail
PyMailGUI Implementation | 1077

text is ascii, and the Python 3.1 email package is partly broken;
"""
def actions(self):
return [ ('Open', self.onOpenMailFile),
('Write', self.onWriteMail),
(' ', None), # 3.0: separators
('View', self.onViewFormatMail),
('Reply', self.onReplyMail),
('Fwd', self.onFwdMail),
('Save', self.onSaveMailFile),
('Delete', self.onDeleteMail),
(' ', None),
('Quit', self.quit) ]
def __init__(self, filename):
# caller: do loadMailFileThread next
PyMailCommon.__init__(self)
self.filename = filename
self.openFileBusy = threadtools.ThreadCounter() # one per window
def loadMailFileThread(self):
"""
load or reload file and update window index list;
called on Open, startup, and possibly on Send if
sent-mail file appended is currently open; there
is always a bogus first item after the text split;
alt: [self.parseHeaders(m) for m in self.msglist];
could pop up a busy dialog, but quick for small files;
2.1: this is now threaded--else runs < 1sec for N meg
files, but can pause GUI N seconds if very large file;
Save now uses addSavedMails to append msg lists for
speed, not this reload; still called from Send just
because msg text unavailable - requires refactoring;
delete threaded too: prevent open and delete overlap;
"""
if self.openFileBusy:
# don't allow parallel open/delete changes
errmsg = 'Cannot load, file is busy:\n"%s"' % self.filename
showerror(appname, errmsg)
else:
#self.listBox.insert(END, 'loading...') # error if user clicks
savetitle = self.title() # set by window class
self.title(appname + ' - ' + 'Loading...')
self.openFileBusy.incr()
threadtools.startThread(
action = self.loadMailFile,
args = (),
context = (savetitle,),
onExit = self.onLoadMailFileExit,
onFail = self.onLoadMailFileFail)
def loadMailFile(self):
# run in a thread while GUI is active
# open, read, parser may all raise excs: caught in thread utility
1078 | Chapter 14: The PyMailGUI Client

file = open(self.filename, 'r', encoding=mailconfig.fetchEncoding) # 3.0
allmsgs = file.read()
self.msglist = allmsgs.split(saveMailSeparator)[1:] # full text
self.hdrlist = list(map(self.parseHeaders, self.msglist)) # msg objects
def onLoadMailFileExit(self, savetitle):
# on thread success
self.title(savetitle) # reset window title to filename
self.fillIndex() # updates GUI: do in main thread
self.lift() # raise my window
self.openFileBusy.decr()
def onLoadMailFileFail(self, exc_info, savetitle):
# on thread exception
showerror(appname, 'Error opening "%s"\n%s\n%s' %
((self.filename,) + exc_info[:2]))
printStack(exc_info)
self.destroy() # always close my window?
self.openFileBusy.decr() # not needed if destroy
def addSavedMails(self, fulltextlist):
"""
optimization: extend loaded file lists for mails
newly saved to this window's file; in past called
loadMailThread to reload entire file on save - slow;
must be called in main GUI thread only: updates GUI;
sends still reloads sent file if open: no msg text;
"""
self.msglist.extend(fulltextlist)
self.hdrlist.extend(map(self.parseHeaders, fulltextlist)) # 3.x iter ok
self.fillIndex()
self.lift()
def doDelete(self, msgnums):
"""
simple-minded, but sufficient: rewrite all
nondeleted mails to file; can't just delete
from self.msglist in-place: changes item indexes;
Py2.3 enumerate(L) same as zip(range(len(L)), L)
2.1: now threaded, else N sec pause for large files
"""
if self.openFileBusy:
# dont allow parallel open/delete changes
errmsg = 'Cannot delete, file is busy:\n"%s"' % self.filename
showerror(appname, errmsg)
else:
savetitle = self.title()
self.title(appname + ' - ' + 'Deleting...')
self.openFileBusy.incr()
threadtools.startThread(
action = self.deleteMailFile,
args = (msgnums,),
context = (savetitle,),
onExit = self.onDeleteMailFileExit,
onFail = self.onDeleteMailFileFail)
PyMailGUI Implementation | 1079

def deleteMailFile(self, msgnums):
# run in a thread while GUI active
indexed = enumerate(self.msglist)
keepers = [msg for (ix, msg) in indexed if ix+1 not in msgnums]
allmsgs = saveMailSeparator.join([''] + keepers)
file = open(self.filename, 'w', encoding=mailconfig.fetchEncoding) # 3.0
file.write(allmsgs)
self.msglist = keepers
self.hdrlist = list(map(self.parseHeaders, self.msglist))
def onDeleteMailFileExit(self, savetitle):
self.title(savetitle)
self.fillIndex() # updates GUI: do in main thread
self.lift() # reset my title, raise my window
self.openFileBusy.decr()
def onDeleteMailFileFail(self, exc_info, savetitle):
showerror(appname, 'Error deleting "%s"\n%s\n%s' %
((self.filename,) + exc_info[:2]))
printStack(exc_info)
self.destroy() # always close my window?
self.openFileBusy.decr() # not needed if destroy
def getMessages(self, msgnums, after):
"""
used by view,save,reply,fwd: file load and delete
threads may change the msg and hdr lists, so disable
all other operations that depend on them to be safe;
this test is for self: saves also test target file;
"""
if self.openFileBusy:
errmsg = 'Cannot fetch, file is busy:\n"%s"' % self.filename
showerror(appname, errmsg)
else:
after() # mail already loaded
def getMessage(self, msgnum):
return self.msglist[msgnum-1] # full text of 1 mail
def headersMaps(self):
return self.hdrlist # email.message.Message objects
def mailSize(self, msgnum):
return len(self.msglist[msgnum-1])
def quit(self):
# don't destroy during update: fillIndex next
if self.openFileBusy:
showerror(appname, 'Cannot quit during load or delete')
else:
if askyesno(appname, 'Verify Quit Window?'):
# delete file from open list
del openSaveFiles[self.filename]
Toplevel.destroy(self)
1080 | Chapter 14: The PyMailGUI Client

###############################################################################
# main window - when viewing messages on the mail server
###############################################################################
class PyMailServer(PyMailCommon):
"""
customize PyMailCommon for viewing mail still on server;
mixed with a Tk, Toplevel, or Frame, adds main mail listbox;
maps load, fetch, delete actions to email server inbox;
embeds a MessageCache, which is a mailtools MailFetcher;
"""
def actions(self):
return [ ('Load', self.onLoadServer),
('Open', self.onOpenMailFile),
('Write', self.onWriteMail),
(' ', None), # 3.0: separators
('View', self.onViewFormatMail),
('Reply', self.onReplyMail),
('Fwd', self.onFwdMail),
('Save', self.onSaveMailFile),
('Delete', self.onDeleteMail),
(' ', None),
('Quit', self.quit) ]
def __init__(self):
PyMailCommon.__init__(self)
self.cache = messagecache.GuiMessageCache() # embedded, not inherited
#self.listBox.insert(END, 'Press Load to fetch mail')
def makeWidgets(self): # help bar: main win only
self.addHelpBar()
PyMailCommon.makeWidgets(self)
def addHelpBar(self):
msg = 'PyMailGUI - a Python/tkinter email client (help)'
title = Button(self, text=msg)
title.config(bg='steelblue', fg='white', relief=RIDGE)
title.config(command=self.onShowHelp)
title.pack(fill=X)
def onShowHelp(self):
"""
load,show text block string
3.0: now uses HTML and webbrowser module here too
user setting in mailconfig selects text, HTML, or both
always displays one or the other: html if both false
"""
if mailconfig.showHelpAsText:
from PyMailGuiHelp import helptext
popuputil.HelpPopup(appname, helptext, showsource=self.onShowMySource)
if mailconfig.showHelpAsHTML or (not mailconfig.showHelpAsText):
PyMailGUI Implementation | 1081

from PyMailGuiHelp import showHtmlHelp
showHtmlHelp() # 3.0: HTML version without source file links
def onShowMySource(self, showAsMail=False):
"""
display my sourcecode file, plus imported modules here & elsewhere
"""
import PyMailGui, ListWindows, ViewWindows, SharedNames, textConfig
from PP4E.Internet.Email.mailtools import ( # mailtools now a pkg
mailSender, mailFetcher, mailParser) # can't use * in def
mymods = (
PyMailGui, ListWindows, ViewWindows, SharedNames,
PyMailGuiHelp, popuputil, messagecache, wraplines, html2text,
mailtools, mailFetcher, mailSender, mailParser,
mailconfig, textConfig, threadtools, windows, textEditor)
for mod in mymods:
source = mod.__file__
if source.endswith('.pyc'):
source = source[:-4] + '.py' # assume a .py in same dir
if showAsMail:
# this is a bit cheesey...
code = open(source).read() # 3.0: platform encoding
user = mailconfig.myaddress
hdrmap = {'From': appname, 'To': user, 'Subject': mod.__name__}
ViewWindow(showtext=code,
headermap=hdrmap,
origmessage=email.message.Message())
else:
# more useful PyEdit text editor
# 4E: assume in UTF8 Unicode encoding (else PeEdit may ask!)
wintitle = ' - ' + mod.__name__
textEditor.TextEditorMainPopup(self, source, wintitle, 'utf-8')
def onLoadServer(self, forceReload=False):
"""
threaded: load or reload mail headers list on request;
Exit,Fail,Progress run by threadChecker after callback via queue;
load may overlap with sends, but disables all but send;
could overlap with loadingMsgs, but may change msg cache list;
forceReload on delete/synch fail, else loads recent arrivals only;
2.1: cache.loadHeaders may do quick check to see if msgnums
in synch with server, if we are loading just newly arrived hdrs;
"""
if loadingHdrsBusy or deletingBusy or loadingMsgsBusy:
showerror(appname, 'Cannot load headers during load or delete')
else:
loadingHdrsBusy.incr()
self.cache.setPopPassword(appname) # don't update GUI in the thread!
popup = popuputil.BusyBoxNowait(appname, 'Loading message headers')
threadtools.startThread(
action = self.cache.loadHeaders,
args = (forceReload,),
context = (popup,),
onExit = self.onLoadHdrsExit,
onFail = self.onLoadHdrsFail,
1082 | Chapter 14: The PyMailGUI Client

onProgress = self.onLoadHdrsProgress)
def onLoadHdrsExit(self, popup):
self.fillIndex()
popup.quit()
self.lift()
loadingHdrsBusy.decr() # allow other actions to run
def onLoadHdrsFail(self, exc_info, popup):
popup.quit()
showerror(appname, 'Load failed: \n%s\n%s' % exc_info[:2])
printStack(exc_info) # send stack trace to stdout
loadingHdrsBusy.decr()
if exc_info[0] == mailtools.MessageSynchError: # synch inbox/index
self.onLoadServer(forceReload=True) # new thread: reload
else:
self.cache.popPassword = None # force re-input next time
def onLoadHdrsProgress(self, i, n, popup):
popup.changeText('%d of %d' % (i, n))
def doDelete(self, msgnumlist):
"""
threaded: delete from server now - changes msg nums;
may overlap with sends only, disables all except sends;
2.1: cache.deleteMessages now checks TOP result to see
if headers match selected mails, in case msgnums out of
synch with mail server: poss if mail deleted by other client,
or server deletes inbox mail automatically - some ISPs may
move a mail from inbox to undeliverable on load failure;
"""
if loadingHdrsBusy or deletingBusy or loadingMsgsBusy:
showerror(appname, 'Cannot delete during load or delete')
else:
deletingBusy.incr()
popup = popuputil.BusyBoxNowait(appname, 'Deleting selected mails')
threadtools.startThread(
action = self.cache.deleteMessages,
args = (msgnumlist,),
context = (popup,),
onExit = self.onDeleteExit,
onFail = self.onDeleteFail,
onProgress = self.onDeleteProgress)
def onDeleteExit(self, popup):
self.fillIndex() # no need to reload from server
popup.quit() # refill index with updated cache
self.lift() # raise index window, release lock
deletingBusy.decr()
def onDeleteFail(self, exc_info, popup):
popup.quit()
showerror(appname, 'Delete failed: \n%s\n%s' % exc_info[:2])
printStack(exc_info)
deletingBusy.decr() # delete or synch check failure
PyMailGUI Implementation | 1083

self.onLoadServer(forceReload=True) # new thread: some msgnums changed
def onDeleteProgress(self, i, n, popup):
popup.changeText('%d of %d' % (i, n))
def getMessages(self, msgnums, after):
"""
threaded: prefetch all selected messages into cache now;
used by save, view, reply, and forward to prefill cache;
may overlap with other loadmsgs and sends, disables delete,load;
only runs "after" action if the fetch allowed and successful;
2.1: cache.getMessages tests if index in synch with server,
but we only test if we have to go to server, not if cached;
3.0: see messagecache note: now avoids potential fetch of mail
currently being fetched, if user clicks again while in progress;
any message being fetched by any other request in progress must
disable entire toLoad batch: else, need to wait for N other loads;
fetches are still allowed to overlap in time, as long as disjoint;
"""
if loadingHdrsBusy or deletingBusy:
showerror(appname, 'Cannot fetch message during load or delete')
else:
toLoad = [num for num in msgnums if not self.cache.isLoaded(num)]
if not toLoad:
after() # all already loaded
return # process now, no wait pop up
else:
if set(toLoad) & self.beingFetched: # 3.0: any in progress?
showerror(appname, 'Cannot fetch any message being fetched')
else:
self.beingFetched |= set(toLoad)
loadingMsgsBusy.incr()
from popuputil import BusyBoxNowait
popup = BusyBoxNowait(appname, 'Fetching message contents')
threadtools.startThread(
action = self.cache.getMessages,
args = (toLoad,),
context = (after, popup, toLoad),
onExit = self.onLoadMsgsExit,
onFail = self.onLoadMsgsFail,
onProgress = self.onLoadMsgsProgress)
def onLoadMsgsExit(self, after, popup, toLoad):
self.beingFetched -= set(toLoad)
popup.quit()
after()
loadingMsgsBusy.decr() # allow other actions after onExit done
def onLoadMsgsFail(self, exc_info, after, popup, toLoad):
self.beingFetched -= set(toLoad)
popup.quit()
showerror(appname, 'Fetch failed: \n%s\n%s' % exc_info[:2])
printStack(exc_info)
loadingMsgsBusy.decr()
1084 | Chapter 14: The PyMailGUI Client

if exc_info[0] == mailtools.MessageSynchError: # synch inbox/index
self.onLoadServer(forceReload=True) # new thread: reload
def onLoadMsgsProgress(self, i, n, after, popup, toLoad):
popup.changeText('%d of %d' % (i, n))
def getMessage(self, msgnum):
return self.cache.getMessage(msgnum) # full mail text
def headersMaps(self):
# list of email.message.Message objects, 3.x requires list() if map()
# return [self.parseHeaders(h) for h in self.cache.allHdrs()]
return list(map(self.parseHeaders, self.cache.allHdrs()))
def mailSize(self, msgnum):
return self.cache.getSize(msgnum)
def okayToQuit(self):
# any threads still running?
filesbusy = [win for win in openSaveFiles.values() if win.openFileBusy]
busy = loadingHdrsBusy or deletingBusy or sendingBusy or loadingMsgsBusy
busy = busy or filesbusy
return not busy
ViewWindows: Message View Windows
Example 14-4 lists the implementation of mail view and edit windows. These windows
are created in response to actions in list windows—View, Write, Reply, and Forward
buttons. See the callbacks for these actions in the list window module of Exam-
ple 14-3 for view window initiation calls.
As in the prior module (Example 14-3), this file is really one common class and a handful
of customizations. The mail view window is nearly identical to the mail edit window,
used for Write, Reply, and Forward requests. Consequently, this example defines the
common appearance and behavior in the view window superclass, and extends it by
subclassing for edit windows.
Replies and forwards are hardly different from the write window here, because their
details (e.g., From and To addresses and quoted message text) are worked out in the
list window implementation before an edit window is created.
Example 14-4. PP4E\Internet\Email\PyMailGui\ViewWindows.py
"""
###############################################################################
Implementation of View, Write, Reply, Forward windows: one class per kind.
Code is factored here for reuse: a Write window is a customized View window,
and Reply and Forward are custom Write windows. Windows defined in this
file are created by the list windows, in response to user actions.
Caveat:'split' pop ups for opening parts/attachments feel nonintuitive.
2.1: this caveat was addressed, by adding quick-access attachment buttons.
New in 3.0: platform-neutral grid() for mail headers, not packed col frames.
PyMailGUI Implementation | 1085

New in 3.0: supports Unicode encodings for main text + text attachments sent.
New in 3.0: PyEdit supports arbitrary Unicode for message parts viewed.
New in 3.0: supports Unicode/mail encodings for headers in mails sent.
TBD: could avoid verifying quits unless text area modified (like PyEdit2.0),
but these windows are larger, and would not catch headers already changed.
TBD: should Open dialog in write windows be program-wide? (per-window now).
###############################################################################
"""
from SharedNames import * # program-wide global objects
###############################################################################
# message view window - also a superclass of write, reply, forward
###############################################################################
class ViewWindow(windows.PopupWindow, mailtools.MailParser):
"""
a Toplevel, with extra protocol and embedded TextEditor;
inherits saveParts,partsList from mailtools.MailParser;
mixes in custom subclass logic by direct inheritance here;
"""
# class attributes
modelabel = 'View' # used in window titles
from mailconfig import okayToOpenParts # open any attachments at all?
from mailconfig import verifyPartOpens # ask before open each part?
from mailconfig import maxPartButtons # show up to this many + '...'
from mailconfig import skipTextOnHtmlPart # 3.0: just browser, not PyEdit?
tempPartDir = 'TempParts' # where 1 selected part saved
# all view windows use same dialog: remembers last dir
partsDialog = Directory(title=appname + ': Select parts save directory')
def __init__(self, headermap, showtext, origmessage=None):
"""
header map is origmessage, or custom hdr dict for writing;
showtext is main text part of the message: parsed or custom;
origmessage is parsed email.message.Message for view mail windows
"""
windows.PopupWindow.__init__(self, appname, self.modelabel)
self.origMessage = origmessage
self.makeWidgets(headermap, showtext)
def makeWidgets(self, headermap, showtext):
"""
add headers, actions, attachments, text editor
3.0: showtext is assumed to be decoded Unicode str here;
it will be encoded on sends and saves as directed/needed;
"""
actionsframe = self.makeHeaders(headermap)
if self.origMessage and self.okayToOpenParts:
self.makePartButtons()
self.editor = textEditor.TextEditorComponentMinimal(self)
1086 | Chapter 14: The PyMailGUI Client

myactions = self.actionButtons()
for (label, callback) in myactions:
b = Button(actionsframe, text=label, command=callback)
b.config(bg='beige', relief=RIDGE, bd=2)
b.pack(side=TOP, expand=YES, fill=BOTH)
# body text, pack last=clip first
self.editor.pack(side=BOTTOM) # may be multiple editors
self.update() # 3.0: else may be @ line2
self.editor.setAllText(showtext) # each has own content
lines = len(showtext.splitlines())
lines = min(lines + 3, mailconfig.viewheight or 20)
self.editor.setHeight(lines) # else height=24, width=80
self.editor.setWidth(80) # or from PyEdit textConfig
if mailconfig.viewbg:
self.editor.setBg(mailconfig.viewbg) # colors, font in mailconfig
if mailconfig.viewfg:
self.editor.setFg(mailconfig.viewfg)
if mailconfig.viewfont: # also via editor Tools menu
self.editor.setFont(mailconfig.viewfont)
def makeHeaders(self, headermap):
"""
add header entry fields, return action buttons frame;
3.0: uses grid for platform-neutral layout of label/entry rows;
packed row frames with fixed-width labels would work well too;
3.0: decoding of i18n headers (and email names in address headers)
is performed here if still required as they are added to the GUI;
some may have been decoded already for reply/forward windows that
need to use decoded text, but the extra decode here is harmless for
these, and is required for other headers and cases such as fetched
mail views; always, headers are in decoded form when displayed in
the GUI, and will be encoded within mailtools on Sends if they are
non-ASCII (see Write); i18n header decoding also occurs in list
window mail indexes, and for headers added to quoted mail text;
text payloads in the mail body are also decoded for display and
encoded for sends elsewhere in the system (list windows, Write);
3.0: creators of edit windows prefill Bcc header with sender email
address to be picked up here, as a convenience for common usages if
this header is enabled in mailconfig; Reply also now prefills the
Cc header with all unique original recipients less From, if enabled;
"""
top = Frame(self); top.pack (side=TOP, fill=X)
left = Frame(top); left.pack (side=LEFT, expand=NO, fill=BOTH)
middle = Frame(top); middle.pack(side=LEFT, expand=YES, fill=X)
# headers set may be extended in mailconfig (Bcc, others?)
self.userHdrs = ()
showhdrs = ('From', 'To', 'Cc', 'Subject')
if hasattr(mailconfig, 'viewheaders') and mailconfig.viewheaders:
self.userHdrs = mailconfig.viewheaders
showhdrs += self.userHdrs
addrhdrs = ('From', 'To', 'Cc', 'Bcc') # 3.0: decode i18n specially
PyMailGUI Implementation | 1087

self.hdrFields = []
for (i, header) in enumerate(showhdrs):
lab = Label(middle, text=header+':', justify=LEFT)
ent = Entry(middle)
lab.grid(row=i, column=0, sticky=EW)
ent.grid(row=i, column=1, sticky=EW)
middle.rowconfigure(i, weight=1)
hdrvalue = headermap.get(header, '?') # might be empty
# 3.0: if encoded, decode per email+mime+unicode
if header not in addrhdrs:
hdrvalue = self.decodeHeader(hdrvalue)
else:
hdrvalue = self.decodeAddrHeader(hdrvalue)
ent.insert('0', hdrvalue)
self.hdrFields.append(ent) # order matters in onSend
middle.columnconfigure(1, weight=1)
return left
def actionButtons(self): # must be method for self
return [('Cancel', self.destroy), # close view window silently
('Parts', self.onParts), # multiparts list or the body
('Split', self.onSplit)]
def makePartButtons(self):
"""
add up to N buttons that open attachments/parts
when clicked; alternative to Parts/Split (2.1);
okay that temp dir is shared by all open messages:
part file not saved till later selected and opened;
partname=partname is required in lambda in Py2.4;
caveat: we could try to skip the main text part;
"""
def makeButton(parent, text, callback):
link = Button(parent, text=text, command=callback, relief=SUNKEN)
if mailconfig.partfg: link.config(fg=mailconfig.partfg)
if mailconfig.partbg: link.config(bg=mailconfig.partbg)
link.pack(side=LEFT, fill=X, expand=YES)
parts = Frame(self)
parts.pack(side=TOP, expand=NO, fill=X)
for (count, partname) in enumerate(self.partsList(self.origMessage)):
if count == self.maxPartButtons:
makeButton(parts, '...', self.onSplit)
break
openpart = (lambda partname=partname: self.onOnePart(partname))
makeButton(parts, partname, openpart)
def onOnePart(self, partname):
"""
locate selected part for button and save and open;
okay if multiple mails open: resaves each time selected;
we could probably just use web browser directly here;
caveat: tempPartDir is relative to cwd - poss anywhere;
caveat: tempPartDir is never cleaned up: might be large,
1088 | Chapter 14: The PyMailGUI Client

could use tempfile module (just like the HTML main text
part display code in onView of the list window class);
"""
try:
savedir = self.tempPartDir
message = self.origMessage
(contype, savepath) = self.saveOnePart(savedir, partname, message)
except:
showerror(appname, 'Error while writing part file')
printStack(sys.exc_info())
else:
self.openParts([(contype, os.path.abspath(savepath))]) # reuse
def onParts(self):
"""
show message part/attachments in pop-up window;
uses same file naming scheme as save on Split;
if non-multipart, single part = full body text
"""
partnames = self.partsList(self.origMessage)
msg = '\n'.join(['Message parts:\n'] + partnames)
showinfo(appname, msg)
def onSplit(self):
"""
pop up save dir dialog and save all parts/attachments there;
if desired, pop up HTML and multimedia parts in web browser,
text in TextEditor, and well-known doc types on windows;
could show parts in View windows where embedded text editor
would provide a save button, but most are not readable text;
"""
savedir = self.partsDialog.show() # class attr: at prior dir
if savedir: # tk dir chooser, not file
try:
partfiles = self.saveParts(savedir, self.origMessage)
except:
showerror(appname, 'Error while writing part files')
printStack(sys.exc_info())
else:
if self.okayToOpenParts: self.openParts(partfiles)
def askOpen(self, appname, prompt):
if not self.verifyPartOpens:
return True
else:
return askyesno(appname, prompt) # pop-up dialog
def openParts(self, partfiles):
"""
auto-open well known and safe file types, but only if verified
by the user in a pop up; other types must be opened manually
from save dir; at this point, the named parts have been already
MIME-decoded and saved as raw bytes in binary-mode files, but text
parts may be in any Unicode encoding; PyEdit needs to know the
encoding to decode, webbrowsers may have to guess or be told;
PyMailGUI Implementation | 1089

caveat: punts for type application/octet-stream even if it has
safe filename extension such as .html; caveat: image/audio/video
could be opened with the book's playfile.py; could also do that
if text viewer fails: would start notepad on Windows via startfile;
webbrowser may handle most cases here too, but specific is better;
"""
def textPartEncoding(fullfilename):
"""
3.0: map a text part filename back to charset param in content-type
header of part's Message, so we can pass this on to the PyEdit
constructor for proper text display; we could return the charset
along with content-type from mailtools for text parts, but fewer
changes are needed if this is handled as a special case here;
part content is saved in binary mode files by mailtools to avoid
encoding issues, but here the original part Message is not directly
available; we need this mapping step to extract a Unicode encoding
name if present; 4E's PyEdit now allows an explicit encoding name for
file opens, and resolves encoding on saves; see Chapter 11 for PyEdit
policies: it may ask user for an encoding if charset absent or fails;
caveat: move to mailtools.mailParser to reuse for <meta> in PyMailCGI?
"""
partname = os.path.basename(fullfilename)
for (filename, contype, part) in self.walkNamedParts(self.origMessage):
if filename == partname:
return part.get_content_charset() # None if not in header
assert False, 'Text part not found' # should never happen
for (contype, fullfilename) in partfiles:
maintype = contype.split('/')[0] # left side
extension = os.path.splitext(fullfilename)[1] # not [-4:]
basename = os.path.basename(fullfilename) # strip dir
# HTML and XML text, web pages, some media
if contype in ['text/html', 'text/xml']:
browserOpened = False
if self.askOpen(appname, 'Open "%s" in browser?' % basename):
try:
webbrowser.open_new('file://' + fullfilename)
browserOpened = True
except:
showerror(appname, 'Browser failed: trying editor')
if not browserOpened or not self.skipTextOnHtmlPart:
try:
# try PyEdit to see encoding name and effect
encoding = textPartEncoding(fullfilename)
textEditor.TextEditorMainPopup(parent=self,
winTitle=' - %s email part' % (encoding or '?'),
loadFirst=fullfilename, loadEncode=encoding)
except:
showerror(appname, 'Error opening text viewer')
# text/plain, text/x-python, etc.; 4E: encoding, may fail
1090 | Chapter 14: The PyMailGUI Client

elif maintype == 'text':
if self.askOpen(appname, 'Open text part "%s"?' % basename):
try:
encoding = textPartEncoding(fullfilename)
textEditor.TextEditorMainPopup(parent=self,
winTitle=' - %s email part' % (encoding or '?'),
loadFirst=fullfilename, loadEncode=encoding)
except:
showerror(appname, 'Error opening text viewer')
# multimedia types: Windows opens mediaplayer, imageviewer, etc.
elif maintype in ['image', 'audio', 'video']:
if self.askOpen(appname, 'Open media part "%s"?' % basename):
try:
webbrowser.open_new('file://' + fullfilename)
except:
showerror(appname, 'Error opening browser')
# common Windows documents: Word, Excel, Adobe, archives, etc.
elif (sys.platform[:3] == 'win' and
maintype == 'application' and # 3.0: +x types
extension in ['.doc', '.docx', '.xls', '.xlsx', # generalize me
'.pdf', '.zip', '.tar', '.wmv']):
if self.askOpen(appname, 'Open part "%s"?' % basename):
os.startfile(fullfilename)
else: # punt!
msg = 'Cannot open part: "%s"\nOpen manually in: "%s"'
msg = msg % (basename, os.path.dirname(fullfilename))
showinfo(appname, msg)
###############################################################################
# message edit windows - write, reply, forward
###############################################################################
if mailconfig.smtpuser: # user set in mailconfig?
MailSenderClass = mailtools.MailSenderAuth # login/password required
else:
MailSenderClass = mailtools.MailSender
class WriteWindow(ViewWindow, MailSenderClass):
"""
customize view display for composing new mail
inherits sendMessage from mailtools.MailSender
"""
modelabel = 'Write'
def __init__(self, headermap, starttext):
ViewWindow.__init__(self, headermap, starttext)
MailSenderClass.__init__(self)
self.attaches = [] # each win has own open dialog
self.openDialog = None # dialog remembers last dir
PyMailGUI Implementation | 1091

def actionButtons(self):
return [('Cancel', self.quit), # need method to use self
('Parts', self.onParts), # PopupWindow verifies cancel
('Attach', self.onAttach),
('Send', self.onSend)] # 4E: don't pad: centered
def onParts(self):
# caveat: deletes not currently supported
if not self.attaches:
showinfo(appname, 'Nothing attached')
else:
msg = '\n'.join(['Already attached:\n'] + self.attaches)
showinfo(appname, msg)
def onAttach(self):
"""
attach a file to the mail: name added here will be
added as a part on Send, inside the mailtools pkg;
4E: could ask Unicode type here instead of on send
"""
if not self.openDialog:
self.openDialog = Open(title=appname + ': Select Attachment File')
filename = self.openDialog.show() # remember prior dir
if filename:
self.attaches.append(filename) # to be opened in send method
def resolveUnicodeEncodings(self):
"""
3.0/4E: to prepare for send, resolve Unicode encoding for text parts:
both main text part, and any text part attachments; the main text part
may have had a known encoding if this is a reply or forward, but not for
a write, and it may require a different encoding after editing anyhow;
smtplib in 3.1 requires that full message text be encodable per ASCII
when sent (if it's a str), so it's crucial to get this right here; else
fails if reply/fwd to UTF8 text when config=ascii if any non-ascii chars;
try user setting and reply but fall back on general UTF8 as a last resort;
"""
def isTextKind(filename):
contype, encoding = mimetypes.guess_type(filename)
if contype is None or encoding is not None: # 4E utility
return False # no guess, compressed?
maintype, subtype = contype.split('/', 1) # check for text/?
return maintype == 'text'
# resolve many body text encoding
bodytextEncoding = mailconfig.mainTextEncoding
if bodytextEncoding == None:
asknow = askstring('PyMailGUI', 'Enter main text Unicode encoding name')
bodytextEncoding = asknow or 'latin-1' # or sys.getdefaultencoding()?
# last chance: use utf-8 if can't encode per prior selections
if bodytextEncoding != 'utf-8':
try:
1092 | Chapter 14: The PyMailGUI Client

bodytext = self.editor.getAllText()
bodytext.encode(bodytextEncoding)
except (UnicodeError, LookupError): # lookup: bad encoding name
bodytextEncoding = 'utf-8' # general code point scheme
# resolve any text part attachment encodings
attachesEncodings = []
config = mailconfig.attachmentTextEncoding
for filename in self.attaches:
if not isTextKind(filename):
attachesEncodings.append(None) # skip non-text: don't ask
elif config != None:
attachesEncodings.append(config) # for all text parts if set
else:
prompt = 'Enter Unicode encoding name for %' % filename
asknow = askstring('PyMailGUI', prompt)
attachesEncodings.append(asknow or 'latin-1')
# last chance: use utf-8 if can't decode per prior selections
choice = attachesEncodings[-1]
if choice != None and choice != 'utf-8':
try:
attachbytes = open(filename, 'rb').read()
attachbytes.decode(choice)
except (UnicodeError, LookupError, IOError):
attachesEncodings[-1] = 'utf-8'
return bodytextEncoding, attachesEncodings
def onSend(self):
"""
threaded: mail edit window Send button press;
may overlap with any other thread, disables none but quit;
Exit,Fail run by threadChecker via queue in after callback;
caveat: no progress here, because send mail call is atomic;
assumes multiple recipient addrs are separated with ',';
mailtools module handles encodings, attachments, Date, etc;
mailtools module also saves sent message text in a local file
3.0: now fully parses To,Cc,Bcc (in mailtools) instead of
splitting on the separator naively; could also use multiline
input widgets instead of simple entry; Bcc added to envelope,
not headers;
3.0: Unicode encodings of text parts is resolved here, because
it may require GUI prompts; mailtools performs the actual
encoding for parts as needed and requested;
3.0: i18n headers are already decoded in the GUI fields here;
encoding of any non-ASCII i18n headers is performed in mailtools,
not here, because no GUI interaction is required;
"""
# resolve Unicode encoding for text parts;
bodytextEncoding, attachesEncodings = self.resolveUnicodeEncodings()
PyMailGUI Implementation | 1093

# get components from GUI; 3.0: i18n headers are decoded
fieldvalues = [entry.get() for entry in self.hdrFields]
From, To, Cc, Subj = fieldvalues[:4]
extraHdrs = [('Cc', Cc), ('X-Mailer', appname + ' (Python)')]
extraHdrs += list(zip(self.userHdrs, fieldvalues[4:]))
bodytext = self.editor.getAllText()
# split multiple recipient lists on ',', fix empty fields
Tos = self.splitAddresses(To)
for (ix, (name, value)) in enumerate(extraHdrs):
if value: # ignored if ''
if value == '?': # ? not replaced
extraHdrs[ix] = (name, '')
elif name.lower() in ['cc', 'bcc']: # split on ','
extraHdrs[ix] = (name, self.splitAddresses(value))
# withdraw to disallow send during send
# caveat: might not be foolproof - user may deiconify if icon visible
self.withdraw()
self.getPassword() # if needed; don't run pop up in send thread!
popup = popuputil.BusyBoxNowait(appname, 'Sending message')
sendingBusy.incr()
threadtools.startThread(
action = self.sendMessage,
args = (From, Tos, Subj, extraHdrs, bodytext, self.attaches,
saveMailSeparator,
bodytextEncoding,
attachesEncodings),
context = (popup,),
onExit = self.onSendExit,
onFail = self.onSendFail)
def onSendExit(self, popup):
"""
erase wait window, erase view window, decr send count;
sendMessage call auto saves sent message in local file;
can't use window.addSavedMails: mail text unavailable;
"""
popup.quit()
self.destroy()
sendingBusy.decr()
# poss \ when opened, / in mailconfig
sentname = os.path.abspath(mailconfig.sentmailfile) # also expands '.'
if sentname in openSaveFiles.keys(): # sent file open?
window = openSaveFiles[sentname] # update list,raise
window.loadMailFileThread()
def onSendFail(self, exc_info, popup):
# pop-up error, keep msg window to save or retry, redraw actions frame
popup.quit()
self.deiconify()
self.lift()
showerror(appname, 'Send failed: \n%s\n%s' % exc_info[:2])
printStack(exc_info)
1094 | Chapter 14: The PyMailGUI Client

MailSenderClass.smtpPassword = None # try again; 3.0/4E: not on self
sendingBusy.decr()
def askSmtpPassword(self):
"""
get password if needed from GUI here, in main thread;
caveat: may try this again in thread if no input first
time, so goes into a loop until input is provided; see
pop paswd input logic for a nonlooping alternative
"""
password = ''
while not password:
prompt = ('Password for %s on %s?' %
(self.smtpUser, self.smtpServerName))
password = popuputil.askPasswordWindow(appname, prompt)
return password
class ReplyWindow(WriteWindow):
"""
customize write display for replying
text and headers set up by list window
"""
modelabel = 'Reply'
class ForwardWindow(WriteWindow):
"""
customize reply display for forwarding
text and headers set up by list window
"""
modelabel = 'Forward'
messagecache: Message Cache Manager
The class in Example 14-5 implements a cache for already loaded messages. Its logic is
split off into this file in order to avoid further complicating list window implementa-
tions. The server list window creates and embeds an instance of this class to interface
with the mail server and to keep track of already loaded mail headers and full text. In
this version, the server list window also keeps track of mail fetches in progress, to avoid
attempting to load the same mail more than once in parallel. This task isn’t performed
here, because it may require GUI operations.
Example 14-5. PP4E\Internet\Email\PyMailGui\messagecache.py
"""
##############################################################################
manage message and header loads and context, but not GUI;
a MailFetcher, with a list of already loaded headers and messages;
the caller must handle any required threading or GUI interfaces;
3.0 change: use full message text Unicode encoding name in local
mailconfig module; decoding happens deep in mailtools, when a message
PyMailGUI Implementation | 1095

is fetched - mail text is always Unicode str from that point on;
this may change in a future Python/email: see Chapter 13 for details;
3.0 change: inherits the new mailconfig.fetchlimit feature of mailtools,
which can be used to limit the maximum number of most recent headers or
full mails (if no TOP) fetched on each load request; note that this
feature is independent of the loadfrom used here to limit loads to
newly-arrived mails only, though it is applied at the same time: at
most fetchlimit newly-arrived mails are loaded;
3.0 change: though unlikely, it's not impossible that a user may trigger a
new fetch of a message that is currently being fetched in a thread, simply
by clicking the same message again (msg fetches, but not full index loads,
may overlap with other fetches and sends); this seems to be thread safe here,
but can lead to redundant and possibly parallel downloads of the same mail
which are pointless and seem odd (selecting all mails and pressing View
twice downloads most messages twice!); fixed by keeping track of fetches in
progress in the main GUI thread so that this overlap is no longer possible:
a message being fetched disables any fetch request which it is part of, and
parallel fetches are still allowed as long as their targets do not intersect;
##############################################################################
"""
from PP4E.Internet.Email import mailtools
from popuputil import askPasswordWindow
class MessageInfo:
"""
an item in the mail cache list
"""
def __init__(self, hdrtext, size):
self.hdrtext = hdrtext # fulltext is cached msg
self.fullsize = size # hdrtext is just the hdrs
self.fulltext = None # fulltext=hdrtext if no TOP
class MessageCache(mailtools.MailFetcher):
"""
keep track of already loaded headers and messages;
inherits server transfer methods from MailFetcher;
useful in other apps: no GUI or thread assumptions;
3.0: raw mail text bytes are decoded to str to be
parsed with Py3.1's email pkg and saved to files;
uses the local mailconfig module's encoding setting;
decoding happens automatically in mailtools on fetch;
"""
def __init__(self):
mailtools.MailFetcher.__init__(self) # 3.0: inherits fetchEncoding
self.msglist = [] # 3.0: inherits fetchlimit
def loadHeaders(self, forceReloads, progress=None):
"""
three cases to handle here: the initial full load,
1096 | Chapter 14: The PyMailGUI Client

load newly arrived, and forced reload after delete;
don't refetch viewed msgs if hdrs list same or extended;
retains cached msgs after a delete unless delete fails;
2.1: does quick check to see if msgnums still in sync
3.0: this is now subject to mailconfig.fetchlimit max;
"""
if forceReloads:
loadfrom = 1
self.msglist = [] # msg nums have changed
else:
loadfrom = len(self.msglist)+1 # continue from last load
# only if loading newly arrived
if loadfrom != 1:
self.checkSynchError(self.allHdrs()) # raises except if bad
# get all or newly arrived msgs
reply = self.downloadAllHeaders(progress, loadfrom)
headersList, msgSizes, loadedFull = reply
for (hdrs, size) in zip(headersList, msgSizes):
newmsg = MessageInfo(hdrs, size)
if loadedFull: # zip result may be empty
newmsg.fulltext = hdrs # got full msg if no 'top'
self.msglist.append(newmsg)
def getMessage(self, msgnum): # get raw msg text
cacheobj = self.msglist[msgnum-1] # add to cache if fetched
if not cacheobj.fulltext: # harmless if threaded
fulltext = self.downloadMessage(msgnum) # 3.0: simpler coding
cacheobj.fulltext = fulltext
return cacheobj.fulltext
def getMessages(self, msgnums, progress=None):
"""
prefetch full raw text of multiple messages, in thread;
2.1: does quick check to see if msgnums still in sync;
we can't get here unless the index list already loaded;
"""
self.checkSynchError(self.allHdrs()) # raises except if bad
nummsgs = len(msgnums) # adds messages to cache
for (ix, msgnum) in enumerate(msgnums): # some poss already there
if progress: progress(ix+1, nummsgs) # only connects if needed
self.getMessage(msgnum) # but may connect > once
def getSize(self, msgnum): # encapsulate cache struct
return self.msglist[msgnum-1].fullsize # it changed once already!
def isLoaded(self, msgnum):
return self.msglist[msgnum-1].fulltext
def allHdrs(self):
return [msg.hdrtext for msg in self.msglist]
def deleteMessages(self, msgnums, progress=None):
PyMailGUI Implementation | 1097

"""
if delete of all msgnums works, remove deleted entries
from mail cache, but don't reload either the headers list
or already viewed mails text: cache list will reflect the
changed msg nums on server; if delete fails for any reason,
caller should forceably reload all hdrs next, because _some_
server msg nums may have changed, in unpredictable ways;
2.1: this now checks msg hdrs to detect out of synch msg
numbers, if TOP supported by mail server; runs in thread
"""
try:
self.deleteMessagesSafely(msgnums, self.allHdrs(), progress)
except mailtools.TopNotSupported:
mailtools.MailFetcher.deleteMessages(self, msgnums, progress)
# no errors: update index list
indexed = enumerate(self.msglist)
self.msglist = [msg for (ix, msg) in indexed if ix+1 not in msgnums]
class GuiMessageCache(MessageCache):
"""
add any GUI-specific calls here so cache usable in non-GUI apps
"""
def setPopPassword(self, appname):
"""
get password from GUI here, in main thread
forceably called from GUI to avoid pop ups in threads
"""
if not self.popPassword:
prompt = 'Password for %s on %s?' % (self.popUser, self.popServer)
self.popPassword = askPasswordWindow(appname, prompt)
def askPopPassword(self):
"""
but don't use GUI pop up here: I am run in a thread!
when tried pop up in thread, caused GUI to hang;
may be called by MailFetcher superclass, but only
if passwd is still empty string due to dialog close
"""
return self.popPassword
popuputil: General-Purpose GUI Pop Ups
Example 14-6 implements a handful of utility pop-up windows in a module, in case
they ever prove useful in other programs. Note that the same windows utility module
is imported here, to give a common look-and-feel to the pop ups (icons, titles, and
so on).
1098 | Chapter 14: The PyMailGUI Client

Example 14-6. PP4E\Internet\Email\PyMailGui\popuputil.py
"""
#############################################################################
utility windows - may be useful in other programs
#############################################################################
"""
from tkinter import *
from PP4E.Gui.Tools.windows import PopupWindow
class HelpPopup(PopupWindow):
"""
custom Toplevel that shows help text as scrolled text
source button runs a passed-in callback handler
3.0 alternative: use HTML file and webbrowser module
"""
myfont = 'system' # customizable
mywidth = 78 # 3.0: start width
def __init__(self, appname, helptext, iconfile=None, showsource=lambda:0):
PopupWindow.__init__(self, appname, 'Help', iconfile)
from tkinter.scrolledtext import ScrolledText # a nonmodal dialog
bar = Frame(self) # pack first=clip last
bar.pack(side=BOTTOM, fill=X)
code = Button(bar, bg='beige', text="Source", command=showsource)
quit = Button(bar, bg='beige', text="Cancel", command=self.destroy)
code.pack(pady=1, side=LEFT)
quit.pack(pady=1, side=LEFT)
text = ScrolledText(self) # add Text + scrollbar
text.config(font=self.myfont)
text.config(width=self.mywidth) # too big for showinfo
text.config(bg='steelblue', fg='white') # erase on btn or return
text.insert('0.0', helptext)
text.pack(expand=YES, fill=BOTH)
self.bind("<Return>", (lambda event: self.destroy()))
def askPasswordWindow(appname, prompt):
"""
modal dialog to input password string
getpass.getpass uses stdin, not GUI
tkSimpleDialog.askstring echos input
"""
win = PopupWindow(appname, 'Prompt') # a configured Toplevel
Label(win, text=prompt).pack(side=LEFT)
entvar = StringVar(win)
ent = Entry(win, textvariable=entvar, show='*') # display * for input
ent.pack(side=RIGHT, expand=YES, fill=X)
ent.bind('<Return>', lambda event: win.destroy())
ent.focus_set(); win.grab_set(); win.wait_window()
win.update() # update forces redraw
return entvar.get() # ent widget is now gone
PyMailGUI Implementation | 1099

class BusyBoxWait(PopupWindow):
"""
pop up blocking wait message box: thread waits
main GUI event thread stays alive during wait
but GUI is inoperable during this wait state;
uses quit redef here because lower, not leftmost;
"""
def __init__(self, appname, message):
PopupWindow.__init__(self, appname, 'Busy')
self.protocol('WM_DELETE_WINDOW', lambda:0) # ignore deletes
label = Label(self, text=message + '...') # win.quit() to erase
label.config(height=10, width=40, cursor='watch') # busy cursor
label.pack()
self.makeModal()
self.message, self.label = message, label
def makeModal(self):
self.focus_set() # grab application
self.grab_set() # wait for threadexit
def changeText(self, newtext):
self.label.config(text=self.message + ': ' + newtext)
def quit(self):
self.destroy() # don't verify quit
class BusyBoxNowait(BusyBoxWait):
"""
pop up nonblocking wait window
call changeText to show progress, quit to close
"""
def makeModal(self):
pass
if __name__ == '__main__':
HelpPopup('spam', 'See figure 1...\n')
print(askPasswordWindow('spam', 'enter password'))
input('Enter to exit') # pause if clicked
wraplines: Line Split Tools
The module in Example 14-7 implements general tools for wrapping long lines, at either
a fixed column or the first delimiter at or before a fixed column. PyMailGUI uses this
file’s wrapText1 function for text in view, reply, and forward windows, but this code is
potentially useful in other programs. Run the file as a script to watch its self-test code
at work, and study its functions to see its text-processing logic.
Example 14-7. PP4E\Internet\Email\PyMailGui\wraplines.py
"""
###############################################################################
split lines on fixed columns or at delimiters before a column;
see also: related but different textwrap standard library module (2.3+);
4E caveat: this assumes str; supporting bytes might help avoid some decodes;
###############################################################################
"""
1100 | Chapter 14: The PyMailGUI Client

defaultsize = 80
def wrapLinesSimple(lineslist, size=defaultsize):
"split at fixed position size"
wraplines = []
for line in lineslist:
while True:
wraplines.append(line[:size]) # OK if len < size
line = line[size:] # split without analysis
if not line: break
return wraplines
def wrapLinesSmart(lineslist, size=defaultsize, delimiters='.,:\t '):
"wrap at first delimiter left of size"
wraplines = []
for line in lineslist:
while True:
if len(line) <= size:
wraplines += [line]
break
else:
for look in range(size-1, size // 2, −1): # 3.0: need // not /
if line[look] in delimiters:
front, line = line[:look+1], line[look+1:]
break
else:
front, line = line[:size], line[size:]
wraplines += [front]
return wraplines
###############################################################################
# common use case utilities
###############################################################################
def wrapText1(text, size=defaultsize): # better for line-based txt: mail
"when text read all at once" # keeps original line brks struct
lines = text.split('\n') # split on newlines
lines = wrapLinesSmart(lines, size) # wrap lines on delimiters
return '\n'.join(lines) # put back together
def wrapText2(text, size=defaultsize): # more uniform across lines
"same, but treat as one long line" # but loses original line struct
text = text.replace('\n', ' ') # drop newlines if any
lines = wrapLinesSmart([text], size) # wrap single line on delimiters
return lines # caller puts back together
def wrapText3(text, size=defaultsize):
"same, but put back together"
lines = wrapText2(text, size) # wrap as single long line
return '\n'.join(lines) + '\n' # make one string with newlines
def wrapLines1(lines, size=defaultsize):
"when newline included at end"
lines = [line[:-1] for line in lines] # strip off newlines (or .rstrip)
lines = wrapLinesSmart(lines, size) # wrap on delimiters
PyMailGUI Implementation | 1101

return [(line + '\n') for line in lines] # put them back
def wrapLines2(lines, size=defaultsize): # more uniform across lines
"same, but concat as one long line" # but loses original structure
text = ''.join(lines) # put together as 1 line
lines = wrapText2(text) # wrap on delimiters
return [(line + '\n') for line in lines] # put newlines on ends
###############################################################################
# self-test
###############################################################################
if __name__ == '__main__':
lines = ['spam ham ' * 20 + 'spam,ni' * 20,
'spam ham ' * 20,
'spam,ni' * 20,
'spam ham.ni' * 20,
'',
'spam'*80,
' ',
'spam ham eggs']
sep = '-' * 30
print('all', sep)
for line in lines: print(repr(line))
print('simple', sep)
for line in wrapLinesSimple(lines): print(repr(line))
print('smart', sep)
for line in wrapLinesSmart(lines): print(repr(line))
print('single1', sep)
for line in wrapLinesSimple([lines[0]], 60): print(repr(line))
print('single2', sep)
for line in wrapLinesSmart([lines[0]], 60): print(repr(line))
print('combined text', sep)
for line in wrapLines2(lines): print(repr(line))
print('combined lines', sep)
print(wrapText1('\n'.join(lines)))
assert ''.join(lines) == ''.join(wrapLinesSimple(lines, 60))
assert ''.join(lines) == ''.join(wrapLinesSmart(lines, 60))
print(len(''.join(lines)), end=' ')
print(len(''.join(wrapLinesSimple(lines))), end=' ')
print(len(''.join(wrapLinesSmart(lines))), end=' ')
print(len(''.join(wrapLinesSmart(lines, 60))), end=' ')
input('Press enter') # pause if clicked
html2text: Extracting Text from HTML (Prototype, Preview)
Example 14-8 lists the code of the simple-minded HTML parser that PyMailGUI uses
to extract plain text from mails whose main (or only) text part is in HTML form. This
extracted text is used both for display and for the initial text in replies and forwards.
1102 | Chapter 14: The PyMailGUI Client

Its original HTML form is also displayed in its full glory in a popped-up web browser
as before.
This is a prototype. Because PyMailGUI is oriented toward plain text today, this parser
is intended as a temporary workaround until a HTML viewer/editor widget solution is
found. Because of that, this is at best a first cut which has not been polished to any
significant extent. Robustly parsing HTML in its entirety is a task well beyond the scope
of this chapter and book. When this parser fails to render good plain text (and it will!),
users can still view and cut-and-paste the properly formatted text from the web browser.
This is also a preview. HTML parsing is not covered until Chapter 19 of this book, so
you’ll have to take this on faith until we refer back to it in that later chapter. Unfortu-
nately, this feature was added to PyMailGUI late in the book project, and avoiding this
forward reference didn’t seem to justify omitting the improvement altogether. For more
details on HTML parsing, stay tuned for (or flip head to) Chapter 19.
In short, the class here provides handler methods that receive callbacks from an HTML
parser, as tags and their content is recognized; we use this model here to save text we’re
interested in along the way. Besides the parser class, we could also use Python’s
html.entities module to map more entity types than are hardcoded here—another
tool we will meet in Chapter 19.
Despite its limitations, this example serves as a rough guide to help get you started, and
any result it produces is certainly an improvement upon the prior edition’s display and
quoting of raw HTML.
Example 14-8. PP4E\Internet\Email\PyMailGui\html2text.py
"""
################################################################
*VERY* preliminary html-to-text extractor, for text to be
quoted in replies and forwards, and displayed in the main
text display component. Only used when the main text part
is HTML (i.e., no alternative or other text parts to show).
We also need to know if this is HTML or not, but findMainText
already returns the main text's content type.
This is mostly provided as a first cut, to help get you started
on a more complete solution. It hasn't been polished, because
any result is better than displaying raw HTML, and it's probably
a better idea to migrate to an HTML viewer/editor widget in the
future anyhow. As is, PyMailGUI is still plain-text biased.
If (really, when) this parser fails to render well, users can
instead view and cut-and-paste from the web browser popped up
to display the HTML. See Chapter 19 for more on HTML parsing.
################################################################
"""
from html.parser import HTMLParser # Python std lib parser (sax-like model)
class Parser(HTMLParser): # subclass parser, define callback methods
def __init__(self): # text assumed to be str, any encoding ok
PyMailGUI Implementation | 1103

HTMLParser.__init__(self)
self.text = '[Extracted HTML text]'
self.save = 0
self.last = ''
def addtext(self, new):
if self.save > 0:
self.text += new
self.last = new
def addeoln(self, force=False):
if force or self.last != '\n':
self.addtext('\n')
def handle_starttag(self, tag, attrs): # + others imply content start?
if tag in ('p', 'div', 'table', 'h1', 'h2', 'li'):
self.save += 1
self.addeoln()
elif tag == 'td':
self.addeoln()
elif tag == 'style': # + others imply end of prior?
self.save -= 1
elif tag == 'br':
self.addeoln(True)
elif tag == 'a':
alts = [pair for pair in attrs if pair[0] == 'alt']
if alts:
name, value = alts[0]
self.addtext('[' + value.replace('\n', '') + ']')
def handle_endtag(self, tag):
if tag in ('p', 'div', 'table', 'h1', 'h2', 'li'):
self.save -= 1
self.addeoln()
elif tag == 'style':
self.save += 1
def handle_data(self, data):
data = data.replace('\n', '') # what about <PRE>?
data = data.replace('\t', ' ')
if data != ' ' * len(data):
self.addtext(data)
def handle_entityref(self, name):
xlate = dict(lt='<', gt='>', amp='&', nbsp='').get(name, '?')
if xlate:
self.addtext(xlate) # plus many others: show ? as is
def html2text(text):
try:
hp = Parser()
hp.feed(text)
return(hp.text)
except:
return text
1104 | Chapter 14: The PyMailGUI Client

if __name__ == '__main__':
# to test me: html2text.py media\html2text-test\htmlmail1.html
# parse file name in commandline, display result in tkinter Text
# file assumed to be in Unicode platform default, but text need not be
import sys, tkinter
text = open(sys.argv[1], 'r').read()
text = html2text(text)
t = tkinter.Text()
t.insert('1.0', text)
t.pack()
t.mainloop()
After this example and chapter had been written and finalized, I did a
search for HTML-to-text translators on the Web to try to find better
options, and I discovered a Python-coded solution which is much more
complete and robust than the simple prototype script here. Regrettably,
I also discovered that this system is named the same as the script
listed here!
This was unintentional and unforeseen (alas, developers are predis-
posed to think alike). For details on this more widely tested and much
better alternative, search the Web for html2text. It’s open source, but
follows the GPL license, and is available only for Python 2.X at this
writing (e.g., it uses the 2.X sgmllib which has been removed in favor
of the new html.parser in 3.X). Unfortunately, its GPL license may raise
copyright concerns if shipped with PyMailGUI in this book’s example
package or otherwise; worse, its 2.X status means it cannot be used at
all with this book’s 3.X examples today.
There are additional plain-text extractor options on the Web worth
checking out, including BeautifulSoup and yet another named
html2text.py (no, really!). They also appear to be available for just 2.X
today, though naturally, this story may change by the time you read this
note. There’s no reason to reinvent the wheel, unless existing wheels
don’t fit your cart!
mailconfig: User Configurations
In Example 14-9, PyMailGUI’s mailconfig user settings module is listed. This program
has its own version of this module because many of its settings are unique for PyMail-
GUI. To use the program for reading your own email, set its initial variables to reflect
your POP and SMTP server names and login parameters. The variables in this module
also allow the user to tailor the appearance and operation of the program without
finding and editing actual program logic.
As is, this is a single-account configuration. We could generalize this module’s code to
allow for multiple email accounts, selected by input at the console when first imported;
PyMailGUI Implementation | 1105

in an upcoming section we’ll see a different approach that allows this module to be
extended externally.
Example 14-9. PP4E\Internet\Email\PyMailGui\mailconfig.py
"""
################################################################################
PyMailGUI user configuration settings.
Email scripts get their server names and other email config options from
this module: change me to reflect your machine names, sig, and preferences.
This module also specifies some widget style preferences applied to the GUI,
as well as message Unicode encoding policy and more in version 3.0. See
also: local textConfig.py, for customizing PyEdit pop-ups made by PyMailGUI.
Warning: PyMailGUI won't run without most variables here: make a backup copy!
Caveat: somewhere along the way this started using mixed case inconsistently...;
TBD: we could get some user settings from the command line too, and a configure
dialog GUI would be better, but this common module file suffices for now.
################################################################################
"""
#-------------------------------------------------------------------------------
# (required for load, delete) POP3 email server machine, user;
#-------------------------------------------------------------------------------
#popservername = '?Please set your mailconfig.py attributes?'
popservername = 'pop.secureserver.net' # see altconfigs/ for others
popusername = 'PP4E@learning-python.com'
#-------------------------------------------------------------------------------
# (required for send) SMTP email server machine name;
# see Python smtpd module for a SMTP server class to run locally ('localhost');
# note: your ISP may require that you be directly connected to their system:
# I once could email through Earthlink on dial up, but not via Comcast cable;
#-------------------------------------------------------------------------------
smtpservername = 'smtpout.secureserver.net'
#-------------------------------------------------------------------------------
# (optional) personal information used by PyMailGUI to fill in edit forms;
# if not set, does not fill in initial form values;
# signature -- can be a triple-quoted block, ignored if empty string;
# address -- used for initial value of "From" field if not empty,
# no longer tries to guess From for replies--varying success;
#-------------------------------------------------------------------------------
myaddress = 'PP4E@learning-python.com'
mysignature = ('Thanks,\n'
'--Mark Lutz (http://learning-python.com, http://rmi.net/~lutz)')
#-------------------------------------------------------------------------------
# (may be required for send) SMTP user/password if authenticated;
# set user to None or '' if no login/authentication is required, and set
1106 | Chapter 14: The PyMailGUI Client

# pswd to name of a file holding your SMTP password, or an empty string to
# force programs to ask (in a console, or GUI)
#-------------------------------------------------------------------------------
smtpuser = None # per your ISP
smtppasswdfile = '' # set to '' to be asked
#smtpuser = popusername
#-------------------------------------------------------------------------------
# (optional) PyMailGUI: name of local one-line text file with your POP
# password; if empty or file cannot be read, pswd is requested when first
# connecting; pswd not encrypted: leave this empty on shared machines;
# PyMailCGI always asks for pswd (runs on a possibly remote server);
#-------------------------------------------------------------------------------
poppasswdfile = r'c:\temp\pymailgui.txt' # set to '' to be asked
#-------------------------------------------------------------------------------
# (required) local file where sent messages are always saved;
# PyMailGUI 'Open' button allows this file to be opened and viewed;
# don't use '.' form if may be run from another dir: e.g., pp4e demos
#-------------------------------------------------------------------------------
#sentmailfile = r'.\sentmail.txt' # . means in current working dir
#sourcedir = r'C:\...\PP4E\Internet\Email\PyMailGui\'
#sentmailfile = sourcedir + 'sentmail.txt'
# determine automatically from one of my source files
import wraplines, os
mysourcedir = os.path.dirname(os.path.abspath(wraplines.__file__))
sentmailfile = os.path.join(mysourcedir, 'sentmail.txt')
#-------------------------------------------------------------------------------
# (defunct) local file where pymail saves POP mail (full text);
# PyMailGUI instead asks for a name in GUI with a pop-up dialog;
# Also asks for Split directory, and part buttons save in ./TempParts;
#-------------------------------------------------------------------------------
#savemailfile = r'c:\temp\savemail.txt' # not used in PyMailGUI: dialog
#-------------------------------------------------------------------------------
# (optional) customize headers displayed in PyMailGUI list and view windows;
# listheaders replaces default, viewheaders extends it; both must be tuple of
# strings, or None to use default hdrs;
#-------------------------------------------------------------------------------
listheaders = ('Subject', 'From', 'Date', 'To', 'X-Mailer')
viewheaders = ('Bcc',)
#-------------------------------------------------------------------------------
# (optional) PyMailGUI fonts and colors for text server/file message list
# windows, message content view windows, and view window attachment buttons;
# use ('family', size, 'style') for font; 'colorname' or hexstr '#RRGGBB' for
PyMailGUI Implementation | 1107

# color (background, foreground); None means use defaults; font/color of
# view windows can also be set interactively with texteditor's Tools menu;
# see also the setcolor.py example in the GUI part (ch8) for custom colors;
#-------------------------------------------------------------------------------
listbg = 'indianred' # None, 'white', '#RRGGBB'
listfg = 'black'
listfont = ('courier', 9, 'bold') # None, ('courier', 12, 'bold italic')
# use fixed-width font for list columns
viewbg = 'light blue' # was '#dbbedc'
viewfg = 'black'
viewfont = ('courier', 10, 'bold')
viewheight = 18 # max lines for height when opened (20)
partfg = None
partbg = None
# see Tk color names: aquamarine paleturquoise powderblue goldenrod burgundy ....
#listbg = listfg = listfont = None
#viewbg = viewfg = viewfont = viewheight = None # to use defaults
#partbg = partfg = None
#-------------------------------------------------------------------------------
# (optional) column at which mail's original text should be wrapped for view,
# reply, and forward; wraps at first delimiter to left of this position;
# composed text is not auto-wrapped: user or recipient's mail tool must wrap
# new text if desired; to disable wrapping, set this to a high value (1024?);
#-------------------------------------------------------------------------------
wrapsz = 90
#-------------------------------------------------------------------------------
# (optional) control how PyMailGUI opens mail parts in the GUI;
# for view window Split actions and attachment quick-access buttons;
# if not okayToOpenParts, quick-access part buttons will not appear in
# the GUI, and Split saves parts in a directory but does not open them;
# verifyPartOpens used by both Split action and quick-access buttons:
# all known-type parts open automatically on Split if this set to False;
# verifyHTMLTextOpen used by web browser open of HTML main text part:
#-------------------------------------------------------------------------------
okayToOpenParts = True # open any parts/attachments at all?
verifyPartOpens = False # ask permission before opening each part?
verifyHTMLTextOpen = False # if main text part is HTML, ask before open?
#-------------------------------------------------------------------------------
# (optional) the maximum number of quick-access mail part buttons to show
# in the middle of view windows; after this many, a "..." button will be
# displayed, which runs the "Split" action to extract additional parts;
#-------------------------------------------------------------------------------
maxPartButtons = 8 # how many part buttons in view windows
# *** 3.0 additions follow ***
1108 | Chapter 14: The PyMailGUI Client

#-------------------------------------------------------------------------------
# (required, for fetch) the Unicode encoding used to decode fetched full message
# bytes, and to encode and decode message text stored in text-mode save files; see
# the book's Chapter 13 for details: this is a limited and temporary approach to
# Unicode encodings until a new bytes-friendly email package parser is provided
# which can handle Unicode encodings more accurately on a message-level basis;
# note: 'latin1' (an 8-bit encoding which is a superset of 7-bit ascii) was
# required to decode message in some old email save files I had, not 'utf8';
#-------------------------------------------------------------------------------
fetchEncoding = 'latin-1' # how to decode and store full message text (ascii?)
#-------------------------------------------------------------------------------
# (optional, for send) Unicode encodings for composed mail's main text plus all
# text attachments; set these to None to be prompted for encodings on mail send,
# else uses values here across entire session; default='latin-1' if GUI Cancel;
# in all cases, falls back on UTF-8 if your encoding setting or input does not
# work for the text being sent (e.g., ascii chosen for reply to non-ascii text,
# or non-ascii attachments); the email package is pickier than Python about
# names: latin-1 is known (uses qp MIME), but latin1 isn't (uses base64 MIME);
# set these to sys.getdefaultencoding() result to choose the platform default;
# encodings of text parts of fetched email are automatic via message headers;
#-------------------------------------------------------------------------------
mainTextEncoding = 'ascii' # main mail body text part sent (None=ask)
attachmentTextEncoding = 'ascii' # all text part attachments sent (utf-8, latin-1)
#-------------------------------------------------------------------------------
# (optional, for send) set this to a Unicode encoding name to be applied to
# non-ASCII headers, as well as non-ASCII names in email addresses in headers,
# in composed messages when they are sent; None means use the UTF-8 default,
# which should work for most use cases; email names that fail to decode are
# dropped (the address part is used); note that header decoding is performed
# automatically for display, according to header content, not user setting;
#-------------------------------------------------------------------------------
headersEncodeTo = None # how to encode non-ASCII headers sent (None=UTF-8)
#-------------------------------------------------------------------------------
# (optional) select text, HTML, or both versions of the help document;
# always shows one or the other: displays HTML if both of these are turned off
#-------------------------------------------------------------------------------
showHelpAsText = True # scrolled text, with button for opening source files
showHelpAsHTML = True # HTML in a web browser, without source file links
#-------------------------------------------------------------------------------
# (optional) if True, don't show a selected HTML text message part in a PyEdit
# popup too if it is being displayed in a web browser; if False show both, to
# see Unicode encoding name and effect in a text widget (browser may not know);
#-------------------------------------------------------------------------------
skipTextOnHtmlPart = False # don't show html part in PyEdit popup too
#-------------------------------------------------------------------------------
PyMailGUI Implementation | 1109

# (optional) the maximum number of mail headers or messages that will be
# downloaded on each load request; given this setting N, PyMailGUI fetches at
# most N of the most recently arrived mails; older mails outside this set are
# not fetched from the server, but are displayed as empty/dummy emails; if this
# is assigned to None (or 0), loads will have no such limit; use this if you
# have very many mails in your inbox, and your Internet or mail server speed
# makes full loads too slow to be practical; PyMailGUI also loads only
# newly-arrived headers, but this setting is independent of that feature;
#-------------------------------------------------------------------------------
fetchlimit = 50 # maximum number headers/emails to fetch on loads
#-------------------------------------------------------------------------------
# (optional) initial width, height of mail index lists (chars x lines); just
# a convenience, since the window can be resized/expanded freely once opened;
#-------------------------------------------------------------------------------
listWidth = None # None = use default 74
listHeight = None # None = use default 15
#-------------------------------------------------------------------------------
# (optional, for reply) if True, the Reply operation prefills the reply's Cc
# with all original mail recipients, after removing duplicates and the new sender;
# if False, no CC prefill occurs, and the reply is configured to reply to the
# original sender only; the Cc line may always be edited later, in either case.
#-------------------------------------------------------------------------------
repliesCopyToAll = True # True=reply to sender + all recipients, else sender
#end
textConfig: Customizing Pop-Up PyEdit Windows
The prior section’s mailconfig module provides user settings for tailoring the PyEdit
component used to view and edit main mail text, but PyMailGUI also uses PyEdit to
display other kinds of pop-up text, including raw mail text, some text attachments, and
source code in its help system. To customize display for these pop ups, PyMailGUI
relies on PyEdit’s own utility, which attempts to load a module like that in Exam-
ple 14-10 from the client application’s own directory. By contrast, PyEdit’s Unicode
settings are loaded from the single textConfig module in its own package’s directory
since they are not expected to vary across a platform (see Chapter 11 for more details).
Example 14-10. PP4E\Internet\Email\PyMailGui\textConfig.py
"""
customize PyEdit pop-up windows other than the main mail text component;
this module (not its package) is assumed to be on the path for these settings;
PyEdit Unicode settings come from its own package's textConfig.py, not this;
"""
bg = 'beige' # absent=white; colorname or RGB hexstr
fg = 'black' # absent=black; e.g., 'beige', '#690f96'
1110 | Chapter 14: The PyMailGUI Client

# etc -- see PP4E\Gui\TextEditor\textConfig.py
# font = ('courier', 9, 'normal')
# height = 20 # Tk default: 24 lines
# width = 80 # Tk default: 80 characters
PyMailGUIHelp: User Help Text and Display
Finally, Example 14-11 lists the module that defines the text displayed in PyMailGUI’s
help pop up as one triple-quoted string, as well as a function for displaying the HTML
rendition of this text. The HTML version of help itself is in a separate file not listed in
full here but included in the book’s examples package.
In fact, I’ve omitted most of the help text string, too, to conserve space here (it spanned
11 pages in the prior edition, and would be longer in this one!). For the full story, see
this module in the examples package, or run PyMailGUI live and click the help bar at
the top of its main server list window to learn more about how PyMailGUI’s interface
operates. If fact, you probably should; the help display may explain some properties of
PyMailGUI not introduced by the demo and other material earlier in this chapter.
The HTML rendition of help includes section links, and is popped up in a web browser.
Because the text version also is able to pop up source files and minimizes external
dependencies (HTML fails if no browser can be located), both the text and HTML
versions are provided and selected by users in the mailconfig module. Other schemes
are possible (e.g., converting HTML to text by parsing as a fallback option), but they
are left as suggested improvements.
Example 14-11. PP4E\Internet\PyMailGui\PyMailGuiHelp.py (partial)
"""
##########################################################################
PyMailGUI help text string and HTML display function;
History: this display began as an info box pop up which had to be
narrow for Linux; it later grew to use scrolledtext with buttons
instead; it now also displays an HTML rendition in a web browser;
2.1/3E: the help string is stored in this separate module to avoid
distracting from executable code. As coded, we throw up this text
in a simple scrollable text box; in the future, we might instead
use an HTML file opened with a browser (use webbrowser module, or
run a "browser help.html" or DOS "start help.html" with os.system);
3.0/4E: the help text is now also popped up in a web browser in HTML
form, with lists, section links, and separators; see the HTML file
PyMailGuiHelp.html in the examples package for the simple HTML
translation of the help text string here, popped up in a browser;
both the scrolled text widget and HTML browser forms are currently
supported: change mailconfig.py to use the flavor(s) you prefer;
##########################################################################
"""
PyMailGUI Implementation | 1111

# new HTML help for 3.0/4E
helpfile = 'PyMailGuiHelp.html' # see book examples package
def showHtmlHelp(helpfile=helpfile):
"""
3.0: popup HTML version of help file in a local web browser via webbrowser;
this module is importable, but html file might not be in current working dir
"""
import os, webbrowser
mydir = os.path.dirname(__file__) # dir of this module's filename
mydir = os.path.abspath(mydir) # make absolute: may be .., etc
webbrowser.open_new('file://' + os.path.join(mydir, helpfile))
##########################################################################
# string for older text display: client responsible for GUI construction
##########################################################################
helptext = """PyMailGUI, version 3.0
May, 2010 (2.1 January, 2006)
Programming Python, 4th Edition
Mark Lutz, for O'Reilly Media, Inc.
PyMailGUI is a multiwindow interface for processing email, both online and
offline. Its main interfaces include one list window for the mail server,
zero or more list windows for mail save files, and multiple view windows for
composing or viewing emails selected in a list window. On startup, the main
(server) list window appears first, but no mail server connection is attempted
until a Load or message send request. All PyMailGUI windows may be resized,
which is especially useful in list windows to see additional columns.
Note: To use PyMailGUI to read and write email of your own, you must change
the POP and SMTP server names and login details in the file mailconfig.py,
located in PyMailGUI's source-code directory. See section 11 for details.
Contents:
0) VERSION ENHANCEMENTS
1) LIST WINDOW ACTIONS
2) VIEW WINDOW ACTIONS
3) OFFLINE PROCESSING
4) VIEWING TEXT AND ATTACHMENTS
5) SENDING TEXT AND ATTACHMENTS
6) MAIL TRANSFER OVERLAP
7) MAIL DELETION
8) INBOX MESSAGE NUMBER SYNCHRONIZATION
9) LOADING EMAIL
10) UNICODE AND INTERNATIONALIZATION SUPPORT
11) THE mailconfig CONFIGURATION MODULE
12) DEPENDENCIES
13) MISCELLANEOUS HINTS ("Cheat Sheet")
...rest of file omitted...
13) MISCELLANEOUS HINTS ("Cheat Sheet")
1112 | Chapter 14: The PyMailGUI Client

- Use ',' between multiple addresses in To, Cc, and Bcc headers.
- Addresses may be given in the full '"name" <addr>' form.
- Payloads and headers are decoded on fetches and encoded on sends.
- HTML mails show extracted plain text plus HTML in a web browser.
- To, Cc, and Bcc receive composed mail, but no Bcc header is sent.
- If enabled in mailconfig, Bcc is prefilled with sender address.
- Reply and Fwd automatically quote the original mail text.
- If enabled, replies prefill Cc with all original recipients.
- Attachments may be added for sends and are encoded as required.
- Attachments may be opened after View via Split or part buttons.
- Double-click a mail in the list index to view its raw text.
- Select multiple mails to process as a set: Ctrl|Shift + click, or All.
- Sent mails are saved to a file named in mailconfig: use Open to view.
- Save pops up a dialog for selecting a file to hold saved mails.
- Save always appends to the chosen save file, rather than erasing it.
- Split asks for a save directory; part buttons save in ./TempParts.
- Open and save dialogs always remember the prior directory.
- Use text editor's Save to save a draft of email text being composed.
- Passwords are requested if/when needed, and not stored by PyMailGUI.
- You may list your password in a file named in mailconfig.py.
- To print emails, "Save" to a text file and print with other tools.
- See the altconfigs directory for using with multiple email accounts.
- Emails are never deleted from the mail server automatically.
- Delete does not reload message headers, unless it fails.
- Delete checks your inbox to make sure it deletes the correct mail.
- Fetches detect inbox changes and may automatically reload the index.
- Any number of sends and disjoint fetches may overlap in time.
- Click this window's Source button to view PyMailGUI source-code files.
- Watch http://www.rmi.net/~lutz for updates and patches
- This is an Open Source system: change its code as you like.
"""
if __name__ == '__main__':
print(helptext) # to stdout if run alone
input('Press Enter key') # pause in DOS console pop ups
See the examples package for the HTML help file, the first few lines of which are shown
in Example 14-12; it’s a simple translation of the module’s help text string (adding a
bit more pizzazz to this page is left in the suggested exercise column).
Example 14-12. PP4E\Internet\PyMailGui\PyMailGuiHelp.html (partial)
<HTML>
<TITLE>PyMailGUI 3.0 Help</TITLE>
<!-- TO DO: add pictures, screen shots, and such --!>
<BODY>
<H1 align=center>PyMailGUI, Version 3.0</H1>
<P align=center>
PyMailGUI Implementation | 1113

<B><I>May, 2010 (2.1 January, 2006)</I></B><BR>
<B><I>Programming Python, 4th Edition</I></B><BR>
<B><I>Mark Lutz, for O'Reilly Media, Inc.</I></B>
<P>
<I>PyMailGUI</I> is a multiwindow interface for processing email, both online and
...rest of file omitted...
altconfigs: Configuring for Multiple Accounts
Though not an “official” part of the system, I use a few additional short files to launch
and test it. If you have multiple email accounts, it can be inconvenient to change a
configuration file every time you want to open one in particular. Moreover, if you open
multiple PyMailGUI sessions for your accounts at the same time, it would be better if
they could use custom appearance and behavior schemes to make them distinct.
To address this, the altconfigs directory in the examples source directory provides a
simple way to select an account and configurations for it at start-up time. It defines a
new top-level script which tailors the module import search path, along with a mail
config that prompts for and loads a custom configuration module whose suffix is
named by console input. A launcher script is also provided to run without module
search path configurations—from PyGadgets or a desktop shortcut, for example, with-
out requiring PYTHONPATH settings for the PP4E root. Examples 14-13 through
14-17 list the files involved.
Example 14-13. PP4E\Internet\PyMailGui\altconfigs\PyMailGui.py
import sys # ..\PyMailGui.py or 'book' for book configs
sys.path.insert(1, '..') # add visibility for real dir
exec(open('../PyMailGui.py').read()) # do this, but get mailconfig here
Example 14-14. PP4E\Internet\PyMailGui\altconfigs\mailconfig.py
above = open('../mailconfig.py').read() # copy version above here (hack?)
open('mailconfig_book.py', 'w').write(above) # used for 'book' and as others' base
acct = input('Account name?') # book, rmi, train
exec('from mailconfig_%s import *' % acct) # . is first on sys.path
Example 14-15. PP4E\Internet\PyMailGui\altconfigs\mailconfig_rmi.py
from mailconfig_book import * # get base in . (copied from ..)
popservername = 'pop.rmi.net' # this is a big inbox: 4800 emails!
popusername = 'lutz'
myaddress = 'lutz@rmi.net'
listbg = 'navy'
listfg = 'white'
listHeight = 20 # higher initially
viewbg = '#dbbedc'
viewfg = 'black'
wrapsz = 80 # wrap at 80 cols
fetchlimit = 300 # load more headers
1114 | Chapter 14: The PyMailGUI Client

Example 14-16. PP4E\Internet\PyMailGui\altconfigs\mailconfig_train.py
from mailconfig_book import * # get base in . (copied from ..)
popusername = 'lutz@learning-python.com'
myaddress = 'lutz@learning-python.com'
listbg = 'wheat' # goldenrod, dark green, beige
listfg = 'navy' # chocolate, brown,...
viewbg = 'aquamarine'
viewfg = 'black'
wrapsz = 80
viewheaders = None # no Bcc
fetchlimit = 100 # load more headers
Example 14-17. PP4E\Internet\PyMailGui\altconfigs\launch_PyMailGui.py
# to run without PYTHONPATH setup (e.g., desktop)
import os # Launcher.py is overkill
os.environ['PYTHONPATH'] = r'..\..\..\..\..' # hmm; generalize me
os.system('PyMailGui.py') # inherits path env var
Account files like those in Examples 14-15 and 14-16 can import the base “book”
module (to extend it) or not (to replace it entirely). To use these alternative account
configurations, run a command line like the following or run the self-configuring
launcher script in Example 14-17 from any location. Either way, you can open these
account’s windows to view the included saved mails, but be sure to change configura-
tions for your own email accounts and preferences first if you wish to fetch or send mail
from these clients:
C:\...\PP4E\Internet\Email\PyMailGui\altconfigs> PyMailGui.py
Account name?rmi
Add a “start” to the beginning of this command to keep your console alive on Windows
so you can open multiple accounts (try a “&” at the end on Unix). Figure 14-45 earlier
shows the scene with all three of my accounts open in PyMailGUI. I keep them open
perpetually on my desktop, since a Load fetches just newly arrived headers no matter
how long the GUI may have sat dormant, and a Send requires nothing to be loaded at
all. While they’re open, the alternative color schemes make the accounts’ windows
distinct. A desktop shortcut to the launcher script makes opening my accounts even
easier.
As is, account names are only requested when this special PyMailGui.py file is run
directly, and not when the original file is run directly or by program launchers (in which
case there may be no stdin to read). Extending a module like mailconfig which might
be imported in multiple places this way turns out to be an interesting task (which is
largely why I don’t consider its quick solution here to be an official end-user feature).
For instance, there are other ways to allow for multiple accounts, including:
• Changing the single mailconfig module in-place
• Importing alternative modules and storing them as key “mailconfig” in sys.modules
PyMailGUI Implementation | 1115

• Copying alternative module variables to mailconfig attributes using __dict__ and
setattr
• Using a class for configuration to better support customization in subclasses
• Issuing a pop-up in the GUI to prompt for an account name after or before the
main window appears
And so on. The separate subdirectory scheme used here was chosen to minimize im-
pacts on existing code in general; to avoid changes to the existing mailconfig module
specifically (which works fine for the single account case); to avoid requiring extra user
input of any kind in single account cases; and to allow for the fact that an “import
module1 as module2” statement doesn’t prevent “module1” from being imported di-
rectly later. This last point is more fraught with peril than you might expect—importing
a customized version of a module is not merely a matter of using the “as” renaming
extension:
import m1 as m2 # custom import: load m1 as m2 alternative
print(m2.attr) # prints attr in m1.py
import m2 # later imports: loads m2.py anyhow!
print(m2.attr) # prints attr in m2.py
In other words, this is a quick-and-dirty solution that I originally wrote for testing
purposes, and it seems a prime candidate for improvement—along with the other ideas
in the next section’s chapter wrap up.
Ideas for Improvement
Although I use the 3.0 version of PyMailGUI as is on a regular basis for both personal
and business communications, there is always room for improvement to software, and
this system is no exception. If you wish to experiment with its code, here are a few
suggested projects to close out this chapter:
Column sorts and list layout
Mail list windows could be sorted by columns on demand. This may require a more
sophisticated list window structure which presents columns more distinctly. The
current display of mail lists seems like the most obvious candidate for cosmetic
upgrade in general, and any column sorting solution would likely address this as
well. tkinter extensions such as the Tix HList widget may show promise here, and
the third-party TkinterTreectrl supports multicolumn sortable listboxes, too, but
is available only for Python 2.X today; consult the Web and other resources for
pointers and details.
Mail save file (and sent file) size
The implementation of save-mail files limits their size by loading them into memory
all at once; a DBM keyed-access implementation may work around this constraint.
See the list windows module comments for ideas. This also applies to sent-mail
1116 | Chapter 14: The PyMailGUI Client

save files, though the user can limit their sizes with periodic deletions; users might
also benefit from a prompt for deletions if they grow too large.
Embedded links
Hyperlink URLs within messages could be highlighted visually and made to spawn
a web browser automatically when clicked by using the launcher tools we met in
the GUI and system parts of this book (tkinter’s text widget supports links directly).
Help text redundancy
In this version, the help text had grown so large that it is also implemented as
HTML and displayed in a web browser using Python’s webbrowser module (instead
of or in addition to text, per mailconfig settings). That means there are currently
two copies of the basic help text: simple text and HTML. This is less than ideal
from a maintenance perspective going forward.
We may want to either drop the simple text version altogether, or attempt to extract
the simple text from the HTML with Python’s html.parser module to avoid re-
dundant copies; see Chapter 19 for more on HTML parsing in general, and see
PyMailGUI’s new html2text module for a plain-text extraction tool prototype. The
HTML help version also does not include links to display source files; these could
be inserted into the HTML automatically with string formatting, though it’s not
clear what all browsers will do with Python source code (some may try to run it).
More threading contexts
Message Save and Split file writes could also be threaded for worst-case scenarios.
For pointers on making Saves parallel, see the comments in the file class of List
Windows.py; there may be some subtle issues that require both thread locks and
general file locking for potentially concurrent updates. List window index fills
might also be threaded for pathologically large mailboxes and woefully slow ma-
chines (optimizing to avoid reparsing headers may help here, too).
Attachment list deletes
There is currently no way to delete an attachment once it has been added in com-
pose windows. This might be supported by adding quick-access part buttons to
compose windows, too, which could verify and delete the part when clicked.
Spam filtering
We could add an automatic spam filter for mails fetched, in addition to any pro-
vided at the email server or ISP. The Python-based SpamBayes might help. This is
often better implemented by servers than clients, but not all ISPs filter spam.
Improve multiple account usage
Per the prior section, the current system selects one of multiple email accounts and
uses its corresponding mail configuration module by running special code in the
altconfigs subdirectory. This works for a book example, but it would be fairly
straightforward to improve for broader audiences.
Ideas for Improvement | 1117

Increased visibility for sent file
We may want to add an explicit button for opening the sent-mails file. PyMailGUI
already does save sent messages to a text file automatically, which may be opened
currently with the list window’s Open button. Frankly, though, this feature may
be a too-well-kept secret—I forgot about it myself when I revisited the program
for this edition! It might also be useful to allow sent-mail saves to be disabled in
mailconfig for users who might never delete from this file (it can grow large fairly
quickly; see the earlier prompt-for-deletion suggestion as well).
Thread queue speed tuning
As mentioned when describing version 3.0 changes, the thread queue has been
sped up by as much as a factor of 10 in this version to quicken initial header down-
loads. This is achieved both by running more than one callback per timer event
and scheduling timer events to occur twice as often as before. Checking the queue
too often, however, might increase CPU utilization beyond acceptable levels on
some machines. On my Windows laptop, this overhead is negligible (the program’s
CPU utilization is 0% when idle), but you may want to tune this if it’s significant
on your platform.
See the list windows code for speed settings, and threadtools.py in Chapter 10 for
the base code. In general, increasing the number of callbacks per event and de-
creasing timer frequency will decrease CPU drain without sacrificing responsive-
ness. (And if I had a nickel for every time I said that…)
Mailing lists
We could add support for mailing lists, allowing users to associate multiple email
addresses with a saved list name. On sends to a list name, the mail would be sent
to all on the list (the To addresses passed to smtplib), but the email list could be
used for the email’s To header line. See Chapter 13’s SMTP coverage for mailing
list–related examples.
HTML main text views and edits
PyMailGUI is still oriented toward supporting only plain text for the main text of
a message, despite the fact that some mailers today are more HTML-biased in this
regard. This partly stems from the fact that PyMailGUI uses a simple tkinter Text
widget for main text composition. PyMailGUI can display such messages’ HTML
in a popped-up web browser, and it attempts to extract text from the HTML for
display per the next note, but it doesn’t come with its own HTML editor. Fully
supporting HTML for main message text will likely require a tkinter extension (or,
regrettably, a port to another GUI toolkit with working support for this feature).
HTML parser honing
On a related note, as described earlier, this version includes a simple-minded
HTML parser, applied to extract text from HTML main (or only) text parts when
they are displayed or quoted in replies and forwards. As also mentioned earlier,
this parser is nowhere near complete or robust; for production-level quality, this
would have to be improved by testing over a large set of HTML emails. Better yet,
1118 | Chapter 14: The PyMailGUI Client

watch for a Python 3.X–compatible version of more robust and complete open
source alternatives, such as the html2text.py same-named third-party utility de-
scribed in this chapter’s earlier note. The open source BeautifulSoup system offers
another lenient and forgiving HTML parser, but is based on SGMLParser tools
available in 2.X only (removed in 3.X).
Text/HTML alternative mails
Also in the HTML department, there is presently no support for sending both text
and HTML versions of a mail as a MIME multipart/alternative message—a popular
scheme which supports both text- and HTML-based clients and allows users to
choose which to use. Such messages can be viewed (both parts are offered in the
GUI), but cannot be composed. Again, since there is no support for HTML editing
anyhow, this is a moot point; if such an editor is ever added, we’d need to support
this sort of mail structure in mailtools message object construction code and re-
factor parts of its current send logic so that it can be shared.
Internationalized headers throw list columns off
As is so often true in software, one feature added in this version broke another
already present: the fonts used for display of some non-ASCII Unicode header fields
is large enough to throw off the fixed-width columns in mail index list windows.
They rely on the assumption that N characters is always the same width among all
mails, and this is no longer true for some Chinese and other character set encodings.
This isn’t a showstopper—it only occurs when some i18n headers are displayed,
and simply means that “|” column separators are askew for such mails only, but
could still be addressed. The fix here is probably to move to a more sophisticated
list display, and might be resolved as a side effect of allowing for the column sorts
described earlier.
Address books
PyMailGUI has no notion of automatically filling in an email address from an ad-
dress book, as many modern email clients do. Adding this would be an interesting
extension; low-level keyboard event binding may allow matching as addresses are
typed, and Python’s pickle and shelve modules of Chapters 1 and 17 might come
in handy for data storage.
Spelling checker
There is currently no spelling checker of the sort most email programs have today.
This could be added in PyMailGUI, but it would probably be more appropriate to
add it in the PyEdit text edit component/program that it uses, so the spell-checking
would be inherited by all PyEdit clients. A quick web search reveals a variety of
options, including the interesting PyEnchant third-party package, none of which
we have space to explore here.
Mail searches
Similarly, there is no support for searching emails’ content (headers or bodies) for
a given string. It’s not clear how this should be provided given that the system
fetches and caches just message headers until a mail is requested, but searching
Ideas for Improvement | 1119

large inboxes can be convenient. As is, this can be performed manually by running
a Save to store fetched mails in a text file and searching in that file externally.
Frozen binary distribution
As a desktop program, PyMailGUI seems an ideal candidate for packing as a self-
contained frozen binary executable, using tools such as PyInstaller, Py2Exe, and
others. When distributed this way, users need not install Python, since the Python
runtime is embedded in the executable.
Selecting Reply versus Reply-All in the GUI
As described in the 3.0 changes overview earlier, in this version, Reply by default
now copies all the original mail’s recipients by prefilling the Cc line, in addition to
replying to the original sender. This Cc feature can be turned off in mailconfig
because it may not be desirable in all cases. Ideally, though, this should be select-
able in the GUI on a mail-by-mail basis, not per session. Adding another button to
list windows for ReplyAll would suffice; since this feature was added too late in
this project for GUI changes, though, this will have to be relegated to the domain
of suggested exercise.
Propagating attachments?
When replying to or forwarding an email, PyMailGUI discards any attachments
on the original message. This is by design, partly because there is currently no way
to delete attached parts in the GUI prior to sending (you couldn’t remove selectively
and couldn’t remove all), and partly because this system’s current sole user prefers
to work this way.
Users can work around this by running a Split to save all parts in a directory, and
then adding any desired attachments to the mail from there. Still, it might be better
to allow the user to choose that this happen automatically for replies and forwards.
Similarly, forwarding HTML mails well currently requires saving and attaching the
HTML part to avoid quoting the text; this might be similarly addressed by parts
propagation in general.
Disable editing for viewed mails?
Mail text is editable in message view windows, even though a new mail is not being
composed. This is deliberate—users can annotate the message’s text and save it in
a text file with the Save button at the bottom of the window, or simply cut-and-
paste portions of it into other windows. This might be confusing, though, and is
redundant (we can also edit and save by clicking on the main text’s quick-access
part button). Removing edit tools would require extending PyEdit. Using PyEdit
for display in general is a useful design—users also have access to all of PyEdit’s
tools for the mail text, including save, find, goto, grep, replace, undo/redo, and so,
though edits might be superfluous in this context.
Automatic periodic new mail check?
It would be straightforward to add the ability to automatically check for and fetch
new incoming email periodically, by registering long-duration timer events with
either the after widget method or the threading module’s timer object. I haven’t
1120 | Chapter 14: The PyMailGUI Client

done so because I have a personal bias against being surprised by software, but
your mileage may vary.
Reply and Forward buttons on view windows, too?
Minor potential ergonomic improvement: we could include Reply and Forward
buttons on the message view windows, too, instead of requiring these operations
to be selected in mail list windows only. As this system’s sole user, I prefer the
uncluttered appearance and conceptual simplicity of the current latter approach;
GUIs have a way of getting out of hand when persistent pop-up windows start
nesting too deeply. It would be trivial to have Reply/Forward on view windows,
too, though; they could probably fetch mail components straight from the GUI
instead of reparsing a message.
Omit Bcc header in view windows?
Minor nit: mail view windows may be better off omitting the Bcc header even if
it’s enabled in the configuration file. Since it shouldn’t be present once a mail is
sent, it really needs to be included in composition windows only. It’s displayed as
is anyhow, to verify that Bcc is omitted on sends (the prior edition did not), to
maintain a uniform look for all mail windows, to avoid special-casing this in the
code, and to avoid making such ergonomic decisions in the absence of actual user
feedback.
Check for empty Subject lines?
Minor usability issue: it would be straightforward to add a check for an empty
Subject field on sends and to pop up a verification dialog to give the user a second
chance to fill the field in. A blank subject is probably unintended. We could do the
same for the To field as well, though there may be valid use cases for omitting this
from mail headers (the mail is still sent to Cc and Bcc recipients).
Removing duplicate recipients more accurately?
As is, the send operation attempts to remove duplicate recipients using set opera-
tions. This works, but it may be inaccurate if the same email address appears twice
with a different name component (e.g., “name1 <eml>, name2 <eml>”). To do
better, we could fully parse the recipient addresses to extract and compare just the
address portion of the full email address. Arguably, though, it’s not clear what
should be done if the same recipient address appears with different names. Could
multiple people be using the same email account? If not, which name should we
choose to use?
For now, end user or mail server intervention may be required in the rare cases
where this might crop up. In most cases, other email clients will likely handle names
in consistent ways that make this a moot point. On related notes, Reply removes
duplicates in Cc prefills in the same simplistic way, and both sends and replies
could use case-insensitive string comparisons when filtering for duplicates.
Handling newsgroup messages, too?
Because Internet newsgroup posts are similar in structure to emails (header lines
plus body text; see the nntplib example in Chapter 13), this script could in principle
Ideas for Improvement | 1121

be extended to display both email messages and news articles. Classifying such a
mutation as clever generalization or diabolical hack is left as an exercise in itself.
SMTP sends may not work in some network configurations?
On my home/office network, SMTP works fine and as shown for sending emails,
but I have occasionally seen sends have issues on public networks of the sort avail-
able in hotels and airports. In some cases, mail sends can fail with exceptions and
error messages in the GUI; in worst cases, such sends might fail with no exception
at all and without reporting an error in the GUI. The mail simply goes nowhere,
which is obviously less than ideal if its content matters.
It’s not clear if these issues are related to limitations of the networks used, of Py-
thon’s smtplib, or of the ISP-provided SMTP server I use. Unfortunately, I ran out
of time to recreate the problem and investigate further (again, a system with a single
user also has just a single tester).
Resolving any such issues is left as an exercise for the reader, but as a caution: if
you wish to use the system to send important emails, you should first test sends in
a new network environment to ensure that they will be routed correctly. Sending
an email to yourself and verifying receipt should suffice.
Performance tuning?
Almost all of the work done on this system to date has been related to its func-
tionality. The system does allow some operation threads to run in parallel, and
optimizes mail downloads by fetching just headers initially and caching already-
fetched full mail text to avoid refetching. Apart from this, though, its performance
in terms of CPU utilization and memory requirements has not been explored in
any meaningful way at all. That’s for the best—in general we code for utility and
clarity first in Python, and deal with performance later if and only if needed. Having
said that, a broader audience for this program might mandate some performance
analysis and improvement.
For example, although the full text of fetched mails is kept just once in a cache,
each open view of a message retains a copy of the parsed mail in memory. For large
mails, this may impact memory growth. Caching parsed mails as well might help
decrease memory footprints, though these will still not be small for large mails,
and the cache might hold onto memory longer than required if not intelligently
designed. Storing messages or their parts in files (perhaps as pickled objects) in-
stead of in memory might alleviate some growth, too, though that may also require
a mechanism for reaping temporary files. As is, Python’s garbage collector should
reclaim all such message space eventually as windows are closed, but this can de-
pend upon how and where we retain object references. See also the gc standard
library modules for possible pointers on finer-grained garbage collection control.
Unicode model tuning?
As discussed in brief at the start of this chapter and in full in Chapter 13, PyMail-
GUI’s support for Unicode encoding of message text and header components is
broad, but not necessarily as general or universally applicable as it might be. Some
1122 | Chapter 14: The PyMailGUI Client

Unicode limitations here stem from the limitations of the email package in
Python 3.1 upon which PyMailGUI heavily depends. It may be difficult for Python-
coded email clients to support some features better until Python’s libraries do, too.
Moreover, the Unicode support that is present in this program has been tested
neither widely nor rigorously. Just like Chapter 11’s PyEdit, this is currently still a
single-user system designed to work as a book example, not an open source project.
Because of that, some of the current Unicode policies are partially heuristic in
nature and may have to be honed with time and practice.
For example, it may prove better in the end to use UTF-8 encoding (or none at all)
for sends in general, instead of supporting some of the many user options which
are included in this book for illustration purposes. Since UTF-8 can represent most
Unicode code points, it’s broadly applicable.
More subtly, we might also consider propagating the main text part’s Unicode
encoding to the embedded PyEdit component in view and edit windows, so it can
be used as a known encoding by the PyEdit Save button. As is, users can pop up
the main text’s part in view windows to save with a known encoding automatically,
but saves of drafts for mails being edited fall back on PyEdit’s own Unicode policies
and GUI prompts. The ambiguous encoding for saved drafts may be unavoidable,
though—users might enter characters from any character set, both while writing
new mails from scratch and while editing the text of replies and forwards (just like
headers in replies and forwards, the initial known encoding of the original main
text part may no longer apply after arbitrary edits).
In addition, there is no support for non-ASCII encodings of full mail text, it’s not
impossible that i18n encoded text might appear in other contexts in rare emails
(e.g., in attachment filenames, whose undecoded form may or may not be valid on
the receiving platform’s filesystem, and may require renaming if allowed at all),
and although Internationalization is supported for mail content, the GUI itself still
uses English for its buttons, labels, and titles—something that a truly location-
neutral program may wish to address.
In other words, if this program were to ever take the leap to commercial-grade or
broadly used software, its Unicode story would probably have to be revisited. Also
discussed in Chapter 13, a future release of the email package may solve some
Unicode issues automatically, though PyMailGUI may also require updates for the
solutions, as well as for incompatibilities introduced by them. For now, this will
have to stand as a useful object lesson in itself: for both better and worse, such
changes will always be a fact of life in the constantly evolving world of software
development.
And so on—because this software is open source, it is also necessarily open-ended.
Ultimately, writing a complete email client is a substantial undertaking, and we’ve
taken this example as far as we can in this book. To move PyMailGUI further along,
we’d probably have to consider the suitability of both the underlying Python 3.1
Ideas for Improvement | 1123

email package, as well as the tkinter GUI toolkit. Both are fully sufficient for the utility
we’ve implemented here, but they might limit further progress.
For example, the current lack of an HTML viewer widget in the base tkinter toolkit
precludes HTML mail viewing and composition in the GUI itself. Moreover, although
PyMailGUI broadly supports Internationalization today, it must rely on workarounds
to get email to work at all. To be fair, some of the email package’s issues described in
this book will likely be fixed by the time you read about them, and email in general is
probably close to a worst case for Internationalization issues brought into the spotlight
by Unicode prominence in Python 3.X. Still, such tool constraints might impede further
system evolution.
On the other hand, despite any limitations in the tools it deploys, PyMailGUI does
achieve all its goals—it’s an arguably full-featured and remarkably quick desktop email
client, which works surprisingly well for my emails and preferences and performs ad-
mirably on the cases I’ve tested to date. It may not satisfy your tastes or constraints,
but it is open to customization and imitation. Suggested exercises and further tweaking
are therefore officially delegated to your imagination; this is Python, after all.
This concludes our tour of Python client-side protocols programming. In the next
chapter, we’ll hop the fence to the other side of the Internet world and explore scripts
that run on server machines. Such programs give rise to the grander notion of applica-
tions that live entirely on the Web and are launched by web browsers. As we take this
leap in structure, keep in mind that the tools we met in this and the previous chapter
are often sufficient to implement all the distributed processing that many applications
require, and they can work in harmony with scripts that run on a server. To completely
understand the Web world view, though, we need to explore the server realm, too.
1124 | Chapter 14: The PyMailGUI Client

CHAPTER 15
Server-Side Scripting
“Oh, What a Tangled Web We Weave”
This chapter is the fourth part of our look at Python Internet programming. In the last
three chapters, we explored sockets and basic client-side programming interfaces such
as FTP and email. In this chapter, our main focus will be on writing server-side scripts
in Python—a type of program usually referred to as CGI scripts. Though something of
a lowest common denominator for web development today, such scripts still provide
a simple way to get started with implementing interactive websites in Python.
Server-side scripting and its derivatives are at the heart of much of the interaction that
happens on the Web. This is true both when scripting manually with CGI and when
using the higher-level frameworks that automate some of the work. Because of that,
the fundamental web model we’ll explore here in the context of CGI scripting is pre-
requisite knowledge for programming the Web well, regardless of the tools you choose
to deploy.
As we’ll see, Python is an ideal language for writing scripts to implement and customize
websites, because of both its ease of use and its library support. In the following chapter,
we will use the basics we learn in this chapter to implement a full-blown website. Here,
our goal is to understand the fundamentals of server-side scripting, before exploring
systems that deploy or build upon that basic model.
A House upon the Sand
As you read the next two chapters of this book, please keep in mind that they focus on
the fundamentals of server-side scripting and are intended only as an introduction to
programming in this domain with Python. The web domain is large and complex,
changes rapidly and constantly, and often prescribes many ways to accomplish a given
goal—some of which can vary from browser to browser and server to server.
For instance, the password encryption scheme of the next chapter may be unnecessary
under certain scenarios (with a suitable server, we could use secure HTTP instead).
Moreover, some of the HTML we’ll use here may not leverage all of that language’s
1125

power, and may even not conform to current HTML standards. In fact, much of the
material added in later editions of this book reflects recent technology shifts in this
domain.
Given such a large and dynamic field, this part of the book does not even pretend to
be a complete look at the server-side scripting domain. That is, you should not take
this text to be a final word on the subject. To become truly proficient in this area, you
should also expect to spend some time studying other texts for additional
webmaster-y details and techniques—for example, Chuck Musciano and Bill
Kennedy’s HTML & XHTML: The Definitive Guide (O’Reilly).
The good news is that here you will explore the core ideas behind server-side program-
ming, meet Python’s CGI tool set, and learn enough to start writing substantial websites
of your own in Python. This knowledge should apply to wherever the Web or you head
next.
What’s a Server-Side CGI Script?
Simply put, CGI scripts implement much of the interaction you typically experience
on the Web. They are a standard and widely used mechanism for programming web-
based systems and website interaction, and they underlie most of the larger web
development models.
There are other ways to add interactive behavior to websites with Python, both on the
client and the server. We briefly met some such alternatives near the start of Chap-
ter 12. For instance, client-side solutions include Jython applets, RIAs such as Silver-
light and pyjamas, Active Scripting on Windows, and the emerging HTML 5 standard.
On the server side, there are a variety of additional technologies that build on the basic
CGI model, such as Python Server Pages, and web frameworks such as Django, App
Engine, CherryPy, and Zope, many of which utilize the MVC programming model.
By and large, though, CGI server-side scripts are used to program much of the activity
on the Web, whether it’s programmed directly or partly automated by frameworks and
tools. CGI scripting is perhaps the most primitive approach to implementing websites,
and it does not by itself offer the tools that are often built into larger frameworks such
as state retention, database interfaces, and reply templating. CGI scripts, however, are
in many ways the simplest technique for server-side scripting. As a result, they are an
ideal way to get started with programming on the server side of the Web. Especially for
simpler sites that do not require enterprise-level tools, CGI is sufficient, and it can be
augmented with additional libraries as needed.
The Script Behind the Curtain
Formally speaking, CGI scripts are programs that run on a server machine and adhere
to the Common Gateway Interface—a model for browser/server communications,
1126 | Chapter 15: Server-Side Scripting

from which CGI scripts take their name. CGI is an application protocol that web servers
use to transfer input data and results between web browsers and other clients and
server-side scripts. Perhaps a more useful way to understand CGI, though, is in terms
of the interaction it implies.
Most people take this interaction for granted when browsing the Web and pressing
buttons in web pages, but a lot is going on behind the scenes of every transaction on
the Web. From the perspective of a user, it’s a fairly familiar and simple process:
Submission
When you visit a website to search, purchase a product, or submit information
online, you generally fill in a form in your web browser, press a button to submit
your information, and begin waiting for a reply.
Response
Assuming all is well with both your Internet connection and the computer you are
contacting, you eventually get a reply in the form of a new web page. It may be a
simple acknowledgment (e.g., “Thanks for your order”) or a new form that must
be filled out and submitted again.
And, believe it or not, that simple model is what makes most of the Web hum. But
internally, it’s a bit more complex. In fact, a subtle client/server socket-based architec-
ture is at work—your web browser running on your computer is the client, and the
computer you contact over the Web is the server. Let’s examine the interaction scenario
again, with all the gory details that users usually never see:
Submission
When you fill out a form page in a web browser and press a submission button,
behind the scenes your web browser sends your information across the Internet to
the server machine specified as its receiver. The server machine is usually a remote
computer that lives somewhere else in both cyberspace and reality. It is named in
the URL accessed—the Internet address string that appears at the top of your
browser. The target server and file can be named in a URL you type explicitly, but
more typically they are specified in the HTML that defines the submission page
itself—either in a hyperlink or in the “action” tag of the input form’s HTML.
However the server is specified, the browser running on your computer ultimately
sends your information to the server as bytes over a socket, using techniques we
saw in the last three chapters. On the server machine, a program called an HTTP
server runs perpetually, listening on a socket for incoming connection requests and
data from browsers and other clients, usually on port number 80.
Processing
When your information shows up at the server machine, the HTTP server program
notices it first and decides how to handle the request. If the requested URL names
a simple web page (e.g., a URL ending in .html), the HTTP server opens the named
HTML file on the server machine and sends its text back to the browser over a
What’s a Server-Side CGI Script? | 1127

socket. On the client, the browser reads the HTML and uses it to construct the
next page you see.
But if the URL requested by the browser names an executable program instead (e.g.,
a URL ending in .cgi or .py), the HTTP server starts the named program on the
server machine to process the request and redirects the incoming browser data to
the spawned program’s stdin input stream, environment variables, and command-
line arguments. That program started by the server is usually a CGI script—a pro-
gram run on the remote server machine somewhere in cyberspace, usually not on
your computer. The CGI script is responsible for handling the request from this
point on; it may store your information in a database, perform a search, charge
your credit card, and so on.
Response
Ultimately, the CGI script prints HTML, along with a few header lines, to generate
a new response page in your browser. When a CGI script is started, the HTTP
server takes care to connect the script’s stdout standard output stream to a socket
that the browser is listening to. As a result, HTML code printed by the CGI script
is sent over the Internet, back to your browser, to produce a new page. The HTML
printed back by the CGI script works just as if it had been stored and read from an
HTML file; it can define a simple response page or a brand-new form coded to
collect additional information. Because it is generated by a script, it may include
information dynamically determined per request.
In other words, CGI scripts are something like callback handlers for requests generated
by web browsers that require a program to be run dynamically. They are automatically
run on the server machine in response to actions in a browser. Although CGI scripts
ultimately receive and send standard structured messages over sockets, CGI is more
like a higher-level procedural convention for sending and receiving information be-
tween a browser and a server.
Writing CGI Scripts in Python
If all of this sounds complicated, relax—Python, as well as the resident HTTP server,
automates most of the tricky bits. CGI scripts are written as fairly autonomous pro-
grams, and they assume that startup tasks have already been accomplished. The HTTP
web server program, not the CGI script, implements the server side of the HTTP pro-
tocol itself. Moreover, Python’s library modules automatically dissect information sent
up from the browser and give it to the CGI script in an easily digested form. The upshot
is that CGI scripts may focus on application details like processing input data and
producing a result page.
As mentioned earlier, in the context of CGI scripts, the stdin and stdout streams are
automatically tied to sockets connected to the browser. In addition, the HTTP server
passes some browser information to the CGI script in the form of shell environment
variables, and possibly command-line arguments. To CGI programmers, that means:
1128 | Chapter 15: Server-Side Scripting

•Input data sent from the browser to the server shows up as a stream of bytes in the
stdin input stream, along with shell environment variables.
•Output is sent back from the server to the client by simply printing properly for-
matted HTML to the stdout output stream.
The most complex parts of this scheme include parsing all the input information sent
up from the browser and formatting information in the reply sent back. Happily, Py-
thon’s standard library largely automates both tasks:
Input
With the Python cgi module, input typed into a web browser form or appended
to a URL string shows up as values in a dictionary-like object in Python CGI scripts.
Python parses the data itself and gives us an object with one key : value pair per
input sent by the browser that is fully independent of transmission style (roughly,
by fill-in form or by direct URL).
Output
The cgi module also has tools for automatically escaping strings so that they are
legal to use in HTML (e.g., replacing embedded <, >, and & characters with HTML
escape codes). Module urllib.parse provides additional tools for formatting text
inserted into generated URL strings (e.g., adding %XX and + escapes).
We’ll study both of these interfaces in detail later in this chapter. For now, keep in mind
that although any language can be used to write CGI scripts, Python’s standard modules
and language attributes make it a snap.
Perhaps less happily, CGI scripts are also intimately tied to the syntax of HTML, since
they must generate it to create a reply page. In fact, it can be said that Python CGI
scripts embed HTML, which is an entirely distinct language in its own right.* As we’ll
also see, the fact that CGI scripts create a user interface by printing HTML syntax means
that we have to take special care with the text we insert into a web page’s code (e.g.,
escaping HTML operators). Worse, CGI scripts require at least a cursory knowledge
of HTML forms, since that is where the inputs and target script’s address are typically
specified.
This book won’t teach HTML in depth; if you find yourself puzzled by some of the
arcane syntax of the HTML generated by scripts here, you should glance at an HTML
introduction, such as HTML & XHTML: The Definitive Guide. Also keep in mind that
higher-level tools and frameworks can sometimes hide the details of HTML generation
from Python programmers, albeit at the cost of any new complexity inherent in the
* Interestingly, in Chapter 12 we briefly introduced other systems that take the opposite route—embedding
Python code or calls in HTML. The server-side templating languages in Zope, PSP, and other web frameworks
use this model, running the embedded Python code to produce part of a reply page. Because Python is
embedded, these systems must run special servers to evaluate the embedded tags. Because Python CGI scripts
embed HTML in Python instead, they can be run as standalone programs directly, though they must be
launched by a CGI-capable web server.
What’s a Server-Side CGI Script? | 1129

framework itself. With HTMLgen and similar packages, for instance, it’s possible to
deal in Python objects, not HTML syntax, though you must learn this system’s API as
well.
Running Server-Side Examples
Like GUIs, web-based systems are highly interactive, and the best way to get a feel for
some of these examples is to test-drive them live. Before we get into some code, let’s
get set up to run the examples we’re going to see.
Running CGI-based programs requires three pieces of software:
• The client, to submit requests: a browser or script
• The web server that receives the request
• The CGI script, which is run by the server to process the request
We’ll be writing CGI scripts as we move along, and any web browser can be used as a
client (e.g., Firefox, Safari, Chrome, or Internet Explorer). As we’ll see later, Python’s
urllib.request module can also serve as a web client in scripts we write. The only
missing piece here is the intermediate web server.
Web Server Options
There are a variety of approaches to running web servers. For example, the open source
Apache system provides a complete, production-grade web server, and its mod_python
extension discussed later runs Python scripts quickly. Provided you are willing to install
and configure it, it is a complete solution, which you can run on a machine of your
own. Apache usage is beyond our present scope here, though.
If you have access to an account on a web server machine that runs Python 3.X, you
can also install the HTML and script files we’ll see there. For the second edition of this
book, for instance, all the web examples were uploaded to an account I had on the
“starship” Python server, and were accessed with URLs of this form:
http://starship.python.net/~lutz/PyInternetDemos.html
If you go this route, replace starship.python.net/~lutz with the names of your own
server and account directory path. The downside of using a remote server account is
that changing code is more involved—you will have to either work on the server ma-
chine itself or transfer code back and forth on changes. Moreover, you need access to
such a server in the first place, and server configuration details can vary widely. On the
starship machine, for example, Python CGI scripts were required to have a .cgi filename
extension, executable permission, and the Unix #! line at the top to point the shell to
Python.
Finding a server that supports Python 3.X used by this book’s examples might prove a
stumbling block for some time to come as well; neither of my own ISPs had it installed
1130 | Chapter 15: Server-Side Scripting

when I wrote this chapter in mid-2010, though it’s possible to find commercial ISPs
today that do. Naturally, this may change over time.
Running a Local Web Server
To keep things simple, this edition is taking a different approach. All the examples will
be run using a simple web server coded in Python itself. Moreover, the web server will
be run on the same local machine as the web browser client. This way, all you have to
do to run the server-side examples is start the web server script and use “localhost” as
the server name in all the URLs you will submit or code (see Chapter 12 if you’ve
forgotten why this name means the local machine). For example, to view a web page,
use a URL of this form in the address field of your web browser:
http://localhost/tutor0.html
This also avoids some of the complexity of per-server differences, and it makes changing
the code simple—it can be edited on the local machine directly.
For this book’s examples, we’ll use the web server in Example 15-1. This is essentially
the same script introduced in Chapter 1, augmented slightly to allow the working di-
rectory and port number to be passed in as command-line arguments (we’ll also run
this in the root directory of a larger example in the next chapter). We won’t go into
details on all the modules and classes Example 15-1 uses here; see the Python library
manual. But as described in Chapter 1, this script implements an HTTP web server,
which:
• Listens for incoming socket requests from clients on the machine it is run on and
the port number specified in the script or command line (which defaults to 80, that
standard HTTP port)
• Serves up HTML pages from the webdir directory specified in the script or com-
mand line (which defaults to the directory it is launched from)
• Runs Python CGI scripts that are located in the cgi-bin (or htbin) subdirectory of
the webdir directory, with a .py filename extension
See Chapter 1 for additional background on this web server’s operation.
Example 15-1. PP4E\Internet\Web\webserver.py
"""
Implement an HTTP web server in Python which knows how to serve HTML
pages and run server-side CGI scripts coded in Python; this is not
a production-grade server (e.g., no HTTPS, slow script launch/run on
some platforms), but suffices for testing, especially on localhost;
Serves files and scripts from the current working dir and port 80 by
default, unless these options are specified in command-line arguments;
Python CGI scripts must be stored in webdir\cgi-bin or webdir\htbin;
more than one of this server may be running on the same machine to serve
from different directories, as long as they listen on different ports;
Running Server-Side Examples | 1131

"""
import os, sys
from http.server import HTTPServer, CGIHTTPRequestHandler
webdir = '.' # where your HTML files and cgi-bin script directory live
port = 80 # http://servername/ if 80, else use http://servername:xxxx/
if len(sys.argv) > 1: webdir = sys.argv[1] # command-line args
if len(sys.argv) > 2: port = int(sys.argv[2]) # else default ., 80
print('webdir "%s", port %s' % (webdir, port))
os.chdir(webdir) # run in HTML root dir
srvraddr = ('', port) # my hostname, portnumber
srvrobj = HTTPServer(srvraddr, CGIHTTPRequestHandler)
srvrobj.serve_forever() # serve clients till exit
To start the server to run this chapter’s examples, simply run this script from the di-
rectory the script’s file is located in, with no command-line arguments. For instance,
from a DOS command line:
C:\...\PP4E\Internet\Web> webserver.py
webdir ".", port 80
On Windows, you can simply click its icon and keep the console window open, or
launch it from a DOS command prompt. On Unix it can be run from a command line
in the background, or in its own terminal window. Some platforms may also require
you to have administrator privileges to run servers on reserved ports, such as the Web’s
port 80; if this includes your machine, either run the server with the required permis-
sions, or run on an alternate port number (more on port numbers later in this chapter).
By default, while running locally this way, the script serves up HTML pages requested
on “localhost” from the directory it lives in or is launched from, and runs Python CGI
scripts from the cgi-bin subdirectory located there; change its webdir variable or pass
in a command-line argument to point it to a different directory. Because of this struc-
ture, in the examples distribution HTML files are in the same directory as the web server
script and CGI scripts are located in the cgi-bin subdirectory. In other words, to visit
web pages and run scripts, we’ll be using URLs of these forms, respectively:
http://localhost/somepage.html
http://localhost/cgi-bin/somescript.py
Both map to the directory that contains the web server script (PP4E\Internet\Web) by
default. Again, to run the examples on a different server machine of your own, simply
replace the “localhost” and “localhost/cgi-bin” parts of these addresses with your server
name and directory path details (more on URLs later in this chapter); with this address
change the examples work the same, but requests are routed across a network to the
server, instead of being routed between programs running on the same local machine.
The server in Example 15-1 is by no means a production-grade web server, but it can
be used to experiment with this book’s examples and is viable as a way to test your CGI
1132 | Chapter 15: Server-Side Scripting
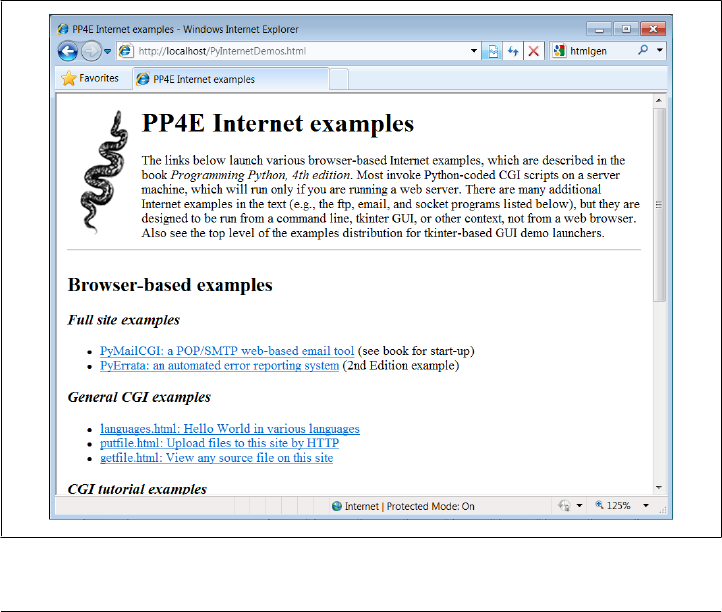
scripts locally with server name “localhost” before deploying them on a real remote
server. If you wish to install and run the examples under a different web server, you’ll
want to extrapolate the examples for your context. Things like server names and path-
names in URLs, as well as CGI script filename extensions and other conventions, can
vary widely; consult your server’s documentation for more details. For this chapter and
the next, we’ll assume that you have the webserver.py script running locally.
The Server-Side Examples Root Page
To confirm that you are set up to run the examples, start the web server script in
Example 15-1 and type the following URL in the address field at the top of your web
browser:
http://localhost/PyInternetDemos.html
This address loads a launcher page with links to this chapter’s example files (see the
examples distribution for this page’s HTML source code, which is not listed in this
book). The launcher page itself appears as in Figure 15-1, shown displayed in the In-
ternet Explorer web browser on Windows 7 (it looks similar on other browsers and
platforms). Each major example has a link on this page, which runs when clicked.
Figure 15-1. The PyInternetDemos launcher page
Running Server-Side Examples | 1133

It’s possible to open some of the examples by clicking on their HTML file directly in
your system’s file explorer GUI. However, the CGI scripts ultimately invoked by some
of the example links must be run by a web server. If you click to browse such pages
directly, your browser will likely display the scripts’ source code, instead of running it.
To run scripts, too, be sure to open the HTML pages by typing their “localhost” URL
address into your browser’s address field.
Eventually, you probably will want to start using a more powerful web server, so we
will study additional CGI installation details later in this chapter. You may also wish
to review our prior exploration of custom server options in Chapter 12 (Apache and
mod_python are a popular option). Such details can be safely skipped or skimmed if
you will not be installing on another server right away. For now, we’ll run locally.
Viewing Server-Side Examples and Output
The source code of examples in this part of the book is listed in the text and included
in the book’s examples distribution package. In all cases, if you wish to view the source
code of an HTML file, or the HTML generated by a Python CGI script, you can also
simply select your browser’s View Source menu option while the corresponding web
page is displayed.
Keep in mind, though, that your browser’s View Source option lets you see the out-
put of a server-side script after it has run, but not the source code of the script itself.
There is no automatic way to view the Python source code of the CGI scripts themselves,
short of finding them in this book or in its examples distribution.
To address this issue, later in this chapter we’ll also write a CGI-based program
called getfile, which allows the source code of any file on this book’s website (HTML,
CGI script, and so on) to be downloaded and viewed. Simply type the desired file’s
name into a web page form referenced by the getfile.html link on the Internet demos
launcher page of Figure 15-1, or add it to the end of an explicitly typed URL as a
parameter like the following; replace tutor5.py at the end with the name of the script
whose code you wish to view, and omit the cgi-bin component at the end to view HTML
files instead:
http://localhost/cgi-bin/getfile.py?filename=cgi-bin\tutor5.py
In response, the server will ship back the text of the named file to your browser. This
process requires explicit interface steps, though, and much more knowledge of URLs
than we’ve gained thus far; to learn how and why this magic line works, let’s move on
to the next section.
1134 | Chapter 15: Server-Side Scripting

Climbing the CGI Learning Curve
Now that we’ve looked at setup issues, it’s time to get into concrete programming
details. This section is a tutorial that introduces CGI coding one step at a time—from
simple, noninteractive scripts to larger programs that utilize all the common web page
user input devices (what we called widgets in the tkinter GUI chapters in Part III).
Along the way, we’ll also explore the core ideas behind server-side scripting. We’ll move
slowly at first, to learn all the basics; the next chapter will use the ideas presented here
to build up larger and more realistic website examples. For now, let’s work through a
simple CGI tutorial, with just enough HTML thrown in to write basic server-side
scripts.
A First Web Page
As mentioned, CGI scripts are intimately bound up with HTML, so let’s start with a
simple HTML page. The file tutor0.html, shown in Example 15-2, defines a bona fide,
fully functional web page—a text file containing HTML code, which specifies the
structure and contents of a simple web page.
Example 15-2. PP4E\Internet\Web\tutor0.html
<HTML>
<TITLE>HTML 101</TITLE>
<BODY>
<H1>A First HTML Page</H1>
<P>Hello, HTML World!</P>
</BODY></HTML>
If you point your favorite web browser to the Internet address of this file, you should
see a page like that shown in Figure 15-2. This figure shows the Internet Explorer
browser at work on the address http://localhost/tutor0.html (type this into your
browser’s address field), and it assumes that the local web server described in the prior
section is running; other browsers render the page similarly. Since this is a static HTML
file, you’ll get the same result if you simply click on the file’s icon on most platforms,
though its text won’t be delivered by the web server in this mode.
Climbing the CGI Learning Curve | 1135

Figure 15-2. A simple web page from an HTML file
To truly understand how this little file does its work, you need to know something
about HTML syntax, Internet addresses, and file permission rules. Let’s take a quick
first look at each of these topics before we move on to the next example.
HTML basics
I promised that I wouldn’t teach much HTML in this book, but you need to know
enough to make sense of examples. In short, HTML is a descriptive markup language,
based on tags— items enclosed in <> pairs. Some tags stand alone (e.g., <HR> specifies
a horizontal rule). Others appear in begin/end pairs in which the end tag includes an
extra slash.
For instance, to specify the text of a level-one header line, we write HTML code of the
form <H1> text </H1>; the text between the tags shows up on the web page. Some tags
also allow us to specify options (sometimes called attributes). For example, a tag pair
like <A href=" address ">text</A> specifies a hyperlink: pressing the link’s text in the
page directs the browser to access the Internet address (URL) listed in the href option.
It’s important to keep in mind that HTML is used only to describe pages: your web
browser reads it and translates its description to a web page with headers, paragraphs,
links, and the like. Notably absent are both layout information—the browser is re-
sponsible for arranging components on the page—and syntax for programming logic—
there are no if statements, loops, and so on. Also, Python code is nowhere to be found
in Example 15-2; raw HTML is strictly for defining pages, not for coding programs or
specifying all user interface details.
HTML’s lack of user interface control and programmability is both a strength and a
weakness. It’s well suited to describing pages and simple user interfaces at a high level.
The browser, not you, handles physically laying out the page on your screen. On the
other hand, HTML by itself does not directly support full-blown GUIs and requires us
to introduce CGI scripts (or other technologies such as RIAs) to websites in order to
add dynamic programmability to otherwise static HTML.
1136 | Chapter 15: Server-Side Scripting

Internet addresses (URLs)
Once you write an HTML file, you need to put it somewhere a web browser can ref-
erence it. If you are using the locally running Python web server described earlier, this
becomes trivial: use a URL of the form http://localhost/file.html to access web pages,
and http://localhost/cgi-bin/file.py to name CGI scripts. This is implied by the fact that
the web server script by default serves pages and scripts from the directory in which it
is run.
On other servers, URLs may be more complex. Like all HTML files, tutor0.html must
be stored in a directory on the server machine, from which the resident web server
program allows browsers to fetch pages. For example, on the server used for the second
edition of this book, the page’s file must be stored in or below the public_html directory
of my personal home directory—that is, somewhere in the directory tree rooted
at /home/lutz/public_html. The complete Unix pathname of this file on the server is:
/home/lutz/public_html/tutor0.html
This path is different from its PP4E\Internet\Web location in the book’s examples dis-
tribution, as given in the example file listing’s title. When referencing this file on the
client, though, you must specify its Internet address, sometimes called a URL, instead
of a directory path name. The following URL was used to load the remote page from
the server:
http://starship.python.net/~lutz/tutor0.html
The remote server maps this URL to the Unix pathname automatically, in much the
same way that the http://localhost resolves to the examples directory containing the web
server script for our locally-running server. In general, URL strings like the one just
listed are composed as the concatenation of multiple parts:
Protocol name: http
The protocol part of this URL tells the browser to communicate with the HTTP
(i.e., web) server program on the server machine, using the HTTP message proto-
col. URLs used in browsers can also name different protocols—for example,
ftp:// to reference a file managed by the FTP protocol and server, file:// to reference
a file on the local machine, telnet to start a Telnet client session, and so on.
Server machine name and port: starship.python.net
A URL also names the target server machine’s domain name or Internet Protocol
(IP) address following the protocol type. Here, we list the domain name of the
server machine where the examples are installed; the machine name listed is used
to open a socket to talk to the server. As usual, a machine name of localhost (or the
equivalent IP address 127.0.0.1) here means the server is running on the same
machine as the client.
Optionally, this part of the URL may also explicitly give the socket port on which
the server is listening for connections, following a colon (e.g., starship.python.net:
8000, or 127.0.0.1:80). For HTTP, the socket is usually connected to port number
Climbing the CGI Learning Curve | 1137

80, so this is the default if the port is omitted. See Chapter 12 if you need a refresher
on machine names and ports.
File path: ~lutz/tutor0.html
Finally, the URL gives the path to the desired file on the remote machine. The
HTTP web server automatically translates the URL’s file path to the file’s true
pathname: on the starship server, ~lutz is automatically translated to the
public_html directory in my home directory. When using the Python-coded web
server script in Example 15-1, files are mapped to the server’s current working
directory instead. URLs typically map to such files, but they can reference other
sorts of items as well, and as we’ll see in a few moments may name an executable
CGI script to be run when accessed.
Query parameters (used in later examples)
URLs may also be followed by additional input parameters for CGI programs.
When used, they are introduced by a ? and are typically separated by & characters.
For instance, a string of the form ?name=bob&job=hacker at the end of a URL passes
parameters named name and job to the CGI script named earlier in the URL, with
values bob and hacker, respectively. As we’ll discuss later in this chapter when we
explore escaping rules, the parameters may sometimes be separated by ; characters
instead, as in ?name=bob;job=hacker, though this form is less common.
These values are sometimes called URL query string parameters and are treated the
same as form inputs by scripts. Technically speaking, query parameters may have
other structures (e.g., unnamed values separated by +), but we will ignore addi-
tional options in this text; more on both parameters and input forms later in this
tutorial.
To make sure we have a handle on URL syntax, let’s pick apart another example that
we will be using later in this chapter. In the following HTTP protocol URL:
http://localhost:80/cgi-bin/languages.py?language=All
the components uniquely identify a server script to be run as follows:
• The server name localhost means the web server is running on the same machine
as the client; as explained earlier, this is the configuration we’re using for our
examples.
• Port number 80 gives the socket port on which the web server is listening for con-
nections (port 80 is the default if this part is omitted, so we will usually omit it).
• The file path cgi-bin/languages.py gives the location of the file to be run on the
server machine, within the directory where the server looks for referenced files.
• The query string ?language=All provides an input parameter to the referenced
script languages.py, as an alternative to user input in form fields (described later).
1138 | Chapter 15: Server-Side Scripting

Although this covers most URLs you’re likely to encounter in the wild, the full format
of URLs is slightly richer:
protocol://networklocation/path;parameters?querystring#fragment
For instance, the fragment part may name a section within a page (e.g., #part1). More-
over, each part can have formats of its own, and some are not used in all protocols.
The ;parameters part is omitted for HTTP, for instance (it gives an explicit file type for
FTP), and the networklocation part may also specify optional user login parameters for
some protocol schemes (its full format is user:password@host:port for FTP and Telnet,
but just host:port for HTTP). We used a complex FTP URL in Chapter 13, for example,
which included a username and password, as well as a binary file type (the server may
guess if no type is given):
ftp://lutz:password@ftp.rmi.net/filename;type=i
We’ll ignore additional URL formatting rules here. If you’re interested in more details,
you might start by reading the urllib.parse module’s entry in Python’s library manual,
as well as its source code in the Python standard library. You may also notice that a
URL you type to access a page looks a bit different after the page is fetched (spaces
become + characters, % characters are added, and so on). This is simply because brows-
ers must also generally follow URL escaping (i.e., translation) conventions, which we’ll
explore later in this chapter.
Using minimal URLs
Because browsers remember the prior page’s Internet address, URLs embedded in
HTML files can often omit the protocol and server names, as well as the file’s directory
path. If missing, the browser simply uses these components’ values from the last page’s
address. This minimal syntax works for URLs embedded in hyperlinks and for form
actions (we’ll meet forms later in this tutorial). For example, within a page that was
fetched from the directory dirpath on the server http://www.server.com, minimal hy-
perlinks and form actions such as:
<A HREF="more.html">
<FORM ACTION="next.py" ...>
are treated exactly as if we had specified a complete URL with explicit server and path
components, like the following:
<A HREF="http://www.server.com/dirpath/more.html">
<FORM ACTION="http://www.server.com/dirpath/next.py" ...>
The first minimal URL refers to the file more.html on the same server and in the same
directory from which the page containing this hyperlink was fetched; it is expanded to
a complete URL within the browser. URLs can also employ Unix-style relative path
syntax in the file path component. A hyperlink tag like <A HREF="../spam.gif">, for
instance, names a GIF file on the server machine and parent directory of the file that
contains this link’s URL.
Climbing the CGI Learning Curve | 1139

Why all the fuss about shorter URLs? Besides extending the life of your keyboard and
eyesight, the main advantage of such minimal URLs is that they don’t need to be
changed if you ever move your pages to a new directory or server—the server and path
are inferred when the page is used; they are not hardcoded into its HTML. The flipside
of this can be fairly painful: examples that do include explicit site names and pathnames
in URLs embedded within HTML code cannot be copied to other servers without
source code changes. Scripts and special HTML tags can help here, but editing source
code can be error-prone.
The downside of minimal URLs is that they don’t trigger automatic Internet connec-
tions when followed offline. This becomes apparent only when you load pages from
local files on your computer. For example, we can generally open HTML pages without
connecting to the Internet at all by pointing a web browser to a page’s file that lives on
the local machine (e.g., by clicking on its file icon). When browsing a page locally like
this, following a fully specified URL makes the browser automatically connect to the
Internet to fetch the referenced page or script. Minimal URLs, though, are opened on
the local machine again; usually, the browser simply displays the referenced page or
script’s source code.
The net effect is that minimal URLs are more portable, but they tend to work better
when running all pages live on the Internet (or served up by a locally running web
server). To make them easier to work with, the examples in this book will often omit
the server and path components in URLs they contain. In this book, to derive a page
or script’s true URL from a minimal URL, imagine that the string:
http://localhost/
appears before the filename given by the URL. Your browser will, even if you don’t.
HTML file permission constraints
One install pointer before we move on: if you want to use a different server and machine,
it may be necessary on some platforms to grant web page files and their directories
world-readable permission. That’s because they are loaded by arbitrary people over the
Web (often by someone named “nobody,” who we’ll introduce in a moment).
An appropriate chmod command can be used to change permissions on Unix-like ma-
chines. For instance, a chmod 755 filename shell command usually suffices; it makes
filename readable and executable by everyone, and writable by you only.† These di-
rectory and file permission details are typical, but they can vary from server to server.
Be sure to find out about the local server’s conventions if you upload HTML files to a
remote site.
† These are not necessarily magic numbers. On Unix machines, mode 755 is a bit mask. The first 7 simply
means that you (the file’s owner) can read, write, and execute the file (7 in binary is 111—each bit enables
an access mode). The two 5s (binary 101) say that everyone else (your group and others) can read and execute
(but not write) the file. See your system’s manpage on the chmod command for more details.
1140 | Chapter 15: Server-Side Scripting

A First CGI Script
The HTML file we saw in the prior section is just that—an HTML file, not a CGI script.
When referenced by a browser, the remote web server simply sends back the file’s text
to produce a new page in the browser. To illustrate the nature of CGI scripts, let’s
recode the example as a Python CGI program, as shown in Example 15-3.
Example 15-3. PP4E\Internet\Web\cgi-bin\tutor0.py
#!/usr/bin/python
"""
runs on the server, prints HTML to create a new page;
url=http://localhost/cgi-bin/tutor0.py
"""
print('Content-type: text/html\n')
print('<TITLE>CGI 101</TITLE>')
print('<H1>A First CGI Script</H1>')
print('<P>Hello, CGI World!</P>')
This file, tutor0.py, makes the same sort of page as Example 15-2 if you point your
browser at it—simply replace .html with .py in the URL, and add the cgi-bin subdir-
ectory name to the path to yield its address to enter in your browser’s address field,
http://localhost/cgi-bin/tutor0.py.
But this time it’s a very different kind of animal—it is an executable program that is run
on the server in response to your access request. It’s also a completely legal Python
program, in which the page’s HTML is printed dynamically, instead of being precoded
in a static file. In fact, little is CGI-specific about this Python program; if run from the
system command line, it simply prints HTML instead of generating a browser page:
C:\...\PP4E\Internet\Web\cgi-bin> python tutor0.py
Content-type: text/html
<TITLE>CGI 101</TITLE>
<H1>A First CGI Script</H1>
<P>Hello, CGI World!</P>
When run by the HTTP server program on a web server machine, however, the standard
output stream is tied to a socket read by the browser on the client machine. In this
context, all the output is sent across the Internet to your web browser. As such, it must
be formatted per the browser’s expectations.
In particular, when the script’s output reaches your browser, the first printed line is
interpreted as a header, describing the text that follows. There can be more than one
header line in the printed response, but there must always be a blank line between the
headers and the start of the HTML code (or other data). As we’ll see later, “cookie”
state retention directives show up in the header area as well, prior to the blank line.
In this script, the first header line tells the browser that the rest of the transmission is
HTML text (text/html), and the newline character (\n) at the end of the first print call
Climbing the CGI Learning Curve | 1141
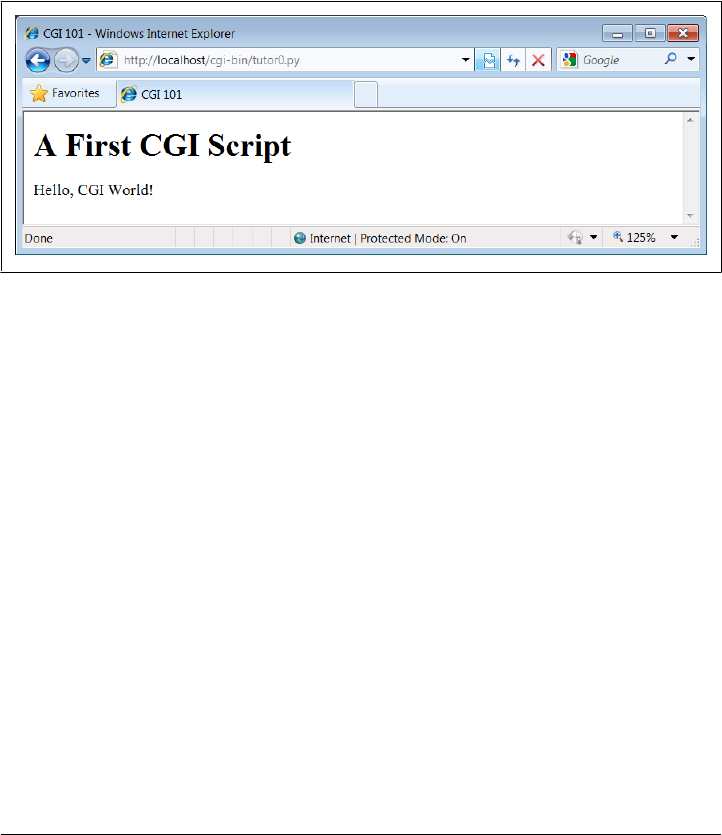
statement generates an extra line feed in addition to the one that the print generates
itself. The net effect is to insert a blank line after the header line. The rest of this pro-
gram’s output is standard HTML and is used by the browser to generate a web page
on a client, exactly as if the HTML lived in a static HTML file on the server.‡
CGI scripts are accessed just like HTML files: you either type the full URL of this script
into your browser’s address field or click on the tutor0.py link line in the examples root
page of Figure 15-1 (which follows a minimal hyperlink that resolves to the script’s full
URL). Figure 15-3 shows the result page generated if you point your browser at this
script.
Figure 15-3. A simple web page from a CGI script
Installing CGI scripts
If you are running the local web server described at the start of this chapter, no extra
installation steps are required to make this example work, and you can safely skip most
of this section. If you want to put CGI scripts on another server, though, there are a
few pragmatic details you may need to know about. This section provides a brief over-
view of common CGI configuration details for reference.
Like HTML files, CGI scripts are simple text files that you can either create on your
local machine and upload to the server by FTP or write with a text editor running
directly on the server machine (perhaps using a Telnet or SSH client). However, because
CGI scripts are run as programs, they have some unique installation requirements that
differ from simple HTML files. In particular, they usually must be stored and named
specially, and they must be configured as programs that are executable by arbitrary
users. Depending on your needs, CGI scripts also may require help finding imported
‡ Notice that the script does not generate the enclosing <HEAD> and <BODY> tags included in the static HTML
file of the prior section. Strictly speaking, it should—HTML without such tags is technically invalid. But
because all commonly used browsers simply ignore the omission, we’ll take some liberties with HTML syntax
in this book. If you need to care about such things, consult HTML references for more formal details.
1142 | Chapter 15: Server-Side Scripting

modules and may need to be converted to the server platform’s text file format after
being uploaded. Let’s look at each install constraint in more depth:
Directory and filename conventions
First, CGI scripts need to be placed in a directory that your web server recognizes
as a program directory, and they need to be given a name that your server recognizes
as a CGI script. In the local web server we’re using in this chapter, scripts need to
be placed in a special cgi-bin subdirectory and be named with a .py extension. On
the server used for this book’s second edition, CGI scripts instead were stored in
the user’s public_html directory just like HTML files, but they required a filename
ending in a .cgi, not a .py. Some servers may allow other suffixes and program
directories; this varies widely and can sometimes be configured per server or per
user.
Execution conventions
Because they must be executed by the web server on behalf of arbitrary users on
the Web, CGI script files may also need to be given executable file permissions to
mark them as programs and be made executable by others. Again, a shell command
chmod 0755 filename does the trick on most servers.
Under some servers, CGI scripts also need the special #! line at the top, to identify
the Python interpreter that runs the file’s code. The text after the #! in the first line
simply gives the directory path to the Python executable on your server machine.
See Chapter 3 for more details on this special first line, and be sure to check your
server’s conventions for more details on non-Unix platforms.
Some servers may expect this line, even outside Unix. Most of the CGI scripts in
this book include the #! line just in case they will ever be run on Unix-like platforms;
under our locally running web server on Windows, this first line is simply ignored
as a Python comment.
One subtlety worth noting: as we saw earlier in the book, the special first line in
executable text files can normally contain either a hardcoded path to the Python
interpreter (e.g., #!/usr/bin/python) or an invocation of the env program (e.g.,
#!/usr/bin/env python), which deduces where Python lives from environment var-
iable settings (i.e., your $PATH). The env trick is less useful in CGI scripts, though,
because their environment settings may be those of the user “nobody” (not your
own), as explained in the next paragraph.
Module search path configuration (optional)
Some HTTP servers may run CGI scripts with the username “nobody” for security
reasons (this limits the user’s access to the server machine). That’s why files you
publish on the Web must have special permission settings that make them acces-
sible to other users. It also means that some CGI scripts can’t rely on the Python
module search path to be configured in any particular way. As you’ve learned by
now, the module path is normally initialized from the user’s PYTHONPATH setting
and .pth files, plus defaults which normally include the current working directory.
Climbing the CGI Learning Curve | 1143

But because CGI scripts are run by the user “nobody,” PYTHONPATH may be arbitrary
when a CGI script runs.
Before you puzzle over this too hard, you should know that this is often not a
concern in practice. Because Python usually searches the current directory for im-
ported modules by default, this is not an issue if all of your scripts and any modules
and packages they use are stored in your web directory, and your web server
launches CGI scripts in the directory in which they reside. But if the module lives
elsewhere, you may need to modify the sys.path list in your scripts to adjust the
search path manually before imports—for instance, with sys.path.append(dir
name) calls, index assignments, and so on.
End-of-line conventions (optional)
On some Unix (and Linux) servers, you might also have to make sure that your
script text files follow the Unix end-of-line convention (\n), not DOS (\r\n). This
isn’t an issue if you edit and debug right on the server (or on another Unix machine)
or FTP files one by one in text mode. But if you edit and upload your scripts from
a PC to a Unix server in a tar file (or in FTP binary mode), you may need to convert
end-of-lines after the upload. For instance, the server that was used for the second
edition of this text returns a default error page for scripts whose end-of-lines are
in DOS format. See Chapter 6 for techniques and a note on automated end-of-line
converter scripts.
Unbuffered output streams (optional)
Under some servers, the print call statement may buffer its output. If you have a
long-running CGI script, to avoid making the user wait to see results, you may wish
to manually flush your printed text (call sys.stdout.flush()) or run your Python
scripts in unbuffered mode. Recall from Chapter 5 that you can make streams
unbuffered by running with the -u command-line flag or by setting your
PYTHONUNBUFFERED environment variable to a nonempty value.
To use -u in the CGI world, try using a first line on Unix-like platforms like #!/
usr/bin/python -u. In typical usage, output buffering is not usually a factor. On
some servers and clients, though, this may be a resolution for empty reply pages,
or premature end-of-script header errors—the client may time out before the buf-
fered output stream is sent (though more commonly, these cases reflect genuine
program errors in your script).
This installation process may sound a bit complex at first glance, but much of it is
server-dependent, and it’s not bad once you’ve worked through it on your own. It’s
only a concern at install time and can usually be automated to some extent with Python
scripts run on the server. To summarize, most Python CGI scripts are text files of Python
code, which:
• Are named according to your web server’s conventions (e.g., file.py)
• Are stored in a directory recognized by your web server (e.g., cgi-bin/)
• Are given executable file permissions if required (e.g., chmod 755 file.py)
1144 | Chapter 15: Server-Side Scripting

• May require the special #!pythonpath line at the top for some servers
• Configure sys.path only if needed to see modules in other directories
• Use Unix end-of-line conventions if your server rejects DOS format
• Flush output buffers if required, or to send portions of the reply periodically
Even if you must use a server machine configured by someone else, most of the ma-
chine’s conventions should be easy to root out during a normal debugging cycle. As
usual, you should consult the conventions for any machine to which you plan to copy
these example files.
Finding Python on remote servers
One last install pointer: even though Python doesn’t have to be installed on any cli-
ents in the context of a server-side web application, it does have to exist on the server
machine where your CGI scripts are expected to run. If you’re running your own server
with either the webserver.py script we met earlier or an open source server such as
Apache, this is a nonissue.
But if you are using a web server that you did not configure yourself, you must be sure
that Python lives on that machine. Moreover, you need to find where it is on that
machine so that you can specify its path in the #! line at the top of your script. If you
are not sure if or where Python lives on your server machine, here are some tips:
• Especially on Unix systems, you should first assume that Python lives in a standard
place (e.g., /usr/local/bin/python): type python (or which python) in a shell window
and see if it works. Chances are that Python already lives on such machines. If you
have Telnet or SSH access on your server, a Unix find command starting at /usr
may help.
• If your server runs Linux, you’re probably set to go. Python ships as a standard
part of Linux distributions these days, and many websites and Internet Service
Providers (ISPs) run the Linux operating system; at such sites, Python probably
already lives at /usr/bin/python.
• In other environments where you cannot control the server machine yourself, it
may be harder to obtain access to an already installed Python. If so, you can relocate
your site to a server that does have Python installed, talk your ISP into installing
Python on the machine you’re trying to use, or install Python on the server machine
yourself.
If your ISP is unsympathetic to your need for Python and you are willing to relocate
your site to one that is, you can find lists of Python-friendly ISPs by searching the Web.
And if you choose to install Python on your server machine yourself, be sure to check
out the Python world’s support for frozen binaries—with it, you can create a single
executable program file that contains the entire Python interpreter, as well as all the
standard library modules. Assuming compatible machines, such a frozen interpreter
might be uploaded to your web account by FTP in a single step, and it won’t require a
Climbing the CGI Learning Curve | 1145

full-blown Python installation on the server. The public domain PyInstaller and Py2Exe
systems can produce a frozen Python binary.
Finally, to run this book’s examples, make sure the Python you find or install is Python
3.X, not Python 2.X. As mentioned earlier, many commercial ISPs support the latter
but not the former as I’m writing this fourth edition, but this is expected to change over
time. If you do locate a commercial ISP with 3.X support, you should be able to upload
your files by FTP and work by SSH or Telnet. You may also be able to run this chapter’s
webserver.py script on the remote machine, though you may need to avoid using the
standard port 80, depending on how much control your account affords.
Adding Pictures and Generating Tables
Let’s get back to writing server-side code. As anyone who’s ever surfed the Web knows,
web pages usually consist of more than simple text. Example 15-4 is a Python CGI
script that prints an <IMG> HTML tag in its output to produce a graphic image in the
client browser. This example isn’t very Python-specific, but note that just as for simple
HTML files, the image file (ppsmall.gif, one level up from the script file) lives on and is
downloaded from the server machine when the browser interprets the output of this
script to render the reply page (even if the server’s machine is the same as the client’s).
Example 15-4. PP4E\Internet\Web\cgi-bin\tutor1.py
#!/usr/bin/python
text = """Content-type: text/html
<TITLE>CGI 101</TITLE>
<H1>A Second CGI Script</H1>
<HR>
<P>Hello, CGI World!</P>
<IMG src="../ppsmall.gif" BORDER=1 ALT=[image]>
<HR>
"""
print(text)
Notice the use of the triple-quoted string block here; the entire HTML string is sent to
the browser in one fell swoop, with the print call statement at the end. Be sure that the
blank line between the Content-type header and the first HTML is truly blank in the
string (it may fail in some browsers if you have any spaces or tabs on that line). If both
client and server are functional, a page that looks like Figure 15-4 will be generated
when this script is referenced and run.
So far, our CGI scripts have been putting out canned HTML that could have just as
easily been stored in an HTML file. But because CGI scripts are executable programs,
they can also be used to generate HTML on the fly, dynamically—even, possibly, in
response to a particular set of user inputs sent to the script. That’s the whole purpose
1146 | Chapter 15: Server-Side Scripting
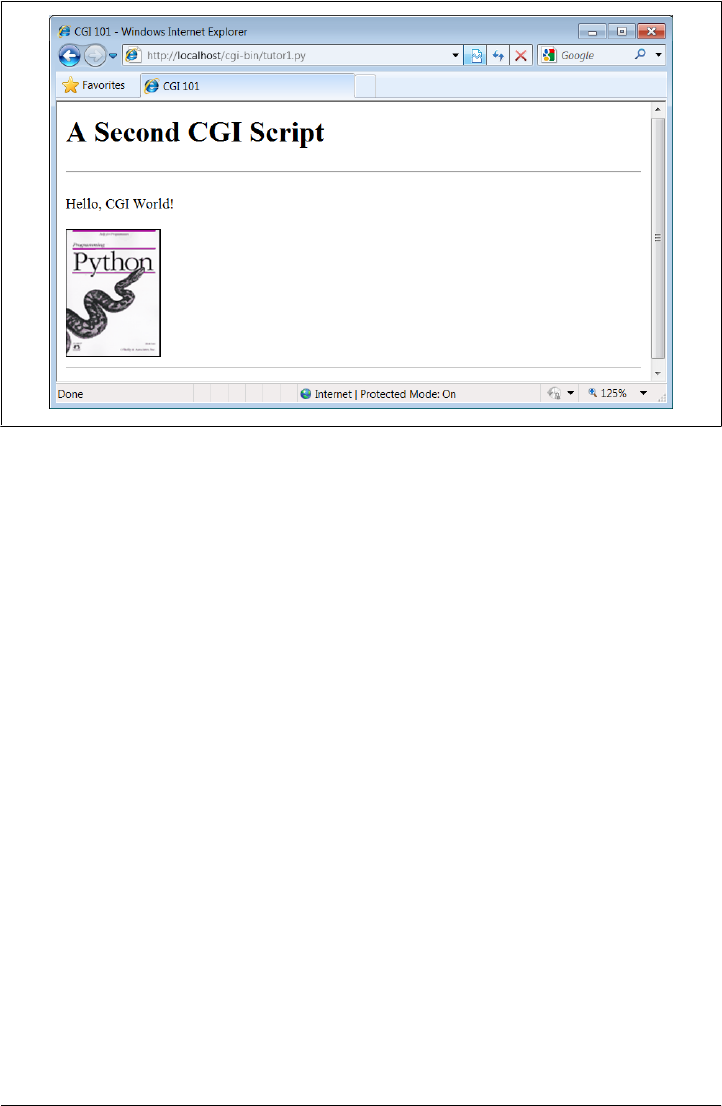
of CGI scripts, after all. Let’s start using this to better advantage now, and write a Python
script that builds up response HTML programmatically, listed in Example 15-5.
Example 15-5. PP4E\Internet\Web\cgi-bin\tutor2.py
#!/usr/bin/python
print("""Content-type: text/html
<TITLE>CGI 101</TITLE>
<H1>A Third CGI Script</H1>
<HR>
<P>Hello, CGI World!</P>
<table border=1>
""")
for i in range(5):
print('<tr>')
for j in range(4):
print('<td>%d.%d</td>' % (i, j))
print('</tr>')
print("""
</table>
<HR>
""")
Despite all the tags, this really is Python code—the tutor2.py script uses triple-quoted
strings to embed blocks of HTML again. But this time, the script also uses nested Python
Figure 15-4. A page with an image generated by tutor1.py
Climbing the CGI Learning Curve | 1147
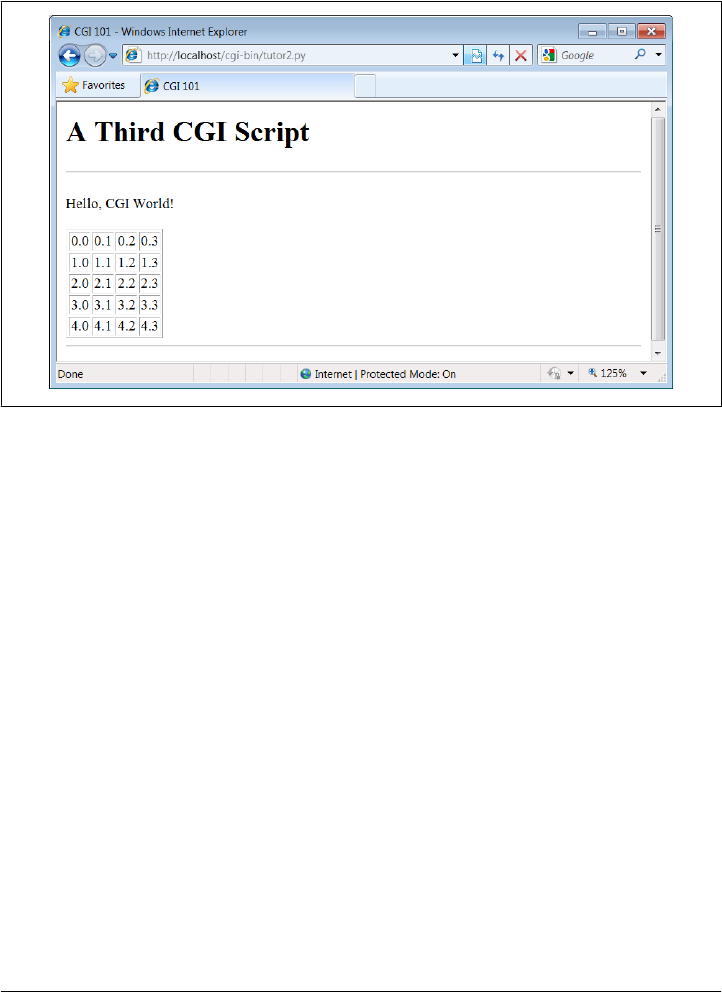
for loops to dynamically generate part of the HTML that is sent to the browser. Spe-
cifically, it emits HTML to lay out a two-dimensional table in the middle of a page, as
shown in Figure 15-5.
Figure 15-5. A page with a table generated by tutor2.py
Each row in the table displays a “row.column” pair, as generated by the executing
Python script. If you’re curious how the generated HTML looks, select your browser’s
View Source option after you’ve accessed this page. It’s a single HTML page composed
of the HTML generated by the first print in the script, then the for loops, and finally
the last print. In other words, the concatenation of this script’s output is an HTML
document with headers.
Table tags
The script in Example 15-5 generates HTML table tags. Again, we’re not out to learn
HTML here, but we’ll take a quick look just so that you can make sense of this book’s
examples. Tables are declared by the text between <table> and </table> tags in HTML.
Typically, a table’s text in turn declares the contents of each table row between <tr>
and </tr> tags and each column within a row between <td> and </td> tags. The loops
in our script build up HTML to declare five rows of four columns each by printing the
appropriate tags, with the current row and column number as column values.
For instance, here is part of the script’s output, defining the first two rows (to see the
full output, run the script standalone from a system command line, or select your
browser’s View Source option):
1148 | Chapter 15: Server-Side Scripting

<table border=1>
<tr>
<td>0.0</td>
<td>0.1</td>
<td>0.2</td>
<td>0.3</td>
</tr>
<tr>
<td>1.0</td>
<td>1.1</td>
<td>1.2</td>
<td>1.3</td>
</tr>
. . .
</table>
Other table tags and options let us specify a row title (<th>), lay out borders, and so
on. We’ll use more table syntax to lay out forms in a uniform fashion later in this
tutorial.
Adding User Interaction
CGI scripts are great at generating HTML on the fly like this, but they are also com-
monly used to implement interaction with a user typing at a web browser. As described
earlier in this chapter, web interactions usually involve a two-step process and two
distinct web pages: you fill out an input form page and press Submit, and a reply page
eventually comes back. In between, a CGI script processes the form input.
Submission page
That description sounds simple enough, but the process of collecting user inputs re-
quires an understanding of a special HTML tag, <form>. Let’s look at the implementa-
tion of a simple web interaction to see forms at work. First, we need to define a form
page for the user to fill out, as shown in Example 15-6.
Example 15-6. PP4E\Internet\Web\tutor3.html
<html>
<title>CGI 101</title>
<body>
<H1>A first user interaction: forms</H1>
<hr>
<form method=POST action="http://localhost/cgi-bin/tutor3.py">
<P><B>Enter your name:</B>
<P><input type=text name=user>
<P><input type=submit>
</form>
</body></html>
Climbing the CGI Learning Curve | 1149
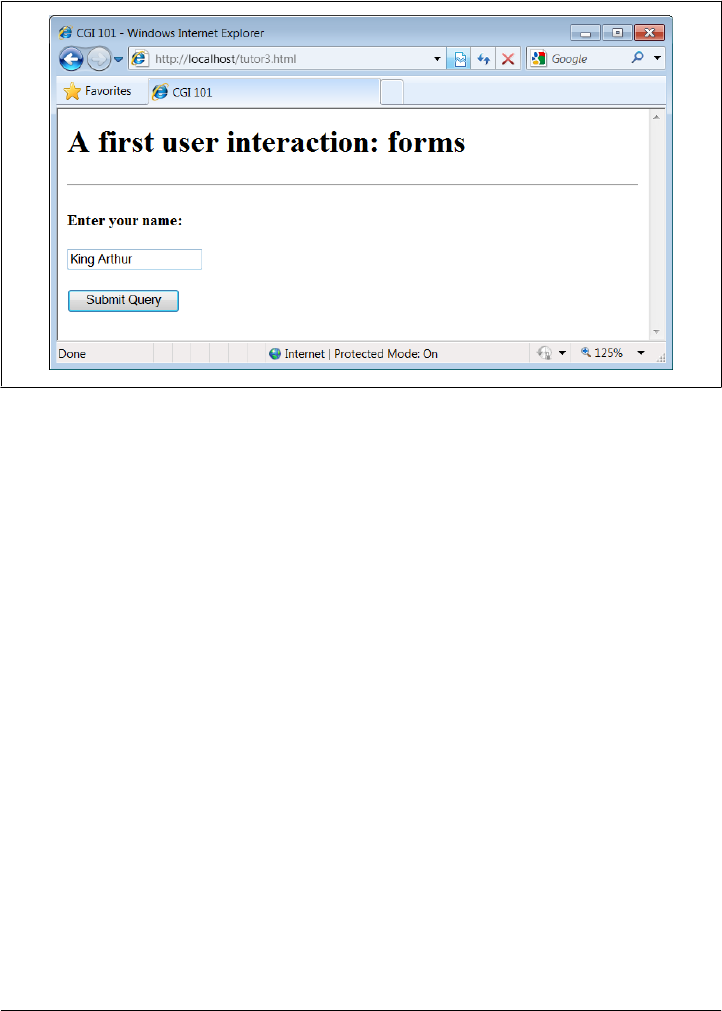
tutor3.html is a simple HTML file, not a CGI script (though its contents could be printed
from a script as well). When this file is accessed, all the text between its <form> and
</form> tags generates the input fields and Submit button shown in Figure 15-6.
Figure 15-6. A simple form page generated by tutor3.html
More on form tags
We won’t go into all the details behind coding HTML forms, but a few highlights are
worth underscoring. The following occurs within a form’s HTML code:
Form handler action
The form’s action option gives the URL of a CGI script that will be invoked to
process submitted form data. This is the link from a form to its handler program—
in this case, a program called tutor3.py in the cgi-bin subdirectory of the locally
running server’s working directory. The action option is the equivalent of
command options in tkinter buttons—it’s where a callback handler (here, a remote
handler script) is registered to the browser and server.
Input fields
Input controls are specified with nested <input> tags. In this example, input tags
have two key options. The type option accepts values such as text for text fields
and submit for a Submit button (which sends data to the server and is labeled
“Submit Query” by default). The name option is the hook used to identify the en-
tered value by key, once all the form data reaches the server. For instance, the
server-side CGI script we’ll see in a moment uses the string user as a key to get the
data typed into this form’s text field.
As we’ll see in later examples, other input tag options can specify initial values
(value=X), display-only mode (readonly), and so on. As we’ll also see later, other
1150 | Chapter 15: Server-Side Scripting

input type option values may transmit hidden data that embeds state information
in pages (type=hidden), reinitializes fields (type=reset), or makes multiple-choice
buttons (type=checkbox).
Submission method: get and post
Forms also include a method option to specify the encoding style to be used to send
data over a socket to the target server machine. Here, we use the post style, which
contacts the server and then ships it a stream of user input data in a separate trans-
mission over the socket.
An alternative get style ships input information to the server in a single transmis-
sion step by appending user inputs to the query string at the end of the URL used
to invoke the script, usually after a ? character. Query parameters were introduced
earlier when we met URLs; we will put them to use later in this section.
With get, inputs typically show up on the server in environment variables or as
arguments in the command line used to start the script. With post, they must be
read from standard input and decoded. Because the get method appends inputs to
URLs, it allows users to bookmark actions with parameters for later submission
(e.g., a link to a retail site, together with the name of a particular item); post is very
generally meant for sending data that is to be submitted once (e.g., comment text).
The get method is usually considered more efficient, but it may be subject to length
limits in the operating system and is less secure (parameters may be recorded in
server logs, for instance). post can handle larger inputs and may be more secure in
some scenarios, but it requires an extra transmission. Luckily, Python’s cgi module
transparently handles either encoding style, so our CGI scripts don’t normally need
to know or care which is used.
Notice that the action URL in this example’s form spells out the full address for illus-
tration. Because the browser remembers where the enclosing HTML page came from,
it works the same with just the script’s filename, as shown in Example 15-7.
Example 15-7. PP4E\Internet\Web\tutor3-minimal.html
<html>
<title>CGI 101</title>
<body>
<H1>A first user interaction: forms</H1>
<hr>
<form method=POST action="cgi-bin/tutor3.py">
<P><B>Enter your name:</B>
<P><input type=text name=user>
<P><input type=submit>
</form>
</body></html>
It may help to remember that URLs embedded in form action tags and hyperlinks are
directions to the browser first, not to the script. The tutor3.py script itself doesn’t care
which URL form is used to trigger it—minimal or complete. In fact, all parts of a URL
Climbing the CGI Learning Curve | 1151

through the script filename (and up to URL query parameters) are used in the conver-
sation between browser and HTTP server, before a CGI script is ever spawned. As long
as the browser knows which server to contact, the URL will work.
On the other hand, URLs submitted outside of a page (e.g., typed into a browser’s
address field or sent to the Python urllib.request module we’ll revisit later) usually
must be completely specified, because there is no notion of a prior page.
Response script
So far, we’ve created only a static page with an input field. But the Submit button on
this page is loaded to work magic. When pressed, it triggers the possibly remote pro-
gram whose URL is listed in the form’s action option, and passes this program the
input data typed by the user, according to the form’s method encoding style option. On
the server, a Python script is started to handle the form’s input data while the user waits
for a reply on the client; that script is shown in Example 15-8.
Example 15-8. PP4E\Internet\Web\cgi-bin\tutor3.py
#!/usr/bin/python
"""
runs on the server, reads form input, prints HTML;
url=http://server-name/cgi-bin/tutor3.py
"""
import cgi
form = cgi.FieldStorage() # parse form data
print('Content-type: text/html') # plus blank line
html = """
<TITLE>tutor3.py</TITLE>
<H1>Greetings</H1>
<HR>
<P>%s</P>
<HR>"""
if not 'user' in form:
print(html % 'Who are you?')
else:
print(html % ('Hello, %s.' % form['user'].value))
As before, this Python CGI script prints HTML to generate a response page in the
client’s browser. But this script does a bit more: it also uses the standard cgi module
to parse the input data entered by the user on the prior web page (see Figure 15-6).
Luckily, this is automatic in Python: a call to the standard library cgi module’s Field
Storage class does all the work of extracting form data from the input stream and
environment variables, regardless of how that data was passed—in a post style stream
or in get style parameters appended to the URL. Inputs sent in both styles look the
same to Python scripts.
1152 | Chapter 15: Server-Side Scripting
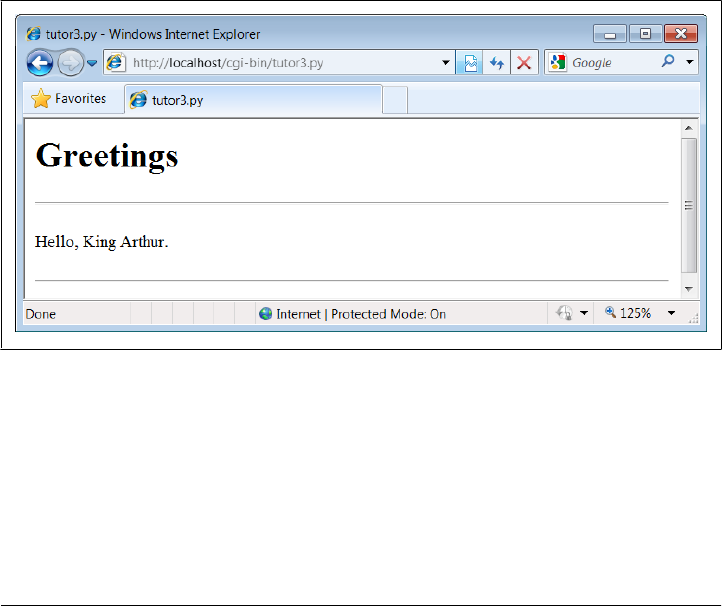
Scripts should call cgi.FieldStorage only once and before accessing any field values.
When it is called, we get back an object that looks like a dictionary—user input fields
from the form (or URL) show up as values of keys in this object. For example, in the
script, form['user'] is an object whose value attribute is a string containing the text
typed into the form’s text field. If you flip back to the form page’s HTML, you’ll notice
that the input field’s name option was user—the name in the form’s HTML has become
a key we use to fetch the input’s value from a dictionary. The object returned by
FieldStorage supports other dictionary operations, too—for instance, the in expres-
sion may be used to check whether a field is present in the input data.
Before exiting, this script prints HTML to produce a result page that echoes back what
the user typed into the form. Two string-formatting expressions (%) are used to insert
the input text into a reply string, and the reply string into the triple-quoted HTML
string block. The body of the script’s output looks like this:
<TITLE>tutor3.py</TITLE>
<H1>Greetings</H1>
<HR>
<P>Hello, King Arthur.</P>
<HR>
In a browser, the output is rendered into a page like the one in Figure 15-7.
Figure 15-7. tutor3.py result for parameters in a form
Passing parameters in URLs
Notice that the URL address of the script that generated this page shows up at the top
of the browser. We didn’t type this URL itself—it came from the action tag of the prior
page’s form HTML. However, nothing is stopping us from typing the script’s URL
explicitly in our browser’s address field to invoke the script, just as we did for our earlier
CGI script and HTML file examples.
Climbing the CGI Learning Curve | 1153

But there’s a catch here: where does the input field’s value come from if there is no form
page? That is, if we type the CGI script’s URL ourselves, how does the input field get
filled in? Earlier, when we talked about URL formats, I mentioned that the get encoding
scheme tacks input parameters onto the end of URLs. When we type script addresses
explicitly, we can also append input values on the end of URLs, where they serve the
same purpose as <input> fields in forms. Moreover, the Python cgi module makes URL
and form inputs look identical to scripts.
For instance, we can skip filling out the input form page completely and directly invoke
our tutor3.py script by visiting a URL of this form (type this in your browser’s address
field):
http://localhost/cgi-bin/tutor3.py?user=Brian
In this URL, a value for the input named user is specified explicitly, as if the user had
filled out the input page. When called this way, the only constraint is that the parameter
name user must match the name expected by the script (and hardcoded in the form’s
HTML). We use just one parameter here, but in general, URL parameters are typically
introduced with a ? and are followed by one or more name=value assignments, separated
by & characters if there is more than one. Figure 15-8 shows the response page we get
after typing a URL with explicit inputs.
Figure 15-8. tutor3.py result for parameters in a URL
In fact, HTML forms that specify the get encoding style also cause inputs to be added
to URLs this way. Try changing Example 15-6 to use method=GET, and submit the form—
the name input in the form shows up as a query parameter in the reply page address
field, just like the URL we manually entered in Figure 15-8. Forms can use the post or
get style. Manually typed URLs with parameters use get.
Generally, any CGI script can be invoked either by filling out and submitting a form
page or by passing inputs at the end of a URL. Although hand-coding parameters in
1154 | Chapter 15: Server-Side Scripting
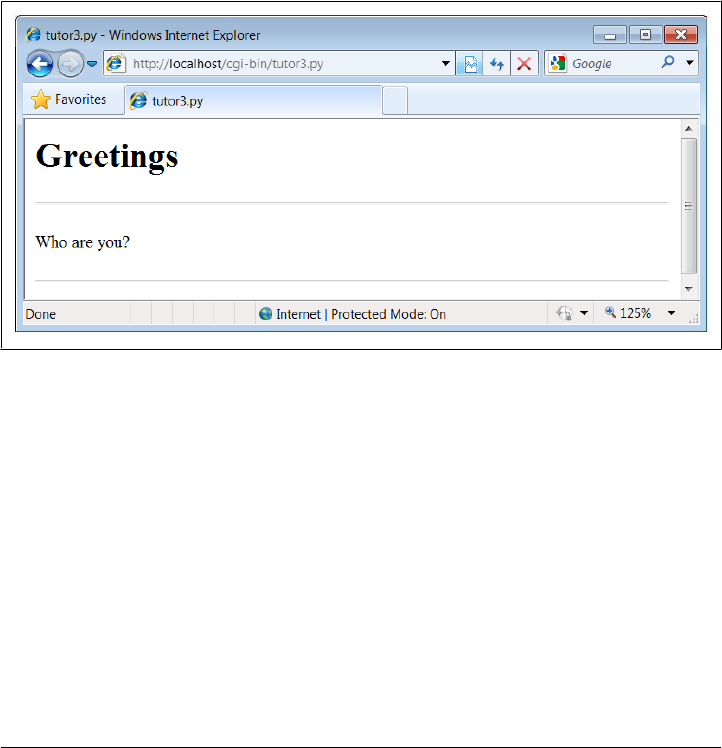
URLs can become difficult for scripts that expect many complex parameters, other
programs can automate the construction process.
When CGI scripts are invoked with explicit input parameters this way, it’s not too
difficult to see their similarity to functions, albeit ones that live remotely on the Net.
Passing data to scripts in URLs is similar to keyword arguments in Python functions,
both operationally and syntactically. In fact, some advanced web frameworks such as
Zope make the relationship between URLs and Python function calls even more literal:
URLs become more direct calls to Python functions.
Incidentally, if you clear out the name input field in the form input page (i.e., make it
empty) and press Submit, the user name field becomes empty. More accurately, the
browser may not send this field along with the form data at all, even though it is listed
in the form layout HTML. The CGI script detects such a missing field with the dic-
tionary in expression and produces the page captured in Figure 15-9 in response.
Figure 15-9. An empty name field producing an error page
In general, CGI scripts must check to see whether any inputs are missing, partly because
they might not be typed by a user in the form, but also because there may be no form
at all—input fields might not be tacked onto the end of an explicitly typed or con-
structed get-style URL. For instance, if we type the script’s URL without any parameters
at all—by omitting the text from the ? and beyond, and visiting http://localhost/cgi-bin/
tutor3.py with an explicitly entered URL—we get this same error response page. Since
we can invoke any CGI through a form or URL, scripts must anticipate both scenarios.
Testing outside browsers with the module urllib.request
Once we understand how to send inputs to forms as query string parameters at the end
of URLs like this, the Python urllib.request module we met in Chapters 1 and 13
becomes even more useful. Recall that this module allows us to fetch the reply generated
Climbing the CGI Learning Curve | 1155

for any URL address. When the URL names a simple HTML file, we simply download
its contents. But when it names a CGI script, the effect is to run the remote script and
fetch its output. This notion opens the door to web services, which generate useful XML
in response to input parameters; in simpler roles, this allows us to test remote scripts.
For example, we can trigger the script in Example 15-8 directly, without either going
through the tutor3.html web page or typing a URL in a browser’s address field:
C:\...\PP4E\Internet\Web> python
>>> from urllib.request import urlopen
>>> reply = urlopen('http://localhost/cgi-bin/tutor3.py?user=Brian').read()
>>> reply
b'<TITLE>tutor3.py</TITLE>\n<H1>Greetings</H1>\n<HR>\n<P>Hello, Brian.</P>\n<HR>\n'
>>> print(reply.decode())
<TITLE>tutor3.py</TITLE>
<H1>Greetings</H1>
<HR>
<P>Hello, Brian.</P>
<HR>
>>> url = 'http://localhost/cgi-bin/tutor3.py'
>>> conn = urlopen(url)
>>> reply = conn.read()
>>> print(reply.decode())
<TITLE>tutor3.py</TITLE>
<H1>Greetings</H1>
<HR>
<P>Who are you?</P>
<HR>
Recall from Chapter 13 that urllib.request.urlopen gives us a file object connected to
the generated reply stream. Reading this file’s output returns the HTML that would
normally be intercepted by a web browser and rendered into a reply page. The reply
comes off of the underlying socket as bytes in 3.X, but can be decoded to str strings
as needed.
When fetched directly this way, the HTML reply can be parsed with Python text pro-
cessing tools, including string methods like split and find, the re pattern-matching
module, or the html.parser HTML parsing module—all tools we’ll explore in Chap-
ter 19. Extracting text from the reply like this is sometimes informally called screen
scraping—a way to use website content in other programs. Screen scraping is an alter-
native to more complex web services frameworks, though a brittle one: small changes
in the page’s format can often break scrapers that rely on it. The reply text can also be
simply inspected—urllib.request allows us to test CGI scripts from the Python in-
teractive prompt or other scripts, instead of a browser.
More generally, this technique allows us to use a server-side script as a sort of function
call. For instance, a client-side GUI can call the CGI script and parse the generated reply
page. Similarly, a CGI script that updates a database may be invoked programmatically
with urllib.request, outside the context of an input form page. This also opens the
1156 | Chapter 15: Server-Side Scripting

door to automated regression testing of CGI scripts—we can invoke scripts on any
remote machine, and compare their reply text to the expected output.§ We’ll see url
lib.request in action again in later examples.
Before we move on, here are a few advanced urllib.request usage notes. First, this
module also supports proxies, alternative transmission modes, the client side of secure
HTTPS, cookies, redirections, and more. For instance, proxies are supported trans-
parently with environment variables or system settings, or by using ProxyHandler
objects in this module (see its documentation for details and examples).
Moreover, although it normally doesn’t make a difference to Python scripts, it is pos-
sible to send parameters in both the get and the put submission modes described earlier
with urllib.request. The get mode, with parameters in the query string at the end of
a URL as shown in the prior listing, is used by default. To invoke post, pass parameters
in as a separate argument:
>>> from urllib.request import urlopen
>>> from urllib.parse import urlencode
>>> params = urlencode({'user': 'Brian'})
>>> params
'user=Brian'
>>>
>>> print(urlopen('http://localhost/cgi-bin/tutor3.py', params).read().decode())
<TITLE>tutor3.py</TITLE>
<H1>Greetings</H1>
<HR>
<P>Hello, Brian.</P>
<HR>
Finally, if your web application depends on client-side cookies (discussed later) these
are supported by urllib.request automatically, using Python’s standard library cookie
support to store cookies locally, and later return them to the server. It also supports
redirection, authentication, and more; the client side of secure HTTP transmissions
(HTTPS) is supported if your computer has secure sockets support available (most do).
See the Python library manual for details. We’ll explore both cookies later in this chap-
ter, and introduce secure HTTPS in the next.
Using Tables to Lay Out Forms
Now let’s move on to something a bit more realistic. In most CGI applications, input
pages are composed of multiple fields. When there is more than one, input labels and
fields are typically laid out in a table, to give the form a well-structured appearance.
The HTML file in Example 15-9 defines a form with two input fields.
§ If your job description includes extensive testing of server-side scripts, you may also want to explore Twill,
a Python-based system that provides a little language for scripting the client-side interface to web applications.
Search the Web for details.
Climbing the CGI Learning Curve | 1157
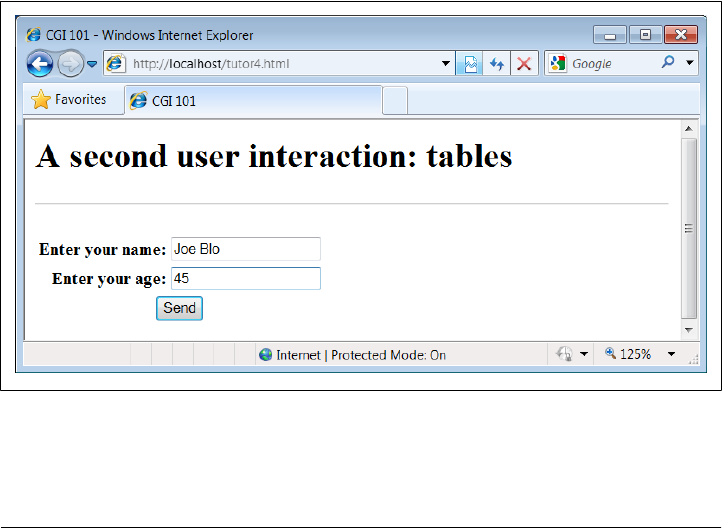
Example 15-9. PP4E\Internet\Web\tutor4.html
<html>
<title>CGI 101</title>
<body>
<H1>A second user interaction: tables
</H1>
<hr>
<form method=POST action="cgi-bin/tutor4.py">
<table>
<TR>
<TH align=right>Enter your name:
<TD><input type=text name=user>
<TR>
<TH align=right>Enter your age:
<TD><input type=text name=age>
<TR>
<TD colspan=2 align=center>
<input type=submit value="Send">
</table>
</form>
</body></html>
The <TH> tag defines a column like <TD>, but also tags it as a header column, which
generally means it is rendered in a bold font. By placing the input fields and labels in a
table like this, we get an input page like that shown in Figure 15-10. Labels and inputs
are automatically lined up vertically in columns, much as they were by the tkinter GUI
geometry managers we met earlier in this book.
Figure 15-10. A form laid out with table tags
1158 | Chapter 15: Server-Side Scripting

When this form’s Submit button (labeled “Send” by the page’s HTML) is pressed, it
causes the script in Example 15-10 to be executed on the server machine, with the
inputs typed by the user.
Example 15-10. PP4E\Internet\Web\cgi-bin\tutor4.py
#!/usr/bin/python
"""
runs on the server, reads form input, prints HTML;
URL http://server-name/cgi-bin/tutor4.py
"""
import cgi, sys
sys.stderr = sys.stdout # errors to browser
form = cgi.FieldStorage() # parse form data
print('Content-type: text/html\n') # plus blank line
# class dummy:
# def __init__(self, s): self.value = s
# form = {'user': dummy('bob'), 'age':dummy('10')}
html = """
<TITLE>tutor4.py</TITLE>
<H1>Greetings</H1>
<HR>
<H4>%s</H4>
<H4>%s</H4>
<H4>%s</H4>
<HR>"""
if not 'user' in form:
line1 = 'Who are you?'
else:
line1 = 'Hello, %s.' % form['user'].value
line2 = "You're talking to a %s server." % sys.platform
line3 = ""
if 'age' in form:
try:
line3 = "Your age squared is %d!" % (int(form['age'].value) ** 2)
except:
line3 = "Sorry, I can't compute %s ** 2." % form['age'].value
print(html % (line1, line2, line3))
The table layout comes from the HTML file, not from this Python CGI script. In fact,
this script doesn’t do much new—it uses string formatting to plug input values into
the response page’s HTML triple-quoted template string as before, this time with one
line per input field. When this script is run by submitting the input form page, its output
produces the new reply page shown in Figure 15-11.
Climbing the CGI Learning Curve | 1159
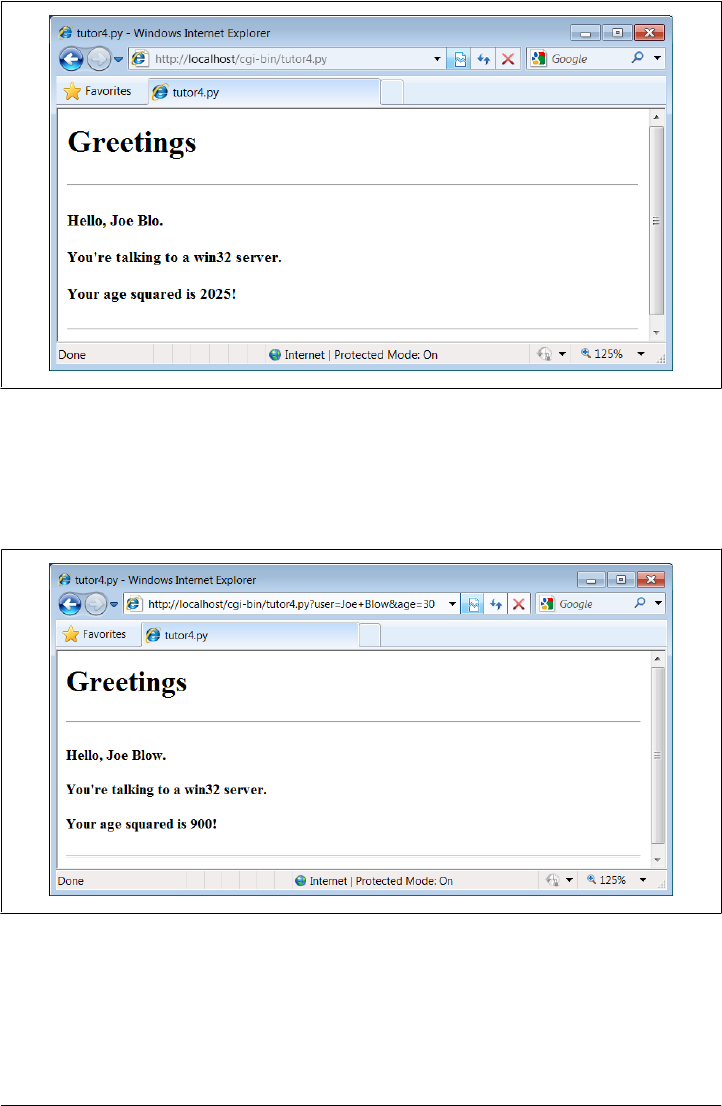
Figure 15-11. Reply page generated by tutor4.py
As usual, we can pass parameters to this CGI script at the end of a URL, too. Fig-
ure 15-12 shows the page we get when passing a user and age explicitly in this URL:
http://localhost/cgi-bin/tutor4.py?user=Joe+Blow&age=30
Figure 15-12. Reply page from tutor4.py for parameters in URL
Notice that we have two parameters after the ? this time; we separate them with &. Also
note that we’ve specified a blank space in the user value with +. This is a common URL
encoding convention. On the server side, the + is automatically replaced with a space
again. It’s also part of the standard escape rule for URL strings, which we’ll revisit later.
1160 | Chapter 15: Server-Side Scripting

Although Example 15-10 doesn’t introduce much that is new about CGI itself, it does
highlight a few new coding tricks worth noting, especially regarding CGI script de-
bugging and security. Let’s take a quick look.
Converting strings in CGI scripts
Just for fun, the script echoes back the name of the server platform by fetching
sys.platform along with the square of the age input field. Notice that the age input’s
value must be converted to an integer with the built-in int function; in the CGI world,
all inputs arrive as strings. We could also convert to an integer with the built-in eval
function. Conversion (and other) errors are trapped gracefully in a try statement to
yield an error line, instead of letting our script die.
But you should never use eval to convert strings that were sent over the
Internet, like the age field in this example, unless you can be absolutely
sure that the string does not contain even potentially malicious code.
For instance, if this example were available on the general Internet, it’s
not impossible that someone could type a value into the age field (or
append an age parameter to the URL) with a value that invokes a system
shell command. Given the appropriate context and process permissions,
when passed to eval, such a string might delete all the files in your server
script directory, or worse!
Unless you run CGI scripts in processes with limited permissions and
machine access, strings read off the Web can be dangerous to run as
code in CGI scripting. You should never pass them to dynamic coding
tools like eval and exec, or to tools that run arbitrary shell commands
such as os.popen and os.system, unless you can be sure that they are
safe. Always use simpler tools for numeric conversion like int and
float, which recognize only numbers, not arbitrary Python code.
Debugging CGI scripts
Errors happen, even in the brave new world of the Internet. Generally speaking, de-
bugging CGI scripts can be much more difficult than debugging programs that run on
your local machine. Not only do errors occur on a remote machine, but scripts generally
won’t run without the context implied by the CGI model. The script in Exam-
ple 15-10 demonstrates the following two common debugging tricks:
Error message trapping
This script assigns sys.stderr to sys.stdout so that Python error messages wind
up being displayed in the response page in the browser. Normally, Python error
messages are written to stderr, which generally causes them to show up in the web
server’s console window or logfile. To route them to the browser, we must make
stderr reference the same file object as stdout (which is connected to the browser
in CGI scripts). If we don’t do this assignment, Python errors, including program
errors in our script, never show up in the browser.
Climbing the CGI Learning Curve | 1161

Test case mock-up
The dummy class definition, commented out in this final version, was used to debug
the script before it was installed on the Net. Besides not seeing stderr messages by
default, CGI scripts also assume an enclosing context that does not exist if they are
tested outside the CGI environment. For instance, if run from the system command
line, this script has no form input data. Uncomment this code to test from the
system command line. The dummy class masquerades as a parsed form field object,
and form is assigned a dictionary containing two form field objects. The net effect
is that form will be plug-and-play compatible with the result of a
cgi.FieldStorage call. As usual in Python, object interfaces, not datatypes, are all
we must adhere to.
Here are a few general tips for debugging your server-side CGI scripts:
Run the script from the command line
It probably won’t generate HTML as is, but running it standalone will detect any
syntax errors in your code. Recall that a Python command line can run source code
files regardless of their extension: for example, python somescript.cgi works fine.
Assign sys.stderr to sys.stdout as early as possible in your script
This will generally make the text of Python error messages and stack dumps appear
in your client browser when accessing the script, instead of the web server’s console
window or logs. Short of wading through server logs or manual exception handling,
this may be the only way to see the text of error messages after your script aborts.
Mock up inputs to simulate the enclosing CGI context
For instance, define classes that mimic the CGI inputs interface (as done with the
dummy class in this script) to view the script’s output for various test cases by running
it from the system command line.‖ Setting environment variables to mimic form
or URL inputs sometimes helps, too (we’ll see how later in this chapter).
Call utilities to display CGI context in the browser
The CGI module includes utility functions that send a formatted dump of CGI
environment variables and input values to the browser, to view in a reply page. For
instance, cgi.print_form(form) prints all the input parameters sent from the client,
and cgi.test() prints environment variables, the form, the directory, and more.
Sometimes this is enough to resolve connection or input problems. We’ll use some
of these in the webmail case study in the next chapter.
Show exceptions you catch, print tracebacks
If you catch an exception that Python raises, the Python error message won’t be
printed to stderr (that is normal behavior). In such cases, it’s up to your script to
‖This technique isn’t unique to CGI scripts, by the way. In Chapter 12, we briefly met systems that embed
Python code inside HTML, such as Python Server Pages. There is no good way to test such code outside the
context of the enclosing system without extracting the embedded Python code (perhaps by using the
html.parser HTML parser that comes with Python, covered in Chapter 19) and running it with a passed-in
mock-up of the API that it will eventually use.
1162 | Chapter 15: Server-Side Scripting

display the exception’s name and value in the response page; exception details are
available in the built-in sys module, from sys.exc_info(). In addition, Python’s
traceback module can be used to manually generate stack traces on your reply page
for errors; tracebacks show source-code lines active when an exception occurred.
We’ll use this later in the error page in PyMailCGI (Chapter 16).
Add debugging prints
You can always insert tracing print statements in your code, just as in normal
Python programs. Be sure you print the content-type header line first, though, or
your prints may not show up on the reply page. In the worst case, you can also
generate debugging and trace messages by opening and writing to a local text file
on the server; provided you access that file later, this avoids having to format the
trace messages according to HTML reply stream conventions.
Run it live
Of course, once your script is at least half working, your best bet is likely to start
running it live on the server, with real inputs coming from a browser. Running a
server locally on your machine, as we’re doing in this chapter, can help by making
changes go faster as you test.
Adding Common Input Devices
So far, we’ve been typing inputs into text fields. HTML forms support a handful of
input controls (what we’d call widgets in the traditional GUI world) for collecting user
inputs. Let’s look at a CGI program that shows all the common input controls at once.
As usual, we define both an HTML file to lay out the form page and a Python CGI script
to process its inputs and generate a response. The HTML file is presented in
Example 15-11.
Example 15-11. PP4E\Internet\Web\tutor5a.html
<HTML><TITLE>CGI 101</TITLE>
<BODY>
<H1>Common input devices</H1>
<HR>
<FORM method=POST action="cgi-bin/tutor5.py">
<H3>Please complete the following form and click Send</H3>
<P><TABLE>
<TR>
<TH align=right>Name:
<TD><input type=text name=name>
<TR>
<TH align=right>Shoe size:
<TD><table>
<td><input type=radio name=shoesize value=small>Small
<td><input type=radio name=shoesize value=medium>Medium
<td><input type=radio name=shoesize value=large>Large
</table>
<TR>
<TH align=right>Occupation:
Climbing the CGI Learning Curve | 1163
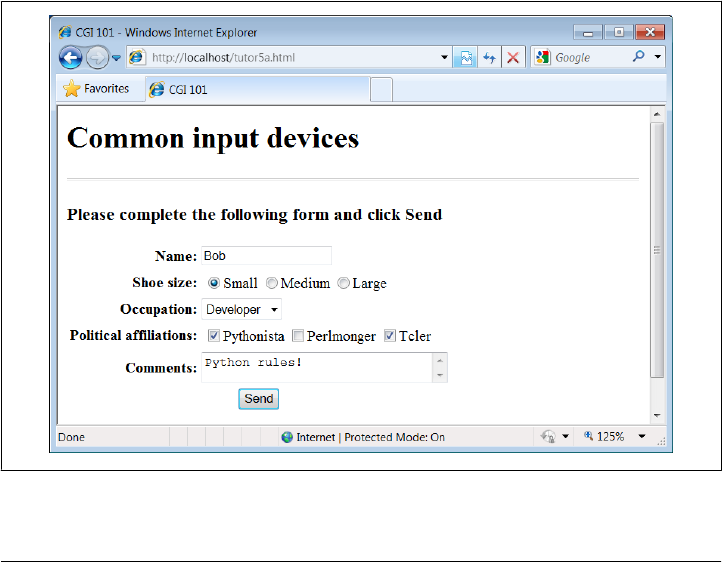
<TD><select name=job>
<option>Developer
<option>Manager
<option>Student
<option>Evangelist
<option>Other
</select>
<TR>
<TH align=right>Political affiliations:
<TD><table>
<td><input type=checkbox name=language value=Python>Pythonista
<td><input type=checkbox name=language value=Perl>Perlmonger
<td><input type=checkbox name=language value=Tcl>Tcler
</table>
<TR>
<TH align=right>Comments:
<TD><textarea name=comment cols=30 rows=2>Enter text here</textarea>
<TR>
<TD colspan=2 align=center>
<input type=submit value="Send">
</TABLE>
</FORM>
<HR>
</BODY></HTML>
When rendered by a browser, the page in Figure 15-13 appears.
Figure 15-13. Input form page generated by tutor5a.html
1164 | Chapter 15: Server-Side Scripting

This page contains a simple text field as before, but it also has radio buttons, a pull-
down selection list, a set of multiple-choice check buttons, and a multiple-line text
input area. All have a name option in the HTML file, which identifies their selected value
in the data sent from client to server. When we fill out this form and click the Send
submit button, the script in Example 15-12 runs on the server to process all the input
data typed or selected in the form.
Example 15-12. PP4E\Internet\Web\cgi-bin\tutor5.py
#!/usr/bin/python
"""
runs on the server, reads form input, prints HTML
"""
import cgi, sys
form = cgi.FieldStorage() # parse form data
print("Content-type: text/html") # plus blank line
html = """
<TITLE>tutor5.py</TITLE>
<H1>Greetings</H1>
<HR>
<H4>Your name is %(name)s</H4>
<H4>You wear rather %(shoesize)s shoes</H4>
<H4>Your current job: %(job)s</H4>
<H4>You program in %(language)s</H4>
<H4>You also said:</H4>
<P>%(comment)s</P>
<HR>"""
data = {}
for field in ('name', 'shoesize', 'job', 'language', 'comment'):
if not field in form:
data[field] = '(unknown)'
else:
if not isinstance(form[field], list):
data[field] = form[field].value
else:
values = [x.value for x in form[field]]
data[field] = ' and '.join(values)
print(html % data)
This Python script doesn’t do much; it mostly just copies form field information into
a dictionary called data so that it can be easily inserted into the triple-quoted response
template string. A few of its techniques merit explanation:
Field validation
As usual, we need to check all expected fields to see whether they really are present
in the input data, using the dictionary in expression. Any or all of the input fields
may be missing if they weren’t entered on the form or appended to an explicit URL.
Climbing the CGI Learning Curve | 1165

String formatting
We’re using dictionary key references in the format string this time—recall that %
(name)s means pull out the value for the key name in the data dictionary and perform
a to-string conversion on its value.
Multiple-choice fields
We’re also testing the type of all the expected fields’ values to see whether they
arrive as a list rather than the usual string. Values of multiple-choice input controls,
like the language choice field in this input page, are returned from
cgi.FieldStorage as a list of objects with value attributes, rather than a simple
single object with a value.
This script copies simple field values to the dictionary verbatim, but it uses a list
comprehension to collect the value fields of multiple-choice selections, and the
string join method to construct a single string with an and inserted between each
selection value (e.g., Python and Tcl). The script’s list comprehension is equivalent
to the call map(lambda x: x.value, form[field]).
Not shown here, the FieldStorage object’s alternative methods getfirst and getlist
can also be used to treat fields as single and multiple items, whether they were sent that
way or not (see Python’s library manuals). And as we’ll see later, besides simple strings
and lists, a third type of form input object is returned for fields that specify file uploads.
To be robust, the script should really also escape the echoed text inserted into the
HTML reply, lest it contain HTML operators; we will discuss escapes in detail later.
When the form page is filled out and submitted, the script creates the response shown
in Figure 15-14—essentially just a formatted echo of what was sent.
Changing Input Layouts
Suppose that you’ve written a system like that in the prior section, and your users,
clients, and significant other start complaining that the input form is difficult to read.
Don’t worry. Because the CGI model naturally separates the user interface (the HTML
input page definition) from the processing logic (the CGI script), it’s completely painless
to change the form’s layout. Simply modify the HTML file; there’s no need to change
the CGI code at all. For instance, Example 15-13 contains a new definition of the input
that uses tables a bit differently to provide a nicer layout with borders.
Example 15-13. PP4E\Internet\Web\tutor5b.html
<HTML><TITLE>CGI 101</TITLE>
<BODY>
<H1>Common input devices: alternative layout</H1>
<P>Use the same tutor5.py server side script, but change the
layout of the form itself. Notice the separation of user interface
and processing logic here; the CGI script is independent of the
HTML used to interact with the user/client.</P><HR>
1166 | Chapter 15: Server-Side Scripting
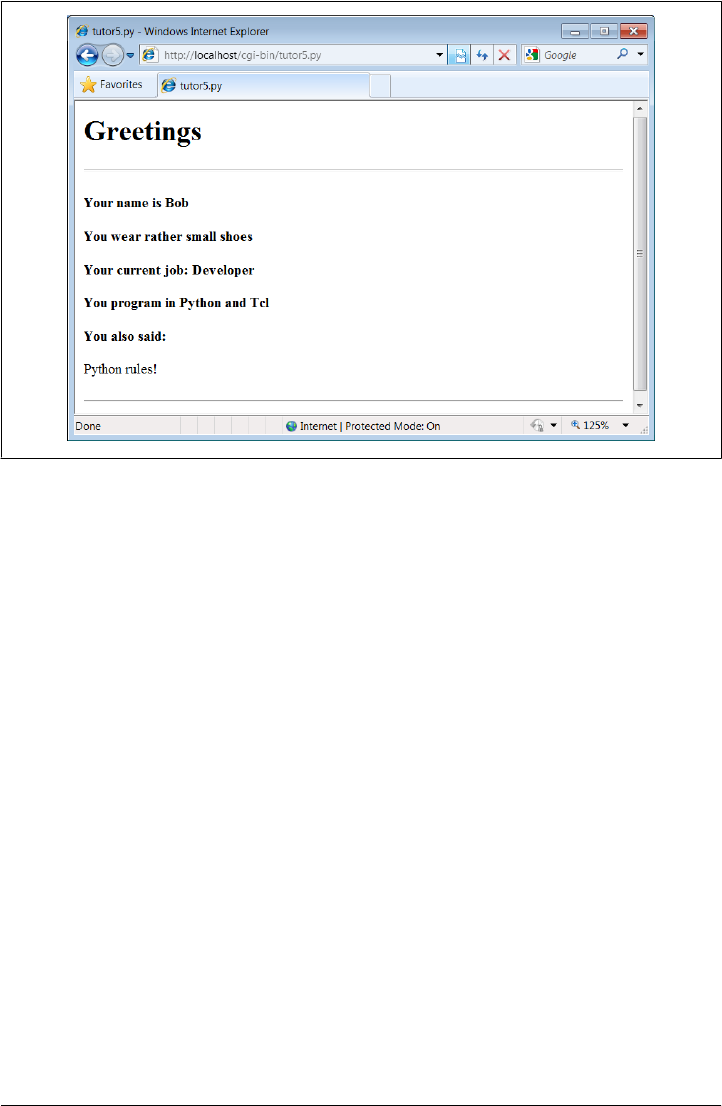
<FORM method=POST action="cgi-bin/tutor5.py">
<H3>Please complete the following form and click Submit</H3>
<P><TABLE border cellpadding=3>
<TR>
<TH align=right>Name:
<TD><input type=text name=name>
<TR>
<TH align=right>Shoe size:
<TD><input type=radio name=shoesize value=small>Small
<input type=radio name=shoesize value=medium>Medium
<input type=radio name=shoesize value=large>Large
<TR>
<TH align=right>Occupation:
<TD><select name=job>
<option>Developer
<option>Manager
<option>Student
<option>Evangelist
<option>Other
</select>
<TR>
<TH align=right>Political affiliations:
<TD><P><input type=checkbox name=language value=Python>Pythonista
<P><input type=checkbox name=language value=Perl>Perlmonger
<P><input type=checkbox name=language value=Tcl>Tcler
<TR>
<TH align=right>Comments:
<TD><textarea name=comment cols=30 rows=2>Enter spam here</textarea>
<TR>
Figure 15-14. Response page created by tutor5.py (1)
Climbing the CGI Learning Curve | 1167
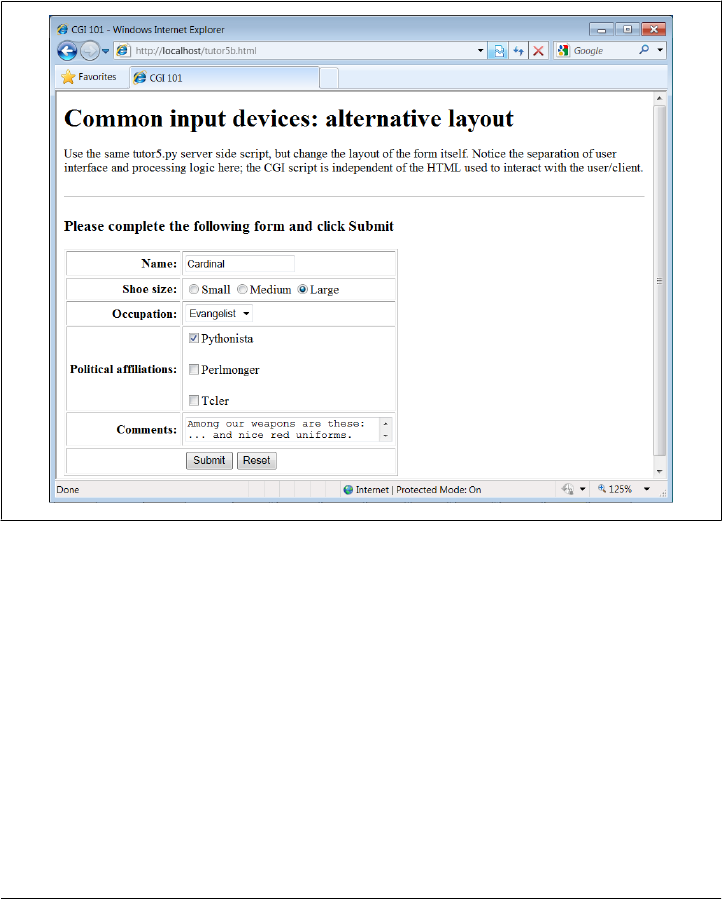
<TD colspan=2 align=center>
<input type=submit value="Submit">
<input type=reset value="Reset">
</TABLE>
</FORM>
</BODY></HTML>
When we visit this alternative page with a browser, we get the interface shown in
Figure 15-15.
Figure 15-15. Form page created by tutor5b.html
Now, before you go blind trying to detect the differences in this and the prior HTML
file, I should note that the HTML differences that produce this page are much less
important for this book than the fact that the action fields in these two pages’ forms
reference identical URLs. Pressing this version’s Submit button triggers the exact same
and totally unchanged Python CGI script again, tutor5.py (Example 15-12).
That is, scripts are completely independent of both the transmission mode (URL query
parameters of form fields) and the layout of the user interface used to send them in-
formation. Changes in the response page require changing the script, of course, because
the HTML of the reply page is still embedded in the CGI script. But we can change the
input page’s HTML as much as we like without affecting the server-side Python code.
Figure 15-16 shows the response page produced by the script this time around.
1168 | Chapter 15: Server-Side Scripting
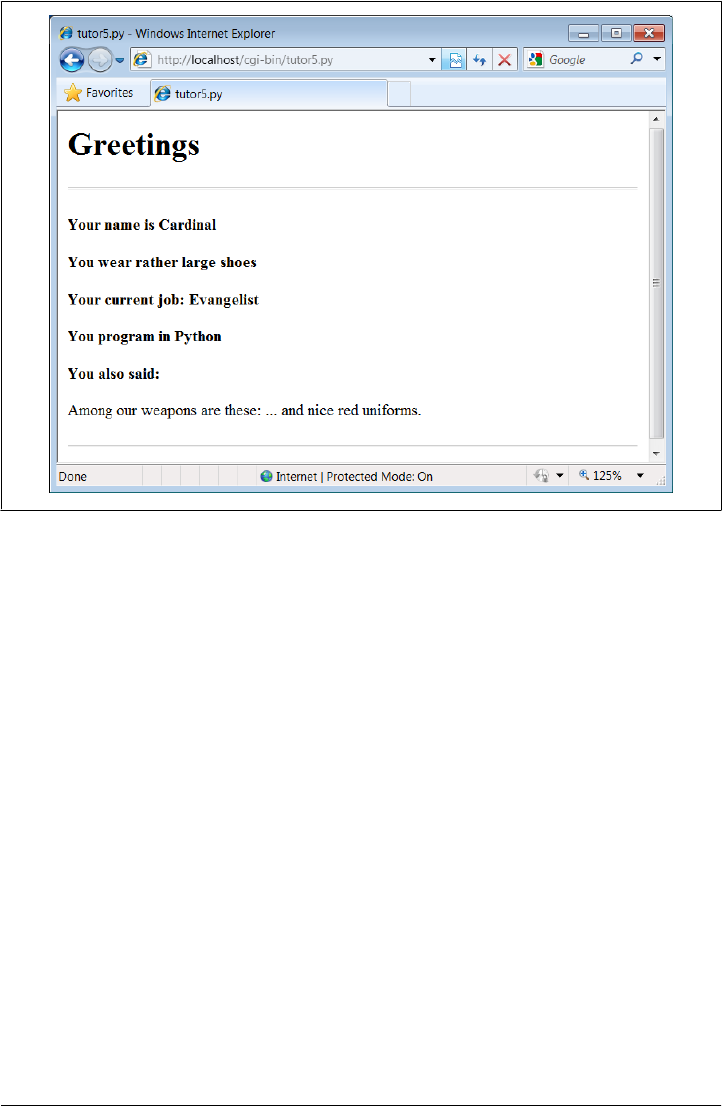
Figure 15-16. Response page created by tutor5.py (2)
Keeping display and logic separate
In fact, this illustrates an important point in the design of larger websites: if we are
careful to keep the HTML and script code separate, we get a useful division of display
and logic—each part can be worked on independently, by people with different skill
sets. Web page designers, for example, can work on the display layout, while pro-
grammers can code business logic.
Although this section’s example is fairly small, it already benefits from this separation
for the input page. In some cases, the separation is harder to accomplish, because our
example scripts embed the HTML of reply pages. With just a little more work, though,
we can usually split the reply HTML off into separate files that can also be developed
independently of the script’s logic. The html string in tutor5.py (Example 15-12), for
instance, might be stored in a text file and loaded by the script when run.
In larger systems, tools such as server-side HTML templating languages help make the
division of display and logic even easier to achieve. The Python Server Pages system
and frameworks such as Zope and Django, for instance, promote the separation of
display and logic by providing reply page description languages that are expanded to
include portions generated by separate Python program logic. In a sense, server-side
templating languages embed Python in HTML—the opposite of CGI scripts that embed
HTML in Python—and may provide a cleaner division of labor, provided the Python
Climbing the CGI Learning Curve | 1169

code is separate components. Search the Web for more details. Similar techniques can
be used for separation of layout and login in the GUIs we studied earlier in this book,
but they also usually require larger frameworks or models to achieve.
Passing Parameters in Hardcoded URLs
Earlier, we passed parameters to CGI scripts by listing them at the end of a URL typed
into the browser’s address field—in the query string parameters part of the URL, after
the ?. But there’s nothing sacred about the browser’s address field. In particular, noth-
ing is stopping us from using the same URL syntax in hyperlinks that we hardcode or
generate in web page definitions.
For example, the web page from Example 15-14 defines three hyperlinks (the text be-
tween the <A> and </A> tags), which trigger our original tutor5.py script again (Exam-
ple 15-12), but with three different precoded sets of parameters.
Example 15-14. PP4E\Internet\Web\tutor5c.html
<HTML><TITLE>CGI 101</TITLE>
<BODY>
<H1>Common input devices: URL parameters</H1>
<P>This demo invokes the tutor5.py server-side script again,
but hardcodes input data to the end of the script's URL,
within a simple hyperlink (instead of packaging up a form's
inputs). Click your browser's "show page source" button
to view the links associated with each list item below.
<P>This is really more about CGI than Python, but notice that
Python's cgi module handles both this form of input (which is
also produced by GET form actions), as well as POST-ed forms;
they look the same to the Python CGI script. In other words,
cgi module users are independent of the method used to submit
data.
<P>Also notice that URLs with appended input values like this
can be generated as part of the page output by another CGI script,
to direct a next user click to the right place and context; together
with type 'hidden' input fields, they provide one way to
save state between clicks.
</P><HR>
<UL>
<LI><A href="cgi-bin/tutor5.py?name=Bob&shoesize=small">Send Bob, small</A>
<LI><A href="cgi-bin/tutor5.py?name=Tom&language=Python">Send Tom, Python</A>
<LI><A href="http://localhost/cgi-bin/tutor5.py?job=Evangelist&comment=spam">
Send Evangelist, spam</A>
</UL>
<HR></BODY></HTML>
1170 | Chapter 15: Server-Side Scripting
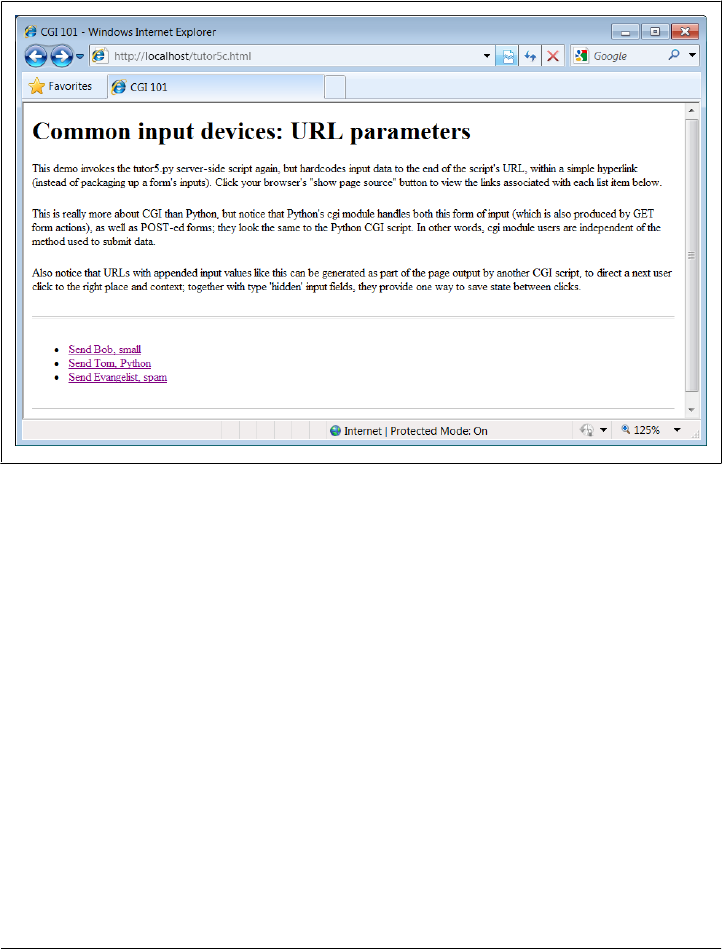
This static HTML file defines three hyperlinks—the first two are minimal and the third
is fully specified, but all work similarly (again, the target script doesn’t care). When we
visit this file’s URL, we see the page shown in Figure 15-17. It’s mostly just a page for
launching canned calls to the CGI script. (I’ve reduced the text font size here to fit in
this book: run this live if you have trouble reading it here.)
Figure 15-17. Hyperlinks page created by tutor5c.html
Clicking on this page’s second link creates the response page in Figure 15-18. This link
invokes the CGI script, with the name parameter set to “Tom” and the language pa-
rameter set to “Python,” simply because those parameters and values are hardcoded in
the URL listed in the HTML for the second hyperlink. As such, hyperlinks with pa-
rameters like this are sometimes known as stateful links—they automatically direct the
next script’s operation. The net effect is exactly as if we had manually typed the line
shown at the top of the browser in Figure 15-18.
Notice that many fields are missing here; the tutor5.py script is smart enough to detect
and handle missing fields and generate an unknown message in the reply page. It’s also
worth pointing out that we’re reusing the Python CGI script again. The script itself is
completely independent of both the user interface format of the submission page, as
well as the technique used to invoke it—from a submitted form or a hardcoded URL
with query parameters. By separating such user interface details from processing logic,
CGI scripts become reusable software components, at least within the context of the
CGI environment.
Climbing the CGI Learning Curve | 1171
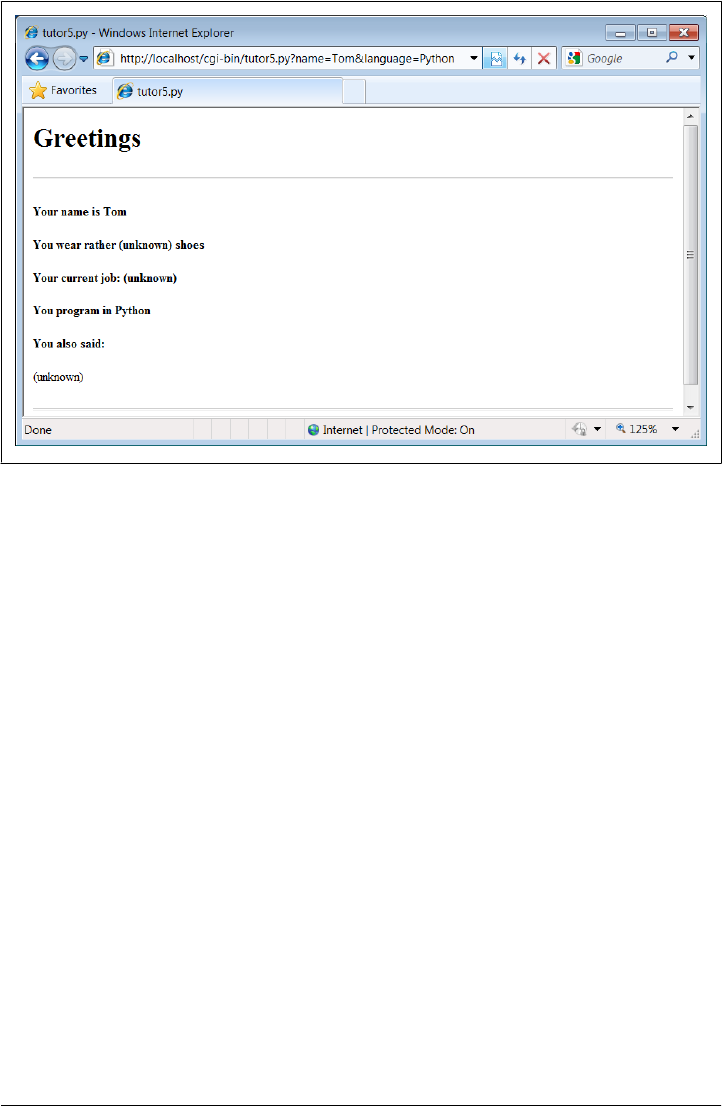
The query parameters in the URLs embedded in Example 15-14 were hardcoded in the
page’s HTML. But such URLs can also be generated automatically by a CGI script as
part of a reply page in order to provide inputs to the script that implements a next step
in user interaction. They are a simple way for web-based applications to “remember”
things for the duration of a session. Hidden form fields, up next, serve some of the same
purposes.
Passing Parameters in Hidden Form Fields
Similar in spirit to the prior section, inputs for scripts can also be hardcoded in a page’s
HTML as hidden input fields. Such fields are not displayed in the page, but are trans-
mitted back to the server when the form is submitted. Example 15-15, for instance,
allows a job field to be entered, but fills in name and language parameters automatically
as hidden input fields.
Example 15-15. PP4E\Internet\Web\tutor5d.html
<HTML><TITLE>CGI 101</TITLE>
<BODY>
<H1>Common input devices: hidden form fields</H1>
<P>This demo invokes the tutor5.py server-side script again,
but hardcodes input data in the form itself as hidden input
fields, instead of as parameters at the end of URL hyperlinks.
As before, the text of this form, including the hidden fields,
can be generated as part of the page output by another CGI
Figure 15-18. Response page created by tutor5.py (3)
1172 | Chapter 15: Server-Side Scripting
script, to pass data on to the next script on submit; hidden
form fields provide another way to save state between pages.
</P><HR><p>
<form method=post action="cgi-bin/tutor5.py">
<input type=hidden name=name value=Sue>
<input type=hidden name=language value=Python>
<input type=text name=job value="Enter job">
<input type=submit value="Submit Sue">
</form>
</p><HR></BODY></HTML>
When Example 15-15 is opened in a browser, we get the input page in Figure 15-19.
Figure 15-19. tutor5d.html input form page
When submitting, we trigger our original tutor5.py script once again (Exam-
ple 15-12), but some of the inputs have been provided for us as hidden fields. The reply
page is captured in Figure 15-20.
Much like the query parameters of the prior section, here again we’ve hardcoded and
embedded the next page’s inputs in the input page’s HTML itself. Unlike query pa-
rameters, hidden input fields don’t show up in the next page’s address. Like query
parameters, such input fields can also be generated on the fly as part of the reply from
a CGI script. When they are, they serve as inputs for the next page, and so are a sort of
memory—session state passed from one script to the next. To fully understand how
and why this is necessary, we need to next take a short diversion into state retention
alternatives.
Climbing the CGI Learning Curve | 1173
Saving State Information in CGI Scripts
One of the most unusual aspects of the basic CGI model, and one of its starkest con-
trasts to the GUI programming techniques we studied in the prior part of this book, is
that CGI scripts are stateless—each is a standalone program, normally run autono-
mously, with no knowledge of any other scripts that may run before or after. There is
no notion of things such as global variables or objects that outlive a single step of
interaction and retain context. Each script begins from scratch, with no memory of
where the prior left off.
This makes web servers simple and robust—a buggy CGI script won’t interfere with
the server process. In fact, a flaw in a CGI script generally affects only the single page
it implements, not the entire web-based application. But this is a very different model
from callback-handler functions in a single process GUI, and it requires extra work to
remember things longer than a single script’s execution.
Lack of state retention hasn’t mattered in our simple examples so far, but larger systems
are usually composed of multiple user interaction steps and many scripts, and they
need a way to keep track of information gathered along the way. As suggested in the
Figure 15-20. Response page created by tutor5.py (4)
1174 | Chapter 15: Server-Side Scripting

last two sections, generating query parameters on URL links and hidden form fields in
input pages sent as replies are two simple ways for a CGI script to pass data to the next
script in the application. When clicked or submitted, such parameters send
preprogrammed selection or session information back to another server-side handler
script. In a sense, the content of the generated reply page itself becomes the memory
space of the application.
For example, a site that lets you read your email may present you with a list of viewable
email messages, implemented in HTML as a list of hyperlinks generated by another
script. Each hyperlink might include the name of the message viewer script, along with
parameters identifying the selected message number, email server name, and so on—
as much data as is needed to fetch the message associated with a particular link. A retail
site may instead serve up a generated list of product links, each of which triggers a
hardcoded hyperlink containing the product number, its price, and so on. Alternatively,
the purchase page at a retail site may embed the product selected in a prior page as
hidden form fields.
In fact, one of the main reasons for showing the techniques in the last two sections is
that we’re going to use them extensively in the larger case study in the next chapter.
For instance, we’ll use generated stateful URLs with query parameters to implement
lists of dynamically generated selections that “know” what to do when clicked. Hidden
form fields will also be deployed to pass user login data to the next page’s script. From
a more general perspective, both techniques are ways to retain state information be-
tween pages—they can be used to direct the action of the next script to be run.
Generating URL parameters and hidden form fields works well for retaining state in-
formation across pages during a single session of interaction. Some scenarios require
more, though. For instance, what if we want to remember a user’s login name from
session to session? Or what if we need to keep track of pages at our site visited by a
user in the past? Because such information must be longer lived than the pages of a
single session of interaction, query parameters and hidden form fields won’t suffice. In
some cases, the required state information might also be too large to embed in a reply
page’s HTML.
In general, there are a variety of ways to pass or retain state information between CGI
script executions and across sessions of interaction:
URL query parameters
Session state embedded in generated reply pages
Hidden form fields
Session state embedded in generated reply pages
Cookies
Smaller information stored on the client that may span sessions
Server-side databases
Larger information that might span sessions
Saving State Information in CGI Scripts | 1175

CGI model extensions
Persistent processes, session management, and so on
We’ll explore most of these in later examples, but since this is a core idea in server-side
scripting, let’s take a brief look at each of these in turn.
URL Query Parameters
We met these earlier in this chapter: hardcoded URL parameters in dynamically gen-
erated hyperlinks embedded in input pages produced as replies. By including both a
processing script name and input to it, such links direct the operation of the next page
when selected. The parameters are transmitted from client to server automatically, as
part of a GET-style request.
Coding query parameters is straightforward—print the correctly formatted URL to
standard output from your CGI script as part of the reply page (albeit following some
escaping conventions we’ll meet later in this chapter). Here’s an example drawn from
the next chapter’s webmail case study:
script = "onViewListLink.py"
user = 'bob'
mnum = 66
pswd = 'xxx'
site = ' pop.myisp.net'
print('<a href="%s?user=%s&pswd=%s&mnum=%d&site=%s">View %s</a>'
% (script, user, pswd, mnum, site, mnum))
The resulting URL will have enough information to direct the next script when clicked:
<a href="onViewListLink.py?user=bob&pswd=xxx&mnum=66&site=pop.myisp.net">View 66</a>
Query parameters serve as memory, and they pass information between pages. As such,
they are useful for retaining state across the pages of a single session of interaction.
Since each generated URL may have different attached parameters, this scheme can
provide context per user-selectable action. Each link in a list of selectable alternatives,
for example, may have a different implied action coded as a different parameter value.
Moreover, users can bookmark a link with parameters, in order to return to a specific
state in an interaction.
Because their state retention is lost when the page is abandoned, though, they are not
useful for remembering state from session to session. Moreover, the data appended as
URL query parameters is generally visible to users and may appear in server logfiles; in
some applications, it may have to be manually encrypted to avoid display or forgery.
Hidden Form Input Fields
We met these in the prior section as well: hidden form input fields that are attached to
form data and are embedded in reply web pages, but are not displayed in web pages or
their URL addresses. When the form is submitted, all the hidden fields are transmitted
1176 | Chapter 15: Server-Side Scripting

to the next script along with any real inputs, to serve as context. The net effect provides
context for an entire input form, not a particular hyperlink. An already entered user-
name, password, or selection, for instance, can be implied by the values of hidden fields
in subsequently generated pages.
In terms of code, hidden fields are generated by server-side scripts as part of the reply
page’s HTML and are later returned by the client with all of the form’s input data.
Previewing the next chapter’s usage again:
print('<form method=post action="%s/onViewSubmit.py">' % urlroot)
print('<input type=hidden name=mnum value="%s">' % msgnum)
print('<input type=hidden name=user value="%s">' % user)
print('<input type=hidden name=site value="%s">' % site)
print('<input type=hidden name=pswd value="%s">' % pswd)
Like query parameters, hidden form fields can also serve as a sort of memory, retaining
state information from page to page. Also like query parameters, because this kind of
memory is embedded in the page itself, hidden fields are useful for state retention
among the pages of a single session of interaction, but not for data that spans multiple
sessions.
And like both query parameters and cookies (up next), hidden form fields may be visible
to users—though hidden in rendered pages and URLs, their values still are displayed
if the page’s raw HTML source code is displayed. As a result, hidden form fields are
not secure; encryption of the embedded data may again be required in some contexts
to avoid display on the client or forgery in form submissions.
HTTP “Cookies”
Cookies, an oextension to the HTTP protocol underlying the web model, are a way for
server-side applications to directly store information on the client computer. Because
this information is not embedded in the HTML of web pages, it outlives the pages of
a single session. As such, cookies are ideal for remembering things that must span
sessions.
Things like usernames and preferences, for example, are prime cookie candidates—
they will be available the next time the client visits our site. However, because cookies
may have space limitations, are seen by some as intrusive, and can be disabled by users
on the client, they are not always well suited to general data storage needs. They are
often best used for small pieces of noncritical cross-session state information, and
websites that aim for broad usage should generally still be able to operate if cookies are
unavailable.
Operationally, HTTP cookies are strings of information stored on the client machine
and transferred between client and server in HTTP message headers. Server-side scripts
generate HTTP headers to request that a cookie be stored on the client as part of the
script’s reply stream. Later, the client web browser generates HTTP headers that send
back all the cookies matching the server and page being contacted. In effect, cookie
Saving State Information in CGI Scripts | 1177

data is embedded in the data streams much like query parameters and form fields, but
it is contained in HTTP headers, not in a page’s HTML. Moreover, cookie data can be
stored permanently on the client, and so it outlives both pages and interactive sessions.
For web application developers, Python’s standard library includes tools that simplify
the task of sending and receiving: http.cookiejar does cookie handling for HTTP cli-
ents that talk to web servers, and the module http.cookies simplifies the task of creating
and receiving cookies in server-side scripts. Moreover, the module urllib.request
we’ve studied earlier has support for opening URLs with automatic cookie handling.
Creating a cookie
Web browsers such as Firefox and Internet Explorer generally handle the client side of
this protocol, storing and sending cookie data. For the purpose of this chapter, we are
mainly interested in cookie processing on the server. Cookies are created by sending
special HTTP headers at the start of the reply stream:
Content-type: text/html
Set-Cookie: foo=bar;
<HTML>...
The full format of a cookie’s header is as follows:
Set-Cookie: name=value; expires=date; path=pathname; domain=domainname; secure
The domain defaults to the hostname of the server that set the cookie, and the path
defaults to the path of the document or script that set the cookie—these are later
matched by the client to know when to send a cookie’s value back to the server. In
Python, cookie creation is simple; the following in a CGI script stores a last-visited time
cookie:
import http.cookies, time
cook = http.cookies.SimpleCookie()
cook['visited'] = str(time.time()) # a dictionary
print(cook.output()) # prints "Set-Cookie: visited=1276623053.89"
print('Content-type: text/html\n')
The SimpleCookie call here creates a dictionary-like cookie object whose keys are strings
(the names of the cookies), and whose values are “Morsel” objects (describing the
cookie’s value). Morsels in turn are also dictionary-like objects with one key per cookie
property: path and domain, expires to give the cookie an expiration date (the default is
the duration of the browser session), and so on. Morsels also have attributes—for in-
stance, key and value give the name and value of the cookie, respectively. Assigning a
string to a cookie key automatically creates a Morsel from the string, and the cookie
object’s output method returns a string suitable for use as an HTTP header; printing
the object directly has the same effect, due to its __str__ operator overloading. Here is
a more comprehensive example of the interface in action:
>>> import http.cookies, time
>>> cooks = http.cookies.SimpleCookie()
1178 | Chapter 15: Server-Side Scripting

>>> cooks['visited'] = time.asctime()
>>> cooks['username'] = 'Bob'
>>> cooks['username']['path'] = '/myscript'
>>> cooks['visited'].value
'Tue Jun 15 13:35:20 2010'
>>> print(cooks['visited'])
Set-Cookie: visited="Tue Jun 15 13:35:20 2010"
>>> print(cooks)
Set-Cookie: username=Bob; Path=/myscript
Set-Cookie: visited="Tue Jun 15 13:35:20 2010"
Receiving a cookie
Now, when the client visits the page again in the future, the cookie’s data is sent back
from the browser to the server in HTTP headers again, in the form “Cookie:
name1=value1; name2=value2 ...”. For example:
Cookie: visited=1276623053.89
Roughly, the browser client returns all cookies that match the requested server’s do-
main name and path. In the CGI script on the server, the environment variable
HTTP_COOKIE contains the raw cookie data headers string uploaded from the client; it
can be extracted in Python as follows:
import os, http.cookies
cooks = http.cookies.SimpleCookie(os.environ.get("HTTP_COOKIE"))
vcook = cooks.get("visited") # a Morsel dictionary
if vcook != None:
time = vcook.value
Here, the SimpleCookie constructor call automatically parses the passed-in cookie data
string into a dictionary of Morsel objects; as usual, the dictionary get method returns
a default None if a key is absent, and we use the Morsel object’s value attribute to extract
the cookie’s value string if sent.
Using cookies in CGI scripts
To help put these pieces together, Example 15-16 lists a CGI script that stores a client-
side cookie when first visited and receives and displays it on subsequent visits.
Example 15-16. PP4E\Internet\Web\cgi-bin\cookies.py
"""
create or use a client-side cookie storing username;
there is no input form data to parse in this example
"""
import http.cookies, os
cookstr = os.environ.get("HTTP_COOKIE")
cookies = http.cookies.SimpleCookie(cookstr)
usercook = cookies.get("user") # fetch if sent
if usercook == None: # create first time
Saving State Information in CGI Scripts | 1179

cookies = http.cookies.SimpleCookie() # print Set-cookie hdr
cookies['user'] = 'Brian'
print(cookies)
greeting = '<p>His name shall be... %s</p>' % cookies['user']
else:
greeting = '<p>Welcome back, %s</p>' % usercook.value
print('Content-type: text/html\n') # plus blank line now
print(greeting) # and the actual html
Assuming you are running this chapter’s local web server from Example 15-1, you can
invoke this script with a URL such as http://localhost/cgi-bin/cookies.py (type this in
your browser’s address field, or submit it interactively with the module url
lib.request). The first time you visit the script, the script sets the cookie within its
reply’s headers, and you’ll see a reply page with this message:
His name shall be... Set-Cookie: user=Brian
Thereafter, revisiting the script’s URL in the same browser session (use your browser’s
reload button) produces a reply page with this message:
Welcome back, Brian
This occurs because the client is sending the previously stored cookie value back to the
script, at least until you kill and restart your web browser—the default expiration of a
cookie is the end of a browsing session. In a realistic program, this sort of structure
might be used by the login page of a web application; a user would need to enter his
name only once per browser session.
Handling cookies with the urllib.request module
As mentioned earlier, the urllib.request module provides an interface for reading the
reply from a URL, but it uses the http.cookiejar module to also support storing and
sending cookies on the client. However, it does not support cookies “out of the box.”
For example, here it is in action testing the last section’s cookie-savvy script—cookies
are not echoed back to the server when a script is revisited:
>>> from urllib.request import urlopen
>>> reply = urlopen('http://localhost/cgi-bin/cookies.py').read()
>>> print(reply)
b'<p>His name shall be... Set-Cookie: user=Brian</p>\n'
>>> reply = urlopen('http://localhost/cgi-bin/cookies.py').read()
>>> print(reply)
b'<p>His name shall be... Set-Cookie: user=Brian</p>\n'
To support cookies with this module properly, we simply need to enable the cookie-
handler class; the same is true for other optional extensions in this module. Again,
contacting the prior section’s script:
>>> import urllib.request as urllib
>>> opener = urllib.build_opener(urllib.HTTPCookieProcessor())
>>> urllib.install_opener(opener)
1180 | Chapter 15: Server-Side Scripting

>>>
>>> reply = urllib.urlopen('http://localhost/cgi-bin/cookies.py').read()
>>> print(reply)
b'<p>His name shall be... Set-Cookie: user=Brian</p>\n'
>>> reply = urllib.urlopen('http://localhost/cgi-bin/cookies.py').read()
>>> print(reply)
b'<p>Welcome back, Brian</p>\n'
>>> reply = urllib.urlopen('http://localhost/cgi-bin/cookies.py').read()
>>> print(reply)
b'<p>Welcome back, Brian</p>\n'
This works because urllib.request mimics the cookie behavior of a web browser on
the client—it stores the cookie when so requested in the headers of a script’s reply, and
adds it to headers sent back to the same script on subsequent visits. Also just as in a
browser, the cookie is deleted if you exit Python and start a new session to rerun this
code. See the library manual for more on this module’s interfaces.
Although easy to use, cookies have potential downsides. For one, they may be subject
to size limitations (4 KB per cookie, 300 total, and 20 per domain are one common
limit). For another, users can disable cookies in most browsers, making them less suited
to critical data. Some even see them as intrusive, because they can be abused to track
user behavior. (Many sites simply require cookies to be turned on, finessing the issue
completely.) Finally, because cookies are transmitted over the network between client
and server, they are still only as secure as the transmission stream itself; this may be an
issue for sensitive data if the page is not using secure HTTP transmissions between
client and server. We’ll explore secure cookies and server concepts in the next chapter.
For more details on the cookie modules and the cookie protocol in general, see Python’s
library manual, and search the Web for resources. It’s not impossible that future mu-
tations of HTML may provide similar storage solutions.
Server-Side Databases
For more industrial-strength state retention, Python scripts can employ full-blown da-
tabase solutions in the server. We will study these options in depth in Chapter 17.
Python scripts have access to a variety of server-side data stores, including flat files,
persistent object pickles and shelves, object-oriented databases such as ZODB, and
relational SQL-based databases such as MySQL, PostgreSQL, Oracle, and SQLite. Be-
sides data storage, such systems may provide advanced tools such as transaction com-
mits and rollbacks, concurrent update synchronization, and more.
Full-blown databases are the ultimate storage solution. They can be used to represent
state both between the pages of a single session (by tagging the data with generated
per-session keys) and across multiple sessions (by storing data under per-user keys).
Given a user’s login name, for example, CGI scripts can fetch all of the context we have
gathered in the past about that user from the server-side database. Server-side databases
Saving State Information in CGI Scripts | 1181

are ideal for storing more complex cross-session information; a shopping cart applica-
tion, for instance, can record items added in the past in a server-side database.
Databases outlive both pages and sessions. Because data is kept explicitly, there is no
need to embed it within the query parameters or hidden form fields of reply pages.
Because the data is kept on the server, there is no need to store it on the client in cookies.
And because such schemes employ general-purpose databases, they are not subject to
the size constraints or optional nature of cookies.
In exchange for their added utility, full-blown databases require more in terms of in-
stallation, administration, and coding. As we’ll see in Chapter 17, luckily the extra
coding part of that trade-off is remarkably simple in Python. Moreover, Python’s da-
tabase interfaces may be used in any application, web-based or otherwise.
Extensions to the CGI Model
Finally, there are more advanced protocols and frameworks for retaining state on the
server, which we won’t cover in this book. For instance, the Zope web application
framework, discussed briefly in Chapter 12, provides a product interface, which allows
for the construction of web-based objects that are automatically persistent.
Other schemes, such as FastCGI, as well as server-specific extensions such as
mod_python for Apache, may attempt to work around the autonomous, one-shot nature
of CGI scripts, or otherwise extend the basic CGI model to support long-lived memory
stores. For example:
•FastCGI allows web applications to run as persistent processes, which receive input
data from and send reply streams to the HTTP web server over Inter-Process Com-
munication (IPC) mechanisms such as sockets. This differs from normal CGI,
which communicates inputs and outputs with environment variables, standard
streams, and command-line arguments, and assumes scripts run to completion on
each request. Because a FastCGI process may outlive a single page, it can retain
state information from page to page, and avoids startup performance costs.
•mod_python extends the open source Apache web server by embedding the Python
interpreter within Apache. Python code is executed directly within the Apache
server, eliminating the need to spawn external processes. This package also sup-
ports the concept of sessions, which can be used to store data between pages.
Session data is locked for concurrent access and can be stored in files or in memory,
depending on whether Apache is running in multiprocess or multithreaded mode.
mod_python also includes web development tools, such as the Python Server Pages
(PSP) server-side templating language for HTML generation mentioned in Chap-
ter 12 and earlier in this chapter.
Such models are not universally supported, though, and may come with some added
cost in complexity—for example, to synchronize access to persistent data with locks.
Moreover, a failure in a FastCGI-style web application impacts the entire application,
1182 | Chapter 15: Server-Side Scripting

not just a single page, and things like memory leaks become much more costly. For
more on persistent CGI models, and support in Python for things such as FastCGI,
search the Web or consult web-specific resources.
Combining Techniques
Naturally, these techniques may be combined to achieve a variety of memory strategies,
both for interaction sessions and for more permanent storage needs. For example:
• A web application may use cookies to store a per-user or per-session key on the
client, and later use that key to index into a server-side database to retrieve the
user’s or session’s full state information.
• Even for short-lived session information, URL query parameters or hidden form
fields may similarly be used to pass a key identifying the session from page to page,
to be used by the next script to index a server-side database.
• Moreover, URL query parameters and hidden fields may be generated for tempo-
rary state memory that spans pages, even though cookies and databases are used
for retention that must span sessions.
The choice of technique is driven by the application’s storage needs. Although not as
straightforward as the in-memory variables and objects of single process GUI programs
running on a client, with creativity, CGI script state retention is entirely possible.
The Hello World Selector
Let’s get back to writing some code again. It’s time for something a bit more useful than
the examples we’ve seen so far (well, more entertaining, at least). This section presents
a program that displays the basic syntax required by various programming languages
to print the string “Hello World,” the classic language benchmark.
To keep it simple, this example assumes that the string is printed to the standard output
stream in the selected language, not to a GUI or web page. It also gives just the output
command itself, not complete programs. The Python version happens to be a complete
program, but we won’t hold that against its competitors here.
Structurally, the first cut of this example consists of a main page HTML file, along with
a Python-coded CGI script that is invoked by a form in the main HTML page. Because
no state or database data is stored between user clicks, this is still a fairly simple
example. In fact, the main HTML page implemented by Example 15-17 is mostly just
one big pull-down selection list within a form.
Example 15-17. PP4E\Internet\Web\languages.html
<html><title>Languages</title>
<body>
<h1>Hello World selector</h1>
The Hello World Selector | 1183

<P>This demo shows how to display a "hello world" message in various
programming languages' syntax. To keep this simple, only the output command
is shown (it takes more code to make a complete program in some of these
languages), and only text-based solutions are given (no GUI or HTML
construction logic is included). This page is a simple HTML file; the one
you see after pressing the button below is generated by a Python CGI script
which runs on the server. Pointers:
<UL>
<LI>To see this page's HTML, use the 'View Source' command in your browser.
<LI>To view the Python CGI script on the server,
<A HREF="cgi-bin/languages-src.py">click here</A> or
<A HREF="cgi-bin/getfile.py?filename=cgi-bin\languages.py">here</A>.
<LI>To see an alternative version that generates this page dynamically,
<A HREF="cgi-bin/languages2.py">click here</A>.
</UL></P>
<hr>
<form method=POST action="cgi-bin/languages.py">
<P><B>Select a programming language:</B>
<P><select name=language>
<option>All
<option>Python
<option>Python2
<option>Perl
<option>Tcl
<option>Scheme
<option>SmallTalk
<option>Java
<option>C
<option>C++
<option>Basic
<option>Fortran
<option>Pascal
<option>Other
</select>
<P><input type=Submit>
</form>
</body></html>
For the moment, let’s ignore some of the hyperlinks near the middle of this file; they
introduce bigger concepts like file transfers and maintainability that we will explore in
the next two sections. When visited with a browser, this HTML file is downloaded to
the client and is rendered into the new browser page shown in Figure 15-21.
That widget above the Submit button is a pull-down selection list that lets you choose
one of the <option> tag values in the HTML file. As usual, selecting one of these language
names and pressing the Submit button at the bottom (or pressing your Enter key) sends
the selected language name to an instance of the server-side CGI script program named
in the form’s action option. Example 15-18 contains the Python script that is run by
the web server upon submission.
1184 | Chapter 15: Server-Side Scripting

Example 15-18. PP4E\Internet\Web\cgi-bin\languages.py
#!/usr/bin/python
"""
show hello world syntax for input language name; note that it uses r'...'
raw strings so that '\n' in the table are left intact, and cgi.escape()
on the string so that things like '<<' don't confuse browsers--they are
translated to valid HTML code; any language name can arrive at this script,
since explicit URLs "http://servername/cgi-bin/languages.py?language=Cobol"
can be typed in a web browser or sent by a script (urllib.request.urlopen).
caveats: the languages list appears in both the CGI and HTML files--could
import from single file if selection list generated by a CGI script too;
"""
debugme = False # True=test from cmd line
inputkey = 'language' # input parameter name
hellos = {
'Python': r" print('Hello World') ",
'Python2': r" print 'Hello World' ",
'Perl': r' print "Hello World\n"; ',
'Tcl': r' puts "Hello World" ',
'Scheme': r' (display "Hello World") (newline) ',
'SmallTalk': r" 'Hello World' print. ",
'Java': r' System.out.println("Hello World"); ',
'C': r' printf("Hello World\n"); ',
'C++': r' cout << "Hello World" << endl; ',
'Basic': r' 10 PRINT "Hello World" ',
'Fortran': r" print *, 'Hello World' ",
'Pascal': r" WriteLn('Hello World'); "
}
Figure 15-21. The “Hello World” main page
The Hello World Selector | 1185

class dummy: # mocked-up input obj
def __init__(self, str): self.value = str
import cgi, sys
if debugme:
form = {inputkey: dummy(sys.argv[1])} # name on cmd line
else:
form = cgi.FieldStorage() # parse real inputs
print('Content-type: text/html\n') # adds blank line
print('<TITLE>Languages</TITLE>')
print('<H1>Syntax</H1><HR>')
def showHello(form): # HTML for one language
choice = form[inputkey].value
print('<H3>%s</H3><P><PRE>' % choice)
try:
print(cgi.escape(hellos[choice]))
except KeyError:
print("Sorry--I don't know that language")
print('</PRE></P><BR>')
if not inputkey in form or form[inputkey].value == 'All':
for lang in hellos.keys():
mock = {inputkey: dummy(lang)}
showHello(mock)
else:
showHello(form)
print('<HR>')
And as usual, this script prints HTML code to the standard output stream to produce
a response page in the client’s browser. Not much is new to speak of in this script, but
it employs a few techniques that merit special focus:
Raw strings and quotes
Notice the use of raw strings (string constants preceded by an “r” character) in the
language syntax dictionary. Recall that raw strings retain \ backslash characters in
the string literally, instead of interpreting them as string escape-code introductions.
Without them, the \n newline character sequences in some of the language’s code
snippets would be interpreted by Python as line feeds, instead of being printed in
the HTML reply as \n. The code also uses double quotes for strings that embed an
unescaped single-quote character, per Python’s normal string rules.
Escaping text embedded in HTML and URLs
This script takes care to format the text of each language’s code snippet with the
cgi.escape utility function. This standard Python utility automatically translates
characters that are special in HTML into HTML escape code sequences, so that
they are not treated as HTML operators by browsers. Formally, cgi.escape trans-
lates characters to escape code sequences, according to the standard HTML
convention: <, >, and & become <, >, and &. If you pass a second true
argument, the double-quote character (") is translated to ".
1186 | Chapter 15: Server-Side Scripting

For example, the << left-shift operator in the C++ entry is translated to <<—
a pair of HTML escape codes. Because printing each code snippet effectively em-
beds it in the HTML response stream, we must escape any special HTML characters
it contains. HTML parsers (including Python’s standard html.parser module pre-
sented in Chapter 19) translate escape codes back to the original characters when
a page is rendered.
More generally, because CGI is based upon the notion of passing formatted strings
across the Net, escaping special characters is a ubiquitous operation. CGI scripts
almost always need to escape text generated as part of the reply to be safe. For
instance, if we send back arbitrary text input from a user or read from a data source
on the server, we usually can’t be sure whether it will contain HTML characters,
so we must escape it just in case.
In later examples, we’ll also find that characters inserted into URL address strings
generated by our scripts may need to be escaped as well. A literal & in a URL is
special, for example, and must be escaped if it appears embedded in text we insert
into a URL. However, URL syntax reserves different special characters than HTML
code, and so different escaping conventions and tools must be used. As we’ll see
later in this chapter, cgi.escape implements escape translations in HTML code,
but urllib.parse.quote (and its relatives) escapes characters in URL strings.
Mocking up form inputs
Here again, form inputs are “mocked up” (simulated), both for debugging and for
responding to a request for all languages in the table. If the script’s global
debugme variable is set to a true value, for instance, the script creates a dictionary
that is plug-and-play compatible with the result of a cgi.FieldStorage call—its
“languages” key references an instance of the dummy mock-up class. This class in
turn creates an object that has the same interface as the contents of a cgi.Field
Storage result—it makes an object with a value attribute set to a passed-in string.
The net effect is that we can test this script by running it from the system command
line: the generated dictionary fools the script into thinking it was invoked by a
browser over the Net. Similarly, if the requested language name is “All,” the script
iterates over all entries in the languages table, making a mocked-up form dictionary
for each (as though the user had requested each language in turn).
This lets us reuse the existing showHello logic to display each language’s code in a
single page. As always in Python, object interfaces and protocols are what we
usually code for, not specific datatypes. The showHello function will happily proc-
ess any object that responds to the syntax form['language'].value.# Notice that
#If you are reading closely, you might notice that this is the second time we’ve used mock-ups in this chapter
(see the earlier tutor4.cgi example). If you find this technique generally useful, it would probably make sense
to put the dummy class, along with a function for populating a form dictionary on demand, into a module so
that it can be reused. In fact, we will do that in the next section. Even for two-line classes like this, typing the
same code the third time around will do much to convince you of the power of code reuse.
The Hello World Selector | 1187
we could achieve similar results with a default argument in showHello, albeit at the
cost of introducing a special case in its code.
Now back to interacting with this program. If we select a particular language, our CGI
script generates an HTML reply of the following sort (along with the required content-
type header and blank line preamble). Use your browser’s View Source option to see:
<TITLE>Languages</TITLE>
<H1>Syntax</H1><HR>
<H3>Scheme</H3><P><PRE>
(display "Hello World") (newline)
</PRE></P><BR>
<HR>
Program code is marked with a <PRE> tag to specify preformatted text (the browser
won’t reformat it like a normal text paragraph). This reply code shows what we get
when we pick Scheme. Figure 15-22 shows the page served up by the script after se-
lecting “Python” in the pull-down selection list (which, for the purposes of both this
edition and the expected future at large, of course, really means Python 3.X).
Figure 15-22. Response page created by languages.py
Our script also accepts a language name of “All” and interprets it as a request to display
the syntax for every language it knows about. For example, here is the HTML that is
generated if we set the global variable debugme to True and run from the system com-
mand line with a single argument, All. This output is the same as what is printed to
the client’s web browser in response to an “All” selection*:
* We also get the “All” reply if debugme is set to False when we run the script from the command line. Instead
of throwing an exception, the cgi.FieldStorage call returns an empty dictionary if called outside the CGI
environment, so the test for a missing key kicks in. It’s likely safer to not rely on this behavior, however.
1188 | Chapter 15: Server-Side Scripting

C:\...\PP4E\Internet\Web\cgi-bin> python languages.py All
Content-type: text/html
<TITLE>Languages</TITLE>
<H1>Syntax</H1><HR>
<H3>C</H3><P><PRE>
printf("Hello World\n");
</PRE></P><BR>
<H3>Java</H3><P><PRE>
System.out.println("Hello World");
</PRE></P><BR>
<H3>C++</H3><P><PRE>
cout << "Hello World" << endl;
</PRE></P><BR>
<H3>Perl</H3><P><PRE>
print "Hello World\n";
</PRE></P><BR>
<H3>Fortran</H3><P><PRE>
print *, 'Hello World'
</PRE></P><BR>
<H3>Basic</H3><P><PRE>
10 PRINT "Hello World"
</PRE></P><BR>
<H3>Scheme</H3><P><PRE>
(display "Hello World") (newline)
</PRE></P><BR>
<H3>SmallTalk</H3><P><PRE>
'Hello World' print.
</PRE></P><BR>
<H3>Python</H3><P><PRE>
print('Hello World')
</PRE></P><BR>
<H3>Pascal</H3><P><PRE>
WriteLn('Hello World');
</PRE></P><BR>
<H3>Tcl</H3><P><PRE>
puts "Hello World"
</PRE></P><BR>
<H3>Python2</H3><P><PRE>
print 'Hello World'
</PRE></P><BR>
<HR>
Each language is represented here with the same code pattern—the showHello function
is called for each table entry, along with a mocked-up form object. Notice the way that
C++ code is escaped for embedding inside the HTML stream; this is the cgi.escape
call’s handiwork. Your web browser translates the < escapes to < characters when
the page is rendered. When viewed with a browser, the “All” response page is rendered
as shown in Figure 15-23; the order in which languages are listed is pseudorandom,
because the dictionary used to record them is not a sequence.
The Hello World Selector | 1189
Figure 15-23. Response page for “All” languages choice
Checking for Missing and Invalid Inputs
So far, we’ve been triggering the CGI script by selecting a language name from the pull-
down list in the main HTML page. In this context, we can be fairly sure that the script
will receive valid inputs. Notice, though, that there is nothing to prevent a client from
passing the requested language name at the end of the CGI script’s URL as an explicit
query parameter, instead of using the HTML page form. For instance, a URL of the
following kind typed into a browser’s address field or submitted with the module
urllib.request:
http://localhost/cgi-bin/languages.py?language=Python
yields the same “Python” response page shown in Figure 15-22. However, because it’s
always possible for a user to bypass the HTML file and use an explicit URL, a user could
invoke our script with an unknown language name, one that is not in the HTML file’s
pull-down list (and so not in our script’s table). In fact, the script might be triggered
with no language input at all if someone explicitly submits its URL with no language
parameter (or no parameter value) at the end. Such an erroneous URL could be entered
into a browser’s address field or be sent by another script using the urllib.request
module techniques described earlier in this chapter. For instance, valid requests work
normally:
1190 | Chapter 15: Server-Side Scripting

>>> from urllib.request import urlopen
>>> request = 'http://localhost/cgi-bin/languages.py?language=Python'
>>> reply = urlopen(request).read()
>>> print(reply.decode())
<TITLE>Languages</TITLE>
<H1>Syntax</H1><HR>
<H3>Python</H3><P><PRE>
print('Hello World')
</PRE></P><BR>
<HR>
To be robust, though, the script also checks for both error cases explicitly, as all CGI
scripts generally should. Here is the HTML generated in response to a request for the
fictitious language GuiDO (again, you can also see this by selecting your browser’s
View Source option after typing the URL manually into your browser’s address field):
>>> request = 'http://localhost/cgi-bin/languages.py?language=GuiDO'
>>> reply = urlopen(request).read()
>>> print(reply.decode())
<TITLE>Languages</TITLE>
<H1>Syntax</H1><HR>
<H3>GuiDO</H3><P><PRE>
Sorry--I don't know that language
</PRE></P><BR>
<HR>
If the script doesn’t receive any language name input, it simply defaults to the “All”
case (this case is also triggered if the URL ends with just ?language= and no language
name value):
>>> reply = urlopen('http://localhost/cgi-bin/languages.py').read()
>>> print(reply.decode())
<TITLE>Languages</TITLE>
<H1>Syntax</H1><HR>
<H3>C</H3><P><PRE>
printf("Hello World\n");
</PRE></P><BR>
<H3>Java</H3><P><PRE>
System.out.println("Hello World");
</PRE></P><BR>
<H3>C++</H3><P><PRE>
cout << "Hello World" << endl;
</PRE></P><BR>
...more...
If we didn’t detect these cases, chances are that our script would silently die on a Python
exception and leave the user with a mostly useless half-complete page or with a default
error page (we didn’t assign stderr to stdout here, so no Python error message would
be displayed). Figure 15-24 shows the page generated and rendered by a browser if the
script is invoked with an explicit URL like this:
http://localhost/cgi-bin/languages.py?language=COBOL
The Hello World Selector | 1191
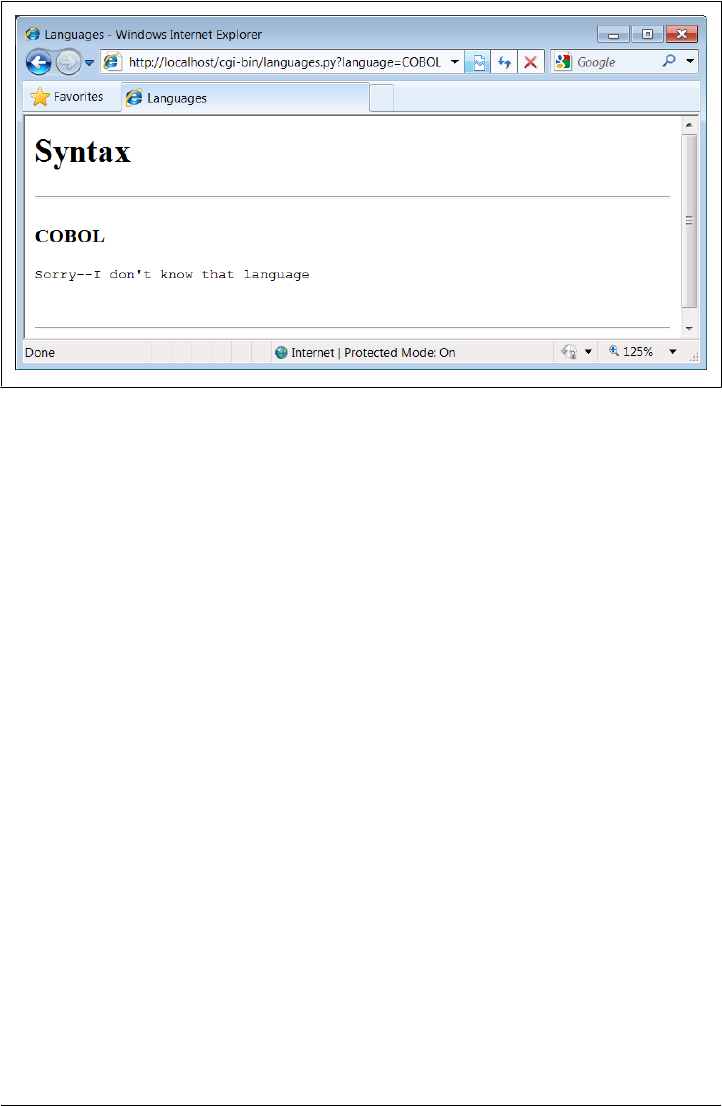
To test this error case interactively, the pull-down list includes an “Other” name, which
produces a similar error page reply. Adding code to the script’s table for the COBOL
“Hello World” program (and other languages you might recall from your sordid de-
velopment past) is left as an exercise for the reader.
For more example invocations of our languages.py script, turn back to its role in the
examples near the end of Chapter 13. There, we used it to test script invocation from
raw HTTP and urllib client-side scripts, but you should now have a better idea of what
those scripts invoke on the server.
Refactoring Code for Maintainability
Let’s step back from coding details for just a moment to gain some design perspective.
As we’ve seen, Python code, by and large, automatically lends itself to systems that are
easy to read and maintain; it has a simple syntax that cuts much of the clutter of other
tools. On the other hand, coding styles and program design can often affect maintain-
ability as much as syntax. For example, the “Hello World” selector pages of the pre-
ceding section work as advertised and were very easy and fast to throw together. But
as currently coded, the languages selector suffers from substantial maintainability
flaws.
Imagine, for instance, that you actually take me up on that challenge posed at the end
of the last section, and attempt to add another entry for COBOL. If you add COBOL
to the CGI script’s table, you’re only half done: the list of supported languages lives
redundantly in two places—in the HTML for the main page as well as in the script’s
syntax dictionary. Changing one does not change the other. In fact, this is something
I witnessed firsthand when adding “Python2” in this edition (and initially forgot to
Figure 15-24. Response page for unknown language
1192 | Chapter 15: Server-Side Scripting

update the HTML, too). More generally, there are a handful of ways that this program
might fail the scrutiny of a rigorous code review:
Selection list
As just mentioned, the list of languages supported by this program lives in two
places: the HTML file and the CGI script’s table, and redundancy is a killer for
maintenance work.
Field name
The field name of the input parameter, language, is hardcoded into both files as
well. You might remember to change it in the other if you change it in one, but you
might not.
Form mock-ups
We’ve redundantly coded classes to mock-up form field inputs twice in this chapter
already; the “dummy” class here is clearly a mechanism worth reusing.
HTML code
HTML embedded in and generated by the script is sprinkled throughout the pro-
gram in print call statements, making it difficult to implement broad web page
layout changes or delegate web page design to nonprogrammers.
This is a short example, of course, but issues of redundancy and reuse become more
acute as your scripts grow larger. As a rule of thumb, if you find yourself changing
multiple source files to modify a single behavior, or if you notice that you’ve taken to
writing programs by cut-and-paste copying of existing code, it’s probably time to think
about more rational program structures. To illustrate coding styles and practices that
are friendlier to maintainers, let’s rewrite (that is, refactor) this example to fix all of
these weaknesses in a single mutation.
Step 1: Sharing Objects Between Pages—A New Input Form
We can remove the first two maintenance problems listed earlier with a simple trans-
formation; the trick is to generate the main page dynamically, from an executable script,
rather than from a precoded HTML file. Within a script, we can import the input field
name and selection list values from a common Python module file, shared by the main
and reply page generation scripts. Changing the selection list or field name in the com-
mon module changes both clients automatically. First, we move shared objects to a
common module file, as shown in Example 15-19.
Example 15-19. PP4E\Internet\Web\cgi-bin\languages2common.py
"""
common objects shared by main and reply page scripts;
need change only this file to add a new language.
"""
inputkey = 'language' # input parameter name
Refactoring Code for Maintainability | 1193

hellos = {
'Python': r" print('Hello World') ",
'Python2': r" print 'Hello World' ",
'Perl': r' print "Hello World\n"; ',
'Tcl': r' puts "Hello World" ',
'Scheme': r' (display "Hello World") (newline) ',
'SmallTalk': r" 'Hello World' print. ",
'Java': r' System.out.println("Hello World"); ',
'C': r' printf("Hello World\n"); ',
'C++': r' cout << "Hello World" << endl; ',
'Basic': r' 10 PRINT "Hello World" ',
'Fortran': r" print *, 'Hello World' ",
'Pascal': r" WriteLn('Hello World'); "
}
The module languages2common contains all the data that needs to agree between pages:
the field name as well as the syntax dictionary. The hellos syntax dictionary isn’t quite
HTML code, but its keys list can be used to generate HTML for the selection list on
the main page dynamically.
Notice that this module is stored in the same cgi-bin directory as the CGI scripts that
will use it; this makes import search paths simple—the module will be found in the
script’s current working directory, without path configuration. In general, external ref-
erences in CGI scripts are resolved as follows:
• Module imports will be relative to the CGI script’s current working directory (cgi-
bin), plus any custom path setting in place when the script runs.
• When using minimal URLs, referenced pages and scripts in links and form actions
within generated HTML are relative to the prior page’s location as usual. For a CGI
script, such minimal URLs are relative to the location of the generating script itself.
•Filenames referenced in query parameters and passed into scripts are normally rel-
ative to the directory containing the CGI script (cgi-bin). However, on some plat-
forms and servers they may be relative to the web server’s directory instead. For
our local web server, the latter case applies.
To prove some of these points to yourself, see and run the CGI script in the examples
package identified by URL http://localhost/cgi-bin/test-context.py: when run on Win-
dows with our local web server, it’s able to import modules in its own directory, but
filenames are relative to the parent directory where the web server is running (newly
created files appear there). Here is this script’s code, if you need to gauge how paths
are mapped for your server and platform; this server-specific treatment of relative file-
names may not be idea for portability, but this is just one of many details that can vary
per server:
import languages2common # from my dir
f = open('test-context-output.txt', 'w') # in .. server dir
f.write(languages2common.inputkey)
f.close()
print('context-type: text/html\n\nDone.\n')
1194 | Chapter 15: Server-Side Scripting

Next, in Example 15-20, we recode the main page as an executable script and populate
the response HTML with values imported from the common module file in the previous
example.
Example 15-20. PP4E\Internet\Web\cgi-bin\languages2.py
#!/usr/bin/python
"""
generate HTML for main page dynamically from an executable Python script,
not a precoded HTML file; this lets us import the expected input field name
and the selection table values from a common Python module file; changes in
either now only have to be made in one place, the Python module file;
"""
REPLY = """Content-type: text/html
<html><title>Languages2</title>
<body>
<h1>Hello World selector</h1>
<P>Similar to file <a href="../languages.html">languages.html</a>, but
this page is dynamically generated by a Python CGI script, using
selection list and input field names imported from a common Python
module on the server. Only the common module must be maintained as
new languages are added, because it is shared with the reply script.
To see the code that generates this page and the reply, click
<a href="getfile.py?filename=cgi-bin\languages2.py">here</a>,
<a href="getfile.py?filename=cgi-bin\languages2reply.py">here</a>,
<a href="getfile.py?filename=cgi-bin\languages2common.py">here</a>, and
<a href="getfile.py?filename=cgi-bin\\formMockup.py">here</a>.</P>
<hr>
<form method=POST action="languages2reply.py">
<P><B>Select a programming language:</B>
<P><select name=%s>
<option>All
%s
<option>Other
</select>
<P><input type=Submit>
</form>
</body></html>
"""
from languages2common import hellos, inputkey
options = []
for lang in hellos: # we could sort keys too
options.append('<option>' + lang) # wrap table keys in HTML code
options = '\n\t'.join(options)
print(REPLY % (inputkey, options)) # field name and values from module
Again, ignore the getfile hyperlinks in this file for now; we’ll learn what they mean in
a later section. You should notice, though, that the HTML page definition becomes a
printed Python string here (named REPLY), with %s format targets where we plug in
Refactoring Code for Maintainability | 1195
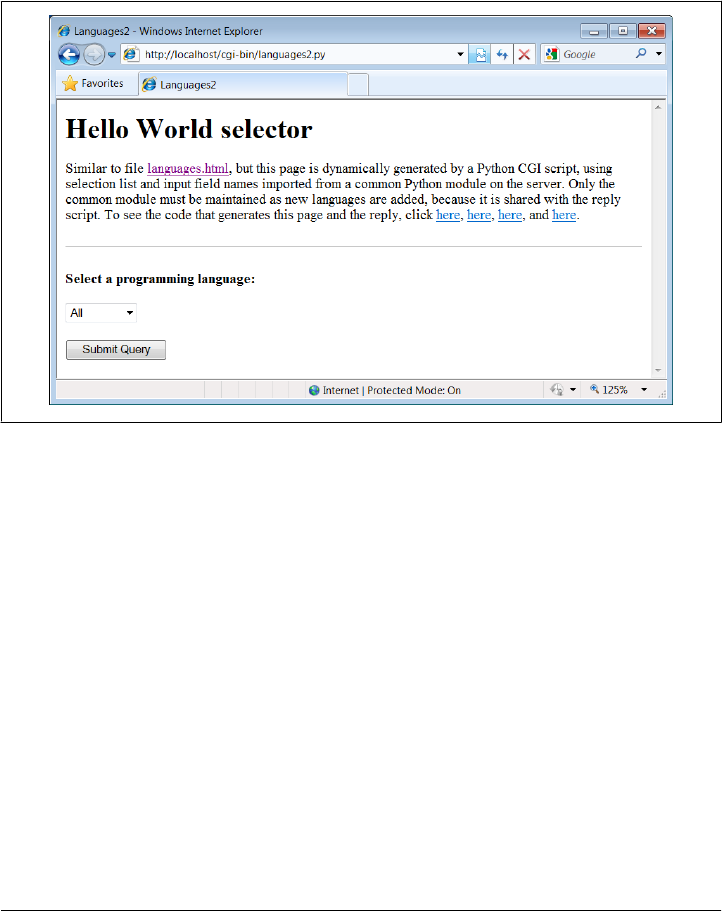
values imported from the common module. It’s otherwise similar to the original HTML
file’s code; when we visit this script’s URL, we get a similar page, shown in Fig-
ure 15-25. But this time, the page is generated by running a script on the server that
populates the pull-down selection list from the keys list of the common syntax table.
Use your browser’s View Source option to see the HTML generated; it’s nearly identical
to the HTML file in Example 15-17, though the order of languages in the list may differ
due to the behavior of dictionary keys.
Figure 15-25. Alternative main page made by languages2.py
One maintenance note here: the content of the REPLY HTML code template string in
Example 15-20 could be loaded from an external text file so that it could be worked on
independently of the Python program logic. In general, though, external text files are
no more easily changed than Python scripts. In fact, Python scripts are text files, and
this is a major feature of the language—it’s easy to change the Python scripts of an
installed system on site, without recompile or relink steps. However, external HTML
files could be checked out separately in a source-control system, if this matters in your
environment.
Step 2: A Reusable Form Mock-Up Utility
Moving the languages table and input field name to a module file solves the first two
maintenance problems we noted. But if we want to avoid writing a dummy field mock-
up class in every CGI script we write, we need to do something more. Again, it’s merely
a matter of exploiting the Python module’s affinity for code reuse: let’s move the
dummy class to a utility module, as in Example 15-21.
1196 | Chapter 15: Server-Side Scripting

Example 15-21. PP4E\Internet\Web\cgi-bin\formMockup.py
"""
Tools for simulating the result of a cgi.FieldStorage()
call; useful for testing CGI scripts outside the Web
"""
class FieldMockup: # mocked-up input object
def __init__(self, str):
self.value = str
def formMockup(**kwargs): # pass field=value args
mockup = {} # multichoice: [value,...]
for (key, value) in kwargs.items():
if type(value) != list: # simple fields have .value
mockup[key] = FieldMockup(str(value))
else: # multichoice have list
mockup[key] = [] # to do: file upload fields
for pick in value:
mockup[key].append(FieldMockup(pick))
return mockup
def selftest():
# use this form if fields can be hardcoded
form = formMockup(name='Bob', job='hacker', food=['Spam', 'eggs', 'ham'])
print(form['name'].value)
print(form['job'].value)
for item in form['food']:
print(item.value, end=' ')
# use real dict if keys are in variables or computed
print()
form = {'name': FieldMockup('Brian'), 'age': FieldMockup(38)} # or dict()
for key in form.keys():
print(form[key].value)
if __name__ == '__main__': selftest()
When we place our mock-up class in the module formMockup.py, it automatically
becomes a reusable tool and may be imported by any script we care to write.† For
readability, the dummy field simulation class has been renamed FieldMockup here. For
convenience, we’ve also added a formMockup utility function that builds up an entire
form dictionary from passed-in keyword arguments. Assuming you can hardcode the
names of the form to be faked, the mock-up can be created in a single call. This module
includes a self-test function invoked when the file is run from the command line, which
demonstrates how its exports are used. Here is its test output, generated by making
and querying two form mock-up objects:
† Assuming, of course, that this module can be found on the Python module search path when those scripts
are run. Since Python searches the current directory for imported modules by default, this generally works
without sys.path changes if all of our files are in our main web directory. For other applications, we may
need to add this directory to PYTHONPATH or use package (directory path) imports.
Refactoring Code for Maintainability | 1197

C:\...\PP4E\Internet\Web\cgi-bin> python formMockup.py
Bob
hacker
Spam eggs ham
38
Brian
Since the mock-up now lives in a module, we can reuse it anytime we want to test a
CGI script offline. To illustrate, the script in Example 15-22 is a rewrite of the
tutor5.py example we saw earlier, using the form mock-up utility to simulate field in-
puts. If we had planned ahead, we could have tested the script like this without even
needing to connect to the Net.
Example 15-22. PP4E\Internet\Web\cgi-bin\tutor5_mockup.py
#!/usr/bin/python
"""
run tutor5 logic with formMockup instead of cgi.FieldStorage()
to test: python tutor5_mockup.py > temp.html, and open temp.html
"""
from formMockup import formMockup
form = formMockup(name='Bob',
shoesize='Small',
language=['Python', 'C++', 'HTML'],
comment='ni, Ni, NI')
# rest same as original, less form assignment
Running this script from a simple command line shows us what the HTML response
stream will look like:
C:\...\PP4E\Internet\Web\cgi-bin> python tutor5_mockup.py
Content-type: text/html
<TITLE>tutor5.py</TITLE>
<H1>Greetings</H1>
<HR>
<H4>Your name is Bob</H4>
<H4>You wear rather Small shoes</H4>
<H4>Your current job: (unknown)</H4>
<H4>You program in Python and C++ and HTML</H4>
<H4>You also said:</H4>
<P>ni, Ni, NI</P>
<HR>
Running it live yields the page in Figure 15-26. Field inputs are hardcoded, similar in
spirit to the tutor5 extension that embedded input parameters at the end of hyperlink
URLs. Here, they come from form mock-up objects created in the reply script that
cannot be changed without editing the script. Because Python code runs immediately,
though, modifying a Python script during the debug cycle goes as quickly as you can
type.
1198 | Chapter 15: Server-Side Scripting

Step 3: Putting It All Together—A New Reply Script
There’s one last step on our path to software maintenance nirvana: we must recode the
reply page script itself to import data that was factored out to the common module and
import the reusable form mock-up module’s tools. While we’re at it, we move code
into functions (in case we ever put things in this file that we’d like to import in another
script), and all HTML code to triple-quoted string blocks. The result is Exam-
ple 15-23. Changing HTML is generally easier when it has been isolated in single strings
like this, instead of being sprinkled throughout a program.
Example 15-23. PP4E\Internet\Web\cgi-bin\languages2reply.py
#!/usr/bin/python
"""
Same, but for easier maintenance, use HTML template strings, get the
Language table and input key from common module file, and get reusable
form field mockup utilities module for testing.
"""
import cgi, sys
from formMockup import FieldMockup # input field simulator
from languages2common import hellos, inputkey # get common table, name
debugme = False
hdrhtml = """Content-type: text/html\n
<TITLE>Languages</TITLE>
Figure 15-26. A response page with simulated inputs
Refactoring Code for Maintainability | 1199

<H1>Syntax</H1><HR>"""
langhtml = """
<H3>%s</H3><P><PRE>
%s
</PRE></P><BR>"""
def showHello(form): # HTML for one language
choice = form[inputkey].value # escape lang name too
try:
print(langhtml % (cgi.escape(choice),
cgi.escape(hellos[choice])))
except KeyError:
print(langhtml % (cgi.escape(choice),
"Sorry--I don't know that language"))
def main():
if debugme:
form = {inputkey: FieldMockup(sys.argv[1])} # name on cmd line
else:
form = cgi.FieldStorage() # parse real inputs
print(hdrhtml)
if not inputkey in form or form[inputkey].value == 'All':
for lang in hellos.keys():
mock = {inputkey: FieldMockup(lang)} # not dict(n=v) here!
showHello(mock)
else:
showHello(form)
print('<HR>')
if __name__ == '__main__': main()
When global debugme is set to True, the script can be tested offline from a simple com-
mand line as before:
C:\...\PP4E\Internet\Web\cgi-bin> python languages2reply.py Python
Content-type: text/html
<TITLE>Languages</TITLE>
<H1>Syntax</H1><HR>
<H3>Python</H3><P><PRE>
print('Hello World')
</PRE></P><BR>
<HR>
When run online using either the page in Figure 15-25 or an explicitly typed URL with
query parameters, we get the same reply pages we saw for the original version of this
example (we won’t repeat them here again). This transformation changed the pro-
gram’s architecture, not its user interface. Architecturally, though, both the input and
reply pages are now created by Python CGI scripts, not static HTML files.
1200 | Chapter 15: Server-Side Scripting

Most of the code changes in this version of the reply script are straightforward. If you
test-drive these pages, the only differences you’ll find are the URLs at the top of your
browser (they’re different files, after all), extra blank lines in the generated HTML
(ignored by the browser), and a potentially different ordering of language names in the
main page’s pull-down selection list.
Again, this selection list ordering difference arises because this version relies on the
order of the Python dictionary’s keys list, not on a hardcoded list in an HTML file.
Dictionaries, you’ll recall, arbitrarily order entries for fast fetches; if you want the se-
lection list to be more predictable, simply sort the keys list before iterating over it using
the list sort method or the sorted function introduced in Python 2.4:
for lang in sorted(hellos): # dict iterator instead of .keys()
mock = {inputkey: FieldMockup(lang)}
Faking Inputs with Shell Variables
If you’re familiar with shells, you might also be able to test CGI scripts from the com-
mand line on some platforms by setting the same environment variables that HTTP
servers set, and then launching your script. For example, we might be able to pretend
to be a web server by storing input parameters in the QUERY_STRING environment vari-
able, using the same syntax we employ at the end of a URL string after the ?:
$ setenv QUERY_STRING "name=Mel&job=trainer,+writer"
$ python tutor5.py
Content-type: text/html
<TITLE>tutor5.py<?TITLE>
<H1>Greetings</H1>
<HR>
<H4>Your name is Mel</H4>
<H4>You wear rather (unknown) shoes</H4>
<H4>Your current job: trainer, writer</H4>
<H4>You program in (unknown)</H4>
<H4>You also said:</H4>
<P>(unknown)</P>
<HR>
Here, we mimic the effects of a GET style form submission or explicit URL. HTTP servers
place the query string (parameters) in the shell variable QUERY_STRING. Python’s cgi
module finds them there as though they were sent by a browser. POST-style inputs can
be simulated with shell variables too, but it’s more complex—so much so that you may
be better off not bothering to learn how. In fact, it may be more robust in general to
mock up inputs with Python objects (e.g., as in formMockup.py). But some CGI scripts
may have additional environment or testing constraints that merit unique treatment.
More on HTML and URL Escapes
Perhaps the subtlest change in the last section’s rewrite is that, for robustness, this
version’s reply script (Example 15-23) also calls cgi.escape for the language name, not
More on HTML and URL Escapes | 1201

just for the language’s code snippet. This wasn’t required in languages2.py (Exam-
ple 15-20) for the known language names in our selection list table. However, it is not
impossible that someone could pass the script a language name with an embedded
HTML character as a query parameter. For example, a URL such as:
http://localhost/cgi-bin/languages2reply.py?language=a<b
embeds a < in the language name parameter (the name is a<b). When submitted, this
version uses cgi.escape to properly translate the < for use in the reply HTML, according
to the standard HTML escape conventions discussed earlier; here is the reply text
generated:
<TITLE>Languages</TITLE>
<H1>Syntax</H1><HR>
<H3>a<b</H3><P><PRE>
Sorry--I don't know that language
</PRE></P><BR>
<HR>
The original version in Example 15-18 doesn’t escape the language name, such that the
embedded <b is interpreted as an HTML tag (which makes the rest of the page render
in bold font!). As you can probably tell by now, text escapes are pervasive in CGI
scripting—even text that you may think is safe must generally be escaped before being
inserted into the HTML code in the reply stream.
In fact, because the Web is a text-based medium that combines multiple language
syntaxes, multiple formatting rules may apply: one for URLs and another for HTML.
We met HTML escapes earlier in this chapter; URLs, and combinations of HTML and
URLs, merit a few additional words.
URL Escape Code Conventions
Notice that in the prior section, although it’s wrong to embed an unescaped < in the
HTML code reply, it’s perfectly all right to include it literally in the URL string used to
trigger the reply. In fact, HTML and URLs define completely different characters as
special. For instance, although & must be escaped as & inside HTML code, we have
to use other escaping schemes to code a literal & within a URL string (where it normally
separates parameters). To pass a language name like a&b to our script, we have to type
the following URL:
http://localhost/cgi-bin/languages2reply.py?language=a%26b
Here, %26 represents &—the & is replaced with a % followed by the hexadecimal value
(0x26) of its ASCII code value (38). Similarly, as we suggested at the end of Chap-
ter 13, to name C++ as a query parameter in an explicit URL, + must be escaped as %2b:
http://localhost/cgi-bin/languages2reply.py?language=C%2b%2b
Sending C++ unescaped will not work, because + is special in URL syntax—it represents
a space. By URL standards, most nonalphanumeric characters are supposed to be
1202 | Chapter 15: Server-Side Scripting

translated to such escape sequences, and spaces are replaced by + signs. Technically,
this convention is known as the application/x-www-form-urlencoded query string for-
mat, and it’s part of the magic behind those bizarre URLs you often see at the top of
your browser as you surf the Web.
Python HTML and URL Escape Tools
If you’re like me, you probably don’t have the hexadecimal value of the ASCII code for
& committed to memory (though Python’s hex(ord(c)) can help). Luckily, Python pro-
vides tools that automatically implement URL escapes, just as cgi.escape does for
HTML escapes. The main thing to keep in mind is that HTML code and URL strings
are written with entirely different syntax, and so employ distinct escaping conventions.
Web users don’t generally care, unless they need to type complex URLs explicitly—
browsers handle most escape code details internally. But if you write scripts that must
generate HTML or URLs, you need to be careful to escape characters that are reserved
in either syntax.
Because HTML and URLs have different syntaxes, Python provides two distinct sets
of tools for escaping their text. In the standard Python library:
•cgi.escape escapes text to be embedded in HTML.
•urllib.parse.quote and quote_plus escape text to be embedded in URLs.
The urllib.parse module also has tools for undoing URL escapes (unquote,
unquote_plus), but HTML escapes are undone during HTML parsing at large (e.g., by
Python’s html.parser module). To illustrate the two escape conventions and tools, let’s
apply each tool set to a few simple examples.
Somewhat inexplicably, Python 3.2 developers have opted to move and
rename the cgi.escape function used throughout this book to
html.escape, to make use of its longstanding original name deprecated,
and to alter its quoting behavior slightly. This is despite the fact that this
function has been around for ages and is used in almost every Python
CGI-based web script: a glaring case of a small group’s notion of aes-
thetics trouncing widespread practice in 3.X and breaking working code
in the process. You may need to use the new html.escape name in a
future Python version; that is, unless Python users complain loudly
enough (yes, hint!).
Escaping HTML Code
As we saw earlier, cgi.escape translates code for inclusion within HTML. We normally
call this utility from a CGI script, but it’s just as easy to explore its behavior interactively:
>>> import cgi
>>> cgi.escape('a < b > c & d "spam"', 1)
More on HTML and URL Escapes | 1203

'a < b > c & d "spam"'
>>> s = cgi.escape("1<2 <b>hello</b>")
>>> s
'1<2 <b>hello</b>'
Python’s cgi module automatically converts characters that are special in HTML syntax
according to the HTML convention. It translates <, >, and & with an extra true argument,
", into escape sequences of the form &X;, where the X is a mnemonic that denotes the
original character. For instance, < stands for the “less than” operator (<) and
& denotes a literal ampersand (&).
There is no unescaping tool in the CGI module, because HTML escape code sequences
are recognized within the context of an HTML parser, like the one used by your web
browser when a page is downloaded. Python comes with a full HTML parser, too, in
the form of the standard module html.parser. We won’t go into details on the HTML
parsing tools here (they’re covered in Chapter 19 in conjunction with text processing),
but to illustrate how escape codes are eventually undone, here is the HTML parser
module at work reading back the preceding output:
>>> import cgi, html.parser
>>> s = cgi.escape("1<2 <b>hello</b>")
>>> s
'1<2 <b>hello</b>'
>>>
>>> html.parser.HTMLParser().unescape(s)
'1<2 <b>hello</b>'
This uses a utility method on the HTML parser class to unquote. In Chapter 19, we’ll
see that using this class for more substantial work involves subclassing to override
methods run as callbacks during the parse upon detection of tags, data, entities, and
more. For more on full-blown HTML parsing, watch for the rest of this story in
Chapter 19.
Escaping URLs
By contrast, URLs reserve other characters as special and must adhere to different es-
cape conventions. As a result, we use different Python library tools to escape URLs for
transmission. Python’s urllib.parse module provides two tools that do the translation
work for us: quote, which implements the standard %XX hexadecimal URL escape code
sequences for most nonalphanumeric characters, and quote_plus, which additionally
translates spaces to + signs. The urllib.parse module also provides functions for un-
escaping quoted characters in a URL string: unquote undoes %XX escapes, and
unquote_plus also changes plus signs back to spaces. Here is the module at work, at the
interactive prompt:
>>> import urllib.parse
>>> urllib.parse.quote("a & b #! c")
'a%20%26%20b%20%23%21%20c'
1204 | Chapter 15: Server-Side Scripting

>>> urllib.parse.quote_plus("C:\stuff\spam.txt")
'C%3A%5Cstuff%5Cspam.txt'
>>> x = urllib.parse.quote_plus("a & b #! c")
>>> x
'a+%26+b+%23%21+c'
>>> urllib.parse.unquote_plus(x)
'a & b #! c'
URL escape sequences embed the hexadecimal values of nonsafe characters following
a % sign (this is usually their ASCII codes). In urllib.parse, nonsafe characters are
usually taken to include everything except letters, digits, and a handful of safe special
characters (any in '_.-'), but the two tools differ on forward slashes, and you can
extend the set of safe characters by passing an extra string argument to the quote calls
to customize the translations:
>>> urllib.parse.quote_plus("uploads/index.txt")
'uploads%2Findex.txt'
>>> urllib.parse.quote("uploads/index.txt")
'uploads/index.txt'
>>>
>>> urllib.parse.quote_plus("uploads/index.txt", '/')
'uploads/index.txt'
>>> urllib.parse.quote("uploads/index.txt", '/')
'uploads/index.txt'
>>> urllib.parse.quote("uploads/index.txt", '')
'uploads%2Findex.txt'
>>>
>>> urllib.parse.quote_plus("uploads\index.txt")
'uploads%5Cindex.txt'
>>> urllib.parse.quote("uploads\index.txt")
'uploads%5Cindex.txt'
>>> urllib.parse.quote_plus("uploads\index.txt", '\\')
'uploads\\index.txt'
Note that Python’s cgi module also translates URL escape sequences back to their
original characters and changes + signs to spaces during the process of extracting input
information. Internally, cgi.FieldStorage automatically calls urllib.parse tools which
unquote if needed to parse and unescape parameters passed at the end of URLs. The
upshot is that CGI scripts get back the original, unescaped URL strings, and don’t need
to unquote values on their own. As we’ve seen, CGI scripts don’t even need to know
that inputs came from a URL at all.
Escaping URLs Embedded in HTML Code
We’ve seen how to escape text inserted into both HTML and URLs. But what do we
do for URLs inside HTML? That is, how do we escape when we generate and embed
text inside a URL, which is itself embedded inside generated HTML code? Some of our
earlier examples used hardcoded URLs with appended input parameters inside
More on HTML and URL Escapes | 1205

<A HREF> hyperlink tags; the file languages2.py, for instance, prints HTML that includes
a URL:
<a href="getfile.py?filename=cgi-bin\languages2.py">
Because the URL here is embedded in HTML, it must at least be escaped according to
HTML conventions (e.g., any < characters must become <), and any spaces should
be translated to + signs per URL conventions. A cgi.escape(url) call followed by the
string url.replace(" ", "+") would take us this far, and would probably suffice for
most cases.
That approach is not quite enough in general, though, because HTML escaping con-
ventions are not the same as URL conventions. To robustly escape URLs embedded in
HTML code, you should instead call urllib.parse.quote_plus on the URL string, or
at least most of its components, before adding it to the HTML text. The escaped result
also satisfies HTML escape conventions, because urllib.parse translates more char-
acters than cgi.escape, and the % in URL escapes is not special to HTML.
HTML and URL conflicts: &
But there is one more astonishingly subtle (and thankfully rare) wrinkle: you may also
have to be careful with & characters in URL strings that are embedded in HTML code
(e.g., within <A> hyperlink tags). The & symbol is both a query parameter separator in
URLs (?a=1&b=2) and the start of escape codes in HTML (<). Consequently, there is
a potential for collision if a query parameter name happens to be the same as an HTML
escape sequence code. The query parameter name amp, for instance, that shows up as
&=1 in parameters two and beyond on the URL may be treated as an HTML escape
by some HTML parsers, and translated to &=1.
Even if parts of the URL string are URL-escaped, when more than one parameter is
separated by a &, the & separator might also have to be escaped as & according to
HTML conventions. To see why, consider the following HTML hyperlink tag with
query parameter names name, job, amp, sect, and lt:
<A HREF="file.py?name=a&job=b&=c§=d<=e">hello</a>
When rendered in most browsers tested, including Internet Explorer on Windows 7,
this URL link winds up looking incorrectly like this (the S character in the first of these
is really a non-ASCII section marker):
file.py?name=a&job=b&=cS=d<=e result in IE
file.py?name=a&job=b&=c%A7=d%3C=e result in Chrome (0x3C is <)
The first two parameters are retained as expected (name=a, job=b), because name is not
preceded with an & and &job is not recognized as a valid HTML character escape code.
However, the &, §, and < parts are interpreted as special characters because
they do name valid HTML escape codes, even without a trailing semicolon.
To see this for yourself, open the example package’s test-escapes.html file in your
browser, and highlight or select its link; the query names may be taken as HTML
1206 | Chapter 15: Server-Side Scripting

escapes. This text appears to parse correctly in Python’s own HTML parser module
described earlier (unless the parts in question also end in a semicolon); that might help
for replies fetched manually with urllib.request, but not when rendered in browsers:
>>> from html.parser import HTMLParser
>>> html = open('test-escapes.html').read()
>>> HTMLParser().unescape(html)
'<HTML>\n<A HREF="file.py?name=a&job=b&=c§=d<=e">hello</a>\n</HTML>'
Avoiding conflicts
What to do then? To make this work as expected in all cases, the & separators should
generally be escaped if your parameter names may clash with an HTML escape code:
<A HREF="file.py?name=a&job=b&amp=c&sect=d&lt=e">hello</a>
Browsers render this fully escaped link as expected (open test-escapes2.html to test),
and Python’s HTML parser does the right thing as well:
file.py?name=a&job=b&=c§=d<=e result in both IE and Chrome
>>> h = '<A HREF="file.py?name=a&job=b&amp=c&sect=d&lt=e">hello</a>'
>>> HTMLParser().unescape(h)
'<A HREF="file.py?name=a&job=b&=c§=d<=e">hello</a>'
Because of this conflict between HTML and URL syntax, most server tools (including
Python’s urlib.parse query-parameter parsing tools employed by Python’s cgi mod-
ule) also allow a semicolon to be used as a separator instead of &. The following link,
for example, works the same as the fully escaped URL, but does not require an extra
HTML escaping step (at least not for the ;):
file.py?name=a;job=b;amp=c;sect=d;lt=e
Python’s html.parser unescape tool allows the semicolons to pass unchanged, too,
simply because they are not significant in HTML code. To fully test all three of these
link forms for yourself at once, place them in an HTML file, open the file in your browser
using its http://localhost/badlink.html URL, and view the links when followed. The
HTML file in Example 15-24 will suffice.
Example 15-24. PP4E\Internet\Web\badlink.html
<HTML><BODY>
<p><A HREF=
"cgi-bin/badlink.py?name=a&job=b&=c§=d<=e">unescaped</a>
<p><A HREF=
"cgi-bin/badlink.py?name=a&job=b&amp=c&sect=d&lt=e">escaped</a>
<p><A HREF=
"cgi-bin/badlink.py?name=a;job=b;amp=c;sect=d;lt=e">alternative</a>
</BODY></HTML>
More on HTML and URL Escapes | 1207

When these links are clicked, they invoke the simple CGI script in Example 15-25. This
script displays the inputs sent from the client on the standard error stream to avoid any
additional translations (for our locally running web server in Example 15-1, this routes
the printed text to the server’s console window).
Example 15-25. PP4E\Internet\Web\cgi-bin\badlink.py
import cgi, sys
form = cgi.FieldStorage() # print all inputs to stderr; stodout=reply page
for name in form.keys():
print('[%s:%s]' % (name, form[name].value), end=' ', file=sys.stderr)
Following is the (edited for space) output we get in our local Python-coded web server’s
console window for following each of the three links in the HTML page in turn using
Internet Explorer. The second and third yield the correct parameters set on the server
as a result of the HTML escaping or URL conventions employed, but the accidental
HTML escapes cause serious issues for the first unescaped link—the client’s HTML
parser translates these in unintended ways (results are similar under Chrome, but the
first link displays the non-ASCII section mark character with a different escape
sequence):
mark-VAIO - - [16/Jun/2010 10:43:24] b'[:c\xa7=d<=e] [job:b] [name:a] '
mark-VAIO - - [16/Jun/2010 10:43:24] CGI script exited OK
mark-VAIO - - [16/Jun/2010 10:43:27] b'[amp:c] [job:b] [lt:e] [name:a] [sect:d]'
mark-VAIO - - [16/Jun/2010 10:43:27] CGI script exited OK
mark-VAIO - - [16/Jun/2010 10:43:30] b'[amp:c] [job:b] [lt:e] [name:a] [sect:d]'
mark-VAIO - - [16/Jun/2010 10:43:30] CGI script exited OK
The moral of this story is that unless you can be sure that the names of all but the
leftmost URL query parameters embedded in HTML are not the same as the name of
any HTML character escape code like amp, you should generally either use a semicolon
as a separator, if supported by your tools, or run the entire URL through cgi.escape
after escaping its parameter names and values with urllib.parse.quote_plus:
>>> link = 'file.py?name=a&job=b&=c§=d<=e'
# escape for HTML
>>> import cgi
>>> cgi.escape(link)
'file.py?name=a&job=b&amp=c&sect=d&lt=e'
# escape for URL
>>> import urllib.parse
>>> elink = urllib.parse.quote_plus(link)
>>> elink
'file.py%3Fname%3Da%26job%3Db%26amp%3Dc%26sect%3Dd%26lt%3De'
# URL satisfies HTML too: same
>>> cgi.escape(elink)
'file.py%3Fname%3Da%26job%3Db%26amp%3Dc%26sect%3Dd%26lt%3De'
1208 | Chapter 15: Server-Side Scripting

Having said that, I should add that some examples in this book do not escape & URL
separators embedded within HTML simply because their URL parameter names are
known not to conflict with HTML escapes. In fact, this concern is likely to be rare in
practice, since your program usually controls the set of parameter names it expects.
This is not, however, the most general solution, especially if parameter names may be
driven by a dynamic database; when in doubt, escape much and often.
“How I Learned to Stop Worrying and Love the Web”
Lest the HTML and URL formatting rules sound too clumsy (and send you screaming
into the night!), note that the HTML and URL escaping conventions are imposed by
the Internet itself, not by Python. (As you’ve learned by now, Python has a different
mechanism for escaping special characters in string constants with backslashes.) These
rules stem from the fact that the Web is based on the notion of shipping formatted text
strings around the planet, and are almost surely influenced by the tendency of different
interest groups to develop very different notations.
You can take heart, though, in the fact that you often don’t need to think in such cryptic
terms; when you do, Python automates the translation process with library tools. Just
keep in mind that any script that generates HTML or URLs dynamically probably needs
to call Python’s escaping tools to be robust. We’ll see both the HTML and the URL
escape tool sets employed frequently in later examples in this chapter and the next.
Moreover, web development frameworks and tools such as Zope and others aim to get
rid of some of the low-level complexities that CGI scripters face. And as usual in pro-
gramming, there is no substitute for brains; amazing technologies like the Internet come
at an inevitable cost in complexity.
Transferring Files to Clients and Servers
It’s time to explain a bit of HTML code that’s been lurking in the shadows. Did you
notice those hyperlinks on the language selector examples’ main pages for showing the
CGI script’s source code (the links I told you to ignore)? Normally, we can’t see such
script source code, because accessing a CGI script makes it execute—we can see only
its HTML output, generated to make the new page. The script in Example 15-26, ref-
erenced by a hyperlink in the main language.html page, works around that by opening
the source file and sending its text as part of the HTML response. The text is marked
with <PRE> as preformatted text and is escaped for transmission inside HTML with
cgi.escape.
Example 15-26. PP4E\Internet\Web\cgi-bin\languages-src.py
#!/usr/bin/python
"Display languages.py script code without running it."
import cgi
filename = 'cgi-bin/languages.py'
Transferring Files to Clients and Servers | 1209
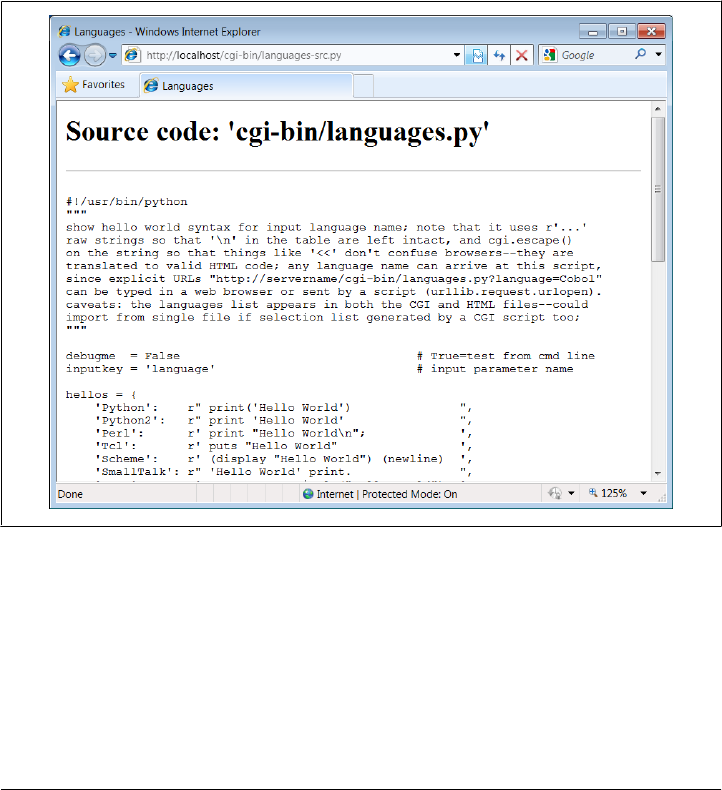
print('Content-type: text/html\n') # wrap up in HTML
print('<TITLE>Languages</TITLE>')
print("<H1>Source code: '%s'</H1>" % filename)
print('<HR><PRE>')
print(cgi.escape(open(filename).read())) # decode per platform default
print('</PRE><HR>')
Here again, the filename is relative to the server’s directory for our web server on Win-
dows (see the prior discussion of this, and delete the cgi-bin portion of its path on
other platforms). When we visit this script on the Web via the first source hyperlink in
Example 15-17 or a manually typed URL, the script delivers a response to the client
that includes the text of the CGI script source file. It’s captured in Figure 15-27.
Figure 15-27. Source code viewer page
Note that here, too, it’s crucial to format the text of the file with cgi.escape, because
it is embedded in the HTML code of the reply. If we don’t, any characters in the text
that mean something in HTML code are interpreted as HTML tags. For example, the
C++ < operator character within this file’s text may yield bizarre results if not properly
escaped. The cgi.escape utility converts it to the standard sequence < for safe
embedding.
1210 | Chapter 15: Server-Side Scripting

Displaying Arbitrary Server Files on the Client
Almost immediately after writing the languages source code viewer script in the pre-
ceding example, it occurred to me that it wouldn’t be much more work, and would be
much more useful, to write a generic version—one that could use a passed-in filename
to display any file on the site. It’s a straightforward mutation on the server side; we
merely need to allow a filename to be passed in as an input. The getfile.py Python script
in Example 15-27 implements this generalization. It assumes the filename is either
typed into a web page form or appended to the end of the URL as a parameter. Re-
member that Python’s cgi module handles both cases transparently, so there is no code
in this script that notices any difference.
Example 15-27. PP4E\Internet\Web\cgi-bin\getfile.py
#!/usr/bin/python
"""
##################################################################################
Display any CGI (or other) server-side file without running it. The filename can
be passed in a URL param or form field (use "localhost" as the server if local):
http://servername/cgi-bin/getfile.py?filename=somefile.html
http://servername/cgi-bin/getfile.py?filename=cgi-bin\somefile.py
http://servername/cgi-bin/getfile.py?filename=cgi-bin%2Fsomefile.py
Users can cut-and-paste or "View Source" to save file locally. On IE, running the
text/plain version (formatted=False) sometimes pops up Notepad, but end-lines are
not always in DOS format; Netscape shows the text correctly in the browser page
instead. Sending the file in text/HTML mode works on both browsers--text is
displayed in the browser response page correctly. We also check the filename here
to try to avoid showing private files; this may or may not prevent access to such
files in general: don't install this script if you can't otherwise secure source!
##################################################################################
"""
import cgi, os, sys
formatted = True # True=wrap text in HTML
privates = ['PyMailCgi/cgi-bin/secret.py'] # don't show these
try:
samefile = os.path.samefile # checks device, inode numbers
except:
def samefile(path1, path2): # not available on Windows
apath1 = os.path.abspath(path1).lower() # do close approximation
apath2 = os.path.abspath(path2).lower() # normalizes path, same case
return apath1 == apath2
html = """
<html><title>Getfile response</title>
<h1>Source code for: '%s'</h1>
<hr>
<pre>%s</pre>
<hr></html>"""
Transferring Files to Clients and Servers | 1211

def restricted(filename):
for path in privates:
if samefile(path, filename): # unify all paths by os.stat
return True # else returns None=false
try:
form = cgi.FieldStorage()
filename = form['filename'].value # URL param or form field
except:
filename = 'cgi-bin\getfile.py' # else default filename
try:
assert not restricted(filename) # load unless private
filetext = open(filename).read() # platform unicode encoding
except AssertionError:
filetext = '(File access denied)'
except:
filetext = '(Error opening file: %s)' % sys.exc_info()[1]
if not formatted:
print('Content-type: text/plain\n') # send plain text
print(filetext) # works on NS, not IE?
else:
print('Content-type: text/html\n') # wrap up in HTML
print(html % (filename, cgi.escape(filetext)))
This Python server-side script simply extracts the filename from the parsed CGI inputs
object and reads and prints the text of the file to send it to the client browser. Depending
on the formatted global variable setting, it sends the file in either plain text mode (using
text/plain in the response header) or wrapped up in an HTML page definition (text/
html).
Both modes (and others) work in general under most browsers, but Internet Explorer
doesn’t handle the plain text mode as gracefully as Netscape does—during testing, it
popped up the Notepad text editor to view the downloaded text, but end-of-line char-
acters in Unix format made the file appear as one long line. (Netscape instead displays
the text correctly in the body of the response web page itself.) HTML display mode
works more portably with current browsers. More on this script’s restricted file logic
in a moment.
Let’s launch this script by typing its URL at the top of a browser, along with a desired
filename appended after the script’s name. Figure 15-28 shows the page we get by
visiting the following URL (the second source link in the language selector page of
Example 15-17 has a similar effect but a different file):
http://localhost/cgi-bin/getfile.py?filename=cgi-bin\languages-src.py
The body of this page shows the text of the server-side file whose name we passed at
the end of the URL; once it arrives, we can view its text, cut-and-paste to save it in a
file on the client, and so on. In fact, now that we have this generalized source code
1212 | Chapter 15: Server-Side Scripting
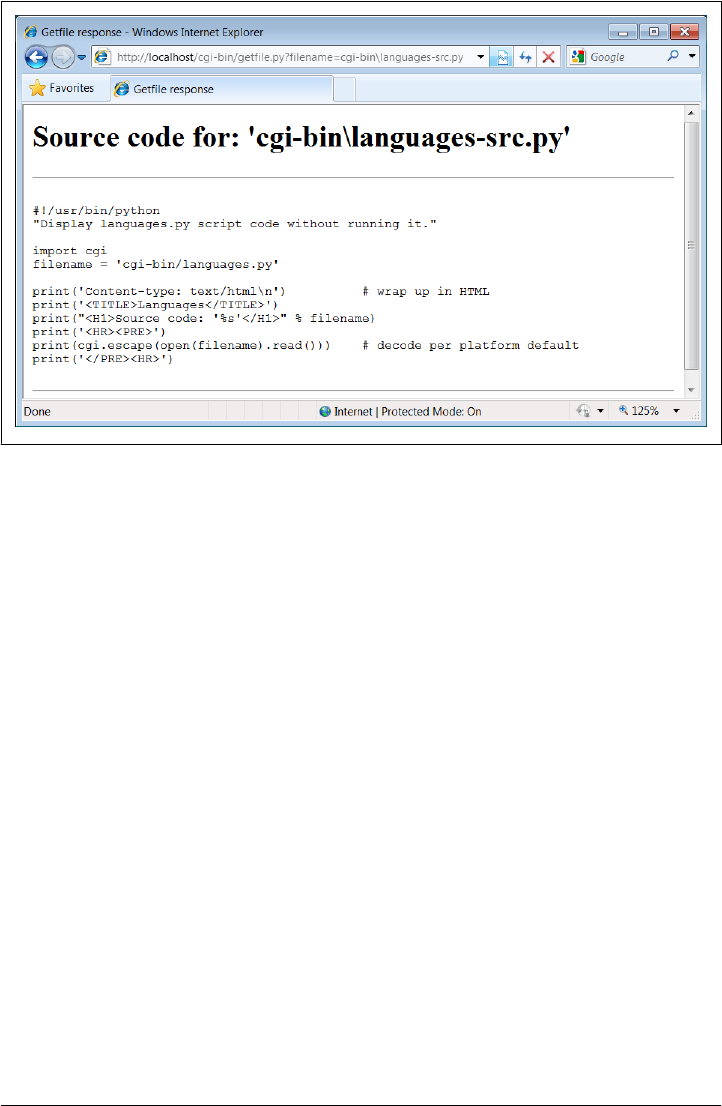
viewer, we could replace the hyperlink to the script languages-src.py in
language.html, with a URL of this form (I included both for illustration):
http://localhost/cgi-bin/getfile.py?filename=cgi-bin\languages.py
Subtle thing: notice that the query parameter in this URL and others in this book use
a backslash as the Windows directory separator. On Windows, and using both the local
Python web server of Example 15-1 and Internet Explorer, we can also use the two
URL-escaped forms at the start of the following, but the literal forward slash of the last
in following fails (in URL escapes, %5C is \ and %2F is /):
http://localhost/cgi-bin/getfile.py?filename=cgi-bin%5Clanguages.py OK too
http://localhost/cgi-bin/getfile.py?filename=cgi-bin%2Flanguages.py OK too
http://localhost/cgi-bin/getfile.py?filename=cgi-bin/languages.py fails
This reflects a change since the prior edition of this book (which used the last of these
for portability), and may or may not be ideal behavior (though like working directory
contexts, this is one of a set of server and platform differences you’re likely to encounter
when working on the Web). It seems to stem from the fact that the urllib.parse mod-
ule’s quote considers / safe, but quote_plus no longer does. If you care about URL
portability in this context, the second of the preceding forms may be better, though
arguably cryptic to remember if you have to type it manually (escaping tools can au-
tomate this). If not, you may have to double-up on backslashes to avoid clashes with
other string escapes, because of the way URL parameter data is handled; see the links
to this script in Example 15-20 for an example involving \f.
Figure 15-28. Generic source code viewer page
Transferring Files to Clients and Servers | 1213
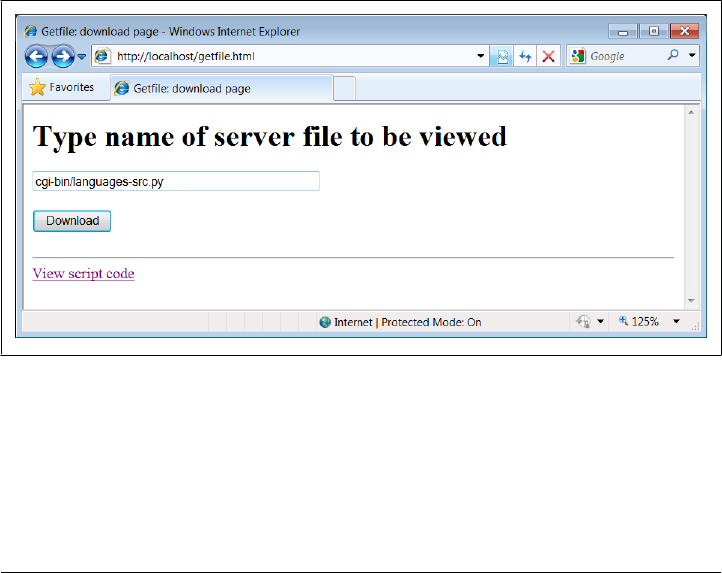
From a higher perspective, URLs like these are really direct calls (albeit across the Web)
to our Python script, with filename parameters passed explicitly—we’re using the script
much like a subroutine located elsewhere in cyberspace which returns the text of a file
we wish to view. As we’ve seen, parameters passed in URLs are treated the same as field
inputs in forms; for convenience, let’s also write a simple web page that allows the
desired file to be typed directly into a form, as shown in Example 15-28.
Example 15-28. PP4E\Internet\Web\getfile.html
<html><title>Getfile: download page</title>
<body>
<form method=get action="cgi-bin/getfile.py">
<h1>Type name of server file to be viewed</h1>
<p><input type=text size=50 name=filename>
<p><input type=submit value=Download>
</form>
<hr><a href="cgi-bin/getfile.py?filename=cgi-bin\getfile.py">View script code</a>
</body></html>
Figure 15-29 shows the page we receive when we visit this file’s URL. We need to type
only the filename in this page, not the full CGI script address; notice that I can use
forward slashes here because the browser will escape on transmission and Python’s
open allows either type of slash on Windows (in query parameters created manually,
it’s up to coders or generators to do the right thing).
Figure 15-29. Source code viewer selection page
When we press this page’s Download button to submit the form, the filename is trans-
mitted to the server, and we get back the same page as before, when the filename was
appended to the URL (it’s the same as Figure 15-28, albeit with a different directory
separator slash). In fact, the filename will be appended to the URL here, too; the get
method in the form’s HTML instructs the browser to append the filename to the URL,
1214 | Chapter 15: Server-Side Scripting
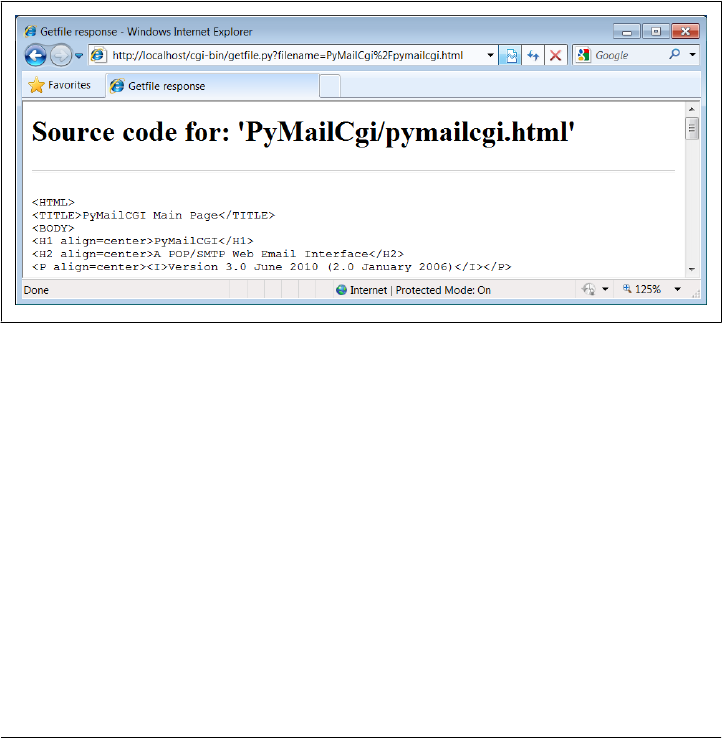
exactly as if we had done so manually. It shows up at the end of the URL in the response
page’s address field, even though we really typed it into a form. Clicking the link at the
bottom of Figure 15-29 opens the file-getter script’s source in the same way, though
the URL is explicit.‡
Handling private files and errors
As long as CGI scripts have permission to open the desired server-side file, this script
can be used to view and locally save any file on the server. For instance, Figure 15-30
shows the page we’re served after asking for the file path PyMailCgi/pymailcgi.html—
an HTML text file in another application’s subdirectory, nested within the parent di-
rectory of this script (we explore PyMailCGI in the next chapter). Users can specify
both relative and absolute paths to reach a file—any path syntax the server understands
will do.
Figure 15-30. Viewing files with relative paths
More generally, this script will display any file path for which the username under which
the CGI script runs has read access. On some servers, this is often the user “nobody”—
a predefined username with limited permissions. Just about every server-side file used
in web applications will be accessible, though, or else they couldn’t be referenced from
browsers in the first place. When running our local web server, every file on the com-
puter can be inspected: C:\Users\mark\Stuff\Websites\public_html\index.html works
fine when entered in the form of Figure 15-29 on my laptop, for example.
‡ You may notice another difference in the response pages produced by the form and an explicitly typed URL:
for the form, the value of the “filename” parameter at the end of the URL in the response may contain URL
escape codes for some characters in the file path you typed. Browsers automatically translate some non-ASCII
characters into URL escapes (just like urllib.parse.quote). URL escapes were discussed earlier in this
chapter; we’ll see an example of this automatic browser escaping at work in an upcoming screenshot.
Transferring Files to Clients and Servers | 1215

That makes for a flexible tool, but it’s also potentially dangerous if you are running a
server on a remote machine. What if we don’t want users to be able to view some files
on the server? For example, in the next chapter, we will implement an encryption
module for email account passwords. On our server, it is in fact addressable as
PyMailCgi/cgi-bin/secret.py. Allowing users to view that module’s source code would
make encrypted passwords shipped over the Net much more vulnerable to cracking.
To minimize this potential, the getfile script keeps a list, privates, of restricted file-
names, and uses the os.path.samefile built-in to check whether a requested filename
path points to one of the names on privates. The samefile call checks to see whether
the os.stat built-in returns the same identifying information (device and inode num-
bers) for both file paths. As a result, pathnames that look different syntactically but
reference the same file are treated as identical. For example, on the server used for this
book’s second edition, the following paths to the encryptor module were different
strings, but yielded a true result from os.path.samefile:
../PyMailCgi/secret.py
/home/crew/lutz/public_html/PyMailCgi/secret.py
Unfortunately, the os.path.samefile call is supported on Unix, Linux, and Macs, but
not on Windows. To emulate its behavior in Windows, we expand file paths to be
absolute, convert to a common case, and compare (I shortened paths in the following
with ... for display here):
>>> import os
>>> os.path.samefile
AttributeError: 'module' object has no attribute 'samefile'
>>> os.getcwd()
'C:\\...\\PP4E\\dev\\Examples\\PP4E\\Internet\\Web'
>>>
>>> x = os.path.abspath('../Web/PYMailCgi/cgi-bin/secret.py').lower()
>>> y = os.path.abspath('PyMailCgi/cgi-bin/secret.py').lower()
>>> z = os.path.abspath('./PYMailCGI/cgi-bin/../cgi-bin/SECRET.py').lower()
>>> x
'c:\\...\\pp4e\\dev\\examples\\pp4e\\internet\\web\\pymailcgi\\cgi-bin\\secret.py'
>>> y
'c:\\...\\pp4e\\dev\\examples\\pp4e\\internet\\web\\pymailcgi\\cgi-bin\\secret.py'
>>> z
'c:\\...\\pp4e\\dev\\examples\\pp4e\\internet\\web\\pymailcgi\\cgi-bin\\secret.py'
>>>
>>> x == y, y == z
(True, True)
Accessing any of the three paths expanded here generates an error page like that in
Figure 15-31. Notice how the names of secret files are global data in this module, on
the assumption that they pertain to files viewable across an entire site; though we could
allow for customization per site, changing the script’s globals per site is likely just as
convenient as changing a per-site customization files.
Also notice that bona fide file errors are handled differently. Permission problems and
attempts to access nonexistent files, for example, are trapped by a different exception
1216 | Chapter 15: Server-Side Scripting
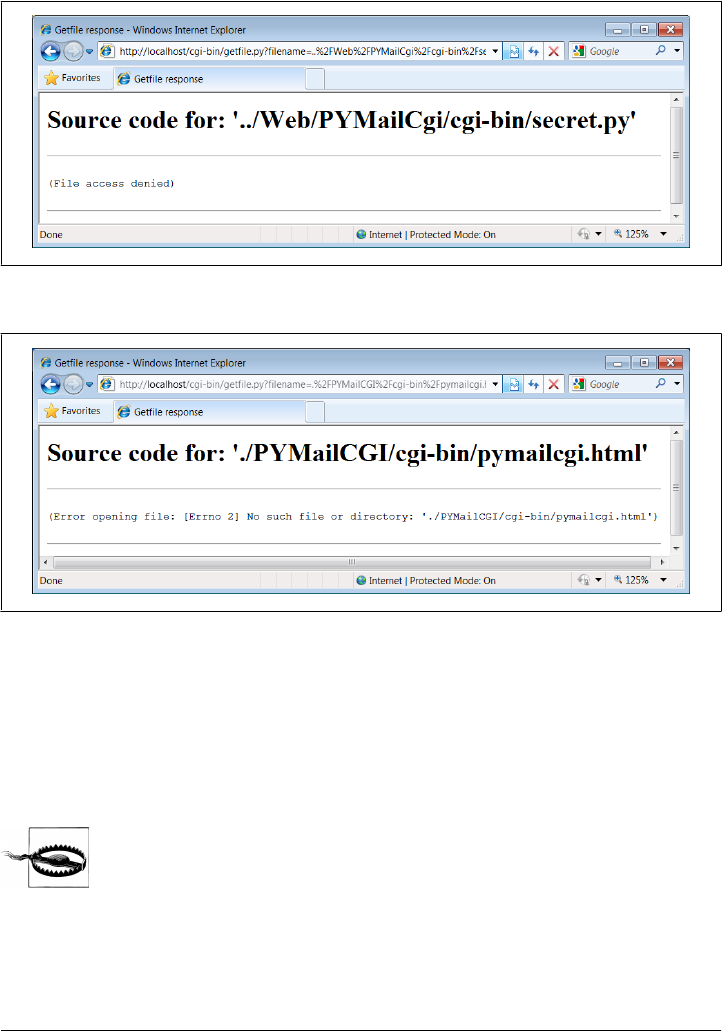
handler clause, and they display the exception’s message—fetched using Python’s
sys.exc_info—to give additional context. Figure 15-32 shows one such error page.
Figure 15-31. Accessing private files
Figure 15-32. File errors display
As a general rule of thumb, file-processing exceptions should always be reported in
detail, especially during script debugging. If we catch such exceptions in our scripts,
it’s up to us to display the details (assigning sys.stderr to sys.stdout won’t help if
Python doesn’t print an error message). The current exception’s type, data, and trace-
back objects are always available in the sys module for manual display.
Do not install the getfile.py script if you truly wish to keep your files
private! The private files list check it uses attempts to prevent the en-
cryption module from being viewed directly with this script, but it may
or may not handle all possible attempts, especially on Windows. This
book isn’t about security, so we won’t go into further details here, except
to say that on the Internet, a little paranoia is often a good thing. Espe-
cially for systems installed on the general Internet at large, you should
generally assume that the worst case scenario might eventually happen.
Transferring Files to Clients and Servers | 1217

Uploading Client Files to the Server
The getfile script lets us view server files on the client, but in some sense, it is a general-
purpose file download tool. Although not as direct as fetching a file by FTP or over raw
sockets, it serves similar purposes. Users of the script can either cut-and-paste the dis-
played code right off the web page or use their browser’s View Source option to view
and cut. As described earlier, scripts that contact the script with urllib can also extract
the file’s text with Python’s HTML parser module.
But what about going the other way—uploading a file from the client machine to the
server? For instance, suppose you are writing a web-based email system, and you need
a way to allow users to upload mail attachments. This is not an entirely hypothetical
scenario; we will actually implement this idea in the next chapter, when we develop
the PyMailCGI webmail site.
As we saw in Chapter 13, uploads are easy enough to accomplish with a client-side
script that uses Python’s FTP support module. Yet such a solution doesn’t really apply
in the context of a web browser; we can’t usually ask all of our program’s clients to
start up a Python FTP script in another window to accomplish an upload. Moreover,
there is no simple way for the server-side script to request the upload explicitly, unless
an FTP server happens to be running on the client machine (not at all the usual case).
Users can email files separately, but this can be inconvenient, especially for email
attachments.
So is there no way to write a web-based program that lets its users upload files to a
common server? In fact, there is, though it has more to do with HTML than with Python
itself. HTML <input> tags also support a type=file option, which produces an input
field, along with a button that pops up a file-selection dialog. The name of the client-
side file to be uploaded can either be typed into the control or selected with the pop-
up dialog. To demonstrate, the HTML file in Example 15-29 defines a page that allows
any client-side file to be selected and uploaded to the server-side script named in the
form’s action option.
Example 15-29. PP4E\Internet\Web\putfile.html
<html><title>Putfile: upload page</title>
<body>
<form enctype="multipart/form-data"
method=post
action="cgi-bin/putfile.py">
<h1>Select client file to be uploaded</h1>
<p><input type=file size=50 name=clientfile>
<p><input type=submit value=Upload>
</form>
<hr><a href="cgi-bin/getfile.py?filename=cgi-bin\putfile.py">View script code</a>
</body></html>
One constraint worth noting: forms that use file type inputs should also specify a
multipart/form-data encoding type and the post submission method, as shown in this
1218 | Chapter 15: Server-Side Scripting

file; get-style URLs don’t work for uploading files (adding their contents to the end of
the URL doesn’t make sense). When we visit this HTML file, the page shown in Fig-
ure 15-33 is delivered. Pressing its Browse button opens a standard file-selection dialog,
while Upload sends the file.
Figure 15-33. File upload selection page
On the client side, when we press this page’s Upload button, the browser opens and
reads the selected file and packages its contents with the rest of the form’s input fields
(if any). When this information reaches the server, the Python script named in the form
action tag is run as always, as listed in Example 15-30.
Example 15-30. PP4E\Internet\Web\cgi-bin\putfile.py
#!/usr/bin/python
"""
##################################################################################
extract file uploaded by HTTP from web browser; users visit putfile.html to
get the upload form page, which then triggers this script on server; this is
very powerful, and very dangerous: you will usually want to check the filename,
etc; this may only work if file or dir is writable: a Unix 'chmod 777 uploads'
may suffice; file pathnames may arrive in client's path format: handle here;
caveat: could open output file in text mode to wite receiving platform's line
ends since file content always str from the cgi module, but this is a temporary
solution anyhow--the cgi module doesn't handle binary file uploads in 3.1 at all;
##################################################################################
"""
import cgi, os, sys
import posixpath, ntpath, macpath # for client paths
debugmode = False # True=print form info
Transferring Files to Clients and Servers | 1219

loadtextauto = False # True=read file at once
uploaddir = './uploads' # dir to store files
sys.stderr = sys.stdout # show error msgs
form = cgi.FieldStorage() # parse form data
print("Content-type: text/html\n") # with blank line
if debugmode: cgi.print_form(form) # print form fields
# html templates
html = """
<html><title>Putfile response page</title>
<body>
<h1>Putfile response page</h1>
%s
</body></html>"""
goodhtml = html % """
<p>Your file, '%s', has been saved on the server as '%s'.
<p>An echo of the file's contents received and saved appears below.
</p><hr>
<p><pre>%s</pre>
</p><hr>
"""
# process form data
def splitpath(origpath): # get file at end
for pathmodule in [posixpath, ntpath, macpath]: # try all clients
basename = pathmodule.split(origpath)[1] # may be any server
if basename != origpath:
return basename # lets spaces pass
return origpath # failed or no dirs
def saveonserver(fileinfo): # use file input form data
basename = splitpath(fileinfo.filename) # name without dir path
srvrname = os.path.join(uploaddir, basename) # store in a dir if set
srvrfile = open(srvrname, 'wb') # always write bytes here
if loadtextauto:
filetext = fileinfo.value # reads text into string
if isinstance(filetext, str): # Python 3.1 hack
filedata = filetext.encode()
srvrfile.write(filedata) # save in server file
else: # else read line by line
numlines, filetext = 0, '' # e.g., for huge files
while True: # content always str here
line = fileinfo.file.readline() # or for loop and iterator
if not line: break
if isinstance(line, str): # Python 3.1 hack
line = line.encode()
srvrfile.write(line)
filetext += line.decode() # ditto
numlines += 1
filetext = ('[Lines=%d]\n' % numlines) + filetext
srvrfile.close()
1220 | Chapter 15: Server-Side Scripting

os.chmod(srvrname, 0o666) # make writable: owned by 'nobody'
return filetext, srvrname
def main():
if not 'clientfile' in form:
print(html % 'Error: no file was received')
elif not form['clientfile'].filename:
print(html % 'Error: filename is missing')
else:
fileinfo = form['clientfile']
try:
filetext, srvrname = saveonserver(fileinfo)
except:
errmsg = '<h2>Error</h2><p>%s<p>%s' % tuple(sys.exc_info()[:2])
print(html % errmsg)
else:
print(goodhtml % (cgi.escape(fileinfo.filename),
cgi.escape(srvrname),
cgi.escape(filetext)))
main()
Within this script, the Python-specific interfaces for handling uploaded files are em-
ployed. They aren’t very new, really; the file comes into the script as an entry in the
parsed form object returned by cgi.FieldStorage, as usual; its key is clientfile, the
input control’s name in the HTML page’s code.
This time, though, the entry has additional attributes for the file’s name on the client.
Moreover, accessing the value attribute of an uploaded file input object will automat-
ically read the file’s contents all at once into a string on the server. For very large files,
we can instead read line by line (or in chunks of bytes) to avoid overflowing memory
space. Internally, Python’s cgi module stores uploaded files in temporary files auto-
matically; reading them in our script simply reads from that temporary file. If they are
very large, though, they may be too long to store as a single string in memory all at once.
For illustration purposes, the script implements either scheme: based on the setting of
the loadtextauto global variable, it either asks for the file contents as a string or reads
it line by line. In general, the CGI module gives us back objects with the following
attributes for file upload controls:
filename
The name of the file as specified on the client
file
A file object from which the uploaded file’s contents can be read
value
The contents of the uploaded file (read from the file on attribute access)
Additional attributes are not used by our script. Files represent a third input field object;
as we’ve also seen, the value attribute is a string for simple input fields, and we may
receive a list of objects for multiple-selection controls.
Transferring Files to Clients and Servers | 1221

For uploads to be saved on the server, CGI scripts (run by the user “nobody” on some
servers) must have write access to the enclosing directory if the file doesn’t yet exist, or
to the file itself if it does. To help isolate uploads, the script stores all uploads in what-
ever server directory is named in the uploaddir global. On one Linux server, I had to
give this directory a mode of 777 (universal read/write/execute permissions) with
chmod to make uploads work in general. This is a nonissue with the local web server
used in this chapter, but your mileage may vary; be sure to check permissions if this
script fails.
The script also calls os.chmod to set the permission on the server file such that it can be
read and written by everyone. If it is created anew by an upload, the file’s owner will
be “nobody” on some servers, which means anyone out in cyberspace can view and
upload the file. On one Linux server, though, the file will also be writable only by the
user “nobody” by default, which might be inconvenient when it comes time to change
that file outside the Web (naturally, the degree of pain can vary per file operation).
Isolating client-side file uploads by placing them in a single directory on
the server helps minimize security risks: existing files can’t be overwrit-
ten arbitrarily. But it may require you to copy files on the server after
they are uploaded, and it still doesn’t prevent all security risks—
mischievous clients can still upload huge files, which we would need to
trap with additional logic not present in this script as is. Such traps may
be needed only in scripts open to the Internet at large.
If both client and server do their parts, the CGI script presents us with the response
page shown in Figure 15-34, after it has stored the contents of the client file in a new
or existing file on the server. For verification, the response gives the client and server
file paths, as well as an echo of the uploaded file, with a line count in line-by-line reader
mode.
Notice that this echo display assumes that the file’s content is text. It turns out that this
is a safe assumption to make, because the cgi module always returns file content as
str strings, not bytes. Less happily, this also stems from the fact that binary file uploads
are not supported in the cgi module in 3.1 (more on this limitation in an upcoming
note).
This file uploaded and saved in the uploads directory is identical to the original (run
an fc command on Windows to verify this). Incidentally, we can also verify the upload
with the getfile program we wrote in the prior section. Simply access the selection
page to type the pathname of the file on the server, as shown in Figure 15-35.
If the file upload is successful, the resulting viewer page we will obtain looks like
Figure 15-36. Since the user “nobody” (CGI scripts) was able to write the file, “nobody”
should be able to view it as well (bad grammar perhaps, but true nonetheless).
1222 | Chapter 15: Server-Side Scripting
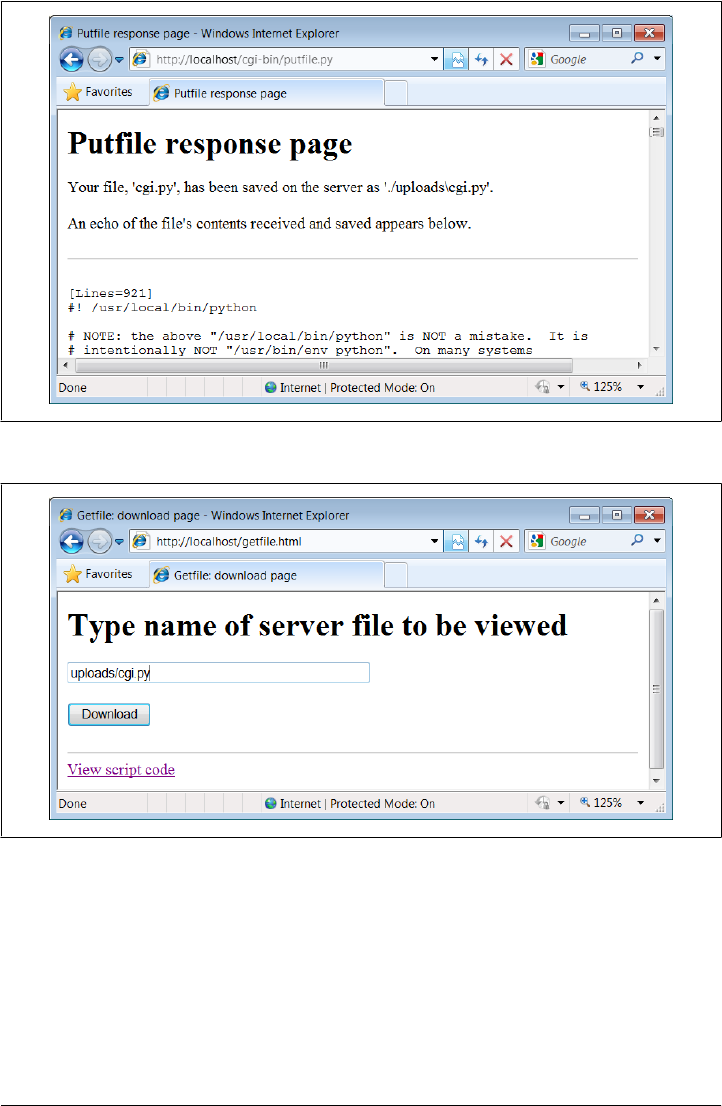
Notice the URL in this page’s address field—the browser translated the / character we
typed into the selection page to a %2F hexadecimal escape code before adding it to the
end of the URL as a parameter. We met URL escape codes like this earlier in this chapter.
In this case, the browser did the translation for us, but the end result is as if we had
manually called one of the urllib.parse quoting functions on the file path string.
Technically, the %2F escape code here represents the standard URL translation for non-
ASCII characters, under the default encoding scheme browsers employ. Spaces are
Figure 15-34. Putfile response page
Figure 15-35. Verifying putfile with getfile—selection
Transferring Files to Clients and Servers | 1223

usually translated to + characters as well. We can often get away without manually
translating most non-ASCII characters when sending paths explicitly (in typed URLs).
But as we saw earlier, we sometimes need to be careful to escape characters (e.g., &)
that have special meaning within URL strings with urllib.parse tools.
Handling client path formats
In the end, the putfile.py script stores the uploaded file on the server within a hardcoded
uploaddir directory, under the filename at the end of the file’s path on the client (i.e.,
less its client-side directory path). Notice, though, that the splitpath function in this
script needs to do extra work to extract the base name of the file on the right. Some
browsers may send up the filename in the directory path format used on the client
machine; this path format may not be the same as that used on the server where the
CGI script runs. This can vary per browser, but it should be addressed for portability.
The standard way to split up paths, os.path.split, knows how to extract the base
name, but only recognizes path separator characters used on the platform on which it
is running. That is, if we run this CGI script on a Unix machine, os.path.split chops
up paths around a / separator. If a user uploads from a DOS or Windows machine,
however, the separator in the passed filename is \, not /. Browsers running on some
Macintosh platforms may send a path that is more different still.
To handle client paths generically, this script imports platform-specific path-processing
modules from the Python library for each client it wishes to support, and tries to split
the path with each until a filename on the right is found. For instance, posixpath handles
paths sent from Unix-style platforms, and ntpath recognizes DOS and Windows client
paths. We usually don’t import these modules directly since os.path.split is auto-
matically loaded with the correct one for the underlying platform, but in this case, we
Figure 15-36. Verifying putfile with getfile—response
1224 | Chapter 15: Server-Side Scripting

need to be specific since the path comes from another machine. Note that we could
have instead coded the path splitter logic like this to avoid some split calls:
def splitpath(origpath): # get name at end
basename = os.path.split(origpath)[1] # try server paths
if basename == origpath: # didn't change it?
if '\\' in origpath:
basename = origpath.split('\\')[-1] # try DOS clients
elif '/' in origpath:
basename = origpath.split('/')[-1] # try Unix clients
return basename
But this alternative version may fail for some path formats (e.g., DOS paths with a drive
but no backslashes). As is, both options waste time if the filename is already a base
name (i.e., has no directory paths on the left), but we need to allow for the more complex
cases generically.
This upload script works as planned, but a few caveats are worth pointing out before
we close the book on this example:
• Firstly, putfile doesn’t do anything about cross-platform incompatibilities in
filenames themselves. For instance, spaces in a filename shipped from a DOS client
are not translated to nonspace characters; they will wind up as spaces in the server-
side file’s name, which may be legal but are difficult to process in some scenarios.
• Secondly, reading line by line means that this CGI script is biased toward uploading
text files, not binary datafiles. It uses a wb output open mode to retain the binary
content of the uploaded file, but it assumes the data is text in other places, including
the reply page. See Chapter 4 for more about binary file modes. This is all largely
a moot point in Python 3.1, though, as binary file uploads do not work at all (see
“CGI File Upload Limitations in 3.1”); in future release, though, this would need
to be addressed.
If you run into any of these limitations, you will have crossed over into the domain of
suggested exercises.
CGI File Upload Limitations in 3.1
Regrettably, I need to document the fact that Python’s standard library support for CGI
file uploads is partially broken in Python 3.1, the version used for this edition. In short,
the cgi module’s internal parsing step fails today with an exception if any binary file
data or incompatible text file data is uploaded. This exception occurs before the script
has a chance to intervene, making simple workarounds nonviable. CGI uploads worked
in Python 2.X because strings handled bytes, but fail in 3.X today.
This regression stems in part from the fact that the cgi module uses the email package’s
parser to extract incoming multipart data for files, and is thus crippled by some of the
very same email package issues we explored in detail in Chapter 13—its email parser
requires str for the full text of a message to be parsed, but this is invalid for some CGI
upload data. As mentioned in Chapter 13, the data transmitted for CGI file uploads
might have mixed text and binary data—including raw binary data that is not
Transferring Files to Clients and Servers | 1225

MIME-encoded, text of any encoding, and even arbitrary combinations of these. The
current email package’s requirement to decode this to str for parsing is utterly incom-
patible, though the cgi module’s own code seems suspect for some cases as well.
If you want to see for yourself how data is actually uploaded by browsers, see and run
the HTML and Python files named test-cgiu-uploads-bug* in the examples package to
upload text, binary, and mixed type files:
•test-cgi-uploads-bug.html/py attempts to parse normally, which works for some
text files but always fails for binary files with a Unicode decoding error
•test-cgi-uploads-bug0.html/py tries binary mode for the input stream, but always
fails with type errors for both text and binary because of email’s str requirement
•test-cgi-uploads-bug1.html/py saves the input stream for a single file
•test-cgi-uploads-bug.html/py saves the input stream for multiple files
The last two of these scripts simply read the data in binary mode and save it in binary
mode to a file for inspection, and display two headers passed in environment variables
which are used for parsing (a “multipart/form-data” content type and boundary, along
with a content length). Trying to parse the saved input data with the cgi module fails
unless the data is entirely text that is compatible with that module’s encoding assump-
tions. Really, because the data can mix text and raw binary arbitrarily, a correct parser
will need to read it as bytes and switch between text and binary processing freely.
It seems likely that this will be improved in the future, but perhaps not until Python
3.3 or later. Nearly two years after 3.0’s release, though, this book project has found
itself playing the role of beta tester more often than it probably should. This primarily
derives from the fact that implications of the Python 3.X str/bytes dichotomy were not
fully resolved in Python’s own libraries prior to release. This isn’t meant to disparage
people who have contributed much time and effort to 3.X already, of course. As some-
one who remembers 0.X, though, this situation seems less than ideal.
Writing a replacement for the cgi module and the email package code it uses—the only
true viable workaround—is not practical given this book project’s constraints. For now,
the CGI scripts that perform file uploads in this book will only work with text files, and
then only with text files of compatible encodings. This extends to email attachments
uploaded to the PyMailCGI webmail case study of the next chapter—yet another reason
why that example was not expanded with new functionality in this edition as much as
the preceding chapter’s PyMailGUI. Being unable to attach images to emails this way
is a severe functional limitation, which limits scope in general.
For updates on the probable fix for this issue in the future, watch this book’s website
(described in the Preface). A fix seems likely to be incompatible with current library
module APIs, but short of writing every new system from scratch, such is reality in the
real world of software development. (And no, “running away more” is not an option…)
1226 | Chapter 15: Server-Side Scripting

More Than One Way to Push Bits over the Net
Finally, let’s discuss some context. We’ve seen three getfile scripts at this point in the
book. The one in this chapter is different from the other two we wrote in earlier chap-
ters, but it accomplishes a similar goal:
• This chapter’s getfile is a server-side CGI script that displays files over the HTTP
protocol (on port 80).
• In Chapter 12, we built a client- and server-side getfile to transfer with raw sockets
(on port 50001).
• In Chapter 13, we implemented a client-side getfile to ship over FTP (on port 21).
Really, the getfile CGI script in this chapter simply displays files only, but it can be
considered a download tool when augmented with cut-and-paste operations in a web
browser. Moreover, the CGI- and HTTP-based putfile script here is also different from
the FTP-based putfile in Chapter 13, but it can be considered an alternative to both
socket and FTP uploads.
The point to notice is that there are a variety of ways to ship files around the Internet—
sockets, FTP, and HTTP (web pages) can move files between computers. Technically
speaking, we can transfer files with other techniques and protocols, too—Post Office
Protocol (POP) email, Network News Transfer Protocol (NNTP) news, Telnet, and
so on.
Each technique has unique properties but does similar work in the end: moving bits
over the Net. All ultimately run over sockets on a particular port, but protocols like
FTP and HTTP add additional structure to the socket layer, and application models
like CGI add both structure and programmability.
In the next chapter, we’re going to use what we’ve learned here to build a more sub-
stantial application that runs entirely on the Web—PyMailCGI, a web-based email
tool, which allows us to send and view emails in a browser, process email attachments,
and more. At the end of the day, though, it’s mostly just bytes over sockets, with a user
interface.
Transferring Files to Clients and Servers | 1227

CGI Downloads: Forcing the Issue
In Example 15-27, we wrote a script named getfile.py, a Python CGI program designed
to display any public server-side file, within a web browser (or other recipient) on the
requesting client machine. It uses a Content type of text/plain or text/html to make
the requested file’s text show up properly inside a browser. In the description, we
compared getfile.py to a generalized CGI download tool, when augmented with cut-
and-paste or save-as interactions.
While true, getfile.py was intended to mostly be a file display tool only, not a CGI
download demo. If you want to truly and directly download a file by CGI (instead of
displaying it in a browser or opening it with an application), you can usually force the
browser to pop up a Save As dialog for the file on the client by supplying the appropriate
Content-type line in the CGI reply.
Browsers decide what to do with a file using either the file’s suffix (e.g., xxx.jpg is
interpreted as an image), or the Content-type line (e.g., text/html is HTML code). By
using various MIME header line settings, you can make the datatype unknown and
effectively render the browser clueless about data handling. For instance, a Content
type of application/octet-stream in the CGI reply generally triggers the standard Save
As dialog box in a browser.
This strategy is sometimes frowned on, though, because it leaves the true nature of the
file’s data ambiguous—it’s usually better to let the user/client decide how to handle
downloaded data, rather than force the Save As behavior. It also has very little to do
with Python; for more details, consult a CGI-specific text, or try a web search on “CGI
download.”
1228 | Chapter 15: Server-Side Scripting

CHAPTER 16
The PyMailCGI Server
“Things to Do When Visiting Chicago”
This chapter is the fifth in our survey of Python Internet programming, and it continues
Chapter 15’s discussion. There, we explored the fundamentals of server-side Common
Gateway Interface (CGI) scripting in Python. Armed with that knowledge, this chapter
moves on to a larger case study that underscores advanced CGI and server-side web
scripting topics.
This chapter presents PyMailCGI—a “webmail” website for reading and sending email
that illustrates security concepts, hidden form fields, URL generation, and more. Be-
cause this system is similar in spirit to the PyMailGUI program we studied in Chap-
ter 14, this example also serves as a comparison of the web and nonweb application
models. This case study is founded on basic CGI scripting, but it implements a complete
website that does something more useful than Chapter 15’s examples.
As usual in this book, this chapter splits its focus between application-level details and
Python programming concepts. For instance, because this is a fairly large case study,
it illustrates system design concepts that are important in actual projects. It also says
more about CGI scripts in general: PyMailCGI expands on the notions of state retention
and security concerns and encryption.
The system presented here is neither particularly flashy nor feature rich as websites go
(in fact, the initial cut of PyMailCGI was thrown together during a layover at Chicago’s
O’Hare airport). Alas, you will find neither dancing bears nor blinking lights at this
site. On the other hand, it was written to serve a real purpose, speaks more to us about
CGI scripting, and hints at just how far Python server-side programs can take us. As
outlined at the start of this part of the book, there are higher-level frameworks, systems,
and tools that build upon ideas we will apply here. For now, let’s have some fun with
Python on the Web.
1229

The PyMailCGI Website
In Chapter 14, we built a program called PyMailGUI that implements a complete
Python+tkinter email client GUI (if you didn’t read that chapter, you may want to take
a quick glance at it now). Here, we’re going to do something of the same, but on the
Web: the system presented in this section, PyMailCGI, is a collection of CGI scripts
that implement a simple web-based interface for sending and reading email in any
browser. In effect, it is a webmail system—though not as powerful as what may be
available from your Internet Service Provider (ISP), its scriptability gives you control
over its operation and future evolution.
Our goal in studying this system is partly to learn a few more CGI tricks, partly to learn
a bit about designing larger Python systems in general, and partly to underscore the
trade-offs between systems implemented for the Web (the PyMailCGI server) and sys-
tems written to run locally (the PyMailGUI client). This chapter hints at some of these
trade-offs along the way and returns to explore them in more depth after the presen-
tation of this system.
Implementation Overview
At the top level, PyMailCGI allows users to view incoming email with the Post Office
Protocol (POP) interface and to send new mail by Simple Mail Transfer Protocol
(SMTP). Users also have the option of replying to, forwarding, or deleting an incoming
email while viewing it. As implemented, anyone can send email from a PyMailCGI site,
but to view your email, you generally have to install PyMailCGI on your own computer
or web server account, with your own mail server information (due to security concerns
described later).
Viewing and sending email sounds simple enough, and we’ve already coded this a few
times in this book. But the required interaction involves a number of distinct web pages,
each requiring a CGI script or HTML file of its own. In fact, PyMailCGI is a fairly
linear system—in the most complex user interaction scenario, there are six states (and
hence six web pages) from start to finish. Because each page is usually generated by a
distinct file in the CGI world, that also implies six source files.
Technically, PyMailCGI could also be described as a state machine, though very little
state is transferred from state to state. Scripts pass user and message information to the
next script in hidden form fields and query parameters, but there are no client-side
cookies or server-side databases in the current version. Still, along the way we’ll en-
counter situations where more advanced state retention tools could be an advantage.
To help keep track of how all of PyMailCGI’s source files fit into the overall system, I
jotted down the file in Example 16-1 before starting any real programming. It informally
sketches the user’s flow through the system and the files invoked along the way. You
can certainly use more formal notations to describe the flow of control and information
1230 | Chapter 16: The PyMailCGI Server

through states such as web pages (e.g., dataflow diagrams), but for this simple example,
this file gets the job done.
Example 16-1. PP4E\Internet\Web\PyMailCgi\pageflow.txt
file or script creates
-------------- -------
[pymailcgi.html] Root window
=> [onRootViewLink.py] Pop password window
=> [onViewPswdSubmit.py] List window (loads all pop mail)
=> [onViewListLink.py] View Window + pick=del|reply|fwd (fetch)
=> [onViewPageAction.py] Edit window, or delete+confirm (del)
=> [onEditPageSend.py] Confirmation (sends smtp mail)
=> back to root
=> [onRootSendLink.py] Edit Window
=> [onEditPageSend.py] Confirmation (sends smtp mail)
=> back to root
This file simply lists all the source files in the system, using => and indentation to denote
the scripts they trigger.
For instance, links on the pymailcgi.html root page invoke onRootViewLink.py and
onRootSendLink.py, both executable scripts. The script onRootViewLink.py generates
a password page, whose Submit button in turn triggers onViewPswdSubmit.py, and so
on. Notice that both the view and the send actions can wind up triggering
onEditPageSend.py to send a new mail; view operations get there after the user chooses
to reply to or forward an incoming mail.
In a system such as this, CGI scripts make little sense in isolation, so it’s a good idea
to keep the overall page flow in mind; refer to this file if you get lost. For additional
context, Figure 16-1 shows the overall contents of this site, viewed as directory listings
under Cygwin on Windows in a shell window.
When you install this site, all the files you see here are uploaded to a PyMailCgi sub-
directory of your web directory on your server’s machine. Besides the page-flow HTML
and CGI script files invoked by user interaction, PyMailCGI uses a handful of utility
modules:
commonhtml.py
Provides a library of HTML tools
externs.py
Isolates access to modules imported from other places
loadmail.py
Encapsulates mailbox fetches for future expansion
secret.py
Implements configurable password encryption
The PyMailCGI Website | 1231
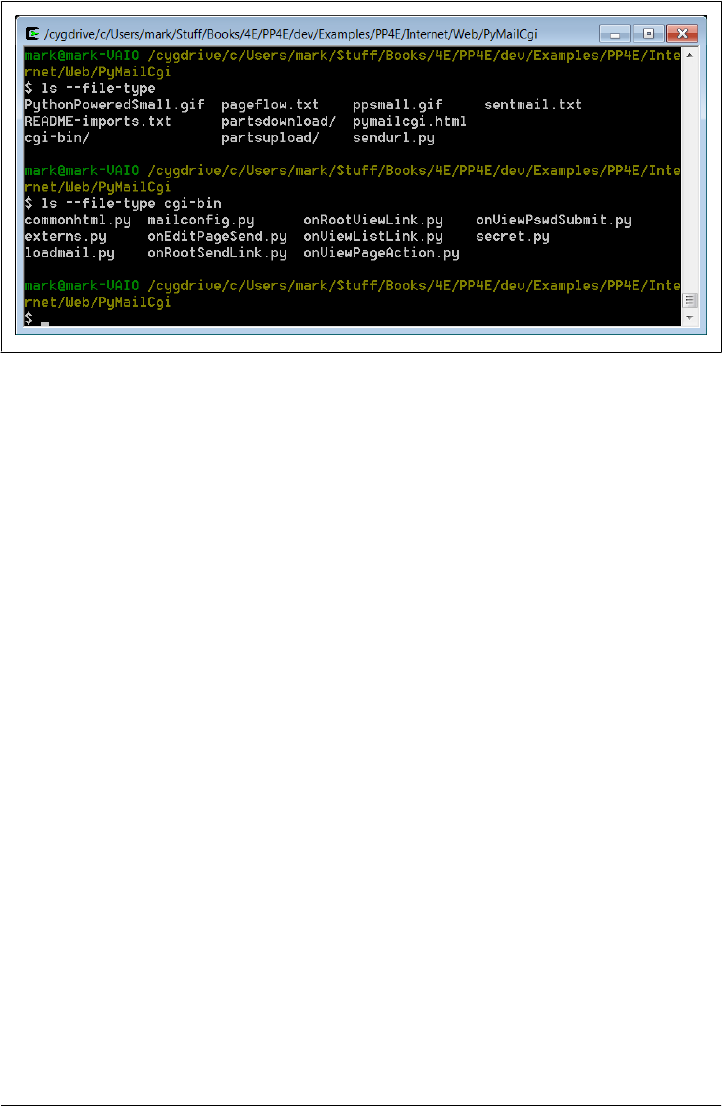
PyMailCGI also reuses parts of the mailtools module package and mailconfig.py
module we wrote in Chapter 13. The former of these is accessible to imports from
the PP4E package root, and the latter is largely copied by a local version in the
PyMailCgi directory so that it can differ between PyMailGUI and PyMailCGI. The
externs.py module is intended to hide these modules’ actual locations, in case
the install structure varies on some machines.
In fact, this system again demonstrates the powers of code reuse in a practical way. In
this edition, it gets a great deal of logic for free from the new mailtools package of
Chapter 13—message loading, sending, deleting, parsing, composing, decoding and
encoding, and attachments—even though that package’s modules were originally de-
veloped for the PyMailGUI program. When it came time to update PyMailCGI later,
tools for handling complex things such as attachments and message text searches were
already in place. See Chapter 13 for mailtools source code.
As usual, PyMailCGI also uses a variety of standard library modules: smtplib, poplib,
email.*, cgi, urllib.*, and the like. Thanks to the reuse of both custom and standard
library code, this system achieves much in a minimal amount of code. All told, Py-
MailCGI consists of just 846 lines of new code, including whitespace, comments, and
the top-level HTML file (see file linecounts.xls in this system’s source directory for
details; the prior edition’s version claimed to be some 835 new lines).
This compares favorably to the size of the PyMailGUI client-side “desktop” program
in Chapter 14, but most of this difference owes to the vastly more limited functionality
in PyMailCGI—there are no local save files, no transfer thread overlap, no message
caching, no inbox synchronization tests or recovery, no multiple-message selections,
no raw mail text views, and so on. Moreover, as the next section describes, PyMailCGI’s
Unicode policies are substantially more limited in this release, and although arbitrary
Figure 16-1. PyMailCGI contents
1232 | Chapter 16: The PyMailCGI Server

attachments can be viewed, sending binary and some text attachments is not supported
in the current version because of a Python 3.1 issue.
In other words, PyMailCGI is really something of a prototype, designed to illustrate
web scripting and system design concepts in this book, and serve as a springboard for
future work. As is, it’s nowhere near as far along the software evolutionary scale as
PyMailGUI. Still, we’ll see that PyMailCGI’s code factoring and reuse of existing mod-
ules allow it to implement much in a surprisingly small amount of code.
New in This Fourth Edition (Version 3.0)
In this fourth edition, PyMailCGI has been ported to run under Python 3.X. In addition,
this version inherits and employs a variety of new features from the mailtools module,
including mail header decoding and encoding, main mail text encoding, the ability to
limit mail headers fetched, and more. Notably, there is new support for Unicode and
Internationalized character sets as follows:
• For display, both a mail’s main text and its headers are decoded prior to viewing,
per email, MIME, and Unicode standards; text is decoded per mail headers and
headers are decoded per their content.
• For sends, a mail’s main text, text attachments, and headers are all encoded per
the same standards, using UTF-8 as the default encoding if required.
• For replies and forwards, headers copied into the quoted message text are also
decoded for display.
Note that this version relies upon web browsers’ ability to display arbitrary kinds of
Unicode text. It does not emit any sort of “meta” tag to declare encodings in the HTML
reply pages generated for mail view and composition. For instance, a properly formed
HTML document can often declare its encoding this way:
<HTML><HEAD>
<META http-equiv=Content-Type content="text/html; charset=windows-1251">
</HEAD>
Such headers are omitted here. This is in part due to the fact that the mail might have
arbitrary and even mixed types of text among is message and headers, which might also
clash with encoding in the HTML of the reply itself. Consider a mail index list page
that displays headers of multiple mails; because each mail’s Subject and From might
be encoding in a different character set (one Russian, one Chinese, and so on), a single
encoding declaration won’t suffice (though UTF-8’s generality can often come to the
rescue). Resolving such mixed character set cases is left to the browser, which may
ultimately require assistance from the user in the form of encoding choices. Such dis-
plays work in PyMailGUI because we pass decoded Unicode text to the tkinter Text
widget, which handles arbitrary Unicode code points well. In PyMailCGI, we’re largely
finessing this issue to keep this example short.
The PyMailCGI Website | 1233

Moreover, both text and binary attachments of fetched mails are simply saved in binary
form and opened by filename in browsers when their links are clicked, relying again on
browsers to do the right thing. Text attachments for sends are also subject to the CGI
upload limitations described in the note just ahead. Beyond all this, Python 3.1 appears
to have an issue printing some types of Unicode text to the standard output stream in
the CGI context, which necessitates a workaround in the main utilities module here
that opens stdout in binary mode and writes text as encoded bytes (see the code for
more details).
This Unicode/i18n support is substantially less rich than that in PyMailGUI. However,
given that we can’t prompt for encodings here, and given that this book is running short
on time and space in general, improving this for cases and browsers where it might
matter is left as a suggested exercise.
For more on specific 3.0 fourth-edition changes made, see the comments marked with
“3.0” in the program code files listed ahead. In addition, all the features added for the
prior edition are still here, as described in the next section.
Limitation on Sending Attachments in This Edition
If you haven’t already done so, see “CGI File Upload Limitations in
3.1” on page 1225. In brief, in Python 3.1 the cgi module, as well as the email package’s
parser which it uses, fail with exceptions when requests submitted by web browsers
include raw binary data or incompatibly encoded text added for uploaded files. Un-
fortunately, because this chapter’s PyMailCGI system relies on CGI uploads for at-
tachments, this limitation means that this system does not currently support sending
emails with binary email attachments such as images and audio files. It did support this
in the prior edition under Python 2.X.
Such sent attachments still work in Chapter 14’s PyMailGUI desktop application, sim-
ply because attachment file data can be read directly from local files (using binary mode
if required, and MIME encoding if needed for inclusion in email). Because the Py-
MailCGI webmail system here relies on CGI uploads to transfer attachments to the
server as an extra first step, though, it’s fully at the mercy of the currently broken cgi
module’s upload support. Coding a cgi replacement is far too ambitious a goal for this
book.
A fix is expected for this in the future, and may be present by the time you read these
words. Being based on Python 3.1, though, this edition’s PyMailCGI simply cannot
support sending such attachments, though they can still be freely viewed in mails
fetched. In fact, although this edition’s PyMailCGI inherits some new features from
mailtools such as i18n header decoding and encoding, this attachment send limitation
is severe enough to preclude expanding this system’s feature set to the same degree as
this edition’s PyMailGUI. For example, Unicode policies are simple here, if not naive.
It’s possible that some client-side scripting techniques such as AJAX may be able to
transfer attachment files independently, and thus avoid CGI uploads altogether. How-
ever, such techniques would also require deploying frameworks and technologies
1234 | Chapter 16: The PyMailCGI Server

outside this book’s scope, would imply a radically different and more complex program
structure, and should probably not be necessitated by a regression in Python 3.X in any
event. A rewrite (PyMailRIA?) will have to await a final verdict on Python 3.X CGI
support fixes.
New in the Prior Edition (Version 2.0)
In the third edition, PyMailCGI was upgraded to use the new mailtools module pack-
age of Chapter 13, employ the PyCrypto package for passwords if it is installed, support
viewing and sending message attachments, and run more efficiently. All these are in-
herited by version 3.0 as well.
We’ll meet these new features along the way, but the last two of these merit a few words
up front. Attachments are supported in a simplistic but usable fashion and use existing
mailtools package code for much of their operation:
• For viewing attachments, message parts are split off the message and saved in local
files on the server. Message view pages are then augmented with hyperlinks point-
ing to the temporary files; when clicked, they open in whatever way your web
browser opens the selected part’s file type.
• For sending attachments, we use the HTML upload techniques presented near the
end of Chapter 15. Mail edit pages now have file-upload controls, to allow a max-
imum of three attachments. Selected files are uploaded to the server by the browser
with the rest of the page as usual, saved in temporary files on the server, and added
to the outgoing mail from the local files on the server by mailtools. As described
in the note in the preceding section, sent attachments can only be compatibly en-
coded text in version 3.0, not binary, though this includes encodable HTML files.
Both schemes would fail for multiple simultaneous users, but since PyMailCGI’s
configuration file scheme (described later in this chapter) already limits it to a single
username, this is a reasonable constraint. The links to temporary files generated for
attachment viewing also apply only to the last message selected, but this works if the
page flow is followed normally. Improving this for a multiuser scenario, as well as
adding additional features such as PyMailGUI’s local file save and open options, are
left as exercises.
For efficiency, this version of PyMailCGI also avoids repeated exhaustive mail down-
loads. In the prior version, the full text of all messages in an inbox was downloaded
every time you visited the list page and every time you selected a single message to view.
In this version, the list page downloads only the header text portion of each message,
and only a single message’s full text is downloaded when one is selected for viewing.
In addition, the headers fetch limits added to mailtools in the fourth edition of this
book are applied automatically to limit download time (earlier mails outside the set’s
size are ignored).
The PyMailCGI Website | 1235

Even so, the list page’s headers-only download can be slow if you have many messages
in your inbox (and as I confessed in Chapter 14, I have thousands in one of mine). A
better solution would somehow cache mails to limit reloads, at least for the duration
of a browser session. For example, we might load headers of only newly arrived mes-
sages, and cache headers of mails already fetched, as done in the PyMailGUI client of
Chapter 14.
Due to the lack of state retention in CGI scripts, though, this would likely require some
sort of server-side database. We might, for instance, store already fetched message
headers under a generated key that identifies the session (e.g., with process number
and time) and pass that key between pages as a cookie, hidden form field, or URL query
parameter. Each page would use the key to fetch cached mail stored directly on the web
server, instead of loading it from the email server again. Presumably, loading from a
local cache file would be faster than loading from a network connection to the mail
server.
This would make for an interesting exercise, too, if you wish to extend this system on
your own, but it would also result in more pages than this chapter has to spend (frankly,
I ran out of time for this project and real estate in this chapter long before I ran out of
potential enhancements).
Presentation Overview
Much of the “action” in PyMailCGI is encapsulated in shared utility modules, especially
one called commonhtml.py. As you’ll see in a moment, the CGI scripts that implement
user interaction don’t do much by themselves because of this. This architecture was
chosen deliberately, to make scripts simple, avoid code redundancy, and implement a
common look-and-feel in shared code. But it means you must jump between files to
understand how the whole system works.
To make this example easier to digest, we’re going to explore its code in two chunks:
page scripts first, and then the utility modules. First, we’ll study screenshots of the
major web pages served up by the system and the HTML files and top-level Python
CGI scripts used to generate them. We begin by following a send mail interaction, and
then trace how existing email is read and then processed. Most implementation details
will be presented in these sections, but be sure to flip ahead to the utility modules listed
later to understand what the scripts are really doing.
I should also point out that this is a fairly complex system, and I won’t describe it in
exhaustive detail; as for PyMailGUI and Chapter 14, be sure to read the source code
along the way for details not made explicit in the narrative. All of the system’s source
code appears in this chapter, as well as in the book’s examples distribution package,
and we will study its key concepts here. But as usual with case studies in this book, I
assume that you can read Python code by now and that you will consult the example’s
source code for more details. Because Python’s syntax is so close to “executable
1236 | Chapter 16: The PyMailCGI Server

pseudocode,” systems are sometimes better described in Python than in English once
you have the overall design in mind.
Running This Chapter’s Examples
The HTML pages and CGI scripts of PyMailCGI can be installed on any web server to
which you have access. To keep things simple for this book, though, we’re going to use
the same policy as in Chapter 15—we’ll be running the Python-coded webserver.py
script from Example 16-1 locally, on the same machine as the web browser client. As
we learned at the start of the prior chapter, that means we’ll be using the server domain
name “localhost” (or the equivalent IP address, “127.0.0.1”) to access this system’s
pages in our browser, as well as in the urllib.request module.
Start this server script on your own machine to test-drive the program. Ultimately, this
system must generally contact a mail server over the Internet to fetch or send messages,
but the web page server will be running locally on your computer.
One minor twist here: PyMailCGI’s code is located in a directory of its own, one level
down from the webserver.py script. Because of that, we’ll start the web server here with
an explicit directory and port number in the command line used to launch it:
C:\...\PP4E\Internet\Web> webserver.py PyMailCgi 8000
Type this sort of command into a command prompt window on Windows or into your
system shell prompt on Unix-like platforms. When run this way, the server will listen
for URL requests on machine “localhost” and socket port number 8000. It will serve
up pages from the PyMailCgi subdirectory one level below the script’s location, and it
will run CGI scripts located in the PyMailCgi\cgi-bin directory below that. This works
because the script changes its current working directory to the one you name when it
starts up.
Subtle point: because we specify a unique port number on the command line this way,
it’s OK if you simultaneously run another instance of the script to serve up the prior
chapter’s examples one directory up; that server instance will accept connections on
port 80, and our new instance will handle requests on port 8000. In fact, you can contact
either server from the same browser by specifying the desired server’s port number. If
you have two instances of the server running in the two different chapters’ directories,
to access pages and scripts of the prior chapter, use a URL of this form:
http://localhost/languages.html
http://localhost/cgi-bin/languages.py?language=All
And to run this chapter’s pages and scripts, simply use URLs of this form:
http://localhost:8000/pymailcgi.html
http://localhost:8000/cgi-bin/onRootSendLink.py
You’ll see that the HTTP and CGI log messages appear in the window of the server
you’re contacting. For more background on why this works as it does, see the
The PyMailCGI Website | 1237

introduction to network socket addresses in Chapter 12 and the discussion of URLs in
Chapter 15.
If you do install this example’s code on a different server, simply replace the “localhost:
8000/cgi-bin” part of the URLs we’ll use here with your server’s name, port, and path
details. In practice, a system such as PyMailCGI would be much more useful if it were
installed on a remote server, to allow mail processing from any web client.*
As with PyMailGUI, you’ll have to edit the mailconfig.py module’s settings to use this
system to read your own email. As provided, the email server information is not useful
for reading email of your own; more on this in a moment.
Carry-On Software
PyMailCGI works as planned and illustrates more CGI and email concepts, but I want
to point out a few caveats up front. This application was initially written during a two-
hour layover in Chicago’s O’Hare airport (though debugging took a few hours more).
I wrote it to meet a specific need—to be able to read and send email from any web
browser while traveling around the world teaching Python classes. I didn’t design it to
be aesthetically pleasing to others and didn’t spend much time focusing on its efficiency.
I also kept this example intentionally simple for this book. For example, PyMailCGI
doesn’t provide nearly as many features as the PyMailGUI program in Chapter 14, and
it reloads email more than it probably should. Because of this, its performance can be
very poor if you keep your inbox large.
In fact, this system almost cries out for more advanced state retention options. As is,
user and message details are passed in generated pages as hidden fields and query pa-
rameters, but we could avoid reloading mail by also using server-side deployment of
the database techniques described in Chapter 17. Such extensions might eventually
bring PyMailCGI up to the functionality of PyMailGUI, albeit at some cost in code
complexity. Even so, this system also suffers from the Python 3.1 attachments limitation
described earlier, which would need to be addressed as well.
Again, you should consider this system a prototype and a work in progress; it’s not yet
software worth selling, and not something that you’ll generally want to use as is for
mail that’s critical to you. On the other hand, it does what it was intended to do, and
you can customize it by tweaking its Python source code—something that can’t be said
of all software sold.
* One downside to running a local webserver.py script that I noticed during development for this chapter is
that on platforms where CGI scripts are run in the same process as the server, you’ll need to stop and restart
the server every time you change an imported module. Otherwise, a subsequent import in a CGI script will
have no effect: the module has already been imported in the process. This is not an issue on Windows today
or on other platforms that run the CGI as a separate, new process. The server’s classes’ implementation varies
over time, but if changes to your CGI scripts have no effect, your platform my fall into this category: try
stopping and restarting the locally running web server.
1238 | Chapter 16: The PyMailCGI Server

The Root Page
Let’s start off by implementing a main page for this example. The file shown in Exam-
ple 16-2 is primarily used to publish links to the Send and View functions’ pages. It is
coded as a static HTML file, because there is nothing to generate on the fly here.
Example 16-2. PP4E\Internet\Web\PyMailCgi\pymailcgi.html
<HTML>
<TITLE>PyMailCGI Main Page</TITLE>
<BODY>
<H1 align=center>PyMailCGI</H1>
<H2 align=center>A POP/SMTP Web Email Interface</H2>
<P align=center><I>Version 3.0 June 2010 (2.0 January 2006)</I></P>
<table>
<tr><td><hr>
<h2>Actions</h2>
<P>
<UL>
<LI><a href="cgi-bin/onRootViewLink.py">View, Reply, Forward, Delete POP mail</a>
<LI><a href="cgi-bin/onRootSendLink.py">Send a new email message by SMTP</a>
</UL></P>
<tr><td><hr>
<h2>Overview</h2>
<P>
<A href="http://rmi.net/~lutz/about-pp.html">
<IMG src="ppsmall.gif" align=left
alt="[Book Cover]" border=1 hspace=10></A>
This site implements a simple web-browser interface to POP/SMTP email
accounts. Anyone can send email with this interface, but for security
reasons, you cannot view email unless you install the scripts with your
own email account information, in your own server account directory.
PyMailCgi is implemented as a number of Python-coded CGI scripts that run on
a server machine (not your local computer), and generate HTML to interact
with the client/browser. See the book <I>Programming Python, 4th Edition</I>
for more details.</P>
<tr><td><hr>
<h2>Notes</h2>
<P>Caveats: PyMailCgi 1.0 was initially written during a 2-hour layover at
Chicago's O'Hare airport. This release is not nearly as fast or complete
as PyMailGUI (e.g., each click requires an Internet transaction, there
is no save operation or multithreading, and there is no caching of email
headers or already-viewed messages). On the other hand, PyMailCgi runs on
any web browser, whether you have Python (and Tk) installed on your machine
or not.
<P>Also note that if you use these scripts to read your own email, PyMailCgi
does not guarantee security for your account password. See the notes in the
View action page as well as the book for more information on security policies.
The Root Page | 1239

<p><I><U>New in Version 2</U></I>: PyMailCGI now supports viewing and sending
Email attachments for a single user, and avoids some of the prior version's
exhaustive mail downloads. It only fetches message headers for the list page,
and only downloads the full text of the single message selected for viewing.
<p><I><U>New in Version 3</U></I>: PyMailCGI now runs on Python 3.X (only),
and employs many of the new features of the mailtools package: decoding and
encoding of Internationalized headers, decoding of main mail text, and so on.
Due to a regression in Python 3.1's cgi and email support, version 3.0 does
not support sending of binary or incompatibly-encoded text attachments, though
attachments on fetched mails can always be viewed (see Chapter 15 and 16).
<p>Also see:
<UL>
<li>The <I>PyMailGUI</I> program in the Internet directory, which
implements a more complete client-side Python+Tk email GUI
<li>The <I>pymail.py</I> program in the Email directory, which
provides a simple console command-line email interface
<li>The Python imaplib module which supports the IMAP email protocol
instead of POP
</UL></P>
</table><hr>
<A href="http://www.python.org">
<IMG SRC="PythonPoweredSmall.gif" ALIGN=left
ALT="[Python Logo]" border=0 hspace=15></A>
<A href="http://rmi.net/~lutz/about-pp.html">[Book]</a>
<A href="http://www.oreilly.com">[O'Reilly]</a>
</BODY></HTML>
The file pymailcgi.html is the system’s root page and lives in a PyMailCgi subdirectory
which is dedicated to this application and helps keep its files separate from other ex-
amples. To access this system, start your locally running web server as described in the
preceding section and then point your browser to the following URL (or do the right
thing for whatever other web server you may be using):
http://localhost:8000/pymailcgi.html
If you do, the server will ship back a page such as that captured in Figure 16-2, shown
rendered in the Google Chrome web browser client on Windows 7. I’m using Chrome
instead of Internet Explorer throughout this chapter for variety, and because it tends
to yield a concise page which shows more details legibly. Open this in your own browser
to see it live—this system is as portable as the Web, HTML, and Python-coded CGI
scripts.
Configuring PyMailCGI
Now, before you click on the “View…” link in Figure 16-2 expecting to read your own
email, I should point out that by default, PyMailCGI allows anybody to send email
from this page with the Send link (as we learned earlier, there are no passwords in
SMTP). It does not, however, allow arbitrary users on the Web to read their email
1240 | Chapter 16: The PyMailCGI Server
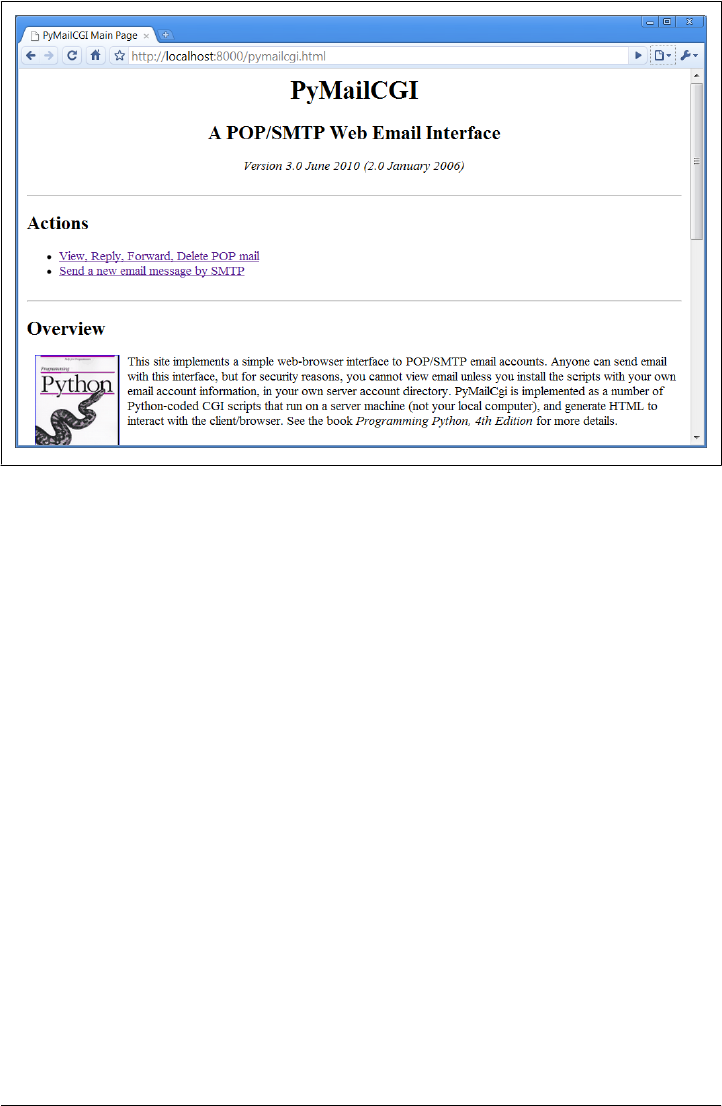
accounts without either typing an explicit and unsafe URL or doing a bit of installation
and configuration.
This is on purpose, and it has to do with security constraints; as we’ll see later,
PyMailCGI is written such that it never associates your email username and password
together without encryption. This isn’t an issue if your web server is running locally,
of course, but this policy is in place in case you ever run this system remotely across
the Web.
By default, then, this page is set up to read the email account shown in this book—
address PP4E@learning-python.com—and requires that account’s POP password to
do so. Since you probably can’t guess the password (and wouldn’t find its email all that
interesting if you could!), PyMailCGI is not incredibly useful as shipped. To use it to
read your email instead, you’ll want to change its mailconfig.py mail configuration file
to reflect your mail account’s details. We’ll see this file later; for now, the examples
here will use the book’s POP email account; it works the same way, regardless of which
account it accesses.
Sending Mail by SMTP
PyMailCGI supports two main functions, as links on the root page: composing and
sending new mail to others, and viewing incoming mail. The View function leads to
Figure 16-2. PyMailCGI main page
Sending Mail by SMTP | 1241

pages that let users read, reply to, forward, and delete existing email. Since the Send
function is the simplest, let’s start with its pages and scripts first.
The Message Composition Page
The root page Send function steps users through two other pages: one to edit a message
and one to confirm delivery. When you click on the Send link on the main page in
Figure 16-2, the Python CGI script in Example 16-3 runs on the web server.
Example 16-3. PP4E\Internet\Web\PyMailCgi\cgi-bin\onRootSendLink.py
#!/usr/bin/python
"""
################################################################################
On 'send' click in main root window: display composition page
################################################################################
"""
import commonhtml
from externs import mailconfig
commonhtml.editpage(kind='Write', headers={'From': mailconfig.myaddress})
No, this file wasn’t truncated; there’s not much to see in this script because all the
action has been encapsulated in the commonhtml and externs modules. All that we can
tell here is that the script calls something named editpage to generate a reply, passing
in something called myaddress for its “From” header.
That’s by design—by hiding details in shared utility modules we make top-level scripts
such as this much easier to read and write, avoid code redundancy, and achieve a
common look-and-feel to all our pages. There are no inputs to this script either; when
run, it produces a page for composing a new message, as shown in Figure 16-3.
Most of the composition page is self-explanatory—fill in headers and the main text of
the message (a “From” header and standard signature line are initialized from settings
in the mailconfig module, discussed further ahead). The Choose File buttons open file
selector dialogs, for picking an attachment. This page’s interface looks very different
from the PyMailGUI client program in Chapter 14, but it is functionally very similar.
Also notice the top and bottom of this page—for reasons explained in the next section,
they are going to look the same in all the pages of our system.
The Send Mail Script
As usual, the HTML of the edit page in Figure 16-3 names its handler script. When we
click its Send button, Example 16-4 runs on the server to process our inputs and send
the mail message.
1242 | Chapter 16: The PyMailCGI Server
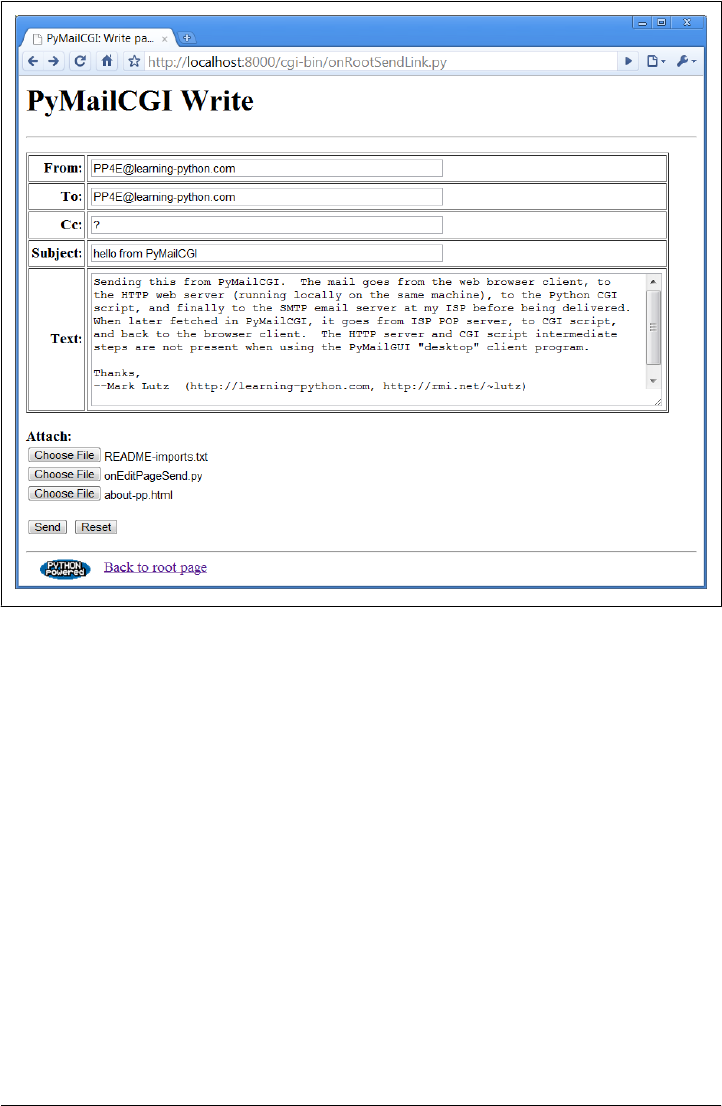
Example 16-4. PP4E\Internet\Web\PyMailCgi\cgi-bin\onEditPageSend.py
#!/usr/bin/python
"""
################################################################################
On submit in edit window: finish a write, reply, or forward;
in 2.0+, we reuse the send tools in mailtools to construct and send the message,
instead of older manual string scheme; we also inherit attachment structure
composition and MIME encoding for sent mails from that module;
3.0: CGI uploads fail in the py3.1 cgi module for binary and incompatibly-encoded
text, so we simply use the platform default here (cgi's parser does no better);
3.0: use simple Unicode encoding rules for main text and attachments too;
################################################################################
"""
import cgi, sys, commonhtml, os
from externs import mailtools
savedir = 'partsupload'
if not os.path.exists(savedir):
Figure 16-3. PyMailCGI send (write) page
Sending Mail by SMTP | 1243

os.mkdir(savedir)
def saveAttachments(form, maxattach=3, savedir=savedir):
"""
save uploaded attachment files in local files on server from
which mailtools will add to mail; the 3.1 FieldStorage parser
and other parts of cgi module can fail for many upload types,
so we don't try very hard to handle Unicode encodings here;
"""
partnames = []
for i in range(1, maxattach+1):
fieldname = 'attach%d' % i
if fieldname in form and form[fieldname].filename:
fileinfo = form[fieldname] # sent and filled?
filedata = fileinfo.value # read into string
filename = fileinfo.filename # client's pathname
if '\\' in filename:
basename = filename.split('\\')[-1] # try DOS clients
elif '/' in filename:
basename = filename.split('/')[-1] # try Unix clients
else:
basename = filename # assume dir stripped
pathname = os.path.join(savedir, basename)
if isinstance(filedata, str): # 3.0: rb needs bytes
filedata = filedata.encode() # 3.0: use encoding?
savefile = open(pathname, 'wb')
savefile.write(filedata) # or a with statement
savefile.close() # but EIBTI still
os.chmod(pathname, 0o666) # need for some srvrs
partnames.append(pathname) # list of local paths
return partnames # gets type from name
#commonhtml.dumpstatepage(0)
form = cgi.FieldStorage() # parse form input data
attaches = saveAttachments(form) # cgi.print_form(form) to see
# server name from module or get-style URL
smtpservername = commonhtml.getstandardsmtpfields(form)
# parms assumed to be in form or URL here
from commonhtml import getfield # fetch value attributes
From = getfield(form, 'From') # empty fields may not be sent
To = getfield(form, 'To')
Cc = getfield(form, 'Cc')
Subj = getfield(form, 'Subject')
text = getfield(form, 'text')
if Cc == '?': Cc = ''
# 3.0: headers encoded per utf8 within mailtools if non-ascii
parser = mailtools.MailParser()
Tos = parser.splitAddresses(To) # multiple recip lists: ',' sept
Ccs = (Cc and parser.splitAddresses(Cc)) or ''
extraHdrs = [('Cc', Ccs), ('X-Mailer', 'PyMailCGI 3.0')]
# 3.0: resolve main text and text attachment encodings; default=ascii in mailtools
1244 | Chapter 16: The PyMailCGI Server

bodyencoding = 'ascii'
try:
text.encode(bodyencoding) # try ascii first (or latin-1?)
except (UnicodeError, LookupError): # else use tuf8 as fallback (or config?)
bodyencoding = 'utf-8' # tbd: this is more limited than PyMailGUI
# 3.0: use utf8 for all attachments; we can't ask here
attachencodings = ['utf-8'] * len(attaches) # ignored for non-text parts
# encode and send
sender = mailtools.SilentMailSender(smtpservername)
try:
sender.sendMessage(From, Tos, Subj, extraHdrs, text, attaches,
bodytextEncoding=bodyencoding,
attachesEncodings=attachencodings)
except:
commonhtml.errorpage('Send mail error')
else:
commonhtml.confirmationpage('Send mail')
This script gets mail header and text input information from the edit page’s form (or
from query parameters in an explicit URL) and sends the message off using Python’s
standard smtplib module, courtesy of the mailtools package. We studied mailtools in
Chapter 13, so I won’t say much more about it now. Note, though, that because we
are reusing its send call, sent mail is automatically saved in a sentmail.txt file on the
server; there are no tools for viewing this in PyMailCGI itself, but it serves as a log.
New in version 2.0, the saveAttachments function grabs any part files sent from the
browser and stores them in temporary local files on the server from which they will be
added to the mail when sent. We covered CGI upload in detail at the end of Chap-
ter 15; see that discussion for more on how the code here works (as well as its limitations
in Python 3.1 and this edition—we’re attaching simple text here to accommodate). The
business of attaching the files to the mail itself is automatic in mailtools.
A utility in commonhtml ultimately fetches the name of the SMTP server to receive the
message from either the mailconfig module or the script’s inputs (in a form field or
URL query parameter). If all goes well, we’re presented with a generated confirmation
page, as captured in Figure 16-4.
Open file sentmail.txt in PyMailCGI’s source directory if you want to see what the
resulting mail’s raw text looks like when sent (or fetch the message in an email client
with a raw text view, such as PyMailGUI). In this version, each attachment part is MIME
encoded per Base64 with UTF-8 Unicode encoding in the multipart message, but the
main text part is sent as simple ASCII if it works as such.
As we’ll see, this send mail script is also used to deliver reply and forward messages for
incoming POP mail. The user interface for those operations is slightly different for
composing new email from scratch, but as in PyMailGUI, the submission handler logic
has been factored into the same, shared code—replies and forwards are really just mail
send operations with quoted text and preset header fields.
Sending Mail by SMTP | 1245
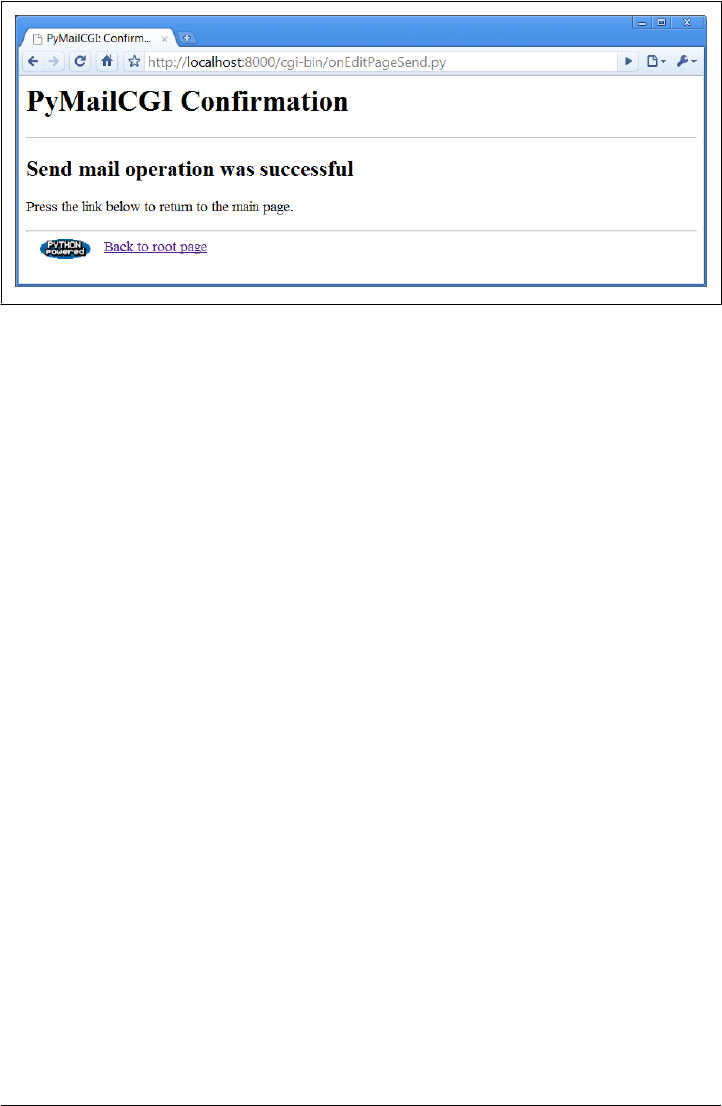
Notice that there are no usernames or passwords to be found here; as we saw in Chap-
ter 13, SMTP usually requires only a server that listens on the SMTP port, not a user
account or password. As we also saw in that chapter, SMTP send operations that fail
either raise a Python exception (e.g., if the server host can’t be reached) or return a
dictionary of failed recipients; our mailtools package modules insulate us from these
details by always raising an exception in either case.
Error Pages
If there is a problem during mail delivery, we get an error page such as the one shown
in Figure 16-5. This page reflects a failed recipient and includes a stack trace generated
by the standard library’s traceback module. On errors Python detects, the Python error
message and extra details would be displayed.
It’s also worth pointing out that the commonhtml module encapsulates the generation of
both the confirmation and the error pages so that all such pages look the same in
PyMailCGI no matter where and when they are produced. Logic that generates the mail
edit page in commonhtml is reused by the reply and forward actions, too (but with dif-
ferent mail headers).
Common Look-and-Feel
In fact, commonhtml makes all pages look similar—it also provides common page
header (top) and footer (bottom) generation functions, which are used everywhere in
the system. You may have already noticed that all the pages so far follow the same
pattern: they start with a title and horizontal rule, have something unique in the middle,
and end with another rule, followed by a Python icon and link at the bottom. This
common look-and-feel is the product of shared code in commonhtml; it generates every-
thing but the middle section for every page in the system (except the root page, a static
HTML file).
Figure 16-4. PyMailCGI send confirmation page
1246 | Chapter 16: The PyMailCGI Server

Most important, if we ever change the header and footer format functions in the
commonhtml module, all our page’s headers and footers will automatically be updated.
If you are interested in seeing how this encapsulated logic works right now, flip ahead
to Example 16-14. We’ll explore its code after we study the rest of the mail site’s pages.
Using the Send Mail Script Outside a Browser
I initially wrote the send script to be used only within PyMailCGI using values typed
into the mail edit form. But as we’ve seen, inputs can be sent in either form fields or
URL query parameters. Because the send mail script checks for inputs in CGI inputs
before importing from the mailconfig module, it’s also possible to call this script outside
the edit page to send email—for instance, explicitly typing a URL of this nature into
your browser’s address field (but all on one line and with no intervening spaces):
http://localhost:8000/cgi-bin/
onEditPageSend.py?site=smtp.rmi.net&
From=lutz@rmi.net&
To=lutz@rmi.net&
Subject=test+url&
text=Hello+Mark;this+is+Mark
Figure 16-5. PyMailCGI send error page
Sending Mail by SMTP | 1247

will indeed send an email message as specified by the input parameters at the end. That
URL string is a lot to type into a browser’s address field, of course, but it might be useful
if generated automatically by another script. As we saw in Chapters 13 and 15, the
module urllib.request can then be used to submit such a URL string to the server from
within a Python program. Example 16-5 shows one way to automate this.
Example 16-5. PP4E\Internet\Web\PyMailCgi\sendurl.py
"""
####################################################################
Send email by building a URL like this from inputs:
http://servername/pathname/
onEditPageSend.py?site=smtp.rmi.net&
From=lutz@rmi.net&
To=lutz@rmi.net&
Subject=test+url&
text=Hello+Mark;this+is+Mark
####################################################################
"""
from urllib.request import urlopen
from urllib.parse import quote_plus
url = 'http://localhost:8000/cgi-bin/onEditPageSend.py'
url += '?site=%s' % quote_plus(input('Site>'))
url += '&From=%s' % quote_plus(input('From>'))
url += '&To=%s' % quote_plus(input('To >'))
url += '&Subject=%s' % quote_plus(input('Subj>'))
url += '&text=%s' % quote_plus(input('text>')) # or input loop
print('Reply html:')
print(urlopen(url).read().decode()) # confirmation or error page HTML
Running this script from the system command line is yet another way to send an email
message—this time, by contacting our CGI script on a web server machine to do all
the work. The script sendurl.py runs on any machine with Python and sockets, lets us
input mail parameters interactively, and invokes another Python script that lives on a
possibly remote machine. It prints HTML returned by our CGI script:
C:\...\PP4E\Internet\Web\PyMailCgi> sendurl.py
Site>smtpout.secureserver.net
From>PP4E@learning-python.com
To >lutz@learning-python.com
Subj>testing sendurl.py
text>But sir, it's only wafer-thin...
Reply html:
<html><head><title>PyMailCGI: Confirmation page (PP4E)</title></head>
<body bgcolor="#FFFFFF"><h1>PyMailCGI Confirmation</h1><hr>
<h2>Send mail operation was successful</h2>
<p>Press the link below to return to the main page.</p>
</p><hr><a href="http://www.python.org">
<img src="../PythonPoweredSmall.gif"
align=left alt="[Python Logo]" border=0 hspace=15></a>
1248 | Chapter 16: The PyMailCGI Server
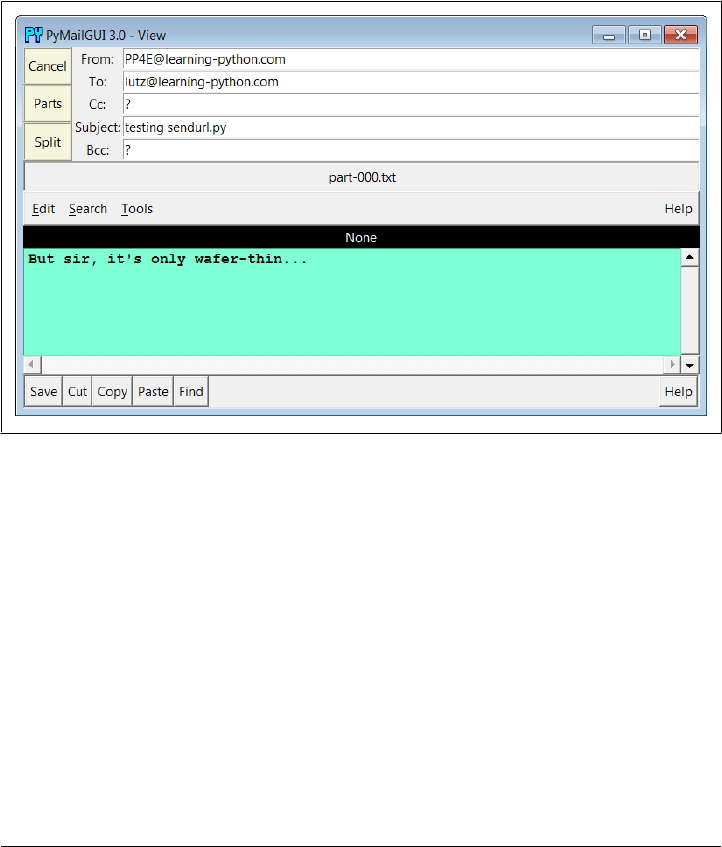
<a href="../pymailcgi.html">Back to root page</a>
</body></html>
The HTML reply printed by this script would normally be rendered into a new web
page if caught by a browser. Such cryptic output might be less than ideal, but you could
easily search the reply string for its components to determine the result (e.g., using the
string find method or an in membership test to look for “successful”), parse out its
components with Python’s standard html.parse or re modules (covered in
Chapter 19), and so on. The resulting mail message—viewed, for variety, with
Chapter 14’s PyMailGUI program—shows up in this book’s email account as seen in
Figure 16-6 (it’s a single text-part message).
Figure 16-6. sendurl.py result
Of course, there are other, less remote ways to send email from a client machine. For
instance, the Python smtplib module (used by mailtools) itself depends only upon the
client and SMTP server connections being operational, whereas this script also depends
on the web server machine and CGI script (requests go from client to web server to
CGI script to SMTP server). Because our CGI script supports general URLs, though, it
can do more than a mailto: HTML tag and can be invoked with urllib.request outside
the context of a running web browser. For instance, as discussed in Chapter 15, scripts
like sendurl.py can be used to invoke and test server-side programs.
Reading POP Email
So far, we’ve stepped through the path the system follows to send new mail. Let’s now
see what happens when we try to view incoming POP mail.
Reading POP Email | 1249

The POP Password Page
If you flip back to the main page in Figure 16-2, you’ll see a View link; pressing it triggers
the script in Example 16-6 to run on the server.
Example 16-6. PP4E\Internet\Web\PyMailCgi\cgi-bin\onRootViewLink.py
#!/usr/bin/python
"""
################################################################################
On view link click on main/root HTML page: make POP password input page;
this could almost be an HTML file because there are likely no input params yet,
but I wanted to use standard header/footer functions and display the site/user
names which must be fetched; on submission, does not send the user along with
password here, and only ever sends both as URL params or hidden fields after the
password has been encrypted by a user-uploadable encryption module;
################################################################################
"""
# page template
pswdhtml = """
<form method=post action=%sonViewPswdSubmit.py>
<p>
Please enter POP account password below, for user "%s" and site "%s".
<p><input name=pswd type=password>
<input type=submit value="Submit"></form></p>
<hr><p><i>Security note</i>: The password you enter above will be transmitted
over the Internet to the server machine, but is not displayed, is never
transmitted in combination with a username unless it is encrypted or obfuscated,
and is never stored anywhere: not on the server (it is only passed along as hidden
fields in subsequent pages), and not on the client (no cookies are generated).
This is still not guaranteed to be totally safe; use your browser's back button
to back out of PyMailCgi at any time.</p>
"""
# generate the password input page
import commonhtml # usual parms case:
user, pswd, site = commonhtml.getstandardpopfields({}) # from module here,
commonhtml.pageheader(kind='POP password input') # from html|url later
print(pswdhtml % (commonhtml.urlroot, user, site))
commonhtml.pagefooter()
This script is almost all embedded HTML: the triple-quoted pswdhtml string is printed,
with string formatting to insert values, in a single step. But because we need to fetch
the username and server name to display on the generated page, this is coded as an
executable script, not as a static HTML file. The module commonhtml either loads user-
names and server names from script inputs (e.g., appended as query parameters to the
script’s URL) or imports them from the mailconfig file; either way, we don’t want to
hardcode them into this script or its HTML, so a simple HTML file won’t do. Again,
in the CGI world, we embed HTML code in Python code and fill in its values this way
1250 | Chapter 16: The PyMailCGI Server
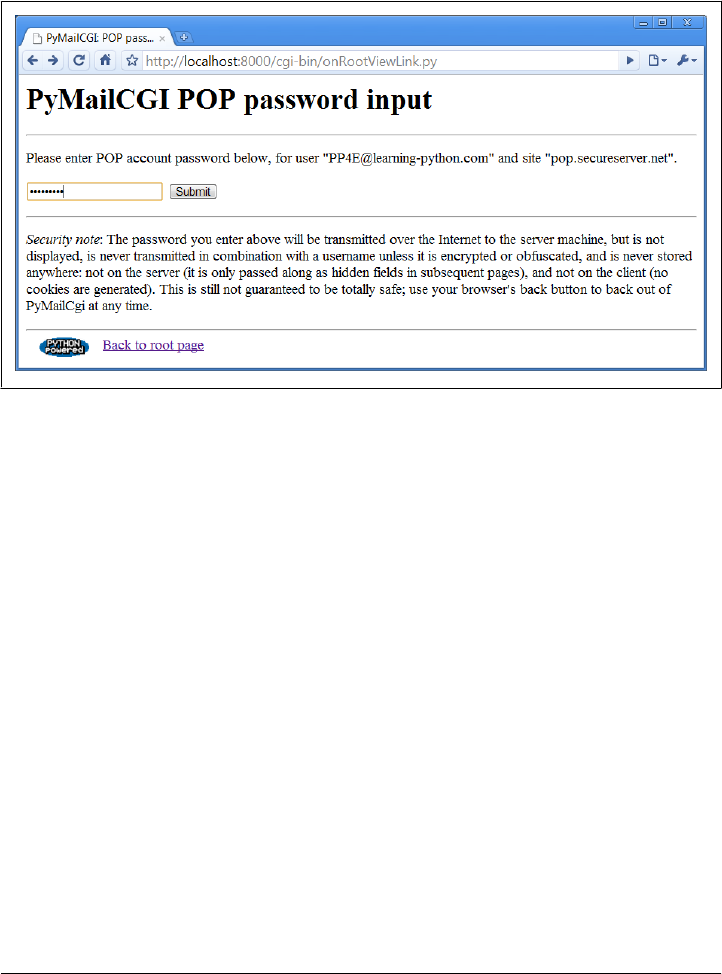
(in server-side templating tools such as PSP the effect is similar, but Python code is
embedded in HTML code instead and run to produce values).
Since this is a script, we can also use the commonhtml page header and footer routines to
render the generated reply page with a common look-and-feel, as shown in Figure 16-7.
Figure 16-7. PyMailCGI view password login page
At this page, the user is expected to enter the password for the POP email account of
the user and server displayed. Notice that the actual password isn’t displayed; the input
field’s HTML specifies type=password, which works just like a normal text field, but
shows typed input as stars. (See also the pymail program in Chapter 13 for doing this
at a console and PyMailGUI in Chapter 14 for doing this in a tkinter GUI.)
The Mail Selection List Page
After you fill out the last page’s password field and press its Submit button, the pass-
word is shipped off to the script shown in Example 16-7.
Example 16-7. PP4E\Internet\Web\PyMailCgi\cgi-bin\onViewPswdSubmit.py
#!/usr/bin/python
"""
################################################################################
On submit in POP password input window: make mail list view page;
in 2.0+ we only fetch mail headers here, and fetch 1 full message later upon
request; we still fetch all headers each time the index page is made: caching
Messages would require a server-side(?) database and session key, or other;
3.0: decode headers for list display, though printer and browser must handle;
################################################################################
Reading POP Email | 1251

"""
import cgi
import loadmail, commonhtml
from externs import mailtools
from secret import encode # user-defined encoder module
MaxHdr = 35 # max length of email hdrs in list
# only pswd comes from page here, rest usually in module
formdata = cgi.FieldStorage()
mailuser, mailpswd, mailsite = commonhtml.getstandardpopfields(formdata)
parser = mailtools.MailParser()
try:
newmails = loadmail.loadmailhdrs(mailsite, mailuser, mailpswd)
mailnum = 1
maillist = [] # or use enumerate()
for mail in newmails: # list of hdr text
msginfo = []
hdrs = parser.parseHeaders(mail) # email.message.Message
addrhdrs = ('From', 'To', 'Cc', 'Bcc') # decode names only
for key in ('Subject', 'From', 'Date'):
rawhdr = hdrs.get(key, '?')
if key not in addrhdrs:
dechdr = parser.decodeHeader(rawhdr) # 3.0: decode for display
else: # encoded on sends
dechdr = parser.decodeAddrHeader(rawhdr) # email names only
msginfo.append(dechdr[:MaxHdr])
msginfo = ' | '.join(msginfo)
maillist.append((msginfo, commonhtml.urlroot + 'onViewListLink.py',
{'mnum': mailnum,
'user': mailuser, # data params
'pswd': encode(mailpswd), # pass in URL
'site': mailsite})) # not inputs
mailnum += 1
commonhtml.listpage(maillist, 'mail selection list')
except:
commonhtml.errorpage('Error loading mail index')
This script’s main purpose is to generate a selection list page for the user’s email ac-
count, using the password typed into the prior page (or passed in a URL). As usual with
encapsulation, most of the details are hidden in other files:
loadmail.loadmailhdrs
Reuses the mailtools module package from Chapter 13 to fetch email with the POP
protocol; we need a message count and mail headers here to display an index list.
In this version, the software fetches only mail header text to save time, not full mail
messages (provided your server supports the TOP command of the POP interface,
and most do—if not, see mailconfig to disable this).
1252 | Chapter 16: The PyMailCGI Server
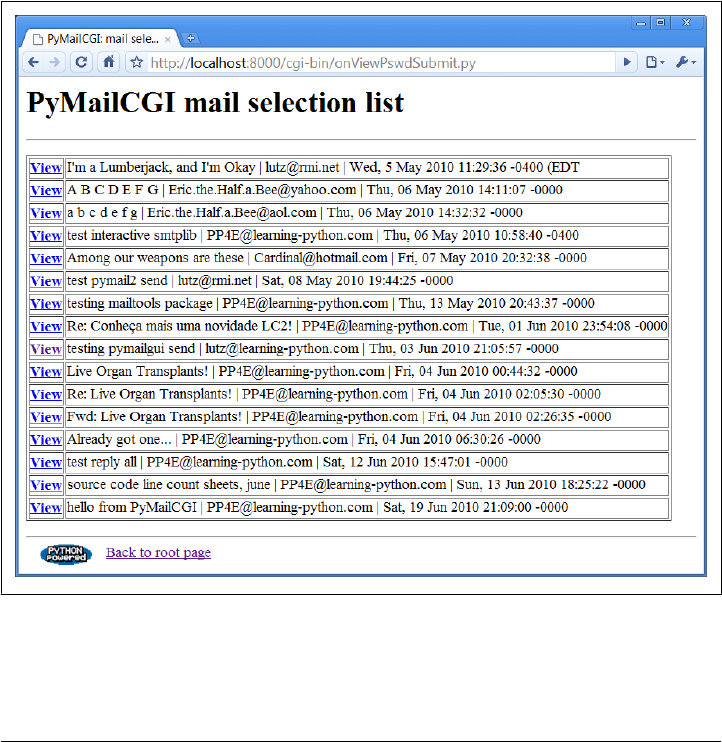
commonhtml.listpage
Generates HTML to display a passed-in list of tuples (text, URL, parameter-
dictionary) as a list of hyperlinks in the reply page; parameter values show up as
query parameters at the end of URLs in the response.
The maillist list built here is used to create the body of the next page—a clickable
email message selection list. Each generated hyperlink in the list page references a con-
structed URL that contains enough information for the next script to fetch and display
a particular email message. As we learned in the preceding chapter, this is a simple kind
of state retention between pages and scripts.
If all goes well, the mail selection list page HTML generated by this script is rendered
as in Figure 16-8. If your inbox is as large as some of mine, you’ll probably need to
scroll down to see the end of this page. This page follows the common look-and-feel
for all PyMailCGI pages, thanks to commonhtml.
Figure 16-8. PyMailCGI view selection list page, top
If the script can’t access your email account (e.g., because you typed the wrong pass-
word), its try statement handler instead produces a commonly formatted error page.
Reading POP Email | 1253
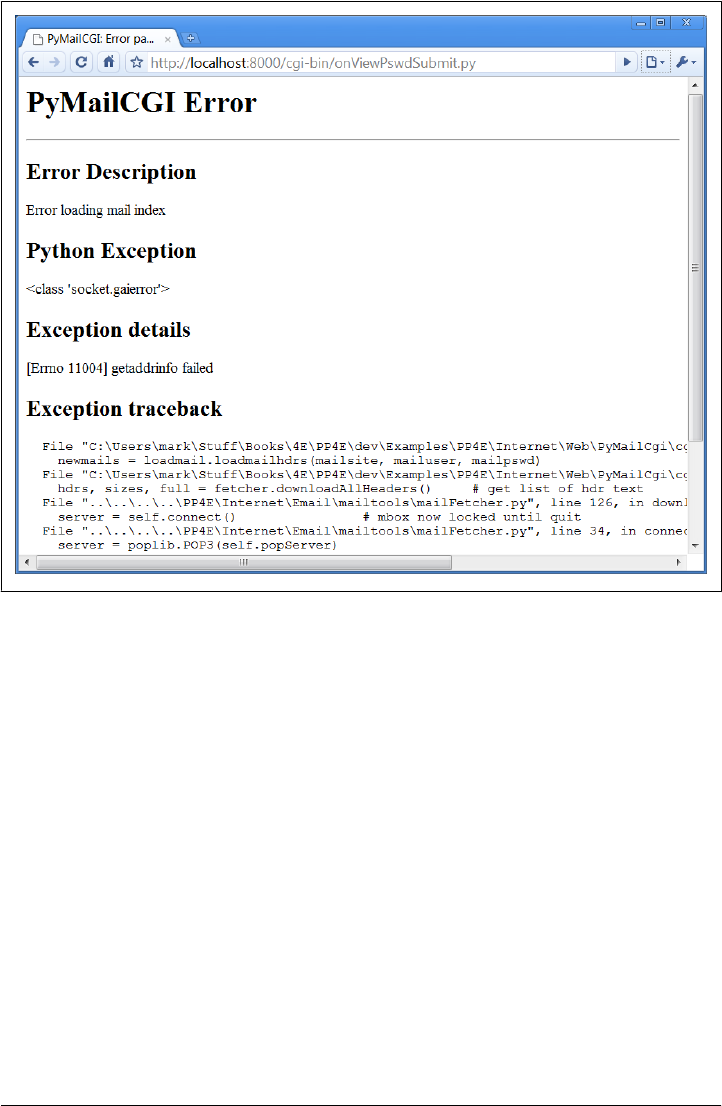
Figure 16-9 shows one that gives the Python exception and details as part of the reply
after a Python-raised exception is caught; as usual, the exception details are fetched
from sys.exc_info, and Python’s traceback module is used to generate a stack trace.
Passing State Information in URL Link Parameters
The central mechanism at work in Example 16-7 is the generation of URLs that embed
message numbers and mail account information. Clicking on any of the View links in
the selection list triggers another script, which uses information in the link’s URL pa-
rameters to fetch and display the selected email. As mentioned in Chapter 15, because
the list’s links are programmed to “know” how to load a particular message, they ef-
fectively remember what to do next. Figure 16-10 shows part of the HTML generated
by this script (use your web browser View Source option to see this for yourself—I did
a Save As and then opened the result which invoked Internet Explorer’s source viewer
on my laptop).
Did you get all the details in Figure 16-10? You may not be able to read generated HTML
like this, but your browser can. For the sake of readers afflicted with human-parsing
Figure 16-9. PyMailCGI login error page
1254 | Chapter 16: The PyMailCGI Server
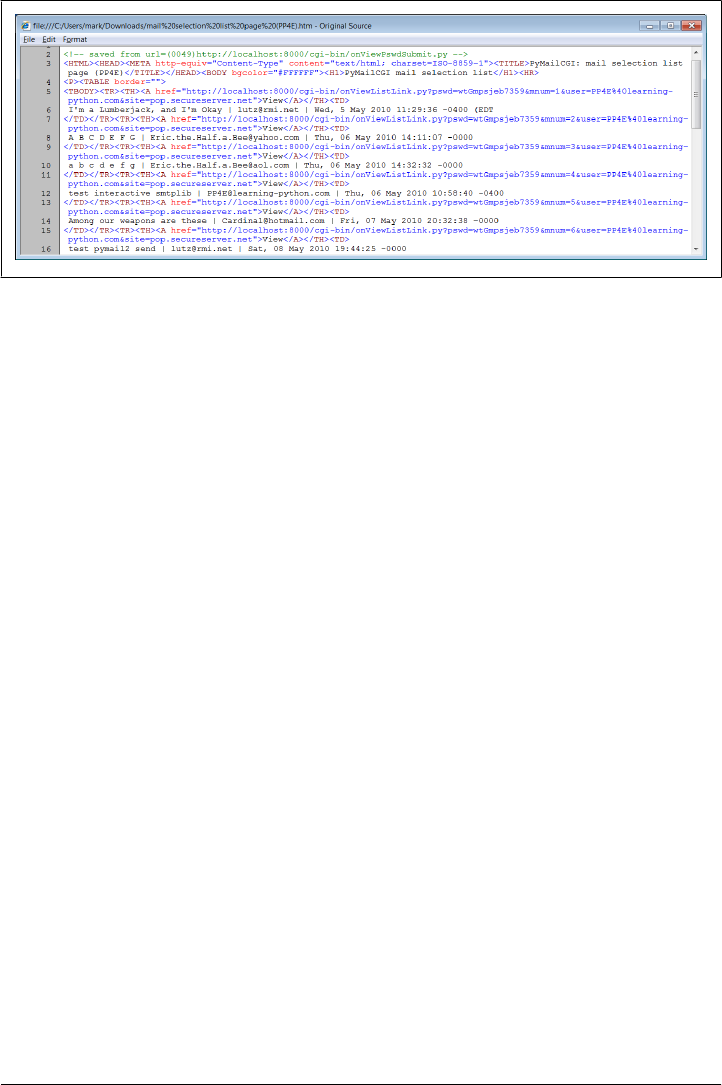
limitations, here is what one of those link lines looks like, reformatted with line breaks
and spaces to make it easier to understand:
<tr><th><a href="onViewListLink.py?
pswd=wtGmpsjeb7359&
mnum=5&
user=PP4E%40learning-python.com&
site=pop.secureserver.net">View</a>
<td>Among our weapons are these | Cardinal@hotmail.com | Fri, 07 May 2010 20:32...
PyMailCGI generates relative minimal URLs (server and pathname values come from
the prior page, unless set in commonhtml). Clicking on the word View in the hyperlink
rendered from this HTML code triggers the onViewListLink script as usual, passing it
all the parameters embedded at the end of the URL: the POP username, the POP mes-
sage number of the message associated with this link, and the POP password and site
information. These values will be available in the object returned by
cgi.FieldStorage in the next script run. Note that the mnum POP message number pa-
rameter differs in each link because each opens a different message when clicked and
that the text after <td> comes from message headers extracted by the mailtools package,
using the email package.
The commonhtml module escapes all of the link parameters with the urllib.parse mod-
ule, not cgi.escape, because they are part of a URL. This can matter in the pswd pass-
word parameter—its value might be encrypted and arbitrary bytes, but urllib.parse
additionally escapes nonsafe characters in the encrypted string per URL convention (it
translates to %xx character sequences). It’s OK if the encryptor yields odd—even non-
printable—characters because URL encoding makes them legible for transmission.
When the password reaches the next script, cgi.FieldStorage undoes URL escape se-
quences, leaving the encrypted password string without % escapes.
It’s instructive to see how commonhtml builds up the stateful link parameters. Earlier, we
learned how to use the urllib.parse.quote_plus call to escape a string for inclusion in
URLs:
Figure 16-10. PyMailCGI view list, generated HTML
Reading POP Email | 1255

>>> import urllib.parse
>>> urllib.parse.quote_plus("There's bugger all down here on Earth")
'There%27s+bugger+all+down+here+on+Earth'
The module commonhtml, though, calls the higher-level urllib.parse.urlencode func-
tion, which translates a dictionary of name:value pairs into a complete URL query pa-
rameter string, ready to add after a ? marker in a URL. For instance, here is
urlencode in action at the interactive prompt:
>>> parmdict = {'user': 'Brian',
... 'pswd': '#!/spam',
... 'text': 'Say no more, squire!'}
>>> urllib.parse.urlencode(parmdict)
'text=Say+no+more%2C+squire%21&pswd=%23%21%2Fspam&user=Brian'
>>> "%s?%s" % ("http://scriptname.py", urllib.parse.urlencode(parmdict))
'http://scriptname.py?text=Say+no+more%2C+squire%21&pswd=%23%21%2Fspam&user=Brian'
Internally, urlencode passes each name and value in the dictionary to the built-in str
function (to make sure they are strings), and then runs each one through url
lib.parse.quote_plus as they are added to the result. The CGI script builds up a list of
similar dictionaries and passes it to commonhtml to be formatted into a selection list
page.†
In broader terms, generating URLs with parameters like this is one way to pass state
information to the next script (along with cookies, hidden form input fields, and server
databases, discussed in Chapter 15). Without such state information, users would have
to reenter the username, password, and site name on every page they visit along the way.
Incidentally, the list generated by this script is not radically different in functionality
from what we built in the PyMailGUI program in Chapter 14, though the two differ
cosmetically. Figure 16-11 shows this strictly client-side GUI’s view on the same email
list displayed in Figure 16-8.
It’s important to keep in mind that PyMailGUI uses the tkinter GUI library to build up
a user interface instead of sending HTML to a browser. It also runs entirely on the client
and talks directly to email servers, downloading mail from the POP server to the client
machine over sockets on demand. Because it retains memory for the duration of the
session, PyMailGUI can easily minimize mail server access. After the initial header load,
it needs to load only newly arrived email headers on subsequent load requests. More-
over, it can update its email index in-memory on deletions instead of reloading anew
from the server, and it has enough state to perform safe deletions of messages that check
for server inbox matches. PyMailGUI also remembers emails you’ve already viewed—
they need not be reloaded again while the program runs.
† Technically, again, you should generally escape & separators in generated URL links by running the URL
through cgi.escape, if any parameter’s name could be the same as that of an HTML character escape code
(e.g., &=high). See Chapter 15 for more details; they aren’t escaped here because there are no clashes
between URL and HTML.
1256 | Chapter 16: The PyMailCGI Server
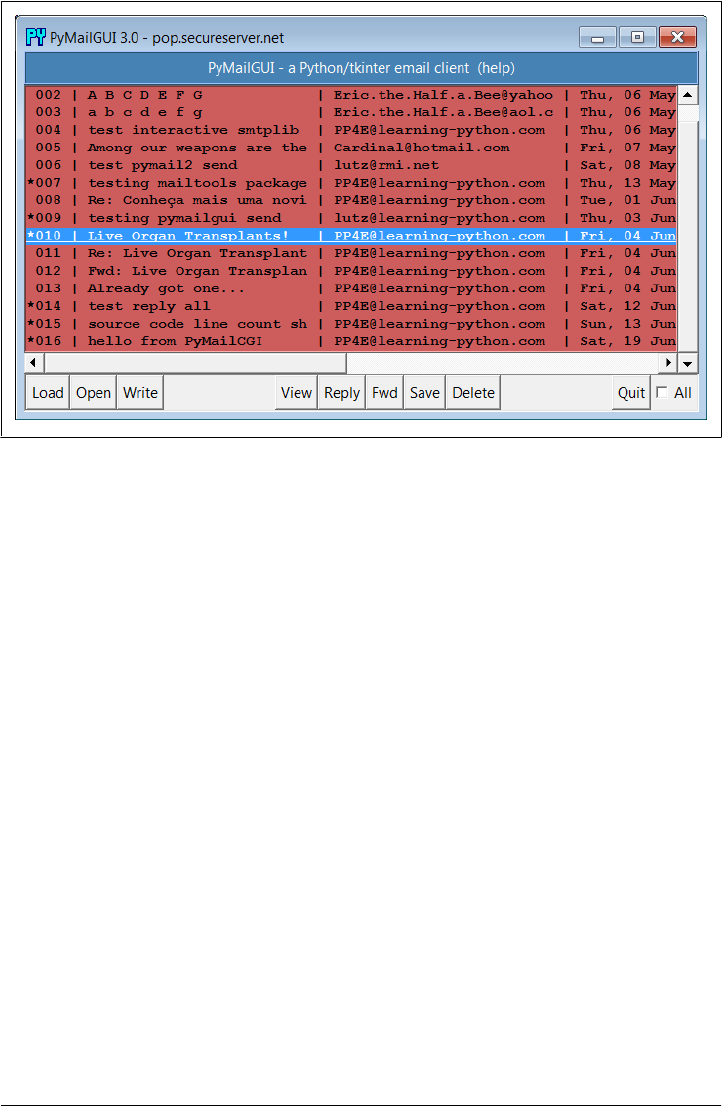
In contrast, PyMailCGI runs on the web server machine and simply displays mail text
on the client’s browser—mail is downloaded from the POP server machine to the web
server, where CGI scripts are run. Due to the autonomous nature of CGI scripts,
PyMailCGI by itself has no automatic memory that spans pages and may need to reload
headers and already viewed messages during a single session. These architecture dif-
ferences have some important ramifications, which we’ll discuss later in this chapter.
Security Protocols
In onViewPswdSubmit’s source code (Example 16-7), notice that password inputs are
passed to an encode function as they are added to the parameters dictionary; this causes
them to show up encrypted or otherwise obfuscated in hyperlinked URLs. They are
also URL encoded for transmission (with % escapes if needed) and are later decoded
and decrypted within other scripts as needed to access the POP account. The password
encryption step, encode, is at the heart of PyMailCGI’s security policy.
In Python today, the standard library’s ssl module supports Secure Sockets Layer
(SSL) with its socket wrapper call, if the required library is built into your Python. SSL
automatically encrypts transmitted data to make it safe to pass over the Net. Unfortu-
nately, for reasons we’ll discuss when we reach the secret.py module later in this
chapter (see Example 16-13), this wasn’t a universal solution for PyMailCGI’s password
data. In short, the Python-coded web server we’re using doesn’t directly support its end
of a secure HTTP encrypted dialog, HTTPS. Because of that, an alternative scheme was
Figure 16-11. PyMailGUI displaying the same view list
Reading POP Email | 1257

devised to minimize the chance that email account information could be stolen off the
Net in transit.
Here’s how it works. When this script is invoked by the password input page’s form,
it gets only one input parameter: the password typed into the form. The username is
imported from a mailconfig module installed on the server; it is not transmitted to-
gether with the unencrypted password because such a combination could be harmful
if intercepted.
To pass the POP username and password to the next page as state information, this
script adds them to the end of the mail selection list URLs, but only after the password
has been encrypted or obfuscated by secret.encode—a function in a module that lives
on the server and may vary in every location that PyMailCGI is installed. In fact,
PyMailCGI was written to not have to know about the password encryptor at all; be-
cause the encoder is a separate module, you can provide any flavor you like. Unless you
also publish your encoder module, the encoded password shipped with the username
won’t mean much if seen.
The upshot is that normally PyMailCGI never sends or receives both username and
password values together in a single transaction, unless the password is encrypted or
obfuscated with an encryptor of your choice. This limits its utility somewhat (since
only a single account username can be installed on the server), but the alternative of
popping up two pages—one for password entry and one for username—seems even
less friendly. In general, if you want to read your mail with the system as coded, you
have to install its files on your server, edit its mailconfig.py to reflect your account
details, and change its secret.py encoder and decoder as desired.
Reading mail with direct URLs
One exception: since any CGI script can be invoked with parameters in an explicit URL
instead of form field values, and since commonhtml tries to fetch inputs from the form
object before importing them from mailconfig, it is possible for any person to use this
script if installed at an accessible address to check his or her mail without installing and
configuring a copy of PyMailCGI of their own. For example, a URL such as the fol-
lowing typed into your browser’s address field or submitted with tools such as url
lib.request (but without the line break used to make it fit here):
http://localhost:8000/cgi-bin/
onViewPswdSubmit.py?user=lutz&pswd=guess&site=pop.earthlink.net
will actually load email into a selection list page such as that in Figure 16-8, using
whatever user, password, and mail site names are appended to the URL. From the
selection list, you may then view, reply, forward, and delete email.
Notice that at this point in the interaction, the password you send in a URL of this form
is not encrypted. Later scripts expect that the password inputs will be sent encrypted,
though, which makes it more difficult to use them with explicit URLs (you would need
to match the encrypted or obfuscated form produced by the secret module on the
1258 | Chapter 16: The PyMailCGI Server

server). Passwords are encoded as they are added to links in the reply page’s selection
list, and they remain encoded in URLs and hidden form fields thereafter.
But you shouldn’t use a URL like this, unless you don’t care about ex-
posing your email password. Sending your unencrypted mail user ID
and password strings across the Net in a URL such as this is unsafe and
open to interception. In fact, it’s like giving away your email—anyone
who intercepts this URL or views it in a server logfile will have complete
access to your email account. It is made even more treacherous by the
fact that this URL format appears in a book that will be distributed all
around the world.
If you care about security and want to use PyMailCGI on a remote server,
install it on your server and configure mailconfig and secret. That
should at least guarantee that both your user and password information
will never be transmitted unencrypted in a single transaction. This
scheme still may not be foolproof, so be careful out there. Without se-
cure HTTP and sockets, the Internet is a “use at your own risk” medium.
The Message View Page
Back to our page flow; at this point, we are still viewing the message selection list in
Figure 16-8. When we click on one of its generated hyperlinks, the stateful URL invokes
the script in Example 16-8 on the server, sending the selected message number and
mail account information (user, password, and site) as parameters on the end of the
script’s URL.
Example 16-8. PP4E\Internet\Web\PyMailCgi\cgi-bin\onViewListLink.py
#!/usr/bin/python
"""
################################################################################
On user click of message link in main selection list: make mail view page;
cgi.FieldStorage undoes any urllib.parse escapes in link's input parameters
(%xx and '+' for spaces already undone); in 2.0+ we only fetch 1 mail here, not
the entire list again; in 2.0+ we also find mail's main text part intelligently
instead of blindly displaying full text (with any attachments), and we generate
links to attachment files saved on the server; saved attachment files only work
for 1 user and 1 message; most 2.0 enhancements inherited from mailtools pkg;
3.0: mailtools decodes the message's full-text bytes prior to email parsing;
3.0: for display, mailtools decodes main text, commonhtml decodes message hdrs;
################################################################################
"""
import cgi
import commonhtml, secret
from externs import mailtools
#commonhtml.dumpstatepage(0)
Reading POP Email | 1259

def saveAttachments(message, parser, savedir='partsdownload'):
"""
save fetched email's parts to files on
server to be viewed in user's web browser
"""
import os
if not os.path.exists(savedir): # in CGI script's cwd on server
os.mkdir(savedir) # will open per your browser
for filename in os.listdir(savedir): # clean up last message: temp!
dirpath = os.path.join(savedir, filename)
os.remove(dirpath)
typesAndNames = parser.saveParts(savedir, message)
filenames = [fname for (ctype, fname) in typesAndNames]
for filename in filenames:
os.chmod(filename, 0o666) # some srvrs may need read/write
return filenames
form = cgi.FieldStorage()
user, pswd, site = commonhtml.getstandardpopfields(form)
pswd = secret.decode(pswd)
try:
msgnum = form['mnum'].value # from URL link
parser = mailtools.MailParser()
fetcher = mailtools.SilentMailFetcher(site, user, pswd)
fulltext = fetcher.downloadMessage(int(msgnum)) # don't eval!
message = parser.parseMessage(fulltext) # email pkg Message
parts = saveAttachments(message, parser) # for URL links
mtype, content = parser.findMainText(message) # first txt part
commonhtml.viewpage(msgnum, message, content, form, parts) # encoded pswd
except:
commonhtml.errorpage('Error loading message')
Again, much of the work here happens in the commonhtml module, listed later in this
section (see Example 16-14). This script adds logic to decode the input password (using
the configurable secret encryption module) and extract the selected mail’s headers and
text using the mailtools module package from Chapter 13 again. The full text of the
selected message is ultimately fetched, parsed, and decoded by mailtools, using the
standard library’s poplib module and email package. Although we’ll have to refetch
this message if viewed again, version 2.0 and later do not grab all mails to get just the
one selected.‡
Also new in version 2.0, the saveAttachments function in this script splits off the parts
of a fetched message and stores them in a directory on the web server machine. This
was discussed earlier in this chapter—the view page is then augmented with URL links
that point at the saved part files. Your web browser will open them according to their
filenames and content. All the work of part extraction, decoding, and naming is
‡ Notice that the message number arrives as a string and must be converted to an integer in order to be used
to fetch the message. But we’re careful not to convert with eval here, since this is a string passed over the Net
and could have arrived embedded at the end of an arbitrary URL (remember that earlier warning?).
1260 | Chapter 16: The PyMailCGI Server
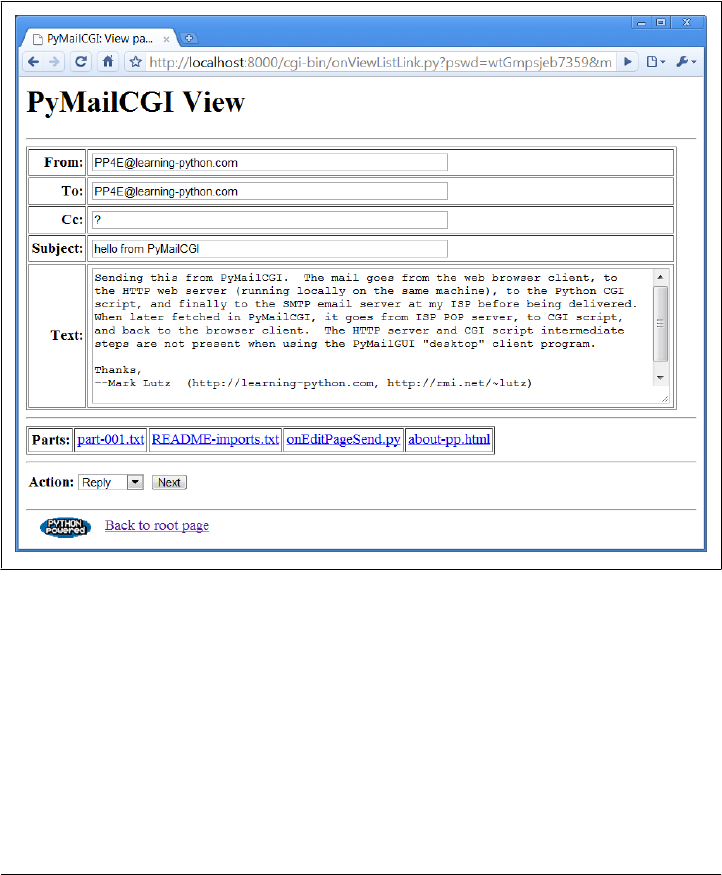
inherited from mailtools. Part files are kept temporarily; they are deleted when the next
message is fetched. They are also currently stored in a single directory and so apply to
only a single user.
If the message can be loaded and parsed successfully, the result page, shown in Fig-
ure 16-12, allows us to view, but not edit, the mail’s text. The function commonhtml.view
page generates a “read-only” HTML option for all the text widgets in this page. If you
look closely, you’ll notice that this is the mail we sent to ourselves in Figure 16-3 and
which showed up at the end of the list in Figure 16-8.
Figure 16-12. PyMailCGI view page
View pages like this have a pull-down action selection list near the bottom; if you want
to do more, use this list to pick an action (Reply, Forward, or Delete) and click on the
Next button to proceed to the next screen. If you’re just in a browsing frame of mind,
click the “Back to root page” link at the bottom to return to the main page, or use your
browser’s Back button to return to the selection list page.
As mentioned, Figure 16-12 displays the mail we sent earlier in this chapter, being
viewed after being fetched. Notice its “Parts:” links—when clicked, they trigger URLs
that open the temporary part files on the server, according to your browser’s rules for
Reading POP Email | 1261
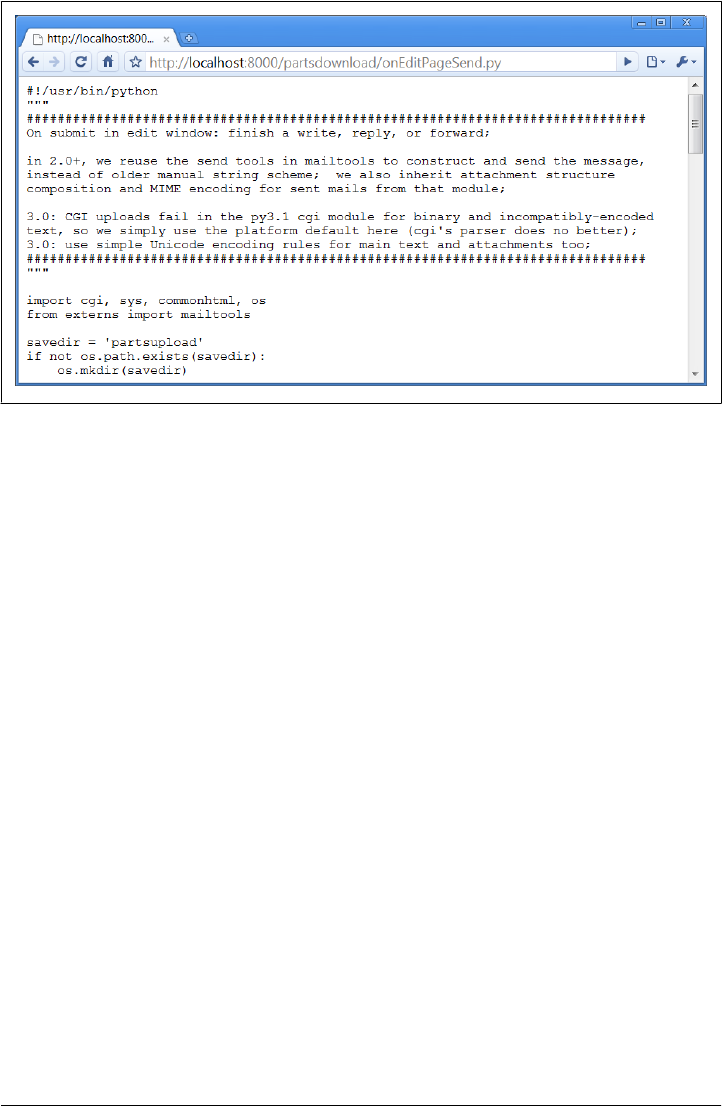
the file type. For instance, clicking on the “.txt” file will likely open it in either the
browser or a text editor. In other mails, clicking on “.jpg” files may open an image
viewer, “.pdf” may open Adobe Reader, and so on. Figure 16-13 shows the result of
clicking the “.py” attachment part of Figure 16-12’s message in Chrome.
Passing State Information in HTML Hidden Input Fields
What you don’t see on the view page in Figure 16-12 is just as important as what you
do see. We need to defer to Example 16-14 for coding details, but something new is
going on here. The original message number, as well as the POP user and (still encoded)
password information sent to this script as part of the stateful link’s URL, wind up
being copied into the HTML used to create this view page, as the values of hidden input
fields in the form. The hidden field generation code in commonhtml looks like this:
print('<form method=post action="%s/onViewPageAction.py">' % urlroot)
print('<input type=hidden name=mnum value="%s">' % msgnum)
print('<input type=hidden name=user value="%s">' % user) # from page|url
print('<input type=hidden name=site value="%s">' % site) # for deletes
print('<input type=hidden name=pswd value="%s">' % pswd) # pswd encoded
As we’ve learned, much like parameters in generated hyperlink URLs, hidden fields in
a page’s HTML allow us to embed state information inside this web page itself. Unless
you view that page’s source, you can’t see this state information because hidden fields
are never displayed. But when this form’s Submit button is clicked, hidden field values
are automatically transmitted to the next script along with the visible fields on the form.
Figure 16-13. Attached part file link display
1262 | Chapter 16: The PyMailCGI Server
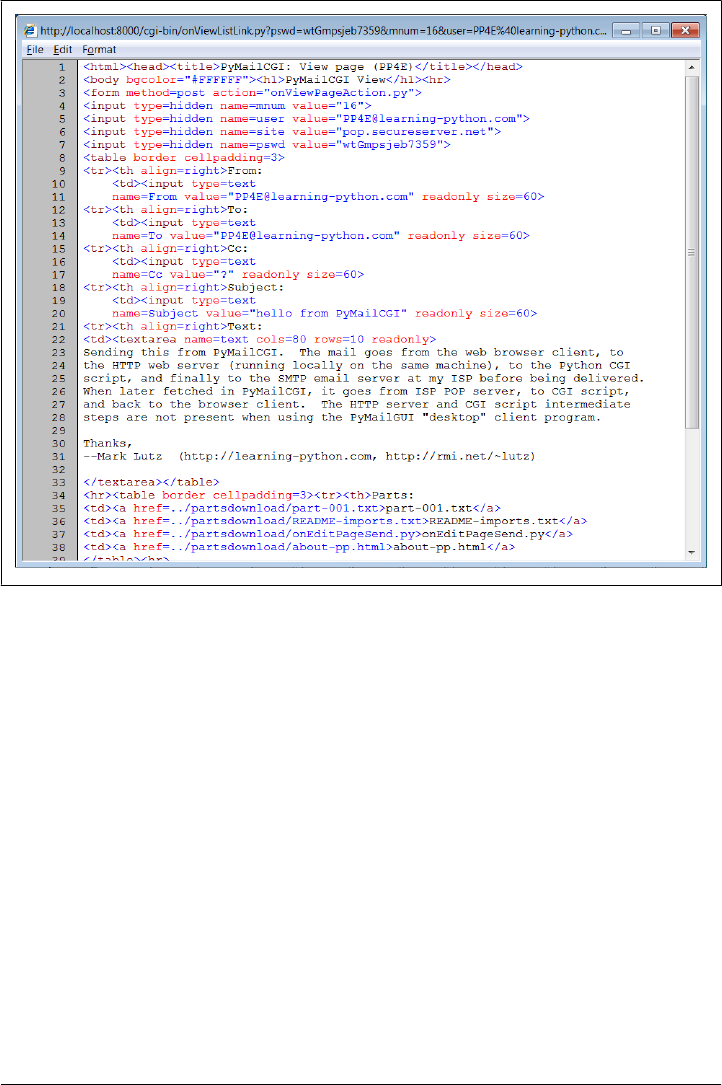
Figure 16-14 shows part of the source code generated for another message’s view page;
the hidden input fields used to pass selected mail state information are embedded near
the top.
The net effect is that hidden input fields in HTML, just like parameters at the end of
generated URLs, act like temporary storage areas and retain state between pages and
user interaction steps. Both are the Web’s simplest equivalent to programming
language variables. They come in handy anytime your application needs to remember
something between pages.
Hidden fields are especially useful if you cannot invoke the next script from a generated
URL hyperlink with parameters. For instance, the next action in our script is a form
submit button (Next), not a hyperlink, so hidden fields are used to pass state. As before,
without these hidden fields, users would need to reenter POP account details some-
where on the view page if they were needed by the next script (in our example, they are
required if the next action is Delete).
Figure 16-14. PyMailCGI view page, generated HTML
Reading POP Email | 1263

Escaping Mail Text and Passwords in HTML
Notice that everything you see on the message view page’s HTML in Figure 16-14 is
escaped with cgi.escape. Header fields and the text of the mail itself might contain
characters that are special to HTML and must be translated as usual. For instance,
because some mailers allow you to send messages in HTML format, it’s possible that
an email’s text could contain a </textarea> tag, which might throw the reply page
hopelessly out of sync if not escaped.
One subtlety here: HTML escapes are important only when text is sent to the browser
initially by the CGI script. If that text is later sent out again to another script (e.g., by
sending a reply mail), the text will be back in its original, nonescaped format when
received again on the server. The browser parses out escape codes and does not put
them back again when uploading form data, so we don’t need to undo escapes later.
For example, here is part of the escaped text area sent to a browser during a Reply
transaction (use your browser’s View Source option to see this live):
<tr><th align=right>Text:
<td><textarea name=text cols=80 rows=10 readonly>
more stuff
--Mark Lutz (http://rmi.net/~lutz) [PyMailCgi 2.0]
> -----Original Message-----
> From: lutz@rmi.net
> To: lutz@rmi.net
> Date: Tue May 2 18:28:41 2000
>
> <table><textarea>
> </textarea></table>
> --Mark Lutz (http://rmi.net/~lutz) [PyMailCgi 2.0]
>
>
> > -----Original Message-----
After this reply is delivered, its text looks as it did before escapes (and exactly as it
appeared to the user in the message edit web page):
more stuff
--Mark Lutz (http://rmi.net/~lutz) [PyMailCgi 2.0]
> -----Original Message-----
> From: lutz@rmi.net
> To: lutz@rmi.net
> Date: Tue May 2 18:28:41 2000
>
> <table><textarea>
> </textarea></table>
> --Mark Lutz (http://rmi.net/~lutz) [PyMailCgi 2.0]
>
1264 | Chapter 16: The PyMailCGI Server
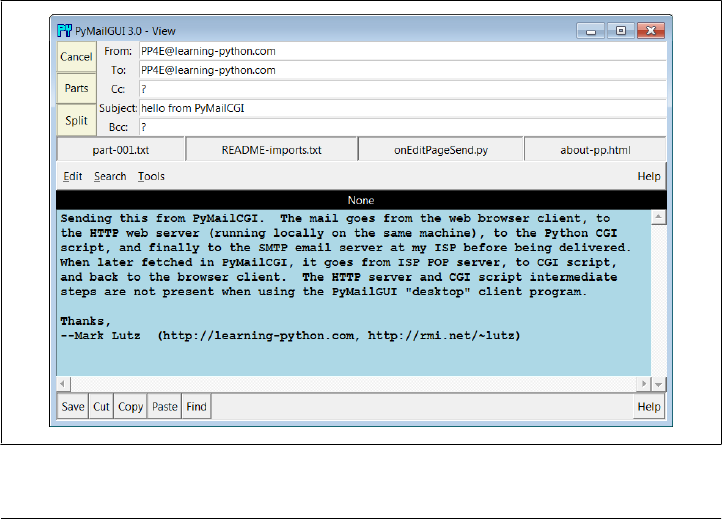
>
> > -----Original Message-----
Beyond the normal text, the password gets special HTML escapes treatment as well.
Though not shown in our examples, the hidden password field of the generated HTML
screenshot (Figure 16-14) can look downright bizarre when encryption is applied. It
turns out that the POP password is still encrypted when placed in hidden fields of the
HTML. For security, they have to be. Values of a page’s hidden fields can be seen with
a browser’s View Source option, and it’s not impossible that the text of this page could
be saved to a file or intercepted off the Net.
The password is no longer URL encoded when put in the hidden field, however, even
though it was when it appeared as a query parameter at the end of a stateful URL in
the mail list page. Depending on your encryption module, the password might now
contain nonprintable characters when generated as a hidden field value here; the
browser doesn’t care, as long as the field is run through cgi.escape like everything else
added to the HTML reply stream. The commonhtml module is careful to route all text
and headers through cgi.escape as the view page is constructed.
As a comparison, Figure 16-15 shows what the mail message captured in Fig-
ure 16-12 looks like when viewed in PyMailGUI, the client-side “desktop” tkinter-based
email tool from Chapter 14. In that program, message parts are listed with the Parts
button and are extracted, saved, and opened with the Split button; we also get quick-
access buttons to parts and attachments just below the message headers. The net effect
is similar from an end user’s perspective.
Figure 16-15. PyMailGUI viewer, same message as Figure 16-12
Reading POP Email | 1265

In terms of implementation, though, the model is very different. PyMailGUI doesn’t
need to care about things such as passing state in URLs or hidden fields (it saves state
in Python in-process variables and memory), and there’s no notion of escaping HTML
and URL strings (there are no browsers, and no network transmission steps once mail
is downloaded). It also doesn’t have to rely on temporary server file links to give access
to message parts—the message is retained in memory attached to a window object and
lives on between interactions. On the other hand, PyMailGUI does require Python to
be installed on the client, but we’ll return to that in a few pages.
Processing Fetched Mail
At this point in our PyMailCGI web interaction, we are viewing an email message
(Figure 16-12) that was chosen from the selection list page. On the message view page,
selecting an action from the pull-down list and clicking the Next button invokes the
script in Example 16-9 on the server to perform a reply, forward, or delete operation
for the selected message viewed.
Example 16-9. PP4E\Internet\Web\PyMailCgi\cgi-bin\onViewPageAction.py
#!/usr/bin/python
"""
################################################################################
On submit in mail view window: action selected=(fwd, reply, delete);
in 2.0+, we reuse the mailtools delete logic originally coded for PyMailGUI;
################################################################################
"""
import cgi, commonhtml, secret
from externs import mailtools, mailconfig
from commonhtml import getfield
def quotetext(form):
"""
note that headers come from the prior page's form here,
not from parsing the mail message again; that means that
commonhtml.viewpage must pass along date as a hidden field
"""
parser = mailtools.MailParser()
addrhdrs = ('From', 'To', 'Cc', 'Bcc') # decode name only
quoted = '\n-----Original Message-----\n'
for hdr in ('From', 'To', 'Date'):
rawhdr = getfield(form, hdr)
if hdr not in addrhdrs:
dechdr = parser.decodeHeader(rawhdr) # 3.0: decode for display
else: # encoded on sends
dechdr = parser.decodeAddrHeader(rawhdr) # email names only
quoted += '%s: %s\n' % (hdr, dechdr)
quoted += '\n' + getfield(form, 'text')
quoted = '\n' + quoted.replace('\n', '\n> ')
return quoted
1266 | Chapter 16: The PyMailCGI Server

form = cgi.FieldStorage() # parse form or URL data
user, pswd, site = commonhtml.getstandardpopfields(form)
pswd = secret.decode(pswd)
try:
if form['action'].value == 'Reply':
headers = {'From': mailconfig.myaddress, # 3.0: commonhtml decodes
'To': getfield(form, 'From'),
'Cc': mailconfig.myaddress,
'Subject': 'Re: ' + getfield(form, 'Subject')}
commonhtml.editpage('Reply', headers, quotetext(form))
elif form['action'].value == 'Forward':
headers = {'From': mailconfig.myaddress, # 3.0: commonhtml decodes
'To': '',
'Cc': mailconfig.myaddress,
'Subject': 'Fwd: ' + getfield(form, 'Subject')}
commonhtml.editpage('Forward', headers, quotetext(form))
elif form['action'].value == 'Delete': # mnum field is required here
msgnum = int(form['mnum'].value) # but not eval(): may be code
fetcher = mailtools.SilentMailFetcher(site, user, pswd)
fetcher.deleteMessages([msgnum])
commonhtml.confirmationpage('Delete')
else:
assert False, 'Invalid view action requested'
except:
commonhtml.errorpage('Cannot process view action')
This script receives all information about the selected message as form input field data
(some hidden and possibly encrypted, some not) along with the selected action’s name.
The next step in the interaction depends upon the action selected:
Reply and Forward actions
Generate a message edit page with the original message’s lines automatically quo-
ted with a leading >.
Delete actions
Trigger immediate deletion of the email being viewed, using a tool imported from
the mailtools module package from Chapter 13.
All these actions use data passed in from the prior page’s form, but only the Delete
action cares about the POP username and password and must decode the password
received (it arrives here from hidden form input fields generated in the prior page’s
HTML).
Reply and Forward
If you select Reply as the next action, the message edit page in Figure 16-16 is generated
by the script. Text on this page is editable, and pressing this page’s Send button again
triggers the send mail script we saw in Example 16-4. If all goes well, we’ll receive the
Processing Fetched Mail | 1267
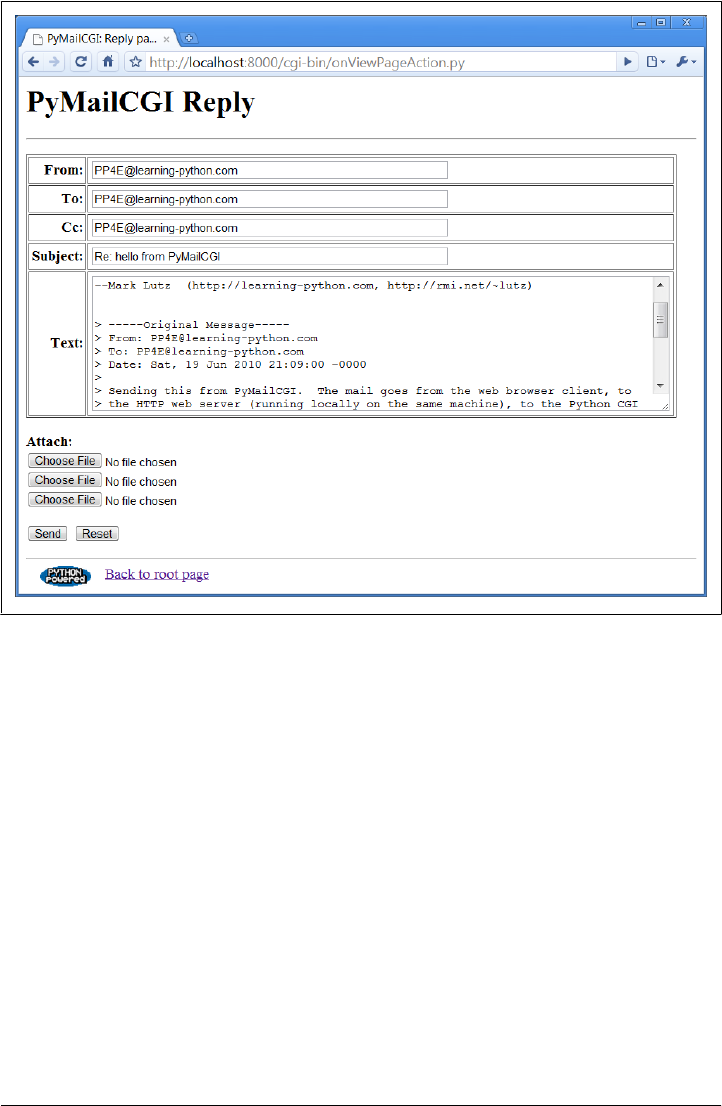
same confirmation page we got earlier when writing new mail from scratch
(Figure 16-4).
Forward operations are virtually the same, except for a few email header differences.
All of this busy-ness comes “for free,” because Reply and Forward pages are generated
by calling commonhtml.editpage, the same utility used to create a new mail composition
page. Here, we simply pass preformatted header line strings to the utility (e.g., replies
add “Re:” to the subject text). We applied the same sort of reuse trick in PyMailGUI,
but in a different context. In PyMailCGI, one script handles three pages; in PyMailGUI,
one superclass and callback method handles three buttons, but the architecture is sim-
ilar in spirit.
Delete
Selecting the Delete action on a message view page and pressing Next will cause the
onViewPageAction script to immediately delete the message being viewed. Deletions are
performed by calling a reusable delete utility function coded in Chapter 13’s mail
Figure 16-16. PyMailCGI reply page
1268 | Chapter 16: The PyMailCGI Server
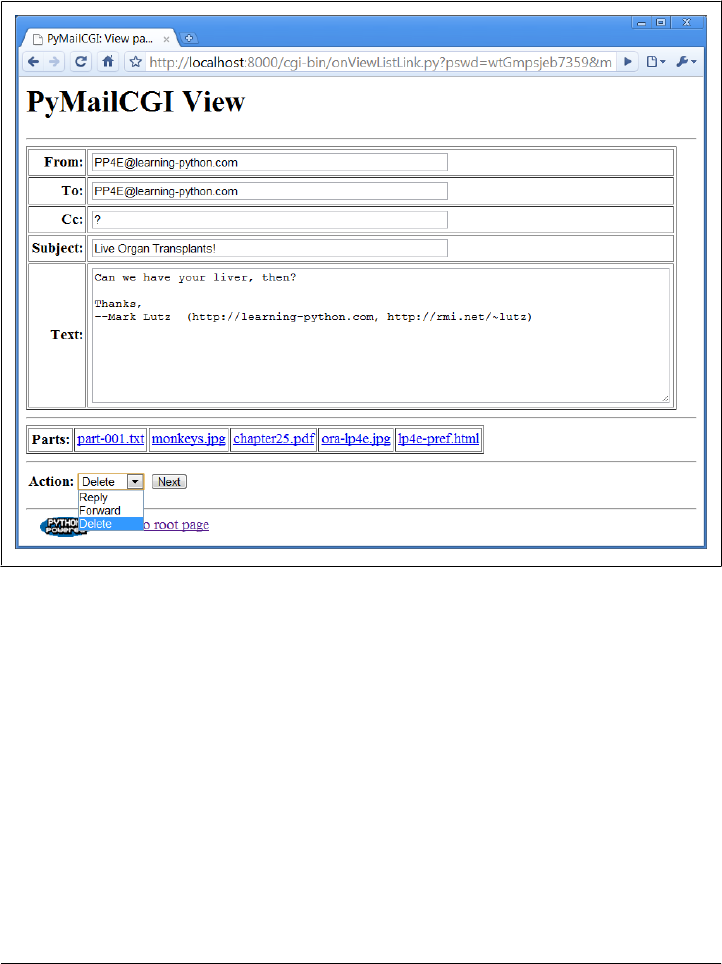
tools package. In a prior version, the call to the utility was wrapped in a commonhtml.run
silent call that prevents print call statements in the utility from showing up in the
HTML reply stream (they are just status messages, not HTML code). In this version,
we get the same capability from the “Silent” classes in mailtools. Figure 16-17 shows
a Delete operation in action.
Figure 16-17. PyMailCGI view page, Delete selected
By the way, notice the varied type of attachment parts on the mail’s page in Fig-
ure 16-17. In version 3.0 we can send only text attachments due to the Python 3.1 CGI
uploads parsing regression described earlier, but we can still view arbitrary attachment
types in fetched mails received from other senders. This includes images and PDFs.
Such attachments open according to your browser’s conventions; Figure 16-18 shows
how Chrome handles a click on the monkeys.jpg link at the bottom of the PyMailCGI
page in Figure 16-17—it’s the same image we sent by FTP in Chapter 13 and via Py-
MailGUI in Chapter 14, but here it has been extracted by a PyMailCGI CGI script and
is being returned by a locally running web server.
Back to our pending deletion. As mentioned, Delete is the only action that uses the
POP account information (user, password, and site) that was passed in from hidden
fields on the prior message view page. By contrast, the Reply and Forward actions
Processing Fetched Mail | 1269
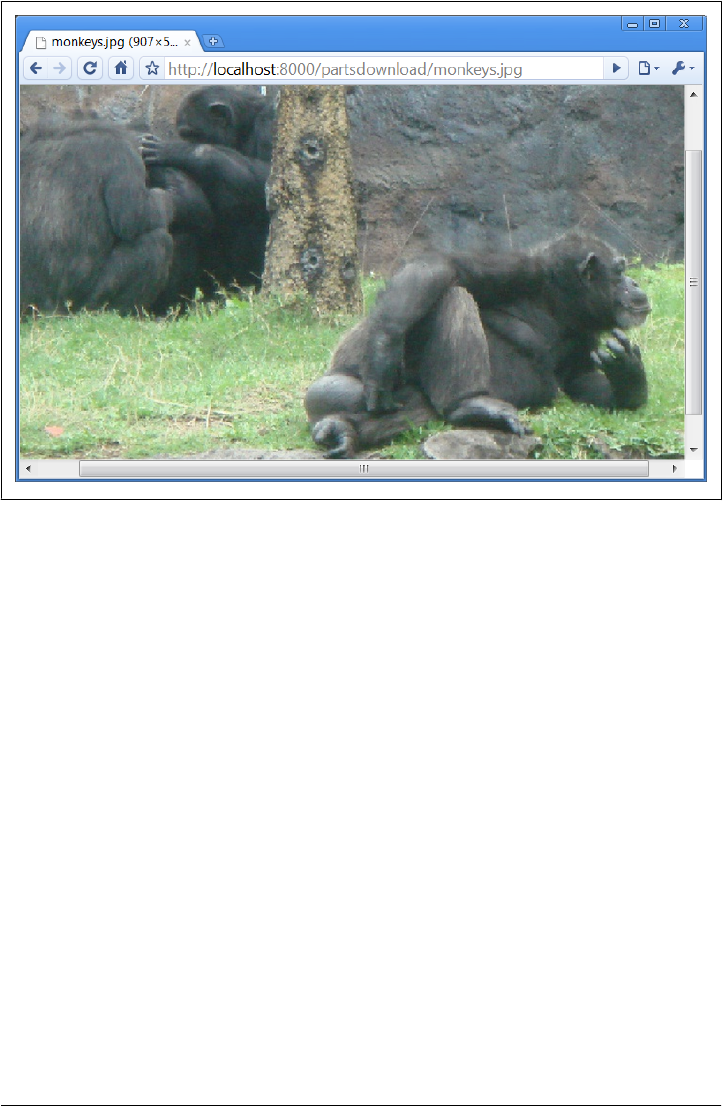
format an edit page, which ultimately sends a message to the SMTP server; no POP
information is needed or passed.
But at this point in the interaction, the POP password has racked up more than a few
frequent flyer miles. In fact, it may have crossed phone lines, satellite links, and conti-
nents on its journey from machine to machine. Let’s trace through the voyage:
1. Input (client): The password starts life by being typed into the login page on the
client (or being embedded in an explicit URL), unencrypted. If typed into the input
form in a web browser, each character is displayed as a star (*).
2. Fetch index (client to CGI server to POP server): It is next passed from the client
to the CGI script on the server, which sends it on to your POP server in order to
load a mail index. The client sends only the password, unencrypted.
3. List page URLs (CGI server to client): To direct the next script’s behavior, the
password is embedded in the mail selection list web page itself as hyperlink URL
query parameters, encrypted (or otherwise obfuscated) and URL encoded.
4. Fetch message (client to CGI server to POP server): When an email is selected from
the list, the password is sent to the next script named within the link’s URL; the
CGI script decodes it and passes it on to the POP server to fetch the selected
message.
Figure 16-18. Image attachment part selected in PyMailCGI
1270 | Chapter 16: The PyMailCGI Server
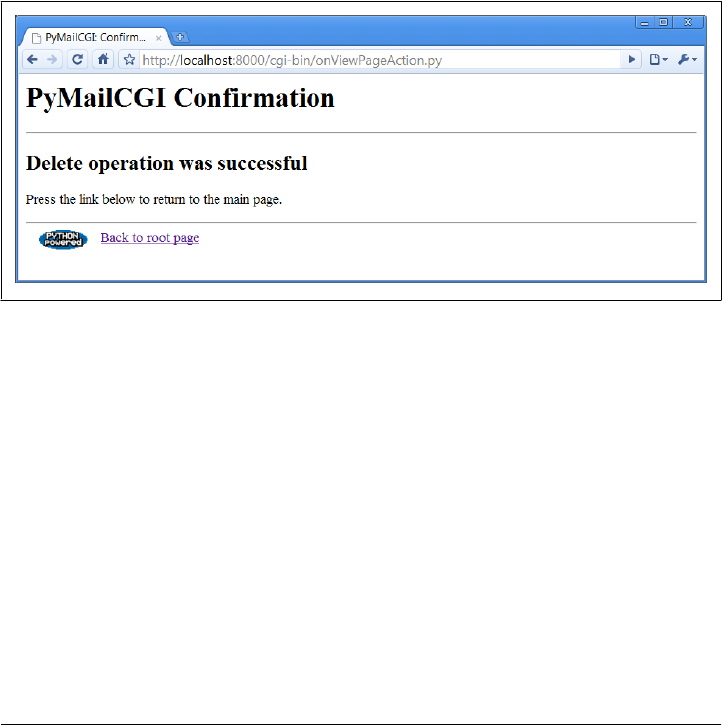
5. View page fields (CGI server to client): To direct the next script’s behavior, the
password is embedded in the view page itself as HTML hidden input fields, en-
crypted or obfuscated, and HTML escaped.
6. Delete message (client to CGI server to POP server): Finally, the password is again
passed from client to CGI server, this time as hidden form field values; the CGI
script decodes it and passes it to the POP server to delete.
Along the way, scripts have passed the password between pages as both a URL query
parameter and an HTML hidden input field; either way, they have always passed its
encrypted or obfuscated string and have never passed an unencoded password and
username together in any transaction. Upon a Delete request, the password must be
decoded here using the secret module before passing it to the POP server. If the script
can access the POP server again and delete the selected message, another confirmation
page appears, as shown in Figure 16-19 (there is currently no verification for the delete,
so be careful).
Figure 16-19. PyMailCGI delete confirmation
One subtlety for replies and forwards: the onViewPageAction mail action script builds
up a >-quoted representation of the original message, with original “From:”, “To:”, and
“Date:” header lines prepended to the mail’s original text. Notice, though, that the
original message’s headers are fetched from the CGI form input, not by reparsing the
original mail (the mail is not readily available at this point). In other words, the script
gets mail header values from the form input fields of the view page. Because there is no
“Date” field on the view page, the original message’s date is also passed along to the
action script as a hidden input field to avoid reloading the message. Try tracing through
the code in this chapter’s listings ahead to see whether you can follow dates from page
to page.
Processing Fetched Mail | 1271

Deletions and POP Message Numbers
Note that you probably should click the “Back to root page” link in Figure 16-19 after
a successful deletion—don’t use your browser’s Back button to return to the message
selection list at this point because the delete has changed the relative numbers of some
messages in the list. The PyMailGUI client program worked around this problem by
automatically updating its in-memory message cache and refreshing the index list on
deletions, but PyMailCGI doesn’t currently have a way to mark older pages as obsolete.
If your browser reruns server-side scripts as you press your Back button, you’ll regen-
erate and hence refresh the list anyhow. If your browser displays cached pages as you
go back, though, you might see the deleted message still present in the list. Worse,
clicking on a view link in an old selection list page may not bring up the message you
think it should, if it appears in the list after a message that was deleted.
This is a property of POP email in general, which we have discussed before in this book:
incoming mail simply adds to the mail list with higher message numbers, but deletions
remove mail from arbitrary locations in the list and hence change message numbers for
all mail following the ones deleted.
Inbox synchronization error potential
As we saw in Chapter 14, even the PyMailGUI client has the potential to get some
message numbers wrong if mail is deleted by another program while the GUI is open—
in a second PyMailGUI instance, for example, or in a simultaneously running
PyMailCGI server session. This can also occur if the email server automatically deletes
a message after the mail list has been loaded—for instance, moving it from inbox to
undeliverable on errors.
This is why PyMailGUI went out of its way to detect server inbox synchronization errors
on loads and deletes, using mailtools package utilities. Its deletions, for instance, match
saved email headers with those for the corresponding message number in the server’s
inbox, to ensure accuracy. A similar test is performed on loads. On mismatches, the
mail index is automatically reloaded and updated. Unfortunately, without additional
state information, PyMailCGI cannot detect such errors: it has no email list to compare
against when messages are viewed or deleted, only the message number in a link or
hidden form field.
In the worst case, PyMailCGI cannot guarantee that deletes remove the intended mail—
it’s unlikely but not impossible that a mail earlier in the list may have been deleted
between the time message numbers were fetched and a mail is deleted at the server.
Without extra state information on the server, PyMailCGI cannot use the safe deletion
or synchronization error checks in the mailtools modules to check whether subject
message numbers are still valid.
To guarantee safe deletes, PyMailCGI would require state retention, which maps mes-
sage numbers passed in pages to saved mail headers fetched when the numbers were
1272 | Chapter 16: The PyMailCGI Server

last determined, or a broader policy, which sidesteps the issue completely. The next
three sections outline suggested improvements and potential exercises.
Alternative: Passing header text in hidden input fields (PyMailCGI_2.1)
Perhaps the simplest way to guarantee accurate deletions is to embed the displayed
message’s full header text in the message view page itself, as hidden form fields, using
the following scheme:
onViewListLink.py
Embed the header text in hidden form fields, escaped per HTML conventions with
cgi.escape (with its quote argument set to True to translate any nested quotes in
the header text).
onViewPageAction.py
Retrieve the embedded header text from the form’s input fields, and pass it along
to the safe deletion call in mailtools for header matching.
This would be a small code change, but it might require an extra headers fetch in the
first of these scripts (it currently loads the full mail text), and it would require building
a phony list to represent all mails’ headers (we would have headers for and delete only
one mail here). Alternatively, the header text could be extracted from the fetched full
mail text, by splitting on the blank line that separates headers and message body text.
Moreover, this would increase the size of the data transmitted both from client and
server—mail header text is commonly greater than 1 KB in size, and it may be larger.
This is a small amount of extra data in modern terms, but it’s possible that this may
run up against size limitations in some client or server systems.
And really, this scheme is incomplete. It addresses only deletion accuracy and does
nothing about other synchronization errors in general. For example, the system still
may fetch and display the wrong message from a message list page, after deletions of
mails earlier in the inbox performed elsewhere. In fact, this technique guarantees only
that the message displayed in a view window will be the one deleted for that view
window’s delete action. It does not ensure that the mail displayed or deleted in the view
window corresponds to the selection made by the user in the mail index list.
More specifically, because this scheme embeds headers in the HTML of view windows,
its header matching on deletion is useful only if messages earlier in the inbox are deleted
elsewhere after a mail has already been opened for viewing. If the inbox is changed
elsewhere before a mail is opened in a view window, the wrong mail may be fetched
from the index page. In that event, this scheme avoids deleting a mail other than the
one displayed in a view window, but it assumes the user will catch the mistake and
avoid deleting if the wrong mail is loaded from the index page. Though such cases are
rare, this behavior is less than user friendly.
Even though it is incomplete, this change does at least avoid deleting the wrong email
if the server’s inbox changes while a message is being viewed—the mail displayed will
Processing Fetched Mail | 1273

be the only one deleted. A working but tentative implementation of this scheme is
implemented in the following directory of the book’s examples distribution:
PP4E\Internet\Web\dev\PyMailCGI_2.1
When developed, it worked under the Firefox web browser and it requires just more
than 10 lines of code changes among three source files, listed here (search for
“#EXPERIMENTAL” to find the changes made in the source files yourself):
# onViewListLink.py
. . .
hdrstext = fulltext.split('\n\n')[0] # use blank line
commonhtml.viewpage( # encodes passwd
msgnum, message, content, form, hdrstext, parts)
# commonhtml.py
. . .
def viewpage(msgnum, headers, text, form, hdrstext, parts=[]):
. . .
# delete needs hdrs text for inbox sync tests: can be multi-K large
hdrstext = cgi.escape(hdrstext, quote=True) # escape '"' too
print('<input type=hidden name=Hdrstext value="%s">' % hdrstext)
# onViewPageAction.py
. . .
fetcher = mailtools.SilentMailFetcher(site, user, pswd)
#fetcher.deleteMessages([msgnum])
hdrstext = getfield(form, 'Hdrstext') + '\n'
hdrstext = hdrstext.replace('\r\n', '\n') # get \n from top
dummyhdrslist = [None] * msgnum # only one msg hdr
dummyhdrslist[msgnum-1] = hdrstext # in hidden field
fetcher.deleteMessagesSafely([msgnum], dummyhdrslist) # exc on sync err
commonhtml.confirmationpage('Delete')
To run this version locally, run the webserver script from Example 15-1 (in Chap-
ter 15) with the dev subdirectory name, and a unique port number if you want to run
both the original and the experimental versions. For instance:
C:\...\PP4E\Internet\Web> webserver.py dev\PyMailCGI_2.1 9000 command line
http://localhost:9000/pymailcgi.html web browser URL
Although this version works on browsers tested, it is considered tentative (and was not
used for this chapter, and not updated for Python 3.X in this edition) because it is an
incomplete solution. In those rare cases where the server’s inbox changes in ways that
invalidate message numbers after server fetches, this version avoids inaccurate dele-
tions, but index lists may still become out of sync. Messages fetches may still be inac-
curate, and addressing this likely entails more sophisticated state retention options.
Note that in most cases, the message-id header would be sufficient for matching against
mails to be deleted in the inbox, and it might be all that is required to pass from page
to page. However, because this field is optional and can be forged to have any value,
this might not always be a reliable way to identify matched messages; full header
1274 | Chapter 16: The PyMailCGI Server

matching is necessary to be robust. See the discussion of mailtools in Chapter 13 for
more details.
Alternative: Server-side files for headers
The main limitation of the prior section’s technique is that it addressed only deletions
of already fetched emails. To catch other kinds of inbox synchronization errors, we
would have to also record headers fetched when the index list page was constructed.
Since the index list page uses URL query parameters to record state, adding large header
texts as an additional parameter on the URLs is not likely a viable option. In principle,
the header text of all mails in the list could be embedded in the index page as a single
hidden field, but this might add prohibitive size and transmission overheads.
As a perhaps more complete approach, each time the mail index list page is generated
in onViewPswdSubmit.py, fetched headers of all messages could be saved in a flat file on
the server, with a generated unique name (possibly from time, process ID, and user-
name). That file’s name could be passed along with message numbers in pages as an
extra hidden field or query parameter.
On deletions, the header’s filename could be used by onViewPageAction.py to load the
saved headers from the flat file, to be passed to the safe delete call in mailtools. On
fetches, the header file could also be used for general synchronization tests to avoid
loading and displaying the wrong mail. Some sort of aging scheme would be required
to delete the header save files eventually (the index page script might clean up old files),
and we might also have to consider multiuser issues.
This scheme essentially uses server-side files to emulate PyMailGUI’s in-process mem-
ory, though it is complicated by the fact that users may back up in their browser—
deleting from view pages fetched with earlier list pages, attempting to refetch from an
earlier list page and so on. In general, it may be necessary to analyze all possible forward
and backward flows through pages (it is essentially a state machine). Header save files
might also be used to detect synchronization errors on fetches and may be removed on
deletions to effectively disable actions in prior page states, though header matching
may suffice to ensure deletion accuracy.
Alternative: Delete on load
As a final alternative, mail clients could delete all email off the server as soon as it is
downloaded, such that deletions wouldn’t impact POP identifiers (Microsoft Outlook
may use this scheme by default, for instance). However, this requires additional mech-
anisms for storing deleted email persistently for later access, and it means you can view
fetched mail only on the machine to which it was downloaded. Since both PyMailGUI
and PyMailCGI are intended to be used on a variety of machines, mail is kept on the
POP server by default.
Processing Fetched Mail | 1275

Because of the current lack of inbox synchronization error checks in
PyMailCGI, you should not delete mails with it in an important account,
unless you employ one of the solution schemes described or you use
other tools to save mails to be deleted before deletion. Adding state
retention to ensure general inbox synchronization may make an inter-
esting exercise, but would also add more code than we have space for
here, especially if generalized for multiple simultaneous site users.
Utility Modules
This section presents the source code of the utility modules imported and used by the
page scripts shown earlier. As installed, all of these modules live in the same directory
as the CGI scripts, to make imports simple—they are found in the current working
directory. There aren’t any new screenshots to see here because these are utilities, not
CGI scripts. Moreover, these modules aren’t all that useful to study in isolation and are
included here primarily to be referenced as you go through the CGI scripts’ code listed
previously. See earlier in this chapter for additional details not repeated here.
External Components and Configuration
When running PyMailCGI out of its own directory in the book examples distribution
tree, it relies on a number of external modules that are potentially located elsewhere.
Because all of these are accessible from the PP4E package root, they can be imported
with dotted-path names as usual, relative to the root. In case this setup ever changes,
though, the module in Example 16-10 encapsulates the location of all external de-
pendencies; if they ever move, this is the only file that must be changed.
Example 16-10. PP4E\Internet\Web\PyMailCgi\cgi-bin\externs.py
"""
isolate all imports of modules that live outside of the PyMailCgi
directory, so that their location must only be changed here if moved;
we reuse the mailconfig settings that were used for pymailgui2 in ch13;
PP4E/'s container must be on sys.path to use the last import here;
"""
import sys
#sys.path.insert(0, r'C:\Users\mark\Stuff\Books\4E\PP4E\dev\Examples')
sys.path.insert(0, r'..\..\..\..') # relative to script dir
import mailconfig # local version
from PP4E.Internet.Email import mailtools # mailtools package
This module simply preimports all external names needed by PyMailCGI into its own
namespace. See Chapter 13 for more on the mailtools package modules’ source code
imported and reused here; as for PyMailGUI, much of the magic behind PyMailCGI is
actually implemented in mailtools.
1276 | Chapter 16: The PyMailCGI Server

This version of PyMailCGI has its own local copy of the mailconfig module we coded
in Chapter 13 and expanded in Chapter 14, but it simply loads all attributes from the
version we wrote in Chapter 13 to avoid redundancy, and customizes as desired; the
local version is listed in Example 16-11.
Example 16-11. PP4E\Internet\Email\PyMailCgi\cgi-bin\mailconfig.py
"""
user configuration settings for various email programs (PyMailCGI version);
email scripts get their server names and other email config options from
this module: change me to reflect your machine names, sig, and preferences;
"""
from PP4E.Internet.Email.mailconfig import * # reuse ch13 configs
fetchlimit = 50 # 4E: maximum number headers/emails to fetch on loads (dflt=25)
POP Mail Interface
Our next utility module, the loadmail file in Example 16-12, depends on external files
and encapsulates access to mail on the remote POP server machine. It currently exports
one function, loadmailhdrs, which returns a list of the header text (only) of all mail in
the specified POP account; callers are unaware of whether this mail is fetched over the
Net, lives in memory, or is loaded from a persistent storage medium on the CGI server
machine. That is by design—because loadmail changes won’t impact its clients, it is
mostly a hook for future expansion.
Example 16-12. PP4E\Internet\Web\PyMailCgi\cgi-bin\loadmail.py
"""
mail list loader; future--change me to save mail list between CGI script runs,
to avoid reloading all mail each time; this won't impact clients that use the
interfaces here if done well; for now, to keep this simple, reloads all mail
for each list page; 2.0+: we now only load message headers (via TOP), not full
msg, but still fetch all hdrs for each index list--in-memory caches don't work
in a stateless CGI script, and require a real (likely server-side) database;
"""
from commonhtml import runsilent # suppress prints (no verbose flag)
from externs import mailtools # shared with PyMailGUI
# load all mail from number 1 up
# this may trigger an exception
import sys
def progress(*args): # not used
sys.stderr.write(str(args) + '\n')
def loadmailhdrs(mailserver, mailuser, mailpswd):
fetcher = mailtools.SilentMailFetcher(mailserver, mailuser, mailpswd)
hdrs, sizes, full = fetcher.downloadAllHeaders() # get list of hdr text
return hdrs
Utility Modules | 1277

This module is not much to look at—just an interface and calls to other modules. The
mailtools.SilentMailFetcher class (reused here from Chapter 13) uses the Python
poplib module to fetch mail over sockets. The silent class prevents mailtools print call
statements from going to the HTML reply stream (although any exceptions are allowed
to propagate there normally).
In this version, loadmail loads just the header text portions of all incoming email to
generate the selection list page. However, it still reloads headers every time you refetch
the selection list page. As mentioned earlier, this scheme is better than the prior version,
but it can still be slow if you have lots of email sitting on your server. Server-side da-
tabase techniques, combined with a scheme for invalidating message lists on deletions
and new receipts, might alleviate some of this bottleneck. Because the interface expor-
ted by loadmail would likely not need to change to introduce a caching mechanism,
clients of this module would likely still work unchanged.
POP Password Encryption
We discussed PyMailCGI’s security protocols in the abstract earlier in this chapter.
Here, we look at their concrete implementation. PyMailCGI passes user and password
state information from page to page using hidden form fields and URL query parameters
embedded in HTML reply pages. We studied these techniques in the prior chapter.
Such data is transmitted as simple text over network sockets—within the HTML reply
stream from the server, and as parameters in the request from the client. As such, it is
subject to security issues.
This isn’t a concern if you are running a local web server on your machine, as all our
examples do. The data is being shipped back and forth between two programs running
on your computer, and it is not accessible to the outside world. If you want to install
PyMailCGI on a remote web server machine, though, this can be an issue. Because this
data is sensitive, we’d ideally like some way to hide it in transit and prevent it from
being viewed in server logs. The policies used to address this have varied across this
book’s lifespan, as options have come and gone:
• The second edition of this book developed a custom encryption module using the
standard library’s rotor encryption module. This module was used to encrypt data
inserted into the server’s reply stream, and then to later decrypt it when it was
returned as a parameter from the client. Unfortunately, in Python 2.4 and later,
the rotor module is no longer available in the standard library; it was withdrawn
due to security concerns. This seems a somewhat extreme measure (rotor was
adequate for simpler applications), but rotor is no longer a usable solution in recent
releases.
• The third edition of this book extended the model of the second, by adding support
for encrypting passwords with the third-party and open source PyCrypto system.
Regrettably, this system is available for Python 2.X but still not for 3.X as I write
these words for the fourth edition in mid-2010 (though some progress on a 3.X
1278 | Chapter 16: The PyMailCGI Server

port has been made). Moreover, the Python web server classes used by the locally
running server deployed for this book still does not support HTTPS in Python 3.1—
the ultimate solution to web security, which I’ll say more about in a moment.
• Because of all the foregoing, this fourth edition has legacy support for both rotor
and PyCrypto if they are installed, but falls back on a simplistic password obfus-
cator which may be different at each PyMailCGI installation. Since this release is
something of a prototype in general, further refinement of this model, including
support for HTTPS under more robust web servers, is left as exercise.
In general, there are a variety of approaches to encrypting information transferred back
and forth between client and server. Unfortunately again, none is easily implemented
for this chapter’s example, none is universally applicable, and most involve tools or
techniques that are well beyond the scope and size constraints of this text. To sample
some of the available options, though, the sections that follow contain a brief rundown
of some of the common techniques in this domain.
Manual data encryption: rotor (defunct)
In principle, CGI scripts can manually encrypt any sensitive data they insert into reply
streams, as PyMailCGI did in this book’s second edition. With the removal of the
rotor module, though, Python 2.4’s standard library has no encryption tools for this
task. Moreover, using the original rotor module’s code is not advisable from a main-
tenance perspective and would not be straightforward, since it was coded in the C
language (it’s not a simple matter of copying a .py file from a prior release). Unless you
are using an older version of Python, rotor is not a real option.
Mostly for historical interest and comparison today, this module was used as follows.
It was based on an Enigma-style encryption scheme: we make a new rotor object with
a key (and optionally, a rotor count) and call methods to encrypt and decrypt:
>>> import rotor
>>> r = rotor.newrotor('pymailcgi') # (key, [,numrotors])
>>> r.encrypt('abc123') # may return nonprintable chars
' \323an\021\224'
>>> x = r.encrypt('spam123') # result is same len as input
>>> x
'* _\344\011pY'
>>> len(x)
7
>>> r.decrypt(x)
'spam123'
Notice that the same rotor object can encrypt multiple strings, that the result may
contain nonprintable characters (printed as \ascii escape codes when displayed), and
that the result is always the same length as the original string. Most important, a string
encrypted with rotor can be decrypted in a different process (e.g., in a later CGI script)
if we re-create the rotor object:
Utility Modules | 1279

>>> import rotor
>>> r = rotor.newrotor('pymailcgi') # can be decrypted in new process
>>> r.decrypt('* _\344\011pY') # use "\ascii" escapes for two chars
'spam123'
Our secret module by default simply used rotor to encrypt and did no additional
encoding of its own. It relies on URL encoding when the password is embedded in a
URL parameter and on HTML escaping when the password is embedded in hidden
form fields. For URLs, the following sorts of calls occur:
>>> from secret import encode, decode
>>> x = encode('abc$#<>&+') # CGI scripts do this
>>> x
' \323a\016\317\326\023\0163'
>>> import urllib.parse # urlencode does this
>>> y = urllib.parse.quote_plus(x)
>>> y
'+%d3a%0e%cf%d6%13%0e3'
>>> a = urllib.parse.unquote_plus(y) # cgi.FieldStorage does this
>>> a
' \323a\016\317\326\023\0163'
>>> decode(a) # CGI scripts do this
'abc$#<>&+'
Although rotor itself is not a widely viable option today, these same techniques can be
used with other encryption schemes.
Manual data encryption: PyCrypto
A variety of encryption tools are available in the third-party public domain, including
the popular Python Cryptography Toolkit, also known as PyCrypto. This package adds
built-in modules for private and public key algorithms such as AES, DES, IDEA, and
RSA encryption, provides a Python module for reading and decrypting PGP files, and
much more. Here is an example of using AES encryption, run after installing PyCrypto
on my machine with a Windows self-installer:
>>> from Crypto.Cipher import AES>>> AES.block_size16
>>> mykey = 'pymailcgi'.ljust(16, '-') # key must be 16, 24, or 32 bytes
>>> mykey
'pymailcgi-------'
>>>
>>> password = 'Already got one.' # length must be multiple of 16
>>> aesobj1 = AES.new(mykey, AES.MODE_ECB)
>>> cyphertext = aesobj1.encrypt(password)
>>> cyphertext
'\xfez\x95\xb7\x07_"\xd4\xb6\xe3r\x07g~X]'
>>>
>>> aesobj2 = AES.new(mykey, AES.MODE_ECB)
>>> aesobj2.decrypt(cyphertext)
'Already got one.'
1280 | Chapter 16: The PyMailCGI Server

This interface is similar to that of the original rotor module, but it uses better encryption
algorithms. AES is a popular private key encryption algorithm. It requires a fixed length
key and a data string to have a length that is a multiple of 16 bytes.
Unfortunately, this is not part of standard Python, may be subject to U.S. (and other
countries’) export controls in binary form at this writing, and is too large and complex
a topic for us to address in this text. This makes it less than universally applicable; at
the least, shipping its binary installer with this book’s examples package may require
legal expertise. And since data encryption is a core requirement of PyMailCGI, this
seems too strong an external dependency.
The real showstopper for this book’s fourth edition, though, is that PyCrypto is a 2.X-
only system not yet available for Python 3.X today; this makes it unusable with the
examples in this book. Still, if you are able to install and learn PyCrypto, this can be a
powerful solution. For more details, search for PyCrypto on the Web.
HTTPS: Secure HTTP transmissions
Provided you are using a server that supports secure HTTP, you can simply write HTML
and delegate the encryption to the web server and browser. As long as both ends of the
transmission support this protocol, it is probably the ultimate encrypting solution for
web security. In fact, it is used by most e-commerce sites on the Web today.
Secure HTTP (HTTPS) is designated in URLs by using the protocol name https://
rather than http://. Under HTTPS, data is still sent with the usual HTTP protocol, but
it is encrypted with the SSL secure sockets layer. HTTPS is supported by most web
browsers and can be configured in most web servers, including Apache and the
webserver.py script that we are running locally in this chapter. If SSL support is com-
piled into your Python, Python sockets support it with ssl module socket wrappers,
and the client-side module urllib.request we met in Chapter 13 supports HTTPS.
Unfortunately, enabling secure HTTP in a web server requires more configuration and
background knowledge than we can cover here, and it may require installing tools
outside the standard Python release. If you want to explore this issue further, search
the Web for resources on setting up a Python-coded HTTPS server that supports SSL
secure communications. As one possible lead, see the third-party M2Crypto package’s
OpenSSL wrapper support for password encryption, HTTPS in urllib, and more; this
could be a viable alternative to manual encryption, but it is not yet available for Python
3.X at this writing.
Also see the Web for more details on HTTPS in general. It is not impossible that some
of the HTTPS extensions for Python’s standard web server classes may make their way
into the Python standard library in the future, but they have not in recent years, perhaps
reflecting the classes’ intended roles—they provide limited functionality for use in lo-
cally running servers oriented toward testing, not deployment.
Utility Modules | 1281

Secure cookies
It’s possible to replace the form fields and query parameter PyMailCGI currently gen-
erates with client-side cookies marked as secure. Such cookies are automatically en-
crypted when sent. Unfortunately again, marking a cookie as secure simply means that
it can be transmitted only if the communications channel with the host is secure. It
does not provide any additional encryption. Because of this, this option really just begs
the question; it still requires an HTTPS server.
The secret.py module
As you can probably tell, web security is a larger topic than we have time to address
here. Because of that, the secret.py module in Example 16-13 finesses the issue, by
trying a variety of approaches in turn:
• If you are able to fetch and install the third-party PyCrypto system described earlier,
the module will use that package’s AES tools to manually encrypt password data
when transmitted together with a username.
• If not, it will try rotor next, if you’re able to find and install the original rotor
module in the version of Python that you’re using.
• And finally, it falls back on a very simplistic default character code shuffling ob-
fuscation scheme, which you can replace with one of your own if you install this
program on the Internet at large.
See Example 16-13 for more details; it uses function definitions nested in if statements
to generate the selected encryption scheme’s functions at run time.
Example 16-13. PP4E\Internet\Web\PyMailCgi\cgi-bin\secret.py
"""
###############################################################################
PyMailCGI encodes the POP password whenever it is sent to/from client over
the Net with a username, as hidden text fields or explicit URL params; uses
encode/decode functions in this module to encrypt the pswd--upload your own
version of this module to use a different encryption mechanism or key; pymail
doesn't save the password on the server, and doesn't echo pswd as typed,
but this isn't 100% safe--this module file itself might be vulnerable;
HTTPS may be better and simpler but Python web server classes don't support;
###############################################################################
"""
import sys, time
dayofweek = time.localtime(time.time())[6] # for custom schemes
forceReadablePassword = False
###############################################################################
# string encoding schemes
###############################################################################
1282 | Chapter 16: The PyMailCGI Server

if not forceReadablePassword:
###########################################################
# don't do anything by default: the urllib.parse.quote
# or cgi.escape calls in commonhtml.py will escape the
# password as needed to embed in URL or HTML; the
# cgi module undoes escapes automatically for us;
###########################################################
def stringify(old): return old
def unstringify(old): return old
else:
###########################################################
# convert encoded string to/from a string of digit chars,
# to avoid problems with some special/nonprintable chars,
# but still leave the result semi-readable (but encrypted);
# some browsers had problems with escaped ampersands, etc.;
###########################################################
separator = '-'
def stringify(old):
new = ''
for char in old:
ascii = str(ord(char))
new = new + separator + ascii # '-ascii-ascii-ascii'
return new
def unstringify(old):
new = ''
for ascii in old.split(separator)[1:]:
new = new + chr(int(ascii))
return new
###############################################################################
# encryption schemes: try PyCrypto, then rotor, then simple/custom scheme
###############################################################################
useCrypto = useRotor = True
try:
import Crypto
except:
useCrypto = False
try:
import rotor
except:
useRotor = False
if useCrypto:
#######################################################
# use third-party pycrypto package's AES algorithm
# assumes pswd has no '\0' on the right: used to pad
# change the private key here if you install this
#######################################################
Utility Modules | 1283

sys.stderr.write('using PyCrypto\n')
from Crypto.Cipher import AES
mykey = 'pymailcgi3'.ljust(16, '-') # key must be 16, 24, or 32 bytes
def do_encode(pswd):
over = len(pswd) % 16
if over: pswd += '\0' * (16-over) # pad: len must be multiple of 16
aesobj = AES.new(mykey, AES.MODE_ECB)
return aesobj.encrypt(pswd)
def do_decode(pswd):
aesobj = AES.new(mykey, AES.MODE_ECB)
pswd = aesobj.decrypt(pswd)
return pswd.rstrip('\0')
elif useRotor:
#######################################################
# use the standard lib's rotor module to encode pswd
# this does a better job of encryption than code above
# unfortunately, it is no longer available in Py 2.4+
#######################################################
sys.stderr.write('using rotor\n')
import rotor
mykey = 'pymailcgi3'
def do_encode(pswd):
robj = rotor.newrotor(mykey) # use enigma encryption
return robj.encrypt(pswd)
def do_decode(pswd):
robj = rotor.newrotor(mykey)
return robj.decrypt(pswd)
else:
#######################################################
# use our own custom scheme as a last resort
# shuffle characters in some reversible fashion
# caveat: very simple -- replace with one of your own
#######################################################
sys.stderr.write('using simple\n')
adder = 1
def do_encode(pswd):
pswd = 'vs' + pswd + '48'
res = ''
for char in pswd:
res += chr(ord(char) + adder) # inc each ASCII code
return str(res)
def do_decode(pswd):
pswd = pswd[2:-2]
res = ''
for char in pswd:
1284 | Chapter 16: The PyMailCGI Server

res += chr(ord(char) - adder)
return res
###############################################################################
# top-level entry points
###############################################################################
def encode(pswd):
return stringify(do_encode(pswd)) # encrypt plus string encode
def decode(pswd):
return do_decode(unstringify(pswd))
In addition to encryption, this module also implements an encoding method for already
encrypted strings, which transforms them to and from printable characters. By default,
the encoding functions do nothing, and the system relies on straight URL or HTML
encoding of the encrypted string. An optional encoding scheme translates the encrypted
string to a string of ASCII code digits separated by dashes. Either encoding method
makes nonprintable characters in the encrypted string printable.
To illustrate, let’s test this module’s tools interactively. For this test, we set
forceReadablePassword to True. The top-level entry points encode and decode into
printable characters (for illustration purposes, this test reflects a Python 2.X installation
where PyCrypto is installed):
>>> from secret import *
using PyCrypto
>>> data = encode('spam@123+')
>>> data
'-47-248-2-170-107-242-175-18-227-249-53-130-14-140-163-107'
>>> decode(data)
'spam@123+'
But there are actually two steps to this—encryption and printable encoding:
>>> raw = do_encode('spam@123+')
>>> raw
'/\xf8\x02\xaak\xf2\xaf\x12\xe3\xf95\x82\x0e\x8c\xa3k'
>>> text = stringify(raw)
>>> text
'-47-248-2-170-107-242-175-18-227-249-53-130-14-140-163-107'
>>> len(raw), len(text)
(16, 58)
Here’s what the encoding looks like without the extra printable encoding:
>>> raw = do_encode('spam@123+')
>>> raw
'/\xf8\x02\xaak\xf2\xaf\x12\xe3\xf95\x82\x0e\x8c\xa3k'
>>> do_decode(raw)
'spam@123+'
Utility Modules | 1285

Rolling your own encryptor
As is, PyMailCGI avoids ever passing the POP account username and password across
the Net together in a single transaction, unless the password is encrypted or obfuscated
according to the module secret.py on the server. This module can be different every-
where PyMailCGI is installed, and it can be uploaded anew in the future—encrypted
passwords aren’t persistent and live only for the duration of one mail-processing in-
teraction session. Provided you don’t publish your encryption code or its private keys,
your data will be as secure as the custom encryption module you provide on your own
server.
If you wish to use this system on the general Internet, you’ll want to tailor this code.
Ideally, you’ll install PyCrypto and change the private key string. Barring that, replace
Example 16-13 with a custom encryption coding scheme of your own or deploy one of
the general techniques mentioned earlier, such as an HTTPS-capable web server. In
any event, this software makes no guarantees; the security of your password is ulti-
mately up to you to ensure.
For additional information on security tools and techniques, search the Web and con-
sult books geared exclusively toward web programming techniques. As this system is
a prototype at large, security is just one of a handful of limitations which would have
to be more fully addressed in a robust production-grade version.
Because the encryption schemes used by PyMailCGI are reversible, it is
possible to reconstruct my email account’s password if you happen to
see its encrypted form in a screenshot, unless the private key listed in
secret.py was different when the tests shown were run. To sidestep this
issue, the email account used in all of this book’s examples is temporary
and will be deleted by the time you read these words. Please use an email
account of your own to test-drive the system.
Common Utilities Module
Finally, the file commonhtml.py in Example 16-14 is the Grand Central Station of this
application—its code is used and reused by just about every other file in the system.
Most of it is self-explanatory, and we’ve already met most of its core idea earlier, in
conjunction with the CGI scripts that use it.
I haven’t talked about its debugging support, though. Notice that this module assigns
sys.stderr to sys.stdout, in an attempt to force the text of Python error messages to
show up in the client’s browser (remember, uncaught exceptions print details to
sys.stderr). That works sometimes in PyMailCGI, but not always—the error text
shows up in a web page only if a page_header call has already printed a response pre-
amble. If you want to see all error messages, make sure you call page_header (or print
Content-type: lines manually) before any other processing.
1286 | Chapter 16: The PyMailCGI Server

This module also defines functions that dump raw CGI environment information to
the browser (dumpstatepage), and that wrap calls to functions that print status messages
so that their output isn’t added to the HTML stream (runsilent). A version 3.0 addition
also attempts to work around the fact that built-in print calls can fail in Python 3.1 for
some types of Unicode text (e.g., non-ASCII character sets in Internationalized head-
ers), by forcing binary mode and bytes for the output stream (print).
I’ll leave the discovery of any remaining magic in the code in Example 16-14 up to you,
the reader. You are hereby admonished to go forth and read, refer, and reuse.
Example 16-14. PP4E\Internet\Web\PyMailCgi\cgi-bin\commonhtml.py
#!/usr/bin/python
"""
##################################################################################
generate standard page header, list, and footer HTML; isolates HTML generation
related details in this file; text printed here goes over a socket to the client,
to create parts of a new web page in the web browser; uses one print per line,
instead of string blocks; uses urllib to escape params in URL links auto from a
dict, but cgi.escape to put them in HTML hidden fields; some tools here may be
useful outside pymailcgi; could also return the HTML generated here instead of
printing it, so it could be included in other pages; could also structure as a
single CGI script that gets and tests a next action name as a hidden form field;
caveat: this system works, but was largely written during a two-hour layover at
the Chicago O'Hare airport: there is much room for improvement and optimization;
##################################################################################
"""
import cgi, urllib.parse, sys, os
# 3.0: Python 3.1 has issues printing some decoded str as text to stdout
import builtins
bstdout = open(sys.stdout.fileno(), 'wb')
def print(*args, end='\n'):
try:
builtins.print(*args, end=end)
sys.stdout.flush()
except:
for arg in args:
bstdout.write(str(arg).encode('utf-8'))
if end: bstdout.write(end.encode('utf-8'))
bstdout.flush()
sys.stderr = sys.stdout # show error messages in browser
from externs import mailconfig # from a package somewhere on server
from externs import mailtools # need parser for header decoding
parser = mailtools.MailParser() # one per process in this module
# my cgi address root
#urlroot = 'http://starship.python.net/~lutz/PyMailCgi/'
#urlroot = 'http://localhost:8000/cgi-bin/'
urlroot = '' # use minimal, relative paths
Utility Modules | 1287

def pageheader(app='PyMailCGI', color='#FFFFFF', kind='main', info=''):
print('Content-type: text/html\n')
print('<html><head><title>%s: %s page (PP4E)</title></head>' % (app, kind))
print('<body bgcolor="%s"><h1>%s %s</h1><hr>' % (color, app, (info or kind)))
def pagefooter(root='pymailcgi.html'):
print('</p><hr><a href="http://www.python.org">')
print('<img src="../PythonPoweredSmall.gif" ')
print('align=left alt="[Python Logo]" border=0 hspace=15></a>')
print('<a href="../%s">Back to root page</a>' % root)
print('</body></html>')
def formatlink(cgiurl, parmdict):
"""
make "%url?key=val&key=val" query link from a dictionary;
escapes str() of all key and val with %xx, changes ' ' to +
note that URL escapes are different from HTML (cgi.escape)
"""
parmtext = urllib.parse.urlencode(parmdict) # calls parse.quote_plus
return '%s?%s' % (cgiurl, parmtext) # urllib does all the work
def pagelistsimple(linklist): # show simple ordered list
print('<ol>')
for (text, cgiurl, parmdict) in linklist:
link = formatlink(cgiurl, parmdict)
text = cgi.escape(text)
print('<li><a href="%s">\n %s</a>' % (link, text))
print('</ol>')
def pagelisttable(linklist): # show list in a table
print('<p><table border>') # escape text to be safe
for (text, cgiurl, parmdict) in linklist:
link = formatlink(cgiurl, parmdict)
text = cgi.escape(text)
print('<tr><th><a href="%s">View</a><td>\n %s' % (link, text))
print('</table>')
def listpage(linkslist, kind='selection list'):
pageheader(kind=kind)
pagelisttable(linkslist) # [('text', 'cgiurl', {'parm':'value'})]
pagefooter()
def messagearea(headers, text, extra=''): # extra for readonly
addrhdrs = ('From', 'To', 'Cc', 'Bcc') # decode names only
print('<table border cellpadding=3>')
for hdr in ('From', 'To', 'Cc', 'Subject'):
rawhdr = headers.get(hdr, '?')
if hdr not in addrhdrs:
dechdr = parser.decodeHeader(rawhdr) # 3.0: decode for display
else: # encoded on sends
dechdr = parser.decodeAddrHeader(rawhdr) # email names only
val = cgi.escape(dechdr, quote=1)
print('<tr><th align=right>%s:' % hdr)
print(' <td><input type=text ')
print(' name=%s value="%s" %s size=60>' % (hdr, val, extra))
1288 | Chapter 16: The PyMailCGI Server

print('<tr><th align=right>Text:')
print('<td><textarea name=text cols=80 rows=10 %s>' % extra)
print('%s\n</textarea></table>' % (cgi.escape(text) or '?')) # if has </>s
def viewattachmentlinks(partnames):
"""
create hyperlinks to locally saved part/attachment files
when clicked, user's web browser will handle opening
assumes just one user, only valid while viewing 1 msg
"""
print('<hr><table border cellpadding=3><tr><th>Parts:')
for filename in partnames:
basename = os.path.basename(filename)
filename = filename.replace('\\', '/') # Windows hack
print('<td><a href=../%s>%s</a>' % (filename, basename))
print('</table><hr>')
def viewpage(msgnum, headers, text, form, parts=[]):
"""
on View + select (generated link click)
very subtle thing: at this point, pswd was URL encoded in the
link, and then unencoded by CGI input parser; it's being embedded
in HTML here, so we use cgi.escape; this usually sends nonprintable
chars in the hidden field's HTML, but works on ie and ns anyhow:
in url: ?user=lutz&mnum=3&pswd=%8cg%c2P%1e%f0%5b%c5J%1c%f3&...
in html: <input type=hidden name=pswd value="...nonprintables..">
could urllib.parse.quote html field here too, but must urllib.parse.unquote
in next script (which precludes passing the inputs in a URL instead
of the form); can also fall back on numeric string fmt in secret.py
"""
pageheader(kind='View')
user, pswd, site = list(map(cgi.escape, getstandardpopfields(form)))
print('<form method=post action="%sonViewPageAction.py">' % urlroot)
print('<input type=hidden name=mnum value="%s">' % msgnum)
print('<input type=hidden name=user value="%s">' % user) # from page|url
print('<input type=hidden name=site value="%s">' % site) # for deletes
print('<input type=hidden name=pswd value="%s">' % pswd) # pswd encoded
messagearea(headers, text, 'readonly')
if parts: viewattachmentlinks(parts)
# onViewPageAction.quotetext needs date passed in page
print('<input type=hidden name=Date value="%s">' % headers.get('Date','?'))
print('<table><tr><th align=right>Action:')
print('<td><select name=action>')
print(' <option>Reply<option>Forward<option>Delete</select>')
print('<input type=submit value="Next">')
print('</table></form>') # no 'reset' needed here
pagefooter()
def sendattachmentwidgets(maxattach=3):
print('<p><b>Attach:</b><br>')
for i in range(1, maxattach+1):
print('<input size=80 type=file name=attach%d><br>' % i)
print('</p>')
Utility Modules | 1289

def editpage(kind, headers={}, text=''):
# on Send, View+select+Reply, View+select+Fwd
pageheader(kind=kind)
print('<p><form enctype="multipart/form-data" method=post', end=' ')
print('action="%sonEditPageSend.py">' % urlroot)
if mailconfig.mysignature:
text = '\n%s\n%s' % (mailconfig.mysignature, text)
messagearea(headers, text)
sendattachmentwidgets()
print('<input type=submit value="Send">')
print('<input type=reset value="Reset">')
print('</form>')
pagefooter()
def errorpage(message, stacktrace=True):
pageheader(kind='Error') # was sys.exc_type/exc_value
exc_type, exc_value, exc_tb = sys.exc_info()
print('<h2>Error Description</h2><p>', message)
print('<h2>Python Exception</h2><p>', cgi.escape(str(exc_type)))
print('<h2>Exception details</h2><p>', cgi.escape(str(exc_value)))
if stacktrace:
print('<h2>Exception traceback</h2><p><pre>')
import traceback
traceback.print_tb(exc_tb, None, sys.stdout)
print('</pre>')
pagefooter()
def confirmationpage(kind):
pageheader(kind='Confirmation')
print('<h2>%s operation was successful</h2>' % kind)
print('<p>Press the link below to return to the main page.</p>')
pagefooter()
def getfield(form, field, default=''):
# emulate dictionary get method
return (field in form and form[field].value) or default
def getstandardpopfields(form):
"""
fields can arrive missing or '' or with a real value
hardcoded in a URL; default to mailconfig settings
"""
return (getfield(form, 'user', mailconfig.popusername),
getfield(form, 'pswd', '?'),
getfield(form, 'site', mailconfig.popservername))
def getstandardsmtpfields(form):
return getfield(form, 'site', mailconfig.smtpservername)
def runsilent(func, args):
"""
run a function without writing stdout
ex: suppress print's in imported tools
else they go to the client/browser
"""
1290 | Chapter 16: The PyMailCGI Server

class Silent:
def write(self, line): pass
save_stdout = sys.stdout
sys.stdout = Silent() # send print to dummy object
try: # which has a write method
result = func(*args) # try to return func result
finally: # but always restore stdout
sys.stdout = save_stdout
return result
def dumpstatepage(exhaustive=0):
"""
for debugging: call me at top of a CGI to
generate a new page with CGI state details
"""
if exhaustive:
cgi.test() # show page with form, environ, etc.
else:
pageheader(kind='state dump')
form = cgi.FieldStorage() # show just form fields names/values
cgi.print_form(form)
pagefooter()
sys.exit()
def selftest(showastable=False): # make phony web page
links = [ # [(text, url, {parms})]
('text1', urlroot + 'page1.cgi', {'a':1}),
('text2', urlroot + 'page1.cgi', {'a':2, 'b':'3'}),
('text3', urlroot + 'page2.cgi', {'x':'a b', 'y':'a<b&c', 'z':'?'}),
('te<>4', urlroot + 'page2.cgi', {'<x>':'', 'y':'<a>', 'z':None})]
pageheader(kind='View')
if showastable:
pagelisttable(links)
else:
pagelistsimple(links)
pagefooter()
if __name__ == '__main__': # when run, not imported
selftest(len(sys.argv) > 1) # HTML goes to stdout
Web Scripting Trade-Offs
As shown in this chapter, PyMailCGI is still something of a system in the making, but
it does work as advertised: when it is installed on a remote server machine, by pointing
a browser at the main page’s URL, I can check and send email from anywhere I happen
to be, as long as I can find a machine with a web browser (and can live with the limi-
tations of a prototype). In fact, any machine and browser will do: Python doesn’t have
to be installed anew, and I don’t need POP or SMTP access on the client machine itself.
That’s not the case with the PyMailGUI client-side program we wrote in Chapter 14.
This property is especially useful at sites that allow web access but restrict more direct
protocols such as POP email.
Web Scripting Trade-Offs | 1291

But before we all jump on the collective Internet bandwagon and utterly abandon tra-
ditional desktop APIs such as tkinter, a few words of larger context may be in order in
conclusion.
PyMailCGI Versus PyMailGUI
Besides illustrating larger CGI applications in general, the PyMailGUI and PyMailCGI
examples were chosen for this book on purpose to underscore some of the trade-offs
you run into when building applications to run on the Web. PyMailGUI and PyMailCGI
do roughly the same things but are radically different in implementation:
PyMailGUI
This is a traditional “desktop” user-interface program: it runs entirely on the local
machine, calls out to an in-process GUI API library to implement interfaces, and
talks to the Internet through sockets only when it has to (e.g., to load or send email
on demand). User requests are routed immediately to callback handler method
functions running locally and in-process, with shared variables and memory that
automatically retain state between requests. As mentioned, because its memory is
retained between events, PyMailGUI can cache messages in memory—it loads
email headers and selected mails only once, fetches only newly arrived message
headers on future loads, and has enough information to perform general inbox
synchronization checks. On deletions, PyMailGUI can simply refresh its memory
cache of loaded headers without having to reload from the server. Moreover, be-
cause PyMailGUI runs as a single process on the local machine, it can leverage tools
such as multithreading to allow mail transfers to overlap in time (you can send
while a load is in progress), and it can more easily support extra functionality such
as local mail file saves and opens.
PyMailCGI
Like all CGI systems, PyMailCGI consists of scripts that reside and run on a server
machine and generate HTML to interact with a user’s web browser on the client
machine. It runs only in the context of a web browser or other HTML-aware client,
and it handles user requests by running CGI scripts on the web server. Without
manually managed state retention techniques such as a server-side database sys-
tem, there is no equivalent to the persistent memory of PyMailGUI—each request
handler runs autonomously, with no memory except that which is explicitly passed
along by prior states as hidden form fields, URL query parameters, and so on.
Because of that, PyMailCGI currently must reload all email headers whenever it
needs to display the selection list, naively reloads messages already fetched earlier
in the session, and cannot perform general inbox synchronization tests. This can
be improved by more advanced state-retention schemes such as cookies and server-
side databases, but none is as straightforward as the persistent in-process memory
of PyMailGUI.
1292 | Chapter 16: The PyMailCGI Server

The Web Versus the Desktop
Of course, these systems’ specific functionality isn’t exactly the same—PyMailCGI is
roughly a functional subset of PyMailGUI—but they are close enough to capture com-
mon trade-offs. On a basic level, both of these systems use the Python POP and SMTP
modules to fetch and send email through sockets. The implementation alternatives they
represent, though, have some critical ramifications that you should consider when
evaluating the prospect of delivering systems on the Web:
Performance costs
Networks are slower than CPUs. As implemented, PyMailCGI isn’t nearly as fast
or as complete as PyMailGUI. In PyMailCGI, every time the user clicks a Submit
button, the request goes across the network (it’s routed to another program on the
same machine for “localhost,” but this setup is for testing, not deployment). More
specifically, every user request incurs a network transfer overhead, every callback
handler may take the form of a newly spawned process or thread on most servers,
parameters come in as text strings that must be parsed out, and the lack of state
information on the server between pages means that either mail needs to be
reloaded often or state retention options must be employed which are slower and
more complex than shared process memory.
In contrast, user clicks in PyMailGUI trigger in-process function calls rather than
network traffic and program executions, and state is easily saved as Python in-
process variables. Even with an ultra-fast Internet connection, a server-side CGI
system is slower than a client-side program. To be fair, some tkinter operations are
sent to the underlying Tcl library as strings, too, which must be parsed. This may
change in time, but the contrast here is with CGI scripts versus GUI libraries in
general. Function calls will probably always beat network transfers.
Some of these bottlenecks may be designed away at the cost of extra program
complexity. For instance, some web servers use threads and process pools to min-
imize process creation for CGI scripts. Moreover, as we’ve seen, some state infor-
mation can be manually passed along from page to page in hidden form fields,
generated URL parameters, and client-side cookies, and state can be saved between
pages in a concurrently accessible database to minimize mail reloads. But there’s
no getting past the fact that routing events and data over a network to scripts is
slower than calling a Python function directly. Not every application must care,
but some do.
Complexity costs
HTML isn’t pretty. Because PyMailCGI must generate HTML to interact with the
user in a web browser, it is also more complex (or at least, less readable) than
PyMailGUI. In some sense, CGI scripts embed HTML code in Python; templating
systems such as PSP often take the opposite approach. Either way, because the end
result of this is a mixture of two very different languages, creating an interface with
Web Scripting Trade-Offs | 1293

HTML in a CGI script can be much less straightforward than making calls to a
GUI API such as tkinter.
Witness, for example, all the care we’ve taken to escape HTML and URLs in this
chapter’s examples; such constraints are grounded in the nature of HTML. Fur-
thermore, changing the system to retain loaded-mail list state in a database between
pages would introduce further complexities to the CGI-based solution (and, most
likely, yet another language such as SQL, even if it only appears near the bottom
of the software stack). And secure HTTP would eliminate the manual encryption
complexity but would introduce new server configuration complexity.
Functionality limitations
HTML can say only so much. HTML is a portable way to specify simple pages and
forms, but it is poor to useless when it comes to describing more complex user
interfaces. Because CGI scripts create user interfaces by writing HTML back to a
browser, they are highly limited in terms of user-interface constructs. For example,
consider implementing an image-processing and animation program as CGI
scripts: HTML doesn’t easily apply once we leave the domain of fill-out forms and
simple interactions.
It is possible to generate graphics in CGI scripts. They may be created and stored
in temporary files on the server, with per-session filenames referenced in image tags
in the generated HTML reply. For browsers that support the notion, graphic images
may also be in-lined in HTML image tags, encoded in Base64 format or similar.
Either technique is substantially more complex than using an image in the tkinter
GUI library, though. Moreover, responsive animation and drawing applications
are beyond the scope of a protocol such as CGI, which requires a network trans-
action per interaction. The interactive drawing and animation scripts we wrote at
the end of Chapter 9, for example, could not be implemented as normal server-
side scripts.
This is precisely the limitation that Java applets were designed to address—
programs that are stored on a server but are pulled down to run on a client on
demand and are given access to a full-featured GUI API for creating richer user
interfaces. Nevertheless, strictly server-side programs are inherently limited by the
constraints of HTML.
Beyond HTML’s limitations, client-side programs such as PyMailGUI also have
access to tools such as multithreading which are difficult to emulate in a CGI-based
application (threads spawned by a CGI script cannot outlive the CGI script itself,
or augment its reply once sent). Persistent process models for web applications
such as FastCGI may provide options here, but the picture is not as clear-cut as on
the client.
Although web developers make noble efforts at emulating client-side capabilities—
see the discussion of RIAs and HTML 5 ahead—such efforts add additional com-
plexity, can stretch the server-side programming model nearly to its breaking point,
and account for much of the plethora of divergent web techniques.
1294 | Chapter 16: The PyMailCGI Server

Portability benefits
All you need is a browser on clients. On the upside, because PyMailCGI runs over
the Web, it can be run on any machine with a web browser, whether that machine
has Python and tkinter installed or not. That is, Python needs to be installed on
only one computer—the web server machine where the scripts actually live and
run. In fact, this is probably the most compelling benefit to the web application
model. As long as you know that the users of your system have an Internet browser,
installation is simple. You still need Python on the server, but that’s easier to
guarantee.
Python and tkinter, you will recall, are very portable, too—they run on all major
window systems (X11, Windows, Mac)—but to run a client-side Python/tkinter
program such as PyMailGUI, you need Python and tkinter on the client machine
itself. Not so with an application built as CGI scripts: it will work on Macintosh,
Linux, Windows, and any other machine that can somehow render HTML web
pages. In this sense, HTML becomes a sort of portable GUI API language in web
scripts, interpreted by your web browser, which is itself a kind of generalized GUI
for rendering GUIs. You don’t even need the source code or bytecode for the CGI
scripts themselves—they run on a remote server that exists somewhere else on the
Net, not on the machine running the browser.
Execution requirements
But you do need a browser. That is, the very nature of web-enabled systems can
render them useless in some environments. Despite the pervasiveness of the Inter-
net, many applications still run in settings that don’t have web browsers or Internet
access. Consider, for instance, embedded systems, real-time systems, and secure
government applications. While an intranet (a local network without external con-
nections) can sometimes make web applications feasible in some such environ-
ments, I have worked at more than one company whose client sites had no web
browsers to speak of. On the other hand, such clients may be more open to instal-
ling systems like Python on local machines, as opposed to supporting an internal
or external network.
Administration requirements
You really need a server, too. You can’t write CGI-based systems at all without
access to a web server. Further, keeping programs on a centralized server creates
some fairly critical administrative overheads. Simply put, in a pure client/server
architecture, clients are simpler, but the server becomes a critical path resource
and a potential performance bottleneck. If the centralized server goes down, you,
your employees, and your customers may be knocked out of commission. More-
over, if enough clients use a shared server at the same time, the speed costs of web-
based systems become even more pronounced. In production systems, advanced
techniques such as load balancing and fail-over servers help, but they add new
requirements.
Web Scripting Trade-Offs | 1295

In fact, one could make the argument that moving toward a web server architecture
is akin to stepping backward in time—to the time of centralized mainframes and
dumb terminals. Some would include the emerging cloud computing model in this
analysis, arguably in part a throwback to older computing models. Whichever way
we step, offloading and distributing processing to client machines at least partially
avoids this processing bottleneck.
Other Approaches
So what’s the best way to build applications for the Internet—as client-side programs
that talk to the Net or as server-side programs that live and breathe on the Net? Natu-
rally, there is no one answer to that question, since it depends upon each application’s
unique constraints. Moreover, there are more possible answers to it than have been
disclosed so far. Although the client and server programming models do imply trade-
offs, many of the common web and CGI drawbacks already have common proposed
solutions. For example:
Client-side solutions
Client- and server-side programs can be mixed in many ways. For instance, applet
programs live on a server but are downloaded to and run as client-side programs
with access to rich GUI libraries.
Other technologies, such as embedding JavaScript or Python directly in HTML
code, also support client-side execution and richer GUI possibilities. Such scripts
live in HTML on the server but run on the client when downloaded and access
browser components through an exposed object model to customize pages.
The Dynamic HTML (DHTML) extensions provide yet another client-side script-
ing option for changing web pages after they have been constructed. And the newly
emerging AJAX model offers additional ways to add interactivity and responsive-
ness to web pages, and is at the heart of the RIA model noted ahead. All of these
client-side technologies add extra complexities all their own, but they ease some
of the limitations imposed by straight HTML.
State retention solutions
We discussed general state retention options in detail in the prior chapter, and we
will study full-scale database systems for Python in Chapter 17. Some web appli-
cation servers (e.g., Zope) naturally support state retention between pages by pro-
viding concurrently accessible object databases. Some of these systems have an
explicit underlying database component (e.g., Oracle and MySQL); others may use
flat files or Python persistent shelves with appropriate locking. In addition, object
relational mappers (ORMs) such as SQLObject allow relational databases to be
processed as Python classes.
Scripts can also pass state information around in hidden form fields and generated
URL parameters, as done in PyMailCGI, or they can store it on the client machine
itself using the standard cookie protocol. As we learned in Chapter 15, cookies are
1296 | Chapter 16: The PyMailCGI Server

strings of information that are stored on the client upon request from the server,
and that are transferred back to the server when a page is revisited (data is sent
back and forth in HTTP header lines). Cookies are more complex than program
variables and are somewhat controversial and optional, but they can offload some
simple state retention tasks.
Alternative models such as FastCGI and mod_python offer additional persistence
options—where supported, FastCGI applications may retain context in long-lived
processes, and mod_python provides session data within Apache.
HTML generation solutions
Third-party extensions can also take some of the complexity out of embedding
HTML in Python CGI scripts, albeit at some cost to execution speed. For instance,
the HTMLgen system and its relatives let programs build pages as trees of Python
objects that “know” how to produce HTML. Other frameworks prove an object-
based interface to reply-stream generation (e.g., a reply object with methods).
When a system like this is employed, Python scripts deal only with objects, not
with the syntax of HTML itself.
For instance, systems such as PHP, Python Server Pages (PSP), Zope’s DTML and
ZPT, and Active Server Pages provide server-side templating languages, which al-
low scripting language code to be embedded in HTML and executed on the server,
to dynamically generate or determine part of the HTML that is sent back to a client
in response to requests. The net result can cleanly insulate Python code from the
complexity of HTML code and promote the separation of display format and busi-
ness logic, but may add complexities of its own due to the mixture of different
languages.
Generalized user interface development
To cover both bases, some systems attempt to separate logic from display so much
as to make the choice almost irrelevant—by completely encapsulating display de-
tails, a single program can, in principle, render its user interface as either a tradi-
tional GUI or an HTML-based web page. Due to the vastly different architectures,
though, this ideal is difficult to achieve well and does not address larger disparities
between the client and server platforms. Issues such as state retention and network
interfaces are much more significant than generation of windows and controls, and
may impact code more.
Other systems may try to achieve similar goals by abstracting the display repre-
sentation—a common XML representation, for instance, might lend itself to both
a GUI and an HTML rendering. Again, though, this addresses only the rendering
of the display, not the fundamental architectural differences of client- and server-
side approaches.
Emerging technologies: RIAs and HTML 5
Finally, higher-level approaches such as the RIA (Rich Internet Application) tool-
kits introduced in Chapters 7 and 12 can offer additional functionality that HTML
lacks and can approach the utility on GUI toolkits. On the other hand, they can
Web Scripting Trade-Offs | 1297

also complicate the web development story even further, and add yet additional
languages to the mix. Though this can vary, the net result is often something of a
Web-hosted Tower of Babel, whose development might require simultaneously
programming in Python, HTML, SQL, JavaScript, a server-side templating lan-
guage, an object-relational mapping API, and more, and even nested and embed-
ded combinations of these. The resulting software stack can be more complex than
Python and a GUI toolkit.
Moreover, RIAs today inherit the inherent speed degradation of network-based
systems in general; although AJAX can add interactivity to web pages, it still implies
network access instead of in-process function calls. Ironically, much like desktop
applications, RIAs may also still require installation of a browser plug-in on the
client to be used at all. The emerging HTML 5 standard may address the plug-in
constraint and ease the complexity somewhat, but it brings along with it a grab
bag of new complexities all its own which we won’t describe here.
Clearly, Internet technology does come with some compromises, and it is still evolving
rapidly. It is nevertheless an appropriate delivery context for many, though not all,
applications. As with every design choice, you must be the judge. While delivering
systems on the Web may have some costs in terms of performance, functionality, and
complexity, it is likely that the significance of those overheads will continue to diminish
with time. See the start of Chapter 12 for more on some systems that promise such
change, and watch the Web for the ever-changing Internet story to unfold.
Suggested Reading: The PyErrata System
Now that I’ve told you all the reasons you might not want to design systems for the
Web, I’m going to completely contradict myself and refer you to a system that almost
requires a web-based implementation. The second edition of this book included a
chapter that presented the PyErrata website—a Python program that lets arbitrary
people on arbitrary machines submit book comments and bug reports (usually called
errata) over the Web, using just a web browser. Such a system must store information
on a server, so it can be read by arbitrary clients.
Because of space concerns, that chapter was cut in this book’s third edition. However,
we’re making its original content available as optional, supplemental reading. You can
find this example’s code, as well as the original chapter’s file in the directory PP4E
\Internet\Web\PyErrata of the book examples distribution tree (see the Preface for more
on the examples distribution).
PyErrata is in some ways simpler than the PyMailCGI case study presented in this
chapter. From a user’s perspective, PyErrata is more hierarchical than linear: user in-
teractions are shorter and spawn fewer pages. There is also little state retention in the
web pages themselves in PyErrata—URL parameters pass state in only one isolated
case, and no hidden form fields are generated.
On the other hand, PyErrata introduces an entirely new dimension: persistent data
storage. State (error and comment reports) is stored permanently by this system on the
1298 | Chapter 16: The PyMailCGI Server

server, either in flat pickle files or in a shelve-based database. Both raise the specter of
concurrent updates, since any number of users out in cyberspace may be accessing the
site at the same time, so PyErrata also introduces file-locking techniques along the way.
I no longer maintain the website described by this extra chapter, and the material itself
is slightly out of date in some ways. For instance, the os.open call is preferred for file
locking now; I would probably use a different data storage system today, such as ZODB;
the code and its chapter may still be in Python 2.X form in the examples package; and
this site might be better implemented as a blog or wiki, concepts and labels that arose
after the site was developed.
Still, PyErrata provides an additional Python website case study, and it more closely
reflects websites that must store information on the server.
Web Scripting Trade-Offs | 1299

PART V
Tools and Techniques
This part of the book presents a collection of additional Python application topics.
Most of the tools presented along the way can be used in a wide variety of application
domains. You’ll find the following chapters here:
Chapter 17
This chapter covers commonly used and advanced Python techniques for storing
information between program executions—DBM files, object pickling, object
shelves, and Python’s SQL database API—and briefly introduces full-blown
OODBs such as ZODB, as well as ORMs such as SQLObject and SQLAlchemy.
The Python standard library’s SQLite support is used for the SQL examples, but
the API is portable to enterprise-level systems such as MySQL.
Chapter 18
This chapter explores techniques for implementing more advanced data structures
in Python—stacks, sets, binary search trees, graphs, and the like. In Python, these
take the form of object implementations.
Chapter 19
This chapter addresses Python tools and techniques for parsing text-based infor-
mation—string splits and joins, regular expression matching, XML parsing, re-
cursive descent parsing, and more advanced language-based topics.
Chapter 20
This chapter introduces integration techniques—both extending Python with
compiled libraries and embedding Python code in other applications. While the
main focus here is on linking Python with compiled C code, we’ll also investigate
integration with Java, .NET, and more. This chapter assumes that you know how
to read C programs, and it is intended mostly for developers responsible for im-
plementing application integration layers.
This is the last technical part of the book, and it makes heavy use of tools presented
earlier in the text to help underscore the notion of code reuse. For instance, a calculator
GUI (PyCalc) serves to demonstrate language processing and code reuse concepts.

CHAPTER 17
Databases and Persistence
“Give Me an Order of Persistence, but Hold the Pickles”
So far in this book, we’ve used Python in the system programming, GUI development,
and Internet scripting domains—three of Python’s most common applications, and
representative of its use as an application programming language at large. In the next
four chapters, we’re going to take a quick look at other major Python programming
topics: persistent data, data structure techniques, text and language processing, and
Python/C integration.
These four topics are not really application areas themselves, but they are techniques
that span domains. The database topics in this chapter, for instance, can be applied on
the Web, in desktop GUI applications, and so on. Text processing is a similarly general
tool. Moreover, none of these final four topics is covered exhaustively (each could easily
fill a book alone), but we’ll sample Python in action in these domains and highlight
their core concepts and tools. If any of these chapters spark your interest, additional
resources are readily available in the Python world.
Persistence Options in Python
In this chapter, our focus is on persistent data—the kind that outlives a program that
creates it. That’s not true by default for objects a script constructs, of course; things
like lists, dictionaries, and even class instance objects live in your computer’s memory
and are lost as soon as the script ends. To make data live longer, we need to do some-
thing special. In Python programming, there are today at least six traditional ways to
save information in between program executions:
Flat files
Text and bytes stored directly on your computer
DBM keyed files
Keyed access to strings stored in dictionary-like files
1303

Pickled objects
Serialized Python objects saved to files and streams
Shelve files
Pickled Python objects saved in DBM keyed files
Object-oriented databases (OODBs)
Persistent Python objects stored in persistent dictionaries (ZODB, Durus)
SQL relational databases (RDBMSs)
Table-based storage that supports SQL queries (SQLite, MySQL, PostGreSQL,
etc.)
Object relational mappers (ORMs)
Mediators that map Python classes to relational tables (SQLObject, SQLAlchemy)
In some sense, Python’s interfaces to network-based object transmission protocols such
as SOAP, XML-RPC, and CORBA also offer persistence options, but they are beyond
the scope of this chapter. Here, our interest is in techniques that allow a program to
store its data directly and, usually, on the local machine. Although some database
servers may operate on a physically remote machine on a network, this is largely trans-
parent to most of the techniques we’ll study here.
We studied Python’s simple (or “flat”) file interfaces in earnest in Chapter 4, and we
have been using them ever since. Python provides standard access to both the stdio
filesystem (through the built-in open function), as well as lower-level descriptor-based
files (with the built-in os module). For simple data storage tasks, these are all that many
scripts need. To save for use in a future program run, simply write data out to a newly
opened file on your computer in text or binary mode, and read it back from that file
later. As we’ve seen, for more advanced tasks, Python also supports other file-like
interfaces such as pipes, fifos, and sockets.
Since we’ve already explored flat files, I won’t say more about them here. The rest of
this chapter introduces the remaining topics on the preceding list. At the end, we’ll also
meet a GUI program for browsing the contents of things such as shelves and DBM files.
Before that, though, we need to learn what manner of beast these are.
Fourth edition coverage note: The prior edition of this book used the
mysql-python interface to the MySQL relational database system, as well
as the ZODB object database system. As I update this chapter in June
2010, neither of these is yet available for Python 3.X, the version of
Python used in this edition. Because of that, most ZODB information
has been trimmed, and the SQL database examples here were changed
to use the SQLite in-process database system that ships with Python 3.X
as part of its standard library. The prior edition’s ZODB and MySQL
examples and overviews are still available in the examples package, as
described later. Because Python’s SQL database API is portable, though,
the SQLite code here should work largely unchanged on most other
systems.
1304 | Chapter 17: Databases and Persistence

DBM Files
Flat files are handy for simple persistence tasks, but they are generally geared toward
a sequential processing mode. Although it is possible to jump around to arbitrary lo-
cations with seek calls, flat files don’t provide much structure to data beyond the notion
of bytes and text lines.
DBM files, a standard tool in the Python library for database management, improve on
that by providing key-based access to stored text strings. They implement a random-
access, single-key view on stored data. For instance, information related to objects can
be stored in a DBM file using a unique key per object and later can be fetched back
directly with the same key. DBM files are implemented by a variety of underlying mod-
ules (including one coded in Python), but if you have Python, you have a DBM.
Using DBM Files
Although DBM filesystems have to do a bit of work to map chunks of stored data to
keys for fast retrieval (technically, they generally use a technique called hashing to store
data in files), your scripts don’t need to care about the action going on behind the
scenes. In fact, DBM is one of the easiest ways to save information in Python—DBM
files behave so much like in-memory dictionaries that you may forget you’re actually
dealing with a file at all. For instance, given a DBM file object:
• Indexing by key fetches data from the file.
• Assigning to an index stores data in the file.
DBM file objects also support common dictionary methods such as keys-list fetches
and tests and key deletions. The DBM library itself is hidden behind this simple model.
Since it is so simple, let’s jump right into an interactive example that creates a DBM
file and shows how the interface works:
C:\...\PP4E\Dbase> python
>>> import dbm # get interface: bsddb, gnu, ndbm, dumb
>>> file = dbm.open('movie', 'c') # make a DBM file called 'movie'
>>> file['Batman'] = 'Pow!' # store a string under key 'Batman'
>>> file.keys() # get the file's key directory
[b'Batman']
>>> file['Batman'] # fetch value for key 'Batman'
b'Pow!'
>>> who = ['Robin', 'Cat-woman', 'Joker']
>>> what = ['Bang!', 'Splat!', 'Wham!']
>>> for i in range(len(who)):
... file[who[i]] = what[i] # add 3 more "records"
...
>>> file.keys()
[b'Cat-woman', b'Batman', b'Joker', b'Robin']
>>> len(file), 'Robin' in file, file['Joker']
DBM Files | 1305

(4, True, b'Wham!')
>>> file.close() # close sometimes required
Internally, importing the dbm standard library module automatically loads whatever
DBM interface is available in your Python interpreter (attempting alternatives in a fixed
order), and opening the new DBM file creates one or more external files with names
that start with the string 'movie' (more on the details in a moment). But after the import
and open, a DBM file is virtually indistinguishable from a dictionary.
In effect, the object called file here can be thought of as a dictionary mapped to an
external file called movie; the only obvious differences are that keys must be strings (not
arbitrary immutables), and we need to remember to open to access and close after
changes.
Unlike normal dictionaries, though, the contents of file are retained between Python
program runs. If we come back later and restart Python, our dictionary is still available.
Again, DBM files are like dictionaries that must be opened:
C:\...\PP4E\Dbase> python
>>> import dbm
>>> file = dbm.open('movie', 'c') # open existing DBM file
>>> file['Batman']
b'Pow!'
>>> file.keys() # keys gives an index list
[b'Cat-woman', b'Batman', b'Joker', b'Robin']
>>> for key in file.keys(): print(key, file[key])
...
b'Cat-woman' b'Splat!'
b'Batman' b'Pow!'
b'Joker' b'Wham!'
b'Robin' b'Bang!'
Notice how DBM files return a real list for the keys call; not shown here, their values
method instead returns an iterable view like dictionaries. Further, DBM files always
store both keys and values as bytes objects; interpretation as arbitrary types of Unicode
text is left to the client application. We can use either bytes or str strings in our code
when accessing or storing keys and values—using bytes allows your keys and values
to retain arbitrary Unicode encodings, but str objects in our code will be encoded to
bytes internally using the UTF-8 Unicode encoding by Python’s DBM implementation.
Still, we can always decode to Unicode str strings to display in a more friendly fashion
if desired, and DBM files have a keys iterator just like dictionaries. Moreover, assigning
and deleting keys updates the DBM file, and we should close after making changes (this
ensure that changes are flushed to disk):
>>> for key in file: print(key.decode(), file[key].decode())
...
Cat-woman Splat!
Batman Pow!
Joker Wham!
1306 | Chapter 17: Databases and Persistence

Robin Bang!
>>> file['Batman'] = 'Ka-Boom!' # change Batman slot
>>> del file['Robin'] # delete the Robin entry
>>> file.close() # close it after changes
Apart from having to import the interface and open and close the DBM file, Python
programs don’t have to know anything about DBM itself. DBM modules achieve this
integration by overloading the indexing operations and routing them to more primitive
library tools. But you’d never know that from looking at this Python code—DBM files
look like normal Python dictionaries, stored on external files. Changes made to them
are retained indefinitely:
C:\...\PP4E\Dbase> python
>>> import dbm # open DBM file again
>>> file = dbm.open('movie', 'c')
>>> for key in file: print(key.decode(), file[key].decode())
...
Cat-woman Splat!
Batman Ka-Boom!
Joker Wham!
As you can see, this is about as simple as it can be. Table 17-1 lists the most commonly
used DBM file operations. Once such a file is opened, it is processed just as though it
were an in-memory Python dictionary. Items are fetched by indexing the file object by
key and are stored by assigning to a key.
Table 17-1. DBM file operations
Python code Action Description
import dbm Import Get DBM implementation
file=dbm.open('filename', 'c') Open Create or open an existing DBM file for I/O
file['key'] = 'value' Store Create or change the entry for key
value = file['key'] Fetch Load the value for the entry key
count = len(file) Size Return the number of entries stored
index = file.keys() Index Fetch the stored keys list (not a view)
found = 'key' in file Query See if there’s an entry for key
del file['key'] Delete Remove the entry for key
for key in file: Iterate Iterate over stored keys
file.close() Close Manual close, not always needed
DBM Files | 1307

DBM Details: Files, Portability, and Close
Despite the dictionary-like interface, DBM files really do map to one or more external
files. For instance, the underlying default dbm i n t e r f a c e u s e d b y P y t h o n 3 . 1 o n W i n d o w s
writes two files—movie.dir a n d movie.dat—when a DBM file called movie i s m a d e , a n d
saves a movie.bak on later opens. If your Python has access to a different underlying
keyed-file interface, different external files might show up on your computer.
Technically, the module dbm i s r e a l l y a n i n t e r f a c e t o w h a t e v e r D B M - l i k e f i l e s y s t e m y o u
have available in your Python:
• When opening an already existing DBM file, dbm t r i e s t o d e t e r m i n e t h e s y s t e m t h a t
created it with the dbm.whichdb f u n c t i o n i n s t e a d . T h i s d e t e r m i n a t i o n i s b a s e d u p o n
the content of the database itself.
• When creating a new file, dbm today tries a set of keyed-file interface modules in a
fixed order. According to its documentation, it attempts to import the interfaces
dbm.bsd, dbm.gnu, dbm.ndbm, or dbm.dumb, and uses the first that succeeds. Pythons
without any of these automatically fall back on an all-Python and always-present
implementation called dbm.dumb, which is not really “dumb,” or course, but may
not be as fast or robust as other options.
Future Pythons are free to change this selection order, and may even add additional
alternatives to it. You normally don’t need to care about any of this, though, unless you
delete any of the files your DBM creates, or transfer them between machines with dif-
ferent configurations—if you need to care about the portability o f y o u r D B M f i l e s ( a n d
as we’ll see later, by proxy, that of your shelve files), you should configure machines
such that all have the same DBM interface installed or rely upon the dumb f a l l b a c k . F o r
example, the Berkeley DB package (a.k.a. bsddb) used by dbm.bsd is widely available
and portable.
Note that DBM files may or may not need to be explicitly closed, per the last entry in
Table 17-1. Some DBM files don’t require a close call, but some depend on it to flush
changes out to disk. On such systems, your file may be corrupted if you omit the close
call. Unfortunately, the default DBM in some older Windows Pythons, dbhash (a.k.a.
bsddb), is one of the DBM systems that requires a close call to avoid data loss. As a rule
of thumb, always close your DBM files explicitly after making changes and before your
program exits to avoid potential problems; it’s essential a “commit” operation for these
files. This rule extends by proxy to shelves, a topic we’ll meet later in this chapter.
1308 | Chapter 17: Databases and Persistence

Recent changes: Be sure to also pass a string 'c' as a second argument
when calling dbm.open, to force Python to create the file if it does not yet
exist and to simply open it for reads and writes otherwise. This used to
be the default behavior but is no longer. You do not need the 'c' argu-
ment when opening shelves discussed ahead—they still use an “open or
create” 'c' mode by default if passed no open mode argument. Other
open mode strings can be passed to dbm, including n to always create the
file, and r for read-only of an existing file—the new default. See the
Python library manual for more details.
In addition, Python 3.X stores both key and value strings as bytes in-
stead of str as we’ve seen (which turns out to be convenient for pickled
data in shelves, discussed ahead) and no longer ships with bsddb as a
standard component—it’s available independently on the Web as a
third-party extension, but in its absence Python falls back on its own
DBM file implementation. Since the underlying DBM implementation
rules are prone to change with time, you should always consult Python’s
library manuals as well as the dbm module’s standard library source code
for more information.
Pickled Objects
Probably the biggest limitation of DBM keyed files is in what they can store: data stored
under a key must be a simple string. If you want to store Python objects in a DBM file,
you can sometimes manually convert them to and from strings on writes and reads
(e.g., with str and eval calls), but this takes you only so far. For arbitrarily complex
Python objects such as class instances and nested data structures, you need something
more. Class instance objects, for example, cannot usually be later re-created from their
standard string representations. Moreover, custom to-string conversions and from-
string parsers are error prone and not general.
The Python pickle module, a standard part of the Python system, provides the con-
version step needed. It’s a sort of super general data formatting and de-formatting
tool—pickle converts nearly arbitrary Python in-memory objects to and from a single
linear string format, suitable for storing in flat files, shipping across network sockets
between trusted sources, and so on. This conversion from object to string is often
called serialization—arbitrary data structures in memory are mapped to a serial string
form.
The string representation used for objects is also sometimes referred to as a byte stream,
due to its linear format. It retains all the content and references structure of the original
in-memory object. When the object is later re-created from its byte string, it will be a
new in-memory object identical in structure and value to the original, though located
at a different memory address.
The net effect is that the re-created object is effectively a copy of the original; in Python-
speak, the two will be == but not is. Since the recreation typically happens in an entirely
Pickled Objects | 1309

new process, this difference is often irrelevant (though as we saw in Chapter 5, this
generally precludes using pickled objects directly as cross-process shared state).
Pickling works on almost any Python datatype—numbers, lists, dictionaries, class in-
stances, nested structures, and more—and so is a general way to store data. Because
pickles contain native Python objects, there is almost no database API to be found; the
objects stored with pickling are processed with normal Python syntax when they are
later retrieved.
Using Object Pickling
Pickling may sound complicated the first time you encounter it, but the good news is
that Python hides all the complexity of object-to-string conversion. In fact, the pickle
module ’s interfaces are incredibly simple to use. For example, to pickle an object into
a serialized string, we can either make a pickler and call its methods or use convenience
functions in the module to achieve the same effect:
P = pickle.Pickler(file)
Make a new pickler for pickling to an open output file object file.
P.dump(object )
Write an object onto the pickler’s file/stream.
pickle.dump(object, file)
Same as the last two calls combined: pickle an object onto an open file.
string = pickle.dumps(object)
Return the pickled representation of object as a character string.
Unpickling from a serialized string back to the original object is similar—both object
and convenience function interfaces are available:
U = pickle.Unpickler(file)
Make an unpickler for unpickling from an open input file object file.
object = U.load()
Read an object from the unpickler’s file/stream.
object = pickle.load(file)
Same as the last two calls combined: unpickle an object from an open file.
object = pickle.loads(string)
Read an object from a character string rather than a file.
Pickler and Unpickler are exported classes. In all of the preceding cases, file is either
an open file object or any object that implements the same attributes as file objects:
•Pickler calls the file’s write method with a string argument.
•Unpickler calls the file’s read method with a byte count, and readline without
arguments.
1310 | Chapter 17: Databases and Persistence

Any object that provides these attributes can be passed in to the file parameters. In
particular, file can be an instance of a Python class that provides the read/write meth-
ods (i.e., the expected file-like interface). This lets you map pickled streams to in-
memory objects with classes, for arbitrary use. For instance, the io.BytesIO class in the
standard library discussed in Chapter 3 provides an interface that maps file calls to and
from in-memory byte strings and is an alternative to the pickler’s dumps/loads string
calls.
This hook also lets you ship Python objects across a network, by providing sockets
wrapped to look like files in pickle calls at the sender, and unpickle calls at the receiver
(see “Making Sockets Look Like Files and Streams” on page 827 for more details). In
fact, for some, pickling Python objects across a trusted network serves as a simpler
alternative to network transport protocols such as SOAP and XML-RPC, provided that
Python is on both ends of the communication (pickled objects are represented with a
Python-specific format, not with XML text).
Recent changes: In Python 3.X, pickled objects are always represented
as bytes, not str, regardless of the protocol level which you request
(even the oldest ASCII protocol yields bytes). Because of this, files used
to store pickled Python objects should always be opened in binary mode.
Moreover, in 3.X an optimized _pickle implementation module is also
selected and used automatically if present. More on both topics later.
Pickling in Action
Although pickled objects can be shipped in exotic ways, in more typical use, to pickle
an object to a flat file, we just open the file in write mode and call the dump function:
C:\...\PP4E\Dbase> python
>>> table = {'a': [1, 2, 3],
'b': ['spam', 'eggs'],
'c': {'name':'bob'}}
>>>
>>> import pickle
>>> mydb = open('dbase', 'wb')
>>> pickle.dump(table, mydb)
Notice the nesting in the object pickled here—the pickler handles arbitrary structures.
Also note that we’re using binary mode files here; in Python 3.X, we really must, because
the pickled representation of an object is always a bytes object in all cases. To unpickle
later in another session or program run, simply reopen the file and call load:
C:\...\PP4E\Dbase> python
>>> import pickle
>>> mydb = open('dbase', 'rb')
>>> table = pickle.load(mydb)
>>> table
{'a': [1, 2, 3], 'c': {'name': 'bob'}, 'b': ['spam', 'eggs']}
Pickled Objects | 1311

The object you get back from unpickling has the same value and reference structure as
the original, but it is located at a different address in memory. This is true whether the
object is unpickled in the same or a future process. Again, the unpickled object is ==
but is not is:
C:\...\PP4E\Dbase> python
>>> import pickle
>>> f = open('temp', 'wb')
>>> x = ['Hello', ('pickle', 'world')] # list with nested tuple
>>> pickle.dump(x, f)
>>> f.close() # close to flush changes
>>>
>>> f = open('temp', 'rb')
>>> y = pickle.load(f)
>>> y
['Hello', ('pickle', 'world')]
>>>
>>> x == y, x is y # same value, diff objects
(True, False)
To make this process simpler still, the module in Example 17-1 wraps pickling and
unpickling calls in functions that also open the files where the serialized form of the
object is stored.
Example 17-1. PP4E\Dbase\filepickle.py
"Pickle to/from flat file utilities"
import pickle
def saveDbase(filename, object):
"save object to file"
file = open(filename, 'wb')
pickle.dump(object, file) # pickle to binary file
file.close() # any file-like object will do
def loadDbase(filename):
"load object from file"
file = open(filename, 'rb')
object = pickle.load(file) # unpickle from binary file
file.close() # re-creates object in memory
return object
To store and fetch now, simply call these module functions; here they are in action
managing a fairly complex structure with multiple references to the same nested
object—the nested list called L at first is stored only once in the file:
C:\...\PP4E\Dbase> python
>>> from filepickle import *
>>> L = [0]
>>> D = {'x':0, 'y':L}
>>> table = {'A':L, 'B':D} # L appears twice
>>> saveDbase('myfile', table) # serialize to file
1312 | Chapter 17: Databases and Persistence

C:\...\PP4E\Dbase>python
>>> from filepickle import *
>>> table = loadDbase('myfile') # reload/unpickle
>>> table
{'A': [0], 'B': {'y': [0], 'x': 0}}
>>> table['A'][0] = 1 # change shared object
>>> saveDbase('myfile', table) # rewrite to the file
C:\...\PP4E\Dbase>python
>>> from filepickle import *
>>> print(loadDbase('myfile')) # both L's updated as expected
{'A': [1], 'B': {'y': [1], 'x': 0}}
Besides built-in types like the lists, tuples, and dictionaries of the examples so far, class
instances may also be pickled to file-like objects. This provides a natural way to associate
behavior with stored data (class methods process instance attributes) and provides a
simple migration path (class changes made in module files are automatically picked up
by stored instances). Here’s a brief interactive demonstration:
>>> class Rec:
def __init__(self, hours):
self.hours = hours
def pay(self, rate=50):
return self.hours * rate
>>> bob = Rec(40)
>>> import pickle
>>> pickle.dump(bob, open('bobrec', 'wb'))
>>>
>>> rec = pickle.load(open('bobrec', 'rb'))
>>> rec.hours
40
>>> rec.pay()
2000
We’ll explore how this works in more detail in conjunction with shelves later in this
chapter—as we’ll see, although the pickle module can be used directly this way, it is
also the underlying translation engine in both shelves and ZODB databases.
In general, Python can pickle just about anything, except for:
• Compiled code objects: functions and classes record just their names and those of
their modules in pickles, to allow for later reimport and automatic acquisition of
changes made in module files.
• Instances of classes that do not follow class importability rules: in short, the class
must be importable on object loads (more on this at the end of the section “Shelve
Files” on page 1315).
• Instances of some built-in and user-defined types that are coded in C or depend
upon transient operating system states (e.g., open file objects cannot be pickled).
A PicklingError is raised if an object cannot be pickled. Again, we’ll revisit the pickler’s
constraints on pickleable objects and classes when we study shelves.
Pickled Objects | 1313

Pickle Details: Protocols, Binary Modes, and _pickle
In later Python releases, the pickler introduced the notion of protocols—storage formats
for pickled data. Specify the desired protocol by passing an extra parameter to the
pickling calls (but not to unpickling calls: the protocol is automatically determined
from the pickled data):
pickle.dump(object, file, protocol) # or protocol=N keyword argument
Pickled data may be created in either text or binary protocols; the binary protocols’
format is more efficient, but it cannot be readily understood if inspected. By default,
the storage protocol in Python 3.X is a 3.X-only binary bytes format (also known as
protocol 3). In text mode (protocol 0), the pickled data is printable ASCII text, which
can be read by humans (it’s essentially instructions for a stack machine), but it is still
a bytes object in Python 3.X. The alternative protocols (protocols 1 and 2) create the
pickled data in binary format as well.
For all protocols, pickled data is a bytes object in 3.X, not a str, and therefore implies
binary-mode reads and writes when stored in flat files (see Chapter 4 if you’ve forgotten
why). Similarly, we must use a bytes-oriented object when forging the file object’s
interface:
>>> import io, pickle
>>> pickle.dumps([1, 2, 3]) # default=binary protocol
b'\x80\x03]q\x00(K\x01K\x02K\x03e.'
>>> pickle.dumps([1, 2, 3], protocol=0) # ASCII format protocol
b'(lp0\nL1L\naL2L\naL3L\na.'
>>> pickle.dump([1, 2, 3], open('temp','wb')) # same if protocol=0, ASCII
>>> pickle.dump([1, 2, 3], open('temp','w')) # must use 'rb' to read too
TypeError: must be str, not bytes
>>> pickle.dump([1, 2, 3], open('temp','w'), protocol=0)
TypeError: must be str, not bytes
>>> B = io.BytesIO() # use bytes streams/buffers
>>> pickle.dump([1, 2, 3], B)
>>> B.getvalue()
b'\x80\x03]q\x00(K\x01K\x02K\x03e.'
>>> B = io.BytesIO() # also bytes for ASCII
>>> pickle.dump([1, 2, 3], B, protocol=0)
>>> B.getvalue()
b'(lp0\nL1L\naL2L\naL3L\na.'
>>> S = io.StringIO() # it's not a str anymore
>>> pickle.dump([1, 2, 3], S) # same if protocol=0, ASCII
TypeError: string argument expected, got 'bytes'
>>> pickle.dump([1, 2, 3], S, protocol=0)
TypeError: string argument expected, got 'bytes'
1314 | Chapter 17: Databases and Persistence

Refer to Python’s library manual for more information on the pickler; it supports ad-
ditional interfaces that classes may use to customize its behavior, which we’ll bypass
here in the interest of space. Also check out marshal, a module that serializes an object
too, but can handle only simple object types. pickle is more general than marshal and
is normally preferred.
An additional related module, _pickle, is a C-coded optimization of pickle, and is
automatically used by pickle internally if available; it need not be selected or used
directly. The shelve module inherits this optimization automatically by proxy. I haven’t
explained shelve yet, but I will now.
Shelve Files
Pickling allows you to store arbitrary objects on files and file-like objects, but it’s still
a fairly unstructured medium; it doesn’t directly support easy access to members of
collections of pickled objects. Higher-level structures can be added to pickling, but they
are not inherent:
• You can sometimes craft your own higher-level pickle file organizations with the
underlying filesystem (e.g., you can store each pickled object in a file whose name
uniquely identifies the object), but such an organization is not part of pickling itself
and must be manually managed.
• You can also store arbitrarily large dictionaries in a pickled file and index them by
key after they are loaded back into memory, but this will load and store the entire
dictionary all at once when unpickled and pickled, not just the entry you are in-
terested in.
Shelves provide structure for collections of pickled objects that removes some of these
constraints. They are a type of file that stores arbitrary Python objects by key for later
retrieval, and they are a standard part of the Python system. Really, they are not much
of a new topic—shelves are simply a combination of the DBM files and object pickling
we just met:
• To store an in-memory object by key, the shelve module first serializes the object
to a string with the pickle module, and then it stores that string in a DBM file by
key with the dbm module.
• To fetch an object back by key, the shelve module first loads the object’s serialized
string by key from a DBM file with the dbm module, and then converts it back to
the original in-memory object with the pickle module.
Because shelve uses pickle internally, it can store any object that pickle can: strings,
numbers, lists, dictionaries, cyclic objects, class instances, and more. Because shelve
uses dbm internally, it inherits all of that module’s capabilities, as well as its portability
constraints.
Shelve Files | 1315

Using Shelves
In other words, shelve is just a go-between; it serializes and deserializes objects so that
they can be placed in string-based DBM files. The net effect is that shelves let you store
nearly arbitrary Python objects on a file by key and fetch them back later with the
same key.
Your scripts never see all of this interfacing, though. Like DBM files, shelves provide
an interface that looks like a dictionary that must be opened. In fact, a shelve is simply
a persistent dictionary of persistent Python objects—the shelve dictionary’s content is
automatically mapped to a file on your computer so that it is retained between program
runs. This is quite a feat, but it’s simpler to your code than it may sound. To gain access
to a shelve, import the module and open your file:
import shelve
dbase = shelve.open("mydbase")
Internally, Python opens a DBM file with the name mydbase, or creates it if it does not
yet exist (it uses the DBM 'c' input/output open mode by default). Assigning to a shelve
key stores an object:
dbase['key'] = object # store object
Internally, this assignment converts the object to a serialized byte stream with pickling
and stores it by key on a DBM file. Indexing a shelve fetches a stored object:
value = dbase['key'] # fetch object
Internally, this index operation loads a string by key from a DBM file and unpickles it
into an in-memory object that is the same as the object originally stored. Most dic-
tionary operations are supported here, too:
len(dbase) # number of items stored
dbase.keys() # stored item key index iterable
And except for a few fine points, that’s really all there is to using a shelve. Shelves are
processed with normal Python dictionary syntax, so there is no new database API to
learn. Moreover, objects stored and fetched from shelves are normal Python objects;
they do not need to be instances of special classes or types to be stored away. That is,
Python’s persistence system is external to the persistent objects themselves.
Table 17-2 summarizes these and other commonly used shelve operations.
Table 17-2. Shelve file operations
Python code Action Description
import shelve Import Get bsddb, gdbm, and so on…whatever is installed
file=shelve.open('filename') Open Create or open an existing shelve’s DBM file
file['key'] = anyvalue Store Create or change the entry for key
value = file['key'] Fetch Load the value for the entry key
count = len(file) Size Return the number of entries stored
1316 | Chapter 17: Databases and Persistence
Python code Action Description
index = file.keys() Index Fetch the stored keys list (an iterable view)
found = 'key' in file Query See if there’s an entry for key
del file['key'] Delete Remove the entry for key
for key in file: Iterate Iterate over stored keys
file.close() Close Manual close, not always needed
Because shelves export a dictionary-like interface, too, this table is almost identical to
the DBM operation table. Here, though, the module name dbm is replaced by shelve,
open calls do not require a second c argument, and stored values can be nearly arbitrary
kinds of objects, not just strings. Keys are still strings, though (technically, keys are
always a str which is encoded to and from bytes automatically per UTF-8), and you
still should close shelves explicitly after making changes to be safe: shelves use dbm
internally, and some underlying DBMs require closes to avoid data loss or damage.
Recent changes: The shelve module now has an optional writeback ar-
gument; if passed True, all entries fetched are cached in memory, and
written back to disk automatically at close time. This obviates the need
to manually reassign changed mutable entries to flush them to disk, but
can perform poorly if many items are fetched—it may require a large
amount of memory for the cache, and it can make the close operation
slow since all fetched entries must be written back to disk (Python can-
not tell which of the objects may have been changed).
Besides allowing values to be arbitrary objects instead of just strings, in
Python 3.X the shelve interface differs from the DBM interface in two
subtler ways. First, the keys method returns an iterable view object (not
a physical list). Second, the values of keys are always str in your code,
not bytes—on fetches, stores, deletes, and other contexts, the str keys
you use are encoded to the bytes expected by DBM using the UTF-8
Unicode encoding. This means that unlike dbm, you cannot use bytes
for shelve keys in your code to employ arbitrary encodings.
Shelve keys are also decoded from bytes to str per UTF-8 whenever they
are returned from the shelve API (e.g., keys iteration). Stored values are
always the bytes object produced by the pickler to represent a serialized
object. We’ll see these behaviors in action in the examples of this
section.
Storing Built-in Object Types in Shelves
Let’s run an interactive session to experiment with shelve interfaces. As mentioned,
shelves are essentially just persistent dictionaries of objects, which you open and close:
C:\...\PP4E\Dbase> python
>>> import shelve
Shelve Files | 1317

>>> dbase = shelve.open("mydbase")
>>> object1 = ['The', 'bright', ('side', 'of'), ['life']]
>>> object2 = {'name': 'Brian', 'age': 33, 'motto': object1}
>>> dbase['brian'] = object2
>>> dbase['knight'] = {'name': 'Knight', 'motto': 'Ni!'}
>>> dbase.close()
Here, we open a shelve and store two fairly complex dictionary and list data structures
away permanently by simply assigning them to shelve keys. Because shelve uses
pickle internally, almost anything goes here—the trees of nested objects are automat-
ically serialized into strings for storage. To fetch them back, just reopen the shelve and
index:
C:\...\PP4E\Dbase> python
>>> import shelve
>>> dbase = shelve.open("mydbase")
>>> len(dbase) # entries
2
>>> dbase.keys() # index
KeysView(<shelve.DbfilenameShelf object at 0x0181F630>)
>>> list(dbase.keys())
['brian', 'knight']
>>> dbase['knight'] # fetch
{'motto': 'Ni!', 'name': 'Knight'}
>>> for row in dbase.keys(): # .keys() is optional
... print(row, '=>')
... for field in dbase[row].keys():
... print(' ', field, '=', dbase[row][field])
...
brian =>
motto = ['The', 'bright', ('side', 'of'), ['life']]
age = 33
name = Brian
knight =>
motto = Ni!
name = Knight
The nested loops at the end of this session step through nested dictionaries—the outer
scans the shelve and the inner scans the objects stored in the shelve (both could use
key iterators and omit their .keys() calls). The crucial point to notice is that we’re using
normal Python syntax, both to store and to fetch these persistent objects, as well as to
process them after loading. It’s persistent Python data on disk.
Storing Class Instances in Shelves
One of the more useful kinds of objects to store in a shelve is a class instance. Because
its attributes record state and its inherited methods define behavior, persistent class
1318 | Chapter 17: Databases and Persistence

objects effectively serve the roles of both database records and database-processing
programs. We can also use the underlying pickle module to serialize instances to flat
files and other file-like objects (e.g., network sockets), but the higher-level shelve mod-
ule also gives us a convenient keyed-access storage medium. For instance, consider the
simple class shown in Example 17-2, which is used to model people in a hypothetical
work scenario.
Example 17-2. PP4E\Dbase\person.py (version 1)
"a person object: fields + behavior"
class Person:
def __init__(self, name, job, pay=0):
self.name = name
self.job = job
self.pay = pay # real instance data
def tax(self):
return self.pay * 0.25 # computed on call
def info(self):
return self.name, self.job, self.pay, self.tax()
Nothing about this class suggests it will be used for database records—it can be im-
ported and used independent of external storage. It’s easy to use it for a database’s
records, though: we can make some persistent objects from this class by simply creating
instances as usual, and then storing them by key on an opened shelve:
C:\...\PP4E\Dbase> python
>>> from person import Person
>>> bob = Person('bob', 'psychologist', 70000)
>>> emily = Person('emily', 'teacher', 40000)
>>>
>>> import shelve
>>> dbase = shelve.open('cast') # make new shelve
>>> for obj in (bob, emily): # store objects
... dbase[obj.name] = obj # use name for key
...
>>> dbase.close() # need for bsddb
Here we used the instance objects’ name attribute as their key in the shelve database.
When we come back and fetch these objects in a later Python session or script, they
are re-created in memory exactly as they were when they were stored:
C:\...\PP4E\Dbase> python
>>> import shelve
>>> dbase = shelve.open('cast') # reopen shelve
>>>
>>> list(dbase.keys()) # both objects are here
['bob', 'emily']
>>> print(dbase['emily'])
<person.Person object at 0x0197EF70>
>>>
>>> print(dbase['bob'].tax()) # call: bob's tax
17500.0
Shelve Files | 1319

Notice that calling Bob’s tax method works even though we didn’t import the Person
class in this last session. Python is smart enough to link this object back to its original
class when unpickled, such that all the original methods are available through fetched
objects.
Changing Classes of Objects Stored in Shelves
Technically, Python reimports a class to re-create its stored instances as they are fetched
and unpickled. Here’s how this works:
Store
When Python pickles a class instance to store it in a shelve, it saves the instance’s
attributes plus a reference to the instance’s class. In effect, pickled class instances
in the prior example record the self attributes assigned in the class. Really, Python
serializes and stores the instance’s __dict__ attribute dictionary along with enough
source file information to be able to locate the class’s module later—the names of
the instance’s class as well as its class’s enclosing module.
Fetch
When Python unpickles a class instance fetched from a shelve, it re-creates the
instance object in memory by reimporting the class using the save class and module
name strings, assigning the saved attribute dictionary to a new empty instance, and
linking the instance back to the class. This is be default, and it can be tailored by
defining special methods that will be called by pickle to fetch and store instance
state (see the Python library manual for details).
The key point in this is that the class and stored instance data are separate. The class
itself is not stored with its instances, but is instead located in the Python source file and
reimported later when instances are fetched.
The downside of this model is that the class must be importable to load instances off
a shelve (more on this in a moment). The upside is that by modifying external classes
in module files, we can change the way stored objects’ data is interpreted and used
without actually having to change those stored objects. It’s as if the class is a program
that processes stored records.
To illustrate, suppose the Person class from the previous section was changed to the
source code in Example 17-3.
Example 17-3. PP4E\Dbase\person.py (version 2)
"""
a person object: fields + behavior
change: the tax method is now a computed attribute
"""
class Person:
def __init__(self, name, job, pay=0):
self.name = name
1320 | Chapter 17: Databases and Persistence

self.job = job
self.pay = pay # real instance data
def __getattr__(self, attr): # on person.attr
if attr == 'tax':
return self.pay * 0.30 # computed on access
else:
raise AttributeError() # other unknown names
def info(self):
return self.name, self.job, self.pay, self.tax
This revision has a new tax rate (30 percent), introduces a __getattr__ qualification
overload method, and deletes the original tax method. Because this new version of the
class is re-imported when its existing instances are loaded from the shelve file, they
acquire the new behavior automatically—their tax attribute references are now inter-
cepted and computed when accessed:
C:\...\PP4E\Dbase> python
>>> import shelve
>>> dbase = shelve.open('cast') # reopen shelve
>>>
>>> print(list(dbase.keys())) # both objects are here
['bob', 'emily']
>>> print(dbase['emily'])
<person.Person object at 0x019AEE90>
>>>
>>> print(dbase['bob'].tax) # no need to call tax()
21000.0
Because the class has changed, tax is now simply qualified, not called. In addition,
because the tax rate was changed in the class, Bob pays more this time around. Of
course, this example is artificial, but when used well, this separation of classes and
persistent instances can eliminate many traditional database update programs. In most
cases, you can simply change the class, not each stored instance, for new behavior.
Shelve Constraints
Although shelves are generally straightforward to use, there are a few rough edges worth
knowing about.
Keys must be strings (and str)
First, although they can store arbitrary objects, keys must still be strings. The following
fails, unless you convert the integer 42 to the string 42 manually first:
dbase[42] = value # fails, but str(42) will work
This is different from in-memory dictionaries, which allow any immutable object to be
used as a key, and derives from the shelve’s use of DBM files internally. As we’ve seen,
Shelve Files | 1321

keys must further be str strings in Python 3.X, not bytes, because the shelve will at-
tempt to encode them in all cases.
Objects are unique only within a key
Although the shelve module is smart enough to detect multiple occurrences of a nested
object and re-create only one copy when fetched, this holds true only within a given slot:
dbase[key] = [object, object] # OK: only one copy stored and fetched
dbase[key1] = object
dbase[key2] = object # bad?: two copies of object in the shelve
When key1 and key2 are fetched, they reference independent copies of the original
shared object; if that object is mutable, changes from one won’t be reflected in the
other. This really stems from the fact the each key assignment runs an independent
pickle operation—the pickler detects repeated objects but only within each pickle call.
This may or may not be a concern in your practice, and it can be avoided with extra
support logic, but an object can be duplicated if it spans keys.
Updates must treat shelves as fetch-modify-store mappings
Because objects fetched from a shelve don’t know that they came from a shelve, oper-
ations that change components of a fetched object change only the in-memory copy,
not the data on a shelve:
dbase[key].attr = value # shelve unchanged
To really change an object stored on a shelve, fetch it into memory, change its parts,
and then write it back to the shelve as a whole by key assignment:
object = dbase[key] # fetch it
object.attr = value # modify it
dbase[key] = object # store back-shelve changed (unless writeback)
As noted earlier, the shelve.open call’s optional writeback argument can be used to
avoid the last step here, by automatically caching objects fetched and writing them to
disk when the shelve is closed, but this can require substantial memory resources and
make close operations slow.
Concurrent updates are not directly supported
The shelve module does not currently support simultaneous updates. Simultaneous
readers are OK, but writers must be given exclusive access to the shelve. You can trash
a shelve if multiple processes write to it at the same time, which is a common potential
in things such as server-side scripts on the Web. If your shelves may be updated by
multiple processes, be sure to wrap updates in calls to the os.open standard library
function to lock files and provide exclusive access.
1322 | Chapter 17: Databases and Persistence

Underlying DBM format portability
With shelves, the files created by an underlying DBM system used to store your per-
sistent objects are not necessarily compatible with all possible DBM implementations
or Pythons. For instance, a file generated by gdbm on Linux, or by the bsddb library on
Windows, may not be readable by a Python with other DBM modules installed.
This is really the same portability issue we discussed for DBM files earlier. As you’ll
recall, when a DBM file (or by proxy, a shelve) is created, the dbm module tries to import
all possible DBM system modules in a predefined order and uses the first that it finds.
When dmb later opens an existing file, it attempts to determine which DBM system
created it by inspecting the files(s). Because the bsddb system is tried first at file creation
time and is available on both Windows and many Unix-like systems, your DBM file is
portable as long as your Pythons support BSD on both platforms. This is also true if all
platforms you’ll use fall back on Python’s own dbm.dumb implementation. If the system
used to create a DBM file is not available on the underlying platform, though, the DBM
file cannot be used.
If DBM file portability is a concern, make sure that all the Pythons that will read your
data use compatible DBM modules. If that is not an option, use the pickle module
directly and flat files for storage (thereby bypassing both shelve and dbm), or use the
OODB systems we’ll meet later in this chapter. Such systems may also offer a more
complete answer to transaction processing, with calls to commit changes, and automatic
rollback to prior commit points on errors.
Pickled Class Constraints
In addition to these shelve constraints, storing class instances in a shelve adds a set of
additional rules you need to be aware of. Really, these are imposed by the pickle mod-
ule, not by shelve, so be sure to follow these if you store class instance objects with
pickle directly too:
Classes must be importable
As we’ve seen, the Python pickler stores instance attributes only when pickling an
instance object, and it reimports the class later to re-create the instance. Because
of that, the classes of stored objects must be importable when objects are
unpickled—they must be coded unnested at the top level of a module file that is
accessible on the module import search path at load time (e.g., named in PYTHON
PATH or in a .pth file, or the current working directory or that of the top-level script).
Further, the class usually must be associated with a real imported module when
instances are pickled, not with a top-level script (with the module name
__main__), unless they will only ever be used in the top-level script. You also need
to be careful about moving class modules after instances are stored. When an in-
stance is unpickled, Python must find its class’s module on the module search using
the original module name (including any package path prefixes) and fetch the class
Shelve Files | 1323

from that module using the original class name. If the module or class has been
moved or renamed, it might not be found.
In applications where pickled objects are shipped over network sockets, it’s pos-
sible to satisfy this constraint by shipping the text of the class along with stored
instances; recipients may simply store the class in a local module file on the import
search path prior to unpickling received instances. Where this is inconvenient or
impossible, simpler pickled objects such as lists and dictionaries with nesting may
be transferred instead, as they require no source file to be reconstructed.
Class changes must be backward compatible
Although Python lets you change a class while instances of it are stored on a shelve,
those changes must be backward compatible with the objects already stored. For
instance, you cannot change the class to expect an attribute not associated with
already stored persistent instances unless you first manually update those stored
instances or provide extra conversion protocols on the class.
Other pickle module constraints
Shelves also inherit the pickling systems’ nonclass limitations. As discussed earlier,
some types of objects (e.g., open files and sockets) cannot be pickled, and thus
cannot be stored in a shelve.
In an early Python release, persistent object classes also had to either use constructors
with no arguments or provide defaults for all constructor arguments (much like the
notion of a C++ copy constructor). This constraint was dropped as of Python 1.5.2—
classes with nondefaulted constructor arguments now work as is in the pickling system.*
Other Shelve Limitations
Finally, although shelves store objects persistently, they are not really object-oriented
database systems. Such systems also implement features such as immediate automatic
write-through on changes, transaction commits and rollbacks, safe concurrent updates,
and object decomposition and delayed (“lazy”) component fetches based on generated
object IDs. Parts of larger objects may be loaded into memory only as they are accessed.
It’s possible to extend shelves to support such features manually, but you don’t need
to—the ZODB system, among others, provides an implementation of a more complete
object-oriented database system. It is constructed on top of Python’s built-in pickling
* Interestingly, Python avoids calling the class to re-create a pickled instance and instead simply makes a class
object generically, inserts instance attributes, and sets the instance’s __class__ pointer to the original class
directly. This avoids the need for defaults, but it also means that the class __init__ constructors that are no
longer called as objects are unpickled, unless you provide extra methods to force the call. See the library
manual for more details, and see the pickle module’s source code (pickle.py in the source library) if you’re
curious about how this works. Or see the PyForm example later in this chapter—it does something very
similar with __class__ links to build an instance object from a class and dictionary of attributes, without
calling the class’s __init__ constructor. This makes constructor argument defaults unnecessary in classes
used for records browsed by PyForm, but it’s the same idea.
1324 | Chapter 17: Databases and Persistence

persistence support, but it offers additional features for advanced data stores. For more
on ZODB, let’s move on to the next section.
The ZODB Object-Oriented Database
ZODB, the Zope Object Database, is a full-featured and Python-specific object-oriented
database (OODB) system. ZODB can be thought of as a more powerful alternative to
Python’s shelves of the preceding section. It allows you to store nearly arbitrary Python
objects persistently by key, like shelves, but it adds a set of additional features in ex-
change for a small amount of extra interface code.
ZODB is not the only OODB available for Python: the Durus system is generally seen
as a simpler OODB which was inspired by ZODB. While Durus offers some advantages,
it does not provide all the features of ZODB today, and it has not been as widely de-
ployed (though perhaps in part because it is newer). Because of that, this section focuses
on ZODB to introduce OODB concepts in general.
ZODB is an open source, third-party add-on for Python. It was originally developed as
the database mechanism for websites developed with the Zope web framework men-
tioned in Chapter 12, but it is now available as a standalone package. It’s useful outside
the context of both Zope and the Web as a general database management system in
any domain.
Although ZODB does not support SQL queries, objects stored in ZODB can leverage
the full power of the Python language. Moreover, in some applications, stored data is
more naturally represented as a structured Python object. Table-based relational sys-
tems often must represent such data as individual parts scattered across multiple tables
and associate them with complex and potentially slow key-based joins, or otherwise
map them to and from the Python class model. Because OODBs store native Python
objects directly, they can often provide a simpler model in systems which do not require
the full power of SQL.
Using a ZODB database is very similar to Python’s standard library shelves, described
in the prior section. Just like shelves, ZODB uses the Python pickling system to imple-
ment a persistent dictionary of persistent Python objects. In fact, there is almost no
database interface to be found—objects are made persistent simply by assigning them
to keys of the root ZODB dictionary object, or embedding them in objects stored in
the database root. And as in a shelve, “records” take the form of native Python objects,
processed with normal Python syntax and tools.
Unlike shelves, though, ZODB adds features critical to some types of programs:
Concurrent updates
You don’t need to manually lock files to avoid data corruption if there are poten-
tially many concurrent writers, the way you would for shelves.
The ZODB Object-Oriented Database | 1325

Transaction commit and rollback
If your program crashes, your changes are not retained unless you explicitly commit
them to the database.
Automatic updates for some types of in-memory object changes
Objects in ZODB derived from a persistence superclass are smart enough to know
the database must be updated when an attribute is assigned.
Automatic caching of objects
Objects are cached in memory for efficiency and are automatically removed from
the cache when they haven’t been used.
Platform-independent storage
Because ZODB stores your database in a single flat file with large-file support, it is
immune to the potential size constraints and DBM filesystem format differences
of shelves. As we saw earlier in this chapter, a shelve created on Windows using
bsddb may not be accessible to a script running with gdbm on Linux.
Because of such advantages, ZODB is probably worth your attention if you need to
store Python objects in a database persistently in a production environment. The only
significant price you’ll pay for using ZODB is a small amount of extra code:
• Accessing the database requires a small amount of extra boilerplate code to inter-
face with ZODB—it’s not a simple open call.
• Classes are derived from a persistence superclass if you want them to take advant-
age of automatic updates on changes—persistent classes are generally not as
completely independent of the database as in shelves, though they can be.
Considering the extra functionality ZODB provides beyond shelves, these trade-offs
are usually more than justified for many applications.
The Mostly Missing ZODB Tutorial
Unfortunately, as I write this edition in June 2010, ZODB is not yet available for Python
3.X, the version used in this book. Because of that, the prior edition’s Python 2.X ex-
amples and material have been removed from this section. However, in deference to
Python 2.X users, as well as 3.X readers of some bright future where a 3.X-base ZODB
has materialized, I’ve made the prior edition’s ZODB materials and examples available
in this edition’s examples package.
See the Preface for details on the examples package, and see these locations within it
for more on ZODB:
C:\...\Dbase\Zodb-2.x # ZODB examples code third edition
C:\...\Dbase\Zodb-2.x\Documentaion # The 3rd Edition's ZODB tutorial
Although I cannot predict the future, ZODB will likely become available for Python
3.X eventually. In the absence of this, other Python-based OODBs may offer additional
3.X options.
1326 | Chapter 17: Databases and Persistence

To give you a brief sample of ZODB’s flavor, though, here’s a quick spin through its
operation in Python 2.X. Once we’ve installed a compatible ZODB, we begin by first
creating a database:
...\PP4E\Dbase\Zodb-2.x> python
>>> from ZODB import FileStorage, DB
>>> storage = FileStorage.FileStorage(r'C:\temp\mydb.fs')
>>> db = DB(storage)
>>> connection = db.open()
>>> root = connection.root()
This is mostly standard “boilerplate” code for connecting to a ZODB database: we
import its tools, create a FileStorage and a DB from it, and then open the database and
create the root object. The root object is the persistent dictionary in which objects are
stored. FileStorage is an object that maps the database to a flat file. Other storage
interface options, such as relational database-based storage, are also possible.
Adding objects to a ZODB database is as simple as in shelves. Almost any Python object
will do, including tuples, lists, dictionaries, class instances, and nested combinations
thereof. As for shelve, simply assign your objects to a key in the database root object
to make them persistent:
>>> object1 = (1, 'spam', 4, 'YOU')
>>> object2 = [[1, 2, 3], [4, 5, 6], [7, 8, 9]]
>>> object3 = {'name': ['Bob', 'Doe'],
'age': 42,
'job': ('dev', 'mgr')}
>>> root['mystr'] = 'spam' * 3
>>> root['mytuple'] = object1
>>> root['mylist'] = object2
>>> root['mydict'] = object3
>>> root['mylist']
[[1, 2, 3], [4, 5, 6], [7, 8, 9]]
Because ZODB supports transaction rollbacks, you must commit your changes to the
database to make them permanent. Ultimately, this transfers the pickled representation
of your objects to the underlying file storage medium—here, three files that include the
name of the file we gave when opening:
>>> import transaction
>>> transaction.commit()
>>> storage.close()
...\PP4E\Dbase\Zodb-2.x> dir /B c:\temp\mydb*
mydb.fs
mydb.fs.index
mydb.fs.tmp
Without the final commit in this session, none of the changes we made would be saved.
This is what we want in general—if a program aborts in the middle of an update task,
The ZODB Object-Oriented Database | 1327

none of the partially complete work it has done is retained. In fact, ZODB supports
general database undo operations.
Pulling persistent objects back from ZODB in another session or program is just as
straightforward: reopen the database as before and index the root to fetch objects back
into memory. Like shelves, the database root supports dictionary interfaces—it may
be indexed, has dictionary methods and a length, and so on:
...\PP4E\Dbase\Zodb-2.x> python
>>> from ZODB import FileStorage, DB
>>> storage = FileStorage.FileStorage(r'C:\temp\mydb.fs')
>>> db = DB(storage)
>>> connection = db.open()
>>> root = connection.root() # connect
>>> len(root), root.keys() # size, index
(4 ['mylist', 'mystr', 'mytuple', 'mydict'])
>>> root['mylist'] # fetch objects
[[1, 2, 3], [4, 5, 6], [7, 8, 9]]
>>> root['mydict']
{'job': ('dev', 'mgr'), 'age': 42, 'name': ['Bob', 'Doe']}
>>> root['mydict']['name'][-1] # Bob's last name
'Doe'
Because the database root looks just like a dictionary, we can process it with normal
dictionary code—stepping through the keys list to scan record by record, for instance:
>>> for key in root.keys():
print('%s => %s' % (key.ljust(10), root[key]))
mylist => [[1, 2, 3], [4, 5, 6], [7, 8, 9]]
mystr => spamspamspam
mytuple => (1, 'spam', 4, 'YOU')
mydict => {'job': ('dev', 'mgr'), 'age': 42, 'name': ['Bob', 'Doe']}
Also like pickling and shelves, ZODB supports storage and retrieval of class instance
objects, though they must inherit from a superclass which provides required protocol
and intercepts attribute changes in order to flush them to disk automatically:
from persistent import Persistent
class Person(Persistent):
def __init__(self, name, job=None, rate=0):
self.name = name
self.job = job
self.rate = rate
def changeRate(self, newrate):
self.rate = newrate # automatically updates database
When changing ZODB persistent class instances, in-memory attribute changes are
automatically written back to the database. Other types of changes, such as in-place
appends and key assignments, still require reassignment to the original key as in shelves
1328 | Chapter 17: Databases and Persistence

to force the change to be written to disk (built-in list and dictionary objects do not
know that they are persistent).
Because ZODB does not yet work with Python 3.X, that’s as much as we can say about
it in this book. For more details, search for ZODB and Zope resources on the Web, and
see the examples package resources listed earlier. Here, let’s move on to see how Python
programs can make use of a very different sort of database interface—relational data-
bases and SQL.
SQL Database Interfaces
The shelve module and ZODB package of the prior sections are powerful tools. Both
allow scripts to throw nearly arbitrary Python objects on a keyed-access file and load
them back later—in a single step for shelves and with a small amount of administrative
code for ZODB. Especially for applications that record highly structured data, object
databases can be convenient and efficient—there is no need to split and later join to-
gether the parts of large objects, and stored data is processed with normal Python syntax
because it is normal Python objects.
Shelves and ZODB aren’t relational database systems, though; objects (records) are
accessed with a single key, and there is no notion of SQL queries. Shelves, for instance,
are essentially databases with a single index and no other query-processing support.
Although it’s possible to build a multiple-index interface to store data with multiple
shelves, it’s not a trivial task and requires manually coded extensions.
ZODB supports some types of searching beyond shelve (e.g., its cataloging feature),
and persistent objects may be traversed with all the power of the Python language.
However, neither shelves nor ZODB object-oriented databases provide the full gener-
ality of SQL queries. Moreover, especially for data that has a naturally tabular structure,
relational databases may sometimes be a better fit.
For programs that can benefit from the power of SQL, Python also broadly supports
relational database management systems (RDBMSs). Relational databases are not nec-
essarily mutually exclusive with the object persistence topics we studied earlier in this
chapter—it is possible, for example, to store the serialized string representation of a
Python object produced by pickling in a relational database. ZODB also supports the
notion of mapping an object database to a relational storage medium.
The databases we’ll meet in this section, though, are structured and processed in very
different ways:
• They store data in related tables of columns (rather than in persistent dictionaries
of arbitrarily structured persistent Python objects).
• They support the SQL query language for accessing data and exploiting relation-
ships among it (instead of Python object traversals).
SQL Database Interfaces | 1329

For some applications, the end result can be a potent combination. Moreover, some
SQL-based database systems provide industrial-strength persistence support for
enterprise-level data.
Today, there are freely available interfaces that let Python scripts utilize all common
relational database systems, both free and commercial: MySQL, Oracle, Sybase, In-
formix, InterBase, PostgreSQL (Postgres), SQLite, ODBC, and more. In addition, the
Python community has defined a database API specification that works portably with
a variety of underlying database packages. Scripts written for this API can be migrated
to different database vendor packages, with minimal or no source code changes.
As of Python 2.5, Python itself includes built-in support for the SQLite relational da-
tabase system as part of its standard library. Because this system supports the portable
database API, it serves as a tool for both program storage and prototyping—systems
developed with SQLite work largely unchanged when a more feature-rich database such
as MySQL or Oracle is deployed.
Moreover, the popular SQLObject and SQLAlchemy third-party systems both provide
an Object Relational Mapper (ORM), which grafts an object interface onto your data-
base, in which tables are modeled by as Python classes, rows by instances of those
classes, and columns by instance attributes. Since ORMs largely just wrap SQL data-
bases in Python classes, we’ll defer their coverage until later in this chapter; for now,
let’s explore SQL basics in Python.
SQL Interface Overview
Like ZODB, and unlike the pickle and shelve persistence modules presented earlier,
most SQL databases are optional extensions that are not part of Python itself. SQLite
is the only relational database package that comes with Python. Moreover, you need
to know SQL to fully understand their interfaces. Because we don’t have space to teach
SQL in this text, this section gives a brief overview of the API; please consult other SQL
references and the database API resources mentioned in the next section for more de-
tails that we’ll skip here.
The good news is that you can access SQL databases from Python, through a straight-
forward and portable model. The Python database API specification defines an interface
for communicating with underlying database systems from Python scripts. Vendor-
specific database interfaces for Python may or may not conform to this API completely,
but all database extensions for Python in common use are minor variations on a theme.
Under the database API, SQL databases in Python are grounded on three core
concepts:
Connection objects
Represent a connection to a database, are the interface to rollback and commit
operations, provide package implementation details, and generate cursor objects.
1330 | Chapter 17: Databases and Persistence

Cursor objects
Represent an SQL statement submitted as a string and can be used to access and
step through SQL statement results.
Query results of SQL select statements
Are returned to scripts as Python sequences of sequences (e.g., a list of tuples),
representing database tables of rows. Within these row sequences, column field
values are normal Python objects such as strings, integers, and floats (e.g., [('bob',
48), ('emily',47)]). Column values may also be special types that encapsulate
things such as date and time, and database NULL values are returned as the Python
None object.
Beyond this, the API defines a standard set of database exception types, special database
type object constructors, and informational top-level calls including thread safety and
replacement style checks.
For instance, to establish a database connection under the Python API-compliant Ora-
cle interface, install the commonly used Python Oracle extension module as well as
Oracle itself, and then run a statement of this form:
connobj = connect("user/password@system")
This call’s arguments may vary per database and vendor (e.g., some may require net-
work details or a local file’s name), but they generally contain what you provide to log
in to your database system. Once you have a connection object, there a variety of things
you can do with it, including:
connobj.close() close connection now (not at object __del__ time)
connobj.commit() commit any pending transactions to the database
connobj.rollback() roll database back to start of pending transactions
But one of the most useful things to do with a connection object is to generate a cursor
object:
cursobj = connobj.cursor() return a new cursor object for running SQL
Cursor objects have a set of methods, too (e.g., close to close the cursor before its
destructor runs, and callproc to call a stored procedure), but the most important may
be this one:
cursobj.execute(sqlstring [, parameters]) run SQL query or command string
Parameters are passed in as a sequence or mapping of values, and are substituted into
the SQL statement string according to the interface module’s replacement target con-
ventions. The execute method can be used to run a variety of SQL statement strings:
• DDL definition statements (e.g., CREATE TABLE)
• DML modification statements (e.g., UPDATE or INSERT)
• DQL query statements (e.g., SELECT)
SQL Database Interfaces | 1331

After running an SQL statement, the cursor’s rowcount attribute gives the number of
rows changed (for DML changes) or fetched (for DQL queries), and the cursor’s
description attribute gives column names and types after a query; execute also returns
the number of rows affected or fetched in the most vendor interfaces. For DQL query
statements, you must call one of the fetch methods to complete the operation:
tuple = cursobj.fetchone() fetch next row of a query result
listoftuple = cursobj.fetchmany([size]) fetch next set of rows of query result
listoftuple = cursobj.fetchall() fetch all remaining rows of the result
And once you’ve received fetch method results, table information is processed using
normal Python sequence operations; for example, you can step through the tuples in
a fetchall result list with a simple for loop or comprehension expression. Most Python
database interfaces also allow you to provide values to be passed to SQL statement
strings, by providing targets and a tuple of parameters. For instance:
query = 'SELECT name, shoesize FROM spam WHERE job = ? AND age = ?'
cursobj.execute(query, (value1, value2))
results = cursobj.fetchall()
for row in results: ...
In this event, the database interface utilizes prepared statements (an optimization and
convenience) and correctly passes the parameters to the database regardless of their
Python types. The notation used to code targets in the query string may vary in some
database interfaces (e.g., :p1 and :p2 or two %s, rather than the two ?s used by the
Oracle interface); in any event, this is not the same as Python’s % string formatting
operator, as it sidesteps security issues along the way.
Finally, if your database supports stored procedures, you can call them with the call
proc method or by passing an SQL CALL or EXEC statement string to the execute method.
callproc may generate a result table retrieved with a fetch variant, and returns a modi-
fied copy of the input sequence—input parameters are left untouched, and output and
input/output parameters are replaced with possibly new values. Additional API fea-
tures, including support for database blobs (roughly, with sized results), is described
in the API’s documentation. For now, let’s move on to do some real SQL processing
in Python.
An SQL Database API Tutorial with SQLite
We don’t have space to provide an exhaustive reference for the database API in this
book. To sample the flavor of the interface, though, let’s step through a few simple
examples. We’ll use the SQLite database system for this tutorial. SQLite is a standard
part of Python itself, which you can reasonably expect to be available in all Python
installations. Although SQLite implements a complete relational database system, it
takes the form of an in-process library instead of a server. This generally makes it better
suited for program storage than for enterprise-level data needs.
1332 | Chapter 17: Databases and Persistence

Thanks to Python’s portable database API, though, other popular database packages
such as PostgreSQL, MySQL, and Oracle are used almost identically; the initial call to
log in to the database will be all that normally requires different argument values for
scripts that use standard SQL code. Because of this, we can use the SQLite system both
as a prototyping tool in applications development and as an easy way to get started
with the Python SQL database API in this book.
As mentioned earlier, the third edition’s coverage of MySQL had to be
replaced here because the interface used is not yet ported to Python 3.X.
However, the third edition’s MySQL-based examples and overview are
available in the book examples package, in directory C:\...\PP4E\Dbase
\Sql\MySql-2.X, and its Documentation subdirectory. The examples are
in Python 2.X form, but their database-related code is largely version
neutral. Since that code is also largely database neutral, it is probably of
limited value to most readers; the scripts listed in this book should work
on other database packages like MySQL with only trivial changes.
Getting started
Regardless of which database system your scripts talk to, the basic SQL interface in
Python is very simple. In fact, it’s hardly object-oriented at all—queries and other da-
tabase commands are sent as strings of SQL. If you know SQL, you already have most
of what you need to use relational databases in Python. That’s good news if you fall
into this category, but adds a prerequisite if you don’t.
This isn’t a book on the SQL language, so we’ll defer to other resources for details on
the commands we’ll be running here (O’Reilly has a suite of books on the topic). In
fact, the databases we’ll use are tiny, and the commands we’ll use are deliberately simple
as SQL goes—you’ll want to extrapolate from what you see here to the more realistic
tasks you face. This section is just a brief look at how to use the Python language in
conjunction with an SQL database.
Whether large or small, though, the Python code needed to process your database turns
out to be surprisingly straightforward. To get started, the first thing we need to do is
open a connection to the database and create a table for storing records:
C:\...\PP4E\Dbase\Sql> python
>>> import sqlite3
>>> conn = sqlite3.connect('dbase1') # use a full path for files elsewhere
We start out by importing the Python SQLite interface here—it’s a standard library
module called sqlite3 to our scripts. Next we create a connection object, passing in
the items our database requires at start-up time—here, the name of the local file where
our databases will be stored. This file is what you’ll want to back up to save your
database. It will create the file if needed, or open its current content; SQLite also accepts
that special string “:memory:” to create a temporary database in memory instead.
SQL Database Interfaces | 1333

As long as a script sticks to using standard SQL code, the connect call’s arguments are
usually the only thing that can vary across different database systems. For example, in
the MySQL interface this call accepts a network host’s domain name, user name, and
password, passed as keyword arguments instead, and the Oracle example sketched
earlier expects a more specific sting syntax. Once we’ve gotten past this platform-
specific call, though, the rest of the API is largely database neutral.
Making databases and tables
Next, let’s make a cursor for submitting SQL statements to the database server, and
submit one to create a first table:
>>> curs = conn.cursor()
>>>>
>>> tblcmd = 'create table people (name char(30), job char(10), pay int(4))'
>>> curs.execute(tblcmd)
The last command here creates the table called “people” within the database; the name,
job, and pay information specifies the columns in this table, as well as their datatypes,
using a “type(size)” syntax—two strings and an integer. Datatypes can be more so-
phisticated than ours, but we’ll ignore such details here (see SQL references). In SQLite,
the file is the database, so there’s no notion of creating or using a specific database
within it, as there is in some systems. At this point, there is a simple flat file in the
current working directory named data1, which contains binary data and contains our
people database table.
Adding records
So far, we’ve logged in (which just means opening a local file in SQLite) and created a
table. Next let’s start a new Python session and create some records. There are three
basic statement-based approaches we can use here: inserting one row at a time or in-
serting multiple rows with a single call statement or a Python loop. Here is the simple
case (I’m omitting some call return values here if they are irrelevant to the story):
C:\...\PP4E\Dbase\Sql> python
>>> import sqlite3
>>> conn = sqlite3.connect('dbase1')
>>> curs = conn.cursor()
>>> curs.execute('insert into people values (?, ?, ?)', ('Bob', 'dev', 5000))
>>> curs.rowcount
1
>>> sqlite3.paramstyle
'qmark'
Create a cursor object to submit SQL statements to the database server as before. The
SQL insert command adds a single row to the table. After an execute call, the cursor’s
rowcount attribute gives the number of rows produced or affected by the last statement
run. This is also available as the return value of an execute call in some database inter-
face modules, but this is not defined in the database API specification, and isn’t
1334 | Chapter 17: Databases and Persistence

provided in SQLite; in other words, don’t depend on it if you want your database scripts
to work on other database systems.
Parameters to substitute into the SQL statement string are generally passed in as a
sequence (e.g., list or tuple). Notice the module’s paramstyle—this tells us what style
it uses for substitution targets in the statement string. Here, qmark means this module
accepts ? for replacement targets. Other database modules might use styles such as
format (meaning a %s target), or numeric indexes or mapping keys; see the DB API for
more details.
To insert multiple rows with a single statement, use the executemany method and a
sequence of row sequences (e.g., a list of lists). This call is like calling execute once for
each row sequence in the argument, and in fact may be implemented as such; database
interfaces may also use database-specific techniques to make this run quicker, though:
>>> curs.executemany('insert into people values (?, ?, ?)',
... [ ('Sue', 'mus', '70000'),
... ('Ann', 'mus', '60000')])
>>> curs.rowcount
2
We inserted two rows at once in the last statement. It’s hardly any more work to achieve
the same result by inserting one row at a time with a Python loop:
>>> rows = [['Tom', 'mgr', 100000],
... ['Kim', 'adm', 30000],
... ['pat', 'dev', 90000]]
>>> for row in rows:
... curs.execute('insert into people values (? , ?, ?)', row)
...
>>> conn.commit()
Blending Python and SQL like this starts to open up all sorts of interesting possibilities.
Notice the last command; we always need to call the connection’s commit method to
write our changes out to the database. Otherwise, when the connection is closed, our
changes may be lost. In fact, until we call the commit method, none of our inserts may
be visible from other database connections.
Technically, the API suggests that a connection object should automatically call its
rollback method to back out changes that have not yet been committed, when it is
closed (which happens manually when its close method is called, or automatically
when the connection object is about to be garbage collected). For database systems
that don’t support transaction commit and rollback operations, these calls may do
nothing. SQLite implements both the commit and rollback methods; the latter rolls
back any changes made since the last commit.
SQL Database Interfaces | 1335

Running queries
OK, we’ve now added six records to our database table. Let’s run an SQL query to see
how we did:
>>> curs.execute('select * from people')
>>> curs.fetchall()
[('Bob', 'dev', 5000), ('Sue', 'mus', 70000), ('Ann', 'mus', 60000), ('Tom', 'mgr',
100000), ('Kim', 'adm', 30000), ('pat', 'dev', 90000)]
Run an SQL select statement with a cursor object to grab all rows and call the cursor’s
fetchall to retrieve them. They come back to our script as a sequence of sequences. In
this module, it’s a list of tuples—the outer list represents the result table, the nested
tuples are that table’s rows, and the nested tuple’s contents are the column data. Be-
cause it’s all Python data, once we get the query result, we process it with normal Python
code. For example, to make the display a bit more coherent, loop through the query’s
result as usual:
>>> curs.execute('select * from people')
>>> for row in curs.fetchall():
... print(row)
...
('Bob', 'dev', 5000)
('Sue', 'mus', 70000)
('Ann', 'mus', 60000)
('Tom', 'mgr', 100000)
('Kim', 'adm', 30000)
('pat', 'dev', 90000)
Tuple unpacking comes in handy in loops here, too, to pick out column values as we
go. Here’s a simple formatted display of two of the columns’ values:
>>> curs.execute('select * from people')
>>> for (name, job, pay) in curs.fetchall():
... print(name, ':', pay)
...
Bob : 5000
Sue : 70000
Ann : 60000
Tom : 100000
Kim : 30000
pat : 90000
Because the query result is a sequence, we can use Python’s powerful sequence and
iteration tools to process it. For instance, to select just the name column values, we can
run a more specific SQL query and get a list of tuples:
>>> curs.execute('select name from people')
>>> names = curs.fetchall()
>>> names
[('Bob',), ('Sue',), ('Ann',), ('Tom',), ('Kim',), ('pat',)]
Or we can use a Python list comprehension to pick out the fields we want—by using
Python code, we have more control over the data’s content and format:
1336 | Chapter 17: Databases and Persistence

>>> curs.execute('select * from people')
>>> names = [rec[0] for rec in curs.fetchall()]
>>> names
['Bob', 'Sue', 'Ann', 'Tom', 'Kim', 'pat']
The fetchall call we’ve used so far fetches the entire query result table all at once, as
a single sequence (an empty sequence comes back, if the result is empty). That’s con-
venient, but it may be slow enough to block the caller temporarily for large result tables
or generate substantial network traffic if the server is running remotely (something
could easily require a parallel thread in GUI). To avoid such a bottleneck, we can also
grab just one row, or a bunch of rows, at a time with fetchone and fetchmany. The
fetchone call returns the next result row or a None false value at the end of the table:
>>> curs.execute('select * from people')
>>> while True:
... row = curs.fetchone()
... if not row: break
... print(row)
...
('Bob', 'dev', 5000)
('Sue', 'mus', 70000)
('Ann', 'mus', 60000)
('Tom', 'mgr', 100000)
('Kim', 'adm', 30000)
('pat', 'dev', 90000)
The fetchmany call returns a sequence of rows from the result, but not the entire table;
you can specify how many rows to grab each time with a parameter or rely on the default
as given by the cursor’s arraysize attribute. Each call gets at most that many more rows
from the result or an empty sequence at the end of the table:
>>> curs.execute('select * from people')
>>> while True:
... rows = curs.fetchmany() # size=N optional argument
... if not rows: break
... for row in rows:
... print(row)
...
('Bob', 'dev', 5000)
('Sue', 'mus', 70000)
('Ann', 'mus', 60000)
('Tom', 'mgr', 100000)
('Kim', 'adm', 30000)
('pat', 'dev', 90000)
For this module at least, the result table is exhausted after a fetchone or fetchmany
returns a False value. The DB API says that fetchall returns “all (remaining) rows,”
so you generally need to call execute again to regenerate results before fetching
new data:
>>> curs.fetchone()
>>> curs.fetchmany()
[]
SQL Database Interfaces | 1337

>>> curs.fetchall()
[]
Naturally, we can do more than fetch an entire table; the full power of the SQL language
is at your disposal in Python:
>>> curs.execute('select name, job from people where pay > 60000')
>>> curs.fetchall()
[('Sue', 'mus'), ('Tom', 'mgr'), ('pat', 'dev')]
The last query fetches name and job fields for people who earn more than $60,000. The
next is similar, but passes in the selection value as a parameter and orders the result
table:
>>> query = 'select name, job from people where pay >= ? order by name'
>>> curs.execute(query, [60000])
>>> for row in curs.fetchall(): print(row)
...
('Ann', 'mus')
('Sue', 'mus')
('Tom', 'mgr')
('pat', 'dev')
Running updates
Cursor objects also are used to submit SQL update statements to the database server—
updates, deletes, and inserts. We’ve already seen the insert statement at work. Let’s
start a new session to perform some other kinds of updates; we begin with the same
data we had in the prior session:
C:\...\PP4E\Dbase\Sql> python
>>> import sqlite3
>>> conn = sqlite3.connect('dbase1')
>>> curs = conn.cursor()
>>> curs.execute('select * from people')
>>> curs.fetchall()
[('Bob', 'dev', 5000), ('Sue', 'mus', 70000), ('Ann', 'mus', 60000), ('Tom', 'mgr',
100000), ('Kim', 'adm', 30000), ('pat', 'dev', 90000)]
The SQL update statement changes records—the following changes three records’ pay
column values to 65000 (Bob, Ann, and Kim), because their pay was no more than
$60,000. As usual, the cursor’s rowcount gives the number of records changed:
>>> curs.execute('update people set pay=? where pay <= ?', [65000, 60000])
>>> curs.rowcount
3
>>> curs.execute('select * from people')
>>> curs.fetchall()
[('Bob', 'dev', 65000), ('Sue', 'mus', 70000), ('Ann', 'mus', 65000), ('Tom', 'mgr',
100000), ('Kim', 'adm', 65000), ('pat', 'dev', 90000)]
The SQL delete statement removes records, optionally according to a condition (to
delete all records, omit the condition). In the following, we delete Bob’s record, as well
as any record with a pay that is at least $90,000:
1338 | Chapter 17: Databases and Persistence

>>> curs.execute('delete from people where name = ?', ['Bob'])
>>> curs.execute('delete from people where pay >= ?',(90000,))
>>> curs.execute('select * from people')
>>> curs.fetchall()
[('Sue', 'mus', 70000), ('Ann', 'mus', 65000), ('Kim', 'adm', 65000)]
>>> conn.commit()
Finally, remember to commit your changes to the database before exiting Python, as-
suming you wish to keep them. Without a commit, a connection rollback or close call,
as well as the connection’s __del__ deletion method, will back out uncommitted
changes. Connection objects are automatically closed if they are still open when they
are garbage collected, which in turn triggers a __del__ and a rollback; garbage collection
happens automatically on program exit, if not sooner.
Building Record Dictionaries
Now that we’ve seen the basics in action, let’s move on and apply them to a few larger
tasks. The SQL API defines query results to be sequences of sequences. One of the more
common features that people seem to miss from the API is the ability to get records
back as something more structured—a dictionary or class instance, for example, with
keys or attributes giving column names. The ORMs we’ll meet at the end of this chapter
map to class instances, but because this is Python, it’s easy to code this kind of trans-
formation in other ways. Moreover, the API already gives us the tools we need.
Using table descriptions
For example, after a query execute call, the DB API specifies that the cursor’s
description attribute gives the names and (for some databases) types of the columns
in the result table. To see how, let’s continue with the database in the state in which
we left it in the prior section:
>>> curs.execute('select * from people')
>>> curs.description
(('name', None, None, None, None, None, None), ('job', None, None, None, None, None,
None), ('pay', None, None, None, None, None, None))
>>> curs.fetchall()
[('Sue', 'mus', 70000), ('Ann', 'mus', 65000), ('Kim', 'adm', 65000)]
Formally, the description is a sequence of column-description sequences, each of the
following form. See the DB API for more on the meaning of the type code slot—it maps
to objects at the top level of the database interface module, but the sqlite3 module
implements only the name component:
(name, type_code, display_size, internal_size, precision, scale, null_ok)
Now, we can use this metadata anytime we want to label the columns—for instance,
in a formatted records display (be sure to regenerate a query result first, since the prior
result has been fetched):
SQL Database Interfaces | 1339

>>> curs.execute('select * from people')
>>> colnames = [desc[0] for desc in curs.description]
>>> colnames
['name', 'job', 'pay']
>>> for row in curs.fetchall():
... for name, value in zip(colnames, row):
... print(name, '\t=>', value)
... print()
...
name => Sue
job => mus
pay => 70000
name => Ann
job => mus
pay => 65000
name => Kim
job => adm
pay => 65000
Notice how a tab character is used to try to make this output align; a better approach
might be to determine the maximum field name length (we’ll see how in a later
example).
Record dictionaries construction
It’s a minor extension of our formatted display code to create a dictionary for each
record, with field names for keys—we just need to fill in the dictionary as we go:
>>> curs.execute('select * from people')
>>> colnames = [desc[0] for desc in curs.description]
>>> rowdicts = []
>>> for row in curs.fetchall():
... newdict = {}
... for name, val in zip(colnames, row):
... newdict[name] = val
... rowdicts.append(newdict)
...
>>> for row in rowdicts: print(row)
...
{'pay': 70000, 'job': 'mus', 'name': 'Sue'}
{'pay': 65000, 'job': 'mus', 'name': 'Ann'}
{'pay': 65000, 'job': 'adm', 'name': 'Kim'}
Because this is Python, though, there are more powerful ways to build up these record
dictionaries. For instance, the dictionary constructor call accepts the zipped name/
value pairs to fill out the dictionaries for us:
>>> curs.execute('select * from people')
>>> colnames = [desc[0] for desc in curs.description]
>>> rowdicts = []
>>> for row in curs.fetchall():
... rowdicts.append( dict(zip(colnames, row)) )
1340 | Chapter 17: Databases and Persistence

...
>>> rowdicts[0]
{'pay': 70000, 'job': 'mus', 'name': 'Sue'}
And finally, a list comprehension will do the job of collecting the dictionaries into a
list—not only is this less to type, but it probably runs quicker than the original version:
>>> curs.execute('select * from people')
>>> colnames = [desc[0] for desc in curs.description]
>>> rowdicts = [dict(zip(colnames, row)) for row in curs.fetchall()]
>>> rowdicts[0]
{'pay': 70000, 'job': 'mus', 'name': 'Sue'}
One of the things we lose when moving to dictionaries is record field order—if you
look back at the raw result of fetchall, you’ll notice that record fields are in the name,
job, and pay order in which they were stored. Our dictionary’s fields come back in the
pseudorandom order of Python mappings. As long as we fetch fields by key, this is
irrelevant to our script. Tables still maintain their order, and dictionary construction
works fine because the description result tuple is in the same order as the fields in row
tuples returned by queries.
We’ll leave the task of translating record tuples into class instances as a suggested
exercise, except for two hints: Python’s standard library collections module imple-
ments more exotic data types, such as named tuples and ordered dictionaries; and we
can access fields as attributes rather than as keys, by simply creating an empty class
instance and assigning to attributes with the Python setattr function. Classes would
also provide a natural place to code inheritable tools such as standard display methods.
In fact, this is part of the utility that the upcoming ORMs can provide for us.
Automating with scripts and modules
Up to this point, we’ve essentially used Python as a command-line SQL client—our
queries have been typed and run interactively. All the kinds of code we’ve run, though,
can be used as the basis of database access in script files. Working interactively requires
retyping things such as multiline loops, which can become tedious. With scripts, we
can automate our work.
To demonstrate, let’s make the last section’s prior example into a utility module—
Example 17-4 is a reusable module that knows how to translate the result of a query
from row tuples to row dictionaries.
Example 17-4. PP4E\Dbase\Sql\makedicts.py
"""
convert list of row tuples to list of row dicts with field name keys
this is not a command-line utility: hardcoded self-test if run
"""
def makedicts(cursor, query, params=()):
cursor.execute(query, params)
colnames = [desc[0] for desc in cursor.description]
SQL Database Interfaces | 1341

rowdicts = [dict(zip(colnames, row)) for row in cursor.fetchall()]
return rowdicts
if __name__ == '__main__': # self test
import sqlite3
conn = sqlite3.connect('dbase1')
cursor = conn.cursor()
query = 'select name, pay from people where pay < ?'
lowpay = makedicts(cursor, query, [70000])
for rec in lowpay: print(rec)
As usual, we can run this file from the system command line as a script to invoke its
self-test code:
...\PP4E\Dbase\Sql> makedicts.py
{'pay': 65000, 'name': 'Ann'}
{'pay': 65000, 'name': 'Kim'}
Or we can import it as a module and call its function from another context, like the
interactive prompt. Because it is a module, it has become a reusable database tool:
...\PP4E\Dbase\Sql> python
>>> from makedicts import makedicts
>>> from sqlite3 import connect
>>> conn = connect('dbase1')
>>> curs = conn.cursor()
>>> curs.execute('select * from people')
>>> curs.fetchall()
[('Sue', 'mus', 70000), ('Ann', 'mus', 65000), ('Kim', 'adm', 65000)]
>>> rows = makedicts(curs, "select name from people where job = 'mus'")
>>> rows
[{'name': 'Sue'}, {'name': 'Ann'}]
Our utility handles arbitrarily complex queries—they are simply passed through the
DB API to the database server or library. The order by clause here sorts the result on
the name field:
>>> query = 'select name, pay from people where job = ? order by name'
>>> musicians = makedicts(curs, query, ['mus'])
>>> for row in musicians: print(row)
...
{'pay': 65000, 'name': 'Ann'}
{'pay': 70000, 'name': 'Sue'}
Tying the Pieces Together
So far, we’ve learned how to make databases and tables, insert records into tables, query
table contents, and extract column names. For reference, and to show how these tech-
niques are combined, Example 17-5 collects them into a single script.
1342 | Chapter 17: Databases and Persistence

Example 17-5. PP4E\Dbase\Sql\testdb.py
from sqlite3 import connect
conn = connect('dbase1')
curs = conn.cursor()
try:
curs.execute('drop table people')
except:
pass # did not exist
curs.execute('create table people (name char(30), job char(10), pay int(4))')
curs.execute('insert into people values (?, ?, ?)', ('Bob', 'dev', 50000))
curs.execute('insert into people values (?, ?, ?)', ('Sue', 'dev', 60000))
curs.execute('select * from people')
for row in curs.fetchall():
print(row)
curs.execute('select * from people')
colnames = [desc[0] for desc in curs.description]
while True:
print('-' * 30)
row = curs.fetchone()
if not row: break
for (name, value) in zip(colnames, row):
print('%s => %s' % (name, value))
conn.commit() # save inserted records
Refer to prior sections in this tutorial if any of the code in this script is unclear. When
run, it creates a two-record database and lists its content to the standard output stream:
C:\...\PP4E\Dbase\Sql> testdb.py
('Bob', 'dev', 50000)
('Sue', 'dev', 60000)
------------------------------
name => Bob
job => dev
pay => 50000
------------------------------
name => Sue
job => dev
pay => 60000
------------------------------
As is, this example is really just meant to demonstrate the database API. It hardcodes
database names, and it re-creates the database from scratch each time. We could turn
this code into generally useful tools by refactoring it into reusable parts, as we’ll see
later in this section. First, though, let’s explore techniques for getting data into our
databases.
SQL Database Interfaces | 1343

Loading Database Tables from Files
One of the nice things about using Python in the database domain is that you can
combine the power of the SQL query language with the power of the Python general-
purpose programming language. They naturally complement each other.
Loading with SQL and Python
Suppose, for example, that you want to load a database table from a flat file, where
each line in the file represents a database row, with individual field values separated by
commas. Examples 17-6 and 17-7 list two such datafiles we’re going to be using here.
Example 17-6. PP4E\Dbase\Sql\data.txt
bob,devel,50000
sue,music,60000
ann,devel,40000
tim,admin,30000
kim,devel,60000
Example 17-7. PP4E\Dbase\Sql\data2.txt
bob,developer,80000
sue,music,90000
ann,manager,80000
Now, some database systems like MySQL have a handy SQL statement for loading such
a table quickly. Its load data statement parses and loads data from a text file, located
on either the client or the server machine. In the following, the first command deletes
all records in the table, and we’re using the fact that Python automatically concatenates
adjacent string literals to split the SQL statement over multiple lines:
# Using MySQL (currently available for Python 2.X only)
...log into MySQL first...
>>> curs.execute('delete from people') # all records
>>> curs.execute(
... "load data local infile 'data.txt' "
... "into table people fields terminated by ','")
>>> curs.execute('select * from people')
>>> for row in curs.fetchall(): print(row)
...
('bob', 'devel', 50000L)
('sue', 'music', 60000L) # 2.X long integers
('ann', 'devel', 40000L)
('tim', 'admin', 30000L)
('kim', 'devel', 60000L)
>>> conn.commit()
This works as expected. But what if you must use a system like the SQLite database
used in this book, which lacks this specific SQL statement? Or, perhaps you just need
to do something more custom than this MySQL statement allows. Not to worry—a
1344 | Chapter 17: Databases and Persistence

small amount of simple Python code can easily accomplish the same result with SQLite
and Python 3.X (again, some irrelevant output lines are omitted here):
C:\...\PP4E\Dbase\Sql> python
>>> from sqlite3 import connect
>>> conn = connect('dbase1')
>>> curs = conn.cursor()
>>> curs.execute('delete from people') # empty the table
>>> curs.execute('select * from people')
>>> curs.fetchall()
[]
>>> file = open('data.txt')
>>> rows = [line.rstrip().split(',') for line in file]
>>> rows[0]
['bob', 'devel', '50000']
>>> for rec in rows:
... curs.execute('insert into people values (?, ?, ?)', rec)
...
>>> curs.execute('select * from people')
>>> for rec in curs.fetchall(): print(rec)
...
('bob', 'devel', 50000)
('sue', 'music', 60000)
('ann', 'devel', 40000)
('tim', 'admin', 30000)
('kim', 'devel', 60000)
This code makes use of a list comprehension to collect string split results for all lines
in the file after removing any newline characters, and file iterators to step through the
file line by line. Its Python loop does the same work as the MySQL load statement, and
it will work on more database types, including SQLite. We can get some similar result
from an executemany DB API call shown earlier as well, but the Python for loop here
has the potential to be more general.
Python versus SQL
In fact, you have the entire Python language at your disposal for processing database
results, and a little Python can often duplicate or go beyond SQL syntax. For instance,
SQL has special aggregate function syntax for computing things such as sums and
averages:
>>> curs.execute("select sum(pay), avg(pay) from people where job = 'devel'")
>>> curs.fetchall()
[(150000, 50000.0)]
By shifting the processing to Python, we can sometimes simplify and do more than
SQL’s syntax allows (albeit potentially sacrificing any query performance optimizations
the database may perform). Computing pay sums and averages with Python can be
accomplished with a simple loop:
SQL Database Interfaces | 1345

>>> curs.execute("select name, pay from people where job = 'devel'")
>>> result = curs.fetchall()
>>> result
(('bob', 50000L), ('ann', 40000L), ('kim', 60000L))
>>> tot = 0
>>> for (name, pay) in result: tot += pay
...
>>> print('total:', tot, 'average:', tot / len(result)) # use // to truncate
total: 150000 average: 50000.0
Or we can use more advanced tools such as comprehensions and generator expressions
to calculate sums, averages, maximums, and the like:
>>> print(sum(rec[1] for rec in result)) # generator expr
150000
>>> print(sum(rec[1] for rec in result) / len(result))
50000.0
>>> print(max(rec[1] for rec in result))
60000
The Python approach is more general, but it doesn’t buy us much until things become
more complex. For example, here are a few more advanced comprehensions that collect
the names of people whose pay is above and below the average in the query result set:
>>> avg = sum(rec[1] for rec in result) / len(result)
>>> print([rec[0] for rec in result if rec[1] > avg])
['kim']
>>> print([rec[0] for rec in result if rec[1] < avg])
['ann']
We may be able to do some of these kinds of tasks with more advanced SQL techniques
such as nested queries, but we eventually reach a complexity threshold where Python’s
general-purpose nature makes it attractive and potentially more portable. For compar-
ison, here is the equivalent SQL:
>>> query = ("select name from people where job = 'devel' and "
... "pay > (select avg(pay) from people where job = 'devel')")
>>> curs.execute(query)
>>> curs.fetchall()
[('kim',)]
>>> query = ("select name from people where job = 'devel' and "
... "pay < (select avg(pay) from people where job = 'devel')")
>>> curs.execute(query)
>>> curs.fetchall()
[('ann',)]
This isn’t the most complex SQL you’re likely to meet, but beyond this point, SQL can
become more involved. Moreover, unlike Python, SQL is limited to database-specific
tasks by design. Imagine a query that compares a column’s values to data fetched off
the Web or from a user in a GUI—simple with Python’s Internet and GUI support, but
well beyond the scope of a special-purpose language such as SQL. By combining Python
and SQL, you get the best of both and can choose which is best suited to your goals.
1346 | Chapter 17: Databases and Persistence

With Python, you also have access to utilities you’ve already coded: your database tool
set is arbitrarily extensible with functions, modules, and classes. To illustrate, here are
some of the same operations coded in a more mnemonic fashion with the dictionary-
record module we wrote earlier:
>>> from makedicts import makedicts
>>> recs = makedicts(curs, "select * from people where job = 'devel'")
>>> print(len(recs), recs[0])
3 {'pay': 50000, 'job': 'devel', 'name': 'bob'}
>>> print([rec['name'] for rec in recs])
['bob', 'ann', 'kim']
>>> print(sum(rec['pay'] for rec in recs))
150000
>>> avg = sum(rec['pay'] for rec in recs) / len(recs)
>>> print([rec['name'] for rec in recs if rec['pay'] > avg])
['kim']
>>> print([rec['name'] for rec in recs if rec['pay'] >= avg])
['bob', 'kim']
Similarly, Python’s set object type provides operations such as intersection, union, and
difference which can serve as alternatives to other SQL database operations (in the
interest of space, we’ll leave their exploration as a suggested side trip). For more
advanced database extensions, see the SQL-related tools available for Python in the
third-party domain. For example, a variety of packages add an OOP flavor to the DB
API—the ORMs we’ll explore near the end of this chapter.
SQL Utility Scripts
At this point in our SQL DB API tour, we’ve started to stretch the interactive prompt
to its breaking point—we wind up retyping the same boilerplate code again every time
we start a session and every time we run a test. Moreover, the code we’re writing is
substantial enough to be reused in other programs. Let’s wrap up by transforming our
code into reusable scripts that automate tasks and support reuse.
To illustrate more of the power of the Python/SQL mix, this section presents a handful
of utility scripts that perform common tasks—the sorts of things you’d otherwise have
to recode often during development. As an added bonus, most of these files are both
command-line utilities and modules of functions that can be imported and called from
other programs. Most of the scripts in this section also allow a database file name to
be passed in on the command line; this allows us to use different databases for different
purposes during development—changes in one won’t impact others.
Table load scripts
Let’s take a quick look at code first, before seeing it in action; feel free to skip ahead to
correlate the code here with its behavior. As a first (and less than ideal) step, Exam-
ple 17-8 shows a simple way to script-ify the table-loading logic of the prior section.
SQL Database Interfaces | 1347

Example 17-8. PP4E\Dbase\Sql\loaddb1.py
"""
load table from comma-delimited text file; equivalent to this nonportable SQL:
load data local infile 'data.txt' into table people fields terminated by ','"
"""
import sqlite3
conn = sqlite3.connect('dbase1')
curs = conn.cursor()
file = open('data.txt')
rows = [line.rstrip().split(',') for line in file]
for rec in rows:
curs.execute('insert into people values (?, ?, ?)', rec)
conn.commit() # commit changes now, if db supports transactions
conn.close() # close, __del__ call rollback if changes not committed yet
As is, Example 17-8 is a top-level script geared toward one particular case. It’s hardly
any extra work to generalize this into a function that can be imported and used in a
variety of scenarios, as in Example 17-9—a much more widely useful module and
command-line script.
Example 17-9. PP4E\Dbase\Sql\loaddb.py
"""
load table from comma-delimited text file: reusable/generalized version
Importable functions; command-line usage: loaddb.py dbfile? datafile? table?
"""
def login(dbfile):
import sqlite3
conn = sqlite3.connect(dbfile) # create or open db file
curs = conn.cursor()
return conn, curs
def loaddb(curs, table, datafile, conn=None, verbose=True):
file = open(datafile) # x,x,x\nx,x,x\n
rows = [line.rstrip().split(',') for line in file] # [[x,x,x], [x,x,x]]
rows = [str(tuple(rec)) for rec in rows] # ["(x,x,x)", "(x,x,x)"]
for recstr in rows:
curs.execute('insert into ' + table + ' values ' + recstr)
if conn: conn.commit()
if verbose: print(len(rows), 'rows loaded')
if __name__ == '__main__':
import sys
dbfile, datafile, table = 'dbase1', 'data.txt', 'people'
if len(sys.argv) > 1: dbfile = sys.argv[1]
if len(sys.argv) > 2: datafile = sys.argv[2]
if len(sys.argv) > 3: table = sys.argv[3]
conn, curs = login(dbfile)
loaddb(curs, table, datafile, conn)
1348 | Chapter 17: Databases and Persistence

Notice the way this code uses two list comprehensions to build a string of record values
for the insert statement (see its comments for the transforms applied). We could also
use an executemany call as we did earlier, but we want to be general and avoid hard-
coding the fields insertion template—this function might be used for tables with any
number of columns.
This file also defines a login function to automate the initial connection calls—after
retyping this four-command sequence enough times, it seemed a prime candidate for
a function. In addition, this reduces code redundancy; in the future, such logic need
only be changed in a single location if we change database systems, as long as the
login function is used everywhere.
Table display script
Once we load data, we probably will want to display it. Example 17-10 allows us to
display results as we go—it prints an entire table with either a simple display (which
could be parsed by other tools) or a formatted display (generated with the dictionary-
record utility we wrote earlier). Notice how it computes the maximum field-name size
for alignment with a generator expression; the size is passed in to a string formatting
expression by specifying an asterisk (*) for the field size in the format string.
Example 17-10. PP4E\Dbase\Sql\dumpdb.py
"""
display table contents as raw tuples, or formatted with field names
command-line usage: dumpdb.py dbname? table? [-] (dash=formatted display)
"""
def showformat(recs, sept=('-' * 40)):
print(len(recs), 'records')
print(sept)
for rec in recs:
maxkey = max(len(key) for key in rec) # max key len
for key in rec: # or: \t align
print('%-*s => %s' % (maxkey, key, rec[key])) # -ljust, *len
print(sept)
def dumpdb(cursor, table, format=True):
if not format:
cursor.execute('select * from ' + table)
while True:
rec = cursor.fetchone()
if not rec: break
print(rec)
else:
from makedicts import makedicts
recs = makedicts(cursor, 'select * from ' + table)
showformat(recs)
if __name__ == '__main__':
import sys
dbname, format, table = 'dbase1', False, 'people'
SQL Database Interfaces | 1349

cmdargs = sys.argv[1:]
if '-' in cmdargs: # format if '-' in cmdline args
format = True # dbname if other cmdline arg
cmdargs.remove('-')
if cmdargs: dbname = cmdargs.pop(0)
if cmdargs: table = cmdargs[0]
from loaddb import login
conn, curs = login(dbname)
dumpdb(curs, table, format)
While we’re at it, let’s code some utility scripts to initialize and erase the database, so
we do not have to type these by hand at the interactive prompt again every time we
want to start from scratch. Example 17-11 completely deletes and re-creates the data-
base, to reset it to an initial state (we did this manually at the start of the tutorial).
Example 17-11. PP4E\Dbase\Sql\makedb.py
"""
physically delete and re-create database files
usage: makedb.py dbname? tablename?
"""
import sys
if input('Are you sure?').lower() not in ('y', 'yes'):
sys.exit()
dbname = (len(sys.argv) > 1 and sys.argv[1]) or 'dbase1'
table = (len(sys.argv) > 2 and sys.argv[2]) or 'people'
from loaddb import login
conn, curs = login(dbname)
try:
curs.execute('drop table ' + table)
except:
print('database table did not exist')
command = 'create table %s (name char(30), job char(10), pay int(4))' % table
curs.execute(command)
conn.commit() # commit may be optional here
print('made', dbname, table)
Next, the clear script in Example 17-12 deletes all rows in the table, instead of dropping
and re-creating them entirely. For testing purposes, either approach is sufficient. Minor
caveat: the rowcount attribute doesn’t always reflect the number of rows deleted in
SQLite; see its library manual entry for details.
Example 17-12. PP4E\Dbase\Sql\cleardb.py
"""
delete all rows in table, but don't drop the table or database it is in
usage: cleardb.py dbname? tablename?
"""
1350 | Chapter 17: Databases and Persistence

import sys
if input('Are you sure?').lower() not in ('y', 'yes'):
sys.exit()
dbname = sys.argv[1] if len(sys.argv) > 1 else 'dbase1'
table = sys.argv[2] if len(sys.argv) > 2 else 'people'
from loaddb import login
conn, curs = login(dbname)
curs.execute('delete from ' + table)
#print(curs.rowcount, 'records deleted') # conn closed by its __del__
conn.commit() # else rows not really deleted
Finally, Example 17-13 provides a command-line tool that runs a query and prints its
result table in formatted style. There’s not much to this script; because we’ve automated
most of its tasks already, this is largely just a combination of existing tools. Such is the
power of code reuse in Python.
Example 17-13. PP4E\Dbase\Sql\querydb.py
"""
run a query string, display formatted result table
example: querydb.py dbase1 "select name, job from people where pay > 50000"
"""
import sys
database, querystr = 'dbase1', 'select * from people'
if len(sys.argv) > 1: database = sys.argv[1]
if len(sys.argv) > 2: querystr = sys.argv[2]
from makedicts import makedicts
from dumpdb import showformat
from loaddb import login
conn, curs = login(database)
rows = makedicts(curs, querystr)
showformat(rows)
Using the scripts
Last but not least, here is a log of a session that makes use of these scripts in command-
line mode, to illustrate their operation. Most of the files also have functions that can
be imported and called from a different program; the scripts simply map command-
line arguments to the functions’ arguments when run standalone. The first thing we do
is initialize a testing database and load its table from a text file:
...\PP4E\Dbase\Sql> makedb.py testdb
Are you sure?y
database table did not exist
made testdb people
...\PP4E\Dbase\Sql> loaddb.py testdb data2.txt
3 rows loaded
SQL Database Interfaces | 1351

Next, let’s check our work with the dump utility (use a - argument to force a formatted
display):
...\PP4E\Dbase\Sql> dumpdb.py testdb
('bob', 'developer', 80000)
('sue', 'music', 90000)
('ann', 'manager', 80000)
...\PP4E\Dbase\Sql> dumpdb.py testdb -
3 records
----------------------------------------
pay => 80000
job => developer
name => bob
----------------------------------------
pay => 90000
job => music
name => sue
----------------------------------------
pay => 80000
job => manager
name => ann
----------------------------------------
The dump script is an exhaustive display; to be more specific about which records to
view, use the query script and pass in a query string on the command line (the command
lines are split here to fit in this book):
...\PP4E\Dbase\Sql> querydb.py testdb
"select name, job from people where pay = 80000"
2 records
----------------------------------------
job => developer
name => bob
----------------------------------------
job => manager
name => ann
----------------------------------------
...\PP4E\Dbase\Sql> querydb.py testdb
"select * from people where name = 'sue'"
1 records
----------------------------------------
pay => 90000
job => music
name => sue
----------------------------------------
Now, let’s erase and start again with a new data set file. The clear script erases all records
but doesn’t reinitialize the database completely:
...\PP4E\Dbase\Sql> cleardb.py testdb
Are you sure?y
...\PP4E\Dbase\Sql> dumpdb.py testdb -
0 records
1352 | Chapter 17: Databases and Persistence

----------------------------------------
...\PP4E\Dbase\Sql> loaddb.py testdb data.txt
5 rows loaded
...\PP4E\Dbase\Sql> dumpdb.py testdb
('bob', 'devel', 50000)
('sue', 'music', 60000)
('ann', 'devel', 40000)
('tim', 'admin', 30000)
('kim', 'devel', 60000)
In closing, here are three queries in action on this new data set: they fetch names of
developers, jobs that pay above an amount, and records with a given pay level sorted
by job. We could run these at the Python interactive prompt, of course, but we’re getting
a lot of setup and boilerplate code for free here:
...\PP4E\Dbase\Sql> querydb.py testdb
"select name from people where job = 'devel'"
3 records
----------------------------------------
name => bob
----------------------------------------
name => ann
----------------------------------------
name => kim
----------------------------------------
...\PP4E\Dbase\Sql> querydb.py testdb
"select job from people where pay >= 60000"
2 records
----------------------------------------
job => music
----------------------------------------
job => devel
----------------------------------------
...\PP4E\Dbase\Sql> querydb.py testdb
"select * from people where pay >= 60000 order by job"
2 records
----------------------------------------
pay => 60000
job => devel
name => kim
----------------------------------------
pay => 60000
job => music
name => sue
----------------------------------------
Before we move on, some context: the scripts in this section illustrate the benefits of
code reuse, accomplish their purpose (which was partly demonstrating the SQL API),
and serve as a model for canned database utilities. But they are still not as general as
they could be; support for sorting options in the dump script, for example, may be a
SQL Database Interfaces | 1353

useful extension. Although we could generalize to support more options, at some point
we may need to revert to typing SQL commands in a client—part of the reason SQL is
a language is because it must support so much generality. Further extensions to these
scripts are left as exercises. Change this code as you like; it’s Python, after all.
SQL Resources
Although the examples we’ve seen in this section are simple, their techniques scale up
to much more realistic databases and contexts. The websites we studied in the prior
part of the book, for instance, can make use of SQL-based systems such as MySQL to
store page state information as well as long-lived client information. Because MySQL
(among others) supports both large databases and concurrent updates, it’s a natural
for website implementation.
There is more to database interfaces than we’ve seen, but additional API documentation
is readily available on the Web. To find the full database API specification, search the
Web for “Python Database API.” You’ll find the formal API definition—really just a
text file describing the PEP (the Python Enhancement Proposal) under which the API
was hashed out.
Perhaps the best resource for additional information about database extensions today
is the home page of the Python database SIG. Go to http://www.python.org, click on
the Community and SIGs links there, and navigate to the database group’s page, or run
a search. There, you’ll find API documentation (this is where it is officially maintained),
links to database vendor–specific extension modules, and more. And as always, see the
PyPI website and search the Web at large for related third-party tools and extensions.
ORMs: Object Relational Mappers
In this chapter, we’ve seen OODBs that store native Python objects persistently, as well
as SQL databases that store information in tables. It turns out that there is another class
of system that attempts to bridge the object and table worlds, which I’ve hinted at earlier
in this chapter: ORMs graft the Python class model onto the tables of relational data-
bases. They combine the power of relational database systems with the simplicity of
Python class-based syntax—you don’t need to forgo SQL-based databases, but you can
still store data that seems like Python objects to your scripts.
Today, there are two leading open source third-party systems that implement this
mapping: SQLObject and SQLAlchemy. Both are fairly complex systems that we can-
not do full justice to in this text, and you’re best off researching their documentation
on the Web for the full story (there are also dedicated books covering SQLAlchemy
today). Moreover, neither is completely Python 3.X ready as I write these words, so we
can’t run live examples with them in this text.
1354 | Chapter 17: Databases and Persistence

To give you a slightly more concrete flavor of the ORM model, though, here is a very
quick look at how you might use it to create and process database records in the
SQLObject system. In brief, SQLObject maps:
• Python classes to database tables
• Python class instances to rows in the table
• Python instance attributes to row columns
For example, to create a table, we define it with a class, with class attributes that define
columns, and call its creation method (this code is derived from a more complete ex-
ample at SQLObject’s website):
from sqlobject import *
sqlhub.processConnection = connectionForURI('sqlite:/:memory:')
class Person(SQLObject): # class: describes table
first = StringCol() # class attributes: row columns
mid = StringCol(length=1, default=None)
last = StringCol()
Person.createTable() # create a database table
Once created, making an instance automatically inserts a row into the database, and
attribute fetches and assignments are automatically mapped to fetches and updates of
the corresponding table row’s column:
p = Person(first='Bob', last='Smith') # new instance: makes and inserts row
p # prints all attributes by name
p.first # attribute: fetches row column
p.mid = 'M' # attribute: updates record
Existing rows/instances may be fetched by methods calls, and we can assign multiple
columns/attributes with a single update operation:
p2 = Person.get(1) # fetch existing record/instance: p2 is p
p.set(first='Tom', last='Jones') # update two attributes/fields at once
In addition, we can select by column values by creating a query object and executing it:
ts = Person.select(Person.q.first=='Tom') # query: select by column value
list(ts) # run the query: list of instances
tjs = Person.selectBy(first='Tom', last='Jones') # alternative query form (AND)
Naturally, this barely scratches the surface of the available functionality. Even at this
level of complexity, though, this is quite a trick—SQLObject automatically issues all
the SQL required to fetch, store, and query the table and rows implied by the Python
class syntax here. Again, the net effect allows systems to leverage the power of
enterprise-level relational databases, but still use familiar Python class syntax to process
stored data in Python scripts.
ORMs: Object Relational Mappers | 1355

The code used with the SQLAlchemy ORM is of course very different, but the end result
is functionally similar. For more details on ORMs for Python, consult your friendly
neighborhood web search engine. You can also learn more about such systems by their
roles in some larger web development frameworks; Django, for instance, has an ORM
which is another variation on this theme.
PyForm: A Persistent Object Viewer (External)
Instead of going into additional database interface details that are freely available on
the Web, I’m going to close out this chapter by directing you to a supplemental example
that shows one way to combine the GUI technology we met earlier in the text with the
persistence techniques introduced in this chapter. This example is named PyForm—a
Python/tkinter GUI designed to let you browse and edit tables of records:
• Tables browsed may be shelves, DBM files, in-memory dictionaries, or any other
object that looks and feels like a dictionary.
• Records within tables browsed can be class instances, simple dictionaries, strings,
or any other object that can be translated to and from a dictionary.
Although this example is about GUIs and persistence, it also illustrates Python design
techniques. To keep its implementation both simple and type-independent, the PyForm
GUI is coded to expect tables to look like dictionaries of dictionaries. To support a
variety of table and record types, PyForm relies on separate wrapper classes to translate
tables and records to the expected protocol:
• At the top table level, the translation is easy—shelves, DBM files, and in-memory
dictionaries all have the same key-based interface.
• At the nested record level, the GUI is coded to assume that stored items have a
dictionary-like interface, too, but classes intercept dictionary operations to make
records compatible with the PyForm protocol. Records stored as strings are con-
verted to and from the dictionary objects on fetches and stores; records stored as
class instances are translated to and from attribute dictionaries. More specialized
translations can be added in new table wrapper classes.
The net effect is that PyForm can be used to browse and edit a wide variety of table
types, despite its dictionary interface expectations. When PyForm browses shelves and
DBM files, table changes made within the GUI are persistent—they are saved in the
underlying files. When used to browse a shelve of class instances, PyForm essentially
becomes a GUI frontend to a simple object database that is built using standard Python
persistence tools. To view and update a shelve of objects with PyForm, for example,
code like the following will suffice:
import shelve
from formgui import FormGui # after initcast
db = shelve.open('../data/castfile') # reopen shelve file
FormGui(db).mainloop() # browse existing shelve-of-dicts
1356 | Chapter 17: Databases and Persistence
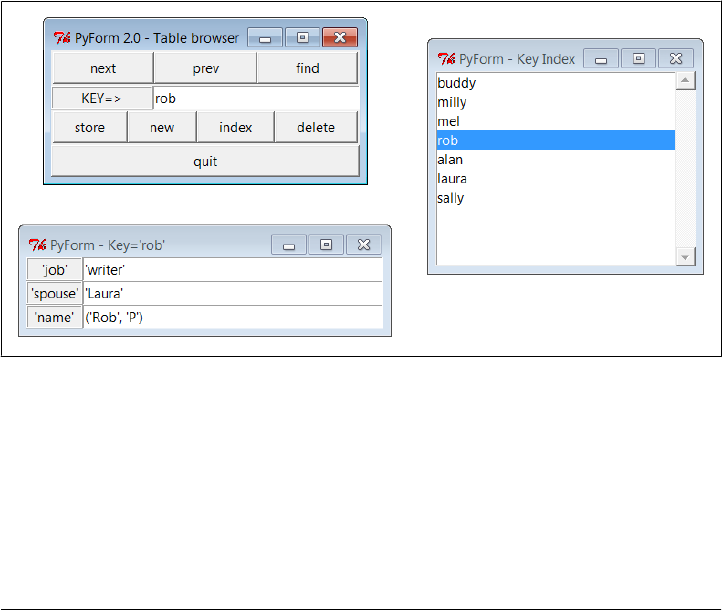
To view or update a shelve of instances of an imported Actor class, we can use code
like this:
from PP4E.Dbase.testdata inport Actor
from formgui import FormGui # run in TableBrowser dir
from formtable import ShelveOfInstance
testfile = '../data/shelve' # external filename
table = ShelveOfInstance(testfile, Actor) # wrap shelf in Table object
FormGui(table).mainloop()
table.close() # close needed for some dbm
Figure 17-1 captures the scene under Python 3.1 and Windows 7 when viewing a shelve
of persistent class instance objects. This PyForm session was kicked off by a command-
line described in its form table module’s self-test code: formtable.py shelve 1, and
omit the 1 (or pass it as 0) to avoid reinitializing the shelve at the start of each session
so changes are retained.
PyForm’s GUI can also be started from the PyDemos launcher we met in Chapter 10,
though it does not save changes persistently in this mode. Run the example on your
own computer to get a better sample of its operation. Though not a fully general Python
persistent object table viewer, PyForm serves as a simple object database front end.
Figure 17-1. PyForm displaying a shelve of Actor objects
Because we are short on time and space in this edition, I’m going to omit both the
source code for this example and its description here. To study PyForm, see the fol-
lowing directory in the book’s examples package distribution described in the Preface:
C:\...\PP4E\Dbase\TableBrowser
PyForm: A Persistent Object Viewer (External) | 1357

See especially the Documentation subdirectory there, which contains the original
PyForm overview material from the third edition in a PDF file. PyForm’s source code
files are ported to Python 3.X form, though code in the overview document still shows
its 2.X third edition roots. For the purposes of the published portions of this book, let’s
move on to the next chapter and our next tools topic: data structure implementations.
1358 | Chapter 17: Databases and Persistence

CHAPTER 18
Data Structures
“Roses Are Red, Violets Are Blue; Lists Are Mutable,
and So Is Set Foo”
Data structures are a central theme in most programs, even if Python programmers
often don’t need to care. Their apathy is warranted—Python comes “out of the box”
with a rich set of built-in and already optimized types that make it easy to deal with
structured data: lists, strings, tuples, dictionaries, sets, and the like. For simple systems,
these types are usually enough. Dictionaries, for example, subsume many of the clas-
sical searching algorithms, and lists replace much of the work you’d do to support
collections in lower-level languages. Even so, both are so easy to use that you generally
never give them a second thought.
But for advanced applications, we may need to add more sophisticated types of our
own to handle extra requirements or special cases. In this chapter, we’ll explore a
handful of advanced data structure implementations in Python: sets, stacks, graphs,
and so on. As we’ll see, data structures can take the form of new object types in Python,
integrated into the language’s type model. That is, objects we code in Python become
full-fledged datatypes—to the scripts that use them, they can look and feel just like
built-in lists, numbers, and dictionaries.
Although the examples in this chapter illustrate advanced programming and computer
science techniques, they also underscore Python’s support for writing reusable soft-
ware. As object implementations are coded with classes and modules, they naturally
become generally useful components that can be used in any program that imports
them. In effect, we will be building libraries of data structure tools, whether we plan
for it or not.
Moreover, though most examples in this chapter are pure Python code (and at least to
linear readers, some may seem relatively simple compared to those of earlier chapters),
they also provide a use case for discussing Python performance issues, and hint at what’s
possible with the subject of Chapter 20—from the most general perspective, new
1359

Python objects can be implemented in either Python or an integrated language such as
C. Types coded in C use patterns similar to those here.
In the end, though, we’ll also see that Python’s built-in support can often take the place
of homegrown solutions in this domain. Although custom data structure implemen-
tations are sometimes necessary and still have much to offer in terms of code mainte-
nance and evolution, they are not always as paramount in Python as they are in less
programmer-friendly languages.
Implementing Stacks
Stacks are a common and straightforward data structure, used in a variety of applica-
tions: language processing, graph searches, and so on. For instance, expression evalu-
ation in the next chapter’s calculator GUI is largely an exercise in juggling stacks, and
programming languages in general typically implement function calls as stack opera-
tions in order to remember what to resume as calls return. Stacks can also help in XML
parsing: they are a natural for tracking progress any time constructs might be arbitrarily
nested.
In short, stacks are a last-in-first-out collection of objects—the last item added to the
collection is always the next one to be removed. Unlike the queues we used for thread
communication, which add and delete at opposite ends, all the activity in stacks hap-
pens at the top. Clients use stacks by:
• Pushing items onto the top
• Popping items off the top
Depending on client requirements, there may also be tools for such tasks as testing
whether the stack is empty, fetching the top item without popping it, iterating over a
stack’s items, testing for item membership, and so on.
Built-in Options
In Python, a simple list is often adequate for implementing a stack: because we can
change lists in place arbitrarily, we can add and delete items from either the beginning
(left) or the end (right). Table 18-1 summarizes various built-in operations available for
implementing stack-like behavior with Python lists and in-place changes. They vary
depending on whether the stack “top” is the first or the last node in the list; in this
table, the string 'b' is the initial top item on the stack.
Table 18-1. Stacks as lists
Operation Top is end-of-list Top is front-of-list Top is front-of-list
New stack=['a', 'b'] stack=['b', 'a'] stack=['b', 'a']
Push stack.append('c') stack.insert(0,'c') stack[0:0]=['c']
1360 | Chapter 18: Data Structures

Operation Top is end-of-list Top is front-of-list Top is front-of-list
Pop top = stack[-1];
del stack[-1]
top = stack[0];
del stack[0]
top = stack[0];
stack[:1] = []
Even more conveniently, Python grew a list pop method later in its life designed to be
used in conjunction with append to implement stacks and other common structures
such as queues, yielding the even simpler coding options listed in Table 18-2.
Table 18-2. Stacks as lists, coding alternatives
Operation Top is end-of-list Top is front-of-list
New stack=['a', 'b'] stack=['b', 'a']
Push stack.append('c') stack.insert(0,'c')
Pop top = stack.pop() top = stack.pop(0)
By default, pop is equivalent to fetching, and then deleting, the last item at offset −1.
With an argument, pop deletes and returns the item at that offset—list.pop(-1) is the
same as list.pop(). For in-place change operations like append, insert, del, and pop,
no new list is created in memory, so execution is quick (performance may further de-
pend upon which end is the “top,” but this in turn depends on Python’s current list
implementation, as well as measurement concepts we’ll explore later). Queues can be
coded similarly, but they pop at the other end of the list.
Other built-in coding schemes are possible as well. For instance, del stack[:1] is yet
another way to delete the first item in a list-based stack in-place. Depending on which
end is interpreted as the top of the stack, the following sequence assignment statement
forms can be used to fetch and remove the top item as well, albeit at the cost of making
a new list object each time:
# top is front of list
top, stack = stack[0], stack[1:] # Python 1.X+
top, *stack = stack # Python 3.X
# top is end of list
stack, top = stack[:-1], stack[-1] # Python 1.X+
*stack, top = stack # Python 3.X
With so many built-in stack options, why bother implementing others? For one thing,
they serve as a simple and familiar context for exploring data structure concepts in this
book. More importantly, though, there is a practical programming motive here. List
representations work and will be relatively fast, but they also bind stack-based pro-
grams to the stack representation chosen: all stack operations will be hardcoded
throughout a program. If we later want to change how a stack is represented or extend
its basic operation set, we’re stuck—every stack-based program will have to be updated,
and in every place where it accesses the stack.
Implementing Stacks | 1361

For instance, to add logic that monitors the number of stack operations a program
performs, we’d have to add code around each hardcoded stack operation. In a large
system, this update may be nontrivial work. As we’ll discuss in Chapter 20, we may
also decide to move stacks to a C-based implementation, if they prove to be a perform-
ance bottleneck. As a general rule, hardcoded operations on built-in data structures
don’t support future migrations as well as we’d sometimes like.
As we’ll see later, built-in types such as lists are actually class-like objects in Python
that we can subclass to customize, too. This might be only a partial fix, though; unless
we anticipate future changes and make instances of a subclass, we may still have a
maintenance issue if we use built-in list operations directly and ever want to extend
what they do in the future.
A Stack Module
Of course, the real solution to such code maintenance dilemmas is to encapsulate—
that is, wrap up—stack implementations behind interfaces, using Python’s code reuse
tools. As long as clients stick to using the interfaces, we’re free to change the interfaces’
implementations arbitrarily without having to change every place they are called. Let’s
begin by implementing a stack as a module containing a Python list, plus functions to
operate on it; Example 18-1 shows one way to code this.
Example 18-1. PP4E\Dstruct\Basic\stack1.py
"a shared stack module"
stack = [] # on first import
class error(Exception): pass # local excs, stack1.error
def push(obj):
global stack # use 'global' to change
stack = [obj] + stack # add item to the front
def pop():
global stack
if not stack:
raise error('stack underflow') # raise local error
top, *stack = stack # remove item at front
return top
def top():
if not stack: # raise local error
raise error('stack underflow') # or let IndexError occur
return stack[0]
def empty(): return not stack # is the stack []?
def member(obj): return obj in stack # item in stack?
def item(offset): return stack[offset] # index the stack
def length(): return len(stack) # number entries
def dump(): print('<Stack:%s>' % stack)
1362 | Chapter 18: Data Structures

This module creates a list object (stack) and exports functions to manage access to it.
The stack is declared global in functions that change it, but not in those that just ref-
erence it. The module also defines an error object (error) that can be used to catch
exceptions raised locally in this module. Some stack errors are built-in exceptions: the
method item triggers IndexError for out-of-bounds indexes.
Most of the stack’s functions just delegate the operation to the embedded list used to
represent the stack. In fact, the module is really just a simple wrapper around a Python
list. Because this extra layer of interface logic makes clients independent of the actual
implementation of the stack, though, we’re able to change the stack later without im-
pacting its clients.
As usual, one of the best ways to understand such code is to see it in action. Here’s an
interactive session that illustrates the module’s interfaces—it implements a stack of
arbitrary Python objects:
C:\...\PP4E\Dstruct\Basic> python
>>> import stack1
>>> stack1.push('spam')
>>> stack1.push(123)
>>> stack1.top()
123
>>> stack1.stack
[123, 'spam']
>>> stack1.pop()
123
>>> stack1.dump()
<Stack:['spam']>
>>> stack1.pop()
'spam'
>>> stack1.empty()
True
>>> for c in 'spam': stack1.push(c)
...
>>> while not stack1.empty():
... print(stack1.pop(), end=' ')
...
m a p s >>>
>>> stack1.pop()
stack1.error: stack underflow
Other operations are analogous, but the main thing to notice here is that all stack
operations are module functions. For instance, it’s possible to iterate over the stack, but
we need to use counter-loops and indexing function calls (item). Nothing is preventing
clients from accessing (and even changing) stack1.stack directly, but doing so defeats
the purpose of interfaces like this one:
>>> for c in 'spam': stack1.push(c)
...
>>> stack1.dump()
<Stack:['m', 'a', 'p', 's']>
>>>
>>> for i in range(stack1.length()):
Implementing Stacks | 1363

... print(stack1.item(i), end=' ')
...
m a p s >>>
A Stack Class
Perhaps the biggest drawback of the module-based stack is that it supports only a single
stack object. All clients of the stack module effectively share the same stack. Sometimes
we want this feature: a stack can serve as a shared-memory object for multiple modules.
But to implement a true stack datatype that can generate independent objects, we need
to use classes.
To illustrate, let’s define a full-featured stack class. The Stack class shown in Exam-
ple 18-2 defines a new datatype with a variety of behaviors. Like the module, the class
uses a Python list to hold stacked objects. But this time, each instance gets its own list.
The class defines both “real” methods and specially named methods that implement
common type operations. Comments in the code describe special methods.
Example 18-2. PP4E\Dstruct\Basic\stack2.py
"a multi-instance stack class"
class error(Exception): pass # when imported: local exception
class Stack:
def __init__(self, start=[]): # self is the instance object
self.stack = [] # start is any sequence: stack..
for x in start: self.push(x)
self.reverse() # undo push's order reversal
def push(self, obj): # methods: like module + self
self.stack = [obj] + self.stack # top is front of list
def pop(self):
if not self.stack: raise error('underflow')
top, *self.stack = self.stack
return top
def top(self):
if not self.stack: raise error('underflow')
return self.stack[0]
def empty(self):
return not self.stack # instance.empty()
# overloads
def __repr__(self):
return '[Stack:%s]' % self.stack # print, repr(),..
def __eq__(self, other):
return self.stack == other.stack # '==', '!='?
def __len__(self):
1364 | Chapter 18: Data Structures

return len(self.stack) # len(instance), not instance
def __add__(self, other):
return Stack(self.stack + other.stack) # instance1 + instance2
def __mul__(self, reps):
return Stack(self.stack * reps) # instance * reps
def __getitem__(self, offset): # see also __iter__
return self.stack[offset] # instance[i], [i:j], in, for
def __getattr__(self, name):
return getattr(self.stack, name) # instance.sort()/reverse()/..
Now distinct instances are created by calling the Stack class like a function. In most
respects, the Stack class implements operations exactly like the stack module in Ex-
ample 18-1. But here, access to the stack is qualified by self, the subject instance object.
Each instance has its own stack attribute, which refers to the instance’s own list. Fur-
thermore, instance stacks are created and initialized in the __init__ constructor
method, not when the module is first imported. Let’s make a couple of stacks to see
how all this works in practice:
>>> from stack2 import Stack
>>> x = Stack() # make a stack object, push items
>>> x.push('spam')
>>> x.push(123)
>>> x # __repr__ prints a stack
[Stack:[123, 'spam']]
>>> y = Stack() # two distinct stack objects
>>> y.push(3.1415) # they do not share content
>>> y.push(x.pop())
>>> x, y
([Stack:['spam']], [Stack:[123, 3.1415]])
>>> z = Stack() # third distinct stack object
>>> for c in 'spam': z.push(c)
...
>>> while z: # __len__ tests stack truth
... print(z.pop(), end=' ')
...
m a p s >>>
>>> z = x + y # __add__ handles stack +
>>> z # holds three different types
[Stack:['spam', 123, 3.1415]]
>>> for item in z: # __getitem__ does for
... print(item, end=' ')
...
spam 123 3.1415 >>>
>>> z.reverse() # __getattr__ delegates to list
>>> z
[Stack:[3.1415, 123, 'spam']]
Implementing Stacks | 1365

Like lists and dictionaries, Stack defines both methods and operators for manipulating
instances by attribute references and expressions. Additionally, it defines the __get
attr__ special method to intercept references to attributes not defined in the class and
to route them to the wrapped list object (to support list methods: sort, append,
reverse, and so on). Many of the module’s operations become operators in the class.
Table 18-3 shows the equivalence of module and class operations (columns 1 and 2)
and gives the class method that comes into play for each (column 3).
Table 18-3. Module/class operation comparison
Module operations Class operations Class method
module.empty() not instance __len__
module.member(x) x in instance __getitem__
module.item(i) instance[i] __getitem__
module.length() len(instance) __len__
module.dump() print(instance) __repr__
range() counter loops for x in instance __getitem__
manual loop logic instance + instance __add__
module.stack.reverse() instance.reverse() __getattr__
module.push/pop/top instance.push/pop/top push/pop/top
In effect, classes let us extend Python’s set of built-in types with reusable types imple-
mented in Python modules. Class-based types may be used just like built-in types:
depending on which operation methods they define, classes can implement numbers,
mappings, and sequences, and may or may not be mutable. Class-based types may also
fall somewhere in between these categories.
Customization: Performance Monitors
So far we’ve seen how classes support multiple instances and integrate better with
Python’s object model by defining operator methods. One of the other main reasons
for using classes is to allow for future extensions and customizations. By implementing
stacks with a class, we can later add subclasses that specialize the implementation for
new demands. In fact, this is often the main reason for using a custom class instead of
a built-in alternative.
For instance, suppose we’ve started using the Stack class in Example 18-2, but we start
running into performance problems. One way to isolate bottlenecks is to instrument
data structures with logic that keeps track of usage statistics, which we can analyze
after running client applications. Because Stack is a class, we can add such logic in a
new subclass without affecting the original stack module (or its clients). The subclass
in Example 18-3 extends Stack to keep track of overall push/pop usage frequencies and
to record the maximum size of each instance.
1366 | Chapter 18: Data Structures

Example 18-3. PP4E\Dstruct\Basic\stacklog.py
"customize stack for usage data"
from stack2 import Stack # extends imported Stack
class StackLog(Stack): # count pushes/pops, max-size
pushes = pops = 0 # shared/static class members
def __init__(self, start=[]): # could also be module vars
self.maxlen = 0
Stack.__init__(self, start)
def push(self, object):
Stack.push(self, object) # do real push
StackLog.pushes += 1 # overall stats
self.maxlen = max(self.maxlen, len(self)) # per-instance stats
def pop(self):
StackLog.pops += 1 # overall counts
return Stack.pop(self) # not 'self.pops': instance
def stats(self):
return self.maxlen, self.pushes, self.pops # get counts from instance
This subclass works the same as the original Stack; it just adds monitoring logic. The
new stats method is used to get a statistics tuple through an instance:
>>> from stacklog import StackLog
>>> x = StackLog()
>>> y = StackLog() # make two stack objects
>>> for i in range(3): x.push(i) # and push object on them
...
>>> for c in 'spam': y.push(c)
...
>>> x, y # run inherited __repr__
([Stack:[2, 1, 0]], [Stack:['m', 'a', 'p', 's']])
>>> x.stats(), y.stats()
((3, 7, 0), (4, 7, 0))
>>>
>>> y.pop(), x.pop()
('m', 2)
>>> x.stats(), y.stats() # my maxlen, all pushes, all pops
((3, 7, 2), (4, 7, 2))
Notice the use of class attributes to record overall pushes and pops, and instance at-
tributes for per-instance maximum length. By hanging attributes on different objects,
we can expand or narrow their scopes.
Optimization: Tuple Tree Stacks
One of the nice things about wrapping objects up in classes is that you are free to change
the underlying implementation without breaking the rest of your program. Optimiza-
tions can be added in the future, for instance, with minimal impact; the interface is
Implementing Stacks | 1367

unchanged, even if the internals are. There are a variety of ways to implement stacks,
some more efficient than others. So far, our stacks have used slicing and extended
sequence assignment to implement pushing and popping. This method is relatively
inefficient: both operations make copies of the wrapped list object. For large stacks,
this practice can add a significant time penalty.
One way to speed up such code is to change the underlying data structure completely.
For example, we can store the stacked objects in a binary tree of tuples: each item may
be recorded as a pair, (object, tree), where object is the stacked item and tree is
either another tuple pair giving the rest of the stack or None to designate an empty stack.
A stack of items [1,2,3,4] would be internally stored as a tuple tree (1,(2,(3,
(4,None)))).
This tuple-based representation is similar to the notion of “cons-cells” in Lisp-family
languages: the object on the left is the car, and the rest of the tree on the right is the
cdr. Because we add or remove only a top tuple to push and pop items, this structure
avoids copying the entire stack. For large stacks, the benefit might be significant. The
next class, shown in Example 18-4, implements these ideas.
Example 18-4. PP4E\Dstruct\Basic\stack3.py
"optimize with tuple pair trees"
class Stack:
def __init__(self, start=[]): # init from any sequence
self.stack = None # even other (fast)stacks
for i in range(-len(start), 0):
self.push(start[-i - 1]) # push in reverse order
def push(self, node): # grow tree 'up/left'
self.stack = node, self.stack # new root tuple: (node, tree)
def pop(self):
node, self.stack = self.stack # remove root tuple
return node # TypeError if empty
def empty(self):
return not self.stack # is it 'None'?
def __len__(self): # on: len, not
len, tree = 0, self.stack
while tree:
len, tree = len+1, tree[1] # visit right subtrees
return len
def __getitem__(self, index): # on: x[i], in, for
len, tree = 0, self.stack
while len < index and tree: # visit/count nodes
len, tree = len+1, tree[1]
if tree:
return tree[0] # IndexError if out-of-bounds
else:
1368 | Chapter 18: Data Structures

raise IndexError() # so 'in' and 'for' stop
def __repr__(self):
return '[FastStack:' + repr(self.stack) + ']'
This class’s __getitem__ method handles indexing, in tests, and for loop iteration as
before (when no __iter__ is defined), but this version has to traverse a tree to find a
node by index. Notice that this isn’t a subclass of the original Stack class. Since nearly
every operation is implemented differently here, inheritance won’t really help. But cli-
ents that restrict themselves to the operations that are common to both classes can still
use them interchangeably—they just need to import a stack class from a different mod-
ule to switch implementations. Here’s a session with this stack version; as long as we
stick to pushing, popping, indexing, and iterating, this version is essentially indistin-
guishable from the original:
>>> from stack3 import Stack
>>> x = Stack()
>>> y = Stack()
>>> for c in 'spam': x.push(c)
...
>>> for i in range(3): y.push(i)
...
>>> x
[FastStack:('m', ('a', ('p', ('s', None))))]
>>> y
[FastStack:(2, (1, (0, None)))]
>>> len(x), x[2], x[-1]
(4, 'p', 'm')
>>> x.pop()
'm'
>>> x
[FastStack:('a', ('p', ('s', None)))]
>>>
>>> while y: print(y.pop(), end=' ')
...
2 1 0 >>>
Optimization: In-Place List Modifications
The last section tried to speed up pushes and pops with a different data structure, but
we might also be able to speed up our stack object by falling back on the mutability of
Python’s list object. Because lists can be changed in place, they can be modified more
quickly than any of the prior examples. In-place change operations such as append are
prone to complications when a list is referenced from more than one place. But because
the list inside the stack object isn’t meant to be used directly, we’re probably safe.
The module in Example 18-5 shows one way to implement a stack with in-place
changes; some operator overloading methods have been dropped to keep this simple.
The Python pop method it uses is equivalent to indexing and deleting the item at
Implementing Stacks | 1369

offset −1 (top is end-of-list here). Compared to using built-in lists directly, this class
incurs some performance degradation for the extra method calls, but it supports future
changes better by encapsulating stack operations.
Example 18-5. PP4E\Dstruct\Basic\stack4.py
"optimize with in-place list operations"
class error(Exception): pass # when imported: local exception
class Stack:
def __init__(self, start=[]): # self is the instance object
self.stack = [] # start is any sequence: stack...
for x in start: self.push(x)
def push(self, obj): # methods: like module + self
self.stack.append(obj) # top is end of list
def pop(self):
if not self.stack: raise error('underflow')
return self.stack.pop() # like fetch and delete stack[-1]
def top(self):
if not self.stack: raise error('underflow')
return self.stack[-1]
def empty(self):
return not self.stack # instance.empty()
def __len__(self):
return len(self.stack) # len(instance), not instance
def __getitem__(self, offset):
return self.stack[offset] # instance[offset], in, for
def __repr__(self):
return '[Stack:%s]' % self.stack
This version works like the original in module stack2, too; just replace stack2 with
stack4 in the previous interaction to get a feel for its operation. The only obvious dif-
ference is that stack items are in reverse when printed (i.e., the top is the end):
>>> from stack4 import Stack
>>> x = Stack()
>>> x.push('spam')
>>> x.push(123)
>>> x
[Stack:['spam', 123]]
>>>
>>> y = Stack()
>>> y.push(3.1415)
>>> y.push(x.pop())
>>> x, y
1370 | Chapter 18: Data Structures

([Stack:['spam']], [Stack:[3.1415, 123]])
>>> y.top()
123
Timing the Improvements
The prior section’s in-place changes stack object probably runs faster than both the
original and the tuple-tree versions, but the only way to really be sure is to time the
alternative implementations.* Since this could be something we’ll want to do more than
once, let’s first define a general module for timing functions in Python. In Exam-
ple 18-6, the built-in time module provides a clock function that we can use to get the
current CPU time in floating-point seconds, and the function timer.test simply calls
a function reps times and returns the number of elapsed seconds by subtracting stop
from start times.
Example 18-6. PP4E\Dstruct\Basic\timer.py
"generic code timer tool"
def test(reps, func, *args): # or best of N? see Learning Python
import time
start = time.clock() # current CPU time in float seconds
for i in range(reps): # call function reps times
func(*args) # discard any return value
return time.clock() - start # stop time - start time
There are other ways to time code, including a best-of-N approach and Python’s own
timeit module, but this module suffices for our purpose here. If you’re interested in
doing better, see Learning Python, Fourth Edition, for a larger case study on this topic,
or experiment on your own.
Next, we define a test driver script which deploys the timer, in Example 18-7. It expects
three command-line arguments: the number of pushes, pops, and indexing operations
to perform (we’ll vary these arguments to test different scenarios). When run at the top
level, the script creates 200 instances of the original and optimized stack classes and
performs the specified number of operations on each stack. Pushes and pops change
the stack; indexing just accesses it.
Example 18-7. PP4E\Dstruct\Basic\stacktime.py
"compare performance of stack alternatives"
import stack2 # list-based stacks: [x]+y
import stack3 # tuple-tree stacks: (x,y)
* Because Python is so dynamic, guesses about relative performance in Python are just as likely to be wrong as
right. Moreover, their accuracy is prone to change over time. Trust me on this. I’ve made sweeping statements
about performance in other books, only to be made wrong by a later Python release that optimized some
operations more than others. Performance measurement in Python is both nontrivial and an ongoing task.
In general, code for readability first, and worry about performance later, but always gather data to support
your optimization efforts.
Implementing Stacks | 1371

import stack4 # in-place stacks: y.append(x)
import timer # general function timer utility
rept = 200
from sys import argv
pushes, pops, items = (int(arg) for arg in argv[1:])
def stackops(stackClass):
x = stackClass('spam') # make a stack object
for i in range(pushes): x.push(i) # exercise its methods
for i in range(items): t = x[i] # 3.X: range generator
for i in range(pops): x.pop()
# or mod = __import__(n)
for mod in (stack2, stack3, stack4): # rept*(push+pop+ix)
print('%s:' % mod.__name__, end=' ')
print(timer.test(rept, stackops, getattr(mod, 'Stack')))
Results under Python 3.1
The following are some of the timings reported by the test driver script. The three
outputs represent the measured run times in seconds for the original, tuple, and in-
place stacks. For each stack type, the first test creates 200 stack objects and performs
roughly 120,000 stack operations (200 repetitions × (200 pushes + 200 indexes + 200
pops)) in the test duration times listed. These results were obtained on a fairly slow
Windows 7 netbook laptop under Python 3.1; as usual for benchmarks, your mileage
will probably vary.
C:\...\PP4E\Dstruct\Basic> python stacktime.py 200 200 200
stack2: 0.838853884098
stack3: 2.52424649244
stack4: 0.215801718938
C:\...\PP4E\Dstruct\Basic> python stacktime.py 200 50 200
stack2: 0.775219065818
stack3: 2.539294115
stack4: 0.156989574341
C:\...\PP4E\Dstruct\Basic> python stacktime.py 200 200 50
stack2: 0.743521212289
stack3: 0.286850521181
stack4: 0.156262000363
C:\...\PP4E\Dstruct\Basic> python stacktime.py 200 200 0
stack2: 0.721035029026
stack3: 0.116366779208
stack4: 0.141471921584
If you look closely enough, you’ll notice that the results show that the tuple-based stack
(stack3) performs better when we do more pushing and popping, but worse if we do
much indexing. Indexing lists is extremely fast for built-in lists (stack2 and stack4), but
very slow for tuple trees—the Python class must traverse the tree manually.
1372 | Chapter 18: Data Structures

The in-place change stacks (stack4) are almost always fastest, unless no indexing is
done at all—tuples (stack3) win by a hair in the last test case. When there is no indexing,
as in the last test, the tuple and in-place change stacks are roughly six and five times
quicker than the simple list-based stack, respectively. Since pushes and pops are most
of what clients would normally do to a stack, tuples are a contender here, despite their
poor indexing performance.
Of course, we’re talking about fractions of a second after many tens of thousands of
operations; in many applications, your users probably won’t care either way. If you
access a stack millions of times in your program, though, this difference may accumu-
late to a significant amount of time.
More on performance analysis
Two last notes on performance here. Although absolute times have changed over the
years with new Pythons and test machines, these results have remained relatively the
same. That is, tuple-based stacks win when no indexing is performed. All performance
measurements in a dynamic language like Python are prone to change over time,
though, so run such tests on your own for more accurate results.
Second, there’s often more to performance measurement than timing alternatives this
way. For a more complete picture, read about Python’s standard library profile module
(and its optimized workalike, cProfile). The profilers run Python code, collect per-
formance data along the way, and provide it in a report on code exit. It’s the most
complete way to isolate your code’s bottleneck, before you start working on optimizing
with better coding, algorithms, and data structures or moving portions to the
C language.
For simple performance analysis, though, our timing module provides the data we need.
In fact, we’ll reuse it to measure a more dramatic improvement in relative speed for set
implementation alternatives—the topic of the next section.
Implementing Sets
Another commonly used data structure is the set, a collection of objects that support
operations such as:
Intersection
Make a new set with all items in common.
Union
Make a new set with all items in either operand.
Membership
Test whether an item exists in a set.
Other operations, such as difference and subset tests, can be useful as well, depending
on the intended use. Sets come in handy for dealing with abstract group combinations.
Implementing Sets | 1373

For instance, given a set of engineers and a set of writers, you can pick out individuals
who do both activities by intersecting the two sets. A union of such sets would contain
either type of individual, but would include any given individual only once. This latter
property also makes sets ideal for removing duplicates from collections—simply con-
vert to and from a set to filter out repeats.
In fact, we relied on such operations in earlier chapters; PyMailGUI in Chapter 14, for
example, used intersection, union, and difference to manage the set of active mail
downloads, and filtered out duplicate recipients in multiple contexts with set conver-
sion. Sets are a widely relevant tool on practical programs.
Built-in Options
If you’ve studied the core Python language, you should already know that, as for stacks,
Python comes with built-in support here as well. Here, though, the support is even
more direct—Python’s set datatype provides standard and optimized set operations
today. As a quick review, built-in set usage is straightforward: set objects are initially
created by calling the type name with an iterable or sequence giving the components
of the set or by running a set comprehension expression:
>>> x = set('abcde') # make set from an iterable/sequence
>>> y = {c for c in 'bdxyz'} # same via set comprehension expression
>>> x
{'a', 'c', 'b', 'e', 'd'}
>>> y
{'y', 'x', 'b', 'd', 'z'}
Once you have a set, all the usual operations are available; here are the most common:
>>> 'e' in x # membership
True
>>> x – y # difference
{'a', 'c', 'e'}
>>> x & y # intersection
{'b', 'd'}
>>> x | y # union
{'a', 'c', 'b', 'e', 'd', 'y', 'x', 'z'}
Interestingly, just like the dictionaries, built-in sets are unordered, and require that all
set components be hashable (immutable). Making a set with a dictionary of items
works, but only because set uses the dictionary iterator, which returns the next key on
each iteration (it ignores key values):
>>> x = set(['spam', 'ham', 'eggs']) # sequence of immutables
>>> x
{'eggs', 'ham', 'spam'}
>>> x = {'spam', 'ham', 'eggs'} # same but set literal if items known
>>> x
{'eggs', 'ham', 'spam'}
>>> x = set([['spam', 'ham'], ['eggs']]) # immutables do not work as items
TypeError: unhashable type: 'list'
1374 | Chapter 18: Data Structures

>>> x = set({'spam':[1, 1], 'ham': [2, 2], 'eggs':[3, 3]})
>>> x
{'eggs', 'ham', 'spam'}
Plus there are additional operations we won’t illuminate here—see a core language text
such as Learning Python for more details. For instance, built-in sets also support op-
erations such as superset testing, and they come in two flavors: mutable and frozen
(frozen sets are hashable, and thus usable in sets of sets). Moreover, set comprehensions
are more powerful than suggested, and sets are a natural at duplicate removal:
>>> y = {c.upper() * 4 for c in 'spamham'} # set comprehension
>>> y
{'SSSS', 'AAAA', 'MMMM', 'HHHH', 'PPPP'}
>>>
>>> list(set([1, 2, 3, 1, 2])) # remove duplicates from a list
[1, 2, 3]
As for stacks, though, the built-in set type might not by itself achieve all our goals.
Moreover, homegrown set implementations turn out to be an ideal vehicle for studying
custom data structure implementations in Python. Although the end result may not
compete with the performance of built-in set objects today, the code can still be in-
structive to read, and fun to experiment with.
Also as for stacks, a custom set implementation will generally be based upon other
built-in types. Python lists, tuples, and strings come close to the notion of a set: the
in operator tests membership, for iterates, and so on. Here, we’ll add operations not
directly supported by Python sequences. In effect, we’re extending built-in types for
unique requirements.
Set Functions
As before, let’s first start out with a function-based set manager. But this time, instead
of managing a shared set object in a module, let’s define functions to implement set
operations on passed-in Python sequences (see Example 18-8).
Example 18-8. PP4E\Dstruct\Basic\inter.py
"set operations for two sequences"
def intersect(seq1, seq2):
res = [] # start with an empty list
for x in seq1: # scan the first sequence
if x in seq2:
res.append(x) # add common items to the end
return res
def union(seq1, seq2):
res = list(seq1) # make a copy of seq1
for x in seq2: # add new items in seq2
if not x in res:
Implementing Sets | 1375

res.append(x)
return res
These functions work on any type of sequence—lists strings, tuples, and other iterable
objects that conform to the protocols expected by these functions (for loops, in mem-
bership tests). In fact, we can even use them on mixed object types: the last two com-
mands in the following test compute the intersection and union of a list and a tuple.
As usual in Python, the object interface is what matters, not the specific types:
C:\...\PP4E\Dstruct\Basic> python
>>> from inter import *
>>> s1 = "SPAM"
>>> s2 = "SCAM"
>>> intersect(s1, s2), union(s1, s2)
(['S', 'A', 'M'], ['S', 'P', 'A', 'M', 'C'])
>>> intersect([1,2,3], (1,4))
[1]
>>> union([1,2,3], (1,4))
[1, 2, 3, 4]
Notice that the result is always a list here, regardless of the type of sequences passed
in. We could work around this by converting types or by using a class to sidestep this
issue (and we will in a moment). But type conversions aren’t clear-cut if the operands
are mixed-type sequences. Which type do we convert to?
Supporting multiple operands
If we’re going to use the intersect and union functions as general tools, one useful
extension is support for multiple arguments (i.e., more than two). The functions in
Example 18-9 use Python’s variable-length argument lists feature to compute the in-
tersection and union of arbitrarily many operands.
Example 18-9. PP4E\Dstruct\Basic\inter2.py
"set operations for multiple sequences"
def intersect(*args):
res = []
for x in args[0]: # scan the first list
for other in args[1:]: # for all other arguments
if x not in other: break # this item in each one?
else:
res.append(x) # add common items to the end
return res
def union(*args):
res = []
for seq in args: # for all sequence-arguments
for x in seq: # for all nodes in argument
if not x in res:
res.append(x) # add new items to result
return res
1376 | Chapter 18: Data Structures

These multi-operand functions work on sequences in the same way as the originals,
but they also support three or more operands. Notice the use of an else on the
intersection’s for loop here to detect common items. Also note that the last two ex-
amples in the following session work on lists with embedded compound objects: the
in tests used by the intersect and union functions apply equality testing to sequence
nodes recursively, as deep as necessary to determine collection comparison results:
C:\...\PP4E\Dstruct\Basic> python
>>> from inter2 import *
>>> s1, s2, s3 = 'SPAM', 'SLAM', 'SCAM'
>>> intersect(s1, s2)
['S', 'A', 'M']
>>> intersect(s1, s2, s3)
['S', 'A', 'M']
>>> intersect(s1, s2, s3, 'HAM')
['A', 'M']
>>> union(s1, s2), union(s1, s2, s3)
(['S', 'P', 'A', 'M', 'L'], ['S', 'P', 'A', 'M', 'L', 'C'])
>>> intersect([1, 2, 3], (1, 4), range(5)) # 3.X: range okay
[1]
>>> s1 = (9, (3.14, 1), "bye", [1, 2], "mello")
>>> s2 = [[1, 2], "hello", (3.14, 0), 9]
>>> intersect(s1, s2)
[9, [1, 2]]
>>> union(s1, s2)
[9, (3.14, 1), 'bye', [1, 2], 'mello', 'hello', (3.14, 0)]
Set Classes
The preceding section’s set functions can operate on a variety of objects, but they aren’t
as friendly as true objects. Among other things, your scripts need to keep track of the
sequences passed into these functions manually. Classes can do better: the class in
Example 18-10 implements a set object that can hold any type of object. Like the stack
classes, it’s essentially a wrapper around a Python list with extra set operations.
Example 18-10. PP4E\Dstruct\Basic\set.py
"multi-instance, customizable, encapsulated set class"
class Set:
def __init__(self, value = []): # on object creation
self.data = [] # manages a local list
self.concat(value)
def intersect(self, other): # other is any sequence type
res = [] # self is the instance subject
for x in self.data:
if x in other:
res.append(x)
return Set(res) # return a new Set
Implementing Sets | 1377

def union(self, other):
res = self.data[:] # make a copy of my list
for x in other:
if not x in res:
res.append(x)
return Set(res)
def concat(self, value): # value: a list, string, Set...
for x in value: # filters out duplicates
if not x in self.data:
self.data.append(x)
def __len__(self): return len(self.data)
def __getitem__(self, key): return self.data[key]
def __and__(self, other): return self.intersect(other)
def __or__(self, other): return self.union(other)
def __repr__(self): return '<Set:' + repr(self.data) + '>'
The Set class is used like the Stack class we saw earlier in this chapter: we make instances
and apply sequence operators plus unique set operations to them. Intersection and
union can be called as methods, or by using the & and | operators normally used for
built-in integer objects. Because we can string operators in expressions now (e.g., x &
y & z), there is no obvious need to support multiple operands in intersect/union
methods here (though this model’s need to create temporary objects within expressions
might eventually come to bear on performance). As with all rightly packaged objects,
we can either use the Set class within a program or test it interactively as follows:
>>> from set import Set
>>> users1 = Set(['Bob', 'Emily', 'Howard', 'Peeper'])
>>> users2 = Set(['Jerry', 'Howard', 'Carol'])
>>> users3 = Set(['Emily', 'Carol'])
>>> users1 & users2
<Set:['Howard']>
>>> users1 | users2
<Set:['Bob', 'Emily', 'Howard', 'Peeper', 'Jerry', 'Carol']>
>>> users1 | users2 & users3
<Set:['Bob', 'Emily', 'Howard', 'Peeper', 'Carol']>
>>> (users1 | users2) & users3
<Set:['Emily', 'Carol']>
>>> users1.data
['Bob', 'Emily', 'Howard', 'Peeper']
Optimization: Moving Sets to Dictionaries
Once you start using the Set class, the first problem you might encounter is its per-
formance: its nested for loops and in scans become exponentially slow. That slowness
may or may not be significant in your applications, but library classes should generally
be coded as efficiently as possible.
One way to optimize set performance is by changing the implementation to use dic-
tionaries rather than lists for storing sets internally—items may be stored as the keys
1378 | Chapter 18: Data Structures

of a dictionary whose values are all None. Because lookup time is constant and short for
dictionaries, the in list scans of the original set can be replaced with direct dictionary
fetches in this scheme. In traditional terms, moving sets to dictionaries replaces slow
linear searches with fast hashtable fetches. A computer scientist would explain this by
saying that the repeated nested scanning of the list-based intersection is an exponen-
tial algorithm in terms of its complexity, but dictionaries can be linear.
The module in Example 18-11 implements this idea. Its class is a subclass of the original
set, and it redefines the methods that deal with the internal representation but inherits
others. The inherited & and | methods trigger the new intersect and union methods
here, and the inherited len method works on dictionaries as is. As long as Set clients
are not dependent on the order of items in a set, most can switch to this version directly
by just changing the name of the module from which Set is imported; the class name
is the same.
Example 18-11. PP4E\Dstruct\Basic\fastset.py
"optimize with linear-time scans using dictionaries"
import set
# fastset.Set extends set.Set
class Set(set.Set):
def __init__(self, value = []):
self.data = {} # manages a local dictionary
self.concat(value) # hashing: linear search times
def intersect(self, other):
res = {}
for x in other: # other: a sequence or Set
if x in self.data: # use hash-table lookup; 3.X
res[x] = None
return Set(res.keys()) # a new dictionary-based Set
def union(self, other):
res = {} # other: a sequence or Set
for x in other: # scan each set just once
res[x] = None
for x in self.data.keys(): # '&' and '|' come back here
res[x] = None # so they make new fastset's
return Set(res.keys())
def concat(self, value):
for x in value: self.data[x] = None
# inherit and, or, len
def __getitem__(self, ix):
return list(self.data.keys())[ix] # 3.X: list()
def __repr__(self):
return '<Set:%r>' % list(self.data.keys()) # ditto
Implementing Sets | 1379

This works about the same as the previous version, even though the internal imple-
mentation is radically different:
>>> from fastset import Set
>>> users1 = Set(['Bob', 'Emily', 'Howard', 'Peeper'])
>>> users2 = Set(['Jerry', 'Howard', 'Carol'])
>>> users3 = Set(['Emily', 'Carol'])
>>> users1 & users2
<Set:['Howard']>
>>> users1 | users2
<Set:['Howard', 'Peeper', 'Jerry', 'Carol', 'Bob', 'Emily']>
>>> users1 | users2 & users3
<Set:['Peeper', 'Carol', 'Howard', 'Bob', 'Emily']>
>>> (users1 | users2) & users3
<Set:['Carol', 'Emily']>
>>> users1.data
{'Peeper': None, 'Bob': None, 'Howard': None, 'Emily': None}
The main functional difference in this version is the order of items in the set: because
dictionaries are randomly ordered, this set’s order will differ from the original. The
order of results can even vary across Python releases (in fact it did, between Python 2.X
and 3.X in the third and fourth editions of this book). For instance, you can store
compound objects in sets, but the order of items varies in this version:
>>> import set, fastset
>>> a = set.Set([(1,2), (3,4), (5,6)])
>>> b = set.Set([(3,4), (7,8)])
>>> a & b
<Set:[(3, 4)]>
>>> a | b
<Set:[(1, 2), (3, 4), (5, 6), (7, 8)]>
>>> a = fastset.Set([(1,2), (3,4), (5,6)])
>>> b = fastset.Set([(3,4), (7,8)])
>>> a & b
<Set:[(3, 4)]>
>>> a | b
<Set:[(1, 2), (5, 6), (3, 4), (7, 8)]>
>>> b | a
<Set:[(1, 2), (5, 6), (3, 4), (7, 8)]>
Sets aren’t supposed to be ordered anyhow, so this isn’t a showstopper. A deviation
that might matter, though, is that this version cannot be used to store unhashable (that
is, immutable) objects. This stems from the fact that dictionary keys must be immutable.
Because values are stored in keys, dictionary sets can contain only things such as tuples,
strings, numbers, and class objects with immutable signatures. Mutable objects such
as lists and dictionaries won’t work directly in this dictionary-based set, but do in the
original set class. Tuples do work here as compound set items, though, because they
are immutable; Python computes hash values and tests key equality as expected:
>>> set.Set([[1, 2],[3, 4]])
<Set:[[1, 2], [3, 4]]>
>>> fastset.Set([[1, 2],[3, 4]])
TypeError: unhashable type: 'list'
1380 | Chapter 18: Data Structures

>>> x = fastset.Set([(1, 2), (3, 4)])
>>> x & fastset.Set([(3, 4), (1, 5)])
<Set:[(3, 4)]>
Timing the results under Python 3.1
So how did we do on the optimization front this time? Again, guesses aren’t usually
good enough, though algorithmic complexity seems a compelling piece of evidence
here. To be sure, Example 18-12 codes a script to compare set class performance. It
reuses the timer module of Example 18-6 used earlier to compare stacks (our code may
implement different objects, but it doesn’t warp time).
Example 18-12. PP4E\Dstruct\Basic\settime.py
"compare set alternatives performance"
import timer, sys
import set, fastset
def setops(Class): # 3.X: range okay
a = Class(range(50)) # a 50-integer set
b = Class(range(20)) # a 20-integer set
c = Class(range(10))
d = Class(range(5))
for i in range(5):
t = a & b & c & d # 3 intersections
t = a | b | c | d # 3 unions
if __name__ == '__main__':
rept = int(sys.argv[1])
print('set => ', timer.test(rept, setops, set.Set))
print('fastset =>', timer.test(rept, setops, fastset.Set))
The setops function makes four sets and combines them with intersection and union
operators five times. A command-line argument controls the number of times this
whole process is repeated. More accurately, each call to setops makes 34 Set instances
(4 + [5 × (3 + 3)]) and runs the intersect and union methods 15 times each (5 × 3) in
the for loop’s body. The performance improvement is equally dramatic this time
around, on the same Windows 7 laptop under Python 3.1:
C:\...\PP4E\Dstruct\Basic> python settime.py 50
set => 0.637593916437
fastset => 0.20435049302
C:\...\PP4E\Dstruct\Basic> python settime.py 100
set => 1.21924758303
fastset => 0.393896570828
C:\...\PP4E\Dstruct\Basic> python settime.py 200
set => 2.51036677716
fastset => 0.802708664223
Implementing Sets | 1381

These results will vary per machine, and they may vary per Python release. But at least
for this specific test case, the dictionary-based set implementation (fastest) is roughly
three times faster than the simple list-based set (set). In fact, this threefold speedup is
probably sufficient. Python dictionaries are already optimized hashtables that you
might be hard-pressed to improve on. Unless there is evidence that dictionary-based
sets are still too slow, our work here is probably done.
By comparison, results for Python 2.4 in the prior edition of this book showed
fastest to be six times faster than set in all cases. Either iteration operations sped up,
or dictionary operations slowed down in 3.X. In the even older Python 1.5.2 and second
edition, the relative results were the same as they are today in Python 3.1. In any event,
this well underscores the fact that you must test performance on your machine and
your Python—today’s Python performance observation may easily be tomorrow’s his-
toric anecdote.
Adding Relational Algebra to Sets (External)
If you are interested in studying additional set-like operations coded in Python, see the
following files in this book’s examples distribution:
PP4E\Dstruct\Basic\rset.py
RSet implementation
PP4E\Dstruct\Basic\reltest.py
Test script for RSet; its expected output is in reltest.results.txt
The RSet subclass defined in rset.py adds basic relational algebra operations for sets of
dictionaries. It assumes the items in sets are mappings (rows), with one entry per col-
umn (field). RSet inherits all the original Set operations (iteration, intersection, union,
& and | operators, uniqueness filtering, and so on), and adds new operations as
methods:
Select
Return a set of nodes that have a field equal to a given value.
Bagof
Collect set nodes that satisfy an expression string.
Find
Select tuples according to a comparison, field, and value.
Match
Find nodes in two sets with the same values for common fields.
Product
Compute a Cartesian product: concatenate tuples from two sets.
Join
Combine tuples from two sets that have the same value for a field.
1382 | Chapter 18: Data Structures

Project
Extract named fields from the tuples in a table.
Difference
Remove one set’s tuples from another.
These operations go beyond the tools provided by Python’s built-in set object, and are
a prime example of why you may wish to implement a custom set type in the first place.
Although I have ported this code to run under Python 3.X, I have not revisited it in any
sort of depth for this edition, because today I would probably prefer to implement it
as a subclass of the built-in set type, rather than a part of a proprietary set implemen-
tation. Coincidentally, that leads us to our next topic.
Subclassing Built-in Types
Before we move on to other classical data structures, there is one more twist in the stack
and set story. In recent Python releases, it is also possible to subclass built-in datatypes
such as lists and dictionaries, in order to extend them. That is, because datatypes are
now themselves customizable classes, we can code unique datatypes that are extensions
of built-ins, with subclasses that inherit built-in tool sets. This is especially true in
Python 3.X, where “type” and “class” have become veritable synonyms altogether.
To demonstrate, Example 18-13 shows the main parts of a module containing variants
of our stack and set objects coded in the prior sections, revised as customized lists. For
variety, the set union method has also been simplified slightly here to remove a redun-
dant loop.
Example 18-13. PP4E\Dstruct\Basic\typesubclass.py
"customize built-in types to extend, instead of starting from scratch"
class Stack(list):
"a list with extra methods"
def top(self):
return self[-1]
def push(self, item):
list.append(self, item)
def pop(self):
if not self:
return None # avoid exception
else:
return list.pop(self)
class Set(list):
" a list with extra methods and operators"
def __init__(self, value=[]): # on object creation
list.__init__(self)
self.concat(value)
Subclassing Built-in Types | 1383

def intersect(self, other): # other is any sequence type
res = [] # self is the instance subject
for x in self:
if x in other:
res.append(x)
return Set(res) # return a new Set
def union(self, other):
res = Set(self) # new set with a copy of my list
res.concat(other) # insert uniques from other
return res
def concat(self, value): # value: a list, string, Set...
for x in value: # filters out duplicates
if not x in self:
self.append(x)
# len, getitem, iter inherited, use list repr
def __and__(self, other): return self.intersect(other)
def __or__(self, other): return self.union(other)
def __str__(self): return '<Set:' + repr(self) + '>'
class FastSet(dict):
pass # this doesn't simplify much
...self-test code omitted: see examples package file...
The stack and set implemented in this code are essentially like those we saw earlier,
but instead of embedding and managing a list, these objects really are customized lists.
They add a few additional methods, but they inherit all of the list object’s functionality.
This can reduce the amount of wrapper code required, but it can also expose func-
tionality that might not be appropriate in some cases. As coded, for example, we’re
able to sort and insert into stacks and reverse a set, because we’ve inherited these
methods from the built-in list object. In most cases, such operations don’t make sense
for these data structures, and barring extra code that disables such nonfeatures, the
wrapper class approach of the prior sections may still be preferred.
For more on the class subtype classes, see the remainder of their implementation file
in the examples package for self-test code and its expected output. Because these objects
are used in the same way as our original stacks and sets, interacting with them is left
as suggested exercise here.
Subclassing built-in types has other applications, which may be more useful than those
demonstrated by the preceding code. Consider a queue, or ordered dictionary, for ex-
ample. The queue could take the form of a list subclass with get and put methods to
insert on one end and delete from the other; the dictionary could be coded as a dic-
tionary subclass with an extra list of keys that is sorted on insertion or request. While
this scheme works well for types that resemble built-ins, though, type subclasses may
1384 | Chapter 18: Data Structures

not address data structures of radically different form—like those of the next two
sections.
Binary Search Trees
Binary trees are a data structure that impose an order on inserted nodes: items less than
a node are stored in the left subtree, and items greater than a node are inserted in the
right. At the bottom, the subtrees are empty. Because of this structure, binary trees
naturally support quick, recursive traversals, and hence fast lookup and search in a
wide variety of applications—at least ideally, every time you follow a link to a subtree,
you divide the search space in half.
Built-in Options
Here too, Python supports search operations with built-in tools. Dictionaries, for ex-
ample, already provide a highly optimized, C-coded search table tool. In fact, indexing
a dictionary by key directly is likely to be faster than searching a Python-coded
equivalent:
>>> x = {} # empty dict
>>> for i in [3, 1, 9, 2, 7]: x[i] = None # insert
...
>>> x
{7: None, 1: None, 2: None, 3: None, 9: None}
>>>
>>> for i in range(8): print((i, i in x), end=' ') # lookup
...
(0, False) (1, True) (2, True) (3, True) (4, False) (5, False) (6, False) (7, True)
Because dictionaries are built into the language, they are always available and will usu-
ally be faster than Python-based data structure implementations. Built-in sets can often
offer similar functionality—in fact, it’s not too much of an abstraction to think of sets
as valueless dictionaries:
>>> x = set() # empty set
>>> for i in [3, 1, 9, 2, 7]: x.add(i) # insert
...
>>> x
{7, 1, 2, 3, 9}
>>> for i in range(8): print((i, i in x), end=' ') # lookup
...
(0, False) (1, True) (2, True) (3, True) (4, False) (5, False) (6, False) (7, True)
In fact, there are a variety of ways to insert items into both sets and dictionaries; both
are useful for checking if a key is stored, but dictionaries further allow search keys to
have associated values:
>>> v = [3, 1, 9]
>>> {k for k in v} # set comprehension
Binary Search Trees | 1385

{1, 3, 9}
>>> set(v) # set constructor
{1, 3, 9}
>>> {k: k+100 for k in v} # dict comprehension
{1: 101, 3: 103, 9: 109}
>>> dict(zip(v, [99] * len(v))) # dict constructor
{1: 99, 3: 99, 9: 99}
>>> dict.fromkeys(v, 99) # dict method
{1: 99, 3: 99, 9: 99}
So why bother with a custom search data structure implementation here, given such
flexible built-ins? In some applications, you might not, but here especially, a custom
implementation often makes sense to allow for customized tree algorithms. For in-
stance, custom tree balancing can help speed lookups in pathological cases, and might
outperform the generalized hashing algorithms used in dictionaries and sets. Moreover,
the same motivations we gave for custom stacks and sets apply here as well—by en-
capsulating tree access in class-based interfaces, we support future extension and
change in more manageable ways.
Implementing Binary Trees
Binary trees are named for the implied branch-like structure of their subtree links.
Typically, their nodes are implemented as a triple of values: (LeftSubtree, NodeValue,
RightSubtree). Beyond that, there is fairly wide latitude in the tree implementation.
Here we’ll use a class-based approach:
•BinaryTree is a header object, which initializes and manages the actual tree.
•EmptyNode is the empty object, shared at all empty subtrees (at the bottom).
•BinaryNode objects are nonempty tree nodes with a value and two subtrees.
Instead of coding distinct search functions, binary trees are constructed with “smart”
objects—class instances that know how to handle insert/lookup and printing requests
and pass them to subtree objects. In fact, this is another example of the object-oriented
programming (OOP) composition relationship in action: tree nodes embed other tree
nodes and pass search requests off to the embedded subtrees. A single empty class
instance is shared by all empty subtrees in a binary tree, and inserts replace an Empty
Node with a BinaryNode at the bottom. Example 18-14 shows what this means in code.
Example 18-14. PP4E\Dstruct\Classics\btree.py
"a valueless binary search tree"
class BinaryTree:
def __init__(self): self.tree = EmptyNode()
def __repr__(self): return repr(self.tree)
def lookup(self, value): return self.tree.lookup(value)
def insert(self, value): self.tree = self.tree.insert(value)
1386 | Chapter 18: Data Structures

class EmptyNode:
def __repr__(self):
return '*'
def lookup(self, value): # fail at the bottom
return False
def insert(self, value):
return BinaryNode(self, value, self) # add new node at bottom
class BinaryNode:
def __init__(self, left, value, right):
self.data, self.left, self.right = value, left, right
def lookup(self, value):
if self.data == value:
return True
elif self.data > value:
return self.left.lookup(value) # look in left
else:
return self.right.lookup(value) # look in right
def insert(self, value):
if self.data > value:
self.left = self.left.insert(value) # grow in left
elif self.data < value:
self.right = self.right.insert(value) # grow in right
return self
def __repr__(self):
return ('( %s, %s, %s )' %
(repr(self.left), repr(self.data), repr(self.right)))
As usual, BinaryTree can contain objects of any type that support the expected interface
protocol—here, > and < comparisons. This includes class instances with the __lt__ and
__gt__ methods. Let’s experiment with this module’s interfaces. The following code
stuffs five integers into a new tree, and then searches for values 0 . . . 7, as we did earlier
for dictionaries and sets:
C:\...\PP4E\Dstruct\Classics> python
>>> from btree import BinaryTree
>>> x = BinaryTree()
>>> for i in [3, 1, 9, 2, 7]: x.insert(i)
...
>>> for i in range(8): print((i, x.lookup(i)), end=' ')
...
(0, False) (1, True) (2, True) (3, True) (4, False) (5, False) (6, False) (7, True)
To watch this tree grow, add a print call statement after each insert. Tree nodes print
themselves as triples, and empty nodes print as *. The result reflects tree nesting:
>>> y = BinaryTree()
>>> y
*
>>> for i in [3, 1, 9, 2, 7]:
... y.insert(i); print(y)
...
Binary Search Trees | 1387

( *, 3, * )
( ( *, 1, * ), 3, * )
( ( *, 1, * ), 3, ( *, 9, * ) )
( ( *, 1, ( *, 2, * ) ), 3, ( *, 9, * ) )
( ( *, 1, ( *, 2, * ) ), 3, ( ( *, 7, * ), 9, * ) )
At the end of this chapter, we’ll see another way to visualize such trees in a GUI named
PyTree (you’re invited to flip ahead now if you prefer). Node values in this tree object
can be any comparable Python object—for instance, here is a tree of strings:
>>> z = BinaryTree()
>>> for c in 'badce': z.insert(c)
...
>>> z
( ( *, 'a', * ), 'b', ( ( *, 'c', * ), 'd', ( *, 'e', * ) ) )
>>> z = BinaryTree()
>>> for c in 'abcde': z.insert(c)
...
>>> z
( *, 'a', ( *, 'b', ( *, 'c', ( *, 'd', ( *, 'e', * ) ) ) ) )
>>> z = BinaryTree()
>>> for c in 'edcba': z.insert(c)
...
>>> z
( ( ( ( ( *, 'a', * ), 'b', * ), 'c', * ), 'd', * ), 'e', * )
Notice the last tests here: if items inserted into a binary tree are already ordered, you
wind up with a linear structure and lose the search-space partitioning magic of binary
trees (the tree grows in right or left branches only). This is a worst-case scenario, and
binary trees generally do a good job of dividing values in practice. But if you are inter-
ested in pursuing this topic further, see a data structures text for tree-balancing tech-
niques that automatically keep the tree as dense as possible but are beyond our scope
here.
Trees with Both Keys and Values
Also note that to keep the code simple, these trees store a value only and lookups return
a true or false result. In practice, you sometimes may want to store both a key and an
associated value (or even more) at each tree node. Example 18-15 shows what such a
tree object looks like, for any prospective lumberjacks in the audience.
Example 18-15. PP4E\Dstruct\Classics\btreevals.py
"a binary search tree with values for stored keys"
class KeyedBinaryTree:
def __init__(self): self.tree = EmptyNode()
def __repr__(self): return repr(self.tree)
def lookup(self, key): return self.tree.lookup(key)
def insert(self, key, val): self.tree = self.tree.insert(key, val)
1388 | Chapter 18: Data Structures

class EmptyNode:
def __repr__(self):
return '*'
def lookup(self, key): # fail at the bottom
return None
def insert(self, key, val):
return BinaryNode(self, key, val, self) # add node at bottom
class BinaryNode:
def __init__(self, left, key, val, right):
self.key, self.val = key, val
self.left, self.right = left, right
def lookup(self, key):
if self.key == key:
return self.val
elif self.key > key:
return self.left.lookup(key) # look in left
else:
return self.right.lookup(key) # look in right
def insert(self, key, val):
if self.key == key:
self.val = val
elif self.key > key:
self.left = self.left.insert(key, val) # grow in left
elif self.key < key:
self.right = self.right.insert(key, val) # grow in right
return self
def __repr__(self):
return ('( %s, %s=%s, %s )' %
(repr(self.left), repr(self.key), repr(self.val), repr(self.right)))
if __name__ == '__main__':
t = KeyedBinaryTree()
for (key, val) in [('bbb', 1), ('aaa', 2), ('ccc', 3)]:
t.insert(key, val)
print(t)
print(t.lookup('aaa'), t.lookup('ccc'))
t.insert('ddd', 4)
t.insert('aaa', 5) # changes key's value
print(t)
The following shows this script’s self-test code at work; nodes simply have more con-
tent this time around:
C:\...\PP4E\Dstruct\Classics> python btreevals.py
( ( *, 'aaa'=2, * ), 'bbb'=1, ( *, 'ccc'=3, * ) )
2 3
( ( *, 'aaa'=5, * ), 'bbb'=1, ( *, 'ccc'=3, ( *, 'ddd'=4, * ) ) )
In fact, the effect is similar to the keys and values of a built-in dictionary, but a custom
tree structure like this might support custom use cases and algorithms, as well as code
Binary Search Trees | 1389
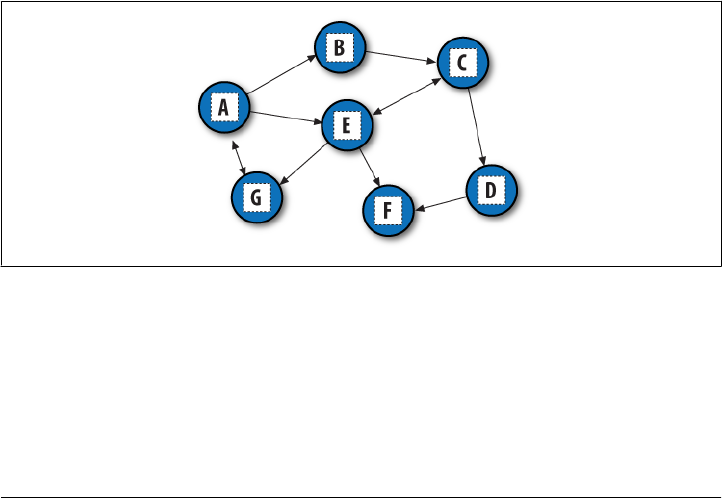
evolution, more robustly. To see a data structure that departs even further from the
built-in gang, though, we need to move on to the next section.
Graph Searching
Many problems that crop up in both real life and real programming can be fairly rep-
resented as a graph—a set of states with transitions (“arcs”) that lead from one state
to another. For example, planning a route for a trip is really a graph search problem in
disguise: the states are places you’d like to visit, and the arcs are the transportation
links between them. A program that searches for a trip’s optimal route is a graph
searcher. For that matter, so are many programs that walk hyperlinks on the Web.
This section presents simple Python programs that search through a directed, cyclic
graph to find the paths between a start state and a goal. Graphs can be more general
than trees because links may point at arbitrary nodes—even ones already searched
(hence the word cyclic). Moreover, there isn’t any direct built-in support for this type
of goal; although graph searchers may ultimately use built-in types, their search routines
are custom enough to warrant proprietary implementations.
The graph used to test searchers in this section is sketched in Figure 18-1. Arrows at
the end of arcs indicate valid paths (e.g., A leads to B, E, and G). The search algorithms
will traverse this graph in a depth-first fashion, and they will trap cycles in order to
avoid looping. If you pretend that this is a map, where nodes represent cities and arcs
represent roads, this example will probably seem a bit more meaningful.
Figure 18-1. A directed graph
Implementing Graph Search
The first thing we need to do is choose a way to represent this graph in a Python script.
One approach is to use built-in datatypes and searcher functions. The file in Exam-
ple 18-16 builds the test graph as a simple dictionary: each state is a dictionary key,
1390 | Chapter 18: Data Structures

with a list of keys of nodes it leads to (i.e., its arcs). This file also defines a function that
we’ll use to run a few searches in the graph.
Example 18-16. PP4E\Dstruct\Classics\gtestfunc.py
"dictionary based graph representation"
Graph = {'A': ['B', 'E', 'G'],
'B': ['C'], # a directed, cyclic graph
'C': ['D', 'E'], # stored as a dictionary
'D': ['F'], # 'key' leads-to [nodes]
'E': ['C', 'F', 'G'],
'F': [ ],
'G': ['A'] }
def tests(searcher): # test searcher function
print(searcher('E', 'D', Graph)) # find all paths from 'E' to 'D'
for x in ['AG', 'GF', 'BA', 'DA']:
print(x, searcher(x[0], x[1], Graph))
Now, let’s code two modules that implement the actual search algorithms. They are
both independent of the graph to be searched (it is passed in as an argument). The first
searcher, in Example 18-17, uses recursion to walk through the graph.
Example 18-17. PP4E\Dstruct\Classics\gsearch1.py
"find all paths from start to goal in graph"
def search(start, goal, graph):
solns = []
generate([start], goal, solns, graph) # collect paths
solns.sort(key=lambda x: len(x)) # sort by path length
return solns
def generate(path, goal, solns, graph):
state = path[-1]
if state == goal: # found goal here
solns.append(path) # change solns in-place
else: # check all arcs here
for arc in graph[state]: # skip cycles on path
if arc not in path:
generate(path + [arc], goal, solns, graph)
if __name__ == '__main__':
import gtestfunc
gtestfunc.tests(search)
The second searcher, in Example 18-18, uses an explicit stack of paths to be expanded
using the tuple-tree stack representation we explored earlier in this chapter.
Graph Searching | 1391

Example 18-18. PP4E\Dstruct\Classics\gsearch2.py
"graph search, using paths stack instead of recursion"
def search(start, goal, graph):
solns = generate(([start], []), goal, graph)
solns.sort(key=lambda x: len(x))
return solns
def generate(paths, goal, graph): # returns solns list
solns = [] # use a tuple-stack
while paths:
front, paths = paths # pop the top path
state = front[-1]
if state == goal:
solns.append(front) # goal on this path
else:
for arc in graph[state]: # add all extensions
if arc not in front:
paths = (front + [arc]), paths
return solns
if __name__ == '__main__':
import gtestfunc
gtestfunc.tests(search)
To avoid cycles, both searchers keep track of nodes visited along a path. If an extension
is already on the current path, it is a loop. The resulting solutions list is sorted by
increasing lengths using the list sort method and its optional key value transform ar-
gument. To test the searcher modules, simply run them; their self-test code calls the
canned search test in the gtestfunc module:
C:\...\PP4E\Dstruct\Classics> python gsearch1.py
[['E', 'C', 'D'], ['E', 'G', 'A', 'B', 'C', 'D']]
AG [['A', 'G'], ['A', 'E', 'G'], ['A', 'B', 'C', 'E', 'G']]
GF [['G', 'A', 'E', 'F'], ['G', 'A', 'B', 'C', 'D', 'F'],
['G', 'A', 'B', 'C', 'E', 'F'], ['G', 'A', 'E', 'C', 'D', 'F']]
BA [['B', 'C', 'E', 'G', 'A']]
DA []
C:\...\PP4E\Dstruct\Classics> python gsearch2.py
[['E', 'C', 'D'], ['E', 'G', 'A', 'B', 'C', 'D']]
AG [['A', 'G'], ['A', 'E', 'G'], ['A', 'B', 'C', 'E', 'G']]
GF [['G', 'A', 'E', 'F'], ['G', 'A', 'E', 'C', 'D', 'F'],
['G', 'A', 'B', 'C', 'E', 'F'], ['G', 'A', 'B', 'C', 'D', 'F']]
BA [['B', 'C', 'E', 'G', 'A']]
DA []
This output shows lists of possible paths through the test graph; I added two line breaks
to make it more readable (Python pprint pretty-printer module might help with read-
ability here as well). Notice that both searchers find the same paths in all tests, but the
order in which they find those solutions may differ. The gsearch2 order depends on
1392 | Chapter 18: Data Structures

how and when extensions are added to its path’s stack; try tracing through the outputs
and code to see how.
Moving Graphs to Classes
Using dictionaries to represent graphs is efficient: connected nodes are located by a fast
hashing operation. But depending on the application, other representations might
make more sense. For instance, classes can be used to model nodes in a network, too,
much like the binary tree example earlier. As classes, nodes may contain content useful
for more sophisticated searches. They may also participate in inheritance hierarchies,
to acquire additional behaviors. To illustrate the basic idea, Example 18-19 shows an
alternative coding for our graph searcher; its algorithm is closest to gsearch1.
Example 18-19. PP4E\Dstruct\Classics\graph.py
"build graph with objects that know how to search"
class Graph:
def __init__(self, label, extra=None):
self.name = label # nodes=inst objects
self.data = extra # graph=linked objs
self.arcs = []
def __repr__(self):
return self.name
def search(self, goal):
Graph.solns = []
self.generate([self], goal)
Graph.solns.sort(key=lambda x: len(x))
return Graph.solns
def generate(self, path, goal):
if self == goal: # class == tests addr
Graph.solns.append(path) # or self.solns: same
else:
for arc in self.arcs:
if arc not in path:
arc.generate(path + [arc], goal)
In this version, graphs are represented as a network of embedded class instance objects.
Each node in the graph contains a list of the node objects it leads to (arcs), which it
knows how to search. The generate method walks through the objects in the graph.
But this time, links are directly available on each node’s arcs list; there is no need to
index (or pass) a dictionary to find linked objects. The search is effectively spread across
the graph’s linked objects.
To test, the module in Example 18-20 builds the test graph again, this time using linked
instances of the Graph class. Notice the use of exec in this code: it executes dynamically
Graph Searching | 1393

constructed strings to do the work of seven assignment statements (A=Graph('A'),
B=Graph('B'), and so on).
Example 18-20. PP4E\Dstruct\Classics\gtestobj1.py
"build class-based graph and run test searches"
from graph import Graph
# this doesn't work inside def in 3.1: B undefined
for name in "ABCDEFG": # make objects first
exec("%s = Graph('%s')" % (name, name)) # label=variable-name
A.arcs = [B, E, G]
B.arcs = [C] # now configure their links:
C.arcs = [D, E] # embedded class-instance list
D.arcs = [F]
E.arcs = [C, F, G]
G.arcs = [A]
A.search(G)
for (start, stop) in [(E,D), (A,G), (G,F), (B,A), (D,A)]:
print(start.search(stop))
Running this test executes the same sort of graph walking, but this time it’s routed
through object methods:
C:\...\PP4E\Dstruct\Classics> python gtestobj1.py
[[E, C, D], [E, G, A, B, C, D]]
[[A, G], [A, E, G], [A, B, C, E, G]]
[[G, A, E, F], [G, A, B, C, D, F], [G, A, B, C, E, F], [G, A, E, C, D, F]]
[[B, C, E, G, A]]
[]
The results are the same as for the functions, but node name labels are not quoted:
nodes on path lists here are Graph instances, and this class’s __repr__ scheme suppresses
quotes. Example 18-21 is one last graph test before we move on; sketch the nodes and
arcs on paper if you have more trouble following the paths than Python.
Example 18-21. PP4E\Dstruct\Classics\gtestobj2.py
from graph import Graph
S = Graph('s')
P = Graph('p') # a graph of spam
A = Graph('a') # make node objects
M = Graph('m')
S.arcs = [P, M] # S leads to P and M
P.arcs = [S, M, A] # arcs: embedded objects
A.arcs = [M]
print(S.search(M)) # find all paths from S to M
1394 | Chapter 18: Data Structures

This test finds three paths in its graph between nodes S and M. We’ve really only
scratched the surface of this academic yet useful domain here; experiment further on
your own, and see other books for additional topics (e.g., breadth-first search by levels,
and best-first search by path or state scores):
C:\...\PP4E\Dstruct\Classics> python gtestobj2.py
[[s, m], [s, p, m], [s, p, a, m]]
Permuting Sequences
Our next data structure topic implements extended functionality for sequences that is
not present in Python’s built-in objects. The functions defined in Example 18-22 shuffle
sequences in a number of ways:
permute
constructs a list with all valid permutations of any sequence
subset
constructs a list with all valid permutations of a specific length
combo
works like subset, but order doesn’t matter: permutations of the same items are
filtered out
These results are useful in a variety of algorithms: searches, statistical analysis, and
more. For instance, one way to find an optimal ordering for items is to put them in a
list, generate all possible permutations, and simply test each one in turn. All three of
the functions make use of generic sequence slicing so that the result list contains se-
quences of the same type as the one passed in (e.g., when we permute a string, we get
back a list of strings).
Example 18-22. PP4E\Dstruct\Classics\permcomb.py
"permutation-type operations for sequences"
def permute(list):
if not list: # shuffle any sequence
return [list] # empty sequence
else:
res = []
for i in range(len(list)):
rest = list[:i] + list[i+1:] # delete current node
for x in permute(rest): # permute the others
res.append(list[i:i+1] + x) # add node at front
return res
def subset(list, size):
if size == 0 or not list: # order matters here
return [list[:0]] # an empty sequence
else:
result = []
Permuting Sequences | 1395

for i in range(len(list)):
pick = list[i:i+1] # sequence slice
rest = list[:i] + list[i+1:] # keep [:i] part
for x in subset(rest, size-1):
result.append(pick + x)
return result
def combo(list, size):
if size == 0 or not list: # order doesn't matter
return [list[:0]] # xyz == yzx
else:
result = []
for i in range(0, (len(list) - size) + 1): # iff enough left
pick = list[i:i+1]
rest = list[i+1:] # drop [:i] part
for x in combo(rest, size - 1):
result.append(pick + x)
return result
All three of these functions work on any sequence object that supports len, slicing, and
concatenation operations. For instance, we can use permute on instances of some of the
stack classes defined at the start of this chapter (experiment with this on your own for
more insights).
The following session shows our sequence shufflers in action. Permuting a list enables
us to find all the ways the items can be arranged. For instance, for a four-item list, there
are 24 possible permutations (4 × 3 × 2 × 1). After picking one of the four for the first
position, there are only three left to choose from for the second, and so on. Order
matters: [1,2,3] is not the same as [1,3,2], so both appear in the result:
C:\...\PP4E\Dstruct\Classics> python
>>> from permcomb import *
>>> permute([1, 2, 3])
[[1, 2, 3], [1, 3, 2], [2, 1, 3], [2, 3, 1], [3, 1, 2], [3, 2, 1]]
>>> permute('abc')
['abc', 'acb', 'bac', 'bca', 'cab', 'cba']
>>> permute('help')
['help', 'hepl', 'hlep', 'hlpe', 'hpel', 'hple', 'ehlp', 'ehpl', 'elhp', 'elph',
'ephl', 'eplh', 'lhep', 'lhpe', 'lehp', 'leph', 'lphe', 'lpeh', 'phel', 'phle',
'pehl', 'pelh', 'plhe', 'pleh']
combo results are related to permutations, but a fixed-length constraint is put on the
result, and order doesn’t matter: abc is the same as acb, so only one is added to the
result set:
>>> combo([1, 2, 3], 3)
[[1, 2, 3]]
>>> combo('abc', 3)
['abc']
>>> combo('abc', 2)
['ab', 'ac', 'bc']
>>> combo('abc', 4)
[]
>>> combo((1, 2, 3, 4), 3)
1396 | Chapter 18: Data Structures

[(1, 2, 3), (1, 2, 4), (1, 3, 4), (2, 3, 4)]
>>> for i in range(0, 6): print(i, combo("help", i))
...
0 ['']
1 ['h', 'e', 'l', 'p']
2 ['he', 'hl', 'hp', 'el', 'ep', 'lp']
3 ['hel', 'hep', 'hlp', 'elp']
4 ['help']
5 []
Finally, subset is just fixed-length permutations; order matters, so the result is larger
than for combo. In fact, calling subset with the length of the sequence is identical to
permute:
>>> subset([1, 2, 3], 3)
[[1, 2, 3], [1, 3, 2], [2, 1, 3], [2, 3, 1], [3, 1, 2], [3, 2, 1]]
>>> subset('abc', 3)
['abc', 'acb', 'bac', 'bca', 'cab', 'cba']
>>> for i in range(0, 6): print(i, subset("help", i))
...
0 ['']
1 ['h', 'e', 'l', 'p']
2 ['he', 'hl', 'hp', 'eh', 'el', 'ep', 'lh', 'le', 'lp', 'ph', 'pe', 'pl']
3 ['hel', 'hep', 'hle', 'hlp', 'hpe', 'hpl', 'ehl', 'ehp', 'elh', 'elp', 'eph',
'epl', 'lhe', 'lhp', 'leh', 'lep', 'lph', 'lpe', 'phe', 'phl', 'peh', 'pel',
'plh', 'ple']
4 ['help', 'hepl', 'hlep', 'hlpe', 'hpel', 'hple', 'ehlp', 'ehpl', 'elhp',
'elph', 'ephl', 'eplh', 'lhep', 'lhpe', 'lehp', 'leph', 'lphe', 'lpeh',
'phel', 'phle', 'pehl', 'pelh', 'plhe', 'pleh']
5 ['help', 'hepl', 'hlep', 'hlpe', 'hpel', 'hple', 'ehlp', 'ehpl', 'elhp',
'elph', 'ephl', 'eplh', 'lhep', 'lhpe', 'lehp', 'leph', 'lphe', 'lpeh',
'phel', 'phle', 'pehl', 'pelh', 'plhe', 'pleh']
These are some fairly dense algorithms (and frankly, may seem to require a Zen-like
“moment of clarity” to grasp completely), but they are not too obscure if you trace
through a few simple cases first. They’re also representative of the sort of operation
that requires custom data structure code—unlike the last stop on our data structures
tour in the next section.
Reversing and Sorting Sequences
The permutation utilities of the prior section are useful in a variety of applications, but
there are even more fundamental operations that might seem prime candidates for
automation. Reversing and sorting collections of values, for example, are core opera-
tions in a broad range of programs. To demonstrate coding techniques, and to provide
examples that yield closure for a recurring theme of this chapter, let’s take a quick look
at both of these in turn.
Reversing and Sorting Sequences | 1397

Implementing Reversals
Reversal of collections can be coded either recursively or iteratively in Python, and as
functions or class methods. Example 18-23 is a first attempt at two simple reversal
functions.
Example 18-23. PP4E\Dstruct\Classics\rev1.py
def reverse(list): # recursive
if list == []:
return []
else:
return reverse(list[1:]) + list[:1]
def ireverse(list): # iterative
res = []
for x in list: res = [x] + res
return res
Both reversal functions work correctly on lists. But if we try reversing nonlist sequences
(strings, tuples, and so on), the ireverse function always returns a list for the result
regardless of the type of sequence passed:
>>> ireverse("spam")
['m', 'a', 'p', 's']
Much worse, the recursive reverse version won’t work at all for nonlists—it gets stuck
in an infinite loop. The reason is subtle: when reverse reaches the empty string (""),
it’s not equal to the empty list ([]), so the else clause is selected. But slicing an empty
sequence returns another empty sequence (indexes are scaled): the else clause recurs
again with an empty sequence, without raising an exception. The net effect is that this
function gets stuck in a loop, calling itself over and over again until Python runs out of
memory.
The versions in Example 18-24 fix both problems by using generic sequence handling
techniques much like that of the prior section’s permutation utilities:
•reverse uses the not operator to detect the end of the sequence and returns the
empty sequence itself, rather than an empty list constant. Since the empty sequence
is the type of the original argument, the + operation always builds the correct type
sequence as the recursion unfolds.
•ireverse makes use of the fact that slicing a sequence returns a sequence of the
same type. It first initializes the result to the slice [:0], a new, empty slice of
the argument’s type. Later, it uses slicing to extract one-node sequences to add to
the result’s front, instead of a list constant.
Example 18-24. PP4E\Dstruct\Classics\rev2.py
def reverse(list):
if not list: # empty? (not always [])
return list # the same sequence type
1398 | Chapter 18: Data Structures

else:
return reverse(list[1:]) + list[:1] # add front item on the end
def ireverse(list):
res = list[:0] # empty, of same type
for i in range(len(list)):
res = list[i:i+1] + res # add each item to front
return res
The combination of the changes allows the new functions to work on any sequence,
and return a new sequence of the same type as the sequence passed in. If we pass in a
string, we get a new string as the result. In fact, they reverse any sequence object that
responds to slicing, concatenation, and len—even instances of Python classes and C
types. In other words, they can reverse any object that has sequence interface protocols.
Here they are working on lists, strings, and tuples:
>>> from rev2 import *
>>> reverse([1, 2, 3]), ireverse([1, 2, 3])
([3, 2, 1], [3, 2, 1])
>>> reverse("spam"), ireverse("spam")
('maps', 'maps')
>>> reverse((1.2, 2.3, 3.4)), ireverse((1.2, 2.3, 3.4))
((3.4, 2.3, 1.2), (3.4, 2.3, 1.2))
Implementing Sorts
Another staple of many systems is sorting: ordering items in a collection according to
some constraint. The script in Example 18-25 defines a simple sort routine in Python,
which orders a list of objects on a field. Because Python indexing is generic, the field
can be an index or a key—this function can sort lists of either sequences or mappings.
Example 18-25. PP4E\Dstruct\Classics\sort1.py
def sort(list, field):
res = [] # always returns a list
for x in list:
i = 0
for y in res:
if x[field] <= y[field]: break # list node goes here?
i += 1
res[i:i] = [x] # insert in result slot
return res
if __name__ == '__main__':
table = [ {'name':'john', 'age':25}, {'name':'doe', 'age':32} ]
print(sort(table, 'name'))
print(sort(table, 'age'))
table = [ ('john', 25), ('doe', 32) ]
print(sort(table, 0))
print(sort(table, 1))
Reversing and Sorting Sequences | 1399

Here is this module’s self-test code in action; the first tests sort dictionaries, and the
last sort tuples:
C:\...\PP4E\Dstruct\Classics> python sort1.py
[{'age': 32, 'name': 'doe'}, {'age': 25, 'name': 'john'}]
[{'age': 25, 'name': 'john'}, {'age': 32, 'name': 'doe'}]
[('doe', 32), ('john', 25)]
[('john', 25), ('doe', 32)]
Adding comparison functions
Since functions can be passed in like any other object, we can easily allow for an optional
comparison function. In the next version, Example 18-26, the second argument takes
a function that should return true if its first argument should be placed before its
second. A lambda is used to provide an ascending-order test by default. This sorter also
returns a new sequence that is the same type as the sequence passed in, by applying the
slicing techniques used in the reversal tools earlier—if you sort a tuple of nodes, you
get back a tuple.
Example 18-26. PP4E\Dstruct\Classics\sort2.py
def sort(seq, func=(lambda x,y: x <= y)): # default: ascending
res = seq[:0] # return seq's type
for j in range(len(seq)):
i = 0
for y in res:
if func(seq[j], y): break
i += 1
res = res[:i] + seq[j:j+1] + res[i:] # seq can be immutable
return res
if __name__ == '__main__':
table = ({'name':'doe'}, {'name':'john'})
print(sort(list(table), (lambda x, y: x['name'] > y['name'])))
print(sort(tuple(table), (lambda x, y: x['name'] <= y['name'])))
print(sort('axbyzc'))
This time, the table entries are ordered per a field comparison function passed in:
C:\...\PP4E\Dstruct\Classics> python sort2.py
[{'name': 'john'}, {'name': 'doe'}]
({'name': 'doe'}, {'name': 'john'})
abcxyz
This version also dispenses with the notion of a field altogether and lets the passed-in
function handle indexing if needed. That makes this version much more general; for
instance, it’s also useful for sorting strings.
Data Structures Versus Built-ins: The Conclusion
But now that I’ve shown you these reversing and sorting algorithms, I need to also tell
you that they may not be an optimal approach, especially in these specific cases.
1400 | Chapter 18: Data Structures

Although these examples serve an educational role, built-in lists and functions generally
accomplish what we just did the hard way:
Built-in sorting tools
Python’s two built-in sorting tools are so fast that you would be hard-pressed to
beat them in most scenarios. To use the list object’s sort method for arbitrary kinds
of iterables, convert first if needed:
temp = list(sequence)
temp.sort()
...use items in temp...
Alternatively, the sorted built-in function operates on any iterable so you don’t
need to convert, and returns a new sorted result list so you can use it within a larger
expression or context. Because it is not an in-place change, you also don’t need to
be concerned about the possible side effects of changing the original list:
for item in sorted(iterable):
...use item...
For custom sorts, simply pass in the key keyword arguments to tailor the built-in
sort’s operation—it maps values to sort keys instead of performing comparisons,
but the effect is just as general (see the earlier graph searchers’ length ordering for
another example):
>>> L = [{'n':3}, {'n':20}, {'n':0}, {'n':9}]
>>> L.sort(key=lambda x: x['n'])
>>> L
[{'n': 0}, {'n': 3}, {'n': 9}, {'n': 20}]
Both sorting tools also accept a Boolean reverse flag to make the result order de-
scending instead of ascending; there is no need to manually reverse after the sort.
The underlying sort routine in Python is so good that its documentation claims
that it has “supernatural performance”—not bad for a sort.
Built-in reversal tools
Our reversal routines are generally superfluous by the same token—because Py-
thon provides for fast reversals in both in-place and iterable forms, you’re likely
better off using them whenever possible:
>>> L = [2, 4, 1, 3, 5]
>>> L.reverse()
>>> L
[5, 3, 1, 4, 2]
>>> L = [2, 4, 1, 3, 5]
>>> list(reversed(L))
[5, 3, 1, 4, 2]
In fact, this has been a recurring theme of this chapter on purpose, to underscore a key
point in Python work: although there are plenty of exceptions, you’re generally better
Reversing and Sorting Sequences | 1401

off not reinventing the data structure wheel unless you have to. Built-in functionality
will often prove a better choice in the end.
Make no mistake: sometimes you really do need objects that add functionality to built-
in types or do something more custom. The set classes we met, for instance, can add
custom tools not directly supported by Python today, binary search trees may support
some algorithms better than dictionaries and sets can, and the tuple-tree stack imple-
mentation was actually faster than one based on built-in lists for common usage pat-
terns. Moreover, graphs and permutations are something you must code on your own.
As we’ve also seen, class encapsulations make it possible to change and extend object
internals without impacting the rest of your system. Although subclassing built-in types
can address much of the same goals, the end result is still a custom data structure.
Yet because Python comes with a set of built-in, flexible, and optimized datatypes, data
structure implementations are often not as important in Python as they are in lesser-
equipped and lower-level programming languages. Before you code that new datatype,
be sure to ask yourself whether a built-in type or call might be more in line with the
Python way of thinking.
For more on extended data structures for use in Python, see also the relatively new
collections module in its standard library. As mentioned in the preceding chapter, this
module implements named tuples, ordered dictionaries, and more. It’s described in
Python’s library manual, but its source code, like much in the standard library, can
serve as a source of supplemental examples as well.
PyTree: A Generic Tree Object Viewer
This chapter has been command line–oriented. To wrap up, I want to refer you to a
program that merges the GUI technology we studied earlier in the book with some of
the data structure ideas we’ve explored here.
This program is called PyTree—a generic tree data structure viewer written in Python
with the tkinter GUI library. PyTree sketches out the nodes of a tree on-screen as boxes
connected by arrows. It also knows how to route mouse clicks on drawn tree nodes
back to the tree, to trigger tree-specific actions. Because PyTree lets you visualize the
structure of the tree generated by a set of parameters, it’s an arguably fun way to explore
tree-based algorithms.
PyTree supports arbitrary tree types by “wrapping” real trees in interface objects. The
interface objects implement a standard protocol by communicating with the underlying
tree object. For the purposes of this chapter, PyTree is instrumented to display binary
search trees; for the next chapter, it’s also set up to render expression parse trees. New
trees can be viewed by coding wrapper classes to interface to new tree types.
1402 | Chapter 18: Data Structures
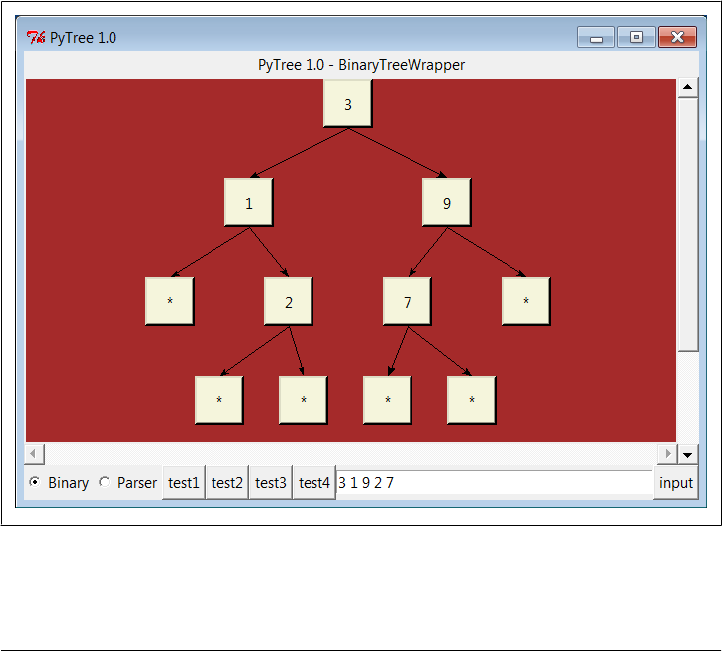
The GUI interfaces PyTree utilizes were covered in depth earlier in this book. Because
it is written with Python and tkinter, it should be portable to Windows, Unix, and
Macs. At the top, it’s used with code of this form:
root = Tk() # build a single viewer GUI
bwrapper = BinaryTreeWrapper() # add extras: input line, test btns
pwrapper = ParseTreeWrapper() # make wrapper objects
viewer = TreeViewer(bwrapper, root) # start out in binary mode
def onRadio():
if var.get() == 'btree':
viewer.setTreeType(bwrapper) # change viewer's wrapper
elif var.get() == 'ptree':
viewer.setTreeType(pwrapper)
Figure 18-2 captures the display produced by PyTree under Python 3.1 on Windows 7
by running its top-level treeview.py file with no arguments; PyTree can also be started
from a button in the PyDemos launcher we met in Chapter 10. As usual, you can run
it on your own computer to get a better feel for its behavior. Although this screenshot
captures one specific kind of tree, PyTree is general enough to display arbitrary tree
types, and can even switch them while running.
Figure 18-2. PyTree viewing a binary search tree (test1 button)
PyTree: A Generic Tree Object Viewer | 1403

Just like the PyForm example of the preceding chapter, the source code and documen-
tation for this example have been moved to the book’s examples package in this edition
to save real estate here. To study PyTree, see the following directory:
C:\...\PP4E\Dstruct\TreeView
Also like PyForm, the Documentation directory there has the original description of this
example that appeared in the third edition of this book; PyTree’s code is in Python 3.X
form, but the third edition overview may not be.
As mentioned, PyTree is set up to display both the binary search trees of this chapter
and the expression parse trees of the next chapter. When viewing the latter, PyTree
becomes a sort of visual calculator—you can generate arbitrary expression trees and
evaluate any part of them by clicking on nodes displayed. But at this point, there is not
much more I can show and/or tell you about those kinds of trees until you move on to
Chapter 19.
1404 | Chapter 18: Data Structures

CHAPTER 19
Text and Language
“See Jack Hack. Hack, Jack, Hack”
In one form or another, processing text-based information is one of the more common
tasks that applications need to perform. This can include anything from scanning a text
file by columns to analyzing statements in a language defined by a formal grammar.
Such processing usually is called parsing—analyzing the structure of a text string. In
this chapter, we’ll explore ways to handle language and text-based information and
summarize some Python development concepts in sidebars along the way. In the proc-
ess, we’ll meet string methods, text pattern matching, XML and HTML parsers, and
other tools.
Some of this material is advanced, but the examples are small to keep this chapter short.
For instance, recursive descent parsing is illustrated with a simple example to show
how it can be implemented in Python. We’ll also see that it’s often unnecessary to write
custom parsers for each language processing task in Python. They can usually be re-
placed by exporting APIs for use in Python programs, and sometimes by a single built-
in function call. Finally, this chapter closes by presenting PyCalc—a calculator GUI
written in Python, and the last major Python coding example in this text. As we’ll see,
writing calculators isn’t much more difficult than juggling stacks while scanning text.
Strategies for Processing Text in Python
In the grand scheme of things, there are a variety of ways to handle text processing and
language analysis in Python:
Expressions
Built-in string object expressions
Methods
Built-in string object method calls
Patterns
Regular expression pattern matching
1405

Parsers: markup
XML and HTML text parsing
Parsers: grammars
Custom language parsers, both handcoded and generated
Embedding
Running Python code with eval and exec built-ins
And more
Natural language processing
For simpler tasks, Python’s built-in string object is often all we really need. Python
strings can be indexed, concatenated, sliced, and processed with both string method
calls and built-in functions. Our main emphasis in this chapter is mostly on higher-
level tools and techniques for analyzing textual information and language, but we’ll
briefly explore each of these techniques in turn. Let’s get started.
Some readers may have come to this chapter seeking coverage of Uni-
code text, too, but this topic is not presented here. For a look at Python’s
Unicode support, see Chapter 2’s discussion of string tools, Chap-
ter 4’s discussion of text and binary file distinctions and encodings, and
Chapter 9’s coverage of text in tkinter GUIs. Unicode also appears in
various Internet and database topics throughout this book (e.g., email
encodings).
Because Unicode is a core language topic, all these chapters will also
refer you to the fuller coverage of Unicode in Learning Python, Fourth
Edition. Most of the topics in this chapter, including string methods and
pattern matching, apply to Unicode automatically simply because the
Python 3.X str string type is Unicode, whether ASCII or wider.
String Method Utilities
The first stop on our text and language tour is the most basic: Python’s string objects
come with an array of text processing tools, and serve as your first line of defense in
this domain. As you undoubtedly know by now, concatenation, slicing, formatting,
and other string expressions are workhorses of most programs (I’m including the newer
format method in this category, as it’s really just an alternative to the % expression):
>>> 'spam eggs ham'[5:10] # slicing: substring extraction
'eggs '
>>> 'spam ' + 'eggs ham' # concatenation (and *, len(), [ix])
'spam eggs ham'
>>> 'spam %s %s' % ('eggs', 'ham') # formatting expression: substitution
'spam eggs ham'
>>> 'spam {} {}'.format('eggs', 'ham') # formatting method: % alternative
'spam eggs ham'
>>> 'spam = "%-5s", %+06d' % ('ham', 99) # more complex formatting
1406 | Chapter 19: Text and Language

'spam = "ham ", +00099'
>>> 'spam = "{0:<5}", {1:+06}'.format('ham', 99)
'spam = "ham ", +00099'
These operations are covered in core language resources such as Learning Python. For
the purposes of this chapter, though, we’re interested in more powerful tools: Python’s
string object methods include a wide variety of text-processing utilities that go above
and beyond string expression operators. We saw some of these in action early on in
Chapter 2, and have been using them ever since. For instance, given an instance str of
the built-in string object type, operations like the following are provided as object
method calls:
str.find(substr)
Performs substring searches
str.replace(old, new)
Performs substring substitutions
str.split(delimiter)
Chops up a string around a delimiter or whitespace
str.join(iterable)
Puts substrings together with delimiters between
str.strip()
Removes leading and trailing whitespace
str.rstrip()
Removes trailing whitespace only, if any
str.rjust(width)
Right-justifies a string in a fixed-width field
str.upper()
Converts to uppercase
str.isupper()
Tests whether the string is uppercase
str.isdigit()
Tests whether the string is all digit characters
str.endswith(substr-or-tuple)
Tests for a substring (or a tuple of alternatives) at the end
str.startswith(substr-or-tuple)
Tests for a substring (or a tuple of alternatives) at the front
This list is representative but partial, and some of these methods take additional op-
tional arguments. For the full list of string methods, run a dir(str) call at the Python
interactive prompt and run help(str.method) on any method for some quick docu-
mentation. The Python library manual and reference books such as Python Pocket Ref-
erence also include an exhaustive list.
String Method Utilities | 1407

Moreover, in Python today all normal string methods apply to both bytes and str
strings. The latter makes them applicable to arbitrarily encoded Unicode text, simply
because the str type is Unicode text, even if it’s only ASCII. These methods originally
appeared as function in the string module, but are only object methods today; the
string module is still present because it contains predefined constants (e.g.,
string.ascii_uppercase), as well as the Template substitution interface in 2.4 and
later—one of the techniques discussed in the next section.
Templating with Replacements and Formats
By way of review, let’s take a quick look at string methods in the context of some of
their most common use cases. As we saw when generating HTML forwarding pages in
Chapter 6, the string replace method is often adequate by itself as a string templating
tool—we can compute values and insert them at fixed positions in a string with simple
replacement calls:
>>> template = '---$target1---$target2---'
>>> val1 = 'Spam'
>>> val2 = 'shrubbery'
>>> template = template.replace('$target1', val1)
>>> template = template.replace('$target2', val2)
>>> template
'---Spam---shrubbery---'
As we also saw when generating HTML reply pages in the CGI scripts of Chapters 15
and 16, the string % formatting operator is also a powerful templating tool, especially
when combined with dictionaries—simply fill out a dictionary with values and apply
multiple substitutions to the HTML string all at once:
>>> template = """
... ---
... ---%(key1)s---
... ---%(key2)s---
... """
>>>
>>> vals = {}
>>> vals['key1'] = 'Spam'
>>> vals['key2'] = 'shrubbery'
>>> print(template % vals)
---
---Spam---
---shrubbery---
Beginning with Python 2.4, the string module’s Template feature is essentially a sim-
plified and limited variation of the dictionary-based format scheme just shown, but it
allows some additional call patterns which some may consider simpler:
>>> vals
{'key2': 'shrubbery', 'key1': 'Spam'}
1408 | Chapter 19: Text and Language

>>> import string
>>> template = string.Template('---$key1---$key2---')
>>> template.substitute(vals)
'---Spam---shrubbery---'
>>> template.substitute(key1='Brian', key2='Loretta')
'---Brian---Loretta---'
See the library manual for more on this extension. Although the string datatype does
not itself support the pattern-directed text processing that we’ll meet later in this chap-
ter, its tools are powerful enough for many tasks.
Parsing with Splits and Joins
In terms of this chapter’s main focus, Python’s built-in tools for splitting and joining
strings around tokens turn out to be especially useful when it comes to parsing text:
str.split(delimiter?, maxsplits?)
Splits a string into a list of substrings, using either whitespace (tabs, spaces, new-
lines) or an explicitly passed string as a delimiter. maxsplits limits the number of
splits performed, if passed.
delimiter.join(iterable)
Concatenates a sequence or other iterable of substrings (e.g., list, tuple, generator),
adding the subject separator string between each.
These two are among the most powerful of string methods. As we saw in Chapter 2,
split chops a string into a list of substrings and join puts them back together:
>>> 'A B C D'.split()
['A', 'B', 'C', 'D']
>>> 'A+B+C+D'.split('+')
['A', 'B', 'C', 'D']
>>> '--'.join(['a', 'b', 'c'])
'a--b--c'
Despite their simplicity, they can handle surprisingly complex text-parsing tasks.
Moreover, string method calls are very fast because they are implemented in C language
code. For instance, to quickly replace all tabs in a file with four periods, pipe the file
into a script that looks like this:
from sys import *
stdout.write(('.' * 4).join(stdin.read().split('\t')))
The split call here divides input around tabs, and the join puts it back together with
periods where tabs had been. In this case, the combination of the two calls is equivalent
to using the simpler global replacement string method call as follows:
stdout.write(stdin.read().replace('\t', '.' * 4))
As we’ll see in the next section, splitting strings is sufficient for many text-parsing goals.
String Method Utilities | 1409

Summing Columns in a File
Let’s look next at some practical applications of string splits and joins. In many do-
mains, scanning files by columns is a fairly common task. For instance, suppose you
have a file containing columns of numbers output by another system, and you need to
sum each column’s numbers. In Python, string splitting is the core operation behind
solving this problem, as demonstrated by Example 19-1. As an added bonus, it’s easy
to make the solution a reusable tool in Python by packaging it as an importable function.
Example 19-1. PP4E\Lang\summer.py
#!/usr/local/bin/python
def summer(numCols, fileName):
sums = [0] * numCols # make list of zeros
for line in open(fileName): # scan file's lines
cols = line.split() # split up columns
for i in range(numCols): # around blanks/tabs
sums[i] += eval(cols[i]) # add numbers to sums
return sums
if __name__ == '__main__':
import sys
print(summer(eval(sys.argv[1]), sys.argv[2])) # '% summer.py cols file'
Notice that we use file iterators here to read line by line, instead of calling the file
readlines method explicitly (recall from Chapter 4 that iterators avoid loading the
entire file into memory all at once). The file itself is a temporary object, which will be
automatically closed when garbage collected.
As usual for properly architected scripts, you can both import this module and call its
function, and run it as a shell tool from the command line. The summer.py script calls
split to make a list of strings representing the line’s columns, and eval to convert
column strings to numbers. Here’s an input file that uses both blanks and tabs to sep-
arate columns, and the result of turning our script loose on it:
C:\...\PP4E\Lang> type table1.txt
1 5 10 2 1.0
2 10 20 4 2.0
3 15 30 8 3
4 20 40 16 4.0
C:\...\PP4E\Lang> python summer.py 5 table1.txt
[10, 50, 100, 30, 10.0]
Also notice that because the summer script uses eval to convert file text to numbers,
you could really store arbitrary Python expressions in the file. Here, for example, it’s
run on a file of Python code snippets:
C:\...\PP4E\Lang> type table2.txt
2 1+1 1<<1 eval("2")
16 2*2*2*2 pow(2,4) 16.0
1410 | Chapter 19: Text and Language

3 len('abc') [1,2,3][2] {'spam':3}['spam']
C:\...\PP4E\Lang> python summer.py 4 table2.txt
[21, 21, 21, 21.0]
Summing with zips and comprehensions
We’ll revisit eval later in this chapter, when we explore expression evaluators. Some-
times this is more than we want—if we can’t be sure that the strings that we run this
way won’t contain malicious code, for instance, it may be necessary to run them with
limited machine access or use more restrictive conversion tools. Consider the following
recoding of the summer function (this is in file summer2.py in the examples package if
you care to experiment with it):
def summer(numCols, fileName):
sums = [0] * numCols
for line in open(fileName): # use file iterators
cols = line.split(',') # assume comma-delimited
nums = [int(x) for x in cols] # use limited converter
both = zip(sums, nums) # avoid nested for loop
sums = [x + y for (x, y) in both] # 3.X: zip is an iterable
return sums
This version uses int for its conversions from strings to support only numbers, and not
arbitrary and possibly unsafe expressions. Although the first four lines of this coding
are similar to the original, for variety this version also assumes the data is separated by
commas rather than whitespace, and runs list comprehensions and zip to avoid the
nested for loop statement. This version is also substantially trickier than the original
and so might be less desirable from a maintenance perspective. If its code is confusing,
try adding print call statements after each step to trace the results of each operation.
Here is its handiwork:
C:\...\PP4E\Lang> type table3.txt
1,5,10,2,1
2,10,20,4,2
3,15,30,8,3
4,20,40,16,4
C:\...\PP4E\Lang> python summer2.py 5 table3.txt
[10, 50, 100, 30, 10]
Summing with dictionaries
The summer logic so far works, but it can be even more general— by making the column
numbers a key of a dictionary rather than an offset in a list, we can remove the need to
pass in a number-columns value altogether. Besides allowing us to associate meaningful
labels with data rather than numeric positions, dictionaries are often more flexible than
lists in general, especially when there isn’t a fixed size to our problem. For instance,
suppose you need to sum up columns of data stored in a text file where the number of
columns is not known or fixed:
String Method Utilities | 1411

C:\...\PP4E\Lang> python
>>> print(open('table4.txt').read())
001.1 002.2 003.3
010.1 020.2 030.3 040.4
100.1 200.2 300.3
Here, we cannot preallocate a fixed-length list of sums because the number of columns
may vary. Splitting on whitespace extracts the columns, and float converts to numbers,
but a fixed-size list won’t easily accommodate a set of sums (at least, not without extra
code to manage its size). Dictionaries are more convenient here because we can use
column positions as keys instead of using absolute offsets. The following code dem-
onstrates interactively (it’s also in file summer3.py in the examples package):
>>> sums = {}
>>> for line in open('table4.txt'):
... cols = [float(col) for col in line.split()]
... for pos, val in enumerate(cols):
... sums[pos] = sums.get(pos, 0.0) + val
...
>>> for key in sorted(sums):
... print(key, '=', sums[key])
...
0 = 111.3
1 = 222.6
2 = 333.9
3 = 40.4
>>> sums
{0: 111.3, 1: 222.6, 2: 333.90000000000003, 3: 40.4}
Interestingly, most of this code uses tools added to Python over the years—file and
dictionary iterators, comprehensions, dict.get, and the enumerate and sorted built-ins
were not yet formed when Python was new. For related examples, also see the tkinter
grid examples in Chapter 9 for another case of eval table magic at work. That chapter’s
table sums logic is a variation on this theme, which obtains the number of columns
from the first line of a data file and tailors its summations for display in a GUI.
Parsing and Unparsing Rule Strings
Splitting comes in handy for dividing text into columns, but it can also be used as a
more general parsing tool—by splitting more than once on different delimiters, we can
pick apart more complex text. Although such parsing can also be achieved with more
powerful tools, such as the regular expressions we’ll meet later in this chapter, split-
based parsing is simper to code in quick prototypes, and may run faster.
For instance, Example 19-2 demonstrates one way that splitting and joining strings can
be used to parse sentences in a simple language. It is taken from a rule-based expert
system shell (holmes) that is written in Python and included in this book’s examples
distribution (more on holmes in a moment). Rule strings in holmes take the form:
"rule <id> if <test1>, <test2>... then <conclusion1>, <conclusion2>..."
1412 | Chapter 19: Text and Language

Tests and conclusions are conjunctions of terms (“,” means “and”). Each term is a
list of words or variables separated by spaces; variables start with ?. To use a rule, it is
translated to an internal form—a dictionary with nested lists. To display a rule, it is
translated back to the string form. For instance, given the call:
rules.internal_rule('rule x if a ?x, b then c, d ?x')
the conversion in function internal_rule proceeds as follows:
string = 'rule x if a ?x, b then c, d ?x'
i = ['rule x', 'a ?x, b then c, d ?x']
t = ['a ?x, b', 'c, d ?x']
r = ['', 'x']
result = {'rule':'x', 'if':[['a','?x'], ['b']], 'then':[['c'], ['d','?x']]}
We first split around the if, then around the then, and finally around rule. The result
is the three substrings that were separated by the keywords. Test and conclusion sub-
strings are split around “,” first and spaces last. join is used later to convert back (un-
parse) to the original string for display. Example 19-2 is the concrete implementation
of this scheme.
Example 19-2. PP4E\Lang\rules.py
def internal_rule(string):
i = string.split(' if ')
t = i[1].split(' then ')
r = i[0].split('rule ')
return {'rule': r[1].strip(), 'if':internal(t[0]), 'then':internal(t[1])}
def external_rule(rule):
return ('rule ' + rule['rule'] +
' if ' + external(rule['if']) +
' then ' + external(rule['then']) + '.')
def internal(conjunct):
res = [] # 'a b, c d'
for clause in conjunct.split(','): # -> ['a b', ' c d']
res.append(clause.split()) # -> [['a','b'], ['c','d']]
return res
def external(conjunct):
strs = []
for clause in conjunct: # [['a','b'], ['c','d']]
strs.append(' '.join(clause)) # -> ['a b', 'c d']
return ', '.join(strs) # -> 'a b, c d'
Today we could use list comprehensions and generator expressions to gain some con-
ciseness here. The internal and external functions, for instance, could be recoded to
simply (see file rules2.py):
def internal(conjunct):
return [clause.split() for clause in conjunct.split(',')]
String Method Utilities | 1413

def external(conjunct):
return ', '.join(' '.join(clause) for clause in conjunct)
to produce the desired nested lists and string by combining two steps into one. This
form might run faster; we’ll leave it to the reader to decide whether it is more difficult
to understand. As usual, we can test components of this module interactively:
>>> import rules
>>> rules.internal('a ?x, b')
[['a', '?x'], ['b']]
>>> rules.internal_rule('rule x if a ?x, b then c, d ?x')
{'then': [['c'], ['d', '?x']], 'rule': 'x', 'if': [['a', '?x'], ['b']]}
>>> r = rules.internal_rule('rule x if a ?x, b then c, d ?x')
>>> rules.external_rule(r)
'rule x if a ?x, b then c, d ?x.'
Parsing by splitting strings around tokens like this takes you only so far. There is no
direct support for recursive nesting of components, and syntax errors are not handled
very gracefully. But for simple language tasks like this, string splitting might be enough,
at least for prototyping or experimental systems. You can always add a more robust
rule parser later or reimplement rules as Python code or classes.
More on the holmes expert system shell
So how are these rules actually used? As mentioned, the rule parser we just met is part
of the Python-coded holmes expert system shell. Holmes is an old system written
around 1993 and before Python 1.0. It implemented both forward and backward
chaining inference over rule sets. For example, the rule:
rule pylike if ?X likes coding, ?X likes spam then ?X likes Python
can be used both to prove whether someone likes Python (chaining backward, from
“then” to “if”), and to deduce that someone likes Python from a set of known facts
(chaining forward, from “if” to “then”). Deductions may span multiple rules, multiple
clauses represent conjunctions, and rules that name the same conclusion represent
alternatives. holmes also performs simple pattern-matching along the way to assign the
variables that appear in rules (e.g., ?X), and it is able to explain both its deductions and
questions.
Holmes also served as proof of concept for Python in general at a time when such
evidence was still sometimes necessary, and at last check it still worked unchanged on
Python 2.X platforms. However, its code no longer reflects modern Python best prac-
tice. Because of this, I no longer maintain this system today. In fact, it has suffered from
bit rot so much and for so long that I’ve opted not to revisit it for this edition at all. Its
original Python 0.X code is included in the book examples package, but it has not been
ported to Python 3.X form, and does not accurately reflect Python as it exists today.
That is, holmes is an ex-system. It has ceased to be. And it won’t be discussed further
here. For more modern AI tools and support for Python, search the Web. This is a fun
1414 | Chapter 19: Text and Language

field to explore, but holmes is probably best left to the foggy mists of Python prehistory
(and souls brave enough to try the port).
Lesson 1: Prototype and Migrate
If you care about performance, try to use the string object’s methods rather than things
such as regular expressions whenever you can. Although this is a broad rule of thumb
and can vary from release to release, some string methods may be faster because they
have less work to do.
In fact, we can learn something from Python’s own history here. Today’s string object
methods began life as Python-coded functions in the original string module. Due to
their prevalence, they were later optimized by moving their implementation to the C
language. When you imported string, it internally replaced most of its content with
functions imported from the strop C extension module; strop methods were reportedly
100 to 1,000 times faster than their Python-coded equivalents at the time.
The result was dramatically faster performance for string client programs without im-
pacting the interface. That is, string module clients became instantly faster without
having to be modified for the new C-based module. Of course, these operations evolved
further and were finally moved to string object methods, their only form today. But this
reflects a common pattern in Python work. A similar migration path was applied to
the pickle module we met in Chapter 17—the later cPickle recoding in Python 2.X
and _pickle in 3.X are compatible but much faster.
This is a great lesson about Python development: modules can be coded quickly in
Python at first and translated to C later for efficiency if required. Because the interface
to Python and C extension modules is identical (both are imported modules with call-
able function attributes), C translations of modules are backward compatible with their
Python prototypes. The only impact of the translation of such modules on clients usu-
ally is an improvement in performance.
There is normally no need to move every module to C for delivery of an application:
you can pick and choose performance-critical modules (such as string and pickle) for
translation and leave others coded in Python. Use the timing and profiling techniques
discussed in Chapter 18 to isolate which modules will give the most improvement when
translated to C. Once you do, the next chapter shows how to go about writing C-based
extension modules.
Regular Expression Pattern Matching
Splitting and joining strings is a simple way to process text, as long as it follows the
format you expect. For more general text analysis tasks where the structure of your
data is not so rigidly defined, Python provides regular expression matching utilities.
Especially for the kinds of text associated with domains such as the Internet and data-
bases today, this flexibility can be a powerful ally.
Regular Expression Pattern Matching | 1415

Regular expressions are simply strings that define patterns to be matched against other
strings. Supply a pattern and a string and ask whether the string matches your pattern.
After a match, parts of the string matched by parts of the pattern are made available to
your script. That is, matches not only give a yes/no answer, but also can pick out
substrings as well.
Regular expression pattern strings can be complicated (let’s be honest—they can be
downright gross to look at). But once you get the hang of them, they can replace larger
handcoded string search routines—a single pattern string generally does the work of
dozens of lines of manual string scanning code and may run much faster. They are a
concise way to encode the expected structure of text and extract portions of it.
The re Module
In Python, regular expressions are not part of the syntax of the Python language itself,
but they are supported by the re standard library module that you must import to use.
The module defines functions for running matches immediately, compiling pattern
strings into pattern objects, matching these objects against strings, and fetching
matched substrings after a match. It also provides tools for pattern-based splitting,
replacing, and so on.
The re module implements a rich regular expression pattern syntax that tries to be close
to that used to code patterns in the Perl language (regular expressions are a feature of
Perl worth emulating). For instance, re supports the notions of named groups; char-
acter classes; and nongreedy matches—regular expression pattern operators that match
as few characters as possible (other operators always match the longest possible sub-
string). The re module has also been optimized repeatedly, and in Python 3.X supports
matching for both bytes byte-strings and str Unicode strings. The net effect is that
Python’s pattern support uses Perl-like patterns, but is invoked with a different top-
level module interface.
I need to point out up front that regular expressions are complex tools that cannot be
covered in depth here. If this area sparks your interest, the text Mastering Regular Ex-
pressions, written by Jeffrey E. F. Friedl (O’Reilly), is a good next step to take. We won’t
be able to cover pattern construction itself well enough here to turn you into an expert.
Once you learn how to code patterns, though, the top-level interface for performing
matches is straightforward. In fact, they are so easy to use that we’ll jump right into
some live examples before getting into more details.
First Examples
There are two basic ways to kick off matches: through top-level function calls and via
methods of precompiled pattern objects. The latter precompiled form is quicker if you
will be applying the same pattern more than once—to all lines in a text file, for instance.
1416 | Chapter 19: Text and Language

To demonstrate, let’s do some matching on the following strings (see file
re-interactive.txt for all the interactive code run in this section):
>>> text1 = 'Hello spam...World'
>>> text2 = 'Hello spam...other'
The match performed in the following code does not precompile: it executes an im-
mediate match to look for all the characters between the words Hello and World in our
text strings:
>>> import re
>>> matchobj = re.match('Hello(.*)World', text2)
>>> print(matchobj)
None
When a match fails as it does here (the text2 string doesn’t end in World), we get back
the None object, which is Boolean false if tested in an if statement.
In the pattern string we’re using here in the first argument to re.match, the words
Hello and World match themselves, and (.*) means any character (.) repeated zero or
more times (*). The fact that it is enclosed in parentheses tells Python to save away the
part of the string matched by that part of the pattern as a group—a matched substring
available after the match. To see how, we need to make a match work:
>>> matchobj = re.match('Hello(.*)World', text1)
>>> print(matchobj)
<_sre.SRE_Match object at 0x009D6520>
>>> matchobj.group(1)
' spam...'
When a match succeeds, we get back a match object, which has interfaces for extracting
matched substrings—the group(1) call returns the portion of the string matched by the
first, leftmost, parenthesized portion of the pattern (our (.*)). As mentioned, matching
is not just a yes/no answer; by enclosing parts of the pattern in parentheses, it is also a
way to extract matched substrings. In this case, we’ve parsed out the text between
Hello and World. Group number 0 is the entire string matched by the pattern—useful
if you want to be sure your pattern is consuming all the text you think it is.
The interface for precompiling is similar, but the pattern is implied in the pattern ob-
ject we get back from the compile call:
>>> pattobj = re.compile('Hello(.*)World')
>>> matchobj = pattobj.match(text1)
>>> matchobj.group(1)
' spam...'
Again, you should precompile for speed if you will run the pattern multiple times, and
you normally will when scanning files line by line. Here’s something a bit more complex
that hints at the generality of patterns. This one allows for zero or more blanks or tabs
at the front ([ \t]*), skips one or more after the word Hello ([ \t]+), captures characters
Regular Expression Pattern Matching | 1417

in the middle ((.*)), and allows the final word to begin with an upper- or lowercase
letter ([Ww]); as you can see, patterns can handle wide variations in data:
>>> patt = '[ \t]*Hello[ \t]+(.*)[Ww]orld'
>>> line = ' Hello spamworld'
>>> mobj = re.match(patt, line)
>>> mobj.group(1)
'spam'
Notice that we matched a str pattern to a str string in the last listing. We can also
match bytes to bytes in order to handle data such as encoded text, but we cannot mix
the two string types (a constraint which is true in Python in general—Python wouldn’t
have the encoding information needed to know how to convert between the raw bytes
and the Unicode text):
>>> patt = b'[ \t]*Hello[ \t]+(.*)[Ww]orld' # both as bytes works too
>>> line = b' Hello spamworld' # and returns bytes groups
>>> re.match(patt, line).group(1) # but cannot mix str/bytes
b'spam'
>>> re.match(patt, ' Hello spamworld')
TypeError: can't use a bytes pattern on a string-like object
>>> re.match('[ \t]*Hello[ \t]+(.*)[Ww]orld', line)
TypeError: can't use a string pattern on a bytes-like object
In addition to the tools these examples demonstrate, there are methods for scanning
ahead to find a match (search), scanning to find all matches (findall), splitting and
replacing on patterns, and so on. All have analogous module and precompiled call
forms. The next section turns to a few examples to demonstrate more of the basics.
String Operations Versus Patterns
Notice how the preceding example skips optional whitespace and allows for uppercase
or lowercase letters. This underscores why you may want to use patterns in the first
place—they support more general kinds of text than string object methods can. Here’s
another case in point: we’ve seen that string methods can split on and replace a sub-
string, but they don’t suffice if the delimiter might be more than one alternative:
>>> 'aaa--bbb--ccc'.split('--')
['aaa', 'bbb', 'ccc']
>>> 'aaa--bbb--ccc'.replace('--', '...') # string methods use fixed strings
'aaa...bbb...ccc'
>>> 'aaa--bbb==ccc'.split(['--', '=='])
TypeError: Can't convert 'list' object to str implicitly
>>> 'aaa--bbb==ccc'.replace(['--', '=='], '...')
TypeError: Can't convert 'list' object to str implicitly
Patterns can do similar work, but also can handle alternatives directly, by virtue of their
pattern matching syntax. In the following, the syntax --|== matches either string -- or
string ==; the syntax [-=] matches either the character - or = (a character set); and the
1418 | Chapter 19: Text and Language

form (?:) can be used to group nested parts of a pattern without forming a saved
substring group (split treats groups specially):
>>> import re
>>> re.split('--', 'aaa--bbb--ccc')
['aaa', 'bbb', 'ccc']
>>> re.sub('--', '...', 'aaa--bbb--ccc') # single string case
'aaa...bbb...ccc'
>>> re.split('--|==', 'aaa--bbb==ccc') # split on -- or ==
['aaa', 'bbb', 'ccc']
>>> re.sub('--|==', '...', 'aaa--bbb==ccc') # replace -- or ==
'aaa...bbb...ccc'
>>> re.split('[-=]', 'aaa-bbb=ccc') # single char alternative
['aaa', 'bbb', 'ccc']
>>> re.split('(--)|(==)', 'aaa--bbb==ccc') # split includes groups
['aaa', '--', None, 'bbb', None, '==', 'ccc']
>>> re.split('(?:--)|(?:==)', 'aaa--bbb==ccc') # expr part, not group
['aaa', 'bbb', 'ccc']
Similarly, splits can extract simple substrings for fixed delimiters, but patterns can also
handle surrounding context like brackets, mark parts as optional, ignore whitespace,
and more. In the next tests \s* means zero or more whitespace characters (a character
class); \s+ means one or more of the same; /? matches an optional slash; [a-z] is any
lowercase letter (a range);(.*?) means a saved substring of zero or more of any character
again—but only as many as needed to match the rest of the pattern (nongreedily); and
the groups method is used to fetch the substrings matched by the parenthesized sub-
patterns all at once:
>>> 'spam/ham/eggs'.split('/')
['spam', 'ham', 'eggs']
>>> re.match('(.*)/(.*)/(.*)', 'spam/ham/eggs').groups()
('spam', 'ham', 'eggs')
>>> re.match('<(.*)>/<(.*)>/<(.*)>', '<spam>/<ham>/<eggs>').groups()
('spam', 'ham', 'eggs')
>>> re.match('\s*<(.*)>/?<(.*)>/?<(.*)>', ' <spam>/<ham><eggs>').groups()
('spam', 'ham', 'eggs')
>>> 'Hello pattern world!'.split()
['Hello', 'pattern', 'world!']
>>> re.match('Hello\s*([a-z]*)\s+(.*?)\s*!', 'Hellopattern world !').groups()
('pattern', 'world')
In fact, there’s more than one way to match. The findall method provides generality
that leaves string objects in the dust—it locates all occurrences of a pattern and returns
all the substrings it matched (or a list of tuples for multiple groups). The search method
is similar but stops at the first match—it’s like match plus an initial forward scan. In the
following, string object finds locate just one specific string, but patterns can be used to
Regular Expression Pattern Matching | 1419

locate and extract bracketed text anywhere in a string, even pairs with optional text
between:
>>> '<spam>/<ham>/<eggs>'.find('ham') # find substring offset
8
>>> re.findall('<(.*?)>', '<spam>/<ham>/<eggs>') # find all matches/groups
['spam', 'ham', 'eggs']
>>> re.findall('<(.*?)>', '<spam> / <ham><eggs>')
['spam', 'ham', 'eggs']
>>> re.findall('<(.*?)>/?<(.*?)>', '<spam>/<ham> ... <eggs><cheese>')
[('spam', 'ham'), ('eggs', 'cheese')]
>>> re.search('<(.*?)>/?<(.*?)>', 'todays menu: <spam>/<ham>...<eggs><s>').groups()
('spam', 'ham')
Especially when using findall, the (?s) operator comes in handy to force . to match
end-of-line characters in multiline text; without it . matches everything except lines
ends. The following searches look for two adjacent bracketed strings with arbitrary text
between, with and without skipping line breaks:
>>> re.findall('<(.*?)>.*<(.*?)>', '<spam> \n <ham>\n<eggs>') # stop at \n
[]
>>> re.findall('(?s)<(.*?)>.*<(.*?)>', '<spam> \n <ham>\n<eggs>') # greedy
[('spam', 'eggs')]
>>> re.findall('(?s)<(.*?)>.*?<(.*?)>', '<spam> \n <ham>\n<eggs>') # nongreedy
[('spam', 'ham')]
To make larger patterns more mnemonic, we can even associate names with matched
substring groups in using the <?P<name>) pattern syntax and fetch them by name after
matches, though this is of limited utility for findall. The next tests look for strings of
“word” characters (\w) separated by a /—this isn’t much more than a string split, but
parts are named, and search and findall both scan ahead:
>>> re.search('(?P<part1>\w*)/(?P<part2>\w*)', '...aaa/bbb/ccc]').groups()
('aaa', 'bbb')
>>> re.search('(?P<part1>\w*)/(?P<part2>\w*)', '...aaa/bbb/ccc]').groupdict()
{'part1': 'aaa', 'part2': 'bbb'}
>>> re.search('(?P<part1>\w*)/(?P<part2>\w*)', '...aaa/bbb/ccc]').group(2)
'bbb'
>>> re.search('(?P<part1>\w*)/(?P<part2>\w*)', '...aaa/bbb/ccc]').group('part2')
'bbb'
>>> re.findall('(?P<part1>\w*)/(?P<part2>\w*)', '...aaa/bbb ccc/ddd]')
[('aaa', 'bbb'), ('ccc', 'ddd')]
Finally, although basic string operations such as slicing and splits are sometimes
enough, patterns are much more flexible. The following uses [^ ] to match any char-
acter not following the ^, and escapes a dash within a [] alternative set using \- so it’s
not taken to be a character set range separator. It runs equivalent slices, splits, and
matches, along with a more general match that the other two cannot approach:
>>> line = 'aaa bbb ccc'
>>> line[:3], line[4:7], line[8:11] # slice data at fixed offsets
1420 | Chapter 19: Text and Language

('aaa', 'bbb', 'ccc')
>>> line.split() # split data with fixed delimiters
['aaa', 'bbb', 'ccc']
>>> re.split(' +', line) # split on general delimiters
['aaa', 'bbb', 'ccc']
>>> re.findall('[^ ]+', line) # find non-delimiter runs
['aaa', 'bbb', 'ccc']
>>> line = 'aaa...bbb-ccc / ddd.-/e&e*e' # handle generalized text
>>> re.findall('[^ .\-/]+', line)
['aaa', 'bbb', 'ccc', 'ddd', 'e&e*e']
At this point, if you’ve never used pattern syntax in the past your head may very well
be spinning (or have blown off entirely!). Before we go into any further examples, let’s
dig into a few of the details underlying the re module and its patterns.
Using the re Module
The Python re module comes with functions that can search for patterns right away or
make compiled pattern objects for running matches later. Pattern objects (and module
search calls) in turn generate match objects, which contain information about success-
ful matches and matched substrings. For reference, the next few sections describe the
module’s interfaces and some of the operators you can use to code patterns.
Module functions
The top level of the module provides functions for matching, substitution, precompil-
ing, and so on:
compile(pattern [, flags])
Compile a regular expression pattern string into a regular expression pattern ob-
ject, for later matching. See the reference manual or Python Pocket Reference for
the flags argument’s meaning.
match(pattern, string [, flags])
If zero or more characters at the start of string match the pattern string, return a
corresponding match object, or None if no match is found. Roughly like a search
for a pattern that begins with the ^ operator.
search(pattern, string [, flags])
Scan through string for a location matching pattern, and return a corresponding
match object, or None if no match is found.
findall(pattern, string [, flags])
Return a list of strings giving all nonoverlapping matches of pattern in string. If
there are any groups in patterns, returns a list of groups, and a list of tuples if the
pattern has more than one group.
finditer(pattern, string [, flags])
Return iterator over all nonoverlapping matches of pattern in string.
Regular Expression Pattern Matching | 1421

split(pattern, string [, maxsplit, flags])
Split string by occurrences of pattern. If capturing parentheses (()) are used in the
pattern, the text of all groups in the pattern are also returned in the resulting list.
sub(pattern, repl, string [, count, flags])
Return the string obtained by replacing the (first count) leftmost nonoverlapping
occurrences of pattern (a string or a pattern object) in string by repl (which may
be a string with backslash escapes that may back-reference a matched group, or a
function that is passed a single match object and returns the replacement string).
subn(pattern, repl, string [, count, flags])
Same as sub, but returns a tuple: (new-string, number-of-substitutions-made).
escape(string)
Return string with all nonalphanumeric characters backslashed, such that they
can be compiled as a string literal.
Compiled pattern objects
At the next level, pattern objects provide similar attributes, but the pattern string is
implied. The re.compile function in the previous section is useful to optimize patterns
that may be matched more than once (compiled patterns match faster). Pattern objects
returned by re.compile have these sorts of attributes:
match(string [, pos] [, endpos])
search(string [, pos] [, endpos])
findall(string [, pos [, endpos]])
finditer(string [, pos [, endpos]])
split(string [, maxsplit])
sub(repl, string [, count])
subn(repl, string [, count])
These are the same as the re module functions, but the pattern is implied, and pos and
endpos give start/end string indexes for the match.
Match objects
Finally, when a match or search function or method is successful, you get back a match
object (None comes back on failed matches). Match objects export a set of attributes of
their own, including:
group(g)
group(g1, g2, ...)
Return the substring that matched a parenthesized group (or groups) in the pattern.
Accept group numbers or names. Group numbers start at 1; group 0 is the entire
string matched by the pattern. Returns a tuple when passed multiple group num-
bers, and group number defaults to 0 if omitted.
1422 | Chapter 19: Text and Language

groups()
Returns a tuple of all groups’ substrings of the match (for group numbers 1 and
higher).
groupdict()
Returns a dictionary containing all named groups of the match (see (?P<name>R)
syntax ahead).
start([group]) end([group])
Indices of the start and end of the substring matched by group (or the entire matched
string, if no group is passed).
span([group])
Returns the two-item tuple: (start(group), end(group)).
expand([template])
Performs backslash group substitutions; see the Python library manual.
Regular expression patterns
Regular expression strings are built up by concatenating single-character regular ex-
pression forms, shown in Table 19-1. The longest-matching string is usually matched
by each form, except for the nongreedy operators. In the table, R means any regular
expression form, C is a character, and N denotes a digit.
Table 19-1. re pattern syntax
Operator Interpretation
.Matches any character (including newline if DOTALL flag is specified or (?s) at pattern front)
^Matches start of the string (of every line in MULTILINE mode)
$Matches end of the string (of every line in MULTILINE mode)
CAny nonspecial (or backslash-escaped) character matches itself
R* Zero or more of preceding regular expression R (as many as possible)
R+ One or more of preceding regular expression R (as many as possible)
R? Zero or one occurrence of preceding regular expression R (optional)
R{m} Matches exactly m copies preceding R: a{5} matches 'aaaaa'
R{m,n} Matches from m to n repetitions of preceding regular expression R
R*?, R+?, R??,
R{m,n}?
Same as *, +, and ? but matches as few characters/times as possible; these are known as
nongreedy match operators (unlike others, they match and consume as few characters as
possible)
[...] Defines character set: e.g., [a-zA-Z] to match all letters (alternatives, with - for ranges)
[^...] Defines complemented character set: matches if char is not in set
\Escapes special chars (e.g., *?+|()) and introduces special sequences in Table 19-2
\\ Matches a literal \ (write as \\\\ in pattern, or use r'\\')
\N Matches the contents of the group of the same number N: '(.+) \1' matches “42 42”
Regular Expression Pattern Matching | 1423

Operator Interpretation
R|R Alternative: matches left or right R
RR Concatenation: match both Rs
(R) Matches any regular expression inside (), and delimits a group (retains matched substring)
(?:R) Same as (R) but simply delimits part R and does not denote a saved group
(?=R) Look-ahead assertion: matches if R matches next, but doesn’t consume any of the string (e.g.,
X (?=Y) matches X only if followed by Y)
(?!R) Matches if R doesn’t match next; negative of (?=R)
(?P<name>R) Matches any regular expression inside (), and delimits a named group
(?P=name) Matches whatever text was matched by the earlier group named name
(?#...) A comment; ignored
(?letter) Set mode flag; letter is one of aiLmsux (see the library manual)
(?<=R) Look-behind assertion: matches if the current position in the string is preceded by a match
of R that ends at the current position
(?<!R) Matches if the current position in the string is not preceded by a match for R; negative of
(?<= R)
(?(id/
name)yespattern|
nopattern)
Will try to match with yespattern if the group with given id or name exists, else with
optional nopattern
Within patterns, ranges and selections can be combined. For instance, [a-zA-Z0-9_]+
matches the longest possible string of one or more letters, digits, or underscores. Special
characters can be escaped as usual in Python strings: [\t ]* matches zero or more tabs
and spaces (i.e., it skips such whitespace).
The parenthesized grouping construct, (R), lets you extract matched substrings after a
successful match. The portion of the string matched by the expression in parentheses
is retained in a numbered register. It’s available through the group method of a match
object after a successful match.
In addition to the entries in this table, special sequences in Table 19-2 can be used in
patterns, too. Because of Python string rules, you sometimes must double up on back-
slashes (\\) or use Python raw strings (r'...') to retain backslashes in the pattern
verbatim. Python ignores backslashes in normal strings if the letter following the back-
slash is not recognized as an escape code. Some of the entries in Table 19-2 are affected
by Unicode when matching str instead of bytes, and an ASCII flag may be set to emulate
the behavior for bytes; see Python’s manuals for more details.
1424 | Chapter 19: Text and Language

Table 19-2. re special sequences
Sequence Interpretation
\number Matches text of group number (numbered from 1)
\A Matches only at the start of the string
\b Empty string at word boundaries
\B Empty string not at word boundaries
\d Any decimal digit character ([0-9] for ASCII)
\D Any nondecimal digit character ([^O-9] for ASCII)
\s Any whitespace character ([ \t\n\r\f\v] for ASCII)
\S Any nonwhitespace character ([^ \t\n\r\f\v] for ASCII)
\w Any alphanumeric character ([a-zA-Z0-9_] for ASCII)
\W Any nonalphanumeric character ([^a-zA-Z0-9_] for ASCII )
\Z Matches only at the end of the string
Most of the standard escapes supported by Python string literals are also accepted by
the regular expression parser: \a, \b, \f, \n, \r, \t, \v, \x, and \\. The Python library
manual gives these escapes’ interpretation and additional details on pattern syntax in
general. But to further demonstrate how the re pattern syntax is typically used in scripts,
let’s go back to writing some code.
More Pattern Examples
For more context, the next few examples present short test files that match simple but
representative pattern forms. Comments in Example 19-3 describe the operations ex-
ercised; check Table 19-1 to see which operators are used in these patterns. If they are
still confusing, try running these tests interactively, and call group(0) instead of
start() to see which strings are being matched by the patterns.
Example 19-3. PP4E\Lang\re-basics.py
"""
literals, sets, ranges, alternatives, and escapes
all tests here print 2: offset where pattern found
"""
import re # the one to use today
pattern, string = "A.C.", "xxABCDxx" # nonspecial chars match themselves
matchobj = re.search(pattern, string) # '.' means any one char
if matchobj: # search returns match object or None
print(matchobj.start()) # start is index where matched
pattobj = re.compile("A.*C.*") # 'R*' means zero or more Rs
matchobj = pattobj.search("xxABCDxx") # compile returns pattern obj
if matchobj: # patt.search returns match obj
Regular Expression Pattern Matching | 1425

print(matchobj.start())
# selection sets
print(re.search(" *A.C[DE][D-F][^G-ZE]G\t+ ?", "..ABCDEFG\t..").start())
# alternatives: R1|R2 means R1 or R2
print(re.search("(A|X)(B|Y)(C|Z)D", "..AYCD..").start()) # test each char
print(re.search("(?:A|X)(?:B|Y)(?:C|Z)D", "..AYCD..").start()) # same, not saved
print(re.search("A|XB|YC|ZD", "..AYCD..").start()) # matches just A!
print(re.search("(A|XB|YC|ZD)YCD", "..AYCD..").start()) # just first char
# word boundaries
print(re.search(r"\bABCD", "..ABCD ").start()) # \b means word boundary
print(re.search(r"ABCD\b", "..ABCD ").start()) # use r'...' to escape '\'
Notice again that there are different ways to kick off a match with re: by calling module
search functions and by making compiled pattern objects. In either event, you can hang
on to the resulting match object or not. All the print call statements in this script show
a result of 2—the offset where the pattern was found in the string. In the first test, for
example, A.C. matches the ABCD at offset 2 in the search string (i.e., after the first xx):
C:\...\PP4E\Lang> python re-basic.py
2
...8 more 2s omitted...
Next, in Example 19-4, parts of the pattern strings enclosed in parentheses delimit
groups; the parts of the string they matched are available after the match.
Example 19-4. PP4E\Lang\re-groups.py
"""
groups: extract substrings matched by REs in '()' parts
groups are denoted by position, but (?P<name>R) can also name them
"""
import re
patt = re.compile("A(.)B(.)C(.)") # saves 3 substrings
mobj = patt.match("A0B1C2") # each '()' is a group, 1..n
print(mobj.group(1), mobj.group(2), mobj.group(3)) # group() gives substring
patt = re.compile("A(.*)B(.*)C(.*)") # saves 3 substrings
mobj = patt.match("A000B111C222") # groups() gives all groups
print(mobj.groups())
print(re.search("(A|X)(B|Y)(C|Z)D", "..AYCD..").groups())
print(re.search("(?P<a>A|X)(?P<b>B|Y)(?P<c>C|Z)D", "..AYCD..").groupdict())
patt = re.compile(r"[\t ]*#\s*define\s*([a-z0-9_]*)\s*(.*)")
mobj = patt.search(" # define spam 1 + 2 + 3") # parts of C #define
print(mobj.groups()) # \s is whitespace
In the first test here, for instance, the three (.) groups each match a single character,
but they retain the character matched; calling group pulls out the character matched.
1426 | Chapter 19: Text and Language

The second test’s (.*) groups match and retain any number of characters. The third
and fourth tests shows how alternatives can be grouped by both position and name,
and the last test matches C #define lines—more on this pattern in a moment:
C:\...\PP4E\Lang> python re-groups.py
0 1 2
('000', '111', '222')
('A', 'Y', 'C')
{'a': 'A', 'c': 'C', 'b': 'Y'}
('spam', '1 + 2 + 3')
Finally, besides matches and substring extraction, re also includes tools for string re-
placement or substitution (see Example 19-5).
Example 19-5. PP4E\Lang\re-subst.py
"substitutions: replace occurrences of pattern in string"
import re
print(re.sub('[ABC]', '*', 'XAXAXBXBXCXC'))
print(re.sub('[ABC]_', '*', 'XA-XA_XB-XB_XC-XC_')) # alternatives char + _
print(re.sub('(.) spam', 'spam\\1', 'x spam, y spam')) # group back ref (or r'')
def mapper(matchobj):
return 'spam' + matchobj.group(1)
print(re.sub('(.) spam', mapper, 'x spam, y spam')) # mapping function
In the first test, all characters in the set are replaced; in the second, they must be followed
by an underscore. The last two tests illustrate more advanced group back-references
and mapping functions in the replacement. Note the \\1 required to escape \1 for
Python’s string rules; r'spam\1' would work just as well. See also the earlier interactive
tests in the section for additional substitution and splitting examples:
C:\...\PP4E\Lang> python re-subst.py
X*X*X*X*X*X*
XA-X*XB-X*XC-X*
spamx, spamy
spamx, spamy
Scanning C Header Files for Patterns
To wrap up, let’s turn to a more realistic example: the script in Example 19-6 puts these
pattern operators to more practical use. It uses regular expressions to find #define and
#include lines in C header files and extract their components. The generality of the
patterns makes them detect a variety of line formats; pattern groups (the parts in pa-
rentheses) are used to extract matched substrings from a line after a match.
Regular Expression Pattern Matching | 1427

Example 19-6. PP4E\Lang\cheader.py
"Scan C header files to extract parts of #define and #include lines"
import sys, re
pattDefine = re.compile( # compile to pattobj
'^#[\t ]*define[\t ]+(\w+)[\t ]*(.*)') # "# define xxx yyy..."
# \w like [a-zA-Z0-9_]
pattInclude = re.compile(
'^#[\t ]*include[\t ]+[<"]([\w\./]+)') # "# include <xxx>..."
def scan(fileobj):
count = 0
for line in fileobj: # scan by lines: iterator
count += 1
matchobj = pattDefine.match(line) # None if match fails
if matchobj:
name = matchobj.group(1) # substrings for (...) parts
body = matchobj.group(2)
print(count, 'defined', name, '=', body.strip())
continue
matchobj = pattInclude.match(line)
if matchobj:
start, stop = matchobj.span(1) # start/stop indexes of (...)
filename = line[start:stop] # slice out of line
print(count, 'include', filename) # same as matchobj.group(1)
if len(sys.argv) == 1:
scan(sys.stdin) # no args: read stdin
else:
scan(open(sys.argv[1], 'r')) # arg: input filename
To test, let’s run this script on the text file in Example 19-7.
Example 19-7. PP4E\Lang\test.h
#ifndef TEST_H
#define TEST_H
#include <stdio.h>
#include <lib/spam.h>
# include "Python.h"
#define DEBUG
#define HELLO 'hello regex world'
# define SPAM 1234
#define EGGS sunny + side + up
#define ADDER(arg) 123 + arg
#endif
Notice the spaces after # in some of these lines; regular expressions are flexible enough
to account for such departures from the norm. Here is the script at work; picking out
#include and #define lines and their parts. For each matched line, it prints the line
number, the line type, and any matched substrings:
1428 | Chapter 19: Text and Language

C:\...\PP4E\Lang> python cheader.py test.h
2 defined TEST_H =
4 include stdio.h
5 include lib/spam.h
6 include Python.h
8 defined DEBUG =
9 defined HELLO = 'hello regex world'
10 defined SPAM = 1234
12 defined EGGS = sunny + side + up
13 defined ADDER = (arg) 123 + arg
For an additional example of regular expressions at work, see the file pygrep1.py in the
book examples package; it implements a simple pattern-based “grep” file search utility,
but was cut here for space. As we’ll see, we can also sometimes use regular expressions
to parse information from XML and HTML text—the topics of the next section.
XML and HTML Parsing
Beyond string objects and regular expressions, Python ships with support for parsing
some specific and commonly used types of formatted text. In particular, it provides
precoded parsers for XML and HTML which we can deploy and customize for our text
processing goals.
In the XML department, Python includes parsing support in its standard library and
plays host to a prolific XML special-interest group. XML (for eXtensible Markup Lan-
guage) is a tag-based markup language for describing many kinds of structured data.
Among other things, it has been adopted in roles such as a standard database and
Internet content representation in many contexts. As an object-oriented scripting lan-
guage, Python mixes remarkably well with XML’s core notion of structured document
interchange.
XML is based upon a tag syntax familiar to web page writers, used to describe and
package data. The xml module package in Python’s standard library includes tools for
parsing this data from XML text, with both the SAX and the DOM standard parsing
models, as well as the Python-specific ElementTree package. Although regular expres-
sions can sometimes extract information from XML documents, too, they can be easily
misled by unexpected text, and don’t directly support the notion of arbitrarily nested
XML constructs (more on this limitation later when we explore languages in general).
In short, SAX parsers provide a subclass with methods called during the parsing oper-
ation, and DOM parsers are given access to an object tree representing the (usually)
already parsed document. SAX parsers are essentially state machines and must record
(and possibly stack) page details as the parse progresses; DOM parsers walk object trees
using loops, attributes, and methods defined by the DOM standard. ElementTree is
roughly a Python-specific analog of DOM, and as such can often yield simpler code; it
can also be used to generate XML text from their object-based representations.
XML and HTML Parsing | 1429

Beyond these parsing tools, Python also ships with an xmlrpc package to support the
client and server sides of the XML-RPC protocol (remote procedure calls that transmit
objects encoded as XML over HTTP), as well as a standard HTML parser, html.parser,
that works on similar principles and is presented later in this chapter. The third-party
domain has even more XML-related tools; most of these are maintained separately from
Python to allow for more flexible release schedules. Beginning with Python 2.3, the
Expat parser is also included as the underlying engine that drives the parsing process.
XML Parsing in Action
XML processing is a large, evolving topic, and it is mostly beyond the scope of this
book. For an example of a simple XML parsing task, though, consider the XML file in
Example 19-8. This file defines a handful of O’Reilly Python books—ISBN numbers
as attributes, and titles, publication dates, and authors as nested tags (with apologies
to Python books not listed in this completely random sample—there are many!).
Example 19-8. PP4E\Lang\Xml\books.xml
<catalog>
<book isbn="0-596-00128-2">
<title>Python & XML</title>
<date>December 2001</date>
<author>Jones, Drake</author>
</book>
<book isbn="0-596-15810-6">
<title>Programming Python, 4th Edition</title>
<date>October 2010</date>
<author>Lutz</author>
</book>
<book isbn="0-596-15806-8">
<title>Learning Python, 4th Edition</title>
<date>September 2009</date>
<author>Lutz</author>
</book>
<book isbn="0-596-15808-4">
<title>Python Pocket Reference, 4th Edition</title>
<date>October 2009</date>
<author>Lutz</author>
</book>
<book isbn="0-596-00797-3">
<title>Python Cookbook, 2nd Edition</title>
<date>March 2005</date>
<author>Martelli, Ravenscroft, Ascher</author>
</book>
<book isbn="0-596-10046-9">
<title>Python in a Nutshell, 2nd Edition</title>
<date>July 2006</date>
<author>Martelli</author>
</book>
<!-- plus many more Python books that should appear here -->
</catalog>
1430 | Chapter 19: Text and Language

Let’s quickly explore ways to extract this file’s book ISBN numbers and corresponding
titles by example, using each of the four primary Python tools at our disposal—patterns,
SAX, DOM, and ElementTree.
Regular expression parsing
In some contexts, the regular expressions we met earlier can be used to parse informa-
tion from XML files. They are not complete parsers, and are not very robust or accurate
in the presence of arbitrary text (text in tag attributes can especially throw them off).
Where applicable, though, they offer a simple option. Example 19-9 shows how we
might go about parsing the XML file in Example 19-8 with the prior section’s re module.
Like all four examples in this section, it scans the XML file looking at ISBN numbers
and associated titles, and stores the two as keys and values in a Python dictionary.
Example 19-9. PP4E\Lang\Xml\rebook.py
"""
XML parsing: regular expressions (no robust or general)
"""
import re, pprint
text = open('books.xml').read() # str if str pattern
pattern = '(?s)isbn="(.*?)".*?<title>(.*?)</title>' # *?=nongreedy
found = re.findall(pattern, text) # (?s)=dot matches /n
mapping = {isbn: title for (isbn, title) in found} # dict from tuple list
pprint.pprint(mapping)
When run, the re.findall method locates all the nested tags we’re interested in, ex-
tracts their content, and returns a list of tuples representing the two parenthesized
groups in the pattern. Python’s pprint module displays the dictionary created by the
comprehension nicely. The extract works, but only as long as the text doesn’t deviate
from the expected pattern in ways that would invalidate our script. Moreover, the XML
entity for “&” in the first book’s title is not un-escaped automatically:
C:\...\PP4E\Lang\Xml> python rebook.py
{'0-596-00128-2': 'Python & XML',
'0-596-00797-3': 'Python Cookbook, 2nd Edition',
'0-596-10046-9': 'Python in a Nutshell, 2nd Edition',
'0-596-15806-8': 'Learning Python, 4th Edition',
'0-596-15808-4': 'Python Pocket Reference, 4th Edition',
'0-596-15810-6': 'Programming Python, 4th Edition'}
SAX parsing
To do better, Python’s full-blown XML parsing tools let us perform this data extraction
in a more accurate and robust way. Example 19-10, for instance, defines a SAX-based
parsing procedure: its class implements callback methods that will be called during the
parse, and its top-level code creates and runs a parser.
XML and HTML Parsing | 1431

Example 19-10. PP4E\Lang\Xml\saxbook.py
"""
XML parsing: SAX is a callback-based API for intercepting parser events
"""
import xml.sax, xml.sax.handler, pprint
class BookHandler(xml.sax.handler.ContentHandler):
def __init__(self):
self.inTitle = False # handle XML parser events
self.mapping = {} # a state machine model
def startElement(self, name, attributes):
if name == "book": # on start book tag
self.buffer = "" # save ISBN for dict key
self.isbn = attributes["isbn"]
elif name == "title": # on start title tag
self.inTitle = True # save title text to follow
def characters(self, data):
if self.inTitle: # on text within tag
self.buffer += data # save text if in title
def endElement(self, name):
if name == "title":
self.inTitle = False # on end title tag
self.mapping[self.isbn] = self.buffer # store title text in dict
parser = xml.sax.make_parser()
handler = BookHandler()
parser.setContentHandler(handler)
parser.parse('books.xml')
pprint.pprint(handler.mapping)
The SAX model is efficient, but it is potentially confusing at first glance, because the
class must keep track of where the parse currently is using state information. For ex-
ample, when the title tag is first detected, we set a state flag and initialize a buffer; as
each character within the title tag is parsed, we append it to the buffer until the ending
portion of the title tag is encountered. The net effect saves the title tag’s content as a
string. This model is simple, but can be complex to manage; in cases of potentially
arbitrary nesting, for instance, state information may need to be stacked as the class
receives callbacks for nested tags.
To kick off the parse, we make a parser object, set its handler to an instance of our
class, and start the parse; as Python scans the XML file, our class’s methods are called
automatically as components are encountered. When the parse is complete, we use the
Python pprint module to display the result again—the mapping dictionary object at-
tached to our handler. The result is the mostly the same this time, but notice that the
“&” escape sequence is properly un-escaped now—SAX performs XML parsing, not
text matching:
1432 | Chapter 19: Text and Language

C:\...\PP4E\Lang\Xml> python saxbook.py
{'0-596-00128-2': 'Python & XML',
'0-596-00797-3': 'Python Cookbook, 2nd Edition',
'0-596-10046-9': 'Python in a Nutshell, 2nd Edition',
'0-596-15806-8': 'Learning Python, 4th Edition',
'0-596-15808-4': 'Python Pocket Reference, 4th Edition',
'0-596-15810-6': 'Programming Python, 4th Edition'}
DOM parsing
The DOM parsing model for XML is perhaps simpler to understand—we simply tra-
verse a tree of objects after the parse—but it might be less efficient for large documents,
if the document is parsed all at once ahead of time and stored in memory. DOM also
supports random access to document parts via tree fetches, nested loops for known
structures, and recursive traversals for arbitrary nesting; in SAX, we are limited to a
single linear parse. Example 19-11 is a DOM-based equivalent to the SAX parser of the
preceding section.
Example 19-11. PP4E\Lang\Xml\dombook.py
"""
XML parsing: DOM gives whole document to the application as a traversable object
"""
import pprint
import xml.dom.minidom
from xml.dom.minidom import Node
doc = xml.dom.minidom.parse("books.xml") # load doc into object
# usually parsed up front
mapping = {}
for node in doc.getElementsByTagName("book"): # traverse DOM object
isbn = node.getAttribute("isbn") # via DOM object API
L = node.getElementsByTagName("title")
for node2 in L:
title = ""
for node3 in node2.childNodes:
if node3.nodeType == Node.TEXT_NODE:
title += node3.data
mapping[isbn] = title
# mapping now has the same value as in the SAX example
pprint.pprint(mapping)
The output of this script is the same as what we generated interactively for the SAX
parser; here, though, it is built up by walking the document object tree after the parse
has finished using method calls and attributes defined by the cross-language DOM
standard specification. This is both a strength and potential weakness of DOM—its
API is language neutral, but it may seem a bit nonintuitive and verbose to some Python
programmers accustomed to simpler models:
C:\...\PP4E\Lang\Xml> python dombook.py
{'0-596-00128-2': 'Python & XML',
XML and HTML Parsing | 1433

'0-596-00797-3': 'Python Cookbook, 2nd Edition',
'0-596-10046-9': 'Python in a Nutshell, 2nd Edition',
'0-596-15806-8': 'Learning Python, 4th Edition',
'0-596-15808-4': 'Python Pocket Reference, 4th Edition',
'0-596-15810-6': 'Programming Python, 4th Edition'}
ElementTree parsing
As a fourth option, the popular ElementTree package is a standard library tool for both
parsing and generating XML. As a parser, it’s essentially a more Pythonic type of
DOM—it parses documents into a tree of objects again, but the API for navigating the
tree is more lightweight, because it’s Python-specific.
ElementTree provides easy-to-use tools for parsing, changing, and generating XML
documents. For both parsing and generating, it represents documents as a tree of
Python “element” objects. Each element in the tree has a tag name, attribute dictionary,
text value, and sequence of child elements. The element object produced by a parse
can be navigating with normal Python loops for a known structures, and with recursion
where arbitrary nesting is possible.
The ElementTree system began its life as a third-party extension, but it was largely
incorporated into Python’s standard library as the package xml.etree. Example 19-12
shows how to use it to parse our book catalog file one last time.
Example 19-12. PP4E\Lang\Xml\etreebook.py
"""
XML parsing: ElementTree (etree) provides a Python-based API for parsing/generating
"""
import pprint
from xml.etree.ElementTree import parse
mapping = {}
tree = parse('books.xml')
for B in tree.findall('book'):
isbn = B.attrib['isbn']
for T in B.findall('title'):
mapping[isbn] = T.text
pprint.pprint(mapping)
When run we get the exact same results as for SAX and DOM again, but the code
required to extract the file’s details seems noticeably simpler this time around:
C:\...\PP4E\Lang\Xml> python etreebook.py
{'0-596-00128-2': 'Python & XML',
'0-596-00797-3': 'Python Cookbook, 2nd Edition',
'0-596-10046-9': 'Python in a Nutshell, 2nd Edition',
'0-596-15806-8': 'Learning Python, 4th Edition',
'0-596-15808-4': 'Python Pocket Reference, 4th Edition',
'0-596-15810-6': 'Programming Python, 4th Edition'}
1434 | Chapter 19: Text and Language

Other XML topics
Naturally, there is much more to Python’s XML support than these simple examples
imply. In deference to space, though, here are pointers to XML resources in lieu of
additional examples:
Standard library
First, be sure to consult the Python library manual for more on the standard li-
brary’s XML support tools. See the entries for re, xml.sax., xml.dom, and
xml.etree for more on this section’s examples.
PyXML SIG tools
You can also find Python XML tools and documentation at the XML Special In-
terest Group (SIG) web page at http://www.python.org. This SIG is dedicated to
wedding XML technologies with Python, and it publishes free XML tools inde-
pendent of Python itself. Much of the standard library’s XML support originated
with this group’s work.
Third-party tools
You can also find free, third-party Python support tools for XML on the Web by
following links at the XML SIGs web page. Of special interest, the 4Suite open
source package provides integrated tools for XML processing, including open
technologies such as DOM, SAX, RDF, XSLT, XInclude, XPointer, XLink, and
XPath.
Documentation
A variety of books have been published which specifically address XML and text
processing in Python. O’Reilly offers a book dedicated to the subject of XML pro-
cessing in Python, Python & XML, written by Christopher A. Jones and Fred L.
Drake, Jr.
As usual, be sure to also see your favorite web search engine for more recent develop-
ments on this front.
HTML Parsing in Action
Although more limited in scope, Python’s html.parser standard library module also
supports HTML-specific parsing, useful in “screen scraping” roles to extract informa-
tion from web pages. Among other things, this parser can be used to process Web
replies fetched with the urllib.request module we met in the Internet part of this book,
to extract plain text from HTML email messages, and more.
The html.parser module has an API reminiscent of the XML SAX model of the prior
section: it provides a parser which we subclass to intercept tags and their data during
a parse. Unlike SAX, we don’t provide a handler class, but extend the parser class
directly. Here’s a quick interactive example to demonstrate the basics (I copied all of
this section’s code into file htmlparser.py in the examples package if you wish to ex-
periment with it yourself):
XML and HTML Parsing | 1435

>>> from html.parser import HTMLParser
>>> class ParsePage(HTMLParser):
... def handle_starttag(self, tag, attrs):
... print('Tag start:', tag, attrs)
... def handle_endtag(self, tag):
... print('tag end: ', tag)
... def handle_data(self, data):
... print('data......', data.rstrip())
...
Now, create a web page’s HTML text string; we hardcode one here, but it might also
be loaded from a file, or fetched from a website with urllib.request:
>>> page = """
... <html>
... <h1>Spam!</h1>
... <p>Click this <a href="http://www.python.org">python</a> link</p>
... </html>"""
Finally, kick off the parse by feeding text to a parser instance—tags in the HTML text
trigger class method callbacks, with tag names and attribute sequences passed in as
arguments:
>>> parser = ParsePage()
>>> parser.feed(page)
data......
Tag start: html []
data......
Tag start: h1 []
data...... Spam!
tag end: h1
data......
Tag start: p []
data...... Click this
Tag start: a [('href', 'http://www.python.org')]
data...... python
tag end: a
data...... link
tag end: p
data......
tag end: html
As you can see, the parser’s methods receive callbacks for events during the parse. Much
like SAX XML parsing, your parser class will need to keep track of its state in attributes
as it goes if it wishes to do something more specific than print tag names, attributes,
and content. Watching for specific tags’ content, though, might be as simple as check-
ing names and setting state flags. Moreover, building object trees to reflect the page’s
structure during the parse would be straightforward.
1436 | Chapter 19: Text and Language

Handling HTML entity references (revisited)
Here’s another HTML parsing example: in Chapter 15, we used a simple method ex-
ported by this module to unquote HTML escape sequences (a.k.a. entities) in strings
embedded in an HTML reply page:
>>> import cgi, html.parser
>>> s = cgi.escape("1<2 <b>hello</b>")
>>> s
'1<2 <b>hello</b>'
>>>
>>> html.parser.HTMLParser().unescape(s)
'1<2 <b>hello</b>'
This works for undoing HTML escapes, but that’s all. When we saw this solution, I
implied that there was a more general approach; now that you know about the method
callback model of the HTML parser class, the more idiomatic way to handle entities
during a parse should make sense—simply catch entity callbacks in a parser subclass,
and translate as needed:
>>> class Parse(html.parser.HTMLParser):
... def handle_data(self, data):
... print(data, end='')
... def handle_entityref(self, name):
... map = dict(lt='<', gt='>')
... print(map[name], end='')
...
>>> p = Parse()
>>> p.feed(s); print()
1<2 <b>hello</b>
Better still, we can use Python’s related html.entities module to avoid hardcoding
entity-to-character mappings for HTML entities. This module defines many more en-
tity names than the simple dictionary in the prior example and includes all those you’ll
likely encounter when parsing HTML text in the wild:
>>> s
'1<2 <b>hello</b>'
>>>
>>> from html.entities import entitydefs
>>> class Parse(html.parser.HTMLParser):
... def handle_data(self, data):
... print(data, end='')
... def handle_entityref(self, name):
... print(entitydefs[name], end='')
...
>>> P = Parse()
>>> P.feed(s); print()
1<2 <b>hello</b>
Strictly speaking, the html.entities module is able to map entity name to Unicode code
point and vice versa; its table used here simply converts code point integers to characters
with chr. See this module’s documentation, as well as its source code in the Python
standard library for more details.
XML and HTML Parsing | 1437

Extracting plain text from HTML (revisited)
Now that you understand the basic principles of the HTML parser class in Python’s
standard library, the plain text extraction module used by Chapter 14’s PyMailGUI
(Example 14-8) will also probably make significantly more sense (this was an unavoid-
able forward reference which we’re finally able to close).
Rather than repeating its code here, I’ll simply refer you back to that example, as well
as its self-test and test input files, for another example of HTML parsing in Python to
study on your own. It’s essentially a minor elaboration on the examples here, which
detects more types of tags in its parser callback methods.
Because of space concerns, we have to cut short our treatment of HTML parsing here;
as usual, knowing that it exists is enough to get started. For more details on the API,
consult the Python library manual. And for additional HTML support, check the Web
for the 3.X status of third-party HTML parser packages like those mentioned in
Chapter 14.
Advanced Language Tools
If you have a background in parsing theory, you may know that neither regular ex-
pressions nor string splitting is powerful enough to handle more complex language
grammars. Roughly, regular expressions don’t have the stack “memory” required by
true language grammars, and so cannot support arbitrary nesting of language con-
structs—nested if statements in a programming language, for instance. In fact, this is
why the XML and HTML parsers of the prior section are required at all: both are
languages of potentially arbitrary nesting, which are beyond the scope of regular ex-
pressions in general.
From a theoretical perspective, regular expressions are really intended to handle just
the first stage of parsing—separating text into components, otherwise known as lexical
analysis. Though patterns can often be used to extract data from text, true language
parsing requires more. There are a number of ways to fill this gap with Python:
Python as language tool
In most applications, the Python language itself can replace custom languages and
parsers—user-entered code can be passed to Python for evaluation with tools such
as eval and exec. By augmenting the system with custom modules, user code in
this scenario has access to both the full Python language and any application-
specific extensions required. In a sense, such systems embed Python in Python.
Since this is a common Python role, we’ll revisit this approach later in this chapter.
Custom language parsers: manual or toolkit
For some sophisticated language analysis tasks, though, a full-blown parser may
still be required. Such parsers can always be written by hand, but since Python is
built for integrating C tools, we can write integrations to traditional parser gener-
ator systems such as yacc and bison, tools that create parsers from language
1438 | Chapter 19: Text and Language

grammar definitions. Better yet, we could use an integration that already exists—
interfaces to such common parser generators are freely available in the open source
domain (run a web search for up-to-date details and links).
In addition, a number of Python-specific parsing systems are available on the Web.
Among them: PLY is an implementation of lex and yacc parsing tools in and for
Python; the kwParsing system is a parser generator written in Python; PyParsing
is a pure-Python class library that makes it easy to build recursive-descent parsers
quickly; and the SPARK toolkit is a lightweight system that employs the Earley
algorithm to work around technical problems with LALR parser generation (if you
don’t know what that means, you probably don’t need to care).
Of special interest to this chapter, YAPPS (Yet Another Python Parser System) is a
parser generator written in Python. It uses supplied grammar rules to generate
human-readable Python code that implements a recursive descent parser; that is,
it’s Python code that generates Python code. The parsers generated by YAPPS look
much like (and were inspired by) the handcoded custom expression parsers shown
in the next section. YAPPS creates LL(1) parsers, which are not as powerful as
LALR parsers but are sufficient for many language tasks. For more on YAPPS, see
http://theory.stanford.edu/~amitp/Yapps or search the Web at large.
Natural language processing
Even more demanding language analysis tasks require techniques developed in
artificial intelligence research, such as semantic analysis and machine learning. For
instance, the Natural Language Toolkit, or NLTK, is an open source suite of Python
libraries and programs for symbolic and statistical natural language processing. It
applies linguistic techniques to textual data, and it can be used in the development
of natural language recognition software and systems. For much more on this sub-
ject, be sure to also see the O’Reilly book Natural Language Processing with Py-
thon, which explores, among other things, ways to use NLTK in Python. Not every
system’s users will pose questions in a natural language, of course, but there are
many applications which can make good use of such utility.
Though widely useful, parser generator systems and natural language analysis toolkits
are too complex for us to cover in any sort of useful detail in this text. Consult http://
python.org/ or search the Web for more information on language analysis tools available
for use in Python programs. For the purposes of this chapter, let’s move on to explore
a more basic and manual approach that illustrates concepts underlying the domain—
recursive descent parsing.
Lesson 2: Don’t Reinvent the Wheel (Usually)
Speaking of parser generators, to use some of these tools in Python programs, you’ll
need an extension module that integrates them. The first step in such scenarios should
always be to see whether the extension already exists in the public domain. Especially
for common tools like these, chances are that someone else has already implemented
an integration that you can use off-the-shelf instead of writing one from scratch.
Advanced Language Tools | 1439

Of course, not everyone can donate all their extension modules to the public domain,
but there’s a growing library of available components that you can pick up for free and
a community of experts to query. Visit the PyPI site at http://www.python.org for links
to Python software resources, or search the Web at large. With at least one million
Python users out there as I write this book, much can be found in the prior-art
department.
Unless, of course, the wheel does not work: We’ve also seen a handful of cases in this
book where standard libraries were either not adequate or were broken altogether. For
instance, the Python 3.1 email package issues we explored in Chapter 13 required us
to code workarounds of our own. In such cases, you may still ultimately need to code
your own infrastructure support. The “not invented here” syndrome can still claim
victory when software dependencies break down.
Still, you’re generally better off trying to use the standard support provided by Python
in most cases, even if doing so requires manually coded fixes. In the email package
example, fixing its problems seems much easier than coding an email parser and gen-
erator from scratch—a task far too large to have even attempted in this book. Python’s
batteries included approach to development can be amazingly productive—even when
some of those batteries require a charge.
Custom Language Parsers
Although toolkits abound in this domain, Python’s status as a general-purpose pro-
gramming language also makes it a reasonable vehicle for writing hand-coded parsers
for custom language analysis tasks. For instance, recursive descent parsing is a fairly
well-known technique for analyzing language-based information. Though not as pow-
erful as some language tools, recursive descent parses are sufficient for a wide variety
of language-related goals.
To illustrate, this section develops a custom parser for a simple grammar—it parses
and evaluates arithmetic expression strings. Though language analysis is the main topic
here, this example also demonstrates the utility of Python as a general-purpose pro-
gramming language. Although Python is often used as a frontend or rapid development
language in tactical modes, it’s also often useful for the kinds of strategic work you may
have formerly done in a systems development language such as C or C++.
The Expression Grammar
The grammar that our parser will recognize can be described as follows:
goal -> <expr> END [number, variable, ( ]
goal -> <assign> END [set]
assign -> 'set' <variable> <expr> [set]
expr -> <factor> <expr-tail> [number, variable, ( ]
1440 | Chapter 19: Text and Language

expr-tail -> ^ [END, ) ]
expr-tail -> '+' <factor> <expr-tail> [+]
expr-tail -> '-' <factor> <expr-tail> [-]
factor -> <term> <factor-tail> [number, variable, ( ]
factor-tail -> ^ [+, -, END, ) ]
factor-tail -> '*' <term> <factor-tail> [*]
factor-tail -> '/' <term> <factor-tail> [/]
term -> <number> [number]
term -> <variable> [variable]
term -> '(' <expr> ')' [(]
tokens: (, ), num, var, -, +, /, *, set, end
This is a fairly typical grammar for a simple expression language, and it allows for
arbitrary expression nesting (some example expressions appear at the end of the test
parser module listing in Example 19-15). Strings to be parsed are either an expression
or an assignment to a variable name (set). Expressions involve numbers, variables, and
the operators +, −, *, and /. Because factor is nested in expr in the grammar, * and /
have higher precedence (i.e., they bind tighter) than + and −. Expressions can be en-
closed in parentheses to override precedence, and all operators are left associative—
that is, they group on the left (e.g., 1-2-3 is treated the same as (1-2)-3).
Tokens are just the most primitive components of the expression language. Each gram-
mar rule listed earlier is followed in square brackets by a list of tokens used to select it.
In recursive descent parsing, we determine the set of tokens that can possibly start a
rule’s substring, and we use that information to predict which rule will work ahead of
time. For rules that iterate (the -tail rules), we use the set of possibly following tokens
to know when to stop. Typically, tokens are recognized by a string processor (a scan-
ner), and a higher-level processor (a parser) uses the token stream to predict and step
through grammar rules and substrings.
The Parser’s Code
The system is structured as two modules, holding two classes:
• The scanner handles low-level character-by-character analysis.
• The parser embeds a scanner and handles higher-level grammar analysis.
The parser is also responsible for computing the expression’s value and testing the
system. In this version, the parser evaluates the expression while it is being parsed. To
use the system, we create a parser with an input string and call its parse method. We
can also call parse again later with a new expression string.
There’s a deliberate division of labor here. The scanner extracts tokens from the string,
but it knows nothing about the grammar. The parser handles the grammar, but it is
Custom Language Parsers | 1441

naive about the string itself. This modular structure keeps the code relatively simple.
And it’s another example of the object-oriented programming (OOP) composition re-
lationship at work: parsers embed and delegate to scanners.
The module in Example 19-13 implements the lexical analysis task—detecting the ex-
pression’s basic tokens by scanning the text string left to right on demand. Notice that
this is all straightforward logic; such analysis can sometimes be performed with regular
expressions instead (described earlier), but the pattern needed to detect and extract
tokens in this example would be too complex and fragile for my tastes. If your tastes
vary, try recoding this module with re.
Example 19-13. PP4E\Lang\Parser\scanner.py
"""
###############################################################################
the scanner (lexical analyser)
###############################################################################
"""
import string
class SyntaxError(Exception): pass # local errors
class LexicalError(Exception): pass # used to be strings
class Scanner:
def __init__(self, text):
self.next = 0
self.text = text + '\0'
def newtext(self, text):
Scanner.__init__(self, text)
def showerror(self):
print('=> ', self.text)
print('=> ', (' ' * self.start) + '^')
def match(self, token):
if self.token != token:
raise SyntaxError(token)
else:
value = self.value
if self.token != '\0':
self.scan() # next token/value
return value # return prior value
def scan(self):
self.value = None
ix = self.next
while self.text[ix] in string.whitespace:
ix += 1
self.start = ix
if self.text[ix] in ['(', ')', '-', '+', '/', '*', '\0']:
self.token = self.text[ix]
ix += 1
1442 | Chapter 19: Text and Language

elif self.text[ix] in string.digits:
str = ''
while self.text[ix] in string.digits:
str += self.text[ix]
ix += 1
if self.text[ix] == '.':
str += '.'
ix += 1
while self.text[ix] in string.digits:
str += self.text[ix]
ix += 1
self.token = 'num'
self.value = float(str)
else:
self.token = 'num'
self.value = int(str) # subsumes long() in 3.x
elif self.text[ix] in string.ascii_letters:
str = ''
while self.text[ix] in (string.digits + string.ascii_letters):
str += self.text[ix]
ix += 1
if str.lower() == 'set':
self.token = 'set'
else:
self.token = 'var'
self.value = str
else:
raise LexicalError()
self.next = ix
The parser module’s class creates and embeds a scanner for its lexical chores and han-
dles interpretation of the expression grammar’s rules and evaluation of the expression’s
result, as shown in Example 19-14.
Example 19-14. PP4E\Lang\Parser\parser1.py
"""
################################################################################
the parser (syntax analyser, evaluates during parse)
################################################################################
"""
class UndefinedError(Exception): pass
from scanner import Scanner, LexicalError, SyntaxError
class Parser:
def __init__(self, text=''):
self.lex = Scanner(text) # embed a scanner
self.vars = {'pi': 3.14159} # add a variable
def parse(self, *text):
if text: # main entry-point
Custom Language Parsers | 1443

self.lex.newtext(text[0]) # reuse this parser?
try:
self.lex.scan() # get first token
self.Goal() # parse a sentence
except SyntaxError:
print('Syntax Error at column:', self.lex.start)
self.lex.showerror()
except LexicalError:
print('Lexical Error at column:', self.lex.start)
self.lex.showerror()
except UndefinedError as E:
name = E.args[0]
print("'%s' is undefined at column:" % name, self.lex.start)
self.lex.showerror()
def Goal(self):
if self.lex.token in ['num', 'var', '(']:
val = self.Expr()
self.lex.match('\0') # expression?
print(val)
elif self.lex.token == 'set': # set command?
self.Assign()
self.lex.match('\0')
else:
raise SyntaxError()
def Assign(self):
self.lex.match('set')
var = self.lex.match('var')
val = self.Expr()
self.vars[var] = val # assign name in dict
def Expr(self):
left = self.Factor()
while True:
if self.lex.token in ['\0', ')']:
return left
elif self.lex.token == '+':
self.lex.scan()
left = left + self.Factor()
elif self.lex.token == '-':
self.lex.scan()
left = left - self.Factor()
else:
raise SyntaxError()
def Factor(self):
left = self.Term()
while True:
if self.lex.token in ['+', '-', '\0', ')']:
return left
elif self.lex.token == '*':
self.lex.scan()
left = left * self.Term()
elif self.lex.token == '/':
1444 | Chapter 19: Text and Language

self.lex.scan()
left = left / self.Term()
else:
raise SyntaxError()
def Term(self):
if self.lex.token == 'num':
val = self.lex.match('num') # numbers
return val
elif self.lex.token == 'var':
if self.lex.value in self.vars.keys(): # keys(): EIBTI!
val = self.vars[self.lex.value] # look up name's value
self.lex.scan()
return val
else:
raise UndefinedError(self.lex.value)
elif self.lex.token == '(':
self.lex.scan()
val = self.Expr() # sub-expression
self.lex.match(')')
return val
else:
raise SyntaxError()
if __name__ == '__main__':
import testparser # self-test code
testparser.test(Parser, 'parser1') # test local Parser
If you study this code closely, you’ll notice that the parser keeps a dictionary
(self.vars) to manage variable names: they’re stored in the dictionary on a set com-
mand and are fetched from it when they appear in an expression. Tokens are repre-
sented as strings, with an optional associated value (a numeric value for numbers and
a string for variable names).
The parser uses iteration (while loops) rather than recursion for the expr-tail and
factor-tail rules. Other than this optimization, the rules of the grammar map directly
onto parser methods: tokens become calls to the scanner, and nested rule references
become calls to other methods.
When the file parser1.py is run as a top-level program, its self-test code is executed,
which in turn simply runs a canned test in the module shown in Example 19-15. Notice
how the scanner converts numbers to strings with int; this ensures that all integer math
invoked by the parser supports unlimited precision, simply because it uses Python
integers which always provide the extra precision if needed (the separate Python 2.X
long type and syntax is no more).
Also notice that mixed integer/floating-point operations cast up to floating point since
Python operators are used to do the actual calculations along the way. The expression
language’s / division operator also inherits Python 3.X’s true division model which
retains remainders and returns floating point results regardless of operand types. We
Custom Language Parsers | 1445

could simply run a // in our evaluation logic to retain prior behavior (or allow for
both / and // in our grammar), but we’ll follow Python 3.X’s lead here.
Example 19-15. PP4E\Lang\Parser\testparser.py
"""
############################################################################
parser test code
############################################################################
"""
def test(ParserClass, msg):
print(msg, ParserClass)
x = ParserClass('4 / 2 + 3') # allow different Parsers
x.parse()
x.parse('3 + 4 / 2') # like eval('3 + 4 / 2')...
x.parse('(3 + 4) / 2') # 3.X: / is now true div
x.parse('4 / (2 + 3)') # // is not supported (yet)
x.parse('4.0 / (2 + 3)')
x.parse('4 / (2.0 + 3)')
x.parse('4.0 / 2 * 3')
x.parse('(4.0 / 2) * 3')
x.parse('4.0 / (2 * 3)')
x.parse('(((3))) + 1')
y = ParserClass()
y.parse('set a 4 / 2 + 1')
y.parse('a * 3')
y.parse('set b 12 / a')
y.parse('b')
z = ParserClass()
z.parse('set a 99')
z.parse('set a a + 1')
z.parse('a')
z = ParserClass()
z.parse('pi')
z.parse('2 * pi')
z.parse('1.234 + 2.1')
def interact(ParserClass): # command-line entry
print(ParserClass)
x = ParserClass()
while True:
cmd = input('Enter=> ')
if cmd == 'stop':
break
x.parse(cmd)
Correlate the following results to print call statements in the self-test module:
C:\...\PP4E\Lang\Parser> python parser1.py
parser1 <class '__main__.Parser'>
1446 | Chapter 19: Text and Language

5.0
5.0
3.5
0.8
0.8
0.8
6.0
6.0
0.666666666667
4
9.0
4.0
100
3.14159
6.28318
3.334
As usual, we can also test and use the system interactively to work through more of its
utility:
C:\...\PP4E\Lang\Parser> python
>>> import parser1
>>> x = parser1.Parser()
>>> x.parse('1 + 2')
3
Error cases are trapped and reported in a fairly friendly fashion (assuming users think
in zero-based terms):
>>> x.parse('1 + a')
'a' is undefined at column: 4
=> 1 + a
=> ^
>>> x.parse('1+a+2')
'a' is undefined at column: 2
=> 1+a+2
=> ^
>>> x.parse('1 * 2 $')
Lexical Error at column: 6
=> 1 * 2 $
=> ^
>>> x.parse('1 * - 1')
Syntax Error at column: 4
=> 1 * - 1
=> ^
>>> x.parse('1 * (9')
Syntax Error at column: 6
=> 1 * (9
=> ^
>>> x.parse('1 + 2 / 3') # 3.X division change
1.66666666667
>>> x.parse('1 + 2 // 3')
Syntax Error at column: 7
=> 1 + 2 // 3
=> ^
Custom Language Parsers | 1447

Lesson 3: Divide and Conquer
As the custom parser system demonstrates, modular program design is almost always
a major win. By using Python’s program structuring tools (functions, modules, classes,
and so on), big tasks can be broken down into small, manageable parts that can be
coded and tested independently.
For instance, the scanner can be tested without the parser by making an instance with
an input string and calling its scan or match methods repeatedly. We can even test it
like this interactively, from Python’s command line. When we separate programs into
logical components, they become easier to understand and modify. Imagine what the
parser would look like if the scanner’s logic was embedded rather than called.
Pathologically big numbers are handled well, too, because Python’s built-in objects and
operators are used along the way:
>>> x.parse('888888888888888888888888888888888888888888888.9999999')
8.88888888889e+44
>>> x.parse('99999999999999999999999999999999999999999 + 2')
100000000000000000000000000000000000000001
>>> x.parse('999999999999999999999999999999.88888888888 + 1.1')
1e+30
In addition, there is an interactive loop interface in the testparser module if you want
to use the parser as a simple command-line calculator (or if you get tired of typing parser
method calls). Pass the Parser class, so testparser can make one of its own:
>>> import testparser
>>> testparser.interact(parser1.Parser)
<class 'parser1.Parser'>
Enter=> 4 * 3 + 5
17
Enter=> 5 + 4 * 3
17
Enter=> (5 + 4) * 3
27
Enter=> set a 99
Enter=> set b 66
Enter=> a + b
165
Enter=> # + 1
Lexical Error at column: 0
=> # + 1
=> ^
Enter=> a * b + c
'c' is undefined at column: 8
=> a * b + c
=> ^
Enter=> a * b * + c
Syntax Error at column: 8
=> a * b * + c
=> ^
Enter=> a
1448 | Chapter 19: Text and Language

99
Enter=> a * a * a
970299
Enter=> stop
>>>
Adding a Parse Tree Interpreter
One weakness in the parser1 program is that it embeds expression evaluation logic in
the parsing logic: the result is computed while the string is being parsed. This makes
evaluation quick, but it can also make it difficult to modify the code, especially in larger
systems. To simplify, we could restructure the program to keep expression parsing and
evaluation separate. Instead of evaluating the string, the parser can build up an inter-
mediate representation of it that can be evaluated later. As an added incentive, building
the representation separately makes it available to other analysis tools (e.g., optimizers,
viewers, and so on)—they can be run as separate passes over the tree.
Example 19-16 shows a variant of parser1 that implements this idea. The parser ana-
lyzes the string and builds up a parse tree—that is, a tree of class instances that repre-
sents the expression and that may be evaluated in a separate step. The parse tree is built
from classes that “know” how to evaluate themselves: to compute the expression, we
just ask the tree to evaluate itself. Root nodes in the tree ask their children to evaluate
themselves, and then combine the results by applying a single operator. In effect, eval-
uation in this version is simply a recursive traversal of a tree of embedded class instances
constructed by the parser.
Example 19-16. PP4E\Lang\Parser\parser2.py
"""
Separate expression parsing from evaluation by building an explicit parse tree
"""
TraceDefault = False
class UndefinedError(Exception): pass
if __name__ == '__main__':
from scanner import Scanner, SyntaxError, LexicalError # if run here
else:
from .scanner import Scanner, SyntaxError, LexicalError # from PyTree
#################################################################################
# the interpreter (a smart objects tree)
#################################################################################
class TreeNode:
def validate(self, dict): # default error check
pass
def apply(self, dict): # default evaluator
pass
def trace(self, level): # default unparser
print('.' * level + '<empty>')
Custom Language Parsers | 1449

# ROOTS
class BinaryNode(TreeNode):
def __init__(self, left, right): # inherited methods
self.left, self.right = left, right # left/right branches
def validate(self, dict):
self.left.validate(dict) # recurse down branches
self.right.validate(dict)
def trace(self, level):
print('.' * level + '[' + self.label + ']')
self.left.trace(level+3)
self.right.trace(level+3)
class TimesNode(BinaryNode):
label = '*'
def apply(self, dict):
return self.left.apply(dict) * self.right.apply(dict)
class DivideNode(BinaryNode):
label = '/'
def apply(self, dict):
return self.left.apply(dict) / self.right.apply(dict)
class PlusNode(BinaryNode):
label = '+'
def apply(self, dict):
return self.left.apply(dict) + self.right.apply(dict)
class MinusNode(BinaryNode):
label = '-'
def apply(self, dict):
return self.left.apply(dict) - self.right.apply(dict)
# LEAVES
class NumNode(TreeNode):
def __init__(self, num):
self.num = num # already numeric
def apply(self, dict): # use default validate
return self.num
def trace(self, level):
print('.' * level + repr(self.num)) # as code, was 'self.num'
class VarNode(TreeNode):
def __init__(self, text, start):
self.name = text # variable name
self.column = start # column for errors
def validate(self, dict):
if not self.name in dict.keys():
raise UndefinedError(self.name, self.column)
def apply(self, dict):
return dict[self.name] # validate before apply
def assign(self, value, dict):
dict[self.name] = value # local extension
1450 | Chapter 19: Text and Language

def trace(self, level):
print('.' * level + self.name)
# COMPOSITES
class AssignNode(TreeNode):
def __init__(self, var, val):
self.var, self.val = var, val
def validate(self, dict):
self.val.validate(dict) # don't validate var
def apply(self, dict):
self.var.assign( self.val.apply(dict), dict )
def trace(self, level):
print('.' * level + 'set ')
self.var.trace(level + 3)
self.val.trace(level + 3)
#################################################################################
# the parser (syntax analyser, tree builder)
#################################################################################
class Parser:
def __init__(self, text=''):
self.lex = Scanner(text) # make a scanner
self.vars = {'pi':3.14159} # add constants
self.traceme = TraceDefault
def parse(self, *text): # external interface
if text:
self.lex.newtext(text[0]) # reuse with new text
tree = self.analyse() # parse string
if tree:
if self.traceme: # dump parse-tree?
print(); tree.trace(0)
if self.errorCheck(tree): # check names
self.interpret(tree) # evaluate tree
def analyse(self):
try:
self.lex.scan() # get first token
return self.Goal() # build a parse-tree
except SyntaxError:
print('Syntax Error at column:', self.lex.start)
self.lex.showerror()
except LexicalError:
print('Lexical Error at column:', self.lex.start)
self.lex.showerror()
def errorCheck(self, tree):
try:
tree.validate(self.vars) # error checker
return 'ok'
except UndefinedError as instance: # args is a tuple
varinfo = instance.args
print("'%s' is undefined at column: %d" % varinfo)
Custom Language Parsers | 1451

self.lex.start = varinfo[1]
self.lex.showerror() # returns None
def interpret(self, tree):
result = tree.apply(self.vars) # tree evals itself
if result != None: # ignore 'set' result
print(result) # ignores errors
def Goal(self):
if self.lex.token in ['num', 'var', '(']:
tree = self.Expr()
self.lex.match('\0')
return tree
elif self.lex.token == 'set':
tree = self.Assign()
self.lex.match('\0')
return tree
else:
raise SyntaxError()
def Assign(self):
self.lex.match('set')
vartree = VarNode(self.lex.value, self.lex.start)
self.lex.match('var')
valtree = self.Expr()
return AssignNode(vartree, valtree) # two subtrees
def Expr(self):
left = self.Factor() # left subtree
while True:
if self.lex.token in ['\0', ')']:
return left
elif self.lex.token == '+':
self.lex.scan()
left = PlusNode(left, self.Factor()) # add root-node
elif self.lex.token == '-':
self.lex.scan()
left = MinusNode(left, self.Factor()) # grows up/right
else:
raise SyntaxError()
def Factor(self):
left = self.Term()
while True:
if self.lex.token in ['+', '-', '\0', ')']:
return left
elif self.lex.token == '*':
self.lex.scan()
left = TimesNode(left, self.Term())
elif self.lex.token == '/':
self.lex.scan()
left = DivideNode(left, self.Term())
else:
raise SyntaxError()
1452 | Chapter 19: Text and Language

def Term(self):
if self.lex.token == 'num':
leaf = NumNode(self.lex.match('num'))
return leaf
elif self.lex.token == 'var':
leaf = VarNode(self.lex.value, self.lex.start)
self.lex.scan()
return leaf
elif self.lex.token == '(':
self.lex.scan()
tree = self.Expr()
self.lex.match(')')
return tree
else:
raise SyntaxError()
#################################################################################
# self-test code: use my parser, parser1's tester
#################################################################################
if __name__ == '__main__':
import testparser
testparser.test(Parser, 'parser2') # run with Parser class here
Notice the way we handle undefined name exceptions in errorCheck. When exceptions
are derived from the built-in Exception class, their instances automatically return the
arguments passed to the exception constructor call as a tuple in their args attribute—
convenient for use in string formatting here.
Also notice that the new parser reuses the same scanner module as well. To catch errors
raised by the scanner, it also imports the specific classes that identify the scanner’s
exceptions. Both the scanner and the parser can raise exceptions on errors (lexical
errors, syntax errors, and undefined name errors). They’re caught at the top level of
the parser, and they end the current parse. There’s no need to set and check status flags
to terminate the recursion. Since math is done using integers, floating-point numbers,
and Python’s operators, there’s usually no need to trap numeric overflow or underflow
errors. But as is, the parser doesn’t handle errors such as division by zero—such Python
exceptions make the parser system exit with a Python stack trace and message. Un-
covering the cause and fix for this is left as suggested exercise.
When parser2 is run as a top-level program, we get the same test code output as
for parser1. In fact, it reuses the very same test code—both parsers pass in their parser
class object to testparser.test. And since classes are also objects, we can also pass
this version of the parser to testparser’s interactive loop:
testparser.interact(parser2.Parser).
The new parser’s external behavior is identical to that of the original, so I won’t repeat
all its output here (run this live for a firsthand look). Of note, though, this parser sup-
ports both use as a top-level script, and package imports from other directories, such
as the PyTree viewer we’ll use in a moment. Python 3.X no longer searches a module’s
Custom Language Parsers | 1453

own directory on the import search path, though, so we have to use package-relative
import syntax for the latter case, and import from another directory when testing
interactively:
C:\...\PP4E\Lang\Parser> parser2.py
parser2 <class '__main__.Parser'>
5.0
...rest is same as for parser1...
C:\...PP4E\Lang\Parser> python
>>> import parser2
from .scanner import Scanner, SyntaxError, LexicalError # from PyTree
ValueError: Attempted relative import in non-package
C:\...\PP4E\Lang\Parser> cd ..
C:\...\PP4E\Lang> Parser\parser2.py
parser2 <class '__main__.Parser'>
5.0
...rest is same as for parser1...
C:\...\PP4E\Lang> python
>>> from Parser import parser2
>>> x = parser2.Parser()
>>> x.parse('1 + 2 * 3 + 4')
11
>>> import Parser.testparser
>>> Parser.testparser.interact(parser2.Parser)
<class 'Parser.parser2.Parser'>
Enter=> 4 * 3 + 5
17
Enter=> stop
>>>
Using full package import paths in parser2 instead of either package-relative or un-
qualified imports:
from PP4E.Lang.Parser import scanner
would suffice for all three use cases—script, and both same and other directory
imports—but requires the path to be set properly, and seems overkill for importing a
file in the same directory as the importer.
Parse Tree Structure
Really, the only tangible difference with this latest parser is that it builds and uses trees
to evaluate an expression internally instead of evaluating as it parses. The intermediate
representation of an expression is a tree of class instances, whose shape reflects the
order of operator evaluation. This parser also has logic to print an indented listing of
the constructed parse tree if the traceme attribute is set to True (or 1). Indentation gives
the nesting of subtrees, and binary operators list left subtrees first. For example:
C:\...\PP4E\Lang>
>>> from Parser import parser2
1454 | Chapter 19: Text and Language

>>> p = parser2.Parser()
>>> p.traceme = True
>>> p.parse('5 + 4 * 2')
[+]
...5
...[*]
......4
......2
13
When this tree is evaluated, the apply method recursively evaluates subtrees and applies
root operators to their results. Here, * is evaluated before +, since it’s lower in the tree.
The Factor method consumes the * substring before returning a right subtree to Expr.
The next tree takes a different shape:
>>> p.parse('5 * 4 - 2')
[-]
...[*]
......5
......4
...2
18
In this example, * is evaluated before -. The Factor method loops through a substring
of * and / expressions before returning the resulting left subtree to Expr. The next
example is more complex, but follows the same rules:
>>> p.parse('1 + 3 * (2 * 3 + 4)')
[+]
...1
...[*]
......3
......[+]
.........[*]
............2
............3
.........4
31
Trees are made of nested class instances. From an OOP perspective, it’s another way
to use composition. Since tree nodes are just class instances, this tree could be created
and evaluated manually, too:
PlusNode( NumNode(1),
TimesNode( NumNode(3),
PlusNode( TimesNode(NumNode(2), NumNode(3)),
NumNode(4) ))).apply({})
But we might as well let the parser build it for us (Python is not that much like Lisp,
despite what you may have heard).
Custom Language Parsers | 1455
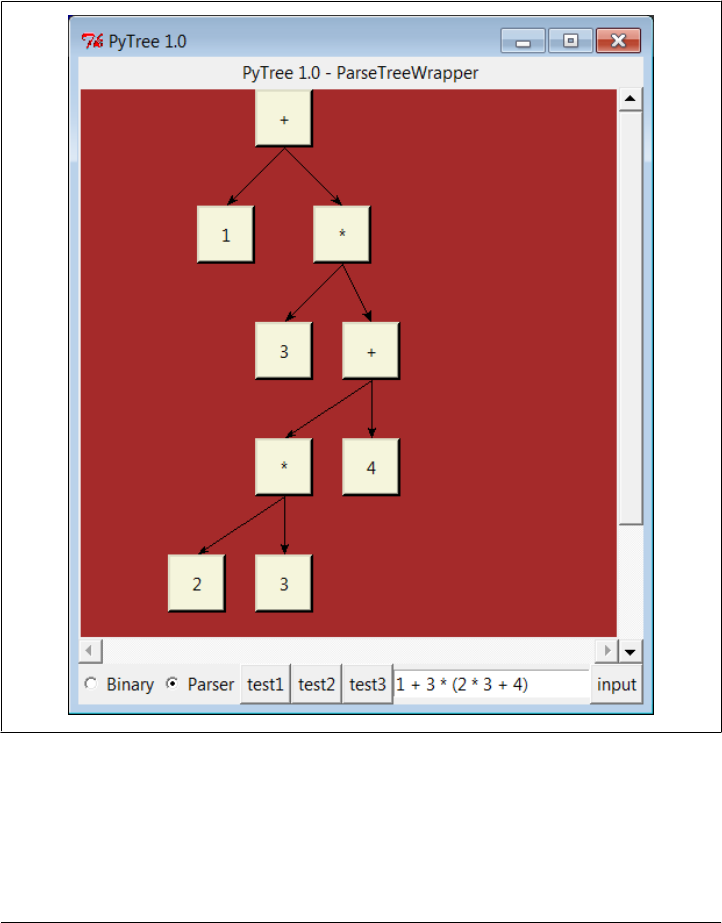
Exploring Parse Trees with the PyTree GUI
But wait—there is a better way to explore parse tree structures. Figure 19-1 shows the
parse tree generated for the string 1 + 3 * (2 * 3 + 4), displayed in PyTree, the tree
visualization GUI described at the end of Chapter 18. This works only because the
parser2 module builds the parse tree explicitly (parser1 evaluates during a parse in-
stead) and because PyTree’s code is generic and reusable.
Figure 19-1. PyTree view of parse tree built for 1 + 3 * (2 * 3 + 4)
If you read the last chapter, you’ll recall that PyTree can draw most any tree data struc-
ture, but it is preconfigured to handle binary search trees and the expression parse trees
we’re studying in this chapter. For parse trees, clicking on nodes in a displayed parse
tree evaluates the subtree rooted there.
1456 | Chapter 19: Text and Language

PyTree makes it easy to learn about and experiment with the parser. To determine the
tree shape produced for a given expression, start PyTree, click on its Parser radio button,
type the expression in the input field at the bottom right, and press “input” (or your
Enter key). The parser class is run to generate a tree from your input, and the GUI
displays the result. Depending on the operators used within an expression, some very
differently shaped trees yield the same result when evaluated.
Try running PyTree on your computer to get a better feel for the parsing process. (I’d
like to show more example trees, but I ran out of page real estate at this point in the
book.)
Parsers Versus Python
The handcoded custom parser programs we’ve met in this section illustrate some in-
teresting concepts and underscore the power of Python for general-purpose program-
ming. Depending on your job description, they may also be typical of the sort of thing
you’d write regularly in a traditional language such as C. Parsers are an important
component in a wide variety of applications, but in some cases, they’re not as necessary
as you might think. Let me explain why.
So far, we started with an expression parser and added a parse tree interpreter to make
the code easier to modify. As is, the parser works, but it may be slow compared to a C
implementation. If the parser is used frequently, we could speed it up by moving parts
to C extension modules. For instance, the scanner might be moved to C initially, since
it’s often called from the parser. Ultimately, we might add components to the grammar
that allow expressions to access application-specific variables and functions.
All of these steps constitute good engineering. But depending on your application, this
approach may not be the best one in Python. Often the easiest way to evaluate input
expressions in Python is to let Python do it for us, by calling its eval built-in function.
In fact, we can usually replace the entire expression evaluation program with this one
function call. The next section will show how this can be used to simplify language-
based systems in general.
More important, the next section underscores a core idea behind the language: if you
already have an extensible, embeddable, high-level language system, why invent an-
other? Python itself can often satisfy language-based component needs.
PyCalc: A Calculator Program/Object
To wrap up this chapter, I’m going to show you a practical application for some of the
parsing technology introduced in the preceding section. This section presents PyCalc,
a Python calculator program with a graphical interface, similar to the calculator pro-
grams available on most window systems. Like most of the GUI examples in this book,
though, PyCalc offers a few advantages over existing calculators. Because PyCalc is
PyCalc: A Calculator Program/Object | 1457

written in Python, it is both easily customized and widely portable across window
platforms. And because it is implemented with classes, it is both a standalone program
and a reusable object library.
A Simple Calculator GUI
Before I show you how to write a full-blown calculator, though, the module shown in
Example 19-17 starts this discussion in simpler terms. It implements a limited calcu-
lator GUI, whose buttons just add text to the input field at the top in order to compose
a Python expression string. Fetching and running the string all at once produces results.
Figure 19-2 shows the window this module makes when run as a top-level script.
Example 19-17. PP4E\Lang\Calculator\calc0.py
"a simplistic calculator GUI: expressions run all at once with eval/exec"
from tkinter import *
from PP4E.Gui.Tools.widgets import frame, button, entry
class CalcGui(Frame):
def __init__(self, parent=None): # an extended frame
Frame.__init__(self, parent) # on default top-level
self.pack(expand=YES, fill=BOTH) # all parts expandable
self.master.title('Python Calculator 0.1') # 6 frames plus entry
self.master.iconname("pcalc1")
self.names = {} # namespace for variables
text = StringVar()
entry(self, TOP, text)
rows = ["abcd", "0123", "4567", "89()"]
for row in rows:
frm = frame(self, TOP)
for char in row:
button(frm, LEFT, char,
lambda char=char: text.set(text.get() + char))
frm = frame(self, TOP)
for char in "+-*/=":
button(frm, LEFT, char,
lambda char=char: text.set(text.get()+ ' ' + char + ' '))
frm = frame(self, BOTTOM)
button(frm, LEFT, 'eval', lambda: self.eval(text) )
button(frm, LEFT, 'clear', lambda: text.set('') )
def eval(self, text):
try:
text.set(str(eval(text.get(), self.names, self.names))) # was 'x'
except SyntaxError:
try:
exec(text.get(), self.names, self.names)
except:
1458 | Chapter 19: Text and Language
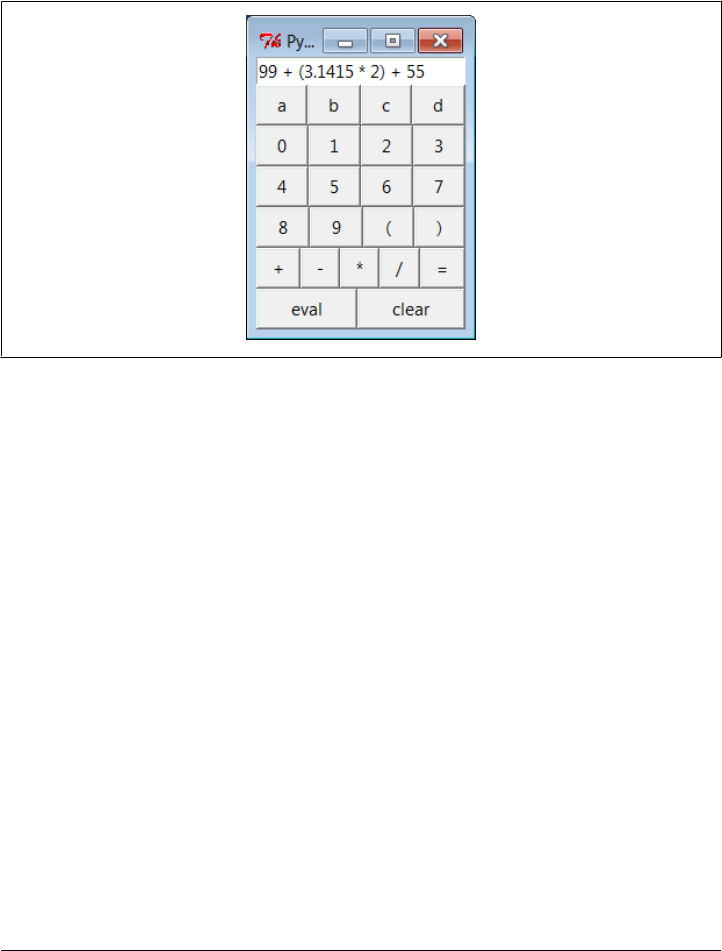
text.set("ERROR") # bad as statement too?
else:
text.set('') # worked as a statement
except:
text.set("ERROR") # other eval expression errors
if __name__ == '__main__': CalcGui().mainloop()
Figure 19-2. The calc0 script in action on Windows 7 (result=160.283)
Building the GUI
Now, this is about as simple as a calculator can be, but it demonstrates the basics. This
window comes up with buttons for entry of numbers, variable names, and operators.
It is built by attaching buttons to frames: each row of buttons is a nested Frame, and
the GUI itself is a Frame subclass with an attached Entry and six embedded row frames
(grids would work here, too). The calculator’s frame, entry field, and buttons are made
expandable in the imported widgets utility module we coded earlier in Example 10-1.
This calculator builds up a string to pass to the Python interpreter all at once on “eval”
button presses. Because you can type any Python expression or statement in the entry
field, the buttons are really just a convenience. In fact, the entry field isn’t much more
than a command line. Try typing import sys, and then dir(sys) to display sys module
attributes in the input field at the top—it’s not what you normally do with a calculator,
but it is demonstrative nevertheless.*
* Once again, I need to warn you about running code strings like this if you can’t be sure they won’t cause
damage. If these strings can be entered by users you cannot trust, they will have access to anything on the
computer that the Python process has access to. See Chapters 9 and 15 for more on security issues related to
code run in GUI, Web, and other contexts.
PyCalc: A Calculator Program/Object | 1459

In CalcGui’s constructor, buttons are coded as lists of strings; each string represents a
row and each character in the string represents a button. Lambdas are used to save
extra callback data for each button. The callback functions retain the button’s character
and the linked text entry variable so that the character can be added to the end of the
entry widget’s current string on a press.
Notice how we must pass in the loop variable as a default argument to some lambdas
in this code. Recall from Chapter 7 how references within a lambda (or nested def) to
names in an enclosing scope are evaluated when the nested function is called, not when
it is created. When the generated function is called, enclosing scope references inside
the lambda reflect their latest setting in the enclosing scope, which is not necessarily
the values they held when the lambda expression ran. By contrast, defaults are evaluated
at function creation time instead and so can remember the current values of loop var-
iables. Without the defaults, each button would reflect the last iteration of the loop.
Lesson 4: Embedding Beats Parsers
The calculator uses eval and exec to call Python’s parser and interpreter at runtime
instead of analyzing and evaluating expressions manually. In effect, the calculator runs
embedded Python code from a Python program. This works because Python’s devel-
opment environment (the parser and bytecode compiler) is always a part of systems
that use Python. Because there is no difference between the development and the de-
livery environments, Python’s parser can be used by Python programs.
The net effect here is that the entire expression evaluator has been replaced with a single
call to eval or exec. In broader terms, this is a powerful technique to remember: the
Python language itself can replace many small, custom languages. Besides saving de-
velopment time, clients have to learn just one language, one that’s potentially simple
enough for end-user coding.
Furthermore, Python can take on the flavor of any application. If a language interface
requires application-specific extensions, just add Python classes, or export an API for
use in embedded Python code as a C extension. By evaluating Python code that uses
application-specific extensions, custom parsers become almost completely
unnecessary.
There’s also a critical added benefit to this approach: embedded Python code has access
to all the tools and features of a powerful, full-blown programming language. It can
use lists, functions, classes, external modules, and even larger Python tools like tkinter
GUIs, shelve storage, multiple threads, network sockets, and web page fetches. You’d
probably spend years trying to provide similar functionality in a custom language
parser. Just ask Guido.
Running code strings
This module implements a GUI calculator in some 45 lines of code (counting comments
and blank lines). But truthfully, it “cheats.” Expression evaluation is delegated entirely
to Python. In fact, the built-in eval and exec tools do most of the work here:
1460 | Chapter 19: Text and Language

eval
Parses, evaluates, and returns the result of a Python expression represented as a
string.
exec
Runs an arbitrary Python statement represented as a string, and has no return value.
Both accept optional dictionaries to be used as global and local namespaces for assign-
ing and evaluating names used in the code strings. In the calculator, self.names be-
comes a symbol table for running calculator expressions. A related Python function,
compile, can be used to precompile code strings to code objects before passing them to
eval and exec (use it if you need to run the same string many times).
By default, a code string’s namespace defaults to the caller’s namespaces. If we didn’t
pass in dictionaries here, the strings would run in the eval method’s namespace. Since
the method’s local namespace goes away after the method call returns, there would be
no way to retain names assigned in the string. Notice the use of nested exception han-
dlers in the class’s eval method:
1. It first assumes the string is an expression and tries the built-in eval function.
2. If that fails because of a syntax error, it tries evaluating the string as a statement
using exec.
3. Finally, if both attempts fail, it reports an error in the string (a syntax error, unde-
fined name, and so on).
Statements and invalid expressions might be parsed twice, but the overhead doesn’t
matter here, and you can’t tell whether a string is an expression or a statement without
parsing it manually. Note that the “eval” button evaluates expressions, but = sets Python
variables by running an assignment statement. Variable names are combinations of the
letter keys “abcd” (or any name typed directly). They are assigned and evaluated in a
dictionary used to represent the calculator’s namespace and retained for the session.
Extending and attaching
Clients that reuse this calculator are as simple as the calculator itself. Like most class-
based tkinter GUIs, this one can be extended in subclasses—Example 19-18 customizes
the simple calculator’s constructor to add extra widgets.
Example 19-18. PP4E\Lang\Calculator\calc0ext.py
from tkinter import *
from calc0 import CalcGui
class Inner(CalcGui): # extend GUI
def __init__(self):
CalcGui.__init__(self)
Label(self, text='Calc Subclass').pack() # add after
Button(self, text='Quit', command=self.quit).pack() # top implied
PyCalc: A Calculator Program/Object | 1461
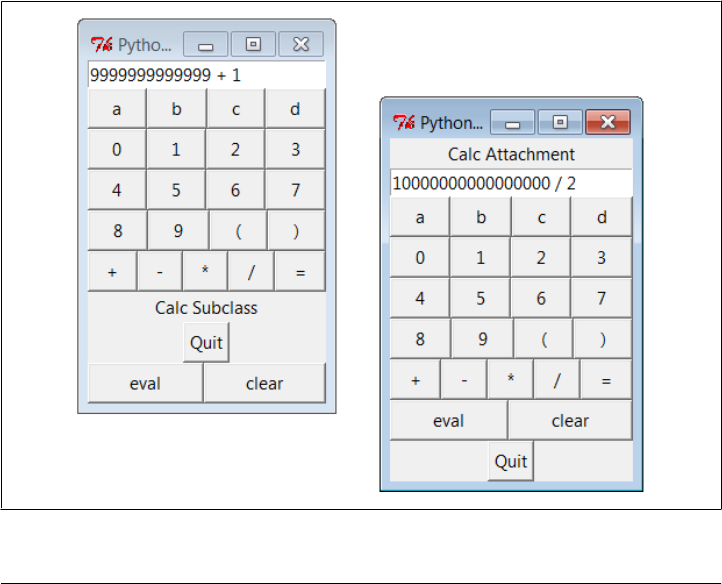
Inner().mainloop()
It can also be embedded in a container class—Example 19-19 attaches the simple cal-
culator’s widget package, along with extras, to a common parent.
Example 19-19. PP4E\Lang\Calculator\calc0emb.py
from tkinter import *
from calc0 import CalcGui # add parent, no master calls
class Outer:
def __init__(self, parent): # embed GUI
Label(parent, text='Calc Attachment').pack() # side=top
CalcGui(parent) # add calc frame
Button(parent, text='Quit', command=parent.quit).pack()
root = Tk()
Outer(root)
root.mainloop()
Figure 19-3 shows the result of running both of these scripts from different command
lines. Both have a distinct input field at the top. This works, but to see a more practical
application of such reuse techniques, we need to make the underlying calculator more
practical, too.
Figure 19-3. The calc0 script’s object attached and extended
1462 | Chapter 19: Text and Language

PyCalc—A “Real” Calculator GUI
Of course, real calculators don’t usually work by building up expression strings and
evaluating them all at once; that approach is really little more than a glorified Python
command line. Traditionally, expressions are evaluated in piecemeal fashion as they
are entered, and temporary results are displayed as soon as they are computed. Imple-
menting this behavior requires a bit more work: expressions must be evaluated man-
ually and in parts, instead of calling the eval function only once. But the end result is
much more useful and intuitive.
Lesson 5: Reusability Is Power
Though simple, attaching and subclassing the calculator graphically, as shown in Fig-
ure 19-3, illustrates the power of Python as a tool for writing reusable software. By
coding programs with modules and classes, components written in isolation almost
automatically become general-purpose tools. Python’s program organization features
promote reusable code.
In fact, code reuse is one of Python’s major strengths and has been one of the main
themes of this book. Good object-oriented design takes some practice and forethought,
and the benefits of code reuse aren’t apparent immediately. And sometimes we have
good cause to be more interested in a quick fix rather than a future use for the code.
But coding with some reusability in mind can save development time in the long run.
For instance, the handcoded custom parsers shared a scanner, the calculator GUI uses
the widgets module from Chapter 10 we discussed earlier, and the next section will
reuse the GuiMixin class from Chapter 10 as well. Sometimes we’re able to finish part
of a job before we start.
This section presents the implementation of PyCalc, a more realistic Python/tkinter
program that implements such a traditional calculator GUI. It touches on the subject
of text and languages in two ways: it parses and evaluates expressions, and it imple-
ments a kind of stack-based language to perform the evaluation. Although its evaluation
logic is more complex than the simpler calculator shown earlier, it demonstrates ad-
vanced programming techniques and serves as an interesting finale for this chapter.
Running PyCalc
As usual, let’s look at the GUI before the code. You can run PyCalc from the PyGadgets
and PyDemos launcher bars at the top of the examples tree, or by directly running the
file calculator.py listed shortly (e.g., click it in a file explorer, or type it in a shell com-
mand line). Figure 19-4 shows PyCalc’s main window. By default, it shows operand
buttons in black-on-blue (and opposite for operator buttons), but font and color op-
tions can be passed into the GUI class’s constructor method. Of course, that means
gray-on-gray in this book, so you’ll have to run PyCalc yourself to see what I mean.
PyCalc: A Calculator Program/Object | 1463
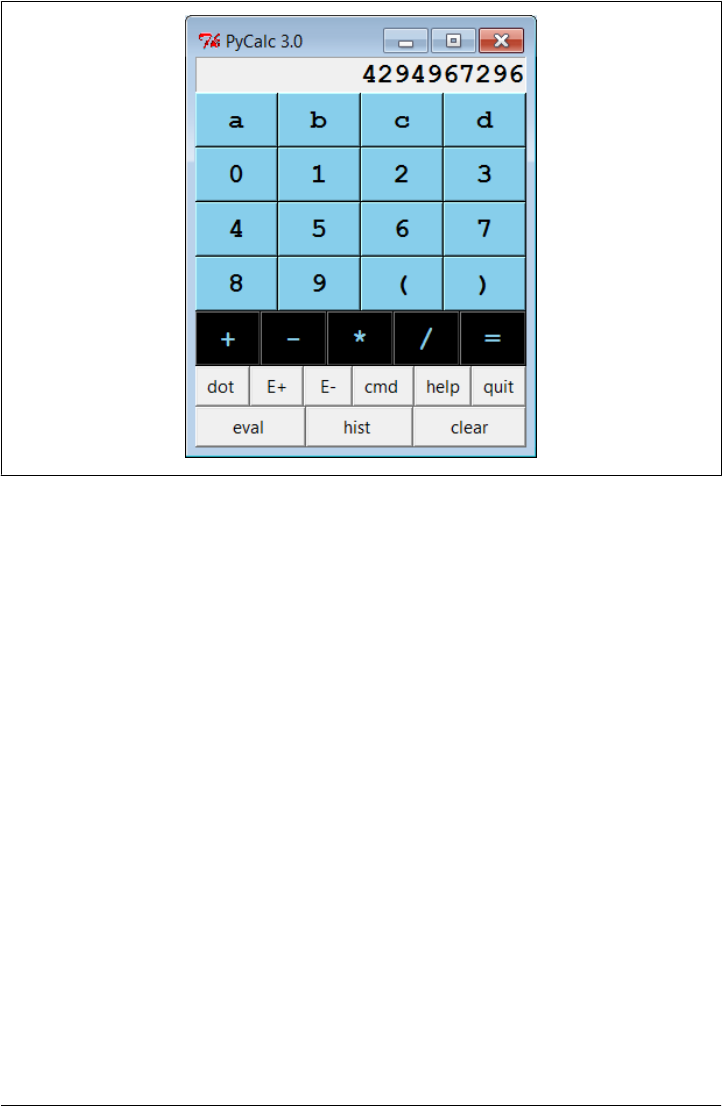
Figure 19-4. PyCalc calculator at work on Windows 7
If you do run this, you’ll notice that PyCalc implements a normal calculator model—
expressions are evaluated as entered, not all at once at the end. That is, parts of an
expression are computed and displayed as soon as operator precedence and manually
typed parentheses allow. The result in Figure 19-4, for instance, reflects pressing “2”,
and then repeatedly pressing “*” to display successive powers of 2. I’ll explain how this
evaluation works in a moment.
PyCalc’s CalcGui class builds the GUI interface as frames of buttons much like the
simple calculator of the previous section, but PyCalc adds a host of new features.
Among them are another row of action buttons, inherited methods from GuiMixin
(presented in Chapter 10), a new “cmd” button that pops up nonmodal dialogs for
entry of arbitrary Python code, and a recent calculations history pop up. Figure 19-5
captures some of PyCalc’s pop-up windows.
You may enter expressions in PyCalc by clicking buttons in the GUI, typing full ex-
pressions in command-line pop ups, or typing keys on your keyboard. PyCalc intercepts
key press events and interprets them the same as corresponding button presses; typing
+ is like pressing the + button, the Space bar key is “clear,” Enter is “eval,” backspace
erases a character, and ? is like pressing “help.”
The command-line pop-up windows are nonmodal (you can pop up as many as you
like). They accept any Python code—press the Run button or your Enter key to evaluate
text in their input fields. The result of evaluating this code in the calculator’s namespace
1464 | Chapter 19: Text and Language
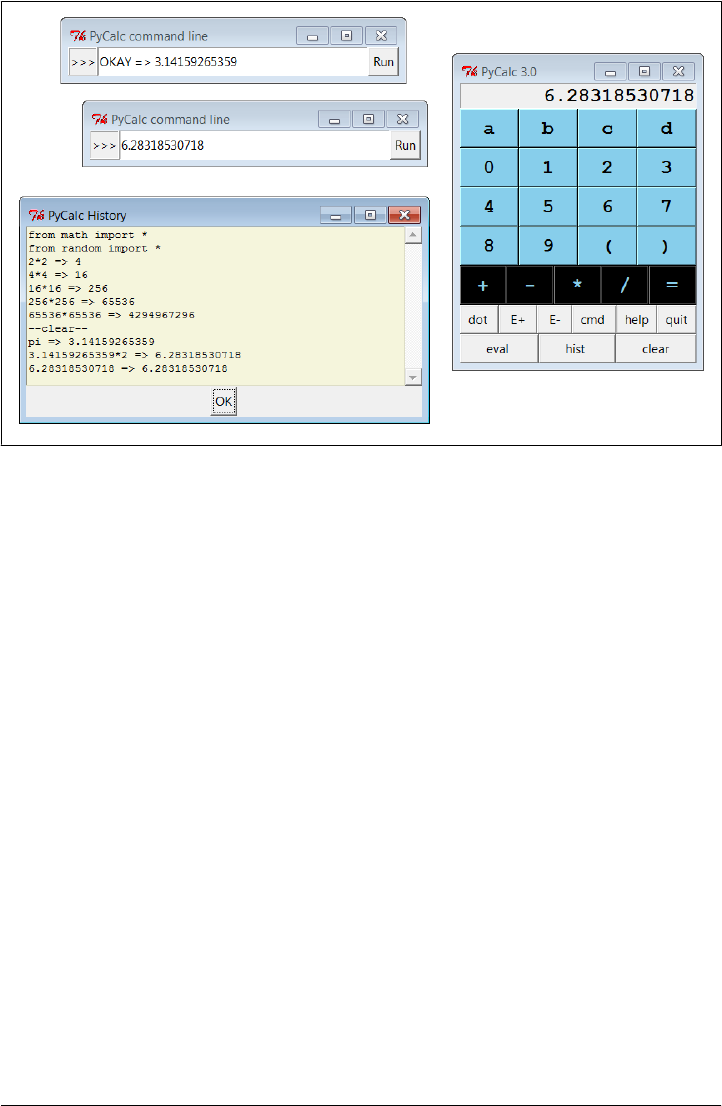
dictionary is thrown up in the main window for use in larger expressions. You can use
this as an escape mechanism to employ external tools in your calculations. For instance,
you can import and use functions coded in Python or C within these pop ups. The
current value in the main calculator window is stored in newly opened command-line
pop ups, too, for use in typed expressions.
PyCalc supports integers (unlimited precision), negatives, and floating-point numbers
just because Python does. Individual operands and expressions are still evaluated with
the eval built-in, which calls the Python parser/interpreter at runtime. Variable names
can be assigned and referenced in the main window with the letter, =, and “eval” keys;
they are assigned in the calculator’s namespace dictionary (more complex variable
names may be typed in command-line pop ups). Note the use of pi in the history
window: PyCalc preimports names in the math and random modules into the namespace
where expressions are evaluated.
Evaluating expressions with stacks
Now that you have the general idea of what PyCalc does, I need to say a little bit about
how it does what it does. Most of the changes in this calculator involve managing the
expression display and evaluating expressions. PyCalc is structured as two classes:
The CalcGui class
Manages the GUI itself. It controls input events and is in charge of the main win-
dow’s display field at the top. It doesn’t evaluate expressions, though; for that, it
Figure 19-5. PyCalc calculator with some of its pop ups
PyCalc: A Calculator Program/Object | 1465

sends operators and operands entered in the GUI to an embedded instance of the
Evaluator class.
The Evaluator class
Manages two stacks. One stack records pending operators (e.g., +), and one records
pending operands (e.g., 3.141). Temporary results are computed as new operators
are sent from CalcGui and pushed onto the operands stack.
As you can see from this, the magic of expression evaluation boils down to juggling the
operator and operand stacks. In a sense, the calculator implements a little stack-based
language, to evaluate the expressions being entered. While scanning expression strings
from left to right as they are entered, operands are pushed along the way, but operators
delimit operands and may trigger temporary results before they are pushed. Because it
records states and performs transitions, some might use the term state machine to de-
scribe this calculator language implementation.
Here’s the general scenario:
1. When a new operator is seen (i.e., when an operator button or key is pressed), the
prior operand in the entry field is pushed onto the operands stack.
2. The operator is then added to the operators stack, but only after all pending op-
erators of higher precedence have been popped and applied to pending operands
(e.g., pressing + makes any pending * operators on the stack fire).
3. When “eval” is pressed, all remaining operators are popped and applied to all
remaining operands, and the result is the last remaining value on the operands
stack.
In the end, the last value on the operands stack is displayed in the calculator’s entry
field, ready for use in another operation. This evaluation algorithm is probably best
described by working through examples. Let’s step through the entry of a few expres-
sions and watch the evaluation stacks grow.
PyCalc stack tracing is enabled with the debugme flag in the module; if true, the operator
and operand stacks are displayed on stdout each time the Evaluator class is about to
apply an operator and reduce (pop) the stacks. Run PyCalc with a console window to
see the traces. A tuple holding the stack lists (operators , operands) is printed on each
stack reduction; tops of stacks are at the ends of the lists. For instance, here is the
console output after typing and evaluating a simple string:
1) Entered keys: "5 * 3 + 4 <eval>" [result = 19]
(['*'], ['5', '3']) [on '+' press: displays "15"]
(['+'], ['15', '4']) [on 'eval' press: displays "19"]
Note that the pending (stacked) * subexpression is evaluated when the + is pressed: *
operators bind tighter than +, so the code is evaluated immediately before the + operator
is pushed. When the + button is pressed, the entry field contains 3; we push 3 onto the
operands stack, reduce the * subexpression (5 * 3), push its result onto operands, push
1466 | Chapter 19: Text and Language

+ onto operators, and continue scanning user inputs. When “eval” is pressed at the end,
4 is pushed onto operands, and the final + on operators is applied to stacked operands.
The text input and display field at the top of the GUI’s main window plays a part in
this algorithm, too. The text input field and expression stacks are integrated by the
calculator class. In general, the text input field always holds the prior operand when
an operator button is pressed (e.g., on 5 *); the text in the input field is pushed onto
the operands stack before the operator is resolved. Because of this, we have to pop
results before displaying them after “eval” or ) is pressed; otherwise the results are
pushed onto the stack twice—they would be both on the stack and in the display field,
from which they would be immediately pushed again when the next operator is input.
For both usability and accuracy, when an operator is seen, we also have to arrange to
erase the input field’s prior value when the next operand’s entry is started (e.g., on both
3 and 4 in 5 * 3 + 4). This erasure of the prior values is also arranged when “eval”
or ) is applied, on the assumption that a subsequent operand key or button replaces
the prior result—for a new expression after “eval,” and for an operand following a new
operator after ); e.g., to erase the parenthesized 12 result on 2 in 5 + (3 * 4) * 2.
Without this erasure, operand buttons and keys simply concatenate to the currently
displayed value. This model also allows user to change temporary result operands after
a ) by entry of operand instead of operator.
Expression stacks also defer operations of lower precedence as the input is scanned. In
the next trace, the pending + isn’t evaluated when the * button is pressed: since * binds
tighter, we need to postpone the + until the * can be evaluated. The * operator isn’t
popped until its right operand 4 has been seen. There are two operators to pop and
apply to operand stack entries on the “eval” press—the * at the top of operators is
applied to the 3 and 4 at the top of operands, and then + is run on 5 and the 12 pushed
for *:
2) Entered keys: "5 + 3 * 4 <eval>" [result = 17]
(['+', '*'], ['5', '3', '4']) [on 'eval' press]
(['+'], ['5', '12']) [displays "17"]
For strings of same-precedence operators such as the following, we pop and evaluate
immediately as we scan left to right, instead of postponing evaluation. This results in
a left-associative evaluation, in the absence of parentheses: 5+3+4 is evaluated as
((5+3)+4). For + and * operations this is irrelevant because order doesn’t matter:
3) Entered keys: "5 + 3 + 4 <eval>" [result = 12]
(['+'], ['5', '3']) [on the second '+']
(['+'], ['8', '4']) [on 'eval']
The following trace is more complex. In this case, all the operators and operands are
stacked (postponed) until we press the ) button at the end. To make parentheses work,
( is given a higher precedence than any operator and is pushed onto the operators stack
to seal off lower stack reductions until the ) is seen. When the ) button is pressed, the
PyCalc: A Calculator Program/Object | 1467

parenthesized subexpression is popped and evaluated ((3 * 4), then (1 + 12)), and 13
is displayed in the entry field. On pressing “eval,” the rest is evaluated ((3 * 13), (1 +39)),
and the final result (40) is shown. This result in the entry field itself becomes the left
operand of a future operator.
4) Entered keys: "1 + 3 * ( 1 + 3 * 4 ) <eval>" [result = 40]
(['+', '*', '(', '+', '*'], ['1', '3', '1', '3', '4']) [on ')']
(['+', '*', '(', '+'], ['1', '3', '1', '12']) [displays "13"]
(['+', '*'], ['1', '3', '13']) [on 'eval']
(['+'], ['1', '39'])
In fact, any temporary result can be used again: if we keep pressing an operator button
without typing new operands, it’s reapplied to the result of the prior press—the value
in the entry field is pushed twice and applied to itself each time. Press * many times
after entering 2 to see how this works (e.g., 2***). On the first *, it pushes 2 and the
*. On the next *, it pushes 2 again from the entry field, pops and evaluates the stacked
(2 * 2), pushes back and displays the result, and pushes the new *. And on each following
*, it pushes the currently displayed result and evaluates again, computing successive
squares.
Figure 19-6 shows how the two stacks look at their highest level while scanning the
expression in the prior example trace. On each reduction, the top operator is applied
to the top two operands and the result is pushed back for the operator below. Because
of the way the two stacks are used, the effect is similar to converting the expression to
a string of the form +1*3(+1*34 and evaluating it right to left. In other cases, though,
parts of the expression are evaluated and displayed as temporary results along the way,
so it’s not simply a string conversion process.
Figure 19-6. Evaluation stacks: 1 + 3 * (1 + 3 * 4)
Finally, the next example’s string triggers an error. PyCalc is casual about error han-
dling. Many errors are made impossible by the algorithm itself, but things such as
unmatched parentheses still trip up the evaluator. Instead of trying to detect all possible
error cases explicitly, a general try statement in the reduce method is used to catch
them all: expression errors, numeric errors, undefined name errors, syntax errors, and
so on.
1468 | Chapter 19: Text and Language

Operands and temporary results are always stacked as strings, and each operator is
applied by calling eval. When an error occurs inside an expression, a result operand of
*ERROR* is pushed, which makes all remaining operators fail in eval too. *ERROR* es-
sentially percolates to the top of the expression. At the end, it’s the last operand and is
displayed in the text entry field to alert you of the mistake:
5) Entered keys: "1 + 3 * ( 1 + 3 * 4 <eval>" [result = *ERROR*]
(['+', '*', '(', '+', '*'], ['1', '3', '1', '3', '4']) [on eval]
(['+', '*', '(', '+'], ['1', '3', '1', '12'])
(['+', '*', '('], ['1', '3', '13'])
(['+', '*'], ['1', '*ERROR*'])
(['+'], ['*ERROR*'])
(['+'], ['*ERROR*', '*ERROR*'])
Try tracing through these and other examples in the calculator’s code to get a feel for
the stack-based evaluation that occurs. Once you understand the general shift/reduce
(push/pop) mechanism, expression evaluation is straightforward.
PyCalc source code
Example 19-20 contains the PyCalc source module that puts these ideas to work in the
context of a GUI. It’s a single-file implementation (not counting utilities imported and
reused). Study the source for more details; as usual, there’s no substitute for interacting
with the program on your own to get a better feel for its functionality.
Also see the opening comment’s “to do” list for suggested areas for improvement. Like
all software systems, this calculator is prone to evolve over time (and in fact it has, with
each new edition of this book). Since it is written in Python, such future mutations will
be easy to apply.
Example 19-20. PP4E\Lang\Calculator\calculator.py
#!/usr/local/bin/python
"""
################################################################################
PyCalc 3.0+: a Python/tkinter calculator program and GUI component.
Evaluates expressions as they are entered, catches keyboard keys for
expression entry; 2.0 added integrated command-line popups, a recent
calculations history display popup, fonts and colors configuration,
help and about popups, preimported math/random constants, and more;
3.0+ (PP4E, version number retained):
-port to run under Python 3.X (only)
-drop 'L' keypress (the long type is now dead in earnest)
3.0 changes (PP3E):
-use 'readonly' entry state, not 'disabled', else field is greyed
out (fix for 2.3 Tkinter change);
-avoid extended display precision for floats by using str(), instead
of `x`/repr() (fix for Python change);
PyCalc: A Calculator Program/Object | 1469

-apply font to input field to make it larger;
-use justify=right for input field so it displays on right, not left;
-add 'E+' and 'E-' buttons (and 'E' keypress) for float exponents;
'E' keypress must generally be followed digits, not + or - optr key;
-remove 'L' button (but still allow 'L' keypress): superfluous now,
because Python auto converts up if too big ('L' forced this in past);
-use smaller font size overall;
-auto scroll to the end in the history window
to do: add a commas-insertion mode (see str.format and LP4E example);
allow '**' as an operator key; allow '+' and 'J' inputs for complex
Numbers; use new decimal type for fixed precision floats; as is, can
use 'cmd' popup windows to input and evaluate things like complex, but
can't be input via main window; caveat: PyCalc's precision, accuracy,
and some of its behaviour, is currently bound by result of str() call;
################################################################################
"""
from tkinter import * # widgets, consts
from PP4E.Gui.Tools.guimixin import GuiMixin # quit method
from PP4E.Gui.Tools.widgets import label, entry, button, frame # widget builders
Fg, Bg, Font = 'black', 'skyblue', ('courier', 14, 'bold') # default config
debugme = True
def trace(*args):
if debugme: print(args)
################################################################################
# the main class - handles user interface;
# an extended Frame, on new Toplevel, or embedded in another container widget
################################################################################
class CalcGui(GuiMixin, Frame):
Operators = "+-*/=" # button lists
Operands = ["abcd", "0123", "4567", "89()"] # customizable
def __init__(self, parent=None, fg=Fg, bg=Bg, font=Font):
Frame.__init__(self, parent)
self.pack(expand=YES, fill=BOTH) # all parts expandable
self.eval = Evaluator() # embed a stack handler
self.text = StringVar() # make a linked variable
self.text.set("0")
self.erase = 1 # clear "0" text next
self.makeWidgets(fg, bg, font) # build the GUI itself
if not parent or not isinstance(parent, Frame):
self.master.title('PyCalc 3.0') # title iff owns window
self.master.iconname("PyCalc") # ditto for key bindings
self.master.bind('<KeyPress>', self.onKeyboard)
self.entry.config(state='readonly') # 3.0: not 'disabled'=grey
else:
self.entry.config(state='normal')
self.entry.focus()
def makeWidgets(self, fg, bg, font): # 7 frames plus text-entry
1470 | Chapter 19: Text and Language

self.entry = entry(self, TOP, self.text) # font, color configurable
self.entry.config(font=font) # 3.0: make display larger
self.entry.config(justify=RIGHT) # 3.0: on right, not left
for row in self.Operands:
frm = frame(self, TOP)
for char in row:
button(frm, LEFT, char,
lambda op=char: self.onOperand(op),
fg=fg, bg=bg, font=font)
frm = frame(self, TOP)
for char in self.Operators:
button(frm, LEFT, char,
lambda op=char: self.onOperator(op),
fg=bg, bg=fg, font=font)
frm = frame(self, TOP)
button(frm, LEFT, 'dot ', lambda: self.onOperand('.'))
button(frm, LEFT, ' E+ ', lambda: self.text.set(self.text.get()+'E+'))
button(frm, LEFT, ' E- ', lambda: self.text.set(self.text.get()+'E-'))
button(frm, LEFT, 'cmd ', self.onMakeCmdline)
button(frm, LEFT, 'help', self.help)
button(frm, LEFT, 'quit', self.quit) # from guimixin
frm = frame(self, BOTTOM)
button(frm, LEFT, 'eval ', self.onEval)
button(frm, LEFT, 'hist ', self.onHist)
button(frm, LEFT, 'clear', self.onClear)
def onClear(self):
self.eval.clear()
self.text.set('0')
self.erase = 1
def onEval(self):
self.eval.shiftOpnd(self.text.get()) # last or only opnd
self.eval.closeall() # apply all optrs left
self.text.set(self.eval.popOpnd()) # need to pop: optr next?
self.erase = 1
def onOperand(self, char):
if char == '(':
self.eval.open()
self.text.set('(') # clear text next
self.erase = 1
elif char == ')':
self.eval.shiftOpnd(self.text.get()) # last or only nested opnd
self.eval.close() # pop here too: optr next?
self.text.set(self.eval.popOpnd())
self.erase = 1
else:
if self.erase:
self.text.set(char) # clears last value
else:
self.text.set(self.text.get() + char) # else append to opnd
PyCalc: A Calculator Program/Object | 1471

self.erase = 0
def onOperator(self, char):
self.eval.shiftOpnd(self.text.get()) # push opnd on left
self.eval.shiftOptr(char) # eval exprs to left?
self.text.set(self.eval.topOpnd()) # push optr, show opnd|result
self.erase = 1 # erased on next opnd|'('
def onMakeCmdline(self):
new = Toplevel() # new top-level window
new.title('PyCalc command line') # arbitrary Python code
frm = frame(new, TOP) # only the Entry expands
label(frm, LEFT, '>>>').pack(expand=NO)
var = StringVar()
ent = entry(frm, LEFT, var, width=40)
onButton = (lambda: self.onCmdline(var, ent))
onReturn = (lambda event: self.onCmdline(var, ent))
button(frm, RIGHT, 'Run', onButton).pack(expand=NO)
ent.bind('<Return>', onReturn)
var.set(self.text.get())
def onCmdline(self, var, ent): # eval cmdline pop-up input
try:
value = self.eval.runstring(var.get())
var.set('OKAY')
if value != None: # run in eval namespace dict
self.text.set(value) # expression or statement
self.erase = 1
var.set('OKAY => '+ value)
except: # result in calc field
var.set('ERROR') # status in pop-up field
ent.icursor(END) # insert point after text
ent.select_range(0, END) # select msg so next key deletes
def onKeyboard(self, event):
pressed = event.char # on keyboard press event
if pressed != '': # pretend button was pressed
if pressed in self.Operators:
self.onOperator(pressed)
else:
for row in self.Operands:
if pressed in row:
self.onOperand(pressed)
break
else: # 4E: drop 'Ll'
if pressed == '.':
self.onOperand(pressed) # can start opnd
if pressed in 'Ee': # 2e10, no +/-
self.text.set(self.text.get()+pressed) # can't: no erase
elif pressed == '\r':
self.onEval() # enter key=eval
elif pressed == ' ':
self.onClear() # spacebar=clear
elif pressed == '\b':
self.text.set(self.text.get()[:-1]) # backspace
1472 | Chapter 19: Text and Language

elif pressed == '?':
self.help()
def onHist(self):
# show recent calcs log popup
from tkinter.scrolledtext import ScrolledText # or PP4E.Gui.Tour
new = Toplevel() # make new window
ok = Button(new, text="OK", command=new.destroy)
ok.pack(pady=1, side=BOTTOM) # pack first=clip last
text = ScrolledText(new, bg='beige') # add Text + scrollbar
text.insert('0.0', self.eval.getHist()) # get Evaluator text
text.see(END) # 3.0: scroll to end
text.pack(expand=YES, fill=BOTH)
# new window goes away on ok press or enter key
new.title("PyCalc History")
new.bind("<Return>", (lambda event: new.destroy()))
ok.focus_set() # make new window modal:
new.grab_set() # get keyboard focus, grab app
new.wait_window() # don't return till new.destroy
def help(self):
self.infobox('PyCalc', 'PyCalc 3.0+\n'
'A Python/tkinter calculator\n'
'Programming Python 4E\n'
'May, 2010\n'
'(3.0 2005, 2.0 1999, 1.0 1996)\n\n'
'Use mouse or keyboard to\n'
'input numbers and operators,\n'
'or type code in cmd popup')
################################################################################
# the expression evaluator class
# embedded in and used by a CalcGui instance, to perform calculations
################################################################################
class Evaluator:
def __init__(self):
self.names = {} # a names-space for my vars
self.opnd, self.optr = [], [] # two empty stacks
self.hist = [] # my prev calcs history log
self.runstring("from math import *") # preimport math modules
self.runstring("from random import *") # into calc's namespace
def clear(self):
self.opnd, self.optr = [], [] # leave names intact
if len(self.hist) > 64: # don't let hist get too big
self.hist = ['clear']
else:
self.hist.append('--clear--')
def popOpnd(self):
value = self.opnd[-1] # pop/return top|last opnd
self.opnd[-1:] = [] # to display and shift next
PyCalc: A Calculator Program/Object | 1473

return value # or x.pop(), or del x[-1]
def topOpnd(self):
return self.opnd[-1] # top operand (end of list)
def open(self):
self.optr.append('(') # treat '(' like an operator
def close(self): # on ')' pop downto highest '('
self.shiftOptr(')') # ok if empty: stays empty
self.optr[-2:] = [] # pop, or added again by optr
def closeall(self):
while self.optr: # force rest on 'eval'
self.reduce() # last may be a var name
try:
self.opnd[0] = self.runstring(self.opnd[0])
except:
self.opnd[0] = '*ERROR*' # pop else added again next:
afterMe = {'*': ['+', '-', '(', '='], # class member
'/': ['+', '-', '(', '='], # optrs to not pop for key
'+': ['(', '='], # if prior optr is this: push
'-': ['(', '='], # else: pop/eval prior optr
')': ['(', '='], # all left-associative as is
'=': ['('] }
def shiftOpnd(self, newopnd): # push opnd at optr, ')', eval
self.opnd.append(newopnd)
def shiftOptr(self, newoptr): # apply ops with <= priority
while (self.optr and
self.optr[-1] not in self.afterMe[newoptr]):
self.reduce()
self.optr.append(newoptr) # push this op above result
# optrs assume next opnd erases
def reduce(self):
trace(self.optr, self.opnd)
try: # collapse the top expr
operator = self.optr[-1] # pop top optr (at end)
[left, right] = self.opnd[-2:] # pop top 2 opnds (at end)
self.optr[-1:] = [] # delete slice in-place
self.opnd[-2:] = []
result = self.runstring(left + operator + right)
if result == None:
result = left # assignment? key var name
self.opnd.append(result) # push result string back
except:
self.opnd.append('*ERROR*') # stack/number/name error
def runstring(self, code):
try: # 3.0: not `x`/repr
result = str(eval(code, self.names, self.names)) # try expr: string
self.hist.append(code + ' => ' + result) # add to hist log
except:
1474 | Chapter 19: Text and Language

exec(code, self.names, self.names) # try stmt: None
self.hist.append(code)
result = None
return result
def getHist(self):
return '\n'.join(self.hist)
def getCalcArgs():
from sys import argv # get cmdline args in a dict
config = {} # ex: -bg black -fg red
for arg in argv[1:]: # font not yet supported
if arg in ['-bg', '-fg']: # -bg red' -> {'bg':'red'}
try:
config[arg[1:]] = argv[argv.index(arg) + 1]
except:
pass
return config
if __name__ == '__main__':
CalcGui(**getCalcArgs()).mainloop() # in default toplevel window
Using PyCalc as a component
PyCalc serves a standalone program on my desktop, but it’s also useful in the context
of other GUIs. Like most of the GUI classes in this book, PyCalc can be customized
with subclass extensions or embedded in a larger GUI with attachments. The module
in Example 19-21 demonstrates one way to reuse PyCalc’s CalcGui class by extending
and embedding, similar to what was done for the simple calculator earlier.
Example 19-21. PP4E\Lang\Calculator\calculator_test.py
"""
test calculator: use as an extended and embedded GUI component
"""
from tkinter import *
from calculator import CalcGui
def calcContainer(parent=None):
frm = Frame(parent)
frm.pack(expand=YES, fill=BOTH)
Label(frm, text='Calc Container').pack(side=TOP)
CalcGui(frm)
Label(frm, text='Calc Container').pack(side=BOTTOM)
return frm
class calcSubclass(CalcGui):
def makeWidgets(self, fg, bg, font):
Label(self, text='Calc Subclass').pack(side=TOP)
Label(self, text='Calc Subclass').pack(side=BOTTOM)
CalcGui.makeWidgets(self, fg, bg, font)
#Label(self, text='Calc Subclass').pack(side=BOTTOM)
PyCalc: A Calculator Program/Object | 1475
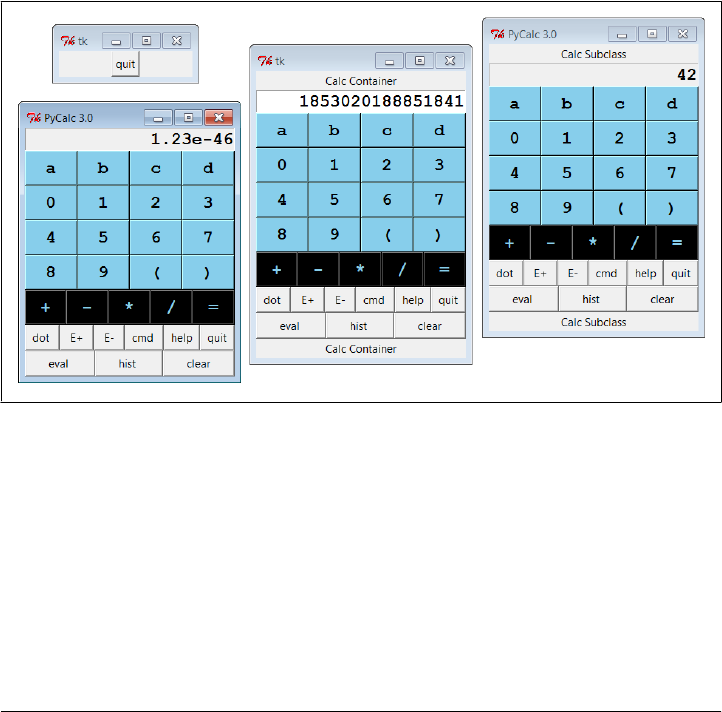
if __name__ == '__main__':
import sys
if len(sys.argv) == 1: # % calculator_test.py
root = Tk() # run 3 calcs in same process
CalcGui(Toplevel()) # each in a new toplevel window
calcContainer(Toplevel())
calcSubclass(Toplevel())
Button(root, text='quit', command=root.quit).pack()
root.mainloop()
if len(sys.argv) == 2: # % calculator_testl.py -
CalcGui().mainloop() # as a standalone window (default root)
elif len(sys.argv) == 3: # % calculator_test.py - -
calcContainer().mainloop() # as an embedded component
elif len(sys.argv) == 4: # % calculator_test.py - - -
calcSubclass().mainloop() # as a customized superclass
Figure 19-7 shows the result of running this script with no command-line arguments.
We get instances of the original calculator class, plus the container and subclass classes
defined in this script, all attached to new top-level windows.
Figure 19-7. The calculator_test script: attaching and extending
These two windows on the right reuse the core PyCalc code running in the window on
the left. All of these windows run in the same process (e.g., quitting one quits them all),
but they all function as independent windows. Note that when running three calcula-
tors in the same process like this, each has its own distinct expression evaluation name-
space because it’s a class instance attribute, not a global module-level variable. Because
of that, variables set in one calculator are set in that calculator only, and they don’t
overwrite settings made in other windows. Similarly, each calculator has its own eval-
uation stack manager object, such that calculations in one window don’t appear in or
impact other windows at all.
1476 | Chapter 19: Text and Language

The two extensions in this script are artificial, of course—they simply add labels at the
top and bottom of the window—but the concept is widely applicable. You could reuse
the calculator’s class by attaching it to any GUI that needs a calculator and customize
it with subclasses arbitrarily. It’s a reusable widget.
Adding new buttons in new components
One obvious way to reuse the calculator is to add additional expression feature
buttons—square roots, inverses, cubes, and the like. You can type such operations in
the command-line pop ups, but buttons are a bit more convenient. Such features could
also be added to the main calculator implementation itself, but since the set of features
that will be useful may vary per user and application, a better approach may be to add
them in separate extensions. For instance, the class in Example 19-22 adds a few extra
buttons to PyCalc by embedding (i.e., attaching) it in a container.
Example 19-22. PP4E\Lang\Calculator\calculator_plus_emb.py
"""
#############################################################################
a container with an extra row of buttons for common operations;
a more useful customization: adds buttons for more operations (sqrt,
1/x, etc.) by embedding/composition, not subclassing; new buttons are
added after entire CalGui frame because of the packing order/options;
#############################################################################
"""
from tkinter import *
from calculator import CalcGui, getCalcArgs
from PP4E.Gui.Tools.widgets import frame, button, label
class CalcGuiPlus(Toplevel):
def __init__(self, **args):
Toplevel.__init__(self)
label(self, TOP, 'PyCalc Plus - Container')
self.calc = CalcGui(self, **args)
frm = frame(self, BOTTOM)
extras = [('sqrt', 'sqrt(%s)'),
('x^2 ', '(%s)**2'),
('x^3 ', '(%s)**3'),
('1/x ', '1.0/(%s)')]
for (lab, expr) in extras:
button(frm, LEFT, lab, (lambda expr=expr: self.onExtra(expr)))
button(frm, LEFT, ' pi ', self.onPi)
def onExtra(self, expr):
text = self.calc.text
eval = self.calc.eval
try:
text.set(eval.runstring(expr % text.get()))
except:
text.set('ERROR')
PyCalc: A Calculator Program/Object | 1477

def onPi(self):
self.calc.text.set(self.calc.eval.runstring('pi'))
if __name__ == '__main__':
root = Tk()
button(root, TOP, 'Quit', root.quit)
CalcGuiPlus(**getCalcArgs()).mainloop() # -bg,-fg to calcgui
Because PyCalc is coded as a Python class, you can always achieve a similar effect by
extending PyCalc in a new subclass instead of embedding it, as shown in
Example 19-23.
Example 19-23. PP4E\Lang\Calculator\calculator_plus_ext.py
"""
#############################################################################
a customization with an extra row of buttons for common operations;
a more useful customization: adds buttons for more operations (sqrt,
1/x, etc.) by subclassing to extend the original class, not embedding;
new buttons show up before frame attached to bottom by calcgui class;
#############################################################################
"""
from tkinter import *
from calculator import CalcGui, getCalcArgs
from PP4E.Gui.Tools.widgets import label, frame, button
class CalcGuiPlus(CalcGui):
def makeWidgets(self, *args):
label(self, TOP, 'PyCalc Plus - Subclass')
CalcGui.makeWidgets(self, *args)
frm = frame(self, BOTTOM)
extras = [('sqrt', 'sqrt(%s)'),
('x^2 ', '(%s)**2'),
('x^3 ', '(%s)**3'),
('1/x ', '1.0/(%s)')]
for (lab, expr) in extras:
button(frm, LEFT, lab, (lambda expr=expr: self.onExtra(expr)))
button(frm, LEFT, ' pi ', self.onPi)
def onExtra(self, expr):
try:
self.text.set(self.eval.runstring(expr % self.text.get()))
except:
self.text.set('ERROR')
def onPi(self):
self.text.set(self.eval.runstring('pi'))
if __name__ == '__main__':
CalcGuiPlus(**getCalcArgs()).mainloop() # passes -bg, -fg on
Notice that these buttons’ callbacks force floating-point division to be used for inverses
just because that’s how / operates in Python 3.X (// for integers truncates remainders
1478 | Chapter 19: Text and Language

instead); the buttons also wrap entry field values in parentheses to sidestep precedence
issues. They could instead convert the entry’s text to a number and do real math, but
Python does all the work automatically when expression strings are run raw.
Also note that the buttons added by these scripts simply operate on the current value
in the entry field, immediately. That’s not quite the same as expression operators ap-
plied with the stacks evaluator (additional customizations are needed to make them
true operators). Still, these buttons prove the point these scripts are out to make—they
use PyCalc as a component, both from the outside and from below.
Finally, to test both of the extended calculator classes, as well as PyCalc configuration
options, the script in Example 19-24 puts up four distinct calculator windows (this is
the script run by PyDemos).
Example 19-24. PP4E\Lang\Calculator\calculator_plusplus.py
#!/usr/local/bin/python
"""
demo all 3 calculator flavors at once
each is a distinct calculator object and window
"""
from tkinter import Tk, Button, Toplevel
import calculator, calculator_plus_ext, calculator_plus_emb
root=Tk()
calculator.CalcGui(Toplevel())
calculator.CalcGui(Toplevel(), fg='white', bg='purple')
calculator_plus_ext.CalcGuiPlus(Toplevel(), fg='gold', bg='black')
calculator_plus_emb.CalcGuiPlus(fg='black', bg='red')
Button(root, text='Quit Calcs', command=root.quit).pack()
root.mainloop()
Figure 19-8 shows the result—four independent calculators in top-level windows
within the same process. The two windows on the right represent specialized reuses of
PyCalc as a component, and the Help dialog appears in the lower right. Although it
may not be obvious in this book, all four use different color schemes; calculator classes
accept color and font configuration options and pass them down the call chain as
needed.
As we learned earlier, these calculators could also be run as independent processes by
spawning command lines with the launchmodes module we met in Chapter 5. In fact,
that’s how the PyGadgets and PyDemos launcher bars run calculators, so see their code
for more details. And as always, read the code and experiment on your own for further
enlightenment; this is Python, after all.
PyCalc: A Calculator Program/Object | 1479
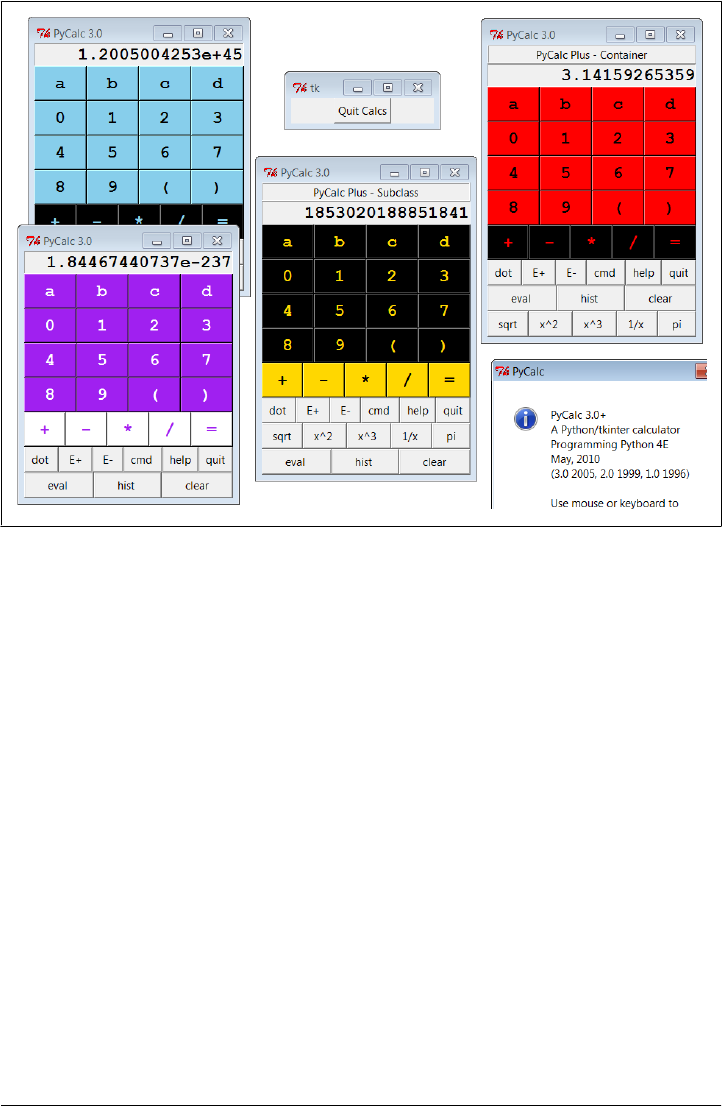
Figure 19-8. calculator_plusplus: extend, embed, and configure!
This chapter concludes our Python language material in this book. The next and final
technical chapter of the text takes us on a tour of techniques for integrating Python
with programs written in compiled languages like C and C++. Not everyone needs to
know how to do this, so some readers may wish to skip ahead to the book’s conclusion
in Chapter 21 at this point. Since most Python programmers use wrapped C libraries
(even if they don’t wrap them themselves), though, I recommend a quick pass over the
next chapter before you close the book on this book.
1480 | Chapter 19: Text and Language

Lesson 6: Have Fun
In closing, here’s a less tangible but important aspect of Python programming. A com-
mon remark among new users is that it’s easy to “say what you mean” in Python without
getting bogged down in complex syntax or obscure rules. It’s a programmer-friendly
language. In fact, it’s not too uncommon for Python programs to run on the first
attempt.
As we’ve seen in this book, there are a number of factors behind this distinction—lack
of declarations, no compile steps, simple syntax, useful built-in objects, powerful li-
braries, and so on. Python is specifically designed to optimize speed of development
(an idea we’ll expand on in Chapter 21). For many users, the end result is a remarkably
expressive and responsive language, which can actually be fun to use for real work.
For instance, the calculator programs of this chapter were initially thrown together in
one afternoon, starting from vague, incomplete goals. There was no analysis phase, no
formal design, and no official coding stage. I typed up some ideas and they worked.
Moreover, Python’s interactive nature allowed me to experiment with new ideas and
get immediate feedback. Since its initial development, the calculator has been polished
and expanded much, of course, but the core implementation remains unchanged.
Naturally, such a laid-back programming mode doesn’t work for every project. Some-
times more upfront design is warranted. For more demanding tasks, Python has mod-
ular constructs and fosters systems that can be extended in either Python or C. And a
simple calculator GUI may not be what some would call “serious” software develop-
ment. But maybe that’s part of the point, too.
PyCalc: A Calculator Program/Object | 1481

CHAPTER 20
Python/C Integration
“I Am Lost at C”
Throughout this book, our programs have all been written in Python code. We have
used interfaces to services outside Python, and we’ve coded reusable tools in the Python
language, but all our work has been done in Python itself. Despite our programs’ scale
and utility, they’ve been Python through and through.
For many programmers and scripters, this mode makes perfect sense. In fact, such
standalone programming is one of the main ways people apply Python. As we’ve seen,
Python comes with batteries included—interfaces to system tools, Internet protocols,
GUIs, data storage, and much more is already available. Moreover, most custom tasks
we’re likely to encounter have prebuilt solutions in the open source world; the PIL
system, for example, allows us to process images in tkinter GUIs by simply running a
self-installer.
But for some systems, Python’s ability to integrate with components written in (or
compatible with) the C programming language is a crucial feature. In fact, Python’s
role as an extension and interface language in larger systems is one of the reasons for
its popularity and why it is often called a “scripting” language in the first place. Its
design supports hybrid systems that mix components written in a variety of program-
ming languages. Because different languages have different strengths, being able to pick
and choose on a component-by-component basis is a powerful concept. You can add
Python to the mix anywhere you need a flexible and comparatively easy-to-use language
tool, without sacrificing raw speed where it matters.
Compiled languages such as C and C++ are optimized for speed of execution, but are
complex to program—for developers, and especially for end users who need to tailor
programs. Because Python is optimized for speed of development, using Python scripts
to control or customize software components written in C or C++ can yield more
flexible systems, quicker execution, and faster development modes. For example, mov-
ing selected components of a pure Python program to C can optimize program per-
formance. Moreover, systems designed to delegate customizations to Python code
1483

don’t need to be shipped with full source code and don’t require end users to learn
complex or proprietary languages.
In this last technical chapter of this book, we’re going to take a brief look at tools for
interfacing with C-language components, and discuss both Python’s ability to be used
as an embedded language tool in other systems, and its interfaces for extending Python
scripts with new modules implemented in C-compatible languages. We’ll also briefly
explore other integration techniques that are less C specific, such as Jython.
Notice that I said “brief” in the preceding paragraph. Because not all Python program-
mers need to master this topic, because it requires studying C language code and
makefiles, and because this is the final chapter of an already in-depth book, this chapter
omits details that are readily available in both Python’s standard manual set, and the
source code of Python itself. Instead, here we’ll take a quick look at a handful of basic
examples to help get you started in this domain, and hint at the possibilities they imply
for Python systems.
Extending and Embedding
Before we get to any code, I want to start out by defining what we mean by “integration”
here. Although that term can be interpreted almost as widely as “object,” our focus in
this chapter is on tight integration—where control is transferred between languages by
a simple, direct, and fast in-process function call. Although it is also possible to link
components of an application less directly using IPC and networking tools such as
sockets and pipes that we explored earlier in the book, we are interested in this part of
the book in more direct and efficient techniques.
When you mix Python with components written in C (or other compiled languages),
either Python or C can be “on top.” Because of that, there are two distinct integration
modes and two distinct APIs:
The extending interface
For running compiled C library code from Python programs
The embedding interface
For running Python code from compiled C programs
Extending generally has three main roles: to optimize programs—recoding parts of a
program in C is a last-resort performance boost; to leverage existing libraries—opening
them up for use in Python code extends their reach; and to allow Python programs to
do things not directly supported by the language—Python code cannot normally access
devices at absolute memory addresses, for instance, but can call C functions that do.
For example, the NumPy package for Python is largely an instance of extending at work:
by integrating optimized numeric libraries, it turns Python into a flexible and efficient
system for numeric programming that some compare to Matlab.
1484 | Chapter 20: Python/C Integration
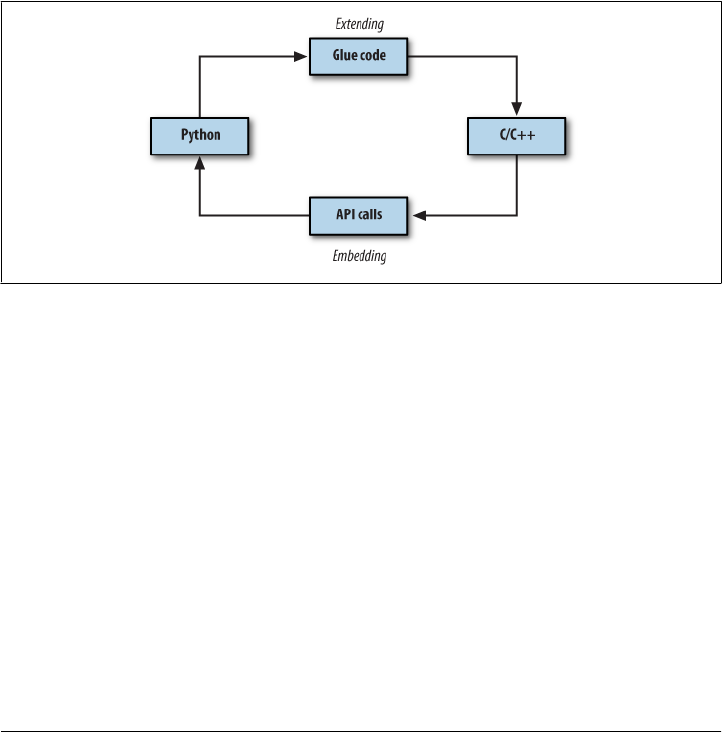
Embedding typically takes the role of customization—by running user-configurable
Python code, a system can be modified without shipping or building its full source
code. For instance, some programs provide a Python customization layer that can be
used to modify the program on site by modifying Python code. Embedding is also
sometimes used to route events to Python-coded callback handlers. Python GUI tool-
kits, for example, usually employ embedding in some fashion to dispatch user events.
Figure 20-1 sketches this traditional dual-mode integration model. In extending, con-
trol passes from Python through a glue layer on its way to C code. In embedding, C
code processes Python objects and runs Python code by calling Python C API functions.
Because Python is “on top” in extending, it defines a fixed integration structure, which
can be automated with tools such as SWIG—a code generator we’ll meet in this chapter,
which produces glue code required to wrap C and C++ libraries. Because Python is
subordinate in embedding, it instead provides a set of API tools which C programs
employ as needed.
Figure 20-1. Traditional integration model
In some models, things are not as clear-cut. For example, under the ctypes module
discussed later, Python scripts make library calls rather than employing C glue code.
In systems such as Cython (and its Pyrex predecessor), things are more different still—
C libraries are produced from combinations of Python and C code. And in Jython and
IronPython, the model is similar, but Java and C# components replace the C language,
and the integration is largely automated. We will meet such alternative systems later
in this chapter. For now, our focus is on traditional Python/C integration models.
This chapter introduces extending first, and then moves on to explore the basics of
embedding. Although we will study these topics in isolation, keep in mind that many
systems combine the two techniques. For instance, embedded Python code run from
C can also import and call linked-in C extensions to interface with the enclosing ap-
plication. And in callback-based systems, C libraries initially accessed through extend-
ing interfaces may later use embedding techniques to run Python callback handlers
on events.
“I Am Lost at C” | 1485

For example, when we created buttons with Python’s tkinter GUI library earlier in the
book, we called out to a C library through the extending API. When our GUI’s user
later clicked those buttons, the GUI C library caught the event and routed it to our
Python functions with embedding. Although most of the details are hidden to Python
code, control jumps often and freely between languages in such systems. Python has
an open and reentrant architecture that lets you mix languages arbitrarily.
For additional Python/C integration examples beyond this book, see the
Python source code itself; its Modules and Objects directories are a
wealth of code resources. Most of the Python built-ins we have used in
this book—from simple things such as integers and strings to more ad-
vanced tools such as files, system calls, tkinter, and DBM files—are built
with the same structures we’ll introduce here. Their utilization of inte-
gration APIs can be studied in Python’s source code distribution as
models for extensions of your own.
In addition, Python’s Extending and Embedding and Python/C API man-
uals are reasonably complete, and provide supplemental information to
the presentation here. If you plan to do integration, you should consider
browsing these as a next step. For example, the manuals go into addi-
tional details about C extension types, C extensions in threaded pro-
grams, and multiple interpreters in embedded programs, which we will
largely bypass here.
Extending Python in C: Overview
Because Python itself is coded in C today, compiled Python extensions can be coded
in any language that is C compatible in terms of call stacks and linking. That includes
C, but also C++ with appropriate “extern C” declarations (which are automatically
provided in Python header files). Regardless of the implementation language, the com-
piled Python extensions language can take two forms:
C modules
Libraries of tools that look and feel like Python module files to their clients
C types
Multiple instance objects that behave like standard built-in types and classes
Generally, C extension modules are used to implement flat function libraries, and they
wind up appearing as importable modules to Python code (hence their name). C ex-
tension types are used to code objects that generate multiple instances, carry per-
instance state information, and may optionally support expression operators just like
Python classes. C extension types can do anything that built-in types and Python-coded
classes can: method calls, addition, indexing, slicing, and so on.
To make the interface work, both C modules and types must provide a layer of “glue”
code that translates calls and data between the two languages. This layer registers
1486 | Chapter 20: Python/C Integration

C-coded operations with the Python interpreter as C function pointers. In all cases, the
C layer is responsible for converting arguments passed from Python to C form and for
converting results from C to Python form. Python scripts simply import C extensions
and use them as though they were really coded in Python. Because C code does all the
translation work, the interface is very seamless and simple in Python scripts.
C modules and types are also responsible for communicating errors back to Python,
detecting errors raised by Python API calls, and managing garbage-collector reference
counters on objects retained by the C layer indefinitely—Python objects held by your
C code won’t be garbage-collected as long as you make sure their reference counts don’t
fall to zero. Once coded, C modules and types may be linked to Python either statically
(by rebuilding Python) or dynamically (when first imported). Thereafter, the C exten-
sion becomes another toolkit available for use in Python scripts.
A Simple C Extension Module
At least that’s the short story; C modules require C code, and C types require more of
it than we can reasonably present in this chapter. Although this book can’t teach you
C development skills if you don’t already have them, we need to turn to some code to
make this domain more concrete. Because C modules are simpler, and because C types
generally export a C module with an instance constructor function, let’s start off by
exploring the basics of C module coding with a quick example.
As mentioned, when you add new or existing C components to Python in the traditional
integration model, you need to code an interface (“glue”) logic layer in C that handles
cross-language dispatching and data translation. The C source file in Example 20-1
shows how to code one by hand. It implements a simple C extension module named
hello for use in Python scripts, with a function named message that simply returns its
input string argument with extra text prepended. Python scripts will call this function
as usual, but this one is coded in C, not in Python.
Example 20-1. PP4E\Integrate\Extend\Hello\hello.c
/********************************************************************
* A simple C extension module for Python, called "hello"; compile
* this into a ".so" on python path, import and call hello.message;
********************************************************************/
#include <Python.h>
#include <string.h>
/* module functions */
static PyObject * /* returns object */
message(PyObject *self, PyObject *args) /* self unused in modules */
{ /* args from Python call */
char *fromPython, result[1024];
if (! PyArg_Parse(args, "(s)", &fromPython)) /* convert Python -> C */
return NULL; /* null=raise exception */
A Simple C Extension Module | 1487

else {
strcpy(result, "Hello, "); /* build up C string */
strcat(result, fromPython); /* add passed Python string */
return Py_BuildValue("s", result); /* convert C -> Python */
}
}
/* registration table */
static PyMethodDef hello_methods[] = {
{"message", message, METH_VARARGS, "func doc"}, /* name, &func, fmt, doc */
{NULL, NULL, 0, NULL} /* end of table marker */
};
/* module definition structure */
static struct PyModuleDef hellomodule = {
PyModuleDef_HEAD_INIT,
"hello", /* name of module */
"mod doc", /* module documentation, may be NULL */
−1, /* size of per-interpreter module state, −1=in global vars */
hello_methods /* link to methods table */
};
/* module initializer */
PyMODINIT_FUNC
PyInit_hello() /* called on first import */
{ /* name matters if loaded dynamically */
return PyModule_Create(&hellomodule);
}
This C module has a 4-part standard structure described by its comments, which all C
modules follow, and which has changed noticeably in Python 3.X. Ultimately, Python
code will call this C file’s message function, passing in a string object and getting back
a new string object. First, though, it has to be somehow linked into the Python inter-
preter. To use this C file in a Python script, compile it into a dynamically loadable object
file (e.g., hello.so on Linux, hello.dll under Cygwin on Windows) with a makefile like
the one listed in Example 20-2, and drop the resulting object file into a directory listed
on your module import search path exactly as though it were a .py or .pyc file.
Example 20-2. PP4E\Integrate\Extend\Hello\makefile.hello
#############################################################
# Compile hello.c into a shareable object file on Cygwin,
# to be loaded dynamically when first imported by Python.
#############################################################
PYLIB = /usr/local/bin
PYINC = /usr/local/include/python3.1
hello.dll: hello.c
gcc hello.c -g -I$(PYINC) -shared -L$(PYLIB) -lpython3.1 -o hello.dll
clean:
rm -f hello.dll core
1488 | Chapter 20: Python/C Integration

This is a Cygwin makefile that uses gcc to compile our C code on Windows; other
platforms are analogous but will vary. As we learned in Chapter 5, Cygwin provides a
Unix-like environment and libraries on Windows. To work along with the examples
here, either install Cygwin on your Windows platform, or change the makefiles listed
per your compiler and platform requirements. Be sure to include the path to Python’s
install directory with -I flags to access Python include (a.k.a. header) files, as well as
the path to the Python binary library file with -L flags, if needed; mine point to
Python 3.1’s location on my laptop after building it from its source. Also note that you’ll
need tabs for the indentation in makefile rules if a cut-and-paste from an ebook sub-
stituted or dropped spaces.
Now, to use the makefile in Example 20-2 to build the extension module in Exam-
ple 20-1, simply type a standard make command at your shell (the Cygwin shell is used
here, and I add a line break for clarity):
.../PP4E/Integrate/Extend/Hello$ make -f makefile.hello
gcc hello.c -g -I/usr/local/include/python3.1 -shared
-L/usr/local/bin -lpython3.1 -o hello.dll
This generates a shareable object file—a .dll under Cygwin on Windows. When com-
piled this way, Python automatically loads and links the C module when it is first
imported by a Python script. At import time, the .dll binary library file will be located
in a directory on the Python import search path, just like a .py file. Because Python
always searches the current working directory on imports, this chapter’s examples will
run from the directory you compile them in (.) without any file copies or moves. In
larger systems, you will generally place compiled extensions in a directory listed in
PYTHONPATH or .pth files instead, or use Python’s distutils to install them in the site-
packages subdirectory of the standard library.
Finally, to call the C function from a Python program, simply import the module
hello and call its hello.message function with a string; you’ll get back a normal Python
string:
.../PP4E/Integrate/Extend/Hello$ python
>>> import hello # import a C module
>>> hello.message('world') # call a C function
'Hello, world'
>>> hello.message('extending')
'Hello, extending'
And that’s it—you’ve just called an integrated C module’s function from Python. The
most important thing to notice here is that the C function looks exactly as if it were
coded in Python. Python callers send and receive normal string objects from the call;
the Python interpreter handles routing calls to the C function, and the C function itself
handles Python/C data conversion chores.
In fact, there is little to distinguish hello as a C extension module at all, apart from its
filename. Python code imports the module and fetches its attributes as if it had been
written in Python. C extension modules even respond to dir calls as usual and have the
A Simple C Extension Module | 1489

standard module and filename attributes, though the filename doesn’t end in a .py
or .pyc this time around—the only obvious way you can tell it’s a C library:
>>> dir(hello) # C module attributes
['__doc__', '__file__', '__name__', '__package__', 'message']
>>> hello.__name__, hello.__file__
('hello', 'hello.dll')
>>> hello.message # a C function object
<built-in function message>
>>> hello # a C module object
<module 'hello' from 'hello.dll'>
>>> hello.__doc__ # docstrings in C code
'mod doc'
>>> hello.message.__doc__
'func doc'
>>> hello.message() # errors work too
TypeError: argument must be sequence of length 1, not 0
Like any module in Python, you can also access the C extension from a script file. The
Python file in Example 20-3, for instance, imports and uses the C extension module in
Example 20-1.
Example 20-3. PP4E\Integrate\Extend\Hello\hellouse.py
"import and use a C extension library module"
import hello
print(hello.message('C'))
print(hello.message('module ' + hello.__file__))
for i in range(3):
reply = hello.message(str(i))
print(reply)
Run this script as any other—when the script first imports the module hello, Python
automatically finds the C module’s .dll object file in a directory on the module search
path and links it into the process dynamically. All of this script’s output represents
strings returned from the C function in the file hello.c:
.../PP4E/Integrate/Extend/Hello$ python hellouse.py
Hello, C
Hello, module /cygdrive/c/.../PP4E/Integrate/Extend/Hello/hello.dll
Hello, 0
Hello, 1
Hello, 2
See Python’s manuals for more details on the code in our C module, as well as tips for
compilation and linkage. Of note, as an alternative to makefiles, also see the
disthello.py and disthello-alt.py files in the examples package. Here’s a quick peek at
the source code of the first of these:
1490 | Chapter 20: Python/C Integration

# to build: python disthello.py build
# resulting dll shows up in build subdir
from distutils.core import setup, Extension
setup(ext_modules=[Extension('hello', ['hello.c'])])
This is a Python script that specifies compilation of the C extension using tools in the
distutils package—a standard part of Python that is used to build, install, and dis-
tribute Python extensions coded in Python or C. distutil’s larger goal is automated
and portable builds and installs for distributed packages, but it also knows how to build
C extensions portably. Systems generally include a setup.py which installs in site-
packages of the standard library. Regrettably, distutils is also too large to have survived
the cleaver applied to this chapter’s material; see its two manuals in Python’s manuals
set for more details.
The SWIG Integration Code Generator
As you can probably tell, manual coding of C extensions can become fairly involved
(this is almost inevitable in C language work). I’ve introduced the basics in this chapter
thus far so that you understand the underlying structure. But today, C extensions are
usually better and more easily implemented with a tool that generates all the required
integration glue code automatically. There are a variety of such tools for use in the
Python world, including SIP, SWIG, and Boost.Python; we’ll explore alternatives at the
end of this chapter. Among these, the SWIG system is widely used by Python
developers.
SWIG—the Simplified Wrapper and Interface Generator, is an open source system
created by Dave Beazley and now developed by its community, much like Python. It
uses C and C++ type declarations to generate complete C extension modules that in-
tegrate existing libraries for use in Python scripts. The generated C (and C++) extension
modules are complete: they automatically handle data conversion, error protocols,
reference-count management, and more.
That is, SWIG is a program that automatically generates all the glue code needed to
plug C and C++ components into Python programs; simply run SWIG, compile its
output, and your extension work is done. You still have to manage compilation and
linking details, but the rest of the C extension task is largely performed by SWIG.
A Simple SWIG Example
To use SWIG, instead of writing the C code in the prior section, write the C function
you want to use from Python without any Python integration logic at all, as though it
is to be used from C alone. For instance, Example 20-4 is a recoding of Example 20-1
as a straight C function.
The SWIG Integration Code Generator | 1491

Example 20-4. PP4E\Integrate\Extend\HelloLib\hellolib.c
/*********************************************************************
* A simple C library file, with a single function, "message",
* which is to be made available for use in Python programs.
* There is nothing about Python here--this C function can be
* called from a C program, as well as Python (with glue code).
*********************************************************************/
#include <string.h>
#include <hellolib.h>
static char result[1024]; /* this isn't exported */
char *
message(char *label) /* this is exported */
{
strcpy(result, "Hello, "); /* build up C string */
strcat(result, label); /* add passed-in label */
return result; /* return a temporary */
}
While you’re at it, define the usual C header file to declare the function externally, as
shown in Example 20-5. This is probably overkill for such a small example, but it will
prove a point.
Example 20-5. PP4E\Integrate\Extend\HelloLib\hellolib.h
/********************************************************************
* Define hellolib.c exports to the C namespace, not to Python
* programs--the latter is defined by a method registration
* table in a Python extension module's code, not by this .h;
********************************************************************/
extern char *message(char *label);
Now, instead of all the Python extension glue code shown in the prior sections, simply
write a SWIG type declarations input file, as in Example 20-6.
Example 20-6. PP4E\Integrate\Extend\Swig\hellolib.i
/******************************************************
* Swig module description file, for a C lib file.
* Generate by saying "swig -python hellolib.i".
******************************************************/
%module hellowrap
%{
#include <hellolib.h>
%}
extern char *message(char*); /* or: %include "../HelloLib/hellolib.h" */
/* or: %include hellolib.h, and use -I arg */
1492 | Chapter 20: Python/C Integration

This file spells out the C function’s type signature. In general, SWIG scans files con-
taining ANSI C and C++ declarations. Its input file can take the form of an interface
description file (usually with a .i suffix) or a C/C++ header or source file. Interface files
like this one are the most common input form; they can contain comments in C or
C++ format, type declarations just like standard header files, and SWIG directives that
all start with %. For example:
%module
Sets the module’s name as known to Python importers.
%{...%}
Encloses code added to generated wrapper file verbatim.
extern statements
Declare exports in normal ANSI C/C++ syntax.
%include
Makes SWIG scan another file (-I flags give search paths).
In this example, SWIG could also be made to read the hellolib.h header file of Exam-
ple 20-5 directly. But one of the advantages of writing special SWIG input files like
hellolib.i is that you can pick and choose which functions are wrapped and exported
to Python, and you may use directives to gain more control over the generation process.
SWIG is a utility program that you run from your build scripts; it is not a programming
language, so there is not much more to show here. Simply add a step to your makefile
that runs SWIG and compile its output to be linked with Python. Example 20-7 shows
one way to do it on Cygwin.
Example 20-7. PP4E\Integrate\Extend\Swig\makefile.hellolib-swig
##################################################################
# Use SWIG to integrate hellolib.c for use in Python programs on
# Cygwin. The DLL must have a leading "_" in its name in current
# SWIG (>1.3.13) because also makes a .py without "_" in its name.
##################################################################
PYLIB = /usr/local/bin
PYINC = /usr/local/include/python3.1
CLIB = ../HelloLib
SWIG = /cygdrive/c/temp/swigwin-2.0.0/swig
# the library plus its wrapper
_hellowrap.dll: hellolib_wrap.o $(CLIB)/hellolib.o
gcc -shared hellolib_wrap.o $(CLIB)/hellolib.o \
-L$(PYLIB) -lpython3.1 -o $@
# generated wrapper module code
hellolib_wrap.o: hellolib_wrap.c $(CLIB)/hellolib.h
gcc hellolib_wrap.c -g -I$(CLIB) -I$(PYINC) -c -o $@
hellolib_wrap.c: hellolib.i
$(SWIG) -python -I$(CLIB) hellolib.i
The SWIG Integration Code Generator | 1493

# C library code (in another directory)
$(CLIB)/hellolib.o: $(CLIB)/hellolib.c $(CLIB)/hellolib.h
gcc $(CLIB)/hellolib.c -g -I$(CLIB) -c -o $(CLIB)/hellolib.o
clean:
rm -f *.dll *.o *.pyc core
force:
rm -f *.dll *.o *.pyc core hellolib_wrap.c hellowrap.py
When run on the hellolib.i input file by this makefile, SWIG generates two files:
hellolib_wrap.c
The generated C extension module glue code file.
hellowrap.py
A Python module that imports the generated C extension module.
The former is named for the input file, and the latter per the %module directive. Really,
SWIG generates two modules today: it uses a combination of Python and C code to
achieve the integration. Scripts ultimately import the generated Python module file,
which internally imports the generated and compiled C module. You can wade through
this generated code in the book’s examples distribution if you are so inclined, but it is
prone to change over time and is too generalized to be simple.
To build the C module, the makefile runs SWIG to generate the glue code; compiles
its output; compiles the original C library code if needed; and then combines the result
with the compiled wrapper to produce _hellowrap.dll, the DLL which hellowrap.py will
expect to find when imported by a Python script:
.../PP4E/Integrate/Extend/Swig$ dir
hellolib.i makefile.hellolib-swig
.../PP4E/Integrate/Extend/Swig$ make -f makefile.hellolib-swig
/cygdrive/c/temp/swigwin-2.0.0/swig -python -I../HelloLib hellolib.i
gcc hellolib_wrap.c -g -I../HelloLib -I/usr/local/include/python3.1
-c -o hellolib_wrap.o
gcc ../HelloLib/hellolib.c -g -I../HelloLib -c -o ../HelloLib/hellolib.o
gcc -shared hellolib_wrap.o ../HelloLib/hellolib.o \
-L/usr/local/bin -lpython3.1 -o _hellowrap.dll
.../PP4E/Integrate/Extend/Swig$ dir
_hellowrap.dll hellolib_wrap.c hellowrap.py
hellolib.i hellolib_wrap.o makefile.hellolib-swig
The result is a dynamically loaded C extension module file ready to be imported by
Python code. Like all modules, _hellowrap.dll must, along with hellowrap.py, be placed
in a directory on your Python module search path (the directory where you compile
will suffice if you run Python there too). Notice that the .dll file must be built with a
leading underscore in its name; this is required because SWIG also created the .py file
of the same name without the underscore—if named the same, only one could be
1494 | Chapter 20: Python/C Integration

imported, and we need both (scripts import the .py which in turn imports the .dll
internally).
As usual in C development, you may have to barter with the makefile to get it to work
on your system. Once you’ve run the makefile, though, you are finished. The generated
C module is used exactly like the manually coded version shown before, except that
SWIG has taken care of the complicated parts automatically. Function calls in our
Python code are routed through the generated SWIG layer, to the C code in Exam-
ple 20-4, and back again; with SWIG, this all “just works”:
.../PP4E/Integrate/Extend/Swig$ python
>>> import hellowrap # import glue + library file
>>> hellowrap.message('swig world') # cwd always searched on imports
'Hello, swig world'
>>> hellowrap.__file__
'hellowrap.py'
>>> dir(hellowrap)
['__builtins__', '__doc__', '__file__', '__name__', '_hellowrap', ... 'message']
>>> hellowrap._hellowrap
<module '_hellowrap' from '_hellowrap.dll'>
In other words, once you learn how to use SWIG, you can often largely forget the details
behind integration coding. In fact, SWIG is so adept at generating Python glue code
that it’s usually easier and less error prone to code C extensions for Python as purely
C- or C++-based libraries first, and later add them to Python by running their header
files through SWIG, as demonstrated here.
We’ve mostly just scratched the SWIG surface here, and there’s more for you to learn
about it from its Python-specific manual—available with SWIG at http://www.swig
.org. Although its examples in this book are simple, SWIG is powerful enough to in-
tegrate libraries as complex as Windows extensions and commonly used graphics APIs
such as OpenGL. We’ll apply it again later in this chapter, and explore its “shadow
class” model for wrapping C++ classes too. For now, let’s move on to a more useful
extension example.
Wrapping C Environment Calls
Our next example is a C extension module that integrates the standard C library’s
getenv and putenv shell environment variable calls for use in Python scripts. Exam-
ple 20-8 is a C file that achieves this goal in a hand-coded, manual fashion.
Example 20-8. PP4E\Integrate\Extend\Cenviron\cenviron.c
/******************************************************************
* A C extension module for Python, called "cenviron". Wraps the
* C library's getenv/putenv routines for use in Python programs.
******************************************************************/
Wrapping C Environment Calls | 1495

#include <Python.h>
#include <stdlib.h>
#include <string.h>
/***********************/
/* 1) module functions */
/***********************/
static PyObject * /* returns object */
wrap_getenv(PyObject *self, PyObject *args) /* self not used */
{ /* args from python */
char *varName, *varValue;
PyObject *returnObj = NULL; /* null=exception */
if (PyArg_Parse(args, "(s)", &varName)) { /* Python -> C */
varValue = getenv(varName); /* call C getenv */
if (varValue != NULL)
returnObj = Py_BuildValue("s", varValue); /* C -> Python */
else
PyErr_SetString(PyExc_SystemError, "Error calling getenv");
}
return returnObj;
}
static PyObject *
wrap_putenv(PyObject *self, PyObject *args)
{
char *varName, *varValue, *varAssign;
PyObject *returnObj = NULL;
if (PyArg_Parse(args, "(ss)", &varName, &varValue))
{
varAssign = malloc(strlen(varName) + strlen(varValue) + 2);
sprintf(varAssign, "%s=%s", varName, varValue);
if (putenv(varAssign) == 0) {
Py_INCREF(Py_None); /* C call success */
returnObj = Py_None; /* reference None */
}
else
PyErr_SetString(PyExc_SystemError, "Error calling putenv");
}
return returnObj;
}
/**************************/
/* 2) registration table */
/**************************/
static PyMethodDef cenviron_methods[] = {
{"getenv", wrap_getenv, METH_VARARGS, "getenv doc"}, /* name, &func,... */
{"putenv", wrap_putenv, METH_VARARGS, "putenv doc"}, /* name, &func,... */
{NULL, NULL, 0, NULL} /* end of table marker */
};
1496 | Chapter 20: Python/C Integration

/*************************/
/* 3) module definition */
/*************************/
static struct PyModuleDef cenvironmodule = {
PyModuleDef_HEAD_INIT,
"cenviron", /* name of module */
"cenviron doc", /* module documentation, may be NULL */
−1, /* size of per-interpreter module state, −1=in global vars */
cenviron_methods /* link to methods table */
};
/*************************/
/* 4) module initializer */
/*************************/
PyMODINIT_FUNC
PyInit_cenviron() /* called on first import */
{ /* name matters if loaded dynamically */
return PyModule_Create(&cenvironmodule);
}
Though demonstrative, this example is arguably less useful now than it was in the first
edition of this book—as we learned in Part II, not only can you fetch shell environment
variables by indexing the os.environ table, but assigning to a key in this table auto-
matically calls C’s putenv to export the new setting to the C code layer in the process.
That is, os.environ['key'] fetches the value of the shell variable 'key', and
os.environ['key']=value assigns a variable both in Python and in C.
The second action—pushing assignments out to C—was added to Python releases after
the first edition of this book was published. Besides illustrating additional extension
coding techniques, though, this example still serves a practical purpose: even today,
changes made to shell variables by the C code linked into a Python process are not
picked up when you index os.environ in Python code. That is, once your program
starts, os.environ reflects only subsequent changes made by Python code in the process.
Moreover, although Python now has both a putenv and a getenv call in its os module,
their integration seems incomplete. Changes to os.environ call os.putenv, but direct
calls to os.putenv do not update os.environ, so the two can become out of sync. And
os.getenv today simply translates to an os.environ fetch, and hence will not pick up
environment changes made in the process outside of Python code after startup time.
This may rarely, if ever, be an issue for you, but this C extension module is not com-
pletely without purpose; to truly interface environment variables with linked-in C code,
we need to call the C library routines directly (at least until Python changes this
model again!).
The cenviron.c C file in Example 20-8 creates a Python module called cenviron that
does a bit more than the prior examples—it exports two functions, sets some exception
descriptions explicitly, and makes a reference count call for the Python None object (it’s
not created anew, so we need to add a reference before passing it to Python). As before,
Wrapping C Environment Calls | 1497

to add this code to Python, compile and link into an object file; the Cygwin makefile
in Example 20-9 builds the C source code for dynamic binding on imports.
Example 20-9. PP4E\Integrate\Extend\Cenviron\makefile.cenviron
##################################################################
# Compile cenviron.c into cenviron.dll--a shareable object file
# on Cygwin, which is loaded dynamically when first imported.
##################################################################
PYLIB = /usr/local/bin
PYINC = /usr/local/include/python3.1
cenviron.dll: cenviron.c
gcc cenviron.c -g -I$(PYINC) -shared -L$(PYLIB) -lpython3.1 -o $@
clean:
rm -f *.pyc cenviron.dll
To build, type make -f makefile.cenviron at your shell. To run, make sure the result-
ing .dll file is in a directory on Python’s module path (the current working directory
works too):
.../PP4E/Integrate/Extend/Cenviron$ python
>>> import cenviron
>>> cenviron.getenv('USER') # like os.environ[key] but refetched
'mark'
>>> cenviron.putenv('USER', 'gilligan') # like os.environ[key]=value
>>> cenviron.getenv('USER') # C sees the changes too
'gilligan'
As before, cenviron is a bona fide Python module object after it is imported, with all
the usual attached information, and errors are raised and reported correctly on errors:
>>> dir(cenviron)
['__doc__', '__file__', '__name__', '__packge__', 'getenv', 'putenv']
>>> cenviron.__file__
'cenviron.dll'
>>> cenviron.__name__
'cenviron'
>>> cenviron.getenv
<built-in function getenv>
>>> cenviron
<module 'cenviron' from 'cenviron.dll'>
>>> cenviron.getenv('HOME')
'/home/mark'
>>> cenviron.getenv('NONESUCH')
SystemError: Error calling getenv
1498 | Chapter 20: Python/C Integration

Here is an example of the problem this module addresses (but you have to pretend that
some of these calls are made by linked-in C code, not by Python; I changed USER in
the shell prior to this session with an export command):
.../PP4E/Integrate/Extend/Cenviron$ python
>>> import os
>>> os.environ['USER'] # initialized from the shell
'skipper'
>>> from cenviron import getenv, putenv # direct C library call access
>>> getenv('USER')
'skipper'
>>> putenv('USER', 'gilligan') # changes for C but not Python
>>> getenv('USER')
'gilligan'
>>> os.environ['USER'] # oops--does not fetch values again
'skipper'
>>> os.getenv('USER') # ditto
'skipper'
Adding Wrapper Classes to Flat Libraries
As is, the C extension module exports a function-based interface, but it’s easy to wrap
its functions in Python code that makes the interface look any way you like. For in-
stance, Example 20-10 makes the functions accessible by dictionary indexing and in-
tegrates with the os.environ object—it guarantees that the object will stay in sync with
fetches and changes made by calling our C extension functions.
Example 20-10. PP4E\Integrate\Extend\Cenviron\envmap.py
import os
from cenviron import getenv, putenv # get C module's methods
class EnvMapping: # wrap in a Python class
def __setitem__(self, key, value):
os.environ[key] = value # on writes: Env[key]=value
putenv(key, value) # put in os.environ too
def __getitem__(self, key):
value = getenv(key) # on reads: Env[key]
os.environ[key] = value # integrity check
return value
Env = EnvMapping() # make one instance
To use this module, clients may import its Env object using Env['var'] dictionary syntax
to refer to environment variables. Example 20-11 goes a step further and exports the
functions as qualified attribute names rather than as calls or keys—variables are refer-
enced with Env.var attribute syntax.
Wrapping C Environment Calls | 1499

Example 20-11. PP4E\Integrate\Extend\Cenviron\envattr.py
import os
from cenviron import getenv, putenv # get C module's methods
class EnvWrapper: # wrap in a Python class
def __setattr__(self, name, value):
os.environ[name] = value # on writes: Env.name=value
putenv(name, value) # put in os.environ too
def __getattr__(self, name):
value = getenv(name) # on reads: Env.name
os.environ[name] = value # integrity check
return value
Env = EnvWrapper() # make one instance
The following shows our Python wrappers running atop our C extension module’s
functions to access environment variables. The main point to notice here is that you
can graft many different sorts of interface models on top of extension functions by
providing Python wrappers in addition to C extensions:
>>> from envmap import Env
>>> Env['USER']
'skipper'
>>> Env['USER'] = 'professor'
>>> Env['USER']
'professor'
>>>
>>> from envattr import Env
>>> Env.USER
'professor'
>>> Env.USER = 'gilligan'
>>> Env.USER
'gilligan'
Wrapping C Environment Calls with SWIG
You can manually code extension modules like we just did, but you don’t necessarily
have to. Because this example really just wraps functions that already exist in standard
C libraries, the entire cenviron.c C code file in Example 20-8 can be replaced with a
simple SWIG input file that looks like Example 20-12.
Example 20-12. PP4E\Integrate\Extend\Swig\Environ\environ.i
/***************************************************************
* Swig module description file, to generate all Python wrapper
* code for C lib getenv/putenv calls: "swig -python environ.i".
***************************************************************/
%module environ
extern char * getenv(const char *varname);
extern int putenv(char *assignment);
1500 | Chapter 20: Python/C Integration

And you’re done. Well, almost; you still need to run this file through SWIG and compile
its output. As before, simply add a SWIG step to your makefile and compile its output
file into a shareable object for dynamic linking, and you’re in business. Exam-
ple 20-13 is a Cygwin makefile that does the job.
Example 20-13. PP4E\Integrate\Extend\Swig\Environ\makefile.environ-swig
# build environ extension from SWIG generated code
PYLIB = /usr/local/bin
PYINC = /usr/local/include/python3.1
SWIG = /cygdrive/c/temp/swigwin-2.0.0/swig
_environ.dll: environ_wrap.c
gcc environ_wrap.c -g -I$(PYINC) -L$(PYLIB) -lpython3.1 -shared -o $@
environ_wrap.c: environ.i
$(SWIG) -python environ.i
clean:
rm -f *.o *.dll *.pyc core environ_wrap.c environ.py
When run on environ.i, SWIG generates two files and two modules—environ.py (the
Python interface module we import) and environ_wrap.c (the lower-level glue code
module file we compile into _environ.dll to be imported by the .py). Because the func-
tions being wrapped here live in standard linked-in C libraries, there is nothing to
combine with the generated code; this makefile simply runs SWIG and compiles the
wrapper file into a C extension module, ready to be imported:
.../PP4E/Integrate/Extend/Swig/Environ$ make -f makefile.environ-swig
/cygdrive/c/temp/swigwin-2.0.0/swig -python environ.i
gcc environ_wrap.c -g -I/usr/local/include/python3.1 -L/usr/local/bin -lpython3.1
-shared -o _environ.dll
And now you’re really done. The resulting C extension module is linked when impor-
ted, and it’s used as before (except that SWIG handled all the gory bits):
.../PP4E/Integrate/Extend/Swig/Environ$ ls
_environ.dll environ.i environ.py environ_wrap.c makefile.environ-swig
.../PP4E/Integrate/Extend/Swig/Environ$ python
>>> import environ
>>> environ.getenv('USER')
'gilligan'
>>> environ.__name__, environ.__file__, environ
('environ', 'environ.py', <module 'environ' from 'environ.py'>)
>>> dir(environ)
[ ... '_environ', 'getenv', 'putenv' ... ]
Wrapping C Environment Calls | 1501

If you look closely, you may notice that I didn’t call putenv this time. It
turns out there’s good cause: the C library’s putenv wants a string of the
form “USER=Gilligan” to be passed, which becomes part of the envi-
ronment. In C code, this means we must create a new piece of memory
to pass in; we used malloc in Example 20-8 to satisfy this constraint.
However, there’s no simple and direct way to guarantee this on the Py-
thon side of the fence. In a prior Python release, it was apparently suf-
ficient to hold on to the string passed to putenv in a temporary Python
variable, but this no longer works with Python 3.X and/or SWIG 2.0. A
fix may require either a custom C function or SWIG’s typemaps which
allow its handling of data translations to be customized. In the interest
of space, we’ll leave addressing this as suggested exercise; see SWIG for
details.
Wrapping C++ Classes with SWIG
So far in this chapter, we’ve been dealing with C extension modules—flat function
libraries. To implement multiple-instance objects in C, you need to code a C extension
type, not a module. Like Python classes, C types generate multiple-instance objects and
can overload (i.e., intercept and implement) Python expression operators and type
operations. C types can also support subclassing just like Python classes, largely be-
cause the type/class distinction has largely evaporated in Python 3.X.
You can see what C types look like in Python’s own source library tree; look for the
Objects directory there. The code required for a C type can be large—it defines instance
creation, named methods, operator implementations, an iterator type, and so on, and
links all these together with tables—but is largely boilerplate code that is structurally
the same for most types.
You can code new object types in C manually like this, and in some applications, this
approach may make sense. But you don’t necessarily have to—because SWIG knows
how to generate glue code for C++ classes, you can instead automatically generate all
the C extension and wrapper class code required to integrate such an object, simply by
running SWIG over an appropriate class declaration. The wrapped C++ class provides
a multiple-instance datatype much like the C extension type, but it can be substantially
simpler for you to code because SWIG handles language integration details.
Here’s how—given a C++ class declaration and special command-line settings, SWIG
generates the following:
• A C++-coded Python extension module with accessor functions that interface with
the C++ class’s methods and members
• A Python-coded module with a wrapper class (called a “shadow” or “proxy” class
in SWIG-speak) that interfaces with the C++ class accessor functions module
1502 | Chapter 20: Python/C Integration

As we did earlier, to use SWIG in this domain, write and debug your class as though it
would be used only from C++. Then, simply run SWIG in your makefile to scan the
C++ class declaration and compile and link its output. The end result is that by im-
porting the shadow class in your Python scripts, you can utilize C++ classes as though
they were really coded in Python. Not only can Python programs make and use in-
stances of the C++ class, they can also customize it by subclassing the generated shadow
class.
A Simple C++ Extension Class
To see how this works, we need a C++ class. To illustrate, let’s code one to be used in
Python scripts. You have to understand C++ to make sense of this section, of course,
and SWIG supports advanced C++ tools (including templates and overloaded func-
tions and operators), but I’ll keep this example simple for illustration. The following
C++ files define a Number class with four methods (add, sub, square, and display), a data
member (data), and a constructor and destructor. Example 20-14 shows the header file.
Example 20-14. PP4E\Integrate\Extend\Swig\Shadow\number.h
class Number
{
public:
Number(int start); // constructor
~Number(); // destructor
void add(int value); // update data member
void sub(int value);
int square(); // return a value
void display(); // print data member
int data;
};
Example 20-15 is the C++ class’s implementation file; most methods print a message
when called to trace class operations. Notice how this uses printf instead of C++’s
cout; this once resolved an output overlap issue when mixing C++ cout with Python
2.X standard output streams on Cygwin. It’s probably a moot point today—because
Python 3.X’s output system and buffering might mix with C++’s arbitrarily, C++
should generally flush the output stream (with fflush(stdout) or cout<<flush) if it
prints intermixed text that doesn’t end in a newline. Obscure but true when disparate
language systems are mixed.
Example 20-15. PP4E\Integrate\Extend\Swig\Shadow\number.cxx
///////////////////////////////////////////////////////////////
// implement a C++ class, to be used from Python code or not;
// caveat: cout and print usually both work, but I ran into a
// c++/py output overlap issue on Cygwin that prompted printf
///////////////////////////////////////////////////////////////
#include "number.h"
#include "stdio.h" // versus #include "iostream.h"
Wrapping C++ Classes with SWIG | 1503

Number::Number(int start) {
data = start; // python print goes to stdout
printf("Number: %d\n", data); // or: cout << "Number: " << data << endl;
}
Number::~Number() {
printf("~Number: %d\n", data);
}
void Number::add(int value) {
data += value;
printf("add %d\n", value);
}
void Number::sub(int value) {
data -= value;
printf("sub %d\n", value);
}
int Number::square() {
return data * data; // if print label, fflush(stdout) or cout << flush
}
void Number::display() {
printf("Number=%d\n", data);
}
So that you can compare languages, the following is how this class is used in a C++
program. Example 20-16 makes a Number object, calls its methods, and fetches and sets
its data attribute directly (C++ distinguishes between “members” and “methods,”
while they’re usually both called “attributes” in Python).
Example 20-16. PP4E\Integrate\Extend\Swig\Shadow\main.cxx
#include "iostream.h"
#include "number.h"
main()
{
Number *num;
int res, val;
num = new Number(1); // make a C++ class instance
num->add(4); // call its methods
num->display();
num->sub(2);
num->display();
res = num->square(); // method return value
cout << "square: " << res << endl;
num->data = 99; // set C++ data member
val = num->data; // fetch C++ data member
cout << "data: " << val << endl;
1504 | Chapter 20: Python/C Integration

cout << "data+1: " << val + 1 << endl;
num->display();
cout << num << endl; // print raw instance ptr
delete num; // run destructor
}
You can use the g++ command-line C++ compiler program to compile and run this
code on Cygwin (it’s the same on Linux). If you don’t use a similar system, you’ll have
to extrapolate; there are far too many C++ compiler differences to list here. Type the
compile command directly or use the cxxtest target in this example directory’s makefile
shown ahead, and then run the purely C++ program created:
.../PP4E/Integrate/Extend/Swig/Shadow$ make -f makefile.number-swig cxxtest
g++ main.cxx number.cxx -Wno-deprecated
.../PP4E/Integrate/Extend/Swig/Shadow$ ./a.exe
Number: 1
add 4
Number=5
sub 2
Number=3
square: 9
data: 99
data+1: 100
Number=99
0xe502c0
~Number: 99
Wrapping the C++ Class with SWIG
But enough C++: let’s get back to Python. To use the C++ Number class of the preceding
section in Python scripts, you need to code or generate a glue logic layer between the
two languages, just as in prior C extension examples. To generate that layer automat-
ically, write a SWIG input file like the one shown in Example 20-17.
Example 20-17. PP4E\Integrate\Extend\Swig\Shadow\number.i
/********************************************************
* Swig module description file for wrapping a C++ class.
* Generate by running "swig -c++ -python number.i".
* The C++ module is generated in file number_wrap.cxx;
* module 'number' refers to the number.py shadow class.
********************************************************/
%module number
%{
#include "number.h"
%}
%include number.h
Wrapping C++ Classes with SWIG | 1505

This interface file simply directs SWIG to read the C++ class’s type signature infor-
mation from the %-included number.h header file. SWIG uses the class declaration to
generate two different Python modules again:
number_wrap.cxx
A C++ extension module with class accessor functions
number.py
A Python shadow class module that wraps accessor functions
The former must be compiled into a binary library. The latter imports and uses the
former’s compiled form and is the file that Python scripts ultimately import. As for
simple functions, SWIG achieves the integration with a combination of Python and
C++ code.
After running SWIG, the Cygwin makefile shown in Example 20-18 combines the gen-
erated number_wrap.cxx C++ wrapper code module with the C++ class implementa-
tion file to create a _number.dll—a dynamically loaded extension module that must be
in a directory on your Python module search path when imported from a Python script,
along with the generated number.py (all files are in the same current working directory
here).
As before, the compiled C extension module must be named with a leading underscore
in SWIG today: _number.dll, following a Python convention, rather than the other
formats used by earlier releases. The shadow class module number.py internally imports
_number.dll. Be sure to use a -c++ command-line argument for SWIG; an older
-shadow argument is no longer needed to create the wrapper class in addition to the
lower-level functional interface module, as this is enabled by default.
Example 20-18. PP4E\Integrate\Extend\Swig\Shadow\makefile.number-swig
###########################################################################
# Use SWIG to integrate the number.h C++ class for use in Python programs.
# Update: name "_number.dll" matters, because shadow class imports _number.
# Update: the "-shadow" swig command line arg is deprecated (on by default).
# Update: swig no longer creates a .doc file to rm here (ancient history).
###########################################################################
PYLIB = /usr/local/bin
PYINC = /usr/local/include/python3.1
SWIG = /cygdrive/c/temp/swigwin-2.0.0/swig
all: _number.dll number.py
# wrapper + real class
_number.dll: number_wrap.o number.o
g++ -shared number_wrap.o number.o -L$(PYLIB) -lpython3.1 -o $@
# generated class wrapper module(s)
number_wrap.o: number_wrap.cxx number.h
g++ number_wrap.cxx -c -g -I$(PYINC)
1506 | Chapter 20: Python/C Integration

number_wrap.cxx: number.i
$(SWIG) -c++ -python number.i
number.py: number.i
$(SWIG) -c++ -python number.i
# wrapped C++ class code
number.o: number.cxx number.h
g++ number.cxx -c -g -Wno-deprecated
# non Python test
cxxtest:
g++ main.cxx number.cxx -Wno-deprecated
clean:
rm -f *.pyc *.o *.dll core a.exe
force:
rm -f *.pyc *.o *.dll core a.exe number_wrap.cxx number.py
As usual, run this makefile to generate and compile the necessary glue code into an
extension module that can be imported by Python programs:
.../PP4E/Integrate/Extend/Swig/Shadow$ make -f makefile.number-swig
/cygdrive/c/temp/swigwin-2.0.0/swig -c++ -python number.i
g++ number_wrap.cxx -c -g -I/usr/local/include/python3.1
g++ number.cxx -c -g -Wno-deprecated
g++ -shared number_wrap.o number.o -L/usr/local/bin -lpython3.1 -o _number.dll
.../PP4E/Integrate/Extend/Swig/Shadow$ ls
_number.dll makefile.number-swig number.i number_wrap.cxx
a.exe number.cxx number.o number_wrap.o
main.cxx number.h number.py
Using the C++ Class in Python
Once the glue code is generated and compiled, Python scripts can access the C++ class
as though it were coded in Python. In fact, it is—the imported number.py shadow class
which runs on top of the extension module is generated Python code. Example 20-19
repeats the main.cxx file’s class tests. Here, though, the C++ class is being utilized from
the Python programming language—an arguably amazing feat, but the code is remark-
ably natural on the Python side of the fence.
Example 20-19. PP4E\Integrate\Extend\Swig\Shadow\main.py
"""
use C++ class in Python code (c++ module + py shadow class)
this script runs the same tests as the main.cxx C++ file
"""
from number import Number # imports .py C++ shadow class module
num = Number(1) # make a C++ class object in Python
num.add(4) # call its methods from Python
Wrapping C++ Classes with SWIG | 1507

num.display() # num saves the C++ 'this' pointer
num.sub(2)
num.display()
res = num.square() # converted C++ int return value
print('square: ', res)
num.data = 99 # set C++ data member, generated __setattr__
val = num.data # get C++ data member, generated __getattr__
print('data: ', val) # returns a normal Python integer object
print('data+1: ', val + 1)
num.display()
print(num) # runs repr in shadow/proxy class
del num # runs C++ destructor automatically
Because the C++ class and its wrappers are automatically loaded when imported by
the number.py shadow class module, you run this script like any other:
.../PP4E/Integrate/Extend/Swig/Shadow$ python main.py
Number: 1
add 4
Number=5
sub 2
Number=3
square: 9
data: 99
data+1: 100
Number=99
<number.Number; proxy of <Swig Object of type 'Number *' at 0x7ff4bb48> >
~Number: 99
Much of this output is coming from the C++ class’s methods and is largely the same
as the main.cxx r e s u l t s s h o w n i n Example 20-16 (less the instance output format—it’s
a Python shadow class instance now).
Using the low-level extension module
SWIG implements integrations as a C++/Python combination, but you can always use
the generated accessor functions module if you want to, as in Example 20-20. This
version runs the C++ extension module directly without the shadow class, to demon-
strate how the shadow class maps calls back to C++.
Example 20-20. PP4E\Integrate\Extend\Swig\Shadow\main_low.py
"""
run similar tests to main.cxx and main.py
but use low-level C accessor function interface
"""
from _number import * # c++ extension module wrapper
num = new_Number(1)
Number_add(num, 4) # pass C++ 'this' pointer explicitly
1508 | Chapter 20: Python/C Integration

Number_display(num) # use accessor functions in the C module
Number_sub(num, 2)
Number_display(num)
print(Number_square(num))
Number_data_set(num, 99)
print(Number_data_get(num))
Number_display(num)
print(num)
delete_Number(num)
This script generates essentially the same output as main.py, but it’s been slightly sim-
plified, and the C++ class instance is something lower level than the proxy class here:
.../PP4E/Integrate/Extend/Swig/Shadow$ python main_low.py
Number: 1
add 4
Number=5
sub 2
Number=3
9
99
Number=99
_6025aa00_p_Number
~Number: 99
Subclassing the C++ class in Python
Using the extension module directly works, but there is no obvious advantage to mov-
ing from the shadow class to functions here. By using the shadow class, you get both
an object-based interface to C++ and a customizable Python object. For instance, the
Python module shown in Example 20-21 extends the C++ class, adding an extra
print call statement to the C++ add method and defining a brand-new mul method.
Because the shadow class is pure Python, this works naturally.
Example 20-21. PP4E\Integrate\Extend\Swig\Shadow\main_subclass.py
"sublass C++ class in Python (generated shadow class)"
from number import Number # import shadow class
class MyNumber(Number):
def add(self, other): # extend method
print('in Python add...')
Number.add(self, other)
def mul(self, other): # add new method
print('in Python mul...')
self.data = self.data * other
num = MyNumber(1) # same tests as main.cxx, main.py
num.add(4) # using Python subclass of shadow class
num.display() # add() is specialized in Python
num.sub(2)
num.display()
Wrapping C++ Classes with SWIG | 1509

print(num.square())
num.data = 99
print(num.data)
num.display()
num.mul(2) # mul() is implemented in Python
num.display()
print(num) # repr from shadow superclass
del num
Now we get extra messages out of add calls, and mul changes the C++ class’s data
member automatically when it assigns self.data—the Python code extends the C++
code:
.../PP4E/Integrate/Extend/Swig/Shadow$ python main_subclass.py
Number: 1
in Python add...
add 4
Number=5
sub 2
Number=3
9
99
Number=99
in Python mul...
Number=198
<__main__.MyNumber; proxy of <Swig Object of type 'Number *' at 0x7ff4baa0> >
~Number: 198
In other words, SWIG makes it easy to use C++ class libraries as base classes in your
Python scripts. Among other things, this allows us to leverage existing C++ class li-
braries in Python scripts and optimize by coding parts of class hierarchies in C++ when
needed. We can do much the same with C extension types today since types are classes
(and vice versa), but wrapping C++ classes with SWIG is often much simpler.
Exploring the wrappers interactively
As usual, you can import the C++ class interactively to experiment with it some more—
besides demonstrating a few more salient properties here, this technique allows us to
test wrapped C++ classes at the Python interactive prompt:
.../PP4E/Integrate/Extend/Swig/Shadow$ python
>>> import _number
>>> _number.__file__ # the C++ class plus generated glue module
'_number.dll'
>>> import number # the generated Python shadow class module
>>> number.__file__
'number.py'
>>> x = number.Number(2) # make a C++ class instance in Python
Number: 2
>>> y = number.Number(4) # make another C++ object
Number: 4
1510 | Chapter 20: Python/C Integration

>>> x, y
(<number.Number; proxy of <Swig Object of type 'Number *' at 0x7ff4bcf8> >,
<number.Number; proxy of <Swig Object of type 'Number *' at 0x7ff4b998> >)
>>> x.display() # call C++ method (like C++ x->display())
Number=2
>>> x.add(y.data) # fetch C++ data member, call C++ method
add 4
>>> x.display()
Number=6
>>> y.data = x.data + y.data + 32 # set C++ data member
>>> y.display() # y records the C++ this pointer
Number=42
>>> y.square() # method with return value
1764
>>> t = y.square()
>>> t, type(t) # type is class in Python 3.X
(1764, <class 'int'>)
Naturally, this example uses a small C++ class to underscore the basics, but even at
this level, the seamlessness of the Python-to-C++ integration we get from SWIG is
astonishing. Python code uses C++ members and methods as though they are Python
code. Moreover, this integration transparency still applies once we step up to more
realistic C++ class libraries.
So what’s the catch? Nothing much, really, but if you start using SWIG in earnest, the
biggest downside may be that SWIG cannot handle every feature of C++ today. If your
classes use some esoteric C++ tools (and there are many), you may need to handcode
simplified class type declarations for SWIG instead of running SWIG over the original
class header files. SWIG development is ongoing, so you should consult the SWIG
manuals and website for more details on these and other topics.
In return for any such trade-offs, though, SWIG can completely obviate the need to
code glue layers to access C and C++ libraries from Python scripts. If you have ever
coded such layers by hand in the past, you already know that this can be a very big win.
If you do go the handcoded route, though, consult Python’s standard extension man-
uals for more details on both API calls used in this chapter, as well as additional ex-
tension tools we don’t have space to cover in this text. C extensions can run the gamut
from short SWIG input files to code that is staunchly wedded to the internals of the
Python interpreter; as a rule of thumb, the former survives the ravages of time much
better than the latter.
Other Extending Tools
In closing the extending topic, I should mention that there are alternatives to SWIG,
many of which have a loyal user base of their own. This section briefly introduces some
of the more popular tools in this domain today; as usual, search the Web for more
Other Extending Tools | 1511

details on these and others. Like SWIG, all of the following began life as third-party
tools installed separately, though Python 2.5 and later incorporates the ctypes extension
as a standard library module.
SIP
Just as a sip is a smaller swig in the drinking world, so too is the SIP system a lighter
alternative to SWIG in the Python world (in fact, it was named on purpose for the
joke). According to its web page, SIP makes it easy to create Python bindings for
C and C++ libraries. Originally developed to create the PyQt Python bindings for
the Qt toolkit, it can be used to create bindings for any C or C++ library. SIP
includes a code generator and a Python support module.
Much like SWIG, the code generator processes a set of specification files and gen-
erates C or C++ code, which is compiled to create the bindings extension module.
The SIP Python module provides support functions to the automatically generated
code. Unlike SWIG, SIP is specifically designed just for bringing together Python
and C/C++. SWIG also generates wrappers for many other scripting languages,
and so is viewed by some as a more complex project.
ctypes
The ctypes system is a foreign function interface (FFI) module for Python. It allows
Python scripts to access and call compiled functions in a binary library file directly
and dynamically, by writing dispatch code in Python itself, instead of generating
or writing the integration C wrapper code we’ve studied in this chapter. That is,
library glue code is written in pure Python instead of C. The main advantage is that
you don’t need C code or a C build system to access C functions from a Python
script. The disadvantage is potential speed loss on dispatch, though this depends
upon the alternative measured.
According to its documentation, ctypes allows Python to call functions exposed
from DLLs and shared libraries and has facilities to create, access, and manipulate
complex C datatypes in Python. It is also possible to implement C callback func-
tions in pure Python, and an experimental ctypes code generator feature allows
automatic creation of library wrappers from C header files. ctypes works on Win-
dows, Mac OS X, Linux, Solaris, FreeBSD, and OpenBSD. It may run on additional
systems, provided that the libffi package it employs is supported. For Windows,
ctypes contains a ctypes.com package, which allows Python code to call and im-
plement custom COM interfaces. See Python’s library manuals for more on the
ctypes functionality included in the standard library.
Boost.Python
The Boost.Python system is a C++ library that enables seamless interoperability
between C++ and the Python programming language through an IDL-like model.
Using it, developers generally write a small amount of C++ wrapper code to create
a shared library for use in Python scripts. Boost.Python handles references, call-
backs, type mappings, and cleanup tasks. Because it is designed to wrap C++ in-
terfaces nonintrusively, C++ code need not be changed to be wrapped. Like other
1512 | Chapter 20: Python/C Integration

tools, this makes the system useful for wrapping existing libraries, as well as
developing new extensions from scratch.
Writing interface code for large libraries can be more involved than the code gen-
eration approaches of SWIG and SIP, but it’s easier than manually wrapping li-
braries and may afford greater control than a fully automated wrapping tool. In
addition, the Py++ and older Pyste systems provide Boost.Python code generators,
in which users specify classes and functions to be exported using a simple interface
file. Both use GCC-XML to parse all the headers and extract the necessary infor-
mation to generate C++ code.
Cython (and Pyrex)
Cython, a successor to the Pyrex system, is a language specifically for writing
Python extension modules. It lets you write files that mix Python code and C da-
tatypes as you wish, and compiles the combination into a C extension for Python.
In principle, developers need not deal with the Python/C API at all, because Cython
takes care of things such as error-checking and reference counts automatically.
Technically, Cython is a distinct language that is Python-like, with extensions for
mixing in C datatype declarations and C function calls. However, almost any Py-
thon code is also valid Cython code. The Cython compiler converts Python code
into C code, which makes calls to the Python/C API. In this aspect, Cython is
similar to the now much older Python2C conversion project. By combining Python
and C code, Cython offers a different approach than the generation or coding of
integration code in other systems.
CXX, weave, and more
The CXX system is roughly a C++ version of Python’s usual C API, which handles
reference counters, exception translation, and much of the type checking and
cleanup inherent in C++ extensions. As such, CXX lets you focus on the
application-specific parts of your code. CXX also exposes parts of the C++ Stand-
ard Template Library containers to be compatible with Python sequences.
The weave package allows the inclusion of C/C++ in Python code. It’s part of the
SciPy package (http://www.scipy.org) but is also available as a standalone system.
A page at http://www.python.org chronicles additional projects in this domain,
which we don’t have space to mention here.
Other languages: Java, C#, FORTRAN, Objective-C, and others
Although we’re focused on C and C++ in this chapter, you’ll also find direct sup-
port for mixing Python with other programming languages in the open source
world. This includes languages that are compiled to binary form like C, as well as
some that are not.
For example, by providing full byte code compilers, the Jython and IronPython
systems allow code written in Python to interface with Java and C#/.NET com-
ponents in a largely seamless fashion. Alternatively, the JPype and Python for .NET
projects support Java and C#/.NET integration for normal CPython (the standard
Other Extending Tools | 1513

C-based implementation of Python) code, without requiring alternative byte code
compilers.
Moreover, the f2py and PyFort systems provide integration with FORTRAN code,
and other tools provide access to languages such as Delphi and Objective-C.
Among these, the PyObjC project aims to provide a bridge between Python and
Objective-C; this supports writing Cocoa GUI applications on Mac OS X in Python.
Search the Web for details on other language integration tools. Also look for a wiki
page currently at http://www.python.org that lists a large number of other integrat-
able languages, including Prolog, Lisp, TCL, and more.
Because many of these systems support bidirectional control flows—both extending
and embedding—we’ll return to this category at the end of this chapter in the context
of integration at large. First, though, we need to shift our perspective 180 degrees to
explore the other mode of Python/C integration: embedding.
Mixing Python and C++
Python’s standard implementation is currently coded in C, so all the normal rules about
mixing C programs with C++ programs apply to the Python interpreter. In fact, there
is nothing special about Python in this context, but here are a few pointers.
When embedding Python in a C++ program, there are no special rules to follow. Simply
link in the Python library and call its functions from C++. Python’s header files auto-
matically wrap themselves in extern "C" {...} declarations to suppress C++ name
mangling. Hence, the Python library looks like any other C component to C++; there
is no need to recompile Python itself with a C++ compiler.
When extending Python with C++ components, Python header files are still C++
friendly, so Python API calls in C++ extensions work like any other C++-to-C call. But
be sure to wrap the parts of your extension code made visible to Python with extern
"C" declarations so that they can be called by Python’s C code. For example, to wrap
a C++ class, SWIG generates a C++ extension module that declares its initialization
function this way.
Embedding Python in C: Overview
So far in this chapter, we’ve explored only half of the Python/C integration picture:
calling C services from Python. This mode is perhaps the most commonly deployed; it
allows programmers to speed up operations by moving them to C and to utilize external
libraries by wrapping them in C extension modules and types. But the inverse can be
just as useful: calling Python from C. By delegating selected components of an appli-
cation to embedded Python code, we can open them up to onsite changes without
having to ship or rebuild a system’s full code base.
This section tells this other half of the Python/C integration tale. It introduces the
Python C interfaces that make it possible for programs written in C-compatible
1514 | Chapter 20: Python/C Integration

languages to run Python program code. In this mode, Python acts as an embedded
control language (what some call a “macro” language). Although embedding is mostly
presented in isolation here, keep in mind that Python’s integration support is best
viewed as a whole. A system’s structure usually determines an appropriate integration
approach: C extensions, embedded code calls, or both. To wrap up, this chapter con-
cludes by discussing a handful of alternative integration platforms such as Jython and
IronPython, which offer broad integration possibilities.
The C Embedding API
The first thing you should know about Python’s embedded-call API is that it is less
structured than the extension interfaces. Embedding Python in C may require a bit
more creativity on your part than extending: you must pick tools from a general col-
lection of calls to implement the Python integration instead of coding to a boilerplate
structure. The upside of this loose structure is that programs can combine embedding
calls and strategies to build up arbitrary integration architectures.
The lack of a more rigid model for embedding is largely the result of a less clear-cut
goal. When extending Python, there is a distinct separation for Python and C respon-
sibilities and a clear structure for the integration. C modules and types are required to
fit the Python module/type model by conforming to standard extension structures. This
makes the integration seamless for Python clients: C extensions look like Python objects
and handle most of the work. It also supports automation tools such as SWIG.
But when Python is embedded, the structure isn’t as obvious; because C is the enclosing
level, there is no clear way to know what model the embedded Python code should fit.
C may want to run objects fetched from modules, strings fetched from files or parsed
out of documents, and so on. Instead of deciding what C can and cannot do, Python
provides a collection of general embedding interface tools, which you use and structure
according to your embedding goals.
Most of these tools correspond to tools available to Python programs. Table 20-1 lists
some of the more common API calls used for embedding, as well as their Python equiv-
alents. In general, if you can figure out how to accomplish your embedding goals in
pure Python code, you can probably find C API tools that achieve the same results.
Table 20-1. Common API functions
C API call Python equivalent
PyImport_ImportModule import module, __import__
PyImport_GetModuleDict sys.modules
PyModule_GetDict module.__dict__
PyDict_GetItemString dict[key]
PyDict_SetItemString dict[key]=val
PyDict_New dict = {}
Embedding Python in C: Overview | 1515

C API call Python equivalent
PyObject_GetAttrString getattr(obj, attr)
PyObject_SetAttrString setattr(obj, attr, val)
PyObject_CallObject funcobj(*argstuple)
PyEval_CallObject funcobj(*argstuple)
PyRun_String eval(exprstr), exec(stmtstr)
PyRun_File exec(open(filename().read())
Because embedding relies on API call selection, becoming familiar with the Python C
API is fundamental to the embedding task. This chapter presents a handful of repre-
sentative embedding examples and discusses common API calls, but it does not provide
a comprehensive list of all tools in the API. Once you’ve mastered the examples here,
you’ll probably need to consult Python’s integration manuals for more details on avail-
able calls in this domain. As mentioned previously, Python offers two standard manuals
for C/C++ integration programmers: Extending and Embedding, an integration tutorial;
and Python/C API, the Python runtime library reference.
You can find the most recent releases of these manuals at http://www.python.org, and
possibly installed on your computer alongside Python itself. Beyond this chapter, these
manuals are likely to be your best resource for up-to-date and complete Python API
tool information.
What Is Embedded Code?
Before we jump into details, let’s get a handle on some of the core ideas in the embed-
ding domain. When this book speaks of “embedded” Python code, it simply means
any Python program structure that can be executed from C with a direct in-process
function call interface. Generally speaking, embedded Python code can take a variety
of forms:
Code strings
C programs can represent Python programs as character strings and run them as
either expressions or statements (much like using the eval and exec built-in func-
tions in Python).
Callable objects
C programs can load or reference Python callable objects such as functions, meth-
ods, and classes, and call them with argument list objects (much like func(*pargs,
*kargs) Python syntax).
Code files
C programs can execute entire Python program files by importing modules and
running script files through the API or general system calls (e.g., popen).
1516 | Chapter 20: Python/C Integration

The Python binary library is usually what is physically embedded and linked in the C
program. The actual Python code run from C can come from a wide variety of sources:
• Code strings might be loaded from files, obtained from an interactive user at a
console or GUI, fetched from persistent databases and shelves, parsed out of
HTML or XML files, read over sockets, built or hardcoded in a C program, passed
to C extension functions from Python registration code, and so on.
• Callable objects might be fetched from Python modules, returned from other
Python API calls, passed to C extension functions from Python registration code,
and so on.
• Code files simply exist as files, modules, and executable scripts in the filesystem.
Registration is a technique commonly used in callback scenarios that we will explore
in more detail later in this chapter. But especially for strings of code, there are as many
possible sources as there are for C character strings in general. For example, C programs
can construct arbitrary Python code dynamically by building and running strings.
Finally, once you have some Python code to run, you need a way to communicate with
it: the Python code may need to use inputs passed in from the C layer and may want
to generate outputs to communicate results back to C. In fact, embedding generally
becomes interesting only when the embedded code has access to the enclosing C layer.
Usually, the form of the embedded code suggests its communication media:
• Code strings that are Python expressions return an expression result as their out-
put. In addition, both inputs and outputs can take the form of global variables in
the namespace in which a code string is run; C may set variables to serve as input,
run Python code, and fetch variables as the code’s result. Inputs and outputs can
also be passed with exported C extension function calls—Python code may use C
module or type interfaces that we met earlier in this chapter to get or set variables
in the enclosing C layer. Communications schemes are often combined; for in-
stance, C may preassign global names to objects that export both state and interface
functions for use in the embedded Python code.*
• Callable objects may accept inputs as function arguments and produce results as
function return values. Passed-in mutable arguments (e.g., lists, dictionaries, class
instances) can be used as both input and output for the embedded code—changes
made in Python are retained in objects held by C. Objects can also make use of the
global variable and C extension functions interface techniques described for strings
to communicate with C.
* For a concrete example, consider the discussion of server-side templating languages in the Internet part of
this book. Such systems usually fetch Python code embedded in an HTML web page file, assign global
variables in a namespace to objects that give access to the web browser’s environment, and run the Python
code in the namespace where the objects were assigned. I worked on a project where we did something
similar, but Python code was embedded in XML documents, and objects that were preassigned to globals in
the code’s namespace represented widgets in a GUI. At the bottom, it was simply Python code embedded in
and run by C code.
Embedding Python in C: Overview | 1517

• Code files can communicate with most of the same techniques as code strings;
when run as separate programs, files can also employ Inter-Process Communica-
tion (IPC) techniques.
Naturally, all embedded code forms can also communicate with C using general system-
level tools: files, sockets, pipes, and so on. These techniques are generally less direct
and slower, though. Here, we are still interested in in-process function call integration.
Basic Embedding Techniques
As you can probably tell from the preceding overview, there is much flexibility in the
embedding domain. To illustrate common embedding techniques in action, this section
presents a handful of short C programs that run Python code in one form or another.
Most of these examples will make use of the simple Python module file shown in
Example 20-22.
Example 20-22. PP4E\Integrate\Embed\Basics\usermod.py
"""
#############################################################
C code runs Python code in this module in embedded mode.
Such a file can be changed without changing the C layer.
This is just standard Python code (C handles conversions).
Must be on the Python module search path if imported by C.
C can also run code in standard library modules like string.
#############################################################
"""
message = 'The meaning of life...'
def transform(input):
input = input.replace('life', 'Python')
return input.upper()
If you know any Python at all, you probably know that this file defines a string and a
function; the function returns whatever it is passed with string substitution and up-
percase conversions applied. It’s easy to use from Python:
.../PP4E/Integrate/Embed/Basics$ python
>>> import usermod # import a module
>>> usermod.message # fetch a string
'The meaning of life...'
>>> usermod.transform(usermod.message) # call a function
'THE MEANING OF PYTHON...'
With a little Python API wizardry, it’s not much more difficult to use this module the
same way in C.
1518 | Chapter 20: Python/C Integration

Running Simple Code Strings
Perhaps the simplest way to run Python code from C is by calling the PyRun_Simple
String API function. With it, C programs can execute Python programs represented as
C character string arrays. This call is also very limited: all code runs in the same name-
space (the module __main__), the code strings must be Python statements (not expres-
sions), and there is no direct way to communicate inputs or outputs with the Python
code run.
Still, it’s a simple place to start. Moreover, when augmented with an imported C ex-
tension module that the embedded Python code can use to communicate with the
enclosing C layer, this technique can satisfy many embedding goals. To demonstrate
the basics, the C program in Example 20-23 runs Python code to accomplish the same
results as the Python interactive session listed in the prior section.
Example 20-23. PP4E\Integrate\Embed\Basics\embed-simple.c
/*******************************************************
* simple code strings: C acts like the interactive
* prompt, code runs in __main__, no output sent to C;
*******************************************************/
#include <Python.h> /* standard API def */
main() {
printf("embed-simple\n");
Py_Initialize();
PyRun_SimpleString("import usermod"); /* load .py file */
PyRun_SimpleString("print(usermod.message)"); /* on Python path */
PyRun_SimpleString("x = usermod.message"); /* compile and run */
PyRun_SimpleString("print(usermod.transform(x))");
Py_Finalize();
}
The first thing you should notice here is that when Python is embedded, C programs
always call Py_Initialize to initialize linked-in Python libraries before using any other
API functions and normally call Py_Finalize to shut the interpreter down.
The rest of this code is straightforward—C submits hardcoded strings to Python that
are roughly what we typed interactively. In fact, we could concatenate all the Python
code strings here with \n characters between, and submit it once as a single string.
Internally, PyRun_SimpleString invokes the Python compiler and interpreter to run the
strings sent from C; as usual, the Python compiler is always available in systems that
contain Python.
Compiling and running
To build a standalone executable from this C source file, you need to link its compiled
form with the Python library file. In this chapter, “library” usually means the binary
Basic Embedding Techniques | 1519

library file that is generated when Python is compiled, not the Python source code
standard library.
Today, everything in Python that you need in C is compiled into a single Python library
file when the interpreter is built (e.g., libpython3.1.dll on Cygwin). The program’s
main function comes from your C code, and depending on your platform and the ex-
tensions installed in your Python, you may also need to link any external libraries ref-
erenced by the Python library.
Assuming no extra extension libraries are needed, Example 20-24 is a minimal makefile
for building the C program in Example 20-23 under Cygwin on Windows. Again,
makefile details vary per platform, but see Python manuals for hints. This makefile uses
the Python include-files path to find Python.h in the compile step and adds the Python
library file to the final link step to make API calls available to the C program.
Example 20-24. PP4E\Integrate\Embed\Basics\makefile.1
# a Cygwin makefile that builds a C executable that embeds
# Python, assuming no external module libs must be linked in;
# uses Python header files, links in the Python lib file;
# both may be in other dirs (e.g., /usr) in your install;
PYLIB = /usr/local/bin
PYINC = /usr/local/include/python3.1
embed-simple: embed-simple.o
gcc embed-simple.o -L$(PYLIB) -lpython3.1 -g -o embed-simple
embed-simple.o: embed-simple.c
gcc embed-simple.c -c -g -I$(PYINC)
To build a program with this file, launch make on it as usual (as before, make sure
indentation in rules is tabs in your copy of this makefile):
.../PP4E/Integrate/Embed/Basics$ make -f makefile.1
gcc embed-simple.c -c -g -I/usr/local/include/python3.1
gcc embed-simple.o -L/usr/local/bin -lpython3.1 -g -o embed-simple
Things may not be quite this simple in practice, though, at least not without some
coaxing. The makefile in Example 20-25 is the one I actually used to build all of this
section’s C programs on Cygwin.
Example 20-25. PP4E\Integrate\Embed\Basics\makefile.basics
# cygwin makefile to build all 5 basic embedding examples at once
PYLIB = /usr/local/bin
PYINC = /usr/local/include/python3.1
BASICS = embed-simple.exe \
embed-string.exe \
embed-object.exe \
embed-dict.exe \
1520 | Chapter 20: Python/C Integration

embed-bytecode.exe
all: $(BASICS)
embed%.exe: embed%.o
gcc embed$*.o -L$(PYLIB) -lpython3.1 -g -o $@
embed%.o: embed%.c
gcc embed$*.c -c -g -I$(PYINC)
clean:
rm -f *.o *.pyc $(BASICS) core
On some platforms, you may need to also link in other libraries because the Python
library file used may have been built with external dependencies enabled and required.
In fact, you may have to link in arbitrarily many more externals for your Python library,
and frankly, chasing down all the linker dependencies can be tedious. Required libraries
may vary per platform and Python install, so there isn’t a lot of advice I can offer to
make this process simple (this is C, after all). The standard C development techniques
will apply.
One hint here: if you’re going to do much embedding work and you run into external
dependency issues, on some platforms you might want to build Python on your ma-
chine from its source with all unnecessary extensions disabled in its build configuration
files (see the Python source package for details). This produces a Python library with
minimal external requirements, which may links more easily.
Once you’ve gotten the makefile to work, run it to build all of this section’s C programs
at once with Python libraries linked in:
.../PP4E/Integrate/Embed/Basics$ make -f makefile.basics clean
rm -f *.o *.pyc embed-simple.exe embed-string.exe embed-object.exe
embed-dict.exe embed-bytecode.exe core
.../PP4E/Integrate/Embed/Basics$ make -f makefile.basics
gcc embed-simple.c -c -g -I/usr/local/include/python3.1
gcc embed-simple.o -L/usr/local/bin -lpython3.1 -g -o embed-simple.exe
gcc embed-string.c -c -g -I/usr/local/include/python3.1
gcc embed-string.o -L/usr/local/bin -lpython3.1 -g -o embed-string.exe
gcc embed-object.c -c -g -I/usr/local/include/python3.1
gcc embed-object.o -L/usr/local/bin -lpython3.1 -g -o embed-object.exe
gcc embed-dict.c -c -g -I/usr/local/include/python3.1
gcc embed-dict.o -L/usr/local/bin -lpython3.1 -g -o embed-dict.exe
gcc embed-bytecode.c -c -g -I/usr/local/include/python3.1
gcc embed-bytecode.o -L/usr/local/bin -lpython3.1 -g -o embed-bytecode.exe
rm embed-dict.o embed-object.o embed-simple.o embed-bytecode.o embed-string.o
After building with either makefile, you can run the resulting C program as usual:
.../PP4E/Integrate/Embed/Basics$ ./embed-simple
embed-simple
The meaning of life...
THE MEANING OF PYTHON...
Basic Embedding Techniques | 1521

Most of this output is produced by Python print statements sent from C to the linked-
in Python library. It’s as if C has become an interactive Python programmer.
Naturally, strings of Python code run by C probably would not be hardcoded in a C
program file like this. They might instead be loaded from a text file or GUI, extracted
from HTML or XML files, fetched from a persistent database or socket, and so on.
With such external sources, the Python code strings that are run from C could be
changed arbitrarily without having to recompile the C program that runs them. They
may even be changed on site, and by end users of a system. To make the most of code
strings, though, we need to move on to more flexible API tools.
Pragmatic details: Under Python 3.1 and Cygwin on Windows, I had to
first set my PYTHONPATH to include the current directory in order to run
the embedding examples, with the shell command export PYTHON
PATH=.. I also had to use the shell command ./embed-simple to execute
the program because . was also not on my system path setting and isn’t
initially when you install Cygwin.
Your mileage may vary; but if you have trouble, try running the embed-
ded Python commands import sys and print sys.path from C to see
what Python’s path looks like, and take a look at the Python/C API
manual for more on path configuration for embedded applications.
Running Code Strings with Results and Namespaces
Example 20-26 uses the following API calls to run code strings that return expression
results back to C:
Py_Initialize
Initializes linked-in Python libraries as before
PyImport_ImportModule
Imports a Python module and returns a pointer to it
PyModule_GetDict
Fetches a module’s attribute dictionary object
PyRun_String
Runs a string of code in explicit namespaces
PyObject_SetAttrString
Assigns an object attribute by namestring
PyArg_Parse
Converts a Python return value object to C form
The import calls are used to fetch the namespace of the usermod module listed in Ex-
ample 20-22 so that code strings can be run there directly and will have access to names
defined in that module without qualifications. Py_Import_ImportModule is like a Python
import statement, but the imported module object is returned to C; it is not assigned
1522 | Chapter 20: Python/C Integration

to a Python variable name. As a result, it’s probably more similar to the Python
__import__ built-in function.
The PyRun_String call is the one that actually runs code here, though. It takes a code
string, a parser mode flag, and dictionary object pointers to serve as the global and local
namespaces for running the code string. The mode flag can be Py_eval_input to run an
expression or Py_file_input to run a statement; when running an expression, the result
of evaluating the expression is returned from this call (it comes back as a PyObject*
object pointer). The two namespace dictionary pointer arguments allow you to distin-
guish global and local scopes, but they are typically passed the same dictionary such
that code runs in a single namespace.
Example 20-26. PP4E\Integrate\Embed\Basics\embed-string.c
/* code-strings with results and namespaces */
#include <Python.h>
main() {
char *cstr;
PyObject *pstr, *pmod, *pdict;
printf("embed-string\n");
Py_Initialize();
/* get usermod.message */
pmod = PyImport_ImportModule("usermod");
pdict = PyModule_GetDict(pmod);
pstr = PyRun_String("message", Py_eval_input, pdict, pdict);
/* convert to C */
PyArg_Parse(pstr, "s", &cstr);
printf("%s\n", cstr);
/* assign usermod.X */
PyObject_SetAttrString(pmod, "X", pstr);
/* print usermod.transform(X) */
(void) PyRun_String("print(transform(X))", Py_file_input, pdict, pdict);
Py_DECREF(pmod);
Py_DECREF(pstr);
Py_Finalize();
}
When compiled and run, this file produces the same result as its predecessor:
.../PP4E/Integrate/Embed/Basics$ ./embed-string
embed-string
The meaning of life...
THE MEANING OF PYTHON...
However, very different work goes into producing this output. This time, C fetches,
converts, and prints the value of the Python module’s message attribute directly by
Basic Embedding Techniques | 1523

running a string expression and assigning a global variable (X) within the module’s
namespace to serve as input for a Python print statement string.
Because the string execution call in this version lets you specify namespaces, you can
better partition the embedded code your system runs—each grouping can have a dis-
tinct namespace to avoid overwriting other groups’ variables. And because this call
returns a result, you can better communicate with the embedded code; expression
results are outputs, and assignments to globals in the namespace in which code runs
can serve as inputs.
Before we move on, I need to explain three coding issues here. First, this program also
decrements the reference count on objects passed to it from Python, using the
Py_DECREF call described in Python’s C API manuals. These calls are not strictly needed
here (the objects’ space is reclaimed when the programs exits anyhow), but they dem-
onstrate how embedding interfaces must manage reference counts when Python passes
object ownership to C. If this was a function called from a larger system, for instance,
you would generally want to decrement the count to allow Python to reclaim the
objects.
Second, in a realistic program, you should generally test the return values of all the API
calls in this program immediately to detect errors (e.g., import failure). Error tests are
omitted in this section’s example to keep the code simple, but they should be included
in your programs to make them more robust.
And third, there is a related function that lets you run entire files of code, but it is not
demonstrated in this chapter: PyRun_File. Because you can always load a file’s text and
run it as a single code string with PyRun_String, the PyRun_File call’s main advantage
is to avoid allocating memory for file content. In such multiline code strings, the \n
character terminates lines and indentation group blocks as usual.
Calling Python Objects
The last two sections dealt with running strings of code, but it’s easy for C programs
to deal in terms of Python objects, too. Example 20-27 accomplishes the same task as
Examples 20-23 and 20-26, but it uses other API tools to interact with objects in the
Python module directly:
PyImport_ImportModule
Imports the module from C as before
PyObject_GetAttrString
Fetches an object’s attribute value by name
PyEval_CallObject
Calls a Python function (or class or method)
PyArg_Parse
Converts Python objects to C values
1524 | Chapter 20: Python/C Integration

Py_BuildValue
Converts C values to Python objects
We used both of the data conversion functions earlier in this chapter in extension
modules. The PyEval_CallObject call in this version of the example is the key point
here: it runs the imported function with a tuple of arguments, much like the Python
func(*args) call syntax. The Python function’s return value comes back to C as a
PyObject*, a generic Python object pointer.
Example 20-27. PP4E\Integrate\Embed\Basics\embed-object.c
/* fetch and call objects in modules */
#include <Python.h>
main() {
char *cstr;
PyObject *pstr, *pmod, *pfunc, *pargs;
printf("embed-object\n");
Py_Initialize();
/* get usermod.message */
pmod = PyImport_ImportModule("usermod");
pstr = PyObject_GetAttrString(pmod, "message");
/* convert string to C */
PyArg_Parse(pstr, "s", &cstr);
printf("%s\n", cstr);
Py_DECREF(pstr);
/* call usermod.transform(usermod.message) */
pfunc = PyObject_GetAttrString(pmod, "transform");
pargs = Py_BuildValue("(s)", cstr);
pstr = PyEval_CallObject(pfunc, pargs);
PyArg_Parse(pstr, "s", &cstr);
printf("%s\n", cstr);
/* free owned objects */
Py_DECREF(pmod);
Py_DECREF(pstr);
Py_DECREF(pfunc); /* not really needed in main() */
Py_DECREF(pargs); /* since all memory goes away */
Py_Finalize();
}
When compiled and run, the result is the same again:
.../PP4E/Integrate/Embed/Basics$ ./embed-object
embed-object
The meaning of life...
THE MEANING OF PYTHON...
However, this output is generated by C this time—first, by fetching the Python mod-
ule’s message attribute value, and then by fetching and calling the module’s transform
Basic Embedding Techniques | 1525

function object directly and printing its return value that is sent back to C. Input to the
transform function is a function argument here, not a preset global variable. Notice
that message is fetched as a module attribute this time, instead of by running its name
as a code string; as this shows, there is often more than one way to accomplish the same
goals with different API calls.
Running functions in modules like this is a simple way to structure embedding; code
in the module file can be changed arbitrarily without having to recompile the C program
that runs it. It also provides a direct communication model: inputs and outputs to
Python code can take the form of function arguments and return values.
Running Strings in Dictionaries
When we used PyRun_String earlier to run expressions with results, code was executed
in the namespace of an existing Python module. Sometimes, though, it’s more con-
venient to create a brand-new namespace for running code strings that is independent
of any existing module files. The C file in Example 20-28 shows how; the new name-
space is created as a new Python dictionary object, and a handful of new API calls are
employed in the process:
PyDict_New
Makes a new empty dictionary object
PyDict_SetItemString
Assigns to a dictionary’s key
PyDict_GetItemString
Fetches (indexes) a dictionary value by key
PyRun_String
Runs a code string in namespaces, as before
PyEval_GetBuiltins
Gets the built-in scope’s module
The main trick here is the new dictionary. Inputs and outputs for the embedded code
strings are mapped to this dictionary by passing it as the code’s namespace dictionaries
in the PyRun_String call. The net effect is that the C program in Example 20-28 works
just like this Python code:
>>> d = {}
>>> d['Y'] = 2
>>> exec('X = 99', d, d)
>>> exec('X = X + Y', d, d)
>>> print(d['X'])
101
But here, each Python operation is replaced by a C API call.
1526 | Chapter 20: Python/C Integration

Example 20-28. PP4E\Integrate\Embed\Basics\embed-dict.c
/* make a new dictionary for code string namespace */
#include <Python.h>
main() {
int cval;
PyObject *pdict, *pval;
printf("embed-dict\n");
Py_Initialize();
/* make a new namespace */
pdict = PyDict_New();
PyDict_SetItemString(pdict, "__builtins__", PyEval_GetBuiltins());
PyDict_SetItemString(pdict, "Y", PyLong_FromLong(2)); /* dict['Y'] = 2 */
PyRun_String("X = 99", Py_file_input, pdict, pdict); /* run statements */
PyRun_String("X = X+Y", Py_file_input, pdict, pdict); /* same X and Y */
pval = PyDict_GetItemString(pdict, "X"); /* fetch dict['X'] */
PyArg_Parse(pval, "i", &cval); /* convert to C */
printf("%d\n", cval); /* result=101 */
Py_DECREF(pdict);
Py_Finalize();
}
When compiled and run, this C program creates this sort of output, tailored for this
use case:
.../PP4E/Integrate/Embed/Basics$ ./embed-dict
embed-dict
101
The output is different this time: it reflects the value of the Python variable X assigned
by the embedded Python code strings and fetched by C. In general, C can fetch module
attributes either by calling PyObject_GetAttrString with the module or by using
PyDict_GetItemString to index the module’s attribute dictionary (expression strings
work, too, but they are less direct). Here, there is no module at all, so dictionary in-
dexing is used to access the code’s namespace in C.
Besides allowing you to partition code string namespaces independent of any Python
module files on the underlying system, this scheme provides a natural communication
mechanism. Values that are stored in the new dictionary before code is run serve as
inputs, and names assigned by the embedded code can later be fetched out of the dic-
tionary to serve as code outputs. For instance, the variable Y in the second string run
refers to a name set to 2 by C; X is assigned by the Python code and fetched later by C
code as the printed result.
Basic Embedding Techniques | 1527

There is one subtlety in this embedding mode: dictionaries that serve as namespaces
for running code are generally required to have a __builtins__ link to the built-in scope
searched last for name lookups, set with code of this form:
PyDict_SetItemString(pdict, "__builtins__", PyEval_GetBuiltins());
This is esoteric, and it is normally handled by Python internally for modules and built-
ins like the exec function. For raw dictionaries used as namespaces, though, we are
responsible for setting the link manually if we expect to reference built-in names. This
still holds true in Python 3.X.
Precompiling Strings to Bytecode
Finally, when you call Python function objects from C, you are actually running the
already compiled bytecode associated with the object (e.g., a function body), normally
created when the enclosing module is imported. When running strings, Python must
compile the string before running it. Because compilation is a slow process, this can be
a substantial overhead if you run a code string more than once. Instead, precompile
the string to a bytecode object to be run later, using the API calls illustrated in
Example 20-29:
Py_CompileString
Compiles a string of code and returns a bytecode object
PyEval_EvalCode
Runs a compiled bytecode object
The first of these takes the mode flag that is normally passed to PyRun_String, as well
as a second string argument that is used only in error messages. The second takes two
namespace dictionaries. These two API calls are used in Example 20-29 to compile and
execute three strings of Python code in turn.
Example 20-29. PP4E\Integrate\Embed\Basics\embed-bytecode.c
/* precompile code strings to bytecode objects */
#include <Python.h>
#include <compile.h>
#include <eval.h>
main() {
int i;
char *cval;
PyObject *pcode1, *pcode2, *pcode3, *presult, *pdict;
char *codestr1, *codestr2, *codestr3;
printf("embed-bytecode\n");
Py_Initialize();
codestr1 = "import usermod\nprint(usermod.message)"; /* statements */
codestr2 = "usermod.transform(usermod.message)"; /* expression */
codestr3 = "print('%d:%d' % (X, X ** 2), end=' ')"; /* use input X */
1528 | Chapter 20: Python/C Integration

/* make new namespace dictionary */
pdict = PyDict_New();
if (pdict == NULL) return −1;
PyDict_SetItemString(pdict, "__builtins__", PyEval_GetBuiltins());
/* precompile strings of code to bytecode objects */
pcode1 = Py_CompileString(codestr1, "<embed>", Py_file_input);
pcode2 = Py_CompileString(codestr2, "<embed>", Py_eval_input);
pcode3 = Py_CompileString(codestr3, "<embed>", Py_file_input);
/* run compiled bytecode in namespace dict */
if (pcode1 && pcode2 && pcode3) {
(void) PyEval_EvalCode((PyCodeObject *)pcode1, pdict, pdict);
presult = PyEval_EvalCode((PyCodeObject *)pcode2, pdict, pdict);
PyArg_Parse(presult, "s", &cval);
printf("%s\n", cval);
Py_DECREF(presult);
/* rerun code object repeatedly */
for (i = 0; i <= 10; i++) {
PyDict_SetItemString(pdict, "X", PyLong_FromLong(i));
(void) PyEval_EvalCode((PyCodeObject *)pcode3, pdict, pdict);
}
printf("\n");
}
/* free referenced objects */
Py_XDECREF(pdict);
Py_XDECREF(pcode1);
Py_XDECREF(pcode2);
Py_XDECREF(pcode3);
Py_Finalize();
}
This program combines a variety of techniques that we’ve already seen. The namespace
in which the compiled code strings run, for instance, is a newly created dictionary (not
an existing module object), and inputs for code strings are passed as preset variables
in the namespace. When built and executed, the first part of the output is similar to
previous examples in this section, but the last line represents running the same pre-
compiled code string 11 times:
.../PP4E/Integrate/Embed/Basics$ embed-bytecode
embed-bytecode
The meaning of life...
THE MEANING OF PYTHON...
0:0 1:1 2:4 3:9 4:16 5:25 6:36 7:49 8:64 9:81 10:100
If your system executes Python code strings multiple times, it is a major speedup to
precompile to bytecode in this fashion. This step is not required in other contexts that
invoke callable Python objects—including the common embedding use case presented
in the next section.
Basic Embedding Techniques | 1529

Registering Callback Handler Objects
In the embedding examples thus far, C has been running and calling Python code from
a standard main program flow of control. Things are not always so simple, though; in
some cases, programs are modeled on an event-driven architecture in which code is
executed only in response to some sort of event. The event might be an end user clicking
a button in a GUI, the operating system delivering a signal, or simply software running
an action associated with an entry in a table.
In any event (pun accidental), program code in such an architecture is typically struc-
tured as callback handlers—units of code invoked by event-processing dispatch logic.
It’s easy to use embedded Python code to implement callback handlers in such a system;
in fact, the event-processing layer can simply use the embedded-call API tools we saw
earlier in this chapter to run Python handlers.
The only new trick in this model is how to make the C layer know what code should
be run for each event. Handlers must somehow be registered to C to associate them
with future events. In general, there is a wide variety of ways to achieve this code/event
association. For instance, C programs can:
• Fetch and call functions by event name from one or more module files
• Fetch and run code strings associated with event names in a database
• Extract and run code associated with event tags in HTML or XML
• Run Python code that calls back to C to tell it what should be run
And so on. Really, any place you can associate objects or strings with identifiers is a
potential callback registration mechanism. Some of these techniques have advantages
all their own. For instance, callbacks fetched from module files support dynamic re-
loading (imp.reload works on modules but does not update objects held directly). And
none of the first three schemes require users to code special Python programs that do
nothing but register handlers to be run later.
It is perhaps more common, though, to register callback handlers with the last
approach—letting Python code register handlers with C by calling back to C through
extension interfaces. Although this scheme is not without trade-offs, it can provide a
natural and direct model in scenarios where callbacks are associated with a large num-
ber of objects.
For instance, consider a GUI constructed by building a tree of widget objects in Python
scripts. If each widget object in the tree can have an associated event handler, it may
be easier to register handlers by simply calling methods of widgets in the tree. Associ-
ating handlers with widget objects in a separate structure such as a module file or an
XML file requires extra cross-reference work to keep the handlers in sync with the tree.
In fact, if you’re looking for a more realistic example of Python callback handlers,
consider the tkinter GUI system we’ve used extensively in this book. tkinter uses both
1530 | Chapter 20: Python/C Integration

extending and embedding. Its extending interface (widget objects) is used to register
Python callback handlers, which are later run with embedding interfaces in response to
GUI events. You can study tkinter’s implementation in the Python source distribution
for more details; its Tk library interface logic makes it a somewhat challenging read,
but the basic model it employs is straightforward.
Registration Implementation
This section’s C and Python files demonstrate the coding techniques used to implement
explicitly registered callback handlers. First, the C file in Example 20-30 implements
interfaces for registering Python handlers, as well as code to run those handlers in
response to later events:
Event router
The Route_Event function responds to an event by calling a Python function object
previously passed from Python to C.
Callback registration
The Register_Handler function saves a passed-in Python function object pointer
in a C global variable. Python scripts call Register_Handler through a simple
cregister C extension module created by this file.
Event trigger
To simulate real-world events, the Trigger_Event function can be called from
Python through the generated C module to trigger an event.
In other words, this example uses both the embedding and the extending interfaces
we’ve already met to register and invoke Python event handler code. Study Exam-
ple 20-30 for more on its operation.
Example 20-30. PP4E\Integrate\Embed\Regist\cregister.c
#include <Python.h>
#include <stdlib.h>
/***********************************************/
/* 1) code to route events to Python object */
/* note that we could run strings here instead */
/***********************************************/
static PyObject *Handler = NULL; /* keep Python object in C */
void Route_Event(char *label, int count)
{
char *cres;
PyObject *args, *pres;
/* call Python handler */
args = Py_BuildValue("(si)", label, count); /* make arg-list */
pres = PyEval_CallObject(Handler, args); /* apply: run a call */
Py_DECREF(args); /* add error checks */
Registering Callback Handler Objects | 1531

if (pres != NULL) {
/* use and decref handler result */
PyArg_Parse(pres, "s", &cres);
printf("%s\n", cres);
Py_DECREF(pres);
}
}
/*****************************************************/
/* 2) python extension module to register handlers */
/* python imports this module to set handler objects */
/*****************************************************/
static PyObject *
Register_Handler(PyObject *self, PyObject *args)
{
/* save Python callable object */
Py_XDECREF(Handler); /* called before? */
PyArg_Parse(args, "(O)", &Handler); /* one argument */
Py_XINCREF(Handler); /* add a reference */
Py_INCREF(Py_None); /* return 'None': success */
return Py_None;
}
static PyObject *
Trigger_Event(PyObject *self, PyObject *args)
{
/* let Python simulate event caught by C */
static count = 0;
Route_Event("spam", count++);
Py_INCREF(Py_None);
return Py_None;
}
static PyMethodDef cregister_methods[] = {
{"setHandler", Register_Handler, METH_VARARGS, ""}, /* name, &func,... */
{"triggerEvent", Trigger_Event, METH_VARARGS, ""},
{NULL, NULL, 0, NULL} /* end of table */
};
static struct PyModuleDef cregistermodule = {
PyModuleDef_HEAD_INIT,
"cregister", /* name of module */
"cregister mod", /* module documentation, may be NULL */
−1, /* size of per-interpreter module state, −1=in global vars */
cregister_methods /* link to methods table */
};
PyMODINIT_FUNC
PyInit_cregister() /* called on first import */
{
return PyModule_Create(&cregistermodule);
}
1532 | Chapter 20: Python/C Integration

Ultimately, this C file is an extension module for Python, not a standalone C program
that embeds Python (though C could just as well be on top). To compile it into a
dynamically loaded module file, run the makefile in Example 20-31 on Cygwin (and
use something similar on other platforms). As we learned earlier in this chapter, the
resulting cregister.dll file will be loaded when first imported by a Python script if it is
placed in a directory on Python’s module search path (e.g., in . or PYTHONPATH settings).
Example 20-31. PP4E\Integrate\Embed\Regist\makefile.regist
######################################################################
# Cygwin makefile that builds cregister.dll. a dynamically loaded
# C extension module (shareable), which is imported by register.py
######################################################################
PYLIB = /usr/local/bin
PYINC = /usr/local/include/python3.1
CMODS = cregister.dll
all: $(CMODS)
cregister.dll: cregister.c
gcc cregister.c -g -I$(PYINC) -shared -L$(PYLIB) -lpython3.1 -o $@
clean:
rm -f *.pyc $(CMODS)
Now that we have a C extension module set to register and dispatch Python handlers,
all we need are some Python handlers. The Python module shown in Example 20-32
defines two callback handler functions and imports the C extension module to register
handlers and trigger events.
Example 20-32. PP4E\Integrate\Embed\Regist\register.py
"""
#########################################################################
in Python, register for and handle event callbacks from the C language;
compile and link the C code, and launch this with 'python register.py'
#########################################################################
"""
####################################
# C calls these Python functions;
# handle an event, return a result
####################################
def callback1(label, count):
return 'callback1 => %s number %i' % (label, count)
def callback2(label, count):
return 'callback2 => ' + label * count
Registering Callback Handler Objects | 1533

#######################################
# Python calls a C extension module
# to register handlers, trigger events
#######################################
import cregister
print('\nTest1:')
cregister.setHandler(callback1) # register callback function
for i in range(3):
cregister.triggerEvent() # simulate events caught by C layer
print('\nTest2:')
cregister.setHandler(callback2)
for i in range(3):
cregister.triggerEvent() # routes these events to callback2
That’s it—the Python/C callback integration is set to go. To kick off the system, run
the Python script; it registers one handler function, forces three events to be triggered,
and then changes the event handler and does it again:
.../PP4E/Integrate/Embed/Regist$ make -f makefile.regist
gcc cregister.c -g -I/usr/local/include/python3.1 -shared -L/usr/local/bin
-lpython3.1 -o cregister.dll
.../PP4E/Integrate/Embed/Regist$ python register.py
Test1:
callback1 => spam number 0
callback1 => spam number 1
callback1 => spam number 2
Test2:
callback2 => spamspamspam
callback2 => spamspamspamspam
callback2 => spamspamspamspamspam
This output is printed by the C event router function, but its content is the return values
of the handler functions in the Python module. Actually, something pretty wild is going
on under the hood. When Python forces an event to trigger, control flows between
languages like this:
1. From Python to the C event router function
2. From the C event router function to the Python handler function
3. Back to the C event router function (where the output is printed)
4. And finally back to the Python script
That is, we jump from Python to C to Python and back again. Along the way, control
passes through both extending and embedding interfaces. When the Python callback
handler is running, two Python levels are active, and one C level in the middle. Luckily,
this just works; Python’s API is reentrant, so you don’t need to be concerned about
1534 | Chapter 20: Python/C Integration

having multiple Python interpreter levels active at the same time. Each level runs dif-
ferent code and operates independently.
Trace through this example’s output and code for more illumination. Here, we’re
moving on to the last quick example we have time and space to explore—in the name
of symmetry, using Python classes from C.
Using Python Classes in C
Earlier in this chapter, we learned how to use C++ classes in Python by wrapping them
with SWIG. But what about going the other way—using Python classes from other
languages? It turns out that this is really just a matter of applying interfaces already
shown.
Recall that Python scripts generate class instance objects by calling class objects as
though they were functions. To do this from C (or C++), simply follow the same steps:
import a class from a module, build an arguments tuple, and call it to generate an
instance using the same C API tools you use to call Python functions. Once you’ve got
an instance, you can fetch its attributes and methods with the same tools you use to
fetch globals out of a module. Callables and attributes work the same everywhere they
live.
To illustrate how this works in practice, Example 20-33 defines a simple Python class
in a module that we can utilize from C.
Example 20-33. PP4E\Integrate\Embed\Pyclasss\module.py
# call this class from C to make objects
class klass:
def method(self, x, y):
return "brave %s %s" % (x, y) # run me from C
This is nearly as simple as it gets, but it’s enough to illustrate the basics. As usual, make
sure that this module is on your Python search path (e.g., in the current directory, or
one listed on your PYTHONPATH setting), or else the import call to access it from C will
fail, just as it would in a Python script. As you surely know if you’ve gotten this far in
this book, you can make always use of this Python class from a Python program as
follows:
...\PP4E\Integrate\Embed\Pyclass$ python
>>> import module # import the file
>>> object = module.klass() # make class instance
>>> result = object.method('sir', 'robin') # call class method
>>> print(result)
brave sir robin
Using Python Classes in C | 1535

This is fairly easy stuff in Python. You can do all of these operations in C, too, but it
takes a bit more code. The C file in Example 20-34 implements these steps by arranging
calls to the appropriate Python API tools.
Example 20-34. PP4E\Integrate\Embed\Pyclass\objects.c
#include <Python.h>
#include <stdio.h>
main() {
/* run objects with low-level calls */
char *arg1="sir", *arg2="robin", *cstr;
PyObject *pmod, *pclass, *pargs, *pinst, *pmeth, *pres;
/* instance = module.klass() */
Py_Initialize();
pmod = PyImport_ImportModule("module"); /* fetch module */
pclass = PyObject_GetAttrString(pmod, "klass"); /* fetch module.class */
Py_DECREF(pmod);
pargs = Py_BuildValue("()");
pinst = PyEval_CallObject(pclass, pargs); /* call class() */
Py_DECREF(pclass);
Py_DECREF(pargs);
/* result = instance.method(x,y) */
pmeth = PyObject_GetAttrString(pinst, "method"); /* fetch bound method */
Py_DECREF(pinst);
pargs = Py_BuildValue("(ss)", arg1, arg2); /* convert to Python */
pres = PyEval_CallObject(pmeth, pargs); /* call method(x,y) */
Py_DECREF(pmeth);
Py_DECREF(pargs);
PyArg_Parse(pres, "s", &cstr); /* convert to C */
printf("%s\n", cstr);
Py_DECREF(pres);
}
Step through this source file for more details; it’s mostly a matter of figuring out how
you would accomplish the task in Python, and then calling equivalent C functions in
the Python API. To build this source into a C executable program, run the makefile in
this file’s directory in the book examples package (it’s analogous to makefiles we’ve
already seen, so we’ll omit it here). After compiling, run it as you would any other C
program:
.../PP4E/Integrate/Embed/Pyclass$ ./objects
brave sir robin
This output might seem anticlimactic, but it actually reflects the return values sent back
to C by the Python class method in file module.py. C did a lot of work to get this little
string—it imported the module, fetched the class, made an instance, and fetched and
called the instance method with a tuple of arguments, performing data conversions and
1536 | Chapter 20: Python/C Integration

reference count management every step of the way. In return for all the work, C gets
to use the techniques shown in this file to reuse any Python class.
Of course, this example could be more complex in practice. As mentioned earlier, you
generally need to check the return value of every Python API call to make sure it didn’t
fail. The module import call in this C code, for instance, can fail easily if the module
isn’t on the search path; if you don’t trap the NULL pointer result, your program will
almost certainly crash when it tries to use the pointer (at least eventually). Exam-
ple 20-35 is a recoding of Example 20-34 with full error-checking; it’s big, but it’s
robust.
Example 20-35. PP4E\Integrate\Embed\Pyclasss\objects-err.c
#include <Python.h>
#include <stdio.h>
#define error(msg) do { printf("%s\n", msg); exit(1); } while (1)
main() {
/* run objects with low-level calls and full error checking */
char *arg1="sir", *arg2="robin", *cstr;
PyObject *pmod, *pclass, *pargs, *pinst, *pmeth, *pres;
/* instance = module.klass() */
Py_Initialize();
pmod = PyImport_ImportModule("module"); /* fetch module */
if (pmod == NULL)
error("Can't load module");
pclass = PyObject_GetAttrString(pmod, "klass"); /* fetch module.class */
Py_DECREF(pmod);
if (pclass == NULL)
error("Can't get module.klass");
pargs = Py_BuildValue("()");
if (pargs == NULL) {
Py_DECREF(pclass);
error("Can't build arguments list");
}
pinst = PyEval_CallObject(pclass, pargs); /* call class() */
Py_DECREF(pclass);
Py_DECREF(pargs);
if (pinst == NULL)
error("Error calling module.klass()");
/* result = instance.method(x,y) */
pmeth = PyObject_GetAttrString(pinst, "method"); /* fetch bound method */
Py_DECREF(pinst);
if (pmeth == NULL)
error("Can't fetch klass.method");
pargs = Py_BuildValue("(ss)", arg1, arg2); /* convert to Python */
if (pargs == NULL) {
Py_DECREF(pmeth);
error("Can't build arguments list");
Using Python Classes in C | 1537

}
pres = PyEval_CallObject(pmeth, pargs); /* call method(x,y) */
Py_DECREF(pmeth);
Py_DECREF(pargs);
if (pres == NULL)
error("Error calling klass.method");
if (!PyArg_Parse(pres, "s", &cstr)) /* convert to C */
error("Can't convert klass.method result");
printf("%s\n", cstr);
Py_DECREF(pres);
}
These 53 lines of C code (not counting its makefile) achieve the same results as the
4 lines of interactive Python we ran earlier—not exactly a stellar result from a developer
productivity perspective! Nevertheless, the model it uses allows C and C++ to leverage
Python in the same way that Python can employ C and C++. As I’ll discuss in this
book’s conclusion in a moment, such combinations can often be more powerful than
their individual parts.
Other Integration Topics
In this chapter, the term integration has largely meant mixing Python with components
written in C or C++ (or other C-compatible languages) in extending and embedding
modes. But from a broader perspective, integration also includes any other technology
that lets us mix Python components into larger, heterogeneous systems. To wrap up
this chapter, this last section briefly summarizes a handful of commonly used integra-
tion technologies beyond the C API tools we’ve explored.
Jython: Java integration
We first met Jython in Chapter 12 and it was discussed earlier in this chapter in
the context of extending. Really, though, Jython is a broader integration platform.
Jython compiles Python code to Java bytecode for execution on the JVM. The
resulting Java-based system directly supports two kinds of integration:
•Extending: Jython uses Java’s reflection API to allow Python programs to call
out to Java class libraries automatically. The Java reflection API provides Java
type information at runtime and serves the same purpose as the glue code we’ve
generated to plug C libraries into Python in this part of the book. In Jython,
however, this runtime type information allows largely automated resolution of
Java calls in Python scripts—no glue code has to be written or generated.
•Embedding: Jython also provides a Java PythonInterpreter class API that allows
Java programs to run Python code in a namespace, much like the C API tools
we’ve used to run Python code strings from C programs. In addition, because
Jython implements all Python objects as instances of a Java PyObject class, it is
straightforward for the Java layer that encloses embedded Python code to proc-
ess Python objects.
1538 | Chapter 20: Python/C Integration

In other words, Jython allows Python to be both extended and embedded in Java,
much like the C integration strategies we’ve seen in this part of the book. By adding
a simpler scripting language to Java applications, Jython serves many of the same
roles as the C integration tools we’ve studied.
On the downside, Jython tends to lag behind CPython developments, and its re-
liance on Java class libraries and execution environments introduces Java depend-
encies that may be a factor in some Python-oriented development scenarios. Nev-
ertheless, Jython provides a remarkably seamless integration model and serves as
an ideal scripting language for Java applications. For more on Jython, check it out
online at http://www.jython.org and search the Web at large.
IronPython: C#/.NET integration
Also mentioned earlier, IronPython does for C#/.NET what Jython does for Java
(and in fact shares a common inventor)—it provides seamless integration between
Python code and software components written for the .NET framework, as well as
its Mono implementation on Linux. Like Jython, IronPython compiles Python
source code to the .NET system’s bytecode format and runs programs on the sys-
tem’s runtime engine. As a result, integration with external components is similarly
seamless. Also like Jython, the net effect is to turn Python into an easy-to-use
scripting language for C#/.NET-based applications and a general-purpose rapid
development tool that complements C#. For more details on IronPython, visit
http://www.ironpython.org or your friendly neighborhood search engine.
COM integration on Windows
COM defines a standard and language-neutral object model with which compo-
nents written in a variety of programming languages may integrate and commu-
nicate. Python’s PyWin32 Windows extension package allows Python programs
to implement both server and client in the COM interface model. As such, it pro-
vides an automated way to integrate Python programs with programs written in
other COM-aware languages such as Visual Basic. Python scripts can also use COM
calls to script Microsoft applications such as Word and Excel, because these sys-
tems register COM object interfaces. On the other hand, COM implies a level of
dispatch indirection overhead and is not as platform agnostic as other approaches
listed here. For more information on COM support and other Windows exten-
sions, see the Web and refer to O’Reilly’s Python Programming on Win32, by Mark
Hammond and Andy Robinson.
CORBA integration
There is also much open source support for using Python in the context of a
CORBA-based application. CORBA stands for the Common Object Request
Broker; it’s a language-neutral way to distribute systems among communicating
components, which speak through an object model architecture. As such, it rep-
resents another way to integrate Python components into a larger system. Python’s
CORBA support includes public domain systems such OmniORB. Like COM,
Other Integration Topics | 1539

CORBA is a large system—too large for us to even scratch the surface in this text.
For more details, search the Web.
Other languages
As we discussed at the end of our extending coverage, you’ll also find direct support
for mixing Python with other languages, including FORTRAN, Objective-C, and
others. Many support both extending (calling out to the integrated languages) as
well as embedding (handling calls from the integrated language). See the prior
discussion and the Web for more details. Some observers might also include the
emerging pyjamas system in this category—by compiling Python code to JavaScript
code, it allows Python programs to access AJAX and web browser–based APIs in
the context of the Rich Internet Applications discussed earlier in this book; see
Chapters 7, 12, and 16.
Network-based integration protocols
Finally, there is also support in the Python world for Internet-based data transport
protocols, including SOAP, and XML-RPC. By routing calls across networks such
systems support distributed architectures, and give rise to the notion of web serv-
ices. XML-RPC is supported by a standard library module in Python, but search
the Web for more details on these protocols.
As you can see, there are many options in the integration domain. Perhaps the best
parting advice I can give you is simply that different tools are meant for different tasks.
C extension modules and types are ideal at optimizing systems and integrating libraries,
but frameworks offer other ways to integrate components—Jython and IronPython for
using Java and .NETs, COM for reusing and publishing objects on Windows, XML-
RPC for distributed services, and so on. As always, the best tools for your programs
will almost certainly be the best tools for your programs.
1540 | Chapter 20: Python/C Integration

PART VI
The End
Like the first part of this book, this last part is a single chapter, this time a short one to
provide some parting context:
Chapter 21
This chapter discusses Python’s roles and scope. It explores some of the broader
ideas of Python’s common roles, with the added perspective afforded by the rest
of the book. Much of this chapter is philosophical in nature, but it underscores
some of the main reasons for using a tool like Python.
Note that there are no reference appendixes here. For additional reference resources,
consult the Python standard manuals available online or commercially published ref-
erence books, such as O’Reilly’s Python Pocket Reference and others you can find in
the usual places on the Web.
For additional Python core language material, see O’Reilly’s Learning Python. Among
other things, the Fourth Edition of that book also explores more advanced API con-
struction tools such as properties, descriptors, decorators, and metaclasses, which we
skipped here because they fall into the core language category. That book also explores
Unicode text in more depth than we did here, since it’s an inherent part of Python 3.
And for help on other Python-related topics, see the resources available at Python’s
official website, http://www.python.org, or search the Web using your favorite search
engine.

CHAPTER 21
Conclusion: Python and the
Development Cycle
Foreword for the Fourth Edition
I wrote the following conclusion in 1995 for the first edition of this book, at a time
when Python’s integration role as a front-end scripting language was viewed as more
important than it often is today. Since then, Python has emerged as one of the top four
or five most widely used programming languages in the world. As it has grown in pop-
ularity, its focus on code quality and readability, and their related impact on developer
productivity, seems to have become the more dominant factor behind Python’s success.
In fact, most Python programmers today write pure Python code, without ever having
to know or care about external libraries. Typically, a small handful of developers inte-
grate external libraries for the majority to leverage in their Python code. While inte-
gration still matters, Python is largely about quality and productivity to most people
today (see “The Python “Secret Handshake”” on page 70 for more on Python contem-
porary philosophy).
Because of this shift, some of this conclusion may have grown a bit narrow. In deference,
I’ve removed all the “postscript” updates that appeared here in prior editions. This
edition retains the conclusion itself, though, partly because of its historical value, partly
because it still reflects the ideals that propelled Python into the limelight in the first
place, and partly because of its continued relevance to Python users who still integrate
hybrid systems (well, that, plus the jokes).
At the end of the day, many of us have gotten off this chapter’s proverbial island by
now, thanks to the rise of tools such as Python. Indeed, over the last 15 years Python
has realized most of its original aspirations laid out here. The choice before us today
seems to be between keeping the boat from growing too heavy or learning to swim well.
1543

“That’s the End of the Book, Now Here’s the Meaning of Life”
Well, the meaning of Python, anyway. In the Preface of this book, I promised that we’d
return to the issue of Python’s roles after seeing how it is used in practice. So in closing,
here are some subjective comments on the broader implications of the language. Most
of this conclusion remains unchanged since the first edition of this book was penned
in 1995, but so are the factors that pushed Python into the development spotlight.
As I mentioned in the Preface sidebar, Python’s focus is on concepts such as quality,
productivity, portability, and integration. I hope that this book has demonstrated some
of the benefits of that focus in action. Along the way, we’ve seen Python applied to
systems programming, GUI development, Internet scripting, database and text pro-
cessing, and more. And we’ve witnessed firsthand the application of the language and
its libraries to realistically scaled software development tasks, which go above and be-
yond what many classify as “scripting.” I hope you’ve also had some fun; that, too, is
part of the Python story.
In this conclusion, I wish now to return to the forest after our long walk among the
trees—to revisit Python’s roles in more concrete terms. In particular, Python’s role as
a prototyping tool can profoundly affect the development cycle.
“Something’s Wrong with the Way We Program Computers”
This has to be one of the most overused lines in the business. Still, given time to ponder
the big picture, most of us would probably agree that we’re not quite there yet. Over
the last few decades, the computer software industry has made significant progress on
streamlining the development task (anyone remember dropping punch cards?). But at
the same time, the cost of developing potentially useful computer applications is often
still high enough to make them impractical.
Moreover, systems built using modern tools and paradigms are often delivered far be-
hind schedule. Software engineering remains largely defiant of the sort of quantitative
measurements employed in other engineering fields. In the software world, it’s not
uncommon to take one’s best time estimate for a new project and multiply by a factor
of two or three to account for unforeseen overheads in the development task. This
situation is clearly unsatisfactory for software managers, developers, and end users.
The “Gilligan Factor”
It has been suggested, tongue in cheek, that if there were a patron saint of software
engineers, the honor would fall on none other than Gilligan, the character in the per-
vasively popular American television show of the 1960s, Gilligan’s Island. Gilligan is
the enigmatic, sneaker-clad first mate, widely held to be responsible for the shipwreck
that stranded the now-residents of the island.
1544 | Chapter 21: Conclusion: Python and the Development Cycle

To be sure, Gilligan’s situation seems oddly familiar. Stranded on a desert island with
only the most meager of modern technological comforts, Gilligan and his cohorts must
resort to scratching out a living using the resources naturally available. In episode after
episode, we observe the Professor developing exquisitely intricate tools for doing the
business of life on their remote island, only to be foiled in the implementation phase
by the ever-bungling Gilligan.
But clearly it was never poor Gilligan’s fault. How could one possibly be expected to
implement designs for such sophisticated applications as home appliances and tele-
communications devices, given the rudimentary technologies available in such an en-
vironment? He simply lacked the proper tools. For all we know, Gilligan may have had
the capacity for engineering on the grandest level. But you can’t get there with bananas
and coconuts.
And pathologically, time after time, Gilligan wound up inadvertently sabotaging the
best of the Professor’s plans: misusing, abusing, and eventually destroying his inven-
tions. If he could just pedal his makeshift stationary bicycle faster and faster (he was
led to believe), all would be well. But in the end, inevitably, the coconuts were sent
hurling into the air, the palm branches came crashing down around his head, and poor
Gilligan was blamed once again for the failure of the technology.
Dramatic though this image may be, some observers would consider it a striking met-
aphor for the software industry. Like Gilligan, we software engineers are often asked
to perform tasks with arguably inappropriate tools. Like Gilligan, our intentions are
sound, but technology can hold us back. And like poor Gilligan, we inevitably must
bear the brunt of management’s wrath when our systems are delivered behind schedule.
You can’t get there with bananas and coconuts…
Doing the Right Thing
Of course, the Gilligan factor is an exaggeration, added for comic effect. But few would
argue that the bottleneck between ideas and working systems has disappeared com-
pletely. Even today, the cost of developing software far exceeds the cost of computer
hardware. And when software is finally delivered, it often comes with failure rates that
would be laughable in other engineering domains. Why must programming be so
complex?
Let’s consider the situation carefully. By and large, the root of the complexity in de-
veloping software isn’t related to the role it’s supposed to perform—usually this is a
well-defined, real-world process. Rather, it stems from the mapping of real-world tasks
onto computer-executable models. And this mapping is performed in the context of
programming languages and tools.
The path toward easing the software bottleneck must therefore lie, at least partially, in
optimizing the act of programming itself by deploying the right tools. Given this realistic
Doing the Right Thing | 1545

scope, there’s much that can be done now—there are a number of purely artificial
overheads inherent in our current tools.
The Static Language Build Cycle
Using traditional static languages, there is an unavoidable overhead in moving from
coded programs to working systems: compile and link steps add a built-in delay to the
development process. In some environments, it’s common to spend many hours each
week just waiting for a static language application’s build cycle to finish. Given that
modern development practice involves an iterative process of building, testing, and
rebuilding, such delays can be expensive and demoralizing (if not physically painful).
Of course, this varies from shop to shop, and in some domains the demand for per-
formance justifies build-cycle delays. But I’ve worked in C++ environments where
programmers joked about having to go to lunch whenever they recompiled their sys-
tems. Except they weren’t really joking.
Artificial Complexities
With many traditional programming tools, you can easily lose focus: the very act of
programming becomes so complex that the real-world goal of the program is obscured.
Traditional languages divert valuable attention to syntactic issues and development of
bookkeeping code. Obviously, complexity isn’t an end in itself; it must be clearly war-
ranted. Yet some of our current tools are so complex that the language itself makes the
task harder and lengthens the development process.
One Language Does Not Fit All
Many traditional languages implicitly encourage homogeneous, single-language sys-
tems. By making integration complex, they impede the use of multiple-language tools.
As a result, instead of being able to select the right tool for the task at hand, developers
are often compelled to use the same language for every component of an application.
Since no language is good at everything, this constraint inevitably sacrifices both prod-
uct functionality and programmer productivity.
Until our machines are as clever at taking directions as we are (arguably, not the most
rational of goals), the task of programming won’t go away. But for the time being, we
can make substantial progress by making the mechanics of that task easier. This topic
is what I want to talk about now.
1546 | Chapter 21: Conclusion: Python and the Development Cycle

Enter Python
If this book has achieved its goals, you should by now have a good understanding of
why Python has been called a “next-generation scripting language.” Compared with
similar tools, it has some critical distinctions that we’re finally in a position to
summarize:
Tcl
Like Tcl, Python can be used as an embedded extension language. Unlike Tcl,
Python is also a full-featured programming language. For many, Python’s data
structure tools and support for programming-in-the-large make it useful in more
domains. Tcl demonstrated the utility of integrating interpreted languages with C
modules. Python provides similar functionality plus a powerful, object-oriented
language; it’s not just a command string processor.
Perl
Like Perl, Python can be used for writing shell tools, making it easy to use for system
services. Unlike Perl, Python has a simple, readable syntax and a remarkably co-
herent design. For some, this makes Python easier to use and a better choice for
programs that must be reused or maintained by others. Without question, Perl is
a powerful system administration tool. But once we move beyond processing text
and files, Python’s features become attractive.
Scheme/Lisp
Like Scheme (and Lisp), Python supports dynamic typing, incremental develop-
ment, and metaprogramming; it exposes the interpreter’s state and supports run-
time program construction. Unlike Lisp, Python has a procedural syntax that is
familiar to users of mainstream languages such as C and Pascal. If extensions are
to be coded by end users, this can be a major advantage.
Smalltalk
Like Smalltalk, Python supports object-oriented programming (OOP) in the con-
text of a highly dynamic language. Unlike Smalltalk, Python doesn’t extend the
object system to include fundamental program control flow constructs. Users need
not come to grips with the concept of if statements as message-receiving objects
to use Python—Python is more conventional.
Icon
Like Icon, Python supports a variety of high-level datatypes and operations such
as lists, dictionaries, and slicing. In more recent times, Python’s notions of iteration
and generators approach Icon’s backtracking in utility. Unlike Icon, Python is fun-
damentally simple. Programmers (and end users) don’t need to master esoteric
concepts such as full-blown backtracking just to get started.
BASIC
Like modern structured BASIC dialects, Python has an interpretive/interactive na-
ture. Unlike most BASICs, Python includes standard support for advanced pro-
gramming features such as classes, modules, exceptions, high-level datatypes, and
Enter Python | 1547

general C integration. And unlike Visual Basic, Python provides a cross-platform
solution, which is not controlled by a commercially vested company.
Java
Like Java, Python is a general-purpose language; supports OOP, exceptions, and
modular design; and compiles to a portable bytecode format. Unlike Java, Python’s
simple syntax and built-in datatypes make development much more rapid. Python
programs are typically one-third to one-fifth the size of the equivalent Java
program.
C/C++
Like C and C++, Python is a general-purpose language and can be used for long-
term strategic system development tasks. Unlike compiled languages in general,
Python also works well in tactical mode, as a rapid development language. Python
programs are smaller, simpler, and more flexible than those written in compiled
languages. For instance, because Python code does not constrain datatypes or sizes,
it both is more concise and can be applied in a broader range of contexts.
All of these languages (and others) have merit and unique strengths of their own—in
fact, Python borrowed most of its features from languages such as these. It’s not Py-
thon’s goal to replace every other language; different tasks require different tools, and
mixed-language development is one of Python’s main ideas. But Python’s blend of
advanced programming constructs and integration tools make it a natural choice for
the problem domains we’ve talked about in this book, and many more.
But What About That Bottleneck?
Back to our original question: how can the act of writing software be made easier? At
some level, Python is really “just another computer language.” It’s certainly true that
Python the language doesn’t represent much that’s radically new from a theoretical
point of view. So why should we be excited about Python when so many languages
have been tried already?
What makes Python of interest, and what may be its larger contribution to the devel-
opment world, is not its syntax or semantics, but its worldview: Python’s combination
of tools makes rapid development a realistic goal. In a nutshell, Python fosters rapid
development by providing features like these:
• Fast build-cycle turnaround
• A very high-level, object-oriented language
• Integration facilities to enable mixed-language development
Specifically, Python attacks the software development bottleneck on four fronts, de-
scribed in the following sections.
1548 | Chapter 21: Conclusion: Python and the Development Cycle
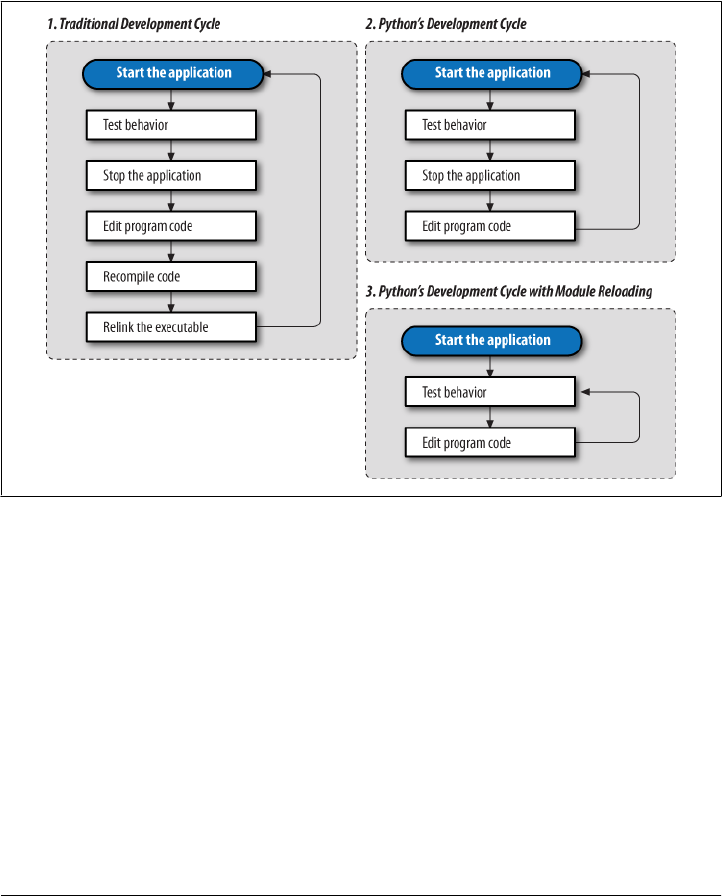
Python Provides Immediate Turnaround
Python’s development cycle is dramatically shorter than that of traditional tools. In
Python, there are no compile or link steps—Python programs simply import modules
at runtime and use the objects they contain. Because of this, Python programs run
immediately after changes are made. And in cases where dynamic module reloading
can be used, it’s even possible to change and reload parts of a running program without
stopping it at all. Figure 21-1 shows Python’s impact on the development cycle.
Figure 21-1. Development cycles
Because Python is interpreted, there’s a rapid turnaround after program changes. And
because Python’s parser is embedded in Python-based systems, it’s easy to modify pro-
grams at runtime. For example, we saw how GUI programs developed with Python
allow developers to change the code that handles a button press while the GUI remains
active; the effect of the code change may be observed immediately when the button is
pressed again. There’s no need to stop and rebuild.
More generally, the entire development process in Python is an exercise in rapid pro-
totyping. Python lends itself to experimental and interactive program development,
and it encourages developing systems incrementally by testing components in isolation
and putting them together later. In fact, we’ve seen that we can switch from testing
components (unit tests) to testing whole systems (integration tests) arbitrarily, as il-
lustrated in Figure 21-2.
But What About That Bottleneck? | 1549

Python Is “Executable Pseudocode”
Python’s very high-level nature means there’s less for us to program and manage. The
lack of compile and link steps isn’t really enough to address the development cycle
bottleneck by itself. For instance, a C or C++ interpreter might provide fast turnaround
but would still be almost useless for rapid development: the language is too complex
and low level.
But because Python is also a simple language, coding is dramatically faster, too. For
example, its dynamic typing, built-in objects, and garbage collection eliminate much
of the manual bookkeeping code required in lower-level languages such as C and
C++. Since things such as type declarations, memory management, and common data
structure implementations are conspicuously absent, Python programs are typically a
fraction of the size of their C and C++ equivalents. There’s less to write and read, and
there are fewer interactions among language components, and thus there is less op-
portunity for coding errors.
Because most bookkeeping code is missing, Python programs are easier to understand
and more closely reflect the actual problem they’re intended to address. And Python’s
high-level nature not only allows algorithms to be realized more quickly but also makes
it easier to learn the language.
Python Is OOP Done Right
For OOP to be useful, it must be easy to apply. Python makes OOP a flexible tool by
delivering it in a dynamic language. More importantly, its class mechanism is a sim-
plified subset of C++’s; this simplification is what makes OOP useful in the context of
a rapid-development tool. For instance, when we looked at data structure classes in
this book, we saw that Python’s dynamic typing let us apply a single class to a variety
of object types; we didn’t need to write variants for each supported type. In exchange
for not constraining types, Python code becomes flexible and agile.
In fact, Python’s OOP is so easy to use that there’s really no reason not to apply it in
most parts of an application. Python’s class model has features powerful enough for
Figure 21-2. Incremental development
1550 | Chapter 21: Conclusion: Python and the Development Cycle
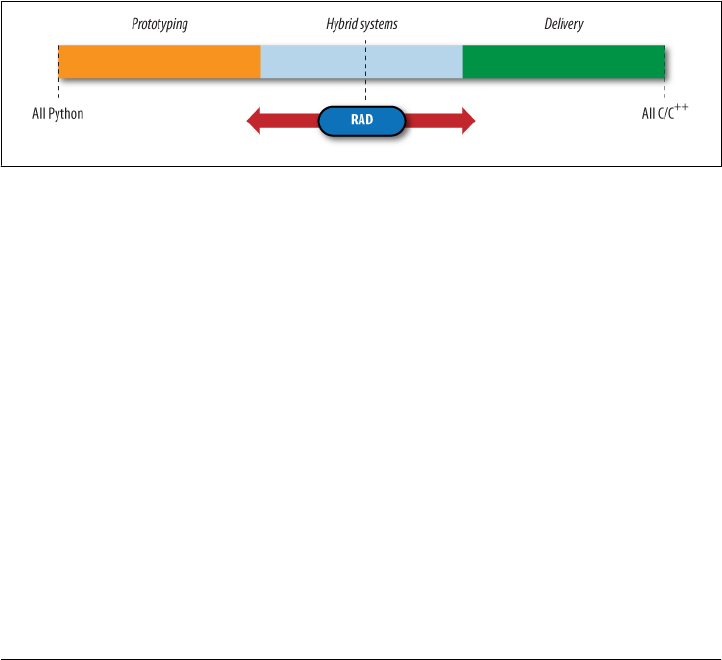
complex programs, yet because they’re provided in simple ways, they do not interfere
with the problem we’re trying to solve.
Python Fosters Hybrid Applications
As we’ve seen earlier in this book, Python’s extending and embedding support makes
it useful in mixed-language systems. Without good integration facilities, even the best
rapid-development language is a “closed box” and is not generally useful in modern
development environments. But Python’s integration tools make it usable in hybrid,
multicomponent applications. As one consequence, systems can simultaneously utilize
the strengths of Python for rapid development and of traditional languages such as C
for rapid execution.
While it’s possible and common to use Python as a standalone tool, it doesn’t impose
this mode. Instead, Python encourages an integrated approach to application devel-
opment. By supporting arbitrary mixtures of Python and traditional languages, Python
fosters a spectrum of development paradigms, ranging from pure prototyping to pure
efficiency. Figure 21-3 shows the abstract case.
Figure 21-3. The development mode “slider”
As we move to the left extreme of the spectrum, we optimize speed of development.
Moving to the right side optimizes speed of execution. And somewhere in between is
an optimum mix for any given project. With Python, not only can we pick the proper
mix for our project, but we can also later move the RAD slider in the picture arbitrarily
as our needs change:
Going to the right
Projects can be started on the left end of the scale in Python and gradually moved
toward the right, module by module, as needed to optimize performance for
delivery.
Going to the left
Similarly, we can move strategic parts of existing C or C++ applications on the
right end of the scale to Python, to support end-user programming and customi-
zation on the left end of the scale.
This flexibility of development modes is crucial in realistic environments. Python is
optimized for speed of development, but that alone isn’t always enough. By themselves,
But What About That Bottleneck? | 1551
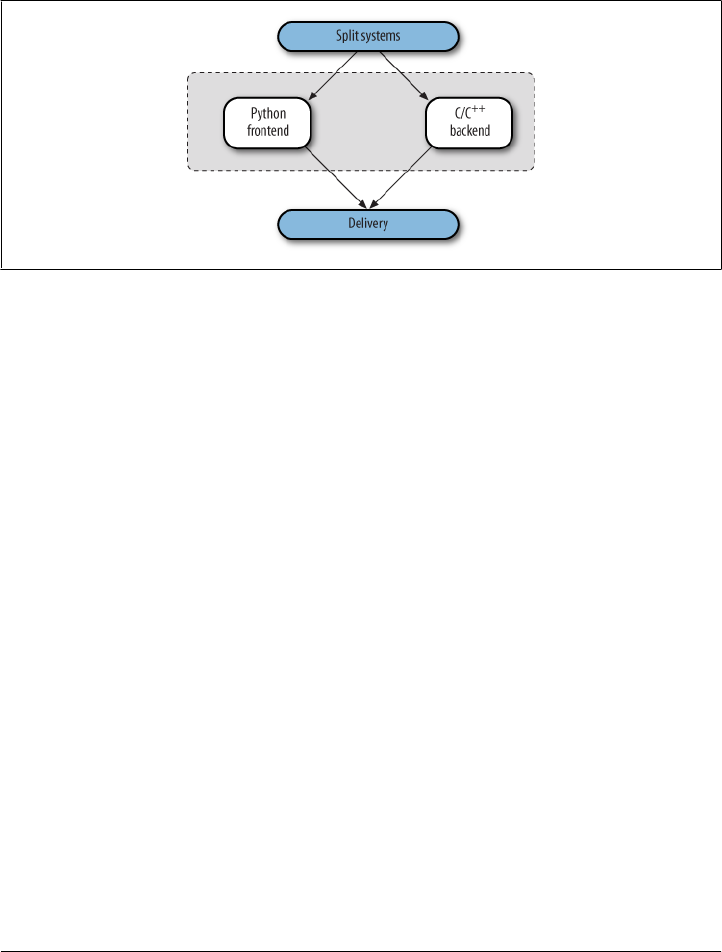
neither C nor Python is adequate to address the development bottleneck; together, they
can do much more. As shown in Figure 21-4, for instance, apart from standalone use,
one of Python’s most common roles splits systems into frontend components that can
benefit from Python’s ease of use and backend modules that require the efficiency of
static languages such as C, C++, or FORTRAN.
Figure 21-4. Hybrid designs
Whether we add Python frontend interfaces to existing systems or design them in early
on, such a division of labor can open up a system to its users without exposing its
internals.
When developing new systems, we also have the option of writing entirely in Python
at first and then optimizing as needed for delivery by moving performance-critical
components to compiled languages. And because Python and C modules look the same
to clients, migration to compiled extensions is transparent.
Prototyping doesn’t make sense in every scenario. Sometimes splitting a system into a
Python frontend and a C/C++ backend up front works best. And prototyping doesn’t
help much when enhancing existing systems. But where it can be applied, early pro-
totyping can be a major asset. By prototyping in Python first, we can show results more
quickly. Perhaps more critically, end users can be closely involved in the early stages
of the process, as sketched in Figure 21-5. The result is systems that more closely reflect
their original requirements.
On Sinking the Titanic
In short, Python is really more than a language; it implies a development philosophy.
The concepts of prototyping, rapid development, and hybrid applications certainly
aren’t new. But while the benefits of such development modes are widely recognized,
there has been a lack of tools that make them practical without sacrificing programming
power. This is one of the main gaps that Python’s design fills: Python provides a simple
1552 | Chapter 21: Conclusion: Python and the Development Cycle
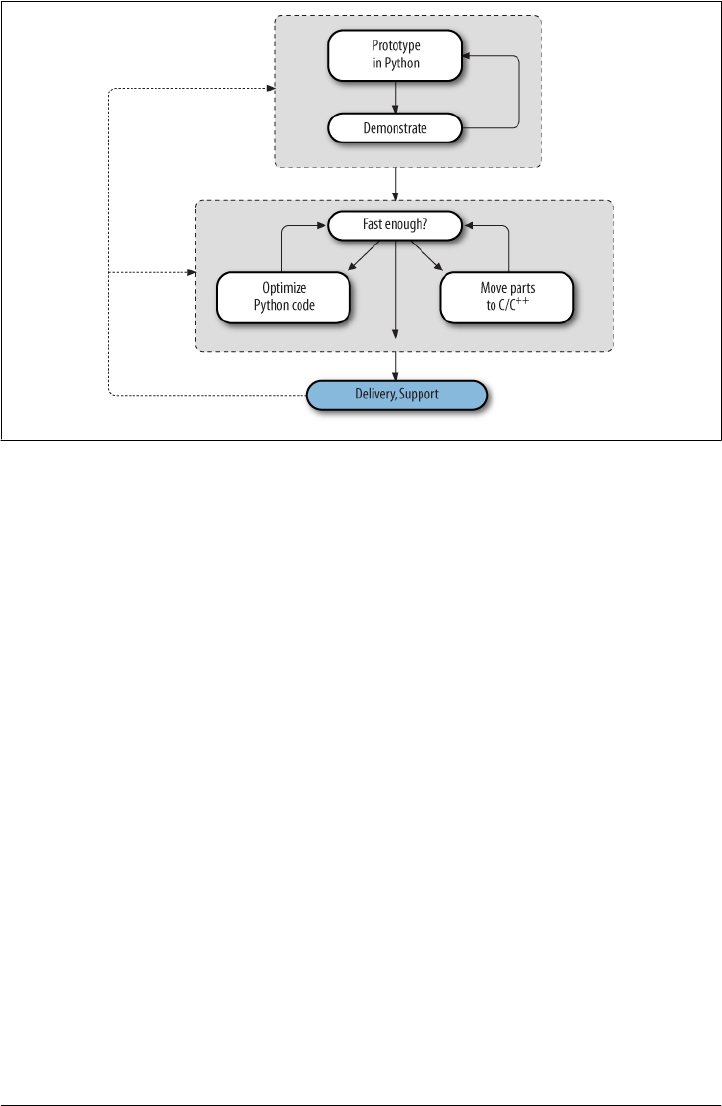
but powerful rapid development language, along with the integration tools needed to apply
it in realistic development environments.
This combination arguably makes Python unique among similar tools. For instance,
Tcl is a good integration tool but not a full-blown language; Perl is a powerful system
administration language but a weak integration tool. But Python’s marriage of a
powerful dynamic language and integration opens the door to fundamentally faster
development modes. With Python, it’s no longer necessary to choose between fast
development and fast execution.
By now, it should be clear that a single programming language can’t satisfy all our
development goals. Our needs are sometimes contradictory: the goals of efficiency and
flexibility will probably always clash. Given the high cost of making software, the choice
between development and execution speed is crucial. Although machine cycles are
cheaper than programmers, we can’t yet ignore efficiency completely.
But with a tool like Python, we don’t need to decide between the two goals at all. Just
as a carpenter wouldn’t drive a nail with a chainsaw, software engineers are now em-
powered to use the right tool for the task at hand: Python when speed of development
matters, compiled languages when efficiency dominates, and combinations of the two
when our goals are not absolute.
Moreover, we don’t have to sacrifice code reuse or rewrite exhaustively for delivery
when applying rapid development with Python. We can have our rapid development
cake and eat it too:
Figure 21-5. Prototyping with Python
On Sinking the Titanic | 1553
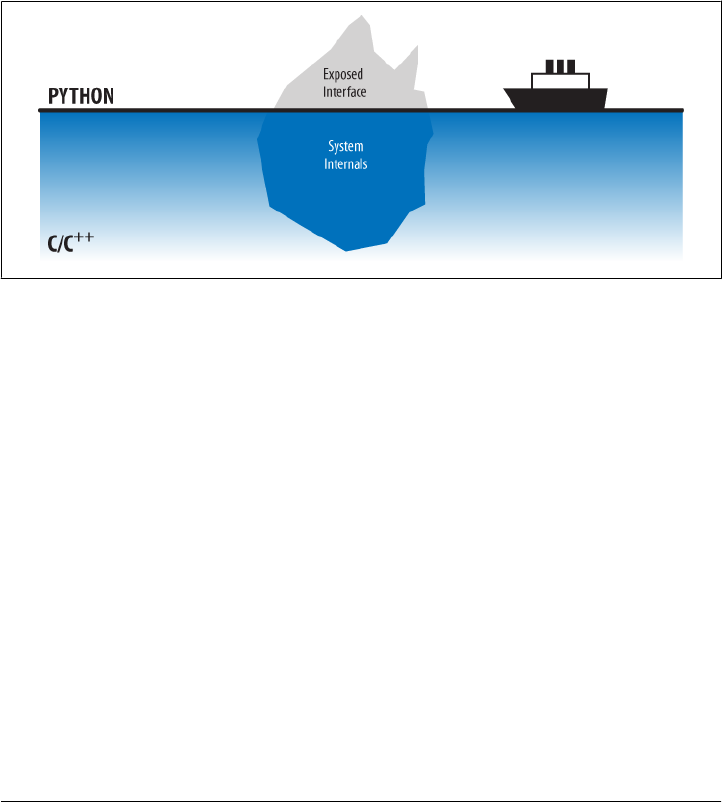
Reusability
Because Python is a high-level, object-oriented language, it encourages writing re-
usable software and well-designed systems.
Deliverability
Because Python is designed for use in mixed-language systems, we don’t have to
move to more efficient languages all at once.
In many scenarios, a system’s frontend and infrastructure may be written in Python for
ease of development and modification, but the kernel is still written in C or C++ for
efficiency. Python has been called the tip of the iceberg in such systems—the part visible
to end users of a package, as captured in Figure 21-6.
Figure 21-6. “Sinking the Titanic” with mixed-language systems
Such an architecture uses the best of both worlds: it can be extended by adding more
Python code or by writing C extension modules, depending on performance require-
ments. But this is just one of many mixed-language development scenarios:
System interfaces
Packaging libraries as Python extension modules makes them more accessible.
End-user customization
Delegating logic to embedded Python code provides for onsite changes.
Pure prototyping
Python prototypes can be moved to C all at once or piecemeal.
Legacy code migration
Moving existing code from C to Python makes it simpler and more flexible.
Standalone use
Of course, using Python all by itself leverages its existing library of tools.
Python’s design lets us apply it in whatever way makes sense for each project.
1554 | Chapter 21: Conclusion: Python and the Development Cycle

So What’s “Python: The Sequel”?
As we’ve seen in this book, Python is a multifaceted tool, useful in a wide variety of
domains. What can we say about Python to sum up here? In terms of some of its best
attributes, the Python language is:
• General purpose
• Object-oriented
• Interpreted
• Very high level
• Openly designed
• Widely portable
• Freely available
• Refreshingly coherent
Python is useful for both standalone development and extension work, and it is opti-
mized to boost developer productivity on many fronts. But the real meaning of Python
is really up to you, the reader. Since Python is a general-purpose tool, what it “is”
depends on how you choose to use it.
In the Final Analysis…
I hope this book has taught you something about Python, both the language and its
roles. Beyond this text, there is really no substitute for doing some original Python
programming. Be sure to grab a reference source or two to help you along the way.
The task of programming computers will probably always be challenging. Perhaps
happily, there will continue to be a need for intelligent software engineers, skilled at
translating real-world tasks into computer-executable form, at least for the foreseeable
future. After all, if it were too easy, none of us would get paid. No language or tool can
obviate the hard work of full-scale programming entirely.
But current development practice and tools make our tasks unnecessarily difficult:
many of the obstacles faced by software developers are purely artificial. We have come
far in our quest to improve the speed of computers; the time has come to focus our
attention on improving the speed of development. In an era of constantly shrinking
schedules, productivity must be paramount.
Python, as a mixed-paradigm tool, has the potential to foster development modes that
simultaneously leverage the benefits of rapid development and of traditional languages.
While Python won’t solve all the problems of the software industry, it offers hope for
making programming simpler, faster, and at least a little more enjoyable.
It may not get us off that island altogether, but it sure beats bananas and coconuts.
In the Final Analysis… | 1555

A Morality Tale of Perl Versus Python
(The following was posted to the rec.humor.funny Usenet newsgroup by Larry
Hastings, and it is reprinted here with the original author’s permission.)
This has been percolating in the back of my mind for a while. It’s a scene from The
Empire Strikes Back, reinterpreted to serve a valuable moral lesson for aspiring
programmers.
EXTERIOR: DAGOBAH—DAY
With Yoda strapped to his back, Luke climbs up one of the many thick vines that grow
in the swamp until he reaches the Dagobah statistics lab. Panting heavily, he continues
his exercises—grepping, installing new packages, logging in as root, and writing re-
placements for two-year-old shell scripts in Python.
YODA: Code! Yes. A programmer’s strength flows from code maintainability. But be-
ware of Perl. Terse syntax…more than one way to do it…default variables. The dark
side of code maintainability are they. Easily they flow, quick to join you when code you
write. If once you start down the dark path, forever will it dominate your destiny,
consume you it will.
LUKE: Is Perl better than Python?
YODA: No…no…no. Quicker, easier, more seductive.
LUKE: But how will I know why Python is better than Perl?
YODA: You will know. When your code you try to read six months from now.
1556 | Chapter 21: Conclusion: Python and the Development Cycle

Index
Symbols
\ (backslash), 88, 1186
/ (forward slash), 88
| (pipe character), 116
_ (underscore), 409
* wildcard character, 166
A
after method
drawbacks, 591
functionality, 585–588
scheduling functions, 582, 589
algebra, relational, 1382
anchoring widgets, 399–400
animation
coordinate system and, 552
graphics and, 594
other effects, 594
simple techniques, 588–593
third-party toolkits, 595
threads and, 594
time.sleep loops, 589–590, 592
anonymous pipes
basic functionality, 224–226
bidirectional IPC and, 228–231
defined, 223, 224
output stream buffering, 231–233
threads and, 227
wrapping descriptors in file objects, 226
Apache web servers, 780, 1130
append list operator, 6, 12
arguments
global variables versus, 206, 385
pass-by-name, 377
threads and, 197–199
Array object (multiprocessing), 248
ASCII encoding, 149
askyesno function, 427
associated variables, 454–456, 457
asyncore.py module, 825
attachments
propagating, 1120
sending via PyMailCGI, 1234
sending via PyMailGUI, 1033–1037
viewing via PyMailGUI, 1037
augmenting methods, 31
B
backslash (\), 88, 1186
backups, verifying, 316
base64 module, 786
BASIC language, 1547
BDFL acronym, 36
BeautifulSoup third-party extension, 1105,
1119
Beazley, Dave, 1491
bell method, 586
BigGui client demo program, 609–612
binary files
defined, 136, 146
parsing with struct module, 151–153
random access processing, 153–155
Unicode encoding and, 546
binary mode transfers, 883
binary trees
built-in options, 1385
defined, 1385
implementing, 1386–1390
binascii module, 786
We’d like to hear your suggestions for improving our indexes. Send email to index@oreilly.com.
1557

bind method mechanism
binding events, 394, 443–448, 563–564
binding tags, 548
functionality, 393
binding
events, 394, 443–448, 563–564
reserved port servers, 802
tags, 548
binhex module, 786
BitmapImage widget class, 411, 484–491
BooleanVar class, 454
Boost.Python system, 1512
bound methods
callback handlers and, 391
defined, 42
PyMailGUI program support, 1029
recoding with, 638–639
browsers
cookie support, 1178
displaying CGI context in, 1162
Grail, 776
PyMailCGI send mail script, 1247–1249
testing with urllib.request, 1155–1157
buffering
command pipes and, 838
line, 835–837
output streams, 832
Button widget class
command option, 458
functionality, 379–380, 411
buttons
adding, 379–380
adding in PyCalc, 1477–1480
deferring calls, 384
fixed-size, 502
Quit button, 429
randomly changing images, 487–491
bytearray string type, 83
bytecode files
cleaning up, 324–327
precompiling strings to, 1528–1529
bytes string type, 83, 539–540, 545–546
C
C language
API standard, 212, 1515
classes and, 1535–1538
embedding interface, 1484–1486, 1515–
1529
extending interface, 1484–1491, 1486–
1491
getenv function, 1495
putenv function, 1495, 1501
Python comparison, 1548
Python support, 1483
scanning files for patterns, 1427–1429
strop extension module, 1415
SWIG tool and, 1491–1495, 1500
wrapping environment calls, 1495–1501
C++ language, 1502–1511, 1514, 1548
CalcGui class, 1464, 1465
calculators (see PyCalc program)
callable objects
defined, 1516
overview, 1524–1526
registering, 1530–1535
callback handlers
adding user-defined, 382
additional protocols, 393
binding events, 394, 444
bound method, 391
callable class object, 392
deferring calls, 384–385
defined, 367
lambda, 383–391
registering objects, 1530–1535
reloading dynamically, 628–630
callbacks
adding, 379–380
arguments versus globals, 385
passing data with lambdas, 434–436
placing on queues, 640–646
Canvas widget class
addtag_withtag method, 553
basic operations, 550
controlling image displays, 505
coordinate system, 551
create_ method, 553
create_polygon method, 552
delete method, 561
event support, 560–564
find_closest method, 554, 564
freeform graphic support, 50
functionality, 411, 485, 528, 550
image thumbnails, 557–560
itemconfig method, 553
move method, 553
object construction, 552
1558 | Index

object identifiers, 553
object tags, 553
postscript method, 554
programming, 551–554
scrolling canvases, 554–556
tag_bind method, 563
tkraise method, 553
update method, 589
xscrollcommand option, 526
xview method, 526
yscrollcommand option, 526
yview method, 526
canvases
basic operations, 550–551
clearing, 561
coordinate system, 551
defined, 550
dragging out object shapes, 561
event support, 560–564
image thumbnails, 557–560
moving objects, 562
object construction, 552
object identifiers, 553
object tags, 553
scrolling, 554–556
cat command, 99
cd command, 106
cenviron module, 1497
cgi module
escape function, 59, 1186, 1202–1206,
1256, 1265
FieldStorage class, 1152, 1166, 1187, 1255
functionality, 786, 1129
PyMailCGI program and, 1232
CGI scripts, 1125
(see also PyMailCGI program; server-side
scripting/processing)
adding common input devices, 1163–1166
adding pictures, 1146–1149
adding user interaction, 1149–1157
building first web page, 1135–1140
changing input layouts, 1166–1170
checking inputs, 1190–1192
converting strings, 1161
debugging, 1161–1163
defined, 1126
escape conventions, 1201–1209
examples, 1141–1146
formatting reply text, 59
functionality, 52–55, 777, 1126–1128
functions and, 1155
generating tables, 1146–1149
Hello World program, 1183–1192
installing, 1142–1145
laying out forms with tables, 1157–1163
model extensions, 1182
name conventions, 1143
passing parameters in hidden form fields,
1172
passing parameters in URLs, 1170–1172
permissions, 1215
programming suggestions, 68
query strings, 57–59
refactoring code, 1192–1201
running, 1130–1134
saving state information in, 1174–1183
text decoding issues, 929
urllib module and, 57–59
using cookies in, 1179
web servers and, 55–57
writing, 1128–1130
Checkbutton widget class
command option, 458
functionality, 411, 457–461
variables and, 460–461
child process
defined, 179
exiting from, 807
spawning, 184
chmod command, 16, 54, 1140
class instances
persistence and, 1303
pickling, 1313
storing in shelves, 1318–1320
class object callback handlers, 392
classes
adding behavior, 29
adding inheritance, 29
adding persistence, 34–36
alternative, 32
C language and, 1535–1538
changing for objects, 1320
container, 408–410
customizing widgets with, 400–403
moving graphs to, 1393–1395
programming considerations, 27–29
recoding with, 638–639
refactoring scripts with, 888–892
Index | 1559

reusable GUI components, 403–410
sets and, 1377–1378
stacks and, 1364–1366
client-side scripting/processing
accessing newsgroups, 991–993
accessing websites, 994–997
additional options, 1002
client socket calls, 792
console-based email client, 947–956
development options, 777
fetching email via POP, 901–910
handling multiple clients, 802–826
Internet applications and, 1296
mailtools utility package, 956–991
parsing/composing mail content, 921–947
processing Internet email, 899–901
protocol considerations, 783
PyMailGUI program and, 1005
Python support, 854
sending email via SMTP, 910–920
spawning clients in parallel, 798–801
transferring directories with ftplib, 874–
892
transferring directory trees, 892–899
transferring files over the Internet, 854
transferring files with ftplib, 854–873
urllib module, 997–1002
client/server architecture
defined, 784
transferring files, 1209–1227
clipboard interface, 536
clipping widgets, 396
closing files, 139–142
cloud computing, 777
code files, 1516
code strings
defined, 1516
precompiling, 1528–1529
running in dictionaries, 1526
running simple, 1519–1522
running with results/namespaces, 1522–
1524
colors, selecting on the fly, 437
columns in files, summing, 1410–1412
COM (Component Object Model), 779, 1539
command-line arguments
accessing, 103
parsing, 107
sys module and, 106–108
command-line pipes
buffering and, 232, 838
GUI programs and, 654–662
sockets and, 839
command-line tools, 613–623
common dialogs, 426–438
comparedirs function, 310
comparing directory trees, 308–319
connection objects (FTP)
cwd method, 894
defined, 248
mkd method, 894
retrbinary method, 856, 861, 877
retrlines method, 861, 877
storbinary method, 864
storlines method, 864
console window
avoiding DOS consoles, 371
shelve interface, 37–39
console-based email client (see pymail console
client)
constructors, customizing, 32
container classes, 408–410
context managers
file closure and, 139–141
file filters and, 163
threads and, 197–199
converting strings, 82, 1161
cookies
creating, 1178
defined, 1177
handling with urllib.request, 1180
receiving, 1179
security considerations, 1282
using in CGI scripts, 1179
coordinate system, canvas, 551
copying directory trees, 304–308
CORBA
integration considerations, 1539
ORB support, 779
persistence options, 1304
counting source code lines, 338
cregister module, 1531
csh shell language, 133
ctypes module
binary data and, 851
functionality, 1512
integration considerations, 1485
shared memory and, 248
1560 | Index

current working directory
accessing, 103
command lines and, 106
defined, 104
import paths and, 104
CXX system, 1513
Cygwin system
C extension module, 1488
C++ extension class, 1505
forking processes, 180, 185, 804
running code strings, 1520
Cython system, 1485, 1513
D
Dabo builder, 361
data structures
binary trees, 1385–1390
graph searching, 1390–1395
implementing sets, 1373–1383
implementing stacks, 1360–1373
permuting sequences, 1395–1397
reversing/sorting sequences, 1397–1402
subclassing built-in types, 1383–1385
databases, 1330
(see also SQL databases)
additional information, 36
creating with SQLite, 1334
displaying with pprint module, 13
freely available interfaces, 1330
server-side, 1181
db.keys method, 13
DBM files
defined, 1303, 1305
shelve constraints and, 1323
standard operations, 1307
Unicode and, 1317
usage considerations, 1305–1308
dbm module, 1306, 1308, 1315
DCOM (Distributed Component Object
Model), 779
deadlocks, output stream buffering and, 231–
233
debugging CGI scripts, 1161–1163
delete statement (SQL), 1338
deleting remote trees, 895–898
dialog module, 438
dialogs
custom, 439–443
flavors of, 426
generating on demand, 430–434
printing results, 434–436
PyEdit text editor, 677, 683, 684, 685
reusable Quit button, 429
selecting colors on the fly, 437
standard/common, 426–438
dialogTable module, 431, 434
dictionaries
building, 1339–1342
of dictionaries, 12–14
implementing graph searching, 1390
lists of, 10
making, 9
moving sets to, 1378–1382
nested structures, 11
record examples, 9
running code strings in, 1526
summing with, 1411
dictionary iterators, 13
dir command
filename patterns, 165
functionality, 78
usage example, 95
dirdiff tool, 311–313
directories
displaying images in, 495
finding differences, 309–311
name conventions, 1143
reporting differences in, 317–319
scanning, 272
transferring with ftplib, 874–892
walking, 164–168, 330–342
web-based interfaces and, 63–64
directory paths
backslashes and, 88
scanning, 274–276
scripts and, 105
splitting/joining listing results, 168
directory tools
handling Unicode filenames, 172–175
overview, 163
walking directory trees, 168–172
walking one directory, 164–168
directory trees
cleaning up bytecode files, 324–327
comparing, 308–319
copying, 304–308
editing files in, 334–336
finding differences, 311–313
Index | 1561

global replacements in, 336–338
PyEdit text editor, 685
scanning, 169–171, 273
searching, 319–329
transferring with ftplib, 892–899
walking, 168–172
disutils package, 1491
Django framework, 777, 1169
__doc__ attribute
formatting display, 78
functionality, 78
doctest framework, 304
documentation sources
modules, 77
recent release manuals, 1516
XML parsing, 1435
DOM parsers, 1429, 1433
DOS console, avoiding, 371
DoubleVar class, 454
downloading files (see transferring files)
Drake, Fred L., Jr., 1435
Durus system, 1325
E
Earley algorithm, 1439
EBCDIC encoding, 147
editing files in directory trees, 334–336
EditVisitor class, 334
EIBTI acronym, 70
ElementTree package, 1429
ElementTree parsing, 1429, 1434
email
console-based client, 947–956
deleting, 1049–1051
fetching at interactive prompt, 909
fetching via POP, 901–910
handling HTML content, 1016, 1053
inbox synchronization errors, 1272
Internationalization and, 1017, 1055–1058
loading, 1025
mailtools utility package, 956–991
parsing/composing mail content, 921–947
processing over Internet, 899–901
reading with direct URLs, 1258
recipient options, 1043–1049
replies and forwards, 1043–1049
sending at interactive prompt, 919
sending attachments, 1033–1037, 1234
sending by SMTP, 910–920, 1241–1249
Unicode encoding and, 900
viewing attachments, 1037–1043, 1235
email addresses, 935–938
email module package
basic interfaces, 924–926
functionality, 786, 901, 921
Internationalized headers, 933
limitations overview, 926
message address headers, 935–938
message composition issues, 941–946
Message objects, 922–923
message text generation issues, 938–941
parser decoding requirement, 927–929
PyMailCGI program and, 1232, 1260
PyMailGUI program and, 1037, 1046,
1124
text payload encodings, 929–933
embedding integration mode
basic techniques, 1518–1529
C embedding API, 1515–1518
defined, 1485
registering callback handler objects, 1530–
1535
enclosing scope reference mode, 386–391
encryption, password, 1278–1286
end-of-line character (\n)
CGI scripts, 1144
overview, 80
in text files, 149–151
Text widget and, 530
endian-ness, 152
Entry widget class
associated variables and, 454–456
functionality, 411, 449–451
laying out input forms, 451–454
programming widgets, 450
xscrollcommand option, 526
xview method, 526
yscrollcommand option, 526
yview method, 526
environment variables (see shell variables)
eval function
C API equivalent, 1516
converting strings, 1161
parsing support, 1438
PyCalc support, 1460, 1461
Evaluator class, 1466
event handlers (see callback handlers)
events
1562 | Index

binding, 394, 443–448, 563–564
Canvas widget support, 560–564
mouse-related, 445–448
routing, 1531
triggering, 1531
exception handlers, file closure and, 139–141
exec function
C API equivalent, 1516
converting strings, 1161
parsing support, 1438
PyCalc support, 1460, 1461
exit status
forking processes and, 219
shell command codes, 216–219
threads and, 220–222
Expat parser, 1430
extend list operator, 6
extending integration mode
additional tools, 1511–1514
defined, 1484
overview, 1486
simple C module, 1487
simple C++ class, 1503–1505
SWIG tool, 1491–1495
F
f2py system, 1514
FastCGI extension, 1182
FFI (foreign function interface), 1512
field labels (lists), 7–8
FieldStorage class, 1152, 1166, 1187, 1255
fifos (see named pipes)
file descriptors
defined, 224
wrapping in file objects, 158, 226
file download system, 840–851
file objects
alternate open options, 144
built-in, 137–145
close method, 137, 139
defined, 135
ensuring closure, 139–141
file object model, 136
input files, 141–142
output files, 137–139
read method, 141
readline method, 141, 143
readlines method, 141, 143, 1410
seek method, 153
wrapping descriptors in, 158, 226
write method, 137
writelines method, 138
file scanners, 160–163
file tools
binary files, 136, 146–155
built-in file objects, 137–145
file object model, 136
file scanners, 160–163
os module support, 155
overview, 135
text files, 136, 146–155
File Transfer Protocol (see FTP)
files, 14
(see also formatted files)
closing, 139–142
code files, 1516
current working directory and, 104
editing in directory trees, 334–336
joining, 286–289–292
loading database tables, 1344–1347
name conventions, 15, 1143
opening, 138, 144
persistence options, 1304
private, 1215–1217
redirecting streams to, 114–119
sockets looking like, 827–839
splitting, 283–286, 289–292
summing columns in, 1410–1412
system scripting and, 83
transferring over the Internet, 854, 857–
860
transferring to clients/servers, 1209–1227
transferring with ftplib, 854–873
Unicode text in, 543
writing, 138
FileVisitor class, 331–334
filters
file scanning and, 162
spam, 1117
find module, 321–324
find shell command, 320
flash method, 586
Flex framework, 361
FLI format, 595
flushes
deadlocks and, 232
output stream buffering and, 231–233
fnmatch module, 166, 323–324
Index | 1563

font input dialog, 683
foreign function interface (FFI), 1512
forking processes
fork/exec combination, 182–184
functionality, 178, 179–182
obtaining exit status, 219
obtaining shared state, 219
os.exec call formats, 183
server considerations, 803–815
spawned child program, 184
formatted files
data format script, 16–18
test data script, 14
utility scripts, 18
forms
action option, 1150
changing input layouts, 1166–1170
HTML tags, 1149–1152
input, 451–454, 565
input fields, 1150
laying out with tables, 1157–1163
method option, 1151
mocking up inputs, 1187
passing parameters in hidden fields, 1172,
1176
reusable form mock-up utility, 1196–1198
sharing objects between pages, 1193–1196
FORTRAN language, 1514
forward slash (/), 88
Frame widget class
adding multiple widgets, 395
attaching widgets to frames, 397
functionality, 411
GUI considerations, 42, 405
menus, 512–517
frozen binaries, 50, 1120
FTP (File Transfer Protocol)
functionality, 854
get and put utilities, 860–867
timeout errors, 884
FTP objects
cwd method, 894
delete method, 882
mkd methods, 894
nlst method, 876, 882
ftplib module
adding user interface, 867–873
functionality, 785, 786
transferring directories, 874–892
transferring directory trees, 892–899
transferring files, 854–873
functions
CGI scripts and, 1155
refactoring scripts with, 884–888
sets and, 1375–1376
threads and, 187
G
gaming toolkits, 594
gcc command, 1489
generator functions, 169
geometry managers
grid, 452, 501, 564–582, 566–573, 845
packer, 370, 374, 397–400, 566–582
getaddresses utility, 936
getfile module
FTP-based, 854, 862
server-side examples, 1134, 1216, 1218,
1227
socket-based, 840–842
getopt module, 108
getpass.getpass method, 857
GIL (global interpreter lock)
atomic operations, 212
C API thread considerations, 212
functionality, 211–212
multiprocessing and, 213
thread switch interval, 212
threads and, 188
Gilligan factor, 1544
glob module
button images, 488
functionality, 22, 76, 166
glob function, 166, 172
scanning directories, 272
searching directory trees, 320
global interpreter lock (see GIL)
global variables
arguments versus, 206, 385
multiprocessing module and, 250–252
Google App Engine, 778
Grail browser, 776
graph searching
defined, 1390
implementing, 1390–1393
moving graphs to classes, 1393–1395
graphical user interface (see GUI)
grep command, 320, 685–687
1564 | Index

grid geometry manager
combining with packer, 568–570
file download system, 845
functionality, 452, 501, 564
input forms, 565
laying out larger tables, 574–582
making expandable, 570
packer comparison, 566–568
reasons for using, 564
resizing in grids, 572
spanning rows/columns, 573
GUI (graphical user interface), 355
(see also tkinter module)
adding buttons, 379–382
adding callback handlers, 382–395
adding callbacks, 379–382
adding multiple widgets, 395–400
adding to non-GUI code, 646–662
additional information, 766
attaching frames, 471–475
basic functionality, 40–42
building for PyCalc, 1459
coding techniques, 46, 368, 635–636
for command-line tools, 613–623
customizing, 44
customizing widgets with classes, 400–403
development options, 358–362
geometry managers, 370
Hello World program, 368, 376
independent windows, 476–477
inputting user data, 44
making widgets, 370
OOP considerations, 42–44
programming suggestions, 49–51, 355
reloading callback handlers, 628–630
reusable components, 403–410
running programs, 357, 371, 478–484
shelve interface, 46–51
threads and, 208–210, 584–585, 639, 657
toolkit suggestions, 50
GuiMaker tool
BigGui client demo program, 609–612
classes supported, 608
functionality, 603–607
self-test, 608
subclass protocols, 607
GuiMixin tool
functionality, 521, 598
mixin utility classes, 599–602
PyCalc program, 1464
widget builder functions, 598
GuiStreams tool
functionality, 623–627
redirecting packing scripts, 627
H
hashing technique, 1305
Hello World program, 368, 376, 1183–1192
help function, 78
hidden fields
passing header text in, 1273–1275
passing parameters in, 1172, 1176
passing state information in, 1262
HList widget, 1116
holmes expert system shell
functionality, 1414
rule strings, 1412
HTML
basic overview, 1136
building web pages with, 1135
CGI script escape conventions, 1201–1209
escaping mail text/passwords, 1264–1266
file permission constraints, 1140
form tags, 1149–1152
hidden input fields, 1262
Internet applications and, 1297
parsing support, 779, 1430, 1435–1438
PyMailGUI text extraction, 1016, 1053
table tags, 1148
URL conflicts and, 1206
html.entities module, 1437
html.parser module
fetched data considerations, 995
functionality, 786, 1430, 1435–1438
screen scraping support, 779
HTMLgen tool, 780
HTTP
accessing websites, 994–997
cookie support, 1177–1181
http.client module, 786, 994
http.cookiejar module, 786, 1178, 1180
http.cookies module, 786, 1178
http.server module, 786, 994
HTTPS (secure HTTP), 1281
HTTP_COOKIE environment variable, 1179
hyperlinks, 1117, 1136, 1170–1172
Index | 1565

I
IANA (Internet Assigned Numbers Authority),
786
Icon language, 1547
IDLE interface
functionality, 366
running GUI programs, 371
text editor positioning issues, 687
IETF (Internet Engineering Task Force), 786
images
adding with CGI scripts, 1146–1149
displaying, 484–491
processing with PIL, 491–505
scrolling, 560
thumbnails, 496–505, 557–560
in toolbars, 520–521
ImageTk module, 557
imaplib module, 786, 900
__import__ function, 473
independent programs
sockets and, 238
starting, 254
independent windows, 476–477
indexes, 531
inheritance
classes and, 29
SimpleEditor class and, 537
Input class, 124
input files, 141–142, 689
input forms
grid basics, 565
laying out, 451–454
input function, 113
input/output streams
capturing stderr stream, 127
CGI scripts and, 1128
io.BytesIO class, 126
io.StringIO class, 126
output stream buffering, 218, 231–233
PyMailCGI program and, 1286
redirecting print calls, 127
redirecting to files/programs, 114–119
redirecting to Python objects, 123–126
redirecting to widgets, 623–628
redirecting with os.popen, 128, 129
redirecting with subprocess, 128, 130–132
redirection utility, 828–839
sockets looking like, 827–839
standard streams, 103, 113
user interaction and, 119–123
insert command (SQL), 1334
Inter-Process Communication (see IPC)
interact function, 115
Internationalization
i18n message headers, 933–935, 1234
mail content support, 1017, 1055–1058
Internet Assigned Numbers Authority (IANA),
786
Internet Engineering Task Force (IETF), 786
Internet Service Providers (ISPs), 292, 874,
901
Internet-related scripting
development options, 777–780
handling multiple clients, 802–826
library modules and, 785–786
protocols and, 782–785
Python file server, 840–851
sockets and, 781–782, 787–802
sockets like files/streams, 827–839
IntVar class, 454
io.BytesIO class, 126
io.StringIO class, 126
IPC (Inter-Process Communication)
anonymous pipes, 223, 224–233
bidirectional, 228–231
FastCGI and, 1182
multiprocessing module and, 224, 248–
254
named pipes, 223, 234–236
overview, 222
shared memory, 223
signals, 223, 240–243
sockets, 76, 223, 236–240, 781
IronPython
development options, 779
integration considerations, 1485, 1539
overview, 361, 1513
ISPs (Internet Service Providers), 292, 874,
901
iterators, line, 101, 143–144, 163
J
Java language, 1548
JavaFX platform, 362
joining files, 286–289–292
Jones, Christopher A., 1435
Jython
development options, 779
1566 | Index

integration considerations, 1485, 1538
overview, 360, 1002, 1513
K
Kennedy, Bill, 1126
kill shell command, 243, 810
kwParsing system, 1439
L
Label widget class
functionality, 411
pack method, 377
LabelFrame widget class, 595
labels
bg option, 417
customizing, 417
expand option, 418
fg option, 417
fill option, 418
font attribute, 417
height attribute, 417
pack option, 418
width attribute, 417
LALR parsers, 1439
lambda callback handlers
callback scope issues, 385–391
deferring calls, 384–385
functionality, 383
LAMP acronym, 775
language analysis (see text processing and
language analysis)
languages2common module, 1194
languages2reply module, 1199–1201
launchmodes module, 264, 478
lexical analysis (see text processing and
language analysis)
library modules, 785–786
line buffering, 835–837
Lisp language, 1547
LIST command (FTP), 877
list comprehensions, summing with, 1411
list operators
append, 6, 12
extend, 6
functionality, 5
Listbox widget class
curselection method, 525
functionality, 411, 522
insert method, 524
programming, 524–525
runCommand method, 524
xscrollcommand option, 526
xview method, 526
yscrollcommand option, 526
yview method, 526
lists
database lists, 6
of dictionaries, 10
field labels, 7–8
in-place modifications, 1369–1370
sample records, 4
stacks as, 1360
loops
threads and, 197–199
time.sleep, 588, 589–590, 592
ls command
filename patterns, 165
shell command limitations, 99
M
M2Crypto third-party package, 1281
Mac environment
language support, 1514
programming user interfaces, 358, 362
tkinter support, 357
machine names, 781
mail configuration module, 902–905, 1232,
1247
mail reader tool, 902, 905–909
mail sender script, 911–919
mailbox module, 786
MailFetcher class, 967–976
MailParser class, 976
MailSender class, 959–967
MailTool class, 958
mailtools utility package
initialization file, 957
MailFetcher class, 967–976
MailParser class, 976
MailSender class, 959–967
MailTool class, 958
overview, 956
pymail client and, 986–991
PyMailCGI and, 1232, 1252, 1260, 1278
PyMailGUI and, 1034, 1051
selftest.py module, 956, 983–986
mainloop function (tkinter), 369, 373
Index | 1567

marks, text, 532
match objects (re module), 1417
media files, playing, 343–351
Menu widget class
add_cascade method, 508
functionality, 411, 508–511
Menubutton widget class, 411, 512–517
menus
automating, 521, 603–612
defined, 507
displaying in windows, 517–518
frame-based, 512–517
menubutton-based, 512–517
PyEdit text editor, 676
top-level, 508–511
message headers
email addresses, 935–938
Internationalized, 933
mailtools utility package, 959, 976
passing text in hidden fields, 1273–1275
Message objects
composing messages, 924–926
functionality, 922–923
get_content_charset method, 931
get_payload method, 930
multipart messages, 925
Message Passing Interface (MPI) standard,
178
Message widget class, 411, 448
messagebox module, 427
MFC (Microsoft Foundation Classes), 362
mimetypes module
functionality, 348–350, 786
guess_extension method, 923
guess_type method, 923
playing media files, 343–347
selecting transfer modes, 877, 882
minimal URLs, 1139, 1194
mixin utility classes, 599–602
mmap module, 223
model-view-controller (MVC) structure, 778
module documentation sources, 77
mod_python module, 780, 1130, 1182
Monty Python theme song, 865
more function
chaining with pipes, 116
functionality, 79
mouse-related events, 445–448
MPEG format, 595
MPI (Message Passing Interface) standard,
178
multiplexing servers, 820–826
multiprocessing (see parallel processing)
multiprocessing module
additional tools supported, 256–257
constraints, 256
functionality, 76, 243–245
GIL and, 213
implementation, 246
IPC support, 224, 248–254
launching GUIs as programs, 479–480
processes and locks, 245–248
socket server portability and, 813–815
starting independent programs, 254
usage rules, 246
Musciano, Chuck, 1126
MVC (model-view-controller) structure, 778
mysql-python interface, 1304
N
name conventions
CGI scripts, 1143
files, 15
__name__ variable, 84
named pipes
basic functionality, 235–236
creating, 234
defined, 223, 224
use cases, 236
namespaces
creating, 1526
running code strings with, 1522–1524
natural language processing, 1439
nested structures
dictionaries, 11
pickling, 1310, 1311
uploading local trees, 893–895
Network News Transfer Protocol (NNTP),
991–993, 1227
network scripting
development options, 777–780
handling multiple clients, 802–826
library modules and, 785–786
making sockets look like files/streams, 827–
839
protocols and, 782–785
Python file server, 840–851
sockets and, 781–782, 787–802
1568 | Index

newsgroups
accessing, 991–993
handling messages, 1121
NLTK suite, 1439
NNTP (Network News Transfer Protocol),
991–993, 1227
nntplib module, 786, 991–993
numeric tools, 750
NumPy programming extension, 750, 1484
O
object references
callback handlers as, 628
deferring calls, 384–385
object relational mappers (see ORMs)
Object Request Broker (ORB), 779
object types, storing in shelves, 1317
object-oriented databases (OODBs), 1304
object-oriented programming (see OOP)
objects
callable, 1516, 1524–1526, 1530–1535
changing classes, 1320
converting to strings, 1309
pickled, 1304, 1309–1315
sharing between pages, 1193–1196
shelve constraints, 1322
offline processing, PyMailGUI program, 1031–
1033
onSignal handler function, 242
OODBs (object-oriented databases), 1304
OOP (object-oriented programming)
adding behavior, 29
adding inheritance, 29
adding persistence, 34–36
alternative database options, 36
class considerations, 27–29
GUI considerations, 42–44
programming considerations, 26–27, 1550
refactoring code, 31–34
open function
buffering policy, 144
functionality, 135, 137
modes supported, 145
open source software, 673, 785
opening files, 138, 144
optimization
in-place list modifications, 1369–1370
moving sets to dictionaries, 1378–1382
tuple tree stacks, 1367–1369
Optionmenu widget class, 515
optparse module, 108
ORB (Object Request Broker), 779
ORMs (object relational mappers)
database options, 36, 778
functionality, 1304, 1354–1356
os module
administrative tools, 91
chdir function, 92, 104
chmod function, 159
close function, 230
dup function, 132
dup2 function, 230
environ mapping
accessing environment variables, 1497
accessing shell variables, 109
changing shell variables, 111
Env object, 1499
functionality, 100, 103
execl function, 183
execle function, 183
execlp function, 100, 182–184, 183
execlpe function, 183
execv function, 183
execve function, 183
execvp function, 183, 230
execvpe function, 183
_exit function, 215
fdopen function, 158, 226
file tools supported, 155
fork function
functionality, 100, 179, 230
os.execlp combination, 182–184
redirecting streams, 132
forking tools, 179
functionality, 75, 77, 90
getcwd function, 91, 103
getenv function, 113
getpid function, 91, 180
kill function, 243, 810
linesep character, 92
listdir function
fetching list of remote files, 876
handling Unicode filenames, 172
joining files, 288
printing Unicode filenames, 280
storing local files, 882
walking directory trees, 171
walking one directory, 167
Index | 1569

lseek function, 156
mkdir function, 100
mkfifo function, 101, 235
open function, 100, 155, 156–158
pathsep character, 92
pipe function
file descriptors and, 224
functionality, 100, 230
redirecting output, 132
popen function
communicating with, 96
exit status, 216
functionality, 95
launching mail program, 910
redirecting streams, 128, 129
shell listing command, 164–166
standard streams and, 103
portability constants, 92
program exits, 215
putenv function, 113, 1497
read function, 155
remove function, 101, 159
rename function, 159
sep character, 92
shell commands from scripts, 94–100
spawnv function, 100, 112, 258–261
spawnve function, 112, 258–261
startfile function, 263
stat function, 101, 160, 1216
system function, 95, 96, 216
tools by functional area, 90
unlink function, 159
walk function
find function and, 322
functionality, 101
handling Unicode filenames, 172
scanning directory trees, 169–171, 273
write function, 155
os.path module
abspath function, 94
functionality, 77
isdir function, 93
isfile function, 93
join function, 93
samefile function, 1216
split function, 93, 1224
tools supported, 91, 92–94
Output class, 124
output files, 137–139
output stream buffering
deadlocks and flushes, 231–233
Pexpect and, 131, 234
program exits and, 218
pty module and, 233
P
Pack class, 377
packer geometry manager
combining with grid, 568–570
defined, 370
expand and fill options, 398
grid comparison, 566–568
layout system, 397
making expandable, 570
resizing widgets, 374
packing
scroll bars, 526
widgets without saving, 377–378
paging script example, 79
PanedWindow widget class, 595
parallel processing
defined, 177
forking processes, 179–184
IPC support, 222–243
multiprocessing module, 243–258
portable framework, 263
program exits, 213–222
socket server portability and, 813–815
spawning clients, 798–801
starting programs, 258–263
system tools coverage, 268
threads, 186–213
parameters
passing in hidden fields, 1172
passing in hidden form fields, 1176
passing in URLs, 1153–1155, 1170–1172,
1254–1257
query, 1138, 1176
parent process, 179
parsing
binary data, 151–153
command-line arguments, 107
custom language parsers
adding parse tree interpreter, 1449–
1454
expression grammar, 1440
parse tree structure, 1454
parser code, 1441–1449
1570 | Index

parser comparisons, 1457
PyTree GUI and, 1456–1457
writing, 1440
defined, 1405
email content, 921–947
HTML support, 779, 1430, 1435–1438
parser decoding requirement, 927–929
recursive descent, 1439, 1440
regular expression support, 1431
rule strings, 1412–1415
with splits and joins, 1409
XML support, 779, 1429, 1430–1435
passwords
encrypting, 1278–1286
escaping in HTML, 1264–1266
PyMailCGI password page, 1250
pattern matching (see regular expressions)
pattern objects (re module), 1417
performance
PyMailCGI program and, 1293
PyMailGUI program and, 1122, 1293
saving thumbnail files, 500
stacks and, 1366, 1373
string object methods and, 1415
threads and, 186
Perl language, 1547, 1556
permissions
CGI scripts and, 1215
HTML constraints, 1140
persistence
DBM files, 1305–1308
object relational mappers, 1354–1356
options available, 1303
pickled objects, 1309–1315
programming considerations, 34–36
shelve files, 1315–1325
SQL databases, 1329–1354
ZODB system, 1325–1329
Peters, Tim, 70
Pexpect package
output stream buffering and, 131, 234
overview, 76
PhotoImage widget class, 411, 484–491, 517
pickle module
background information, 1415
constraints, 1323–1324
functionality, 19–22, 786, 1309
per-record pickle files, 22–23
Pickler class, 1310
PyMailGUI program and, 1119
Unpickler class, 1310
pickled objects
defined, 1304, 1309
usage considerations, 1310–1315
PIL (Python Imaging Library) extension toolkit
animation and, 595
basics overview, 491
creating image thumbnails, 496–505
displaying other image types, 493–496
functionality, 358, 366
images in toolbars, 520
thumbnail support, 557
pipe character (|), 116
Pipe object (multiprocessing), 248
pipes
anonymous, 223, 224–233
command-line, 232, 654–662, 838, 839
implementing, 224
multiprocessing module and, 249
named, 223, 234–236
sockets and, 659
unbuffered modes, 232
playfile module, 866
Plone website builder, 778
plotting points on a circle, 747–751
PLY parsing system, 1439
Pmw (Python Mega Widgets) extension toolkit
functionality, 358, 364
scrolling support, 505
polymorphism, 123
POP (Post Office Protocol)
fetching email at interactive prompt, 909
mail configuration module, 902–905
mail reader script, 905–909
overview, 901
PyMailCGI and, 1249–1266, 1272–1275,
1277–1286
PyMailGUI and, 1051–1053
poplib module
functionality, 786, 900
mail reader script, 905
pymail script and, 947
PyMailCGI program and, 1232, 1260
popmail script, 902, 905–909
port numbers
defined, 782
protocol rules, 783
reserved, 801–802
Index | 1571

pprint module
displaying databases, 13
regular expression parsing and, 1431
SAX parsing and, 1432
scanning directory trees, 273
print function
CGI scripts and, 1163
functionality, 78
redirecting, 127
standard streams and, 113
printing
dialog results, 434–436
Unicode filenames, 279–282
Process class (multiprocessing), 245
process forking (see forking processes)
program execution
automated program launchers, 351
CGI scripts, 1143
cross-program communication, 480
GUI programs, 371, 478–484
launching email programs, 910
launching methods, 258–263
persistence options, 1303
PyCalc program, 1463
pymail console client, 952–956, 989–991
PyMailGUI, 1010
server-side scripts, 1130–1134
threads and, 187
program exits
with child threads, 206
os module, 215
process exit status and shared state, 219
shell commands and, 216–219
sys module, 214
thread exits and shared state, 220–222
programming Python
adding behavior, 29
adding GUI, 40–51
adding inheritance, 29
adding persistence, 34–36
adding web-based interfaces, 52–69
alternative database options, 36
class considerations, 27–29
coding for reusability, 482–484
console interaction, 37–39
Hello World program, 368, 376
inputting user data, 44
Internet development options, 777–780
OOP considerations, 26–36
programming pointers, 5
rapid development features, 1548–1552
refactoring code, 31–34
representing records, 4–14
socket programming, 787–802
storing records persistently, 14–25
programs, 112
(see also spawned programs)
chaining with pipes, 116
independent, 238, 254
redirecting streams to, 114–119
protocols
client/server considerations, 783
defined, 782
development options, 777
pickle module and, 1314
port number rules, 783
standards overview, 786
structural considerations, 784
PSF (Python Software Foundation), 36
PSP (Python Server Pages), 780, 1169, 1182
pty module, 233
putfile module, 866
PY extension, 372
py2exe tool, 359
PyArg_Parse API function, 1522, 1524
Py_BuildValue API function, 1525
PyCalc program
adding buttons, 1477–1480
building GUI, 1459
CalcGui class, 1464, 1465
as component, 1475–1477
Evaluator class, 1466
extending and attaching, 1461
functionality, 1457–1459, 1463
running, 1463
running code strings, 1460
source code, 1469–1475
PyClock program
functionality, 747
plotting points on a circle, 747–751
running, 751–754
source code, 754–761
widget support, 528
Py_CompileString API function, 1528
PyCrypto system, 1278, 1280
PyDemos launcher toolbar, 662–664, 673,
1061
1572 | Index

PyDict_GetItemString API function, 1515,
1526
PyDict_New API function, 1515, 1526
PyDict_SetItemString API function, 1515,
1526
PyDoc system, 79
PyDraw paint program
functionality, 738
running, 738
source code, 738–747
widget support, 528
PyEdit text editor
changes in version 2.0
configuration module, 683
font dialog, 683
summarized, 682
undo, redo, modified tests, 683
changes in version 2.1
improvements for running code, 687
modal dialog state fix, 684
new Grep dialog, 685–687
Quit checks, 685, 692
summarized, 684
Unicode text support, 688–692
update for initial positioning, 687
embedding in PyView, 729–732
examples and screenshots, 682
functionality, 512, 674
implementing, 528
launching, 675
menus and toolbars, 676
multiple windows, 678–681
PyMailGUI program and, 1034
running program code, 677
source code
launch files, 695
main implementation file, 696–716
overview, 693
user configuration file, 694
Unicode support, 547
PyEnchant third-party package, 1119
PyErrata website, 1298
PyEval_CallObject API function, 1515, 1524
PyEval_EvalCode API function, 1528
PyEval_GetBuiltIns API function, 1526
PyForm example, 1356–1358
PyFort system, 1514
PyGadgets launcher toolbar, 667–670, 673,
1061
PyGame package, 595
PyGTK package, 360
PyImport_GetModuleDict API function, 1515
PyImport_ImportModule API function, 1515,
1522, 1524
Py_Initialize API function, 1522
PyInstaller tool, 359
pyjamas toolkit, 362
pymail console client
functionality, 947–956, 1009
updating, 986–991
PyMailCGI program
background information, 1229, 1230
configuring, 1240
fourth edition enhancements, 1233–1235
implementation overview, 1230–1233
presentation overview, 1236
processing fetched mail
delete action, 1268–1271
deletions/POP message numbers, 1272–
1275
overview, 1266–1267
reply and forward, 1267
reading POP email
escaping mail text/passwords, 1264–
1266
mail selection list page, 1251–1254
message view page, 1259–1262
passing state information, 1254–1257,
1262
POP password page, 1250
security protocols, 1257
root page, 1231, 1239–1241
running chapter examples, 1237–1238
sending mail by SMTP
common look-and-feel, 1246
error pages, 1246
message composition page, 1242
overview, 1241
send mail script, 1242–1246, 1247–
1249
third edition enhancements, 1235–1236
utility modules
common utilities module, 1286–1291
configuration, 1276
external components, 1276
overview, 1276
POP mail interface, 1277
POP password encryption, 1278–1286
Index | 1573

Web scripting tradeoffs
alternative approaches, 1296–1298
PyMailGUI versus, 1292
Web versus desktop, 1293–1296
PyMailGUI program
components
altconfigs module, 1059, 1114–1116,
1117
functionality, 1019
html2text module, 1102–1105, 1117
implementation overview, 1062–1063
ListWindows module, 1067–1085,
1117
mailconfig module, 1026, 1034, 1057,
1105–1110, 1118
main module, 1063–1066
messagecache module, 1095–1098
popuputil module, 1098–1100
PyMailGUIHelp program, 1111–1114
SharedNames module, 1066
textconfig module, 1110
ViewWindows module, 1085–1095
wraplines module, 1100–1102
deleting email, 1049–1051
email recipient options, 1043–1049
email replies and forwards, 1043–1049
extracting plain text, 1438
frame-based menus, 512
getting started, 1020–1025
HTML content in email, 1053
improvement suggestions, 1116–1124
load server interface, 1030
loading mail, 1025
mail content Internationalization, 1017,
1055–1058
major changes, 1011–1019
multiple windows, 1060–1062
offline processing, 1031–1033
overview, 1008–1010
placing callbacks on queues, 640–646
POP support, 1051–1053
presentation strategy, 1010
PyMailCGI versus, 1292
running, 1010
sending email and attachments, 1033–
1037
source code modules and size, 1006–1008
status messages, 1060–1062
synchronization, 1051–1053
threading model, 1027–1030
Unicode support policies, 1017–1019
viewing email and attachments, 1037–1043
PyMailGUIHelp program, 1111–1114
PyModule_GetDict API function, 1515, 1522
PyObjC toolkit, 362
PyObject_CallObject API function, 1515
PyObject_GetAttrString API function, 1515,
1524, 1527
PyObject_SetAttrString API function, 1515,
1522
PyParsing system, 1439
PyPhoto image program
limitations, 560
overview, 716
running, 717–719
source code, 719–727
widget support, 528
PyPI website, 780, 1440
PyQt package, 360
Pyrex system, 1485, 1513
PyRun_File API function, 1515
PyRun_SimpleString API function, 1519
PyRun_String API function, 1515, 1522, 1526
pySerial interface, 76, 851
python interpreter program, 109
Python language
Internet development option, 777–780
language comparisons, 1547–1548
name origin, 25
third-party packages, 75
Python Server Pages (PSP), 780, 1169, 1182
Python Software Foundation (PSF), 36
PythonCard builder, 361
PythonInterpreter class API, 1538
PYTHONIOENCODING environment
variable, 282
PYTHONPATH environment variable
defined, 110
pickled class constraints, 1323
running code strings, 1522
syntax errors and, 87
PYTHONUNBUFFERED environment
variable, 1144
PyToe game widget
functionality, 762
running, 762
source code, 763–766
PyTree program, 556, 1402–1404, 1456–1457
1574 | Index

PyView image program
frame-based menus, 512
functionality, 727
running, 727–732
source code, 732–738
widget support, 528
PYW extension, 371
PyWin32 package
development options, 779
overview, 362
PyXML SIG, 1435
Q
queries
automating, 1341–1342
CGI script support, 57–59
parameter considerations, 1138, 1176
running with SQLite, 1336–1338
QUERY_STRING environment variable, 1201
queue module
arguments versus globals, 206
functionality, 76, 204
program exit with child threads, 206
running the script, 207
threads and, 188
Queue object (multiprocessing), 248, 252–254
queues
placing callbacks on, 640–646
placing data on, 636–640
Quit button, 429
quit method, 369
quopri module, 786
R
Radiobutton widget class
associated variables, 457
command option, 462
functionality, 411, 462–467
variables and, 463–465
random access files, 153–155
random module, 51, 488
range function, 7
re module
compile function, 1417, 1421, 1422
escape function, 1422
findall function, 1418, 1419, 1421, 1431
finditer function, 1421
functionality, 1416
match function, 1417, 1419, 1421, 1422
search function, 1418, 1419, 1421, 1422
sub function, 1422
subn function, 1422
records
adding with SQLite, 1334
building dictionaries, 1339–1342
built-in dictionaries, 9–14
formatted files, 14–19
list-based, 4–8
per-record pickle files, 22–23
pickle files, 19–22
shelves and, 23–25
recursive descent parsing, 1439, 1440
refactoring code
alternative classes, 32
augmenting methods, 31
with CGI scripts, 1192–1201
with classes, 888–892
constructor customization, 32
display format, 31
with functions, 884–888
Register_Handler function, 1531
regression test scripts, 297–304
regular expressions
defined, 1416
limitations, 1438
parsing support, 1431
pattern examples, 1425–1427
pattern matching techniques, 1416–1418
pattern syntax, 1423–1425
re module, 1416, 1421–1425
scanning C header files, 1427–1429
string operations versus, 1418–1421
remote sites
deleting remote trees, 895–898
downloading directories, 874–880
downloading remote trees, 899
remote servers, 798, 1145
uploading directories, 880–884
repeater method, 586
ReplaceVisitor class, 336
reporting directory differences, 317–319
reserved port numbers, 801–802
RETR string (FTP), 860
RFC822, 899
rfc822 module, 924
RIAs (rich Internet applications), 361, 778,
1297
Index | 1575

rotor module, 1279
Route_Event function, 1531
rule strings, parsing/unparsing, 1412–1415
running programs (see program execution)
S
SAX parsers, 1429, 1431
Scale widget class
command option, 467
from_ option, 468
functionality, 411, 467–471
get/set methods, 467
label option, 468
resolution option, 468
showvalue option, 468
tickinterval option, 468
to option, 468
variables and, 469–471
scanner function, 160
scanning
C header files for patterns, 1427–1429
directories, 272
directory trees, 273
entire machines, 276–279
module search paths, 274–276
Scheme language, 1547
SciPy package, 1513
screen scraping, 779, 1156
scripts, 52
(see also CGI scripts; client-side scripting;
Internet-related scripting; network
scripting; server-side scripting; system
programs; system scripting)
automating queries, 1341–1342
command-line arguments and, 106–108
command-line mode, 1351–1354
current working directory and, 104–106
custom paging script, 79
data format script, 16–18
launching, 104
queue module example, 207
refactoring with classes, 888–892
refactoring with functions, 884–888
regression test, 297–304
running shell commands from, 94–100
shell variables and, 109–113
SQL utility, 1347–1354
standard streams and, 113–132
start command in, 262
start-up pointers, 16
test data script, 14
Unix platforms and, 108
utility scripts, 18
Web tradeoffs, 1291–1298
Scrollbar widget class
functionality, 411, 522
packing scroll bars, 526
programming, 525
set method, 526
ScrolledCanvas class, 554–556
ScrolledList component class, 523
ScrolledText component class, 529, 533, 537
search paths, CGI scripts, 1143
search_all script, 330
searcher function, 328
searching directory trees, 319–329
SearchVisitor class, 331–334, 349
Secure Sockets Layer (SSL), 1257
security
password encryption and, 1278–1286
PyMailCGI program and, 1241, 1257
web-based interfaces and, 63–64
select module
functionality, 76
multiplexing servers, 820–826
sendmail program, 911
sequences
permuting, 1395–1397
reversing/sorting, 1397–1402
serial port interfaces, 851
serialization, 1309
server-side databases, 1181
server-side scripting/processing, 1125
(see also CGI scripts; PyMailCGI program)
development options, 777
forking servers, 803–815
Internet applications and, 1296
multiplexing servers with select, 820–826
overview, 1125
protocol considerations, 783
Python file server, 840–851
root page examples, 1133
running, 1130–1134
server socket calls, 790–791
templating languages, 1129
threading servers, 815–818
transferring files, 1209–1227
sets
1576 | Index

adding relational algebra, 1382
built-in options, 1374
classes and, 1377–1378
defined, 1373
functions and, 1375–1376
moving to dictionaries, 1378–1382
operations supported, 1373
shared memory
mmap module, 223
multiprocessing module and, 250–252
threads and, 186
shared state
forking processes and, 219
threads and, 220–222
shell commands
communicating with, 96
defined, 95
exit status codes, 216–219
find, 320
kill, 243
limitations, 99
os module support, 94
running, 95
subprocess module alternative, 97–99
shell variables
accessing, 103
changing, 111
defined, 109
environment settings, 113
fetching, 110
wrapping calls, 1495–1501
ShellGui tool
adding GUI frontends to command lines,
617–623
application-specific tool set classes, 615
functionality, 613
generic shell-tools display, 613–615
GUI input dialogs, 619–622
non-GUI scripts, 617–619
shelve files
changing classes of objects, 1320
constraints, 1321–1323
defined, 1304, 1315
standard operations, 1316
storing built-in object types, 1317
storing class instances, 1318–1320
usage considerations, 1316
shelve module
console interface, 37–39
dictionary-of-dictionaries format and, 14
functionality, 23–25
GUI interface, 46–51
open method, 25
pickle support and, 1315
PyMailGUI program and, 1119
unique objects and, 1322
usage considerations, 1316
web-based interfaces, 60–69
writeback argument, 1317, 1322
shutil module
additional information, 159
functionality, 76
signal handlers, 809–813
signal module
alarm function, 242
functionality, 76, 240–243
pause function, 241
signal function, 241
signals
defined, 223
functionality, 240–243
Silverlight framework, 361
SimpleEditor class
clipboard support, 537
functionality, 535
inheritance support, 537
limitations, 538
SIP system, 1512
Smalltalk language, 1547
SMTP (Simple Mail Transfer Protocol)
date formatting standard, 919
mail sender script, 911–919
overview, 910
PyMailCGI program, 1241–1249
sending email at interactive prompt, 919
smtplib module
functionality, 786, 901, 911
pymail script and, 947
PyMailCGI program and, 1232
PyMailGUI program and, 1034, 1122
smtpmail script, 911–919
SOAP
integration considerations, 1540
persistence options, 1304
pickled objects and, 1311
Web services support, 779
socket module
functionality, 76, 236–240, 786
Index | 1577

programming, 787–802
socket objects
bind method, 790
close method, 793
connect method, 793
defined, 790
listen method, 790
makefile method, 232, 827
send method, 793
setblocking method, 825
sockets
basic functionality, 237–238, 781, 788–793
client calls, 792
command pipes and, 839
defined, 223, 773
development options, 777
forked processes and, 807
independent programs and, 238
looking like files and streams, 827–839
machine identifiers, 781
output stream buffering and, 232
pipes and, 659
practical usage considerations, 796
programming support, 787
running programs locally, 794
running programs remotely, 795–797
server calls, 790–791
spawning clients in parallel, 798–801
spawning GUI as separate programs, 649–
654
talking to reserved ports, 801–802
transferring byte strings/objects, 791
use cases, 239
socketserver module, 56, 786, 818
sorted function, 119
source code lines, counting, 338
spam, 914, 1117
SPARK toolkit, 1439
spawned programs
command-line pipes, 654–662
defined, 112
sockets example, 649–654, 798–801
spawned threads (see threads)
spelling checkers, 1119
Spinbox widget class, 595
splitting files, 283–286, 289–292
SQL databases
additional resources, 1354
API tutorial with SQLite, 1332–1339
building record dictionaries, 1339–1342
code consolidation, 1342–1343
functionality, 1304, 1329–1330
interface overview, 1330–1332
loading database tables from files, 1344–
1347
SQL utility scripts, 1347–1354
SQLAlchemy system, 36, 1330
SQLite database system
adding records, 1334
getting started, 1333
making databases/tables, 1334
overview, 1332
running queries, 1336–1338
running updates, 1338
SQLObject system, 36, 1330, 1355
SSL (Secure Sockets Layer), 1257
ssl module, 786, 1257
stacks
built-in options, 1360–1362
customizing performance monitors, 1366
defined, 1360
defining Stack class, 1364–1366
defining stack module, 1362–1363
evaluating expressions with, 1465–1469
in-place list modifications, 1369–1370
as lists, 1360
timing improvements, 1371–1373
tuple tree, 1367–1369
Stajano, Frank, 75
standard dialogs, 426–438
standard streams (see input/output streams)
start command, 99, 261
state information
combining techniques, 1183
extensions to CGI model, 1182
hidden form input fields, 1176
HTTP cookies, 1177–1181
Internet applications and, 1296
passing with PyMailCGI, 1230, 1254–1257,
1262
process exit status, 219
saving in CGI scripts, 1174–1183
SAX parsers and, 1429
server-side databases, 1181
thread exits, 220–222
URL query parameters, 1176
status codes, exit, 216–219
1578 | Index

status messages, PyMailGUI program, 1060–
1062
STOR string (FTP), 860
str object type
functionality, 82
string method calls, 1406–1408
Text widget and, 539–540
usage considerations, 545–546
string methods
basics overview, 80–82
endswith method, 1407
find method, 1407
format method, 1406
isdigit method, 1407
isupper method, 1407
join method, 94, 1407, 1409, 1413
pattern matching versus, 1418–1421
performance and, 1415
replace method, 1407, 1408
templating with replacements/formats,
1408
rjust method, 1407
rstrip method, 1407
split method, 1407, 1409, 1410
startswith method, 1407
strip method, 1407
summing columns in files, 1410–1412
upper method, 1407
string module
ascii_uppercase constant, 1408
background information, 1415
preset variables, 81
string methods and, 1408
Template feature, 1408
strings, 1416
(see also code strings; regular expressions)
converting, 82, 1161
converting objects to, 1309
formatting, 63–64
functionality, 1406
query, 57–59
shelve constraints, 1321
specifying positions, 531
Text widget as, 530
Unicode text in, 540–542
StringVar class, 454
strop module, 1415
struct module
functionality, 786
parsing binary data, 151–153
serial ports and, 851
unpack method, 152
subclassing
attaching class components, 405–407
attaching frames, 475
built-in types, 1383–1385
C++ class, 1509
customizing widgets with classes, 400–403
extending class components, 407
multiprocessing module and, 252–254
protocol considerations, 607
PyCalc program and, 1463
recursive uploads, 893
reusable GUI components, 403–410
subprocess module
exit status, 218
functionality, 76
Popen object, 101
redirecting streams, 128, 130–132
SumGrid class, 579
summer function, 1410–1412
SWIG tool, 1491–1495, 1500, 1502–1511
synchronization
inbox error potential, 1272
mailtools utility package, 968
PyMailGUI program and, 1051–1053
_thread module and, 193–195
threading module, 202–204
threads and, 187
sys module
argv parameter, 103, 106
command-line arguments, 106–108
current working directory, 104
documentation sources, 77
exception details, 89
exc_info function, 89
exit function, 214
functionality, 75, 77, 90
getdefaultencoding function, 148
getrefcount function, 89
loaded modules table, 88
module search path, 87, 104, 275
modules dictionary, 88
platform string, 87
platforms and versions, 86
program exits, 214, 379
setcheckinterval function, 211
standard streams and, 113–132
Index | 1579

sys.stderr
capturing stream, 127
CGI scripts and, 1161
functionality, 103
output stream buffering, 231
PyMailCGI program and, 1286
sys.stdin
CGI scripts and, 1128
end-of-file character, 115
end-of-line character, 115
functionality, 103
redirecting to Python objects, 123–126
user interaction and, 120–123
sys.stdout
CGI scripts and, 1128
functionality, 103
output stream buffering, 231
redirecting print calls, 128
redirecting to Python objects, 123–126
system programs
additional examples, 341
automated program launchers, 351
comparing directory trees, 308–319
copying directory trees, 304
counting source code lines, 338
generating redirection web pages, 292–297
playing media files, 343–351
printing Unicode filenames, 279–282
recoding copies with classes, 339–341
regression test scripts, 297–304
scanning directories, 272
scanning directory trees, 273
scanning entire machine, 276–279
scanning module search path, 274–276
searching directory trees, 319–329
splitting and joining files, 282–292
walking directories, 330–342
system scripting
additional references, 86
bytes string type, 82
custom paging scripts, 79
file operations and, 83
module documentation sources, 77
overview, 75
paging documentation strings, 78
program usage considerations, 84
Python library manuals, 85
string methods, 80–82
system modules, 76
Unicode encoding, 82
system tools, 177
(see also parallel processing)
defined, 73
os module, 90–101
sys module, 86–90
system scripting, 75–86
systems application domain, 73
T
tables
creating with SQLite, 1334
description considerations, 1339
generating, 1146–1149
laying out forms, 1157–1163
loading from files, 1344–1347
ORM support, 1304
table display script, 1349–1351
table load script, 1347
tags
binding, 548
form, 1149–1152
objects, 553
table, 1148
text, 532
Tcl language, 412, 1547
Telnet service, 874, 901
telnetlib module, 786
tempfile module, 76
templating
server-side languages supporting, 1129,
1297
with replacements and formats, 1408
testparser module, 1441, 1453
text files
buffered output streams and, 832
end-of-line translations, 149–151
Unicode encoding and, 136, 146, 147–149,
538–548
text payload encodings, 929–933, 976
text processing and language analysis
advanced language tools, 1438–1480
custom language parsers, 1440–1457
PyCalc program, 1457
regular expressions, 1415–1429
strategies for, 1405
string method utilities, 1406–1415
XML and HTML parsing, 1429–1438
Text widget class
1580 | Index

advanced operations, 548–550
functionality, 411, 528–530
get method, 532
index support, 531
mark_set method, 532
programming, 530–533
PyMailGUI program and, 1053, 1118
search method, 533
tag support, 532
tag_add method, 532
tag_bind method, 548
tag_delete method, 533
tag_remove method, 533
text-editing operations, 533–538
Unicode and, 538–548
xscrollcommand option, 526
xview method, 526
yscrollcommand option, 526
yview method, 526
text-mode transfers, 882
this module, 70
Thread class, 199
_thread module
allocate_lock function, 194
basic usage, 189–191
coding alternatives, 197–199
functionality, 76
running multiple threads, 191–193
start_new_thread function, 190
synchronizing access, 193–195
waiting for spawned thread exits, 195–197
ways to code threads, 191
threading module
functionality, 76, 199–201
synchronizing access, 202–204
thread exits in GUIs, 639
timer function, 210
ways to code threads, 201
threads
advantages using, 186
animation and, 594
anonymous pipes and, 227
exit considerations, 220–222, 639
global interpreter lock and, 211–213
GUIs and, 208–210, 584–585, 657
potential usage downsides, 187
PyEdit text editor, 685
PyMailGUI program and, 1015, 1027–
1030
queue module, 204–208
servers and, 815–818
shared state, 220–222
spawned, 178
_thread module, 189–199
threading module, 199–204
time.sleep loops, 592
thumbnails, 560
(see also PyPhoto image program)
creating, 496–505
scrollable canvases and, 557–560
time module
functionality, 76
sleep call, 180, 588, 589–590, 592
timeit module, 76
timer objects, 210
Tix extension toolkit
functionality, 358, 365
HList widget, 1116
Tk GUI library, 412
Tk widget class
coding example, 373
destroy method, 423
exporting methods, 422–426
functionality, 411, 421
iconbitmap method, 424
iconify method, 424
maxsize method, 424
menu option, 425, 508–511
protocol method, 423
quit method, 424
title method, 424
withdraw method, 424
tkinter module, 375
(see also specific widget classes; widgets)
after method, 210
coding alternatives, 372–373
coding basics, 369
configuring window titles, 375
createfilehandler tool, 583
documentation, 364, 767
extensions supported, 364–366, 596
functionality, 40–42, 358, 363
geometry managers, 370
implementation structure, 366
programming structure, 367
underscore character, 409
widget classes supported, 411
TkinterTreectrl third-party extension, 1116
Index | 1581

toolbars
automating, 603–612
displaying in windows, 517–518
images in, 520–521
PyDemos, 662–664, 673, 1061
PyEdit text editor, 676
PyGadgets, 667–670, 673, 1061
Toplevel widget class
automating building windows, 630–634
custom dialogs, 439
deiconify method, 587
destroy method, 423
dialogs and, 426
functionality, 411, 419–426
iconbitmap method, 424
iconify method, 424, 587
independent windows, 476
lift method, 587
maxsize method, 424
menu option, 425, 508–511
protocol method, 423
quit method, 424
state method, 588
title method, 424
withdraw method, 424, 587
traceback module
CGI scripts and, 1163
functionality, 89
PyMailCGI program and, 1246, 1254
transferring directories, 874–892
transferring directory trees, 892–899
transferring files
to clients and servers, 1209–1227
over the Internet, 854, 857–860
with ftplib, 854–873
Trigger_Event function, 1531
try/finally statement, 140
ttk extension toolkit, 358, 365
tuple tree stacks, 1367–1369
Turbo Gears tool collection, 778
Twisted framework
overview, 76, 780
server options, 825
type command (Windows), 95
U
underscore (_), 409
Unicode encoding
additional information, 1406
DBM files and, 1317
email and, 900
email package limitations overview, 927
file policies, 174
handling filenames, 172–175
Internationalized headers, 933–935
mailtools utility package, 959, 967, 976
message address headers, 935–938
message composition issues, 941–946
message text generation issues, 938–941
overview, 82, 146, 147–149
parser decoding requirement, 927–929
printing filenames, 279–282
PyEdit text editor, 685, 686, 688–692
PyMailCGI program and, 1232, 1245
PyMailGUI program and, 1017–1019,
1122
text files and, 136
text payload encodings, 929–933
Text widget and, 538–548
unique function, 311
unittest framework, 303
Unix platforms
changing permissions, 1140
executable scripts, 108
find shell command, 320
forking support, 180
preventing zombies, 809–813
programming user interfaces, 358
redirecting streams, 115
shell command limitations, 99
urllib module
CGI script support, 57–59
client-side scripting, 997–1002
downloading files, 857–860
PyMailCGI program and, 1232
urlretrieve interface, 999
urllib.parse module
CGI scripts and, 1129
functionality, 786
invoking programs, 1001
PyMailCGI program and, 1255
quote_plus function, 1255
URL escapes, 1203–1209
URL formatting, 1139
urlencode function, 1256
urllib.request module
CGI scripts and, 1130
cookie support, 1178, 1180
1582 | Index

downloading files, 857
functionality, 786, 997
HTML parsing and, 1435
PyMailCGI program and, 1237, 1248
screen scraping support, 779
testing browsers with, 1155–1157
urlopen method, 1156
URLs
CGI script escape conventions, 1201–1209
HTML conflicts and, 1206
minimal, 1139, 1194
passing parameters, 1153–1155, 1170–
1172, 1254–1257
PyMailGUI program improvements, 1117
query parameters, 1176
reading mail with, 1258
syntax, 1137–1139
user interaction
checking for missing/invalid inputs, 1190–
1192
form tags, 1150–1152
passing parameters in URLs, 1153–1155,
1170–1172, 1254–1257
response script, 1152
submission page, 1149
uu module, 786
V
Value object (multiprocessing), 248
van Rossum, Guido, 25, 36, 357, 776
variables
associated, 454–456, 457
check buttons and, 460–461
global, 206, 250–252, 385
radio buttons and, 463–465
scales and, 469–471
usage recommendations, 466
W
weave package, 1513
web browsers (see browsers)
Web frameworks, 777
web pages
building with CGI scripts, 1135–1140
generator script, 294–297
sharing objects between, 1193–1196
template files, 293
web servers
root page examples, 1133
running CGI scripts, 55–57, 1130
running local, 1131–1133
Web services, 779
web-based interfaces
CGI scripts, 52–55
formatting reply text, 59
programming suggestions, 68
query strings and, 57–59
running web servers, 55–57
shelve module support, 60–69
toolkit suggestions, 52
urllib module support, 57–59
webbrowser module, 343–347–348
websites
accessing, 994–997
design considerations, 1169
generating redirection web pages, 292–297
widget builder functions, 598
widgets, 448
(see also specific widget classes)
adding multiple, 395–400
adding via CGI scripts, 1163–1166
advanced, 595
after tool, 582, 589, 591
after_cancel tool, 583
after_idle tool, 583
anchor option, 399–400
attaching to frames, 397, 471–475
bd option, 418
binding events, 443–448
clipping, 396
config method, 375, 416
configuring appearance, 416–419
configuring options, 375
constructing, 370
cursor option, 418
customizing labels, 417
customizing with classes, 400–403
dialogs and, 426–443
expanding, 380
focus tool, 584
grab tool, 584
hiding and redrawing, 587
laying out input forms, 451–454
packing layout, 397–400
packing without saving, 377–378
pack_forget method, 587
padx option, 418
Index | 1583

pady option, 418
positioning in windows, 370
PyCalc program as, 1475–1477
redirecting streams to, 623–628
resizing, 373–375, 396
standardizing appearance, 402
standardizing behavior, 402
state option, 418
tkinter widget classes, 411
top-level windows, 419–426
update tool, 583
update_idletasks tool, 583
wait_variable tool, 584
wait_visibility tool, 584
wait_window tool, 584
wildcard characters, 166
windows
automating building, 630–634
configuring titles, 375
hiding and redrawing, 587
independent, 476–477
menus and toolbars, 517–522
popping up on demand, 647–649
positioning widgets in, 370
PyEdit text editor, 678–681
PyMailGUI program support, 1060–1062
Windows environment
avoiding DOS consoles, 371
Component Object Model, 779
directory paths, 88
Distributed Component Object Model,
779
programming user interfaces, 358, 362
redirecting streams, 115
shell command limitations, 99
standard streams and, 114
tkinter support, 357
with statement, 140
wrapping
C environment calls, 1495–1501
C++ classes with SWIG, 1502–1511
descriptors in file objects, 158, 226
writing
CGI scripts, 1128–1130
custom language parsers, 1440–1457
files, 138
wxPython system, 359
X
X11 interface, 358
xdrlib module, 786
xml package
development options, 779
functionality, 1429
XML parsing
additional resources, 1435
DOM parsers, 1429, 1433
ElementTree support, 1429, 1434
functionality, 1430
overview, 779, 1429
regular expressions and, 1431
SAX parsers, 1429, 1431
third-party tools, 1435
XML-RPC
functionality, 779
integration considerations, 1540
persistence options, 1304
pickled objects and, 1311
xml.etree package, 1434
xmlrpc package, 1003, 1430
Y
YAPPS parser generator, 1439
Z
zips, summing with, 1411
ZODB system
functionality, 36, 1325–1326
pickled objects and, 1313
usage considerations, 1326–1329
zombie processes, 807–813
Zope toolkit, 778, 1169
1584 | Index

About the Author
Mark Lutz is the world leader in Python training, the author of Python’s earliest and
best-selling texts, and a pioneering figure in the Python community.
Mark is the author of the popular O’Reilly books Learning Python, Programming Py-
thon, and Python Pocket Reference, all currently in fourth editions. He has been using
and promoting Python since 1992, started writing Python books in 1995, and began
teaching Python classes in 1997. As of early 2010, Mark has instructed some 250 Python
training sessions, taught over 3,500 students, and written Python books which have
sold roughly a quarter of a million copies and been translated to over a dozen languages.
In addition, he holds BS and MS degrees in computer science from the University of
Wisconsin, and over the last 25 years has worked as a professional developer on com-
pilers, programming tools, scripting applications, and assorted client/server systems.
Mark maintains a book support site on the Web at http://rmi.net/~lutz and a training
site at http://learning-python.com.
Colophon
The animal on the cover of Programming Python is an African rock python, one of
approximately 18 species of python. Pythons are nonvenomous constrictor snakes that
live in tropical regions of Africa, Asia, Australia, and some Pacific Islands. Pythons live
mainly on the ground, but they are also excellent swimmers and climbers. Both male
and female pythons retain vestiges of their ancestral hind legs. The male python uses
these vestiges, or spurs, when courting a female.
The python kills its prey by suffocation. While the snake’s sharp teeth grip and hold
the prey in place, the python’s long body coils around its victim’s chest, constricting
tighter each time it breathes out. Pythons feed primarily on mammals and birds. Python
attacks on humans are extremely rare.
The cover image is a 19th-century engraving from the Dover Pictorial Archive. The
cover font is Adobe ITC Garamond. The text font is Linotype Birka; the heading
font is Adobe Myriad Condensed; and the code font is LucasFont’s
TheSansMonoCondensed.
