OSRMT User Guide Ver 1.6 Feb 2019
User Manual:
Open the PDF directly: View PDF ![]() .
.
Page Count: 24

OSRMT
Open Source Requirements Management Tool
User Guide
Version 1.6
February 2019

Revision History
Date
Version
Description
Author
02-14-2019
1.6 1.6 Rebuild Suchita Arunan
10-10-2006
1.3 Updated Aron Smith
8-26-2006
1.2 Updated Aron Smith
6-19-2006
1.1 Updated Aron Smith
5-14-2006
1.0
Initial Draft
Aron Smith

Table of Contents
1. Introduction --------------------------------------------------------------------- 4
1.1 Purpose of this Document:
1.2 Who can use OSMRT?
1.3 Installation Options
2. Getting Started -------------------------------------------------------------------- 5
2.1 Start Application
2.2 Application Logon
2.3 New product
2.4 Open Product
3. Managing Artifacts / Functionalities -------------------------------------- 8
3.1 Artifact Tree
3.2 Artifact Data Entry
4. Traceability --------------------------------------------------------------------------------- 14
4.1 Traceability
4.2 Traceability Tree
4.3 Traceability Views
4.4 Trace Impact
5. Reports --------------------------------------------------------------------------------------18
5.1 Standard Reports
5.2 Custom Reports
6. Import/Export ---------------------------------------------------------------------------- 21
6.1 Exporting artifacts
6.2 Importing arifacts
7. User Management ------------------------------------------------------------- 22
7.1 User Creation
7.2 Adding / Removing user from user groups
8. Definitions --------------------------------------------------------------------------- 24

1. Introduction
Open Source Requirements Management Tool (OSRMT) is a highly configurable, free open
source solution for defining and managing Requirements for software development. This is
an easy to install and easy to use solution with capabilities to document all aspects of
software development life cycle (SDLC).
This solution was initially built in 2006. However no further development happened for many
years. In 2019, the redevelopment was initiated by Alan Clifford and a new version (Version
1.6) was released in Feb 2019 at GitHub. This can be accessed through
https://github.com/osrmt/osrmt
1.1 Purpose of this Document:
The purpose of this document is to assist end users to get an understanding of the functionality
of the system and help them to navigate through the application and effectively use it.
1.2 Who can use OSMRT ?
OSMRT can be used by
1. Single user using their work station
2. A group of users independently working, but willing to share a common database
3. A corporation or organization with multiple users including multi location users.
1.3 Installation Options
OSMRT Application can be installed in any of the below scenarios
1. 2 Tier Architecture where the Application connects directly to a Database and has
the following installation options
a. Single user installation where the Database and Application resides in the
same computer
b. Multi user installation where the Database is centralised and Application
resides in computer of every user.
2. 3 Tier Architecture where the Application connects to the Database through the
J2EE server and has the following installation options
a. Multi user installation with multiple servers and a central database.
b. Multi user installation with Central database and web browser clients
Please refer to Installation manual for help with the installing the application.
2. Getting Started
2.1 Start Application
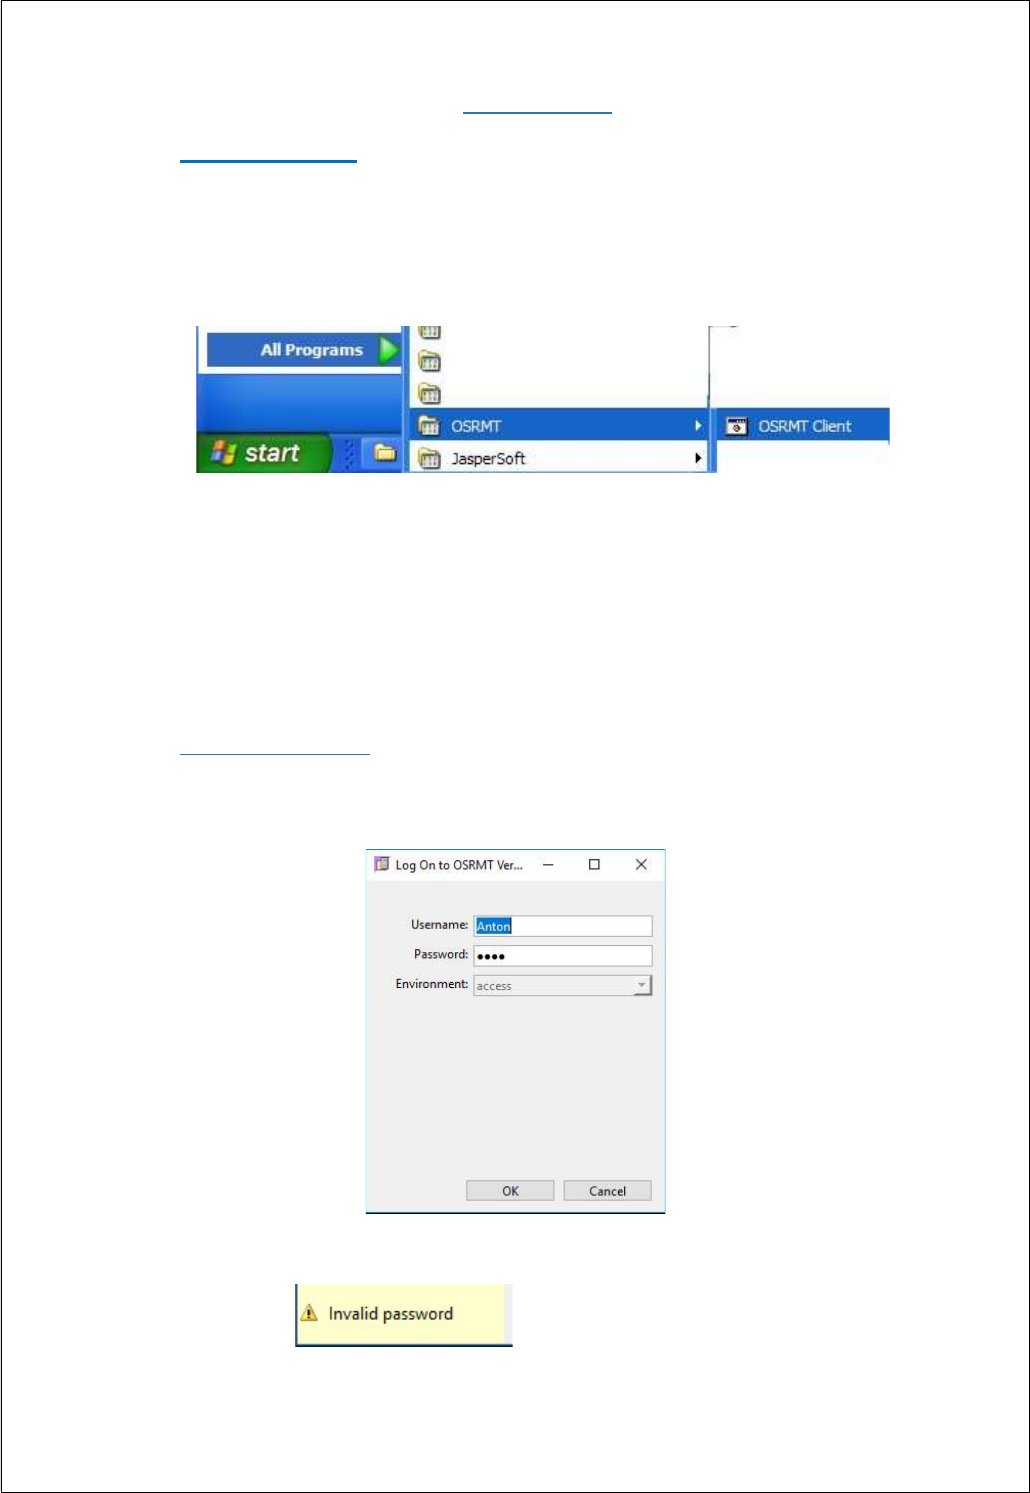
The Open Source Requirements Management Tool (OSRMT) can be started in the
following ways
1. Using Windows Start
Programs
OSRMT
OSRMTClient
2.
Using a Desktop shortcut
3.
From the command prompt
The application may be started from the command line as below
C:\Program Files\OSRMT > run.bat
2.2 Application Log On
The Log On screen prompts for a username, password and environment.
An error message will display if an incorrect username
or password is used. Clicking on the warning message will open a system log
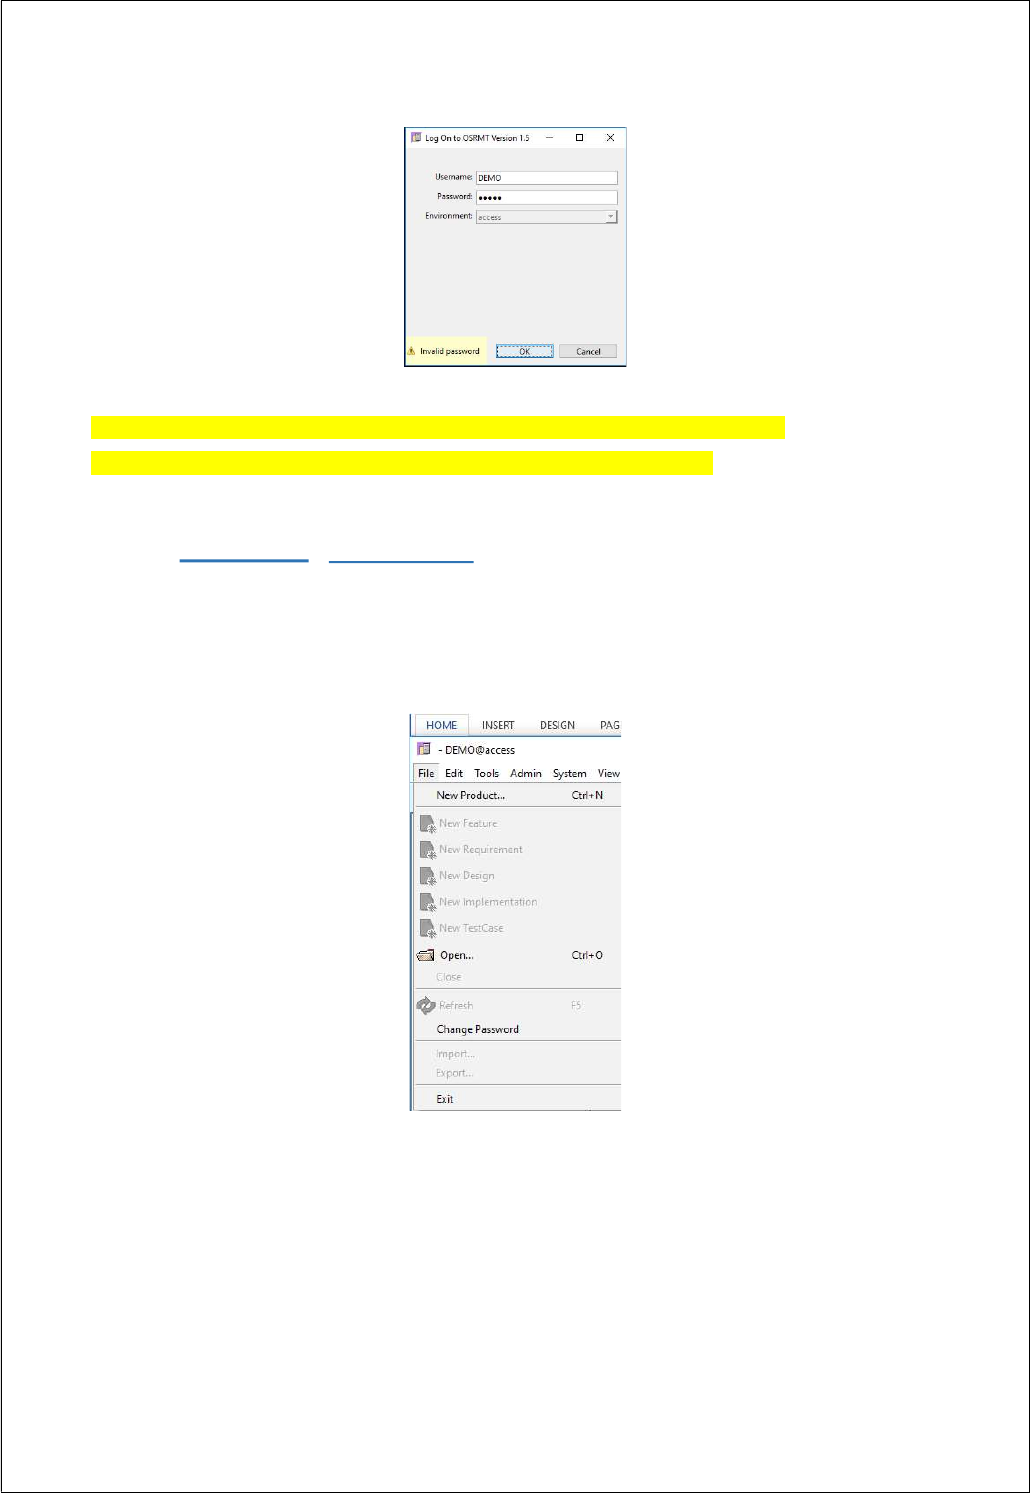
screen where additional technical messages may be displayed.
See the Application Log-on Error section in the Appendix for diagnosing any
application log on errors. Click on the error display to view all errors.
2.3 New Project -
New Product
The first step is to create a new project is to create a
“New Product”
to store all
requirements and other artifacts.
Create a new product from the menu item File
New Product as below
The product name that is entered above will be displayed throughout the application and
standard reports.
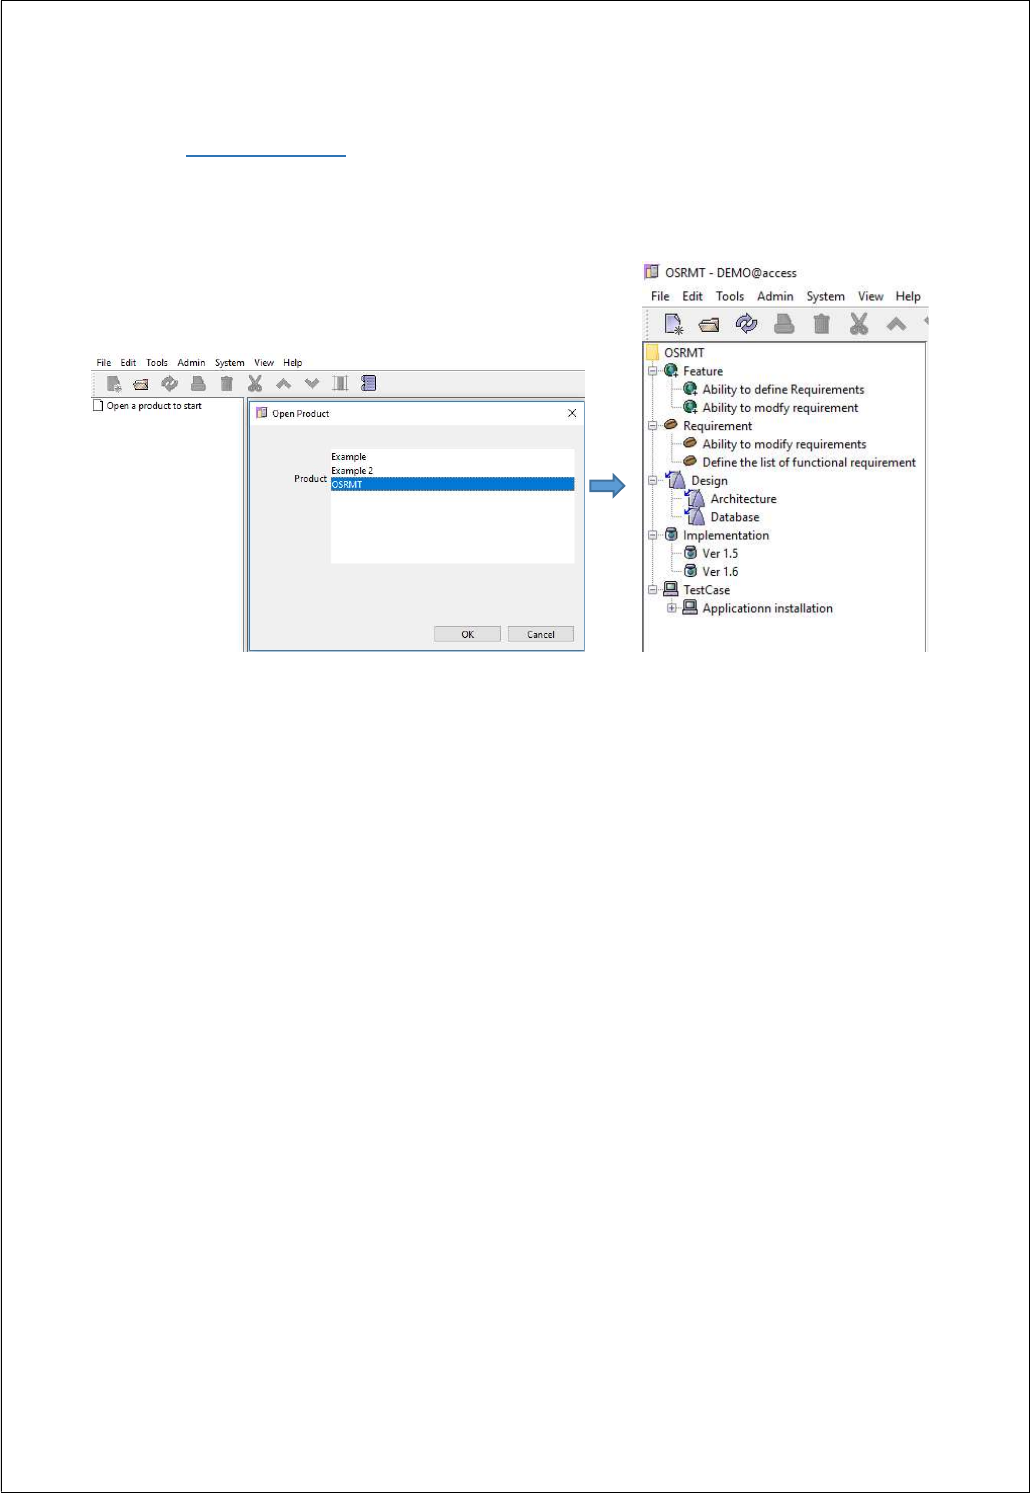
2.4
Open
Product
The product can be opened from Menu item as below
3. Managing Artifacts/ Functionalities
3.1. Artifact Tree
Artifacts can be defined by the administrator. The artifacts that are available
as base line are Features, Requirements, Design Modules,
Implementations and Test Cases
The name of the artifact can be customized by the Administrator. The
default list is shown below. Artifacts can be created under each of these
artifact types.
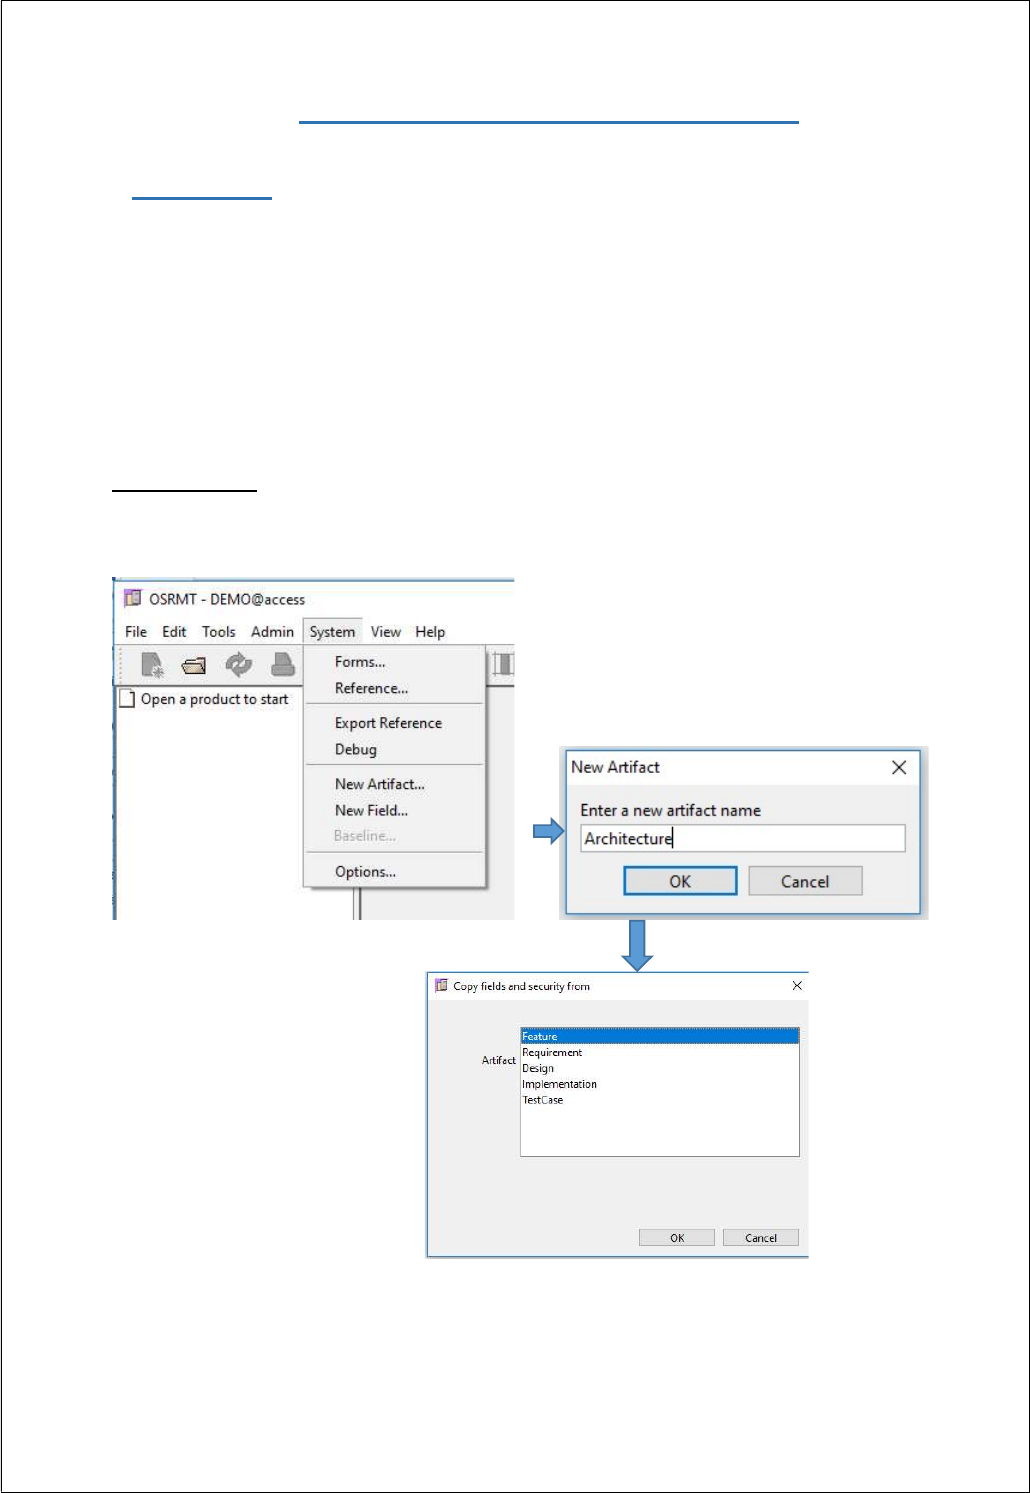
New Artifact
a. To create a new arteficat, choose
New Artifact
option under
System Menu
as
below
b. To create an artifact of a specified type, select the artifact and click on the New button
as below.
s
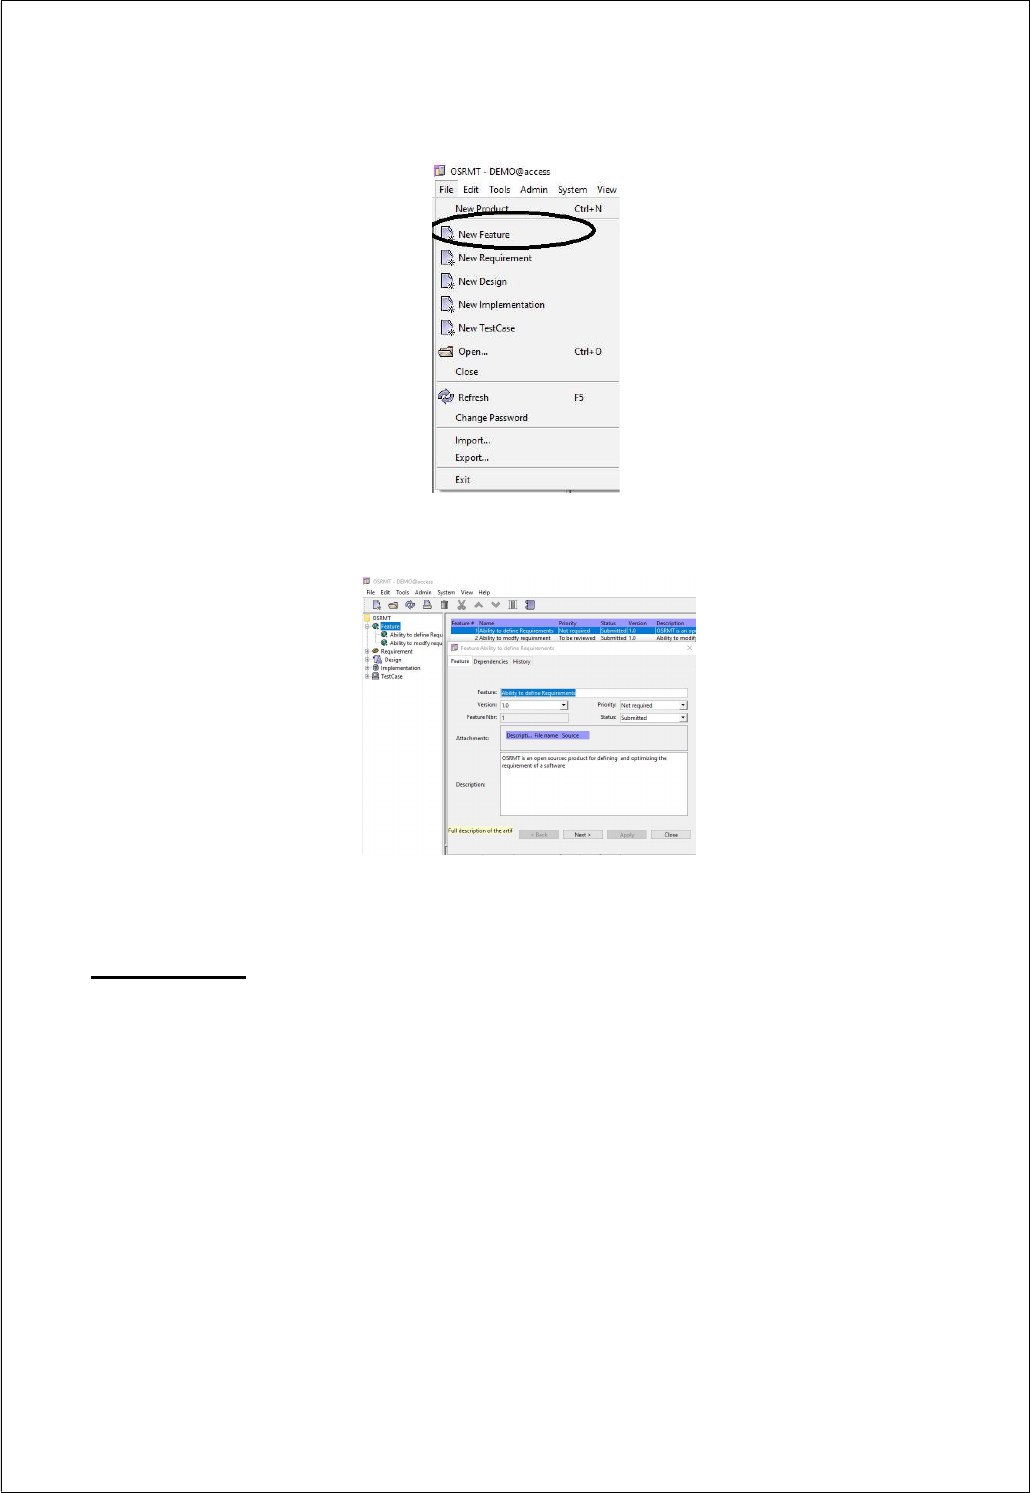
For example to create a New Feature, Choose New Feature from Menu as below
Enter the relevant data in the screen/form below and save the record to create a child
record under Feature artifact
Delete Artifact
An artifact can be deleted by selecting it in the Artifact Tree and using the
“
Delete”
option under Edit on the Menu bar.
Alternatively, the delete button on the tool bar can also be used
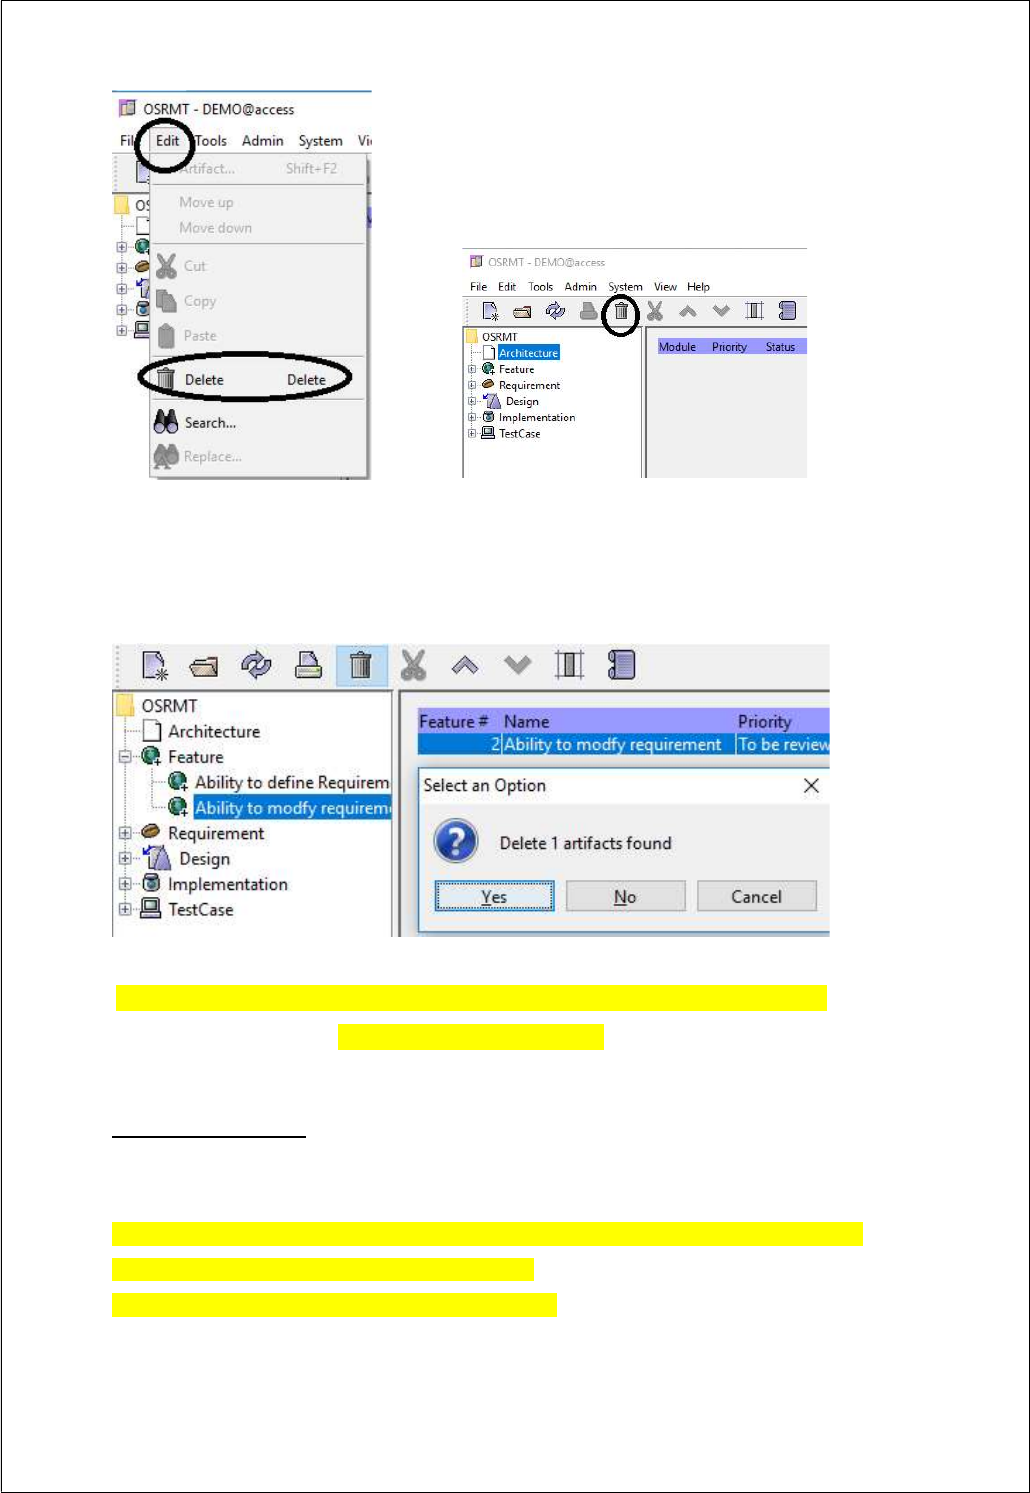
OR
Note that only the artifacts selected in the tree will be deleted. On delete the total number
of artifacts to be deleted will be displayed for confirmation of action.
Deleting an artifact which is a branch will delete all descendant artifacts
under the selected artifact.
Moving Artifacts
The hierarchy of the artifacts can be changed by dragging an artifact from one
parent to another.
Dragging artifacts from one type to a different type will create a dependency on the
target artifact – but it will not move the artifact.
The artifact types cannot be dragged and moved
View Artifact List
Selecting an artifact in the tree will display all child artifacts in a list to the right.
TIPS
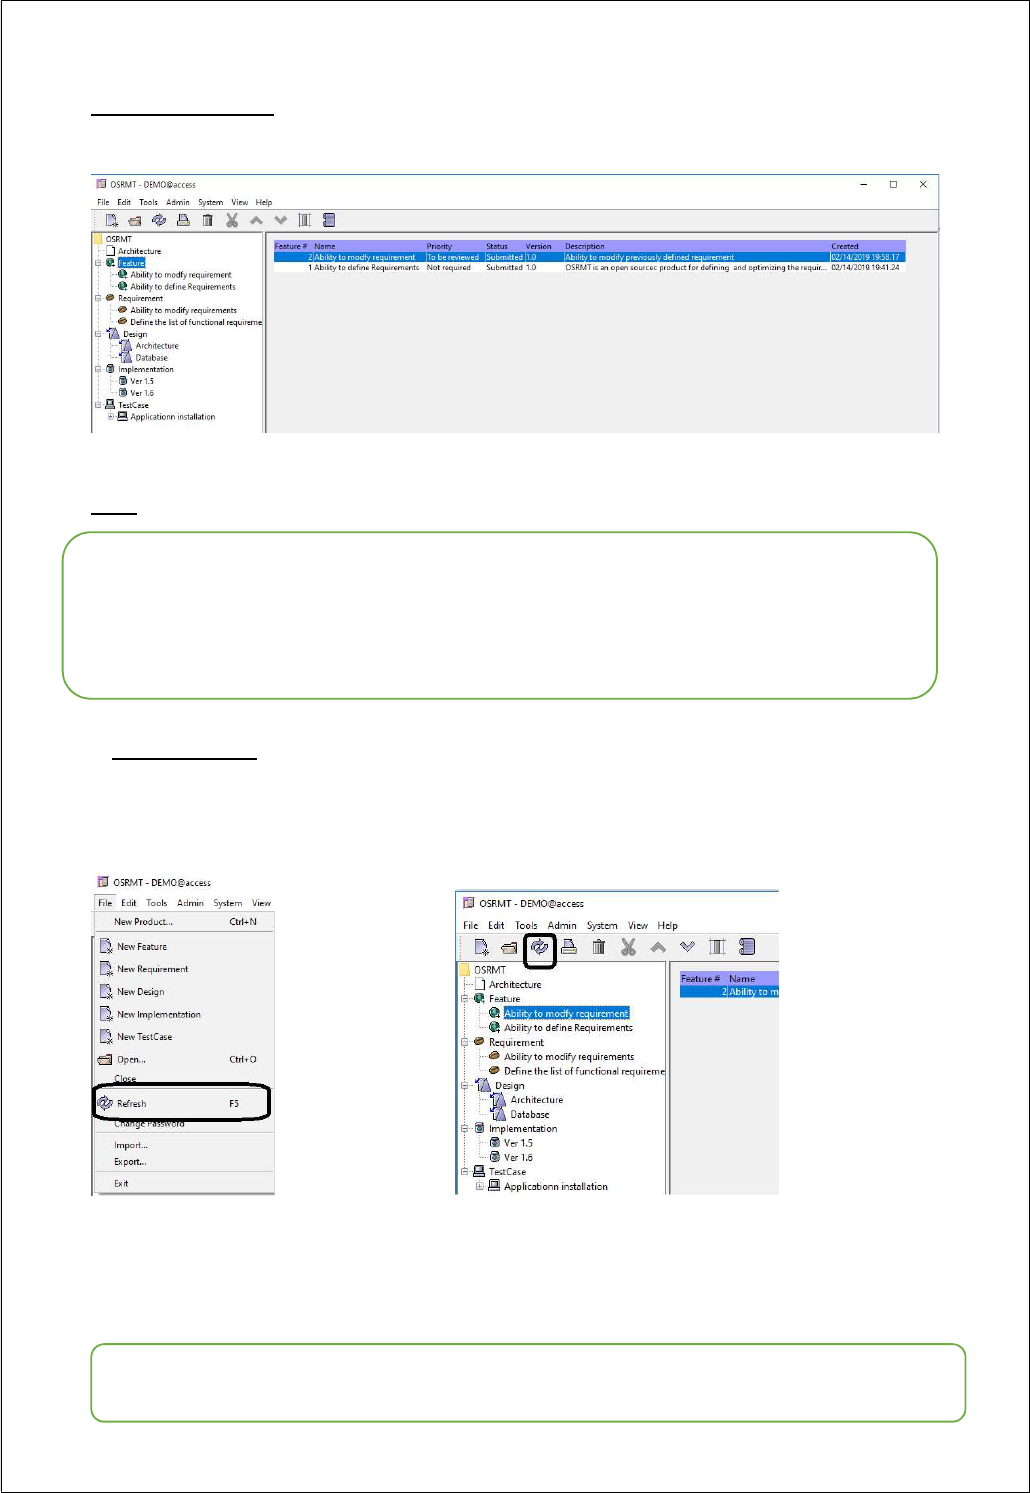
Refresh Tree
The artifact tree can be refreshed by using the menu options
File
Refresh
or by
clicking on the icon on the toolbar as below.
OR
Refreshing the tree is used for getting the true state of the system. This will refresh the
screen by extracting the relevant data from the data base again.
TIP
The display sequence and choice of columns can be customized by the Administrator.
To edit an existing artifact select from the list and double click on it.
To sort the list of artifacts, click on the column header, click on a column header
Refresh is normally done to reflect additions or changes by other users or in case of any
errors
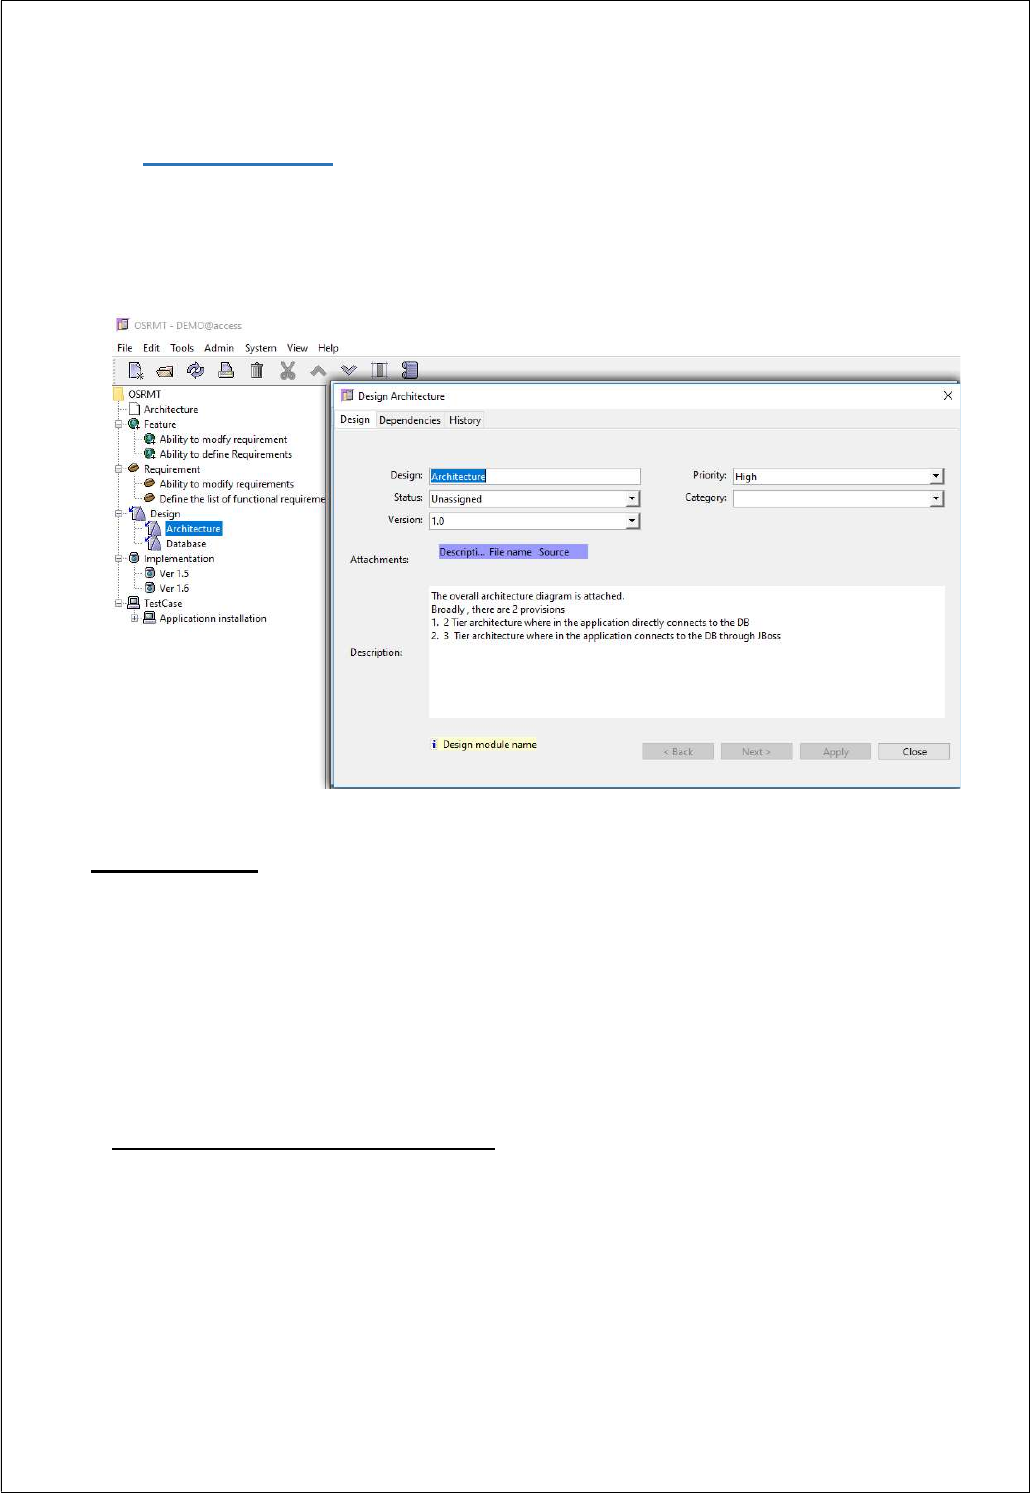
3.2 Artifact Data Entry
Each artifact type (feature, requirement, design etc.) will have a different data entry form as
configured by the Administrator.
See below an example of it.
Custom Forms
The Administrator may add or remove tabs and controls or lock controls from editing. Controls
may have default values or a custom list of values from the Reference table. The Administrator
may write a custom Javascript to format or initialize a control.
Custom controls may be created to store new data in the database.
Attaching or Linking Documents
Right click in the attachment list to popup a menu of additional options.
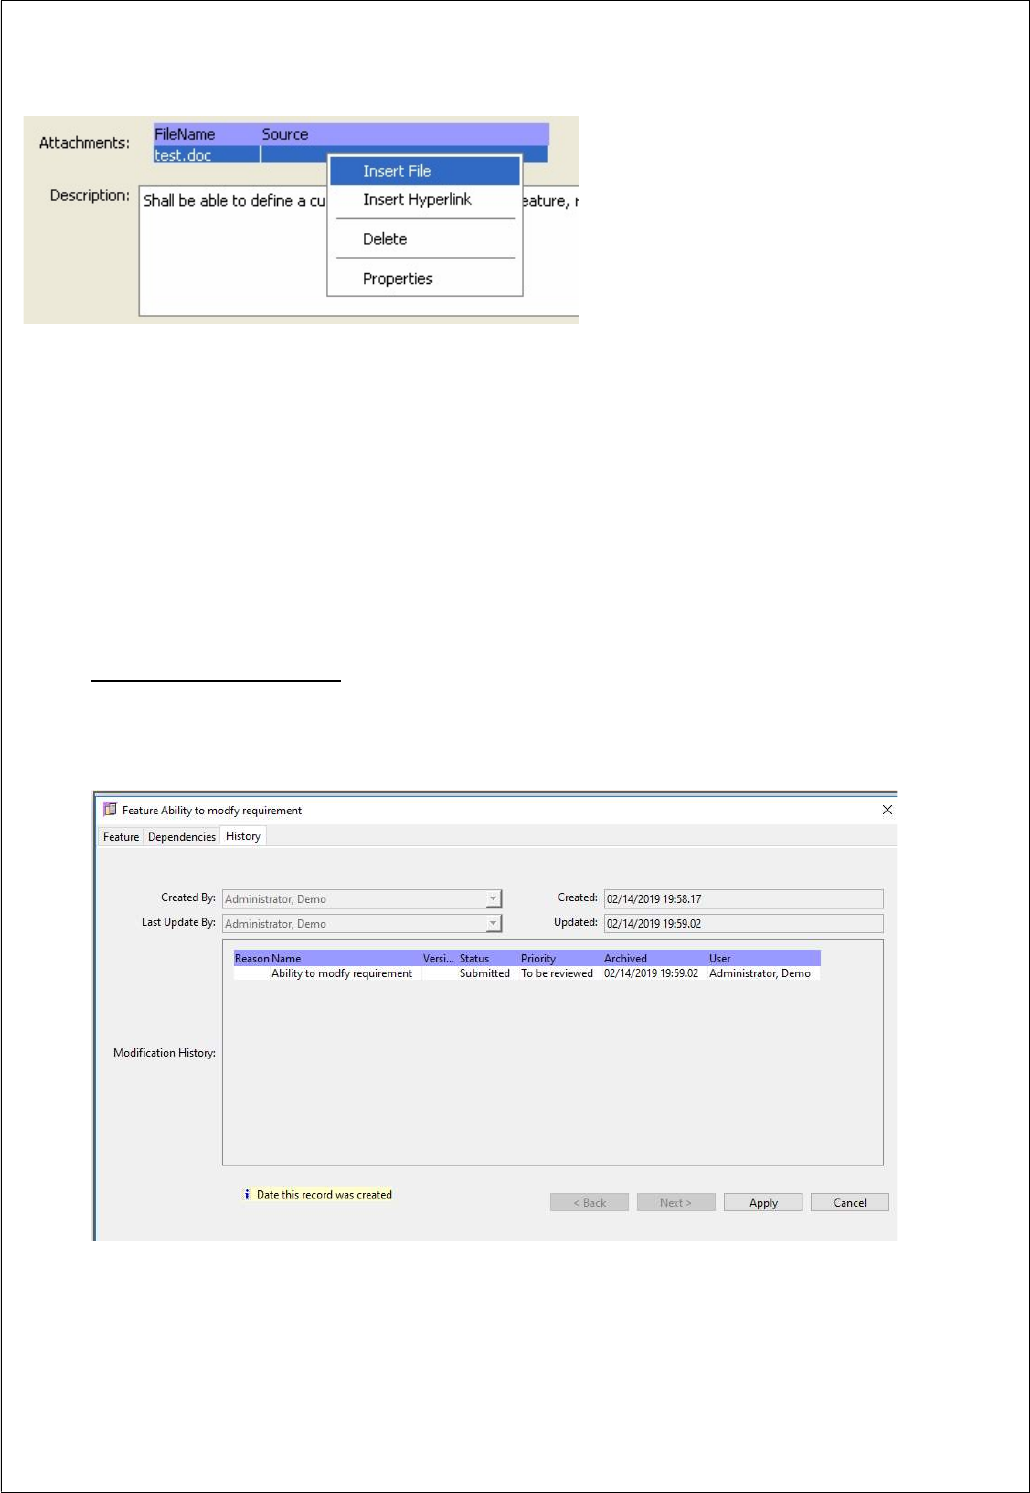
Selecting the menu item “Insert” will prompt to select a local or network file. Select and
press “Open” to upload the file to the server or local storage where a copy is placed in a
storage area defined by the Administrator.
Once a file is in the list, the FileName display or Source description may be changed using
the menu item Properties.
Hyperlinks may be stored using the menu item Insert Hyperlink.
Modification History
The full history of creation and modification is available including the time and date before
each update. See Sample below
4.
Traceability
4.1 Traceability
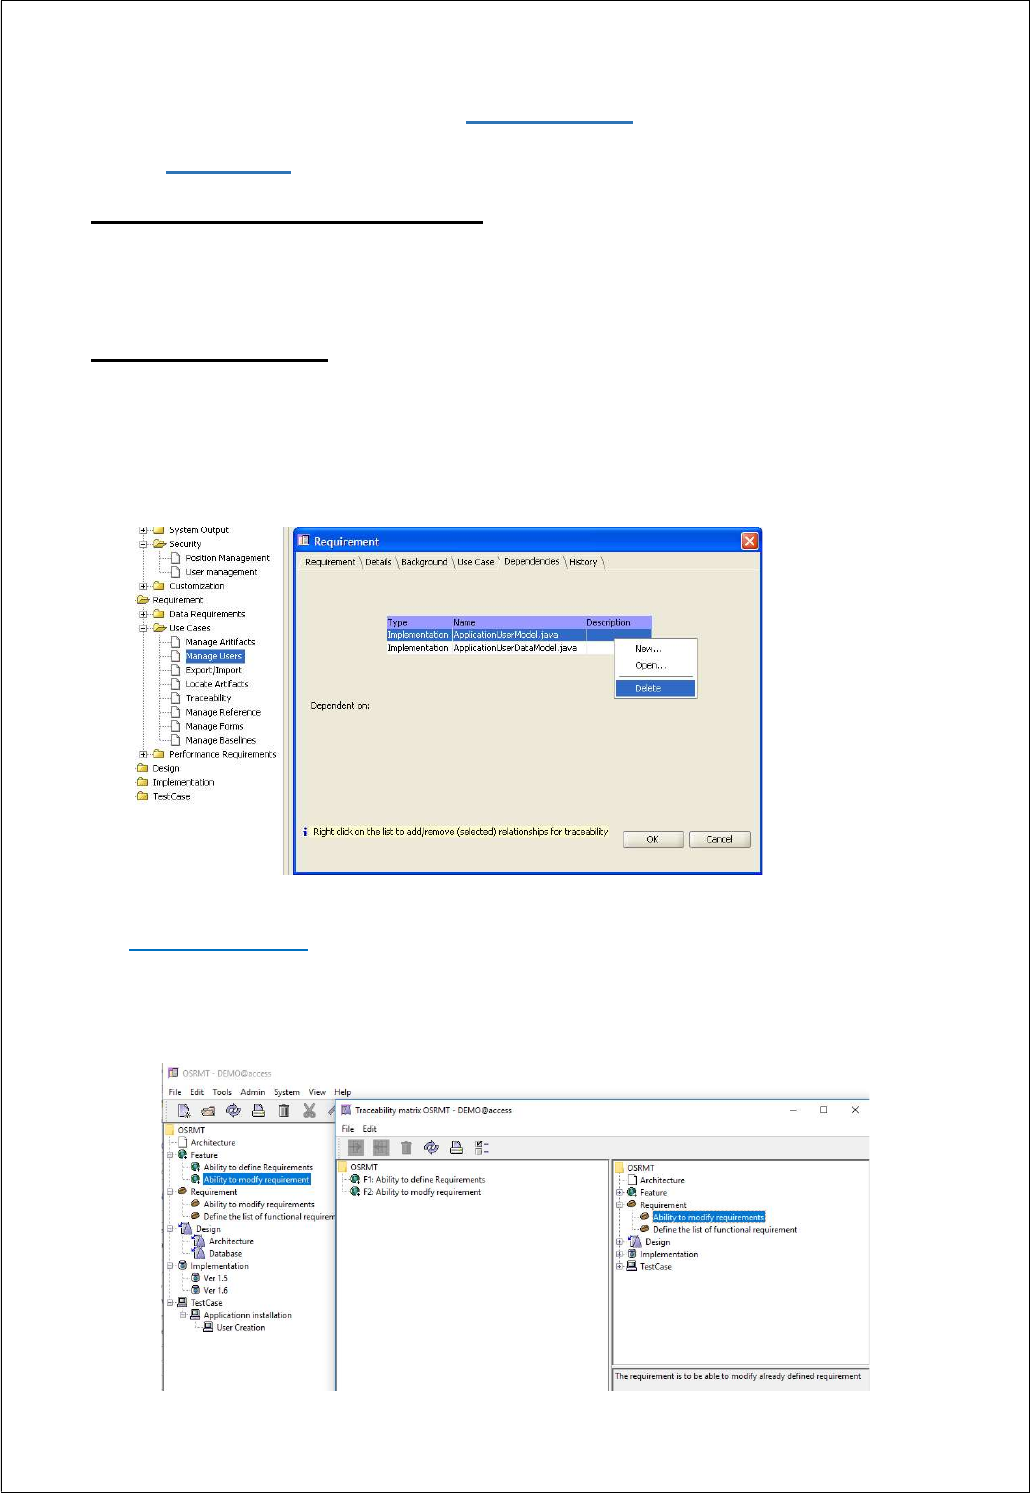
Child Artifacts are not dependent
Selecting an existing artifact and creating a child artifact will automatically create a relationship
between the two artifacts. This however does not create a dependency.
Adding dependencies
The dependencies define the traceability between the artifacts. To trace additional artifacts to
an opened form, right click in the related artifact list and select the menu New.... Select all
artifacts to be dependent on.
4.2 Traceability Tree
T
he traceability tree can be viewed using the menu option View traceability from the menu
bar as below
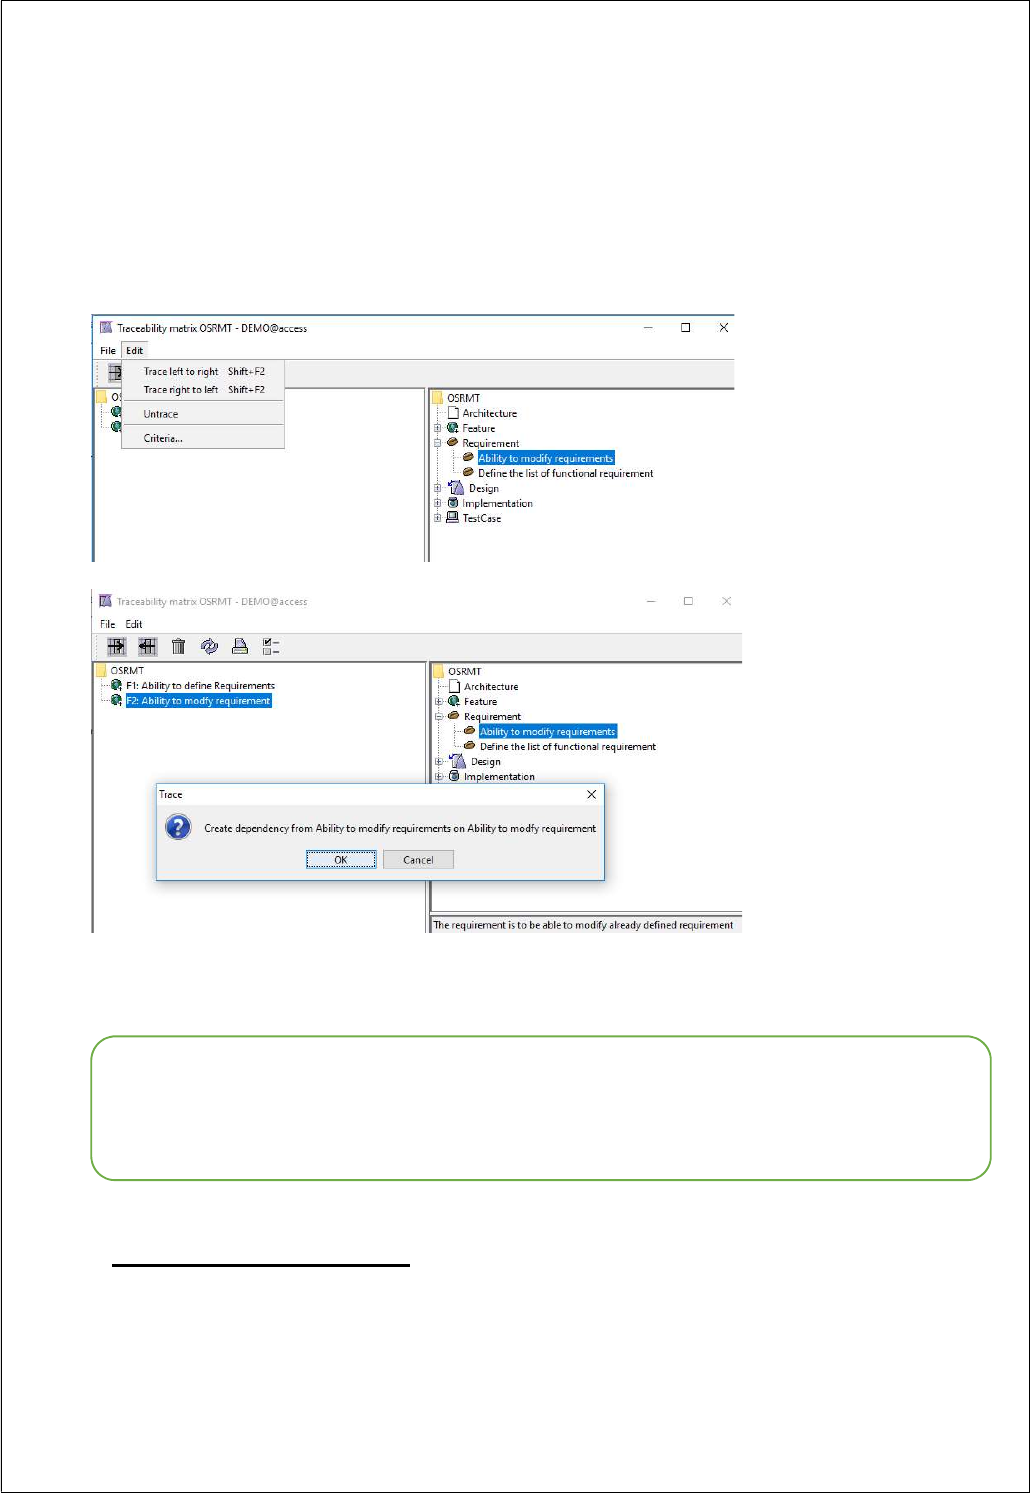
Pressing the Trace “
left to right”
button will create a dependency from the artifact on the top
to the artifacts just below it. You can also trace from the menu
Edit
Trace left to
right.
Pressing the Trace right to left button will create a dependency in the opposite direction.
See below.
TIP
Traceability Tree Options
The display on the right pane is the full artifact tree. The display on the left is a
dependency or traceability tree. To change the display of the traceability tree
use
menu Edit
Criteria
or press
the Criteria toolbar button.
Only one artifact should be selected on one of the sides – otherwise a confusing number of
dependencies will be created.
It is possible to create a dependency for a single feature on multiple artifacts.
4.3 Traceability Views
“Traced”
and “
untraced”
views are available in the system. To get to these views,
Use
Tools
Trace
Options from the menu bar.

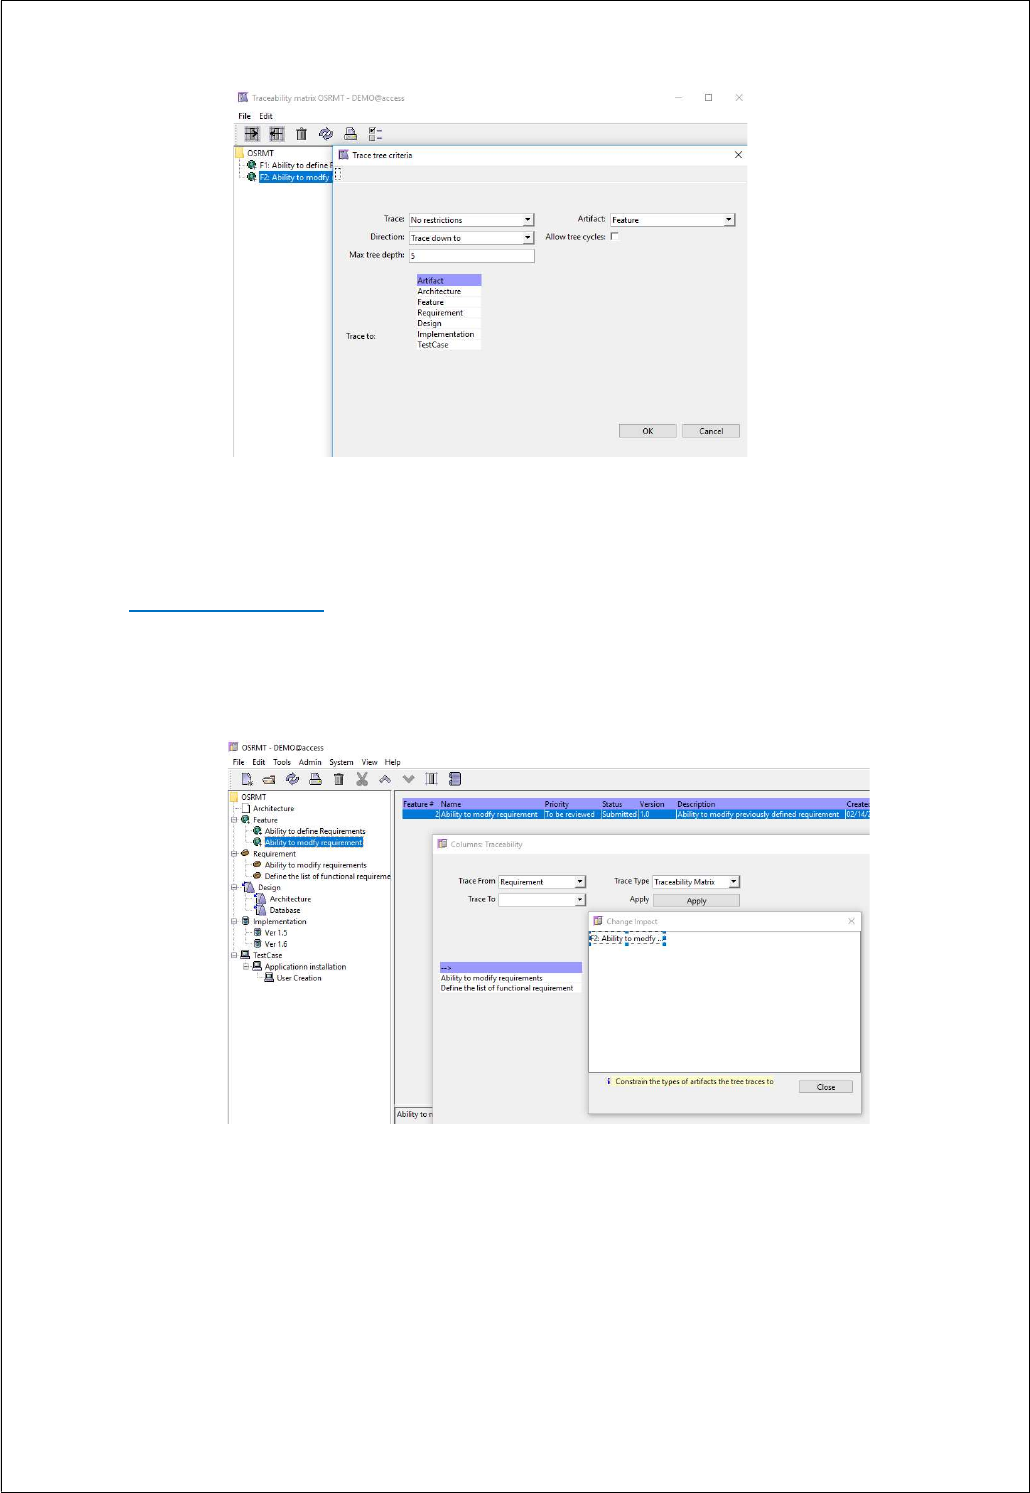
4.4 Trace Impact
To trace the impact, select an artifact from the tree and use menu items
Tools
Trace
Impact.
A graph of the artifacts dependent on or from the selected artifact is shown.
5.
Reports
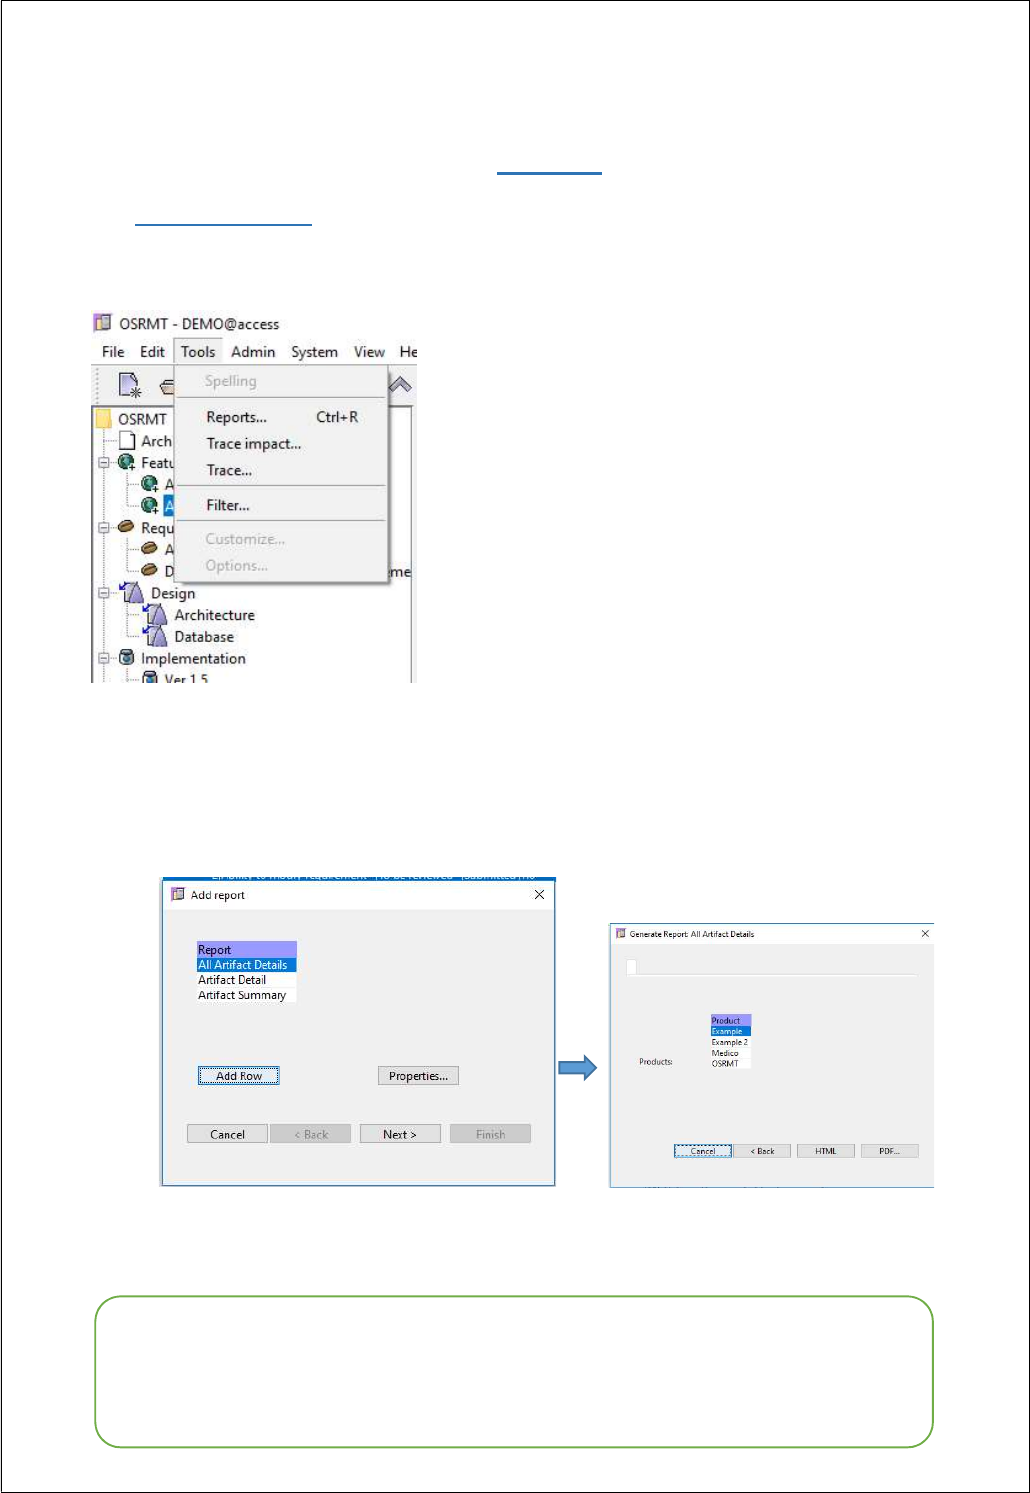
5.1 Standard Reports
Reports can be accessed from the menu item
Tools
Reports
option as below
To create a report for a single product, select that product. Otherwise make no selection as
below.
Then choose HTML or PDF option to generate the report
TIP
Report may fail with some operating system. In that case start the local browser or pdf
viewer and then open the generated report file.
Files are typically created in <client directory>\temp\<filename>
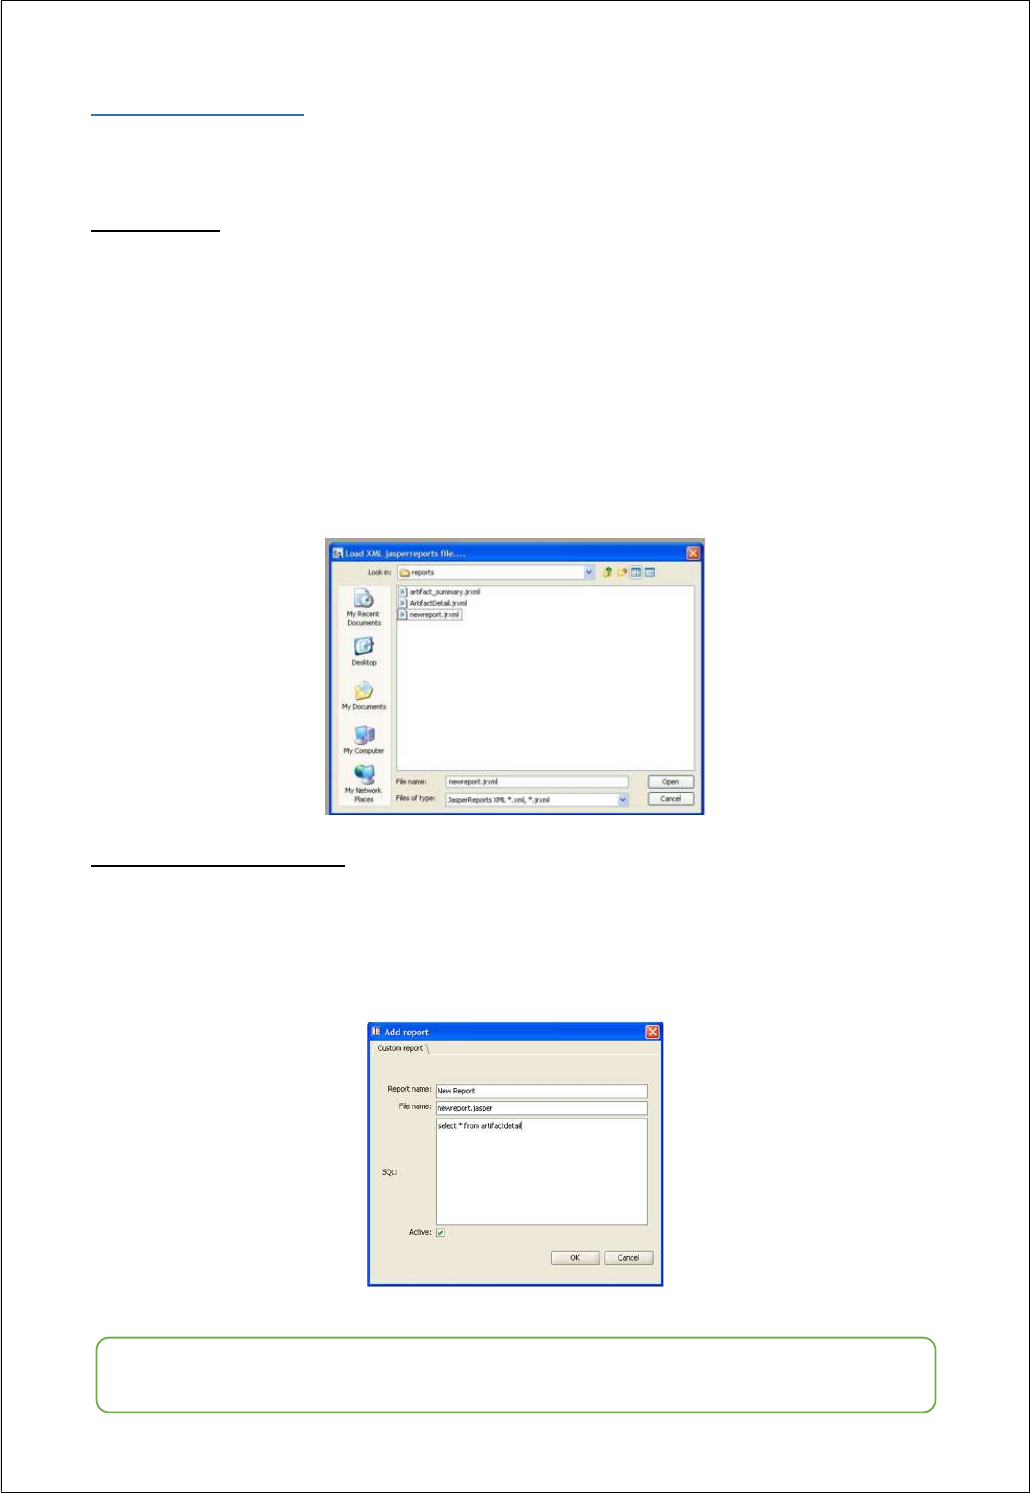
5.2 Custom Reports
*Backup any reports you do not wish to lose*
Copy report
Navigate to the reports directory e.g. C:\Program Files\osrmt\v1_6\client\reports.
Copy an existing source file report to a new name
Example: “copy ArtifactDetail.jrxml newreport.jrxml”
Open the report writer via shortcut or from report writer bin directory. Example below
“C:\Program Files\osrmt\v1_6\client\reportwriter\JasperSoft\iReport-
1.2.2\bin\startup.bat”
Add report to OSRMT
Within
OSRMT
use
Menu Tool R
eports
and press
the Add Report button.
Complete the form ensuring the file name in the reports directory matches the file name
listed (without any directory prefix).
TIP
Please get assistance from a system administrator or developer if you are developing a
report with complex SQL as it may have impact across forms
6.
Import/Export
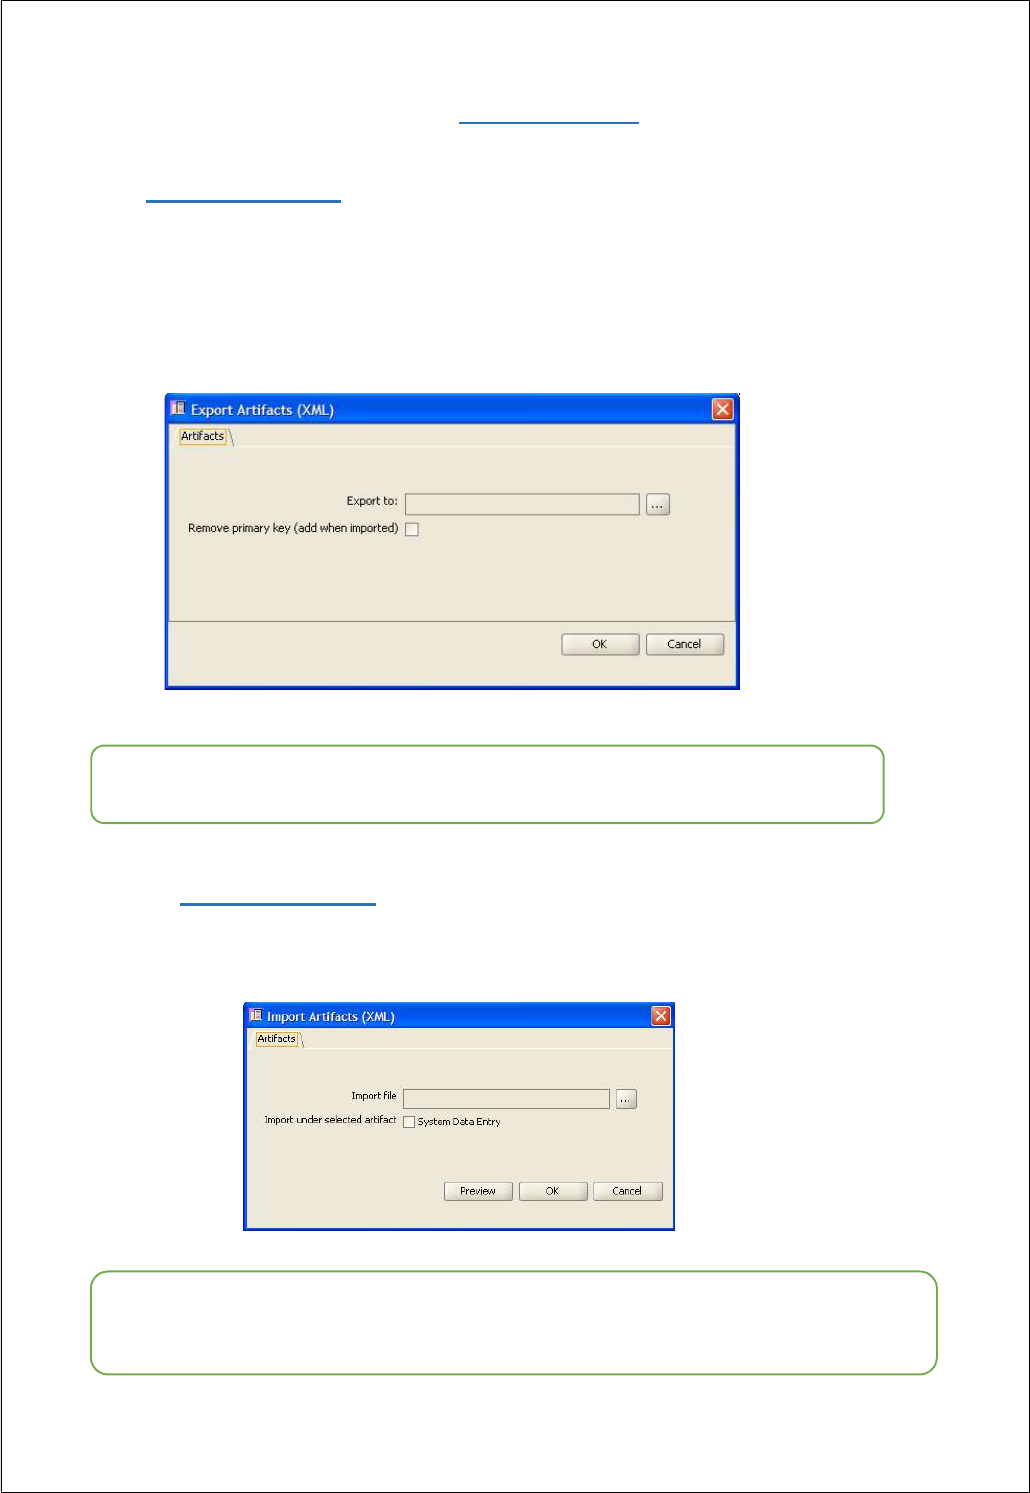
6.1 Exporting artifacts
For exporting artifacts, Navigate to selected branch of the requirements tree. Then filter the
list and/or search for artifacts to create a custom list of artifacts.
File
Export options from Menu bar can also be used for exporting the artifacts from the
filtered
lis
t.
TIP
6.2 Importing Artifacts
Navigating to a branch in the requirements tree will enable the option to
import artifacts under a specific branch in the tree.
TIP
Select the option -“Remove the primary” key” to import into a new database.
Ensure the artifacts that are added have the artifactId = 0 and artifactNbr = 0 .
The import file should be of the same XML format as the file exported
7. User Management
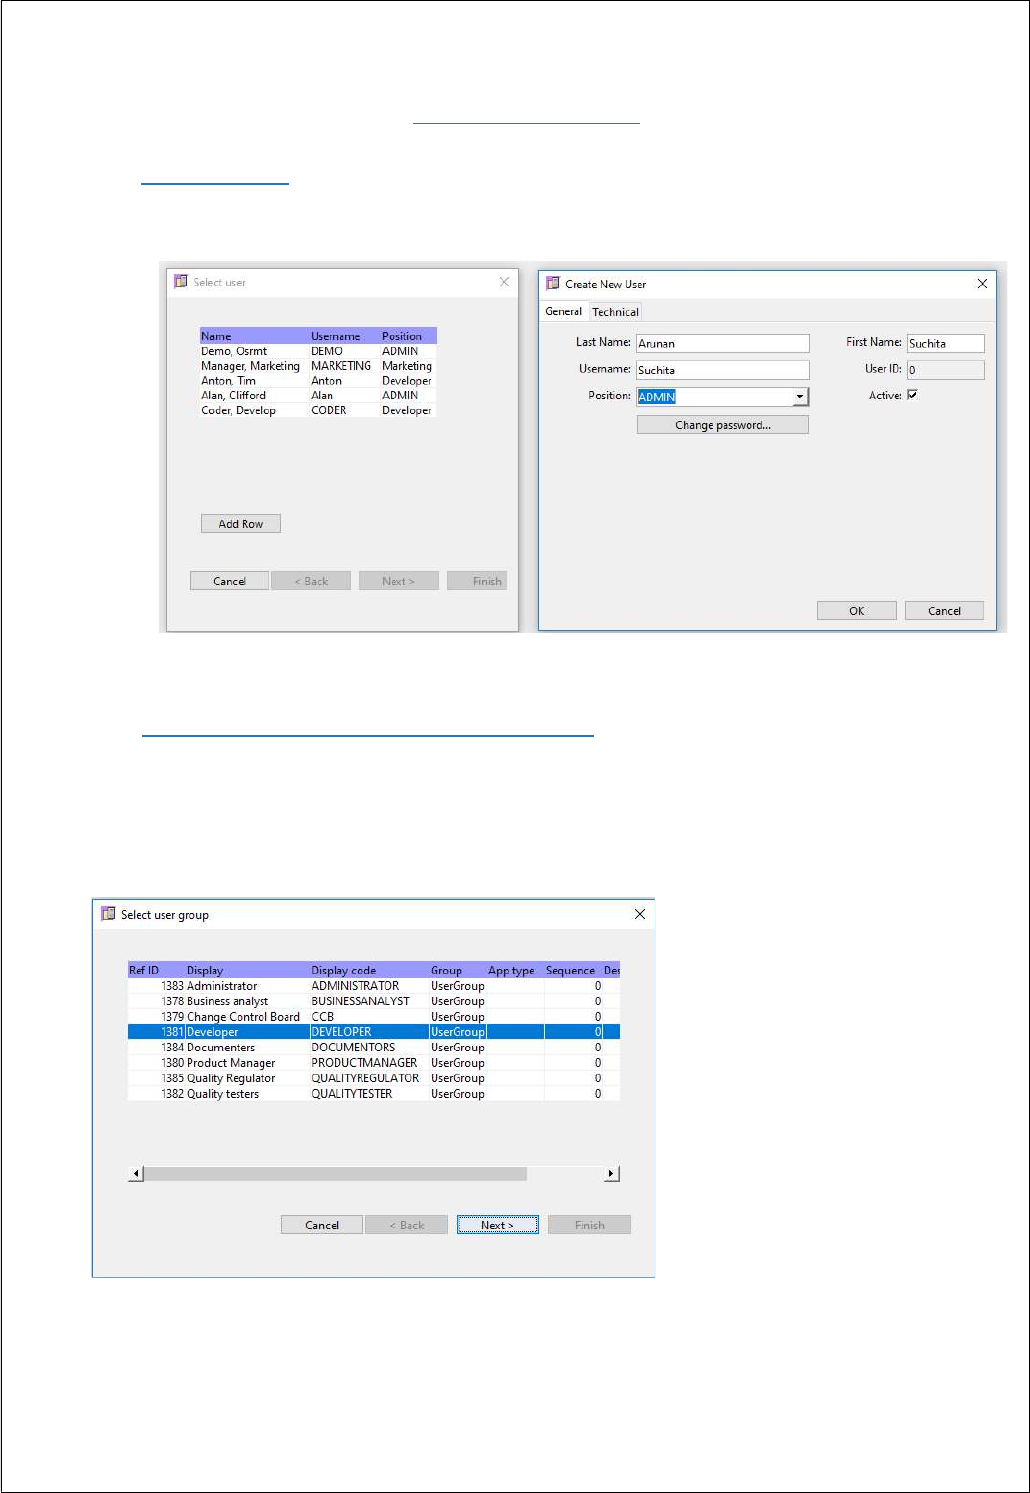
7.1 User Creation
To add a new user choose Admin Users option from menu bar as below
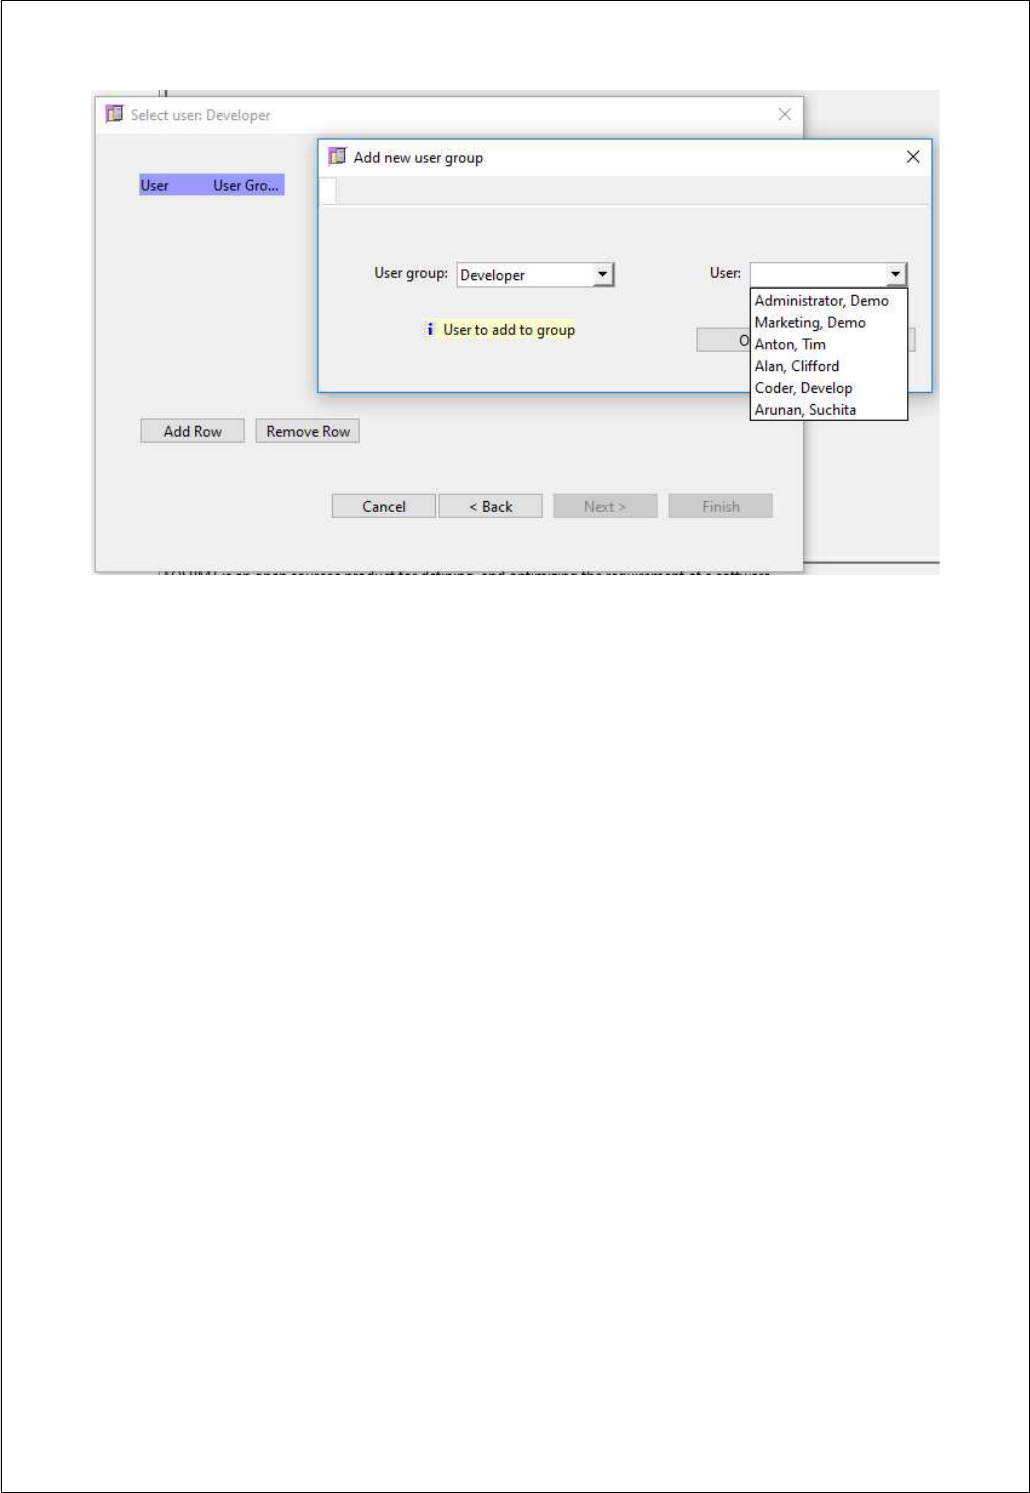
7.2 Adding / Removing user from user groups
To add or remove a user from/To a group, choose
Admin User Groups option from menu bar as below
The below screens show how to add a user or remove a user from a group
9. Definitions
Below are the list of key words used in this project and their definitions.
Field Description
Trace Allows auditing on the artifact list.
‘Child dependencies’ restricts artifacts in the list to those with
an existing trace(dependency) to a child artifact
‘No Child dependencies’ shows all artifacts without a trace to a
child artifact ‘Parent dependencies’ restricts artifacts in the list to
those which have another artifact tracing to it.
‘No Parent dependencies’ shows all without a trace to a child artifact.
Direction Trace down to will show dependencies on child artifacts.
Trace up to will show artifacts which trace to the top level artifacts. The
fact that the ‘parent’ artifacts will be shown as a child in the tree may be
counter intuitive. Note if you just created a dependency – but not in this
direction the tree will not change.
Allow tree cycles With this off no artifact added to the tree will display twice. This may
create a misleading picture.
Max tree depth Prevents circular dependencies from going too deep.
Trace to The type of artifacts to trace down or up to in the tree.
Artifact An artifact is the specification of a physical piece of information that is
used or produced by a software development process, or by deployment
and operation of a system