Oculus Platform Developer Guide OVRPlatform SDK
User Manual:
Open the PDF directly: View PDF ![]() .
.
Page Count: 34

Oculus Platform
Developer Guide
Version 1.0.0.0
2|Introduction|Oculus Platform
2||
Copyrights and Trademarks
© 2016 Oculus VR, LLC. All Rights Reserved.
OCULUS VR, OCULUS, and RIFT are trademarks of Oculus VR, LLC. (C) Oculus VR, LLC. All rights reserved.
BLUETOOTH is a registered trademark of Bluetooth SIG, Inc. All other trademarks are the property of their
respective owners. Certain materials included in this publication are reprinted with the permission of the
copyright holder.
Oculus Platform|Contents|3
Contents
Introduction.......................................................................................................... 4
Create an Organization........................................................................................5
Create an App..................................................................................................... 6
Getting AppIDs.................................................................................................... 7
Giving Entitlement to an App............................................................................. 8
Viewing App Information.....................................................................................9
Updating Your App for Platform Features.........................................................10
Adding Oculus Platform Support to Your Project...........................................................................................10
REST Requests................................................................................................................................................. 12
Integrating with the Oculus Platform.............................................................................................................. 13
Native C++.................................................................................................................................................13
Unity............................................................................................................................................................14
Ownership.......................................................................................................... 16
Presence and Friends.........................................................................................17
Rooms.................................................................................................................18
In-App Purchases (Gear VR)...............................................................................20
Achievements..................................................................................................... 23
Leaderboards..................................................................................................... 25
Matchmaking......................................................................................................27
P2P..................................................................................................................... 30
Build Channels................................................................................................... 32
Viewing Build Channels................................................................................................................................... 32
Uploading a Binary.......................................................................................................................................... 33
Migrating a Build.............................................................................................................................................34
Adding Users................................................................................................................................................... 34
4|Introduction|Oculus Platform
Introduction
Welcome to the Oculus Platform Developer Guide.
The Oculus Platform is designed to provide you with the infrastructure you need, so you can focus on creating a
great game or experience. The Oculus Platform currently provides the following features:
• Friend Management—to enable social functionality and increase engagement, this enables players to add
friends and find friends that are currently online.
• Rooms—your app can create rooms where players gather or you can enable players to create them.
• Achievements—you can create trophies, badges, awards, medals, or challenges in your app and Oculus will
manage it.
• Leaderboards—if your app or experience is competitive, you can create leaderboards to track the top
players.
• Matchmaking—if players can't find a match, you can help them find available games. The platform supports
both standard and skill-based pools.
• In-App Purchases—enables you to monetize your games and experiences.
• Peer-to-Peer Networking—enables players to communicate directly.
The Oculus Platform API is a non-blocking asynchronous API that enables you to be in control of the
performance profile of your application. Your application makes API calls that are routed through the Oculus
App. These calls return JSON objects that are passed back to your application. This allows you to process
responses when convenient and enables Oculus to make updates and improvements with a minimal number of
client side API changes.
The Platform services run on a globally distributed network of servers to ensure calls have a similar performance
profile regardless of geographical location. Since API calls are essentially web calls, some of them are also
available to you as secure server-to-server calls, which you can make from your backend.
Oculus Platform|Create an Organization|5
Create an Organization
Before you can do anything with the Oculus Platform, you need to create or join an organization.
To create an organization, go to https://developer2.oculus.com/organization/create and follow the on-screen
prompts.
To add yourself to an organization, ask the organization owner to go to https://developer2.oculus.com/
organization/create and click the Members tab. Then, he or she simply has to click Add User and enter your
username.
6|Create an App|Oculus Platform
Create an App
After you create or join an organization, you can create one or more apps.
To create an app, click your username in the upper right corner and select My Apps. Then, click Create New
App and follow the on-screen prompts.
After the app is created, the Platform UI displays the Builds tab. To add a build, click Update Build. To provide
app metadata to the platform, click Update App Info.
Oculus Platform|Getting AppIDs|7
Getting AppIDs
AppIDs are used to identify your app when making programmatic requests to the Oculus Platform.
To get the AppID for one of your apps:
1. Go to https://developer.oculus.com/.
2. Click My Apps. Your applications are displayed.
3. Hover over an app and click Overview. The information page appears.
4. Click the Platform tab.
5. Select from the following:
a. App ID—the ID used to initialize the SDK and make REST requests.
8|Giving Entitlement to an App|Oculus Platform
Giving Entitlement to an App
Creating apps is usually a collaborative process. To enable developers and coworkers to access your app
without having to pay for it and to enable access before public release, you can grant entitlements.
To give a developer an entitlement to an app:
1. Go to https://developer.oculus.com/.
2. Click My Apps. Your applications are displayed.
3. Hover over an app and click Overview. The information page appears.
4. Click the Platform tab.
5. Click Developers.
6. Select the developers who should be granted entitlements and click Save.
Oculus Platform|Viewing App Information|9
Viewing App Information
The App Information page contains information that is displayed to users when they are deciding whether to
download or purchase your app. This information includes information about your company, the App's genre, a
description of the App, and so on.
To view information about one of your Apps:
1. Go to https://developer.oculus.com/.
2. Click My Apps. Your applications are displayed.
3. To view information about an App, hover over it and click Overview. The information page appears.
4. Review the information.
5. To view the image assets associated with the app, click Image Assets.
6. To view information about the build, click Build Info.

10|Updating Your App for Platform Features|Oculus Platform
Updating Your App for Platform Features
This section describes how to prepare your app or experience for the Oculus Platform features.
Adding Oculus Platform Support to Your Project
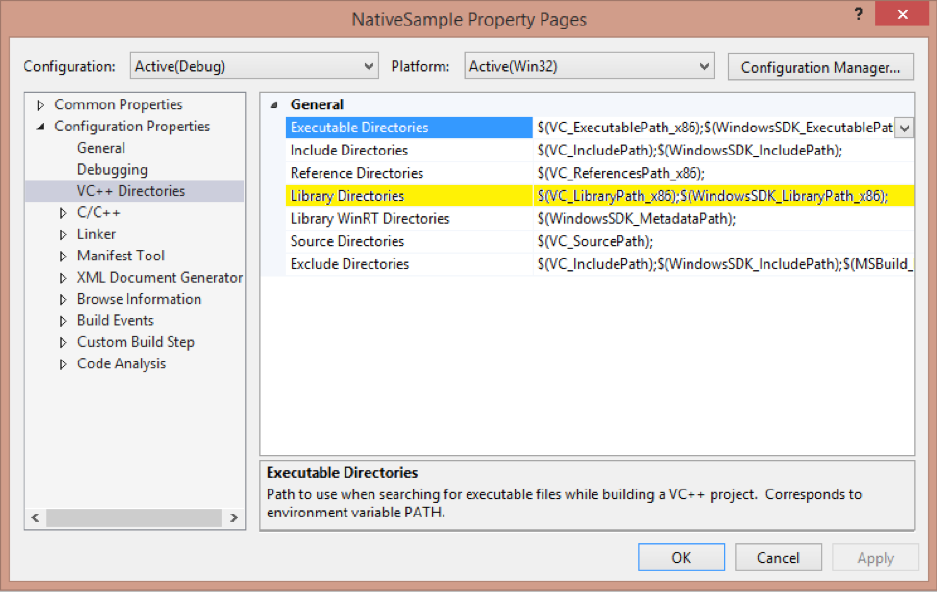
To add Oculus Platform support to your Visual C++ project:
1. Open the Properties page.
2. Select VC++ Directories.
3. Add the location of the SDK includes folder (InstallFolder\include) to Include Directories.
Figure 1: Project Property Pages
Oculus Platform|Updating Your App for Platform Features|11
4. Add the location of the lib file (InstallFolder\Windows) to Library Directories.
Figure 2: Project Property Pages
5. Expand Linker and select Input.
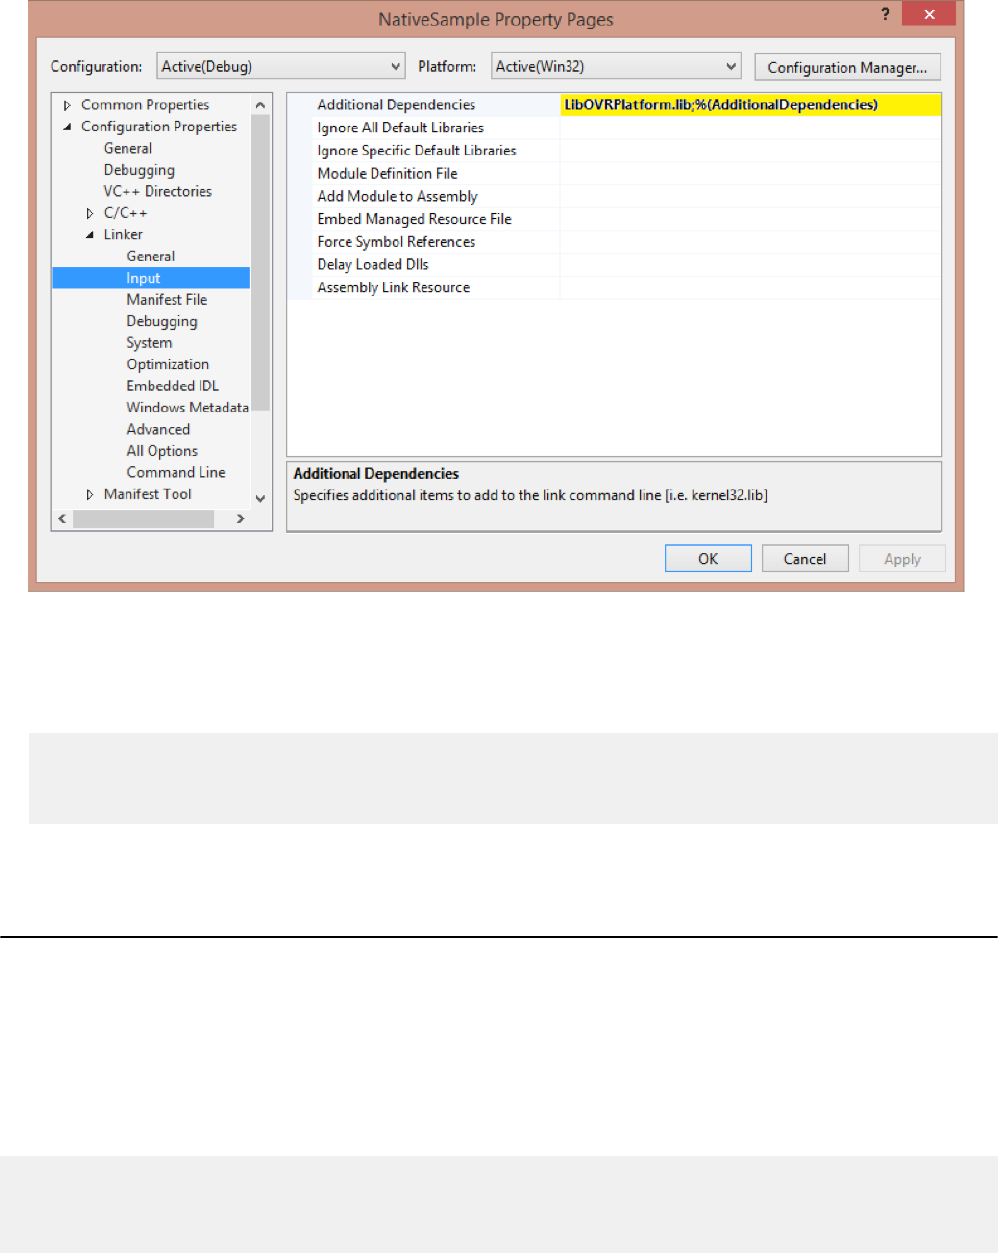
12|Updating Your App for Platform Features|Oculus Platform
6. Add the loader library (LibOVRPlatform32_1.lib or LibOVRPlatform64_1.lib) to Additional Dependencies.
Figure 3: Project Property Pages
7. Using the DLL loader instead of direct linking enables DLL signature verification and graceful detection of
the Oculus Runtime. To use the loader, drop the cpp file (InstallFolder/Windows/OVR_PlatformLoader.cpp )
into your project.
To bypass the Loader, add this define before including OVR_Platform.
#define OVRPL_DISABLED
#include <OVR_Platform.h>
REST Requests
Depending on the type of operation, you might use the Platform UI or API.
Although many requests are made in the UI, eventually you will be able to make most of them
programmatically. This section describes how to make REST requests.
Before you can make a request, make sure you have the credentials for your App. For more information, see
Getting AppIDs on page 7.
Many types of requests to the API use the following format:
[GET/POST/DELETE] https://graph.oculus.com/app_id/api
?access_token=token|app_id|app_secret
&option_1=<option-1>
&option_2=<option-2>
Oculus Platform|Updating Your App for Platform Features|13
...
where:
• app_id—ID of the app.
• api—name of the API (e.g., "leaderboards").
• token—Request token.
• app_secret—the secret key for the app.
• option_1, option_2, ...—options specific to the API.
The following is an example request that creates a leaderboard:
[POST]https://graph.oculus.com/3294569807254367/leaderboards?access_token=OC|3294569807254367|
971bf33c22d4e56438900334be288e43&api_name=game-leaders&sort_order=HIGHER_IS_BETTER>
Note: All requests are encrypted; only the endpoint (graph.oculus.com) is passed in the clear.
Integrating with the Oculus Platform
To ensure that your game is ready for the Oculus Store, you will need to add code that ensures each user has
an entitlement for your app.
Depending on your development environment, there are different ways to verify entitlements. This section
describes how to check entitlements for native C++ and Unity applications.
Native C++
This section describes how to set up your app for native C++ development.
Initializing in Production
Applications that run in a production environment and are launched from the Oculus App use a call, similar to
the following, that passes in your AppID:
// Initialization call
if (ovr_PlatformInitializeWindows(appID) != ovrPlatformInitialize_Success)
{
// Exit. Initialization failed which means either the oculus service isn’t on the machine or
they’ve hacked their DLL
}
ovr_Entitlement_GetIsViewerEntitled();
Use code similar to the following to poll for a response:
// Poll for a response
while ((message = ovr_PopMessage()) != nullptr) {
switch (ovr_Message_GetType(message)) {
case ovrMessage_Entitlement_GetIsViewerEntitled:
if (!ovr_Message_IsError(message))
{
// User is entitled. Continue with normal game behaviour
}
else
{
// User is NOT entitled. Exit

14|Updating Your App for Platform Features|Oculus Platform
}
break;
default:
break;
}
}
Checking Entitlement in Production
Make the following call, which will return a bool that indicates whether the user is entitled:
ovr_Entitlement_GetIsViewerEntitled();
which will result in a message returned with the results.
Note: If you are using the legacy test token for standalone development, all entitlement checks will
pass.
Modifying Your Game Loop
To modify your game loop:
1. Look for messages being sent from the platform by modifying your game loop to call ovr_PopMessage()
in a loop until it returns null. These can be returned from a call or a notification sent from the platform.
2. When a message is received, call ovr_Message_GetType() to extract the message type.
3. Use ovr_Message_IsError() to verify if the message contains a failure or a success response.
Messages include different data, based on the type. There are several helper functions in OVR_Platform.h
that parse the data into a convenient struct, which use the ovr_Message_* naming convention.
4. After processing a message, call ovr_FreeMessage() to clean up and prevent memory leaks.
Unity
This section describes how to set up your app for Unity development.
Initializing in Production
To initialize in Unity, use the Initialize method of the Platform object:
Oculus.Platform.Core.Initialize(appID)
Checking Entitlement in Production
To check for an entitlement:
Platform.Entitlement.IsUserEntitledToApplication().OnComplete(callbackMethod);
which will call your callback method when returning the results.
To process the results, use code similar to the following:
void callbackMethod (Message msg)
{
if (!msg.IsError)
{
// Entitlement check passed
}
Oculus Platform|Updating Your App for Platform Features|15
else
{
// Entitlement check failed
}
}
}
}
Note: If you are using the legacy test token for standalone development, all entitlement checks will
pass.
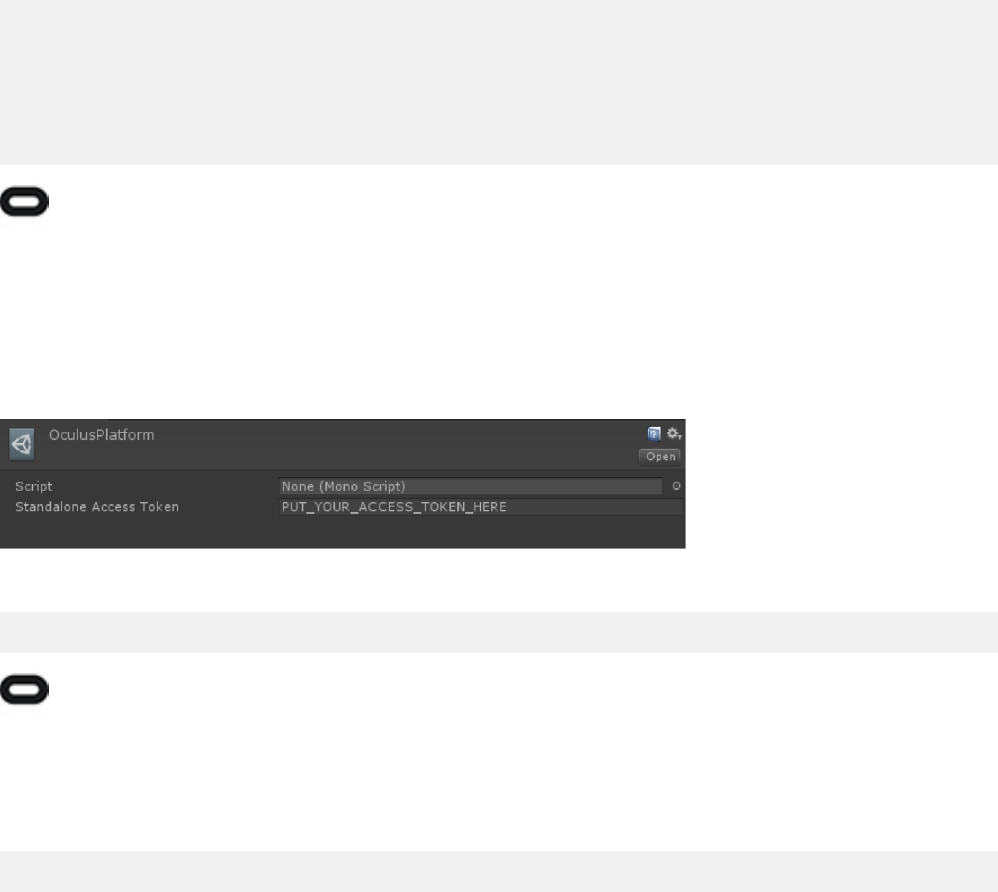
Initializing in the Unity Editor
For Unity, you set your test token in the Unity editor. After importing the Oculus Platform wrapper, the Oculus
Platform menu item is added to the editor. Select Platform Settings and paste in your Token:
Figure 4: Unity Platform Token
Then, initialize normally:
Oculus.Platform.Core.Initialize(appID)
Note: Make sure to give an entitlement to the user. For more information, see Giving Entitlement to
an App on page 8. Make sure you are logged into the Oculus App while developing in a standalone
environment.
Modifying the Game Loop
Add the following call to your Update() method to make sure your callbacks are processed:
Request.RunCallbacks();

16|Ownership|Oculus Platform
Ownership
The Oculus Platform uses entitlements to ensure users have an entitlement to your software before they can run
it.
To ensure that the user running your application is a legitimate customer, we provide a couple basic ways for
you to verify the user currently owns the game. On the client side, we have a synchronous and an asynchronous
call. These calls work even if the user isn’t connected to the internet by using the last known cached value. We
also provide a way to make a server-server call using a client-provided nonce that can’t be tampered with by
the client.
Is Entitled
The following function checks if the user is entitled to use the application:
ovr_Entitlement_GetIsViewerEntitled()
This function returns a boolean that specifies whether the user is entitled.
Get Cryptographic Nonce
This method is a single use; once verified with the server, it is no longer valid. The following function requests a
cryptographic nonce that identifies the current user:
ovr_UserProof_Generate()
It returns the ovrMessage_UserProof_Generate message type. Use ovr_Message_GetUserProof() to
parse the message into an ovrUserProof pointer.
Your server can validate a Nonce using a secure server-server call using an HTTP POST to the following end
point:
[POST] https://graph.oculus.com/user_nonce_validate
?access_token=<user-access-token>
&nonce=<nonce>
&user_id=<user-id>
The request returns verification. For example:
{"is_valid":true}
Note: Your current App Secret can be found on the developer portal under Platform > API. A user-
generated nonce is single-use only. To test requests, Oculus recommends the Postman Chrome plugin.

Oculus Platform|Presence and Friends|17
Presence and Friends
In a connected world, it is important to be able to find your friends.
The Oculus platform enables users to add friends by entering their usernames or selecting them from a
"recently played" list. Once added, games can access those connections and identities.
Get Logged In User
The following function returns information for the currently logged in user:
ovr_User_GetLoggedInUser()
It returns the ovrMessage_UserGetLoggedInUser. Use ovr_Message_GetUser to parse the message into
an ovrUser pointer.
Get Currently Logged In Friends
The following function returns all friends who are currently logged in:
ovr_User_GetLoggedInUserFriends()
It returns the ovrMessage_UserGetFriends message type. Use ovr_Message_GetUserArray() to parse
the message into an ovrUserArray pointer.
Get Information About a User
To display additional information about a user:
ovr_User_Get()
It returns the ovrMessage_UserGet message type. Use ovr_Message_GetUser() to parse the message
into an ovrUser pointer.
Get All Friends
The following function returns all friends of the currently logged in user:
ovr_User_GetFriends()
It returns the ovrMessage_UserGetFriends message type. Use ovr_Message_GetUserArray() to parse
the message into an ovrUserArray pointer.

18|Rooms|Oculus Platform
Rooms
Rooms are virtual places where users can meet to chat or initiate games and experiences.
There are three types of rooms: public rooms, private rooms that only friends can join, and private rooms that
are invitation only. Rooms can be moderated and initiated by your app or you can allow users to create rooms
that they control.
Get Information About a Room
The following requests information for the provided room ID:
ovr_Room_Get()
It returns the ovrMessage_RoomGet. Use ovr_Message_GetRoom() to parse message into an ovrRoom
pointer.
Join an Existing Room
To have the logged in user join an existing room:
ovr_Room_Join()
It returns the ovrMessage_RoomJoin message type. Use ovr_Message_GetRoom() to parse the message
into an ovrRoom pointer.
Get Information About the Current Room
To get information about the current room:
ovr_Room_GetCurrent()
It returns the ovrMessage_RoomGetCurrent message type. Use ovr_Message_GetRoom() to parse the
message into an ovrUser pointer.
Leave a Room
To have the logged in user leave the room:
ovr_Room_Leave()
It returns the ovrMessage_RoomLeave message type. Use ovr_Message_GetRoom() to parse the message
into an ovrRoom pointer.
Create a Room
You can create a public or private room and set a maximum room size. To create a room or enable a user to
create and join a room:
ovr_Room_CreateAndJoinPrivate()
It returns the ovrMessage_RoomCreateAndJoinPrivate message type. Use ovr_Message_GetRoom() to
parse the message into an ovrRoom pointer.

Oculus Platform|Rooms|19
Find Users to Invite
To get a list of users that are entitled to the app and can currently log in:
ovr_Room_GetInvitableUsers()
It returns the ovrMessage_UserGetInvitableUsers message type. Use ovr_Message_GetUserArray()
to parse the message into an ovrUserArray pointer.
Invite a User to a Room
Using the list of invitable users, your app or user can invite one or more users to the room:
ovr_Room_InviteUser()
It returns the ovrMessage_RoomInviteUser message type. Use ovr_Message_GetRoom() to parse the
message into an ovrRoom pointer.
Kick a User out of a Room
To kick a user out of a room:
ovr_Room_KickUser()
It returns the ovrMessage_RoomKickUser message type. Use ovr_Message_GetRoom() to parse the
message into an ovrRoom pointer.
Update Room Metadata
You can add up to 2k of key/value pairs to a room. To add metadata:
ovr_Room_UpdateDataStore()
It returns the ovrMessage_RoomUpdateDataStore message type. Use ovr_Message_GetRoom() to parse
the message into an ovrRoom pointer.
View Room Updates
The following is a platform notification that isn't triggered by a call:
ovrMessage_RoomUpdateNotification
Use ovr_Message_GetRoom() to parse the message into an ovrRoom pointer.

20|In-App Purchases (Gear VR)|Oculus Platform
In-App Purchases (Gear VR)
To create in-app purchases, you create multiple items in a tab-delimited spreadsheet and make them available
to your users.
Defining Purchases
The current format of the in-app purchases file is:
SKU Name Description Currency Amount Item Type
EXAMPLE1 Example 1 Example IAP item 1 USD 1.99 Consumable
EXAMPLE2 Example 2 Example IAP item 2 USD 1.99 Durable
To get the latest sample template:
1. Go to https://developer.oculus.com/.
2. Click My Apps. Your applications are displayed.
3. Hover over the and click Overview. The information page appears.
4. Click the Platform tab.
5. Click IAP.
6. Click Download Template.
To upload IAPs:
1. Go to https://developer.oculus.com/.
2. Click My Apps. Your applications are displayed.
3. Hover over the and click Overview. The information page appears.
4. Click the Platform tab.
5. Click IAP.
6. Click Upload TSV and follow the on-screen prompts.
Initiating a Purchase
The following function initiates the Oculus checkout flow for the specified SKU:
ovr_IAP_LaunchCheckoutFlow()
It returns the ovrMessage_IAPStartCheckout. Use ovr_Message_GetPurchase() to parse the message
into an ovrPurchase pointer.
Get Products by SKU
The following function returns an array of products that match the SKU:
ovr_IAP_GetViewerPurchases()
It returns the ovrMessage_IAPGetPurchases message type. Use the
ovr_Message_GetPurchaseArray() to parse the message into an ovrPurchaseArray pointer.

Oculus Platform|In-App Purchases (Gear VR)|21
View Purchases
The following function returns purchases for the user:
ovr_IAP_GetViewerPurchases()
It returns the ovrMessage_IAPGetProducts message type. Use the GetProductArray() to parse the
message into an ovrProductArray pointer.
Consume Purchase
The following function consumes the specified SKU:
ovr_IAP_ConsumePurchase()
It returns the ovrMessage_IAPConsumePurchase message type. Use the ovr_Message_GetBoolean() to
see if the item was consumed.
REST Requests
The App access token is a string composed of OC|$APPID|$APPSECRET, where $APPID and $APPSECRET are
per-application values that can be found on the Platform tab of the developer console.
The user access token is returned by the ovr_AccessToken_Get() SDK call.
To verify ownership of an IAP item:
[POST] https://graph.oculus.com/$APPID/verify_entitlement
?sku=<sku-to-check>
&access_token=<user-access-token>
The request returns verification. For example:
{"success":true}
To consume an IAP item:
[POST] https://graph.oculus.com/$APPID/consume_entitlement
?sku=<sku-to-consume>
&access_token=<user-access-token>
The request returns verification. For example:
{"success":true}
To verify consumption, repeat the previous operation. It should return false.
To view all items owned by a user:
[GET] https://graph.oculus.com/$APPID/viewer_purchases
?sku=<sku-to-check>
&access_token=<user-access-token>
&fields==id,item{sku}

22|In-App Purchases (Gear VR)|Oculus Platform
The request returns an array of items, based on the fields you specified. For example:
{"data":[{"id":"963119010431337","item":{"sku":"EXAMPLE1"}}]}
Oculus Platform|Achievements|23
Achievements
You can create trophies, badges, awards, medals, or challenges in your apps and Oculus will manage it.
There are currently three types of achievements: simple, count, and bitfield. Although Oculus will track and
manage these achievements, your app is responsible for rendering and displaying achievements to your users.
Create Achievements
To create an achievement:
1. Go to https://developer.oculus.com/.
2. Click My Apps. Your applications are displayed.
3. Hover over an app and click Overview. The information page appears.
4. Click the Platform tab.
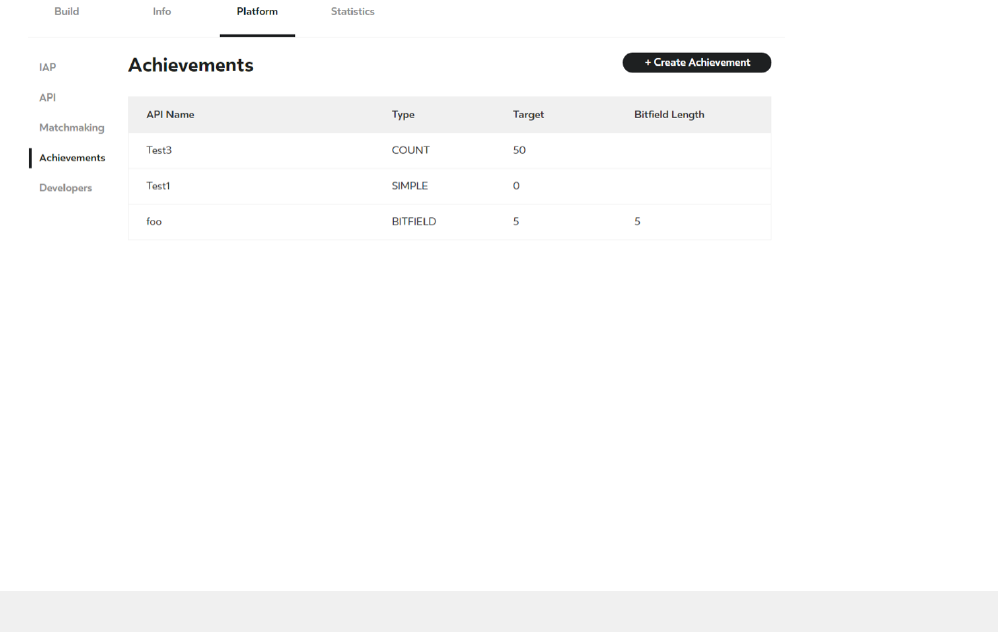
5. Click Achievements.
The Achievements page appears.
Figure 5: Achievements
6. Click Create Achievement.
7. Select from the following:
• Simple—select Simple and enter the name that will be used by the API.
• Count—select Count and enter the name and count that will trigger the achievement.
• Bitfield—select Bitfield and enter the name, bitfield length, and the number of that must be met to be
awarded the achievement.
8. Click Submit.
Get Achievement Definition
To check the definition of an achievement:
ovr_AchievementDefinition_GetByName()
It returns the GetAchievementDefinitionArray message type. Use
ovrMessage_AchievementDefinitionGetByName() to parse the message into an array of
ovrAchievementDefinition pointers.

24|Achievements|Oculus Platform
Get Achievement Progress
To check the progress of an achievement:
ovr_AchievementProgress_GetByName()
It returns the ovrMessage_AchievementProgressGetByName message type. Use
ovr_Message_GetAchievementProgressArray() to parse the message into an array of
ovrAchievementProgress pointers.
Unlock an Achievement
To unlock an achievement:
ovr_AchievementProgress_Unlock()
It returns the ovrMessage_AchievementProgressUnlock message type. Use ovr_Message_IsError()
to verify success.
Increment a Count
To increment a count achievement:
ovr_AchievementProgress_AddCount()
It returns the ovrMessage_AchievementProgressAddCount message type. Use
ovr_Message_IsError() to verify success.
Add to a Bitfield
To add to a bitfield achievement:
ovr_AchievementProgress_AddFields()
It returns the ovrMessage_AchievementProgressAddFields message type. Use
ovr_Message_IsError() to verify success.
Oculus Platform|Leaderboards|25
Leaderboards
You can create leaderboards, update them, and view their results.
Although Oculus will manage your leaderboards, your app is responsible for rendering and displaying the
results to your users.
Creating Leaderboards
Currently, leaderboards can only be created programmatically. To create a leaderboard you can make an HTTP
POST request to the following web endpoint:
https://graph.oculus.com/<appid>/leaderboards?access_token=OC|<appid>|
<app_secret>&api_name=<leaderboard_name>&sort_order=<HIGHER_IS_BETTER||LOWER_IS_BETTER >
To obtain your credentials, see Getting AppIDs on page 7.
Writing to a Leaderboard
To write to a leaderboard:
ovr_Leaderboard_WriteEntry()
It returns the ovrMessage_LeaderboardWriteEntry message type. Use
ovr_Message_GetLeaderboardUpdateStatus() to parse the message into a
ovrLeaderboardUpdateStatus pointer.
Note:
Extradata is 2KB of space that can be used for game specific information.
This will only update if the current score is better than the previous score, unless forceUpdate is true.
Get Leaderboard Entries
To retrieve leaderboard entries for a leaderboard:
ovr_Leaderboard_GetEntries()
It returns the ovrMessage_LeaderboardGetEntries message type. Use
ovr_Message_GetLeaderboardEntryArray() to parse the message into an ovrLeaderboardEntryArray
pointer.
Use ovr_Leaderboard_GetNextEntries() and ovr_Leaderboard_GetPreviousEntries() to
paginate through results
REST Requests
The App access token is a string composed of OC|$APPID|$APPSECRET, where $APPID and $APPSECRET are
per-application values that can be found on the Platform tab of the developer console.
The user access token is returned by the ovr_AccessToken_Get() SDK call. To get the user ID:
[GET] https://graph.oculus.com/me
?access_token=<access-token>

26|Leaderboards|Oculus Platform
The request returns the ID of the user. For example:
{"id":"1095130347203668"}
To create a new leaderboard programmatically:
[POST] https://graph.oculus.com/$APPID/leaderboards
?access_token=<access-token>
&api_name=<leaderboard-name>
&sort_order={HIGHER_IS_BETTER | LOWER_IS_BETTER}
The request returns the ID of the leaderboard. For example:
{"id":"1074233745960170"}
To get the ID of a leaderboard, using the leaderboard name:
[GET] https://graph.oculus.com/$APPID/leaderboards
?access_token=<access-token>
&api_name=<leaderboard-name>
The request returns the ID of the leaderboard. For example:
{"id":"1074233745960170"}
To delete a leaderboard:
[DELETE] https://graph.oculus.com/<leaderboard-id>
The request returns the status. For example:
{"success":true}
Note: Once deleted, a leaderboard cannot be recovered.

Oculus Platform|Matchmaking|27
Matchmaking
For multiplayer games, you can create matchmaking pools that help users find each other and start a game.
There are two types of pools: standard pools and skill pools.
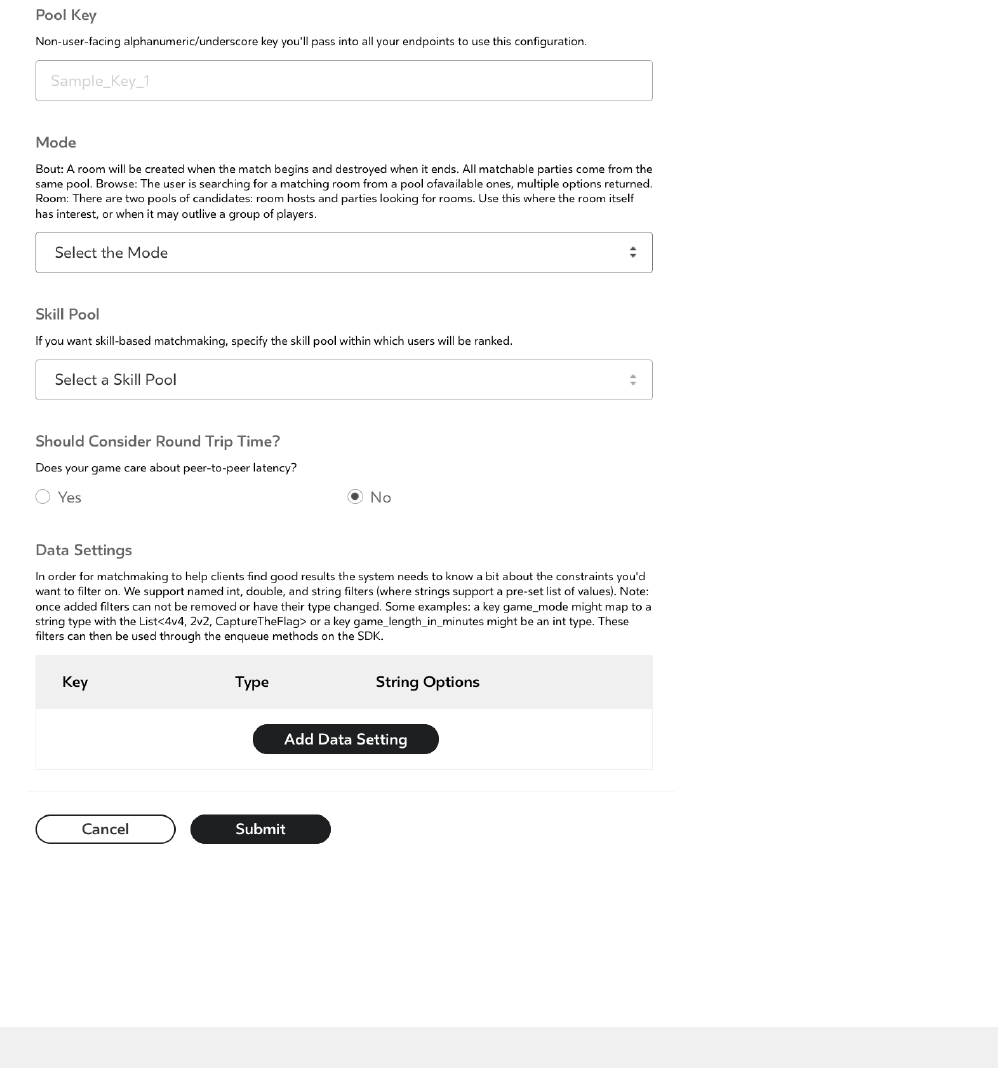
When you create a new pool you will have the following options to set:
• Pool key—unique text string that identifies the matchmaking pool in your app.
• Mode—current available modes are:
• Bout—head-to-head pool where all clients queue alone.
• Room—pool where clients can queue alone or a client can create a room to queue.
• Skill pool—the rating used to creating matches. This can be set to none for matchmaking that doesn't use
skill as a matching factor.
• Data Settings—filters you can use with matchmaking queries to limit the matches. Current filter types
include:
• String—defines a set of string values that are valid inputs.
• Double.
• Integer.
Skill pools have the following additional options:
• Luck factor—how much luck is a factor in the results of a game.
• Draw probability—initial estimate of how often, between 0.0 and 1.0, a draw occurs between players of
equal skill.
Find a Pool
To cancel a search:
ovr_Matchmaking_Cancel()
If successful, it returns the ovrMessage_MatchmakingBrowse message type. Use
ovr_Message_GetRoom() to parse the message into an ovrRoomArray array.
Cancel a Pool Search
To return a list of matchmaking rooms in the current pool, filtered by skill and ping (if enabled):
ovr_Matchmaking_Browse()
You receive the following message the search is canceled:
ovrMessage_Matchmaking_Cancel
Create Pools
To create a pool:
1. Go to https://developer.oculus.com/.
2. Click My Apps. Your applications are displayed.
3. Hover over an app and click Overview. The information page appears.
28|Matchmaking|Oculus Platform
4. Click the Platform tab.
5. Click Matchmaking.
The Matchmaking page appears.
6. Click Create Pool.
The Create Matchmaking Pool dialog box appears.
Figure 6: Create Matchmaking Pool
7. Configure the pool settings.
8. Click Submit.
Create a Room for a Matchmaking Pool
To create a room for a matchmaking pool:
ovr_Matchmaking_CreateRoom()

Oculus Platform|Matchmaking|29
The client automatically joins the room on success. It returns the ovrMessage_MatchmakingCreateRoom
message type. Use ovr_Message_GetRoom() to parse the message into an ovrRoom pointer.
Queue for a Matchmaking Pool
To request to queue a user into a matchmaking pool:
ovr_Matchmaking_Enqueue()
It returns the ovrMessage_MatchmakingEnqueue message type. Use ovr_Message_IsError() to parse
the message for success or failure.
Receive Match Notification
You receive the following message when a match is found:
ovrMessage_MatchmakingMatchFoundNotification
Use ovr_Message_GetRoom() to parse the message into an ovrRoom pointer.
The user is not automatically joined to the room. You must join using ovr_Room_Join().
Start Match (Rated Pools Only)
To indicate that a match started:
ovr_Matchmaking_StartMatch()
It returns the ovrMessage_MatchmakingStartMatch message type. Use ovr_Message_IsError() to
parse the message for success or failure.
Submit Results (Rated Pools Only)
To submit the results of a match for a given roomID:
ovr_Matchmaking_ReportResultInsecure()
It returns the ovrMessage_MatchmakingReportResultInsecure message type which contains a set of
key-value pairs for each user in the match where the key is the user ID and the value is the final ranking in the
match. Use ovr_Message_IsError() to parse the message for success or failure.

30|P2P|Oculus Platform
P2P
Users can send messages to each other through peer-to-peer (P2P) networking.
You can choose between reliable messages and unreliable messages. The following is an example of a P2P
message exchange session:
1. Your application sends a message from Alice to Bob using ovr_Net_SendPacket().
2. Bob's application polls for messages and receives ovrMessage_NetworkingPeerConnectRequest.
3. Your application displays a prompt to Bob. Bob agrees to connect.
4. Because Alice included a message, your application parses the message using ovr_Net_ReadPacket()
and ovr_Packet_GetBytes , which it then displays to Bob. Your application frees memory used by the
message with ovr_Packet_Free().
5. Alice is requesting donations for her ferret rescue foundation.
6. Bob closes the message and connection. Your application closes the connection using ovr_Net_Close().
Open Connection
The following function attempts to open a connection with a user:
ovr_Net_Connect(const char* peerID, ovrSendPolicy policy)
It sends a ovrMessage_NetworkingPeerConnectRequest to the specified user ID. It returns a
ovrMessage_NetworkingPeerConnectionStateChange when the connection is established.
Note: ovr_Net_SendPacket() still implicitly connects. However, it does not buffer messages in
unreliable mode. ovr_Net_Connect() allows the application to delay sending messages until an
actual connection is established.
Send Message
The following function sends data to the specified user ID:
ovr_Net_SendPacket()
It sends a ovrMessage_NetworkingPeerConnectRequest to the specified user ID.
Open Connection
Opens a connection with the specified user ID:
ovr_Net_Accept()
It sends a ovrMessage_NetworkingPeerConnectRequest to the specified user ID.
This should be called after receiving a ovrMessage_NetworkingPeerConnectRequest.
Close Connection
Closes a connection with the specified user ID:
ovr_Net_Close()

Oculus Platform|P2P|31
Read Packet
Reads a received packet, if available:
ovr_Net_ReadPacket()
It returns the ovrMessage_ReadPacket message type. Use o ovr_Packet_GetSenderID() to get the
sender ID, o ovr_Packet_GetSize to get the size of the packet, or ovr_Packet_GetBytes to get the
contents of the packet.
Free Memory
After you parse the message, free the memory used by the packet:
ovr_Packet_Free()
Connection State Change
You receive the following message any time a connection state changes:
ovrMessage_NetworkingConnectionStateChange
Valid states include ovrPeerState_Unknown, ovrPeerState_Connected, and ovrPeerState_Timeout.
Use ovr_Message_GetNetworkingPeer() to extract the ID of the sender.
Timeout indicates a client is unreachable or has rejected a connection.
Connection Request
This message is received when a user receives a connection request:
ovrMessage_NetworkingPeerConnectRequest
Use ovr_Message_GetNetworkingPeer() to extract the ID of the sender.

32|Build Channels|Oculus Platform
Build Channels
The Oculus Platform supports release management through build channels, so you can guide your game or
experience through different testing and release stages.
The Oculus Platform provides four build channel stages:
• Alpha
• Beta
• Release Candidate (RC)
• Live
You can upload different versions of your app and make it available to different groups of testers in each
channel.
After your app is available in the store, any new builds that you promote to the Live channel are automatically
pushed to users that have the app or download the app.
Viewing Build Channels
You can view the state of your build channels at any time.
To view build channels for an app:
1. Go to https://developer.oculus.com/.
2. Click My Apps. Your applications are displayed.
3. Hover over an app and click Overview. The information page appears.
Oculus Platform|Build Channels|33
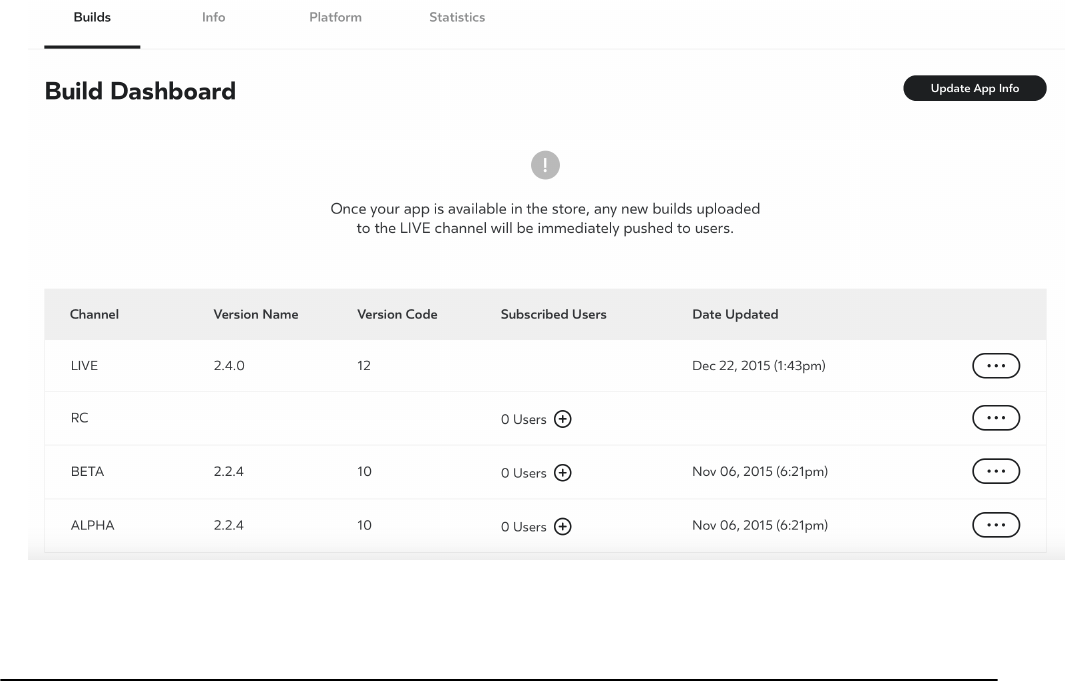
4. Click the Builds tab. The Platform UI displays each build channel, the version of its build, a version code,
subscribed users, and the date the version was last updated.
Figure 7: Build Channels
Uploading a Binary
You can upload a binary into any build channel.
As you are developing and testing your app, it moves from Alpha, to Beta, to RC, and finally to Live. The first
time it is set to Live, it will be submitted to the Oculus Store Team for review. After the Oculus Store Team
approves it, all future updates immediately deploy to users without review.
To upload a binary:
1. Make sure your manifest file is correct and that the install location is set correctly. For more information, see
the Publishing documentation.
2. Go to https://developer.oculus.com/.
3. Click My Apps. Your applications are displayed.
4. Hover over an app and click Overview. The information page appears.
5. Click the Builds tab.
6. Locate the channel where you want to upload the file, click the ... button, and select Upload New Binary.
You are prompted to upload the file.
7. Follow the on-screen prompts.

34|Build Channels|Oculus Platform
Migrating a Build
After verifying a build, you can migrate it to another build channel.
When migrating, the binary is not deleted from the old channel. To migrate a binary to another build channel:
1. Go to https://developer.oculus.com/.
2. Click My Apps. Your applications are displayed.
3. Hover over an app and click Overview. The information page appears.
4. Click the Builds tab.
5. Locate the channel where you want to upload the file, click the ... button, and select Migrate to Another
Channel. You are prompted to select another channel.
6. Select the channel and click Migrate. The binary is copied to the new channel and the old binary is deleted
(if present).
Note: To move a binary to production, simply select the Live channel. The first time it is set to Live,
it will be submitted to the Oculus Store Team for review. After the Oculus Store Team approves it, all
future updates immediately deploy to users without review.
Adding Users
Depending on your release process, you can add different users to each build channel.
You can add a user to multiple build channels; currently, the user will see the highest version.
To add a user:
1. Go to https://developer.oculus.com/.
2. Click My Apps. Your applications are displayed.
3. Hover over an app and click Overview. The information page appears.
4. Click the Builds tab.
5. Locate the channel to which you want to add users and click the + button. You are prompted to add a user.
6. Enter the email address of a registered Oculus user and click Add User. The user is added.
7. Repeat this process for each user to add.
