1 Open Hand CAD Guide
User Manual:
Open the PDF directly: View PDF ![]() .
.
Page Count: 9

From the beginning of the Yale OpenHand Project in Fall 2012 through Spring 2015, I have been the only
one modifying the associated CAD files. This means that at the very least, the source files will be consistent,
but they’re also all susceptible to the same shortfalls and inefficiencies if I have done anything wrong. One of
the project’s main goals is to provide a set of files that researchers can easily update and improve. I’ve tried,
wherever possible, to minimize the number of features in each part, and all features have descriptive names
to make future modifications easier.
The part files are dependent on two main sets of global variables: one set for print parameters and another
for finger design parameters. Print parameters include: minimal wall thicknesses, minimal structural wall
thicknesses, clearance dimensions for common fasteners in the final assembly, etc. These may be tweaked to
accommodate different 3D printers or another set of desired fastener sizes. Finger design parameters include:
linkage lengths, flexure sizes, flexure angular offsets, and transmission ratios. These determine the
performance of the underactuated fingers and are commonly analyzed/discussed in research literature.
Now, it would make sense to use Solidworks’ default global variables, but the program slows to a crawl
once you get beyond 10-20 equations. This has been documented [here] and [here], with no official answer
other than to upgrade the system GPU. Fortunately, linking dimension values to those in an existing sketch
works just as well, so I use two separate part files (ie. params_finger_t.sldprt, params_print_t.sldprt) that
each contain only a single sketch with several dimensioned lines. These dimensions are tied to a Design Table
that can be modified, after which the dimensional changes are propagated through the dependent parts
during the next rebuild. This is why many parts will contain these parameter parts inserted in their feature
tree. I’ve read that we’re generally supposed to avoid dependencies, as that can make future edits more
difficult, but in the context of what we’ve done with the OpenHand Project, it still makes sense.
The rest of this document will try to clarify some of the common questions our beta users have asked me
when trying to edit the source files. If you have any questions not answered by this document or have any
suggestions on how to better organize our source files, feel free to (try to) contact me at
raymond.ma@yale.edu.
* I apologize ahead of time for any snark or sarcasm you may experience while reading this document. I
have been working on this project alone for quite a long time and am dubious that anyone will actually read
this document in-depth. *
1
Godspeed,
Raymond Ma
2
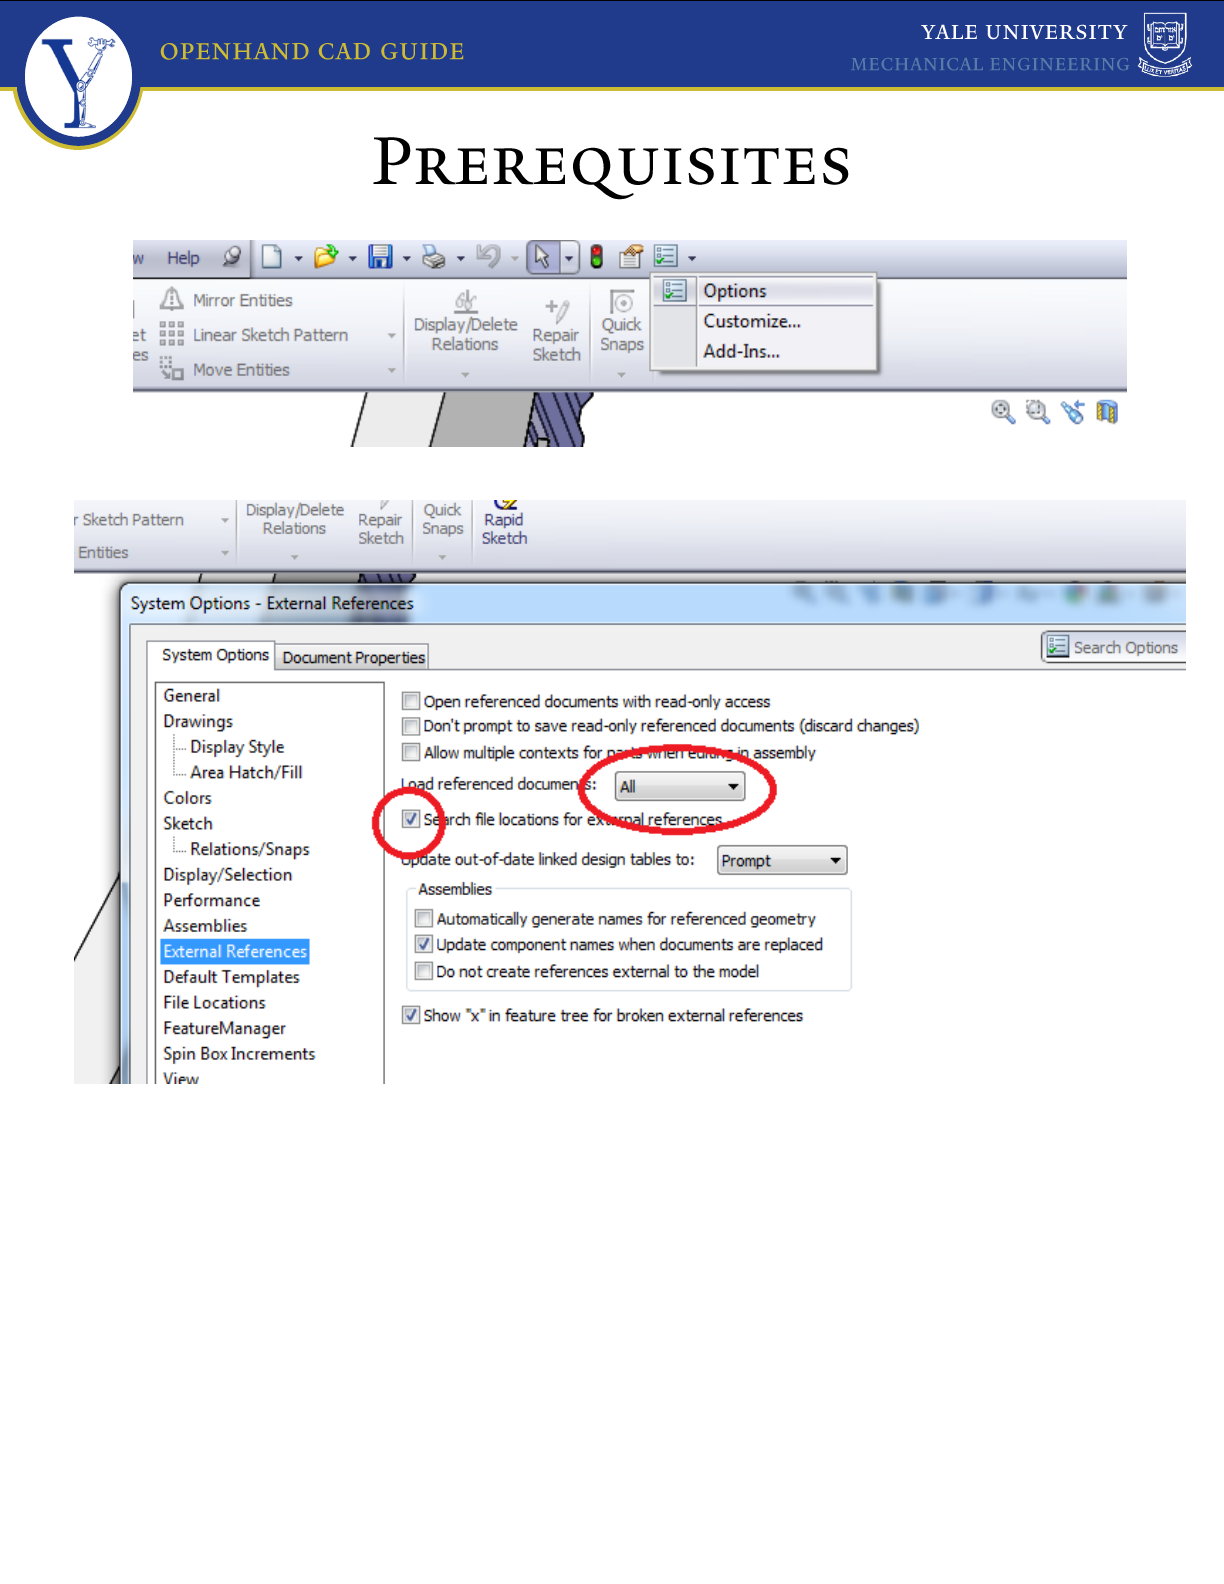
First, please check that under Options>>External References, you have Solidworks set to automatically load
all referenced documents. Solidworks will throw an error if part tries to rebuild without its reference parts
already loaded.
This will most commonly happen if you don’t have the parameter files open and try to open a dependent
part. With this option selected, the referenced parts will load automatically and avoid errors.
After this, the easiest way for you to start playing with the CAD files is to open an hand assembly. They
should be named hand_[model name].sldasm. For example, hand_m.sldasm for the Model M hand.
3
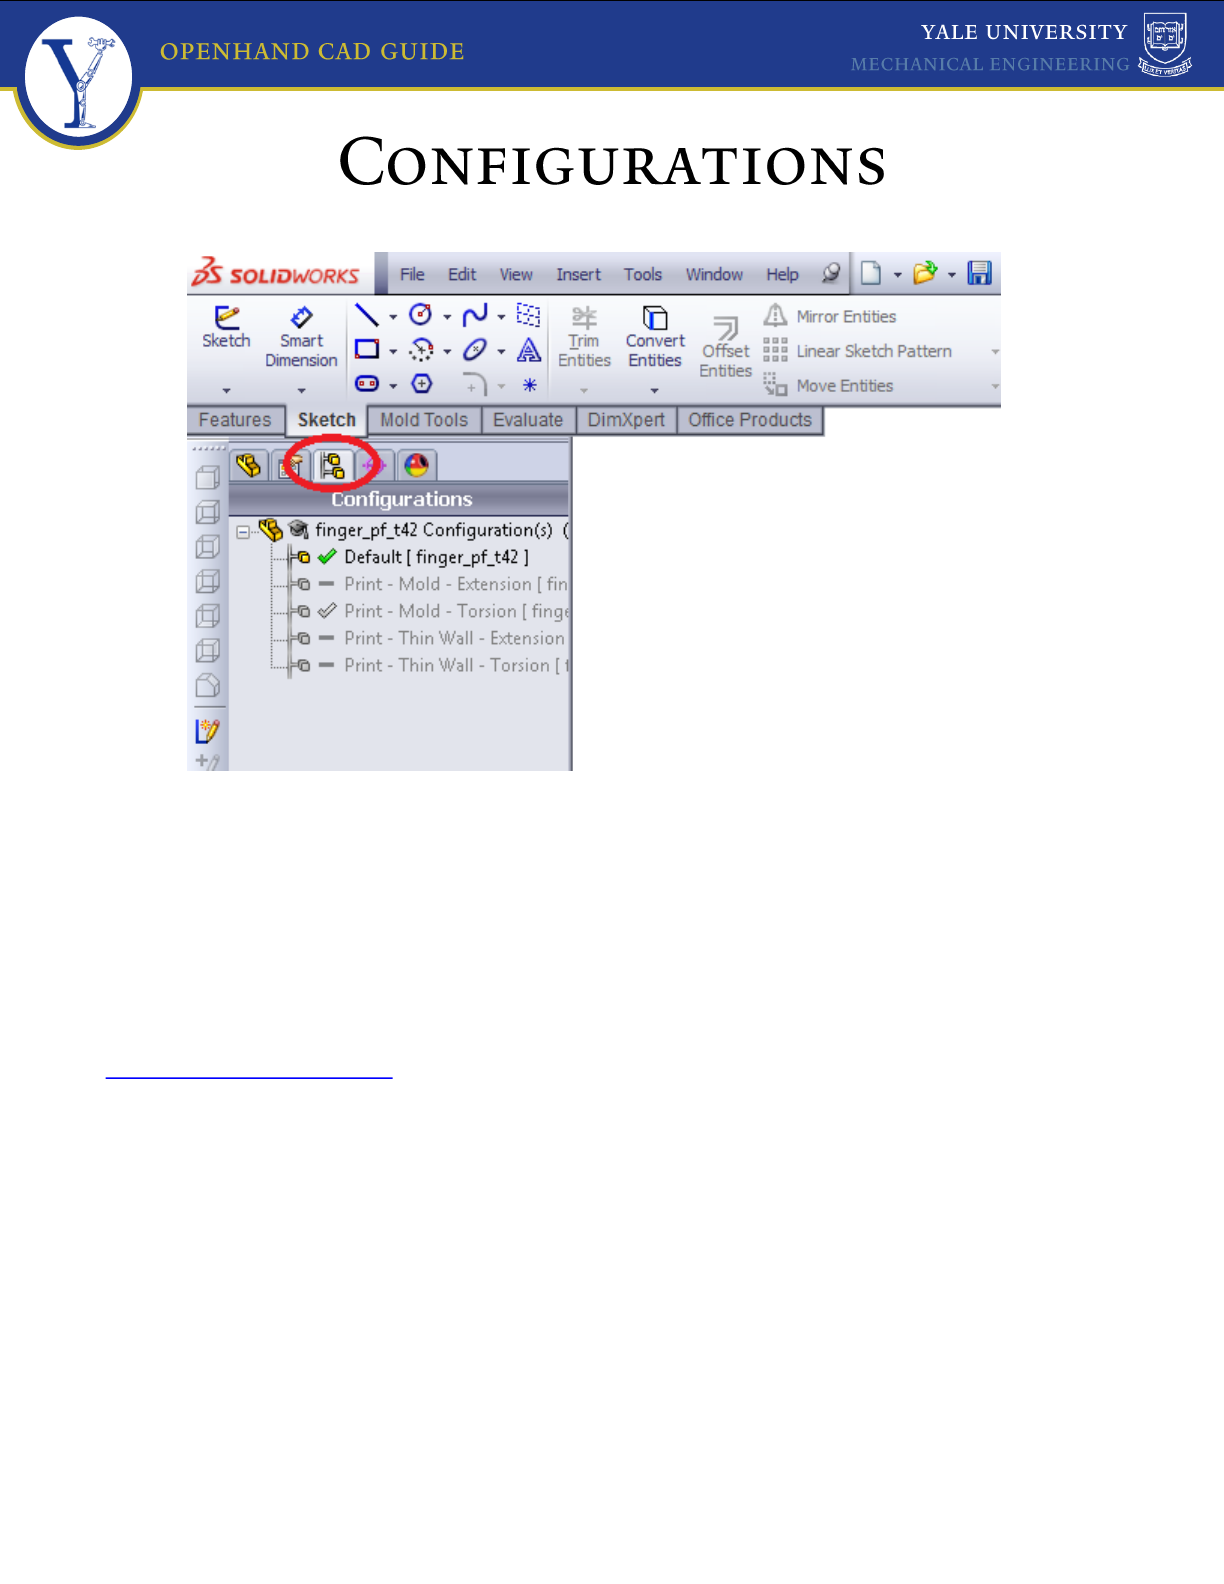
Please check the Configurations tab for the assemblies and parts that you open! To cut down the number of
parts I needed to maintain in the CAD library, and to make it easier to update sets of parts that have many
commonalities, I’ve used configurations extensively in the OpenHand repository. To switch to another
configuration, just double click on the name.
The different configurations mostly suppress/unsuppress different subsets of features, so you shouldn’t have
to switch between different configurations if you just want to see the full set of features.
The OpenHand Github repository should have a full directory of stl’s that have been generated from all
possible configurations. Going this route has cut down the size of our CAD library in half, and it has also
preserved the remnants of my sanity.
4
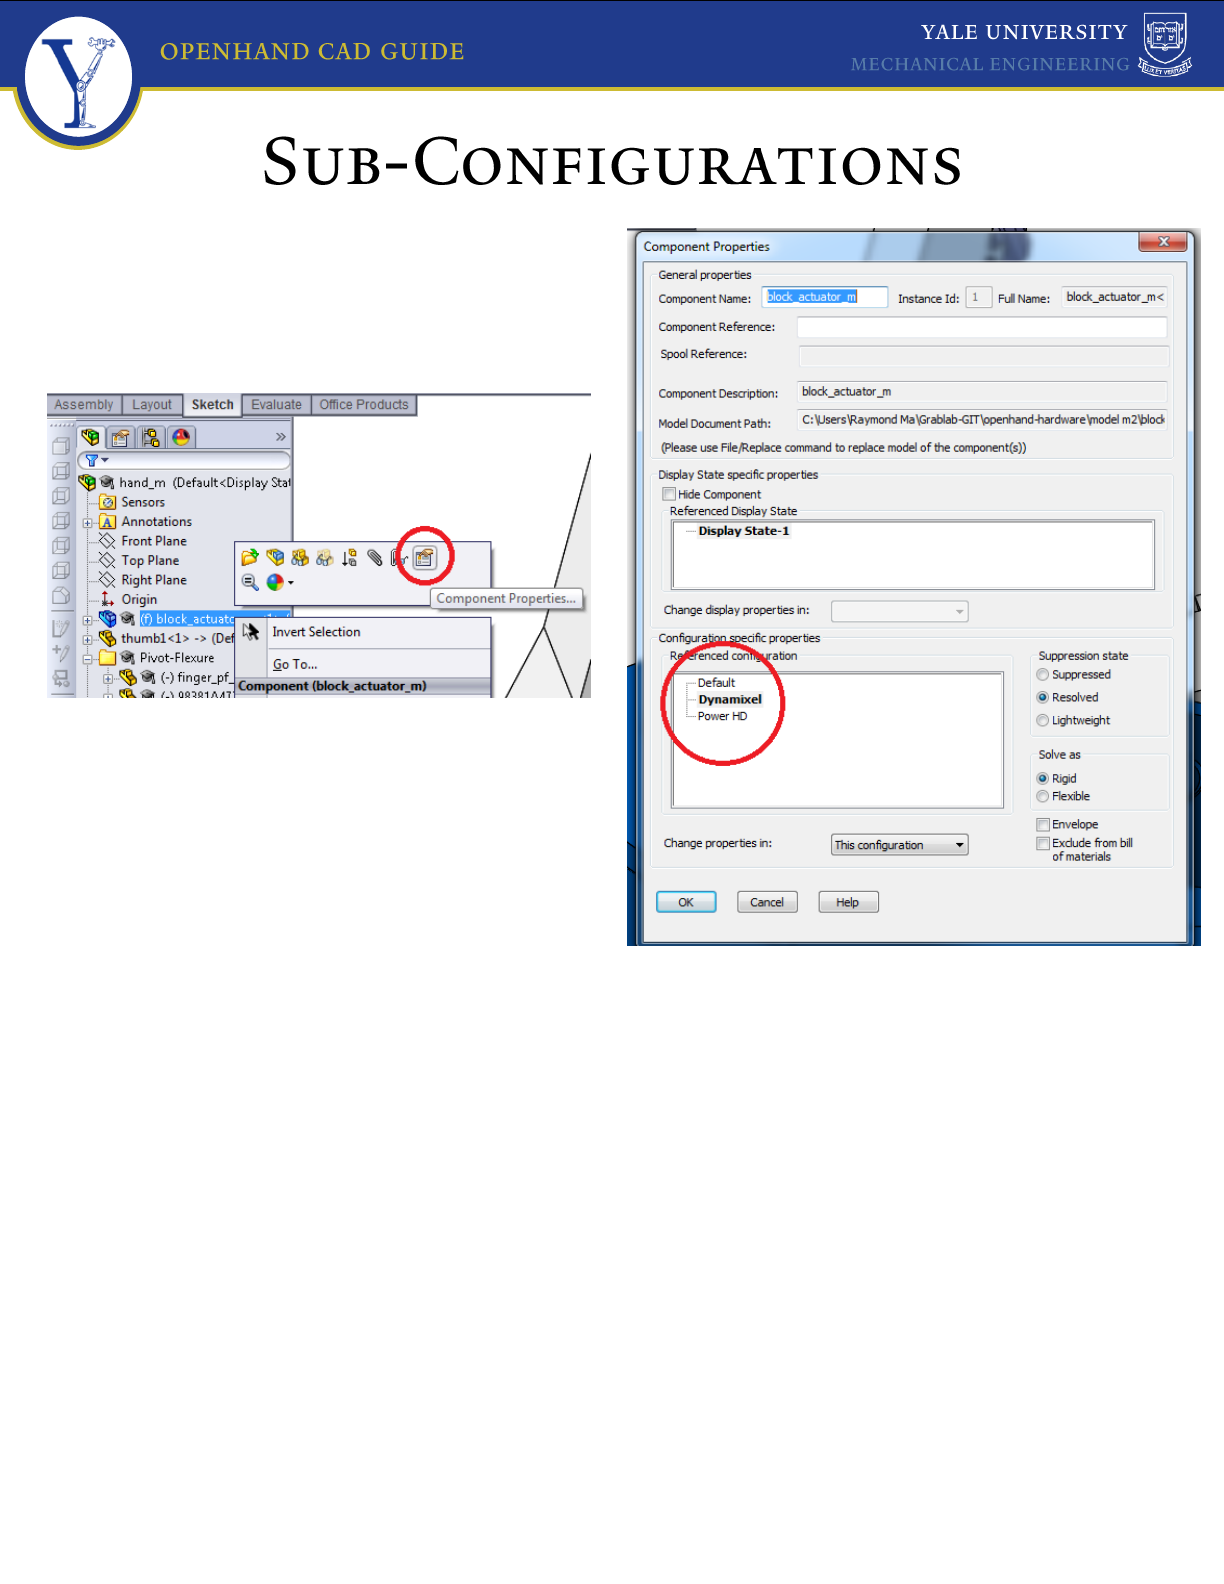
If you need to select a particular configuration for a sub-assembly inserted into another assembly, right-click
on the sub-assembly name and select Component Properties… to bring up a dialog for the sub-assembly. You
can select the desired configuration for the sub-assembly in the bottom half of the dialog box, as shown
above.
5
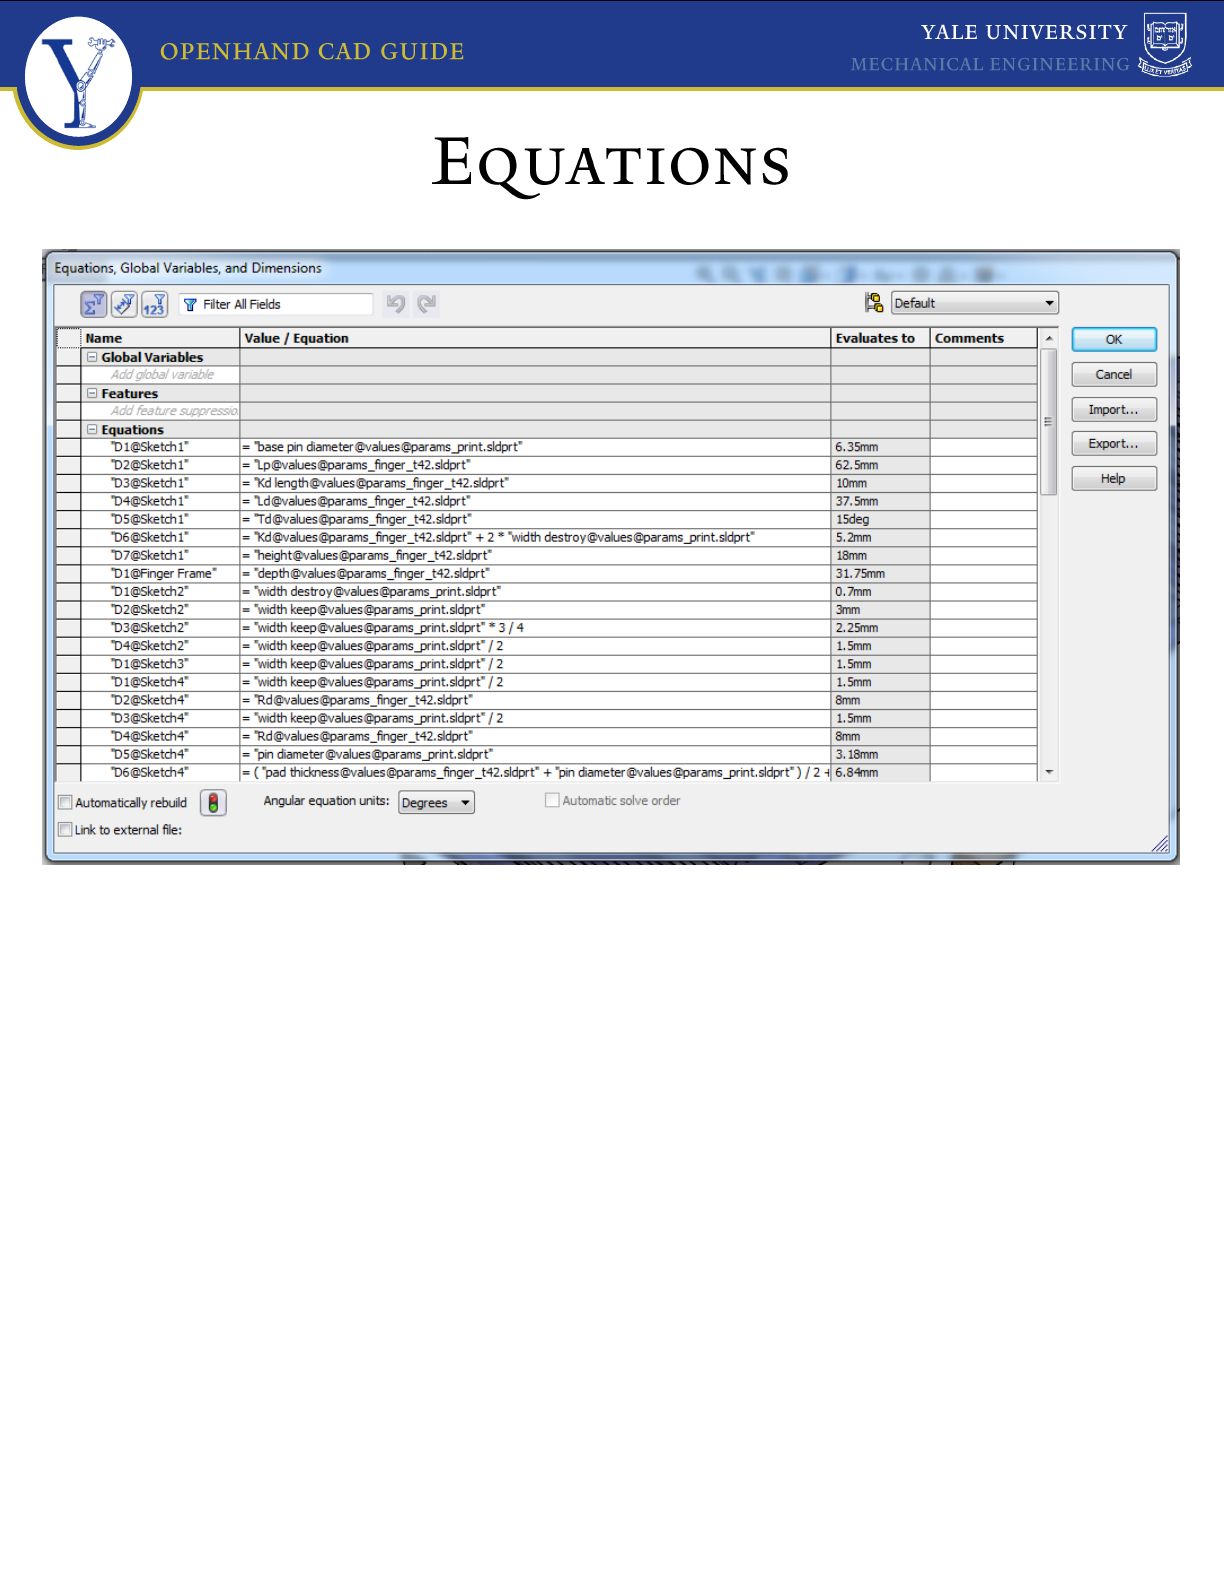
The Equations dialog can be loaded through Tools>>Equations…
The parameters files each contains a single sketch named values. The global parameters can commonly be
directly referenced in a link value by “[variable name]@values@[parameter file name].sldprt”. Through the
Smart Dimension tool, the variable should turn from red to blue once you have typed in the full reference
name correctly.
If you absolutely cannot stand to use these equations but also do not want to re-make the parts from
scratch, the easiest work-around is probably to go through the Equations dialog box and delete all the
equations here.
It is typically only the finger part files that will have more than 5-10 equations.
Though my initial intent with using so many equations was to make modifications through design parameters
much easier and completely automatic, the truth is that the part file is very likely to break in some form or
another once certain parameters are changed too much. However, looking through the Equations dialog will
go a long way to helping you hunt down the error. Every element in each sketch should be fully defined.
6
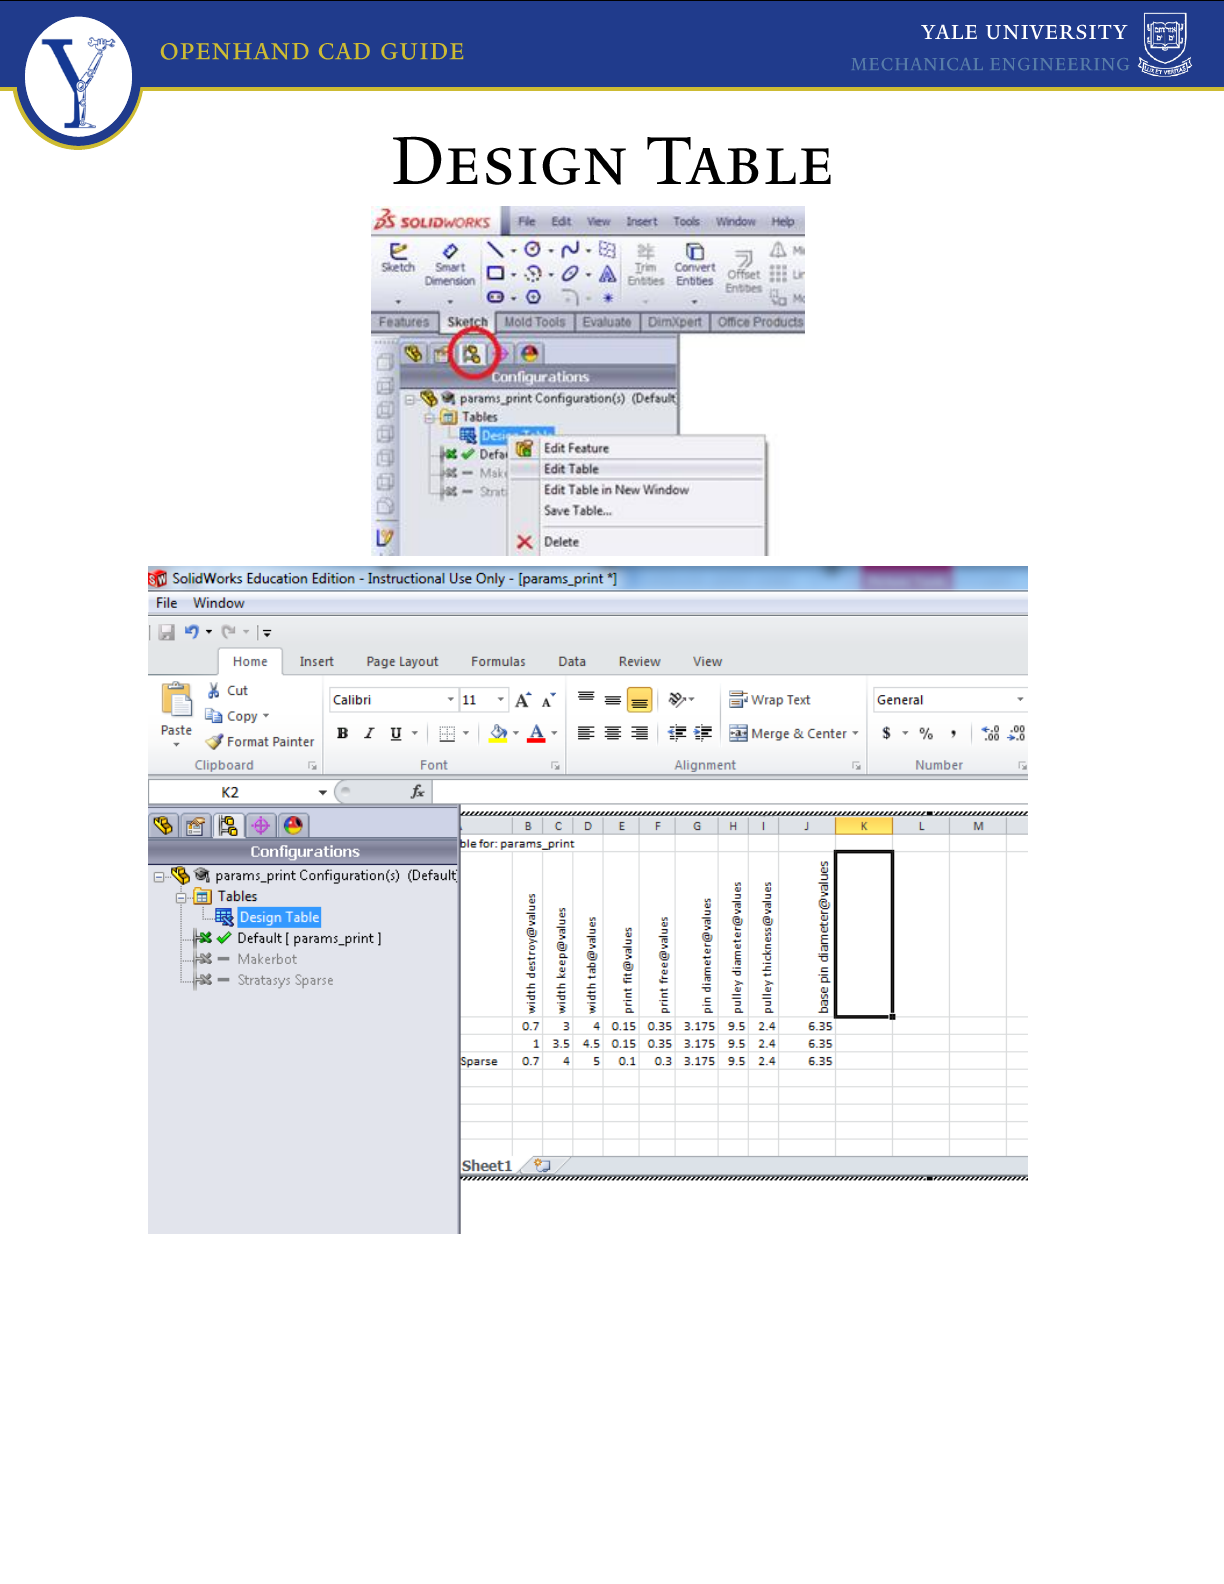
To tweak the global parameter values in each parameter file, open up the Design Table under the
Configurations tab on the left. There may be some pre-set configurations already there, but no guarantees
there.
We had originally hoped to fully populate the Design Tables with configurations that other labs/users had
tested on their own machines, but due to low user participation/adoption, that hasn’t been possible.
After making a change, save the parameter file and rebuild the dependent files. The changes should
propagate accordingly. Hopefully you can understand that it’s impossible for me to check even a small range
of all possible parameter combinations, so experiment with the parameters at your own peril.
7
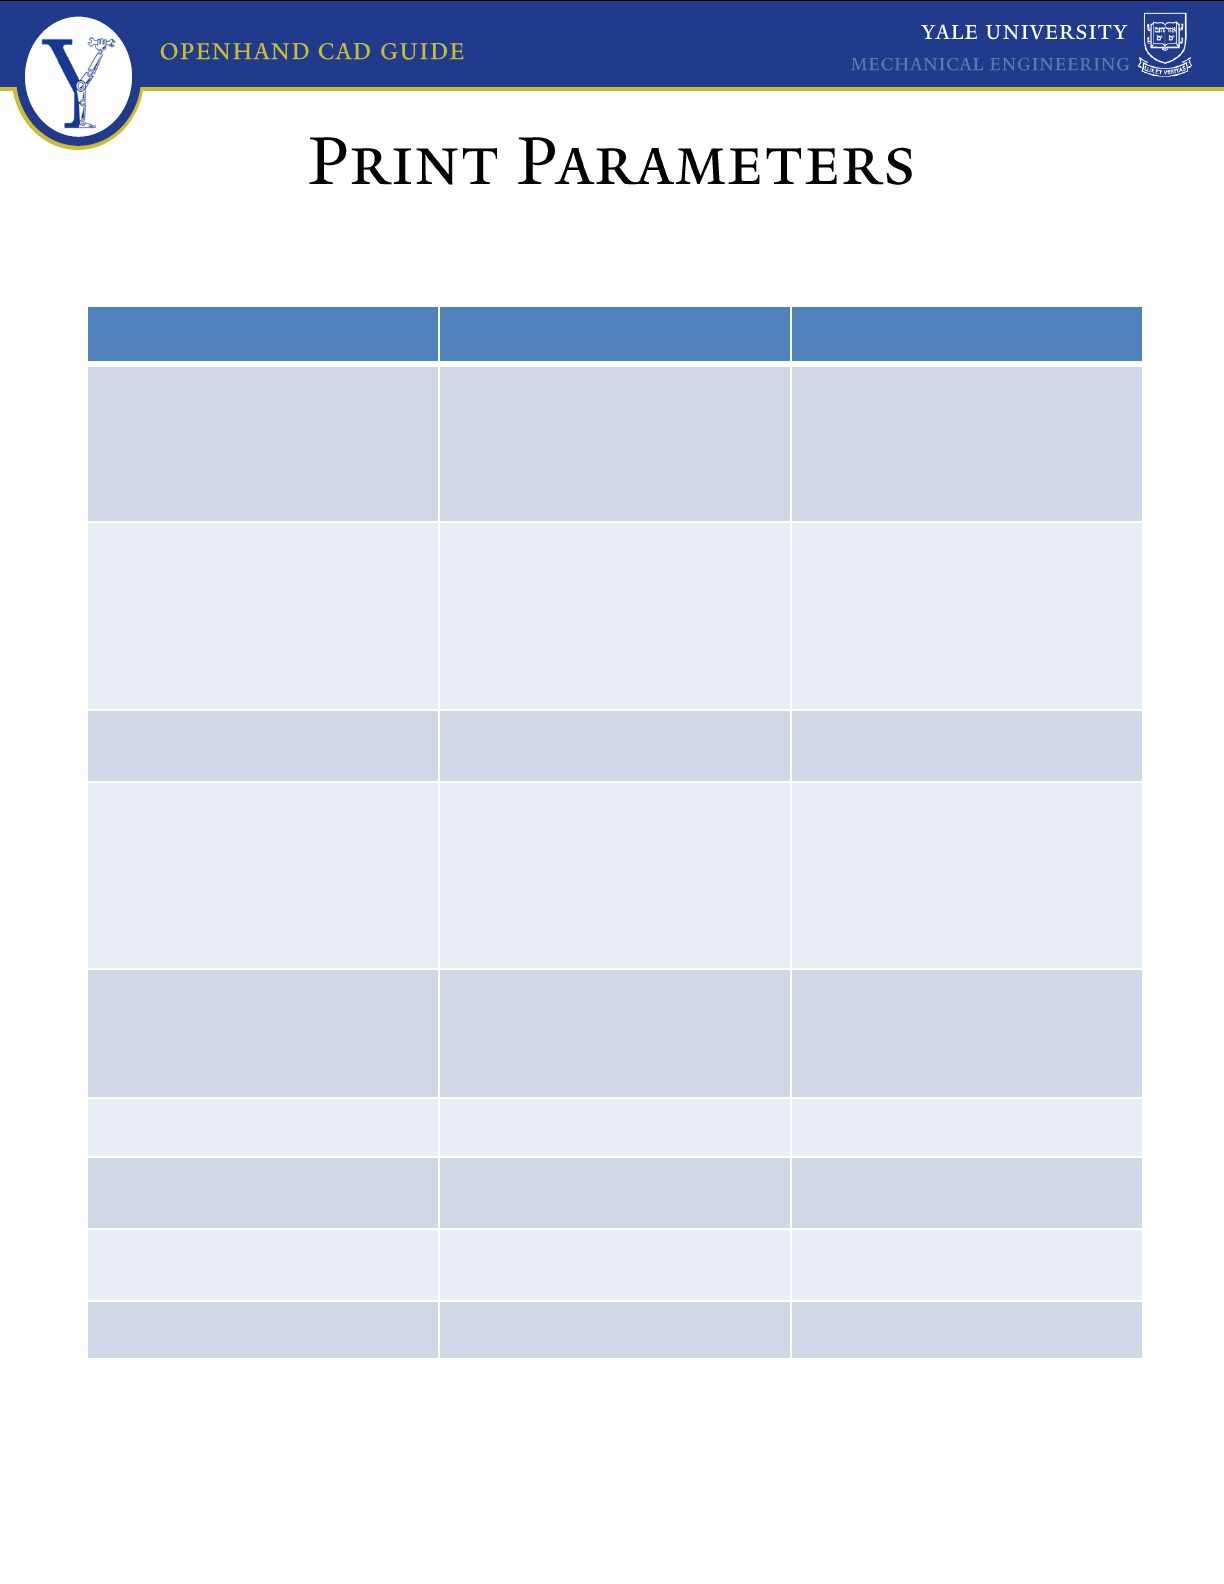
There is a file params_print.sldprt that should be common to all parts in the OpenHand library. This contains
values related to the 3D printer capabilities and fastener selection
Parameter Name Default Value Description
width destroy 0.7 (mm) Minimal wall thickness that the
printer can produce. Typically 2x
the nozzle diameter. This value is
usually used for sacrificial walls
or temporary elements.
width keep 3 (mm) Minimal structural wall
thickness. This is the minimal
dimensional value I’ll typically
use for a structural component,
such as the thickness of ribbing
or a framing wall.
width tab 4 (mm) Thickness of the tabs that keep
the fingers in place.
print fit 0.15 (mm) Printed parts tend to be smaller
than you specify. Print fit is the
amount to increase certain
dimensions for features that
need to be press fit (ie.
clearances for dowel pins)
print free 0.35 (mm) Amount to increase certain
dimensions for features that
need to have a free clearance,
such as a freely rotating joint.
pin diameter 3.125 (mm) We use 1/8” diameter steel pins
base pin diameter 6.35 (mm) We use ¼” diameter steel pins
for pivot joints
pulley diameter 9.5 (mm) Some of our designs use small
nylon pulleys from McMaster
pulley thickness 2.4 (mm) Thickness of the nylon pulleys
8
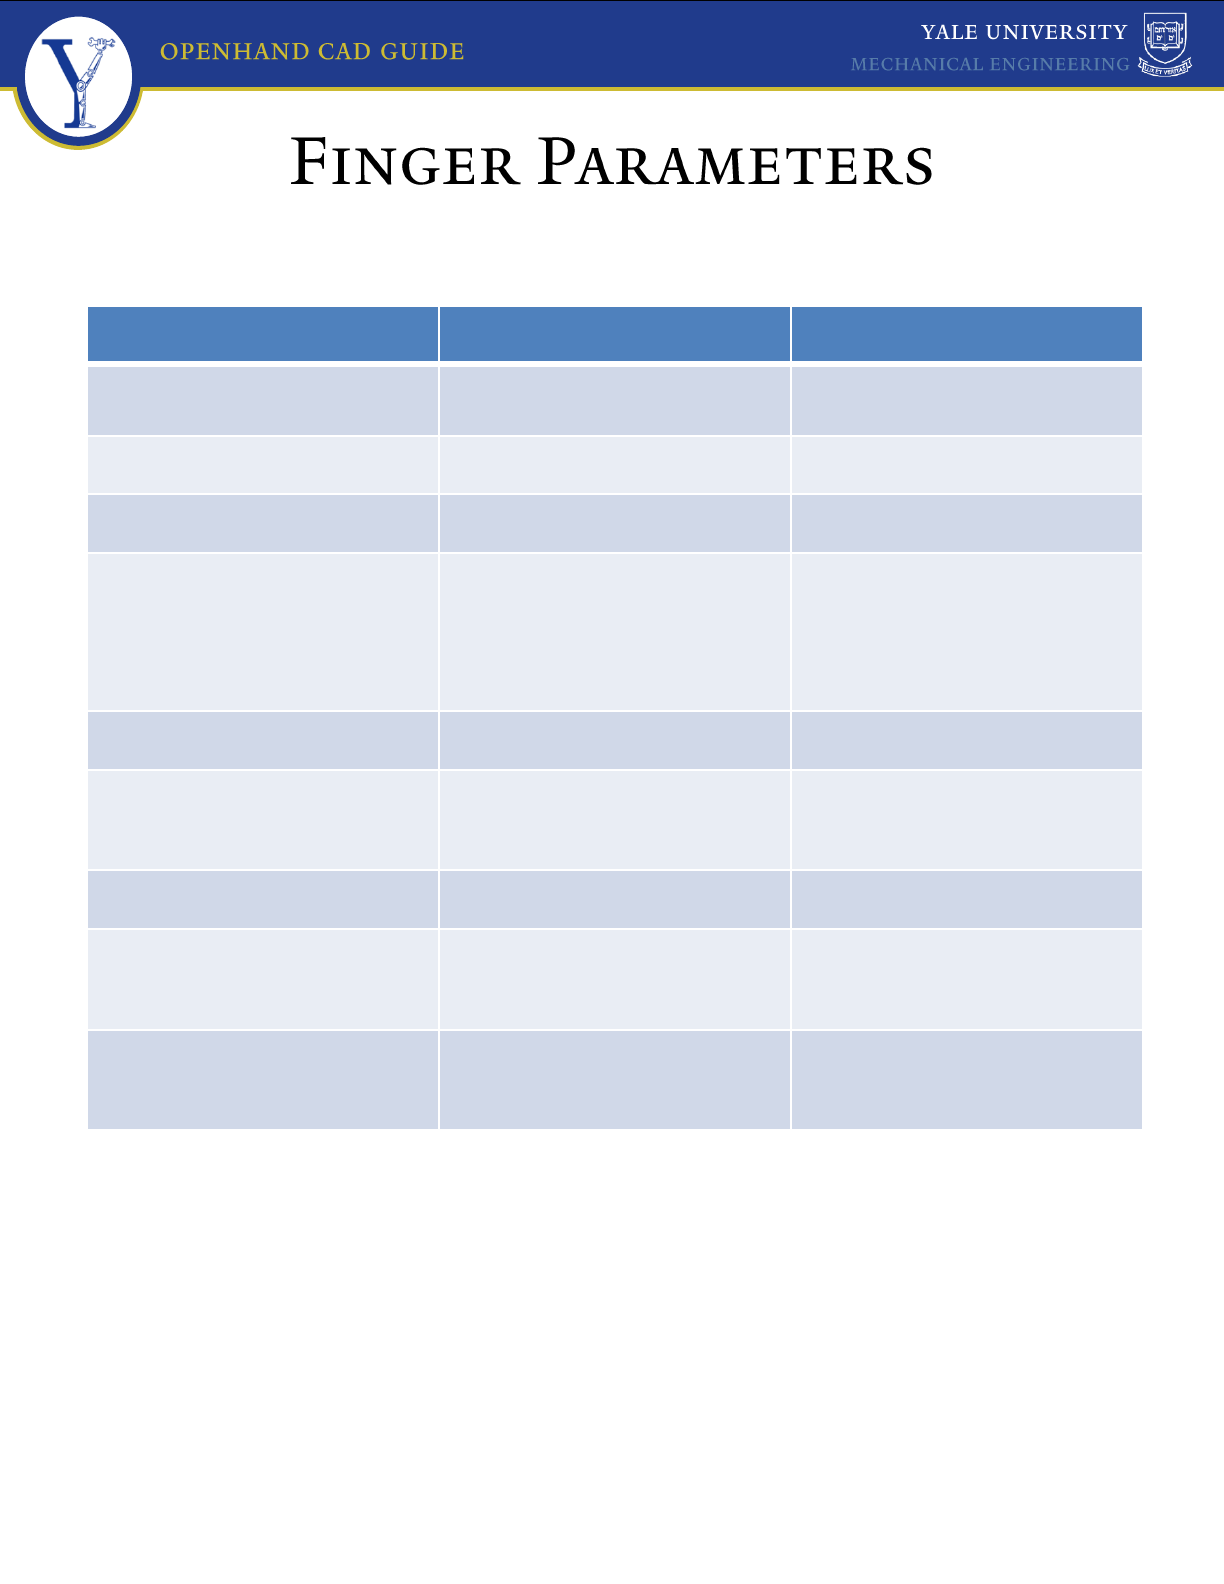
There are two main finger parameter files: params_finger_t.sldprt for the thinner fingers found on the
Model T and O, and params_finger_t42.sldprt for deeper fingers found on the Model T42 and M2/M.
Parameter Name Default Value Description
Lp, Ld 62.5, 37.5 (mm) Proximal and distal linkage
lengths.
Kp, Kd Varies Thickness of the flexural joints
Kp length, Kd length 10 (mm) Length of the flexure joints
Rp, Rd 8 (mm) Transmission radius of each
joint. Approximately the distance
from the center of rotation of
the joint to the centerline of the
actuating tendon.
height 18 (mm) Height of the finger links
depth 16, 31.75 (mm) Depth of the finger links, should
be approximately 5/8” and 1-
1/4”
pad thickness 4.5 (mm) Thickness of the fingerpads
Lb Varies Separation between the
proximal joints of opposing sets
of fingers
Tp, Td 15 (degrees) Rest angle of each of the joints,
where 0 is the finger starting in a
fully linear orientation