Open School Admin Manual
Open-School%20Admin%20Manual
User Manual:
Open the PDF directly: View PDF ![]() .
.
Page Count: 300 [warning: Documents this large are best viewed by clicking the View PDF Link!]

Open-School 2.6.5 Administrator Manual
1
DISCLAIMER
The instructions in this document have been carefully checked for accuracy and are presumed
to be reliable. WIWO Enterprises Pvt. Ltd. and its writers assume no responsibility for
inaccuracies and reserve the right to modify and revise this document without notice.
It is WIWO’s goal to supply accurate and reliable documentation. If you discover a discrepancy
in this document, please e-mail your comments to support@open-school.org
Unauthorised reproduction in whole or in part is an infringement of copyright. WIWO
Enterprises Pvt. Ltd will actively pursue any breach of its copyright.
All names, addresses and details of individuals portrayed in this book are fictitious. No
identification with actual persons (living or deceased), places, buildings, and products is
intended or should be inferred.
Published in India by:
WIWO Enterprises Pvt. Ltd
B3, Pais Avenue,
Elamkulam, Cochin - 20
Kerala, India
Telephone +91 (0484) 6009496
This publication is copyright. Other than for the purposes of and subject to the conditions prescribed under the
Copyright Act 1968 (as amended), no part of it may in any form or by any means (electronic, mechanical, micro
copying, photocopying, recording or otherwise) be reproduced, stored in a retrieval system or transmitted without
prior written permission of the copyright owner. Enquiries should be addressed to WIWO Enterprises Pvt. Ltd.
Open-School 2.6.5 Administrator Manual
2
PREFACE
ABOUT THIS MANUAL
The Administrative Manual serves as a guide to assist employees in an institution with their
day-to-day performance of administrative and management functions. The manual contains
instructions for registering students, parents and teachers and other functionalities like marking
attendance, collecting fees etc.
This guide will give you detailed insight into each module and feature in the system. It also has
a getting started section to help you setup a fresh application from scratch.
INTENDED AUDIENCE
This manual is intended for users who manage institutions on an administrative level, track day-
to-day activities of students and teachers, manage financial details etc. In case you find it
difficult to understand or have any doubts regarding the application please feel free to reach
out to our Happiness Team at support@open-school.org or simply use the chat widget on our
website www.open-school.org.
NEW TO THIS RELEASE
Open-School Version 2.6.5 comes out with a lot of enhancements in functionalities and design
making user interaction and operation easier. Below are some of the new features available in
this version.
1. New reports in Fees Module
2. Translation Import/Export ability added
3. New look for Admin dashboard
4. Import Module workflow changes
5. Attendance Module improvements

Open-School 2.6.5 Administrator Manual
3
CONTENT
1. GETTING STARTED 11
1.1 Creating an Academic Year 12
1.2 Creating Courses, Batches and Semesters 13
1.2.1 Creating Courses 14
1.2.2 Creating Semesters 14
1.2.3 Creating Batches 16
1.3 Adding Subjects / Electives 18
1.3.1 Adding common subjects 18
1.3.2 Adding individual subjects 20
1.3.3 Creating Elective Groups and Electives 21
1.4 Setting up weekdays and class timings 23
1.4.1 Setting up weekdays 24
1.4.2 Creating Class Timings 24
1.5 Adding Teachers 27
1.5.1 Adding departments 27
1.5.2 Teacher Registration 28
1.6 Subject-Teacher association 28
1.6.1 Subject association 29
1.6.2 Elective association 30
1.7 Assigning teachers to the timetable 31
2. DASHBOARD 35
3. MY ACCOUNT 37
3.1 Activity Feed 37
3.2 Mailbox 39
3.2.1 Group Message 39
3.2.2 Individual Message 41
3.2.3 Managing your mailbox 42
3.3 News 44
3.3.1 Creating a news 44
3.3.2 Publishing a news 45
3.4 Events 46

Open-School 2.6.5 Administrator Manual
4
3.4.1 Events List 46
3.4.2 Calendar 47
3.4.3 Event Types 48
3.5 Document Uploads 50
3.6 Complaints 50
3.6.1 Managing Complaint Categories 51
3.6.2 Managing Complaints 52
4. STUDENTS 54
4.1 Student Field Settings 55
4.1.1 Creating a new Field 55
4.1.2 Managing fields 56
4.1.3 Rearranging fields 58
4.2 Adding a new student 59
4.2.1 Admin Student Registration 59
4.2.1a Step 1: Student Details 59
4.2.1b Step 2: Guardian Details 61
4.2.1c Step 3: Previous Details 63
4.2.1d Step 4: Student Documents 63
4.3 Students List 64
4.3.1 Student Profile 65
4.3.1a Documents 66
4.3.1b Achievements 67
4.4 The Online Registration Process 68
4.4.1 Enabling the online registration link 68
4.4.2 The application approval process 69
4.4.3 Online Applicants 72
4.4.4 Waiting List 73
4.4.5 Incomplete Registrations 73
4.5 Student leave type management 74
4.5.1 Creating a leave type 74
4.5.2 Manage Leave types 75
4.6 Archive 75
4.6.1 Student Archive 76
4.6.1 Guardian Archive 77
4.7 Student Log Management 77
4.7.1 Student log category 78

Open-School 2.6.5 Administrator Manual
5
4.7.2 Entering student logs 79
5. TEACHERS 79
5.1 Teacher Settings 80
5.1.1 Manage Category 81
5.1.2 Manage Positions 82
5.1.3 Manage Department 83
5.1.4 Manage Grades 84
5.2 Teacher Management 86
5.2.1 Creating a Teacher 86
5.2.1a Step 1: Teacher Details 87
5.2.1b Step 2: Contact Details 88
5.2.1c Step 3: Documents 89
5.2.2 Teacher Log 89
5.2.2a Creating Teacher Log categories 89
5.2.2b Adding logs for teachers 90
5.3 Teacher Attendance Management 91
5.4 Teacher Profile 93
5.4.1 Achievements 94
5.4.2 Subject Association View 95
6. COURSES 96
6.1 Creating a Course 97
To create a course click on the ‘Add Course’ button. 97
6.2 Creating Semesters 98
6.3 Creating a Batch 99
6.4 Adding a common subject 101
6.5 Previous Year Courses 102
6.6 Batch View 103
6.6.1 View students in the batch 104
6.6.2 Manage Subjects in a batch 105
6.6.3 Managing Electives for a batch 107
6.6.3a Creating Elective Groups: 108
6.6.3b Creating Electives: 109
6.6.3c Assigning students to electives: 109
6.6.4 Managing students in the waiting list 110
6.6.5 Batch settings and actions 112
6.6.5a Promoting students in a batch 113

Open-School 2.6.5 Administrator Manual
6
7. EXAMINATION 116
7.1 Default Examination Format 117
7.1.1 Setup default grading levels 120
7.1.2 Creating an exam in default format 122
7.1.3 Creating subject exams in default format 123
7.1.4 Entering Exam Scores 125
7.1.5 Exam results 126
7.1.6 Default Gradebook 128
7.2 CBSE Examination Format 129
7.3 Online Exams 129
7.3.1 Creating an online exam 129
7.3.2 Evaluating online exams 133
8.1 Student Attendance 136
8.1.1 Individual Attendance 137
8.1.1a Individual Daily Attendance 137
8.1.1b Individual Subject wise attendance 139
8.1.2 Batch Attendance 140
8.1.2a Batch daily attendance 140
8.1.2b Batch subject wise attendance 145
8.2 Teacher Attendance 147
8.2.1 Teacher daily attendance 147
8.2.2 Teacher subject wise attendance 149
9. TIMETABLE 151
9.1 Setting up weekdays 151
9.1.1 Weekdays for batches 151
9.1.2 Default weekdays 152
9.2 Class Timings 152
9.2.1 Class timings for individual batches 152
9.2.2 Common class timings 154
9.3 Setting up your timetables 155
9.4 Timetable views 158
9.4.1 View Batchwise Timetable 158
9.4.2 View Full Timetable 158
9.4.3 View Teacher’s Timetable 160
10. FEES 161
10.1 Creating Fees 162

Open-School 2.6.5 Administrator Manual
7
10.1.1 Fee creation: STEP 1 162
10.1.2 Fee creation: STEP 2 (Subscriptions) 164
10.1.3 Invoice generation and management 166
10.1.3a Making payments 169
10.2 Transportation Fees 170
10.2.1 Generating invoices for transportation 170
10.3 Managing Payment Types 172
10.4 Managing Taxes 173
10.5 Fee Reports 174
10.5.1 Daily Collection Report 174
10.5.2 Due Report 175
10.6 Payment gateway settings 176
11. SETTINGS 177
11.1 General Settings 177
11.1.1 School Setup 178
11.1.2 Backup/Restore 180
11.1.3 Translation 181
11.1.4 Module Management 183
11.1.5 User role management 185
11.1.6 Annual Holidays 186
11.1.7 Theme Management 189
11.1.8 System upgrade 191
11.1.9 Features 193
11.1.10 Authentication 193
11.1.11 SMS counter 194
11.1.12 Notification Settings 195
11.1.13 Help 197
11.2 Creating a custom user 197
11.3 Manage Users 199
12. HOSTEL 201
12.1 Managing Hostels 201
12.1 Managing Rooms 202
12.1.1 Creating a room 203
12.1.2 Allotting a student to a room 204
12.1.3 Changing Rooms 207
12.1.4 Vacating a room 208

Open-School 2.6.5 Administrator Manual
8
12.2 Mess Management 209
12.3 Notifications 211
13. TRANSPORT 211
13.1 Adding and managing vehicles 212
13.2 Adding and managing drivers 214
13.3 Driver-Vehicle association 215
13.4 Managing routes and stops 216
13.5 Allotment 218
13.6 Managing devices and attendance log 219
13.7 Transport Fee 221
13.8 Bus Log 221
13.9 Search student details 223
14. LIBRARY 224
14.1 Managing Authors 224
14.2 Managing book categories 225
14.3 Managing Books 226
14.3.1 List Books 226
14.3.2 Search books 227
14.4 Manage issue and return of books 228
14.4.1 Issue a book 228
14.4.2 Return a book 228
14.4.3 View details of borrowed books 229
14.4.4 Check books that are due 230
15. DOWNLOADS 231
15.1 Creating and managing file categories 231
15.1.1 Creating a file category 231
15.1.2 Managing file categories 232
15.2 Creating and managing file uploads 232
15.2.1 Creating a file upload 232
15.2.2 Managing your uploaded files 234
16. IMPORT 235
16.1 Import Add Action 236
16.2 Creating user account for imported data 240
16.3 Import Edit action 241

Open-School 2.6.5 Administrator Manual
9
17. EXPORT 242
18. NOTIFY 244
18.1 Emails 244
18.1.1 Sending an email 244
18.1.2 Managing drafts 247
18.1.3 Managing Mailshots 247
18.1.4 Sent Emails 248
18.1.5 Email Templates 249
18.2 SMS 251
18.2.1 Managing groups 251
18.2.2 Managing contacts 253
18.2.3 Importing contacts 254
18.2.4 SMS gateway settings 255
18.2.5 Sending an SMS 257
18.2.6 SMS templates 258
19. REPORTS 261
19.1 Advanced Report 262
19.2 Assessment Reports 263
19.2.1 Batch Assessment Report 263
19.2.2 Student Assessment Report 264
19.2.3 Semester Assessment Report 265
19.3 Attendance Reports 266
19.3.1 Teacher Attendance 266
19.3.2 Teacher Subject wise Attendance 267
19.3.3 Student Attendance 268
19.3.4 Student Subject wise Attendance 269
19.3.5 Attendance percentage reminder 270
20. PURCHASE 272
20.1 Creating and managing items 272
20.2 Adding and managing vendors 273
20.3 Managing purchase orders 276
20.4 Managing supply orders 277
20.5 Material Requisition 278
20.6 Issue Items 279
20.7 Managing stocks 280

Open-School 2.6.5 Administrator Manual
10
20.8 Manage Sales 281
21. HR 284
21.1 Managing non-teaching staffs 284
21.1.1 Creating a new Staff 284
21.1.2 Managing your staffs 286
21.2 Managing leaves 286
21.2.1 Create and manage leave types for employees 286
21.2.2 Manage leave requests 288
21.2.2 Approved requests 289
21.2.3 Cancelled requests 289
21.3 Salary Management 289
21.3.1 Salary Details 289
21.3.2 Generate payslips 290
21.3.3 Salary Reports 293
MISCELLANEOUS 294
Lost Password 294
Change Password 296
FREQUENTLY ASKED QUESTIONS 298
Open-School 2.6.5 Administrator Manual
11
1. GETTING STARTED
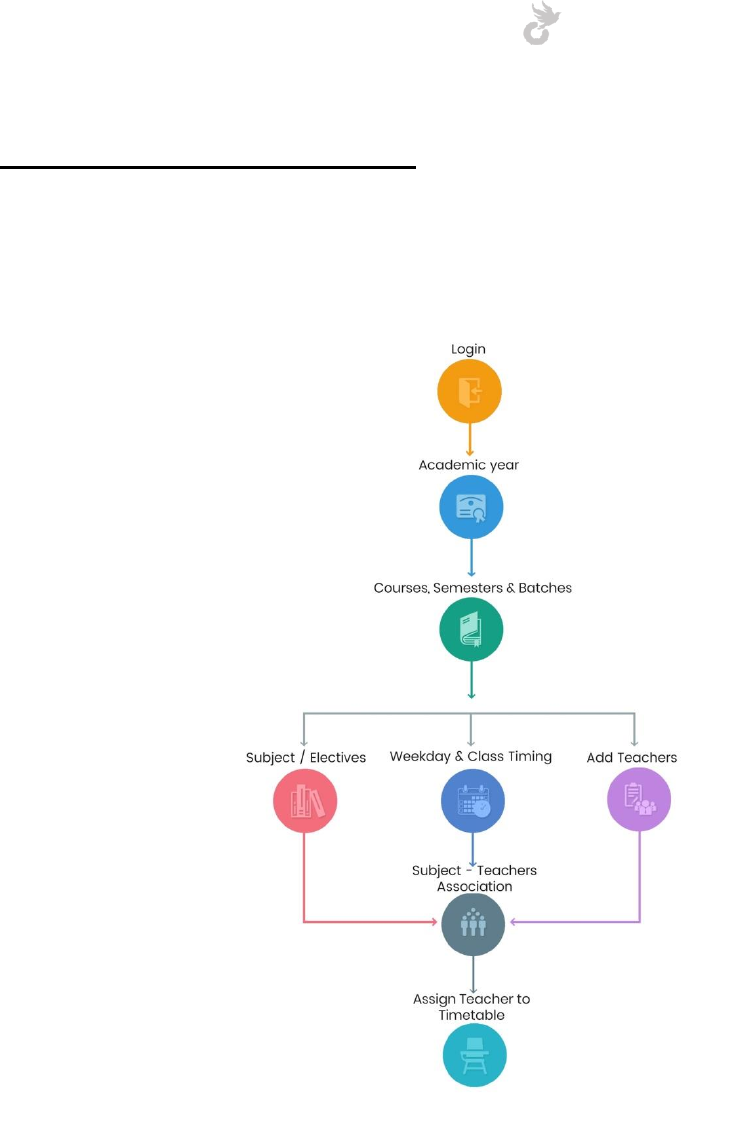
Considering you are using a fresh system, you may follow these steps to setup the application
for initial use. If you are already past this stage please ignore this section.
1. Create an academic year. Everything from course, batches, examination, student
attendance, timetable fees etc revolves round the academic year.
2. School Setup. Start by filling in your school details, setting up the timezone, currency,
favicon, school logo.
3. Create courses and batches. Students are added to batches, so creating them and
setting them up first would be a good option.
Open-School 2.6.5 Administrator Manual
12
4. Add subjects to courses or batches.
5. Set up weekdays or the default weekdays and create class timings for timetables.
6. Add teachers and create subject associations, assign them to batch timetables and
assign class teachers for each batch.
Once you've completed the above checklist you are ready to start adding students.
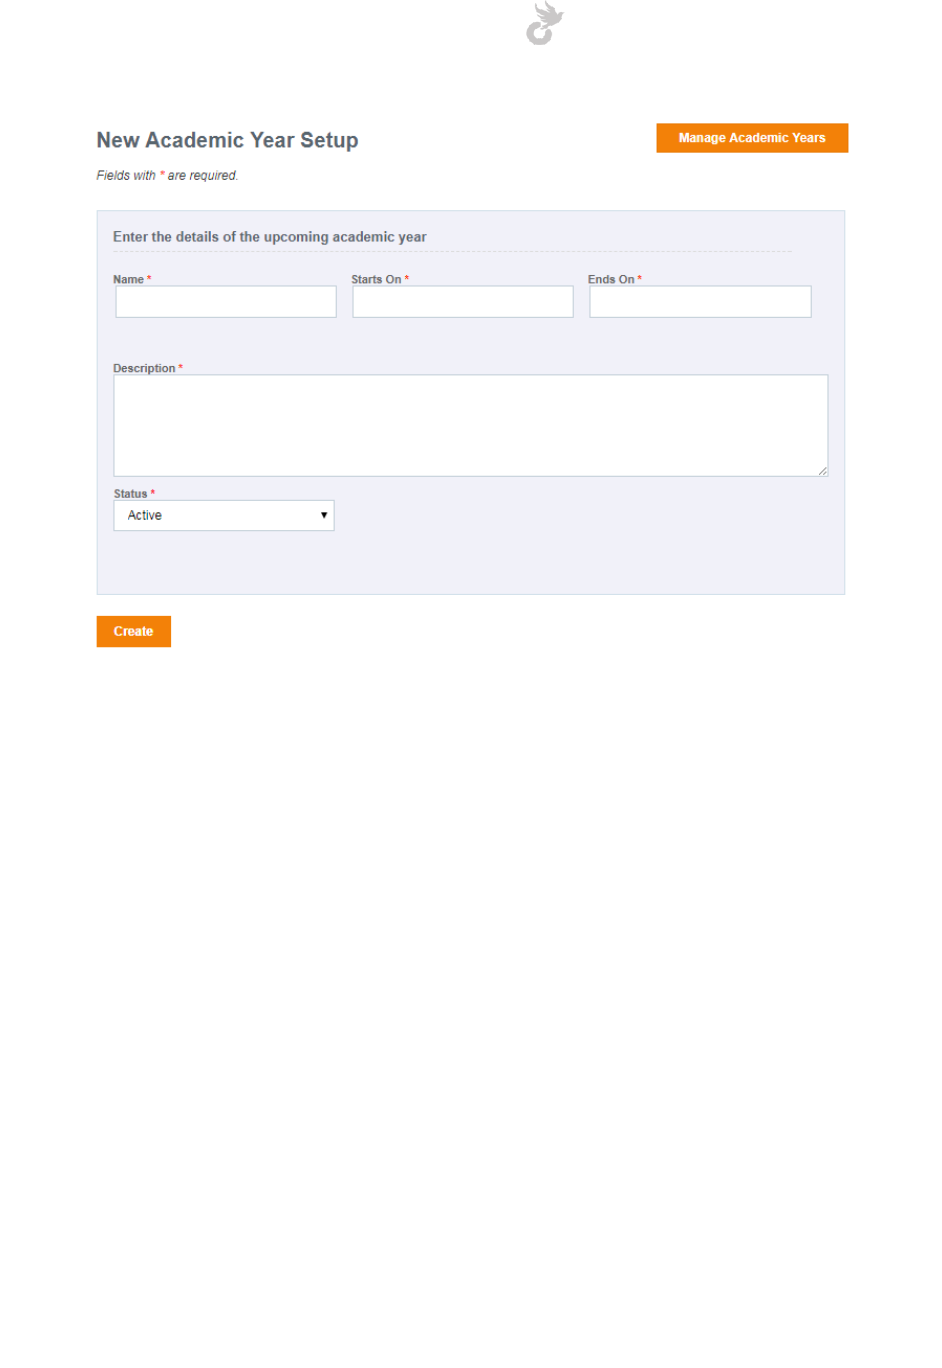
1.1 Creating an Academic Year
Academic years can be created from the Settings Module > General Settings > Academic Year
Creating an academic year is quite easy. Choose a start date and an end date for which your
institution runs for the year, give it a description and a name and click create!
Click the ‘Add Academic Year’ button to get going.
You see a form with the following fields:
1. Name
2. Starts on
3. Ends on
4. Description
5. Status
Open-School 2.6.5 Administrator Manual
13
Fill in the details for the fields above and click the create button to successfully create an
academic year.
Please note, only ONE academic year can be ACTIVE at a time. You may switch between
academic years from the dropdown on top to view relevant data for each module.
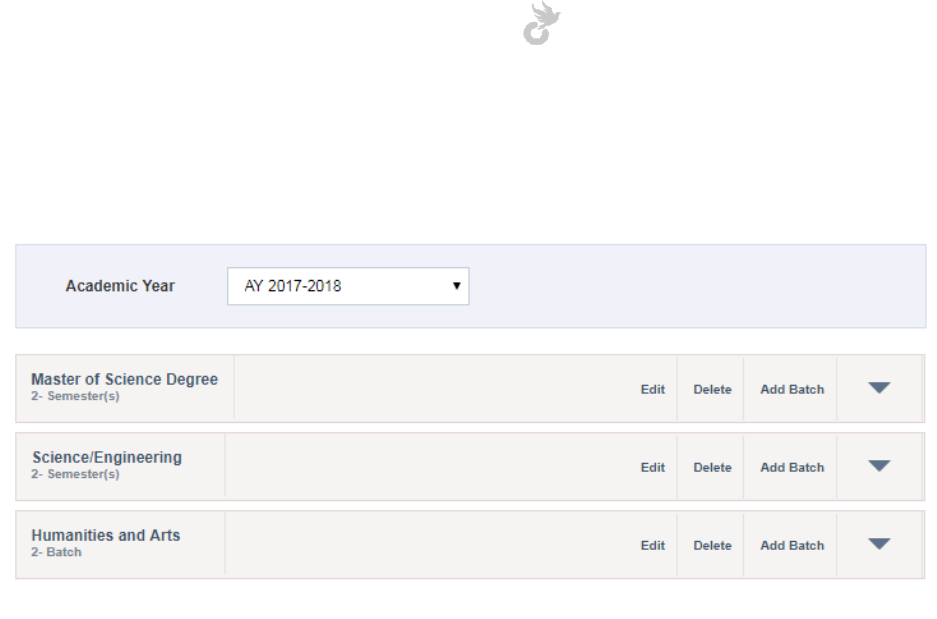
1.2 Creating Courses, Batches and Semesters
Once you've created an active academic year, you can go ahead with adding courses, batches
and semesters(optional). This is the basic hierarchy of the academic structure. Courses act as
the top level. Batches come under a course and students are added to these batches. You may
also add semesters and classify the batches under it. This level is optional(mostly needed in
college level institutions) and can be toggled for each course separately.
A single teacher can be assigned to a batch as a Class Teacher to manage all processes within it.
Several other teachers can also be associated with a batch as subject teachers who teach
specific subjects for the batch.
Open-School 2.6.5 Administrator Manual
14
1.2.1 Creating Courses
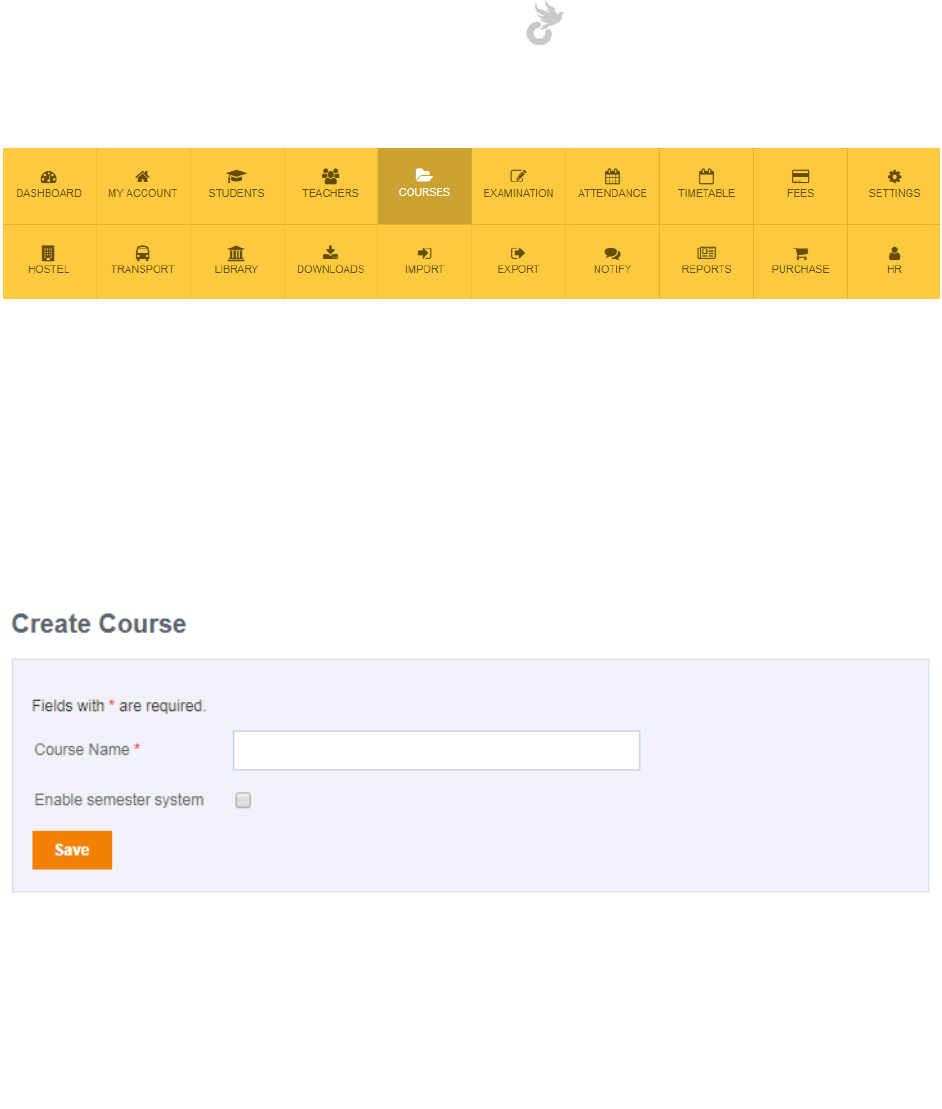
Courses can be created from the Courses Module > Create Courses
Creating a course is really simple. All you have to do is enter a course name! You’ll be able to
see an option to ‘Enable semester system’ for the course you create. Check this if necessary.
You can create courses with and without semesters in the same academic year.
After you have created a course you can go ahead with adding semesters and batches. Let's
take a look at adding semesters.
1.2.2 Creating Semesters
Creating a semester if optional. If you do not require a semester system skip to the next step of
creating batches.
To add a semester click on ‘Manage Semesters’ in the left side menu under the Courses
Module. This should take you to the list of semesters which ofcourse will be empty the first
time you use the application.
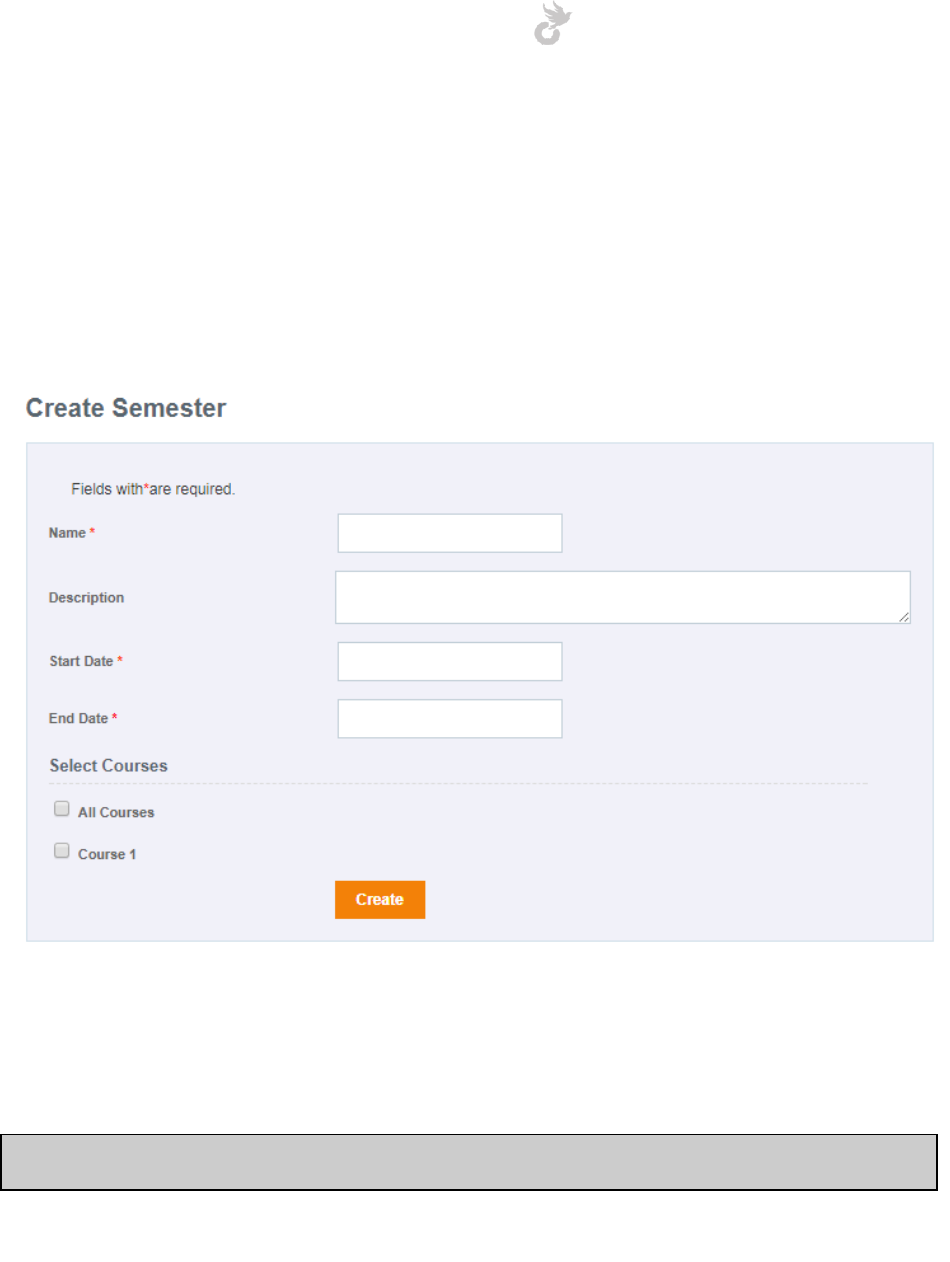
Click on the ‘Add Semester’ button to start adding semesters to a course.
Open-School 2.6.5 Administrator Manual
15
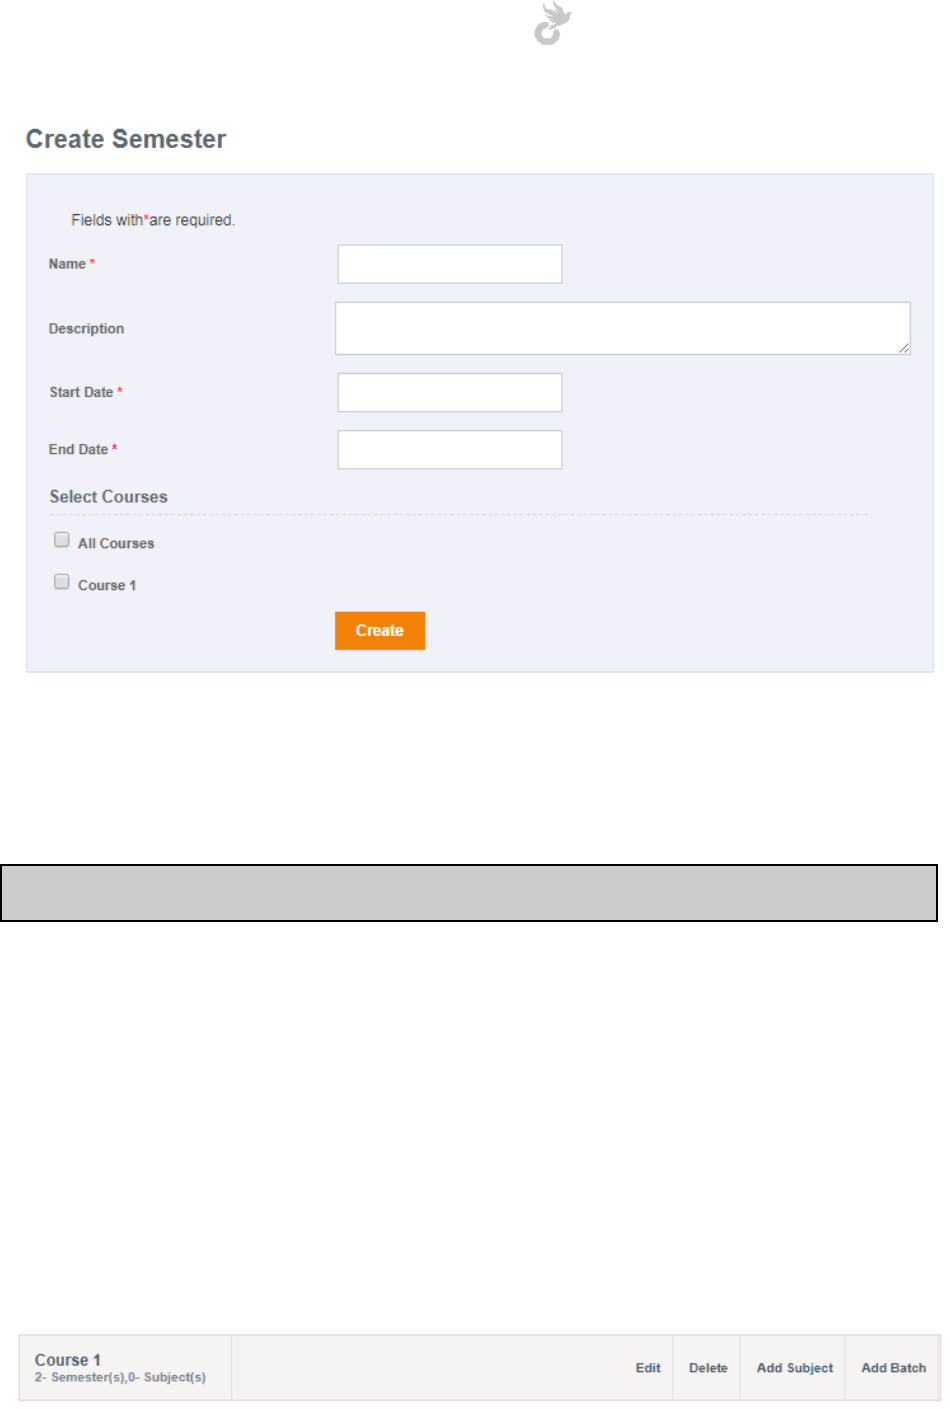
You should see a form with the following fields:
1. Name
2. Description
3. Start date
4. End date
5. Select Courses
Enter the above details and choose the courses this semester can be applicable to. Then click
‘Create’ to generate the semester.
Note: Make sure the dates you enter are within the range of the selected Academic Year.
Open-School 2.6.5 Administrator Manual
16
1.2.3 Creating Batches
Once you have created a course you can go ahead with adding batches even if you haven’t
added semesters. Students will be added to these batches. Attendance, examination scores etc
can be entered for students on a batch level.
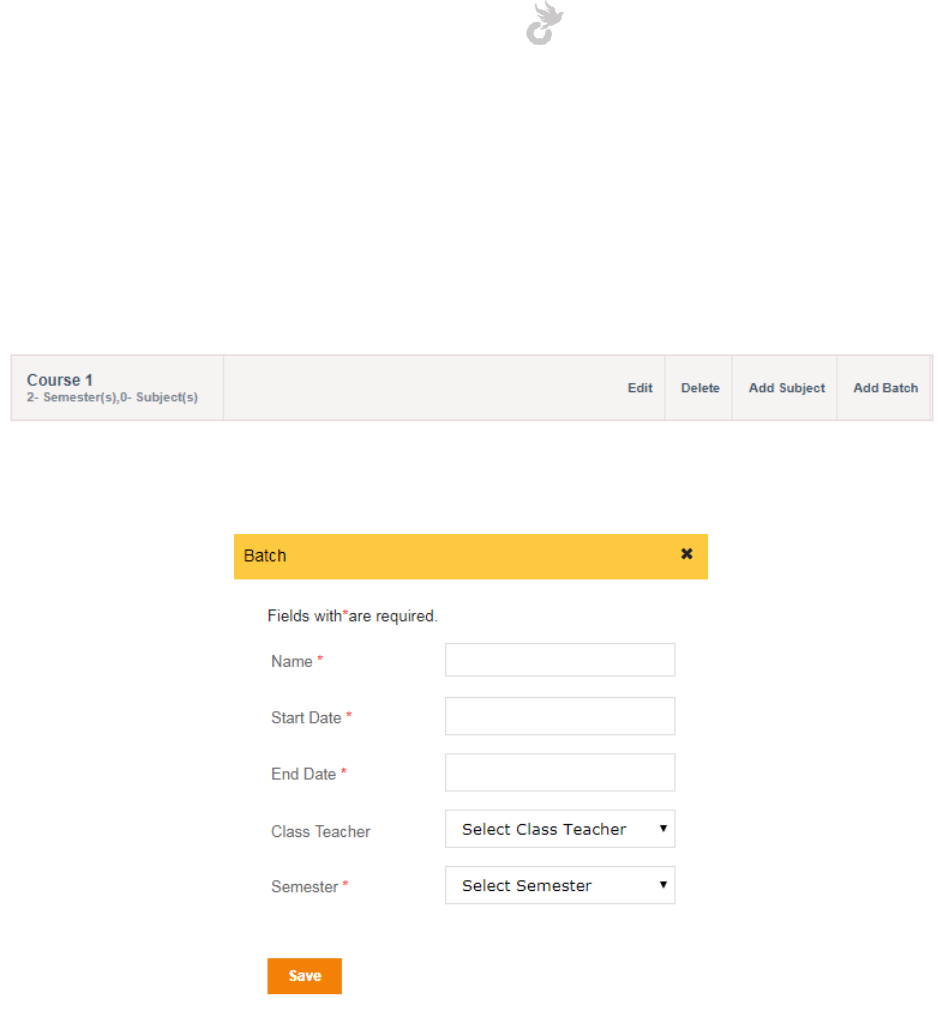
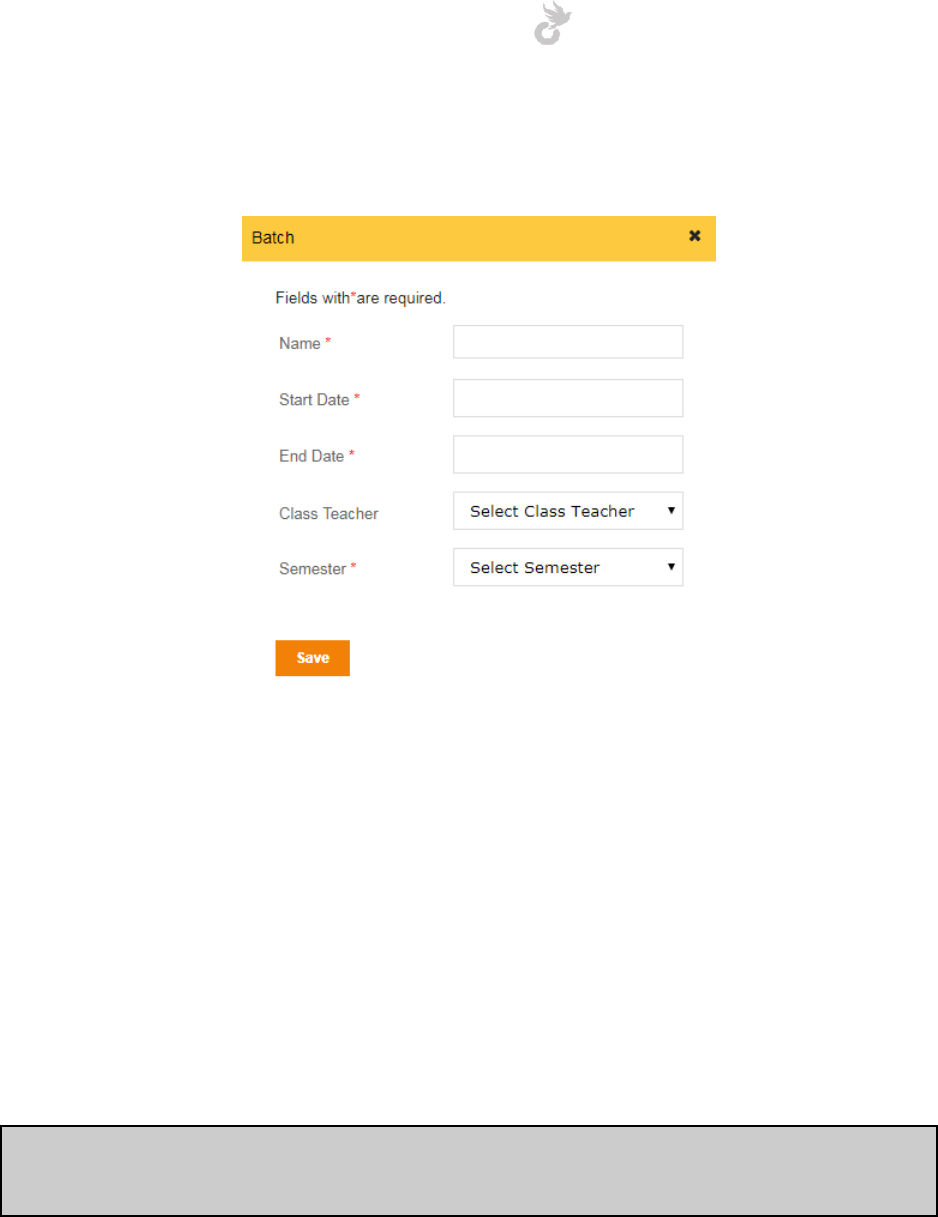
To start adding batches click on the ‘Add Batch’ link on a course.
This should bring a pop-up on screen with a form to enter your batch details.
1. Name
2. Start date
3. End Date
4. Class Teacher
5. Semester
The class teacher can be chosen later once you have added teachers. This is not a mandatory
field. Class teachers have the ability to manage daily attendance and also enter examination
scores for all subjects in the batch.
If you have enabled the semester system for the course, the semester needs to be selected too.
This option will not be displayed if you haven’t enabled semesters for the course.
Open-School 2.6.5 Administrator Manual
17
Note: Make sure the dates you enter are within the range of the selected Academic Year and
chosen semester.
On the Courses Module page click on a course to see the list of semesters, batches and
common subjects you have added. Adding Subjects / Common subjects can be found in the
next section.
Note : You may start adding students at this stage. The following steps are part of an
initializing process our team has devised to make things easier for use. To learn how to add
students refer the Adding Students section.
Open-School 2.6.5 Administrator Manual
18
1.3 Adding Subjects / Electives
Subjects and electives can be added to a batch once you have created it. Subjects / Electives,
class timings and weekdays together make up the time table for the batch.
Subjects can be added on two levels:
1. Common Subjects (Course Level: Applicable to all batches)
2. Individual Subjects (Batch Level: Applicable only to a single batch)
1.3.1 Adding common subjects
Considering you have added multiple batches to a course and that these batches all have same
subjects or have a few subjects in common, you would want an option to create them in a
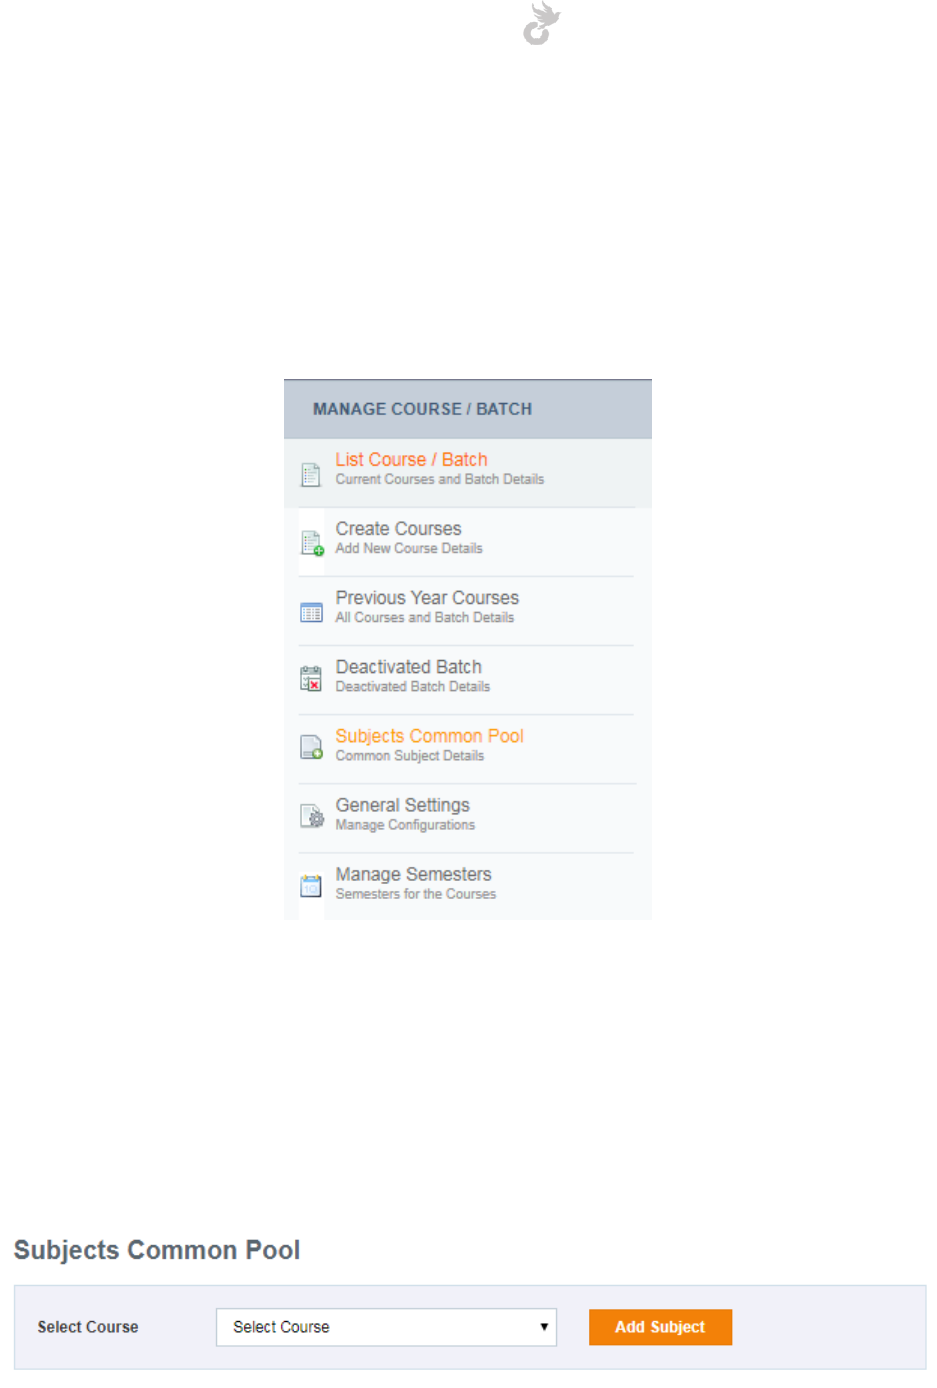
single click instead of creating them separately for each batch. The Subjects Common Pool in
the Courses Module and the ‘Add Subject’ link in each course tab allows you to do this.
Open-School 2.6.5 Administrator Manual
19
Selecting a course from the dropdown, lists the common subjects already added to it. Click the
‘Add Subject’ button to get started with adding subjects.
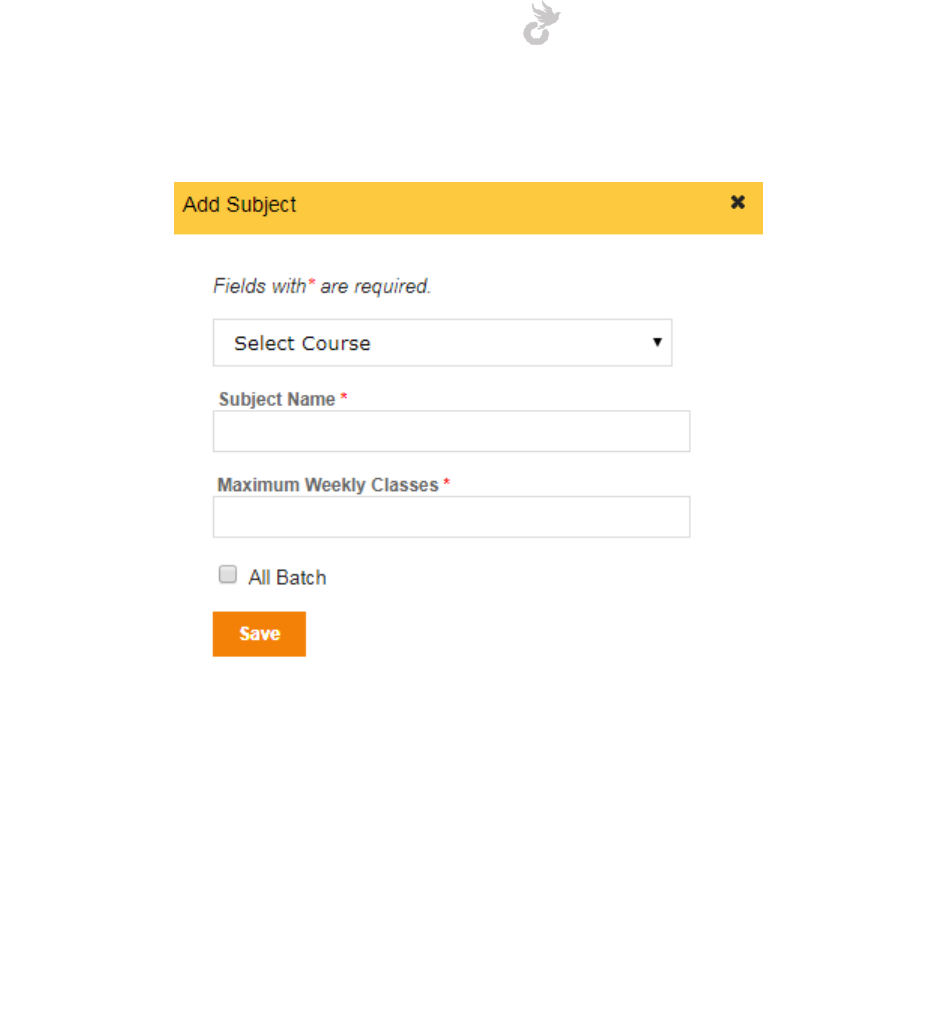
In the popup that appears, enter your subject details.
1. Select Course
2. Subject Name
3. Maximum Weekly Classes
4. All Batch
The Maximum Weekly Classes field defines how many classes this particular subject will have in
a week. You will not be able to add more classes in the timetable once you reach this limit. It
can always be edited if needed.
Make sure you check the ‘All Batch’ option before clicking ‘Save’.
Open-School 2.6.5 Administrator Manual
20
1.3.2 Adding individual subjects
In case you want to add subjects to each batch separately rather than add common subjects or
if some batches under the same course have different subjects, you can add them individually.
For this, select a batch from the courses module by clicking on the name.
Once in the batch view select the Subjects Tab next to Students. This shows you the list of
subjects added to that batch. It also includes common subjects added if any.
Open-School 2.6.5 Administrator Manual
21
Click the ‘Add Subjects to batch’ button to start adding subjects.
In the popup that appears enter the details just as in the above common subjects option. Click
‘Submit’ to add the subject to the chosen batch.
1.3.3 Creating Elective Groups and Electives
The whole concept of electives is based on elective groups. You create elective groups and then
add electives to it. Students in a batch can then be added to these electives. This option is
useful when you have groups of students within the same batch studying different
subjects(electives).
1. Create an Elective group: Go into a batch view by selecting a batch. Select the Elective
tab and click on the Electives button. An option to Create Elective Groups should be
visible now. Click on this button to display the pop-up for creation. Enter the details and
save.
2. Creating Electives: Click on the Create Electives button, select the Elective Group you
wish to add the elective to from the drop-down in the pop-up that is displayed. Enter a
name for the elective and save.
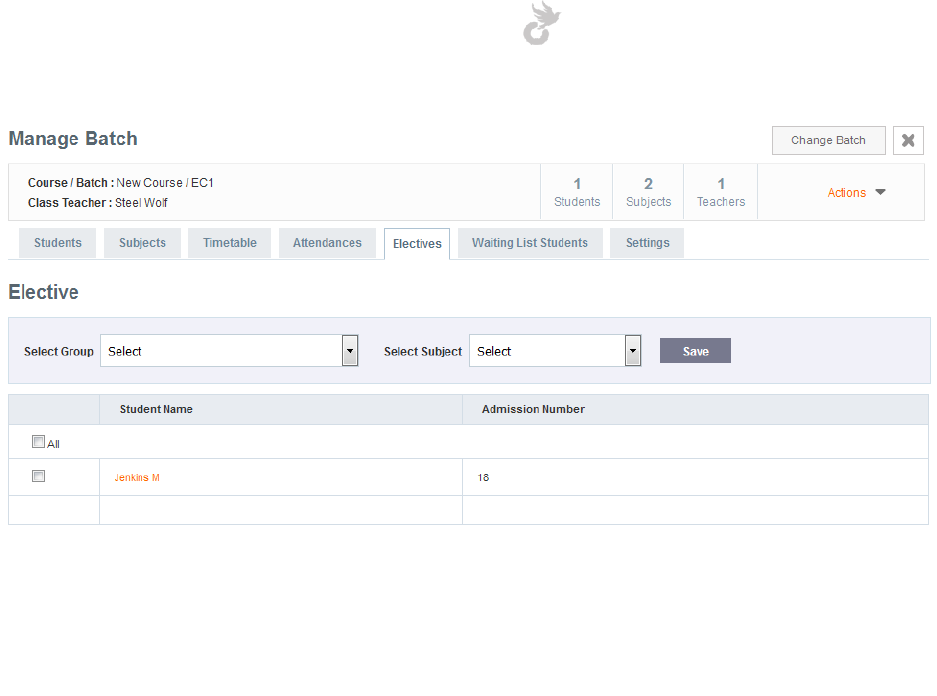
3. Adding students: This is relevant only after you have added students to the batch. To
assign students to different electives within the batch click the ‘Add Students’ button.
Open-School 2.6.5 Administrator Manual
22
Here, you will be able to select the Elective group, elective subject and select the students to be
added to it. You can choose multiple students by using the checkbox before each student. Click
‘Save’ after you have chosen the right details to assign the students to their electives.
Open-School 2.6.5 Administrator Manual
23
1.4 Setting up weekdays and class timings
Once you've added subjects you would want to have them assigned in the timetable. For this,
you will first have to set up the weekdays for your institution or even separately for each batch.
Then create class timings for these working days.
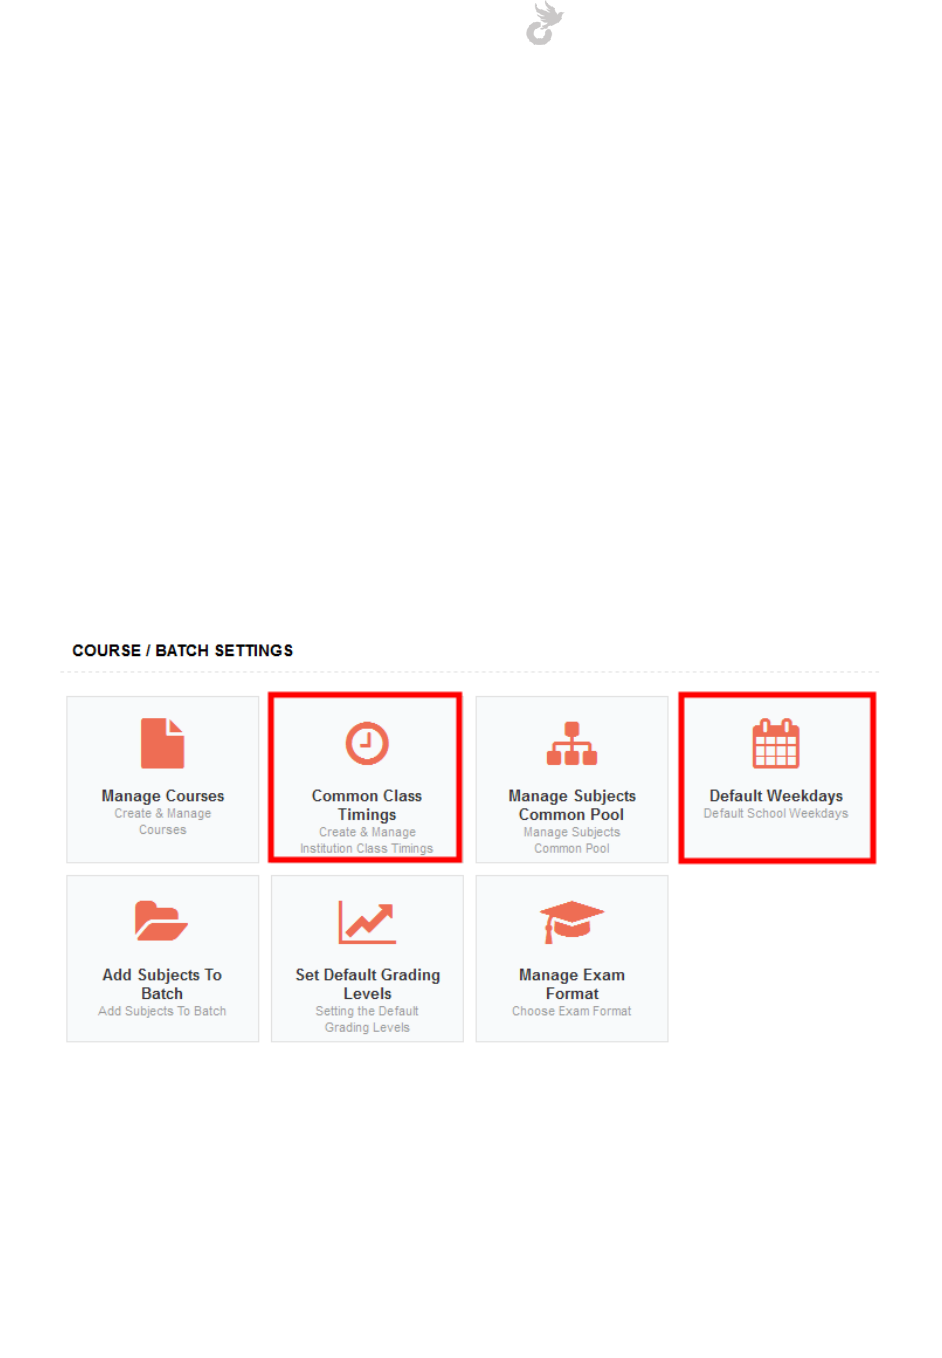
You can set up default weekdays / common class timings for the whole system from the
Settings Module > Course/Batch Settings.
Open-School 2.6.5 Administrator Manual
24
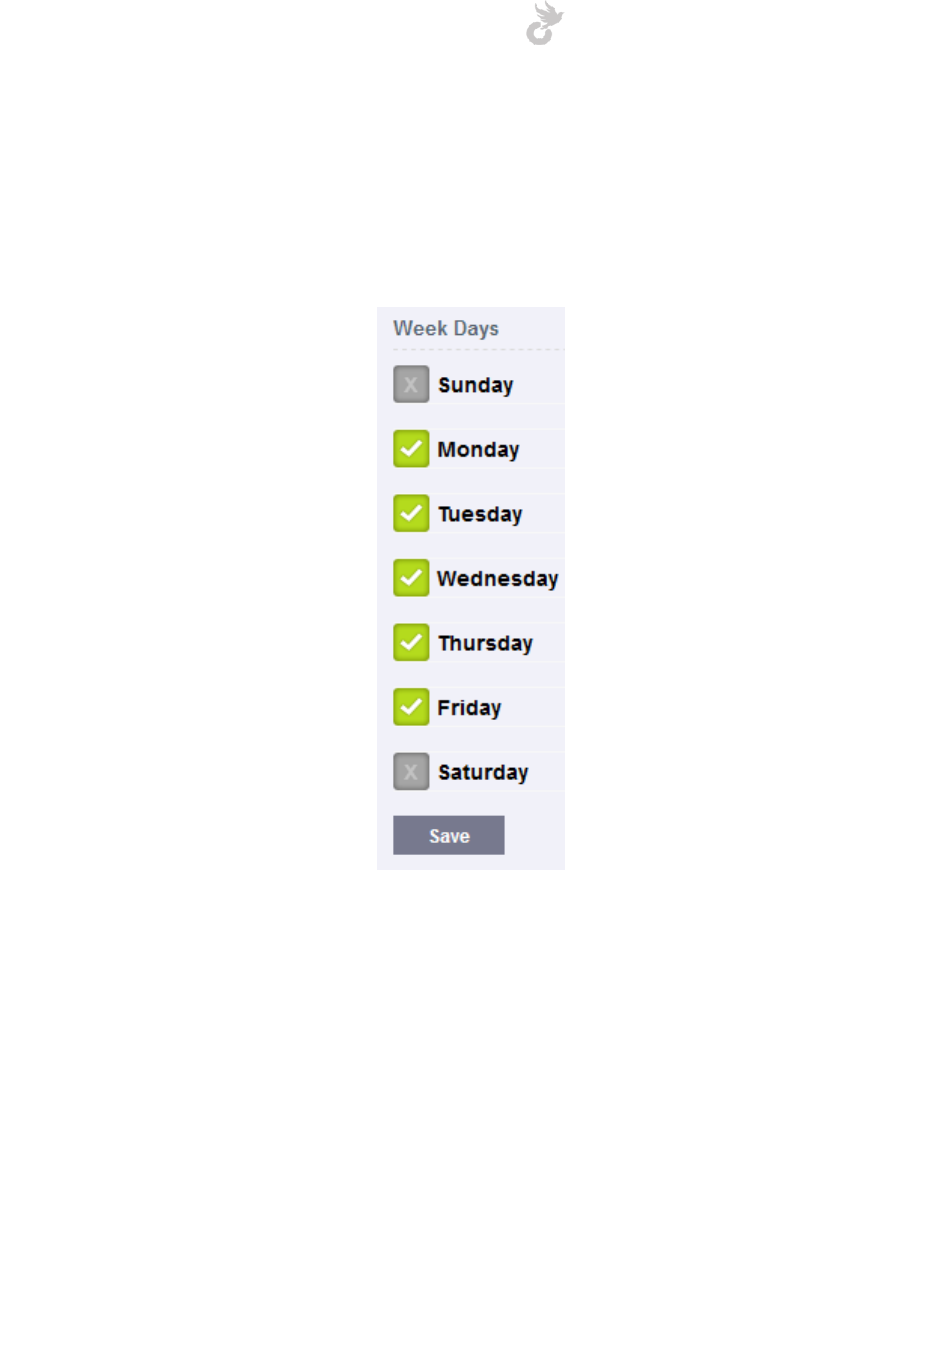
1.4.1 Setting up weekdays
The default weekdays will be automatically selected for each batch if it hasn't been set
individually. Default weekdays can be setup from the Settings Module. To set your institutions
weekdays simply keep the days in the list selected and hit save.
You can follow the same steps to set up weekdays for each batch individually from within the
batch view. Weekday settings can be found under the Timetable tab in Batch View.
1.4.2 Creating Class Timings
Class timings can be created for the whole institution i.e for every active batch in the system,
New batches created will also have these timings added to them automatically.
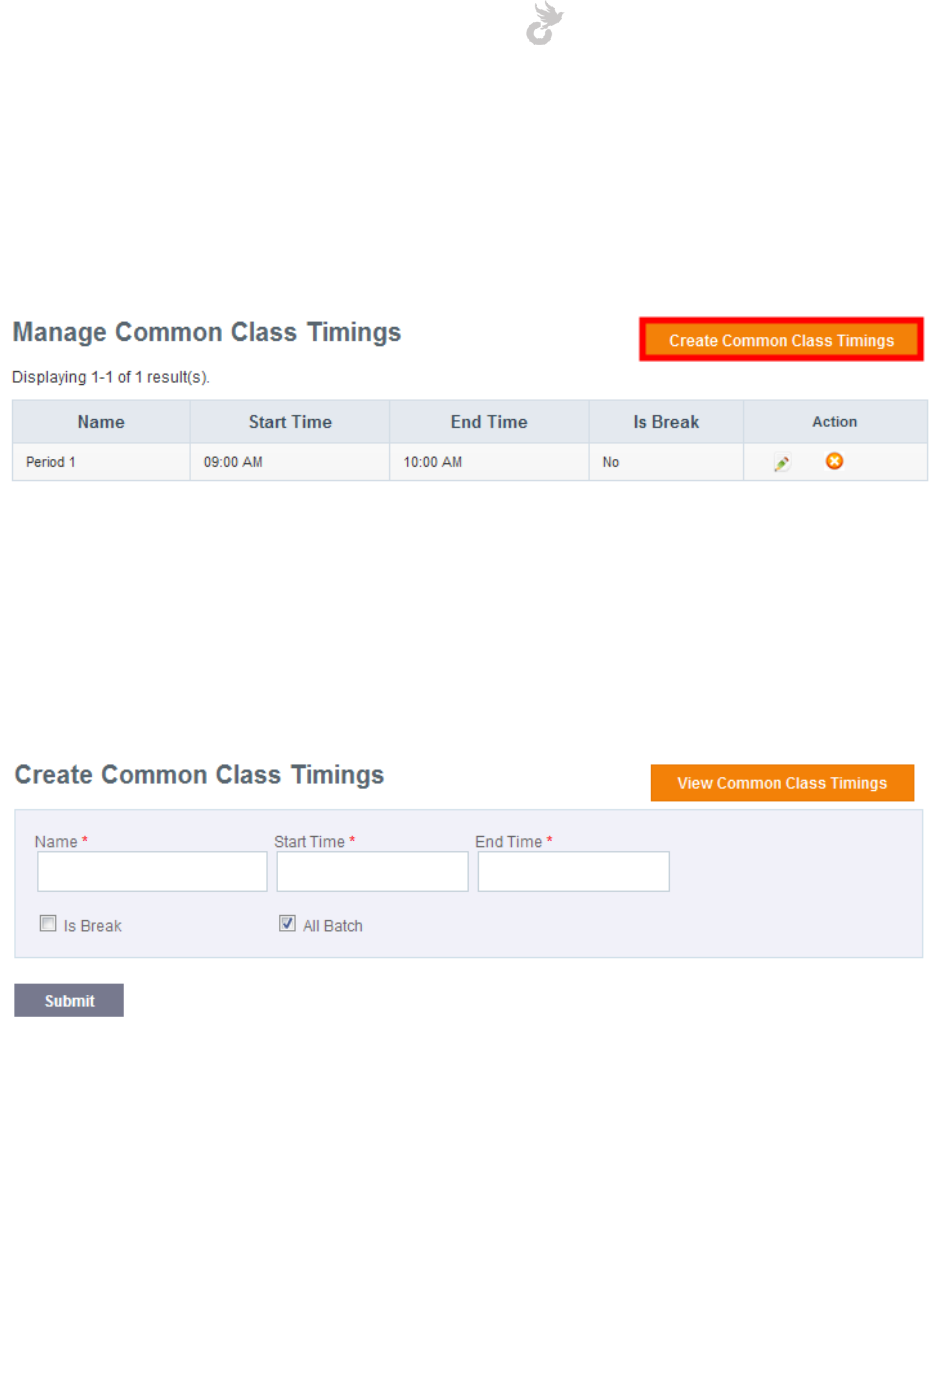
Creating a common class timing
As displayed in the above picture, you can access Common Class Timings from the Settings
Module > Course/Batch Settings
Open-School 2.6.5 Administrator Manual
25
This option is similar to the Subjects Common Pool but different as it applies for every batch
irrespective of course. Click the Create Common Class Timings button as shown in the figure
below to start adding timings.
In the page that follows, enter all the details for your class timing. Make sure you have selected
the ‘All Batch’ check box so the timing is applied to all active batches.
Check the ‘Is Break’ check box to indicate a break or recess. No subjects can be assigned during
this time.
Open-School 2.6.5 Administrator Manual
26
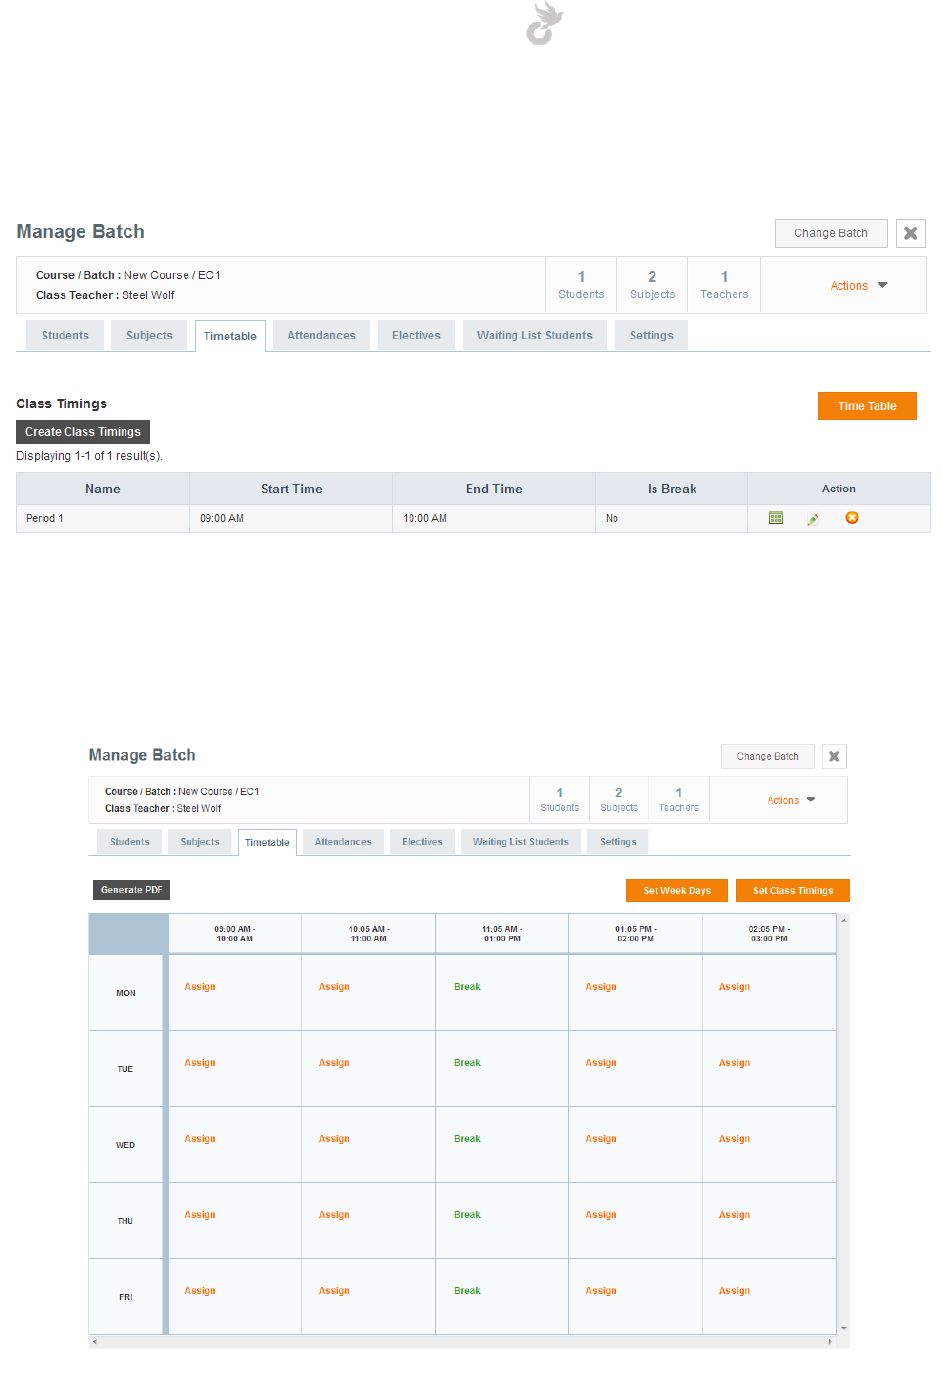
Once you have added the timing you will notice it shows up in all batches. You can view it by
selecting the Timetable tab > Set Class Timings in the Batch View.
You can add individual timings here by clicking the 'Create Class Timings' button and following
the same steps as above.
After setting up the above you have a timetable all ready to start assigning subjects / teachers.

Open-School 2.6.5 Administrator Manual
27
1.5 Adding Teachers
The reason for adding this step here is to show how teachers can be associated with subjects /
batches and added in the timetable. You can find detailed instructions on teachers under the
Teacher’s Module section.
To start adding teachers you first have to make sure you’ve added Departments as teachers are
classified based on it. There are other labels like teacher positions, categories etc too. Let’s take
a look at how to add departments.
1.5.1 Adding departments
Click on the ‘Manage Departments’ link in the left side menu under Teacher Settings in the
Teacher’s Module. This should redirect you to the page where you can see existing
departments if any.
Click on the ‘Add Department’ button to add a department.
Enter the name for the department and a code(which can be initials too) and click ‘Create’.
That’s it, you’ve successfully created a Teacher Department. You can now start adding teachers.
Below you will find instructions to adding a teacher using the registration process. You can find
details on Import under the Import Module.
Open-School 2.6.5 Administrator Manual
28
1.5.2 Teacher Registration
Teacher’s can be added in two ways:
1. Teacher Registration (Single)
2. Teacher Import (Bulk)
We’ll be discussing the Teacher Registration process here. To add a teacher click on the ‘Create
Teacher’ in the left side menu. The registration process consists of 3 steps where you enter the
teacher’s details. User account is automatically created during registration, an email containing
the username and password will be sent to the teacher after registration given that you have
enabled it in Settings Module > Notification Settings. Refer the Settings Module for more details
on this.
Fill in the details for each step to move on to the next. Make sure you enter a valid email if you
need the teachers to get notifications. Email is a unique field in the system , no two users can
use the same email for registration.
Once you have finished adding teachers move to the next step which involves associating
teachers with subjects and batches.
1.6 Subject-Teacher association
The subject-teacher association allows you to link teachers with specific subjects in different
batches. This association can then be used in the time-table module to assign subjects and
teachers to class timings.
To start associating teachers with subjects / electives click the ‘Subject Association’ link in the
left side menu under Teacher Settings.
Open-School 2.6.5 Administrator Manual
29
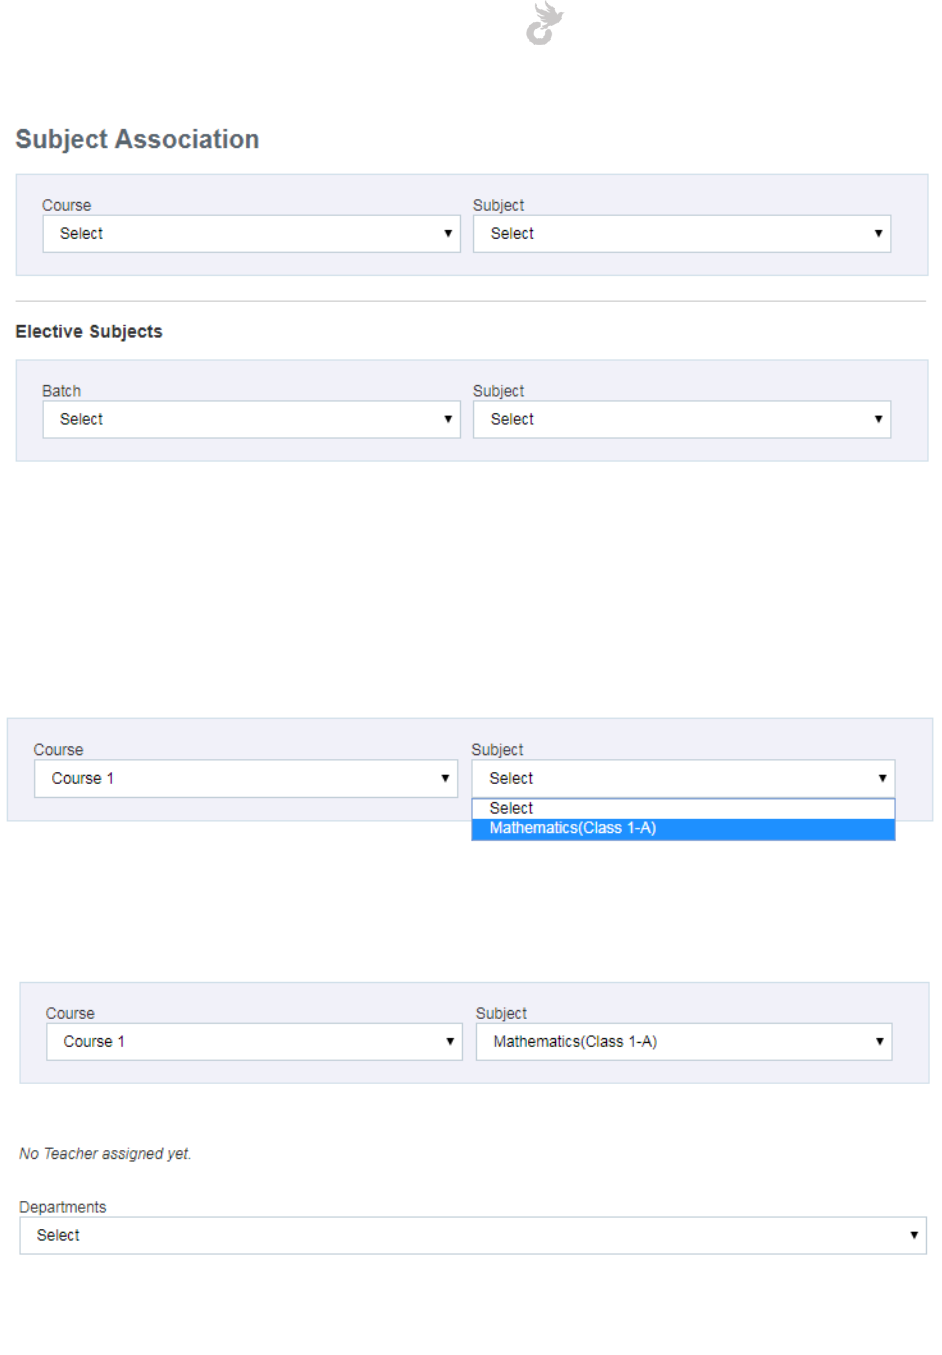
1.6.1 Subject association
To associate a subject with a teacher select a course from the Course dropdown. This will
automatically update the Subject dropdown. The format in the subject dropdown is as follows:
Subject Name(Batch Name).
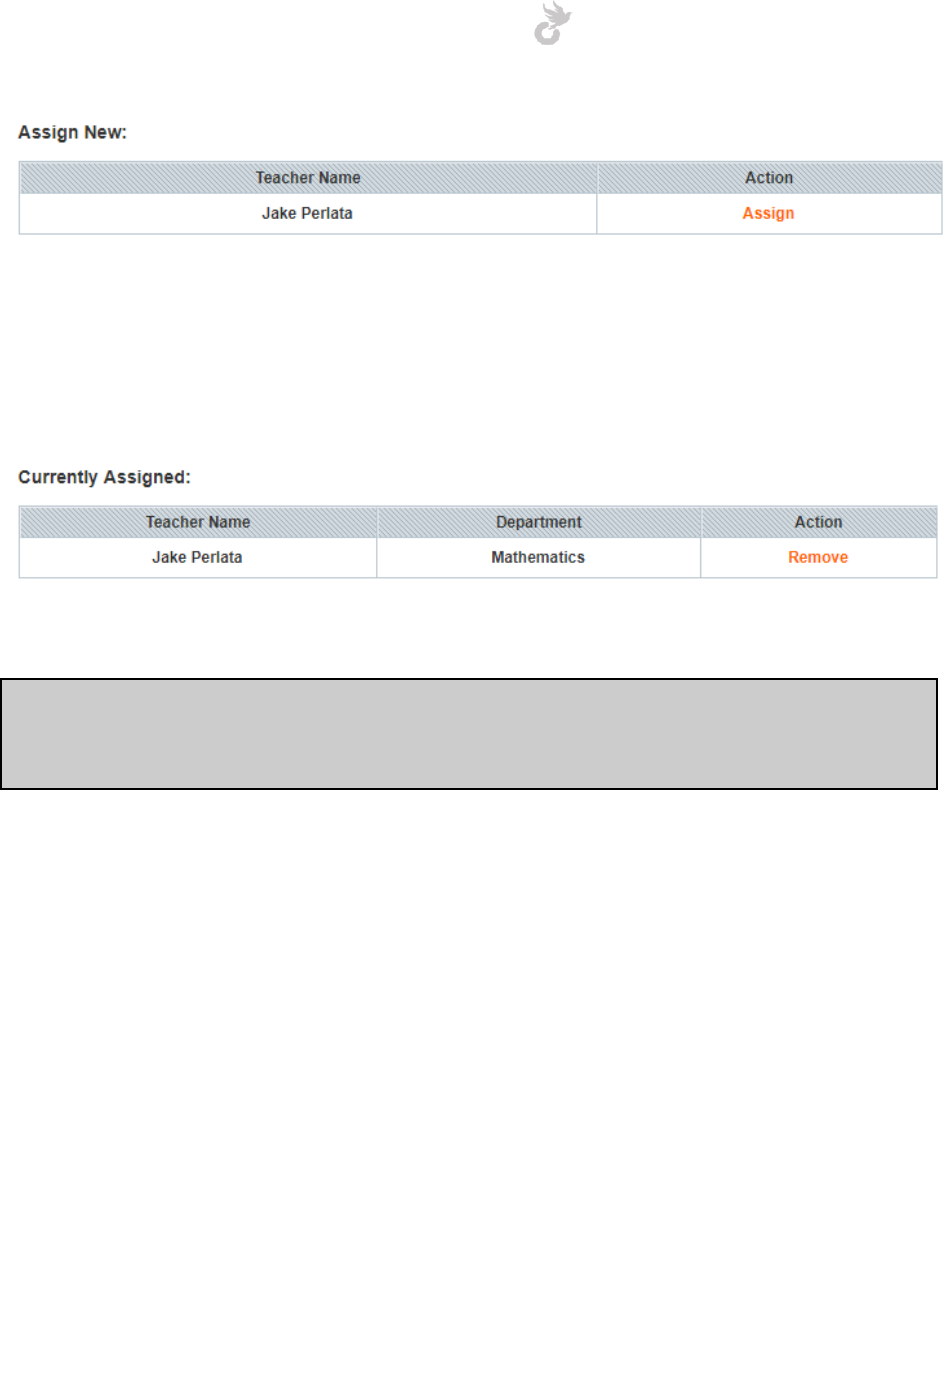
Once you have selected the subject / batch, you will be able to see the list of teachers who are
already assigned to it and a dropdown to select the department for teachers.
Select the department to see the list of teachers available to be assigned.
Open-School 2.6.5 Administrator Manual
30
Click on the ‘Assign’ link corresponding to a teacher to assign him / her to the subject / batch
selected. This will make him / her a subject teacher for that batch.
Remove an association by selecting the course / subject details to see list of associated teachers
and then click on the ‘Remove’ link.
Note: You can assign multiple teachers to a single subject / batch and a single teacher to
multiple subjects / batches. However, two teachers cannot be assigned to a batch in the same
class timing in the timetable.
1.6.2 Elective association
This is the same as the subject association. The only difference is the drop-down, here you
select the batch directly then select the elective subjects association with it.
Follow the same steps as above to associate / remove teachers.
Open-School 2.6.5 Administrator Manual
31
1.7 Assigning teachers to the timetable
We’re down to the last step in the getting started process. Let’s take a quick recap at what all
we’ve done till now.
1. Created an Academic Year
2. Added courses, batches and semesters
3. Added Subjects and Electives
4. Setup weekdays and class timings
5. Added teachers
6. Associated teachers with subjects and electives
Now let’s learn how to assign subjects and teachers to the time-table. This will help students
and teachers track their subjects and day-to-day timetable. Teachers will also be able to take
subject-wise attendances for students and can also view their own schedules.
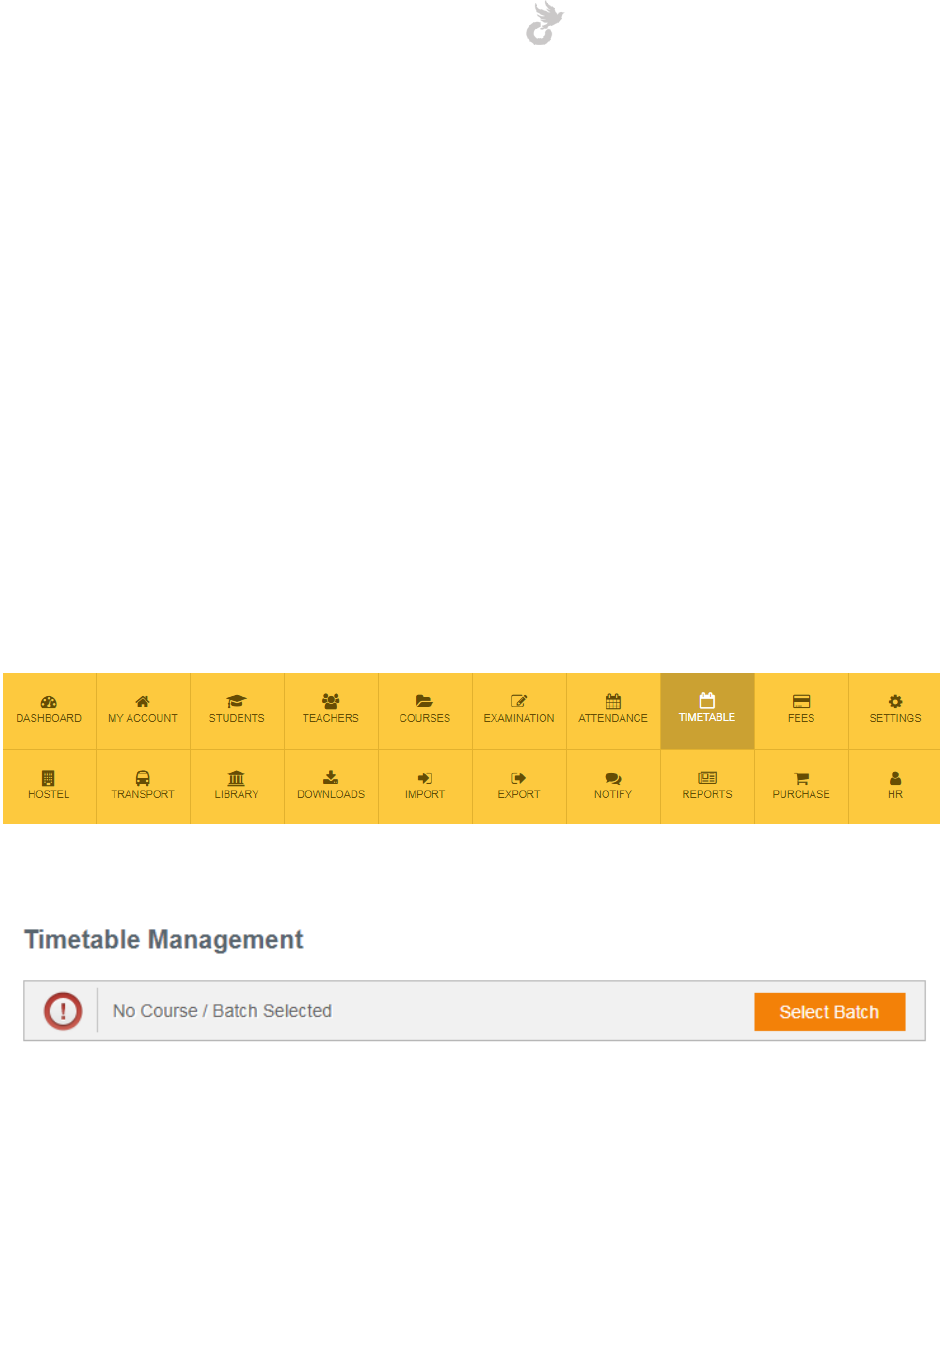
The timetable can be accessed from the timetable module.
Select your course / batch to get started.
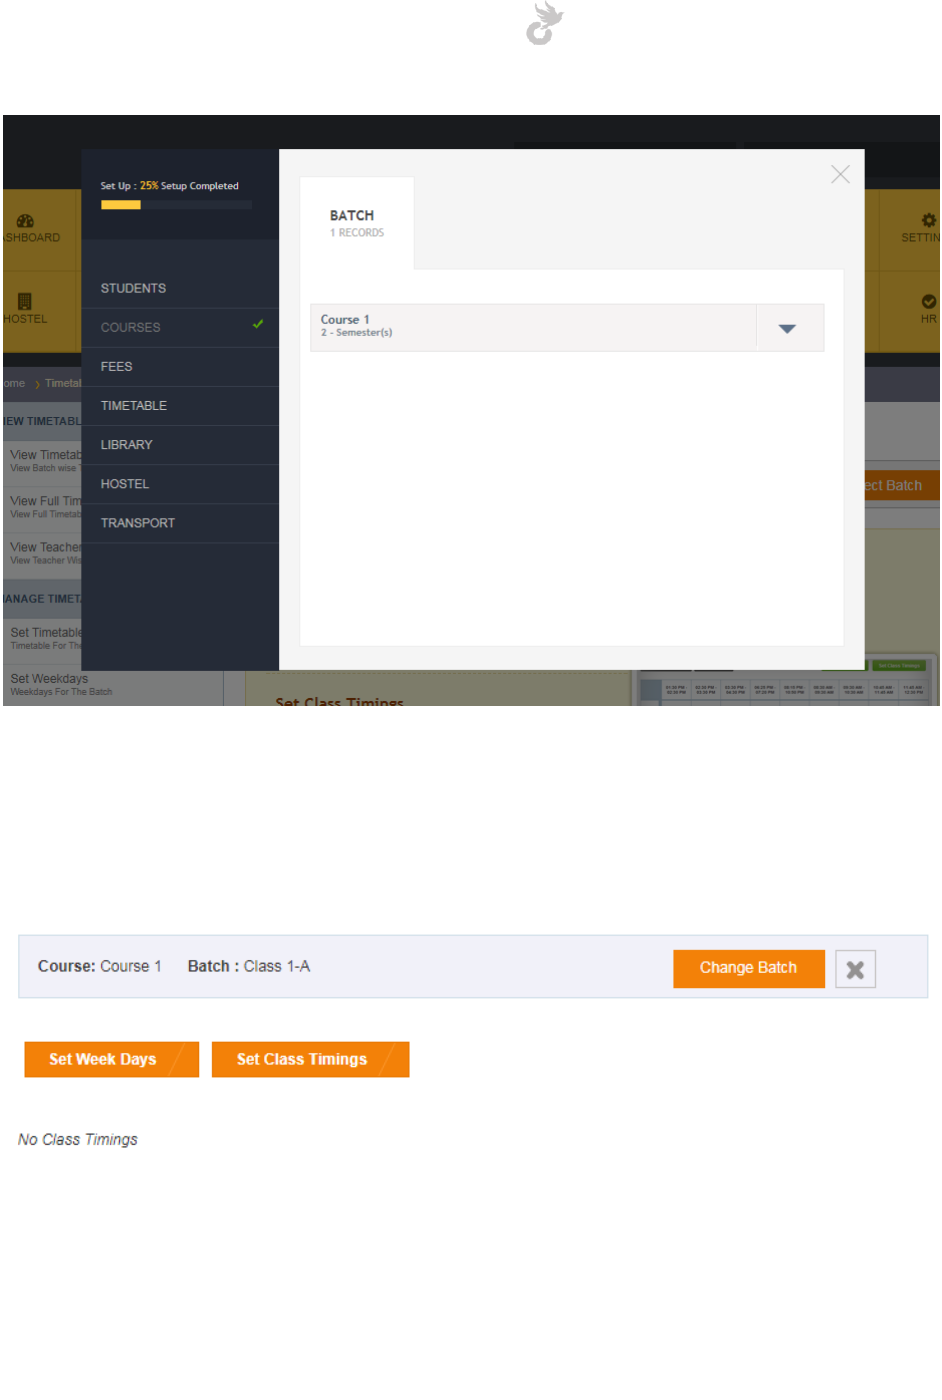
This should bring down the app explorer. You’re probably hearing this for the first time in this
manual. The app explorer is basically a section that drops down in areas where you have to
select a course / batch or even a student, mostly in attendance, examination, timetable etc.
Check the image below to see what the app explorer looks like.
Open-School 2.6.5 Administrator Manual
32
So back to assigning teachers and subjects to the timetable. Once you have selected your
course / batch from the app explorer you should be able to see the timetable structure if you
have already created the timings and set the weekdays or you might view this:
Open-School 2.6.5 Administrator Manual
33
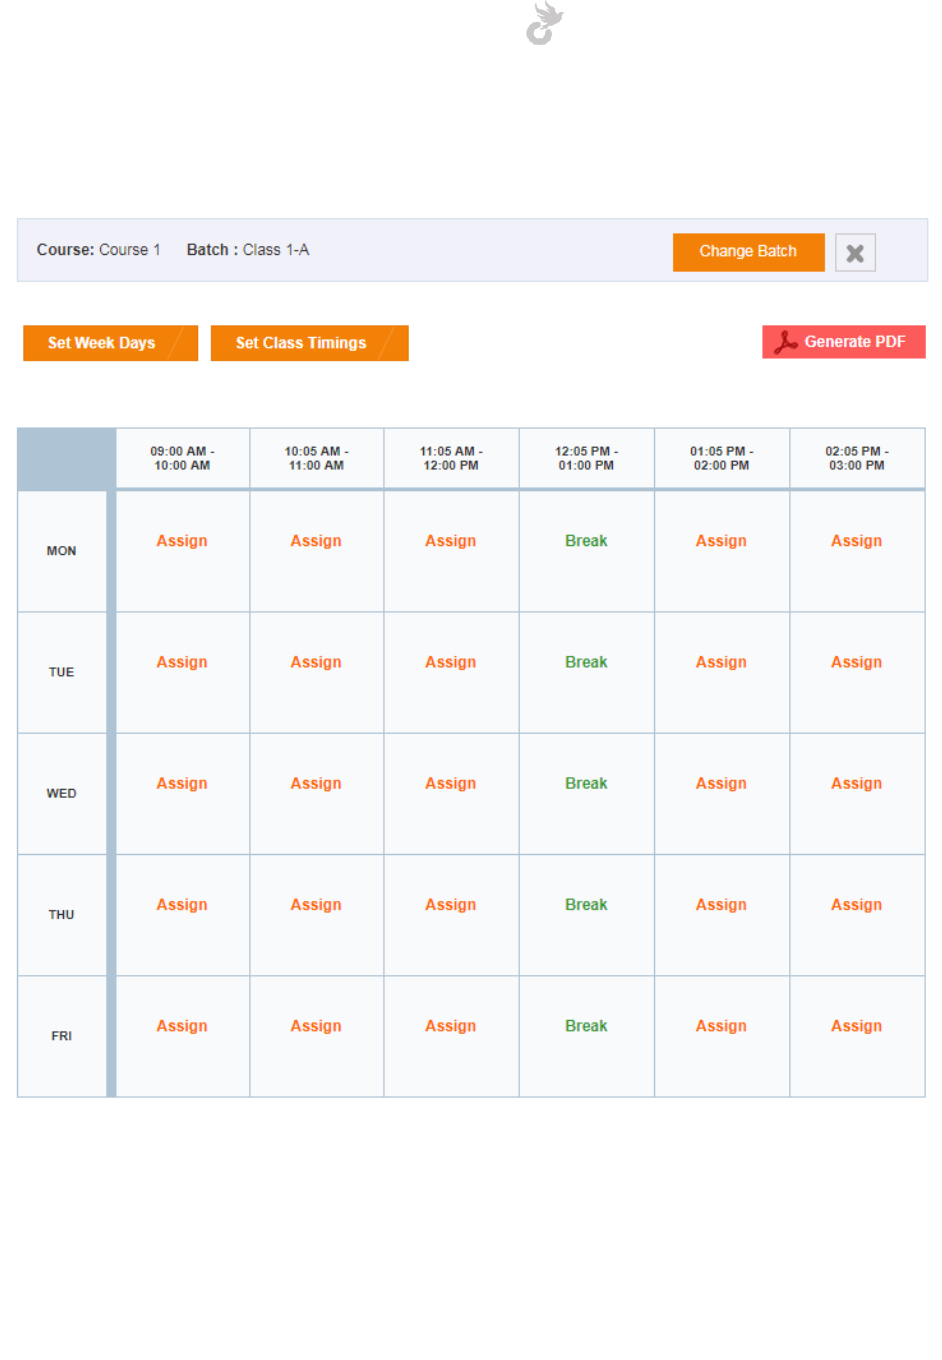
Considering you have followed the previous steps and have created class timings, you should be
able to see the timetable structure similar to the one shown in the image below,
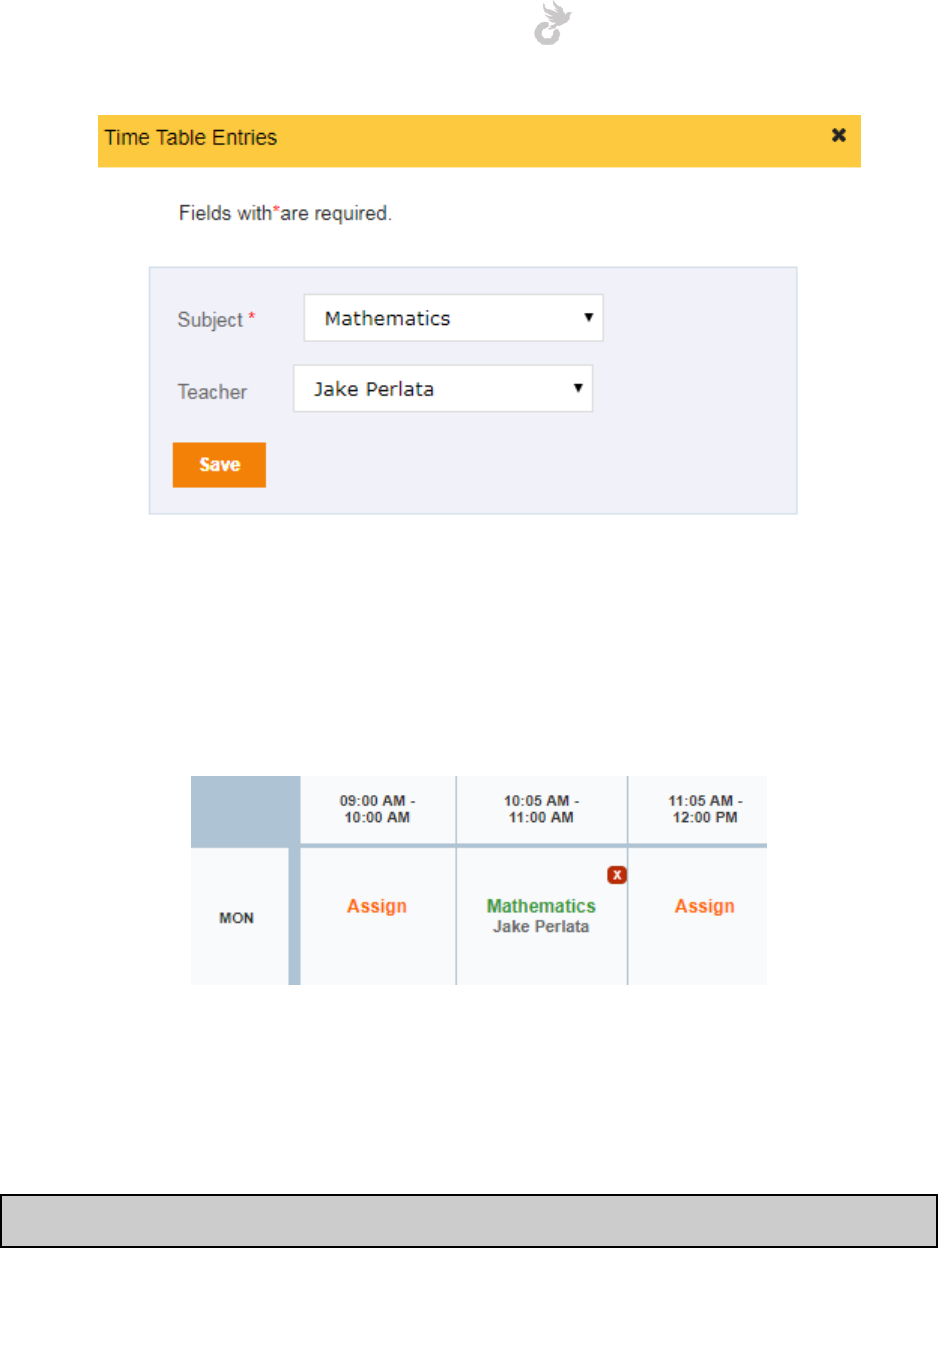
The ‘Assign’ link allows you to assign a subject / teacher to the corresponding timing. Click on
the link to view the dropdown for doing this.
Open-School 2.6.5 Administrator Manual
34
Select the desired subject to view the teacher dropdown. Only teachers associated with the
selected subject will be displayed in the dropdown for selection. After you have selected the
teacher click on ‘Save’ to assign.
Assigned subjects / teachers will be displayed on the timetable as shown below,
Click the cross to remove the entry from the timetable.
Note: A teacher cannot be assigned to the same timing for the same day in multiple batches
Open-School 2.6.5 Administrator Manual
35
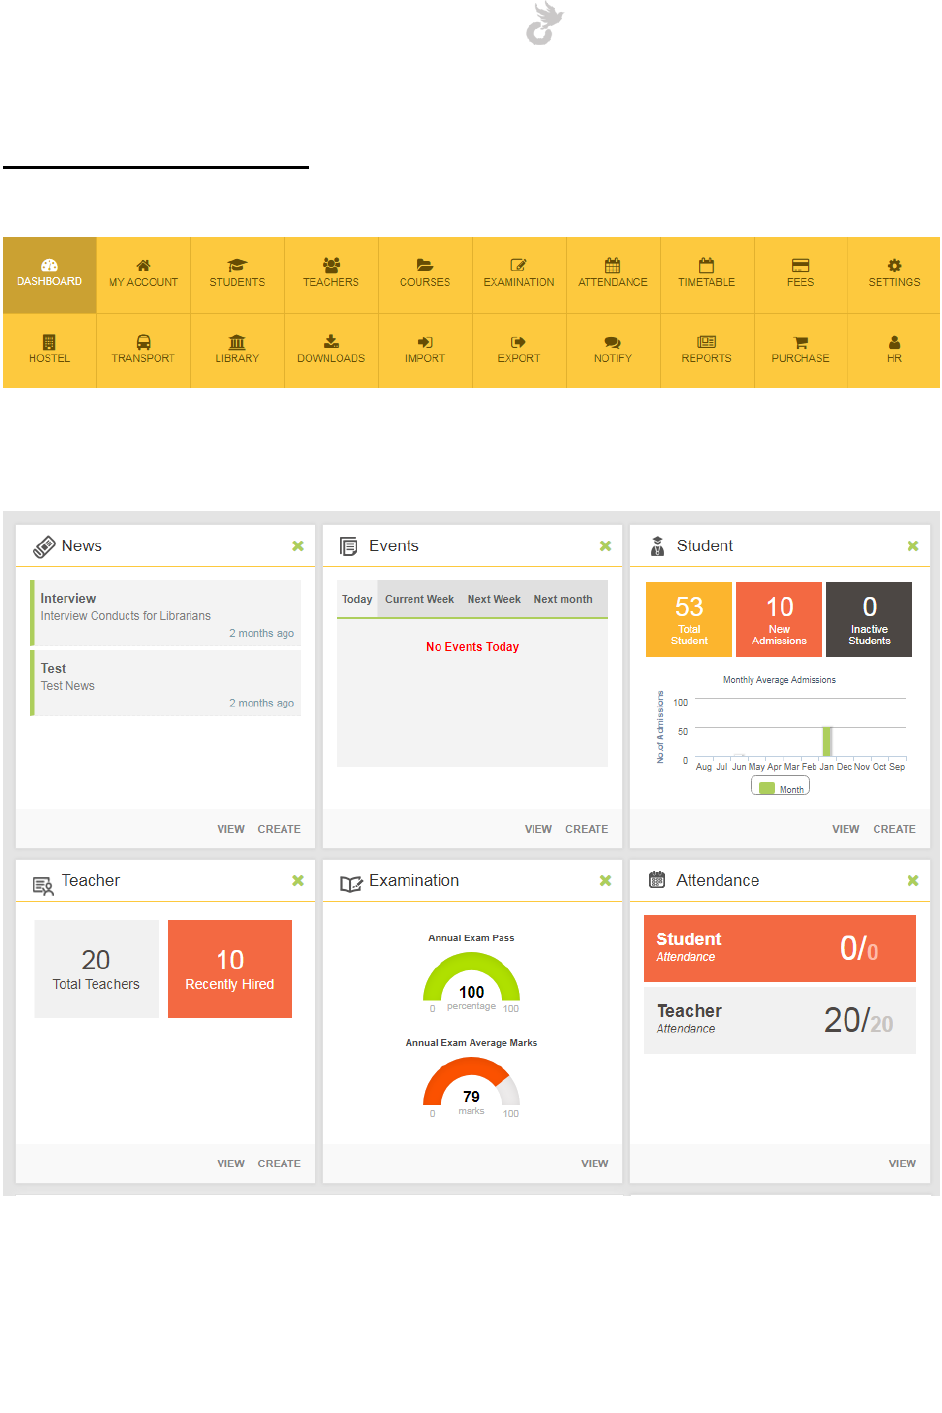
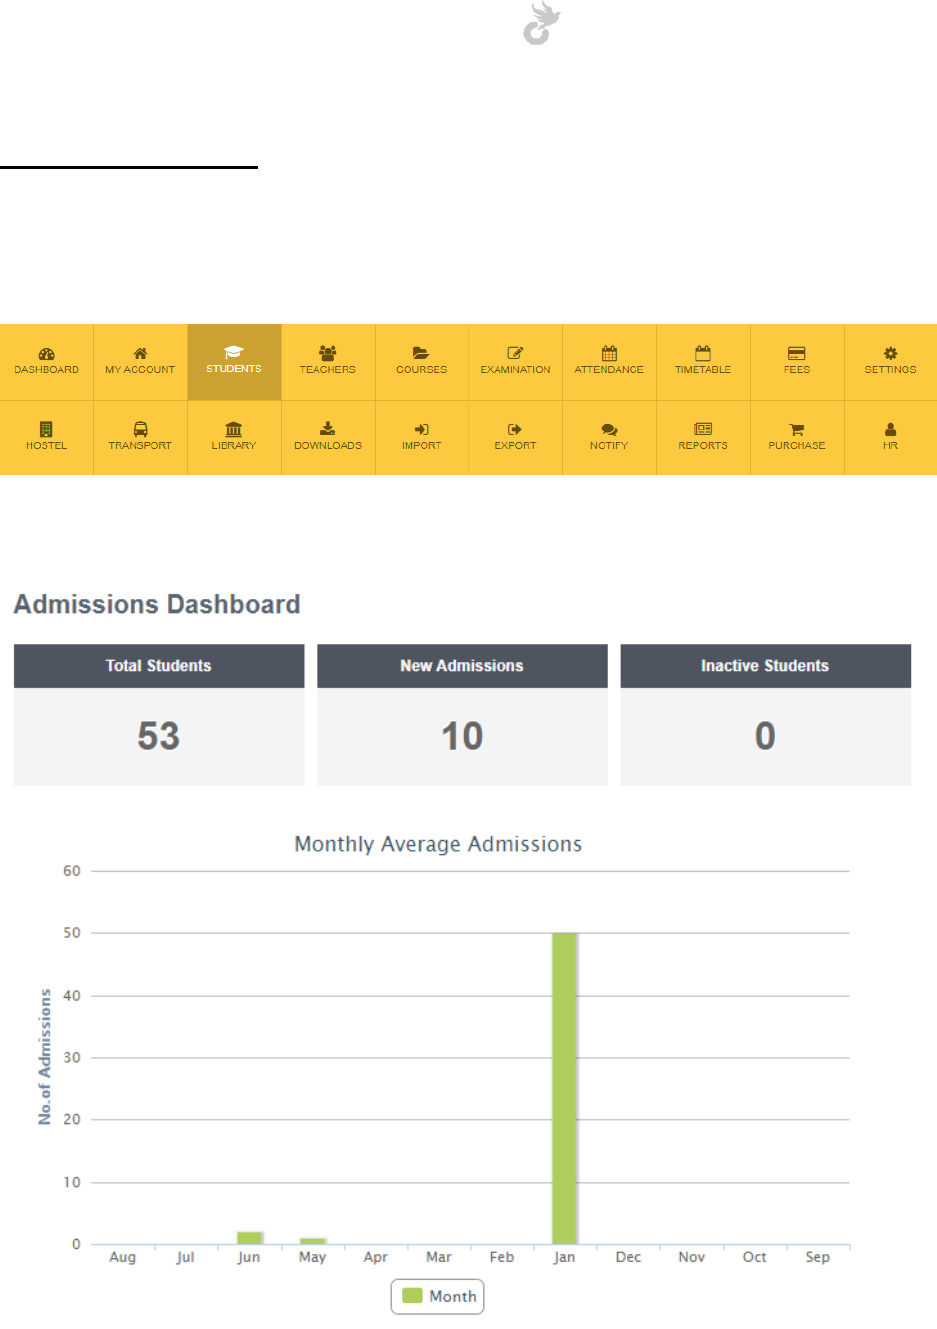
2. DASHBOARD
The dashboard module gives you an overview of major modules and details like, new student
admissions, events, news and even a preview of your internal message inbox.
You can drag and arrange these boxes in the order of your choice. You can also remove
unwanted tabs by clicking the cross on each of them. You can also rearrange and
disable/enable blocks on the dashboard from the Settings Module.
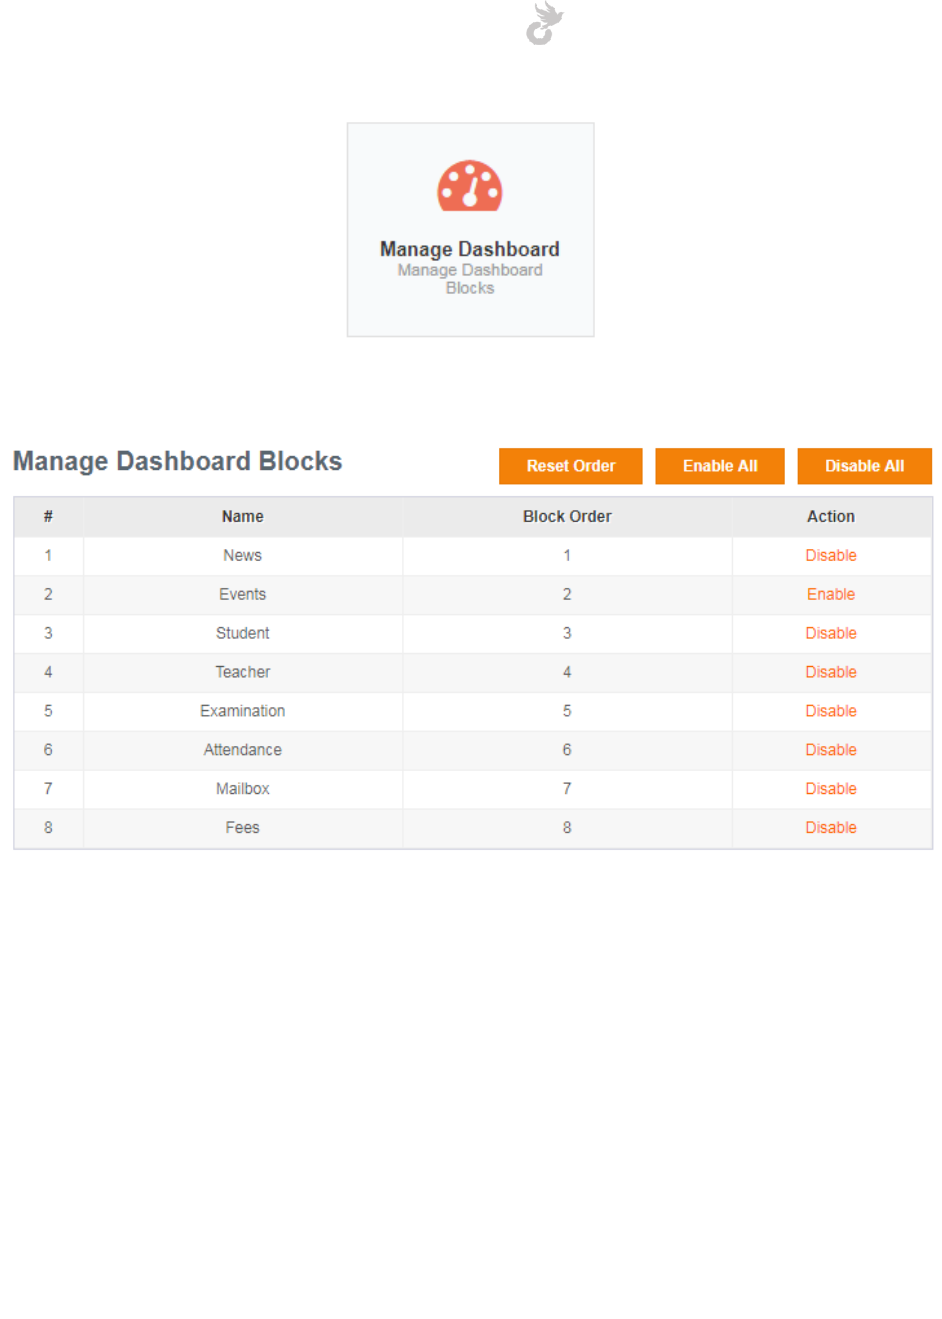
Click on the ‘Manage Dashboard’ button in the Settings Module under General Settings.
Open-School 2.6.5 Administrator Manual
36
Here you will be able to see the list of blocks on the dashboard and their order and status.
Click on the link in the Action column against each entry to enable / disable it. You can also use
the buttons on top to enable / disable all at once. If you have rearranged the order of the blocks
you can use the ‘Reset Order’ button to bring it to default.
Open-School 2.6.5 Administrator Manual
37
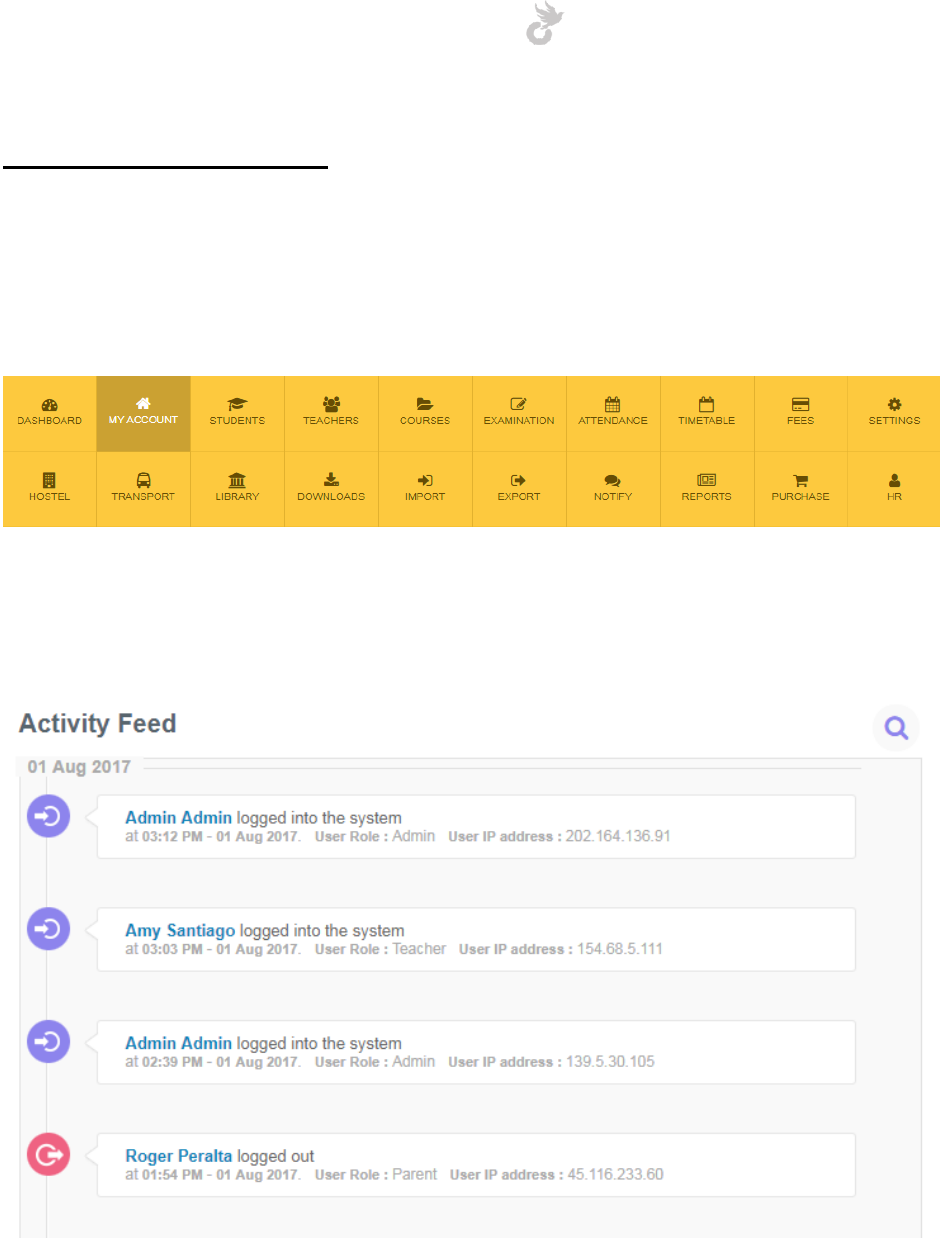
3. MY ACCOUNT
The My Account module allows you to manage News, events, complaints, document uploads
and also view your internal mailbox. The Activity Feed allows you to view different activities in
the system such as who logged in / out, if a student / teacher was added, if attendance was
marked etc.
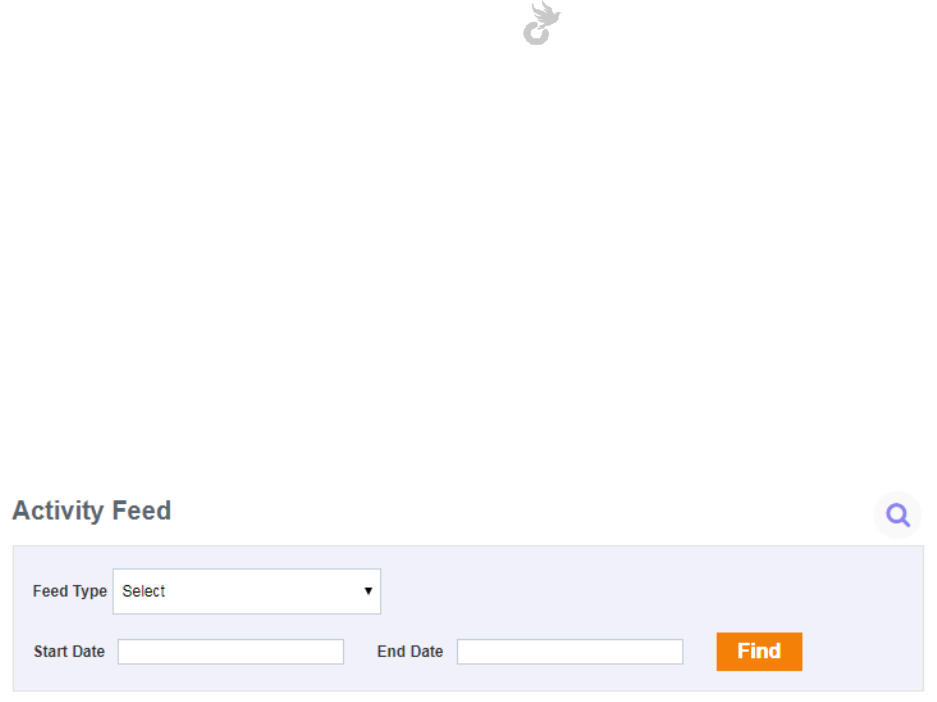
3.1 Activity Feed
Let’s learn a little more about the activity feed.
So you can see the activities like a timeline. Different activities that are tracked in the system
include:
1. Employee Attendance creation/update/delete
Open-School 2.6.5 Administrator Manual
38
2. Employee create/update/delete
3. Exam create/update/delete
4. Exam score create/update/delete
5. Guardian create/update/delete
6. Log in/out
7. Student attendance create/update/delete
8. Student activate/deactivate
9. Student create/update/delete
You can filter out these activities by clicking on the search icon. This will display a list of options.
1. The field type allows you to select the activity type you want to search.
2. Start and end date allows you to choose a range to view the list of activities.

Open-School 2.6.5 Administrator Manual
39
3.2 Mailbox
The application has an internal messaging system that allows it users to communicate with each
other, given they know each other’s registered emails. Do not confuse this with an external
emailing system, the Mailbox allows you to send and receive messages within the system only.
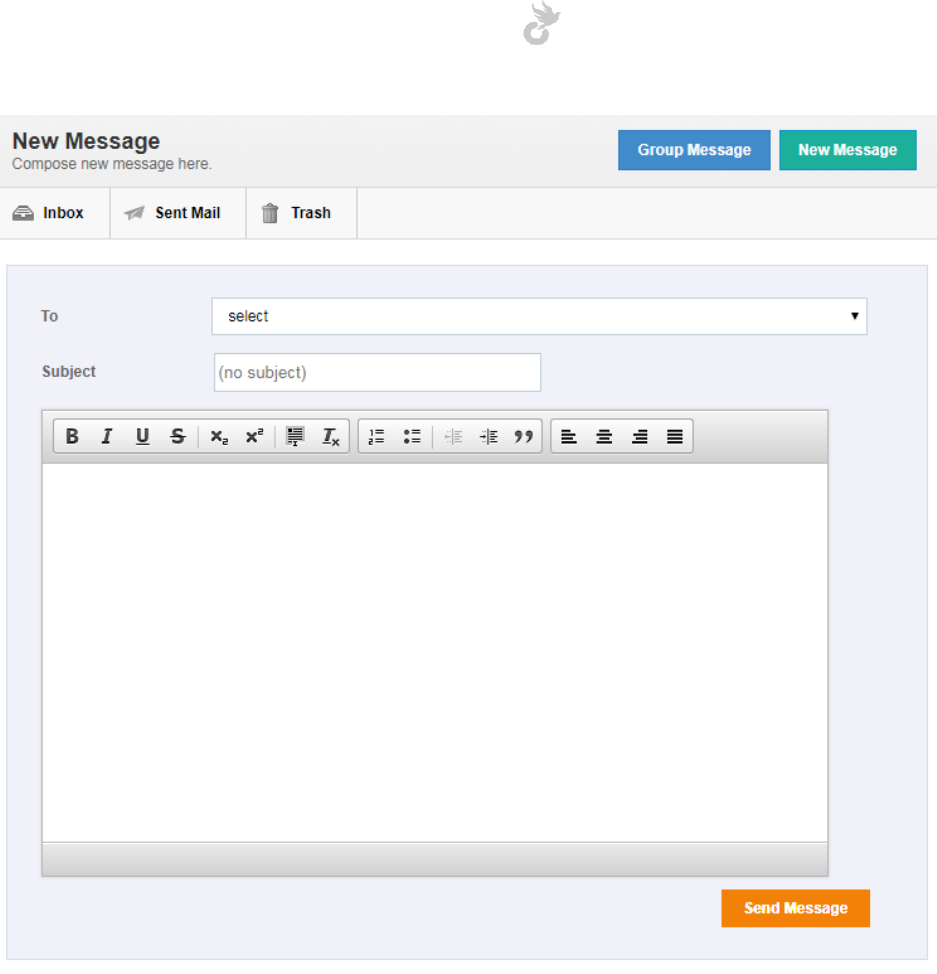
3.2.1 Group Message
The admin has the capability to send Group Messages based on roles i.e a group message can
be sent to all parents, or all teachers or all students. If you create custom roles (Refer Settings
Module), then a group message can be sent to all users assigned to that role.
To send a group message click on the ‘Group Message’ button.
Open-School 2.6.5 Administrator Manual
40
There are 3 fields here:
1. To (Select the role for users you want to send the message to)
2. Subject
3. Body of the message
Once you’ve filled in the necessary details click ‘Send Message’ to send it to the chosen group.
Open-School 2.6.5 Administrator Manual
41
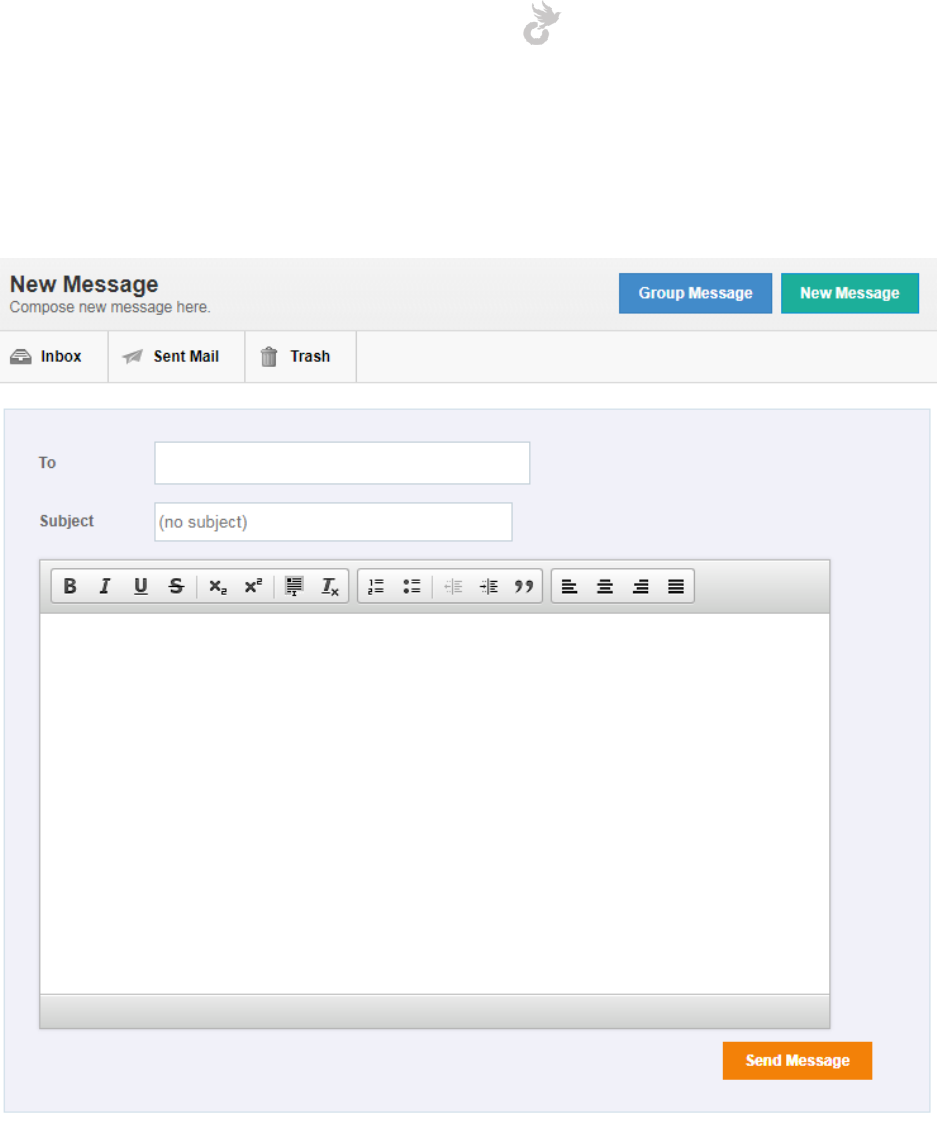
3.2.2 Individual Message
To send an individual message click on the ‘New Message’ button.
The new message option is very similar to the group message option except for the difference
of the ‘to’ field. Here instead of selecting a role, you can enter the registered email id of the
user you want to send the message to. This is an auto-fill field, so once you start entering the id
you should be able to see it in the list, make sure you select the user from the list.
Open-School 2.6.5 Administrator Manual
42
The rest of the steps are the same as sending a group message.
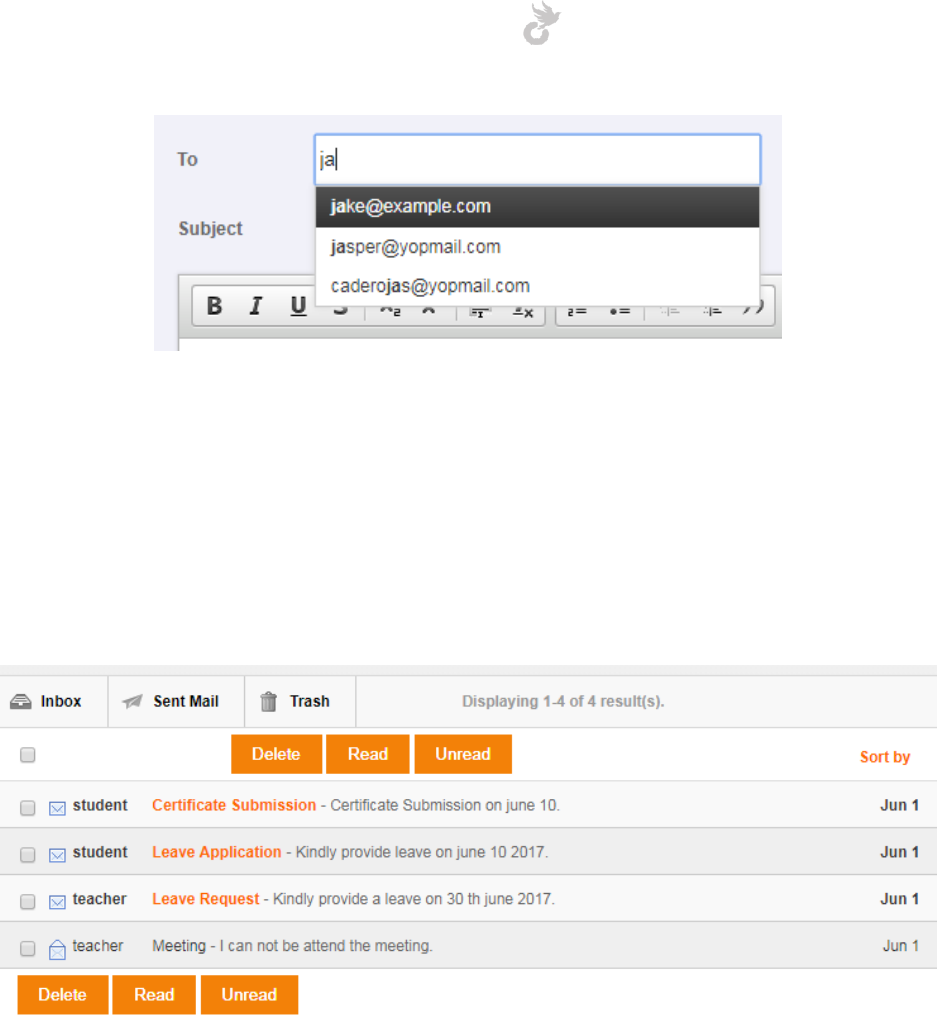
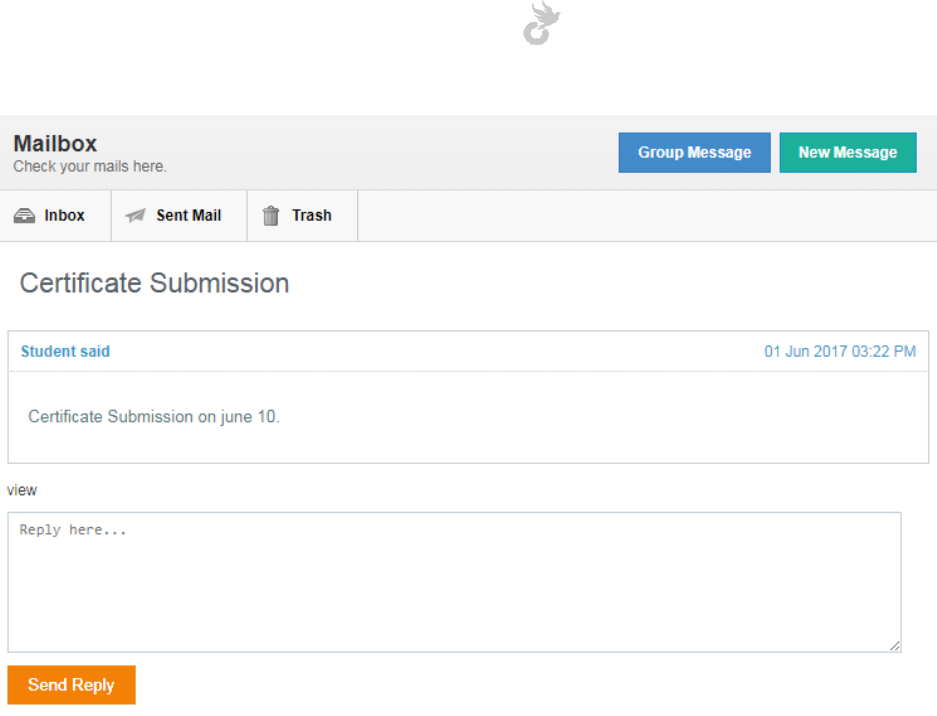
3.2.3 Managing your mailbox
So you’ve learned how to send messages, now read on to find more about how you can
manage your inbox.
Unread messages are highlighted, click on it to open the message.
Open-School 2.6.5 Administrator Manual
43
You can enter your reply to a message once you have opened it. Click on ‘Send Reply’ to send
your message.
You can also view the list of Sent messages, deleted messages and also mark multiple messages
as read, unread or even delete them. Messages in the trash are deleted automatically after 30
days.

Open-School 2.6.5 Administrator Manual
44
3.3 News
The News section allows you to write and publish news that will be displayed to all users in the
system.
You can see the list of published new articles here. They can be deleted by checking the box
next to it and clicking ‘Delete’.
3.3.1 Creating a news
Click on the ‘Create News’ button to write a news article. You will see a form with two fields:
1. Title
2. Description( Your article goes here)
Open-School 2.6.5 Administrator Manual
45
Once you have entered the details click ‘Create’.
Note: This step does not publish your news. Users will not be able to see it unless you publish
it. See the next section for publishing a new article.
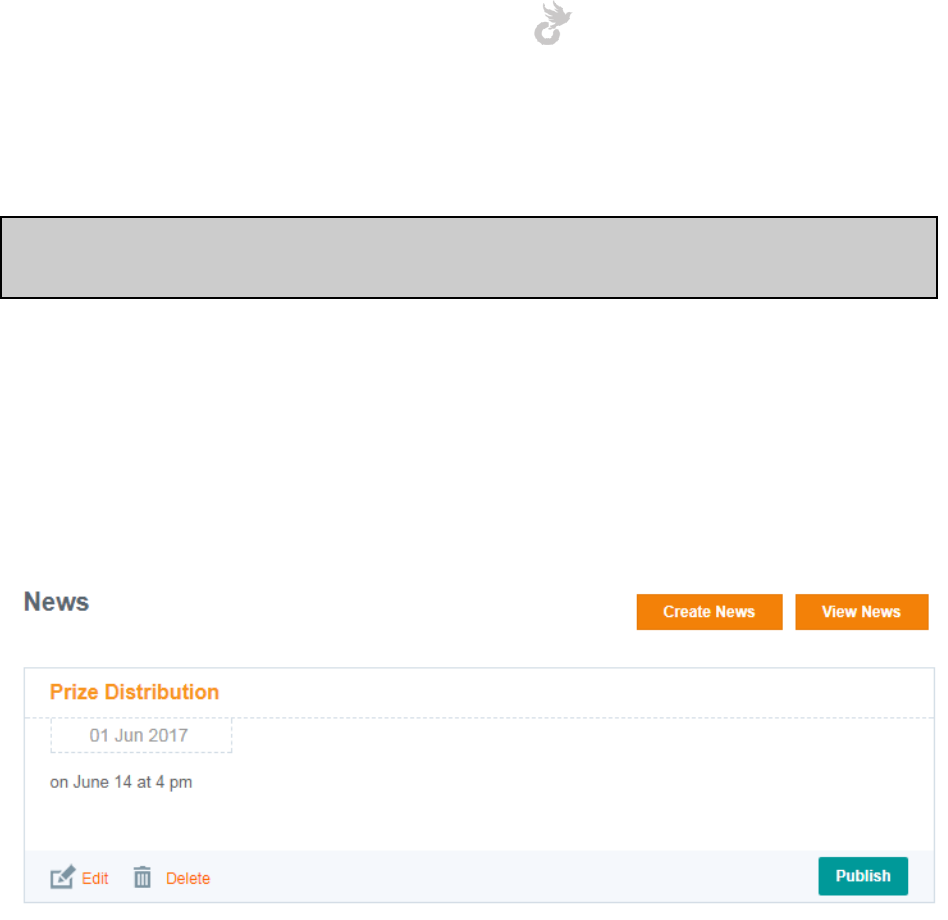
3.3.2 Publishing a news
As mentioned above, creating a news article does not actually post it. Users will only see your
news article once you publish it. To publish an already written article click on the ‘Publish
News’ button in the site new page.
Here you will be able to see the list of unpublished news articles. You can edit / delete these
articles from here. Once you are ready to post the news to all users in the application click the
‘Publish’ button for the news you wish to be published.
Open-School 2.6.5 Administrator Manual
46
3.4 Events
The events feature allows the administrator to create events in the institution and set it up in
the calendar. The calendar is available to every user in the system.
The application already has a couple of events types but you can generate your own too.
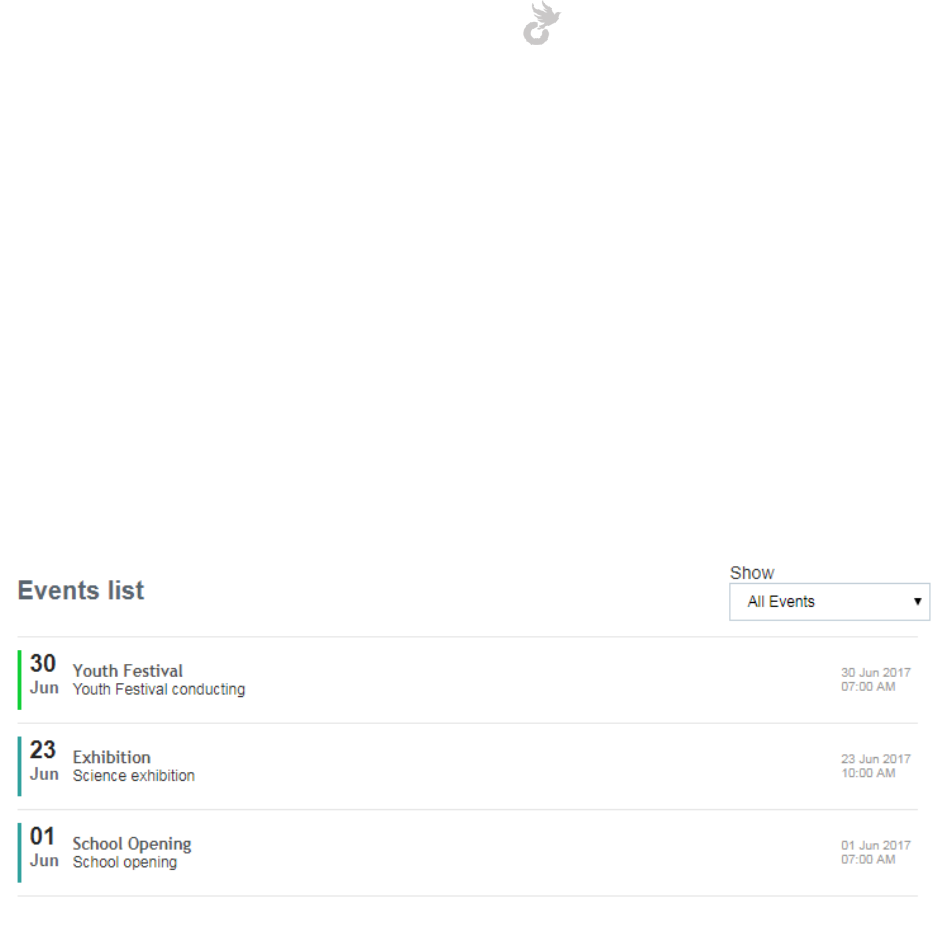
3.4.1 Events List
Click on the ‘Events List’ link in the left side menu to view the list of events created in
descending order.
You can filter through events based on the type by selecting the required on from the
dropdown in the top right corner.

Open-School 2.6.5 Administrator Manual
47
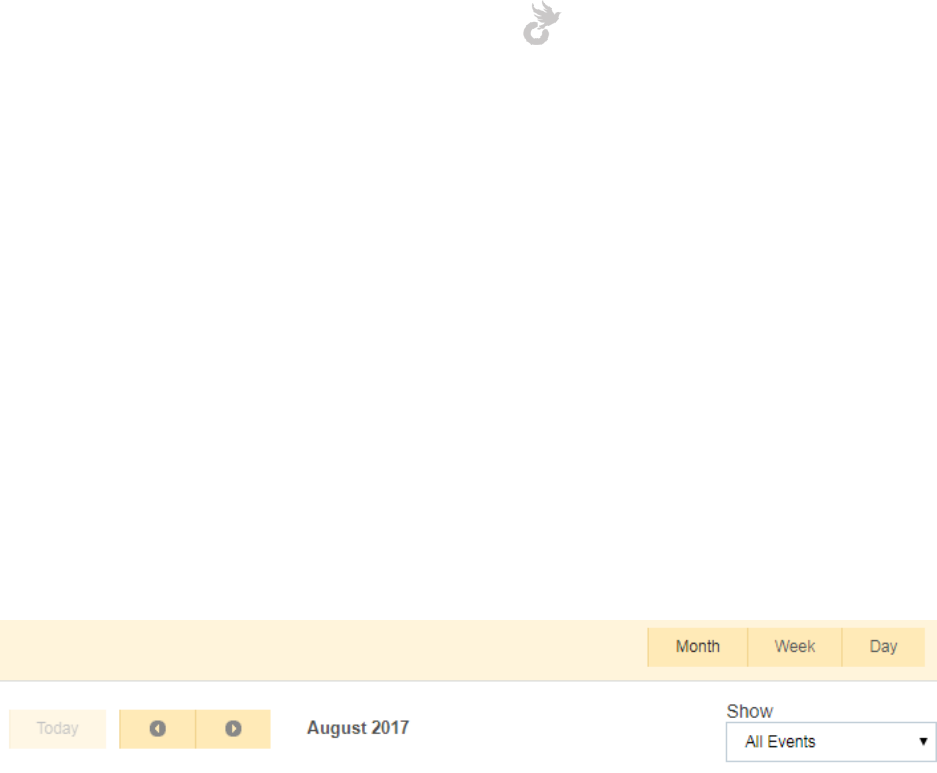
3.4.2 Calendar
Click on the ‘Calendar’ link to view the calendar. Generate an event by clicking on the necessary
date in the calendar. This should bring up a popup form for details of the event.
Fill up the necessary details in this form and click ‘OK’ to generate the event.
1. Title : Event Name.
Open-School 2.6.5 Administrator Manual
48
2. Event type: Select from your event types.
3. Event Privacy: Who this event is for and who it will be visible to.
4. Description: Enter a description for the event
5. Start: Start time for the event
6. End: End time for the event
7. Organizer / In-charge: Name of the event organizer
8. All day: Check this box if the event is for the whole day
9. Editable: Check this box if you would want to edit this event later
Once you click ‘OK’ the event gets saved and is displayed on the calendar as a block with the
color code of the event type. This will be visible to the users(roles) you generated it for.
You can browse through different months, view the calendar in Month, week and day views
using the toggles on top of it.
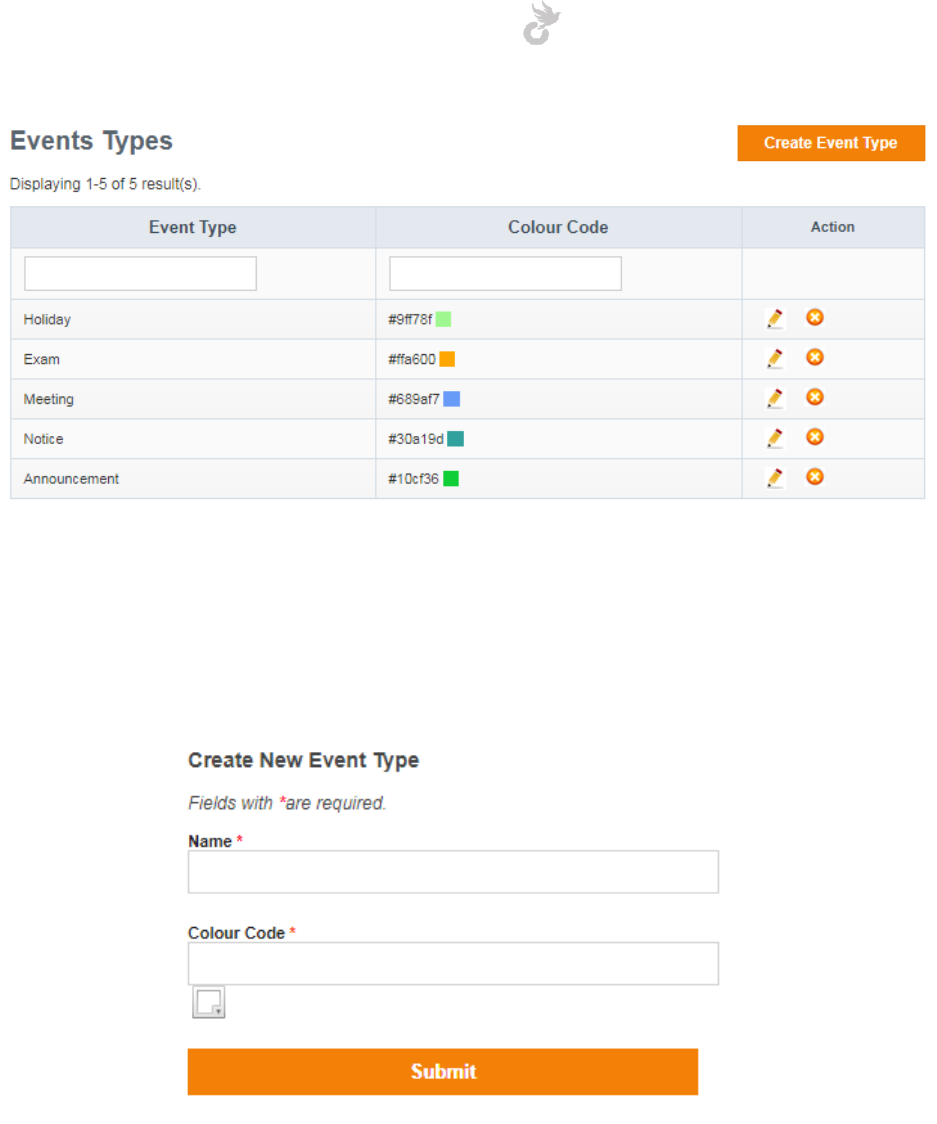
3.4.3 Event Types
As mentioned earlier, there are a few event types that are already in the system. These can be
edited / deleted. You may also create your own event types, click on the ‘Event Types’ link in
the left side menu to see the list.
Open-School 2.6.5 Administrator Manual
49
Each type can have it’s on color code to help identify it on the calendar.
Click on the ‘Create Event Type’ button to start creating event types.
In the popup that follows, enter the name for the event type, choose a desired color from the
color picker and click ‘Submit’ to save your event type.
Open-School 2.6.5 Administrator Manual
50
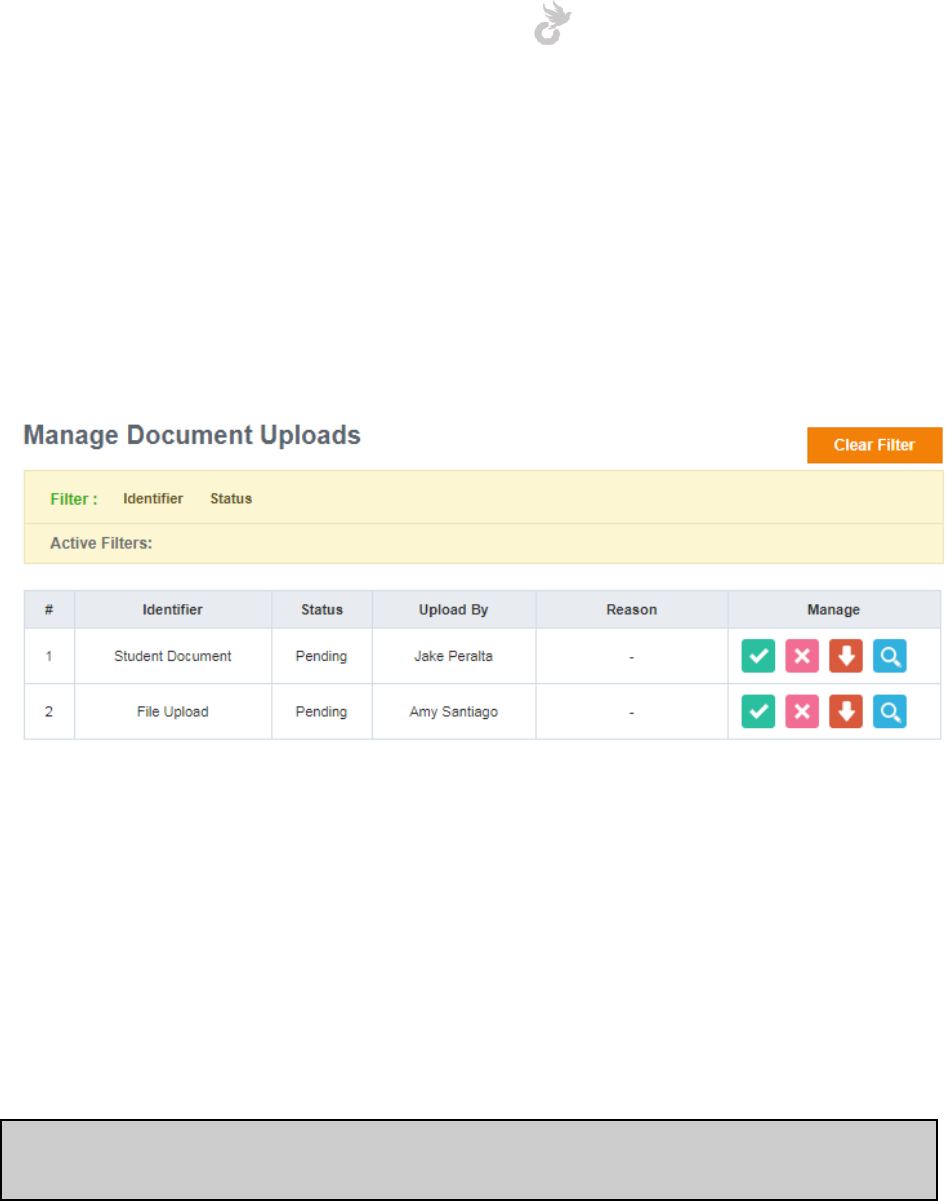
3.5 Document Uploads
The document uploads area allows you to manage all documents that are uploaded into the
system. This involves documents teachers upload via the downloads module, student
documents uploaded by students / parents via the student profile etc. All uploads will need
authorization from the admin side to be saved into the system. You can approve, disapprove,
download and view(only for images) these uploads.
3.6 Complaints
The complaints module is similar to a support ticketing system. Students, parents and teachers
can raise complaints to communicate with the administrator. You can pass comments with each
other and mark a complaint as closed once it’s resolved externally of course.
Note: You need to create complaint categories first so users can raise complaints. See the next
section on how to create complaint categories.
Open-School 2.6.5 Administrator Manual
51
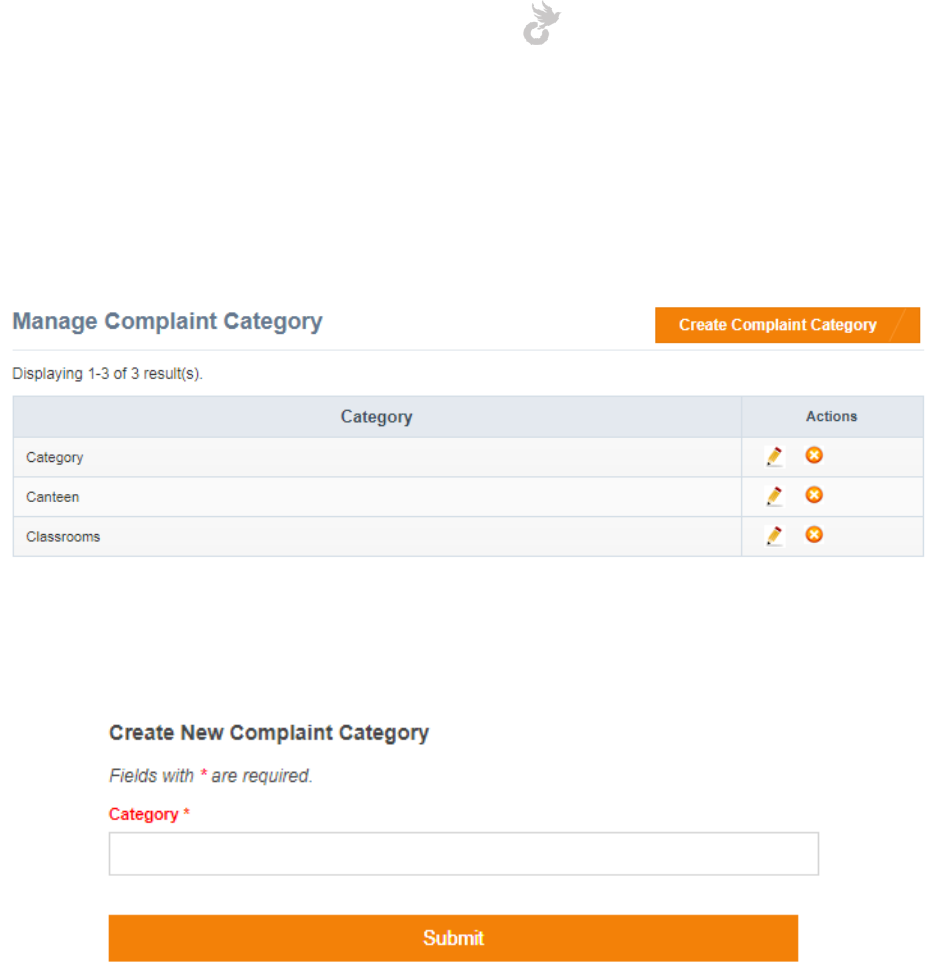
3.6.1 Managing Complaint Categories
Click on the ‘Category’ link under Complaints in the left side menu to manage complaint
categories. You can edit / delete existing categories from here.
The ‘Create Complaint Category’ button allows you to create a new category. Enter a category
name in the popup that follows and click ‘Submit’.
Open-School 2.6.5 Administrator Manual
52
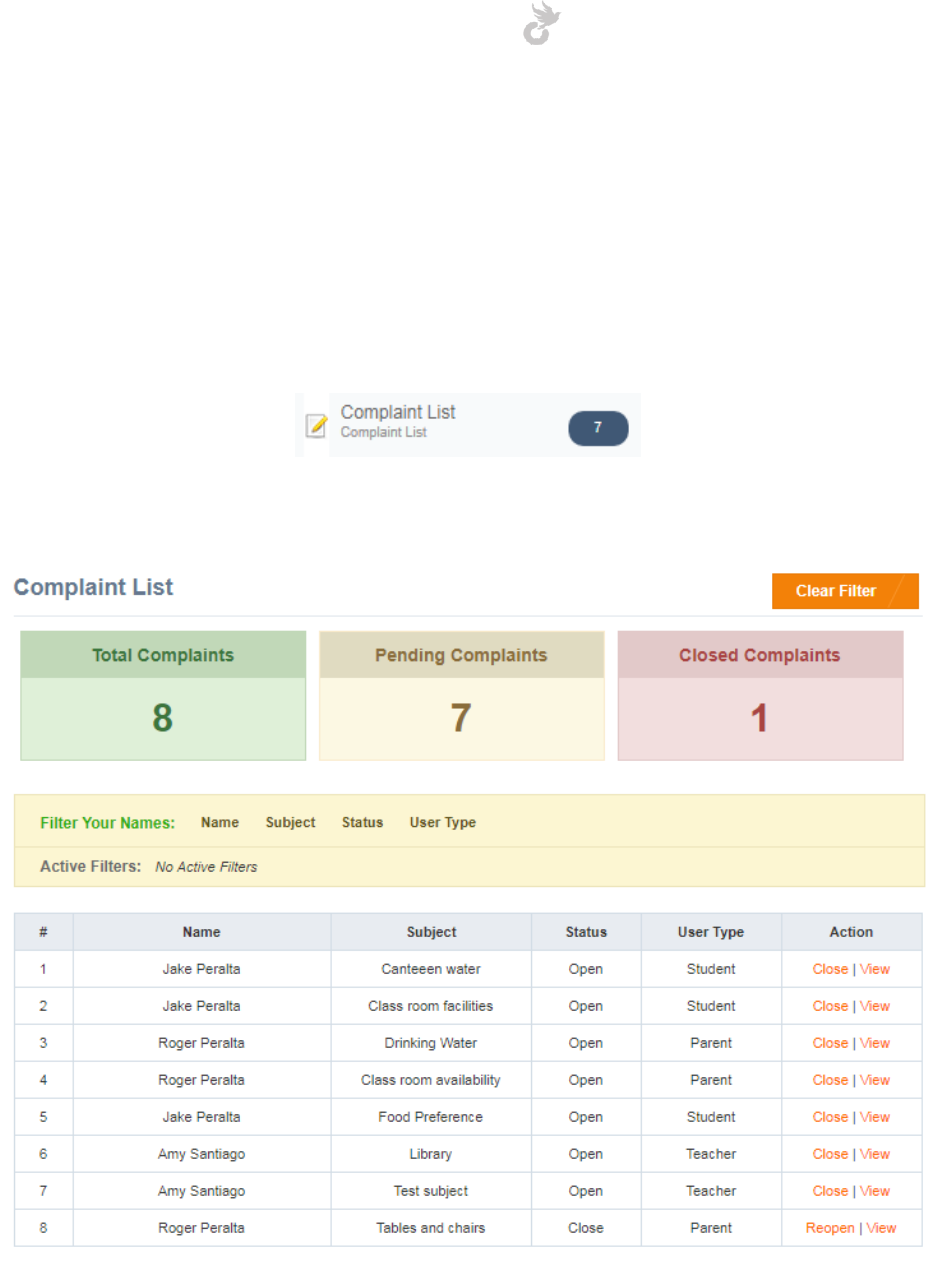
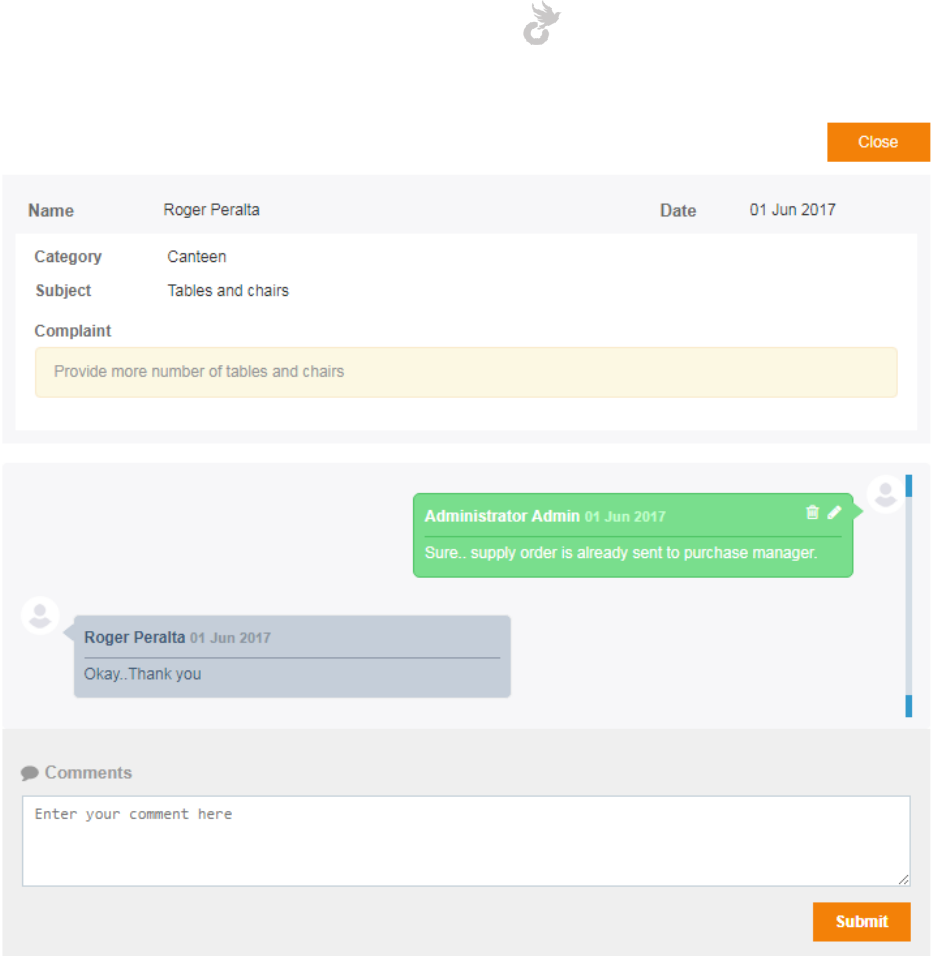
3.6.2 Managing Complaints
Once you have created complaint categories other users can start raising complaints. Let’s take
a look at how to manage these complaints.
Click on the ‘Complaint List’ link under complaints to view the list. This link also displays the
number of ‘open’ complaints in the system.
You can use filters to find different complaints if there are too many.
There are two options for a complaint: Close and View. A closed complaint can also be
reopened. To view details of a complaint click the ‘View’ link next to it.
Open-School 2.6.5 Administrator Manual
53
You can see all details of the complaint here. The comments section allows you to leave a
comment for the user who raised the complaint.
To leave a comment, simply enter it in the text area under comments and click submit.
You can also close the ticket from here.
Open-School 2.6.5 Administrator Manual
54
4. STUDENTS
The students module allows you to manage student and parent details, register new students,
manage online admissions etc.
Clicking on the Students Module displays an overview of all recent admissions.
Let’s take a look at the different options you have in the student's module.
Open-School 2.6.5 Administrator Manual
55
4.1 Student Field Settings
The student field settings option allows you to customize the student/parent registration form.
You can add/delete new fields, edit default fields in the system and also rearrange the fields
you create.
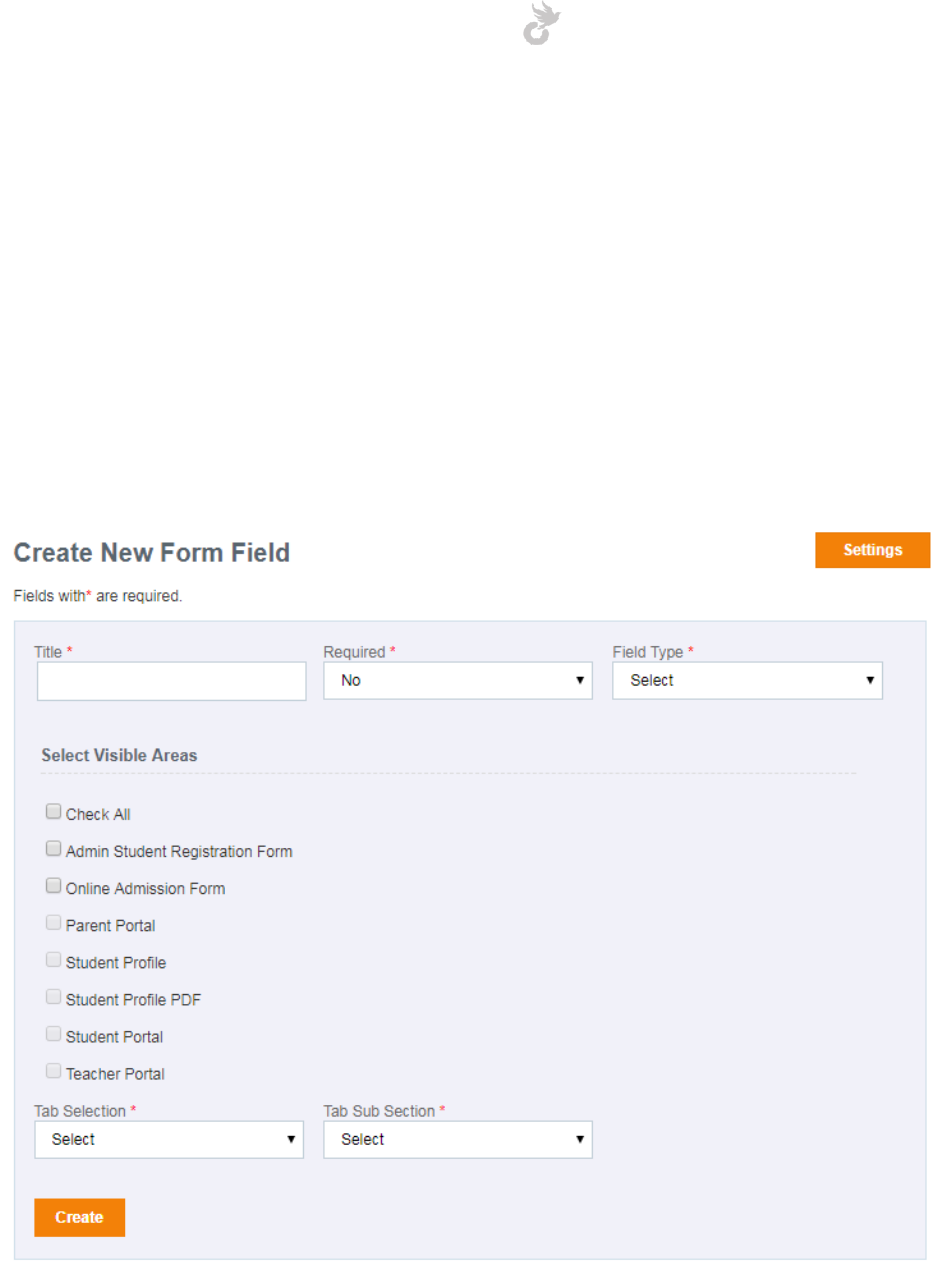
4.1.1 Creating a new Field
Click on the ‘Student Field Settings’ link in the left side menu to access the create custom field
area.
Here you can give your field a name, choose what type of field it should be, whether it should
be mandatory or not and also select where all it needs to be displayed.
Open-School 2.6.5 Administrator Manual
56
The Tab Selection and Tab Sub Section are a list of the different steps in the Student
Registration form, you can choose where your field needs to appear.
Once you have entered all the details click ‘Create’ to generate the field. You will be redirected
to the list of fields once you’ve created the new one.
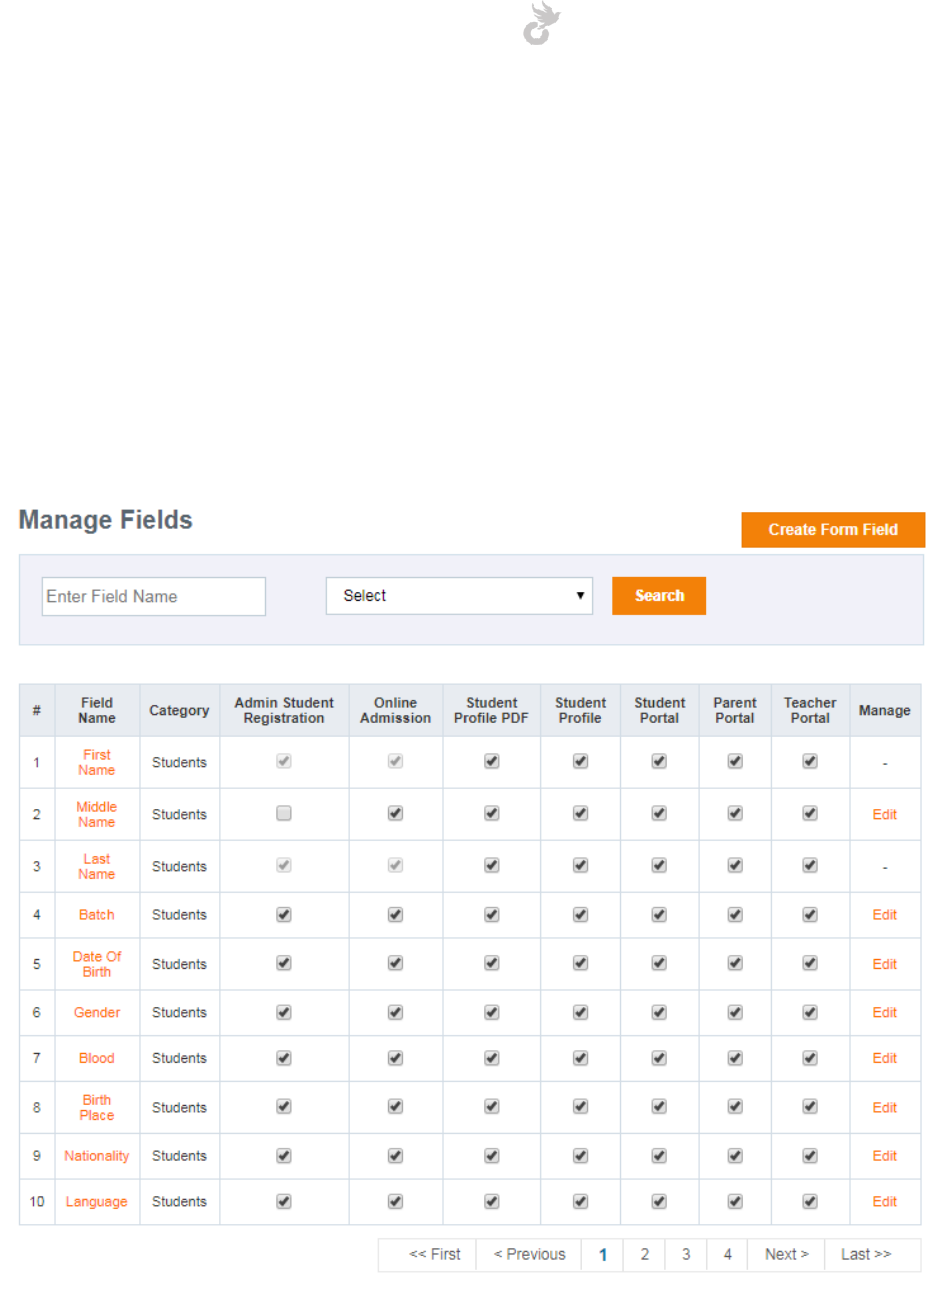
4.1.2 Managing fields
The students field list can be accessed from the Settings Module > Student Field Settings too.
The list of all student related fields can be viewed from here. You may edit default fields that
are in the system already by clicking the ‘Edit’ link next to them. New fields created by you will
have a delete option too.

Open-School 2.6.5 Administrator Manual
57
Certain fields will not have any of these two links as it is important for various functionalities in
the system. For example, First Name, Last Name and email cannot be edited or deleted as they
are required for user account creation.
You can enable / disable fields for different areas in the system by simply checking / unchecking
them in the list for the corresponding area. These changes are automatically saved and does
not require hitting any button.
Fields can also be searched for by entering keywords in the search bar on top of the list.
Open-School 2.6.5 Administrator Manual
58
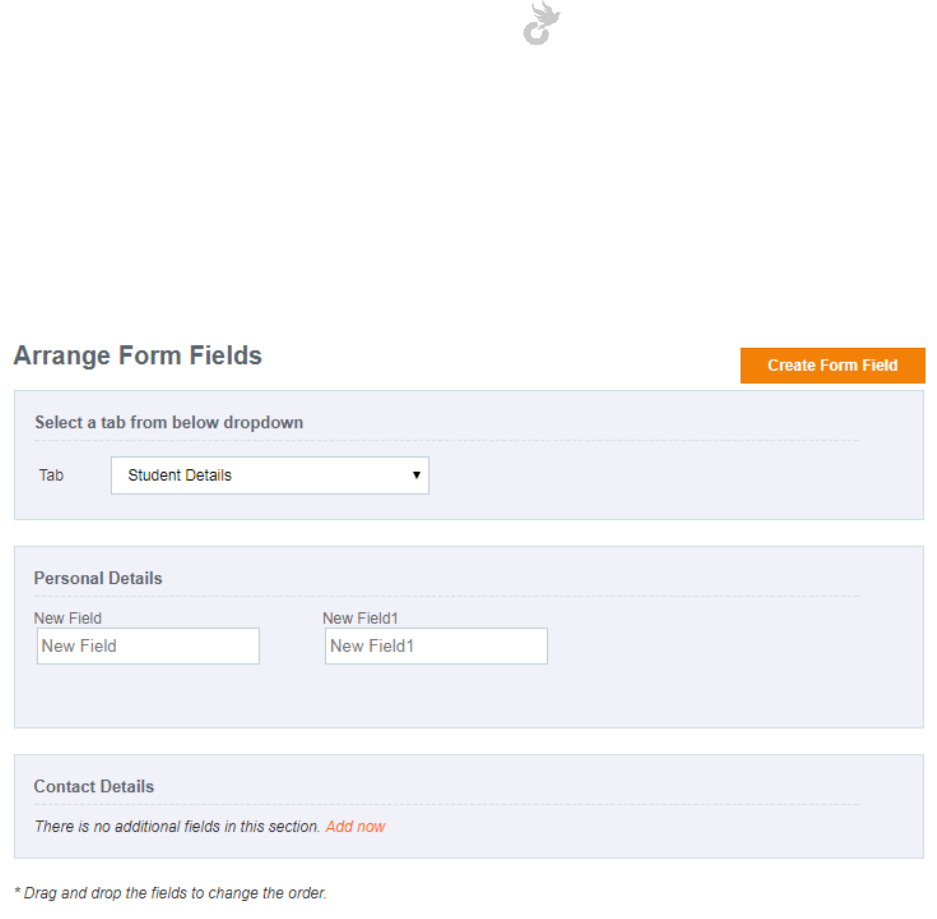
4.1.3 Rearranging fields
Fields created by you can be rearranged in the form. Click on the ‘Arrange Form Fields’ link in
the left side menu under Student Field Settings to access the area. Next select a tab section you
require to rearrange the fields.
Simply click and drag the fields around to rearrange them.

Open-School 2.6.5 Administrator Manual
59
4.2 Adding a new student
So now that we’ve learned how to create new fields in the student registration form let’s take a
look at adding a new student in the system. There are actually 3 ways to do this,
1. Admin Student Registration
2. Online Admission (Section 4.4)
3. Import
Here, we’ll be discussing the first two methods. The import method is described in the import
module section.
4.2.1 Admin Student Registration
Click on the ‘Create New Student’ link in the left-side menu of the Students module to access
the Admin Student Registration form. This is a series of steps where you enter the student and
parent data to be saved in the system. User accounts for both student and parent are created
directly during registration, giving a valid email will allow the system to send the login details to
them. You must be wondering about students/parents who do not have an email id. Well in
that case simply enter a fake email address for example, ‘student123@example.com’. The
password can be reset by you from the Manage Users section under Settings Module.
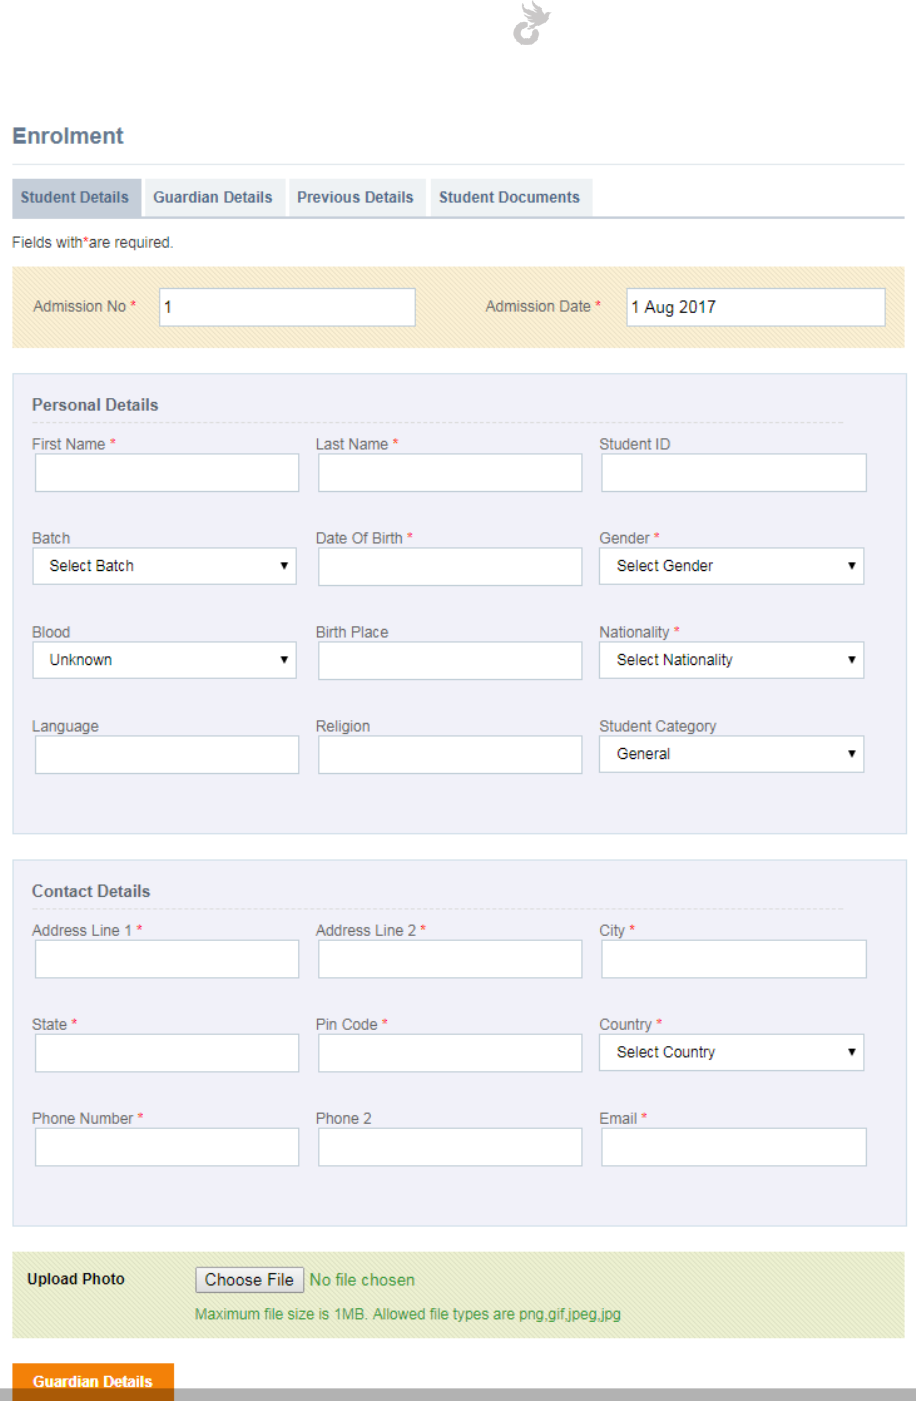
4.2.1a Step 1: Student Details
The first step involves entering the student details such as admission date, name, contact
details etc. You can also upload a profile picture for the student which will display in his/her
profile report that can be generated as a PDF and printed.
Open-School 2.6.5 Administrator Manual
60

Open-School 2.6.5 Administrator Manual
61
The email, first name and last name are important fields necessary for user account generation
if you are using the full version of the application. Email and phone numbers are unique fields
and cannot be used repeatedly for multiple registrations. As mentioned above, you may use a
fake random number or email. Just make sure it’s not a real email/phone that belongs to
someone.
Admission date of the student acts as the start date for the students attendance.
Once you have entered all necessary student details click the ‘Guardian Details’ button at the
bottom of the page to move on to the next step.
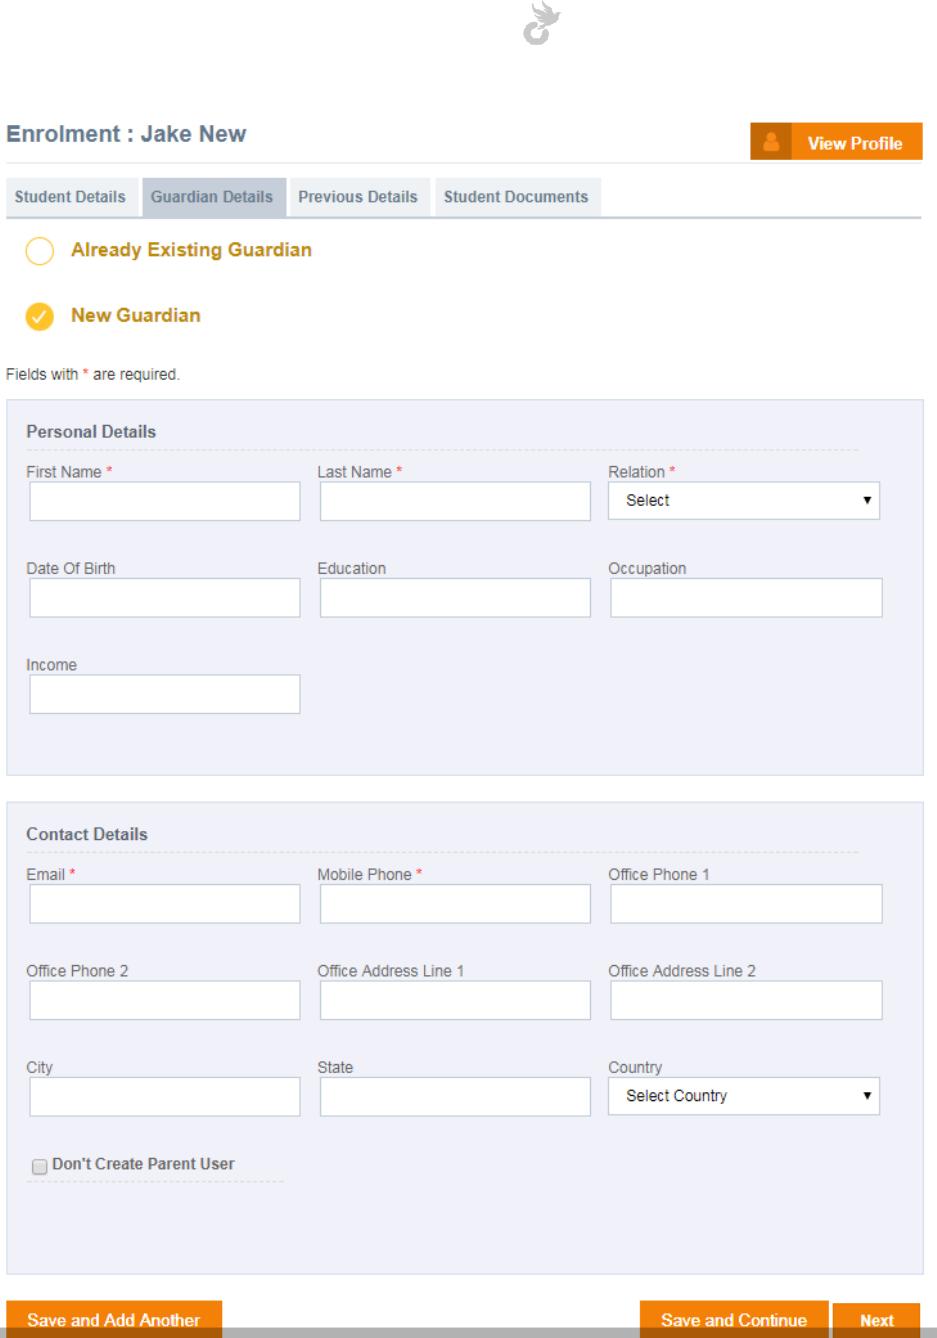
4.2.1b Step 2: Guardian Details
Step 2 of the registration process is where you enter the guardian/parent details. You can
choose to add a new guardian or select details of an existing guardian (in case of adding more
than one child of a parent).
User account is generated automatically for the first parent, you may however choose to opt
out for this by checking the ‘Don't create parent user’ checkbox at the bottom.
Just like students, parents too have personal and contact information that needs to be filled in.
Once you’ve entered the details you have two options:
1. Save and add another parent
2. Save and continue to the next step
Buttons for these can be found at the bottom of the page.
You may also edit/delete guardians or parents who have been added.
Open-School 2.6.5 Administrator Manual
62
Open-School 2.6.5 Administrator Manual
63
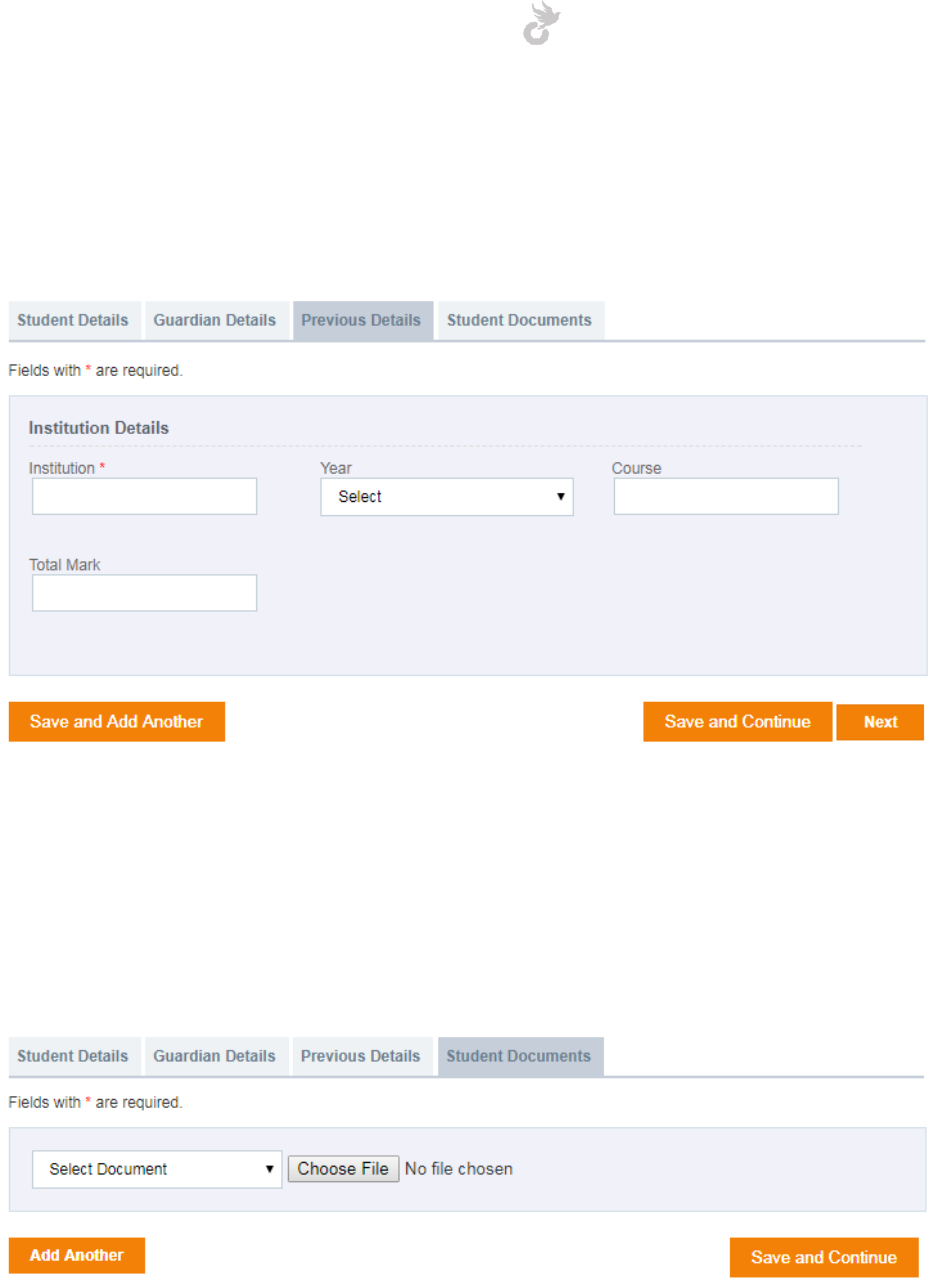
4.2.1c Step 3: Previous Details
Step 3 is where you enter the previous educational details of the student. This step is optional
and can be skipped by hitting the ‘Next’ button.
4.2.1d Step 4: Student Documents
Here you can upload student documents like transfer certificates etc. To manage student
documents go to Settings > Enrollment Settings > Manage Student Documents. You can find
more details on this in the Settings Module section. This step is also optional and can be
skipped by clicking ‘Save and continue’.
Completing this step brings you to the end of the student registration process. You can now
find the student under the Students List area explained below.
Open-School 2.6.5 Administrator Manual
64
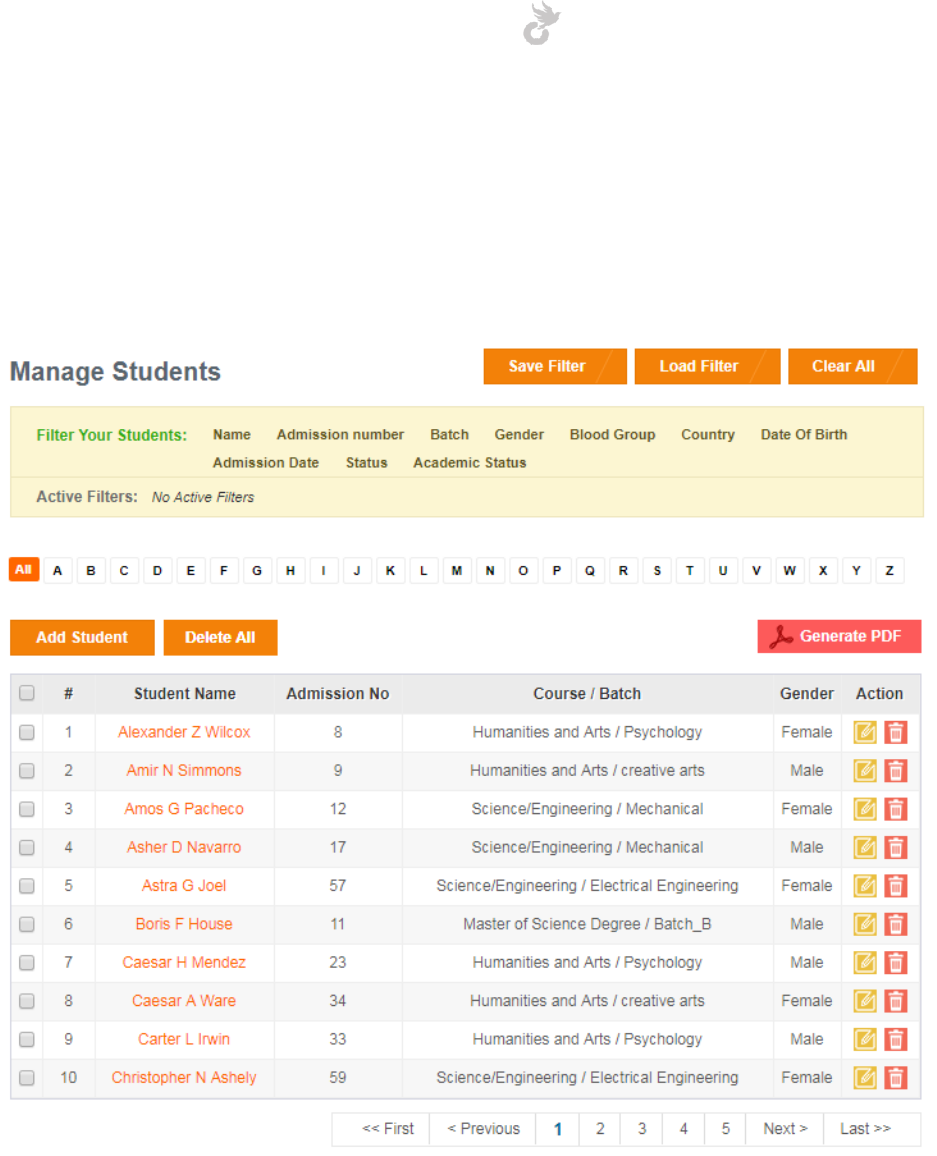
4.3 Students List
The students list displays all active students registered. Clicking on a student name takes you to
the student’s profile. You can use various filters to list out the students. You can generate a PDF
of this list and also edit / delete students from here.
Open-School 2.6.5 Administrator Manual
65
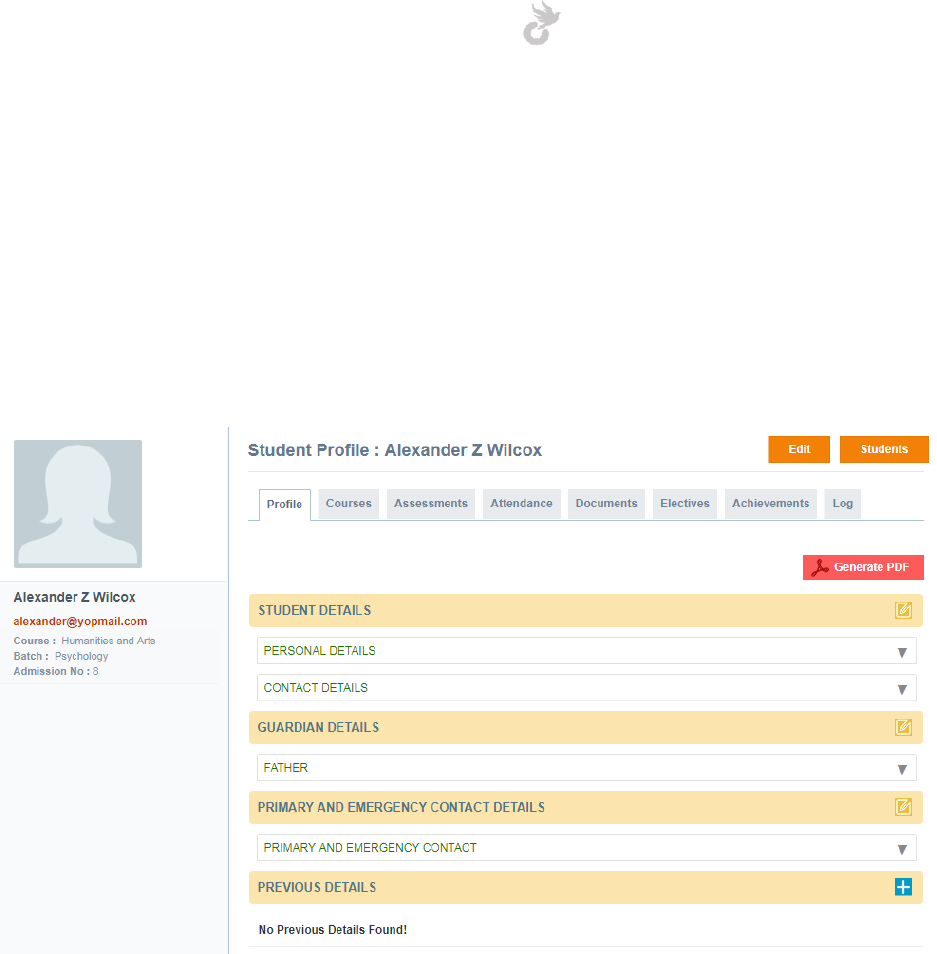
4.3.1 Student Profile
To view a student profile simply click on his/her name from the student list as mentioned
above. The student profile gives you insight on the current course, history of courses the
student has attended, assessment details, attendance details, documents, electives,
achievements and logs.
You can also see the details entered during registration.
You may edit the profile from here, there is also an option to generate the details of the
student as a PDF file which can be downloaded and printed.
Courses, attendance and assessments(exams) will be covered in their respective module
sections.
Open-School 2.6.5 Administrator Manual
66
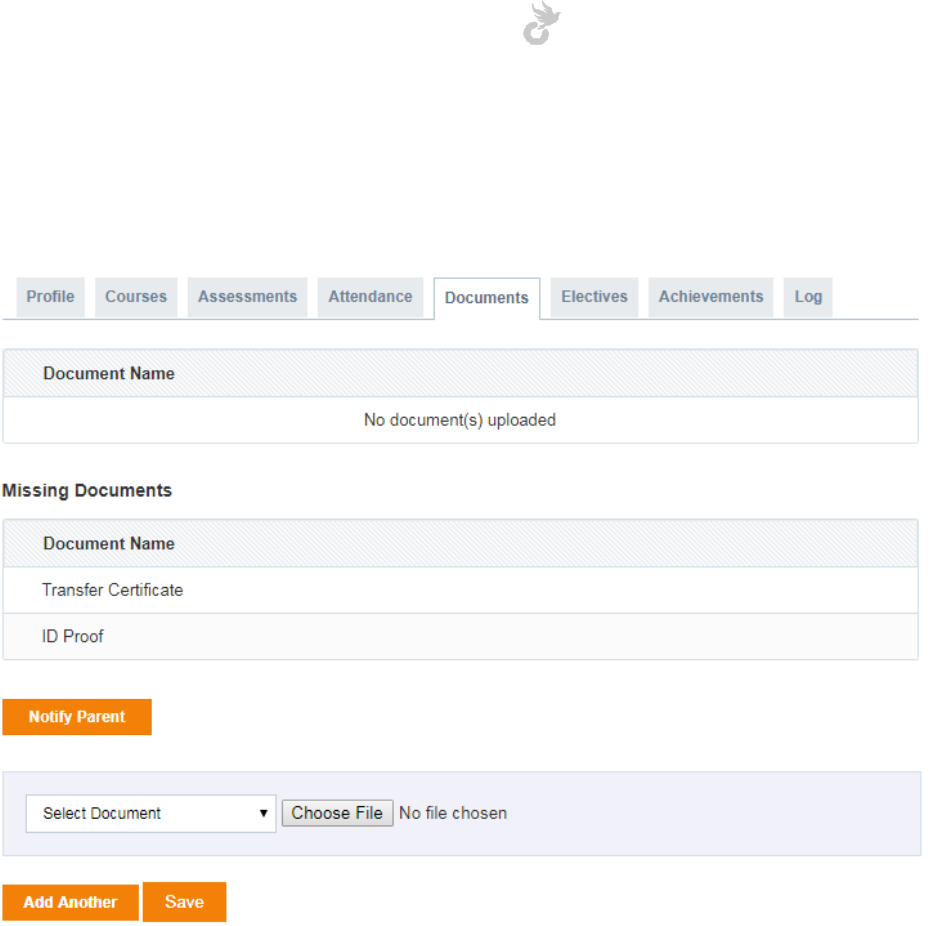
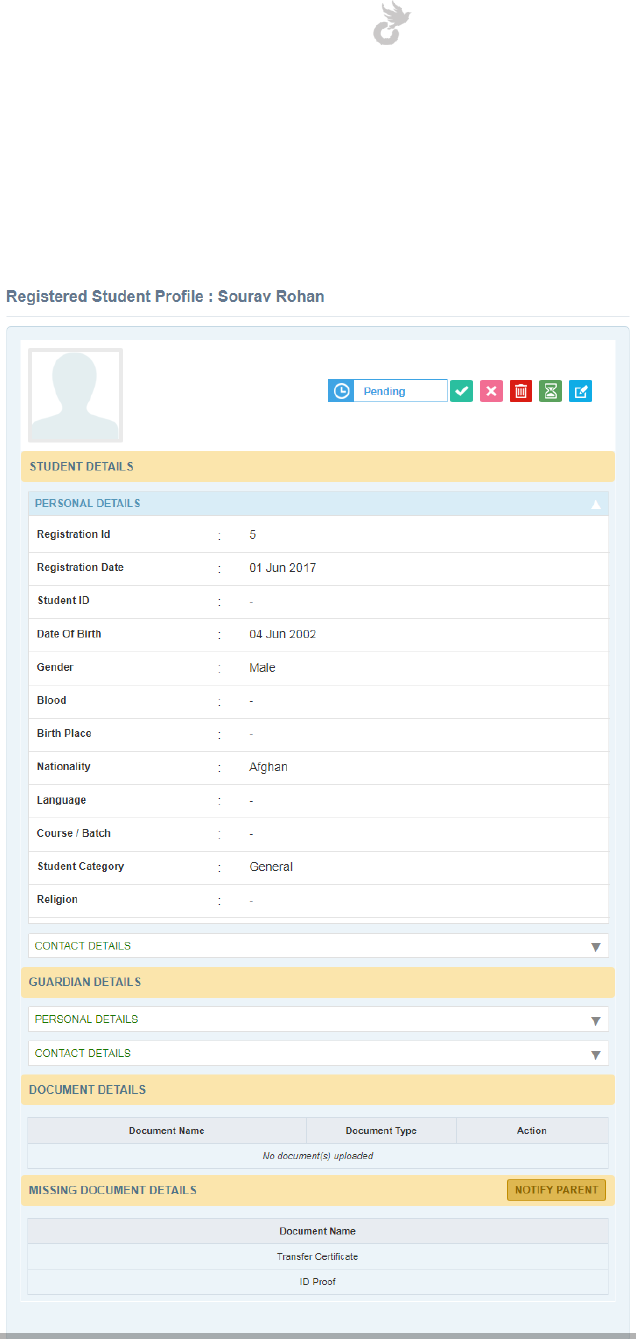
4.3.1a Documents
The documents section allows you to upload relevant documents for the selected student.
The missing documents section displays the list of mandatory documents that the student
hasn’t uploaded yet. You can send a notification to the parent by clicking the ‘Notify Parent’
button about missing documents.
Mandatory documents list can be managed from the Settings Module > Manage Student
Document. You can find more details on this in the Settings Module section.
To upload documents select the type from the dropdown and choose your file by clicking the
‘Choose File’ button. Once you have selected the document click ‘Save’ to upload it. You can
upload upto 5 documents at a time by clicking the ‘Add Another’ button.
Open-School 2.6.5 Administrator Manual
67
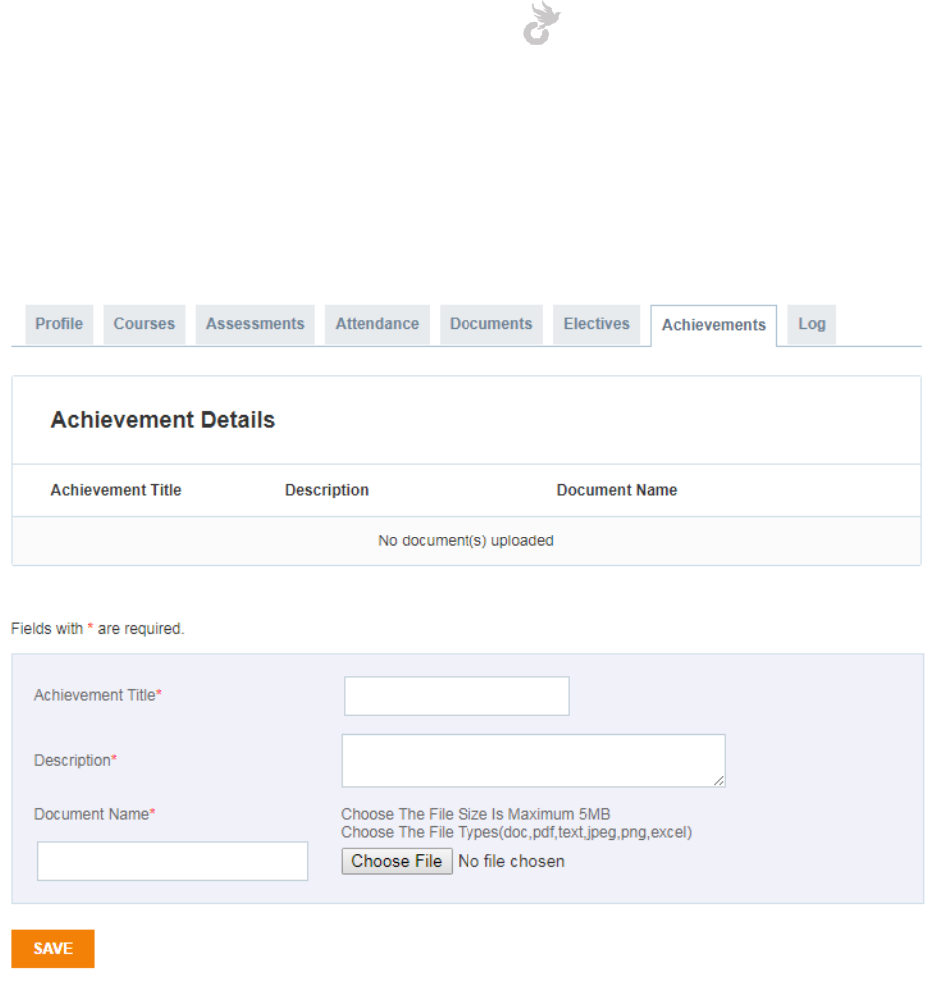
4.3.1b Achievements
The achievements section allows you to upload documents related to any achievements the
student has accomplished in the school or outside academics.
To upload an achievement simply enter the following details:
1. Achievement Title
2. Description
3. Document name
4. Choose document
Once you have entered these details and chosen the file to be uploaded click the ‘Save’ button
to upload.
Open-School 2.6.5 Administrator Manual
68
4.4 The Online Registration Process
We took a look at how the admin student registration process works and it seems pretty time
consuming if you need to add students in bulk. The online registration process makes things a
tad easier for administrators by allowing students/parents to register themselves. The admin
however has to analyse these online applications and approve them to save the data on the
system. Let’s take a look at enabling and using the online admission.
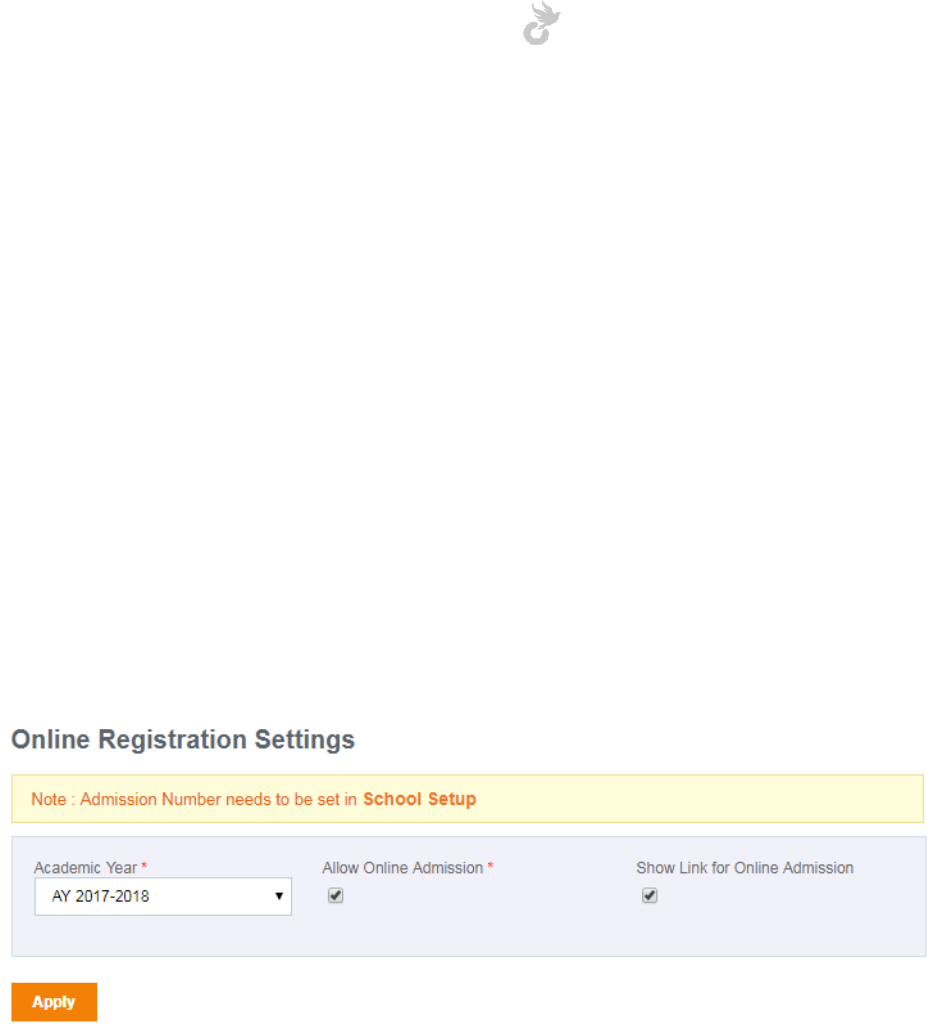
4.4.1 Enabling the online registration link
To enable the online admission link you will first have to create and active academic year.
Assuming you have already done that as it’s the most important step in the system let’s move
on to enabling the online registration for a selected academic year.
Settings Module > Enrollment Settings > Online Registration Settings
As mentioned in the screenshot, you can define a separate starting admission number series for
online registrations from the School Setup which can be found in the Settings Module.
To enable the link, simply select the Academic Year for which you would like to open
registrations for. Check both the boxes for Online admission and click ‘Apply’. This will now
display the ‘Student Registration’ link on the login page of the application. Students/parents
accessing your application URL can now start applying for online registration.
Open-School 2.6.5 Administrator Manual
69
Note: The online admission form is the same as the admin student registration form. You can
customize this form too using the Student Field Settings option.
4.4.2 The application approval process
So once you have enabled the registration link on the login page you will have to start
managing the applications that are coming in. Here, we’re going to explain on how you can
approve, disapprove, edit or delete applications submitted by students.
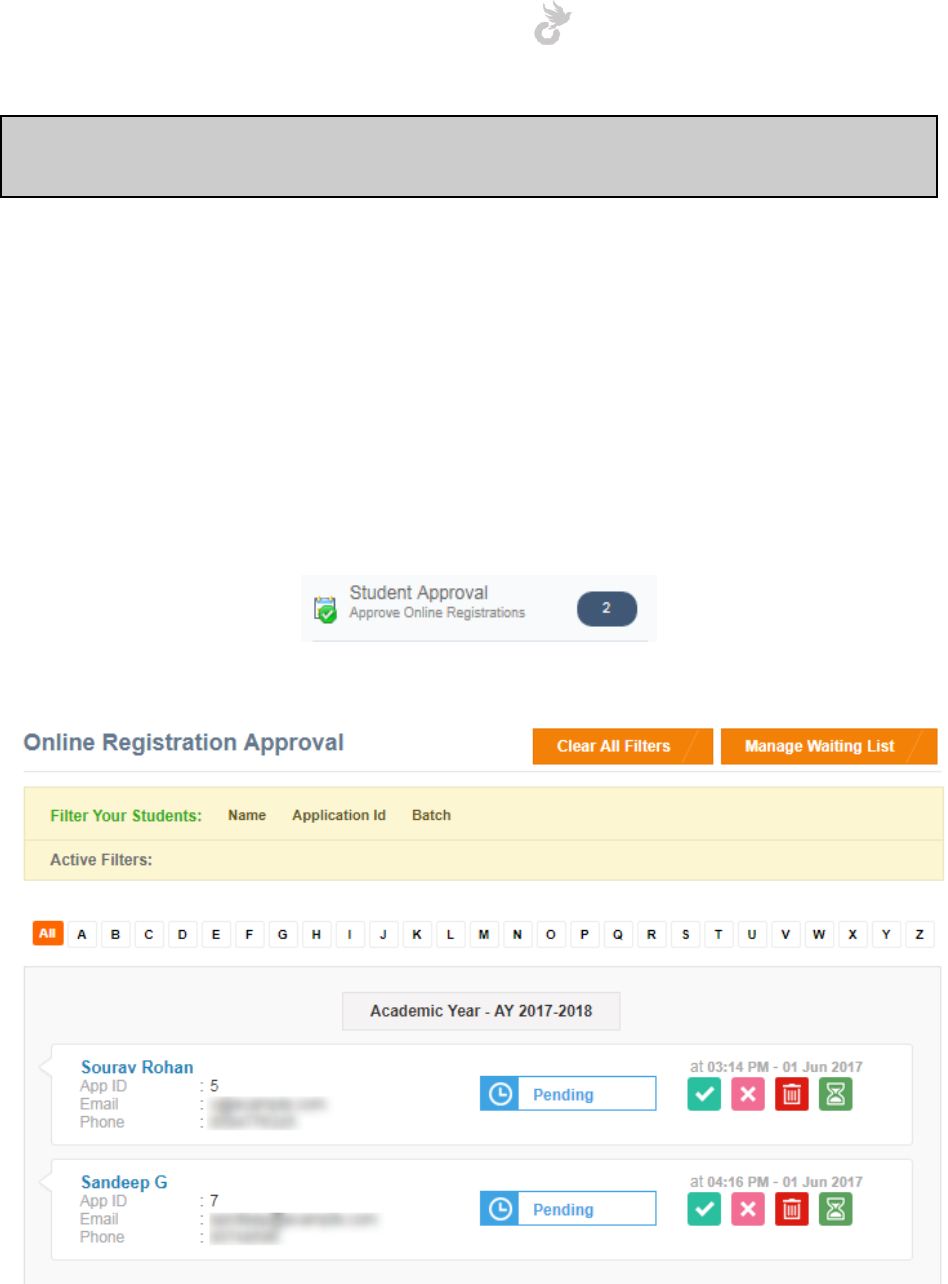
The count of new online registrations that are pending can be seen next to the ‘Student
Approval’ link in the left side menu under the Students Module.
Click on the Student Approval link to start managing pending applications.
All pending applications is listed here and can be filtered based on student name, application id,
course/batch applied for etc. You can also view the date and time the application was
Open-School 2.6.5 Administrator Manual
70
submitted on. Even though the student chooses the course/batch while registering, it is the
admin who gets to finalize it. Course/batch can be changed during approval.
To view an application in detail simply click the student’s name.
You may also edit the application from here.
Against each application in the pending list are four options,
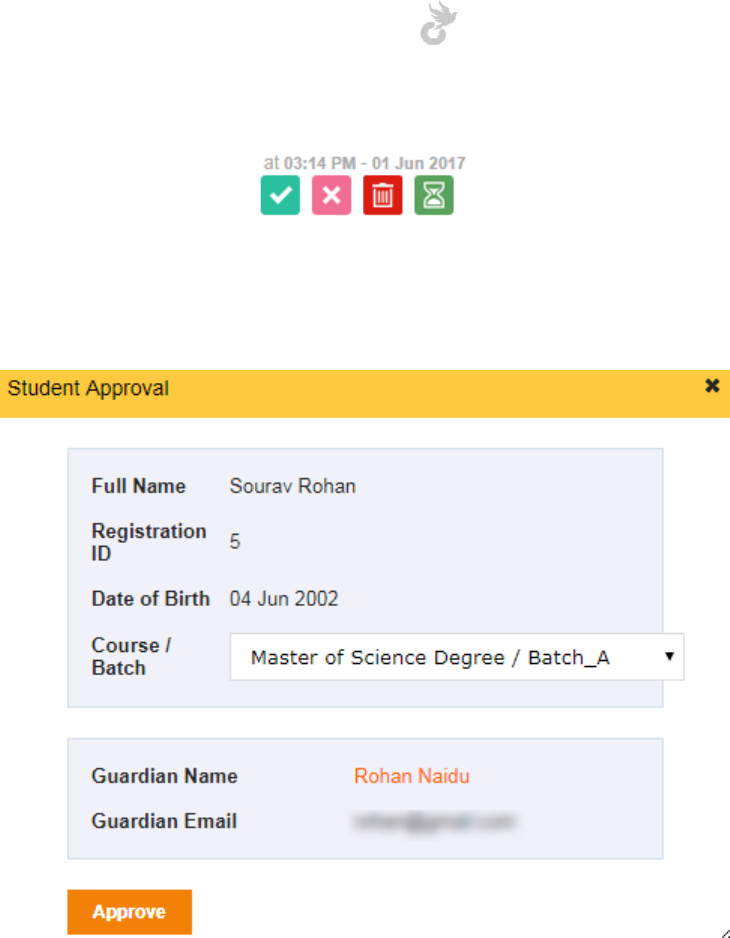
Open-School 2.6.5 Administrator Manual
71
Approve: Clicking the Approve icon(the first in the image above) raises a pop-up with details of
the course/batch chosen by the student.
The admin can change the selected course/batch here before hitting the approve button.
Clicking on ‘Approve’ will enter all details from the online application into the system and also
generate user accounts for the student and parent.
Disapprove: Clicking the disapprove button will reject the application submitted by the student.
They will be able to see the status by checking the submitted application using the application
id and random password received on successful registration. Disapproved applications can be
approved from the Online Applicants area.
Delete: Clicking the delete button removes the application from the system completely.
Waiting List: The waiting list button allows you to add the application to a temporary list that
can be used to manage excessive application requests. You can set priorities for an application
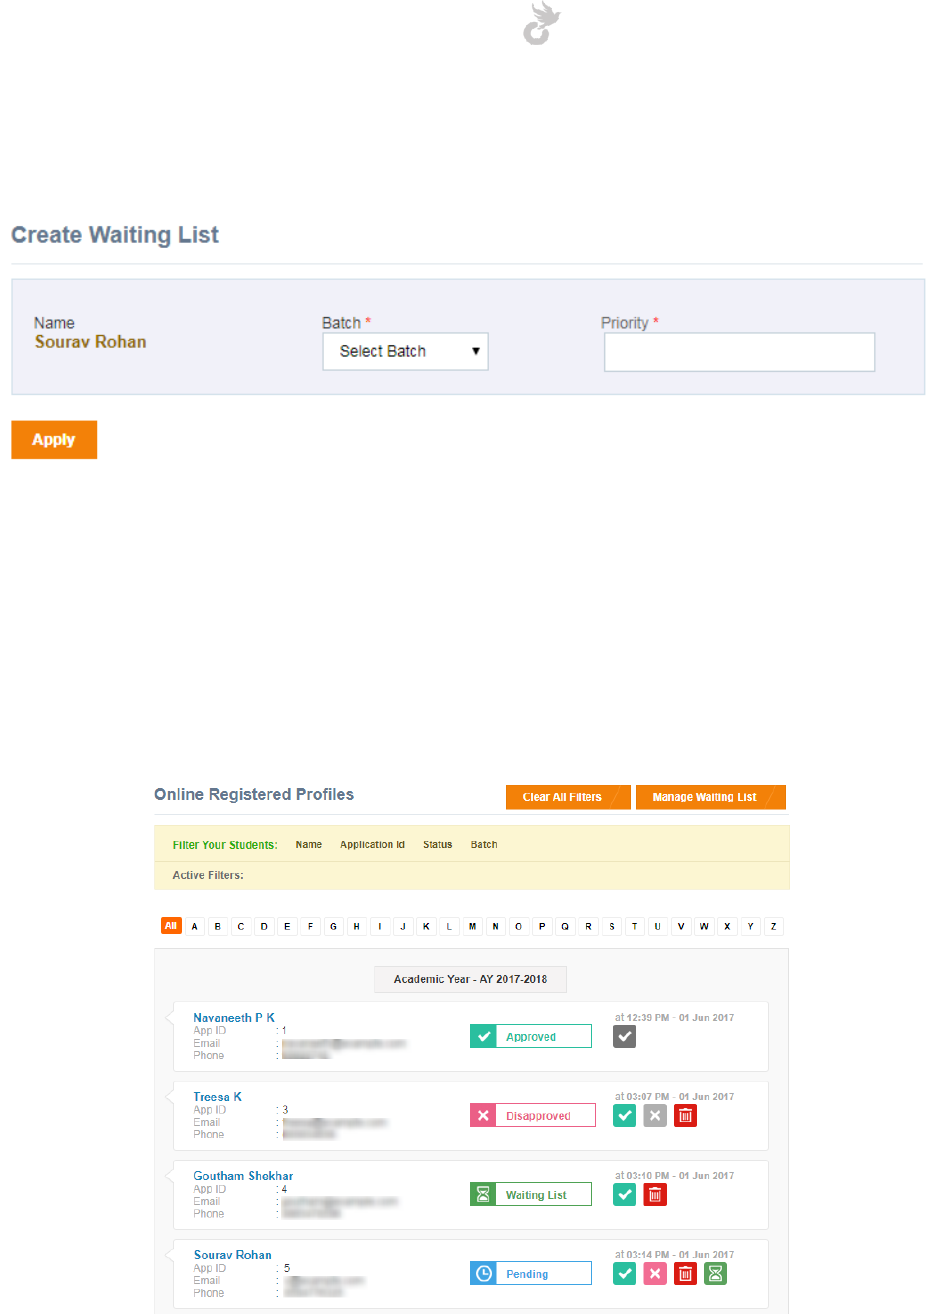
Open-School 2.6.5 Administrator Manual
72
so it can be managed at a later time. All requests marked as waiting list can be viewed under
the Waiting List area.
Applications will be listed according to the priority number in the waiting list.
4.4.3 Online Applicants
The Online Applicants area displays all online applications that were approved, disapproved or
is under the waiting list. Disapproved/Waiting list applications can be approved from here.
Open-School 2.6.5 Administrator Manual
73
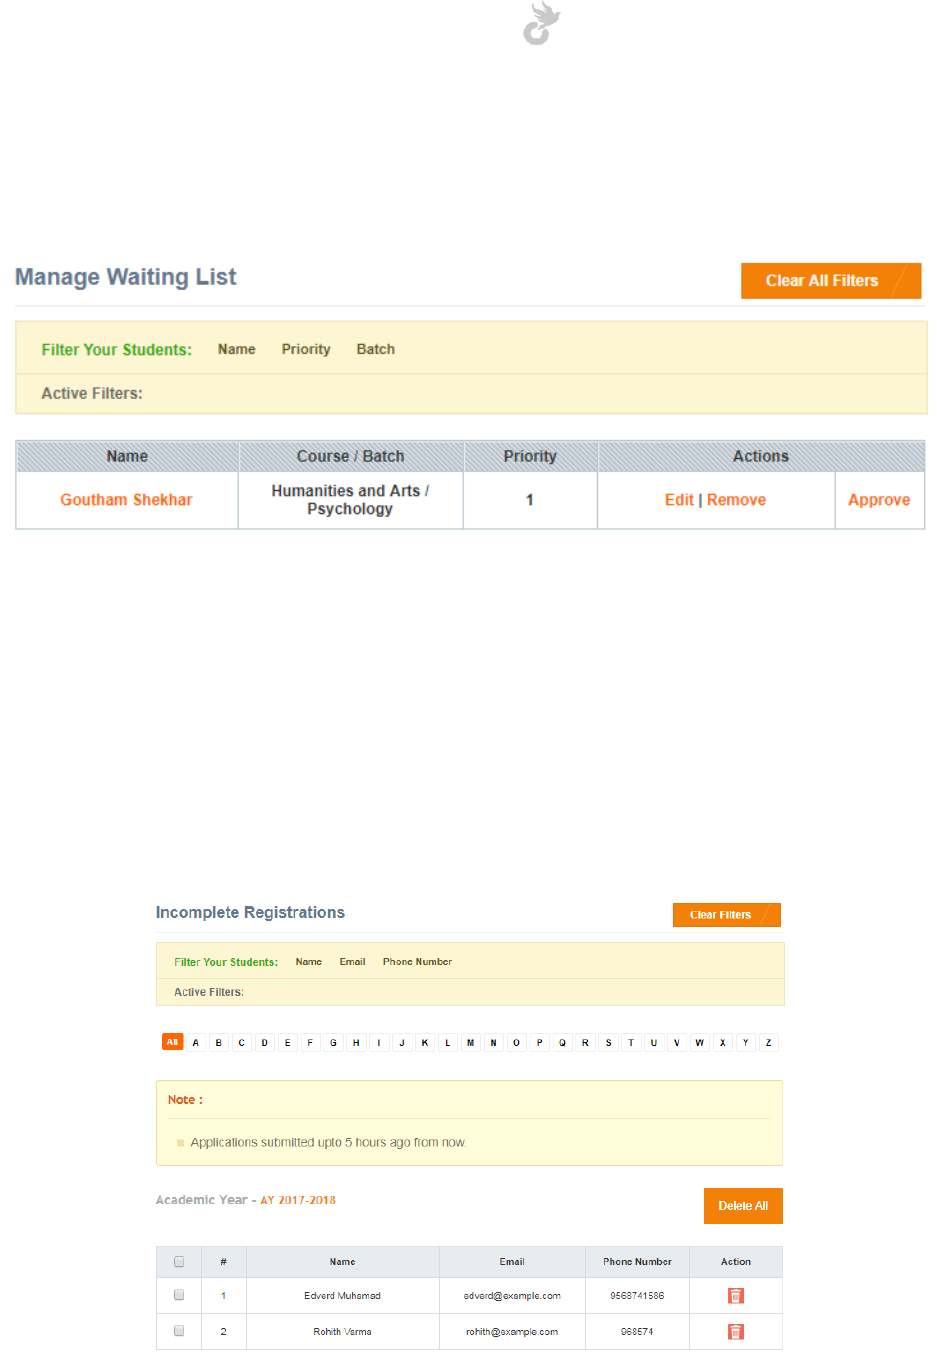
4.4.4 Waiting List
The waiting list area displays all online applications that have been marked as waiting.
Requests can be edited, removed from waiting list or even approved directly from here. The
approval process is same as the one mentioned in the previous section. Filters are available to
browse through requests in this list.
4.4.5 Incomplete Registrations
The incomplete registrations area displays all applications that were not completed (skipped
steps or closed window during registration) by students/parents who tried to register.
Open-School 2.6.5 Administrator Manual
74
Incomplete applications that are older than 5 hours are automatically deleted. The admin can
also delete these applications manually.
4.5 Student leave type management
This area allows you to create leave types for students which can be used while marking
attendances. Click on the ‘Add Leave Type’ link in the left side of the students module to get
started.
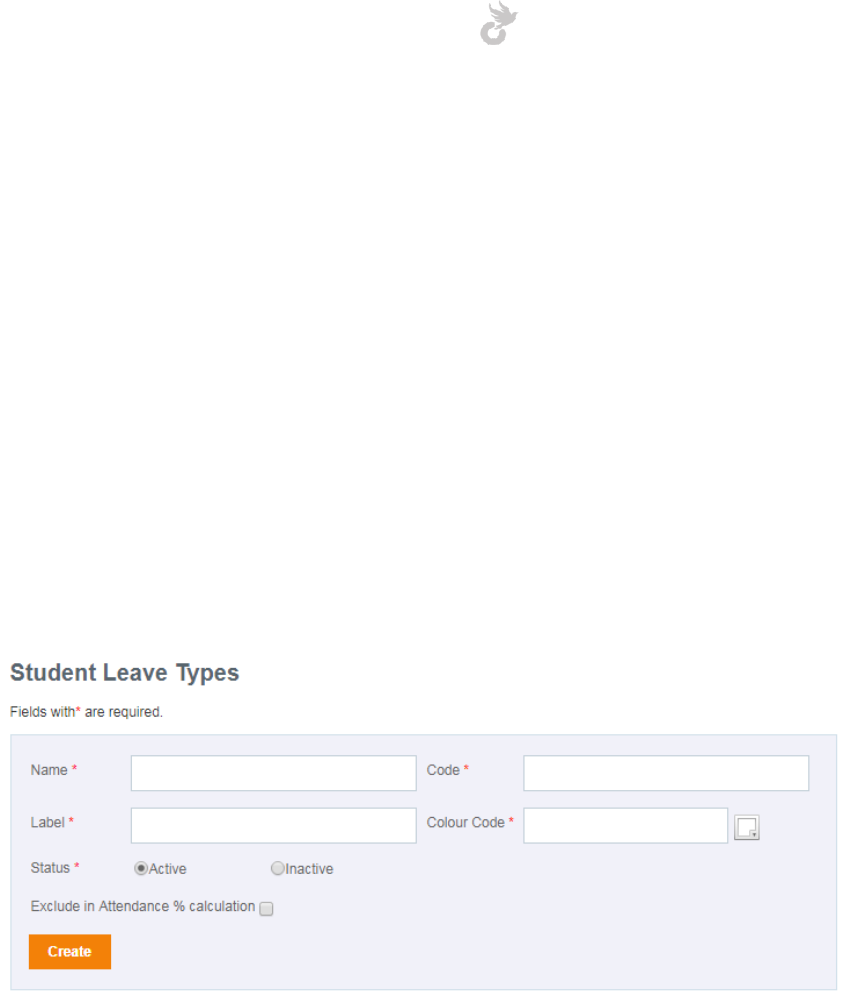
4.5.1 Creating a leave type
Enter the details for your leave type in the form under the leave type management area.
1. Name: Enter a name for your leave type. For example, Sick Leave
2. Code: An abbreviated code for the leave type.
3. Label: A single or double character label. This label will be displayed in the attendance
sheet when marked.
4. Color code: Use the color picker to pick a colour for the label that will be displayed in
the attendance sheet.
5. Status: Set as active/inactive. Only active leaves can be marked in attendance.
6. The checkbox that says `Exclude in attendance % calculation` allows you to create a
leave type that can be excluded in attendance. For example, create a type called ‘Late’
to mark a student late but not calculated as a leave. This can be done only if the
checkbox is ticked.
Open-School 2.6.5 Administrator Manual
75
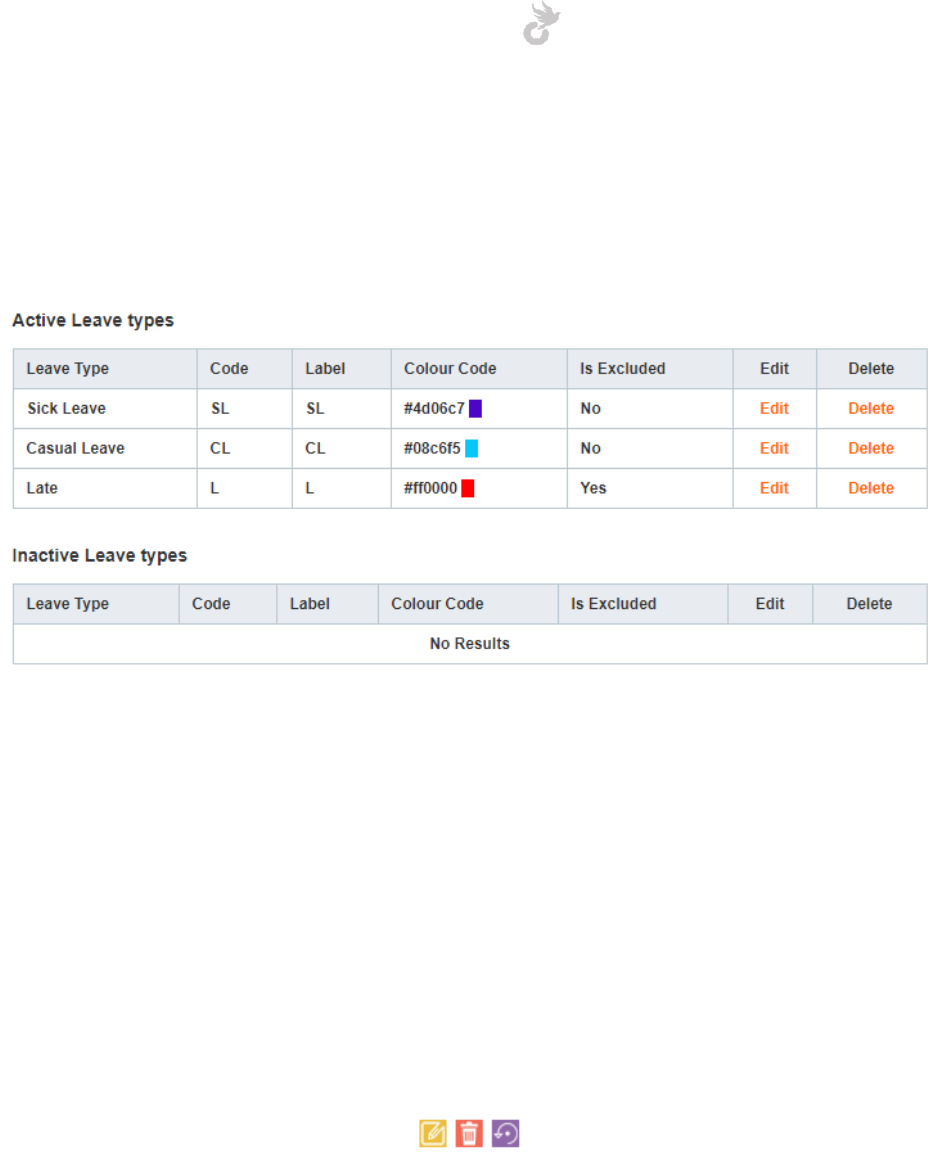
4.5.2 Manage Leave types
Details of created leave types can be viewed from the table below the form. They can also be
edited/deleted from here.
4.6 Archive
The archive area allows you to manage deleted students and parents. When a student/parent is
deleted they are first moved to the archive. Details can be restored from here as long as it is
updated(if necessary) so it’s uniques fields(email,phone) doesn’t coincide with user details
already in the system.
Users deleted from the archive cannot be retrieved as they will be completely deleted from the
system.
Entries can be edited, deleted and restored from here using the respective buttons in the
actions column.

Open-School 2.6.5 Administrator Manual
76
4.6.1 Student Archive
After restoring a student you will have to change his/her course status. This can be done from
the courses tab in the student’s profile accessible from the student’s list.
Open-School 2.6.5 Administrator Manual
77
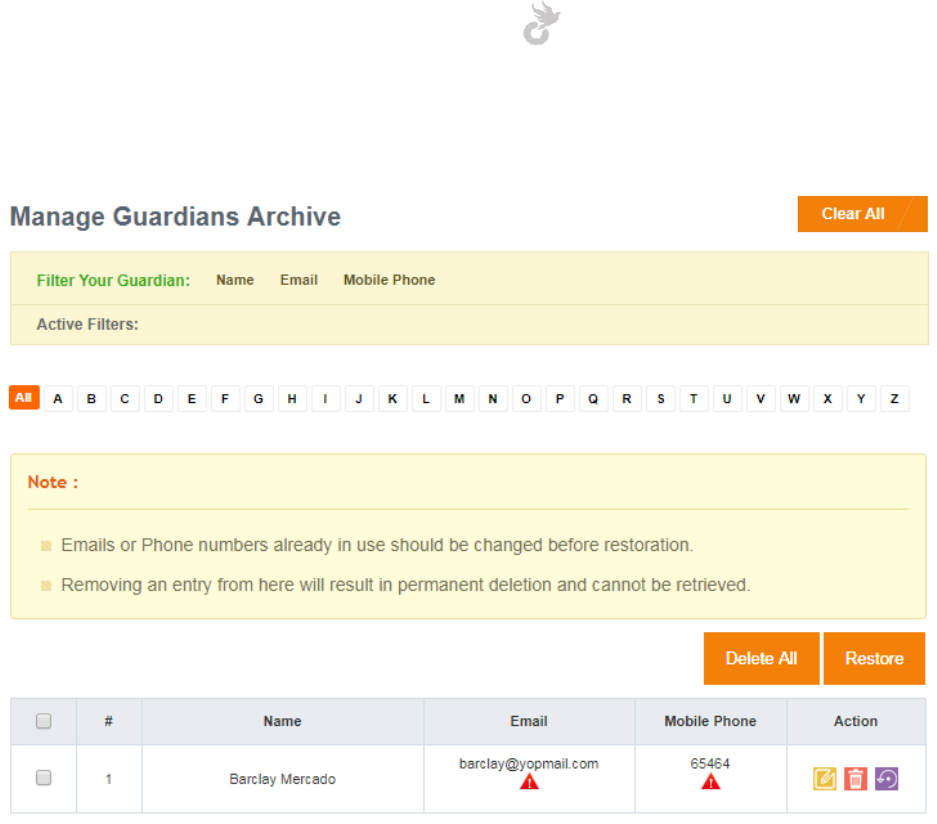
4.6.1 Guardian Archive
The same rules apply to the guardian list as well. Email/phone already in the system is
highlighted by the red exclamation symbol. In case you are wondering how this happens, when
you delete a student/parent they are first transferred to the archive. In this time you can
actually register a student/parent with the details of the deleted users. So when you want to
restore a deleted user you will have to update the email/phone records.
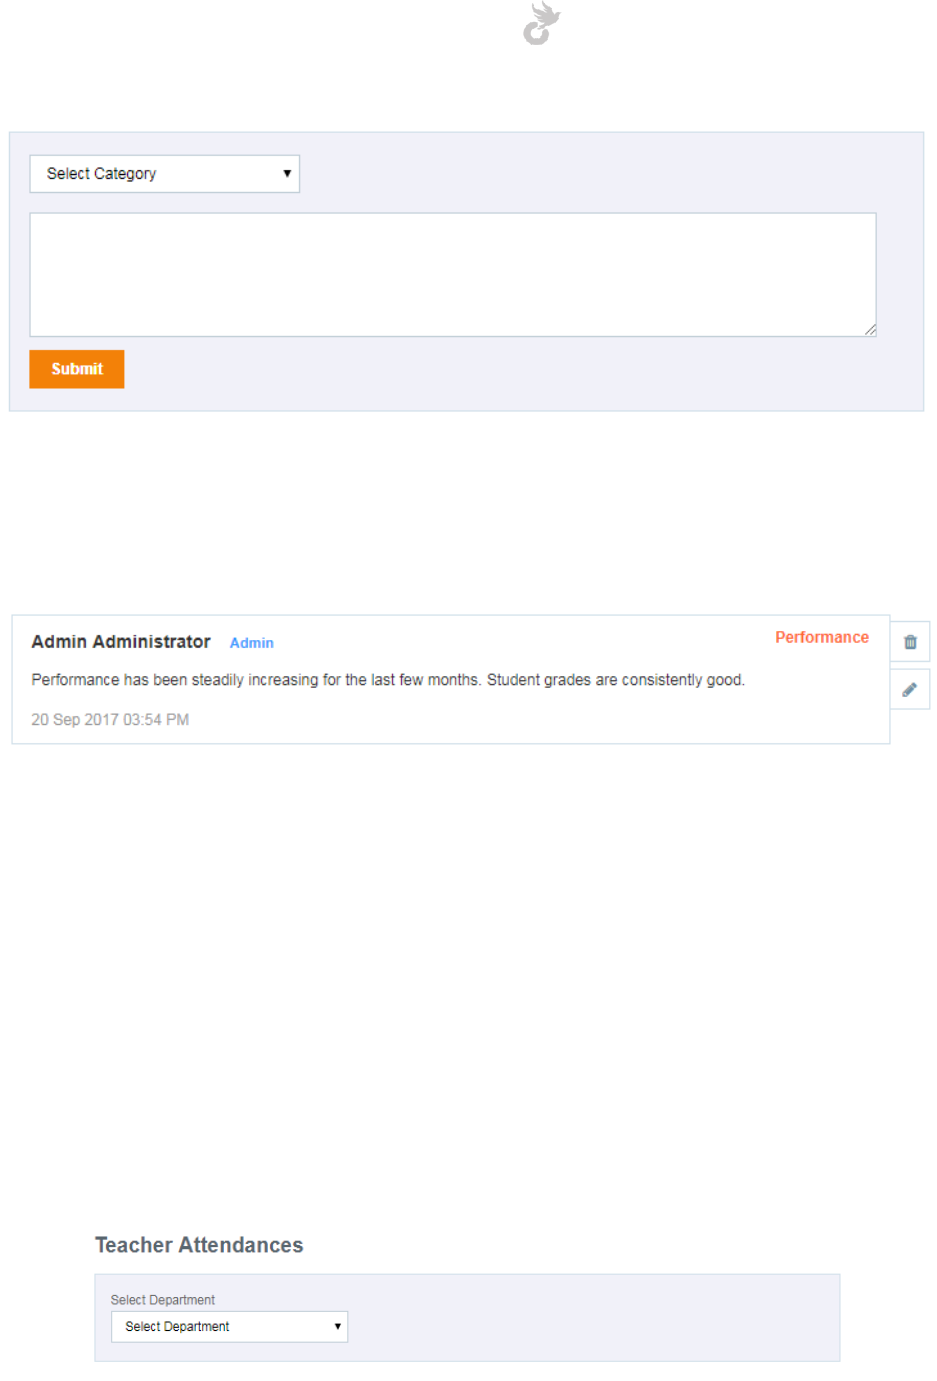
4.7 Student Log Management
The student log management allows you and class teachers to enter logs for students that can
be visible to both students and parent from their respective portals. To start adding logs you
must first create Log categories.
Open-School 2.6.5 Administrator Manual
78
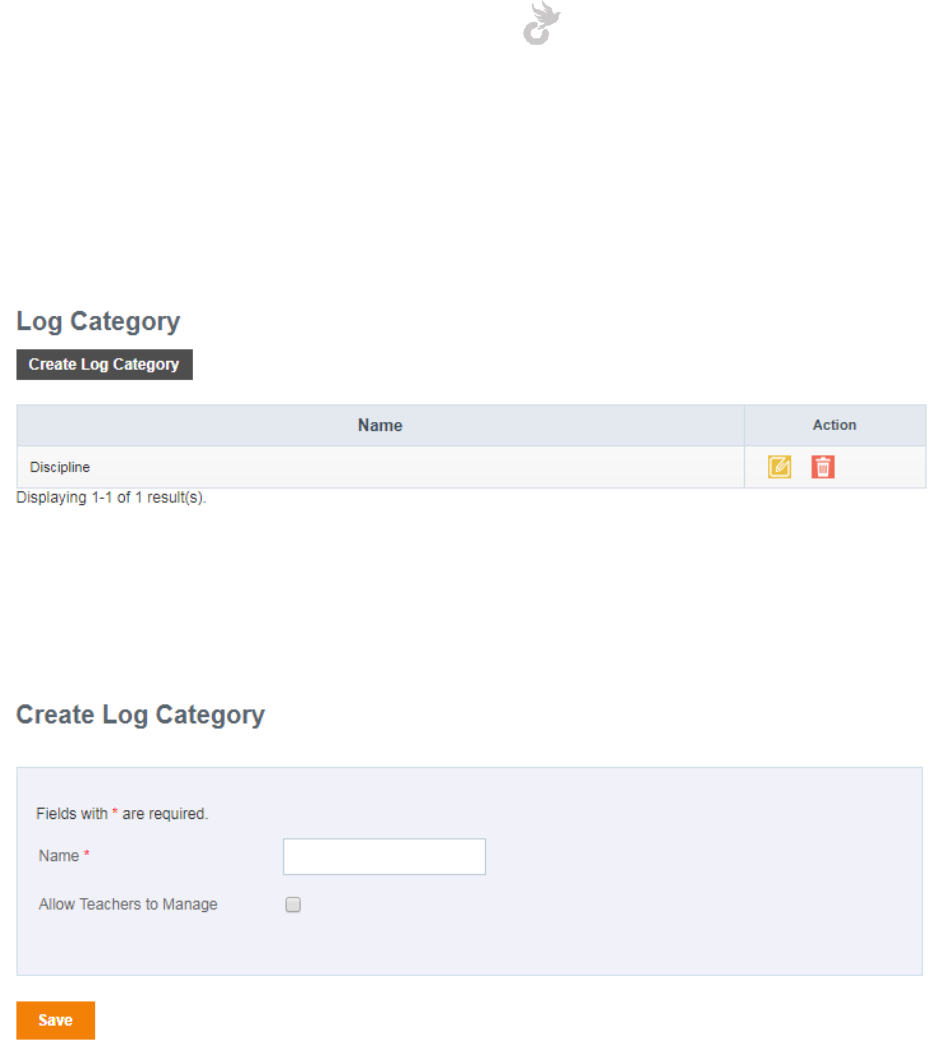
4.7.1 Student log category
To start creating a student log category click on the ‘Manage Log Category’ link in the left side
menu of the Students Module.
Here you will be able to see the existing log categories (if any). They can be edited and deleted
from here. To create a new one click on the ‘Create Log Category’ button.
You can create log categories that can be used by only you and other admins or check the box
that says ‘Allow Teachers to Manage’ to allow class teachers too to enter logs in that category.
Open-School 2.6.5 Administrator Manual
79
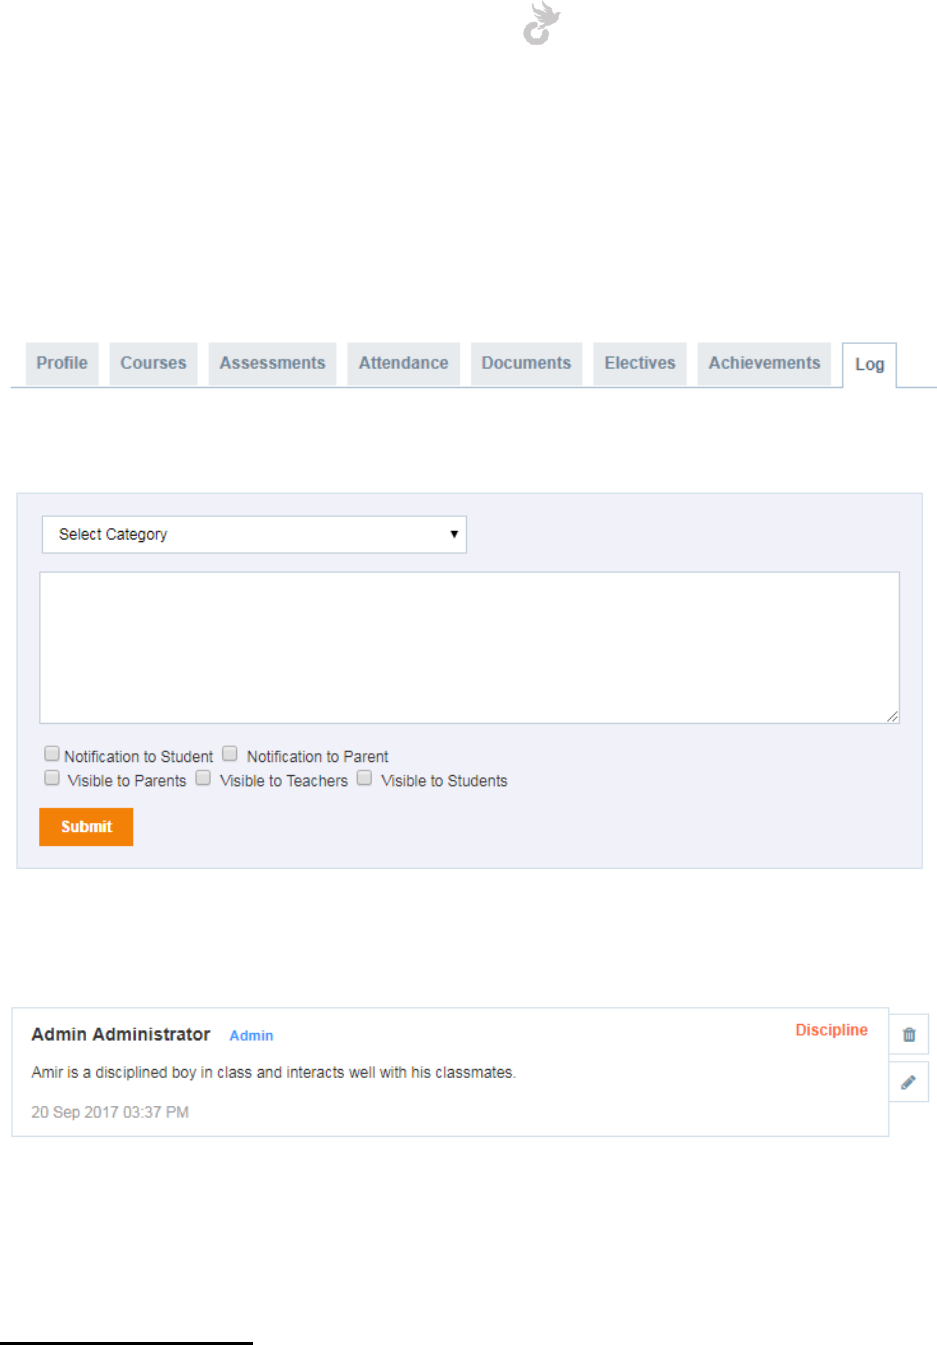
4.7.2 Entering student logs
To enter a log for a student access his/her profile from Students Module > Students List > Click
on student name.
In the student’s profile move to the Log tab.
Here you can enter your logs for the chosen student for a particular log category.
You can choose whether a notification needs to be sent to the student / parent and also who all
it should be visible to. Once you have entered your log, you can see it listed under the create
form.
Logs can be edited or deleted from here. Details of user who entered the log, the log category
etc can be seen in each log comment.
5. TEACHERS

Open-School 2.6.5 Administrator Manual
80
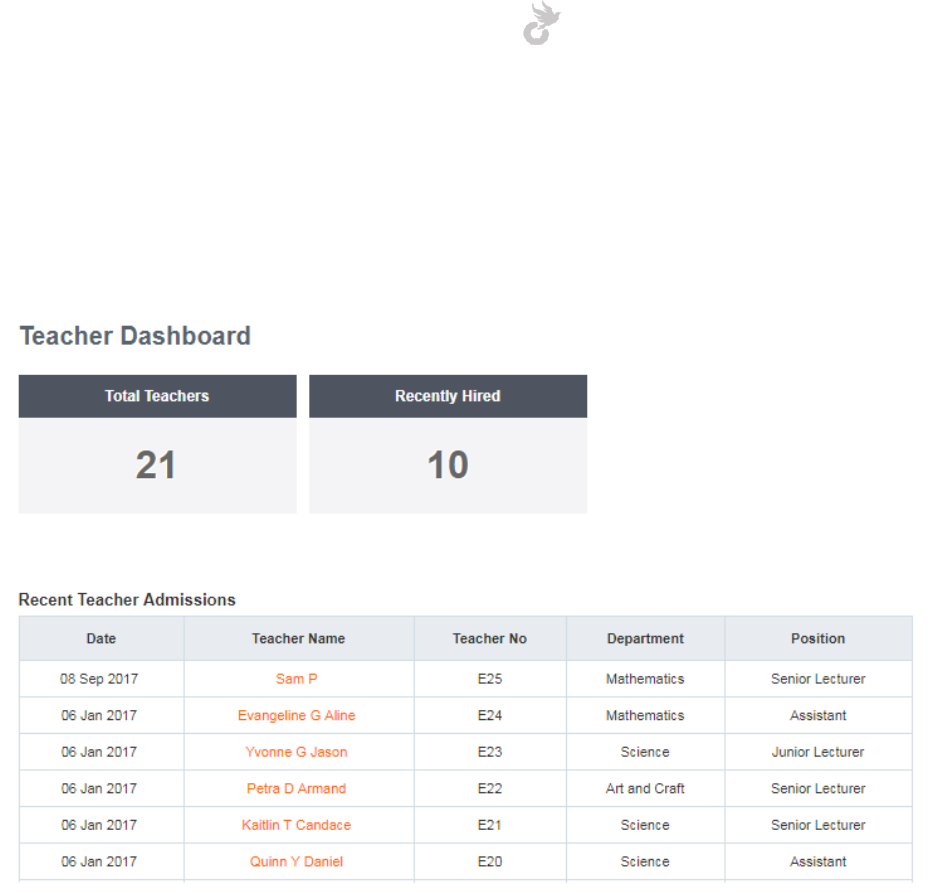
The Teachers Modules allows you to create and manage teachers, associate them with subjects
and batches and also manage their attendances.
The teacher’s dashboard displays the list of recently added teachers, their department and
position in the school. Click on a teacher’s name here to view their profile.
5.1 Teacher Settings
Open-School 2.6.5 Administrator Manual
81
Before creating teachers we’ll first have to add departments for them. There are other labels
too like positions, categories and grades. Let’s take a look at generating these labels.
Note: To create teachers only the department is mandatory. Category, position and grades
are not necessary for teacher registration. To start adding teachers you must create
department first.
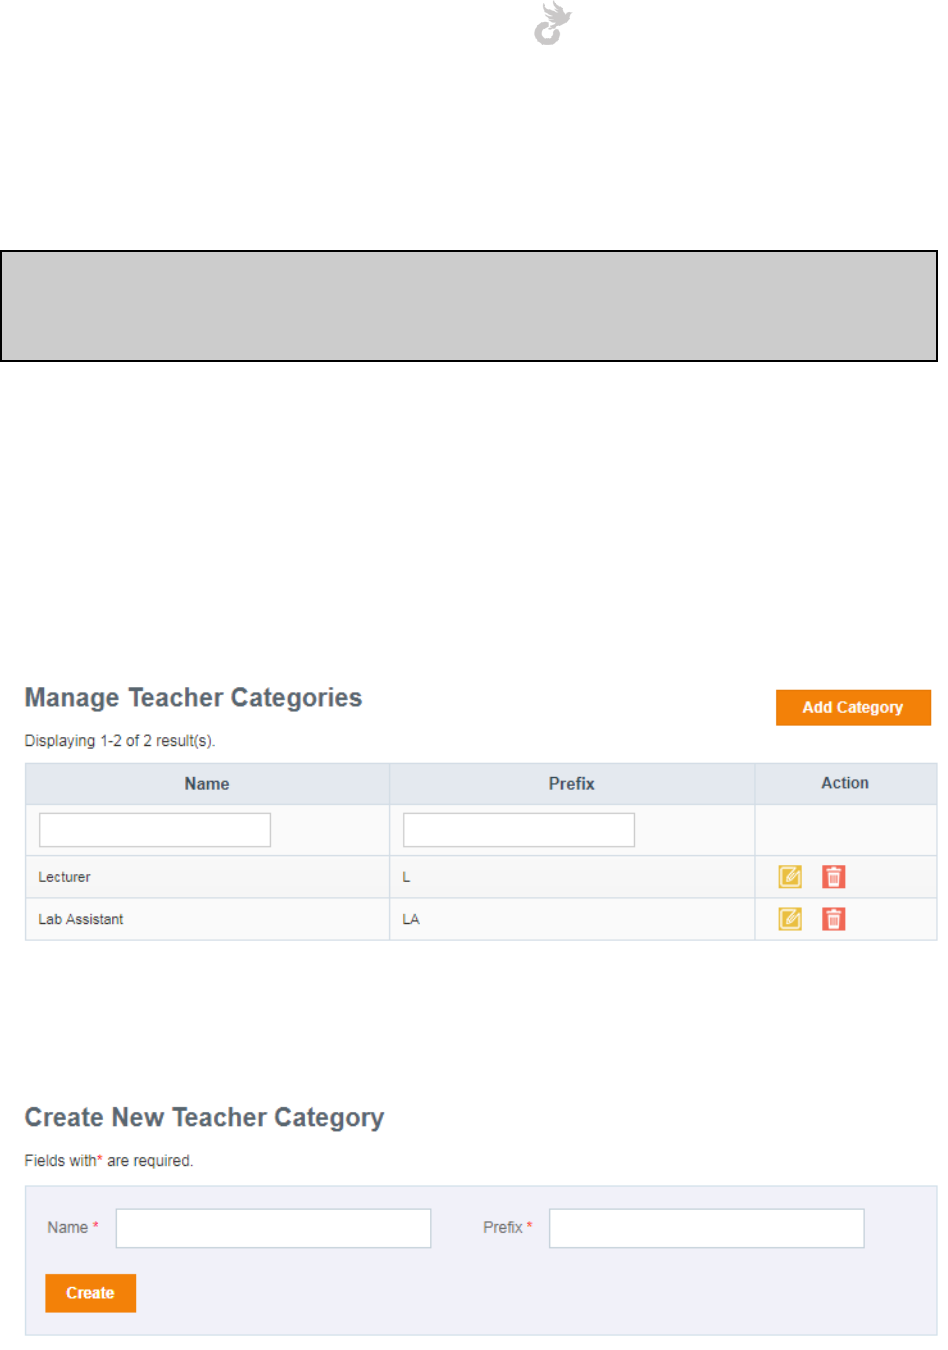
5.1.1 Manage Category
Teacher categories and positions are linked in the system. Positions are based on the categories
you create. You can manage teacher categories by clicking the ‘Manage Category’ link in the
left side menu under the Teachers Module.
You can see the list of categories you have created. Edit/delete option is available in the Action
column. To add a new category click the ‘Add Category’ button.

Open-School 2.6.5 Administrator Manual
82
Adding a category is quite easy, you just enter the Name and a prefix for it and hit Create. The
category you create will be listed along with others in the Manage Category page. This can be
used during Teacher Registration.
5.1.2 Manage Positions
As mentioned above Teacher Positions are created based on the categories available. To access
this area click on the ‘Manage Positions’ link in the left side menu.
Positions can be edited/deleted using the options in the Action column as usual. They can be
searched based on name and category by entering the values in the filter option in the
respective columns.
To add a new position click the ‘Add Position’ button.
The position creation form contains two fields
1. Name: Enter the desired name for the position here
2. Teacher Category: Select the category to which this position must be added to
Open-School 2.6.5 Administrator Manual
83
Click Create once you have entered the desired values.
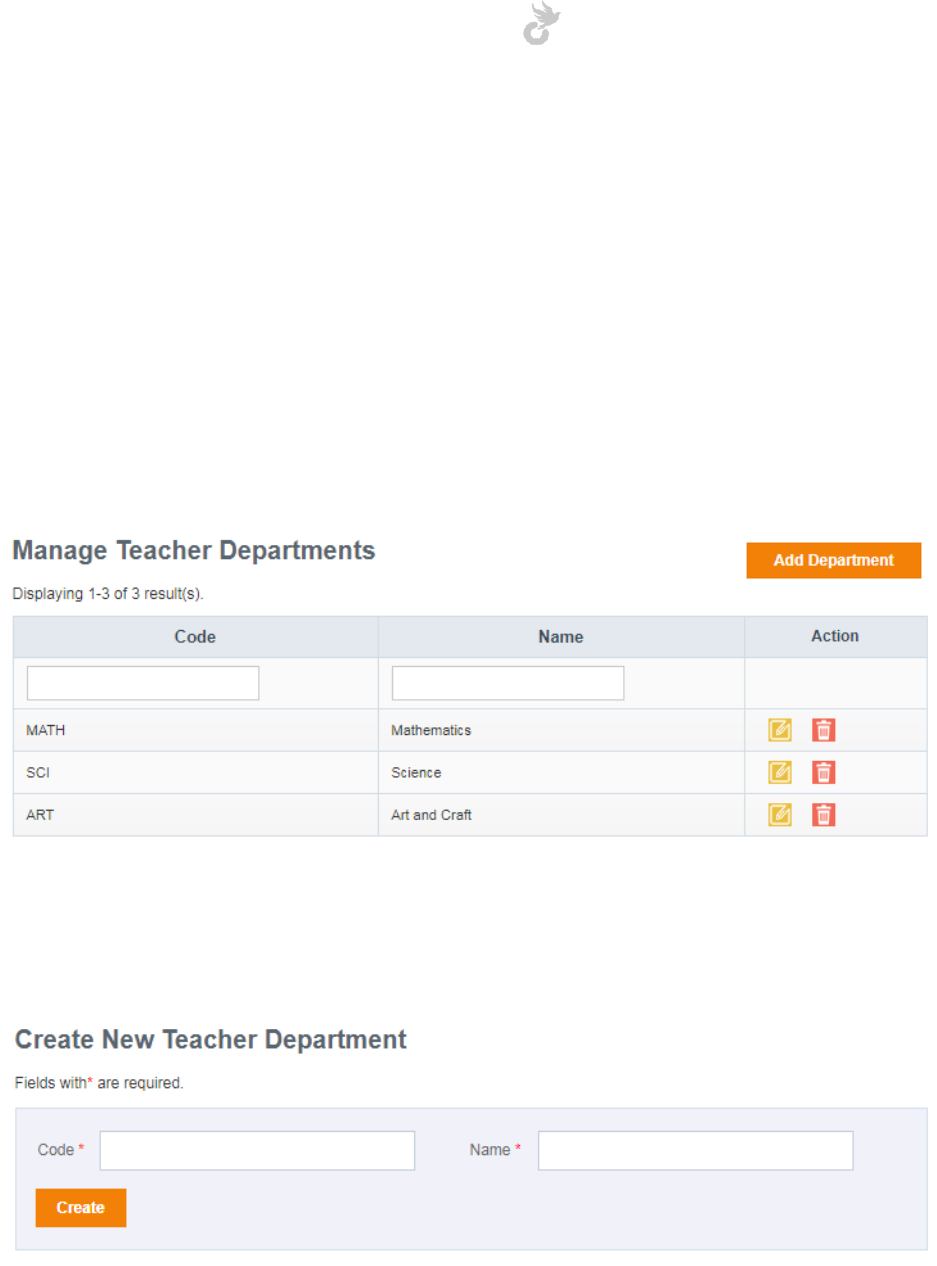
5.1.3 Manage Department
As mentioned above, departments are the only mandatory label for registering teachers. To
start adding teachers you have to create departments first. The other labels are not mandatory
and can be skipped.
To manage departments click the ‘Manage Department’ link in the left side menu.
To add a department click the ‘Add Department’ button.
To create a new department simply enter
1. Code: An abbreviated code to identify the department
2. Name: The name of the department.
Open-School 2.6.5 Administrator Manual
84
Departments can be assigned during teacher registration and is applicable while associating
subjects to teachers.
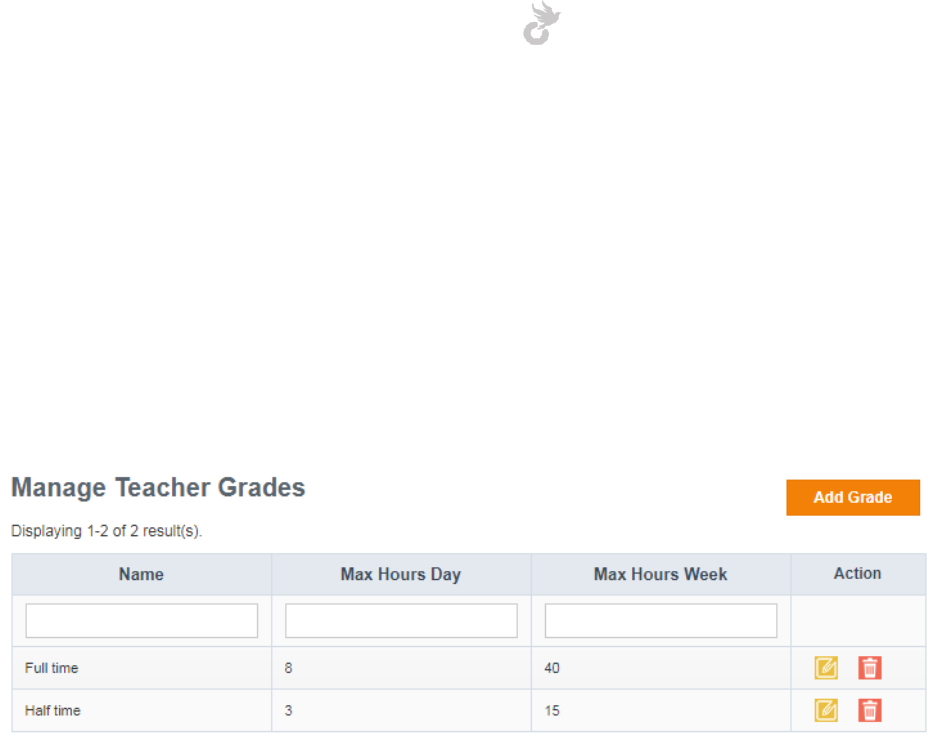
5.1.4 Manage Grades
Grades is another label that can be added to a teacher during registration. To create and
manage grades for teachers click on the ‘Manage Grades’ link in the left side menu.
Grades can be used to define teachers who work full-time/part-time. It basically defines the
number of hours a teacher works each day and each week.
To create a grade click on the ‘Add Grade’ button.
Open-School 2.6.5 Administrator Manual
85
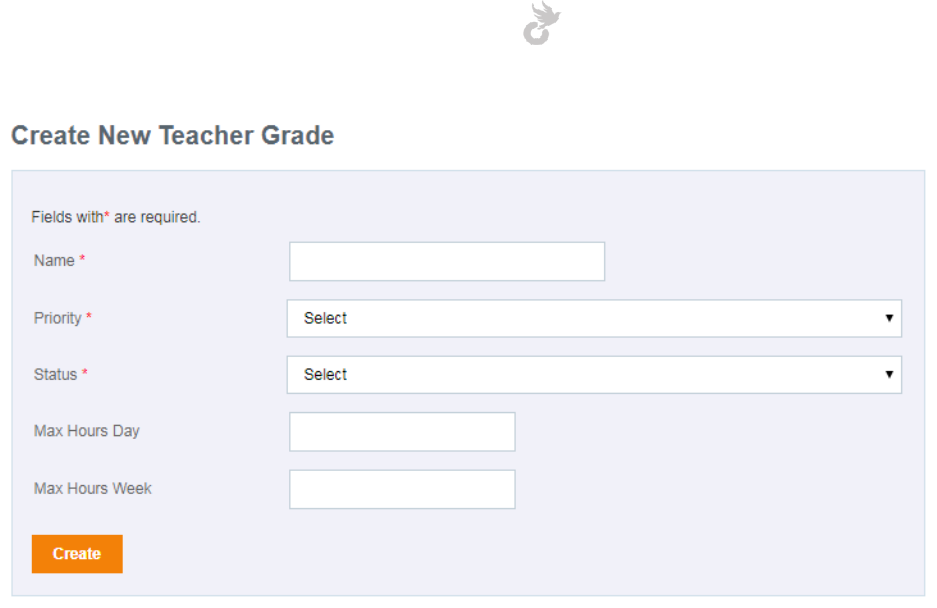
The teacher grade creation form has a few fields,
1. Name: A name for the grade you are about to create.
2. Priority: A set of values(low, medium and high) to define the priority of the grade
3. Status: Active/Inactive grade. Only active grades will be listed for selection during
registration
4. Max Hours Day: The number of hours the teacher belonging to this grade teaches
5. Max Hours Week: Total number of hours in a week that the teacher belonging to this
grade teaches
Open-School 2.6.5 Administrator Manual
86
5.2 Teacher Management
This section will give you insight on adding and managing teachers and also associating them
with subjects and batches.
5.2.1 Creating a Teacher
Adding a teacher to a system can be done in two ways,
1. Admin Teacher registration (individual)
2. Import (bulk)
The import process will be discussed in the Import Module section. For now, let’s take a look at
the Admin Teacher Registration process.
To get started click on the ‘Create Teacher’ link in the left side menu of the Teachers Module.
There are basically 3 steps to be completed to register a teacher successfully.
Open-School 2.6.5 Administrator Manual
87
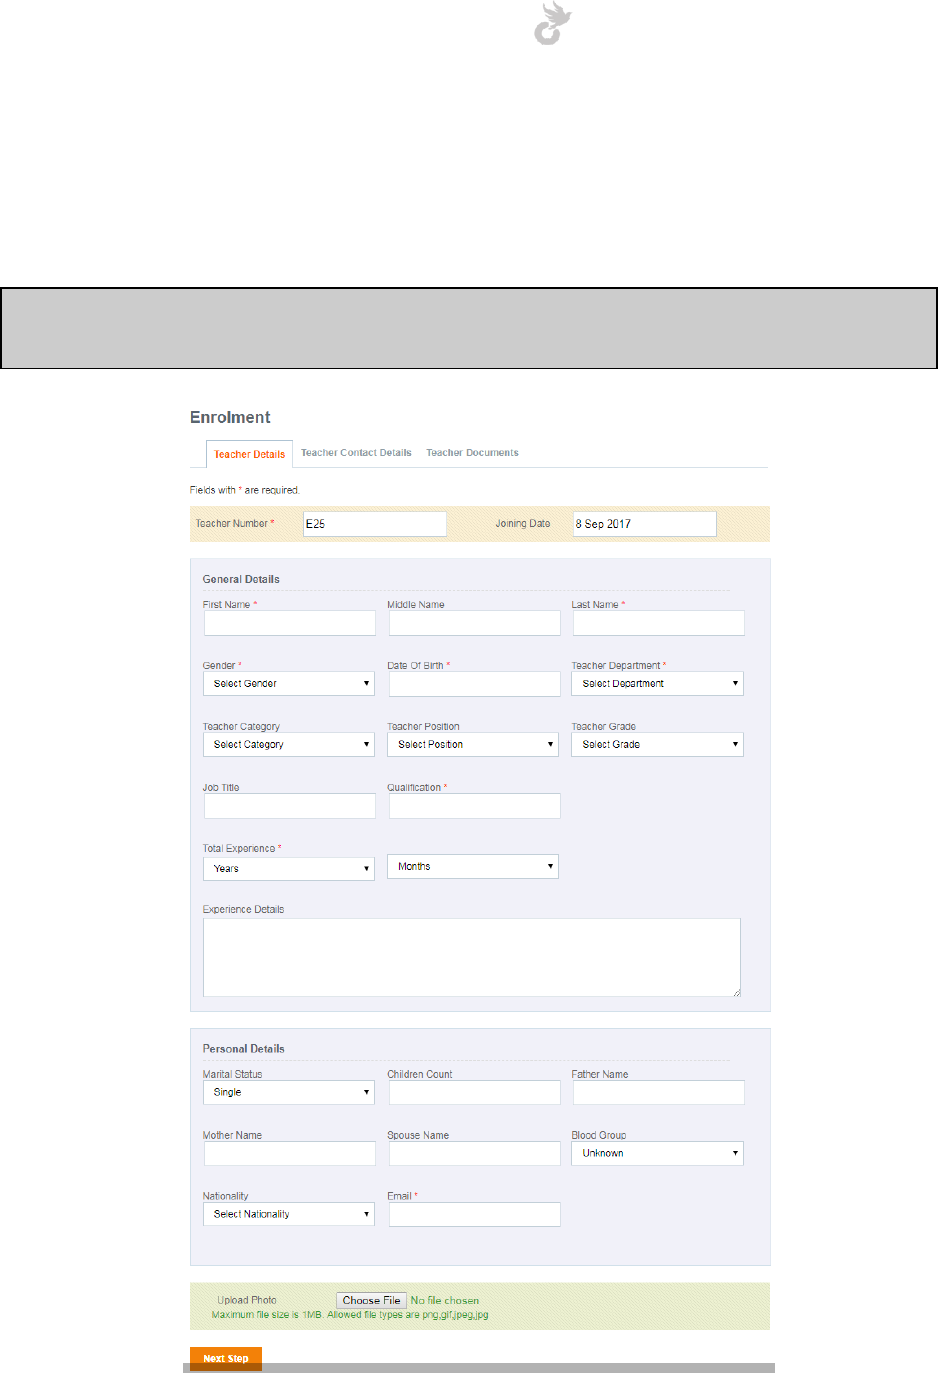
5.2.1a Step 1: Teacher Details
The first step includes entering teacher details such as name, department, experience and
personal details.
Note: The teacher registration form cannot be edited like the one for students. The fields in
this form are fixed.
Open-School 2.6.5 Administrator Manual
88
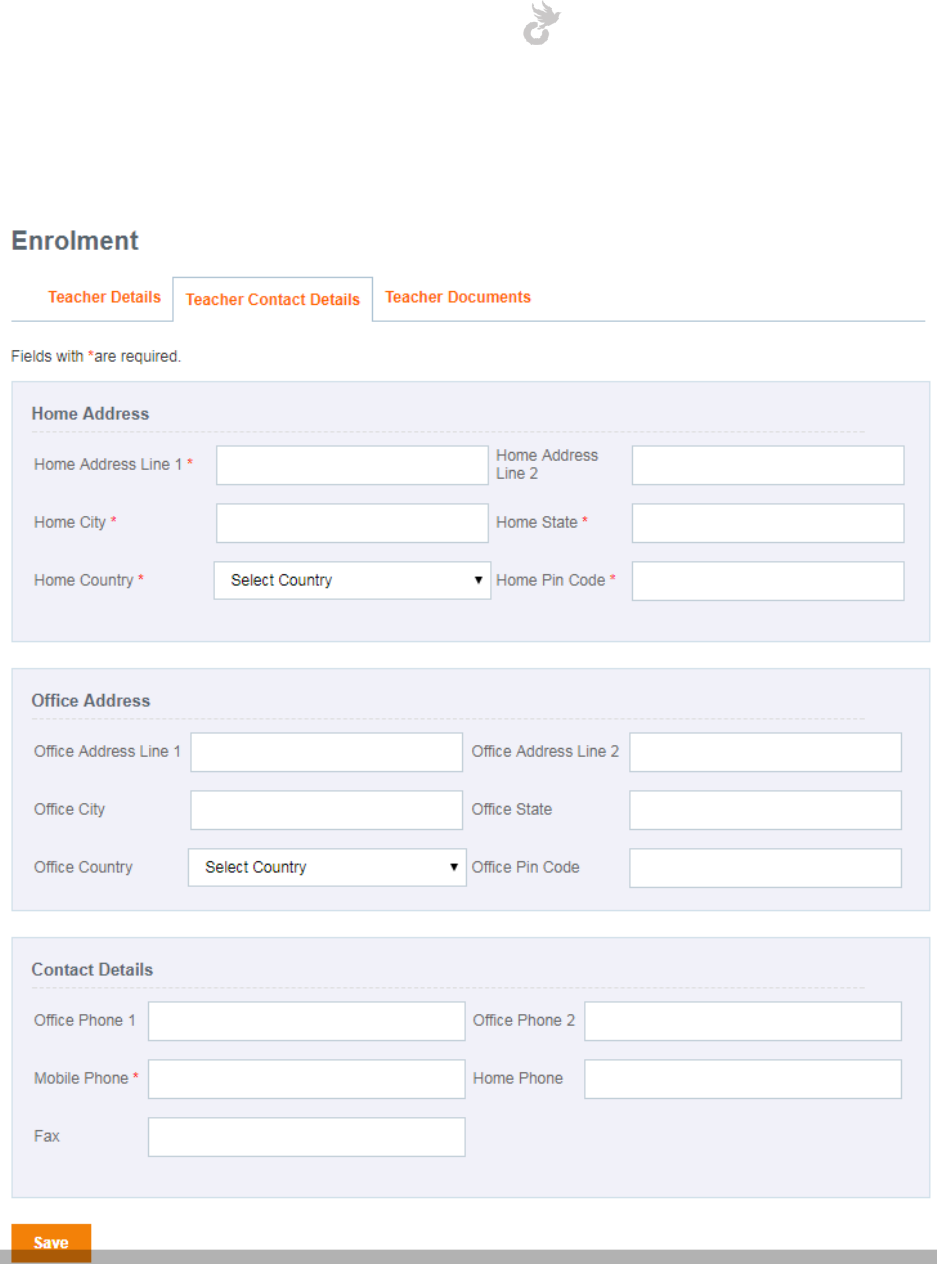
5.2.1b Step 2: Contact Details
Contact details such as address, email and phone numbers are added here.
Click on ‘Save’ at the bottom to move on to the last step.
Open-School 2.6.5 Administrator Manual
89
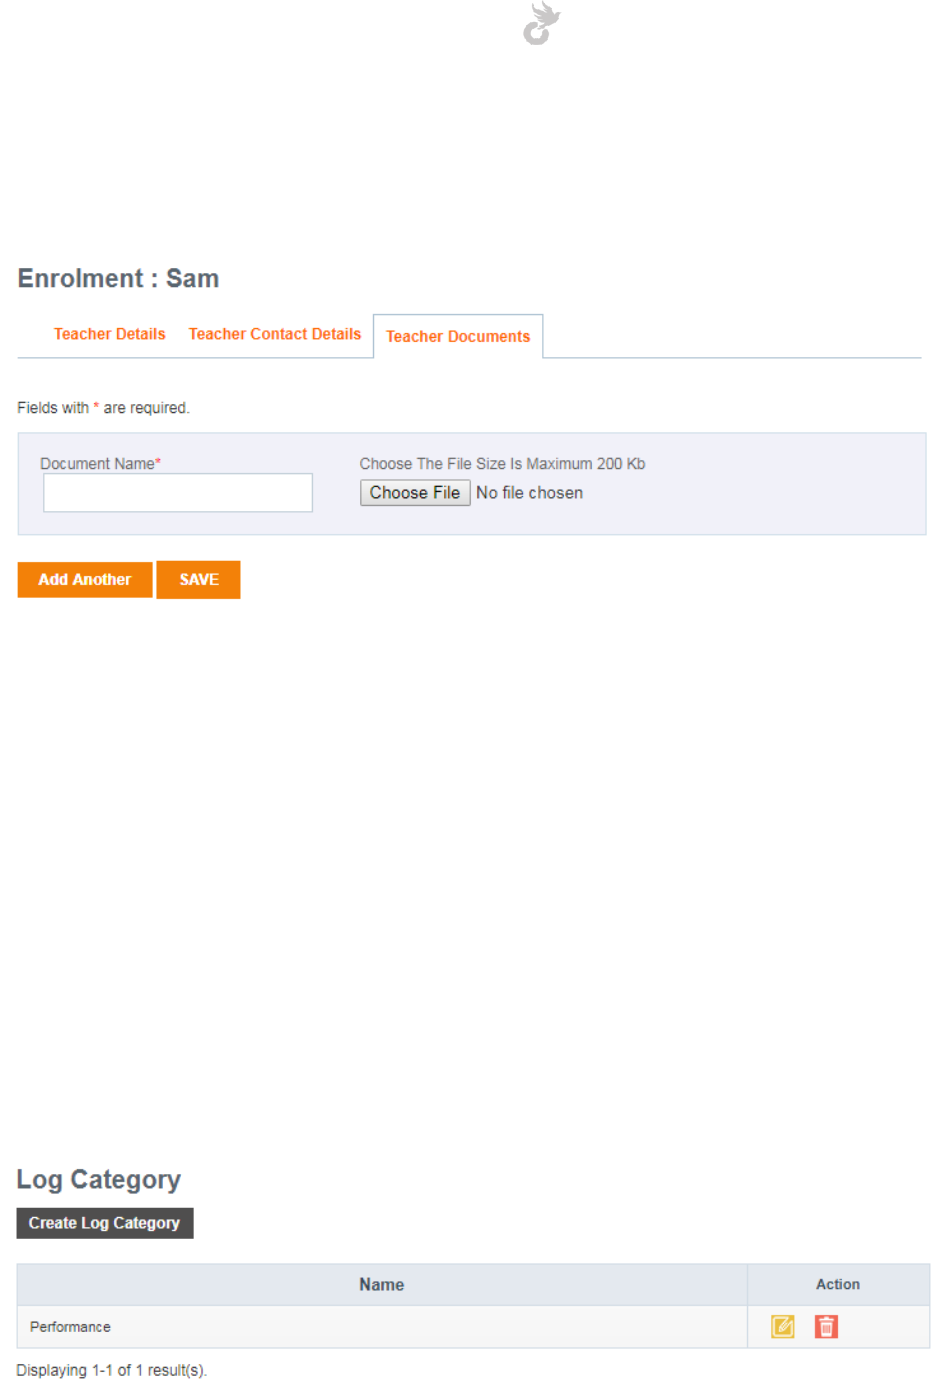
5.2.1c Step 3: Documents
The last step of teacher registration involves uploading documents related to the teacher.
This step isn’t mandatory and can be skipped by clicking ‘Save’ without uploading documents.
5.2.2 Teacher Log
The Log feature in Teachers Module is quite similar to the one in Students Module. Here you
can create log categories and enter logs for teachers. These logs would be visible only to other
admins.
5.2.2a Creating Teacher Log categories
To create a teacher log category click on the ‘Manage Log Category’ link in the left side menu
of the Teachers Module.
Open-School 2.6.5 Administrator Manual
90
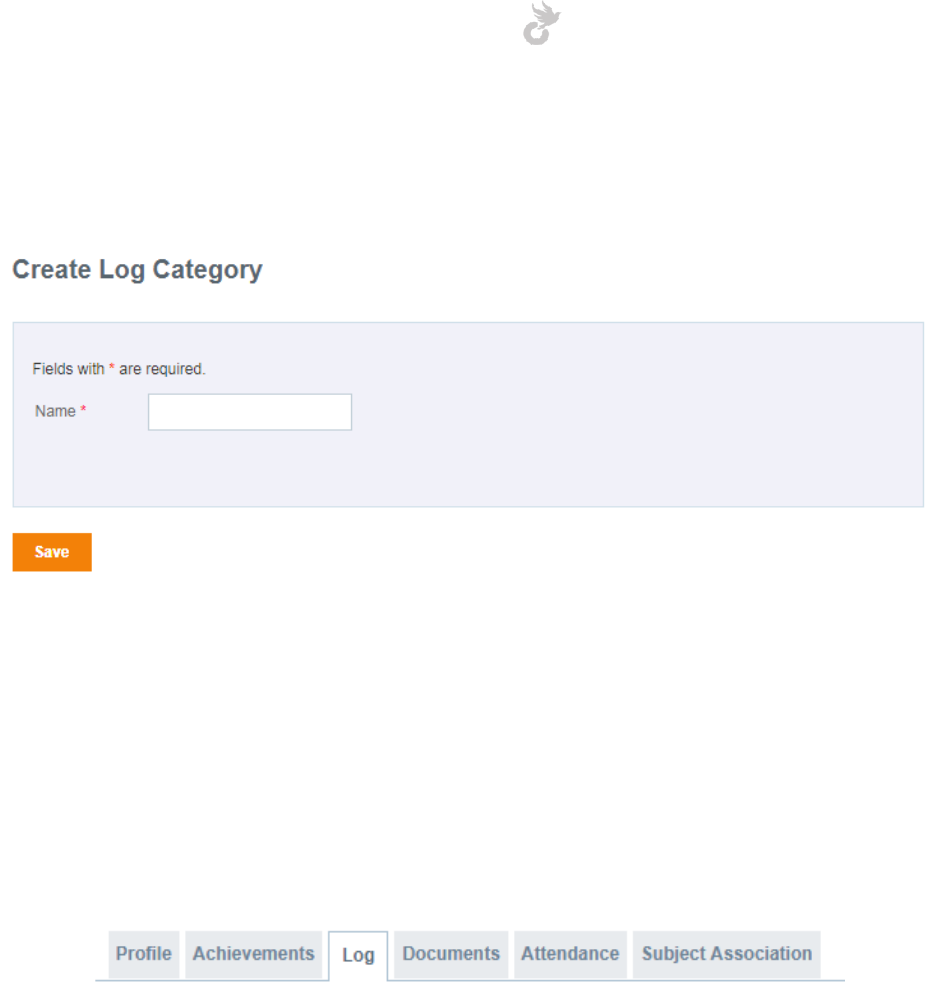
Categories can be viewed, edited and deleted from here. Click on the ‘Create Log Category’
button to create a new one.
Enter a name for your log category and hit ‘Save’ to add it. This can then be used while adding
logs for a teacher.
5.2.2b Adding logs for teachers
To add a log for a particular teacher click on the ‘Log’ tab in his/her profile (Teachers List > Click
on teacher name).
Logs already entered are listed below the create form.
Open-School 2.6.5 Administrator Manual
91
To add a new log, simply select from the list of categories you have created and enter your
comment in the textarea and click ‘Submit’. The log comment entered will have details of user
who entered it and category type. It can be edited or deleted too.
5.3 Teacher Attendance Management
Attendance for teachers can be managed either from the Teachers module or from the
Attendance Module. Leave types for teachers and non-teaching staff are managed from the HR
Module, more details can be found there.
Let’s take a look at how you can mark absences for teachers of various departments.
To start managing attendances click on the ‘Attendance Register’ link in the left side menu of
the Teachers module. To get started select a department.
Open-School 2.6.5 Administrator Manual
92
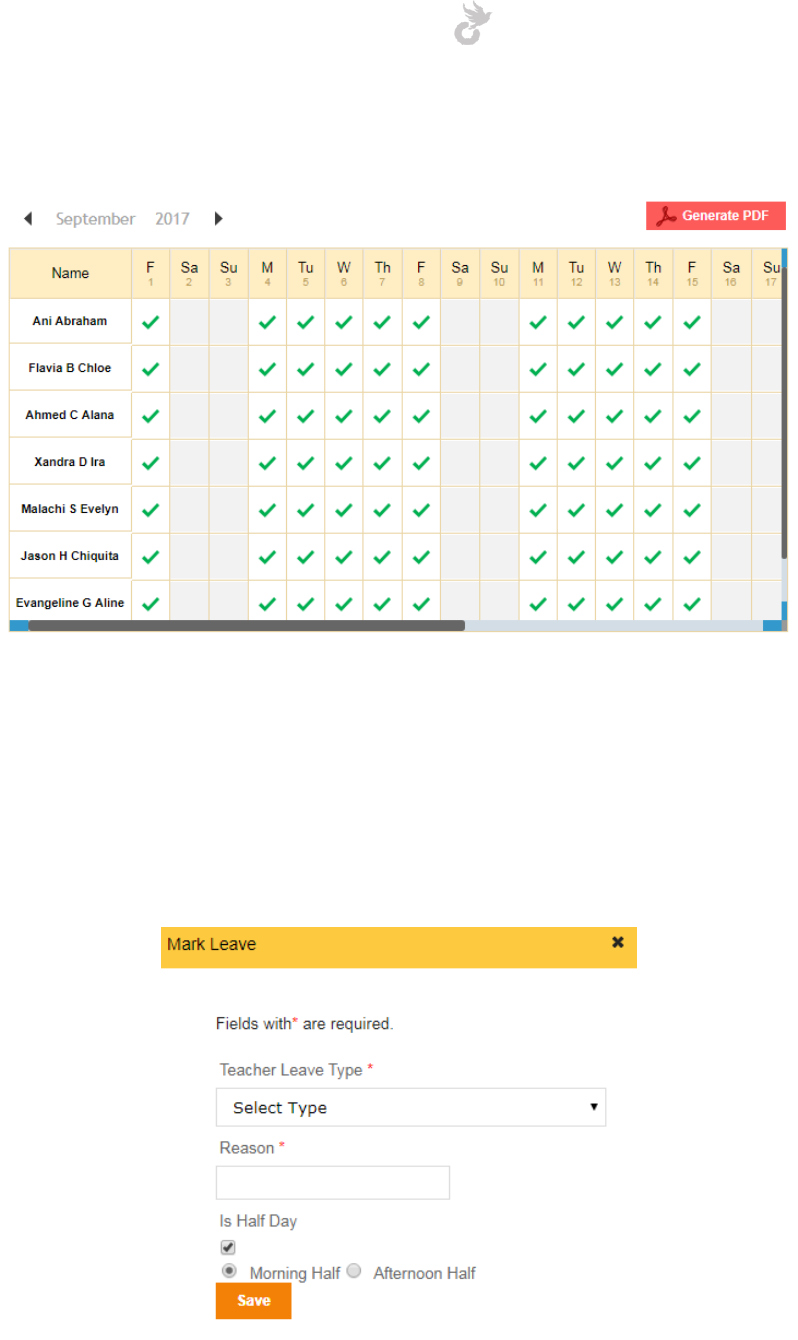
Selecting a department from the dropdown displays all teachers associated with it.
Presence is automatically marked as each day passes. You can switch between months using
the arrows on top. The sheet can also be saved as a PDF file by clicking the ‘Generate PDF’
button. Weekdays are greyed out, the default weekdays set in the application are taken for
teacher attendance.
To mark an absence click on the box for a working day, this opens up a pop-up.
Open-School 2.6.5 Administrator Manual
93
Leave type has to be selected first. Leave types have to be created first from the HR module as
mentioned above. Refer the HR section for more details.
Note: You will be alerted if a teacher has reached the maximum count for a particular leave
type.
You can also choose whether the leave is a half day or a full day. In case of half day, you can
also choose whether it was the morning or afternoon half that the leave is to be marked for.
Click on ‘Save’ to mark the absence.
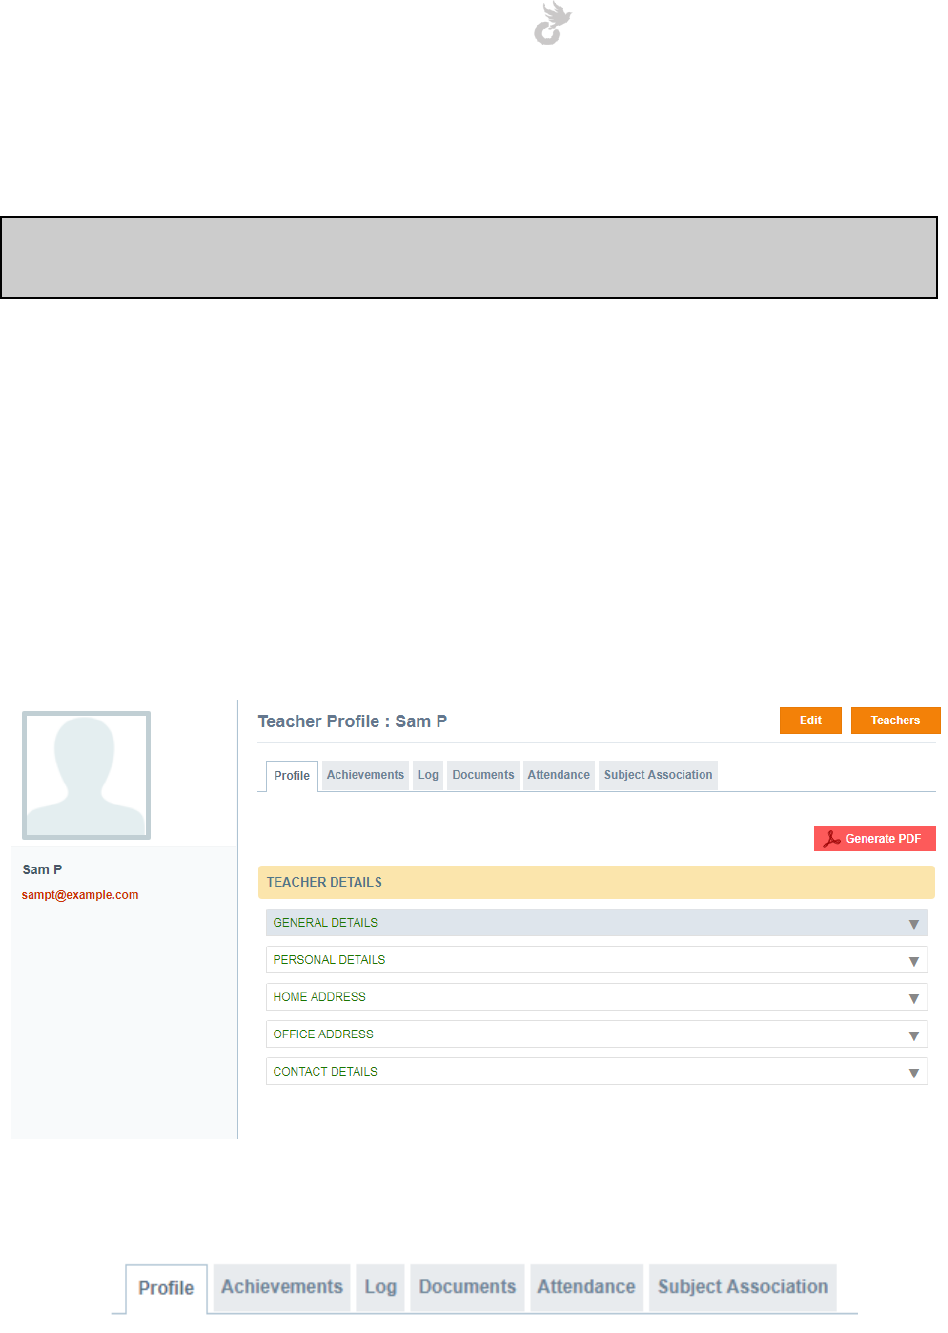
5.4 Teacher Profile
The teacher profile allows you to check all details such as achievements, subject associations
and contact/personal details of a registered teacher. To view a teacher’s profile simply click on
the name under the list of teachers.
Click on a particular section to view the details under it. You can also browse through the tabs
on top depending on the area you would like to see.
Open-School 2.6.5 Administrator Manual
94
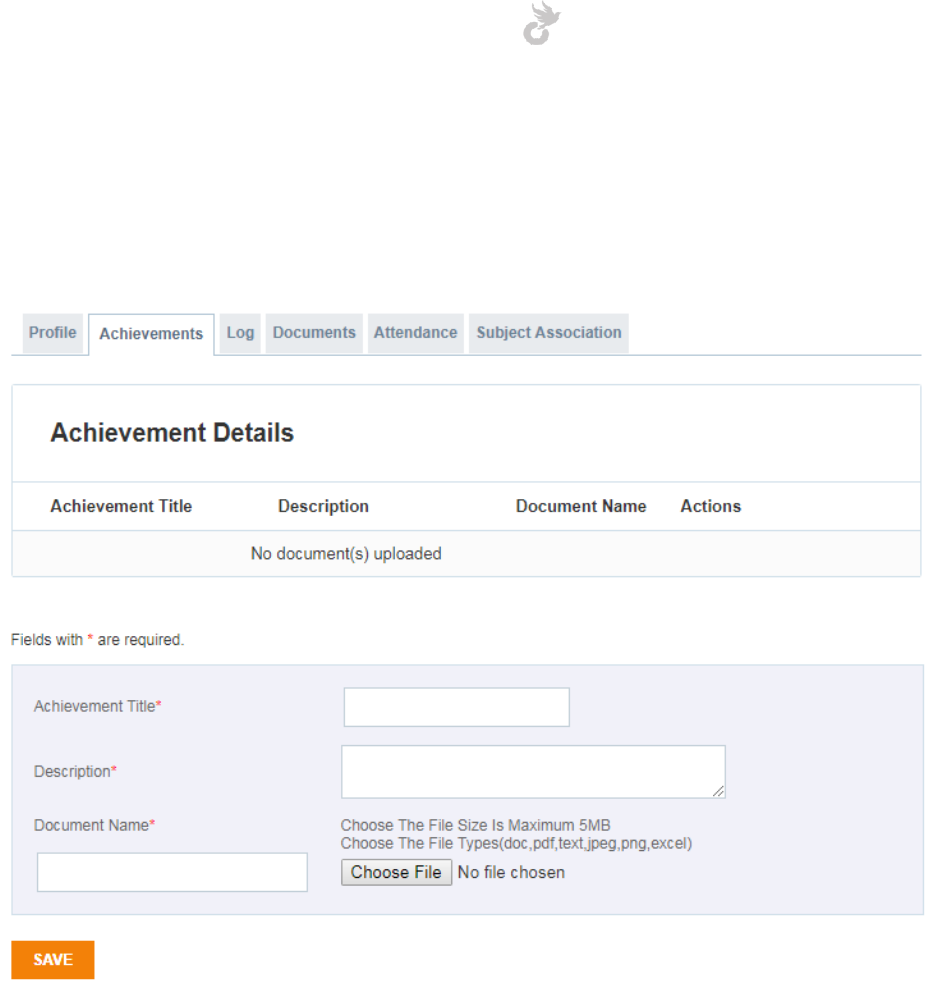
5.4.1 Achievements
The achievements section is similar to the one in students. Here you can enter achievement
details and upload relevant documents for it.
You can enter
1. An achievement title
2. Description
3. Upload a document
Once done simply click ‘Save’ to add the achievement for the teacher.
For teacher log management refer section 5.2.2
For teacher document uploads refer section 5.2.1c
Open-School 2.6.5 Administrator Manual
95
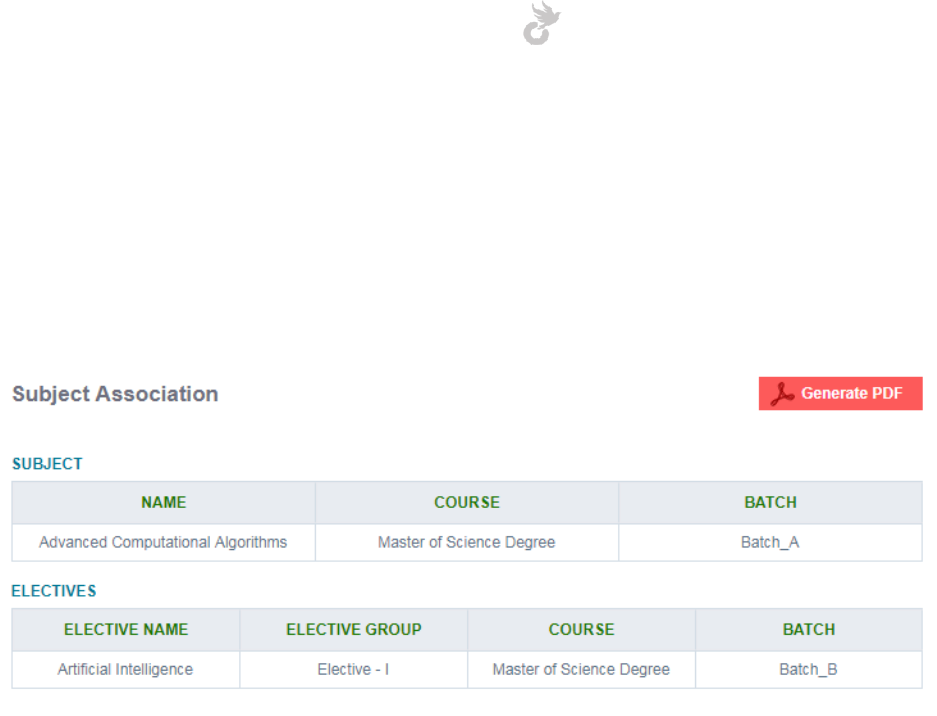
5.4.2 Subject Association View
For Subject-Teacher Association refer article 1.6 under the Getting Started section.
If association has been done for a teacher it will be visible from this section. You can see all the
course, batch and subject details for the association. This can also be generated as a PDF.
Open-School 2.6.5 Administrator Manual
96
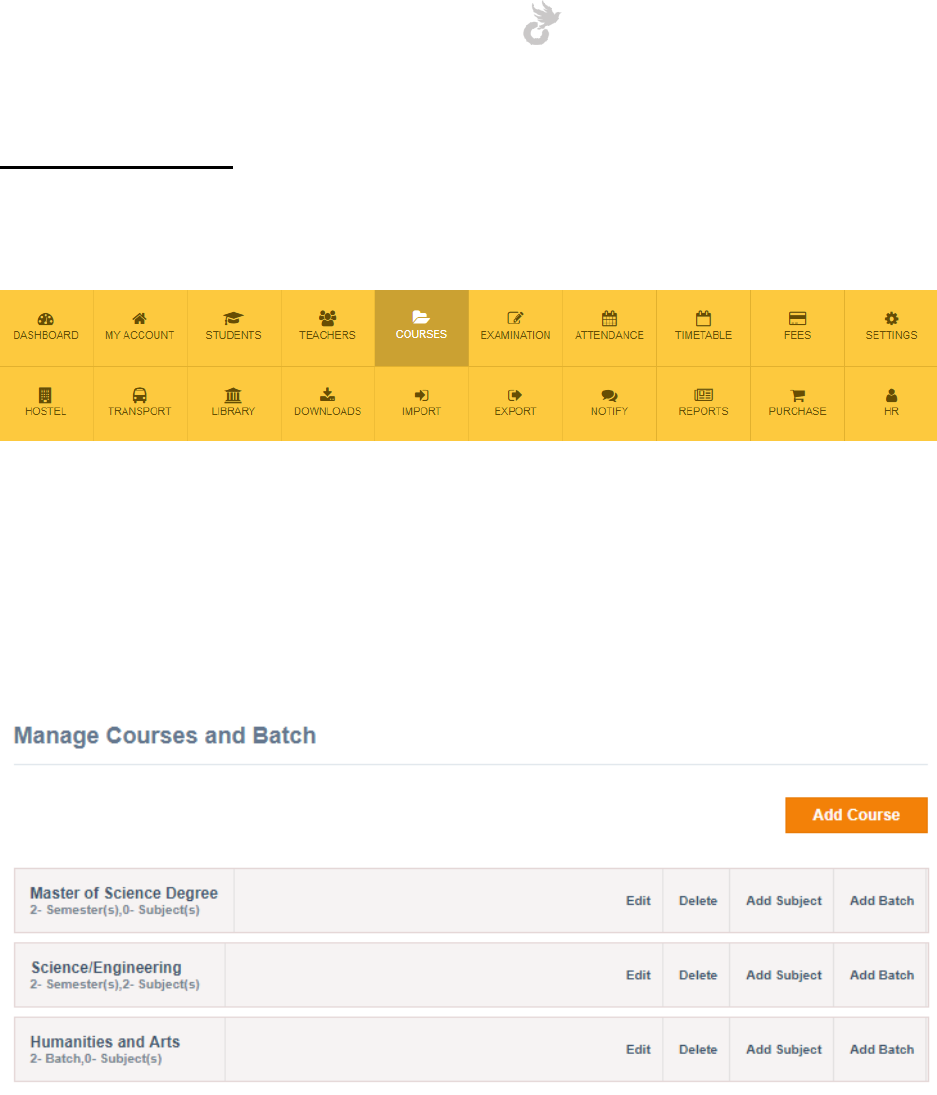
6. COURSES
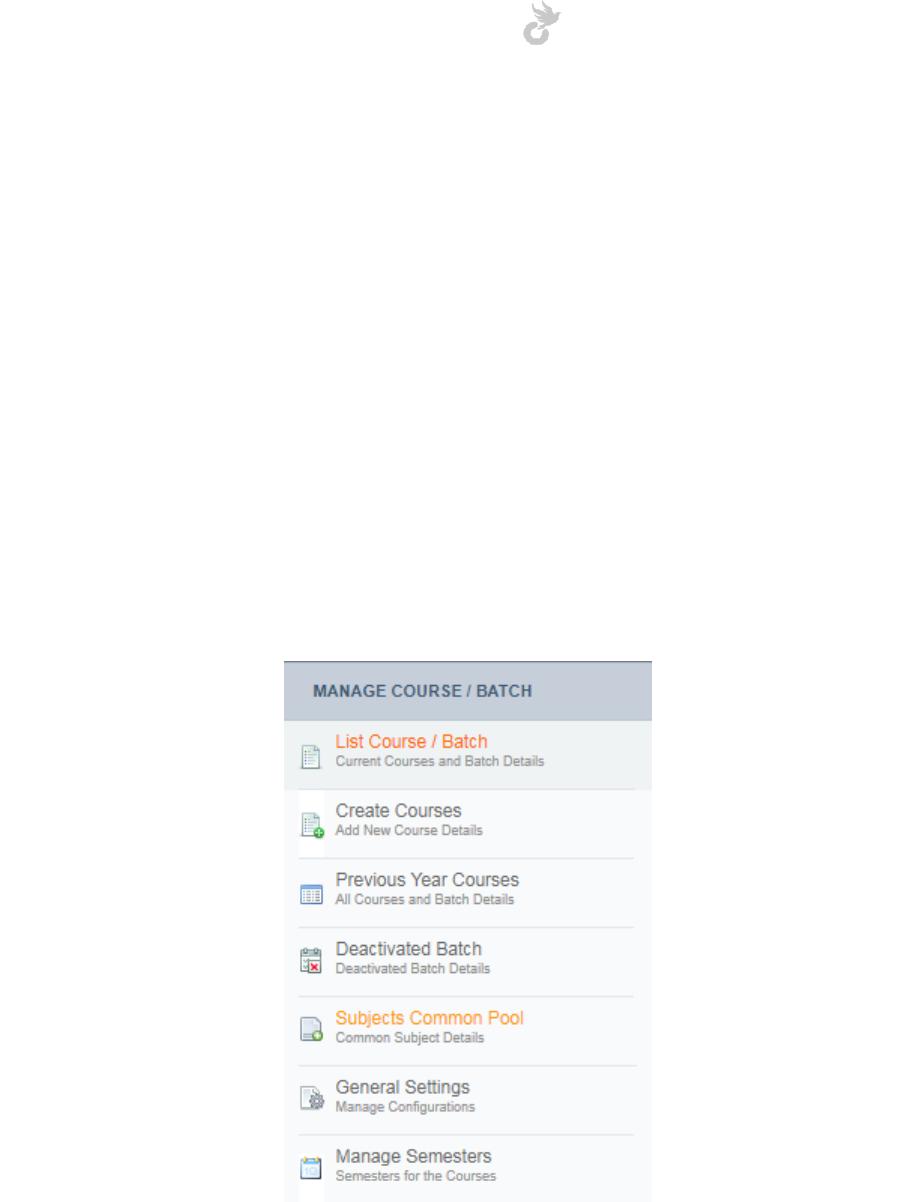
The courses module allows you to manage course, batches and semesters.
Click on the Courses Module in the module list to access it. This will take you to the page where
all the courses and listed as shown below.
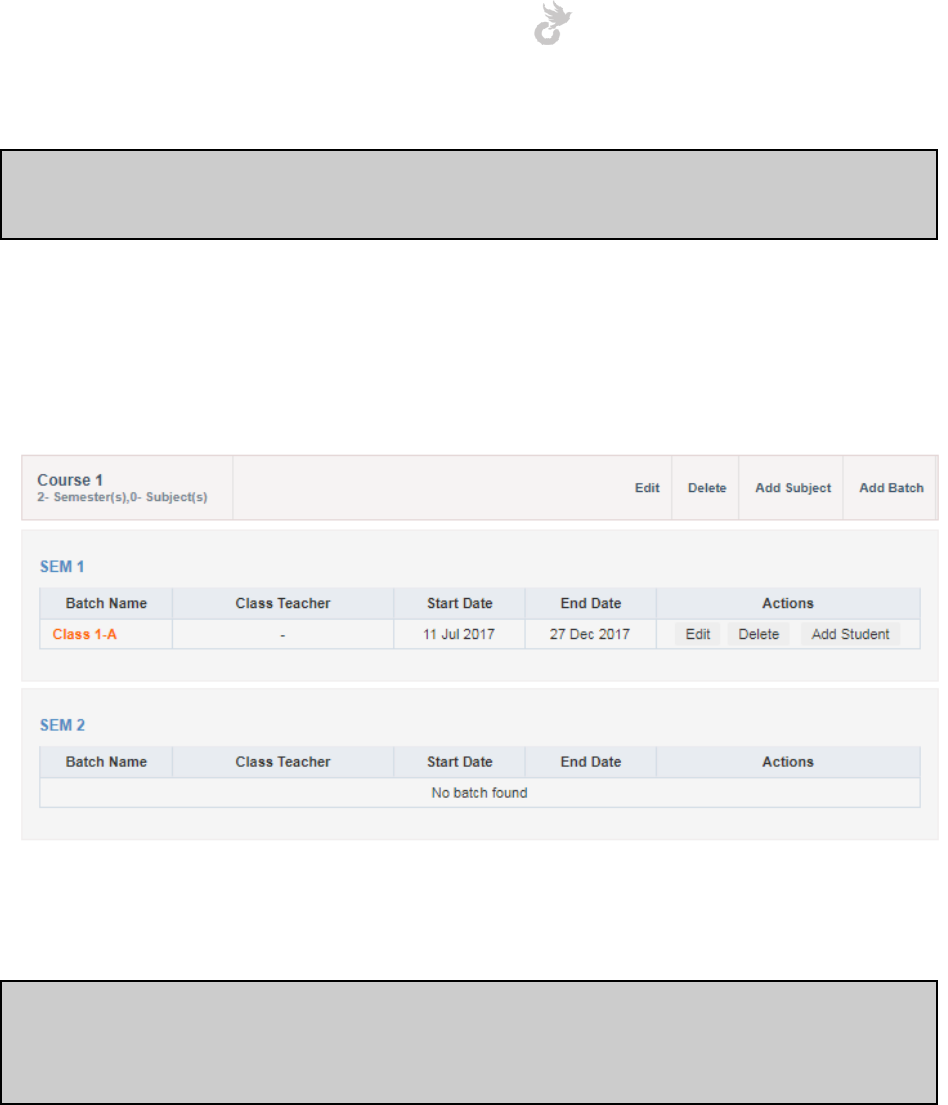
To view details of the batches, semesters and common subjects for a course simply click on it.
Open-School 2.6.5 Administrator Manual
97
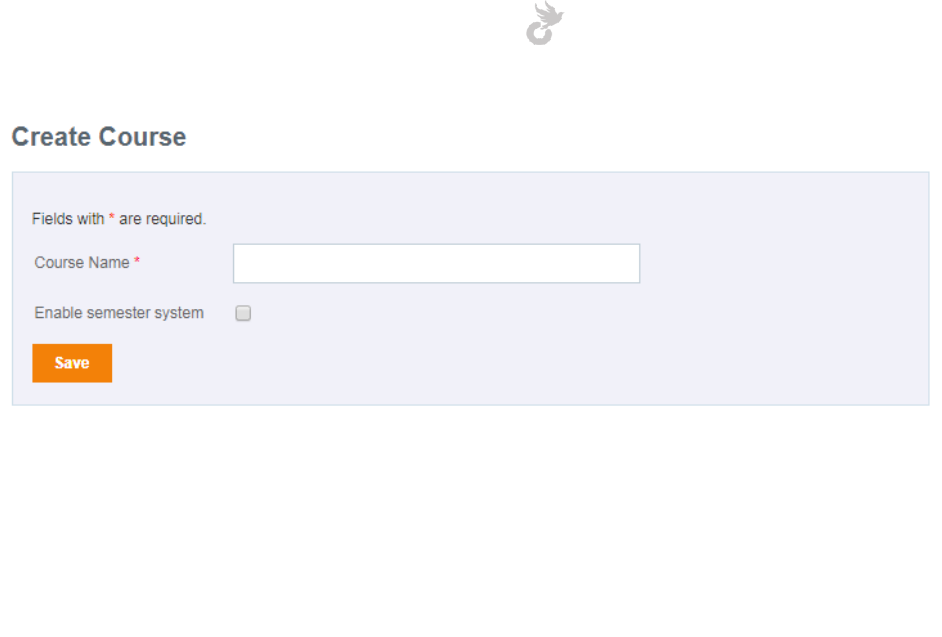
6.1 Creating a Course
To create a course click on the ‘Add Course’ button.
Creating a course is really simple. All you have to do is enter a course name! You’ll be able to
see an option to ‘Enable semester system’ for the course you create. Check this if necessary.
You can create courses with and without semesters in the same academic year.
Open-School 2.6.5 Administrator Manual
98
After you have created a course you can go ahead with adding semesters and batches. Let's
take a look at adding semesters.
6.2 Creating Semesters
Creating a semester if optional. If you do not require a semester system skip to the next step of
creating batches.
To add a semester click on ‘Manage Semesters’ in the left side menu under the Courses
Module. This should take you to the list of semesters which of course will be empty the first
time you use the application.
Click on the ‘Add Semester’ button to start adding semesters to a course. Those courses with
the Semester system enabled during creation will be listed here.
You should see a form with the following fields:
1. Name
2. Description
3. Start date
4. End date
5. Select Courses
Open-School 2.6.5 Administrator Manual
99
Enter the above details and choose the courses this semester can be applicable to. Then click
‘Create’ to generate the semester.
Note: Make sure the dates you enter are within the range of the selected Academic Year.
6.3 Creating a Batch
Once you have created a course you can go ahead with adding batches even if you haven’t
added semesters. Students will be added to these batches. Attendance, examination scores etc
can be entered for students on a batch level.
To start adding batches click on the ‘Add Batch’ link on a course.
Open-School 2.6.5 Administrator Manual
100
This should bring a pop-up on screen with a form to enter your batch details.
1. Name
2. Start date
3. End Date
4. Class Teacher
5. Semester
The class teacher can be chosen later once you have added teachers. This is not a mandatory
field. Class teachers have the ability to manage daily attendance and also enter examination
scores for all subjects in the batch.
If you have enabled the semester system for the course, the semester needs to be selected too.
This option will not be displayed if you haven’t enabled semesters for the course.
Note: Make sure the dates you enter are within the range of the selected Academic Year and
chosen semester.
Open-School 2.6.5 Administrator Manual
101
6.4 Adding a common subject
Considering you have added multiple batches to a course and that these batches all have same
subjects or have a few subjects in common, you would want an option to create them in a
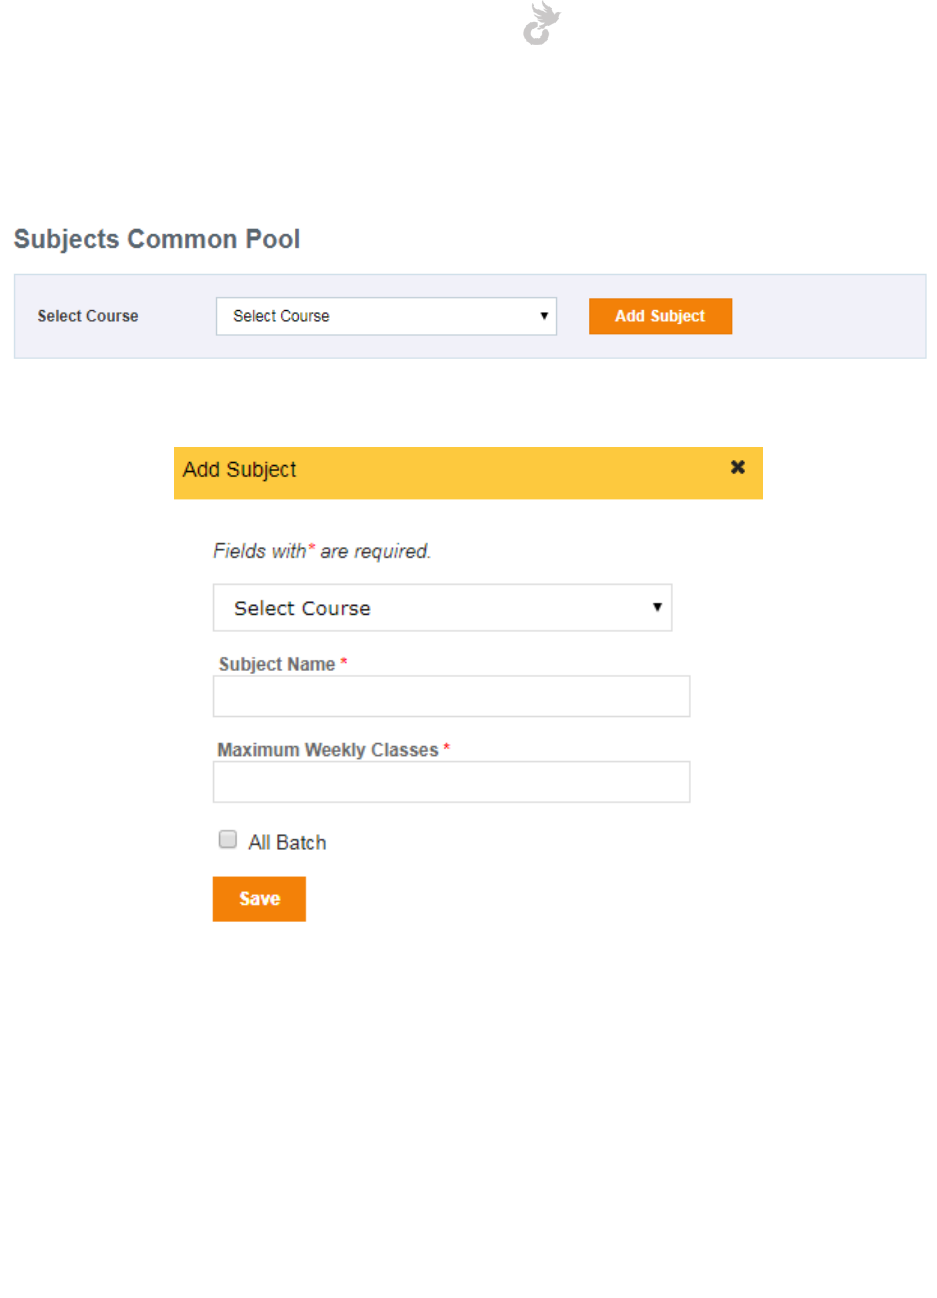
single click instead of creating them separately for each batch. The ‘Subjects Common Pool’ in
the Courses Module and the ‘Add Subject’ link in each course tab allows you to do this.
Selecting a course from the dropdown, lists the common subjects already added to it. Click the
‘Add Subject’ button to get started with adding subjects.
Open-School 2.6.5 Administrator Manual
102
In the popup that appears, enter your subject details.
1. Select Course
2. Subject Name
3. Maximum Weekly Classes
4. All Batch
The Maximum Weekly Classes field defines how many classes this particular subject will have in
a week. You will not be able to add more classes in the timetable once you reach this limit. It
can always be edited if needed.
Make sure you check the ‘All Batch’ option before clicking ‘Save’.
6.5 Previous Year Courses
Open-School 2.6.5 Administrator Manual
103
The previous year courses section allows you to view courses from different academic years
without having to change the academic year from the dropdown on top.
Here, simply select the academic year to view the course details under it.
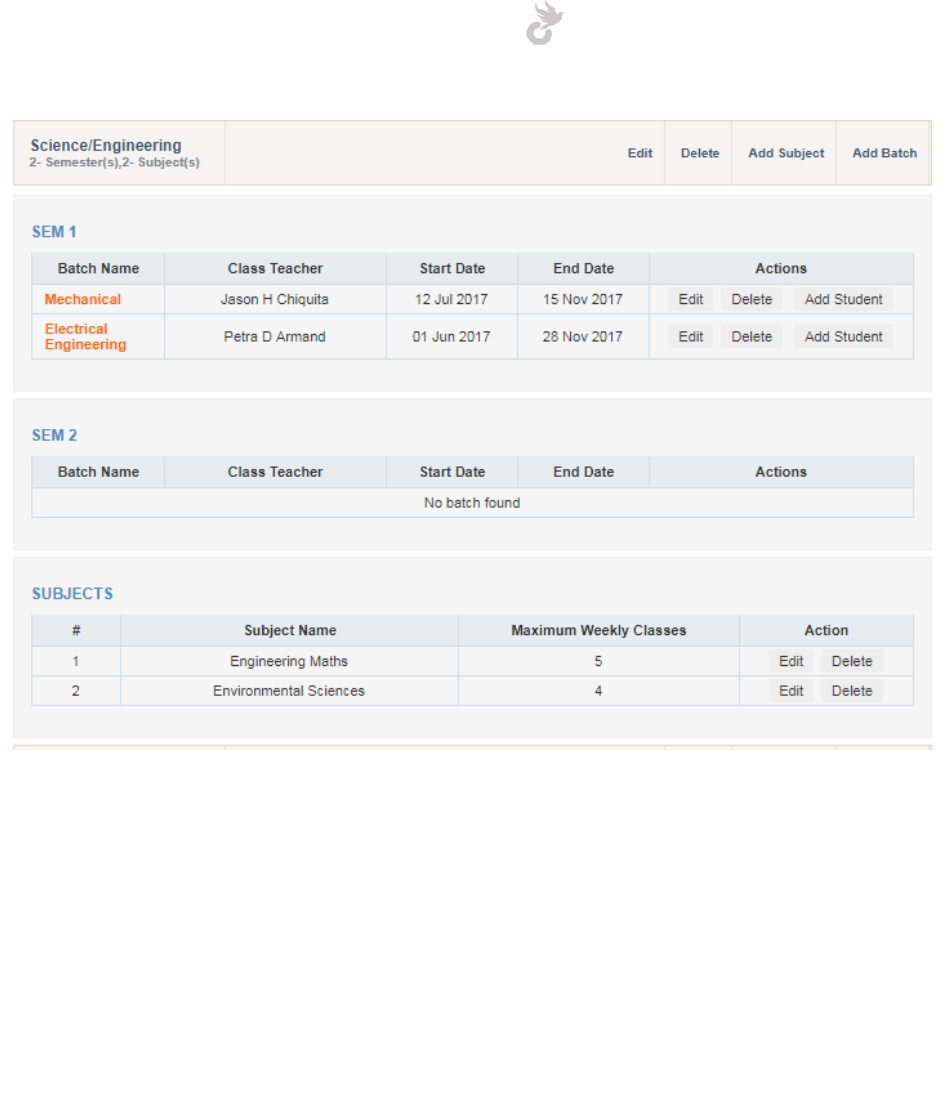
6.6 Batch View
Here we’ll be discussing the various actions that can be carried out within the batch view such
as adding students, subjects, setting up weekdays, class timings and timetable, promoting
students, marking attendances etc.
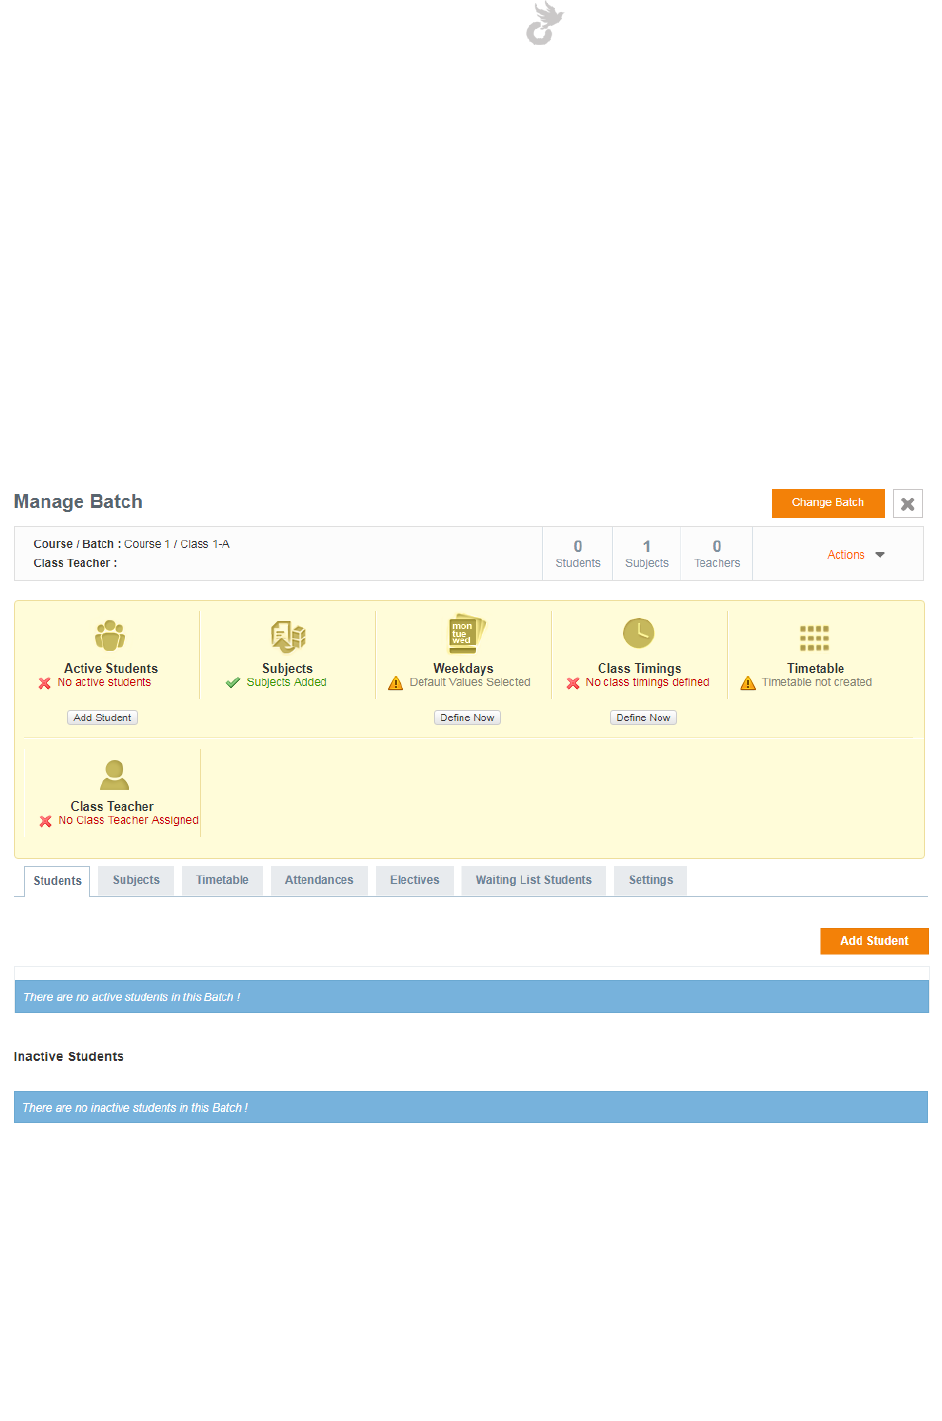
To get into the batch view simply click on the batch name in the course list. Once in, you’ll be
able to see the steps that need to be completed for a batch. This includes,
1. Adding students
2. Adding subjects
3. Setting weekdays
4. Adding class timings
5. Timetable (Weekdays and class timings make up the timetable)
6. Assigning a class teacher
Open-School 2.6.5 Administrator Manual
104
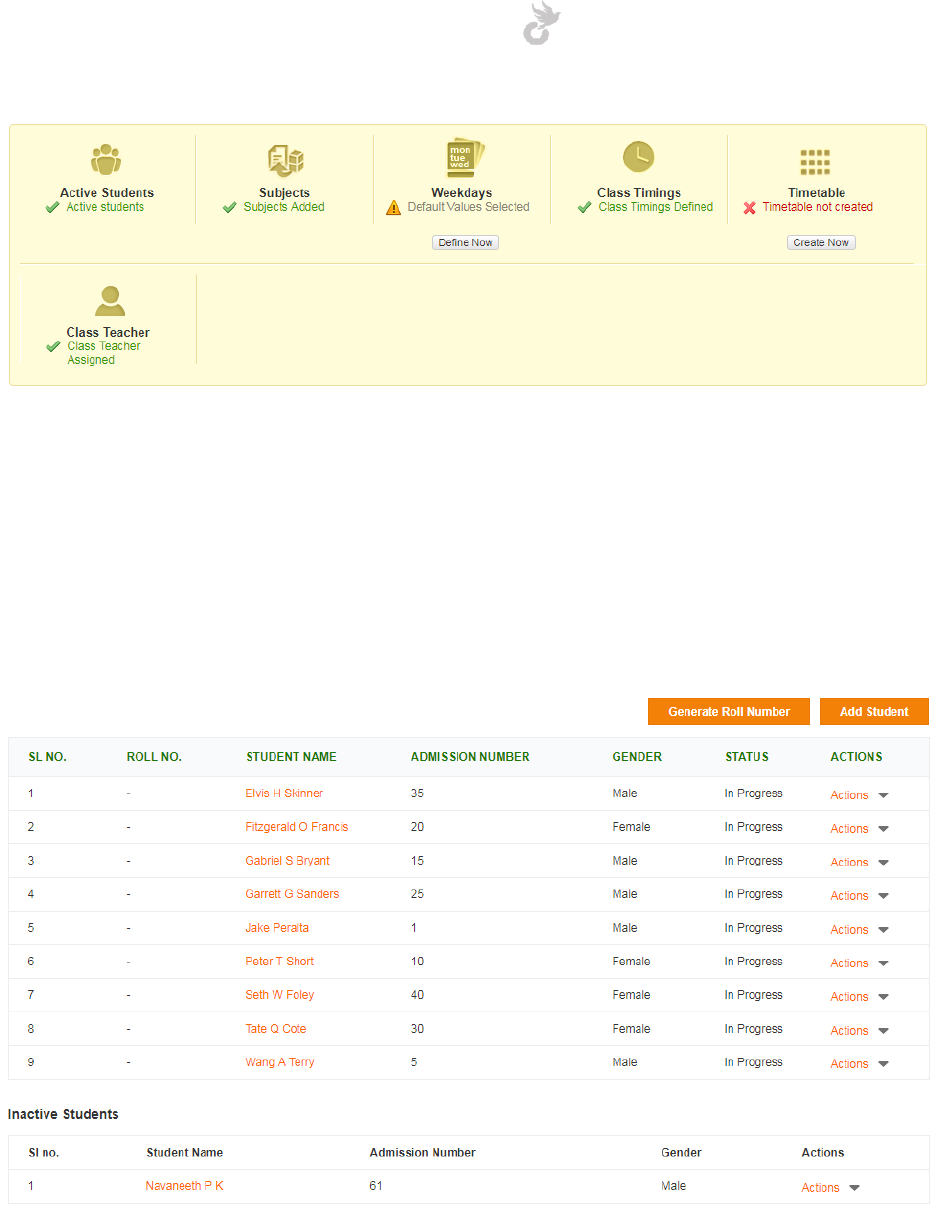
6.6.1 View students in the batch
The students tab in Batch view allows you to see all the active/inactive students for the chosen
batch. You can access their profiles directly by clicking on their name. This option is available
anywhere in the system.
This list shows the status of each student too. You can see whether a student has passed, failed
or is in progress. The ‘Generate Roll Number’ option creates roll numbers starting from 1 for
each student in an alphabetical order based on first name.
Open-School 2.6.5 Administrator Manual
105
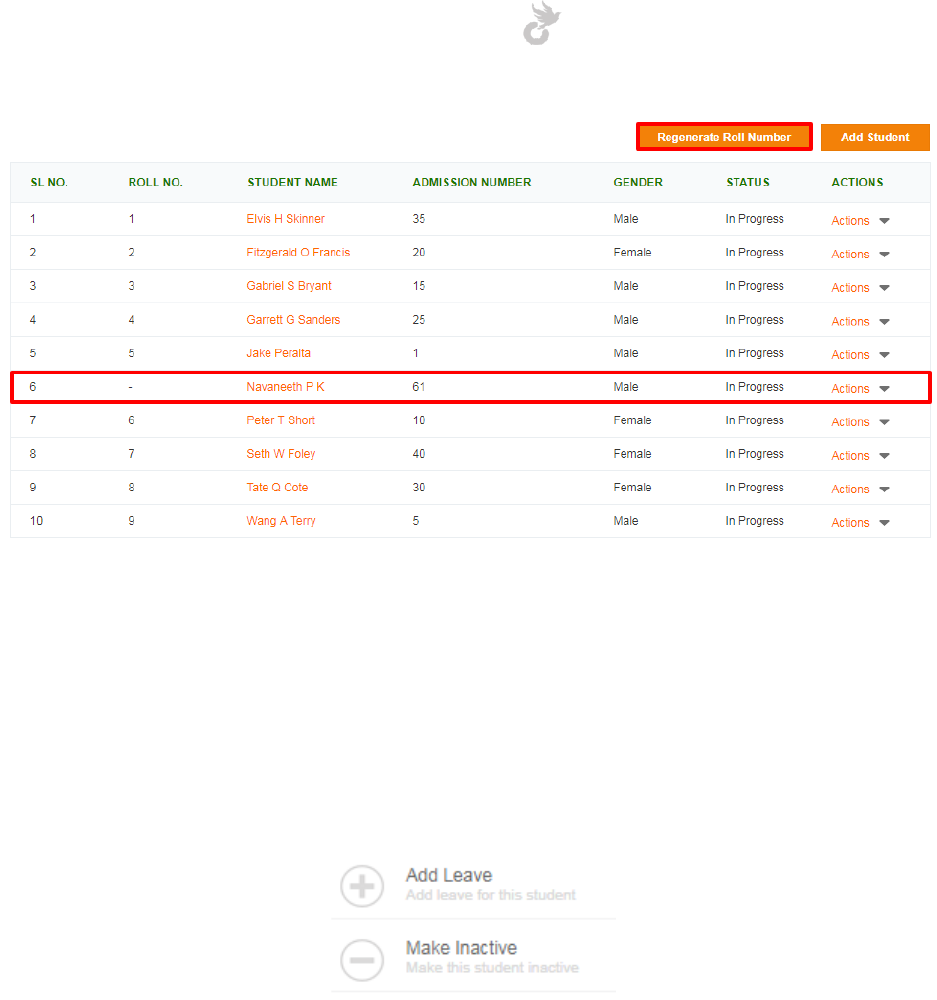
If a new student is added in between or a student is set to active after generating roll number,
you get an option to re-generate the roll numbers for the students in the class. This option will
re-write all roll numbers of student alphabetically below the new student.
You can set a student as active/inactive by using the options in the ‘Actions’ dropdown next to
each student. You can also mark a leave for a particular student from this dropdown.
There is also a link ‘Add Student’ that re-directs to the Student Create page to allow you to
register a new student in the application. The batch in the registration page will automatically
be set to the chosen batch.
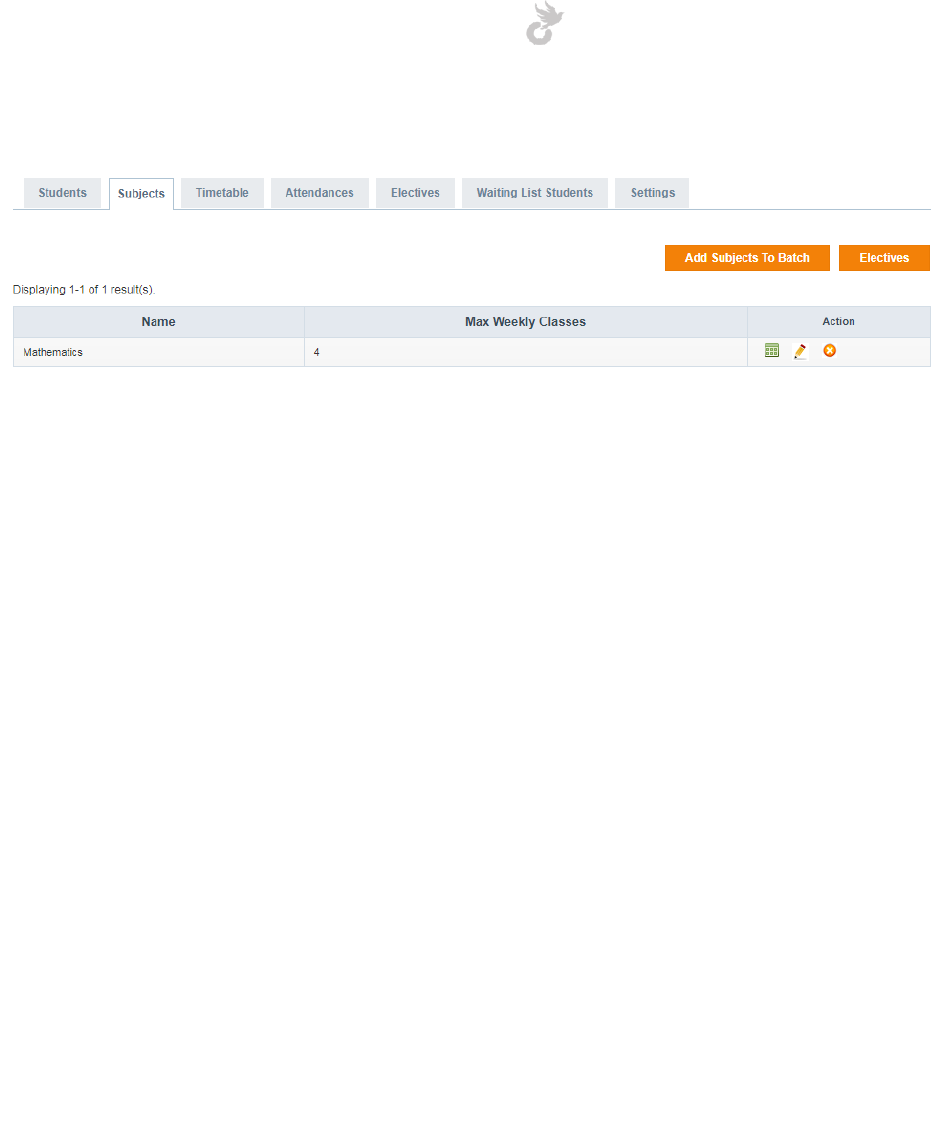
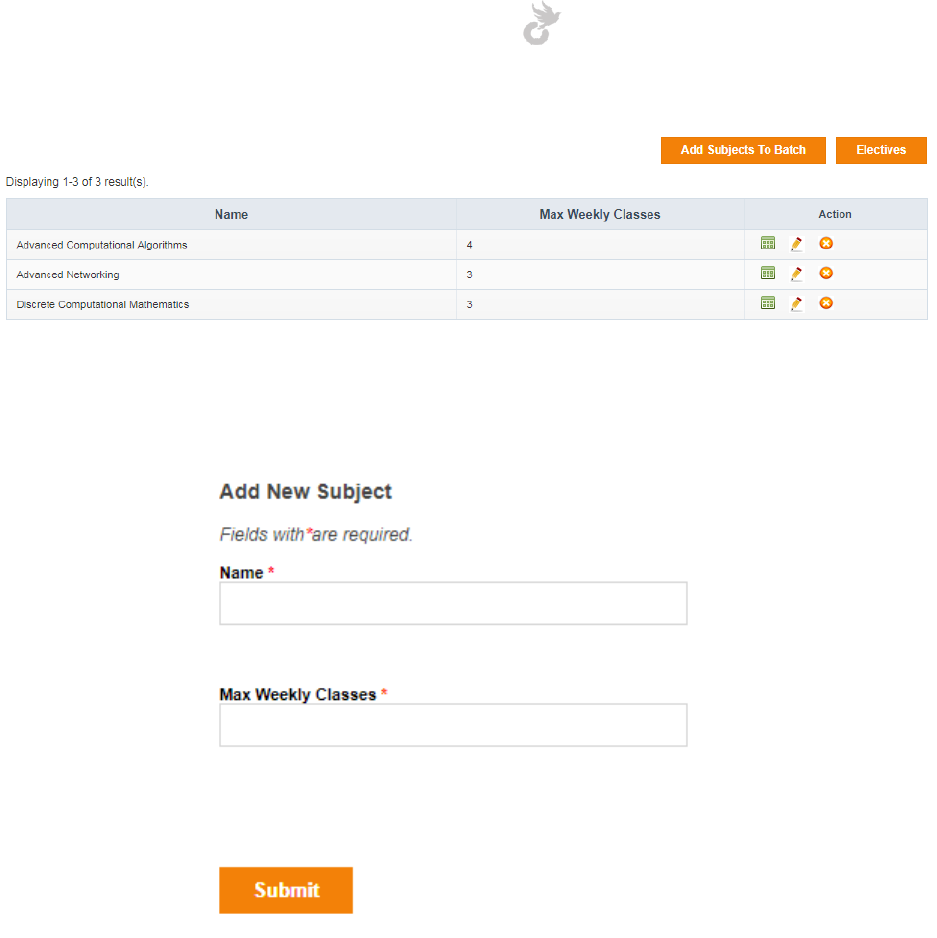
6.6.2 Manage Subjects in a batch
Click on the ‘Subjects’ tab in batch view to manage subjects for the chosen batch. You can add,
view and delete subjects from here. Common subjects are also listed here when created.
Open-School 2.6.5 Administrator Manual
106
Use the ‘Add subjects to Batch’ option to add subjects specific to the chosen batch. These
subjects will not be displayed in other batches.
The form is the same,
1. Name of the subject
2. Number of classes per week
You can also view, edit and delete these subjects from the Action column. Electives can be
accessed by the clicking the button or even by selecting Electives in the tab. This is explained in
the next section.

Open-School 2.6.5 Administrator Manual
107
6.6.3 Managing Electives for a batch
As explained above click on the Electives Tab or the Electives button under Subjects to view and
manage Electives, Elective Groups and add students to Electives for students. Given below is
the workflow for assigning electives to students.
Let’s take a look at these steps one-by-one,
To access Electives click on the Elective tab in batch view. This will display all students in the
batch who have been assigned to electives. Click on the “Electives” button here to view and
create electives. The ‘Add Students’ button allows you to assign electives to students in the
batch. This will be explained in the steps below.
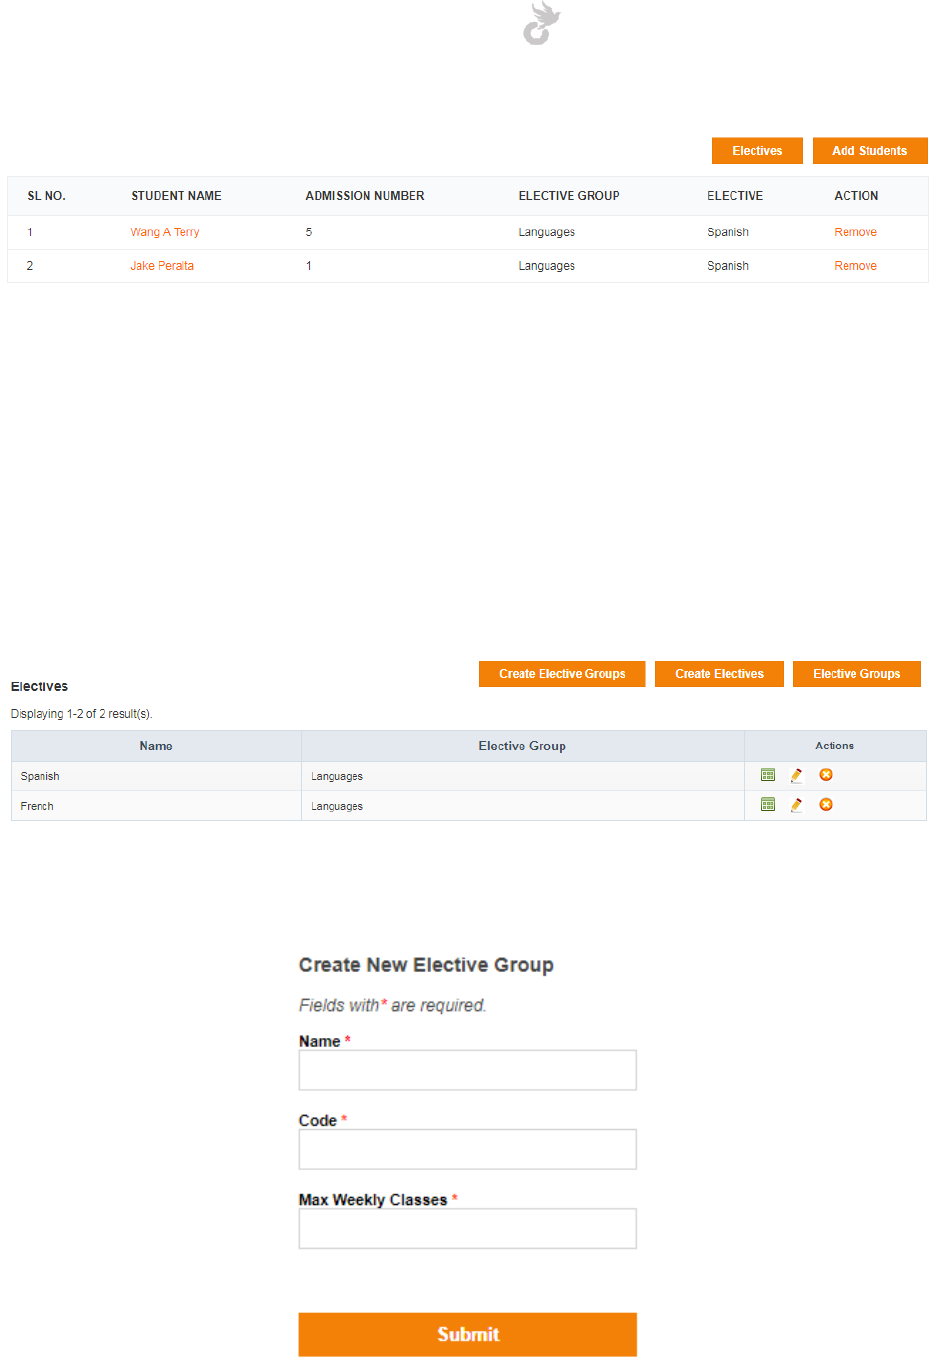
Open-School 2.6.5 Administrator Manual
108
6.6.3a Creating Elective Groups:
The first thing you will need to do is create an Elective Group. Elective subjects come under an
Elective Group. For example, say you have electives such as French, Spanish etc. You can create
an Elective Group called Languages. The Electives will then be added to this group as explained
in the next step.
Click on the ‘Electives’ button to see the list of Electives and view the option to add Elective
Groups.
Click on the ‘Create Elective Groups’ to create and Elective Group.
The Elective Group form consists of the following:
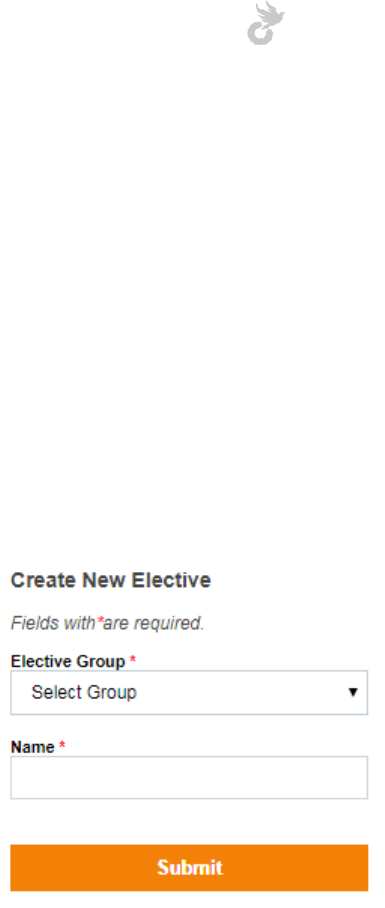
Open-School 2.6.5 Administrator Manual
109
1. Name
2. Code
3. Maximum Weekly Classes (Number of classes per week)
These fields are the same as the one seen while creating subjects. The Max Weekly Classes field
limits the number of classes that can be assigned for this elective group/elective in the
timetable.
6.6.3b Creating Electives:
Once you have created Elective Groups you can go ahead and add Electives to it. To start adding
Electives click on the ‘Create Electives’ button.
The form has two fields,
1. Select the Elective Group
2. Name of Elective
While adding an Elective you have to select the Elective Group you would want to add the
Elective to. The second field is for the name of the elective. Click ‘Submit’ to save the elective.
6.6.3c Assigning students to electives:
After you are done creating Elective Groups and adding Electives to them, you can go ahead
and start assigning them to students in the selected batch. To start assigning click on the
electives tab again.
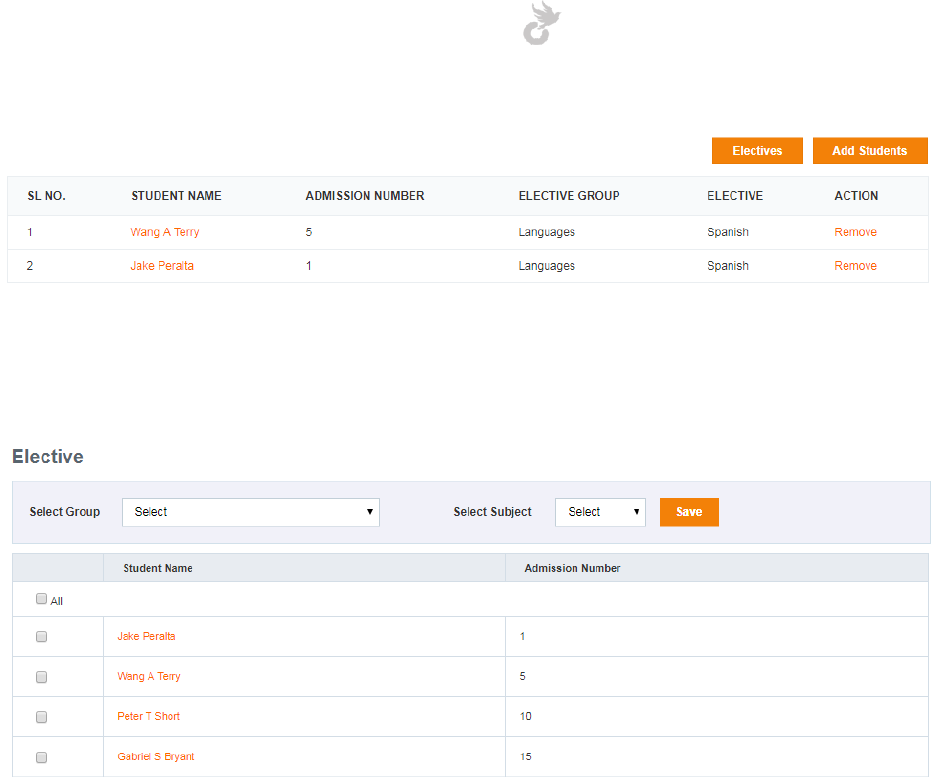
Open-School 2.6.5 Administrator Manual
110
You’ll be able to see the listed of already assigned students if any. Click on ‘Add Students’ to
start assigning.
There are three steps to assign electives to a student.
1. Select Group
2. Select Elective (List will vary depending on chosen group)
3. Select students to be assigned to the elective using the checkboxes next to them
Finally click ‘Save’ to assign them to the selected elective. You can remove a student from an
elective from the list shown while clicking the Electives Tab.
6.6.4 Managing students in the waiting list
You have seen earlier in section 4.4.2 The application approval process how to add online
admission applicants to the waiting list for a certain batch. You can manage these students
from within the batch view too.
Click on the ‘Waiting List Students’ tab to view the list of students added to the queue for the
chosen batch.
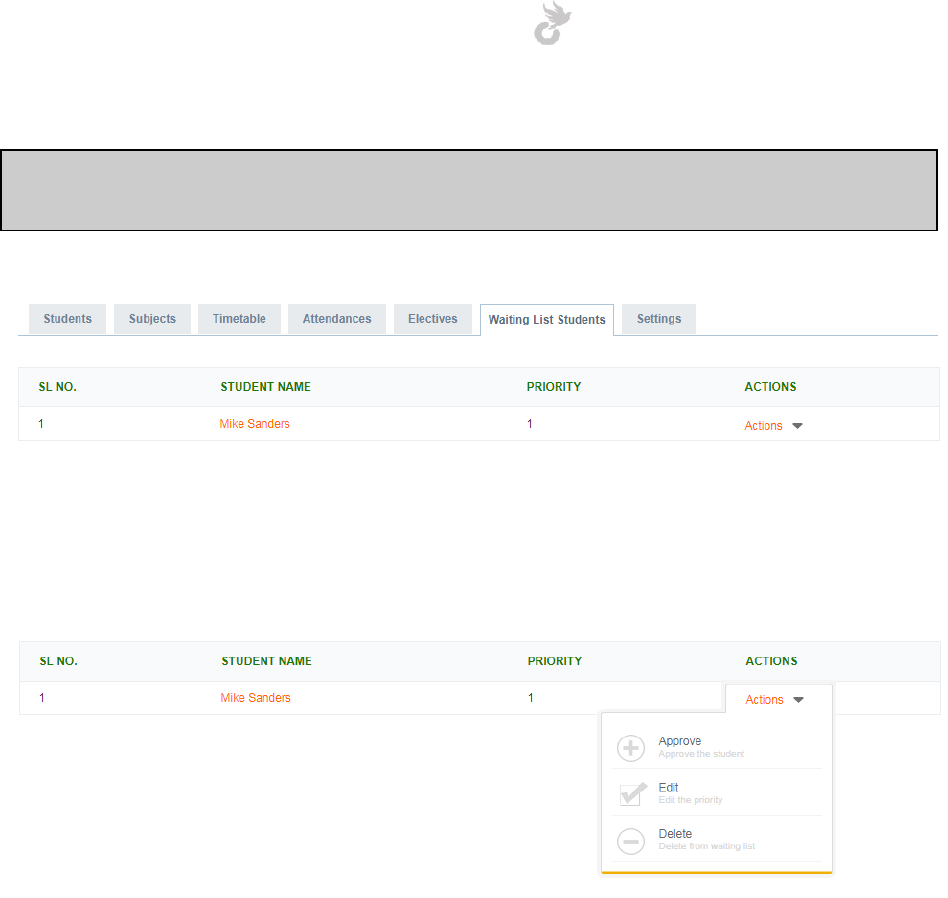
Open-School 2.6.5 Administrator Manual
111
Note: Only students added under the chosen batch will be listed here. To see the whole list of
students in the waiting list go to Students Module > Waiting List (in left side menu)
You can click on the student’s name to view the online application. Approval, rejection or
deletion of this application can be done directly from this list too by clicking the ‘Actions’
dropdown corresponding to the student.
As mentioned in the Online Admission process section, you can change the course/batch while
approving.
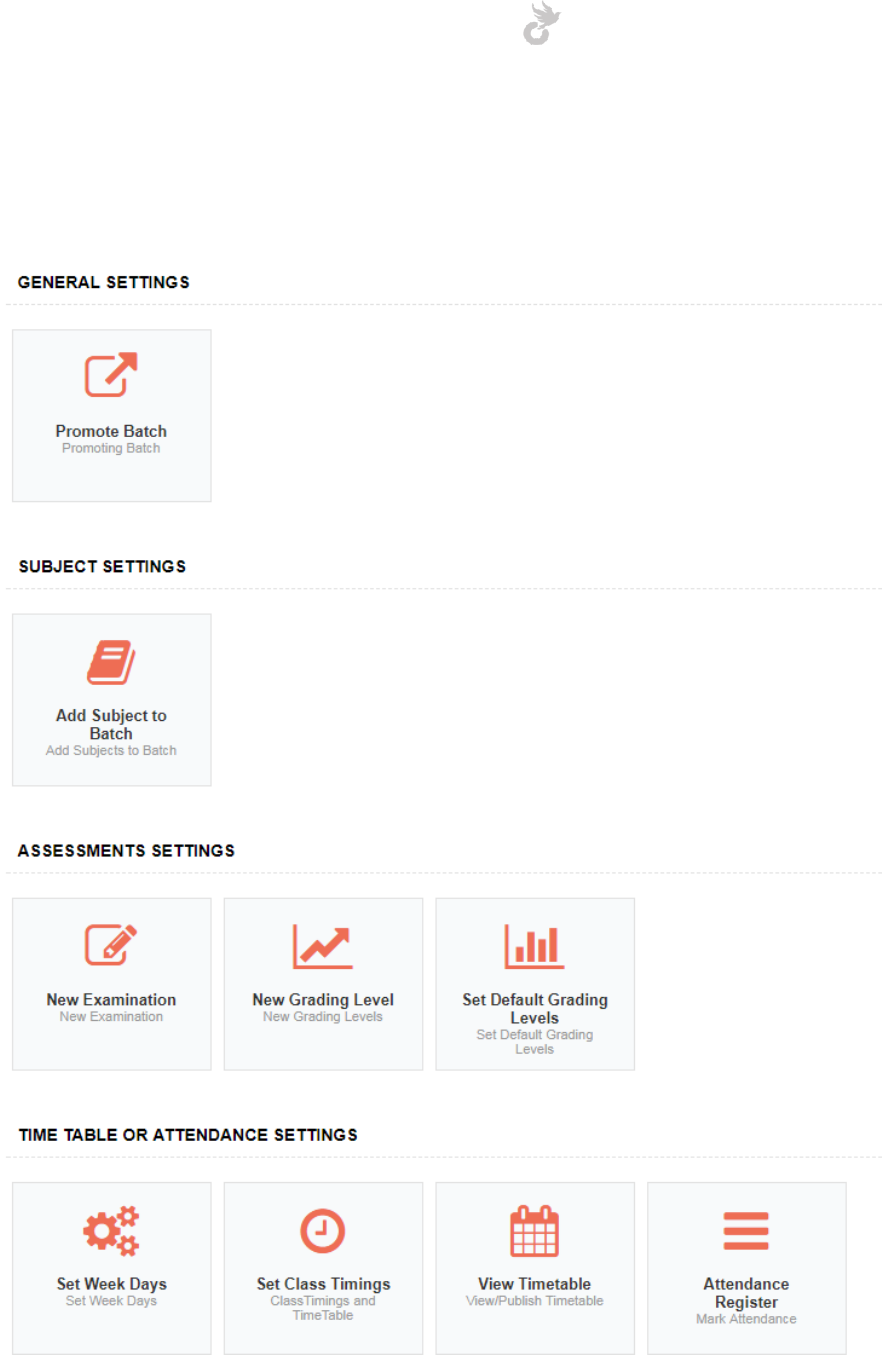
Open-School 2.6.5 Administrator Manual
112
6.6.5 Batch settings and actions
You still have a couple of options that can be done in the batch view. Let’s take a look at the
remaining options.
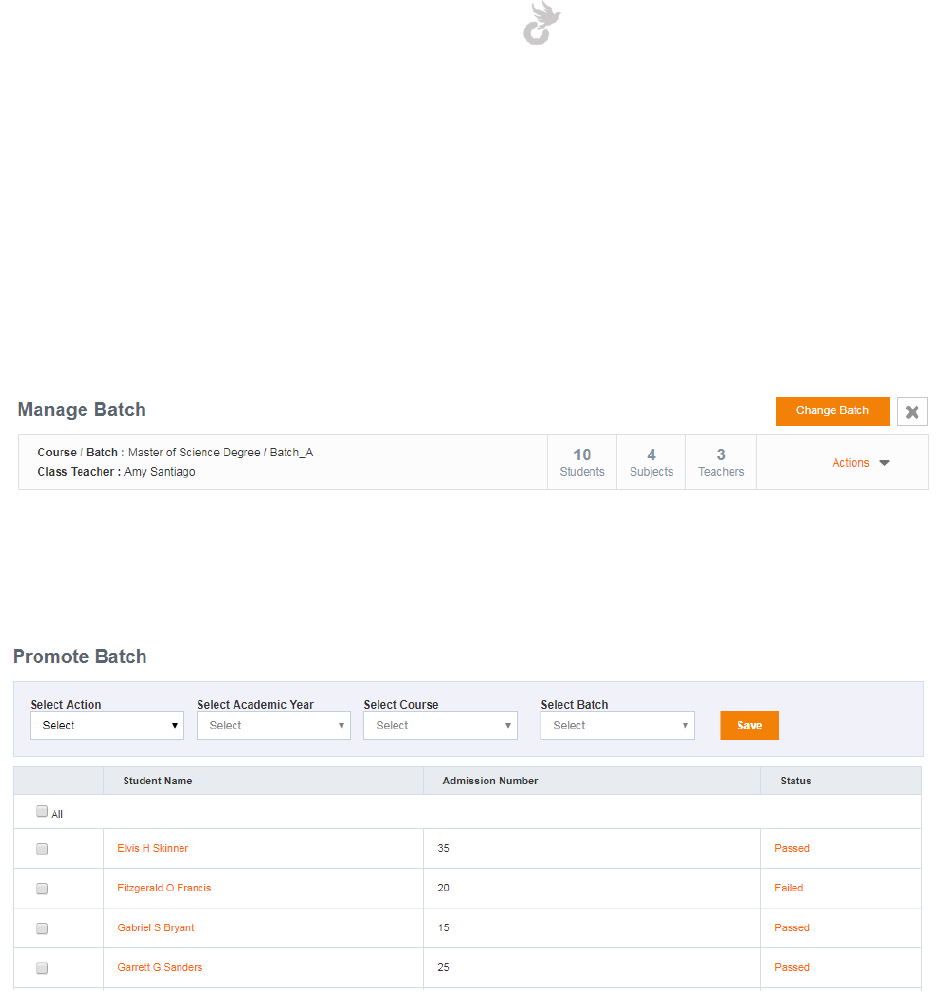
Open-School 2.6.5 Administrator Manual
113
6.6.5a Promoting students in a batch
So you’re moving on to the next academic year/semester and want to promote your students
to their new batches, or want to just transfer students from one batch to another, the promote
option allows you to do this efficiently.
You can access the promote option from the settings tab or even the actions dropdown on top.
The promote page lists all students in the chosen batch and promote options as explained
below,
The status column on the far right displays the Exam status for each student. Click on the status
to see the list of exams and the student’s status for each. The details are shown in a pop-up
window as shown below.
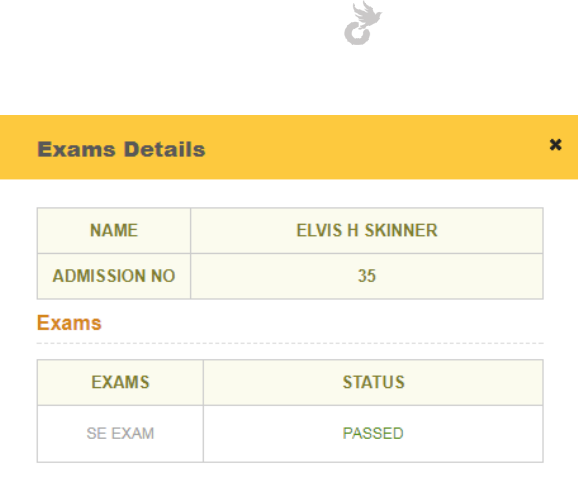
Open-School 2.6.5 Administrator Manual
114
Clicking on the exam name will redirect you to the list of subject exams for it. You can then view
the student’s score.
The promotion process has a few steps,
1. Select the students using the checkbox in the left side column.
2. Select Action: Whether passed, failed or alumni. This status will reflect for the chosen
batch details in student profile
3. Select Academic Year: Choose which academic year you want to promote the student
to. You can transfer students to new academic years or even within the same one.
4. Select Course: The courses dropdown will be updated depending on the chosen
academic year.
5. Select Semester: If the chosen course has semester system enabled then this dropdown
will be displayed and you may choose the semester you want the student moved to.
6. Batch: Depending on Course and/or semester chosen the batch list will be updated.
Once all this is done, simply click the ‘Save’ button to save changes and promote the students.
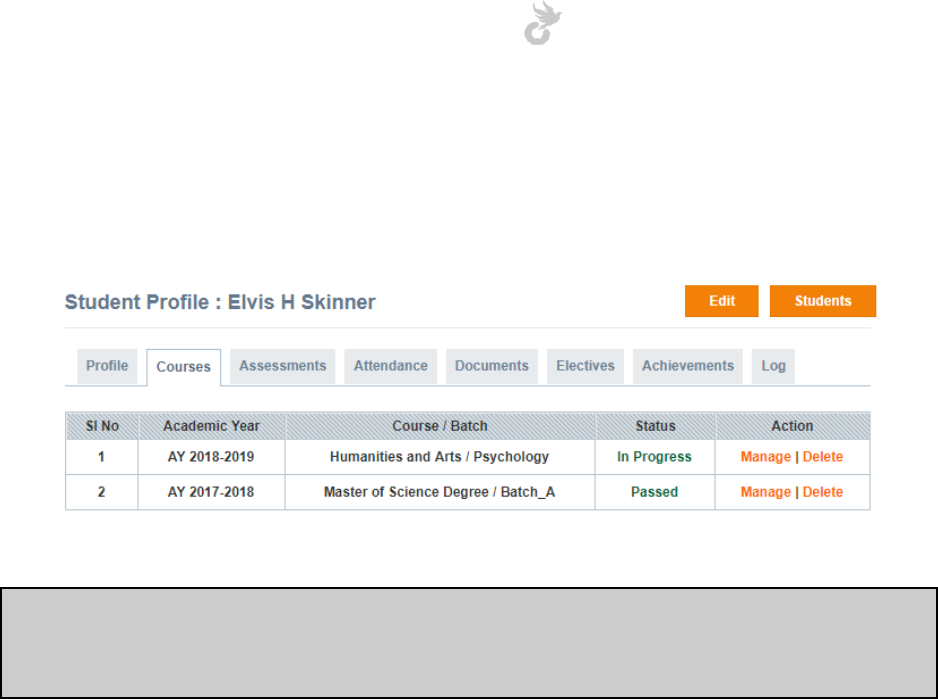
Open-School 2.6.5 Administrator Manual
115
You can view details of previous and current batches in the student’s profile.
Note: Promoting a student from a batch will no longer display the student in the old batch. IF
the promotion is to a new academic year the student will be seen only in the Student’s List for
the new year and not for the previous one.
Other settings in batch view will be explained in their respective modules.
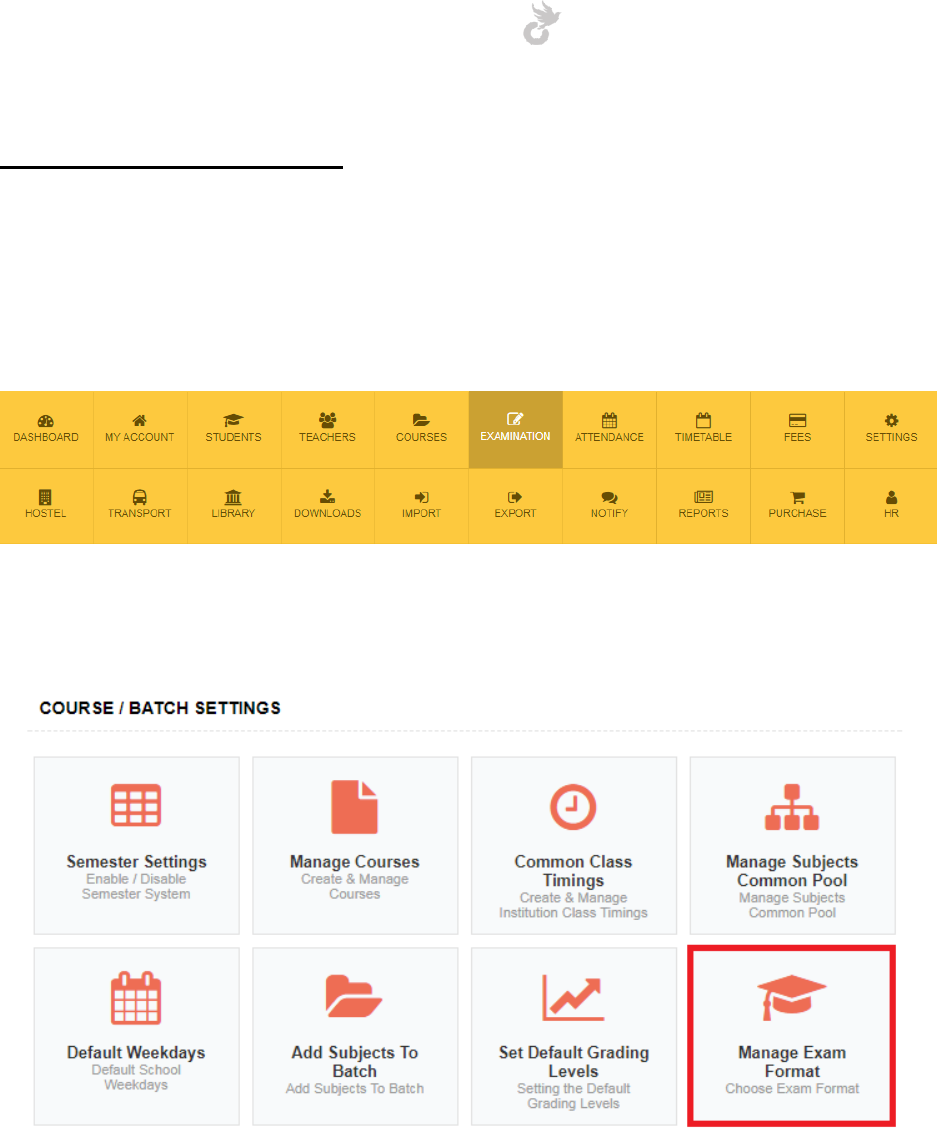
Open-School 2.6.5 Administrator Manual
116
7. EXAMINATION
The examination module allows you to manage exams in CBSE (Central Board of Secondary
Education, India) and the normal (default) formats. Admins and teachers can also create online
exams that students can attend from their portals within a specified time. Calculation of marks
etc are based on the questions and weightage defined.
You can set the type of exam from the Settings Module > Course / Batch Settings > Manage
Exam Format
The exam format can be set on
1. School Level (all courses and batches in the application)
2. Course Level (format can be selected while adding a course, this will apply to all batches
under it)
3. Batch Level (format can be selected during creation, the format will only apply to the
created batch)
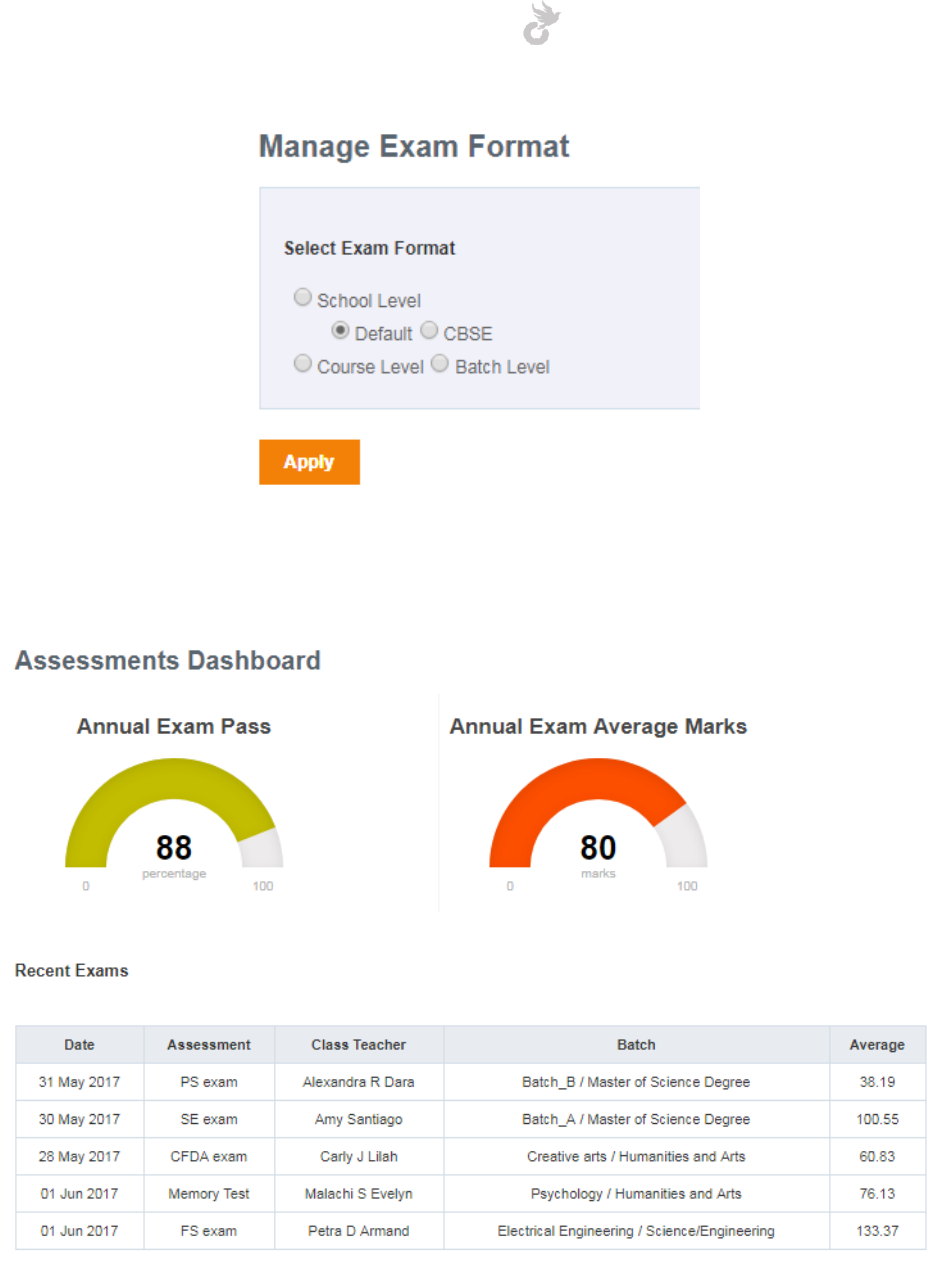
Open-School 2.6.5 Administrator Manual
117
The Examination Module dashboard displays a summary of recent exams and the average pass
rate and marks for all exams created in the academic year.
7.1 Default Examination Format
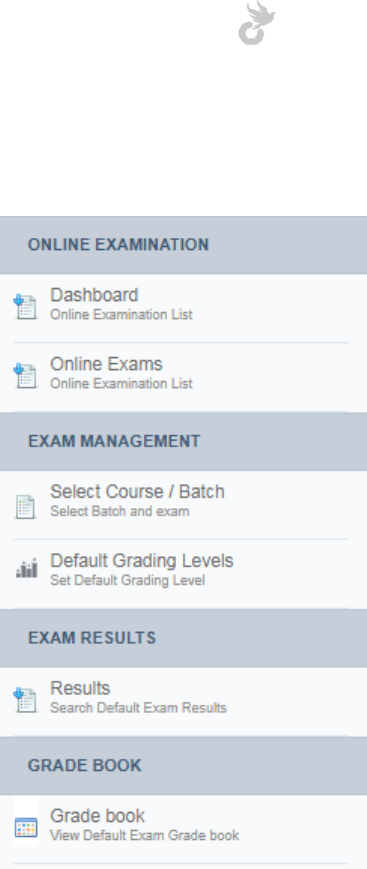
Open-School 2.6.5 Administrator Manual
118
The options in the left side menu of the examination module will change according to the exam
format chosen.
You can set your own grading levels for batches individually or even set default ones that apply
to all batches. To get started select your required course/batch by clicking the link in the left
side menu. Choose your batch from the app explorer to reveal all exams created for it.
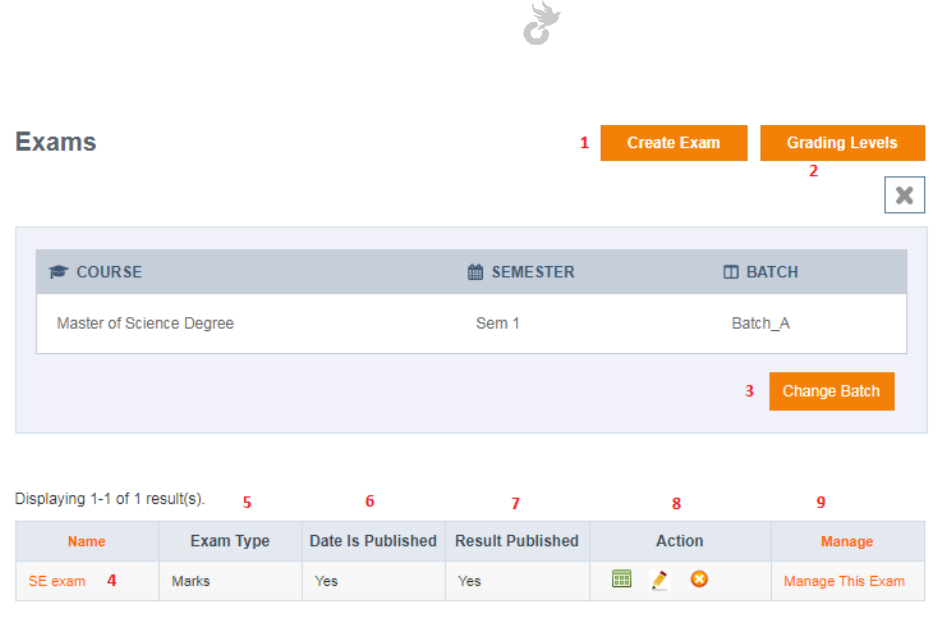
Open-School 2.6.5 Administrator Manual
119
1. Create Exam: The ‘Create Exam’ button allows you to create new exams for the chosen
batch. This is explained in detail under Creating new exams.
2. Grading Levels: You can configure the grading levels for your batch or select default
grading levels for it from here.
3. Change batch: Allows you to change the current batch.
4. Exam Name: Click on the exam name to manage it.
5. Exam Type: Default exams can be of 3 types,
a. Marks
b. Grades
c. Marks and grades
These options are only for display purposes, all scores are entered in numbers.
The grades will be displayed based on the minimum mark set for it.
6. Date is published: Indicates whether the date for the exam has been published to
students. They will receive a notification via email/sms/internal message if date has
been published.
7. Result is published: Indicates whether the result has been published for an exam.
Student and parents will receive notifications and will also be able to view results
through their respective portals.
8. Action: View, edit or delete an exam.
9. Manage: The options under this column differs based on whether the date or result has
been published.
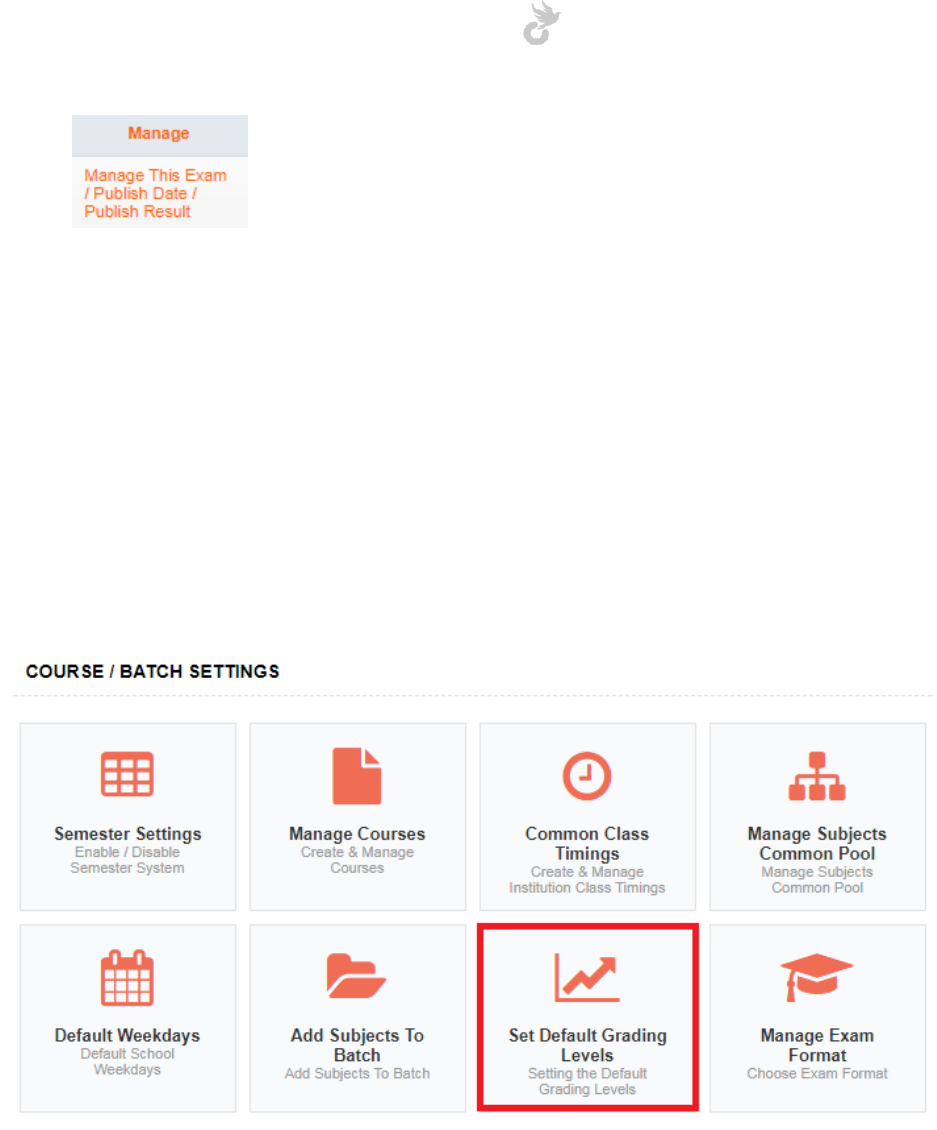
Open-School 2.6.5 Administrator Manual
120
a. Manage this exam: Allows you to start creating subject exams etc.
b. Publish Date: Click this link to publish the date for the exam if not already done.
c. Publish Result: Click this link to publish the result of the exam.
7.1.1 Setup default grading levels
You can access the default grading levels area from the left side menu of the Examination
module (before selecting a course/batch) or even under course/batch settings in the Settings
Module.
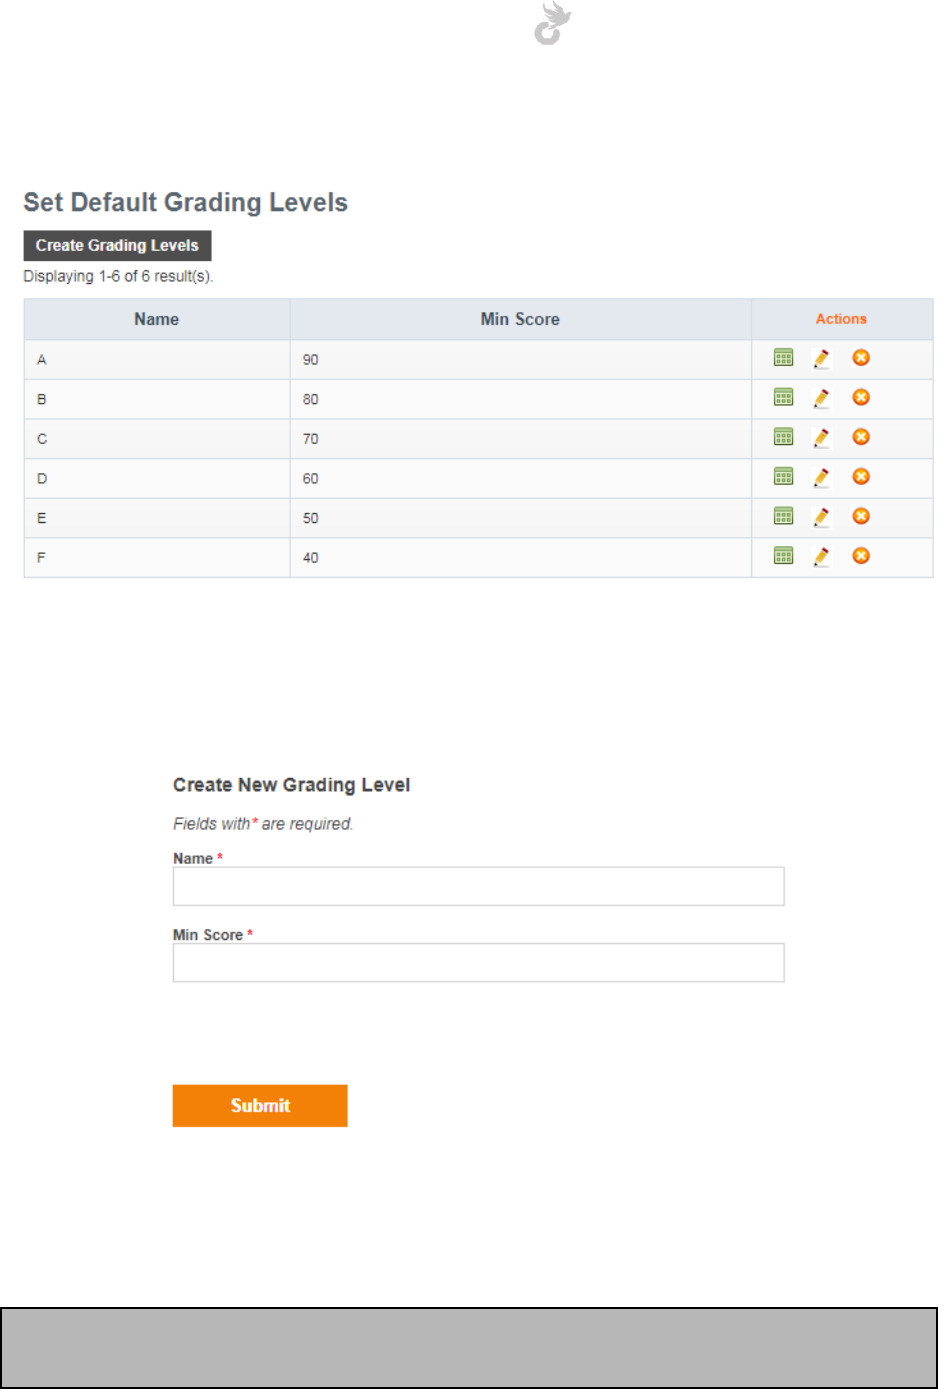
Open-School 2.6.5 Administrator Manual
121
The default grading levels will be listed here, you may edit, delete or create new ones.
The Actions column can be used for view/edit/delete options. To create a new grading level
click on the ‘Create Grading Levels’ button. This generates a popup form where you can enter
the grade and the minimum mark needed to achieve it.
Once you have entered the required data click ‘Submit’ to save. These grading levels can be
viewed wherever the student exam scores are displayed.
Note: The process is the same for setting individual grading levels in batches. The link in the
left side menu will change to ‘Set Grading Levels’ once you have chosen the batch.
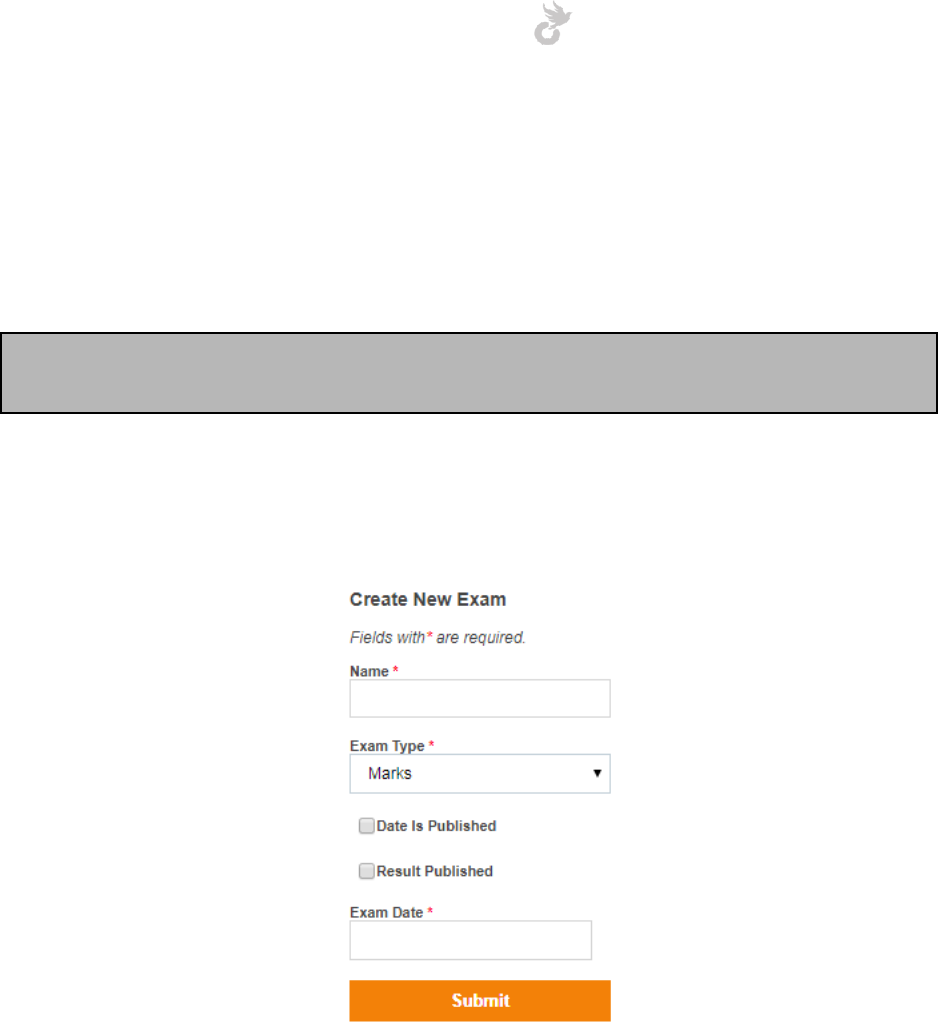
Open-School 2.6.5 Administrator Manual
122
7.1.2 Creating an exam in default format
The exam creation process in default mode has 2 steps,
1. Create Exam
2. Create Subject Exams
Note: Teachers can enter scores for their students through their portal but cannot create
normal exams. They can, however, create online exams.
To create an exam you first have to select your course/batch. Once this is done, click on the
‘Create Exam’ button on top. This should open up a popup with details to be entered,
1. Name: Give a name for the exam (Eg: Final Exam, Midterm Exam etc)
2. Exam Type: Choose whether it needs to be displayed as Marks, Grades or Marks &
Grades
3. Date is published: Check this box if you want to notify students that the exam has been
scheduled. You can do this later too.
4. Result Published: Initially you won’t need to check this box, this indicates publishing a
result. Notifications will be sent out and students and parent will be able to view the
results through their portals. You can publish the result later through the link under the
Manage column in exam listing.
5. Exam Date: Choose a start date for the exam
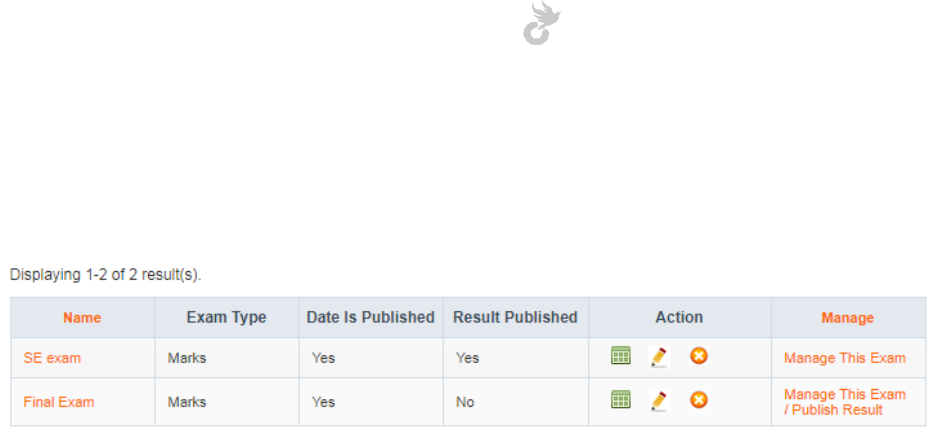
Open-School 2.6.5 Administrator Manual
123
Click ‘Save’ to create the exam with the details you have entered. Created exams for the batch
will be listed on the Exams page.
7.1.3 Creating subject exams in default format
After creating an exam, you will have to create the subject exams under it. For this you will first
need to create subjects for your batch. To schedule subject exams click on the ‘Manage This
Exam’ link for the required exam.
Here, you will be able to view all the subjects you have added for the chosen batch. Each
subject has 4 fields,
1. Max Marks (Maximum mark for that subject exam)
2. Min Marks (Minimum mark needed to pass that subject exam)
3. Start date (Day and time)
4. End date (Day and time)
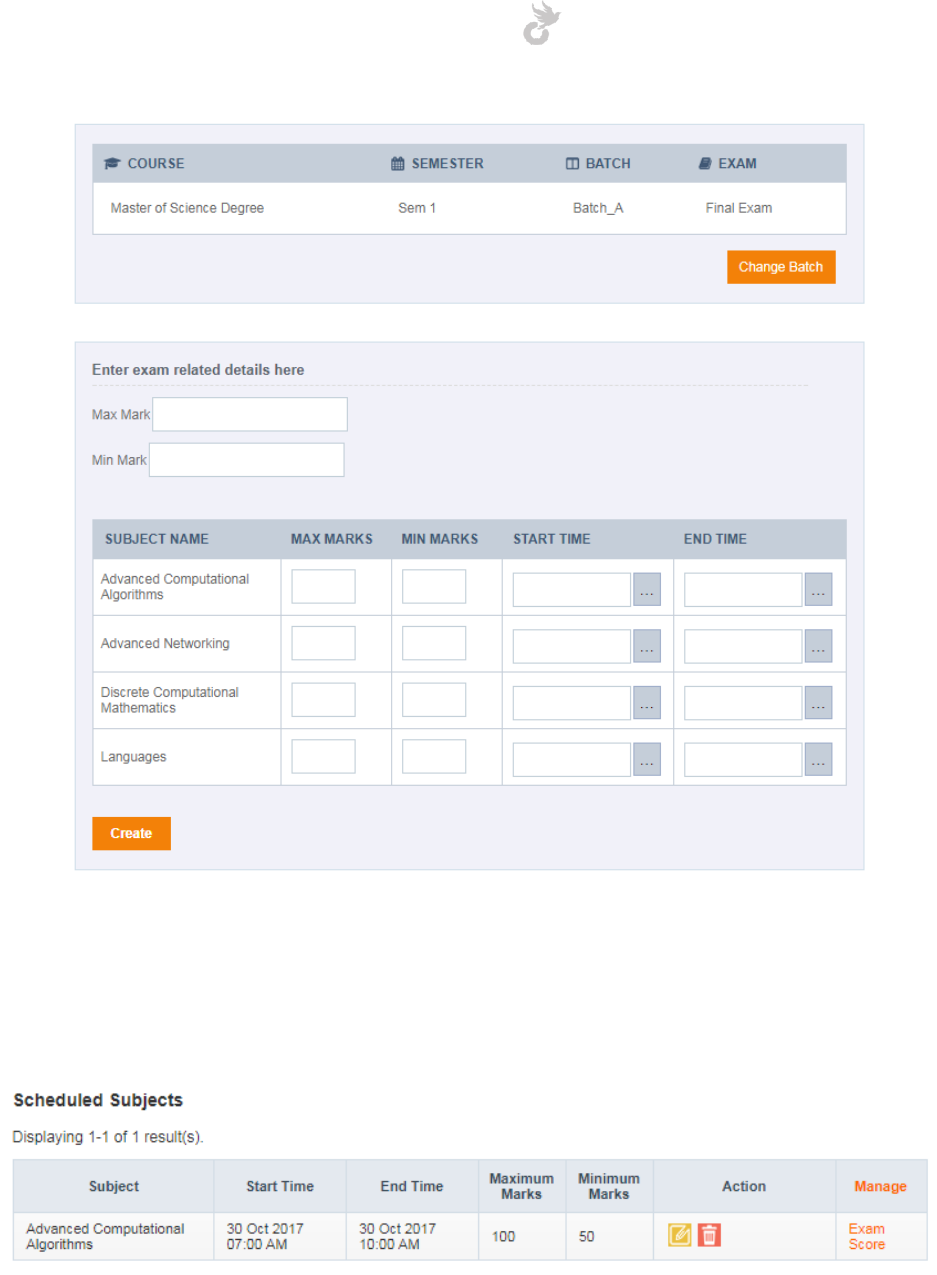
Open-School 2.6.5 Administrator Manual
124
You can use the Max and Min mark field on top to enter the same value for all subjects. Once
you have entered all the required data click ‘Create’ to save changes and create the exams. It is
not necessary to create all exams together.
You can now go ahead and enter scores for students by clicking the ‘Exam Score’ link against
the required subject.
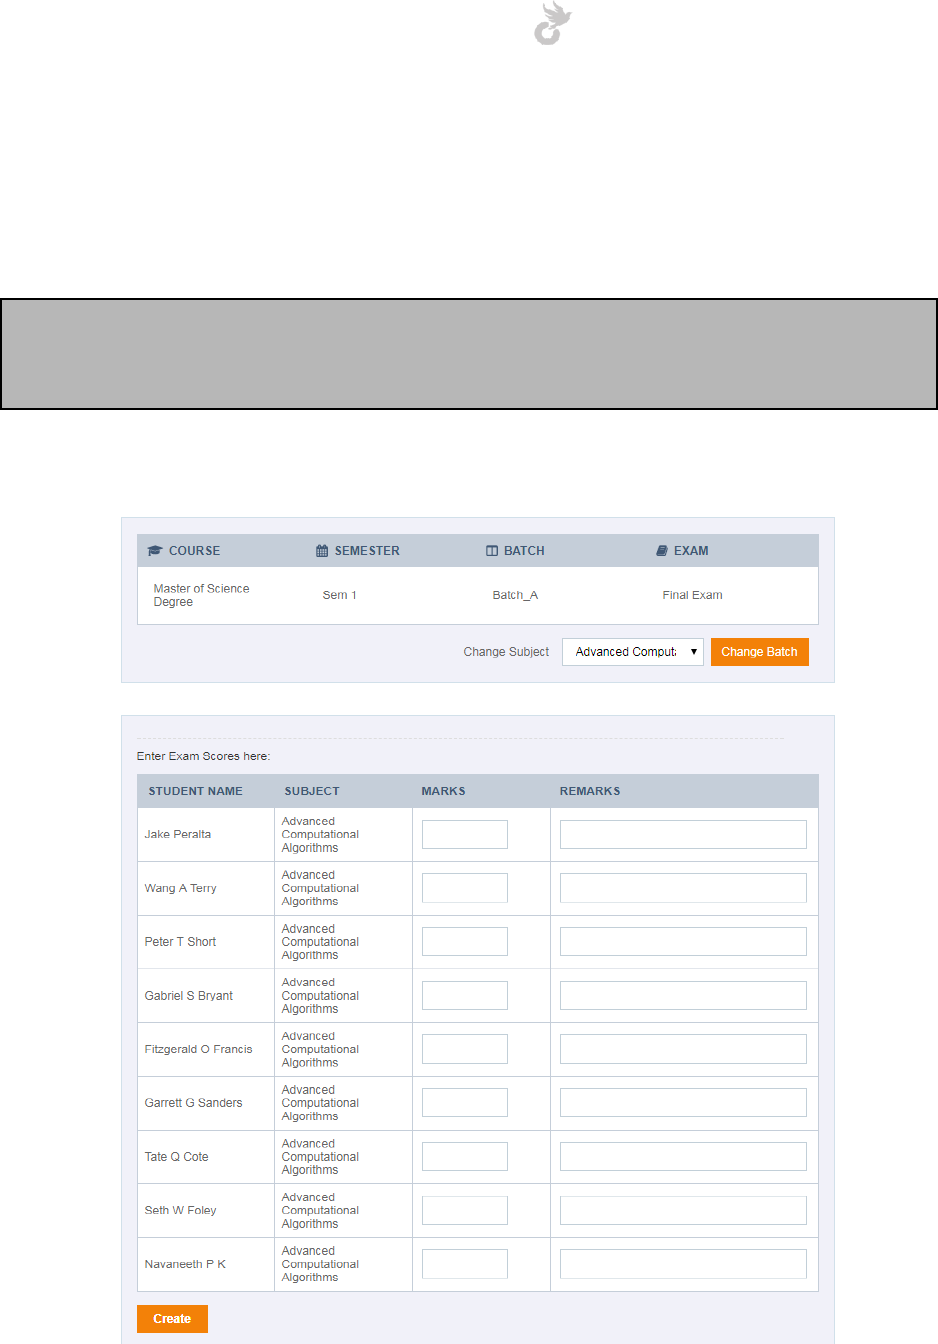
Open-School 2.6.5 Administrator Manual
125
7.1.4 Entering Exam Scores
Scores and remarks can be entered for students after creating the subject exams. Admins and
teachers associated with the batch can enter scores for students.
Note: Class teachers can enter scores for all subjects in the batch associated with him/her.
Subject teachers can only enter scores for the subjects they are assigned to. Make sure they
are assigned in the timetable too.
Click on the ‘Exam Score’ link against a subject to get started.
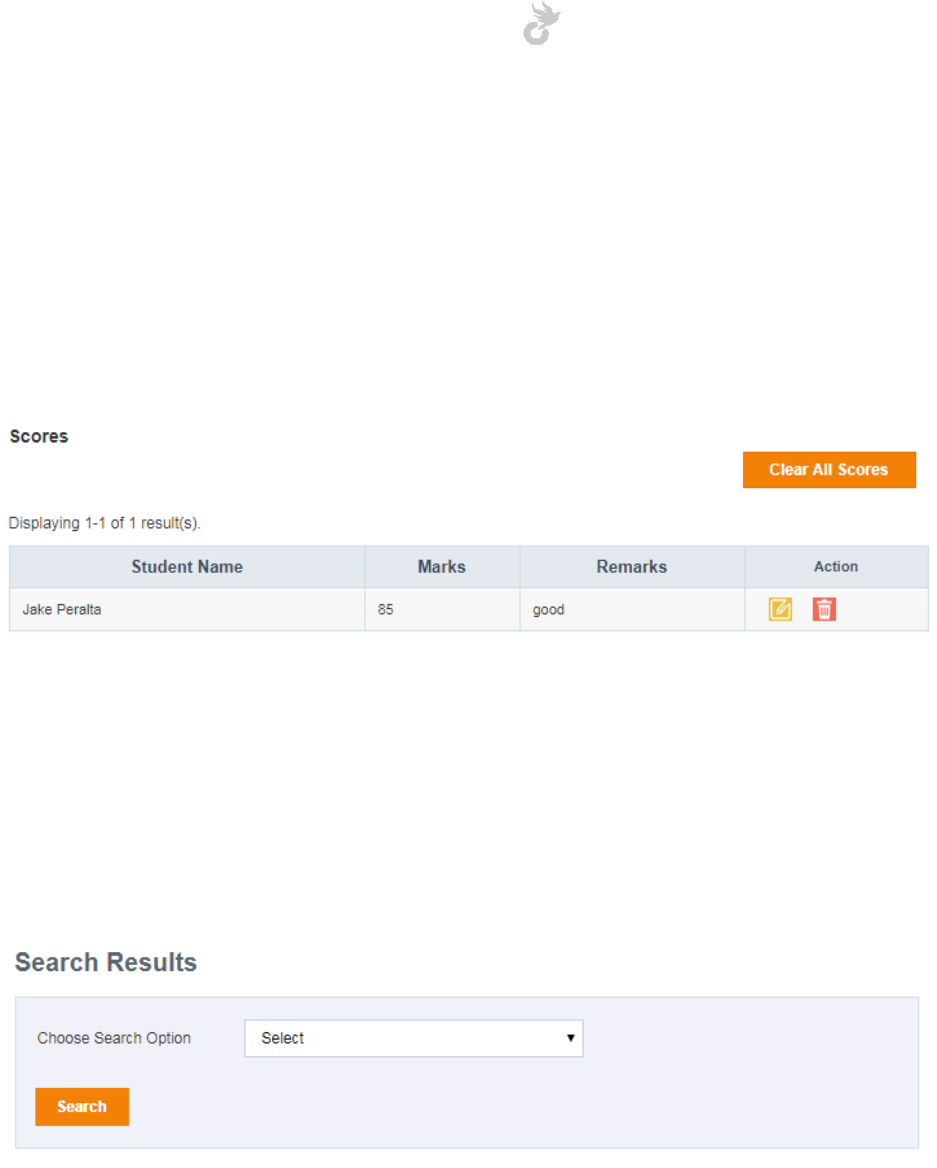
Open-School 2.6.5 Administrator Manual
126
Enter the marks and remarks if needed for each student here. To save changes click the ‘Create’
button at the bottom of the page.
You can switch subjects using the subject dropdown next to the change batch button. Student’s
will be listed if you have created an exam for the chosen subject.
Scores entered are listed at the bottom of the page. Scores will be displayed depending on the
Exam Type you have selected.
You can edit/delete scores from here. You may also clear all scores entered.
7.1.5 Exam results
Exams results can be viewed once the scores have been entered. Click on the ‘Exam Results’
link in the left side menu to view options for pulling results.
The search has two options:
1. Course: Data for results can be pulled based on course/batch. You can view results for
all students in a particular course/batch or all courses/batches, for all subjects or for
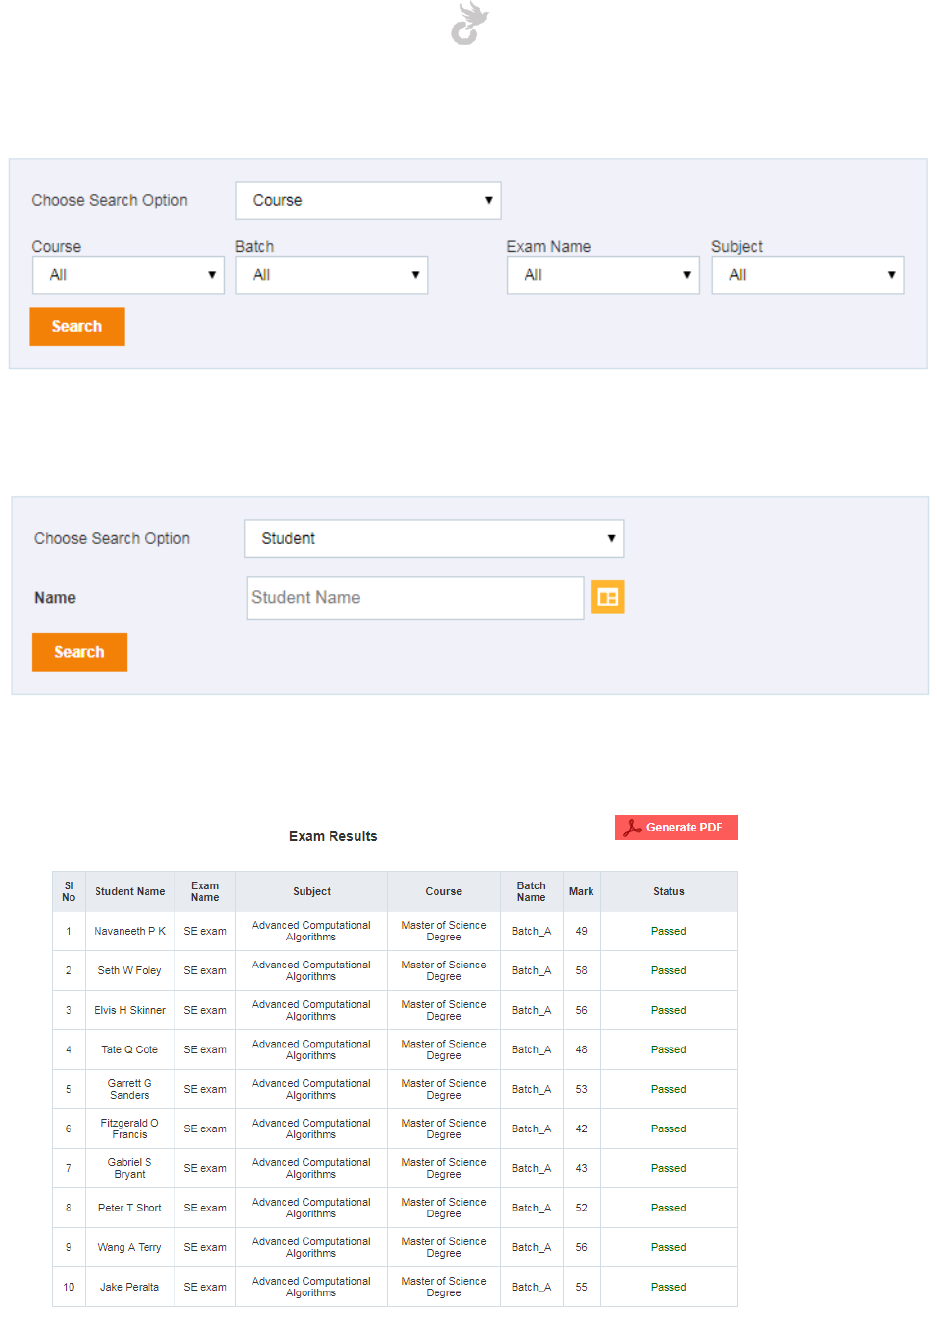
Open-School 2.6.5 Administrator Manual
127
individual subjects etc.
2. Student: The student name field is an auto-fill form, it lists names as suggestions when
you start typing. Simply choose a student from the list and search. You can also use the
app explorer icon next to the field to select a student from the app explorer.
The results will be displayed as shown below,
PDFs can be generated for this. The view will depend on the search option you choose.
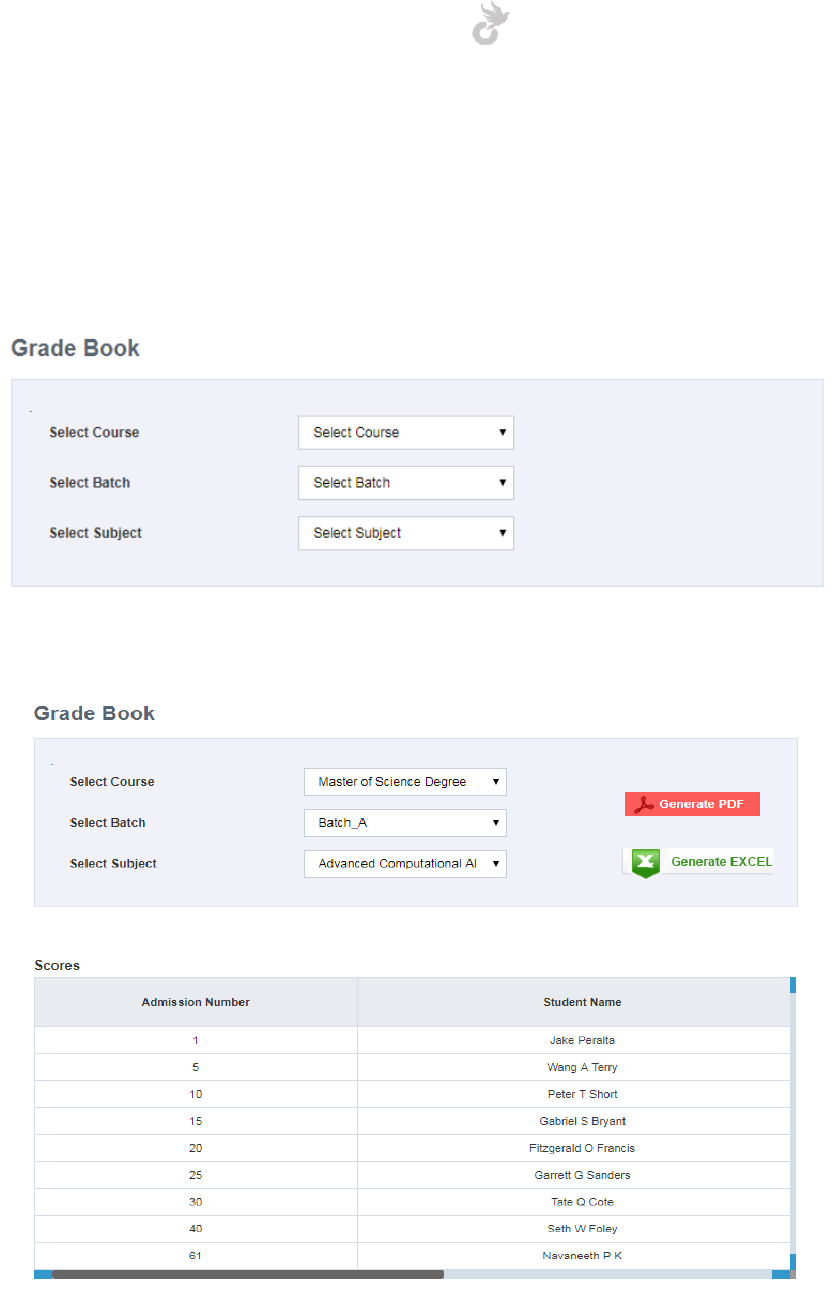
Open-School 2.6.5 Administrator Manual
128
7.1.6 Default Gradebook
The gradebook option in default examination is a cumulative report of all exam scores of a
student in the academic year. Scores of all exams for the subject will be listed here, you may
also generate excel and PDF reports for this.
Choose a course/batch and a subject under it to view the gradebooks for students.
Use the scroll bar to view more details in the box.
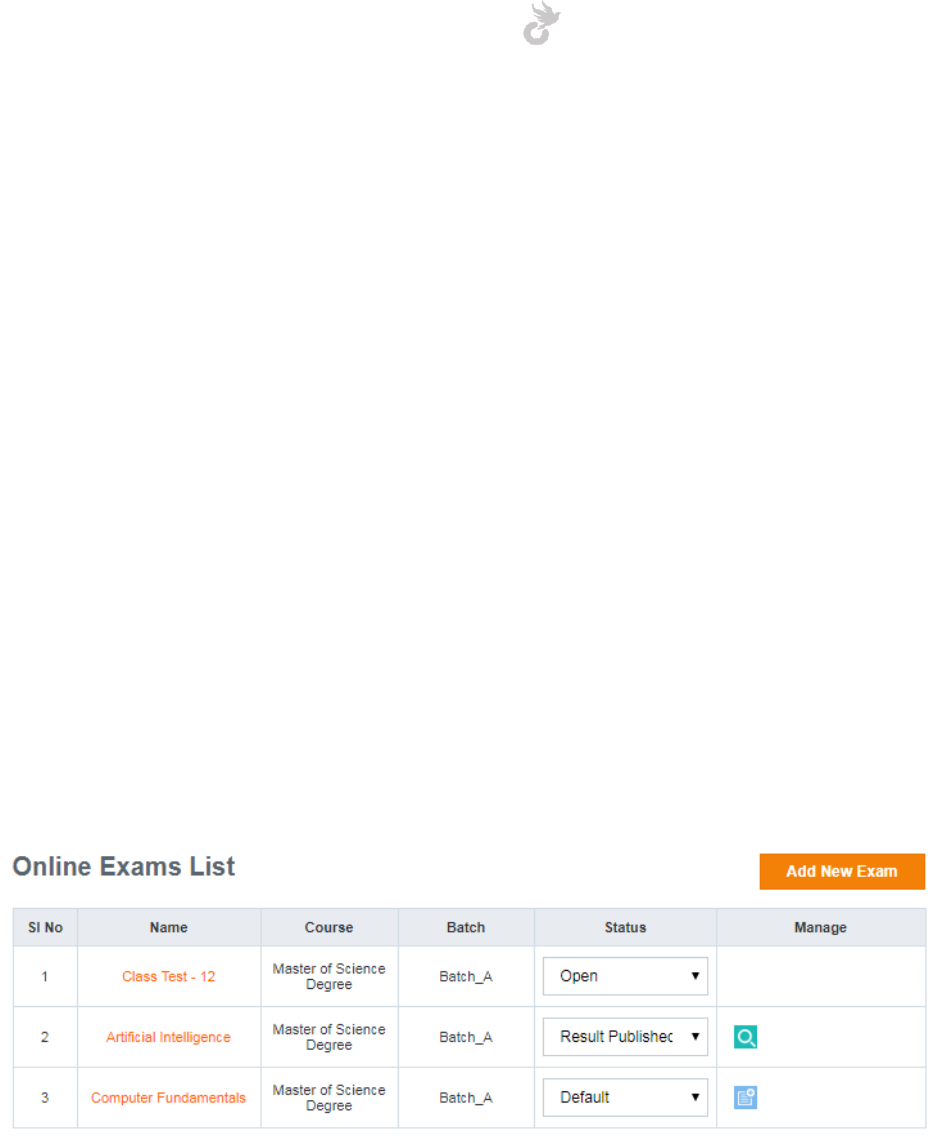
Open-School 2.6.5 Administrator Manual
129
7.2 CBSE Examination Format
TO BE UPDATED.
7.3 Online Exams
The online exam feature allows you and teachers to create online exams that can be attended
by students at a specified time for a specified duration through their portal. Questions can vary
from multi-choice, true/false to long and short answers.
7.3.1 Creating an online exam
Click on the ‘Online Exam’ link in the left side menu of the Examination Module to list the
online exams already created.
To create a new exam click on the ‘Add New Exam’ button.
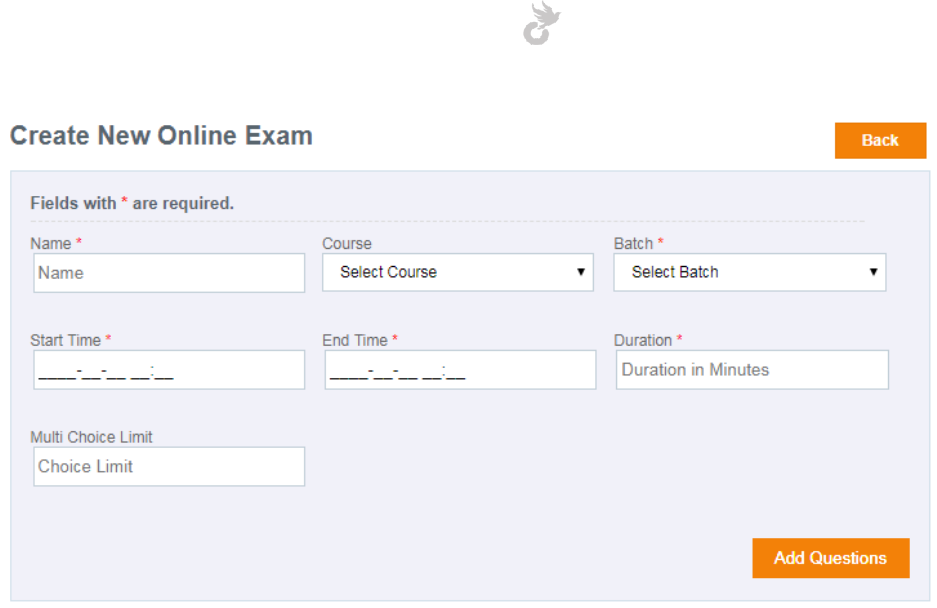
Open-School 2.6.5 Administrator Manual
130
The form displayed has the following fields,
1. Name: Name of the examination you want to conduct
2. Course: Select the course
3. Batch: Select the batch under the chosen course for which you want to create the exam
4. Start time: Choose a start time
5. End time: Choose an end time
The start and end time simply indicates the time window during which the students can
attend the exam.
6. Duration: Enter the total duration of the exam in minutes. The session will be
automatically terminated after this duration has passed starting from the given start
time.
Students will be able to attend the exam only if he/she accesses it within 1 hour from
the specified end time.
7. Multi choice limit: Indicates the number of multiple choices you can offer for your
multiple choice questions.
Once you have entered all required data click the ‘Add questions’ button to save the exam
details and go ahead with creating the questions for it.
Adding your questions
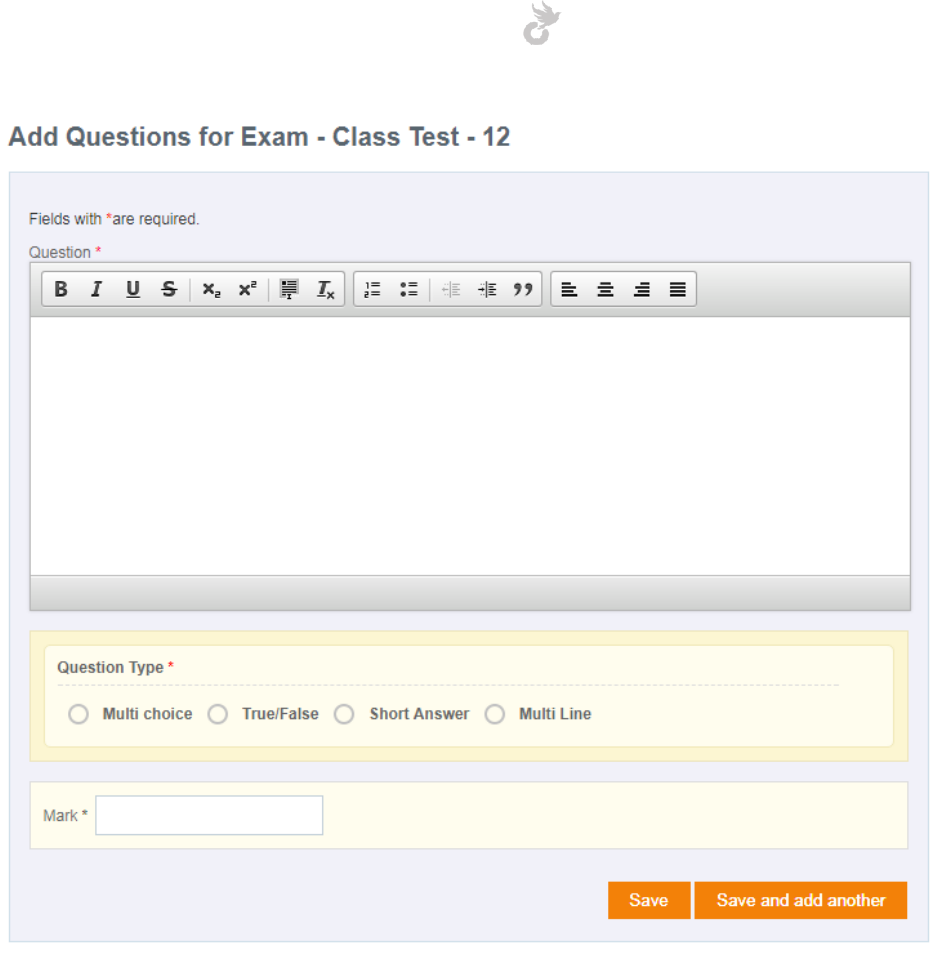
Open-School 2.6.5 Administrator Manual
131
You can enter your question in the editor as shown above. Question type can be selected at the
bottom. Your options for multi choice will be limited to the number you entered in the previous
step.
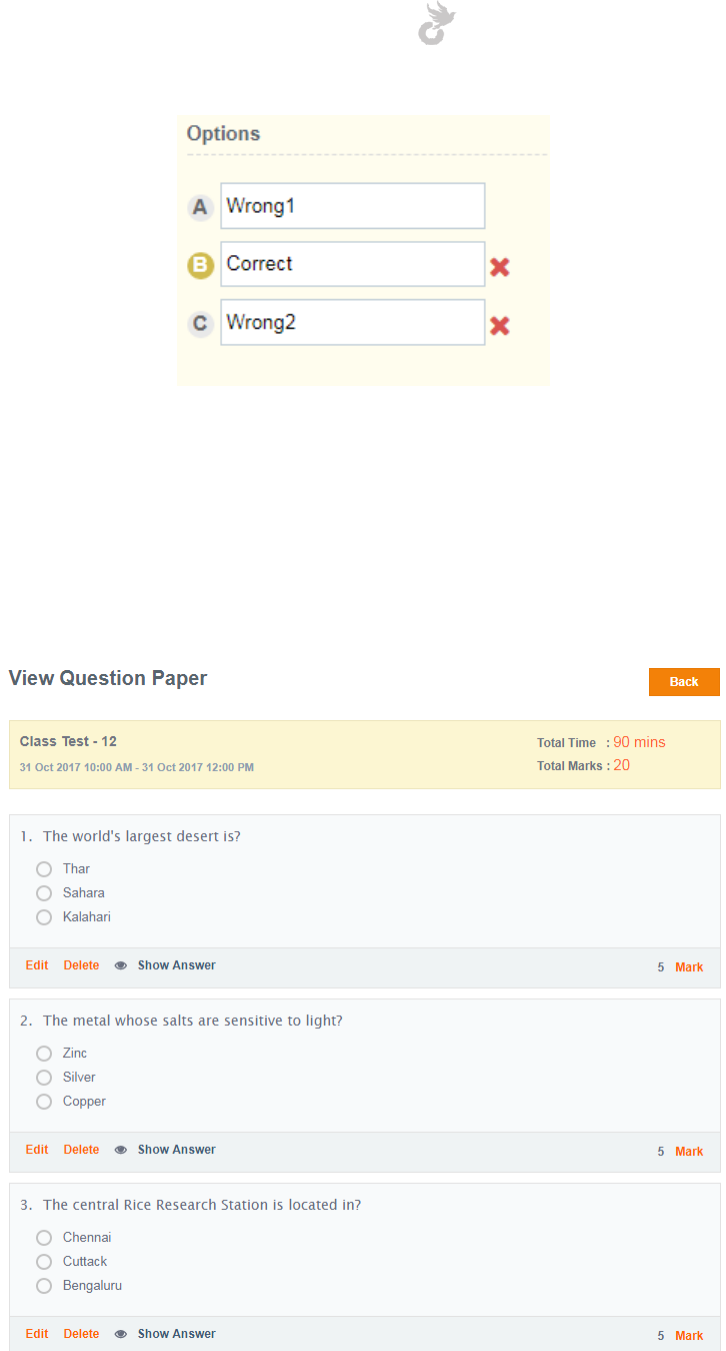
Open-School 2.6.5 Administrator Manual
132
Options can be added using the ‘Add’ button. To remove an option click the remove icon next
to it. To choose your correct option click the alphabet corresponding to it.
Enter a mark for the question.
You may now go ahead and save or save and add another question. Questions can be added
later too.

Open-School 2.6.5 Administrator Manual
133
Note: Multi choice and true/false answers and automatically calculated based on the
predefined answers you save. Short and long answers have to be evaluated by you.
Your exam will now be displayed in the list on the main page. You can use the options in the
manage column to add questions, edit or remove the exam. These options will change based on
the status you set for the exam.
There are different statuses for the exam you create,
1. Default: This is automatically set as you create the exam.
2. Open: Setting the exam to open will allow students to attend the exam at the specified
time. You will not be able to edit or add questions at this point.
3. Closed: This closes the examination. Students will not be able to attend it anymore. The
option to evaluate the exam answers will be available with this status.
4. Result Published: This status allows you to view the results of the students and they too
will be able to view it from their portal.
7.3.2 Evaluating online exams
After your students have attended the online exam you hosted, you will be able to evaluate
them. Multi choice and true/false answers are automatically calculated based on the mark and
predefined answers you added while creating the questions. The option to evaluate each
student’s answer raises if there are short or long answer questions in the paper.
Evaluation is possible only if the status is set to ‘Closed’. You should be able to see the verify
icon for the exam once it has been closed and the end time has elapsed.
Click on the ‘Evaluate’ link corresponding to a student to check answers.
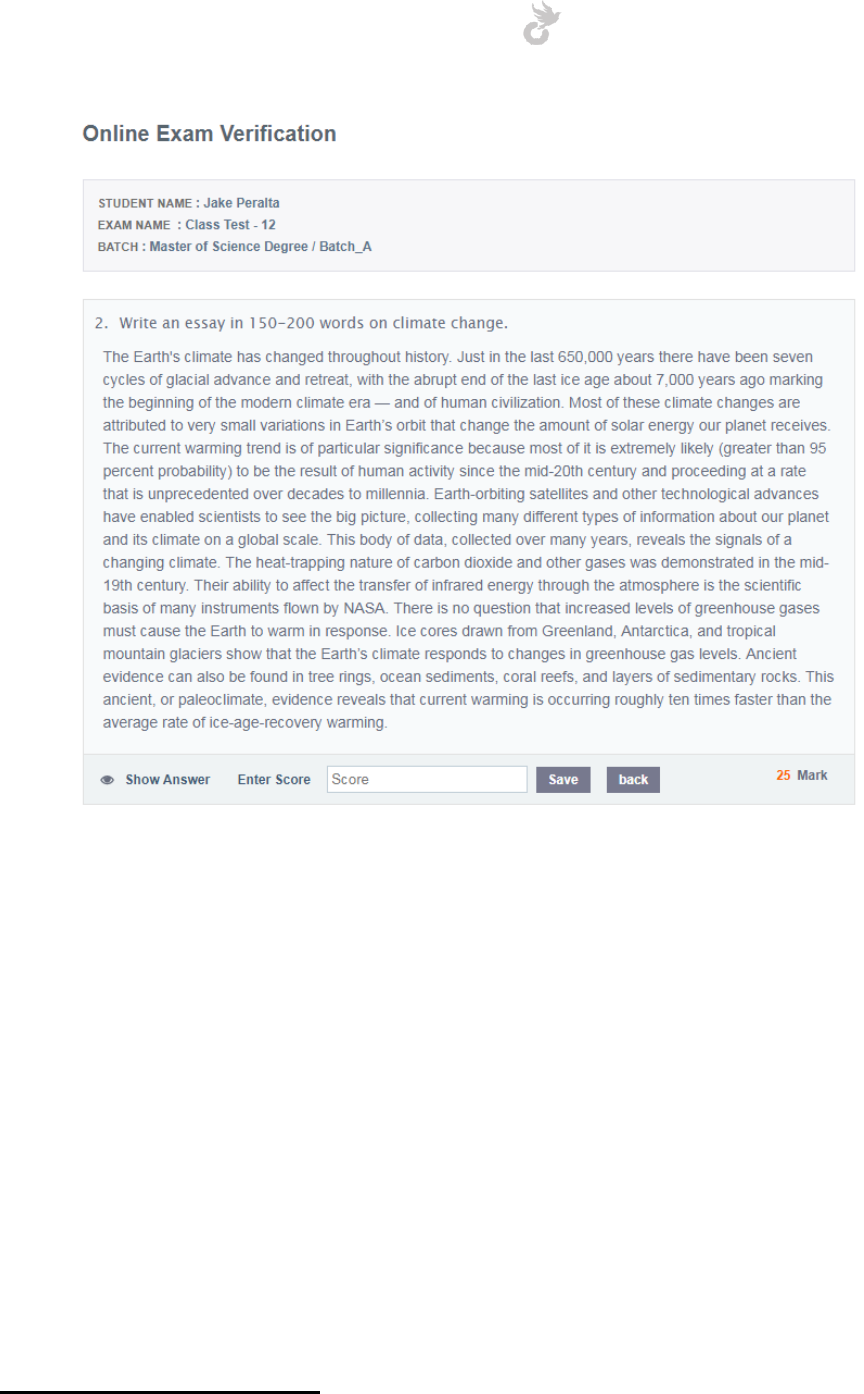
Open-School 2.6.5 Administrator Manual
134
You can enter a score and save the mark for the answer. Total marks for the question is
displayed on the right corner. You may also see the predefined answer by clicking the ‘Show
Answer’ link in the left corner.
8. ATTENDANCE
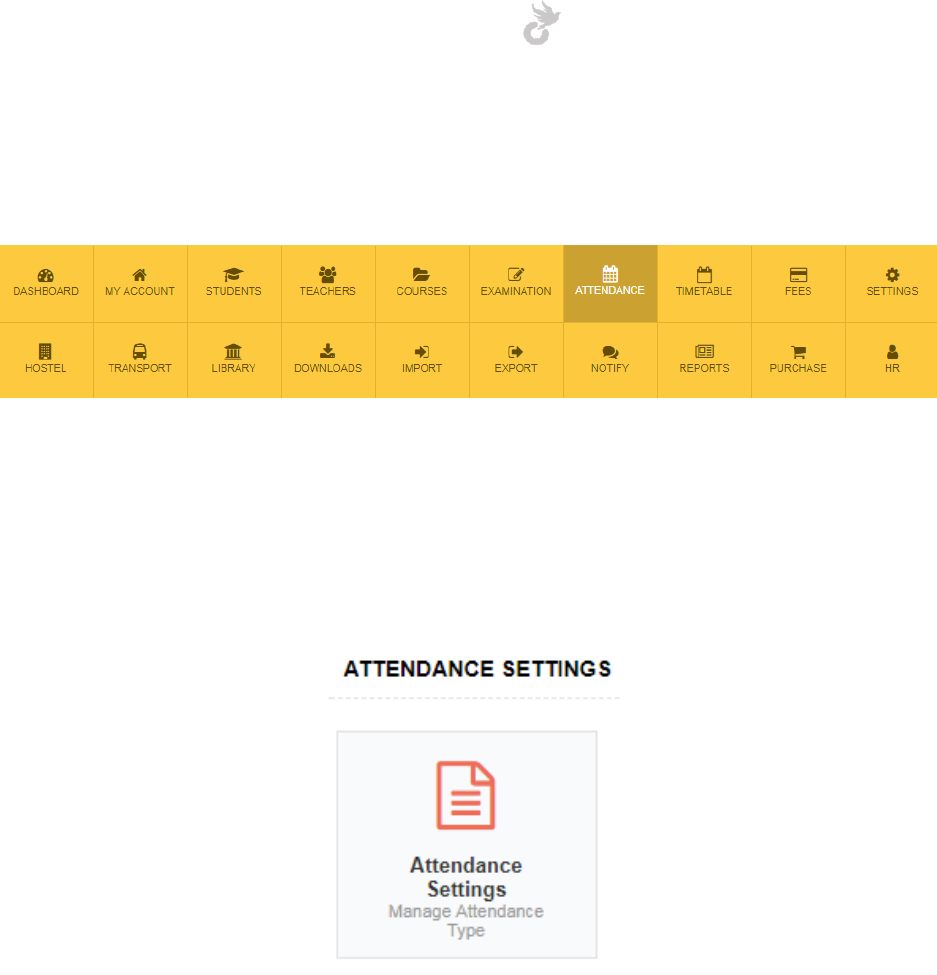
Open-School 2.6.5 Administrator Manual
135
The attendance module allows you to manage both daily and subject-wise attendances for your
students and teachers. Presence is automatically marked as each working day passes.
Working days are defined by the weekdays you set for each batch. Default weekdays are
automatically taken for a batch if not configured individually. More details can be found in
section 1.4.
You can manage attendance types from the Settings Module > Attendance Settings.
This will bring up a pop-up window where you get to choose what type of attendance you
would want to manage for students and teachers. Choose the option you need and click ‘Save’.
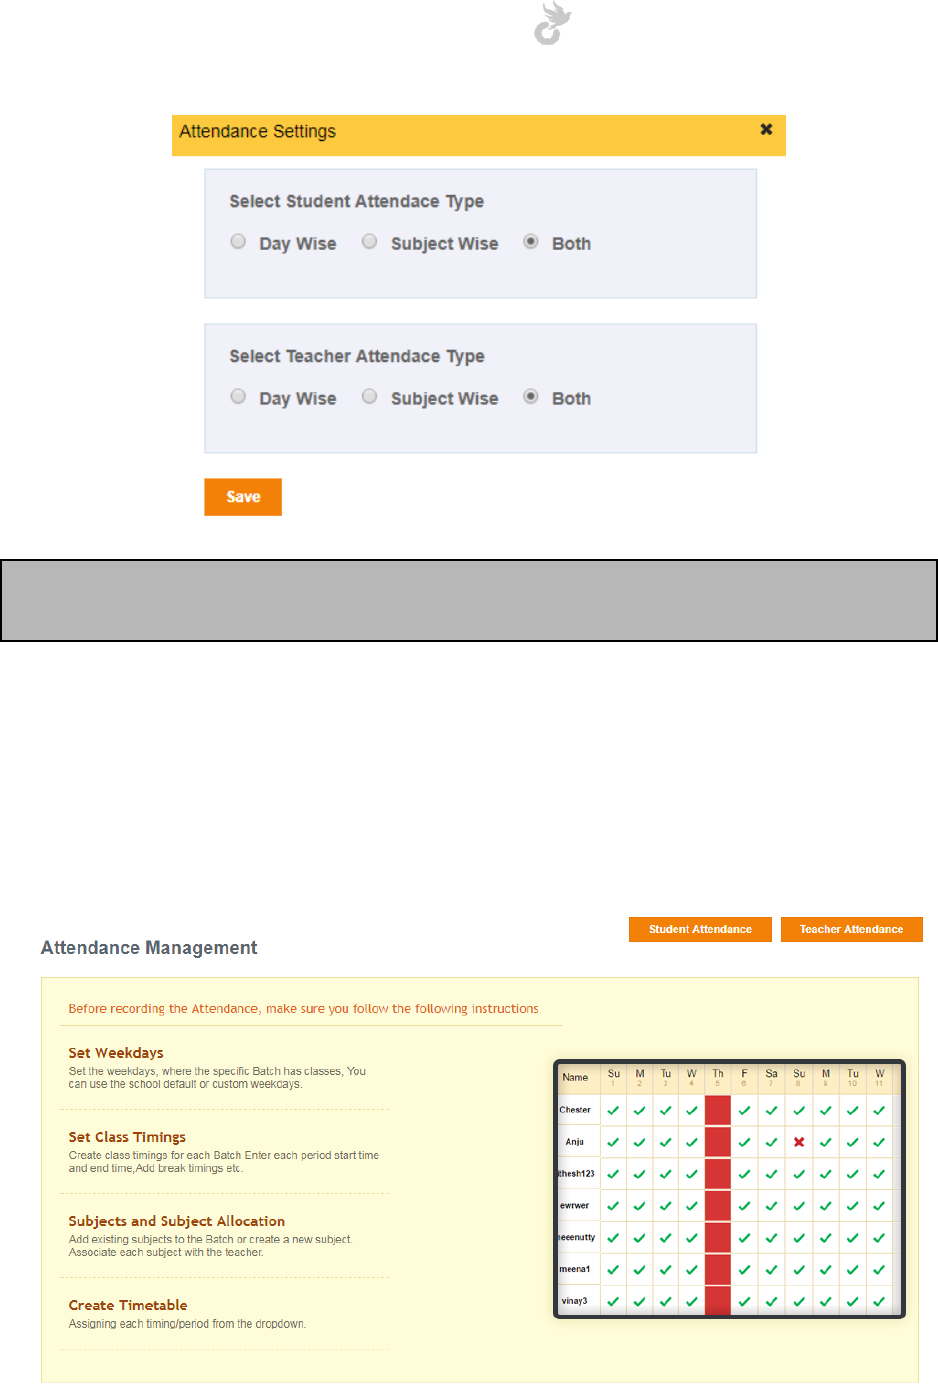
Open-School 2.6.5 Administrator Manual
136
Note: You will have to create leave types first to be able to mark leaves for both students and
teachers. Refer the respective modules to understand how to create leave types.
8.1 Student Attendance
Here you’ll learn how to mark attendances (subject and daily) for students, send notifications to
parents etc. Considering you have already created leave types, select ‘Student Attendance’ in
the Attendance Module dashboard to get started.
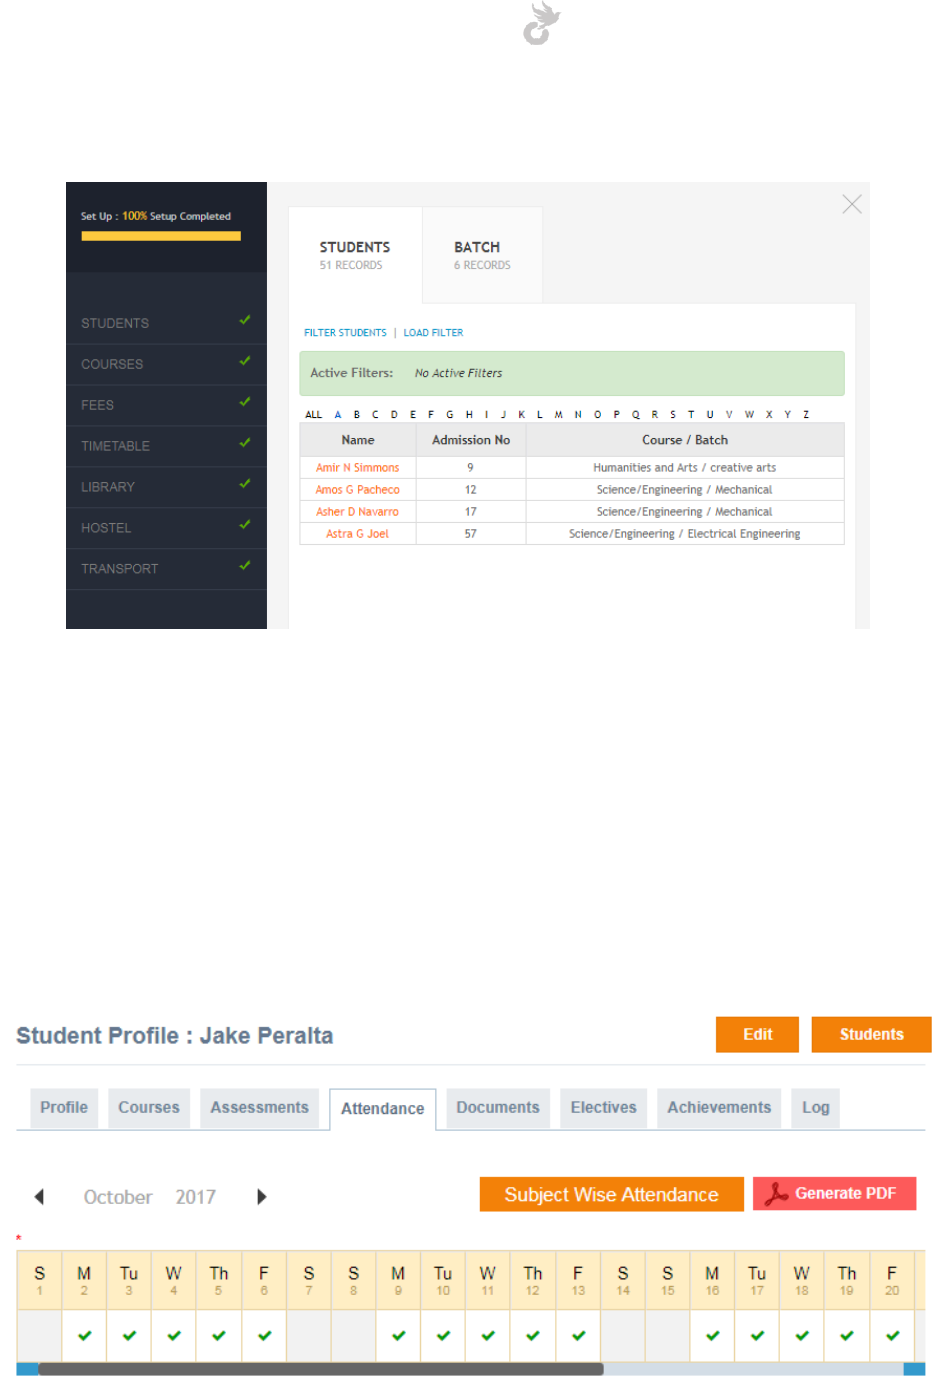
Open-School 2.6.5 Administrator Manual
137
This should bring down the app explorer which was earlier seen in section 1.7.
You can select individual students or even a batch to mark attendance.
8.1.1 Individual Attendance
Choosing an individual student from the app explorer will redirect you to his/her profile.
Depending on the attendance setting you have chosen you will be able to mark absences for
this student.
8.1.1a Individual Daily Attendance
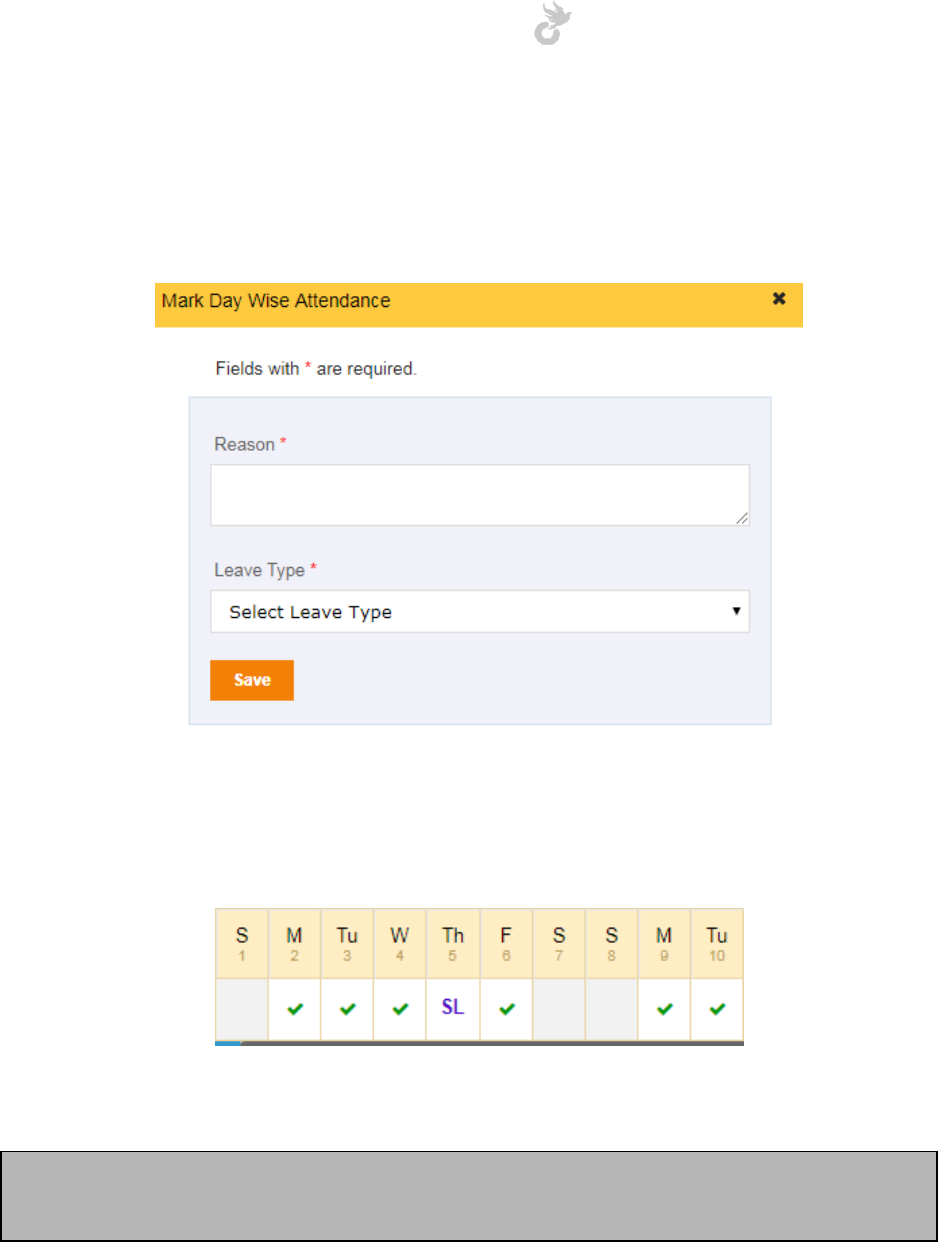
Open-School 2.6.5 Administrator Manual
138
As mentioned above, presence is automatically marked as each day passes. To mark an absence
simply click the box for the desired date. This should bring up a popup to enter the reason and
leave type.
Once you have entered the reason and selected the leave type simply click on ‘Save’ to mark
the absence. Now the label displayed on the attendance calendar will differ depending on the
leave type you have selected.
You can click on the same box to edit/remove the absence you have marked.
Note: Weekends are greyed out and will not be considered as working days in reports. You
will also not be able to mark absences for these days.
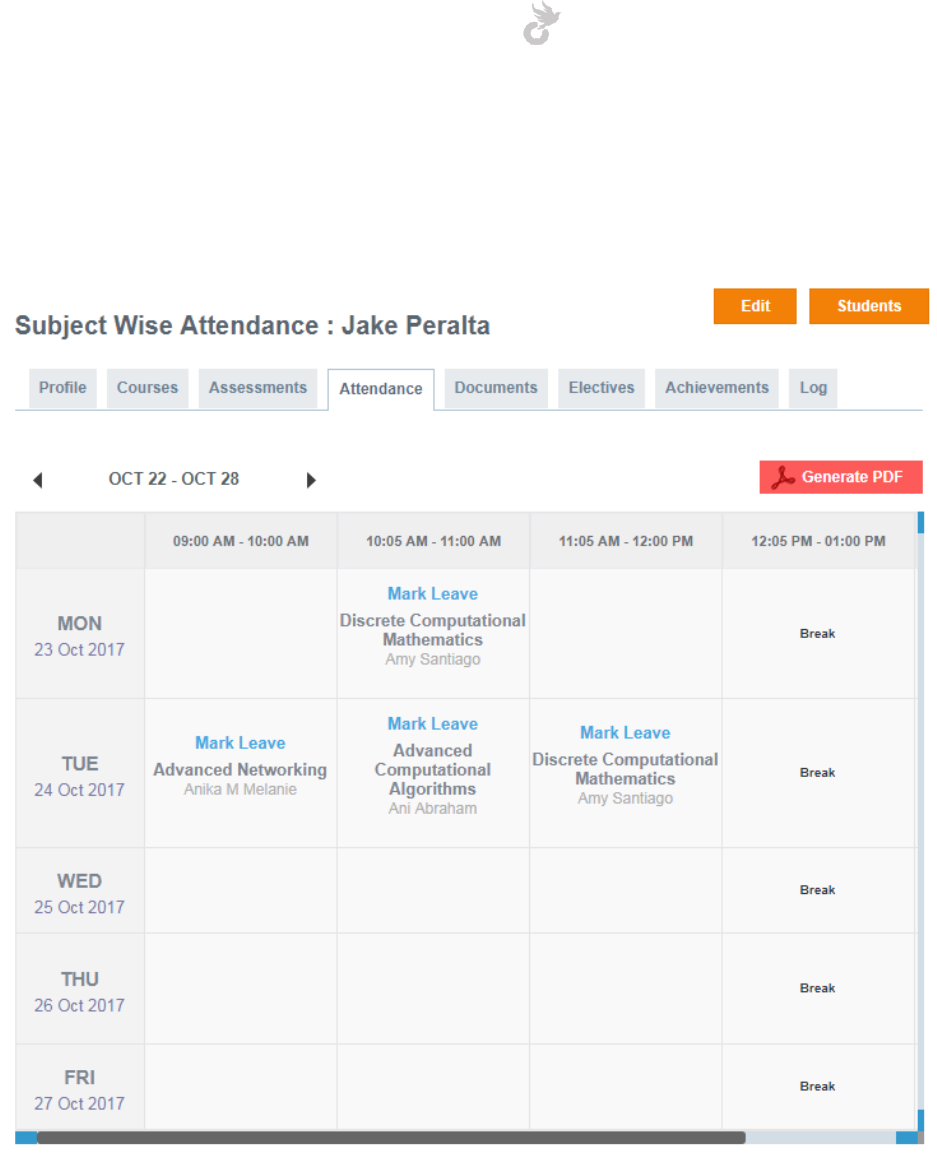
Open-School 2.6.5 Administrator Manual
139
8.1.1b Individual Subject wise attendance
To switch to subject wise attendance for the student click the ‘Subject Wise Attendance’
button.
Here you will be able to view each subject attendances for a week. By default the current week
will be chosen.
Click on the ‘Mark Leave’ link for a class to mark an absence. The form is the same as explained
in daily attendance. Marked absences can be edited or removed.
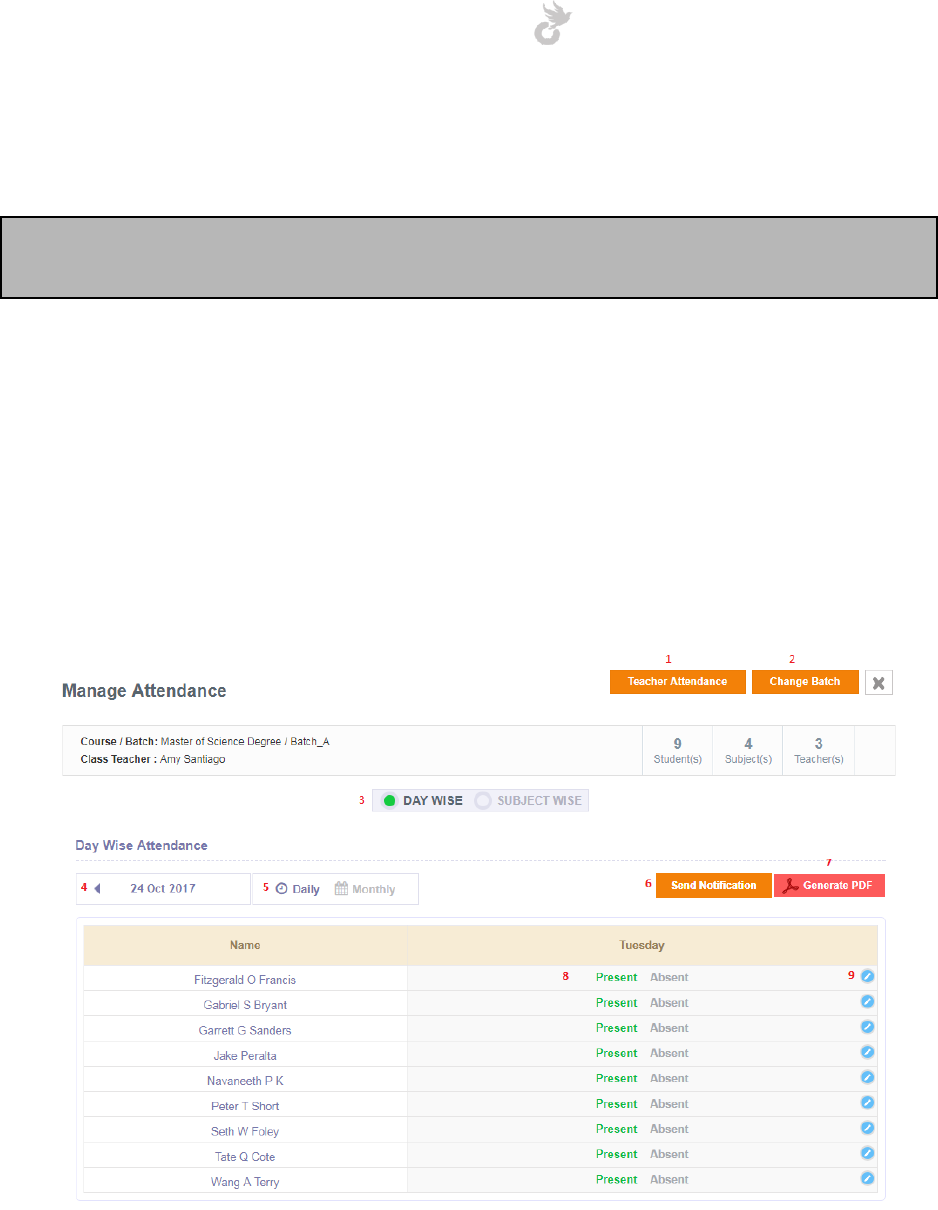
Open-School 2.6.5 Administrator Manual
140
Weeks can be switched by using the arrows next to the dates.
Note: You need to configure weekdays, class timings and timetable first to use the subject
wise attendance feature.
8.1.2 Batch Attendance
Selecting a batch from the app explorer displays all the students in it for marking attendance.
8.1.2a Batch daily attendance
The batch attendance page too has day wise and subject wise view like individual student
attendance. There is also a calendar view for daily attendance that displays the whole month
and a daywise view for subject attendance which allows you to mark subject attendance for a
day. The weekly view is also available.
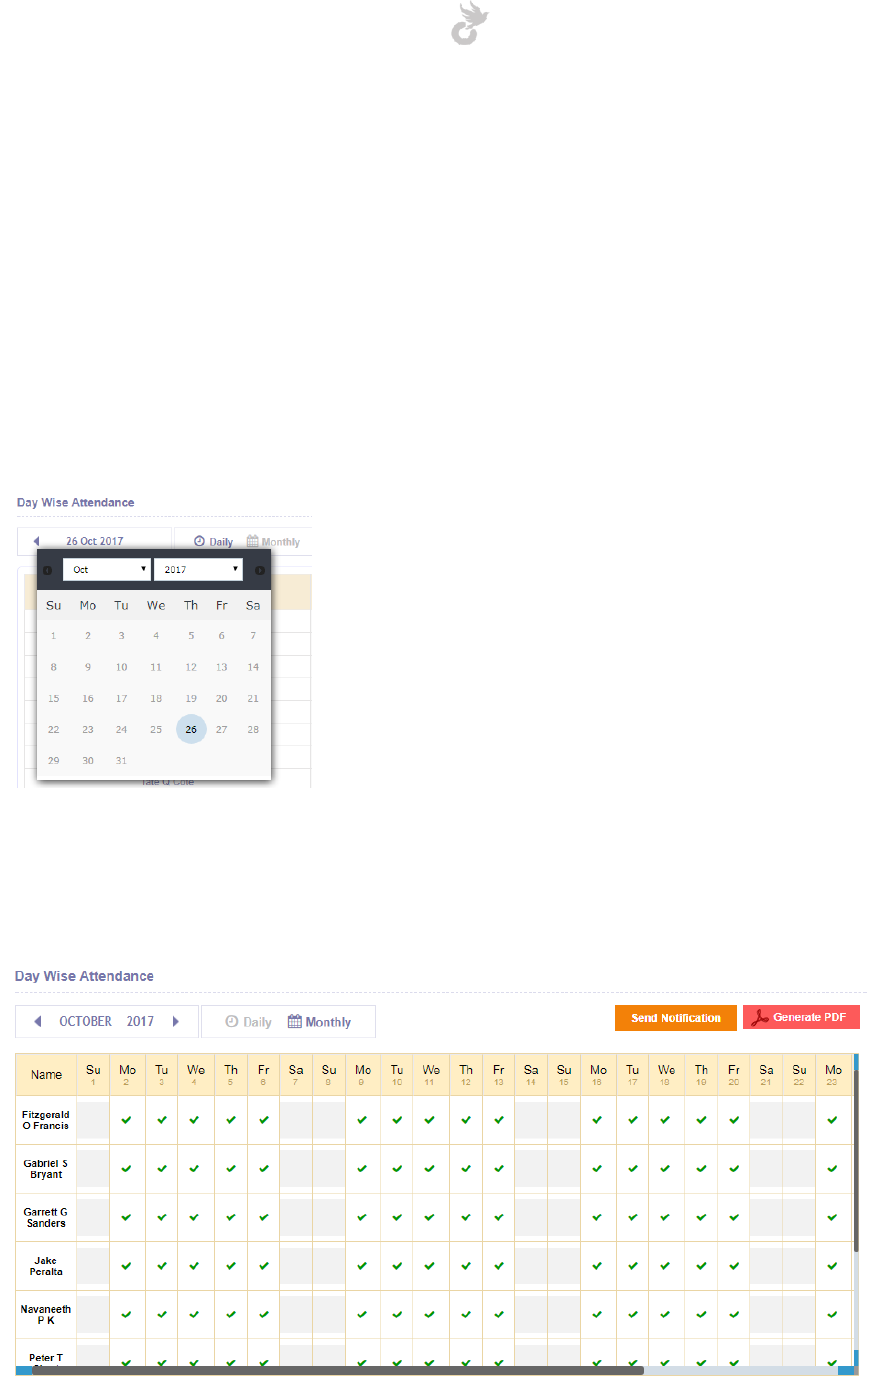
Open-School 2.6.5 Administrator Manual
141
Let’s take a look at the different areas marked in the picture above,
1. Teacher Attendance: This button redirects you to the teacher attendance page which
will be explained later.
2. Change Batch: You can use this button to change between batches without having to go
back. The change batch button brings down the app explorer.
3. Day wise / Subject wise: This option allows you to toggle daily and subject wise
attendance. Simply click on the circle next to the option change views.
4. Date: This area displays the current date. You can use the arrows on the sides to switch
dates. Click on the date itself to view the date picker for more options.
5. Daily / Monthly view: This option allows you to switch between the daily and monthly
view. The monthly view is as shown below, you have already seen it in student
individual attendance.
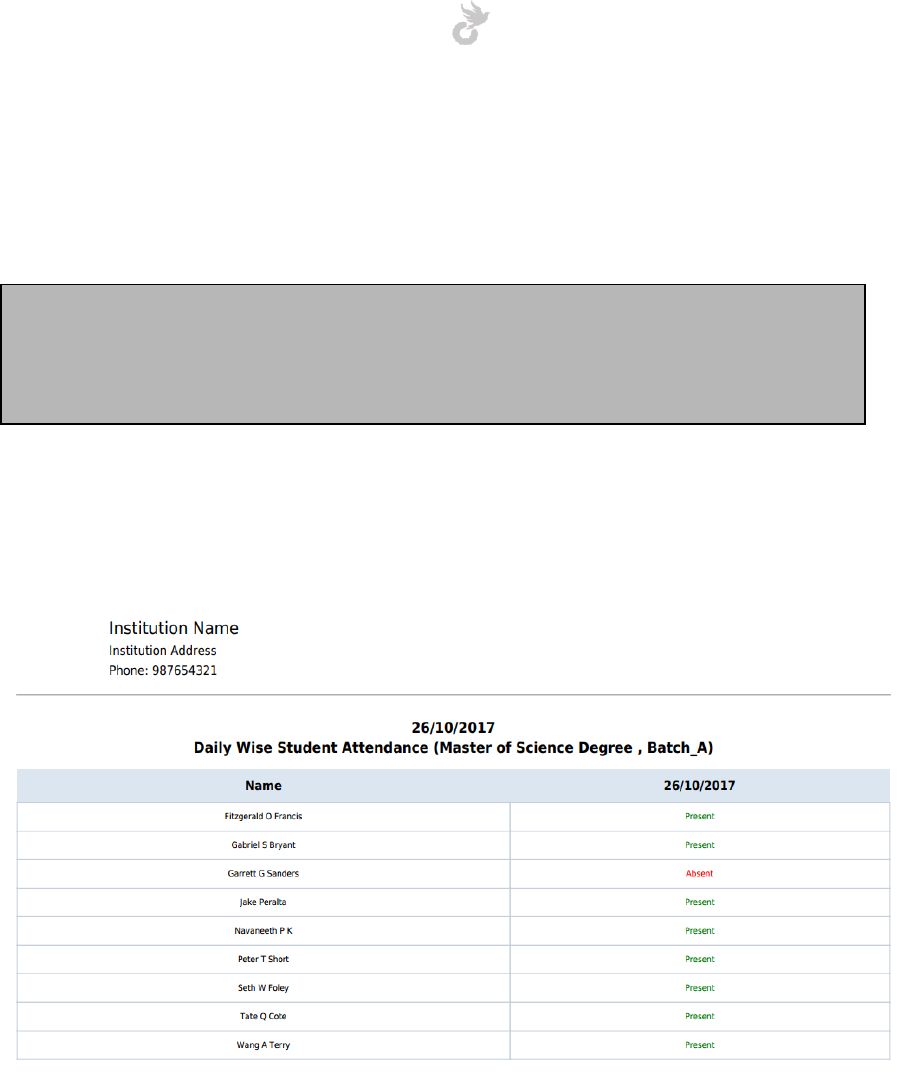
Open-School 2.6.5 Administrator Manual
142
6. Send Notification: This button allows you to send a notification to parents. Clicking this
button checks the selected date in daily view and current date in calendar view for any
absentees and sends out email and sms notifications to parents of all students who
were absent for that day.
Note: Templates for these notifications can be viewed and edited in Notify Module >
Email Templates / SMS Templates. They can also be accessed from the Settings
Module. Notifications can be enabled / disabled from the Notification Settings option
in the Settings Module. Details will be explained in the Settings module section
7. Generate PDF: This button allows you to generate a PDF for the selected view. Below
are the different PDF views in attendance
Day view
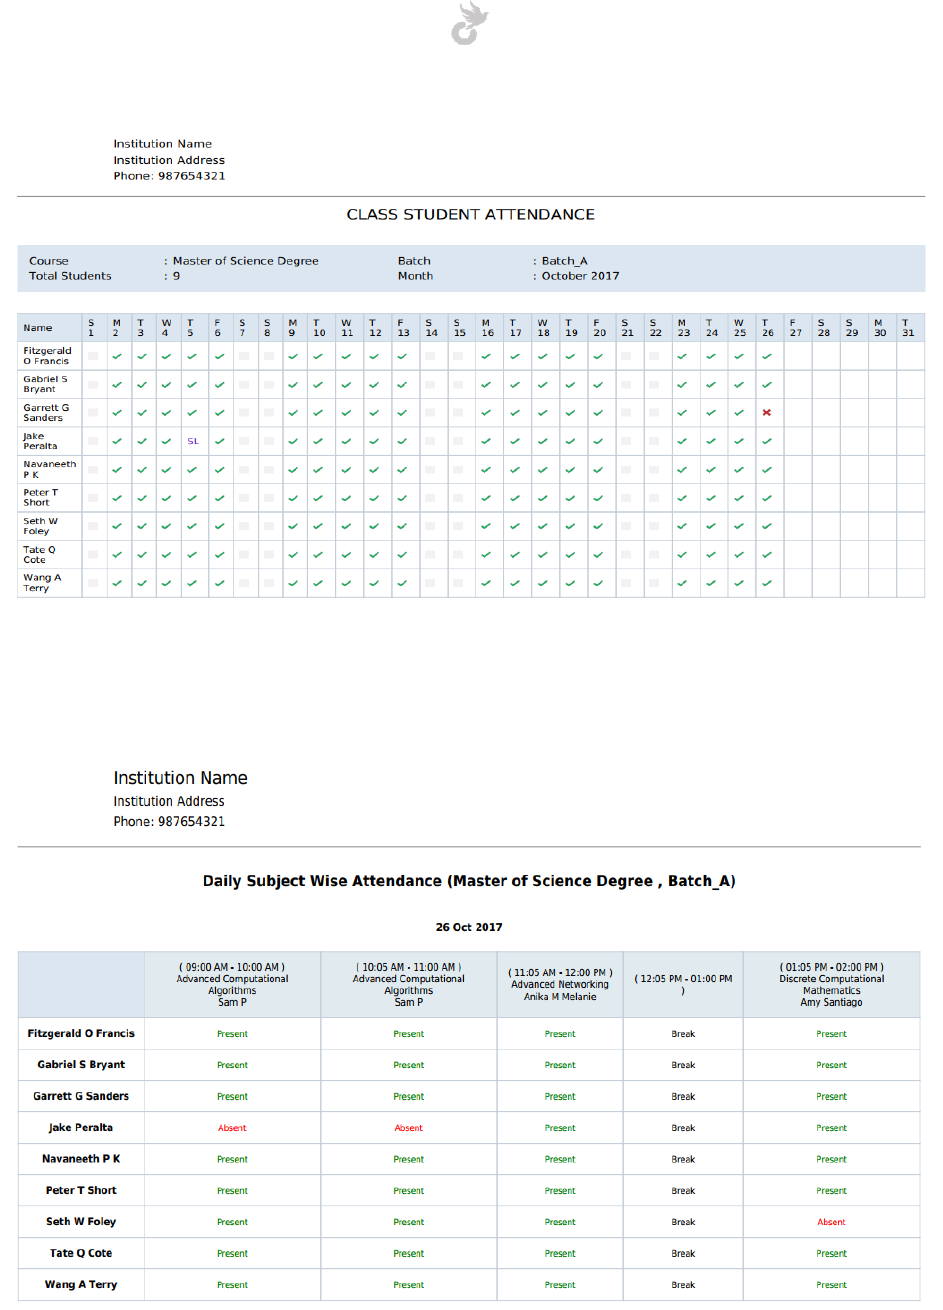
Open-School 2.6.5 Administrator Manual
143
Calendar View
Subject Attendance in daily view
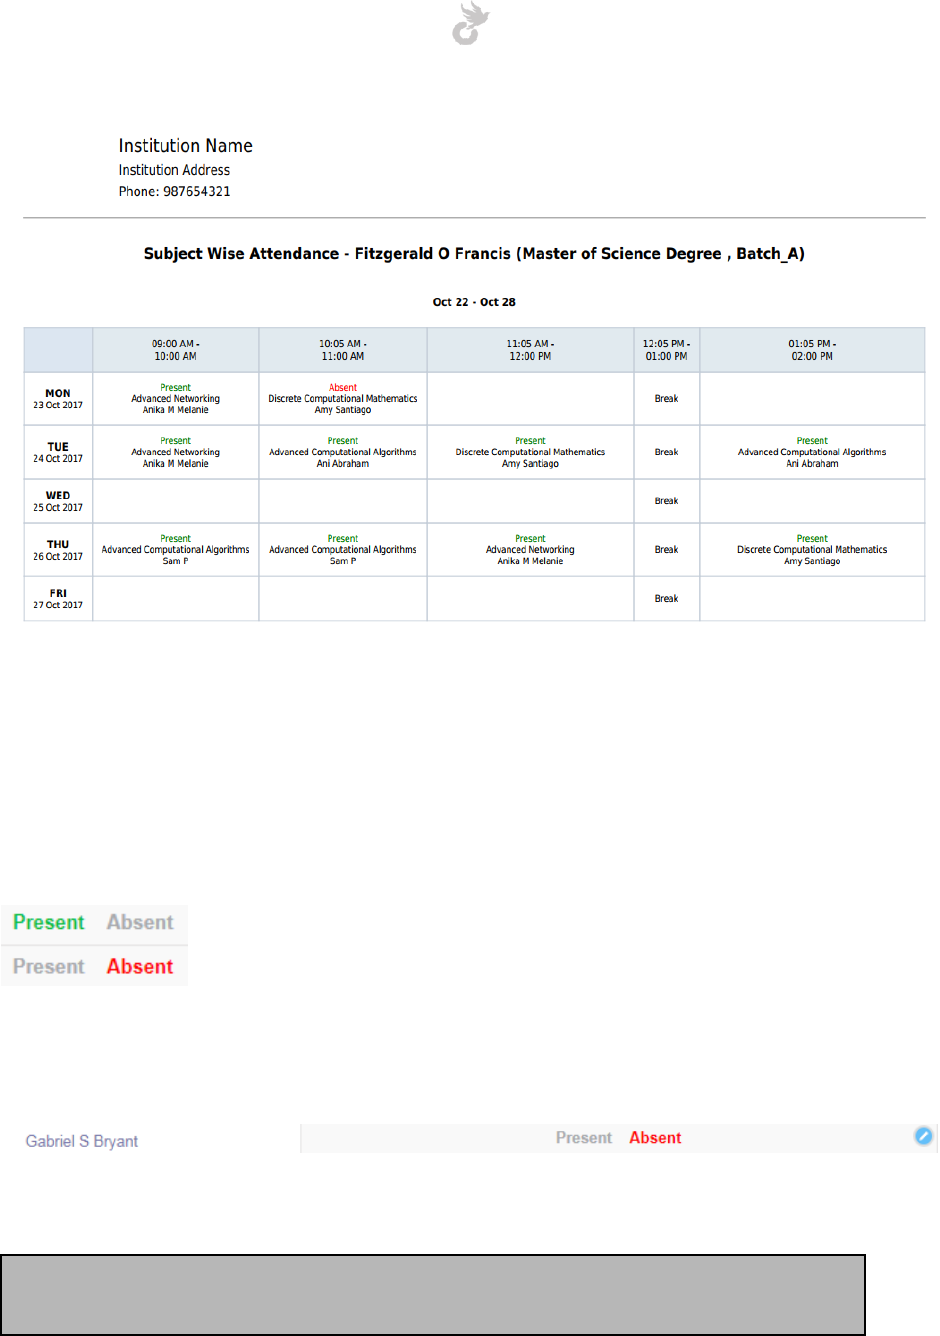
Open-School 2.6.5 Administrator Manual
144
Subject Attendance in weekly view
8. Present / Absent: This option allows you to toggle between present and absent for a
student. The present link is selected by default. To mark a student absent simply click on
absent. You will notice that the option you choose is highlighted.
9. Add / Update reason: The add reason option next to each student allows you to choose
a leave type and add a reason for leave to that student.
Note: Adding a reason automatically sets the student’s attendance to absent. To
remove an absence simply click on Present.
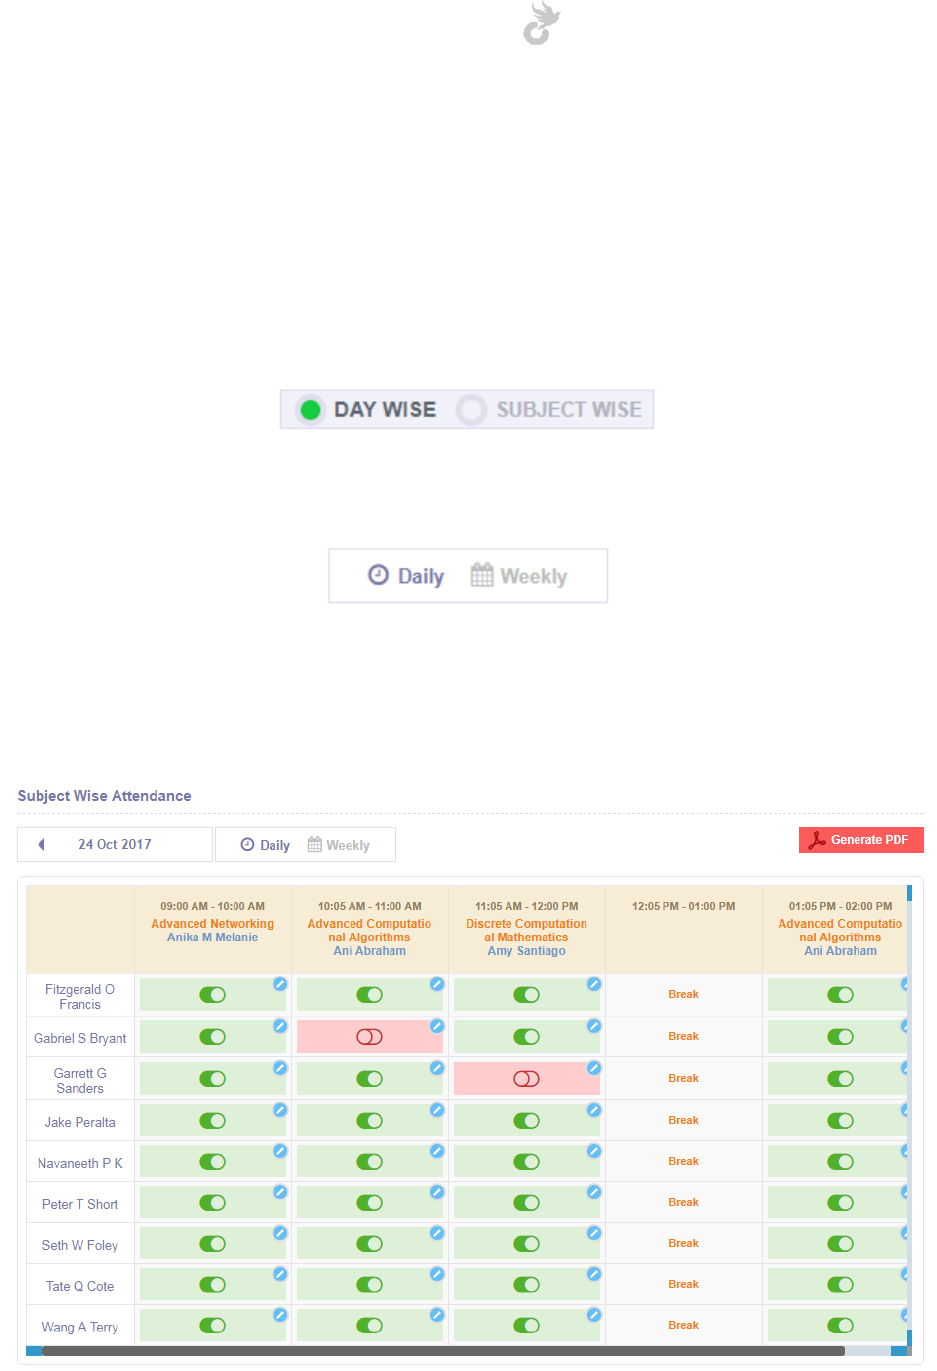
Open-School 2.6.5 Administrator Manual
145
8.1.2b Batch subject wise attendance
The subject wise attendance option allows you to mark absence for students based on class
timings and subjects attended for a day. You can toggle to subject wise attendance using the
option displayed below
The subject attendance option has two views,
Daily View
The daily view allows you to view all class timings/subjects for a certain day with all students in
the batch.
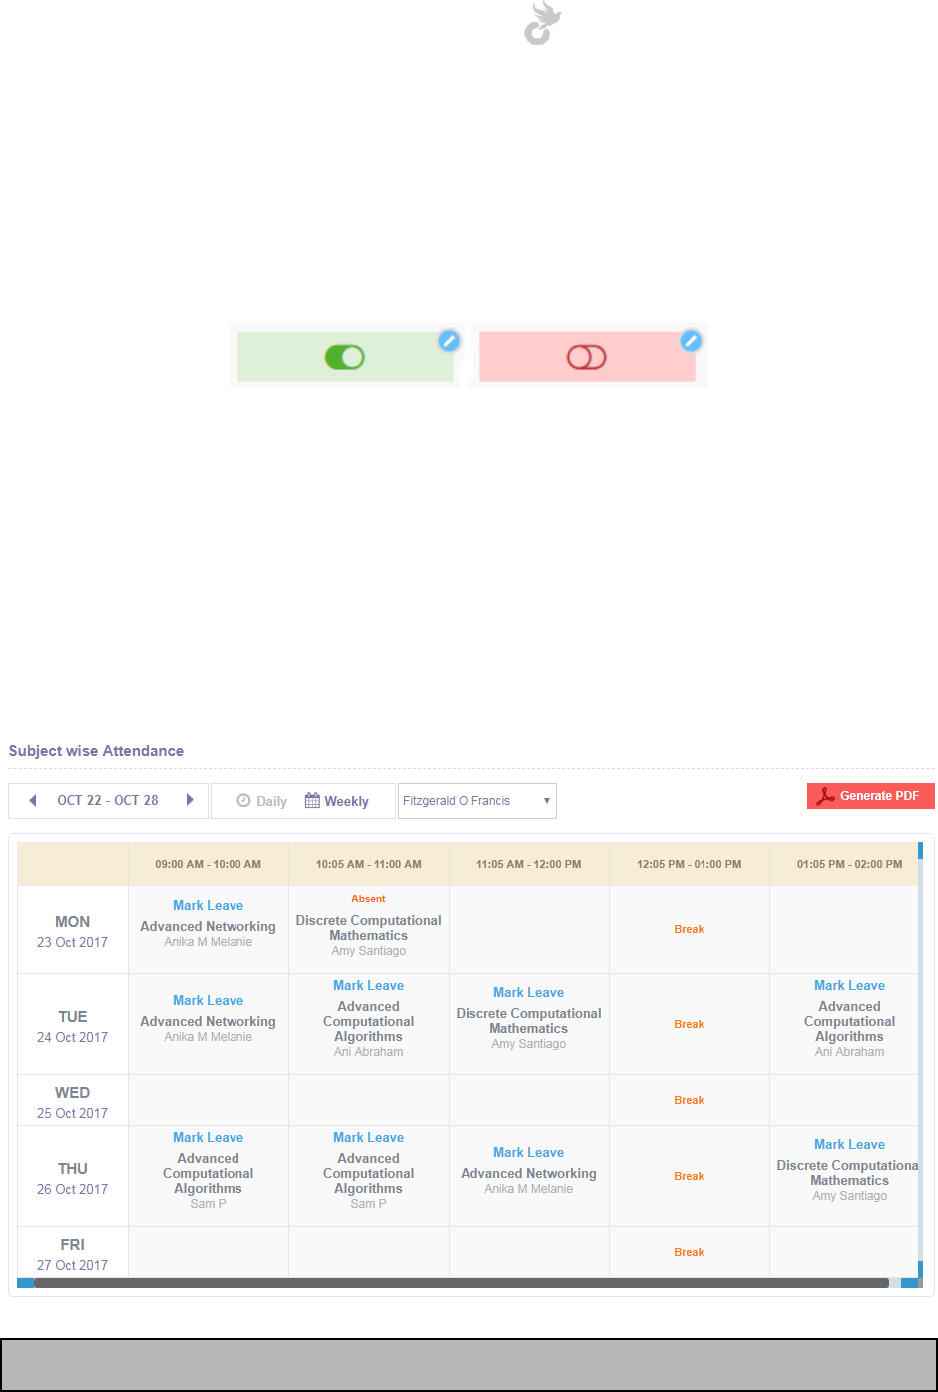
Open-School 2.6.5 Administrator Manual
146
Students are listed in the far left column as shown above. You can change the date using the
date selector.
Absences can be marked by simply clicking on the button to toggle between present and
absent. As always presence is marked automatically.
Present and absent in subject view
To add a reason simply click the blue icon. This will display the pop to add your reason and
select a leave type for the absence. To remove a marked absence click on the toggle again to
change it to present.
Weekly View
The weekly view displays all class timings for the selected week. This view is for individual
students.
Note: A slot will be empty if a subject/teacher has not been assigned for a particular timing.
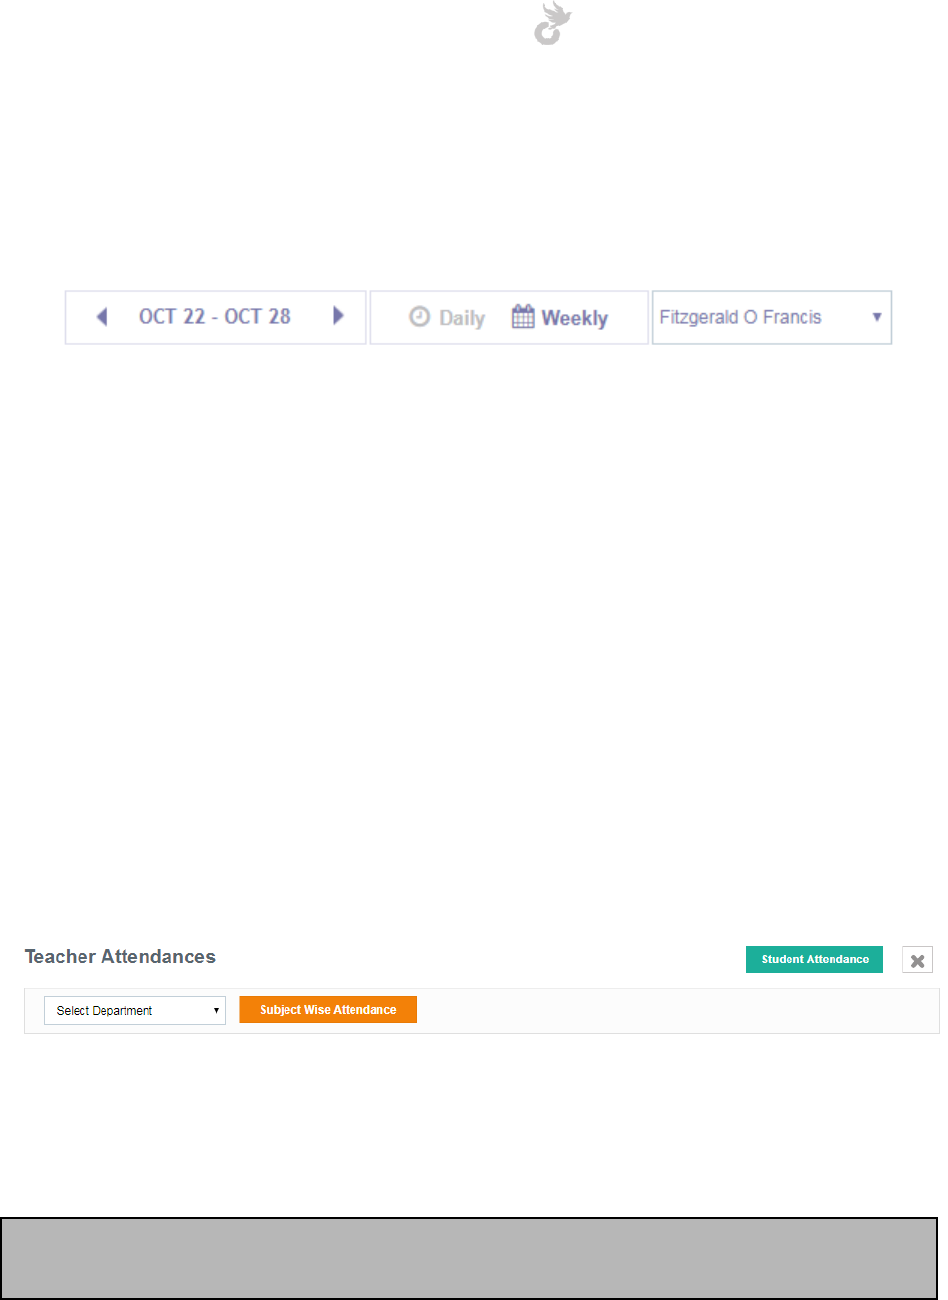
Open-School 2.6.5 Administrator Manual
147
To mark an absence click on the ‘Mark Leave’ option for the required subject. Enter your
reason and leave type in the popup that shows and click save to record the absence.
You can change the week and student from the tab shown below,
Use the arrows to switch between weeks. The required student can be selected from the
dropdown on the right.
8.2 Teacher Attendance
Teacher’s attendance is based on departments. They too have daily and subject wise
attendances. To get started click on the ‘Teacher Attendance’ button.
8.2.1 Teacher daily attendance
Select the department for which you would like to mark attendances for teachers.
On selection of department, you will be able to see all the teachers associated with it and the
calendar view to mark absences.
Note: Before marking absences make sure you have created leave types for teachers. This can
be done in the Teachers Module.

Open-School 2.6.5 Administrator Manual
148
Weekdays for teachers are defined by the ‘Default Weekdays’ configured in the Settings
Module > Course / Batch Settings.
Just like student attendance, teachers are also marked present by default as each day passes.
To mark an absence click on the block for the desired date corresponding to the teacher.
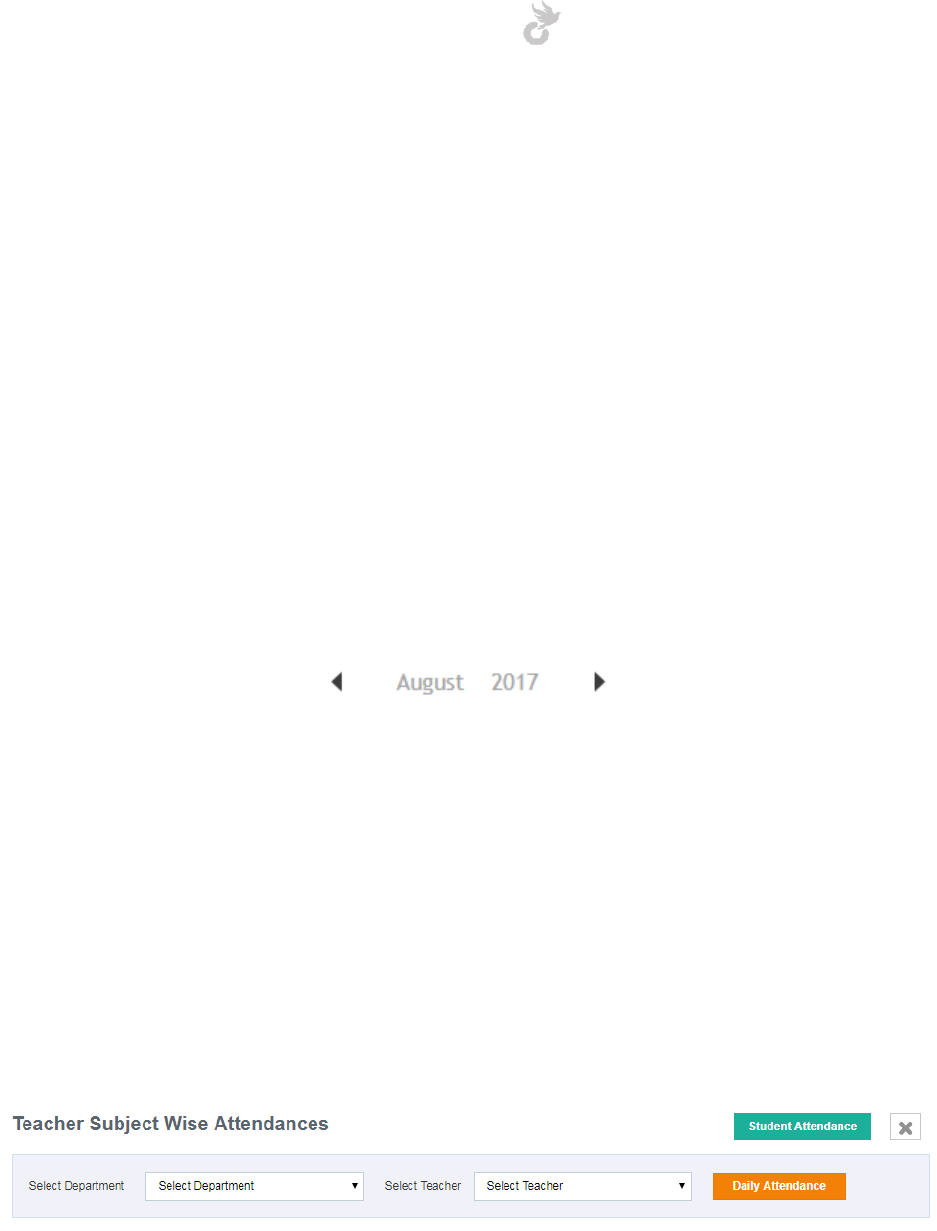
Open-School 2.6.5 Administrator Manual
149
The teacher attendance popup form has an extra field to determine half-day/full-day leave. The
fields for teacher attendance are
1. Leave type: This is defined under Leave Types in the Teachers Module. Each leave type
has a maximum count beyond which a teacher will not be able to apply for that leave
type.
2. Reason: Enter a reason for absence.
3. Is Half Day: Check this box if the teacher has taken a half-day leave. When checked you
also have the option to select whether the absence is for the morning half or afternoon
half. The labels displayed on the calendar for these will be different.
One you have entered the necessary details click ‘Save’ to mark the absence.
You can switch between months using the arrows shown below,
8.2.2 Teacher subject wise attendance
You can mark subject wise attendances for teachers just like students. Before you start make
sure you have associated the teachers with subjects in batches and assigned them in the
timetable.
To get started with Subject wise attendance click on the ‘Subject Wise Attendance’ button next
to the department dropdown.
You will have to select the department and the teacher under it to view the subject wise
attendance page.
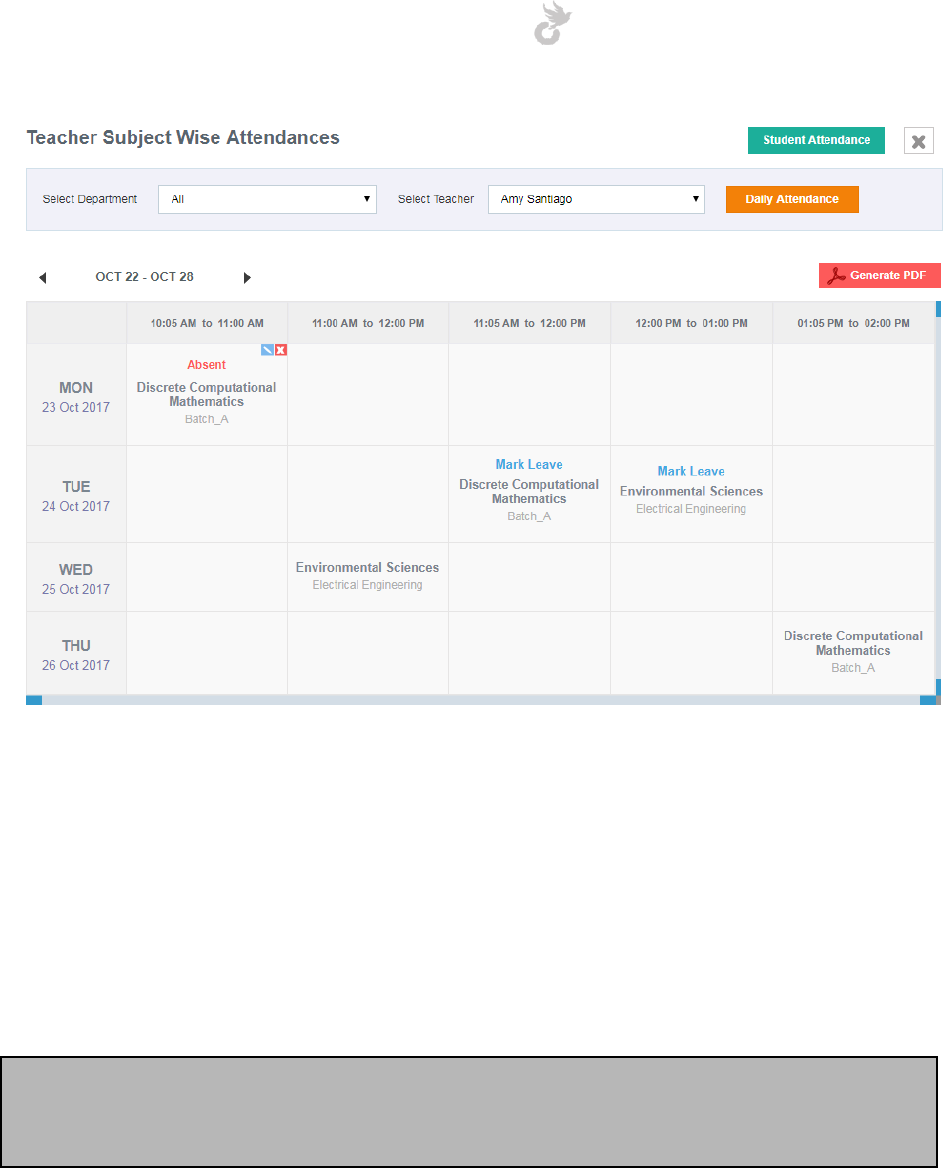
Open-School 2.6.5 Administrator Manual
150
The current week will be displayed for the chosen teacher. You may switch between weeks
using the left and right arrows. Only days on which the teacher has classes assigned will be
displayed here.
You can mark an absence by clicking the ‘Mark Leave’ link for a class. Marked absences can be
updated or removed using the respective icons as shown above.
Note: Teachers can request for leaves from their portals. These requests will be displayed in
the HR module, they can be managed from there. Accepting a leave will automatically reflect
in the calendar.
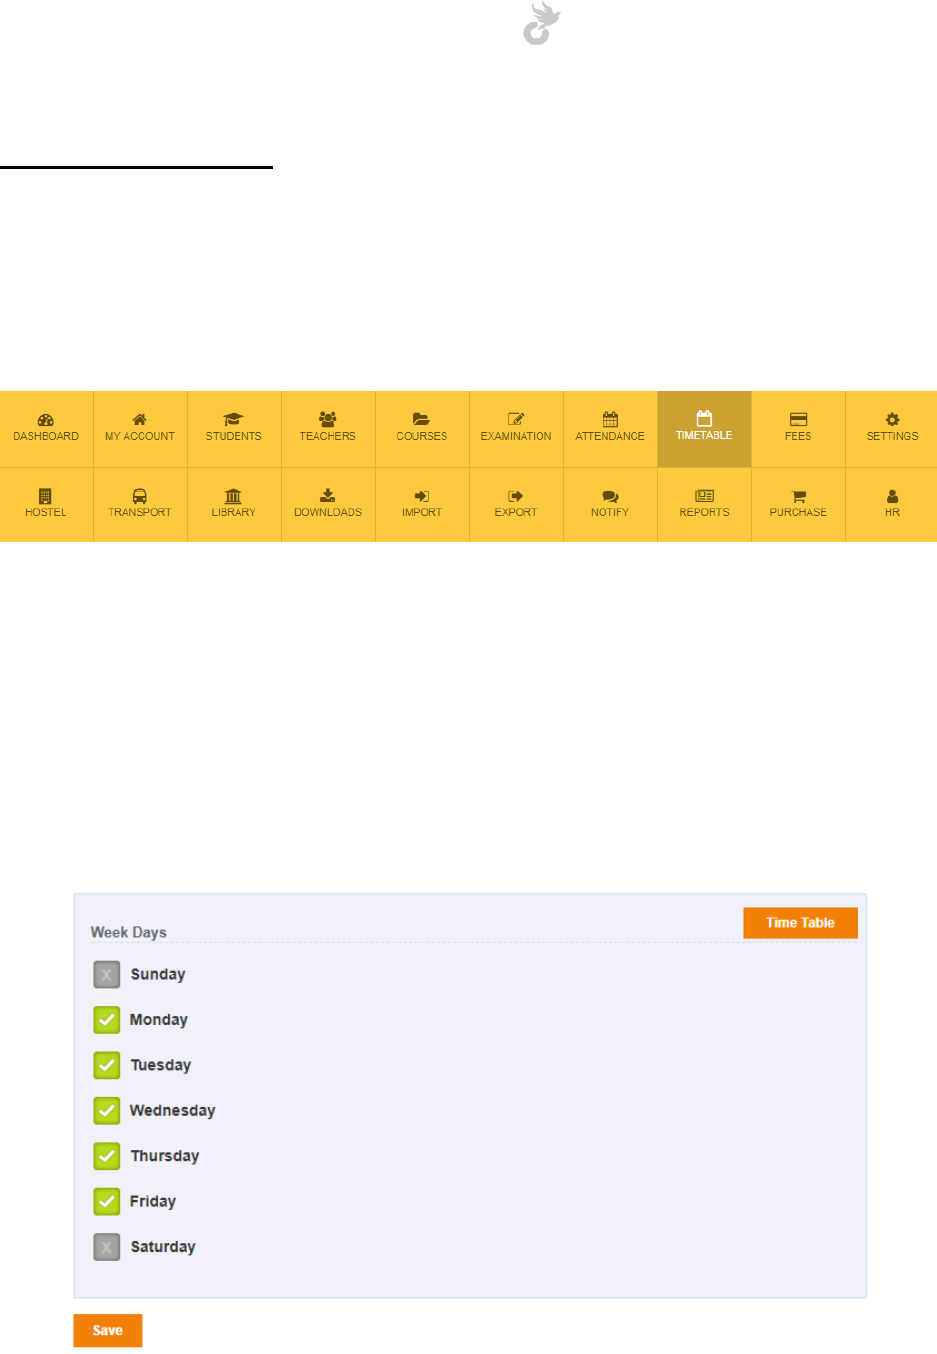
Open-School 2.6.5 Administrator Manual
151
9. TIMETABLE
The timetable module allows you to set up timetables for batches, view timetables for teachers,
batches etc, set up class timings and weekdays. We already took a look at creating class timings
and weekdays in the getting started section. Let’s go into detail on all options we have
regarding the time table.
9.1 Setting up weekdays
9.1.1 Weekdays for batches
The ‘Set Weekdays’ link in the left side menu allows you to setup weekdays for individual
batches. Clicking this link will bring down the app explorer from where you can choose the
required batch.

Open-School 2.6.5 Administrator Manual
152
Check or uncheck days to set your weekdays. Once you have selected all needed working days
click save to apply changes for the chosen batch.
9.1.2 Default weekdays
The default weekdays are from monday to friday in the system. You can change this according
to your region. These default weekdays are automatically chosen for batches whose weekdays
haven’t been set up separately.
To configure default weekdays click the ‘Set Default Weekdays’ link in the left side menu.
The steps for setting up the weekdays are the same as above except you do not have to choose
a batch.
9.2 Class Timings
You can configure class timings for batches individually or for all courses/batches in the system
using common class timings.
9.2.1 Class timings for individual batches
The ‘Set Class Timings’ link in the timetable module allow you to configure class timings for
individual batches. This can be used if you have different timings for each of your batches.
Click on the link in the left side menu and choose your batch from the app explorer to get
started.
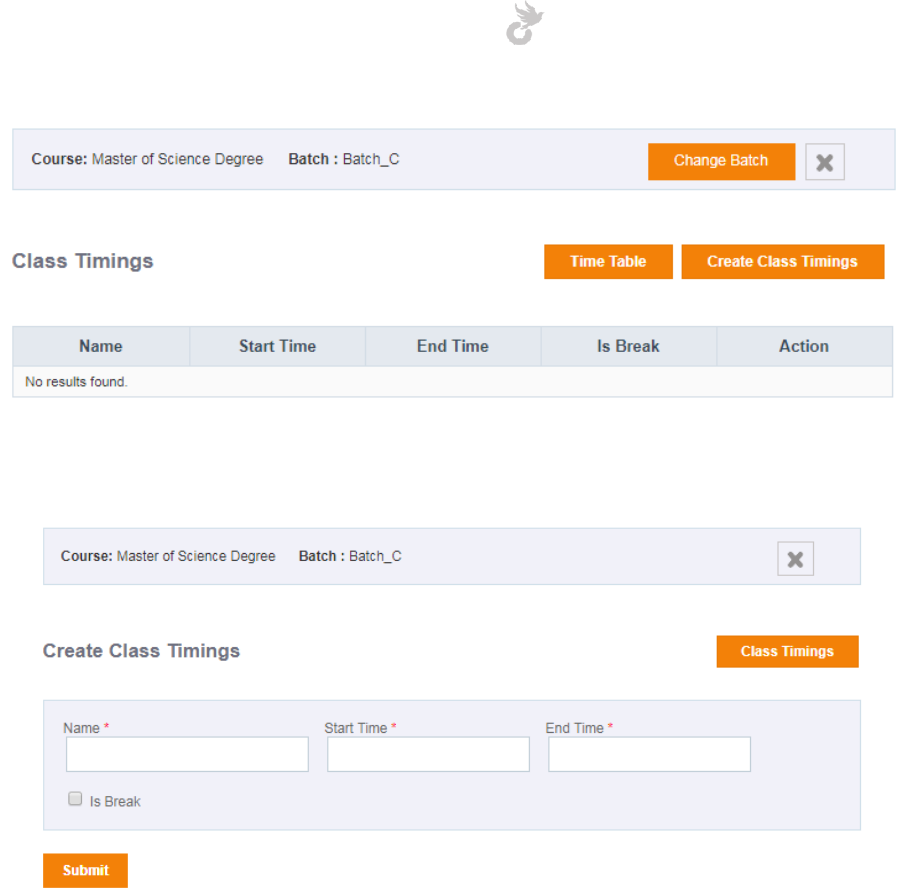
Open-School 2.6.5 Administrator Manual
153
This will bring up the list of existing class timings. To create a new class timing, click on the
‘Create Class TImings’ button.
The class timing form has 4 fields,
1. Name: Enter a name for the class timing. Eg: Period 1, Period 2 etc
2. Start time: Select a start time from the timepicker that can be viewed by clicking in the
box.
3. End time: Select an end time from the timepicker that can be viewed by clicking in the
box.
4. Is Break: Select this check box if the timing is a break or recess. You will not be able to
assign subjects for the timing if this option has been selected. It will be displayed as
‘Break’ in the timetable.
Click the ‘Submit’ button to save the class timing. This will take you back to the class timing list
where you will be able to see the timing you created. To create another timing follow the above
steps again. You can view, edit and delete timings using the respective icons beside it.
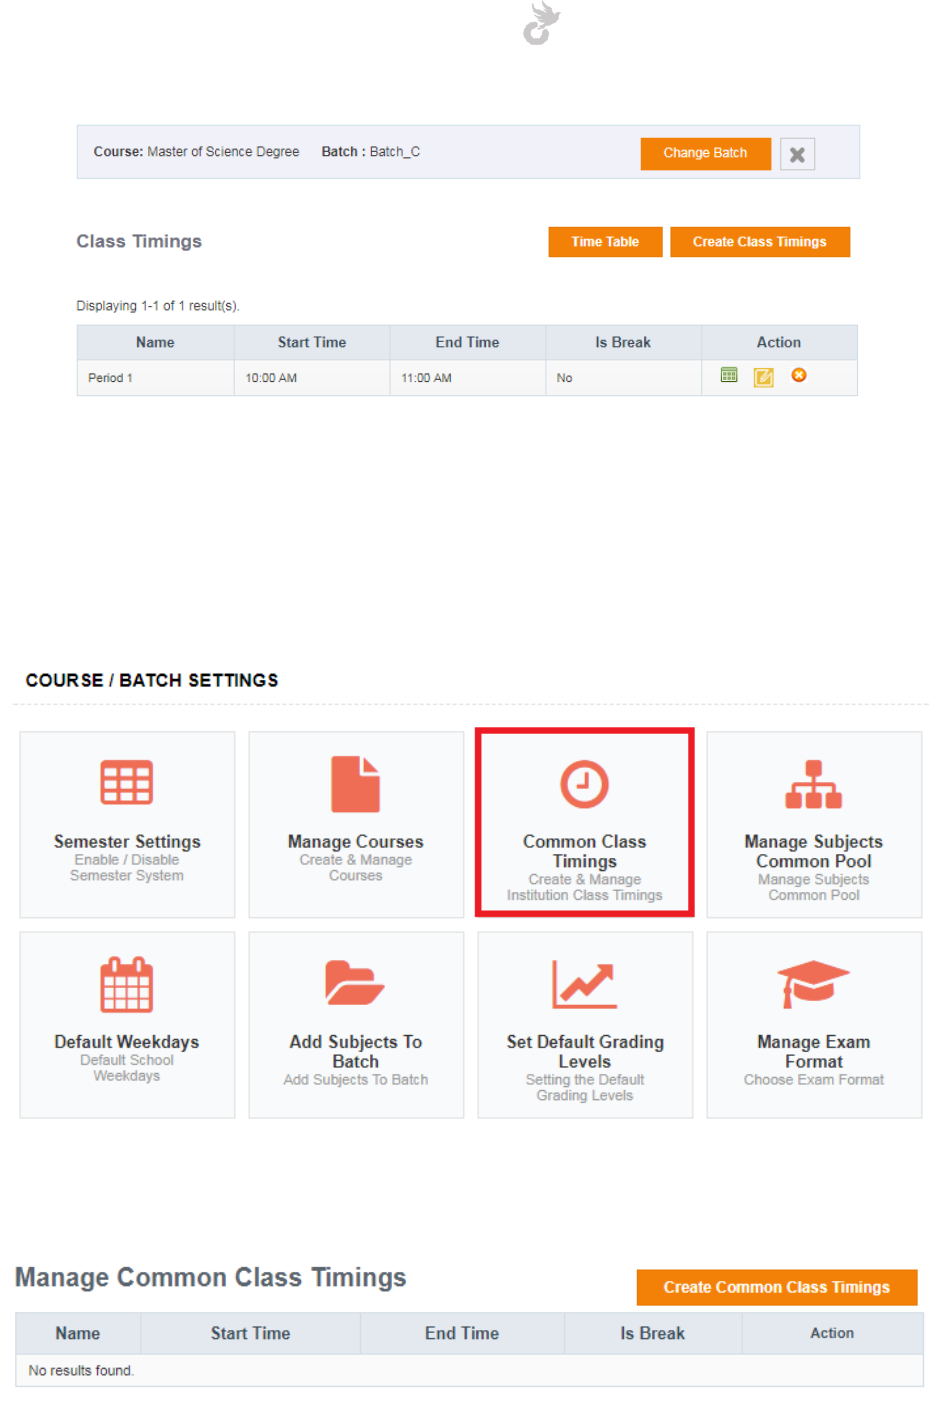
Open-School 2.6.5 Administrator Manual
154
9.2.2 Common class timings
You can also create common class timings for all course/batches in the application. You can
create common class timings from the Settings Module > Course/Batch Settings > Common
Class Timings.
This will redirect you to the page with existing common class timings.
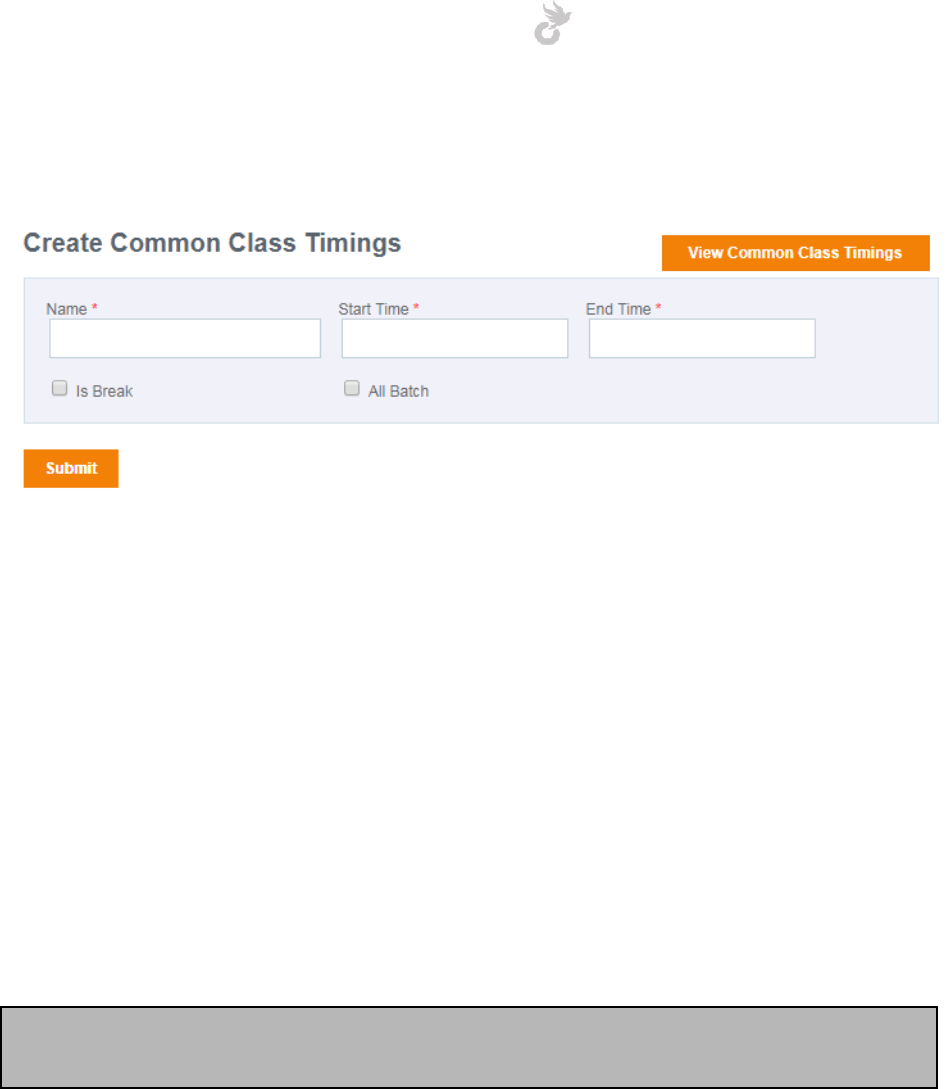
Open-School 2.6.5 Administrator Manual
155
Click on the ‘Create Common Class Timings’ button to get started.
The form is quite the same as that of normal class timings creation but with an extra field,
1. Name: Enter a name for the class timing. Eg: Period 1, Period 2 etc
2. Start time: Select a start time from the timepicker that can be viewed by clicking in the
box.
3. End time: Select an end time from the timepicker that can be viewed by clicking in the
box.
4. Is Break: Select this check box if the timing is a break or recess. You will not be able to
assign subjects for the timing if this option has been selected. It will be displayed as
‘Break’ in the timetable.
5. All Batch: Check this box to have the class timing applied to all batches in the system.
After filling up the required details click on ‘Submit’ to save the class timing.
Note: Even though the class timing will be added to all batches, you may individually delete it
for batches that do not need the same timing.
9.3 Setting up your timetables
Once you have configured weekdays and class timings you can move forward with assigning
your subjects and teachers in the timetable.
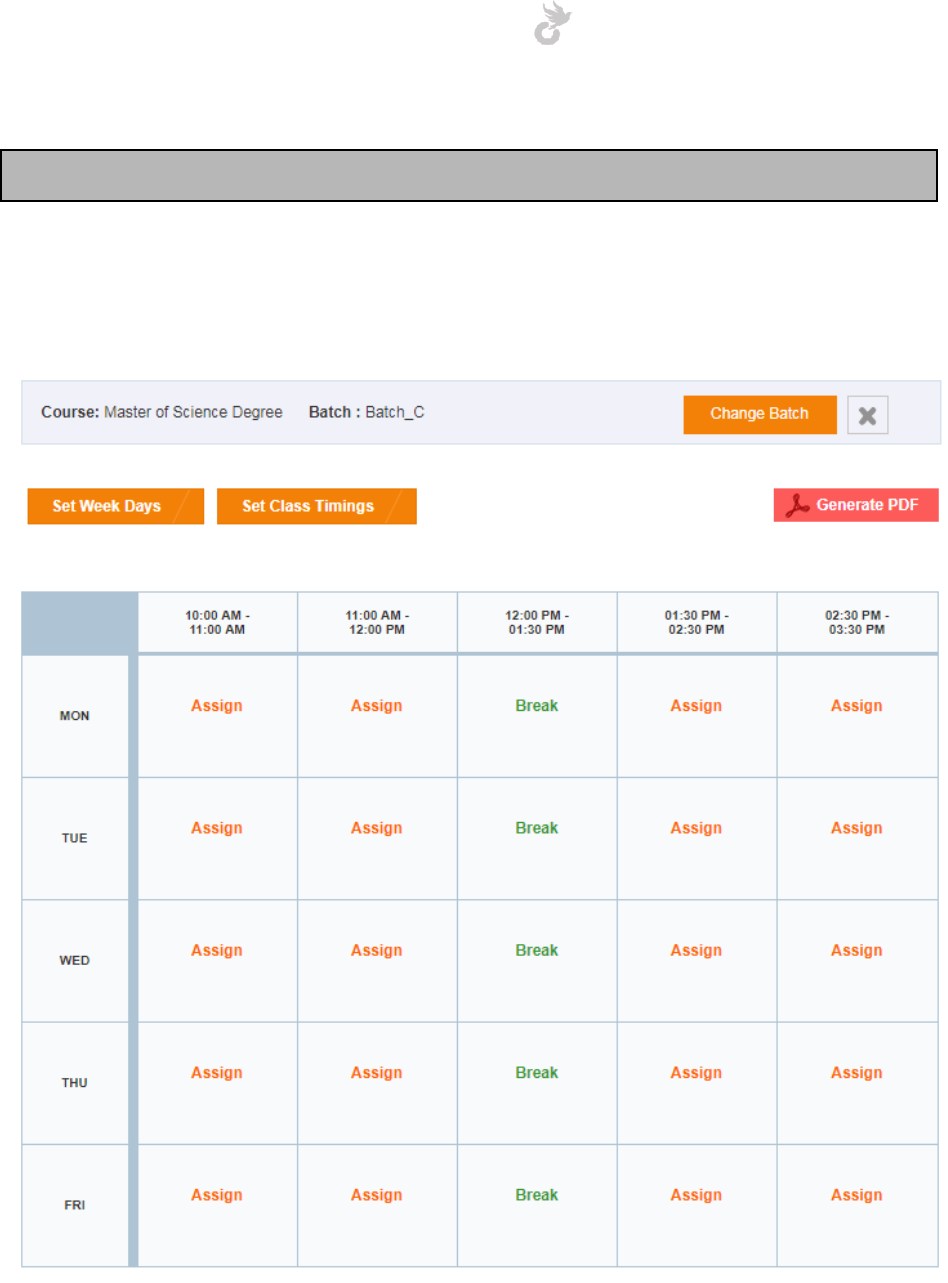
Open-School 2.6.5 Administrator Manual
156
Note: Teachers need to be assigned to subjects first before setting up the timetable
The weekdays and class timings together make up the timetable. To start assigning subjects and
teachers to the timetable click on the ‘Set Timetable’ link in the left side menu. Choose your
required batch from the app explorer to view the timetable structure.
The ‘Assign’ link allows you to assign a subject for a particular timing in the timetable. Clicking
the link will bring up a popup form that allows you to select a subject.
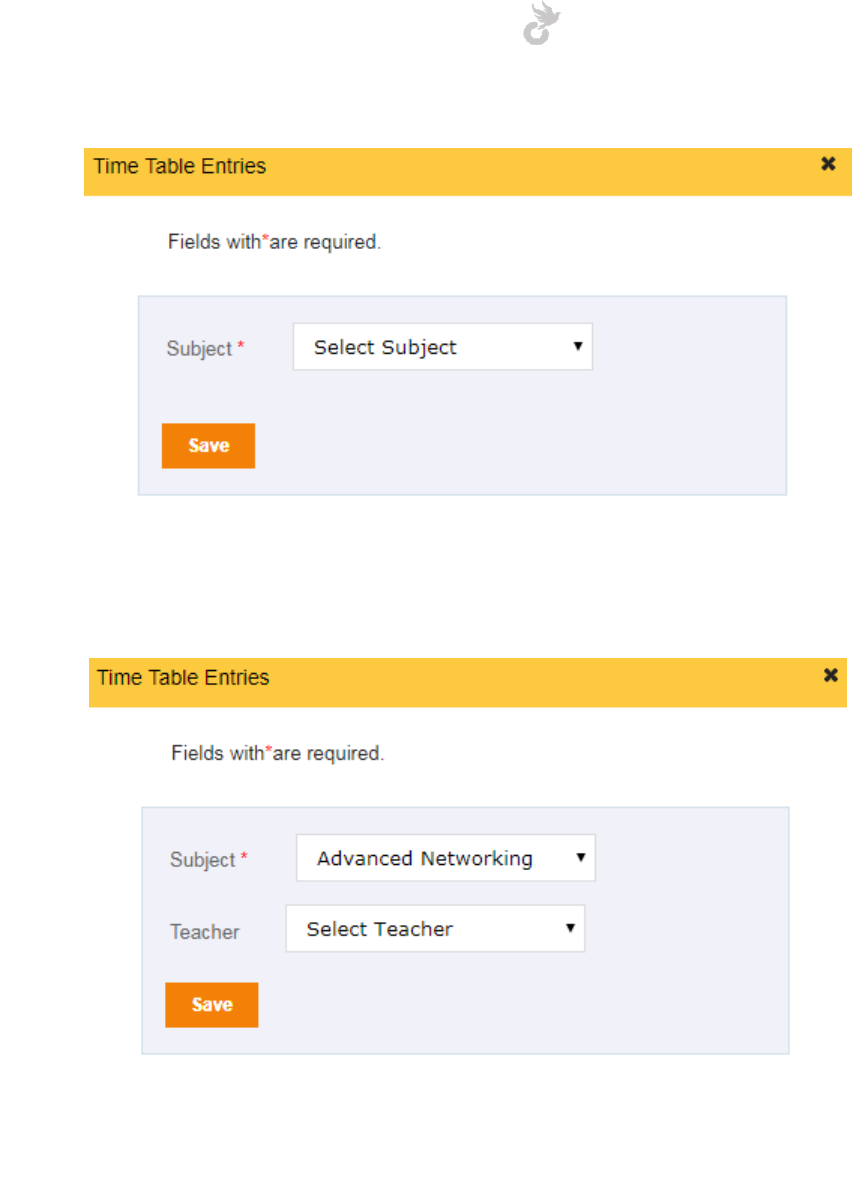
Open-School 2.6.5 Administrator Manual
157
Selecting a subject will reveal the dropdown to select a teacher. All teachers associated with
the subject for the chosen batch will be listed in the dropdown.
Select a teacher too and click ‘Save’ to assign the teacher and the subject to the timing.
Assigned subjects / teachers will be displayed on the timetable as shown below,
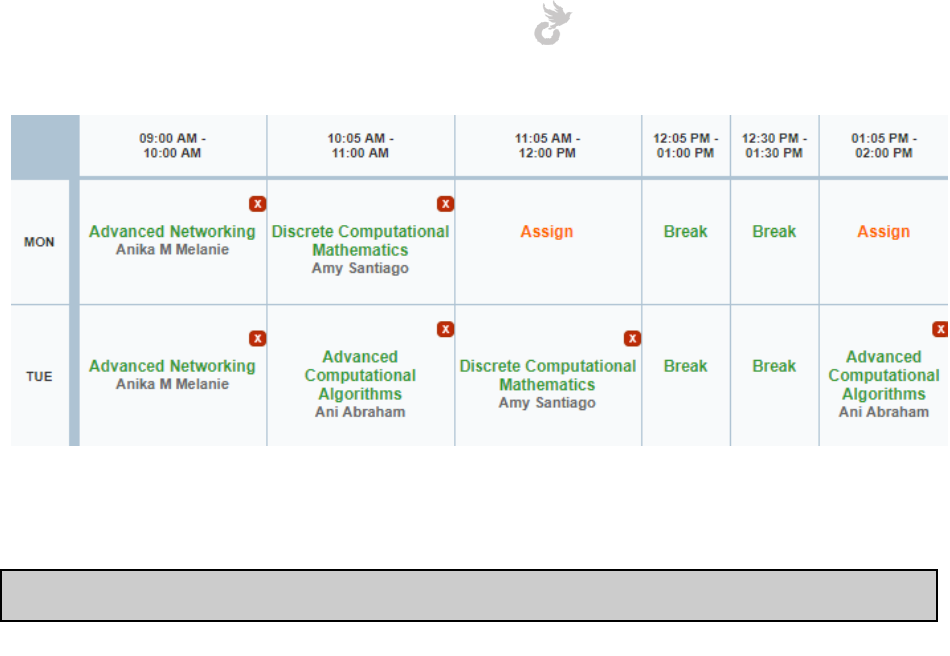
Open-School 2.6.5 Administrator Manual
158
Click the cross to remove the entry from the timetable.
Note: A teacher cannot be assigned to the same timing for the same day in multiple batches
9.4 Timetable views
9.4.1 View Batchwise Timetable
The ‘View Timetable’ link in the left side menu allows you to view the timetable for a single
batch. Click the link and choose the required batch from the app explorer to view the timetable.
This timetable can then be printed using ‘Generate PDF’ button on top.
9.4.2 View Full Timetable
The ‘View Full Timetable’ link in the left side menu give you various options to view timetables.
You can either search for individual batches, all batches in a course, all courses in the academic
year etc. You can also view the timetables in weekly or daywise formats by choosing the
required mode.
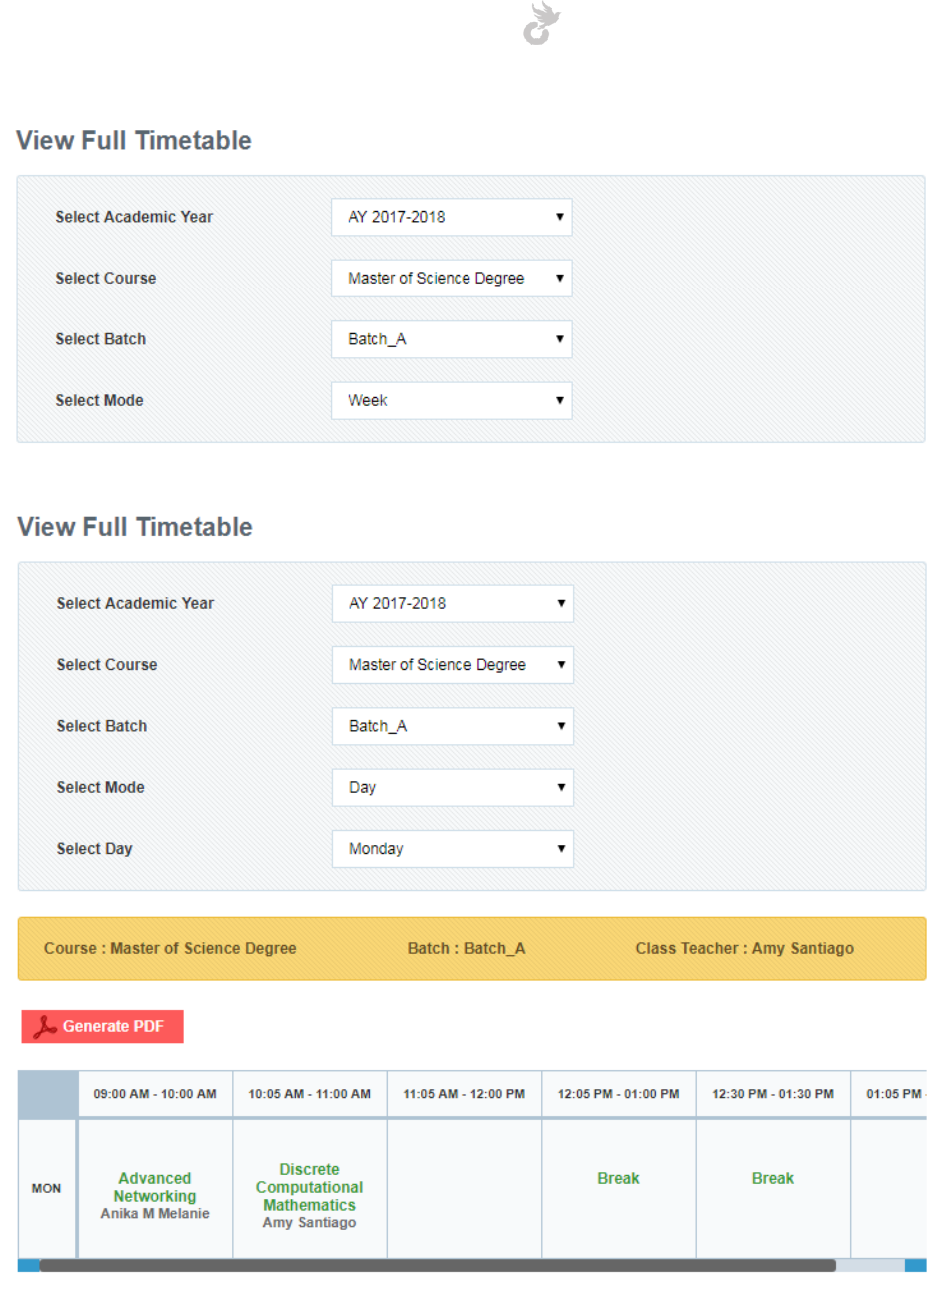
Open-School 2.6.5 Administrator Manual
159

Open-School 2.6.5 Administrator Manual
160
9.4.3 View Teacher’s Timetable
The teacher’s timetable view gives you a day wise timetable for teachers in the system. You
also get the option to print out these timetable reports.
You can view the timings for teachers by choosing a department, teacher and day.

Open-School 2.6.5 Administrator Manual
161
10. FEES
The fees module allows you to create a flexible fee structure with invoice generation, custom
subscription methods etc. You can also view daily collection reports, due reports and pull out
invoices based on various filters.
You also have the ability to configure a paypal online payment facility in the system. Entering
the PayPal details will enable an online payment option for parents where they will be able to
make payments from their portal.
The fees dashboard displays a summary of fee categories created. It also allows you to view
invoices for these categories and remove them if invoices have not been generated already.
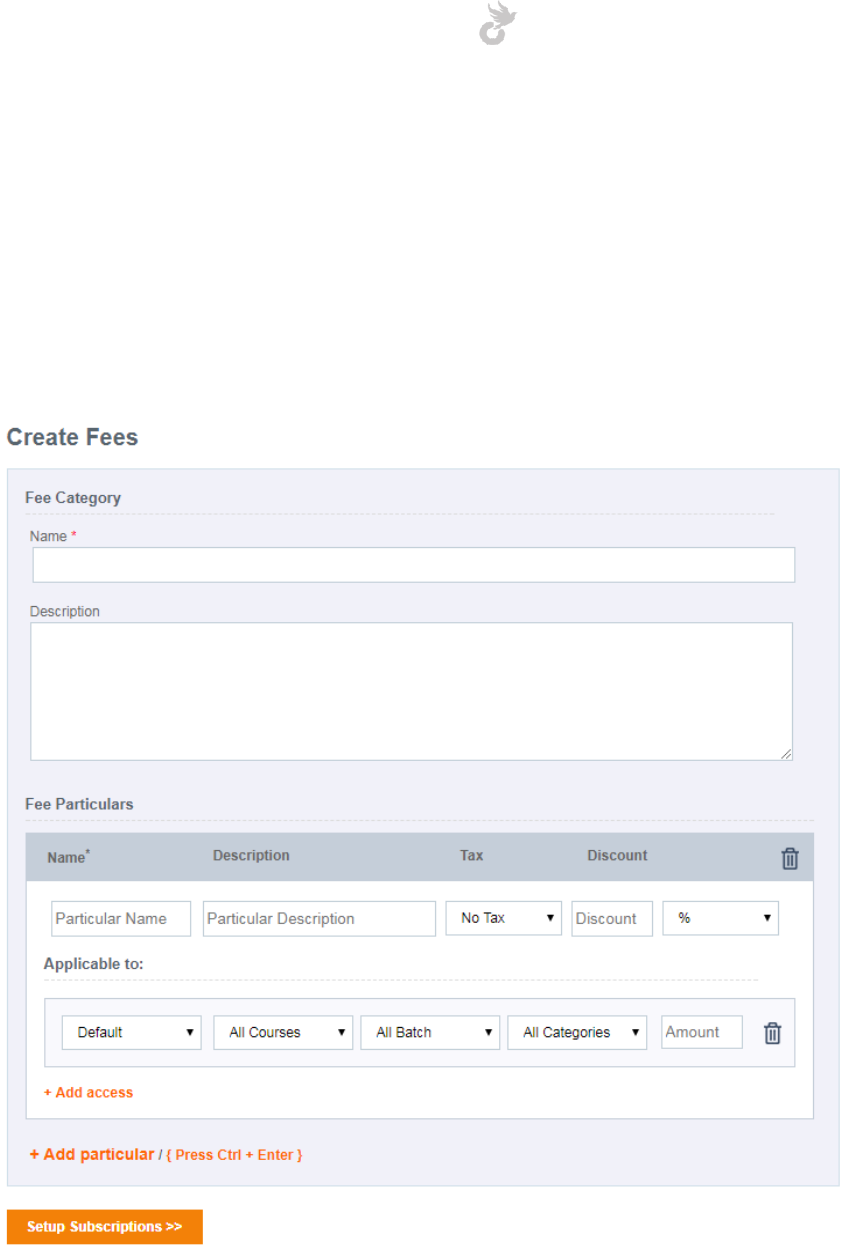
Open-School 2.6.5 Administrator Manual
162
10.1 Creating Fees
Creating a fees has two steps,
1. Create Fee category with fee particulars (name, amount, applicable groups/individual)
2. Set up subscriptions (collection date, due date etc)
10.1.1 Fee creation: STEP 1
Step 1 involves giving a name for the fee category you want to create and entering amount
details for particulars and accesses as shown in the image above. You can add multiple
particulars and accesses.
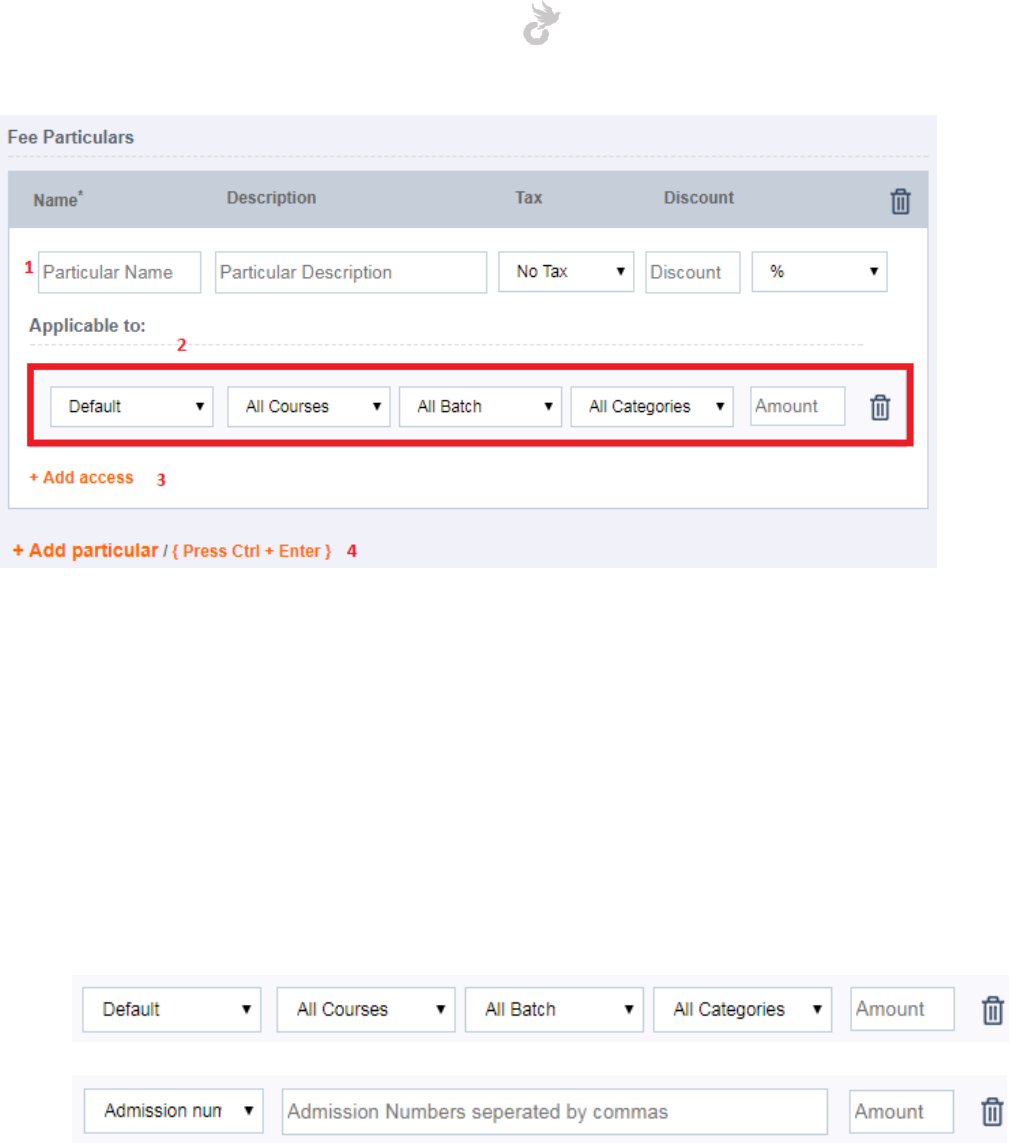
Open-School 2.6.5 Administrator Manual
163
1. Particulars: Item name in the invoice. For example, you could create a fee category
called ‘Fees for 2017’ and add particulars like ‘Admission Fee’, ‘Tuition Fee’, ‘Lab Fee’
etc. Each particular will have an access, where you can add an amount for particular
groups or individual students ‘Applicable to’ as shown above.
The particular will have a name, a description, tax (can be setup in Tax Settings),
discount (can be in percentage or amount, choose suitable option from the dropdown
next to it).
2. Access: A single particular can have multiple accesses / amounts applicable to different
groups or individuals. The access area have a couple of fields, the first dropdown
indicates whether you want to select a group or enter admission numbers
Choose your required options and enter required data.
3. Add access: To add another access for the same particular click on the ‘+Add access’ link
below the access fields. This option is if you have different amount for the same
particular for different groups or individuals.
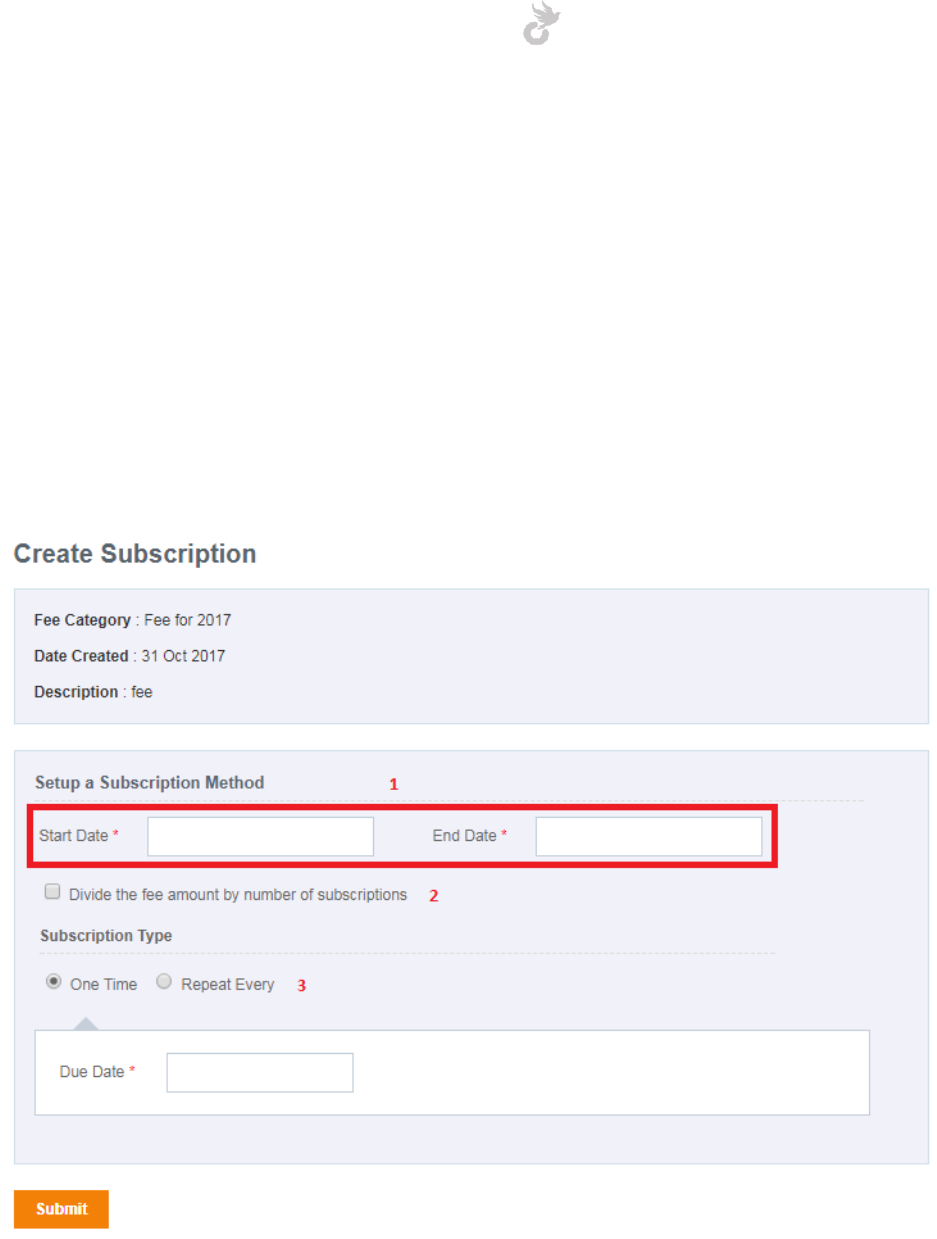
Open-School 2.6.5 Administrator Manual
164
4. Add particular: The ‘Add particular’ link allows you to add more particulars for the Fee
Category you are creating. You may add a new particular using the hotkey: CNTRL +
ENTER.
Once you are done entering all the required details on step 1, click on the ‘Setup Subscriptions’
button to move to step 2.
10.1.2 Fee creation: STEP 2 (Subscriptions)
The second step involves setting up the payment subscription method. You can either set it as a
one-time fee or a repeating one. Let’s get into details,
There are a couple of fields that need to be filled in,
1. Dates: You have to select a start and end date for your fee collection. These dates have
to be within the range of the academic year. If you are going for a recurring payment
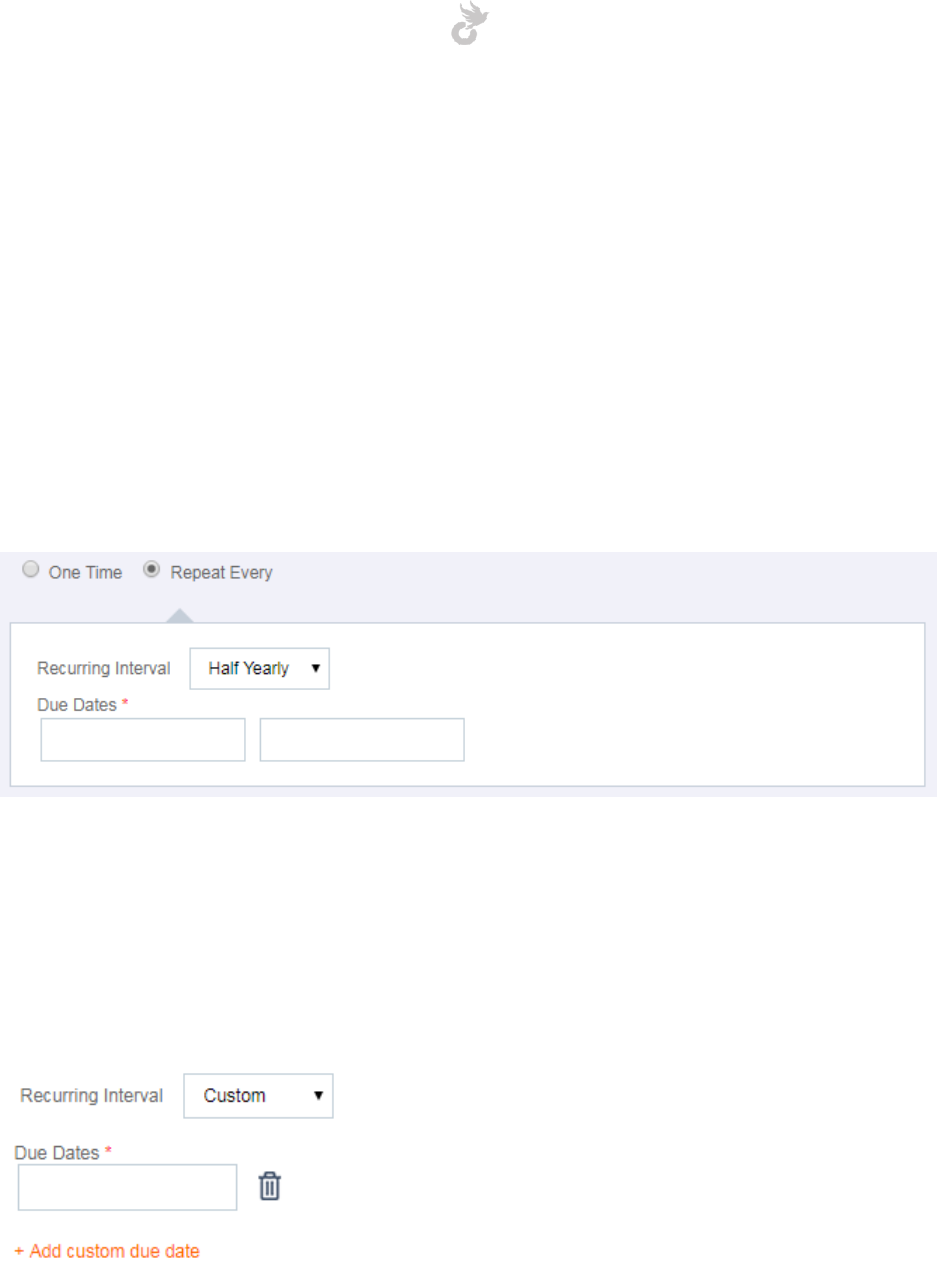
Open-School 2.6.5 Administrator Manual
165
method you will have to set the start date and end date for the range you want to keep
collecting the fee.
2. Divide: In case of recurring payments you can either choose to collect the amount you
entered in step 1 every interval or even split that amount into the number of intervals
you set. Check this box to split the amount by the number of intervals.
For example, say you entered an amount of 1000 in step 1 and your subscription is half-
yearly (collected every six months, number of recurring payments: 2). Checking this box
will split the 1000 by the number of intervals (2) and invoices will be generated for each
half with an amount of 500.
3. Payment interval: You can either choose the payment to be one-time or recurring. For
one-time simply select a due date. You will be able to send reminders to students and
parents who haven’t made payments past the due date. You can also choose a recurring
interval.
There are 5 options for recurring intervals,
Half-Yearly: Collected twice (every six months)
Quarterly: Collected 4 times (every three months)
Monthly: Collected every month (set a day for due date)
Weekly: Collected every week (select a day for due date)
Custom: Create your own custom due dates. Click on ‘Add custom due date’ to add a
new date and the trash icon to delete(you will need to have at least one).
Click the submit button once you are done configuring your subscriptions. This will create the
Fee category only. You will have to generate the invoices separately from the Fees dashboard.
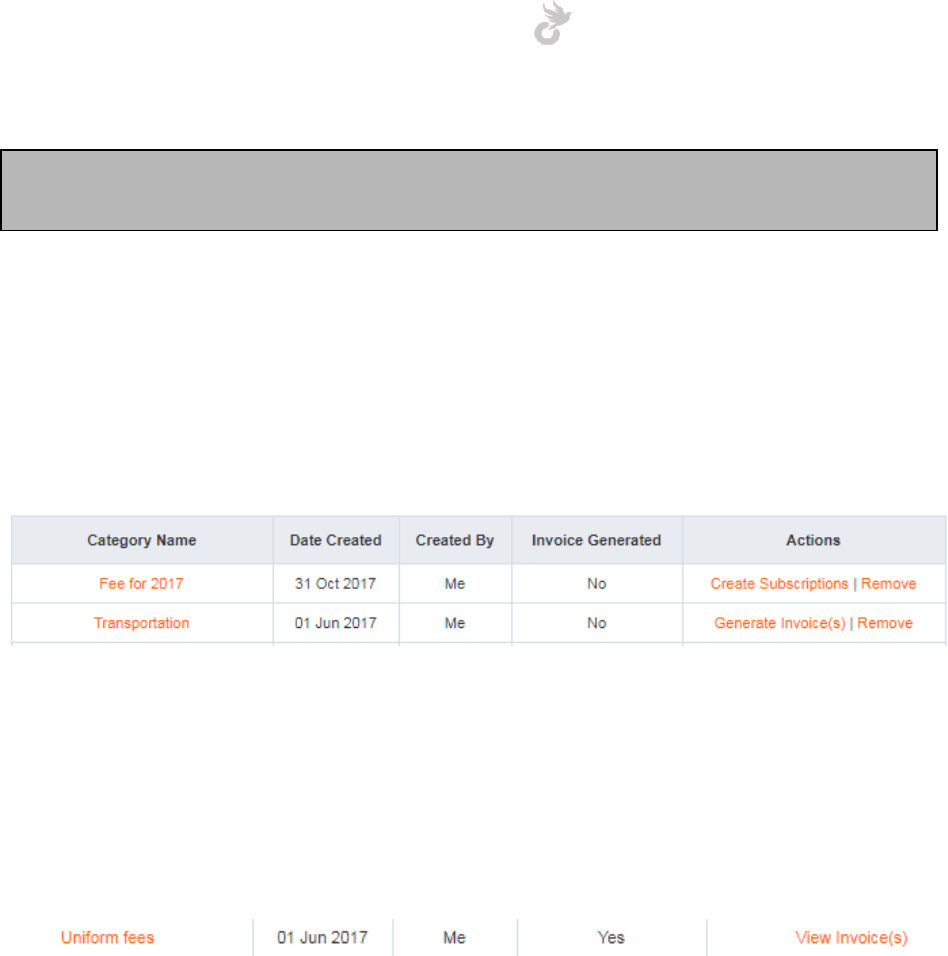
Open-School 2.6.5 Administrator Manual
166
Note: If you skip step 2, you can always come back and continue using the ‘Create
Subscriptions’ link next to your Fee category in the fees dashboard.
10.1.3 Invoice generation and management
After you’ve added your fee category it will be listed in the fees dashboard. Invoices have to be
generated separately using the ‘Generate Invoices’ link next to it.
You have the option to remove categories if invoices have not been generated. A fee category
cannot be removed once you have generated invoices for students. You can only cancel an
invoice after generation. Invoices can also be edited individually.
Click on the ‘View Invoices’ link against the fee category to view its invoices once you have
generated them.
You can also use the ‘Manage Invoices’ link in the left side menu to view invoices of all
categories.
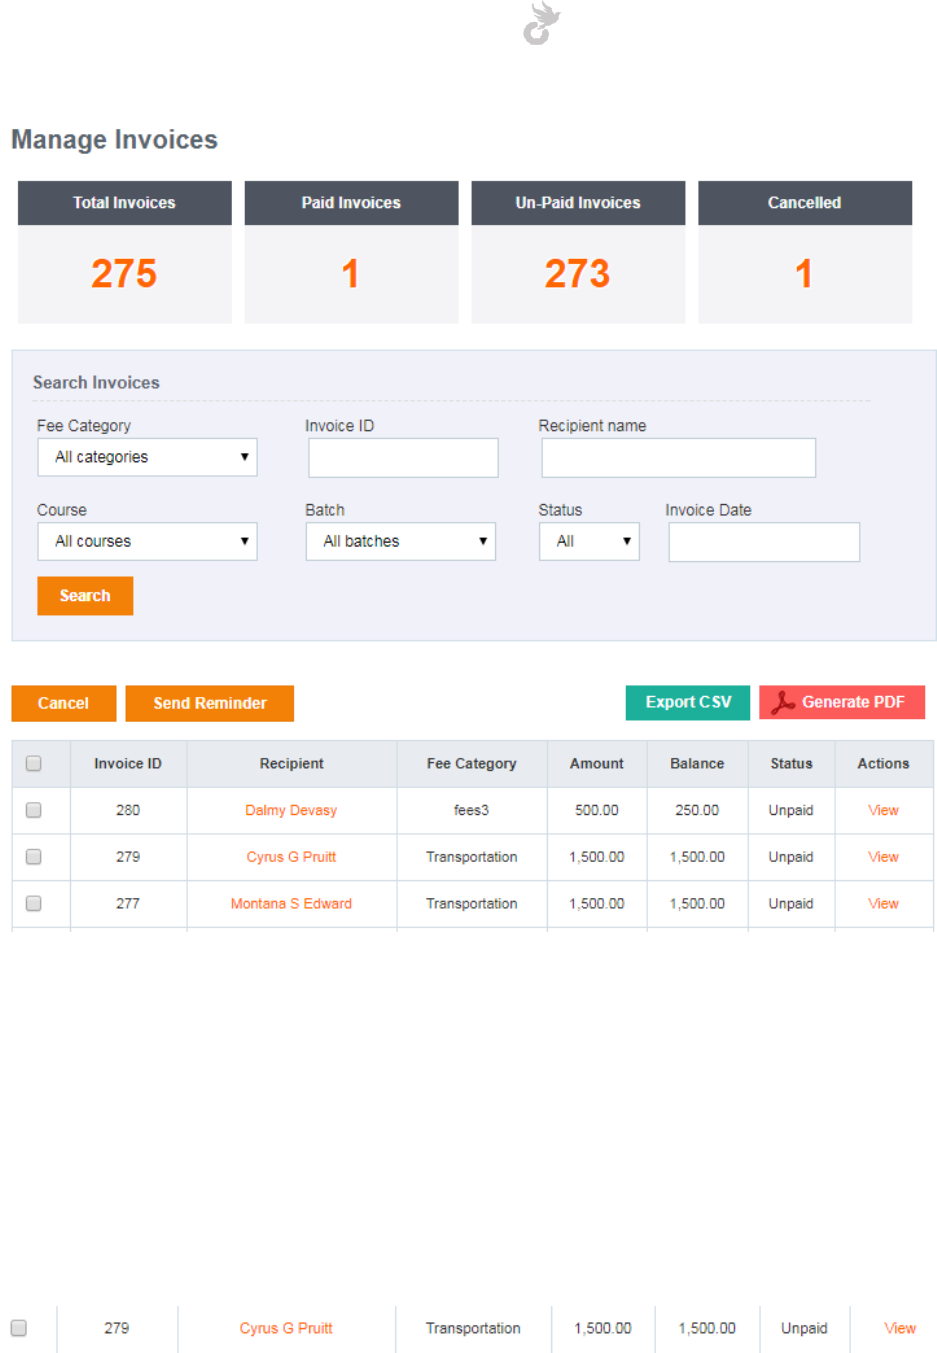
Open-School 2.6.5 Administrator Manual
167
Number of paid, unpaid and cancelled invoices can be seen here. You also have various filters to
browse through generated invoices. Option to generate PDF and CSV reports of invoices is also
available here.
You can cancel invoices by checking them using the checkboxes next to them and then clicking
the ‘Cancel’ button on top. The ‘Send Reminder’ button can also be used in the same way to
send notifications to parents and students.
To view an invoice click the ‘View’ link next to it.
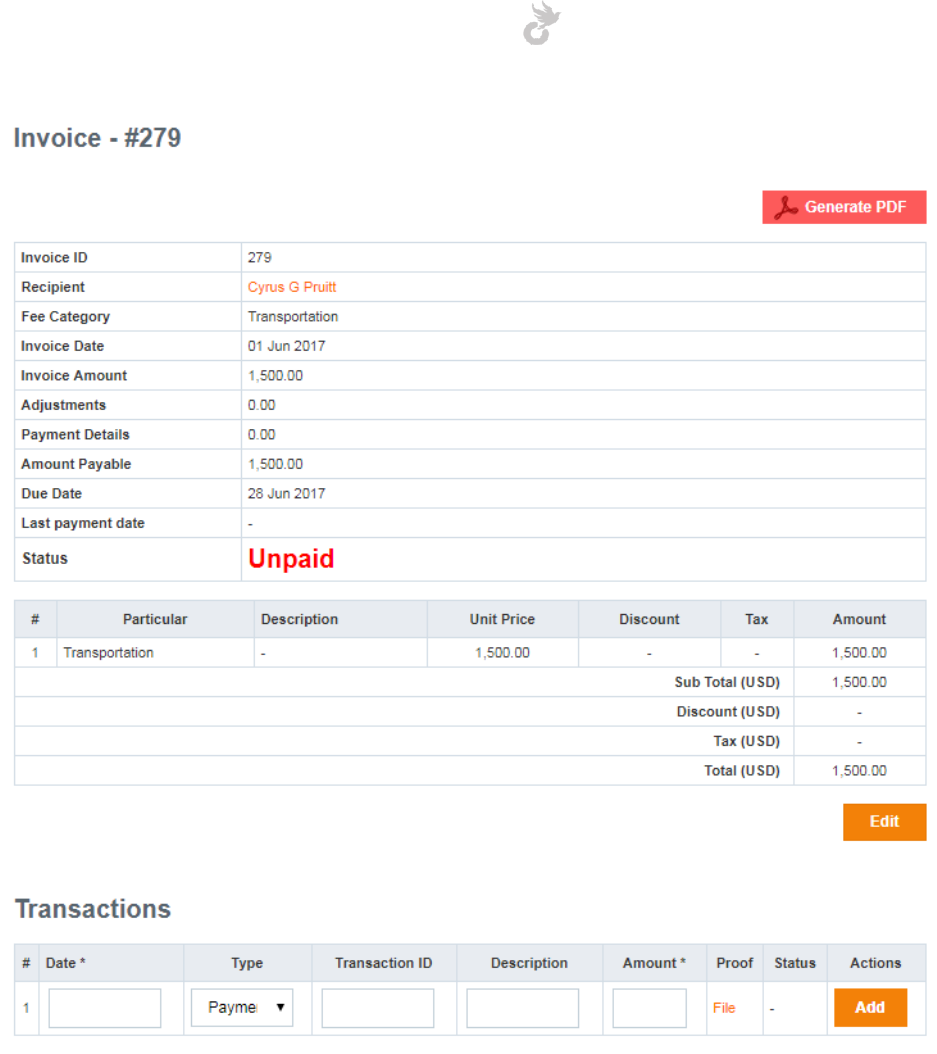
Open-School 2.6.5 Administrator Manual
168
You can view details of particulars, amount due, amount paid, adjustments(discount),
transactions etc here.
New particulars can be added or existing ones can be edited by clicking the ‘Edit’ button below
the particular listing.
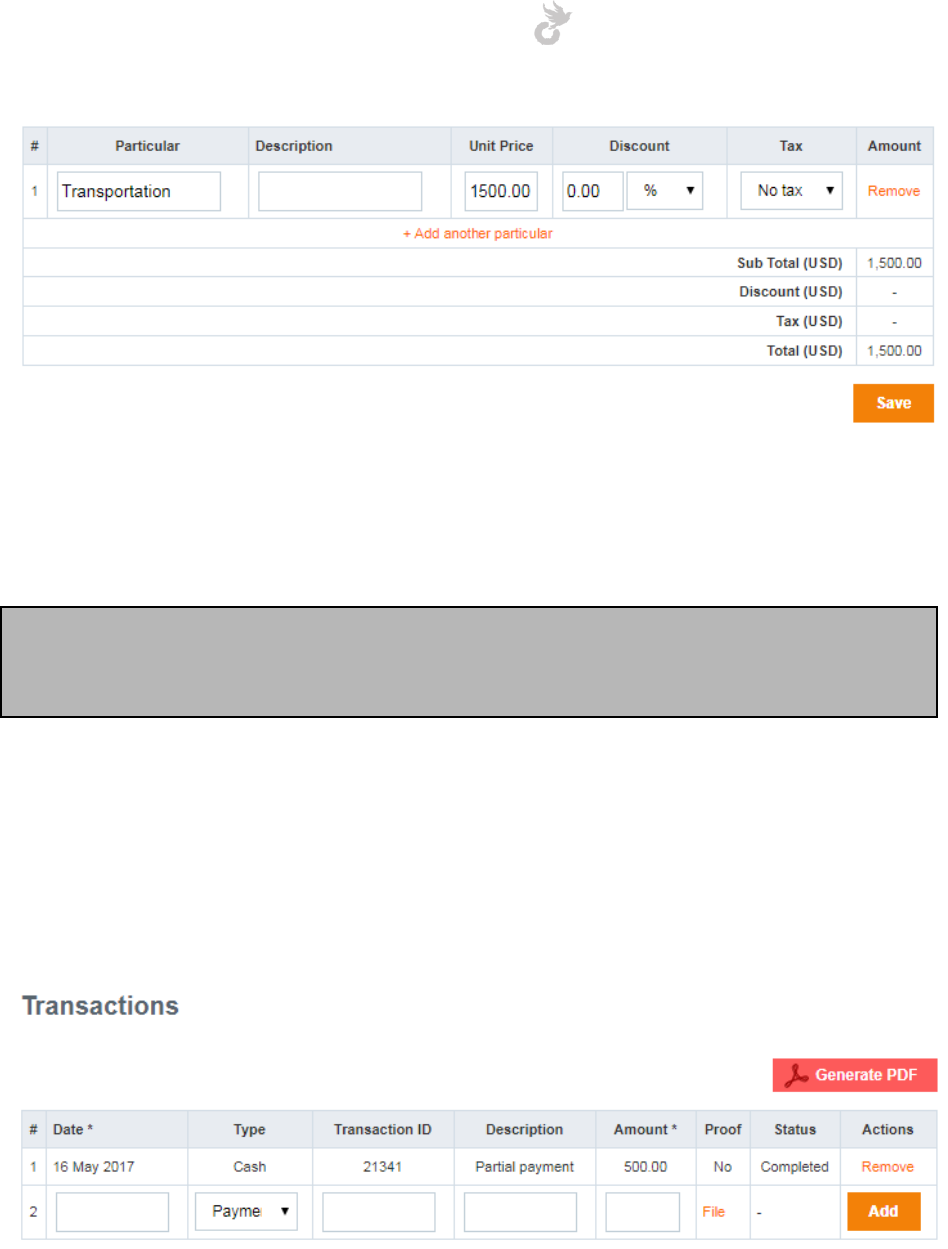
Open-School 2.6.5 Administrator Manual
169
Click on the ‘+ Add another particular’ link to add a new one. Existing ones can be removed
using the ‘Remove’ link next to it. Click the save button once you are done editing, to save
changes.
Note: Changes made here will only affect the selected invoice and will not change particulars
or details for other invoices in the same category. Updation of all invoices under a particular
category is not available.
10.1.3a Making payments
Partial or full payments can be made from within the invoice view. Previous transactions can
also be viewed under the Transactions section.
To add a new transaction enter the details for it and click ‘Add’ to save. You can also upload
proof of payment as a file by clicking the ‘file’ link under the proof column. Payment types can
be managed under ‘Manage Payment Types’ explained later.
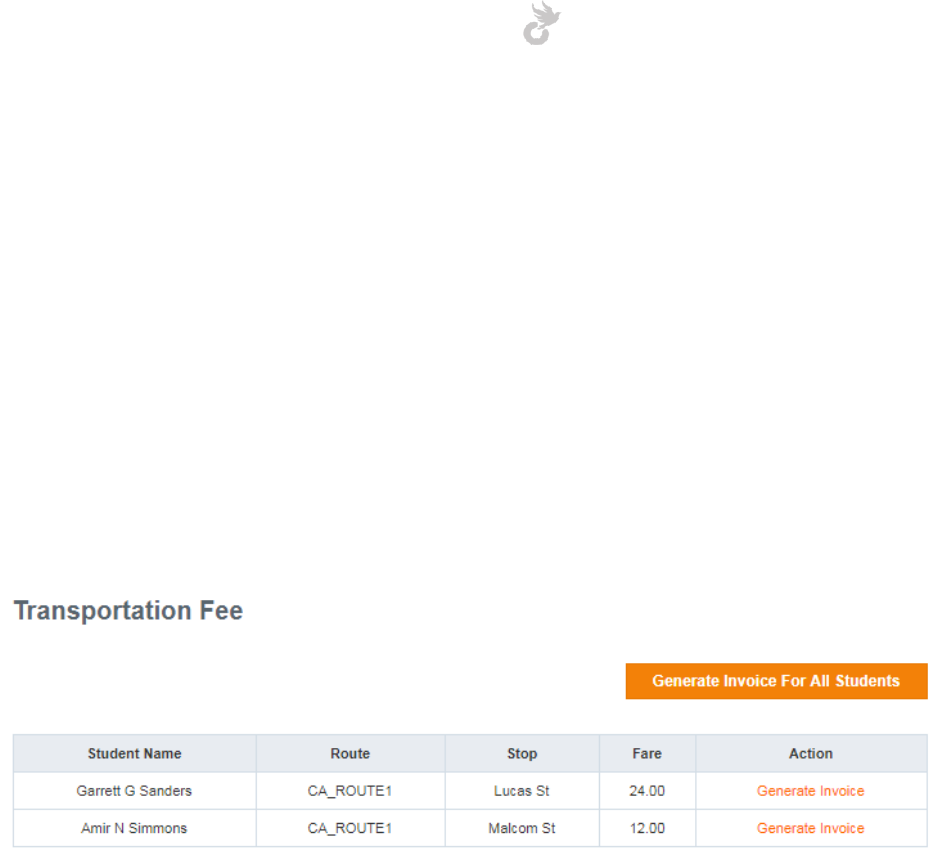
Open-School 2.6.5 Administrator Manual
170
10.2 Transportation Fees
The Transportation fees area in this module is linked to routes and students allotted in the
Transportation Module. Invoices can be generated for each month, the rates are defined in the
transportation module. The amount for the stop the student is allotted to will be calculated for
each invoice you generate.
10.2.1 Generating invoices for transportation
Click the ‘Transportation Fee’ link in the left side menu to view details of students assigned to
stops in the transportation module.
Invoices can be generated individually for each student by clicking the ‘Generate Invoice’ link
next to him/her. To generate invoices for all students together click the ‘Generate Invoice for
all students’ button on top.
In the next step choose the month for which you would want to generate the invoices for.
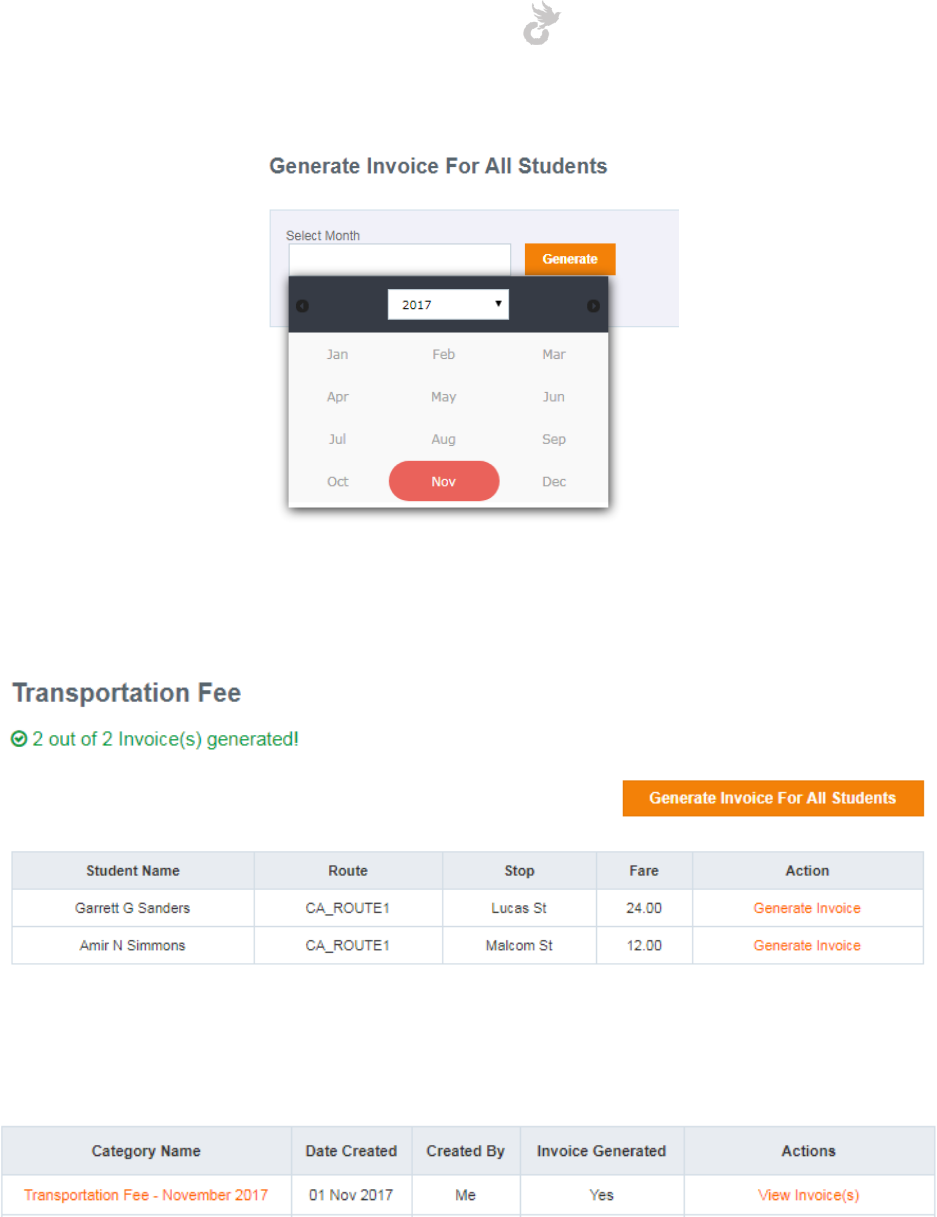
Open-School 2.6.5 Administrator Manual
171
Click the ‘Generate’ button to create invoices after choosing the month. You should see a flash
message depending on the options you choose.
The fee you generate for each month will be displayed as a new fee category in the fees
dashboard with the month’s name.
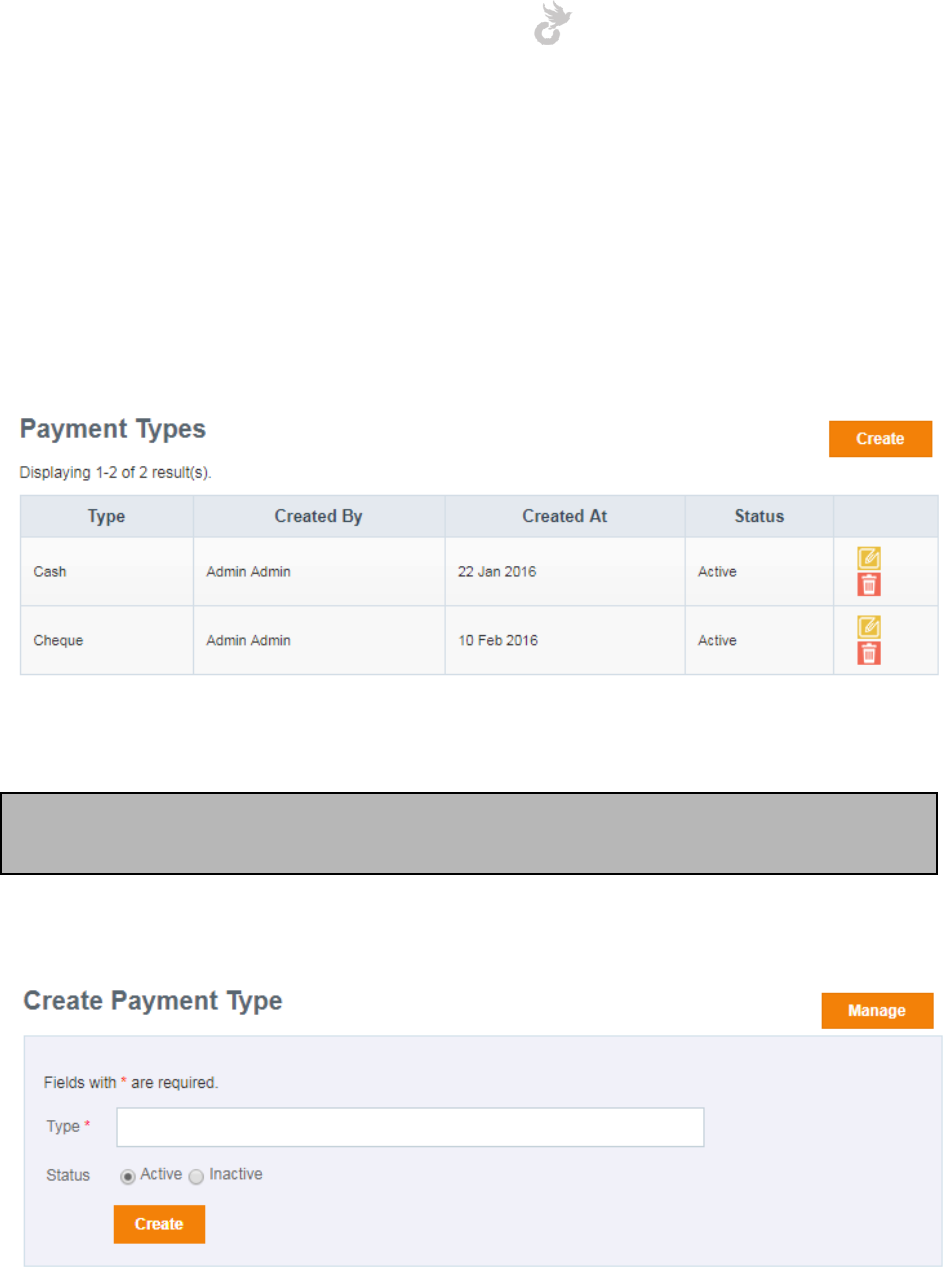
Open-School 2.6.5 Administrator Manual
172
10.3 Managing Payment Types
We noticed the ability to select a payment type while making payments for an invoice. Let’s
take a look at how to create and manage your own payment types. These are basically labels
used to identify how transactions were made.
Click the ‘Manage Payment Types’ link in the left side menu to view all existing payment types.
Existing types can be edited or deleted from here.
Note: Removing an existing payment type will also remove it from the transaction details it
was used in.
To create a new payment type click the ‘Create’ button on top.
The create payment type form has two fields,
1. Type: Enter a name for your payment type. This will be displayed everywhere relevant.
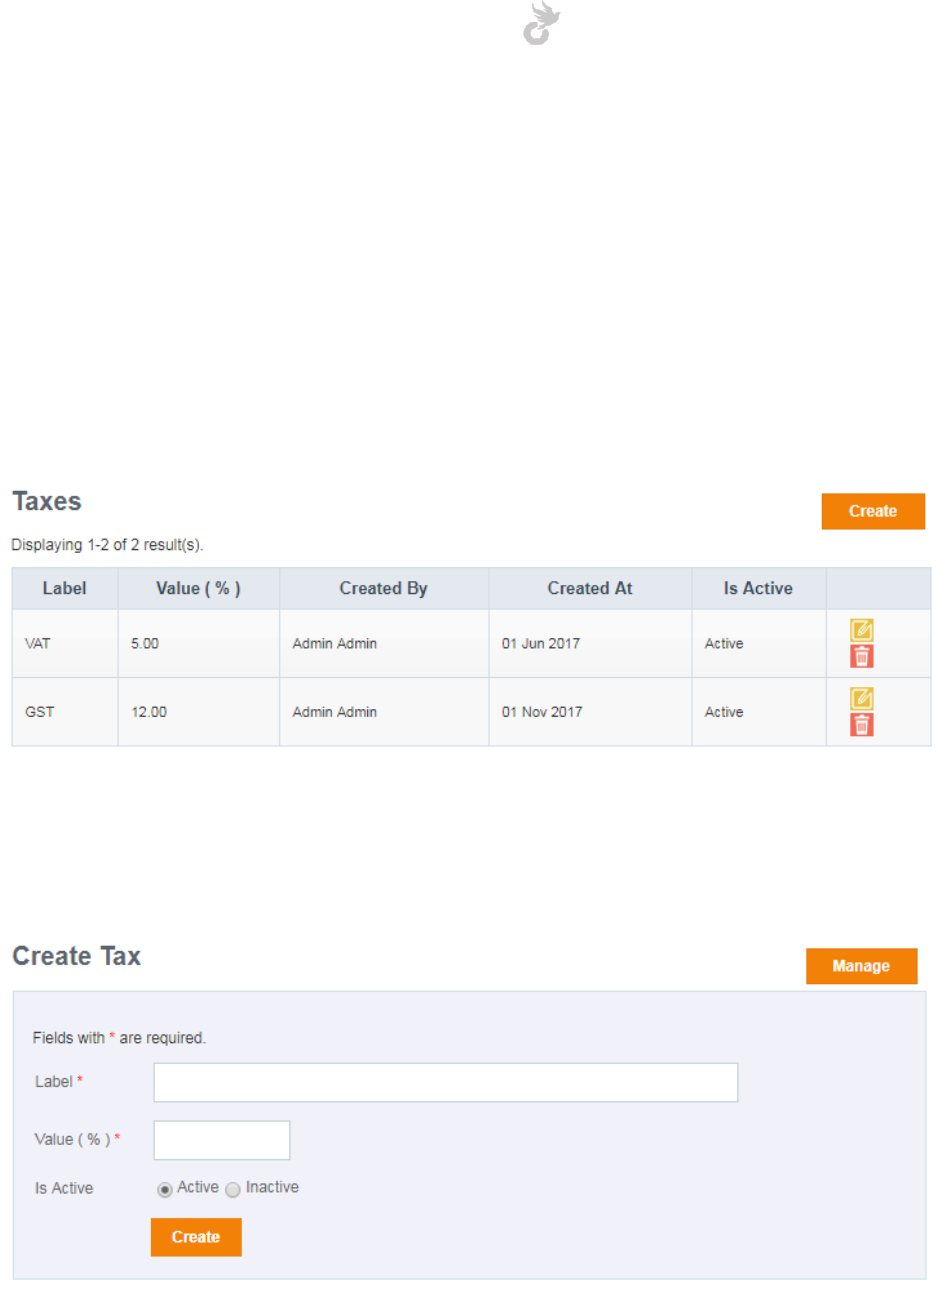
Open-School 2.6.5 Administrator Manual
173
2. Status: Active payment types will be displayed for selection while making a payment.
You can always edit and set a payment type as active from inactive when needed.
To save click the ‘Create’ button.
10.4 Managing Taxes
Taxes to be added during fee creation can be managed by clicking the ‘Manage Tax’ link in the
left side menu.
Existing taxes will be listed here. You may edit or delete these taxes.
To create a new tax value click on the ‘Create’ button or the ‘Create Tax’ link in the left side
menu.
The form has three fields,
1. Label: Enter the name of the tax you want to create.
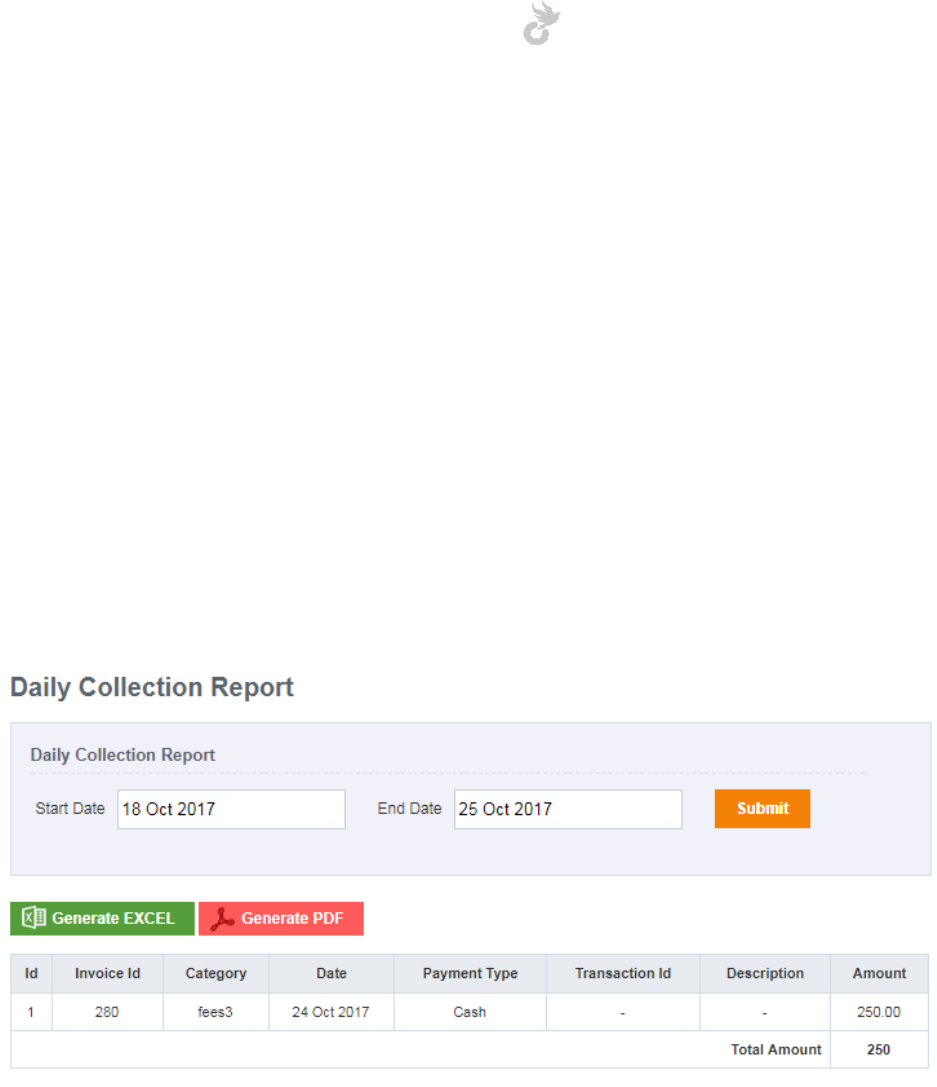
Open-School 2.6.5 Administrator Manual
174
2. Value: Enter a value in percentage for the tax to be calculated
3. Status: Select whether this tax should be active or not for adding in fees.
Click the ‘Create’ button once you are done entering the required values.
10.5 Fee Reports
There are two reports in the Fee Module,
10.5.1 Daily Collection Report
This report allows you to pull details of fees collected within a specific date range. Click on the
‘Daily Collection Report’ in the left side menu to access this area.
Choose a start date and end date to specify the required date range and click ‘Submit’ to pull
up records. You can also view the total amount collected during that range at the bottom. The
report can be saved as excel and PDF.
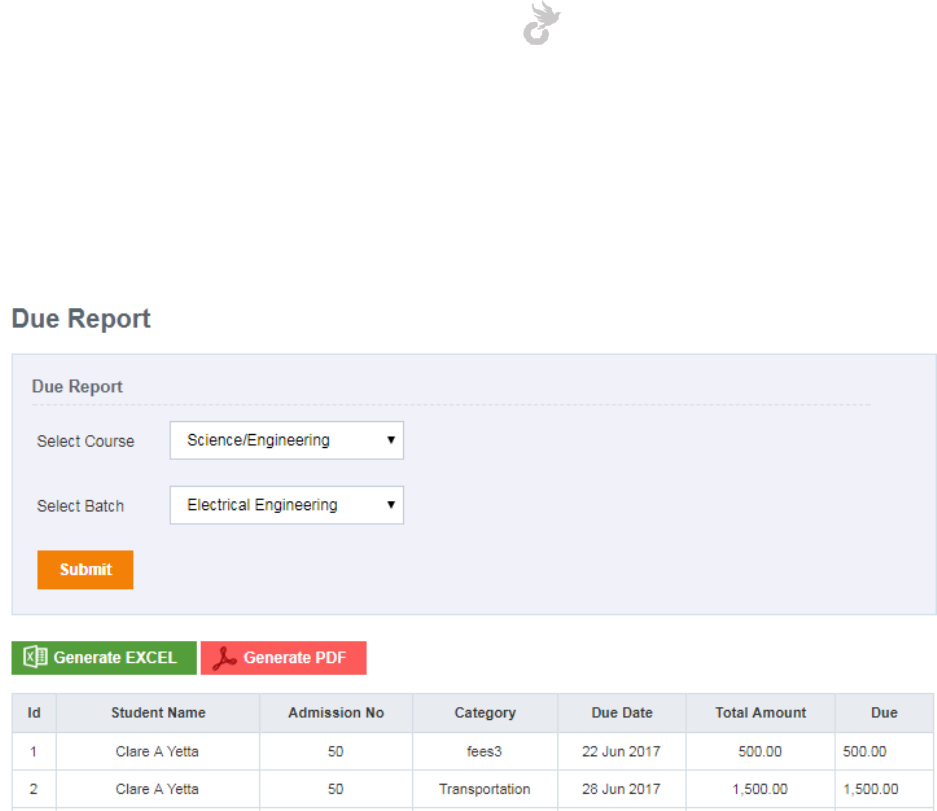
Open-School 2.6.5 Administrator Manual
175
10.5.2 Due Report
The due report option allows you to view all dues for a specific course and batch. Click the ‘Due
Report’ link in the left side menu to get started.
Select a course and batch under it, then click ‘Submit’ to view the list of all students who have
pending fees. This report can also be saved as excel and PDF.
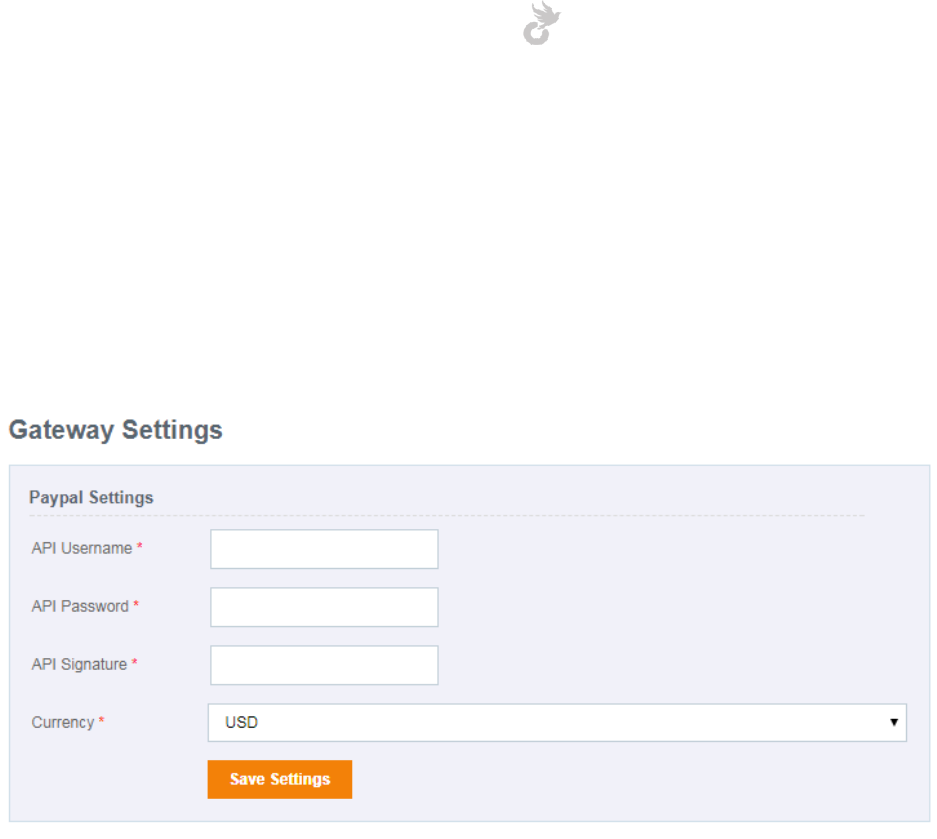
Open-School 2.6.5 Administrator Manual
176
10.6 Payment gateway settings
The application comes with the PayPal gateway already integrated. This will allows parents to
make online payments via PayPal for his/her child/children from the parent portal. You will
need to have a PayPal Business account to receive payments.
Details to configure your account with the application can be found in your PayPal login.
Click on the ‘Settings’ link in the left-side menu under Payment gateway to view the form for
configuring the gateway.
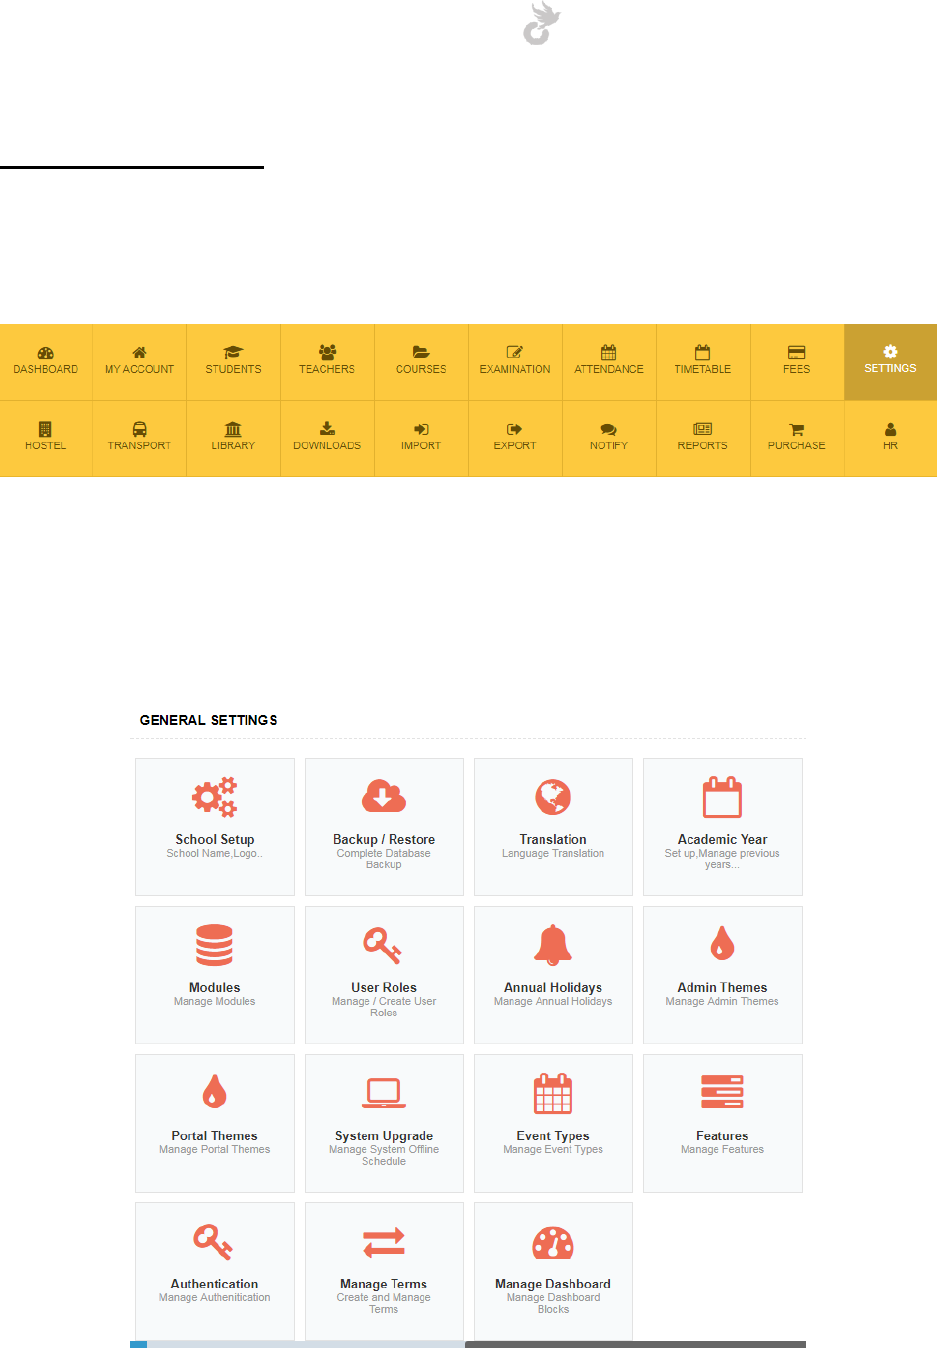
Open-School 2.6.5 Administrator Manual
177
11. SETTINGS
The Settings Module allows you to manage details of school, take backups, create user roles,
custom users, change themes, enable/disable modules etc.
11.1 General Settings
The general settings area contains the basic functionalities like taking backup, setting up school
data etc.
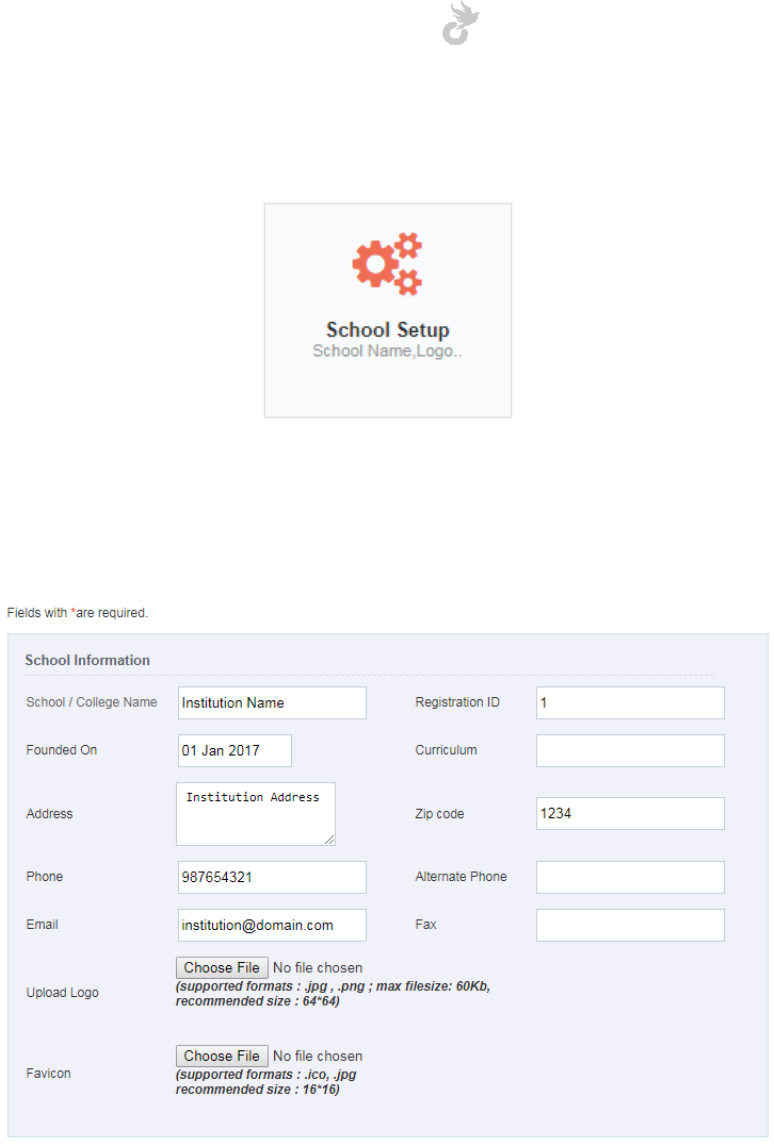
Open-School 2.6.5 Administrator Manual
178
11.1.1 School Setup
The School setup area allows you enter school details like school address, phone number etc
which will be displayed in the header of every PDF generated in the system. You can also
upload the school logo to be displayed inside(top left corner) all portals.
Several other details like principal name, number, financial year start and end dates can be
saved. You may also manage academic years from here.

Open-School 2.6.5 Administrator Manual
179
Currency, time zone, language and date formats to be used in the application can also be
customized here.
The online admission number setup helps you to give a starting number for which students
applying for online admissions should have admission numbers. The admission numbers for
these students will be incremented from the number you enter. If it’s 1, the series will go on as
2,3,4….
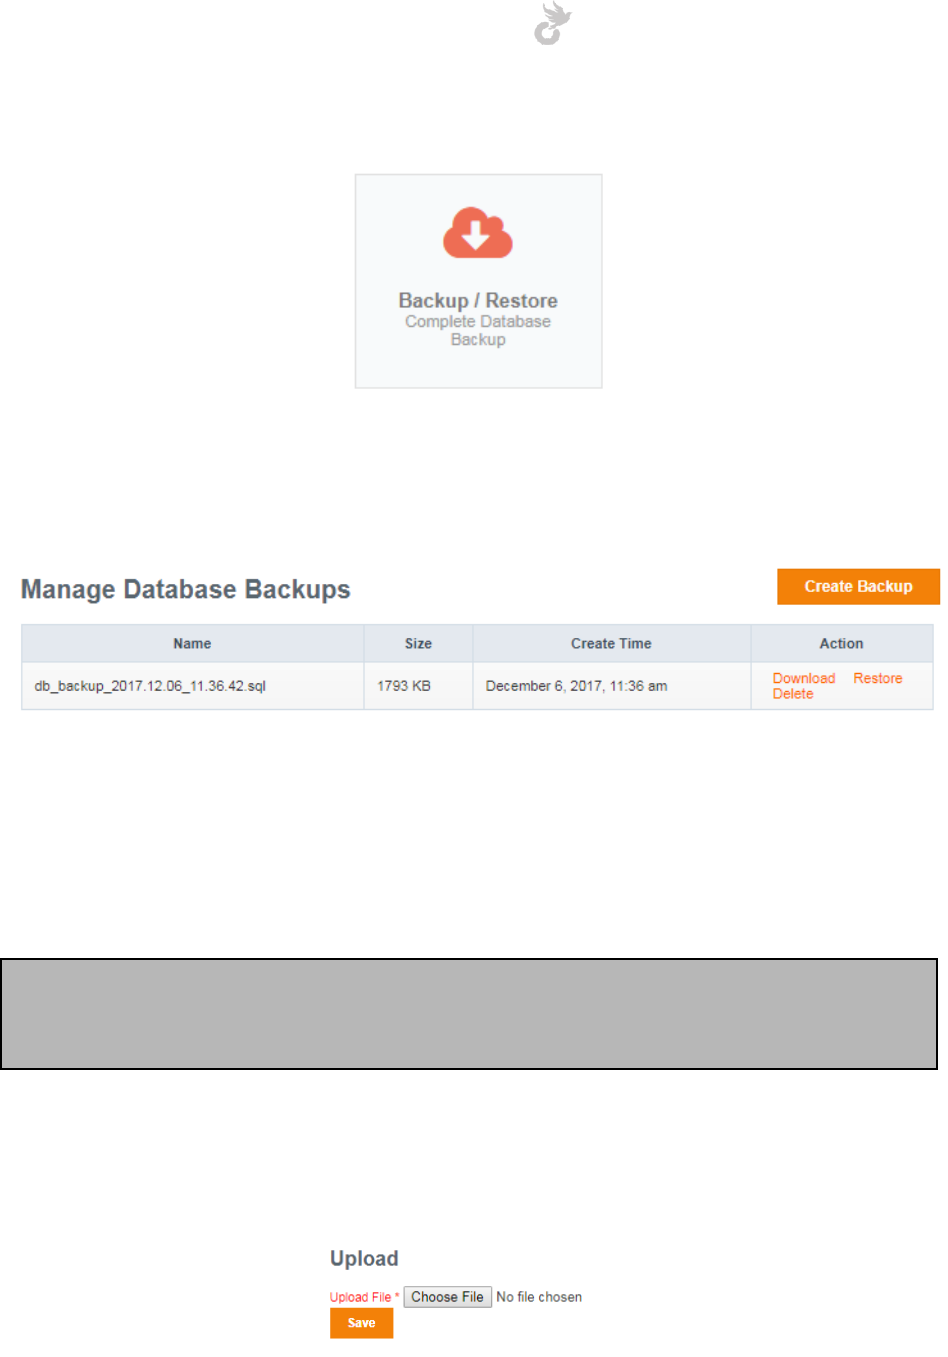
Open-School 2.6.5 Administrator Manual
180
11.1.2 Backup/Restore
The backup/restore function allows you to take a backup of the application and download it or
even use it to restore. This feature takes a complete backup of the data at the time, you can
download it as a SQL(Structured query language) file.
All backups taken are listed here. You can download, restore and delete them. Restoring a
backup actually overwrites whatever data is in the system at the point and inserts the data
from the backup.
Click on the ‘Create Backup’ button to generate a backup of the application at that point.
Note: To start taking backups make sure the folder permission for the folder
protected/_backup is set to 755 on your server. If not set by default please changed it to 755
for the backup feature to work.
You may also upload backups to the system and then use it to restore. Only backups generated
by the application can be used to upload and restore. Uploading other SQL files will cause
abnormalities in the functioning of the application and also cause it to crash!
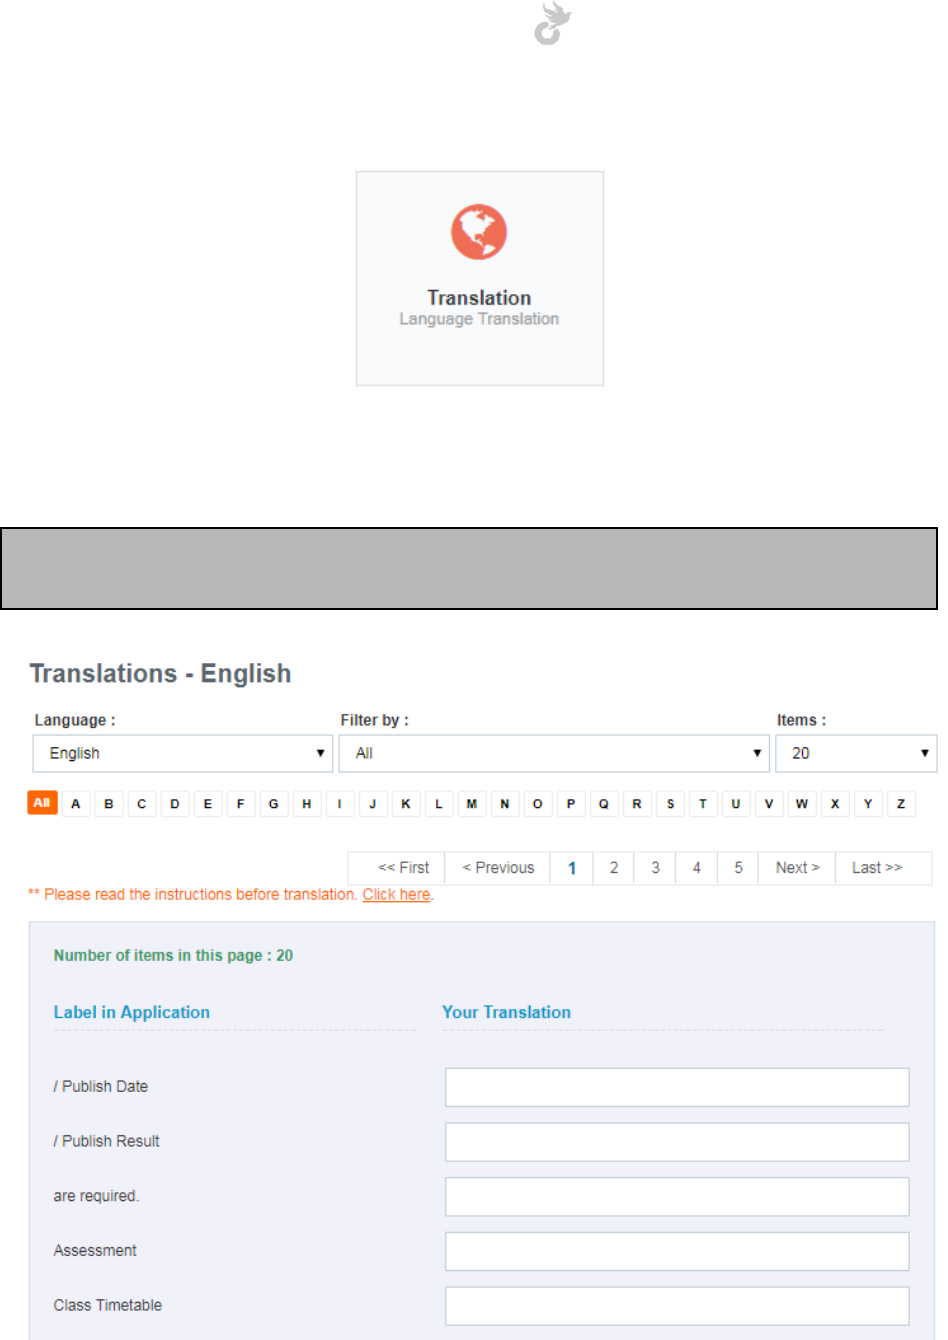
Open-School 2.6.5 Administrator Manual
181
11.1.3 Translation
The application has a translation module that allows you and other users to personalize their
portal languages.
Note: The system does not come with predefined language libraries, meaning the translations
have to be first entered into the application manually before you can use it.
Choose the language for which you would want to enter translations from the drop-down on
top. All words/phrases in the system are displayed below in the left side. Enter your translations
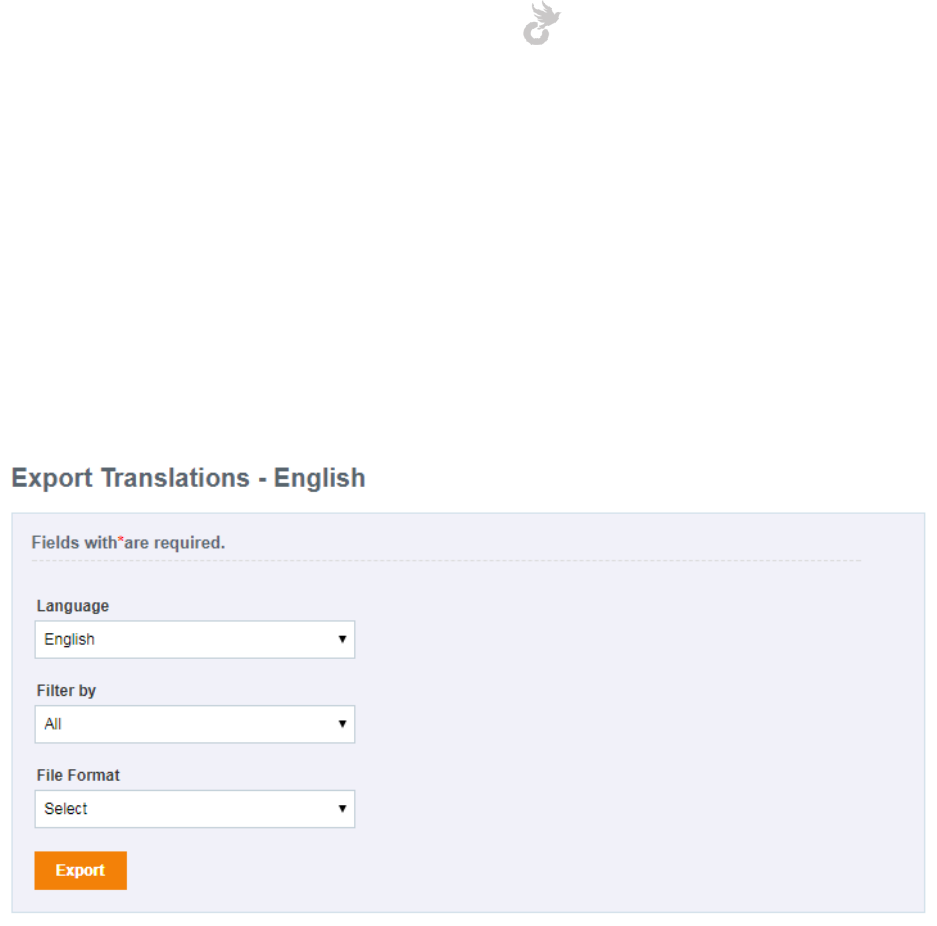
Open-School 2.6.5 Administrator Manual
182
in the corresponding field in the right side and click the ‘Generate Translations’ button at the
bottom.
This might be a cumbersome job as there are around 1000-2000 words in the system. You may
use the export option here to get all the words/missing translations in the system as an excel
file then use the import option to insert the translations using the excel file.
Click on the ‘Export Translation’ link in the left side menu to extract the english words in the
application as an excel file.
You may export completed and missing translations from here.
The import translation option allows you to import an excel file.
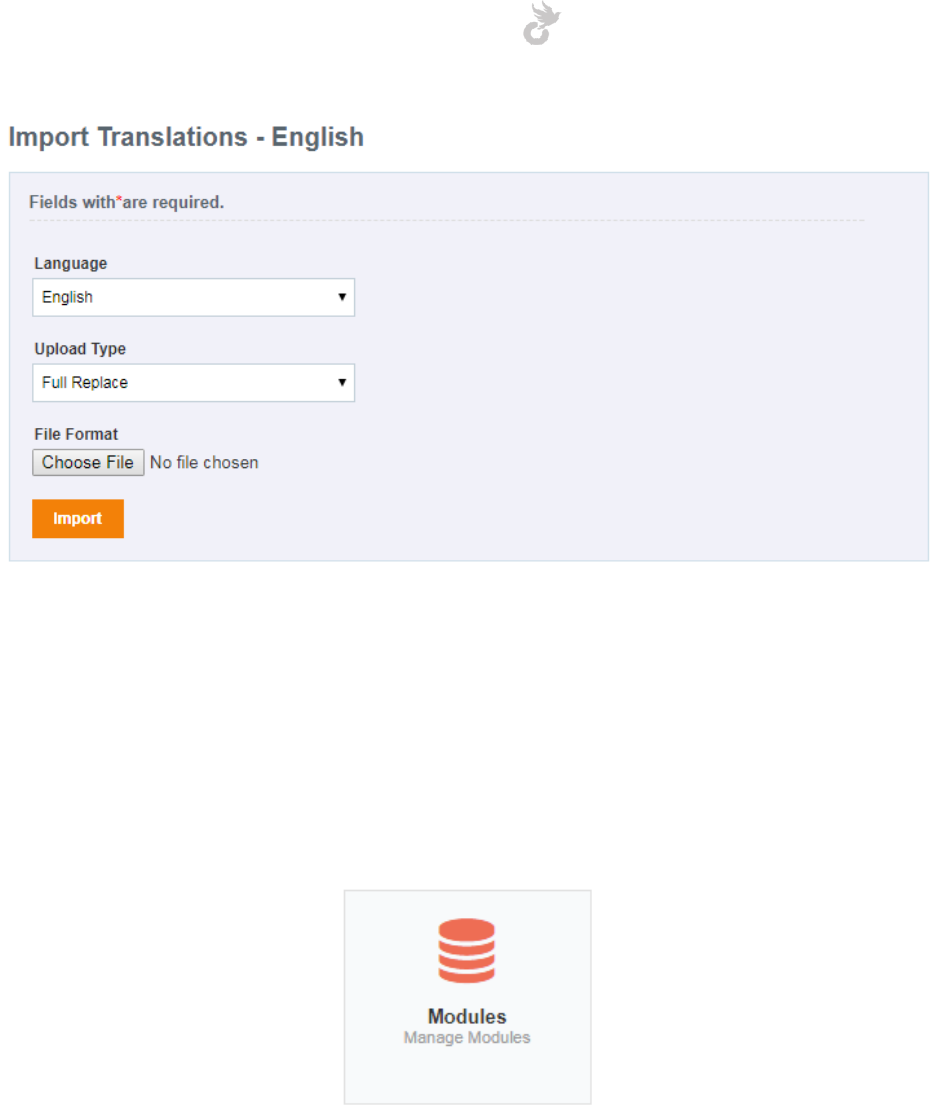
Open-School 2.6.5 Administrator Manual
183
Choose the language for which translations need to be inserted. Next choose the whether the
import is for missing translations or replacing all translations.
Select your file from your system and click the ‘Import’ button to start the import process.
11.1.4 Module Management
The ‘Modules’ option in general settings allows you to enable/disable modules in the system.
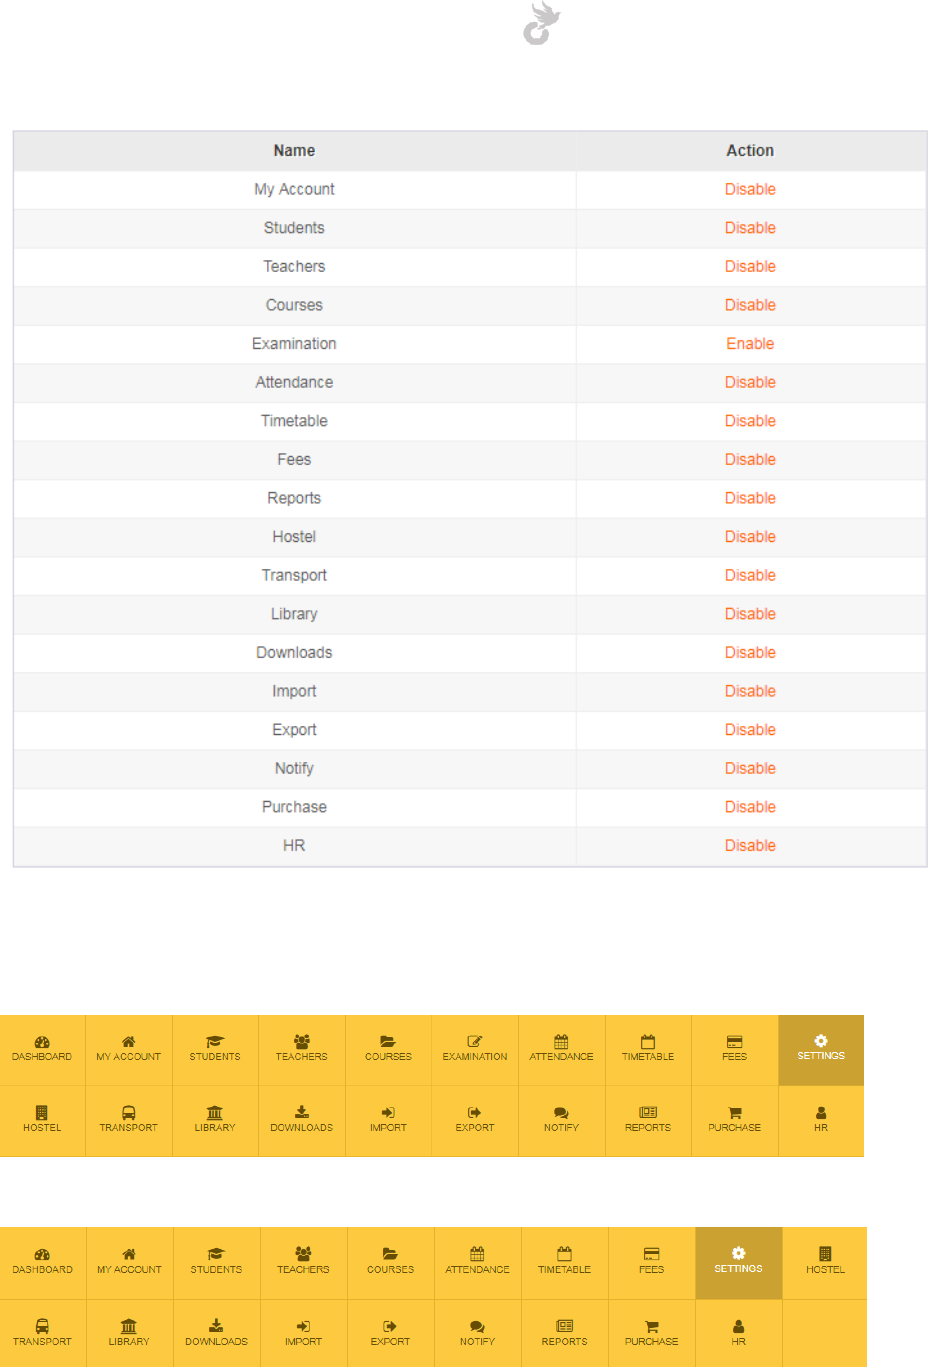
Open-School 2.6.5 Administrator Manual
184
To enable/disable a module simply click the respective link next to it.
Before disabling Examination module
After disabling Examination module
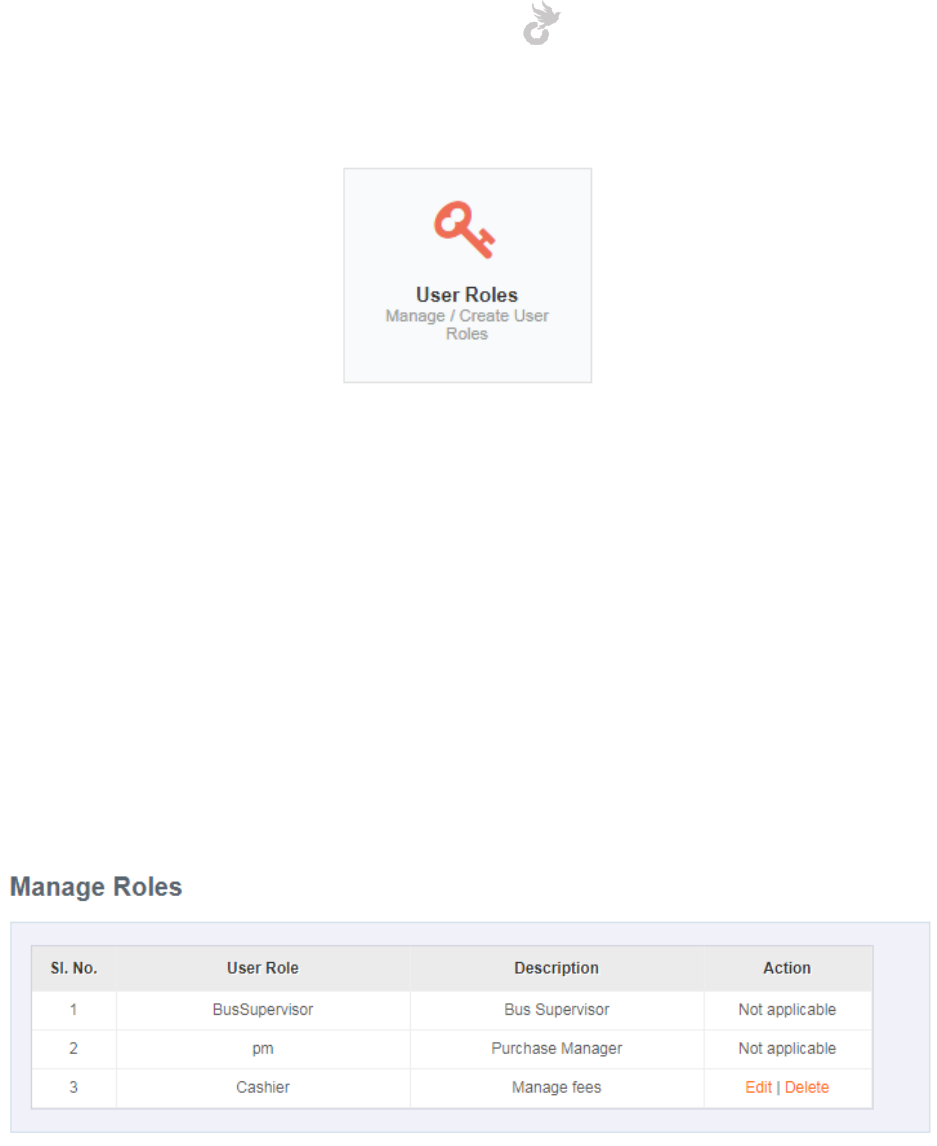
Open-School 2.6.5 Administrator Manual
185
11.1.5 User role management
The default roles in the system are,
1. Admin
2. Teacher
3. Parent
4. Student
These roles are fixed and cannot be changed. Teacher, student and parent roles are assigned
automatically during their registration process. Custom admins can be created by using the
‘Create New User’ link in the left side menu of the Settings Module. These custom users can be
assigned custom roles with access to specific modules.
The list of user roles already in the application are listed here.
Bus Supervisor and PM(Purchase Manager) roles are also default and cannot be edited/deleted
but can be assigned to custom users. Roles that are created by you can be edited and deleted.
To create a new role click the ‘Create User Role’ link in the left side menu.
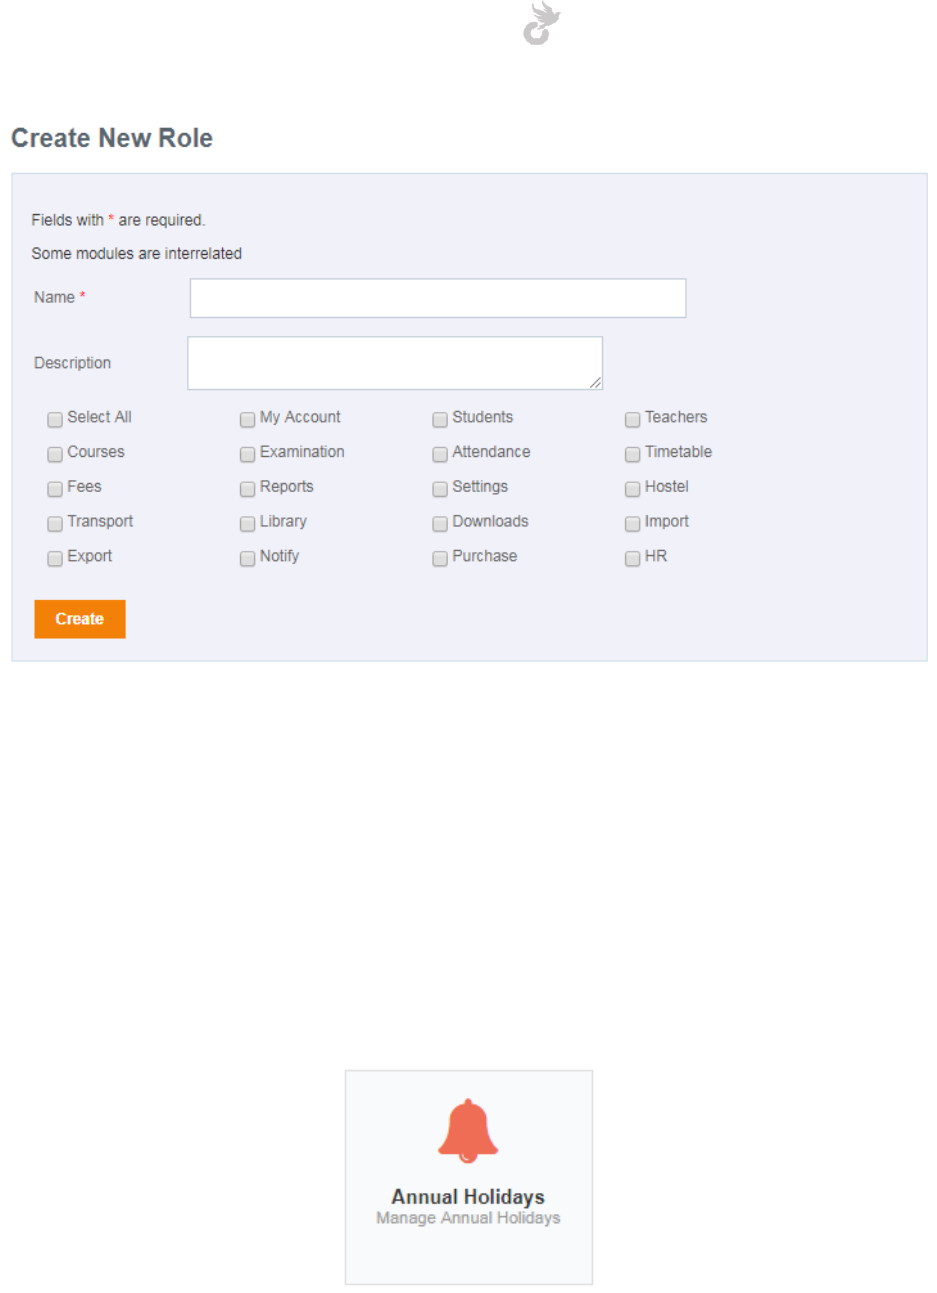
Open-School 2.6.5 Administrator Manual
186
1. Name: Enter a name for the role you are about to create
2. Description: Enter a description of the role (not mandatory)
3. Choose the modules you would want the user with this role to access. Only the modules
chosen will be displayed when the user assigned to this role logs in to his/her account.
Click on the ‘Create’ button to save changes and create the role. This can then be assigned to a
custom user during creation. Check the miscellaneous section for details on creating a custom
user.
11.1.6 Annual Holidays
The annual holidays feature allows you to set holidays in your application. This will also reflect
in the attendance module. Days marked as holidays will not be considered as working days.
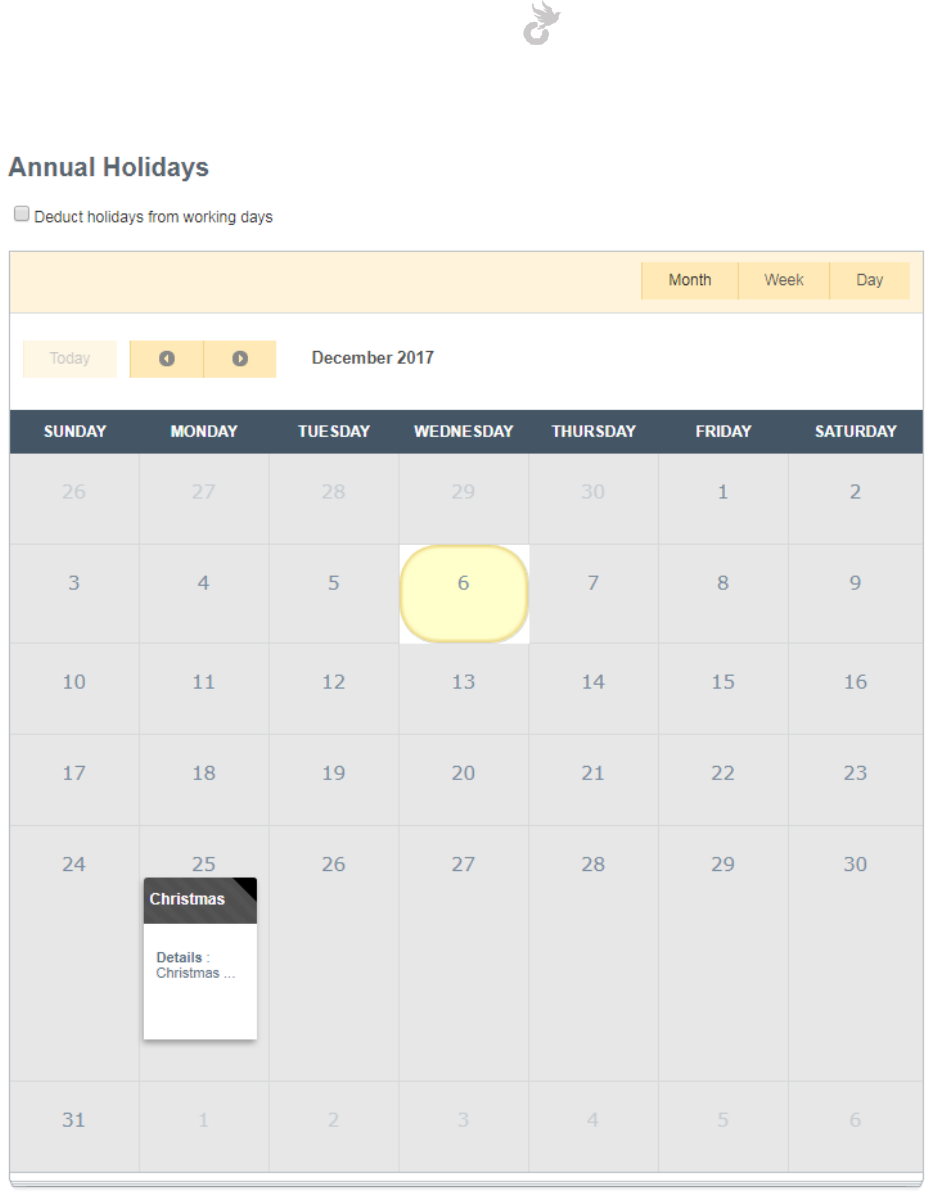
Open-School 2.6.5 Administrator Manual
187
To mark a holiday simply click on a day in the calendar.
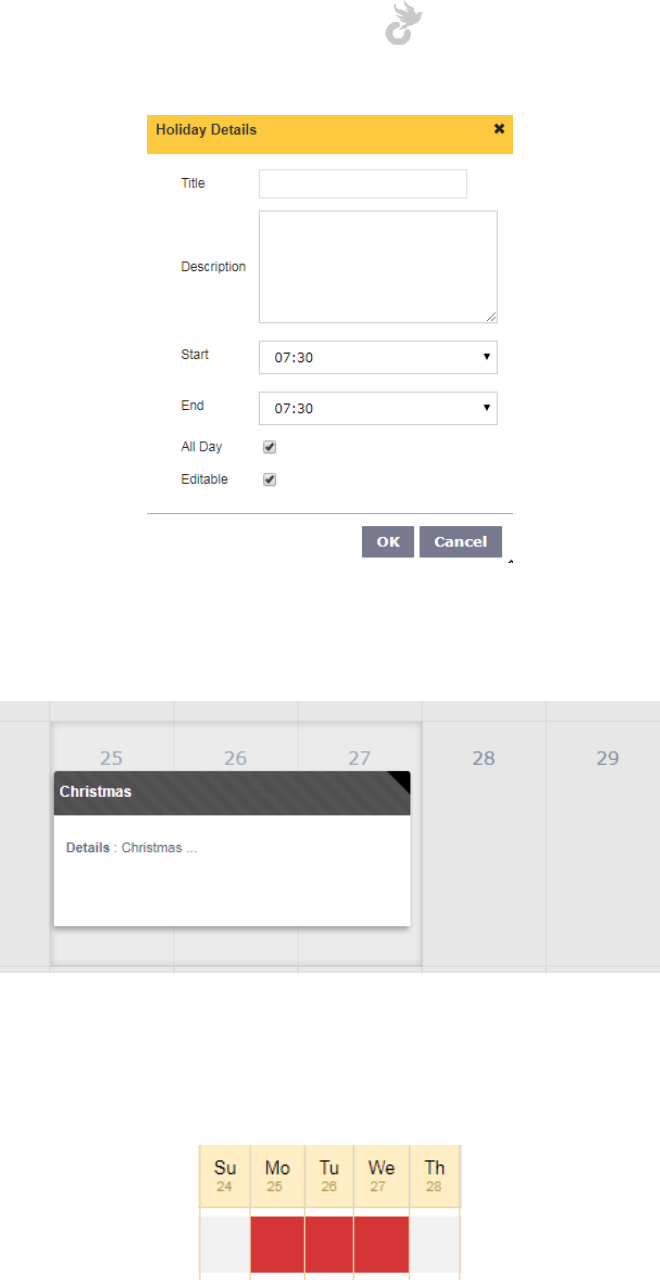
Open-School 2.6.5 Administrator Manual
188
In the pop-up form that appears enter the details of the holiday and click OK to save changes.
You may extend the holiday for a couple of days by clicking the edge of the holiday card and
pulling it to an extent of your choice. Holidays will automatically reflect in the attendance
register as shown below.
The ‘Deduct holidays from working days’ option if checked will not consider holidays in
attendance percentage calculation.
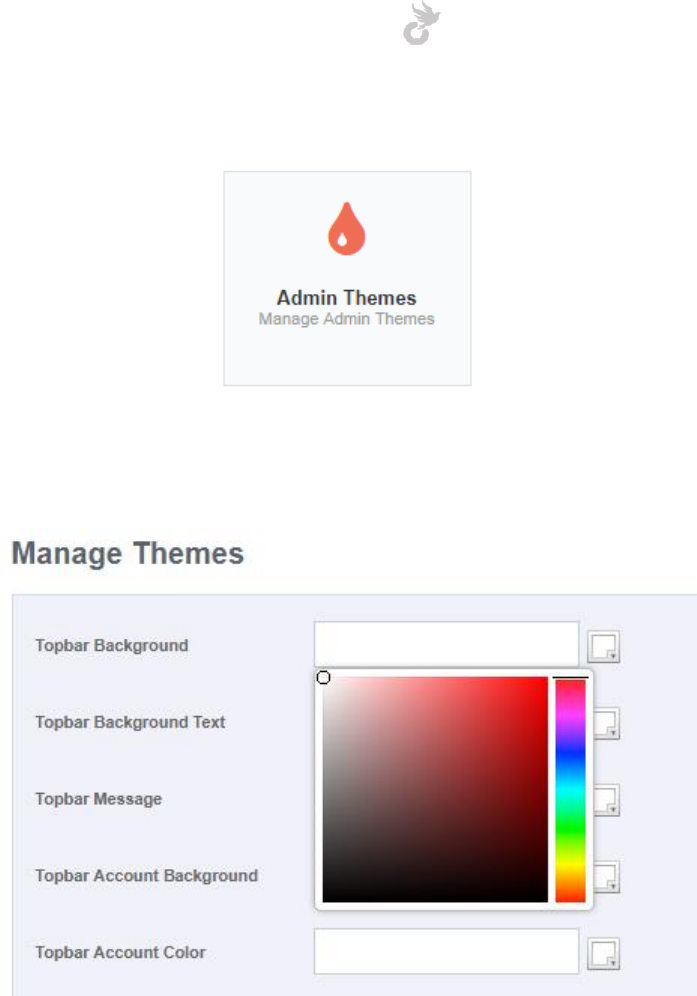
Open-School 2.6.5 Administrator Manual
189
11.1.7 Theme Management
Student, parent and teacher users can either set their own themes in their portals or use the
admin theme. Admins can change use the default theme or set a new one of their choice for
admin portal as well as other portals.
This area allows you to change colors for different sections of the application. The sections are
mentioned in the left side of the page. The fields next to it are color pickers where you can
either enter the hex-code for the color you wish or select it from the picker.
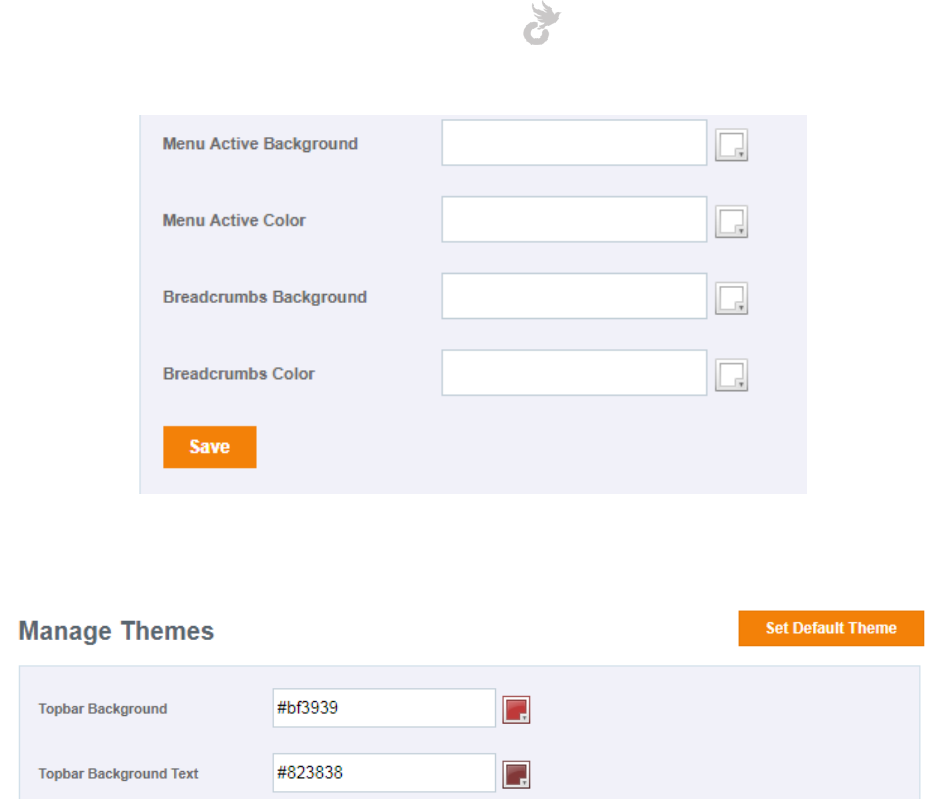
Open-School 2.6.5 Administrator Manual
190
Click on the ‘Save’ button below to save changes made.
You can always revert back to the default theme by clicking the ‘Set default theme’ button on
top. This button is visible only if you have set a different theme.
The portal themes feature is similar to the admin theme but the changes are applied to the
teacher, student and parent portals.
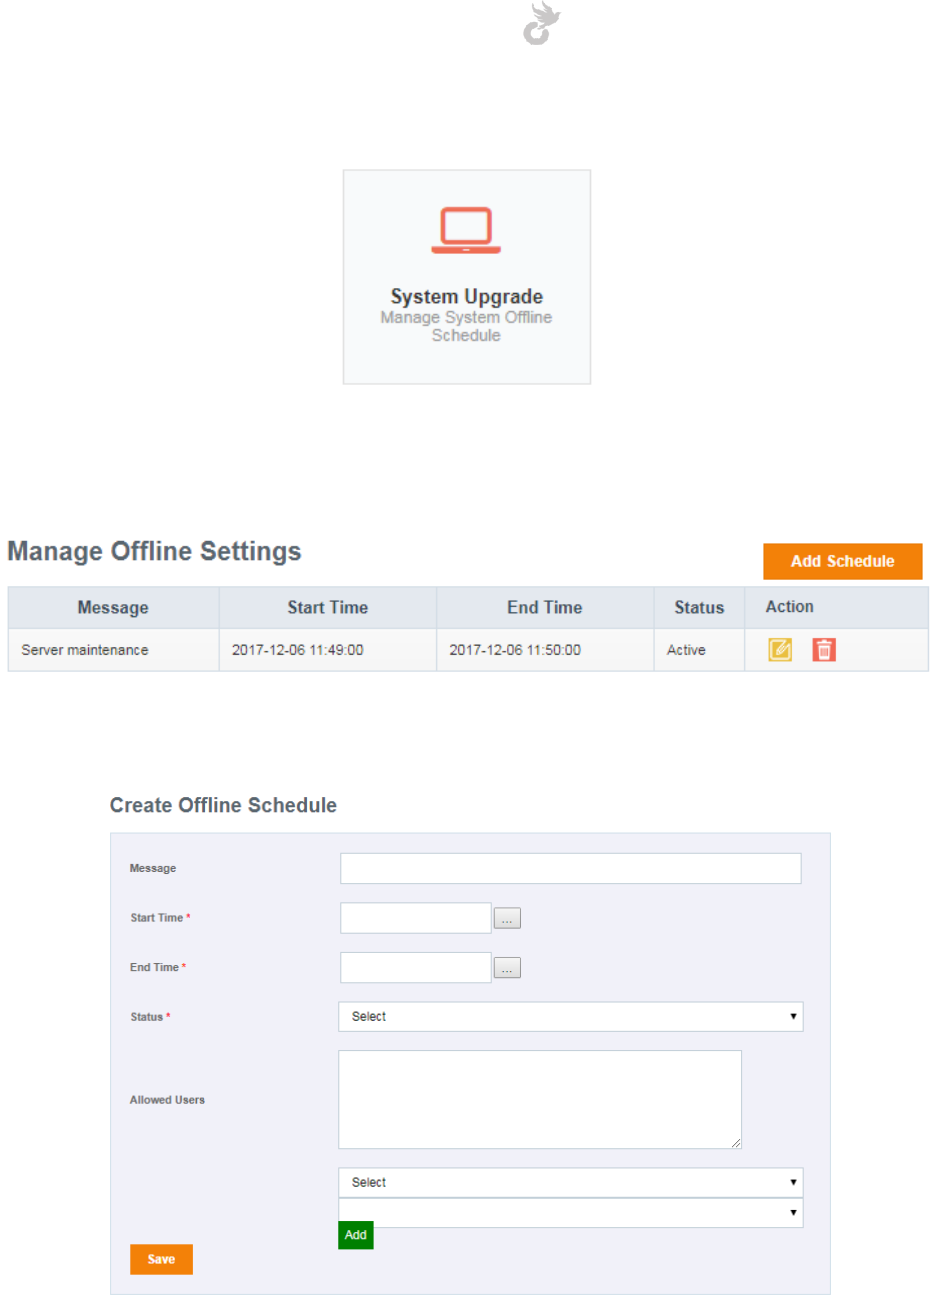
Open-School 2.6.5 Administrator Manual
191
11.1.8 System upgrade
The system upgrade option allows you to set a timeframe where no one except allowed users
can access the system. This can be used to restrict access during server maintenance or
application upgrades etc.
Scheduled upgrades are listed here. To add a new schedule click the ‘Add Schedule’ button.
Enter the following details to schedule an upgrade,
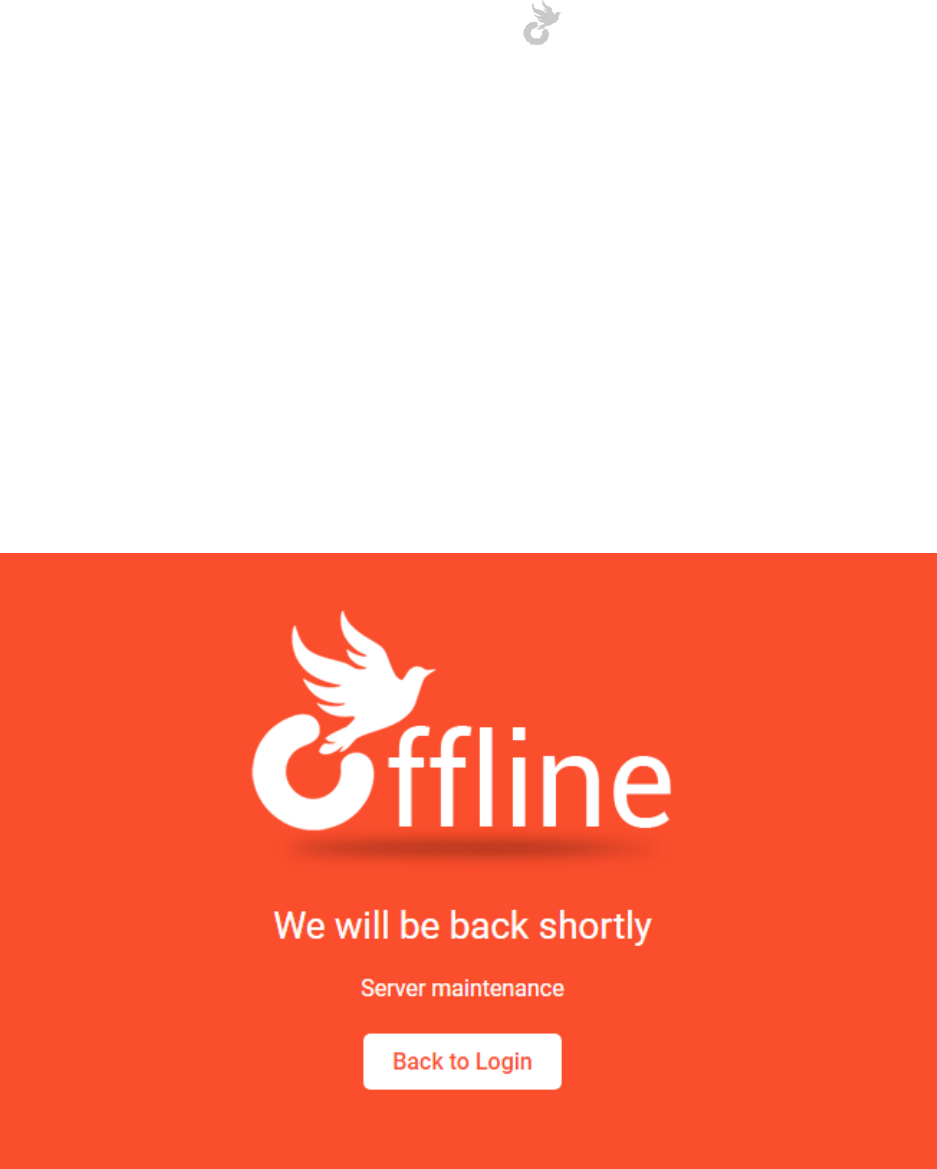
Open-School 2.6.5 Administrator Manual
192
1. Message: The text entered here will be displayed on the offline page.
2. Start time: The start time for the upgrade.
3. End time: the end time for the upgrade.
4. Status: Can be inactive(upgrade will not work unless set to active), active or completed.
5. Allowed users: The first drop-down allows you to select the role of the users you wish to
allow during this timeframe. The second dropdown lists all the usernames under the
selected role. Select a role and user then click the ‘Add’ button to save the user to the
whitelist.
Click on the ‘Save’ button once you are done.
When a user who isn’t in the whitelist tries to access the system while an upgrade is in process
they will see the screen below.
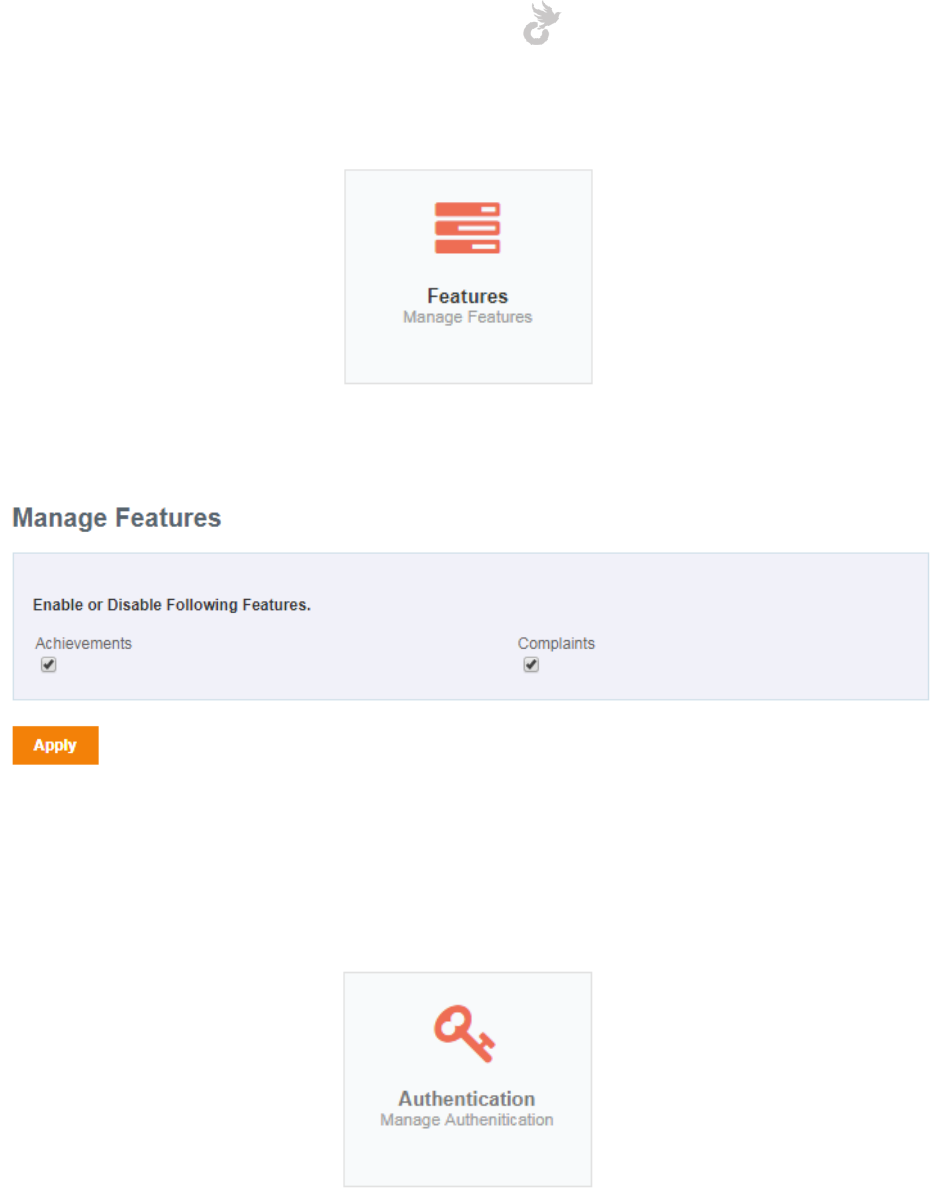
Open-School 2.6.5 Administrator Manual
193
11.1.9 Features
The features option allows you to enable/disable the complaints and achievements(in students
and teachers) ability.
Simply check/uncheck the features to enable/disable them respectively.
11.1.10 Authentication
The application allows 2 ways to login,
1. Single step: This involves entering your username/email and password.
2. Two step: This type of authentication has a one-time password(OTP) check during login.
Users will receive a temporary pin via SMS to their registered phone number. They will
be able to login only after entering the OTP.
Open-School 2.6.5 Administrator Manual
194
Note: The two-step verification process will only work once you have integrated the SMS
gateway in the application.
11.1.11 SMS counter
The SMS counter allows you to track the number of SMS sent from the system. You can filter
results based on date, month and date range.
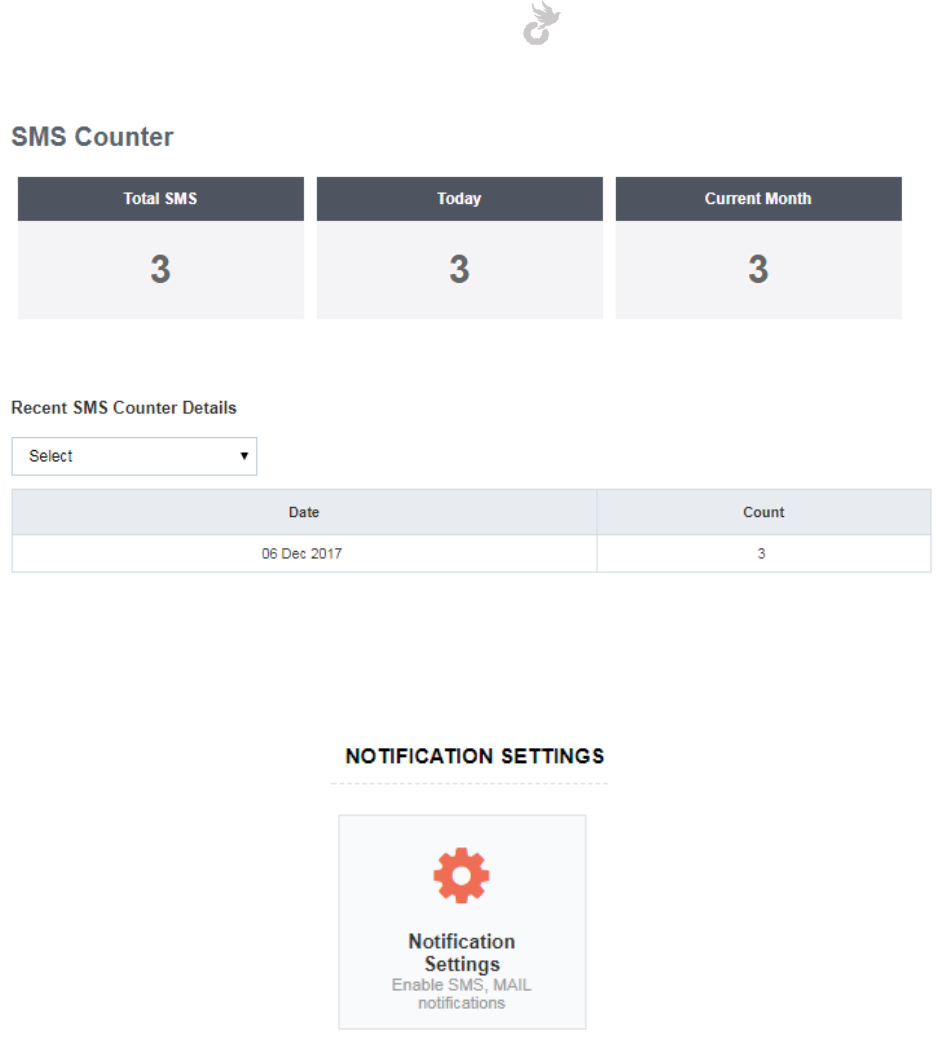
Open-School 2.6.5 Administrator Manual
195
11.1.12 Notification Settings
The notification settings area is the hub for controlling all your notifications sent out from the
application. As you may have seen there are different notifications(SMS, email and internal
messages) sent from the system to users for different functions.
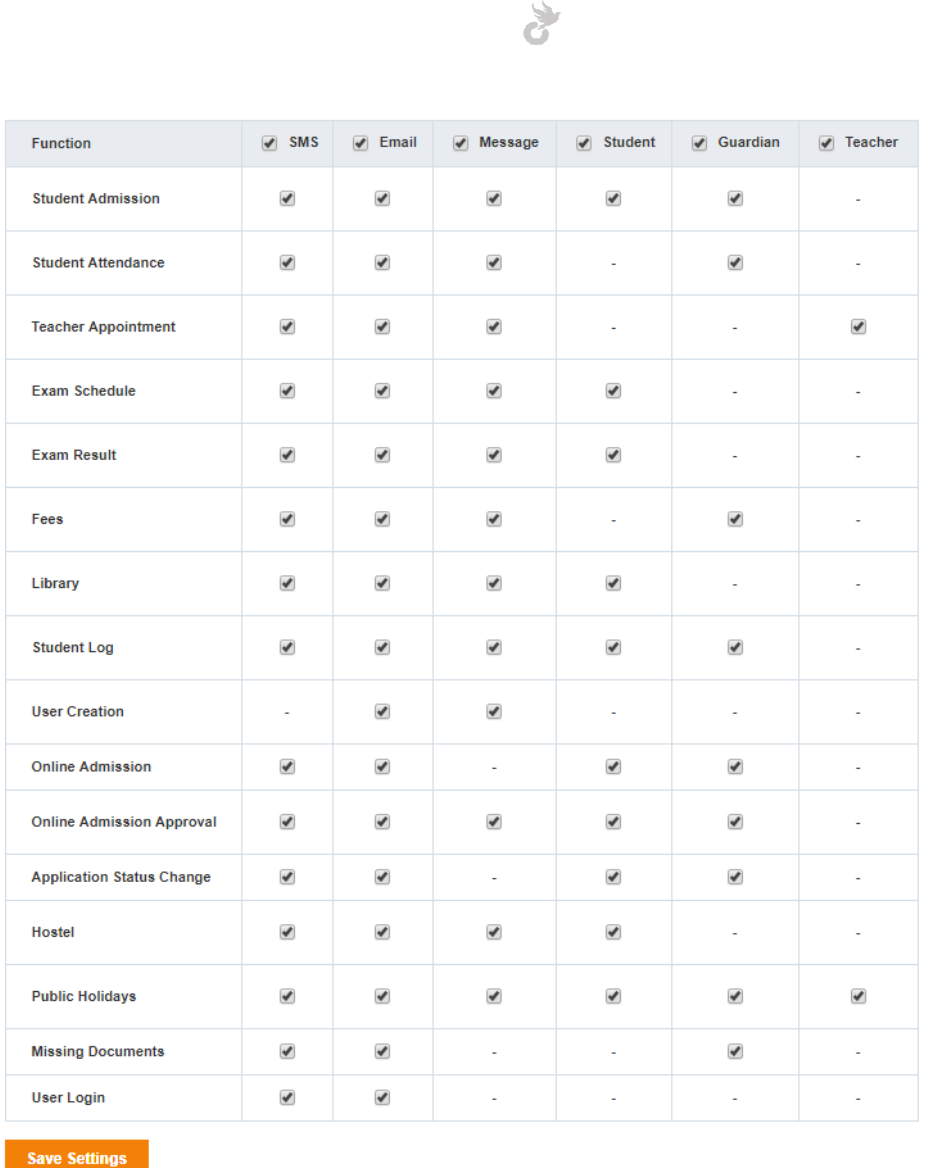
Open-School 2.6.5 Administrator Manual
196
Check/uncheck the required options based on the functions in the first column and the
notification mode/user in the first row to enable/disabled notifications respectively. Once you
have chosen your required options click the ‘Save Settings’ button at the bottom to save the
changes you made.
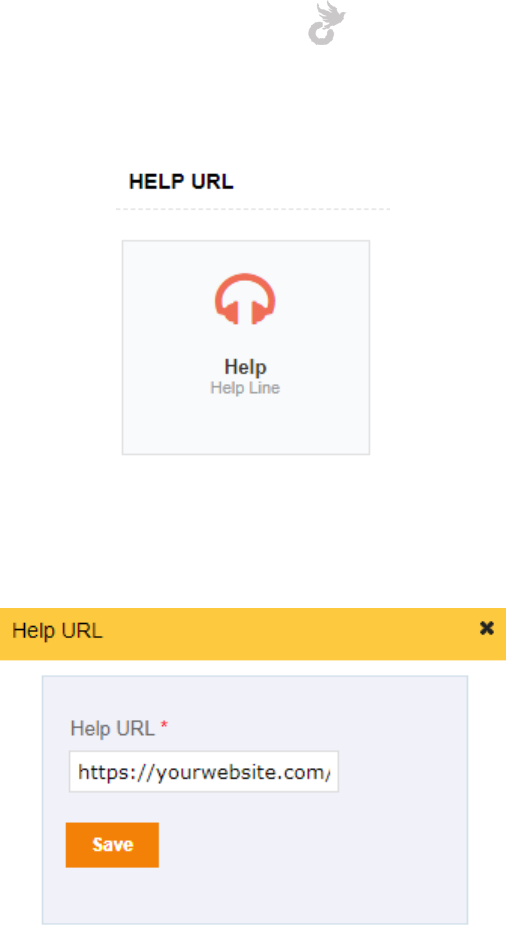
Open-School 2.6.5 Administrator Manual
197
11.1.13 Help
The help option allows you to enter the URL for your help page. Users can access this from their
portals.
11.2 Creating a custom user
We’ve seen how you can create custom roles in the system. The ability to create custom users
allows you to assign your custom roles to them. To create a custom user click on the ‘Create
New User’ link in the left side menu.
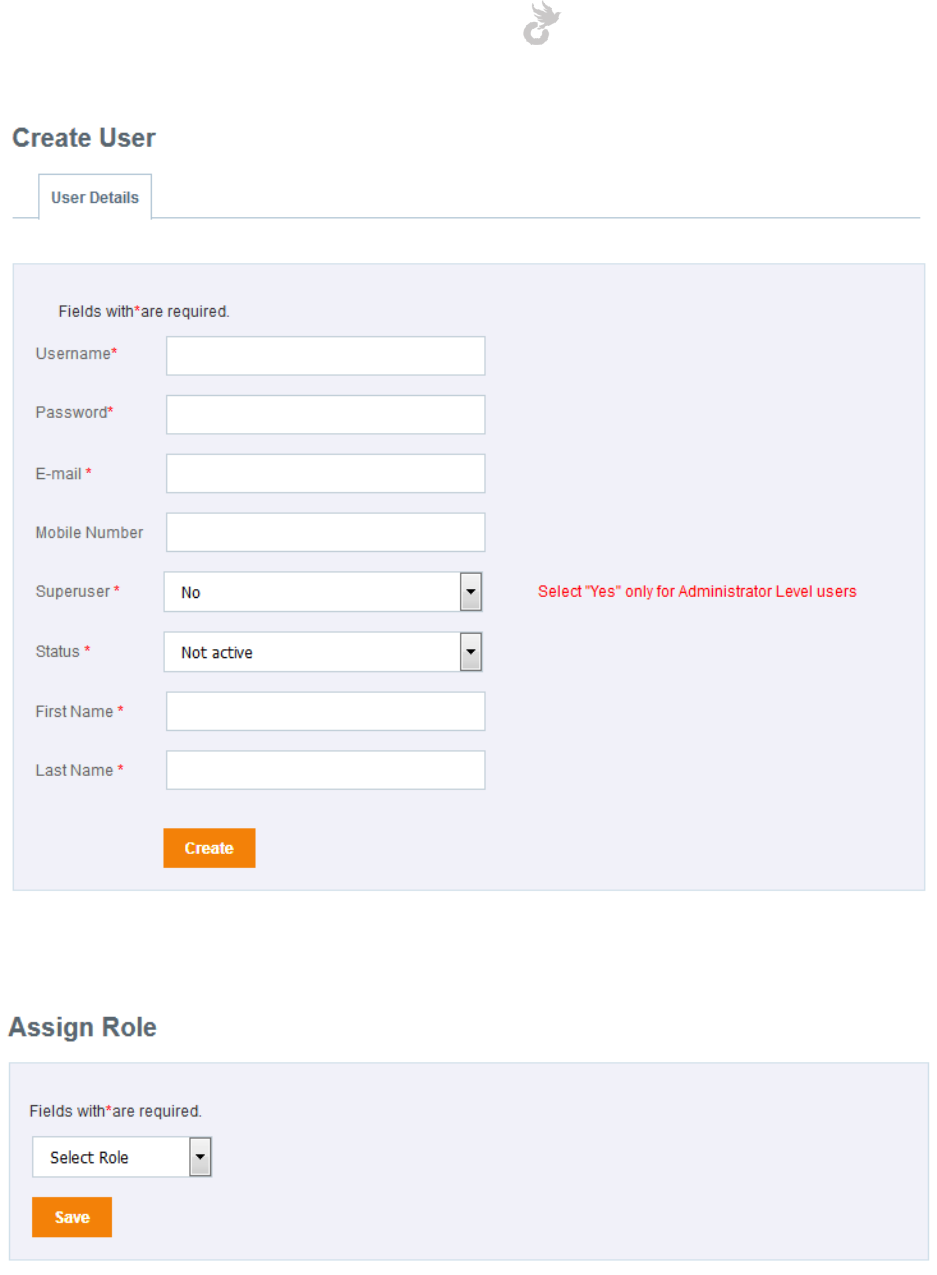
Open-School 2.6.5 Administrator Manual
198
Fill up the details in the form and hit the ‘Create’ button to move to the next step.
The next steps involves assigning the role to the user you are about to create. You may either
choose an existing role from the drop down on top (this also includes the Admin role) or create
a new role and assign it directly.
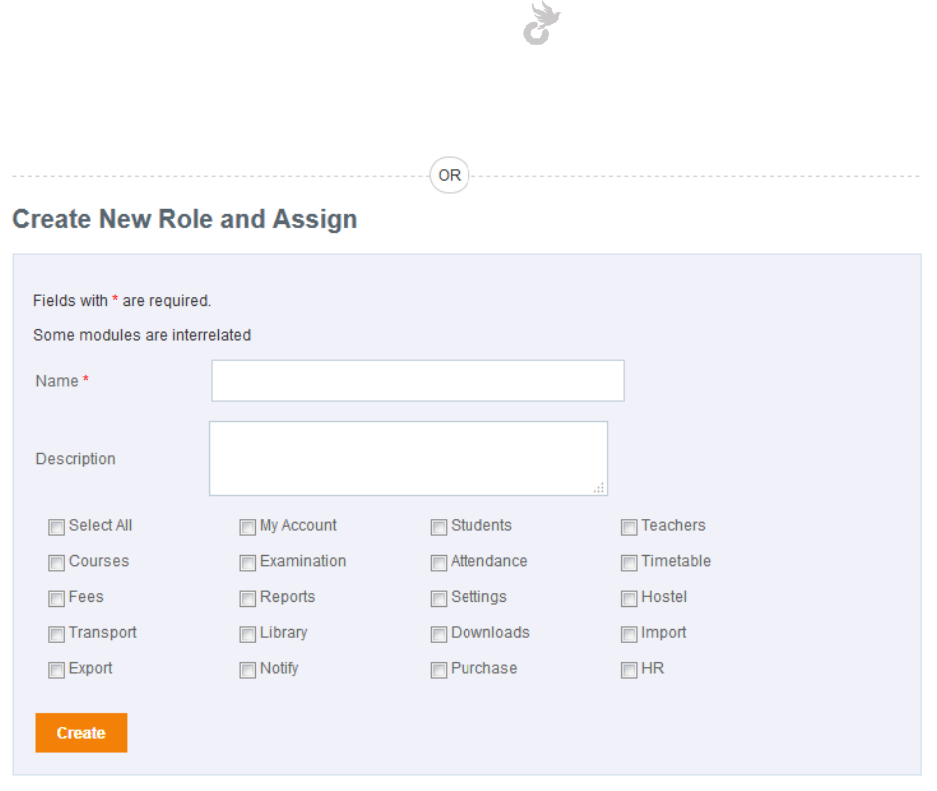
Open-School 2.6.5 Administrator Manual
199
Click Save/Create based on your selection to finish the process. A mail will be sent to the
custom user’s email with the login details. You may also manage this user from the ‘Manage
Users’ section.
11.3 Manage Users
All user accounts for parents, students, teacher, non-teaching staff, custom users, admins etc
are listed in the ‘Manage Users’ section which can be accessed from the link in the left side
menu.
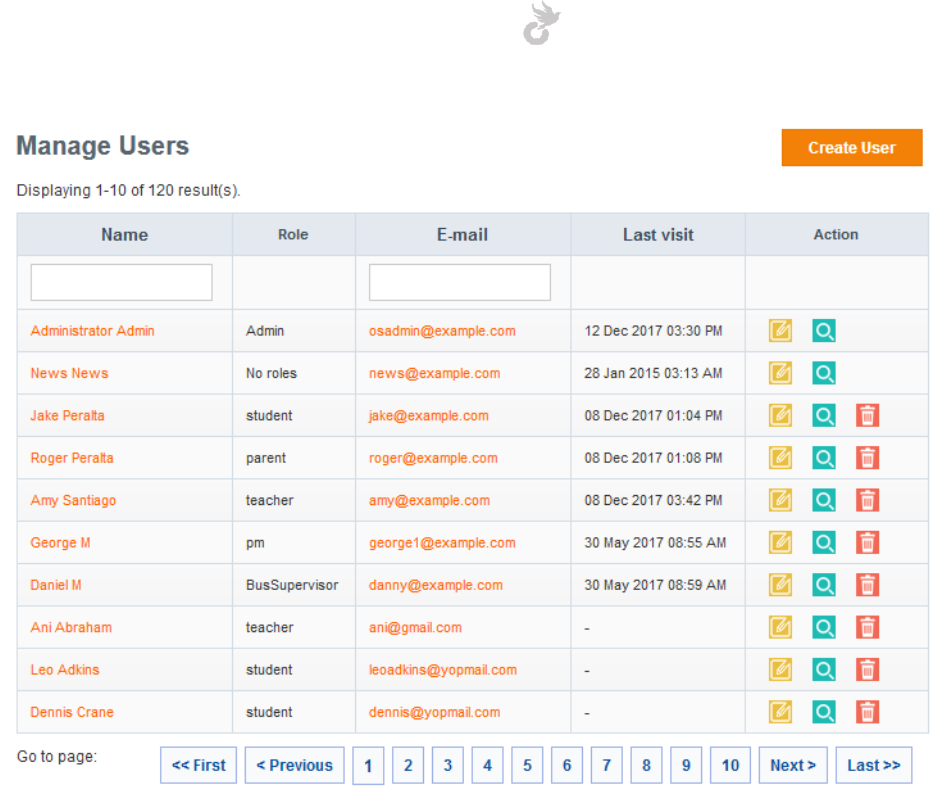
Open-School 2.6.5 Administrator Manual
200
You may view, edit or delete these accounts from here. This area allows you to change
passwords for other users by using the edit function(click the edit icon).

Open-School 2.6.5 Administrator Manual
201
12. HOSTEL
The Hostel Module allows you to manage your hostels, floors, rooms and mess details. Students
can enroll for the hostel facility from their portal and you can allot them to different hostels and
rooms based on the requests or even without it.
The hostel dashboard displays the available rooms, vacant beds, pending room requests and
mess dues.
12.1 Managing Hostels
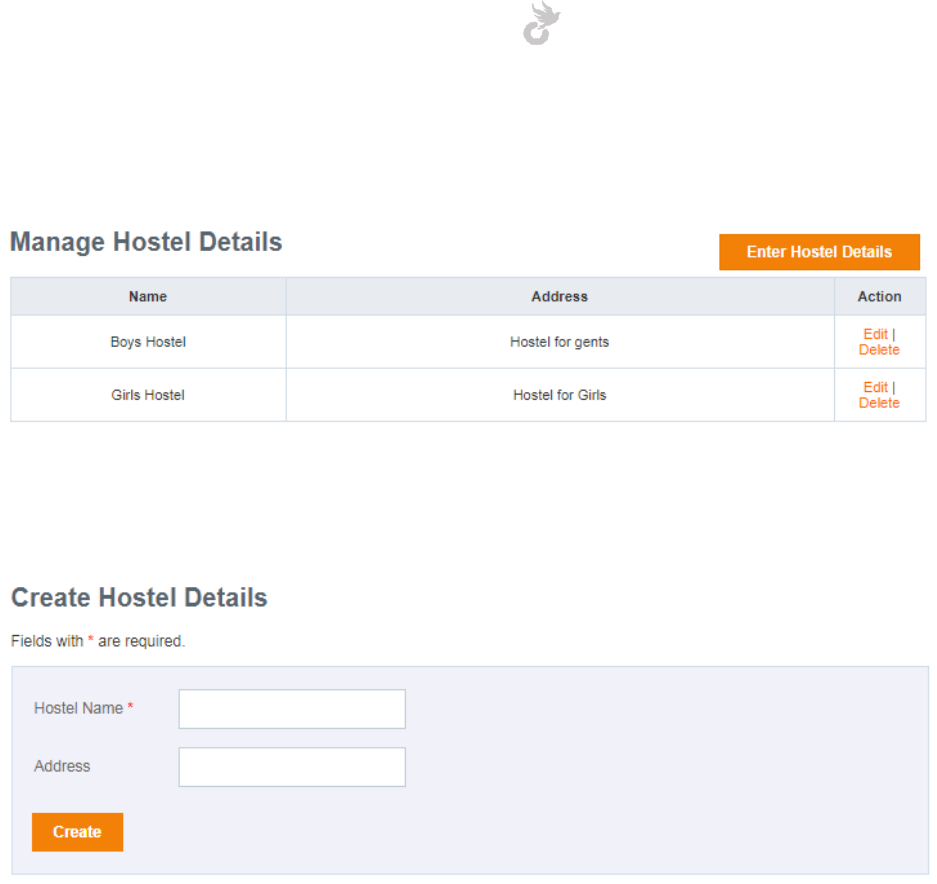
Open-School 2.6.5 Administrator Manual
202
Click on the ‘Hostel Details’ link in the left side menu to create and manage hostels for your
institution. This will list the existing hostels and also give you an option to create a new one.
Existing hostels can be edited or deleted too. To create a new hostel click the ‘Enter Hostel
Details’ button on top.
Enter your hostel name and address in the respective fields and click ‘Create’ to save details.
You can now start adding rooms which can be assigned to students.
12.1 Managing Rooms
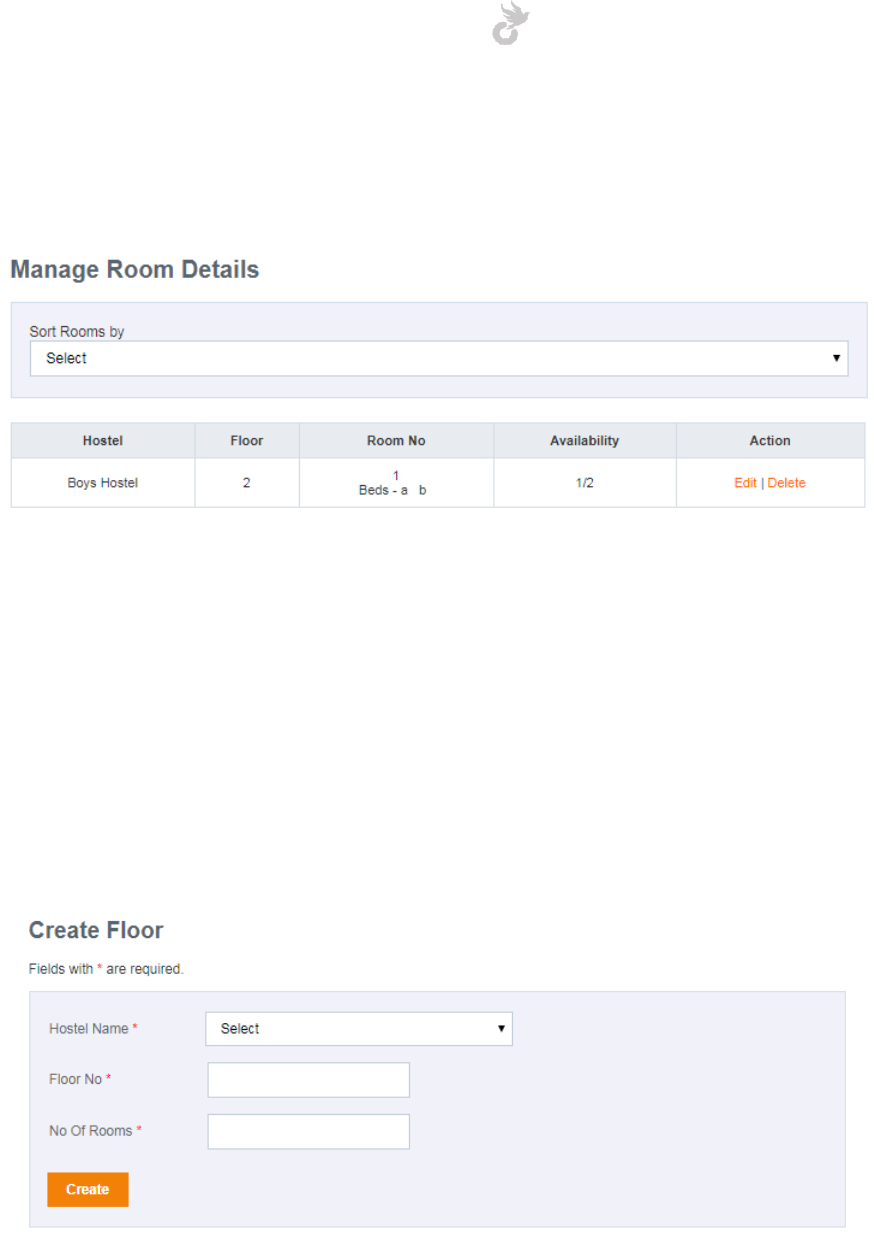
Open-School 2.6.5 Administrator Manual
203
Once you have created hostels, you can now start adding floors, rooms and mess details. Let’s
take a look at how to manage your rooms, allocate students to it, change rooms etc.
Click on ‘List Room Details’ to sort rooms based on different filters.
You can sort rooms based on,
1. All
2. Occupied
3. Vacant
Click on the edit or delete links to update details or delete rooms respectively.
12.1.1 Creating a room
Click on ‘Add Room Details’ in the left side menu to start creating a room. The first step is to
add a floor.
Enter the following details,
1. Hostel Name: Select a hostel from the dropdown. All hostels created will be listed here.
2. Floor No: Enter a floor number. This is a unique field. Floor numbers cannot be repeated
for the same hostel.
3. No. of rooms: Enter the number of rooms to be created for that floor.
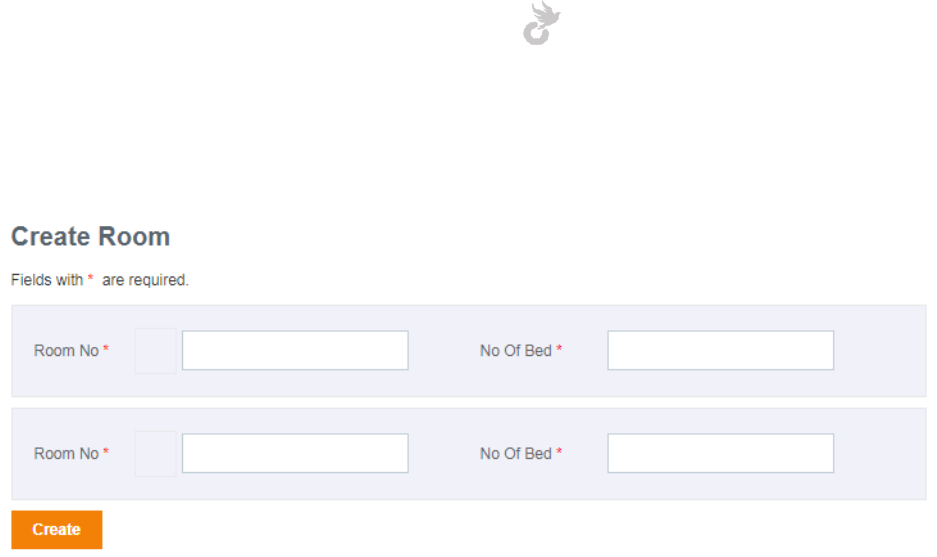
Open-School 2.6.5 Administrator Manual
204
Click ‘Create’ to move on to the next step.
The next step requires entering room details. The number of rows will depend on the value you
entered for number of rooms in the previous step.
Here you can enter your,
1. Room number: Enter a room number
2. No. of beds: Enter the number of beds available for each room
The beds will be added alphabetically depending on the number you have entered.
12.1.2 Allotting a student to a room
You can start allotting students to hostels and rooms once you have created them. To start,
click the ‘Allot Room’ link in the left side menu.
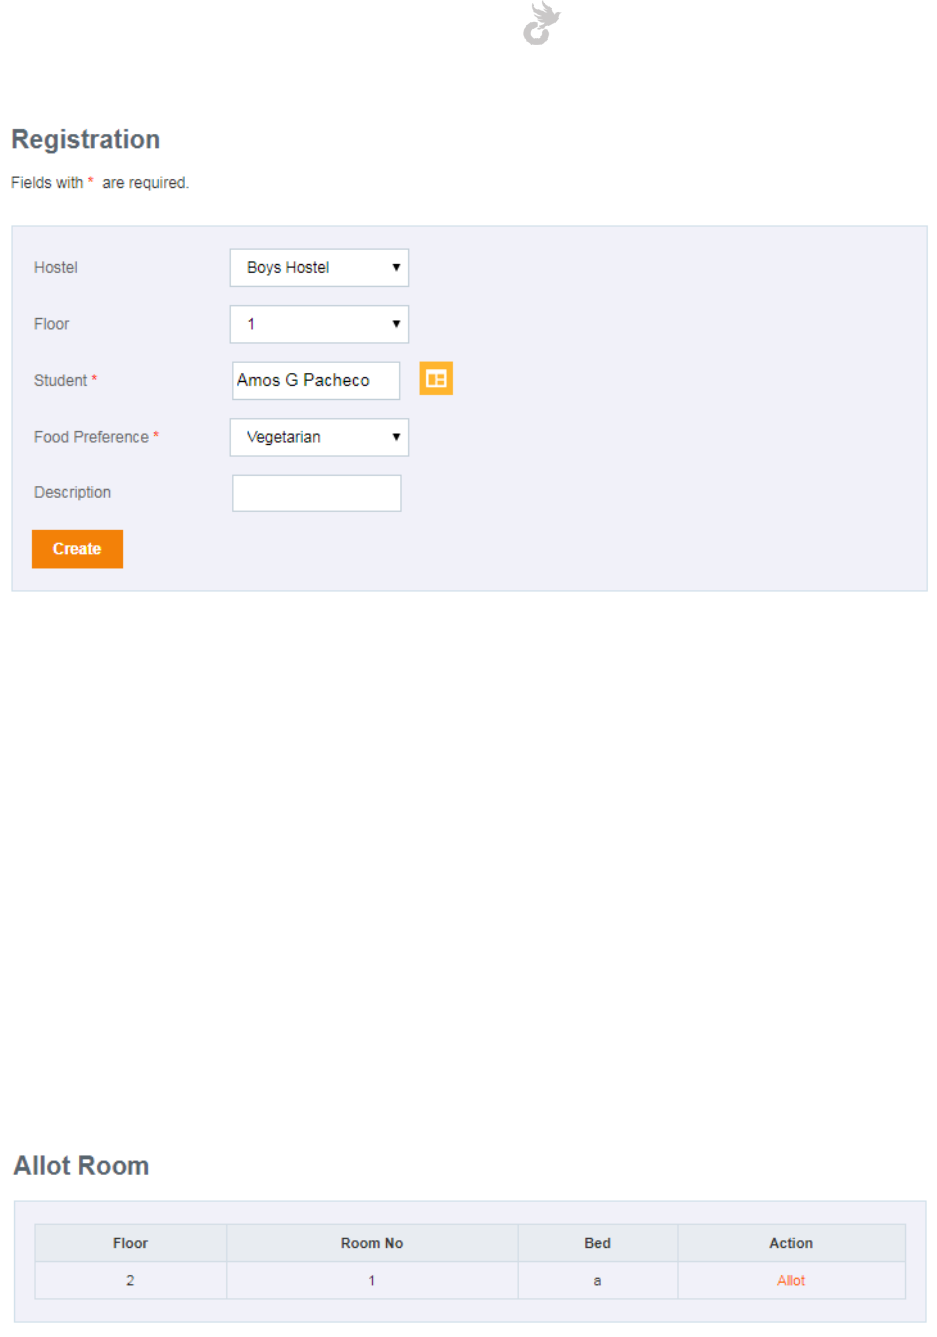
Open-School 2.6.5 Administrator Manual
205
Fill in the following details to move to the next step,
1. Hostel: Select a hostel from the list of ones created.
2. Floor: Select a floor number from the dropdown. This is updated based on the hostel
you choose.
3. Student: Select a student by either using the app explorer(click the icon next to the field
to bring it out) or by entering a name. The field is an auto fill form, you have to choose
the name from the list of suggestions.
4. Food Preference: Choose a food preference. (Refer Mess management section on how
to create and manage food preferences)
5. Description: Give a note if needed.
Click on ‘Create’ to move to the next step.
If rooms are available in the chosen hostel and floor. You will be able to see the list and allot
the selected student.
Click on the ‘Allot’ link for the require room/bed to move forward.
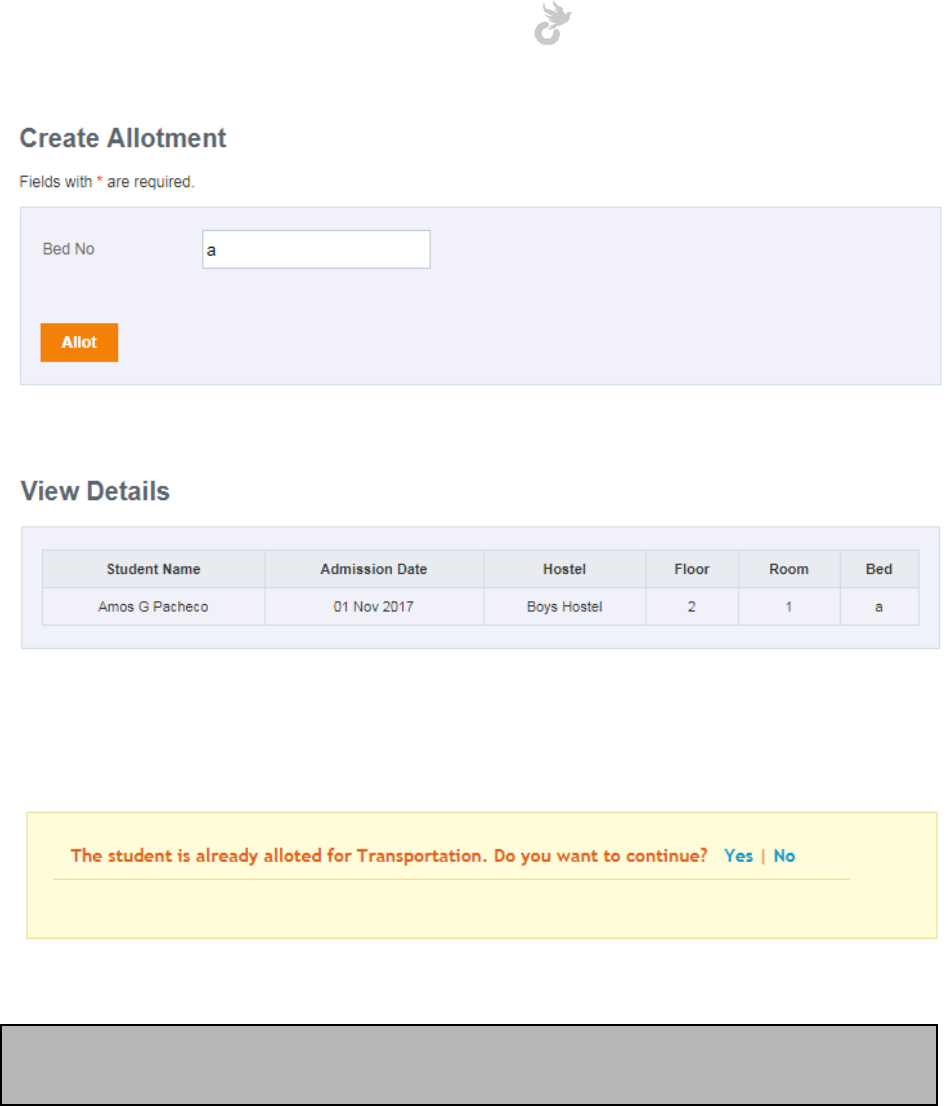
Open-School 2.6.5 Administrator Manual
206
Confirm the bed you chose. Click on ‘Allot’ to confirm and finish allotment.
If the student is already assigned to a route in the Transportation module you will receive an
error as shown below.
Note: Allotment can be carried out from the Notifications area in Hostel Module. You can see
requests from students for applying to hostel there.
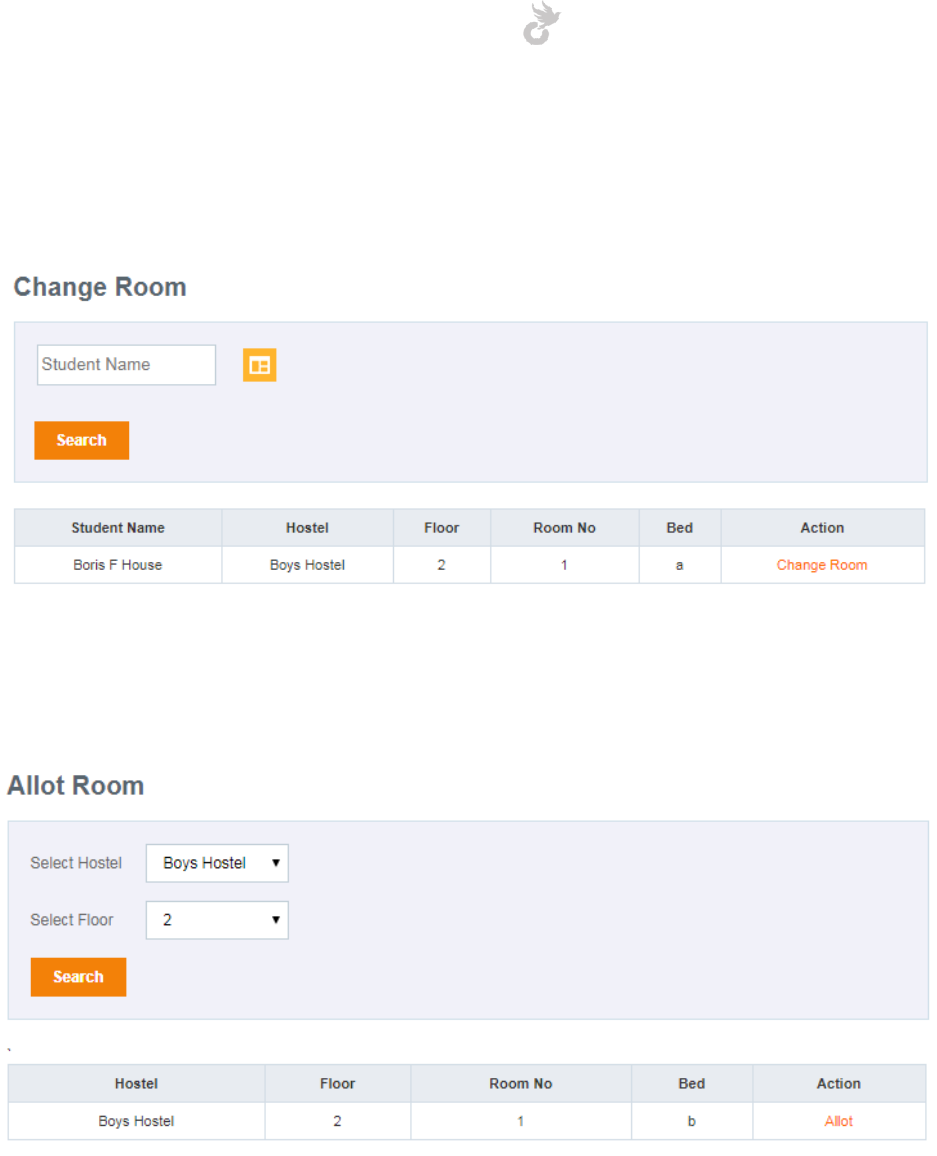
Open-School 2.6.5 Administrator Manual
207
12.1.3 Changing Rooms
Rooms can be changed for students already assigned to hostels. Click on the ‘Change Room’
link in the left side menu to change a student’s room.
Search a student in the field or using the app explorer icon. Selecting a student and hitting
‘Search’ will bring out the student’s current details.
To change rooms, click on the ‘Change Room’ link next to the student.
In the next step browse through hostels and floors to find available rooms. You can see the list
of available rooms in the dashboard(click on the Hostel module icon to view).
Find the required room and click on ‘Allot’ to assign the student to the new room.
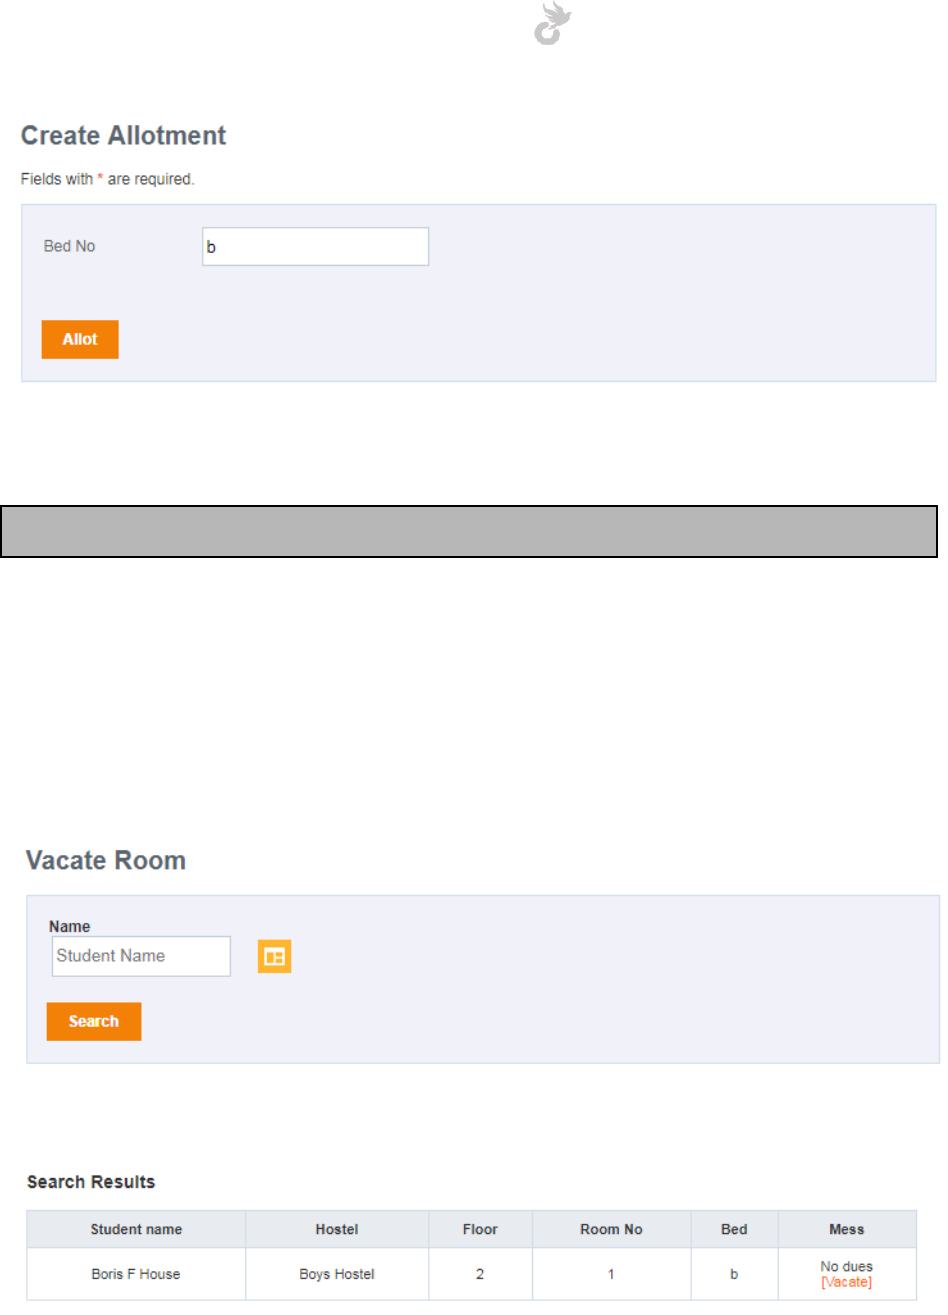
Open-School 2.6.5 Administrator Manual
208
Confirm the bed by clicking the ‘Allot’ button.
Note: You can use the Vacate room option for clearing rooms to increase availability.
12.1.4 Vacating a room
You can vacate students from rooms once they leave. To do this click on the ‘Vacate Room’ link
in the left side menu.
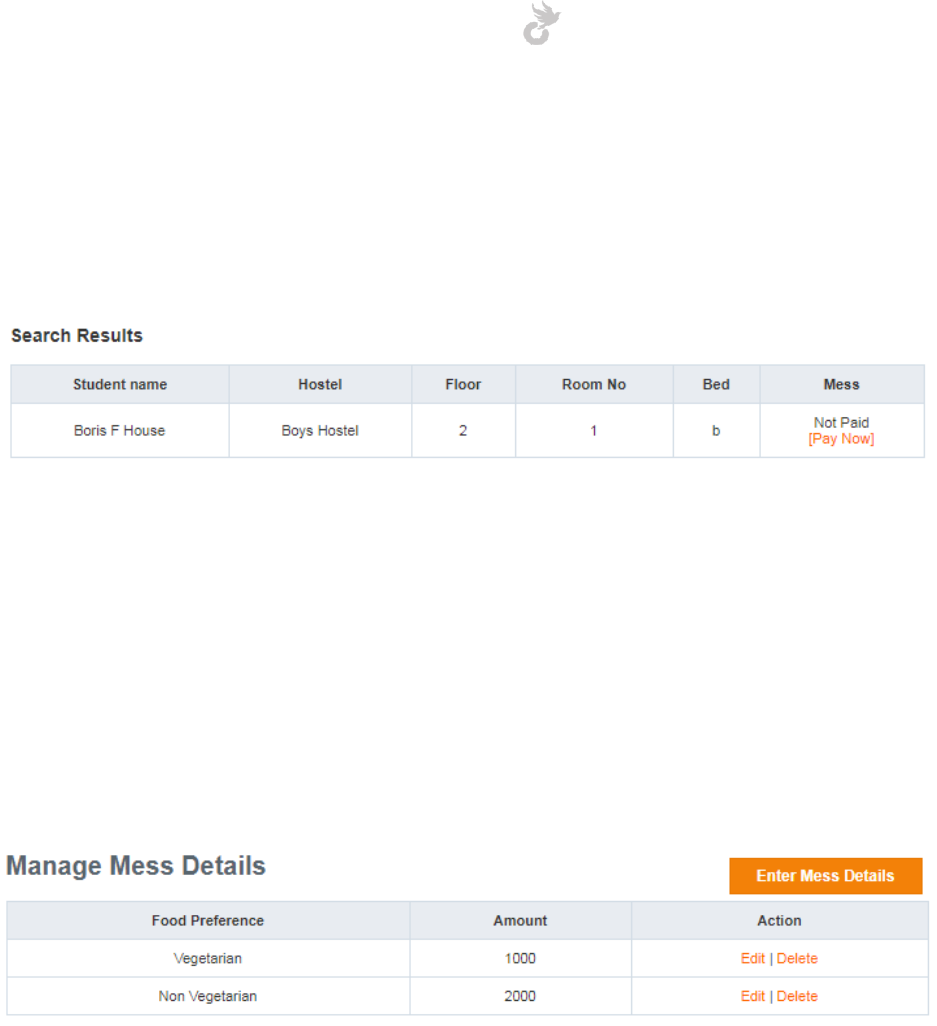
Open-School 2.6.5 Administrator Manual
209
Search a student using the name field or the app explorer icon. The search results will show up
for the students displaying details like hostel, floor, room and bed. You can also see if any mess
fees are pending. If not you can use the ‘Vacate’ link to remove the student from the hostel.
If mess fees are pending, you will have the option to ‘Pay Now’.
You will not be able to remove the student once the fees is paid.
12.2 Mess Management
You can create food preferences and view pending details of mess fees for students. This
preference can be chosen while registering.
To start managing mess details click on the ‘Add Mess Details’ link in the left side menu.
This will display the existing food preferences if any. You can edit or delete them from here. To
create a new one click the ‘Enter Mess Details’ button on top.
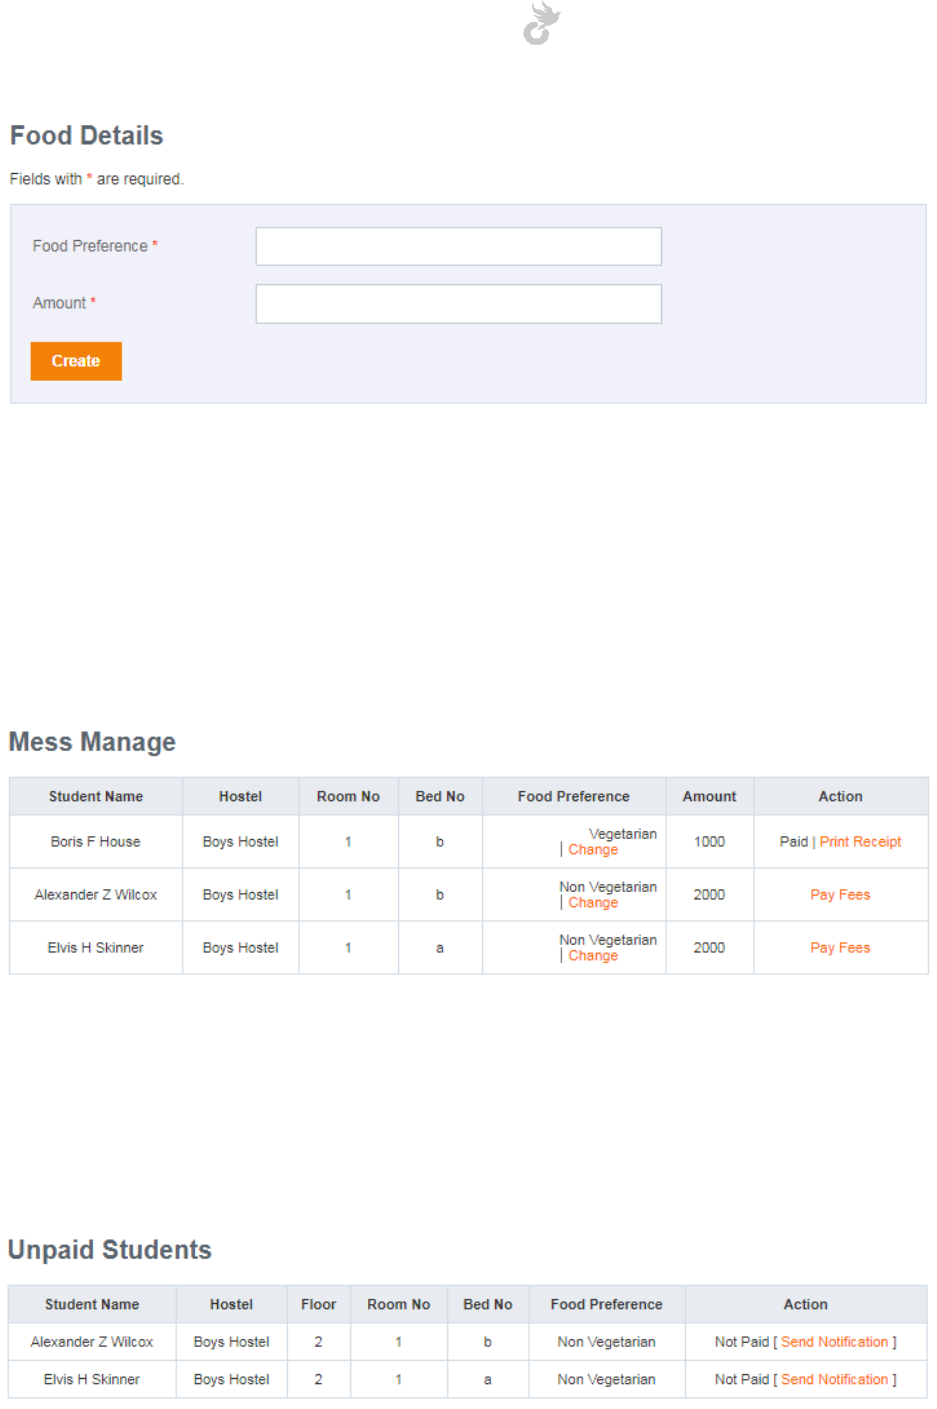
Open-School 2.6.5 Administrator Manual
210
The form’s pretty simple, you have only two fields.
1. Food Preference: Enter a name. Eg: Vegetarian, Non-Vegetarian, Eggetarian
2. Amount: Enter an amount for the food preference
Click ’Create’ once you’re done entering the details, to save it.
To manage mess fees click on the ‘Mess Manage’ link in the left side.
All students in hostels will be listed here. You can change food preferences by clicking the
‘Change’ link under the food preference column for the student. Paid fees receipts can be
printed using the ‘Print receipt’ link. To pay the mess fees simply click the ‘Pay Fees’ link for a
student.
To view your mess dues, click on the ‘Mess Dues’ link in the left side menu.
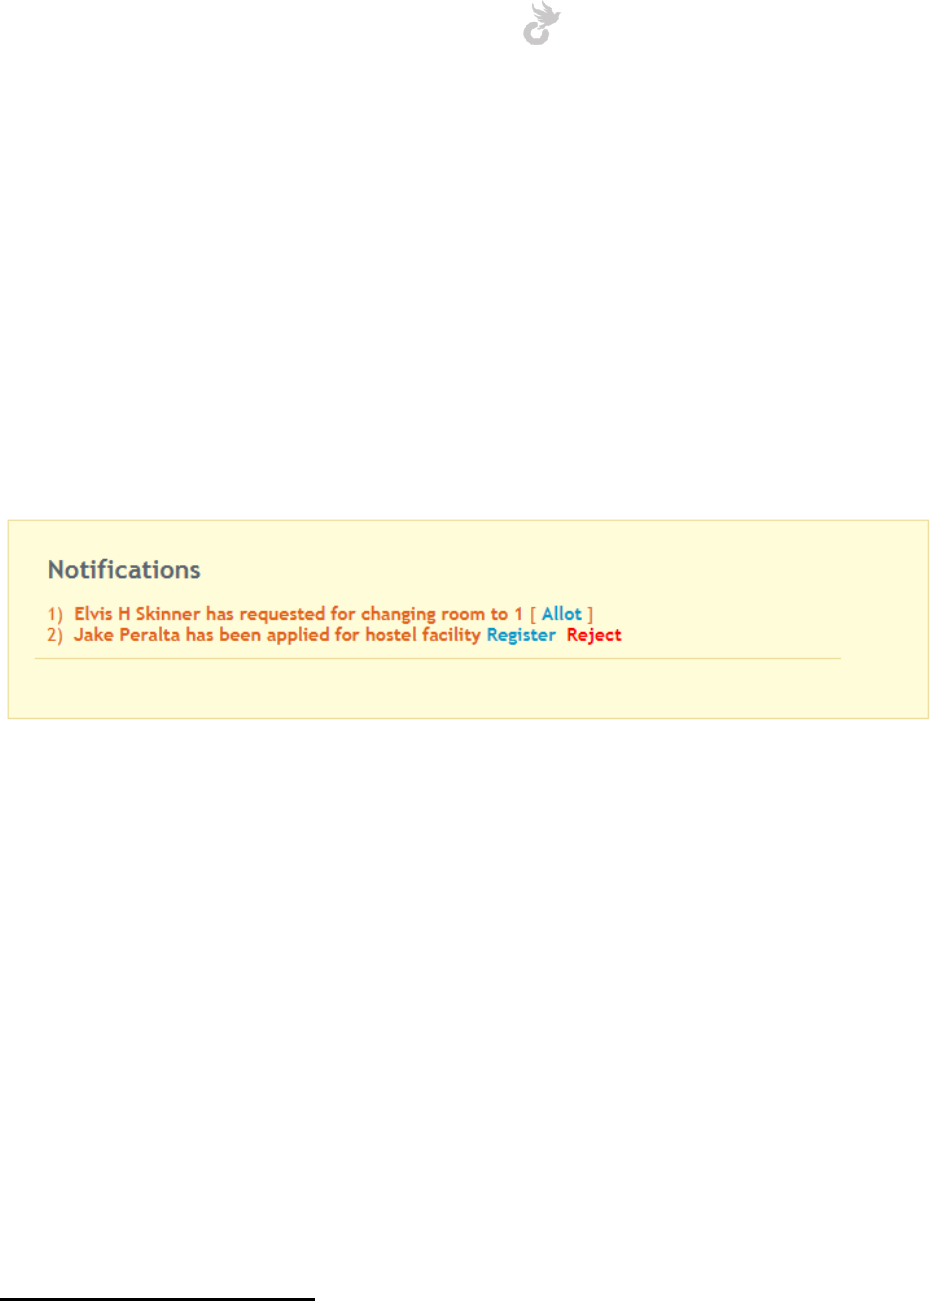
Open-School 2.6.5 Administrator Manual
211
You can send notifications to unpaid students using the ‘Send Notification’ link corresponding
to the student. This will send out an email notification.
12.3 Notifications
Requests for registering and changing rooms from students raised through their portals can be
viewed under the Notifications area. This can be accessed by clicking the ‘Notifications’ link in
the left side menu. The number of unattended notifications is displayed in parentheses.
13. TRANSPORT
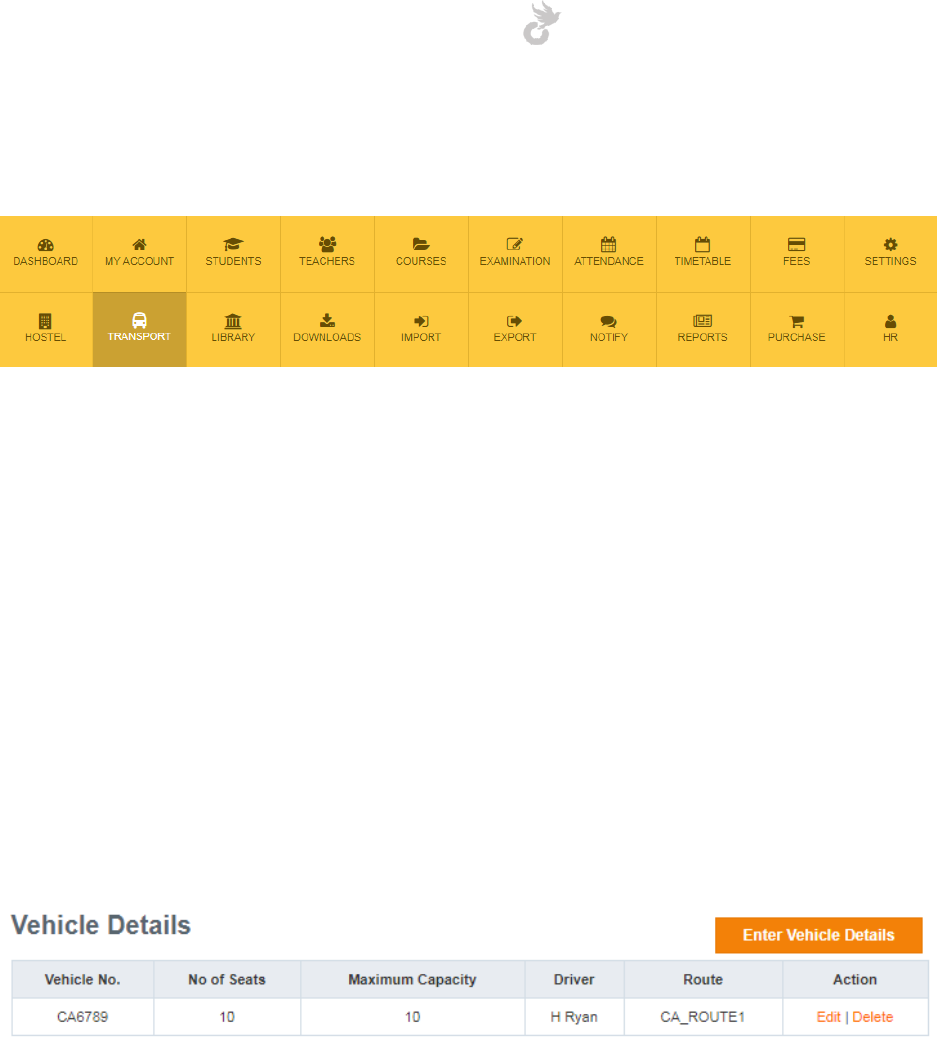
Open-School 2.6.5 Administrator Manual
212
The Transport Module allows you to manage drivers, buses, routes, stops and students using
your institution’s transport facility.
There are a few steps you need to complete to use the transport module effectively,
1. Create Vehicles
2. Create Drivers
3. Associate drivers with vehicles
4. Create routes and stops
Let’s take a look at these steps and other functionalities in the module.
13.1 Adding and managing vehicles
A vehicle can be added in a single step. To start adding new vehicles click on the ‘Vehicle
Details’ link in the left side menu. This will display the list of existing vehicles in the system.
To enter new vehicle details click on the ‘Enter Vehicle Details’ button.
This will bring up the form for entering the vehicle details.
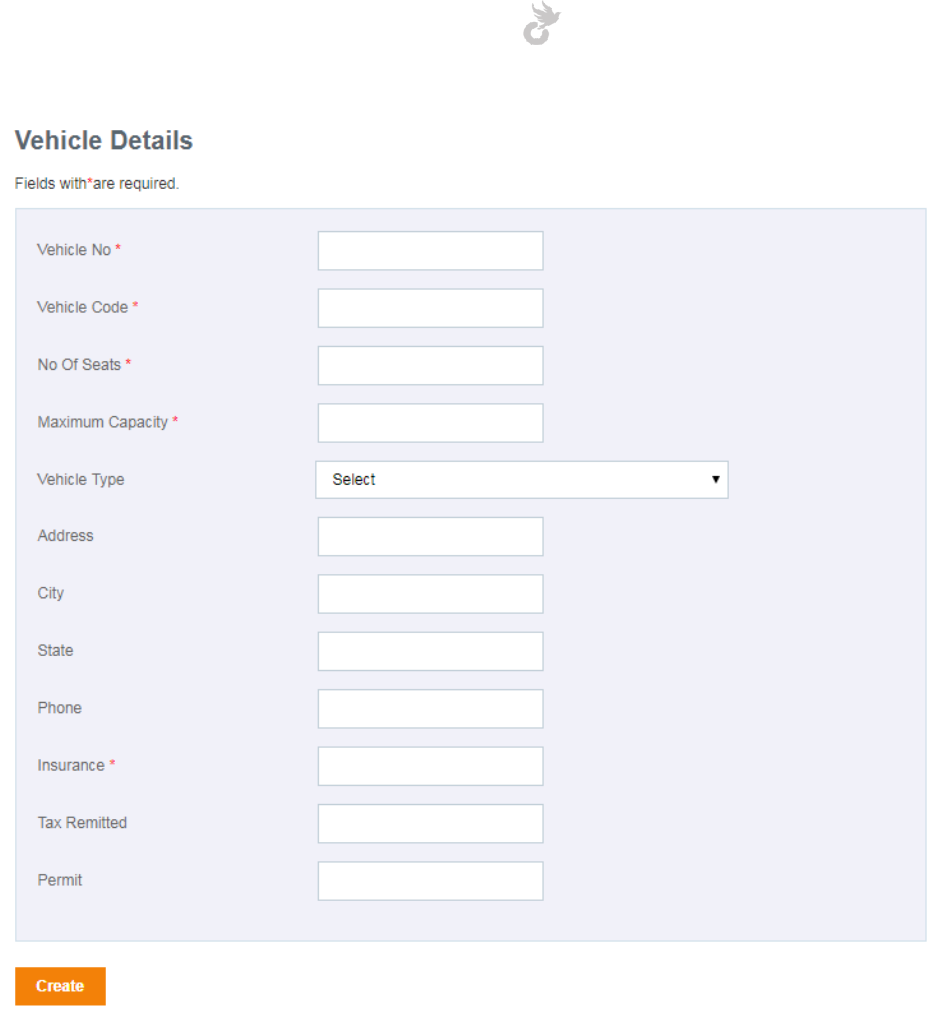
Open-School 2.6.5 Administrator Manual
213
Once you have entered all required details click on ‘Create’ to save the vehicle. This will then be
displayed in the vehicle list. You may edit or delete your vehicles from that list.
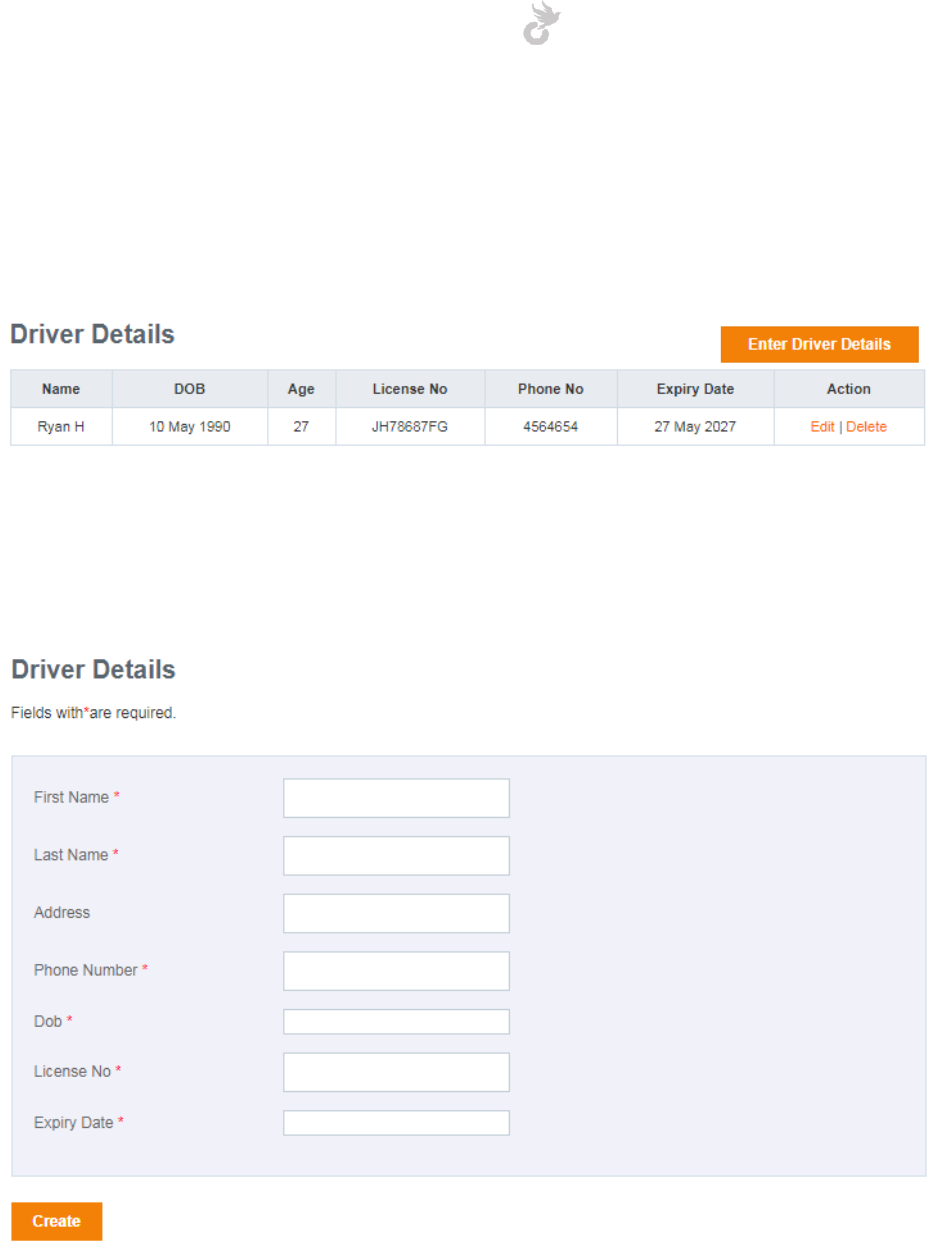
Open-School 2.6.5 Administrator Manual
214
13.2 Adding and managing drivers
The next step to setting up your transportation details is adding drivers in the system. Click on
the ‘Driver Details’ link in the left side menu to manage your institution’s drivers.
Here you will be able to see the list of existing drivers. You can edit / delete them using the
options in the action column. To create a new driver click on the ‘Enter Driver Details’ button
on top.
Fill up the details in the form and click ‘Create’ to finish the add driver process.
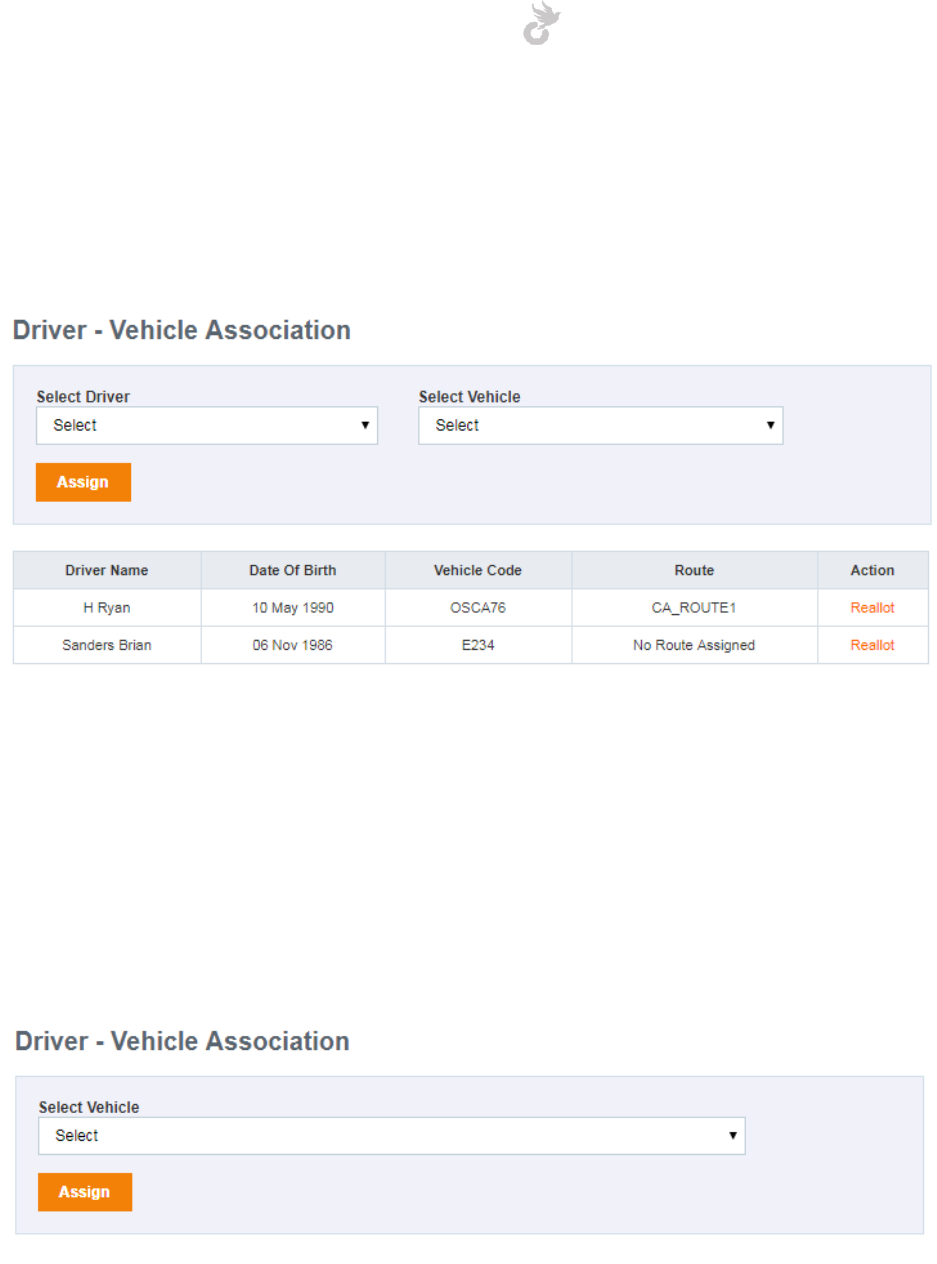
Open-School 2.6.5 Administrator Manual
215
13.3 Driver-Vehicle association
Once you have added vehicles and drivers in the system the next step is to assign them. You can
associate drivers with vehicles using the ‘Driver-Vehicle association’ link in the left side menu.
Existing associations are listed on this page. You can reallot drivers to other vehicles here by
clicking the ‘Re-allot’ link under the action tab.
To associate a new driver to a new vehicle, select your required options from the two
dropdowns on top and click on ‘Assign’ to associate them.
To reallot a driver click on the link corresponding to him/her. This will redirect you to a page
where you can choose from a list of unassociated vehicles.
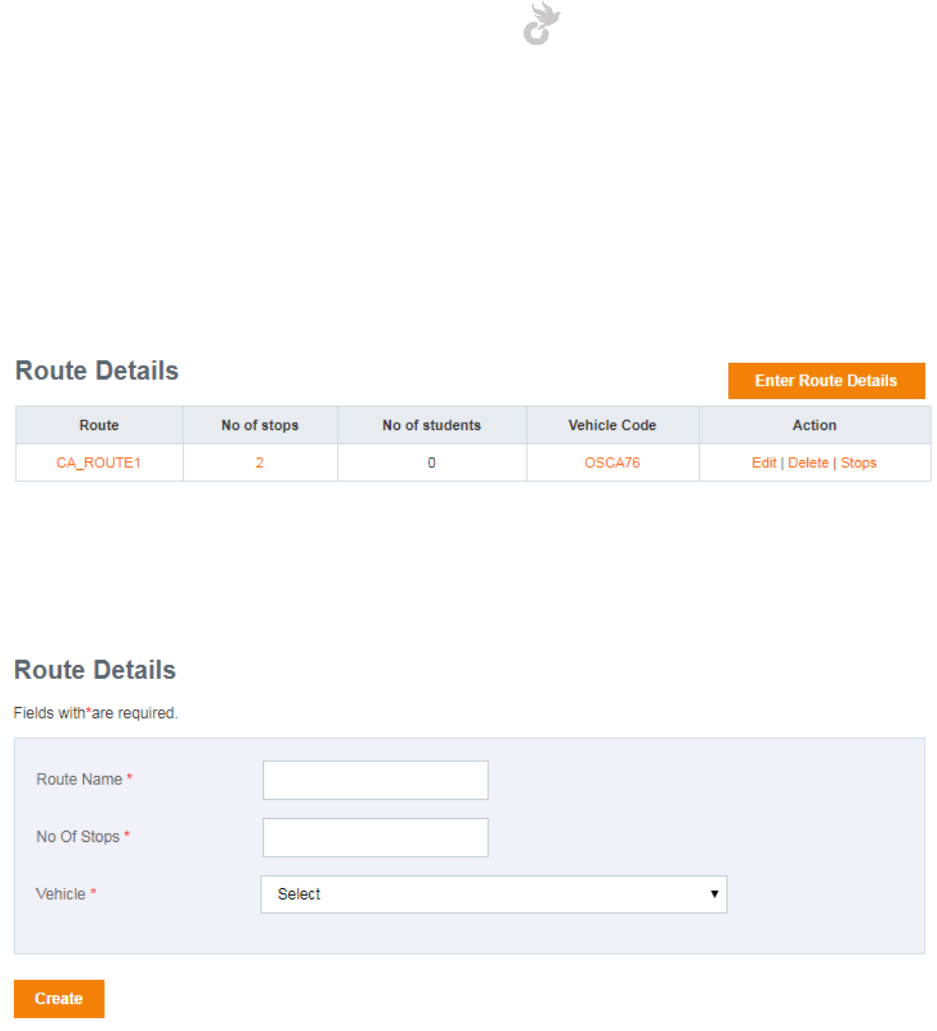
Open-School 2.6.5 Administrator Manual
216
13.4 Managing routes and stops
After associating drivers with their vehicles you can assign them to specific routes. Students can
then be added to various stops on these routes. To create / manage routes click on the ‘List all
routes’ link in the left side menu.
Here you will be able to see the list of existing routes and it’s details if any. To create a new
route click on the ‘Enter route details’ button.
The first step involves entering the following details,
1. Route name
2. Number of stops (details for each stop will have to be given in the next step)
3. Choose the vehicle you would want to associate with the route you are about to create
Click ‘Create’ to move on to the next step.
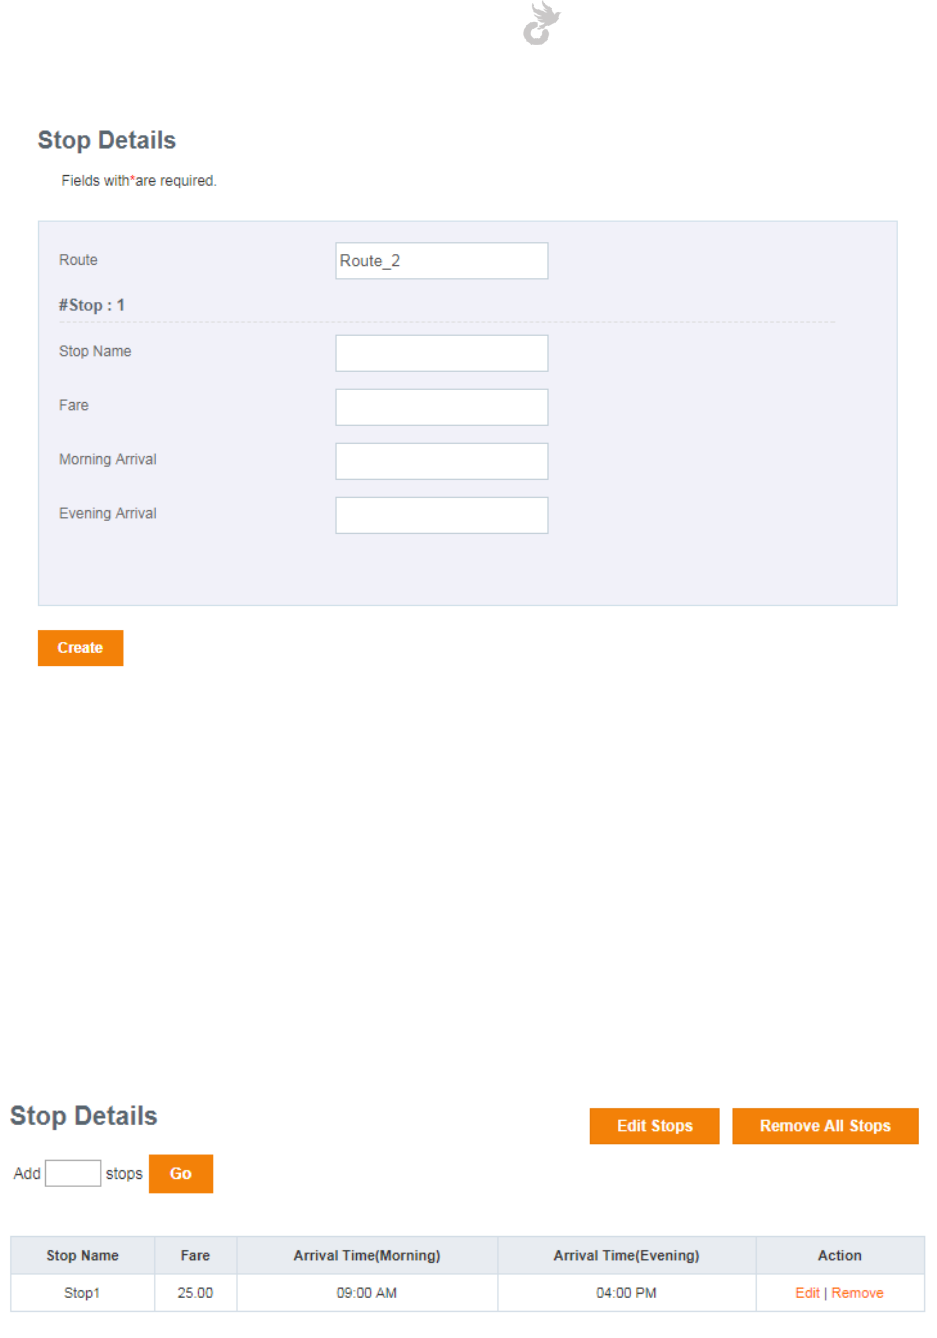
Open-School 2.6.5 Administrator Manual
217
Enter the details for each stop in the second step. The number of stops will depend on the
value you entered in step 1.
The stop details include,
1. Stop Name
2. Fare (this will be calculated as the transport fee each month for the student)
3. Morning arrival (choose a time for morning pick up)
4. Evening arrival (choose a time for evening drop)
Click the ‘Create’ button once you are done entering details for all your stops on the route.
You may edit/remove or even add new stops in the final step.
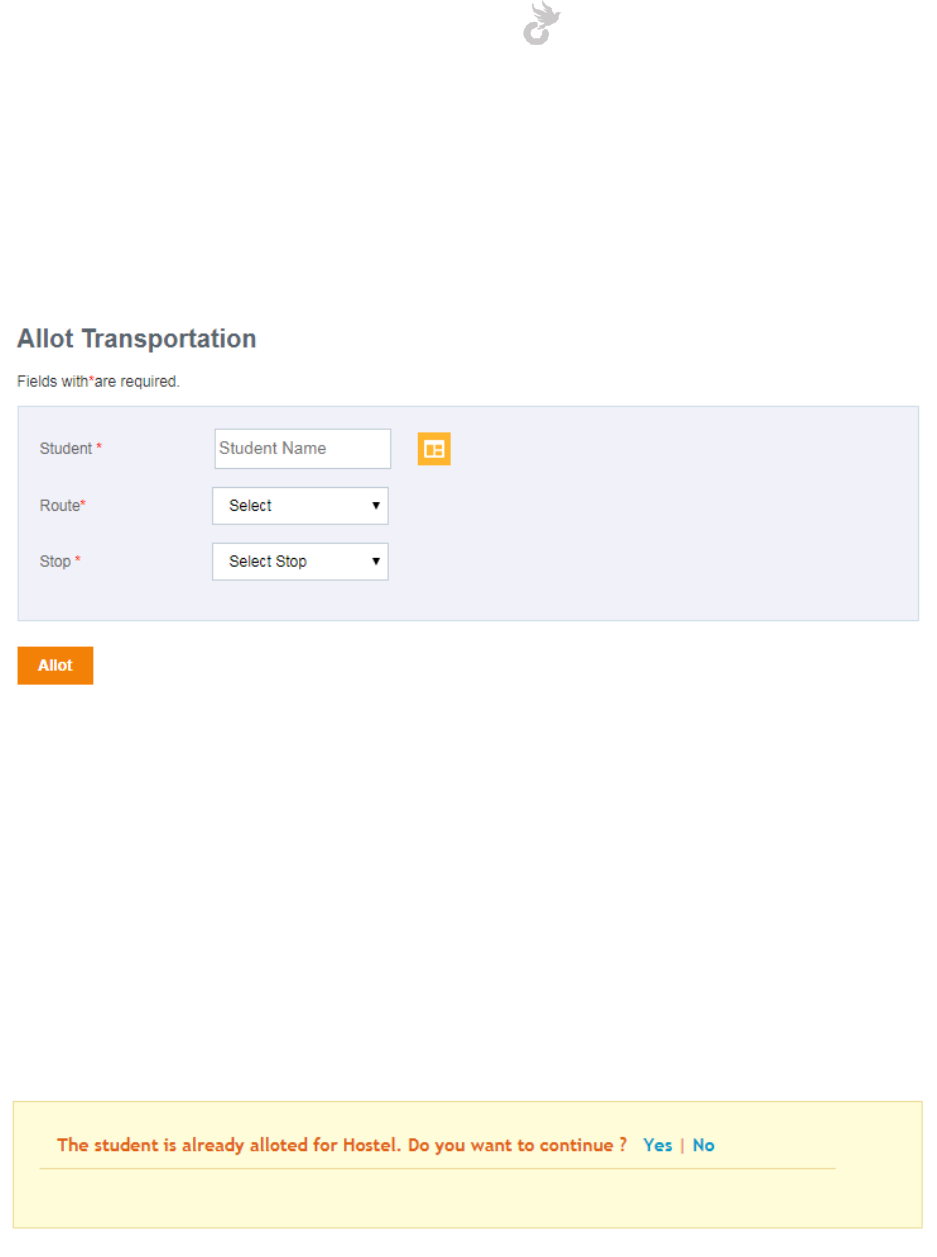
Open-School 2.6.5 Administrator Manual
218
13.5 Allotment
To allot a student to a particular route and stop for transportation click on the ‘Allotment’ link
in the left side menu.
Enter a student name in the autofill form and choose from the suggestions or click on the app
explorer icon to choose from it.
Select a route for the student. This will update the stop dropdown with all stops under the
selected route. Choose the stop for the student and click on ‘Allot’ to save changes. The
student’s transportation fee will be the fare entered for the stop assigned for him/her.
An alert will be displayed if the student is already assigned to the hostel. Students cannot be
assigned to both hostel and transport at the same time.
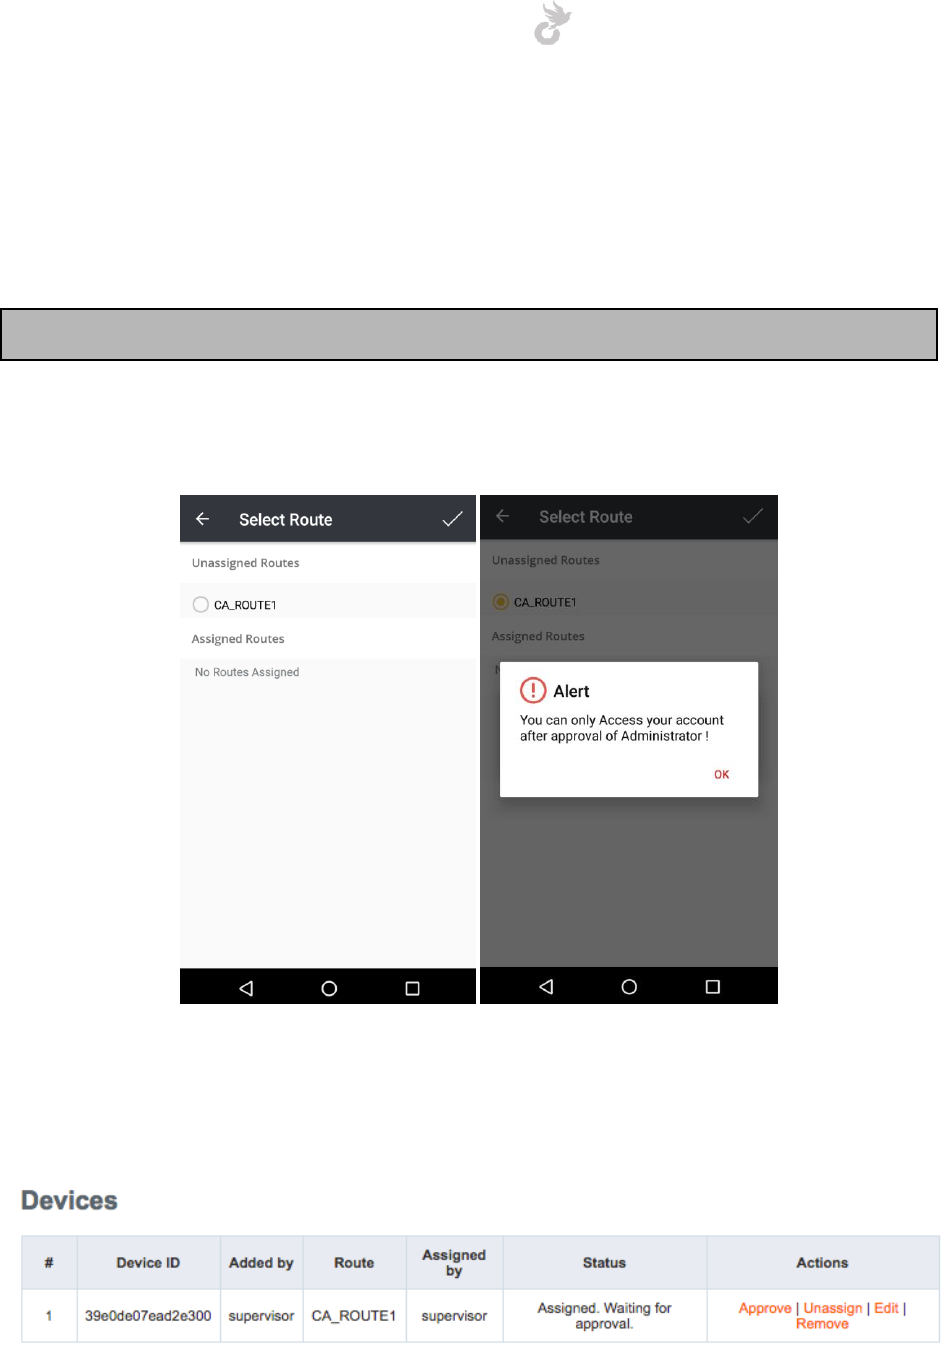
Open-School 2.6.5 Administrator Manual
219
13.6 Managing devices and attendance log
Users with the bus supervisor role can add their mobile devices for attendance purposes. These
users will be able to mark attendances for students getting picked and dropped at their stops.
Note: Check ‘Creating a custom user’ in Settings Module for more details on Bus Supervisors
A bus supervisor can request to be assigned to a route by logging into his/her account through
the mobile app and then choosing a route as shown below.
They will be assigned to the route and will be able to take attendances once you have approved
the request from your portal. These requests can be accessed by clicking the ‘Devices’ link in
the left side menu.
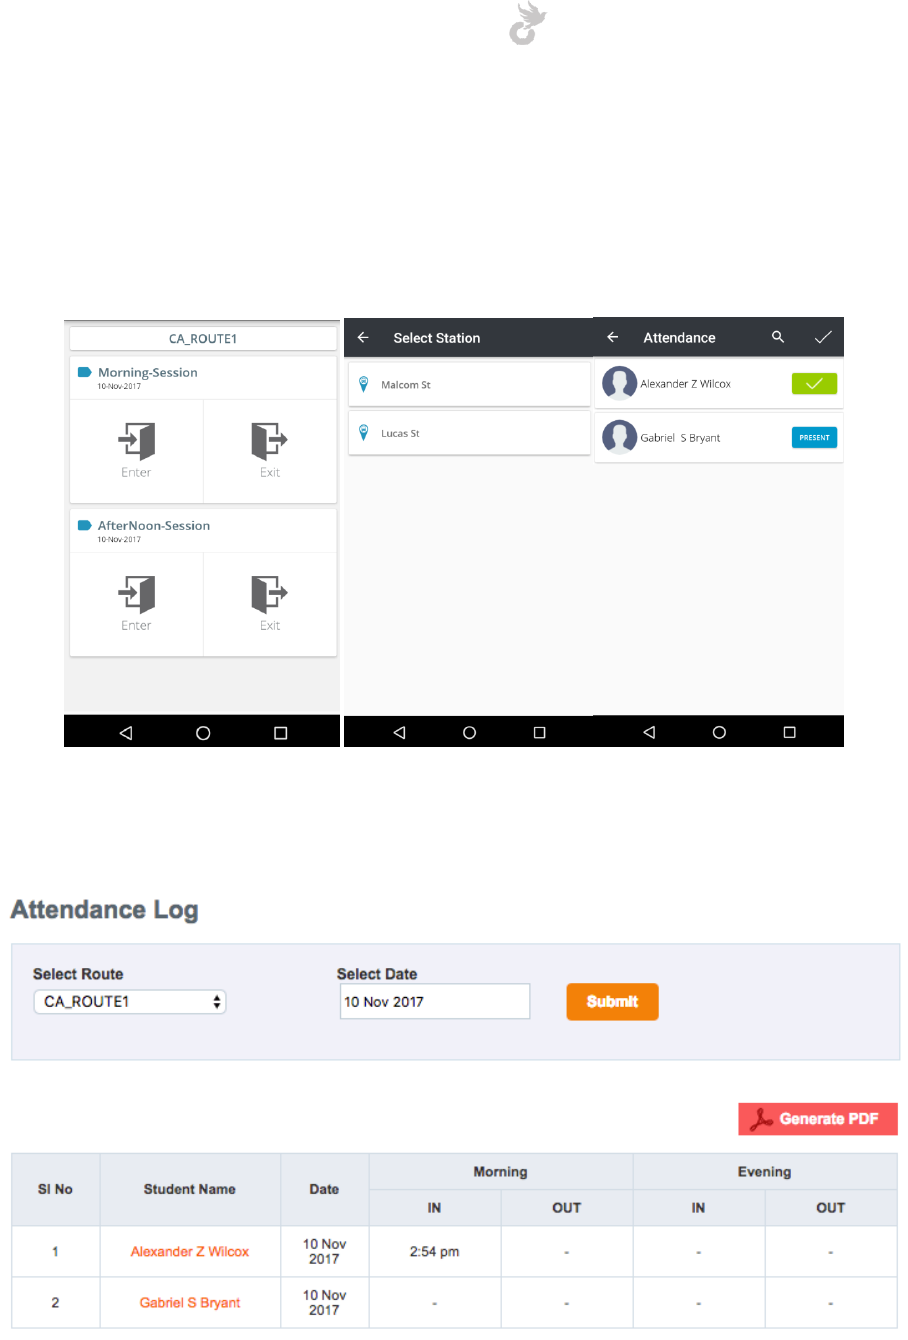
Open-School 2.6.5 Administrator Manual
220
You will be able to see the details of the device, the user and can approve, unassign, edit and
remove these requests.
Once a request has been approved the supervisor will be able to start marking attendances for
the route assigned to him/her.
These attendance logs can be viewed through your portal by clicking the ‘Attendance Log’ link
in the left side menu.
Select the route and date for which you wish to view attendance of students and click ‘Submit’.

Open-School 2.6.5 Administrator Manual
221
13.7 Transport Fee
You can also manage fees for transport directly from the transport module rather than the
invoice generation method in Fee Module. To view and pay fees for transportation click on the
‘Transportation Fee Management’ link in the left side menu.
All students assigned to stops will be displayed here along with details of stop and the fare for
it.
To pay a fee for a particular student click on the ‘Unpaid’ link next to him/her.
13.8 Bus Log
Use the bus log feature to record fuel and mileage details for buses running every day. To
manage bus logs click on the ‘Bus Log’ link in the left side menu.
Existing log entries will be listed here. You can create a new bus log entry by clicking the ‘Create
new bus log’ button on top.

Open-School 2.6.5 Administrator Manual
222
Select the vehicle for which you would want to enter the log entry. Enter a start time reading of
the odometer and the end time reading of it after the days travel. Click ‘Create’ to save the log
entry.
You can also record fuel consumption details for a log entry by clicking the ‘Record
consumption details’ link in the log entry listing.
Enter the fuel consumed in litres, the amount paid for it and the date. Click ‘Create’ to save the
fuel consumption detail for that particular bus log.
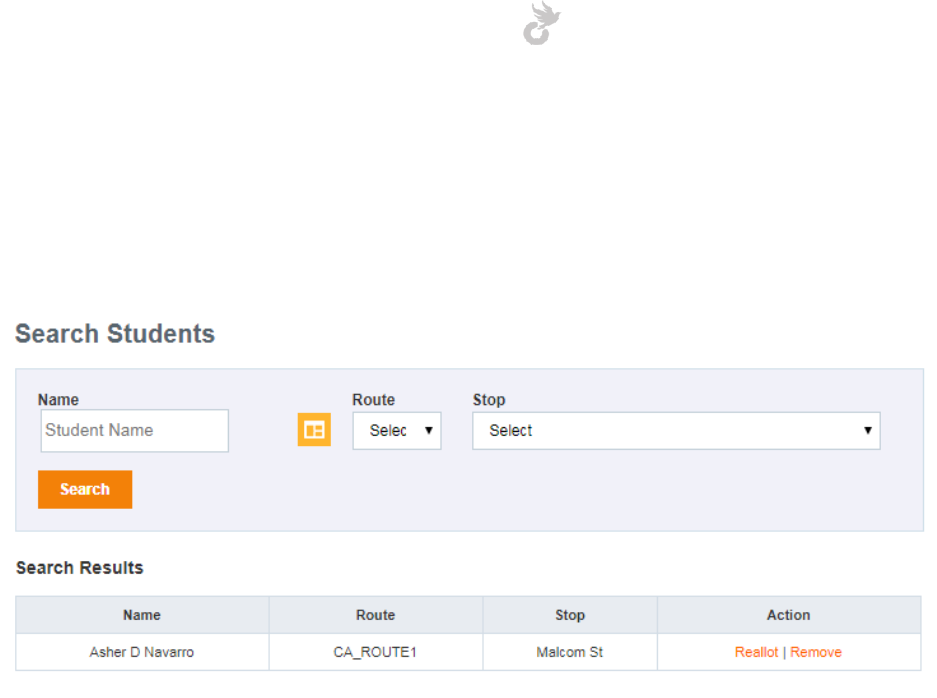
Open-School 2.6.5 Administrator Manual
223
13.9 Search student details
Student details for transport can be retrieved using the search option. Click on the ‘Search
Students’ link in the left side menu to pull out transportation details for students.
You can use student name or route & stop to search student details. Select your options and
click the ‘Search’ button to display details of students with the selected criteria.
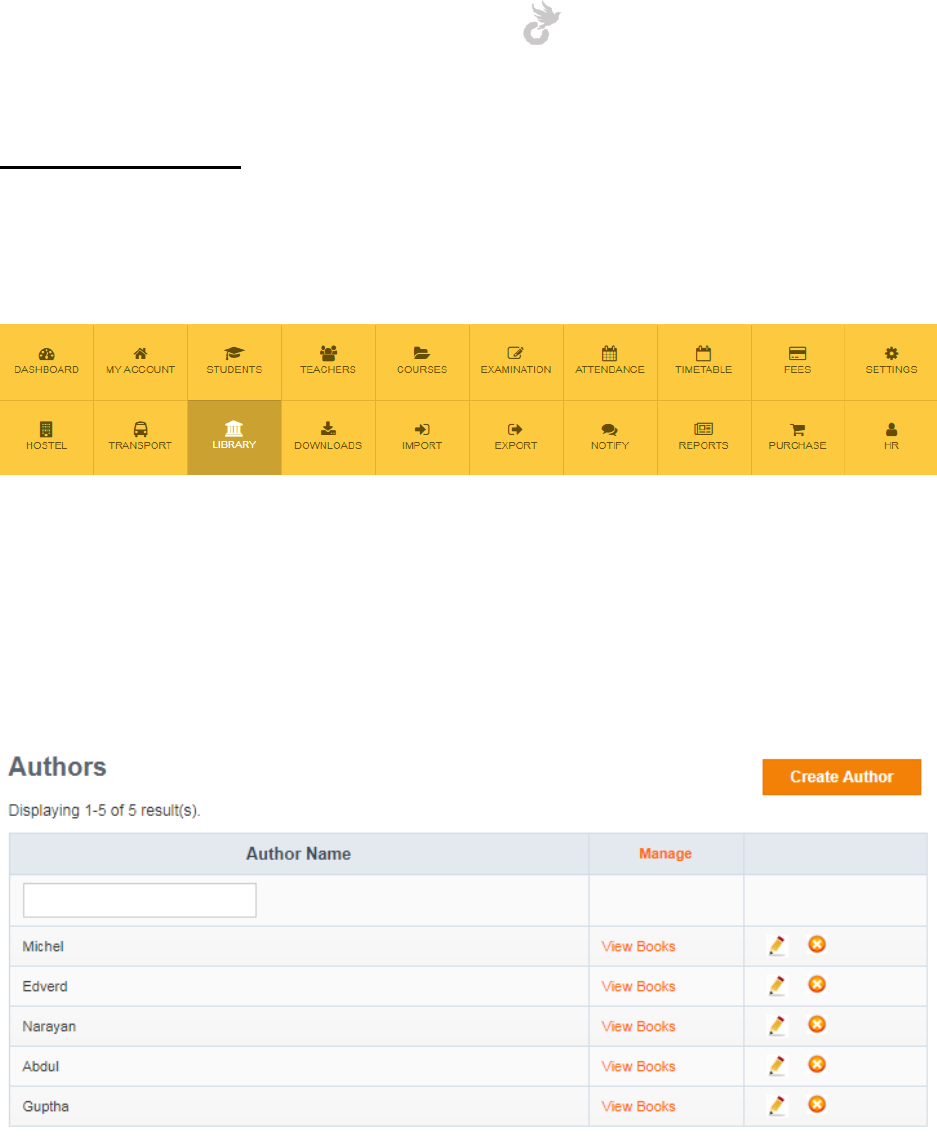
Open-School 2.6.5 Administrator Manual
224
14. LIBRARY
The Library module maintains details of books available in your library, the books lent out to
students, books that are due etc.
The first step for setting up the library module is to add authors, book categories and books.
14.1 Managing Authors
Before you add books you need to add your authors and book categories. For this, click on the
‘View Authors’ link in the left side menu.
The list of existing authors(if any) are displayed here. To create a new author click on the
‘Create Author’ button on top.
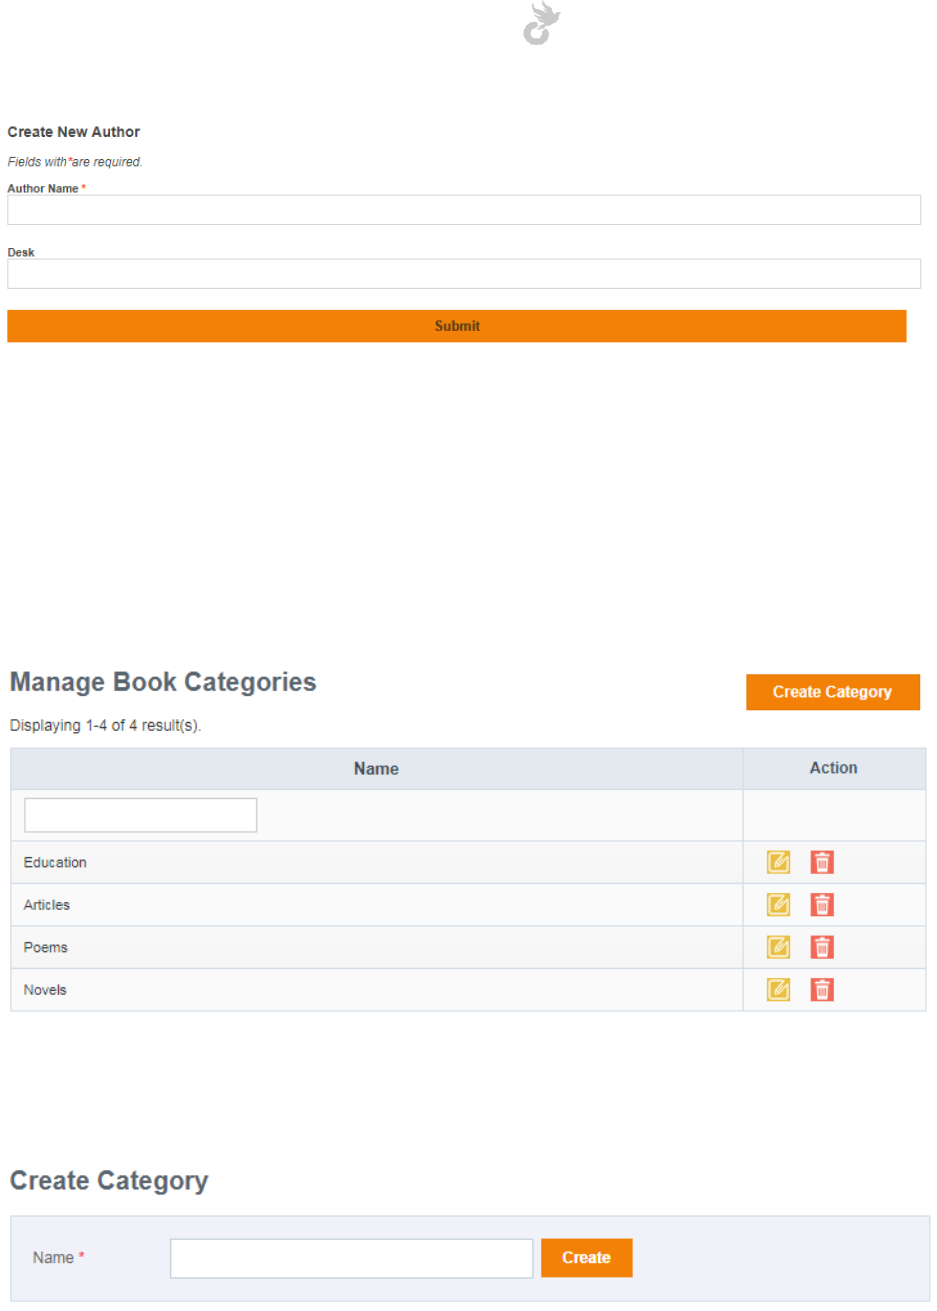
Open-School 2.6.5 Administrator Manual
225
In the pop-up that follows enter the author name and hit submit to save the details.
14.2 Managing book categories
To create and manage book categories click on the ‘Manage Book Category’ link in the left side
menu.
The list of existing book categories are listed here. To create a new book category click on the
‘Create Category’ button.
Enter a category name and click on the ‘Create’ button to save it.

Open-School 2.6.5 Administrator Manual
226
14.3 Managing Books
To add a new book click the ‘Add Book’ link in the left side menu.
Enter all your book details here, select the required category and author required for this book
and hit the ‘Create’ button at the bottom to save your book.
Once you have added your book you may lend it out to students. Your students can also check
the list of available books from their portal.
14.3.1 List Books
The list books link in the left side menu displays details of all books added in the system. They
can be edited/deleted from here.
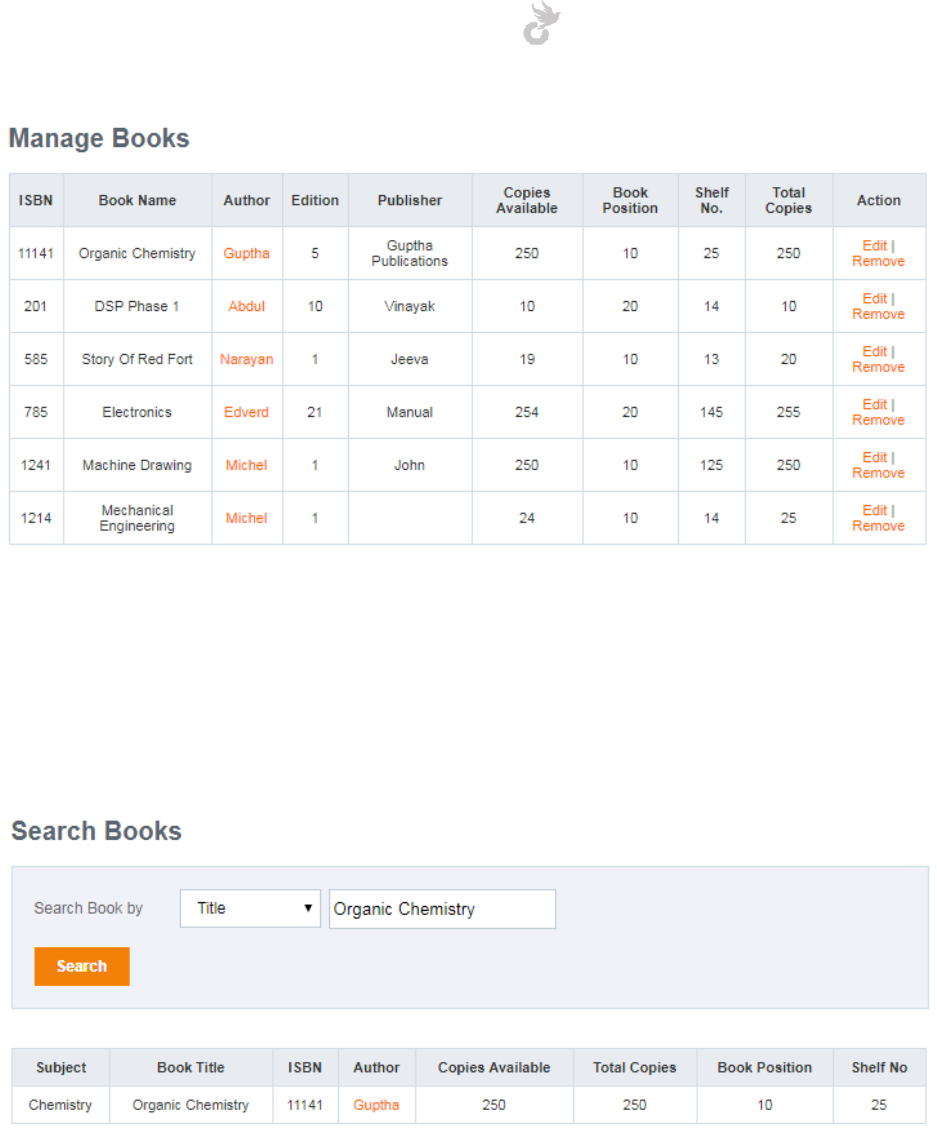
Open-School 2.6.5 Administrator Manual
227
14.3.2 Search books
The search books link in the left side menu allows you to search for specific books added in the
system using filters like title, author, isbn etc.
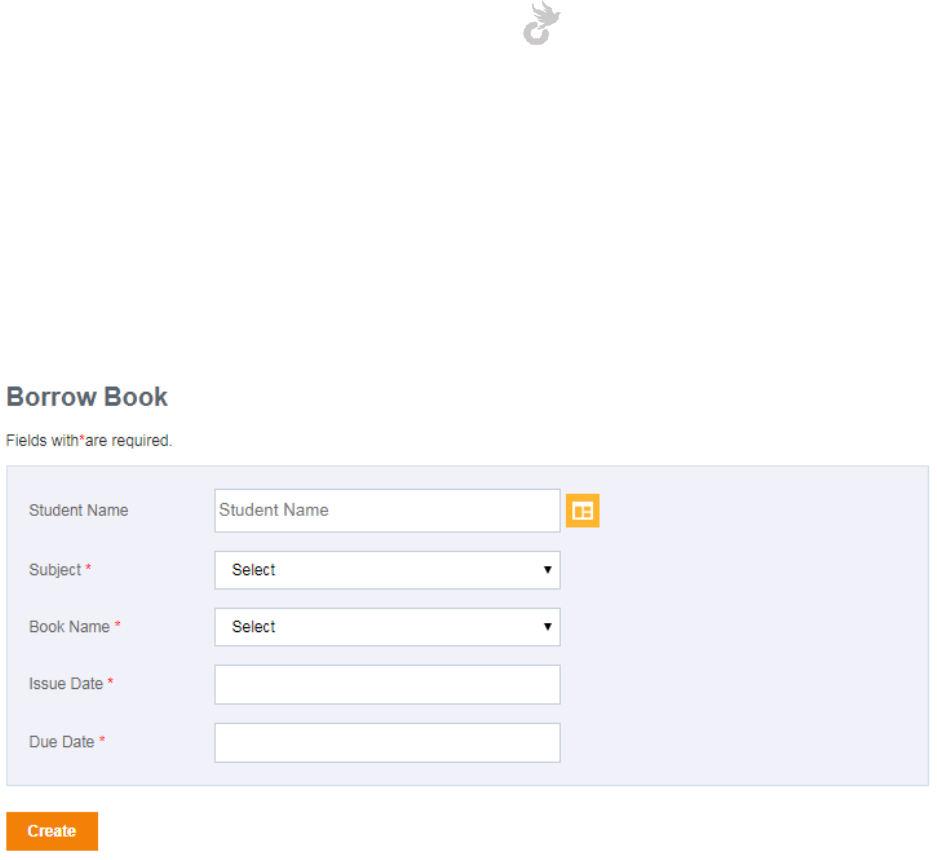
Open-School 2.6.5 Administrator Manual
228
14.4 Manage issue and return of books
14.4.1 Issue a book
The ‘Borrow Book’ link in the left side menu allows you to issue books to students in the
system.
You can either use the app explorer icon next to the student name field to select a student or
type in the name and choose the student from the autofill list.
Choose the subject and book you wish to issue. Select the date of issuing and the due date by
which it should be returned then click ‘Create’ to issue the book. The details will also be
available to the selected student in his/her portal.
The number of available copies will be updated based on the number of books you issue.
14.4.2 Return a book
To return a book click on the ‘Return Book’ link in the left side menu.
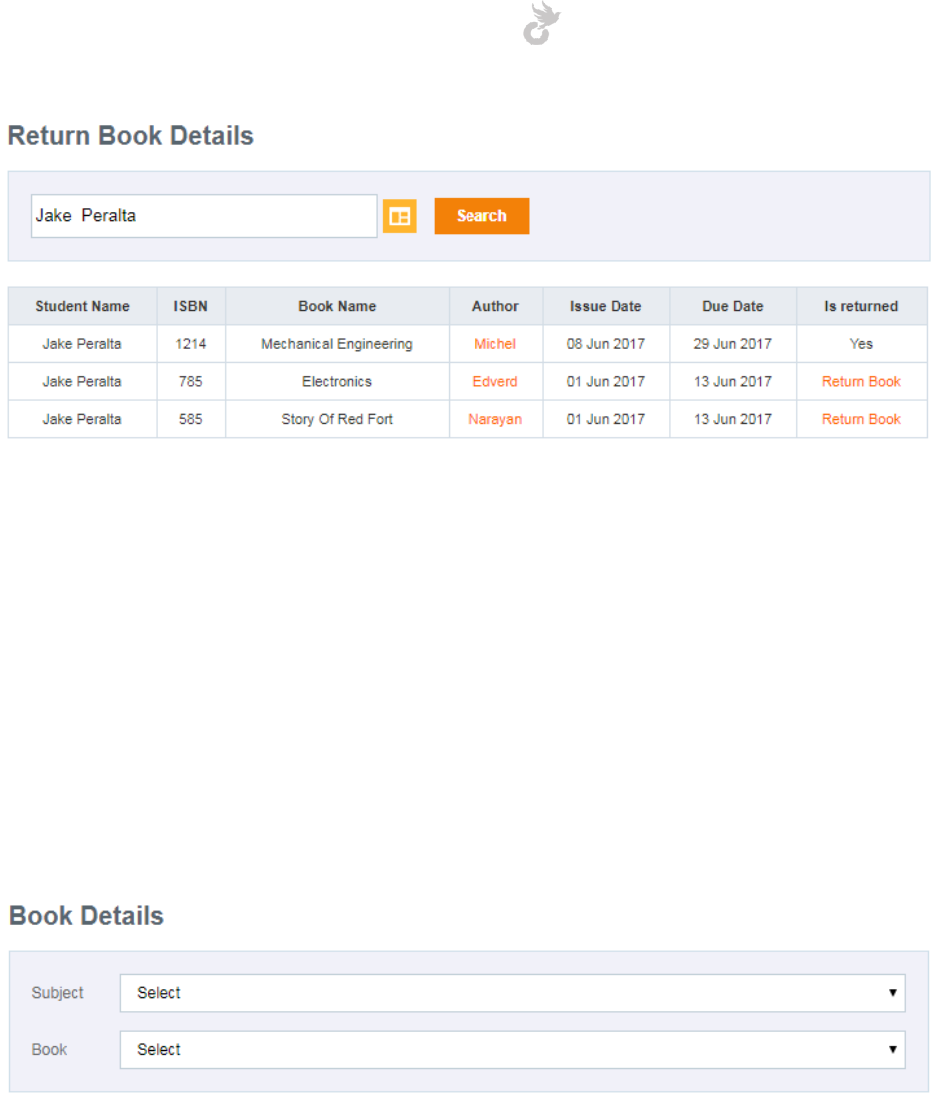
Open-School 2.6.5 Administrator Manual
229
Select the student using the app explorer icon or use the autofill form to select a student and
then click the ‘Search’ button to view all the books the student has been issued.
Here you will be able to see all details of books issued to the selected student. You may also
return a book by clicking the ‘Return Book’ link in the last column for the corresponding book.
14.4.3 View details of borrowed books
The ‘View Book Details’ in the left side menu allows you to check the list of all students who
have borrowed a particular book.
Select the subject and the book for which you would want to view details for. The list is
automatically displayed once you select the book name.
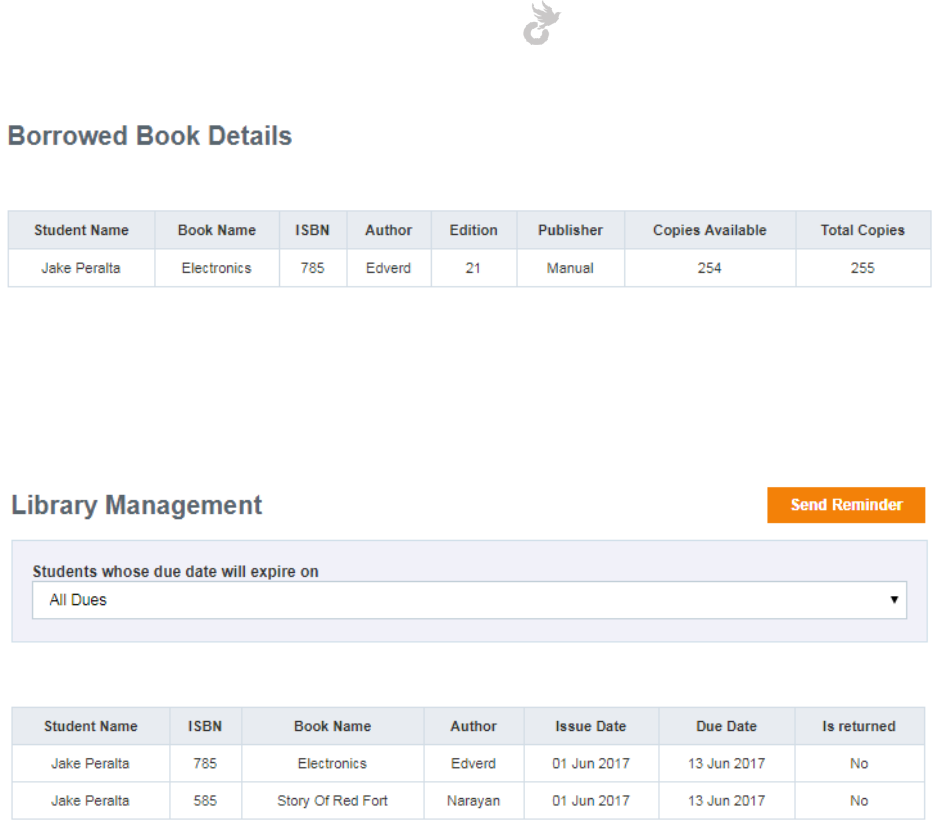
Open-School 2.6.5 Administrator Manual
230
14.4.4 Check books that are due
Click on the ‘Due Dates’ link in the left side menu to pull out details of all books that are due.
You can choose from different options. Once the list is displayed you can also send reminders to
students to return the book. This can be done using the ‘Send Reminder’ button that appears
once you search with your required criteria.
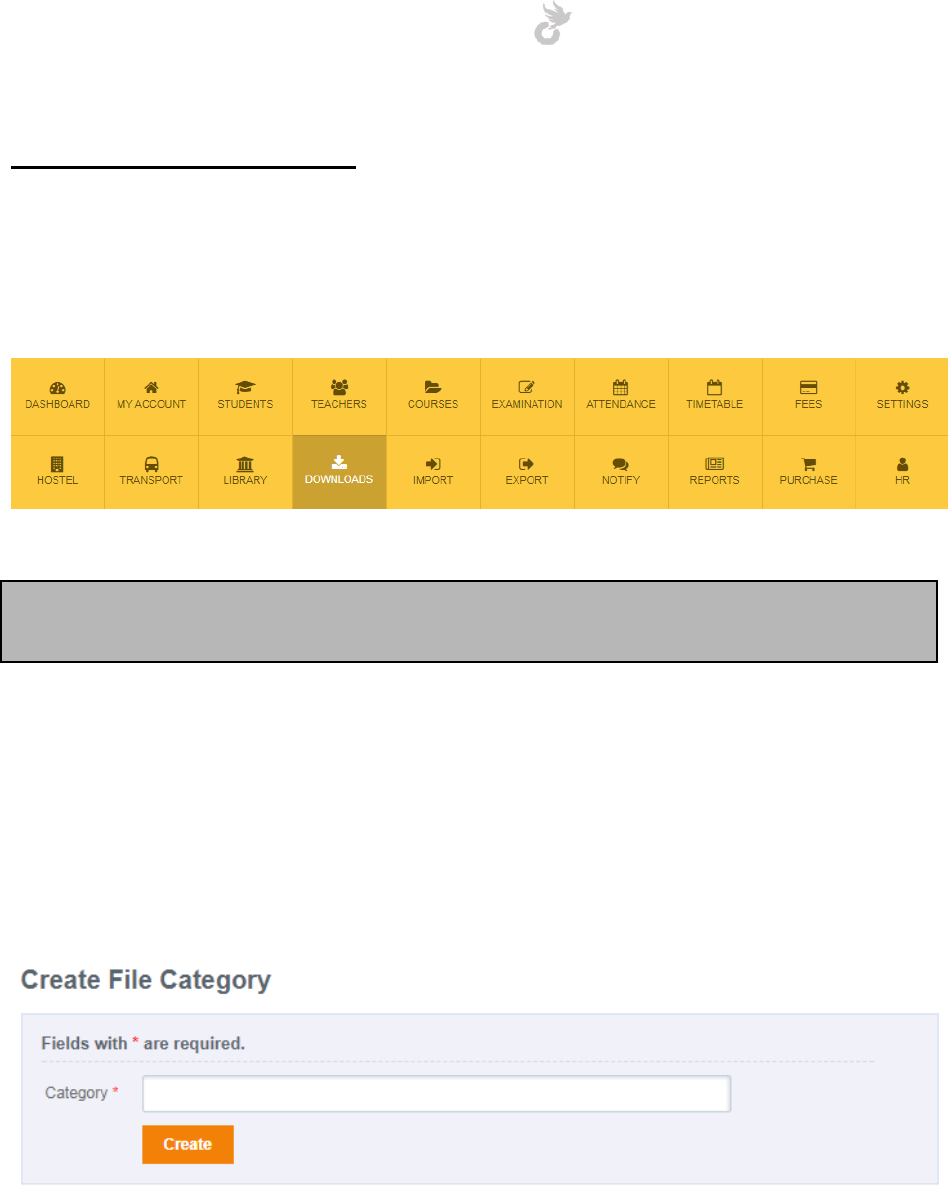
Open-School 2.6.5 Administrator Manual
231
15. DOWNLOADS
The downloads module is accessible in the admin, teacher and students portal. This module
allows you and teachers to upload files for students which can be downloaded in their portals.
Admins can also share files with other admins in the system.
Note: You need to create file categories first to start uploading documents and files. Only
admins can create file categories. Teachers can then use it to upload files.
15.1 Creating and managing file categories
15.1.1 Creating a file category
To create a new file category click on the ‘Create File Category’ link in the left side menu.
All you need to enter is a category name and click on the ‘Create’ button to save it.
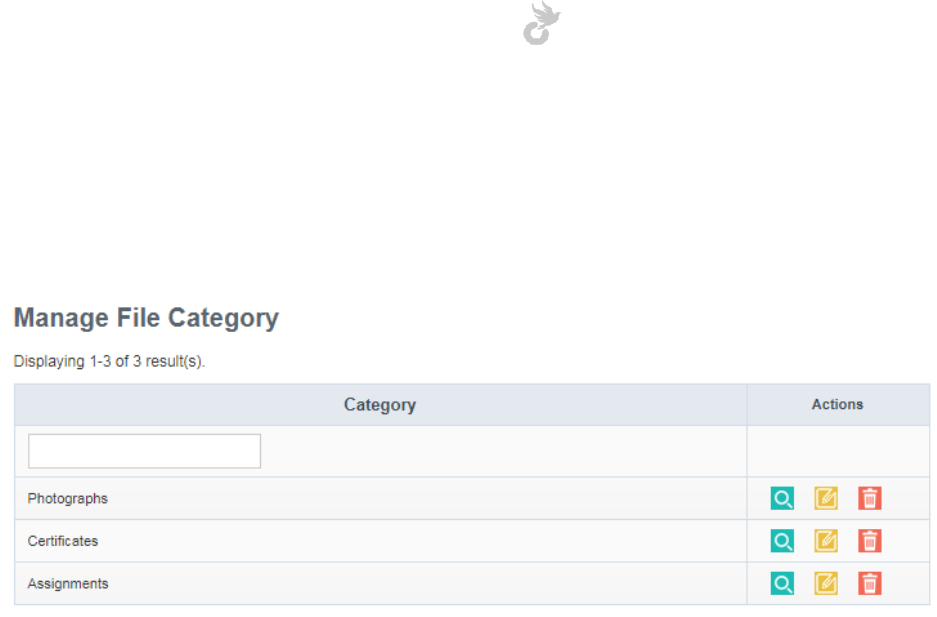
Open-School 2.6.5 Administrator Manual
232
15.1.2 Managing file categories
All existing file categories can be viewed by clicking the ‘Manage File Category’ link in the left
side menu.
Categories can be viewed, edited or even deleted from here using the respective options under
the actions column.
15.2 Creating and managing file uploads
15.2.1 Creating a file upload
Once you have created the file categories you can go ahead with uploading files for other users.
To upload a file click on the ‘Create File Uploads’ link in the left side menu.
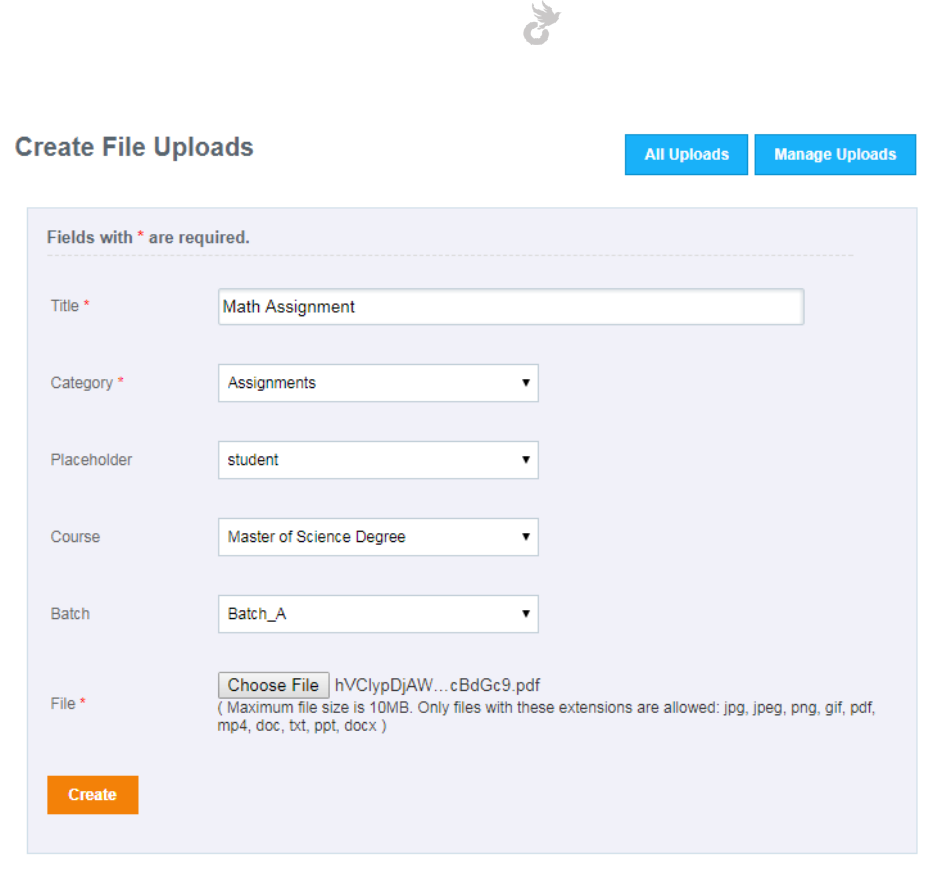
Open-School 2.6.5 Administrator Manual
233
Fill in the form with the respective fields,
1. Title (Name for your upload)
2. Category (Choose from the list of categories you have created)
3. Placeholder (Choose the role of users for whom you want this file uploaded)
4. Course & Batch (Applicable only if placeholder chosen is student)
5. File (Browse from your computer to add a file)
Click the ‘Create’ button once you are done entering all necessary details.
Uploaded files can be viewed under Manage File Uploads.
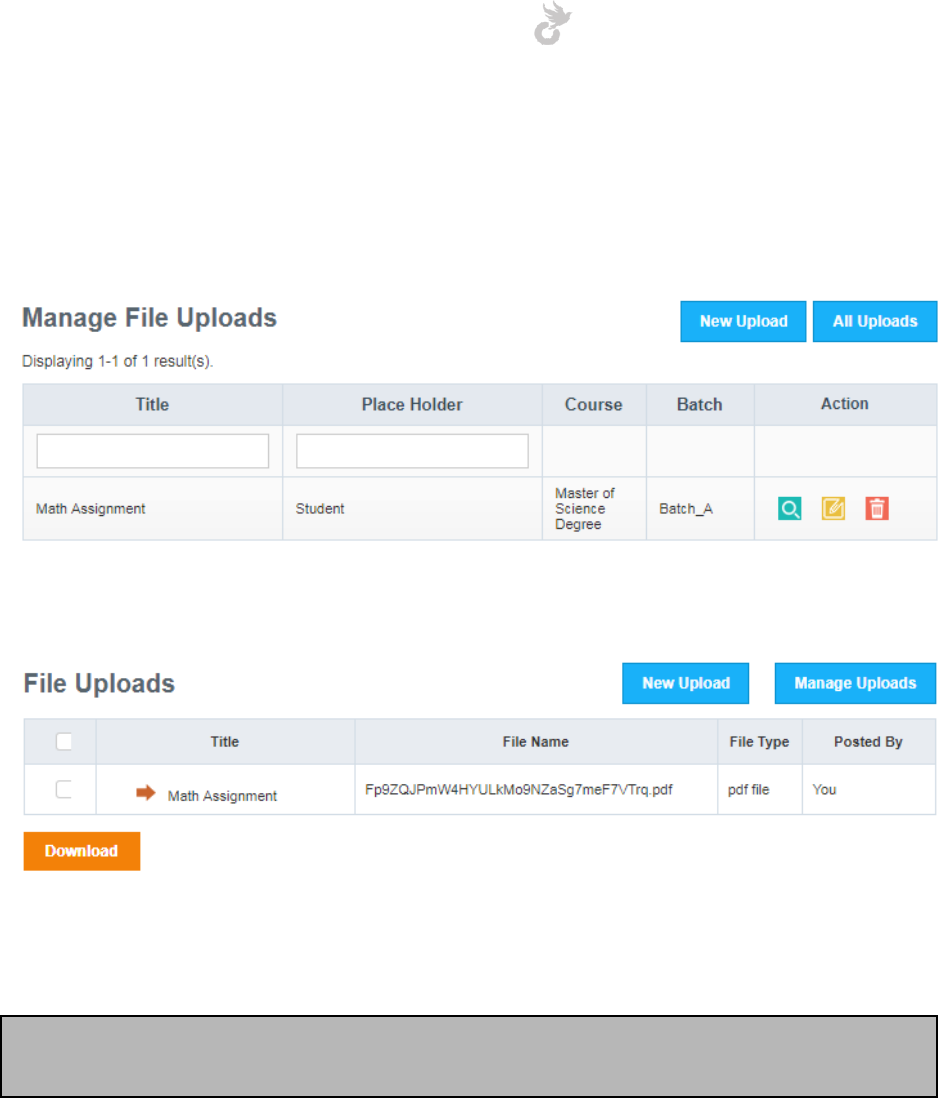
Open-School 2.6.5 Administrator Manual
234
15.2.2 Managing your uploaded files
You can view details, edit or even delete your uploaded files by clicking the ‘Manage File
Uploads’ link in the left side menu.
To view files uploaded by you and other users click the ‘All uploads’ link in the left side menu.
You can download these files from here.
Note: Files uploaded by other users will be listed here only after you approve them from My
Account Module > Document List
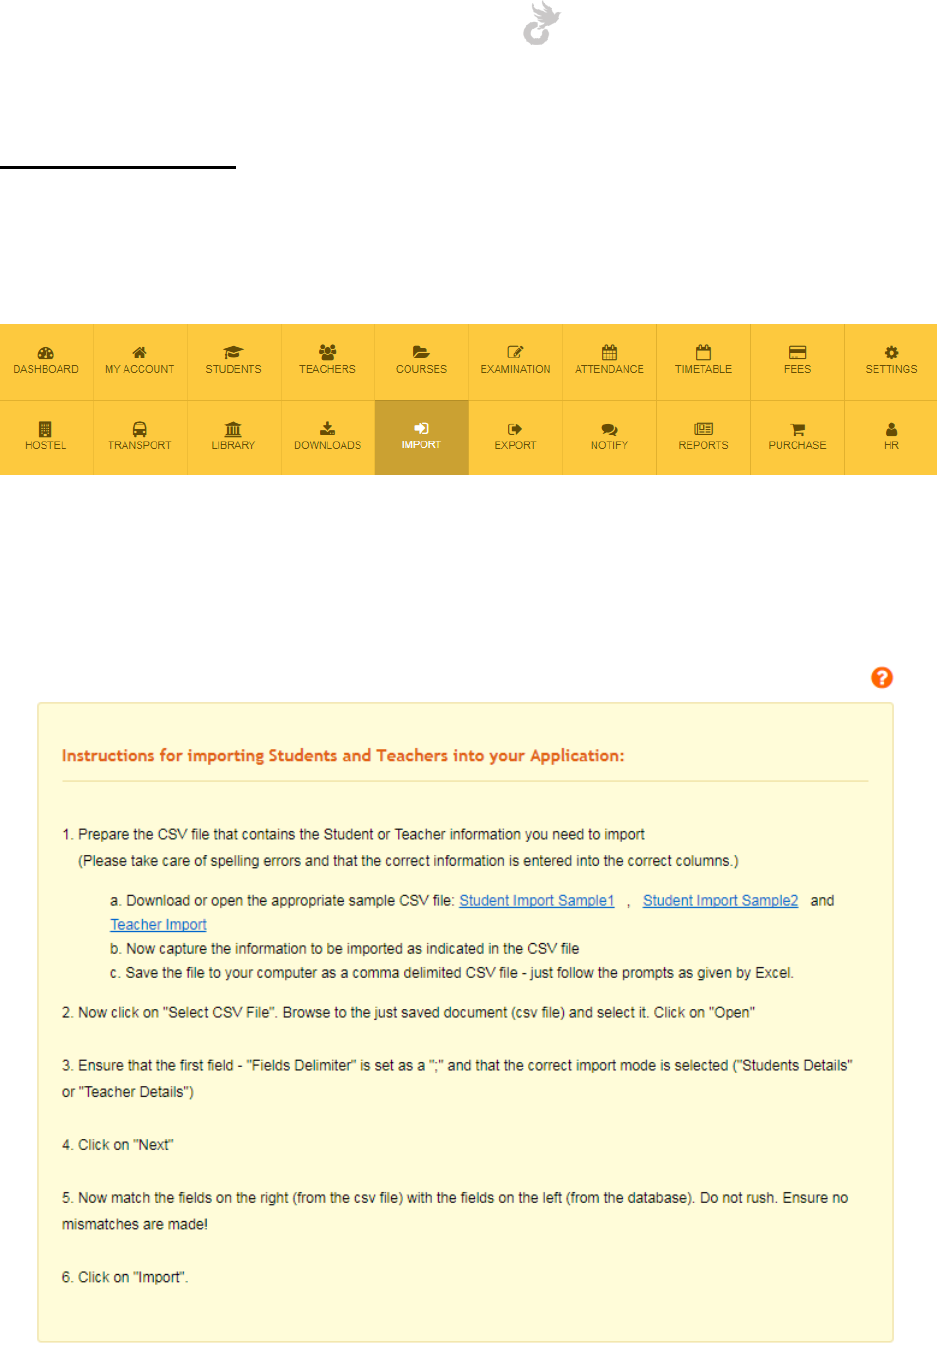
Open-School 2.6.5 Administrator Manual
235
16. IMPORT
The import module allows you to insert student, parent and teacher details into the system in
bulk using csv files. This is the easiest way to add them in case you have a lot of data.
The import module has the option to add new data and also edit existing data in the system.
You can download sample csv files for students and teachers using the help icon in the import
module.
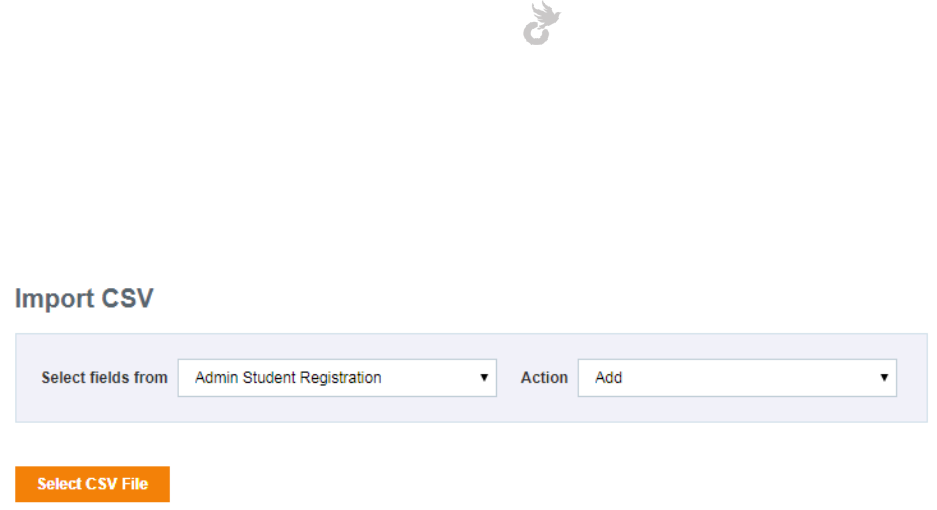
Open-School 2.6.5 Administrator Manual
236
16.1 Import Add Action
The add option in import module allows you to add new data into the system. To get started
select the required option from the dropdowns.
The ‘select fields from’ drop-down allows you to choose the areas for fields you would like to
upload. This is applicable in students as you have the option to enable/disable fields for
different areas for students. The areas for students are,
1. Admin student registration
2. Online admission
3. Student Profile
4. Student Profile PDF
5. Student Portal
6. Parent Portal
Student and parent details are inserted together. For teachers, select the ‘Teacher Portal’
option.
For the action drop-down select ‘Add’ for new entries.
Now select the csv file from your computer by clicking the ‘Select CSV file’ button. This will
bring down different options for choosing the field and text delimiters.
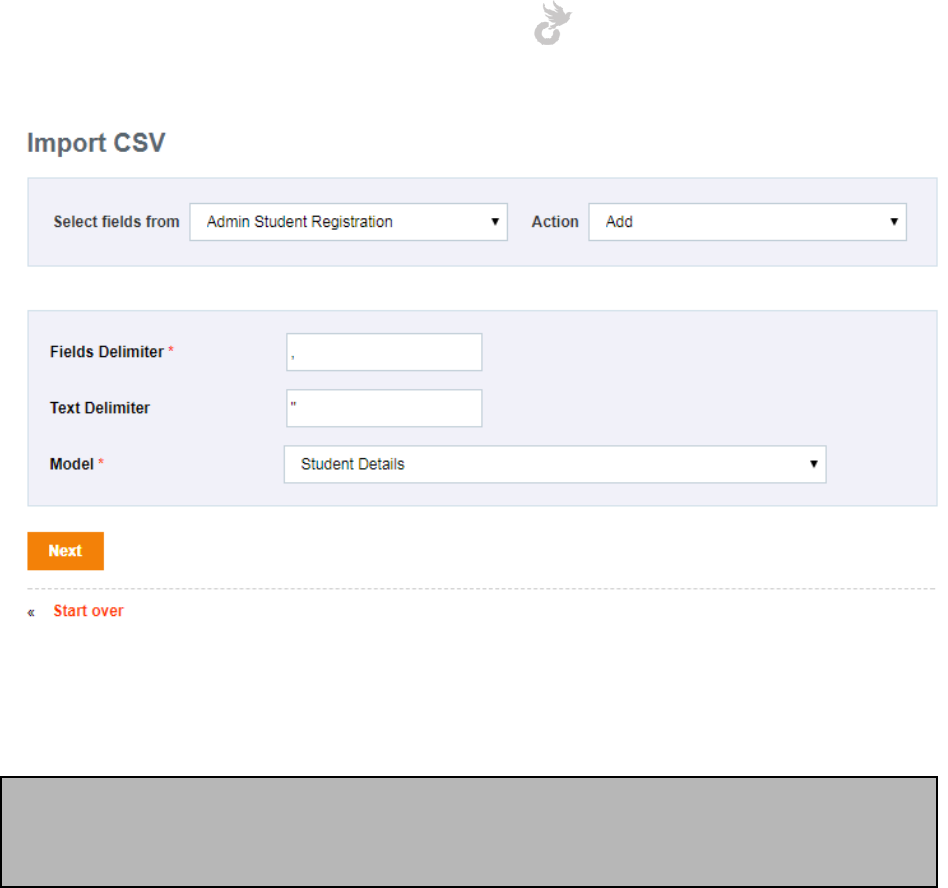
Open-School 2.6.5 Administrator Manual
237
For student details select the Model as ‘Student Details’. In case of teachers select ‘Teachers
Data’. Click ‘Next’ to move on to the next step.
Note: Delimiters will depend on what was used to create the file. It can either be a comma (,)
or a semicolon (;). To see what delimiters you have in your system go to Control Panel >
Region and Languages > Additional Settings if you are a windows user.
The next step involves matching the fields in the system with the columns in your csv file. Fields
on the right represent the ones in the system. The corresponding drop-downs on the right
contain the column names of the csv file you uploaded. Make sure the value on the right is
matches with the left for getting the right data inserted for the right field.
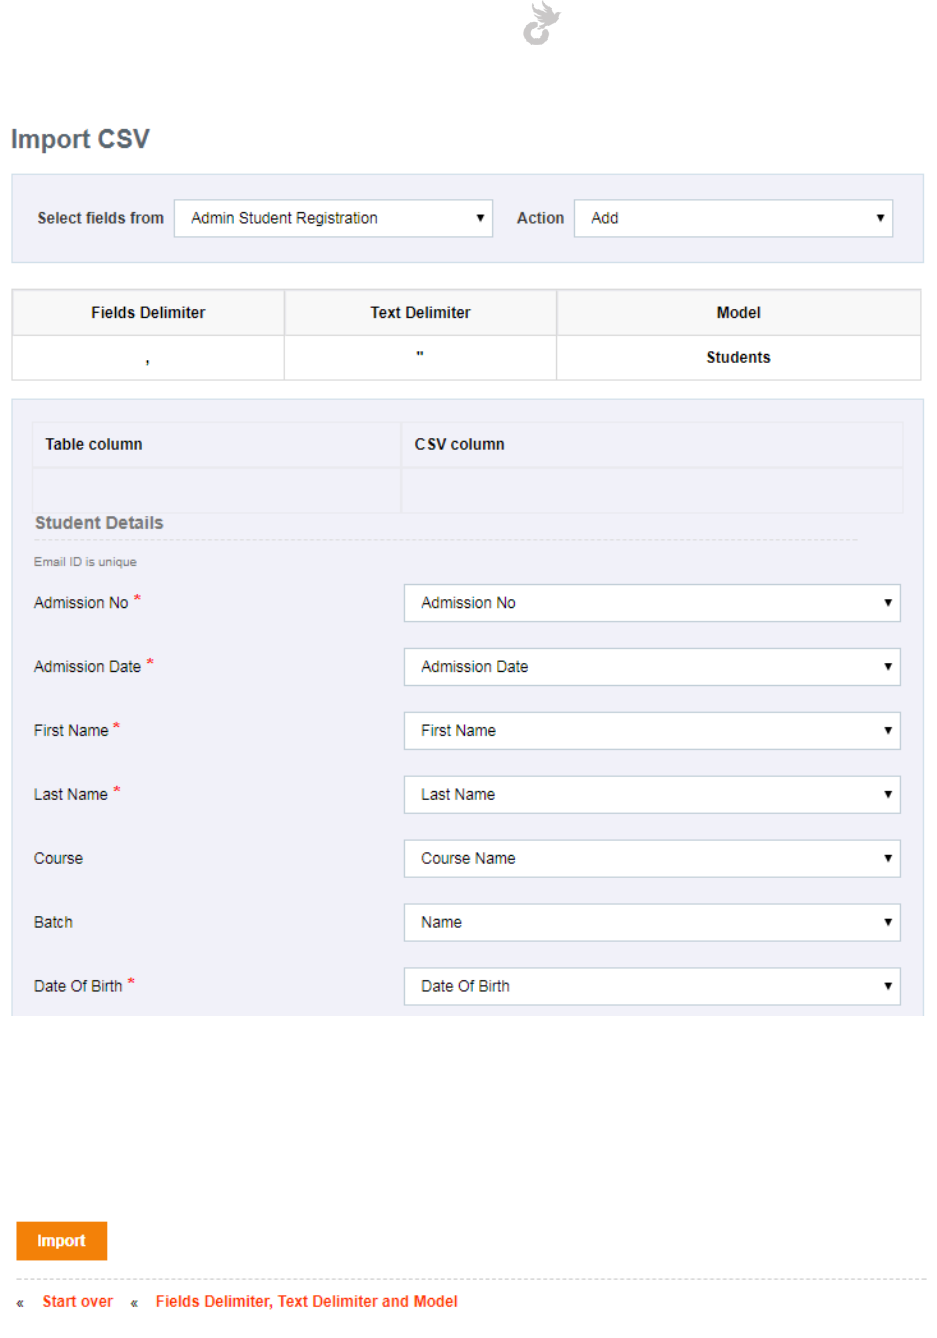
Open-School 2.6.5 Administrator Manual
238
Once the matching is confirmed click on the ‘Import’ button at the bottom of the page to start
the import process.
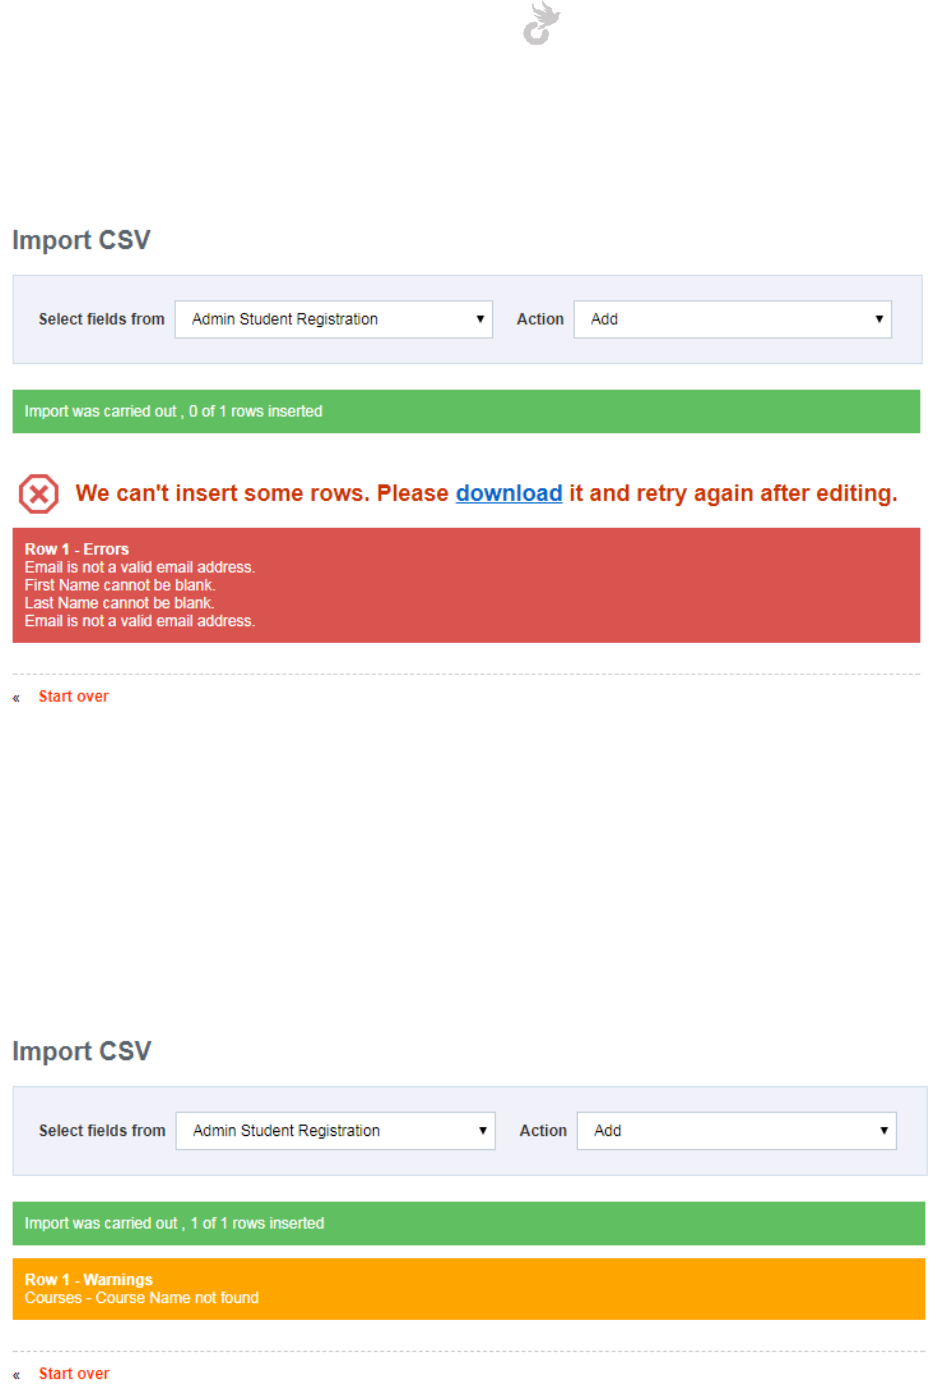
Open-School 2.6.5 Administrator Manual
239
The system returns any errors like invalid data or repeating unique factors etc based on the
validations.
You can view which row has the error, how many were inserted etc. Those that were not
inserted can be downloaded separately using the ‘download’ link as shown above and import
again after correction.
Students can be inserted directly into their course/batch given that the name in the system
match the one in the sheet. A wrong course/batch/country name will only return a warning but
will insert data anyway.
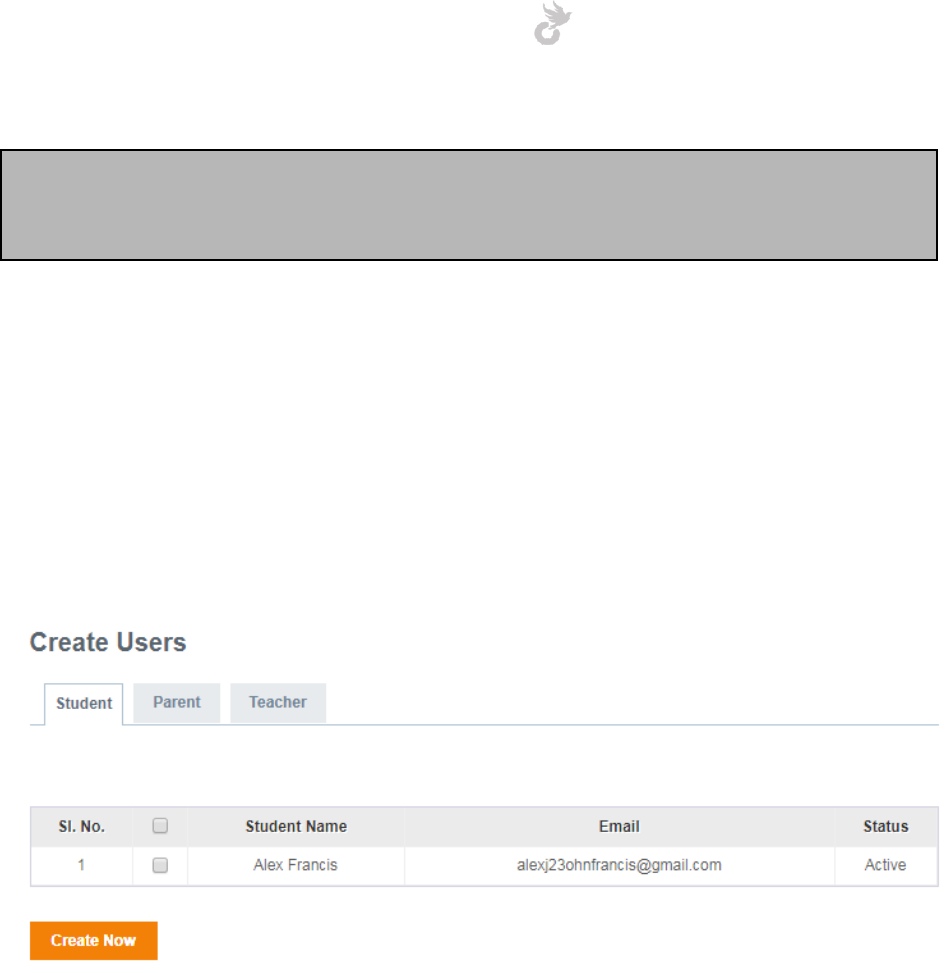
Open-School 2.6.5 Administrator Manual
240
Note: Importing student, parent and teacher data does not create their user accounts as done
while registering them normally. In import the user accounts need to be created separately
using the ‘Create Users’ option.
16.2 Creating user account for imported data
Once you have imported your student, parent or teacher data, their user accounts needs to be
created as it does not happen during import. You can create users in bulk through the ‘Create
Users’ link. This option allows you to choose whose user accounts need to be generated. It
displays all student, parent and teachers in the system without an user account.
Click on the ‘Create Users’ link in the left side menu to view the list of users to be created. You
can browse through the different tabs to search for users to be created.
Check the boxes corresponding to the person(s) you want to create users for and then click the
‘Create Now’ button at the end of the list to generate their user account. Email templates with
login details are sent as usual during this process. They can also be managed from the ‘Manage
Users’ area in Settings Module once the accounts have been generated.
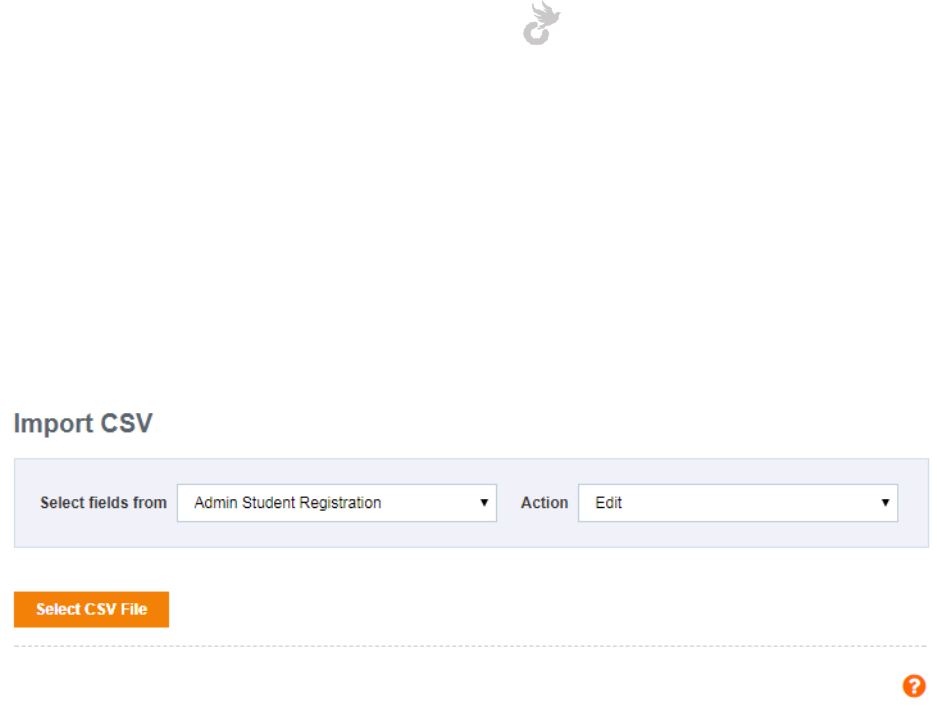
Open-School 2.6.5 Administrator Manual
241
16.3 Import Edit action
Consider you want to change information for all students, parents or teachers in the system.
You can use the edit option to edit field(s) in the system for multiple users in a single click.
The process is the same as the add function except you choose the edit action in the drop-
down.
The edit function checks for unique identifiers in the system to match existing entries, retrieve
and then edit their data.
1. For students the unique attributes are admission number and email.
2. For parents the unique attribute is email.
3. For teacher the unique attribute is email.
Make sure you have all fields data in the sheet as the system will erase information for a
particular field if the data is not present in the sheet while editing.
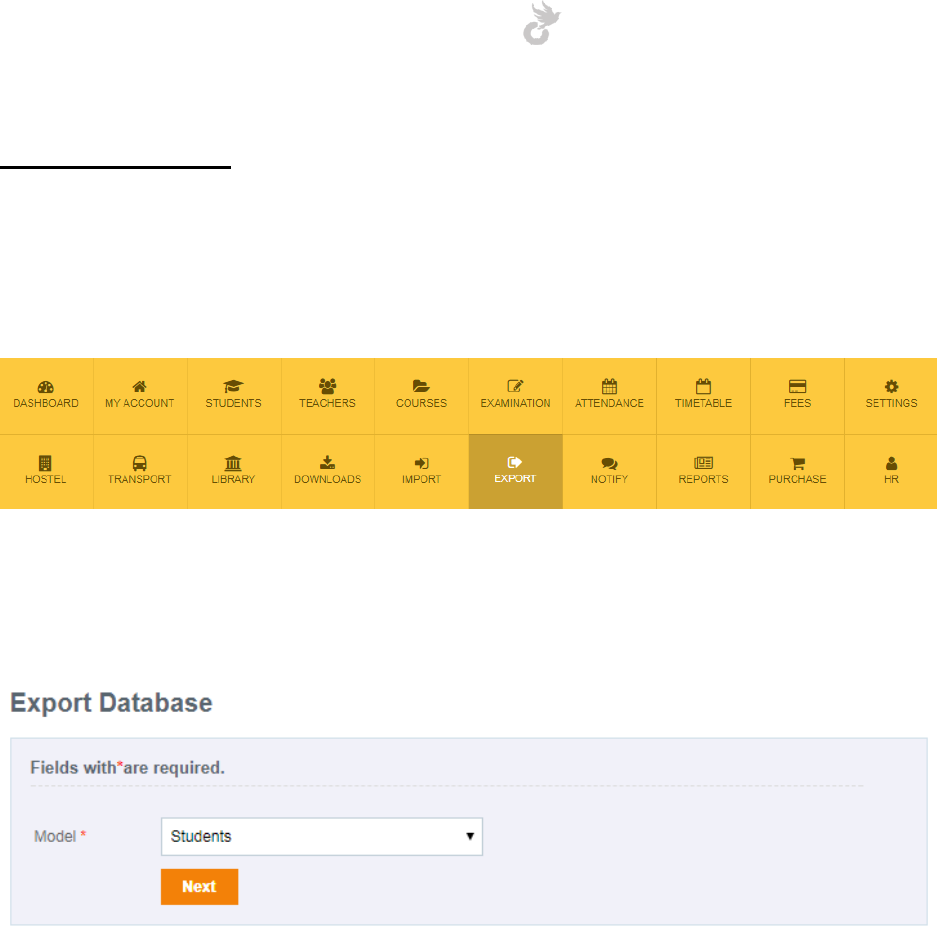
Open-School 2.6.5 Administrator Manual
242
17. EXPORT
The Export module allows you to pull out data from the application and save it as a CSV file.
This can then be used for various purposes and also for importing to another software if
compatible.
The first step includes selecting the data to be exported (student/teacher).
Click the ‘Next’ button after you have selected your required choice.
Simply click and drag the fields you want to be exported from the left side to the column in the
right side. You can export students from specific courses/batches in case of students and
departments in case of teachers. After selecting your fields click the ‘Export Database’ button
at the bottom to export the data in CSV format.
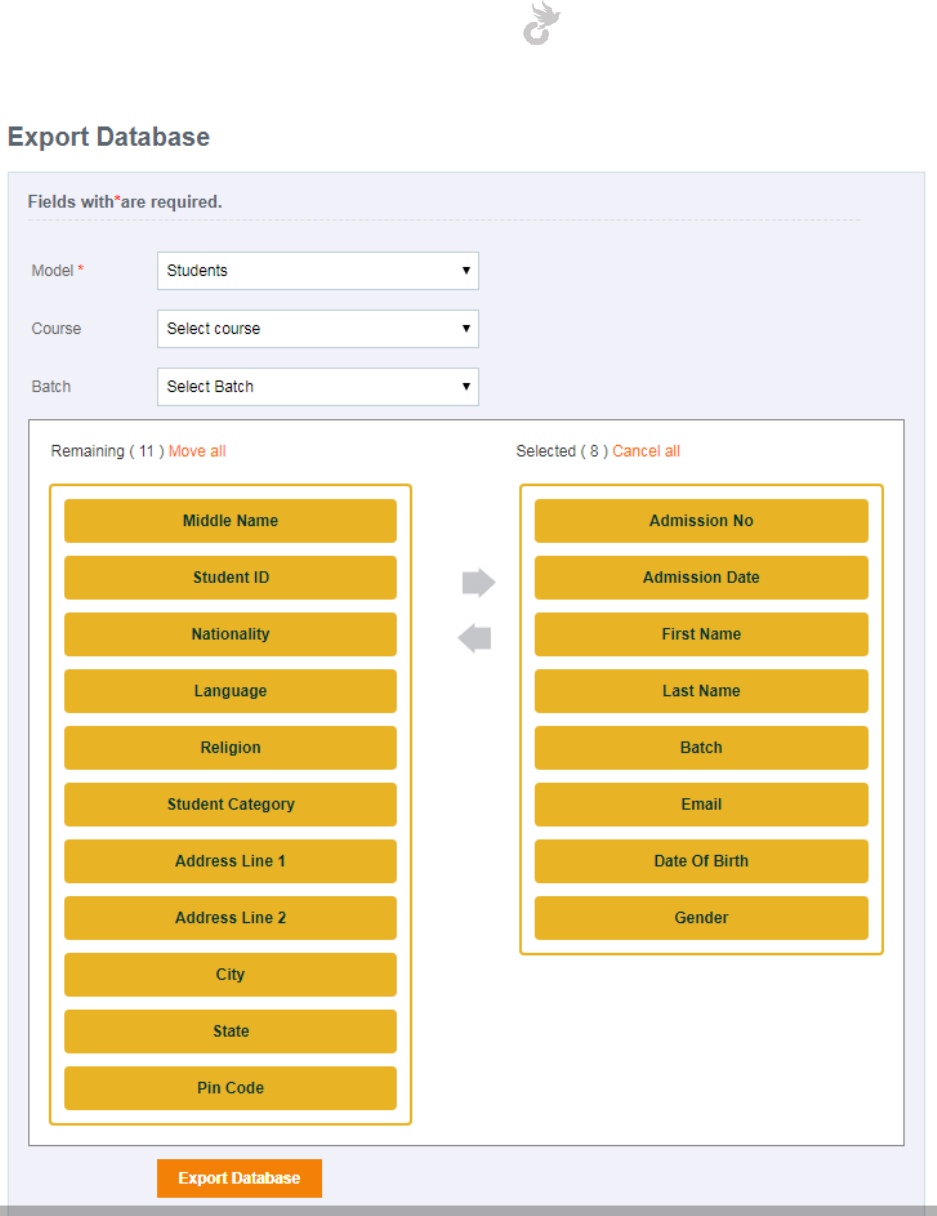
Open-School 2.6.5 Administrator Manual
243
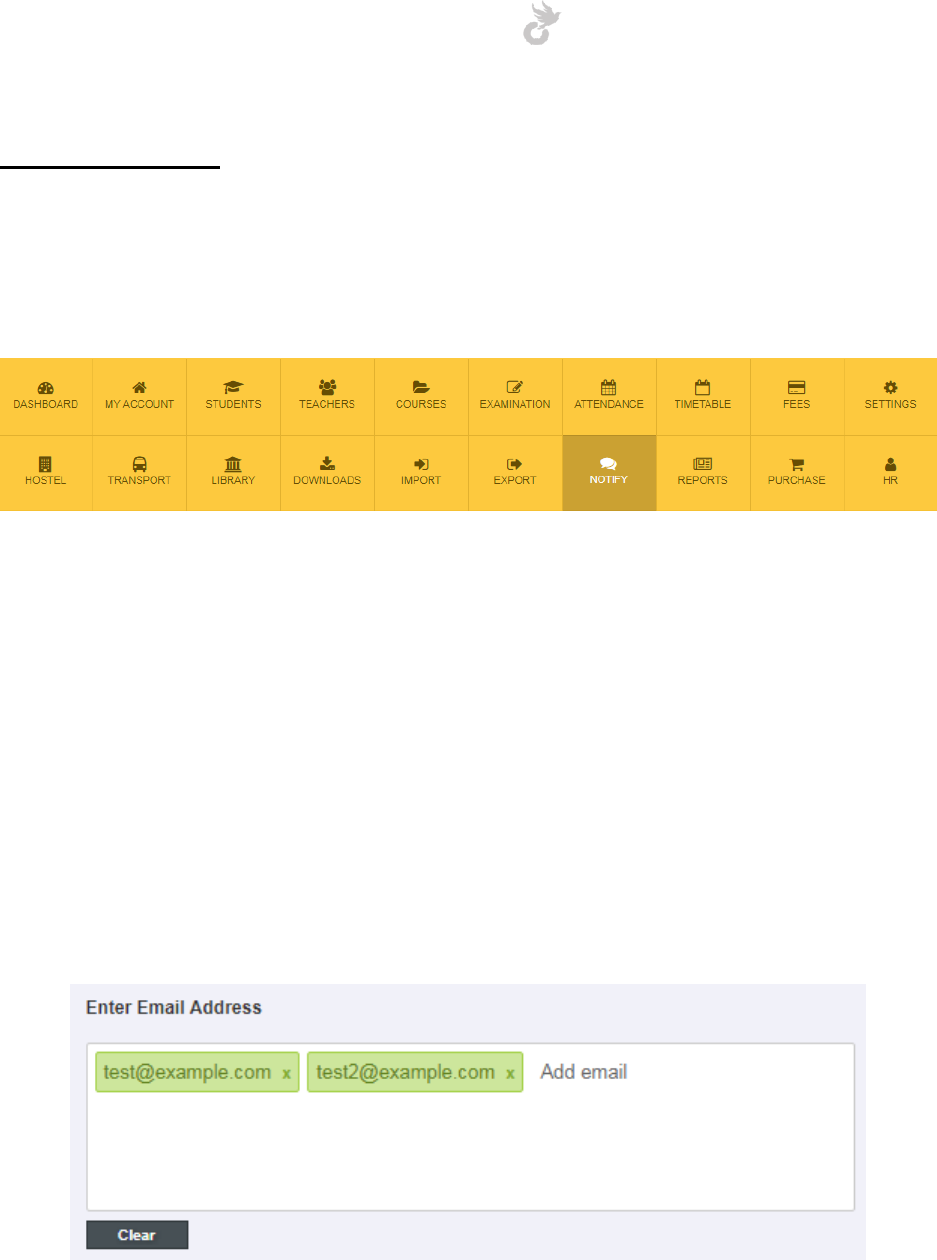
Open-School 2.6.5 Administrator Manual
244
18. NOTIFY
The Notify module allows you to send out emails and SMS to users, manage contacts and
contact groups and also manage the SMS and email templates sent out during general
notifications.
18.1 Emails
18.1.1 Sending an email
You can send emails to teachers, parents and students using the Notify Module. To send a new
email click on the ‘New Compose’ link in the left side menu.
Here you will have options to enter email addresses, choose recipients, batches, enter a subject
for the email, enter a message, attach a file and send your email. Let’s take a look at the
different parts of sending out an email using the Notify Module.
You can enter email addresses in the text area as shown above. Options for recipients and
batches do not need to be selected for custom email addresses entered in the box.
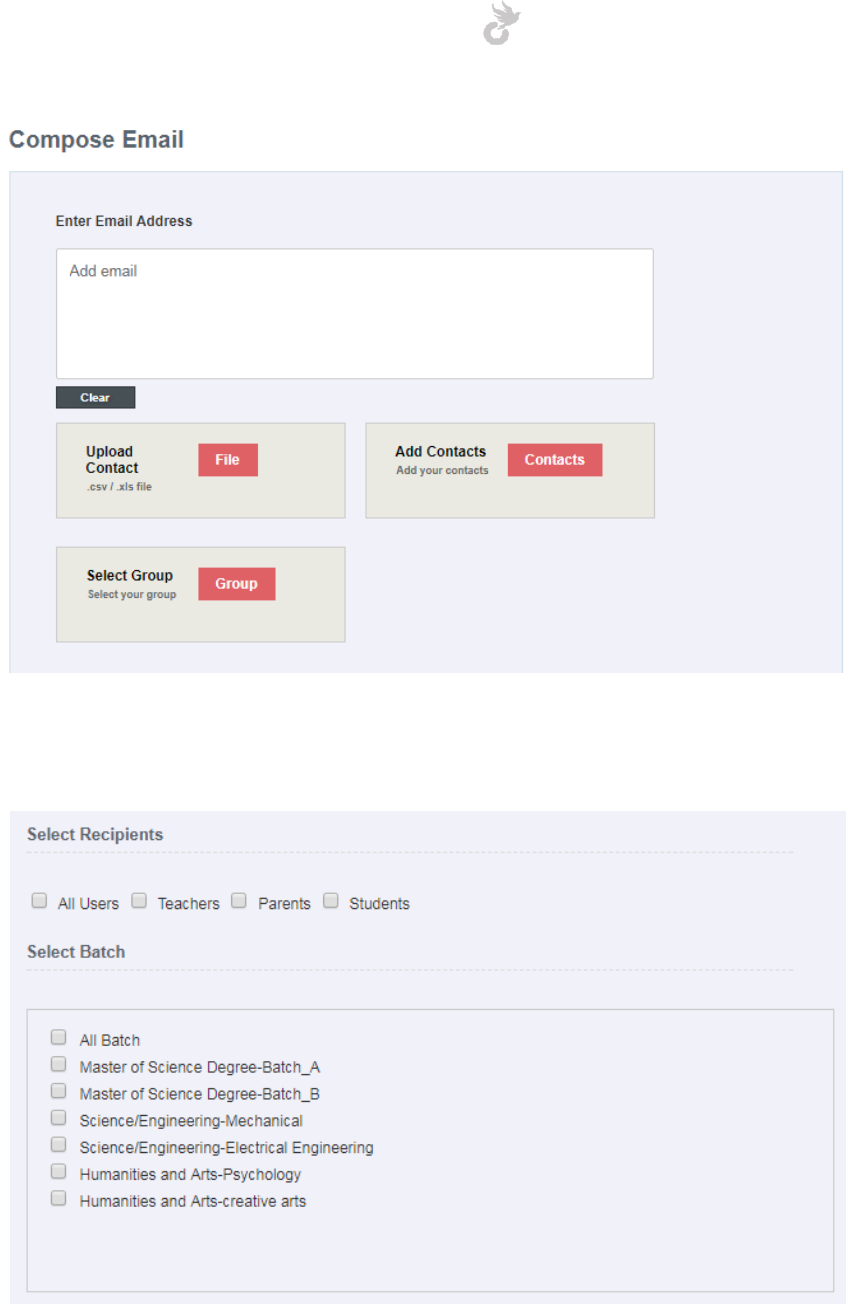
Open-School 2.6.5 Administrator Manual
245
You can also upload contacts directly using a csv file, or add from existing contacts and groups.
(Discussed under creating contacts and groups).
Recipients (Teachers, Parents and Students) can be chosen. Once you have chosen a
recipient(s), select the course/batch for which these recipients should get the email. For
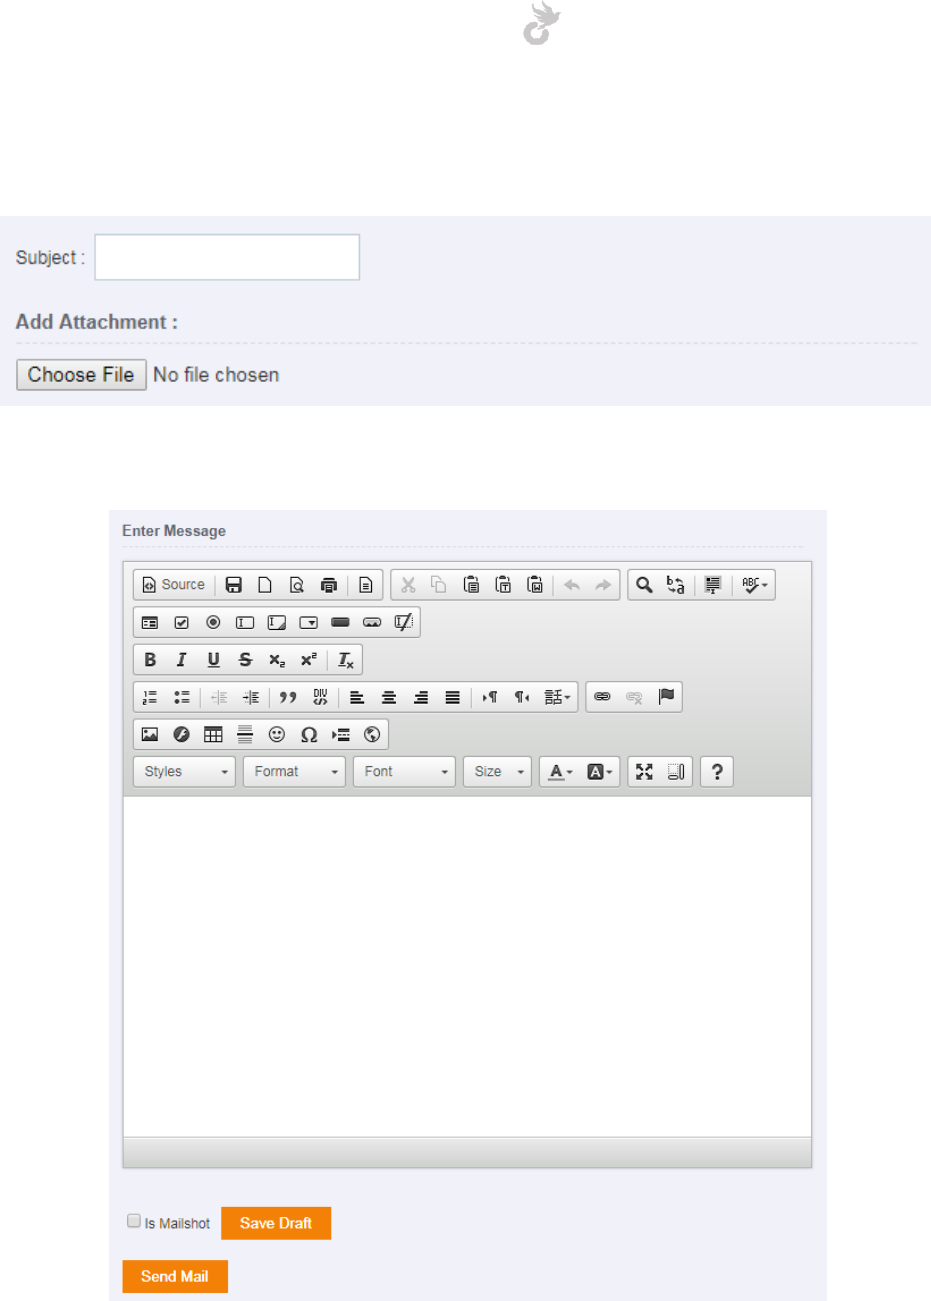
Open-School 2.6.5 Administrator Manual
246
example, if you want all students of the course/batch Master of Science Degree - Batch_A to
get the email you send check ‘Students’ and ‘Master of Science Degree-Batch_A’.
You can enter a subject and also choose an attachment to be sent along with the mail.
The system provides a full option editor that allows you to add text, HTML content/templates
etc. The body for the mail goes in there.
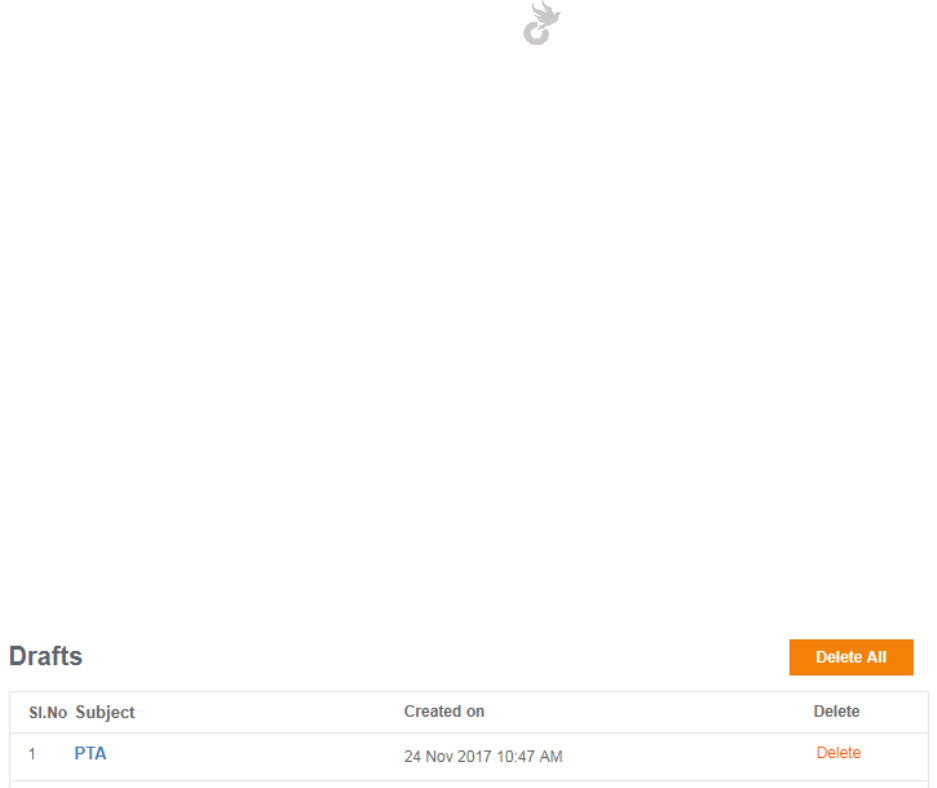
Open-School 2.6.5 Administrator Manual
247
There are two options under the editor,
1. Is Mailshot (allows you to save the mail as a template which can be sent multiple times
later). To save as a mailshot, check the box and click the ‘Save Draft’ button.
2. Save draft (allows you to save the mail as a draft for sending it later. This can be sent
only once)
Click the ‘Send Mail’ button once you are ready to send out the email to your recipients.
18.1.2 Managing drafts
As explained in the Sending Emails section, you can save messages as drafts that can be sent
later. To view the list of drafts saved click on the ‘Drafts’ link in the left side menu.
This will bring up the list of all saved drafts that have not been sent yet.
Click on the subject name to view the draft details. This will redirect you to the send mail page
with all the saved options selected. You may change the details (subject, message, recipients
etc) and save again.
Drafts once sent will not appear in the list again. You may delete drafts using the delete link
next to it, or even clear all using the ‘Delete All’ button.
18.1.3 Managing Mailshots
Emails saved as mail shots can be used multiple times for sending. This is basically like a
template that can be used again and again. To manage saved mailshots click on the ‘Mailshots’
link in the left side menu.
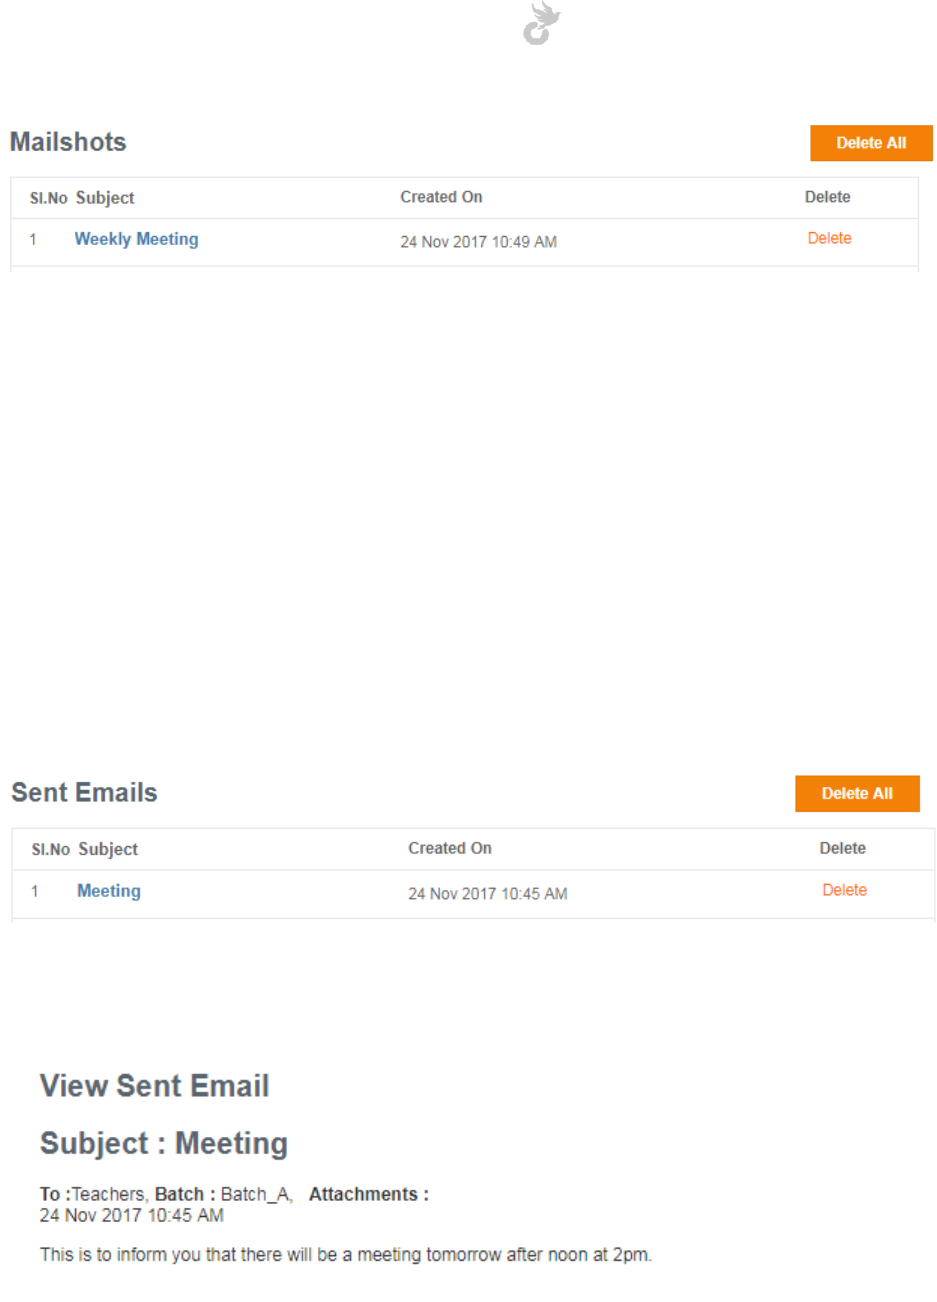
Open-School 2.6.5 Administrator Manual
248
Click on the subject to view the mail. You will be redirected to the send email area with all
saved options just like in sending a draft. The only difference here is that the mailshot will
remain in the list even after you have sent it.
You can delete them by either using the link next to each one or use the delete all option to
clear all mailshots.
18.1.4 Sent Emails
All mails sent through the Notify module are stored in the Sent Emails area. Click on the link in
the left side to view the list of sent emails.
Click on the subject name to view details of the sent email.
Subject, recipients, message date and time can be viewed here.
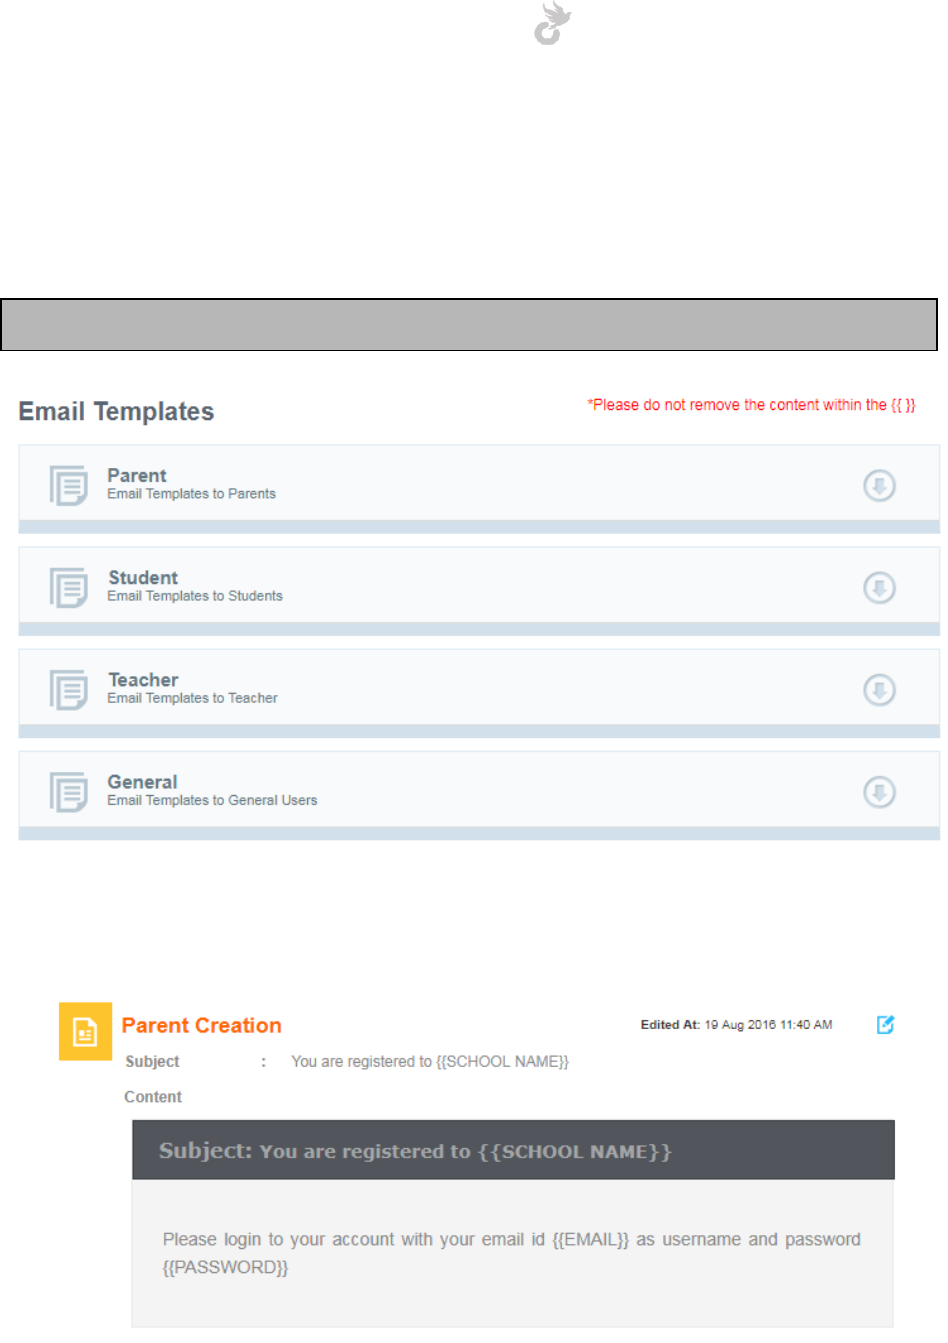
Open-School 2.6.5 Administrator Manual
249
18.1.5 Email Templates
The ‘Templates’ link in the left side menu under Email section in the notify module allows you
to manage the default templates sent out during different functions in the system.
Note: These templates cannot be used to send custom emails.
Email templates sent to parents, students, teachers and custom admins can all be viewed and
edited from here. Click on a tab to view all default templates for the user.
You may edit the content of a template by clicking the edit icon in the top right corner.
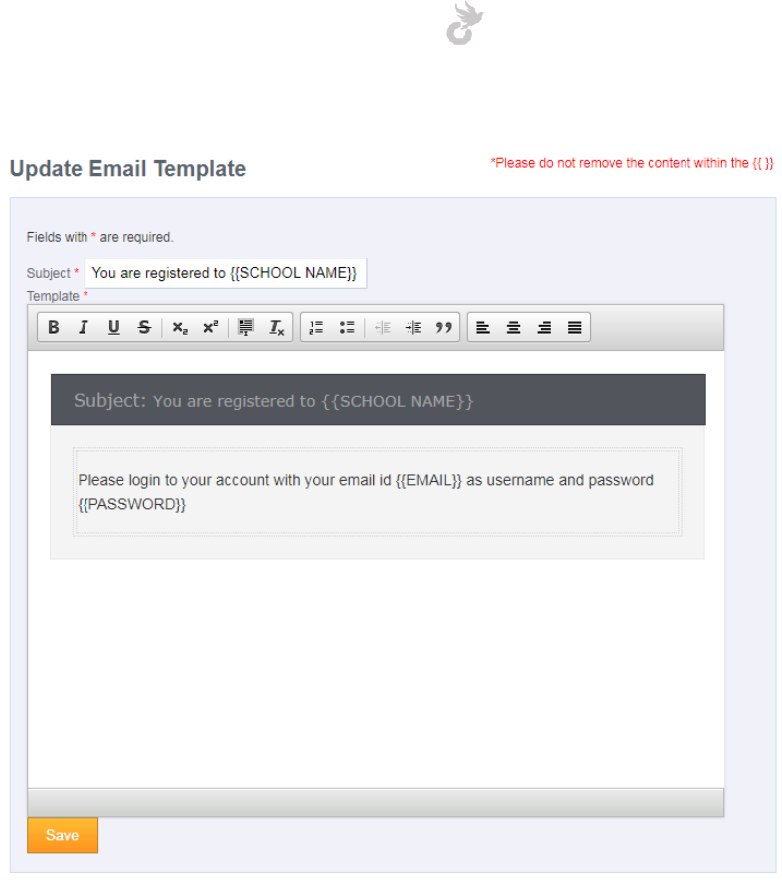
Open-School 2.6.5 Administrator Manual
250
The subject and content can be changed from this area. However, note that the text enclosed
in {{ }} should not be tampered with as it can cause problems in sending the template.
Once you are done editing the template click on the ‘Save’ button to finish.
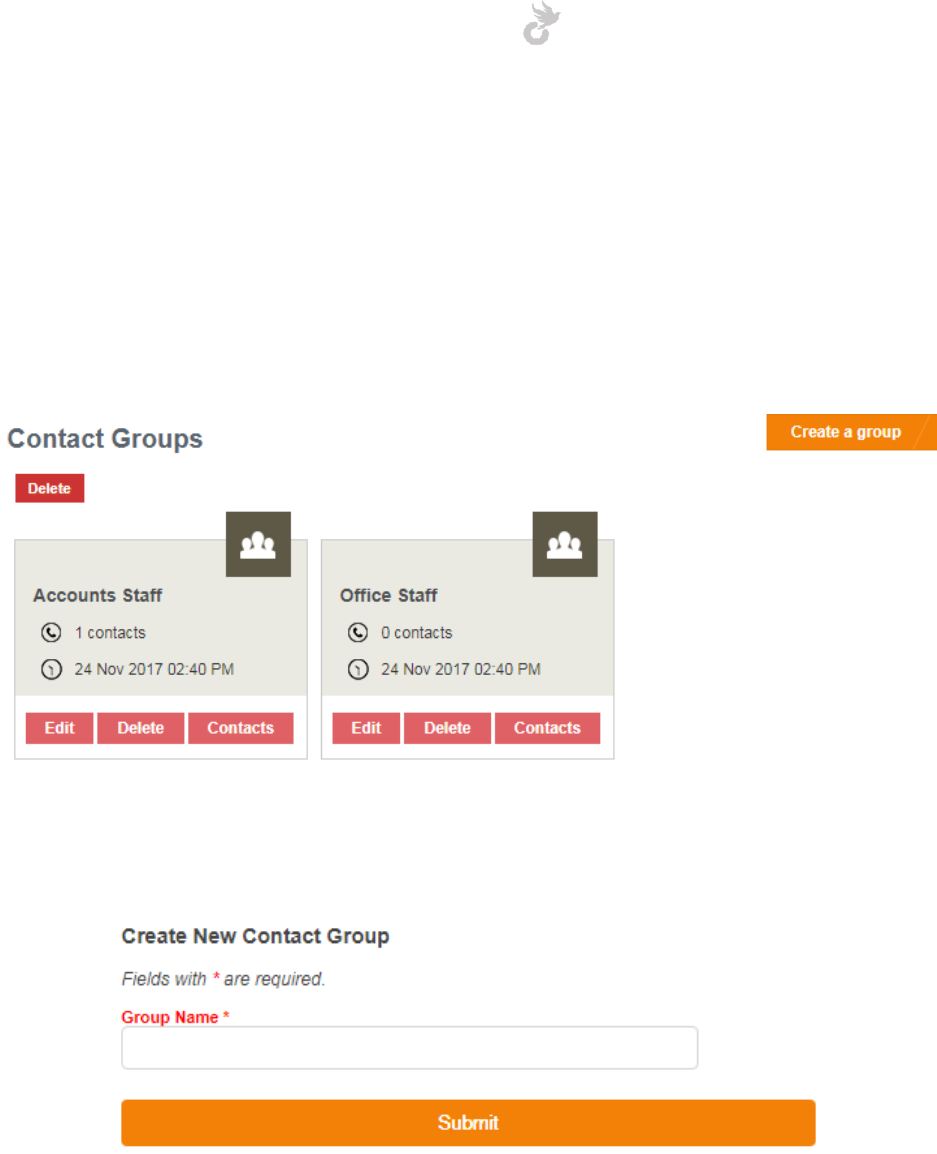
Open-School 2.6.5 Administrator Manual
251
18.2 SMS
18.2.1 Managing groups
The system gives you the ability to add contacts and groups containing these contacts while
sending an email or SMS. To manage contact groups click on the ‘Groups’ link in the left side
menu.
Existing groups are displayed here. You can create a new group by clicking the ‘Create a group’
button on top. This will bring out a pop-up where you can enter a name for your contact group.
To add contacts to your groups click on the contacts button in the box for the group.
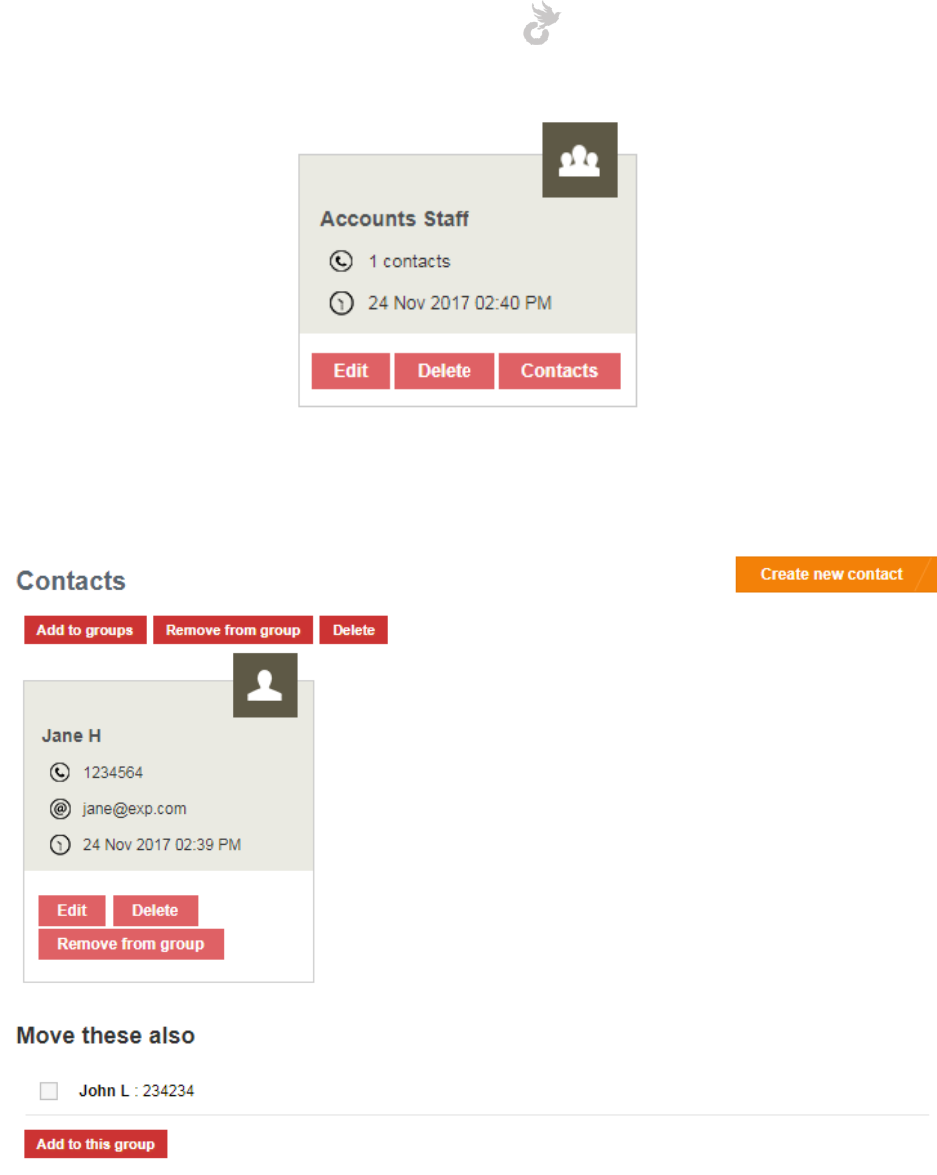
Open-School 2.6.5 Administrator Manual
252
This will bring up a page where all the contacts you added will be listed. You may simply check
and add them to the group.
Existing contacts within the group are displayed in the boxes above. Ones that can be added are
listed below under the ‘Move these also’ heading. They can be checked and added to the
groups by clicking the ‘Add to this group’ button.
Contacts can be removed from a group by selecting the boxes(click on them to select) and use
the ‘Remove from group’ button.
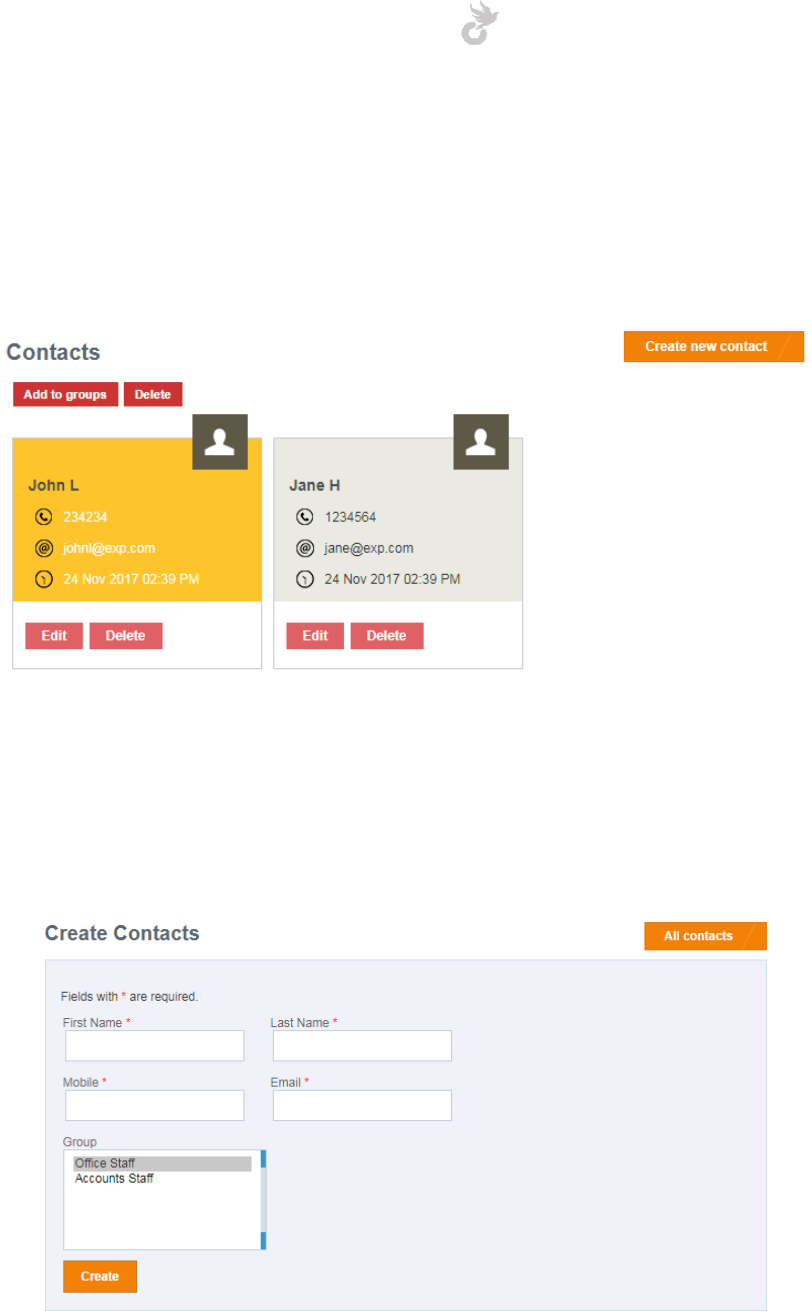
Open-School 2.6.5 Administrator Manual
253
18.2.2 Managing contacts
To manage your contacts click on the ‘All Contacts’ link in the left side menu.
Existing contacts are displayed here. You may select contacts by clicking in the box. Selected
contacts are highlighted as shown above. You may add selected contacts to a group by selecting
them and clicking the ‘Add to groups’ button.
To create a new contact click on the ‘Create new contact’ button on top.
Enter the following fields,
1. First Name
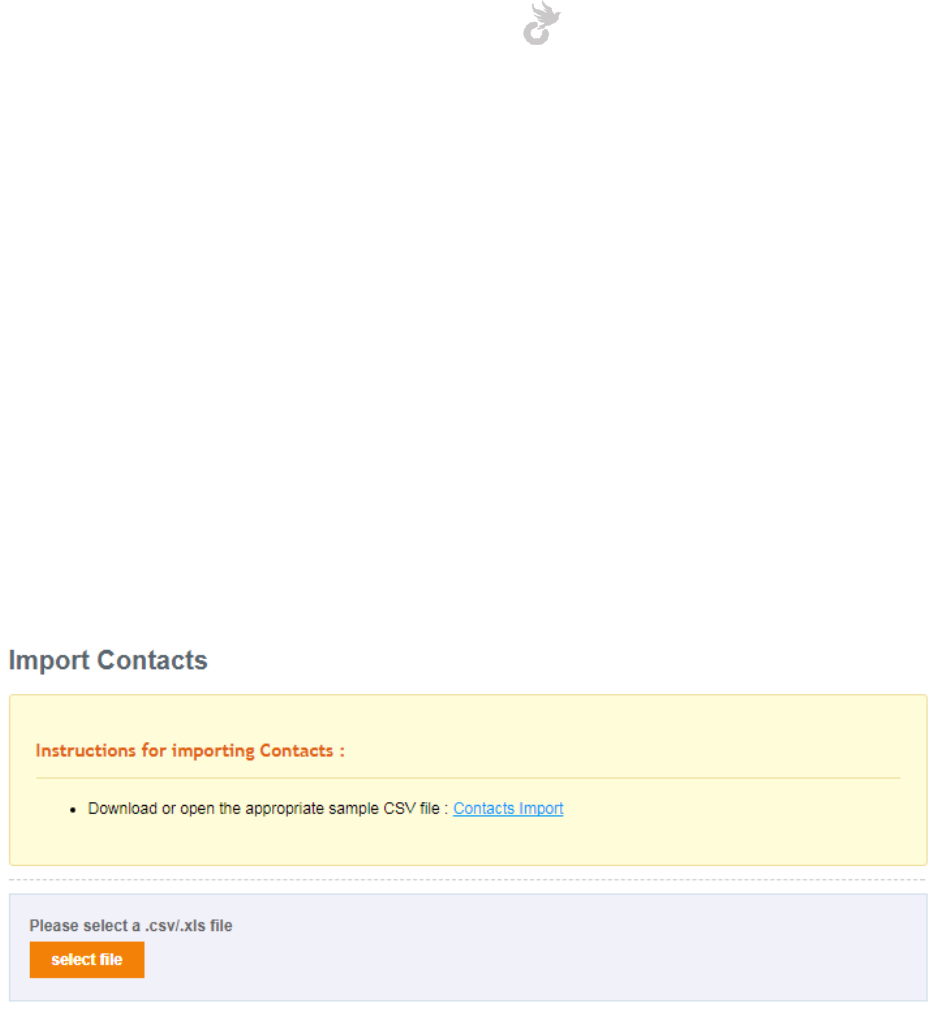
Open-School 2.6.5 Administrator Manual
254
2. Last Name
3. Mobile Number
4. Email
5. Group (Select a contact group if required)
Click ‘Create’ to save the contact.
18.2.3 Importing contacts
Contacts can be imported in bulk to groups in the system using the import option. This feature
allows you to import the contacts using a csv sheet just like in the import module.
Click on the ‘Import’ link in the left side menu to access the Import Area.
The sample csv file can be downloaded by clicking the ‘Contacts Import’ link on this page.
Click the ‘Select File’ button when you are ready to import your contacts. Browse through your
system and select the file in the window that opens up.
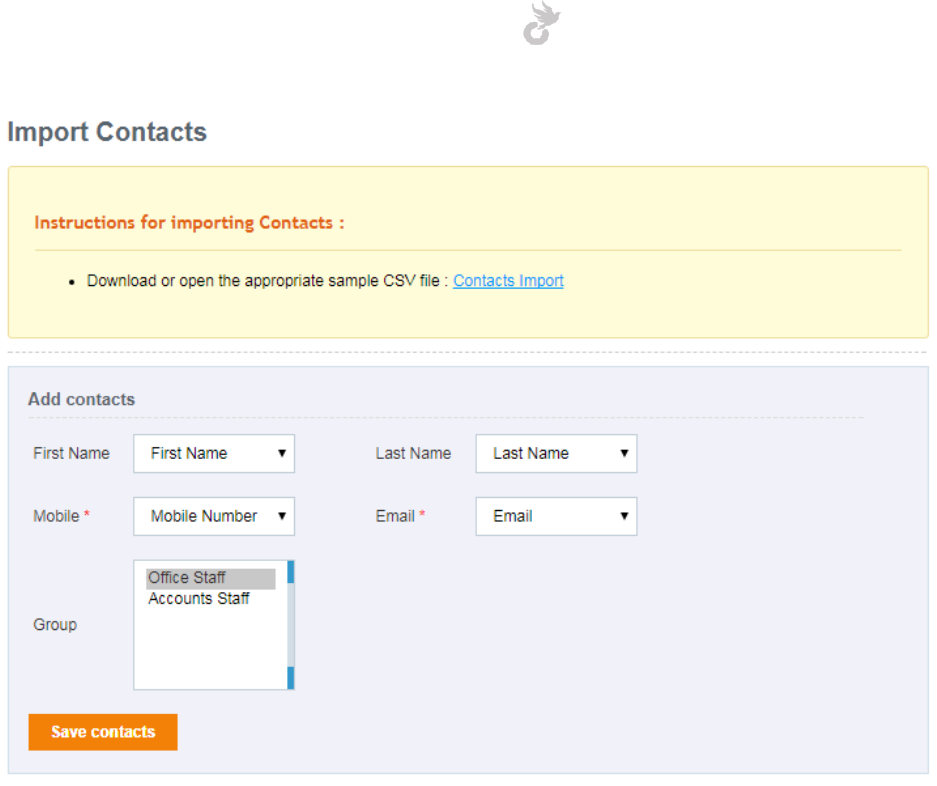
Open-School 2.6.5 Administrator Manual
255
After the file has been selected, you will see the fields required. Select the columns in the csv
using the dropdown next to each field. You may also select which group they should be added
to. After matching the fields with the csv file click on ‘Save Contacts’ to import them into the
system.
18.2.4 SMS gateway settings
The application allows you to configure the SMS gateway from within the application. SMS
notifications will work only if you have integrated the gateway with the application.
Click on the ‘Gateway’ link in the left side menu to configure these settings.
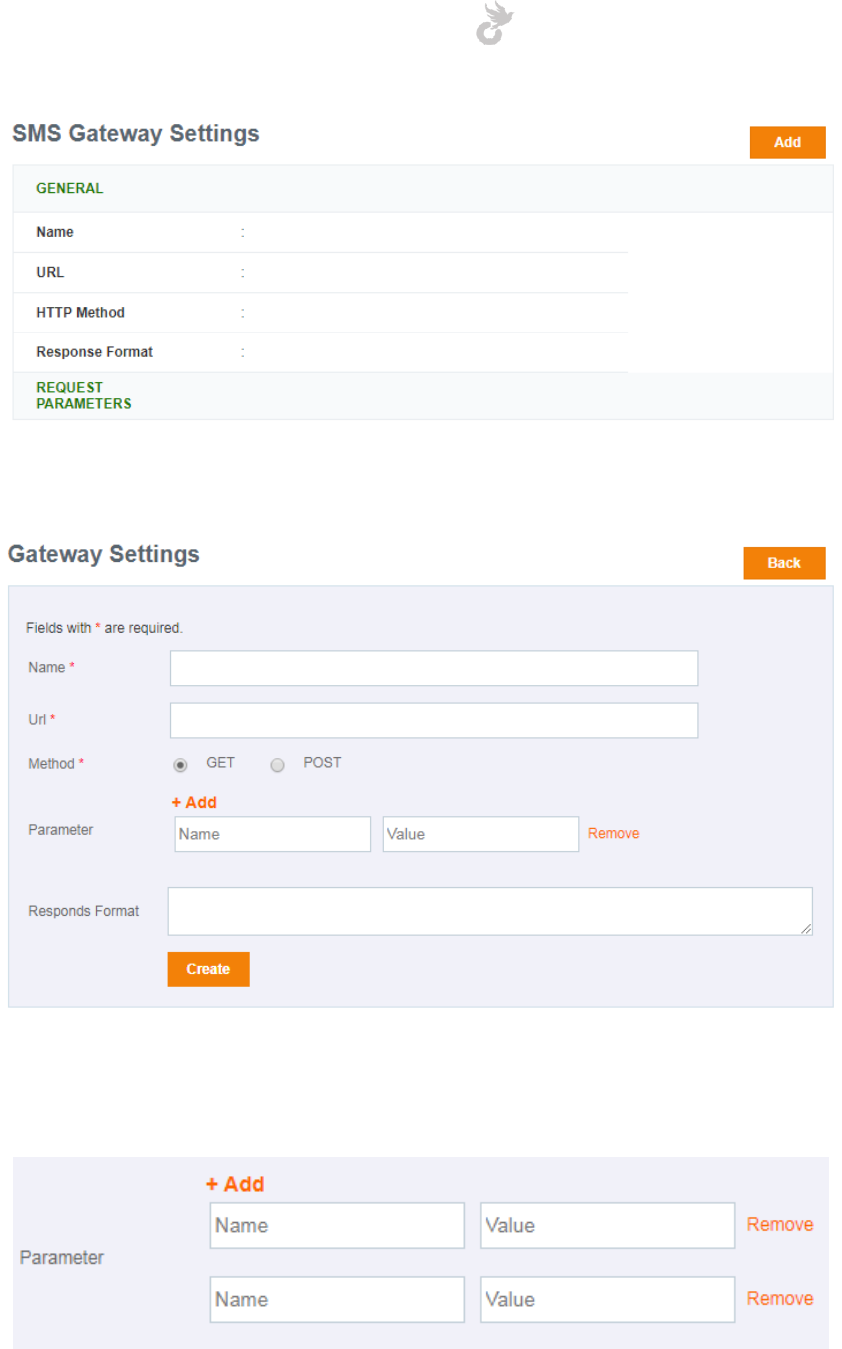
Open-School 2.6.5 Administrator Manual
256
Details will be displayed here. You can click the ‘Add’ button to add/edit the details.
Enter the required details using the API documentation of your gateway provider for PHP. You
may add additional parameters by clicking the ‘+Add’ link for the parameter field.
Click ‘Create’ once you are done.
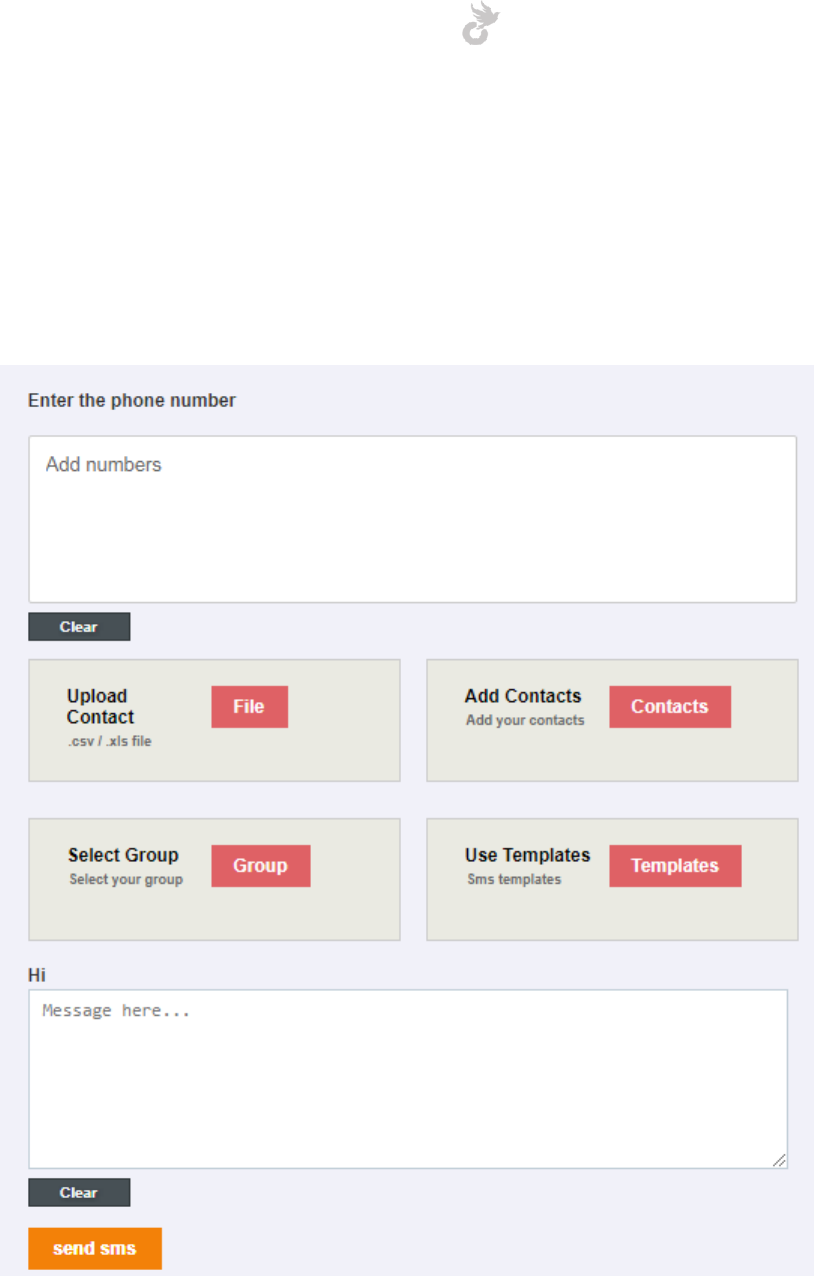
Open-School 2.6.5 Administrator Manual
257
18.2.5 Sending an SMS
After setting up your gateway with the application you can now start sending SMS to your
contacts and notifications to students, parents and teachers.
Click on the ‘Send SMS’ link in the left side menu to get started.
You can either enter your numbers in the text area or even select your contacts and groups
using the options below it.
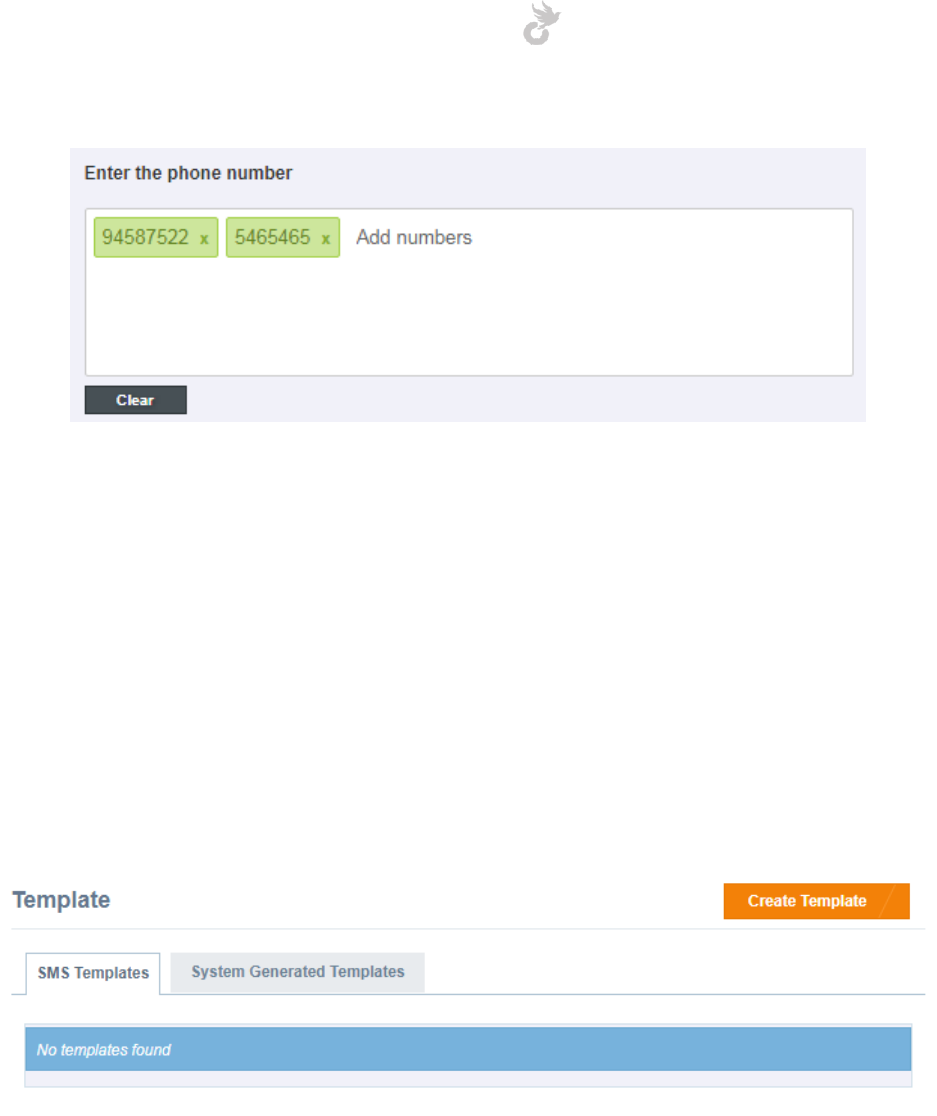
Open-School 2.6.5 Administrator Manual
258
Enter a message for your SMS to be sent and click the ‘Send SMS’ button to send your message
to all recipients mentioned.
18.2.6 SMS templates
SMS templates can be of two types,
1. SMS templates (custom made templates)
2. System generated templates (default templates in the system which can be edited)
Click on the ‘Templates’ link in the left side menu under SMS section to view the templates.
The first tab displays the custom made templates in the system. You can create your own
templates which can be used while sending an SMS. To create a new one click on the ‘Create
Template’ button.
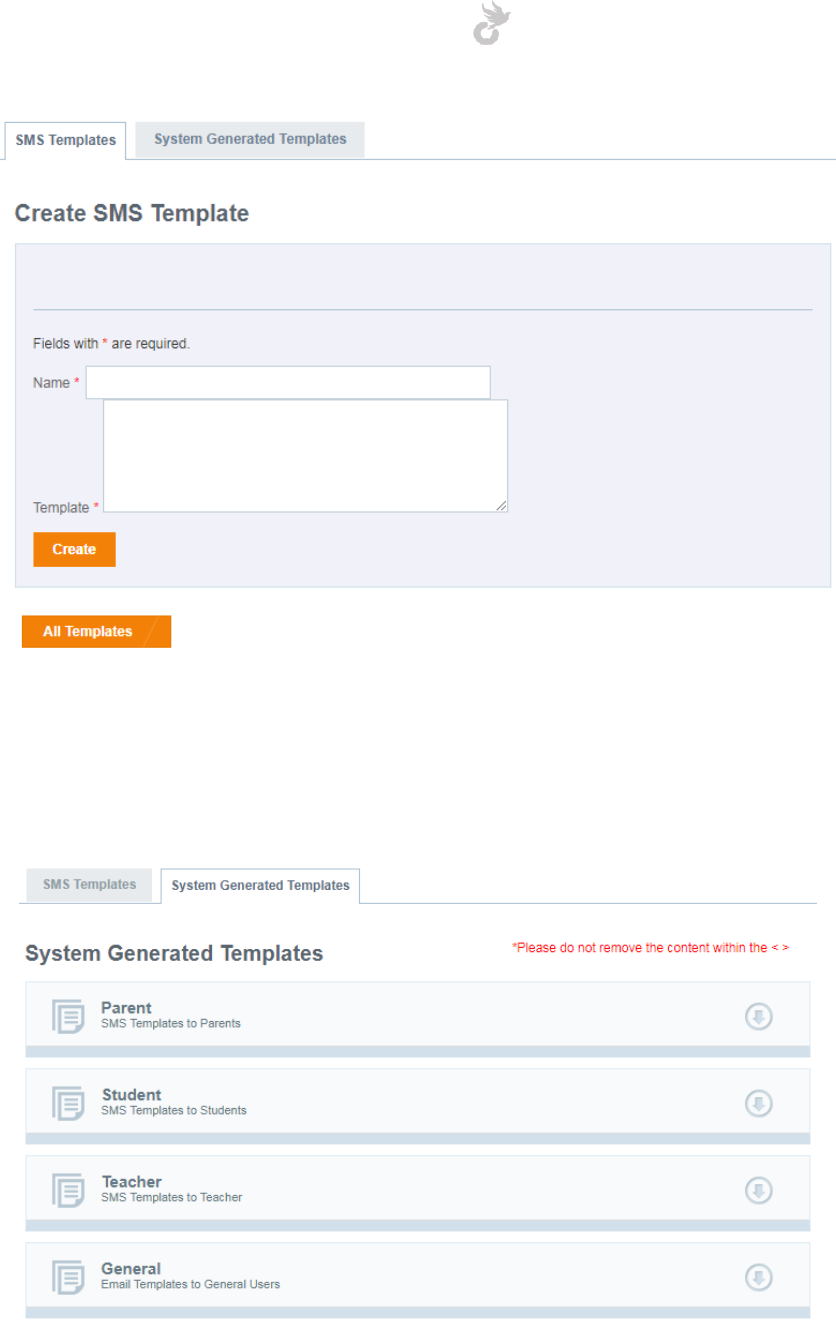
Open-School 2.6.5 Administrator Manual
259
In the form that follows enter a name and content for your template. Click the ‘Create’ button
once you are done to save changes.
To switch to System generated templates, click the tab on top.
Click on the tab for a user to display all the default templates for it.
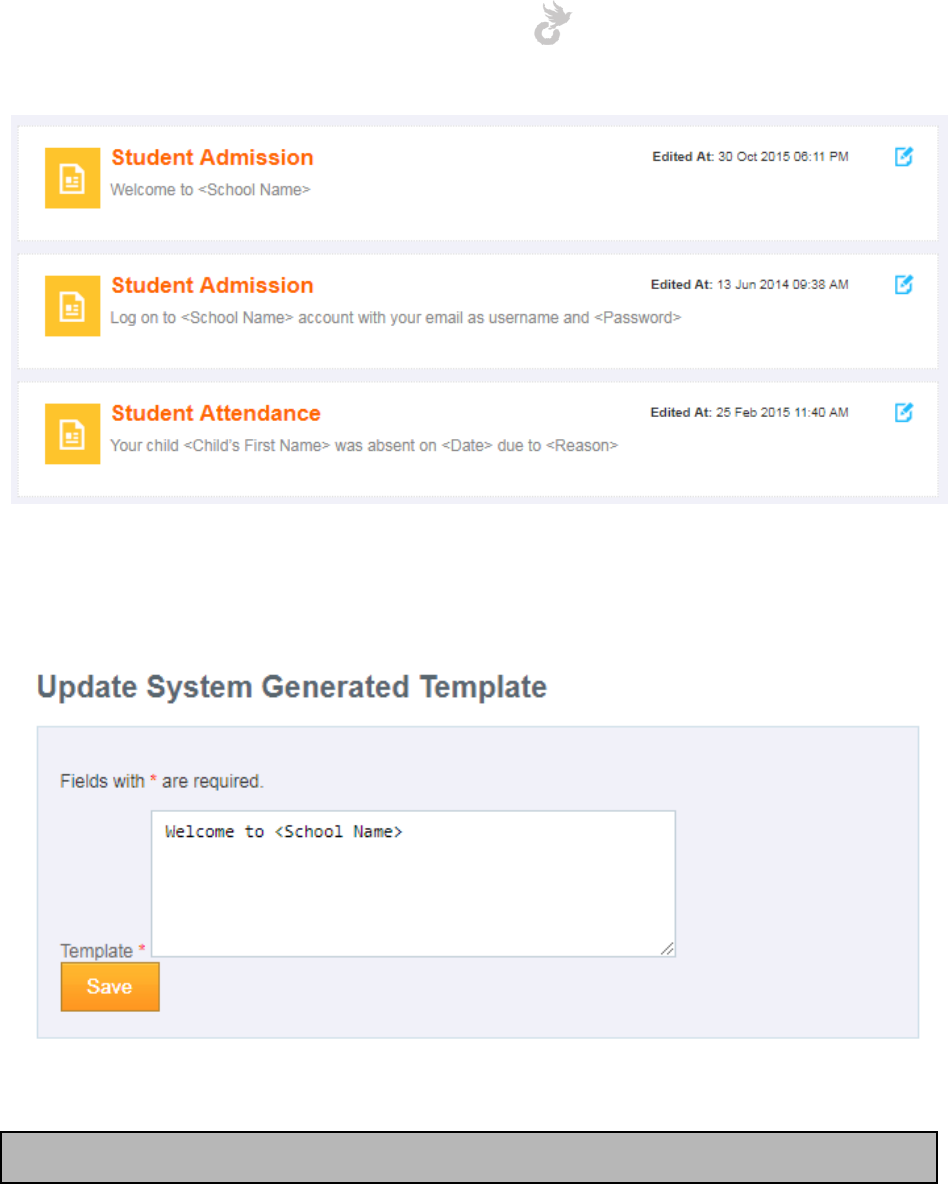
Open-School 2.6.5 Administrator Manual
260
The name and content of the templates are displayed here. You can use the edit icon for each
to start editing it.
Note: Do not change values encoded in < >. This will affect the sending of the template.
Click the ‘Save’ button after editing the template.
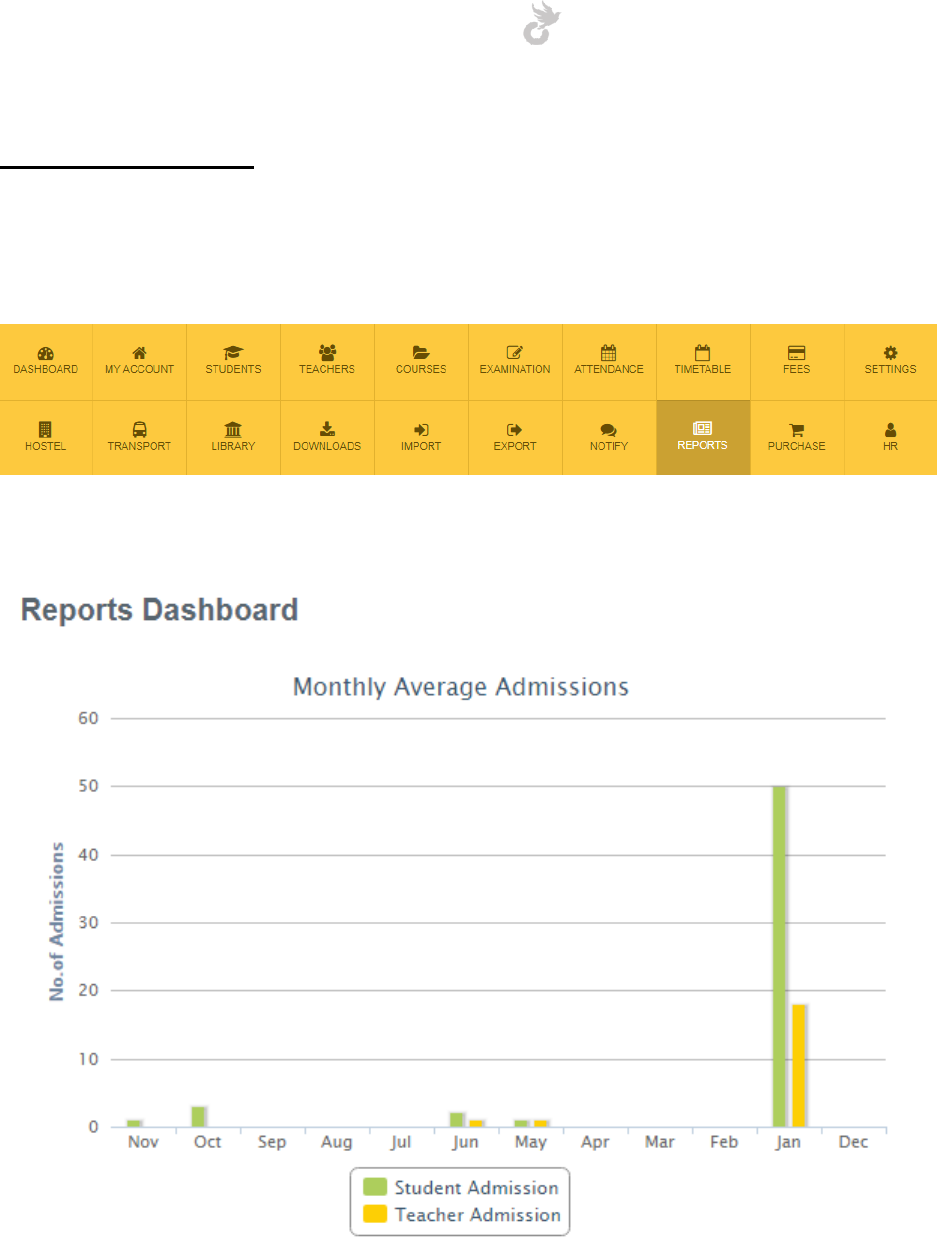
Open-School 2.6.5 Administrator Manual
261
19. REPORTS
The Reports Module gives you the ability to extract examination and attendance reports for
students and attendance reports for teachers.
A graphical chart shows the average admissions in the dashboard of the reports module.
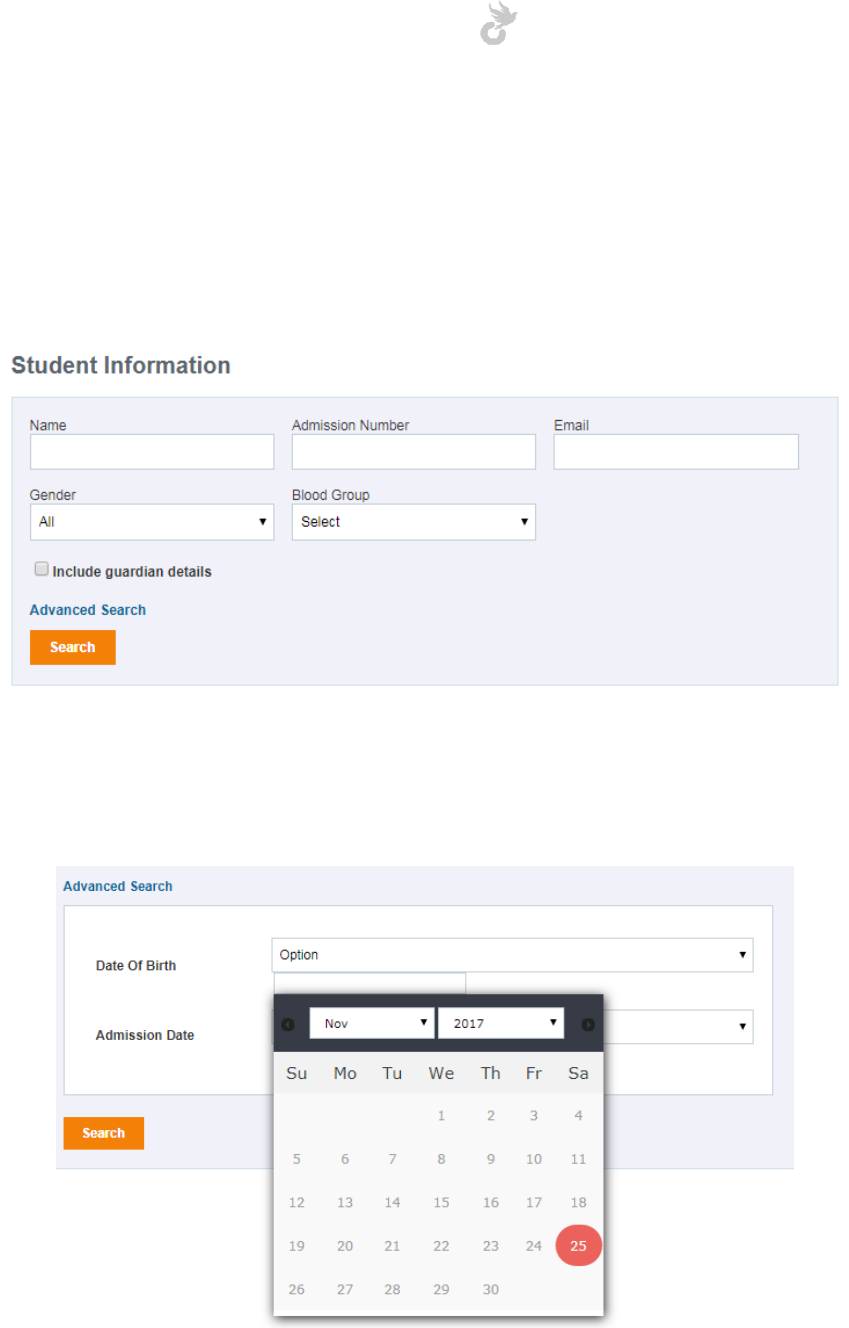
Open-School 2.6.5 Administrator Manual
262
19.1 Advanced Report
The advanced report option fetches student data based on different parameters such as name,
admission number, email, gender, date of admission range etc. To access the advanced report
feature click the ‘Advanced Report’ link in the left side menu.
Enter values for any of the fields shown in the image above and click the ‘Search’ button to
fetch the data. Click on the ‘Advanced Search’ link to view options for searching using date
ranges.
Results can be generated as a PDF using the ‘Generate PDF’ button and then printed.
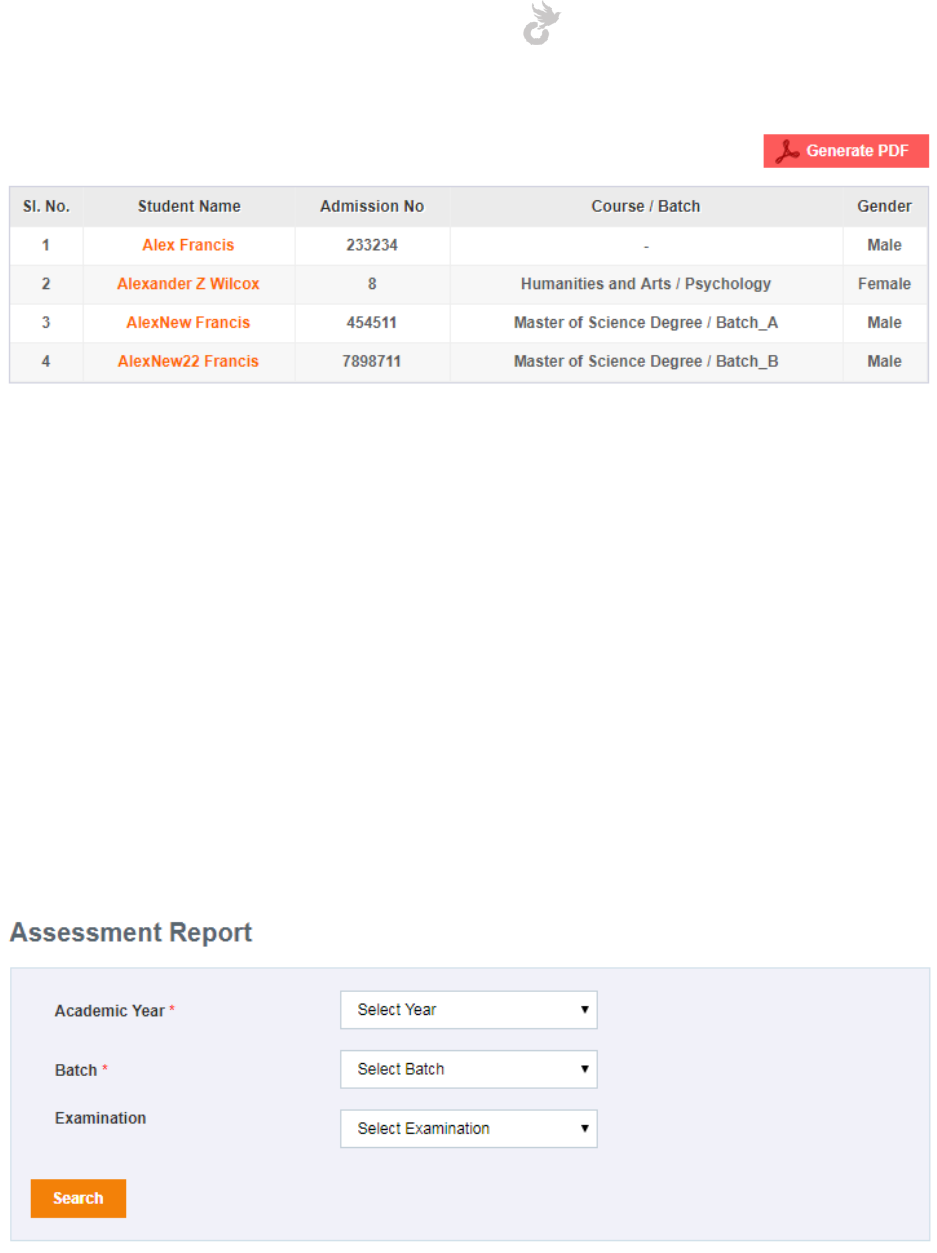
Open-School 2.6.5 Administrator Manual
263
Click on a student’s name to view his/her profile.
19.2 Assessment Reports
Examination reports can be extracted batchwise or even individually for each student. Semester
wise reports are also available.
19.2.1 Batch Assessment Report
The batch assessment report option displays examination reports batchwise. Click on the ‘Batch
Assessment Report’ link in the left side menu to start searching.
Choose the required academic year, a batch under it and the examination related to the batch,
then click the ‘Search’ button below to view the details.
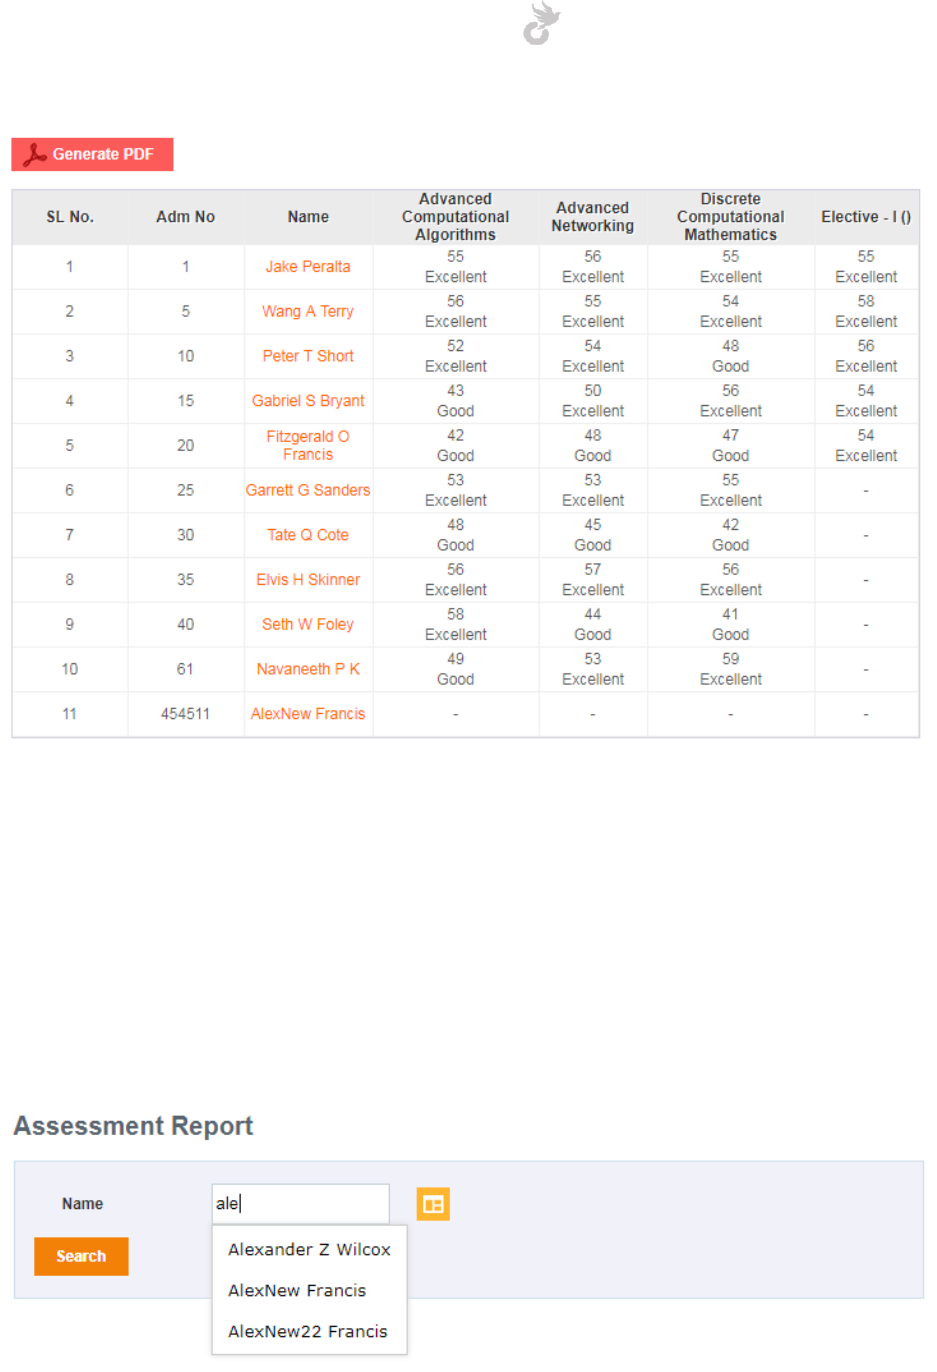
Open-School 2.6.5 Administrator Manual
264
Details of all students in the batch with their respective marks and remarks for each subject for
the chosen examination can be viewed now. You can also save this as a PDF using the ‘Generate
PDF’ button.
19.2.2 Student Assessment Report
The student assessment report option allows you to pull out individual reports for students.
Click on the ‘Student Assessment Report’ link in the left side menu to get started.
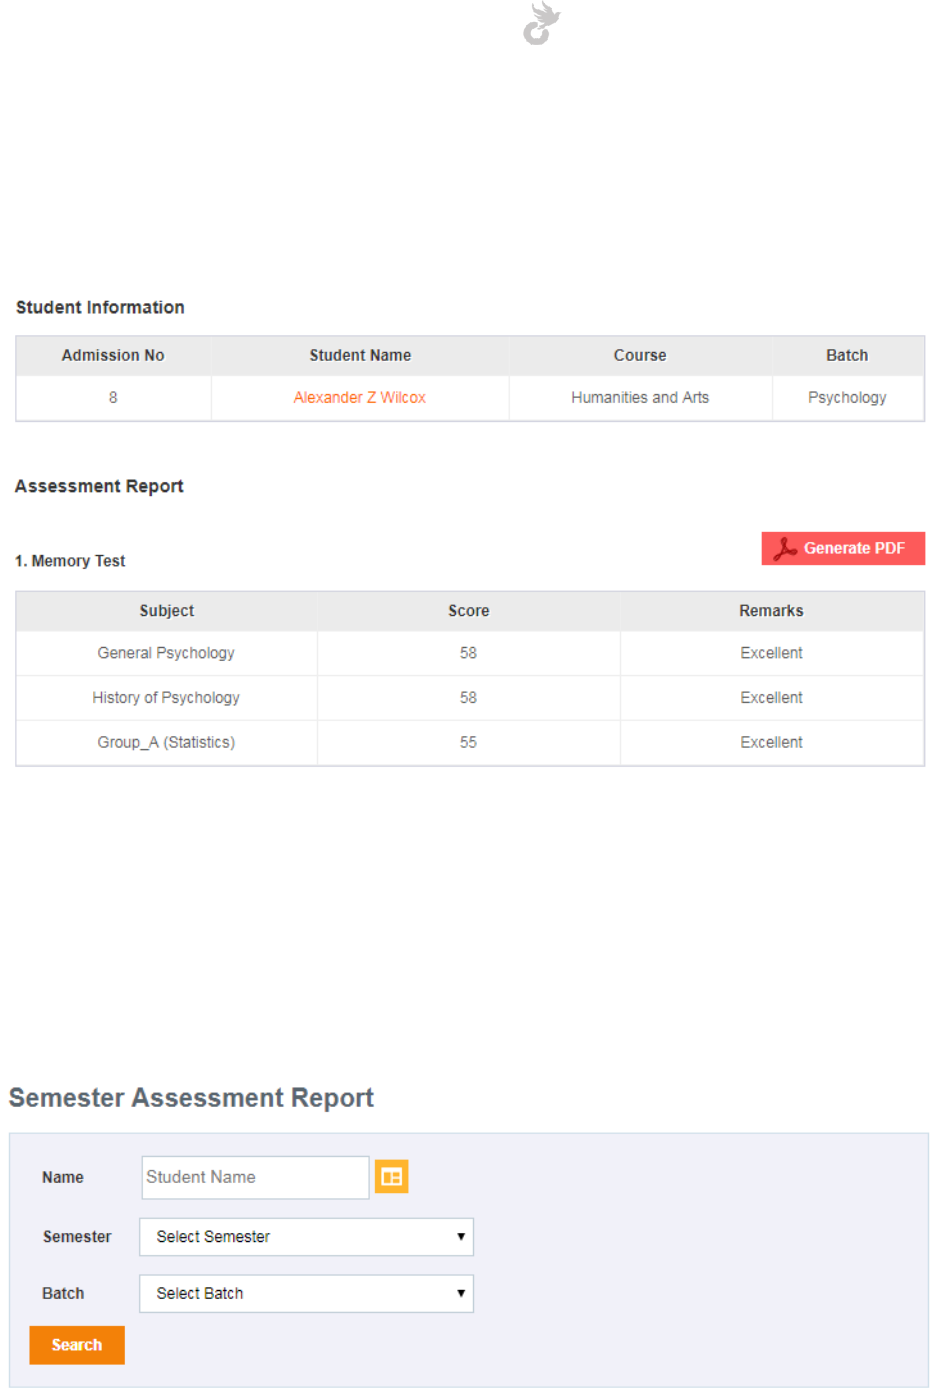
Open-School 2.6.5 Administrator Manual
265
Enter your student’s name in the name field which is an autofill area. You may choose the
student name from the suggestion or even use the app explorer icon to select a student from it.
Once you have chosen your student click the ‘Search’ button to bring up results.
All examination details for the student will be displayed one below the other. You may save
each as a PDF.
19.2.3 Semester Assessment Report
The system also allows you to pull up semester wise examination reports. Click on the
‘Semester Assessment Reports’ link in the left side menu for this option.
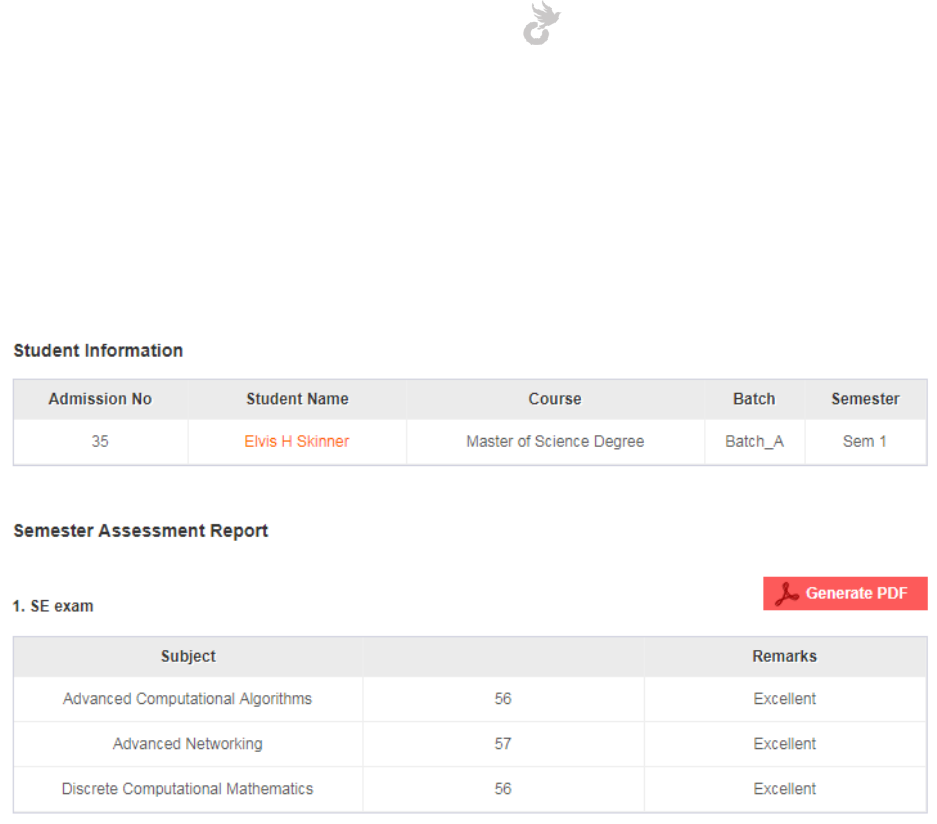
Open-School 2.6.5 Administrator Manual
266
Choose a student by either entering his/her name in the field or using the app explorer. The
semester field will be updated with compatible semesters for that student. Choose a semester
for which you would want to pull examination details for the student.
Select the batch and click the ‘Search’ button to bring up results.
Examination details for the chosen student for the selected semester and batch will be
displayed, you may save the result as a PDF file too.
19.3 Attendance Reports
The attendance reports feature displays daily and subject wise attendance reports for both
teachers and students. There is also an attendance percentage reminder feature which allows
you to pull out records of students belo
19.3.1 Teacher Attendance
The ‘Teacher Attendance’ link in the left side menu allows you to view the daily attendance of
teachers. The search option varies between individual to department wise attendance.
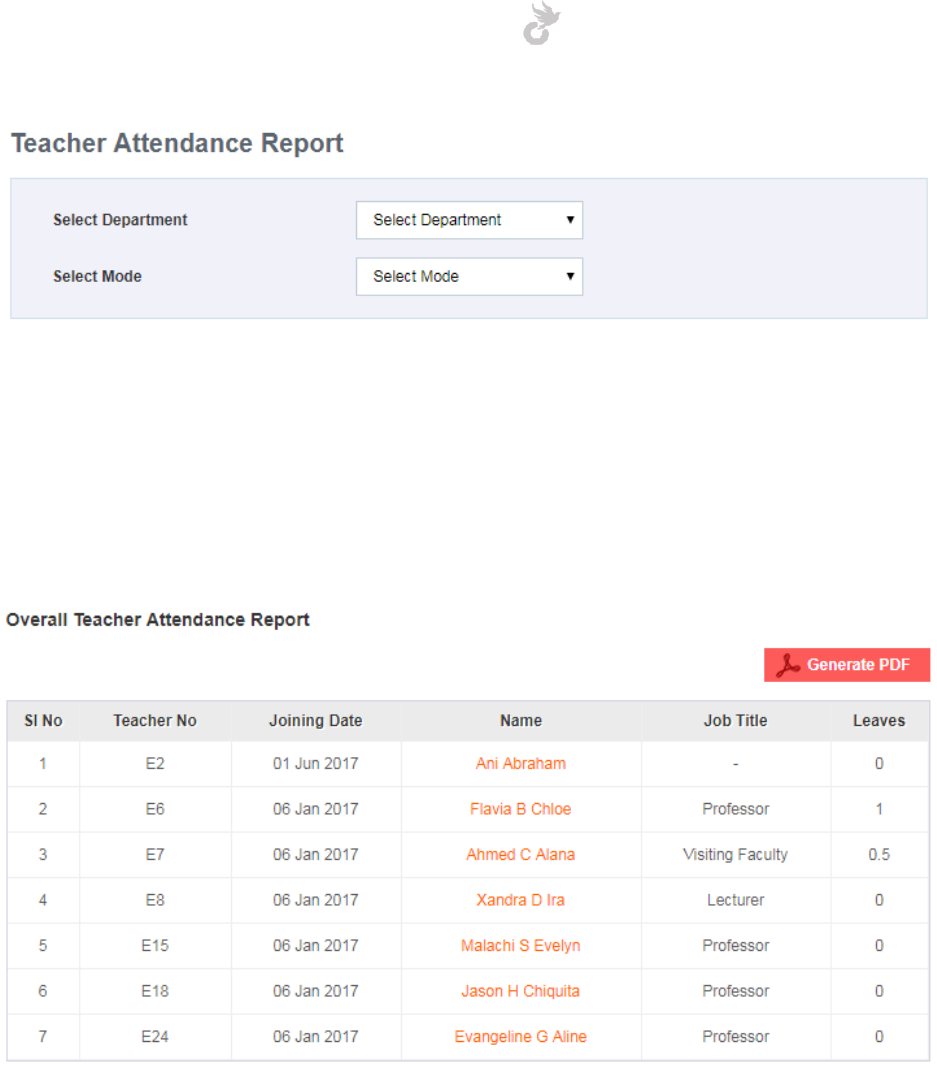
Open-School 2.6.5 Administrator Manual
267
Select a department from the first department. The mode option allows you to browse
different display options,
1. Overall: Displays the total leaves taken for all teachers in the selected department.
2. Yearly: Displays the total leaves taken for the year selected
3. Monthly: Displays the total leaves taken for the month selected
4. Individual: Displays the total leaves taken for the selected teacher
19.3.2 Teacher Subject wise Attendance
Print reports for subject wise attendance of teachers using the ‘Teacher Subject wise
Attendance’ link in the left side menu. This feature allows you to see the number of sessions
missed for a teacher in a particular date range.
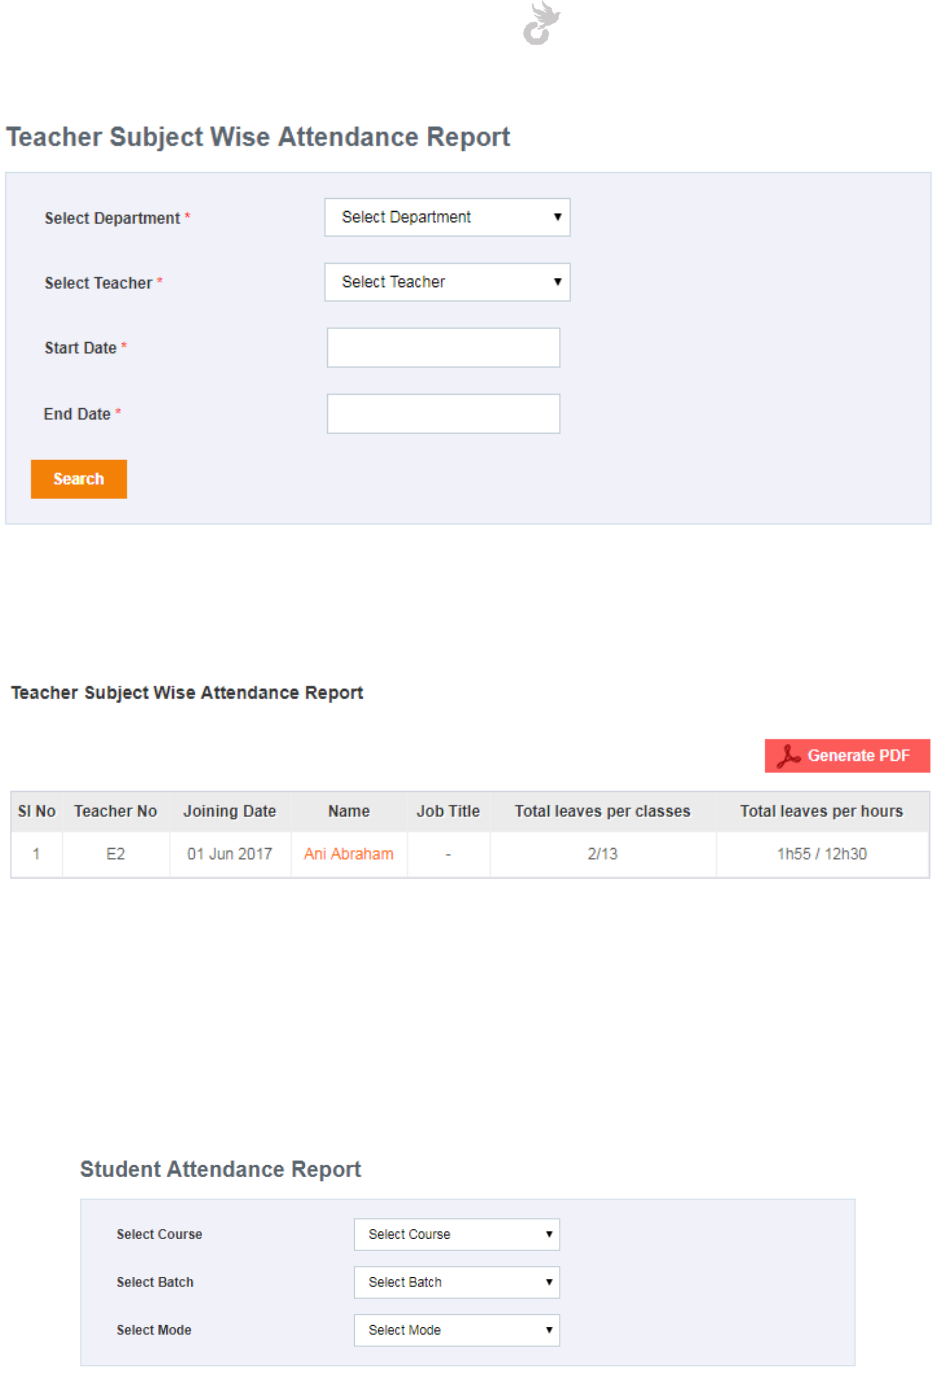
Open-School 2.6.5 Administrator Manual
268
Choose a department and a teacher under it. Then choose a start date and end date to display
details of sessions between this.
You can save this detail as a PDF using the ‘Generate PDF’ button on top.
19.3.3 Student Attendance
Click on the ‘Student Attendance’ link in the left side menu to view student daily attendance
reports.
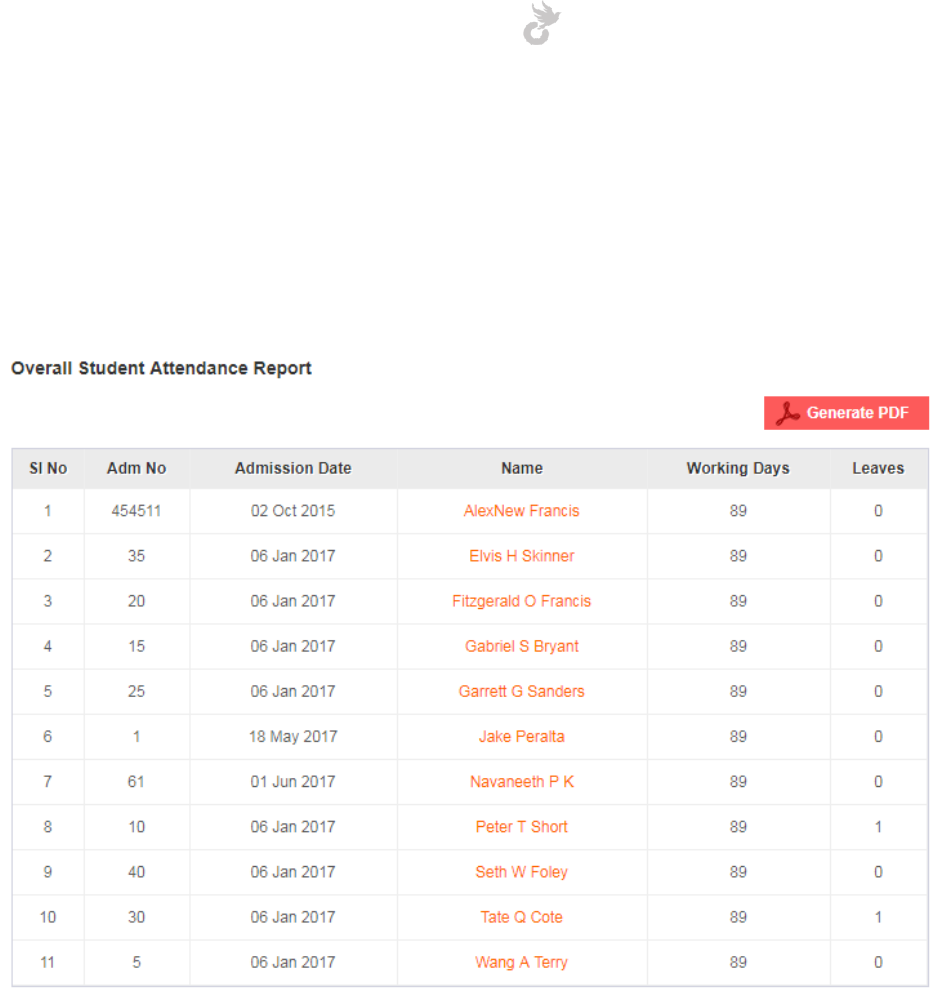
Open-School 2.6.5 Administrator Manual
269
Select a course/batch and then a mode. The mode option allows you to browse different
display options,
1. Overall: Displays the total leaves taken for all students in the selected course/batch.
2. Yearly: Displays the total leaves taken for the year selected
3. Monthly: Displays the total leaves taken for the month selected
4. Individual: Displays the total leaves taken for the selected student
19.3.4 Student Subject wise Attendance
The student subject wise attendance option allows you to view detailed attendance reports for
specific subjects for a student.
It displays the total number of classes for a particular subject in the course/batch the student is
studying and the total sessions missed for it.
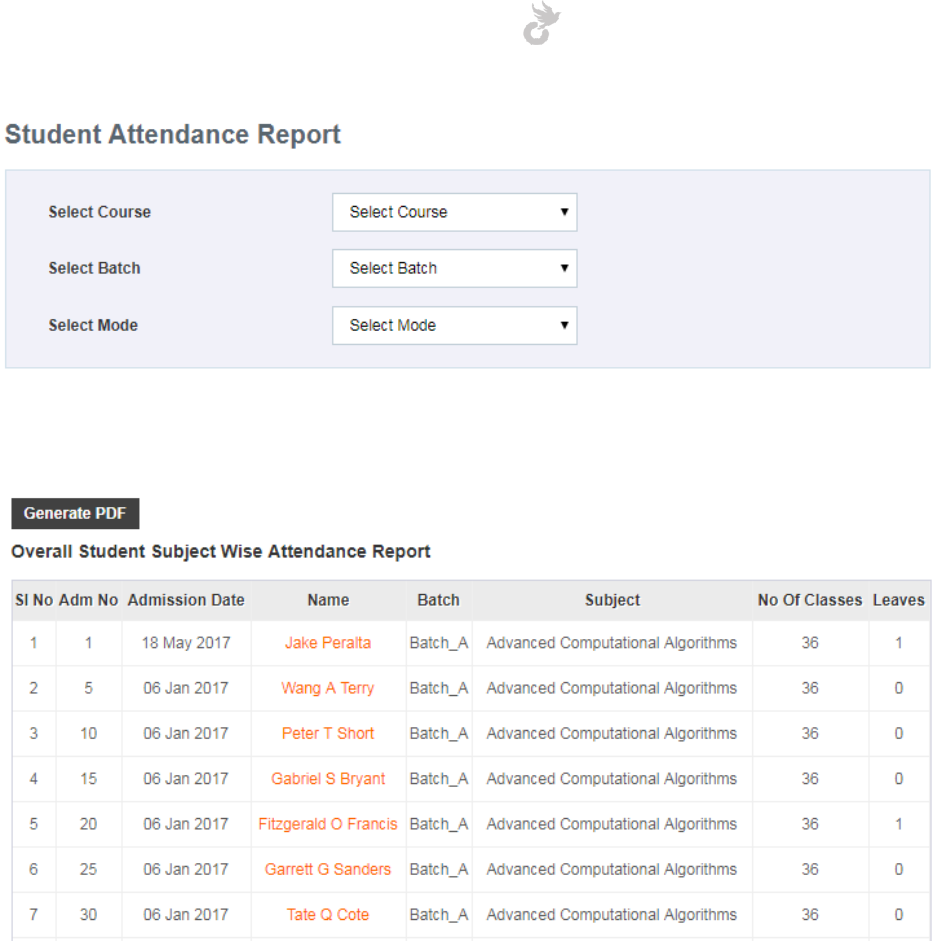
Open-School 2.6.5 Administrator Manual
270
Choose the same options as in student attendance to view subject wise details.
19.3.5 Attendance percentage reminder
Consider you want to send a reminder to parents about their students attendance shortage.
The ‘Attendance percentage reminder’ option in the left side menu allows you to send
customizable email notifications to them based on a cut off percentage of attendance.
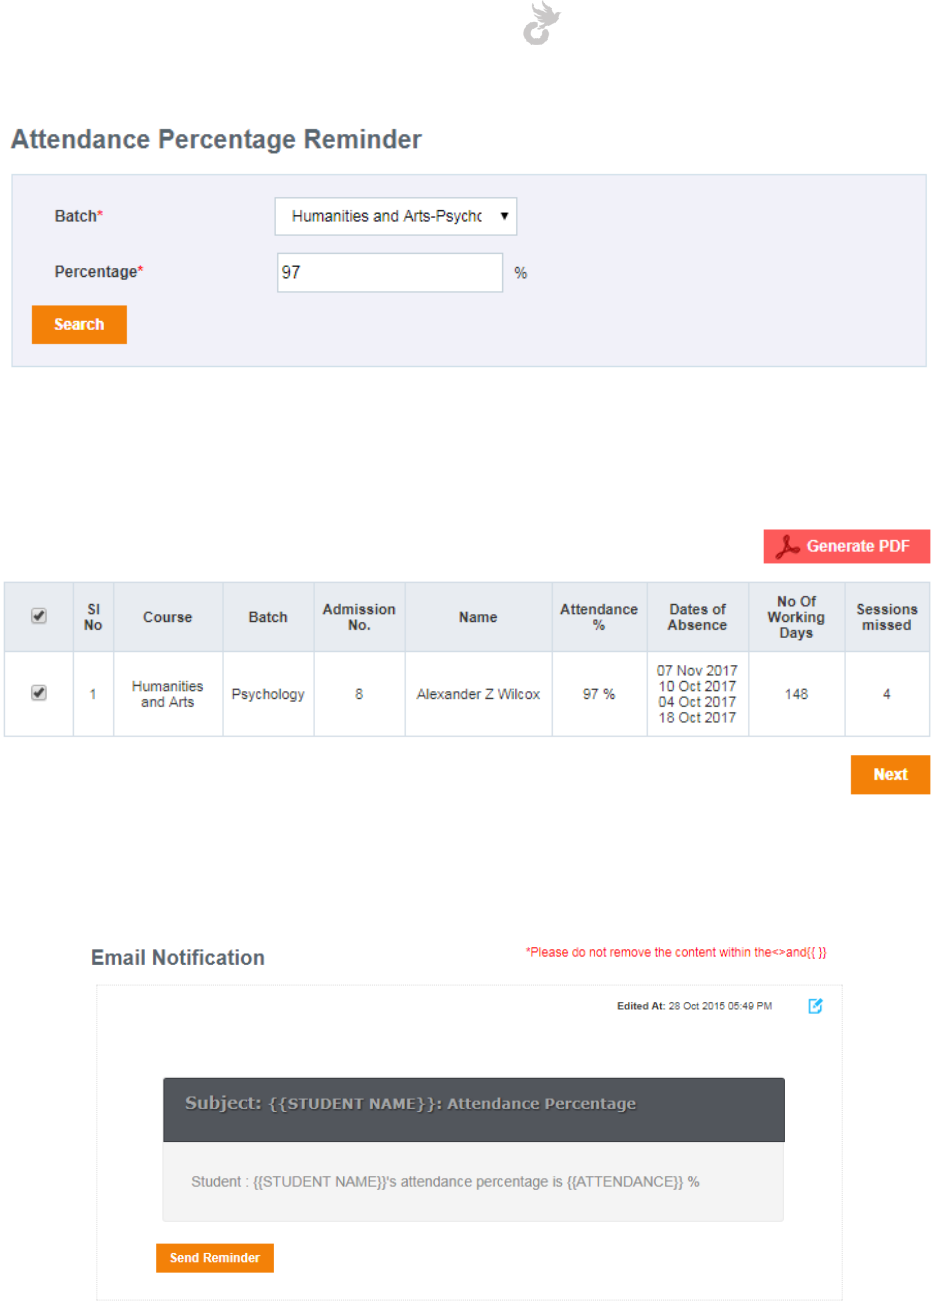
Open-School 2.6.5 Administrator Manual
271
Choose a course/batch and then enter a percentage. Students with or below this percentage of
attendance will be listed once you hit the ‘Search’ button.
Details with dates of absence, total number of working days for the students and number of
sessions missed are displayed here. Check the students you want to send reminders to and hit
the ‘Next’ button below.
You may edit this template before sending. To send the email reminder simply click the ‘Send
Reminder’ button.
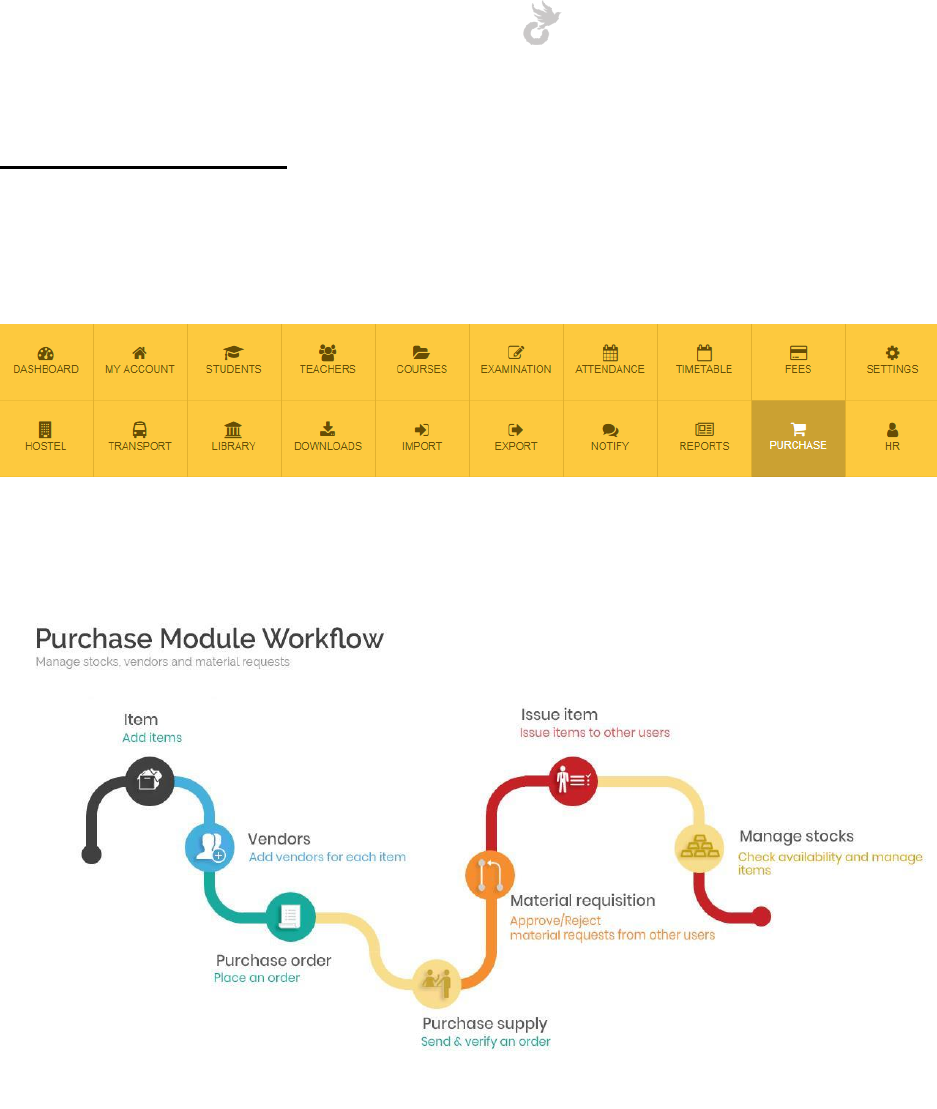
Open-School 2.6.5 Administrator Manual
272
20. PURCHASE
The purchase module is basically like an inventory module. It helps you manage vendors and
items, sales etc in your institution.
The chart below displays the workflow for the purchase module.
20.1 Creating and managing items
Click on the ‘Manage Items’ link in the left side menu to get started with adding items. This will
list the existing items (if any).
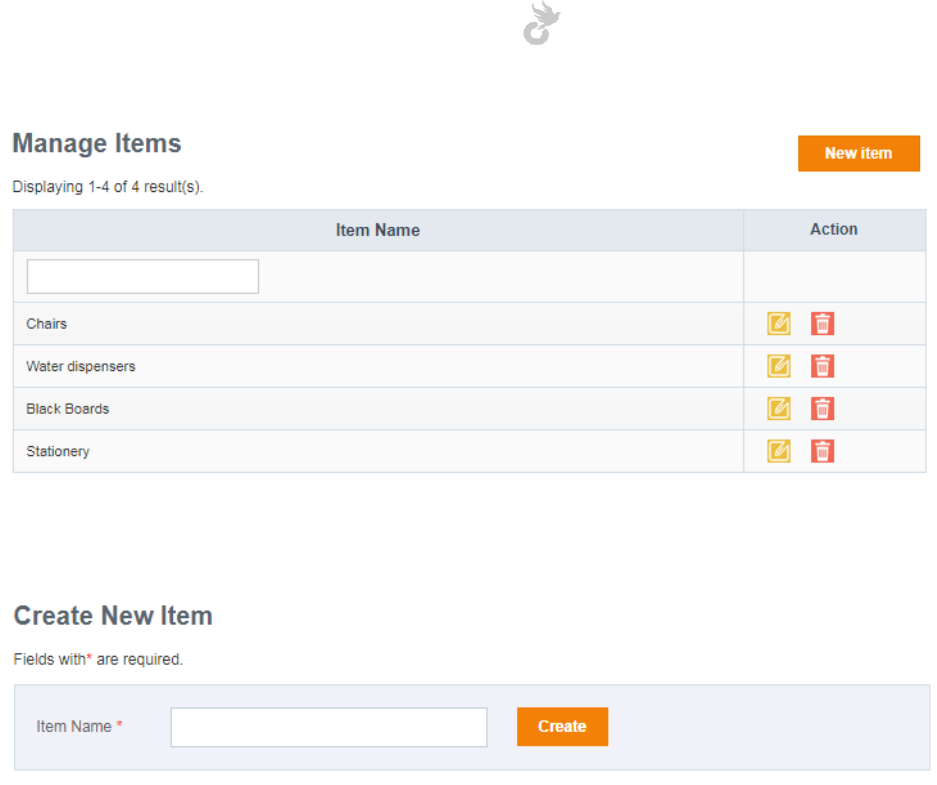
Open-School 2.6.5 Administrator Manual
273
To add a new item click on the ‘New Item’ button on top.
In the form that follows, enter a name for the item and click the ‘Create’ button to save it.
20.2 Adding and managing vendors
Click on the ‘Manage Vendors’ link in the left side menu to add and manage vendors who
supply items for your institution. Their details can be viewed by clicking on their name. A
vendor can also be deleted from here using the delete icon in the action column.
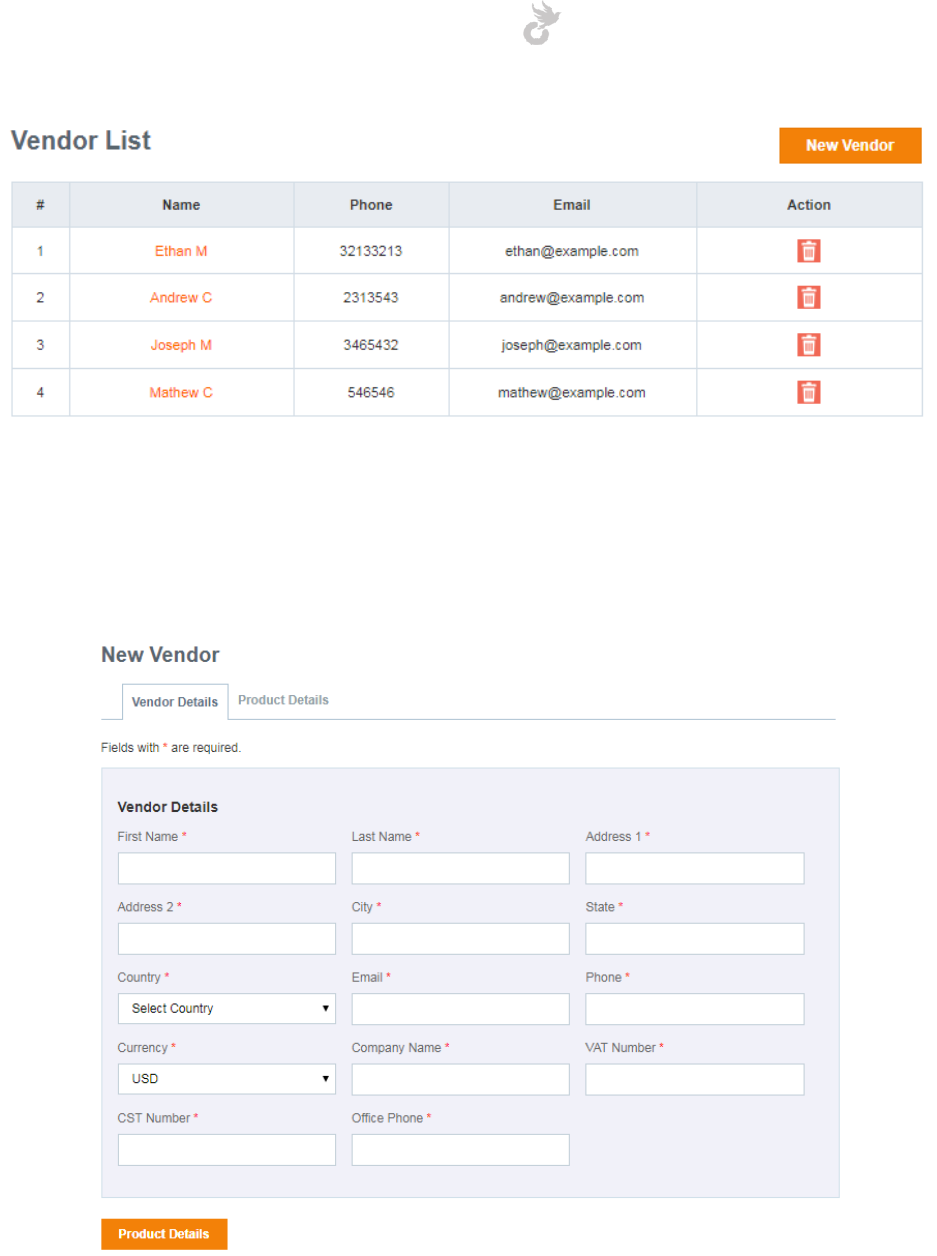
Open-School 2.6.5 Administrator Manual
274
This will bring up the list of existing vendors in the system. To add a new one click on the ‘New
Vendor’ button on top.
The vendor creation process is a two step registration process and involves details of items
supplied etc.
The first step is for vendor details like name, address, number, company name etc
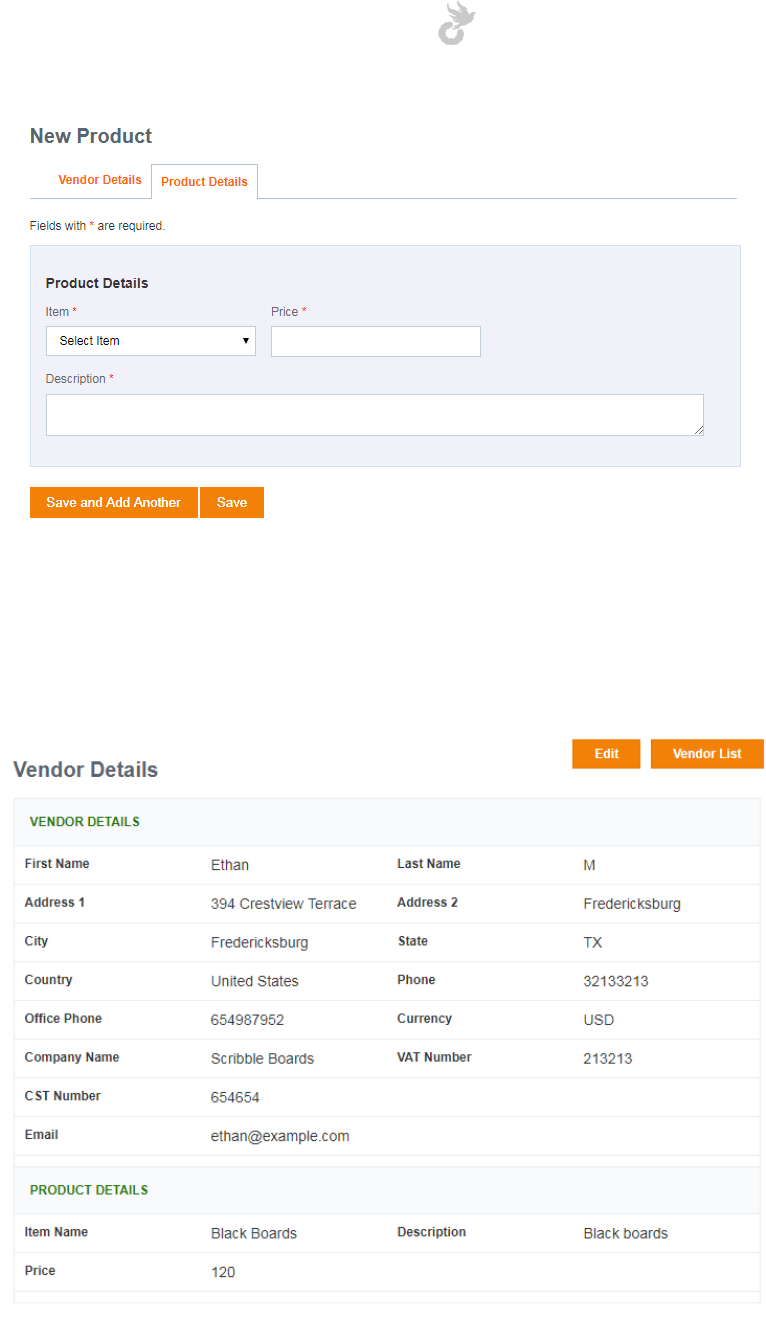
Open-School 2.6.5 Administrator Manual
275
The second step involves choosing the item(s) that the vendor will supply along with details of
price and a description for the item.
You may add multiple items for the same vendor by using the ‘Save and add another’ button.
To finish the registration process click on the ‘Save’ button.
The last step displays the vendor’s profile with all details entered during registration.

Open-School 2.6.5 Administrator Manual
276
20.3 Managing purchase orders
Click on the ‘Purchase Order’ link in the left side menu to get started with orders for items. All
pending orders if any will be listed in the area first.
You may approve/reject orders from here. To send a new order click on the ‘Send Order’
button on top.
You may send orders to vendors from here. An email will be sent to the vendor’s registered
email address with the details of the order. This template can be edited from the Notify
Module > Email > Templates > General.
To place an order,
1. Select an item
2. Select a vendor who supplies the item you chose
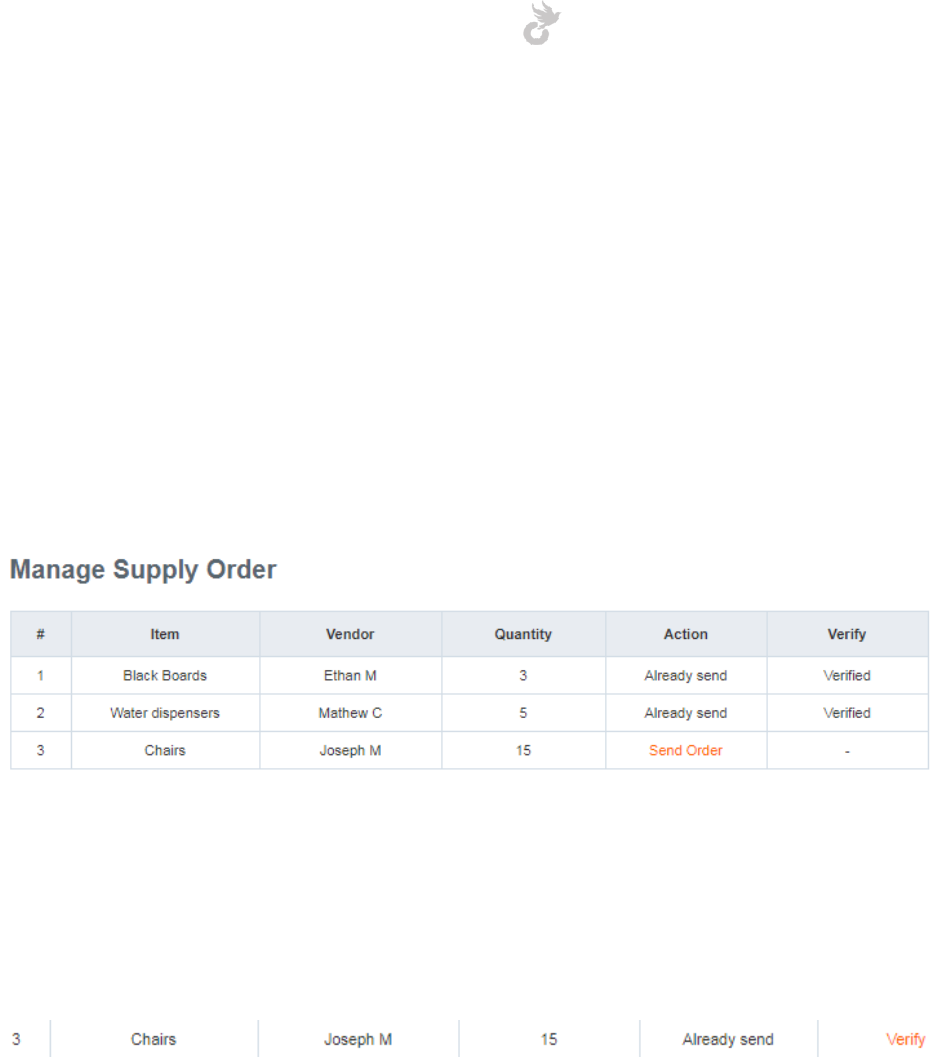
Open-School 2.6.5 Administrator Manual
277
3. Enter the quantity of items needed
Click on ‘Create’ to place the order and send the mail to the vendor.
Once you have placed an order you will be able to see it in the list of orders on the Manage
Purchase order page. Click on Approve to be able to add the items to your stock.
20.4 Managing supply orders
After you have approved a purchase order, it will be listed in the purchase supply page. To
access this area click on the ‘Purchase Supply’ link in the left side menu.
Here you will be able to see the orders approved in the Manage Purchase Orders area. The first
step is to send the order. This can be done by clicking the ‘Send Order’ link under the action
column for the required order.
An order can be verified after it has been sent.
Click on the ‘Verify’ link to verify an order. This will add the item and quantity requested to the
stock area. You can then view the details under ‘Manage Stock’.
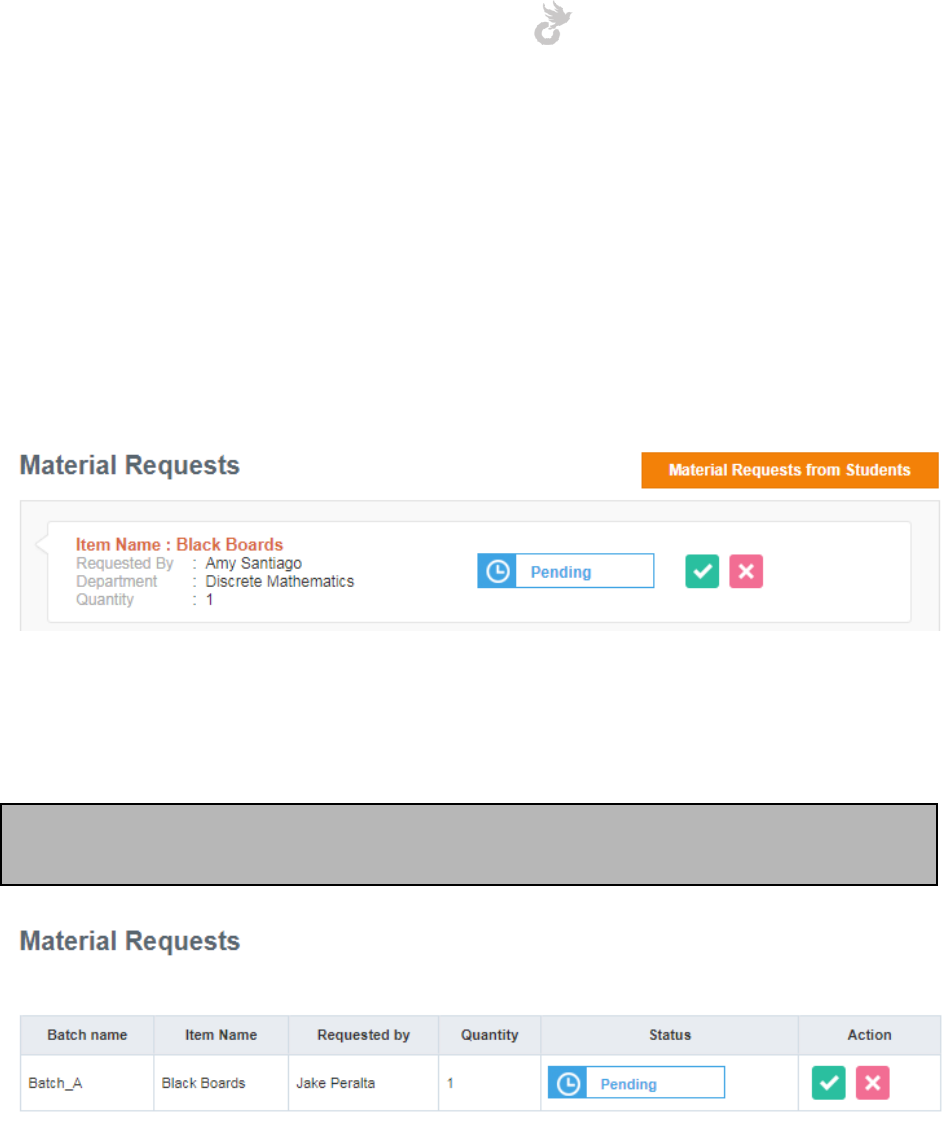
Open-School 2.6.5 Administrator Manual
278
20.5 Material Requisition
After you have placed and verified orders of items to your stock other users can start
requesting for the materials/items. Requests made by students have to be approved by
teachers first before it is displayed in the admin side.
Click on the ‘Material Requisition’ link in the left side menu to view requests from all users
except students.
You may approve/disapprove requests from here. To see requests from students click on the
‘Material Requests from Students’ button on top.
Note: Requests from students can be viewed in the admin portal only if it is approved by their
class teacher.
The process isn’t complete once you approve the request. After approval you need to issue the
item so that it is processed. The quantity requested will be deducted from the total stock
available for the requested item.
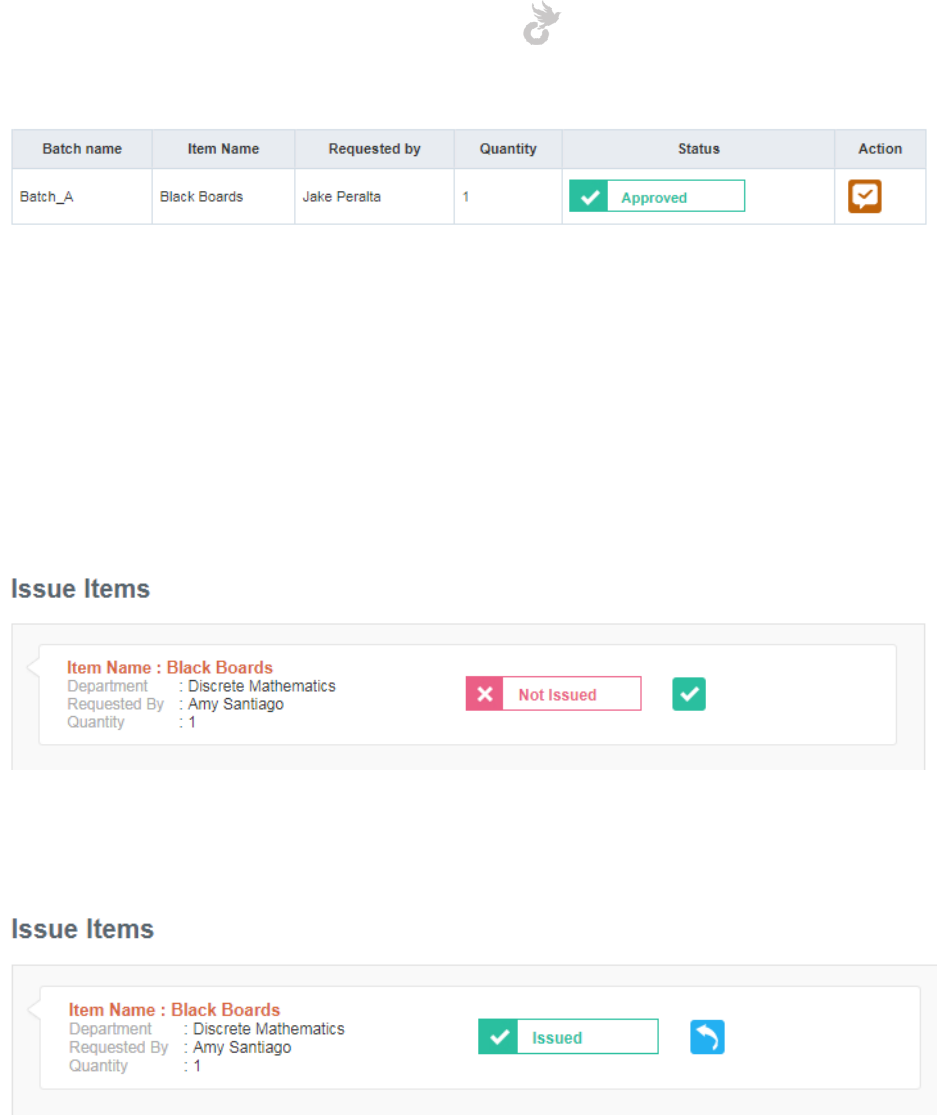
Open-School 2.6.5 Administrator Manual
279
Click on the ‘Issue’ button under the action column to complete the process. This can also be
done from the ‘Issue Item’ section.
20.6 Issue Items
All approved requests will be displayed under the Issue Item area. To access this click on the
‘Issue Item’ link in the left side menu.
All request and their statuses can be seen here. To issue an item simply click the icon
corresponding to the request. The quantity will be automatically reduced in stocks.
You may also return an item that has already been issued using the ‘Return’ button next to it.
This will bring up a pop-up as shown below.
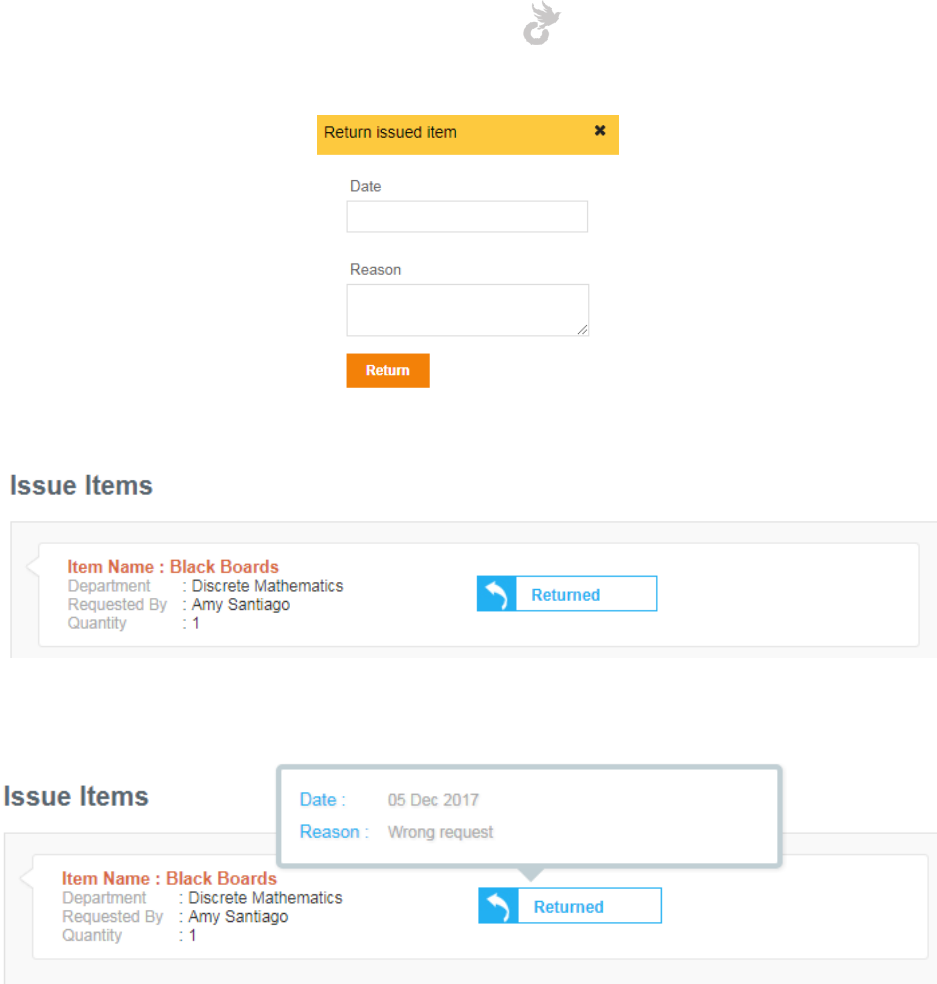
Open-School 2.6.5 Administrator Manual
280
Select your date and enter a reason. Click on the ‘Return’ button below the form to finish the
return process.
Hover your cursor over the status box to view the saved date and reason for return.
20.7 Managing stocks
To view all items purchased, details of quantity available, details of items issued etc click the
‘Manage Stock’ link in the left side menu.
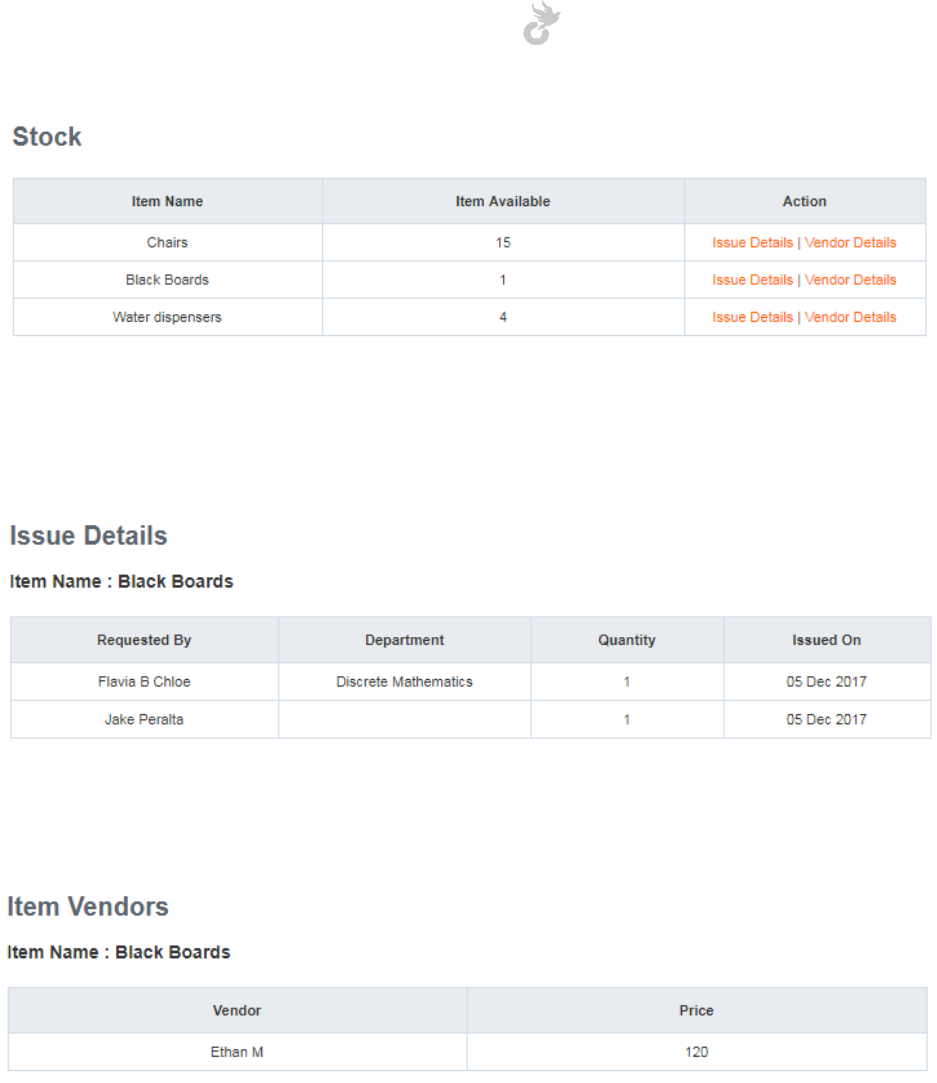
Open-School 2.6.5 Administrator Manual
281
All items that have been purchased and verified will be displayed here along with the available
quantity. Click on the ‘Issue Details’ link in the action column against an item to see all issued
material requests for it.
Click on the ‘Vendor Details’ link against an item to see details of the vendor supplying it and
price per unit.
20.8 Manage Sales
Admins can directly issue items to users in the system rather than them requesting for it. This
can be done from the Manage Sale area. To view this click on the ‘Manage Sale’ link in the left
side menu.
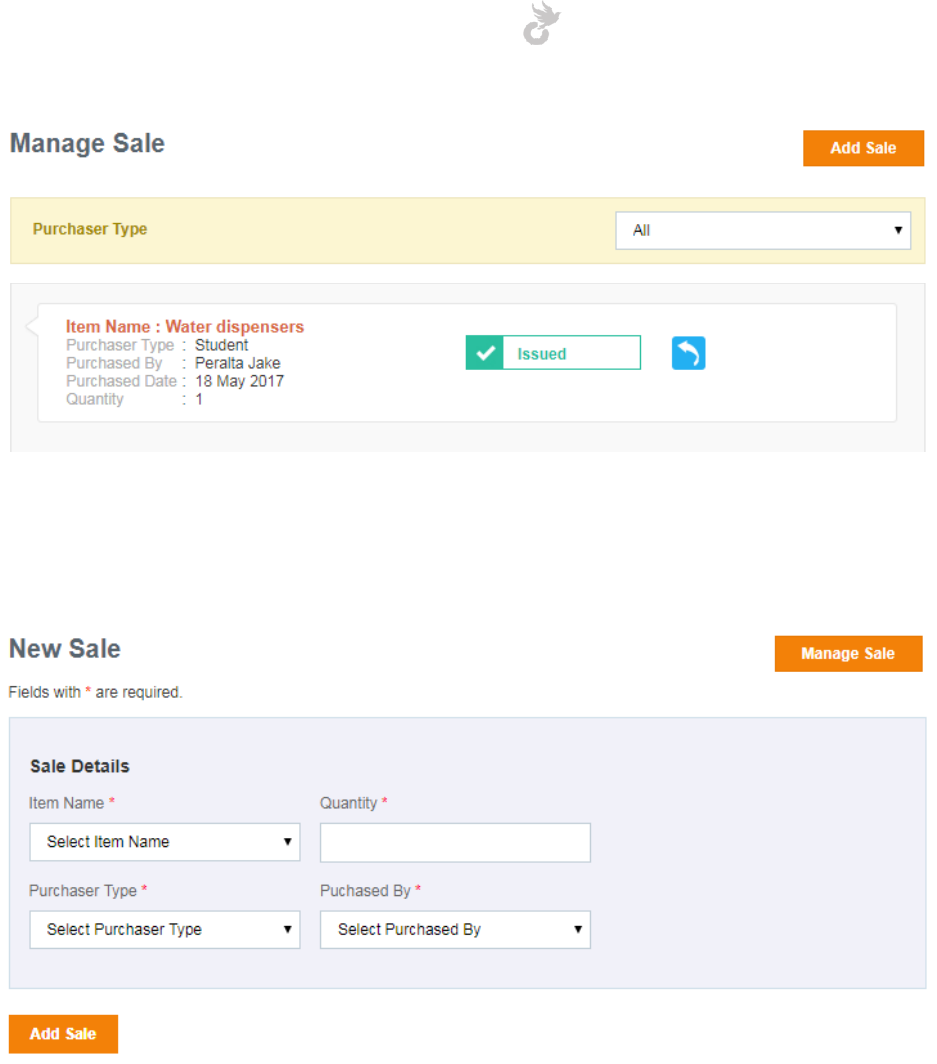
Open-School 2.6.5 Administrator Manual
282
Details of items issued can be viewed here. They can also be returned using the return button.
To add a new sale click on the ‘Add Sale’ button on top.
Enter the following details,
1. Item
2. Quantity
3. Purchaser type (student, parent or teacher)
4. Purchase by (names will be listed once the purchaser type is selected)
Click on the ‘Add Sale’ button to finish the sale process.
Sales reports can be generated using the ‘Sale Report’ link in the left side menu.
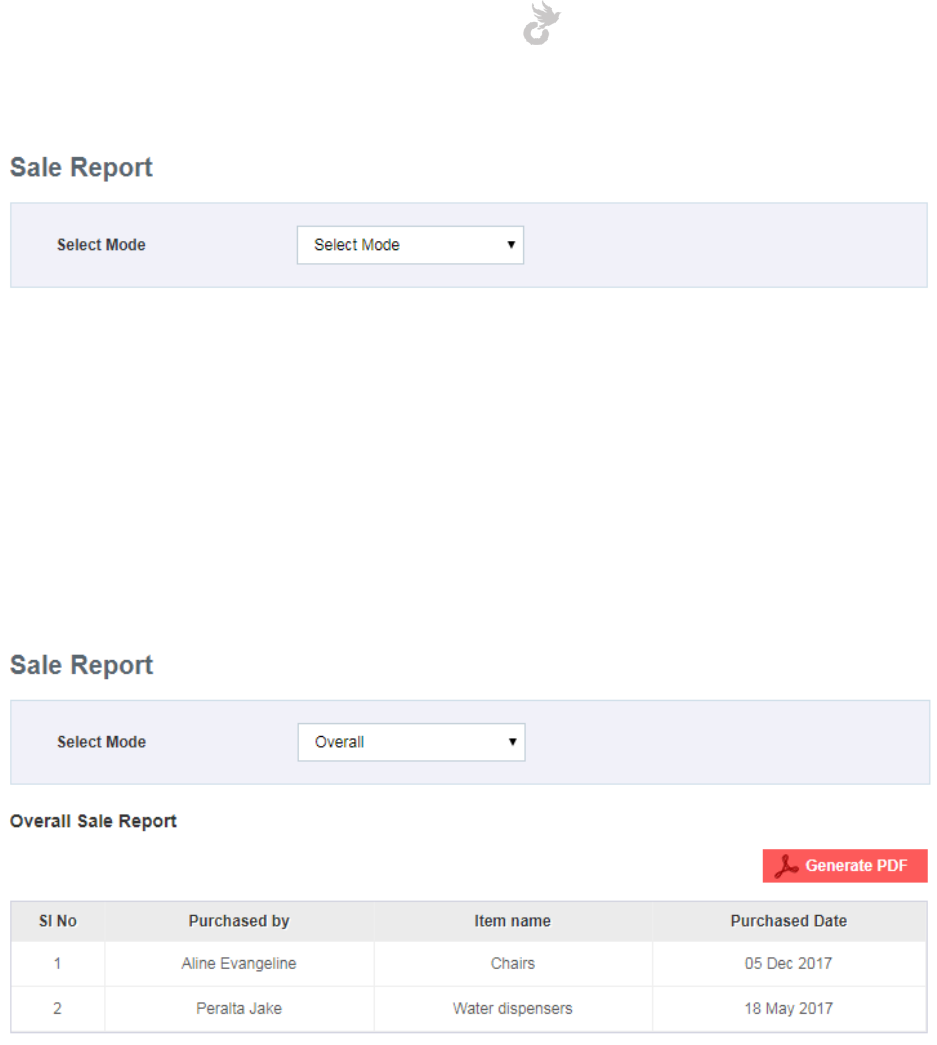
Open-School 2.6.5 Administrator Manual
283
The mode can be,
1. Overall
2. Yearly
3. Monthly
4. Daily
On selection of a mode, all sale details for the chosen period will be displayed. You may also
generate this as a PDF file that can be printed.
Open-School 2.6.5 Administrator Manual
284
21. HR
The HR module allows you to create non-teaching staff, manage leave requests for teaching
and non-teaching staff, manage salary details and generate salary slips for all staffs in your
institution.
21.1 Managing non-teaching staffs
You can create non-teaching staffs in the application based on user roles (refer User Roles in
Settings Module). These users are similar to creating custom users, but you have the ability to
manage their salary too. They will be assigned specific modules based on the role you have
created.
Note: Make sure you have created the necessary user roles first before attempting to create a
non-teaching staff.
21.1.1 Creating a new Staff
Click on the ‘Create Staff’ link in the left side menu to create a new staff.
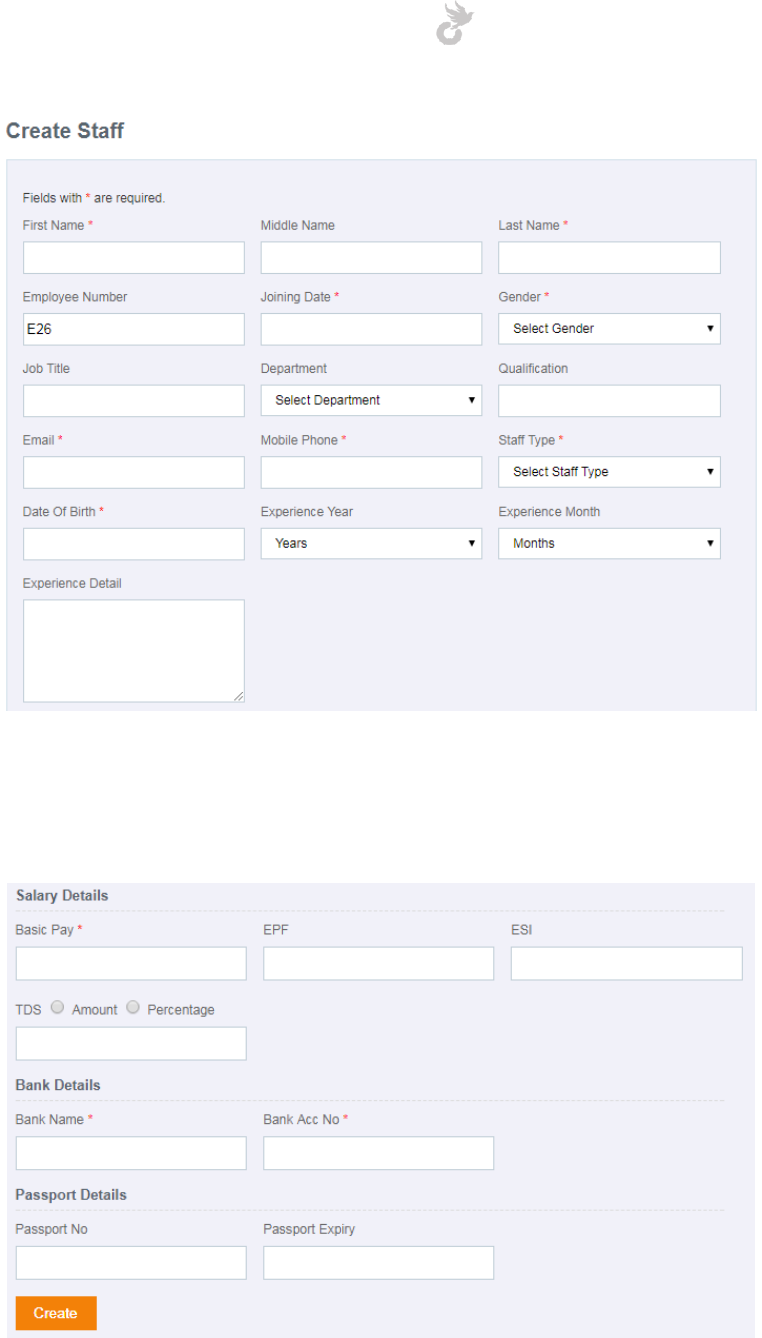
Open-School 2.6.5 Administrator Manual
285
Enter all the details here, the section below covers the salary details for the staff. The ‘Staff
Type’ drop-down lists the custom user roles you have created, select one to assign it to the staff
you create.
The salary details entered here will be used to help generate the salary slips for the staff. Click
on the ‘Create’ button to register the staff.
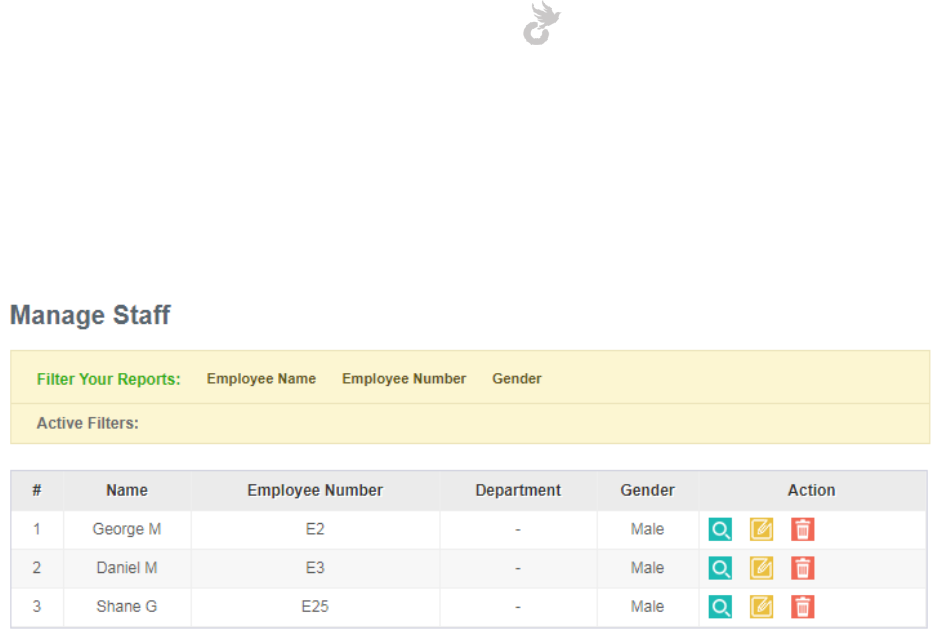
Open-School 2.6.5 Administrator Manual
286
21.1.2 Managing your staffs
Click on the ‘Manage Staff’ link in the left side menu to view the list of all your non-teaching
staffs.
You may view, edit and delete a staff from here using the respective icons under the action
column.
Filters are available to search for specific employees based on different criteria.
21.2 Managing leaves
Leave types and requests for teachers as well as non-teaching staff are managed in the HR
module. The first step is to create leave types.
21.2.1 Create and manage leave types for employees
Click on the ‘Leave Types’ link in the left side menu to start creating and managing leave types
in the system.
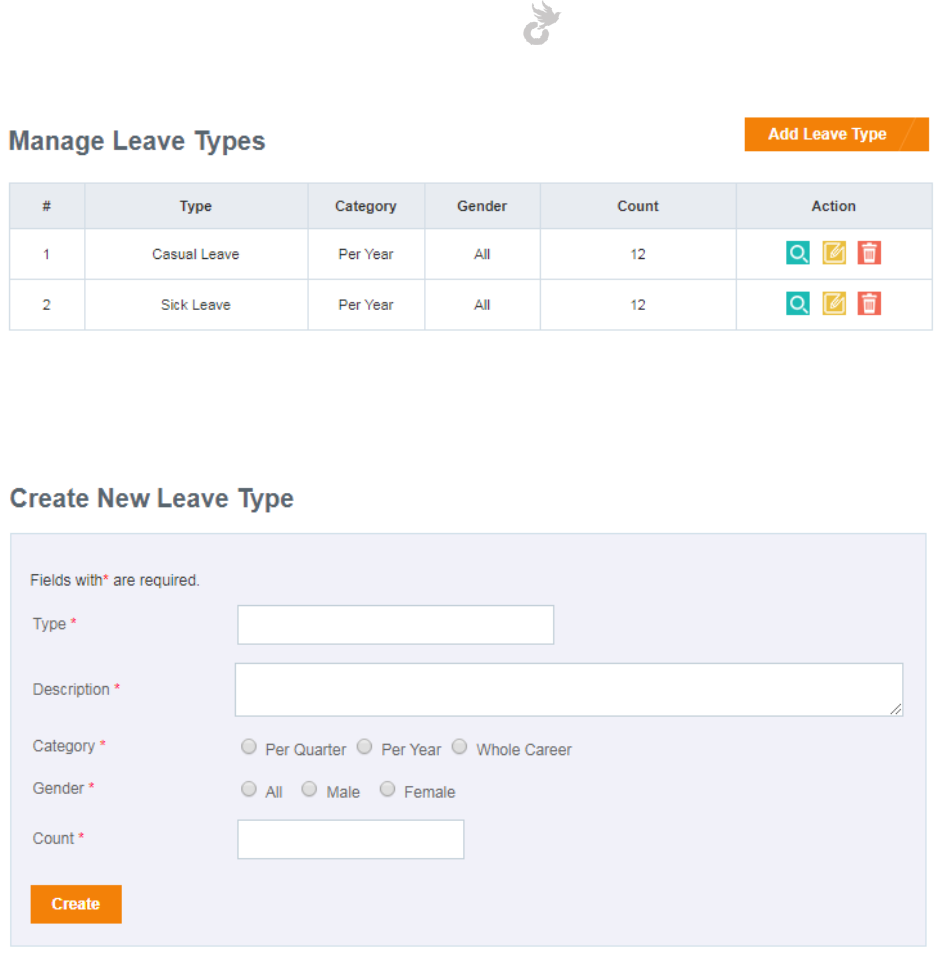
Open-School 2.6.5 Administrator Manual
287
Existing leave types are listed here. To create a new leave type click on the ‘Add Leave Type’
button.
The leave type form contains the following fields,
1. Type: Enter a name for the leave type
2. Description: Details of the leave type goes here
3. Category: Whether the number of leaves for this type is limited to each quarter, year or
the entire career.
4. Gender: Whether the leave type is specific to a particular gender (Eg: Maternity for
females etc)
5. Count: The maximum number of leaves a staff can take for this leave type.
Click the ‘Create’ button once you have entered all details for the leave type. It will then be
displayed in the list of leave types created, where you can view, edit or delete it.
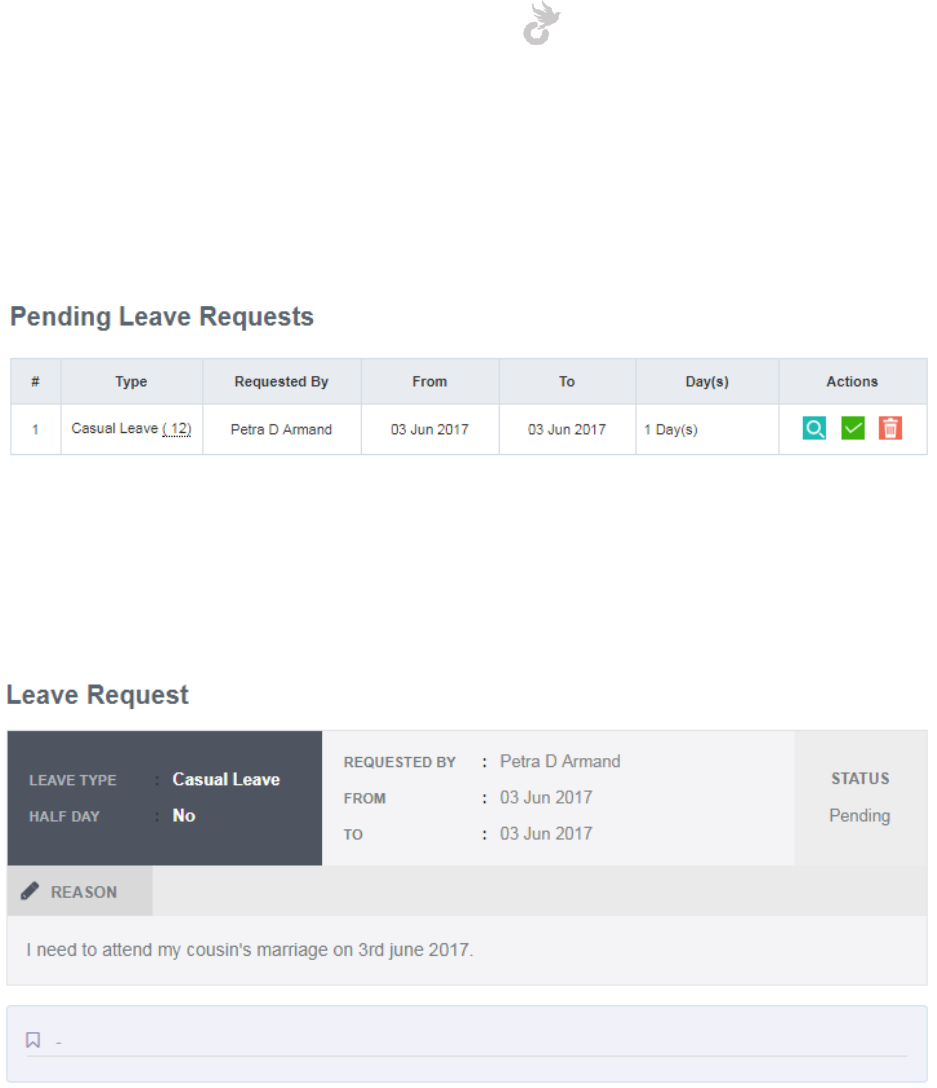
Open-School 2.6.5 Administrator Manual
288
21.2.2 Manage leave requests
Click on the ‘Leave Requests’ link in the left side menu to view all pending leave requests from
your staffs.
The number displayed in parenthesis next to the leave type indicates the remaining number of
leaves that particular staff has for the leave type applied. All details as to who requested the
leave, for which date, the number of days etc are displayed in this list. To view more details
click on the view icon in the actions column.
Use the approve icon to approve the request. You can edit the date for the leave while
approving it. When a leave request is approved the absence is automatically marked in the
attendance register.
You may also reject the leave type by clicking the reject icon in the actions column.
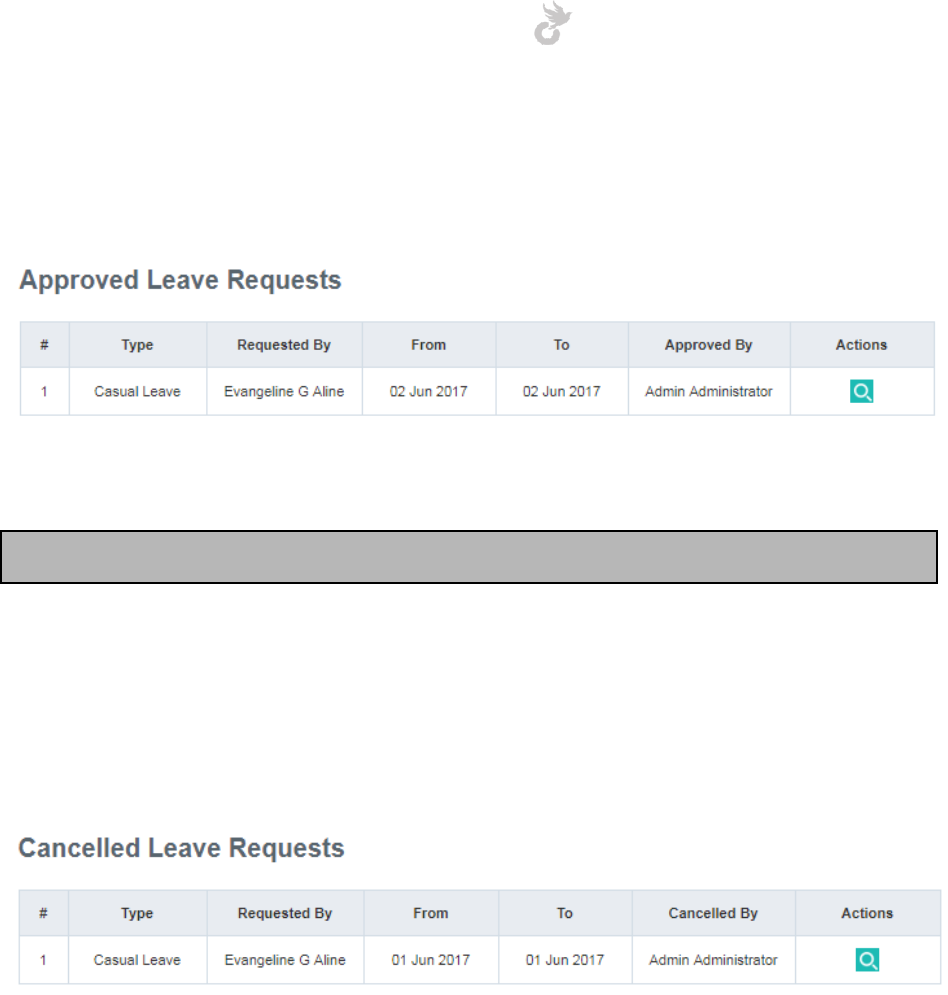
Open-School 2.6.5 Administrator Manual
289
21.2.2 Approved requests
All leave requests that have been approved are listed under the ‘Approved Requests’ area.
Click on the view icon to see details of the leave.
Note: An approved leave can be deleted from the attendance register.
21.2.3 Cancelled requests
All leave requests that have been rejected can be viewed here. A request once rejected cannot
be approved later.
21.3 Salary Management
The salary management section allows you to manage salary details for all you teachers and
non-teaching staffs, generate payslips for them and also pull up salary reports.
21.3.1 Salary Details
Click on the ‘Salary Details’ link in the left side menu to view the list of teachers and staff
registered.
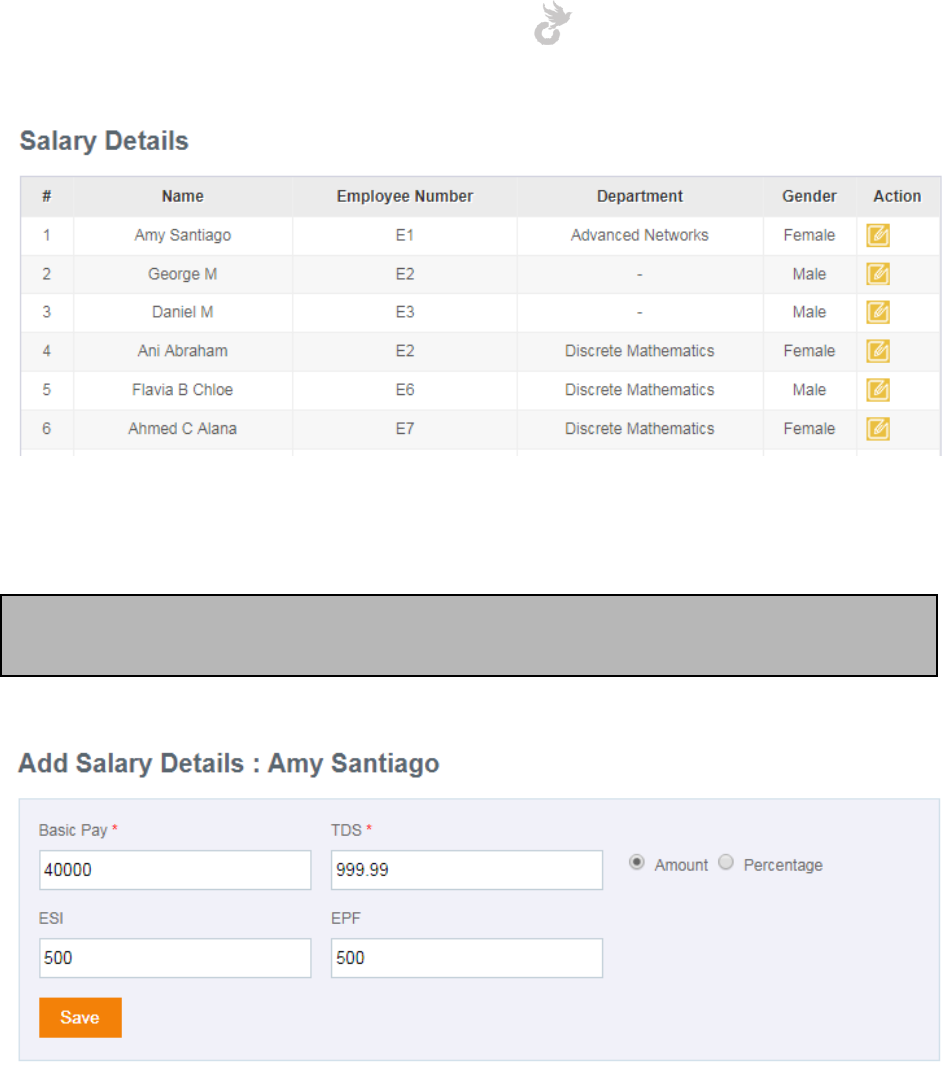
Open-School 2.6.5 Administrator Manual
290
You can use the edit icon in the action column to enter/edit salary details for teachers / staff.
Note: Teachers will not have salary details entered as it is not available in the teacher
registration form. You have to edit and enter it here.
Click on the ‘Save’ button to save changes. These details will be used during payslip generation.
21.3.2 Generate payslips
The ‘Generate Payslip’ link in the left side menu allows you to generate and view payslip details
of your employees.
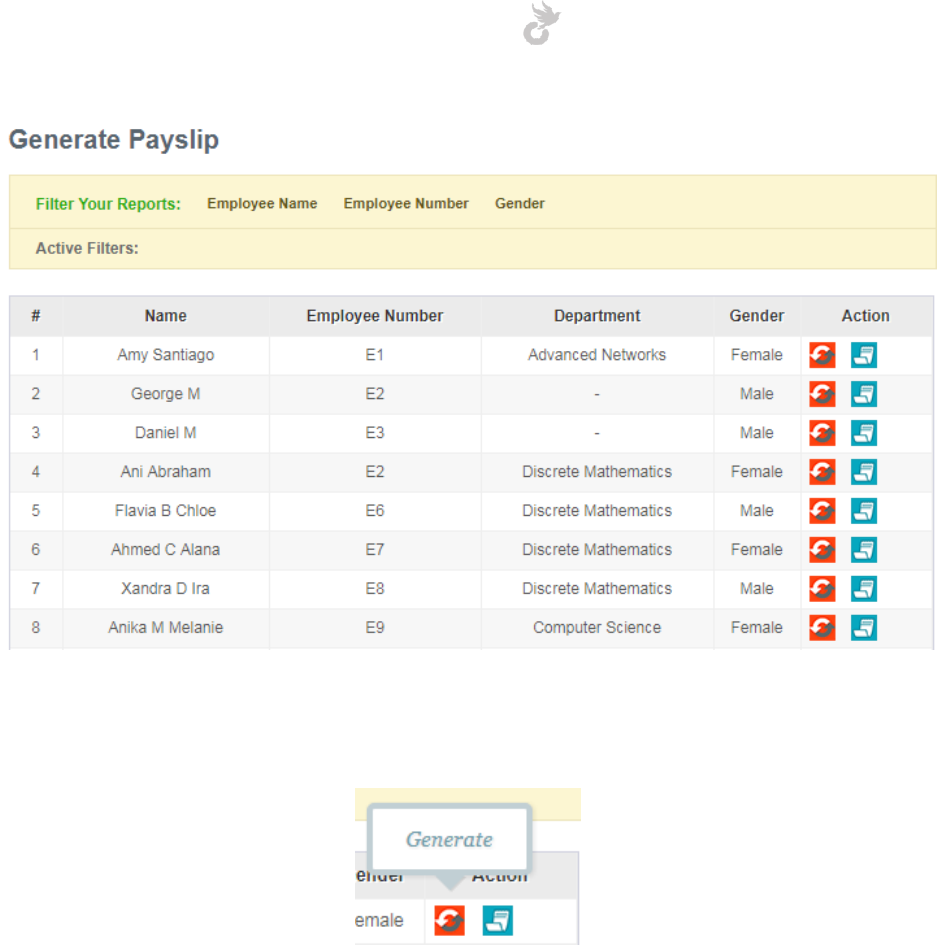
Open-School 2.6.5 Administrator Manual
291
Click on the ‘Generate’ icon in the action column to generate a payslip for the corresponding
employee.
You will be re-directed to another page with all the salary details entered during the time of
registration. Select a date for the payslip generation, make changes if necessary and hit the
‘Generate’ button to generate the slip.
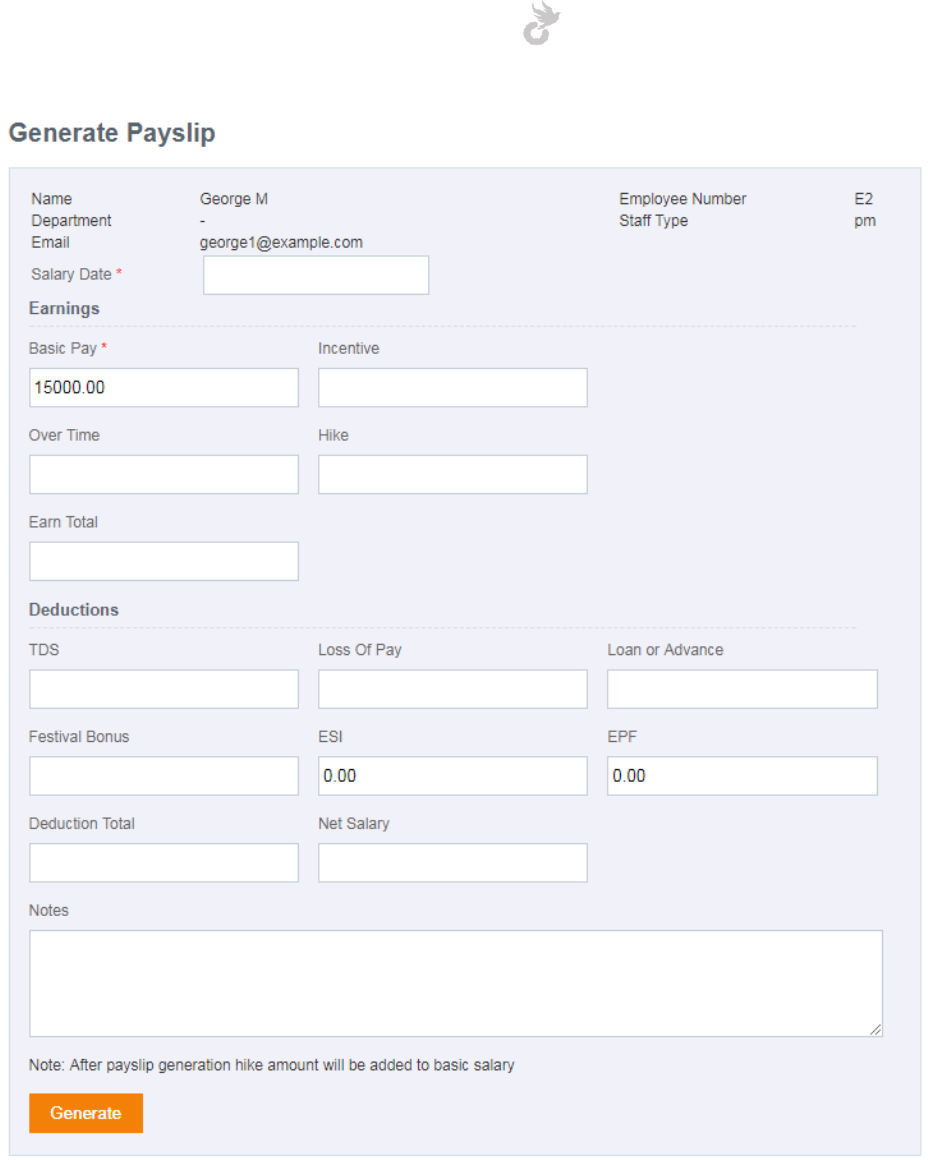
Open-School 2.6.5 Administrator Manual
292
Click on the ‘Payslip’ icon in the list for a corresponding staff to see all payslips generated for
him/her.
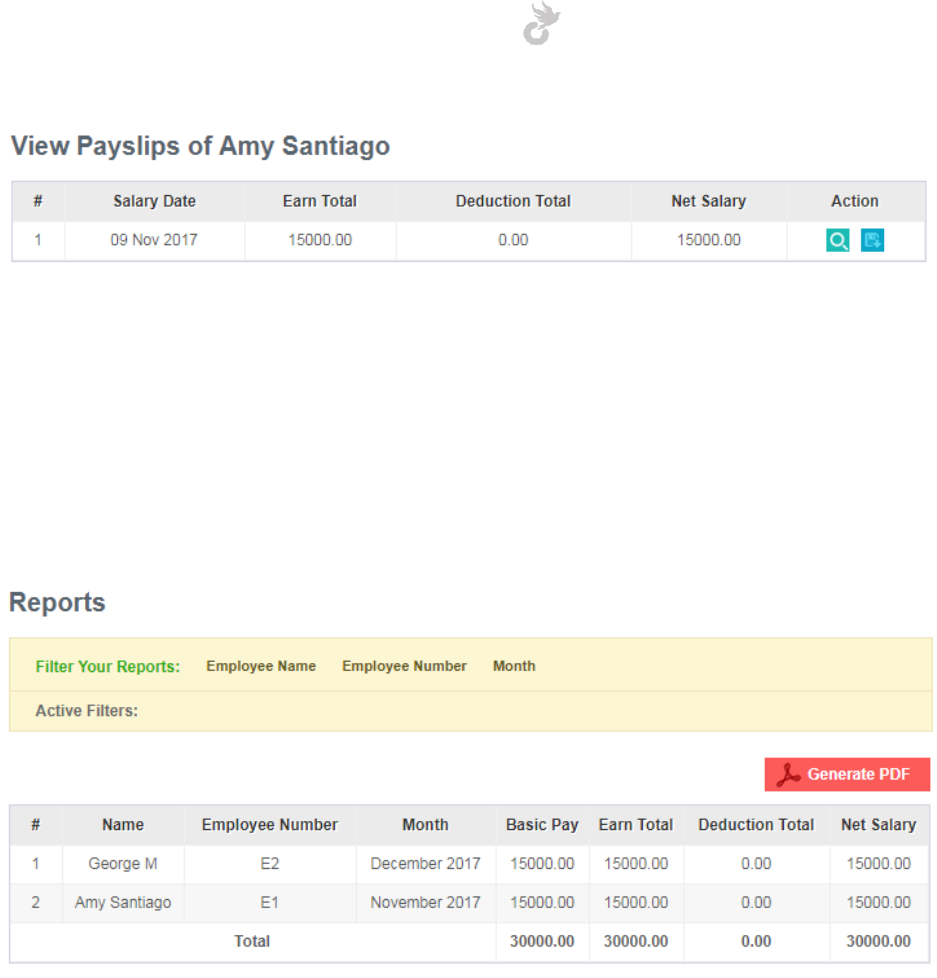
Open-School 2.6.5 Administrator Manual
293
You can view or download these payslips individually by clicking the required icons under the
action column.
21.3.3 Salary Reports
The ‘Reports’ link in the left side menu displays all payslips generated for every staff in the
application. The total amount is displayed at the bottom.
You may filter these results based on employee name, number and month of payslip
generation. The displayed results can also be generated as a PDF and printed later.
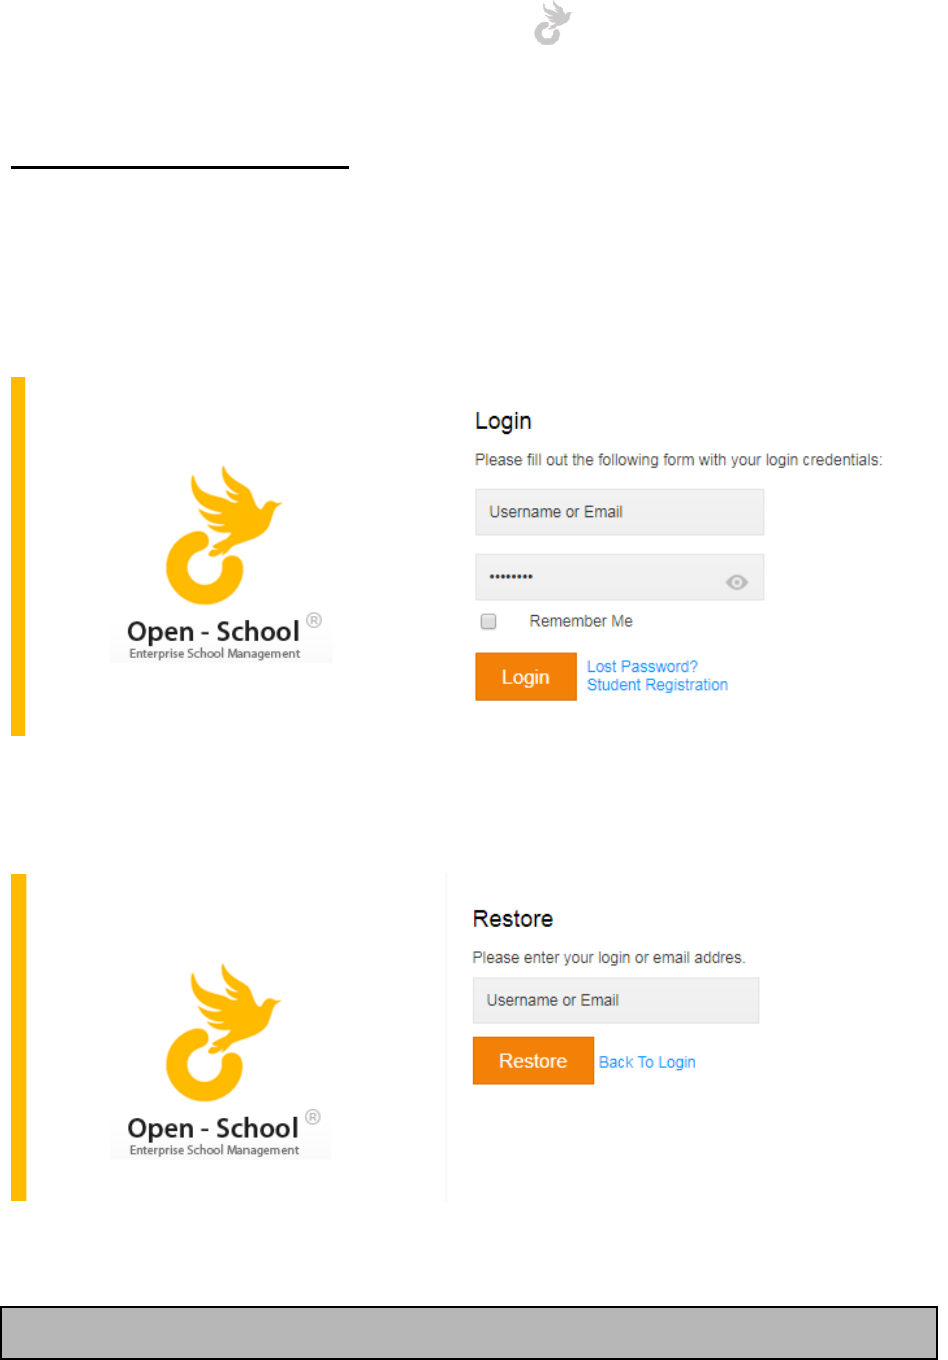
Open-School 2.6.5 Administrator Manual
294
MISCELLANEOUS
Lost Password
In case of a lost password, click on the ‘Lost Password’ link in the login page.
You will have to enter the registered email id in the field that shows up.
Click on ‘Restore’ once you enter the email.
Note: Make sure the email is valid. This feature will not work for invalid emails.
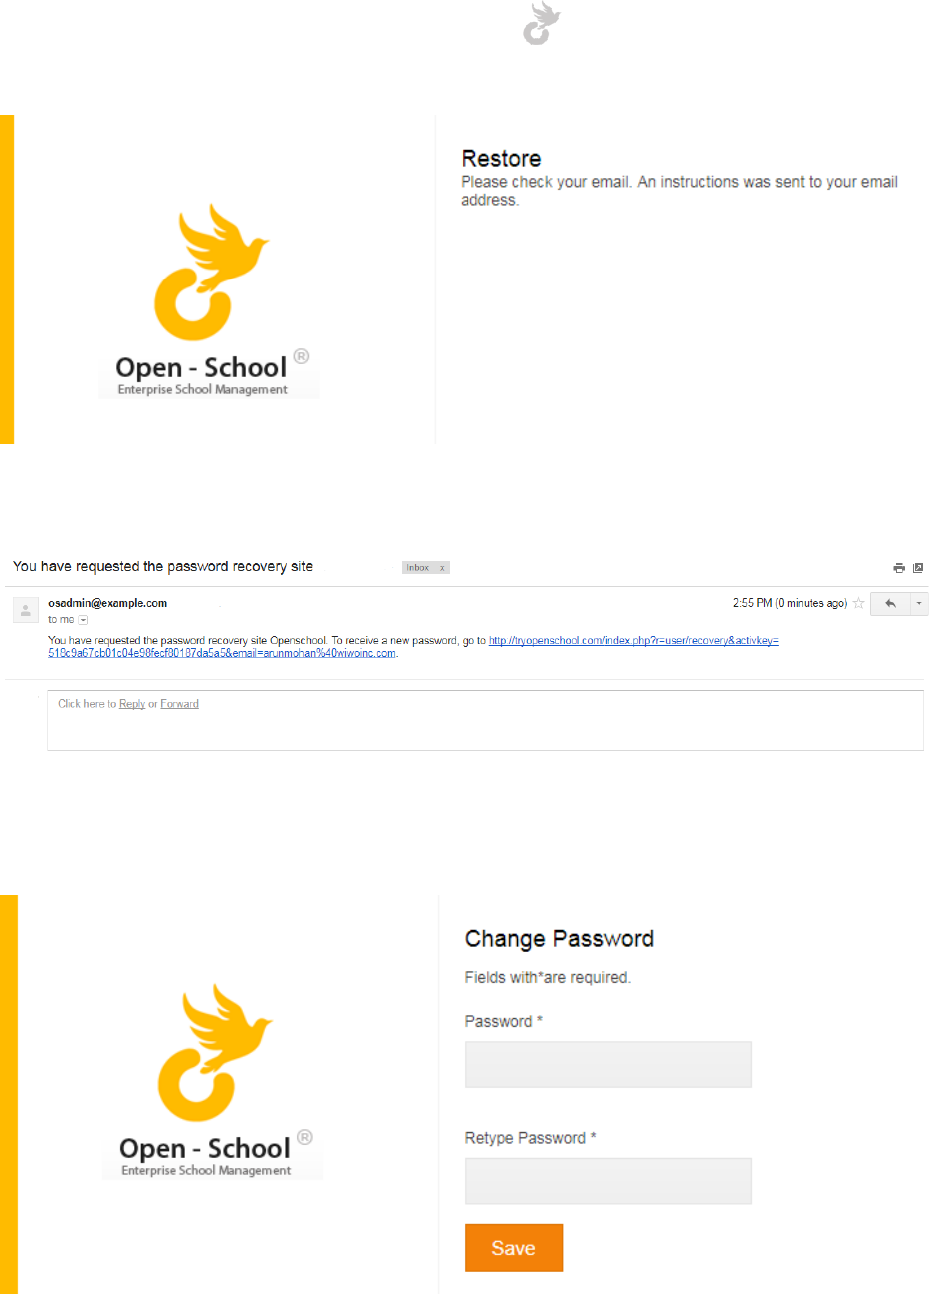
Open-School 2.6.5 Administrator Manual
295
A restore link will be sent to your email.
Click this link to create a new password for your account.
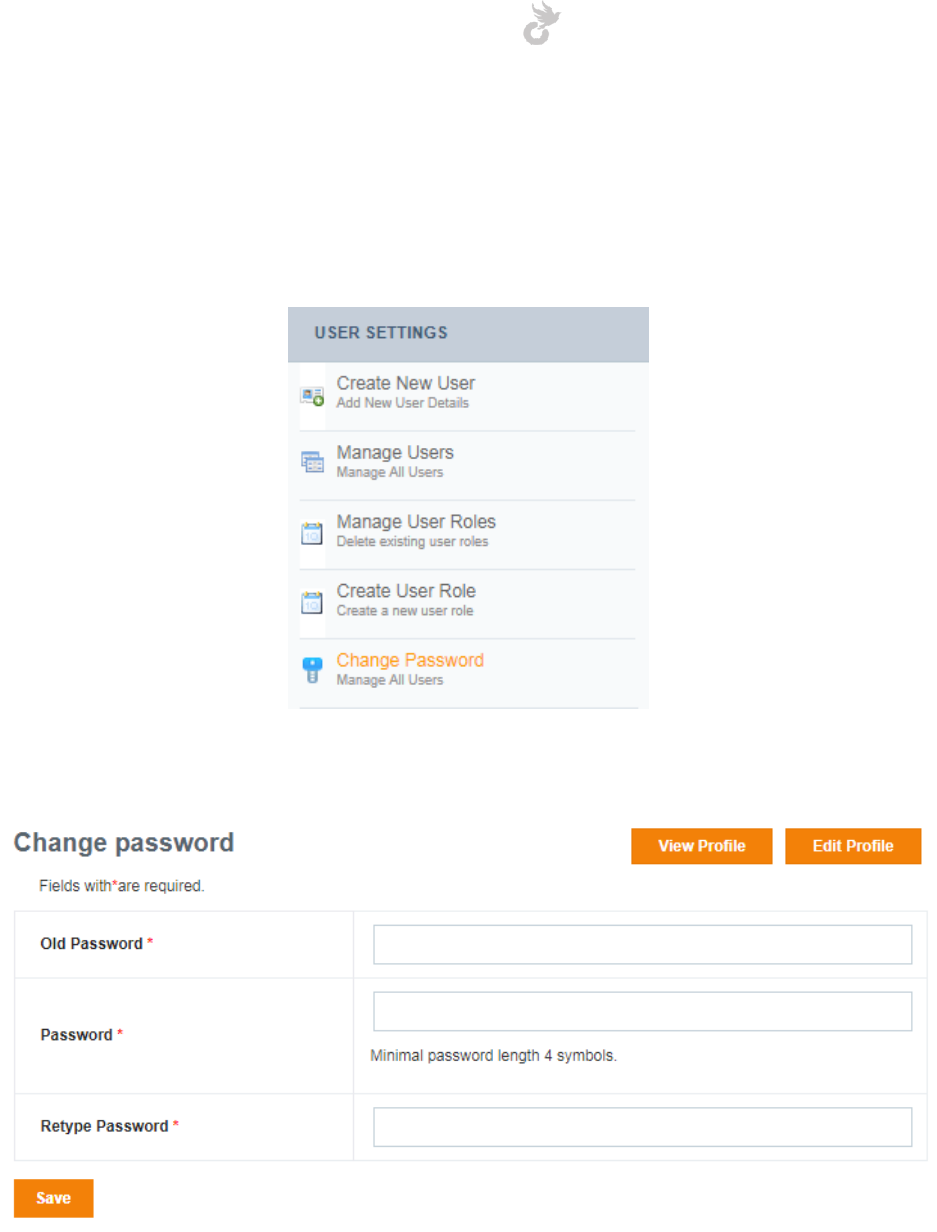
Open-School 2.6.5 Administrator Manual
296
Change Password
The ‘Change Password’ link in the left side menu of the Settings Module allows you to change
your password.
You can also edit your account from the Manage Users section.
Enter your old password and new password here and click ‘Save’ to change it. Your profile can
be viewed and edited from here using the respective buttons on top.
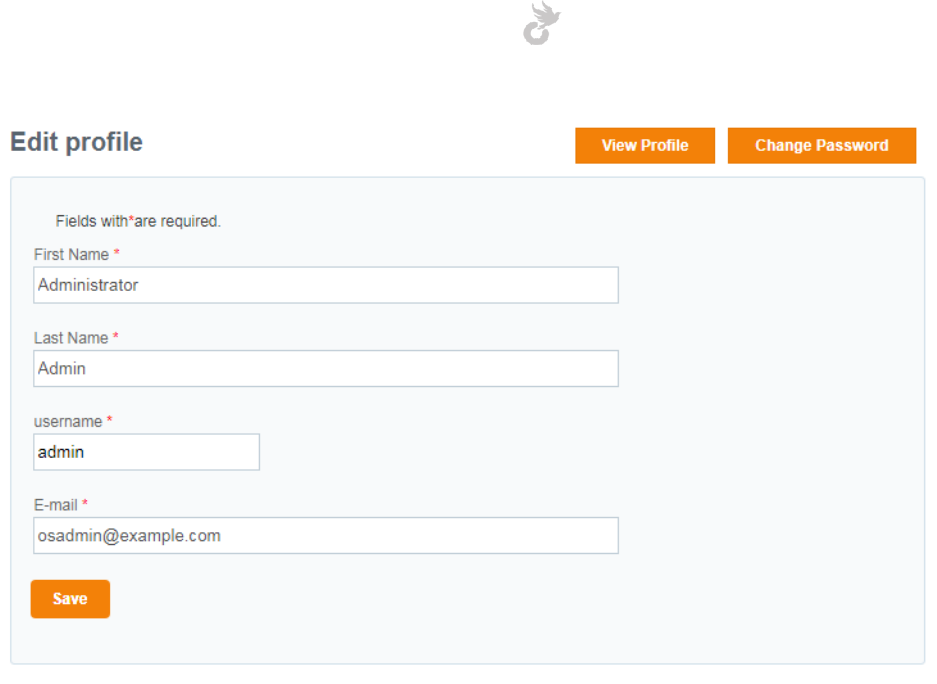
Open-School 2.6.5 Administrator Manual
297
Open-School 2.6.5 Administrator Manual
298
FREQUENTLY ASKED QUESTIONS
Q: What is the use for Result Published and Date Published checkboxes while creating an
exam?
A: The Result Published checkbox indicates that the result is published. Checking this will also
send out a notification and allow parents/students to view results through their portals. This
can be avoided while creating the exam.
The Date published checkbox sends out a notification of the exam being scheduled.
Q: Documents uploaded by teachers via the Downloads Module cannot be seen. How do I
view them?
A: Any document uploaded by any user needs to be approved by an Admin first. The list of
uploaded documents for approval can be viewed in the My Account Module > Document List
are. They have to be approved from here so students and related users can view/download it.
This goes for all documents uploaded from anywhere in the system.
Q: Can I generate custom reports in the application?
A: Currently no, the report formats are fixed. If you wish to change this please contact our
support team at support@open-school.org.
Q: How can I remove fee invoices that have been generated?
A: Once an invoice has been generated it can only be cancelled and not removed. To cancel an
invoice go to the view invoices area for the fee category in question, select the invoice you
want to cancel using the corresponding checkbox and then click on the Cancel button.
Q: Can parents pay fees online from their portal?
A: Yes, they can. For a parent to pay their child’s fee you have to first integrate a required
payment gateway. The system comes with PayPal integration by default. All you have to do is
enter the API details available in your PayPal login into the application. This can be done from
Payment Gateway Settings in the fee module. Other payment gateway integrations have to be
customized.
Q: I imported students using the import module but cannot see them in the student’s list in
students module. All rows were inserted during import. How do I see the students?
A: The reason you cannot see students in the student’s list is probably because they were not
inserted into their course/batch. The import inserts the rows anyway if they don’t match the
course/batch in the system as it’s not a mandatory field. Students not in batches will not be

Open-School 2.6.5 Administrator Manual
299
listed directly in the student’s list. To see these students change the Academic Status filter in
the Student’s List are to ‘All’. You should now be able to see all the students.
Q: My students have not been inserted into their batches. Is there anyway to update them all
at once instead of doing it one-by-one?
A: You can use the edit option in the import module to update multiple student details. Make
sure all other fields are also filled as they will be overwritten. For more details refer the Import
Module section.
Q: How does a teacher post homework?
A: A teacher can use the Downloads module to upload documents or images to students in a
batch. This however, will first have to be approved by the admin.
Q: I sent an email and text, but did not receive anything.
A: To use the SMS module you first need to purchase an SMS gateway account. Our team will
then integrate it with your application so you will be able to send SMS. Some servers require
SMTP configuration for sending emails. You may contact our team for more assistance on this.
Q: Can a teacher add her own exams or tests for her class, or is this centrally controlled? And
how is this done?
A: Teachers can create and conduct online exams from their portal. Normal exams have to be
first created by the admin. After this teachers can enter scores from their portal.
Q: What happens next year, when students move to the next class..what will we have to do?
A: You can use the Promote option to move students from one academic year to the next to
new batches. The promote option can be found inside the Actions tab in a batch view. Refer the
Course module section for more details on this.
Q: Is it possible to add multiple students under a single parent? How is this done in import?
A: Yes, it is possible to have multiple students for one parent. While using the student
registration process select Existing Guardian in step 2(Parent Details). You can search for the
parent using the email or even the existing sibling’s name. Fields are automatically filled based
on selection. In import, you can add multiple students by giving the same parent details for
each.
