OpenShot Help File Open Shot Manual
User Manual:
Open the PDF directly: View PDF ![]() .
.
Page Count: 54
- Introduction
- Getting Started
- Learn OpenShot in 5 Minutes!
- Main Window
- Projects - Create, Open, and Save
- Import Files – Audio, Video, and Images
- Image Sequences
- Manage Files & Folders
- Add Files to Timeline
- Move & Trim Clips on Timeline
- Separate Audio From Video
- Duplicate Clips
- Clip Properties
- Key Frames
- Crop Effect
- Rotate Effect
- Title Editor
- Transitions
- List of Transitions
- Effects
- List of Effects
- Export Video
- List of Formats & Codecs
- Project Types / Profiles
- Preferences
- About OpenShot

OpenShot Video Editor Manual – v2.0.0
Introduction
OpenShot Video Editor is a program designed to create videos on Linux. It can easily
combine multiple video clips, audio clips, and images into a single project, and then
export the video into many common video formats.
OpenShot is a non-linear video editor, which means any frame of video can be
accessed at any time, and thus the video clips can be layered, mixed, and arranged in
very creative ways. All video clip edits (trimming, cutting, etc...) are non-destructive,
meaning that the original video clips are never modified.
You can use OpenShot to create photo slide shows, edit home videos, create television
commercials and on-line films, or anything else you can dream up.
Features Overview:
●Support for many video, audio, and image formats (based on FFmpeg)
●Gnome integration (drag and drop support)
●Multiple tracks
●Clip resizing, trimming, snapping, and cutting
●Video transitions with real-time previews
●Compositing, image overlays, watermarks
●Title templates, title creation
●SVG friendly, to create and include titles and credits
●Scrolling motion picture credits
●Solid color clips (including alpha compositing)
●Support for Rotoscoping / Image sequences
●Drag and drop timeline
●Frame stepping, key-mappings: J,K, and L keys
●Video encoding (based on FFmpeg)
●Key Frame animation
●Digital zooming of video clips
●Speed changes on clips (slow motion etc)
●Custom transition lumas and masks
●Re-sizing of clips (frame size)
●Audio mixing and editing
●Presets for key frame animations and layout
●Ken Burns effect (making video by panning over an image)
●Digital video effects, including brightness, gamma, hue, greyscale, chroma
key (bluescreen / greenscreen), and over 20 other video effects
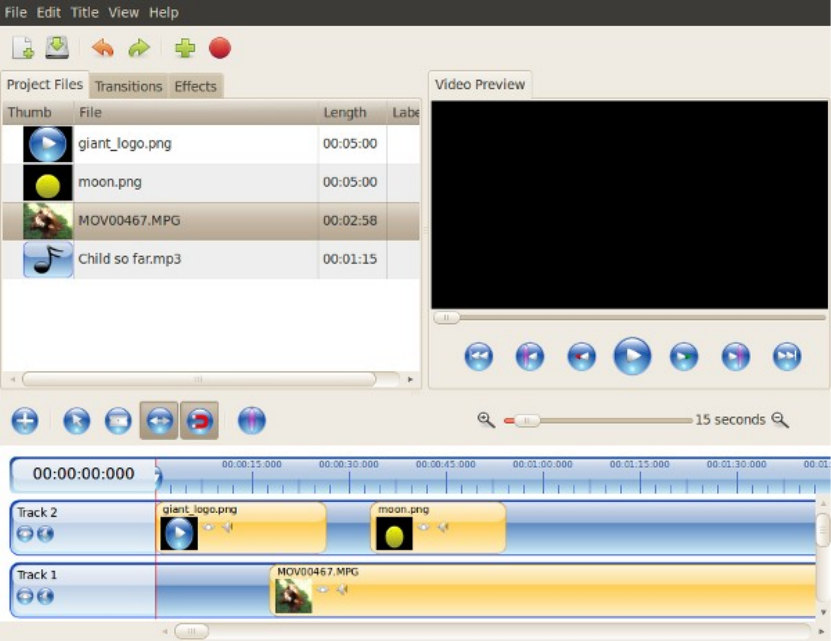
Screenshot
Getting Started
To Launch OpenShot Video Editor
You can start OpenShot in the following ways:
Applications menu
Choose Sound & Video > OpenShot Video Editor.
Command Line
To start OpenShot from a command line, launch a Terminal and type the following
command, then press Return:

openshot [filename]
The optional [filename] parameter can be either an audio or video file, or an
OpenShot project file (*.osp). Multiple files can also be specified (with spaces
between each filename), and all files will be imported into a single instance of
OpenShot.
Open With...
To start OpenShot from Nautilus, right-click on an image, video, or audio file, and
choose Open With > OpenShot Video Editor. Or choose Open With > Open with
Other Application > openshot.
Learn OpenShot in 5 Minutes!
Using OpenShot is very easy, and this tutorial will take you through the basics in
under 5 minutes. After this tutorial, you will be able to make a simple photo slide-
show with music.
Step 1 – Import Photos & Music
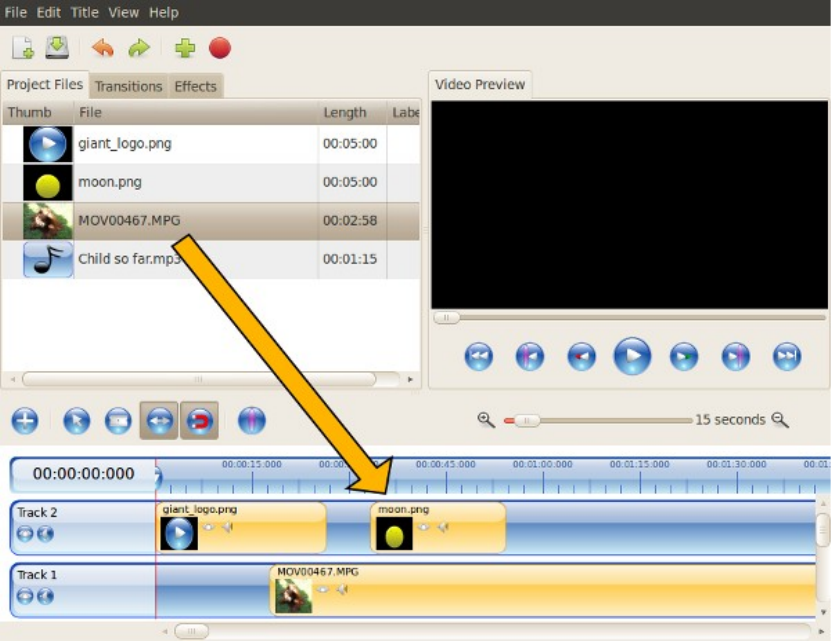
Before we can begin making a video, we need to import files into OpenShot. Drag
and drop a few images (*.JPG, *.PNG, etc...) and a music file (most formats will
work) from your Desktop to OpenShot Video Editor. Be sure to drop the files where
the arrow in the illustration is pointing to.
Step 2 – Arrange Photos on Timeline
After you have imported some files, the next step is adding them to the timeline and
arranging them. Click on each photo (one at a time), and drag them onto Track 2 on
the timeline. Drag and drop the photos (also known as clips) to arrange them.
Step 3 – Add Music to Timeline
To make our photo slide-show more interesting, we need to add some music. You
should have imported a music file in step 1. Click on the music file, and drag it onto
Track 1 on the timeline.
Step 4 – Preview your Project
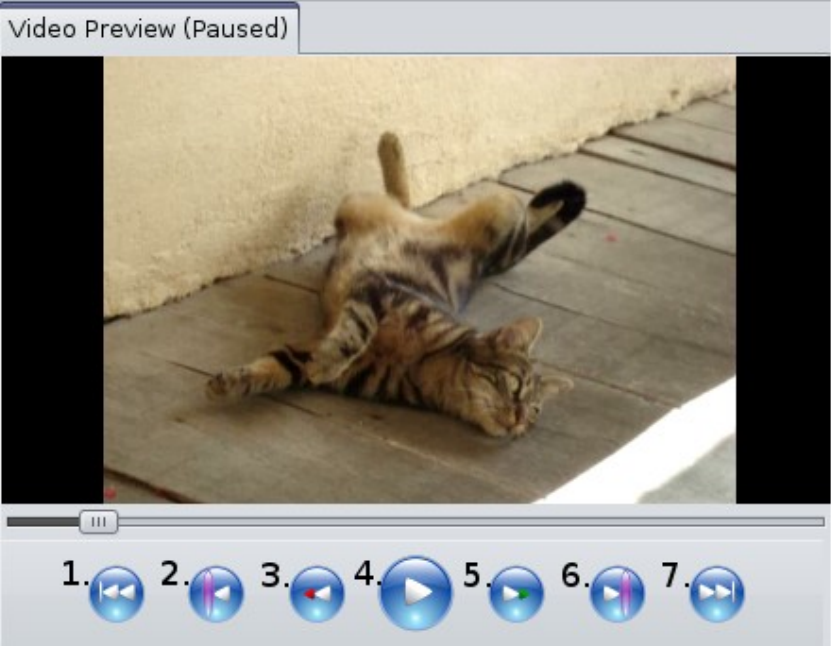
To preview what our video looks & sounds like, click the Play button under the
preview window. Click the Play button again to pause your video. Remember, if you
need to re-arrange any clips, just drag and drop the clips to move them.
Step 5 – Export your Video
Once you are happy with your photo slide-show video, the next step is to export your
video. This will convert your OpenShot project into a single video file, which should
work on any Linux media player (such as Totem, VLC, etc...) or websites (such as
YouTube, Vimeo, etc...).
Click on the Export Video icon at the top of the screen (or use the File > Export
Video... menu). Choose from one of the many preset export options, and click the
Export Video button.

Step 6 – Enjoy OpenShot!
You should now have a basic understanding of how OpenShot works. Importing,
Arranging, Previewing, and Exporting. Hopefully this tutorial took less than 5
minutes for you to complete. Please read the rest of this manual for a more detailed
understanding of OpenShot, and it's advanced features. Enjoy!
Main Window
OpenShot Video Editor has one main window which contains most of the
information, buttons, and menus needed to edit your video project.
Overview
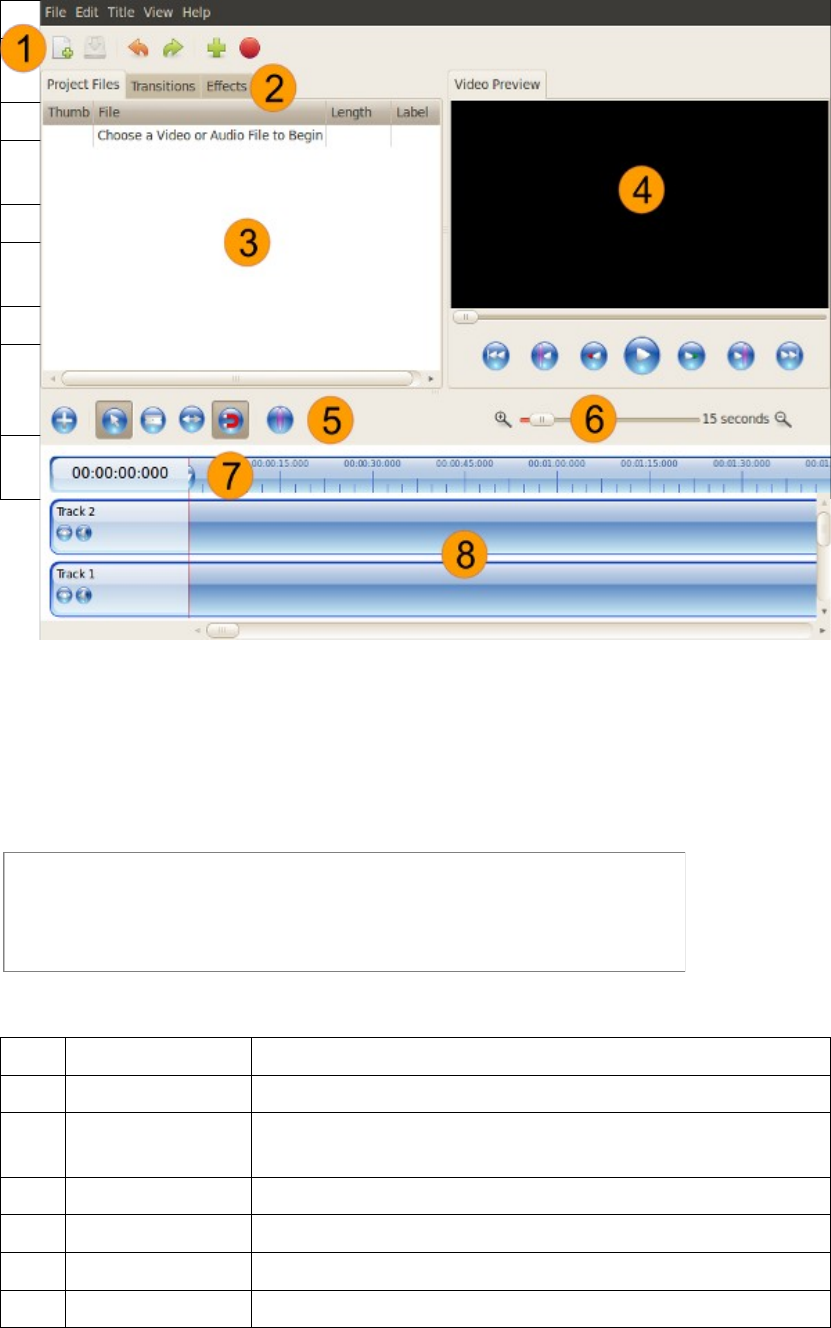
Id component description
1 Main Toolbar Contains buttons to open, save, and export your video
project.
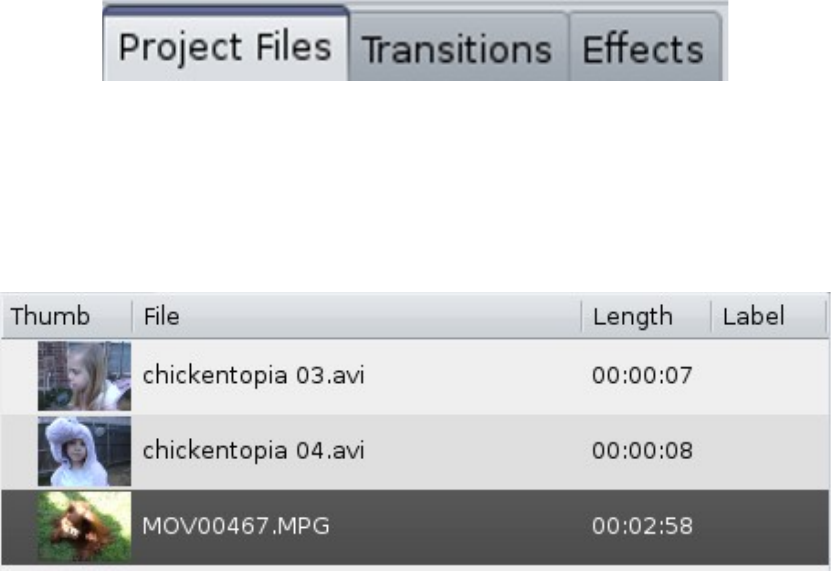
2 Function Tabs Switch between Project Files, Transitions, and Effects.
3 Project Files All audio, video, and image files that have been imported
into your project.
4 Preview Window This is the area that the video will playback on the screen.
5 Edit Toolbar This toolbar contains toggle buttons used for editing,
trimming, and splitting clips.
6 Zoom Slider This slider will adjust the time-scale of your timeline.
7 Play-head / Ruler The ruler shows the time-scale, and the red line is the play-
head. The play-head represents the current playback
position.
8 Timeline The timeline visualizes your video project, and each clip
and transition in your project.
Main Toolbar
The main toolbar contains buttons to quickly open and save your project, import files,
and export your video. All of these functions can also be accessed through the File
menu.
Id component description
1 Open Project Open an OpenShot project file (*.OSP).
2 Save Project Save the current project. If no project has been created, a
dialog screen will open to gather more information.
3 Undo Undo the most recent action.
4 Redo Reverses the most recent Undo.
5 Import Files Import 1 or more files into your current OpenShot project.
6 Export Video Export the current project to a single video file.
Function Tabs
These tabs let you switch between 3 different functions: Project Files, Transitions, and
Effects. The items in these tabs can be dragged and dropped onto the timeline.
Project Files
The Project Files section contains all clips that have been imported into your project.
Before you can add an image, audio file, or video file to your project timeline, it must
first be imported into your Project Files section.
Preview Window
The Preview Window is what controls the playback (or preview) of your video
project. Clicking the buttons under the preview window controls the playback, and
outputs video to this area. The size of this area can be modified by clicking and
dragging on the handles (or lines) around this section.
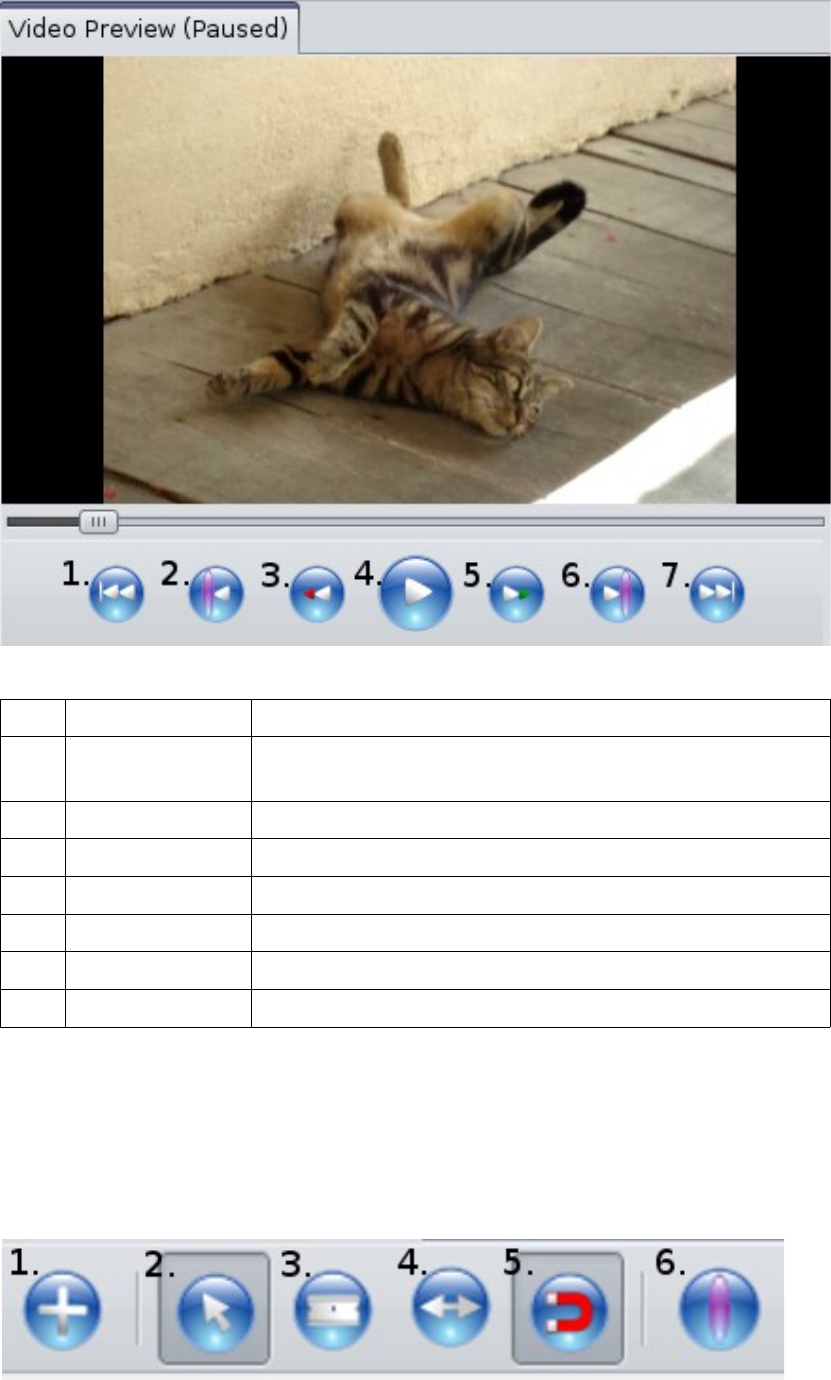
Id component description
1 Skip to
Beginning
Skip to the very beginning of the project.
2 Previous Marker Skip to the previous marker (if any).
3 Rewind Rewind the video from the current playback position.
4 Play / Pause Play or Pause the playback of your project.
5 Fast Forward Fast forward the video from the current playback position.
6 Next Marker Skip to the next marker (if any).
7 Skip to End Skip to the end of the project.
Edit Toolbar
The Edit Toolbar lets you toggle between different edit modes for the timeline. When
moving, trimming, and slicing clips, it is necessary to change the edit mode using this
toolbar.
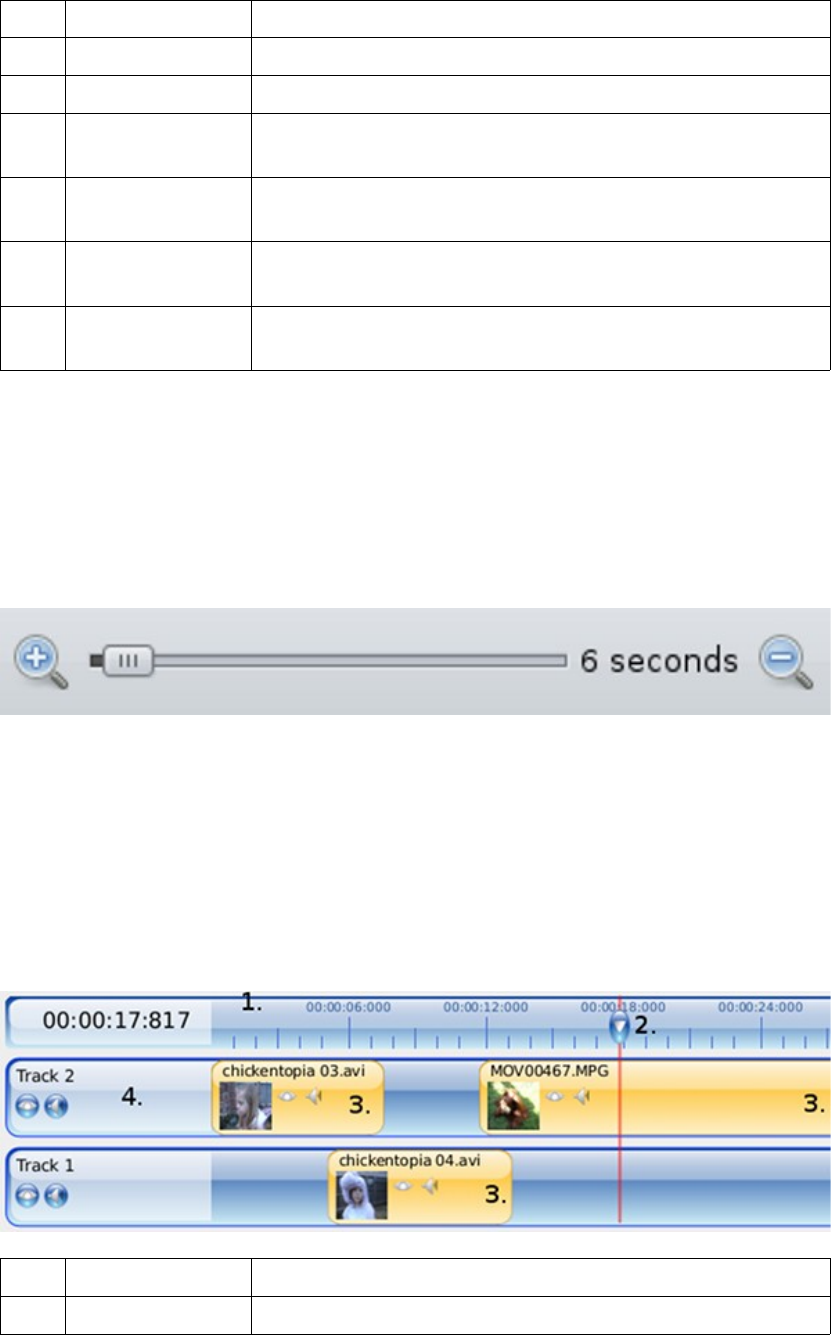
Id component description
1 Add Track Add a new track to the top of the stack.
2 Select Mode Select mode allows you to click and move clips.
3 Razor Mode Razor mode allows you to split a clip where ever you
click.
4 Resize Mode Resize mode allows you to grab the edges of a clip and
drag to resize (or trim) the clip.
5 Snap Mode Snap mode allows clips to snap (or jump) to the nearest
clip or play-head (if any are close) when you drop them.
6 Add Marker Add a new marker, which allows you to quickly jump
back to this exact point while previewing.
Zoom Slider
The zoom slider allows you to change the time-scale of the timeline. Zoom in to see
the timeline more closely, or zoom out the see the entire project without scrolling.
You can either click the zoom buttons (on the left and right), or slide the zoom slider.
When dragging the slider, it will update the timeline when you pause or stop moving
it.
Timeline
The timeline visualizes your project in a very graphical way. Each clip is represented
by a yellow rectangle. Each track is represented by a a blue rectangle. The Play-head
(red line) represents the current playback (or preview) position of your project.
Click anywhere on the ruler to jump to that point in time. If you drag along the ruler,
it will “scrub” the video, which is a fast, rough way to preview your project.
Id component description
1 Ruler The ruler shows the current time-scale of the timeline.
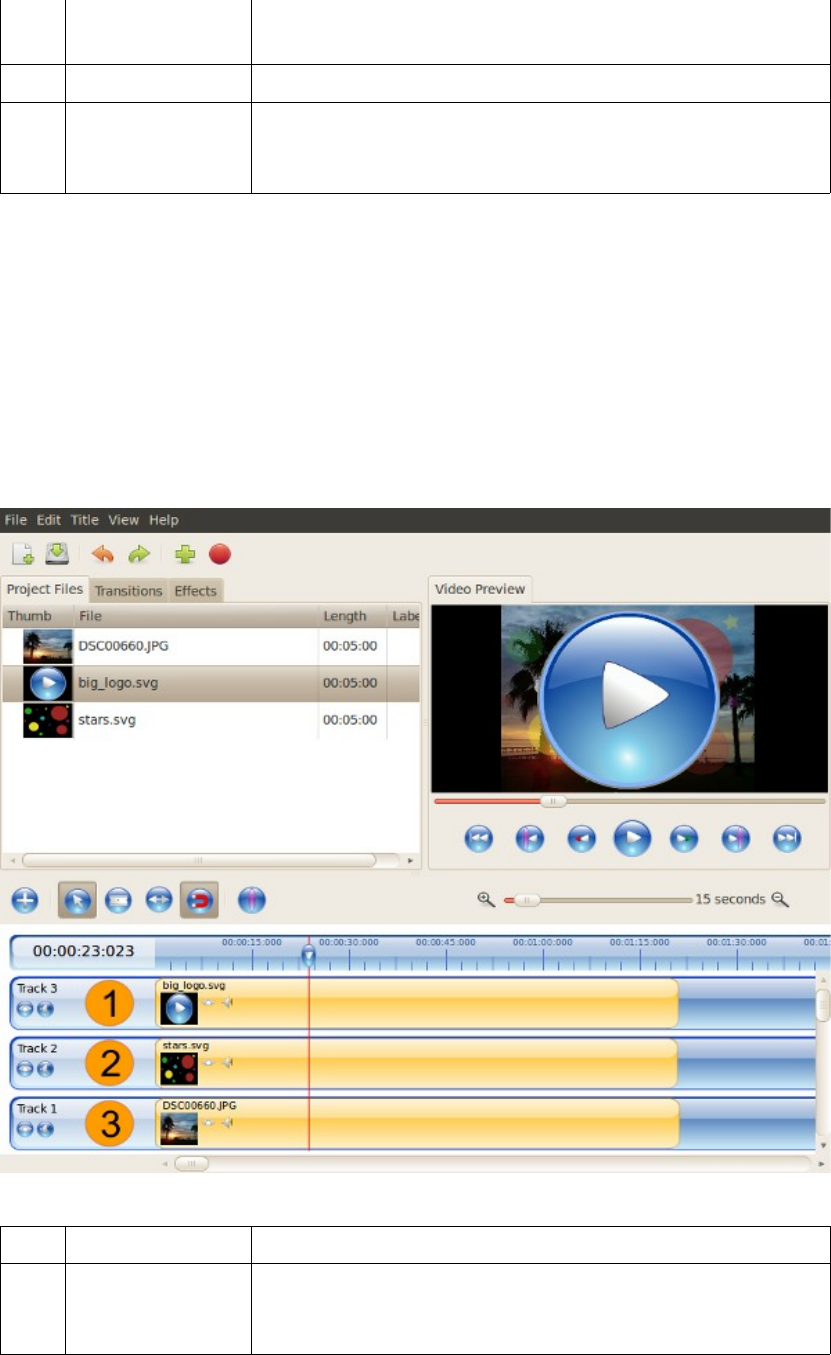
2 Play-Head The Play-head represents the current playback position of
your preview window.
3 Clip A clip represents an audio, image, or video file.
4 Track A track is similar to a layer. The higher tracks show video
and images above the lower tracks. There is no limit to
how many tracks a project can have.
Tracks
OpenShot uses tracks to layer videos and images. The top most track is the top layer,
and the bottom track is the bottom layer. If you are familiar with layers in a photo
editing application, then you should be quite familiar with this concept. OpenShot
will mix each layer together, just like a photo editing application.
For example, imagine a 3 track video project. A sunset image should be used as the
background, a moon should be in the middle, and a logo should be on top.
Id component description
1 Top Track Clips on this track will be on top. Logos and watermarks
should be on this layer. The OpenShot logo is on this
track in the illustration.

2 Middle Track These clips are under the top track, but above the bottom
track. The moon image is on this track in the illustration.
3 Bottom Track These clips are under all other tracks. The sunset is on
this track in the illustration.
Controlling Playback of Video
Playing, Pausing, and Seeking are very important features in a video editor. While
you are creating a video project, you will need to playback the project over and over
again. While clicking on the Play button is an easy way to accomplish this, there are
many faster ways.
Playback Methods
There are 7 ways to control the video playback in OpenShot.
●Click the Preview Toolbar (Play, Fast-forward, etc...)
●Dragging the Slider above the Preview Toolbar
●Dragging the Play-Head on the Ruler
●Clicking on the Ruler at any point
●Using Keyboard Shortcuts (J, K, L keys)
●Using the Arrow Buttons (Left, Right, Up, Down)
●Using the Space bar key (Play / Pause)
Keyboard Short-Cuts
A keyboard short-cut is simply a key on the keyboard that saves you the trouble of
moving your mouse and clicking. It is often faster to type a key, than to point and
click. Here are all keyboard short-cuts in OpenShot:
key description
C or S Cut all tracks at the playhead position.
J Rewind the video playback
K Pause / Play
L Fast-forward the video playback
Ctrl + B Open the 3d Title Editor.
Ctrl + D Take a snapshot of the current video frame.
Ctrl + E Open the Export Window.
Ctrl + F Open the File Import Window.
Ctrl + I Open the Image Sequence import Window.
Ctrl + N Create a new project.
Ctrl + O Open an existing project.
Ctrl + P Open the Preferences Window.
Ctrl + Q Exit Openshot.
Ctrl + S Save the current project.
Ctrl + T Open the Title Editor.
Ctrl + Y Redo.
Ctrl + Z Undo.
Space bar Pause / Play
Up Seek to previous maker (if any)
Down Seek to next marker (if any)
Left Step backwards one frame (frame stepping)
Right Step forwards one frame (frame stepping)
TAB Switch between Resize and Select mode
Ctrl + Scroll
Wheel
Zoom in & out of the timeline
Ctrl + Home Seek to the beginning of the timeline
Ctrl + End Seek to the end of the timeline
F1 Launch the help file (if installed)
F11 Fullscreen Mode
Projects - Create, Open, and Save
OpenShot needs a project file to save the information that makes up a video project.
Information such as the name and location of your project, video and audio files,
timeline information, which clips have been trimmed, arranged, etc...
When OpenShot is launched, it creates a new project file automatically. You can
start using OpenShot immediately, without first creating a project.
Project files have an .OSP file extension (ExampleProject.osp). Also, project files
need a /thumbnail/ folder, which contains all of the thumbnails in your project. If you
move a project file, be sure to move the /thumbnail/ folder also.
Project File /home/user/Desktop/ProjectA.osp
Thumbnail Folder /home/user/Desktop/thumbnail/
Create a Project
There are 2 ways to create a project file.
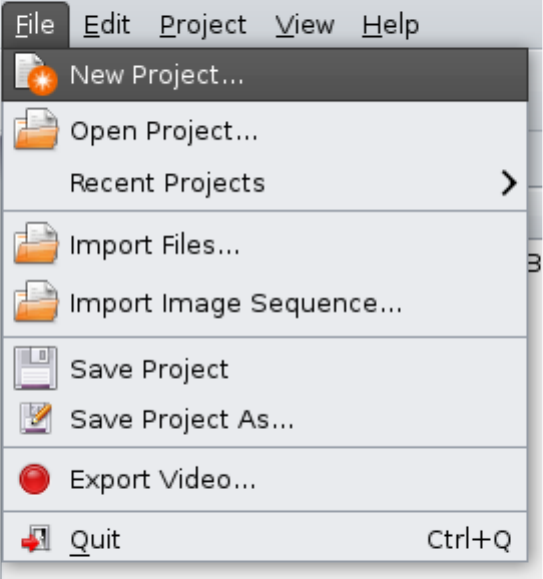
Method 1 – File Menu:
Choose File > New Project. The New Project screen will open. Change the project
name, project type, length of timeline, and then click “Save Project”.
Method 2 – Save Default:
Since OpenShot creates a project by default when you launch the program, you can
simply choose File > Save. The Save Project screen will open. Change the project
name, project type, length of timeline, and then click “Save Project”.
Save Project Screen
Clicking New Project or Save Project will result in this screen being shown.
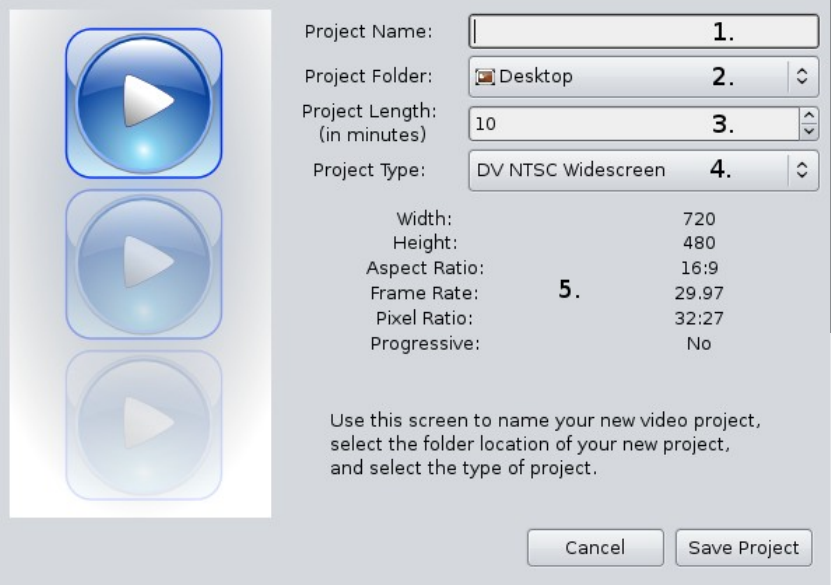
Id component description
1 Project Name The name of your project file (.osp file extension)
2 Project Folder The folder location to save your project file to.
3 Project Length The maximum length of the timeline.
4 Project Type The affects the preview window. It determines the size,
aspect ratio, and frames per second of the video files you
are previewing.
5 Project Type
Details
This table previews the project type details, such as size,
aspect ratio, and frames per second. When you change the
project type dropdown, it will update this table.
Open a Project
To open a project, choose File > Open Project. The Open Project dialog is displayed.
Select the project file (*.osp) that you want to open, then click Open Project.
If you are opening a recent project, choose File > Recent Projects. This is often the
fastest way to open a project from within OpenShot.
If you want to launch OpenShot and have your project automatically opened, double
click on the .OSP file (on your computer), and choose openshot as the command.
Import Files – Audio, Video, and Images
Before you can use a clip on the timeline, you must first import the clip into your
project. There are a few different ways to import a clip. The most common way is to
drag and drop files from your computer into the Project Files section of the screen.
There are 4 different methods to import a clip.
Method 1 - Drag & Drop
●Run OpenShot
●Drag and drop multiple files at once from your Desktop to the Project Files
tree.
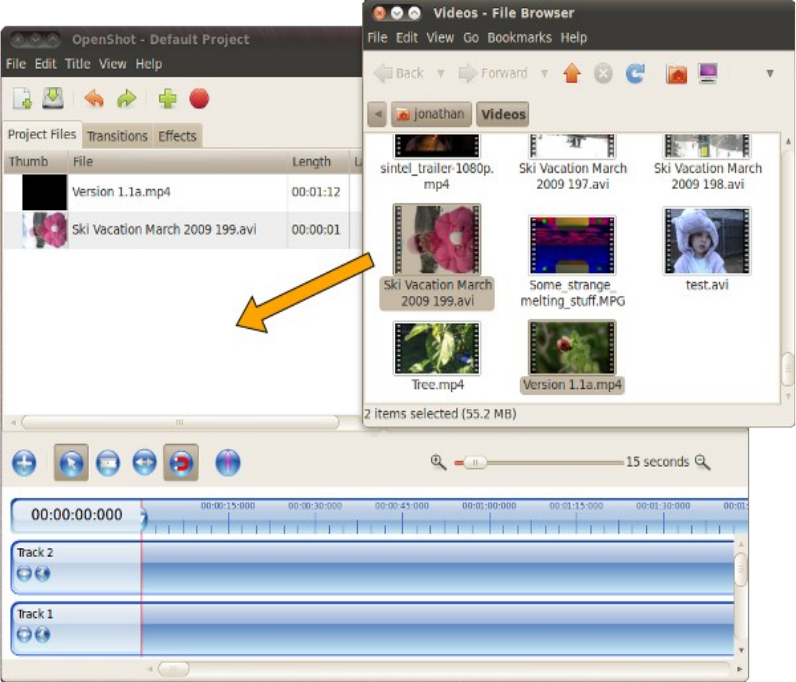
Method 2 - Drop Folder
●Run OpenShot
●Drag and drop a folder full of media files from your Desktop to the "Project
Files" tree.
* All audio, video, and image files will be imported from this folder
Method 3 - Open With
●While browsing files in Gnome, select 1 or more media files
●Right click on the selected files, and choose "Open With Other Application..."
●Choose "OpenShot Video Editor" (or the openshot command)
* Even after you start working in OpenShot with your files, you can still
return to the file system, and right click on more files and choose "OpenShot".
It will add them to the currently running instance of OpenShot.
Method 4 - Import Button
●Run OpenShot
●Click the "Import Files" toolbar button
●Select 1 or more files, and click "Import"
Image Sequences
One of the most powerful features in OpenShot is the ability to import sequences of
images. A sequence of images is really just a folder full of images that are named
very similar, and of course named sequentially. Each image file represents one frame
of video. So for a 30 second long clip, with 30 frames per second, you would have
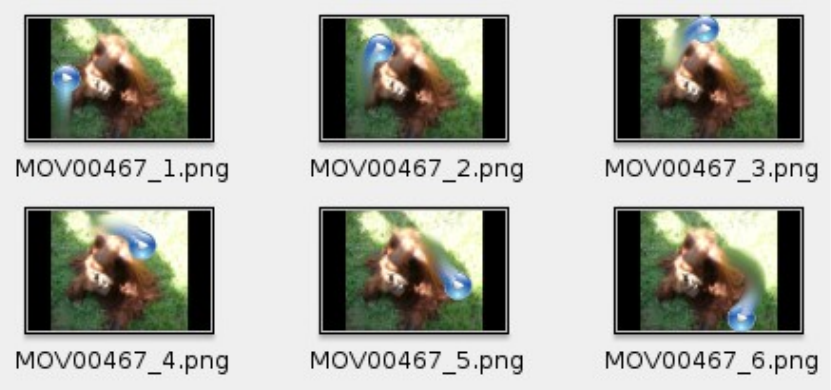
900 image files. Although image sequences can be tough to work with (because of
the shear volume of files), it can do just about anything.
To import an image sequence, follow these steps:
Locate an Image Sequence
Many programs can generate an image sequence. For example, in Blender (a 3D
animation package), you can create a great animated title sequence and export it as a
series of named .PNG files (with transparency). It will create a folder on your
computer that contains all of the image files.
Import the Image Sequence
Choose the File > Import Image Sequence menu option, and that will launch the
Image Sequence dialog.
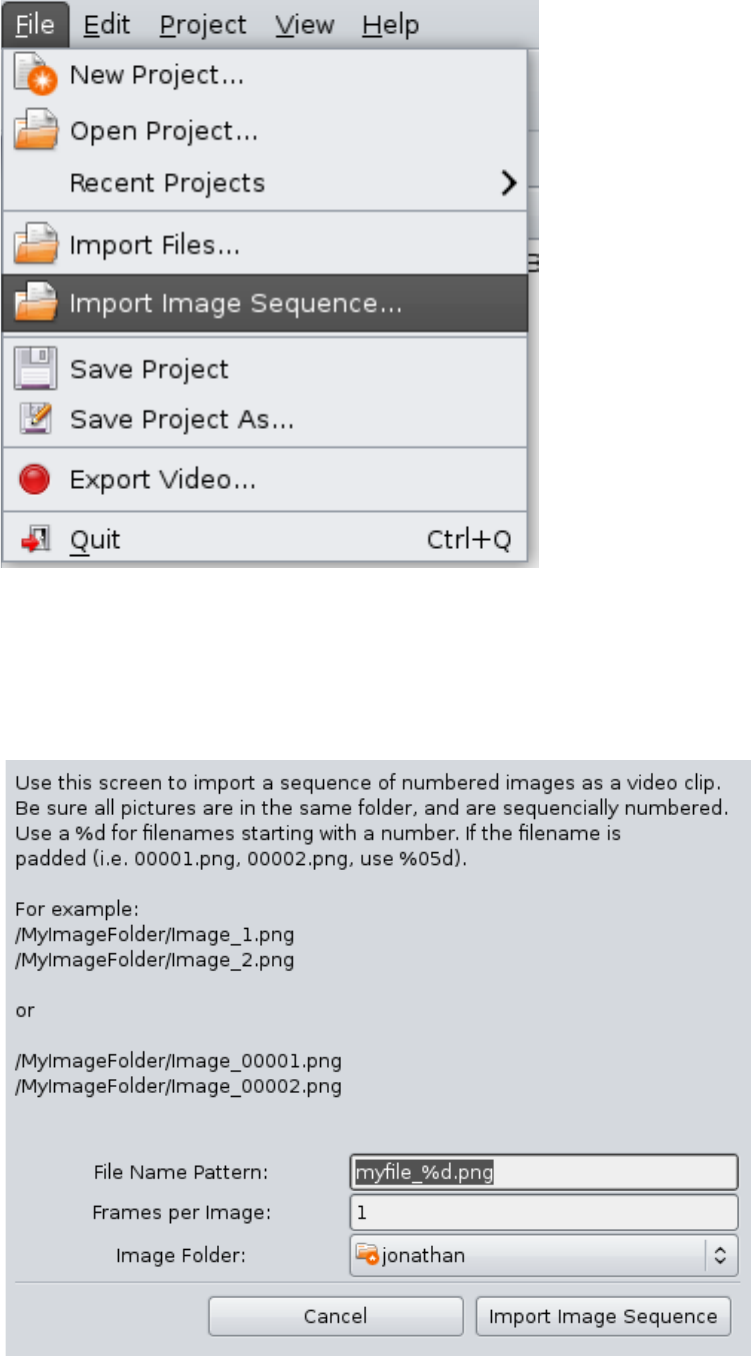
Choose the folder location of your image sequence, and the file naming pattern. Not
all image sequences are named the same way. For example, Movie_0001.JPG is
different from Movie_1.JPG. Once you enter the correct filename pattern, click
Import Image Sequence.
Add to Timeline
Drop your new image sequence on the timeline. It is represented by a single clip, just
like a regular video clip.
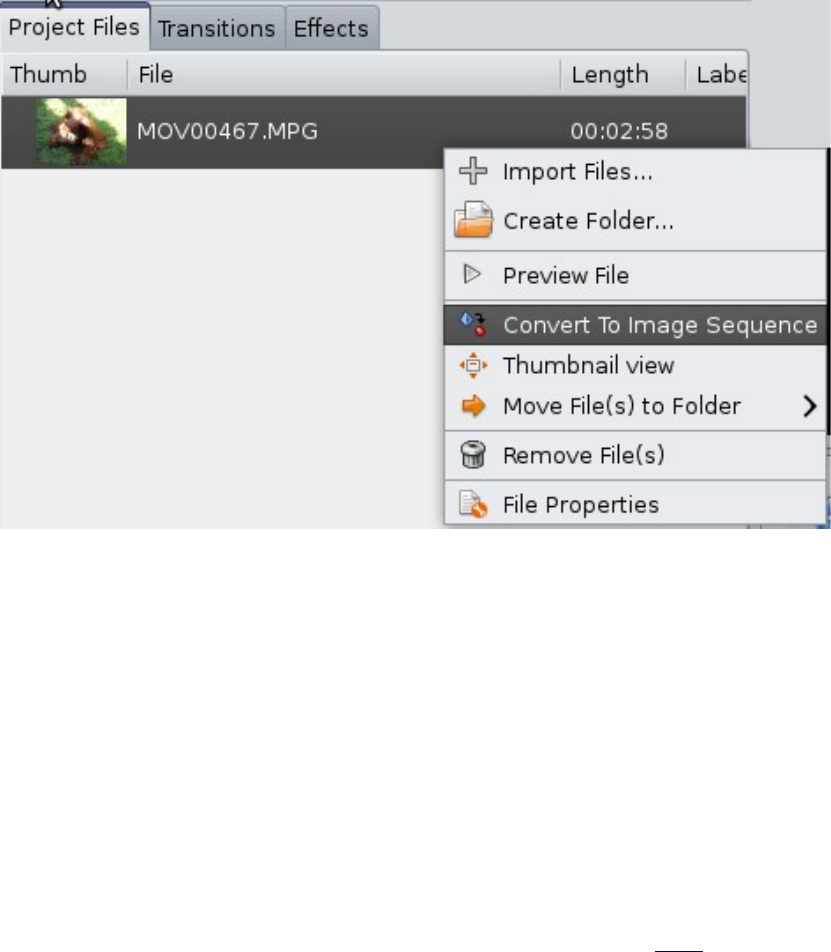
Create an Image Sequence
If you do not already have an image sequence, it is easy to create one. Just right-click
on any video file in your Project Files and choose Convert to Image Sequence. It will
create a new folder, and export every frame as a .PNG image file. It will also add a
reference to your new image sequence in the Project Files section automatically.
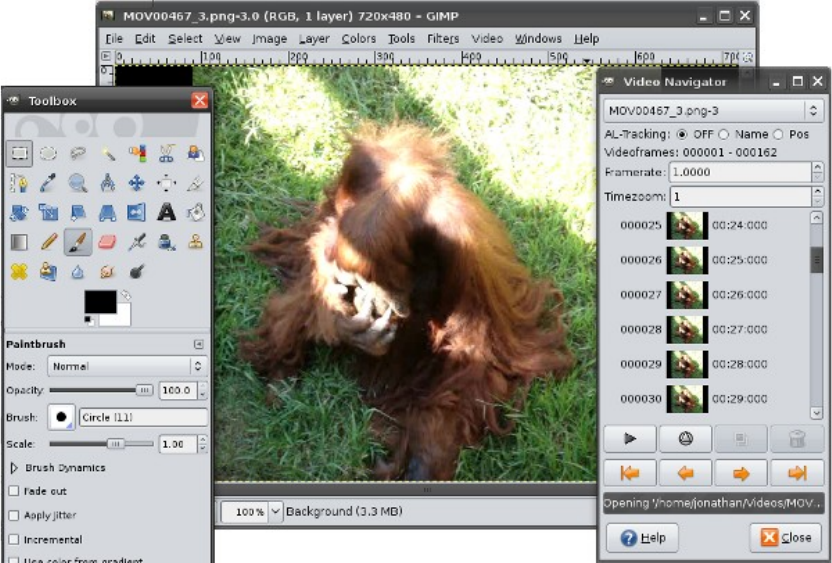
Edit an Image Sequence
If you want to edit a sequence of images, we recommend using The Gimp (an open-
source image editor). It has plug-ins to assist in editing large sequences of images,
and can simplify the process of editing, saving, and opening the next image in a
sequence. You can then touch up each frame, remove red-eye, add glowing effects to
light sabers, erase wires, etc... There is really nothing you can not do with a frame by
frame editing approach, but it does take a lot of effort.
Gimp Animation Package (GAP)
GAP is a plug-in for The Gimp, which assists in editing image sequences. It can
quickly save the current image and load the next image in a sequence. It can also use
key-frames to apply effects across many frames, or even create animations. If you
need to edit an image sequence, you should definitely take a look at GAP.
Screenshot of Gimp Animation Package
Manage Files & Folders
When making a video, you will need to import many different files into your project,
including audio, videos, images, titles, overlays, sound effects, and more. This can
quickly get out of hand, and make your list of project files too long, which will slow
you down looking for the right file.
If your project has too many files (which is up to you to decide), you can use folders
as a way to organize your files.
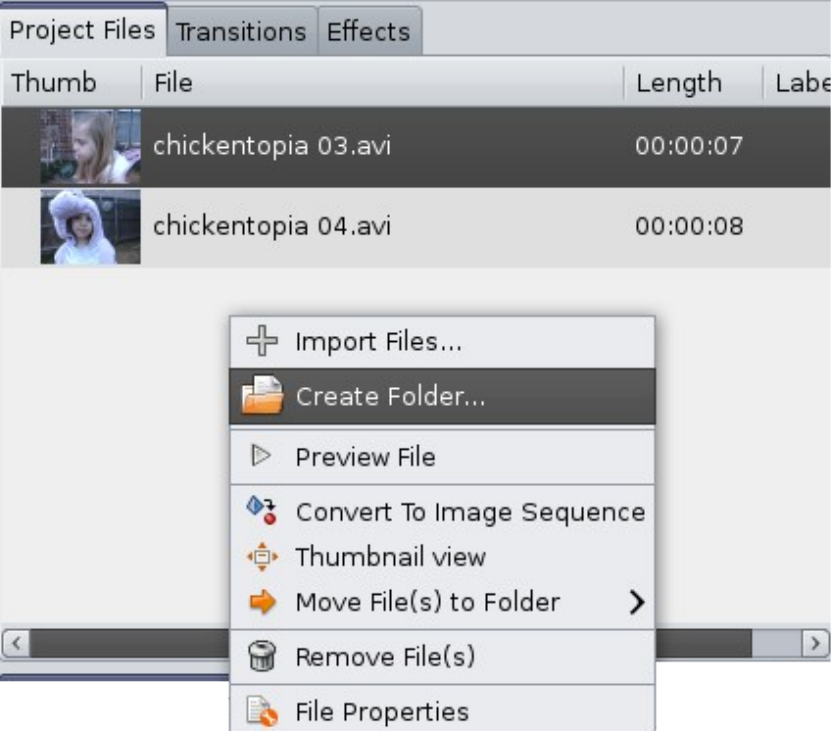
Create a Folder
●Right click on the Project Files section.
●Choose Create Folder...
●Enter a name for your folder.
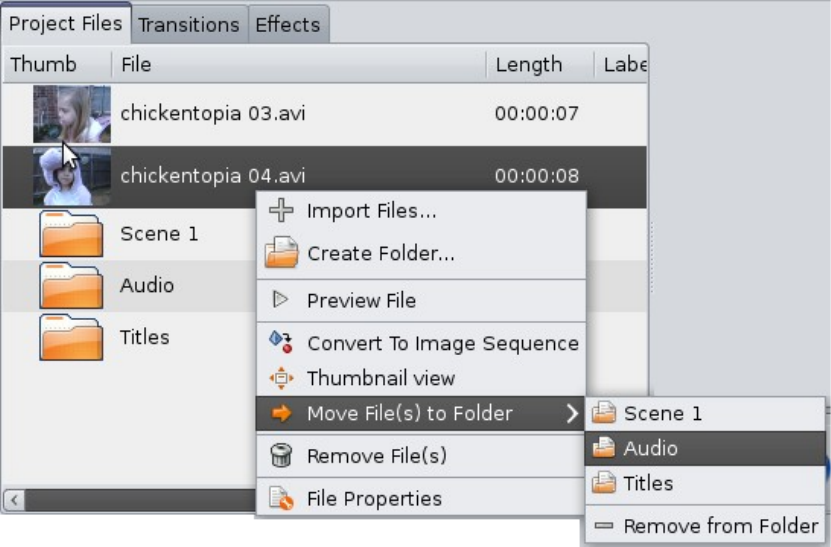
Move Files to a Folder
●Be sure you have created a folder first.
●Right click on 1 or more files in the Project Files section.
●Choose Move File(s) to Folder.
●Choose a folder.
Remove a Folder
●Right click on a folder
●Choose Remove Folder.
* Be sure to move all files out of a folder before removing it.
Add Files to Timeline
Once you have imported files into your project, the next step is to add them to the
timeline. To add a file from your Project Files to the timeline, follow these steps:
●Click on a file.
●Drag over the timeline and drop it.
●The clip will now be added to the timeline.
* You can only add 1 file at a time.

Move & Trim Clips on Timeline
Once you have files (also referred to as clips) on the timeline, we need to arrange
them onto tracks, and put them in the correct order. Also, we will need to trim off the
beginning and endings of the video clip (if needed).
Move a Clip (Select Mode)
●Switch to Select Mode (this is the default mode)
●Click on a clip.
●Drag the clip to a new position on the timeline, and drop it.
* If snapping is enabled, the clip will jump to any close-by clips (or the play-
head, if it is close-by).
Trim a Clip (Resize Mode)
●Switch to Resize Mode, by clicking on the resize icon.
●Move you mouse cursor over the right or left edge of a clip.
●Drag the edge of the clip to trim the video.
* As you drag the edge of the clip, the preview window will display where the
clip will begin or end (based on which side of the clip you are dragging).
Slice a Clip (Razor Mode)
●To slice a clip into 2 pieces, switch to Razor Mode.
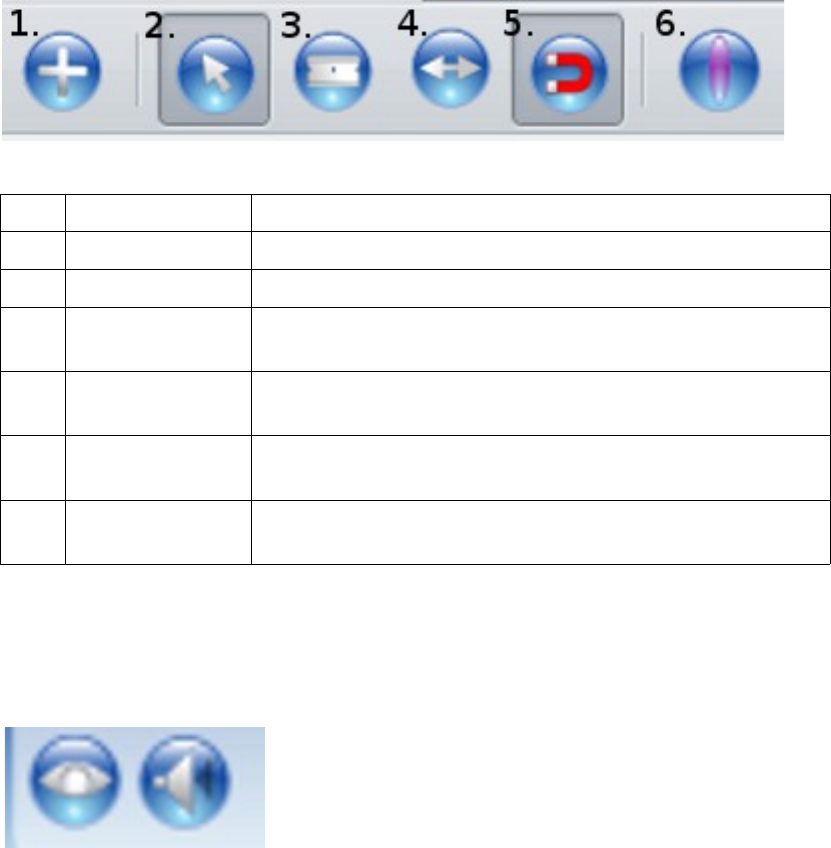
●The mouse cursor will change to a dotted line & razor icon.
●Click on a clip at the point you want to cut / slice it.
Edit Toolbar
The Edit Toolbar lets you toggle between different edit modes for the timeline. When
moving, trimming, and slicing clips, it is necessary to change the edit mode using this
toolbar.
Id component description
1 Add Track Add a new track to the top of the stack.
2 Select Mode Select mode allows you to click and move clips.
3 Razor Mode Razor mode allows you to split a clip where ever you
click.
4 Resize Mode Resize mode allows you to grab the edges of a clip and
drag to resize (or trim) the clip.
5 Snap Mode Snap mode allows clips to snap (or jump) to the nearest
clip or play-head (if any are close) when you drop them.
6 Add Marker Add a new marker, which allows you to quickly jump
back to this exact point while previewing.
Separate Audio From Video
OpenShot can separate the audio and video of a clip, if needed. If you only want to
play the audio of a clip, or only play the video with no audio, then follow these steps:
Only the Video
To only play the video of a clip, click on the speaker icon, located on the clip. This
will mute the audio for this clip. Or if you want to mute the audio for the entire track,
click the speaker icon on the track.
Only the Audio
To only hear the audio of a clip, click on the eye icon, located on the clip. This will
hide the video output. Or if you want hide the video output for the entire track, click
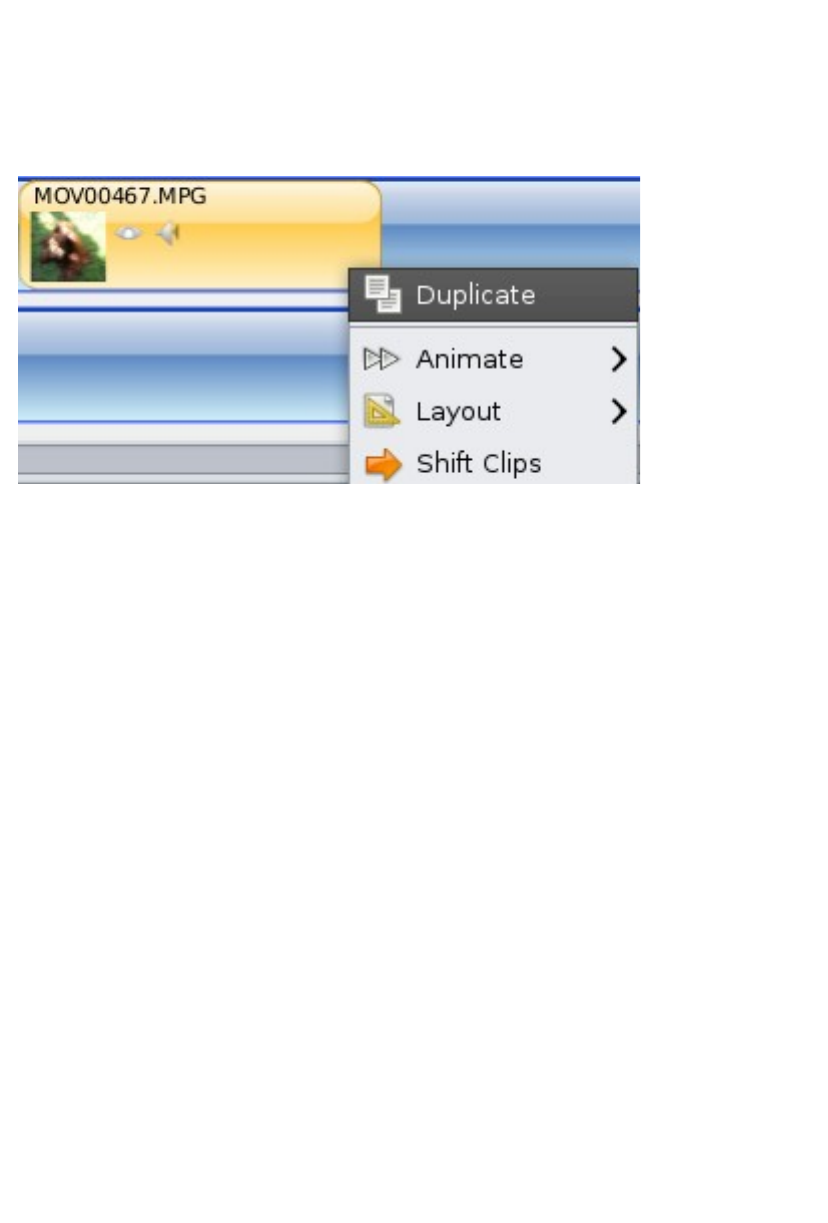
the eye icon on the track.
Duplicate Clips
A very useful feature in OpenShot is the ability to duplicate clips, transitions, and
masks. To duplicate an item, right-click on the item (such as a clip or transition), and
choose Duplicate. This will add an exact copy of the duplicated item to the timeline.
Including the IN and OUT points, effects applied to the clip, and key-frame animation
settings.
A common use of the Duplicate feature, is to trim a video clip down to a specific
scene, and then duplicate the clip. Once you have two identical clips, you can mute
the audio on one, and hide the video of the other. The is a quick way to separate the
audio and video of a clip. Now you can offset the audio of the clip, or continue the
audio of the clip, while trimming the video down. This is often used in films, when
two people are talking. They continue to play the audio from the first person talking,
while showing the reaction of the second person.
Clip Properties
Each clip in OpenShot has many properties that can be manipulated. However,
because it is not possible to display and adjust all of the settings on the timeline, this
screen was created. It lets the user adjust every possible setting and property that a
clip has, including Length, Speed, Volume, Size, Position, Aspect Ratio, and many
others.
Launch the Clip Properties Screen
To launch the clip properties screen, right-click on a clip and choose Properties.
Preview Changes
To quickly preview what your new settings will produce, click the Play button or drag
the preview Slider. You can preview your changes over and over again to get them
just right. No changes are saved to your timeline until you click the Apply button.
General Tab
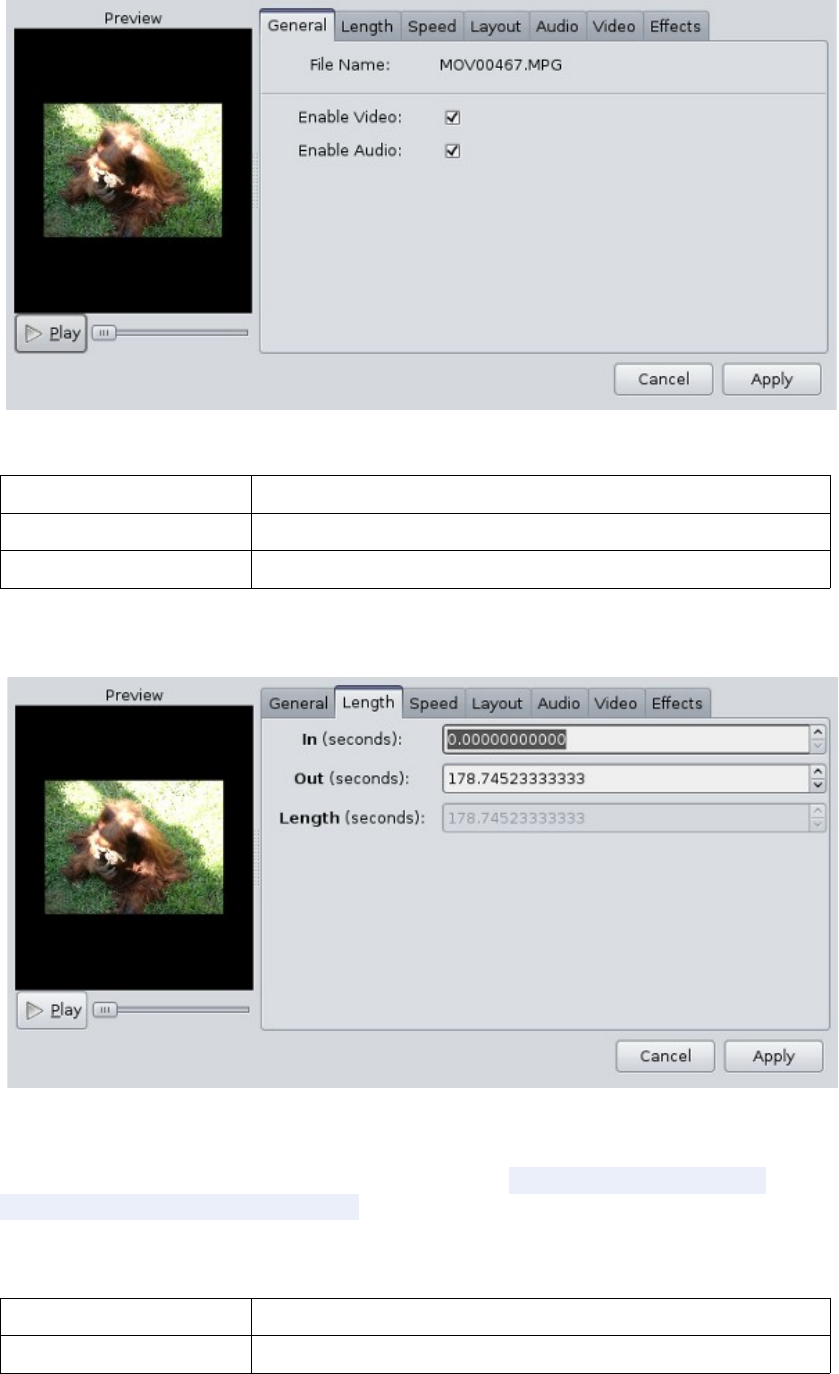
The general tab has the following properties:
component description
Enable Video Output video for this clip
Enable Audio Output audio for this clip
Length Tab
The length tab provides information on the beginning, end, and total length of a clip.
By adjusting these values, you can delay when a clip starts, end the clip sooner, or
both. Use the Play button to preview your changes. Practice by adjusting these
values without using the Resize tool.
The length tab has the following properties:
component description
In (seconds) The second to start playing the video (decimal)
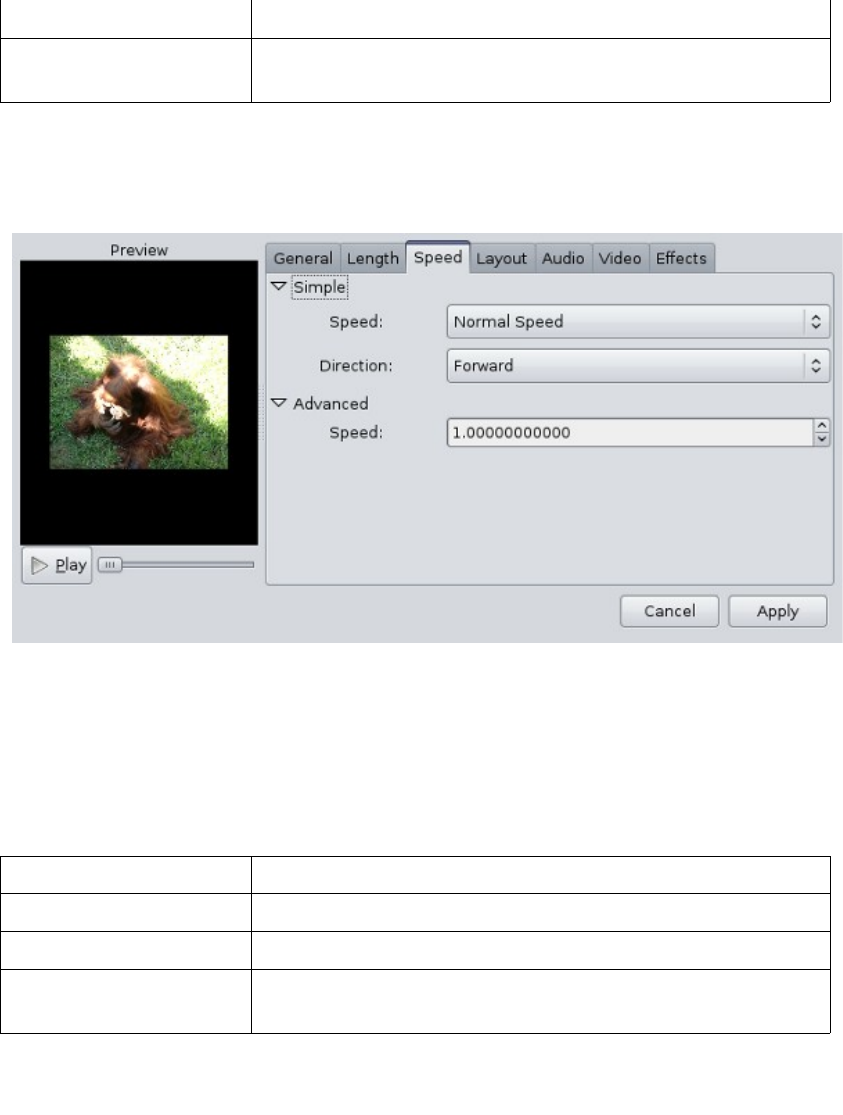
Out (seconds) The last second of the video clip (decimal)
Length (seconds) The length of the clip is calculated based on the IN and
OUT points.
Speed Tab
The speed tab speed consists of a simple mode and advanced mode. In the simple
mode, using predefined values, you can speed up the clip to 16x normal speed or slow
down the clip to 1/16 normal speed. Also, you can change the direction. The
advanced tab let's you set a high-precision speed decimal, instead of the simple
predefined fractions.
The speed tab has the following properties:
component description
Speed The second to start playing the video (decimal)
Direction The last second of the video clip (decimal)
Advanced Speed A high-precision decimal value for the speed of a clip.
This value changes as the speed dropdown changes.
Layout Tab
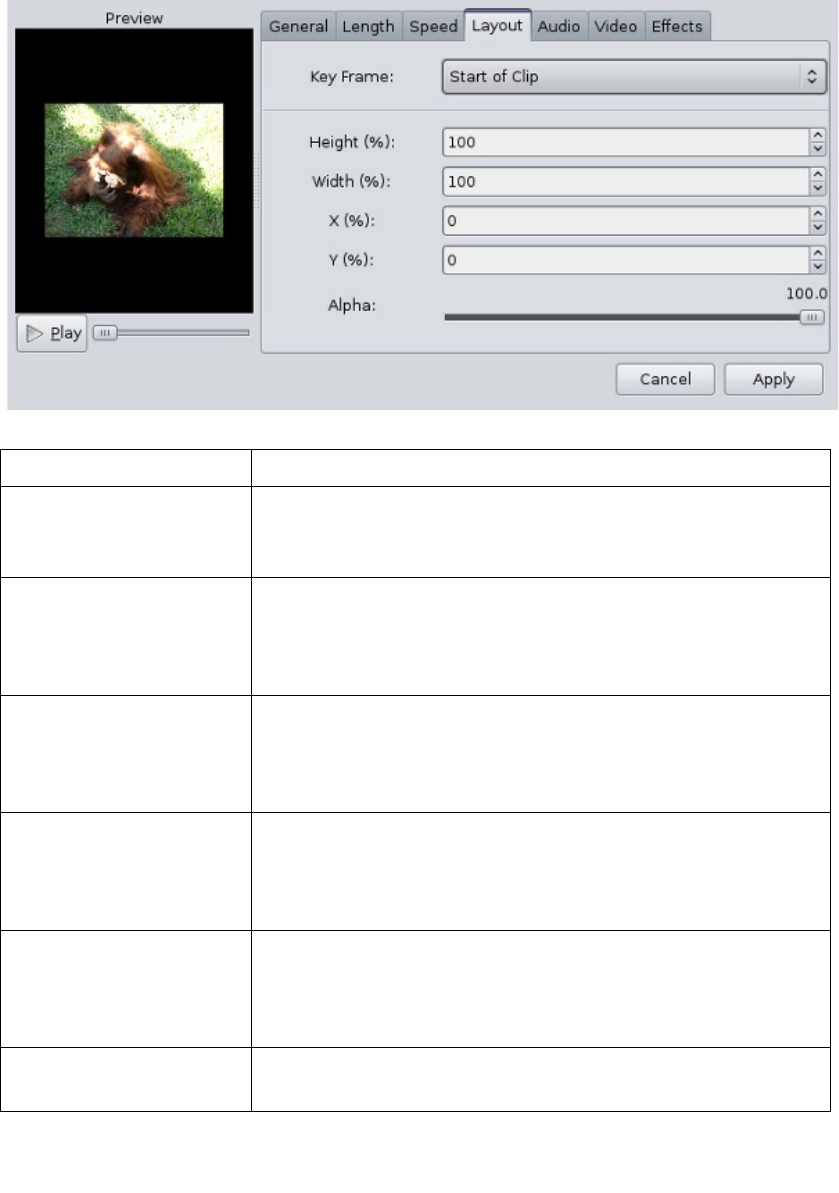
The layout tab has the following properties:
component description
Key Frame This dropdown determines which key frame you are
working with. Each clip has 2 key frames, the start of a
clip, and the end of a clip.
Height The height of a clip (percent based). The larger the
number, the taller the clip will be. The smaller the
number, the shorter the clip will be. This only affects the
current key-frame, not the entire clip.
Width The width of a clip (percent based). The larger the
number, the wider the clip will be. The smaller the
number, the narrower the clip will be. This only affects
the current key-frame, not the entire clip.
X X position of the center of the clip. The larger the number,
the further to the right the clip will be. The smaller the
number, the closer to the left the clip will be. This only
affects the current key-frame, not the entire clip.
Y Y position of the center of the clip. The larger the number,
the closer to the bottom the clip will be. The smaller the
number, the closer to the top the clip will be. This only
affects the current key-frame, not the entire clip.
Alpha The alpha level of the clip. 100 = opaque. 0 = invisible.
This only affects the current key-frame, not the entire clip.
Audio Tab
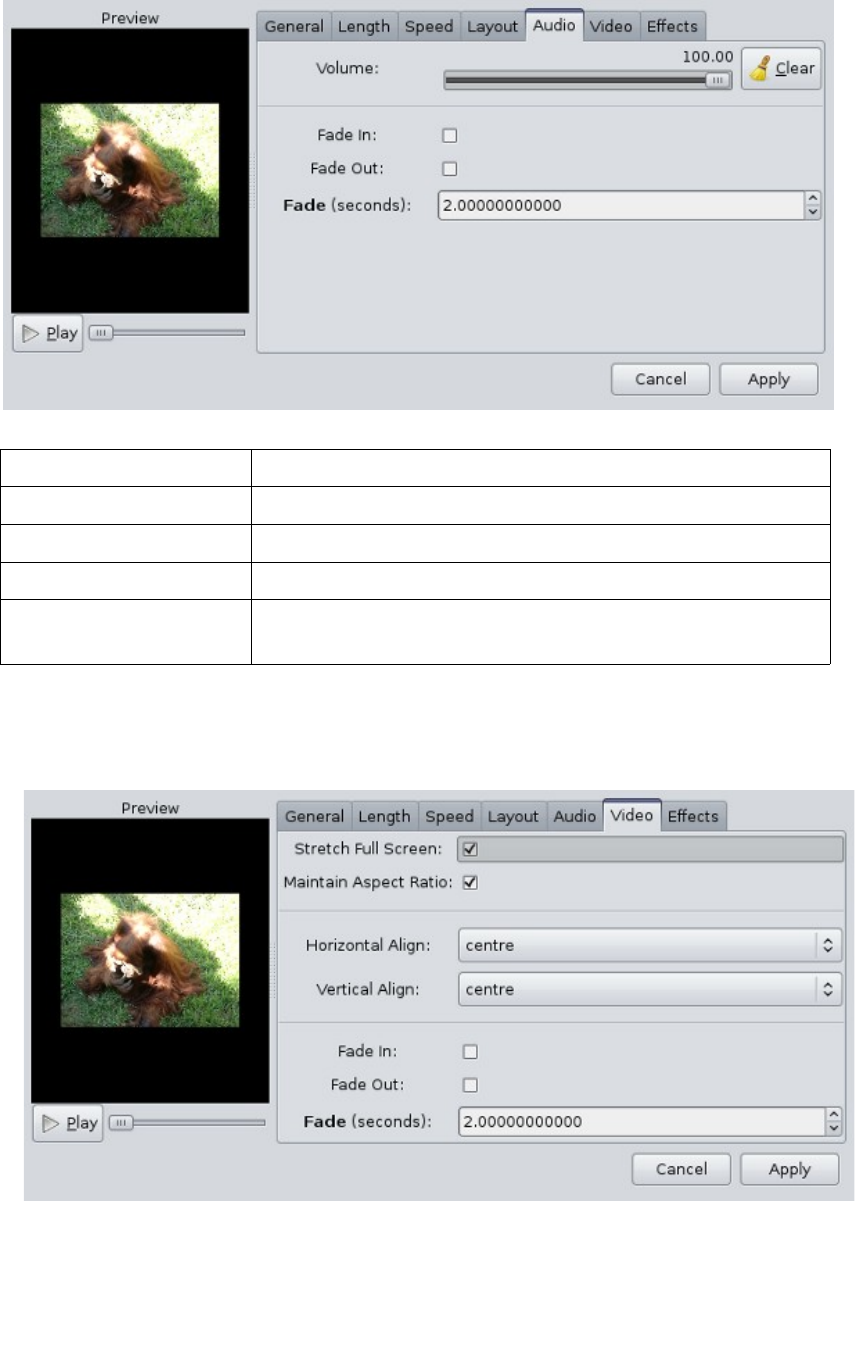
The audio tab has the following properties:
component description
Volume The volume level of this clip. 0 = mute, 100 = max.
Fade In Fade the clip in from mute to volume level.
Fade Out Fade the clip out from volume level to mute.
Fade (Seconds) The number of seconds the fade will last. The bigger this
number, the more gradual the fade will be.
Video Tab
The video tab can adjust the size, position, and alignment of a clip. Also, it can apply
a fade effect to the beginning and ending of a clip, which is sometimes easier than
using a transition. Because the fade is a property of the clip, it moves when you move
the clip. So, unlike transitions, fades stay with the clip when you move them.
The video tab has the following properties:
component description
Stretch Full Screen Stretch clips to the size of the screen (based on project
type).
Maintain Aspect Ratio Do not distort the clip.
Horizontal Align Alignment of the clip left to right.
Vertical Align Alignment of the clip top to bottom.
Fade In Fade the clip in from transparent to opaque.
Fade Out Fade the clip out from opaque to transparent.
Fade (Seconds) The number of seconds the fade will last. The bigger this
number, the more gradual the fade will be.
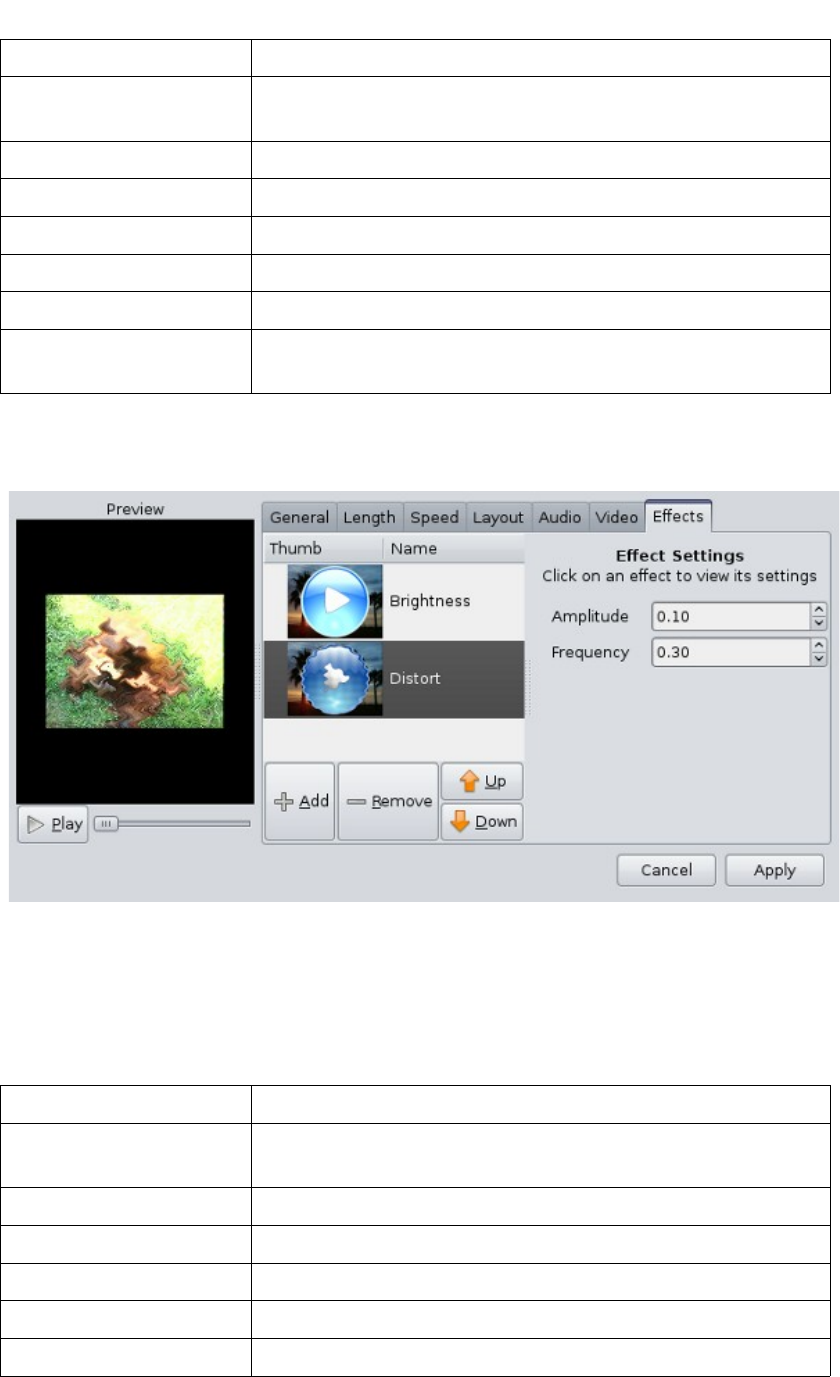
Effects Tab
The effects tab can apply and manage multiple effects that are applied to a clip. To
preview your clip with effects, use the Play button. Each effect can have many
settings, so use the Play button as you change settings to see the result.
The effects tab has the following properties:
component description
Effect List This box has a list of all effects applied to this clip. Clips
are processed in a top to bottom order.
Add Add a new effect to this clip.
Remove Remove the selected effect from the clip.
Up Move the selected effect up in the list.
Down Move the selected effect down in the list.
Effect Settings This area will contain settings for the selected clip (if any).
Key Frames
OpenShot can use Key Frames to animate a clip. A key frame is a point in time that
contains many settings, such as size, position, and transparency. There are two ways
to set key-frames in OpenShot, manually or with a preset.
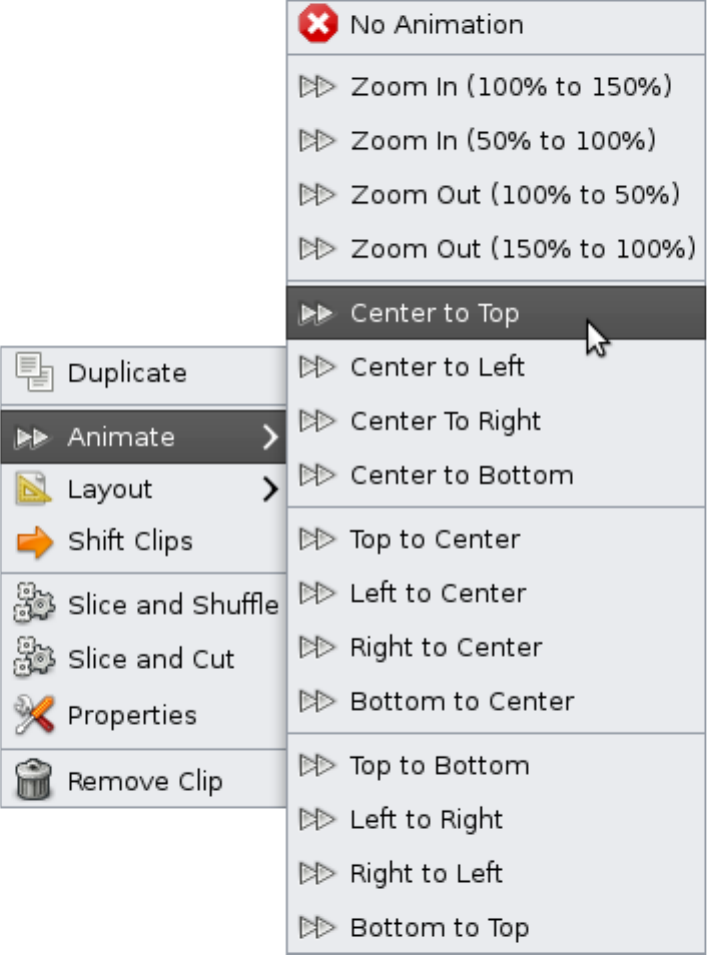
Preset Animation
Many preset animations are available, such as moving a clip from bottom to top of the
screen or slowly zooming up on a clip. To add a preset animation to a clip, right-click
on a clip, and choose Animate.
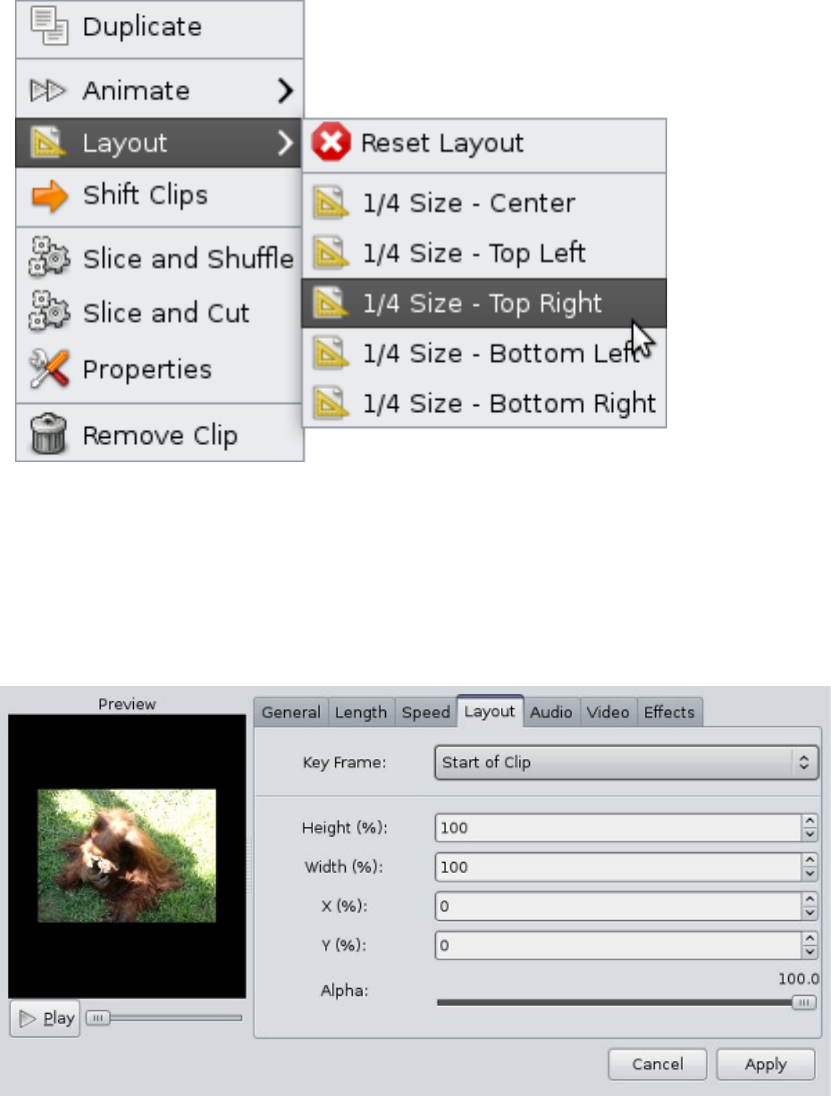
Preset Layout
Many preset layouts are available, such as resizing a clip and positioning it to the
corner of the screen or centering a clip. To add a preset layout to a clip, right-click on
a clip, and choose Layout.
Manually
To manually create key frames, right click on a clip, and choose Properties. Switch
to the Layout tab, and choose which key frame you want to edit from the dropdown.
Each clip has 2 key frames, the start of a clip, and the end of a clip. If there are any
differences between the start and end key frames, OpenShot will interpolate the
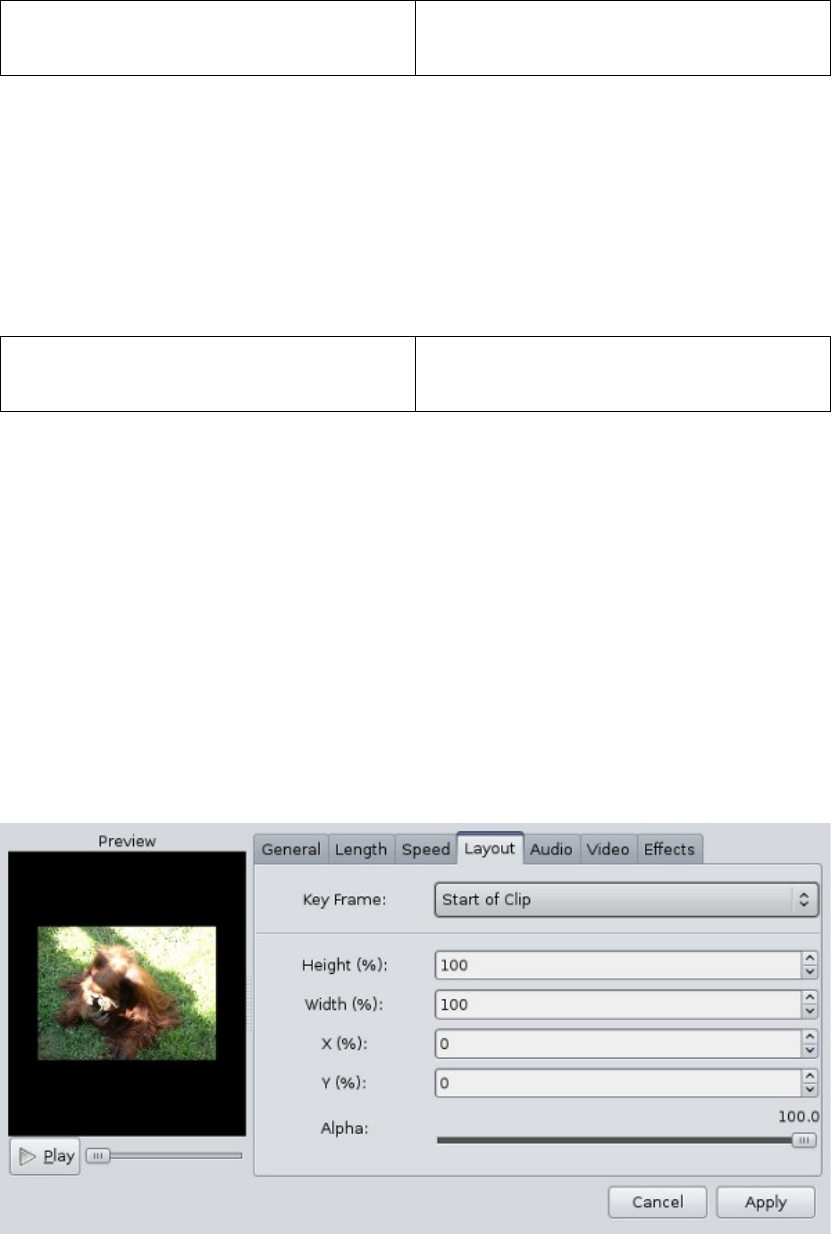
difference on a each frame, and thus animate the clip. The following properties are
effected by key-frames: Height, Wight, X, Y, and Alpha.
For example, consider these key frames:
Start Key Frame: X=-50, Y=0
End Key Frame: X =150, Y=0
This would result in the clip animating from the left to the right side of the screen.
The difference in the X setting is interpolated across all frames in this clip. The
longer the clip, the slower the animation. The shorter the clip, the faster the
animation.
If you want to statically change the size or position of a clip, just set the start and end
key frames to the same value:
For example, consider these key frames:
Start Key Frame: X=-50, Y=-50
End Key Frame: X=-50, Y=-50
This would offset the clip to the top right of the screen. It would not animate, because
the start and end key frames are the same value.
If you need to more than 2 key frames, slice the clip into many pieces, and at the
beginning and ending of each slice, you can set the key frames, thus giving you the
ability to make an unlimited number of key frames.
Crop Effect
OpenShot can crop video and image clips using our Layout setting, found on the Clip
Properties screen. Right click on a clip, and choose Properties. Then switch to the
Layout tab.
To crop a clip, you need to zoom up on the part of the clip you want to see. Adjust
the Height, Width, X, and Y settings to zoom up on the area of the clip you want to
crop. Be sure to set both key frames to the same values. Use the Play button to
preview your crop. Once you are happy with the crop, click the Apply button.
Rotate Effect
If you need to rotate a clip 90 degrees, 180 degrees, or even animate the rotation
around in circles, OpenShot has a Rotate effect which can help.
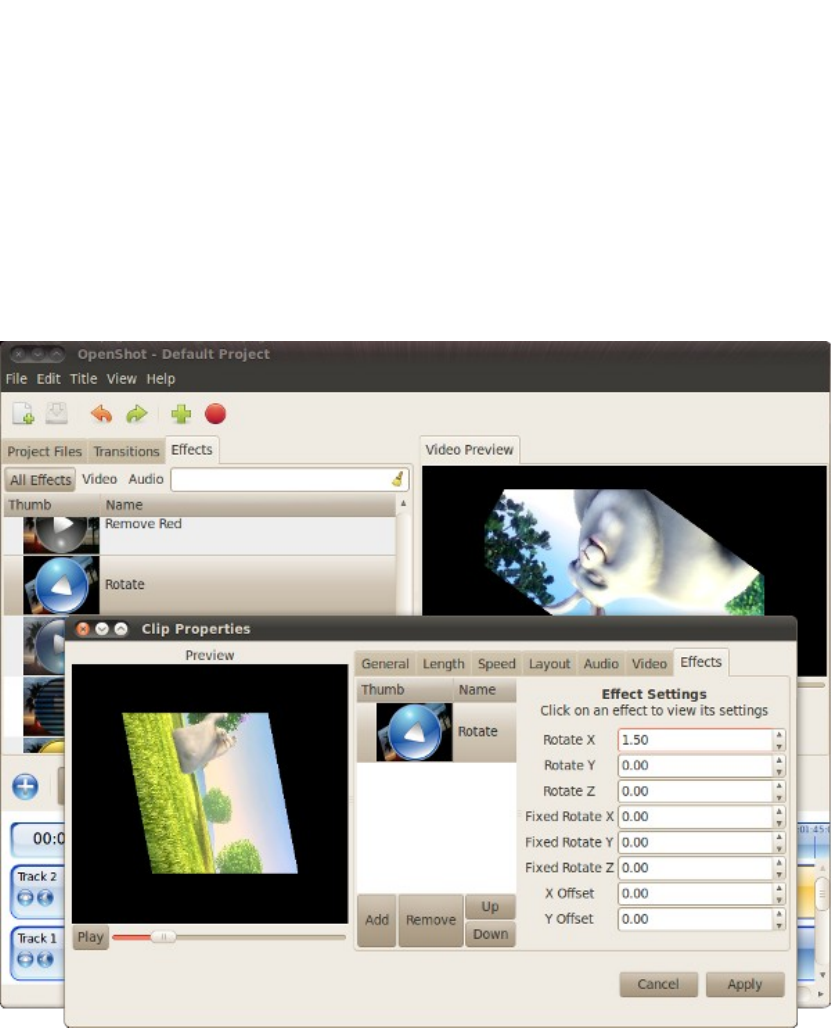
OpenShot has two types of rotation effects available, fixed and animated. To apply a
rotation effect, switch to the Effects Tab on the main window, and drag the Rotate
effect onto your clip.
To adjust your rotation settings, right-click on the clip and choose Properties. Then
switch to the Effects tab on the properties window, and click on the Rotate effect.
This will bring up a list of rotation settings that can be adjusted. Try changing each
setting, and use the Play Button to preview the effect.
Fixed Rotation
A fixed rotation can rotate a video 90 degrees, 180 degrees, or any number of degrees
you need. It does not animate the rotation. This is useful when you record a video
sideways, and need to rotate it. To use a fixed rotation, only adjust the settings with
that start with “Fixed”. Be sure to adjust the other settings back to zero.
Animated Rotation
An animated rotation can be used to spin a clip around in circles, or many other
patterns. This can be a nice effect for titles, spinning newspapers, or other creative
uses. To use an animated rotation, adjust the “Fixed” settings to zero, and only use
the settings that start with “Rotate”.
Title Editor
Like many video editors, OpenShot has a built-in title editor. It has some basic
functionality to help you create titles for your video project. Here are the features of
OpenShot's title system:
●Many Templates (Including a Solid Color Template)
●Easy Text Editing (title, subtitle)
●Change Font and Color (including alpha channel)
●Change the Background Color (including alpha channel)
●Uses SVG Image Format (vector based)
●Adds Titles to the Project Files Section
●Integration with Inkscape (as the advanced editor)
However, if the basic editor is not powerful enough for you, any SVG image file can
be imported and used as a title. The alpha channel (transparency) is respected, which
means titles can be overlayed on top of other tracks, and will show the video through
the transparent parts.
Launch Title Editor
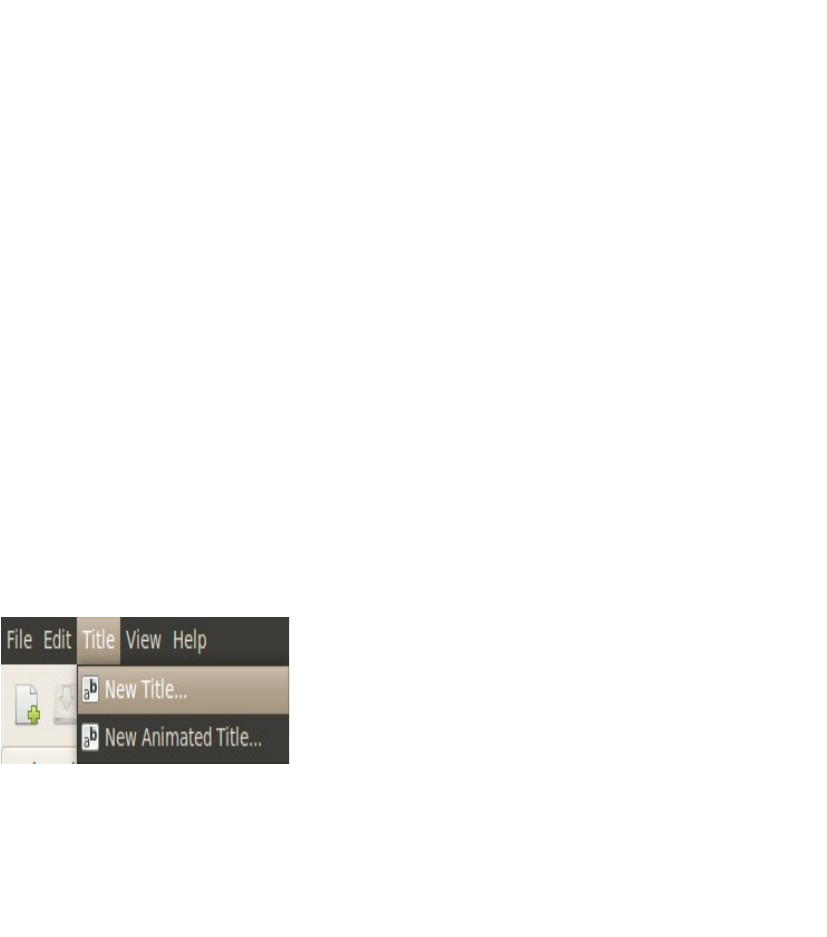
To add a new title, click the Project > New Title... menu option. This will launch the
Title Editor.
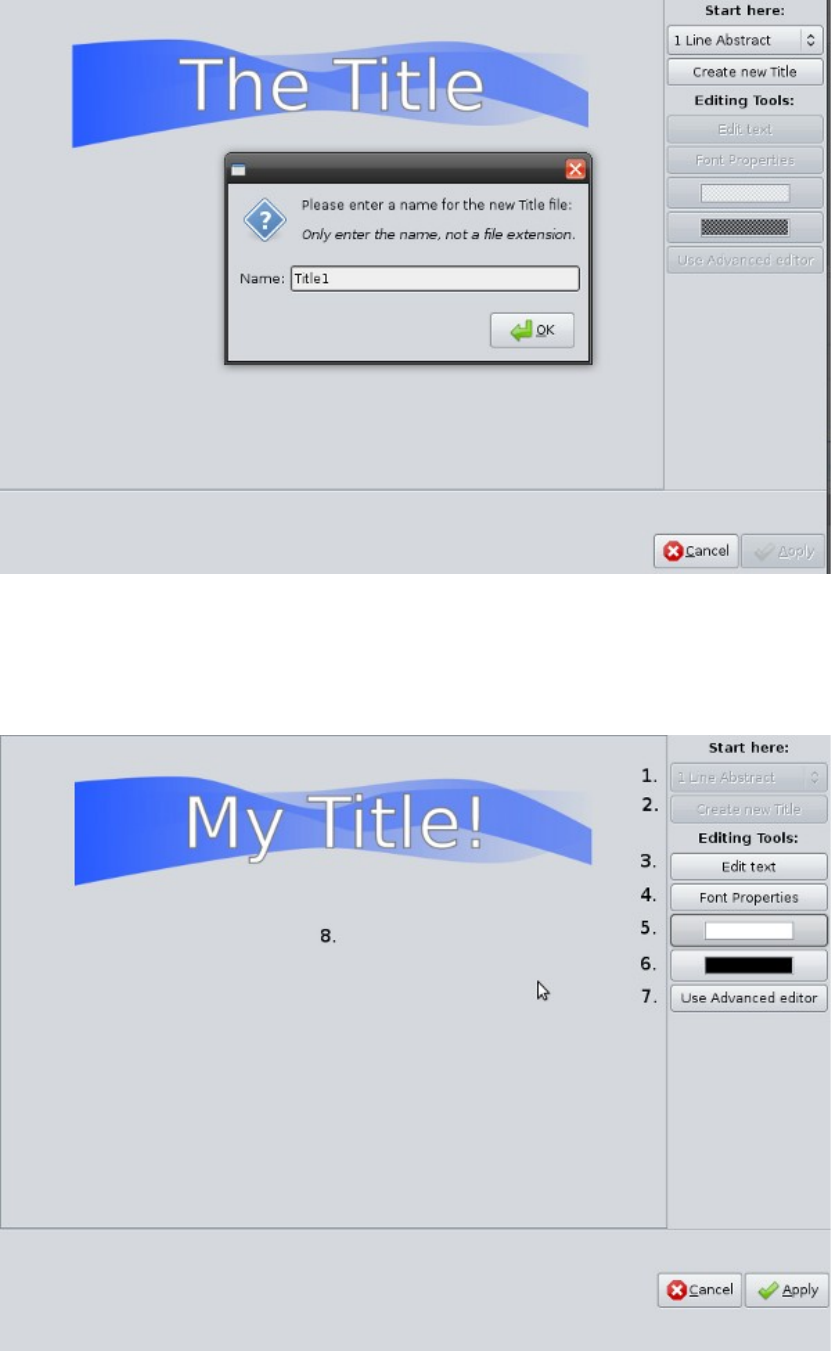
Create New Title File
Once the title editor launches, you need to select a template, and click the Create New
Title button. The will make a copy of the template SVG title, and add it to your
Project Files. Enter the name of the file, as it will be saved to your hard-drive.
Title Editor Window
The title dialog allows you to choose a template, edit text, change colors, and create
your own titles for your video project. Once you are finished editing your title, click
the Apply button.
Id component description
1 Choose Template Choose a template SVG file to use as a title.
2 Create Title
Button
Click this button to create your copy of the SVG template.
3 Edit Text Launch the text editing window.
4 Change Font Change the size and family of the font.
5 Font Color Change the font color and alpha (transparency) level.
6 Background
Color
Change the background color and alpha (transparency)
level.
7 Advanced Editor Edit this SVG title in Inkscape.
8 Title Preview Preview your title after each edit, color change, or font
change.
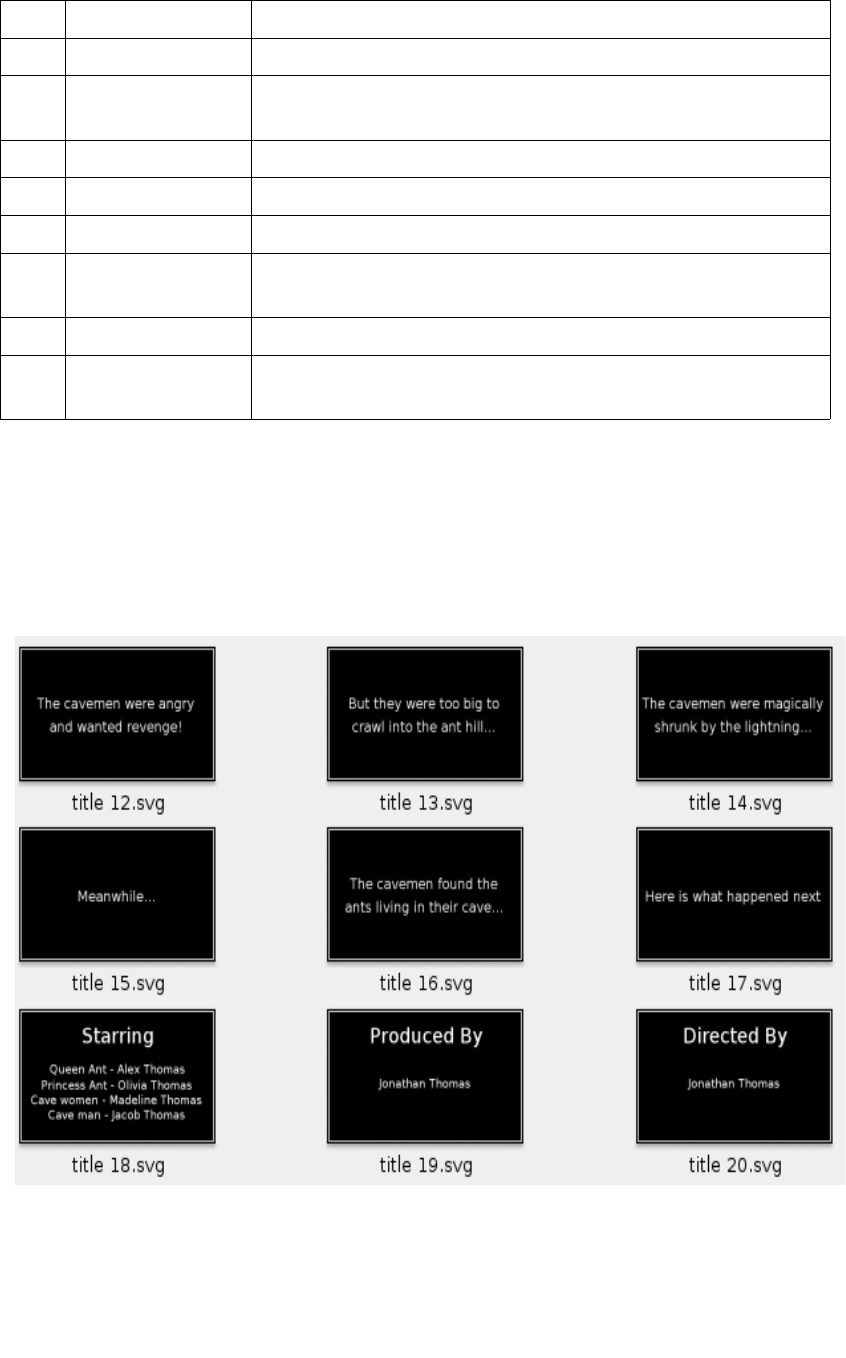
Scrolling Titles / Credits
To create the effect of scrolling titles, you need to cut your title sequence into many
different screen-sized titles.
Create Each Title Image
Offset Each Title on the Timeline
Add each title image of your scrolling credits to the timeline, set the length of each
image to 7 seconds, and then offset them between two tracks.
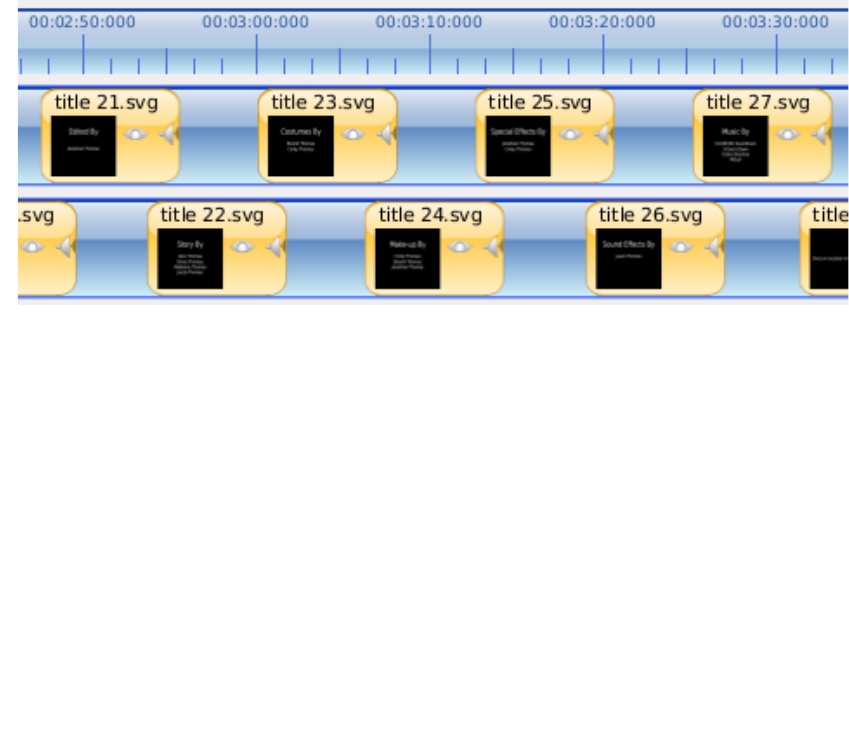
Animate Each Title
Right-click on each title clip and choose Animate > Bottom to Top. This will create
the illusion that your entire credits are scrolling from bottom to top in one continuous
sequence, with no gaps. Be sure to overlap the titles (as show in the illustration) so
there are no gaps between the titles.
Transitions
Transitions are used to gradually move between 2 different clips. Many different
transitions are available in OpenShot. They are easy to drag and drop onto the
timeline, and can add lots of fun to a video project.
Transition Screen
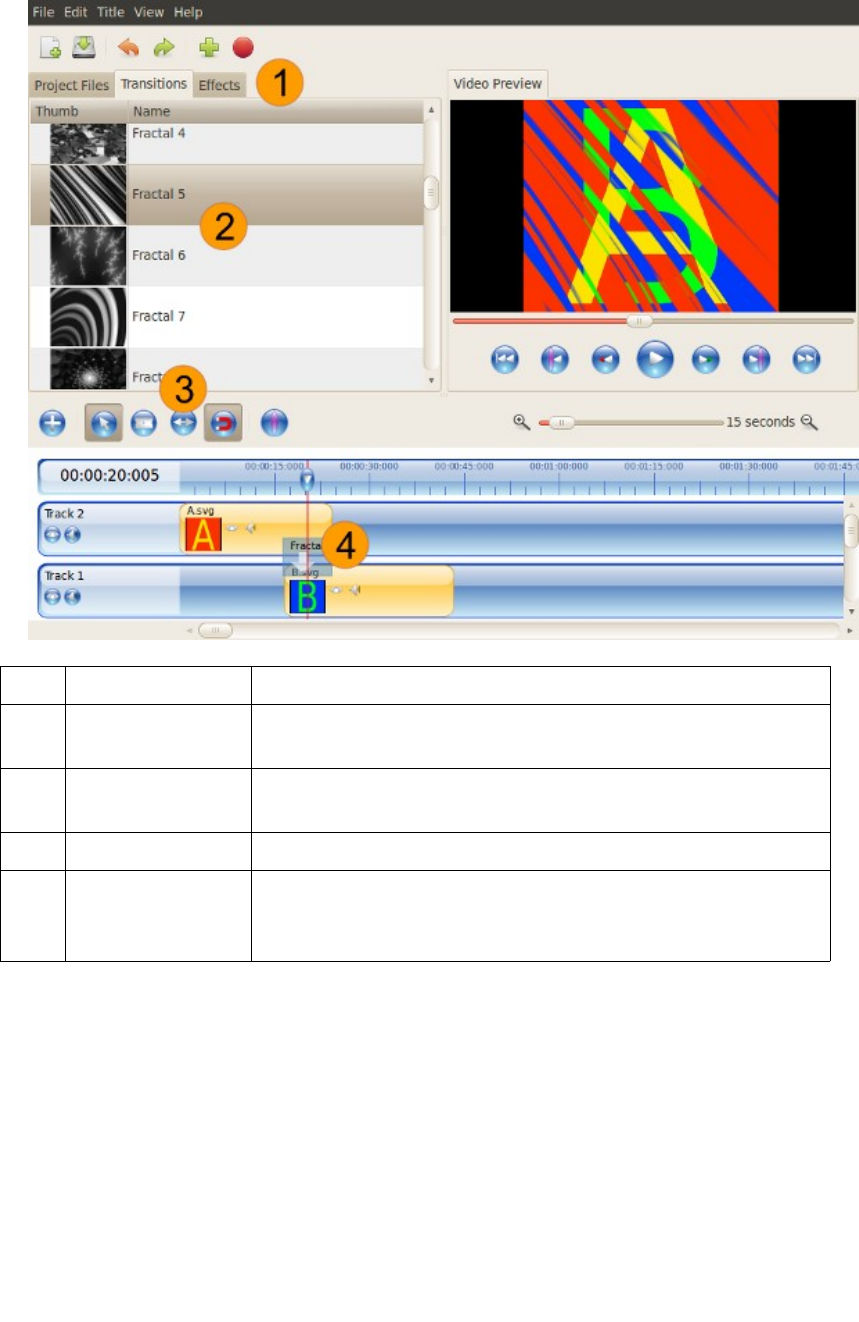
Id component description
1 Transition Tab This is the transitions tab. It contains a list of all
transitions available in OpenShot.
2 Transition List This is the transition list. Select a transition and drag and
drop it onto the timeline.
3 Resize Tool The resize tool can be used to resize a transition.
4 Transition on the
Timeline
Once you drop a transition on the timeline, it can be
moved and resized just like any other clip. The transition
snaps between tracks, and blends between the 2 tracks.
Add a Transition
To add a transition, switch to the Transition Tab, and select a transition by clicking on
it. Drag and drop the transition onto the timeline. It will snap between 2 tracks.
Move a Transition
To move a transition, switch to Select Mode on the Timeline Toolbar, and drag it to a
new position.
Resize a Transition
To resize a transition, switch to Resize Mode on the Timeline Toolbar, and drag the
left or right edge to a new size.
Switch the Direction
Because transitions blend between 2 tracks, it is important to know which direction it
is blending. On the transition, it has an arrow that shows the direction, top to bottom,
or bottom to top. In general, the transition should go from the first clip to the next
clip by timeline position.
To change the direction of a transition, right-click on a transition, and choose Switch
Direction.
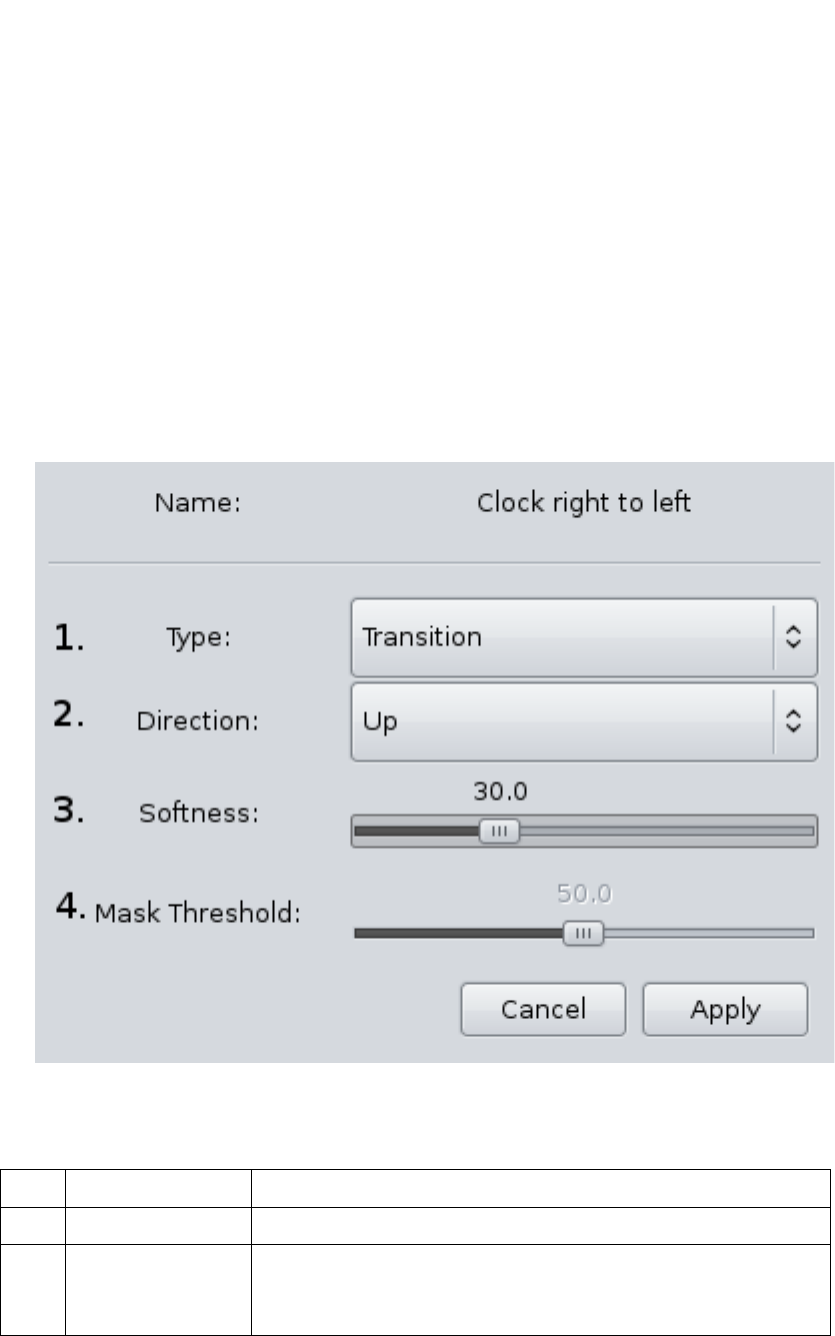
Transition Properties
Just like a clip, a transition has a properties window. To launch the properties
window for a transition or a mask, right-click on the item, and choose Properties. To
save your changes, click on the Apply button.
Id component description
1 Type Mask or Transition
2 Direction The direction of the transition or mask. Up blends from
the bottom clip to the top clip. And Down blends from the
top clip down to the bottom clip.
3 Softness The softness of the transition. The bigger the number, the
wider the wipe, and the smaller the number to narrower the
wipe.
4 Mask Threshold The mask threshold is the amount of gray to use for the
mask. The bigger the number, the more of the mask is
used, the smaller the number, the less is used. Experiment
to find the right threshold for a mask.
Convert to Mask
A mask is very similar to a transition, except that a mask is static. It does not
gradually change from one clip to the next. Instead, it mixes the 2 tracks at some
predetermined point. A mask can be used to only show a small section of a clip, to
show a border around a clip, to block out something from a clip. To experiment with
a mask, simply convert a transition to a mask and watch what happens.
To convert a transition to a mask, right-click on the transition, and choose Convert to
Mask.
Create a New Transition / Mask
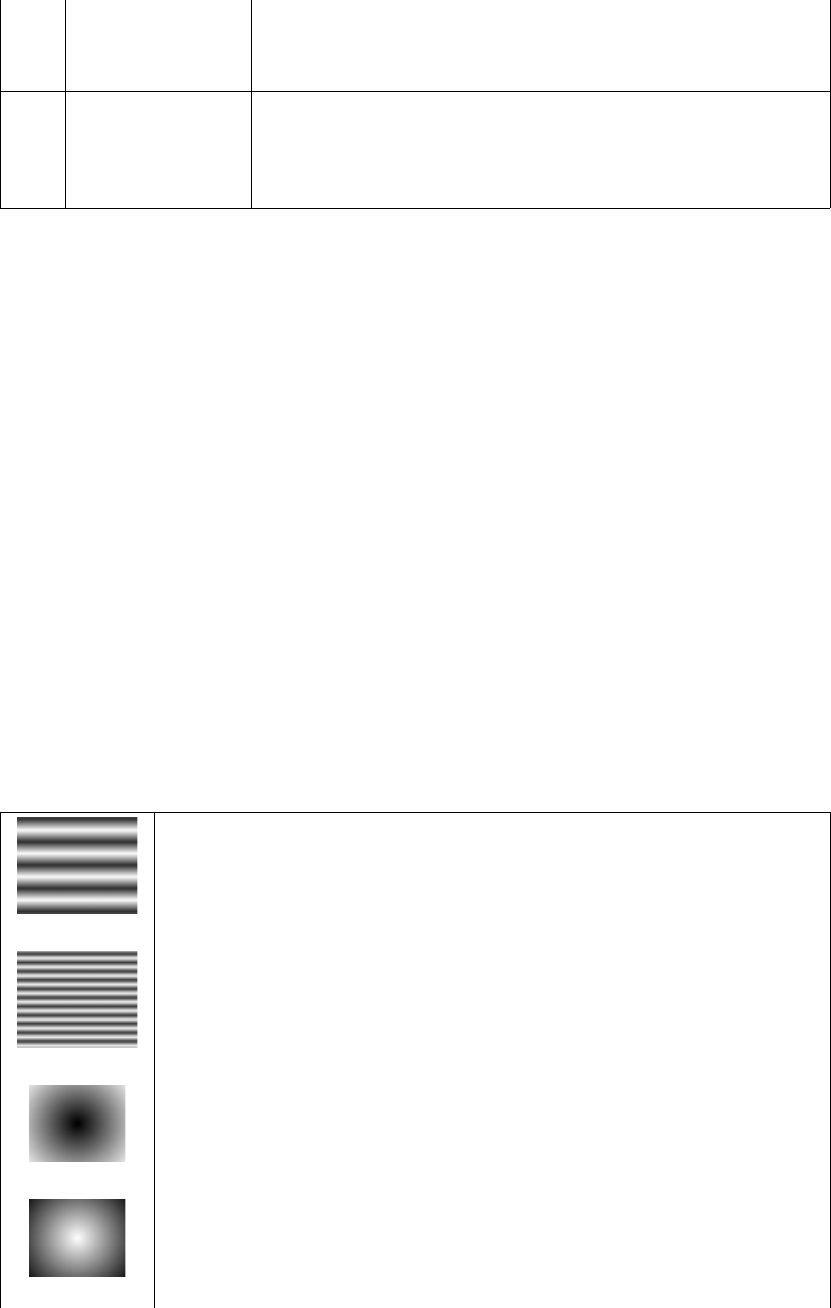
Transitions are just gray-scale images. They can be easily created in any graphics
program. Locate the /openshot/transitions/ folder on your computer, and take a look
at the default transitions. To add your own, just copy a new gray-scale image into this
folder. The next time you launch OpenShot, it will show up in the list of transitions.
Remove a Transition
To remove a transition, right-click on a transition on the timeline, and choose Remove.
List of Transitions
Blinds In to Out Big
Blinds In to Out Small
Circle In to Out
Circle Out to In
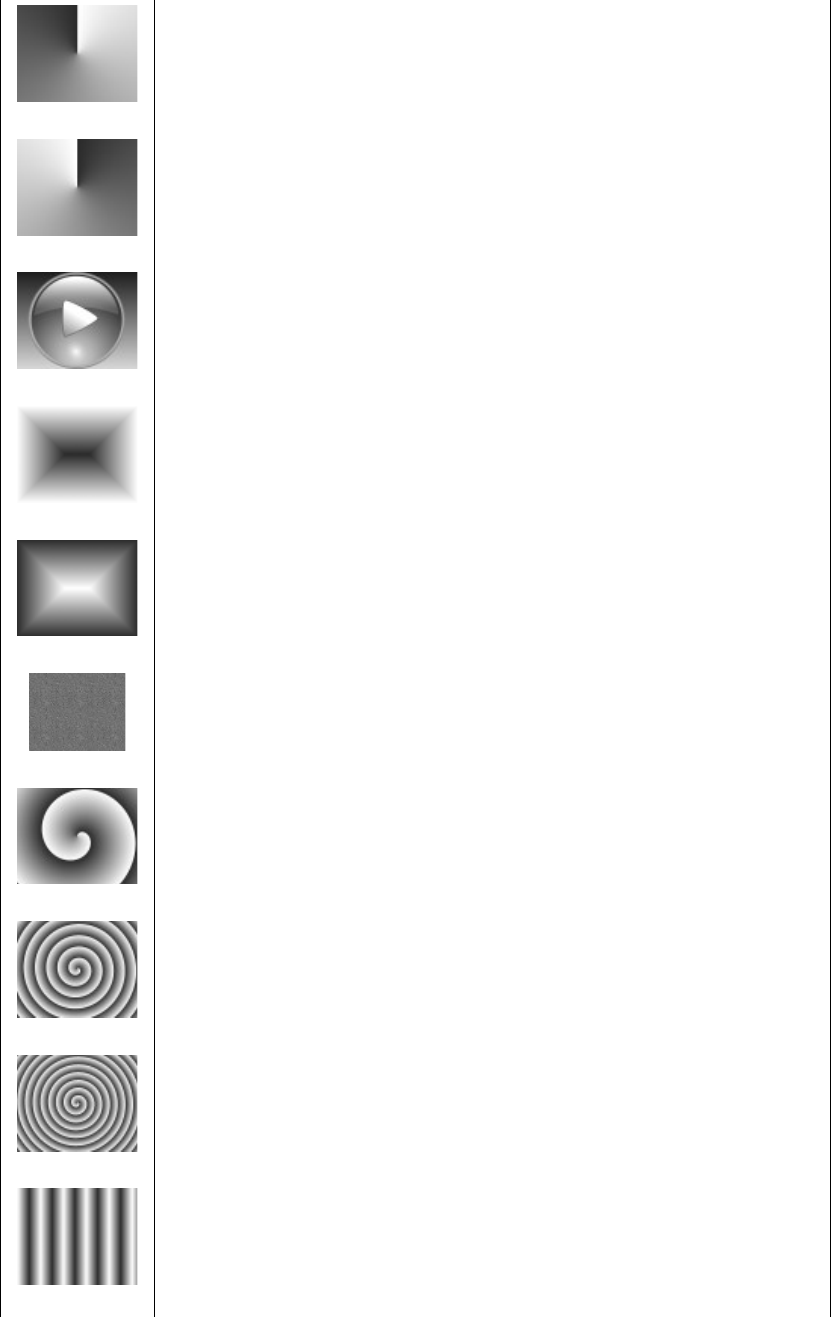
Clock Left to Right
Clock Right to Left
OpenShot Logo
Rectangle In to Out
Rectangle Out to In
Dissolve – This is the default transition in OpenShot. It smoothly
blends between 2 clips.
Spiral Big
Spiral Medium
Spiral Small
Vertical Blinds Big
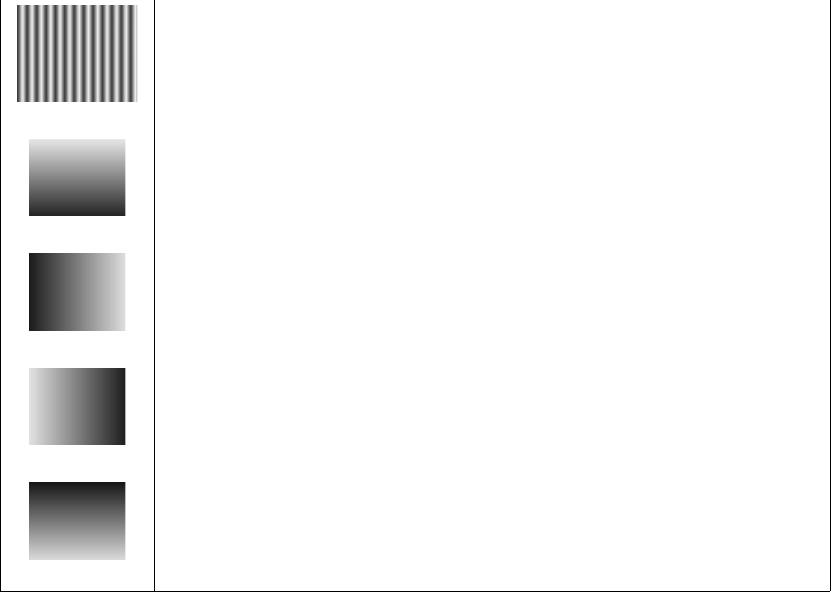
Vertical Blinds Small
Wipe Bottom to Top
Wipe Left to Right
Wipe Right to Left
Wipe Top to Bottom
Effects
OpenShot has over 30 effects designed to manipulate the video or audio output of a
clip. Adjusting color hue, brightness, and gamma can all be done with effects. Also,
more exotic effects, such as distort, wave, old-film, green screen (also known as
Chroma Key), and audio effects.
Add an Effect
To add an effect, switch to the Effects tab, select an effect from the list, and drag the
effect onto a clip on the timeline.
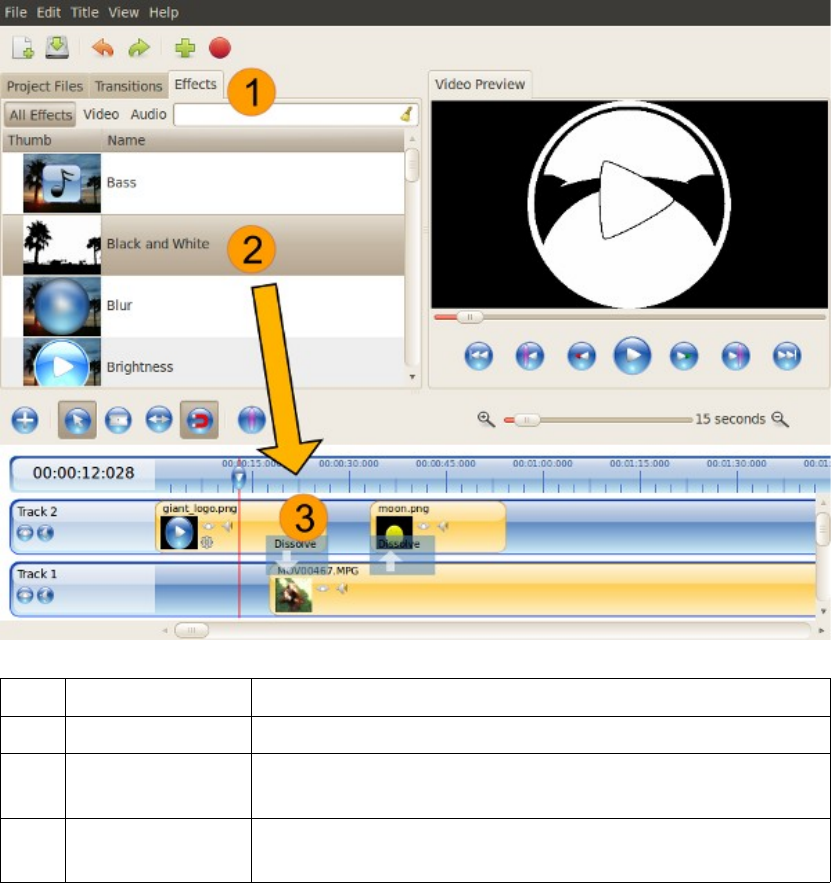
Id component description
1 Effects Tab This tab holds the effects list.
2 Effects List The effects list contains every effect available in
OpenShot.
3 Clip Drag the selected effect onto any clip. Use the Clip
Properties to adjust effect settings.
Adjust Effect Settings
To adjust the settings of an effect, right-click on a clip, and choose Properties.
Switch to the Effects tab, and you will see a list of all effects that have been applied to
the current clip.
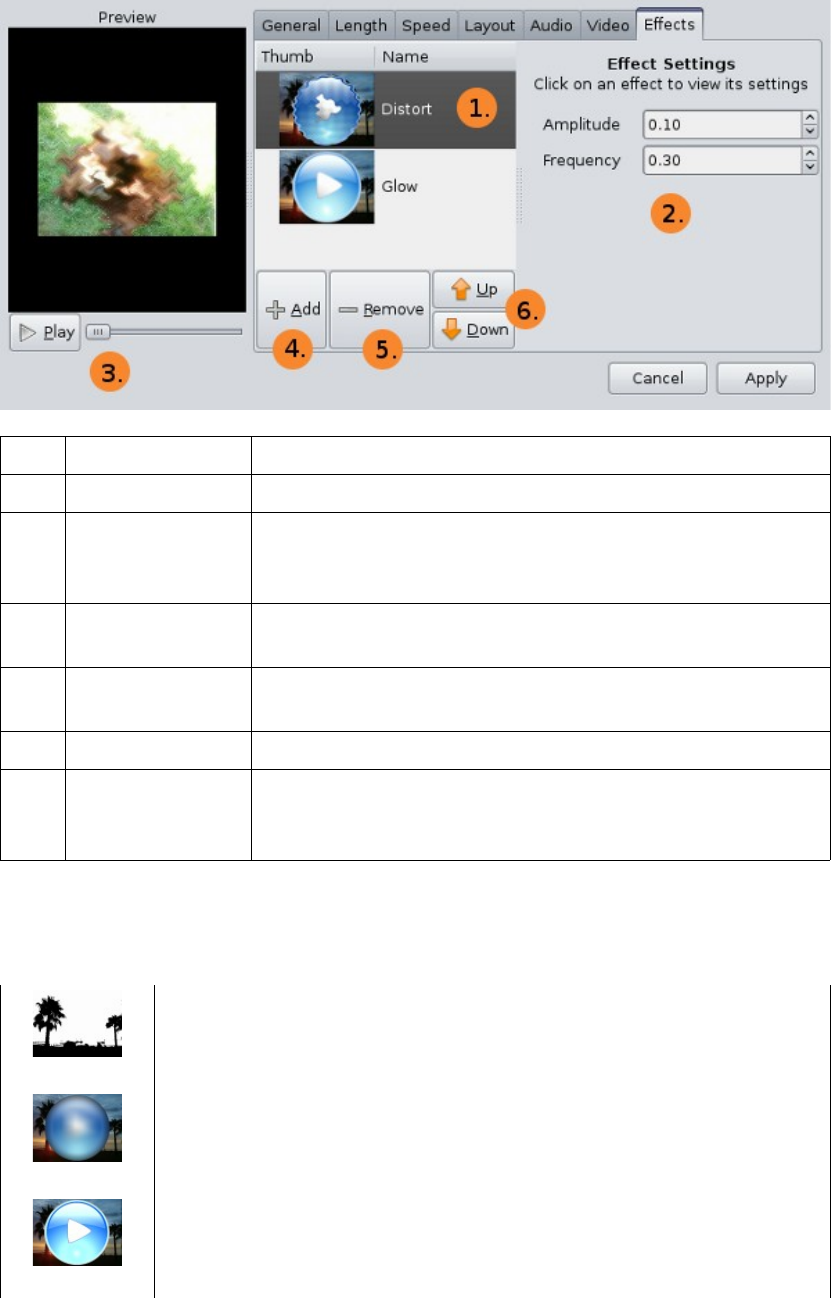
Id component description
1 List of Effects List of effects that belong to the selected clip.
2 Effect Settings A list of settings for the selected effect. Click on an effect
to load this list of settings. As you change the values of
these settings, use the Play button to preview the effect.
3 Preview Buttons Use the Play button and slider to preview the effects
before you click Apply.
4 Add Effect This button launches the Add Effect window. Select an
effect to add and click Add Effect.
5 Remove Effect This button removes the selected effect (if any).
6 Move Effect Effects are applied top to bottom. Use these buttons to
arrange the order of effects. Use the Play button to
preview your changes.
List of Effects
Black and White - This effect converts the video to just black and
white. This is different than gray-scale, as it only has two colors,
and no gray.
Blur – This effect blurs the video. It can also animate the blur from
blurry to focused, or focused to blurry.
Brightness – This effect adjusts the brightness of a video clip.
BurningTV – This effect animates a fire burning your video.
Charcoal – This effect applies a charcoal filter to the video.
Chroma Key (also known as green-screen or blue-screen). This
effect removes a specific color and makes it transparent.
Deinterlace – Remove the odd and even fields, and combine them
into a single full frame.
Distort – This effect adds ripples and distortions to a video clip.
Gamma – This effect adjusts the gamma level of the video.
Glow – This effect adds a glow to the video.
Gray-scale – This effect converts a color video clip into shades of
gray. If you want just black and white, use the Black and White
effect.
Hue – Adjust the hue / color of the clip.
Invert – This effect produces a negative of the video output.
Mirror – Creates a mirror effect. Vertical, horizontal, and diagonal
mirrors are supported.
Old Dust – Adds dust particles to your clip. Add all 4 “old” effects
for the ultimate old video look.
Old Film – Jumps the video up and down randomly. Add all 4 “old”
effects for the ultimate old video look.
Old Grain – Adds some grain to the clip. Add all 4 “old” effects for
the ultimate old video look.
Old Lines – Adds some lines to the clip. Add all 4 “old” effects for
the ultimate old video look.
Oversaturate – This effect over-saturates the color of a video.
Pixelate – This effect turns the video into small blocks, to distort the
video and make it less clear.
Remove Blue – This effect removes the color blue from the video.
Remove Green – This effect removes the color green from the video.
Remove Red – This effect removes the color red from the video.
Scan-lines – Add artificial scan-lines, similar to a TV or some
computer monitors.
Sepia – This effect tints the color, and makes it look like an old
photograph.
Sobel – This effect finds the edges in your video clip.
Threshold – This effect will adjust which colors to show based on a
threshold.
Water – Add rain drops, surfing waves, or a vortex.
Wave – Ripple the screen in a wave pattern. This can be animated to
slowly wave your video.

White Balance – Adjust what color is considered white, and then
adjust all other colors to be relative to that adjustment.
Echo – Add an echo to the audio of the clip.
Phaser – Give a futuristic sound to your clip.
Pitch – Adjust the audio pitch of a clip.
Export Video
Once your have completed a project, you will want to export it to the correct format,
based on your needs. OpenShot has many predefined formats to simplify this process.
There are two modes to export a video in OpenShot, Simple Mode and Advanced
Mode.
Both modes share a common area at the top of the screen, General Options. Name
your video file (no extension) and choose an export folder.
Launch Export Window
To launch the export window, click on the Export Video toolbar icon at the top of the
main window, or choose File > Export Video.
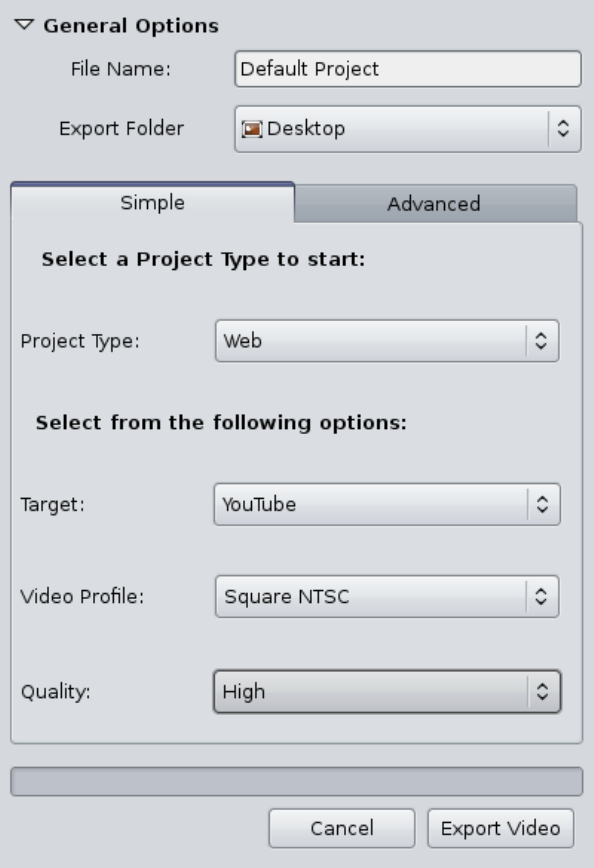
Simple Mode
OpenShot has many predefined export formats, which cover the most common export
scenarios. Select a Project Type, such as DVD or Web, and then choose the Target,
Video Profile, and Quality. If you select All Formats, it will give you a list of all
common formats, and let you pick the one you want.
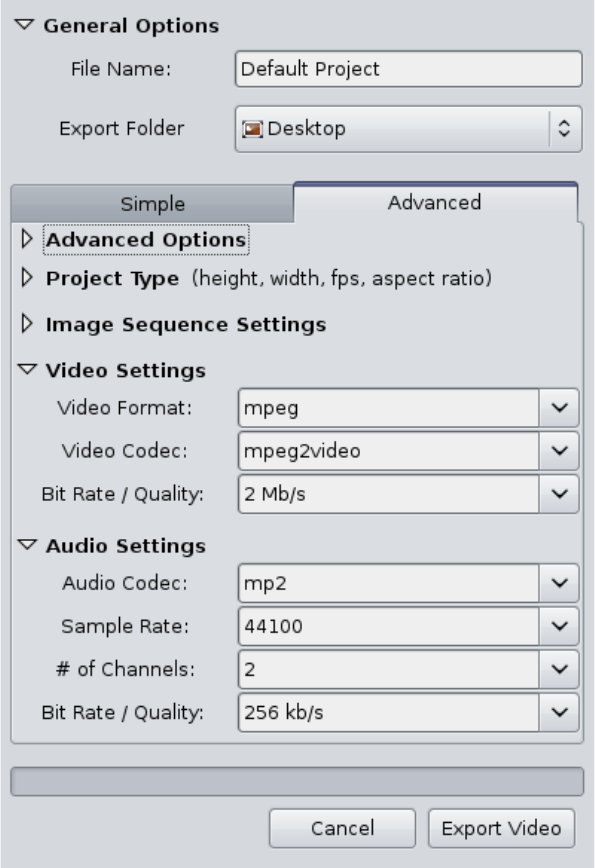
Advanced Mode
The advanced options should only be used by someone familiar with FFmpeg, since it
is so easy to create invalid combinations of codecs, formats, and bit-rate settings.
However, if you are familiar with these settings, any FFmpeg supported
format/codec/bit-rate can be used, which opens up dozens and dozens of additional
formats that can be used during the export process. You can also export your video as
an image sequence, which can be useful if you intend to import this video into a
program that requires image sequences, such as Blender.
Also, if you first select values for the Simple Mode, and then switch to the Advanced
Mode, it will preselect all of the Simple Mode settings.
List of Formats & Codecs
Set of tables for exports based on video type categories
Video
Type
Vid
eo
For
mat
Video
Codec
Audio
Codec
Suggested Project
Profile Notes on Usage
AVC
HD
Disks
MP
EG-
TS
libx264 libfaac ATSC 1080i 50Hz
1920x1080 Interlaced Use
for Blu-Ray and AVCHD
Disks
AVC
HD
Disks
MP
EG-
TS
libx264 ac3 ATSC 1080i 50Hz
1920x1080 Interlaced Use
for Blu-Ray and AVCHD
Disks
AVC
HD
Disks
MP
EG-
TS
libx264 libfaac ATSC 1080i 60Hz
1920x1080 Interlaced Use
for Blu-Ray and AVCHD
Disks (mainly in USA) but
not necessary Modern TV's
adapt rate.
AVC
HD
Full
HD
MK
Vlibx264 libfaac ATSC 1080p 25Hz 1920x1080 Progressive for
use on computers
AVC
HD
Full
HD
MK
Vlibx264 ac3 ATSC 1080p 25Hz 1920x1080 Progressive for
use on computers
Quick
Time
Full
HD
mov libx264 libfaac ATSC 1080p 25Hz 1920x1080 AVCHD
Quicktime 7 Progressive
Quick
Time
Full
HD
mov libx264 ac3 ATSC 1080p 25Hz 1920x1080 AVCHD
Quicktime 7 Progressive
Quick
Time
Apple
TV
mov libx264 libfaac ATSC 720p 30Hz
1280x720 29.97Hz AVCHD
Quicktime 7 Progressive
Web Publishing
Quick
Time
Web
mov libx264 ac3 ATSC 720p 30Hz
1280x720 29.97Hz AVCHD
Quicktime 7 Progressive
Web Publishing
Quick
Time
Web
ipod libx264 libfaac Square NTSC 640x480 29.97Hz AVCHD
Quicktime 7
Quick
Time
iPod
ipod libx264 libfaac Quarter Square
NTSC
320x240 29.97Hz AVCHD
Quicktime 7
DVD vob MPEG-2 ac3 DV PAL DV PAL
Widescreen
For native SD movies only!
Not for down-converting
HD
DVD vob MPEG-2 ac3 DV NTSC DV
NTSC Widescreen
For native SD movies only!
Not for down-converting
HD
Xbox
360 mov libx264 libfaac
DV NTSC
Widescreen HDV
720 30p HDV 720
60p
Xbox
360 mp4 libx264 libfaac
DV NTSC
Widescreen HDV
720 30p HDV 720
60p

Vimeo
High
Def
mp4 libx264 libfaac HDV 720 25p
HDV 720 30p
1280x720 square pixels
needs to be de-interlaced or
progressive
Vimeo
Std
Def
mp4 libx264 libfaac Square NTSC
640x480 square pixels needs
to be de-interlaced or
progressive
Vimeo
Std
Def
Wides
creen
mp4 libx264 libfaac Square NTSC
Widescreen
854x480 square pixels needs
to be de-interlaced or
progressive
Flickr
High
Def
mov libx264 ac3 HDV 720 30p
1280x720 square pixels
needs to be de-interlaced or
progressive
Picasa mpe
g
mpeg2vide
omp2 Square NTSC
640x480 will be converted
to 480x360 or 320x240
Flash
YouT
ube
mpe
g
mpeg2vide
omp2 Square NTSC
640x480 will be converted
to 480x360 or 320x240
Flash
YouT
ube
High
Def
mp4 libx264 libfaac HDV 720 25p
HDV 720 30p
1280x720 square pixels
needs to be de-interlaced or
progressive
YouT
ube
Full
High
Def
mp4 libx264 libfaac HDV 1080 25p
HDV 1080 30p
1920x1080 square pixels
needs to be de-interlaced or
progressive
Nokia
nHD mp4 libxvid libfaac Nokia nHD 640x360 New Standard for
S60 5th Edition Devices
MetaC
afe mp4 mpeg4 libmp3lam
eSquare NTSC 640x480 will be converted
to 320x240 Flash
Project Types / Profiles
Every project in OpenShot must have a project type (also known as a profile). A
profile determines the following playback & export settings for your video project:
frame rate, height & width, aspect ratio, and pixel ratio.
Here is an example profile, for ATSC 1080i 60Hz:
description ATSC 1080i 60Hz Name of your profile as it will appear
in OpenShot.
frame_rate_num 30000 Numerator of the frame-rate.
frame_rate_den 1001 Denominator of the frame-rate.
width 1920 Width of the video.
height 1080 Height of the video.
progressive 00 = Interlaced, 1 = Progressive
sample_aspect_num 1Numerator of pixel ratio.
sample_aspect_den 1Denominator of pixel ratio.
display_aspect_num 16 Numerator of display aspect ratio.
display_aspect_den 9Denominator of display aspect ratio.
OpenShot has over 40 predefined profiles / project types available. However, if you
can not find a profile that works for your project, you can also create your own.
Locate the /openshot/profiles/ folder. Copy and rename an existing profile. Edit the
profile with your favorite text editor. Next time you launch OpenShot, you will be
able to choose your new profile.
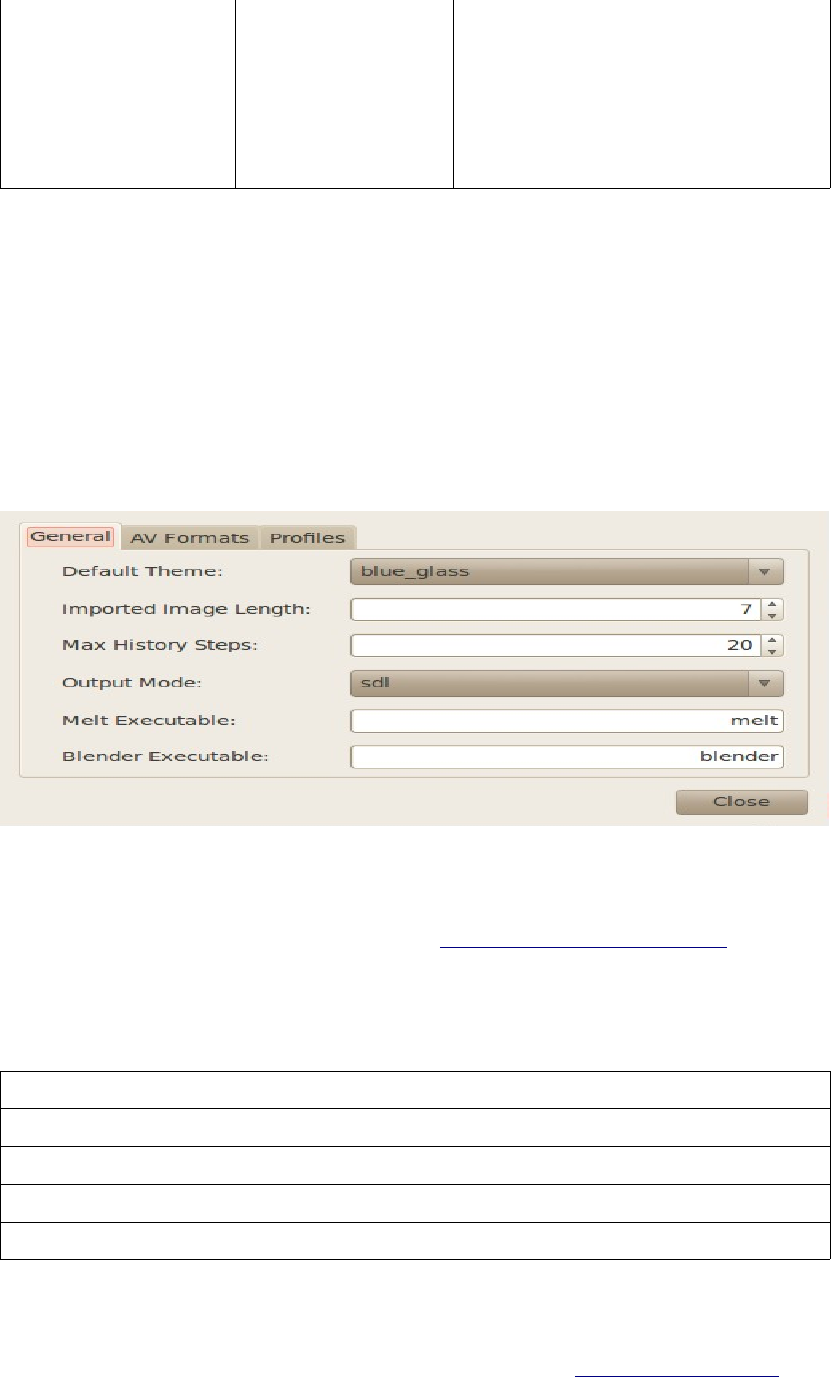
Preferences
To configure OpenShot, choose Edit > Preferences . The Preferences dialog can
adjust the default length of images, the default theme, and the default project type /
profile. Setting these values can save you valuable time when starting a new project.
About OpenShot
OpenShot was created by Jonathan Thomas (Jonathan.Oomph@gmail.com) in
August 2008 with the objective to provide a stable, free, and friendly-to-use video
editor.
OpenShot Development Team
Jonathan Thomas Jonathan.Oomph@gmail.com
Andy Finch we.rocked.in79@googlemail.com
Helen McCall helen.wildnfree@googlemail.com
Olivier Girard eolinwen@gmail.com
TJ ubuntu@tjworld.net
More Information
To find more information about OpenShot, please visit the OpenShot Web page

(http://www.OpenShotVideo.com). To report a bug or make a suggestion regarding
this application or this manual, go to the OpenShot site on Launchpad. To discuss
OpenShot with other users, visit our user website & forum:
http://OpenShotUsers.com/forum/
Copyright & Trademark
Copyright (C) 2009 Jonathan Thomas, Andy Finch, and TJ. OpenShot(TM) is a
registered trademark owned by Jonathan Thomas.
License
This program is distributed under the terms of the GNU General Public license as
published by the Free Software Foundation; either version 3 of the License, or (at
your option) any later version. A copy of this license can be found at this link, or in
the file COPYING included with the source code of this program.