Optiga Trust X Integration Manual V1.2
User Manual:
Open the PDF directly: View PDF ![]() .
.
Page Count: 47

Application Note Please read the Important Notice and Warnings at the end of this document <Revision 1.0>
www.infineon.com <2018-07-03>
OPTIGA Trust X
Integration Manual
About this document
Scope and purpose
The scope of this document is to help users get started with OPTIGA Trust X and Infineon’s OPTIGA™Trust X
Host Library. OPTIGA™Trust X Host Library has been designed with flexibility and portability in mind reducing
design efforts and abstracting complexity. Some of its key characteristis are:
• Portable: Host controller architecture agnostic
• Ease of Use: Well defined set of APIs that take away complexity, but still enable all powerful features that
OPTIGA™Trust X provides.
• External Services Tool Box: provides plug-in services such TLS, MQTT, Json. These services can be
added as needed.
• x.509 certificate support: Through its External Services Tool Box, OPTIGA™Trust X Lib provides support
for X.509 certificate handling without adding any extra computing burden on the host such as
compressing or de-compressing certificates before they are used.
OPTIGA™Trust X Host Library is the base of any application that will incorporate OPTIGA™Trust X. It is written in
C so it can be used with a broad set of system architectures such as ARM, Linux or bare metal.
This application note discusses how to get started, how to incorporate and use OPTIGA™Trust X Software
Library alongside a Host controller. Some examples will also be provided to better illustrate the ease of
integration with the Host.
Other use cases for OPTIGA™Trust X such as Secure Boot or Firmware Upgrade will be provided as independent
application notes.
Intended audience
This document addresses the audience: customers, solution providers, and system integrators.

Application Note 2 <Revision 1.0>
<2018-07-03>
OPTIGA Trust X
Integration Manual
Table of contents
About this document ......................................................................................................................... 1
Table of contents .............................................................................................................................. 2
Figures 3
1 Introduction .................................................................................................................... 5
1.1 Device Features ........................................................................................................................................ 5
2 OPTIGA TrustX Software Library ....................................................................................... 6
3 Connecting to Host .......................................................................................................... 8
3.1 OPTIGA™ Trust X Host Software Architecture ......................................................................................... 8
3.2 Release Package Folder Structure .......................................................................................................... 8
3.3 Host Software Folder Structure ............................................................................................................... 9
3.3.1 Host Software Source Folder Structure ............................................................................................. 9
4 Prerequisites .................................................................................................................. 11
5 Getting Development Environment Ready ........................................................................ 13
5.1 Installing Dave™ 4 ................................................................................................................................... 13
5.2 Installing Device Library and Dave™ Apps ............................................................................................ 13
5.3 Importing to Host Project into Workspace ........................................................................................... 14
5.4 Host Project File Structure ..................................................................................................................... 15
5.5 Testing Host Application ........................................................................................................................ 15
6 Integrating OPTIGA Trust X Host Library into Host Project ................................................. 18
6.1 Including Necessary PAL Directories ..................................................................................................... 18
6.2 Adding Necessary Header Files to Workspace Path ............................................................................. 20
7 Configuring Platform Specific Modules Required by OPTIGA Trust X Host Library ................. 22
7.1 Scheduler Timer ..................................................................................................................................... 22
7.2 Tick Timer ............................................................................................................................................... 24
7.3 I2C Master Module .................................................................................................................................. 27
7.4 IO for OPTIGA™ Trust Reset Control ...................................................................................................... 29
8 Working with OPTIGA™Trust X from the Application Layer ................................................. 31
8.1 Initializing OPTIGA™Trust X using the Host Library .............................................................................. 31
8.2 OPTIGA™Trust X Host Library Crypt API Layer ...................................................................................... 32
8.2.1 optiga_crypt_random ....................................................................................................................... 32
8.2.2 optiga_crypt_hash_start .................................................................................................................. 32
8.2.3 optiga_crypt_hash_update .............................................................................................................. 33
8.2.4 optiga_crypt_hash_finalize .............................................................................................................. 33
8.2.5 optiga_crypt_ecc_generate_keypair ............................................................................................... 33
8.2.6 optiga_crypt_ecdsa_sign ................................................................................................................. 33
8.2.7 optiga_crypt_ecdsa_verify ............................................................................................................... 33
8.2.8 optiga_crypt_ecdh ............................................................................................................................ 33
8.2.9 optiga_crypt_tls_prf_sha256 ........................................................................................................... 33
8.3 Using OPTIGA™Trust X Host Library Crypt API Layer to interact with Application ............................. 33
8.3.1 Configuring Application cmd_iface.c for Optiga Trust Library ....................................................... 35
8.3.2 optx_get_rng ..................................................................................................................................... 35
8.3.3 optx_get_sha256 ............................................................................................................................... 36
8.3.4 optx_genKey_pair ............................................................................................................................. 37
8.3.5 optx_sign_hash ................................................................................................................................. 38

Application Note 3 <Revision 1.0>
<2018-07-03>
OPTIGA Trust X
Integration Manual
8.3.6 optx_verify_sig .................................................................................................................................. 39
8.3.7 optx_sign_verify_sig ......................................................................................................................... 40
8.3.8 optx_echd .......................................................................................................................................... 41
8.3.9 optx_read_ifx_cert ............................................................................................................................ 44
Revision history ............................................................................................................................... 46
Figures
Figure 1 System Block Diagram ........................................................................................................................ 6
Figure 2 OPTIGA™ Trust X Host Software Architecture .................................................................................... 8
Figure 3 Release Package Folder Structure ...................................................................................................... 8
Figure 4 Host Software Folder Structure .......................................................................................................... 9
Figure 5 Host Source Folder Structure ........................................................................................................... 10
Figure 6 XMC and OPTIGA™ 2Go™ series boards ........................................................................................... 11
Figure 7 8-PIN Male and Female Headers ...................................................................................................... 11
Figure 8 Installing Device Library and Dave™ APP ........................................................................................ 13
Figure 9 Installing DAVE Project Library Manage .......................................................................................... 14
Figure 10 Importing xmc2go-TrustX project to Dave™4 .................................................................................. 14
Figure 11 Host Project File Structure ................................................................................................................ 15
Figure 12 OPTIGA™2Go Shield Connected to XMC2Go .................................................................................... 15
Figure 13 Debug Configuration ......................................................................................................................... 16
Figure 14 Initializing Debug Session ................................................................................................................. 16
Figure 15 Running Host Application ................................................................................................................. 17
Figure 16 OPTIGA™Trust X Host Library ............................................................................................................ 18
Figure 17 Excluding a Directory from Build ...................................................................................................... 18
Figure 18 Selecting XMC1100 PAL ..................................................................................................................... 19
Figure 19 Excluding other PAL’s from Build Process ....................................................................................... 20
Figure 20 Adding a New Directory to the Build Process ................................................................................... 20
Figure 21 Adding OPTIGA™Trust X Header Files to the Path ........................................................................... 21
Figure 23 Preparing Host Platform Specific Hardware .................................................................................... 22
Figure 24 Scheduler Timer Module ................................................................................................................... 23
Figure 25 Scheduler Timer Interrupt ................................................................................................................ 23
Figure 26 HW Signal Connections for Scheduler Timer ................................................................................... 24
Figure 27 Tick Timer Under Existing APP Instance ............................................................................................... 25
Figure 28 Tick Timer Module ............................................................................................................................. 25
Figure 29 Tick Timer Interrupt .......................................................................................................................... 26
Figure 30 HW Signal Connections for Tick Timer ............................................................................................. 26
Figure 31 I2C Master Module .............................................................................................................................. 27
Figure 32 Opening Pin Mapping Perspective ................................................................................................... 28
Figure 33 Pin Mapping Perspective ................................................................................................................... 29
Figure 35 Adding OPTIGA™ Trust X Reset Control ............................................................................................ 30
Figure 36 Successful Integration of OPTIGA™Trust X Host Library into Host Project .................................... 30
Figure 37 Successful Initialization of OPTIGA™Trust X Host Library ............................................................... 32
Figure 38 xmc2Go-TrustX Application Layer ................................................................................................... 34
Figure 39 Execution of optx_get_rng by xmc2Go application. ........................................................................ 36
Figure 40 Execution of optx_get_sha256 by xmc2Go application. ................................................................. 37
Figure 41 Execution of optx_genKey_pair by xmc2Go application. ............................................................... 38
Figure 42 Execution of optx_sign_hash by xmc2Go application. .................................................................... 38

Application Note 4 <Revision 1.0>
<2018-07-03>
OPTIGA Trust X
Integration Manual
Figure 43 Execution of optx_verify_sig by xmc2Go application. ..................................................................... 39
Figure 44 Execution of optx_verify_sig by xmc2Go application. ......................................................................... 41
Figure 45 Execution of optx_sign_hash by xmc2Go application. .................................................................... 44
Figure 47 Execution of optx_read_ifx_cert by xmc2Go application ............................................................... 45

Application Note 5 <Revision 1.0>
<2018-07-03>
OPTIGA Trust X
Integration Manual
1 Introduction
As embedded systems (e.g. IoT devices) are increasingly gaining the attention of attackers, Infineon offers the
OPTIGA™ Trust X as a turnkey security solution for industrial automation systems, smart homes, consumer
devices and medical devices. This high-end security controller comes with full system integration support for
easy and cost-effective deployment of high-end security for your assets.
1.1 Device Features
Device Features The OPTIGA™ Trust X comes with up to 10kB user memory that can be used to store X.509
certificates. OPTIGA™ Trust X is based on Common Criteria Certified EAL6+ (high) hardware enabling it to
prevent physical attacks on the device itself and providing high assurance that the keys or arbitrary data stored
cannot be accessed by an unauthorized entity. OPTIGA™ Trust X supports a high speed I2C communication
interface of up to 1MHz (FM+).
For further reference and electrical characteristics refer to OPTIGA™Trust X Datasheet.
Application Note 6 <Revision 1.0>
<2018-07-03>
OPTIGA Trust X
Integration Manual
2 OPTIGA TrustX Software Library
OPTIGA™ Trust X Host Library is a structured library which purpose is to abstract any complexity to the
application by using APIs.
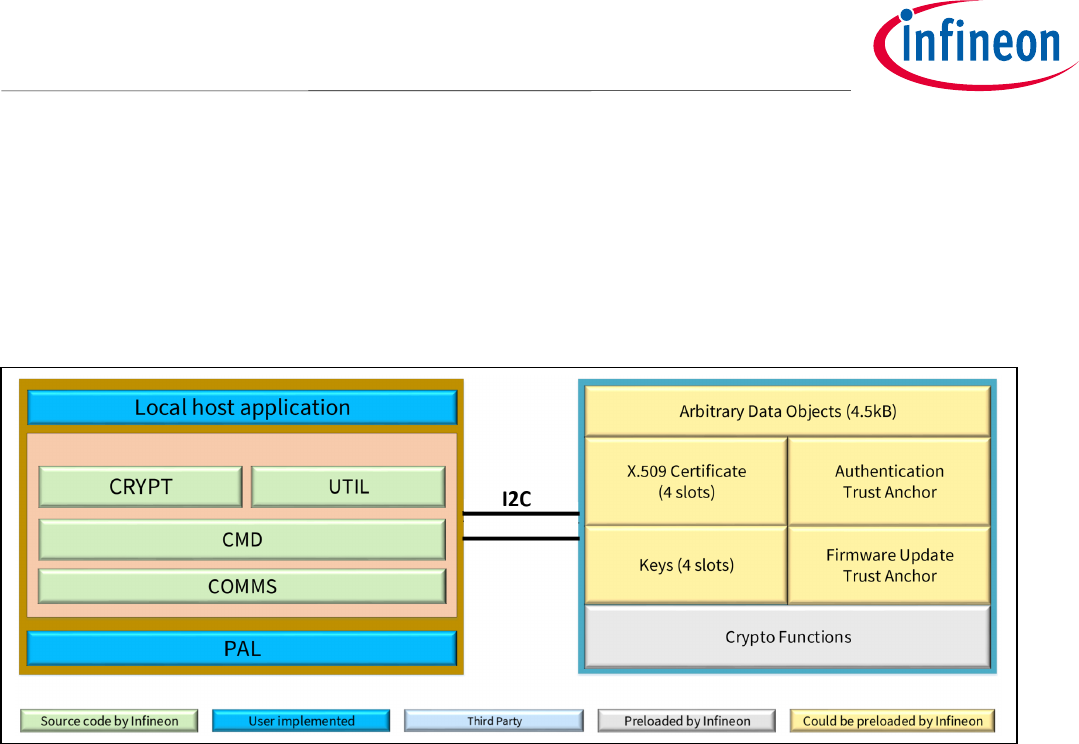
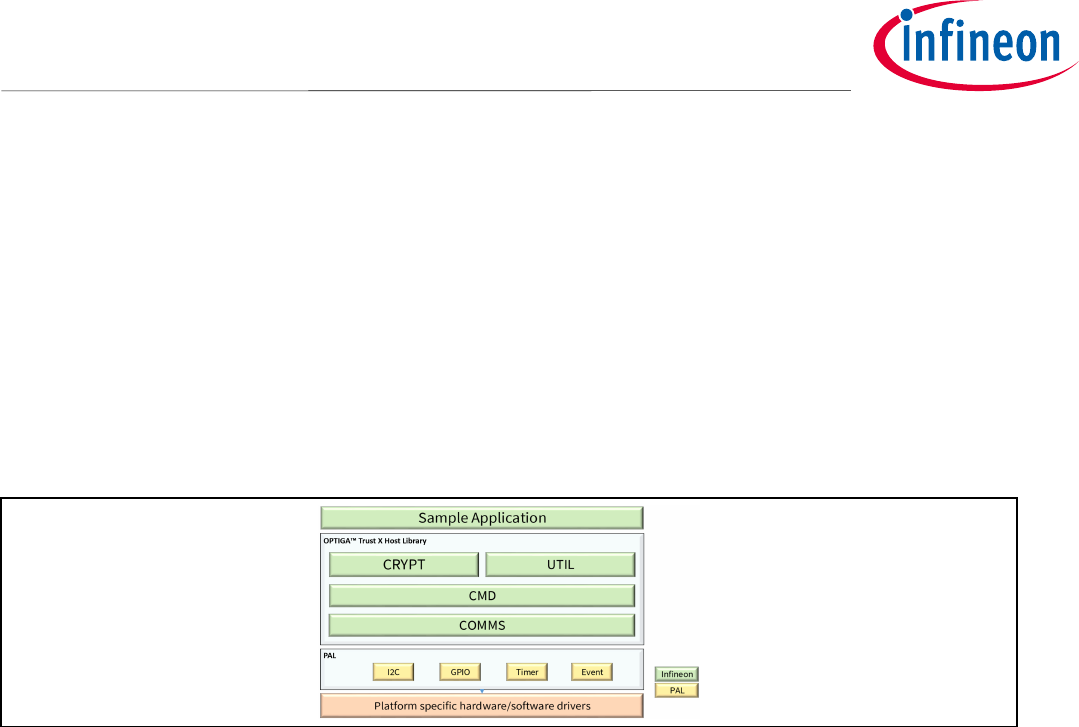
Figure 1 depicts the system block diagram for OPTIGA™ Trust X
Figure 1 System Block Diagram
The System Block Diagram is explained below for each layer.
1. Local Host
• Local Host Application – This is the target application which utilizes OPTIGA™ Trust X for its security
needs
• OPTIGA™ Trust X Host Library
o Crypt – Provides APIs to perform cryptographic functionalities. Any TLS stack can be integrated
to offload crypto operations to OPTIGA™ Trust X.
o Util – Provides APIs such as read/write and open/close applications (e.g. Hibernate)
o Cmd – Provides APIs to send and receive commands to and from OPTIGA™ Trust X. Crypto Lib
Wrapper – Provides wrapper APIs for Third Party crypto library
o Comms – Provides wrapper APIs for communication with OPTIGA™ Trust X which internally uses
Infineon I2C Protocol (IFX I2C)
• PAL – A layer that abstracts platform specific drivers (e.g. i2c, timer, gpio, sockets, 3rd party crypto
library etc.)
2. OPTIGA™ Trust X
• Arbitrary Data Objects – The target application can store up to 4.5kB (~4600 bytes) of data into OPTIGA™
Trust X
• X.509 – up to 3, X.509 based Certificates can be stored into OPTIGA™ Trust X
• Keys – up to 3, ECC based keys can be stored into OPTIGA™ Trust X

Application Note 7 <Revision 1.0>
<2018-07-03>
OPTIGA Trust X
Integration Manual
• Trust Anchors for Mutual Authentication (TLS/DTLS) and Firmware Updates can be stored into OPTIGA™
Trust X
• Crypto Functions - OPTIGA™ Trust X provides cryptographic functions that can be invoked via local host
Note: Unique ECC private keys and X.509 Certificates – During production at the Infineon fab, unique
asymmetric keys (private and public) are generated. The public key is signed by customer specific
CA and resulting X.509 certificate issued is securely stored on OPTIGA™ Trust X. Special measures
are taken to prevent leakage and modification of the private key at the Common Criteria Certified
production site
Application Note 8 <Revision 1.0>
<2018-07-03>
OPTIGA Trust X
Integration Manual
3 Connecting to Host
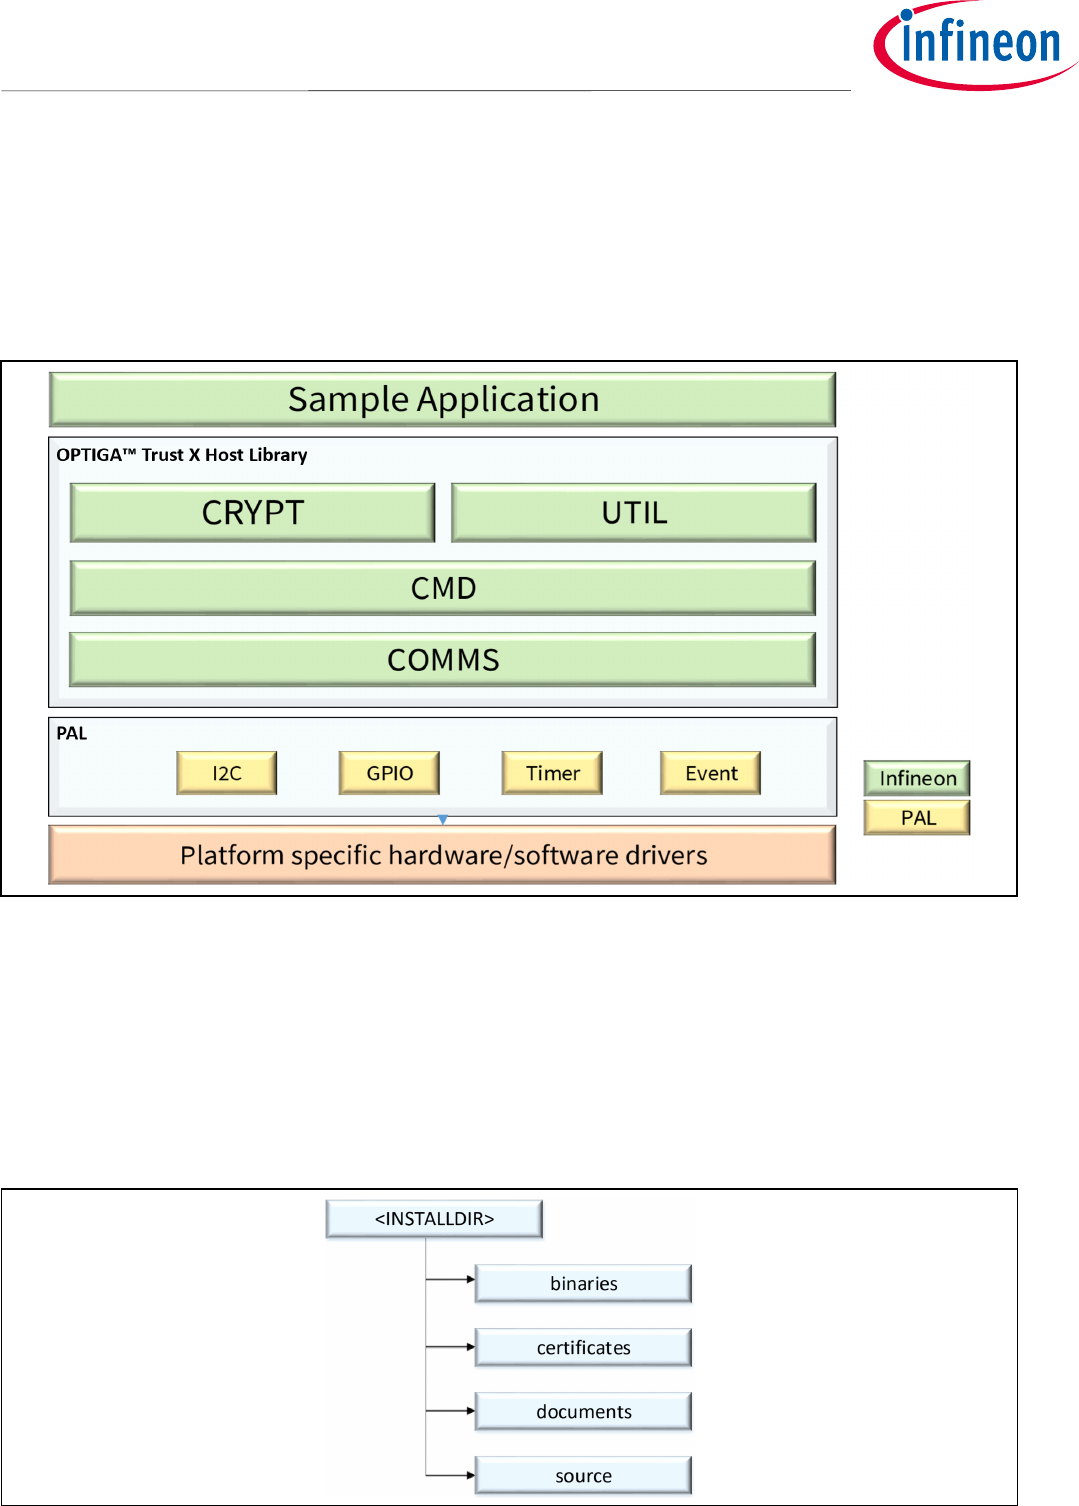
3.1 OPTIGA™ Trust X Host Software Architecture
In Figure 1 the System Block Diagram was explained which covered the OPTIGA™ Trust X Host Library layers. In
following sections, we will cover how to communicate with OPTIGA™ Trust X using I2C.
Figure 2 OPTIGA™ Trust X Host Software Architecture
3.2 Release Package Folder Structure
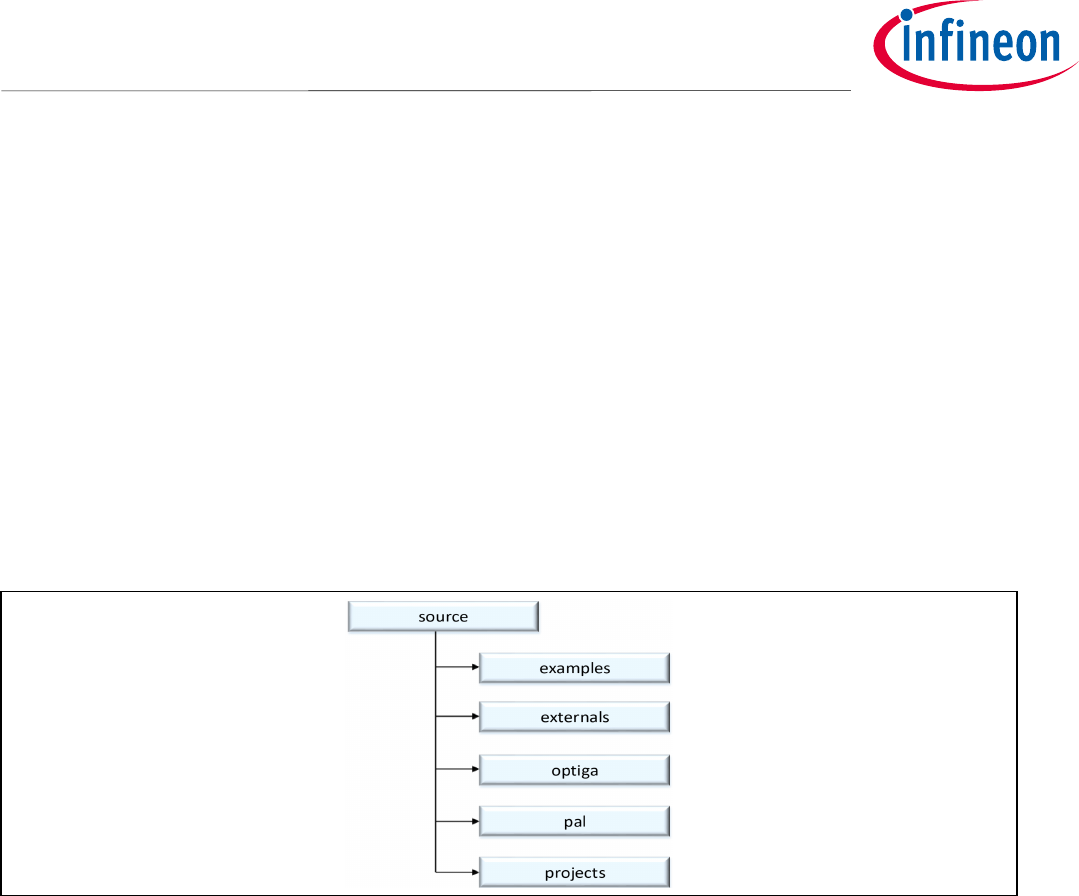
Figure 3 shows the release package structure when OPTIGA™ Trust X Host Library is installed/extracted on PC.
Figure 3 Release Package Folder Structure
Application Note 9 <Revision 1.0>
<2018-07-03>
OPTIGA Trust X
Integration Manual
1. <INSTALLDIR> is the root directory to which the release contents are installed or extracted. The content of each
subdirectory under installed directory <INSTALLDIR> is explained below.
2. Certificates: This directory contains OPTIGA™ Trust X Test and Productive Trust-Anchor/CA certificates.
3. Documents: This directory contains all common OPTIGA™ Trust X documentation.
4. Binaries: This directory contains binaries for OPTIGA™ Trust X Host Software.
5. Source: This directory contains source files, header files for OPTIGA™ Trust X Host Software.
3.3 Host Software Folder Structure
Figure 4 shows the Host Software folder structure when OPTIGA™ Trust X is installed or extracted on PC.
Figure 4 Host Software Folder Structure
1. Examples
This directory contains the examples code for demonstration of crypt and util APIs.
2. Externals
This directory contains the external source code e.g. mbedTLS
3. Optiga
This directory contains OPTIGA™ Trust X host library source code which is platform agnostic.
4. Pal
This directory contains Platform Abstraction Layer source code which needs to be ported, depending on the
platform e.g. XMC1100 etc.
5. Projects
This directory contains project files for build/compilation e.g. XMC1100 based on Dave.
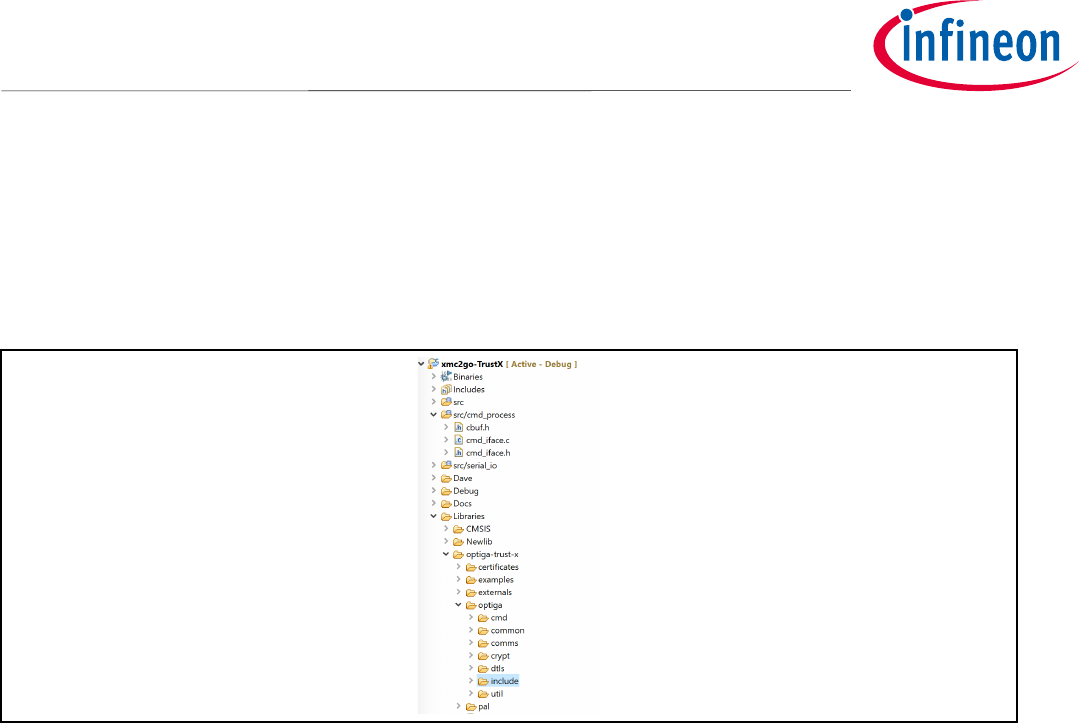
3.3.1 Host Software Source Folder Structure
Figure 5 elaborates the Host Software source folder structure.

Application Note 10 <Revision 1.0>
<2018-07-03>
OPTIGA Trust X
Integration Manual
Figure 5 Host Source Folder Structure
1. cmd – This folder contains sources for all OPTIGA™ Trust X commands
2. common – This folder contains the common functions used across all the modules
3. comms – This folder contains the driver to communicate with OPTIGA™ Trust X
4. crypt – This folder contains sources for cryptographic functions
5. include – This folder contains header files for all OPTIGA™ Trust X Host Software
6. util – This folder contains utility functions e.g. read/write and open/close application
Application Note 11 <Revision 1.0>
<2018-07-03>
OPTIGA Trust X
Integration Manual
4 Prerequisites
These are the prerequisites for successfully completing this training
• System Requirements
o Windows 7/8/10
o 4GB of RAM or above
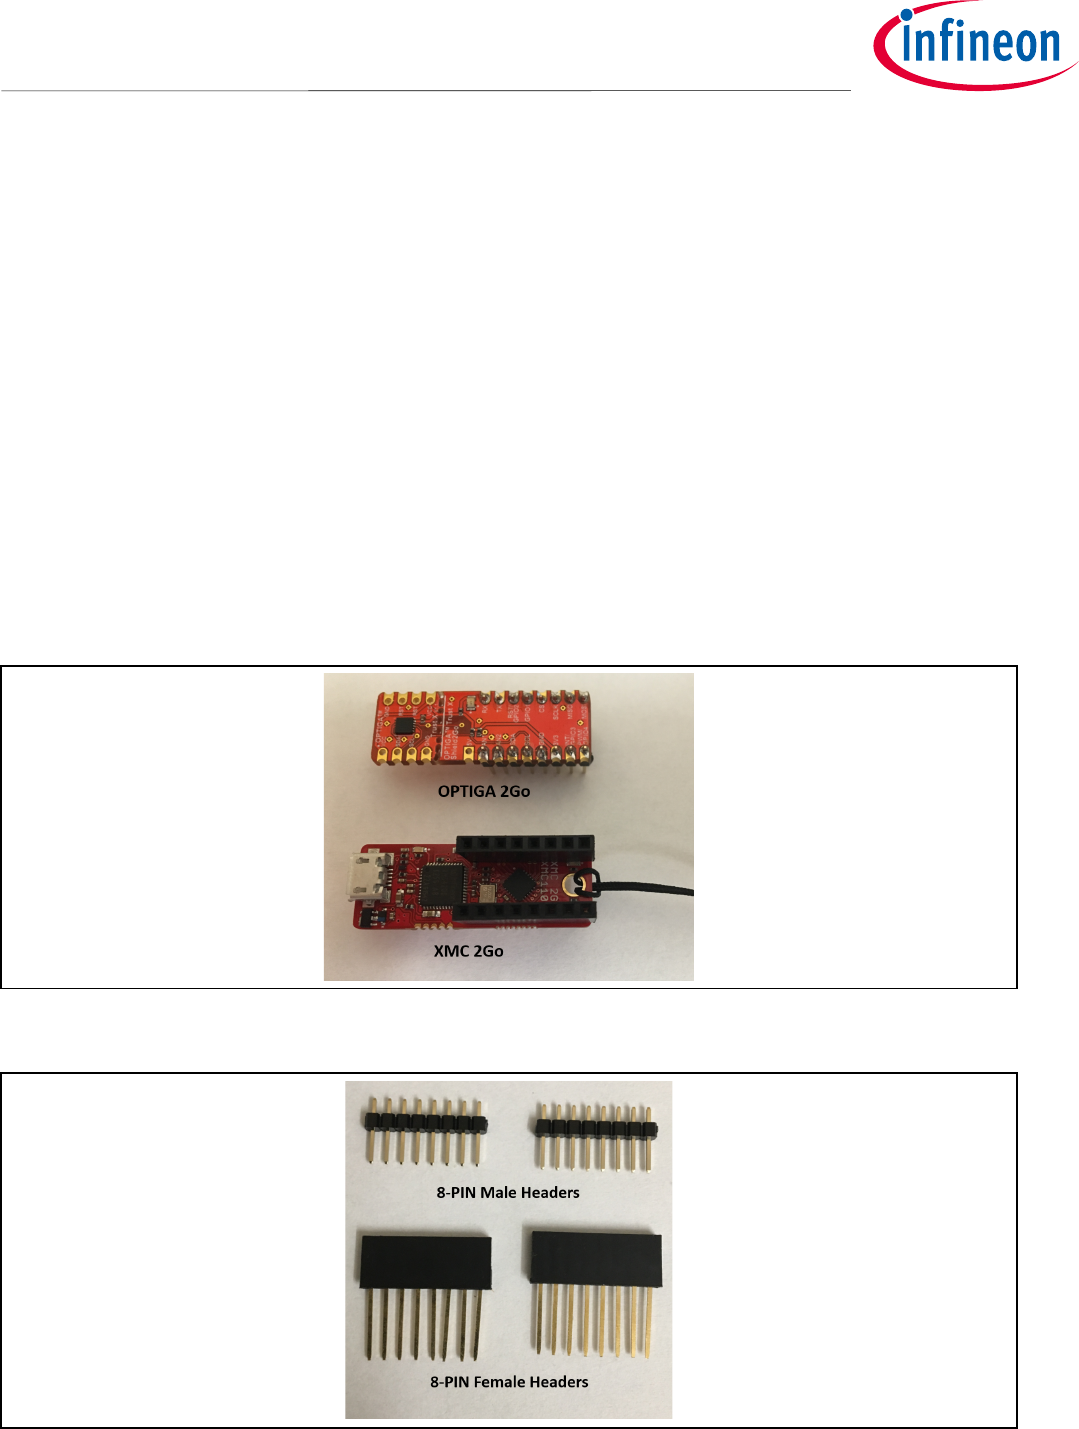
• Hardware Requirements, shown in Figure 6 and Figure 7
o XMC2Go™
o OPTIGA2Go™
o 2x 8-PIN Male Headers
o 2x 8-PIN Female Headers
o Micro USB Cable
Figure 6 XMC and OPTIGA™ 2Go™ series boards
Figure 7 8-PIN Male and Female Headers

Application Note 12 <Revision 1.0>
<2018-07-03>
OPTIGA Trust X
Integration Manual
• Software Requirements
o OPTIGA™ Trust X Host Library available at
https://github.com/Infineon/optiga-trust-x
Note: The version of OPTIGA™ Trust X Host Library used in this application note is:
commit f257697135ab8e9e17a381a7441cc6d247b89a14
o Dave™ 4.4.2
o Putty or any other Terminal Interface. You can obtain Putty from the link below.
https://www.chiark.greenend.org.uk/~sgtatham/putty/latest.html
Application Note 13 <Revision 1.0>
<2018-07-03>
OPTIGA Trust X
Integration Manual
5 Getting Development Environment Ready
5.1 Installing Dave™ 4
If you have not downloaded Dave™4, please proceed to download
https://infineoncommunity.com/dave-download_ID645
Once you have Downloaded Dave ™, extract it to a folder of your choosing. As a recommendation we suggest
creating a new folder and name it DAVE4 in C: directory.
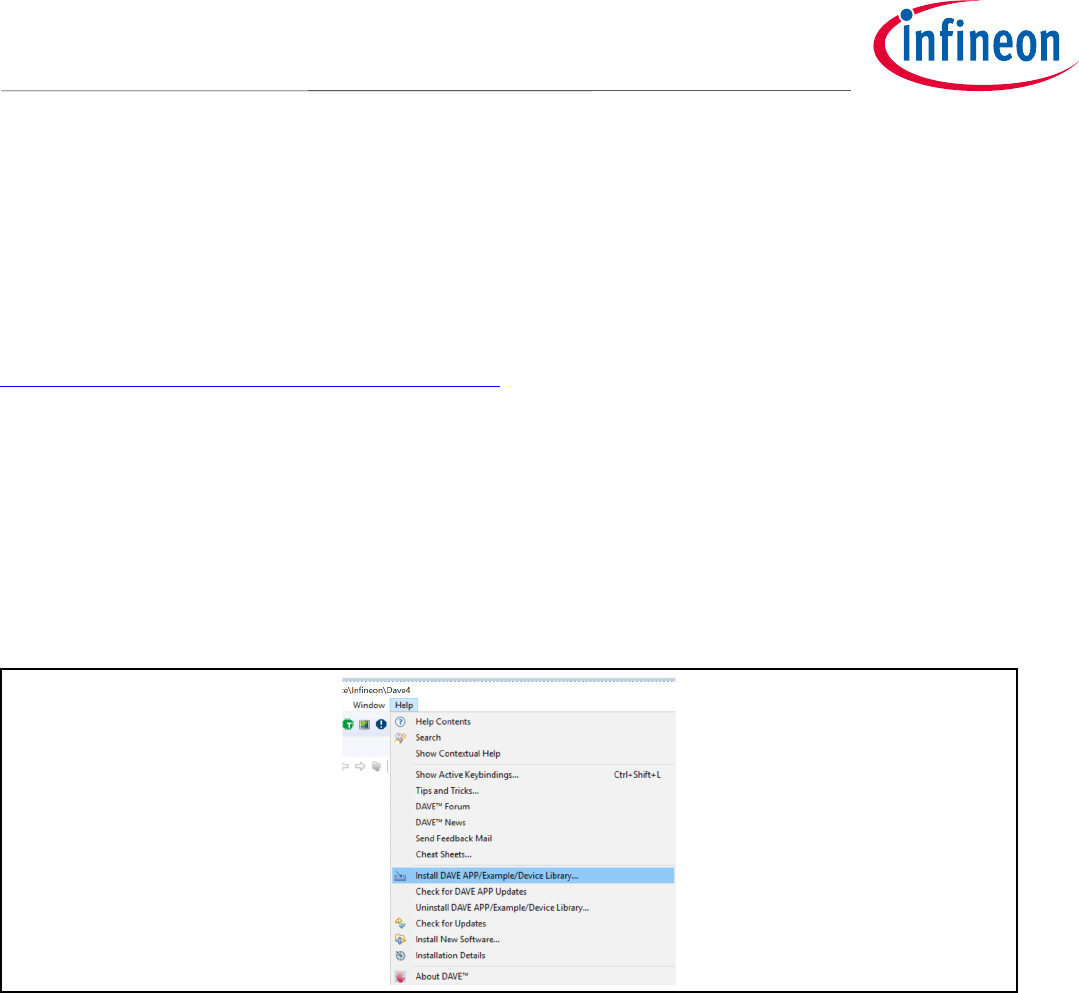
5.2 Installing Device Library and Dave™ Apps
• Installing Toolchain
o From the top menu (under Help), select “Install DAVE APP/Example/DeviceLibrary” as shown in
Fig 8.
Figure 8 Installing Device Library and Dave™ APP
o From the drop-down menu select “DAVE Project Library Manager”
o Select the libraries that are needed for your board
Application Note 14 <Revision 1.0>
<2018-07-03>
OPTIGA Trust X
Integration Manual
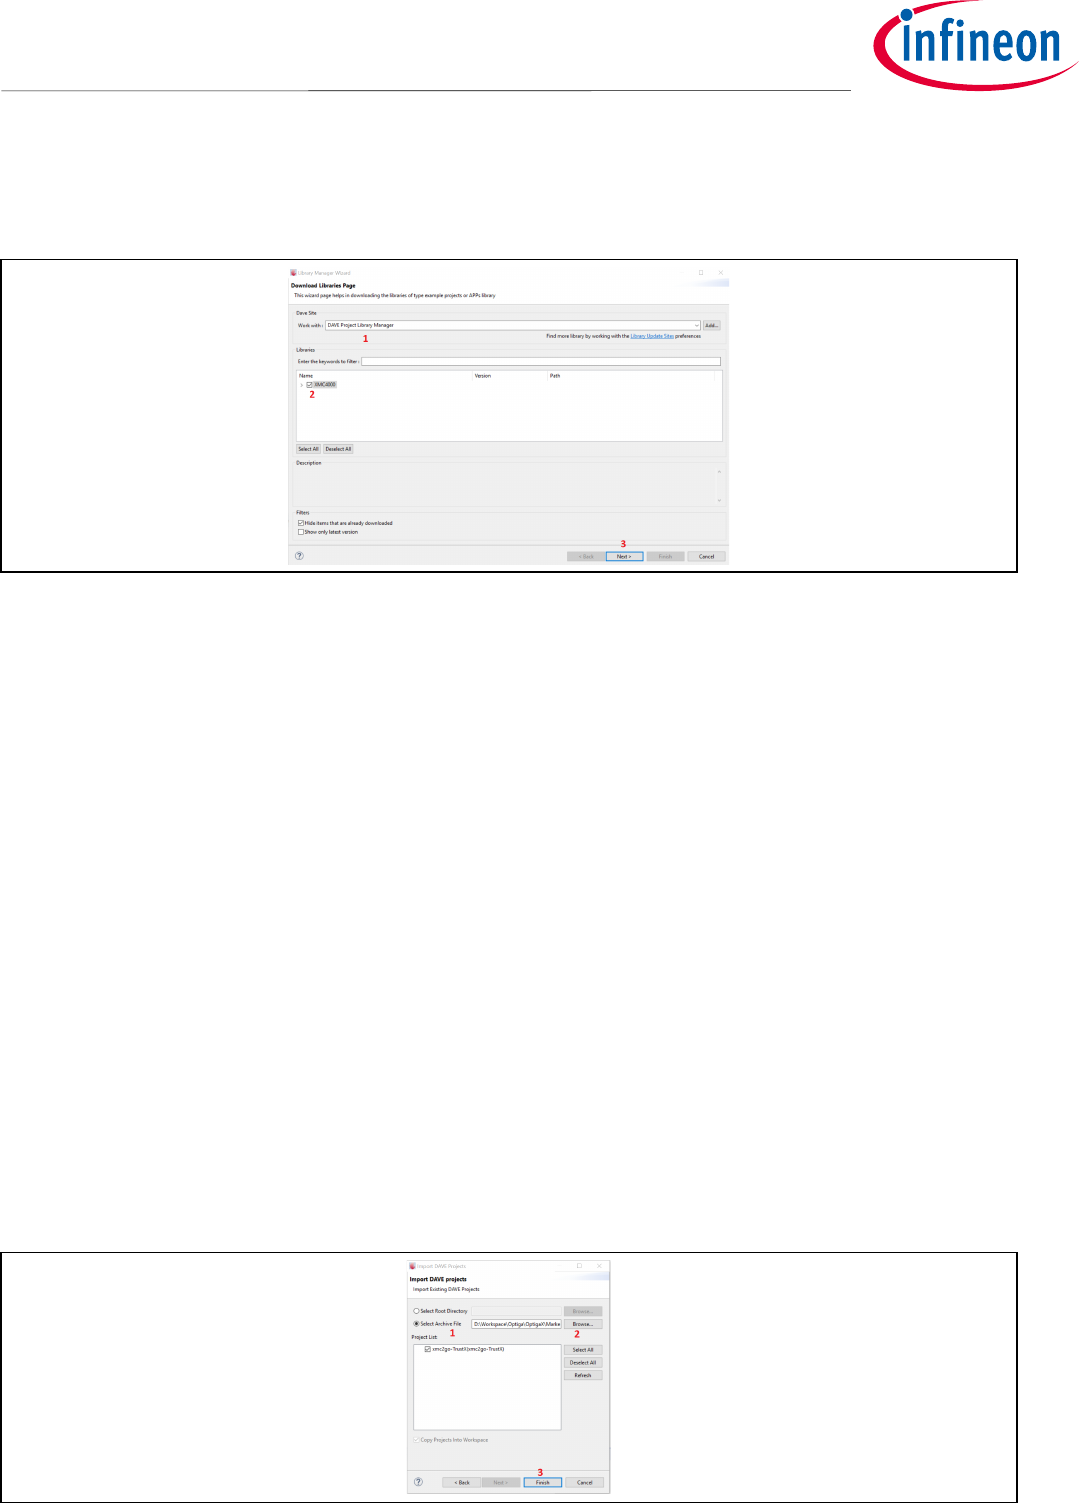
Figure 9 Installing DAVE Project Library Manage
o Repeat the process and from the drop-down menu select “DAVE APPs Library Manager”
o Install DAVE APPs Library Manager if needed.
5.3 Importing to Host Project into Workspace
We will now import our Host project template. This project will be used as base for integrating OPTIGA Trust X
Host Library.
• Open Dave™ 4
o Go to File -> Import
o Select Infineon -> DAVE Project
o Select Archive File
o Browse to “xmc-2Go-template”. This Folder in inside your “Optiga Trust X Technical Training”
training package
o Select “xmc2go-TrustX.zip” as the project to import into our workspace, as shown in Figure 10.
o Finish
Figure 10 Importing xmc2go-TrustX project to Dave™4
Application Note 15 <Revision 1.0>
<2018-07-03>
OPTIGA Trust X
Integration Manual
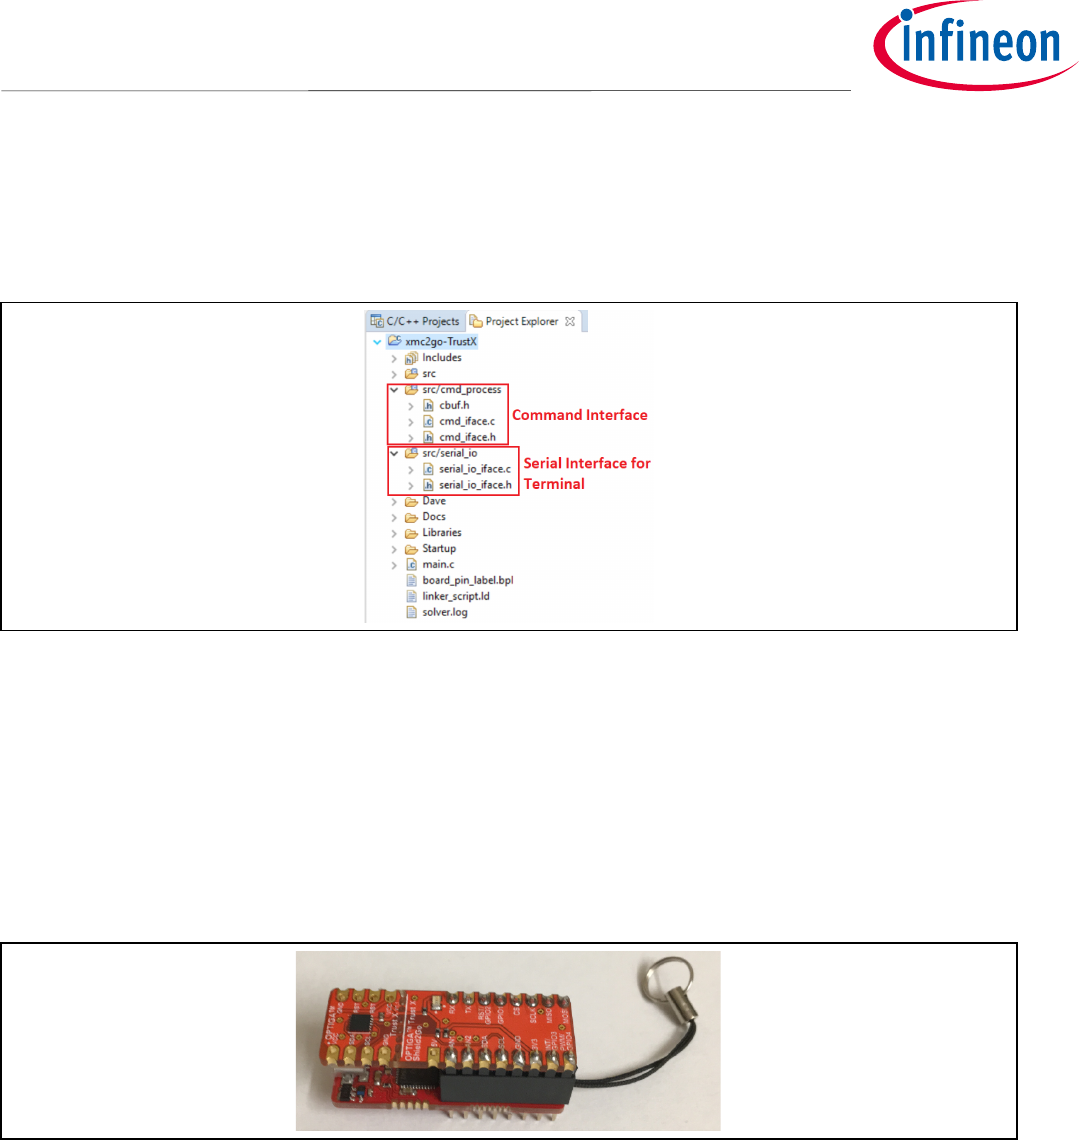
5.4 Host Project File Structure
The Host project file structure is as follows. Figure 11:
Figure 11 Host Project File Structure
• Command Interface: Here we specify the commands that we will use to interact between the terminal
window in the PC and OPTIGA™ Trust X.
• Serial Interface for Terminal: This is where we manage the serial communication as well as the input
and output of characters
5.5 Testing Host Application
To test our Host Application, proceed with the following steps:
• Assemble the OPTIGA™ 2Go Shield on top of the XMC2Go board, like showing in Figure 12.
Figure 12 OPTIGA™2Go Shield Connected to XMC2Go
• Connect the micro USB cable to the PC and the 2Go Board Stack up.
• Open “Windows Device Manager” to see which COM port was assigned. It should appear as JLink CDC
UART port.
• Open Putty or any COM Terminal Interface.
• The terminal settings are the following
o Desired speed (baud): 57600
o Data bits: 8
o Stop bit: 1 Stop Bit
o Parity selection: No Parity

Application Note 16 <Revision 1.0>
<2018-07-03>
OPTIGA Trust X
Integration Manual
• Proceed to build Host Application
o Project -> Build all or Ctrl + B
• To flash the board, we will open a Debug session
o Open Debug Configurations as shown in Figure 13.
Figure 13 Debug Configuration
o Select, GDB SEGGER J-Link Debugging
o Press Debug to initialize debug session as shown in Figure 14.
Figure 14 Initializing Debug Session
o Press F8 or Run to start code execution
If everything works fine the output of the Terminal Window should display our command options, as shown in
Figure 15.
Note: We can type a command now, but nothing will happen. We need to incorporate the OPTIGA Trust X
Host Library to our Host Project.

Application Note 17 <Revision 1.0>
<2018-07-03>
OPTIGA Trust X
Integration Manual
Figure 15 Running Host Application
Application Note 18 <Revision 1.0>
<2018-07-03>
OPTIGA Trust X
Integration Manual
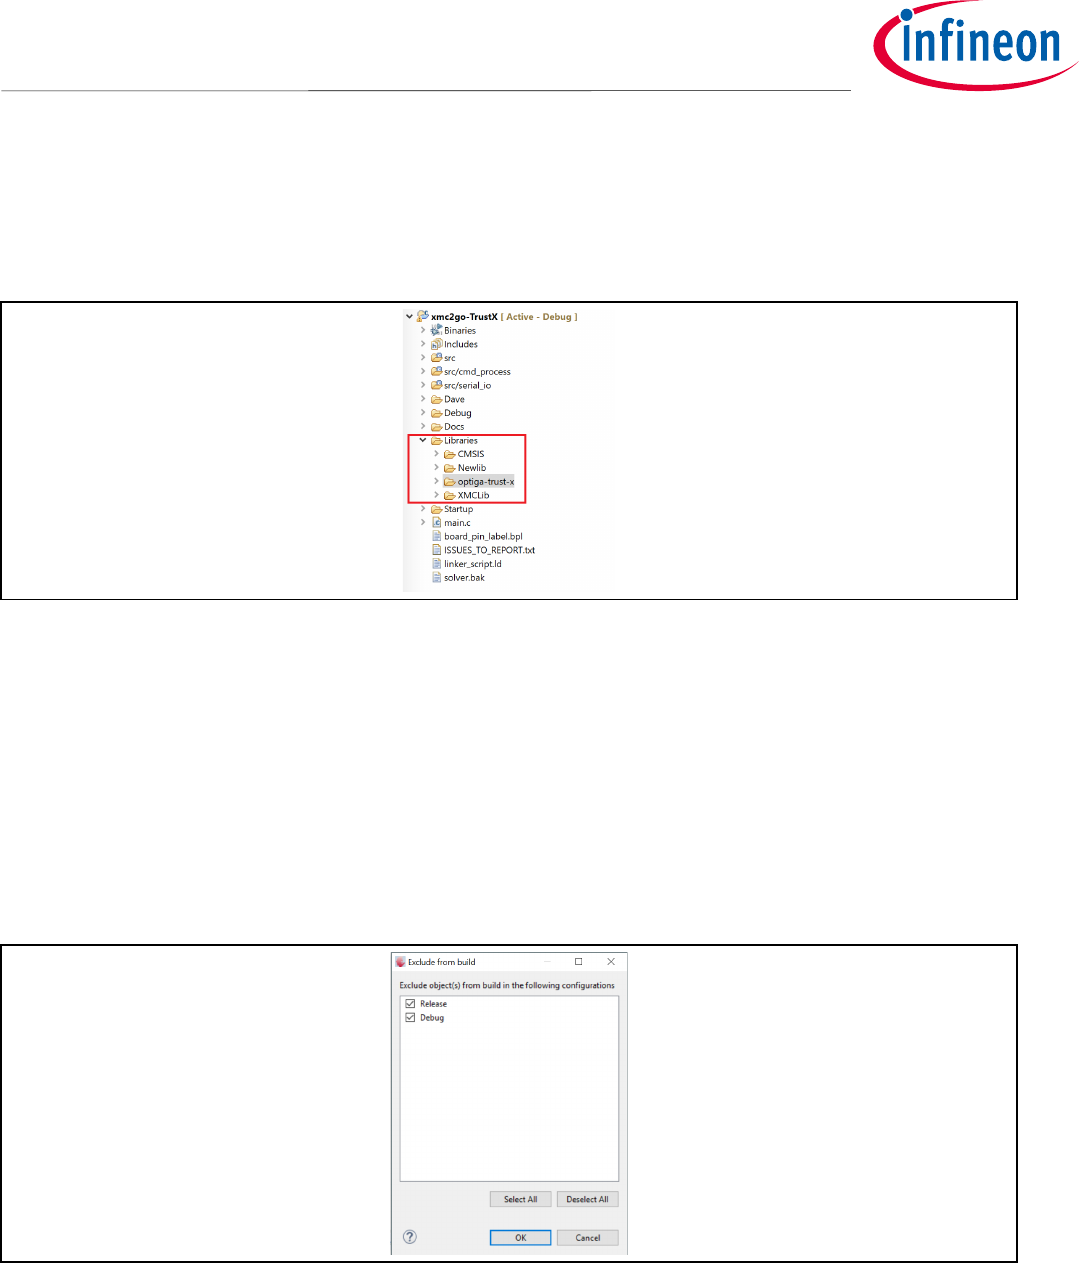
6 Integrating OPTIGA Trust X Host Library into Host Project
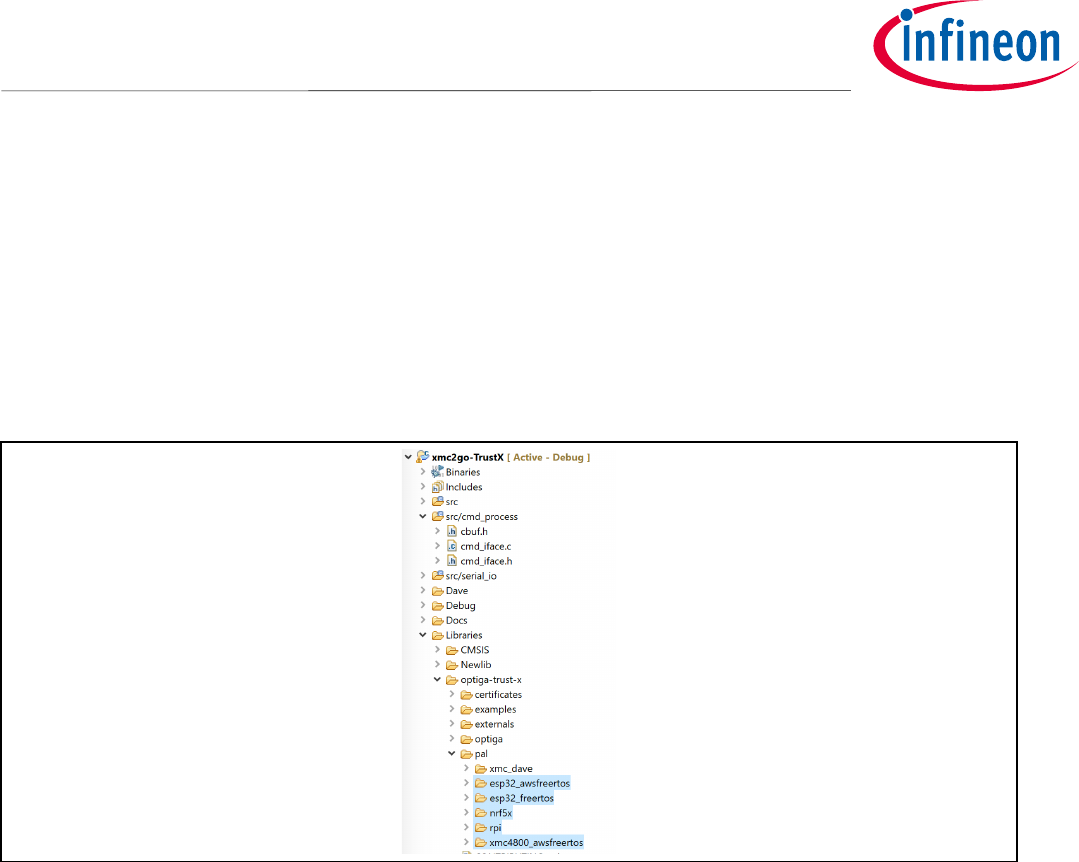
The OPTIGA™ Trust X Host Library can be placed anywhere in the project directory tree. In this case we will place
it in our Libraries folder, as shown in Figure 16.
Figure 16 OPTIGA™Trust X Host Library
6.1 Including Necessary PAL Directories
We will exclude some of the folders from the compilation process that we don’t need to build in the library but
are rather in place for our reference. e.g.: examples.
• In the “Project Explorer” pane, right click on the “examples” folder.
• Under “Resource Configuration” -> Exclude from build
• Select both “Release” and “Debug” as shown in figure 17.
Figure 17 Excluding a Directory from Build
Application Note 19 <Revision 1.0>
<2018-07-03>
OPTIGA Trust X
Integration Manual
The OPTIGA™Trust X Host Library was designed to be agnostic to the Host Controller, Operating System or IDE
that will be used for the integration process. Having this in mind, the user only needs to adapt the Platform
Abstraction Layer and configure the necessary drivers and components needed by OPTIGA™Trust X Host Library
to operate (adapting necessary drivers and peripheral components will be covered in section 7 Configuring
Platform Specific Modules Required by OPTIGA Trust X Host Library).
• In Project Explorer open the “pal” directory
• Select all directories except for xmc_dave (Ctrl + Mouse Click on each), as shown in Figure 18.
Figure 18 Selecting XMC1100 PAL
• Right Click on the selection
• Go to “Resource Configuration”
• Select “Exclude from Build”
• Select both “Release” and “Debug” and OK

Application Note 20 <Revision 1.0>
<2018-07-03>
OPTIGA Trust X
Integration Manual
Exclude from build also the mbedtls-2.12.0 directory, under externals. We will not be using it, as shown in
Figure 19.
Figure 19 Excluding other PAL’s from Build Process
6.2 Adding Necessary Header Files to Workspace Path
To successfully integrate the OPTIGA™Trust X Host Library we need to add to the the necessary header files to
the build directory.
• Under Project Explorer, select our project
• Go to Project -> Properties
• C/C++Build -> Settings
• ARM-GCC C Compiler -> Directories, as shown in Figure 20.
• Add a new path (3)
Figure 20 Adding a New Directory to the Build Process
Application Note 21 <Revision 1.0>
<2018-07-03>
OPTIGA Trust X
Integration Manual
• Under “Add directory to path window”, select Workspace
• Go to: Libraries->optiga-trust-x -> optiga -> include
• Add the “include” directory to the path, as shown in Figure 21.
• Apply -> OK
Figure 21 Adding OPTIGA™Trust X Header Files to the Path
Application Note 22 <Revision 1.0>
<2018-07-03>
OPTIGA Trust X
Integration Manual
7 Configuring Platform Specific Modules Required by OPTIGA
Trust X Host Library
OPTIGA™ Trust X Host Library was designed with portability and flexibility in mind. The result is a powerful
platform agnostic library.
To start with the integration process as we can see from Figure 1 and Figure 2, we need to start by preparing
the different peripheral components that the OPTIGA™ Trust X Host Library needs to operate.
Figure 22 Preparing Host Platform Specific Hardware
This are the components we need to enable:
• Scheduler Timer
• Tick Timer
• I2C Module
• I/O for OPTIGA™ Trust Reset Control
7.1 Scheduler Timer
Using Dave™4 App wizard we will create a Timer module.
• Go to DAVE->Add New APP
• In the search filed, type “Timer”. Add the Timer module
• Right click on TIMER_0 and select “Rename Instance Label”
• Change the timer module name to “scheduler_timer”, as shown in Figure 2324
This timer will provide a system tick.
Application Note 23 <Revision 1.0>
<2018-07-03>
OPTIGA Trust X
Integration Manual
Figure 23 Scheduler Timer Module
To configure the “scheduler_timer”, double click on the module in the APP Dependency. Configure the timer
with the following settings:
• General Settings
o Timer interval: 1000usec
o Start after initialization: Not selected
• Event Settings
o Time interval even: Selected
Note: An alert will appear after we select time interval event. Disregard as we will configure it later.
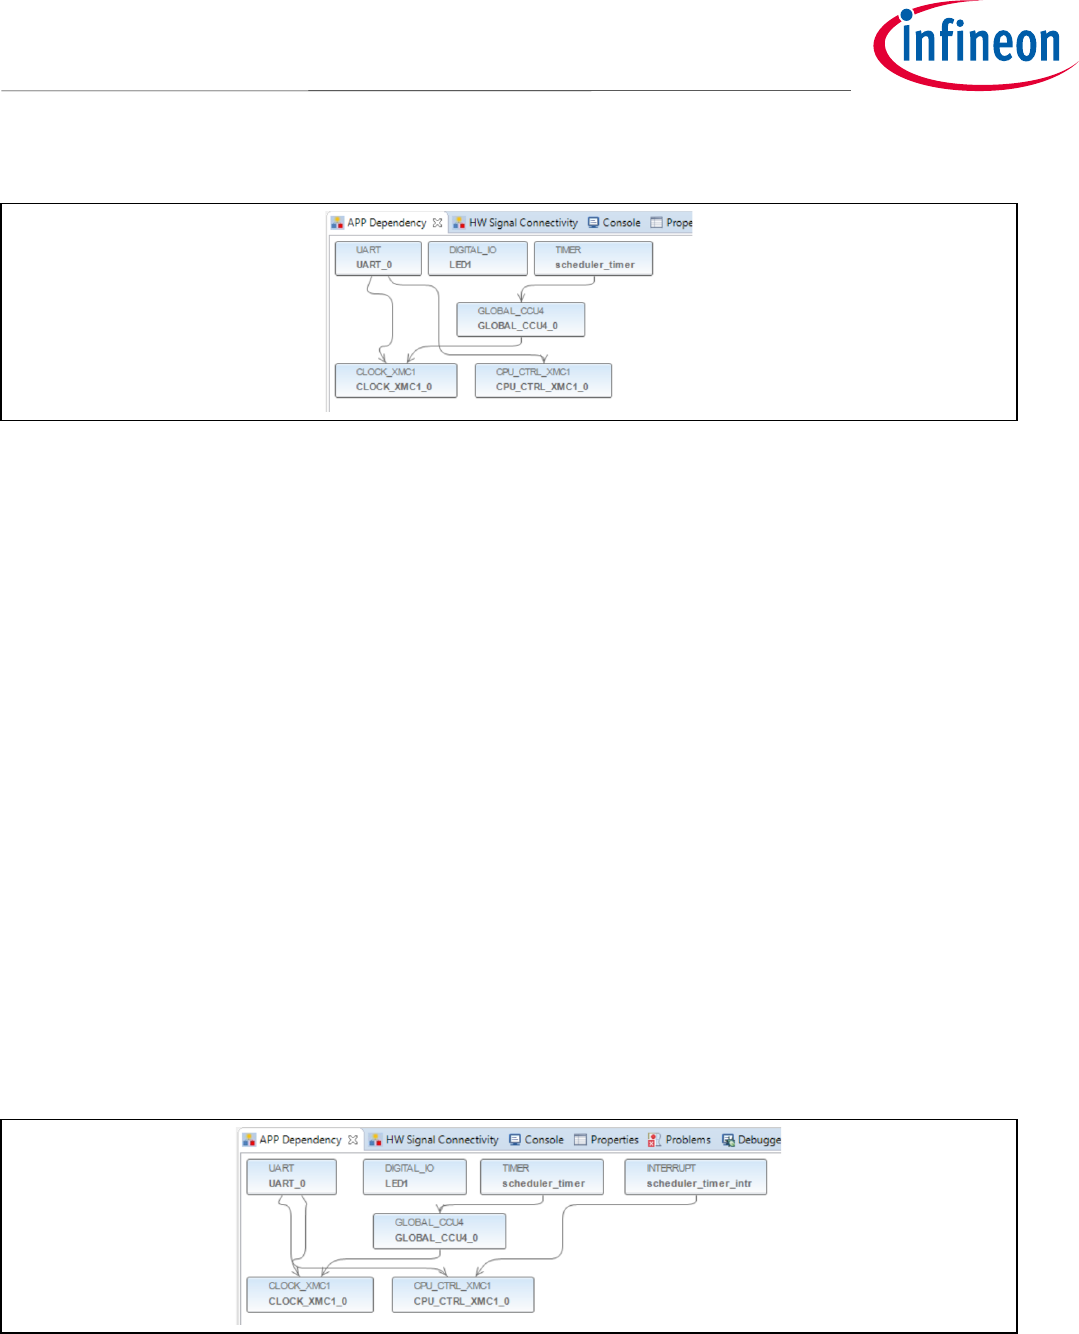
Add an Interrupt Module to serve the “scheduler_timer”
• Go to DAVE->Add New APP
• In the search filed, type “Interrupt”. Add the INTERRUPT module
• Right click on INTERRUPT_0 and select “Rename Instance Label”
• Change INTERRUPT_0 module to “scheduler_timer_intr”, as shown in
Figure 24 Scheduler Timer Interrupt
To configure the “scheduler_timer_intr”, double click on the interrupt module, in the APP Dependency pane.
Configure the timer with the following settings:

Application Note 24 <Revision 1.0>
<2018-07-03>
OPTIGA Trust X
Integration Manual
• Under Interrupt Settings
o Enable interrupt at initialization: Selected
o Interrupt priority: 3 (It is the max for XMC1100)
o Interrupt handler: scheduler_timer_isr
A signal connection between the modules needs to be configured now as shown in Figure 2526.
• Go to DAVE->HW Signal Connections
• Under Filter, select “scheduler_timer”
• Under Source Signal
o Select “event_time_interval”
• Under Target APP Instance Name
o Select “scheduler_timer_intr”
• Under Target Signal
o Select “sr_irq”
Figure 25 HW Signal Connections for Scheduler Timer
7.2 Tick Timer
Using Dave™4 App wizard we will create a Timer module.
• Go to DAVE->Add New APP
• In the search filed, type “Timer”. Add the Timer module
• When “Required APP Instance Selection” window appears, select
“APP/GLOBAL_CCU4/GLOBAL_CCU4_0” option as shown in Figure 2627
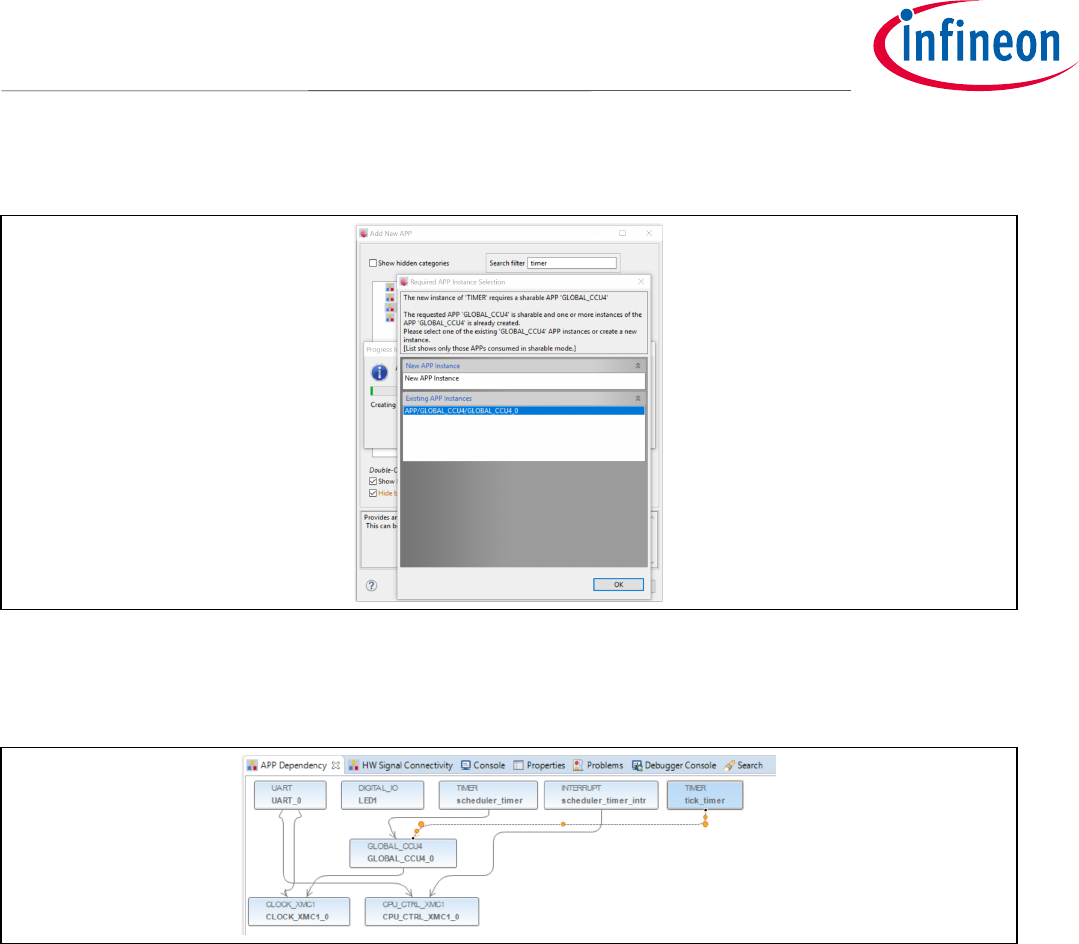
Application Note 25 <Revision 1.0>
<2018-07-03>
OPTIGA Trust X
Integration Manual
Figure 26 Tick Timer Under Existing APP Instance
• Right click on TIMER_0 and select “Rename Instance Label”
• Change the timer module name to “tick_timer”, as shown in Figure 2728
Figure 27 Tick Timer Module
To configure the “tick_timer”, double click on the module in the APP Dependency pane. Configure the timer
with the following settings:
• General Settings
o Timer interval: 1000usec
o Start after initialization: Selected
• Event Settings
o Time interval even: Selected
Note: An alert will appear after we select time interval event. Disregard as we will configure it later.
Application Note 26 <Revision 1.0>
<2018-07-03>
OPTIGA Trust X
Integration Manual
Add an Interrupt Module to serve the “tick_timer”
• Go to DAVE->Add New APP
• In the search filed, type “Interrupt”. Add the INTERRUPT module
• Right click on INTERRUPT_0 and select “Rename Instance Label”
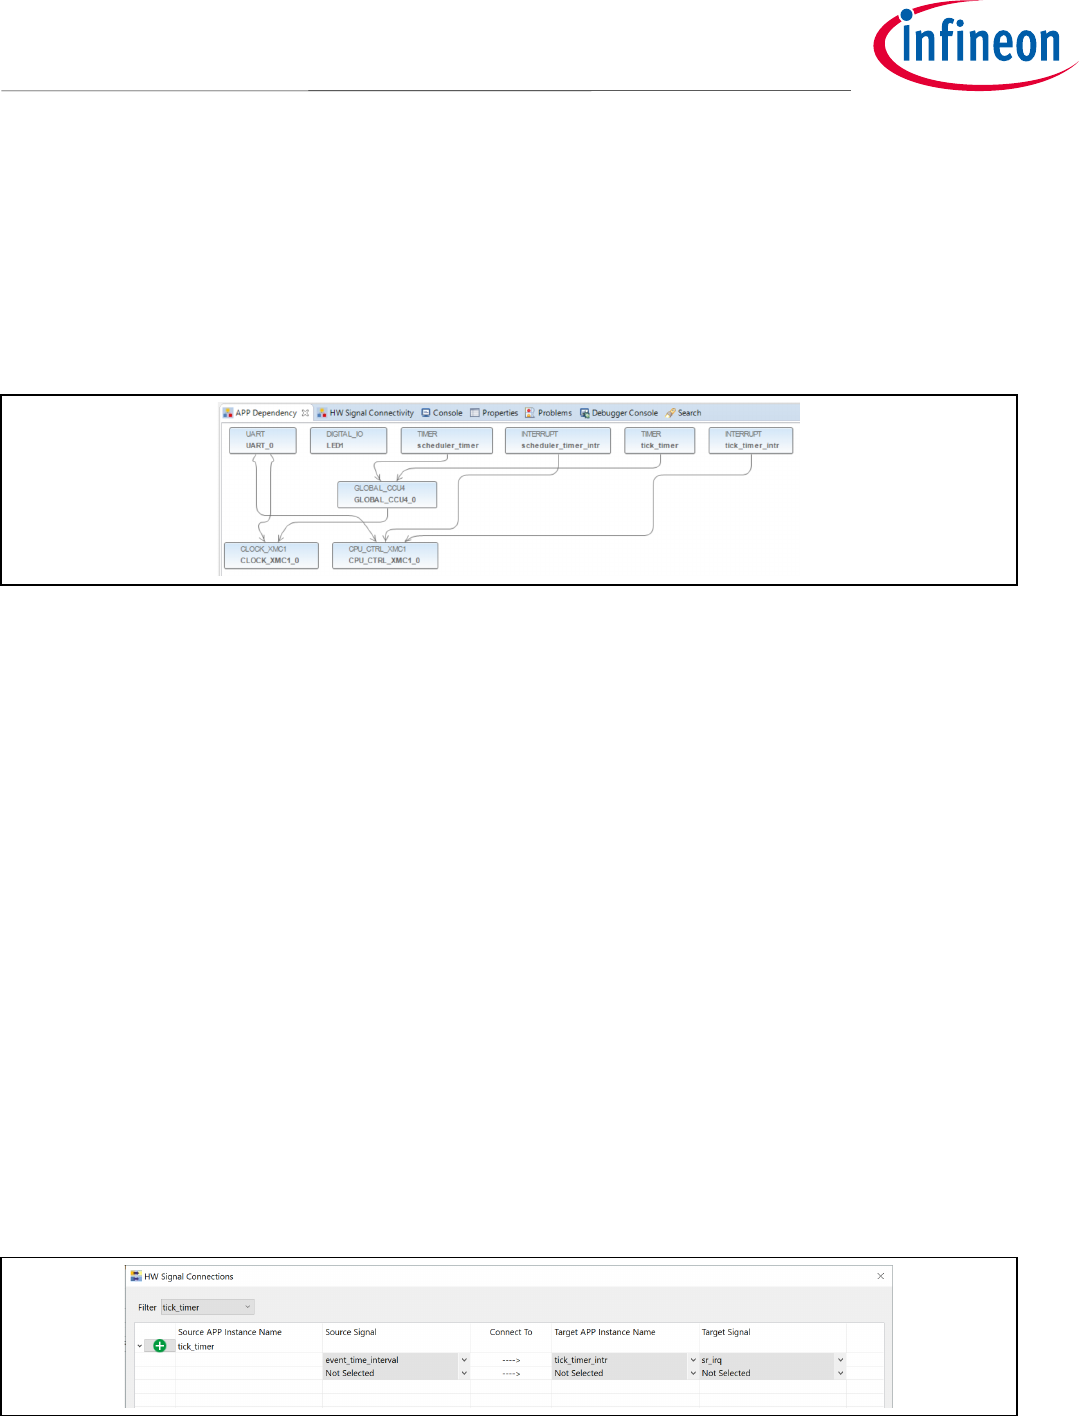
• Change INTERRUPT_0 module to “tick_timer_intr”, as shown in Figure 2829
Figure 28 Tick Timer Interrupt
To configure the “tick_timer_intr”, double click on the interrupt module, in the APP Dependency pane.
Configure the timer with the following settings:
• Under Interrupt Settings
o Enable interrupt at initialization: Selected
o Interrupt priority: 3 (It is the max for XMC1100)
o Interrupt handler: delay_timer_isr
A signal connection between the modules needs to be configured now as shown in Figure 2930.
• Go to DAVE->HW Signal Connections
• Under Filter, select “tick_timer”
• Under Source Signal
o Select “event_time_interval”
• Under Target APP Instance Name
o Select “tick_timer_intr”
• Under Target Signal
o Select “sr_irq”
Figure 29 HW Signal Connections for Tick Timer
Application Note 27 <Revision 1.0>
<2018-07-03>
OPTIGA Trust X
Integration Manual
7.3 I2C Master Module
Using Dave™4 App wizard we will create an I2C Master module.
• Go to DAVE->Add New APP
• In the search filed, type “I2C”
• Select “I2C MASTER”
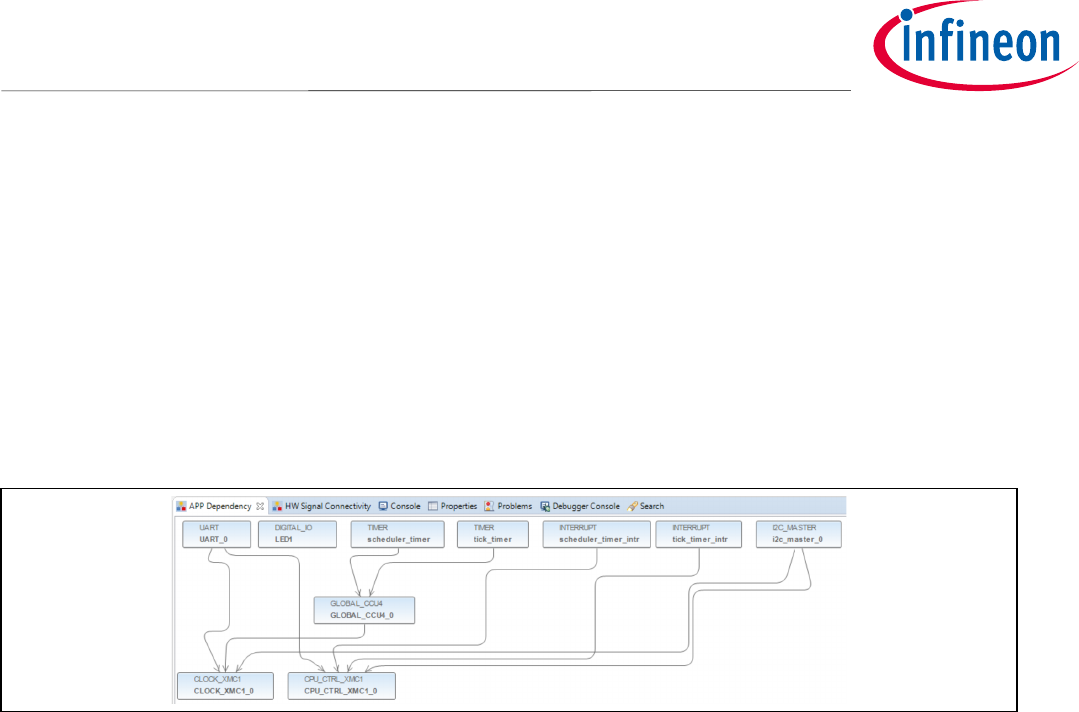
• Right click on I2C_MASTER_0 and select “Rename Instance Label”
• Change the of I2C_MASTER_0 instance to “i2c_master_0”, as shown in Figure 2728
Figure 30 I2C Master Module
To configure the “i2c_master_0”, double click on the module in the APP Dependency pane. Configure the I2C
with the following settings:
• General Settings
o Desired bus speed [KHz]: 400
o Enable multi-master: Not selected
• Advanced Settings
o Transmit mode: Interrupt
o Receive mode: Interrupt
o Enable Tx FIFO: 16
o Enable Rx FIFO: 16
Note: An alert will appear after enabling the different I2C interrupt callbacks because the callback name
field is empty. It will be fixed as we add the different callback names.
• Interrupt Settings
a. Transmit
i. Preemption priority: 3
ii. End of transmit callback: Selected
1. End of transmit callback name: i2c_master_end_of_transmit_callback
b. Receive
i. Preemption priority: 3
ii. End of receive callback: Selected
1. End of transmit callback name: i2c_master_end_of_receive_callback
Application Note 28 <Revision 1.0>
<2018-07-03>
OPTIGA Trust X
Integration Manual
c. Error Handling
i. Preemption priority: 3
ii. Nack receive: Selected
1. Nack receive name: i2c_master_nack_received_callback
iii. Arbitration lost: Selected
1. Arbitration lost name: i2c_master_arbitration_lost_callback
iv. Error detect: Selected
1. Error detect name: i2c_master_error_detected_callback
• Pin Settings
d. Enable noise filter: Not Selected
e. Enable advance pin configuration: Not Selected
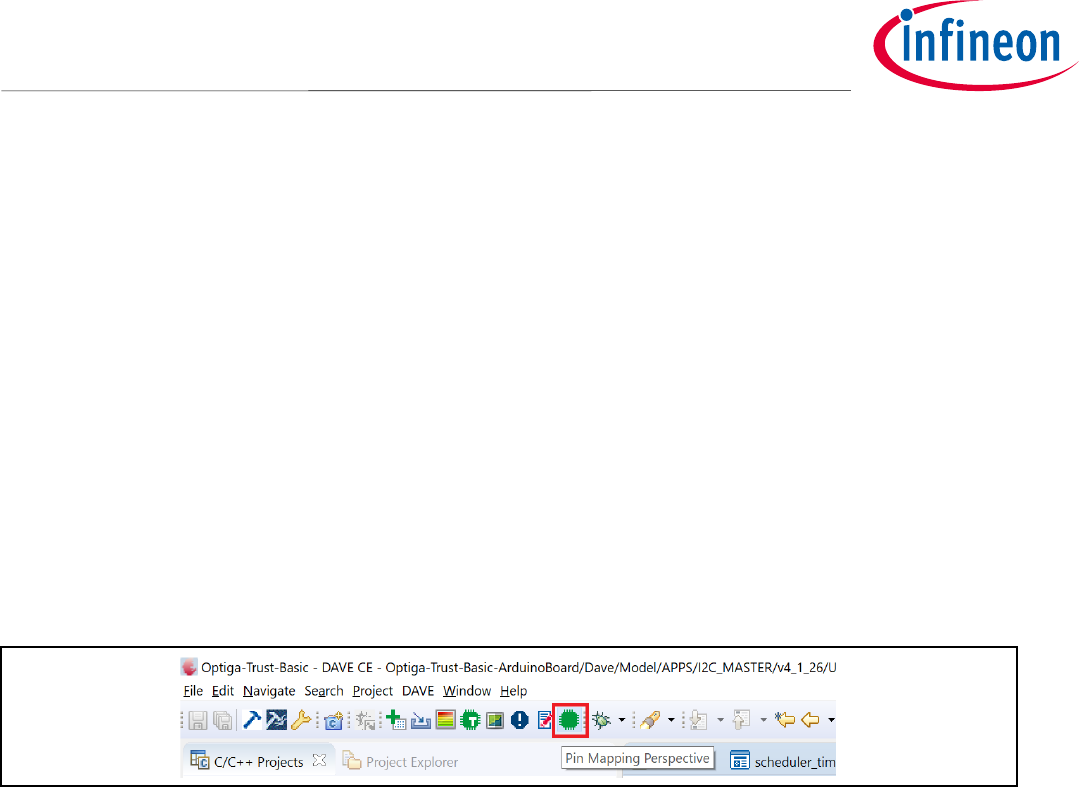
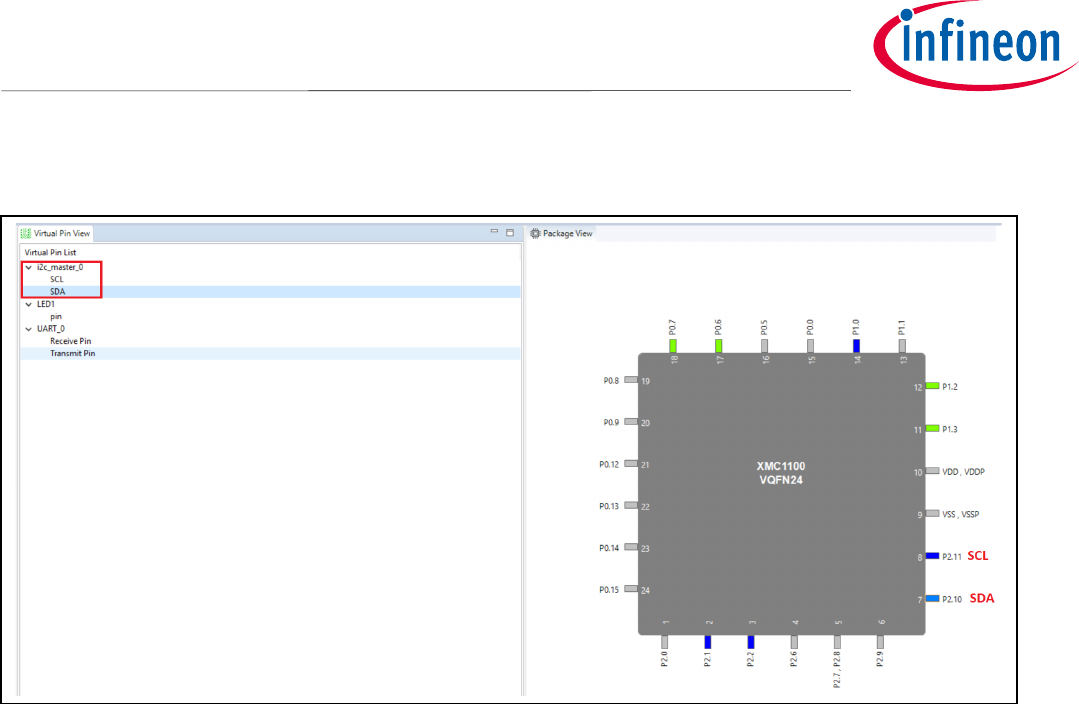
To physically configure the SDA and SCL IO for the I2C module, open the Pin Mapping Perspective, as shown in
Figure 3132.
Figure 31 Opening Pin Mapping Perspective
• Select SCL from the i2c_master_0 menu on the left side, as shown in Figure 3233.
• Go to pin P2.11 and assign it to SCL. Right Click and select “i2c_master_0/SCL”
• Select SDA from the i2c_master_0 menu on the left side
• Go to pin P2.10 and assign it to SDA. Right Click and select “i2c_master_0/SDA”
Application Note 29 <Revision 1.0>
<2018-07-03>
OPTIGA Trust X
Integration Manual
Figure 32 Pin Mapping Perspective
7.4 IO for OPTIGA™ Trust Reset Control
OPTIGA™Trust X Host Library can control OPTIGA™Trust X Reset and Vdd. The OPTIGA™2Go board has only
support to control OPTIGA™Trust X Reset. To enable this functionality, we need to add an IO module to our
Host Project.
• Go to DAVE->Add New APP
• In the search filed, type “IO”
• Select “DIGITAL_IO”
• Right click on DIGITAL_IO _0 and select “Rename Instance Label”
• Change the of DIGITAL_IO _0 instance to “pin0_15”, which is the IO Pin assigned to the Reset control, as
shown in Figure 3335.
To configure the IO PIN, double click on the interrupt module, in the APP Dependency pane.
• General Settings
o Pin direction: Input/Output
• Output Settings
o Mode: Push Pull
o Initial output level: High
Application Note 30 <Revision 1.0>
<2018-07-03>
OPTIGA Trust X
Integration Manual
Figure 33 Adding OPTIGA™ Trust X Reset Control
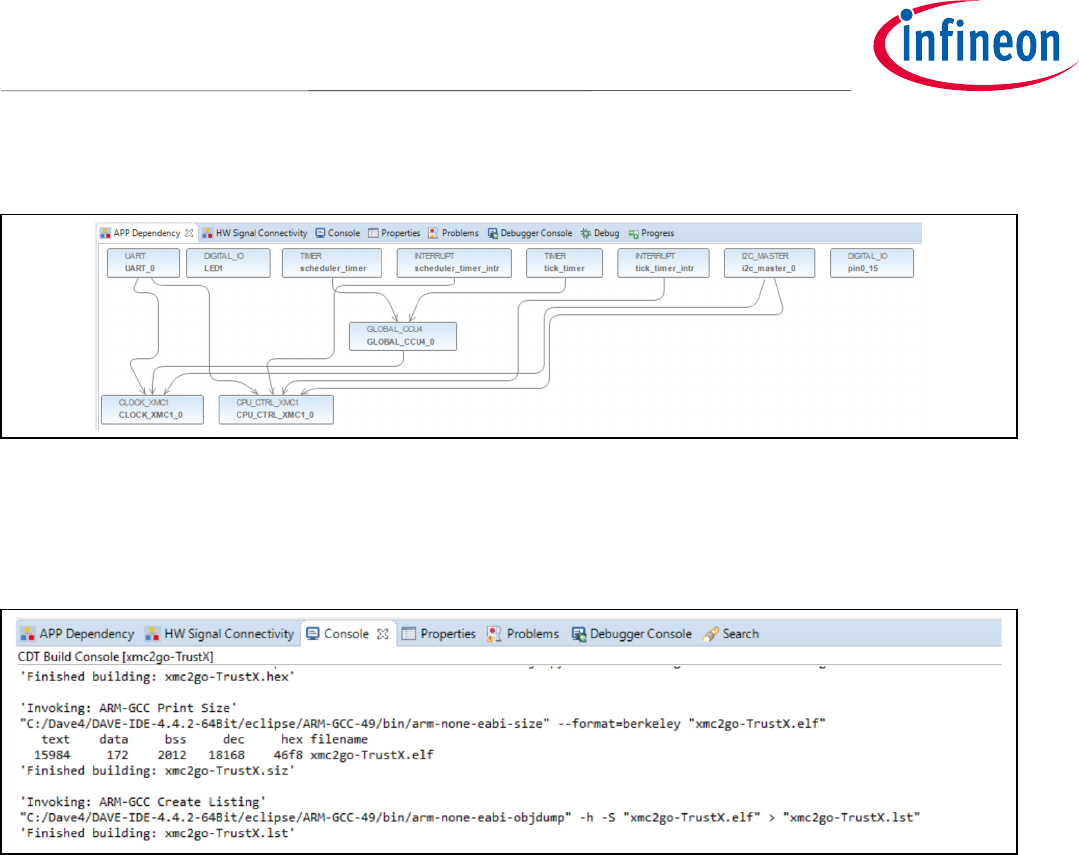
Compile the project now and there should not be any errors.
Figure 34 Successful Integration of OPTIGA™Trust X Host Library into Host Project

Application Note 31 <Revision 1.0>
<2018-07-03>
OPTIGA Trust X
Integration Manual
8 Working with OPTIGA™Trust X from the Application Layer
8.1 Initializing OPTIGA™Trust X using the Host Library
For the Application Layer to interact with OPTIGA™Trust X using the Host Library, we need to initialize OPTIGA™
Trust X first.
• Open main.c
• Add the following code, as shown in Error! Reference source not found..
Code Listing 1 OPTIGA™Trust X Host Library Init and Deinit methods.
/*OPTIGA Trust Include Files*/
#include "optiga/comms/optiga_comms.h"
#include "optiga/optiga_util.h"
#include "optiga/ifx_i2c/ifx_i2c_config.h"
#include "optiga/common/AuthLibSettings.h"
/*************************************************************************
* function prototypes
*************************************************************************/
static int32_t optiga_init(void);
static int32_t optiga_deinit(void);
/*************************************************************************
* Global
*************************************************************************/
optiga_comms_t optiga_comms = {(void*)&ifx_i2c_context_0,NULL,NULL, OPTIGA_COMMS_SUCCESS};
/*************************************************************************
* functions
*************************************************************************/
static int32_t optiga_init(void)
{
int32_t status = (int32_t) OPTIGA_LIB_ERROR;
do
{
status = optiga_util_open_application(&optiga_comms);
if(OPTIGA_LIB_SUCCESS != status)
{
sprintf(stderr, "Failure: CmdLib_OpenApplication(): 0x%04X", status);
break;
}
status = OPTIGA_LIB_SUCCESS;
} while(0);
return status;
}
static int32_t optiga_deinit(void)
{
int32_t status = (int32_t) OPTIGA_LIB_ERROR;
//Close IFX I2C Protocol and switch off the security chip
status = optiga_comms_close(&optiga_comms);
if(OPTIGA_LIB_SUCCESS != status)
{
sprintf(stderr, "Failure: optiga_comms_close(): 0x%04X", status);
}
printf("Device closed\n");
return status;
}

Application Note 32 <Revision 1.0>
<2018-07-03>
OPTIGA Trust X
Integration Manual
Within “main” add the call to optiga_init() as shown in Code Listing 2.
Code Listing 2 Calling optiga_init from main.
• Compile xmc2Go-TrustX project.
• No errors should appear, as shown in Figure 3537.
Figure 35 Successful Initialization of OPTIGA™Trust X Host Library
8.2 OPTIGA™Trust X Host Library Crypt API Layer
OPTIGA™Trust X Host Library Crypt Layer, provides the following API’s:
8.2.1 optiga_crypt_random
Generates a random Number of a specific size. It has the option of using either of two methodologies supported
by OPTIGA™Trust X.
• TRNG
• DRNG
8.2.2 optiga_crypt_hash_start
Starts a Hash sequence using SHA256 algorithm.
int main(void)
{
//Return value
optiga_lib_status_t return_status = OPTIGA_LIB_ERROR;
.
.
.
return_status = optiga_init();
if (OPTIGA_LIB_SUCCESS != return_status)
{
OPTIGAprintf("OPTIGA Trust initialization failed\n");
while(1U)
{
}
}
/* Placeholder for user application code. The while loop below can be replaced with user application code. */
.
.
.
}

Application Note 33 <Revision 1.0>
<2018-07-03>
OPTIGA Trust X
Integration Manual
8.2.3 optiga_crypt_hash_update
Updates previously started Hash context, adding to the Hash sequence the new Hash (using SHA256 algorithm)
of a given message.
8.2.4 optiga_crypt_hash_finalize
Finalized Hash sequence and outputs the Sha256 Digest.
8.2.5 optiga_crypt_ecc_generate_keypair
Generates a Key pair based on the NIST P256 or 384 Elliptic Curve Algorithm. Curve ID can be:
• OPTIGA_ECC_NIST_P_256
• OPTIGA_ECC_NIST_P_384
8.2.6 optiga_crypt_ecdsa_sign
Calculates an Elliptic Curve Signature on provided SHA256 Digest.
8.2.7 optiga_crypt_ecdsa_verify
Verifies an Elliptic Curve Signature.
8.2.8 optiga_crypt_ecdh
Generates shared secret (premaster secret), using ECDH algorithm. The Public key is sourced from the host and
the Private Key is sourced from OPTIGA™Trust X.
8.2.9 optiga_crypt_tls_prf_sha256
Generates a derived secret based on the ECDH premaster secret. It provides the following options:
• Derived key is exported to the host from OPTIGA™Trust X.
• Derived key is stored in an OPTIGA™Trust X Session OID.
8.3 Using OPTIGA™Trust X Host Library Crypt API Layer to interact with
Application
This section will demonstrate how to use the OPTIGA™Trust X Host Library Crypt API layer to add cryptographic
primitive methods to the Host Application. These methods when combined provide a high level of security to
the application. We will use our xmc2Go-TrustX project as reference.

Application Note 34 <Revision 1.0>
<2018-07-03>
OPTIGA Trust X
Integration Manual
• In your xmc2Go-TrustX project go src/cmd_pocess. It is where the core of our application resides. This is
shown in
• Figure 3638.
Figure 36 xmc2Go-TrustX Application Layer
• Under parse_cmd(), we can find the application user interface commands. We will be adding
functionality to these commands to demonstrate the interaction with Crypt Layer APIs.
• The xmc2Go application user interface commands are:
o optx_get_rng()
o optx_get_sha256()
o optx_genKey_pair()
o optx_sign_hash()
o optx_verify_sig()
o optx_sign_verify_sig()
o optx_ecdh_derive_key()
o optx_read_ifx_cert()
• The above commands use OPTIGA™Trust X Crypt layer APIs to bring application layer functionality to
xmc2go application.
Now let’s start building our xmc2Go application user interface commands. This will do in the following
subsections.

Application Note 35 <Revision 1.0>
<2018-07-03>
OPTIGA Trust X
Integration Manual
8.3.1 Configuring Application cmd_iface.c for Optiga Trust Library
To use OPTIGA™Trust X Crypt layer APIs we need to add the following header files to our application sorce file
cmd_iface.c.
Add #include "optiga/optiga_crypt.h", like shown in the code listing below.
Code Listing 3 Addign Optiga Trust Library header files to application source file
Now add the global variables we will use.
Note: In a real-world application, the use of global variables should be avoided.
Code Listing 4 Addign global variable used for this example.
8.3.2 optx_get_rng
When our xmc2Go application calls this command, it uses OPTIGA™Trust X Host Library Crypt API
optiga_crypt_random to generate a random number provided by OPTIGA™Trust X.
Copy the piece of code in Code Listing 5 to cmd_iface.c under optx_get_rng(void).
Code Listing 5 xmc2Go optx_get_rng application API
When we run our xmc2Go application and test the command, it will provide an output as shown in
int optx_get_rng(void)
{
optiga_lib_status_t optiga_status = OPTIGA_LIB_ERROR;
uint8_t rnd[32];
do{
OPTIGAprintf("Retrieving random numbers from OPTIGA Trust X:\r\n");
optiga_status = optiga_crypt_random(rnd, sizeof(rnd));
if(optiga_status!= 0)
break;
memcpy(global_random, rnd, sizeof(rnd));
HexDump(rnd, sizeof(rnd));
}while(0);
return optiga_status;
}
#include <DAVE.h> //Declarations from DAVE Code Generation (includes SFR declaration)
#include <cmd_iface.h>
#include <string.h>
#include <stdio.h>
#include <string.h>
#include "cbuf.h"
#include "serial_io_iface.h"
/*OPTIGA Trust Include Files*/
#include "optiga/optiga_crypt.h"
#include "optiga/optiga_util.h"
/*Global variable used for this exercise*/
uint8_t global_random[32] = {};
uint8_t global_digest[32] = {};
uint8_t global_signature[80] = {};
uint8_t global_sig_length = 0;
uint8_t global_pubkey[80] = {};
uint8_t global_pubkey_length = 0;

Application Note 36 <Revision 1.0>
<2018-07-03>
OPTIGA Trust X
Integration Manual
Figure 3739
Figure 37 Execution of optx_get_rng by xmc2Go application.
8.3.3 optx_get_sha256
When our xmc2Go application calls this command, it uses OPTIGA™Trust X Host Library Crypt API
optiga_crypt_hash to compute a SHA256 hash over the provided data. In our xmc2Go application the data
is the following message: “OPTIGA Trust X, Hardened Security”
Copy the piece of code in Code Listing 6 to cmd_iface.c under optx_get_sha256(void).
Code Listing 6 xmc2Go opiga_get_sha256 application API
int optx_get_sha256(void)
{
optiga_lib_status_t optiga_status = OPTIGA_LIB_ERROR;
uint8_t hash_context_buffer [130];
optiga_hash_context_t hash_context;
uint8_t data_to_hash [] = {"OPTIGA Trust X, Hardened Security"};
hash_data_from_host_t hash_data_host;
hash_context.context_buffer = hash_context_buffer;
hash_context.context_buffer_length = sizeof(hash_context_buffer);
hash_context.hash_algo = OPTIGA_HASH_TYPE_SHA_256;
uint8_t digest[32];
do{
OPTIGAprintf("Message to Hash: -OPTIGA Trust X, Hardened Security- \r\n");
OPTIGAprintf("OPTIGA Trust X Performing SHA256 of Message\r\n");
//Hash start
optiga_status = optiga_crypt_hash_start(&hash_context);
if(optiga_status != OPTIGA_LIB_SUCCESS)
{
break;
}
//Hash update
hash_data_host.buffer = data_to_hash;
hash_data_host.length = sizeof(data_to_hash);
optiga_status = optiga_crypt_hash_update(&hash_context,
// OPTIGA_CRYPT_OID_DATA stands for OID
OPTIGA_CRYPT_HOST_DATA,
&hash_data_host);
if(optiga_status != OPTIGA_LIB_SUCCESS)
{
break;
}
// hash finalize
optiga_status = optiga_crypt_hash_finalize(&hash_context, digest);
if(optiga_status != OPTIGA_LIB_SUCCESS)
{
break;
}
HexDump(digest, sizeof(digest));
memcpy(global_digest, digest, sizeof(digest));
}while(0);
return optiga_status;
}

Application Note 37 <Revision 1.0>
<2018-07-03>
OPTIGA Trust X
Integration Manual
When we run our xmc2Go application and test the command, it will provide an output as shown in Figure 3840.
Figure 38 Execution of optx_get_sha256 by xmc2Go application.
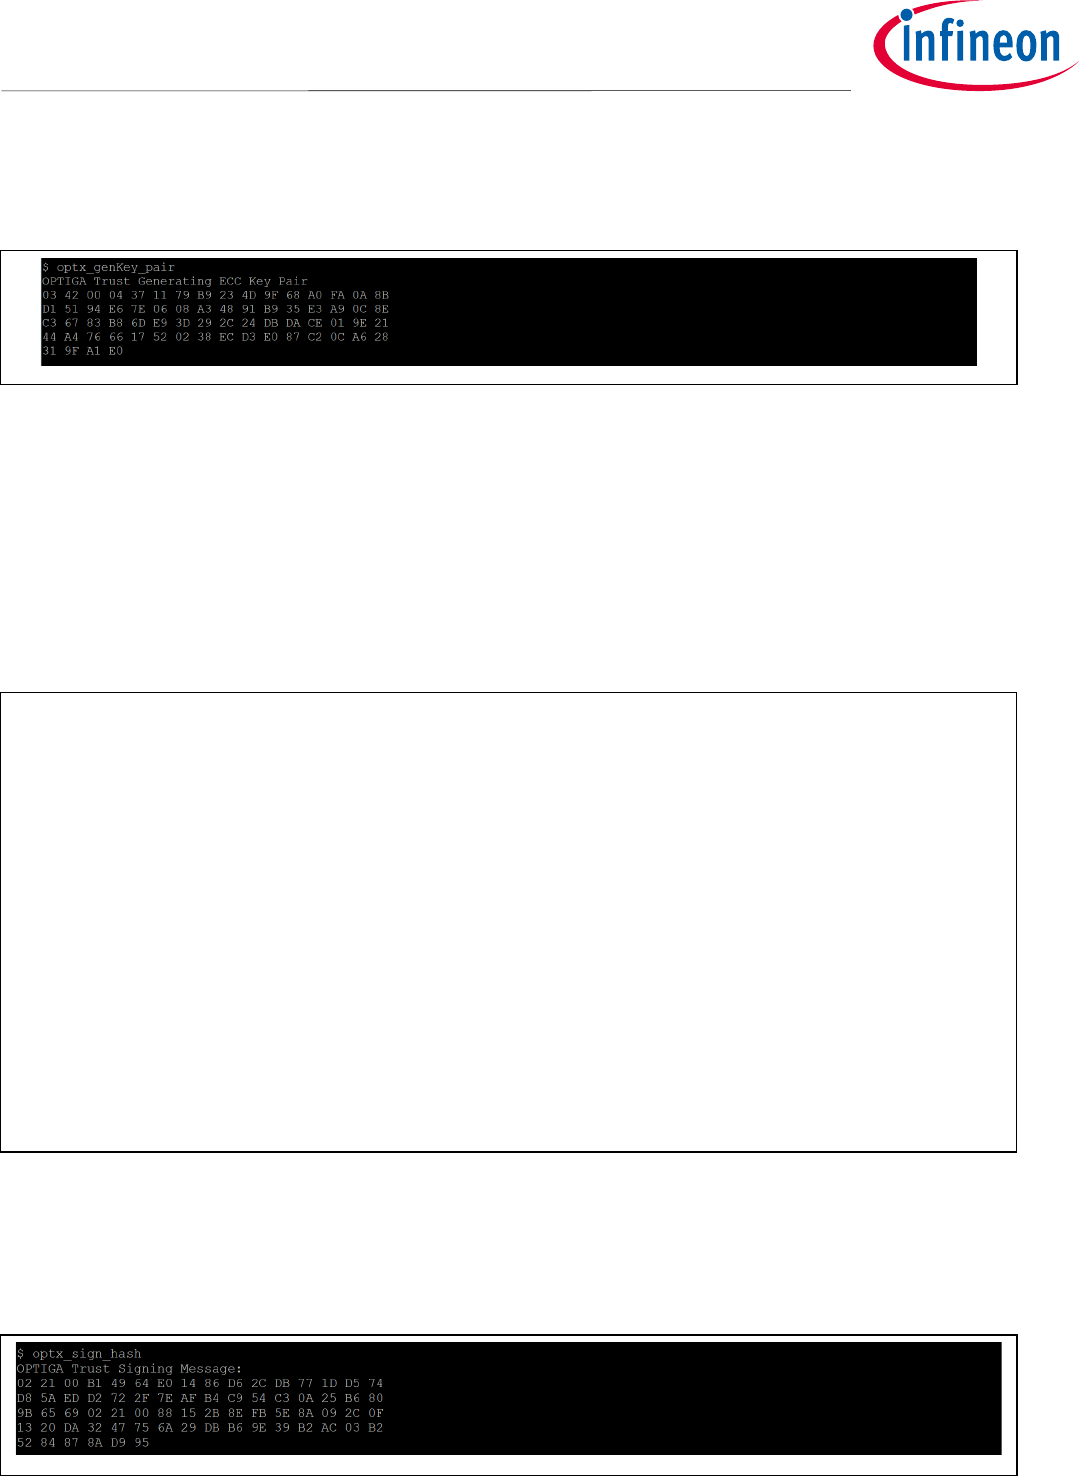
8.3.4 optx_genKey_pair
When our xmc2Go application calls this command, it uses OPTIGA™Trust X Host Library Crypt API
optiga_crypt_ecc_generate_keypair. By calling this API OPTIGA™Trust X will generate an ECC256
key pair. It will securely keep the ECC Private Key portion internal and will export to the ECC Public Key to the
host.
Copy the piece of code in Code Listing 7 to cmd_iface.c under optx_genKey_pair(void).
Code Listing 7 xmc2Go optx_genKey_pair application API
int optx_genKey_pair(void)
{
optiga_lib_status_t optiga_status;
optiga_key_id_t optiga_key_id;
//To store the generated public key as part of Generate key pair
uint8_t public_key [100];
uint16_t public_key_length = sizeof(public_key);
do{
/**
* Generate ECC Key pair
* - Use ECC NIST P 256 Curve
* - Specify the Key Usage (Key Agreement or Sign based on requirement)
* - Store the Private key in OPTIGA Key store
* - Export Public Key
*/
optiga_key_id = OPTIGA_KEY_STORE_ID_E0F1;
//for Session based, use OPTIGA_KEY_ID_SESSION_BASED as key id as shown below.
//optiga_key_id = OPTIGA_KEY_ID_SESSION_BASED;
optiga_status = optiga_crypt_ecc_generate_keypair(OPTIGA_ECC_NIST_P_256,
(uint8_t)OPTIGA_KEY_USAGE_SIGN,
FALSE,
&optiga_key_id,
public_key,
&public_key_length);
if (OPTIGA_LIB_SUCCESS != optiga_status)
{
//Key pair generation failed
break;
}
HexDump(public_key, public_key_length);
memcpy(global_pubkey, public_key, public_key_length);
global_pubkey_length = public_key_length;
}while(0);
return optiga_status;
}
Application Note 38 <Revision 1.0>
<2018-07-03>
OPTIGA Trust X
Integration Manual
When we run our xmc2Go application and test the command, it will provide an output as shown in Figure 3941.
Figure 39 Execution of optx_genKey_pair by xmc2Go application.
8.3.5 optx_sign_hash
When our xmc2Go application calls this command, it uses OPTIGA™Trust X Host Library Crypt API
optiga_crypt_ecdsa_sign to sign a message (SHA256 hash of the message). OPTIGA™Trust X receives
the SHA256 digest and using the ECC Private Key, signs it and exports the signature back to the Host.
Copy the piece of code in Code Listing 8 to cmd_iface.c under optx_sign_hash(void).
Code Listing 8 xmc2Go optx_sign_hash application API.
When we run our xmc2Go application and test the command, it will provide an output as shown in Figure 4042.
Figure 40 Execution of optx_sign_hash by xmc2Go application.
int optx_sign_hash(void)
{
optiga_lib_status_t optiga_status;
uint8_t signature [80]; //To store the signture generated
uint16_t signature_length = sizeof(signature);
do{
OPTIGAprintf("OPTIGA Trust Signing Message: \r\n");
optiga_status = optiga_crypt_ecdsa_sign(global_digest,
sizeof(global_digest),
OPTIGA_KEY_STORE_ID_E0F1,
signature,
&signature_length);
if (OPTIGA_LIB_SUCCESS != optiga_status)
break;
HexDump(signature, signature_length);
memcpy(global_signature, signature, signature_length);
global_sig_length = signature_length;
}while(0);
return optiga_status;
}

Application Note 39 <Revision 1.0>
<2018-07-03>
OPTIGA Trust X
Integration Manual
8.3.6 optx_verify_sig
When our xmc2Go application calls this command, it uses the past executed commands to verify the ECC256
signature generated
The optiga_crypt_ecdsa_verify will take the:
• hashed message
• signature of the hashed message
• ECC Public Key
To verify if the signature is mathematically related to the message by using the ECC Public Key.
Note: We should remember that an ECC Private Key is the only one able to perform a signature that can
later be verified using the ECC Public Key.
Copy the piece of code in Code Listing 9 to cmd_iface.c under optx_verify_sig(void).
Code Listing 9 xmc2Go optx_verify_sig application API.
When we run our xmc2Go application and test the command, it will provide an output as shown in Figure 4143.
Figure 41 Execution of optx_verify_sig by xmc2Go application.
int optx_verify_sig(void)
{
optiga_lib_status_t optiga_status;
public_key_from_host_t public_key_details = {
global_pubkey,
global_pubkey_length,
OPTIGA_ECC_NIST_P_256
};
do{
optiga_status = optiga_crypt_ecdsa_verify (global_digest,
sizeof(global_digest),
global_signature,
global_sig_length,
OPTIGA_CRYPT_OID_DATA stands for OID in the public_key_detail
&public_key_details);
if (OPTIGA_LIB_SUCCESS != optiga_status)
break;
}while(0);
return optiga_status;
}

Application Note 40 <Revision 1.0>
<2018-07-03>
OPTIGA Trust X
Integration Manual
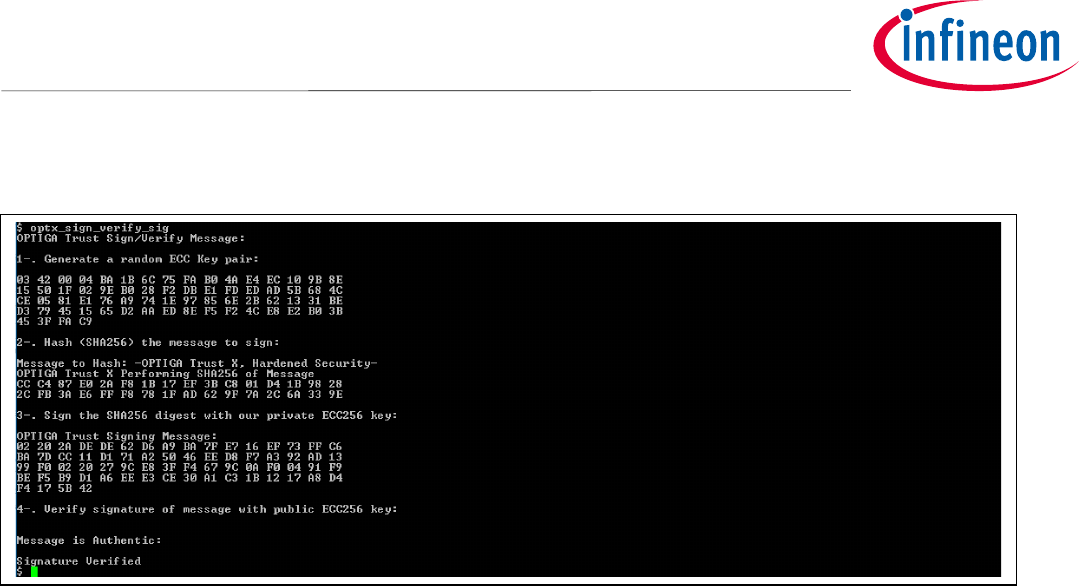
8.3.7 optx_sign_verify_sig
When our xmc2Go application calls this command, it will execute the following commads following
OPTIGA™Trust X Host Library Crypt APIs:
• optiga_crypt_hash
• optiga_crypt_ecc_generate_keypair
• optiga_crypt_ecdsa_sign
• optiga_crypt_ecdsa_verify
Copy the piece of code in Code Listing 10 to cmd_iface.c under optx_sign_verify_sig(void).
Code Listing 10 optx_sign_verify_sig application API.
After executing the command, it will provide an output as shown in Figure 4244.
int optx_sign_verify_sig(void)
{
optiga_lib_status_t optiga_status;
do{
OPTIGAprintf("OPTIGA Trust Sign/Verify Message: \r\n\n");
do{
OPTIGAprintf("1-. Generate a random ECC Key pair: \r\n\n");
optiga_status = optx_genKey_pair();
OPTIGAprintf("\r\n");
if (optiga_status != 0)
break;
OPTIGAprintf("2-. Hash (SHA256) the message to sign: \r\n\n");
optiga_status = optx_get_sha256();
OPTIGAprintf("\r\n");
if (optiga_status != 0)
break;
OPTIGAprintf("3-. Sign the SHA256 digest with our private ECC256 key: \r\n\n");
optiga_status = optx_sign_hash();
OPTIGAprintf("\r\n");
if (optiga_status != 0)
break;
OPTIGAprintf("4-. Verify signature of message with public ECC256 key: \r\n\n");
optiga_status = optx_verify_sig();
OPTIGAprintf("\r\n");
if (optiga_status != 0)
break;
}while(0);
if (optiga_status != 0)
break;
OPTIGAprintf("Message is Authentic: \r\n\n");
}while(0);
return optiga_status;
}
Application Note 41 <Revision 1.0>
<2018-07-03>
OPTIGA Trust X
Integration Manual
Figure 42 Execution of optx_verify_sig by xmc2Go application.
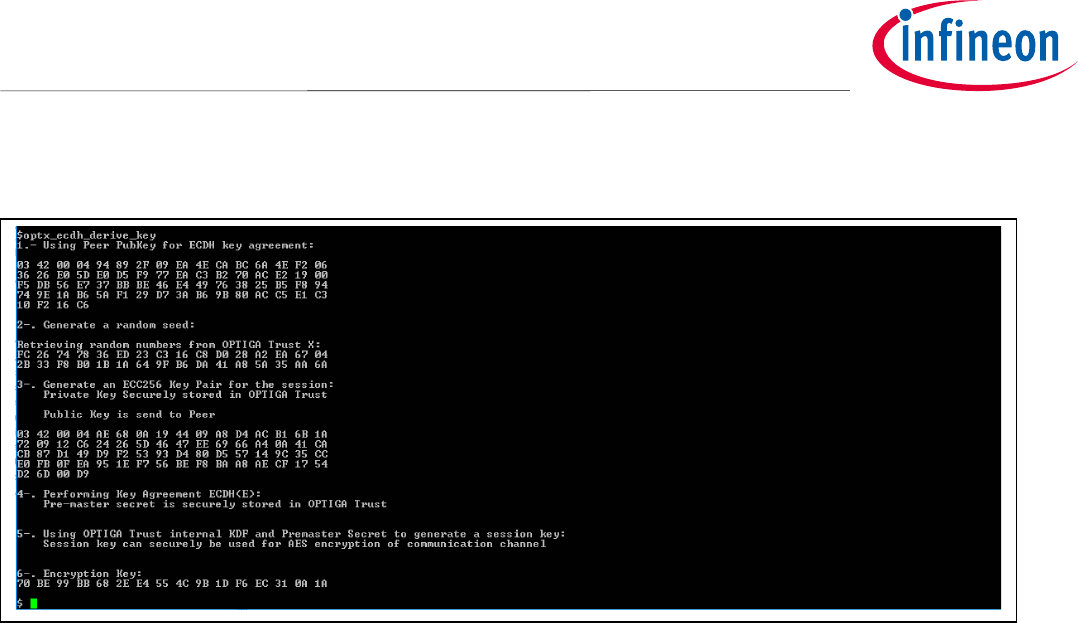
8.3.8 optx_ecdh_derive_key
When our xmc2Go application calls this command, it uses the following OPTIGA™Trust X Host Library Crypt
APIs:
• optiga_crypt_ecc_generate_keypair
• optiga_crypt_ecdh
• optx_get_rng
• optiga_crypt_tls_prf_sha256
Note: We use a new generated ECC Key Pair for ECDH. The reason this is done, is because in practice
ECDH keys life span is only for the lifetime of the session they are used for. OPTIGA™Trust X can
create ECC Key Pairs that are RAM resident and their life span is determined by the life span of the
context used when initializing OPTIGA™Trust X. When closing the context all RAM resident keys are
flushed from OPTIGA™Trust X RAM.
In practice we keep the Premaster secret generated by ECDH secret. We then use the Premaster Secret along
with a Random Number or Nonce to generate a Session Key.
Copy the piece of code in Code Listing 11 to cmd_iface.c under optx_ecdh(void).

Application Note 42 <Revision 1.0>
<2018-07-03>
OPTIGA Trust X
Integration Manual
int optx_ecdh_derive_key(void)
{
optiga_lib_status_t optiga_status;
uint8_t decryption_key [16] = {0};
uint8_t public_key [80];
uint16_t public_key_length = sizeof(public_key);
optiga_key_id_t optiga_key_id;
uint8_t label [] = "";
// Peer public key details for the ECDH operation
static uint8_t peer_public_key [] =
{
//Bit string format
0x03,
//Remaining length
0x42,
//Unused bits
0x00,
//Compression format
0x04,
//Public Key
0x94, 0x89, 0x2F, 0x09, 0xEA, 0x4E, 0xCA, 0xBC, 0x6A, 0x4E, 0xF2, 0x06, 0x36, 0x26, 0xE0, 0x5D,
0xE0, 0xD5, 0xF9, 0x77, 0xEA, 0xC3, 0xB2, 0x70, 0xAC, 0xE2, 0x19, 0x00, 0xF5, 0xDB, 0x56, 0xE7,
0x37, 0xBB, 0xBE, 0x46, 0xE4, 0x49, 0x76, 0x38, 0x25, 0xB5, 0xF8, 0x94, 0x74, 0x9E, 0x1A, 0xB6,
0x5A, 0xF1, 0x29, 0xD7, 0x3A, 0xB6, 0x9B, 0x80, 0xAC, 0xC5, 0xE1, 0xC3, 0x10, 0xF2, 0x16, 0xC6,
};
do{
OPTIGAprintf("1.- Using Peer PubKey for ECDH key agreement: \r\n\n");
HexDump(peer_public_key, sizeof(peer_public_key));
OPTIGAprintf("\r\n");
public_key_from_host_t peer_public_key_details = {
(uint8_t *)&peer_public_key,
sizeof(peer_public_key),
OPTIGA_ECC_NIST_P_256
};
OPTIGAprintf("2-. Generate a random seed: \r\n\n");
optiga_status = optx_get_rng();
OPTIGAprintf("\r\n");
if (OPTIGA_LIB_SUCCESS != optiga_status)
{
// Key pair generation failed
break;
}
OPTIGAprintf("3-. Generate an ECC256 Key Pair for the session: \r\n");
OPTIGAprintf(" Private Key Securely stored in OPTIGA Trust\r\n\n");
/**
* Generate ECC Key pair - To use the private key with ECDH in the next step
* - Use ECC NIST P 256 Curve
* - Specify the Key Usage as Key Agreement
* - Store the Private key with in OPTIGA Session
* - Export Public Key
*/
optiga_key_id = OPTIGA_SESSION_ID_E100;
optiga_status = optiga_crypt_ecc_generate_keypair(OPTIGA_ECC_NIST_P_256,
(uint8_t)OPTIGA_KEY_USAGE_KEY_AGREEMENT,
FALSE,
&optiga_key_id,
public_key,
&public_key_length);
OPTIGAprintf(" Public Key is send to Peer\r\n\n");
HexDump(public_key, public_key_length);
OPTIGAprintf("\r\n");
if (OPTIGA_LIB_SUCCESS != optiga_status)
{
// Key pair generation failed
break;
}

Application Note 43 <Revision 1.0>
<2018-07-03>
OPTIGA Trust X
Integration Manual
Code Listing 11 xmc2Go optx_ecdh application API.
When we run our xmc2Go application and test the command, it will provide an output as shown in Figure 4345.
OPTIGAprintf("4-. Performing Key Agreement ECDH(E): \r\n");
OPTIGAprintf(" Pre-master secret is securely stored in OPTIGA Trust\r\n\n");
/**
* Perform ECDH using the Peer Public key
* - Use ECC NIST P 256 Curve
* - Provide the peer public key details
* - Export the generated shared secret
*/
optiga_status = optiga_crypt_ecdh(optiga_key_id,
&peer_public_key_details,
FALSE,
(uint8_t *)&optiga_key_id);
OPTIGAprintf("\r\n");
if (OPTIGA_LIB_SUCCESS != optiga_status)
{
//ECDH Operation failed.
break;
}
OPTIGAprintf("5-. Using OPTIGA Trust internal KDF and Premaster Secret to generate a session key: \r\n");
OPTIGAprintf(" Session key can securely be used for AES encryption of communication channel\r\n\n");
/**
* Derive key (e.g. decryption key) using optiga_crypt_tls_prf_sha256 with I2C communication.
* - Use shared secret from F1D0 data object
*/
optiga_status = optiga_crypt_tls_prf_sha256(optiga_key_id,
/* Input secret OID */
label,
sizeof(label),
global_random,
sizeof(global_random),
sizeof(decryption_key),
TRUE,
decryption_key);
OPTIGAprintf("\r\n");
if(OPTIGA_LIB_SUCCESS != optiga_status)
{
//Derive key operation failed.
break;
}
OPTIGAprintf("6-. Encryption Key: \r\n");
HexDump(decryption_key, sizeof(decryption_key));
OPTIGAprintf("\r\n");
}while(0);
return optiga_status;
}
Application Note 44 <Revision 1.0>
<2018-07-03>
OPTIGA Trust X
Integration Manual
Figure 43 Execution of optx_sign_hash by xmc2Go application.
Note: Remember that the Premaster Secret created by ECDH in practice is kept secret. OPTIGA™Trust X
has the option of also exporting it to the Host. In practice we use the Premaster Secret to generate
a session key. OPTIGA™Trust X has a built in Key Derivation Function (KDF) that uses the internally
kept Premaster Secret along with a Random Seed to generate a session key.
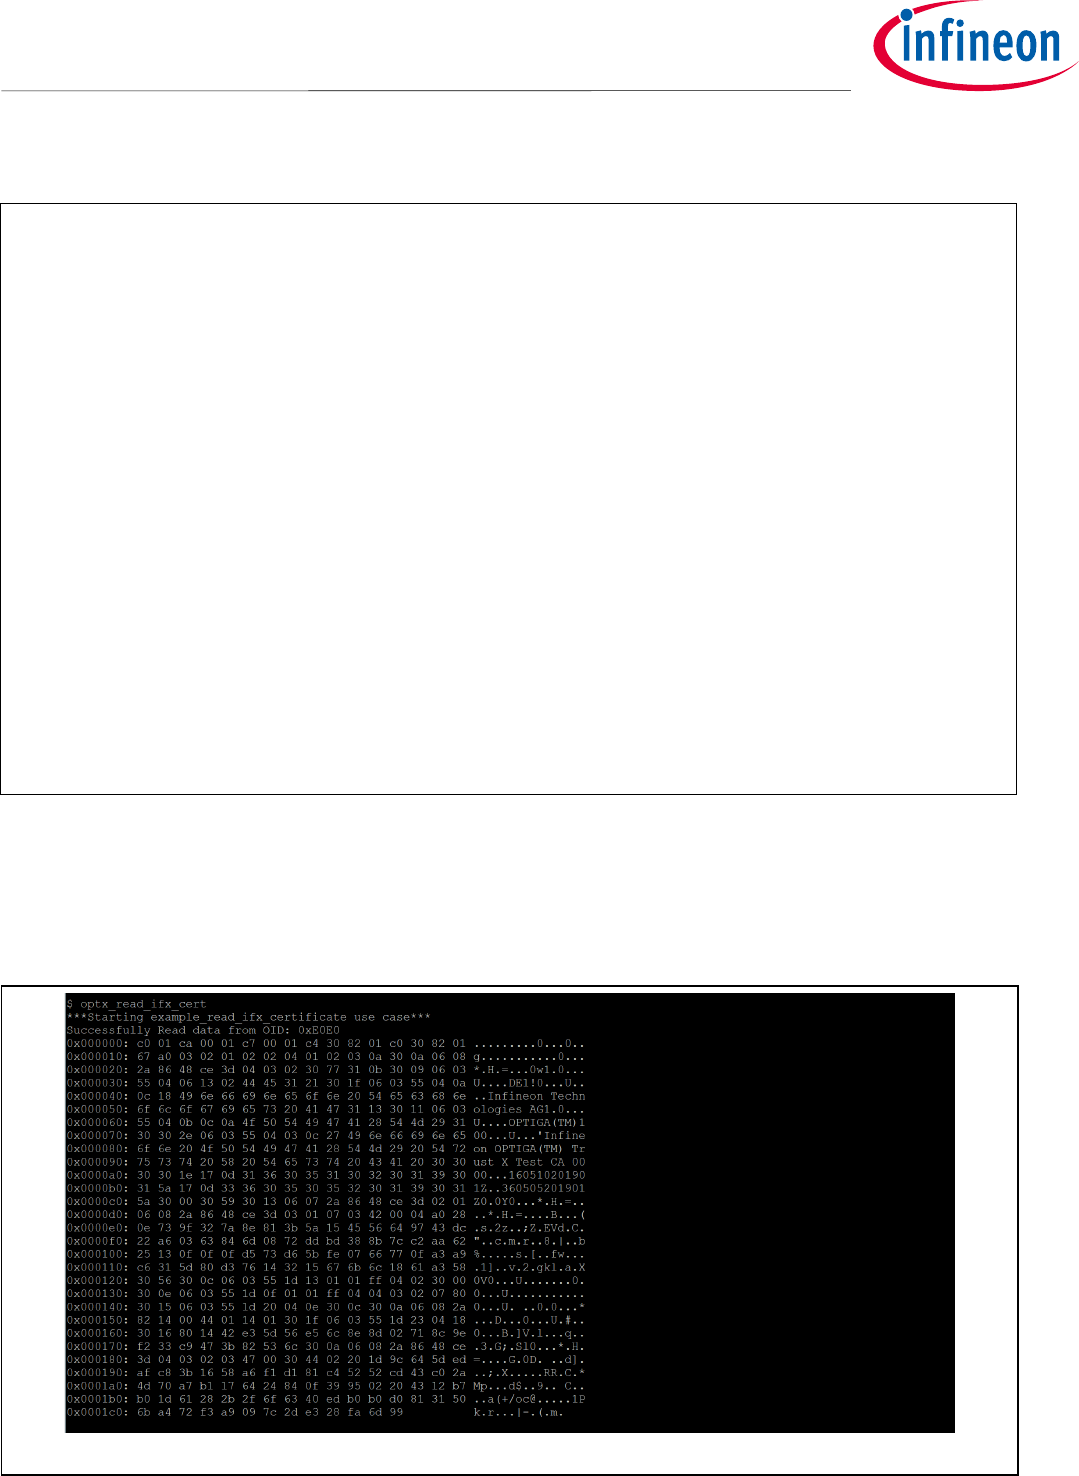
8.3.9 optx_read_ifx_cert
When our xmc2Go application calls this command, it uses the following OPTIGA™Trust X Host Library Util API
optiga_util_read_data to read out the Infineon Endorsement Certificate provisioned during the
fabrication process of OPTIGA™Trust X.
Copy the piece of code in Code Listing 12 to cmd_iface.c under optx_read_ifx_cert(void).
Note: To run this API successfully we need to add #include "optiga/optiga_util.h" to our
cmd_iface.c file.
Application Note 45 <Revision 1.0>
<2018-07-03>
OPTIGA Trust X
Integration Manual
Code Listing 12 xmc2Go optx_read_ifx_cert application API.
When we run our xmc2Go application and test the command, it will provide an output as shown in Figure 4447.
Figure 44 Execution of optx_read_ifx_cert by xmc2Go application
int optx_read_ifx_cert(void)
{
optiga_lib_status_t optiga_status;
uint16_t offset, bytes_to_read;
uint16_t optiga_oid;
uint8_t read_data_buffer[1024];
do{
//Read device end entity certificate from OPTIGA
optiga_oid = eDEVICE_PUBKEY_CERT_IFX;
offset = 0x00;
bytes_to_read = sizeof(read_data_buffer);
/**
* 1. Read data from a data object (e.g. certificate data object)
* using optiga_util_read_data.
*/
optiga_status = optiga_util_read_data(optiga_oid,
offset,
read_data_buffer,
&bytes_to_read);
if (OPTIGA_LIB_SUCCESS != optiga_status)
{
//Reading the data object failed.
break;
}
OPTIGAprintf("Infineon Endorsement Certificate provisioned in factory: \r\n");
__hexdump_ascii__(read_data_buffer, bytes_to_read);
}while(0);
return optiga_status;
}

Application Note 46 <Revision 1.0>
<2018-07-03>
OPTIGA Trust X
Integration Manual
Revision history
Major changes since the last revision
Page or Reference
Description of change
Entire Document
Spelling and grammer check

Trademarks of Infineon Technologies AG
µHVIC™, µIPM™, µPFC™, AU-ConvertIR™, AURIX™, C166™, CanPAK™, CIPOS™, CIPURSE™, CoolDP™, CoolGaN™, COOLiR™, CoolMOS™, CoolSET™, CoolSiC™,
DAVE™, DI-POL™, DirectFET™, DrBlade™, EasyPIM™, EconoBRIDGE™, EconoDUAL™, EconoPACK™, EconoPIM™, EiceDRIVER™, eupec™, FCOS™, GaNpowIR™,
HEXFET™, HITFET™, HybridPACK™, iMOTION™, IRAM™, ISOFACE™, IsoPACK™, LEDrivIR™, LITIX™, MIPAQ™, ModSTACK™, my-d™, NovalithIC™, OPTIGA™,
OptiMOS™, ORIGA™, PowIRaudio™, PowIRStage™, PrimePACK™, PrimeSTACK™, PROFET™, PRO-SIL™, RASIC™, REAL3™, SmartLEWIS™, SOLID FLASH™,
SPOC™, StrongIRFET™, SupIRBuck™, TEMPFET™, TRENCHSTOP™, TriCore™, UHVIC™, XHP™, XMC™
Trademarks updated November 2015
Other Trademarks
All referenced product or service names and trademarks are the property of their respective owners.
ifx1owners.
Edition <2018-07-03>
Published by
Infineon Technologies AG
81726 Munich, Germany
© 2018 Infineon Technologies AG.
All Rights Reserved.
Do you have a question about this
document?
Email: erratum@infineon.com
Document reference
IMPORTANT NOTICE
The information contained in this application note is
given as a hint for the implementation of the product
only and shall in no event be regarded as a
description or warranty of a certain functionality,
condition or quality of the product. Before
implementation of the product, the recipient of this
application note must verify any function and other
technical information given herein in the real
application. Infineon Technologies hereby disclaims
any and all warranties and liabilities of any kind
(including without limitation warranties of non-
infringement of intellectual property rights of any
third party) with respect to any and all information
given in this application note.
The data contained in this document is exclusively
intended for technically trained staff. It is the
responsibility of customer’s technical departments
to evaluate the suitability of the product for the
intended application and the completeness of the
product information given in this document with
respect to such application.
For further information on the product, technology,
delivery terms and conditions and prices please
contact your nearest Infineon Technologies office
(www.infineon.com).
WARNINGS
Due to technical requirements products may contain
dangerous substances. For information on the types
in question please contact your nearest Infineon
Technologies office.
Except as otherwise explicitly approved by Infineon
Technologies in a written document signed by
authorized representatives of Infineon
Technologies, Infineon Technologies’ products may
not be used in any applications where a failure of the
product or any consequences of the use thereof can
reasonably be expected to result in personal injury.
