Oracle Data Integrator Integation And Administration Student Guide
User Manual:
Open the PDF directly: View PDF ![]() .
.
Page Count: 466 [warning: Documents this large are best viewed by clicking the View PDF Link!]
- Oracle Data Integrator 11g: Integration and Administration - Student Guide - Volume I
- Table of Contents
- Lesson 1: Introduction to Integration and Administration
- Course Objectives
- Lesson Objectives
- Agenda of Lessons
- Oracle Data Integrator: Introduction
- Why Oracle Data Integrator?
- Conventional Integration Process: ETL
- ELT
- ODI Architecture and Components
- ODI Architecture
- ODI Components: Overview
- Using ODI Studio
- Designer Navigator (Work Repository)
- Operator Navigator (Work Repository)
- Topology Navigator (Master Repository)
- Security Navigator (Master Repository)
- What Is an Agent?
- ODI Agents
- Two Types of Agents: Java EE and Standalone
- Using the Two Types of Agents
- Example of Standalone Agent
- ODI Console
- Enterprise Manager Console
- Oracle Data Integrator Repositories
- ODI Repositories
- Master and Work Repositories
- Repository Setup: Example
- Repository Setup: Multiple Master Repositories
- Components: A Global View
- Possible ODI Methodology
- Checklist of Practice Activities
- Starting Oracle Data Integrator
- Using Online Help
- Quiz
- Summary
- Practice 1-1: Overview
- Lesson 2: Administering ODI Repositories
- Objectives
- Administering the ODI Repositories
- Initial Repository Administration Tasks
- Steps to Set Up ODI Repositories
- 1. Creating Repository Storage Spaces
- 2. Creating the Master Repository
- 3. Connecting to the Master Repository
- Importing the Master Repository
- Exporting the Master Repository
- 4. Creating a Work Repository
- 5. Connecting to the Work Repository
- Changing the Work Repository Password
- Creating Repositories with the RCU
- Quiz
- Summary
- Checklist of Practice Activities
- Practice 2-1: Overview
- Lesson 3: ODI Topology Concepts
- Objectives
- ODI Topology: Overview
- What Is Topology?
- What Is in the Topology?
- Data Servers and Physical Schemas
- What Is a Data Server?
- Important Guideline 1
- What Is a Physical Schema?
- Physical Schemas: Properties
- Technology Terminology Among Vendors
- Important Guideline 2 and Recommendations
- Defining Topology: Example
- Example: Infrastructure for Two Production Sites
- ODI Design: Physical Architecture of the Two Production Sites
- Logical Schemas and Contexts
- What Is a Logical Schema?
- Important Guideline 3
- Logical Versus Physical Architecture
- Note: Design Time Versus Run Time
- What Is a Context?
- A Context Maps a Logical to a Physical Schema
- Defining Contexts
- Mapping Logical and Physical Resources
- Agents in Topology
- ODI Physical Agents
- Creating a Physical Agent
- ODI Agent Parameters
- Launching a Standalone Agent: Examples
- Stopping the ODI Agent
- Deploying and Configuring a Java EE Agent
- Deploying and Configuring Java EE Agent
- Load Balancing: Example
- Important Guideline 5
- Infrastructure with Agents: Example
- Defining Agents: Example
- Special Case: Fragmentation Problem
- Special Case: Important Guideline 6
- Special Case: Defining the Physical Architecture
- Special Case: The Infrastructure
- Special Case: Physical Architecture in ODI
- Defining a Topology: Best Practices
- Planning the Topology
- Matrix of Logical and Physical Mappings
- Quiz
- Summary
- Checklist of Practice Activities
- Practice 3-1: Overview
- Lesson 4: Describing the Physical and Logical Architecture
- Objectives
- Topology Navigator
- What Topology Navigator Contains
- Topology Navigator: Overview
- Review: Context Connects Logical to Physical
- Objects You Create in the Practice
- Defining a Context
- Creating Physical Architecture
- Physical Architecture View
- Prerequisites for Connecting to a Server
- Important Note
- Creating a Data Server
- Creating a Data Server: JDBC
- JDBC Driver
- JDBC URL
- Creating a Data Server: JNDI
- Testing a Data Server Connection
- Creating a Physical Schema
- Creating Logical Architecture
- Logical Architecture and Context Views
- Creating a Logical Schema
- Creating a Logical Agent
- Editing a Context to Link the Logical and Physical Agents
- Quiz
- Summary
- Checklist of Practice Activities
- Practice 4-1: Overview
- Lesson 5: Setting Up a New ODI Project
- Objectives
- ODI Projects
- What Is a Project?
- Oracle Data Integrator Projects: Overview
- How to Use ODI Projects in Your Work
- Creating a New Project
- Using Folders
- What Is a Folder?
- Creating a New Folder
- Organizing Projects and Folders
- Understanding Knowledge Modules
- What Is a Knowledge Module?
- Types of Knowledge Modules
- Which Knowledge Modules Are Needed?
- Knowledge Modules: Examples
- Importing Knowledge Modules
- Replacing Existing KMs
- Knowledge Module Editor
- Editing a Knowledge Module
- Exporting and Importing Objects
- Exporting and Importing
- Exporting an Object
- Importing an Object
- ID Numbers: Overview
- Import Types
- Choosing the Import Mode
- Import Report
- What Is a Marker?
- Tagging Objects with Markers
- Removing Markers
- Marker Groups
- Project and Global Markers
- Creating a Marker Group
- Quiz
- Summary
- Checklist of Practice Activities
- Practice 5-1: Overview
- Lesson 6: Oracle Data Integrator Model Concepts
- Objectives
- What Is a Model?
- Understanding the Relational Model
- Relational Model
- Relational Model: Tables and Columns
- Relational Model: Keys
- Relational Model: Foreign Keys
- Relational Model: Constraints
- Relational Model: Indexes
- Relational Model Support in ODI
- Additional Metadata in ODI
- FlexFields
- Understanding Reverse-Engineering
- What Is Reverse-Engineering?
- Methods for DBMS Reverse-Engineering
- Other Methods for Reverse-Engineering
- Standard Versus Customized Reverse- Engineering
- Note
- Creating Models
- How to Create a Model by Reverse-Engineering
- Step 1: Creating and Naming a New Model
- Note About Creating and Naming a New Model
- Step 2: Defining a Reverse-Engineering Strategy
- Step 3: Starting the Reverse-Engineering Process
- Using RKM for Customized Reverse-Engineering
- Selective Reverse-Engineering
- Step 4: Fleshing Out Models
- Shortcuts
- Smart Export and Import
- Quiz
- Summary
- Checklist of Practice Activities
- Practice 6-1 Overview: Results of Reverse-Engineering into Models
- Lesson 7: Organizing ODI Models and Creating ODI Datastores
- Objectives
- Organizing Models
- What Is a Model Folder?
- Creating a Model Folder
- What Is a Submodel?
- Creating a Submodel
- Organizing Datastores into Submodels
- Setting Up Automatic Distribution
- Creating Datastores
- Creating a Datastore in a Model
- Adding Columns to a Datastore
- Constraints in ODI
- What Is a Constraint in ODI?
- Constraints in ODI
- Creating a Mandatory Column
- Creating Keys and References
- Creating a Key
- Checking a Key
- Creating a Reference
- Creating a Simple Reference
- Creating a Complex Reference
- Checking a Reference
- Creating Conditions
- Creating a Condition
- Checking a Condition
- Overview
- When and Why?
- An Overview of the Process
- Exploring Your Data
- Displaying the Contents of a Datastore
- Viewing the Distribution of Values
- Analyzing the Contents of a Datastore
- Constructing Business Rules
- Defining Business Rules in ODI
- From Business Rules to Constraints
- Deducing Constraints from Data Analysis
- Testing a Constraint
- Auditing a Model or Datastore
- How to Review Erroneous Records
- Quiz
- Summary
- Checklist of Practice Activities
- Practice 7-1: Overview
- Lesson 8: ODI Interface Concepts
- Objectives
- ODI Interfaces
- What Is an Interface?
- Business Rules for Interfaces
- Where Are the Rules Defined?
- Mapping
- What Is a Mapping?
- What Is a Join?
- What Is a Filter?
- What Is a Lookup?
- What Is a Data Set?
- Behind the Rules
- How Does ODI Implement Business Rules?
- A Business Problem
- Implementing the Rules
- Integration Process
- Process Details
- Process Implementation: Example 1
- Process Implementation: Example 2
- Process Implementation: Example 3
- Staging Area and Execution Location
- What Is the Staging Area?
- Execution Location
- Understanding Knowledge Modules
- From Business Rules to Processes
- Knowledge Modules
- What Is a Knowledge Module?
- Code Generation
- KM Types Used in Interfaces
- Interfaces: An Overview
- The Purpose of an Interface
- Creating a One-to-One Interface
- Creating and Naming an Interface
- Defining the Target Datastore
- Important Note
- Defining the Source Datastore
- What Is a Mapping?
- Defining the Mappings
- Valid Mapping Types
- Saving the Interface
- Executing the Interface
- Quiz
- Summary
- Checklist of Practice Activities
- Practice 8-1: Overview
- Lesson 9: Designing Interfaces
- Objectives
- Multiple Sources and Joins
- Multiple-Source Datastores
- Creating a Join Manually
- Advanced Joins
- Types of Joins
- Setting Up a Join
- Lookups
- Using Lookups
- Lookup Wizard
- Lookup Limitations
- Filtering Data
- Filters in ODI
- Defining a Filter Manually
- Setting Up a Filter
- Overview of the Flow in ODI Interface
- Flow
- What Defines the Flow?
- The Scenario
- The Basic Process
- Selecting a Staging Area
- The Purpose of a Staging Area
- Placing the Staging Area
- Important Note
- How to Specify the Staging Area
- Configuring Filters
- Options for Filters
- Setting Options for Filters
- How to Disable a Transformation
- How to Enable a Mapping for Inserts or Updates
- Execution Location
- Execution Location and Syntax
- Why Change the Execution Location?
- How to Change the Execution Location
- ODI Interface Execution Simulation
- Selecting the Knowledge Module
- Which KMs for Which Flow?
- More About KMs
- Identifying IKMs and LKMs
- IKMs and LKMs: Strategies and Methods
- How to Specify an LKM
- How to Specify an IKM
- Common KM Options
- Flow: Example 1
- Flow: Example 2
- Flow: Example 3
- Quiz
- Summary
- Checklist of Practice Activities
- Practice 9-1: Overview
- Practice 9-2: Overview
- Lesson 10: Interfaces: Monitoring and Debugging
- Objectives
- Monitoring Interfaces
- Operator Navigator: Viewing the Log
- Using Operator Navigator
- Sessions
- Viewing Details of Sessions
- How to Monitor Execution of an Interface
- How to Troubleshoot a Session
- 1. Identifying the Error
- 2. Reviewing the Code
- 3. How to Fix the Code and Restart the Session
- 4. Fixing the Interface
- Keys to Reviewing the Generated Code
- Working with Errors
- Common Errors and Symptoms
- Important Note
- Tips for Preventing Errors
- Using Quick-Edit Editor
- Quiz
- Summary
- Checklist of Practice Activities
- Practice 10-1: Overview
- Lesson 11: Designing Interfaces: Advanced Topics 1
- Objectives
- Working with Business Rules
- Business Rules in Interfaces
- Business Rule Elements
- More Elements
- The Expression Editor
- Using Variables
- Using a Variable in Code
- Binding Versus Substitution
- Note: Case Sensitivity
- Data Sets and Set-Based Operators
- Flow with Multiple Data Sets
- Defining a Data Set
- Using Set-Based Operators
- Using Sequences
- Types of Sequences
- Support for Native Sequences
- Creating a Native Sequence
- Referring to Sequences
- Note: Sequences Updated by Agent
- Using Standard Sequences in Mappings Correctly
- Using ODI Standard Sequences in Mappings
- Populating Native Identity Columns
- Note
- Automatic Temporary Index Management
- Tracking Variables and Sequences
- How Variable and Sequence Tracking Works
- New Variable Actions
- Definition Tab of Session Step or Session Task
- Quiz
- Summary
- Checklist of Practice Activities
- Practice 11-1: Overview
- Practice 11-2: Overview
- Practice 11-3: Overview

Oracle Data Integrator 11g:
Integration and Administration
Student Guide - Volume I
D64974GC20
Edition 2.0
September 2012
D78954
Oracle University and (Oracle Corporation) use only.
These eKit materials are to be used ONLY by you for the express purpose SELF STUDY. SHARING THE FILE IS STRICTLY PROHIBITED.

Copyright © 2012, Oracle and/or its affiliates. All rights reserved.
Disclaimer
This document contains proprietary information and is protected by copyright and
other intellectual property laws. You may copy and print this document solely for your
own use in an Oracle training course. The document may not be modified or altered
in any way. Except where your use constitutes "fair use" under copyright law, you
may not use, share, download, upload, copy, print, display, perform, reproduce,
publish, license, post, transmit, or distribute this document in whole or in part without
the express authorization of Oracle.
The information contained in this document is subject to change without notice. If you
find any problems in the document, please report them in writing to: Oracle University,
500 Oracle Parkway, Redwood Shores, California 94065 USA. This document is not
warranted to be error-free.
Restricted Rights Notice
If this documentation is delivered to the United States Government or anyone using
the documentation on behalf of the United States Government, the following notice is
applicable:
U.S. GOVERNMENT RIGHTS
The U.S. Government’s rights to use, modify, reproduce, release, perform, display, or
disclose these training materials are restricted by the terms of the applicable Oracle
license agreement and/or the applicable U.S. Government contract.
Trademark Notice
Oracle and Java are registered trademarks of Oracle and/or its affiliates. Other names
may be trademarks of their respective owners.
Author
Richard Green
Technical Contributors
and Reviewers
Alex Kotopoulis
Denis Gray
Christophe Dupupet
Julien Testut
David Allan
Sachin Thatte
Viktor Tchemodanov
Gerry Jurrens
Veerabhadra Putrevu
Editors
Rashmi Rajagopal
Vijayalakshmi Narasimhan
Aju Kumar Kumar
Graphic Designers
Satish Bettegowda
Seema Bopaiah
Publishers
Giri Venugopal
Sumesh Koshy
Srividya Rameshkumar
Oracle University and (Oracle Corporation) use only.
These eKit materials are to be used ONLY by you for the express purpose SELF STUDY. SHARING THE FILE IS STRICTLY PROHIBITED.

iii
Contents
1 Introduction to Integration and Administration
Course Objectives 1-2
Lesson Objectives 1-3
Agenda of Lessons 1-4
Oracle Data Integrator: Introduction 1-7
Why Oracle Data Integrator? 1-8
Conventional Integration Process: ETL 1-10
ELT 1-11
ODI Architecture and Components 1-13
ODI Architecture 1-14
ODI Components: Overview 1-15
Using ODI Studio 1-16
Designer Navigator (Work Repository) 1-17
Operator Navigator (Work Repository) 1-18
Topology Navigator (Master Repository) 1-19
Security Navigator (Master Repository) 1-20
What Is an Agent? 1-21
ODI Agents 1-22
Two Types of Agents: Java EE and Standalone 1-23
Using the Two Types of Agents 1-24
Example of Standalone Agent 1-25
ODI Console 1-26
Enterprise Manager Console 1-27
Oracle Data Integrator Repositories 1-28
ODI Repositories 1-29
Master and Work Repositories 1-30
Repository Setup: Example 1-32
Repository Setup: Multiple Master Repositories 1-33
Components: A Global View 1-34
Possible ODI Methodology 1-35
Checklist of Practice Activities 1-36
Starting Oracle Data Integrator 1-37
Using Online Help 1-38
Quiz 1-39
Oracle University and (Oracle Corporation) use only.
These eKit materials are to be used ONLY by you for the express purpose SELF STUDY. SHARING THE FILE IS STRICTLY PROHIBITED.

iv
Summary 1-41
Practice 1-1: Overview 1-42
2 Administering ODI Repositories
Objectives 2-2
Administering the ODI Repositories 2-3
Initial Repository Administration Tasks 2-4
Steps to Set Up ODI Repositories 2-5
1. Creating Repository Storage Spaces 2-6
2. Creating the Master Repository 2-7
3. Connecting to the Master Repository 2-9
Importing the Master Repository 2-11
Exporting the Master Repository 2-12
4. Creating a Work Repository 2-13
5. Connecting to the Work Repository 2-15
Changing the Work Repository Password 2-16
Creating Repositories with the RCU 2-17
Quiz 2-20
Summary 2-21
Checklist of Practice Activities 2-22
Practice 2-1: Overview 2-23
3 ODI Topology Concepts
Objectives 3-2
ODI Topology: Overview 3-3
What Is Topology? 3-4
What Is in the Topology? 3-5
Data Servers and Physical Schemas 3-6
What Is a Data Server? 3-7
Important Guideline 1 3-9
What Is a Physical Schema? 3-10
Physical Schemas: Properties 3-11
Technology Terminology Among Vendors 3-12
Important Guideline 2 and Recommendations 3-13
Defining Topology: Example 3-14
Example: Infrastructure for Two Production Sites 3-15
ODI Design: Physical Architecture of the Two Production Sites 3-16
Logical Schemas and Contexts 3-17
What Is a Logical Schema? 3-18
Important Guideline 3 3-19
Logical Versus Physical Architecture 3-20
Oracle University and (Oracle Corporation) use only.
These eKit materials are to be used ONLY by you for the express purpose SELF STUDY. SHARING THE FILE IS STRICTLY PROHIBITED.

v
Note: Design Time Versus Run Time 3-21
What Is a Context? 3-22
A Context Maps a Logical to a Physical Schema 3-23
Defining Contexts 3-24
Mapping Logical and Physical Resources 3-25
Agents in Topology 3-27
ODI Physical Agents 3-28
Creating a Physical Agent 3-29
ODI Agent Parameters 3-30
Launching a Standalone Agent: Examples 3-32
Stopping the ODI Agent 3-33
Deploying and Configuring a Java EE Agent 3-34
Deploying and Configuring Java EE Agent 3-36
Load Balancing: Example 3-37
Important Guideline 5 3-39
Infrastructure with Agents: Example 3-40
Defining Agents: Example 3-41
Special Case: Fragmentation Problem 3-42
Special Case: Important Guideline 6 3-44
Special Case: Defining the Physical Architecture 3-45
Special Case: The Infrastructure 3-46
Special Case: Physical Architecture in ODI 3-47
Defining a Topology: Best Practices 3-48
Planning the Topology 3-49
Matrix of Logical and Physical Mappings 3-50
Quiz 3-51
Summary 3-54
Checklist of Practice Activities 3-55
Practice 3-1: Overview 3-56
4 Describing the Physical and Logical Architecture
Objectives 4-2
Topology Navigator 4-3
What Topology Navigator Contains 4-4
Topology Navigator: Overview 4-5
Review: Context Connects Logical to Physical 4-7
Objects You Create in the Practice 4-8
Defining a Context 4-9
Creating Physical Architecture 4-10
Physical Architecture View 4-11
Prerequisites for Connecting to a Server 4-12
Oracle University and (Oracle Corporation) use only.
These eKit materials are to be used ONLY by you for the express purpose SELF STUDY. SHARING THE FILE IS STRICTLY PROHIBITED.

vi
Important Note 4-13
Creating a Data Server 4-14
Creating a Data Server: JDBC 4-15
JDBC Driver 4-16
JDBC URL 4-17
Creating a Data Server: JNDI 4-18
Testing a Data Server Connection 4-19
Creating a Physical Schema 4-20
Creating Logical Architecture 4-21
Logical Architecture and Context Views 4-22
Creating a Logical Schema 4-23
Creating a Logical Agent 4-24
Editing a Context to Link the Logical and Physical Agents 4-25
Quiz 4-26
Summary 4-28
Checklist of Practice Activities 4-29
Practice 4-1: Overview 4-30
5 Setting Up a New ODI Project
Objectives 5-2
ODI Projects 5-3
What Is a Project? 5-4
Oracle Data Integrator Projects: Overview 5-5
How to Use ODI Projects in Your Work 5-6
Creating a New Project 5-7
Using Folders 5-8
What Is a Folder? 5-9
Creating a New Folder 5-10
Organizing Projects and Folders 5-11
Understanding Knowledge Modules 5-12
What Is a Knowledge Module? 5-13
Types of Knowledge Modules 5-14
Which Knowledge Modules Are Needed? 5-15
Knowledge Modules: Examples 5-16
Importing Knowledge Modules 5-17
Replacing Existing KMs 5-18
Knowledge Module Editor 5-20
Editing a Knowledge Module 5-21
Exporting and Importing Objects 5-22
Exporting and Importing 5-23
Exporting an Object 5-24
Oracle University and (Oracle Corporation) use only.
These eKit materials are to be used ONLY by you for the express purpose SELF STUDY. SHARING THE FILE IS STRICTLY PROHIBITED.

vii
Importing an Object 5-25
ID Numbers: Overview 5-26
Import Types 5-27
Choosing the Import Mode 5-28
Import Report 5-29
What Is a Marker? 5-31
Tagging Objects with Markers 5-32
Removing Markers 5-33
Marker Groups 5-34
Project and Global Markers 5-35
Creating a Marker Group 5-36
Quiz 5-37
Summary 5-39
Checklist of Practice Activities 5-40
Practice 5-1: Overview 5-41
6 Oracle Data Integrator Model Concepts
Objectives 6-2
What Is a Model? 6-3
Understanding the Relational Model 6-4
Relational Model 6-5
Relational Model: Tables and Columns 6-6
Relational Model: Keys 6-7
Relational Model: Foreign Keys 6-8
Relational Model: Constraints 6-9
Relational Model: Indexes 6-11
Relational Model Support in ODI 6-12
Additional Metadata in ODI 6-13
FlexFields 6-15
Understanding Reverse-Engineering 6-16
What Is Reverse-Engineering? 6-17
Methods for DBMS Reverse-Engineering 6-18
Other Methods for Reverse-Engineering 6-19
Standard Versus Customized Reverse- Engineering 6-20
Note 6-21
Creating Models 6-22
How to Create a Model by Reverse-Engineering 6-23
Step 1: Creating and Naming a New Model 6-24
Note About Creating and Naming a New Model 6-25
Step 2: Defining a Reverse-Engineering Strategy 6-26
Step 3: Starting the Reverse-Engineering Process 6-28
Oracle University and (Oracle Corporation) use only.
These eKit materials are to be used ONLY by you for the express purpose SELF STUDY. SHARING THE FILE IS STRICTLY PROHIBITED.

viii
Using RKM for Customized Reverse-Engineering 6-29
Selective Reverse-Engineering 6-31
Step 4: Fleshing Out Models 6-32
Shortcuts 6-33
Smart Export and Import 6-34
Quiz 6-35
Summary 6-37
Checklist of Practice Activities 6-38
Practice 6-1 Overview: Results of Reverse-Engineering into Models 6-39
7 Organizing ODI Models and Creating ODI Datastores
Objectives 7-2
Organizing Models 7-3
What Is a Model Folder? 7-4
Creating a Model Folder 7-5
What Is a Submodel? 7-6
Creating a Submodel 7-7
Organizing Datastores into Submodels 7-8
Setting Up Automatic Distribution 7-9
Creating Datastores 7-10
Creating a Datastore in a Model 7-12
Adding Columns to a Datastore 7-13
Constraints in ODI 7-14
What Is a Constraint in ODI? 7-15
Constraints in ODI 7-16
Creating a Mandatory Column 7-17
Creating Keys and References 7-18
Creating a Key 7-19
Checking a Key 7-20
Creating a Reference 7-21
Creating a Simple Reference 7-22
Creating a Complex Reference 7-23
Checking a Reference 7-24
Creating Conditions 7-25
Creating a Condition 7-26
Checking a Condition 7-27
Overview 7-28
When and Why? 7-29
An Overview of the Process 7-30
Exploring Your Data 7-31
Displaying the Contents of a Datastore 7-32
Oracle University and (Oracle Corporation) use only.
These eKit materials are to be used ONLY by you for the express purpose SELF STUDY. SHARING THE FILE IS STRICTLY PROHIBITED.

ix
Viewing the Distribution of Values 7-33
Analyzing the Contents of a Datastore 7-34
Constructing Business Rules 7-35
Defining Business Rules in ODI 7-36
From Business Rules to Constraints 7-37
Deducing Constraints from Data Analysis 7-38
Testing a Constraint 7-39
Auditing a Model or Datastore 7-40
How to Review Erroneous Records 7-41
Quiz 7-42
Summary 7-44
Checklist of Practice Activities 7-45
Practice 7-1: Overview 7-46
8 ODI Interface Concepts
Objectives 8-2
ODI Interfaces 8-3
What Is an Interface? 8-4
Business Rules for Interfaces 8-5
Where Are the Rules Defined? 8-6
Mapping, Join, Filter, Lookup, and Data Sets 8-7
What Is a Mapping? 8-8
What Is a Join? 8-9
What Is a Filter? 8-10
What Is a Lookup? 8-11
What Is a Data Set? 8-12
Behind the Rules 8-13
How Does ODI Implement Business Rules? 8-14
A Business Problem 8-15
Implementing the Rules 8-16
Integration Process 8-17
Process Details 8-18
Process Implementation: Example 1 8-19
Process Implementation: Example 2 8-20
Process Implementation: Example 3 8-21
Staging Area and Execution Location 8-22
What Is the Staging Area? 8-23
Execution Location 8-24
Understanding Knowledge Modules 8-25
From Business Rules to Processes 8-26
Knowledge Modules 8-27
Oracle University and (Oracle Corporation) use only.
These eKit materials are to be used ONLY by you for the express purpose SELF STUDY. SHARING THE FILE IS STRICTLY PROHIBITED.

x
What Is a Knowledge Module? 8-28
Code Generation 8-29
KM Types Used in Interfaces 8-30
Interfaces: An Overview 8-31
The Purpose of an Interface 8-32
Creating a One-to-One Interface 8-33
Creating and Naming an Interface 8-34
Defining the Target Datastore 8-35
Important Note 8-36
Defining the Source Datastore 8-37
What Is a Mapping? 8-38
Defining the Mappings 8-39
Valid Mapping Types 8-40
Saving the Interface 8-41
Executing the Interface 8-42
Quiz 8-43
Summary 8-45
Checklist of Practice Activities 8-46
Practice 8-1: Overview 8-47
9 Designing Interfaces
Objectives 9-2
Multiple Sources and Joins 9-3
Multiple-Source Datastores 9-4
Creating a Join Manually 9-5
Advanced Joins 9-6
Types of Joins 9-7
Setting Up a Join 9-8
Lookups 9-10
Using Lookups 9-11
Lookup Wizard 9-12
Lookup Limitations 9-13
Filtering Data 9-14
Filters in ODI 9-15
Defining a Filter Manually 9-16
Setting Up a Filter 9-17
Overview of the Flow in ODI Interface 9-18
Flow 9-19
What Defines the Flow? 9-20
The Scenario 9-21
The Basic Process 9-22
Oracle University and (Oracle Corporation) use only.
These eKit materials are to be used ONLY by you for the express purpose SELF STUDY. SHARING THE FILE IS STRICTLY PROHIBITED.

xi
Selecting a Staging Area 9-23
The Purpose of a Staging Area 9-24
Placing the Staging Area 9-25
Important Note 9-26
How to Specify the Staging Area 9-27
Configuring Filters, Joins, Mappings, and Lookups 9-28
Options for Filters, Joins, Mappings, and Lookups 9-29
Setting Options for Filters, Joins, Mappings, and Lookups 9-30
How to Disable a Transformation 9-31
How to Enable a Mapping for Inserts or Updates 9-32
Execution Location 9-33
Execution Location and Syntax 9-34
Why Change the Execution Location? 9-35
How to Change the Execution Location 9-36
ODI Interface Execution Simulation 9-37
Selecting the Knowledge Module 9-38
Which KMs for Which Flow? 9-39
More About KMs 9-41
Identifying IKMs and LKMs 9-42
IKMs and LKMs: Strategies and Methods 9-43
How to Specify an LKM 9-44
How to Specify an IKM 9-45
Common KM Options 9-46
Flow: Example 1 9-47
Flow: Example 2 9-48
Flow: Example 3 9-49
Quiz 9-50
Summary 9-51
Checklist of Practice Activities 9-52
Practice 9-1: Overview 9-53
Practice 9-2: Overview 9-54
10 Interfaces: Monitoring and Debugging
Objectives 10-2
Monitoring Interfaces 10-3
Operator Navigator: Viewing the Log 10-4
Using Operator Navigator 10-5
Sessions, Steps, Tasks: The Hierarchy 10-6
Viewing Details of Sessions, Steps, and Tasks 10-7
How to Monitor Execution of an Interface 10-8
How to Troubleshoot a Session 10-9
Oracle University and (Oracle Corporation) use only.
These eKit materials are to be used ONLY by you for the express purpose SELF STUDY. SHARING THE FILE IS STRICTLY PROHIBITED.

xii
1. Identifying the Error 10-10
2. Reviewing the Code 10-11
3. How to Fix the Code and Restart the Session 10-12
4. Fixing the Interface 10-13
Keys to Reviewing the Generated Code 10-14
Working with Errors 10-15
Common Errors and Symptoms 10-16
Important Note 10-18
Tips for Preventing Errors 10-19
Using Quick-Edit Editor 10-20
Quiz 10-21
Summary 10-23
Checklist of Practice Activities 10-24
Practice 10-1: Overview 10-25
11 Designing Interfaces: Advanced Topics 1
Objectives 11-2
Working with Business Rules 11-3
Business Rules in Interfaces 11-4
Business Rule Elements 11-5
More Elements 11-6
The Expression Editor 11-7
Using Variables 11-9
Using a Variable in Code 11-10
Binding Versus Substitution 11-12
Note: Case Sensitivity 11-13
Data Sets and Set-Based Operators 11-14
Flow with Multiple Data Sets 11-15
Defining a Data Set 11-16
Using Set-Based Operators 11-17
Using Sequences 11-18
Types of Sequences 11-19
Support for Native Sequences 11-20
Creating a Native Sequence 11-21
Referring to Sequences 11-22
Note: Sequences Updated by Agent 11-23
Using Standard Sequences in Mappings Correctly 11-24
Using ODI Standard Sequences in Mappings 11-25
Populating Native Identity Columns 11-26
Note 11-27
Automatic Temporary Index Management 11-28
Oracle University and (Oracle Corporation) use only.
These eKit materials are to be used ONLY by you for the express purpose SELF STUDY. SHARING THE FILE IS STRICTLY PROHIBITED.

xiii
Tracking Variables and Sequences 11-29
How Variable and Sequence Tracking Works 11-30
New Variable Actions 11-31
Definition Tab of Session Step or Session Task 11-32
Quiz 11-33
Summary 11-34
Checklist of Practice Activities 11-35
Practice 11-1: Overview 11-36
Practice 11-2: Overview 11-37
Practice 11-3: Overview 11-38
12 Designing Interfaces: Advanced Topics 2
Objectives 12-2
Partitioning 12-3
Definition in Datastore after Reverse-Engineering 12-4
Using Partitioning in an Interface 12-5
Temporary Interfaces 12-6
Using Temporary Interfaces: Example 12-7
Derived Select for Temporary Interfaces 12-8
Using User Functions 12-9
What Is a User Function? 12-10
Why Use User Functions? 12-11
Properties of User Functions 12-13
Using User Functions 12-14
How to Create a User Function 12-15
Defining an Implementation 12-16
Syntax and Implementations 12-17
User Functions at Design Time 12-18
User Functions at Run Time 12-19
Note: Functions in Execution Log 12-20
Substitution Methods 12-21
Using Substitution Methods 12-22
Substitution Methods: Examples 12-24
Modifying Knowledge Modules 12-25
Description of KM Steps 12-26
Details of the Steps 12-27
Setting KM Options 12-28
Developing Your Own KM: Guidelines 12-29
Complex File Technology 12-31
Quiz 12-32
Summary 12-33
Oracle University and (Oracle Corporation) use only.
These eKit materials are to be used ONLY by you for the express purpose SELF STUDY. SHARING THE FILE IS STRICTLY PROHIBITED.

xiv
Checklist of Practice Activities 12-34
Practice 12-1: Overview 12-35
Practice 12-2: Overview 12-36
13 Using ODI Procedures
Objectives 13-2
Procedures: Overview 13-3
What Is a Procedure? 13-4
Procedure: Examples 13-5
Creating Procedures: Overview 13-7
Creating a Blank Procedure 13-8
How to Create a New Procedure 13-9
Adding Commands 13-10
Creating a Command 13-11
Arranging Tasks in Order 13-13
Which Parameters Should Be Set? 13-14
Valid Types of Commands 13-15
More Elements 13-16
Why Use a Source Command? 13-17
Adding Options 13-18
Types of Options 13-19
How to Create a New Option 13-20
How to Make a Command Optional 13-21
Using an Option Value in a Command 13-22
Running a Procedure 13-23
Procedure Execution 13-24
Using the Operator Navigator to View Results 13-25
Quiz 13-26
Summary 13-28
Checklist of Practice Activities 13-29
Practice 13-1: Overview 13-30
14 Using ODI Packages
Objectives 14-2
Packages: Overview 14-3
What Is a Package? 14-4
How to Create a Package 14-5
1. Creating and Naming a Package 14-6
How to Create and Name a Package 14-7
Package Diagram 14-8
Package Diagram Toolbar 14-9
Oracle University and (Oracle Corporation) use only.
These eKit materials are to be used ONLY by you for the express purpose SELF STUDY. SHARING THE FILE IS STRICTLY PROHIBITED.

xv
2. Adding Steps to the Package 14-11
Package Steps 14-12
How to Create a Package Step 14-13
What Is an ODI Tool? 14-14
How to Create an ODI Tool Step 14-15
Note 14-16
3. Arranging Package Steps in a Sequence 14-17
Sequencing Steps 14-18
A Simple Package 14-19
How to Sequence Package Steps 14-20
Executing a Package 14-21
Review of Package Steps 14-23
Basic Step Types 14-24
Advanced Step Types 14-25
Model, Submodel, and Datastore Steps 14-26
How to Create Model, Submodel, and Datastore Steps 14-27
Models, Submodels, and Datastore Steps 14-28
Variable Steps 14-30
How to Create a Variable Step 14-31
Variable Steps 14-32
Controlling the Execution Path 14-34
Controlling Execution 14-35
Error Handling 14-36
How to Create a Loop 14-37
The Advanced Tab 14-38
Quiz 14-39
Summary 14-41
Checklist of Practice Activities 14-42
Practice 14-1: Overview 14-43
Practice 14-2: Overview 14-44
15 Managing ODI Scenarios
Objectives 15-2
Scenarios 15-3
What Is a Scenario? 15-4
Properties of Scenarios 15-5
Managing Scenarios 15-6
Scenario-Related Tasks 15-7
Generating a Scenario 15-8
Regenerating a Scenario 15-9
Generation Versus Regeneration 15-10
Oracle University and (Oracle Corporation) use only.
These eKit materials are to be used ONLY by you for the express purpose SELF STUDY. SHARING THE FILE IS STRICTLY PROHIBITED.

xvi
Executing a Scenario from the GUI 15-11
Executing a Scenario from a Command Line 15-12
Executing a Scenario from a Package 15-13
Exporting a Scenario 15-14
Preparing for Deployment 15-15
Preparing Scenarios for Deployment 15-16
Automating Scenario Management 15-17
Scheduling the ODI Scenario 15-18
Scheduling ODI Scenario with External Scheduler 15-21
Managing Schedules 15-22
Quiz 15-23
Summary 15-24
Checklist of Practice Activities 15-25
Practice 15-1: Overview 15-26
16 Using Load Plans
Objectives 16-2
Should You Organize Executions with Load Plans? 16-3
What Are Load Plans? 16-4
Load Plan Editor 16-5
Load Plan Steps 16-6
Defining the Restart Behavior 16-7
Are Load Plans Substitutes for Packages or Scenarios? 16-9
Benefits of Utilizing Load Plans 16-10
Handling Failed Load Plans 16-11
Quiz 16-12
Summary 16-13
Checklist of Practice Activities 16-14
Practice 16-1: Overview 16-15
17 Managing ODI Versions
Objectives 17-2
Overview of ODI Version Management 17-3
What Is Version Management? 17-4
Working with Object Flags 17-5
Creating Versions 17-6
Restoring Versions 17-7
Using Version Browser 17-8
Using the Version Comparison Tool 17-9
Opening the Version Comparison Tool 17-11
Working with Solutions 17-12
Oracle University and (Oracle Corporation) use only.
These eKit materials are to be used ONLY by you for the express purpose SELF STUDY. SHARING THE FILE IS STRICTLY PROHIBITED.

xvii
Working with Solutions: Synchronizing 17-14
Handling Concurrent Changes 17-15
Quiz 17-17
Summary 17-18
Checklist of Practice Activities 17-19
Practice 17-1: Overview 17-20
18 Enforcing Data Quality with ODI
Objectives 18-2
Data Quality 18-3
Why Data Quality? 18-4
When to Enforce Data Quality 18-5
Data Quality in Source Applications 18-6
Data Quality Control in the Integration Process 18-7
Data Quality in the Target Applications 18-8
Business Rules for Data Quality 18-9
Data Quality Business Rules 18-10
From Business Rules to Constraints 18-11
Enforcing Data Quality with ODI 18-12
Data Quality System: Overview 18-13
Static and Flow Controls: Differences 18-14
Data Quality Control: Properties 18-15
Synchronous Control 18-16
What Is a Constraint? 18-17
What Can Be Checked? 18-18
How to Enforce Data Quality in an Interface 18-19
1. Enabling Static or Flow Control for an Interface 18-20
Setting Up Static or Flow Control 18-21
How to Enable Static or Flow Control 18-22
2. Setting the Options 18-23
How to Set the Options 18-24
3. Selecting Which Constraints to Enforce 18-25
How to Select Which Constraints to Enforce 18-26
How to Select Which Constraints to Check 18-27
Differences Between Control Types 18-28
4. Reviewing Erroneous Records 18-29
How to Review Erroneous Records 18-30
EnterpriseDataQuality Open Tool 18-31
Using the EDQ Open Tool 18-32
Quiz 18-33
Summary 18-35
Oracle University and (Oracle Corporation) use only.
These eKit materials are to be used ONLY by you for the express purpose SELF STUDY. SHARING THE FILE IS STRICTLY PROHIBITED.

xviii
Checklist of Practice Activities 18-36
Practice 18-1: Overview 18-37
19 Working with Changed Data Capture
Objectives 19-2
Why Changed Data Capture? 19-3
CDC Techniques 19-4
Changed Data Capture in ODI 19-5
Journalizing Components 19-6
CDC Infrastructure in ODI 19-7
Simple Versus Consistent Set Journalizing 19-8
Limitations of Simple CDC Journalizing: Example 19-9
Consistent CDC Journalizing 19-10
Consistent CDC: Infrastructure 19-11
Setting Up Journalizing 19-12
Setting CDC Parameters: Example 19-13
Adding a Subscriber: Example 19-14
Starting Journal: Example 19-15
Journalizing Status 19-16
Viewing Data/Changed Data: Example 19-17
Using Changed Data 19-18
Quiz 19-20
Summary 19-22
Checklist of Practice Activities 19-23
Practice 19-1: Overview 19-24
20 Advanced ODI Administration
Objectives 20-2
Setting Up ODI Security 20-3
Introduction to ODI Security Navigator 20-4
Overview of Security Concepts 20-6
Defining Security Policies 20-8
Creating Profiles 20-9
Using Generic and Nongeneric Profiles 20-10
Built-in Profiles 20-11
Creating Users 20-12
Assigning a Profile to a User 20-13
Assigning an Authorization by Profile or User 20-14
Defining Password Policies 20-15
Setting User Parameters 20-17
Overview of ODI Security Integration 20-18
Oracle University and (Oracle Corporation) use only.
These eKit materials are to be used ONLY by you for the express purpose SELF STUDY. SHARING THE FILE IS STRICTLY PROHIBITED.

xix
Implementing External Authentication (OPSS) 20-19
Implementing External Authentication (OPSS): Switching the
Authentication Mode 20-21
Implementing External Password Storage 20-22
Managing ODI Reports 20-24
Types of ODI Reports 20-25
Generating Topology Reports 20-26
Generated Topology Report: Example 20-27
Version Comparison Report: Example 20-28
Generating Object Reports 20-29
ODI Integration with Java EE 20-30
Integration of ODI with Enterprise Manager 20-31
Overview of Java EE Agent and Enterprise Manager Configuration
with WebLogic Domain 20-32
Using ODI Console: Example 20-33
Quiz 20-34
Summary 20-35
Checklist of Practice Activities 20-36
Practice 20-1: Overview 20-37
Practice 20-2: Overview 20-38
21 Extending Oracle Data Integrator with SDK, Web Services, and SOA
Objectives 21-2
Interacting Programmatically with ODI 21-3
Overview of ODI SDK 21-4
SDK-Supported ODI Operations 21-5
ODI Operations Not Supported by SDK 21-6
ODI 11g SDK Usage Examples 21-7
Combining Different APIs 21-8
Example of ODI SDK Setup and Performing an SDK Task Using Java 21-9
Using Web Services with ODI 21-10
Web Services in Action 21-11
Two Types of Web Services 21-12
What Are Data Services? 21-13
Generation of Data Services 21-14
Data Services in Action 21-15
Using Public Web Services 21-16
What Are Public Web Services? 21-17
Using Public Web Services 21-18
Public Web Services in Action: Java EE 21-19
Public Web Services in Action: Standalone Agent 21-20
Oracle University and (Oracle Corporation) use only.
These eKit materials are to be used ONLY by you for the express purpose SELF STUDY. SHARING THE FILE IS STRICTLY PROHIBITED.

xx
Installing Public Web Services 21-21
A Simple SOAP Request for the OdiInvoke Web Service with
Standalone Agent: Example 21-22
Note 21-23
A Simple SOAP Response for the OdiInvoke Web Service: Example 21-24
Invoking Web Services 21-25
OdiInvokeWebService Tool 21-26
Invoking a Web Service: Example 21-29
Processing a Web Service Response 21-33
Integration of ODI with SOA 21-36
Ways to Integrate ODI with SOA 21-37
ODI with SOA: Example 1 21-39
ODI and Business Process Management 21-40
ODI with SOA: Example 2 21-41
Creating an ODI Error Hospital with BPEL Human Workflow 21-43
Quiz 21-48
Summary 21-49
Checklist of Practice Activities 21-50
Practice 21-1: Overview 21-51
Oracle University and (Oracle Corporation) use only.
These eKit materials are to be used ONLY by you for the express purpose SELF STUDY. SHARING THE FILE IS STRICTLY PROHIBITED.

Copyright © 2012, Oracle and/or its affiliates. All rights reserved.
Introduction to Integration and Administration
Oracle University and (Oracle Corporation) use only.
These eKit materials are to be used ONLY by you for the express purpose SELF STUDY. SHARING THE FILE IS STRICTLY PROHIBITED.

Oracle Data Integrator 11g: Integration and Administration 1 - 2
Copyright © 2012, Oracle and/or its affiliates. All rights reserved.
Course Objectives
After completing this course, you should be able to:
•Describe the Oracle Data Integrator (ODI) 11garchitecture
and apply ODI Topology Concepts for data integration
•Describe Oracle Data Integrator model concepts
•Design ODI interfaces, procedures, and packages to
perform data transformations
•Explore, audit data, and enforce data quality with ODI
•Administer ODI resources and set up security with ODI
•Implement Changed Data Capture with ODI
•Use ODI Web services and perform integration of ODI with
Service-Oriented Architecture (SOA)
Oracle University and (Oracle Corporation) use only.
These eKit materials are to be used ONLY by you for the express purpose SELF STUDY. SHARING THE FILE IS STRICTLY PROHIBITED.
This lesson provides a general overview of the ODI architecture. You learn the roles of the
different ODI components. The lesson also covers repositories, the most important
component of ODI, in detail.
Oracle Data Integrator 11g: Integration and Administration 1 - 3
Copyright © 2012, Oracle and/or its affiliates. All rights reserved.
Lesson Objectives
After completing this lesson, you should be able to:
•Describe the course objectives
and agenda of lessons
•Describe the benefits of using ODI
•Describe the ODI 11garchitecture
and components
•Describe how to use ODI Studio
to create, administer, and monitor
ODI objects
•Start Oracle Data Integrator (ODI) client
•Access online Help
Oracle University and (Oracle Corporation) use only.
These eKit materials are to be used ONLY by you for the express purpose SELF STUDY. SHARING THE FILE IS STRICTLY PROHIBITED.

Oracle Data Integrator 11g: Integration and Administration 1 - 4
Copyright © 2012, Oracle and/or its affiliates. All rights reserved.
Agenda of Lessons
•Day 1:
–Lesson 1: Introduction to Integration and Administration
–Lesson 2: Administering ODI Repositories
–Lesson 3: ODI Topology Concepts
–Lesson 4: Describing the Physical and Logical Architecture
•Day 2:
–Lesson 5: Setting Up a New ODI Project
–Lesson 6: Oracle Data Integrator Model Concepts
–Lesson 7: Organizing ODI Models and Creating ODI
Datastores
–Lesson 8: ODI Interface Concepts
Oracle University and (Oracle Corporation) use only.
These eKit materials are to be used ONLY by you for the express purpose SELF STUDY. SHARING THE FILE IS STRICTLY PROHIBITED.

Oracle Data Integrator 11g: Integration and Administration 1 - 5
Copyright © 2012, Oracle and/or its affiliates. All rights reserved.
Agenda of Lessons
•Day 3:
–Lesson 9: Designing Interfaces
–Lesson 10: Interfaces: Monitoring and Debugging
–Lesson 11: Designing Interfaces: Advanced Topics 1
–Lesson 12: Designing Interfaces: Advanced Topics 2
•Day 4:
–Lesson 13: Using ODI Procedures
–Lesson 14: Using ODI Packages
–Lesson 15: Managing ODI Scenarios
–Lesson 16: Using Load Plans
Oracle University and (Oracle Corporation) use only.
These eKit materials are to be used ONLY by you for the express purpose SELF STUDY. SHARING THE FILE IS STRICTLY PROHIBITED.

Oracle Data Integrator 11g: Integration and Administration 1 - 6
Copyright © 2012, Oracle and/or its affiliates. All rights reserved.
Agenda of Lessons
•Day 5:
–Lesson 17: Managing ODI Versions
–Lesson 18: Enforcing Data Quality with ODI
–Lesson 19: Working with Changed Data Capture
–Lesson 20: Advanced ODI Administration
–Lesson 21: Extending ODI with the SDK, Web Services,
and SOA
Oracle University and (Oracle Corporation) use only.
These eKit materials are to be used ONLY by you for the express purpose SELF STUDY. SHARING THE FILE IS STRICTLY PROHIBITED.

First, look at Oracle Data Integrator’s approach to data integration.
Oracle Data Integrator 11g: Integration and Administration 1 - 7
Copyright © 2012, Oracle and/or its affiliates. All rights reserved.
Oracle Data Integrator: Introduction
Oracle University and (Oracle Corporation) use only.
These eKit materials are to be used ONLY by you for the express purpose SELF STUDY. SHARING THE FILE IS STRICTLY PROHIBITED.

•ODI’s ELT architecture leverages disparate RDBMS engines to process and transform
data. This approach optimizes performance and scalability, and lowers overall solution
costs.
•ODI turns the promise of active integration into reality by providing all the key
components that are required to enable real-time data warehousing and operational
data hubs. ODI combines three styles of data integration: data-based, event-based, and
service-based. ODI unifies silos of integration by transforming large volumes of data in
batch mode, by processing events in real time through its advanced Changed Data
Capture, and by providing data services to the Oracle SOA Suite.
•Oracle Data Integrator shortens implementation times with its declarative design
approach. Designers specify what they want to accomplish with their data, and then the
tool generates the details of how to perform the task. With ODI, the business user or the
developer specifies the rules to apply to the integration processes. The tool
automatically generates data flows and administers correct instructions for the various
source and target systems. With declarative design, the number and complexity of steps
is greatly reduced, which in turn shortens implementation times. Automatic code
generation reduces the learning curve for integration developers and streamlines non-IT
professionals to the definition of integration processes and data formats.
Oracle Data Integrator 11g: Integration and Administration 1 - 8
Copyright © 2012, Oracle and/or its affiliates. All rights reserved.
Why Oracle Data Integrator?
•ELT architecture provides high performance.
–ELT faster than ETL
•Active integration enables real-time data warehousing and
operational data hubs.
–Changed data capture technology for real-time data
warehousing
–Data services provided to the Oracle SOA Suite
•Declarative design improves developer productivity.
–Business users specify what they want; ODI generates the
flows and code.
•Knowledge modules provide flexibility and extensibility.
–Predefined, reusable code templates with built-in
connectivity to all major databases
Oracle University and (Oracle Corporation) use only.
These eKit materials are to be used ONLY by you for the express purpose SELF STUDY. SHARING THE FILE IS STRICTLY PROHIBITED.

•Knowledge modules are at the core of the ODI architecture. They make all ODI processes
modular, flexible, and extensible. Knowledge modules implement the actual data flows
and define the templates for generating code across the multiple systems involved in each
process. ODI provides a comprehensive library of knowledge modules, which can be
tailored to implement existing best practices (for example, for highest performance, for
adhering to corporate standards, or for specific vertical knowhow). By helping companies
capture and reuse technical expertise and best practices, ODI’s knowledge module
framework reduces the cost of ownership. It also enables metadata-driven extensibility of
product functionality to meet the most demanding data integration challenges.
ODI streamlines the high-performance movement and transformation of data between
heterogeneous systems in batch, real-time, synchronous, and asynchronous modes. It
dramatically enhances user productivity with an innovative, modularized design approach and
built-in connectivity to all major databases, data warehouse appliances, analytic applications,
and SOA suites.
Oracle Data Integrator 11g: Integration and Administration 1 - 9
Oracle University and (Oracle Corporation) use only.
These eKit materials are to be used ONLY by you for the express purpose SELF STUDY. SHARING THE FILE IS STRICTLY PROHIBITED.
This integration process is also known as an extract, transform, and load (ETL) process.
The first part of an ETL process involves extracting data from the source systems. Most data
warehousing projects consolidate data from different source systems.
The transform stage applies a series of rules or functions to the data extracted from the
source to derive the data for loading into the target. Some data sources will require very little
or even no manipulation of data. In other cases, transformations (such as filtering, joining,
sorting, and so on) may be required to meet the business and technical needs of the target
database.
The load phase loads the data into the target, usually the data warehouse.
Note: You can add to this process the checks that ensure the quality of data flow, as shown in
the slide.
Oracle Data Integrator 11g: Integration and Administration 1 - 10
Copyright © 2012, Oracle and/or its affiliates. All rights reserved.
Conventional Integration Process: ETL
Integration process
Extract - Transform (check) - Load
Source
ORDERS
LINES
CORRECTIONS
File
Target
SALES
Errors
Transform
A machine
A machine
A machine
Extract Transform Load
Oracle University and (Oracle Corporation) use only.
These eKit materials are to be used ONLY by you for the express purpose SELF STUDY. SHARING THE FILE IS STRICTLY PROHIBITED.

Data is one of the most important assets of any company, and data integration constitutes the
backbone of any enterprise’s IT systems. Choosing the technology for data integration is
critical for productivity and responsiveness of business divisions within an enterprise.
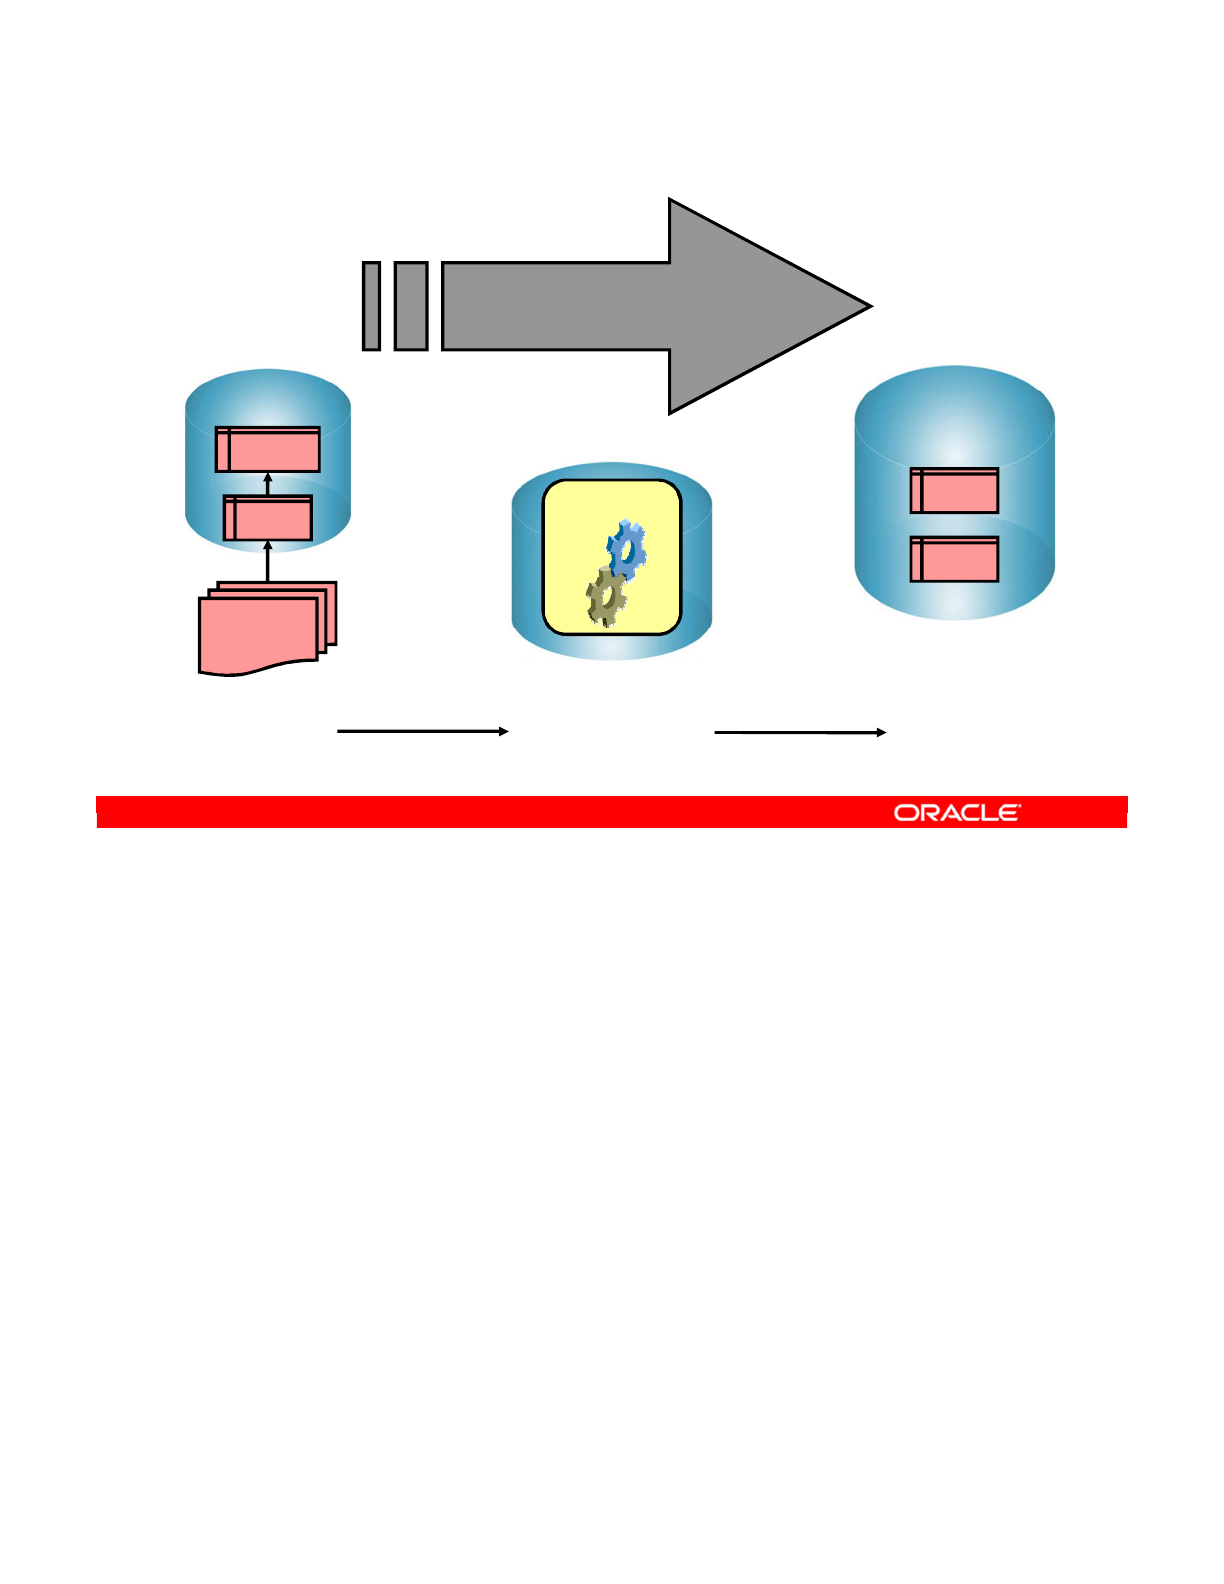
ELT stands for extract, load, and transform. It includes the processes that enable companies
to move data from multiple sources, reformat and cleanse the data, and load it into another
database, or a data warehouse for analysis, to support a business process.
ODI provides a strong and reliable integration platform for IT infrastructure. Built on the next-
generation architecture of extract, load, and transform (ELT), ODI delivers superior
performance and scalability connecting heterogeneous systems at a lower cost than
traditional, proprietary ETL products. Unlike the conventional extract, transform, and load
(ETL) design, with ODI, ELT architecture extracts data from sources, loads it into a target, and
transforms it by using the database power according to business rules. The tool automatically
generates data flows, manages their complexity, and administers correct instructions for the
various source and target systems.
Oracle Data Integrator 11g: Integration and Administration 1 - 11
Copyright © 2012, Oracle and/or its affiliates. All rights reserved.
ELT
1. Extract: Extracting data from various sources
2. Load: Loading the data into the destination target
3. Transform: Transforming the data according to a set of
business rules
Extract
Transform
Conventional ETL architecture
Load LoadExtract
Transform Transform
Next-generation ELT architecture
Oracle University and (Oracle Corporation) use only.
These eKit materials are to be used ONLY by you for the express purpose SELF STUDY. SHARING THE FILE IS STRICTLY PROHIBITED.

Extract
The first step in the ELT process is extracting data from various sources. Each of the source
systems may store its data in a completely different format. The sources are usually flat files or
RDBMS, but almost any data storage can be used as a source for an ELT process.
Load
This step involves loading the data into the destination target, which might be a database or
data warehouse.
Transform
After the data has been extracted and loaded, the next step is to transform the data according to
a set of business rules. The data transformation may involve various operations including, but
not limited to filtering data, sorting data, aggregating data, joining data, cleaning data,
generating calculated data based on existing values, and validating data.
Oracle Data Integrator 11g: Integration and Administration 1 - 12
Oracle University and (Oracle Corporation) use only.
These eKit materials are to be used ONLY by you for the express purpose SELF STUDY. SHARING THE FILE IS STRICTLY PROHIBITED.
To fully understand the ODI architecture, you must look at each of its components.
Oracle Data Integrator 11g: Integration and Administration 1 - 13
Copyright © 2012, Oracle and/or its affiliates. All rights reserved.
ODI Architecture and Components
For more information, see the Installation Guide and User’s Guide.
To find ODI documentation, go to otn.oracle.com/goto/odi
Oracle University and (Oracle Corporation) use only.
These eKit materials are to be used ONLY by you for the express purpose SELF STUDY. SHARING THE FILE IS STRICTLY PROHIBITED.
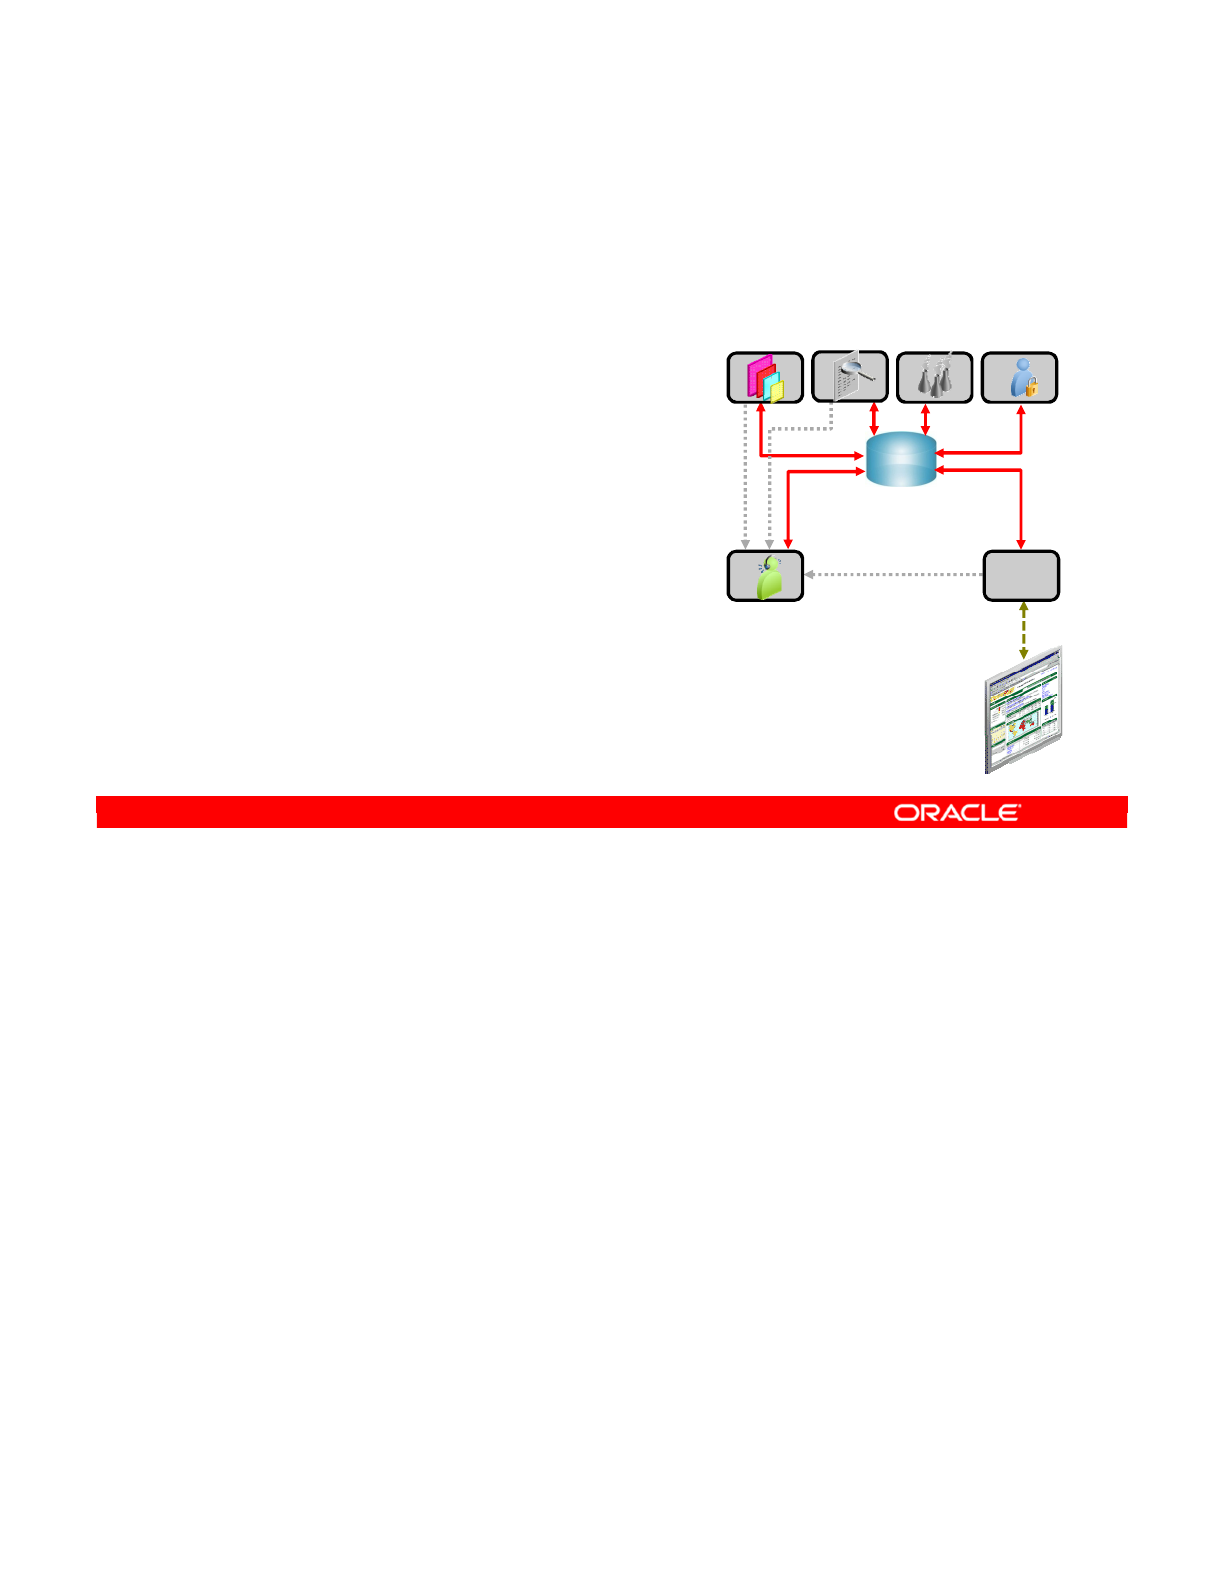
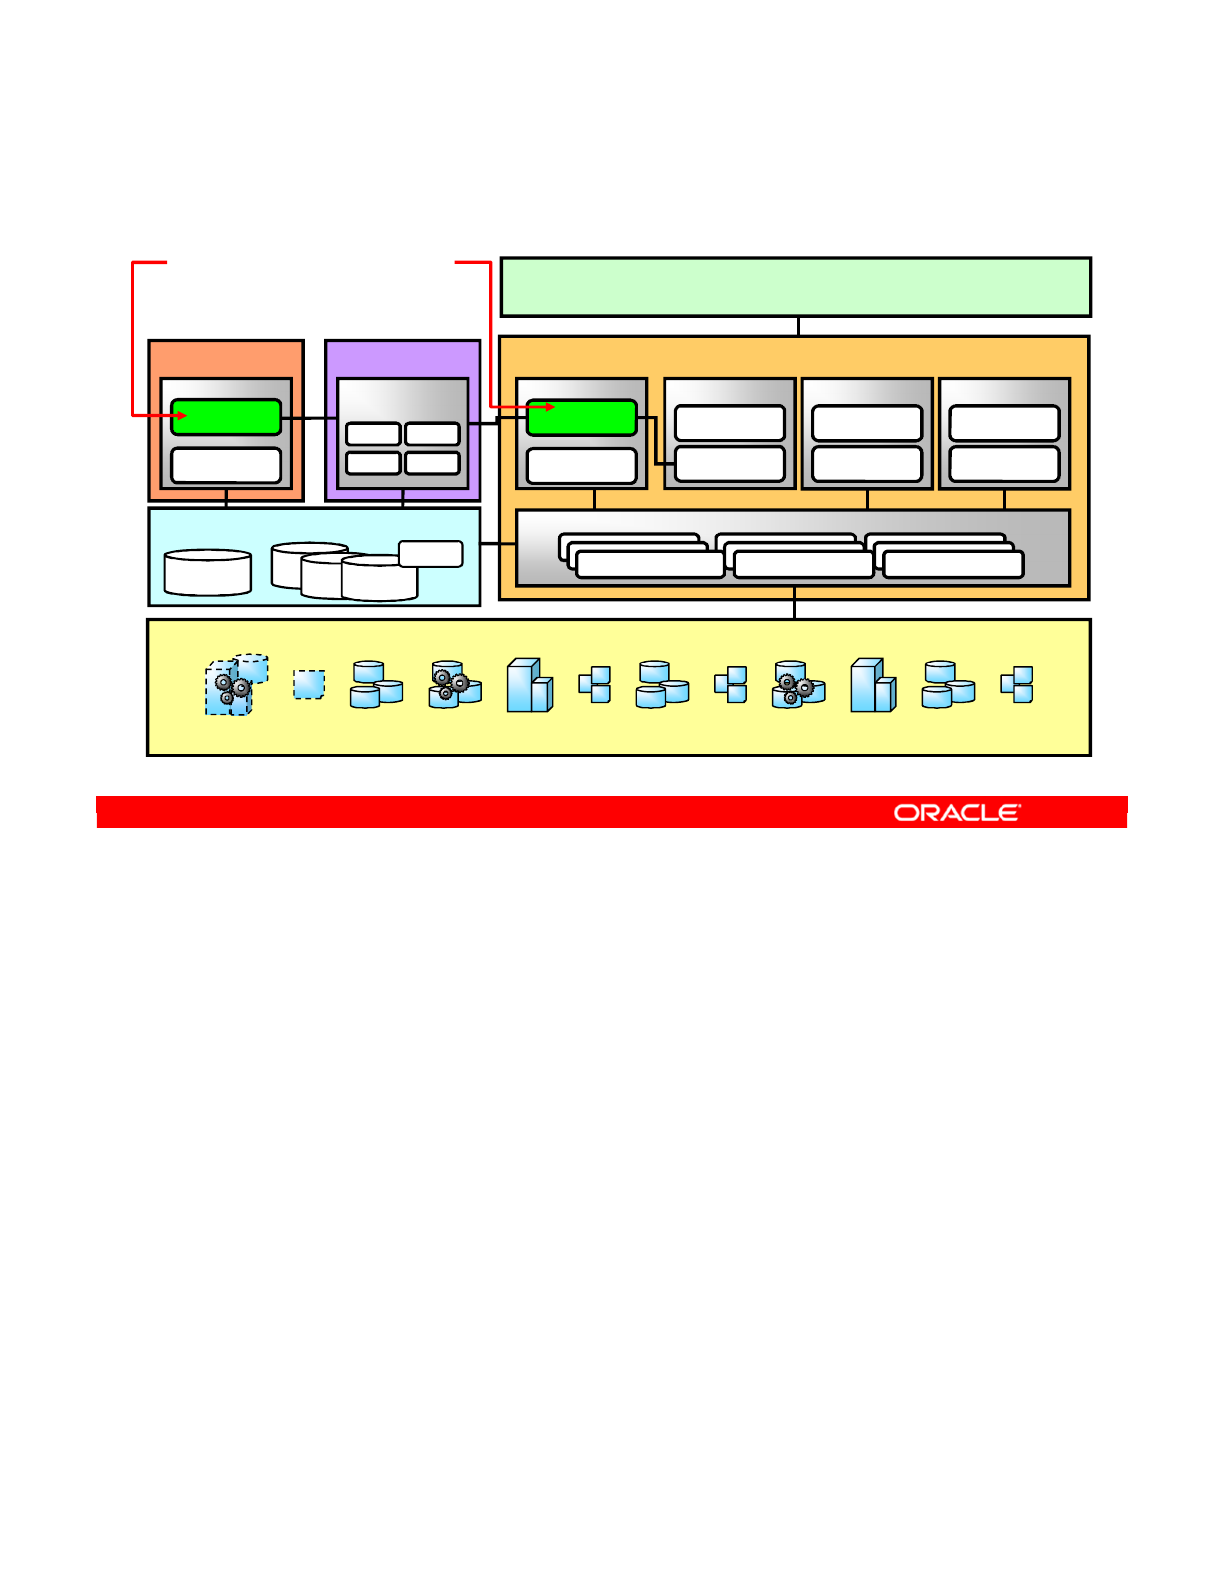
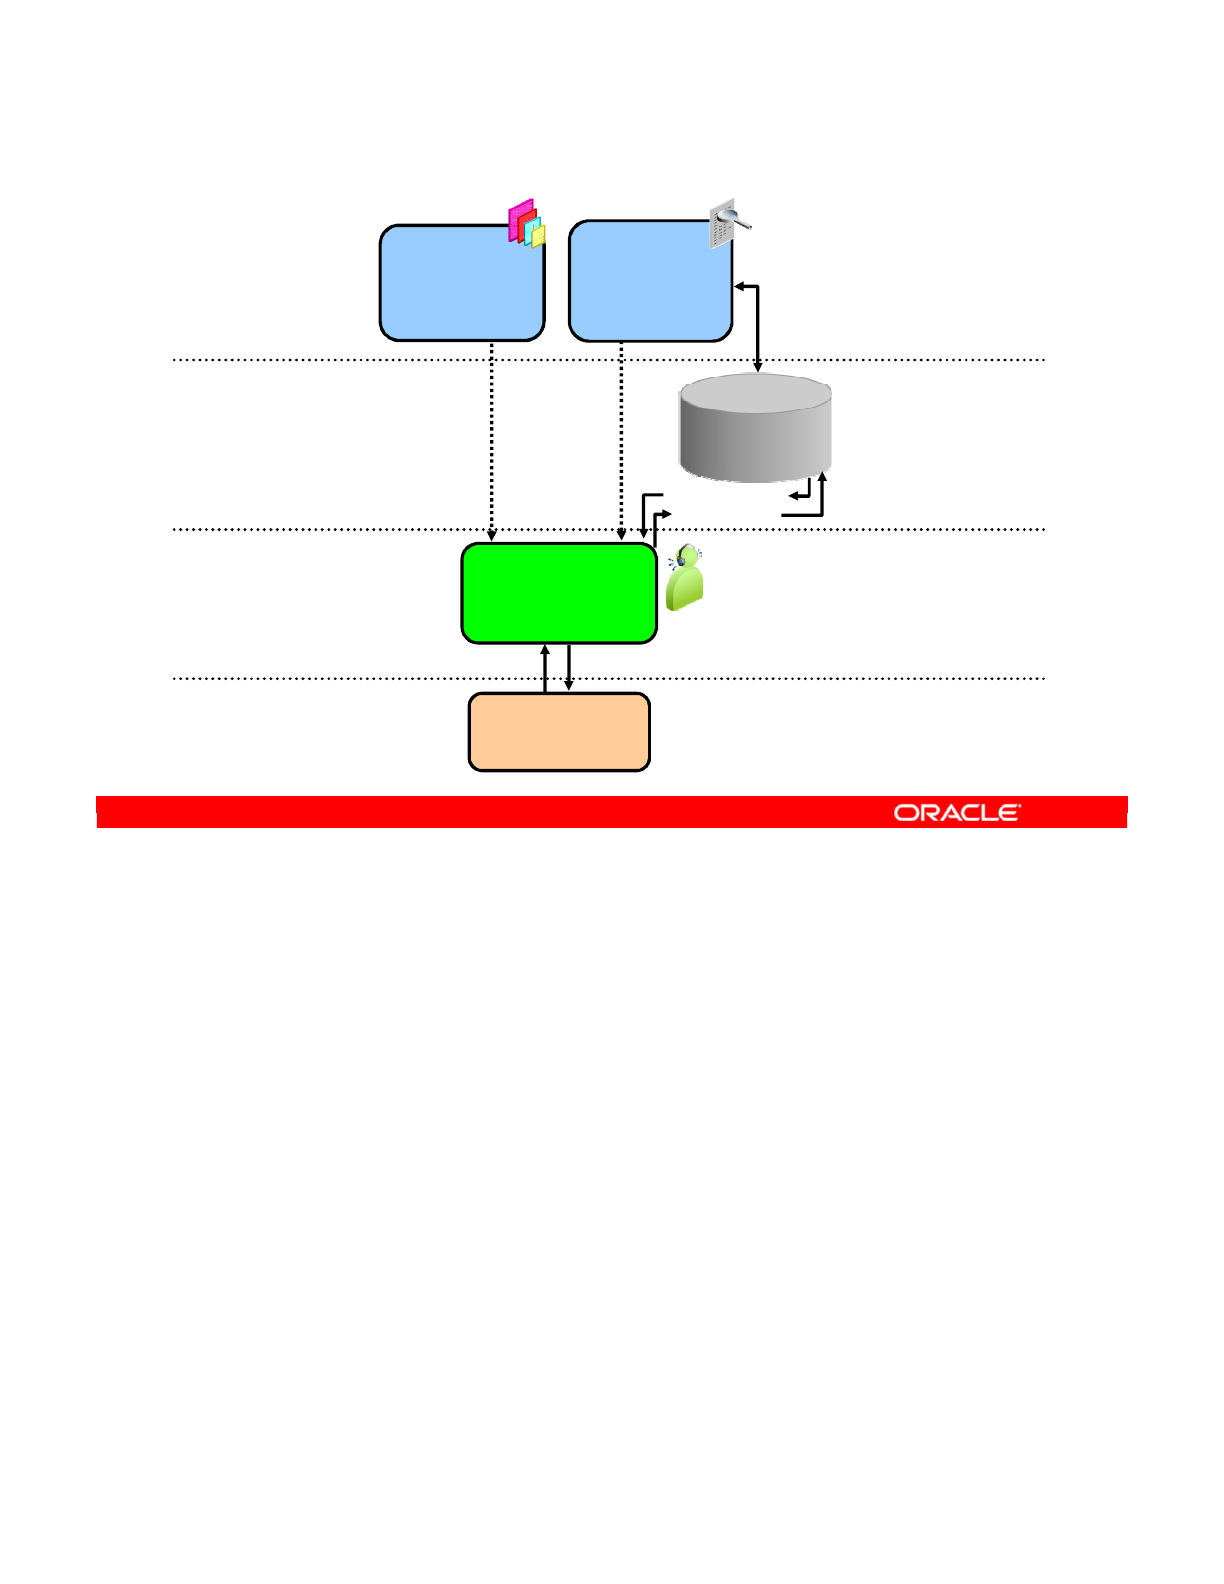
The repository forms the central component of the ODI architecture. This stores configuration
information about the IT infrastructure; the metadata for all applications, projects, scenarios,
and execution logs. Repositories can be installed in an online transaction processing (OLTP)
relational database. The repository also contains information about the ODI infrastructure,
defined by the administrators. The two types of ODI repositories are Master and Work
Repositories.
At design time, developers work in a repository to define metadata and business rules. The
resulting processing jobs are executed by the agent, which orchestrates the execution by
leveraging existing systems. The agent connects to available servers and asks them to
execute the code. It then stores all return codes and messages in the repository. The agent
also stores statistics, such as the number of records processed, and the elapsed time.
Several repositories can coexist in an IT infrastructure. The graphic in this slide shows two
repositories: one for the development environment and the other for the production
environment. Developers release their projects in the form of scenarios that are sent to
production.
In production, these scenarios are scheduled and executed on a Scheduler Agent that also
stores all its information in the repository. Operators have access to this information and can
monitor the integration processes in real time.
Business users, as well as developers, administrators, and operators, can gain web-based
read access to the repository by using the ODI Console.
Oracle Data Integrator 11g: Integration and Administration 1 - 14
Copyright © 2012, Oracle and/or its affiliates. All rights reserved.
ODI Architecture
Desktop
Repositories
ODI Studio
Operator
Designer
Topology
Security
ODI Master
Repository ODI Work
Repository
Sources and Targets
Legacy Applications
ERP/CRM/PLM/SCM
Files / XML DBMS DW / BI / EPM
JVM
Java EE
Application
ODI SDK
WebLogic 11g/ Application Server
Data Sources Connection Pool
Web Service Container
Public WS Data
Services
FMW Console
ODI Plug-in
Servlet Container
ODI Console
Java EE
Application
ODI SDK
Runtime WS
Java EE
Agent
JVM
Run-time WS
Standalone
Agent
Open Web Services for
decoupled invocation of
any ODI jobs
Heterogeneous access
SDK APIs for Java
generation of any
ODI system
metadata
Metadata is an open
relational model
with built-in Flex
Fields
OpenTools for
adding OS
functionality to any
ELT/ETL job
Oracle University and (Oracle Corporation) use only.
These eKit materials are to be used ONLY by you for the express purpose SELF STUDY. SHARING THE FILE IS STRICTLY PROHIBITED.

ODI Studio provides four navigators for managing the different aspects and steps of an ODI
integration project.
The navigators are discussed in detail in the next several slides.
•ODI agents are runtime processes that orchestrate executions.
•ODI Console provides users web access to ODI metadata.
•ODI repositories store all of your ODI objects as databases in a relational database
management system.
Oracle Data Integrator 11g: Integration and Administration 1 - 15
Copyright © 2012, Oracle and/or its affiliates. All rights reserved.
ODI Components: Overview
•ODI Studio Components:
–Designer Navigator
–Operator Navigator
–Topology Navigator
–Security Navigator
•ODI agents
•ODI Console
•ODI repositories
Oracle University and (Oracle Corporation) use only.
These eKit materials are to be used ONLY by you for the express purpose SELF STUDY. SHARING THE FILE IS STRICTLY PROHIBITED.
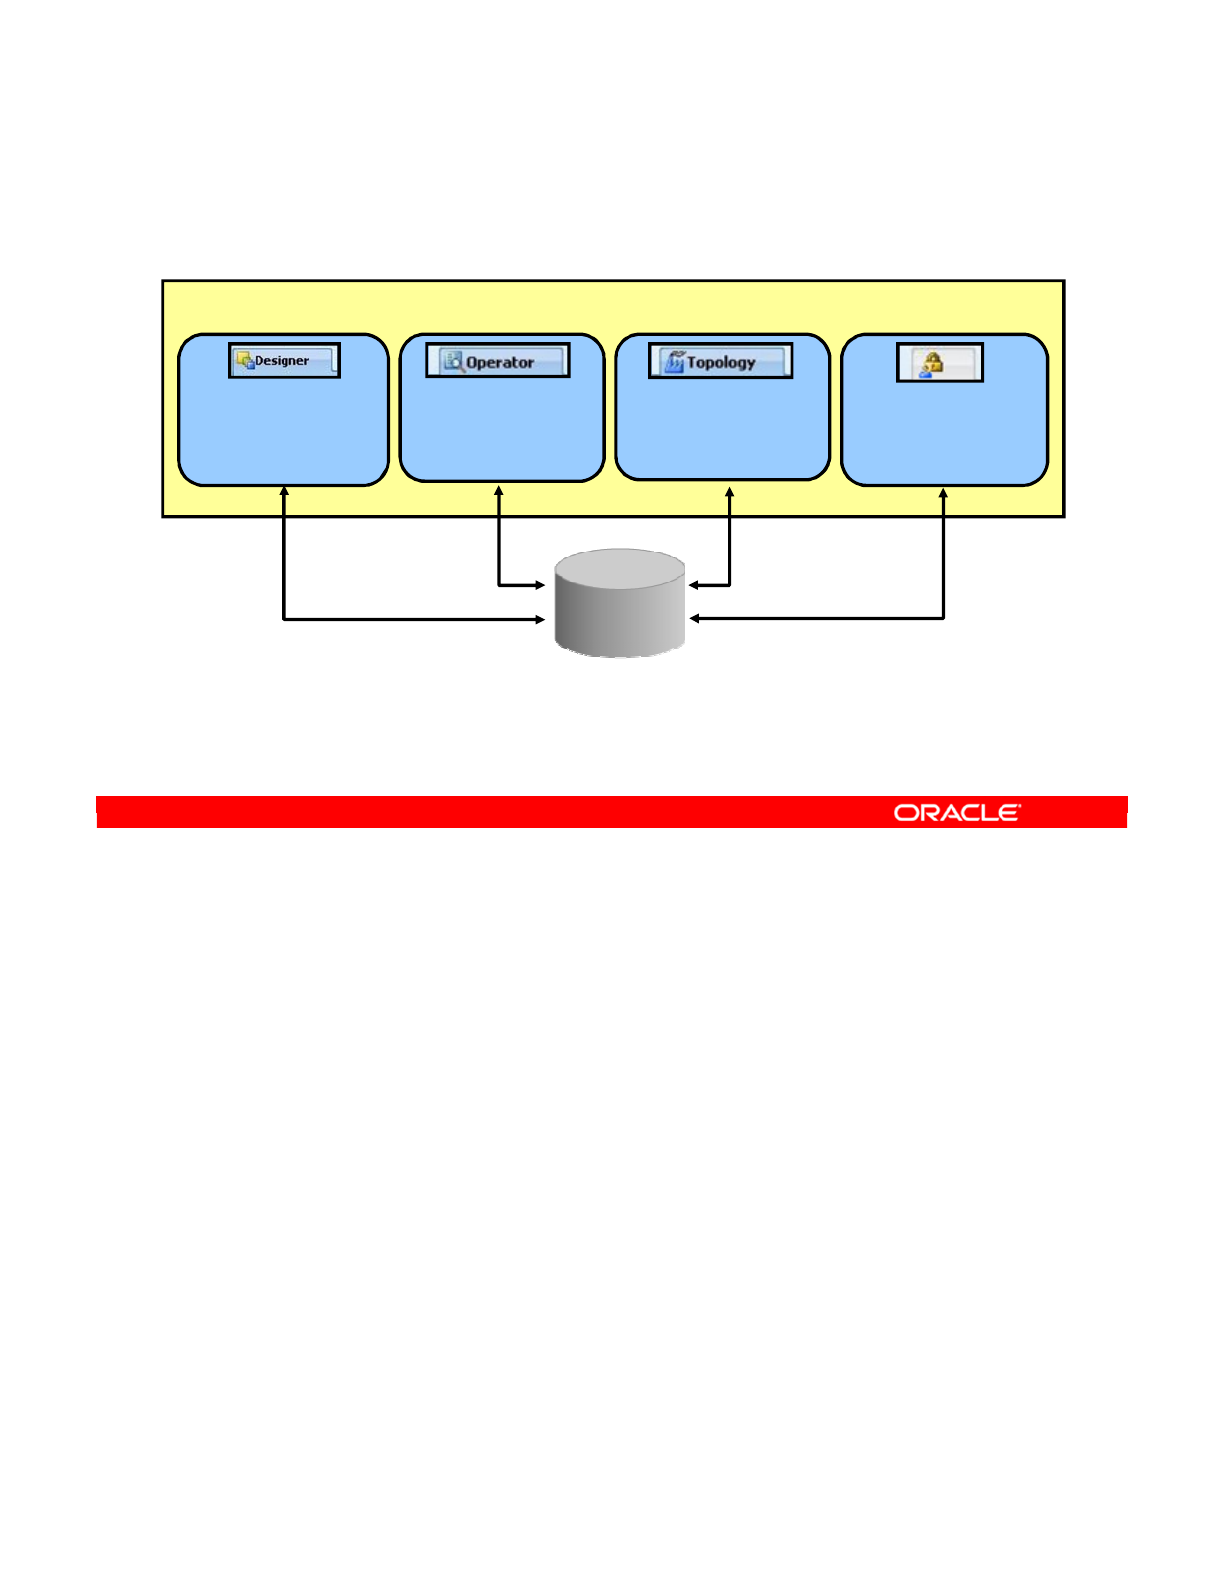
Graphical Navigators
Administrators, developers, and operators use the Oracle Data Integrator Studio to access the
repositories. This Fusion Client Platform (FCP) based UI is used for administering the
infrastructure (security and topology), reverse-engineering the metadata, developing projects,
and scheduling, operating, and monitoring executions. FCP provides an efficient and flexible
way to manage navigators, panels, and editors.
Business users (as well as developers, administrators, and operators) can have read access
to the repository. They can also perform topology configuration and production operations
through a web-based UI called Oracle Data Integrator Console. This web application can be
deployed in a Java EE application server such as Oracle WebLogic.
The four ODI graphical navigators are based on the Java programming language and can be
installed on any platform that supports Java Virtual Machine 1.6, including Windows, Linux,
HP-UX, Solaris, and pSeries. All ODI navigators store their information in the centralized ODI
repository.
Oracle Data Integrator 11g: Integration and Administration 1 - 16
Copyright © 2012, Oracle and/or its affiliates. All rights reserved.
Security Navigator
Manage user
privileges.
Operator Navigator
Operate production.
Monitor sessions.
Topology Navigator
Define the
infrastructure of the IS.
Designer Navigator
Reverse-engineer.
Develop projects.
Release scenarios.
Repository
ODI Studio
The Fusion Client Platform (FCP) based UI provides an efficient and
flexible way to manage navigators, panels, and editors.
Using ODI Studio
Oracle University and (Oracle Corporation) use only.
These eKit materials are to be used ONLY by you for the express purpose SELF STUDY. SHARING THE FILE IS STRICTLY PROHIBITED.
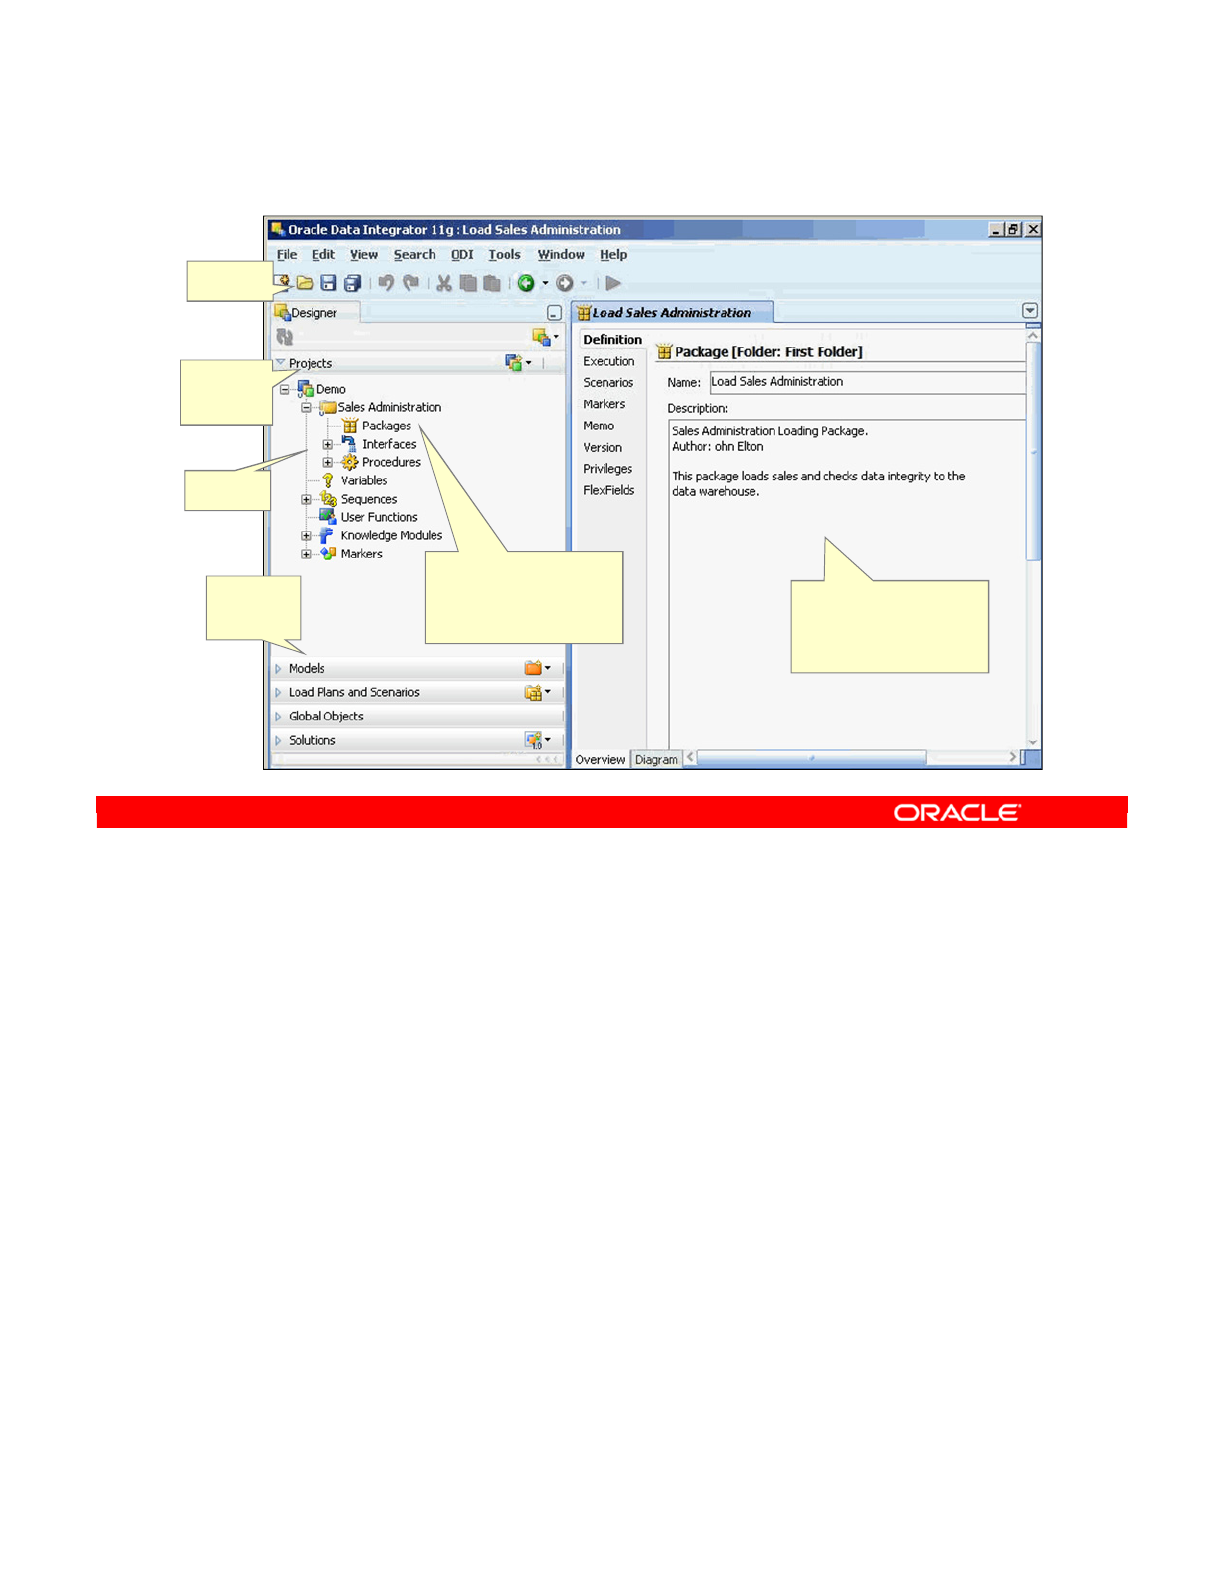
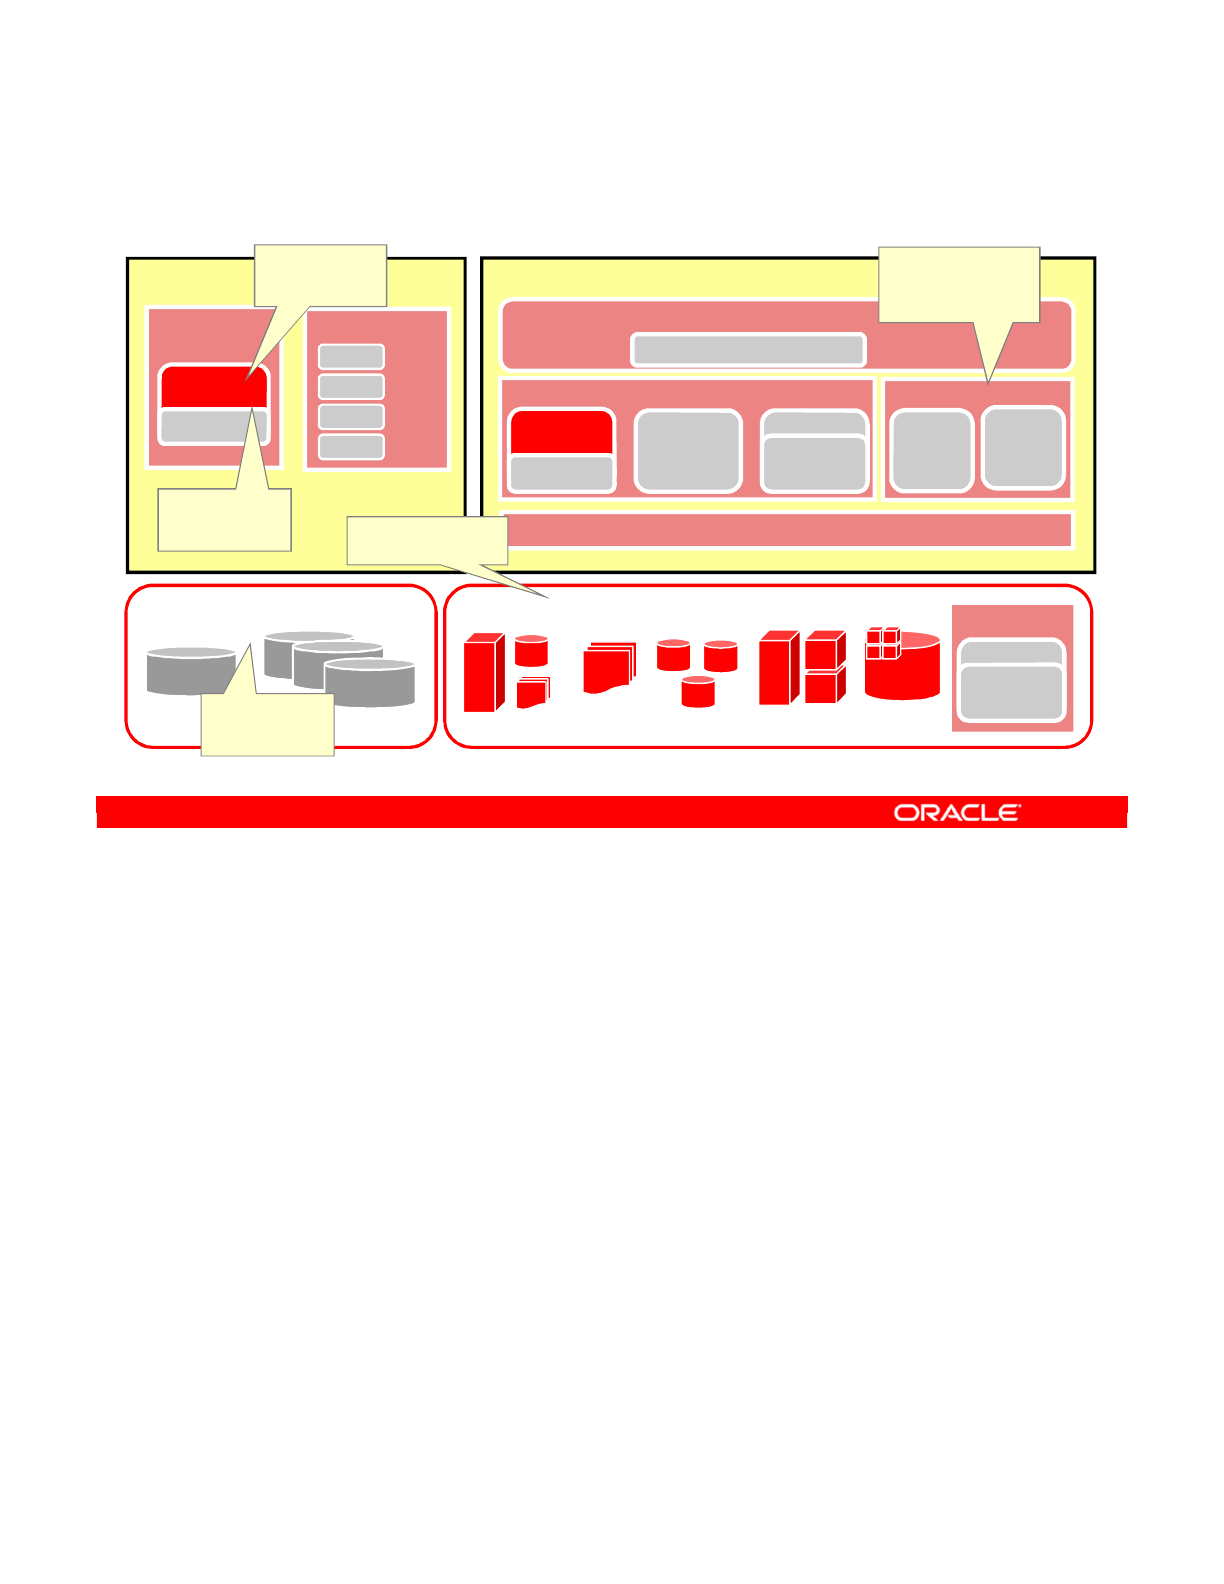
Designer Navigator is the GUI for defining metadata and rules for transformation and data
quality. ODI uses this information to generate scenarios for production, and is where all the
project development takes place. Designer Navigator is the core module for developers and
metadata administrators.
Through the Designer Navigator, you can handle the following:
•Models: Descriptions of data and application structures
•Projects: Development of various ODI objects
Note: Designer Navigator stores this information in a Work Repository, while using the
topology and the security information defined in the Master repository.
Oracle Data Integrator 11g: Integration and Administration 1 - 17
Copyright © 2012, Oracle and/or its affiliates. All rights reserved.
Designer Navigator (Work Repository)
In ODI Designer, you
can create, configure,
and execute various
ODI objects.
Workspace to
define ODI objects and
design ELT
transformations
Toolbar
Object
tree
Other
Designer
editors
Designer
Projects
editor
Oracle University and (Oracle Corporation) use only.
These eKit materials are to be used ONLY by you for the express purpose SELF STUDY. SHARING THE FILE IS STRICTLY PROHIBITED.
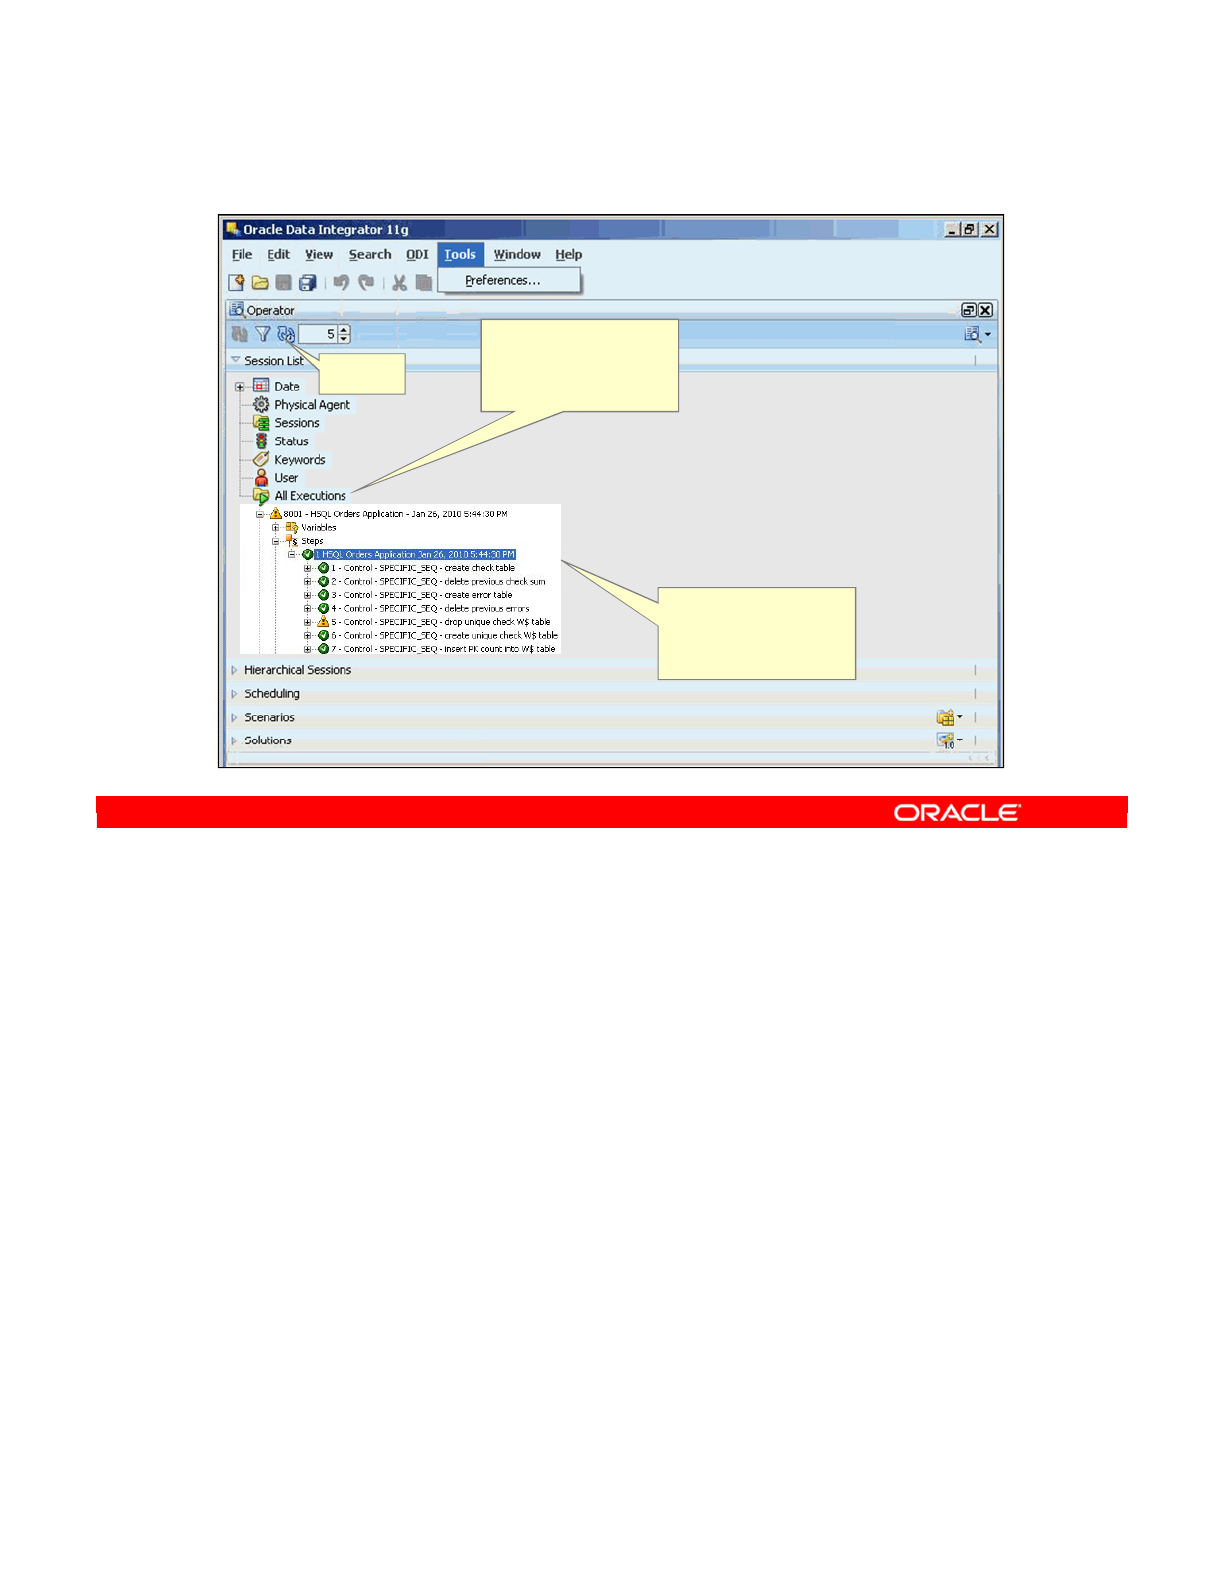
The Operator Navigator is used to manage and monitor ODI in production. It is designed for
production operators, and displays the execution logs with error counts, the number of rows
processed, execution statistics, and so on. At design time, developers use the Operator
Navigator for debugging purposes.
Through the Operator Navigator, you can manage your interface executions in the sessions,
as well as the scenarios in production.
The Operator Navigator stores this information in a Work Repository, while using the topology
defined in the Master Repository.
Oracle Data Integrator 11g: Integration and Administration 1 - 18
Copyright © 2012, Oracle and/or its affiliates. All rights reserved.
Operator Navigator (Work Repository)
In the Operator
Navigator, you can
monitor execution of
ODI objects.
Toolbar
The monitoring
session steps enable
you to perform
debugging.
Oracle University and (Oracle Corporation) use only.
These eKit materials are to be used ONLY by you for the express purpose SELF STUDY. SHARING THE FILE IS STRICTLY PROHIBITED.
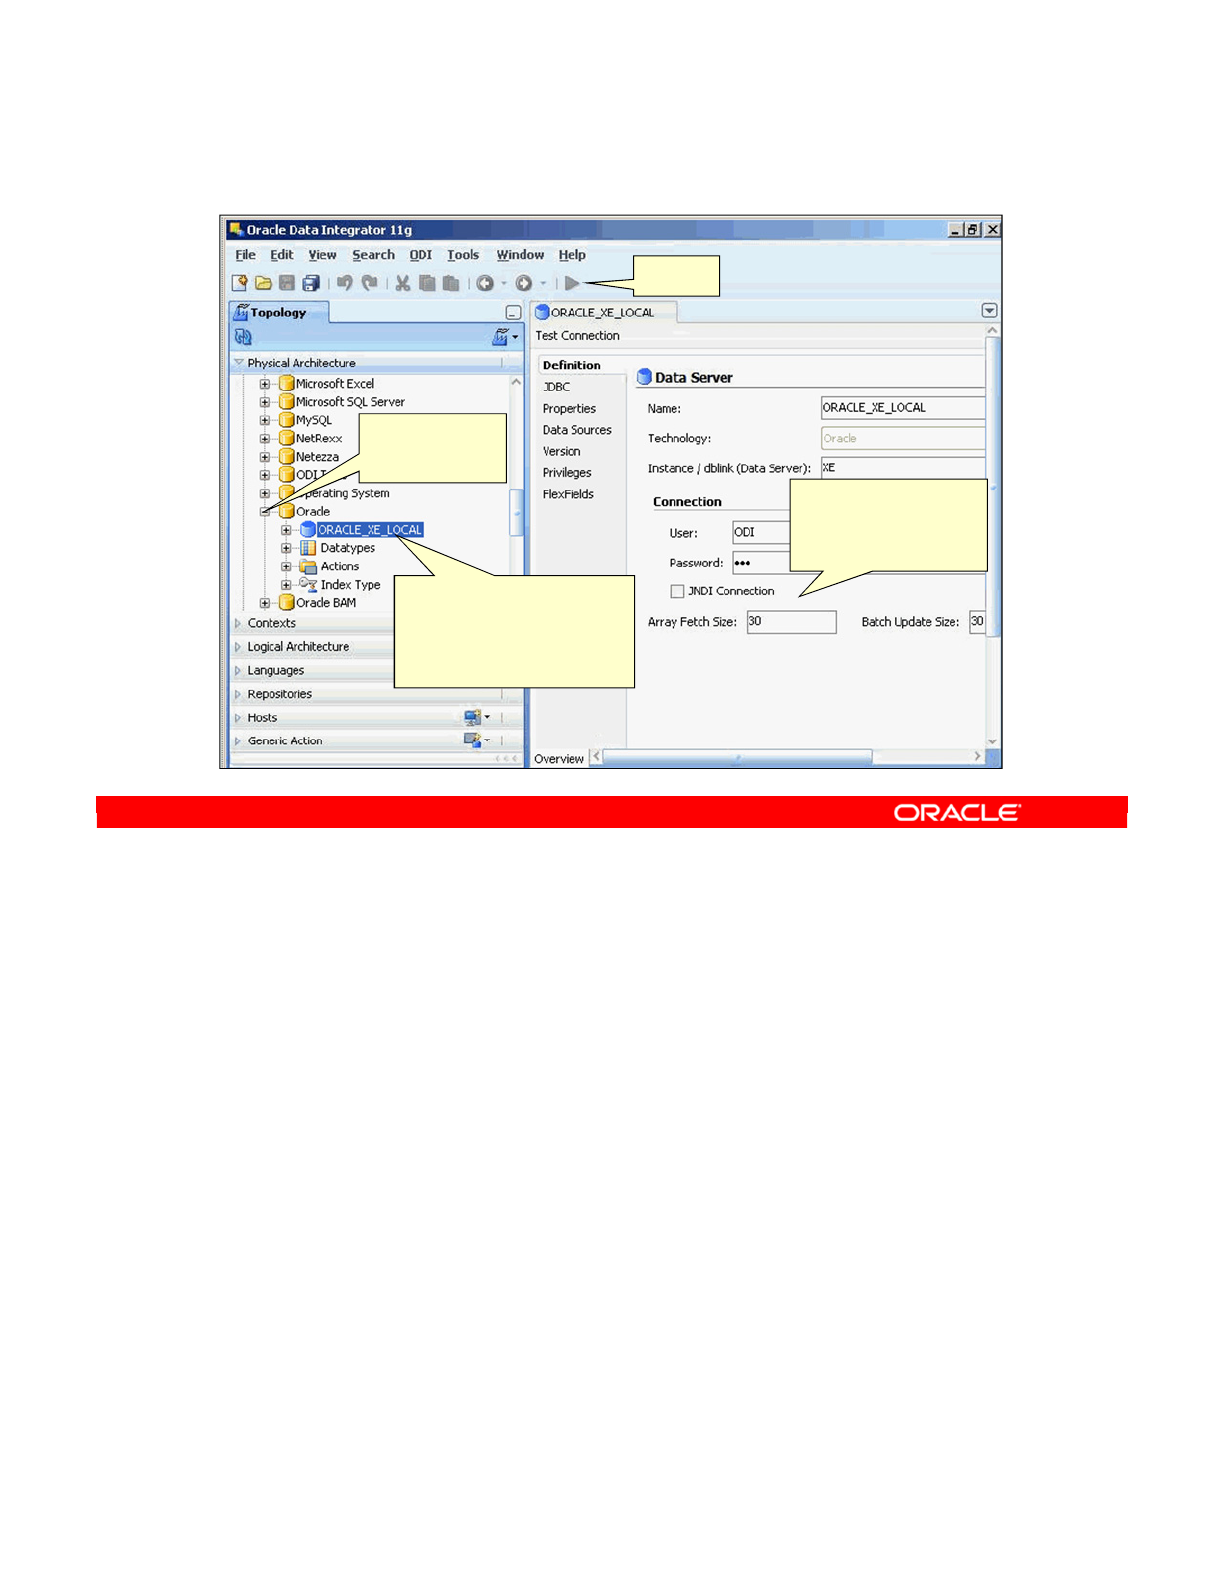
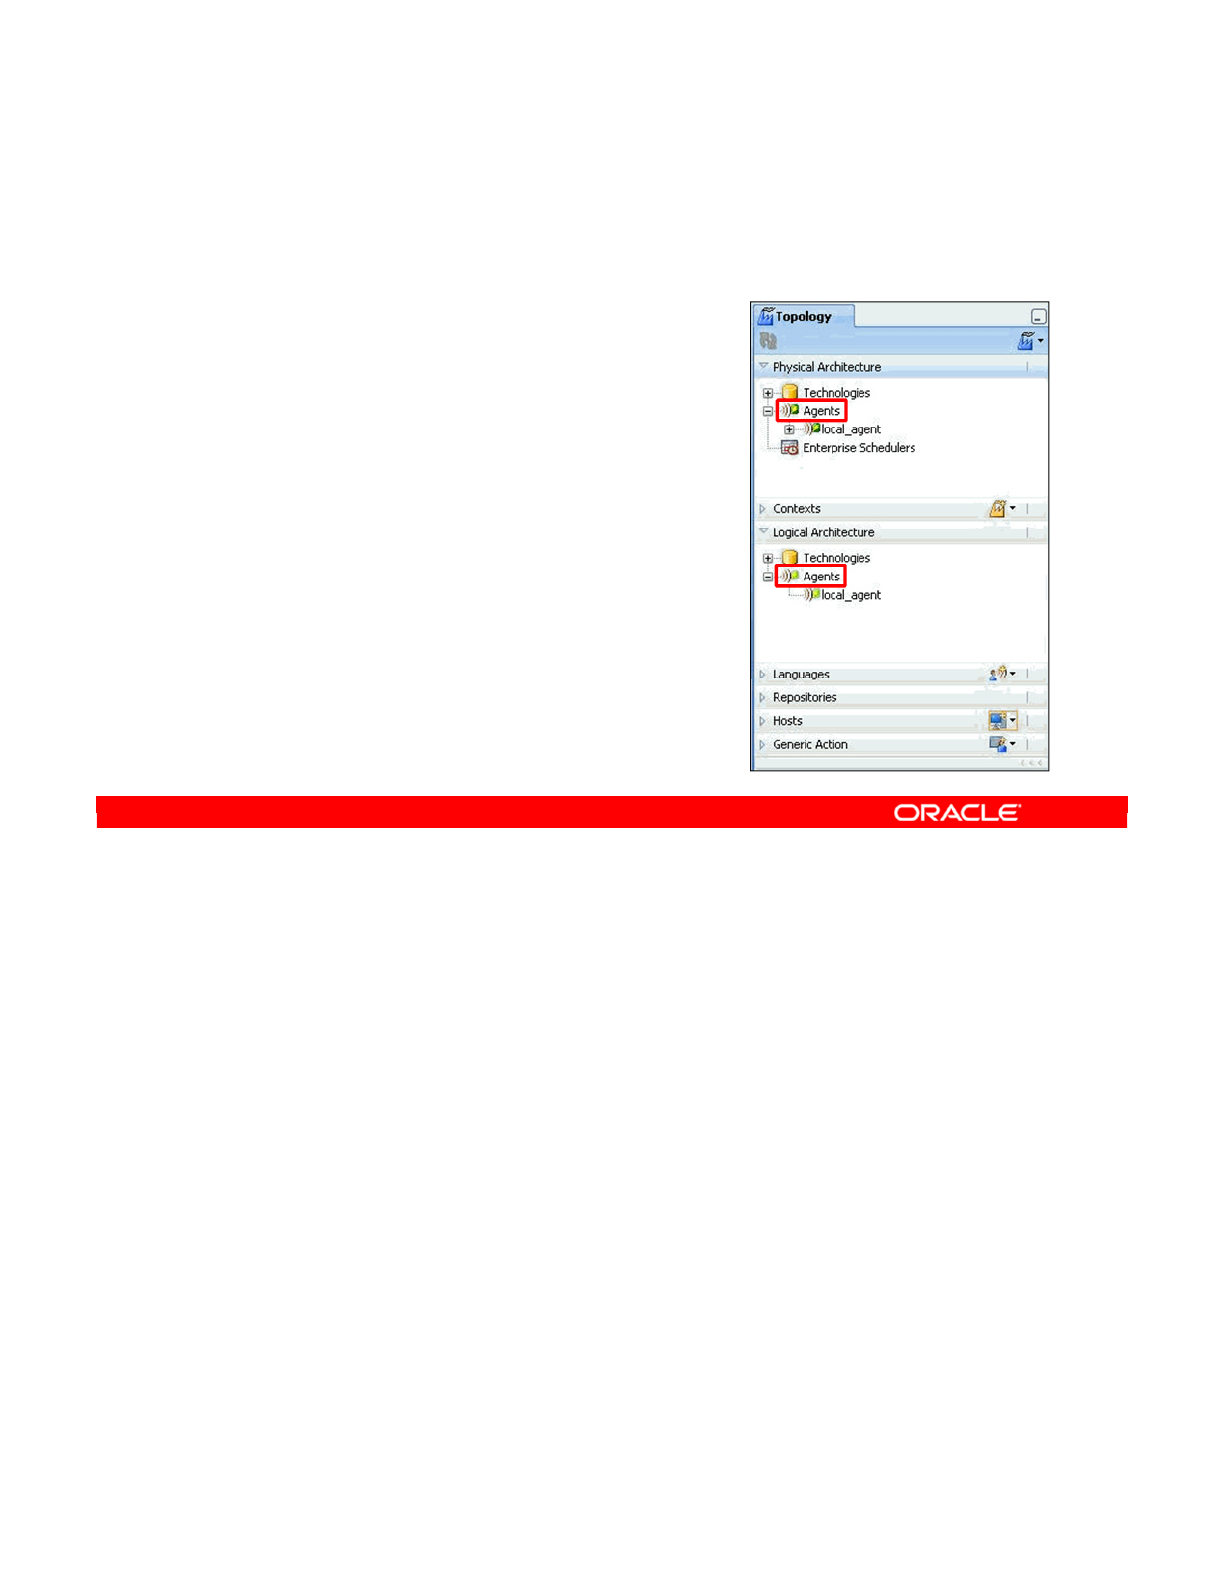
The Topology Navigator manages the physical and logical architecture of the infrastructure.
Servers, schemas, and agents are registered in the ODI Master Repository—a major ODI
component that contains information about the topology of the company’s IT resources,
security, and ODI resources that will be discussed later in this course.
Using the Topology Navigator, you can define the topology of your information system to ODI
so that it can be accessed by other ODI modules. In addition, the Topology Navigator enables
you to manage the repositories. The Topology Navigator stores this information in a Master
Repository. This information can be used by all the other modules.
Oracle Data Integrator 11g: Integration and Administration 1 - 19
Copyright © 2012, Oracle and/or its affiliates. All rights reserved.
Topology Navigator (Master Repository)
In ODI Topology Navigator,
you set the architecture of
your information system,
technologies, servers,
schemas, and repositories.
Technologies
tree
Toolbar
Workspace to
define ODI Topology
objects
Oracle University and (Oracle Corporation) use only.
These eKit materials are to be used ONLY by you for the express purpose SELF STUDY. SHARING THE FILE IS STRICTLY PROHIBITED.
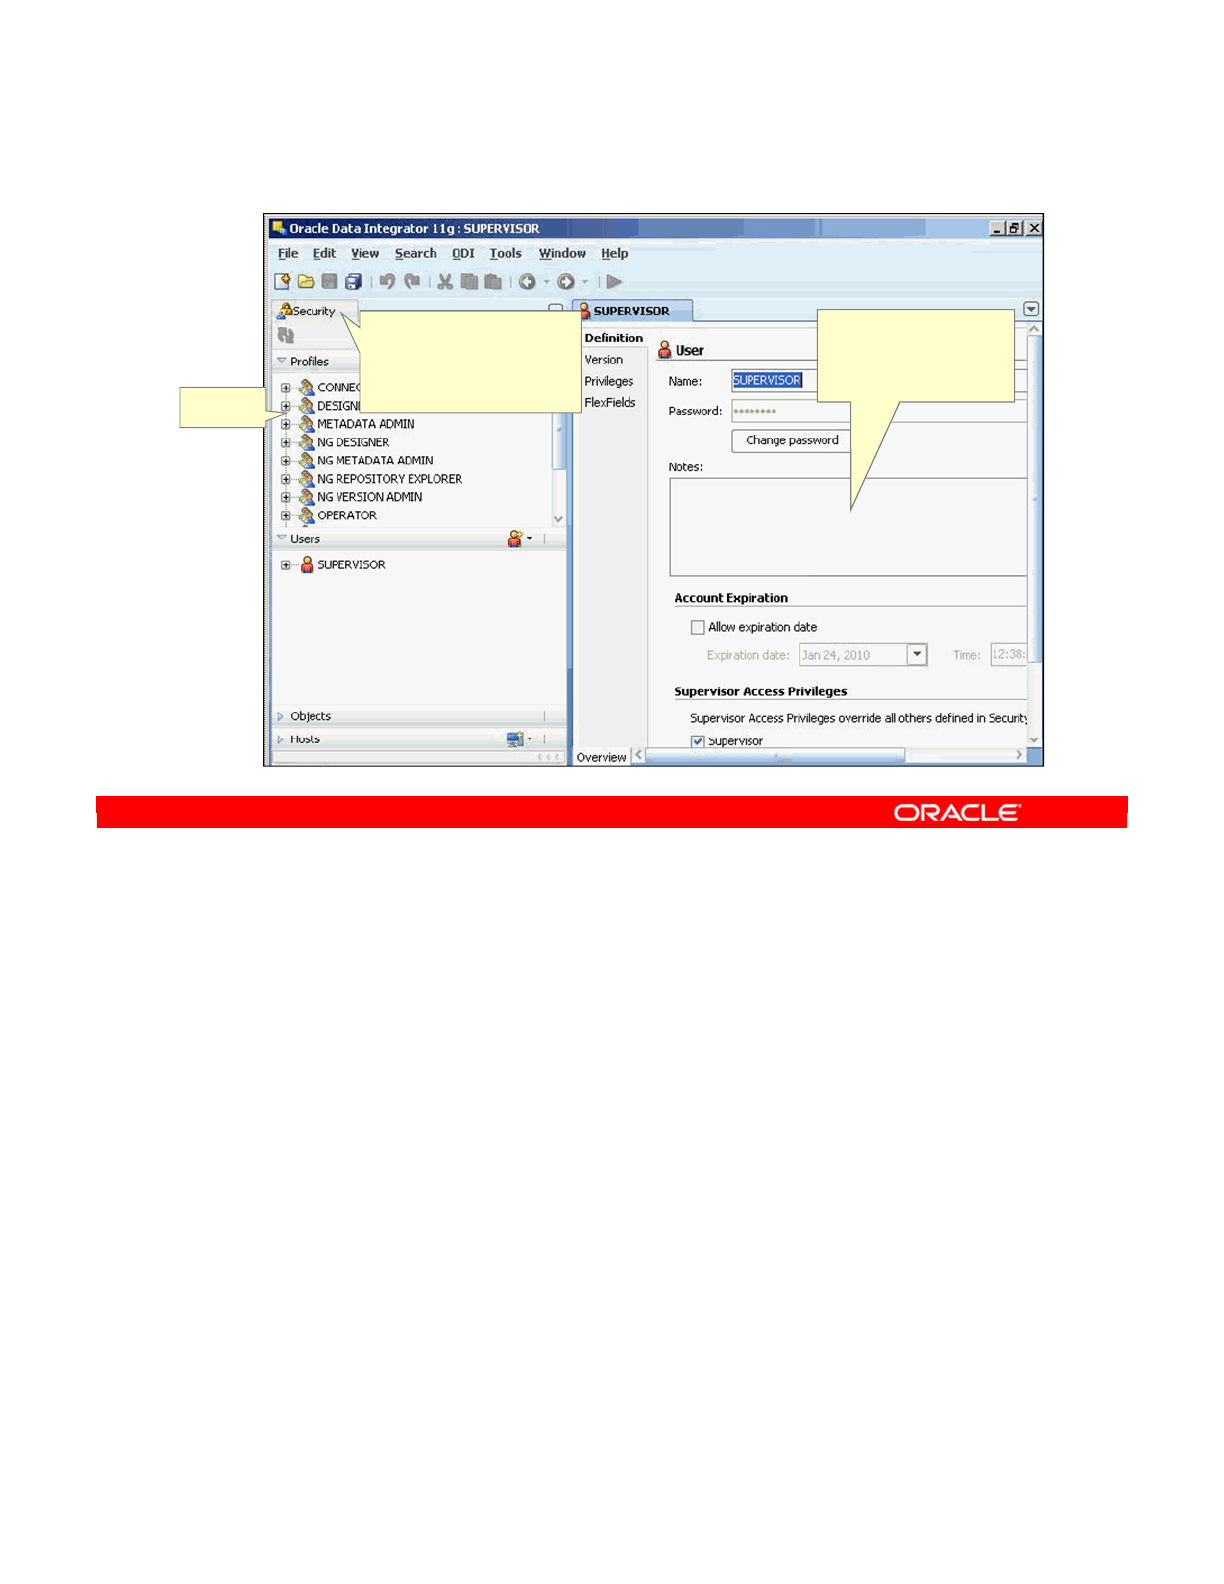
The Security Navigator manages users and their privileges in ODI. It is used to create profiles
and provide rights to users to access ODI objects and features. This navigator is usually used
by security administrators.
It is used to assign user rights for methods (edit and delete, for example) on generic objects
(data server and data types, for example), and to fine-tune these rights on the object
instances (Server 1 and Server 2, for example).
The Security Navigator stores this information in a Master Repository. This information can be
used by all the other modules.
Oracle Data Integrator 11g: Integration and Administration 1 - 20
Copyright © 2012, Oracle and/or its affiliates. All rights reserved.
Security Navigator (Master Repository)
In the Security Navigator,
you manage objects,
profiles, users and their
privileges, and hosts.
Object
tree
Workspace to
define objects, profiles,
users, and hosts
Oracle University and (Oracle Corporation) use only.
These eKit materials are to be used ONLY by you for the express purpose SELF STUDY. SHARING THE FILE IS STRICTLY PROHIBITED.

An agent is a special ODI component that runs in the background.
At design time, developers generate scenarios from the business rules that they have
designed.
The code of these scenarios is then retrieved from the repository by the agent at run time.
This agent then connects to the data servers, and orchestrates the code execution on these
servers.
The agent orchestrates the integration process by sending commands to data servers, the
operating system, or other technologies. It retrieves the return codes and messages for the
execution, as well as additional logging information, such as the number of rows processed,
execution time, and so on, in the repository.
Oracle Data Integrator 11g: Integration and Administration 1 - 21
Copyright © 2012, Oracle and/or its affiliates. All rights reserved.
What Is an Agent?
•An agent is a runtime component of ODI that orchestrates
the integration process.
•It is a lightweight Java program that retrieves code from
the repository at run time.
•At design time, developers generate scenarios from the
business rules that they have designed. The code of these
scenarios is then retrieved from the repository by the agent
at run time.
•This agent then connects to the data servers, and
orchestrates the code execution on these servers.
Oracle University and (Oracle Corporation) use only.
These eKit materials are to be used ONLY by you for the express purpose SELF STUDY. SHARING THE FILE IS STRICTLY PROHIBITED.
You can install an agent on any machine with network access. This is worth bearing in mind
when planning your deployment strategy.
Note: Before ODI 11g, ODI had two types of agents: listener agents and scheduler agents.
With ODI 11g, agents are always connected to a Master Repository, and are started with the
built-in scheduler service activated. This scheduler service takes its schedules from all the
Work Repositories attached to the connected Master.
Oracle Data Integrator 11g: Integration and Administration 1 - 22
Copyright © 2012, Oracle and/or its affiliates. All rights reserved.
ODI Agents
•Agents are lightweight Java
processes that orchestrate the
execution of objects at run time.
•Agents can do one of the following:
–Execute objects on demand
–Execute according to predefined
schedules
Oracle University and (Oracle Corporation) use only.
These eKit materials are to be used ONLY by you for the express purpose SELF STUDY. SHARING THE FILE IS STRICTLY PROHIBITED.
The Agent comes in two types:
•The Java Enterprise Edition (Java EE; formerly J2EE) agent can be deployed as a web
application and benefit from the features of an application server.
•The Standalone agent runs in a simple Java Machine and can be deployed where
needed to perform the integration flows.
Both agents are multithreaded Java programs that support load balancing (discussed in the
lesson titled “Administering ODI Repositories”) and can be distributed across the information
system. The agent can hold its own execution schedule, which can be defined in Oracle Data
Integrator, and can also be called from an external scheduler. It can also be invoked from a
Java API or a web service interface.
Oracle Data Integrator 11g: Integration and Administration 1 - 23
Copyright © 2012, Oracle and/or its affiliates. All rights reserved.
Two Types of Agents: Java EE and Standalone
JDeveloper
ODI Studio
Designer Operator
Security Topology
WebLogic 11g(or other Java EE)
Data Sources Connection Pool
Repository Data Sources Sources Data Sources Target Data Sources
Repository Data Sources Sources Data Sources Target Data Sources
Repository Data Sources Sources Data Sources Target Data Sources
Servlet Container
ODI Agent
ODI Console
Web Service Container
ODI Public
Web Service
ODI Data
Services
Any Application Container
Any Application
ODI SDK APIs
MBeans Server Registry
Any MBeans App
ODI MBeans
for ODI Agent
Sources and Targets
ERP
---
------
---
---
---
CRM
---
Legacy
---
---
---
---
---
--- ---
---
---
---
---
---
Best-of-Breed ApplicationsPLM
RDBMS – ODI Repositories
ODI Master
Repository
ODI Work
Repository
ODI Work
Repository
ODI Work
Repository
Standalone Java
Any Java App
ODI SDK APIs
Any Web App
Knowledge
Modules
ODI Agent
Standalone
agent
Java EE
agent
Oracle University and (Oracle Corporation) use only.
These eKit materials are to be used ONLY by you for the express purpose SELF STUDY. SHARING THE FILE IS STRICTLY PROHIBITED.

Deploying an Oracle Data Integrator Agent in Oracle WebLogic Server (WLS)
The easiest way to deploy an Oracle Data Integrator agent in Oracle WebLogic Server (WLS)
is to generate a WLS template with Oracle Data Integrator. This template can directly be
deployed by using the WLS Configuration Wizard.
Deploying an agent in a Java EE Application Server (Oracle WebLogic Server) involves the
following tasks:
•Task 1: Define the Java EE agent in the Topology. Defining a Java EE agent consists of
two tasks. First, you need to create the physical agent corresponding to your Java EE
agent, and then create a logical agent.
•Task 2: Create the WLS template for the Java EE agent. Oracle Data Integrator
provides a WLS Template Generation wizard to help you create a WLS template for a
runtime agent.
•Task 3: Deploy the template directly by using the WLS Configuration Wizard.
The next slide discusses using a standalone agent.
Oracle Data Integrator 11g: Integration and Administration 1 - 24
Copyright © 2012, Oracle and/or its affiliates. All rights reserved.
Using the Two Types of Agents
•Deploying a Java EE agent in a Java EE Application
Server (Oracle WebLogic Server):
1. In ODI, define the Java EE agent in Topology Navigator.
2. In ODI, create the WLS template for the Java EE agent.
3. Deploy the template directly using WLS Configuration
Wizard.
•Using a standalone agent:
1. Launch an Agent.
2. Display Scheduling Information.
3. Stop the Agent.
•Advantages of Java EE agents over standalone agents:
–High availability
–Multiple agents, using Coherence
–Load balancing
–Connection pooling back to repositories
Oracle University and (Oracle Corporation) use only.
These eKit materials are to be used ONLY by you for the express purpose SELF STUDY. SHARING THE FILE IS STRICTLY PROHIBITED.
At run time, the standalone agent orchestrates the execution of the developed scenarios. It
can be installed on any platform provided that it supports a JVM 1.6 at minimum (Windows,
Linux, HP-UX, Solaris, pSeries, iSeries, zSeries, and so on).
Execution may be from one of the graphical modules or by using the built-in scheduler.
Due to the ELT architecture of ODI, the standalone agent rarely performs transformation itself.
It usually retrieves code from the execution repository and requests database servers,
operating systems, or scripting engines to execute it. When the execution is completed, the
standalone agent updates the logs in the repository, reporting error messages and execution
statistics. The execution log can be viewed from the Operator Navigator.
Note: Although it can act as a transformation engine, the agent is rarely used for this purpose.
Agents are installed at tactical locations in the information system to orchestrate integration
processes and leverage existing systems. Agents are lightweight components in this
distributed integration architecture.
Oracle Data Integrator 11g: Integration and Administration 1 - 25
Copyright © 2012, Oracle and/or its affiliates. All rights reserved.
Example of Standalone Agent
Lightweight
Distributed Architecture
Any ISO-92 RDBMS
Execute Jobs
Standalone Agent
Orchestrates
sessions
Java - Any Platform
Operator
Operate
production
monitor sessions
Java - Any Platform
Return Code
Use Designer
or Operator to
Submit Jobs
to execute
Read sessions
Write reports
Monitor sessions
View Reports
Designer
Reverse-engineer
Develop projects
Release
scenarios
Information System
Repository
Oracle University and (Oracle Corporation) use only.
These eKit materials are to be used ONLY by you for the express purpose SELF STUDY. SHARING THE FILE IS STRICTLY PROHIBITED.

The ODI Console provides web access to ODI repositories. It enables users to navigate
projects, models, logs, and so on. Business users, developers, operators, and administrators
use their web browsers to access the ODI Console. The ODI Console replaces the Metadata
Navigator of ODI releases before ODI 11g.
Note that with the ODI Console, you also can perform executions.
Oracle Data Integrator 11g: Integration and Administration 1 - 26
Copyright © 2012, Oracle and/or its affiliates. All rights reserved.
ODI Console
Development
ODI
Console
ODI
Console
Agent
Web access
Oracle University and (Oracle Corporation) use only.
These eKit materials are to be used ONLY by you for the express purpose SELF STUDY. SHARING THE FILE IS STRICTLY PROHIBITED.
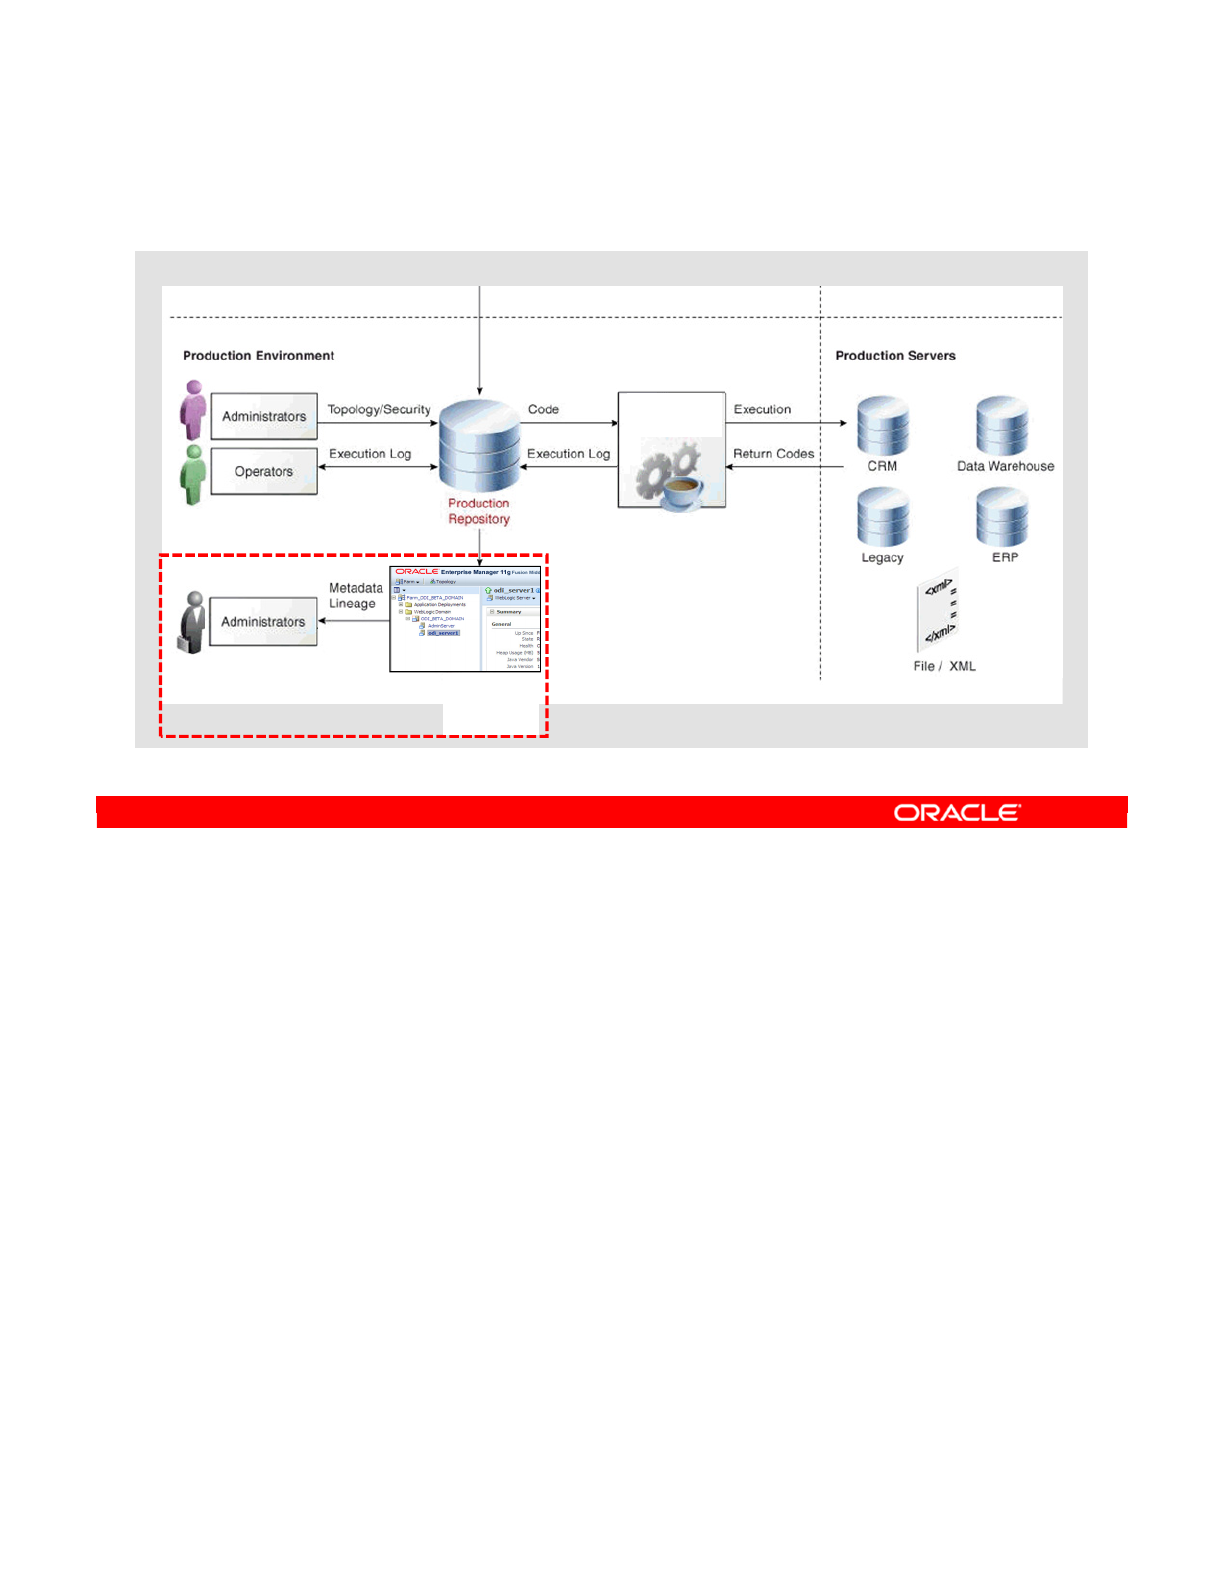
Oracle Data Integrator provides an extension that is integrated into the Enterprise Manager
Fusion Middleware Control Console. The Oracle Data Integrator components can be
monitored as a “domain server” (a WebLogic term) through this Console, and administrators
can have a global view of these components, along with other Fusion Middleware
components from a single administration console.
Oracle Data Integrator 11g: Integration and Administration 1 - 27
Copyright © 2012, Oracle and/or its affiliates. All rights reserved.
Enterprise Manager Console
Development
Enterprise Manager
Console
ODI Plug-in
for EM
Console
Agent
Oracle University and (Oracle Corporation) use only.
These eKit materials are to be used ONLY by you for the express purpose SELF STUDY. SHARING THE FILE IS STRICTLY PROHIBITED.

The repository is the central component in ODI. The following slides cover what the repository
stores.
Oracle Data Integrator 11g: Integration and Administration 1 - 28
Copyright © 2012, Oracle and/or its affiliates. All rights reserved.
Oracle Data Integrator Repositories
Oracle University and (Oracle Corporation) use only.
These eKit materials are to be used ONLY by you for the express purpose SELF STUDY. SHARING THE FILE IS STRICTLY PROHIBITED.
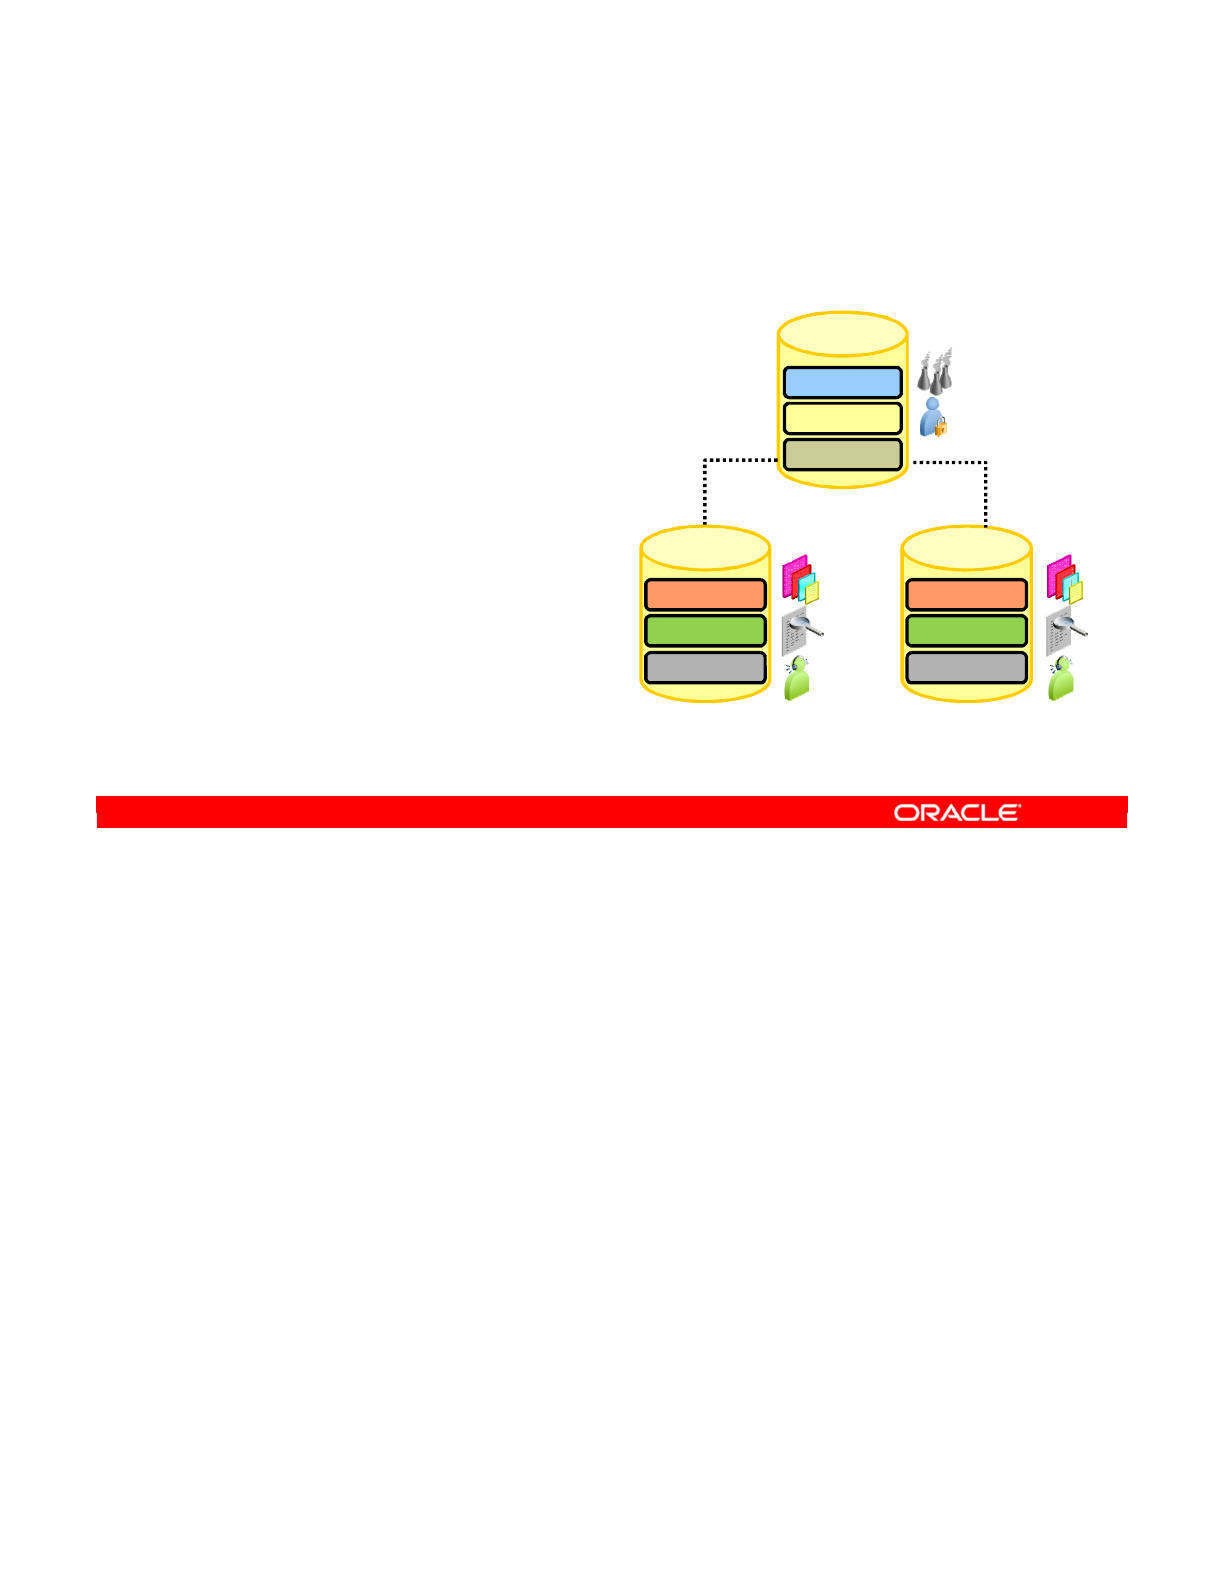
ODI repositories are databases stored in relational database management systems. There
are two types of ODI repositories: Master Repository and Work Repository. All the objects
configured, developed, or used by the ODI modules are stored in one of these two types of
repositories. The repositories are accessed in client/server mode by various components of
the ODI architecture.
Whereas a Master Repository is usually associated with multiple Work Repositories, each
Work repository can belong to only one Master Repository. This restriction supports ODI
version management.
Oracle Data Integrator 11g: Integration and Administration 1 - 29
Copyright © 2012, Oracle and/or its affiliates. All rights reserved.
ODI Repositories
•Two types of repositories are included in ODI:
–Master repository
–Work repository
—
Development repository
—
Execution repository
•Work repositories are always
attached to a single
Master repository.
MASTER
repository
Security
Topology
Versioning
Models
Execution
WORK repository
(Dev)
Projects
Models
Execution
WORK repository
(Prod)
Projects
Oracle University and (Oracle Corporation) use only.
These eKit materials are to be used ONLY by you for the express purpose SELF STUDY. SHARING THE FILE IS STRICTLY PROHIBITED.

Two types of repositories are included in ODI:
•Master Repository: It is the data structure containing information about the topology of
the company’s IT resources, security, and version management of projects and data
models. This repository is stored on a relational database accessible in client/server
mode from the different ODI modules. In general, you need only one Master Repository.
•Work Repository: It is the data structure containing information about data models,
projects, and their use. This repository is stored on a relational database accessible in
client/server mode from the different ODI modules.
Several Work Repositories can be designated with several Master Repositories, if necessary.
However, a Work Repository can be linked with only one Master Repository for version
management purposes. The ODI Repository comprises a Master Repository and several
Work Repositories. There is usually only one Master Repository, which contains the following
information:
•Security information, including users, profiles, and access privileges for the ODI platform
•Topology information, including technologies, definitions of servers and schemas,
contexts and languages
•Old versions of objects
Oracle Data Integrator 11g: Integration and Administration 1 - 30
Copyright © 2012, Oracle and/or its affiliates. All rights reserved.
Master and Work Repositories
You can create a Work repository that stores only execution information,
usually for PRODUCTION purposes. This type of Work repository can be
called an execution repository.
Master repository
Models
Execution
Work repository
(Development)
Execution
Execution repository
(Production)
Security
Topology
Versioning
Projects
Oracle University and (Oracle Corporation) use only.
These eKit materials are to be used ONLY by you for the express purpose SELF STUDY. SHARING THE FILE IS STRICTLY PROHIBITED.

The information contained in the Master Repository is maintained with the Topology Navigator
and the Security Navigator. All modules access the Master Repository because they all need
the topology and security information stored there.
The Work Repository is where the projects are developed. Several Work Repositories may
coexist in the same ODI installation. This is useful, for example, in maintaining separate
environments or in reflecting a particular versioning life cycle.
A Work Repository stores information for the following:
•Data models, which include the descriptions of schemas, data store structures and
metadata, fields and columns, data quality constraints, cross-references, data lineage, and
so on
•Projects, which include business rules, packages, procedures, folders, knowledge
modules, variables, and so on
•Execution, which means scenarios, scheduling information, and logs
The contents of a Work Repository are managed by using Designer and Operator. They are
also accessed by the agent at run time.
When a Work Repository is used only to store execution information (typically for production
purposes), it is called an execution repository. Execution repositories are accessed at run time
by using Operator and also by using agents.
Note: Work Repositories are always attached to one Master Repository.
Oracle Data Integrator 11g: Integration and Administration 1 - 31
Oracle University and (Oracle Corporation) use only.
These eKit materials are to be used ONLY by you for the express purpose SELF STUDY. SHARING THE FILE IS STRICTLY PROHIBITED.
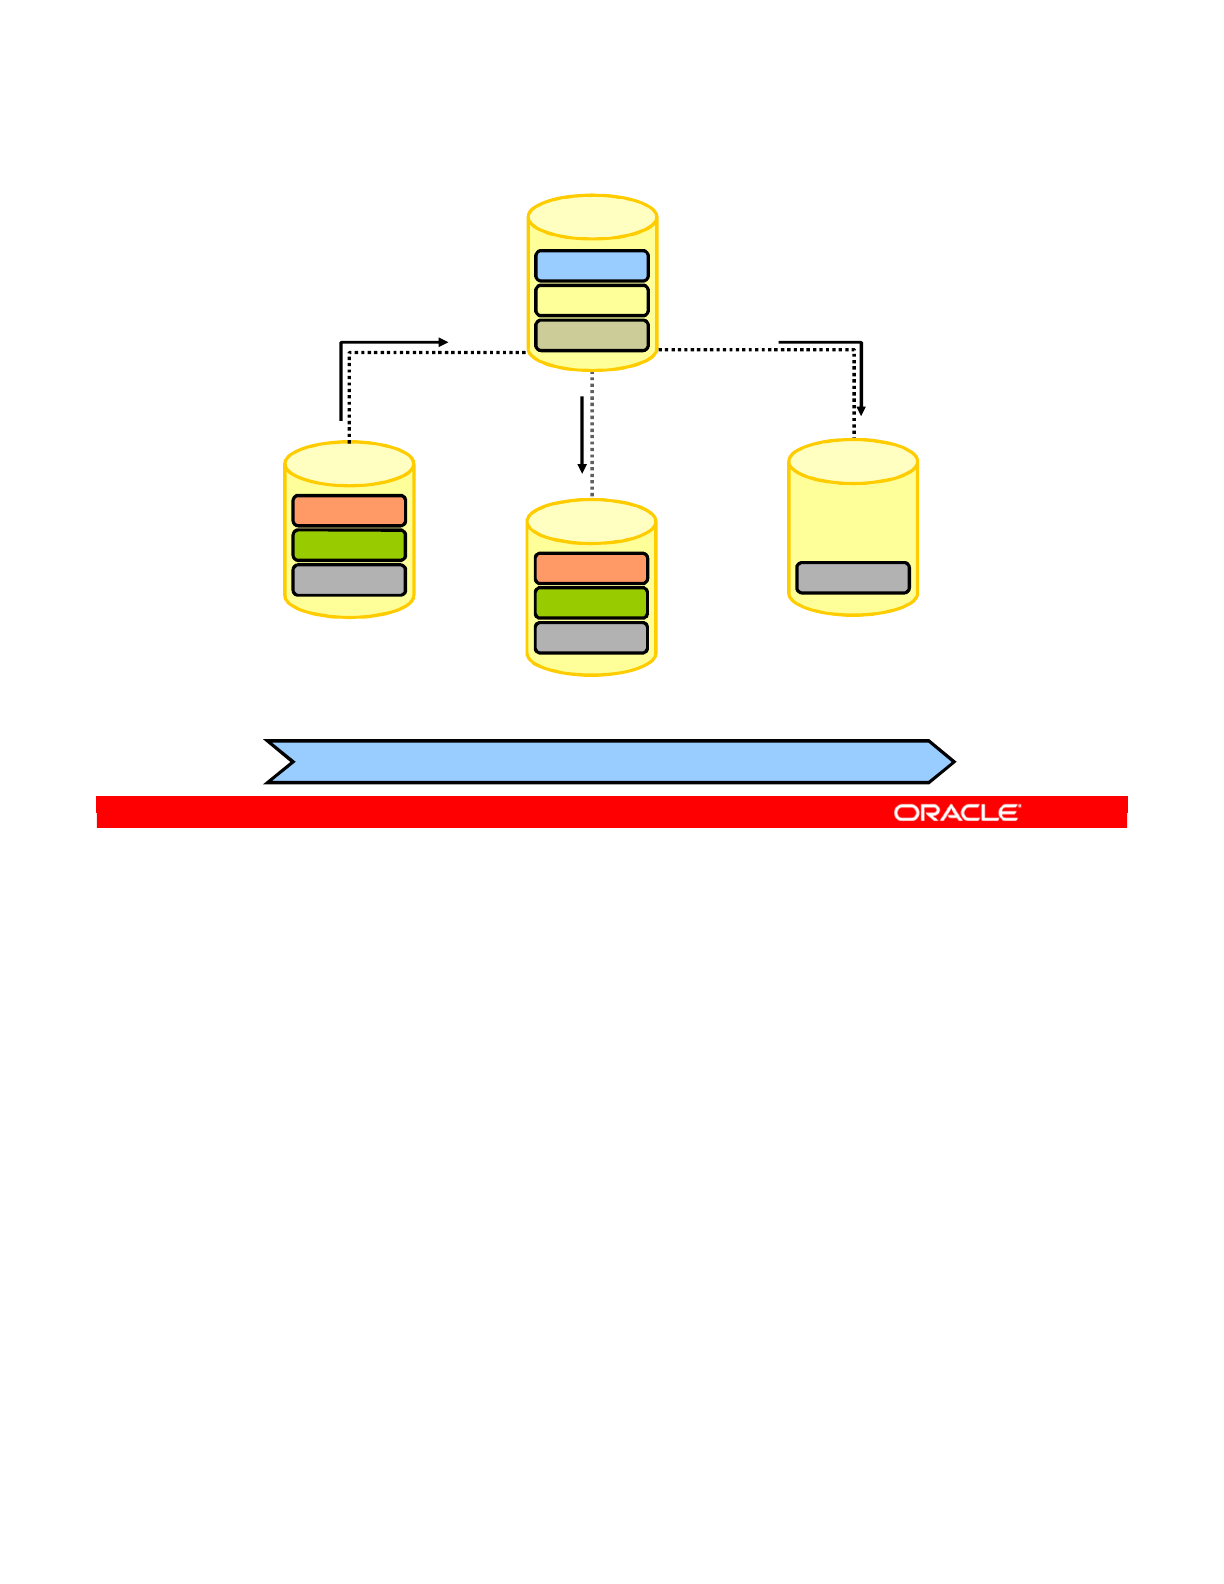
The graphic in the slide gives an overview of a typical repository architecture where
development, testing, and production are carried out in separate Work Repositories. When
the development team finishes work on certain projects, it releases them into the Master
Repository. The testing team imports these released versions for testing in a separate Work
repository, thereby allowing the development team to continue working on the next versions.
When the test team successfully validates the developed items, the production team exports
the executable versions (called scenarios) into the final production Work Repository.
This repository structure corresponds to a simple development-test-production cycle.
Oracle Data Integrator 11g: Integration and Administration 1 - 32
Copyright © 2012, Oracle and/or its affiliates. All rights reserved.
Repository Setup: Example
Development-test-production cycle
Models
Projects
Execution
Work Repository
(Development)
Work Repository
(Test and QA)
Execution
Repository
(Production)
Security
Topology
Versioning
Master
Repository
Import released
versions of models,
projects, and
scenarios for
testing.
Import released
and tested
versions of
scenarios for
production.
Models
Projects
Execution
Execution
Create and
archive versions
of models,
projects, and
scenarios.
Oracle University and (Oracle Corporation) use only.
These eKit materials are to be used ONLY by you for the express purpose SELF STUDY. SHARING THE FILE IS STRICTLY PROHIBITED.
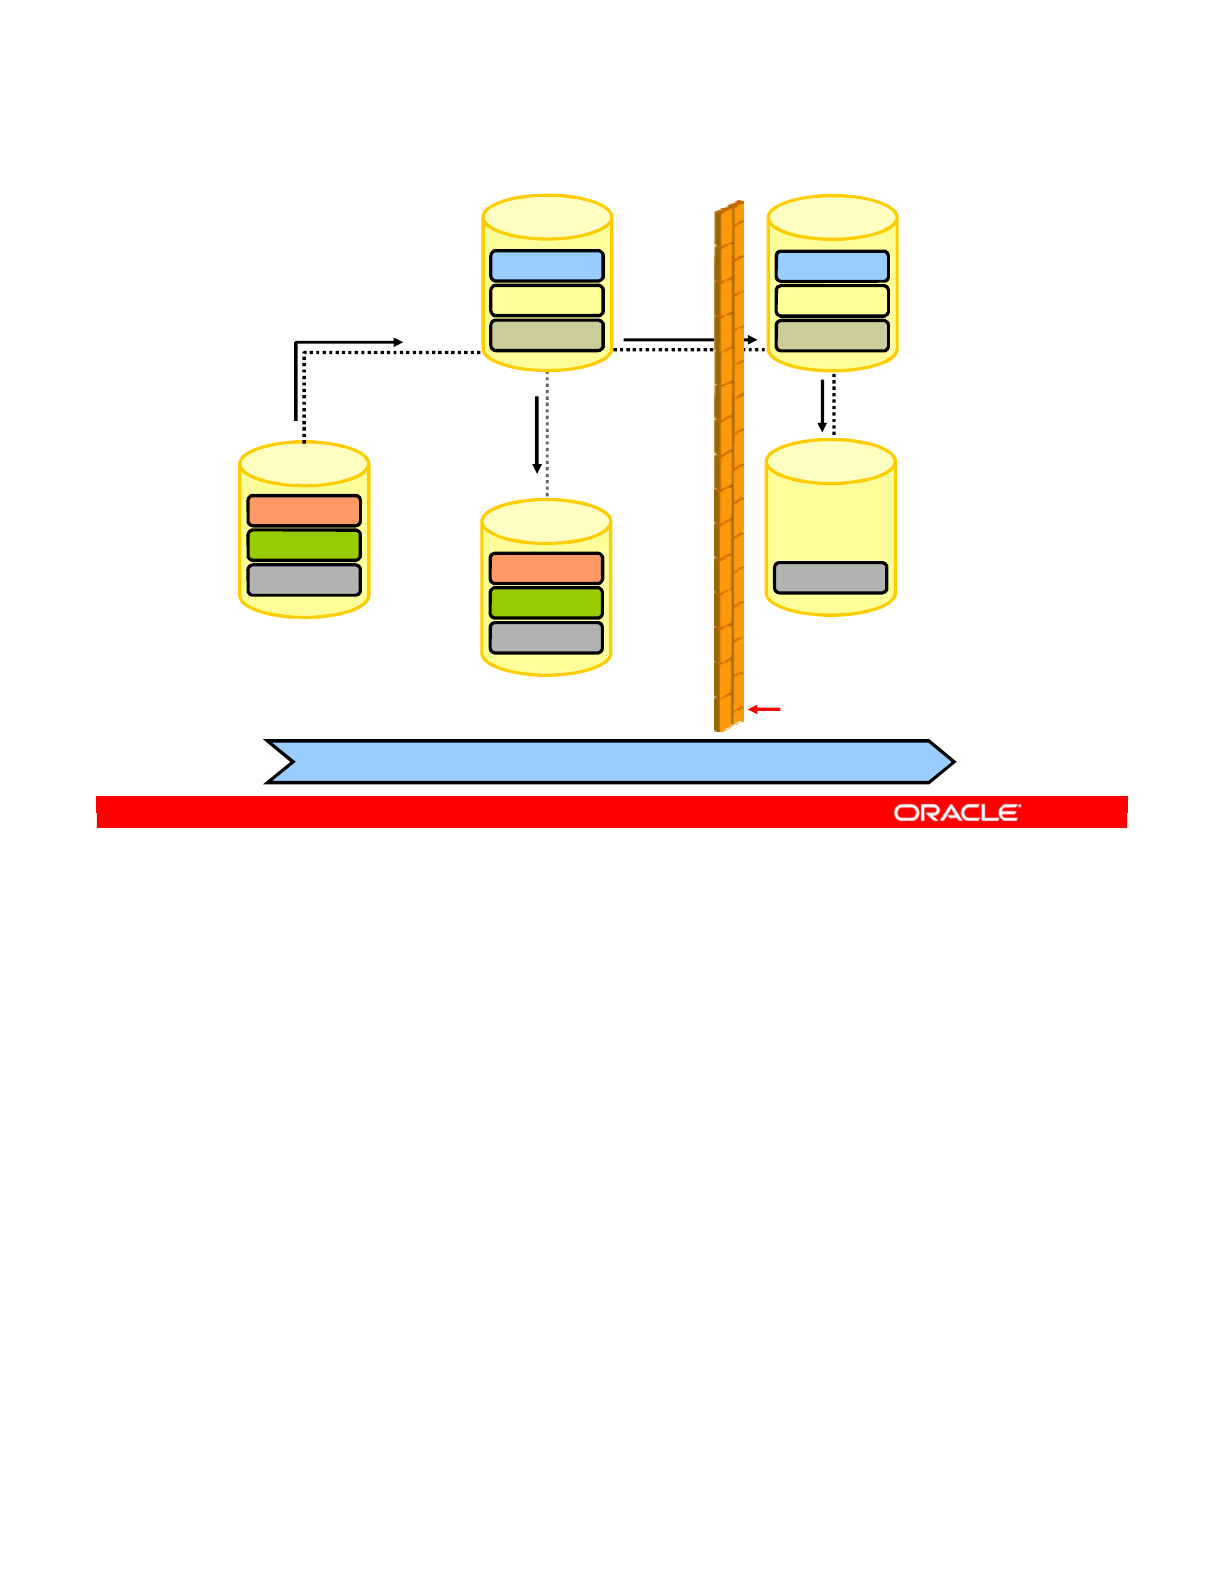
Imagine that a firewall protects Production from Development/Test/QA. This diagram shows
that a second Master Repository can be used to deal with the firewall.
Oracle Data Integrator 11g: Integration and Administration 1 - 33
Copyright © 2012, Oracle and/or its affiliates. All rights reserved.
Repository Setup: Multiple Master Repositories
Development-test-production cycle
Models
Projects
Execution
Work Repository
(Development)
Work Repository
(Test and QA)
Execution
Repository
(Production)
Security
Topology
Versioning
Master
Repository
Create and
archive versions
of models,
projects, and
scenarios. Import released
versions of models,
projects, and
scenarios for
testing.
Import released and
tested versions of
scenarios for production.
Models
Projects
Execution
Execution
Security
Topology
Versioning
Master
Repository
Firewall
Oracle University and (Oracle Corporation) use only.
These eKit materials are to be used ONLY by you for the express purpose SELF STUDY. SHARING THE FILE IS STRICTLY PROHIBITED.
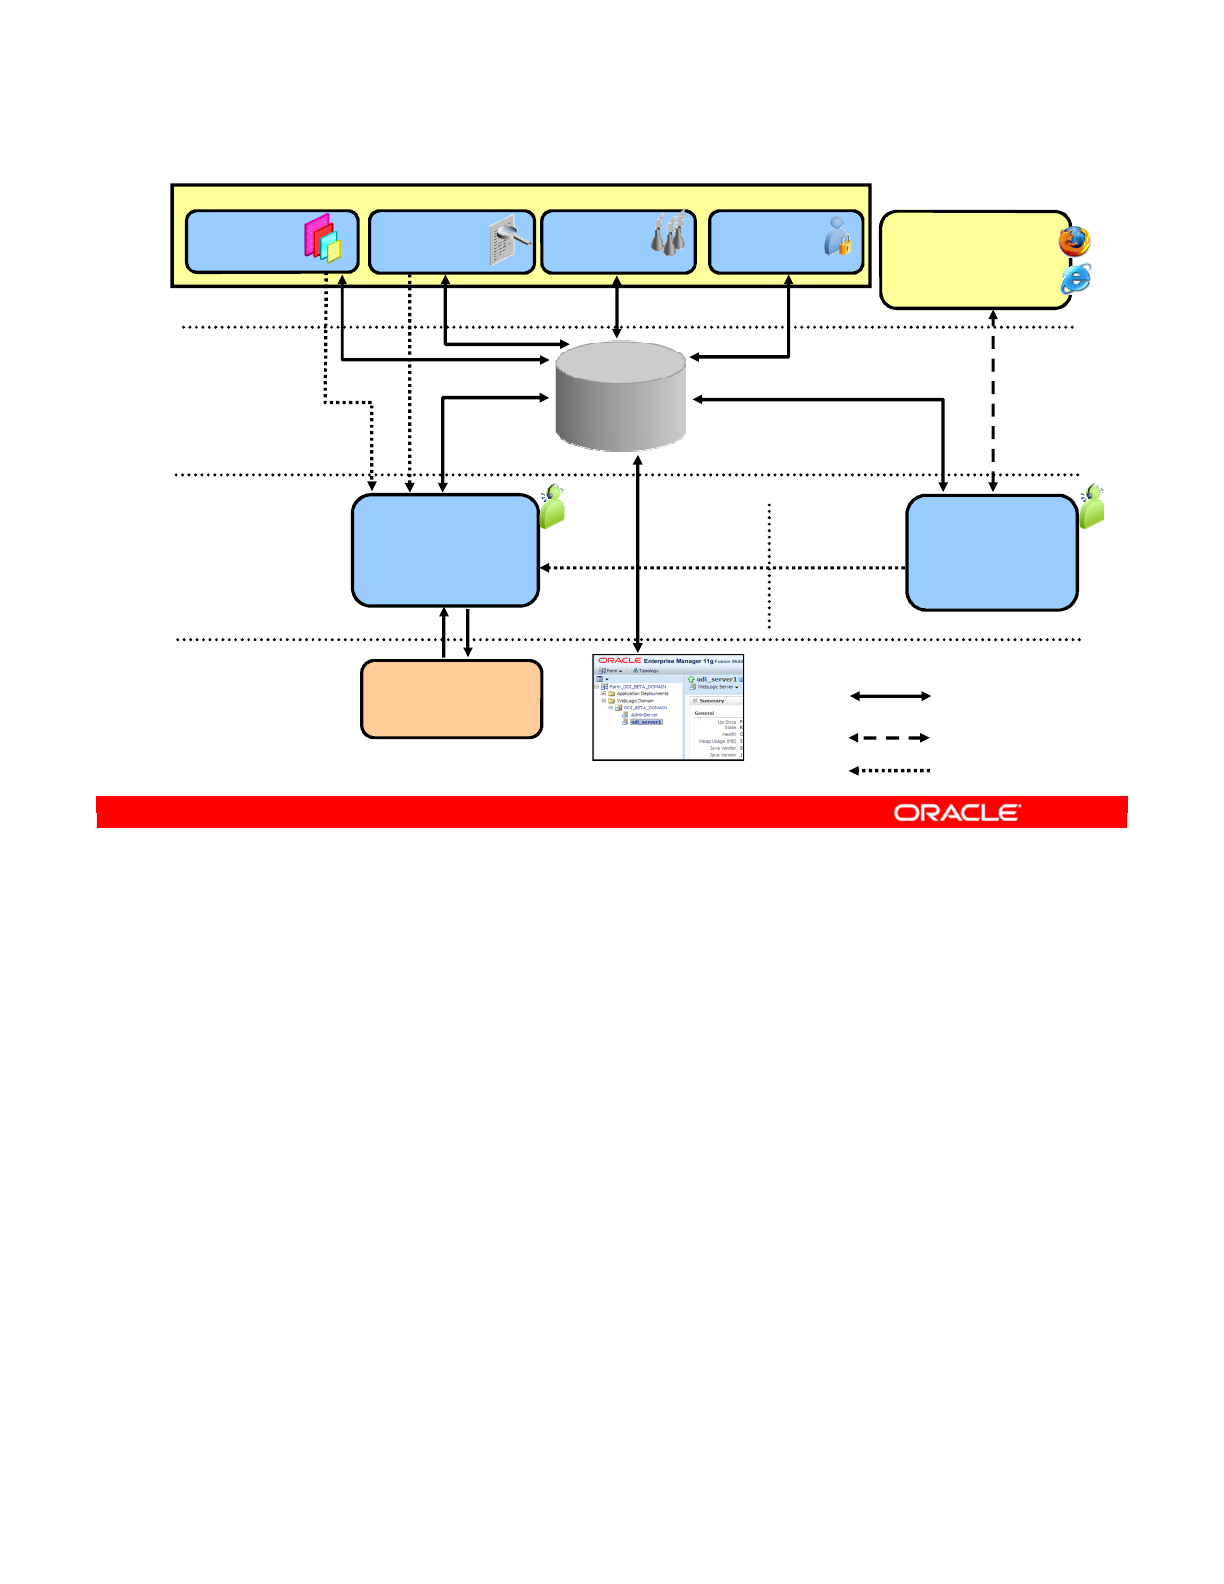
You now have a global view of the components that make up ODI: the graphical components,
the repository, the standalone or Java EE agent, and the ODI Console.
Oracle Data Integrator 11g: Integration and Administration 1 - 34
Copyright © 2012, Oracle and/or its affiliates. All rights reserved.
Components: A Global View
Any web browser
Browse metadata
lineage
Operate production
Java EE Agent
ODI Console
Web access to the
repository
Java EE Application Server
Java - Any Platform
Execute Jobs
Standalone Agent
Orchestrates
sessions
Return Code
Java - Any Platform
Security
Navigator
Operator
Navigator
Topology
Navigator
Designer
Navigator
Repository
Access
HTTP
Connection
Execution
Query
Any ISO-92 RDBMS
Information System
Repository
ODI Studio
ODI Plug-in for EM Console
Oracle University and (Oracle Corporation) use only.
These eKit materials are to be used ONLY by you for the express purpose SELF STUDY. SHARING THE FILE IS STRICTLY PROHIBITED.

This slide suggests, at a very high level, one possible methodology for using ODI in a project.
Due to class time constraints, the practices of this course do not follow this generic checklist.
The next slide provides a checklist of the practices that you perform in this course.
Oracle Data Integrator 11g: Integration and Administration 1 - 35
Copyright © 2012, Oracle and/or its affiliates. All rights reserved.
Possible ODI Methodology
Designer
•Model Definition
•Project Interface
Designer
•Project/KM
•Project/Package
•Project/Scenario
•Solution/
Versioning
Install
Security
Topology
Operator
OEM or Operator
1. Install the GUI.
2. Create the Master and Work Repositories.
3. Define users and profiles.
4. Define the IS architecture.
a. Identify the sources and targets.
b. Physical and logical schemas, contexts to associate them
c. Source and target data server connections, agents
5. Metadata into data models
a. Table, views, constraints
6. Define elementary transformations.
a. Define transformation rules and control rules.
b. Define the transfer rules.
7. Unit tests of interfaces
a. Understand the outcome.
b. Debug.
8. Optimize strategies.
a. Knowledge modules
9. Define the sequencing.
a. Order the interfaces and procedures in packages.
b. Integration tests.
10. Dev to QA
a. Generate scenario.
b. Create a solution for the project.
c. Version the solution.
d. Restore solution in QA repository.
11. QA to Prod
a. Export scenario from QA.
b. Import in Production.
12. Operations
a. Define execution schedules.
b. Follow up executions.
Oracle University and (Oracle Corporation) use only.
These eKit materials are to be used ONLY by you for the express purpose SELF STUDY. SHARING THE FILE IS STRICTLY PROHIBITED.

This checklist provides a preview of the practices that you perform in this course. These
hands-on practices begin in the next lesson.
Oracle Data Integrator 11g: Integration and Administration 1 - 36
Copyright © 2012, Oracle and/or its affiliates. All rights reserved.
Checklist of Practice Activities
1-1: Logging In and Using Help
2-1: Creating Users and Repositories and Logging In
3-1: Creating an ODI Agent for Orchestrating Execution of ODI Objects
4-1: Defining the Topology
5-1: Setting Up a New ODI Project
6-1: Creating a Model
7-1: Checking Data Quality in the Model
8-1: ODI Interface: Simple Transformations
9-1: ODI Interface: Complex Transformations
9-2: ODI Interface: Implementing Lookup
10-1: ODI Interface: Exporting a Flat File to a Relational Table
11-1: Using Native Sequences with ODI Interface
11-2: Using Temporary Indexes
11-3: Using Data Sets with ODI Interface
12-1: Using Temporary ODI Interfaces
12-2: Developing a New Knowledge Module
13-1: Creating an ODI Procedure
14-1: Creating an ODI Package
14-2: Using ODI Package with Variables and User Functions
15-1: Creating and Scheduling an ODI Scenario
16-1: Using Load Plans
17-1: Working with ODI Versions
18-1: Enforcing Data Quality with ODI Interface
19-1: Implementing Changed Data Capture
20-1: Setting Up ODI Security
20-2: Integrating with Enterprise Manager and Using ODI Console
21-1: Executing an ODI Scenario Through the ODI Public Web Service
Oracle University and (Oracle Corporation) use only.
These eKit materials are to be used ONLY by you for the express purpose SELF STUDY. SHARING THE FILE IS STRICTLY PROHIBITED.
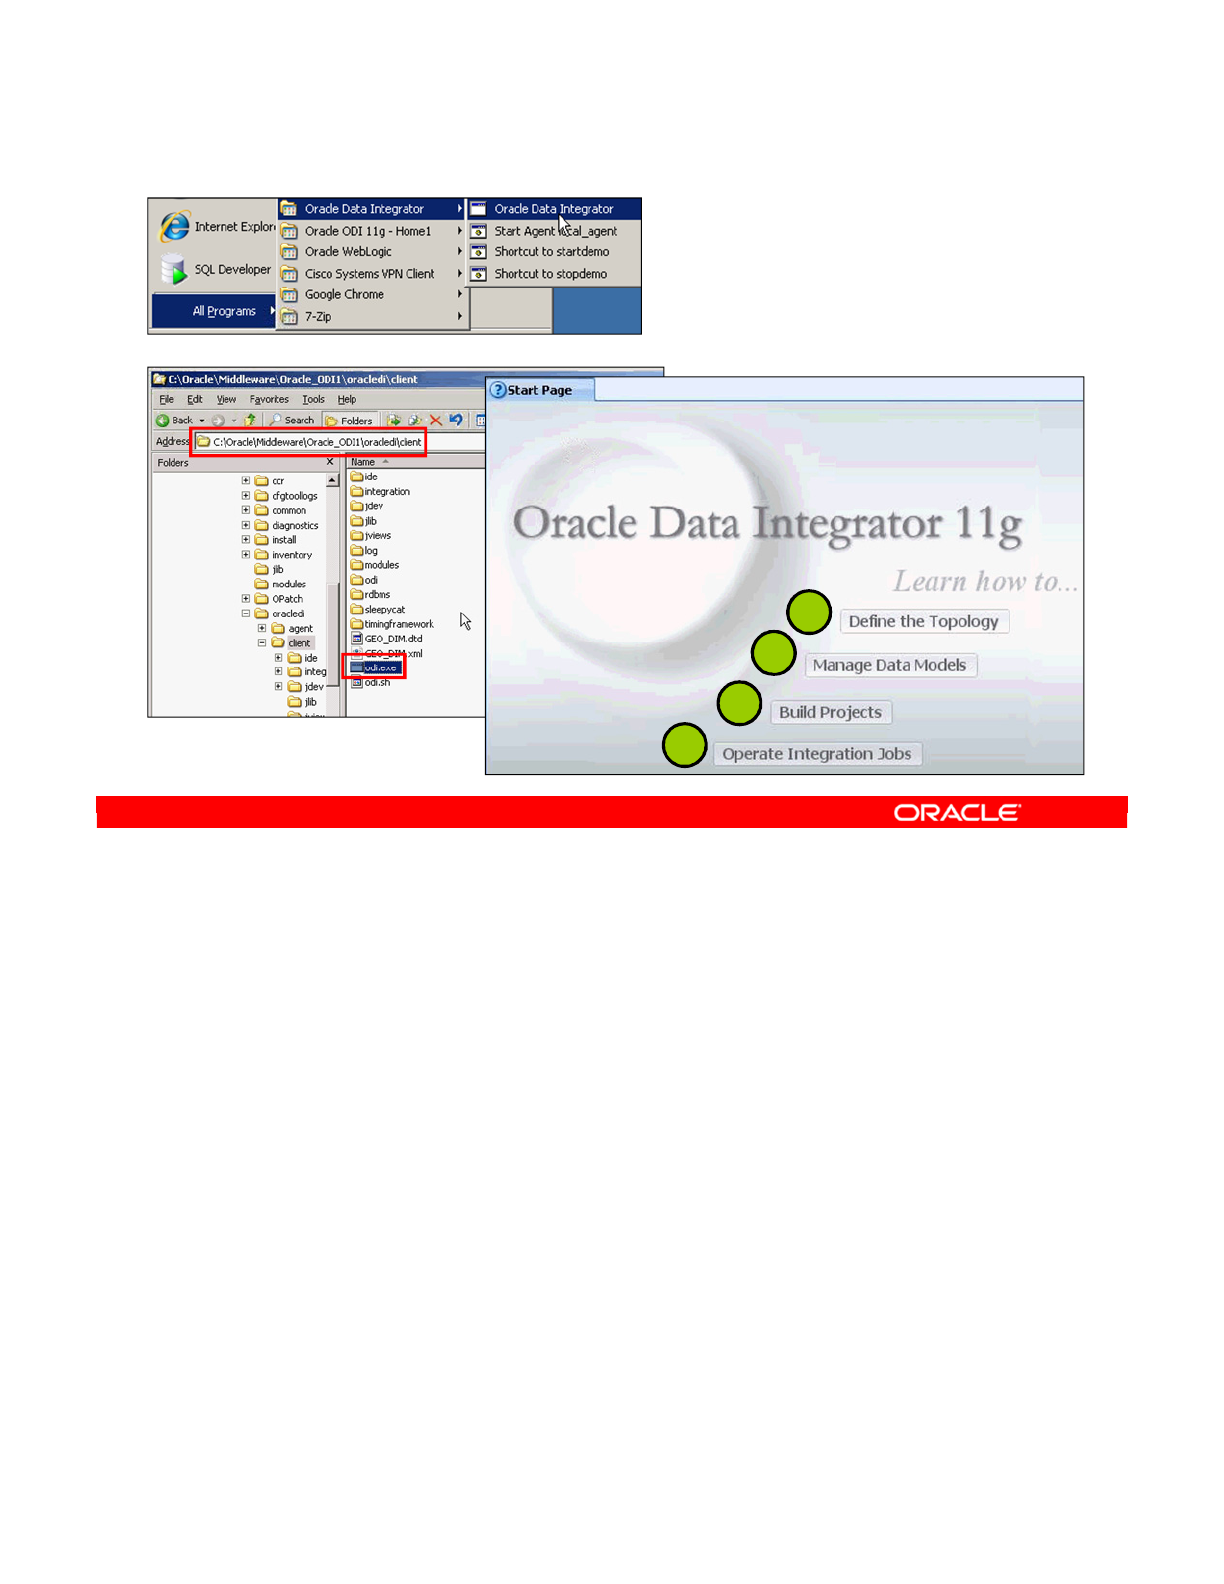
You can find the ODI client in the Oracle > Middleware subfolders. In this class, a desktop
icon is provided to start the ODI client.
When you log in to the ODI client for the first time, you are presented with the Start Page, with
links to common sets of tasks. The top level of links is organized by a typical sequence of ODI
tasks:
1. Define the Topology
2. Manage Data Models
3. Build Projects
4. Operate Integration Jobs
Oracle Data Integrator 11g: Integration and Administration 1 - 37
Copyright © 2012, Oracle and/or its affiliates. All rights reserved.
Starting Oracle Data Integrator
Start Page
1
2
3
4
or
Oracle University and (Oracle Corporation) use only.
These eKit materials are to be used ONLY by you for the express purpose SELF STUDY. SHARING THE FILE IS STRICTLY PROHIBITED.
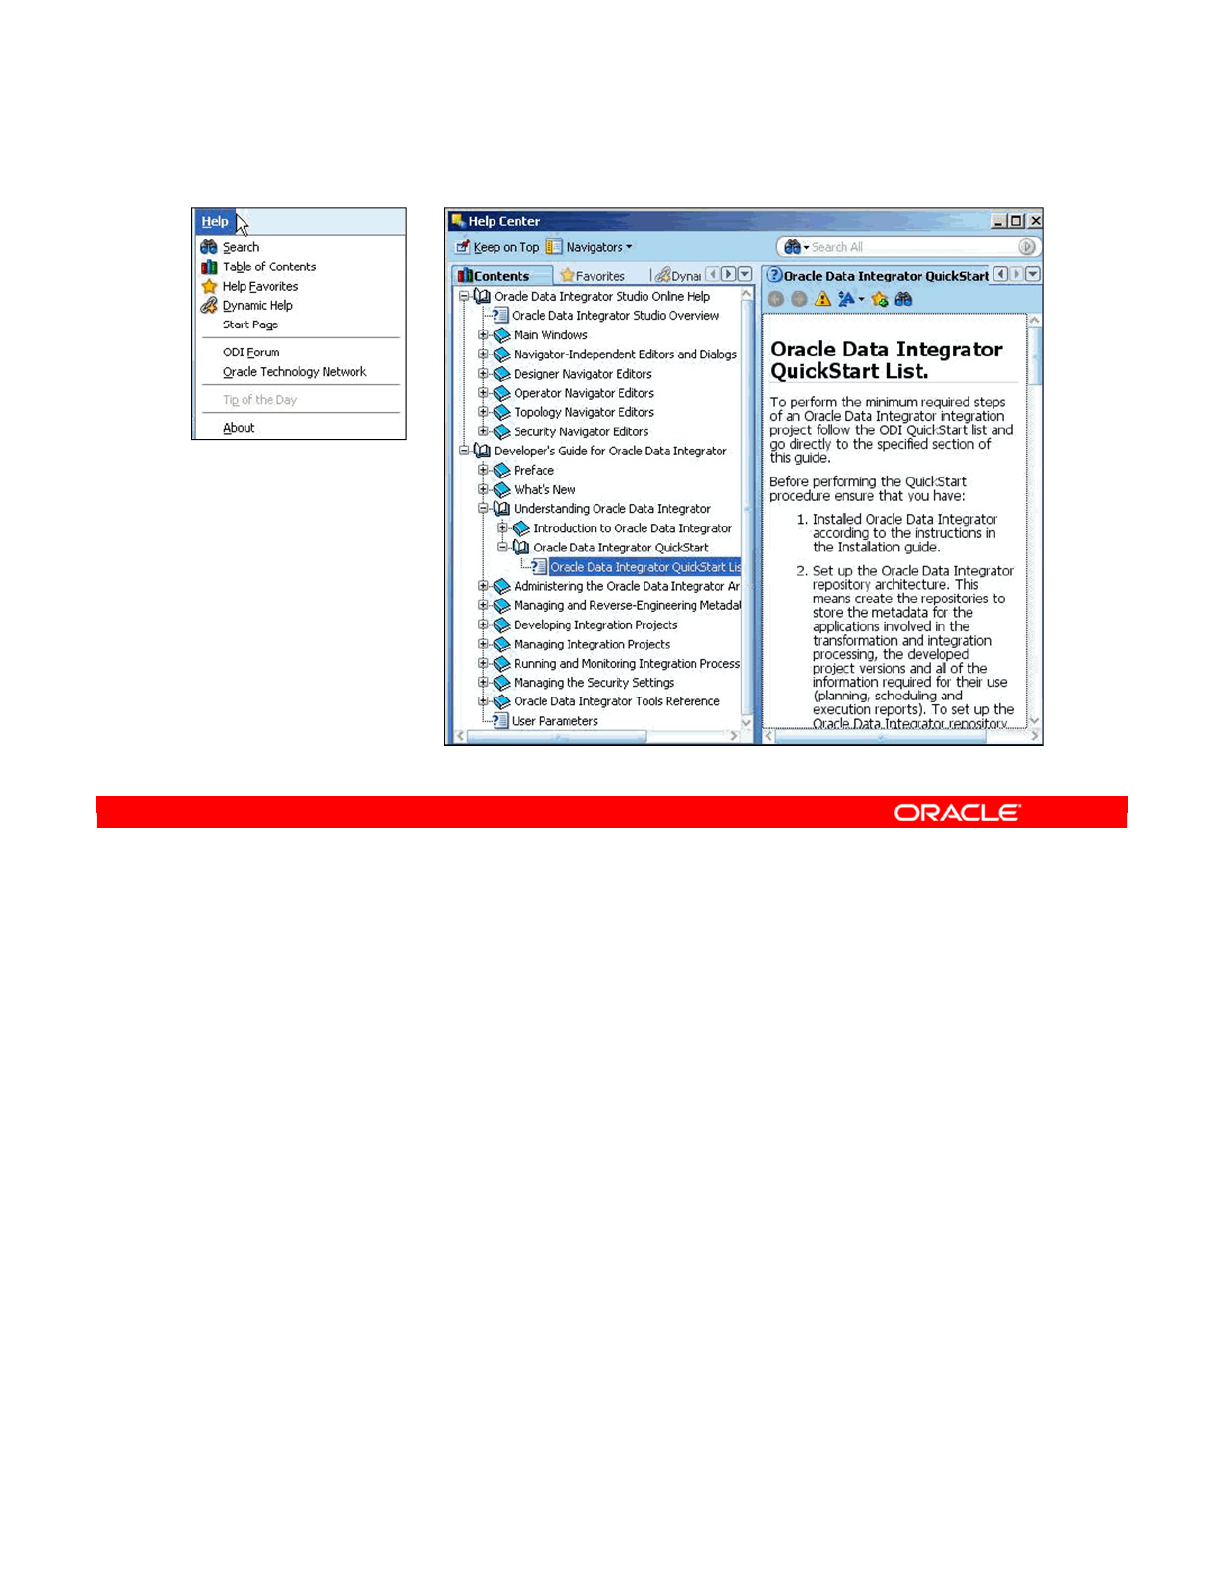
The online Help is available immediately, even before creating or connecting to repositories,
and has been entirely rewritten to support the new ODI 11guser interface.
The Help Center provides quick access to help and common tasks, as well as links to useful
Oracle resources.
Help bookmarks: The Help window has a tab labeled Favorites. While browsing help, you
can click the Add to Favorites button to add the document to this tab.
Oracle Data Integrator 11g: Integration and Administration 1 - 38
Copyright © 2012, Oracle and/or its affiliates. All rights reserved.
Using Online Help
Oracle University and (Oracle Corporation) use only.
These eKit materials are to be used ONLY by you for the express purpose SELF STUDY. SHARING THE FILE IS STRICTLY PROHIBITED.

Answer: c, d
Explanation: The ODI Topology Navigator and the ODI Security Navigator are not runtime
components. The Topology Navigator is used for creating physical and logical architecture
and is not involved in runtime processing. Similarly, the Security Navigator is not a runtime
component because it is used for managing users and maintaining security policies.
Oracle Data Integrator 11g: Integration and Administration 1 - 39
Copyright © 2012, Oracle and/or its affiliates. All rights reserved.
Quiz
Which of the following does not belong to the ODI runtime
components?
a. ODI Operator
b. ODI Standalone agent
c. ODI Topology Navigator
d. ODI Security Navigator
e. ODI Repository
Oracle University and (Oracle Corporation) use only.
These eKit materials are to be used ONLY by you for the express purpose SELF STUDY. SHARING THE FILE IS STRICTLY PROHIBITED.

Answer: a
Explanation: A Work repository can be linked with only one Master Repository, for version
management purposes. However, several Work Repositories can be designated with one or
several Master Repositories, if necessary.
Oracle Data Integrator 11g: Integration and Administration 1 - 40
Copyright © 2012, Oracle and/or its affiliates. All rights reserved.
Quiz
If necessary, several Work Repositories can be designated with
several Master Repositories.
a. True
b. False
Oracle University and (Oracle Corporation) use only.
These eKit materials are to be used ONLY by you for the express purpose SELF STUDY. SHARING THE FILE IS STRICTLY PROHIBITED.

In this lesson, you learned about the ODI architecture; the different architecture components,
including Topology Navigator, Designer, Operator, Security Navigator, and the agents that
enable information processing; and the types of information stored in each type of repository.
Oracle Data Integrator 11g: Integration and Administration 1 - 41
Copyright © 2012, Oracle and/or its affiliates. All rights reserved.
Summary
In this lesson, you should have learned how to describe:
•The course objectives and agenda of lessons
•The benefits of using ODI
•The ODI 11g architecture and components
•How to use ODI Studio to create, administer, and monitor
ODI objects
•Start Oracle Data Integrator (ODI) client
•Access online Help
Oracle University and (Oracle Corporation) use only.
These eKit materials are to be used ONLY by you for the express purpose SELF STUDY. SHARING THE FILE IS STRICTLY PROHIBITED.

In this practice, you learn how to start the ODI client and log in. You also practice using the
Start Page and Help system.
Oracle Data Integrator 11g: Integration and Administration 1 - 42
Copyright © 2012, Oracle and/or its affiliates. All rights reserved.
Practice 1-1: Overview
1. Start the ODI client and log in.
2. Use the Start Page and Help system.
Oracle University and (Oracle Corporation) use only.
These eKit materials are to be used ONLY by you for the express purpose SELF STUDY. SHARING THE FILE IS STRICTLY PROHIBITED.

Copyright © 2012, Oracle and/or its affiliates. All rights reserved.
Administering ODI Repositories
Oracle University and (Oracle Corporation) use only.
These eKit materials are to be used ONLY by you for the express purpose SELF STUDY. SHARING THE FILE IS STRICTLY PROHIBITED.

Oracle Data Integrator 11g: Integration and Administration 2 - 2
Copyright © 2012, Oracle and/or its affiliates. All rights reserved.
Objectives
After completing this lesson, you should be able to:
•Create and connect to the Master Repository
•Export and import the Master Repository
•Create, connect, and set a password to the Work
Repository
Oracle University and (Oracle Corporation) use only.
These eKit materials are to be used ONLY by you for the express purpose SELF STUDY. SHARING THE FILE IS STRICTLY PROHIBITED.

In the next few slides, you will learn how to create and administer ODI Master and Work
Repositories.
Oracle Data Integrator 11g: Integration and Administration 2 - 3
Copyright © 2012, Oracle and/or its affiliates. All rights reserved.
Administering the ODI Repositories
Oracle University and (Oracle Corporation) use only.
These eKit materials are to be used ONLY by you for the express purpose SELF STUDY. SHARING THE FILE IS STRICTLY PROHIBITED.

The initial tasks involved in setting up an ODI environment include creation of Master and
Work Repository database schemas/users, and defining connections to the Master and Work
Repositories.
Oracle Data Integrator 11g: Integration and Administration 2 - 4
Copyright © 2012, Oracle and/or its affiliates. All rights reserved.
Initial Repository Administration Tasks
•ODI Master and Work Repositories require creating
repository storage spaces (database schema/user).
–Name
–Password
–Privileges
•You need to set up connections to ODI Master and Work
Repositories:
–Setting ODI connection information (login name, user, and
password)
–Entering database connection information (driver and URL)
•You may need to import or export an existing repository in
ODI.
Oracle University and (Oracle Corporation) use only.
These eKit materials are to be used ONLY by you for the express purpose SELF STUDY. SHARING THE FILE IS STRICTLY PROHIBITED.

These five steps for setting up ODI repositories are covered in detail in the following slides.
Oracle Data Integrator 11g: Integration and Administration 2 - 5
Copyright © 2012, Oracle and/or its affiliates. All rights reserved.
Steps to Set Up ODI Repositories
1. Create repository storage spaces.
2. Create the Master Repository.
3. Connect to the Master Repository.
4. Create a Work Repository.
5. Connect to the Work Repository.
Oracle University and (Oracle Corporation) use only.
These eKit materials are to be used ONLY by you for the express purpose SELF STUDY. SHARING THE FILE IS STRICTLY PROHIBITED.
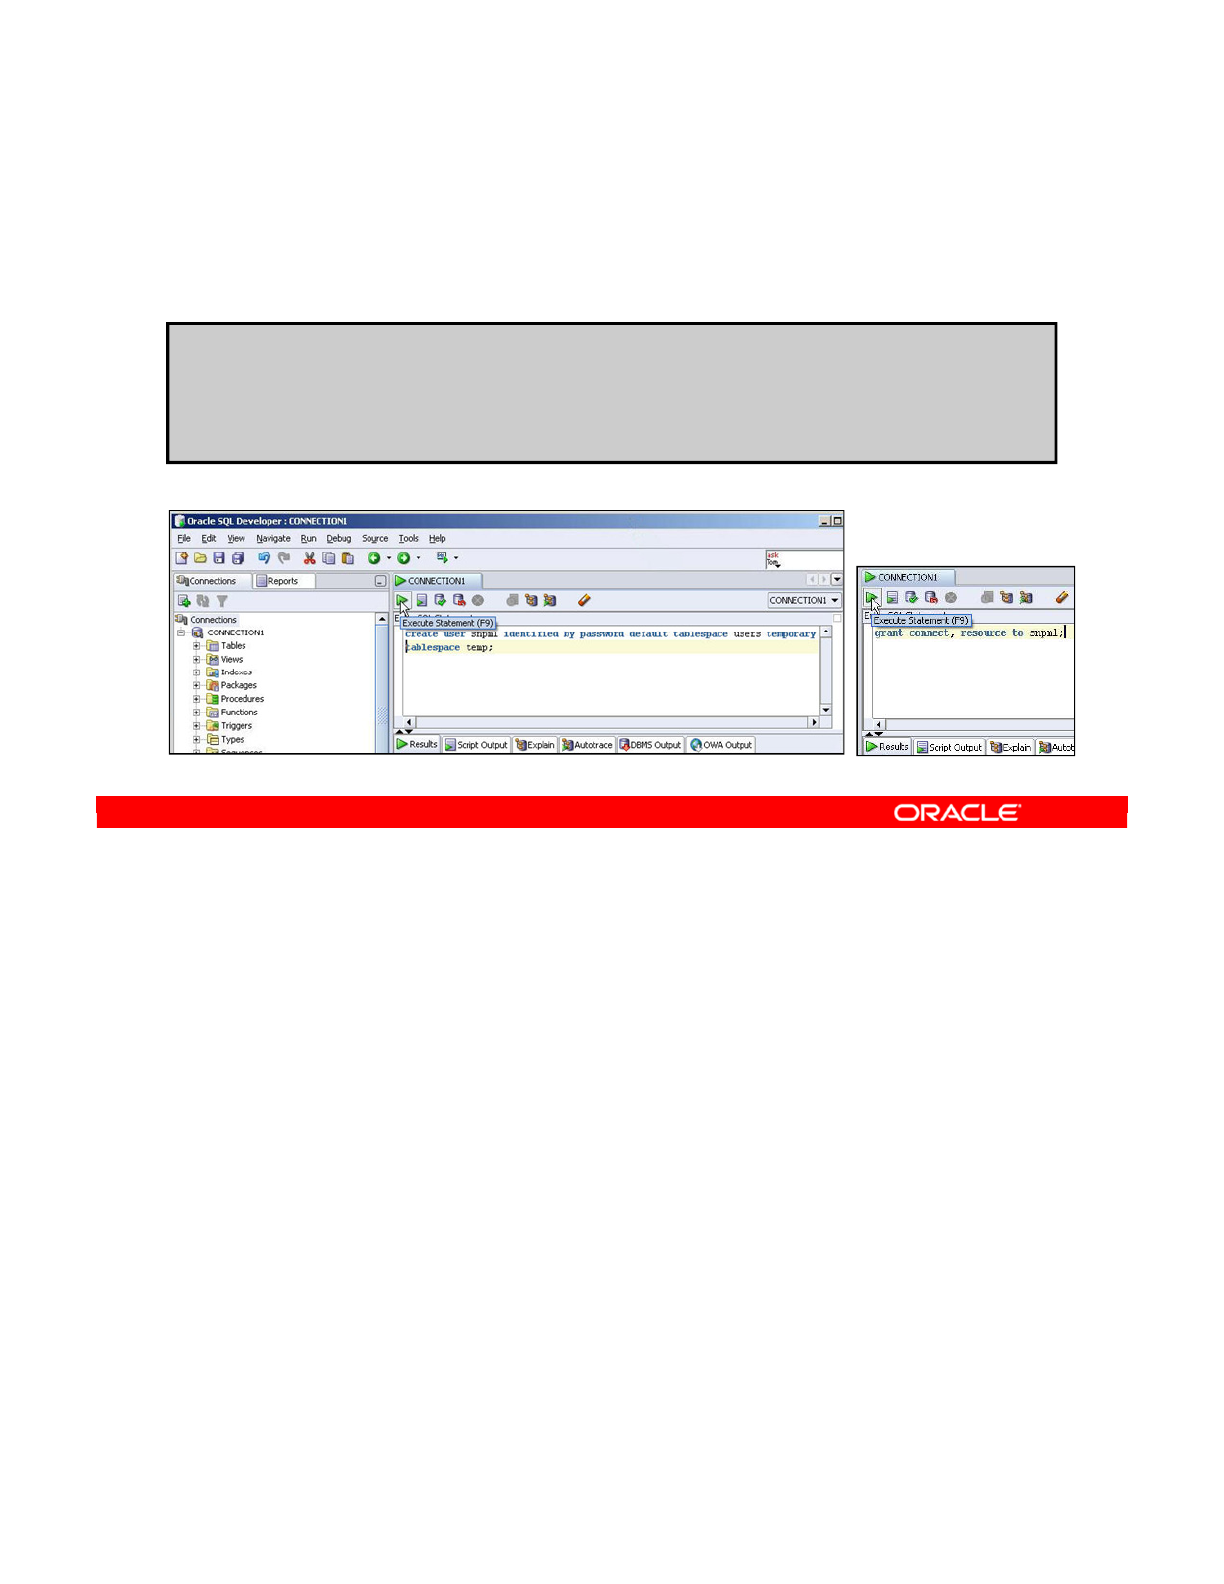
You must first create a storage space in each database that will be the host for a repository. In
this slide, you see the Oracle SQL syntax to create a User/Schema to host the Master
Repository. You use the same commands to create a User/Schema to host the ODI Work
Repository.
Note: Your Master Repository can be stored in the same schema as one of your Work
Repositories. However, you cannot create two different Work repositories in the same
schema. Thus you must create a separate schema for any additional Work Repository that
you create.
Oracle Data Integrator 11g: Integration and Administration 2 - 6
Copyright © 2012, Oracle and/or its affiliates. All rights reserved.
1. Creating Repository Storage Spaces
Create a schema to host the Master repository and a schema
to host the Work repository.
Example: Creating User/Schema snpm1
SQL> create user <MY_SCHEMA> identified by <MY_PASS>
default tablespace <MY_TBS> temporary tablespace
<MY_TEMP>;
SQL> grant connect, resource to <MY_SCHEMA>;
Oracle University and (Oracle Corporation) use only.
These eKit materials are to be used ONLY by you for the express purpose SELF STUDY. SHARING THE FILE IS STRICTLY PROHIBITED.
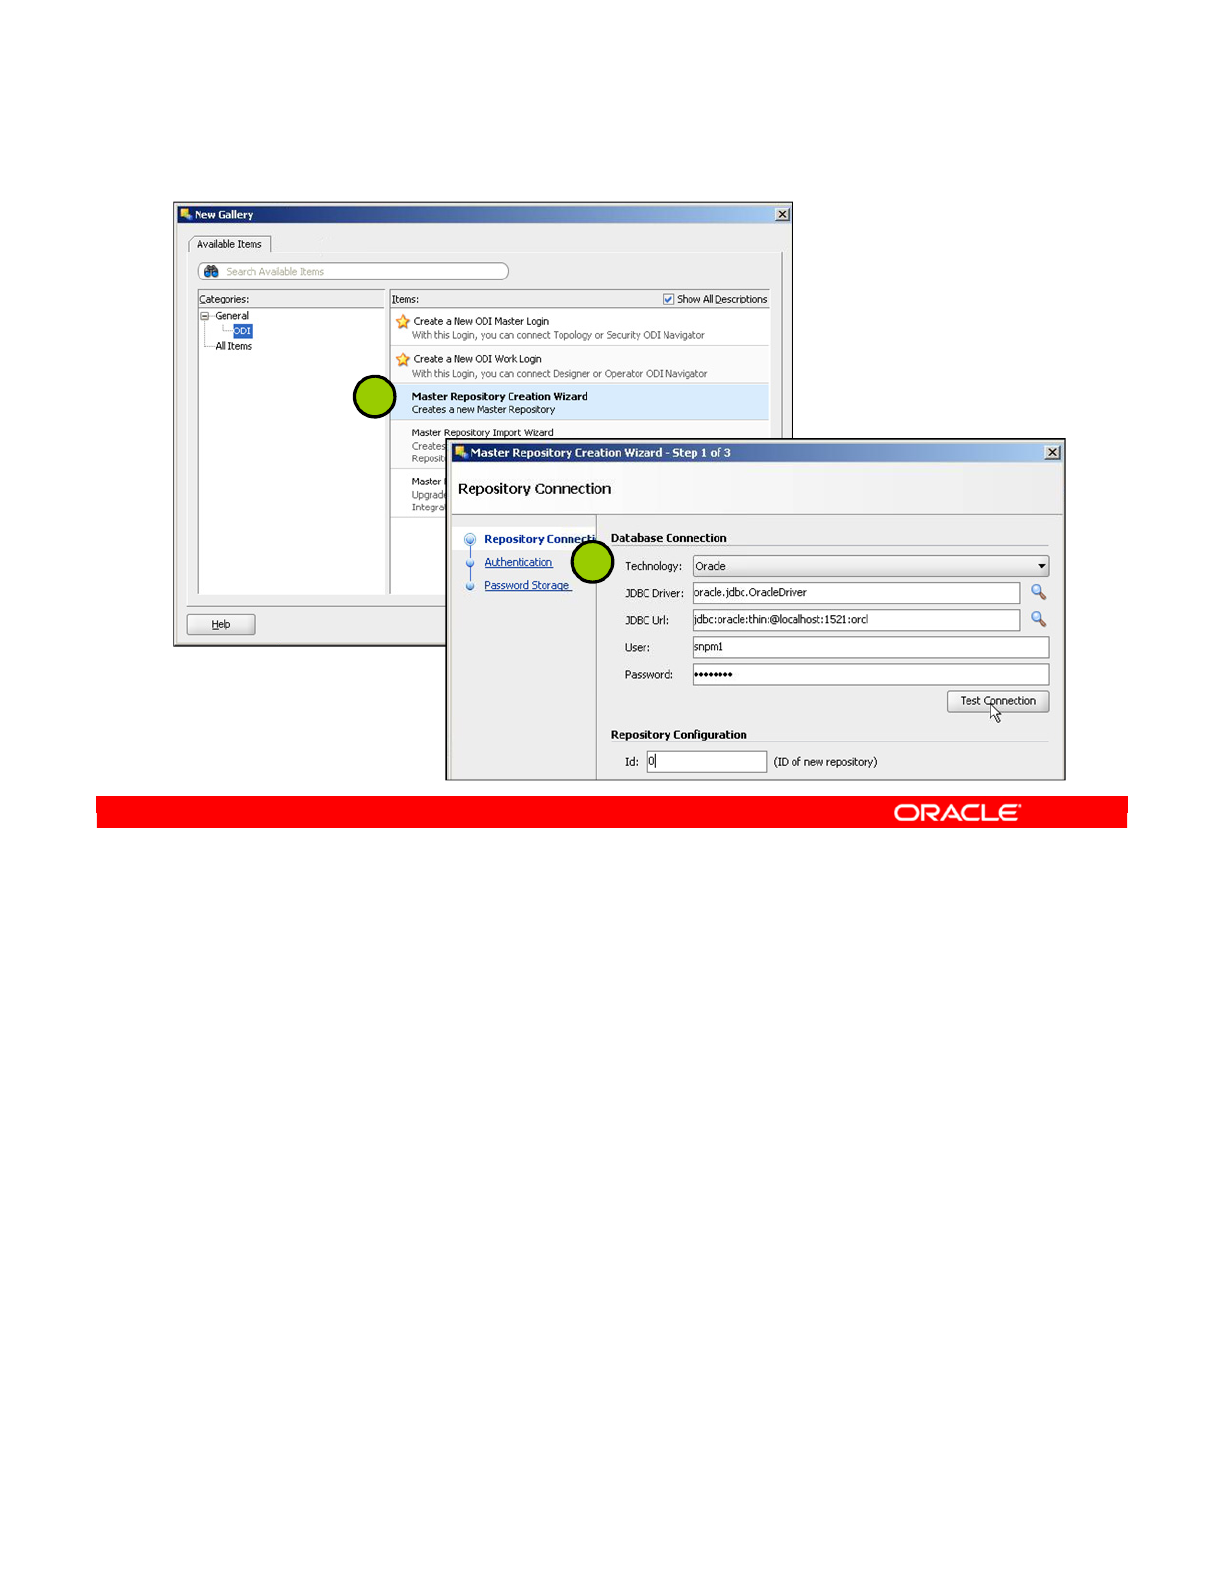
Creating the Master Repository consists of creating the tables and the automatic importing of
definitions for the different technologies.
To create the Master Repository, perform the following:
1. From the File menu, select New. In the New Gallery dialog box, select Master
Repository Creation Wizard. Alternatively, launch bin/repcreate.bat or
bin/repcreate.sh.
2. Complete the fields that define database connectivity:
-Technology: From the list, select the technology your repository will be based on.
-JDBC Driver: Type the name of the driver used to access the technology that will
host the repository.
-JDBC URL: Type the complete path for the data server to host the repository.
-User: Provide the user ID or login of the owner of the tables (previously created
under the name snpm1).
-Password: This is the user’s password.
-Id: This is a specific ID for the new repository, rather than the default 0.
Note: You are strongly urged to ensure that every ID is unique and not used for any other
Master Repository, because it affects imports and exports between repositories.
Oracle Data Integrator 11g: Integration and Administration 2 - 7
Copyright © 2012, Oracle and/or its affiliates. All rights reserved.
2. Creating the Master Repository
1
2
Oracle University and (Oracle Corporation) use only.
These eKit materials are to be used ONLY by you for the express purpose SELF STUDY. SHARING THE FILE IS STRICTLY PROHIBITED.
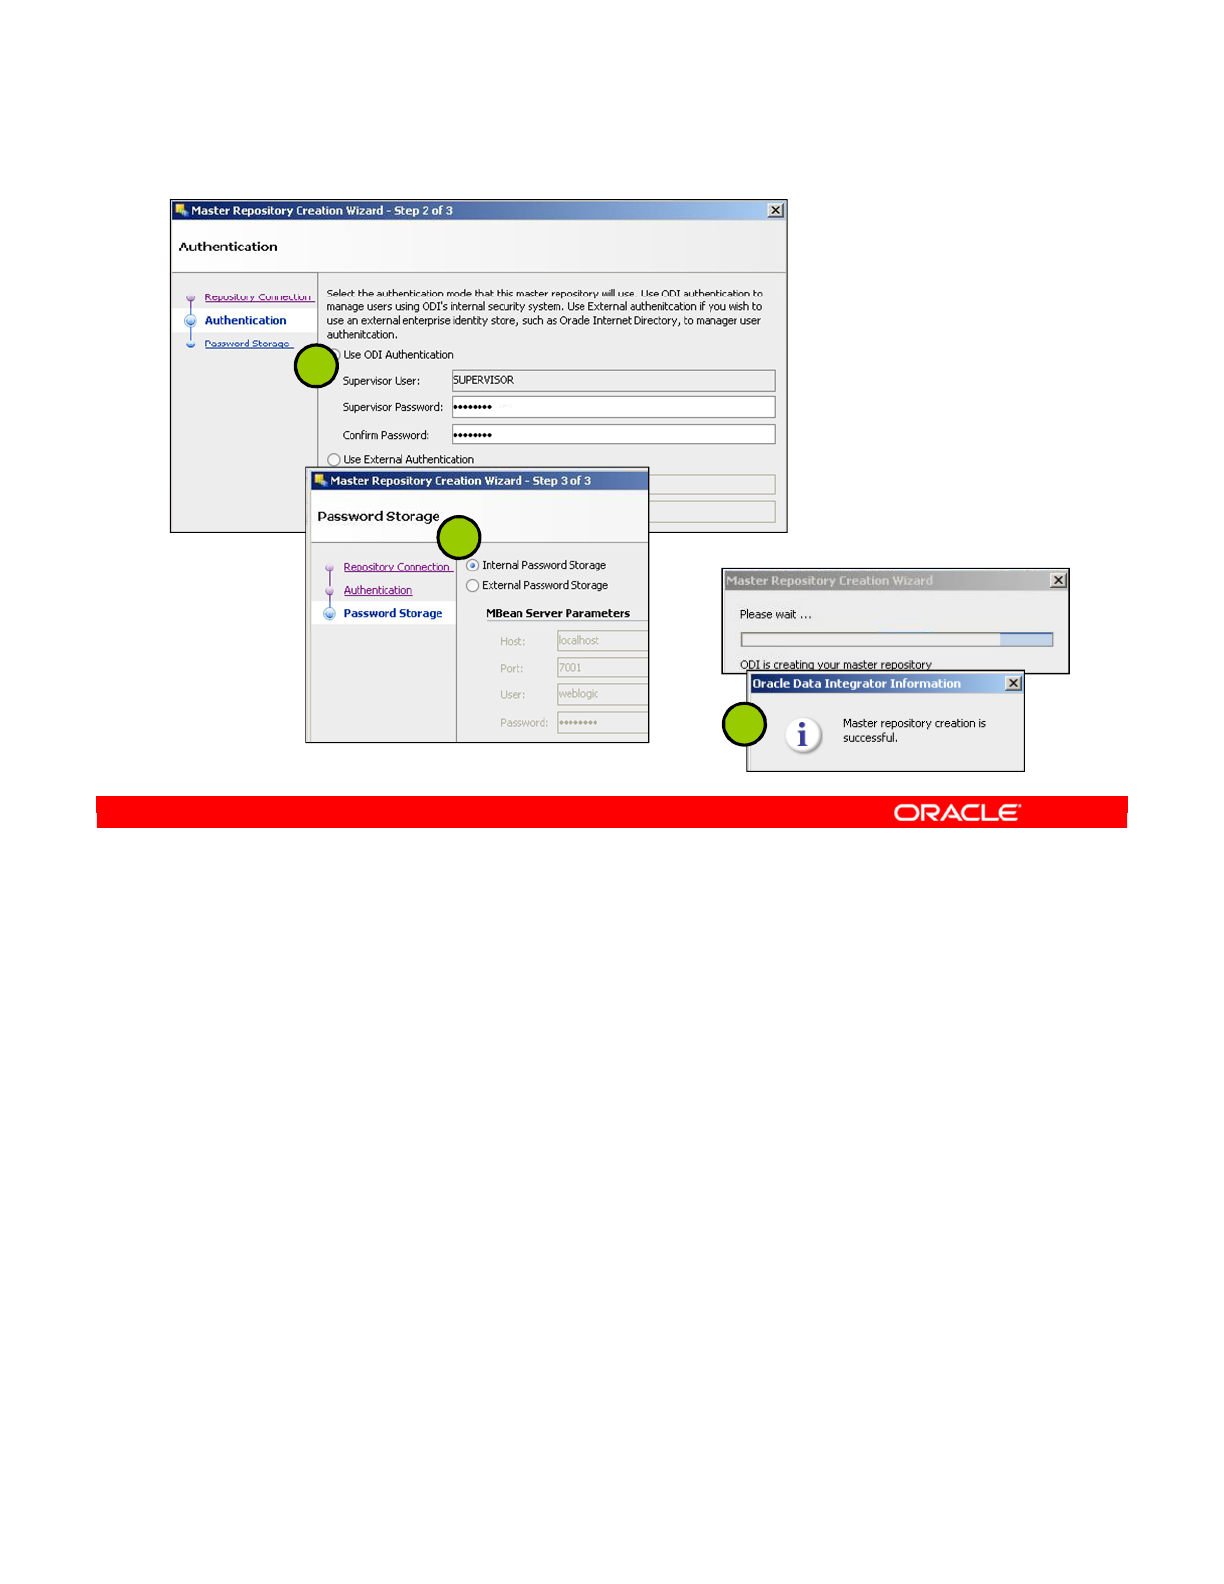
3. Select the authentication mode that the Master Repository will use.
4. On the Password Storage screen, click Finish.
5. Verify that the Master Repository is created successfully. When the Master Repository is
successfully created, you will see the Oracle Data Integrator Information message. Click
OK. The ODI Master Repository is now created.
Oracle Data Integrator 11g: Integration and Administration 2 - 8
Copyright © 2012, Oracle and/or its affiliates. All rights reserved.
2. Creating the Master Repository
3
5
4
Oracle University and (Oracle Corporation) use only.
These eKit materials are to be used ONLY by you for the express purpose SELF STUDY. SHARING THE FILE IS STRICTLY PROHIBITED.
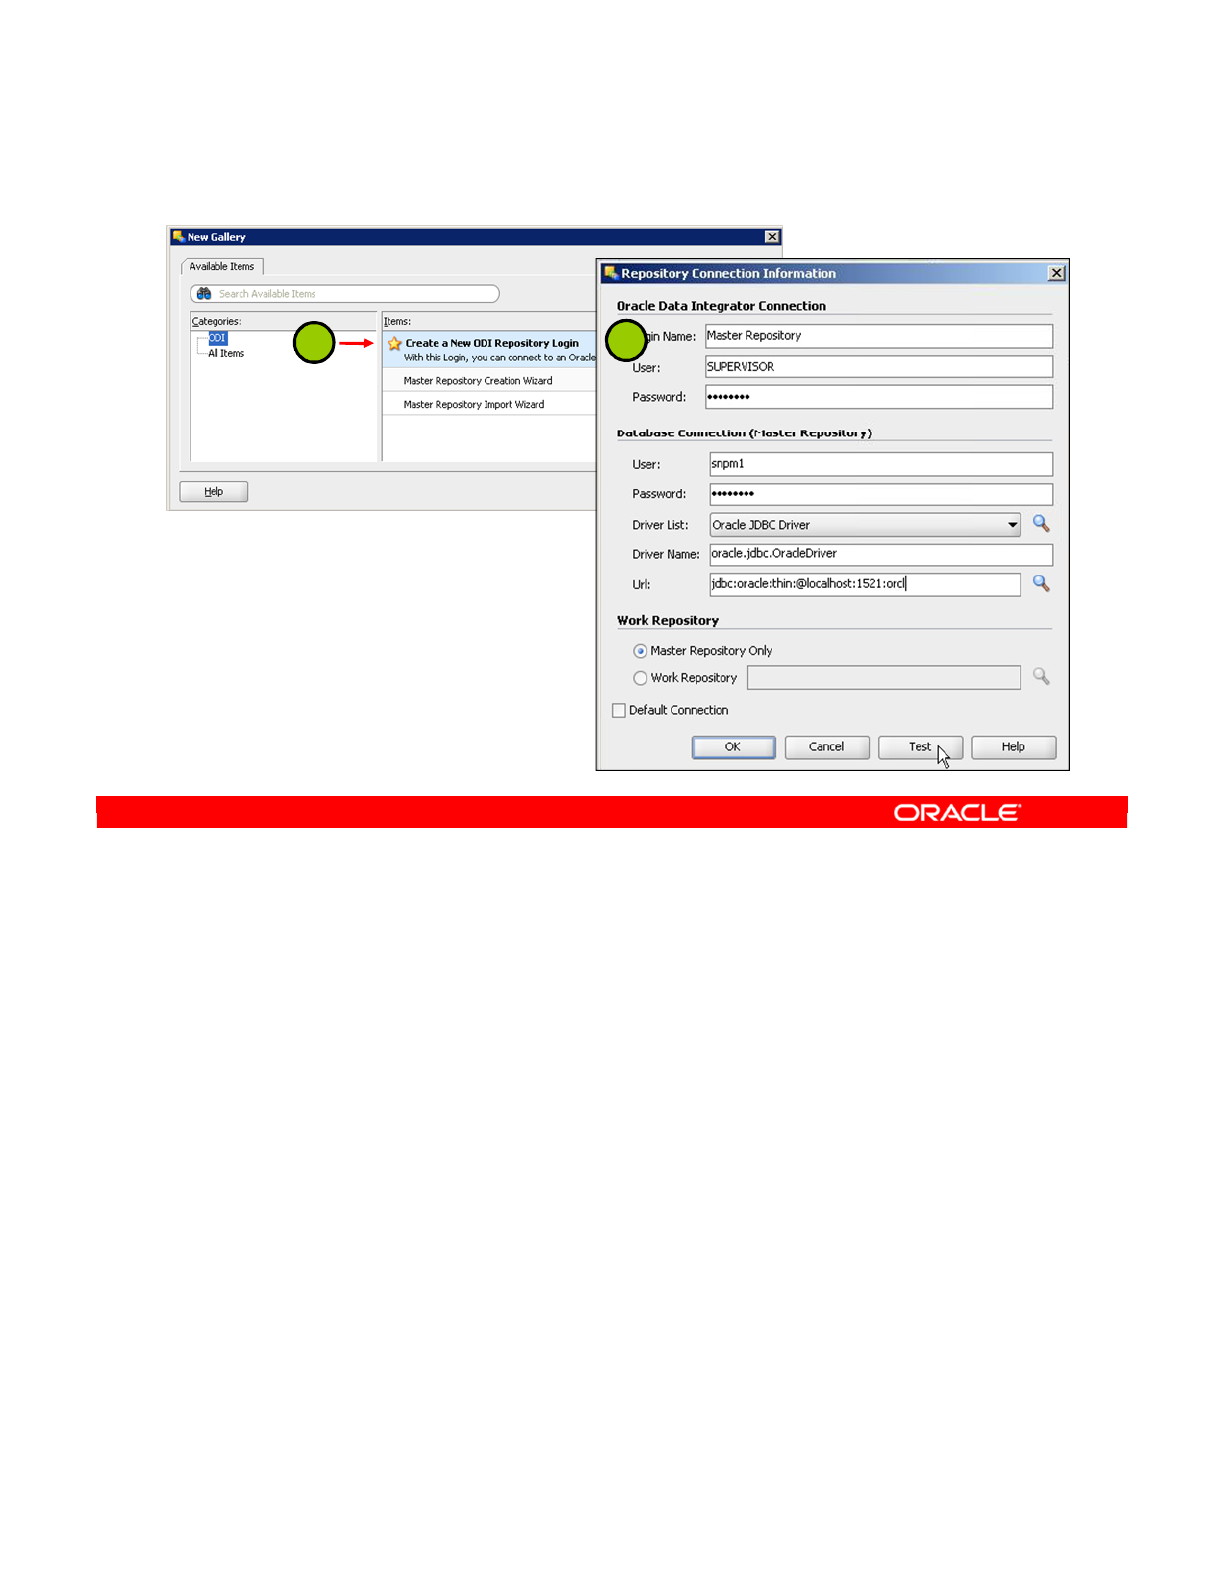
To connect to the new Master Repository, perform these steps in ODI Topology Navigator:
1. Open the New Gallery by choosing File > New. In the New Gallery, in the Categories
tree, select General, then ODI. From Items, select Create a New ODI Master Login.
2. Complete the fields that define a connection in ODI and a connection to the database:
Oracle Data Integrator Connection:
-Login Name: A generic alias (for example, Master Repository)
-User: SUPERVISOR (use uppercase)
-Password: SUNOPSIS (use uppercase; SUNOPSIS is the default password of the
SUPERVISOR account.)
Database Connection:
-User: User ID or login of the owner of tables you created for the Master Repository
-Password: The user’s password
-Driver List and Driver Name: Choose the driver required to connect to the DBMS
supporting the Master Repository that you have just created.
-Url: Type the complete path of the data server hosting the repository.
Click Test to check if the connection is working. Validate by clicking OK twice.
Oracle Data Integrator 11g: Integration and Administration 2 - 9
Copyright © 2012, Oracle and/or its affiliates. All rights reserved.
3. Connecting to the Master Repository
12
Oracle University and (Oracle Corporation) use only.
These eKit materials are to be used ONLY by you for the express purpose SELF STUDY. SHARING THE FILE IS STRICTLY PROHIBITED.
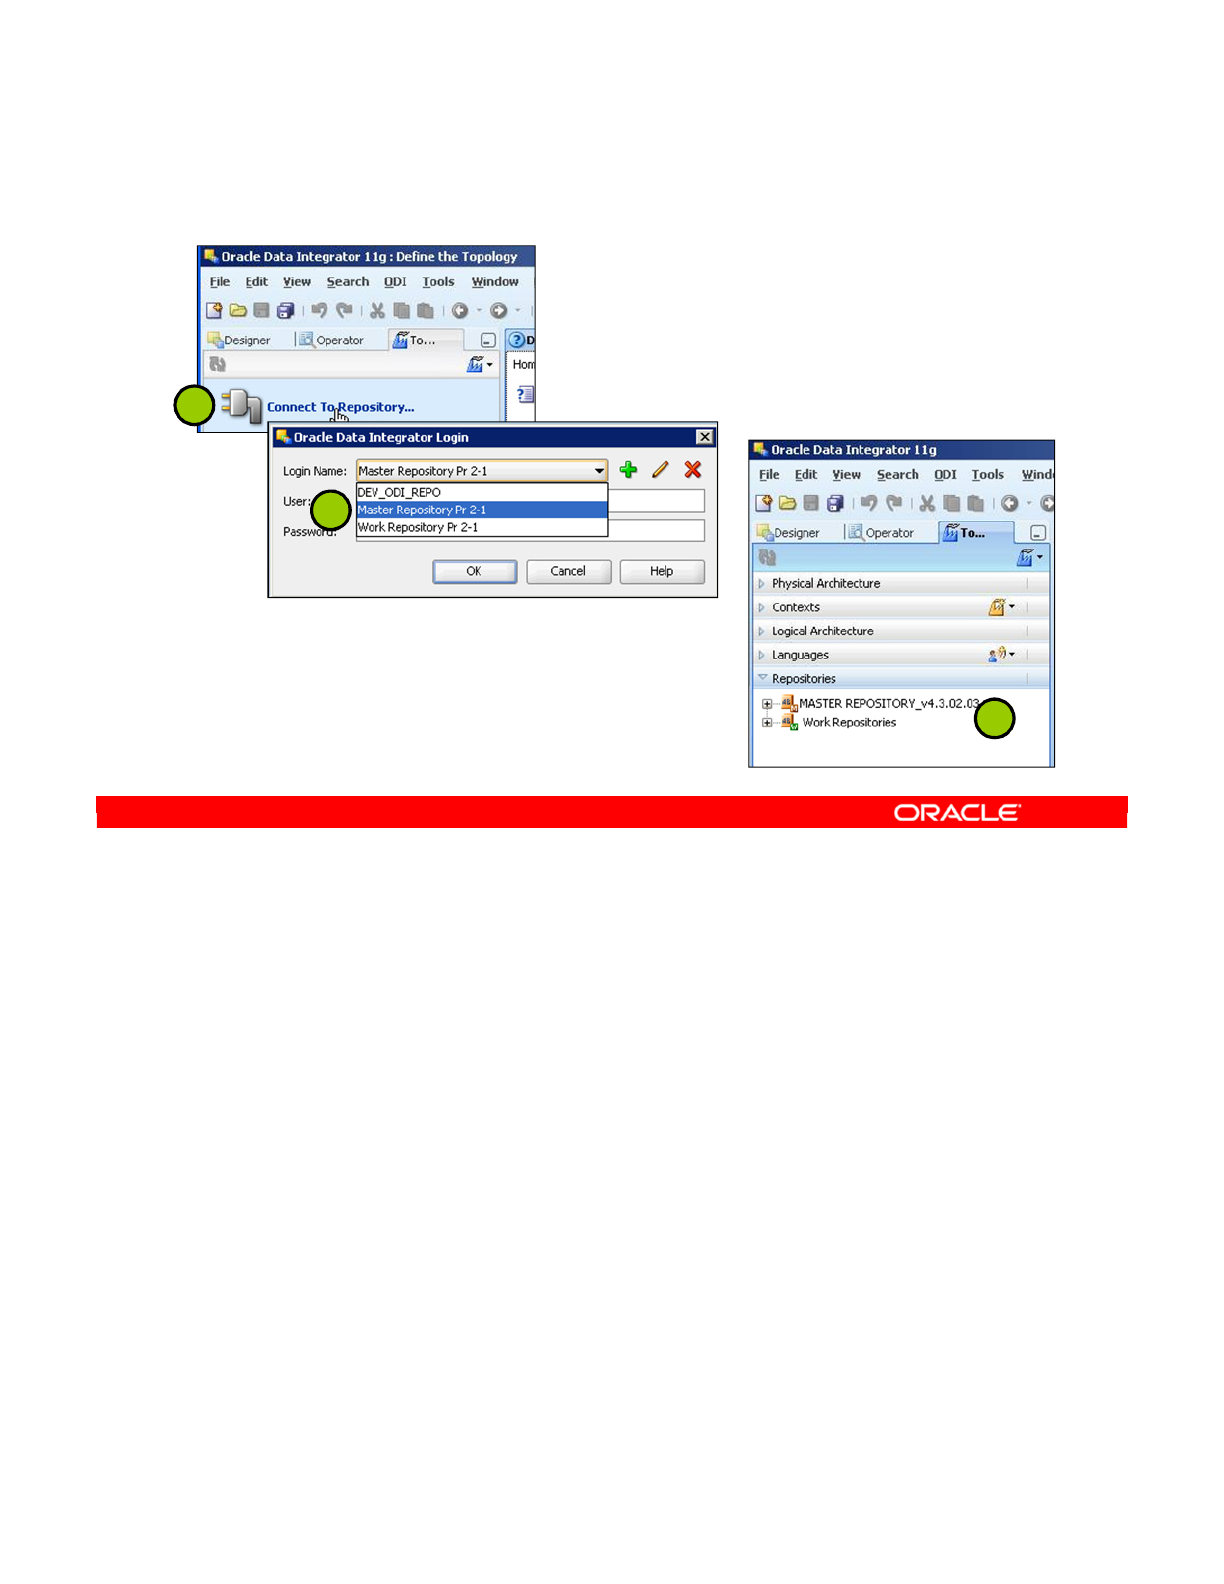
3. Click the Topology Navigator tab. Click Connect To Repository.
4. Select the newly created repository connection (Master Repository) from the drop-
down list. Click OK. The ODI Topology Navigator starts. You are now successfully
logged in to the ODI Topology Navigator.
5. Click the Topology tab. Click the Repositories tab in the left panel of the Topology
Navigator. Verify that your newly created Master Repository is in the Repositories
window.
Oracle Data Integrator 11g: Integration and Administration 2 - 10
Copyright © 2012, Oracle and/or its affiliates. All rights reserved.
3. Connecting to the Master Repository
3
5
4
Oracle University and (Oracle Corporation) use only.
These eKit materials are to be used ONLY by you for the express purpose SELF STUDY. SHARING THE FILE IS STRICTLY PROHIBITED.
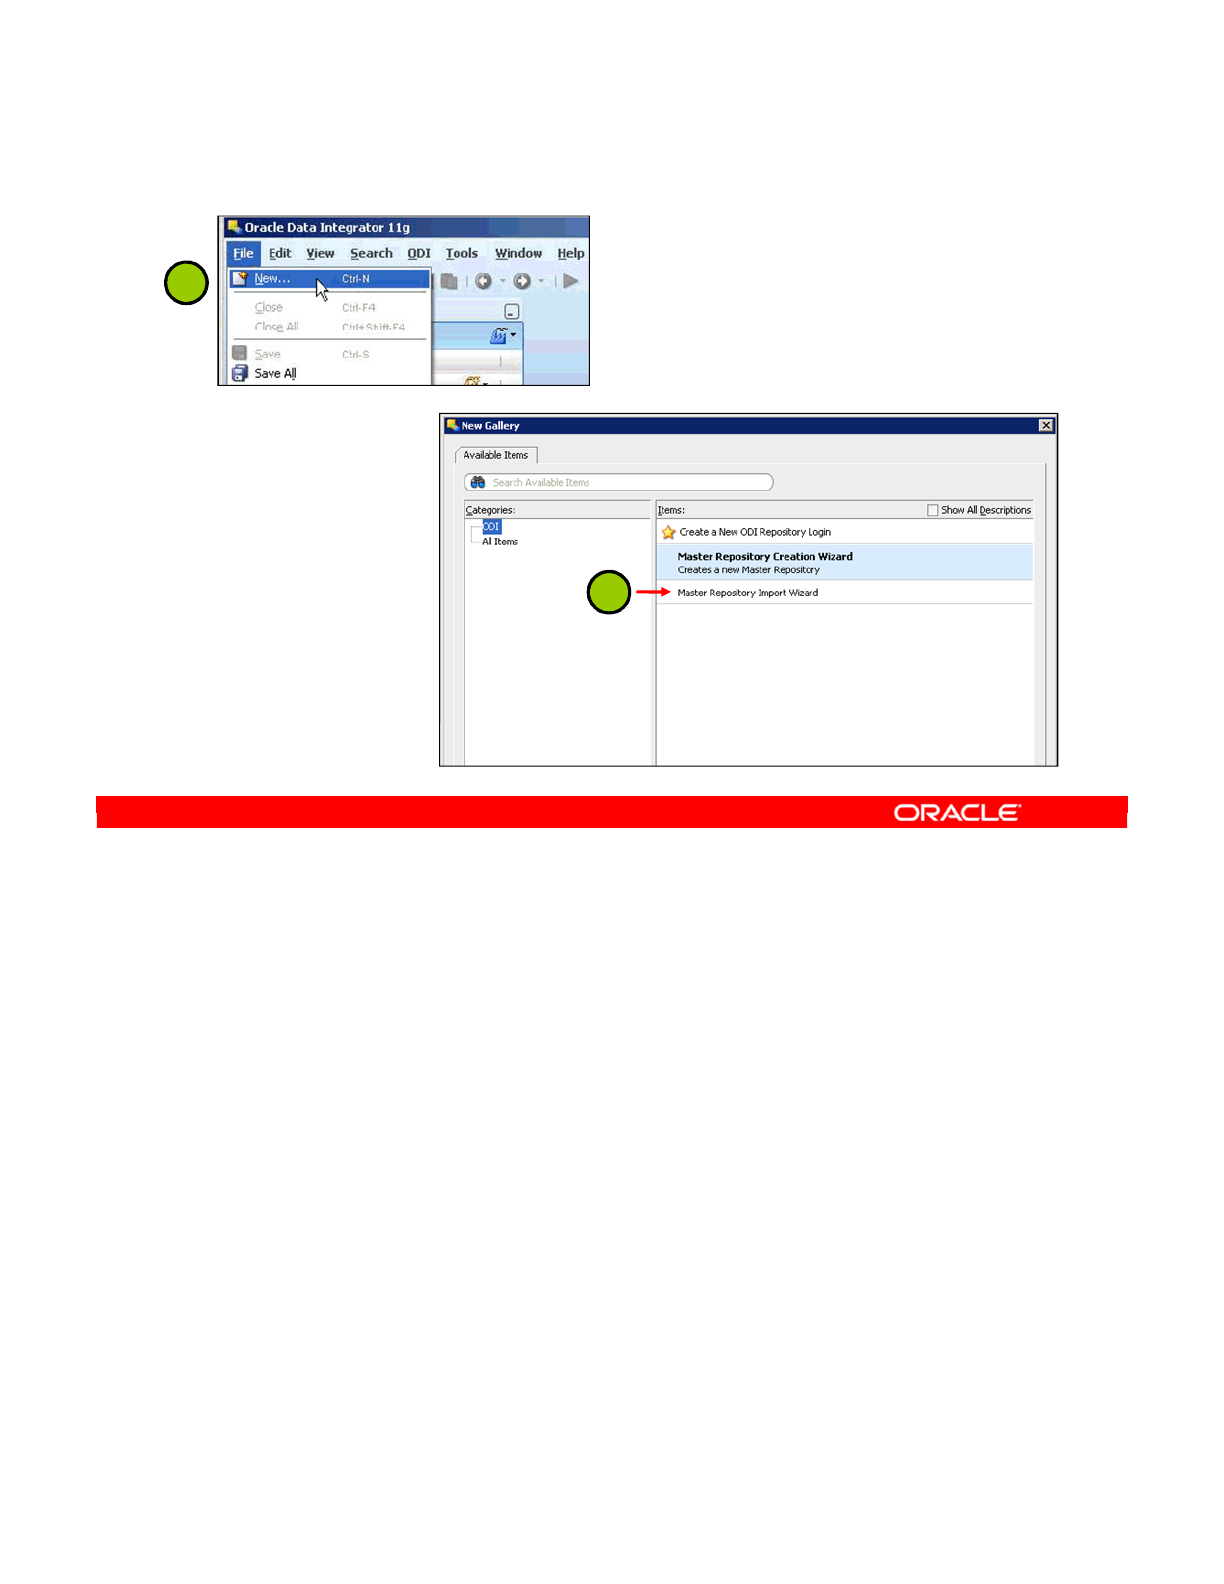
Optionally, instead of creating a new empty Master Repository, you can create a new Master
Repository and populate it by importing an existing one.
The Master Repository Import/Export procedure enables you to optionally transfer the whole
repository (Topology and Security domains included) from one repository to another. It can be
performed in Topology, to import the exported objects in an existing repository, or while
creating a new Master Repository.
To import a Master Repository into an existing Master repository, perform the following:
1. From the File menu, select New.
2. In the New Gallery dialog box, select Master Repository Import Wizard.
3. Navigate to the folder of the zip file to locate the Master Repository that you are
importing and click OK.
The specified file or files are imported into the current Master Repository.
Oracle Data Integrator 11g: Integration and Administration 2 - 11
Copyright © 2012, Oracle and/or its affiliates. All rights reserved.
1
Importing the Master Repository
2
Oracle University and (Oracle Corporation) use only.
These eKit materials are to be used ONLY by you for the express purpose SELF STUDY. SHARING THE FILE IS STRICTLY PROHIBITED.

The Master Repository Import/Export procedure enables you to optionally transfer the whole
repository (Topology and Security domains included) from one repository to another.
1. In the Topology Navigator, click the drop box on the upper-right corner of the Topology
tab, and select Export > Master Repository.
2. Fill in the export parameters:
-Export to directory: Directory in which the export file(s) will be created
-Export to zip file: When this option is selected, a unique compressed file
containing all export files will be created. Otherwise, a set of export files is created.
-Zip File name: Name of the compressed file if the “Make a Compressed Export”
option is selected
-XML Character Set: Encoding specified in the export file. Parameter encoding in
the Extensible Markup Language (XML) file header
-Java Character Set: Java character set used to generate the file
-Export versions: Exports all stored versions of objects that are stored in the
repository. You may want to deselect this option to reduce the size of the exported
repository, and to avoid transferring irrelevant project work.
-Export solutions: Exports all stored solutions that are stored in the repository
3. Click OK. The export files are created in the Export Directory specified.
Oracle Data Integrator 11g: Integration and Administration 2 - 12
Copyright © 2012, Oracle and/or its affiliates. All rights reserved.
Exporting the Master Repository
Click drop box
1
2
3
Oracle University and (Oracle Corporation) use only.
These eKit materials are to be used ONLY by you for the express purpose SELF STUDY. SHARING THE FILE IS STRICTLY PROHIBITED.
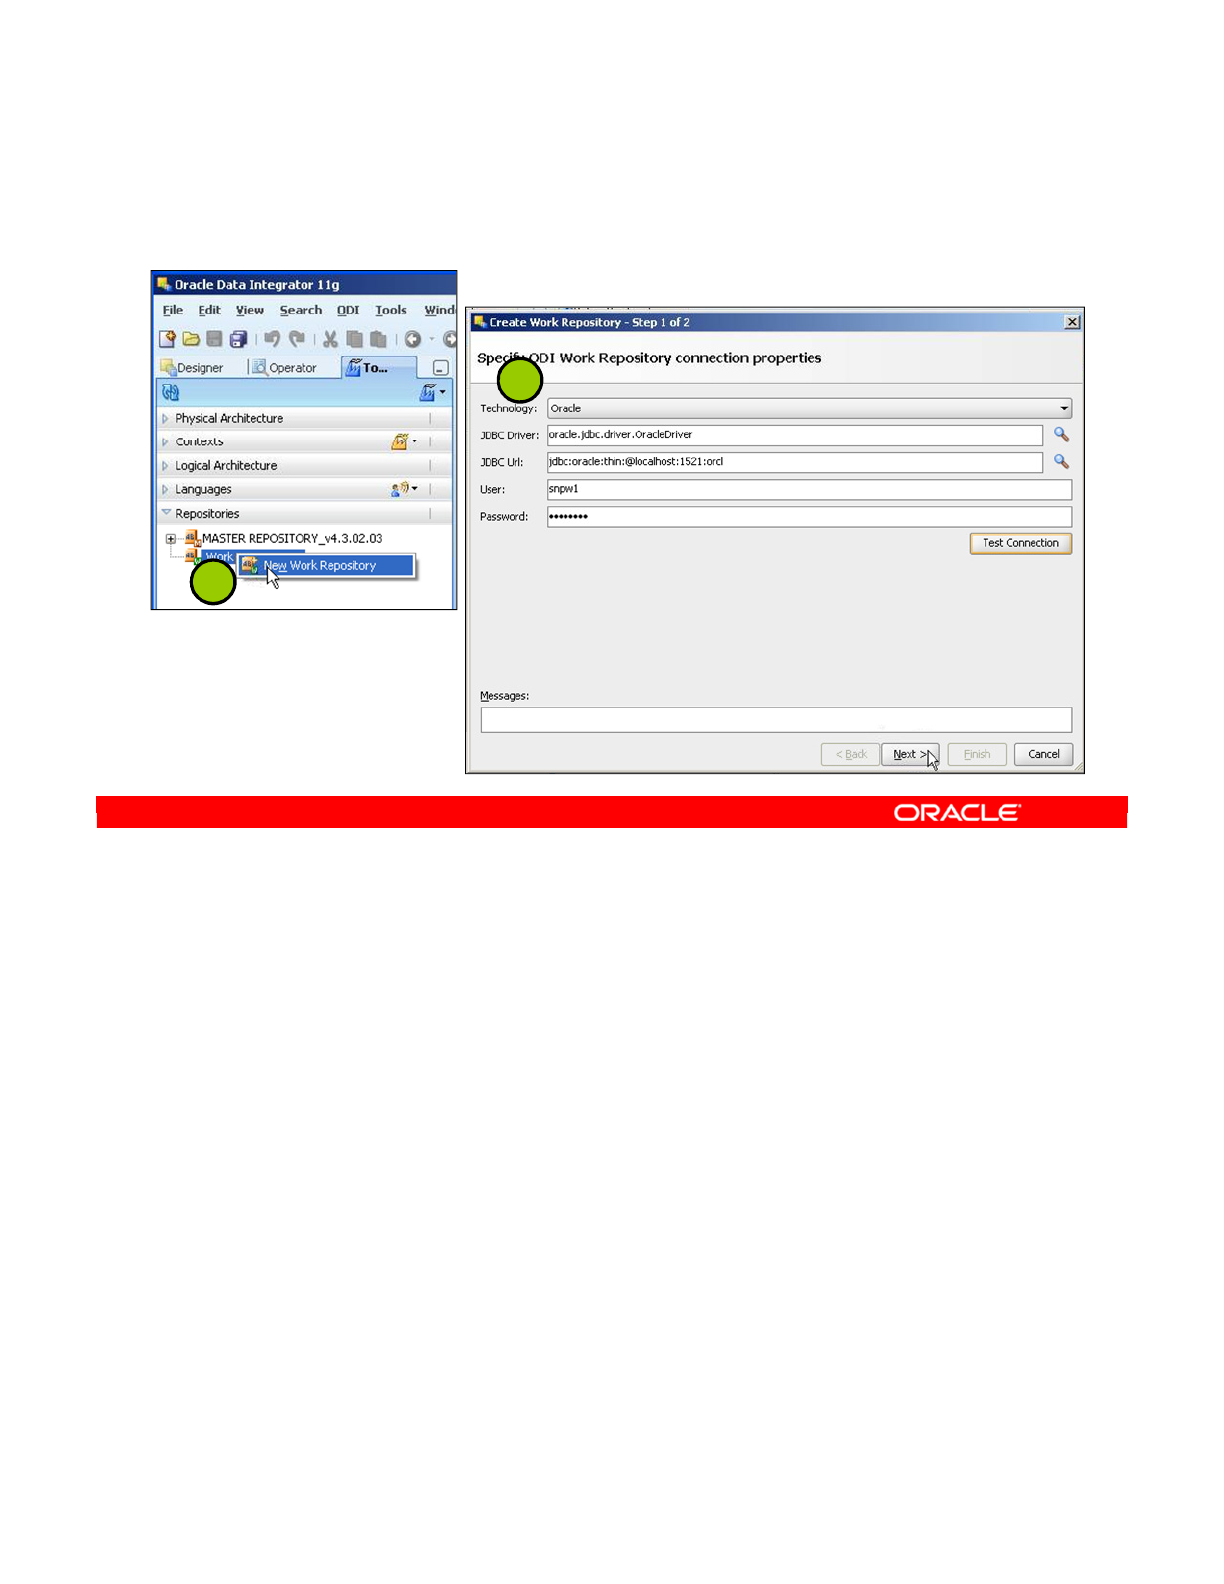
You use ODI Work Repositories when designing new transformations with ODI Designer.
Several Work Repositories can be designated with several Master Repositories, if necessary.
However, a Work Repository can be linked with only one Master Repository for version
management purposes.
To launch a Work Repository creation, perform the following steps:
1. Connect to your Master Repository through the Topology Navigator. In the Topology
Navigator, click the Repositories tab. Right-click Work Repositories and select New
Work Repository. A Create Work Repository wizard appears, asking you to complete
the connection parameters for your Work Repository.
2. In the wizard’s first window, complete the following parameters:
-Technology: Select the technology of the server to host your Work Repository.
-JDBC Driver: Set the JDBC Driver (the driver required for the connection to the
DBMS to host the Work Repository).
-JDBC URL: Set the JDBC URL (the path of the data server to host the Work
Repository).
-User: Enter the user ID or login of the owner of the tables that you will create and
host in the Work Repository.
-Password: Enter the user’s password.
Oracle Data Integrator 11g: Integration and Administration 2 - 13
Copyright © 2012, Oracle and/or its affiliates. All rights reserved.
4. Creating a Work Repository
1
2
Oracle University and (Oracle Corporation) use only.
These eKit materials are to be used ONLY by you for the express purpose SELF STUDY. SHARING THE FILE IS STRICTLY PROHIBITED.
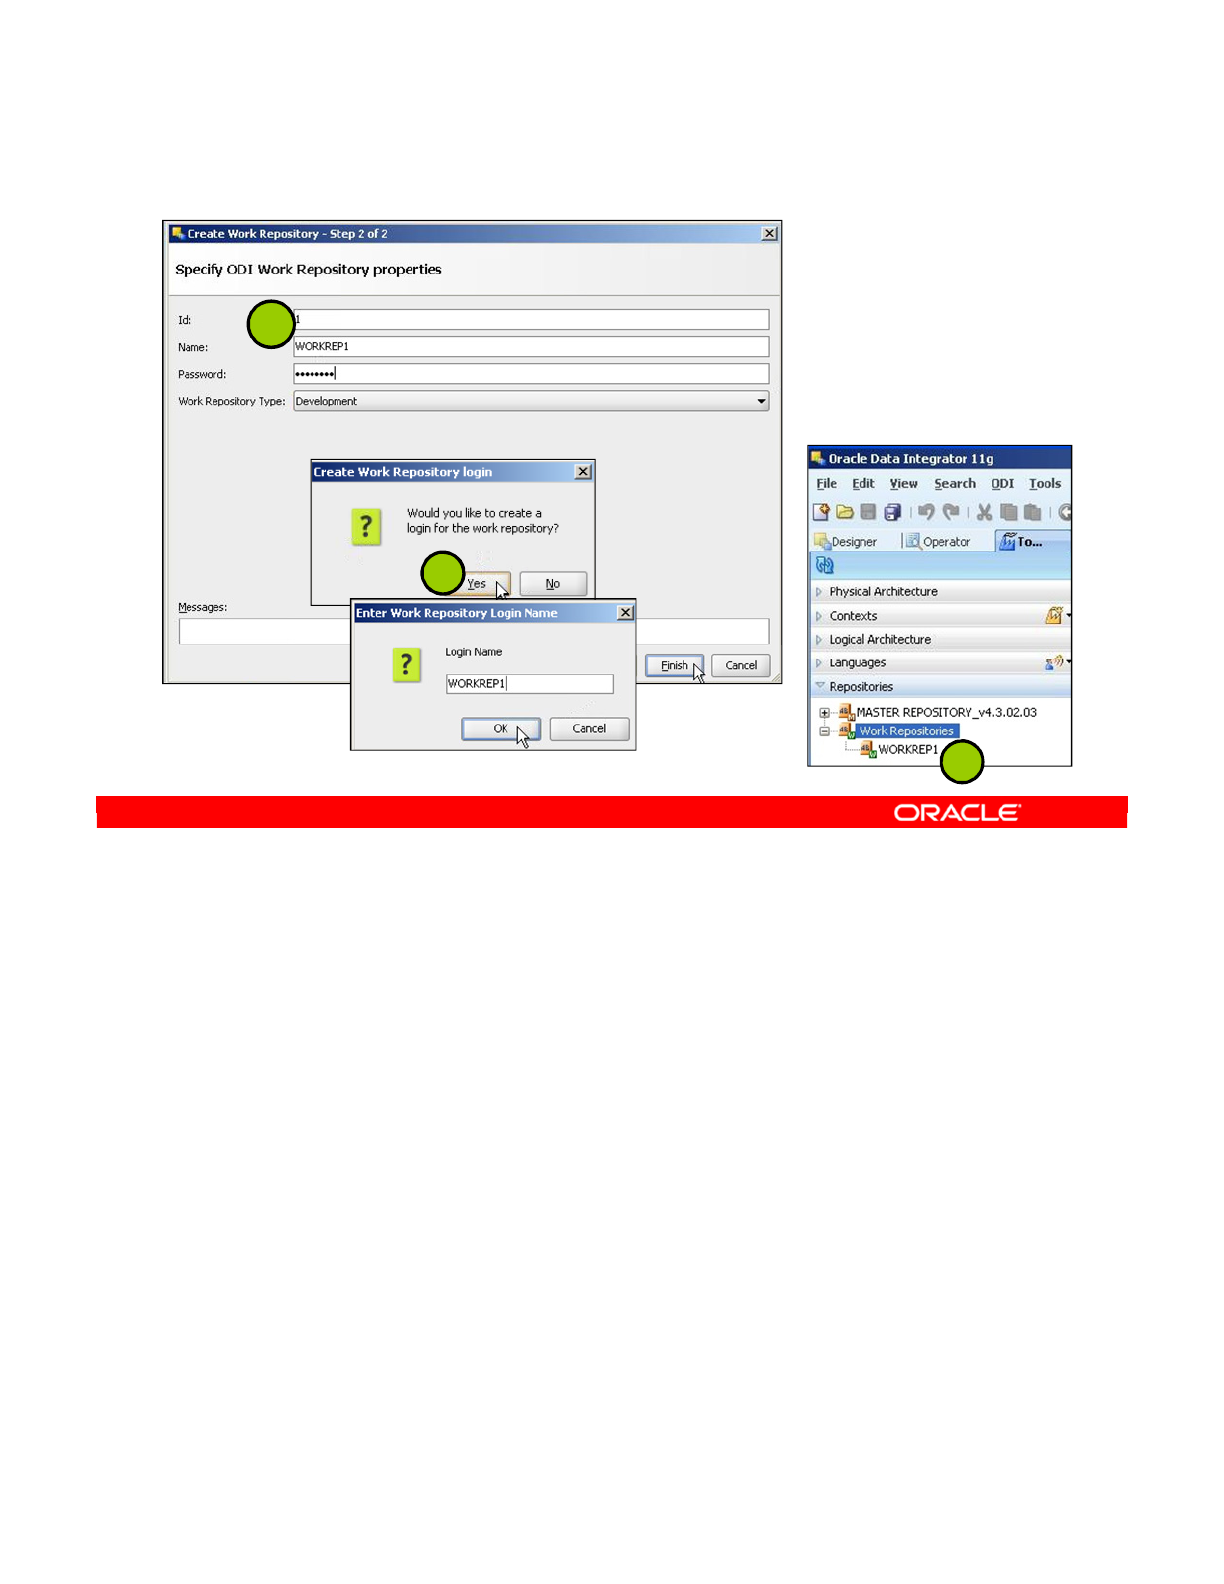
3. In the wizard’s second window, complete the following parameters:
ID: Give a unique number to your repository, from 1 to 998 (included).
Name: Give a unique name to your Work Repository (for example, WORKREP1).
Password: SUNOPSIS
Note: You are urged not to set a password for the Work Repository (can be more
painful than useful). See the lesson titled “Advanced ODI Administration” to learn
about using the Security Navigator to handle passwords at the security level.
Type: Select Development from the list.
Note: Development type of repository enables management of design-time objects
such as data models and projects (including interfaces, procedures, and so on). A
development repository also includes the runtime objects (scenarios and sessions).
This type of repository is suitable for development environments.
4. Click Finish. In the Create Work Repository login window, click Yes. Enter the Login
name: WORKREP1 as shown in the screenshot. Click OK.
5. Verify that the newly created Work Repository is now in the Work Repositories tree view.
When the Work Repository has been created, the Work Repository window closes. You
can now access this repository through the Designer and Operator modules.
Oracle Data Integrator 11g: Integration and Administration 2 - 14
Copyright © 2012, Oracle and/or its affiliates. All rights reserved.
4. Creating a Work Repository
3
5
4
Oracle University and (Oracle Corporation) use only.
These eKit materials are to be used ONLY by you for the express purpose SELF STUDY. SHARING THE FILE IS STRICTLY PROHIBITED.
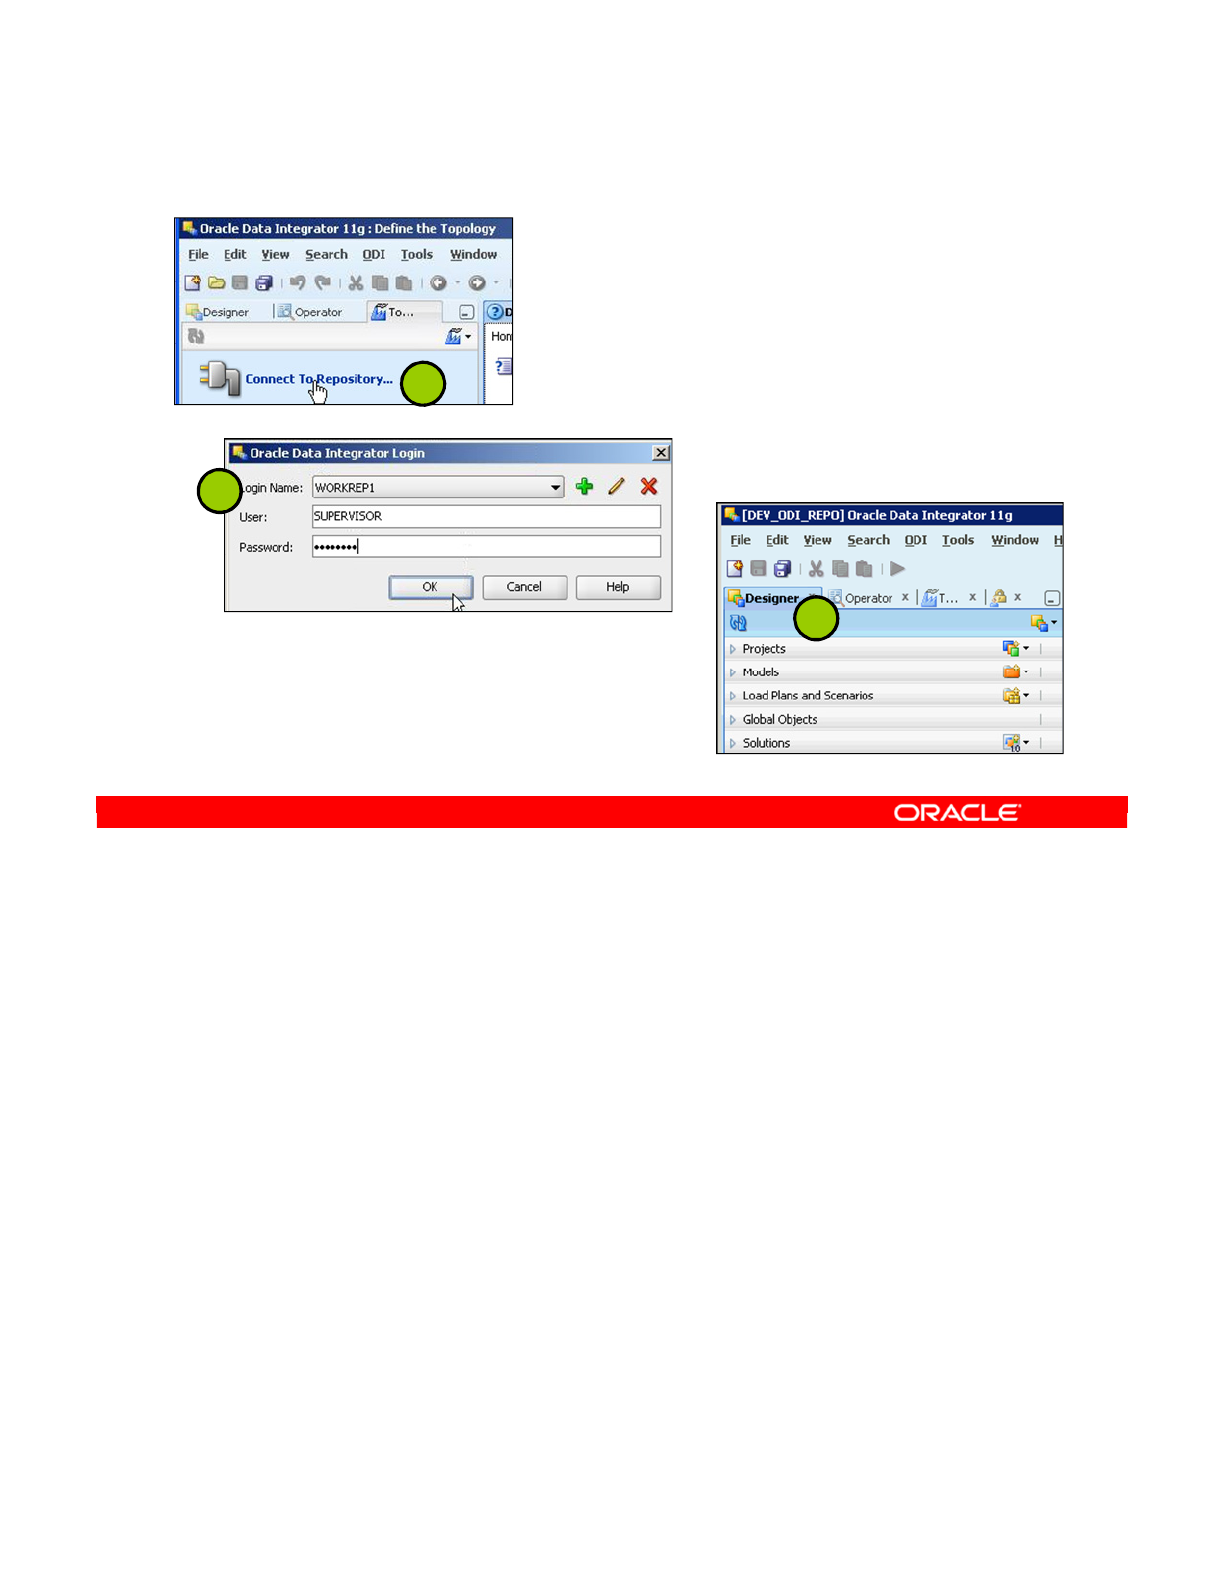
Now you need to create a connection to your Work Repository.
1. Start Oracle Data Integrator, if necessary. Click Connect to Repository.
2. Select Work Repository WORKREP1 from the Login Name drop-down list. Click OK.
3. The ODI Designer Navigator appears.
You have now successfully created and connected to the ODI Work Repository. You can
begin working in the ODI Designer.
Oracle Data Integrator 11g: Integration and Administration 2 - 15
Copyright © 2012, Oracle and/or its affiliates. All rights reserved.
5. Connecting to the Work Repository
1
2
3
Oracle University and (Oracle Corporation) use only.
These eKit materials are to be used ONLY by you for the express purpose SELF STUDY. SHARING THE FILE IS STRICTLY PROHIBITED.
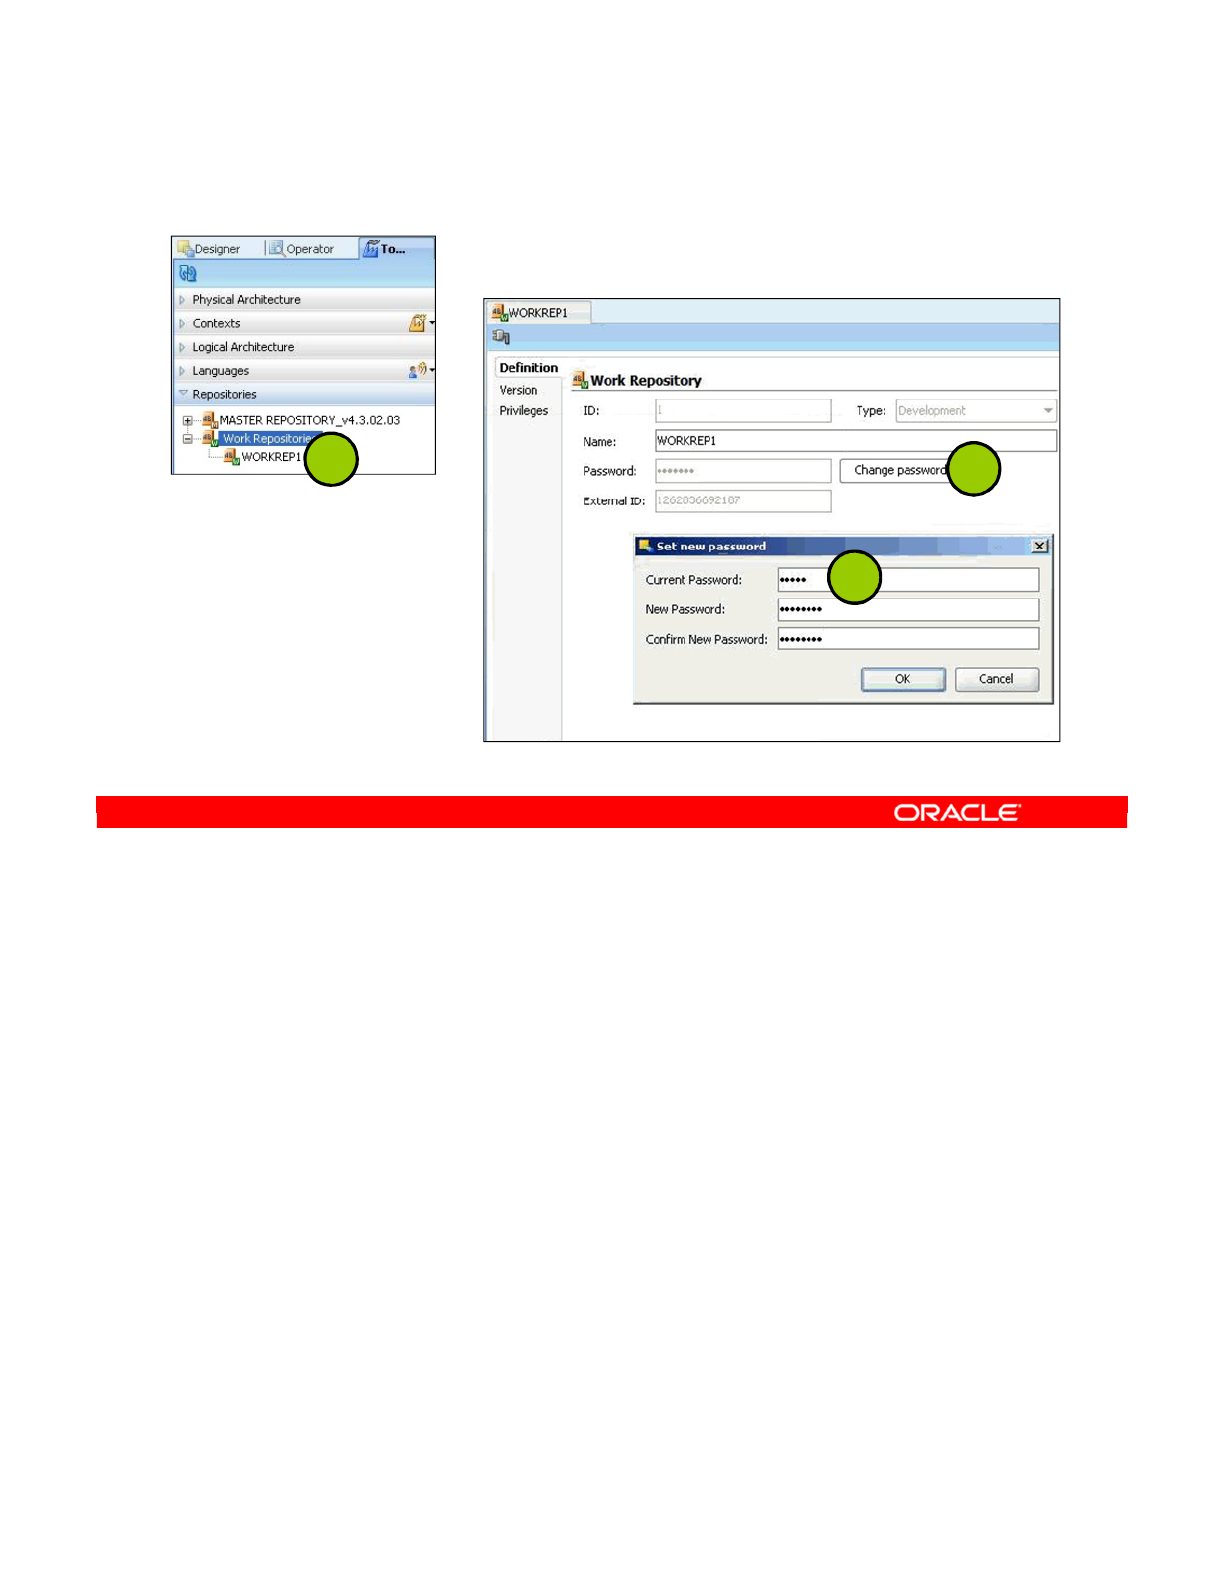
For security purposes, you might have to change the Work Repository password. To change
the password, you perform the following steps:
1. On the Repositories tab of the Topology Navigator, double-click the Work Repository. A
repository window opens.
2. Click the Change password button.
3. Enter the old password and the new one. Click the OK button.
Oracle Data Integrator 11g: Integration and Administration 2 - 16
Copyright © 2012, Oracle and/or its affiliates. All rights reserved.
Changing the Work Repository Password
12
3
Oracle University and (Oracle Corporation) use only.
These eKit materials are to be used ONLY by you for the express purpose SELF STUDY. SHARING THE FILE IS STRICTLY PROHIBITED.
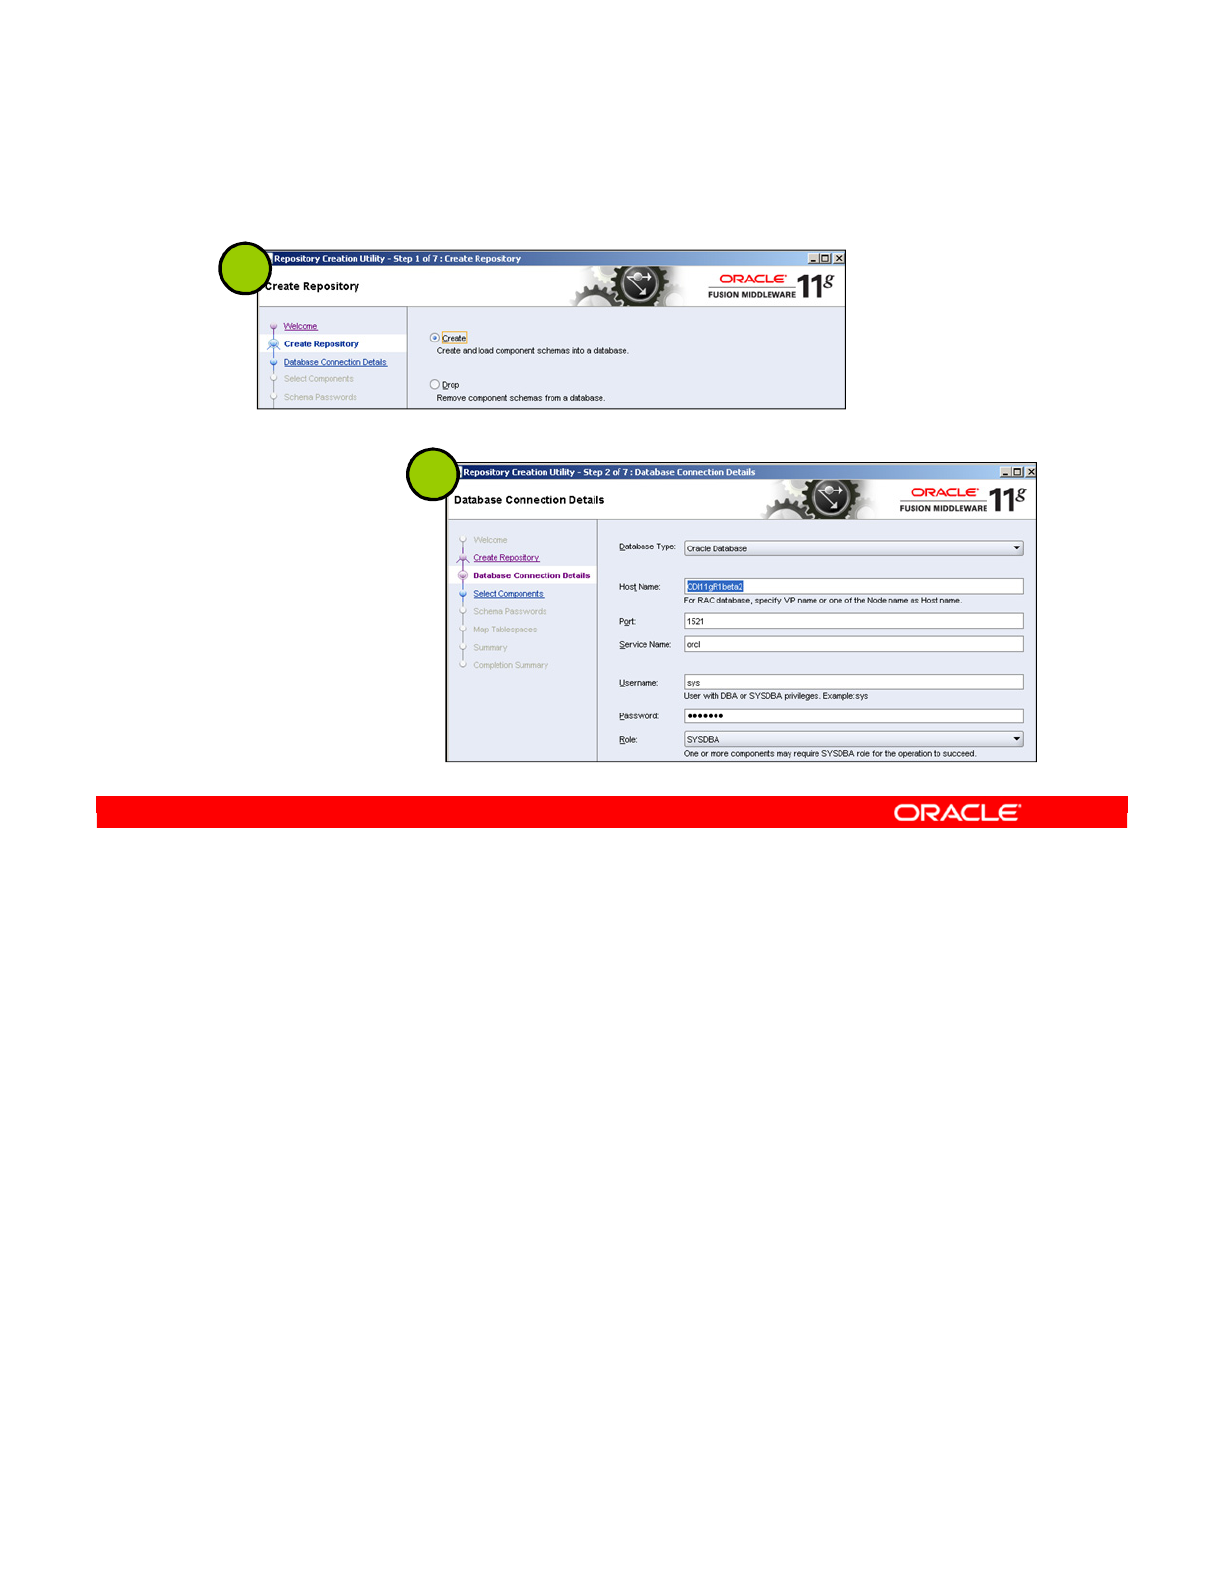
You have seen how to manually create repositories by using the ODI Studio. Now you will see
how to use Fusion Middleware Repository Creation Utility (RCU) to create a Master
Repository and user repositories for a single schema. You can find details in the ODI
Installation Guide.
The RCU wizard guides you through seven steps:
1. Create Repository
2. Database Connection Details
3. Select Components
4. Schema Passwords
5. Custom Variables
6. Map Tablespaces
7. Summary
The first step involves clicking the Create button.
The second step involves specifying database connection details.
Oracle Data Integrator 11g: Integration and Administration 2 - 17
Copyright © 2012, Oracle and/or its affiliates. All rights reserved.
Creating Repositories with the RCU
1
2
Oracle University and (Oracle Corporation) use only.
These eKit materials are to be used ONLY by you for the express purpose SELF STUDY. SHARING THE FILE IS STRICTLY PROHIBITED.

The third step involves selecting components. On this screen, the prefix BETA is used to
group the components associated with this deployment.
The fourth step involves selecting the passwords for the main and additional schema users.
Oracle Data Integrator 11g: Integration and Administration 2 - 18
Copyright © 2012, Oracle and/or its affiliates. All rights reserved.
Creating Repositories with the RCU
3
4
Oracle University and (Oracle Corporation) use only.
These eKit materials are to be used ONLY by you for the express purpose SELF STUDY. SHARING THE FILE IS STRICTLY PROHIBITED.
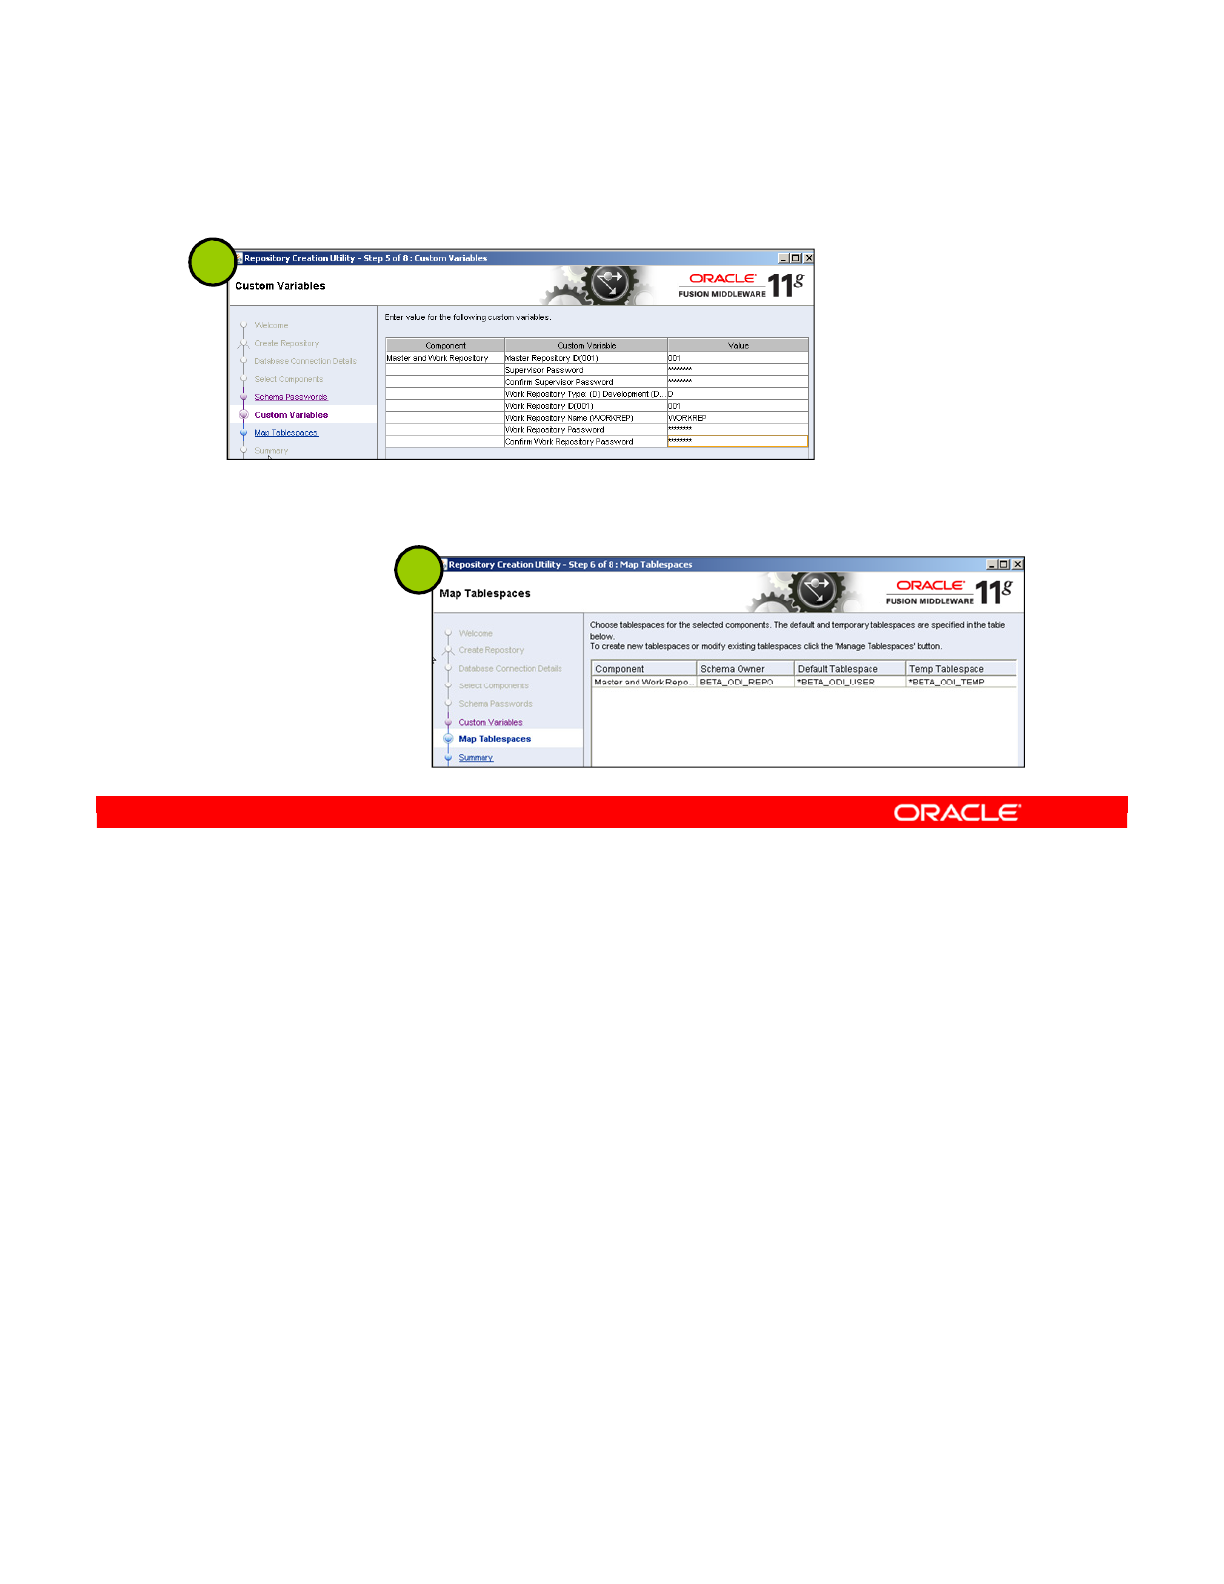
The fifth step involves entering values for a set of custom variables.
The sixth step involves choosing tablespaces for the selected components.
The seventh step involves checking a summary of your selection, and proceeding with the
creation.
Oracle Data Integrator 11g: Integration and Administration 2 - 19
Copyright © 2012, Oracle and/or its affiliates. All rights reserved.
Creating Repositories with the RCU
5
6
Oracle University and (Oracle Corporation) use only.
These eKit materials are to be used ONLY by you for the express purpose SELF STUDY. SHARING THE FILE IS STRICTLY PROHIBITED.

Answer: a
Explanation: Storage spaces are created in a database by using SQL*Plus or SQL
Developer. One Master Repository is defined in ODI. One or more Work Repositories are
defined in ODI.
Oracle Data Integrator 11g: Integration and Administration 2 - 20
Copyright © 2012, Oracle and/or its affiliates. All rights reserved.
Quiz
The following steps are performed to set up an ODI repository
environment:
1. Create repository storage spaces.
2. Create the Master Repository.
3. Create one or more Work Repositories.
a. True
b. False
Oracle University and (Oracle Corporation) use only.
These eKit materials are to be used ONLY by you for the express purpose SELF STUDY. SHARING THE FILE IS STRICTLY PROHIBITED.

In this lesson, you learned about the ODI architecture; the different architecture components,
including the Topology Manager, Designer, Operator, Security Manager, and the agents that
enable information processing; and the types of information stored in each type of repository.
Oracle Data Integrator 11g: Integration and Administration 2 - 21
Copyright © 2012, Oracle and/or its affiliates. All rights reserved.
Summary
In this lesson, you should have learned how to:
•Create and connect to the Master Repository
•Export and import the Master Repository
•Create, connect, and set a password to the Work
Repository
Oracle University and (Oracle Corporation) use only.
These eKit materials are to be used ONLY by you for the express purpose SELF STUDY. SHARING THE FILE IS STRICTLY PROHIBITED.

Oracle Data Integrator 11g: Integration and Administration 2 - 22
Copyright © 2012, Oracle and/or its affiliates. All rights reserved.
Checklist of Practice Activities
1-1: Logging In and Using Help
2-1: Creating Users and Repositories and Logging In
3-1: Creating an ODI Agent for Orchestrating Execution of ODI Objects
4-1: Defining the Topology
5-1: Setting Up a New ODI Project
6-1: Creating a Model
7-1: Checking Data Quality in the Model
8-1: ODI Interface: Simple Transformations
9-1: ODI Interface: Complex Transformations
9-2: ODI Interface: Implementing Lookup
10-1: ODI Interface: Exporting a Flat File to a Relational Table
11-1: Using Native Sequences with ODI Interface
11-2: Using Temporary Indexes
11-3: Using Data Sets with ODI Interface
12-1: Using Temporary ODI Interfaces
12-2: Developing a New Knowledge Module
13-1: Creating an ODI Procedure
14-1: Creating an ODI Package
14-2: Using ODI Package with Variables and User Functions
15-1: Creating and Scheduling an ODI Scenario
16-1: Using Load Plans
17-1: Working with ODI Versions
18-1: Enforcing Data Quality with ODI Interface
19-1: Implementing Changed Data Capture
20-1: Setting Up ODI Security
20-2: Integrating with Enterprise Manager and Using ODI Console
21-1: Executing an ODI Scenario Through the ODI Public Web Service
Oracle University and (Oracle Corporation) use only.
These eKit materials are to be used ONLY by you for the express purpose SELF STUDY. SHARING THE FILE IS STRICTLY PROHIBITED.

In this practice, you use two tools. You use SQL Developer to create the database users for
the Master and Work Repositories. You use Oracle Data Integrator to create the Master and
Work Repositories.
1. Create RDBMS users for the Master and Work Repositories by using SQL Developer.
2. Create the ODI Master Repository by using the ODI New Gallery Master Repository
Creation Wizard.
3. Create the ODI Master Login by using ODI New Gallery Create a New ODI Master
Login.
4. Create an RDBMS user for the Work Repository by using SQL Developer.
5. Create the Work Repository in ODI Topology Manager.
6. Log out of the Master Repository and log in to the Work Repository in ODI Topology
Manager.
Oracle Data Integrator 11g: Integration and Administration 2 - 23
Copyright © 2012, Oracle and/or its affiliates. All rights reserved.
Practice 2-1: Overview
Note: These are practice repositories. In later lessons, you use other
Master and Work Repositories that are partially predefined with source
and target objects.
SQL Developer
•Create SNPM1 database
user for Master Repository.
•Create SNPW1 database
user for Work Repository.
Oracle Data
Integrator
•Create Master Repository.
–Create Master Repository
connection “Master
Repository Pr 2-1” with
SNPM1 as the user.
•Create Work Repository.
–Create WORKREP_PR2-1
Work Repository connection
with SNPW1 as the user.
Oracle University and (Oracle Corporation) use only.
These eKit materials are to be used ONLY by you for the express purpose SELF STUDY. SHARING THE FILE IS STRICTLY PROHIBITED.

Oracle University and (Oracle Corporation) use only.
These eKit materials are to be used ONLY by you for the express purpose SELF STUDY. SHARING THE FILE IS STRICTLY PROHIBITED.

Copyright © 2012, Oracle and/or its affiliates. All rights reserved.
ODI Topology Concepts
Oracle University and (Oracle Corporation) use only.
These eKit materials are to be used ONLY by you for the express purpose SELF STUDY. SHARING THE FILE IS STRICTLY PROHIBITED.
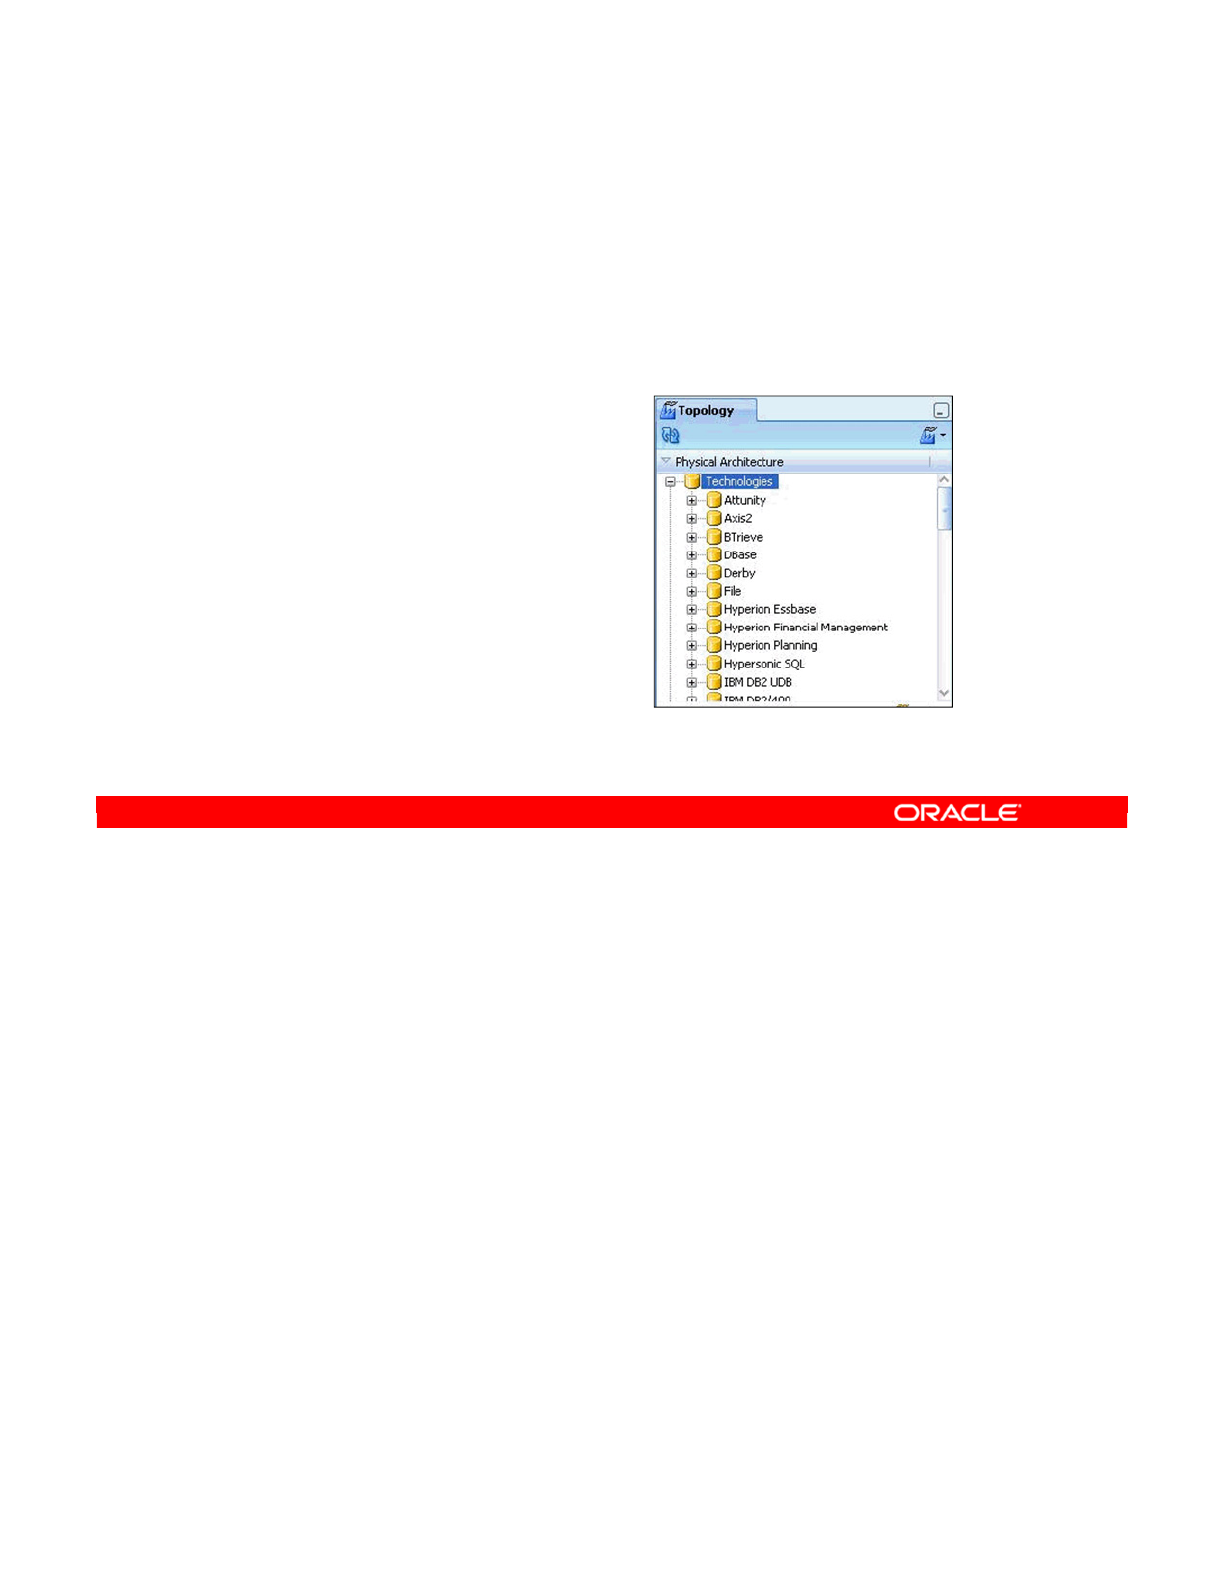
This lesson is a detailed introduction to the Oracle Data Integrator (ODI) topology and gives
some basic recommendations about how to set it up. In this lesson, you should learn:
•The basic concepts of the ODI topology
•The definition of a physical architecture in ODI and its relationship to a logical
architecture
•To plan a topology by using a simple set of guidelines
•Some of the current best practices in setting up a topology in ODI
Oracle Data Integrator 11g: Integration and Administration 3 - 2
Copyright © 2012, Oracle and/or its affiliates. All rights reserved.
Objectives
After completing this lesson, you should be able to:
•Describe the basic concepts of the ODI topology
•Describe the logical and physical architecture
•Plan a topology
•Use best practices to set up
a topology
•Launch ODI agents and
set agent parameters
Oracle University and (Oracle Corporation) use only.
These eKit materials are to be used ONLY by you for the express purpose SELF STUDY. SHARING THE FILE IS STRICTLY PROHIBITED.

In the following slides, you learn what the ODI topology contains, how it defines the logical
and physical architectures of your information system, and how the contexts link the two
together.
Oracle Data Integrator 11g: Integration and Administration 3 - 3
Copyright © 2012, Oracle and/or its affiliates. All rights reserved.
ODI Topology: Overview
Logical and Physical Architectures and
Contexts
Oracle University and (Oracle Corporation) use only.
These eKit materials are to be used ONLY by you for the express purpose SELF STUDY. SHARING THE FILE IS STRICTLY PROHIBITED.

In ODI, the Topology Navigator is used to define a complete representation of your
information system.
It includes everything—from data servers and schemas through reserved keywords in
languages used by different technologies. ODI uses this topology to access the resources
available in the information system to carry out integration tasks.
Oracle Data Integrator 11g: Integration and Administration 3 - 4
Copyright © 2012, Oracle and/or its affiliates. All rights reserved.
What Is Topology?
•Topology is the representation of the information system in
ODI.
•ODI uses the topology to connect to the resources in the
information system for integration processes.
Oracle University and (Oracle Corporation) use only.
These eKit materials are to be used ONLY by you for the express purpose SELF STUDY. SHARING THE FILE IS STRICTLY PROHIBITED.
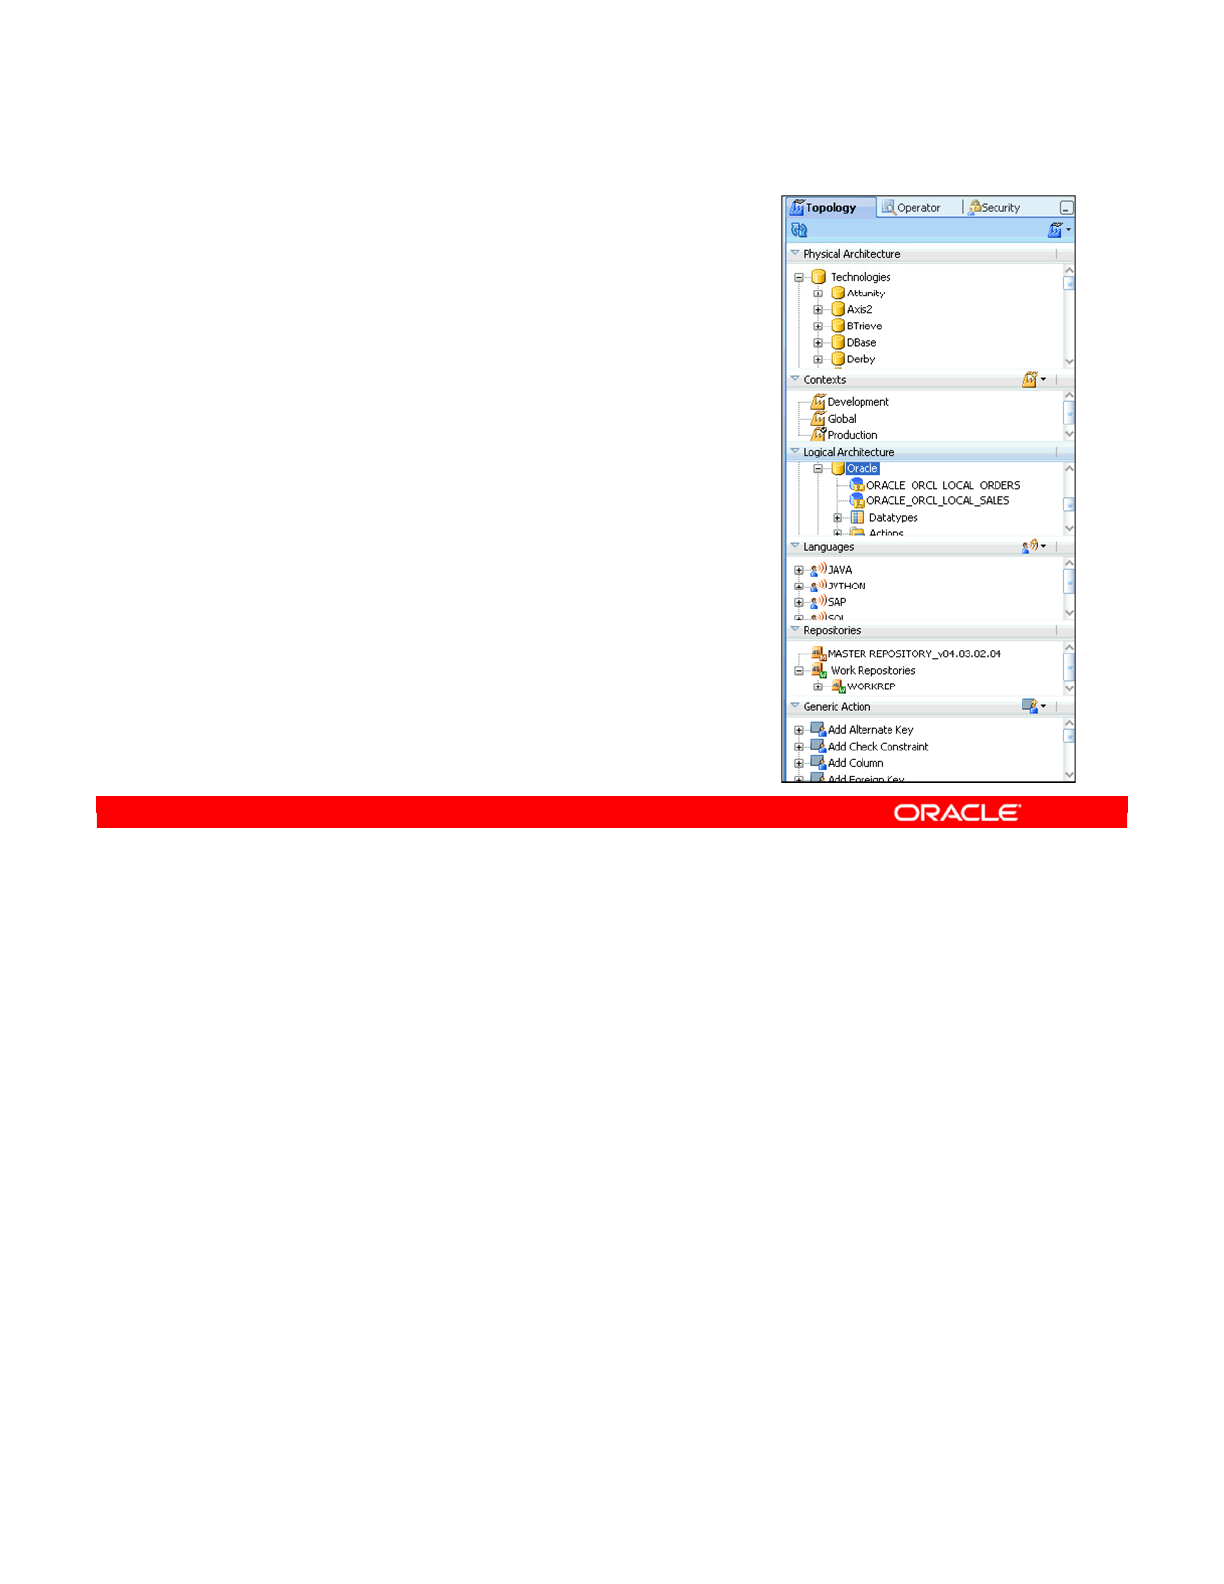
All available technologies are defined in the topology. For each technology, the available data
types are defined. You rarely, if ever, need to modify these. However, you define all the data
servers that use the technology in your information system. For each data server, you then
define the subdivisions that are known as schemas in ODI.
Next, you must define the agents that carry out the integration tasks at run time. You also set
up the contexts that enable you to define an integration process at an abstract logical level,
and then link it to the physical data servers where it will be performed.
Languages and actions are also found in the topology. Languages specify the keywords that
exist for each technology, and actions are used to generate the data definition language
(DDL) scripts. You would only need to modify these parts of the topology if you were adding a
new technology to ODI.
Oracle Data Integrator 11g: Integration and Administration 3 - 5
Copyright © 2012, Oracle and/or its affiliates. All rights reserved.
What Is in the Topology?
•Physical architecture
–Technologies: Oracle, DB2, File,
and so on
—
Data types for the given technology
—
Data Servers: Definition of your
servers, databases, and so on
—
Schemas: Subdivisions of data
servers
–Agents: ODI runtime modules
•Contexts: Mapping logical to physical
•Logical architecture
–Technologies and Agents
•Languages
•Repositories
•Generic Actions
Oracle University and (Oracle Corporation) use only.
These eKit materials are to be used ONLY by you for the express purpose SELF STUDY. SHARING THE FILE IS STRICTLY PROHIBITED.

The most essential things to define in your topology are your data servers and physical
schemas. These enable you to connect to your data through ODI.
Oracle Data Integrator 11g: Integration and Administration 3 - 6
Copyright © 2012, Oracle and/or its affiliates. All rights reserved.
Data Servers
and Physical Schemas
Oracle University and (Oracle Corporation) use only.
These eKit materials are to be used ONLY by you for the express purpose SELF STUDY. SHARING THE FILE IS STRICTLY PROHIBITED.
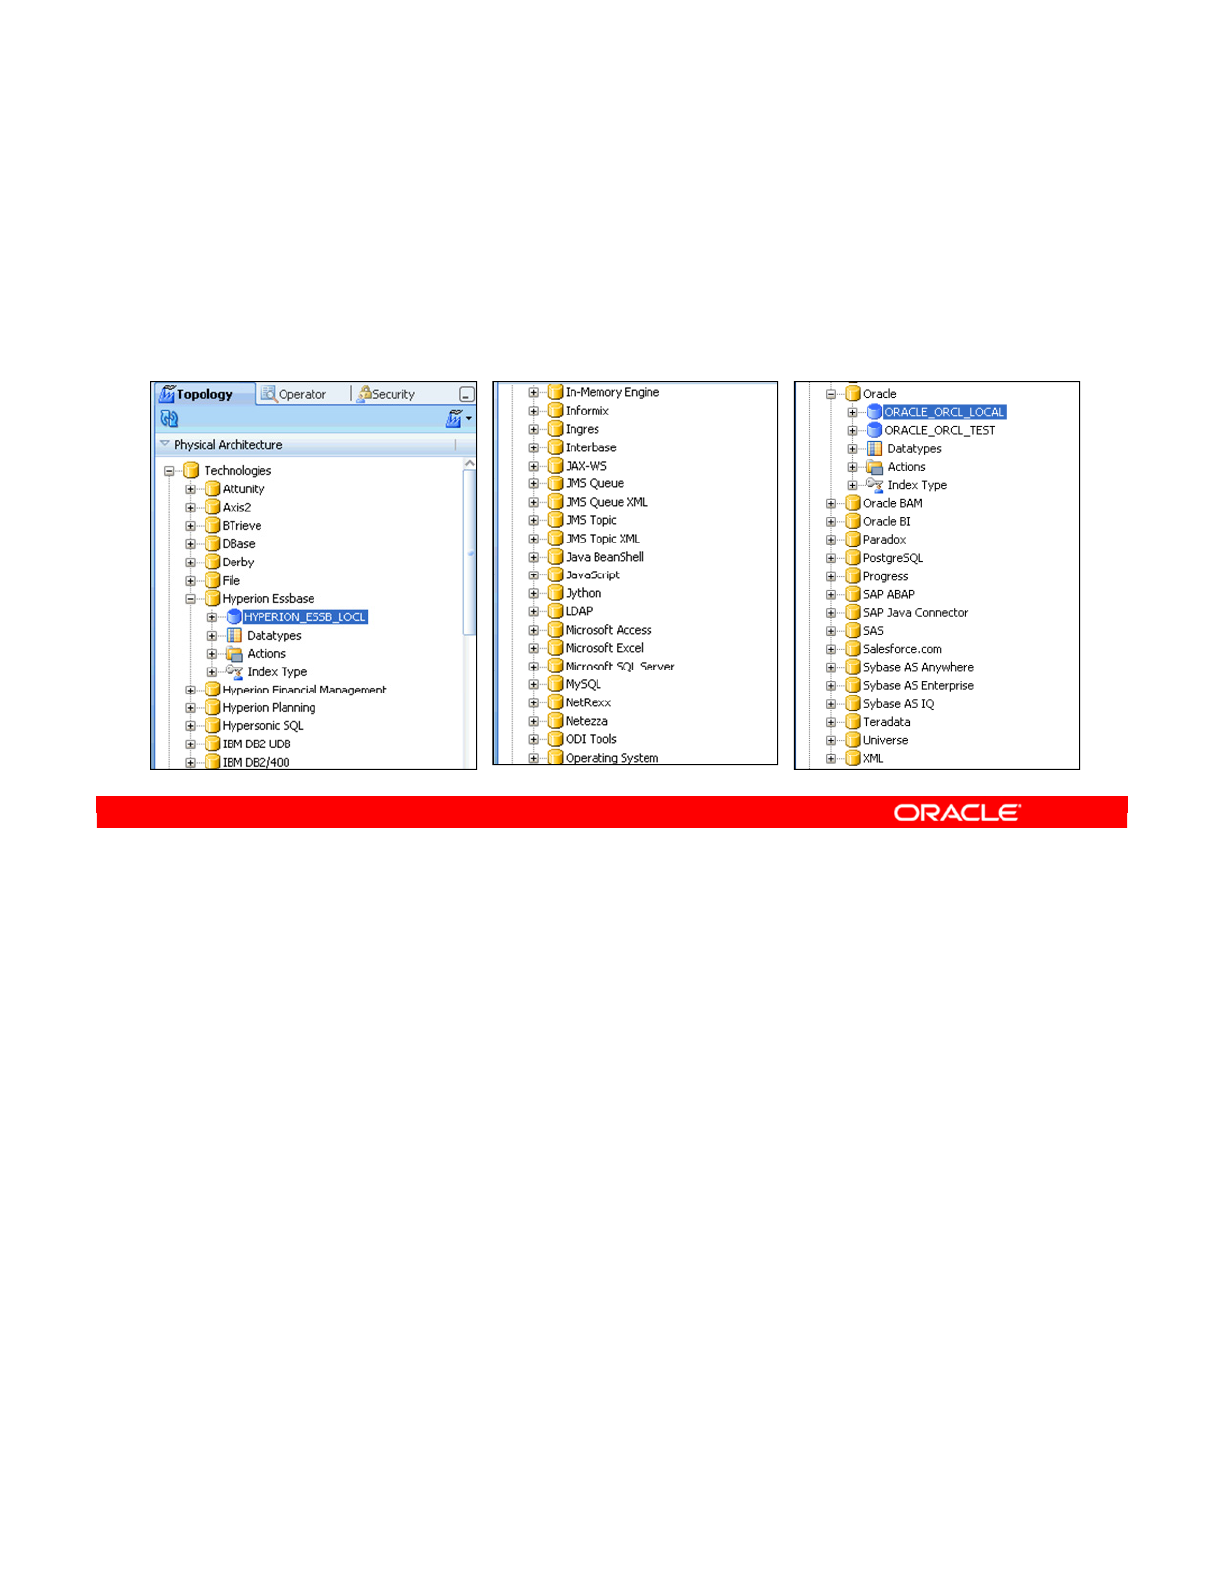
The definition of a data server in ODI is fairly broad. A data server may not always be a
traditional DBMS. Instead, any system that is capable of storing data and making that data
available in the form of tables is a potential data server in ODI. In ODI topology, a data server
is always attached to a specific technology, such as Oracle, Oracle Essbase, Sybase,
Extensible Markup Language (XML), or Microsoft Access.
Oracle Data Integrator 11g: Integration and Administration 3 - 7
Copyright © 2012, Oracle and/or its affiliates. All rights reserved.
What Is a Data Server?
•A data server is any system that is capable of storing data
and making it available in the form of tables.
•A data server is always attached to a specific technology.
Oracle University and (Oracle Corporation) use only.
These eKit materials are to be used ONLY by you for the express purpose SELF STUDY. SHARING THE FILE IS STRICTLY PROHIBITED.

There are multiple ways of connecting a data server to ODI. Most often, Java Database
Connectivity (JDBC) is used. JDBC drivers exist for a wide range of technologies. Java
Naming and Directory Interface (JNDI) is another way to connect to your data server through
a directory service. Additionally new technologies can be created that enable connectivity to
application-specific data sources such as Oracle’s Hyperion Essbase.
Some concrete examples of data servers may be helpful. Each instance of a traditional
database engine, such as Oracle or Microsoft SQL Server, is a data server. Thus, if you have
two instances that are running on the same machine, ODI considers them to be separate data
servers.
A Hyperion Essbase server instance is also a data server. The ODI physical schema
represents an Essbase application and the database represents the Essbase database
(cube). This is an example of an application that is capable of storing data and presenting it in
the form of tables.
Oracle Data Integrator 11g: Integration and Administration 3 - 8
Copyright © 2012, Oracle and/or its affiliates. All rights reserved.
What Is a Data Server?
•ODI connects to a data server by using JDBC or JNDI.
•Examples of data servers:
–Oracle instance
–Microsoft SQL Server instance
–IBM DB2
–Oracle’s Hyperion Essbase
–Oracle E-Business instance
–File server
Oracle University and (Oracle Corporation) use only.
These eKit materials are to be used ONLY by you for the express purpose SELF STUDY. SHARING THE FILE IS STRICTLY PROHIBITED.
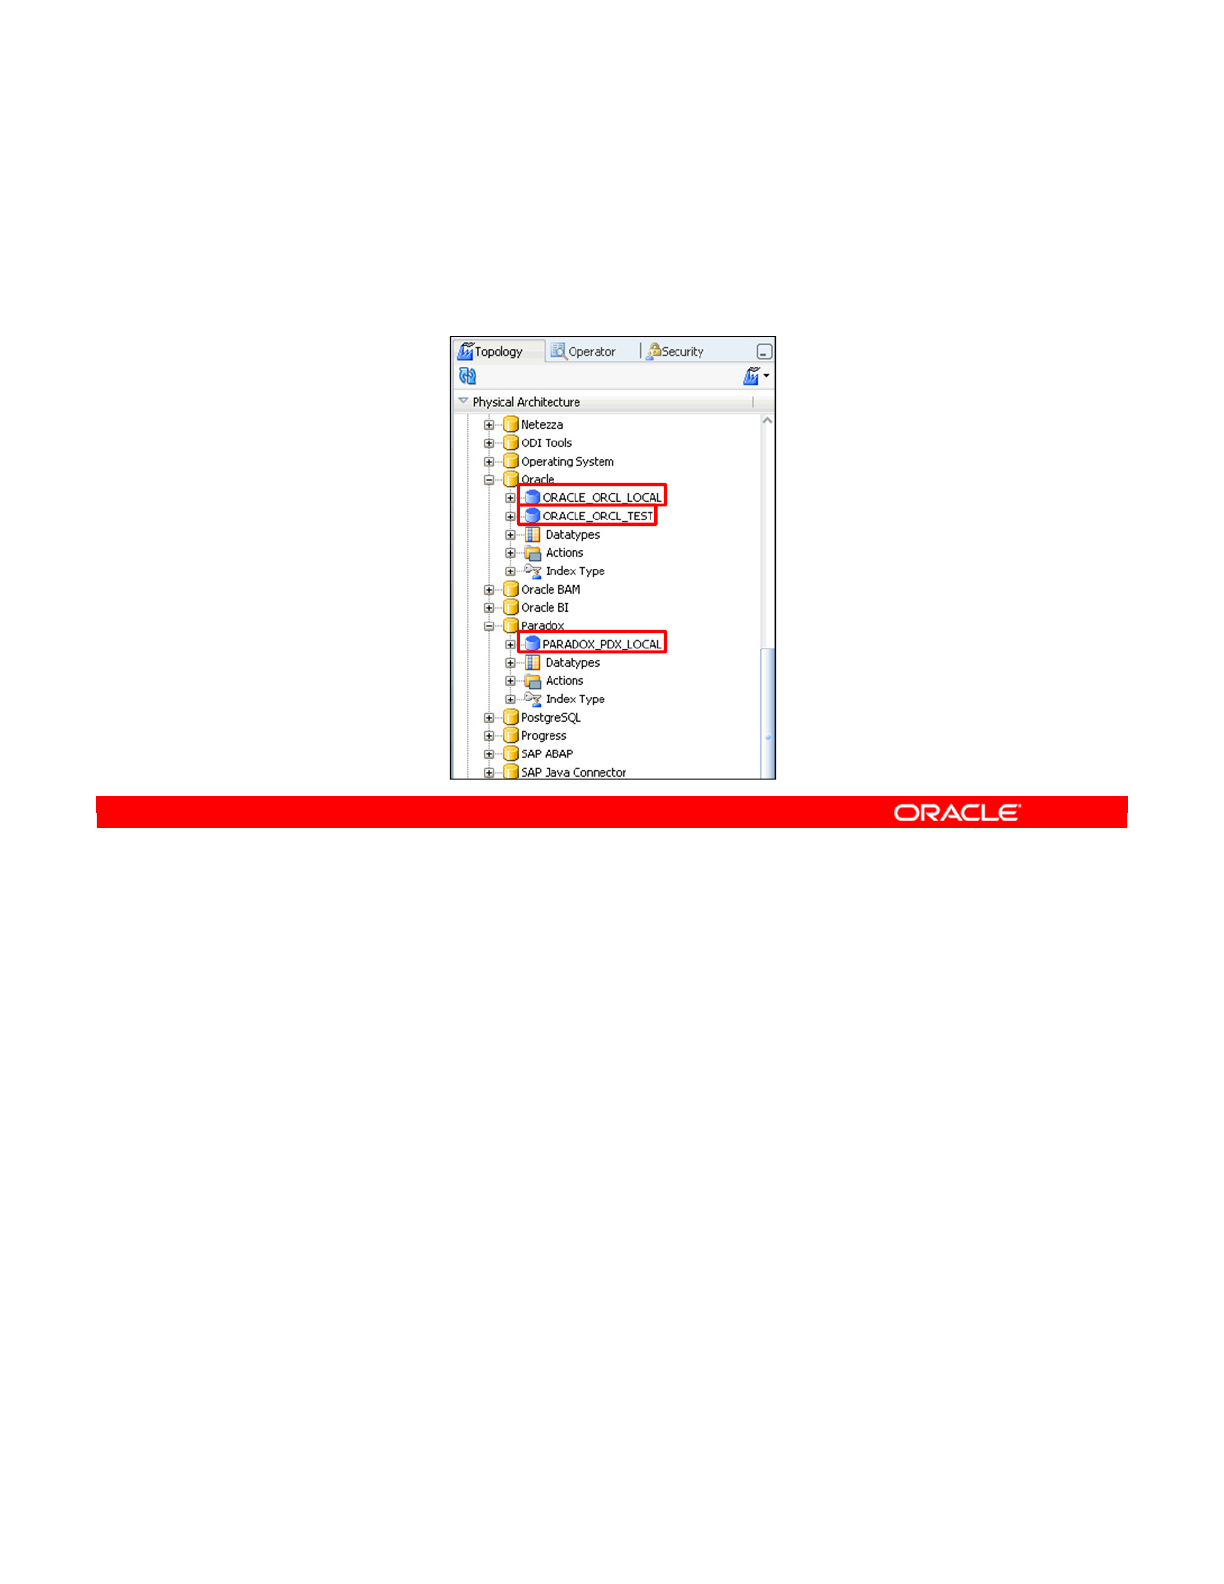
There are a number of simple guidelines to remember when setting up your topology in ODI.
Guideline 1 is that every data server in your information system should appear once in your
topology. For example, if you have a machine running two instances of Oracle and one
Paradox data source, you have three physical data servers.
Oracle Data Integrator 11g: Integration and Administration 3 - 9
Copyright © 2012, Oracle and/or its affiliates. All rights reserved.
Important Guideline 1
Guideline 1: Each physical data server must be defined once in
the topology.
Oracle University and (Oracle Corporation) use only.
These eKit materials are to be used ONLY by you for the express purpose SELF STUDY. SHARING THE FILE IS STRICTLY PROHIBITED.

A physical schema is a subdivision of a data server whose precise definition depends on the
technology involved. Physical schemas indicate the physical location of the datastores, such
as tables, files, topics, and queues in a data server. The names of physical schemas are used
to prefix object names when generating code to produce their qualified names.
The physical schemas that need to be accessed must be defined in their corresponding data
servers. You will now see some examples of how this works on different technologies.
Oracle Data Integrator 11g: Integration and Administration 3 - 10
Copyright © 2012, Oracle and/or its affiliates. All rights reserved.
What Is a Physical Schema?
•A physical schema is a technology-dependent subdivision
of a data server.
•Datastores on a data server are located in a physical
schema.
Oracle University and (Oracle Corporation) use only.
These eKit materials are to be used ONLY by you for the express purpose SELF STUDY. SHARING THE FILE IS STRICTLY PROHIBITED.

An ODI physical schema comprises two separate data server schemas: A data schema where
the datastores for the physical schema are located and a work schema that is used by ODI to
store temporary objects during integration processing. Several physical schemas can share
the same work schema.
A data server schema in a data server is uniquely identified, depending on the technology, by
a catalog name or a schema name, or both. The terms for the catalog name and the schema
name differ depending on the technology.
For example, in Microsoft SQL Server, the catalog is called “database,” and the schema is
called the “owner.”
In Oracle, there is no catalog, and a schema is called a “schema” or “user.” You will see some
examples later in this lesson.
Though a data server can have several physical schemas, it has one default physical schema
that is used to select a work schema to store server-level temporary objects during certain
integration processes.
Oracle Data Integrator 11g: Integration and Administration 3 - 11
Copyright © 2012, Oracle and/or its affiliates. All rights reserved.
Physical Schemas: Properties
•An ODI physical schema always consists of two data
server schemas:
–The data schema, which contains the datastores
–The work schema, which stores temporary objects
•A data server schema is technology dependent.
–Catalog name and/or schema name
–Example: Database and owner, schema
•A data server has:
–One or more physical schemas
–One default physical schema for server-level temporary
objects
Oracle University and (Oracle Corporation) use only.
These eKit materials are to be used ONLY by you for the express purpose SELF STUDY. SHARING THE FILE IS STRICTLY PROHIBITED.
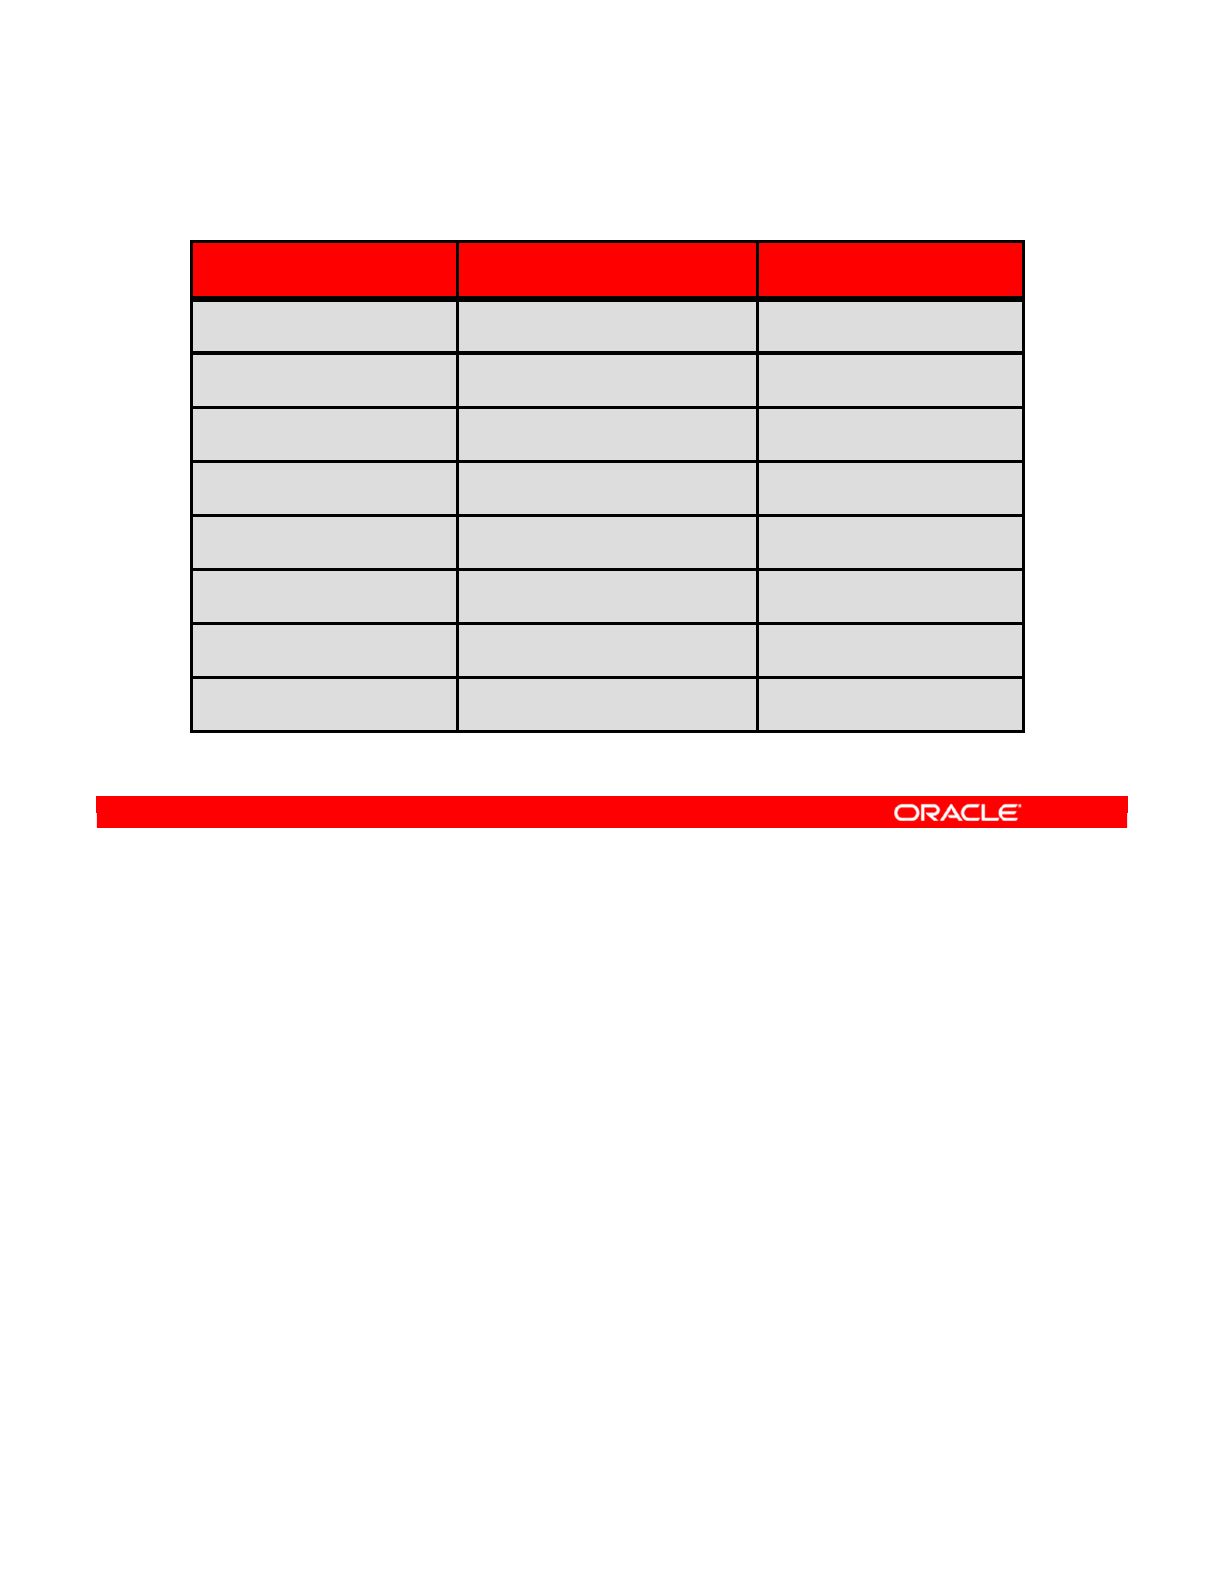
The terms “data server” and “schema” are general terms in ODI that represent different
concepts in different database technologies. The table in the slide shows the relationship
between the ODI terms “data server” and “schema” with their equivalents in some common
technologies.
For example, an Oracle server “instance” is equivalent to an ODI “data server.” A “schema” on
this Oracle instance is represented as a “schema” in ODI.
However, for SQL Server, an ODI schema represents a combination of “database” and
“owner.” For example, a table might be called “salesdb.bill.mytable.” In ODI, the
schema is “salesdb.bill.”
Not every technology supports schemas. For example, an Access “database” corresponds to
an ODI data server. However, Access databases are not subdivided into schemas. Thus,
when you define an Access data server, you do not need to specify a schema.
ODI also supports technologies that are not true databases. For example, you can set up a
directory of files as a database. Here, the file server becomes the data server and a specific
directory is an ODI schema. Individual files in that directory are then treated as datastores.
Note: The recommended practice in ODI is to create a separate area on each data server
specifically for the temporary objects. You should use this dedicated area as the work schema
for your physical schema. Thus, there is no risk of temporary objects created by ODI polluting
your production data.
Oracle Data Integrator 11g: Integration and Administration 3 - 12
Copyright © 2012, Oracle and/or its affiliates. All rights reserved.
Technology Terminology Among Vendors
Technology Data Server Schema
Oracle Instance Schema
Microsoft SQL Server Server Database/Owner
Sybase ASE Server Database/Owner
DB2/400 Server Library
Teradata
Server Schema
Microsoft Access Database (N/A)
JMS Topic Router Topic
File File Server Directory
Oracle University and (Oracle Corporation) use only.
These eKit materials are to be used ONLY by you for the express purpose SELF STUDY. SHARING THE FILE IS STRICTLY PROHIBITED.

For each data server in your topology, you must define a physical schema to represent each
subdivision of the server that will be used. So, if a server has four technology-specific
subdivisions, but you want to use only two in ODI, you must define two physical schemas for
that server.
Oracle Data Integrator 11g: Integration and Administration 3 - 13
Copyright © 2012, Oracle and/or its affiliates. All rights reserved.
Important Guideline 2 and Recommendations
•Guideline 2: Under each data server, define a physical
schema for each subdivision of the server that will be used
in ODI.
•Recommendations:
–All schemas in the same instance of the database must be
defined under the same data server.
–The best possible login to the data server is the owner of the
staging schema (also called “work schema”).
–Ensure that all data servers have a DEFAULT schema (by
default, the first one that is created). This is required for most
knowledge modules.
Oracle University and (Oracle Corporation) use only.
These eKit materials are to be used ONLY by you for the express purpose SELF STUDY. SHARING THE FILE IS STRICTLY PROHIBITED.

The most essential things to define in your topology are your data servers and physical
schemas. These enable you to connect to your data through ODI.
Oracle Data Integrator 11g: Integration and Administration 3 - 14
Copyright © 2012, Oracle and/or its affiliates. All rights reserved.
Defining Topology: Example
Oracle University and (Oracle Corporation) use only.
These eKit materials are to be used ONLY by you for the express purpose SELF STUDY. SHARING THE FILE IS STRICTLY PROHIBITED.
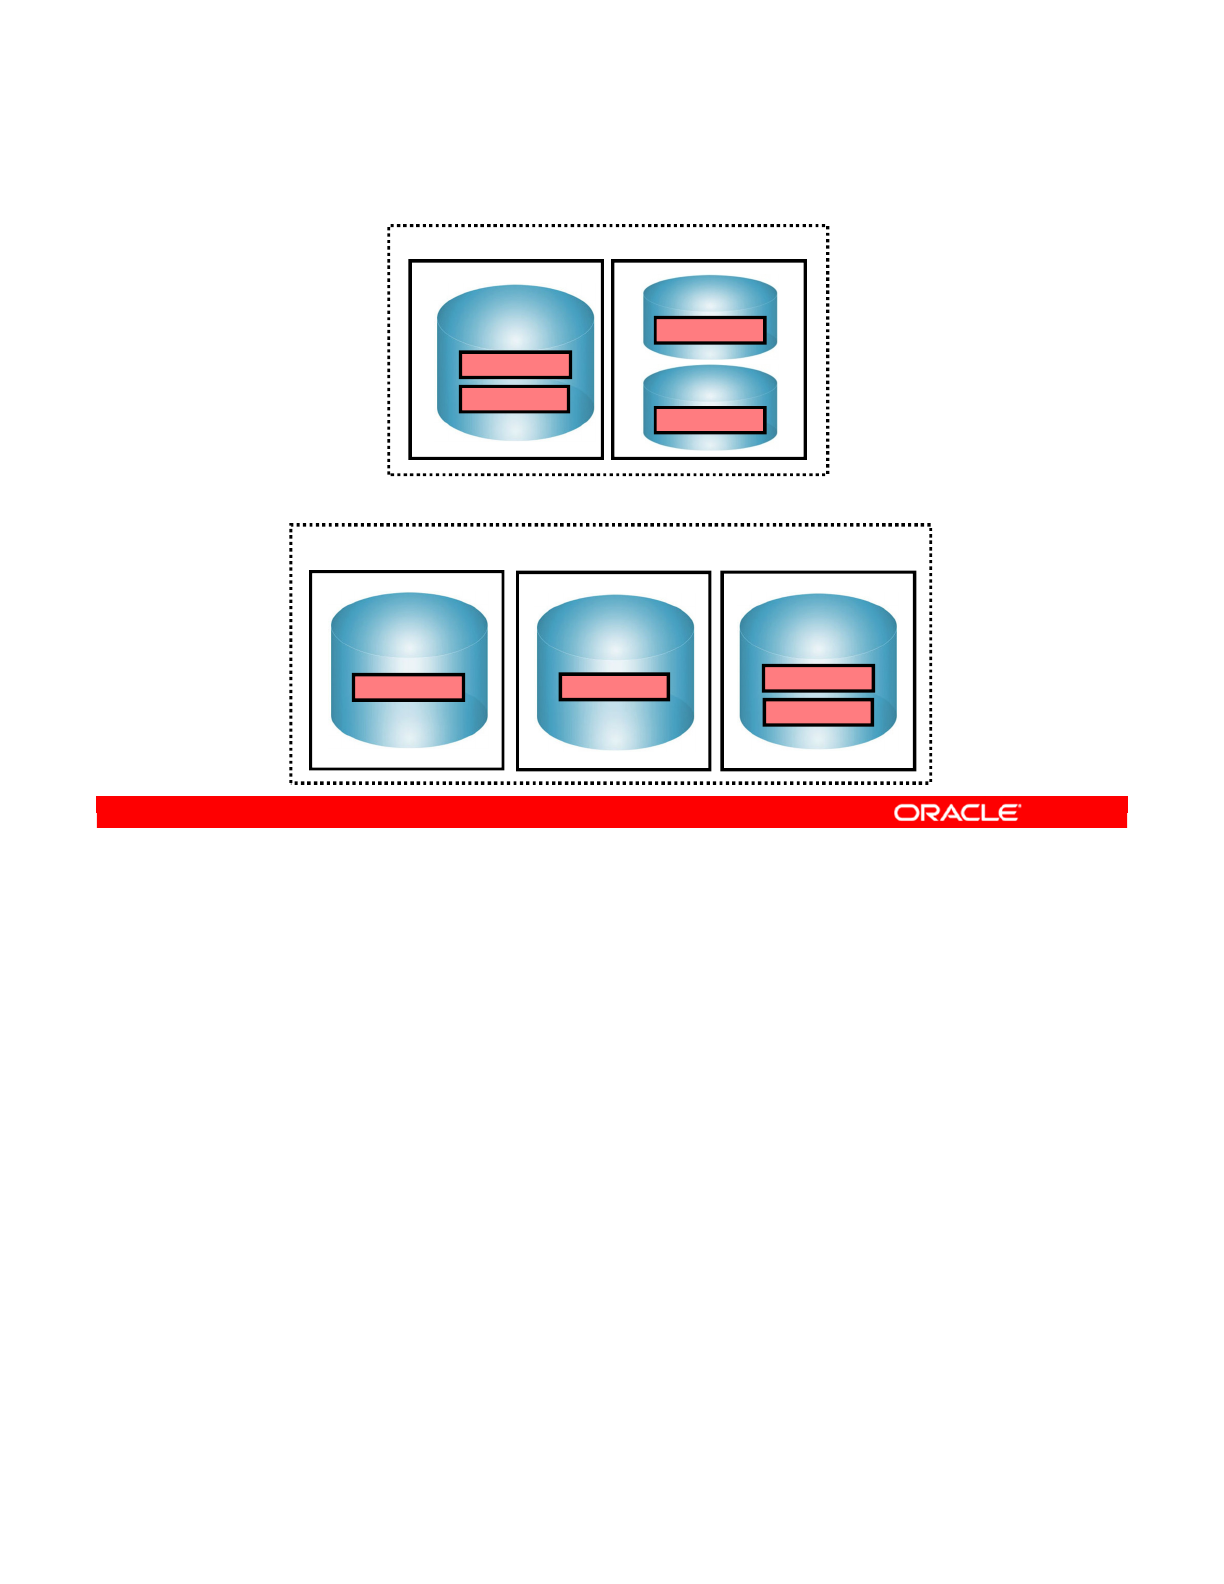
Here is an example that you will refer to throughout this lesson. It is a simple setup with
accounting and sales information that is used to populate a data warehouse and a purchasing
database.
There are two separate production sites, with the first based in Boston. The Boston production
site has a Windows machine that runs SQL Server. The data warehouse for Boston is hosted
on this machine. The SQL Server database is named db_dwh at this site and the Boston
purchasing database, also hosted on this machine, is named db_purchase.
The example also shows a Linux machine, which, for historical reasons, has two different
versions of Oracle running on the same system. One version has a schema for accounting,
and the other version has a schema for sales.
A second production site is in Tokyo. Here, the data warehouse and purchasing databases
are split onto different Windows machines that run SQL Server. The data servers are labeled
“MS SQL Server A” and “MS SQL Server B.” However, the accounting and sales databases
run on a single Oracle server. Note that the physical schemas at this site have different
names from those at the Boston site.
The next slide shows how to model this physical architecture in ODI.
Oracle Data Integrator 11g: Integration and Administration 3 - 15
Copyright © 2012, Oracle and/or its affiliates. All rights reserved.
Example: Infrastructure for Two Production Sites
MS SQL Server B
purchase
Windows machine Linux machine
Oracle
ACCT
SAL
Windows machine
MS SQL Server A
dwh
Production site: Tokyo
Windows machine Linux machine
Oracle 10g
ACCOUNTING
Oracle 11g
SALES
MS SQL Server
db_dwh
db_purchase
Production site: Boston
Oracle University and (Oracle Corporation) use only.
These eKit materials are to be used ONLY by you for the express purpose SELF STUDY. SHARING THE FILE IS STRICTLY PROHIBITED.

Applying the previous slide’s architecture in ODI design, guidelines 1 and 2 enable you to
design this physical architecture in ODI. You disregard which machines physically run which
servers.
Each Oracle and SQL Server instance is represented as a data server in the ODI topology.
Similarly, each Oracle schema or SQL Server database is represented as a physical schema.
Oracle Data Integrator 11g: Integration and Administration 3 - 16
Copyright © 2012, Oracle and/or its affiliates. All rights reserved.
ODI Design: Physical Architecture of the Two
Production Sites
Oracle-Boston 10g
ACCOUNTING
Oracle-Boston11g
SALES
MSSQL-Boston
db_dwh
db_purchase
Production site: Boston
Data server
Data server
Data server
ODI Design Considerations:
•Disregard which machines
physically run which servers.
•Each database instance is
represented as a data server.
An ODI data server
representing one SQL
Server instance with 2
schemas
2 ODI data servers, each
representing one Oracle
instance with 1 schema
(disregard that they are
hosted on 1 Linux machine)
MSSQL-TokyoB
purchase
Oracle-Tokyo
ACCT
SAL
MSSQL-TokyoA
dwh
Production site: Tokyo
Data serverData server Data server
An ODI data server
representing one
Oracle instance with
2 schemas
ODI data servers
representing one SQL
Server instance with 1
schema
Oracle University and (Oracle Corporation) use only.
These eKit materials are to be used ONLY by you for the express purpose SELF STUDY. SHARING THE FILE IS STRICTLY PROHIBITED.
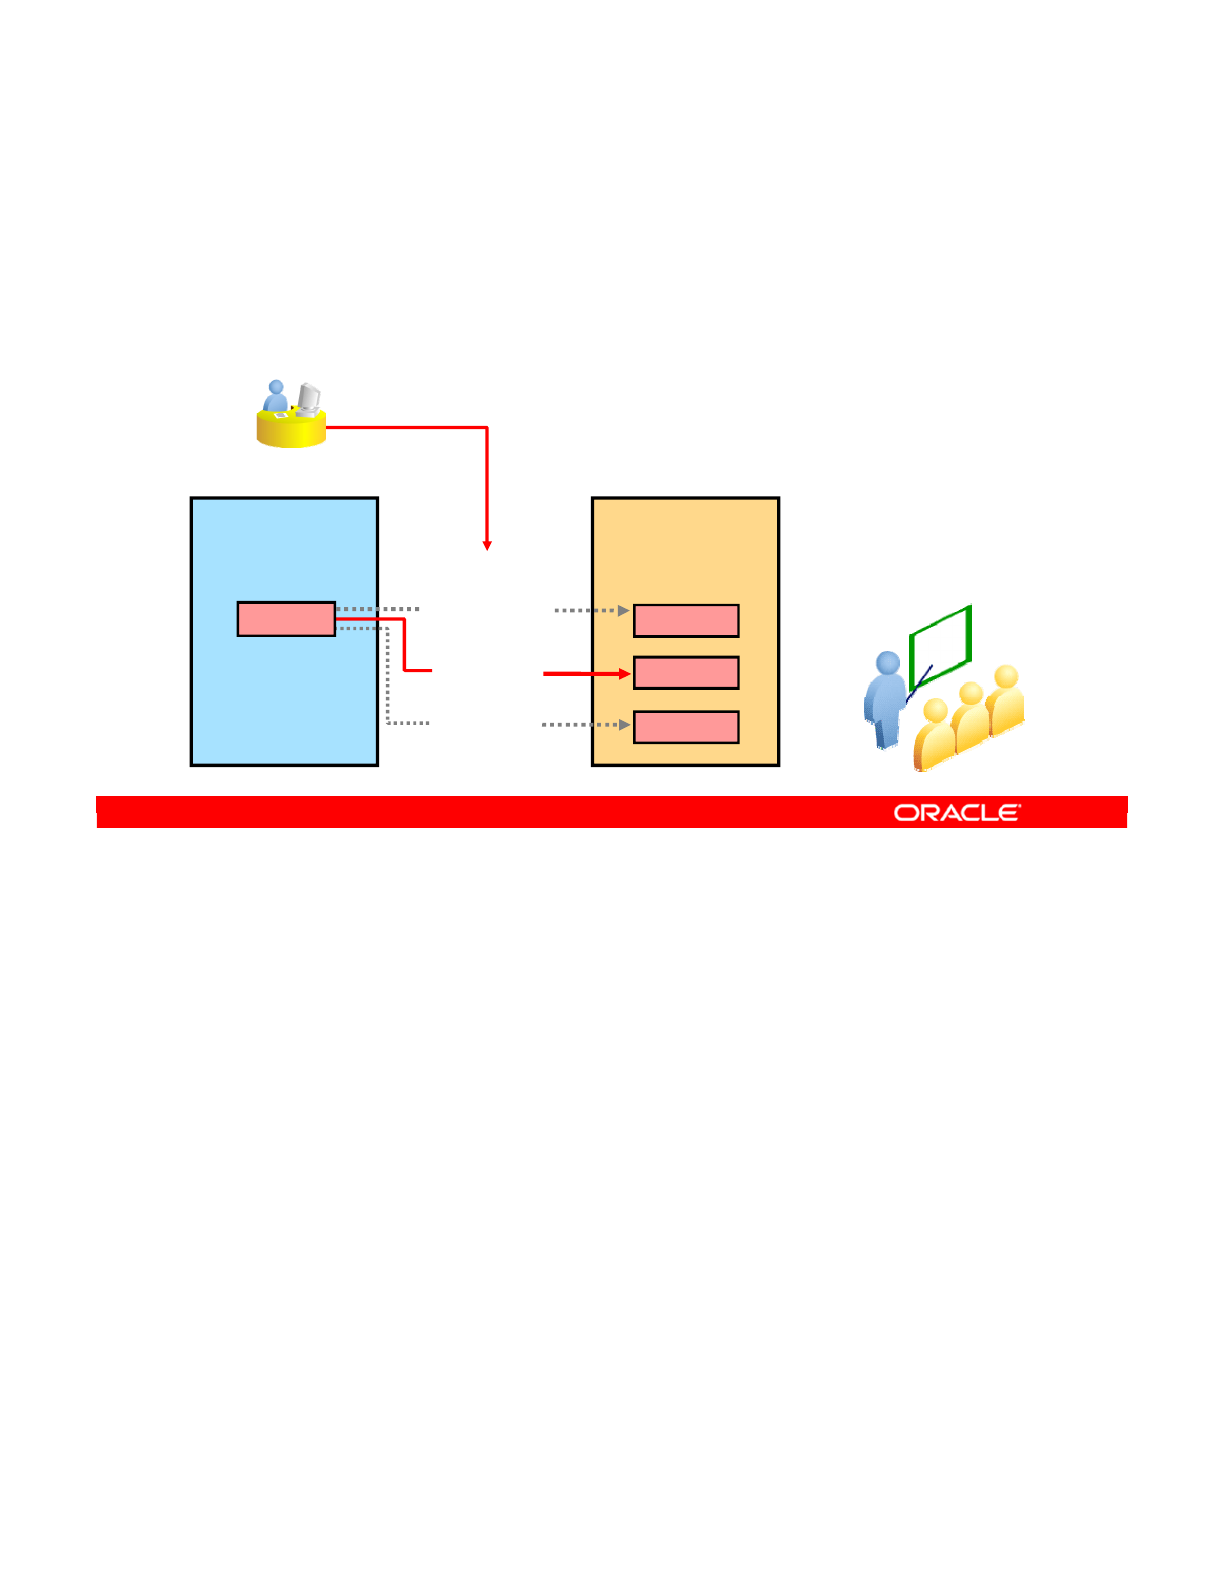
You learned about the physical architecture, which describes how ODI physically accesses
data. Now, you look at the logical architecture, which is a more general view that takes into
account the similarities between the physical schemas in different environments.
Oracle Data Integrator 11g: Integration and Administration 3 - 17
Copyright © 2012, Oracle and/or its affiliates. All rights reserved.
Logical Schemas and Contexts
Design time
Logical
architecture
Select a
context
Run time
Physical
architecture
Logical schema Development
New York
Production
Boston
Production
Tokyo
Physical schemas
ACCOUNTING
ACCOUNTING
ACCT
Accounting
Oracle University and (Oracle Corporation) use only.
These eKit materials are to be used ONLY by you for the express purpose SELF STUDY. SHARING THE FILE IS STRICTLY PROHIBITED.
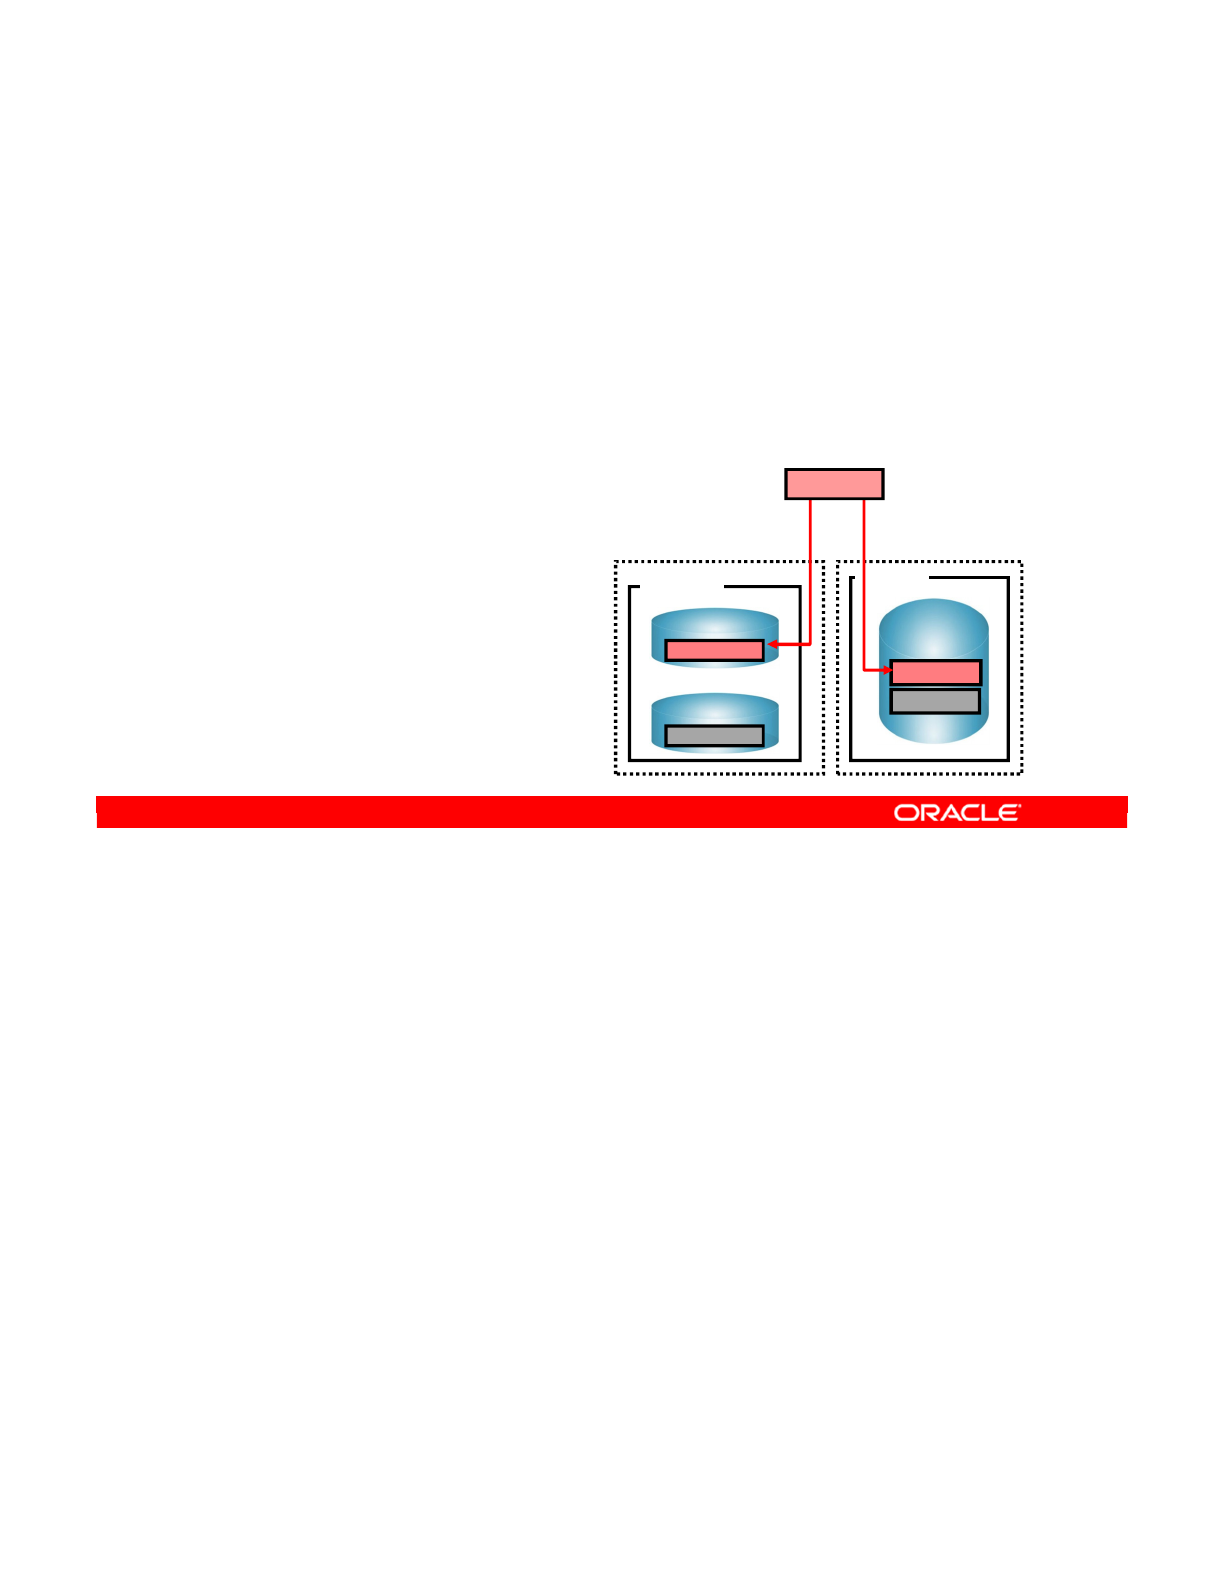
The essential concept to understand in the logical architecture is the logical schema. A logical
schema is a single alias for different physical schemas. These schemas should have similar
or identical data structures, and must be based on the same technology. The logical schema
thus brings together different physical schemas representing the same kind of data in different
contexts.
If two similar data schemas are stored in two different data servers, but they have the same
data structures, you declare the two data schemas as physical schemas in ODI, according to
guideline 2. However, you create a single logical schema that represents the pair of schemas.
The context determines the physical schema that will be used at any given time.
A good example of a logical schema is found in the information system example. In Boston,
the accounting database is stored in a schema called ACCOUNTING. In Tokyo, the schema is
called ACCT. Both of them have the same data structure; they contain all tables for an
accounting application. In the ODI topology, you consider them as one logical schema:
Accounting.
Oracle Data Integrator 11g: Integration and Administration 3 - 18
Copyright © 2012, Oracle and/or its affiliates. All rights reserved.
What Is a Logical Schema?
•A logical schema is a single alias for different physical
schemas that have similar data structures based on the
same technology, but in different contexts.
•If two data schemas stored in data servers contain the
same data structures, they are declared as:
–Two physical schemas
–One single logical schema
Linux
Oracle
ACCT
SAL
Production site:
Tokyo
Linux
Oracle
ACCOUNTING
Oracle
SALES
Production site:
Boston
1 Logical schema
Accounting
Oracle University and (Oracle Corporation) use only.
These eKit materials are to be used ONLY by you for the express purpose SELF STUDY. SHARING THE FILE IS STRICTLY PROHIBITED.
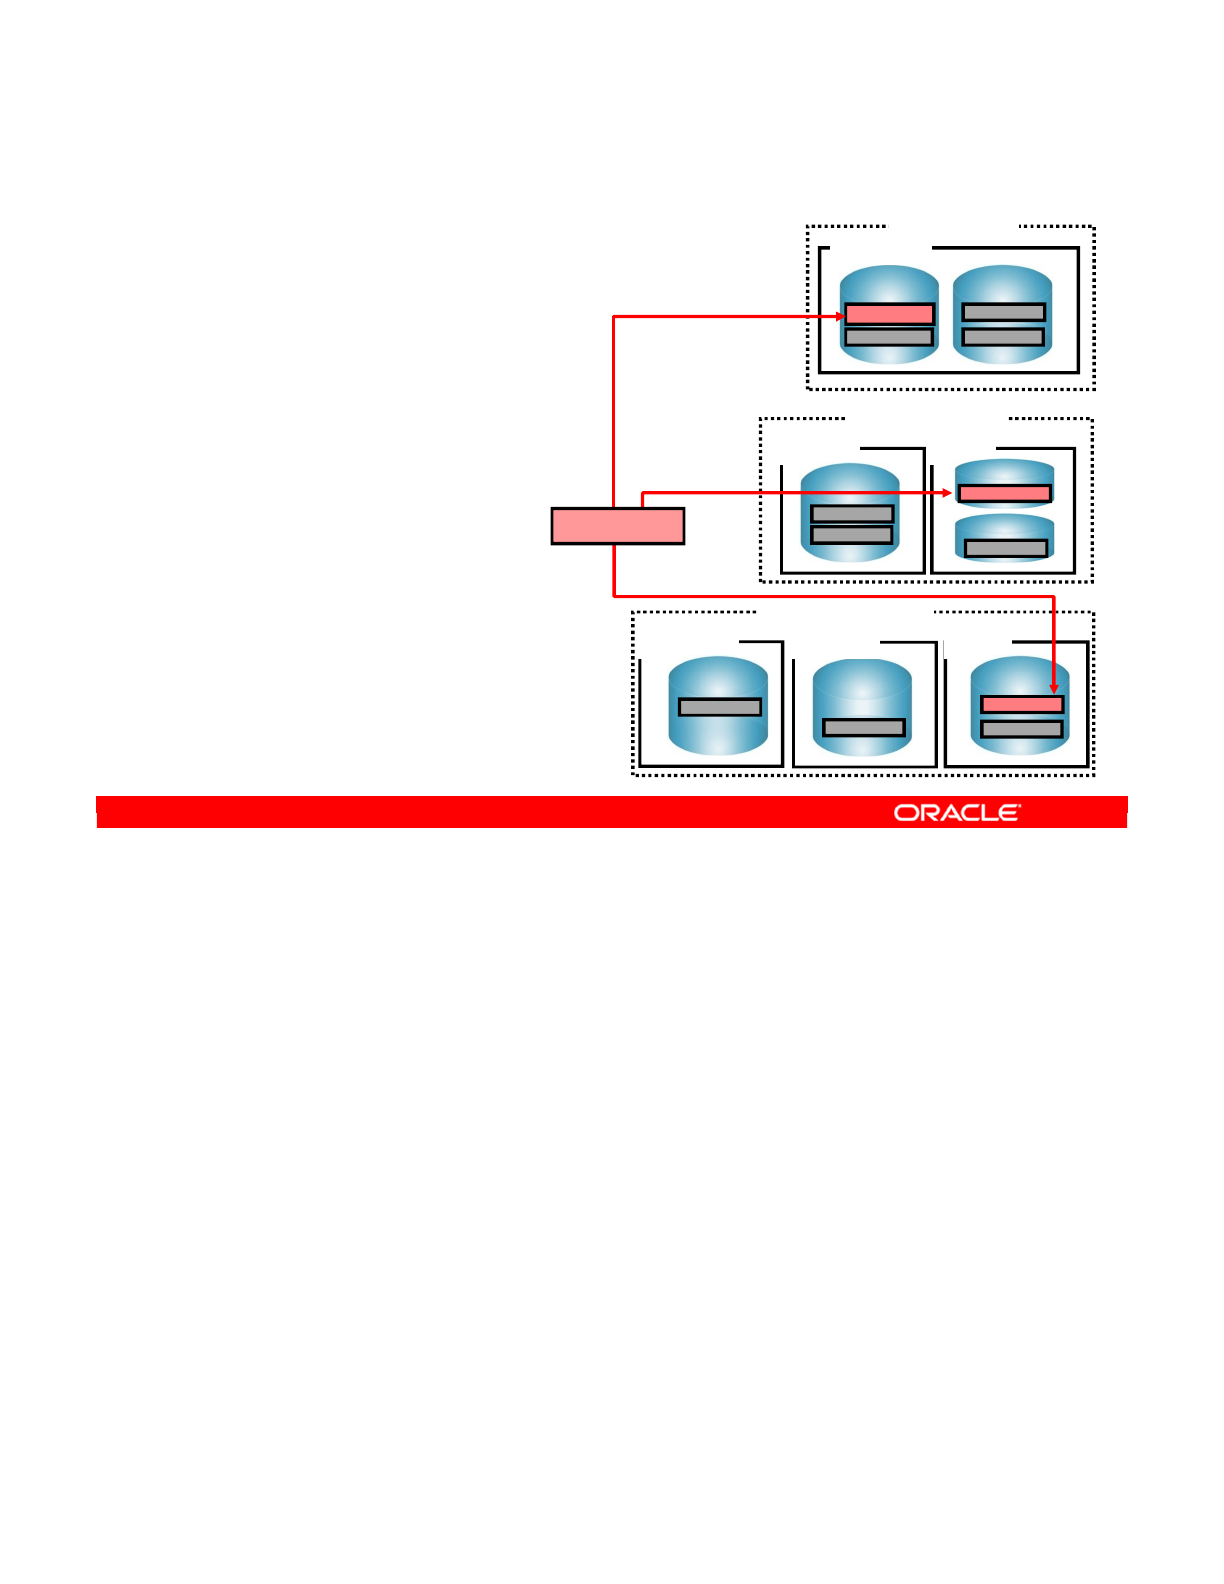
You should define one logical schema each time you have a group of physical schemas
containing similar data structures.
In this example, Accounting represents the ACCOUNTING Oracle schema on the Windows
machine in New York, the ACCOUNTING schema on the Oracle 10gserver running on Linux in
Boston, and the ACCT schema running on Linux in Tokyo.
Note: A simple way to understand guideline 3 is to remember that one logical schema
corresponds to the data structure for one application, implemented in several places called
physical schemas.
Oracle Data Integrator 11g: Integration and Administration 3 - 19
Copyright © 2012, Oracle and/or its affiliates. All rights reserved.
Important Guideline 3
•Guideline 3: Define one
logical schema for each
group of physical schemas
containing a similar data
structure.
•Note that for similar
data structures,
only the structure
counts. The content
can be completely
different on each
physical schema.
MS SQL Server
db_dwh
db_purchase
Windows
MS SQL Server B
purchase
Windows Linux
Oracle
ACCT
SAL
Linux
Oracle 10g
ACCOUNTING
Oracle 11g
SALES
Windows
MS SQL Server A
dwh
MS SQL Server
db_dwh
db_purchase
Production site: Tokyo
Production site:
Boston
Oracle
ACCOUNTING
SALES
Windows
Development:
New York
Accounting
Oracle University and (Oracle Corporation) use only.
These eKit materials are to be used ONLY by you for the express purpose SELF STUDY. SHARING THE FILE IS STRICTLY PROHIBITED.

This distinction can be generalized into the logical architecture as distinct from the physical
architecture.
The physical architecture tells ODI about physical resources, such as connections to data
servers and agents, which will be covered later in the lesson. The physical architecture
describes the locations of servers that exist in your information system and the schemas that
you want to use on them. For example, you may logically have one data schema representing
your accounting application. But, if this schema exists in different places, you should declare
these as separate physical schemas.
The logical architecture, on the other hand, gives a more abstract view of these resources. In
this example, your accounting application schema is defined only once in the logical
architecture. It is a single schema implemented in several different contexts. The contexts are
covered in the following slides.
Oracle Data Integrator 11g: Integration and Administration 3 - 20
Copyright © 2012, Oracle and/or its affiliates. All rights reserved.
Logical Versus Physical Architecture
•Physical architecture:
–Defines physical resources
–Describes the real locations of servers and schemas
—
If the accounting application data schema exists at several
places, it is declared as different physical schemas.
•Logical architecture:
–Abstract view of the resources
—
The accounting application schema is defined only once here. It
is one logical schema implemented in different contexts.
Oracle University and (Oracle Corporation) use only.
These eKit materials are to be used ONLY by you for the express purpose SELF STUDY. SHARING THE FILE IS STRICTLY PROHIBITED.
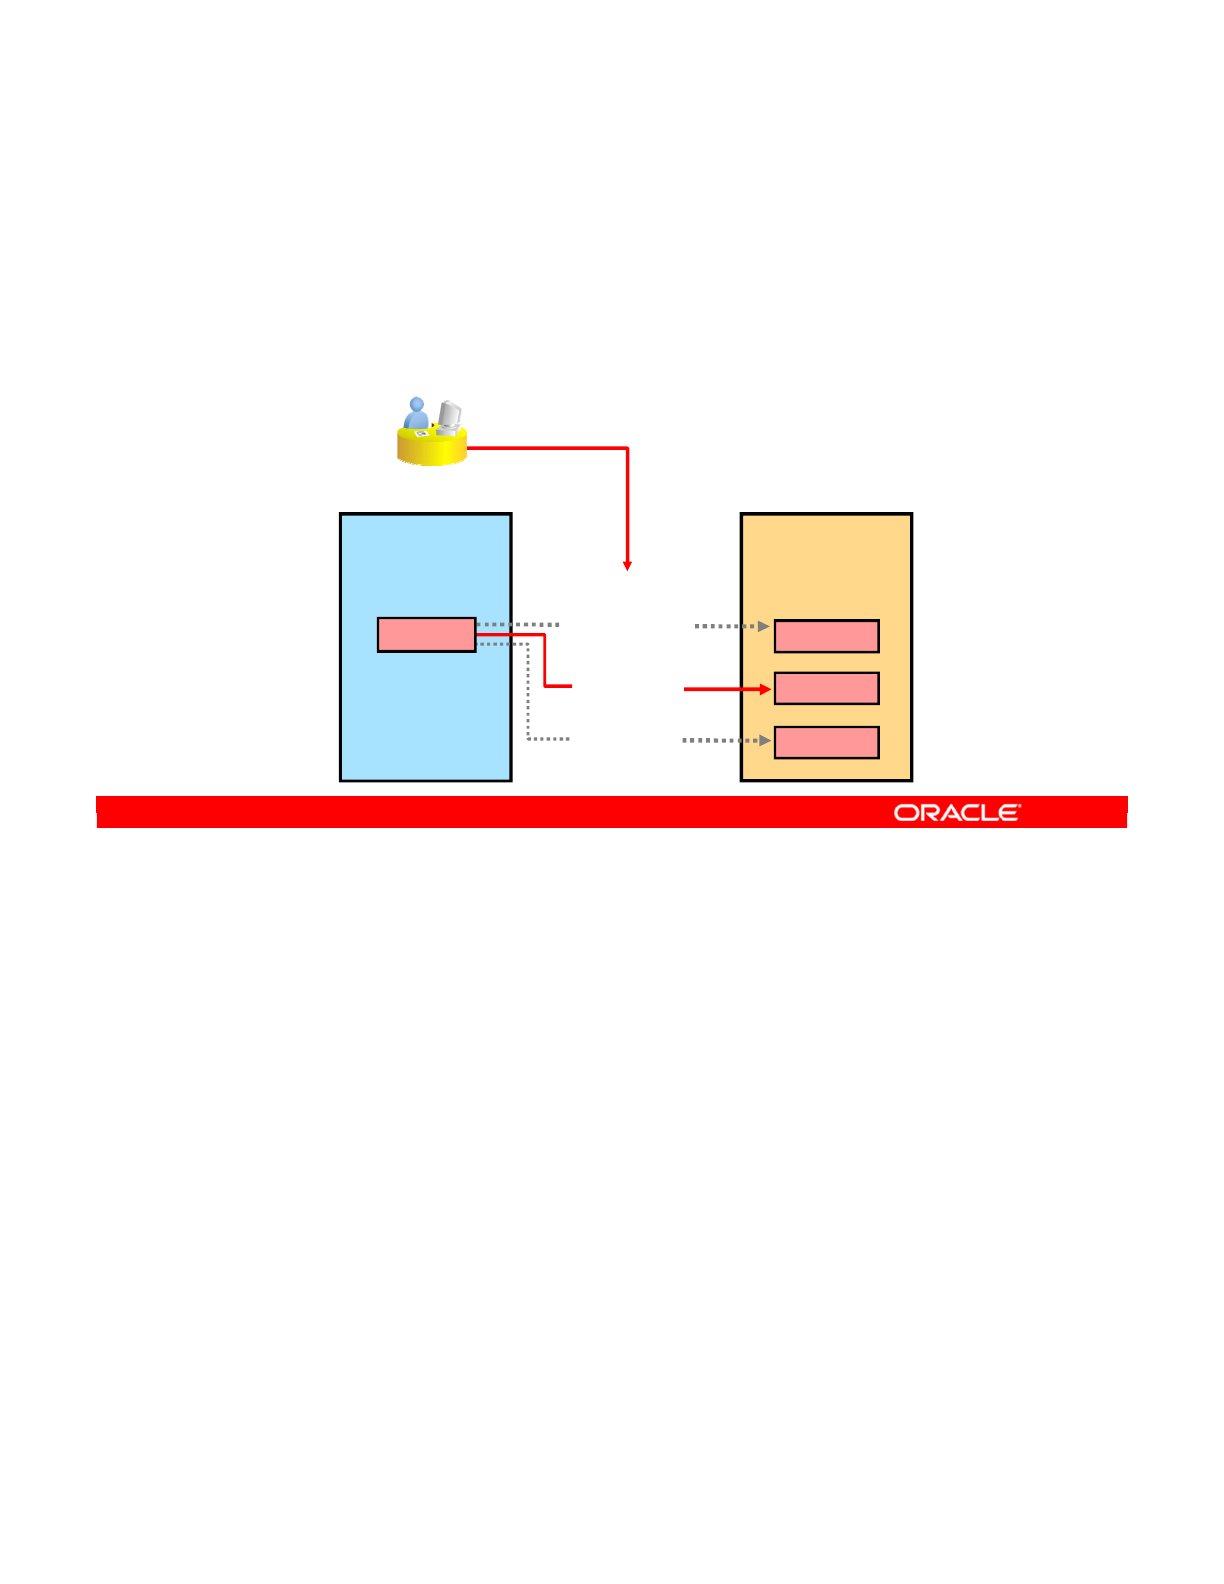
It is important to understand that in ODI, you always work at design time using objects defined
in the logical architecture. For example, you would refer to the datastores defined in the
logical schema Accounting without specifying whether you meant the server in Tokyo or
Boston.
At run time, physical resources are required to carry out the integration process. You,
therefore, specify a particular context to execute within. ODI is then able to provide access to
the physical resources of that context.
Oracle Data Integrator 11g: Integration and Administration 3 - 21
Copyright © 2012, Oracle and/or its affiliates. All rights reserved.
Note: Design Time Versus Run Time
•In ODI, you work at design time on logical resources.
•At run time, execution is started in a particular context,
allowing access to the physical resources of that context.
Design time
Logical
architecture
Select a
context
Run time
Physical
architecture
Logical schema
Development
New York
Production
Boston
Production
Tokyo
Physical schemas
ACCOUNTING
ACCOUNTING
ACCT
Accounting
Oracle University and (Oracle Corporation) use only.
These eKit materials are to be used ONLY by you for the express purpose SELF STUDY. SHARING THE FILE IS STRICTLY PROHIBITED.

A context represents a “situation” where you see the same group of resources. From a
technical perspective, a context maps individual logical resources onto individual physical
resources. So, given a context and a logical resource, ODI can determine the unique physical
resource that is appropriate.
In terms of topology, the logical architecture is mapped onto the physical architecture through
a context. In your example, Boston, Tokyo, and Development are contexts representing
different geographical sites. However, it can also represent situations for different purposes,
such as development, test, or production sites.
Oracle Data Integrator 11g: Integration and Administration 3 - 22
Copyright © 2012, Oracle and/or its affiliates. All rights reserved.
What Is a Context?
•A context is an ODI object you define that represents a
“situation” where a similar group of resources appears.
•A context maps logical resources onto their
implementations as physical resources (logical architecture
onto a physical architecture).
•In a given context, one logical resource is mapped to one
unique physical resource.
•Example of contexts:
–Sites: Boston, Tokyo, and Development
–Environments: Development, Test, and Production
Oracle University and (Oracle Corporation) use only.
These eKit materials are to be used ONLY by you for the express purpose SELF STUDY. SHARING THE FILE IS STRICTLY PROHIBITED.

A logical schema can have multiple physical schemas resolved per context. In this example,
for the Development context, the ORACLE_ORCL_LOCAL_SALES logical schema maps to the
ORACLE_ORCL_LOCAL.SALES_DEV physical schema.
Oracle Data Integrator 11g: Integration and Administration 3 - 23
Copyright © 2012, Oracle and/or its affiliates. All rights reserved.
A Context Maps a Logical to a Physical Schema
Logical to Physical
mapping, per the
Development context
Contexts
Data server
Physical schemas
Logical schema
Oracle University and (Oracle Corporation) use only.
These eKit materials are to be used ONLY by you for the express purpose SELF STUDY. SHARING THE FILE IS STRICTLY PROHIBITED.

Guideline 4: If you have similar groups of resources in different situations, you should define
one context for each situation.
If you apply guideline 4 to the example, each site clearly represents the same collection of
four different resources. Therefore, you have three contexts: Development, Boston, and
Tokyo.
Oracle Data Integrator 11g: Integration and Administration 3 - 24
Copyright © 2012, Oracle and/or its affiliates. All rights reserved.
Defining Contexts
•Guideline 4: Similar resources appear on the three
different sites.
•Three contexts:
–Development
–Boston
–Tokyo
MS SQL Server
db_dwh
db_purchase
Windows
MS SQL Server B
purchase
Windows Linux
Oracle
ACCT
SAL
Linux
Oracle 10g
ACCOUNTING
Oracle 11g
SALES
Windows
MS SQL Server A
dwh
MS SQL Server
db_dwh
db_purchase
Production site: Tokyo
Production site: Boston
Development site: New York
Oracle
ACCOUNTING
SALES
Windows
Oracle University and (Oracle Corporation) use only.
These eKit materials are to be used ONLY by you for the express purpose SELF STUDY. SHARING THE FILE IS STRICTLY PROHIBITED.
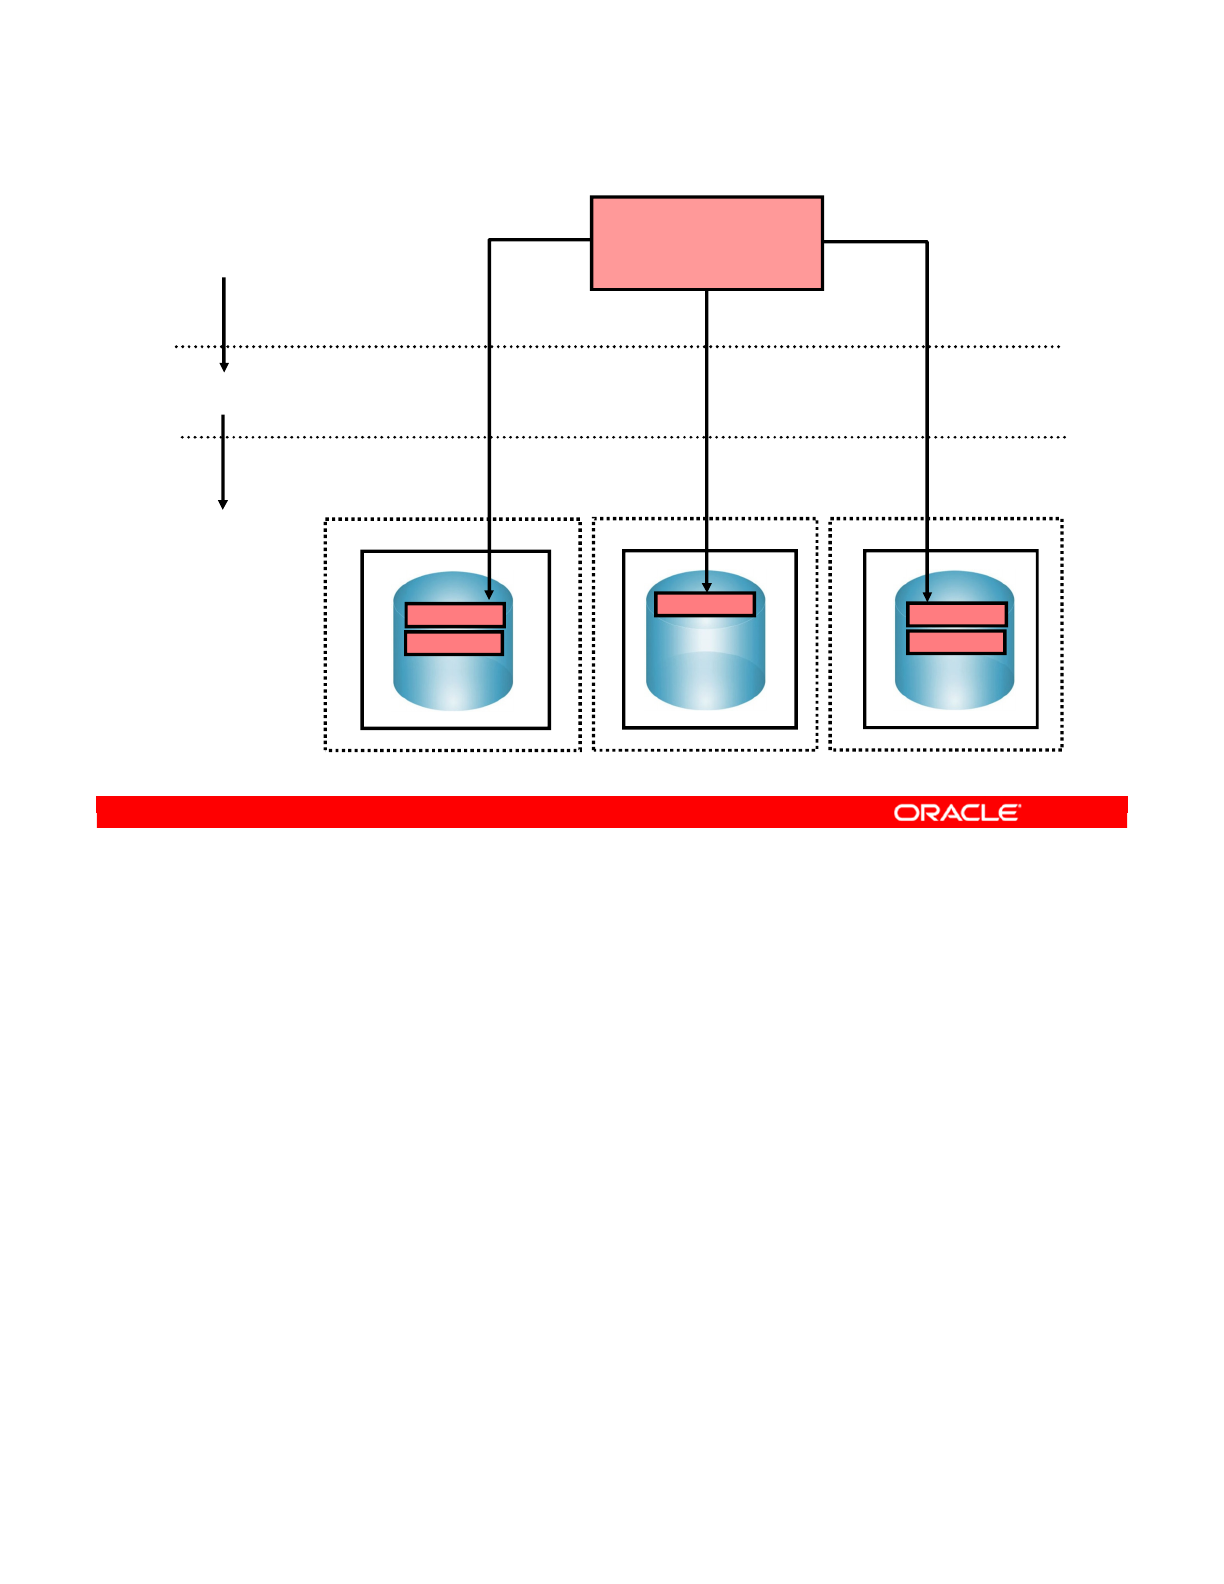
You now illustrate the meaning of a context graphically by using the infrastructure example.
You know about the data warehouses in New York, Tokyo, and Boston that have different
names but share similar data structures. At the logical architecture level, you have a single
logical schema called Datawarehouse. However, you have three contexts. In the
“Development” context, this logical schema is mapped onto the physical schema db_dwh at
the New York site. In the “Tokyo” context, it is mapped onto the physical schema dwh at the
Tokyo site. In the Boston context, the logical schema is mapped onto the physical schema
db_dwh at the Boston site.
Oracle Data Integrator 11g: Integration and Administration 3 - 25
Copyright © 2012, Oracle and/or its affiliates. All rights reserved.
Mapping Logical and Physical Resources
MS SQL Server
Windows
Development site: New York
Windows
MS SQL Server
Production site: Boston
Windows
MS SQL Server A
Production site: Tokyo
Logical
architecture
Contexts
Physical
architecture
dwh db_dwh
db_purchase
db_dwh
Development Tokyo Boston
Datawarehouse
(Logical schema)
db_purchase
Oracle University and (Oracle Corporation) use only.
These eKit materials are to be used ONLY by you for the express purpose SELF STUDY. SHARING THE FILE IS STRICTLY PROHIBITED.
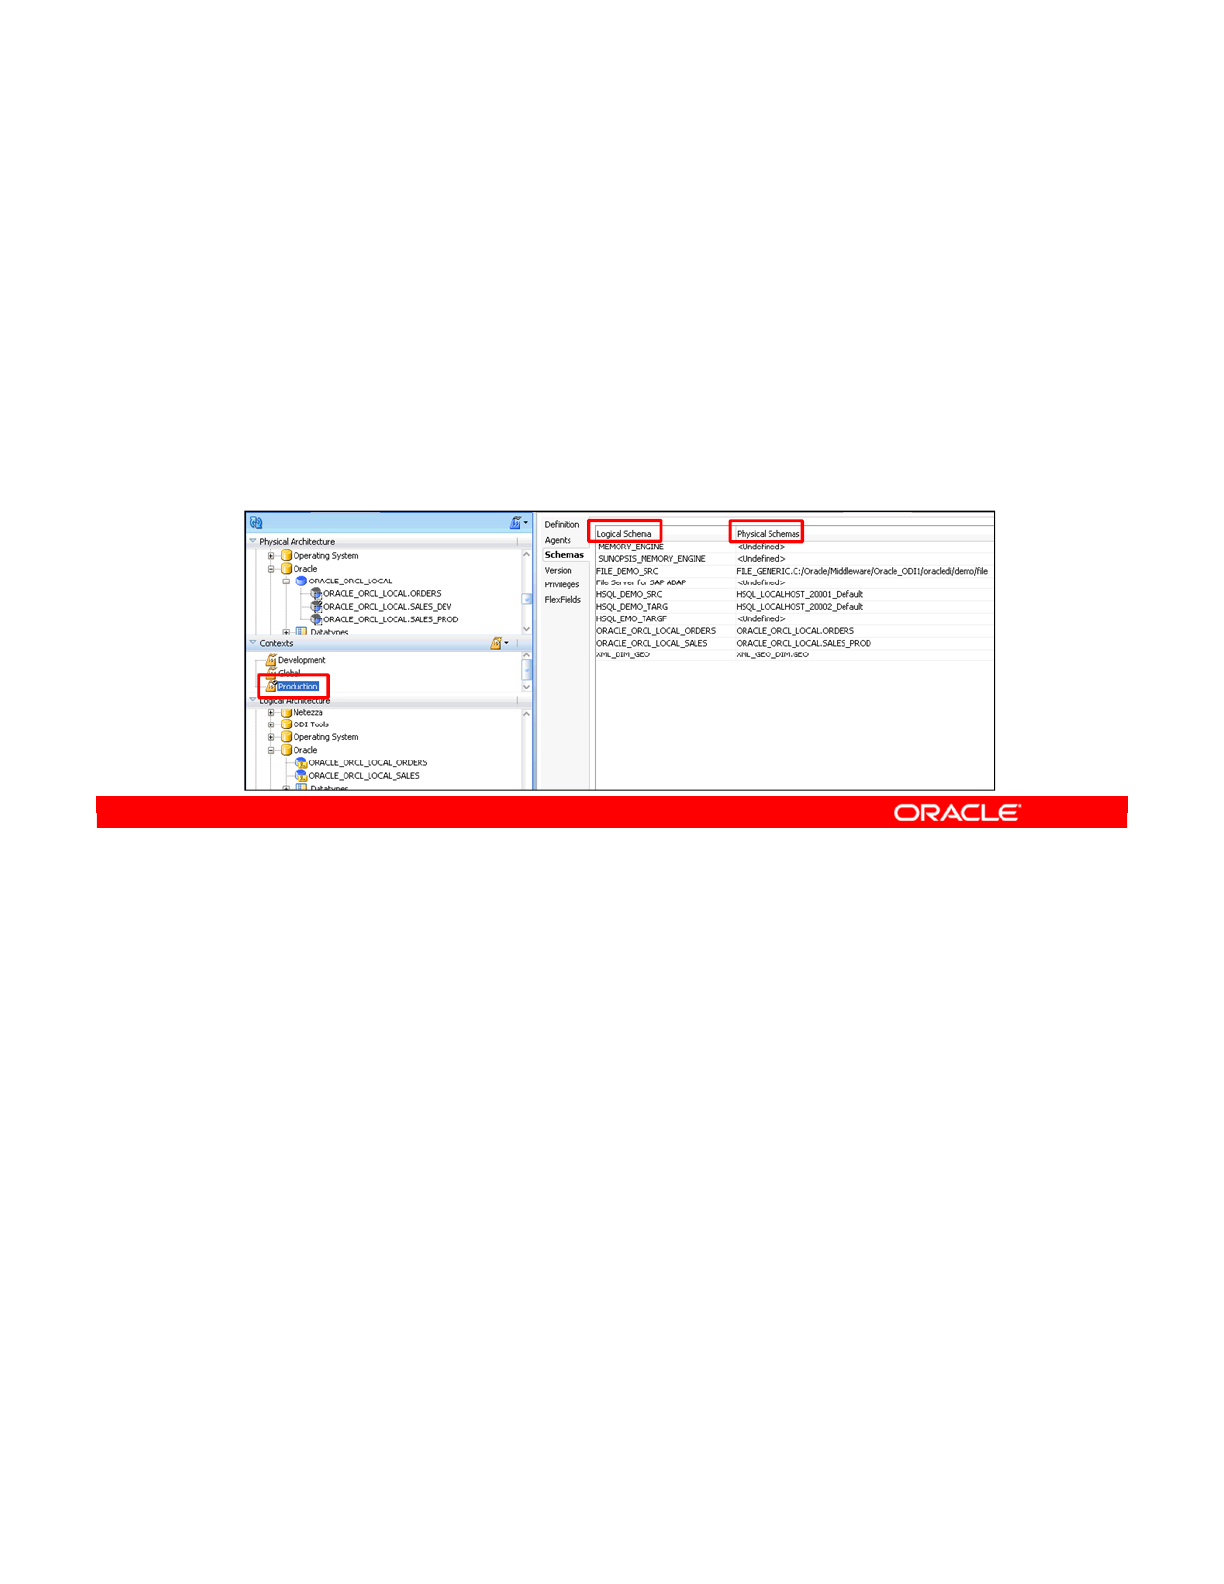
You may wonder what would happen if you had a large number of logical resources and a
large number of contexts. Would you have to map every single logical resource in every
context?
The answer is no. You can leave logical resources unmapped in any context. However, when
executing an object in that context, unmapped logical resources cannot be reached.
In addition, one single physical resource may be useful in several contexts. For example, you
may want to retrieve information from the company web server in various contexts. This does
not pose a problem. You simply map it to a logical resource in each context.
There is a restriction regarding contexts and mapping logical and physical resources. In a
given context, a logical resource can be mapped to one physical resource at the most. That
is, in a certain context, the data warehouse logical schema cannot be mapped to the data
warehouses in Boston and Tokyo simultaneously.
This means that when you ask for one logical resource in one context, you will always have
access to one physical resource if the logical resource is mapped in the context.
Oracle Data Integrator 11g: Integration and Administration 3 - 26
Copyright © 2012, Oracle and/or its affiliates. All rights reserved.
Mapping Logical and Physical Resources
•Logical resources may remain unmapped to any physical
resource in a given context.
•However, unmapped resources cannot be used in the
context.
•A single physical resource may be mapped in several
contexts.
•In a given context, a logical resource is mapped at the
most to one physical resource.
Oracle University and (Oracle Corporation) use only.
These eKit materials are to be used ONLY by you for the express purpose SELF STUDY. SHARING THE FILE IS STRICTLY PROHIBITED.

The following slides cover defining agents in your topology. In any production environment,
you have at least one agent running in ODI.
Oracle Data Integrator 11g: Integration and Administration 3 - 27
Copyright © 2012, Oracle and/or its affiliates. All rights reserved.
Agents in Topology
Oracle University and (Oracle Corporation) use only.
These eKit materials are to be used ONLY by you for the express purpose SELF STUDY. SHARING THE FILE IS STRICTLY PROHIBITED.

The physical agent is a Java service, which can be placed as a listener on a TCP/IP port.
An agent orchestrates the entire process of integration. It carries out data transformations by
sending generated code to the relevant technologies. This could mean sending SQL
statements to a data server, shell commands to the operating system, or even Simple Mail
Transfer Protocol (SMTP) commands to an email server.
Just as data servers, agents are a part of your topology. Physical agents in the topology
correspond to the agents that run at run time. However, you must also define logical agents
that are mapped onto physical agents through contexts.
Oracle Data Integrator 11g: Integration and Administration 3 - 28
Copyright © 2012, Oracle and/or its affiliates. All rights reserved.
ODI Physical Agents
•Agents are lightweight runtime components.
–Can start execution on demand or on schedule
–Can be installed on any machine
•Agents orchestrate the integration process.
–Send generated code to be executed by data servers
–Update the execution log
•Agents must be declared in the topology.
–Physical agents represent components running at run time.
–Physical agents must also be abstracted as logical agents.
•Two types of agents:
–The Java EE agent can be deployed as a web application
and benefit from the features of an application server.
–The Standalone agent runs in a simple Java machine and
can be deployed where needed to perform the integration
flows.
Oracle University and (Oracle Corporation) use only.
These eKit materials are to be used ONLY by you for the express purpose SELF STUDY. SHARING THE FILE IS STRICTLY PROHIBITED.

Though you do not need to have an agent running before you declare it in ODI, the best
practice is to have it running. The physical agent should be created with ODI Topology
Navigator.
1. Connect to the Topology Navigator. Log in to the Master Repository.
2. Right-click the Agents node on the Physical Architecture tab and select New Agent.
3. Define the agent’s parameters. These parameters essentially tell ODI how to find the
agent on the network.
For agent name, you can specify anything. It is, however, recommended that you use the
name of the machine, an underscore, and then the port that it is running on. Then specify
the host or IP address of the machine, and finally the port.
Note: If you want to set up load balancing, click the Load balancing tab and select a set of
physical agents to which the current agent can delegate executions. When the agent has
queued more than the specified number of sessions, it will reject further requests. You can
also define other agents to which this agent can delegate sessions. Load balancing will be
discussed in detail later in this lesson.
Oracle Data Integrator 11g: Integration and Administration 3 - 29
Copyright © 2012, Oracle and/or its affiliates. All rights reserved.
Creating a Physical Agent
1
2
128.1585.34.118
Oracle University and (Oracle Corporation) use only.
These eKit materials are to be used ONLY by you for the express purpose SELF STUDY. SHARING THE FILE IS STRICTLY PROHIBITED.

These parameters are generally stored in the odiparams file. This slide lists the ODI Agent
parameters that enable the agent to be configured. The parameters are preceded by the “-”
character and the possible values are preceded by the “=” character. The ODI Agent
parameters include:
•-port=<port>: Is the port on which the agent is listening. If this parameter is not
specified, the agent runs as a listener on the default port 20910.
•-help: Displays the options and parameters that can be used, without launching the
agent
•-name=<agent name>: Is the name of the physical agent used. ODI needs this
parameter to identify the agent that executes a session in the following cases:
-More than one agent is declared on the same machine (on different ports).
-Your machine’s IP configuration is insufficient to enable ODI to identify the agent
(this problem occurs frequently on AS/400).
-The agent’s IP address does not enable the agent to be identified (127.0.0.1 or
“loopback”).
•-v=<trace level>: Enables the agent to generate traces (verbose mode). There are
five trace levels:
-Displays the start and end of each session
Oracle Data Integrator 11g: Integration and Administration 3 - 30
Copyright © 2012, Oracle and/or its affiliates. All rights reserved.
ODI Agent Parameters
•Agent parameters:
-port=<port>: Port on which the agent is listening (default port is 20910)
-help: Displays the options and parameters that can be used, without launching the
agent
-name=<agent name>: The name of the physical agent used
-v=<trace level>: Enables the agent to generate traces (verbose mode)
•Work Repository connection parameters:
-SECU_DRIVER=<driver name>: JDBC driver to access the Master Repository
-SECU_URL=<url>: JDBC URL to access for the Master Repository
-SECU_USER=<user>: User of the Master Repository connection
-SECU_PASS=<password>: Password of the user of the Master Repository. This
password must be encrypted.
-WORK_REPOSITORY=<work repository name>: Name of the Work Repository
containing scenarios to be executed
Connection parameters are specified in the odiparams file.
Oracle University and (Oracle Corporation) use only.
These eKit materials are to be used ONLY by you for the express purpose SELF STUDY. SHARING THE FILE IS STRICTLY PROHIBITED.

-Displays level 1, and the start and end of each step
-Displays level 2, and each task executed
-Displays the SQL queries executed
-Complete trace, generally reserved for support
Some of these traces can be voluminous and so it is recommended that you redirect them
to a text file by using the following command:
-In Windows: agent.bat "-v=5" > trace.txt
-In UNIX: agent.sh -v=5 > trace.txt
•Work Repository connection parameters. These parameters, which are used to specify the
connection to the Work Repository, are specified in the odiparams file.
--SECU_DRIVER=<driver name>: JDBC driver to access the Master Repository,
for example: oracle.jdbc.driver.OracleDriver
--SECU_URL=<url>: JDBC URL to access for the Master Repository, for example,
jdbc:oracle:thin@localhost:1521:XE
--SECU_USER=<user>: User of the Master Repository connection (the database
user)
--SECU_PASS=<password>: Password of the user of the Master Repository
connection. This password must be encrypted by using the command agent
ENCODE <password>.
--WORK_REPOSITORY=<work repository name>: Name of the Work Repository
containing the scenarios to be executed
Oracle Data Integrator 11g: Integration and Administration 3 - 31
Oracle University and (Oracle Corporation) use only.
These eKit materials are to be used ONLY by you for the express purpose SELF STUDY. SHARING THE FILE IS STRICTLY PROHIBITED.
Note: Each agent will have its own directory.
By default, the agent.bat and odiparams.bat (or sh in Linux) files are available in the
<odi home>/oracledi/agent/bin directory.
Oracle Data Integrator 11g: Integration and Administration 3 - 32
Copyright © 2012, Oracle and/or its affiliates. All rights reserved.
Launching a Standalone Agent: Examples
•On Windows:
Agent.bat "-port=20300" "-v=5" launches the Standalone agent on
port 20300 with a level 5 trace on the console.
•On UNIX:
./agent.sh "-port=20300" "-name=Agent001" launches the
Standalone agent and names it Agent001.
Oracle University and (Oracle Corporation) use only.
These eKit materials are to be used ONLY by you for the express purpose SELF STUDY. SHARING THE FILE IS STRICTLY PROHIBITED.
You can stop a standalone ODI agent, which is listening on a TCP/IP port by using the
agentstop command.
To stop an agent:
1. Open a UNIX shell, CMD, or QSH (for AS/400) session
2. Launch the appropriate command file (agentstop.bat on Windows, agentstop.sh
on UNIX or AS/400-QSH), with any required parameters. The listening agent is stopped.
Note: For security reasons, you can stop an agent only from a command line launched on the
same machine from which the agent’s process was started. You cannot stop a remote agent.
OPMN Integration
The OPMN files are in the <odi home>/oracledi/agent/bin directory. For more
information, see Oracle Fusion Middleware Installation Guide for Oracle Data Integrator.
Oracle Data Integrator 11g: Integration and Administration 3 - 33
Copyright © 2012, Oracle and/or its affiliates. All rights reserved.
Stopping the ODI Agent
•On Windows:
agentstop "-PORT=20300" stops the Listener agent on port 20300.
•On UNIX:
./agentstop.sh stops the Listener agent on the default port.
OPMN Integration
Standalone agents can be made highly available by using Oracle Process
Manager and Notification Server (OPMN). Scripts are provided to configure
OPMN to protect standalone agents against failure.
Oracle University and (Oracle Corporation) use only.
These eKit materials are to be used ONLY by you for the express purpose SELF STUDY. SHARING THE FILE IS STRICTLY PROHIBITED.

The Runtime Agent can be deployed as a Java EE component within an application server. It
benefits in this configuration from the application server layer features such as clustering and
connection pooling for large configurations. This Java EE agent exposes an MBeans
interface, enabling lifecycle operations (start/stop) from the application server console and
metrics that can be used by the application server console to monitor the agent activity and
health.
•Oracle WebLogic Server Integration: Oracle Data Integrator components integrate
seamlessly with the Java EE application server.
•Java EE Agent Template Generation: Oracle Data Integrator provides a wizard to
automatically generate templates for deploying Java EE agents in Oracle WebLogic
Server. Such a template includes the Java EE agent and its configuration, and can
optionally include the JDBC data sources definitions required for this agent, as well as
the drivers and libraries files for these data sources to work.
•Oracle WebLogic Configuration Wizard: By using the Oracle WebLogic Configuration
Wizard, domain administrators can extend their domains or create a new domain for the
Oracle Data Integrator Java EE runtime agents.
Oracle Data Integrator 11g: Integration and Administration 3 - 34
Copyright © 2012, Oracle and/or its affiliates. All rights reserved.
Deploying and Configuring a Java EE Agent
The deployment features:
•Oracle WebLogic Server Integration
•Java EE Agent Template Generation
•Oracle WebLogic Configuration Wizard
•Automatic Data Source Creation for WebLogic Server
Oracle University and (Oracle Corporation) use only.
These eKit materials are to be used ONLY by you for the express purpose SELF STUDY. SHARING THE FILE IS STRICTLY PROHIBITED.
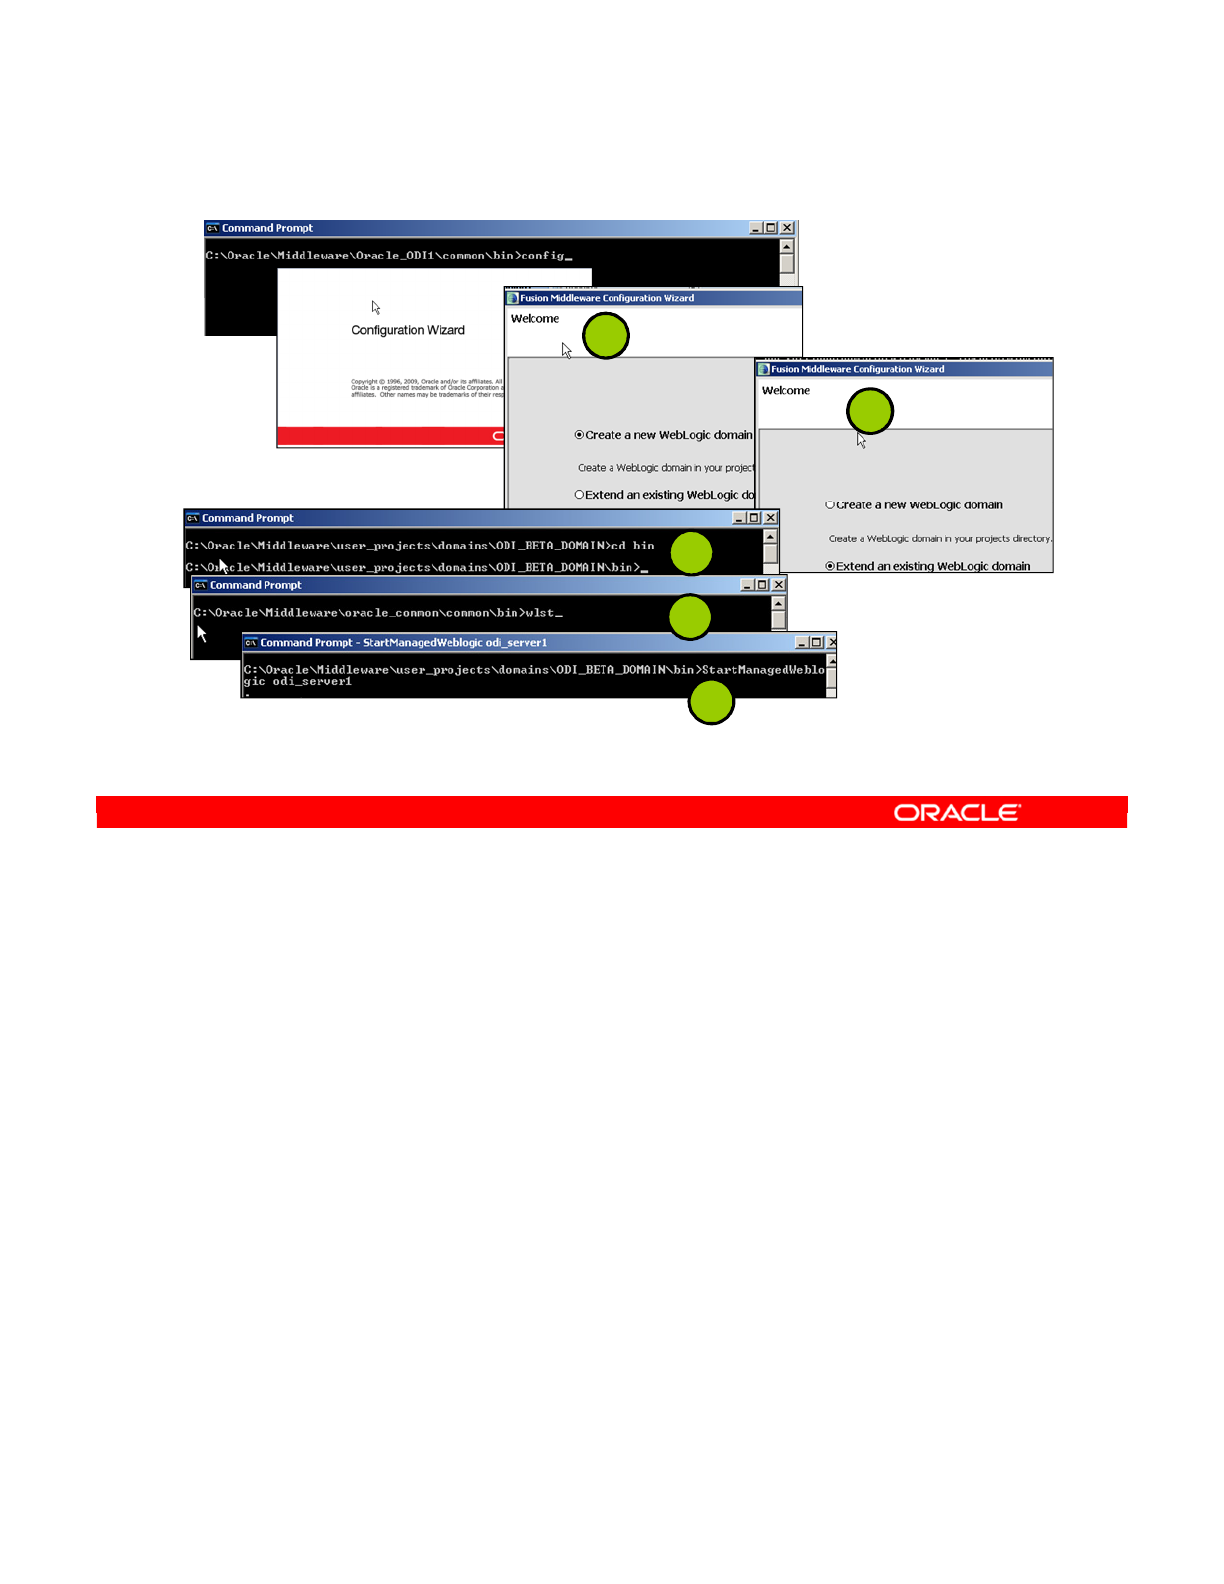
•Automatic Data Source Creation for WebLogic Server: Java EE Components use JDBC
data sources to connect to the repositories as well as to the source and target data
servers, and benefit, when deployed in an application server, from the connection
pooling feature of their container.
To facilitate the creation of these data sources in the application server, Oracle Data
Integrator Studio provides an option to deploy a data source into a remote Oracle WebLogic
application server.
1. To deploy and configure domains with WLS, start the config.bat file, which is found
in the ODI Home Install subfolder. On the Configuration Wizard Welcome screen, select
“Create new Weblogic domain.”
2. Extend the domain with the ODI_AGENT application.
3. Start the Admin Server.
4. Set up JPS Security within the Admin Server.
5. Start your Weblogic domain from the command shell.
Oracle Data Integrator 11g: Integration and Administration 3 - 35
Copyright © 2012, Oracle and/or its affiliates. All rights reserved.
Deploying and Configuring a Java EE Agent
1
2
3
4
5
Oracle University and (Oracle Corporation) use only.
These eKit materials are to be used ONLY by you for the express purpose SELF STUDY. SHARING THE FILE IS STRICTLY PROHIBITED.

6. Start ODI and connect to the Work Repository.
7. Test the connectivity of the ODI agent using Topology Manager.
Now you can start executing your ODI objects with the configured Java EE agent.
Oracle Data Integrator 11g: Integration and Administration 3 - 36
Copyright © 2012, Oracle and/or its affiliates. All rights reserved.
Deploying and Configuring Java EE Agent
7
6
Oracle University and (Oracle Corporation) use only.
These eKit materials are to be used ONLY by you for the express purpose SELF STUDY. SHARING THE FILE IS STRICTLY PROHIBITED.

ODI implements load balancing between physical agents. Each physical agent is defined with
the maximum number of sessions it can execute simultaneously and optionally with a number
of linked physical agents to which it can delegate sessions’ executions. An agent’s load is
determined at a given time by the ratio (number of running sessions/maximum number of
sessions) for this agent.
The maximum number of sessions is a value that must be set depending on the capabilities of
the machine running the agent. It can also be set depending on the amount of processing
power you want to give to the Data Integrator agent.
Delegating Sessions
When a session is started on an agent with linked agents, ODI determines which one of the
linked agents is less loaded, and the session is delegated to this linked agent. If the user
parameter “Use new load balancing” is in use, sessions are also rebalanced each time a
session finishes. This means that if an agent runs out of sessions, it will possibly be
reallocated some sessions from another agent.
Note: An agent can be linked to itself. An agent not linked to itself can only delegate sessions
to its linked agents, and will never execute a session. Delegation works on cascades of linked
agents. Besides, it is possible to make loops in agents’ links. This option is not recommended.
Oracle Data Integrator 11g: Integration and Administration 3 - 37
Copyright © 2012, Oracle and/or its affiliates. All rights reserved.
Load Balancing: Example
Agent localagent2 is
linked to the agent
localagent and to itself.
Agent localagent3 is linked
to the agent localagent,
localagent2, and to itself.
Oracle University and (Oracle Corporation) use only.
These eKit materials are to be used ONLY by you for the express purpose SELF STUDY. SHARING THE FILE IS STRICTLY PROHIBITED.

Agent Unavailable
When for a given agent the number of running sessions is equal to its maximum number of
sessions, the agent will set incoming sessions in a “queued” status until the number of running
sessions falls below the maximum number of sessions for this agent.
To set up load balancing:
•Define a set of physical agents and link them to a root agent (see “Create a Physical
Agent”)
•Start the root and linked agents
•Run the executions on the root agent. ODI will balance the load of the executions between
its linked agents.
Note: You can see the execution agent for a session in the session window in Operator.
Oracle Data Integrator 11g: Integration and Administration 3 - 38
Oracle University and (Oracle Corporation) use only.
These eKit materials are to be used ONLY by you for the express purpose SELF STUDY. SHARING THE FILE IS STRICTLY PROHIBITED.

Important Note 5
For every agent that you have started, you need to create one physical agent in the topology.
Oracle Data Integrator 11g: Integration and Administration 3 - 39
Copyright © 2012, Oracle and/or its affiliates. All rights reserved.
Important Guideline 5
Guideline 5: You need one physical agent defined in ODI for
every agent you have started.
Oracle University and (Oracle Corporation) use only.
These eKit materials are to be used ONLY by you for the express purpose SELF STUDY. SHARING THE FILE IS STRICTLY PROHIBITED.
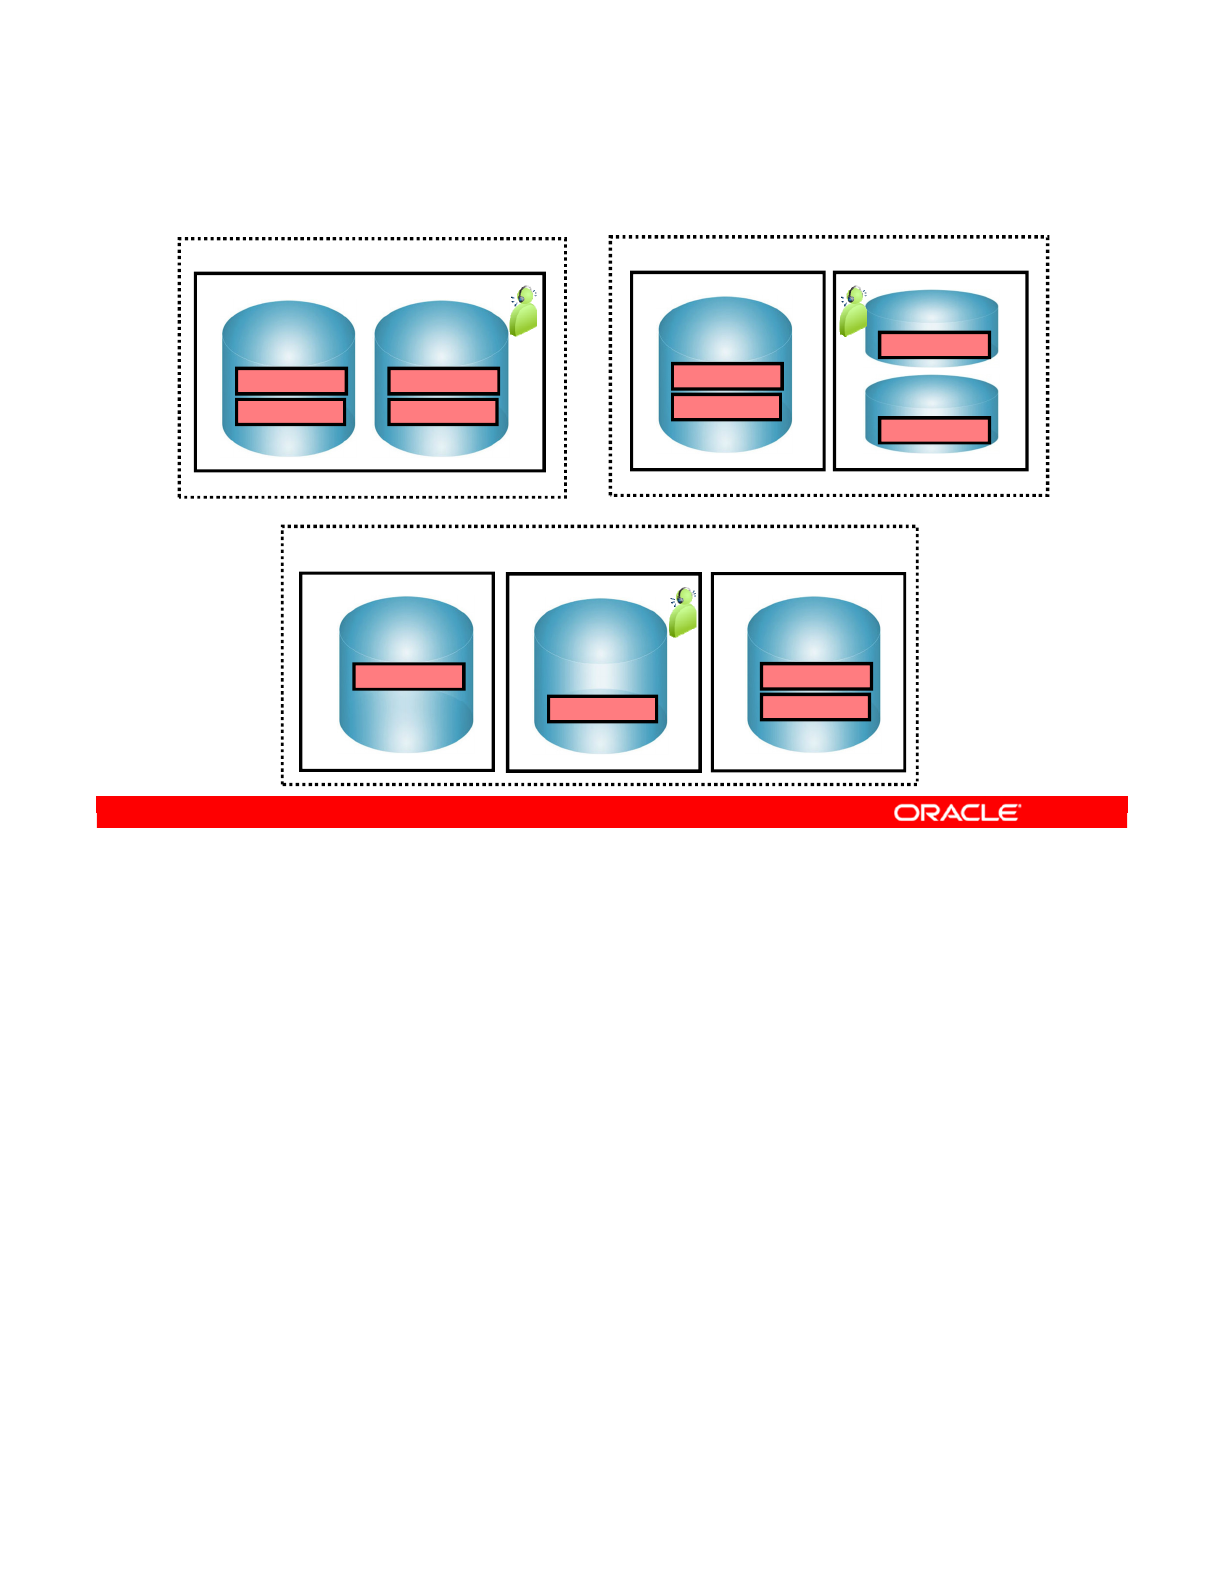
Now you add the agents that you have installed to the graphic. Here, you have one agent in
each context. In the New York and Tokyo sites, the agent runs on a Windows machine. At the
Boston site, it runs on Linux.
Oracle Data Integrator 11g: Integration and Administration 3 - 40
Copyright © 2012, Oracle and/or its affiliates. All rights reserved.
Infrastructure with Agents: Example
Production site: Boston
Windows Linux
Oracle 10g
ACCOUNTING
Oracle 11g
SALES
MS SQL Server
db_dwh
db_purchase
Oracle
ACCOUNTING
SALES
MS SQL Server
db_dwh
db_purchase
Windows
Development site: New York
MS SQL Server B
purchase
Windows Linux
Oracle
ACCT
SAL
Windows
MS SQL Server A
dwh
Production site: Tokyo
Oracle University and (Oracle Corporation) use only.
These eKit materials are to be used ONLY by you for the express purpose SELF STUDY. SHARING THE FILE IS STRICTLY PROHIBITED.
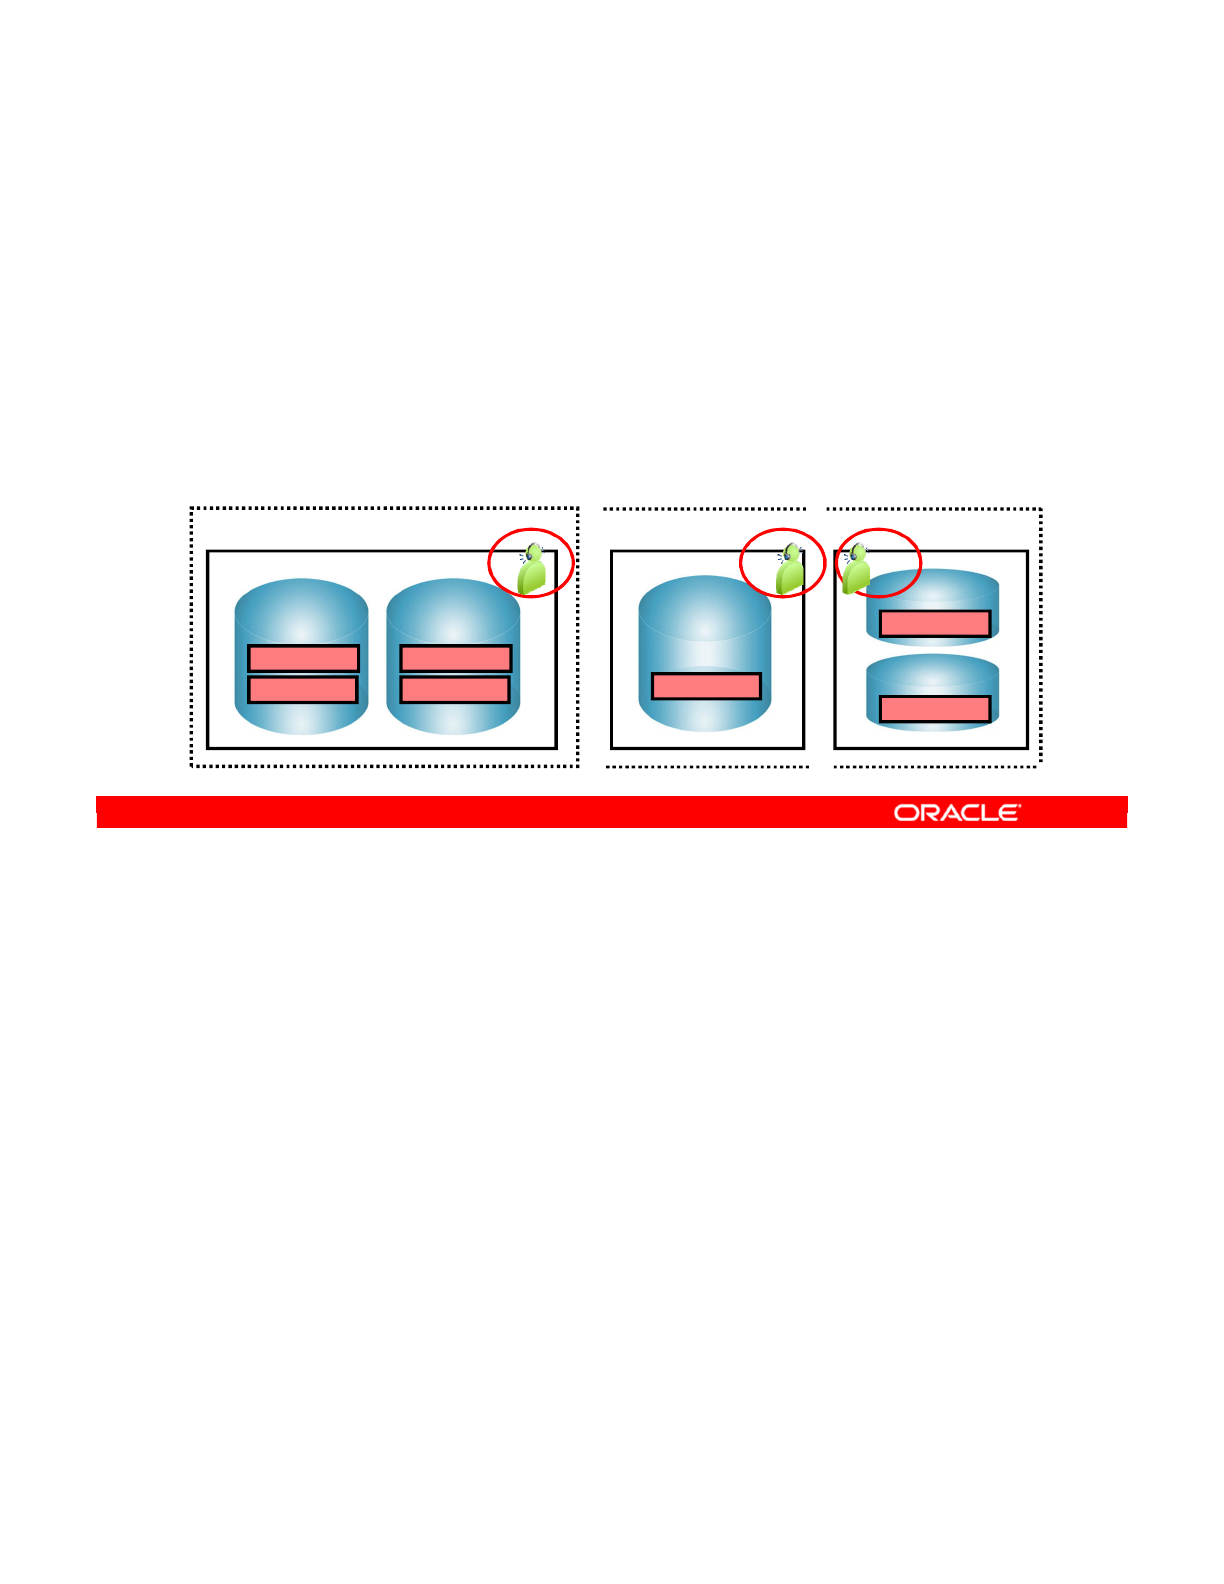
In ODI, you must define each of these agents as a physical agent. Then, you must define a
logical agent. For example, for the “Development” context, you should map it onto the agent
running at the New York development site.
Note: The logical agent is selected when processes are started. The execution context then
defines which physical agent will orchestrate the process.
Oracle Data Integrator 11g: Integration and Administration 3 - 41
Copyright © 2012, Oracle and/or its affiliates. All rights reserved.
Defining Agents: Example
•In ODI, you need to define each of these physical agents–
one per agent launched.
•One logical agent (depending on the context) will be
mapped onto one of the physical agents.
Development site: New York
Oracle
ACCOUNTING
SALES
MS SQL Server
db_dwh
db_purchase
Windows Linux
Oracle 10g
ACCOUNTING
Oracle 11g
SALES
MS SQL Server B
purchase
Windows
Development site: Tokyo Development site: Boston
Oracle University and (Oracle Corporation) use only.
These eKit materials are to be used ONLY by you for the express purpose SELF STUDY. SHARING THE FILE IS STRICTLY PROHIBITED.
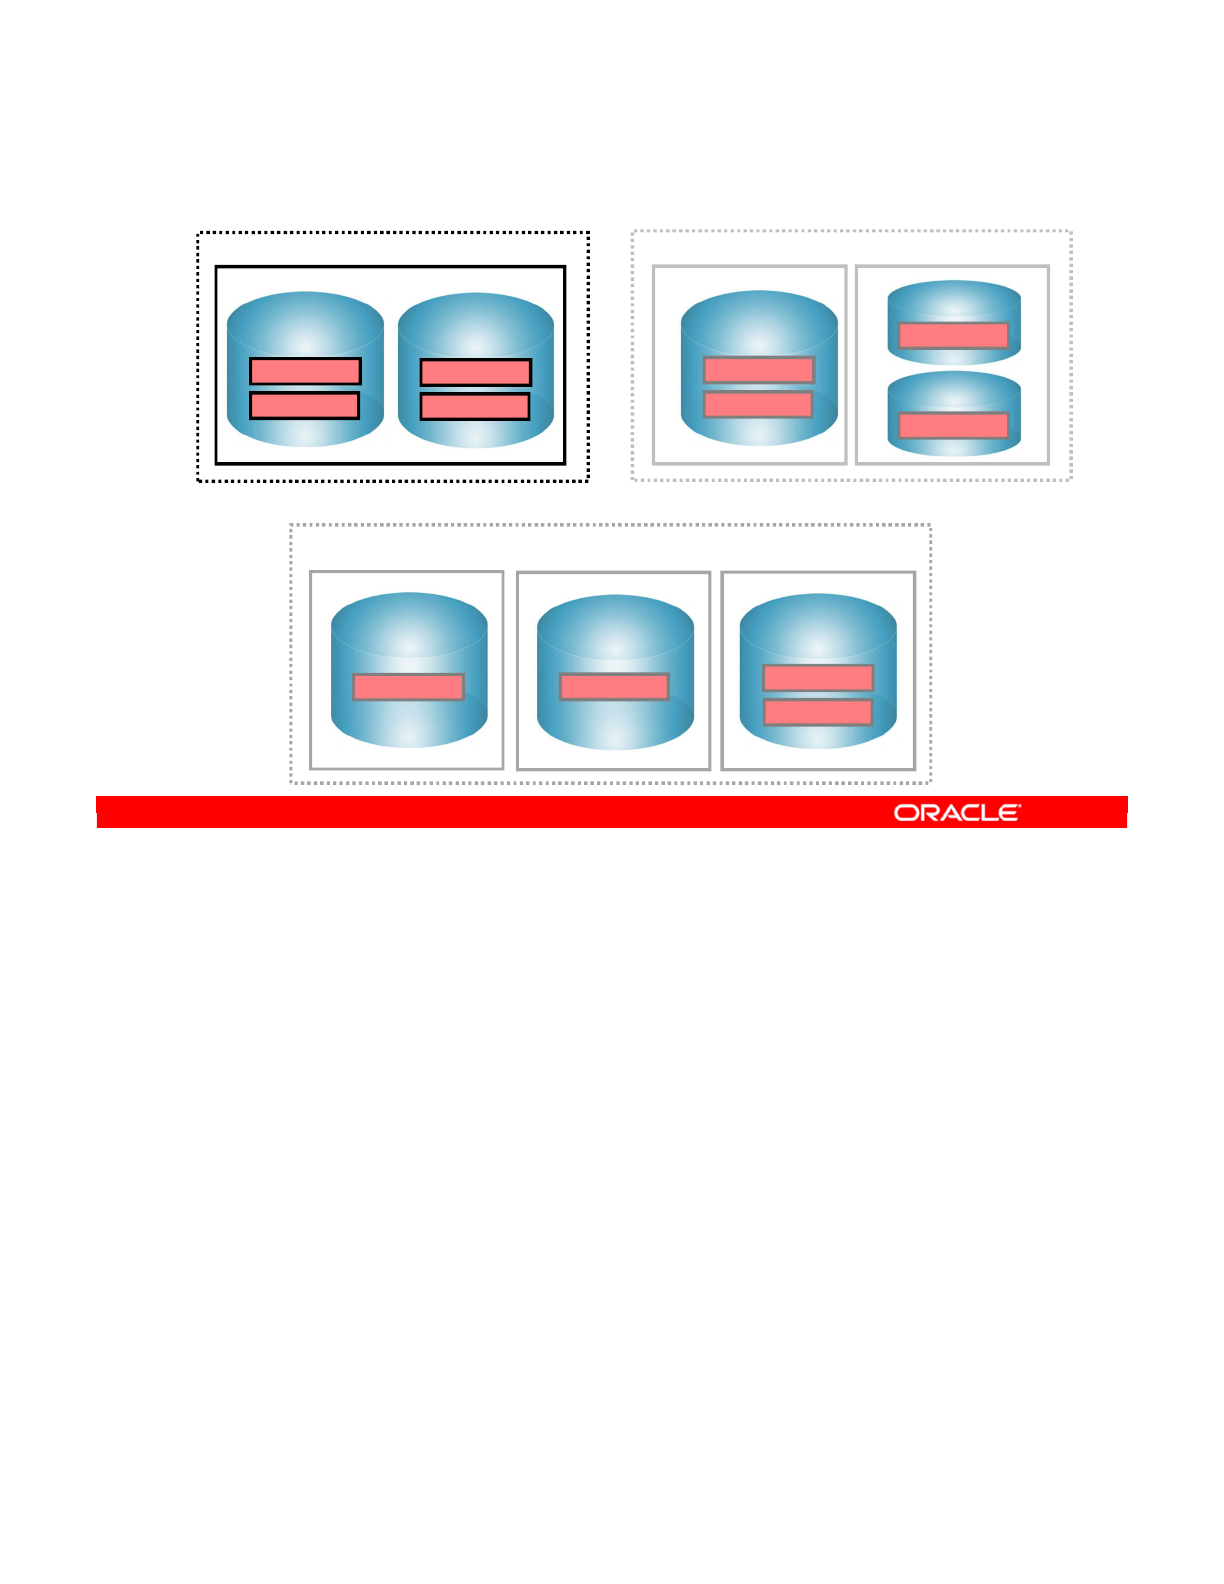
Returning to the earlier example of the infrastructure for two production sites, the
development site must now be added. The site where most of the ODI development occurs is
based in New York. This site has access to the development versions of the databases. For
cost reasons, all databases at this site are hosted on a single Windows machine. This
machine runs one Oracle instance and one SQL Server instance.
Oracle Data Integrator 11g: Integration and Administration 3 - 42
Copyright © 2012, Oracle and/or its affiliates. All rights reserved.
Special Case: Fragmentation Problem
Development site: New York
MS SQL Server B
purchase
Windows machine Linux machine
Oracle
ACCT
SAL
Windows machine
MS SQL Server A
dwh
Production site: Tokyo
Windows machine Linux machine
Oracle 10g
ACCOUNTING
Oracle 11g
SALES
MS SQL Server
db_dwh
db_purchase
Production site: Boston
Windows machine
MS SQL Server
db_dwh
db_purchase
Oracle
ACCOUNTING
SALES
Oracle University and (Oracle Corporation) use only.
These eKit materials are to be used ONLY by you for the express purpose SELF STUDY. SHARING THE FILE IS STRICTLY PROHIBITED.

You will now see how to define the development databases in ODI.
You know that the production site in Boston has the accounting and sales schemas on two
separate Oracle instances. A data server was created for each schema in the ODI topology.
However, at the development site in New York, a single Oracle instance, Oracle_dev,
contains the two schemas. Normally, you create a single data server in the ODI topology with
two physical schemas.
When developing the integration processes, you can take advantage of the fact that the
accounting and sales databases are on the same Oracle instance. However, when you try to
put these into production on the Boston site, the processes will not work because the
development environment does not reflect the production environment. For example, a join in
the source in New York might work, while failing when moved into production in Boston.
Therefore, you must develop the processes such that they reflect the production environment
closely. That is, the development site must reflect the fragmentation of databases at the
production site.
You need to define two data servers at the Boston site. In reality, both of them point to the
same server. However, by separating them this way, you prevent the developers and ODI
from making false assumptions.
Oracle Data Integrator 11g: Integration and Administration 3 - 43
Copyright © 2012, Oracle and/or its affiliates. All rights reserved.
Special Case: Fragmentation Problem
Physical architecture in Oracle Data Integrator
Oracle_dev
ACCOUNTING
SALES
New York
Development Server
Boston
Production Server
Oracle 10g
ACCOUNTING
Oracle 11g
SALES
Oracle 10g
ACCOUNTING
Oracle 11g
SALES
Oracle_dev1
ACCOUNTING
Oracle_dev2
SALES
Information System
Oracle_dev
ACCOUNTING
SALES
Oracle University and (Oracle Corporation) use only.
These eKit materials are to be used ONLY by you for the express purpose SELF STUDY. SHARING THE FILE IS STRICTLY PROHIBITED.

This problem and solution is generalized as guideline number six. When you set up the
topology for the development environment, it should mirror the most fragmented production
environment. That is, if a production environment has four schemas on four different servers,
the development environment should be defined in the same way. If several production
environments are fragmented in different ways, the development environment should take all
these fragmentations into account.
This is an exception to guideline one, which states that data servers should be defined only
once.
Oracle Data Integrator 11g: Integration and Administration 3 - 44
Copyright © 2012, Oracle and/or its affiliates. All rights reserved.
Special Case: Important Guideline 6
Guideline 6: The topology of the development environment
should always reflect the most fragmented production
environment.
Oracle University and (Oracle Corporation) use only.
These eKit materials are to be used ONLY by you for the express purpose SELF STUDY. SHARING THE FILE IS STRICTLY PROHIBITED.

Here is how you define this situation in ODI. First, how many data servers do you need?
Guideline 1 states that you must have one data server for every instance of a server. In this
example, you need to have three servers in Tokyo and three in Boston.
If you apply guideline 6, you get two Oracle servers to reflect the fragmentation of the two
Oracle servers in Boston. Similarly, you have two SQL Servers because the two SQL Servers
in Tokyo are split. That gives a total of 10 data servers.
How many physical schemas do you need?
Guideline 2 states that each physical schema used by ODI must be defined. You have two
Oracle schemas and two MS SQL database/owner combinations in New York, Boston, and
Tokyo. That gives 12 physical schemas in all, each attached to the respective data server.
Oracle Data Integrator 11g: Integration and Administration 3 - 45
Copyright © 2012, Oracle and/or its affiliates. All rights reserved.
Special Case: Defining the Physical Architecture
•Data servers
–Guideline 1: One data server per Oracle instance or MS SQL
Server
—
Tokyo: 3 + Boston: 3
–Guideline 6: Reflect the fragmented production environment.
—
New York (development): 2 Oracle data servers + 2 MS SQL
data servers
–Total: 10 Data Servers
•Physical schemas
–Guideline 2: One physical schema per Oracle schema or MS
SQL database/owner
—
Tokyo: 4 + Boston: 4 + New York: 4
–Total: 12 physical schemas
Oracle University and (Oracle Corporation) use only.
These eKit materials are to be used ONLY by you for the express purpose SELF STUDY. SHARING THE FILE IS STRICTLY PROHIBITED.
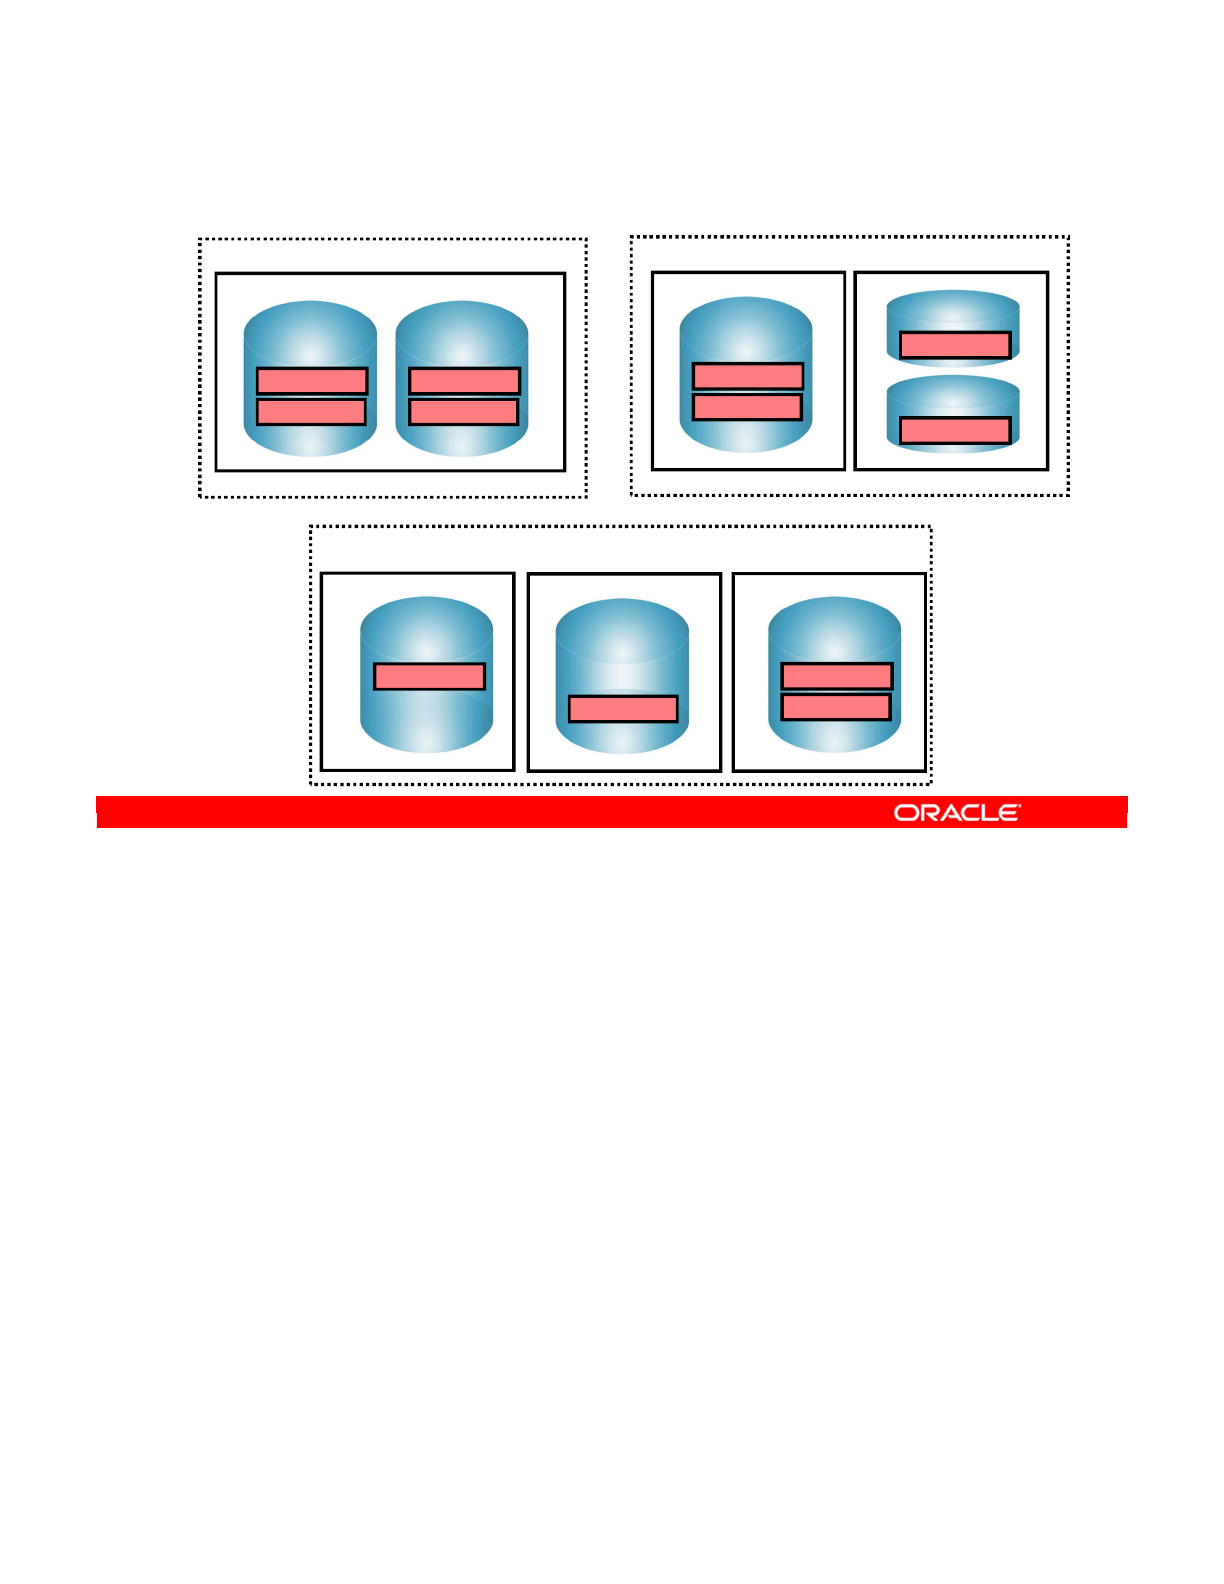
Eight servers are in the information infrastructure.
Oracle Data Integrator 11g: Integration and Administration 3 - 46
Copyright © 2012, Oracle and/or its affiliates. All rights reserved.
Special Case: The Infrastructure
Oracle
ACCOUNTING
SALES
MS SQL Server
db_dwh
db_purchase
Windows Windows
MS SQL Server B
purchase
Windows Linux
Oracle
ACCT
SAL
Linux
Oracle 10g
ACCOUNTING
Oracle 11g
SALES
Windows
MS SQL Server A
dwh
MS SQL Server
db_dwh
db_purchase
Production site: Tokyo
Production site: Boston
Development site: New York
Oracle University and (Oracle Corporation) use only.
These eKit materials are to be used ONLY by you for the express purpose SELF STUDY. SHARING THE FILE IS STRICTLY PROHIBITED.

The eight servers in the infrastructure are defined in ODI as 10 data servers containing 12
physical schemas.
Oracle Data Integrator 11g: Integration and Administration 3 - 47
Copyright © 2012, Oracle and/or its affiliates. All rights reserved.
Special Case: Physical Architecture in ODI
Oracle-Dev1
ACCOUNTING
MSSQL-Dev2
Oracle-Dev2
SALES
MSSQL-Dev1
db_dwh
db_purchase
Oracle-Boston 10g
ACCOUNTING
Oracle-Boston 11g
SALES
MSSQL-Boston
db_dwh
db_purchase
MSSQL-TokyoB
purchase
Oracle-Tokyo
ACCT
SAL
MSSQL-TokyoA
dwh
Oracle
ACCOUNTING
SALES
MS SQL Server
db_dwh
db_purchase
Windows
Development site: New York
Oracle University and (Oracle Corporation) use only.
These eKit materials are to be used ONLY by you for the express purpose SELF STUDY. SHARING THE FILE IS STRICTLY PROHIBITED.

In the following slides, you learn how to set up a topology to capture your information system
in ODI.
Oracle Data Integrator 11g: Integration and Administration 3 - 48
Copyright © 2012, Oracle and/or its affiliates. All rights reserved.
Defining a Topology: Best Practices
Oracle University and (Oracle Corporation) use only.
These eKit materials are to be used ONLY by you for the express purpose SELF STUDY. SHARING THE FILE IS STRICTLY PROHIBITED.

To plan your topology:
1. Identify the physical architecture that you have in place. All physical data servers and
schemas need to be defined in ODI.
2. Similarly, consider the agents you would need and the machines on which they would
be located.
3. Identify the different contexts you have by looking for similar data schemas and agents
in different situations.
4. Provide names for those similarities to create a logical architecture. Provide a name for
each logical schema and logical agent.
5. Finally, write a matrix of the mappings from your logical architecture to your physical
architecture. (Use pen and paper.) The next slide shows an example of a matrix.
Oracle Data Integrator 11g: Integration and Administration 3 - 49
Copyright © 2012, Oracle and/or its affiliates. All rights reserved.
Planning the Topology
1. Identify the physical architecture.
–All data servers
–All physical schemas
–Required physical agents
2. Identify the contexts you have by looking for similar data
schemas and agents in different situations.
3. Define the logical architecture by naming:
–The logical schemas
–The logical agents
4. On paper, write a matrix of the logical and physical
mappings.
–This matrix helps you plan your topology.
Oracle University and (Oracle Corporation) use only.
These eKit materials are to be used ONLY by you for the express purpose SELF STUDY. SHARING THE FILE IS STRICTLY PROHIBITED.

This is a simple matrix of mappings from the logical architecture to the physical architecture.
1. In horizontal order, make a list of all the logical schemas (Accounting, Sales).
2. In vertical order, write down all the contexts that you have defined (Development,
Tokyo).
3. Fill in the squares. For each combination of logical schema and context, write down the
name of the physical schema, the data server, and the technology.
Oracle Data Integrator 11g: Integration and Administration 3 - 50
Copyright © 2012, Oracle and/or its affiliates. All rights reserved.
Matrix of Logical and Physical Mappings
…………
…
…
ACCT in Oracle on
Linux
Tokyo
…
SALES in
Oracle on
Windows
ACCOUNTING in
Oracle on Windows
Development
…SalesAccountingContexts
Logical schemas
1
3
2
Oracle University and (Oracle Corporation) use only.
These eKit materials are to be used ONLY by you for the express purpose SELF STUDY. SHARING THE FILE IS STRICTLY PROHIBITED.

Answer: a
Explanation: For each data server in your topology, you must define a physical schema to
represent each subdivision of the server that will be used in ODI.
Oracle Data Integrator 11g: Integration and Administration 3 - 51
Copyright © 2012, Oracle and/or its affiliates. All rights reserved.
Quiz
You use a data server that has five technology-specific
subdivisions. You want to use one of them in ODI. How many
physical schemas should you define for that server?
a. One
b. Two
c. Three
d. Five
Oracle University and (Oracle Corporation) use only.
These eKit materials are to be used ONLY by you for the express purpose SELF STUDY. SHARING THE FILE IS STRICTLY PROHIBITED.

Answer: b
Explanation: A context maps individual logical resources onto individual physical resources.
So, given a context and a logical resource, ODI can determine the unique physical resource
that is appropriate.
Oracle Data Integrator 11g: Integration and Administration 3 - 52
Copyright © 2012, Oracle and/or its affiliates. All rights reserved.
Quiz
In a given context, how many physical resources can a logical
resource be mapped to at the most?
a. None
b. One
c. Two
d. Any number
Oracle University and (Oracle Corporation) use only.
These eKit materials are to be used ONLY by you for the express purpose SELF STUDY. SHARING THE FILE IS STRICTLY PROHIBITED.

Answer: d
Explanation: There is no limit (actually the limit is the number of contexts).
Oracle Data Integrator 11g: Integration and Administration 3 - 53
Copyright © 2012, Oracle and/or its affiliates. All rights reserved.
Quiz
In how many contexts can a physical schema be used?
a. None
b. One
c. Two
d. Any number
Oracle University and (Oracle Corporation) use only.
These eKit materials are to be used ONLY by you for the express purpose SELF STUDY. SHARING THE FILE IS STRICTLY PROHIBITED.

Oracle Data Integrator 11g: Integration and Administration 3 - 54
Copyright © 2012, Oracle and/or its affiliates. All rights reserved.
Summary
In this lesson, you should have learned how to:
•Describe the basic concepts of the topology
•Describe the logical and physical architecture
•Plan a topology
•Use best practices to set up a topology
•Launch ODI agents and set agent parameters
Oracle University and (Oracle Corporation) use only.
These eKit materials are to be used ONLY by you for the express purpose SELF STUDY. SHARING THE FILE IS STRICTLY PROHIBITED.

Oracle Data Integrator 11g: Integration and Administration 3 - 55
Copyright © 2012, Oracle and/or its affiliates. All rights reserved.
Checklist of Practice Activities
1-1: Logging In and Using Help
2-1: Creating Users and Repositories and Logging In
3-1: Creating an ODI Agent for Orchestrating Execution of ODI Objects
4-1: Defining the Topology
5-1: Setting Up a New ODI Project
6-1: Creating a Model
7-1: Checking Data Quality in the Model
8-1: ODI Interface: Simple Transformations
9-1: ODI Interface: Complex Transformations
9-2: ODI Interface: Implementing Lookup
10-1: ODI Interface: Exporting a Flat File to a Relational Table
11-1: Using Native Sequences with ODI Interface
11-2: Using Temporary Indexes
11-3: Using Data Sets with ODI Interface
12-1: Using Temporary ODI Interfaces
12-2: Developing a New Knowledge Module
13-1: Creating an ODI Procedure
14-1: Creating an ODI Package
14-2: Using ODI Package with Variables and User Functions
15-1: Creating and Scheduling an ODI Scenario
16-1: Using Load Plans
17-1: Working with ODI Versions
18-1: Enforcing Data Quality with ODI Interface
19-1: Implementing Changed Data Capture
20-1: Setting Up ODI Security
20-2: Integrating with Enterprise Manager and Using ODI Console
21-1: Executing an ODI Scenario Through the ODI Public Web Service
Oracle University and (Oracle Corporation) use only.
These eKit materials are to be used ONLY by you for the express purpose SELF STUDY. SHARING THE FILE IS STRICTLY PROHIBITED.
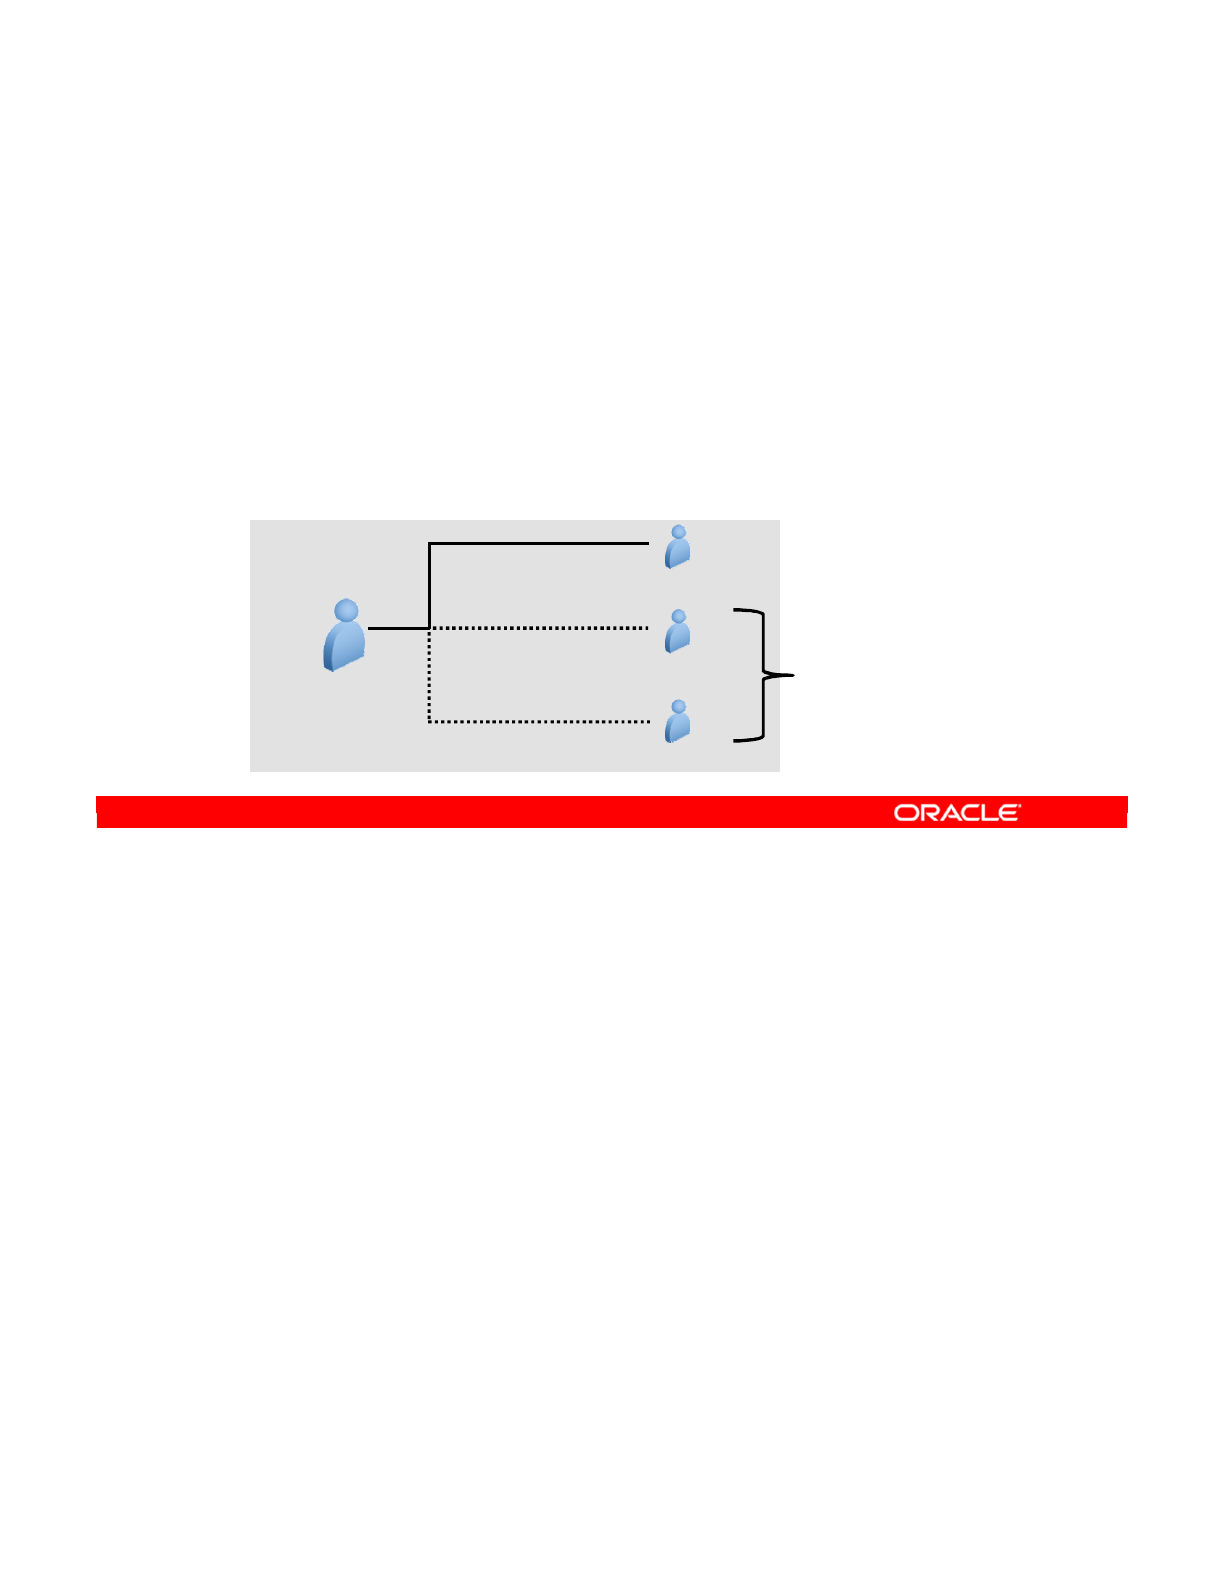
A common task that is performed by using ODI is to set up and install ODI Agent as a service.
After the ODI scenarios are created, they can be scheduled and orchestrated by using an ODI
Agent, which is a lightweight Java process that orchestrates the execution of ODI scenarios.
In this practice, you learn how to set up and install an ODI Agent, which will then be used in
subsequent practices for orchestration of the execution of ODI objects.
Oracle Data Integrator 11g: Integration and Administration 3 - 56
Copyright © 2012, Oracle and/or its affiliates. All rights reserved.
Practice 3-1: Overview
1. Run encode <password> to generate an encrypted password string.
2. Edit odiparams.bat, inserting the encrypted password.
3. In ODI, define a physical agent named localagent.
4. In ODI, define a logical agent named localagent.
5. Execute agent.bat, to create, install, and start an agent named
localagent.
6. Verify connection to the newly created agent localagent in ODI.
One Logical
agent
Maps via
context(s) to Physical
agent(s)
Global
context
Development
context
Production
context
localagent
localagent for
Global context
localagent for
Development context
localagent for
Production context
Agents for the
other 2 contexts
will be created in
a later lesson.
Oracle University and (Oracle Corporation) use only.
These eKit materials are to be used ONLY by you for the express purpose SELF STUDY. SHARING THE FILE IS STRICTLY PROHIBITED.

Copyright © 2012, Oracle and/or its affiliates. All rights reserved.
Describing the Physical and Logical
Architecture
Oracle University and (Oracle Corporation) use only.
These eKit materials are to be used ONLY by you for the express purpose SELF STUDY. SHARING THE FILE IS STRICTLY PROHIBITED.

In the previous lessons, you created Master and Work Repositories and installed an ODI
Agent as a background service. To complete setting up your ODI infrastructure, you need to
create contexts, a data server, and physical and logical schemas.
This lesson introduces you to the Topology Navigator and takes you through the process of
defining your physical architecture.
In this lesson, you gain a basic understanding of how to use the Topology Navigator to create
your physical architecture in Oracle Data Integrator (ODI). You also learn to create data
servers and define physical schemas on them, and to declare the physical agents so that ODI
can use them to execute tasks.
Oracle Data Integrator 11g: Integration and Administration 4 - 2
Copyright © 2012, Oracle and/or its affiliates. All rights reserved.
Objectives
After completing this lesson, you should be able to:
•Use the Topology Navigator to create the physical and
logical architectures
•Create data servers and physical schemas
•Link the physical and logical architectures
Oracle University and (Oracle Corporation) use only.
These eKit materials are to be used ONLY by you for the express purpose SELF STUDY. SHARING THE FILE IS STRICTLY PROHIBITED.

You learn about the Topology Navigator and get an overview of what is represented in the
ODI physical architecture in the next few slides.
Oracle Data Integrator 11g: Integration and Administration 4 - 3
Copyright © 2012, Oracle and/or its affiliates. All rights reserved.
Topology Navigator
Oracle University and (Oracle Corporation) use only.
These eKit materials are to be used ONLY by you for the express purpose SELF STUDY. SHARING THE FILE IS STRICTLY PROHIBITED.

Topology Navigator provides access to everything that is considered part of the ODI topology.
The three principal elements of the physical architecture are the data servers, physical
schemas, and physical agents.
The logical architecture provides the logical aliasing of physical objects—that is, logical
schemas and logical agents, as well as the contexts that link logical objects with their physical
counterparts.
Also, elements that define the technologies are available. Languages define the reserved
keywords and functions available in the Expression Editor. Actions are used to generate data
definition language (DDL) statements.
Topology Navigator also contains information specific to ODI architecture, including
information about repositories and agents.
However, this lesson deals only with physical and logical architectures, including data
servers, physical schemas and agents, logical schemas and agents, and contexts.
Oracle Data Integrator 11g: Integration and Administration 4 - 4
Copyright © 2012, Oracle and/or its affiliates. All rights reserved.
What Topology Navigator Contains
•Physical architecture
–Data servers, physical schemas, and agents
•Logical architecture
–Logical schemas and agents, contexts
•Technology-related information
–Technologies, languages, actions
•ODI architecture components
–Repositories and agents
Oracle University and (Oracle Corporation) use only.
These eKit materials are to be used ONLY by you for the express purpose SELF STUDY. SHARING THE FILE IS STRICTLY PROHIBITED.

All that you can create or modify in Topology Navigator is stored in the Master Repository.
This contrasts with Designer, which stores project-related information in Work Repositories.
However, be aware that any changes made in Topology Navigator immediately affect all the
Work Repositories attached to it. Such changes may also affect other people’s work.
For example, modifying the definition of a technology immediately affects any code that is
subsequently generated for that technology. Similarly, modifying the connection parameters
for a data server can prevent a scheduled scenario from connecting to that server.
Oracle Data Integrator 11g: Integration and Administration 4 - 5
Copyright © 2012, Oracle and/or its affiliates. All rights reserved.
Topology Navigator: Overview
•Topology Navigator stores all its information in the Master
Repository.
–In contrast, Designer Navigator stores project-related
information in Work Repositories.
•Making changes in Topology Navigator:
–Affects all attached repositories, possibly other people’s work
–May affect the behavior of the work in progress or running
processes
Oracle University and (Oracle Corporation) use only.
These eKit materials are to be used ONLY by you for the express purpose SELF STUDY. SHARING THE FILE IS STRICTLY PROHIBITED.
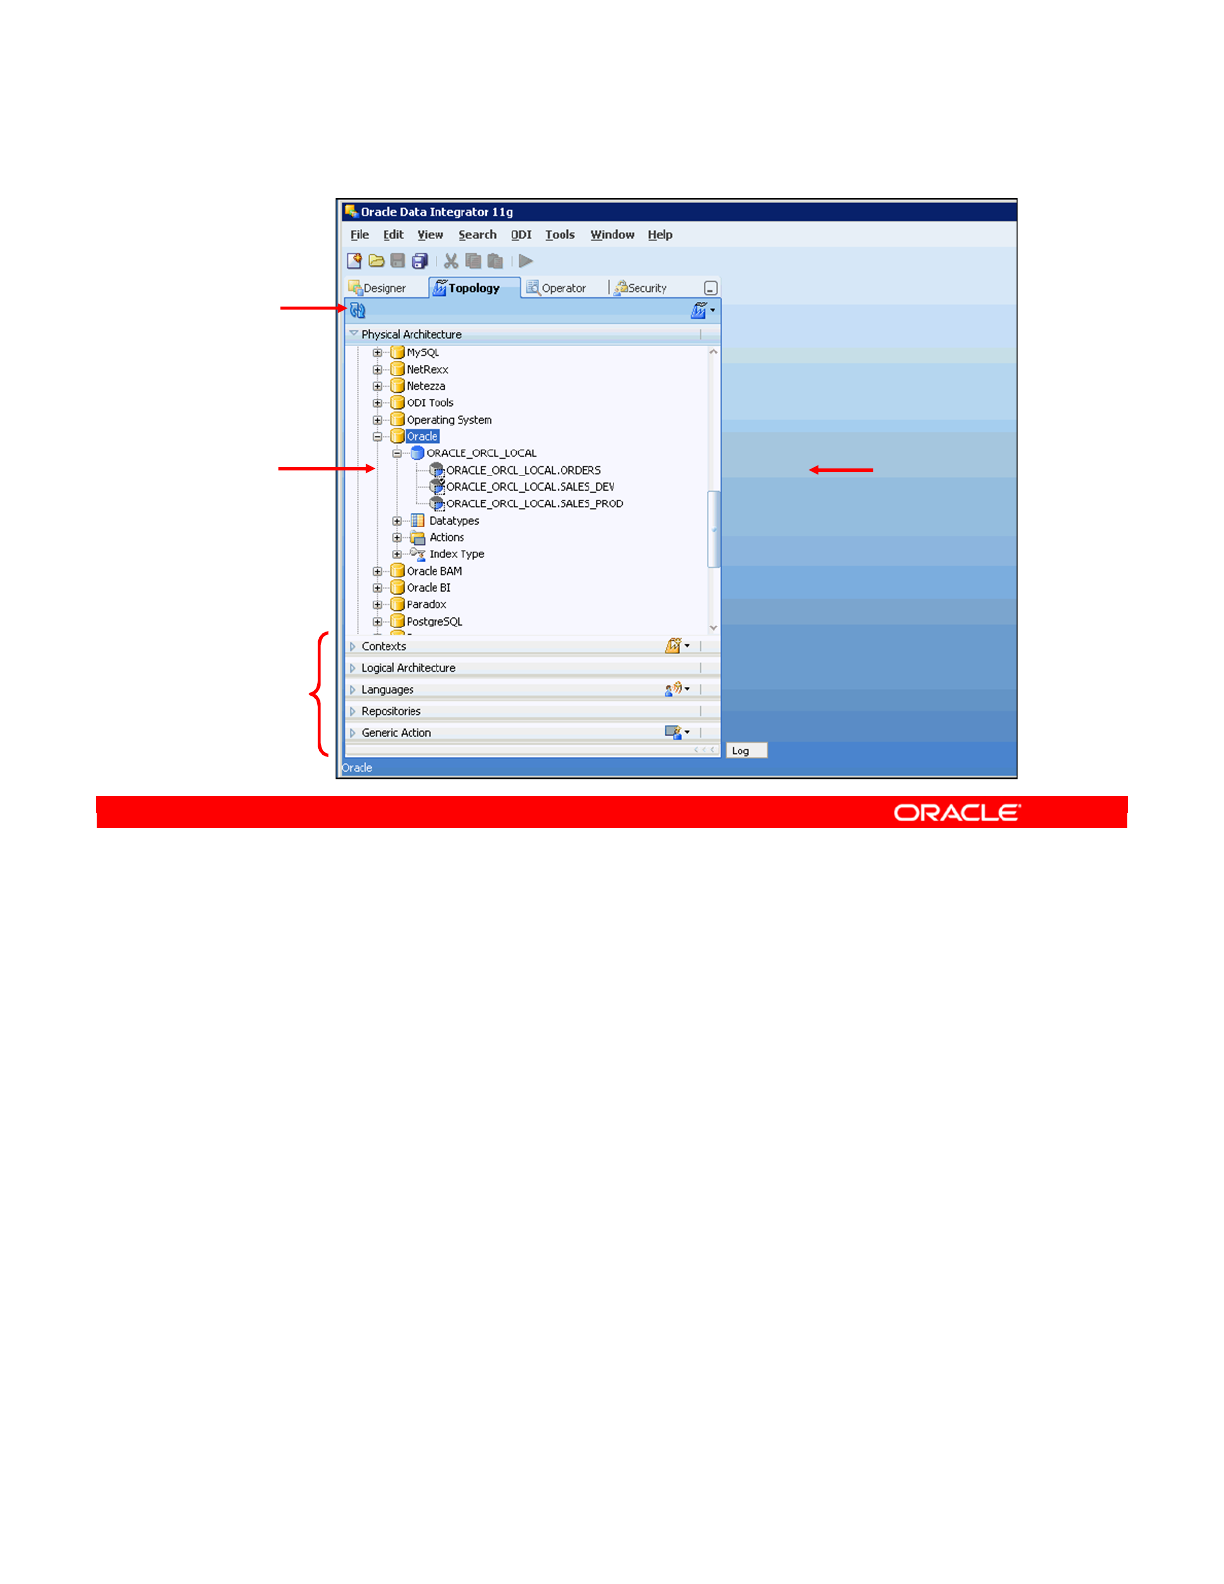
This is what the Topology Navigator looks like.
A number of tree views provide access to different kinds of information. You can dock,
undock, and rearrange these views to customize your work environment. For example, the
slide shows the Physical Architecture view that lists data servers and physical schemas
sorted by technology.
The background area is referred to as the Workbench. When you double-click an element, its
window appears in this area.
At the top is the toolbar. Manual refresh refreshes the screen from the Master Repository.
Oracle Data Integrator 11g: Integration and Administration 4 - 6
Copyright © 2012, Oracle and/or its affiliates. All rights reserved.
Topology Navigator: Overview
Tree view
Topology
Navigator
views
Workbench
Manual
refresh
(from Master
Repository)
Oracle University and (Oracle Corporation) use only.
These eKit materials are to be used ONLY by you for the express purpose SELF STUDY. SHARING THE FILE IS STRICTLY PROHIBITED.
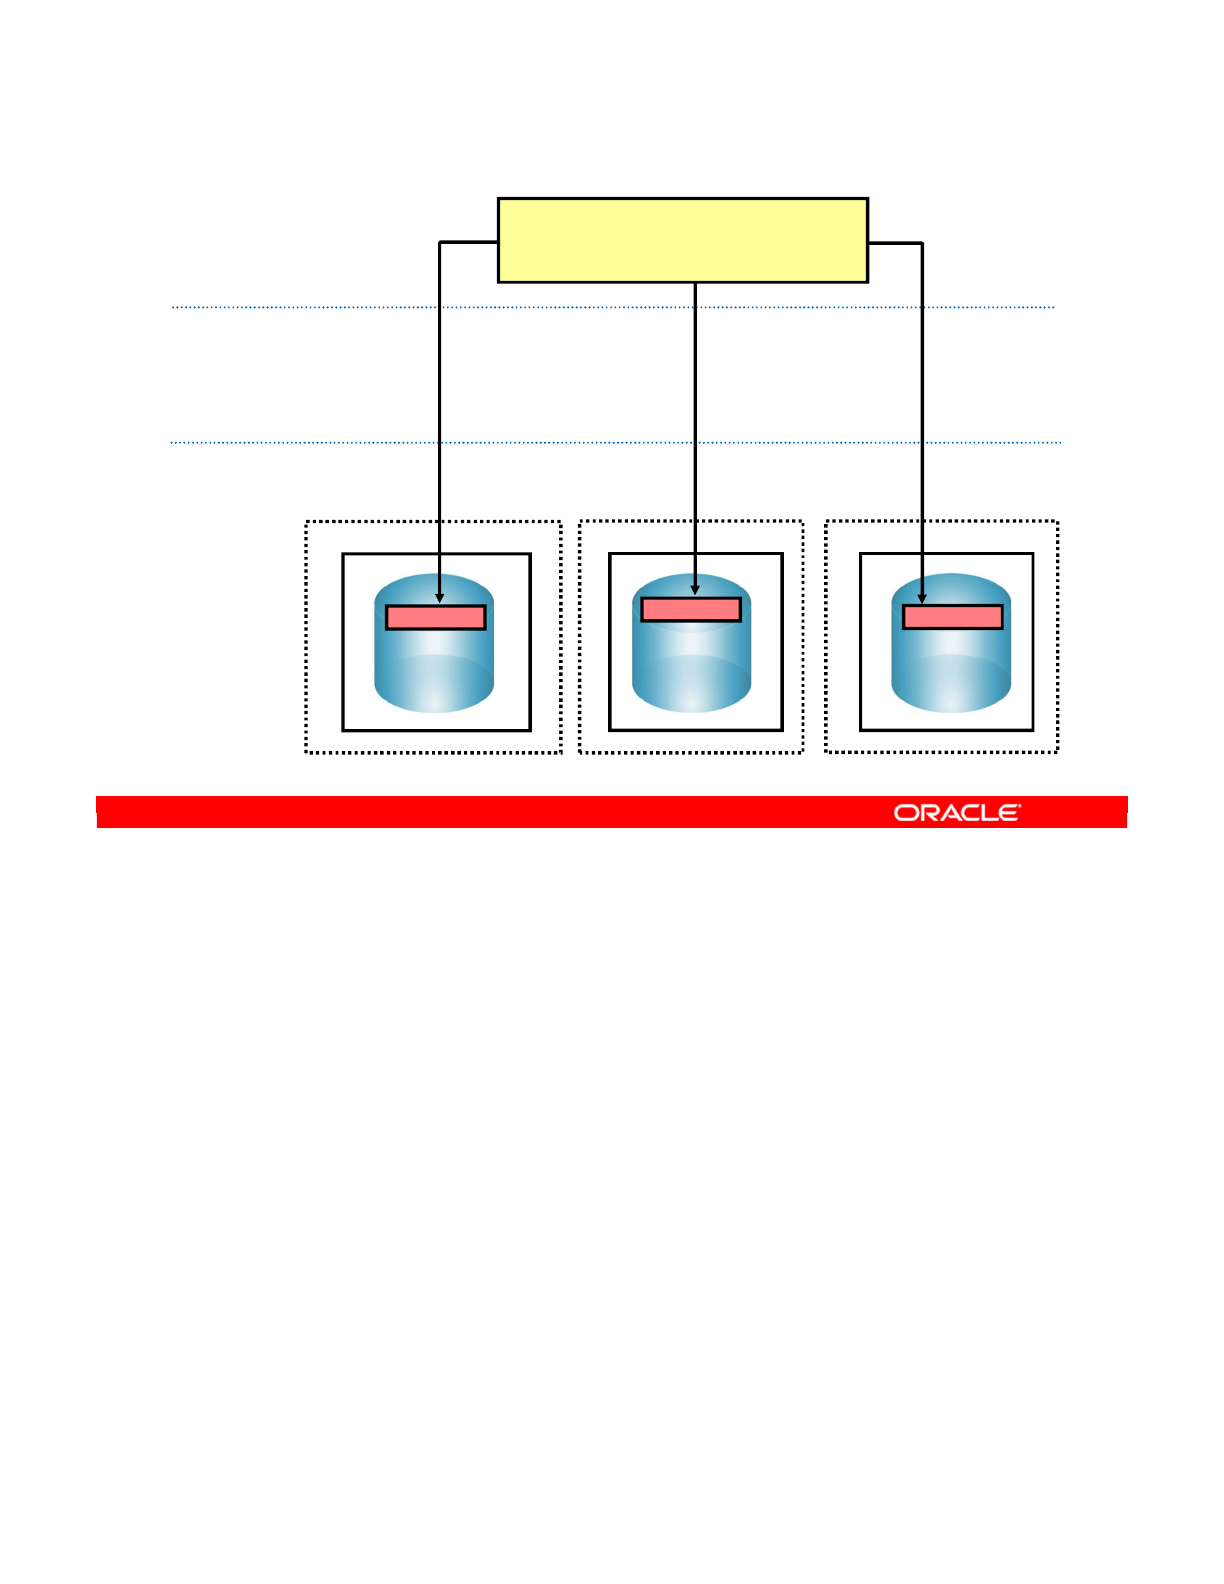
A context is a set of resources that enables the operation or simulation of one or more data
processing applications. Contexts enable the same jobs (Development, Test, Production, and
so on) to be executed on different databases and/or schemas.
You will define contexts in the practice, and edit them to point logical schemas to physical
schemas.
Oracle Data Integrator 11g: Integration and Administration 4 - 7
Copyright © 2012, Oracle and/or its affiliates. All rights reserved.
Review: Context Connects Logical to Physical
Oracle
Windows
Development site: New York
Linux
Oracle
Production site: Boston
Linux
Oracle
Production site: Tokyo
Logical
architecture
Contexts
(A context maps individual
logical resources onto
individual physical resources.)
Physical
architecture
SALES_DEV SALES_PROD
SALES_DEV
Development Global Production
ORACLE_ORCL_LOCAL_SALES
(Logical schema)
Oracle University and (Oracle Corporation) use only.
These eKit materials are to be used ONLY by you for the express purpose SELF STUDY. SHARING THE FILE IS STRICTLY PROHIBITED.
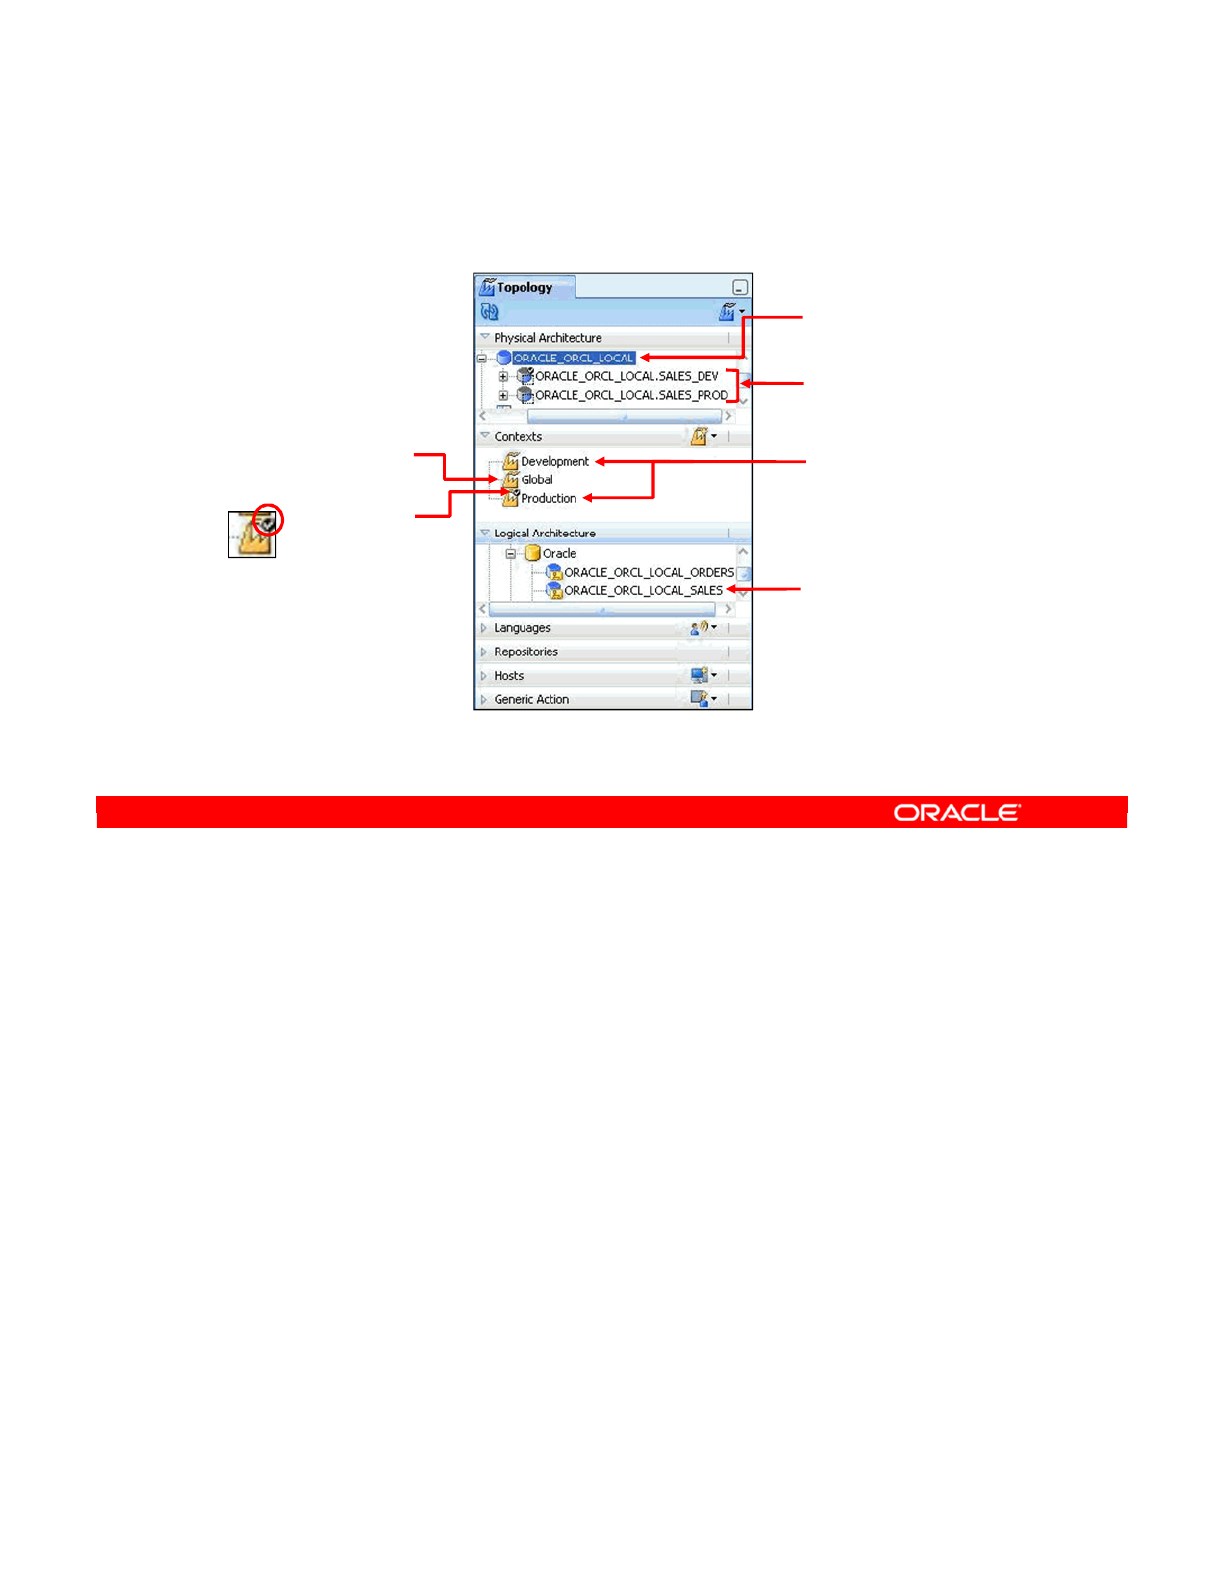
In this lesson’s practice, you first define two new contexts, Development and Production, in
addition to the pre-seeded context, Global.
You then define a data server, ORACLE_ORCL_LOCAL. Next, you define two physical
schemas for that data server, SALES_DEV and SALES_PROD.
Then you define a logical schema, ORACLE_ORCL_LOCAL_SALES.
Next, you map your one logical schema to your two physical schemas, in terms of the three
contexts.
Finally, you check the mappings of several other predefined logical schemas against
predefined physical schemas, in terms of the three contexts.
Note: When executing any object, the Default context is the context selected by default in the
Execution dialog box. If an invalid context name is specified, the default context in Designer is
used.
Oracle Data Integrator 11g: Integration and Administration 4 - 8
Copyright © 2012, Oracle and/or its affiliates. All rights reserved.
Objects You Create in the Practice
Check mark
indicates
default context.
Logical schema you
create in practice
Data server you
create in practice
Physical schemas
you create in practice
Global is a
pre-seeded
context. Two contexts you
create in practice
Oracle University and (Oracle Corporation) use only.
These eKit materials are to be used ONLY by you for the express purpose SELF STUDY. SHARING THE FILE IS STRICTLY PROHIBITED.
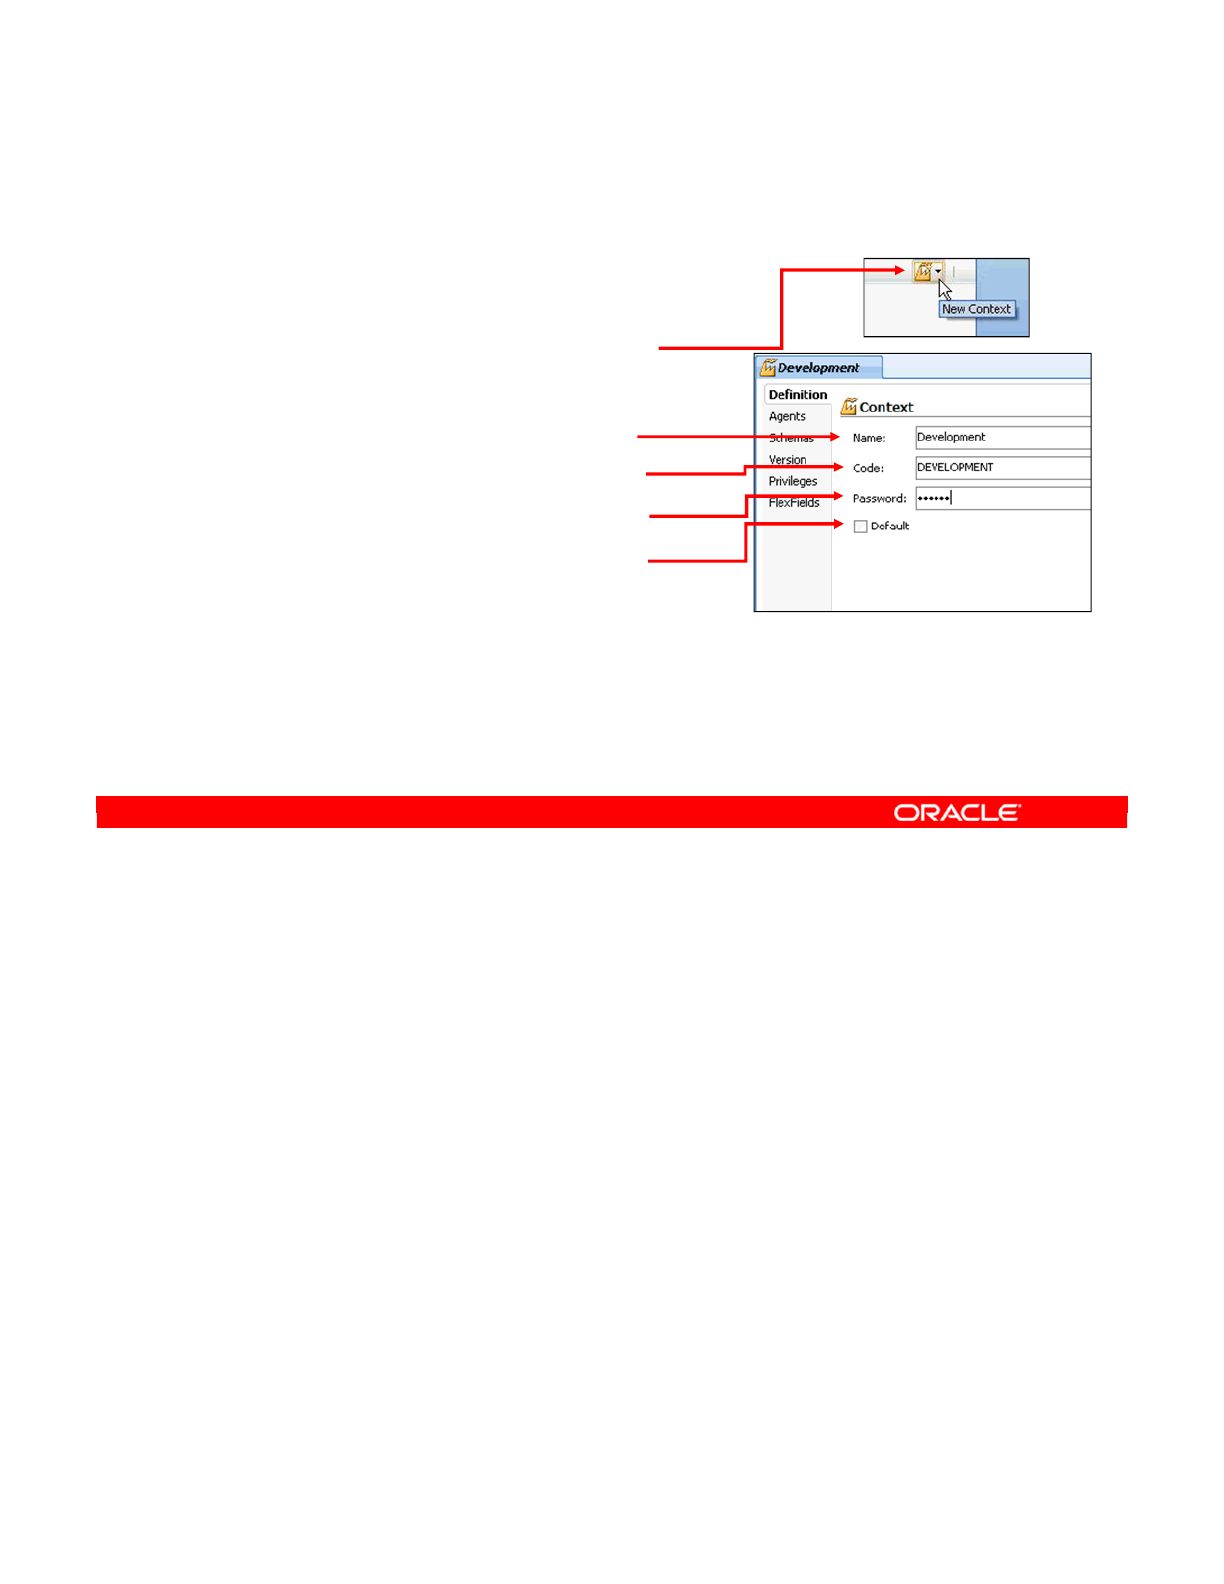
To define a context, perform the following steps:
1. Go to the Contexts tab of the Topology Navigator.
2. Click the New Context button. This opens a new context window.
3. Give the context a name and a code. This is the name of the context as it appears in
ODI. The code is used to make reference to the context.
4. You can also define a password that must be entered to launch a session in this context.
To make the context the default context for all sessions launched, select the Default
check box. This determines the execution context that is set by default each time
Designer is loaded.
Note: Although you can specify a password for a context, it is not a best practice. The
addition of context passwords for security would impose upon users the need to manage
additional passwords in addition to their login password. Users should rely on standard ODI
security features for password access control. Nevertheless, special cases might warrant the
use of passwords to control context switching between, for example, Test and Development.
Oracle Data Integrator 11g: Integration and Administration 4 - 9
Copyright © 2012, Oracle and/or its affiliates. All rights reserved.
Defining a Context
1. Go to the Topology
Contexts tab.
2. Click the New Context button.
3. Type:
–The name of the context
–The code for the context
–The password (optional)
4. If you want this context to be
the default, select the Default
check box.
Oracle University and (Oracle Corporation) use only.
These eKit materials are to be used ONLY by you for the express purpose SELF STUDY. SHARING THE FILE IS STRICTLY PROHIBITED.

In the next few slides, you learn how to create the physical architecture in ODI Topology
Navigator.
Oracle Data Integrator 11g: Integration and Administration 4 - 10
Copyright © 2012, Oracle and/or its affiliates. All rights reserved.
Creating Physical Architecture
Oracle University and (Oracle Corporation) use only.
These eKit materials are to be used ONLY by you for the express purpose SELF STUDY. SHARING THE FILE IS STRICTLY PROHIBITED.
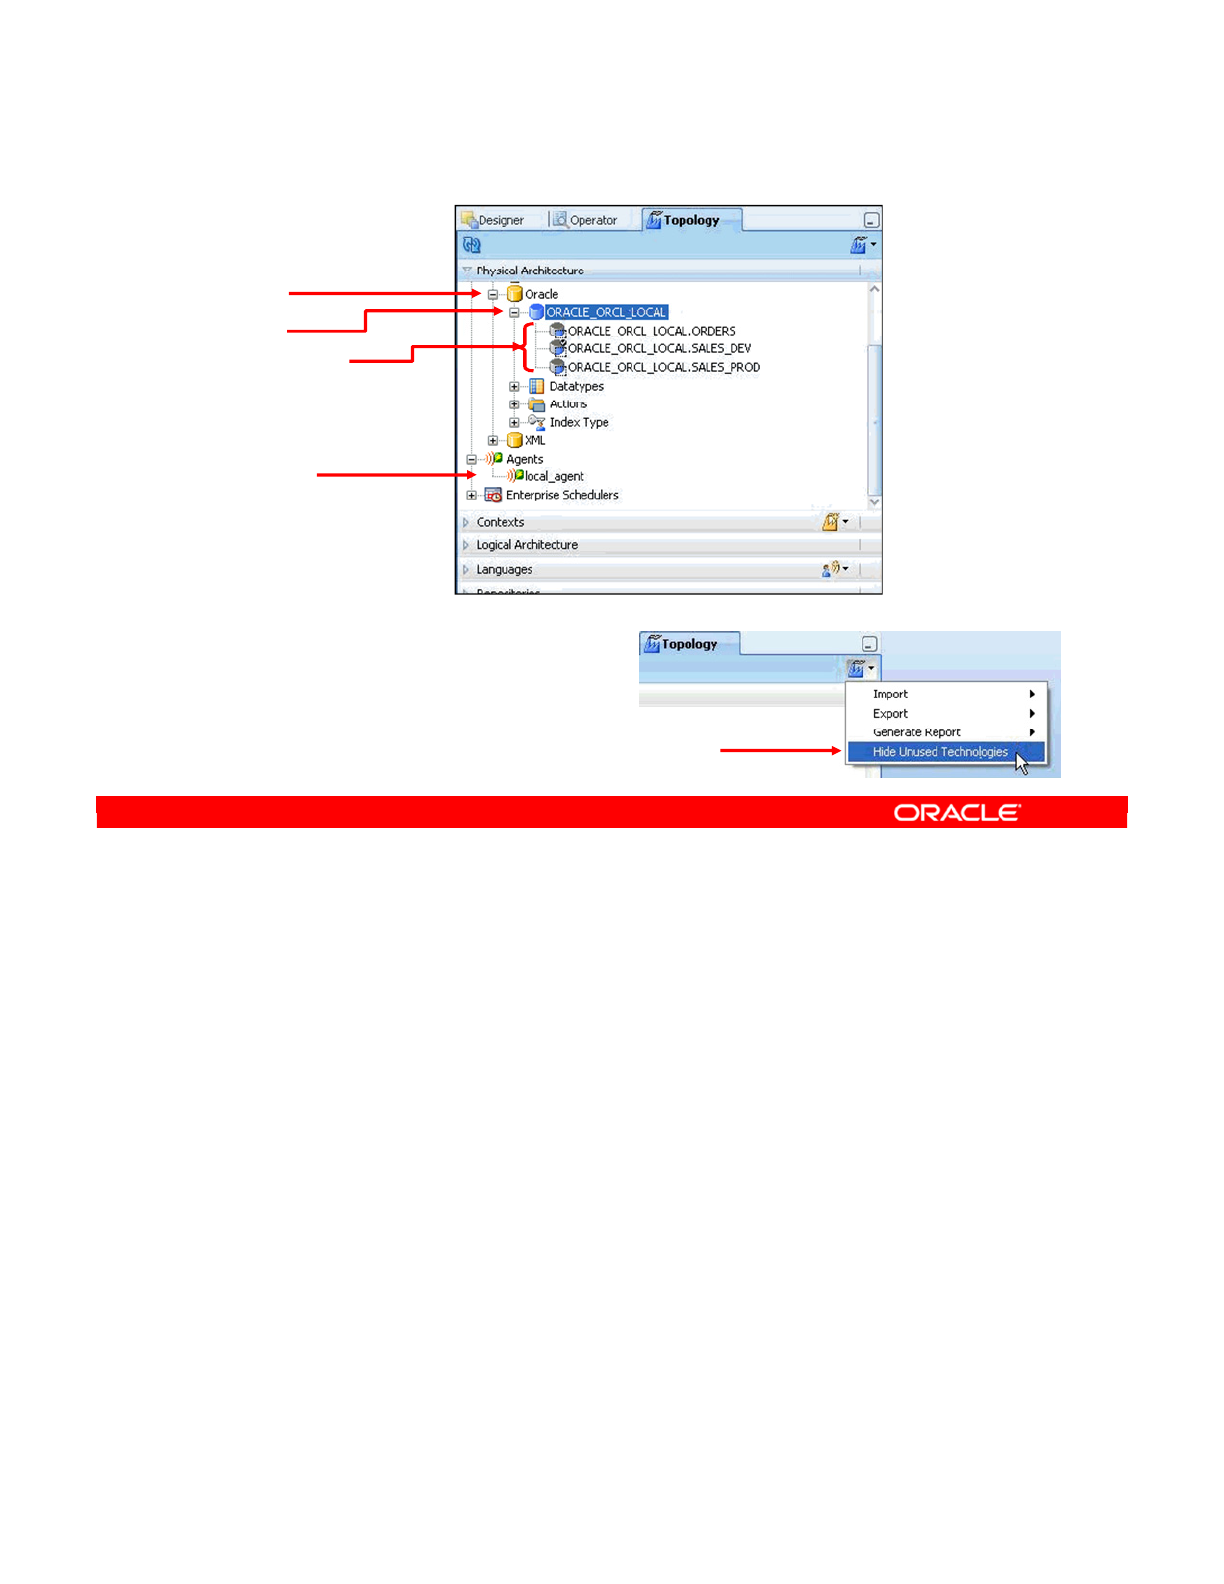
The Physical Architecture view is where you modify the definition of data servers, physical
schemas, and physical agents.
This view is organized by technology. So, to see data servers and physical schemas based
on Oracle, expand the Oracle node.
Under this node, all data servers are displayed. There are also data types, actions, and index
types for the given technology.
Under a data server, you can access the physical schemas defined for the server. Here you
have a single data server, ORACLE_ORCL_LOCAL, with three physical schemas named
ORACLE_ORCL_LOCAL.ORDERS, ORACLE_ORCL_LOCAL.SALES_DEV, and
ORACLE_ORCL_LOCAL.SALES_PROD.
All physical agents are displayed separately. These will be covered later in the lesson.
The number of technologies available in ODI can be somewhat overwhelming. Fortunately,
you can make Topology Navigator display only technologies with at least one attached data
server. To do this, select Hide Unused Technologies from the Topology Navigator’s menu.
Remember to redisplay the technologies when you want to add a data server to a new
technology.
Oracle Data Integrator 11g: Integration and Administration 4 - 11
Copyright © 2012, Oracle and/or its affiliates. All rights reserved.
Physical Architecture View
Technology
Data server
Physical agent
Physical schemas
To reduce the number of
technologies displayed:
•Select Windows >
Hide Unused Technologies
Oracle University and (Oracle Corporation) use only.
These eKit materials are to be used ONLY by you for the express purpose SELF STUDY. SHARING THE FILE IS STRICTLY PROHIBITED.

ODI connects to a data server by using standard Java connectivity methods. These methods
usually require server-specific drivers.
For example, to connect to a database server supporting Java Database Connectivity (JDBC),
ODI needs the database’s JDBC driver. Similarly, to connect to a message-oriented
middleware (MOM) router supporting the Java Message Service (JMS), it needs the MOM’s
JMS client.
These drivers must be installed in the driver’s subdirectory. A driver is either a .jar or a
.zip file. Driver installation should be performed for every machine that may connect to the
data server with an ODI graphical user interface or an ODI Agent.
You also need to specify appropriate settings to connect to the data server. The settings vary
depending on the type of the data server.
Typically, you need to specify an IP address or a machine name and a port to connect to the
appropriate service on the machine. You will also need a username and password with
sufficient privileges on the server.
Lastly, you may need server-specific information, such as the database and/or instance name
for a database server.
Oracle Data Integrator 11g: Integration and Administration 4 - 12
Copyright © 2012, Oracle and/or its affiliates. All rights reserved.
Prerequisites for Connecting to a Server
•Drivers (JDBC or JMS)
–Drivers must be installed in the appropriate driver
subdirectory for ODI Studio, the standalone agent, or the
Java EE agent.
–This installation must be performed on all the machines
connecting to the data server.
—
Machines running an Oracle Data Integrator GUI
—
Machines running an Oracle Data Integrator Agent
•Connection settings (server-dependent)
–Machine name (IP address), port
–User/password
–Instance/database name, if the server is a database server
Oracle University and (Oracle Corporation) use only.
These eKit materials are to be used ONLY by you for the express purpose SELF STUDY. SHARING THE FILE IS STRICTLY PROHIBITED.

Note that the username that you supply for a data server is used for many purposes by ODI.
This includes accessing and altering data or data structure in schemas, databases, or libraries
in the data server, depending on the technology. You, therefore, must ensure that the user
account has sufficient privileges to be able to do this everywhere.
In the case of a database, the user should have SELECT privileges to all the schemas defined
in the data server. The user should also have INSERT/UPDATE privileges to the tables into
which ODI will integrate data. The user must have sufficient privileges to CREATE/DROP
objects into temporary, or work, schemas, and should be able to READ the structure of the
tables to reverse-engineer them.
Note: As a best practice, generally use the same owner as the schema that owns the Work
schema.
Oracle Data Integrator 11g: Integration and Administration 4 - 13
Copyright © 2012, Oracle and/or its affiliates. All rights reserved.
Important Note
•The username that you specify for a data server is used to
access all underlying schemas, databases, or libraries in
the data server.
•Ensure that this user account has sufficient privileges.
–For database:
—
SELECT
—
INSERT/UPDATE
—
CREATE/DROP
—
READ
Additional Note: It is possible to define for a data server
commands that will be automatically executed when
connections to this data server are created or closed by
ODI components or by a session.
Oracle University and (Oracle Corporation) use only.
These eKit materials are to be used ONLY by you for the express purpose SELF STUDY. SHARING THE FILE IS STRICTLY PROHIBITED.
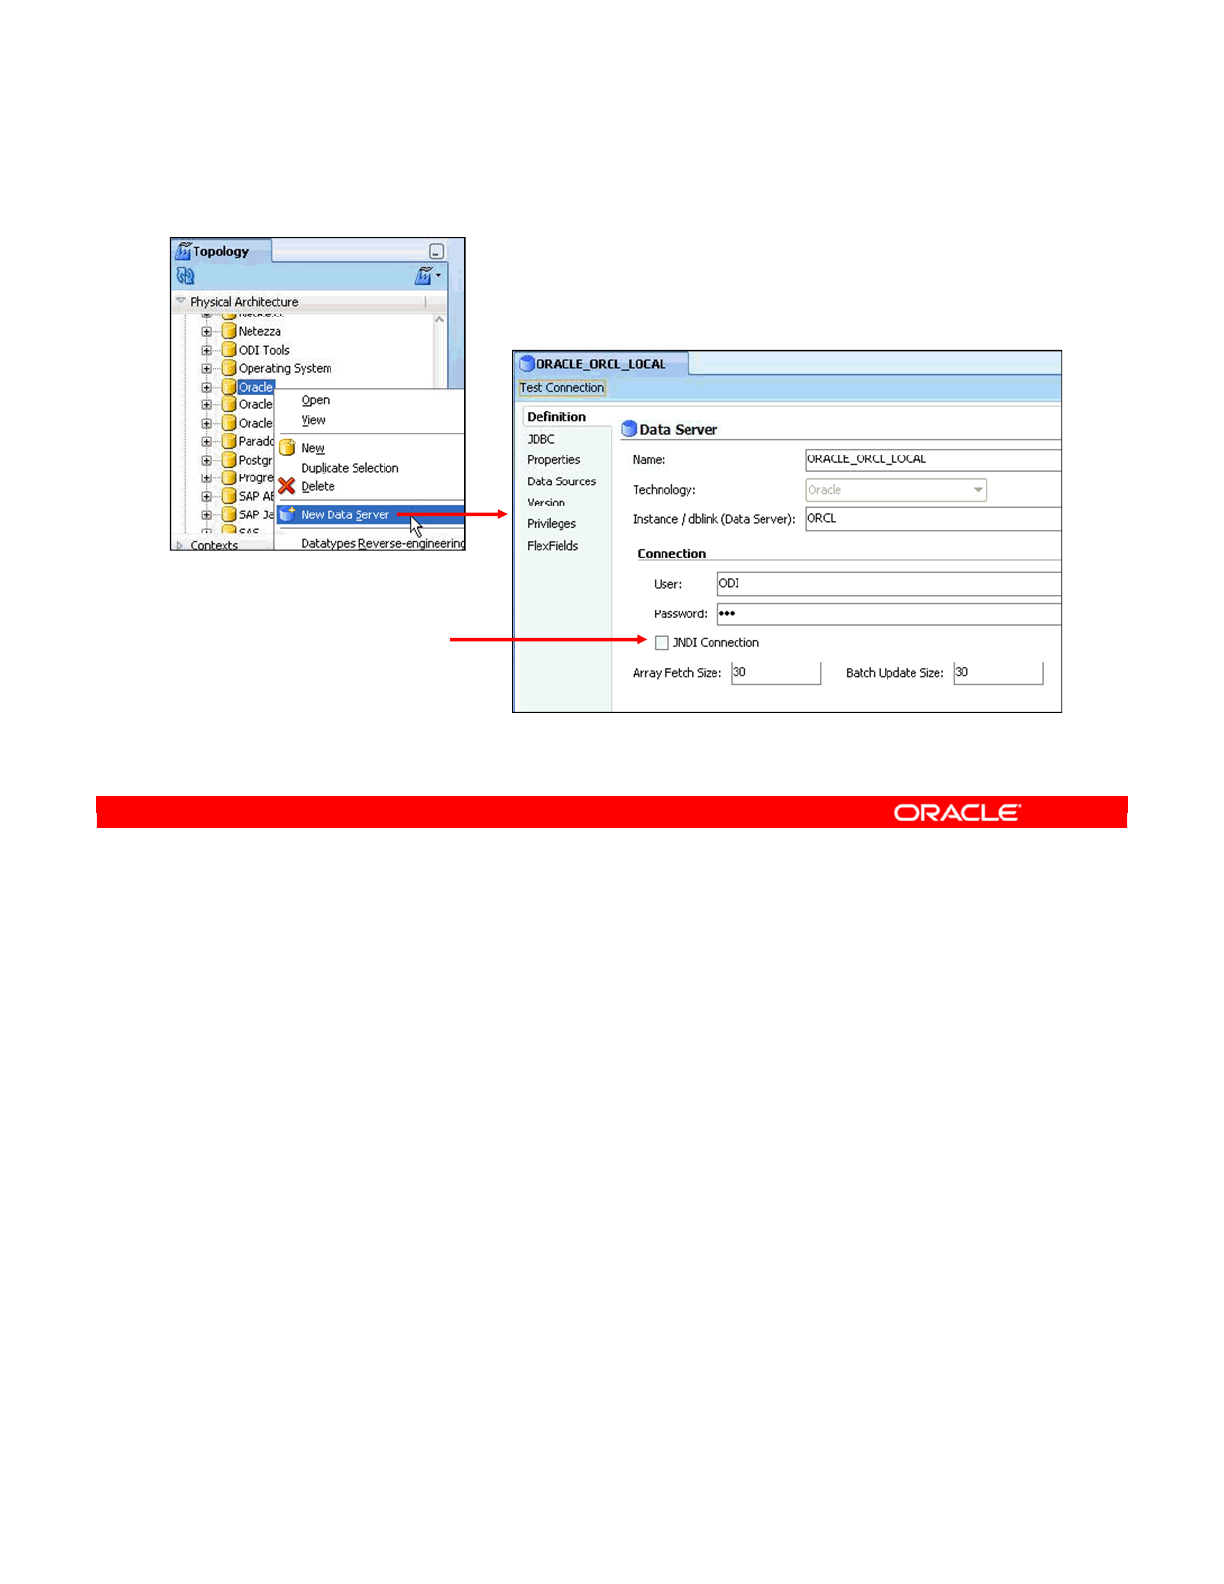
To create a data server connection in ODI, perform the following steps:
1. In Topology Navigator, expand the Technologies node in the Physical Architecture
panel.
2. Select the technology to which you want to attach your data server.
3. Right-click and select New Data Server.
4. Give a name for the data server. Prefix the name of the server with the name of the
technology, for example, ORACLE_DW.
5. Type the specific connection settings. Enter the username and password for a
sufficiently privileged user. It is a good idea to create a user especially for ODI.
6. Optionally, you select the JNDI Connection check box to use a directory to gain access
to the server. By default, ODI assumes that you want to connect directly to your data
server by using JDBC. This happens if you do not select the JNDI Connection check
box.
Note: The Data Server field is a technology-specific value that identifies the server. In many
cases, this represents the server instance, as understood by the database engine.
Oracle Data Integrator 11g: Integration and Administration 4 - 14
Copyright © 2012, Oracle and/or its affiliates. All rights reserved.
Creating a Data Server
By default, ODI connects
by JDBC, unless you
select JNDI to use a
directory to access the
server.
Oracle University and (Oracle Corporation) use only.
These eKit materials are to be used ONLY by you for the express purpose SELF STUDY. SHARING THE FILE IS STRICTLY PROHIBITED.

To complete the connection settings, click the JDBC tab.
You must specify the JDBC driver with which to access the defined technology. However, this
must be correctly installed. You can use the browse button to select a driver from the list.
You then need to provide a URL that defines the location of the server. You can use the
“select” button to choose an available URL format. Then, set the URL parameters with your
server’s connection parameters.
Test the connection by clicking the Test Connection button. This operation will be covered in
greater detail later in the lesson.
Oracle Data Integrator 11g: Integration and Administration 4 - 15
Copyright © 2012, Oracle and/or its affiliates. All rights reserved.
Creating a Data Server: JDBC
Select JDBC URL.
Select JDBC driver.
1
2
3
Test the
connection.
Click the
JDBC tab.
4
Oracle University and (Oracle Corporation) use only.
These eKit materials are to be used ONLY by you for the express purpose SELF STUDY. SHARING THE FILE IS STRICTLY PROHIBITED.
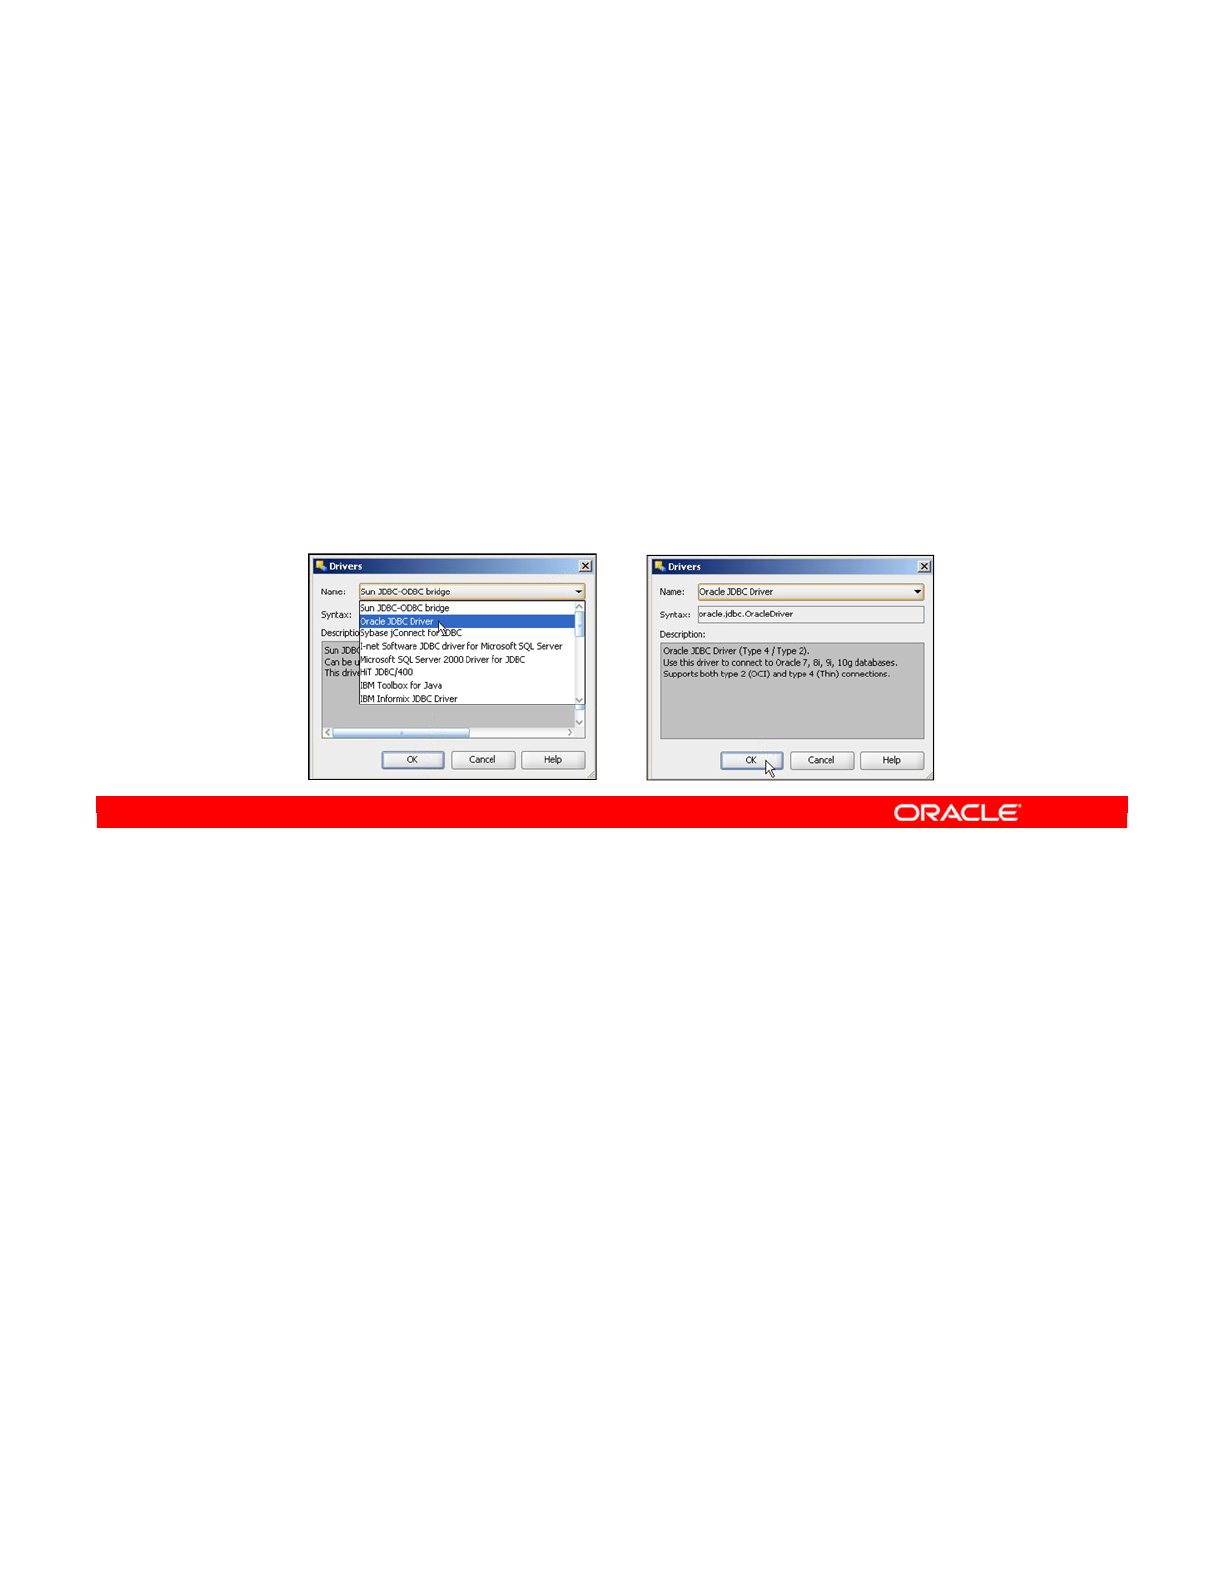
The JDBC driver is always a Java class. It provides access to a particular type of database.
Four categories of databases require different levels of network infrastructure.
Type 4 drivers are generally preferred. They connect directly to the target machine over
TCP/IP. They do not require any other component.
Type 3 drivers are specific to three-tier architectures. These drivers connect to an
intermediate server that is used as a gateway to the target machine.
Type 2 drivers require the database-specific client layer to be present and correctly configured
on the client machine. This can present difficulties when deploying scenarios onto distant
servers, as each machine must be configured in exactly the same way.
Type 1 is a generic driver to connect to Open Database Connectivity (ODBC) data sources. It
has the same problems as type 2 drivers, but can be even slower. This is why type 4 drivers
are the best if they are available for the given technology.
When you specify the driver, you are actually specifying the name of a Java class. This class
must be present in the Java classpath of ODI. The easiest way to ensure that it is on the
classpath is to copy the driver’s file—usually a .jar or .zip file—in the appropriate driver’s
subdirectory of the ODI installation directory.
Oracle Data Integrator 11g: Integration and Administration 4 - 16
Copyright © 2012, Oracle and/or its affiliates. All rights reserved.
JDBC Driver
•A JDBC driver is a Java driver that provides access to a type of
database.
–Type 4: Direct access through TCP/IP (the generally preferred type)
–Type 3: Specific to three-tier architectures
–Type 2: Requires the database client layer
–Type 1: Generic driver to connect ODBC data sources
•Drivers are identified by a Java class name.
–Class must be present on the classpath.
•Drivers are distributed as .jar or .zip files.
–Copy the driver file to the appropriate driver subdirectory.
Oracle University and (Oracle Corporation) use only.
These eKit materials are to be used ONLY by you for the express purpose SELF STUDY. SHARING THE FILE IS STRICTLY PROHIBITED.
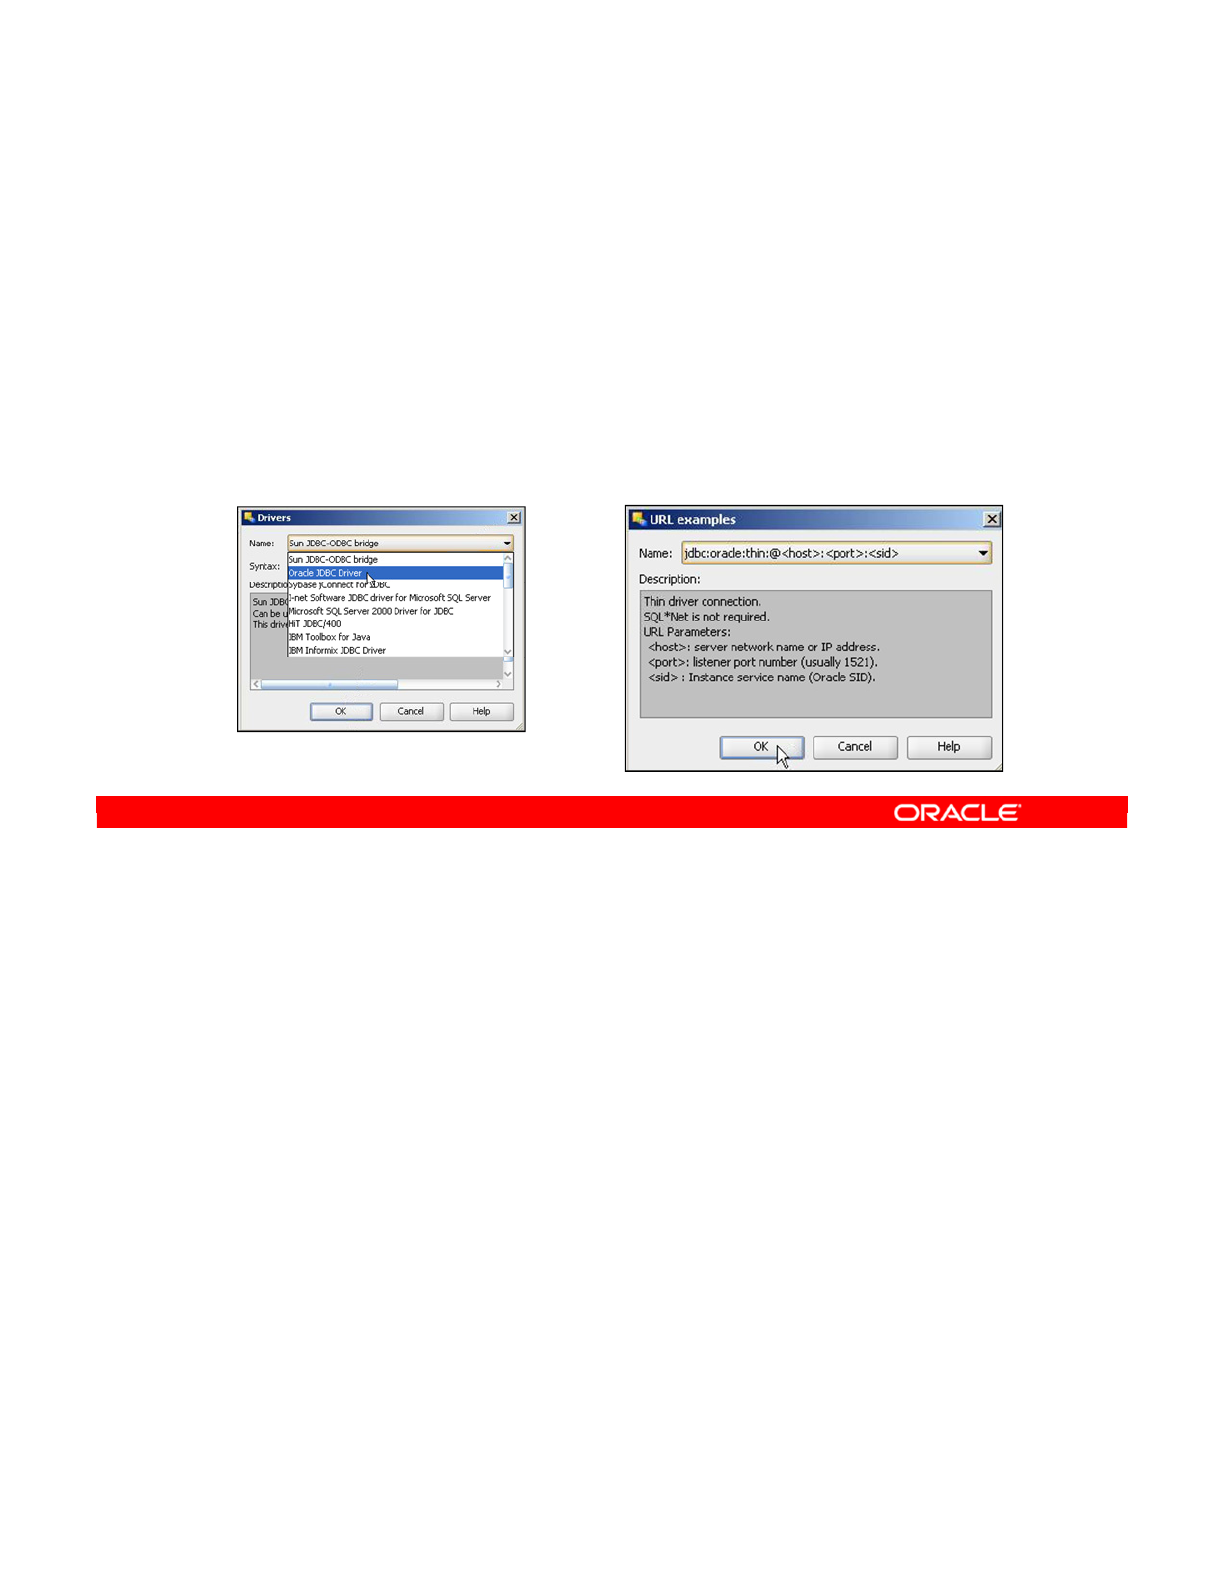
As mentioned earlier, the JDBC driver needs a special JDBC URL to connect to a particular
database. This URL contains the information necessary to connect to this particular database
system. For example, it often contains the IP address of the database server.
However, it can also contain other parameters defined specifically by the chosen JDBC driver.
For example, the ODI file driver contains a parameter to specify the character encoding to
use.
The “select” buttons next to the relevant fields on the JDBC tab enable you to fill in these
fields easily. Here, the Sun JDBC-ODBC bridge has been selected, which is a standard driver
built in Java. You can use it to connect to any ODBC data source. Note that when you select
a URL template, a field is displayed for you to enter the name of the ODBC Data Source
Name (DSN) alias.
Select the Oracle driver, and then click the button next to the JDBC Url field to select Oracle
JDBC Url, as shown in the screenshot in the slide. Fill in the appropriate values for <host>,
<port>, and <sid> to edit the URL.
Oracle Data Integrator 11g: Integration and Administration 4 - 17
Copyright © 2012, Oracle and/or its affiliates. All rights reserved.
JDBC URL
•The JDBC driver uses a URL to connect to a database
system.
–The URL describes how to connect to the database system.
–The URL may also contain driver-specific parameters.
•Use the “select” button to choose the driver class name
and the URL template.
Oracle University and (Oracle Corporation) use only.
These eKit materials are to be used ONLY by you for the express purpose SELF STUDY. SHARING THE FILE IS STRICTLY PROHIBITED.
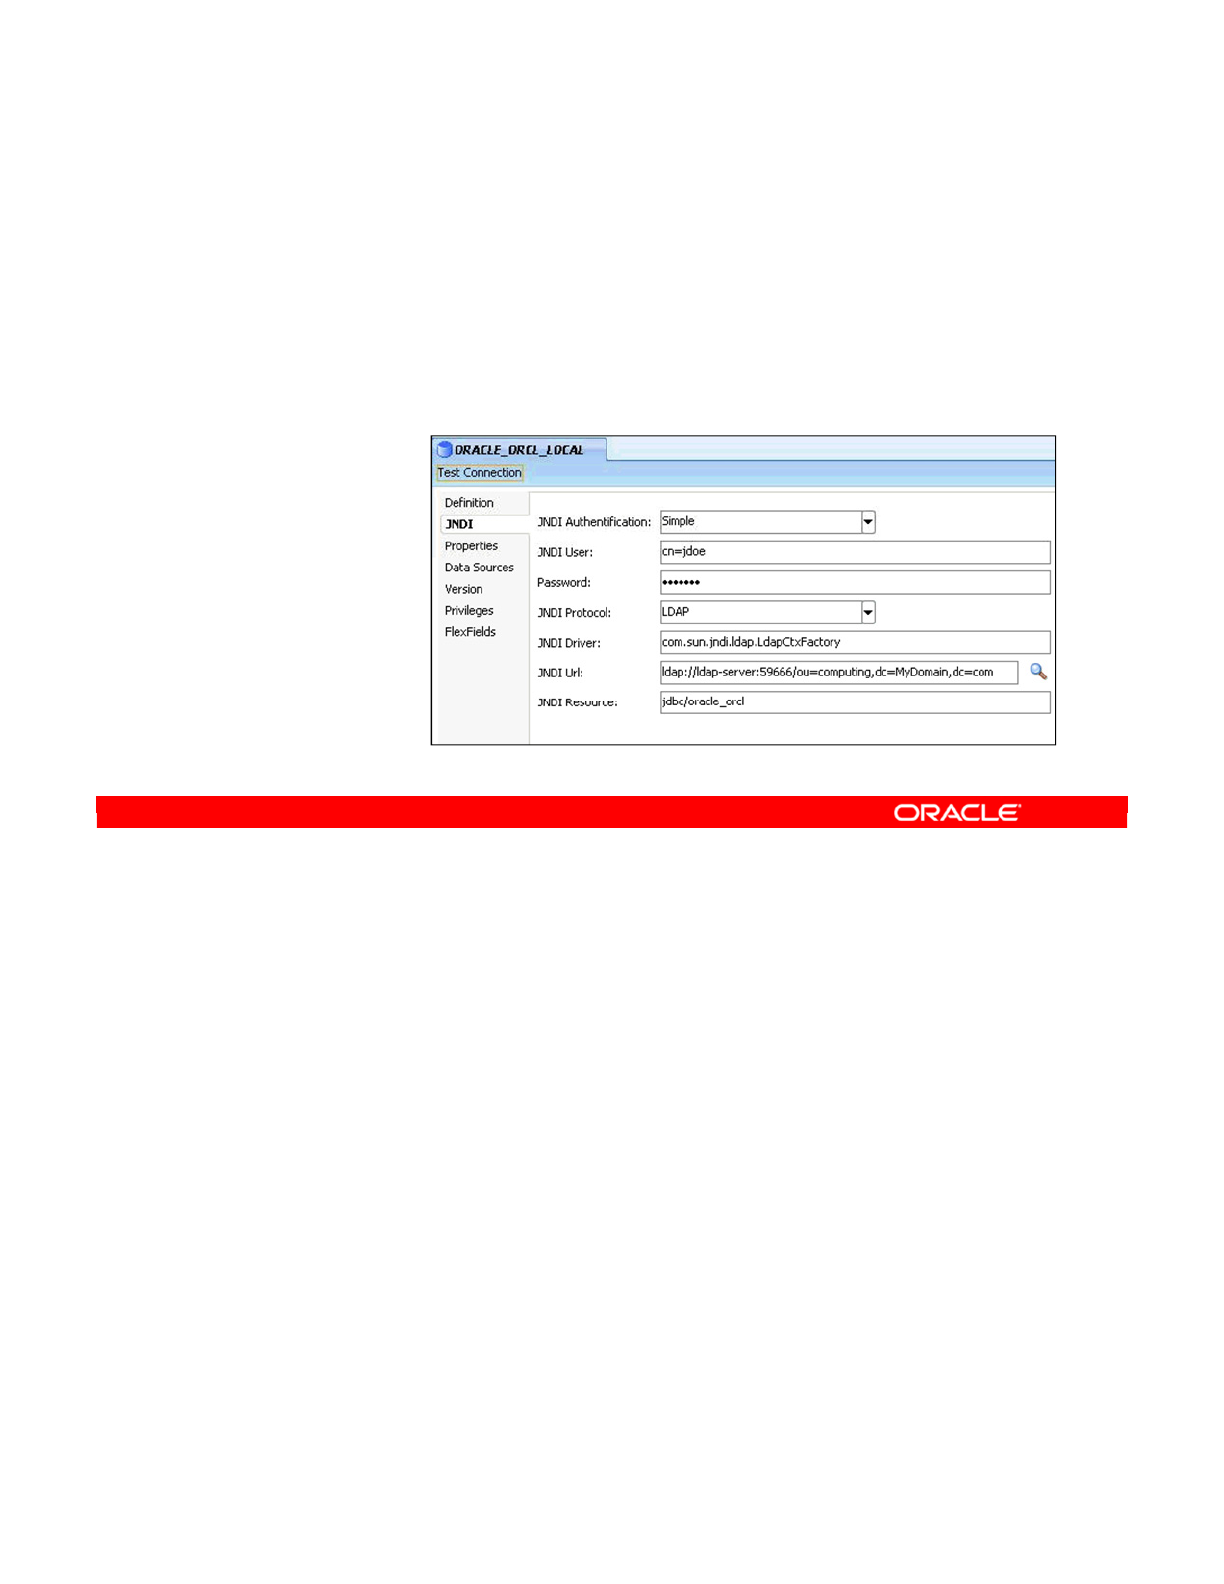
If you selected the option to connect to your data server with JNDI by using a directory, the
JDBC tab is replaced by the JNDI tab. Click this tab to begin defining the parameters. The
meaning of these parameters depends on the type of directory you want to use and the JNDI
driver. The parameters include the JNDI Authentication mode, a user and password, and the
JNDI protocol.
You must also specify the JNDI driver. The JNDI URL is specified in the same way as the
JDBC URL, and depends on the type of directory connected. The JNDI Resource name is the
directory resource corresponding to your data server. For database connections, it should
correspond to a JDBC data source. For JDBC connections, you must test your connection.
Click OK to save your settings.
Recall that when connecting a data server through a JNDI directory, you need both the JNDI
directory driver and the data server driver (for example, a JDBC driver). Both these drivers
should be installed in the driver’s subdirectory.
Oracle Data Integrator 11g: Integration and Administration 4 - 18
Copyright © 2012, Oracle and/or its affiliates. All rights reserved.
Creating a Data Server: JNDI
1. Click the JNDI tab, after selecting JNDI on the Definition
tab.
2. Set the JNDI parameters.
–Authentication
–User/password
–Protocol
–Driver
–URL
–Resource
3. Test the
connection.
Oracle University and (Oracle Corporation) use only.
These eKit materials are to be used ONLY by you for the express purpose SELF STUDY. SHARING THE FILE IS STRICTLY PROHIBITED.
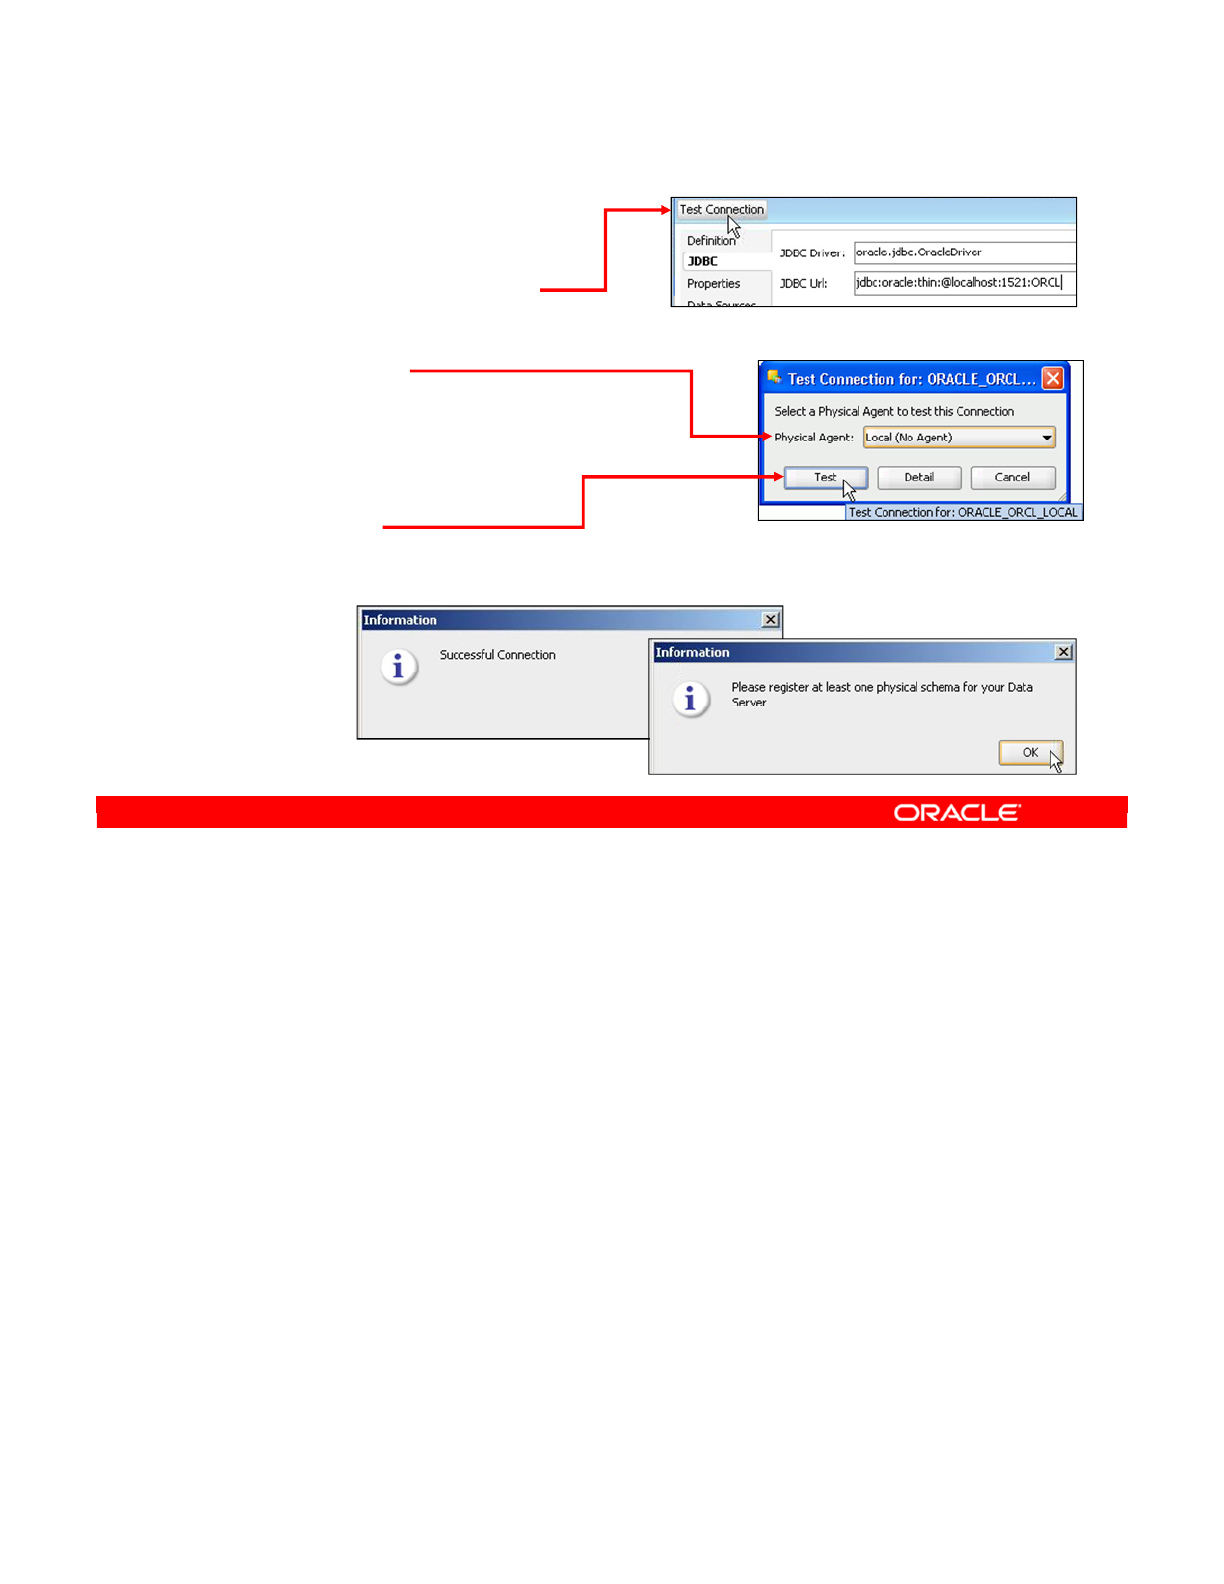
After you have chosen a driver and set up a URL, you must test the connection. It is quicker to
test the connection now than to find later that your connection parameters are wrong. To test,
perform the following:
1. Click Test Connection in the data server window.
2. Be sure to test every data server connection for every agent you have defined. If you are
connecting to a production data server, you should test to ensure that the agent that will
be used in production can connect to it.
3. You can select Local (No Agent) to perform the test from your workstation. This setting
uses the agent that is built into ODI, which is always available.
4. Click the Test button to launch the test. This validates the driver, the URL, and the
network connectivity to the server. Generally, if the test is successful, a result is returned
instantly. Note the second information window informing you to register at least one
physical schema for your data server.
You can repeat the test with different agents.
Note: You must always test the connection to check that the data server is correctly
configured.
Oracle Data Integrator 11g: Integration and Administration 4 - 19
Copyright © 2012, Oracle and/or its affiliates. All rights reserved.
Testing a Data Server Connection
1. Click Test Connection.
2. Select the agent to test this
connection.
–Local (No Agent) performs
the test with the Topology
Navigator GUI.
3. Click Test.
4. This validates driver, URL, and network connectivity.
Oracle University and (Oracle Corporation) use only.
These eKit materials are to be used ONLY by you for the express purpose SELF STUDY. SHARING THE FILE IS STRICTLY PROHIBITED.
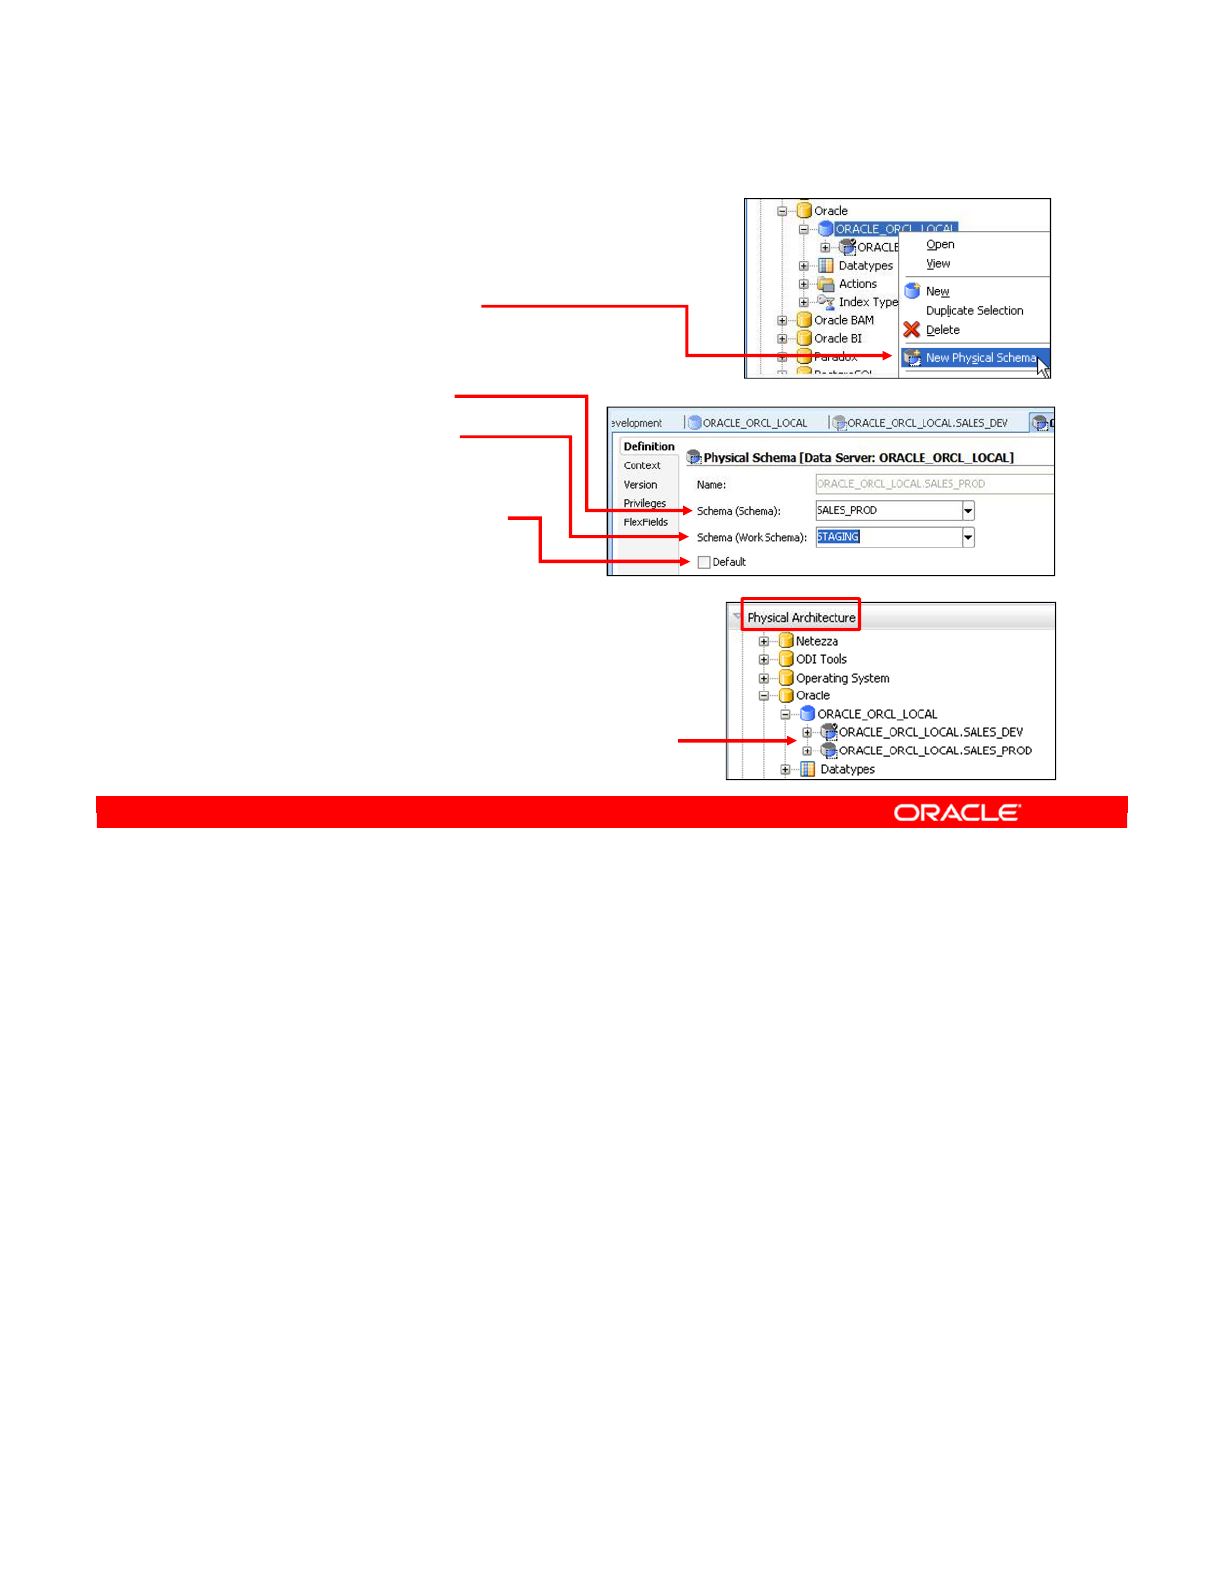
Now that you have created a data server, the next step is to define the physical schemas in
ODI. To do this, right-click the data server and select New Physical Schema. If you have just
created a data server, this window opens automatically. The layout of the window depends on
the technology. Certain technologies qualify each data server schema by using a catalog
name and a schema name. Others use only one of these qualifiers, and some do not support
multiple schemas at all.
In this window, you choose the data server schemas that you want to use as the data schema
and work schema. To choose a data server schema, specify the catalog name, the schema
name, both, or none. Remember that the data schema is where your data is stored and the
work schema is a different schema where ODI stores temporary objects.
If you want to use the default schema for the data server, select the Default check box. This
means that ODI will store temporary objects that belong to the entire data server in this work
schema.
Note: The recommended practice in ODI is that you create a separate area on each data
server specifically for ODI temporary objects—the dedicated area. You can then use this
dedicated area as the work schema so that you have no risk of ODI temporary objects
polluting your production data.
Oracle Data Integrator 11g: Integration and Administration 4 - 20
Copyright © 2012, Oracle and/or its affiliates. All rights reserved.
Creating a Physical Schema
1. Right-click the data
server and select New
Physical Schema.
2. Select or fill in:
–Data Schema
–Work Schema
3. Select whether this is
the Default schema.
You define these two physical
schemas in the practice.
Oracle University and (Oracle Corporation) use only.
These eKit materials are to be used ONLY by you for the express purpose SELF STUDY. SHARING THE FILE IS STRICTLY PROHIBITED.

You have defined a representation of your system’s actual physical architecture.
Now, you define a higher-level logical representation of that architecture. You can then map
the logical objects to specific physical versions of those objects, by way of the contexts that
you defined.
Oracle Data Integrator 11g: Integration and Administration 4 - 21
Copyright © 2012, Oracle and/or its affiliates. All rights reserved.
Creating Logical Architecture
Oracle University and (Oracle Corporation) use only.
These eKit materials are to be used ONLY by you for the express purpose SELF STUDY. SHARING THE FILE IS STRICTLY PROHIBITED.
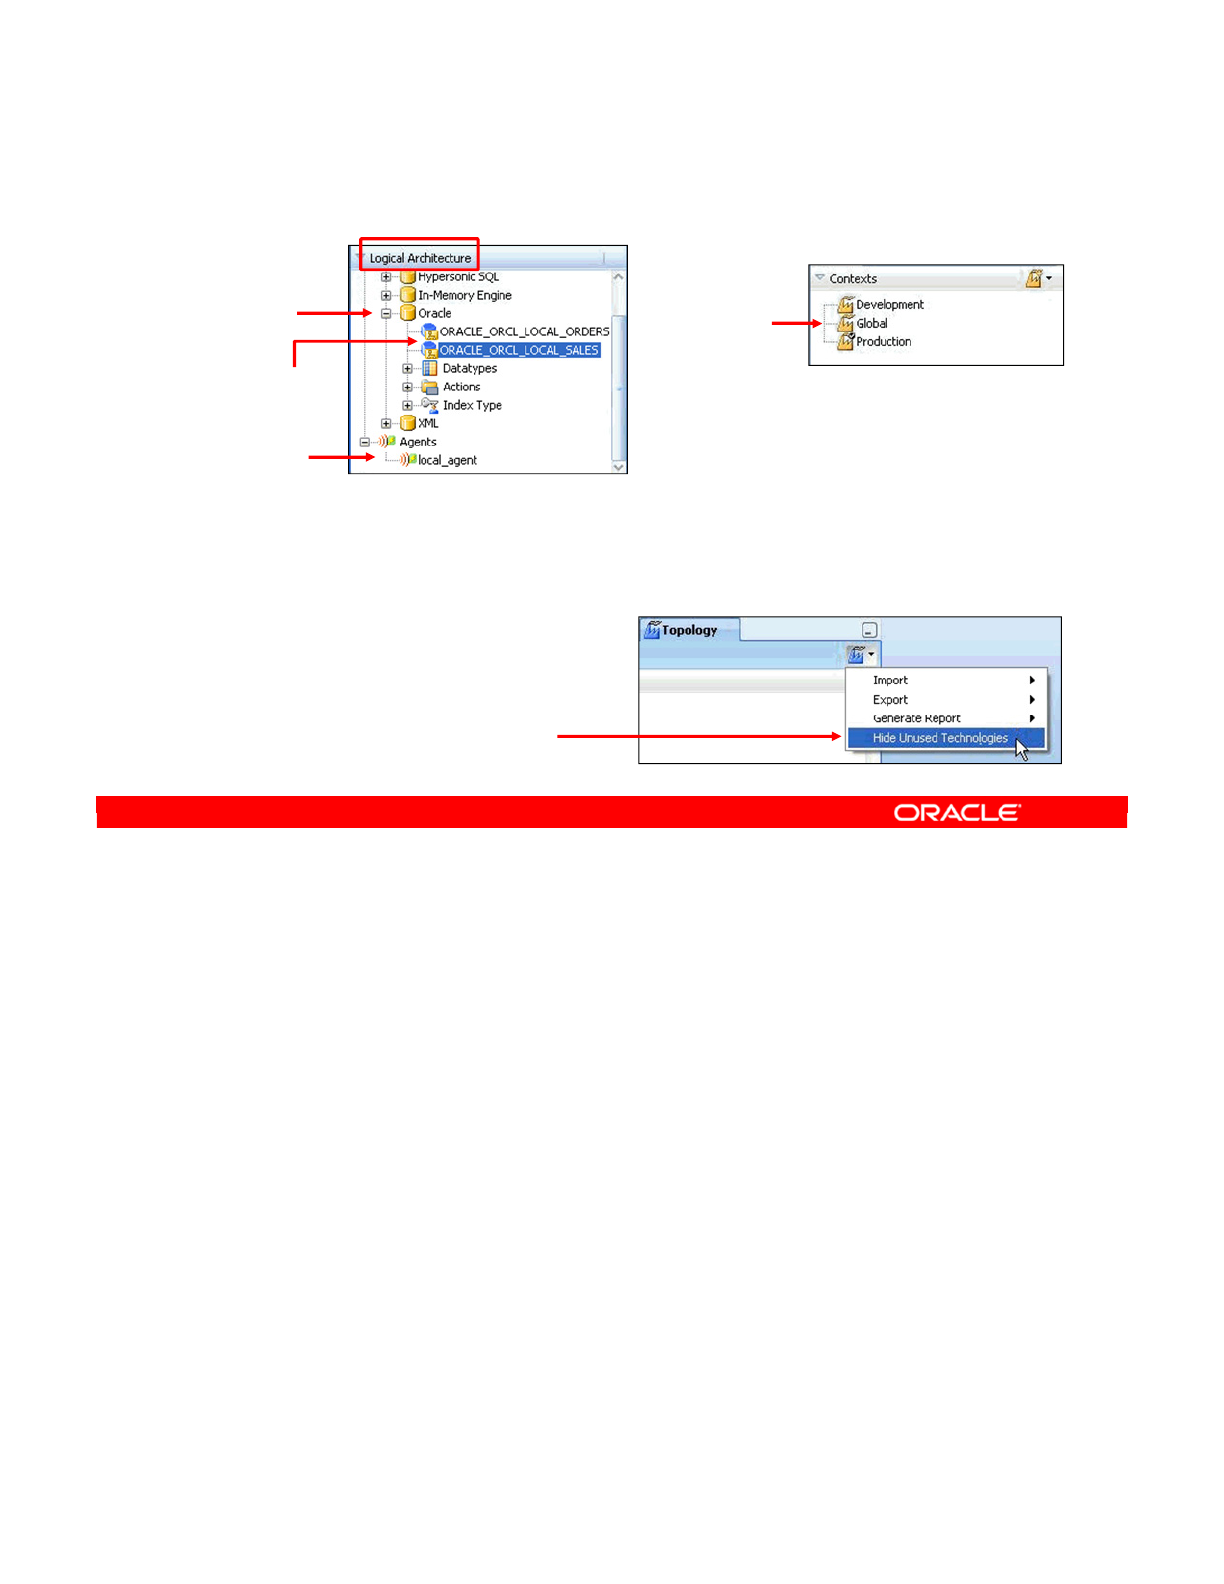
The Logical Architecture view is where you modify the definition of the logical schemas and
logical agents. The Logical Architecture is organized by technology. So, to see logical
schemas based on Oracle, expand the Oracle node.
Under this node, all logical schemas are displayed. Here, you see two logical schemas,
ORACLE_ORCL_LOCAL_SALES and ORACLE_ORCL_LOCAL_ORDERS, which are based on
Oracle technology. You will define these two schemas in the practice.
The logical agent displayed will be covered at the end of this lesson.
You can see the contexts that link the logical and physical architectures in the Contexts view.
In both the Logical Architecture and Physical Architecture views, the same list of technologies
is presented. Thus, to modify the definition of a technology, you can use either view.
The number of technologies available in ODI can be somewhat overwhelming. Fortunately,
you can make Topology Navigator display only those technologies on which at least one
logical schema is defined. To do this, select Hide Unused Technologies from the Topology
Navigator drop-down menu. Do not forget to redisplay the technologies when you want to
define a logical schema on a new technology.
Oracle Data Integrator 11g: Integration and Administration 4 - 22
Copyright © 2012, Oracle and/or its affiliates. All rights reserved.
Logical Architecture and Context Views
•The same technologies are displayed in
Physical and Logical Architecture views.
Technology
Logical schemas
Logical agent
Contexts
To reduce the number of
technologies displayed,
select Hide Unused
Technologies.
Oracle University and (Oracle Corporation) use only.
These eKit materials are to be used ONLY by you for the express purpose SELF STUDY. SHARING THE FILE IS STRICTLY PROHIBITED.
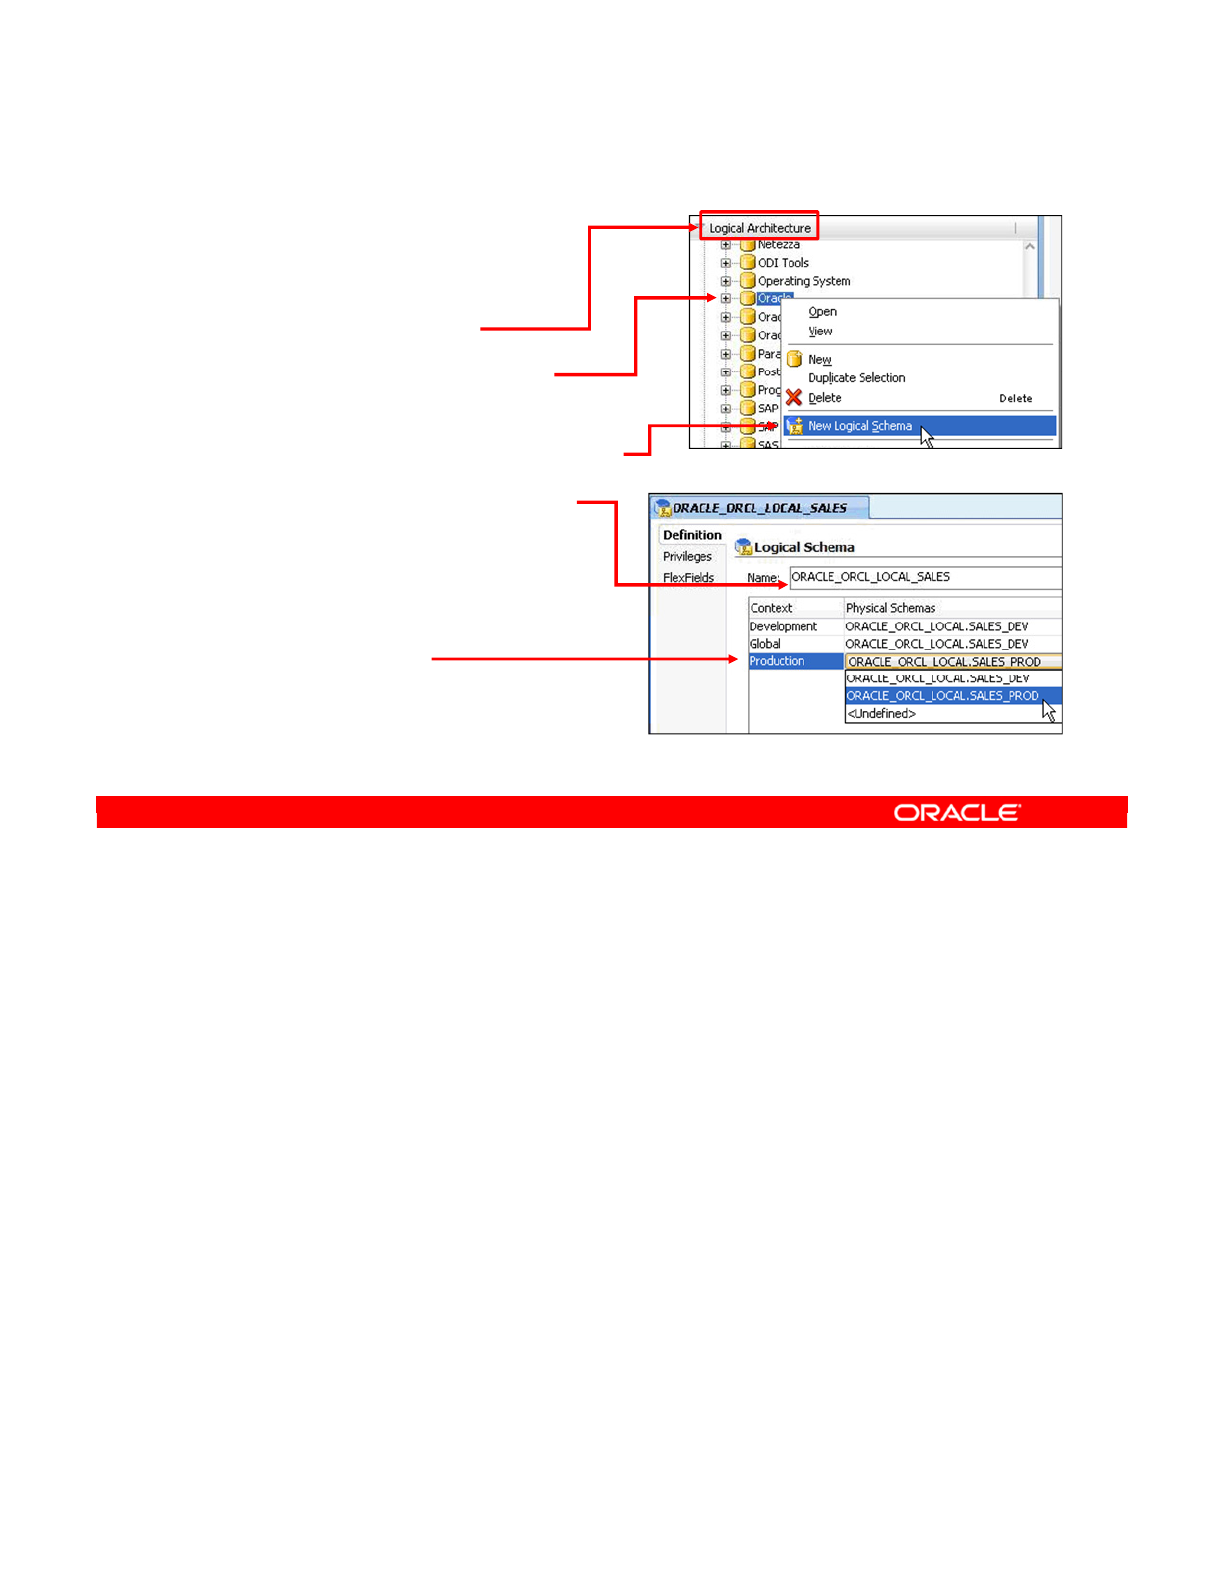
To create a logical schema, perform the following steps:
1. Go to the Logical Architecture view in Topology Navigator.
2. Find the technology appropriate for your logical schema and right-click its node.
3. From the context menu, click New Logical Schema.
4. In the window that opens, provide a name for the logical schema. The best practice is to
include the name of the technology in the logical schema name.
5. To map this logical schema to physical schemas in different contexts, select the
appropriate physical schema for each context.
Note: You can associate the logical schema with any physical schemas defined for this
technology directly on the Definition tab. However, it does not have to be associated with a
physical schema in every context.
Oracle Data Integrator 11g: Integration and Administration 4 - 23
Copyright © 2012, Oracle and/or its affiliates. All rights reserved.
Creating a Logical Schema
1. Go to the Logical
Architecture view.
2. Right-click the schema
technology.
3. Select New Logical Schema.
4. Type the schema name.
5. You can associate the
schema with the physical
schemas, in different
contexts, here.
Oracle University and (Oracle Corporation) use only.
These eKit materials are to be used ONLY by you for the express purpose SELF STUDY. SHARING THE FILE IS STRICTLY PROHIBITED.
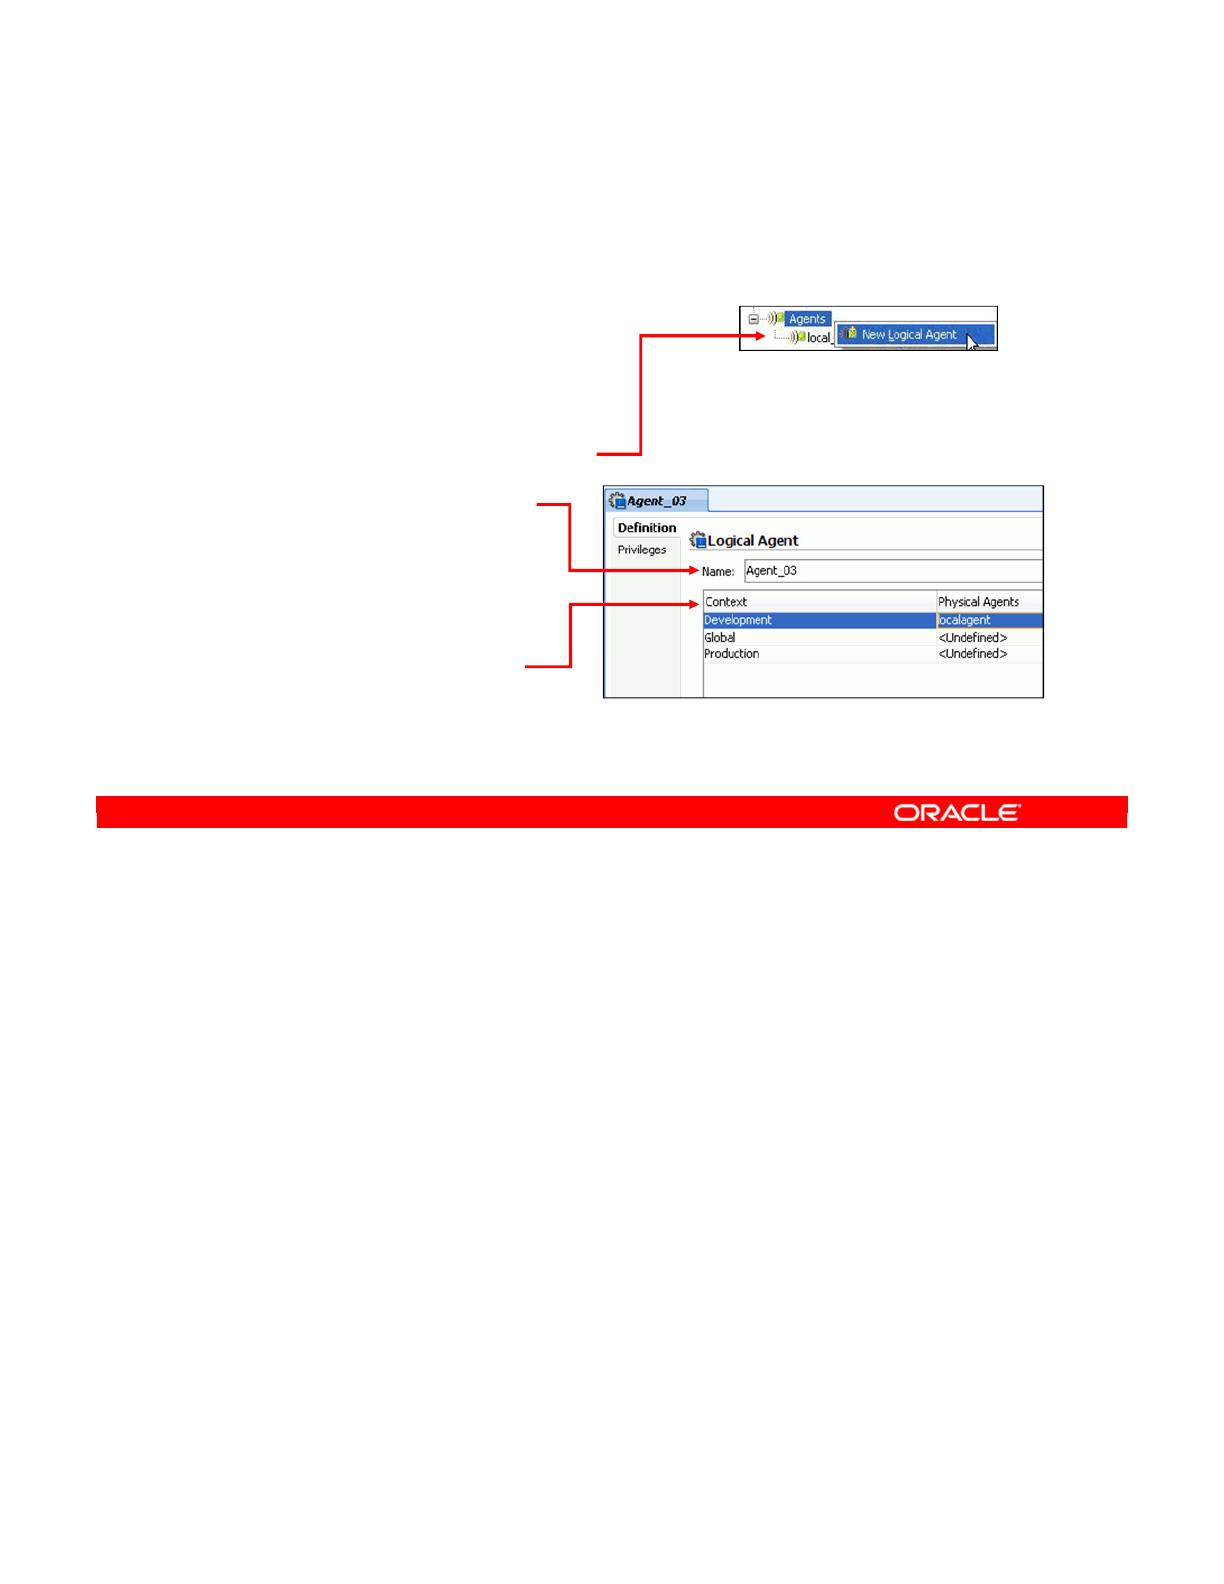
The procedure to create a logical agent is similar to creating a logical schema. Perform the
following:
1. Go to the Logical Architecture view.
2. Right-click the Agents node.
3. Select New Logical Agent from the context menu.
4. Provide a name for the logical agent.
5. As with logical schemas, you can define the associated physical agents here.
Note: The physical agents should be defined before logical agents. You learned how to
create physical agents in the lesson titled “Administering ODI Repositories.”
Oracle Data Integrator 11g: Integration and Administration 4 - 24
Copyright © 2012, Oracle and/or its affiliates. All rights reserved.
Creating a Logical Agent
1. Go to the Logical
Architecture view.
2. Right-click the Agents
node.
3. Select New Logical Agent.
4. Type the agent name.
5. You can associate the
logical agent with the
physical agents here.
Oracle University and (Oracle Corporation) use only.
These eKit materials are to be used ONLY by you for the express purpose SELF STUDY. SHARING THE FILE IS STRICTLY PROHIBITED.
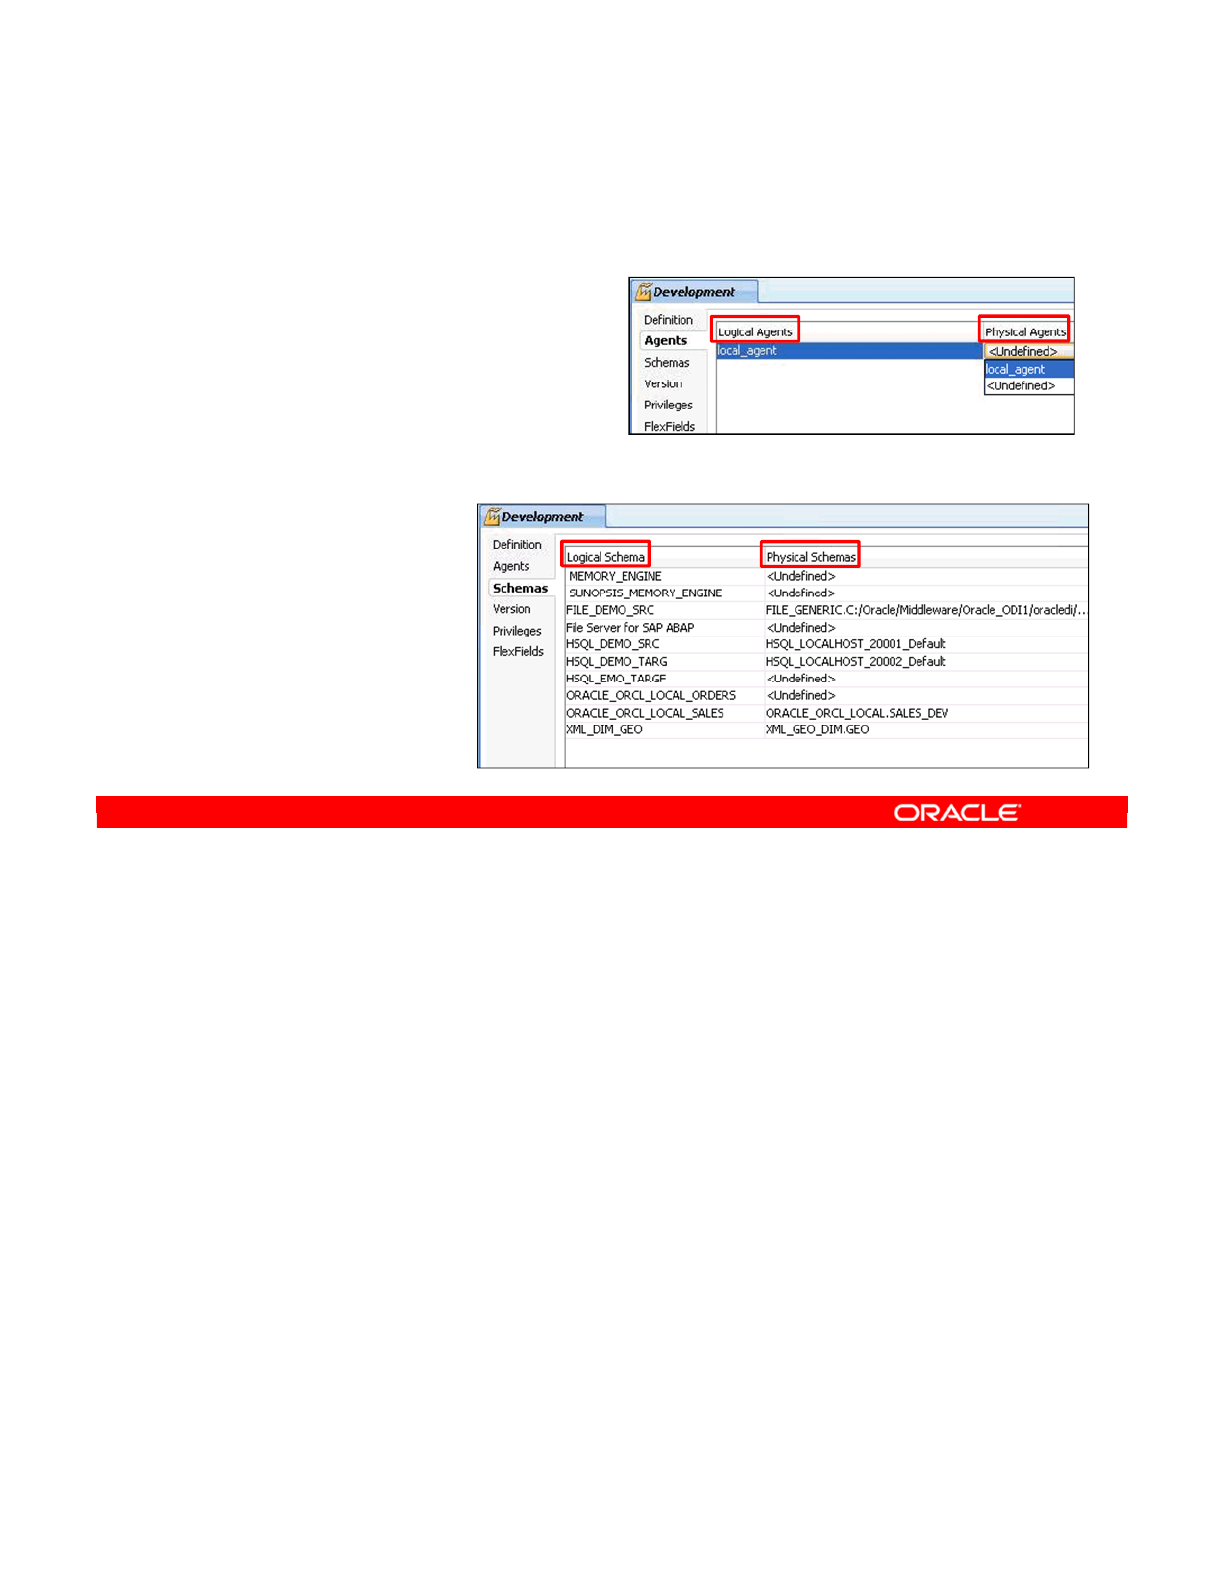
As you saw earlier, you can associate logical schemas and agents with physical objects in
their respective windows. However, it is easier to set up an entire context by editing the
context itself.
•To do this, double-click the context in the Contexts view.
•Click the Agents tab to assign agents.
Now, the list of logical agents is displayed. For each logical agent, you can assign a physical
agent from the drop-down list. Or, you can set the physical agent to <Undefined> to make it
unavailable in this context.
Similarly, click the Schemas tab to associate the logical schemas with the physical schemas.
Note: You do not have to associate every logical schema with a physical schema, or every
logical agent with a physical agent, in every context. However, such an unresolved agent or
schema cannot be used in the given context.
Oracle Data Integrator 11g: Integration and Administration 4 - 25
Copyright © 2012, Oracle and/or its affiliates. All rights reserved.
Editing a Context to Link the Logical and
Physical Agents
1. Double-click the context.
2. Click the Agents tab.
3. For each logical agent,
select the corresponding
physical agent in the context.
4. Click the
Schemas tab.
5. For each logical
schema, select
a corresponding
physical schema
in the context.
Oracle University and (Oracle Corporation) use only.
These eKit materials are to be used ONLY by you for the express purpose SELF STUDY. SHARING THE FILE IS STRICTLY PROHIBITED.

Answer: d
Explanation: In the case of a database, the user should have SELECT privileges to all the
schemas defined in the data server. The user must also have INSERT/UPDATE privileges to
the tables into which ODI will integrate data. The user must have sufficient privileges to
CREATE/DROP objects into temporary, or work, schemas, and should be able to READ the
structure of the tables to reverse-engineer them.
Note: This is the reason why it is a best practice to log in with the owner of the work schema.
Oracle Data Integrator 11g: Integration and Administration 4 - 26
Copyright © 2012, Oracle and/or its affiliates. All rights reserved.
Quiz
Which of the following privileges must the user have to
integrate data into the database tables and reverse-engineer
them?
a. SELECT, INSERT, and UPDATE
b. READ, INSERT, and UPDATE
c. SELECT, INSERT, UPDATE, CREATE, and DROP
d. SELECT, INSERT, UPDATE, CREATE, DROP, and READ
Oracle University and (Oracle Corporation) use only.
These eKit materials are to be used ONLY by you for the express purpose SELF STUDY. SHARING THE FILE IS STRICTLY PROHIBITED.

Answer: b
Explanation: You do not have to associate every logical schema with a physical schema, in
every context. However, such unresolved schema cannot be used in the given context.
Oracle Data Integrator 11g: Integration and Administration 4 - 27
Copyright © 2012, Oracle and/or its affiliates. All rights reserved.
Quiz
On the Definition tab, you must associate the logical schema
with the physical schemas defined for this technology in every
context.
a. True
b. False
Oracle University and (Oracle Corporation) use only.
These eKit materials are to be used ONLY by you for the express purpose SELF STUDY. SHARING THE FILE IS STRICTLY PROHIBITED.

Oracle Data Integrator 11g: Integration and Administration 4 - 28
Copyright © 2012, Oracle and/or its affiliates. All rights reserved.
Summary
In this lesson, you should have learned how to:
•Use Topology Navigator to create the physical and logical
architectures
•Create data servers and physical schemas
•Link the physical and logical architectures
Oracle University and (Oracle Corporation) use only.
These eKit materials are to be used ONLY by you for the express purpose SELF STUDY. SHARING THE FILE IS STRICTLY PROHIBITED.

Oracle Data Integrator 11g: Integration and Administration 4 - 29
Copyright © 2012, Oracle and/or its affiliates. All rights reserved.
Checklist of Practice Activities
1-1: Logging In and Using Help
2-1: Creating Users and Repositories and Logging In
3-1: Creating an ODI Agent for Orchestrating Execution of ODI Objects
4-1: Defining the Topology
5-1: Setting Up a New ODI Project
6-1: Creating a Model
7-1: Checking Data Quality in the Model
8-1: ODI Interface: Simple Transformations
9-1: ODI Interface: Complex Transformations
9-2: ODI Interface: Implementing Lookup
10-1: ODI Interface: Exporting a Flat File to a Relational Table
11-1: Using Native Sequences with ODI Interface
11-2: Using Temporary Indexes
11-3: Using Data Sets with ODI Interface
12-1: Using Temporary ODI Interfaces
12-2: Developing a New Knowledge Module
13-1: Creating an ODI Procedure
14-1: Creating an ODI Package
14-2: Using ODI Package with Variables and User Functions
15-1: Creating and Scheduling an ODI Scenario
16-1: Using Load Plans
17-1: Working with ODI Versions
18-1: Enforcing Data Quality with ODI Interface
19-1: Implementing Changed Data Capture
20-1: Setting Up ODI Security
20-2: Integrating with Enterprise Manager and Using ODI Console
21-1: Executing an ODI Scenario Through the ODI Public Web Service
Oracle University and (Oracle Corporation) use only.
These eKit materials are to be used ONLY by you for the express purpose SELF STUDY. SHARING THE FILE IS STRICTLY PROHIBITED.
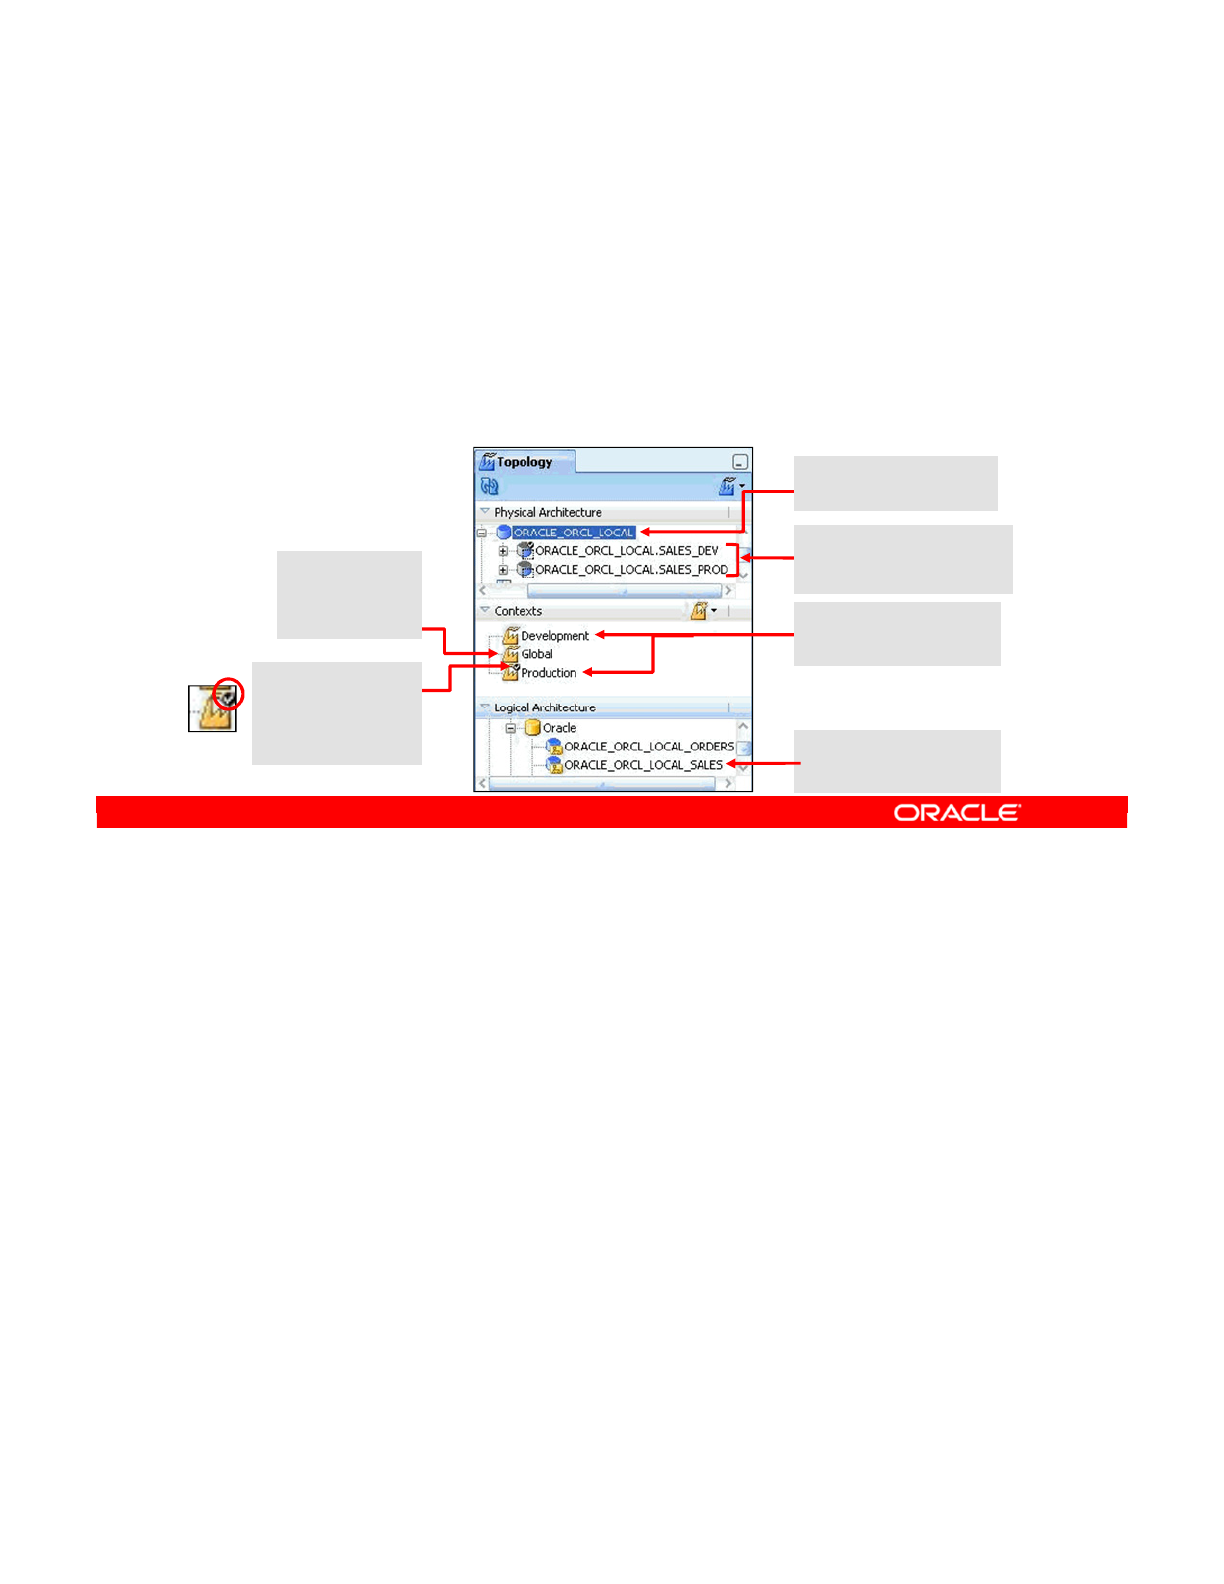
In previous practices, you created Master and Work Repositories and installed an ODI Agent
as a background service.
Before you begin working on your ODI projects, you need to describe your ODI infrastructure
in the topology. You need to define contexts, a data server, physical and logical schemas, and
mappings of your logical schema to the physical schemas in terms of contexts.
Oracle Data Integrator 11g: Integration and Administration 4 - 30
Copyright © 2012, Oracle and/or its affiliates. All rights reserved.
Practice 4-1: Overview
1. Define Production context.
2. Define Development context (a third context, Global, is preseeded).
3. Define ORACLE_ORCL_LOCAL data server.
4. Define ODI physical schemas for data server: SALES_DEV,
SALES_PROD.
5. Define ORACLE_ORCL_LOCAL_SALES ODI logical schema.
6. Map the logical schema to the two physical schemas, in terms of the
three contexts.
Logical schema you
create in the practice
Check mark
indicates
default context.
Global is a
preseeded
context. Two contexts you
create in the practice
Data server you
create in the practice
Physical schemas you
create in the practice
Oracle University and (Oracle Corporation) use only.
These eKit materials are to be used ONLY by you for the express purpose SELF STUDY. SHARING THE FILE IS STRICTLY PROHIBITED.

Copyright © 2012, Oracle and/or its affiliates. All rights reserved.
Setting Up a New ODI Project
Oracle University and (Oracle Corporation) use only.
These eKit materials are to be used ONLY by you for the express purpose SELF STUDY. SHARING THE FILE IS STRICTLY PROHIBITED.
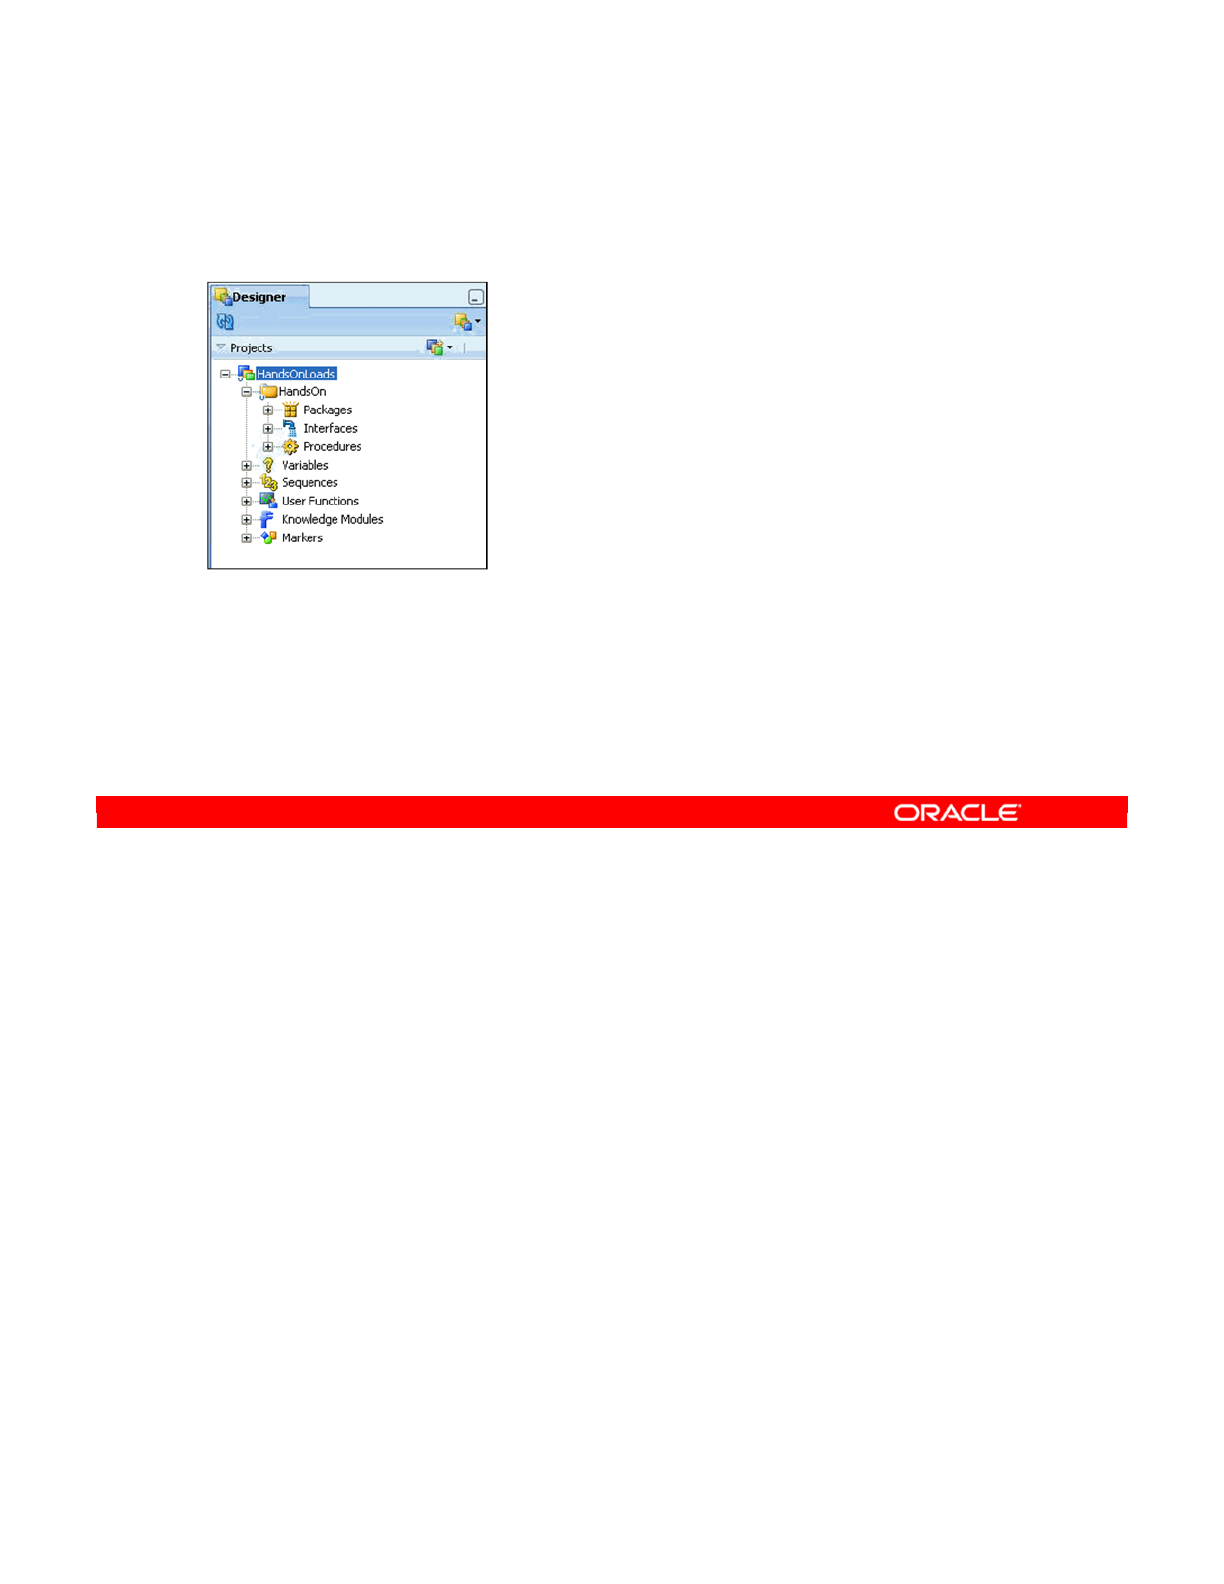
This lesson explains the basic organization of projects by using markers and folders. In this
lesson, you should learn how to:
•Set up a data integration project in Oracle Data Integrator (ODI)
•Use folders to organize your work into subprojects
•Import knowledge modules and know which ones to import
•Use markers to help organize your project by adding project-specific information to your
objects
•Import and export objects to share your work
Oracle Data Integrator 11g: Integration and Administration 5 - 2
Copyright © 2012, Oracle and/or its affiliates. All rights reserved.
Objectives
After completing this lesson,
you should be able to:
•Set up a new project
•Use folders to organize
your work
•Import the right knowledge
modules
•Import and export objects
•Use markers to manage
the project
Oracle University and (Oracle Corporation) use only.
These eKit materials are to be used ONLY by you for the express purpose SELF STUDY. SHARING THE FILE IS STRICTLY PROHIBITED.

This section provides an overview of what projects do and a description of how to set one up.
Oracle Data Integrator 11g: Integration and Administration 5 - 3
Copyright © 2012, Oracle and/or its affiliates. All rights reserved.
ODI Projects
Overview and Setup
Oracle University and (Oracle Corporation) use only.
These eKit materials are to be used ONLY by you for the express purpose SELF STUDY. SHARING THE FILE IS STRICTLY PROHIBITED.

Oracle Data Integrator 11g: Integration and Administration 5 - 4
Copyright © 2012, Oracle and/or its affiliates. All rights reserved.
What Is a Project?
A project is a collection of ODI objects created by users for a
particular functional domain.
Oracle University and (Oracle Corporation) use only.
These eKit materials are to be used ONLY by you for the express purpose SELF STUDY. SHARING THE FILE IS STRICTLY PROHIBITED.
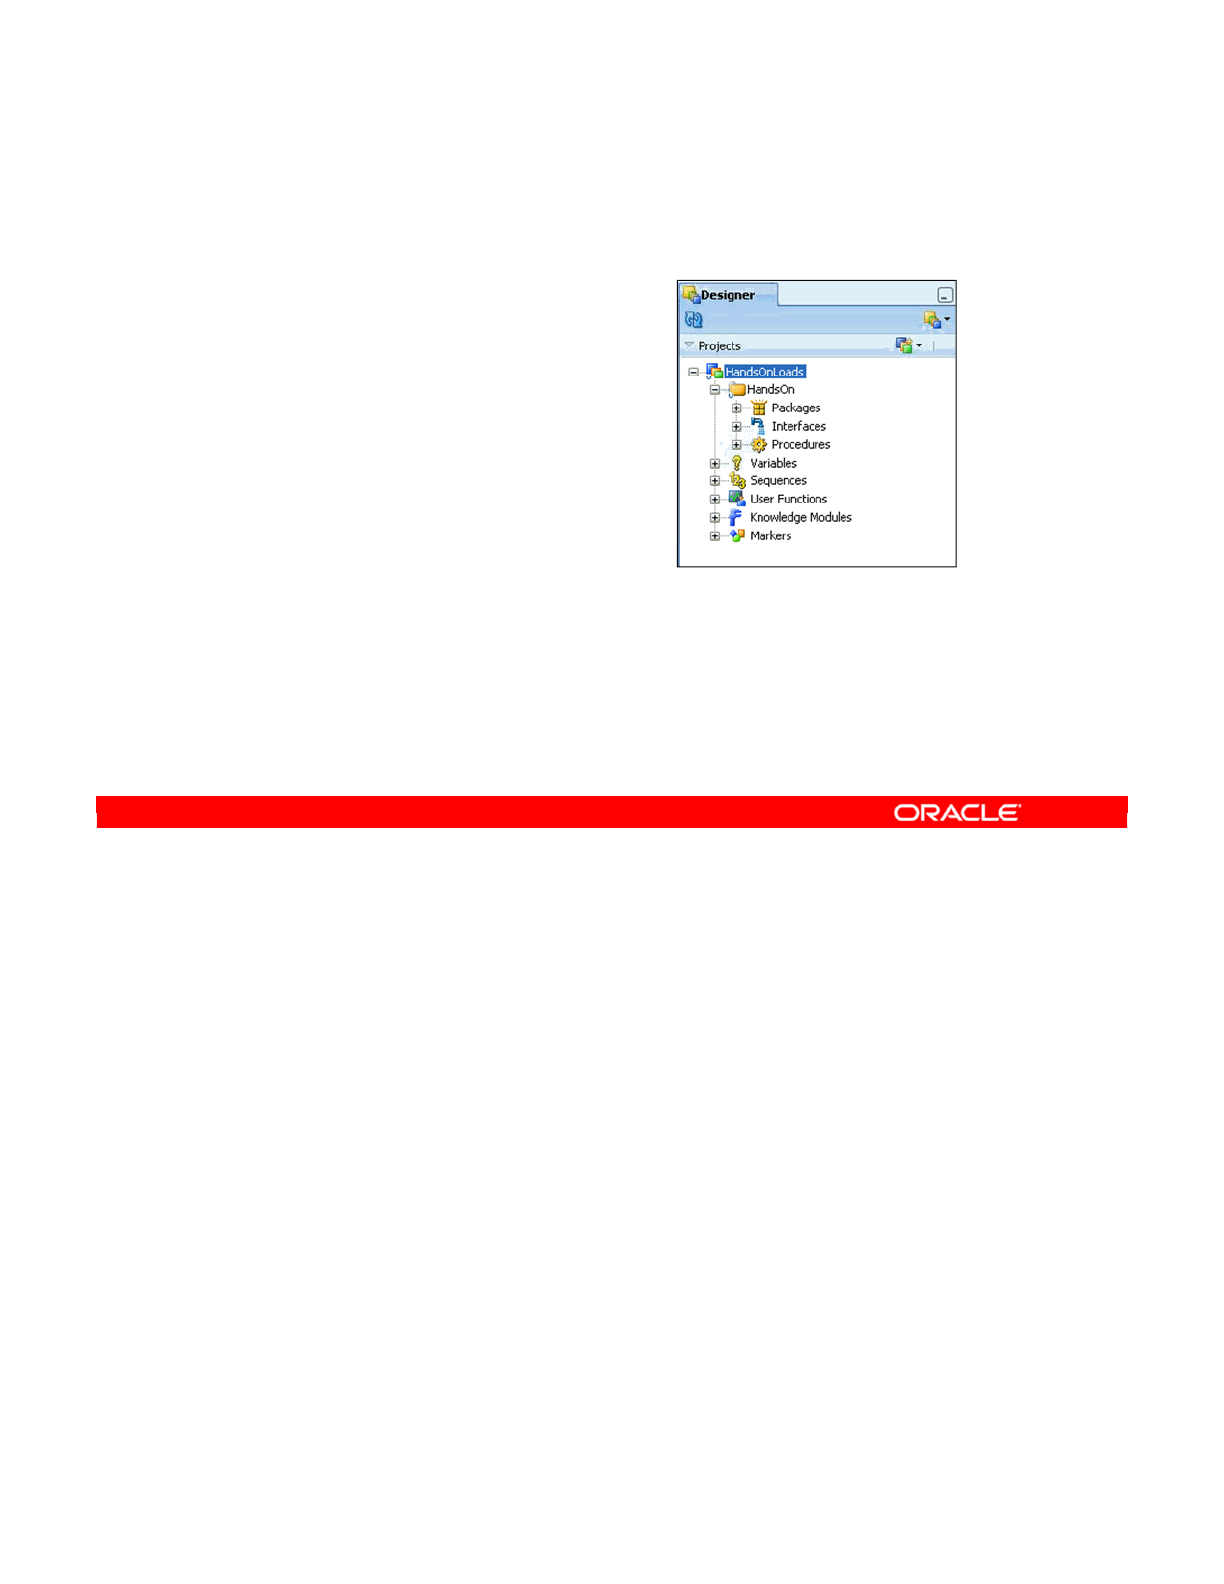
You know that projects are collections of ODI objects. However, only certain objects can
belong to projects. Similarly, certain objects always belong to projects.
•Packages, procedures, and interfaces always belong to folders, and folders always
belong to projects.
•Variables, sequences, and user functions either belong to projects or can be created
with global scope.
•Knowledge modules and markers always belong to a project.
In this lesson, you learn how to use folders and markers to organize projects. You also learn
to import the correct knowledge modules, which is an important step in project administration.
Oracle Data Integrator 11g: Integration and Administration 5 - 5
Copyright © 2012, Oracle and/or its affiliates. All rights reserved.
Oracle Data Integrator Projects: Overview
What can a project contain?
•Folders:
–Packages
–Interfaces
–Procedures
•Variables, sequences,
user functions
•Knowledge modules
•Markers
Oracle University and (Oracle Corporation) use only.
These eKit materials are to be used ONLY by you for the express purpose SELF STUDY. SHARING THE FILE IS STRICTLY PROHIBITED.

You can use projects in your work in different ways. But the best way is to use a project to
represent a functional domain in your integration process or an integration project that you
need to develop with ODI.
Each project contains its own knowledge modules, variables, markers, and other types of
objects. These objects can be shared between different projects by duplicating them.
You can also use global objects such as variables, sequences, or knowledge modules to
define parameters that are common to all projects.
Examples of suitable projects would be chaining the accounting and invoicing databases,
populating the data warehouse, or generating and sharing sales results.
Oracle Data Integrator 11g: Integration and Administration 5 - 6
Copyright © 2012, Oracle and/or its affiliates. All rights reserved.
How to Use ODI Projects in Your Work
•An ODI project should represent a functional domain or an
integration project.
•Projects have their own objects (knowledge modules,
variables, markers, and so on).
–Objects in the projects can be shared by duplication.
–You can also use global variables, sequences, knowledge
modules, and so on.
•Examples of projects:
–Chaining ACCOUNTING and INVOICING databases
–Loading the data warehouse
–Generating and sharing sales results
Oracle University and (Oracle Corporation) use only.
These eKit materials are to be used ONLY by you for the express purpose SELF STUDY. SHARING THE FILE IS STRICTLY PROHIBITED.
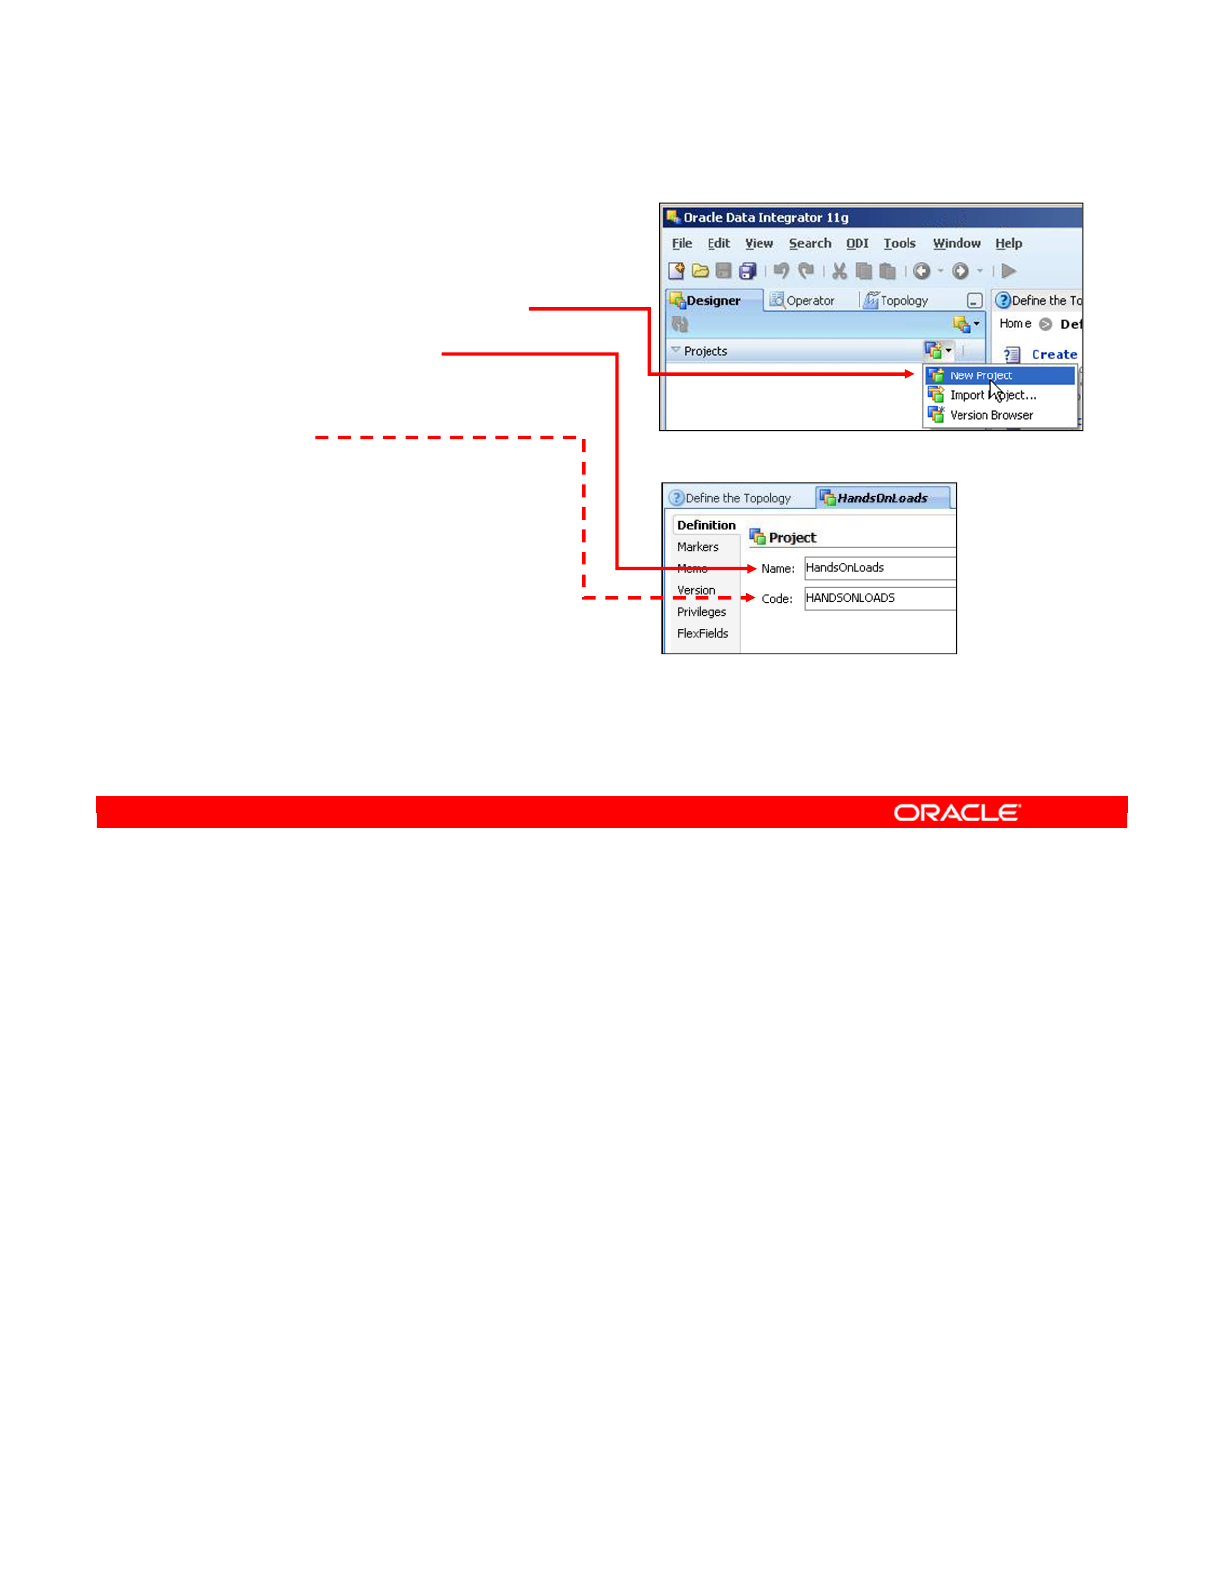
To create a new project, perform the following:
1. In the Designer Navigator, select New Project from the drop-down menu at the top of
Projects view.
2. Name the project. You should generally make it reflect the functional domain that it
covers.
3. A code is generated but can be changed to anything you like. You may want to shorten
the code to something more manageable. The code is used as a prefix when referring to
variables created within this project.
4. Default marker sets are automatically added to your blank project.
5. Similarly, a folder is created automatically to hold the interfaces, packages, and
procedures that you develop.
Oracle Data Integrator 11g: Integration and Administration 5 - 7
Copyright © 2012, Oracle and/or its affiliates. All rights reserved.
Creating a New Project
1. Select New Project from
the drop-down menu.
2. Select a name.
3. Optionally, change the
code.
–Use the code to prefix
project variables.
–Keep it short.
4. Default markers are
added automatically.
5. One folder is created to hold interfaces, packages, and
procedures.
Oracle University and (Oracle Corporation) use only.
These eKit materials are to be used ONLY by you for the express purpose SELF STUDY. SHARING THE FILE IS STRICTLY PROHIBITED.

The following slides describe the folders that group packages, interfaces, and procedures
within projects.
Oracle Data Integrator 11g: Integration and Administration 5 - 8
Copyright © 2012, Oracle and/or its affiliates. All rights reserved.
Using Folders
Oracle University and (Oracle Corporation) use only.
These eKit materials are to be used ONLY by you for the express purpose SELF STUDY. SHARING THE FILE IS STRICTLY PROHIBITED.

Oracle Data Integrator 11g: Integration and Administration 5 - 9
Copyright © 2012, Oracle and/or its affiliates. All rights reserved.
What Is a Folder?
•A folder is a hierarchical grouping beneath a project and
can contain other folders and objects.
•Every package, interface, or procedure must belong to a
folder.
•When should you create folders? One guideline is to create a
folder per "package" or scenario.
–This way, all interfaces that are used in the same
package are grouped together.
–The folder represents all that is necessary for a given
execution unit.
–As a result, maintenance is typically simplified.
Oracle University and (Oracle Corporation) use only.
These eKit materials are to be used ONLY by you for the express purpose SELF STUDY. SHARING THE FILE IS STRICTLY PROHIBITED.
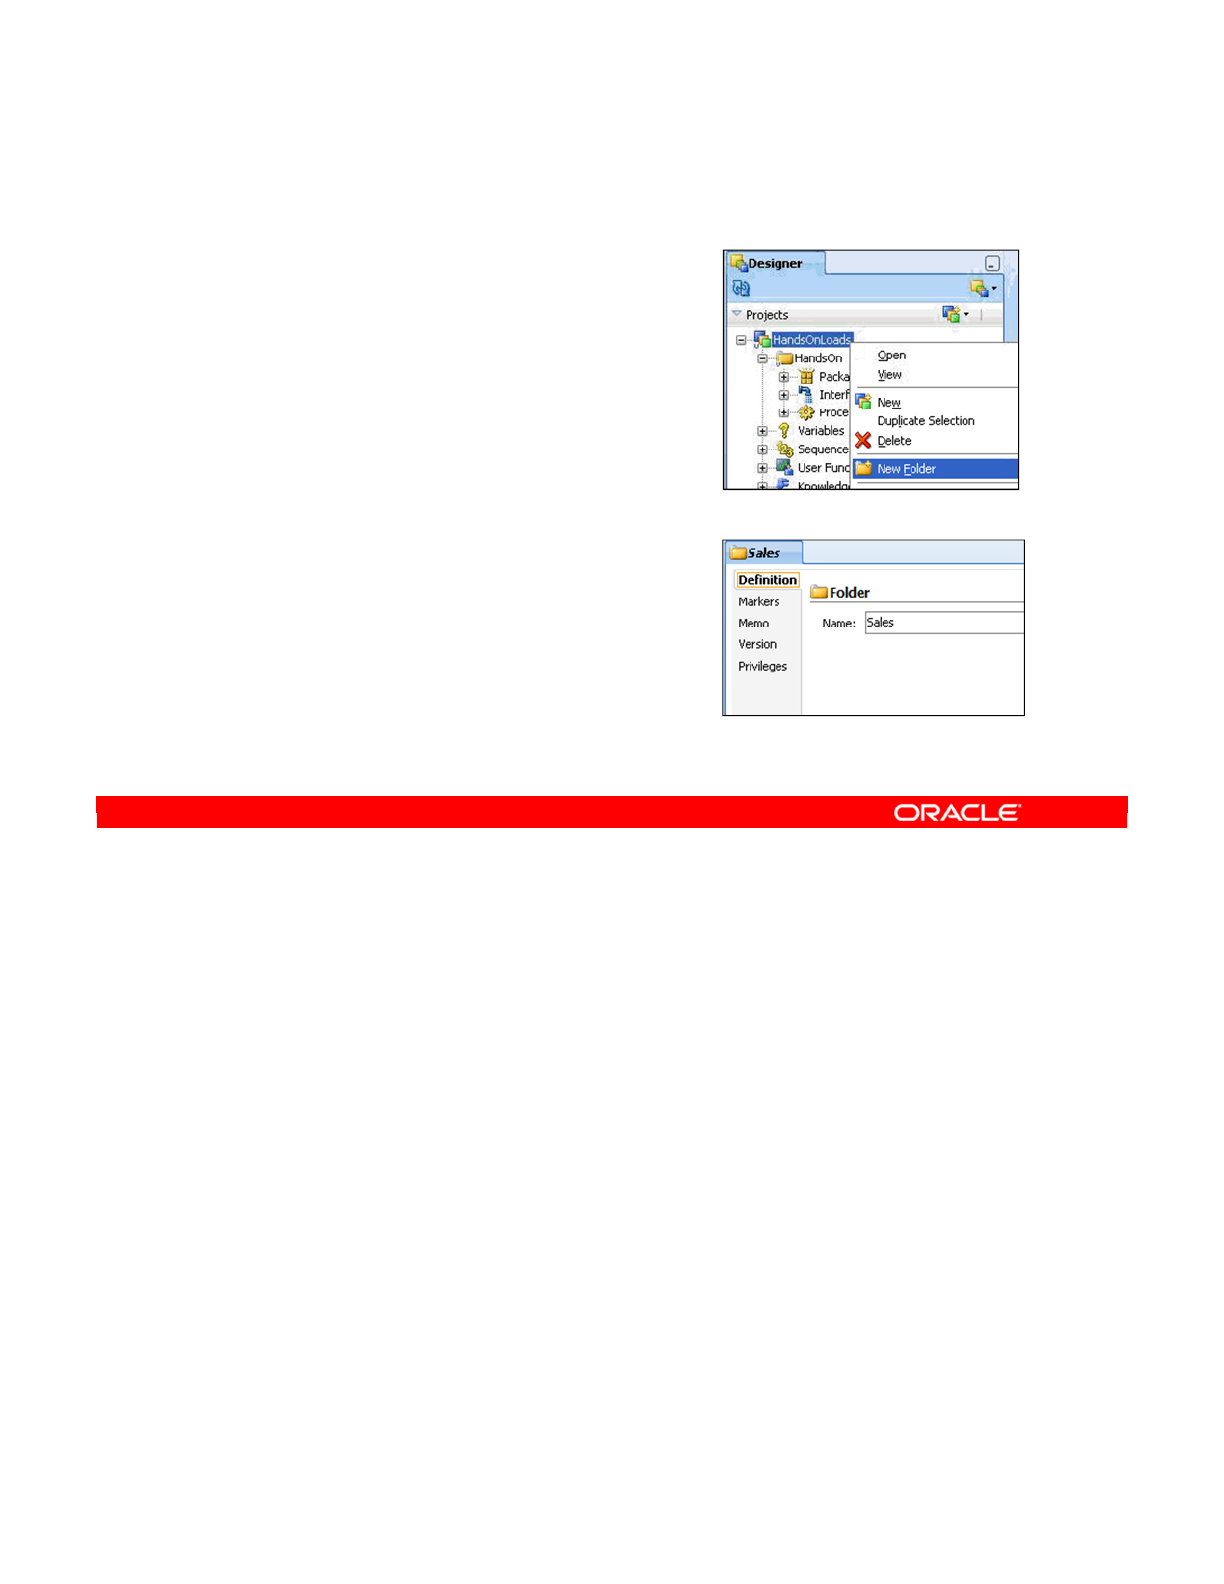
You can create folders within projects or within other folders as subfolders. To create a new
folder, perform the following:
1. Right-click the project or folder where you want to create the new folder.
2. Select Insert Folder from the context menu.
3. Give a name to the folder.
After the folder is created, you can drag it to other folders, or onto the parent project, to
reorganize the structure of your project.
Oracle Data Integrator 11g: Integration and Administration 5 - 10
Copyright © 2012, Oracle and/or its affiliates. All rights reserved.
Creating a New Folder
1. Right-click a project
or folder.
2. Select New Folder.
3. Name the folder.
You can drag folders to other
folders.
Oracle University and (Oracle Corporation) use only.
These eKit materials are to be used ONLY by you for the express purpose SELF STUDY. SHARING THE FILE IS STRICTLY PROHIBITED.

It is not always easy to know when to create a project or when to create a subfolder within the
same project. As a general rule, if you have a new functional domain or are starting an
integration project, you should create a new project. Also, if you specifically want to keep
objects separate from each other, you should create them in separate projects.
On the other hand, a folder is useful when you want to organize an existing project. When you
have a large number of interfaces, procedures, or packages in a project, you should consider
grouping them into folders. You can also use folders to set up different security levels within
the same project. Each folder can have its own unique privileges.
However, you should be aware that projects do impose strict boundaries on information
sharing. This means that objects created in one project cannot be used by another project. If
you want to enable the objects to be used by other projects, you should make the object
global. Thus, you enable the global variables, sequences, knowledge modules, and user
functions to be used by any project.
Folders, however, do not impose boundaries. Thus, objects in one folder can be used by any
other object in the project.
Oracle Data Integrator 11g: Integration and Administration 5 - 11
Copyright © 2012, Oracle and/or its affiliates. All rights reserved.
Organizing Projects and Folders
•When do you need a new project?
–When you start working on a new integration project or
functional domain
–When you want to keep objects separated
•When do you need a new folder?
–For organizational purposes within an existing project
–To define different user privileges within the project
•Project/folder boundaries:
–Objects cannot be shared between projects.
—
Global variables, sequences, knowledge modules, and user
functions can be used by any project.
–Objects within a project can be used in all folders.
Oracle University and (Oracle Corporation) use only.
These eKit materials are to be used ONLY by you for the express purpose SELF STUDY. SHARING THE FILE IS STRICTLY PROHIBITED.

Probably the most important thing when you create a project is importing the correct
knowledge modules. These modules enable your integration interfaces to work on the
technologies used by your data servers. Without importing any knowledge modules, no
interfaces can be made or executed.
Oracle Data Integrator 11g: Integration and Administration 5 - 12
Copyright © 2012, Oracle and/or its affiliates. All rights reserved.
Understanding Knowledge Modules
Oracle University and (Oracle Corporation) use only.
These eKit materials are to be used ONLY by you for the express purpose SELF STUDY. SHARING THE FILE IS STRICTLY PROHIBITED.

Technically, this term describes a template containing the code necessary to implement a
particular data integration task. These tasks include loading data, checking it for errors, or
setting up triggers necessary to implement journalization. However, all knowledge modules
basically work the same way: ODI uses them to generate code, which is then executed by a
technology at run time.
ODI 11.1.1.6 introduces Global Knowledge Modules (KMs) allowing specific KMs to be
shared across multiple projects. In previous versions of ODI, Knowledge Modules were
always specific to a Project and could only be used within the project into which they were
imported. Global KMs are listed in the Designer Navigator in the Global Objects accordion.
Note: Knowledge modules are independent of the structure of the source and target
datastores. The same KM can be used, no matter which source table you have, or how many
source tables you have. Likewise, all target tables can use the same knowledge module.
Oracle Data Integrator 11g: Integration and Administration 5 - 13
Copyright © 2012, Oracle and/or its affiliates. All rights reserved.
What Is a Knowledge Module?
•A knowledge module is a code template containing the
sequence of commands necessary to implement a data
integration task.
•There are different predefined knowledge modules for
loading, integration, checking, reverse-engineering,
journalizing, and deploying data services.
•All knowledge modules work by generating code to be
executed at run time.
•KMs can be specified as “Global,” allowing them to be
shared across multiple projects.
Oracle University and (Oracle Corporation) use only.
These eKit materials are to be used ONLY by you for the express purpose SELF STUDY. SHARING THE FILE IS STRICTLY PROHIBITED.
The first group of knowledge modules is critical for doing any work with interfaces.
•Loading Knowledge Modules (LKMs) extract data from the source of interfaces. So, if
your data is stored in flat files, you will need the “File to SQL” LKM.
•Integration Knowledge Modules (IKMs) implement a particular strategy for loading the
target of an interface. Thus, to load an Oracle table while taking into account the slowly
changing dimensions properties, a particular IKM can be used.
•Check Knowledge Modules (CKMs) are selected in Interfaces and constraints can be
individually enforced by ODI at the interface level.
The second group is used for setting up, checking, and configuring models.
•Check Knowledge Modules (CKMs) enforce constraints defined on the target data store.
CKMs are used by models to perform static checks outside of interfaces.
•Reverse-Engineering Knowledge Modules (RKMs) are needed only to perform
customized reverse-engineering. They are used to recover the structure of a data model
and are used when standard reverse- engineering cannot be performed.
•Journalizing Knowledge Modules (JKMs) are used to set up Changed Data Capture.
This makes interfaces react only to changes in data and can vastly reduce the amount
of data that needs to be transferred.
•Service Knowledge Module (SKM) is the code template for generating data services.
Oracle Data Integrator 11g: Integration and Administration 5 - 14
Copyright © 2012, Oracle and/or its affiliates. All rights reserved.
Types of Knowledge Modules
There are six types of knowledge modules you may import.
InterfacesModels
KM Type Description
LKM Loading Assembles data from source datastores to the Staging
Area
IKM Integration Uses a given strategy to populate the target datastore from
the Staging Area
CKM Check Checks data in a datastore for errors statically or during an
integration process
RKM Reverse-
engineering
Retrieves the structure of a data model from a database. It
is needed only for customized reverse-engineering.
JKM Journalizing Sets up a system for Changed Data Capture to reduce the
amount of data that needs to be processed
SKM Data
Services
Deploys data services that provide access to data in
datastores
Oracle University and (Oracle Corporation) use only.
These eKit materials are to be used ONLY by you for the express purpose SELF STUDY. SHARING THE FILE IS STRICTLY PROHIBITED.

You now know what the various types of knowledge modules are. But, how do you know
which ones need to be imported into your specific project?
The most important thing to remember is to import all knowledge modules that may be used in
a project. Each time you create a project, you must import the knowledge modules that will be
used by that project.
The basic strategy for importing knowledge modules is as follows:
•First, import the most basic SQL knowledge modules. These work on almost every
database management system (DBMS) with acceptable performance.
•Then, consider importing more specific knowledge modules for the particular
technologies involved in your project. If you are transferring data to an Oracle server,
consider adding the Oracle-based IKMs.
•Technology-specific knowledge modules can take advantage of certain characteristics
or the special tools provided by the technologies. However, it is often best to begin with
the most generic knowledge modules to start your interface, then choose specific
knowledge modules later to increase performance.
Oracle Data Integrator 11g: Integration and Administration 5 - 15
Copyright © 2012, Oracle and/or its affiliates. All rights reserved.
Which Knowledge Modules Are Needed?
•All knowledge modules to be used in a project must be
imported into the project.
•Which knowledge modules would you need?
–Start with basic SQL knowledge modules.
–Add technology-specific knowledge modules as needed.
–For your projects, you will need LKMs, IKMs, and CKMs
only.
•You need to become familiar with the library of available
knowledge modules, and what they can do for you.
–Examine the ODI Knowledge Modules Reference Guide.
Oracle University and (Oracle Corporation) use only.
These eKit materials are to be used ONLY by you for the express purpose SELF STUDY. SHARING THE FILE IS STRICTLY PROHIBITED.

To make the descriptions of knowledge modules more concrete, here are some examples of
the knowledge modules that are shipped with ODI.
The first module is an LKM that is used to load an Oracle server from a flat file server.
According to the naming convention, the SQLLDR in parentheses must correspond to the
method by which data is loaded.
In this case, the Oracle bulk-loading tool, SQL*LOADER, is the method. This tool is capable
of loading vast amounts of data directly into Oracle. Using this knowledge module is much
faster than the generic File to SQL LKM.
The next module is another LKM, this time loading from an Oracle data server to another
Oracle data server by using Oracle DBLink.
You have an integration knowledge module for populating Sybase ASE servers with the
Slowly Changing Dimension strategy. You would choose this IKM when you need SCD flags
on model columns to be taken into account.
CKM Oracle enforces logical constraints during data load and automatically captures error
records.
Oracle Data Integrator 11g: Integration and Administration 5 - 16
Copyright © 2012, Oracle and/or its affiliates. All rights reserved.
Knowledge Modules: Examples
•LKM File to Oracle (SQLLDR)
–Uses Jython to run SQL*LOADER through the OS
–Much faster than basic LKM File to SQL
•LKM Oracle to Oracle (DBLINK)
–Loads from Oracle data server to Oracle data server
–Uses Oracle DBLink
•IKM Sybase ASE Slowly Changing Dimension
–Uses SCD flags on columns
–Creates historical rows when needed
•CKM Oracle
–Enforces logical constraints during data load
–Automatically captures error records
Oracle University and (Oracle Corporation) use only.
These eKit materials are to be used ONLY by you for the express purpose SELF STUDY. SHARING THE FILE IS STRICTLY PROHIBITED.

To import one or more knowledge modules into your project, perform the following steps:
1. Right-click the name of the project in the Projects view.
2. Select Import > Import Knowledge Modules.
3. Select the import directory. Each knowledge module is stored in a separate Extensible
Markup Language (XML) file. The knowledge modules that come with ODI are stored in
the /xml-reference subdirectory.
4. The list of available knowledge modules is displayed. Use the Ctrl/Shift keys for multiple
selection of knowledge modules.
Oracle Data Integrator 11g: Integration and Administration 5 - 17
Copyright © 2012, Oracle and/or its affiliates. All rights reserved.
Importing Knowledge Modules
1. Right-click the project.
2. Select Import > Import
Knowledge Modules.
3. Choose the
import directory.
–ODI KMs are found
in the /xml-reference
subdirectory.
4. Select one or more
knowledge modules.
–Use the Ctrl/Shift keys for
multiple selection.
Oracle University and (Oracle Corporation) use only.
These eKit materials are to be used ONLY by you for the express purpose SELF STUDY. SHARING THE FILE IS STRICTLY PROHIBITED.

Normally, if you import a knowledge module with the same name as an existing knowledge
module, you end up with two copies in your project. This can be useful if you want to make
changes to the knowledge module without breaking your existing interfaces.
However, another mode of importing is available: the “import replace” mode. In this mode, the
existing interface is replaced with the version imported from the disk. All interfaces that used
the old knowledge module are automatically updated to use the new version. Also, values that
are set for the knowledge module options in these interfaces are transferred to the new
version. However, any existing scenarios are not regenerated. If you want to incorporate
changes to the knowledge module into your scenarios, you must regenerate them.
There are various reasons why you would want to replace a knowledge module. The most
common reason is that a newer version of the knowledge module is released, perhaps by
someone on your team. You import the knowledge module again and all your existing
interfaces will still work.
Similarly, you may have made some undesirable changes to your knowledge module. You
can quickly undo these changes by reimporting from a saved version.
Note: Any interface that uses the replaced KM also will be impacted.
Oracle Data Integrator 11g: Integration and Administration 5 - 18
Copyright © 2012, Oracle and/or its affiliates. All rights reserved.
Replacing Existing KMs
•“Import replace” mode
–Updates all interfaces that use the KM
–Preserves existing options
–Does not update generated scenarios
•Why replace an existing KM?
–Because a newer version is released
–To undo any undesirable changes made
Oracle University and (Oracle Corporation) use only.
These eKit materials are to be used ONLY by you for the express purpose SELF STUDY. SHARING THE FILE IS STRICTLY PROHIBITED.
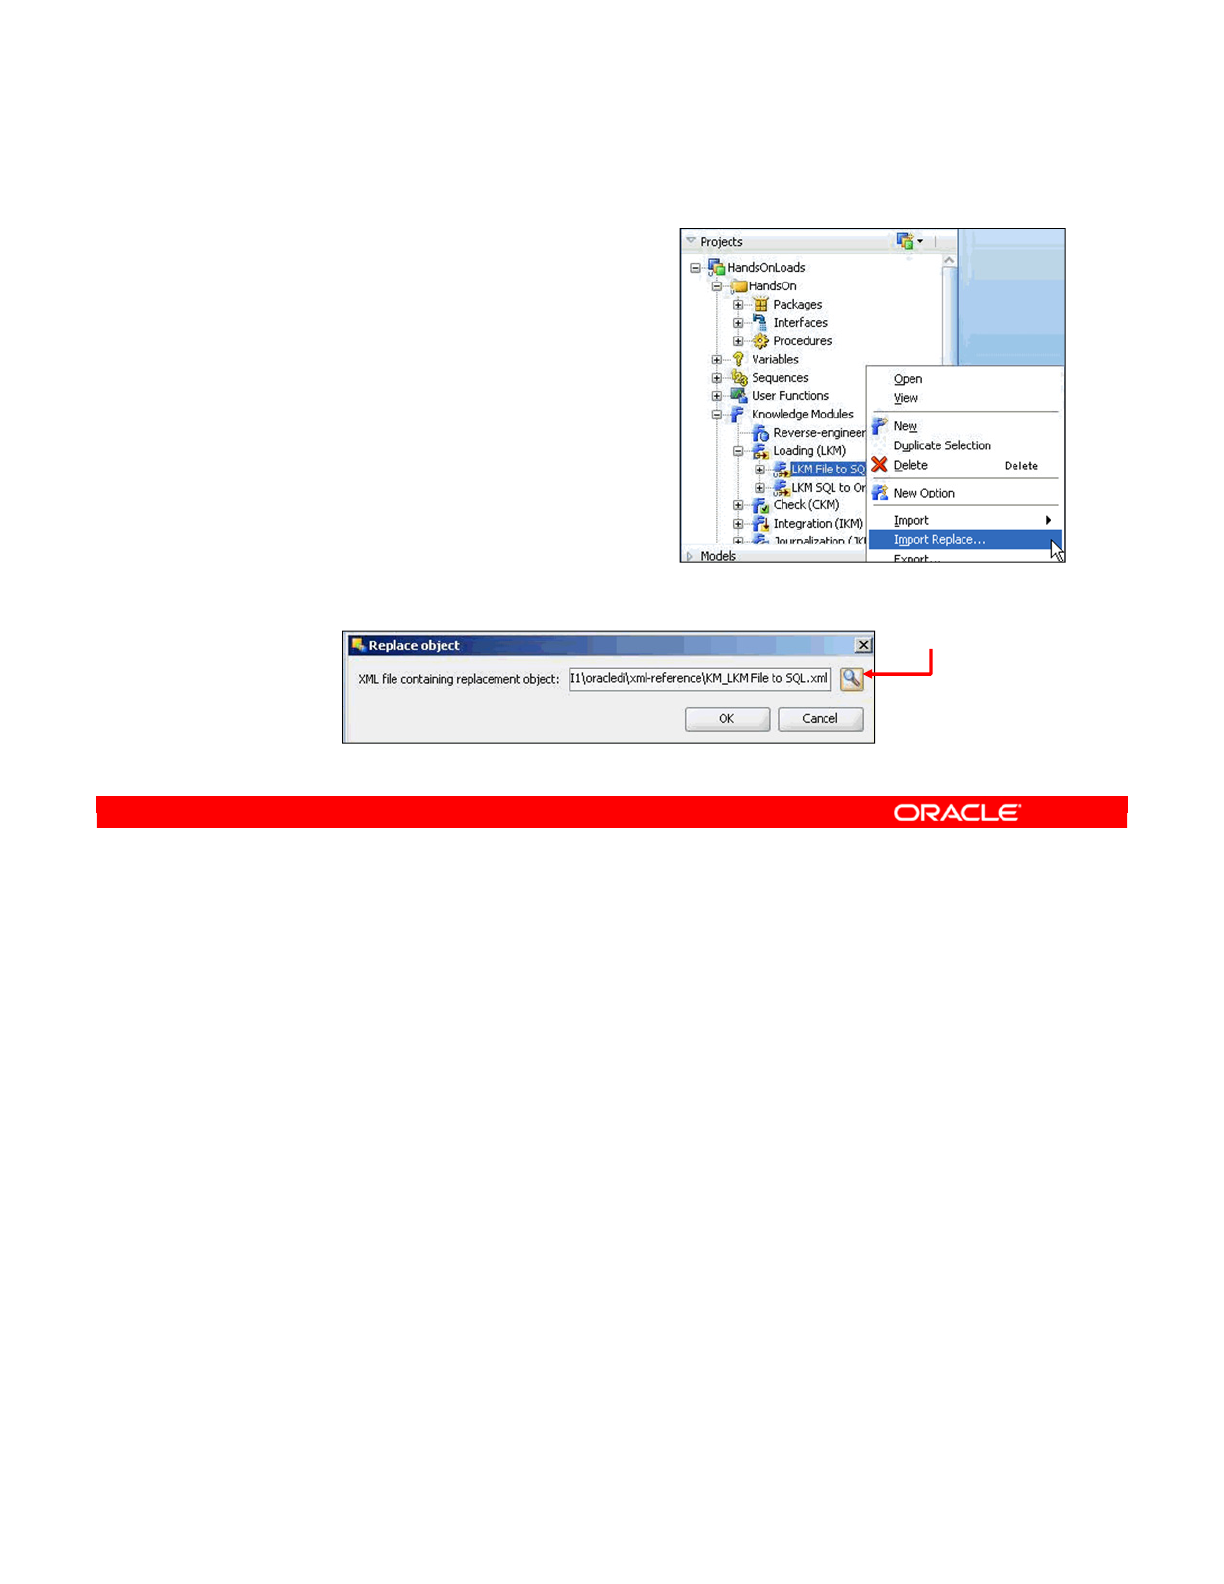
To import a knowledge module in replacement mode, perform the following:
1. Right-click the name of the knowledge module that is to be replaced.
2. Select Import Replace from the context menu.
3. Enter the name of the XML file that contains the new version of the knowledge module.
You can use the browse button to select a file. Note that you can replace only one
knowledge module at a time.
4. Consider regenerating any scenarios that use the knowledge module to take the
changes into account. This includes both the interfaces and packages. Regenerating
scenarios is discussed later in the course.
Note: You should regenerate any scenarios that use the KM.
Oracle Data Integrator 11g: Integration and Administration 5 - 19
Copyright © 2012, Oracle and/or its affiliates. All rights reserved.
Replacing Existing KMs
1. Right-click the KM.
2. Select Import Replace.
3. Select the replacement file.
Browse for the file.
Oracle University and (Oracle Corporation) use only.
These eKit materials are to be used ONLY by you for the express purpose SELF STUDY. SHARING THE FILE IS STRICTLY PROHIBITED.
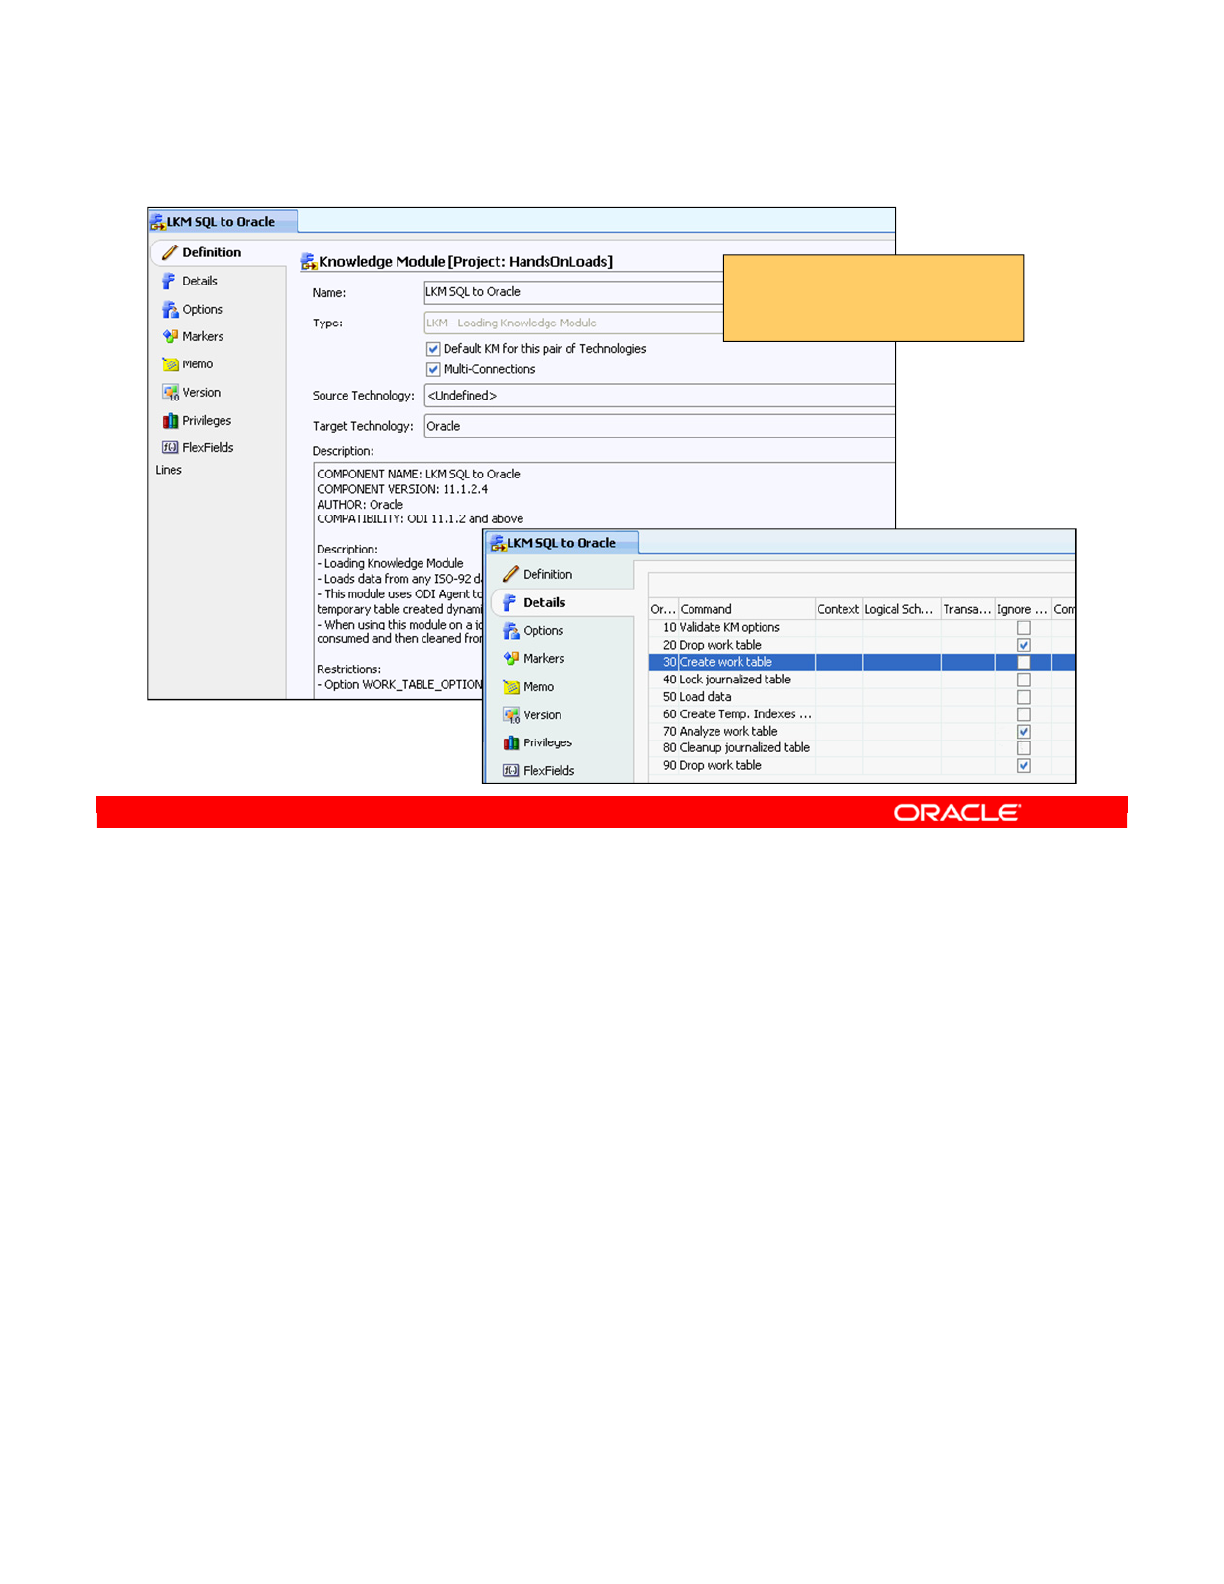
Use the Knowledge Module Editor to create and customize your knowledge modules. In this
example, the third line is highlighted, “Create work table.” If you double-click this line, a
detailed editor opens, as shown on the next slide.
Oracle Data Integrator 11g: Integration and Administration 5 - 20
Copyright © 2012, Oracle and/or its affiliates. All rights reserved.
Knowledge Module Editor
•Create KMs
•Customize KMs
Oracle University and (Oracle Corporation) use only.
These eKit materials are to be used ONLY by you for the express purpose SELF STUDY. SHARING THE FILE IS STRICTLY PROHIBITED.
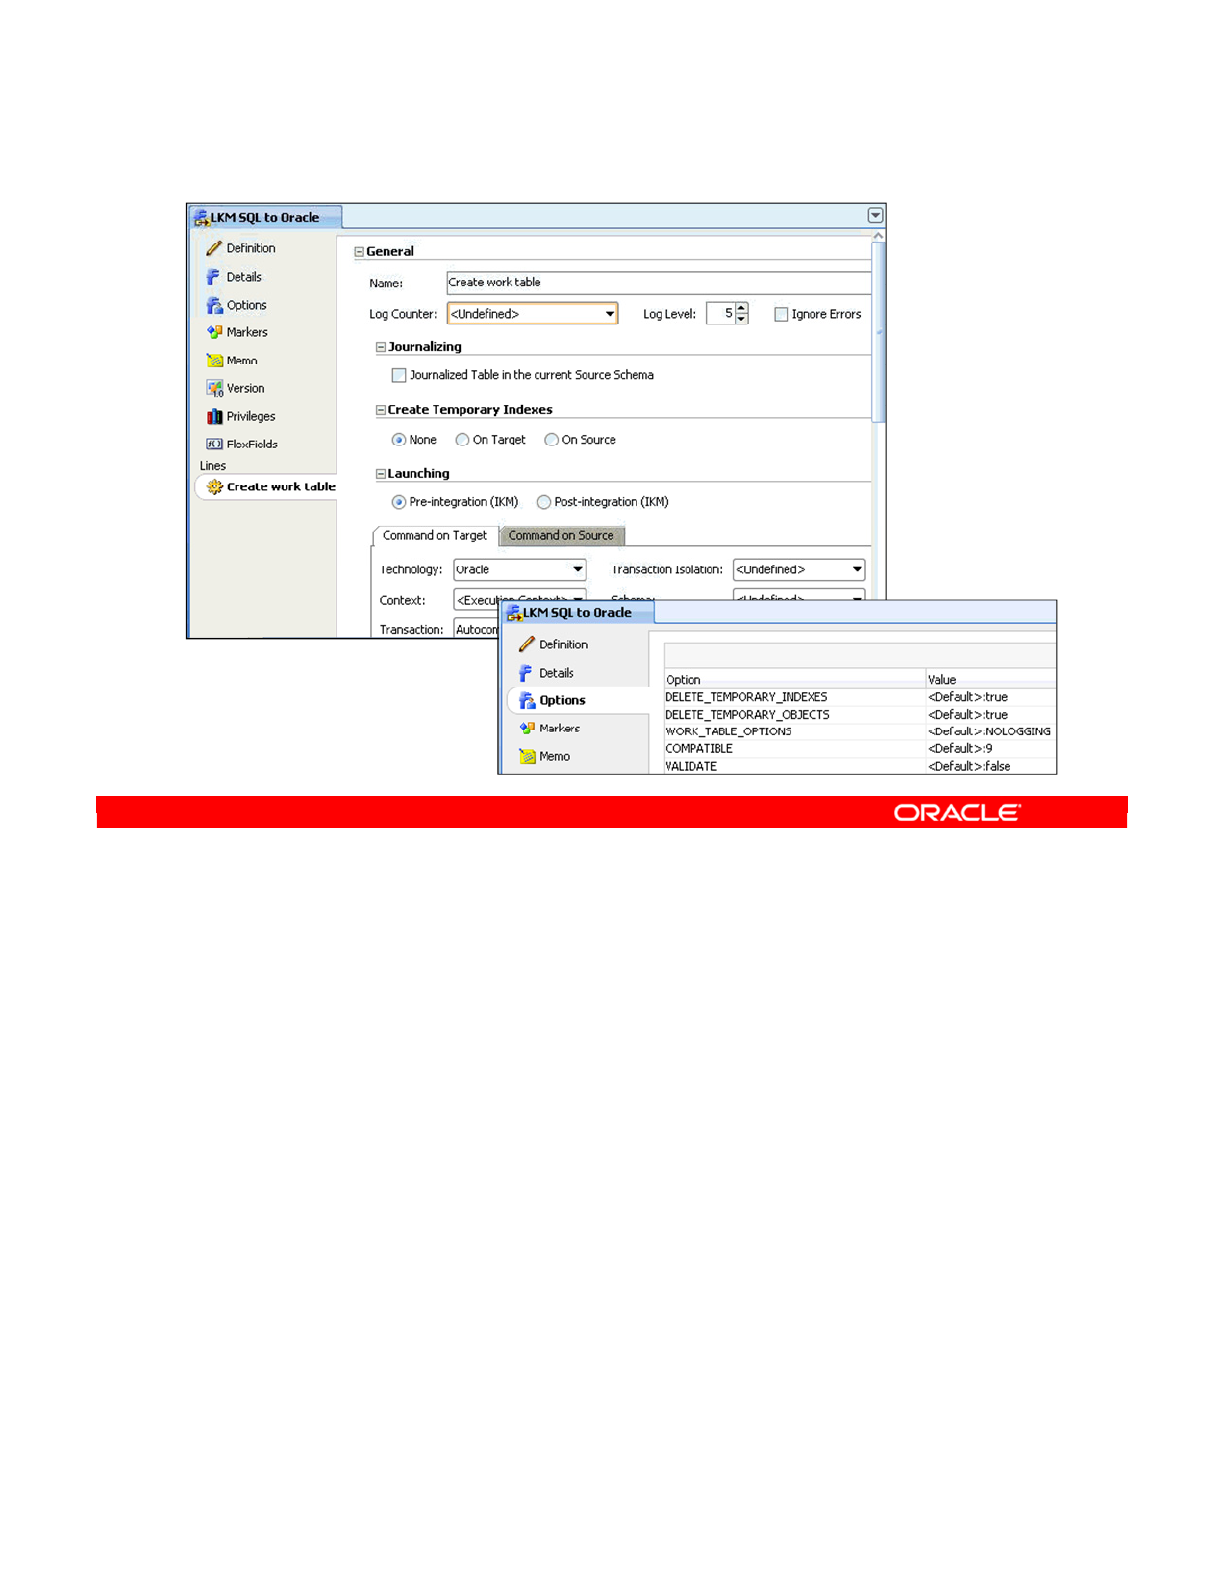
The KM editor has a section to edit general information about an item within the KM, such as
this “Create work table” item in the “LKM SQL to Oracle” knowledge module.
The KM editor also has a section to edit the KM’s options.
Knowledge modules are used later in this course. For additional detailed information about
KMs, see the ODI Knowledge Modules Reference Guide.
Oracle Data Integrator 11g: Integration and Administration 5 - 21
Copyright © 2012, Oracle and/or its affiliates. All rights reserved.
Editing a Knowledge Module
Options
editing
General
editing
Oracle University and (Oracle Corporation) use only.
These eKit materials are to be used ONLY by you for the express purpose SELF STUDY. SHARING THE FILE IS STRICTLY PROHIBITED.

The last part of organizing a project is knowing how to import and export objects to share
them with other projects.
Oracle Data Integrator 11g: Integration and Administration 5 - 22
Copyright © 2012, Oracle and/or its affiliates. All rights reserved.
Exporting and Importing Objects
Oracle University and (Oracle Corporation) use only.
These eKit materials are to be used ONLY by you for the express purpose SELF STUDY. SHARING THE FILE IS STRICTLY PROHIBITED.

The following slides discuss the solution to several problems that can arise.
You cannot drag-and-drop objects between projects. For example, you may want to copy an
interface from one project to another. Similarly, you may want to send an object you have
developed to a colleague at a different site. Or, you may want to share an object between two
repositories—for example, moving an object that was in development to a maintenance
repository.
The solution to these three problems is the same: exporting, and then reimporting.
•First, you export the object to an XML file.
•Then, you reimport the object into the other project. This other project can be in a
different repository, or even at a different site.
You will see how this is done in the next few slides.
Oracle Data Integrator 11g: Integration and Administration 5 - 23
Copyright © 2012, Oracle and/or its affiliates. All rights reserved.
Exporting and Importing
•Needs:
–Moving objects between projects
–Wanting to send an interface to an off-site colleague
–Sharing ODI objects between repositories
—
For example, migrating objects from a development
repository to a maintenance repository
•Solution:
–Export to an XML file.
–Import the file into the other project.
Oracle University and (Oracle Corporation) use only.
These eKit materials are to be used ONLY by you for the express purpose SELF STUDY. SHARING THE FILE IS STRICTLY PROHIBITED.
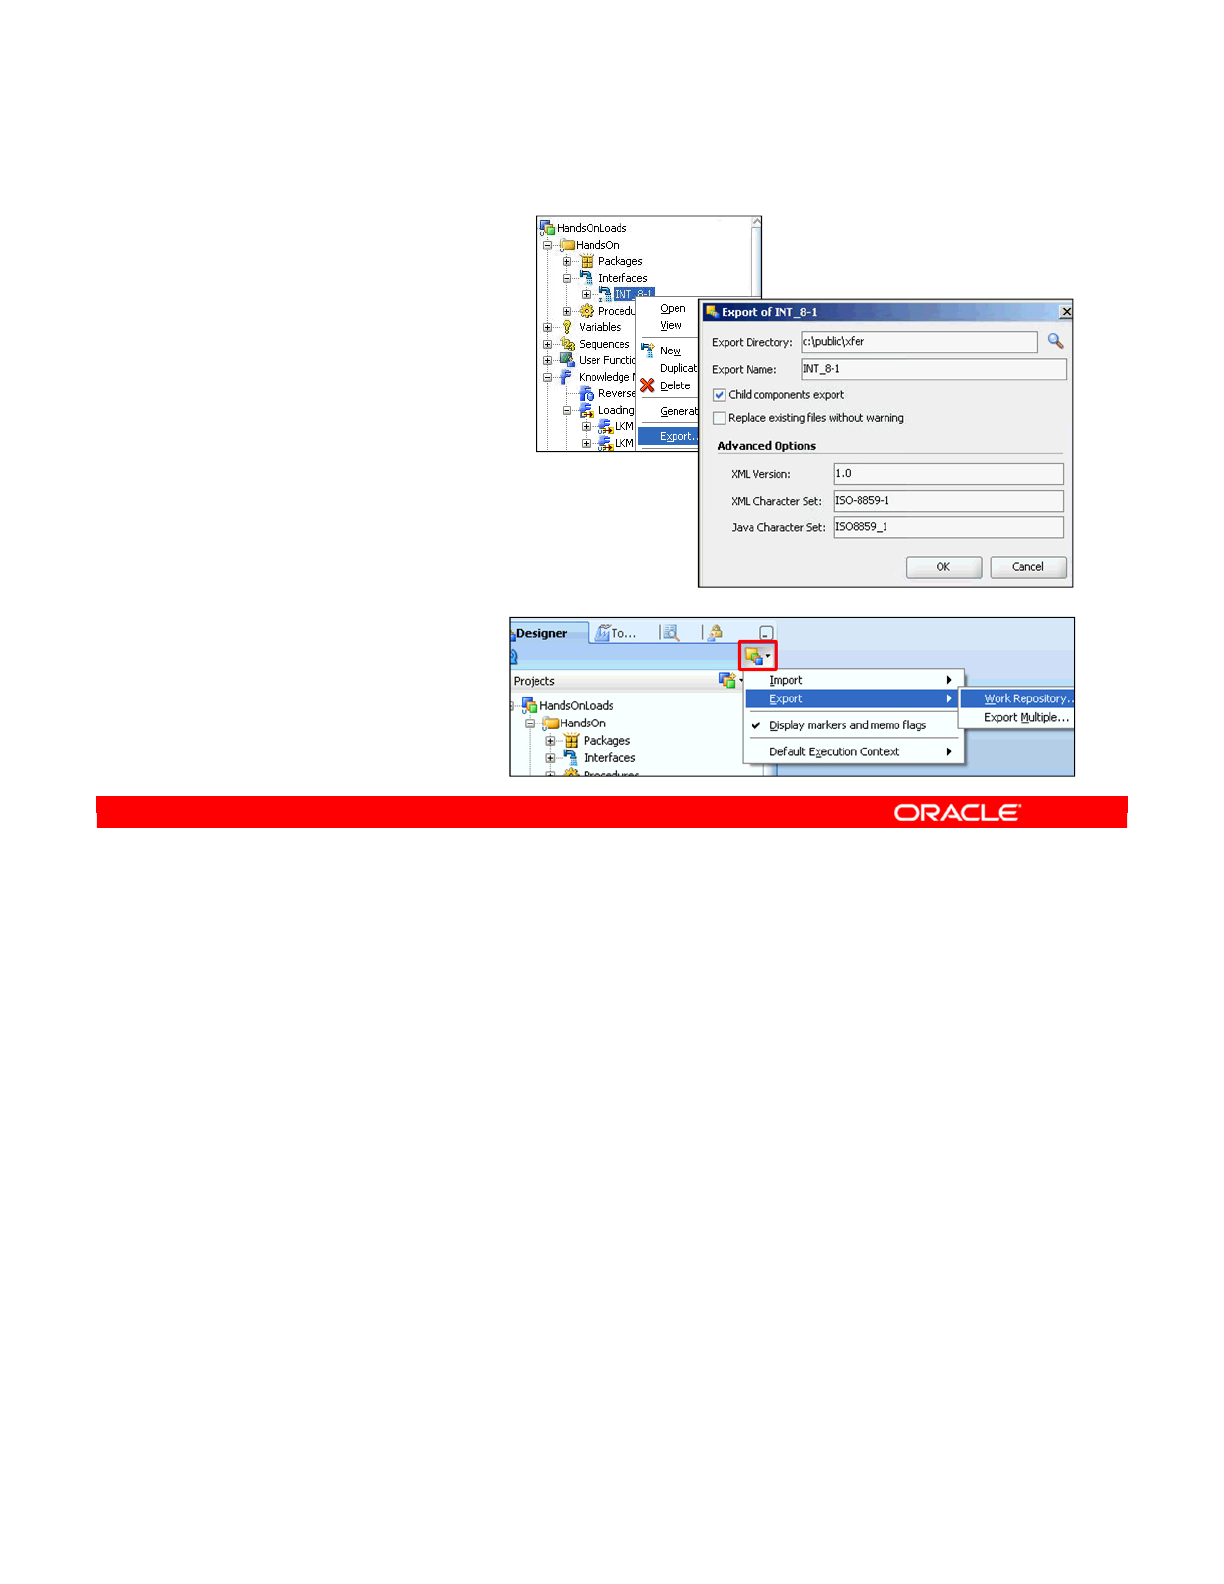
To export an object, perform the following:
1. Right-click the object. In this example, you export an interface. However, you can export
any object.
2. Select Export from the context menu. The Export window appears.
3. Specify the directory where you want to export the object. You can use the browse
button to select the directory by navigating to it.
4. You must also specify the file name to export to. The .xml extension will automatically
be added to it.
5. Some objects, such as folders, projects, and packages, can contain child objects. If you
do not want these objects in the .xml file, deselect the “Child components export” check
box.
Though almost every object in ODI can be exported by using this method, there are
exceptions. To export a Work Repository, use the relevant option in the File menu in Designer
Navigator.
Oracle Data Integrator 11g: Integration and Administration 5 - 24
Copyright © 2012, Oracle and/or its affiliates. All rights reserved.
Exporting an Object
1. Right-click the object.
2. Select Export.
3. Specify:
–The export
directory
–The export file name
(without .xml)
–Whether to export child objects
4. To export a Work
Repository, use the
menu system.
Oracle University and (Oracle Corporation) use only.
These eKit materials are to be used ONLY by you for the express purpose SELF STUDY. SHARING THE FILE IS STRICTLY PROHIBITED.
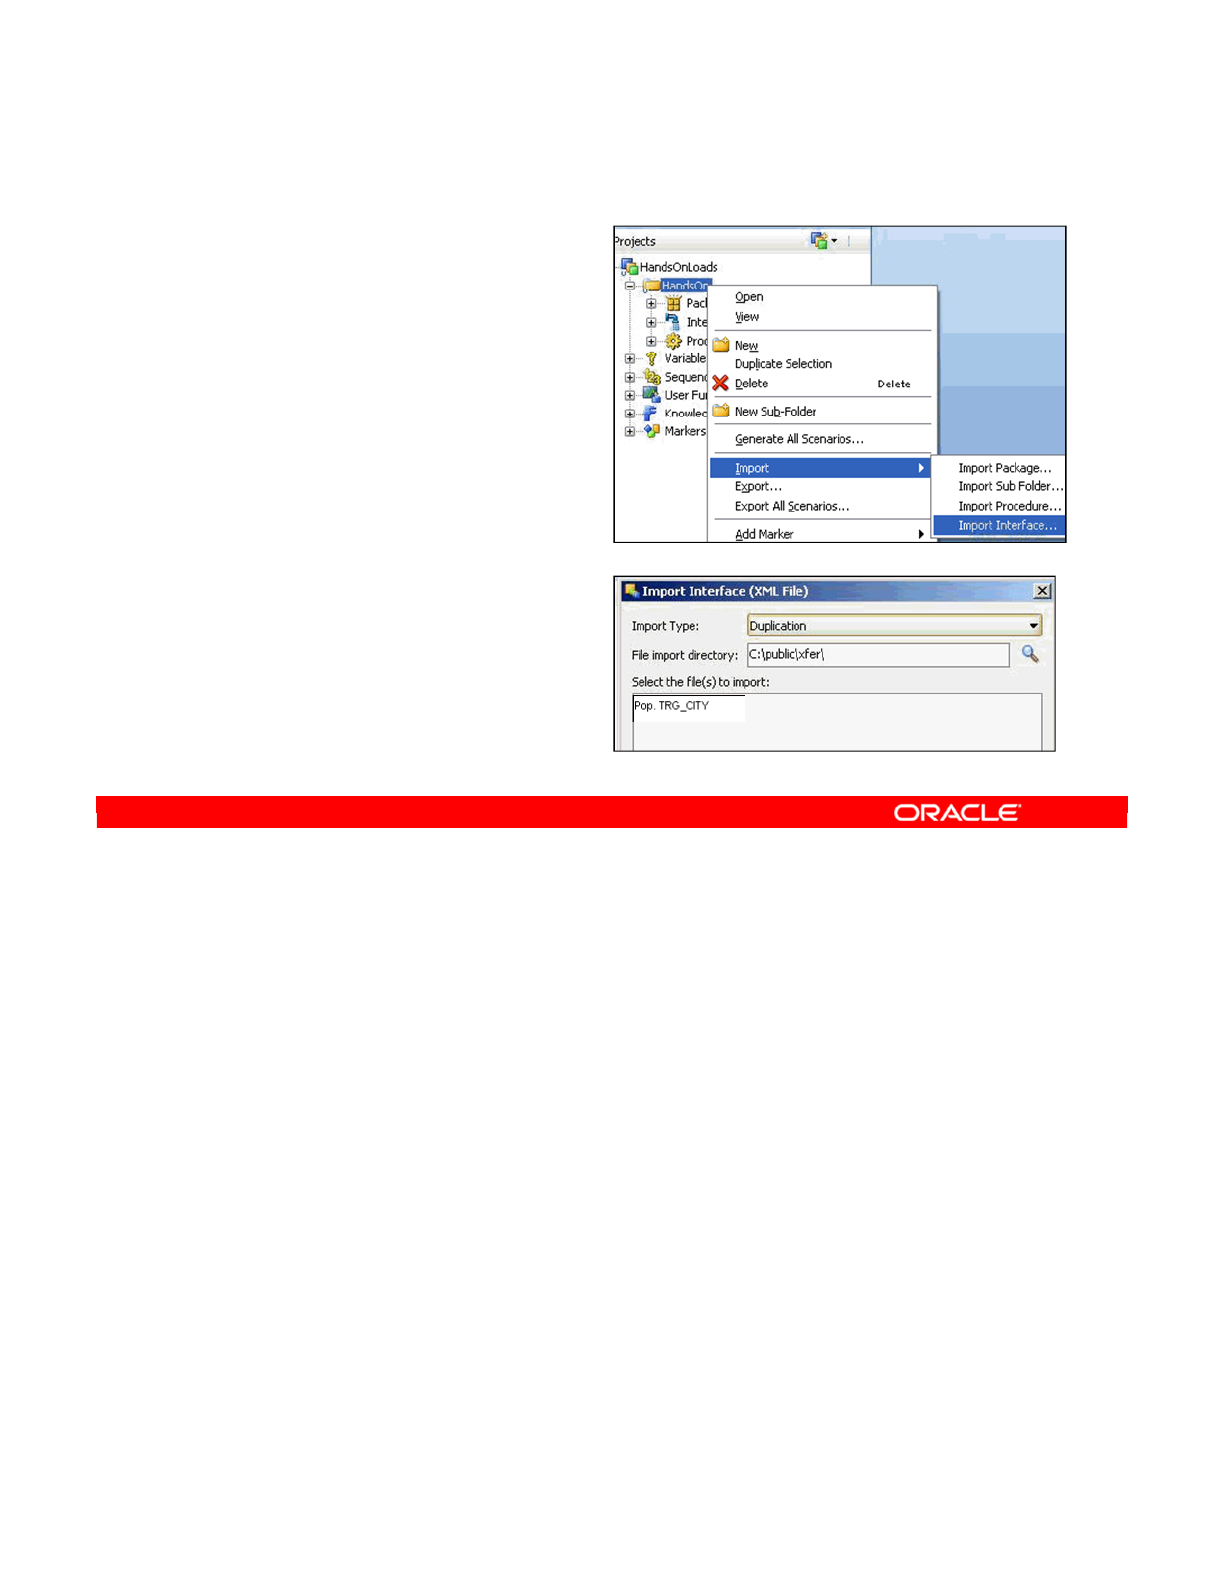
To import an object, perform the following:
1. Right-click the project or folder you want to import into. In this example, you import an
interface.
2. Select Import from the context menu, and then the type of object to import. The type of
object depends on where you are importing. For folders, you can import packages, other
folders, procedures, or interfaces.
3. Specify the import type.
4. Specify the directory from where you want to import the object. You can use the browse
button to select the directory by navigating to it.
5. ODI displays all importable objects in this directory as a list. Select one or more of these
objects to import.
6. Click OK to begin the import.
To import a repository or the topology, use the relevant options in the File menu in Topology
Navigator or Designer.
Oracle Data Integrator 11g: Integration and Administration 5 - 25
Copyright © 2012, Oracle and/or its affiliates. All rights reserved.
Importing an Object
1. Right-click the project
or folder.
2. Select Import > Import
<object>.
3. Specify:
–The import type
–The import directory
–The file(s) to import
4. To import a repository
or topology, use the
File menu.
Oracle University and (Oracle Corporation) use only.
These eKit materials are to be used ONLY by you for the express purpose SELF STUDY. SHARING THE FILE IS STRICTLY PROHIBITED.
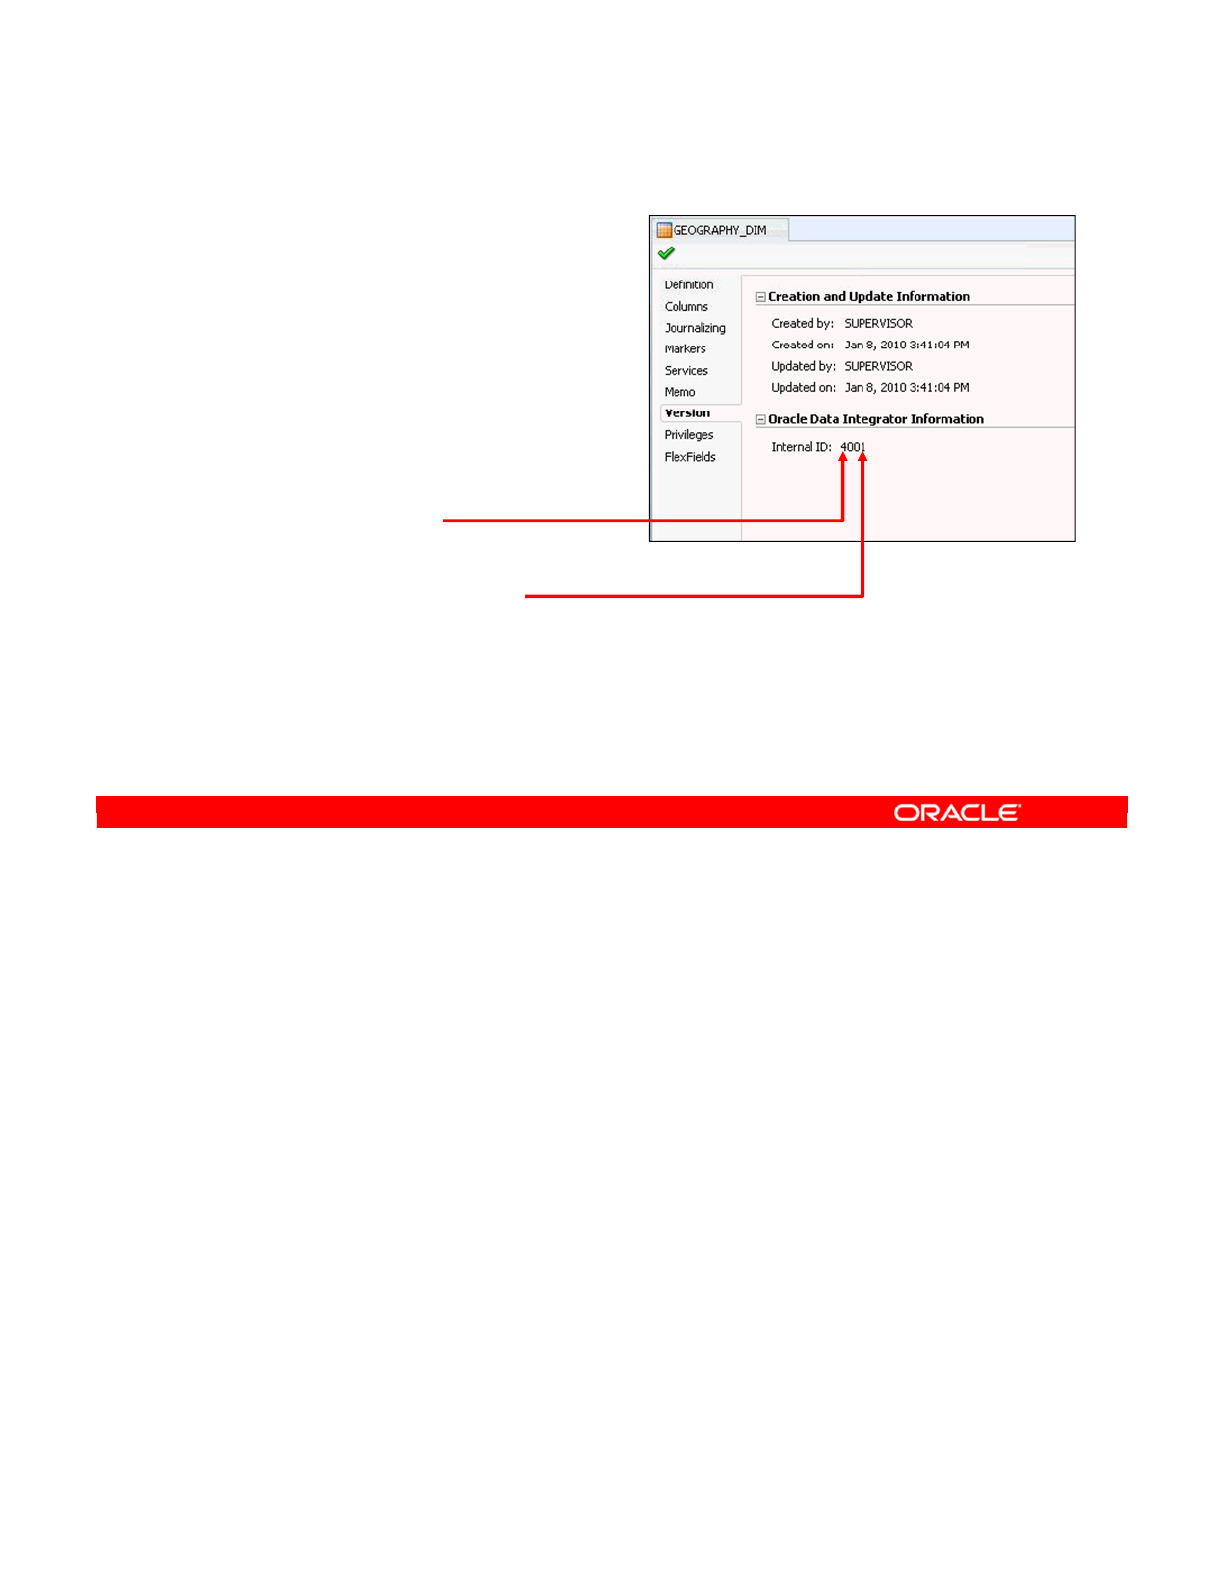
Before looking at what the import type does, you must understand the concept of ID numbers.
Every ODI object has an ID number that can be seen on the Version tab of every object.
The ID number is composed of two parts. The first number is unique for this type of object in
this repository. In the example, 4 means that this is the fourth datastore created in this
repository.
The second part is the identifier for the repository where the object was created. In the
example, the datastore was created in repository 001.
Thus, the identifier is unique only for a given type of object within a given repository. In the
example, another package or user function in the same repository can have ID number 4001.
But only one datastore in this repository can have ID number 4001.
When you export an object, its ID number is recorded in the .xml file. This raises an issue
that is discussed in the following slide.
Oracle Data Integrator 11g: Integration and Administration 5 - 26
Copyright © 2012, Oracle and/or its affiliates. All rights reserved.
ID Numbers: Overview
•Every ODI object has
an internal ID number.
•It is shown on the ODI
object’s Version tab.
–Unique number for this
datastore in this
repository: 4
–ID of the repository where
it was created: 001
•The ID number is unique for each type of
object.
•The ID number is exported with the object.
Oracle University and (Oracle Corporation) use only.
These eKit materials are to be used ONLY by you for the express purpose SELF STUDY. SHARING THE FILE IS STRICTLY PROHIBITED.
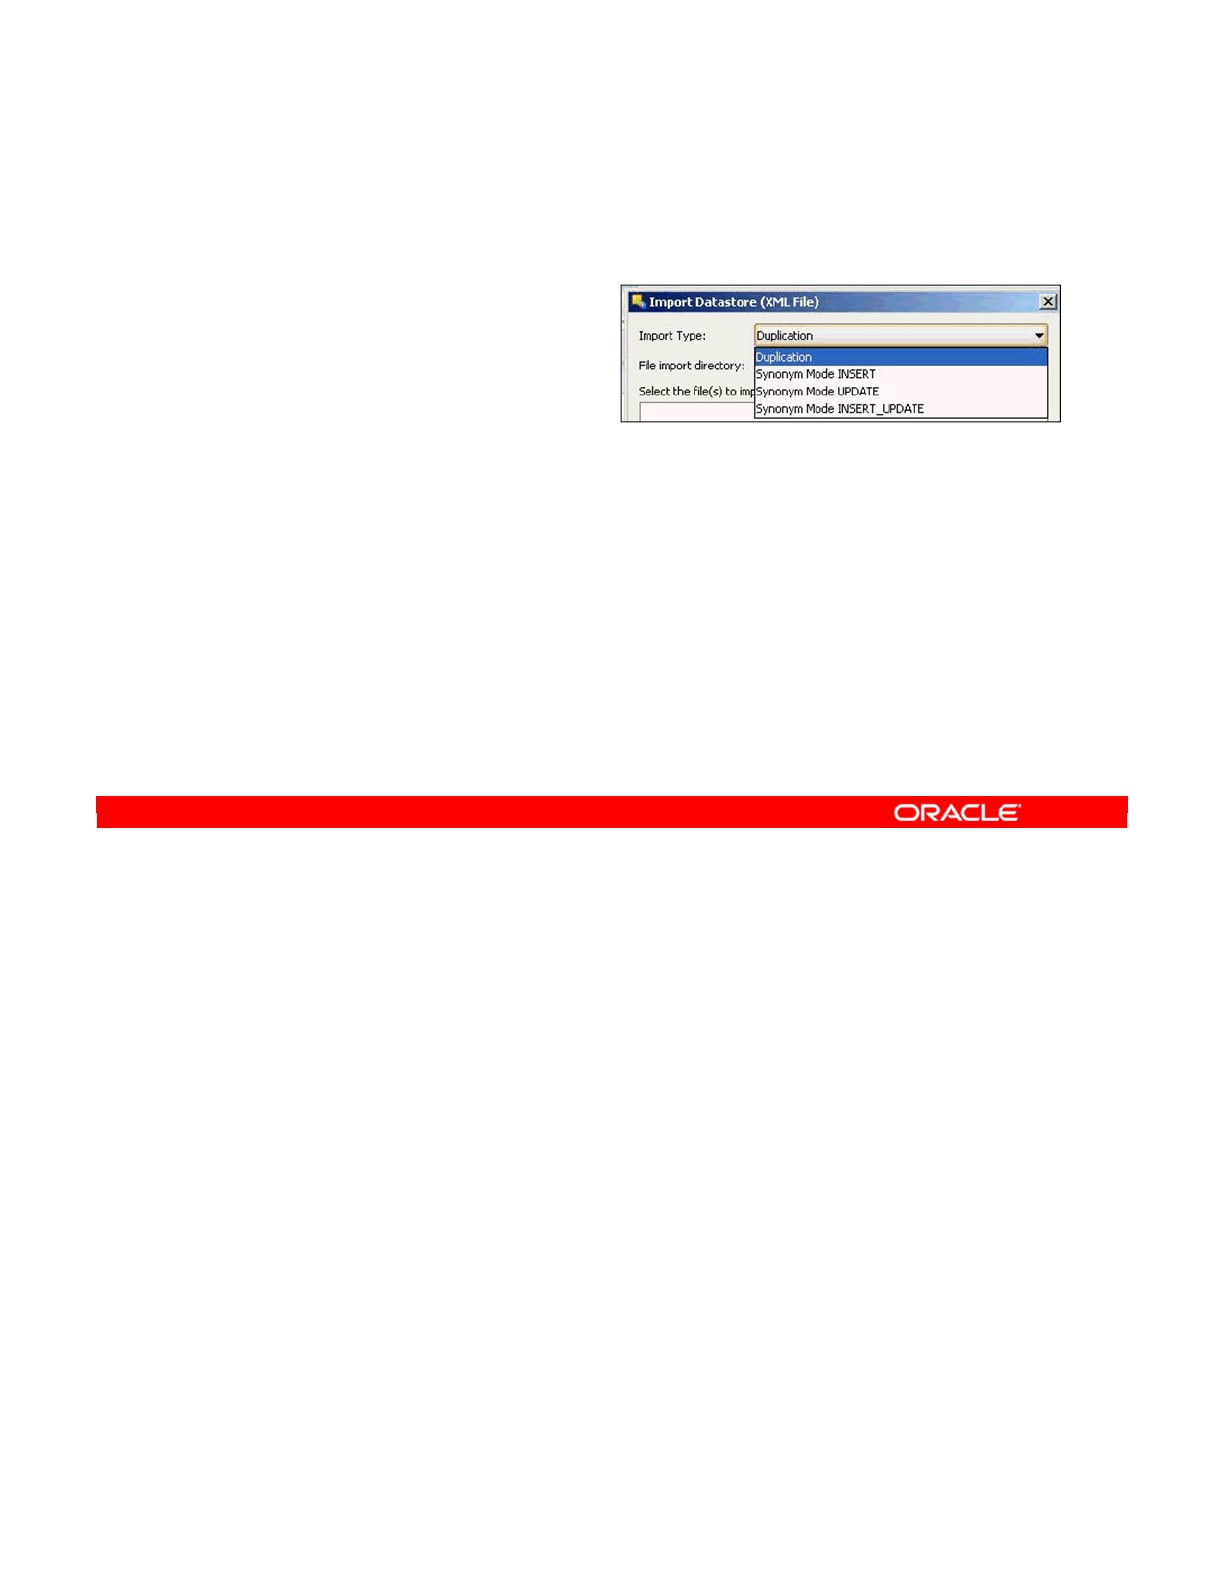
You know now that when you export an object, the object ID is stored in the file and that each
ID must be unique for each type of object. So, what happens if you try to import an object
back into the repository?
The answer is that there are two ways of using the stored ID, as specified by the Import Type
option.
•In Duplication mode, the ID in the file is ignored. Instead, a new ID is generated based
on the ID of the new repository. The object is then completely duplicated.
•In Synonym mode, the ID in the file is retained. This can raise an issue if the original
object is present in this repository. To deal with this problem, three options are available:
INSERT mode performs blind inserts into the repository. If an object has the same ID, the
import fails.
UPDATE mode performs only updates. If no corresponding object exists, the import does not
fail, but it does not create the missing object.
INSERT_UPDATE mode updates the corresponding objects and inserts them if they do not
exist. This is the most useful mode in many situations.
In every mode, one rule is constant: No ODI objects are ever deleted.
Oracle Data Integrator 11g: Integration and Administration 5 - 27
Copyright © 2012, Oracle and/or its affiliates. All rights reserved.
Import Types
There are two modes for importing ODI objects:
•Duplication:
–A new ID number for the
object is generated based
on the new repository.
•Synonym:
–The ID stored in the export file is used.
–There are three submodes:
—
INSERT: Performs inserts into the repository
—
UPDATE: Performs updates in the repository
—
INSERT_UPDATE: Inserts new records and updates existing records in the
repository
–No ODI objects are deleted.
–Internal ID references are maintained.
Oracle University and (Oracle Corporation) use only.
These eKit materials are to be used ONLY by you for the express purpose SELF STUDY. SHARING THE FILE IS STRICTLY PROHIBITED.

A couple of recommendations can help you select the mode for use.
Synonym mode effectively creates a link between two objects in two different repositories. It is
useful when you want to exchange objects between two repositories. The repositories must
have different identifiers.
If you use Synonym mode, you can update the same object later. Because the ID of the object
does not change in a synonym import, you can replace it without breaking any links.
Note: You must be careful to import objects in the right order. It means that you must import
objects before other objects that depend on them. For example, you should import models
before interfaces because interfaces depend on models. There is also an optional module in
ODI that can help with dependency management.
Duplication mode, on the other hand, is simpler. You use it when you want to create a
duplicate of the original object—for example, when you want to have two packages that do
the same thing, perhaps, with a slight change.
It is also useful for crossing project boundaries—for example, to reuse a marker group defined
in one project in a different project, in the same repository. You cannot use the Synonym
mode here because there would be a conflict of ID.
Oracle Data Integrator 11g: Integration and Administration 5 - 28
Copyright © 2012, Oracle and/or its affiliates. All rights reserved.
Choosing the Import Mode
•Select Synonym mode:
–To exchange objects between two repositories having
different identifiers
–To update (add components to) an object with an export file
–To ensure that you import objects in the right order:
—
Import objects on which other objects depend first.
—
For example: Before importing an interface, you should import
the models that it uses.
—
There is an optional module for dependency management.
•Select Duplication mode:
–To create a duplicate of the original object from the export
file
–To reuse an object in a different project, in the same
repository
Oracle University and (Oracle Corporation) use only.
These eKit materials are to be used ONLY by you for the express purpose SELF STUDY. SHARING THE FILE IS STRICTLY PROHIBITED.
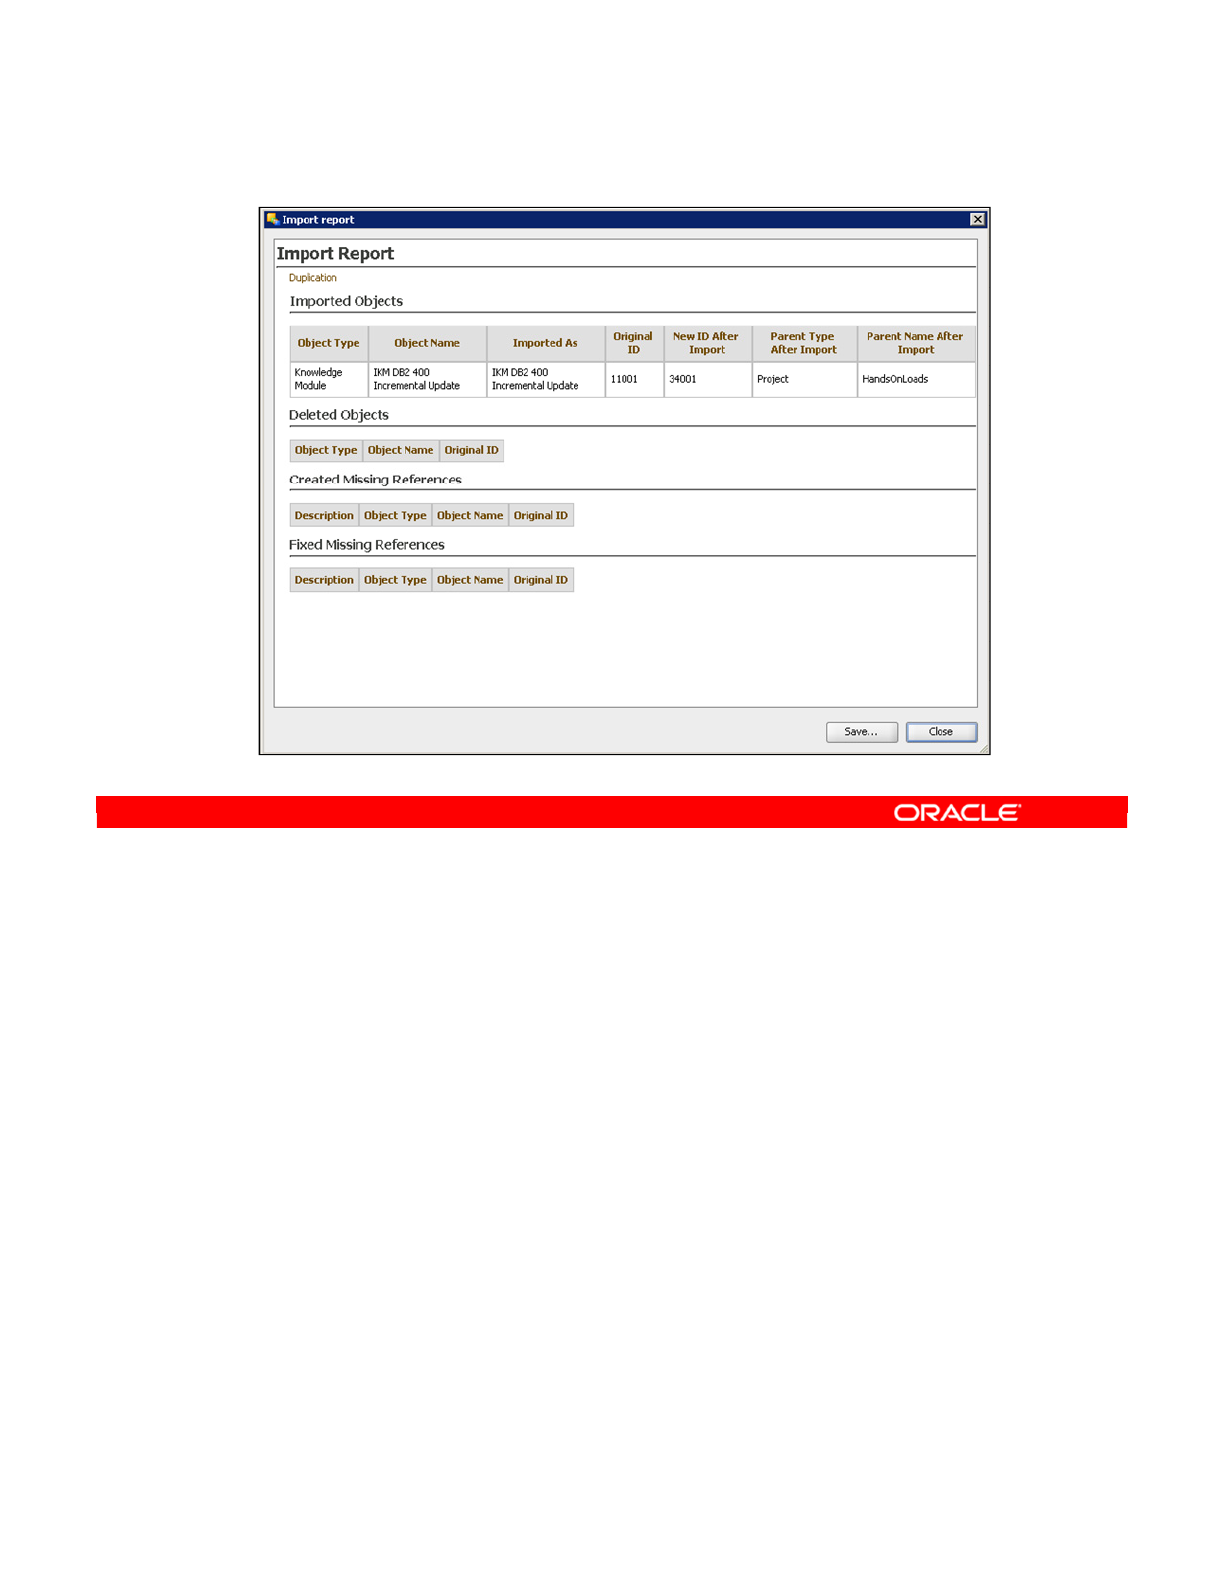
The import report is displayed after every import operation. Read it carefully to uncover errors
from the import process.
The import report gives you details on the following:
•Import Mode: This section appears at the top of the report without its own subheading,
under the “Import Report” main heading. In this screen, the chosen import mode is
indicated as “Duplication.”
•Imported Objects: For every imported object, this section indicates the object type, the
original object name, the object name used for the import, the original ID, and the new,
recalculated ID.
•Deleted Objects: For every deleted object, this section indicates the object type, the
object name, and the original ID.
•Created Missing References: This section lists the missing references detected after
the import.
•Fixed Missing References: This section lists the missing references fixed during the
import. You can save the import report as an .xml or .html file. Click Save to save the
import report.
Oracle Data Integrator 11g: Integration and Administration 5 - 29
Copyright © 2012, Oracle and/or its affiliates. All rights reserved.
Import Report
Oracle University and (Oracle Corporation) use only.
These eKit materials are to be used ONLY by you for the express purpose SELF STUDY. SHARING THE FILE IS STRICTLY PROHIBITED.

Markers, which are simple organizational tags that can help in the planning and management
of an integration project, are described in the following slides.
Oracle Data Integrator 11g: Integration and Administration 5 - 30
Copyright © 2012, Oracle and/or its affiliates. All rights reserved.
Using Markers
Oracle University and (Oracle Corporation) use only.
These eKit materials are to be used ONLY by you for the express purpose SELF STUDY. SHARING THE FILE IS STRICTLY PROHIBITED.
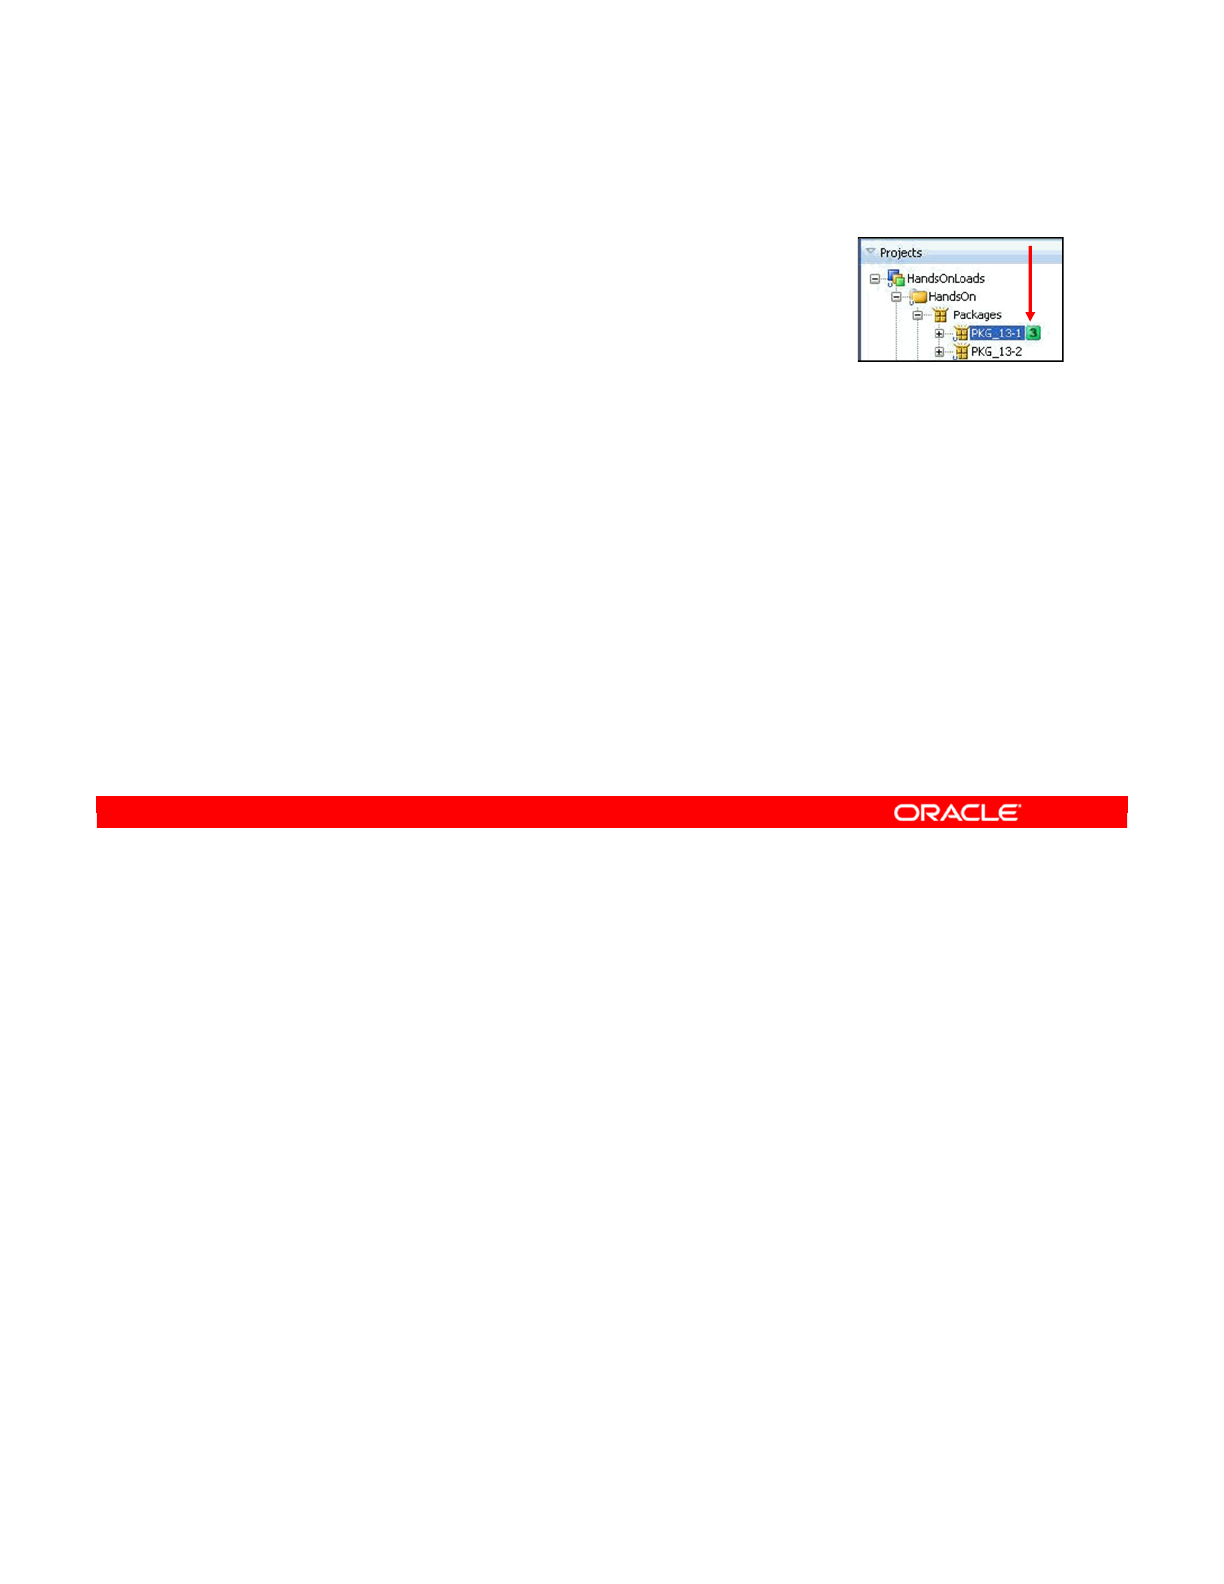
Markers are tags that you can use to attach arbitrary information to ODI objects. They can be
attached to any objects: interfaces, user functions, knowledge modules, columns of models,
or even whole projects. Markers help you organize your project in whatever way makes sense
to you. Typically, you use them to indicate progress in the development of an object or the
current state in the life cycle of an object.
There are two types of markers:
•Graphical markers cause an icon to be displayed next to the object in Designer.
•Nongraphical markers attach other information, such as numbers or dates to the object.
Not only can you assign objects with markers, you can also lock those objects that are
assigned to certain users. That way there is less confusion in a big project.
Oracle Data Integrator 11g: Integration and Administration 5 - 31
Copyright © 2012, Oracle and/or its affiliates. All rights reserved.
What Is a Marker?
•A marker is a tag that you can attach to any
ODI object to help organize your project.
•Markers can be used to indicate progress,
review status, or the life cycle of an object.
•Graphical markers attach an icon to the object, whereas
nongraphical markers attach numbers, strings, or dates.
•Markers can be crucial for large teams, enabling
communication among developers from within the tool.
–Review priorities.
–Review completion progress.
–Add memos to provide details on what has been done or has
to be done.
–This can be helpful for geographically dispersed teams.
Oracle University and (Oracle Corporation) use only.
These eKit materials are to be used ONLY by you for the express purpose SELF STUDY. SHARING THE FILE IS STRICTLY PROHIBITED.
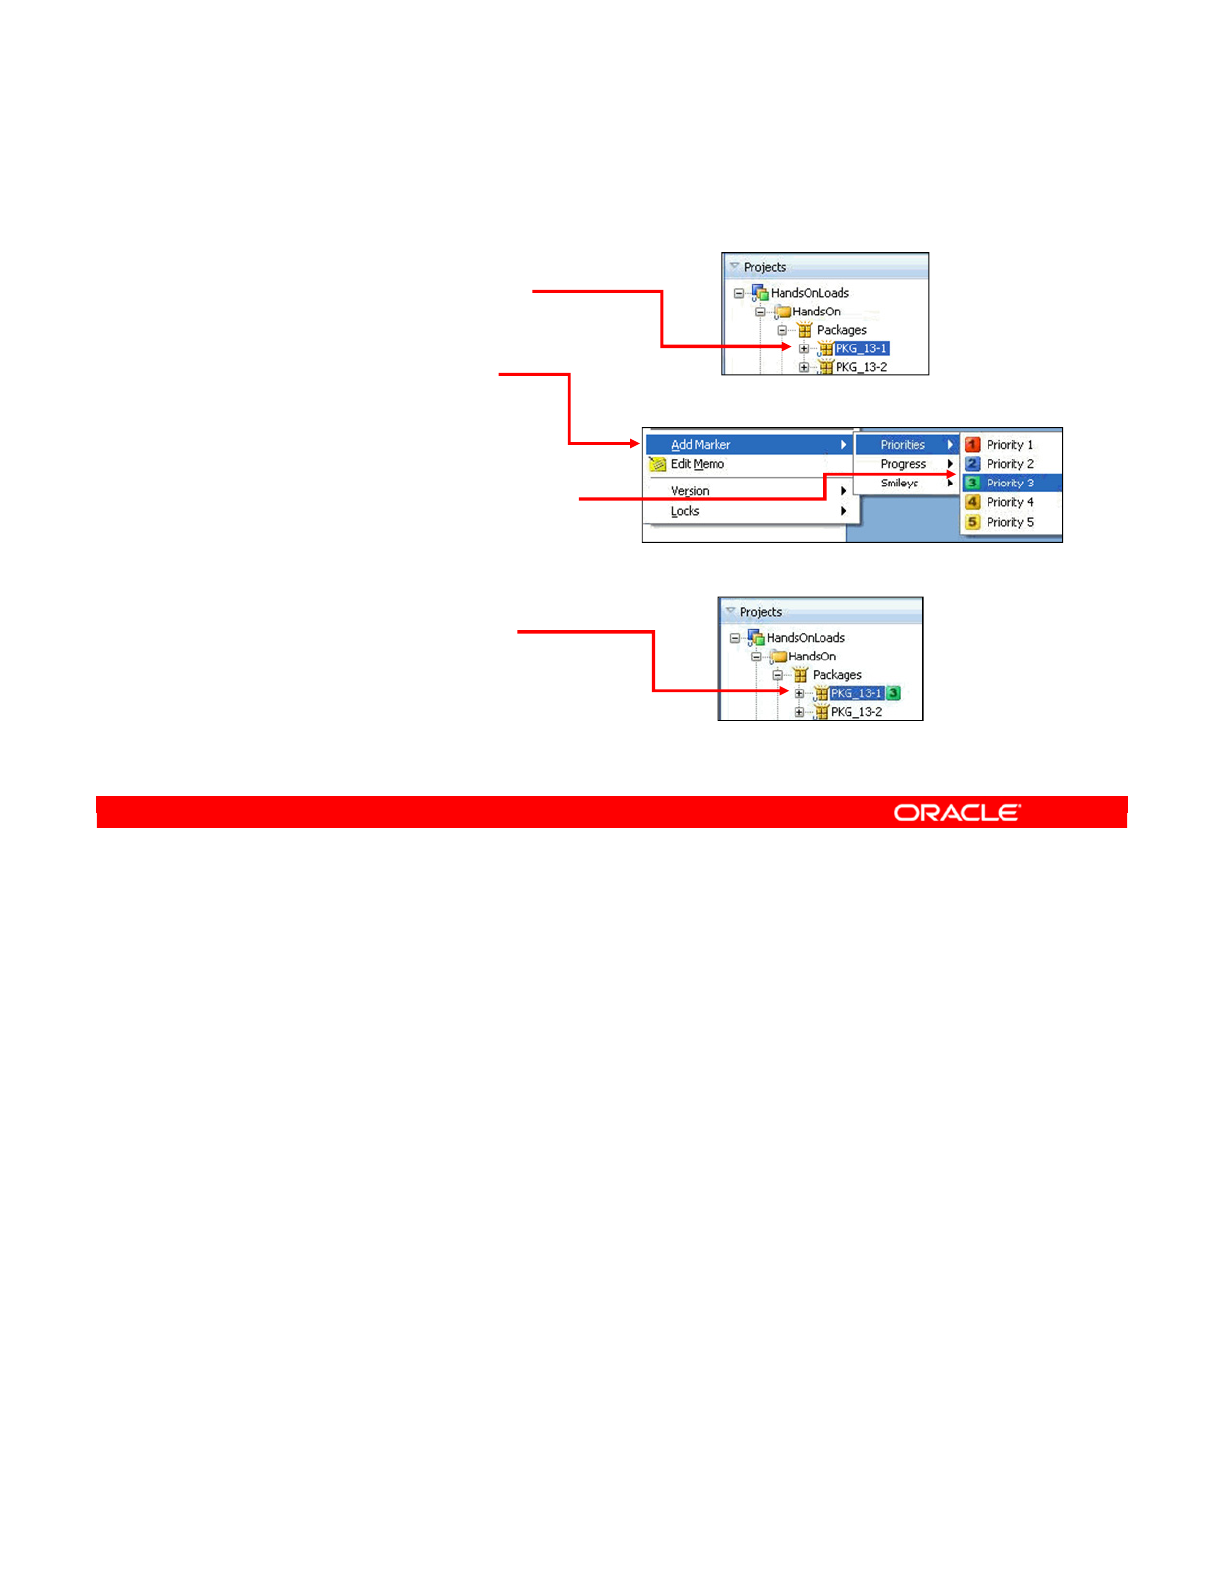
Tagging an object with a marker is very simple. Perform the following:
1. Right-click the object that you want to attach it to. Almost any object can be marked in
this way. In this example, you add a marker to a package.
2. Select Add Marker from the context menu.
3. Select the appropriate marker group. Marker groups are covered in greater detail later in
this lesson.
4. Select the marker.
5. The marker appears next to the package you selected. You can choose whether it
appears to the left or the right of the object name.
Oracle Data Integrator 11g: Integration and Administration 5 - 32
Copyright © 2012, Oracle and/or its affiliates. All rights reserved.
Tagging Objects with Markers
1. Right-click the object.
2. Select Add Marker.
3. Select the marker group,
then the
marker.
4. The marker appears
next to the object.
Oracle University and (Oracle Corporation) use only.
These eKit materials are to be used ONLY by you for the express purpose SELF STUDY. SHARING THE FILE IS STRICTLY PROHIBITED.
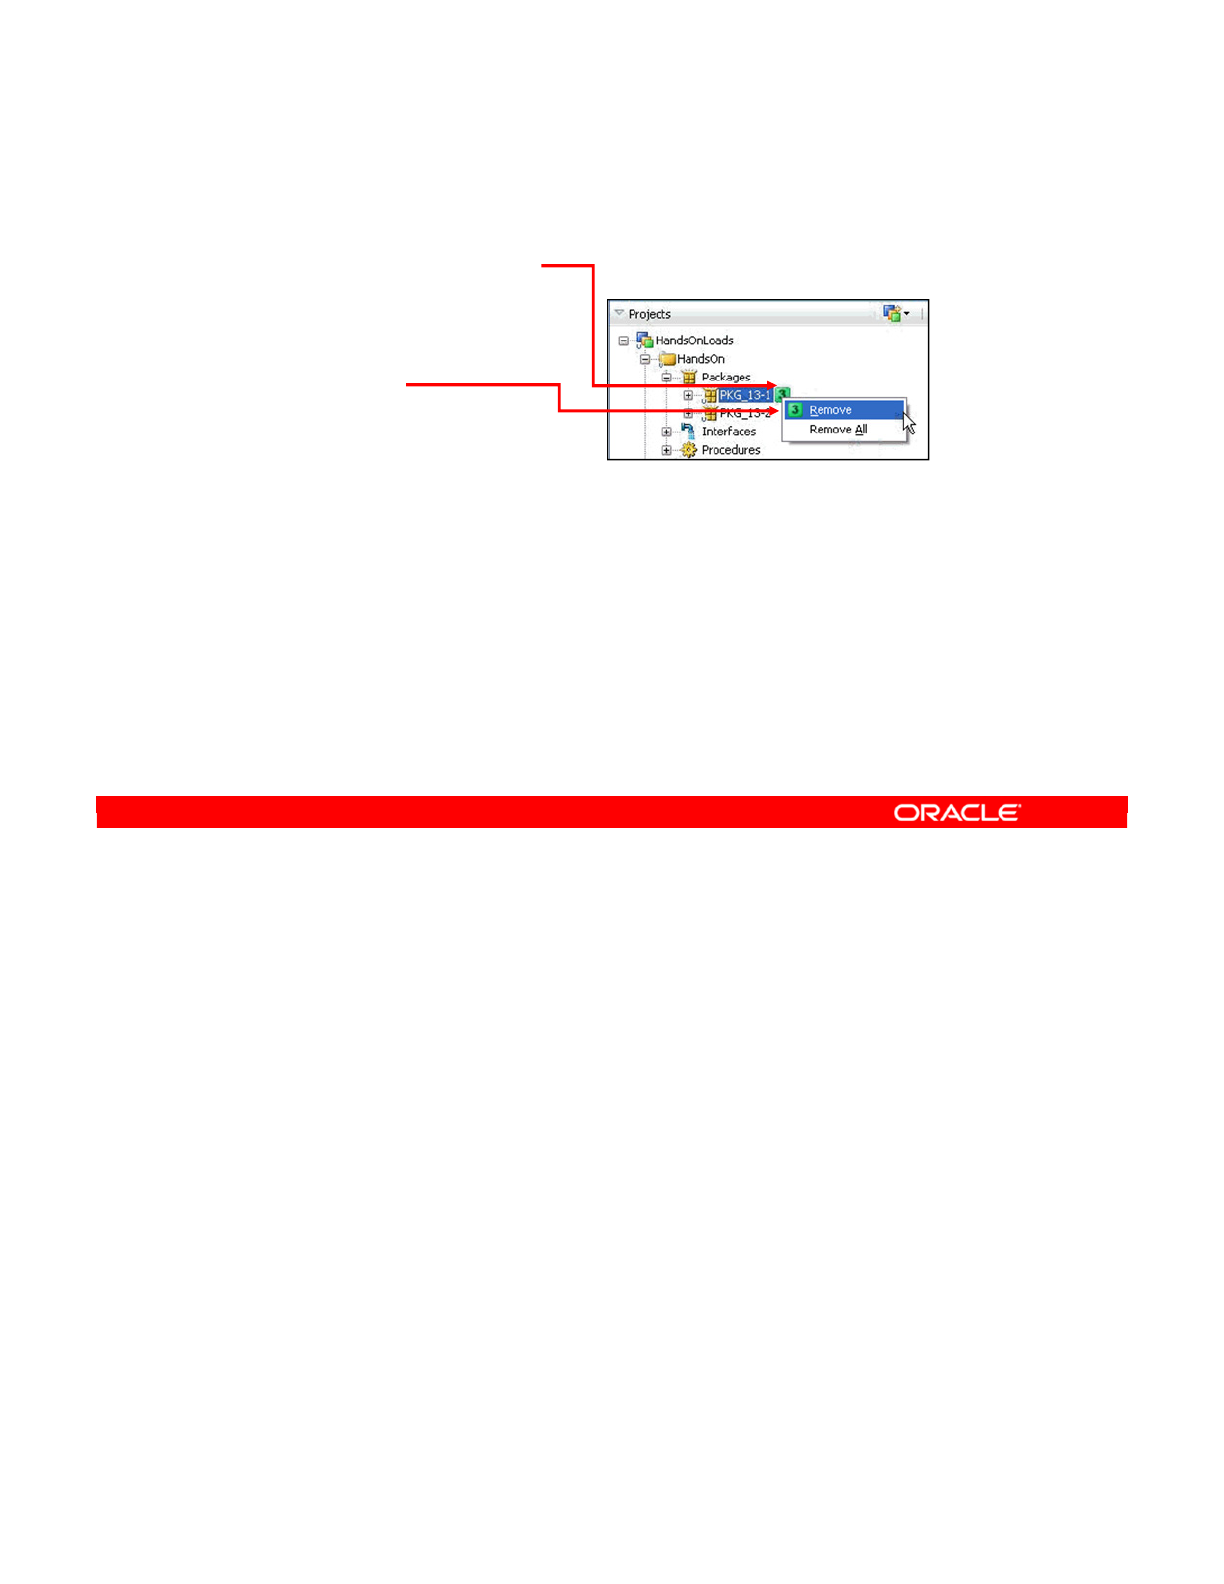
To remove markers from an object, right-click the marker. From the context menu, you can
select either Remove to remove the marker or Remove All to remove all the markers from this
object. However, nongraphical markers are not removed.
Oracle Data Integrator 11g: Integration and Administration 5 - 33
Copyright © 2012, Oracle and/or its affiliates. All rights reserved.
Removing Markers
1. Right-click the marker.
2. Select Remove or
Remove All.
Oracle University and (Oracle Corporation) use only.
These eKit materials are to be used ONLY by you for the express purpose SELF STUDY. SHARING THE FILE IS STRICTLY PROHIBITED.

A marker group is a collection of related markers. When you add a marker to an object, you
first choose the group to select from, before choosing the individual marker.
Normally, only one marker can be selected for a given object at a given time. However, there
are multistate markers. This means that several markers from the same group can
simultaneously be attached to an object. For example, you can have a group called
“Reviewed by” with markers Ann, Bill, and Chris. Then, you attach one marker for each
person who has reviewed the selected object.
Note that a single marker group can contain both graphical and nongraphical markers.
Oracle Data Integrator 11g: Integration and Administration 5 - 34
Copyright © 2012, Oracle and/or its affiliates. All rights reserved.
Marker Groups
•A marker group is a collection of related markers.
–Normal: One marker is selected at a time, to mark an object.
–Multistate: Any combination of symbols can be selected to
mark one object.
•One marker group can contain both graphical and
nongraphical markers.
Oracle University and (Oracle Corporation) use only.
These eKit materials are to be used ONLY by you for the express purpose SELF STUDY. SHARING THE FILE IS STRICTLY PROHIBITED.
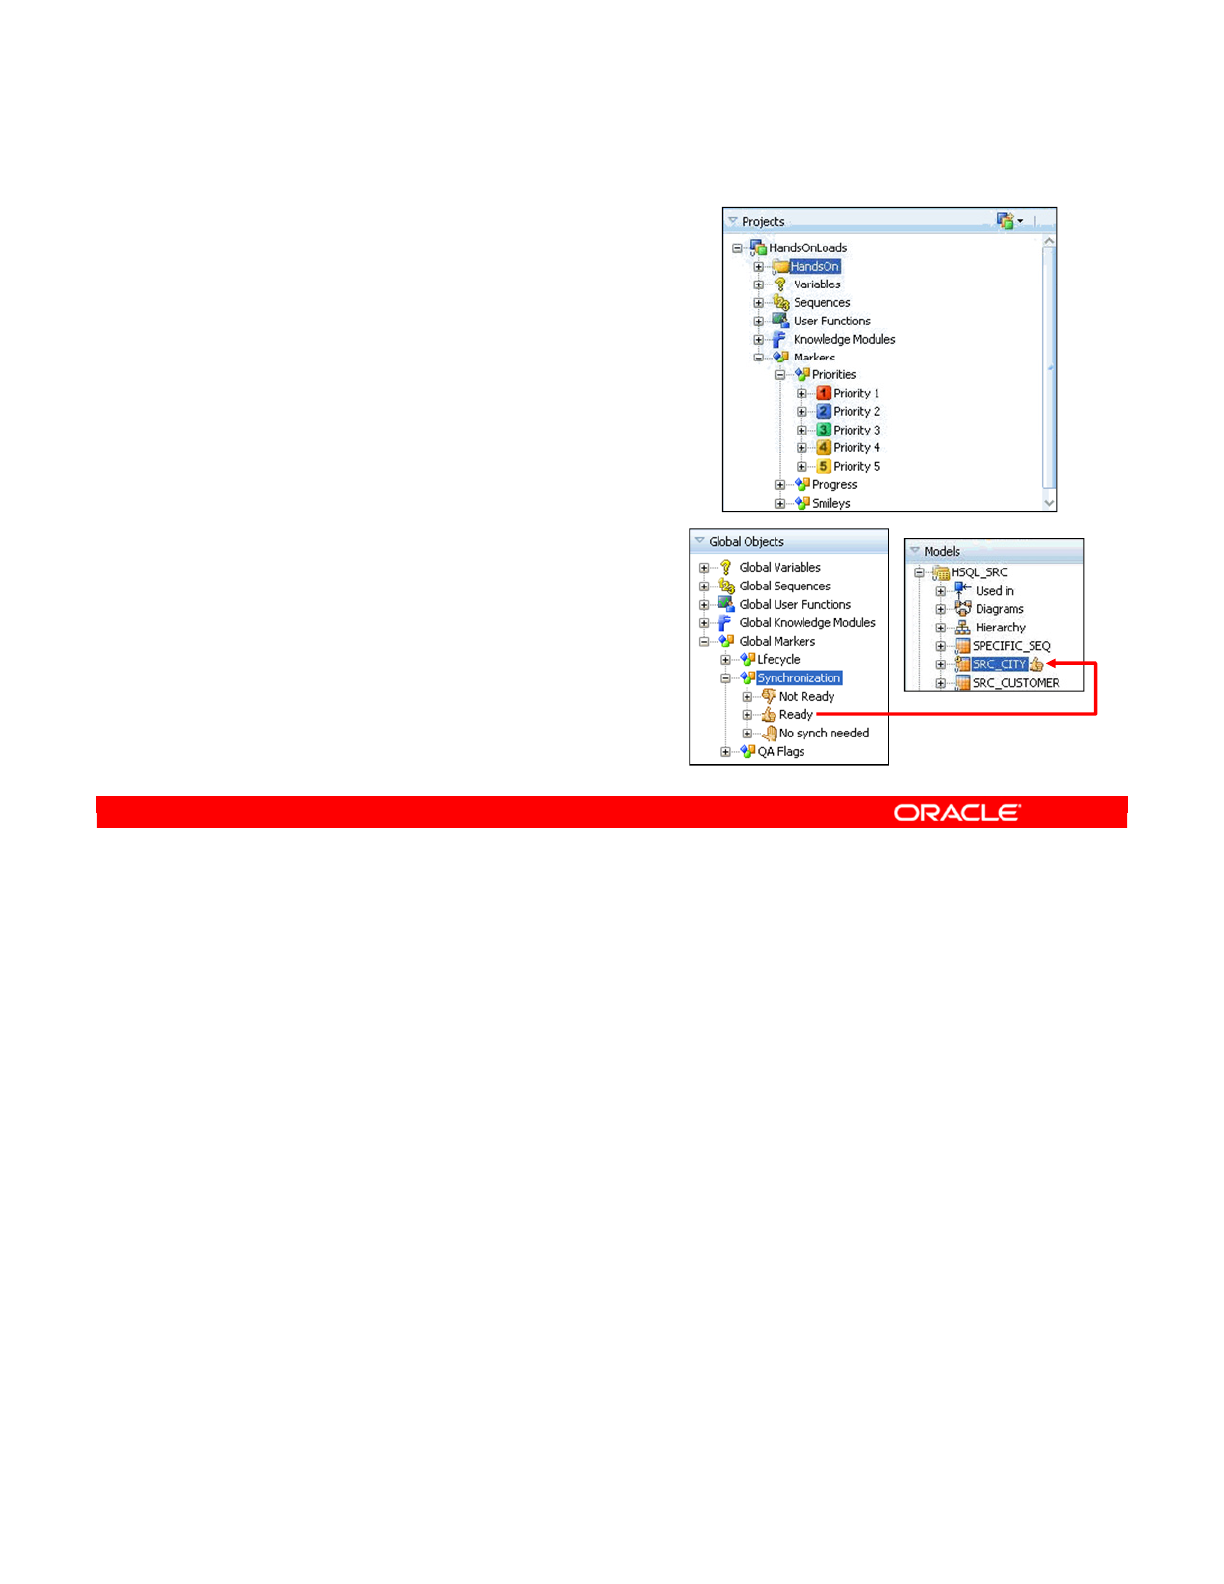
Marker groups are created in one of two places. Depending on where they are created, they
can be attached to different kinds of objects.
Project markers are created in a project, under the Markers folder. They can be attached only
to objects, such as interfaces, packages, or user functions, in the same project.
Global markers, on the other hand, are created in the Global Markers folder in the Others
view. They are primarily intended to be attached to models and components of models, such
as datastores or columns. However, you can also attach them to other global objects, such as
global variables or global user functions. They cannot be attached to project objects.
Oracle Data Integrator 11g: Integration and Administration 5 - 35
Copyright © 2012, Oracle and/or its affiliates. All rights reserved.
Project and Global Markers
•Project markers:
–Are created in the Markers
folder under a project
–Can be attached only to objects
in the same project
•Global markers:
–Are created in the Global Markers
folder in the Others view
–Can be attached to models
and global objects
Oracle University and (Oracle Corporation) use only.
These eKit materials are to be used ONLY by you for the express purpose SELF STUDY. SHARING THE FILE IS STRICTLY PROHIBITED.
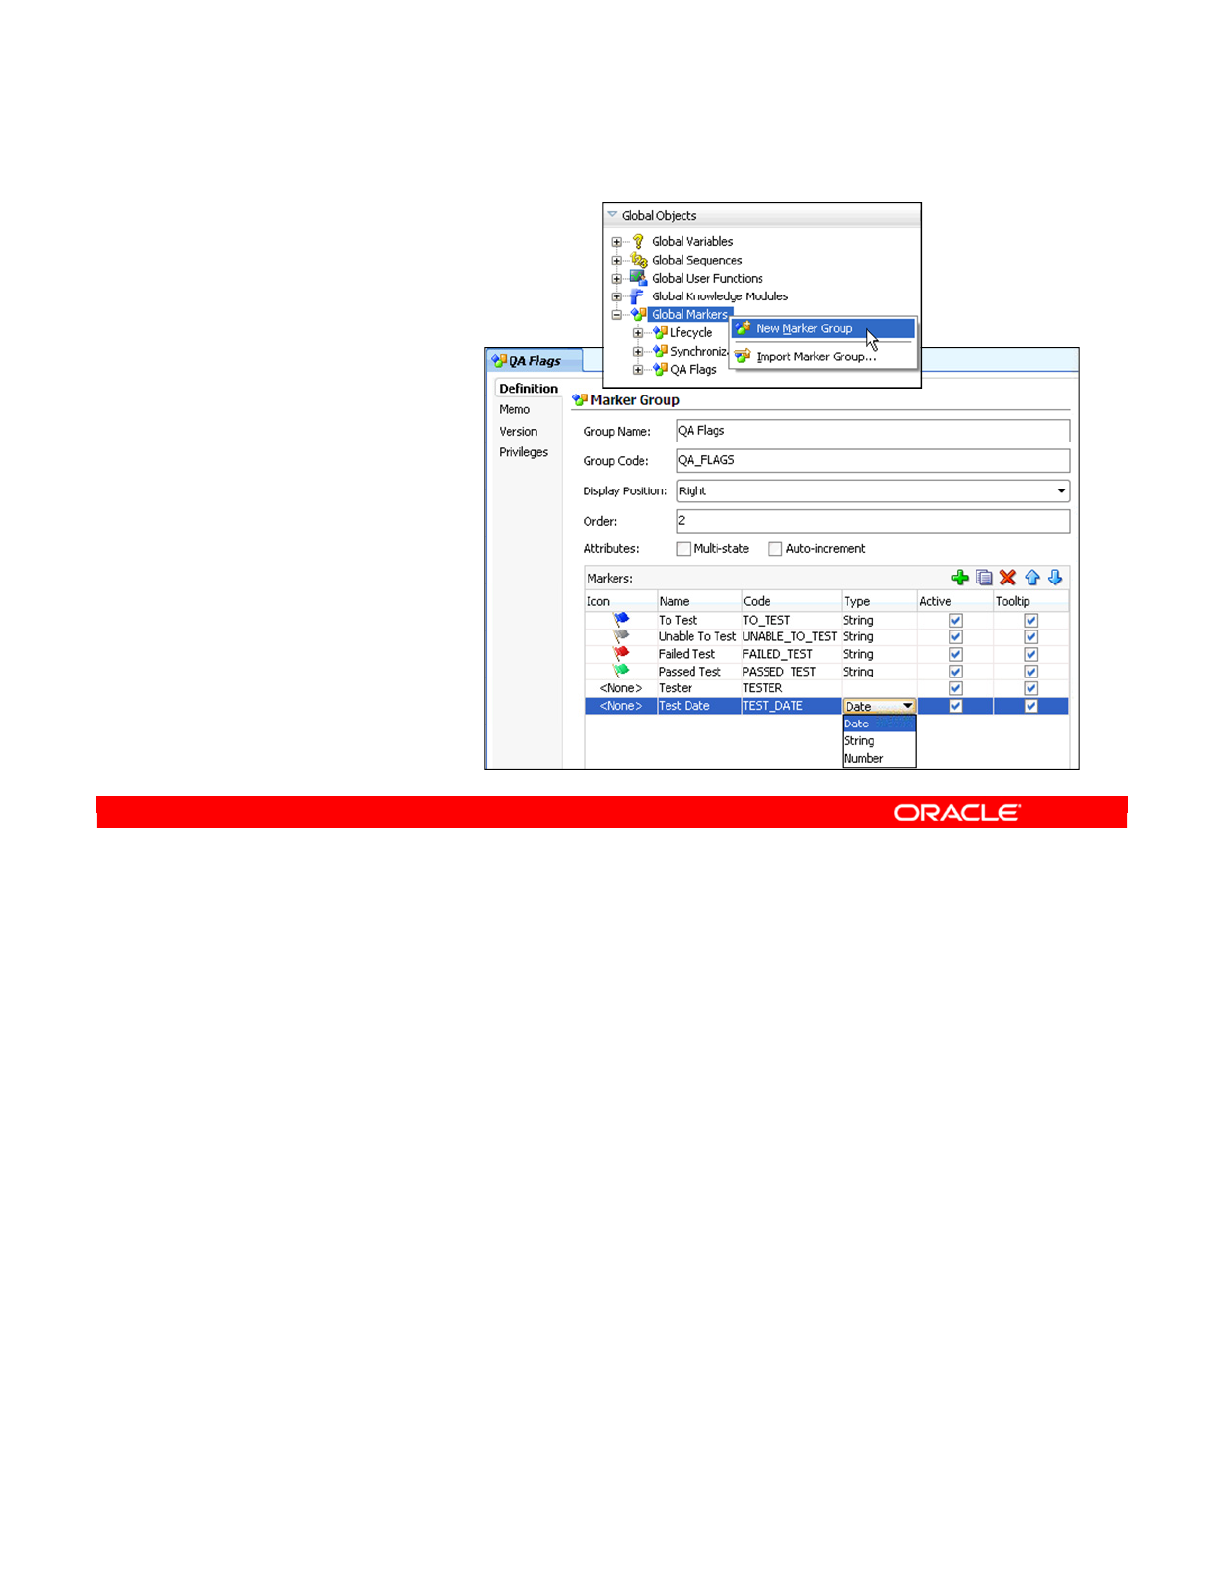
The basic process for creating a new marker group is as follows:
1. To create a global marker group, right-click Global Markers in the Others view. For a
project marker group, right-click the Markers node in the Project view.
2. Select New Marker Group from the context menu. The Marker Group window appears.
3. Select a name for the marker group. This name is displayed wherever you can select a
marker to attach to an object.
4. Set the options for the group as a whole.
5. Display Position specifies whether the icon for the marker appears to the left of the
object, to the right, or not at all. If several markers are attached to an object, markers
with lower order numbers are displayed to the left of markers with higher numbers.
6. Auto-increment means that you can click the marker to automatically advance it to the
next marker in the group. This is useful for progress-type markers, so you can quickly
advance from 10% to 20%, and so on.
7. Multi-state enables several markers from this group to be attached to an object at once,
as described earlier.
8. Add some markers to your group by clicking the Add Marker button.
9. Set the options for each marker. This includes the icon, name, and type of each marker.
Oracle Data Integrator 11g: Integration and Administration 5 - 36
Copyright © 2012, Oracle and/or its affiliates. All rights reserved.
1. Right-click Global
Markers or Markers.
2. Select New Marker
Group.
3. Enter the Group
Name.
4. Enter the group
options.
–Display Position
–Auto-increment
–Multi-state
5. Add markers.
6. For each marker, set:
–The icon
–The name
–The type
Creating a Marker Group
Oracle University and (Oracle Corporation) use only.
These eKit materials are to be used ONLY by you for the express purpose SELF STUDY. SHARING THE FILE IS STRICTLY PROHIBITED.

Answer: b
Explanation: IKMs are used to integrate (load) data to the target tables.
Oracle Data Integrator 11g: Integration and Administration 5 - 37
Copyright © 2012, Oracle and/or its affiliates. All rights reserved.
Quiz
Integration Knowledge Modules (IKMs):
a. Extract data from the source of interfaces
b. Implement a particular strategy for loading the target of an
interface
c. Enforce constraints defined on the target data store
d. Perform customized reverse-engineering
Oracle University and (Oracle Corporation) use only.
These eKit materials are to be used ONLY by you for the express purpose SELF STUDY. SHARING THE FILE IS STRICTLY PROHIBITED.

Answer: b
Explanation: UPDATE mode performs only updates. If no corresponding object exists, the
import does not fail, but it does not create the missing object.
Oracle Data Integrator 11g: Integration and Administration 5 - 38
Copyright © 2012, Oracle and/or its affiliates. All rights reserved.
Quiz
Which of the following is not true?
a. INSERT mode performs blind inserts into the repository. If
an object has the same ID, the import fails.
b. UPDATE mode performs only updates. If no corresponding
object exists, the import fails.
c. INSERT_UPDATE mode updates the corresponding
objects and inserts them if they do not exist.
d. In Duplication mode, the ID in the file is ignored. A new ID
is generated based on the ID of the new repository.
e. In every mode, no ODI objects are ever deleted.
Oracle University and (Oracle Corporation) use only.
These eKit materials are to be used ONLY by you for the express purpose SELF STUDY. SHARING THE FILE IS STRICTLY PROHIBITED.

This lesson covered the different types of objects that projects can contain and the
boundaries imposed by projects. You also learned about the following:
•Projects that can contain folders and using them to create subprojects
•The various types of knowledge modules and adding them to your project
•Creating and using markers to tag your ODI objects with information and graphical
symbols
•Importing and exporting objects to share your work between projects
Oracle Data Integrator 11g: Integration and Administration 5 - 39
Copyright © 2012, Oracle and/or its affiliates. All rights reserved.
Summary
In this lesson, you should have learned how to:
•Set up a new project
•Use folders to organize your work
•Import the right knowledge modules
•Use markers to manage the project
•Import and export objects
Oracle University and (Oracle Corporation) use only.
These eKit materials are to be used ONLY by you for the express purpose SELF STUDY. SHARING THE FILE IS STRICTLY PROHIBITED.

Oracle Data Integrator 11g: Integration and Administration 5 - 40
Copyright © 2012, Oracle and/or its affiliates. All rights reserved.
Checklist of Practice Activities
1-1: Logging In and Using Help
2-1: Creating Users and Repositories and Logging In
3-1: Creating an ODI Agent for Orchestrating Execution of ODI Objects
4-1: Defining the Topology
5-1: Setting Up a New ODI Project
6-1: Creating a Model
7-1: Checking Data Quality in the Model
8-1: ODI Interface: Simple Transformations
9-1: ODI Interface: Complex Transformations
9-2: ODI Interface: Implementing Lookup
10-1: ODI Interface: Exporting a Flat File to a Relational Table
11-1: Using Native Sequences with ODI Interface
11-2: Using Temporary Indexes
11-3: Using Data Sets with ODI Interface
12-1: Using Temporary ODI Interfaces
12-2: Developing a New Knowledge Module
13-1: Creating an ODI Procedure
14-1: Creating an ODI Package
14-2: Using ODI Package with Variables and User Functions
15-1: Creating and Scheduling an ODI Scenario
16-1: Using Load Plans
17-1: Working with ODI Versions
18-1: Enforcing Data Quality with ODI Interface
19-1: Implementing Changed Data Capture
20-1: Setting Up ODI Security
20-2: Integrating with Enterprise Manager and Using ODI Console
21-1: Executing an ODI Scenario Through the ODI Public Web Service
Oracle University and (Oracle Corporation) use only.
These eKit materials are to be used ONLY by you for the express purpose SELF STUDY. SHARING THE FILE IS STRICTLY PROHIBITED.
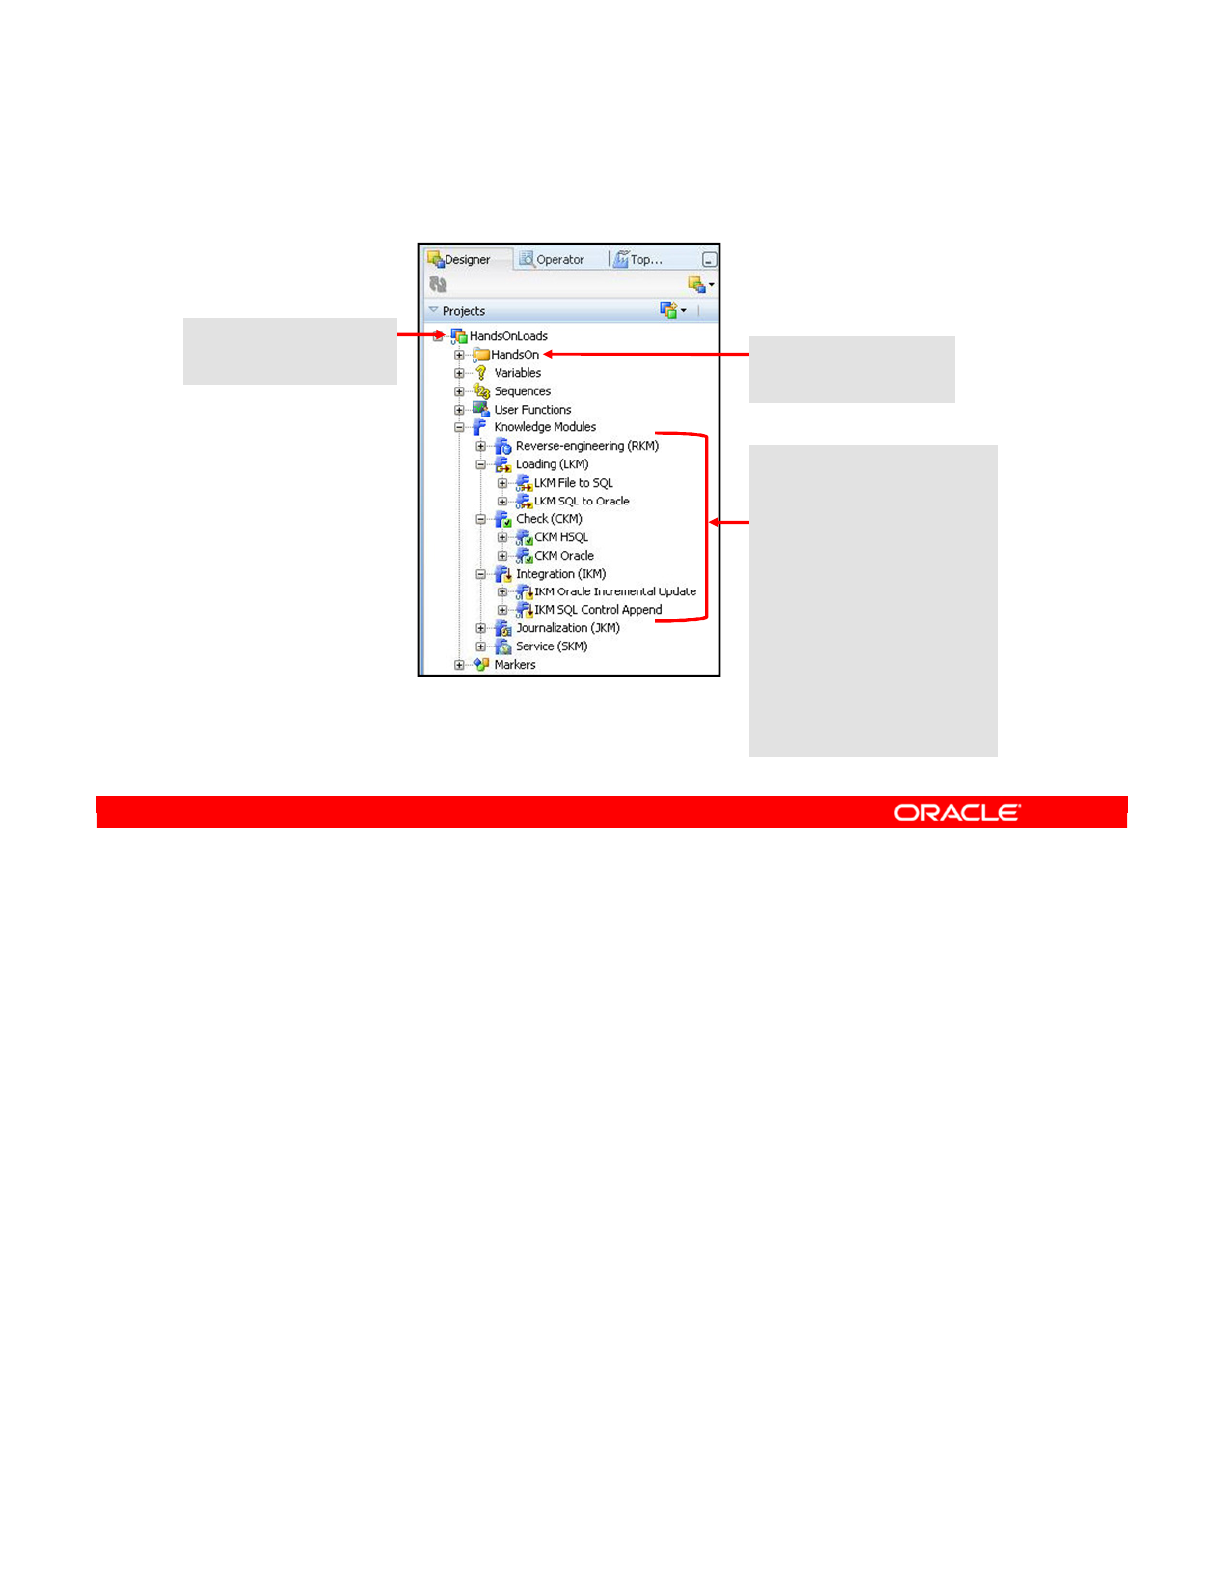
In this practice, you create a project named HandsOnLoads with a folder named HandsOn.
You import knowledge modules for working with three sources (Hypersonic SQL, XML, and
File) and one target (Oracle).
Oracle Data Integrator 11g: Integration and Administration 5 - 41
Copyright © 2012, Oracle and/or its affiliates. All rights reserved.
Practice 5-1: Overview
2. Create folder
HandsOn
1. Create project
HandsOnLoads
3. Import knowledge
modules required for
working with the
following
technologies:
•Sources:
•Hypersonic SQL
•XML
•File
•Targets:
•Oracle
Oracle University and (Oracle Corporation) use only.
These eKit materials are to be used ONLY by you for the express purpose SELF STUDY. SHARING THE FILE IS STRICTLY PROHIBITED.

Oracle University and (Oracle Corporation) use only.
These eKit materials are to be used ONLY by you for the express purpose SELF STUDY. SHARING THE FILE IS STRICTLY PROHIBITED.

Copyright © 2012, Oracle and/or its affiliates. All rights reserved.
Oracle Data Integrator Model Concepts
Oracle University and (Oracle Corporation) use only.
These eKit materials are to be used ONLY by you for the express purpose SELF STUDY. SHARING THE FILE IS STRICTLY PROHIBITED.

Oracle Data Integrator 11g: Integration and Administration 5 - 2
Copyright © 2012, Oracle and/or its affiliates. All rights reserved.
Objectives
After completing this lesson, you should be able to:
•Describe the purpose of Oracle Data Integrator (ODI)
models and reverse-engineering in ODI
•Describe the methods of reverse-engineering
•Create ODI models by reverse-engineering
•Use shortcuts
•Use Smart Export and Import
Oracle University and (Oracle Corporation) use only.
These eKit materials are to be used ONLY by you for the express purpose SELF STUDY. SHARING THE FILE IS STRICTLY PROHIBITED.

A model in ODI is a description of a relational data model. It is a representation of the
structure of a number of interconnected datastores stored in a single schema on a particular
technology. The model in ODI does not, however, hold data, such as banking figures or
names of customers. Instead, it holds only metadata: the names of columns or constraints
that exist between tables.
This metadata can be imported automatically into ODI by a process called reverse-
engineering. However, you can also define the metadata manually, creating columns or
constraints directly in ODI. These additions do not necessarily exist in any physical database
table.
This lesson will cover both methods of creating model metadata.
Oracle Data Integrator 11g: Integration and Administration 6 - 3
Copyright © 2012, Oracle and/or its affiliates. All rights reserved.
What Is a Model?
•A model is an ODI description of a relational data model.
•It is a group of datastores stored in a given schema on a
given technology.
•A model contains metadata reverse-engineered from the
“real” data model, or created in ODI.
Oracle University and (Oracle Corporation) use only.
These eKit materials are to be used ONLY by you for the express purpose SELF STUDY. SHARING THE FILE IS STRICTLY PROHIBITED.

It is crucial that you have a solid understanding of the relational paradigm. In this lesson, you
learn about the key concepts, and about how the relational paradigm is implemented in ODI.
Oracle Data Integrator 11g: Integration and Administration 6 - 4
Copyright © 2012, Oracle and/or its affiliates. All rights reserved.
Understanding the Relational
Model
Oracle University and (Oracle Corporation) use only.
These eKit materials are to be used ONLY by you for the express purpose SELF STUDY. SHARING THE FILE IS STRICTLY PROHIBITED.

ODI works with different databases and other sources of data. It is, therefore, not surprising
that ODI is strongly based on the relational paradigm. This means that ODI uses the same
terms and approach to data as is common to all database products. This commonality
enables ODI to work seamlessly with all database engines.
According to this paradigm, the basic structure of data is the two-dimensional tabular
structure, known as a table or datastore.
ODI uses the term “datastore” broadly to refer to the database tables, flat files, XML files, JMS
messages, and so on. So, a database table is a datastore, but a datastore is not necessarily a
database table.
Oracle Data Integrator 11g: Integration and Administration 6 - 5
Copyright © 2012, Oracle and/or its affiliates. All rights reserved.
Relational Model
•ODI is strongly based on the relational paradigm.
•In ODI, data is handled through tabular structures defined
as datastores.
•Datastores are used for all types of “real” data structures,
including flat files, Extensible Markup Language (XML)
files, and Java Message Service (JMS) messages.
Oracle University and (Oracle Corporation) use only.
These eKit materials are to be used ONLY by you for the express purpose SELF STUDY. SHARING THE FILE IS STRICTLY PROHIBITED.
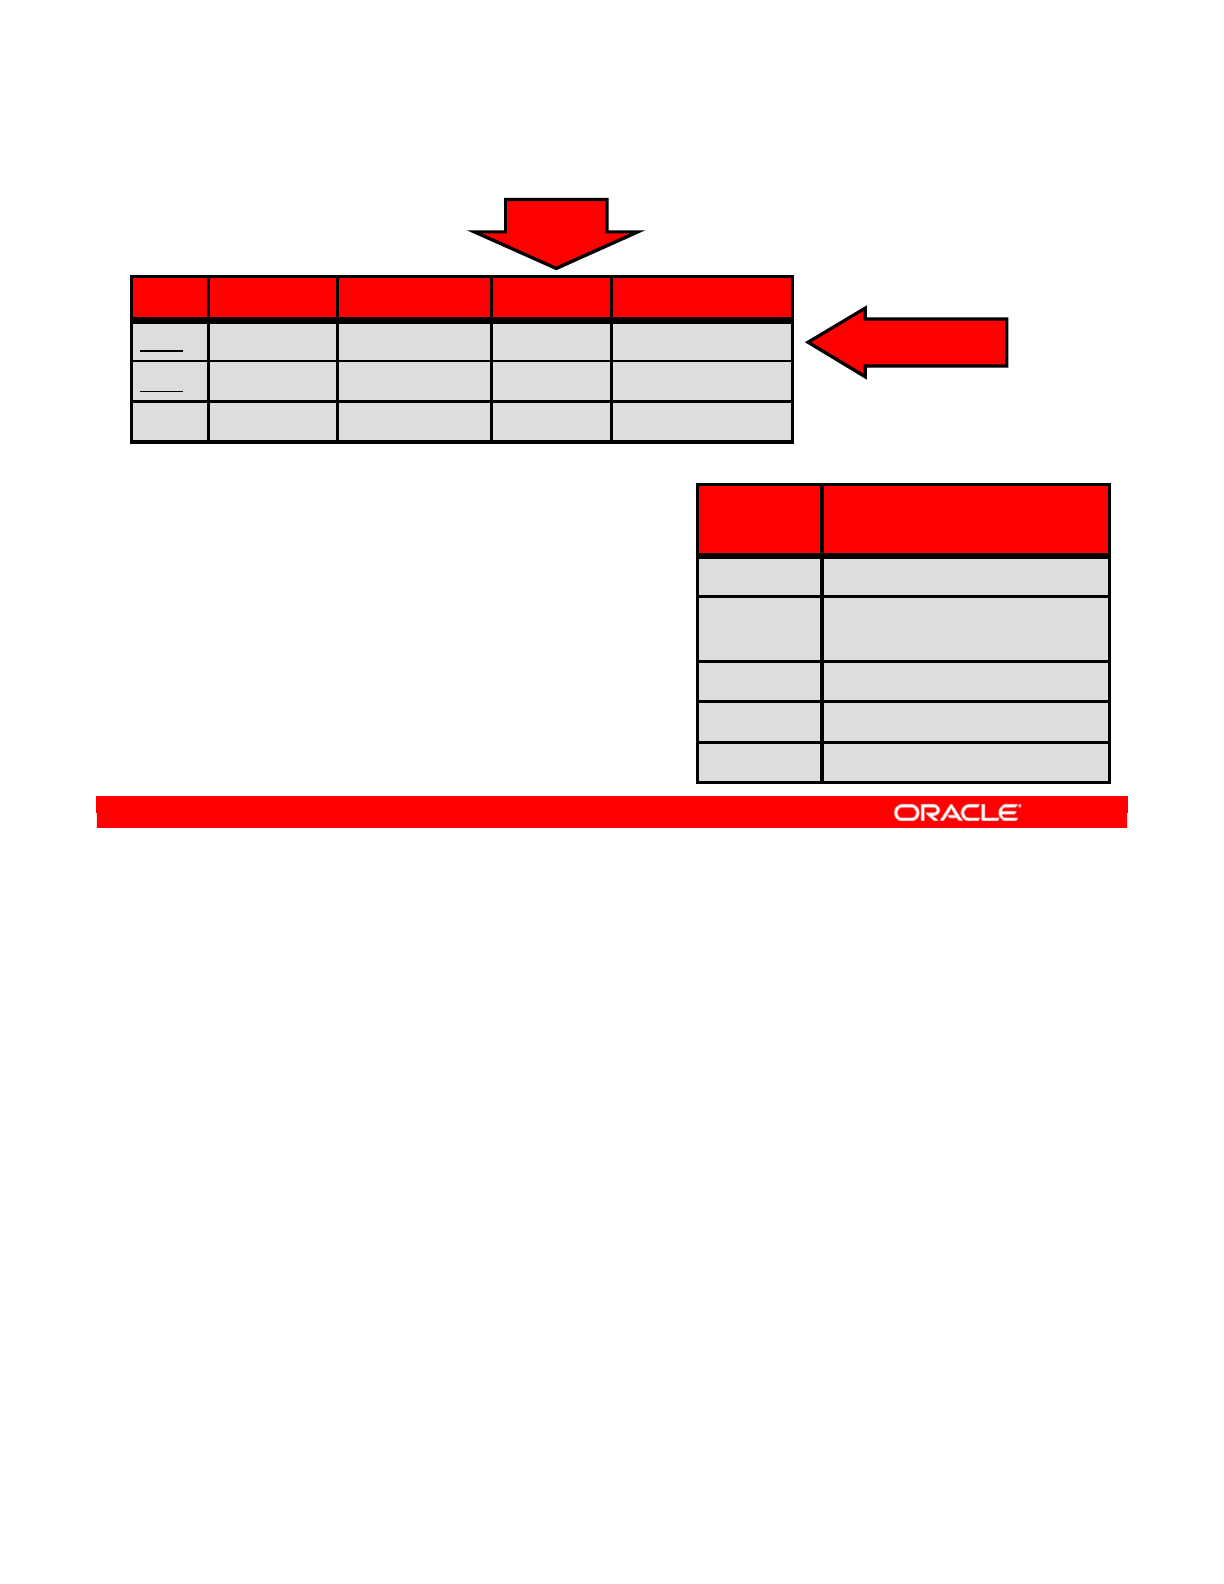
First, you recall how a relational model works.
The table forms the basic structure and stores information relating to one subject, in this case,
customers. Each row represents an individual customer, and contains different pieces of
information about that one customer.
A column describes that piece of information. For example, the LAST_NAME column in this
example contains the surname of each customer. You can find the surnames of all customers
in the table by looking at the column.
Every column must have a data type that describes the kind of information stored. For
example, the LAST_NAME field would contain a string of characters, not a number or date. At
times, the length and precision are also stored. For example, you can limit the LAST_NAME
field to 255 characters. Similarly, you may limit the ID number of a customer to 10 digits.
Each column can either allow or not allow null values. A null value means that no value is
stored in this column for this row. The information is not known, not applicable, or not stored.
By setting a column to “not null,” you prevent the gaps in data of this sort from occurring.
Columns may also have default values. These are values that are given by default when no
other value is entered.
Oracle Data Integrator 11g: Integration and Administration 6 - 6
Copyright © 2012, Oracle and/or its affiliates. All rights reserved.
Relational Model: Tables and Columns
•Tables store data in rows and
columns.
•Each column has a data type.
–Optionally, a length and
precision
•Each column may or may not
allow null values.
•Each column may have a default
value.
CUSTOMERS
table structure (example)
CUSTOMERS
table contents
Row (record)
Column
ID FIRST_N LAST_NAME CITY_ID ADDRESS
1001 John Adams 1266 23 St. Martin St.
1002 Clark Gable 23
…… … … …
Column
Name
Data Type
ID NUMERIC(10), Not Null
FIRST_NAM
E
VARCHAR(255), Not Null
LAST_NAME VARCHAR(255), Not Null
CITY_ID NUMERIC(5), Not Null
ADDRESS VARCHAR(500), Allows Nulls
Oracle University and (Oracle Corporation) use only.
These eKit materials are to be used ONLY by you for the express purpose SELF STUDY. SHARING THE FILE IS STRICTLY PROHIBITED.
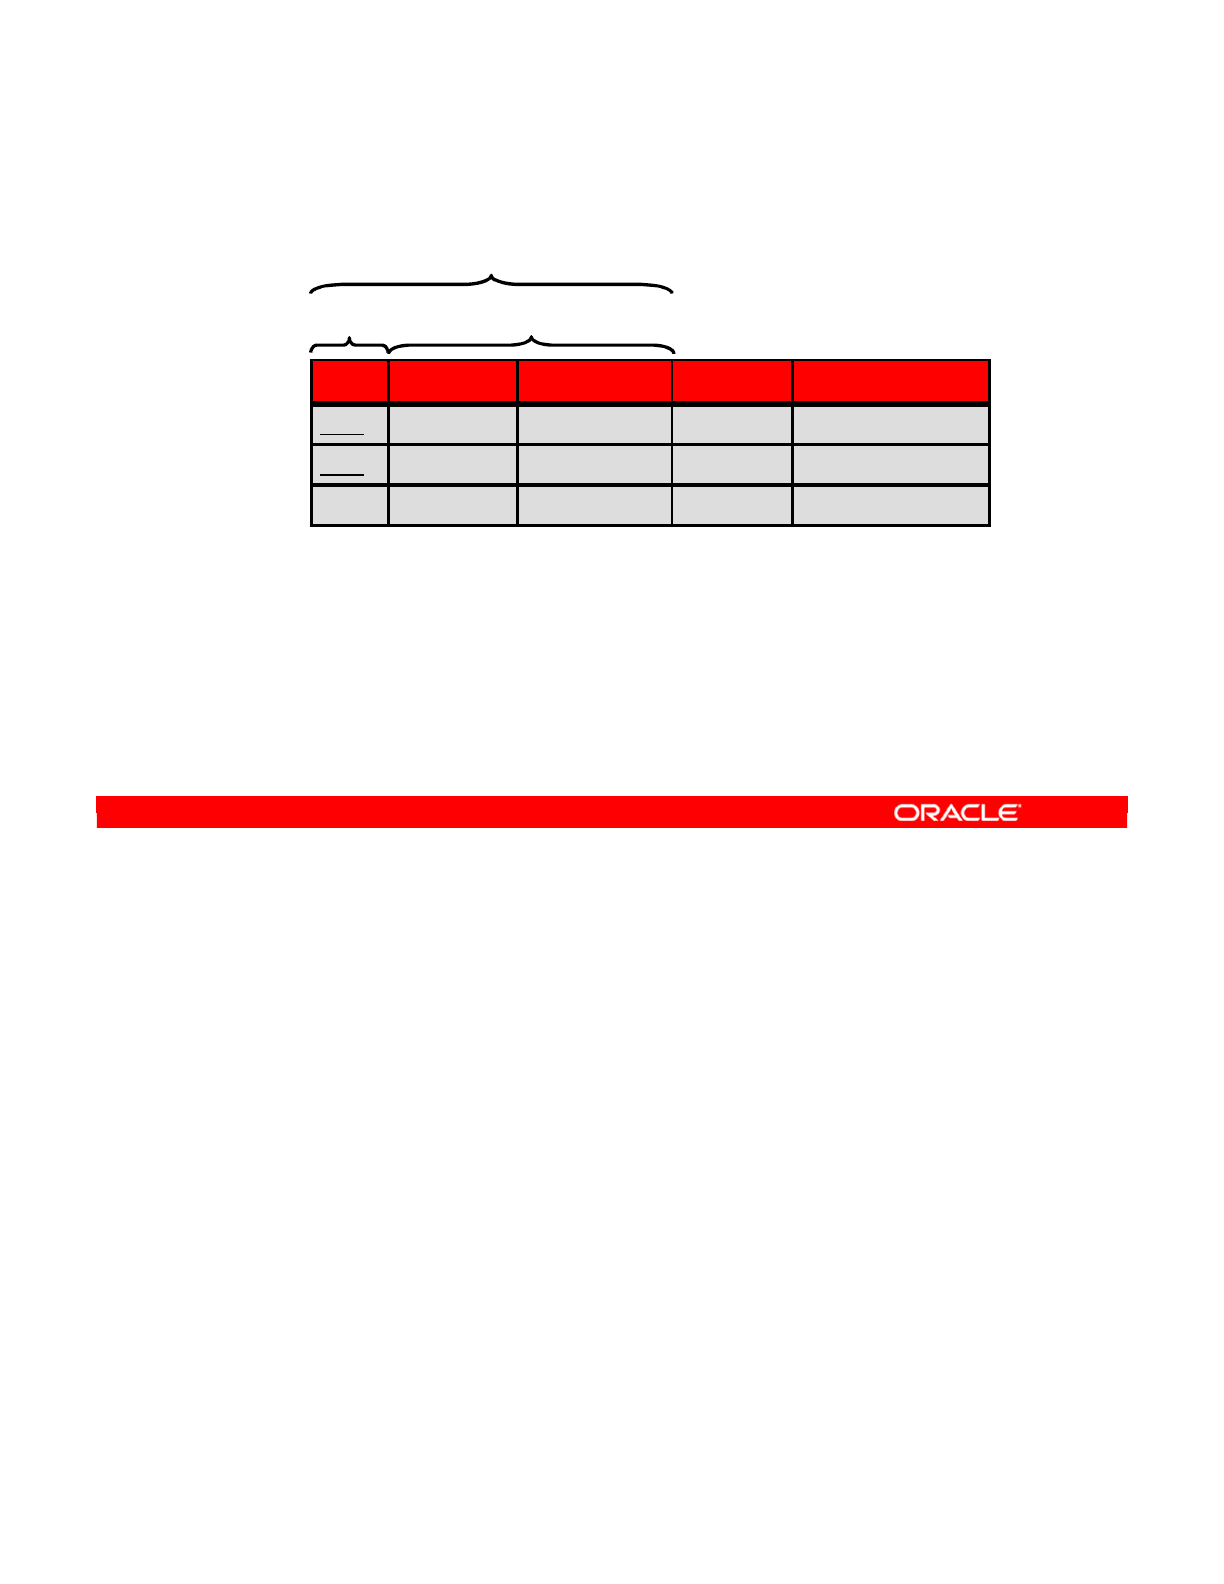
So far, you have not defined any rules on the data in the table or looked at what the ID field
may be used for. Keys are important for defining relationships between tables—it is not useful
to have information on customer orders if you are unable to look up the customer to find his or
her address.
A candidate key is a set of columns that can uniquely distinguish one row in the table from
any other row. In this example, each customer has a unique ID. So, you can find all
information about a customer by just specifying the ID.
You can also find information about a customer by using the FIRST_NAME and LAST_NAME
columns together. By specifying a customer’s full name, you can locate him or her.
However, it is likely that you have two customers with the same name. Therefore, you select
the ID column as the primary key. This means that this column must always contain unique
values.
The other candidate keys are then referred to as the alternate keys. In this case, the alternate
key is the combination of FIRST_NAME and LAST_NAME.
Oracle Data Integrator 11g: Integration and Administration 6 - 7
Copyright © 2012, Oracle and/or its affiliates. All rights reserved.
Relational Model: Keys
•A candidate key can uniquely identify one row in the table.
•One of the keys is chosen as the primary key (PK).
•Other keys are called alternate keys (AK).
Primary key Alternate Key
Candidate keys
ID FIRST_N LAST_NAME CITY_ID ADDRESS
1001 John Adams 1266 23 St. Martin St.
1002 Clark Gable 23 32 South Ave.
…… … … …
Oracle University and (Oracle Corporation) use only.
These eKit materials are to be used ONLY by you for the express purpose SELF STUDY. SHARING THE FILE IS STRICTLY PROHIBITED.
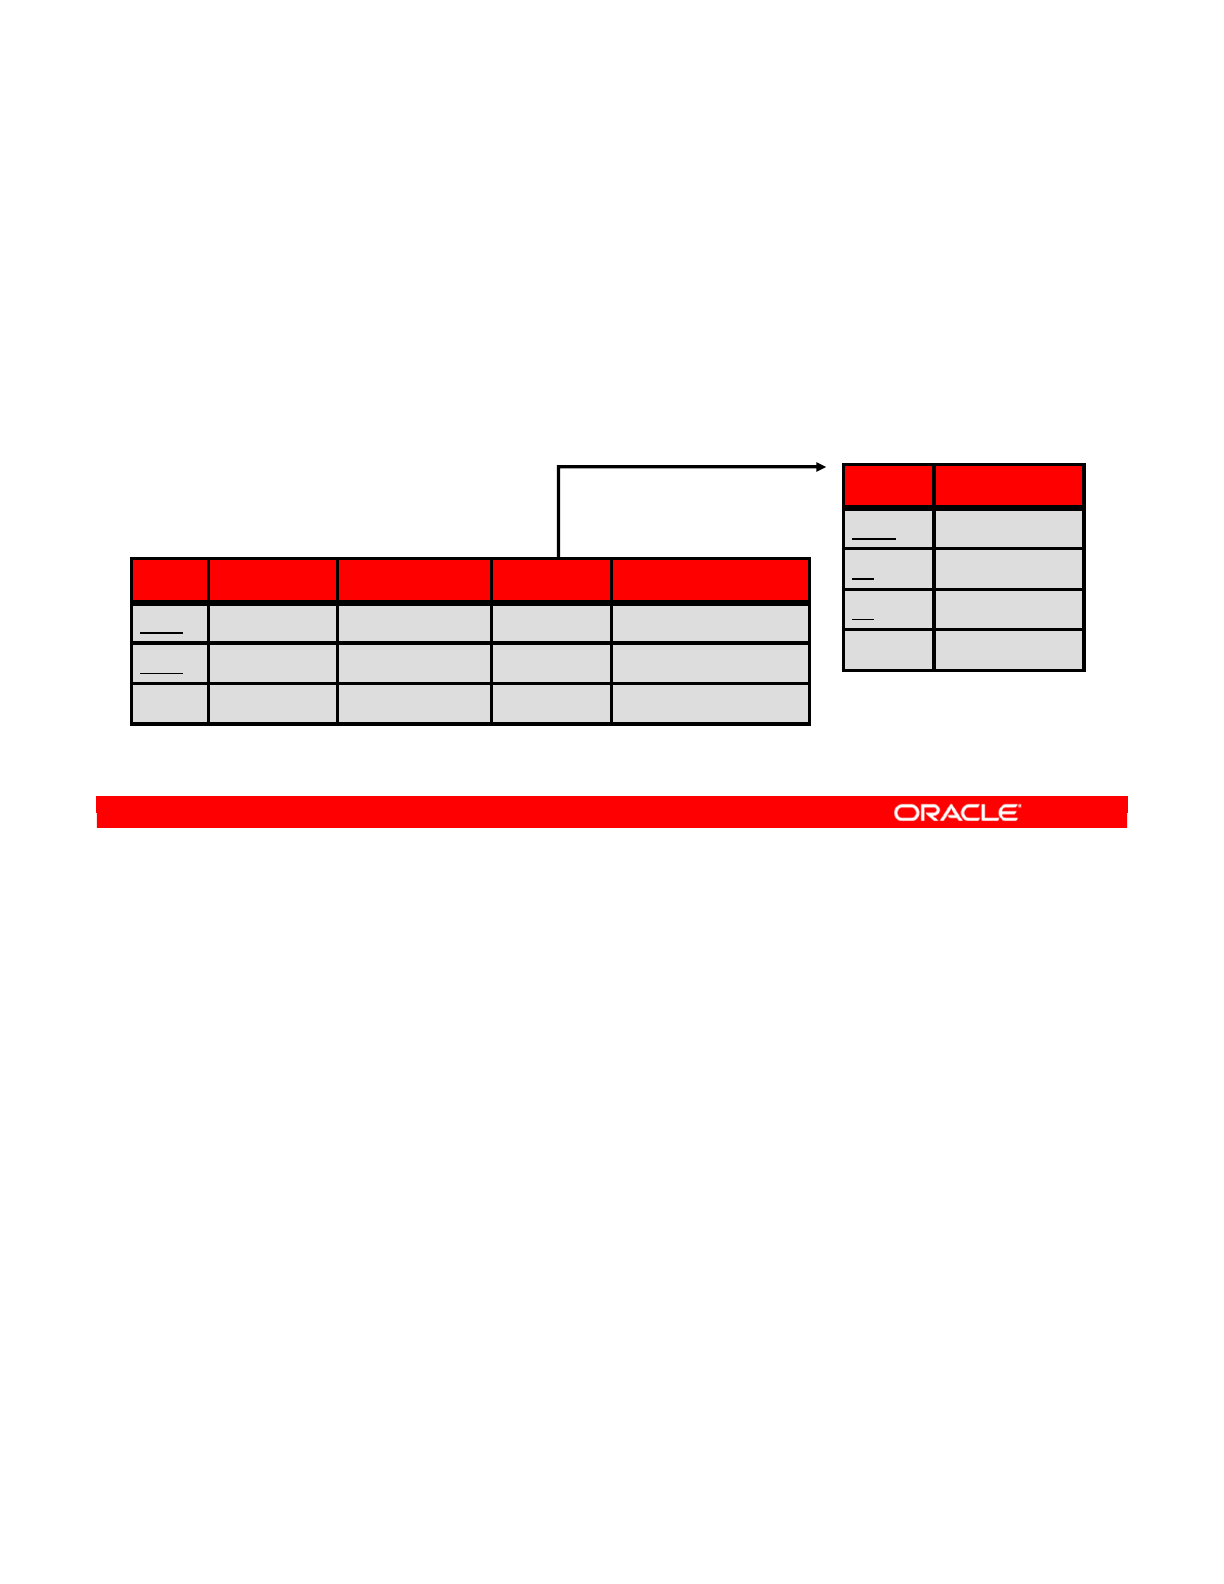
Foreign keys are a way of linking several tables together. They are used to ensure the
integrity of your information as a whole. More specifically, a foreign key defines a relationship
between one or more columns in one table and a candidate key in another table.
In this example, the CITY_ID column in the CUSTOMERS table should always refer to an ID
column in the CITIES table. Therefore, you define a foreign key from the CITY_ID column in
the CUSTOMERS table to the ID column in the CITIES table. Note that foreign keys have a
direction: Make sure that only the city ID of a customer exists. It is not important if there are no
customers from a particular city.
Oracle Data Integrator 11g: Integration and Administration 6 - 8
Copyright © 2012, Oracle and/or its affiliates. All rights reserved.
Relational Model: Foreign Keys
•Foreign keys (FK) define relationships between tables.
•A foreign key uses one or more columns from one table to
reference a candidate key in another table.
CUSTOMERS
table
CITIES
table
FK_CUSTOMER_CITY (Foreign Key)
ID FIRST_N LAST_NAME CITY_ID ADDRESS
1001 John Adams 1266 23 St. Martin St.
1002 Clark Gable 23 32 South Ave.
…… … … …
ID CITY_NAME
1266 Newyork
23 Boston
55 Tokyo
……
Oracle University and (Oracle Corporation) use only.
These eKit materials are to be used ONLY by you for the express purpose SELF STUDY. SHARING THE FILE IS STRICTLY PROHIBITED.

Constraints are basically rules in the database that exist to enforce business rules on data.
Primary keys, alternate keys, foreign keys, and not null columns are all types of constraints.
The database prevents any data modification that does not respect these constraints. Here is
a brief description of the different types again:
•The primary key on the ID column of the CUSTOMERS table ensures that each customer
ID is unique.
•The alternate key comprising the FIRST_NAME and LAST_NAME columns in the
CUSTOMERS table prevents any two customers having the same full name.
•The foreign key defined from the CITY_ID column in the CUSTOMERS table to the ID
column in the CITIES table prevents invalid CITY_ID values from being added.
•Lastly, defining the LAST_NAME column as a “not null” column ensures that a value is
always present in this field.
Oracle Data Integrator 11g: Integration and Administration 6 - 9
Copyright © 2012, Oracle and/or its affiliates. All rights reserved.
Relational Model: Constraints
•Constraints enforce business rules on data.
•PKs, AKs, FKs, and Not Null are types of constraints.
–A customer ID must be unique.
–Two customers cannot have the same first name and last
name.
–A customer city must be referenced in the CITIES table.
–A customer must have a last name.
Oracle University and (Oracle Corporation) use only.
These eKit materials are to be used ONLY by you for the express purpose SELF STUDY. SHARING THE FILE IS STRICTLY PROHIBITED.

You can define other, more complex types of constraints. For example, you can define check
constraints on your tables. These constraints implement other kinds of business rules.
For example, you may know that all the customers of your organization are aged between 16
and 120. You can implement this rule as a check constraint. Thus, it will be impossible for
invalid ages to be entered into the database.
The goal of constraints is to ensure quality of data. They do not define relationships between
tables like foreign keys. Nor do they set a property for a whole table, like primary keys.
Instead, they just define statements that must be true for each individual row of a table.
In the same way as other constraints, after check constraints are implemented and enabled,
they prevent modifications that violate these rules. For example, attempting to create a
customer with an age of zero usually triggers a database error. Thus, you are alerted
immediately to the presence of “bad” data.
Oracle Data Integrator 11g: Integration and Administration 6 - 10
Copyright © 2012, Oracle and/or its affiliates. All rights reserved.
Relational Model: Constraints
•Check constraints are another type of constraint.
–They map more complex business rules.
—
For example: “Every customer’s age must be between 16 and
120.”
•Constraints ensure quality of data.
–A constraint key characterizes the identifier for an index.
—
(is unique, primary key, or not unique)
–A constraint reference is a relationship between datastores;
a constraint condition is the where clause.
–Foreign keys are constraint references, not conditions.
•Trying to insert or update a value violating a constraint
usually generates an error at the database level.
Oracle University and (Oracle Corporation) use only.
These eKit materials are to be used ONLY by you for the express purpose SELF STUDY. SHARING THE FILE IS STRICTLY PROHIBITED.

Indexes are another property of database tables that are implemented in most database
engines. They are not constraints, but a tool for improving database performance.
An index is defined on a group of one or more columns in a table. Thus, it is similar to a key.
The difference is that an index is used specifically to speed up database access. A query that
uses this group of columns to retrieve data can generally be performed faster if it has an index
on it.
Unique indexes behave in the same way as unique keys. They are indexes with the additional
property that duplicate values must not exist.
Oracle Data Integrator 11g: Integration and Administration 6 - 11
Copyright © 2012, Oracle and/or its affiliates. All rights reserved.
Relational Model: Indexes
•Indexes are defined on a group of columns in a table.
–Indexes speed up access to the table data when a query
selects data through this group.
•Unique indexes are a specific type of index that prevent
duplicate values.
Oracle University and (Oracle Corporation) use only.
These eKit materials are to be used ONLY by you for the express purpose SELF STUDY. SHARING THE FILE IS STRICTLY PROHIBITED.
As stated earlier, all key aspects of a relational model are supported in ODI.
Tables in a relational model are generally referred to as datastores in ODI. Columns in tables
are also referred to as fields.
Not null columns can be specified directly in ODI or accessed from the database during
reverse-engineering. They are often referred to as mandatory fields in ODI. Default values are
similarly supported.
Primary keys and alternate keys have the same meaning in ODI. They can be enforced
whether they exist in the database or not. ODI treats unique indexes as alternate keys and
marks other types of indexes as not unique indexes.
Foreign keys in ODI are referred to as references. References in ODI can be defined between
heterogeneous databases, which is not possible with traditional foreign keys.
Check constraints in a relational model are referred to as conditions in ODI for clarity. Thus, a
condition is a type of constraint, along with references, primary keys, and so on.
Oracle Data Integrator 11g: Integration and Administration 6 - 12
Copyright © 2012, Oracle and/or its affiliates. All rights reserved.
Relational Model Support in ODI
All elements of relational models can be described in ODI
metadata:
Relational model Description in ODI
Table; Column Datastore; Column
Not Null; Default value Not Null/Mandatory; Default value
Primary keys; Alternate Keys Primary keys; Alternate keys
Indexes; Unique Indexes Not unique indexes; Alternate keys
Foreign Key Reference
Check constraint Condition
Oracle University and (Oracle Corporation) use only.
These eKit materials are to be used ONLY by you for the express purpose SELF STUDY. SHARING THE FILE IS STRICTLY PROHIBITED.
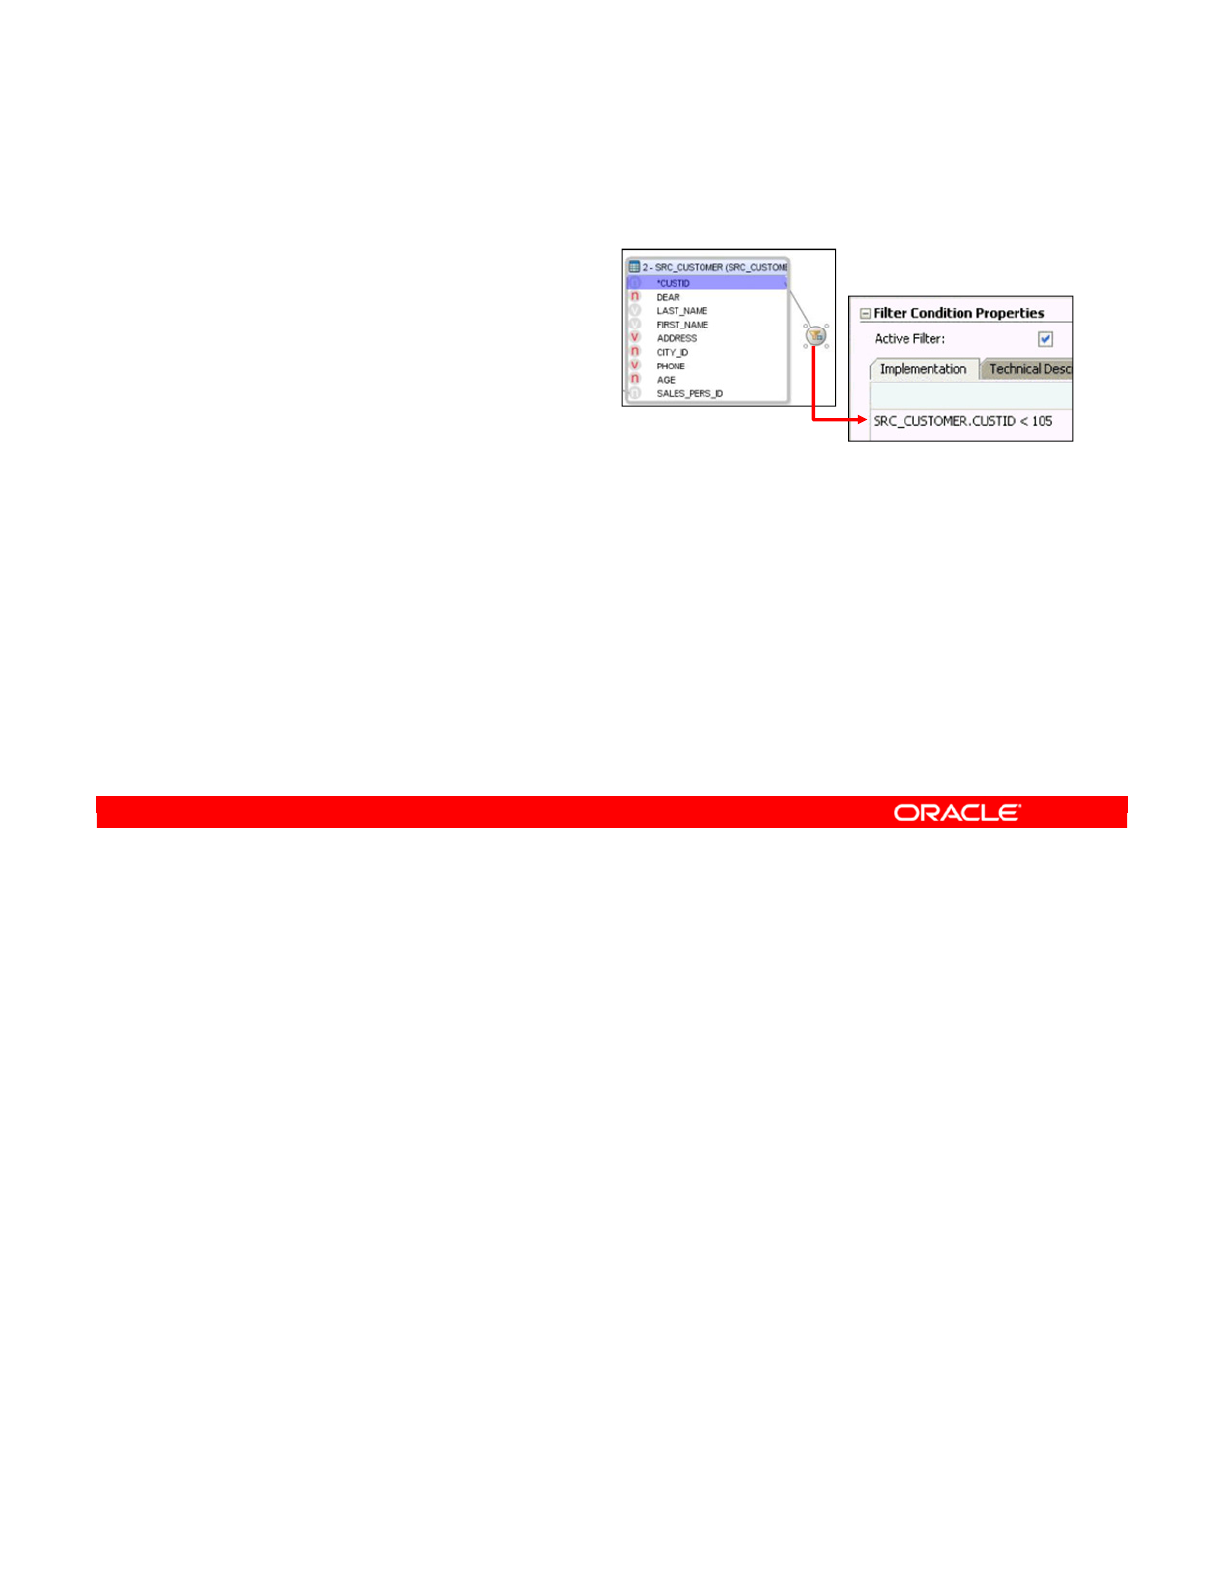
ODI adds more capabilities to relational data models. For example, some types of metadata
may not exist in most databases, but are useful to implement certain business rules.
Filters reduce the amount of data retrieved from source datastores by specifying conditions
that must be matched, for example, processing only confirmed orders. This does not remove
any data from the source datastores. It simply reduces the amount of data entering the data
flow.
Heterogeneous references are foreign keys that work between heterogeneous systems. That
is, you can specify that orders stored in an Oracle table reference a customer stored in a
Sybase table. Although these references cannot exist in the database systems, ODI can
implement them during integration.
Other types of specialized metadata can optionally serve particular purposes. For example,
datastores in ODI can have an OLAP type, such as dimension table or facts table.
Similarly, columns can have a “slowly changing dimension” behavior defined. For these
columns, you use ODI knowledge modules that are designed specifically to manage the
slowly changing dimension values of source datastores.
Oracle Data Integrator 11g: Integration and Administration 6 - 13
Copyright © 2012, Oracle and/or its affiliates. All rights reserved.
Additional Metadata in ODI
•Filters:
–Apply when data is
loaded from a datastore
•Heterogeneous references:
–Link datastores from
different models or technologies
•Additional, optional technical or functional metadata:
–Online analytical processing (OLAP) type on datastores
–Slowly changing dimension behavior on columns
–Read-only data types or columns
–User-defined metadata (FlexFields)
Oracle University and (Oracle Corporation) use only.
These eKit materials are to be used ONLY by you for the express purpose SELF STUDY. SHARING THE FILE IS STRICTLY PROHIBITED.

Read-only data types and columns serve similar purposes. They enable ODI to avoid inserting
data into certain columns during the integration process.
ODI also enables you to define user-defined metadata in the form of FlexFields. For example,
you can record that a datastore is a time or a regular dimension for OLAP purposes.
Oracle Data Integrator 11g: Integration and Administration 6 - 14
Oracle University and (Oracle Corporation) use only.
These eKit materials are to be used ONLY by you for the express purpose SELF STUDY. SHARING THE FILE IS STRICTLY PROHIBITED.
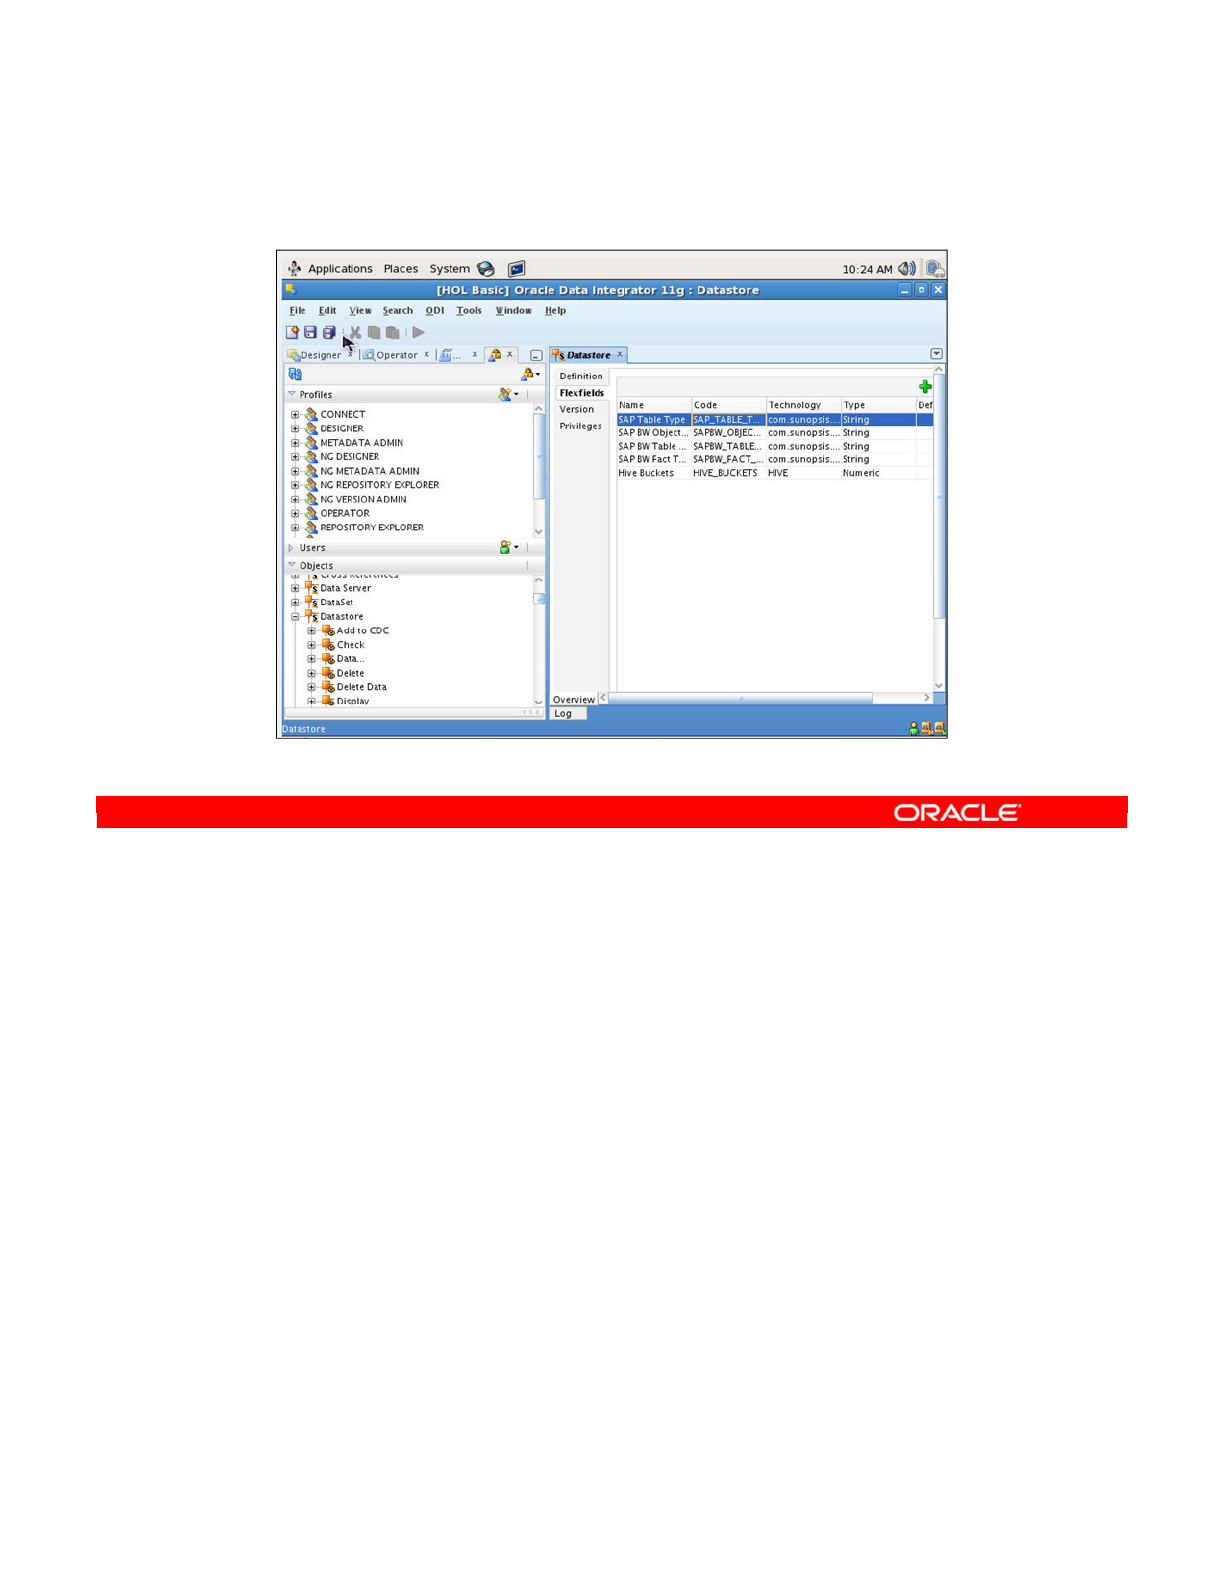
FlexFields are defined using the Security Navigator. They are defined for each Object type
(that can have FlexFields) by dragging the Object, for example, “Datastore,” into the
workspace to edit it.
Click the FlexFields tab to add them, after which you can edit them. Not all object types can
have FlexFields defined for them.
Search “FlexFields” in Oracle Data Integrator Online help for further information.
Oracle Data Integrator 11g: Integration and Administration 6 - 15
Copyright © 2012, Oracle and/or its affiliates. All rights reserved.
FlexFields
Oracle University and (Oracle Corporation) use only.
These eKit materials are to be used ONLY by you for the express purpose SELF STUDY. SHARING THE FILE IS STRICTLY PROHIBITED.

Reverse-engineering in ODI is about automatically retrieving metadata from a database to
populate an ODI model.
Oracle Data Integrator 11g: Integration and Administration 6 - 16
Copyright © 2012, Oracle and/or its affiliates. All rights reserved.
Understanding Reverse-Engineering
Retrieving Metadata
Oracle University and (Oracle Corporation) use only.
These eKit materials are to be used ONLY by you for the express purpose SELF STUDY. SHARING THE FILE IS STRICTLY PROHIBITED.

Reverse-engineering is a completely automated process in ODI for retrieving metadata from a
database. It can be used to create new models or to fill in gaps in the existing models.
You will use reverse-engineering in the practice to populate several models.
Oracle Data Integrator 11g: Integration and Administration 6 - 17
Copyright © 2012, Oracle and/or its affiliates. All rights reserved.
What Is Reverse-Engineering?
Reverse-engineering is an automated process to retrieve
metadata to create or update a model in ODI.
Oracle University and (Oracle Corporation) use only.
These eKit materials are to be used ONLY by you for the express purpose SELF STUDY. SHARING THE FILE IS STRICTLY PROHIBITED.

ODI can perform reverse-engineering in two ways:
Standard reverse-engineering uses the standard capabilities of the JDBC API.
•ODI queries the JDBC driver for information about table structures, foreign keys, and so
on. It then writes these to the ODI repository, where all metadata is stored.
•Although it is technically independent of the technology being used, standard reverse-
engineering requires a sufficiently capable JDBC driver.
Customized reverse-engineering is quite different.
•In this case, ODI connects to the database by using the basic features of the JDBC
driver and directly queries the system tables to retrieve the metadata.
•It then transforms and writes this metadata into the ODI repository.
Naturally, the method for doing this varies greatly depending on the technology that is being
reverse-engineered. Thus, for each technology there is a specific RKM. This RKM tells ODI
how to extract metadata for the given technology.
Oracle Data Integrator 11g: Integration and Administration 6 - 18
Copyright © 2012, Oracle and/or its affiliates. All rights reserved.
Methods for DBMS Reverse-Engineering
•Standard reverse-engineering:
–Uses Java Database Connectivity (JDBC) features to
retrieve metadata, which is then written to the ODI repository
–Requires a suitable driver
•Customized reverse-engineering:
–Reads metadata from the application/database system
repository, and then writes this metadata in the ODI
repository
–Uses a technology-specific strategy, implemented in a
Reverse-Engineering Knowledge Module (RKM)
—
For each technology, there is a specific RKM that tells ODI how
to extract metadata for that specific technology.
Oracle University and (Oracle Corporation) use only.
These eKit materials are to be used ONLY by you for the express purpose SELF STUDY. SHARING THE FILE IS STRICTLY PROHIBITED.

In addition to standard and customized reverse-engineering for databases, you can also
reverse-engineer files. There are two methods for this, as there are supported file formats.
Delimited files contain data separated by a delimiter, such as a comma or tab character. ODI
can parse the file content directly and determine the number of columns and their name
depending on the file header.
Fixed format files allocate a specific length to each field, rather than using a defined delimiter
between fields. They are reverse-engineered with a different method.
To collect metadata for these fields, you need a description of the fields in the COBOL
copybook format. ODI can parse this type of file natively.
ODI can also reverse-engineer metadata in XML files through standard reverse-engineering.
ODI uses the ODI JDBC driver for XML to access them like any other data source.
Similarly, lightweight directory access protocol (LDAP) directories can be reverse-engineered
by using the standard method. Here, ODI uses the ODI JDBC driver for LDAP.
You should, therefore, consider XML files and LDAP directories as normal databases for the
purposes of reverse-engineering.
Oracle Data Integrator 11g: Integration and Administration 6 - 19
Copyright © 2012, Oracle and/or its affiliates. All rights reserved.
Other Methods for Reverse-Engineering
•Delimited format reverse-engineering
–File parsing built into ODI; based on file header
•Fixed-format reverse-engineering
–Built into ODI; uses COBOL copybook description files
•XML file reverse-engineering (standard)
–Uses ODI JDBC driver for XML
•LDAP directory reverse-engineering (standard)
–Uses ODI JDBC driver for LDAP
Oracle University and (Oracle Corporation) use only.
These eKit materials are to be used ONLY by you for the express purpose SELF STUDY. SHARING THE FILE IS STRICTLY PROHIBITED.
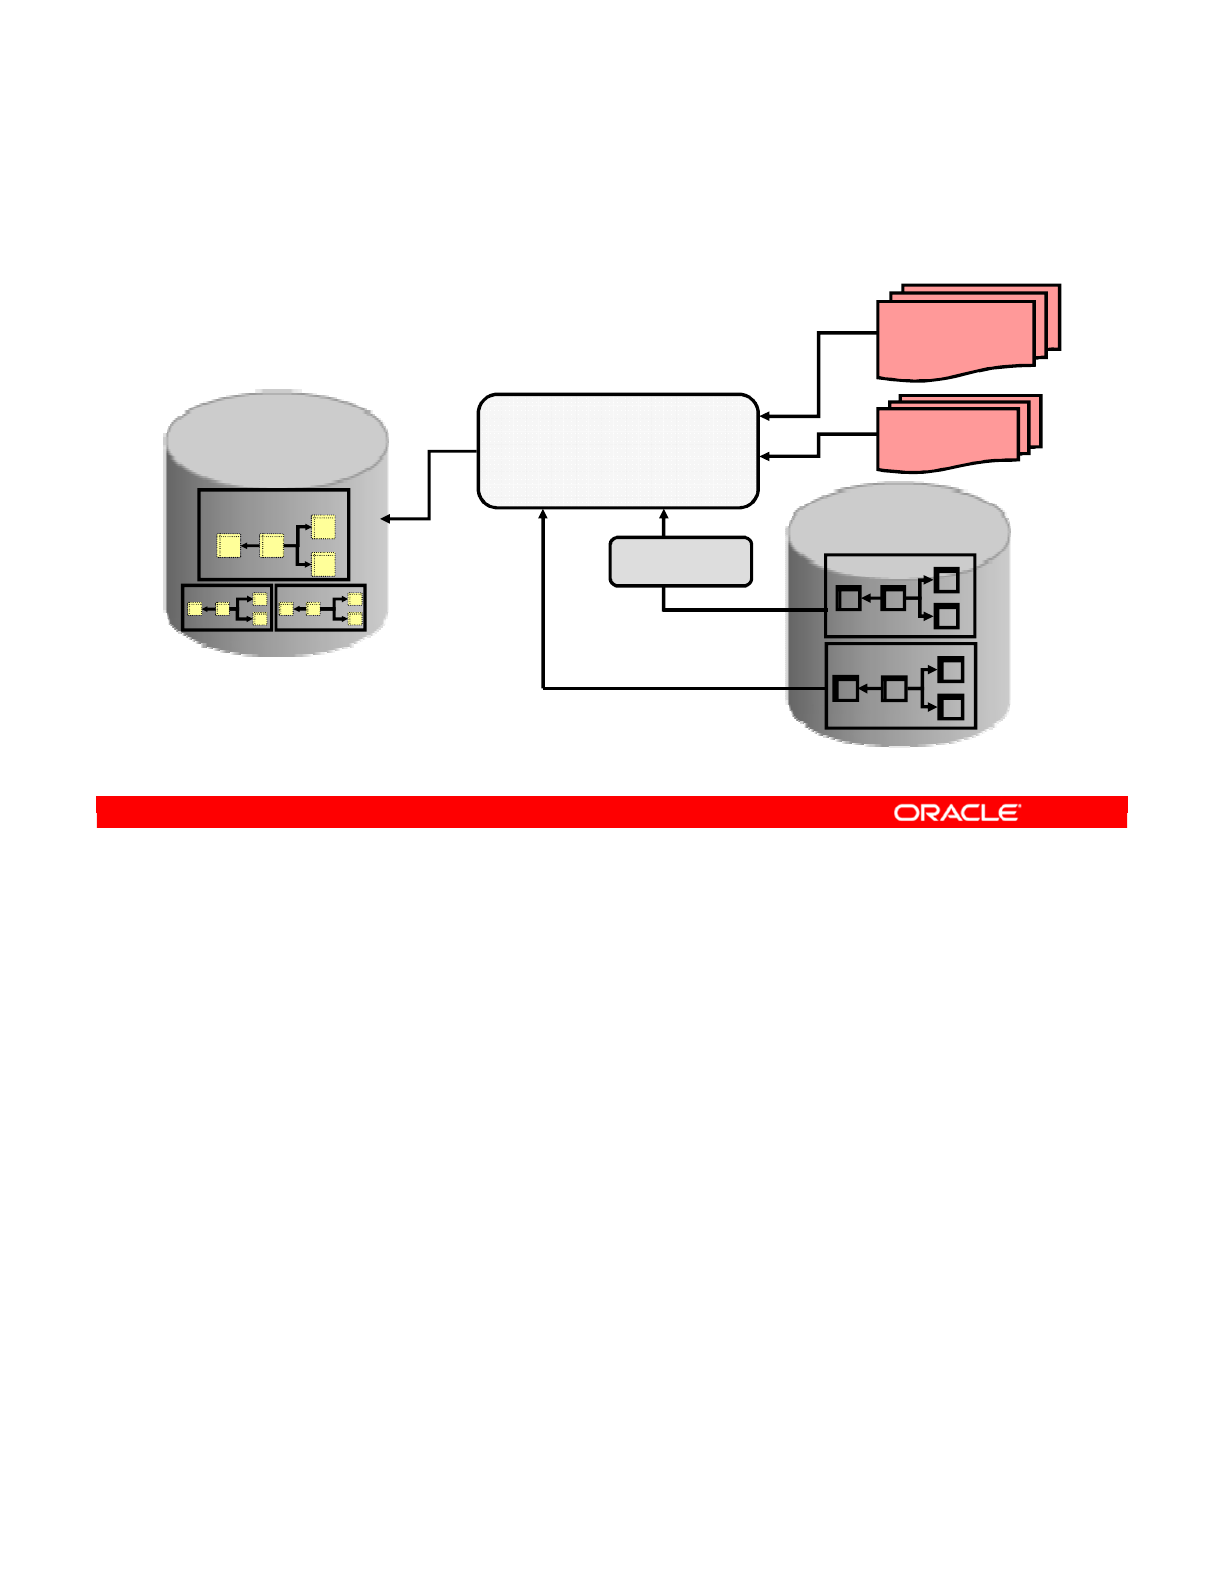
A graphical representation of the differences between the types of reverse-engineering is
shown in the slide. In the example shown, the goal is to get the models into ODI. The
metadata of the model represents the structure of the data that is in a database, XML file, or
LDAP directory.
Standard reverse-engineering queries the JDBC driver directly to retrieve the structure of
these tables. However, you must remember that all databases must store their own metadata.
Often, this metadata is made available in the form of system tables. ODI can also query these
system tables to extract the metadata directly. This is customized reverse-engineering.
As mentioned earlier, data can also be reverse-engineered from files. For example, ODI
directly reads metadata from COBOL copybook files without passing through the JDBC driver.
Similarly, delimited format files are parsed directly.
Having collected the metadata, ODI now stores it in the repository. This is where metadata for
all models, datastores, projects, interfaces, and so on, are stored.
In this example, the model that was originally retrieved is now stored in the repository. This
includes a representation of the datastores, and the joins and foreign keys linking them.
It thus becomes one of a collection of many models that can be stored in the same repository.
Oracle Data Integrator 11g: Integration and Administration 6 - 20
Copyright © 2012, Oracle and/or its affiliates. All rights reserved.
Standard Versus Customized Reverse-
Engineering
Data Model
System tables
Oracle Data Integrator
Repository
Model (Metadata)
Oracle Data Integrator
Customized
reverse-engineering
(queries database system tables)
JDBC Driver
Standard
reverse-engineering
(queries database data model)
Delimited
format
Fixed format
COBOL
copybooks
File-specific
reverse-engineering
Oracle University and (Oracle Corporation) use only.
These eKit materials are to be used ONLY by you for the express purpose SELF STUDY. SHARING THE FILE IS STRICTLY PROHIBITED.

An important property of reverse-engineering in ODI is that it is an incremental procedure.
ODI does not destroy the old metadata, and then replace it with the new metadata. It just
checks what is missing from the current model and updates it with the new information from
the database.
ODI never removes metadata from the repository during a reverse-engineering operation. For
example, if a table is removed from the database, you must manually remove the datastore
from ODI as well.
Oracle Data Integrator 11g: Integration and Administration 6 - 21
Copyright © 2012, Oracle and/or its affiliates. All rights reserved.
Note
•Reverse-engineering is incremental.
•New metadata is added, but old metadata is not removed.
–If a table is removed from the database, you must manually
remove the datastore from ODI as well.
Oracle University and (Oracle Corporation) use only.
These eKit materials are to be used ONLY by you for the express purpose SELF STUDY. SHARING THE FILE IS STRICTLY PROHIBITED.

Next, take a look at the steps for creating ODI models in the tool’s windows.
Oracle Data Integrator 11g: Integration and Administration 6 - 22
Copyright © 2012, Oracle and/or its affiliates. All rights reserved.
Creating Models
Oracle University and (Oracle Corporation) use only.
These eKit materials are to be used ONLY by you for the express purpose SELF STUDY. SHARING THE FILE IS STRICTLY PROHIBITED.

The basic procedure to create a model in ODI is as follows:
1. Create and set up an empty model.
2. Define the reverse-engineering strategy that the ODI will follow. This includes selecting
a knowledge module and setting up other parameters. In particular, you must choose
between standard and customized reverse-engineering.
3. Tell ODI to run the reverse-engineering process using the strategy you defined. If you
use standard reverse-engineering, you can choose to import only certain metadata. This
is known as performing a selective reverse.
4. Flesh out the model that you have reverse-engineered. This means that you add
information that was not retrieved during the reverse-engineering process. For example,
you add datastores, columns, constraints, or ODI-specific metadata.
Oracle Data Integrator 11g: Integration and Administration 6 - 23
Copyright © 2012, Oracle and/or its affiliates. All rights reserved.
How to Create a Model by Reverse-Engineering
1. Create an empty model.
2. Set up the reverse-engineering strategy.
–Standard versus customized reverse engineering
3. Run the reverse-engineering process.
–Use the selective reverse option (if using standard reverse-
engineering).
4. Flesh out the model.
–Add datastores, columns, constraints, and so on.
Oracle University and (Oracle Corporation) use only.
These eKit materials are to be used ONLY by you for the express purpose SELF STUDY. SHARING THE FILE IS STRICTLY PROHIBITED.
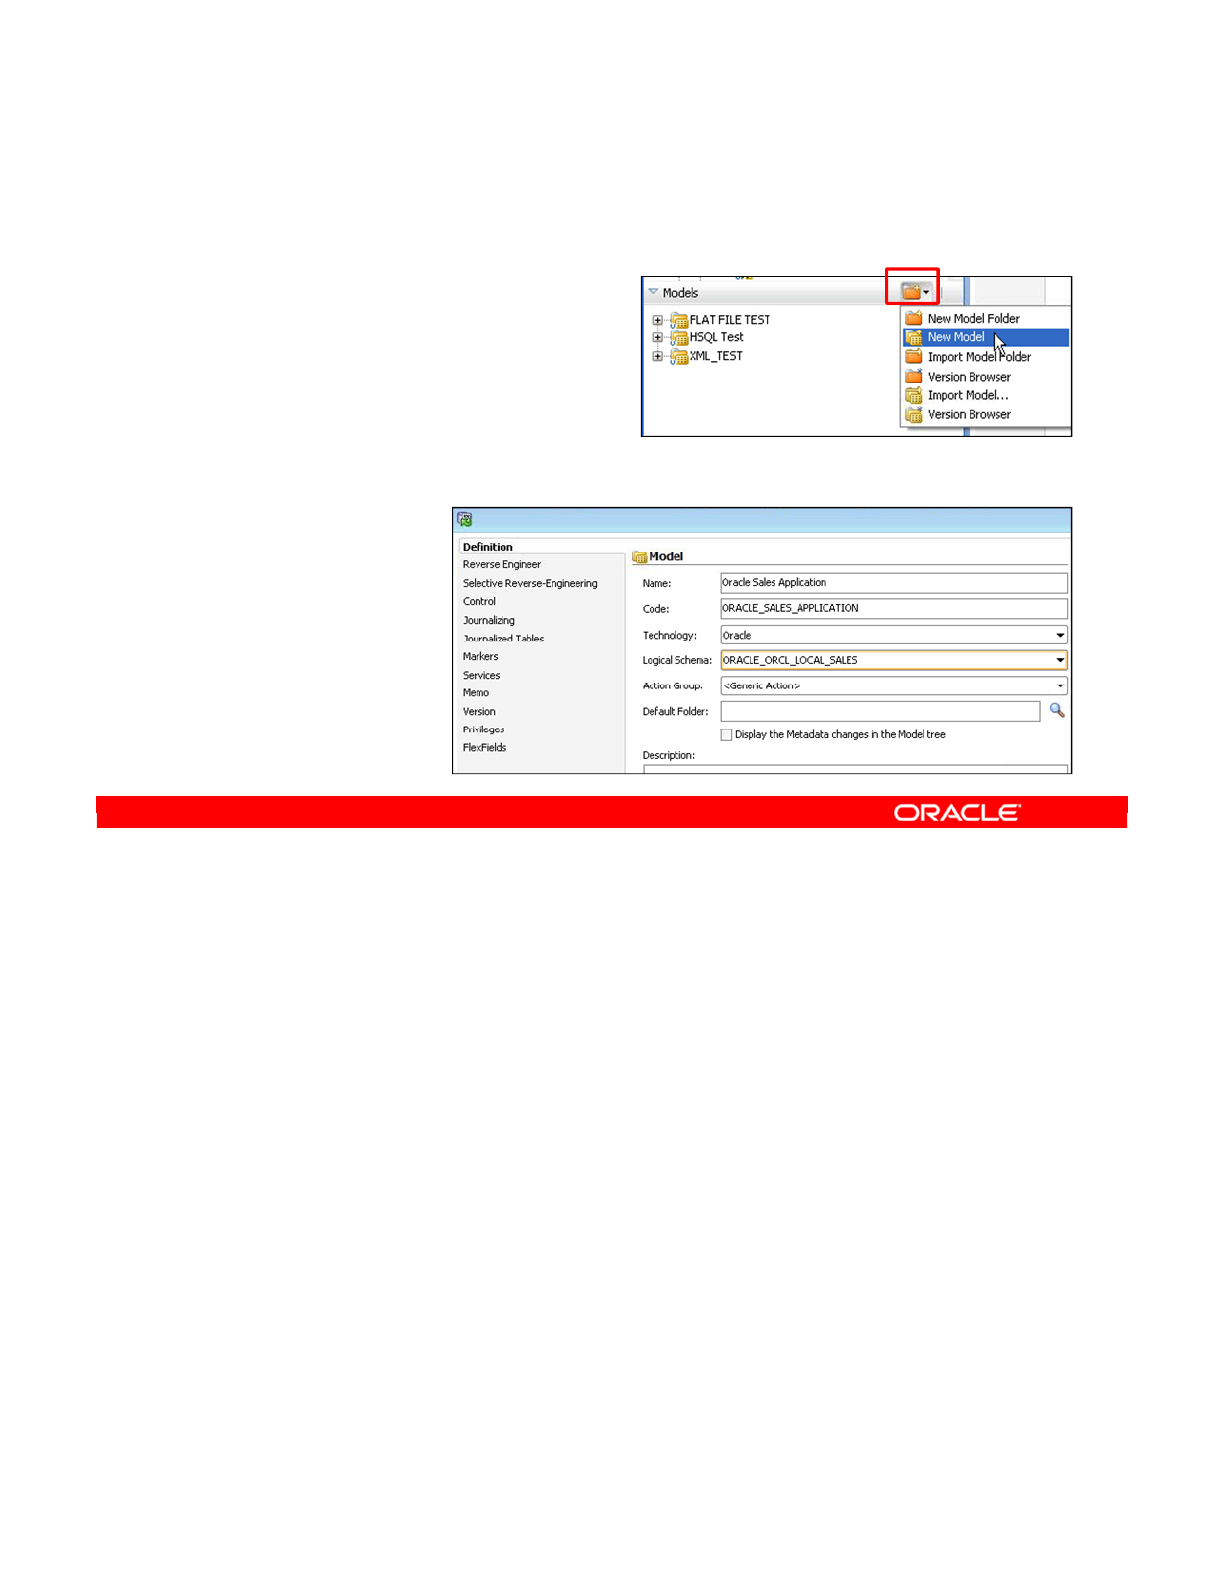
The basic steps in creating and naming a model are as follows:
1. Select the Models view. You can select a model folder to create the model in.
Otherwise, you create a top-level model.
2. Click the New Model icon. The window for the new model appears.
3. Enter the name of your model. Like most objects in ODI, there is also a code to enter. By
default, this is the same as the name, but with underscores instead of spaces.
4. A model must be linked to a specific technology. Specify the technology of the
underlying database here.
5. A model always belongs to a specific logical schema. This specifies where in your
logical architecture it is found. You later specify a context, which determines the physical
schema that will be used as the source of the metadata. Select the logical schema from
the drop-down list.
6. Enter a description for your model.
Note: You may notice the “Display the Metadata changes in the Model tree” check box. If you
select this check box, ODI automatically compares its version of the model with the database,
whenever the Model tree is refreshed. This can be useful, but slows down ODI.
Oracle Data Integrator 11g: Integration and Administration 6 - 24
Copyright © 2012, Oracle and/or its affiliates. All rights reserved.
Step 1: Creating and Naming a New Model
1. Select the Models view.
2. Click the New Model icon.
3. Enter the name (and
code).
4. Select the model
technology.
5. Select the
logical schema
where the
model is found.
6. Enter the
description
(optional).
Oracle University and (Oracle Corporation) use only.
These eKit materials are to be used ONLY by you for the express purpose SELF STUDY. SHARING THE FILE IS STRICTLY PROHIBITED.

As mentioned earlier, a model is always linked to a specific technology. For example, your
sales model may be defined as being an Oracle model. This defines the language and feature
set that is used for all objects related to this model, including interfaces, procedures, and
packages.
It is, however, possible to change the technology of a model. You must then carefully check
every related object to ensure that it is compatible with the new technology. You also need to
change the knowledge modules, such as Check Knowledge Modules (CKMs) and
Journalizing Knowledge Modules (JKMs), and possibly rewrite the interfaces that use the
model.
Oracle Data Integrator 11g: Integration and Administration 6 - 25
Copyright © 2012, Oracle and/or its affiliates. All rights reserved.
Note About Creating and Naming a New Model
•A model is always defined in a given technology.
•If you change a model’s technology, you must recheck
every object related to that model.
Oracle University and (Oracle Corporation) use only.
These eKit materials are to be used ONLY by you for the express purpose SELF STUDY. SHARING THE FILE IS STRICTLY PROHIBITED.
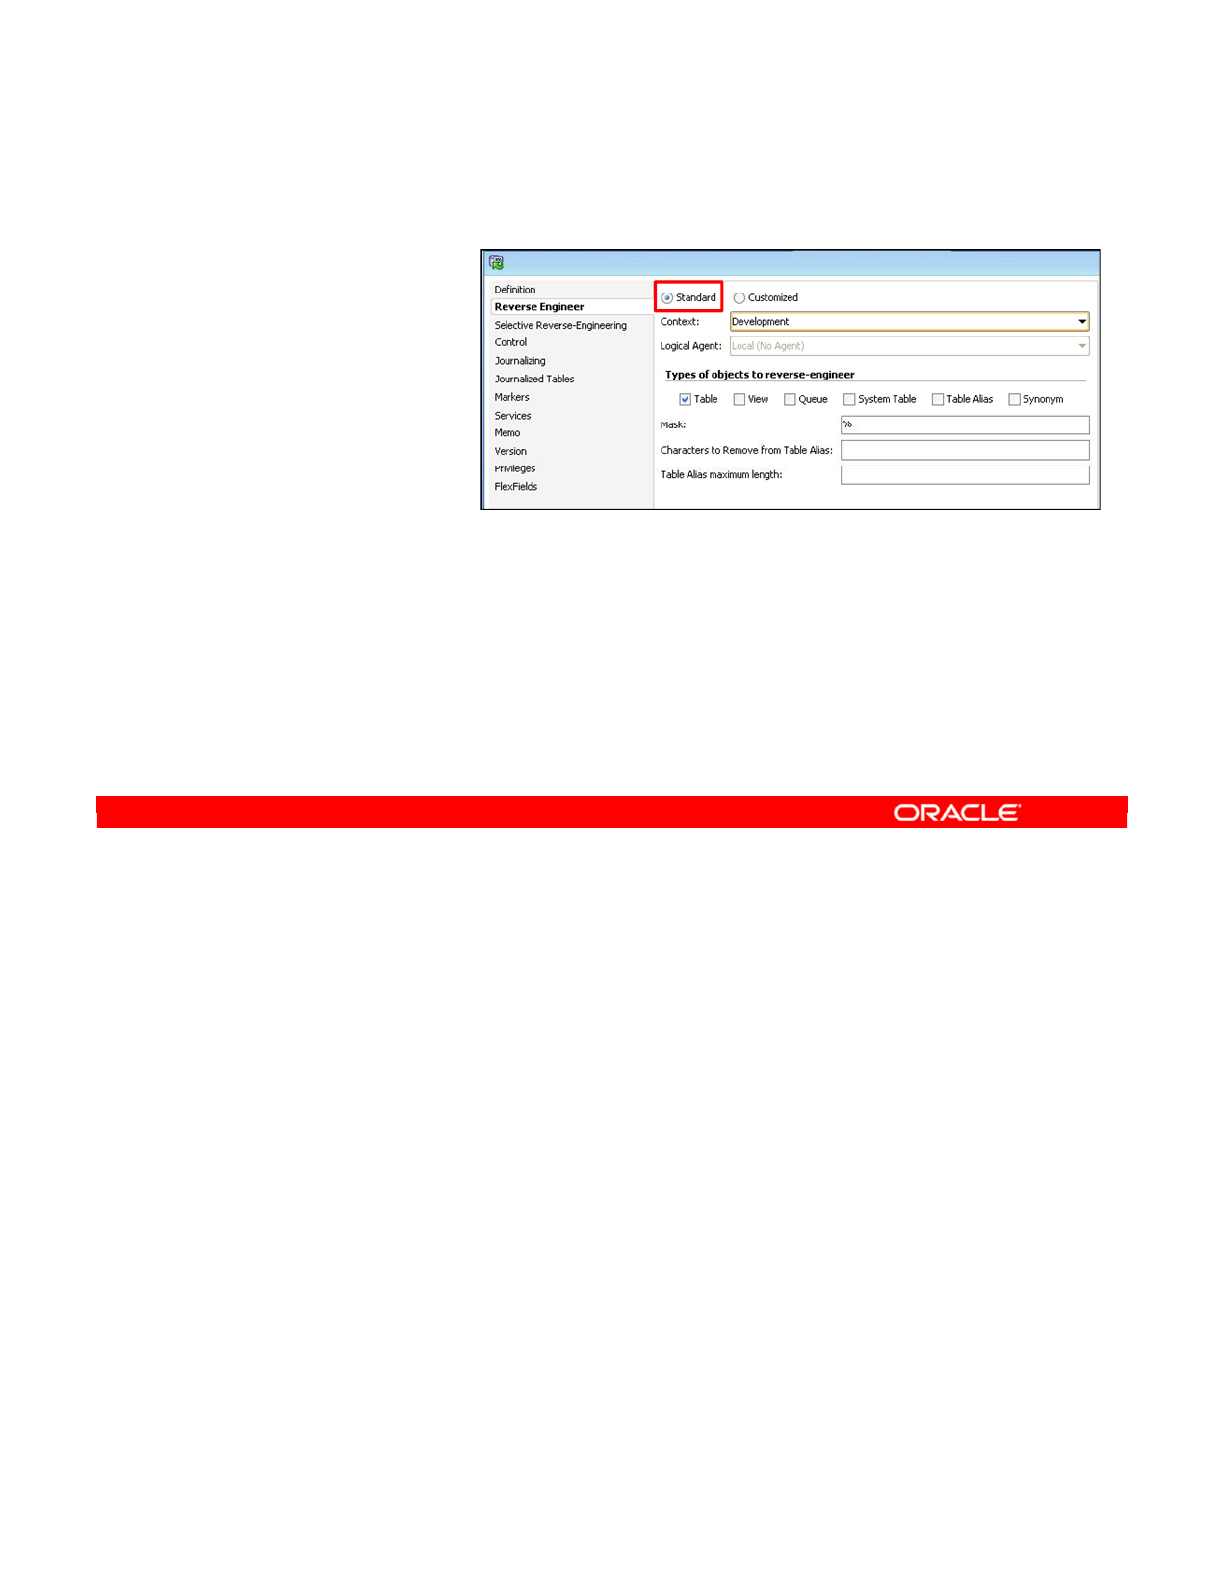
To define a reverse-engineering strategy, perform the following:
1. Click the Reverse tab in the model window.
2. Select the reverse-engineering type to be used. The standard mode requires a JDBC
driver, which provides metadata for the specific technology. The customized mode
requires a specific ODI knowledge module to directly access the system tables. This
choice causes some differences in the reverse-engineering process, as will be
discussed.
3. Select the reverse-engineering context. Remember that you only defined a logical
schema, which describes where the model would fit in the logical architecture. However,
this logical schema could correspond to several physical schemas in different physical
contexts, such as development, testing, and production.
4. By selecting the context, you specify which one of those physical schemas will be used
to provide metadata for the model. You should therefore select the context that best
conforms to the structure of the model that you want to create.
Oracle Data Integrator 11g: Integration and Administration 6 - 26
Copyright © 2012, Oracle and/or its affiliates. All rights reserved.
Step 2: Defining a Reverse-Engineering Strategy
1. Click the Reverse
Engineer tab.
2. Select the reverse-
engineering type.
3. Select the context
for reverse-
engineering.
4. Select the object
type (optional).
5. Enter the object name mask and the characters to remove
for the table alias (optional).
6. If customized:
–Select the RKM
–Select the Logical Agent
Oracle University and (Oracle Corporation) use only.
These eKit materials are to be used ONLY by you for the express purpose SELF STUDY. SHARING THE FILE IS STRICTLY PROHIBITED.

Oracle Data Integrator 11g: Integration and Administration 6 - 27
5. By default, tables or datastores that closely resemble tables are reverse-engineered.
However, you can choose to reverse-engineer different types of objects, such as views
or table aliases.
6. By default, all objects of the correct type are reverse-engineered. However, there are
situations where you want to reverse tables that are named according to a certain mask.
For example, to load tables starting with “SALES,” set the mask to “SALES” followed by
a percent sign (“SALES%”).
7. Similarly, you can specify a group of characters to remove to derive the alias for each
table. This alias is used in interfaces and is usually the first three characters of the table
name. In the example, set the mask to “SALES.” Thus, a table with the name
“SALESDATA” generates an alias of “DAT.”
8. You must set two additional options if you are using the customized mode: You must set
the RKM, which tells ODI how to retrieve metadata for this technology. The RKM must
have been imported into your project. You should also specify the logical agent to be
used for executing the reverse-engineering tasks.
Oracle University and (Oracle Corporation) use only.
These eKit materials are to be used ONLY by you for the express purpose SELF STUDY. SHARING THE FILE IS STRICTLY PROHIBITED.
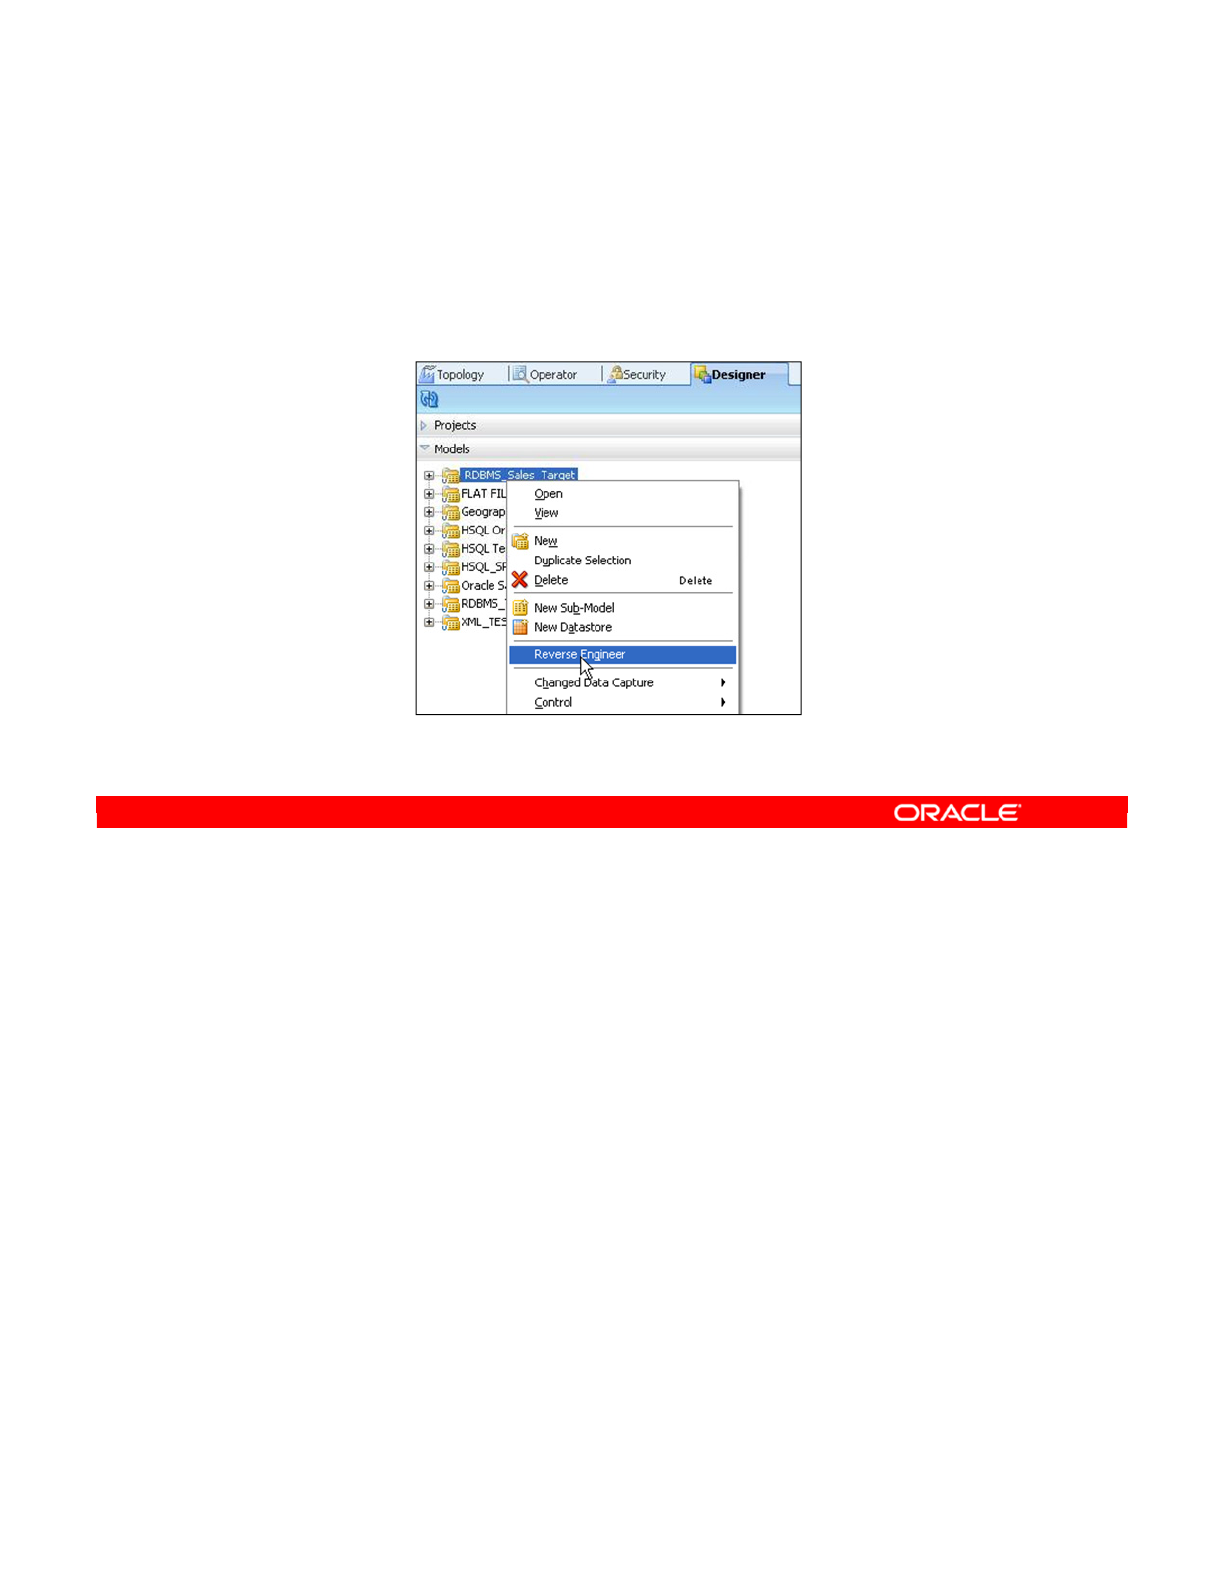
To start the reverse-engineering process, right-click the model, and then select Reverse
Engineer.
Note: You cannot use this method to perform Selective Reverse Engineering, which is
discussed later.
Oracle Data Integrator 11g: Integration and Administration 6 - 28
Copyright © 2012, Oracle and/or its affiliates. All rights reserved.
Step 3: Starting the Reverse-Engineering Process
Right-click the model and select Reverse Engineer.
Oracle University and (Oracle Corporation) use only.
These eKit materials are to be used ONLY by you for the express purpose SELF STUDY. SHARING THE FILE IS STRICTLY PROHIBITED.
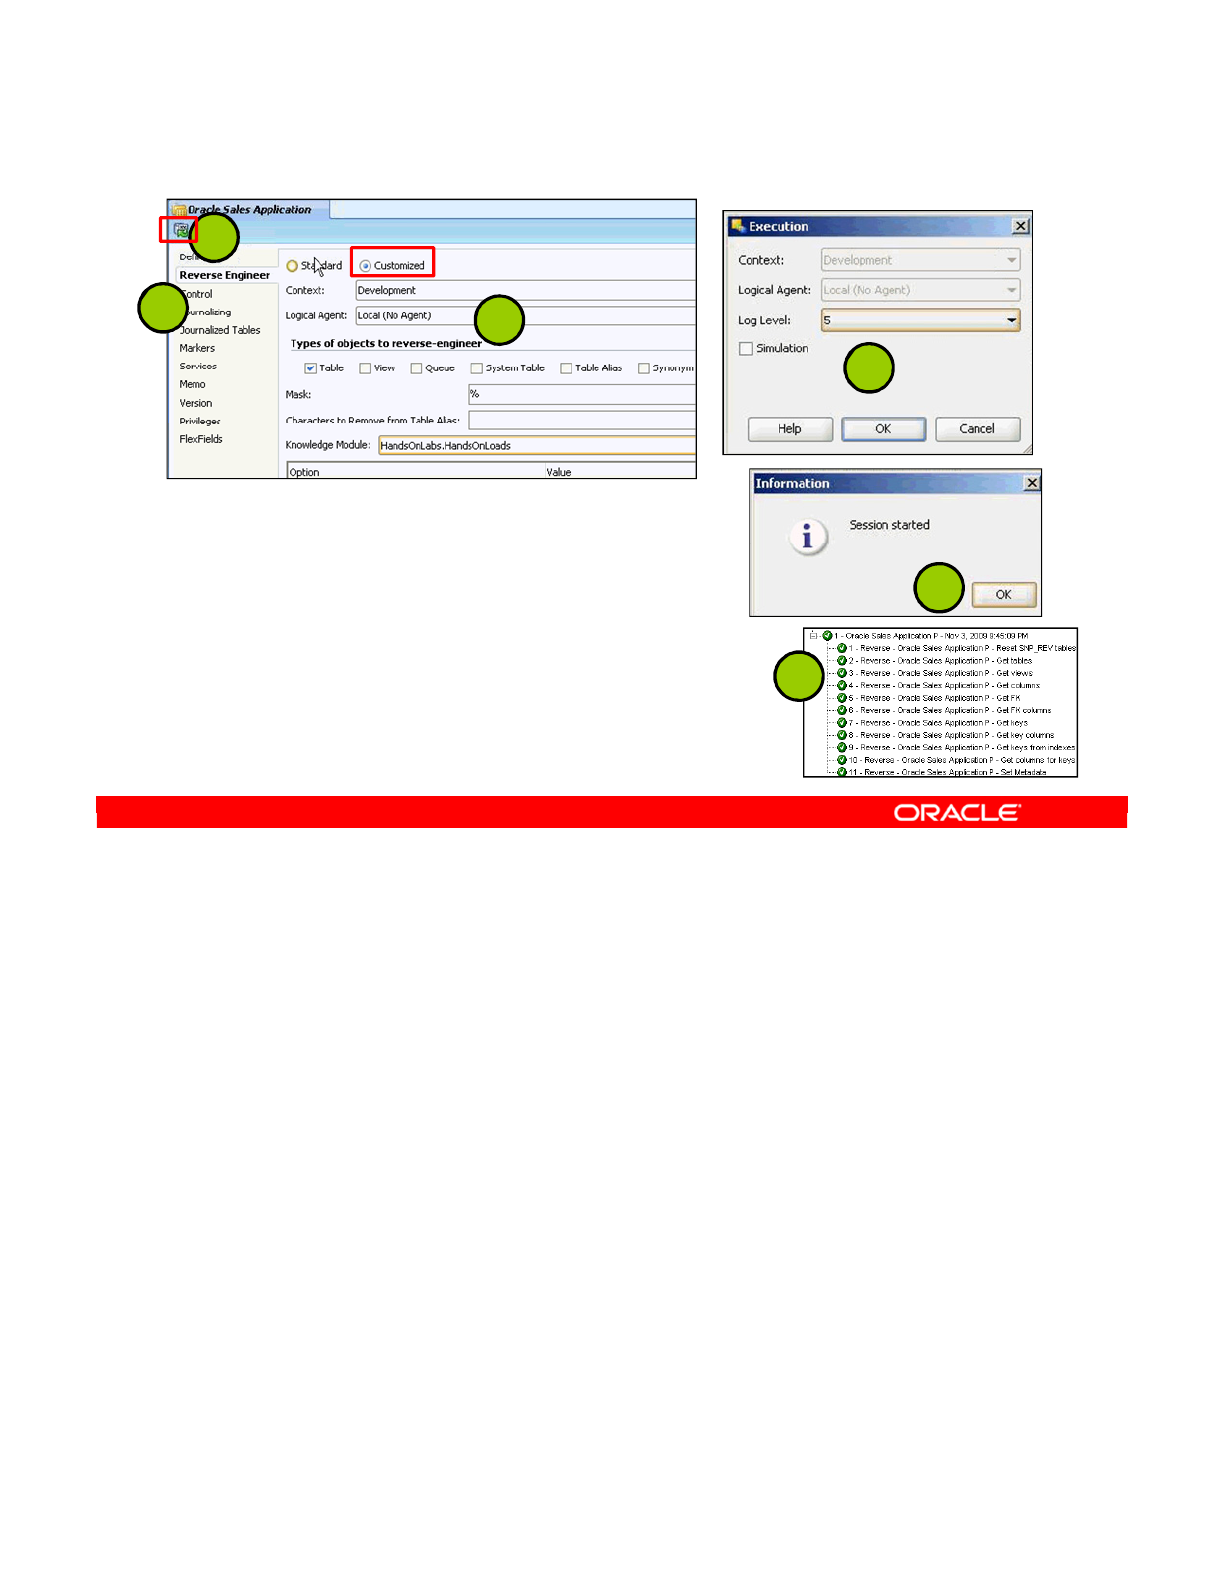
Reverse-Engineering Knowledge Modules (RKMs) are used to perform customized reverse-
engineering of data models for a specific technology. Customized reverse-engineering is
more complete and entirely customizable, but also more complex to run. RKMs are provided
only for certain technologies.
To perform customized reverse-engineering by using an RKM, perform the following steps:
1. Go to the Reverse Engineer tab of the Model.
2. Click the Customized option button and fill in the following fields:
Context: Context used for the reverse-engineering
Object Type: Type of objects to reverse-engineer (tables, view, and so on)
Mask: %
Select the Knowledge Module: “<Project Name>.<Project Folder>” for example,
“Knowledge Module: HandsOnLabs.HandsOnLoads”
3. Click the Reverse button, and then click Yes to validate the changes. Click OK.
4. The “session started” window appears. Click OK.
Oracle Data Integrator 11g: Integration and Administration 6 - 29
Copyright © 2012, Oracle and/or its affiliates. All rights reserved.
Using RKM for Customized Reverse-Engineering
12
3
3
4
5
Oracle University and (Oracle Corporation) use only.
These eKit materials are to be used ONLY by you for the express purpose SELF STUDY. SHARING THE FILE IS STRICTLY PROHIBITED.

5. Follow and validate your model’s reverse-engineering operations in the Oracle Data
Integrator Log. If it finished correctly, the reversed datastores appear under the reversed
module in the tree.
Note: Using an RKM requires the import of this RKM into a project. Only imported RKMs are
available for reverse operations. You can refine the reverse-engineering process by using the
options of the Reverse and Selective Reverse tabs. See the RKM description in Oracle Data
Integrator Knowledge Modules Reference Guide.
Oracle Data Integrator 11g: Integration and Administration 6 - 30
Oracle University and (Oracle Corporation) use only.
These eKit materials are to be used ONLY by you for the express purpose SELF STUDY. SHARING THE FILE IS STRICTLY PROHIBITED.
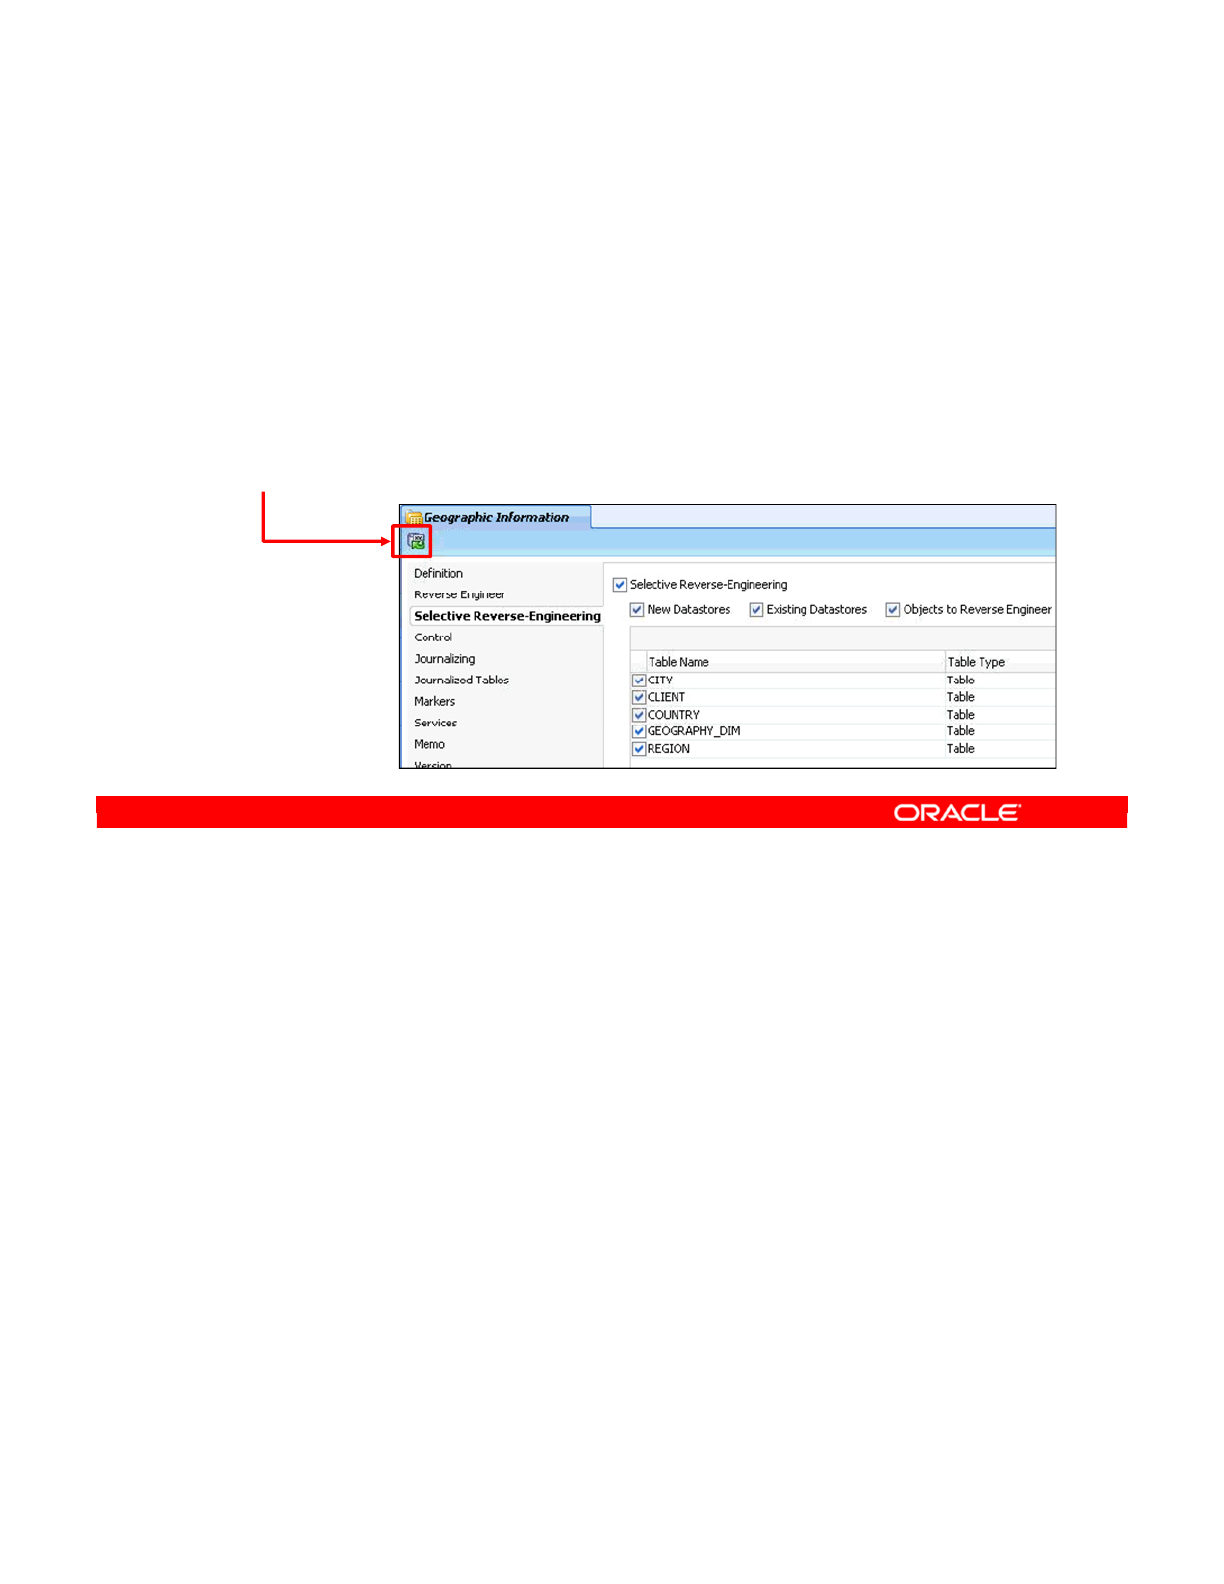
If you use standard reverse-engineering, you can individually select the tables to reverse-
engineer. To do so, perform the following:
1. Click the Selective Reverse-Engineering tab.
2. Select the Selective Reverse-Engineering check box. This enables the next few
options.
3. Now, you can select the New Datastores check box to reverse-engineer the datastores
that do not exist in your model. Selecting the Existing Datastores check box selects the
datastores that exist in your model. Selecting both options selects all datastores for
reverse-engineering.
4. Select the Objects to Reverse Engineer check box to select the individual datastores
that you want to include. The datastores that are displayed depend on the New
Datastores and Existing Datastores options that you just selected.
5. Select (with a check mark) the datastore that you want to include in the reverse-
engineering process.
6. Click the Reverse button to launch the process.
Oracle Data Integrator 11g: Integration and Administration 6 - 31
Copyright © 2012, Oracle and/or its affiliates. All rights reserved.
Selective Reverse-Engineering
1. Click the Selective Reverse-Engineering tab.
2. Select the Selective Reverse-Engineering check box.
3. Select the New Datastores and/or Existing Datastores
check box.
4. Click the objects to reverse.
5. Select the datastores to reverse-engineer.
6. Click the Reverse button.
Oracle University and (Oracle Corporation) use only.
These eKit materials are to be used ONLY by you for the express purpose SELF STUDY. SHARING THE FILE IS STRICTLY PROHIBITED.
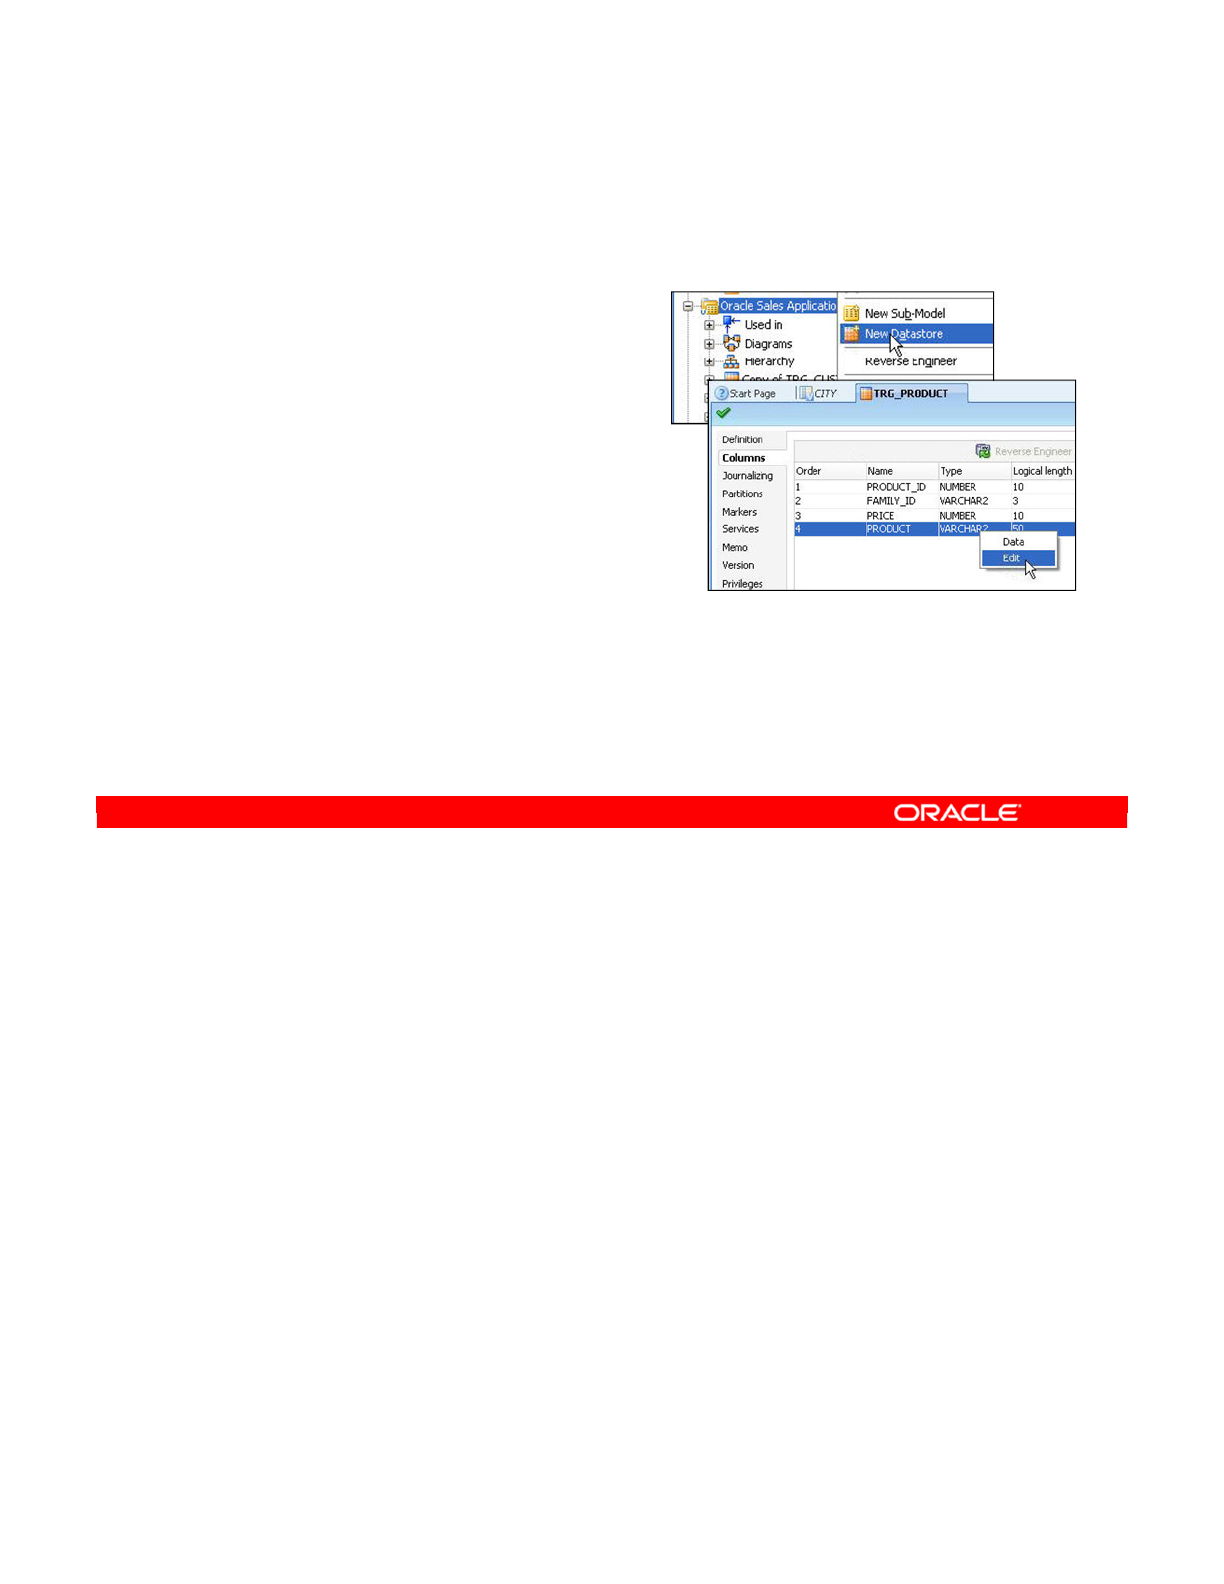
You can manually add, remove, or edit any element of a model by using the ODI interface.
This includes creating datastores, columns, keys, and so on.
You can do this through the Designer Navigator. Note that these changes are applied only to
the model in ODI. They do not update the underlying model in the database.
To edit models graphically, you can edit the model’s diagram, a graphical depiction of the
model and the relationship between its elements. You can drag and drop elements to define
new relationships. This component also enables ODI to modify the model in the original
database with your changes. Thus, you can create your model in ODI, and then generate the
code to implement this on a database server.
Oracle Data Integrator 11g: Integration and Administration 6 - 32
Copyright © 2012, Oracle and/or its affiliates. All rights reserved.
Step 4: Fleshing Out Models
•ODI enables you to add, remove, or edit any model
element manually.
–You do this in Designer
Navigator.
–This updates only the ODI
model, not the database.
•The model diagram is a
graphical tool for editing models.
–You can update the database
with your changes.
–Or, you can create a model in ODI, and then generate the
code to implement this on a database server. (This is rarely
done.)
Oracle University and (Oracle Corporation) use only.
These eKit materials are to be used ONLY by you for the express purpose SELF STUDY. SHARING THE FILE IS STRICTLY PROHIBITED.
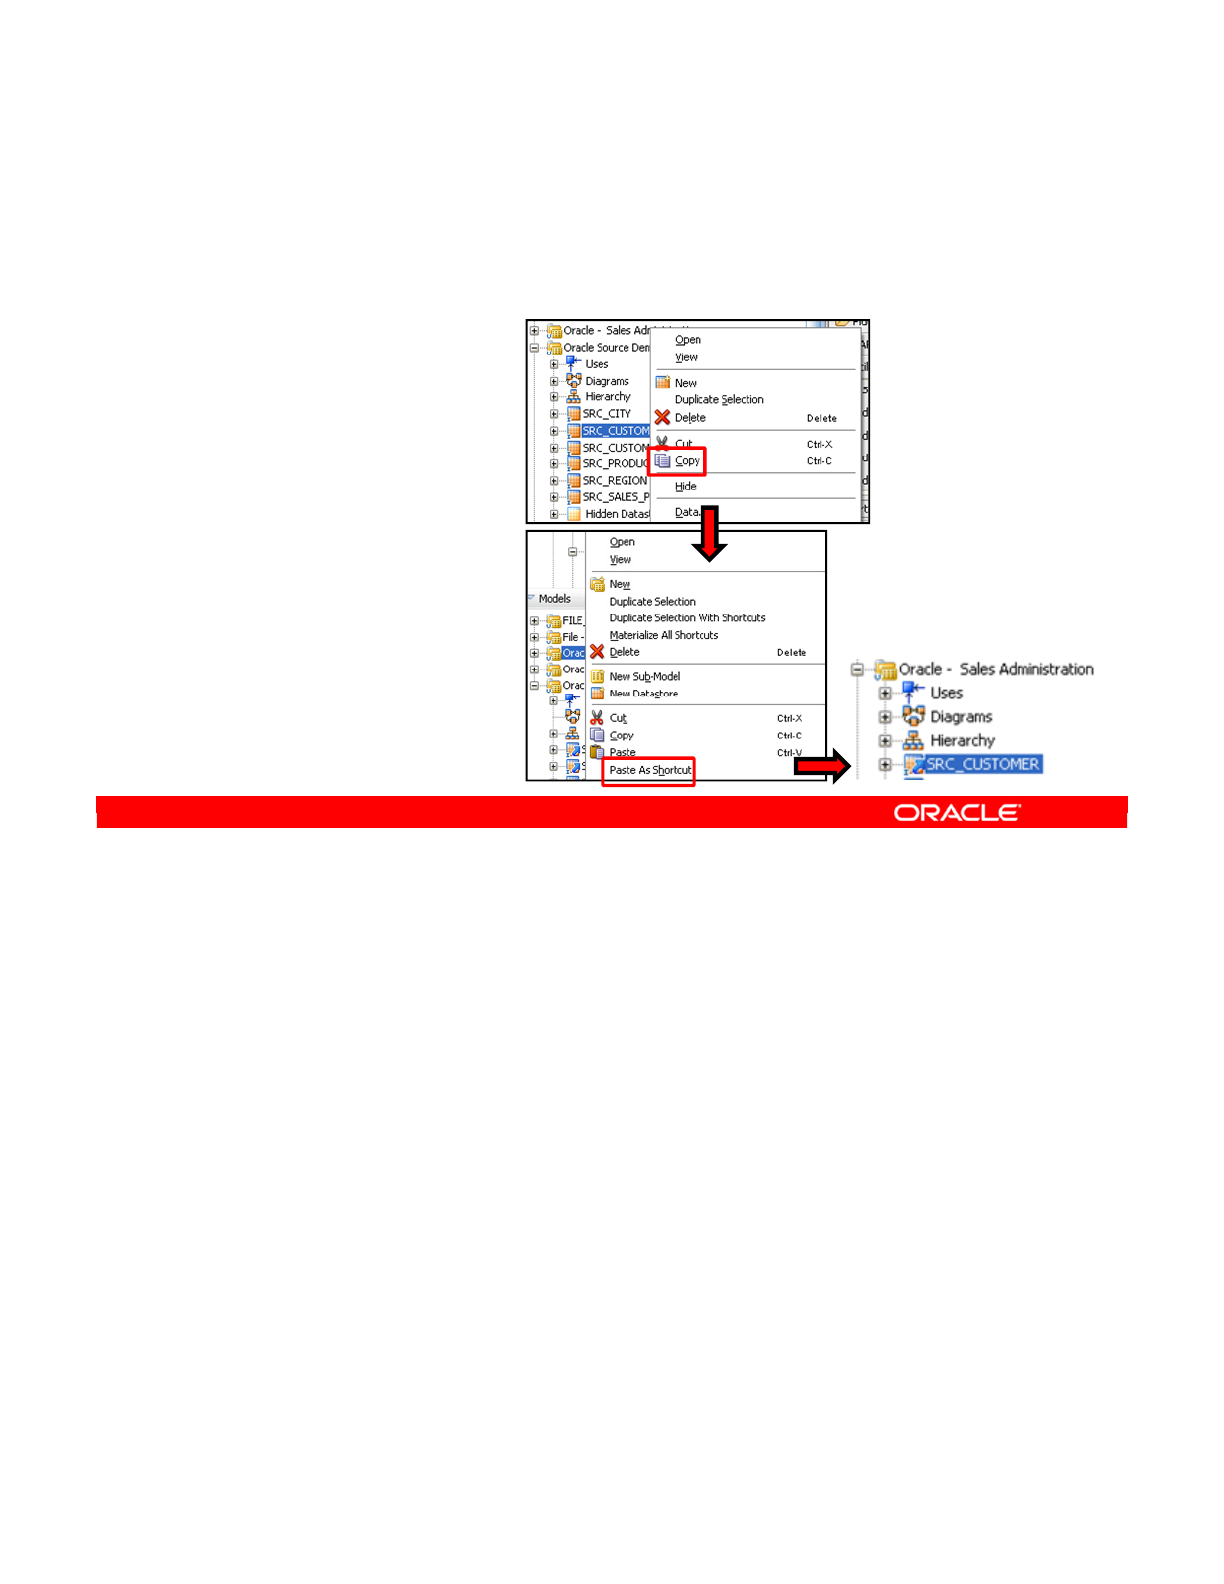
Shortcuts greatly improve productivity by allowing end users to express the large commonality
that often exists between two different versions of the same source application, such as same
tables and columns, constraints, and transformations.
Shortcuts are links to common Oracle Data Integrator objects that are stored in separate
locations, and can be created for datastores, integration interfaces, packages, and
procedures. In addition, release tags have been introduced to manage the materialization of
shortcuts based on specific tags. Release tags can be added to folders and model folders.
A referenced object is the object that is directly referenced by the shortcut. The referenced
object of a shortcut may be a shortcut itself.
The base object is the original base object. It is the real object associated with the shortcut.
Changes made to the base object are reflected in all the shortcuts created for this object.
When a shortcut is materialized, it is converted in the design repository to a real object with
the same properties as the ultimate base object. The materialized shortcut retains its name,
relationships, and object ID.
For more information, see Chapter 17 of the Developer’s Guide for ODI 11.1.1.
Oracle Data Integrator 11g: Integration and Administration 6 - 33
Copyright © 2012, Oracle and/or its affiliates. All rights reserved.
Shortcuts
•Shortcuts are links that designate common objects stored
in separate locations.
1. Right-click a Datastore.
2. Select Copy to copy the
object.
3. Right-click a different
Model.
4. Select Paste As Shortcut to
create a shortcut to this
Datastore in a separate
Model.
Oracle University and (Oracle Corporation) use only.
These eKit materials are to be used ONLY by you for the express purpose SELF STUDY. SHARING THE FILE IS STRICTLY PROHIBITED.

Exporting and importing Oracle Data Integrator objects between repositories is a common
practice when working with multiple environments such as Development, Quality Assurance,
and Production. The new Smart Export and Import feature guides you through this task, and
provides advanced code management features.
Smart Export automatically exports an object with all its object dependencies. It is particularly
useful when you want to move a consistent lightweight set of objects from one repository to
another, including only a set of modified objects.
The Smart Export and Import feature is a lightweight and consistent export and import
mechanism that provides several key features such as:
•Automatic and customizable object matching rules between the objects to import and
the objects already present in the repository
•A set of actions that can be applied to the object to import when a matching object has
been found in the repository
•Proactive issue detection and resolution that suggests a default working solution for
every broken link or conflict detected during the Smart Import
For more information about Smart Export and Import, see Chapter 20, section 20.2.7, of the
Developer’s Guide for ODI 11.1.1.
Oracle Data Integrator 11g: Integration and Administration 6 - 34
Copyright © 2012, Oracle and/or its affiliates. All rights reserved.
Smart Export and Import
•Smart Export automatically exports an object with all its
object dependencies.
•Smart Export and Import use a lightweight and consistent
export and import mechanism that provides several smart
features.
•Smart Export and Import help avoid most of the common
issues that are encountered during an export or import,
such as broken links or ID conflicts.
Oracle University and (Oracle Corporation) use only.
These eKit materials are to be used ONLY by you for the express purpose SELF STUDY. SHARING THE FILE IS STRICTLY PROHIBITED.

Answer: a
Explanation: The goal of ODI user-defined constraints is to ensure quality of data. They do
not define relationships between tables like foreign keys. Neither do they set a property for a
whole table, like primary keys. Instead, they just define statements that must be true for each
individual row of a table.
A constraint key characterizes the identifier for an index (is unique, primary key, or not
unique). A constraint reference is a relationship between datastores. A constraint condition
is the where clause. Foreign keys are constraint references, not conditions.
You are dealing here with ODI user-defined constraint conditions, not database constraints.
ODI user-defined constraints just add a where clause to check the data. Answer #3 would
also be correct if you were dealing with database constraints, but not for ODI constraints.
Oracle Data Integrator 11g: Integration and Administration 6 - 35
Copyright © 2012, Oracle and/or its affiliates. All rights reserved.
Quiz
The goal of ODI constraint conditions is to ensure the quality of
data. Which of the following statements are true?
a. ODI constraint conditions define statements that must be
true for each individual row of a table.
b. ODI constraint conditions set properties for the whole
table.
c. ODI constraint conditions define the relationship between
tables.
d. All of the above
Oracle University and (Oracle Corporation) use only.
These eKit materials are to be used ONLY by you for the express purpose SELF STUDY. SHARING THE FILE IS STRICTLY PROHIBITED.

Answer: b
Explanation: You can manually add, remove, or edit any element of a model by using the
ODI interface. You can do this through the Designer component.
However, these changes are applied only to the model in ODI. They do not update the
underlying model in the database. If you generate the DDL, the database model is not
updated.
Oracle Data Integrator 11g: Integration and Administration 6 - 36
Copyright © 2012, Oracle and/or its affiliates. All rights reserved.
Quiz
You manually add and edit some elements of a model by using
the ODI Designer. After the model is saved in ODI, these
changes update the underlying model in the database.
a. True
b. False
Oracle University and (Oracle Corporation) use only.
These eKit materials are to be used ONLY by you for the express purpose SELF STUDY. SHARING THE FILE IS STRICTLY PROHIBITED.

Oracle Data Integrator 11g: Integration and Administration 6 - 37
Copyright © 2012, Oracle and/or its affiliates. All rights reserved.
Summary
In this lesson, you should have learned how to:
•Describe the purpose of ODI models and reverse-
engineering in ODI
•Describe methods of reverse-engineering
•Create ODI models by reverse-engineering
•Use shortcuts
•Use Smart Export and Import
Oracle University and (Oracle Corporation) use only.
These eKit materials are to be used ONLY by you for the express purpose SELF STUDY. SHARING THE FILE IS STRICTLY PROHIBITED.

Oracle Data Integrator 11g: Integration and Administration 6 - 38
Copyright © 2012, Oracle and/or its affiliates. All rights reserved.
Checklist of Practice Activities
1-1: Logging In and Using Help
2-1: Creating Users and Repositories and Logging In
3-1: Creating an ODI Agent for Orchestrating Execution of ODI Objects
4-1: Defining the Topology
5-1: Setting Up a New ODI Project
6-1: Creating a Model
7-1: Checking Data Quality in the Model
8-1: ODI Interface: Simple Transformations
9-1: ODI Interface: Complex Transformations
9-2: ODI Interface: Implementing Lookup
10-1: ODI Interface: Exporting a Flat File to a Relational Table
11-1: Using Native Sequences with ODI Interface
11-2: Using Temporary Indexes
11-3: Using Data Sets with ODI Interface
12-1: Using Temporary ODI Interfaces
12-2: Developing a New Knowledge Module
13-1: Creating an ODI Procedure
14-1: Creating an ODI Package
14-2: Using ODI Package with Variables and User Functions
15-1: Creating and Scheduling an ODI Scenario
16-1: Using Load Plans
17-1: Working with ODI Versions
18-1: Enforcing Data Quality with ODI Interface
19-1: Implementing Changed Data Capture
20-1: Setting Up ODI Security
20-2: Integrating with Enterprise Manager and Using ODI Console
21-1: Executing an ODI Scenario Through the ODI Public Web Service
Oracle University and (Oracle Corporation) use only.
These eKit materials are to be used ONLY by you for the express purpose SELF STUDY. SHARING THE FILE IS STRICTLY PROHIBITED.

In the previous practice, you configured the schemas containing the application data stored in
the Oracle database.
You now create the models corresponding to this data and reverse-engineer the schemas’
data structures. You also reverse-engineer the structure of an XML file.
Oracle Data Integrator 11g: Integration and Administration 6 - 39
Copyright © 2012, Oracle and/or its affiliates. All rights reserved.
Practice 6-1 Overview:
Results of Reverse-Engineering into Models
Data sources
Model
HSQL_SRC
Model
Geographic Information
Model
FLAT_FILE_SRC
SRC_SALES_PERSON
SRC_AGE_GROUP
SPECIFIC_SEQ, SRC_CITY,
SRC_CUSTOMER, SRC_ORDERS,
SRC_ORDER_FORM,
SRC_ORDER_LINES,
SRC_PRODUCT,
SRC_REGION
Model
Oracle
Sales
Application
Target
CITY, CLIENT, COUNTRY,
GEOGRAPHY_DIM, REGION
TRG_PROD_FAMILY
TRG_PRODUCT
TRG_CUSTOMER
TRG_SALES
TRG_CITY
TRG_REGION
TRG_COUNTRY
Datastores (tables) of
target model
Logical schema:
XML_DIM_GEO
You will reverse-
engineer.
Logical schema:
FILE_DEMO_SRC
Predefined
Logical schema:
HSQL_DEMO_SRC
Predefined
Logical schema:
ORACLE_ORCL_LOCAL_SALES
You will reverse-
engineer.
Oracle University and (Oracle Corporation) use only.
These eKit materials are to be used ONLY by you for the express purpose SELF STUDY. SHARING THE FILE IS STRICTLY PROHIBITED.

Oracle University and (Oracle Corporation) use only.
These eKit materials are to be used ONLY by you for the express purpose SELF STUDY. SHARING THE FILE IS STRICTLY PROHIBITED.

Copyright © 2012, Oracle and/or its affiliates. All rights reserved.
Organizing ODI Models and Creating
ODI Datastores
Oracle University and (Oracle Corporation) use only.
These eKit materials are to be used ONLY by you for the express purpose SELF STUDY. SHARING THE FILE IS STRICTLY PROHIBITED.

Oracle Data Integrator 11g: Integration and Administration 7 - 2
Copyright © 2012, Oracle and/or its affiliates. All rights reserved.
Objectives
After completing this lesson, you should be able to:
•Organize Oracle Data Integrator (ODI) models
•Create datastores in ODI models
•Create constraints in ODI:
–Create mandatory columns
–Create keys and references in ODI models
–Create and check conditions
•Explore data
•Audit an ODI model or data store
Oracle University and (Oracle Corporation) use only.
These eKit materials are to be used ONLY by you for the express purpose SELF STUDY. SHARING THE FILE IS STRICTLY PROHIBITED.

First, you learn about the two ways to organize data models: into model folders that contain
data models, and into submodels that contain datastores.
Oracle Data Integrator 11g: Integration and Administration 7 - 3
Copyright © 2012, Oracle and/or its affiliates. All rights reserved.
Organizing Models
Model Folders and Submodels
Oracle University and (Oracle Corporation) use only.
These eKit materials are to be used ONLY by you for the express purpose SELF STUDY. SHARING THE FILE IS STRICTLY PROHIBITED.

A model folder is a device used to group several models together. You can use a model folder
to create a meaningful collection, such as models relating to customers. Because model
folders can also contain other model folders, you can build a tree structure this way.
Oracle Data Integrator 11g: Integration and Administration 7 - 4
Copyright © 2012, Oracle and/or its affiliates. All rights reserved.
What Is a Model Folder?
•A model folder is an optional means of grouping several
models together.
•It can be used to organize models into a meaningful tree
structure; for example, models relating to customers.
Oracle University and (Oracle Corporation) use only.
These eKit materials are to be used ONLY by you for the express purpose SELF STUDY. SHARING THE FILE IS STRICTLY PROHIBITED.

To create a model folder, perform the following:
1. Select the Models view. Click the New Model Folder icon, and select New Model Folder
from the menu.
2. The new Model Folder window appears. Enter the name to describe the model folder.
3. Click OK to save your changes.
Now you can drag models or other model folders into your new model folder.
Oracle Data Integrator 11g: Integration and Administration 7 - 5
Copyright © 2012, Oracle and/or its affiliates. All rights reserved.
Creating a Model Folder
1. In the Models view,
click the New Model
Folder icon, and select
New Model Folder.
2. Enter the name.
3. Now you can drag
models or other model
folders into the folder.
Oracle University and (Oracle Corporation) use only.
These eKit materials are to be used ONLY by you for the express purpose SELF STUDY. SHARING THE FILE IS STRICTLY PROHIBITED.

A submodel is effectively the opposite of a model folder. It groups several datastores within a
model. Thus, it serves to divide a model into subcomponents. In ODI, you can create
submodels manually or automatically to distribute datastores into submodels.
Oracle Data Integrator 11g: Integration and Administration 7 - 6
Copyright © 2012, Oracle and/or its affiliates. All rights reserved.
What Is a Submodel?
•A submodel is a group of several datastores in the same
model.
•Data stores can be arranged manually or automatically into
submodels.
Oracle University and (Oracle Corporation) use only.
These eKit materials are to be used ONLY by you for the express purpose SELF STUDY. SHARING THE FILE IS STRICTLY PROHIBITED.
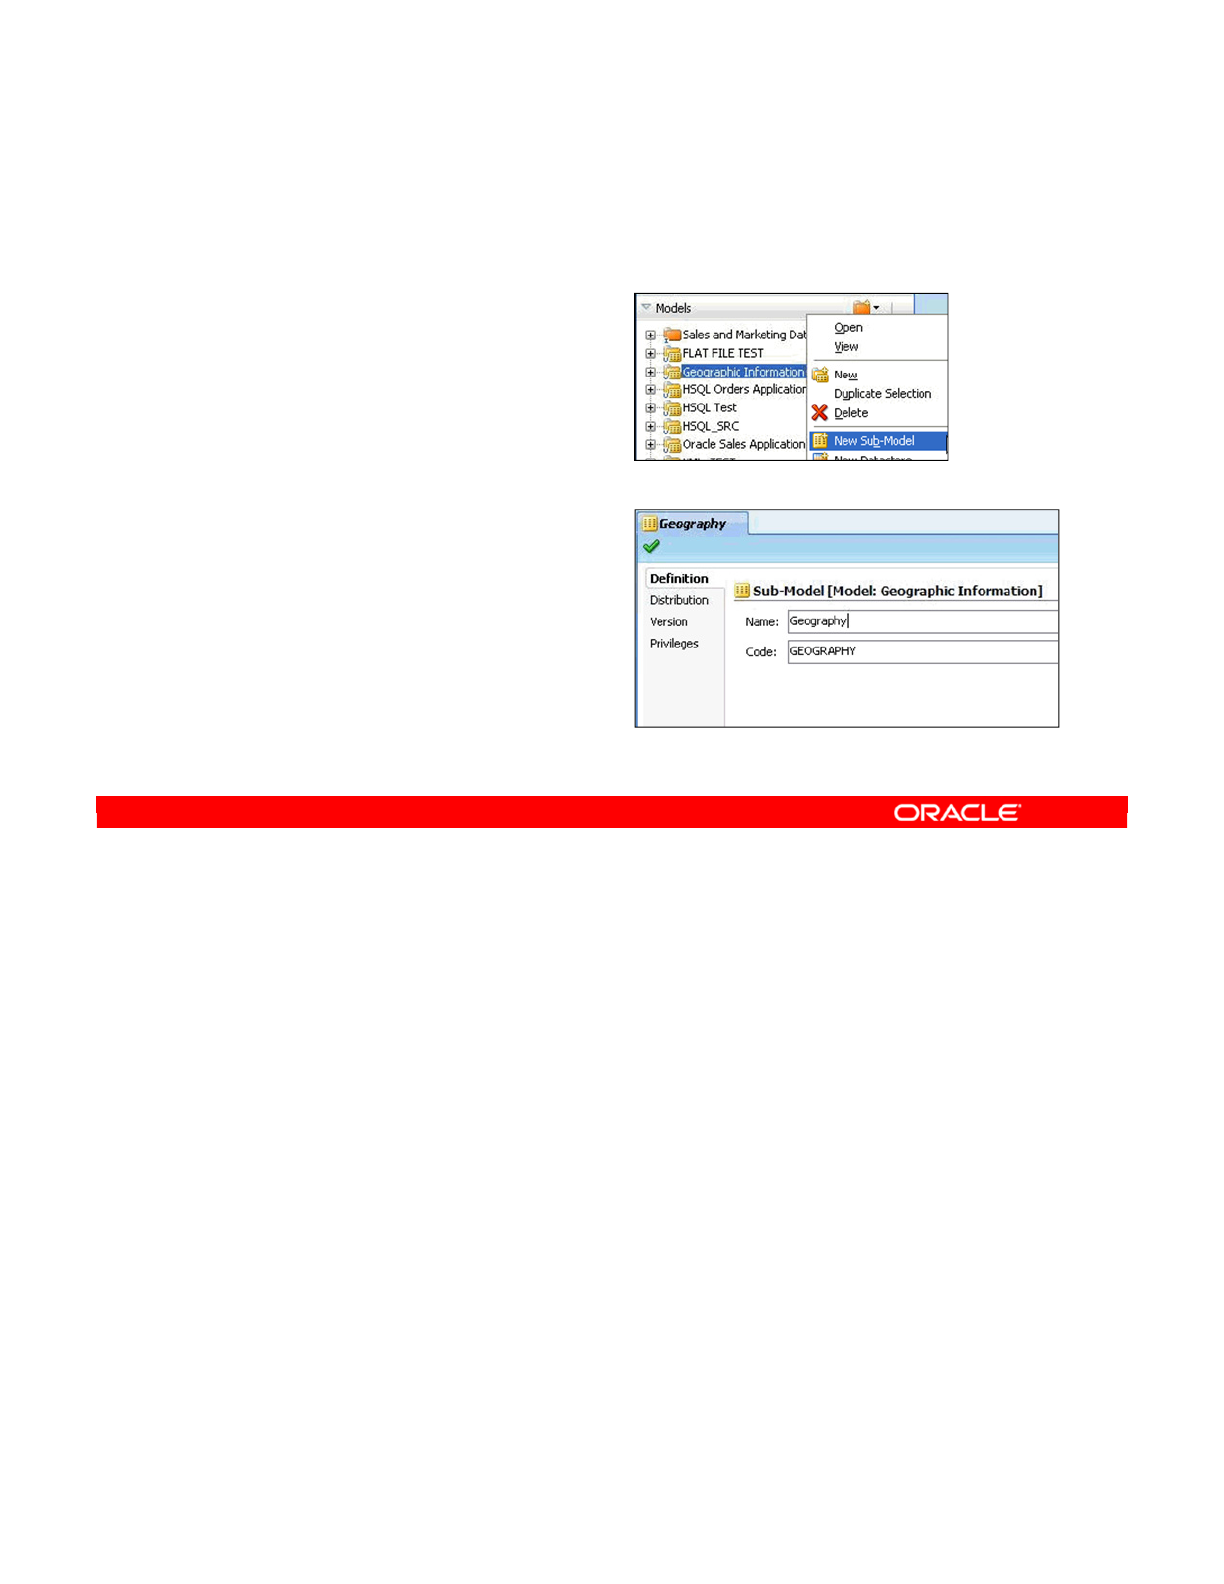
To create a submodel, perform the following:
1. Select the model that will contain the sub-model.
2. Right-click and select New Sub-Model from the context menu.
3. Enter the name for the submodel. You must also specify a unique code.
Note: You cannot create a submodel directly in a model folder; you can only create a sub-
model within a model. Submodels can be created under models or submodels. You can have
as many levels as you want.
Oracle Data Integrator 11g: Integration and Administration 7 - 7
Copyright © 2012, Oracle and/or its affiliates. All rights reserved.
Creating a Submodel
1. Select a Model.
2. Right-click and select New
Sub-Model.
3. Enter the name
and code.
Oracle University and (Oracle Corporation) use only.
These eKit materials are to be used ONLY by you for the express purpose SELF STUDY. SHARING THE FILE IS STRICTLY PROHIBITED.

You can organize your datastores into submodels in several ways.
If you want to do organize manually, you just have to drag the datastores into submodels. You
can also drag submodels into other submodels. However, this may not be practical when you
have a large number of datastores. In this case, you can use automatic distribution.
For automatic distribution, you define a mask that is compared with the datastores. Any
datastore matching the mask is moved into that submodel.
You can choose to move only those datastores not currently in a submodel or all datastores.
You can also specify the order in which to apply the masks, to determine what happens when
a datastore matches several masks. This kind of automatic distribution is possible only when
using standard reverse-engineering, without an RKM.
However, certain specialized RKMs can distribute datastores into submodels. The ODI Open
Connectors to enterprise resource planning (ERP) packages use this feature to automatically
organize the large number of tables reverse-engineered in the ERP models.
Oracle Data Integrator 11g: Integration and Administration 7 - 8
Copyright © 2012, Oracle and/or its affiliates. All rights reserved.
Organizing Datastores into Submodels
The three possible ways to achieve this are:
•Manually: Drag datastores and submodels into submodels.
•Set up automatic distribution:
–Data stores are distributed into submodels according to a
name mask.
–This moves all datastores or only those not already in a
submodel.
–Masks can be applied in a specific order after reverse-
engineering.
–It is possible only when using standard reverse-engineering.
•Use certain customized Reverse-Engineering Knowledge
Modules (RKMs) to distribute datastores into submodels.
Oracle University and (Oracle Corporation) use only.
These eKit materials are to be used ONLY by you for the express purpose SELF STUDY. SHARING THE FILE IS STRICTLY PROHIBITED.
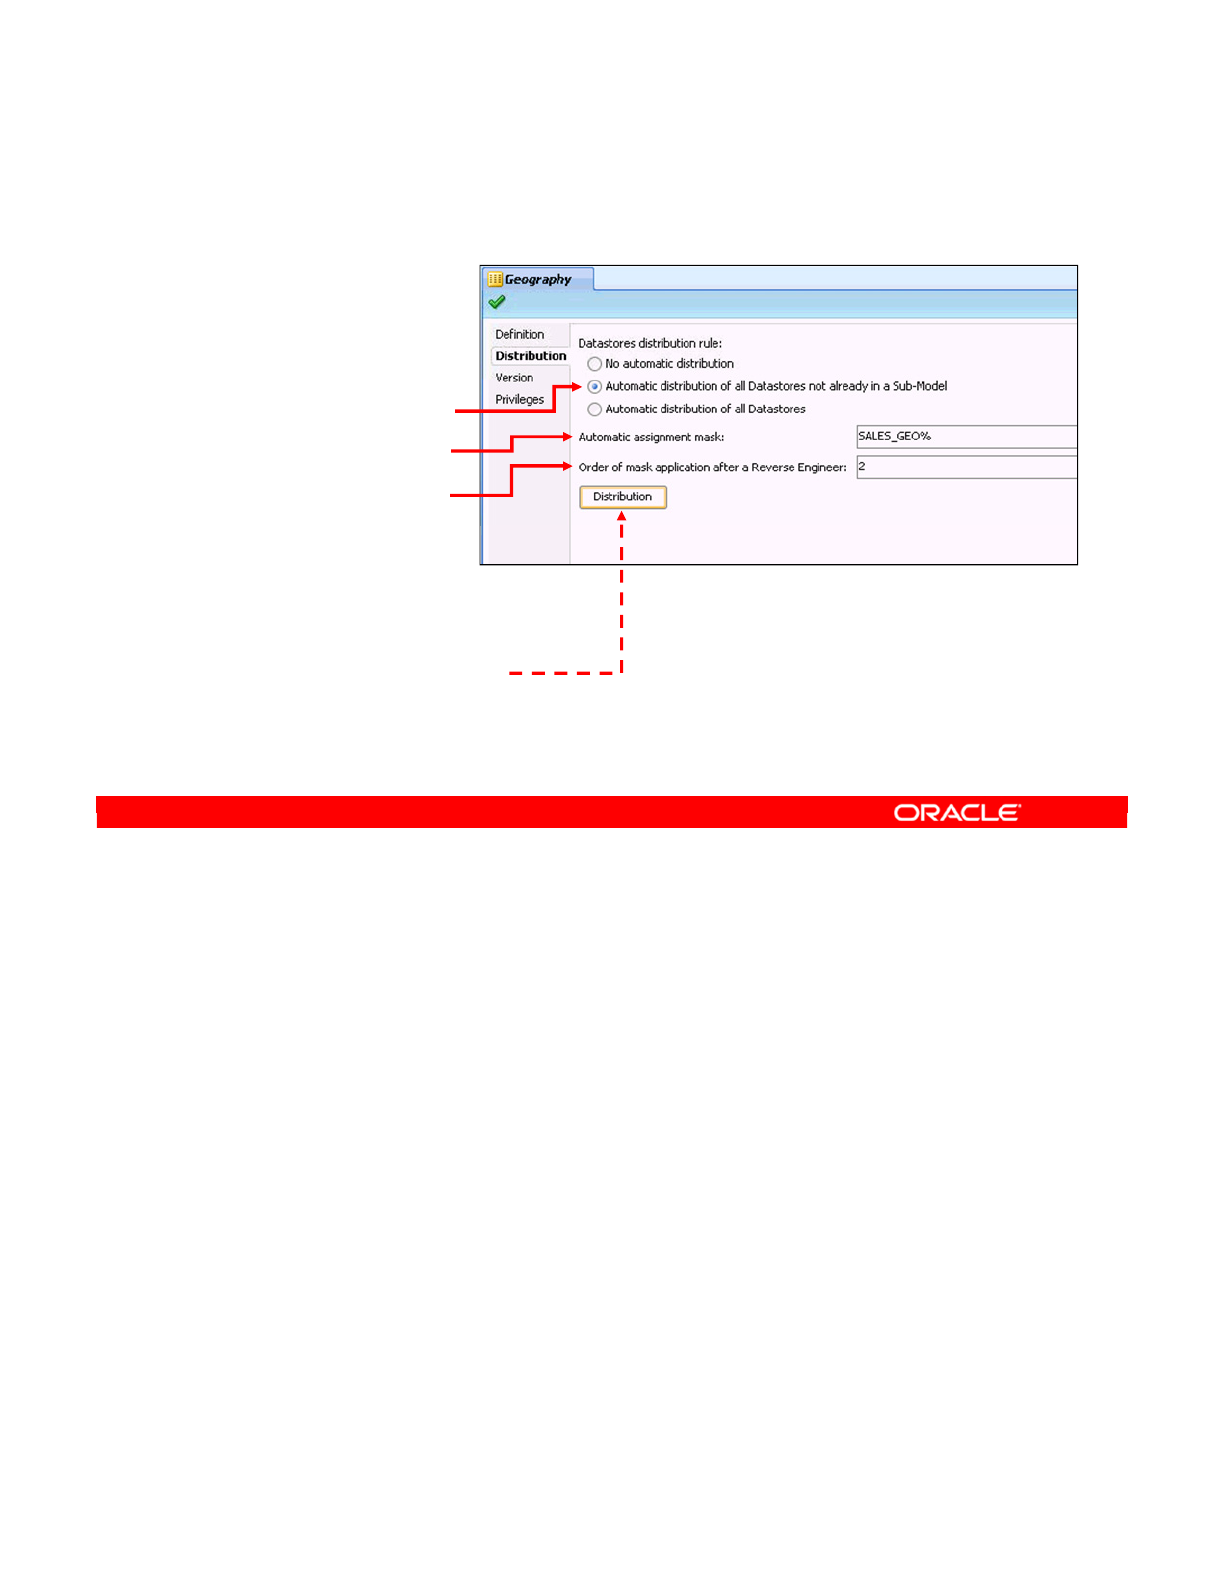
Automatic distribution is set up on a submodel. It applies a mask to the names of datastores
that have been reverse-engineered. If the mask matches, it moves the datastore to this
submodel. To set up automatic distribution, perform the following:
1. Click the Distribution tab.
2. Select a distribution rule. If you have manually organized your datastores into
submodels, select “Automatic distribution of all Datastores not already in a Sub-Model.”
If you want to reorganize all datastores, select “Automatic distribution of all Datastores.”
3. Enter details in the mask field. This is specified in SQL format by using a percent sign to
match any number of characters. For example, to move a datastore whose name begins
with SALES_GEO, specify a mask of SALES_GEO%.
4. Now select the order in which this mask is applied. This is used to resolve conflicts
when a datastore name matches several masks. For example, another submodel might
have a distribution mask of %PARIS%, with a mask order of 5. Where should a datastore
named SALES_GEO_PARIS go? The answer is that the mask with the higher order
number, in this case, %PARIS%, takes precedence.
5. To have the distribution applied immediately, click the Distribution button. Otherwise, it
is applied the next time reverse-engineering is performed on the model.
Oracle Data Integrator 11g: Integration and Administration 7 - 9
Copyright © 2012, Oracle and/or its affiliates. All rights reserved.
Setting Up Automatic Distribution
1. Click the
Distribution tab.
2. Select a
distribution rule.
3. Enter the mask.
4. Set the order in
which the mask
is applied.
–Higher numbers
take precedence.
5. Optionally, click the
Distribution button to
run this rule.
Oracle University and (Oracle Corporation) use only.
These eKit materials are to be used ONLY by you for the express purpose SELF STUDY. SHARING THE FILE IS STRICTLY PROHIBITED.

Having just learned how models, model folders, and submodels are organized, you now learn
how to create datastores manually.
Oracle Data Integrator 11g: Integration and Administration 7 - 10
Copyright © 2012, Oracle and/or its affiliates. All rights reserved.
Creating Datastores
Oracle University and (Oracle Corporation) use only.
These eKit materials are to be used ONLY by you for the express purpose SELF STUDY. SHARING THE FILE IS STRICTLY PROHIBITED.

The easiest and most common way to create datastores in ODI is by reverse-engineering
their structure from the database. However, you can create datastores in two other ways:
directly in the model, as you see in the next few slides, or by using the Common Format
Designer component (this infrequently discussed component is required for creating
diagrams).
In these cases, the datastores do not necessarily have to exist in the data server. This can be
useful for creating a new text file with a structure that you define.
Oracle Data Integrator 11g: Integration and Administration 7 - 11
Copyright © 2012, Oracle and/or its affiliates. All rights reserved.
Creating Datastores
•Data stores are usually created by reverse-engineering.
•However, you can create datastores manually:
–In a model
–Using Common Format Designer
•These datastores do not need to exist in the data server.
Oracle University and (Oracle Corporation) use only.
These eKit materials are to be used ONLY by you for the express purpose SELF STUDY. SHARING THE FILE IS STRICTLY PROHIBITED.
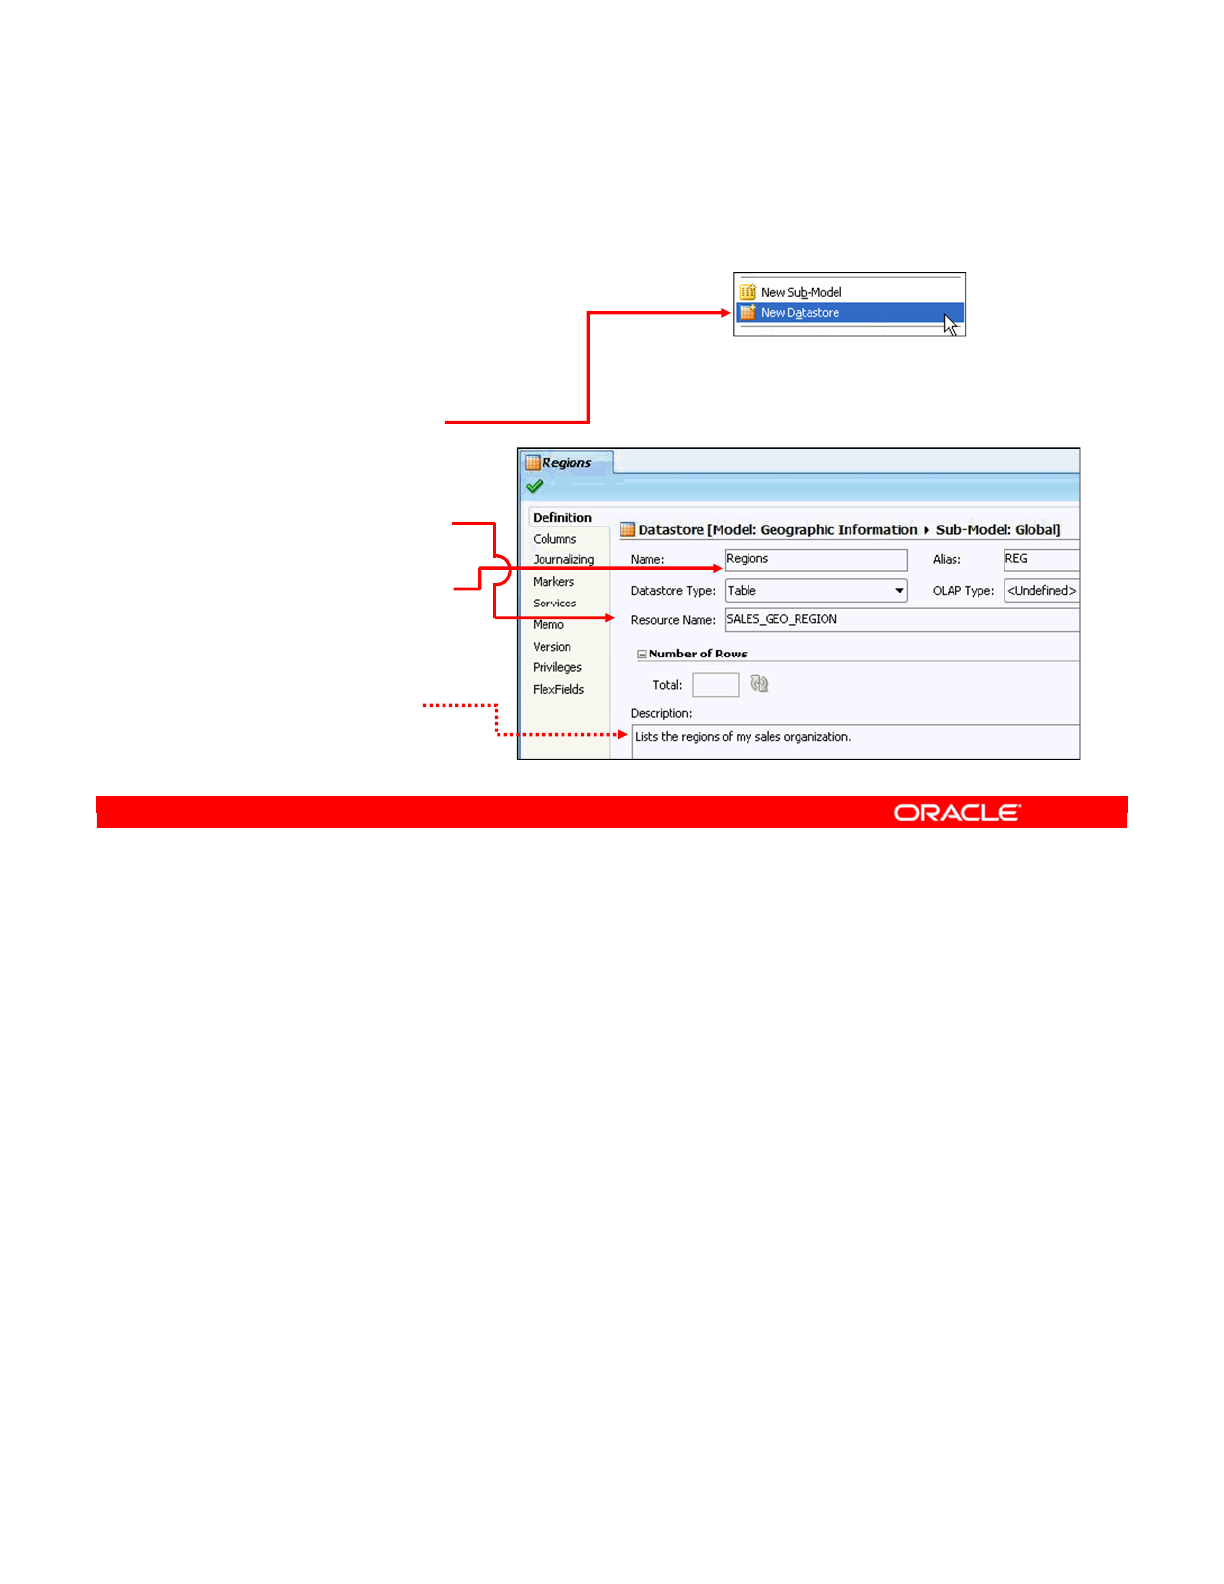
To create a datastore directly in a model, perform the following:
1. Select a model.
2. Right-click and select New Datastore.
3. The Resource Name field refers to the physical name of the table in a database or the
name of the file for a file-based data store. If you use an interface to create this
datastore in a database, the resource name is the name of the table that is generated.
The alias, on the other hand, is the name that you use to refer to the datastore in
mappings, joins, and so on.
4. Set the name. This is the name that is displayed in ODI in the model tree view. Often,
this is similar to the resource name.
5. Provide a description for the datastore (optional).
Oracle Data Integrator 11g: Integration and Administration 7 - 12
Copyright © 2012, Oracle and/or its affiliates. All rights reserved.
Creating a Datastore in a Model
1. Select a model.
2. Right-click and select
New Datastore.
3. Enter the resource
name and alias.
4. Enter the name.
5. Optionally, enter
a description.
Oracle University and (Oracle Corporation) use only.
These eKit materials are to be used ONLY by you for the express purpose SELF STUDY. SHARING THE FILE IS STRICTLY PROHIBITED.
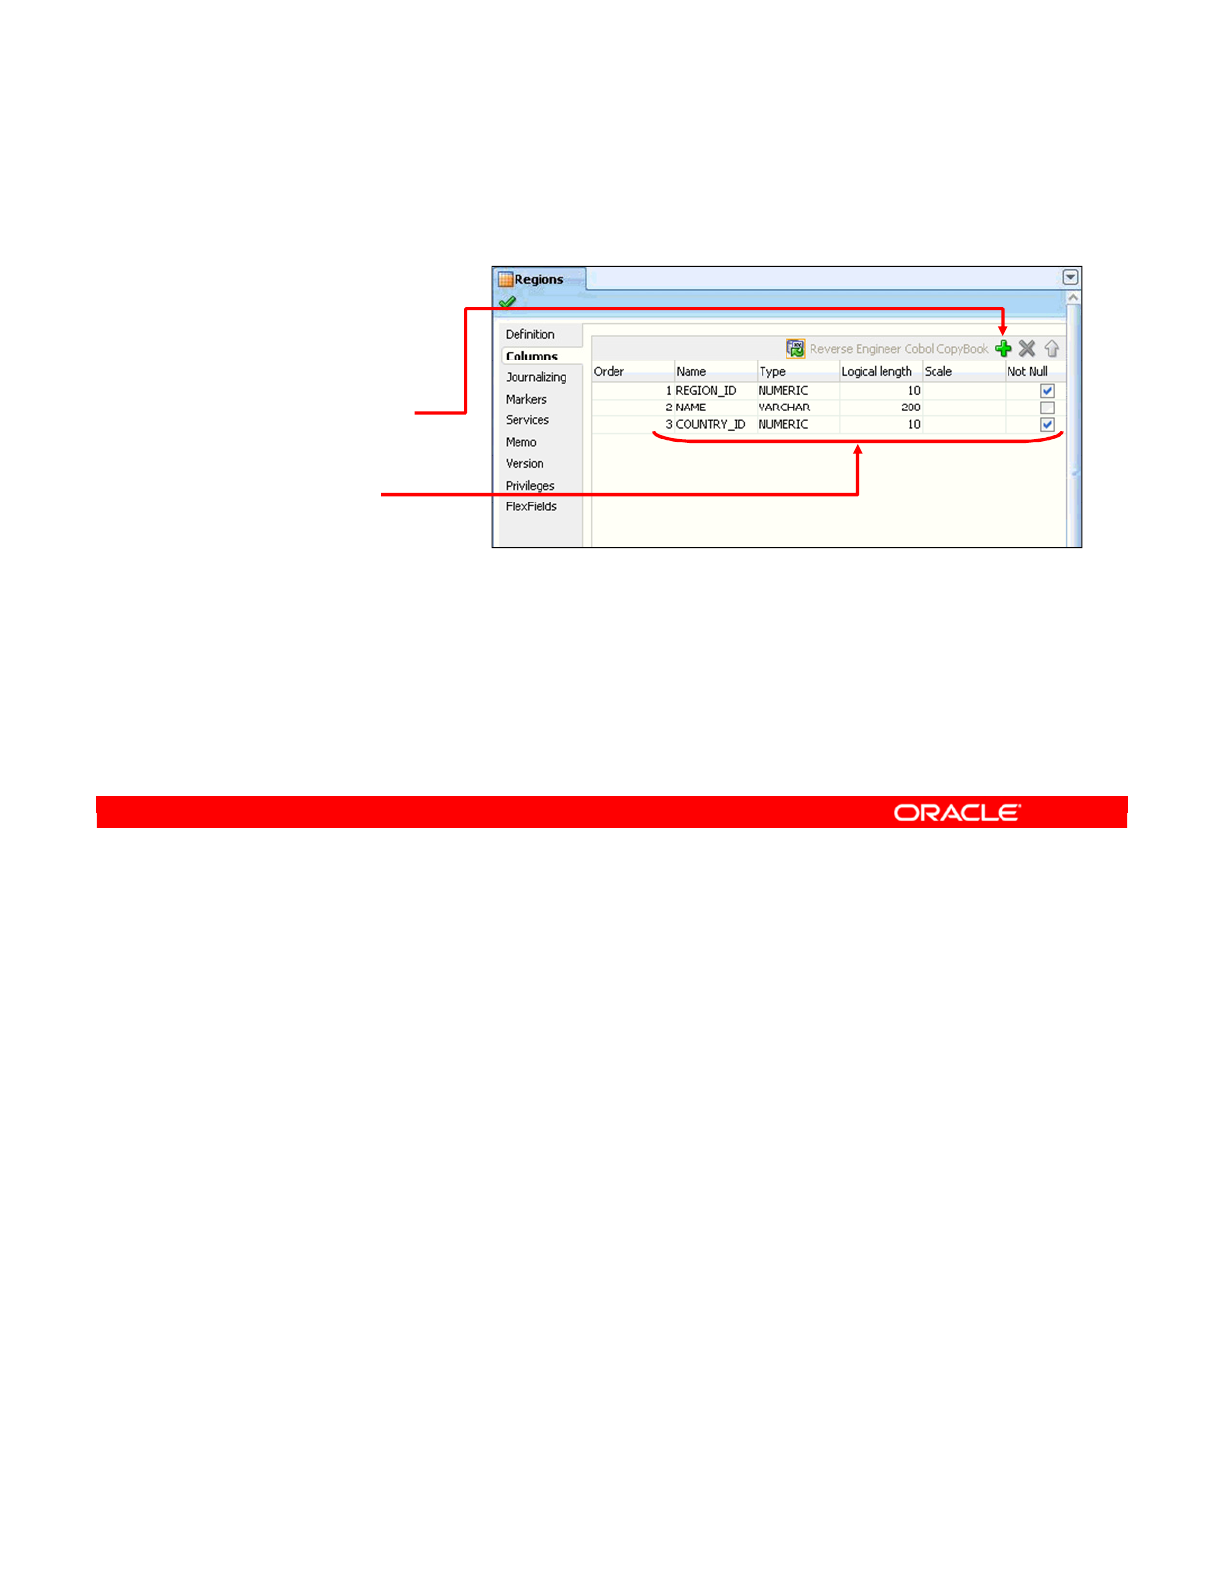
Having set up the basic parameters, you may want to add columns to the definition. To do
this, perform the following:
1. Click the Column tab.
2. Click the Add Column icon to add another column.
3. Define the properties for each column. The meanings of the Name, Type, Logical length,
and Scale options depend on the technology of the model. Not Null means that the field
is mandatory. This will be covered in greater detail later. You can set other properties in
the columns by double-clicking their names in the Models view.
4. After you add all your columns, you can reorder them by using the up and down arrows.
Oracle Data Integrator 11g: Integration and Administration 7 - 13
Copyright © 2012, Oracle and/or its affiliates. All rights reserved.
Adding Columns to a Datastore
1. Click the Columns
tab.
2. Click the Add
Column icon.
3. Define column’s
properties:
–Name, Type,
Length, Scale,
Not Null
4. Repeat and order
the columns.
Oracle University and (Oracle Corporation) use only.
These eKit materials are to be used ONLY by you for the express purpose SELF STUDY. SHARING THE FILE IS STRICTLY PROHIBITED.

The following slides describe adding constraints to datastores. This is a general term for the
various types of rules that you want to impose on your data model.
Oracle Data Integrator 11g: Integration and Administration 7 - 14
Copyright © 2012, Oracle and/or its affiliates. All rights reserved.
Constraints in ODI
Oracle University and (Oracle Corporation) use only.
These eKit materials are to be used ONLY by you for the express purpose SELF STUDY. SHARING THE FILE IS STRICTLY PROHIBITED.

A constraint defines the rules that will be enforced on data in datastores. Constraints on
source datastores ensure that invalid data is kept out of the data flow. You can also define
constraints on the target data store. This serves to test that the interface itself is functioning
correctly.
Oracle Data Integrator 11g: Integration and Administration 7 - 15
Copyright © 2012, Oracle and/or its affiliates. All rights reserved.
What Is a Constraint in ODI?
•A constraint is a statement that defines the rules enforced
on data in datastores.
•A constraint ensures the validity of the data in a given
datastore and the integrity of the data of a model.
•Constraints on the target datastore are used in interfaces
to check the validity of the data before integration in the
target.
Oracle University and (Oracle Corporation) use only.
These eKit materials are to be used ONLY by you for the express purpose SELF STUDY. SHARING THE FILE IS STRICTLY PROHIBITED.

There are four basic types of constraints in ODI:
•Mandatory columns are often known as “not null” columns. You just specify that a
column must have a non-null value for a given row to be valid.
•The keys include the primary keys, alternate keys, and indexes.
•References are equivalent to foreign keys. In ODI, these can be either simple equalities
or complex relationships between columns in different tables.
•Conditions are expressions that must evaluate to true for a row to be considered valid.
You will see how to add each of these types of constraints to a model in the next few slides.
Oracle Data Integrator 11g: Integration and Administration 7 - 16
Copyright © 2012, Oracle and/or its affiliates. All rights reserved.
Constraints in ODI
There are four basic types of constraints in ODI:
•Mandatory columns known as “not null”
•Keys, including:
–Primary keys
–Alternate keys
–Indexes
•References (equivalent to foreign keys):
–Simple: column A = column B
–Complex: column A = function (column B, column C)
•Conditions
Oracle University and (Oracle Corporation) use only.
These eKit materials are to be used ONLY by you for the express purpose SELF STUDY. SHARING THE FILE IS STRICTLY PROHIBITED.
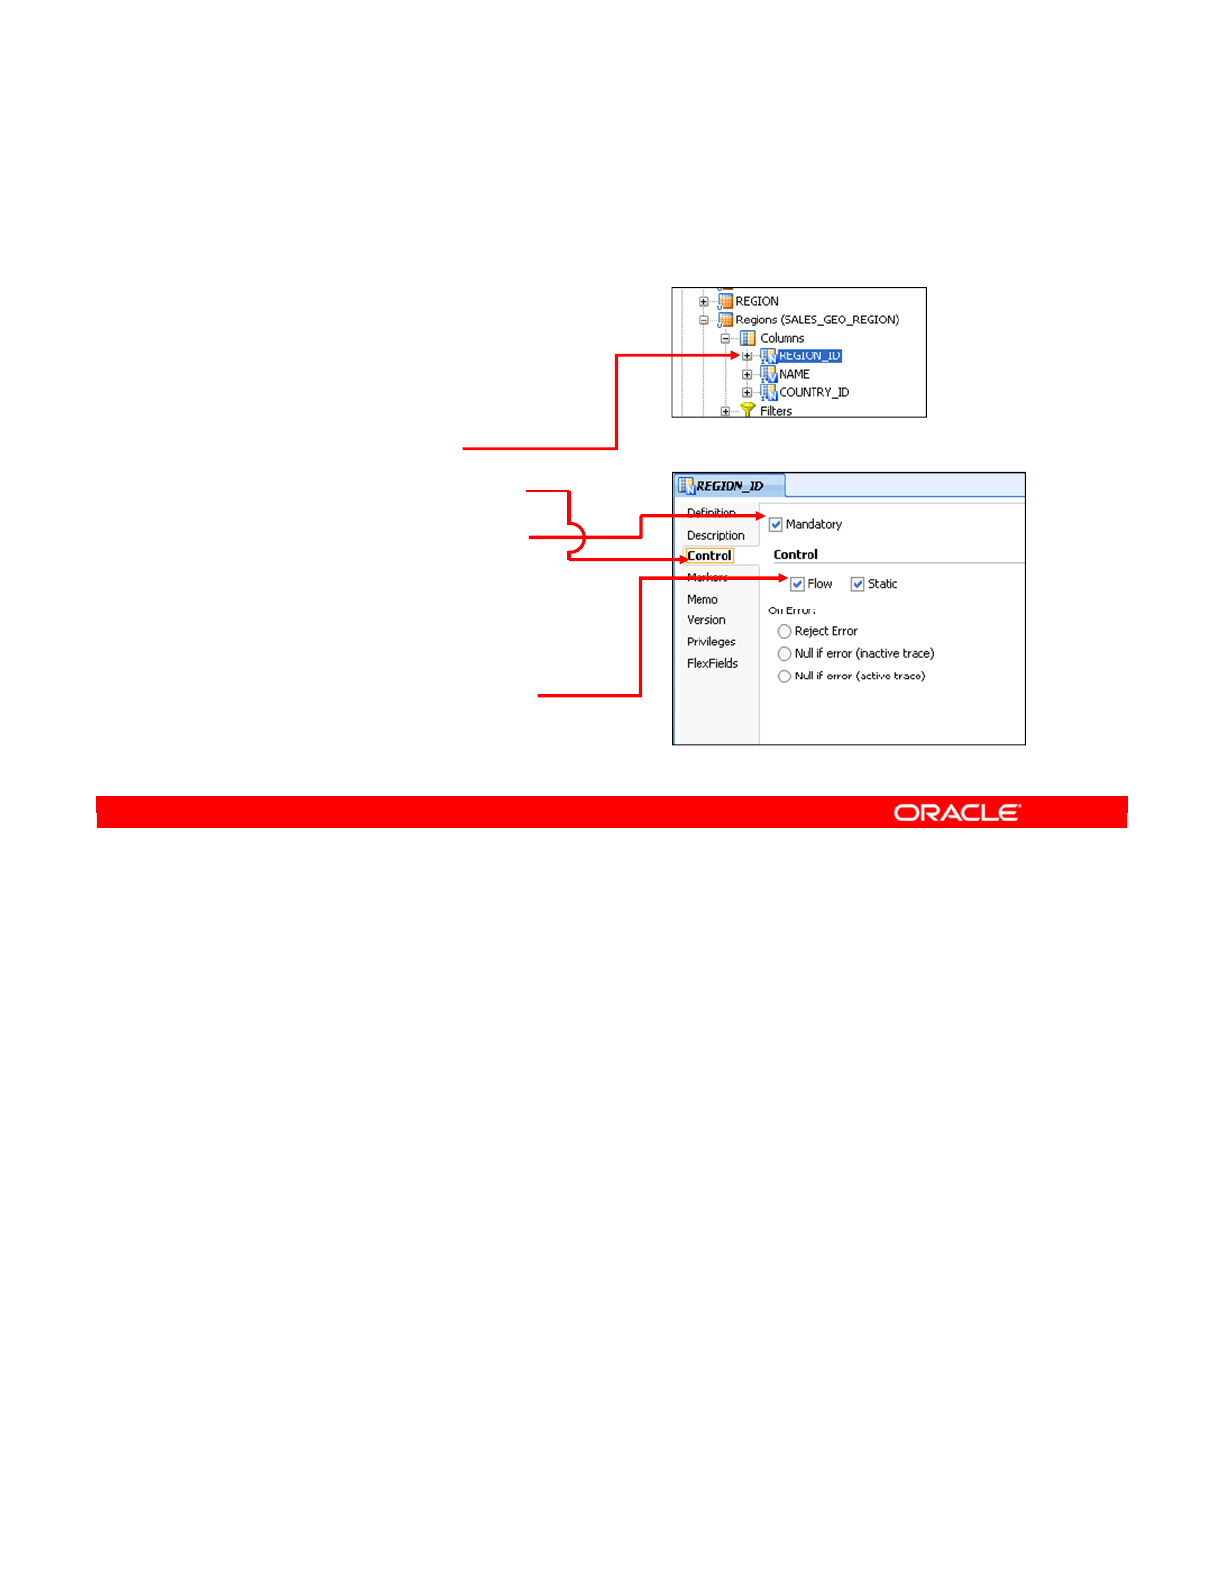
To create a mandatory column, perform the following:
1. Double-click the column in the Models view.
2. Click the Control tab.
3. Select the Mandatory check box. This specifies that the column should always have a
value, but does not actually enforce it.
4. To enforce the mandatory status of a column, select one or both of the Flow and Static
check boxes. These act as default settings for future interfaces. For example, if you
select the Flow check box, any interfaces that populate this column automatically enable
the column for checking during flow control.
Oracle Data Integrator 11g: Integration and Administration 7 - 17
Copyright © 2012, Oracle and/or its affiliates. All rights reserved.
Creating a Mandatory Column
1. Double-click the column in
the Models view.
2. Click the Control tab.
3. Select the Mandatory
check box.
4. Select when the
constraint should be
checked (Flow/Static).
Oracle University and (Oracle Corporation) use only.
These eKit materials are to be used ONLY by you for the express purpose SELF STUDY. SHARING THE FILE IS STRICTLY PROHIBITED.

You have examined manually creating datastores and their columns, and adding constraints
to datastores.
Now look at creating keys and references.
Oracle Data Integrator 11g: Integration and Administration 7 - 18
Copyright © 2012, Oracle and/or its affiliates. All rights reserved.
Creating Keys and References
Oracle University and (Oracle Corporation) use only.
These eKit materials are to be used ONLY by you for the express purpose SELF STUDY. SHARING THE FILE IS STRICTLY PROHIBITED.
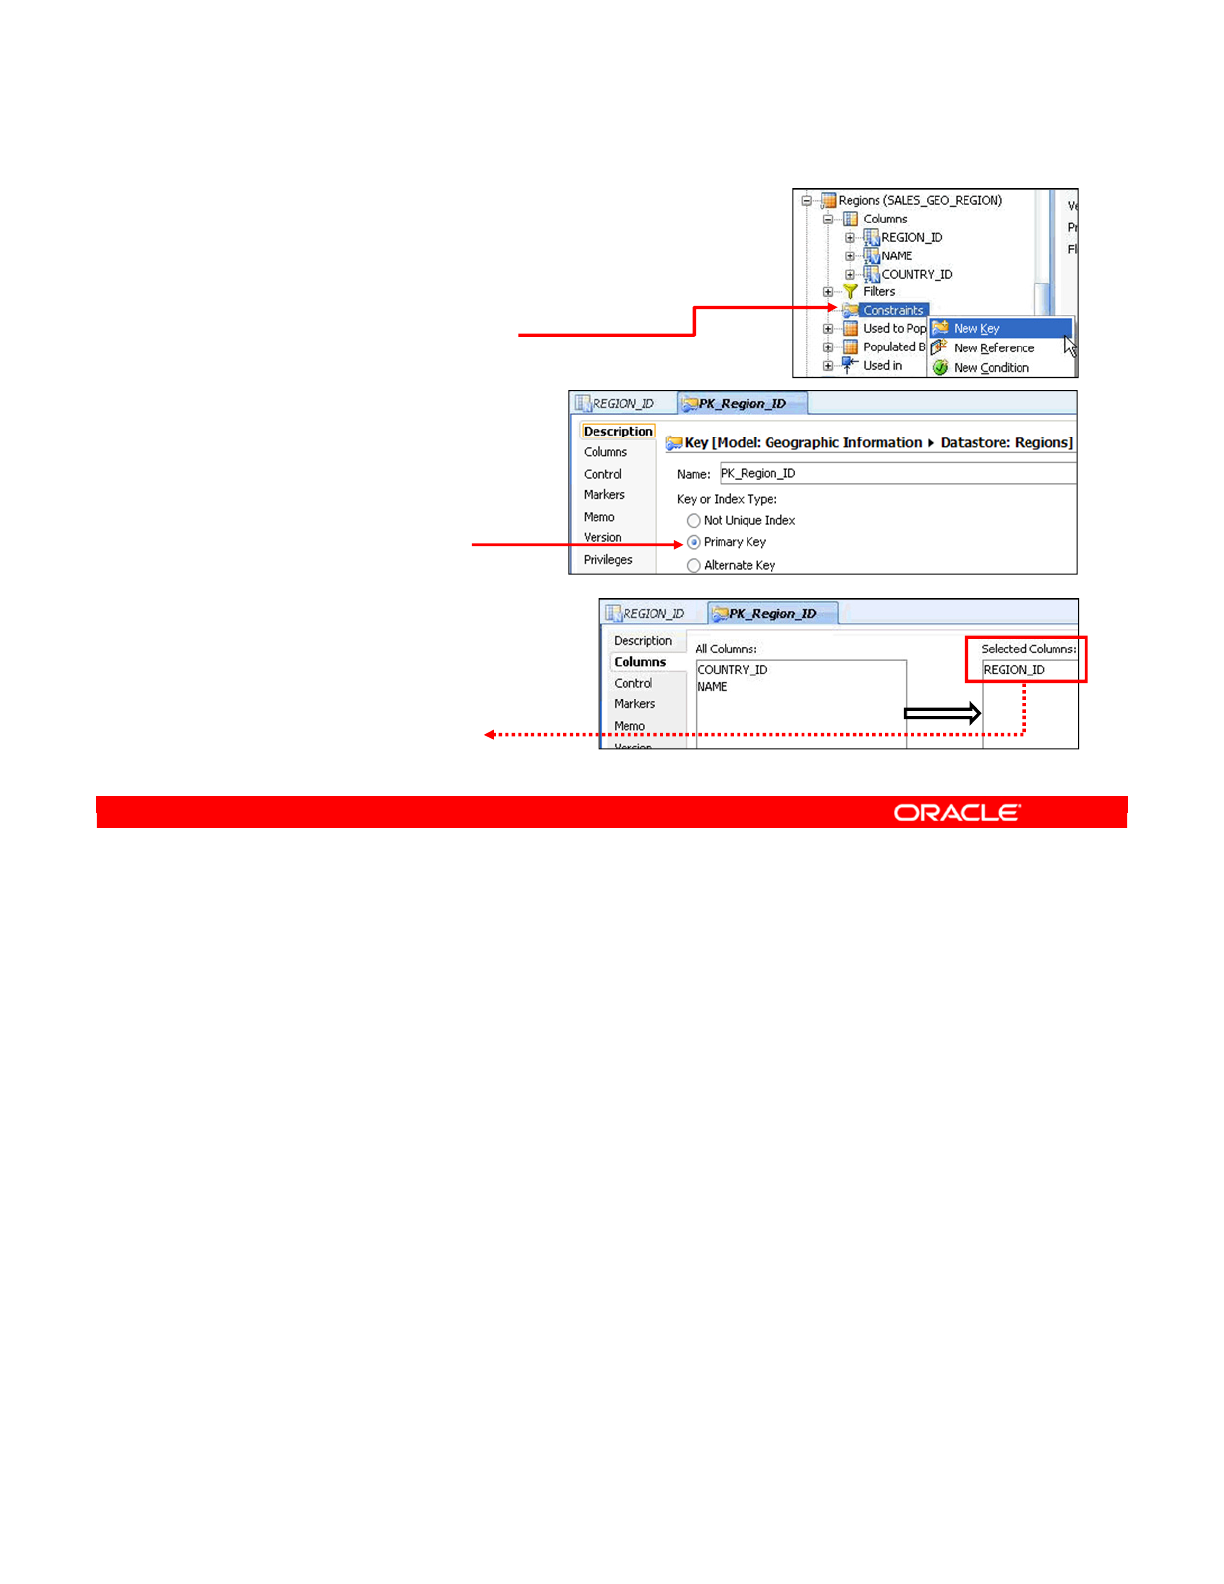
To create a key, perform the following:
1. Select the Constraints node under the data store.
2. Right-click and select New Key.
3. Name the key. This name is used only in ODI. The key will not be created in the
database.
4. Then, select the type of key or index. “Not Unique Index” corresponds to the indexes.
Both the Primary Key and Alternate Key can be used to enforce uniqueness.
5. Click the Columns tab.
6. Here, add the columns that form part of this key. The combination of columns in the list
at the right must contain unique values. You can include any number of columns in the
key, not just one.
Oracle Data Integrator 11g: Integration and Administration 7 - 19
Copyright © 2012, Oracle and/or its affiliates. All rights reserved.
Creating a Key
1. Select the Constraints node
under the data store.
2. Right-click and
select New Key.
3. Enter the name.
4. Select the key or
index type option.
5. Click the Columns tab.
6. Add or remove columns
from the key.
–Any number of columns
can be selected.
Oracle University and (Oracle Corporation) use only.
These eKit materials are to be used ONLY by you for the express purpose SELF STUDY. SHARING THE FILE IS STRICTLY PROHIBITED.
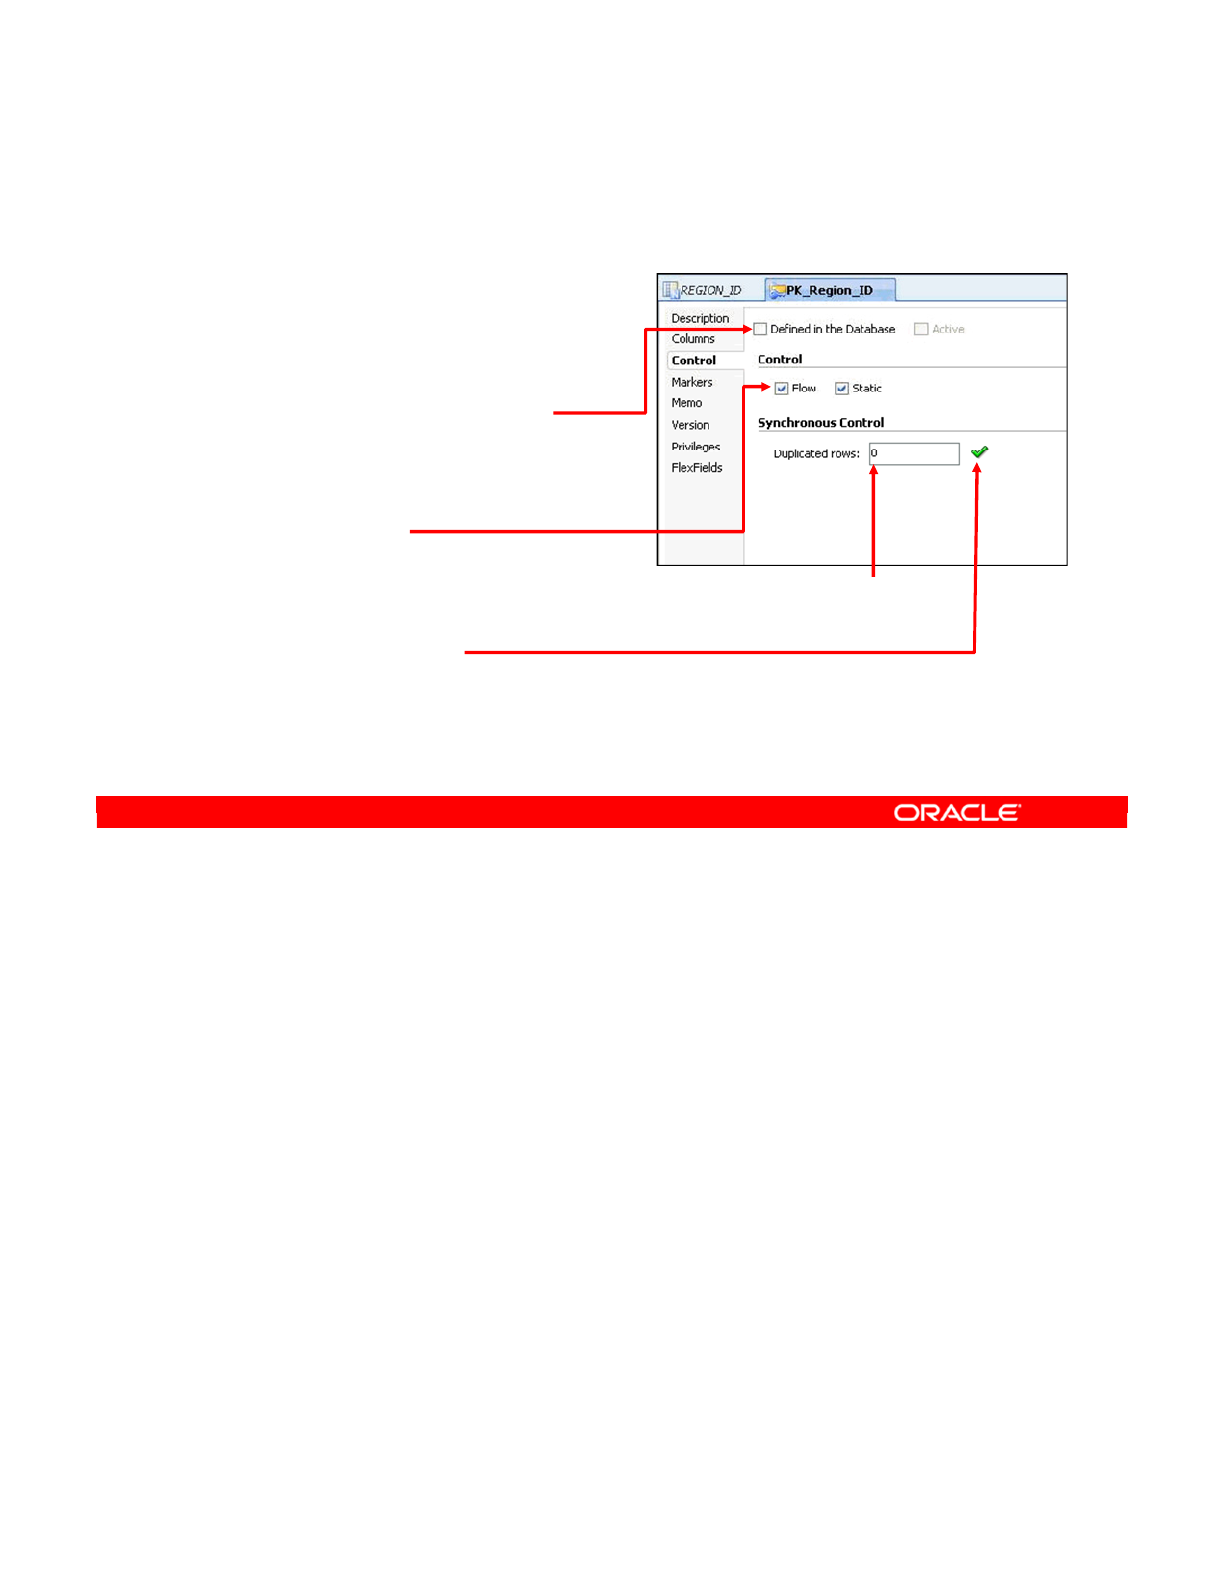
As with the mandatory columns, ODI has not yet been asked to check your constraint. To do
this, perform the following:
1. Click the Control tab.
2. The “Defined in the Database” check box is purely informational. When a key is reverse-
engineered from a database, it is set to true. Changing it has no meaning to ODI, but
you may want to do so if a corresponding key in the database cannot be reverse-
engineered for some reason. The Active flag is very similar: It indicates whether the key
is enabled in the database.
3. To enforce the key, select the Flow or Static check boxes, or both. These behave the
same as for mandatory columns; they are mere defaults for future interfaces.
4. You can also click the Check button to perform a synchronous check on the column.
This tells you the number of rows that violate the constraint. Use this button whenever
possible to check whether your key is correct. For example, if the check says that half of
your rows are duplicates, a mistake has probably occurred somewhere.
Note: Synchronous checks are available only on SQL-based systems. For instance, you
cannot perform a synchronous check on a file-based data store. Also, when compared to a
normal static check, the result of a synchronous check is not saved anywhere.
Oracle Data Integrator 11g: Integration and Administration 7 - 20
Copyright © 2012, Oracle and/or its affiliates. All rights reserved.
Checking a Key
1. Click the Control tab.
2. Select whether the
key is defined in the
database, and is active.
3. Select when the constraint
must be checked
(Flow/Static).
4. Click the Check button to
perform a synchronous
check of the key.
Number of
duplicate rows
Oracle University and (Oracle Corporation) use only.
These eKit materials are to be used ONLY by you for the express purpose SELF STUDY. SHARING THE FILE IS STRICTLY PROHIBITED.
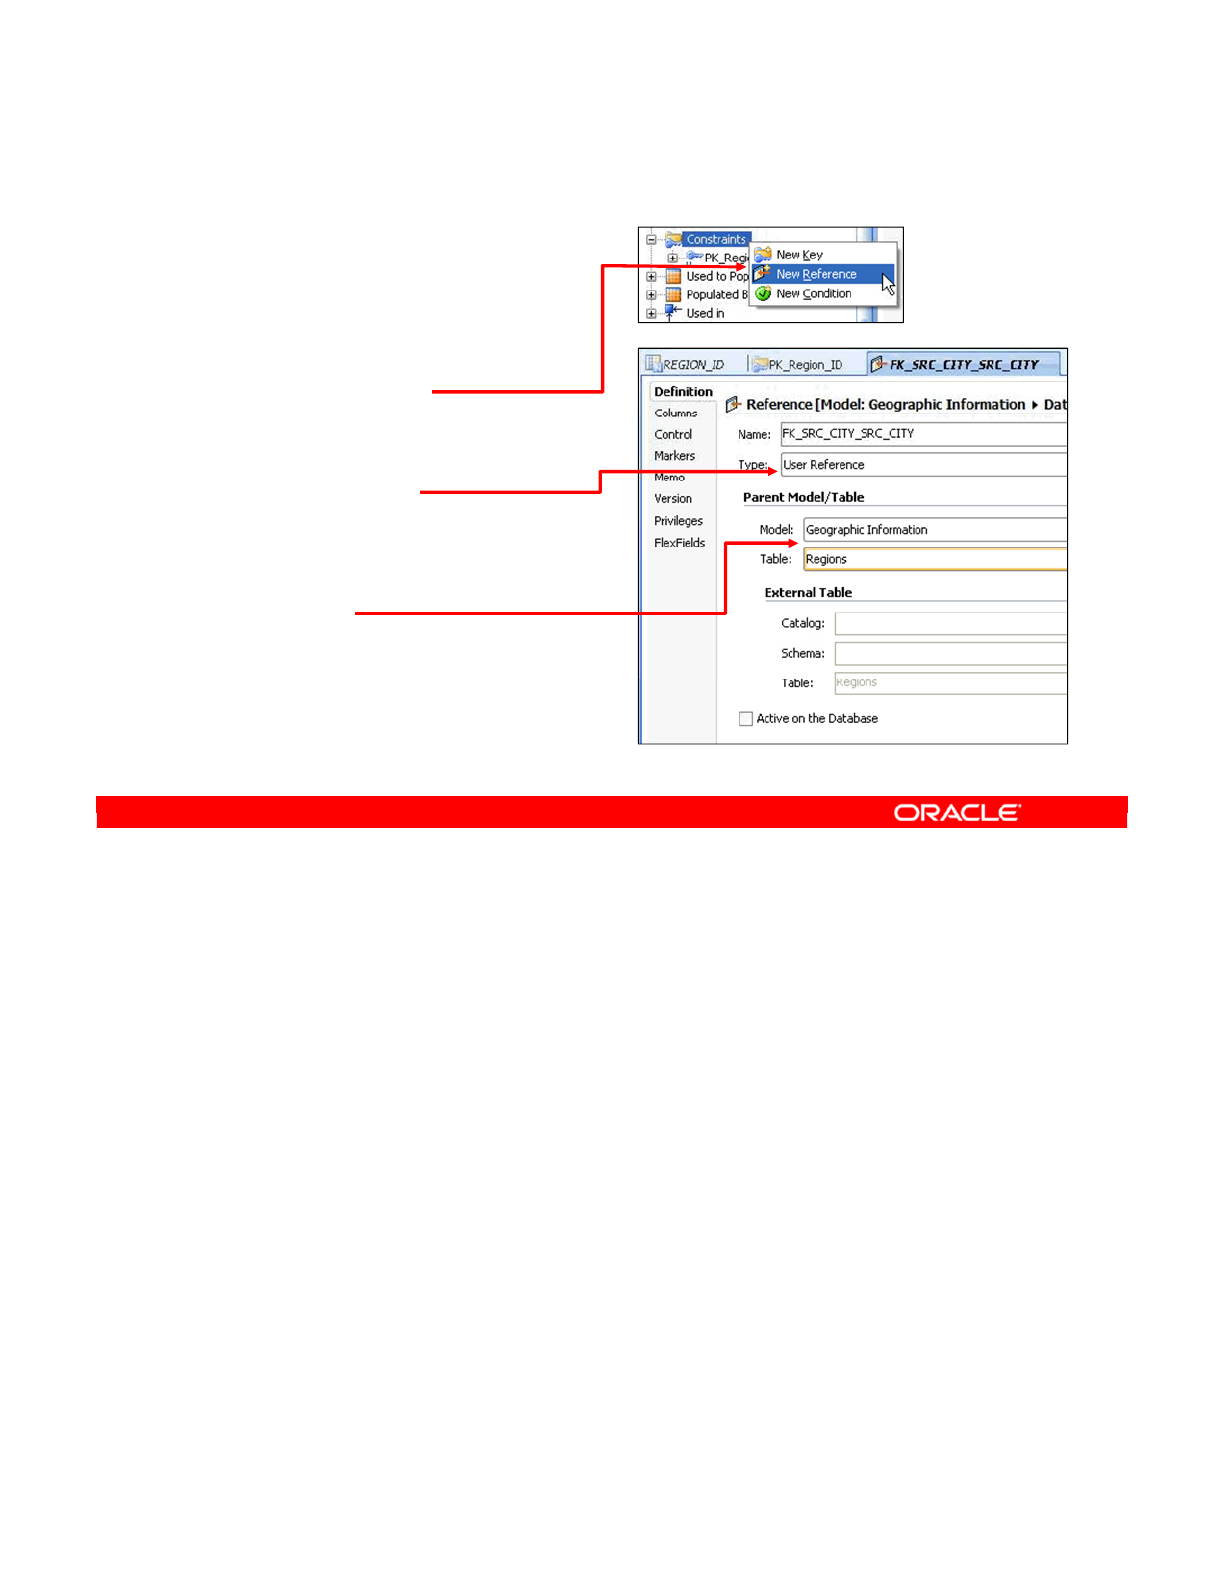
Creating a reference is not similar to creating a key. Perform the following:
1. Select the Constraints node, then right-click and select New Reference.
2. Provide a name for the reference and select a reference type.
3. The type is Database Reference, User Reference, or Complex User Reference. The first
of these is similar to the “Defined in the Database” option for keys and is, therefore, not
useful for this purpose. A User Reference is an equality between a column in this
datastore and a column in some other data store, possibly in another model. A Complex
User Reference defines an expression that relates two columns together.
4. Select the “parent” model and the datastore that this column relates to. For example, if
this column is a city ID in an address table, the parent model and datastore would be a
table of cities. The column in the cities table would be specified on the Columns tab.
5. If you want to manually specify a specific physical table to relate to, set the model and
table to <undefined>, and set the parameters enabling access to the physical table in
the External Table fields group.
Oracle Data Integrator 11g: Integration and Administration 7 - 21
Copyright © 2012, Oracle and/or its affiliates. All rights reserved.
Creating a Reference
1. Select the Constraints node
under the data store.
2. Right-click and select
New Reference.
3. Enter the name.
4. Select the
reference type:
–User Reference
–Complex User Reference
5. Select a parent model
and table.
–Set the model and
table to <undefined> to
manually enter the catalog,
schema, and table name.
Oracle University and (Oracle Corporation) use only.
These eKit materials are to be used ONLY by you for the express purpose SELF STUDY. SHARING THE FILE IS STRICTLY PROHIBITED.
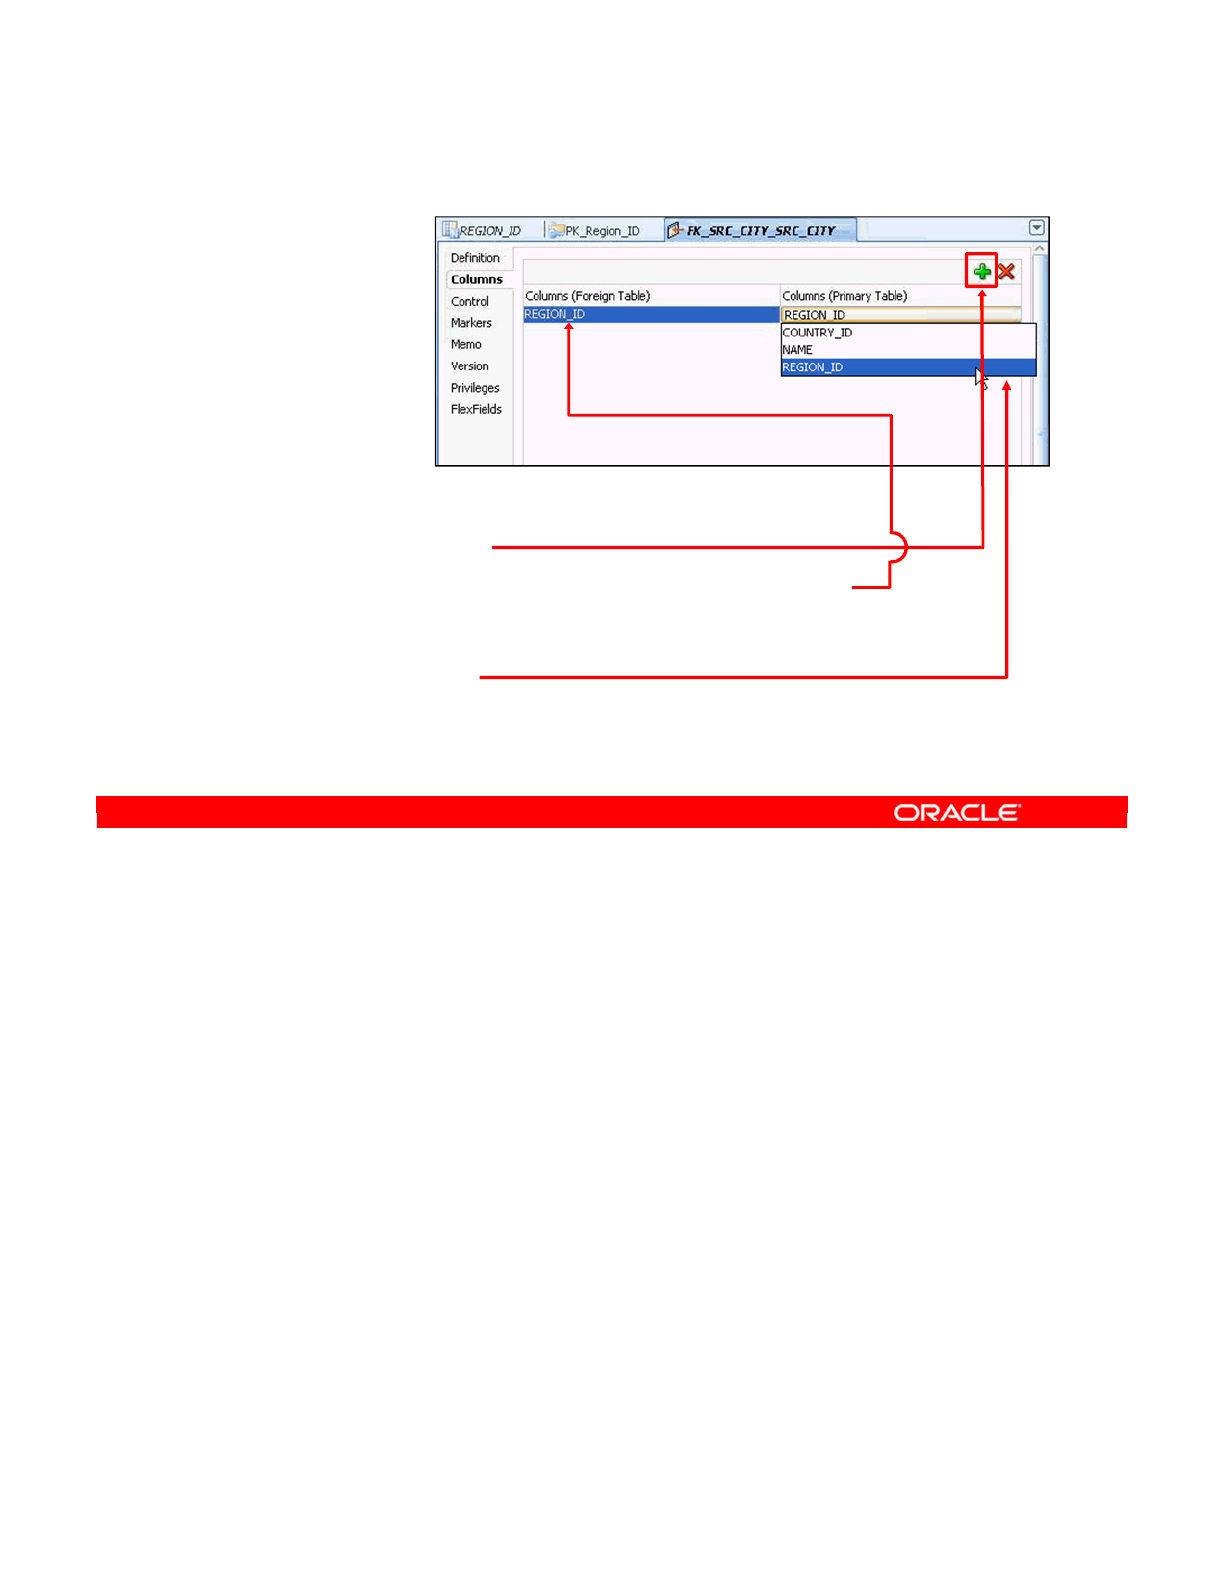
If you want to create a Simple User Reference, perform the following:
1. Click the Columns tab to specify the columns that must be equal.
2. Click the Add icon to add a new column pair.
3. The list of columns at the left contains the columns in this data store. Select a column to
include it in the reference.
4. Select a corresponding column from the Primary Key table at the right.
5. You can repeat these steps as necessary to build a reference that uses multiple
columns.
Oracle Data Integrator 11g: Integration and Administration 7 - 22
Copyright © 2012, Oracle and/or its affiliates. All rights reserved.
Creating a Simple Reference
1. Click the Columns tab.
2. Click the Add icon.
3. Select the column from the foreign key table.
4. Select the corresponding column from the
primary key table.
5. Repeat for all column pairs in the reference.
Oracle University and (Oracle Corporation) use only.
These eKit materials are to be used ONLY by you for the express purpose SELF STUDY. SHARING THE FILE IS STRICTLY PROHIBITED.
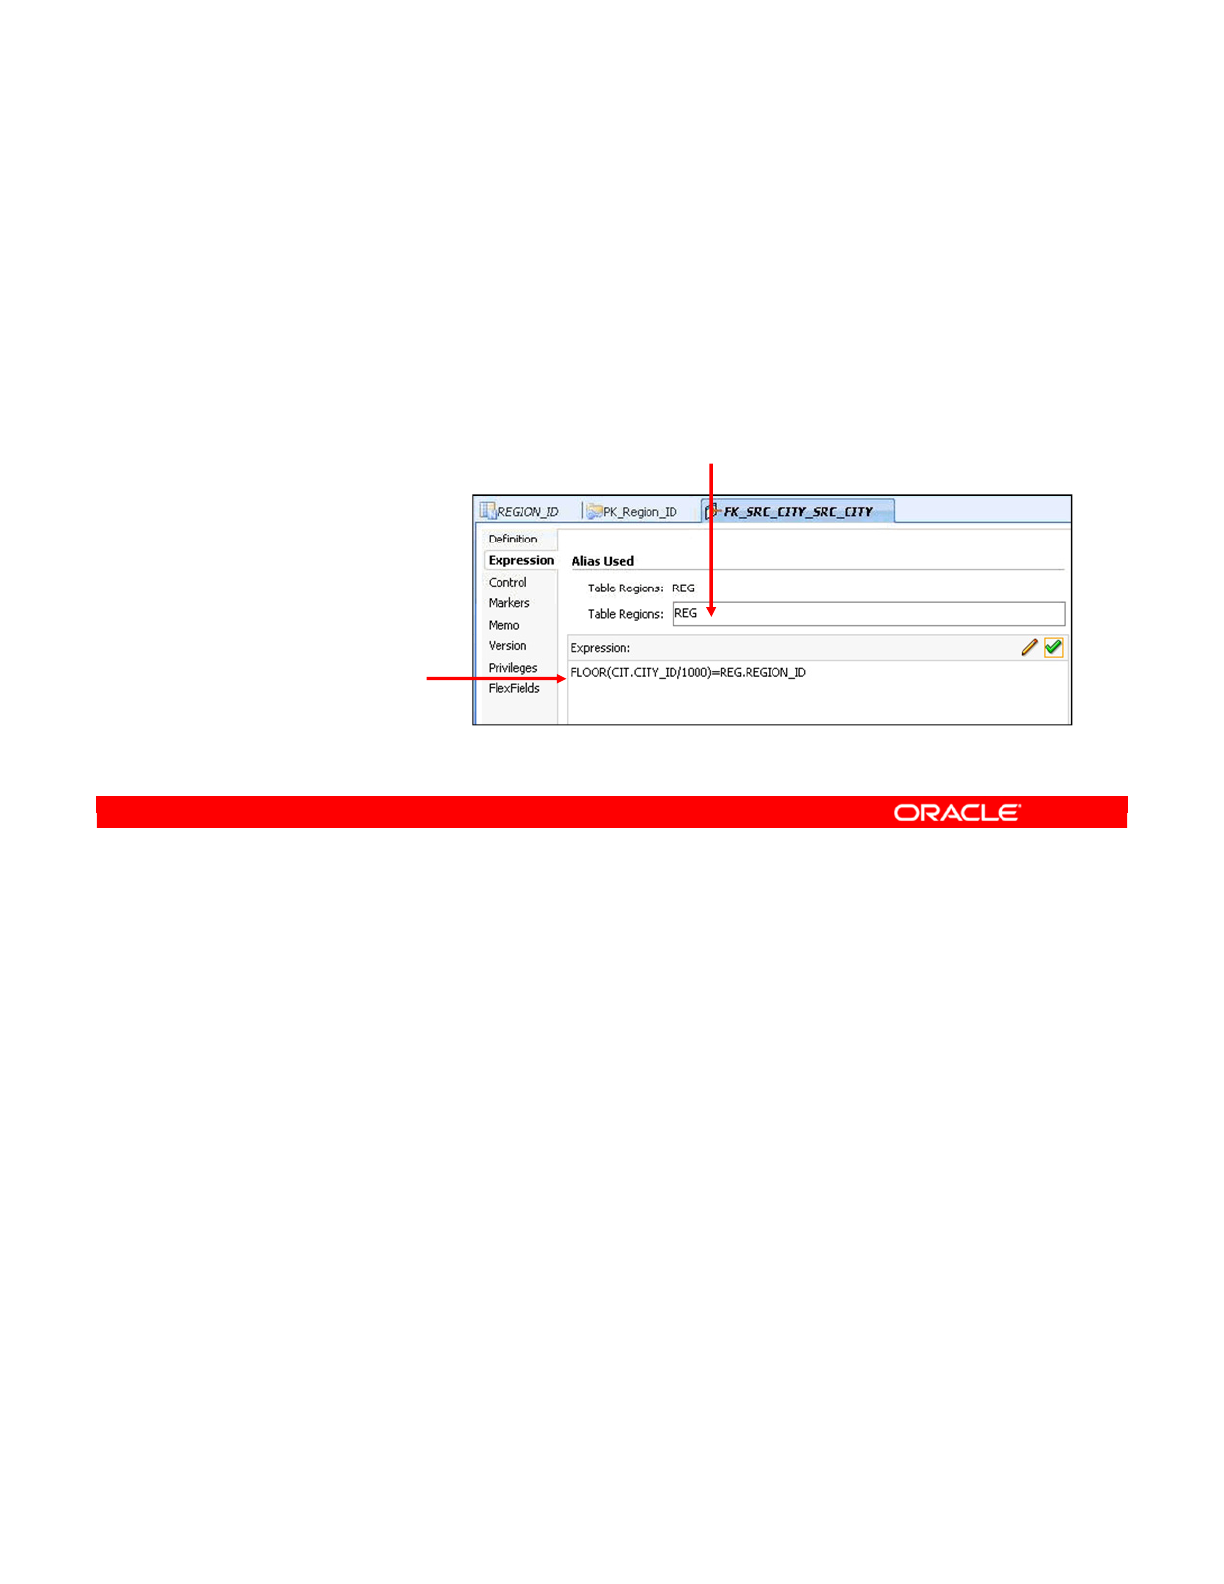
If you select Complex User Reference back in the Definition tab, the Columns tab is replaced
by the Expression tab.
You define an alias for the primary table that the reference will refer to. This enables you to
write an unambiguous and concise expression. Then, you add a SQL expression that links
the two tables. You should use the table aliases to prefix the names of all the columns. The
best practice is to use the Expression Editor to build the right expression.
Oracle Data Integrator 11g: Integration and Administration 7 - 23
Copyright © 2012, Oracle and/or its affiliates. All rights reserved.
Creating a Complex Reference
1. Select Complex User Reference (in the Definitions tab).
2. Click the Expression tab.
3. Set the alias for the primary key table.
4. Code the
expression:
•Prefix with the
tables’ aliases.
•Use the
Expression
Editor.
Oracle University and (Oracle Corporation) use only.
These eKit materials are to be used ONLY by you for the express purpose SELF STUDY. SHARING THE FILE IS STRICTLY PROHIBITED.
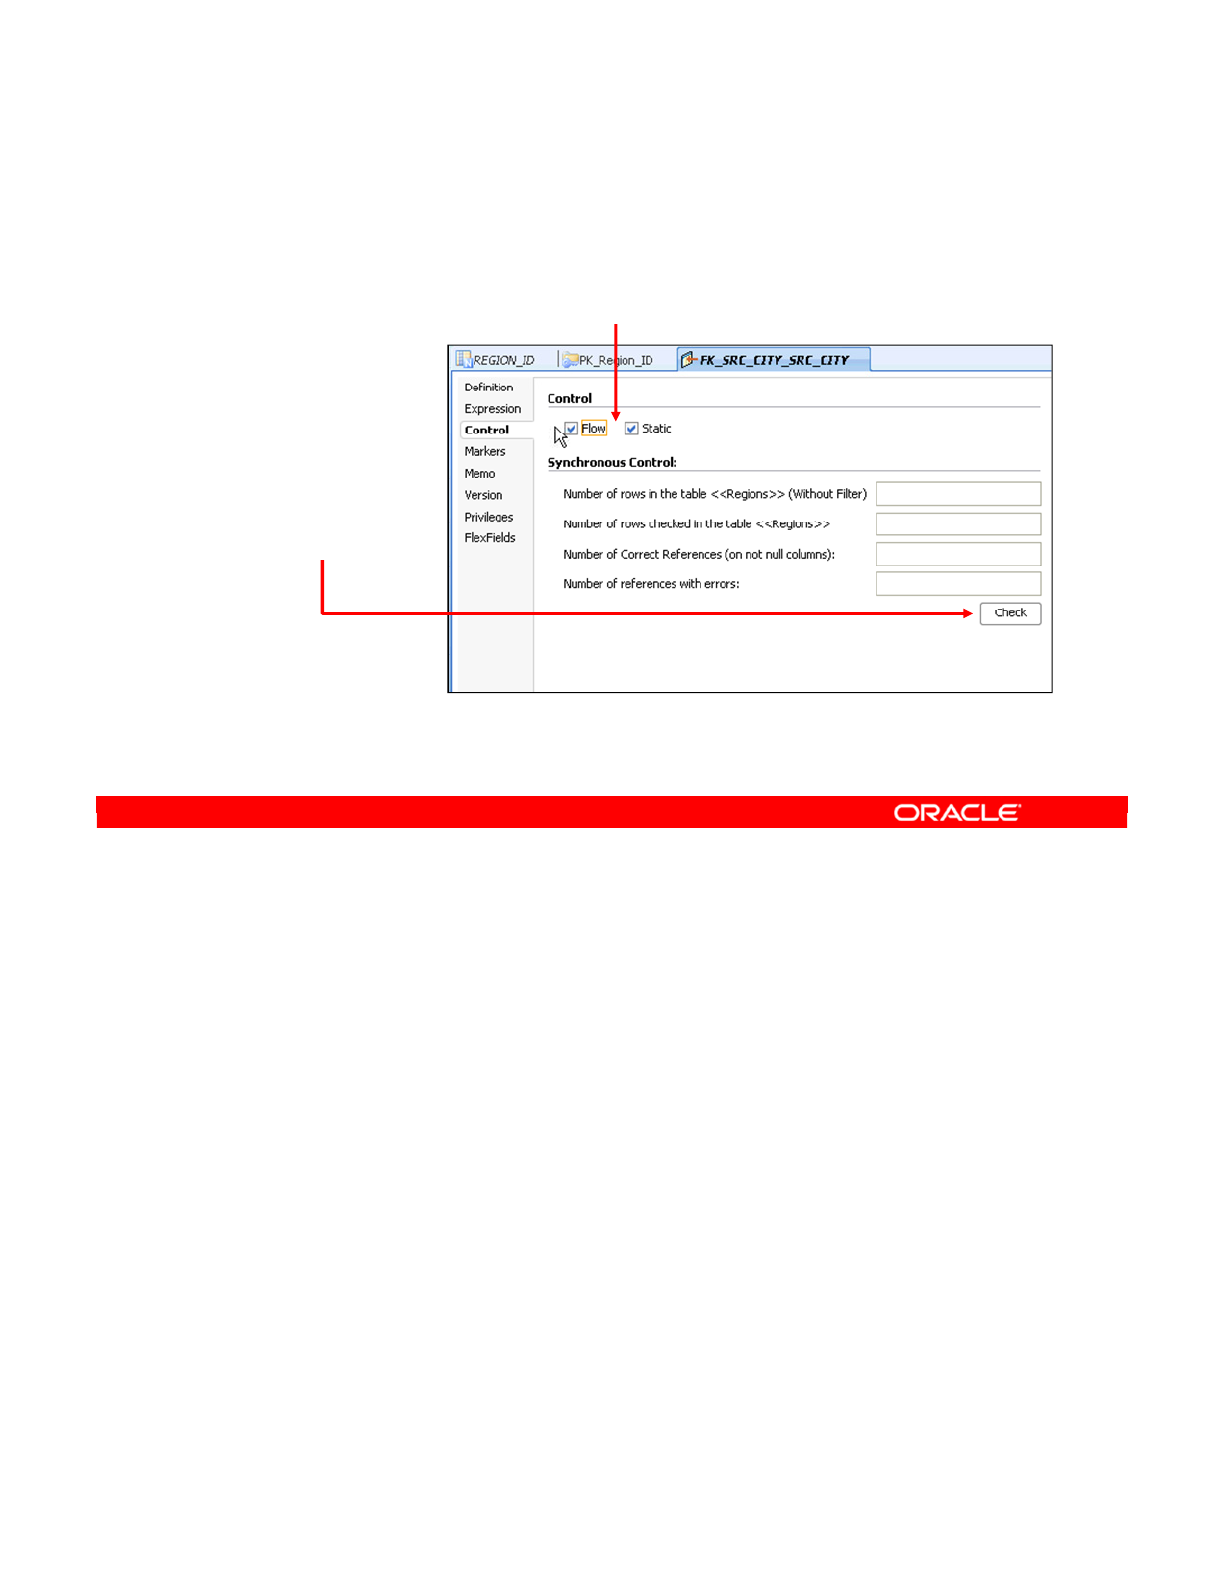
Finally, as for the other types of constraints, click the Control tab to specify when to check this
reference. Again, you can use the Check button to perform a synchronous check. This tells
you the number of rows in the data store, the number of rows for which the reference is
satisfied, and the number of rows that fail the reference. However, this is not possible for a
heterogeneous reference.
Note: Immediate check reference is not possible for heterogeneous references.
Oracle Data Integrator 11g: Integration and Administration 7 - 24
Copyright © 2012, Oracle and/or its affiliates. All rights reserved.
1. Click the Control tab.
2. Select when the constraint
should be checked (Flow/Static).
3. Click the
Check
button to
immediately
check the
reference.
Checking a Reference
Oracle University and (Oracle Corporation) use only.
These eKit materials are to be used ONLY by you for the express purpose SELF STUDY. SHARING THE FILE IS STRICTLY PROHIBITED.

The last type of constraints to create is conditions. These are simply SQL expressions that
enforce certain rules based only on the columns within the data store.
Oracle Data Integrator 11g: Integration and Administration 7 - 25
Copyright © 2012, Oracle and/or its affiliates. All rights reserved.
Creating Conditions
Oracle University and (Oracle Corporation) use only.
These eKit materials are to be used ONLY by you for the express purpose SELF STUDY. SHARING THE FILE IS STRICTLY PROHIBITED.

To create a condition, perform the following:
1. Right-click the Constraints node under a datastore and select New Condition.
2. Select a name that will appear only in ODI.
3. Select the Oracle Data Integrator Condition type from the Type drop-down list.
4. Add the expression that must evaluate to true. For example, here you specify that the
population of the city must be greater than 1,000. It is recommended that you use the
Expression Editor to do this.
5. Lastly, specify a message that is written to the execution log if the condition fails.
Oracle Data Integrator 11g: Integration and Administration 7 - 26
Copyright © 2012, Oracle and/or its affiliates. All rights reserved.
Creating a Condition
1. Right-click the Constraints
node and select New Condition.
2. Enter the name.
3. Select the Oracle
Data Integrator
Condition type.
4. Edit the condition
clause.
–Prefix with the
tables’ aliases.
–Use the
Expression Editor
.
5. Enter the error message for the condition.
Oracle University and (Oracle Corporation) use only.
These eKit materials are to be used ONLY by you for the express purpose SELF STUDY. SHARING THE FILE IS STRICTLY PROHIBITED.

To specify when to check the condition, you select the Flow and/or Static check boxes on the
Control tab. Use the Check button to display the number of rows that do not satisfy the
condition.
Oracle Data Integrator 11g: Integration and Administration 7 - 27
Copyright © 2012, Oracle and/or its affiliates. All rights reserved.
Checking a Condition
1. Click the Control tab.
2. Select when the
constraint should be
checked (Flow/Static).
3. Click the Check button to
perform a synchronous
check of the condition.
Oracle University and (Oracle Corporation) use only.
These eKit materials are to be used ONLY by you for the express purpose SELF STUDY. SHARING THE FILE IS STRICTLY PROHIBITED.

The following slides provide an overview of when and why you should use the data
exploration and auditing process.
Oracle Data Integrator 11g: Integration and Administration 7 - 28
Copyright © 2012, Oracle and/or its affiliates. All rights reserved.
Overview
Exploring and Auditing
Oracle University and (Oracle Corporation) use only.
These eKit materials are to be used ONLY by you for the express purpose SELF STUDY. SHARING THE FILE IS STRICTLY PROHIBITED.

When and why should you begin exploring and auditing your data? You should explore and
audit your data to:
•Improve your understanding of the data model
•Get a clear picture of the level of data quality after you have audited every table
You should explore and audit your data:
•In a situation where you face a set of undocumented models. This may come from old
proprietary software or in-house systems.
•When your organization has business rules that have never been enforced. Before
enforcing them, you should verify the extent to which the existing data respects these
rules.
•In situations where you must attempt to work with data that is entirely unknown to you
Oracle Data Integrator 11g: Integration and Administration 7 - 29
Copyright © 2012, Oracle and/or its affiliates. All rights reserved.
When and Why?
•Why explore and audit your data?
–To understand the data model
–To evaluate the quality of the data
•When?
–If you are using undocumented models
–Unimplemented business rules
–Totally unknown data
Oracle University and (Oracle Corporation) use only.
These eKit materials are to be used ONLY by you for the express purpose SELF STUDY. SHARING THE FILE IS STRICTLY PROHIBITED.

The basic process is as follows:
1. You explore your data in ODI. You learn to view the contents of a datastore and analyze
the data to see the distribution of values.
2. You learn to construct a coherent set of business rules appropriate for your data. For
example, if columns contain only certain values, you may want to enforce that pattern on
future data. After adding constraints, you learn to test them.
3. In the final phase, you audit the quality of your data against the new rules that you have
set. You also learn to automate this process.
Oracle Data Integrator 11g: Integration and Administration 7 - 30
Copyright © 2012, Oracle and/or its affiliates. All rights reserved.
An Overview of the Process
1. Explore the data.
–Contents of datastores
–Distribution of values
2. Construct business rules based on your data exploration.
–Add constraints.
–Test the constraints.
3. Audit the data against your business rules.
–Verify data quality in batch.
Oracle University and (Oracle Corporation) use only.
These eKit materials are to be used ONLY by you for the express purpose SELF STUDY. SHARING THE FILE IS STRICTLY PROHIBITED.

You will begin by exploring and analyzing your data. Three techniques enable you to explore
and analyze data. These techniques are covered in the following slides.
Oracle Data Integrator 11g: Integration and Administration 7 - 31
Copyright © 2012, Oracle and/or its affiliates. All rights reserved.
Exploring Your Data
Oracle University and (Oracle Corporation) use only.
These eKit materials are to be used ONLY by you for the express purpose SELF STUDY. SHARING THE FILE IS STRICTLY PROHIBITED.

The simplest technique is to view all data in a datastore in raw format. To do this, perform the
following:
1. Select the datastore in the Models view.
2. Right-click and select Data from the context menu.
3. The Data window appears.
4. You can use the arrow buttons to move around different rows.
5. To edit the value in a cell, click it.
Note: When you select Data from the context menu, the resulting grid is editable. When you
select View Data, the grid is noneditable.
Oracle Data Integrator 11g: Integration and Administration 7 - 32
Copyright © 2012, Oracle and/or its affiliates. All rights reserved.
Displaying the Contents of a Datastore
1. Select the data
store in the
Models view.
2. Right-click and
select Data.
3. In the Data
window:
–Navigate
–View/Edit
Oracle University and (Oracle Corporation) use only.
These eKit materials are to be used ONLY by you for the express purpose SELF STUDY. SHARING THE FILE IS STRICTLY PROHIBITED.
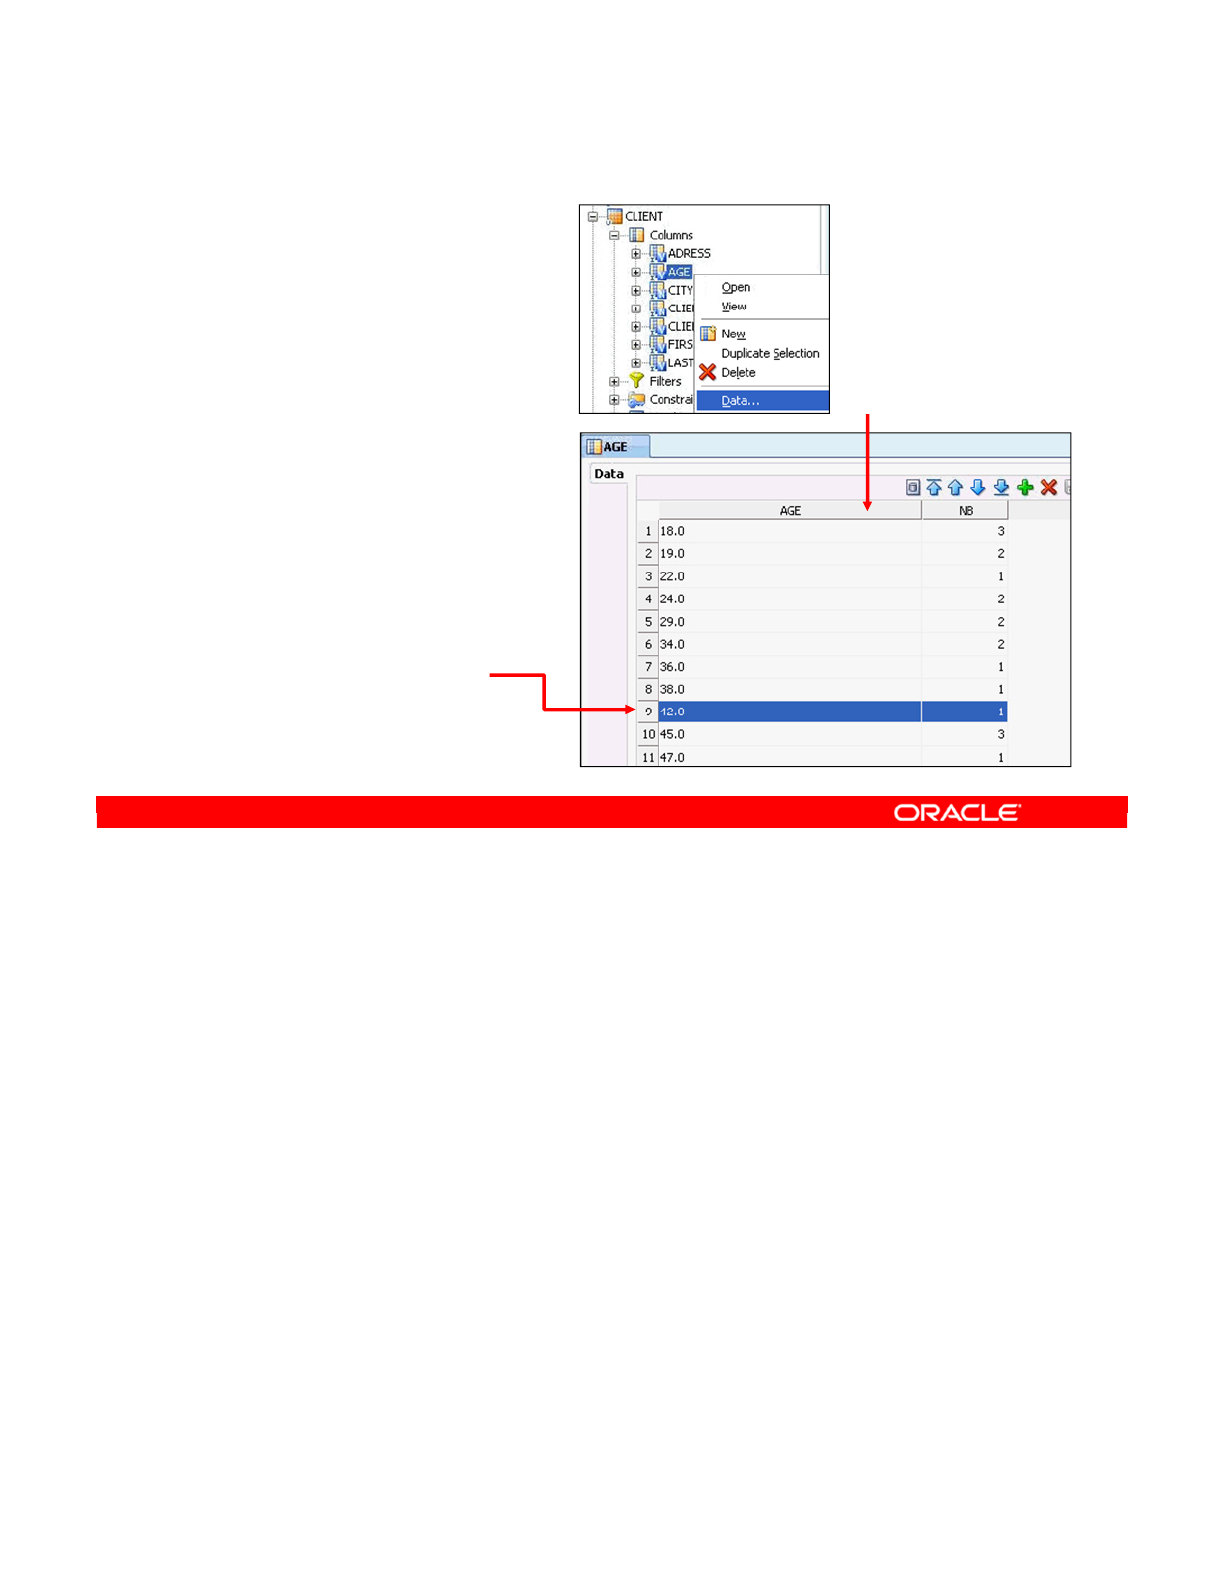
In many cases, it is useful to see the types of values that appear in a column. To do this,
perform the following:
1. Right-click the name of the column in the Models view.
2. Select Data from the context menu.
3. The Data window is a bit different this time. There are always two columns. The first
column shows the different values and the second shows the number of times each
value appears in this column. That is, for the AGE column, if three rows have the value
“18.0” in this column, there is a row here with the values “18.0” and “3.” You can click
the column headings to sort by the value or by the number of occurrences.
Oracle Data Integrator 11g: Integration and Administration 7 - 33
Copyright © 2012, Oracle and/or its affiliates. All rights reserved.
Viewing the Distribution of Values
1. Select the column
in the Models view.
2. Right-click, select Data.
3. In the Data window:
–Values
–Number of
occurrences
Click to
sort
For the AGE column,
there is 1 occurrence
of the value “42.0”
Oracle University and (Oracle Corporation) use only.
These eKit materials are to be used ONLY by you for the express purpose SELF STUDY. SHARING THE FILE IS STRICTLY PROHIBITED.
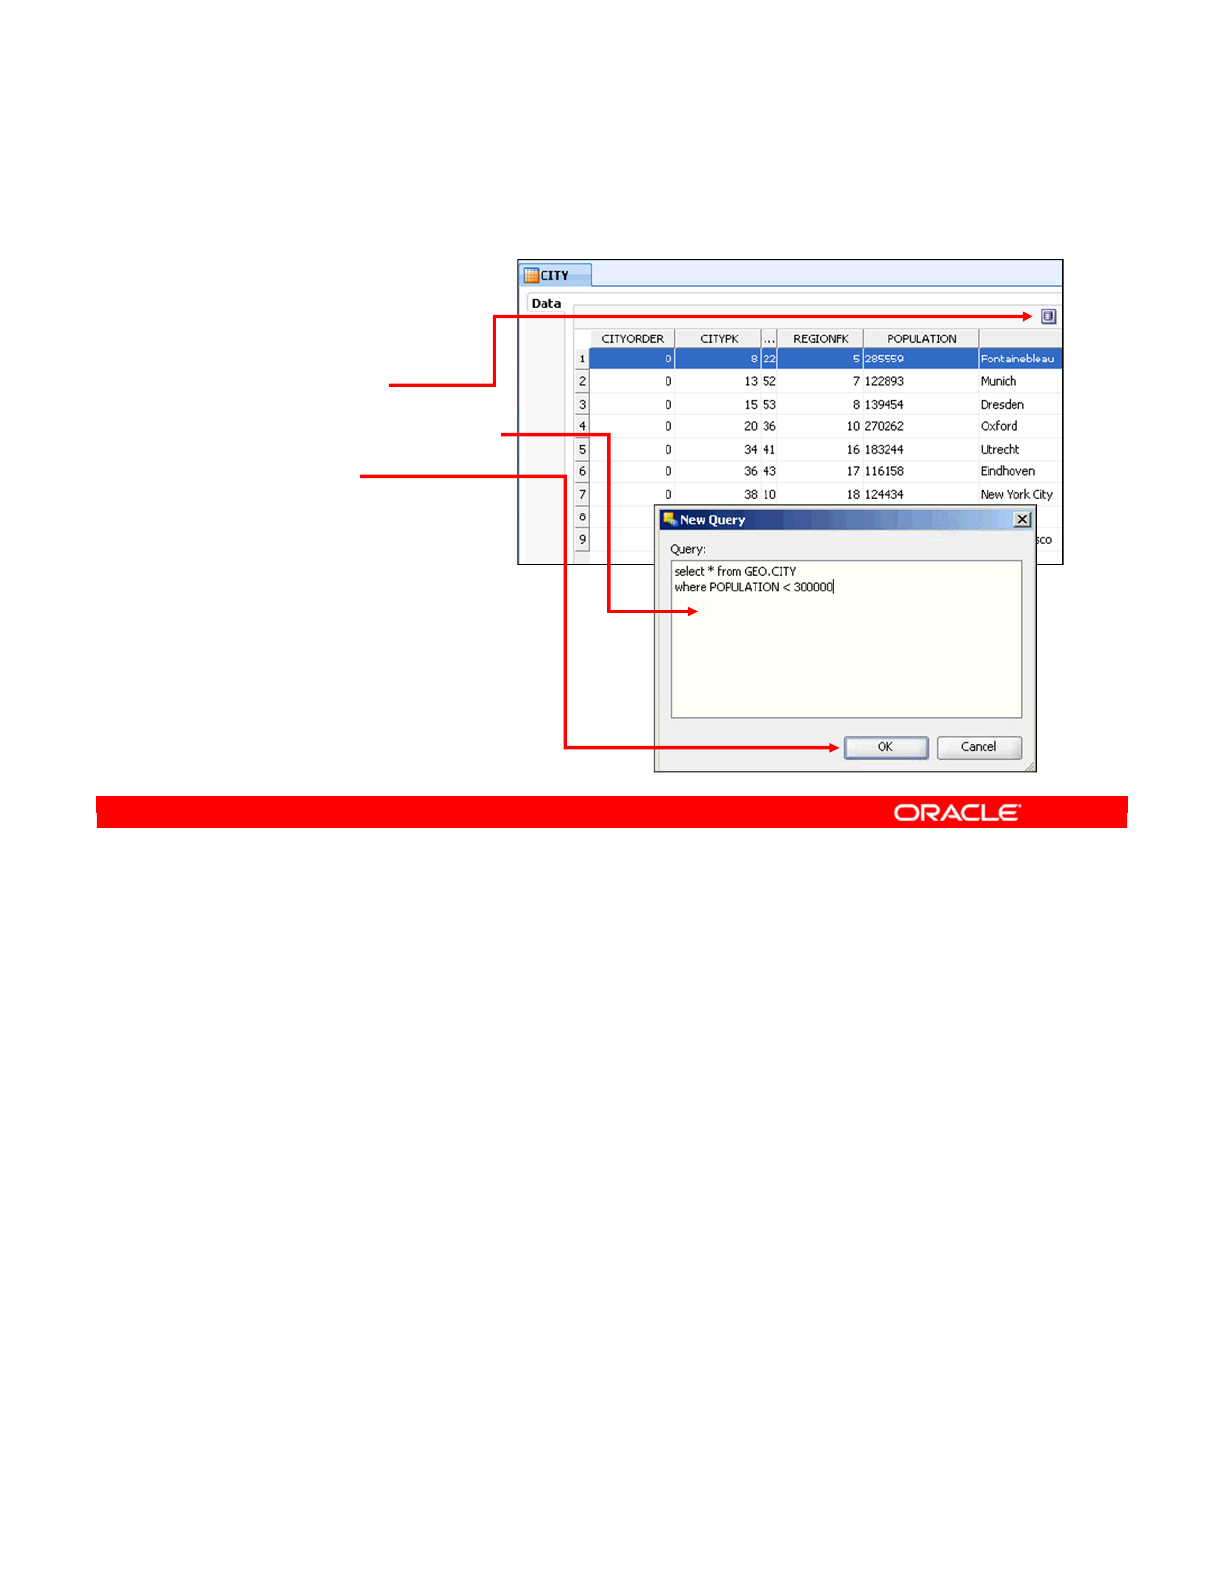
At times you might need to use more advanced queries to analyze your data. In this case,
open the Data window for a datastore as before. Then, click the SQL icon. This enables you
to enter an arbitrary SQL query directly. Click OK to launch it. You can use any database
functions or features supported by the database engine that hosts the model.
Oracle Data Integrator 11g: Integration and Administration 7 - 34
Copyright © 2012, Oracle and/or its affiliates. All rights reserved.
Analyzing the Contents of a Datastore
1. Open the data window
for a datastore,
as before.
2. Click the New
Query icon.
3. Edit the SQL query.
4. Click OK.
You can use any
functions or features
from the database engine.
Oracle University and (Oracle Corporation) use only.
These eKit materials are to be used ONLY by you for the express purpose SELF STUDY. SHARING THE FILE IS STRICTLY PROHIBITED.

You have analyzed your data. Now you construct a set of business rules to match the data in
your model.
Oracle Data Integrator 11g: Integration and Administration 7 - 35
Copyright © 2012, Oracle and/or its affiliates. All rights reserved.
Constructing Business Rules
Oracle University and (Oracle Corporation) use only.
These eKit materials are to be used ONLY by you for the express purpose SELF STUDY. SHARING THE FILE IS STRICTLY PROHIBITED.

ODI enables application designers and business analysts to define business rules that target
data quality maintenance. There are two ways to do this:
•First, by automatically reverse-engineering metadata from the source application data.
ODI detects existing data quality rules defined at the database level. For example, it
turns foreign keys into references.
•It also enables application designers to add additional, user-defined rules in the
repository.
The rules can generally be reconstructed by data analysis and profiling. As you become
familiar with the data, you can deduce the business rules that apply to them.
Refer to the lesson titled “ODI Interface Concepts” for more details about creating
business rules.
Oracle Data Integrator 11g: Integration and Administration 7 - 36
Copyright © 2012, Oracle and/or its affiliates. All rights reserved.
Defining Business Rules in ODI
•There are two ways to define business rules in ODI to
maintain data quality:
–Automatic retrieval with other metadata
—
Obtained by reverse-engineering
–Addition by designers manually
—
User-defined rules
•Rules can be deduced by data analysis and profiling.
Oracle University and (Oracle Corporation) use only.
These eKit materials are to be used ONLY by you for the express purpose SELF STUDY. SHARING THE FILE IS STRICTLY PROHIBITED.

The business rules for data quality can include:
•Deduplication rules (unique keys):
-These rules can be used to identify and isolate inconsistent data sets.
-For example: “Customers with the same email address,” “Products having the
same item code and item family code”
-These rules are defined in ODI as primary keys, alternate keys, or unique indexes.
•Simple and complex reference rules:
-For example, “Customers that are linked to nonexistent sales reps,” “Orders that
are linked to customers that are marked as Invalid”
-These rules are defined in ODI as references.
•Validation rules:
-These rules enforce consistency at the record level.
-For example: “The list of customers with an empty zip code,” “The list of Web
prospect responses with an invalid email address”
-These rules are defined in ODI as conditions or mandatory columns.
Oracle Data Integrator 11g: Integration and Administration 7 - 37
Copyright © 2012, Oracle and/or its affiliates. All rights reserved.
From Business Rules to Constraints
•Deduplication rules:
–Primary keys
–Alternate keys
–Unique indexes
•Reference rules:
–Simple: column A = column B
–Complex: column A = function (column B, column C)
•Validation rules:
–Mandatory columns
–Conditions
Oracle University and (Oracle Corporation) use only.
These eKit materials are to be used ONLY by you for the express purpose SELF STUDY. SHARING THE FILE IS STRICTLY PROHIBITED.

The following are some general principles for creating meaningful constraints from the results
of data analysis:
•If a column has no null values, you may want to add a mandatory constraint.
•If every set of values in a set of columns is unique, you may want to add an alternate
key.
•If every value in a column is unique and numeric, and there are no null values, you can
add a primary key and flag the column as mandatory.
•When a set of columns contains the same values often, you may want to add an index
for performance. You can also create a condition that prevents values outside this range
from being entered.
•Lastly, consider adding a reference when data in a group of columns in one table
matches data in another table. The two types should be the same, of course.
Oracle Data Integrator 11g: Integration and Administration 7 - 38
Copyright © 2012, Oracle and/or its affiliates. All rights reserved.
Deducing Constraints from Data Analysis
•If a column has no null values, consider a mandatory
constraint.
•If a set of columns never contains a set of values more
than once, consider an alternate key.
•If a column contains distinct, not-null, numeric values,
consider a primary key with the column flagged as
mandatory.
•If a set of columns contains few different values:
–Consider an index
–Consider a condition based on these values
•If a table has a group of columns with data matching a key
of the same type from another table, consider a reference.
Oracle University and (Oracle Corporation) use only.
These eKit materials are to be used ONLY by you for the express purpose SELF STUDY. SHARING THE FILE IS STRICTLY PROHIBITED.
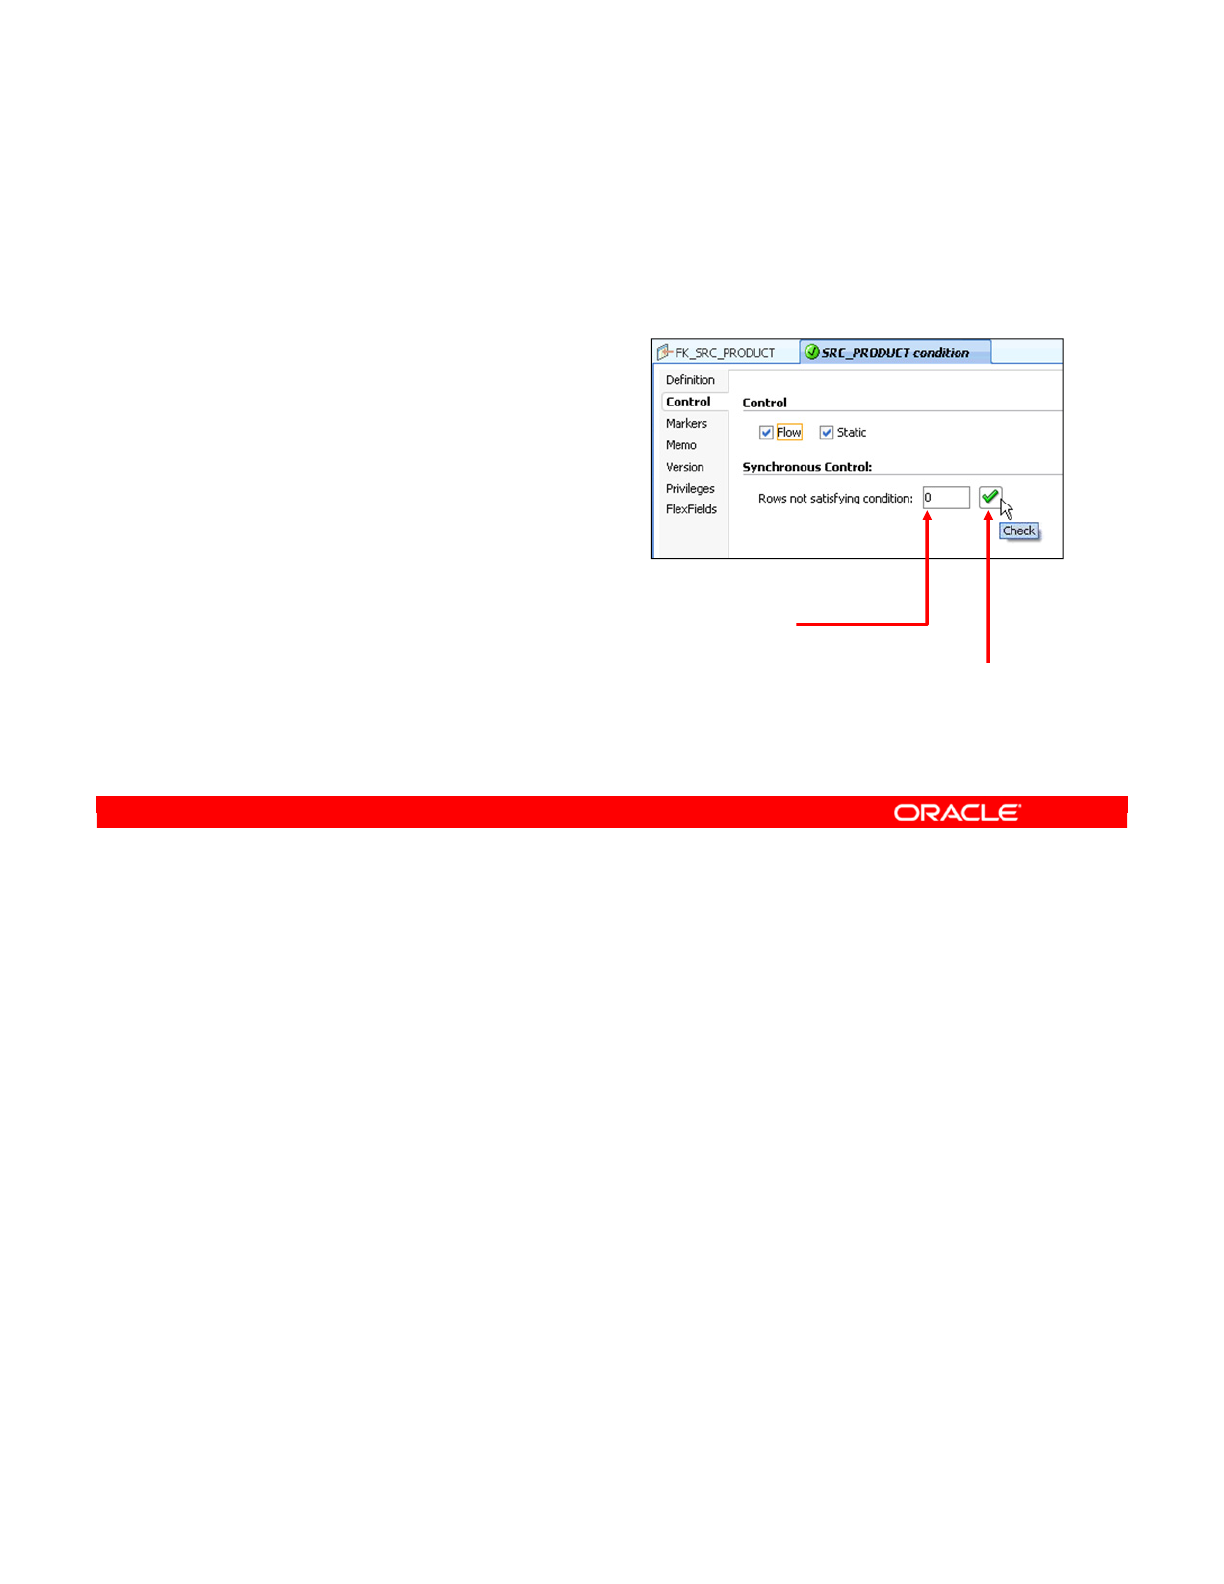
A synchronous option to perform a “quick” check of a constraint after it is created is available
on the Control tab of the window for keys, references, and conditions.
By clicking the Check button, you can perform a synchronous check on the constraint, which
tells you the number of rows that violate the constraint. Use this button whenever possible to
check whether your rule is correct. For example, if this check returns half of your rows as
duplicates, you probably have made a mistake somewhere.
You should remember that synchronous checks query the data server directly to obtain the
number of invalid rows. This feature works only with SQL-based systems. Thus, you cannot
perform a synchronous check on a file-based data store. Also, note that, unlike a normal static
check, the result of a synchronous check is not saved anywhere.
Oracle Data Integrator 11g: Integration and Administration 7 - 39
Copyright © 2012, Oracle and/or its affiliates. All rights reserved.
Testing a Constraint
Synchronous data check:
•“Quick” check
•Available on the Control tab
of the Constraint window
–For keys, references, and
conditions
•Useful to check whether a
rule is correct
•Requires a SQL-enabled
system
Start
synchronous
control.
Number of
erroneous
rows
Oracle University and (Oracle Corporation) use only.
These eKit materials are to be used ONLY by you for the express purpose SELF STUDY. SHARING THE FILE IS STRICTLY PROHIBITED.
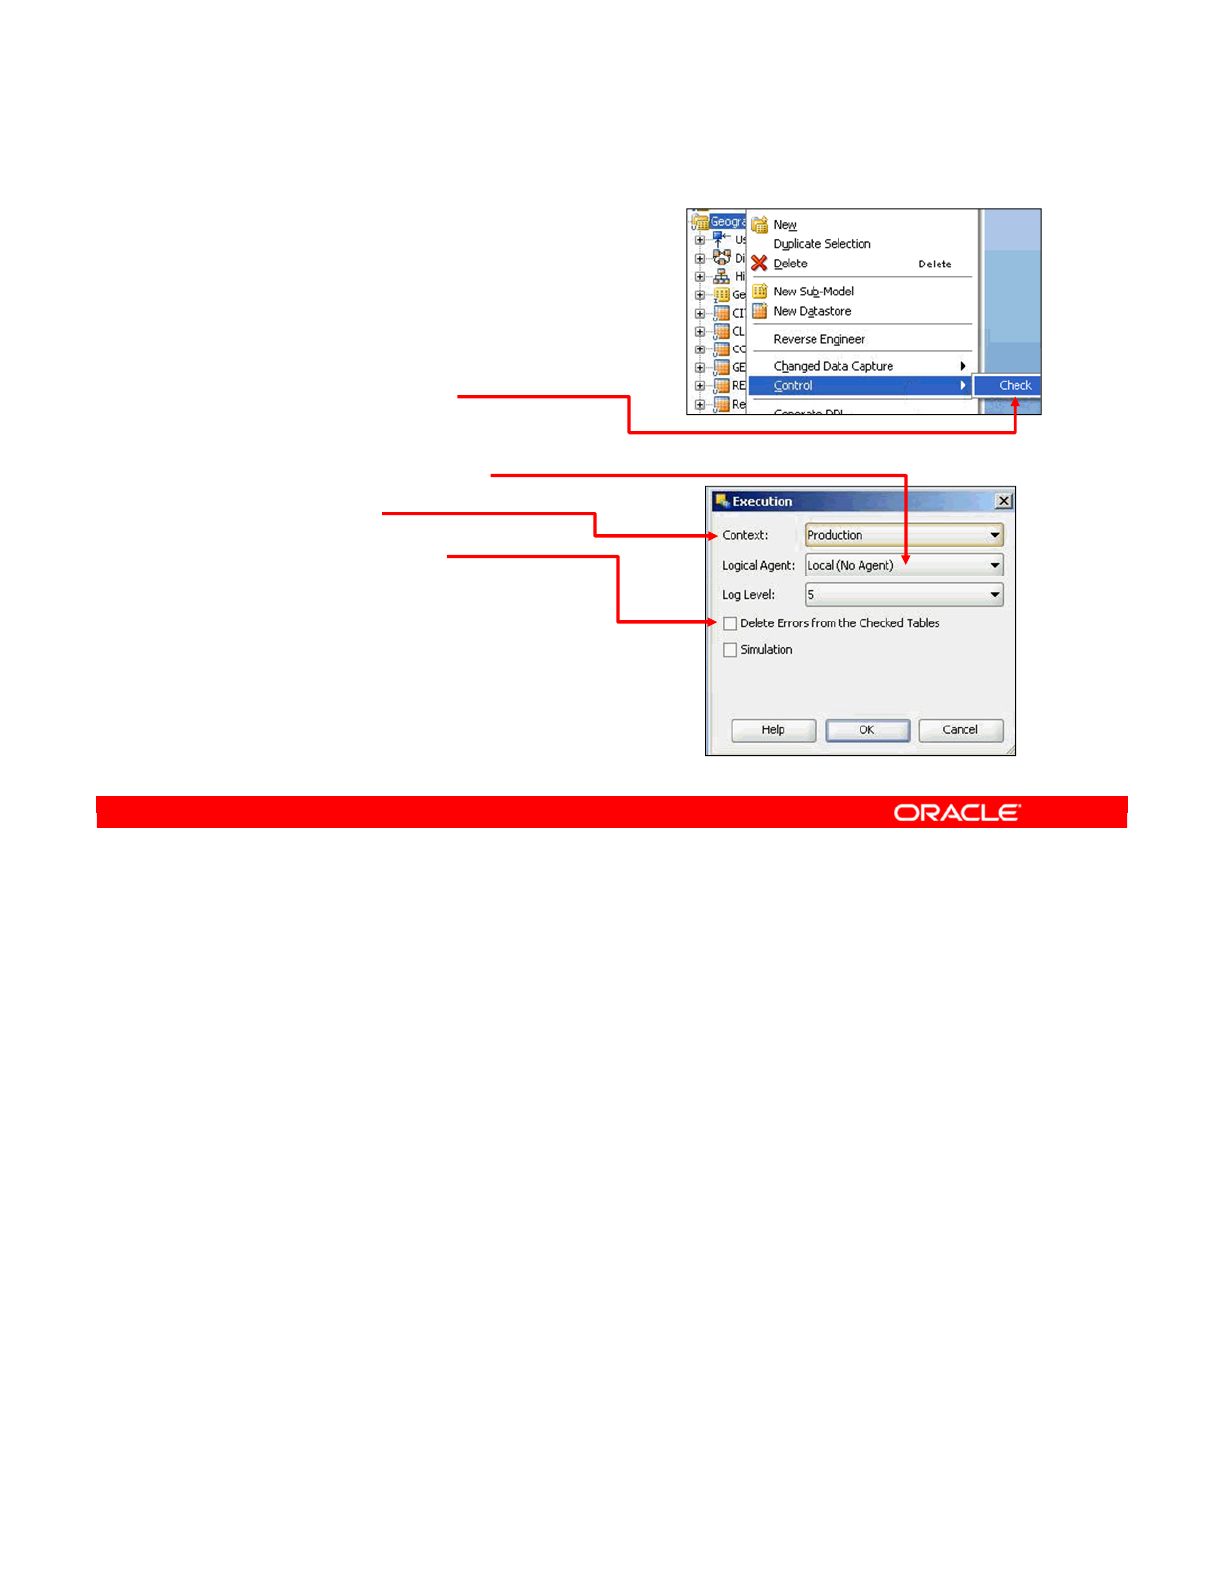
To audit data in a model or a data store, perform the following:
1. Select the datastore or model in the Models view.
2. Right-click and select the Check from the Control submenu.
3. The audit must be performed by an ODI Agent. You also need to specify the context that
determines which instance of the data will be checked.
4. The Agent now launches the session. You can follow its progress in Operator, if
necessary. This will let you know when the audit has finished so that you can review the
results. Note that to perform such a data check, a Check Knowledge Module must be
defined in the data model you are working with.
Oracle Data Integrator 11g: Integration and Administration 7 - 40
Copyright © 2012, Oracle and/or its affiliates. All rights reserved.
Auditing a Model or Datastore
1. Select the datastore or model in
the Models view.
2. Right-click and select
Control > Check.
3. Select:
–Execution Agent
–Context
–Delete errors
The session starts.
4. Use Operator to check
the audit’s progress.
Oracle University and (Oracle Corporation) use only.
These eKit materials are to be used ONLY by you for the express purpose SELF STUDY. SHARING THE FILE IS STRICTLY PROHIBITED.
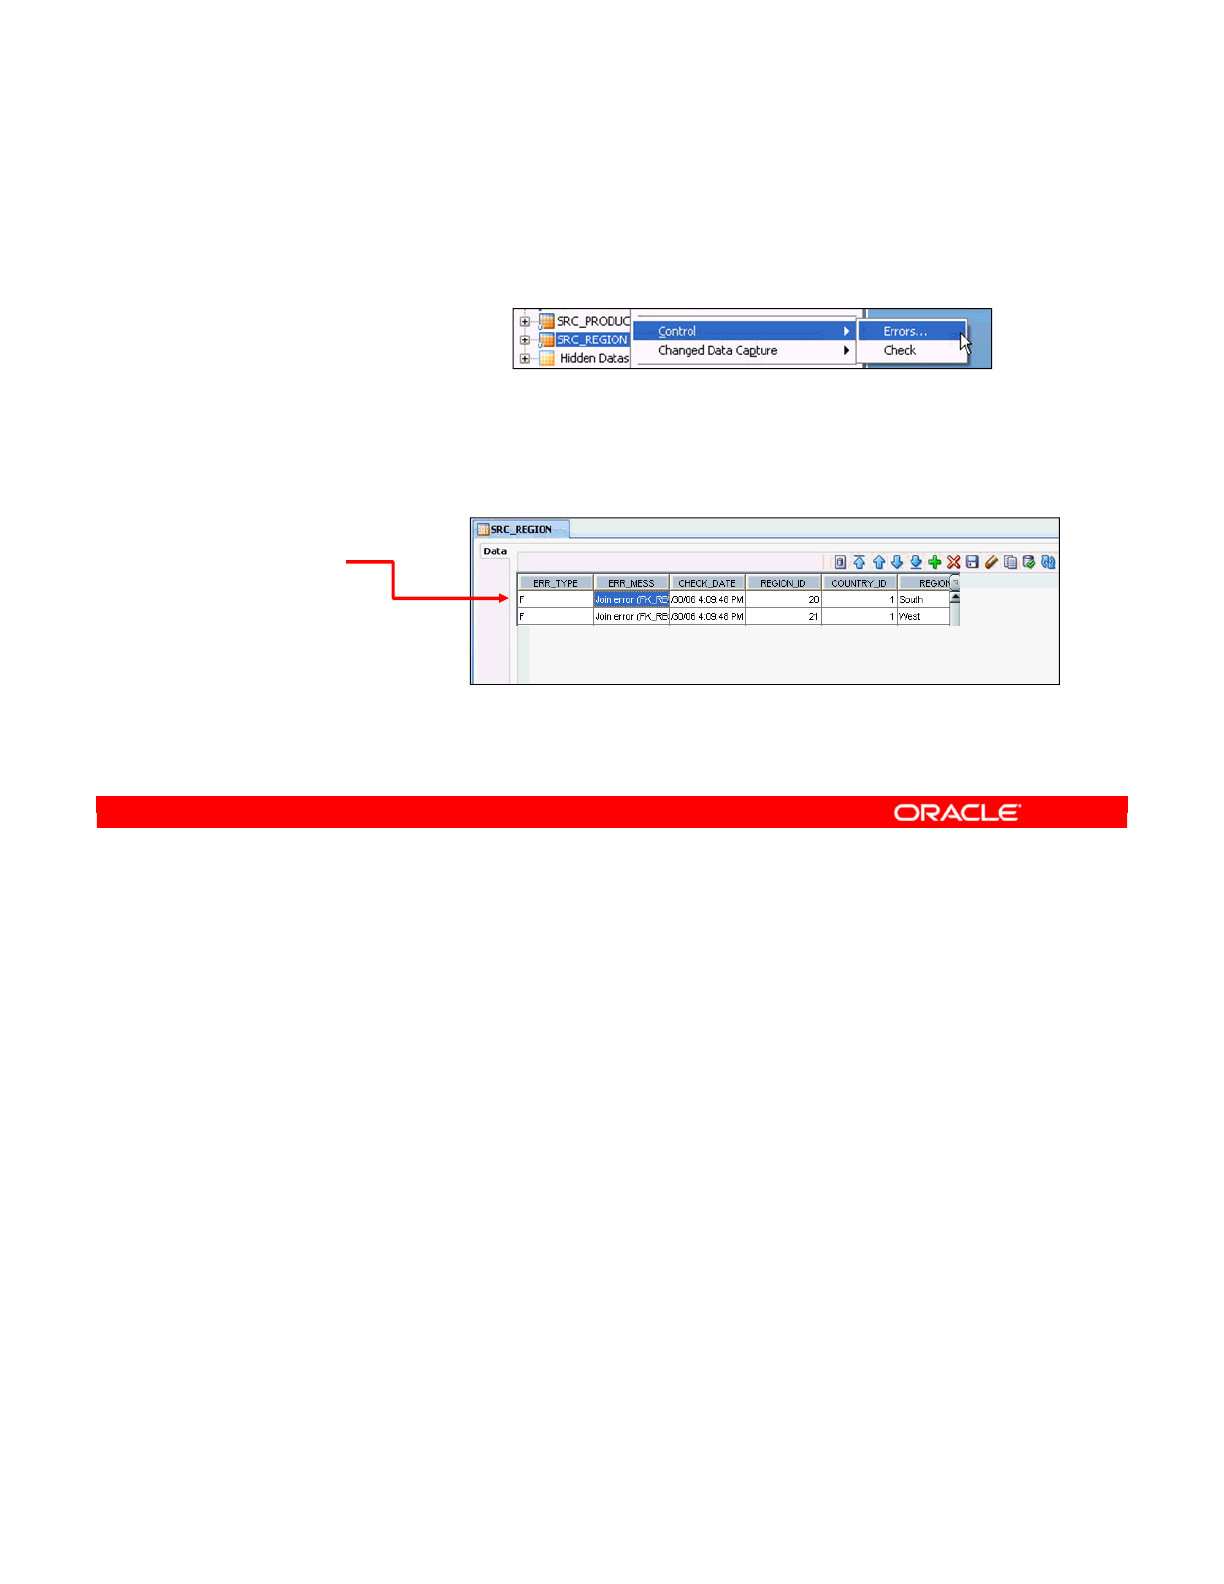
The process to view the bad records that were picked up in the audit is similar to starting the
audit. Perform the following:
1. Select the target datastore from the Models view.
2. You must check the results for each datastore individually.
3. Now, right-click and select Control > Errors. The erroneous rows are now displayed. For
each error, the business rule that was violated is also shown.
Oracle Data Integrator 11g: Integration and Administration 7 - 41
Copyright © 2012, Oracle and/or its affiliates. All rights reserved.
How to Review Erroneous Records
Select the datastore
in the Models view.
1. Right-click, select
Control > Errors.
2. Review the
erroneous
rows.
Oracle University and (Oracle Corporation) use only.
These eKit materials are to be used ONLY by you for the express purpose SELF STUDY. SHARING THE FILE IS STRICTLY PROHIBITED.

Answer: b
Explanation: The most common way to create datastores in ODI is by reverse-engineering
their structure from the database. However, you can do so directly in the model.
Oracle Data Integrator 11g: Integration and Administration 7 - 42
Copyright © 2012, Oracle and/or its affiliates. All rights reserved.
Quiz
The only way to create datastores in ODI is by reverse-
engineering their structure from the database.
a. True
b. False
Oracle University and (Oracle Corporation) use only.
These eKit materials are to be used ONLY by you for the express purpose SELF STUDY. SHARING THE FILE IS STRICTLY PROHIBITED.

Answer: a, b
Explanation: References in ODI can be either simple equalities between columns in tables,
or complex expressions that define a relationship between columns in tables.
Answers a and b compare across tables. Why not answer c? Answer c is more like a
condition within a table.
Oracle Data Integrator 11g: Integration and Administration 7 - 43
Copyright © 2012, Oracle and/or its affiliates. All rights reserved.
Quiz
In ODI, references can be represented by:
a. Simple equalities between columns in tables
b. Complex relationships between columns in tables
c. Expressions that must evaluate to true or false
d. All of the above
Oracle University and (Oracle Corporation) use only.
These eKit materials are to be used ONLY by you for the express purpose SELF STUDY. SHARING THE FILE IS STRICTLY PROHIBITED.

Oracle Data Integrator 11g: Integration and Administration 7 - 44
Copyright © 2012, Oracle and/or its affiliates. All rights reserved.
Summary
In this lesson, you should have learned how to:
•Organize ODI models
•Create datastores in ODI models
•Create constraints in ODI:
–Create mandatory columns
–Create keys and references in ODI models
–Create and check conditions
•Explore data
•Audit an ODI model or data store
Oracle University and (Oracle Corporation) use only.
These eKit materials are to be used ONLY by you for the express purpose SELF STUDY. SHARING THE FILE IS STRICTLY PROHIBITED.

Oracle Data Integrator 11g: Integration and Administration 7 - 45
Copyright © 2012, Oracle and/or its affiliates. All rights reserved.
Checklist of Practice Activities
1-1: Logging In and Using Help
2-1: Creating Users and Repositories and Logging In
3-1: Creating an ODI Agent for Orchestrating Execution of ODI Objects
4-1: Defining the Topology
5-1: Setting Up a New ODI Project
6-1: Creating a Model
7-1: Checking Data Quality in the Model
8-1: ODI Interface: Simple Transformations
9-1: ODI Interface: Complex Transformations
9-2: ODI Interface: Implementing Lookup
10-1: ODI Interface: Exporting a Flat File to a Relational Table
11-1: Using Native Sequences with ODI Interface
11-2: Using Temporary Indexes
11-3: Using Data Sets with ODI Interface
12-1: Using Temporary ODI Interfaces
12-2: Developing a New Knowledge Module
13-1: Creating an ODI Procedure
14-1: Creating an ODI Package
14-2: Using ODI Package with Variables and User Functions
15-1: Creating and Scheduling an ODI Scenario
16-1: Using Load Plans
17-1: Working with ODI Versions
18-1: Enforcing Data Quality with ODI Interface
19-1: Implementing Changed Data Capture
20-1: Setting Up ODI Security
20-2: Integrating with Enterprise Manager and Using ODI Console
21-1: Executing an ODI Scenario Through the ODI Public Web Service
Oracle University and (Oracle Corporation) use only.
These eKit materials are to be used ONLY by you for the express purpose SELF STUDY. SHARING THE FILE IS STRICTLY PROHIBITED.
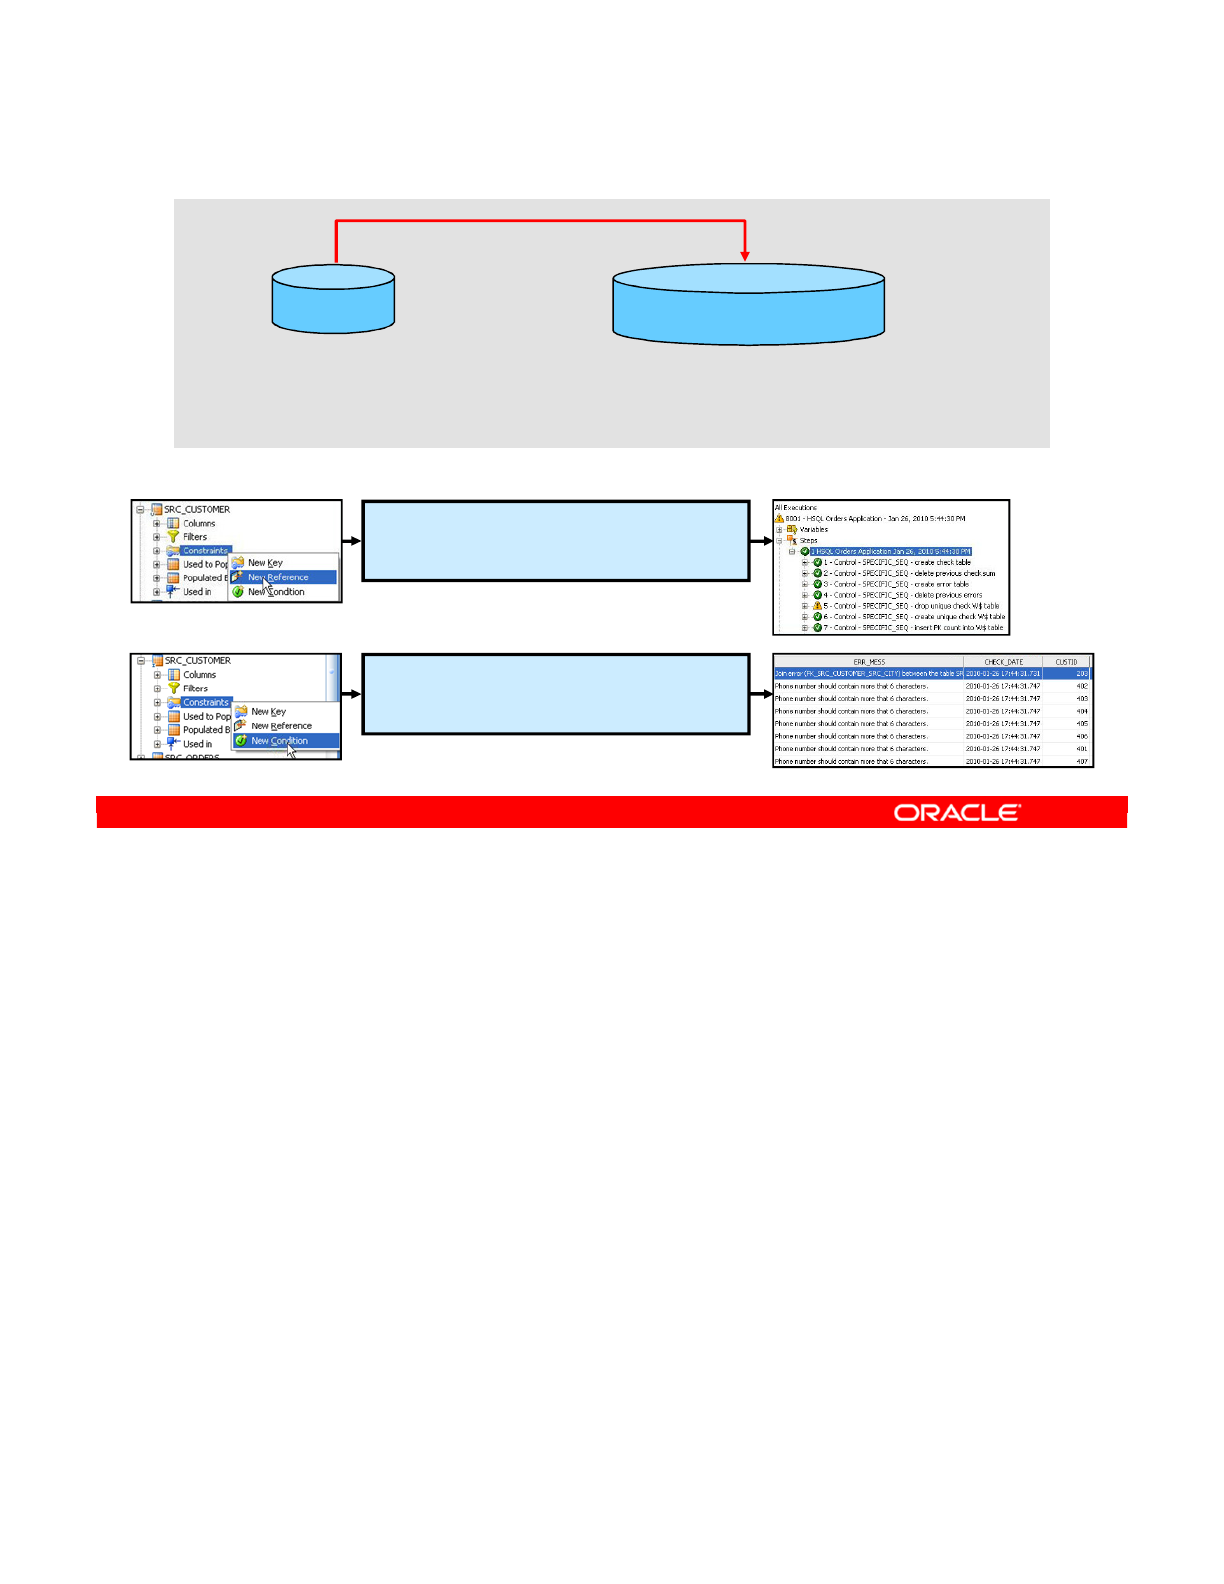
After the models are defined, you need to check the quality of the data in these models. In this
practice, you check the quality of data in the models and define constraints on models for the
given sample application.
First you create a new model, HSQL_ORDERS_APPLICATION, as a duplicate of the model
HSQL_SRC.
You then create a referential constraint on the SRC_CUSTOMER table's CITY_ID column,
using SRC_CITY as the parent table.
Next, you create a condition constraint on the SRC_CUSTOMER table:
Length(SRC_CUSTOMER.PHONE) > 6
Oracle Data Integrator 11g: Integration and Administration 7 - 46
Copyright © 2012, Oracle and/or its affiliates. All rights reserved.
Practice 7-1: Overview
Model
HSQL_SRC
SPECIFIC_SEQ, SRC_CITY,
SRC_CUSTOMER, SRC_ORDERS,
SRC_ORDER_FORM,
SRC_ORDER_LINES, SRC_PRODUCT,
SRC_REGION
Logical schema:
HSQL_DEMO_SRC
Model
HSQL_ORDERS_APPLICATION
SPECIFIC_SEQ, SRC_CITY,
SRC_CUSTOMER, SRC_ORDERS,
SRC_ORDER_FORM,
SRC_ORDER_LINES, SRC_PRODUCT,
SRC_REGION
Logical schema:
HSQL_DEMO_SRC
Duplicate
Execute and test
Create a reference constraint on
SRC_CUSTOMER, CITY_ID column,
using SRC_CITY as the parent table.
Create a condition constraint on
SRC_CUSTOMER:
Length(SRC_CUSTOMER.PHONE) > 6.
Oracle University and (Oracle Corporation) use only.
These eKit materials are to be used ONLY by you for the express purpose SELF STUDY. SHARING THE FILE IS STRICTLY PROHIBITED.

Copyright © 2012, Oracle and/or its affiliates. All rights reserved.
ODI Interface Concepts
Oracle University and (Oracle Corporation) use only.
These eKit materials are to be used ONLY by you for the express purpose SELF STUDY. SHARING THE FILE IS STRICTLY PROHIBITED.

Oracle Data Integrator 11g: Integration and Administration 8 - 2
Copyright © 2012, Oracle and/or its affiliates. All rights reserved.
Objectives
After completing this lesson, you should be able to:
•Describe the concept of Oracle Data Integrator (ODI)
Interface
•Describe the concept of mapping, join, and filter
•Describe the process of implementing business rules
•Describe the concepts of staging area and execution
location
•Use knowledge modules with ODI Interface
•Create and execute a basic ODI Interface
•Use lookups
Oracle University and (Oracle Corporation) use only.
These eKit materials are to be used ONLY by you for the express purpose SELF STUDY. SHARING THE FILE IS STRICTLY PROHIBITED.

This section provides a detailed description of some of the concepts involved in interfaces
and in using interfaces to implement business rules.
Oracle Data Integrator 11g: Integration and Administration 8 - 3
Copyright © 2012, Oracle and/or its affiliates. All rights reserved.
ODI Interfaces
Key Concepts
Oracle University and (Oracle Corporation) use only.
These eKit materials are to be used ONLY by you for the express purpose SELF STUDY. SHARING THE FILE IS STRICTLY PROHIBITED.

An interface is an object in ODI that serves primarily to populate a datastore, which is known
as the target. The data comes from one or more source datastores, which can be located on
different servers from each other, and from the target. The business rules that govern this
data transfer are expressed directly in the interface as mappings, joins, filters, and
constraints. All these concepts are explored in detail in this lesson.
Oracle Data Integrator 11g: Integration and Administration 8 - 4
Copyright © 2012, Oracle and/or its affiliates. All rights reserved.
What Is an Interface?
•An interface is an ODI object that loads one target
datastore with data from one or more source datastores.
•An interface defines the loading and integration strategies
from sources to target based on the selection of
knowledge modules.
•An interface implements business rules as mappings,
joins, filters, and constraints.
Oracle University and (Oracle Corporation) use only.
These eKit materials are to be used ONLY by you for the express purpose SELF STUDY. SHARING THE FILE IS STRICTLY PROHIBITED.

Business rules are visible in interfaces in five ways:
•Mappings describe the transformation of data from source datastores to a target
datastore.
•Filters specify the incoming rows that you would want to treat.
•Joins link several source datastores.
•Constraints ensure that both incoming and outgoing data conform to business
requirements.
•Lookups use a source as the driving table and a lookup datastore or interface.
Filters, joins, and constraints can be attached permanently to models in Designer. Mappings
exist only within the context of an interface.
Oracle Data Integrator 11g: Integration and Administration 8 - 5
Copyright © 2012, Oracle and/or its affiliates. All rights reserved.
Business Rules for Interfaces
•Business rules are implemented in interfaces as:
–Mappings
–Filters
–Joins
–Constraints
–Lookups
•They are implemented within Designer in:
–Data models
–Interfaces
•They are stored in the Work Repository.
Oracle University and (Oracle Corporation) use only.
These eKit materials are to be used ONLY by you for the express purpose SELF STUDY. SHARING THE FILE IS STRICTLY PROHIBITED.
As mentioned previously, business rules are implemented as mappings, filters, joins,
constraints, and lookups. You now see where these are found in the interface window.
Mappings, filters, and joins are found in the interface diagram. Because mappings are tied to
the target columns directly, you see them by clicking the names of columns in the target
datastore.
Filters can be created for the purposes of an interface or attached permanently to models.
Joins appear as lines in the interface diagram. You can create them directly in the interface
diagram, or define references between models. These references are automatically converted
into joins.
Constraints exist only on models. You can define constraints on source datastores through
the Models view. These become static controls. You can also define constraints on target
datastores in the same way. These constraints become flow controls and can be activated
through the Controls tab.
Use a wizard in the interface editor to create lookups by using a source as the driving table
and a lookup datastore or interface.
Oracle Data Integrator 11g: Integration and Administration 8 - 6
Copyright © 2012, Oracle and/or its affiliates. All rights reserved.
Where Are the Rules Defined?
The business rules implemented in an interface are located as
follows:
Mapping In the interface diagram. Each column of the target has at most one
mapping.
Filters In the interface diagram. Filters may be inherited from the datastore
definition in the model or created manually.
Joins In the interface diagram. Joins may be inherited from the model
definition or created manually.
Constraints In target datastore definition in the model. Constraints to be
enforced are selected on the interface’s Control tab.
Lookups In the interface editor. Create lookups by using a source as the
driving table and a lookup datastore or interface.
Oracle University and (Oracle Corporation) use only.
These eKit materials are to be used ONLY by you for the express purpose SELF STUDY. SHARING THE FILE IS STRICTLY PROHIBITED.

The next few slides look at each of these types of business rule implementations.
Oracle Data Integrator 11g: Integration and Administration 8 - 7
Copyright © 2012, Oracle and/or its affiliates. All rights reserved.
Mapping, Join, Filter, Lookup,
and Data Sets
Oracle University and (Oracle Corporation) use only.
These eKit materials are to be used ONLY by you for the express purpose SELF STUDY. SHARING THE FILE IS STRICTLY PROHIBITED.
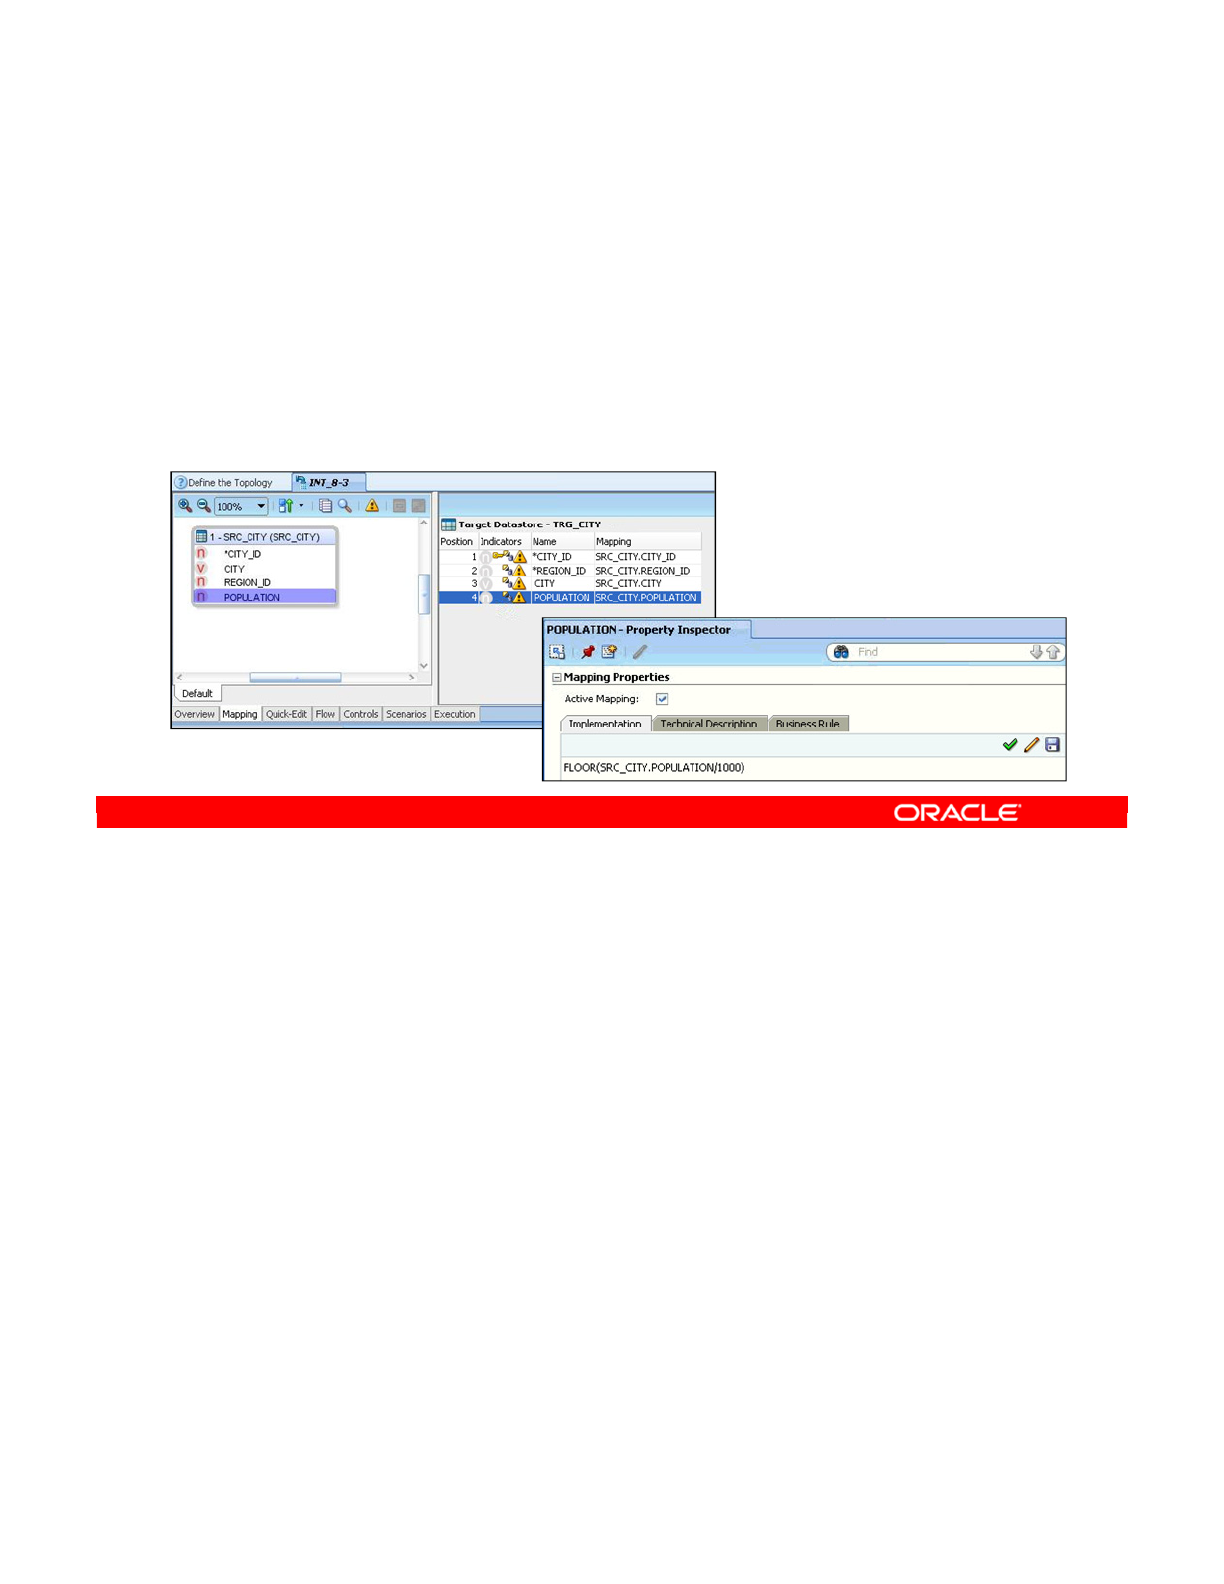
A mapping is a business rule that maps one or more columns from one or more source
datastores onto one of the target datastore columns, possibly transforming them in the
process. It can be as simple as stating that the Age column in the target datastore represents
the Age column in the source datastore, or as complex as calculating aggregate properties of
multiple columns in various datastores located on different servers.
A mapping can be defined manually by entering code in the mapping field or by using the
drag-and-drop functionality in the graphical user interface (GUI). ODI also includes an
Expression Editor, which helps in building the mapping.
Oracle Data Integrator 11g: Integration and Administration 8 - 8
Copyright © 2012, Oracle and/or its affiliates. All rights reserved.
What Is a Mapping?
•A mapping is a business rule implemented in ODI as a
SQL clause.
•It is a transformation rule that maps columns in source
datastores onto one of the target datastore columns.
•It is executed by a relational database server at run time.
Oracle University and (Oracle Corporation) use only.
These eKit materials are to be used ONLY by you for the express purpose SELF STUDY. SHARING THE FILE IS STRICTLY PROHIBITED.
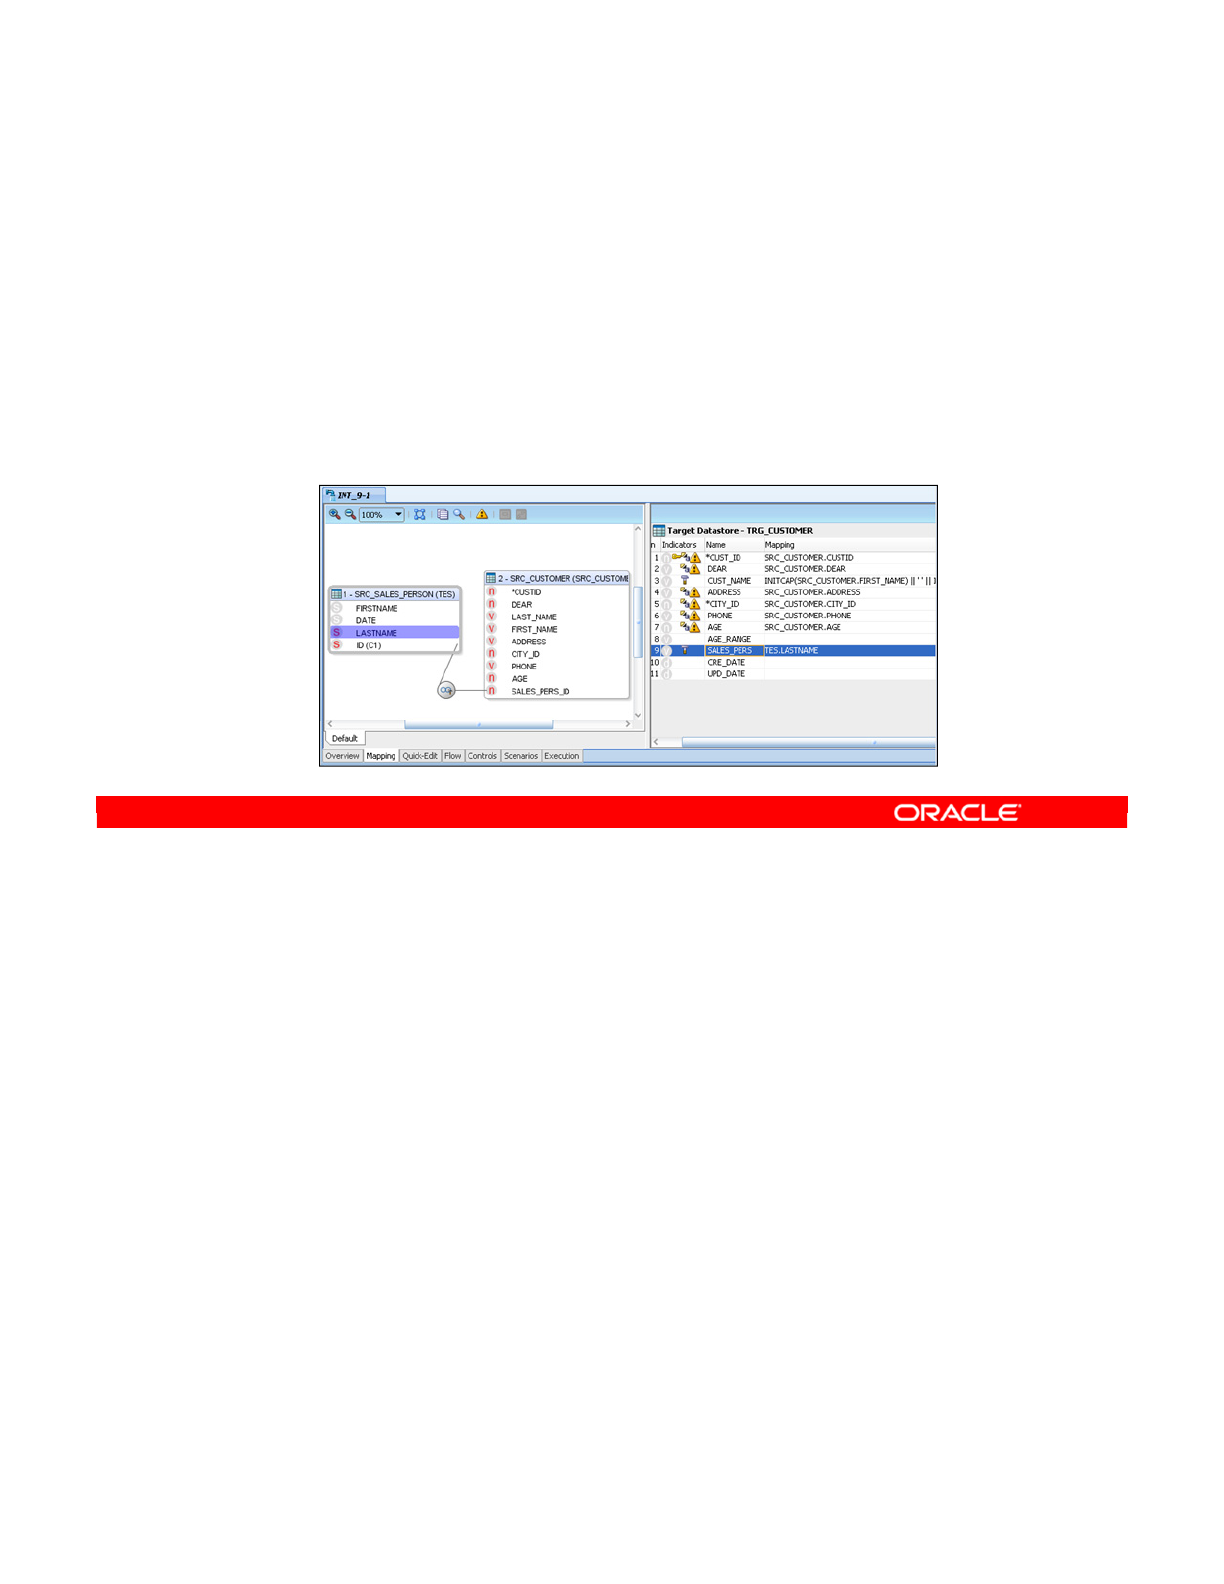
In relational models, a join operation links individual records in several tables. An interface
uses the same concept of linking source datastores to act as a single source to populate the
target. A join is implemented as a clause in SQL, and it defines a relation between the
columns of two or more datastores.
For example, you use a join to link the records from the ORDER table to records from the
CUSTOMER table. If a CUSTOMER_ID column is in both tables, you can use it to perform a join.
Orders with a given CUSTOMER_ID value are linked to the customer having the same
CUSTOMER_ID. Thus, you can populate a target table with not only the information about a
given order, but also with information about the customer who is making the order.
Oracle Data Integrator 11g: Integration and Administration 8 - 9
Copyright © 2012, Oracle and/or its affiliates. All rights reserved.
What Is a Join?
•In relational models, a join operation links records in
several tables, from any technologies.
•Interfaces use joins to link multiple-source datastores.
•A join is implemented as a SQL clause that relates the
columns of two or more datastores.
Oracle University and (Oracle Corporation) use only.
These eKit materials are to be used ONLY by you for the express purpose SELF STUDY. SHARING THE FILE IS STRICTLY PROHIBITED.

More precisely, a filter is an expression written in SQL that is attached to one or more
columns of one source datastore. The filter imposes a constraint that is applied to each row in
the source datastore, and only rows that match continue to be processed by the rest of the
interface. A source datastore can have more than one filter or none at all.
Oracle Data Integrator 11g: Integration and Administration 8 - 10
Copyright © 2012, Oracle and/or its affiliates. All rights reserved.
What Is a Filter?
A filter is a SQL clause applied to the columns of one source
datastore. Only records matching this filter are processed by
the interface.
Oracle University and (Oracle Corporation) use only.
These eKit materials are to be used ONLY by you for the express purpose SELF STUDY. SHARING THE FILE IS STRICTLY PROHIBITED.

An expression in the SELECT clause is sometimes more efficient on small lookup tables.
Oracle Data Integrator 11g: Integration and Administration 8 - 11
Copyright © 2012, Oracle and/or its affiliates. All rights reserved.
What Is a Lookup?
•Use a wizard in the interface editor to create lookups by
using a source as the driving table and a lookup datastore
or interface.
•Lookups appear as compact graphical objects in the
interface sources diagram.
•Choose how each lookup is generated:
–Left Outer Join in the FROM clause
–Expression in the SELECT clause (in-memory lookup with
nested loop)
•Benefits of using lookups:
–Simplifies the design and readability of interfaces that use
lookups
–Enables optimized code for execution
Oracle University and (Oracle Corporation) use only.
These eKit materials are to be used ONLY by you for the express purpose SELF STUDY. SHARING THE FILE IS STRICTLY PROHIBITED.
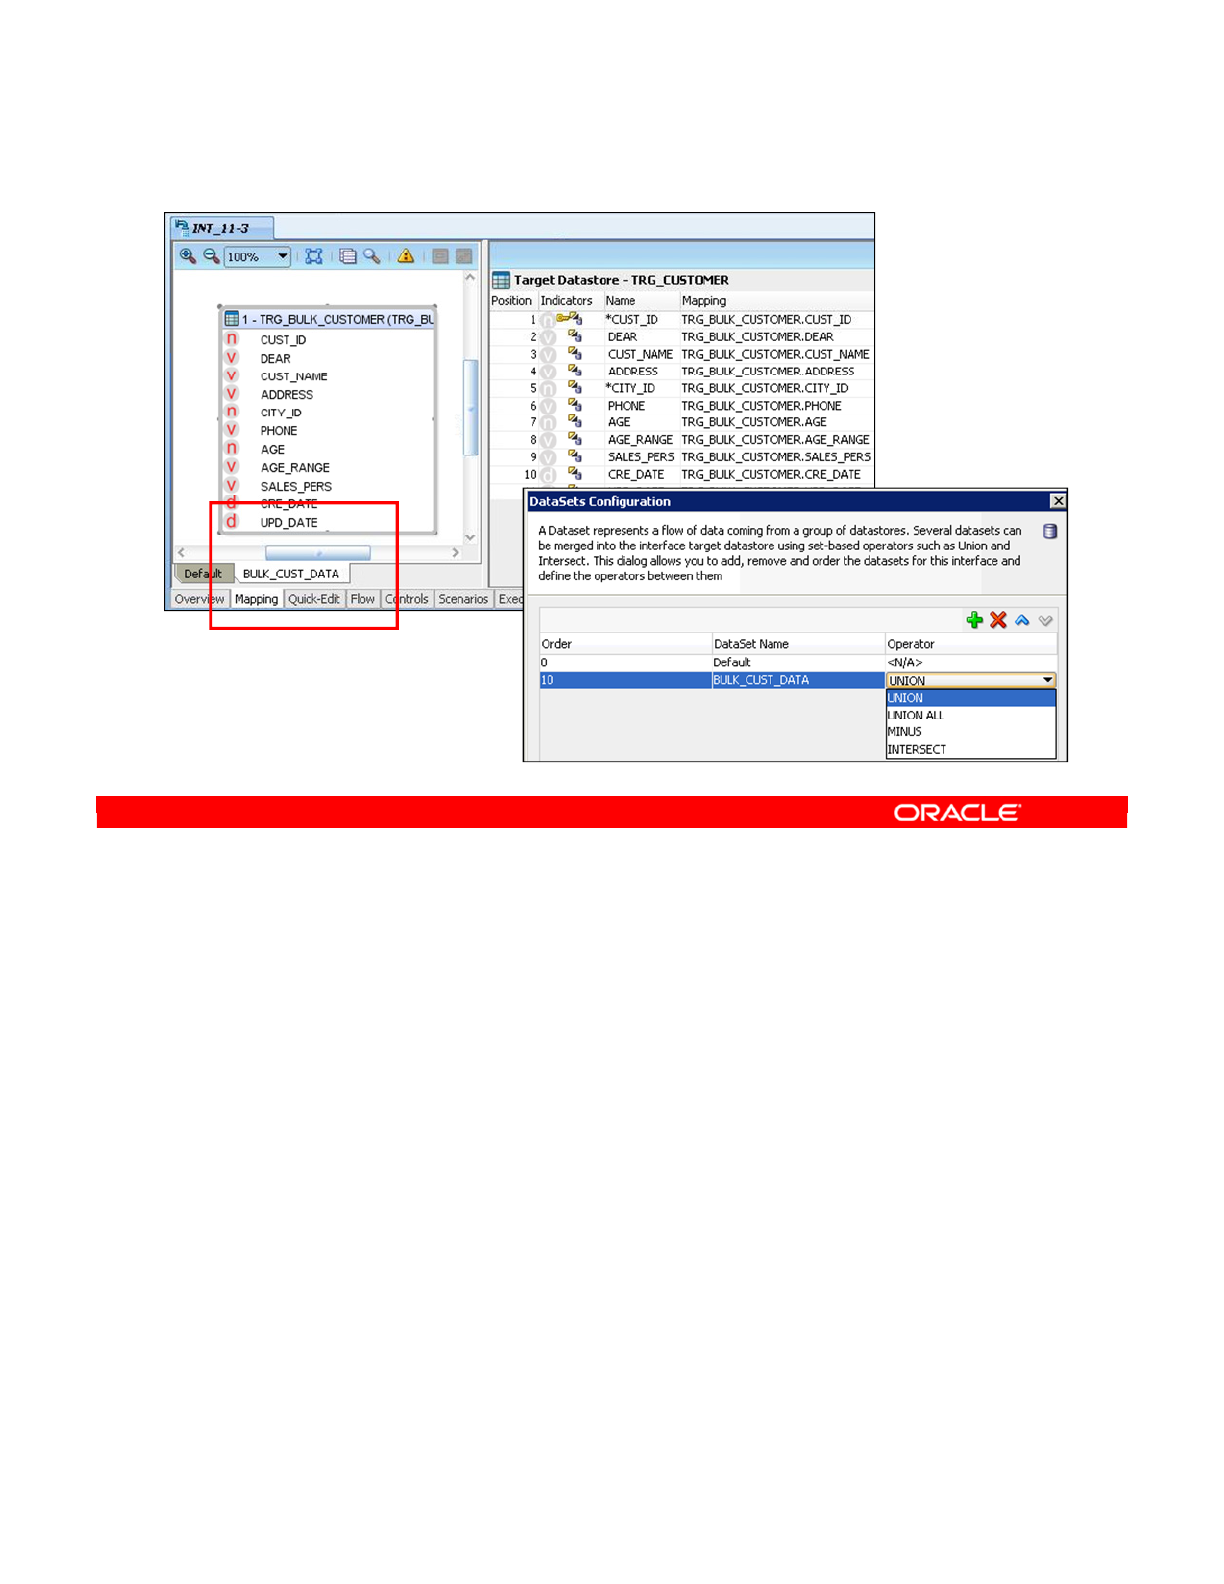
A data set represents the data flow coming from a group of datastores. Several data sets can
be merged into the interface target datastore by using set-based operators such as Union and
Intersect. The support for data sets, as well as the set-based operators supported, depends
on the technology of the staging area.
You can add, remove, and order the data sets of an interface and define the operators
between them in the Data Sets Configuration dialog box. Note that the set-based operators
are always executed on the staging area.
When designing the integration interface, the mappings for each data set must be consistent.
This means that each data set must have the same number of target columns mapped. One
target is loaded with data coming from several data sets. Set-based operators (Union, Union
All, Minus, Intersect) are used to merge the different data sets into the target datastore.
Each dataset corresponds to one diagram of source datastores and each target column has
one mapping per data set. If a mapping is executed of the target, it is the same mapping that
applies for all data sets. Data sets are displayed as tabs in the Interface Editor.
Oracle Data Integrator 11g: Integration and Administration 8 - 12
Copyright © 2012, Oracle and/or its affiliates. All rights reserved.
What Is a Data Set?
Oracle University and (Oracle Corporation) use only.
These eKit materials are to be used ONLY by you for the express purpose SELF STUDY. SHARING THE FILE IS STRICTLY PROHIBITED.

The next set of slides shows how ODI implements business rules.
Oracle Data Integrator 11g: Integration and Administration 8 - 13
Copyright © 2012, Oracle and/or its affiliates. All rights reserved.
Behind the Rules
Transforming the Rules into Code
Oracle University and (Oracle Corporation) use only.
These eKit materials are to be used ONLY by you for the express purpose SELF STUDY. SHARING THE FILE IS STRICTLY PROHIBITED.

So, what distinguishes ODI from similar products?
•Data integration in ODI is based entirely on business rules. ODI encourages you to first
define your business rules in a way that makes sense to you. Then you express the
rules in SQL and attach them directly to the relevant objects.
•You can use whatever database servers you have available to perform all the
processing. ODI generates either specific code for your database engine or standard
SQL code. Using native code or database-specific features may give you superior
performance over a standard SQL. But, the standard SQL module is more flexible and
works on all servers.
•ODI makes a clear distinction between the transformation rules and the processing
required to make them happen. You define the business rules on an interface. Then you
select a knowledge module, which knows how to implement these rules for a specific
technology.
Oracle Data Integrator 11g: Integration and Administration 8 - 14
Copyright © 2012, Oracle and/or its affiliates. All rights reserved.
How Does ODI Implement Business Rules?
•ODI is based on business rules.
–First, define the business rules.
–Next, implement them in SQL.
•ODI does not require a proprietary engine.
–Exploits in-house RDBMS engines to perform the required
processes
–Generates native or standard SQL code
•ODI separates the rules from the processes.
–Business rules are defined on an interface.
–Processing instructions are implemented in knowledge
modules.
Oracle University and (Oracle Corporation) use only.
These eKit materials are to be used ONLY by you for the express purpose SELF STUDY. SHARING THE FILE IS STRICTLY PROHIBITED.
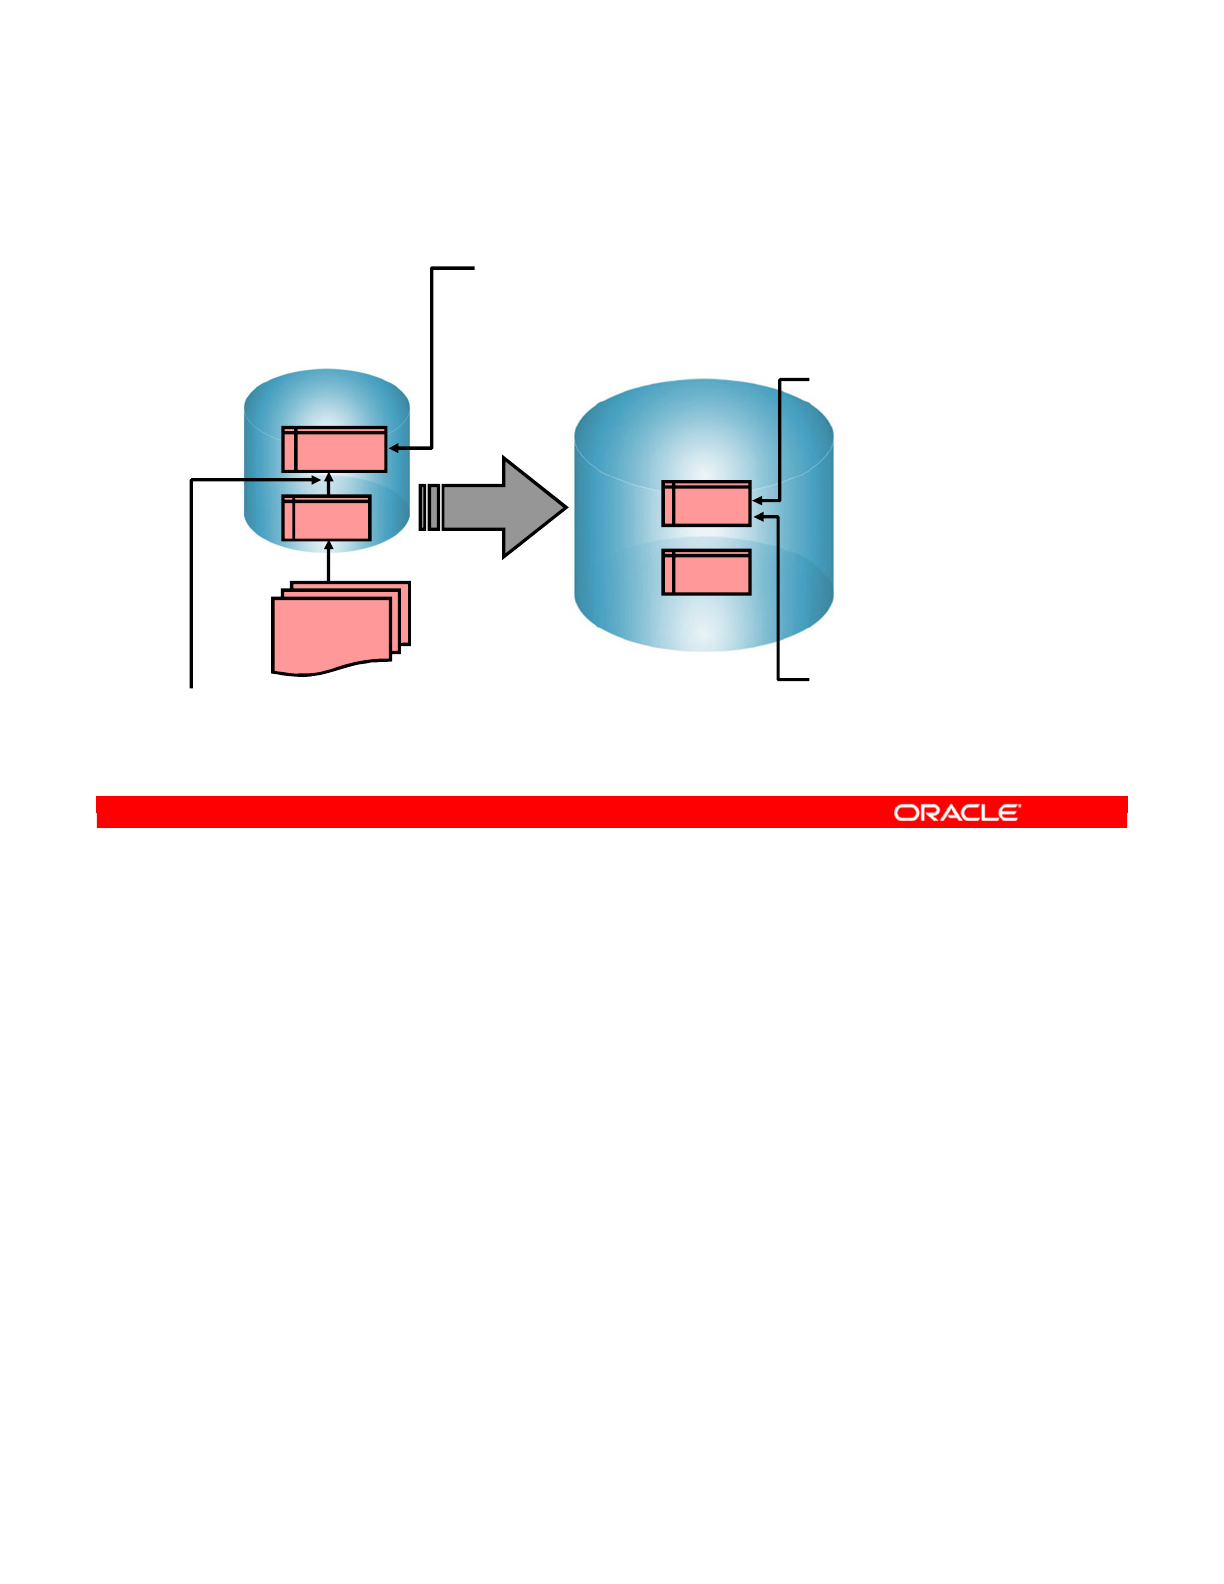
You now see an example involving the collection of statistics on the sales force. First, you see
how to express the scenario as natural language business rules. Then you see the same
rules expressed in SQL.
Imagine that you have a source ORDERS database, in Sybase, which contains customer
orders broken down into individual items. You also have a list of corrections stored in a flat
file. You now want to update your SALES database, stored on an Oracle server. This
database is used to determine who is the best sales representative for the month.
In particular, your business rule is that you want to store the sum of the sales of each sales
representative. This is a mapping, as it links source data to target data. You must include the
data from the corrections file as well.
Now, you only want to use data from orders marked as “closed,” or finalized. This limitation on
source data is a filter in ODI.
Then, you need to link the individual items or “lines” of an individual order to the order. This is
to enable you to calculate the total of each order. This linking of source tables is a join in ODI.
Lastly, you want only one record per sales representative in the target database. You also
need to ensure that each sales figure corresponds to an existing sales representative. Any
figures that fail either of these criteria should be rejected and placed in an ERRORS table. This
condition on a table is called a constraint.
Oracle Data Integrator 11g: Integration and Administration 8 - 15
Copyright © 2012, Oracle and/or its affiliates. All rights reserved.
A Business Problem
Source (Sybase)
ORDERS
LINES
CORRECTIONS
file
Target (Oracle)
SALES
ERRORS
Business rules
Filter
- Take into account only
ORDERS marked as “closed.”
Join
-A row from LINES has
a matching ORDER_ID
in ORDERS.
Mapping
- Target’s SALES is the
sum of the order lines’
AMOUNT grouped by
sales rep. and the
corrections applied.
Sales Rep = Sales Rep
ID from ORDERS
Constraints
-ID cannot be null and
must be unique.
The sales rep. ID
should exist in the
Target sales Rep table.
Oracle University and (Oracle Corporation) use only.
These eKit materials are to be used ONLY by you for the express purpose SELF STUDY. SHARING THE FILE IS STRICTLY PROHIBITED.

Now you see the same scenario as expressed in SQL. The mapping of the orders information
onto the sales figures is straightforward: In the target database, the sales figure is the sum of
the amounts of individual LINES plus the correction value in the source database. The sales
representative ID in the target is the same as the ID in the source.
Similarly, the filter is clear: You define that the “status” of the order is CLOSED. ODI filters out
any rows that do not match these criteria.
Your join consists of the equality ORDERS.ORDER_ID = LINES.ORDER_ID. You do not
have to remember any SQL syntax other than creating an expression.
Now the constraints. First, you flag the ID as a “not null” column in the model. If the underlying
table is already marked, ODI can detect this constraint. Similarly, you define a unique index in
the SALES table. ODI automatically rejects any faulty rows and places them in an ERRORS
table.
Oracle Data Integrator 11g: Integration and Administration 8 - 16
Copyright © 2012, Oracle and/or its affiliates. All rights reserved.
Implementing the Rules
Business rules implemented in SQL
Source (Sybase)
ORDERS
LINES
CORRECTIONS
File
Target (Oracle)
SALES
ERRORS
Join
ORDERS.ORDER_ID =
LINES.ORDER_ID
…
Mapping
SALES =
SUM(LINES.AMOUNT)
+
CORRECTION.VALUE
•SALES_REP =
ORDERS.SALES_REP_
ID
Constraints
ID is flagged not null
in the model. Unique
index UK_ID is declared
in the SALES table.
Filter
ORDERS.STATUS=CLOSED
…
Oracle University and (Oracle Corporation) use only.
These eKit materials are to be used ONLY by you for the express purpose SELF STUDY. SHARING THE FILE IS STRICTLY PROHIBITED.
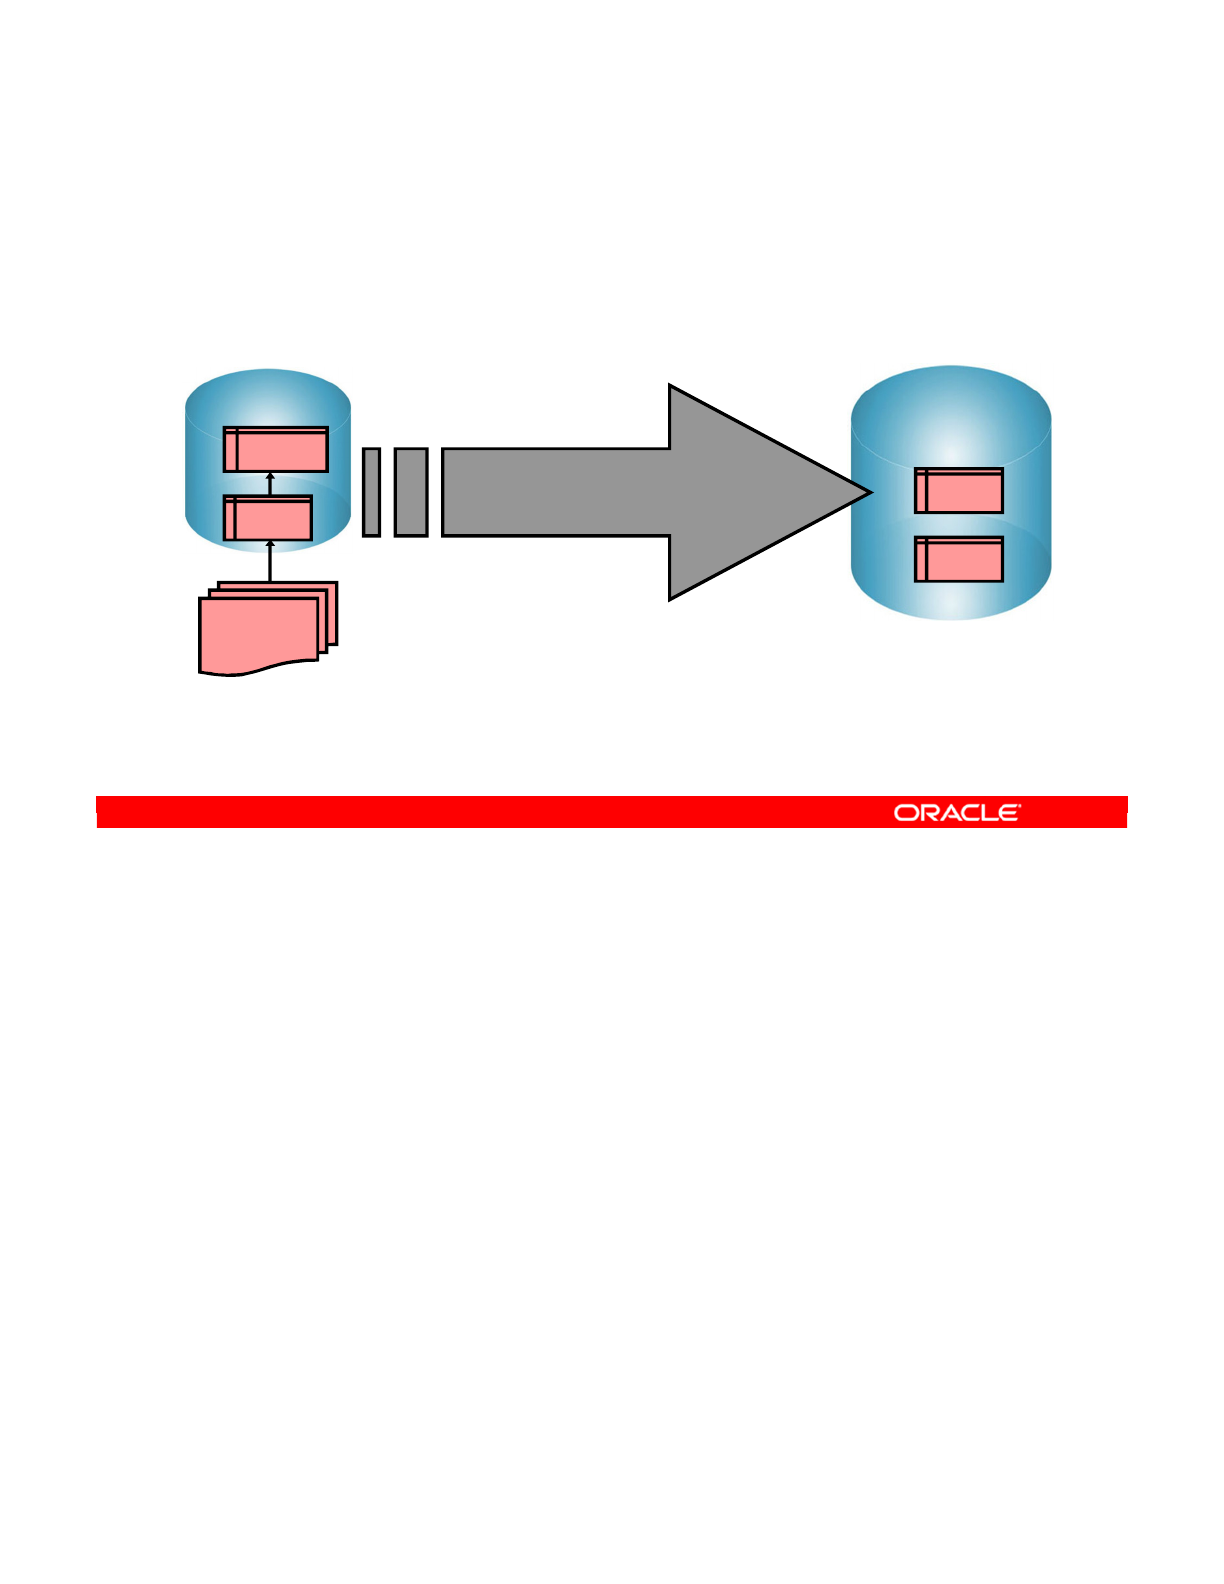
ODI enables you to implement the integration process from the business rules that you have
defined. Note that you add to this process the checks that ensure the quality of the data flow.
In the scenario described in the previous slide, discussions about how to move the data,
which infrastructure connects the servers, or how to combine the corrections file into the other
data, were deliberately excluded. This is because in ODI, you work at the conceptual
(“business rules”) level.
Oracle Data Integrator 11g: Integration and Administration 8 - 17
Copyright © 2012, Oracle and/or its affiliates. All rights reserved.
Integration Process
These business rules form the basis of the integration process.
Target (Oracle)
Integration Process
Extract–Load–Transform (check)
Source (Sybase)
ORDERS
LINES
CORRECTIONS
File
SALES
ERRORS
Oracle University and (Oracle Corporation) use only.
These eKit materials are to be used ONLY by you for the express purpose SELF STUDY. SHARING THE FILE IS STRICTLY PROHIBITED.
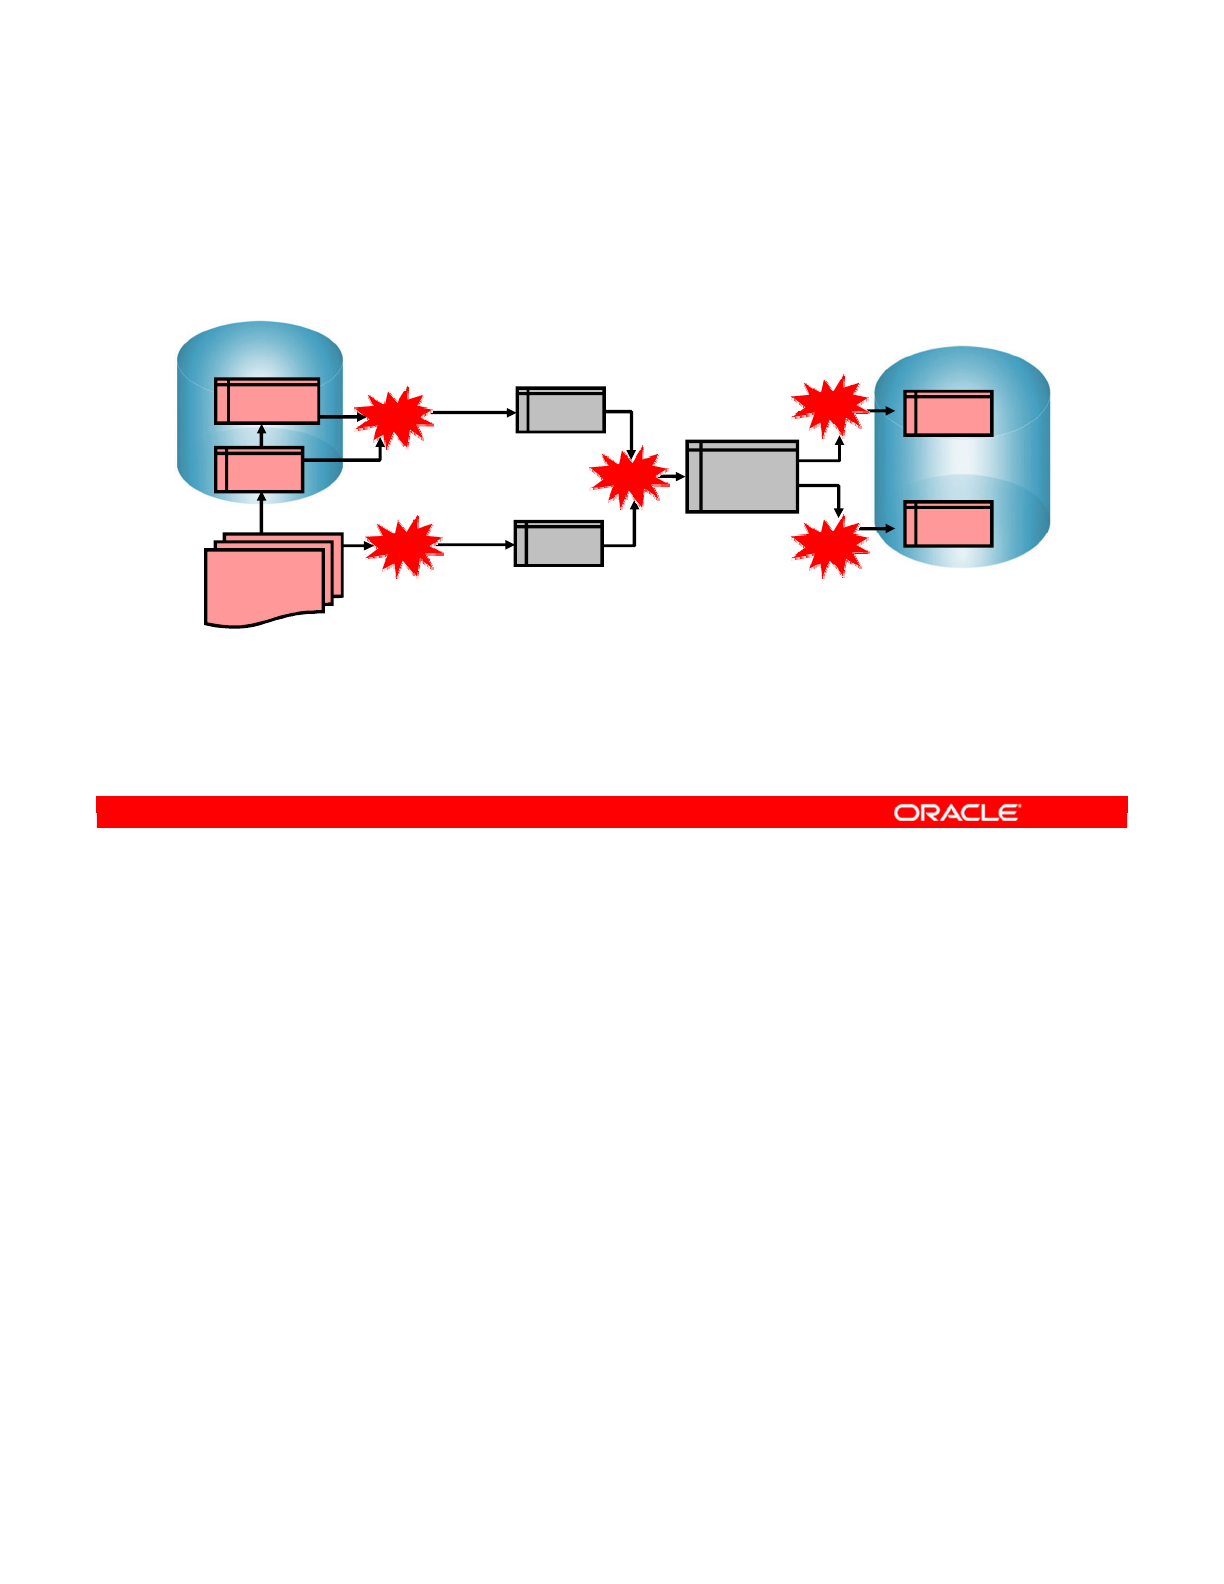
Now you look at how this process occurs. Imagine that you are attempting this process
manually. What steps do you have to perform?
1. First, you extract the data from the ORDERS and LINES tables, then join it and place it
into a temporary table.
2. Next, you extract the data from the CORRECTIONS file and place that data in another
temporary table.
3. Then, you join these two tables to combine the corrections into the orders data and store
it somewhere. You normally want this temporary table to closely resemble the target
SALES table.
4. Before integrating the data into the destination table, you run some checks and isolate
the errors in a separate table.
5. Finally, you integrate the remaining data in the SALES table, with UPDATE or INSERT
statements.
However, the implementing sequence of operations depends totally on the Physical
Architecture and the tools that you have available.
Oracle Data Integrator 11g: Integration and Administration 8 - 18
Copyright © 2012, Oracle and/or its affiliates. All rights reserved.
Process Details
Detailed sequence of operations for the process
Target (Oracle)
SALES
ERRORS
Transform and
integrate
TEMP_
SALES
Check constraints/
Isolate errors
Source (Sybase)
ORDERS
LINES
CORRECTIONS
File
TEMP_1
Extract/Join/
Transform
TEMP_2
Extract/Transform
Join/Transform
1
2
3
4
5
Oracle University and (Oracle Corporation) use only.
These eKit materials are to be used ONLY by you for the express purpose SELF STUDY. SHARING THE FILE IS STRICTLY PROHIBITED.
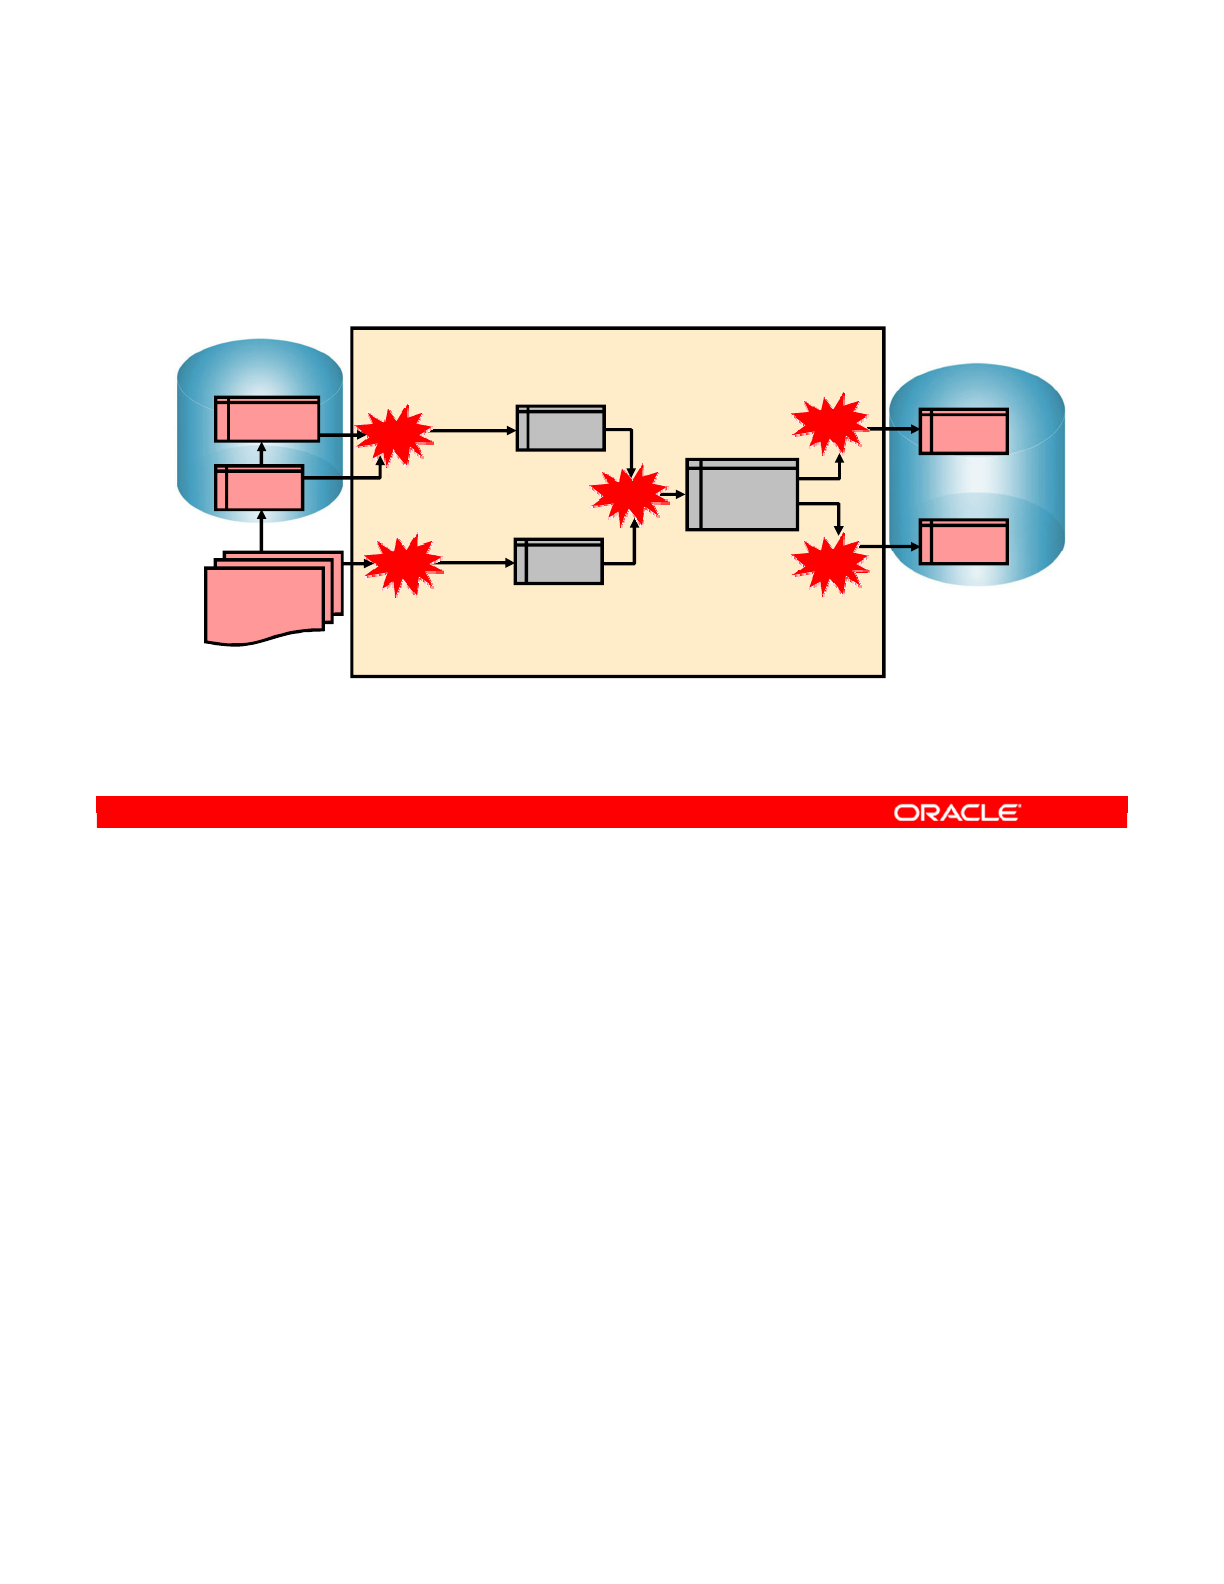
One solution is to use a custom application running on your desktop. You can, for example,
code the whole operation in a Java applet. This applet connects to the Sybase server,
perhaps by using a custom library, and retrieves the data. It can use a proprietary engine to
perform the joins and transformation. It then connects to the Oracle server to write the results.
This can work, and with appropriate technologies, can result in an acceptable performance.
However, the application has to be recoded every time any of the business rules changes.
Similarly, if the results are to be saved to an Excel spreadsheet instead of the Oracle server,
major changes are required.
Oracle Data Integrator 11g: Integration and Administration 8 - 19
Copyright © 2012, Oracle and/or its affiliates. All rights reserved.
Process Implementation: Example 1
Using a proprietary engine or application
Proprietary Engine
- Specific Language
Target (Oracle)
SALES
ERRORS
Transform and
integrate
TEMP_
SALES
Check constraints/
Isolate errors
Source (Sybase)
ORDERS
LINES
CORRECTIONS
File
TEMP_1
Extract/Join/
Transform
TEMP_2
Extract/Transform
Join/Transform
1
2
3
4
5
Oracle University and (Oracle Corporation) use only.
These eKit materials are to be used ONLY by you for the express purpose SELF STUDY. SHARING THE FILE IS STRICTLY PROHIBITED.
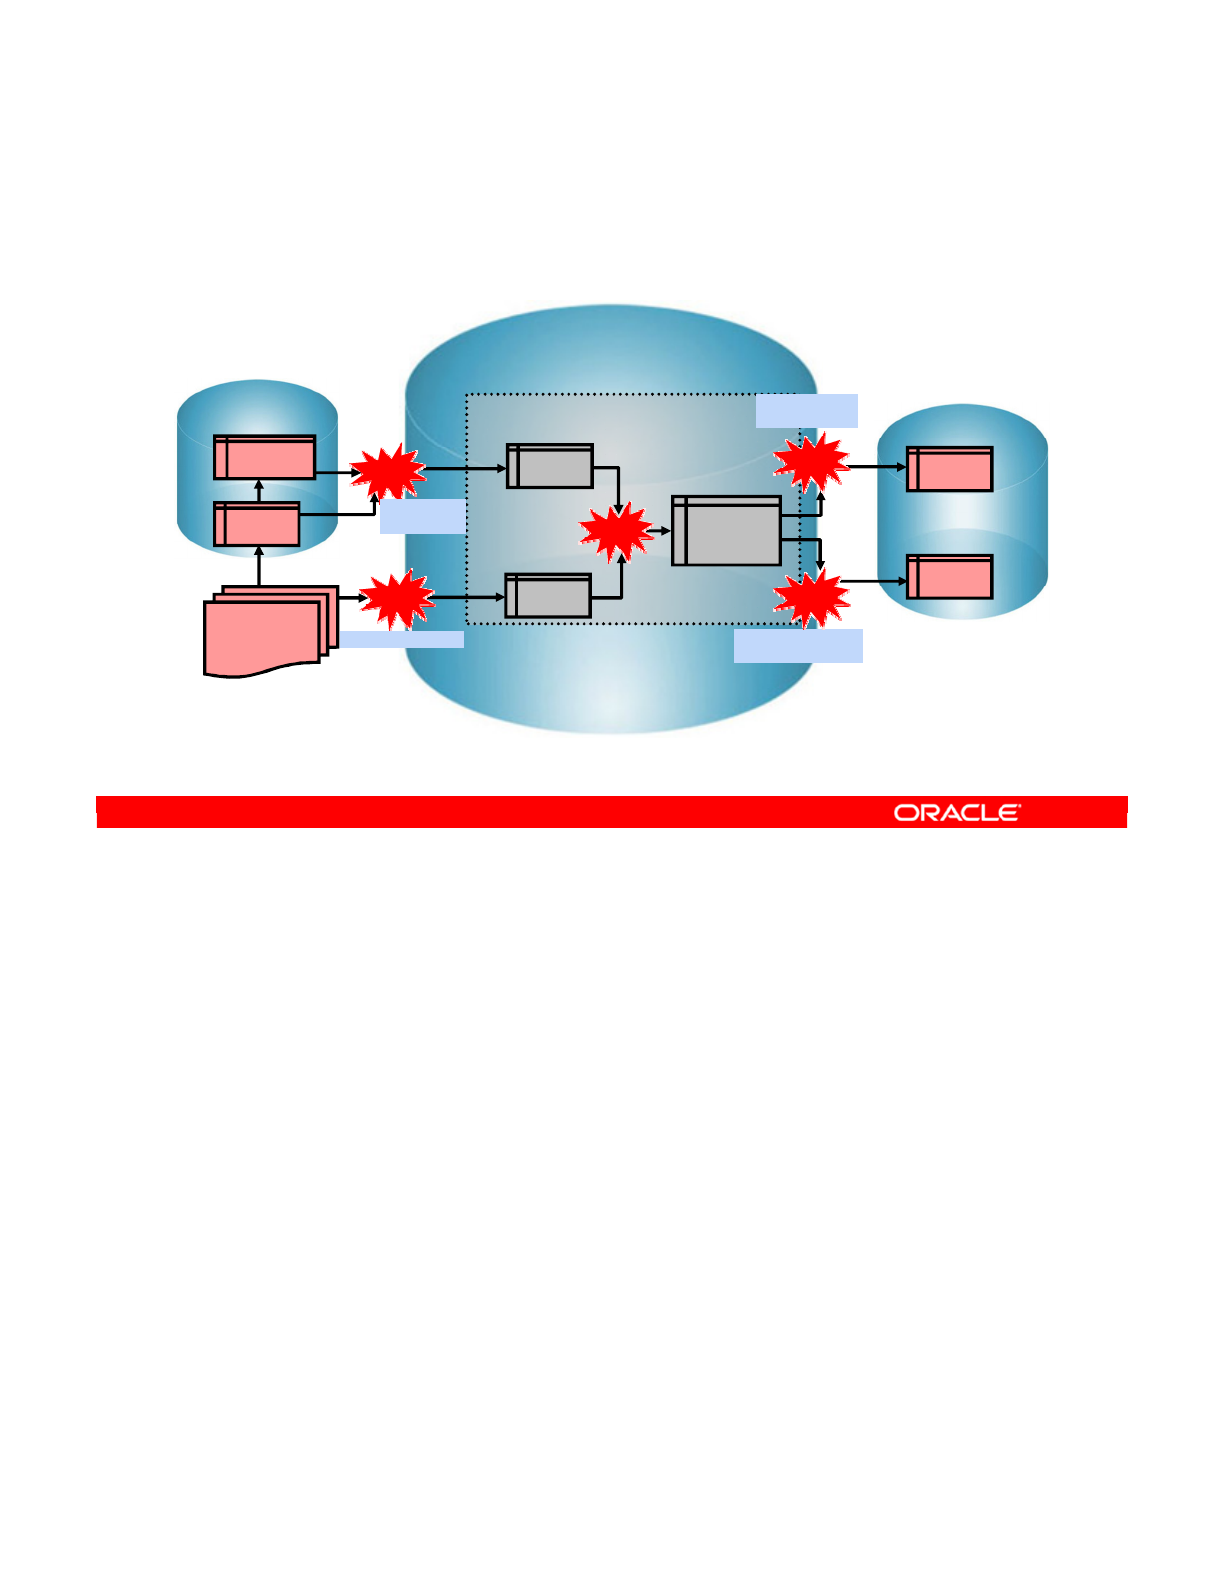
A second, traditional solution is to use a dedicated Extract-Transform-Load (ETL) server.
Here, data is first imported into the transformation server. Depending on the technology and
the physical topology, it might be necessary to first dump the data from Sybase, copy the data
across a network, and reimport it. Then the transformations would be hard-coded in SQL.
Finally, a similar process is used to move the data into the Oracle server.
This is a very common solution to the problem. However, it means that the business rules end
up being tightly coupled with the SQL code, which creates temporary tables and performs
transformations. It also means that if either the source or target database servers change,
some script files need to be modified. In short, the implementation is not flexible.
Oracle Data Integrator 11g: Integration and Administration 8 - 20
Copyright © 2012, Oracle and/or its affiliates. All rights reserved.
Process Implementation: Example 2
Using an RDBMS data server: DB2/UDB
DB2/UDB
Staging AREA
The language is SQL Target (Oracle)
SALES
ERRORS
Source (Sybase)
ORDERS
LINES
CORRECTIONS
File
TEMP_1
TEMP_2
Extract/Transform
Join/Transform
Transform and
integrate
TEMP_
SALES
Check constraints/
Isolate errors
1
2
3
4
5
Extract/Join/
Transform
Oracle University and (Oracle Corporation) use only.
These eKit materials are to be used ONLY by you for the express purpose SELF STUDY. SHARING THE FILE IS STRICTLY PROHIBITED.

ODI generally encourages the use of the EL-T method—extracting the data from the source,
then performing both transformation and loading on the target server. To do this, it uses the
notion of a staging area.
In this example, you put the staging area on the target server. Now your problem consists
only of extracting the data from the Sybase server and getting it to the Oracle target. Then all
the transformation and loading logic is performed directly on the Oracle server, in a separate
schema. This keeps the temporary data separate from the usable data.
However, you still have not solved the problem of separating business rules from the
implementation.
Oracle Data Integrator 11g: Integration and Administration 8 - 21
Copyright © 2012, Oracle and/or its affiliates. All rights reserved.
Process Implementation: Example 3
Using the Oracle target data server (the “ODI Way”)
Target (Oracle)
Staging AREA
The language is SQL
SALES
ERRORS
Source (Sybase)
ORDERS
LINES
CORRECTIONS
File
TEMP_1
TEMP_2
Join/Transform
TEMP_
SALES
1
2
3
4
5
Extract/Transform
Transform and
integrate
Check constraints/
Isolate errors
Extract/Join/
Transform
Oracle University and (Oracle Corporation) use only.
These eKit materials are to be used ONLY by you for the express purpose SELF STUDY. SHARING THE FILE IS STRICTLY PROHIBITED.

The next two slides examine using staging areas and choosing the location to execute an
interface.
Oracle Data Integrator 11g: Integration and Administration 8 - 22
Copyright © 2012, Oracle and/or its affiliates. All rights reserved.
Staging Area and Execution
Location
Oracle University and (Oracle Corporation) use only.
These eKit materials are to be used ONLY by you for the express purpose SELF STUDY. SHARING THE FILE IS STRICTLY PROHIBITED.

You have just been introduced to the notion of a “staging area.” The goal is to create a place
where a majority of the transformation and error checking are performed. Then all that is left
to do is to copy or load the data into the target server.
The staging area itself is a special area that you must create somewhere in a database. ODI
creates temporary tables in the staging area and uses these to perform data transformation.
You can place the staging area on your source server, target server, or another server
altogether. However, the best place for the staging area is usually on the target server. The
target server tends to give the best performance and reduces the complexity of data transfer
processes.
Oracle Data Integrator 11g: Integration and Administration 8 - 23
Copyright © 2012, Oracle and/or its affiliates. All rights reserved.
What Is the Staging Area?
•The staging area is a separate, dedicated area in an
RDBMS where ODI creates its temporary objects and
executes some of your transformation rules.
•The staging area is usually located on the target data
server.
Oracle University and (Oracle Corporation) use only.
These eKit materials are to be used ONLY by you for the express purpose SELF STUDY. SHARING THE FILE IS STRICTLY PROHIBITED.
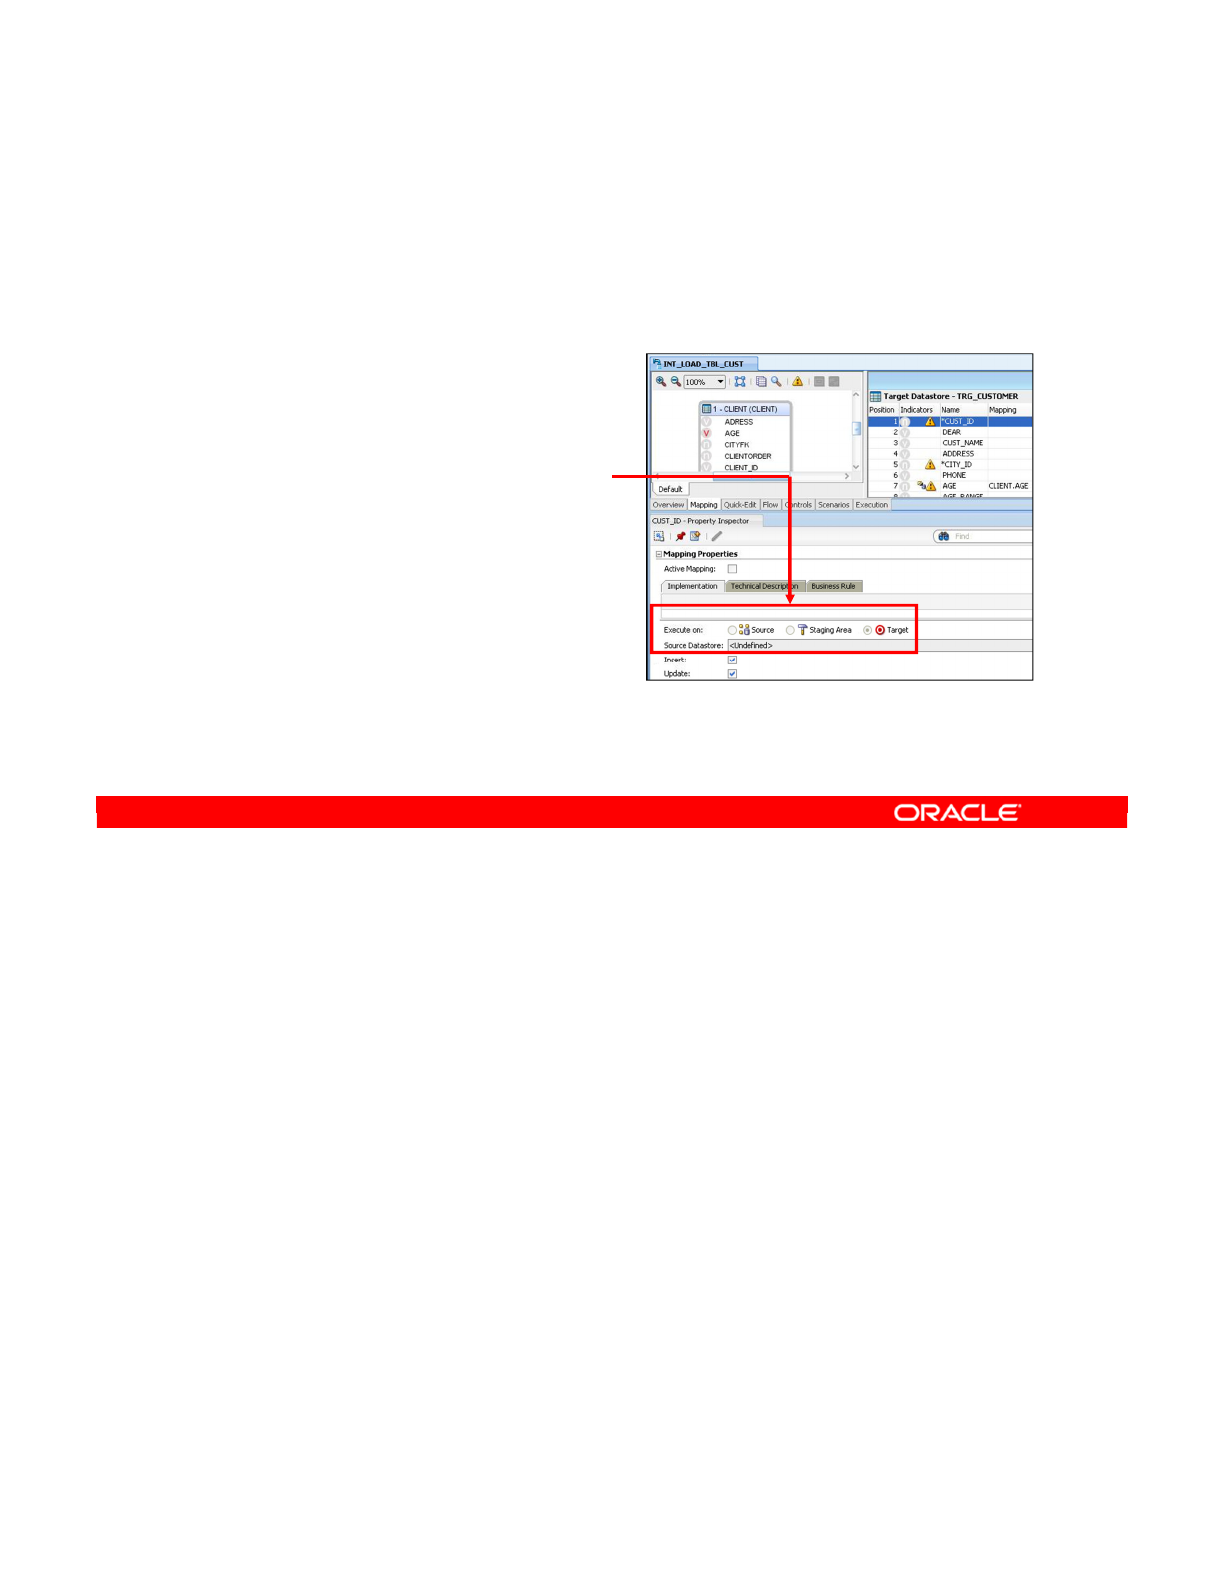
Now you begin to see the flexibility of using ODI to perform your ELT operations. Recall that
when you described your interfaces before, you specified only the transformation you wanted.
You did not specify how or where this should happen. In fact, you can specify that an interface
be executed on the source or target servers, or in the staging area.
You specify the execution location at design time by selecting the appropriate option in the
interface window.
At run time, ODI generates the appropriate code to take this choice into account. However,
the SQL expressions that you write must also be compatible with the technology.
Note: The staging area must be an RDBMS, with a schema dedicated to ODI temporary
objects.
Oracle Data Integrator 11g: Integration and Administration 8 - 24
Copyright © 2012, Oracle and/or its affiliates. All rights reserved.
Execution Location
•In an ODI Interface, each rule may be executed on the:
–Source
–Target
–Staging area
•The execution location
is specified at design time.
•How a rule is implemented
depends on the technology
of its execution location.
Oracle University and (Oracle Corporation) use only.
These eKit materials are to be used ONLY by you for the express purpose SELF STUDY. SHARING THE FILE IS STRICTLY PROHIBITED.

The next few slides explore how to use knowledge module code templates to implement the
abstract logic of your business rules on the data servers of a given technology.
Oracle Data Integrator 11g: Integration and Administration 8 - 25
Copyright © 2012, Oracle and/or its affiliates. All rights reserved.
Understanding Knowledge
Modules
Oracle University and (Oracle Corporation) use only.
These eKit materials are to be used ONLY by you for the express purpose SELF STUDY. SHARING THE FILE IS STRICTLY PROHIBITED.
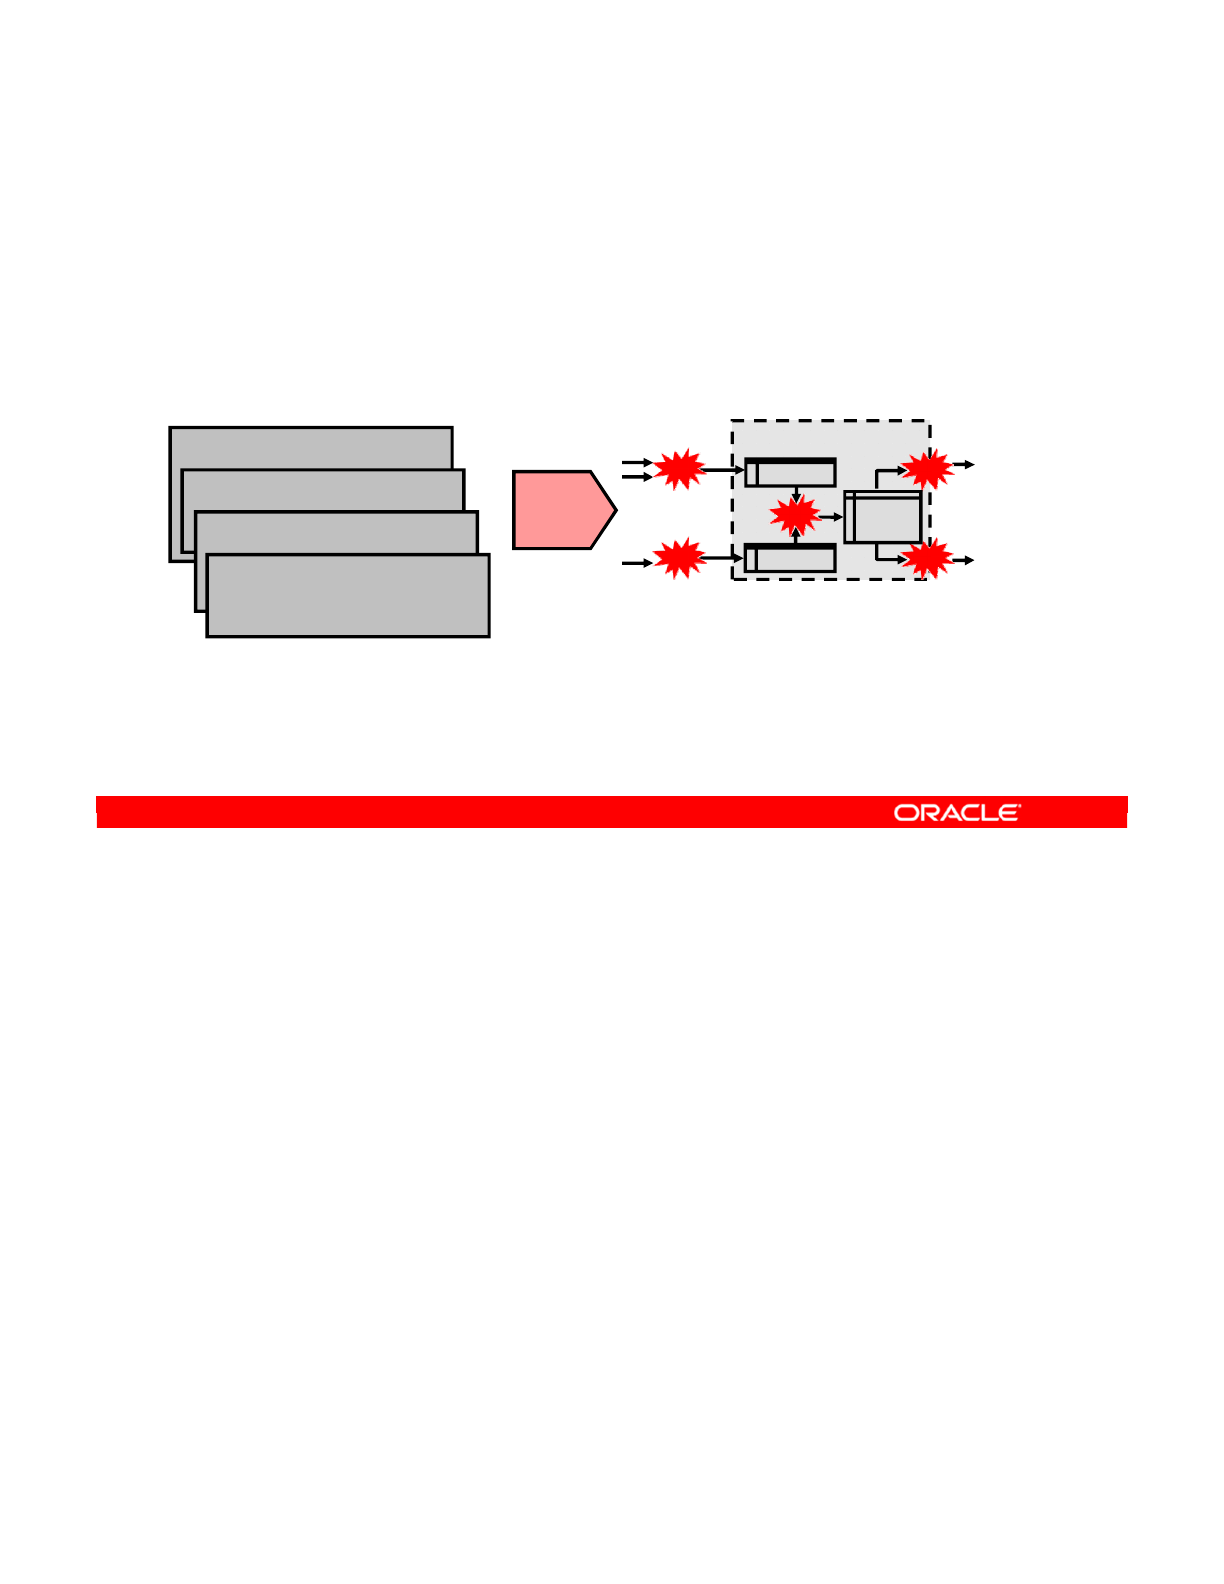
One of the key benefits of using ODI is separating business rules from the processes required
to transform data. You have seen how you can implement these processes manually by using
several different techniques. But how does ODI know how to do this and how does it remain
flexible enough to handle any conceivable server topology, while keeping the business rules
separate from the implementation?
Oracle Data Integrator 11g: Integration and Administration 8 - 26
Copyright © 2012, Oracle and/or its affiliates. All rights reserved.
From Business Rules to Processes
After the business rules are implemented, how does ODI
generate the transformation processes?
Staging Area
Extract/Join/Transform
Extract/Transform
Join/Transform
Mapping
-SALES = SUM(LINES.AMOUNT) +
CORRECTION.VALUE.
-SALES_REP =
ORDERS.SALES_REP_ID
…
Filter
-ORDERS.STATUS=CLOSED
…Constraints
-ID is flagged not null in the model.
-Unique index UK_ID is declared on
table SALES.
…
Join
-ORDERS.ORDER_ID =
LINES.ORDER_ID
…
?
TEMP_1
TEMP_2
TEMP_
SALES
1
2
3
4
5
Transform and integrate
Oracle University and (Oracle Corporation) use only.
These eKit materials are to be used ONLY by you for the express purpose SELF STUDY. SHARING THE FILE IS STRICTLY PROHIBITED.

The answer is knowledge modules. Knowledge modules define a way of implementing
business rules on a given technology. They connect the abstract logic of your business rules
to the concrete reality of your data servers.
If your data servers change, you just select a different knowledge module to match. Your
business rules remain unchanged. If your business rules change, you do not have to modify
any code—you just update the SQL expressions that define them in ODI.
In your example, you have Loading Knowledge Modules that describe how to move data from
the Sybase source server to the DB2/UDB staging area. Integration Knowledge Modules
perform the work of creating temporary tables and moving data onto the Oracle target server.
Lastly, Check Knowledge Modules implement constraint checking and isolating errors in a
separate table.
Note: Knowledge modules are generic because they enable data flows to be generated
regardless of the transformation rules. And they are highly specific because the code they
generate and the integration strategy they implement are finely tuned for a given technology.
Oracle Data Integrator 11g: Integration and Administration 8 - 27
Copyright © 2012, Oracle and/or its affiliates. All rights reserved.
Knowledge Modules
Knowledge modules implement the required operations.
DB2/UDB
Staging Area Target (Oracle)
SALES
ERRORS
Source (Sybase)
ORDERS
LINES
CORRECTIONS
File
TEMP_1
TEMP_2
Join/Transform
TEMP_
SALES
LKM
LKM
IKM
IKM
CKM
Extract/Transform
Transform and
integrate
Check constraints/
Isolate errors
Extract/Join/
Transform
Oracle University and (Oracle Corporation) use only.
These eKit materials are to be used ONLY by you for the express purpose SELF STUDY. SHARING THE FILE IS STRICTLY PROHIBITED.

Now that you have seen the usefulness of knowledge modules, how do they actually work?
A knowledge module is a kind of template designed for a specific task, such as loading,
integrating, or checking in part of an integration process.
Oracle Data Integrator 11g: Integration and Administration 8 - 28
Copyright © 2012, Oracle and/or its affiliates. All rights reserved.
What Is a Knowledge Module?
•It is a template designed for a specific processing task,
such as loading, integrating, or checking in an integration
process.
•It contains:
–A sequence of commands for the technology it is designed
for (in SQL, shell, native language, and so on)
–Substitution tags, which connect the template to your
business rules
•It is used to generate code from business rules and other
metadata you defined in ODI.
Oracle University and (Oracle Corporation) use only.
These eKit materials are to be used ONLY by you for the express purpose SELF STUDY. SHARING THE FILE IS STRICTLY PROHIBITED.
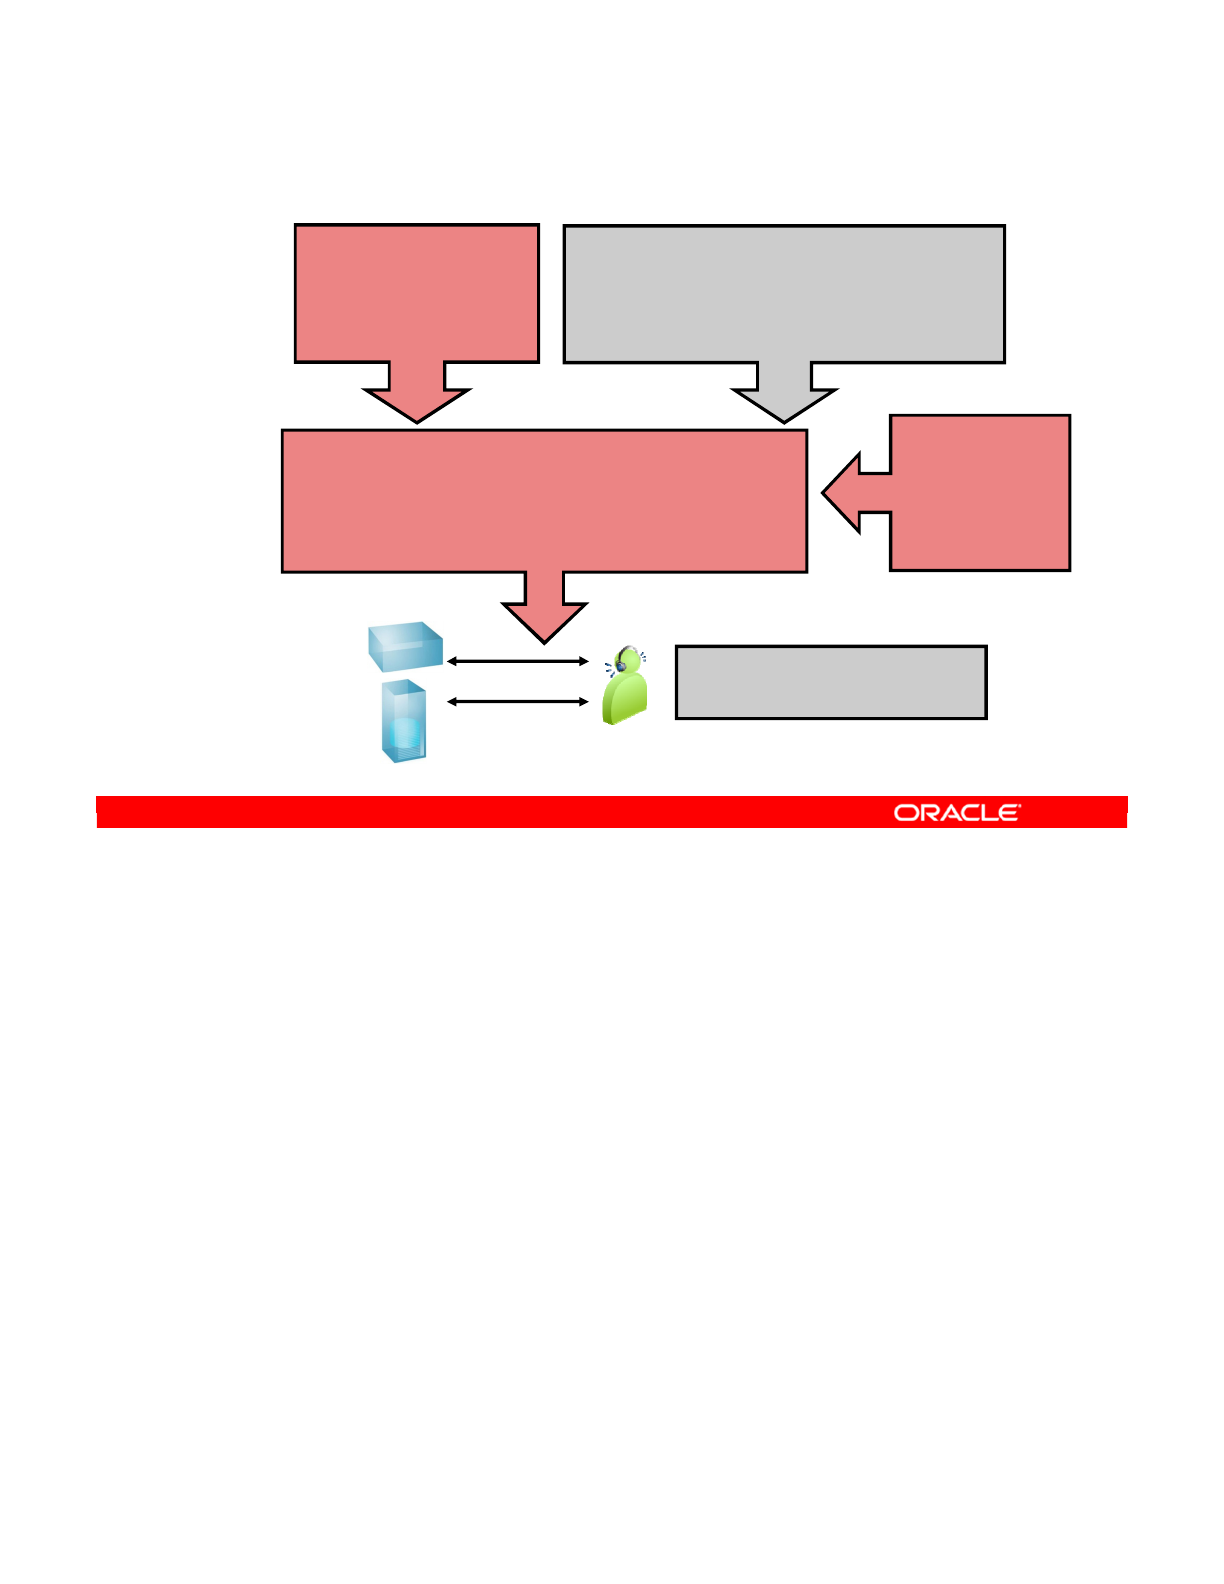
You have seen how business rules and their implementation on a server have been carefully
kept separate. Now you will see how ODI combines the two at run time.
For example, you have a mapping that the net income of an employee is the sum of the
income components multiplied by their coefficients. This is an expression in SQL, but there is
no code to perform this integration.
You have a knowledge module that can wipe a destination table and fill it with source data.
However, it knows nothing about your business rules.
Then you have all other metadata that you defined in ODI: the topology of your servers, the
models that exist on them, the technologies used by each server, and so on.
When you put these three things together, ODI generates a code to carry out the integration.
This code is specific to a technology, a layout, and a set of business rules. However, if any of
these three things changes, all you need to do is regenerate the code.
At run time, the ODI Agent orchestrates the running of the generated code. Based on
execution locations, various parts of the generated code will be executed either on the
Source, Staging or Target.
Oracle Data Integrator 11g: Integration and Administration 8 - 29
Copyright © 2012, Oracle and/or its affiliates. All rights reserved.
Code Generation
Generated code
Truncate Table SCOTT.EMP
Insert into SCOTT.EMP
Select Round(Sum(Sal*Coeff)) …
Begin … If .. Then … Else
ftp ...
Implemented business
rules
Inc_net = Round
(Sum(Inc * coeff))
Knowledge module
Truncate Table <%=odiRef.getTable(« »)%>
Insert into <%=odiRef.getColList(…)%>
Select <%=odiRef.getFrom()%> …
Begin … If .. Then … Else
ftp ...
Design
time
ODI Agent orchestrates the
running of the generated code
Run
time
Truncate Table SCOTT.EMP
Insert into SCOTT.EMP
…
Other metadata
- Topology of your
servers
- Models in servers
- Technology, and
so on
Targets
Sources
plus
Oracle University and (Oracle Corporation) use only.
These eKit materials are to be used ONLY by you for the express purpose SELF STUDY. SHARING THE FILE IS STRICTLY PROHIBITED.
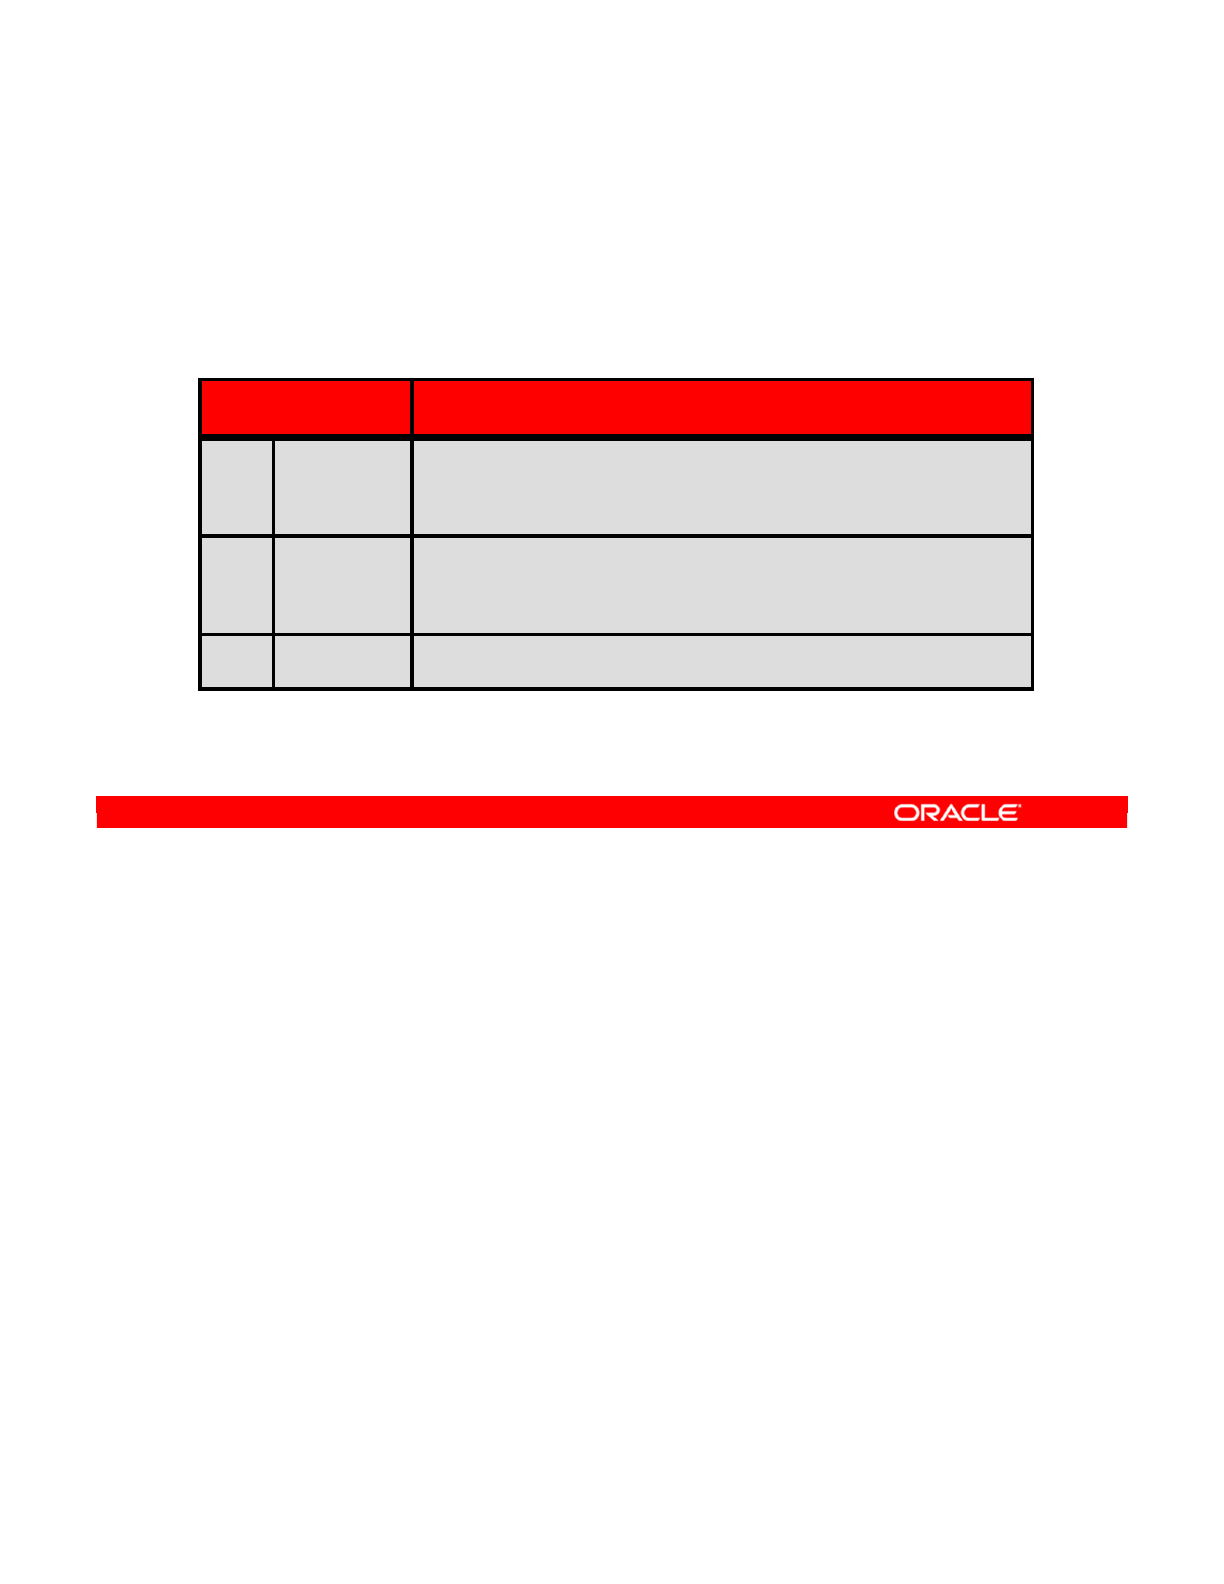
Interfaces in ODI primarily rely on three types of knowledge modules. They are:
•Loading Knowledge Modules (LKMs): They define how to extract and then
reassemble data between specific technologies.
•Integration Knowledge Modules (IKMs): They determine the strategy for populating
the target datastore. You should choose this strategy based on the type of data, how
much data is being transferred, and whether you want to delete the target datastore first.
•Check Knowledge Modules (CKMs): They enforce the constraints that you define on
the target datastore. Generally, these are the least specific to a certain technology.
Note: Ensure that all useful knowledge modules are imported into the interface project.
Oracle Data Integrator 11g: Integration and Administration 8 - 30
Copyright © 2012, Oracle and/or its affiliates. All rights reserved.
KM Types Used in Interfaces
The following types of knowledge modules are used in
interfaces:
KM Type Description
LKM Loading How to extract and reassemble data from multiple data
servers (example: how to transfer data from AS/400 to
Oracle)
IKM Integration Which strategy for populating a target datastore from the
staging area (delete/insert, incremental update, slowly
changing dimensions, and so on)
CKM Check How to check data in a datastore or in the staging area
Oracle University and (Oracle Corporation) use only.
These eKit materials are to be used ONLY by you for the express purpose SELF STUDY. SHARING THE FILE IS STRICTLY PROHIBITED.

You learn about the basic concept of interfaces in the following slides.
Oracle Data Integrator 11g: Integration and Administration 8 - 31
Copyright © 2012, Oracle and/or its affiliates. All rights reserved.
Interfaces: An Overview
Oracle University and (Oracle Corporation) use only.
These eKit materials are to be used ONLY by you for the express purpose SELF STUDY. SHARING THE FILE IS STRICTLY PROHIBITED.

An interface populates one datastore, called the “target,” with data from one or more other
datastores, known as “sources.” The columns in the source datastores are linked to the
columns in the target datastore through business rules. The business rules are implemented
as “mappings.”
Oracle Data Integrator 11g: Integration and Administration 8 - 32
Copyright © 2012, Oracle and/or its affiliates. All rights reserved.
The Purpose of an Interface
•An interface is an ODI object that you define.
•It loads one target datastore with data from one or more
source datastores, based on the business rules
implemented as mappings.
•The columns in the source datastores are linked to the
columns in the target datastores through business rules.
Oracle University and (Oracle Corporation) use only.
These eKit materials are to be used ONLY by you for the express purpose SELF STUDY. SHARING THE FILE IS STRICTLY PROHIBITED.
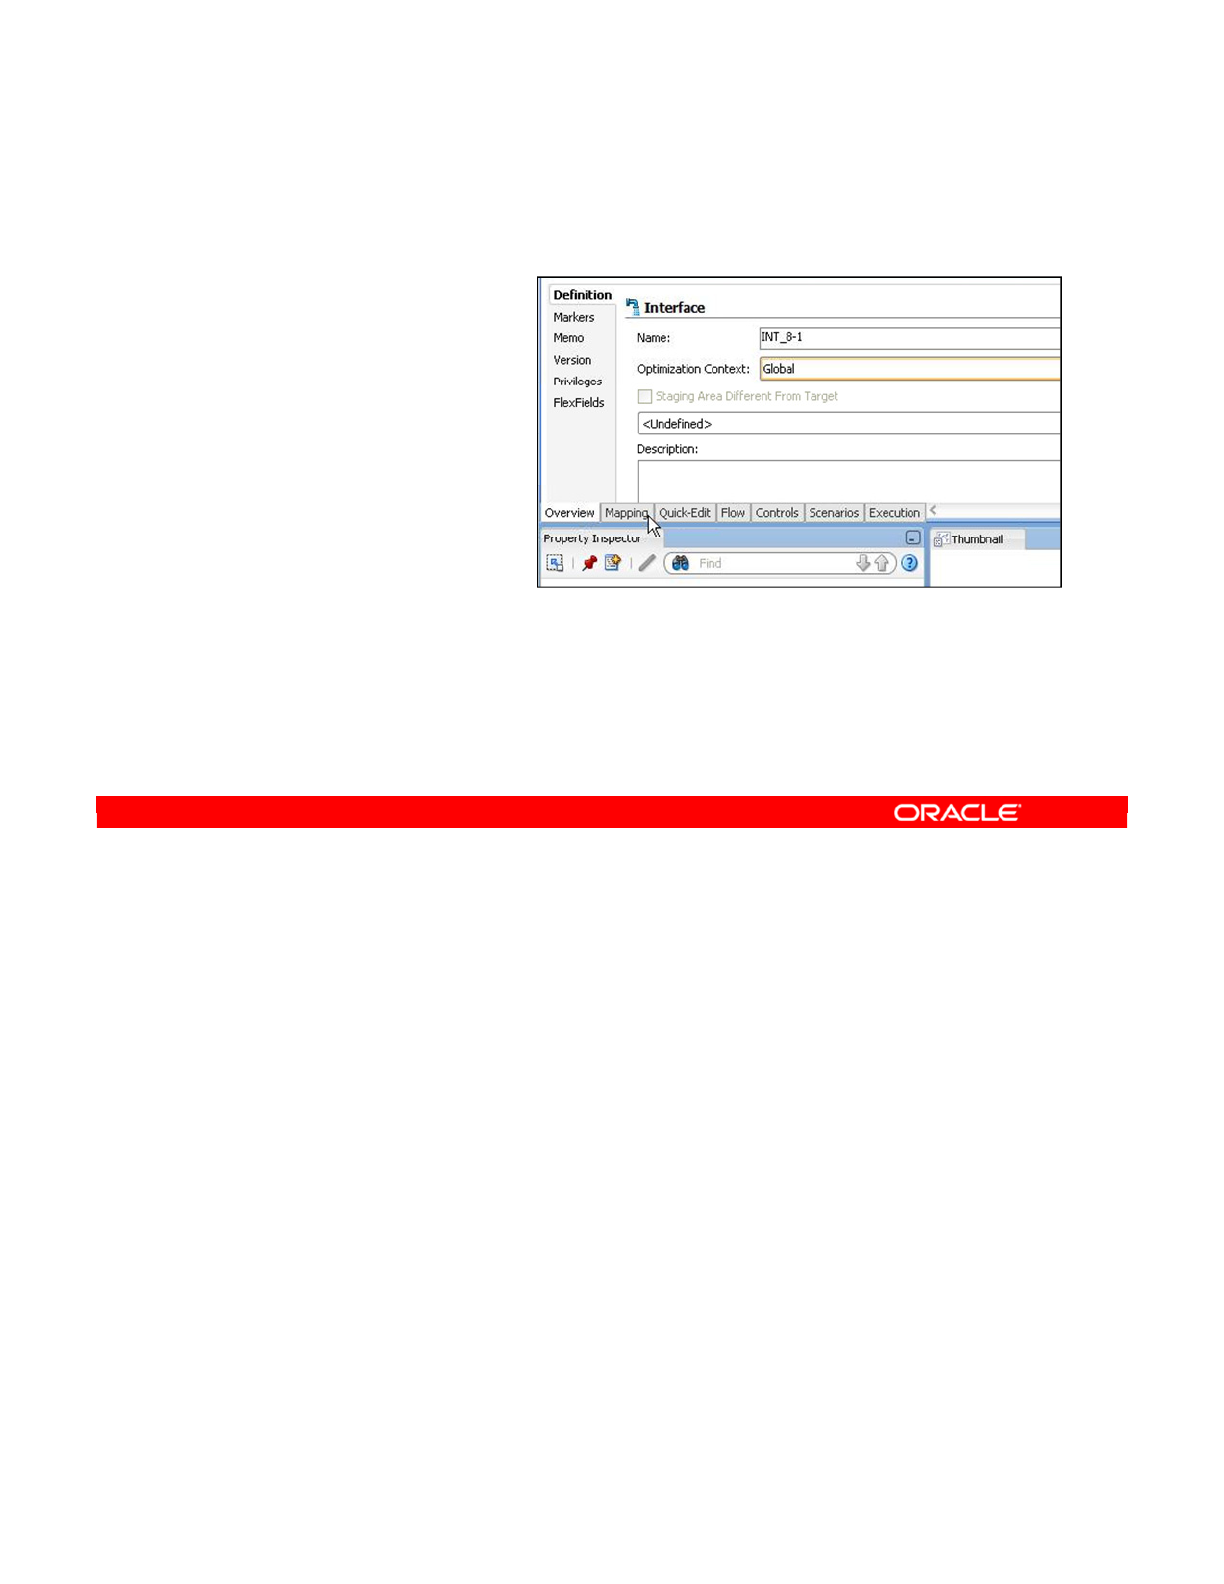
A one-to-one interface transforms data from one source datastore into one target datastore.
The basic process for creating a simple one-to-one interface is as shown.
The following slides will cover each of these steps in detail.
Oracle Data Integrator 11g: Integration and Administration 8 - 33
Copyright © 2012, Oracle and/or its affiliates. All rights reserved.
Creating a One-to-One Interface
1. Create and name the
interface.
2. Define the target
datastore.
3. Define the source
datastore.
4. Define the mappings.
5. Save the interface.
Oracle University and (Oracle Corporation) use only.
These eKit materials are to be used ONLY by you for the express purpose SELF STUDY. SHARING THE FILE IS STRICTLY PROHIBITED.
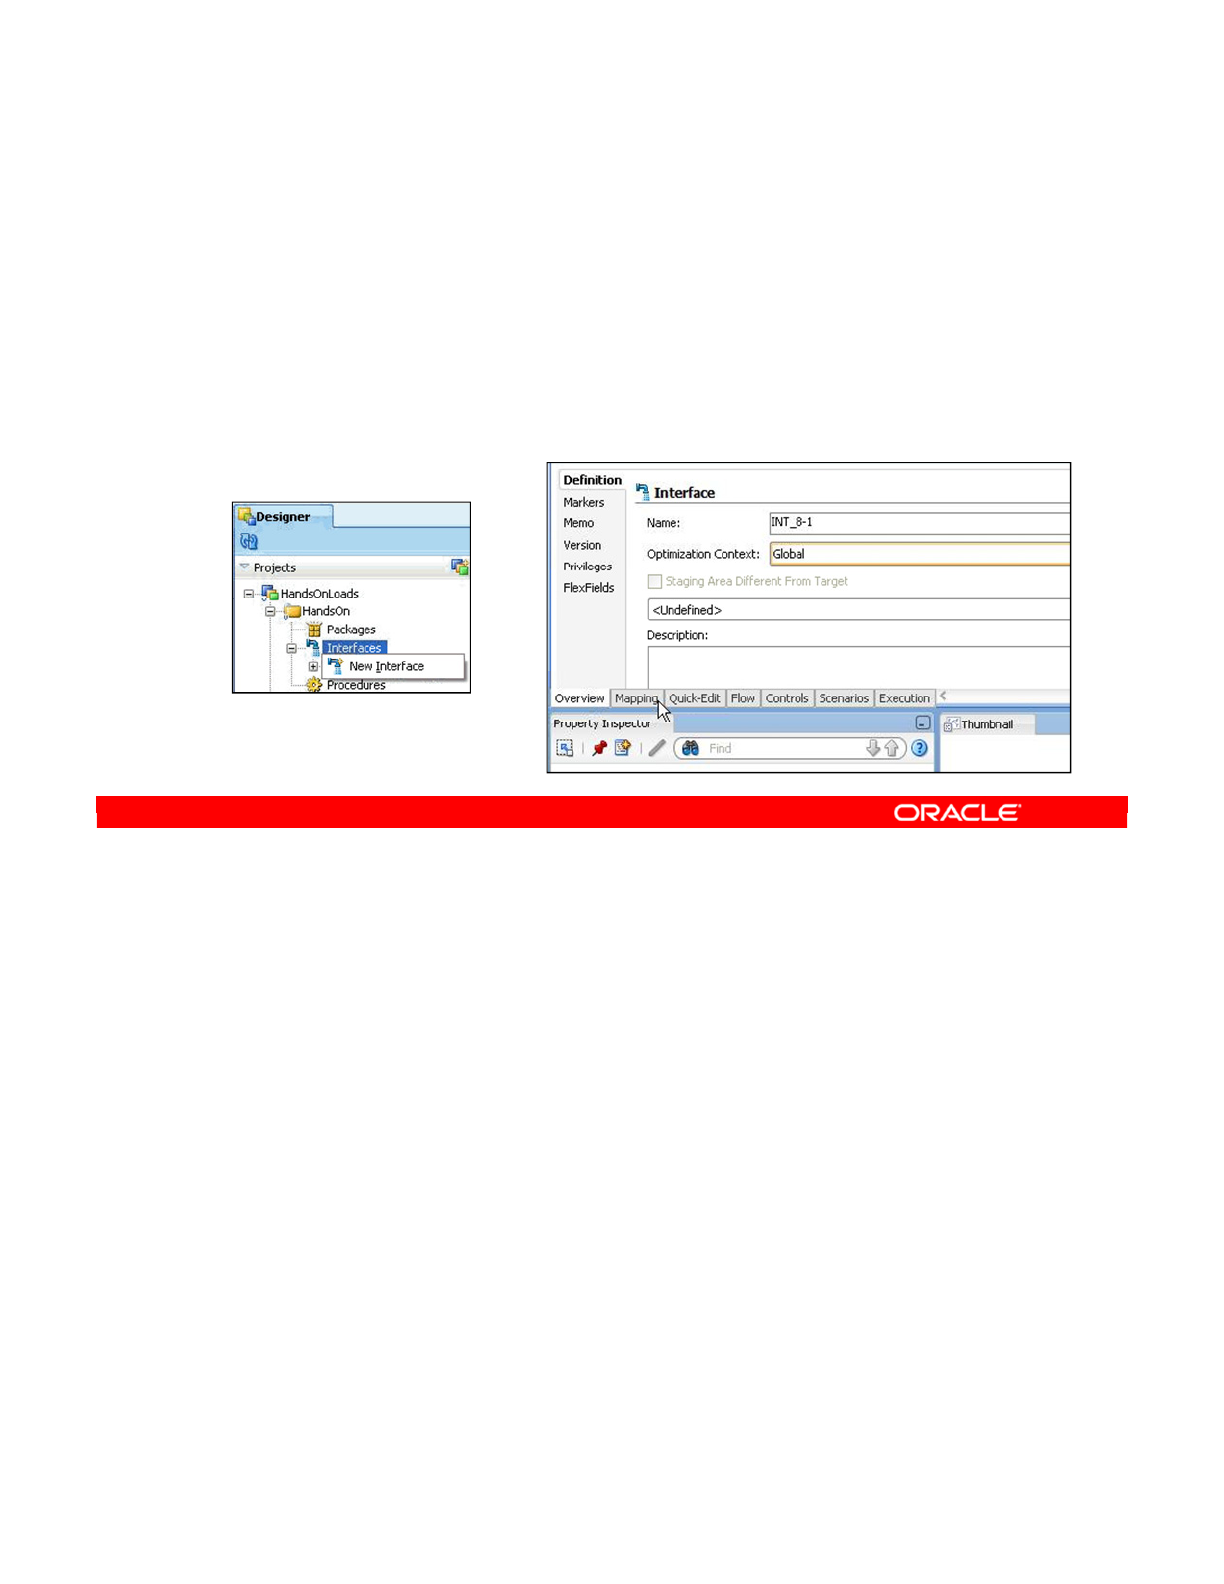
To create a blank interface, perform the following:
1. In the Projects view, find the project and the folder where you want to create the
interface.
2. Right-click the Interfaces node and select New Interface.
3. Select a name for the interface. You should probably follow a naming convention
defined for your project.
4. You can optionally enter the description for your interface. This description generally
explains the purpose of the interface. It appears in the interface documentation, and
may be useful later when performing changes or maintenance on this interface.
Optimization Context
Optimization Context sets the initial design context that determines which “version” of the
Sources and Targets will be dragged into the Mapping tab areas. It also determines the
physical location where the data will come from when you right-click data on the object. It is
not the execution context, which determines which physical schema the interface will use at
execution time.
Note: Ensure that the appropriate knowledge modules have been imported into the project.
Oracle Data Integrator 11g: Integration and Administration 8 - 34
Copyright © 2012, Oracle and/or its affiliates. All rights reserved.
Creating and Naming an Interface
1. Navigate to the project and folder where you want to
create your interface.
2. Right-click the Interfaces node and select New Interface.
3. Enter the name.
4. Enter the description.
Oracle University and (Oracle Corporation) use only.
These eKit materials are to be used ONLY by you for the express purpose SELF STUDY. SHARING THE FILE IS STRICTLY PROHIBITED.

The target datastore is populated by the interface when it is executed.
To define the target datastore:
1. You select the Models view usually found at the left of the Designer window.
2. Then, you locate and expand the node of the model containing the datastore that you
want as the target of your interface.
3. You now click the interface’s Mapping tab. On this tab, you can define the source and
target datastores, and the various mappings between them.
4. Finally, you drag the datastore from the Models view to the Target Datastore area.
Oracle Data Integrator 11g: Integration and Administration 8 - 35
Copyright © 2012, Oracle and/or its affiliates. All rights reserved.
Defining the Target Datastore
1. Select the Models view.
2. Expand the model containing the target datastore.
3. Click the interface’s Mapping tab.
4. Drag the datastore from the Models view to the Target
Datastore area.
Oracle University and (Oracle Corporation) use only.
These eKit materials are to be used ONLY by you for the express purpose SELF STUDY. SHARING THE FILE IS STRICTLY PROHIBITED.

Oracle Data Integrator 11g: Integration and Administration 8 - 36
Copyright © 2012, Oracle and/or its affiliates. All rights reserved.
Important Note
•An interface populates only a single target datastore.
•To populate several targets, you need several interfaces.
–You can make the interfaces run sequentially in a package.
Oracle University and (Oracle Corporation) use only.
These eKit materials are to be used ONLY by you for the express purpose SELF STUDY. SHARING THE FILE IS STRICTLY PROHIBITED.
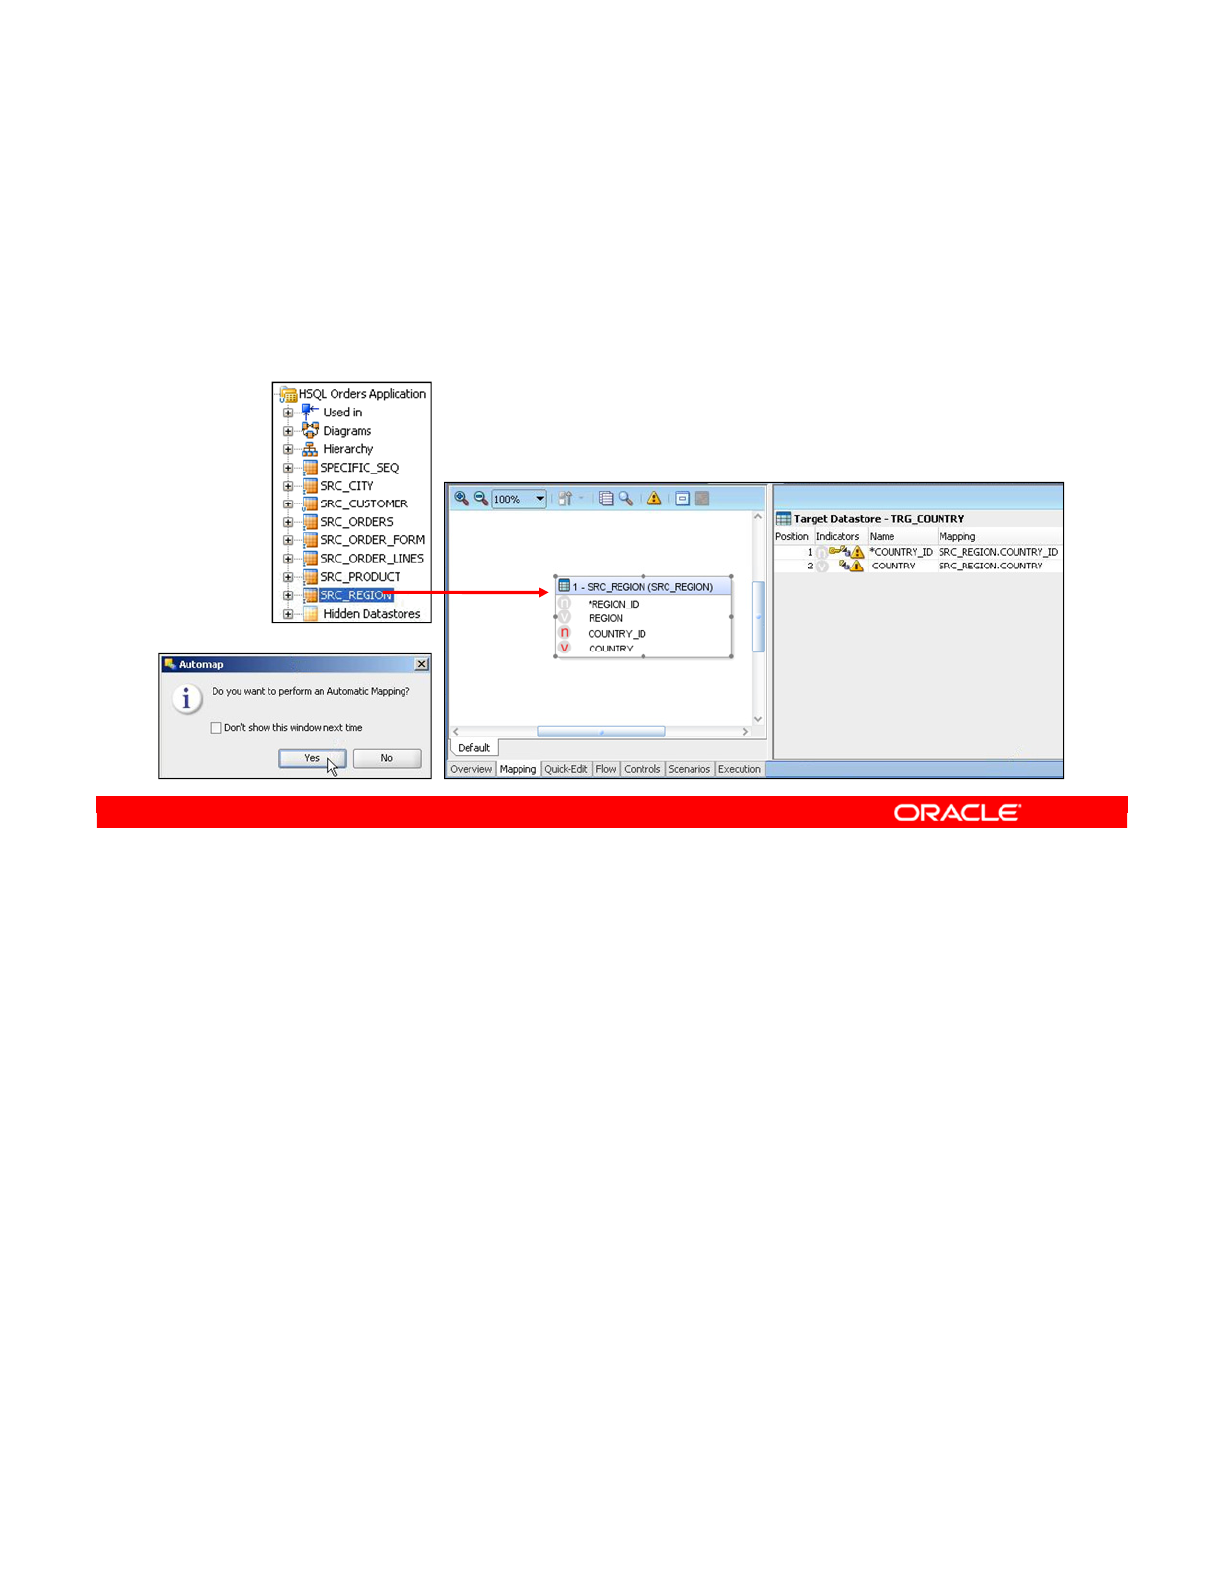
The source datastore supplies data that the interface uses to populate the target datastore
when it is executed.
To define the source datastore:
1. Find and expand the model that contains the datastore you want to use as the source of
your interface.
2. Drag the datastore from the Models view somewhere on the interface’s Mapping tab.
ODI can automatically perform mappings by matching column names. A pop-up window
appears to notify you of this automatic mapping. You can disable this information window.
Automatic Mapping maps each source column onto the matching target column without any
transformation. If you want to define transformations, you need to edit the mappings later.
Note
•An interface may have more than one source.
•For this lesson, you will use only one source.
•Automatic Mapping creates mappings by matching column names automatically. You
may disable the information window.
•With ODI 11gyou can now drag directly over the target column. Multiple source columns
can be selected together for the drag and drop.
Oracle Data Integrator 11g: Integration and Administration 8 - 37
Copyright © 2012, Oracle and/or its affiliates. All rights reserved.
Defining the Source Datastore
1. Expand the model containing the source datastore.
2. Drag the datastore from the Models view to the Diagram
zone in the interface.
Diagram zone for source Diagram zone for target
Oracle University and (Oracle Corporation) use only.
These eKit materials are to be used ONLY by you for the express purpose SELF STUDY. SHARING THE FILE IS STRICTLY PROHIBITED.

•It is a rule that maps one or more columns from one or more source datastores onto one
of the target datastore columns, possibly transforming them in the process.
•It can be as simple as stating that the AGE column in the target datastore corresponds to
the AGE column in the source datastore, or as complex as calculating aggregates or
operations on multiple columns in various datastores located on different servers.
•A mapping can be defined manually by entering code in the mapping field or by using
the drag-and-drop functionality. You can now drag and drop directly over the target
column. Multiple source columns can be selected together for the drag and drop.
•ODI also includes an Expression Editor that helps you build the mapping.
Oracle Data Integrator 11g: Integration and Administration 8 - 38
Copyright © 2012, Oracle and/or its affiliates. All rights reserved.
What Is a Mapping?
•A mapping is a business rule implemented as a SQL
clause.
•It is a transformation rule that maps columns in source
datastores onto one of the target datastore columns.
•It is executed by a relational database server at run time.
Oracle University and (Oracle Corporation) use only.
These eKit materials are to be used ONLY by you for the express purpose SELF STUDY. SHARING THE FILE IS STRICTLY PROHIBITED.
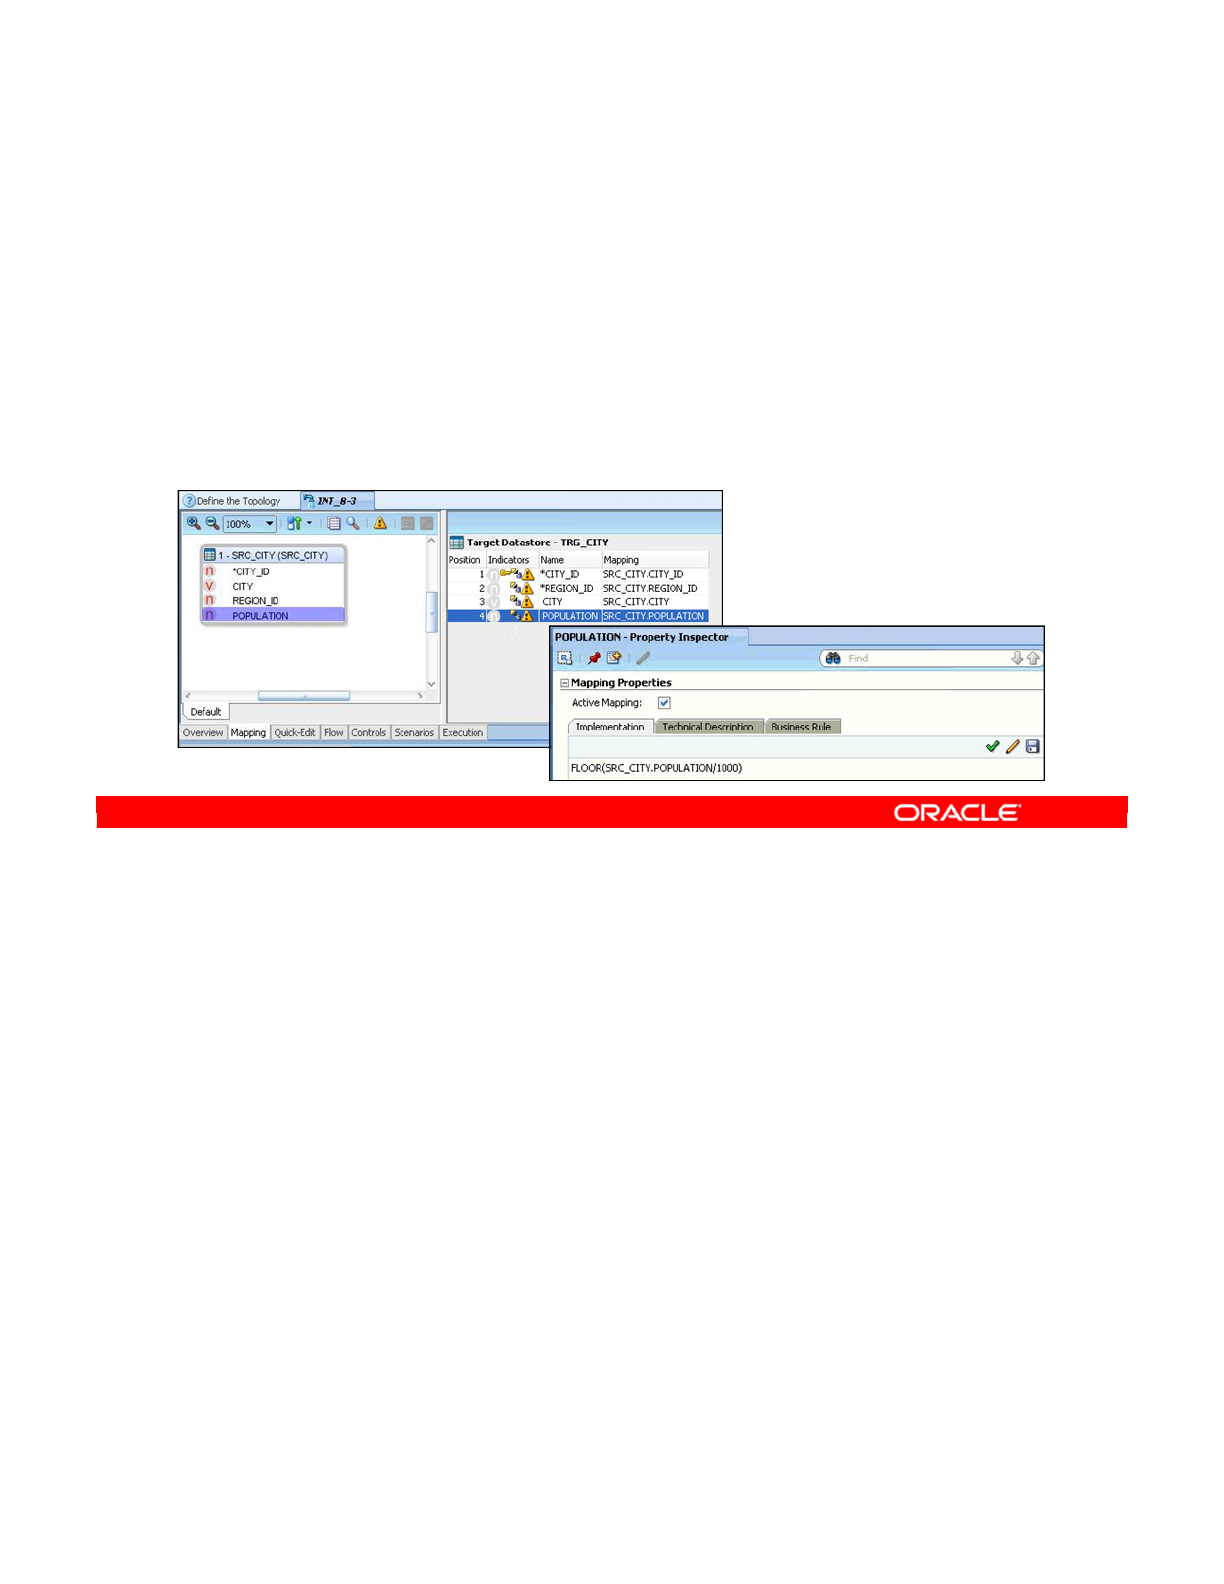
You now see how to manually define a mapping. You can have one mapping for every target
column. It is also technically possible to have no mappings, which would have the effect of
deleting the target. To create one mapping, perform the following:
1. Select the column from the target datastore that you want to map. You usually have at
least one source column in a mapping, but you may have more than one.
2. Manually edit the mapping by clicking in the mapping field. You can drag columns from
the source table directly into the mapping code. You can then modify the mapping by
entering the code. You may also use the Expression Editor by clicking its icon at the
right of the mapping code box.
3. Check the code by clicking the Check Expression button. This sends a query to the
DBMS engine to check that its syntax is correct.
You must always try to check the code syntax. It does not always provide accurate
results. Many types of syntax checks require execution on the selected environment,
and due to limitations in the design environment, this is not always feasible. Thus, one
may check syntax that is correct, but the syntax checker may report it as invalid. False
positives are rare, if ever, but false negatives (the code will run fine at execution time)
are frequent.
Oracle Data Integrator 11g: Integration and Administration 8 - 39
Copyright © 2012, Oracle and/or its affiliates. All rights reserved.
Defining the Mappings
1. Select the column of the target datastore that you want to
map.
2. Click the Implementation tab in the Mapping pane, then
drag columns from the source table directly into the
mapping area. You may use the Expression Editor.
3. If possible, check the code.
Oracle University and (Oracle Corporation) use only.
These eKit materials are to be used ONLY by you for the express purpose SELF STUDY. SHARING THE FILE IS STRICTLY PROHIBITED.
Mappings may include any type of clause that is allowed in SQL languages. This includes:
•Constant values: These represent fixed numeric or string values that do not depend on
the source tables. For example, you may want to always populate a target field
“Approved” with 0 to mean that sales always starts unapproved. Enter numeric values
directly, but enclose strings within single quotation marks.
•Source columns: Precede the column name with the name of the datastore. It is
suggested that you drag column names from the diagram in the Expression Editor to
add source columns to a mapping clause.
•DBMS functions: You can use any functions supported by the DBMS that will run the
interface’s generated code.
•You can use aggregate functions such as MIN, MAX, and COUNT. ODI automatically
manages the generation of the specific GROUP BY clauses in these cases.
•You can combine constants, columns, DBMS, or aggregate functions in any legal SQL
way in the code to build your mapping.
This is just the start of what you can do with mappings. The rest is covered in the lessons
about advanced interface designs.
Oracle Data Integrator 11g: Integration and Administration 8 - 40
Copyright © 2012, Oracle and/or its affiliates. All rights reserved.
Valid Mapping Types
The following types of clauses may be used in the mappings:
MAX(), MIN(), and so on. ODI automatically generates
the GROUP BY clause.
DBMS Aggregate
Any combination of clauses is allowed:
SRC_SALES_PERSON.FIRST_NAME || ' ' ||
UCASE(SRC_SALES_PERSON.LAST_NAME)
Combination
DBMS Function
Source Column
Value
Drag the column or use the Expression Editor. It is
prefixed by the datastore’s alias. For example:
SRC_SALES.PROD_ID
Use the Expression Editor for the list of supported
functions and operators, or enter them directly.
String values should be enclosed within single quotation
marks: ‘SQL', but not for numeric values: 5, 10.3
Oracle University and (Oracle Corporation) use only.
These eKit materials are to be used ONLY by you for the express purpose SELF STUDY. SHARING THE FILE IS STRICTLY PROHIBITED.
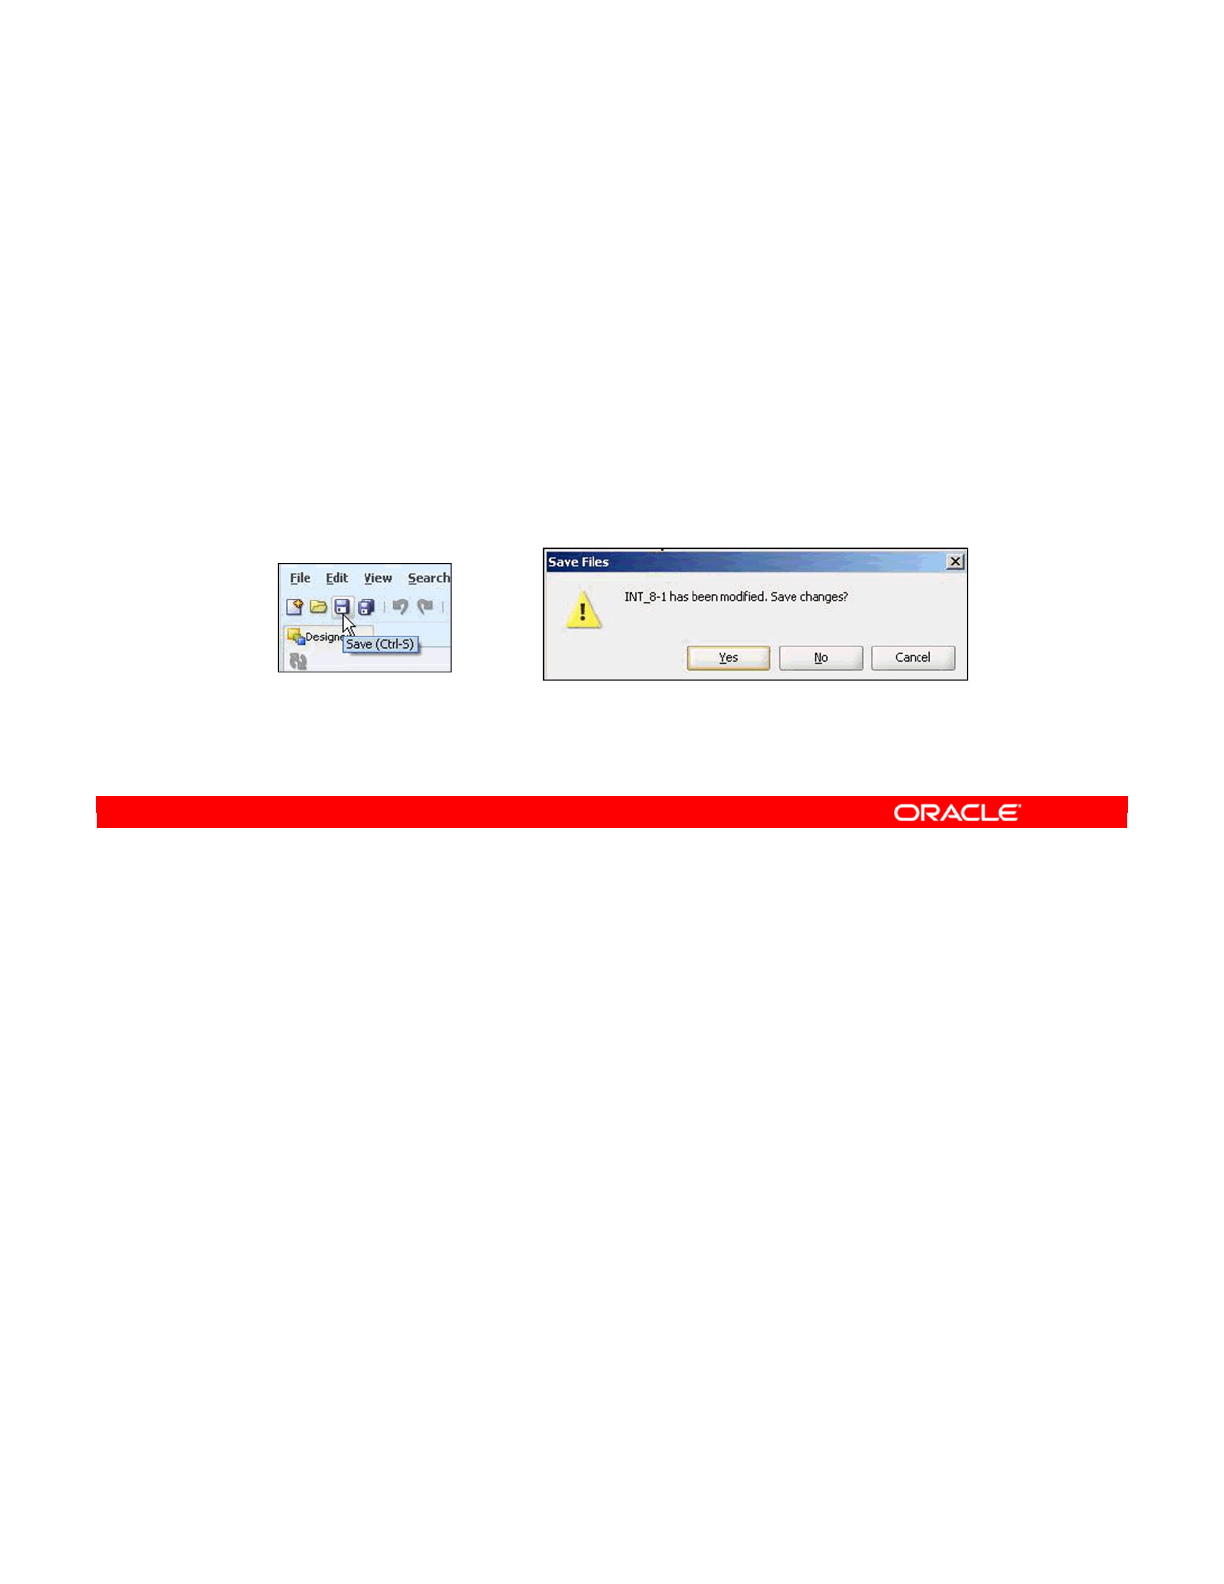
To save an interface:
•Click the Save button in the Interface window.
•You may also use the Yes or Cancel buttons to close the interface after saving or
discarding it, respectively. You will be prompted to confirm if you click the Cancel button
to discard the changes that you have made.
Note
•Interfaces are not saved locally on your machine, but in the centralized ODI Work
Repository.
•Save your work regularly by clicking the Save button.
Oracle Data Integrator 11g: Integration and Administration 8 - 41
Copyright © 2012, Oracle and/or its affiliates. All rights reserved.
Saving the Interface
•Click the Save button to save the interface.
•You can click Yes to save and close the interface.
•The Cancel button closes the interface without saving.
•Interfaces are saved in the Work Repository.
•The Edit/Undo feature can Undo the last change, even if
you have issued a Save!
Oracle University and (Oracle Corporation) use only.
These eKit materials are to be used ONLY by you for the express purpose SELF STUDY. SHARING THE FILE IS STRICTLY PROHIBITED.
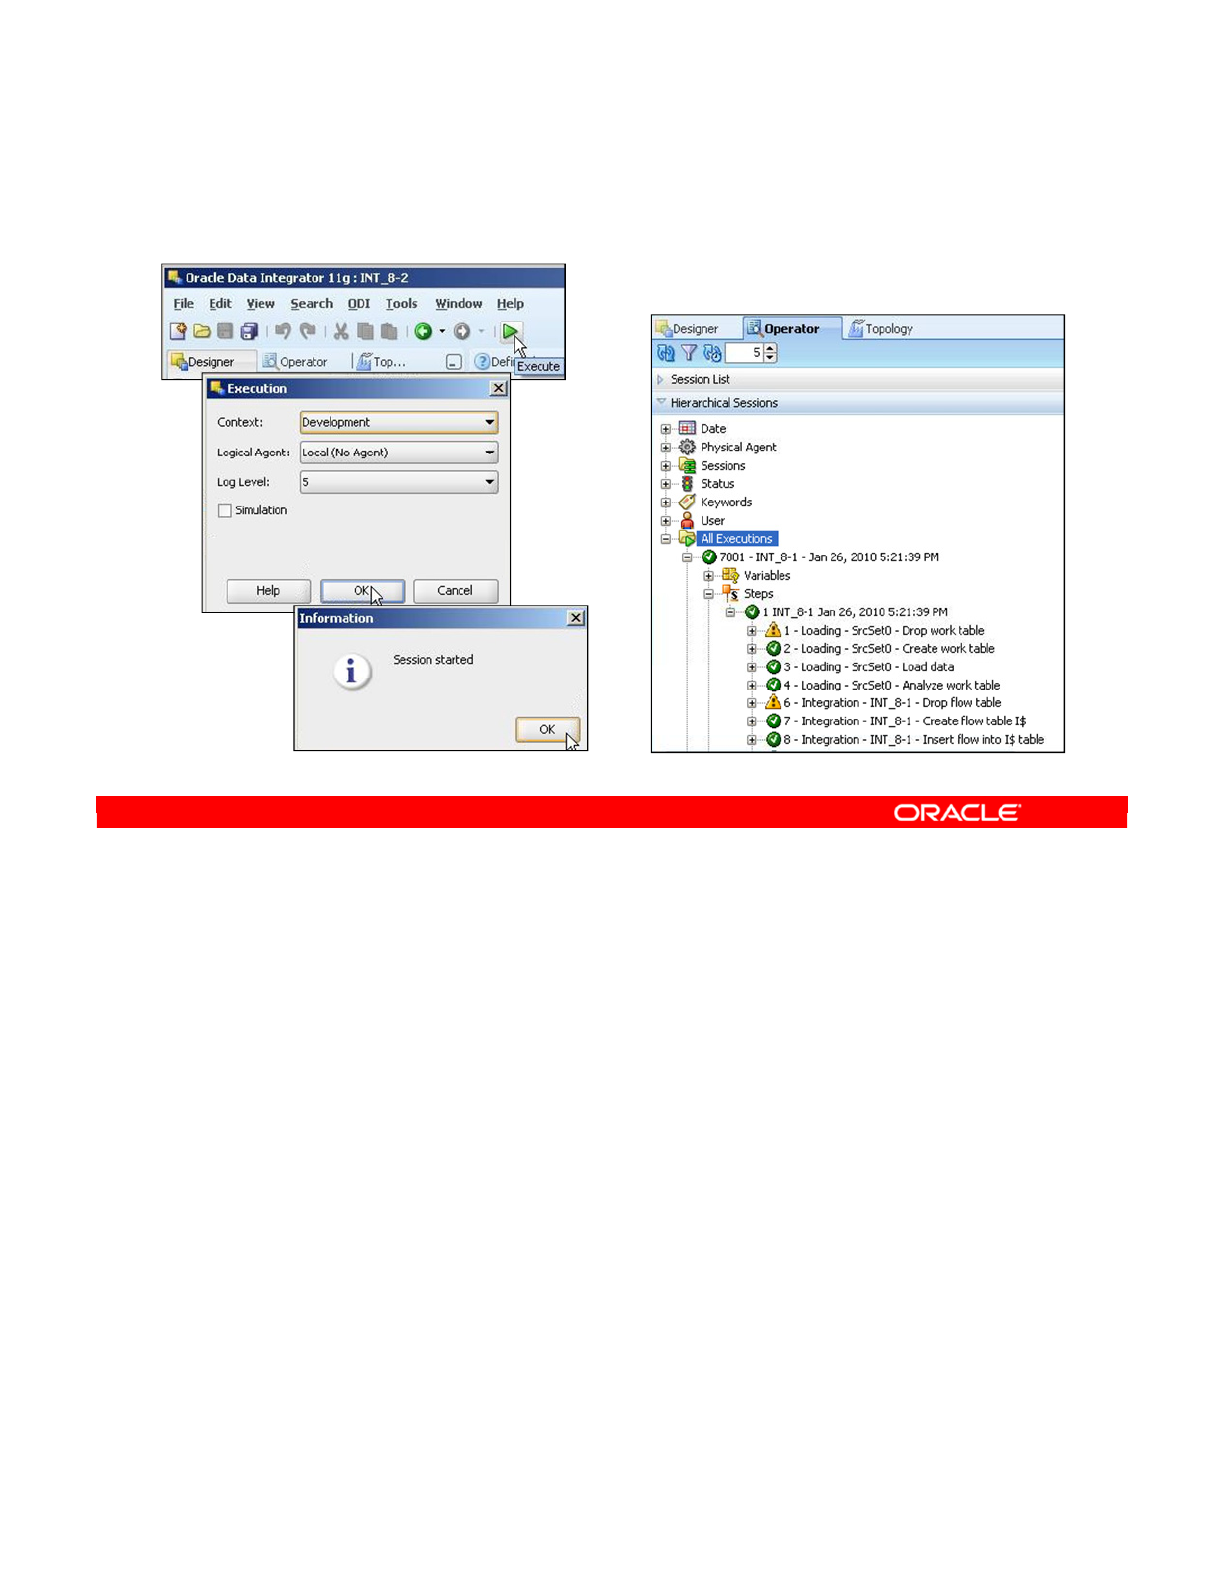
1. Click the Execute button to execute the ODI Interface.
2. Click OK in the Execution window that appears, and then click OK when the Session
Started message appears.
The execution results in ODI Operator are displayed as shown in the screen.
Oracle Data Integrator 11g: Integration and Administration 8 - 42
Copyright © 2012, Oracle and/or its affiliates. All rights reserved.
Executing the Interface
Oracle University and (Oracle Corporation) use only.
These eKit materials are to be used ONLY by you for the express purpose SELF STUDY. SHARING THE FILE IS STRICTLY PROHIBITED.

Answer: b
Explanation: ODI exploits in-house RDBMS engines to perform the required processes.
When ODI generates ANSI-standard SQL code, that code should run on any SQL database.
Oracle Data Integrator 11g: Integration and Administration 8 - 43
Copyright © 2012, Oracle and/or its affiliates. All rights reserved.
Quiz
Which of the following statements is not true?
a. ODI is based on business rules.
b. ODI requires a proprietary engine.
c. ODI can generate native or standard SQL code.
d. ODI business rules are defined on an interface.
e. In ODI, the processing instructions are implemented in
knowledge modules.
Oracle University and (Oracle Corporation) use only.
These eKit materials are to be used ONLY by you for the express purpose SELF STUDY. SHARING THE FILE IS STRICTLY PROHIBITED.

Answer: b
Explanation: An interface has only one target datastore. If you want to populate several
targets, you need to create several interfaces.
Oracle Data Integrator 11g: Integration and Administration 8 - 44
Copyright © 2012, Oracle and/or its affiliates. All rights reserved.
Quiz
If you want to populate several targets, you need to insert
several datastores in the target area.
a. True
b. False
Oracle University and (Oracle Corporation) use only.
These eKit materials are to be used ONLY by you for the express purpose SELF STUDY. SHARING THE FILE IS STRICTLY PROHIBITED.

Oracle Data Integrator 11g: Integration and Administration 8 - 45
Copyright © 2012, Oracle and/or its affiliates. All rights reserved.
Summary
In this lesson, you should have learned how to:
•Describe the concept of ODI Interface
•Describe the concept of mapping, join, and filter
•Describe the process of implementing business rules
•Describe the concepts of staging area and execution
location
•Use knowledge modules with ODI Interface
•Create and execute a basic ODI Interface
•Use lookups
Oracle University and (Oracle Corporation) use only.
These eKit materials are to be used ONLY by you for the express purpose SELF STUDY. SHARING THE FILE IS STRICTLY PROHIBITED.

Oracle Data Integrator 11g: Integration and Administration 8 - 46
Copyright © 2012, Oracle and/or its affiliates. All rights reserved.
Checklist of Practice Activities
1-1: Logging In and Using Help
2-1: Creating Users and Repositories and Logging In
3-1: Creating an ODI Agent for Orchestrating Execution of ODI Objects
4-1: Defining the Topology
5-1: Setting Up a New ODI Project
6-1: Creating a Model
7-1: Checking Data Quality in the Model
8-1: ODI Interface: Simple Transformations
9-1: ODI Interface: Complex Transformations
9-2: ODI Interface: Implementing Lookup
10-1: ODI Interface: Exporting a Flat File to a Relational Table
11-1: Using Native Sequences with ODI Interface
11-2: Using Temporary Indexes
11-3: Using Data Sets with ODI Interface
12-1: Using Temporary ODI Interfaces
12-2: Developing a New Knowledge Module
13-1: Creating an ODI Procedure
14-1: Creating an ODI Package
14-2: Using ODI Package with Variables and User Functions
15-1: Creating and Scheduling an ODI Scenario
16-1: Using Load Plans
17-1: Working with ODI Versions
18-1: Enforcing Data Quality with ODI Interface
19-1: Implementing Changed Data Capture
20-1: Setting Up ODI Security
20-2: Integrating with Enterprise Manager and Using ODI Console
21-1: Executing an ODI Scenario Through the ODI Public Web Service
Oracle University and (Oracle Corporation) use only.
These eKit materials are to be used ONLY by you for the express purpose SELF STUDY. SHARING THE FILE IS STRICTLY PROHIBITED.
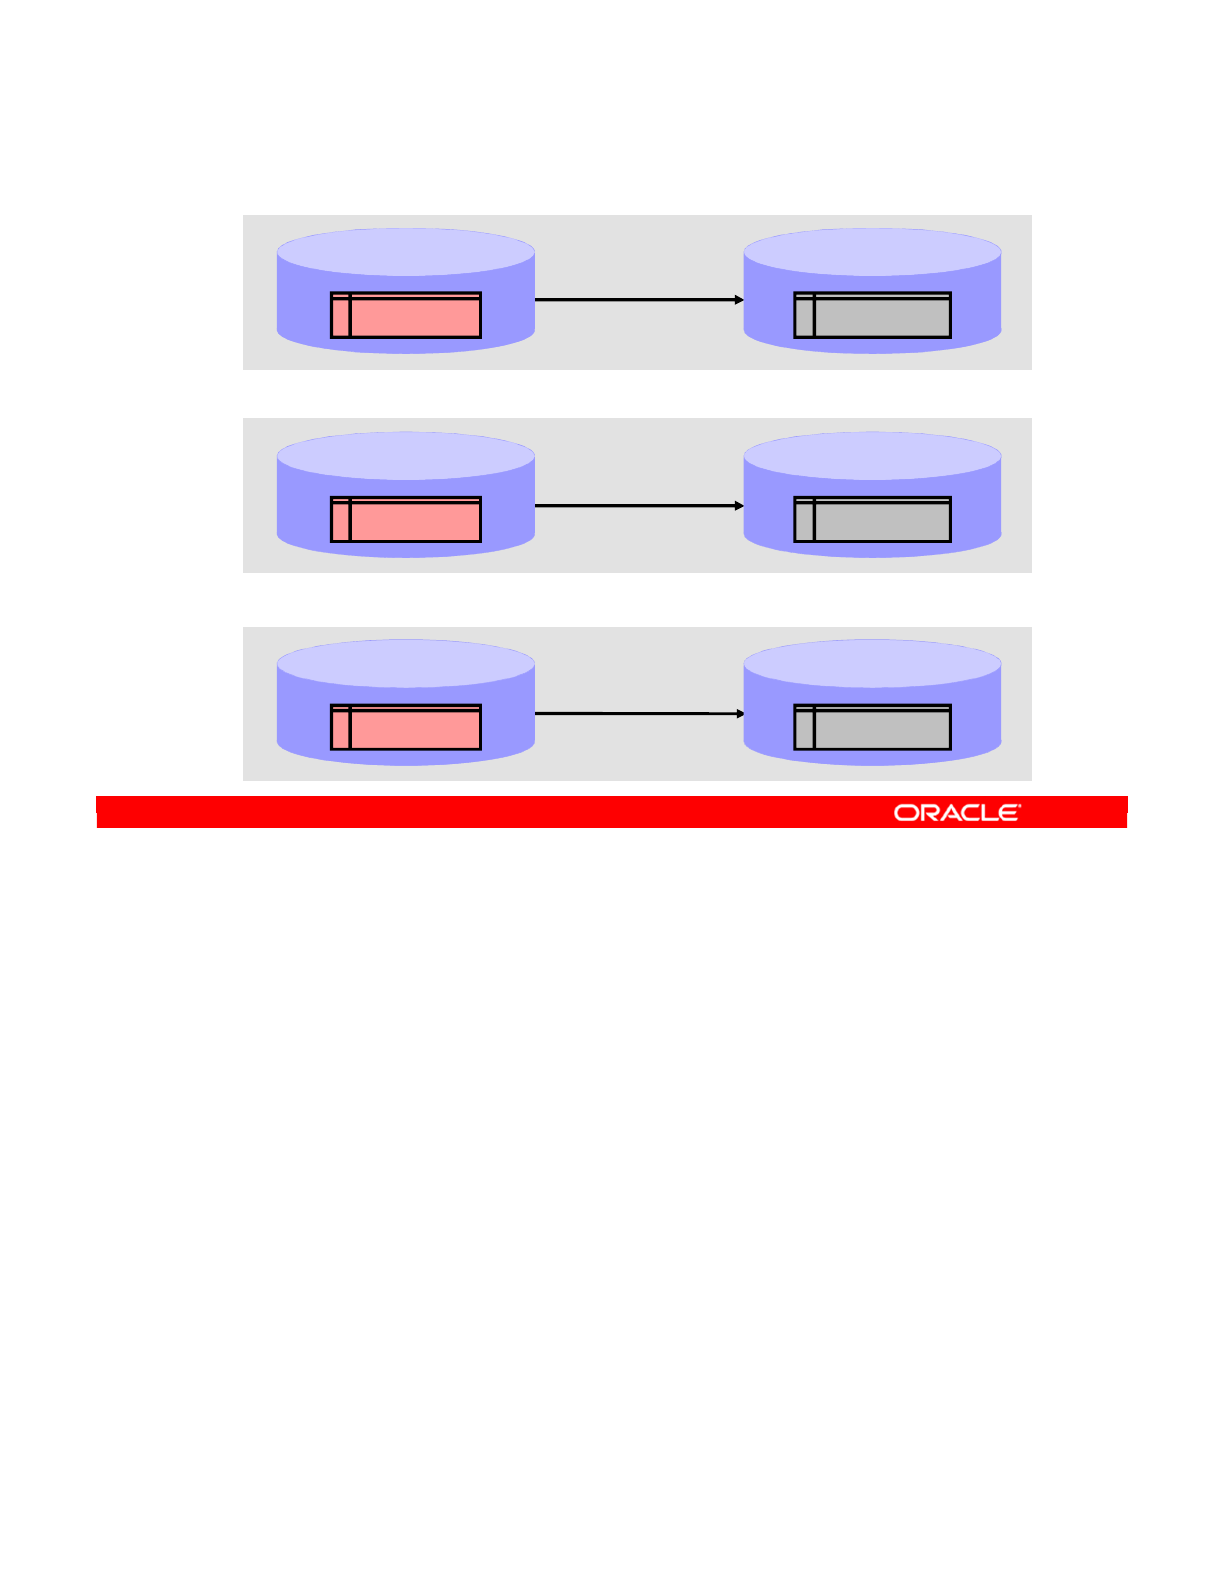
In this practice, you create three interfaces. First, you create an interface called INT_8-1 by
loading the TRG_COUNTRY datastore in the Oracle Sales Application model with the content of
the SRC_REGION table from the HSQL Orders Application model. This simple interface has no
transformations.
The second interface, INT_8-2, starts out as a duplicate of INT_8-1. The target is changed to
TRG_REGION, flow control is activated, and constraints in the target table are checked.
The third interface, INT_8-3, loads the TRG_CITY datastore in the Oracle Sales Application
model with the content of the SRC_CITY table from the HSQL Orders Application model. In
this interface, flow control is activated, constraints in the target table are checked, and city
population values are transformed from individual to times 1000.
Oracle Data Integrator 11g: Integration and Administration 8 - 47
Copyright © 2012, Oracle and/or its affiliates. All rights reserved.
Practice 8-1: Overview
Create interface INT_8-1
•No transformations
HSQL_Orders_Application
model
SRC_REGION TRG_COUNTRY
Oracle Sales Application
model
Create interface INT_8-2
•Flow control
activated
•Constraints in target
table are checked
HSQL_Orders_Application
model
SRC_REGION TRG_COUNTRY
Oracle Sales Application
model
Create interface INT_8-3
•Flow control
activated
•Constraints in target
table are checked
•Transform city
population values from
individual to x 1000
HSQL_Orders_Application
model
SRC_CITY
Oracle Sales Application
model
TRG_CITY
Oracle University and (Oracle Corporation) use only.
These eKit materials are to be used ONLY by you for the express purpose SELF STUDY. SHARING THE FILE IS STRICTLY PROHIBITED.

Oracle University and (Oracle Corporation) use only.
These eKit materials are to be used ONLY by you for the express purpose SELF STUDY. SHARING THE FILE IS STRICTLY PROHIBITED.

Copyright © 2012, Oracle and/or its affiliates. All rights reserved.
Designing Interfaces
Oracle University and (Oracle Corporation) use only.
These eKit materials are to be used ONLY by you for the express purpose SELF STUDY. SHARING THE FILE IS STRICTLY PROHIBITED.

Oracle Data Integrator 11g: Integration and Administration 9 - 2
Copyright © 2012, Oracle and/or its affiliates. All rights reserved.
Objectives
After completing this lesson, you should be able to:
•Design Oracle Data Integrator (ODI) interfaces with
multiple-source datastores
•Create joins and lookups, and filter data
•Define the flow in ODI Interface
•Specify ODI Interface Staging area and execution location
•Select knowledge modules
Oracle University and (Oracle Corporation) use only.
These eKit materials are to be used ONLY by you for the express purpose SELF STUDY. SHARING THE FILE IS STRICTLY PROHIBITED.

You learned how to create a one-to-one interface with a single source. Now you learn how to
combine multiple sources in a single interface.
You learn how to create interfaces with multiple-source datastores, and how to create joins or
relationships between these sources, in the following slides.
Oracle Data Integrator 11g: Integration and Administration 9 - 3
Copyright © 2012, Oracle and/or its affiliates. All rights reserved.
Multiple Sources and Joins
Oracle University and (Oracle Corporation) use only.
These eKit materials are to be used ONLY by you for the express purpose SELF STUDY. SHARING THE FILE IS STRICTLY PROHIBITED.
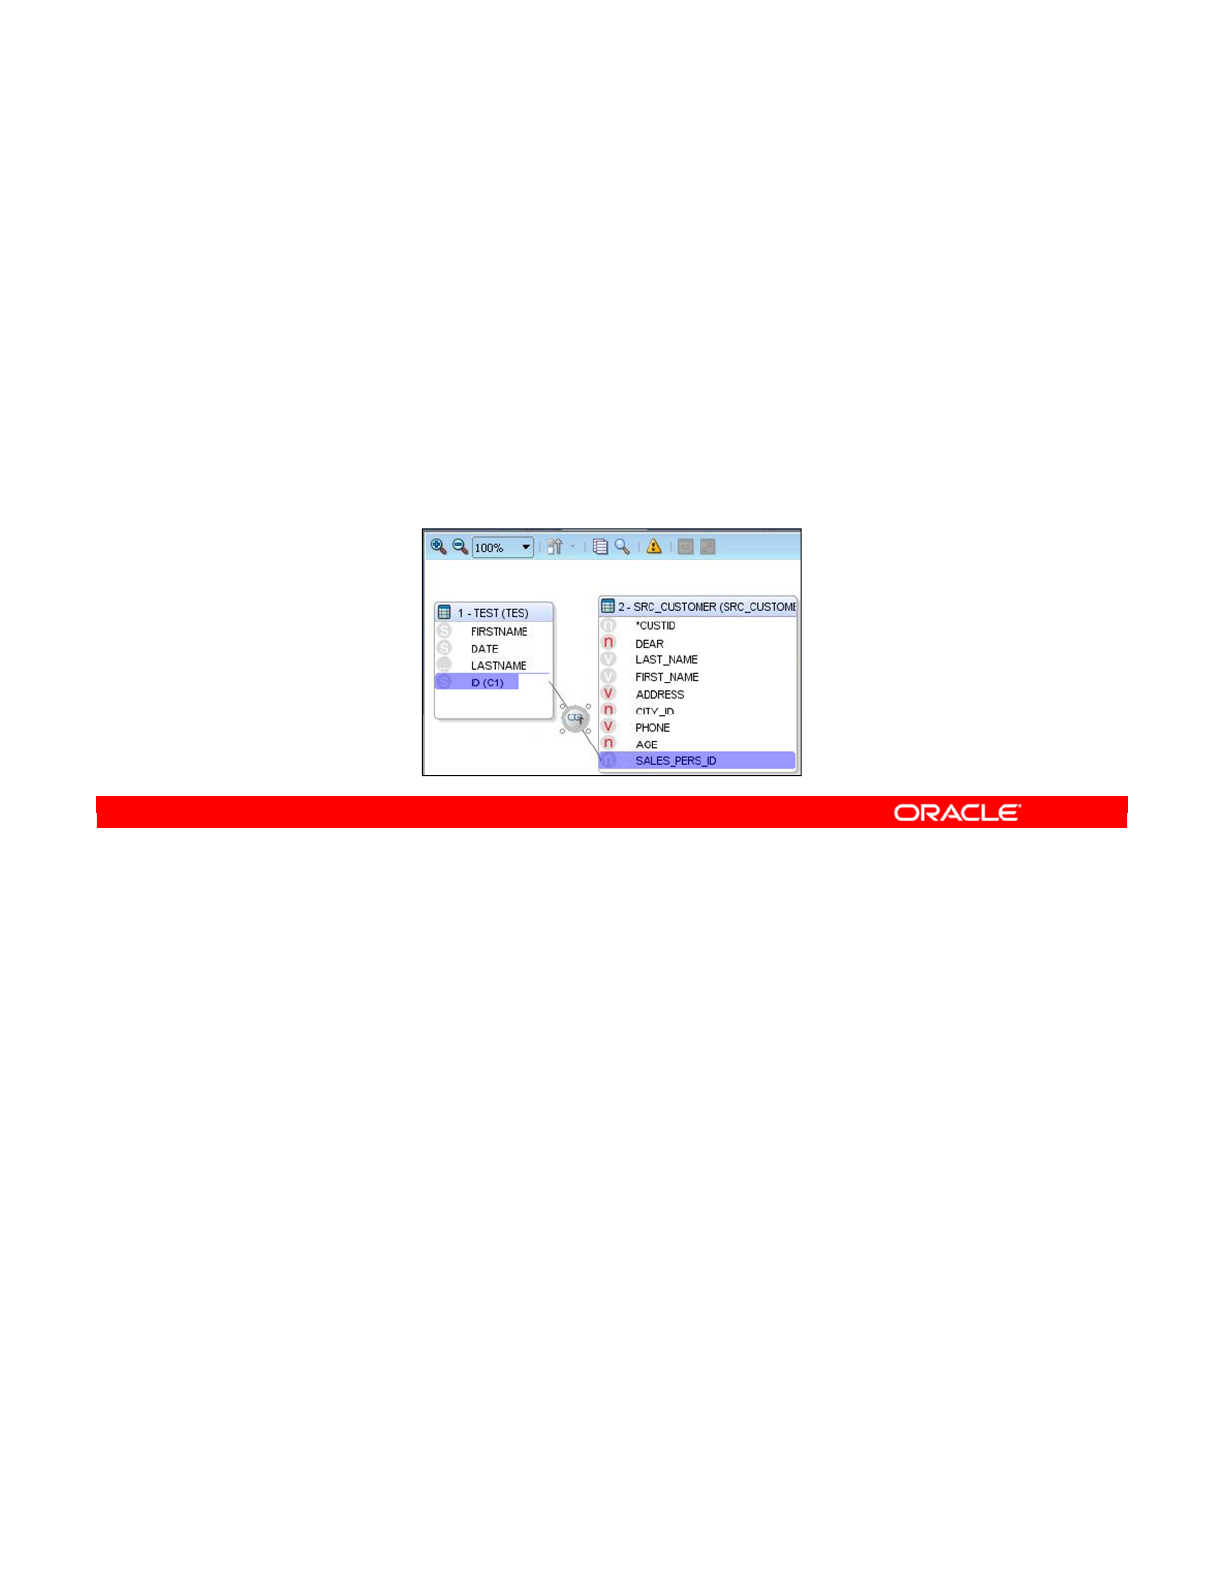
Populating a target datastore from multiple-source datastores has a wide range of uses.
There should be a relationship between the tables, which is then expressed as a join. If any
source datastores are unjoined when you try to execute an interface, ODI displays an error.
Joins are made in two ways:
•If references such as foreign keys are in the source datastores, these are automatically
converted into joins in the interface.
•Alternatively, you can create joins manually by using the drag-and-drop functionality in
the diagram. This is necessary for datastores with no references defined.
Note: All source datastores must be directly or indirectly joined.
Oracle Data Integrator 11g: Integration and Administration 9 - 4
Copyright © 2012, Oracle and/or its affiliates. All rights reserved.
Multiple-Source Datastores
•You can add more than one source datastore to an
interface.
•Datastores must be linked by using joins.
•There are two ways to create joins:
–References (for example, foreign keys) in the models
automatically become joins in the diagram.
–Joins must be manually defined in the diagram for isolated
datastores.
Oracle University and (Oracle Corporation) use only.
These eKit materials are to be used ONLY by you for the express purpose SELF STUDY. SHARING THE FILE IS STRICTLY PROHIBITED.
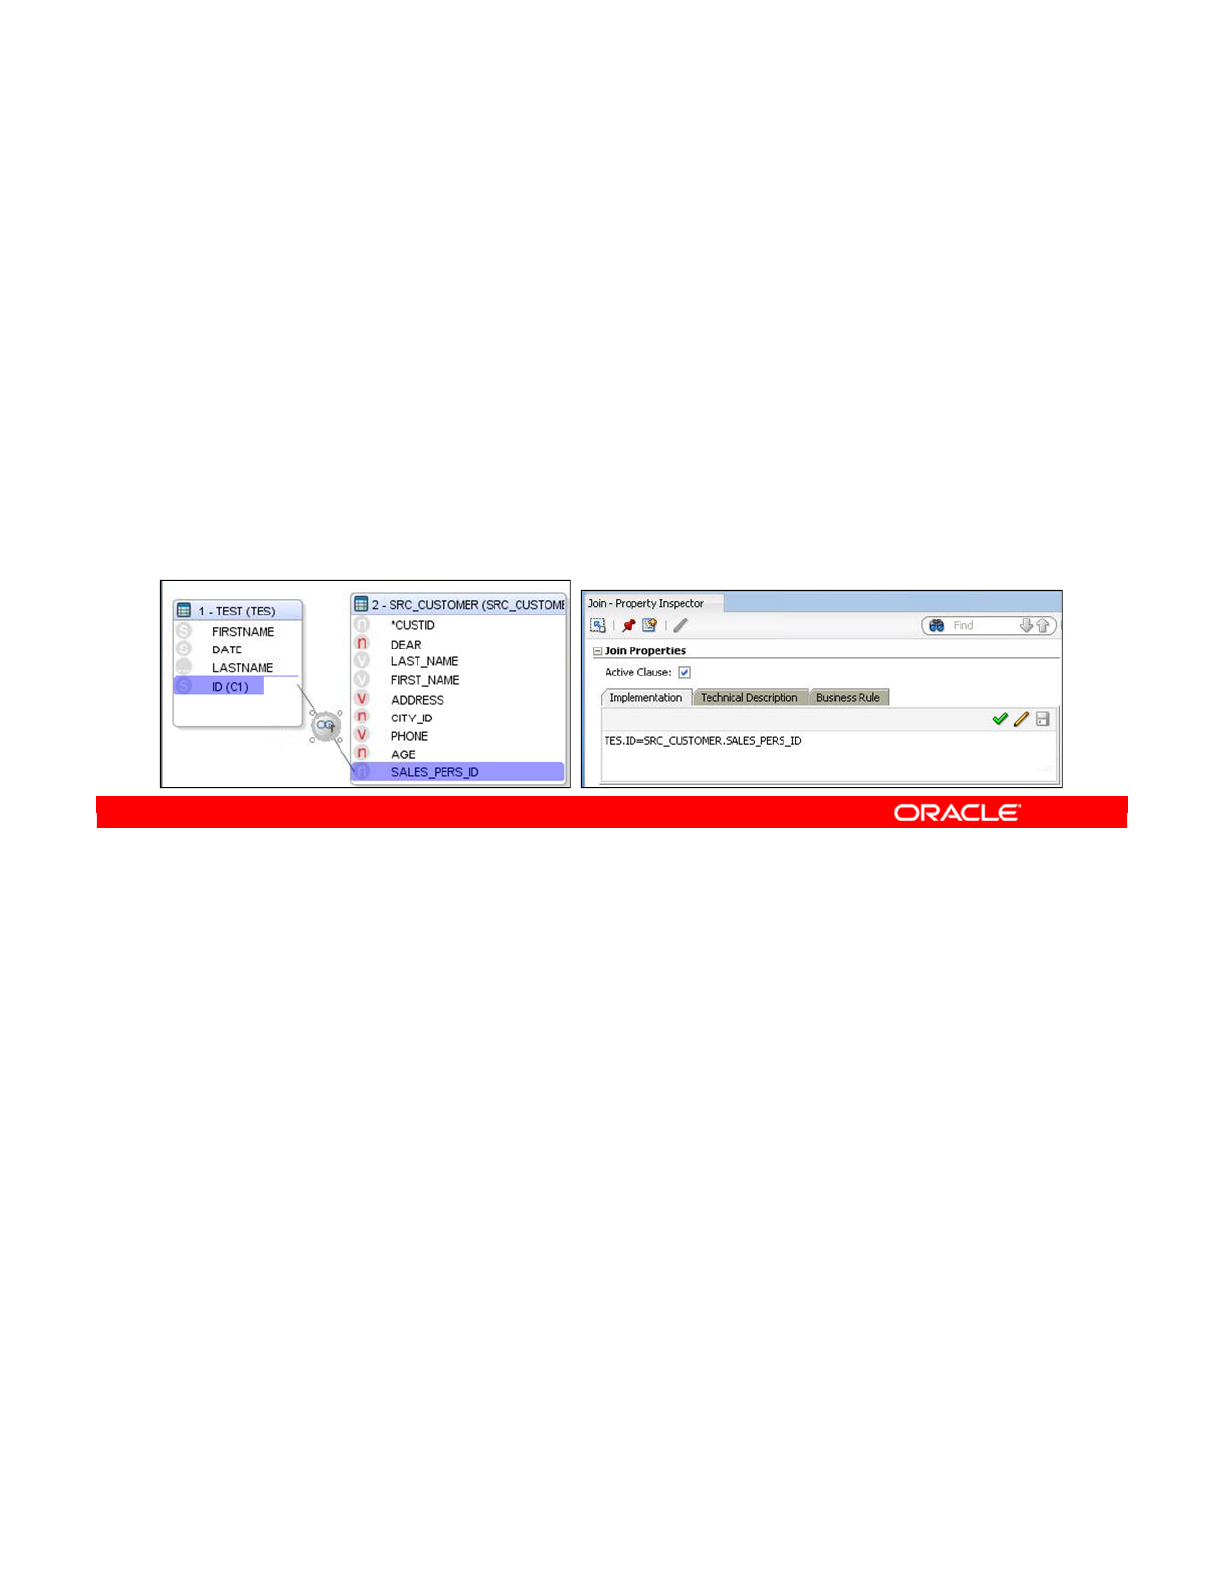
To manually create a join, you drag a column from one datastore onto a column in another
datastore. ODI creates a simple join, linking rows where the values in these two columns are
identical. This join appears in the diagram as a bent line connecting the two columns, and
also in the join code box as an expression, such as
TES.ID=SRC_CUSTOMER.SALES_PERS_ID.
To express more complex relationships, you modify the join expression manually. Thus, you
can incorporate database functions such as arithmetic or string-handling functions as more
advanced ODI functionality. The best practice is to use the Expression Editor to avoid making
errors in code.
After creating the join expression, you should have its syntax checked by the DBMS, if
possible. To do this, click the Check Expression button next to the join expression box.
Where possible, you should also test the join by right-clicking it and selecting Data. This
shows you all the rows that are selected by the join. You can also select Number of Rows to
see the row count. You can do this only when the technology supports joins and when the join
is on the source.
Oracle Data Integrator 11g: Integration and Administration 9 - 5
Copyright © 2012, Oracle and/or its affiliates. All rights reserved.
Creating a Join Manually
1. Drag a column from one datastore onto a column in
another datastore.
–A join linking the two datastores appears in the diagram.
–In the join code box, an expression joining the two columns
also appears.
2. Modify the join expression to create the required relation.
–You can use the Expression Editor.
3. Check the expression’s syntax.
4. Test the join if possible.
Oracle University and (Oracle Corporation) use only.
These eKit materials are to be used ONLY by you for the express purpose SELF STUDY. SHARING THE FILE IS STRICTLY PROHIBITED.

Simple joins, as seen earlier, feature two similar datastores from the same model, and thus
share the same technology. However, you can create joins between datastores in different
models (for example, two database tables in different schemas), and even across two servers
that use different technologies. In these cases, ODI migrates the data to a staging area and
performs the join there.
Similarly, you can have joins between three or more tables. To do this, drag column names
from other datastores in the diagram onto the join expression box.
Oracle Data Integrator 11g: Integration and Administration 9 - 6
Copyright © 2012, Oracle and/or its affiliates. All rights reserved.
Advanced Joins
•Heterogeneous joins:
–Datastores from different models or schemas
–Datastores from different technologies
•Joins between more than two datastores
–Columns from any datastore in the diagram can be added to
the join expression to create multiple data store joins.
Oracle University and (Oracle Corporation) use only.
These eKit materials are to be used ONLY by you for the express purpose SELF STUDY. SHARING THE FILE IS STRICTLY PROHIBITED.
The four types of joins are cross, inner, outer, and natural.
•A cross-join retrieves all possible row combinations between the two tables, without any
filtering.
•In an inner join, records from two tables are combined and added to a query’s results
only if the values of the joined fields meet the specified criteria.
•An outer join returns all the rows from the joined tables whether or not there is a
matching row between them. In the three types of outer joins—left, right, and full—the
type indicates the source of the main data.
-When you use a left outer join to combine two tables, all the rows from the left
table are included in the results. A right outer join is the same as a left outer join,
but in the other way. Rows from the left table can be included more than once.
-A full outer join retrieves all the rows from both joined tables. It returns all paired
rows where the join condition is true, and the unpaired rows from each table
concatenated with NULL rows from the other table. Effectively, it returns any rows
that would be returned by either a left or right outer join.
Note: In some technologies, not all these operators are valid. In that case, ODI will not enable
some types of join to be selected. Joins may be expressed either in a database-specific
syntax or in a standard ISO-92 syntax, supported by most databases.
Oracle Data Integrator 11g: Integration and Administration 9 - 7
Copyright © 2012, Oracle and/or its affiliates. All rights reserved.
Types of Joins
The following types of joins exist: cross, inner, outer, natural.
Cross-Join Cartesian product; every combination of any customer with
any order, without restriction
Inner Join Only records where a customer and an order are linked
Left Outer Join All customers combined with any linked orders, or blanks if
none
Right Outer Join All orders combined with any linked customer, or blanks if
none
Full Outer Join All customers and all orders
A natural join is a join statement that compares the common columns of two tables with each other.
You should check whether common columns exist in both tables before doing a natural join.
Natural joins may cause problems if columns are added or renamed.
Also, no more than two tables can be joined by using this method.
So, it is best to avoid natural joins as much as possible.
Oracle University and (Oracle Corporation) use only.
These eKit materials are to be used ONLY by you for the express purpose SELF STUDY. SHARING THE FILE IS STRICTLY PROHIBITED.
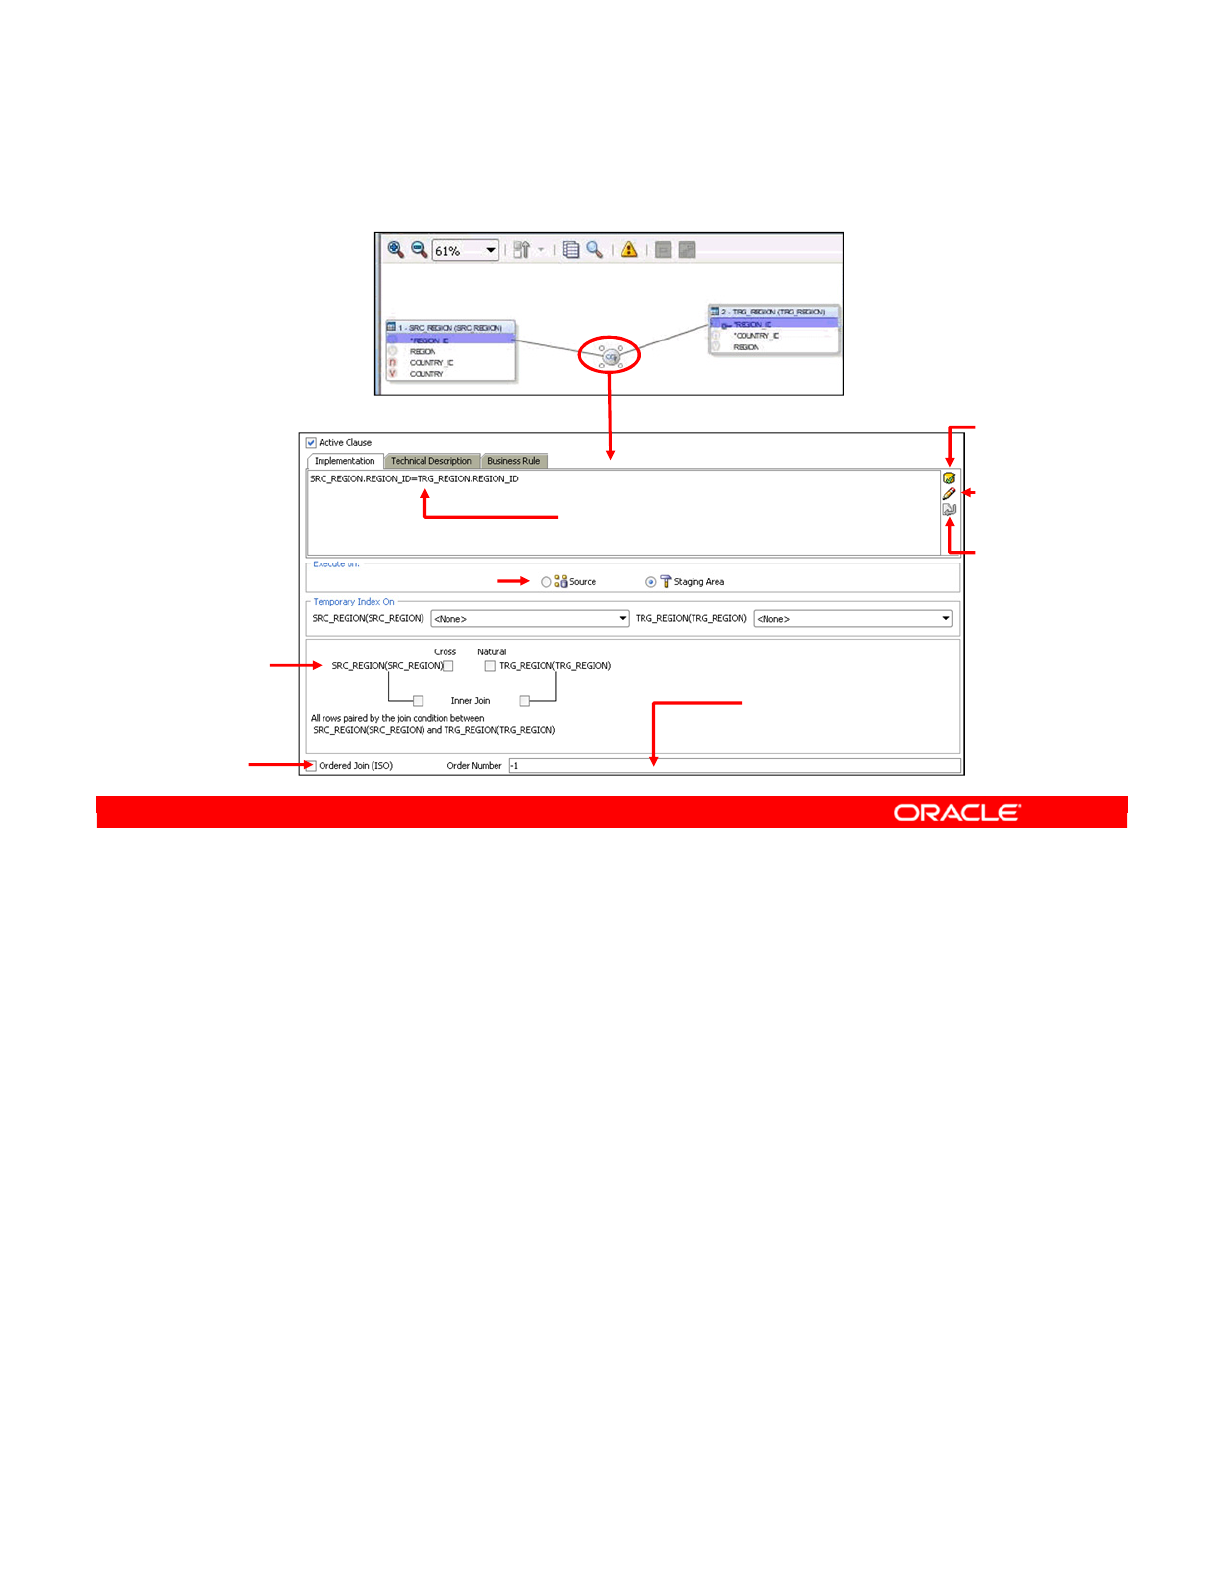
This is how the Join Property Inspector window appears when a join is selected.
The SQL join expression expresses the join, written in SQL. A valid SQL expression involving
qualified column names from at least two different datastores is acceptable. Note that the
word “JOIN” is never used.
You can also launch the Expression Editor, which helps you create more complex joins and
avoid mistyping names.
The join type check boxes enable you to choose between a left, right, natural, or cross join.
Select a full outer join by selecting both left and right joins simultaneously. Note that ODI
automatically rearranges a right outer join to be a left outer join, if possible, for readability.
However, not every technology supports every type of join.
Oracle Data Integrator 11g: Integration and Administration 9 - 8
Copyright © 2012, Oracle and/or its affiliates. All rights reserved.
Setting Up a Join
Validate
Expression
Expression
Editor
Save
Expression
Join order
(ISO-92 Syntax)
SQL join expression
(technology dependent)
Execution location
Use ISO-92
syntax.
Join type
Inner/Outer,
Left/Right,
Natural
Oracle University and (Oracle Corporation) use only.
These eKit materials are to be used ONLY by you for the express purpose SELF STUDY. SHARING THE FILE IS STRICTLY PROHIBITED.

Oracle Data Integrator 11g: Integration and Administration 9 - 9
After you click the Validate Expression button, when available, the expression is sent to the
DBMS for syntax checking. To avoid unpleasant surprises later, perform the syntax checking
when you finish a join.
After you click the Save Expression button, the code is recorded in the repository. You must
save frequently when working on complex joins. The expression does not have to be
complete in order to be saved.
There are also some more advanced options. For example, the Execution location determines
whether the joins are executed on the source or the staging area server. This choice can be
important for performance or compatibility reasons.
You can select the Ordered Join (ISO) check box if it is important that the joins be performed
in a certain order, using ISO-92 syntax, usually for performance reasons. In this case, you
specify the Order Number to control the sequence of the joins. Low-numbered joins are
performed before high-numbered joins.
The join test will not pass if the join is not entirely between two SQL sources on the same
physical schema.
Note: Although ODI has always supported the ISO-92 Ordered Join syntax, the current 11g
Release 2 version of Oracle Database now supports this syntax for the first time. This support
was added to Oracle Server so that developers coming from other technologies can use a
feature that is in other vendors’ databases with which they are familiar.
Oracle University and (Oracle Corporation) use only.
These eKit materials are to be used ONLY by you for the express purpose SELF STUDY. SHARING THE FILE IS STRICTLY PROHIBITED.

A wizard is available in the interface editor to create lookups by using a source as the driving
table and a lookup datastore or interface. These lookups now appear as compact graphical
objects in the interface sources diagram.
The user can choose how each lookup is generated, either as a Left Outer Join in the FROM
clause or as an expression in the SELECT clause (in-memory lookup with nested loop). The
second syntax is sometimes more efficient in small lookup tables.
This feature simplifies the design and readability of interfaces that use lookups, and enables
optimized code for execution.
Oracle Data Integrator 11g: Integration and Administration 9 - 10
Copyright © 2012, Oracle and/or its affiliates. All rights reserved.
Lookups
You can ease the creation and maintenance of lookups through:
•Wizard
•Graphical artifact
You can generate lookups by using either of these methods:
•Left outer join (execution plan can be sort/merge, hash join)
select
O.ORDER_ID,
C.COUNTRY_NAME COUNTY_NAME_LOOKUP
From ORDERS O left outer join COUNTRY C
on (O.COUNTRY_ID = C. COUNTRY_ID)
•As an expression in the SELECT clause: In-memory lookup with
nested loops (lookup table accessed in-memory)
select
O.ORDER_ID,
(select C.COUNTRY_NAME from COUNTRY C
where O.COUNTRY_ID = C. COUNTRY_ID)COUNTY_NAME_LOOKUP
From ORDERS O
Oracle University and (Oracle Corporation) use only.
These eKit materials are to be used ONLY by you for the express purpose SELF STUDY. SHARING THE FILE IS STRICTLY PROHIBITED.
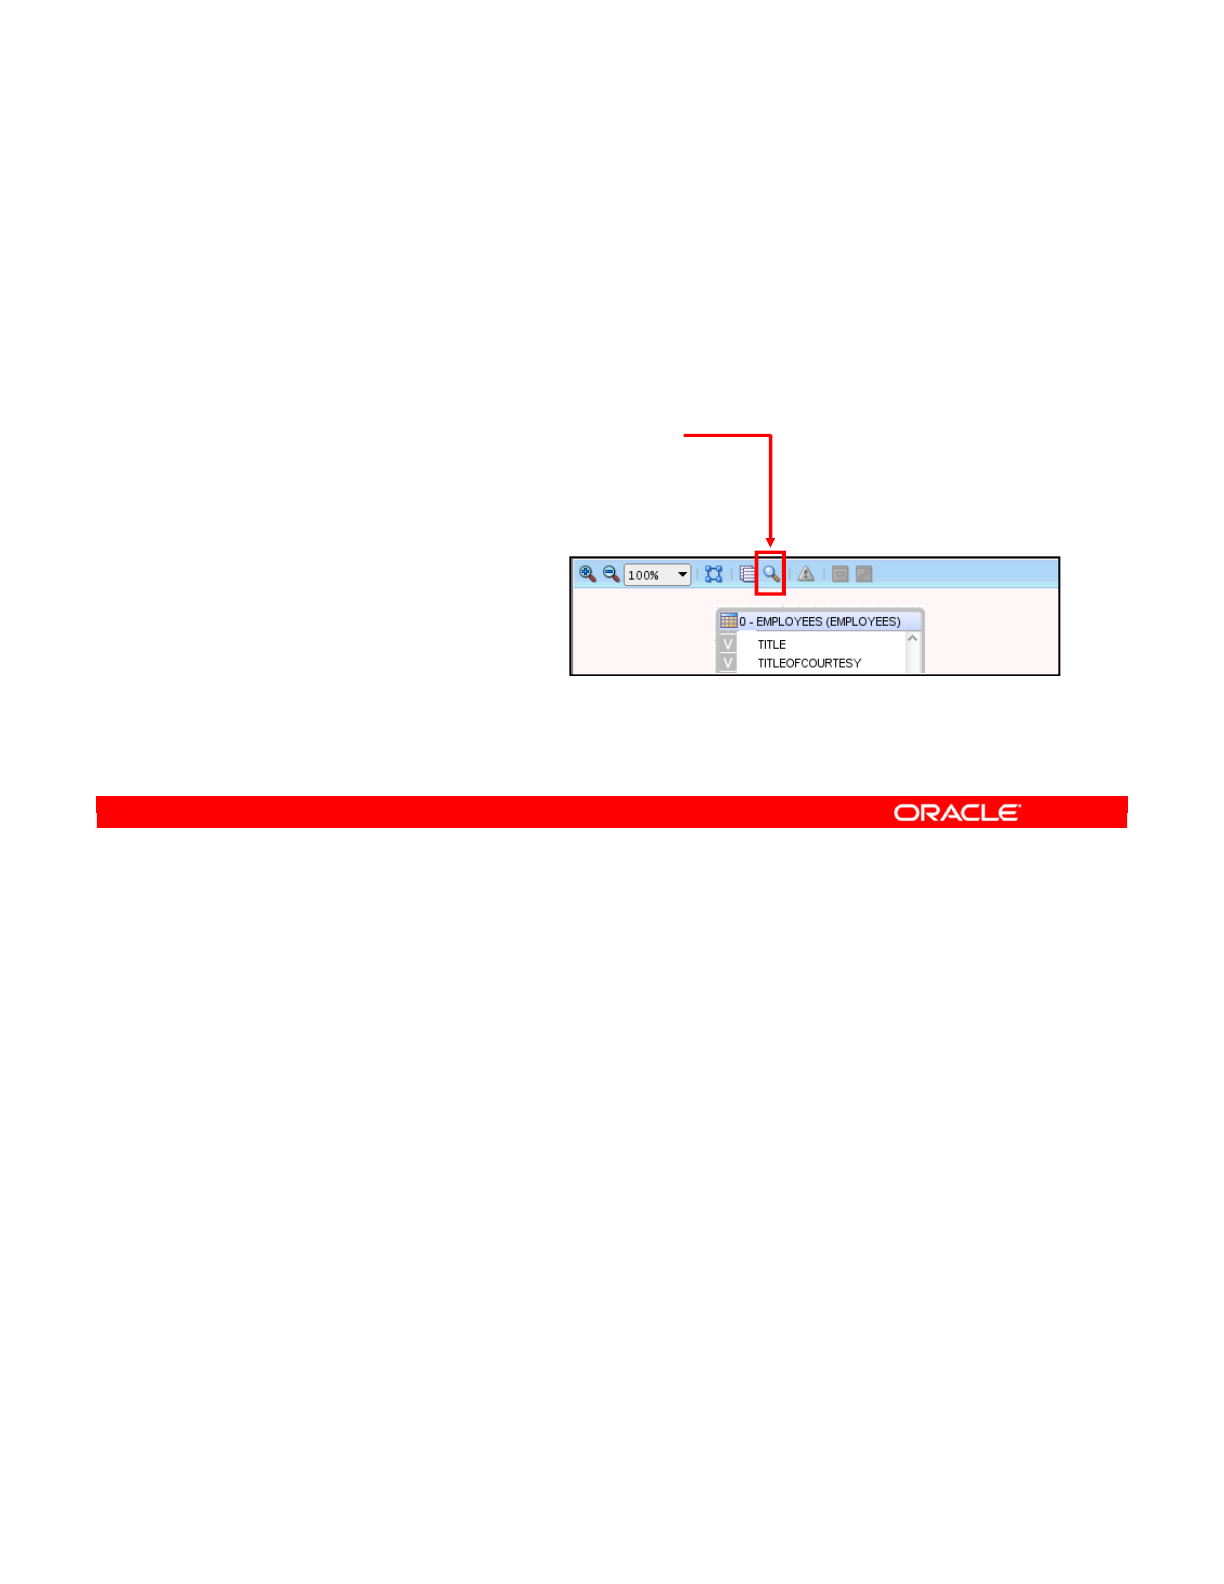
Ensure that the technology you have chosen supports lookups.
Oracle Data Integrator 11g: Integration and Administration 9 - 11
Copyright © 2012, Oracle and/or its affiliates. All rights reserved.
Using Lookups
•Make sure that your chosen technology supports lookups.
–Three possible levels of Lookup Support: None | Join | Select
•Two ways to create lookups from an interface:
–File > New to open the Gallery and the Table Lookup Wizard
–Click the Lookup Wizard button.
Oracle University and (Oracle Corporation) use only.
These eKit materials are to be used ONLY by you for the express purpose SELF STUDY. SHARING THE FILE IS STRICTLY PROHIBITED.

The lookup wizard has two steps. In the first step, you simply select your driving and lookup
tables. In the second step, you define the lookup condition and you can specify several
options.
Oracle Data Integrator 11g: Integration and Administration 9 - 12
Copyright © 2012, Oracle and/or its affiliates. All rights reserved.
Lookup Wizard
Oracle University and (Oracle Corporation) use only.
These eKit materials are to be used ONLY by you for the express purpose SELF STUDY. SHARING THE FILE IS STRICTLY PROHIBITED.

This slide mentions two limitations to keep in mind about the use of lookups in ODI.
Oracle Data Integrator 11g: Integration and Administration 9 - 13
Copyright © 2012, Oracle and/or its affiliates. All rights reserved.
Lookup Limitations
•Limitations
–“Left-outer-join” lookups will be available only on sources or
staging technologies that support them.
–“Expression-select” lookups will be available only on sources
or staging technologies that support them.
•Apart from that, lookups are all handled transparently by
the OdiRef APIs.
Oracle University and (Oracle Corporation) use only.
These eKit materials are to be used ONLY by you for the express purpose SELF STUDY. SHARING THE FILE IS STRICTLY PROHIBITED.

Data filtering aims at reducing the amount of source data to process in the interface.
Oracle Data Integrator 11g: Integration and Administration 9 - 14
Copyright © 2012, Oracle and/or its affiliates. All rights reserved.
Filtering Data
Oracle University and (Oracle Corporation) use only.
These eKit materials are to be used ONLY by you for the express purpose SELF STUDY. SHARING THE FILE IS STRICTLY PROHIBITED.

Filters in interfaces are created in two ways, just as joins were. First, any filter defined on a
datastore in the Models view is automatically copied into the interface. This is useful when
you want to filter data from a particular datastore always, for example, to never consider rows
of the “temporary” type.
Alternatively, you can manually add other filters to the datastore, which will apply only in this
interface. This is useful when different interfaces work on different sets of data from the same
datastore. For example, one interface may treat only North American sales, whereas another
works only on European sales. You will see how to do this in this lesson.
In either case, the goal of a filter in an interface is the same: To reduce the amount of data
being transferred to some specialized subset. Some examples might be “Sales worth more
than $1000,” “Orders from new customers,” or “Customers who have made at least one
support request in the last six months.”
Ensure that you do not confuse filters with constraints. If the data that you want to remove is
not erroneous, but irrelevant, you should use a filter rather than a constraint.
Oracle Data Integrator 11g: Integration and Administration 9 - 15
Copyright © 2012, Oracle and/or its affiliates. All rights reserved.
Filters in ODI
•Creating filters:
–Filters defined on the datastores in their models are
automatically copied into the diagram.
–You can manually add additional filters in the diagram.
•Filters are used in interfaces to reduce the amount of data
retrieved from the source datastores.
•Filters are not constraints.
–Nonmatching data is not “erroneous.”
Oracle University and (Oracle Corporation) use only.
These eKit materials are to be used ONLY by you for the express purpose SELF STUDY. SHARING THE FILE IS STRICTLY PROHIBITED.
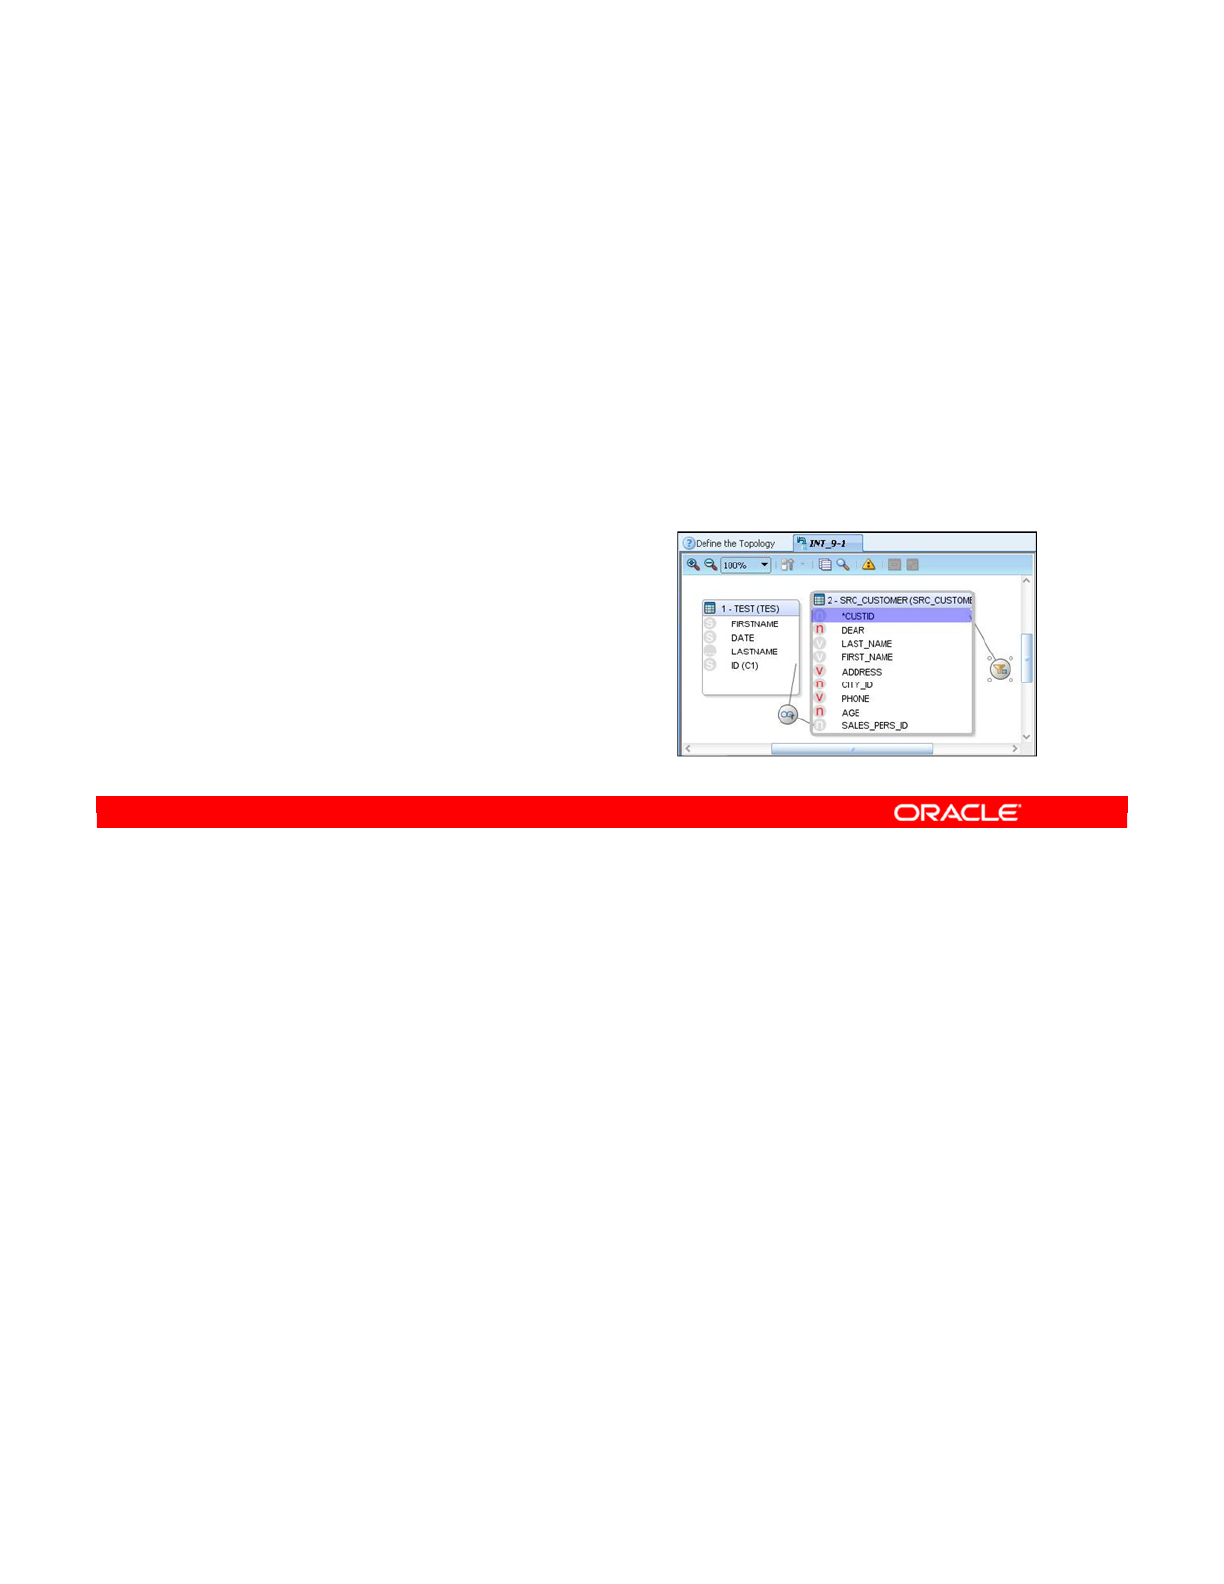
To create a new filter manually, drag the name of a column onto an empty space in the
diagram. You see a filter icon in the diagram connected to the column name by a line. Below
the diagram, on the Implementation tab, you see the filter expression. For the moment, this
consists of just the name of the column.
Modify this expression to implement the constraint that you want to impose. Make your
modifications by entering details in the filter expression box, or by clicking the Expression
Editor button and proceeding from there. Where possible, you should check the syntax of the
expression by clicking the Check Expression button.
You should also test the filter by right-clicking it and selecting Data. This shows you the data
that matches the filter. You can also select Number of Rows to see the row count. You can do
this only when the technology supports filters, and when the filter is on the source.
Oracle Data Integrator 11g: Integration and Administration 9 - 16
Copyright © 2012, Oracle and/or its affiliates. All rights reserved.
Defining a Filter Manually
1. Drag a column from one data source onto the diagram.
–A funnel representing the filter appears in the diagram.
–In the filter expression field, the column name appears.
2. Modify the filter expression to implement your filtering rule.
–You can call the Expression Editor.
3. Validate the expression if possible.
4. Test the filter:
Right-click and select Data.
Oracle University and (Oracle Corporation) use only.
These eKit materials are to be used ONLY by you for the express purpose SELF STUDY. SHARING THE FILE IS STRICTLY PROHIBITED.
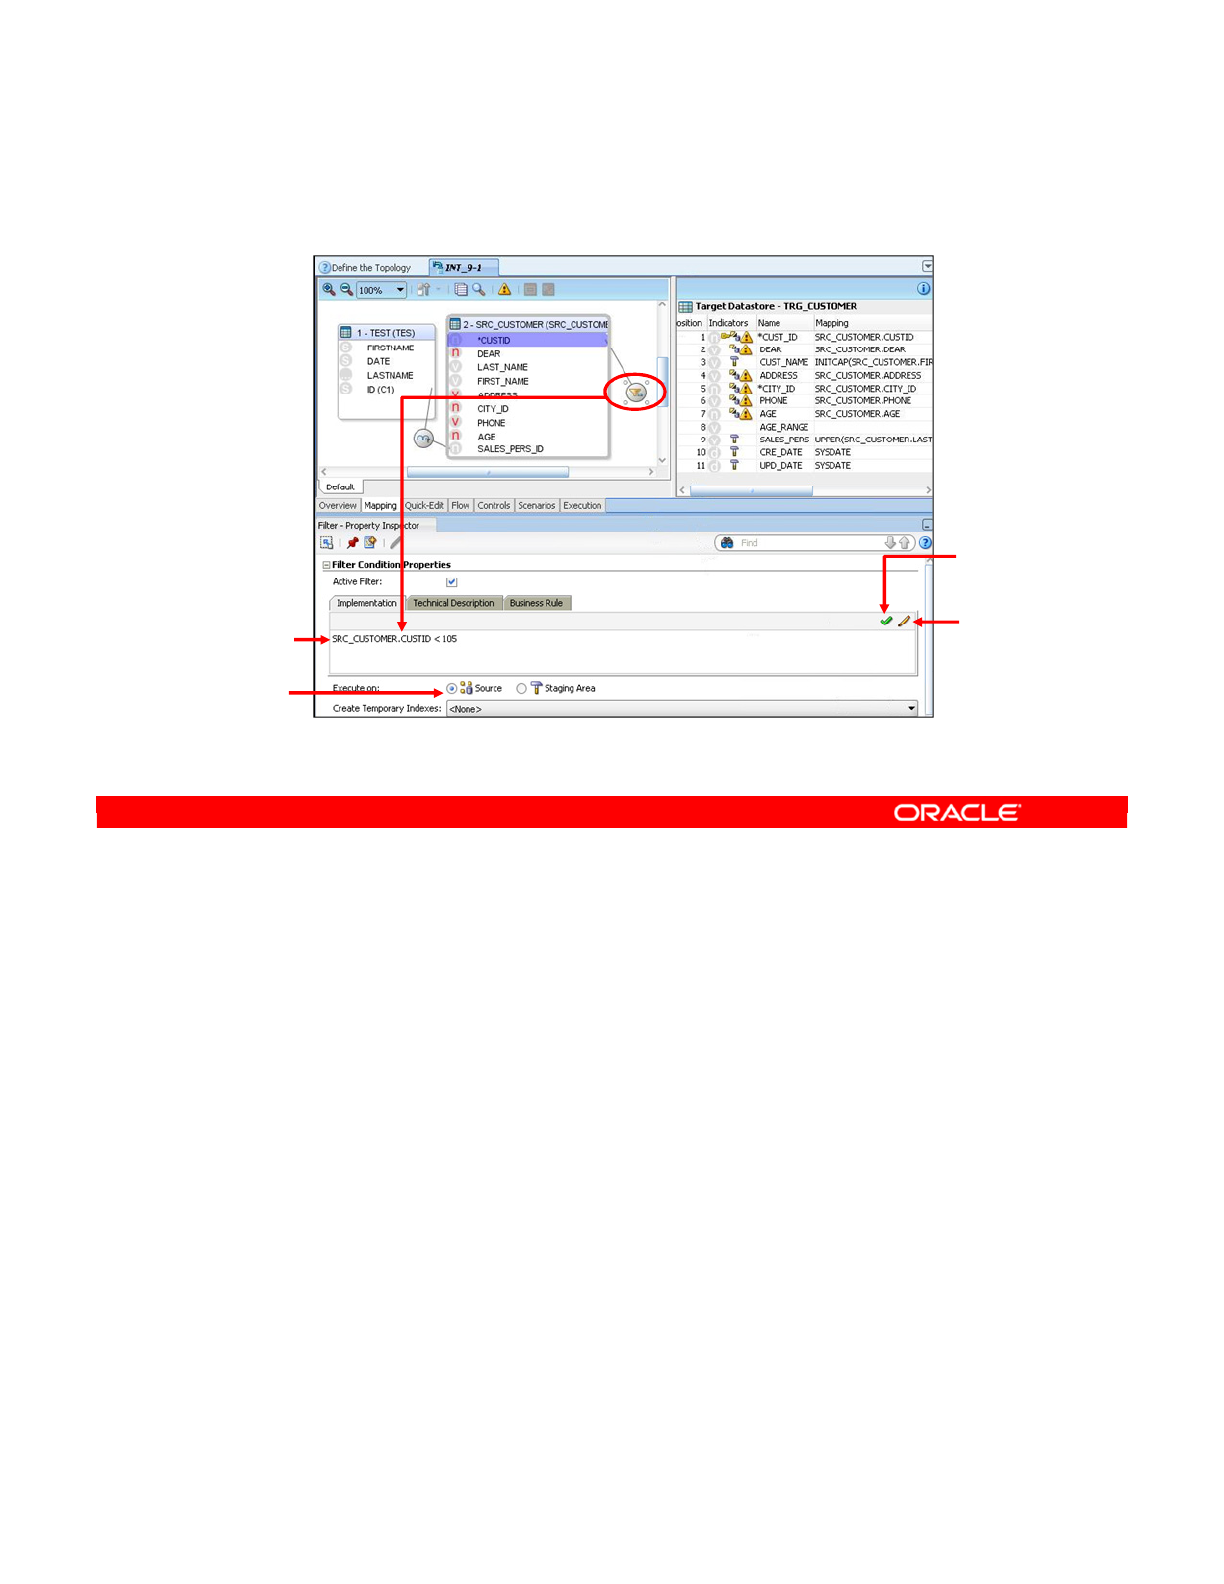
In this slide, you see the entire Interface screen as it appears when you create a filter. The
SQL filter expression is where you type the condition that must be matched by the rows in the
datastore.
The Execution location specifies the server on which the filtering is performed. This is
examined more closely in later lessons. The Check Expression, Expression Editor, and Save
Expression buttons behave in the same way as for joins.
Oracle Data Integrator 11g: Integration and Administration 9 - 17
Copyright © 2012, Oracle and/or its affiliates. All rights reserved.
Setting Up a Filter
SQL filter
expression
Execution
location
Check
Expression
Expression
Editor
Oracle University and (Oracle Corporation) use only.
These eKit materials are to be used ONLY by you for the express purpose SELF STUDY. SHARING THE FILE IS STRICTLY PROHIBITED.

The word “flow” has a special meaning in ODI. It refers to the passage of data between
sources of data and integration targets. Understanding this flow is critical in configuring your
integration path for maximum performance and flexibility.
Oracle Data Integrator 11g: Integration and Administration 9 - 18
Copyright © 2012, Oracle and/or its affiliates. All rights reserved.
Overview of the Flow in ODI
Interface
Oracle University and (Oracle Corporation) use only.
These eKit materials are to be used ONLY by you for the express purpose SELF STUDY. SHARING THE FILE IS STRICTLY PROHIBITED.

The definition of “flow” in the slide is the one that you will use. Remember that an interface
takes data from source datastores to a target by mapping source columns onto target
columns.
However, there are several possible routes to get that data from the source to the target. So,
the flow of the interface is the actual path that the data follows. It determines how the data is
extracted from the source datastores, where it is transformed, and finally how it is integrated
into the target datastore.
Note: Having a clear understanding of the flow of your data enables you to prevent many
problems at run time. Mastering the flow of your data also enables you to maximize the
performance of your data integration projects.
Oracle Data Integrator 11g: Integration and Administration 9 - 19
Copyright © 2012, Oracle and/or its affiliates. All rights reserved.
Flow
•Flow is the path taken by data from the sources to the
target in an ODI interface.
•The flow determines where and how data is extracted,
transformed, and then integrated into the target.
Oracle University and (Oracle Corporation) use only.
These eKit materials are to be used ONLY by you for the express purpose SELF STUDY. SHARING THE FILE IS STRICTLY PROHIBITED.

Each interface defines its flow with three factors. These are effectively the choices that you
make about how data integration occurs:
1. The most fundamental and important choice is where you put the Staging area. This
temporary workspace can be placed on the target server, on a source server, or on a
third server, which is neither a source nor the target.
2. Second, you can select the location of individual mappings, filters, and joins. Moving a
join to the Staging area, for example, causes all source data to be transferred to the
staging area for the join. Moving it back to a source can mean that less data transfer is
required. Similarly, you can mark all transformations as active or inactive. Making a
transformation inactive also affects the flow of data.
3. You must select the knowledge modules that will generate the code to implement the
integration. Different knowledge modules take advantage of different ways of moving
data. Thus, knowledge modules define how data is loaded, transformed, and integrated.
Each of these three factors is examined in greater detail in the rest of the lesson.
Oracle Data Integrator 11g: Integration and Administration 9 - 20
Copyright © 2012, Oracle and/or its affiliates. All rights reserved.
What Defines the Flow?
Three factors:
1. Where the Staging area is located
–On the target, on a source, or on a third server
2. How mappings, filters, and joins are set up:
–Execution location: Source, target, or Staging area
–Whether transformations are “active”
3. Choice of knowledge modules:
–LKM: Loading Knowledge Module
–IKM: Integration Knowledge Module
Oracle University and (Oracle Corporation) use only.
These eKit materials are to be used ONLY by you for the express purpose SELF STUDY. SHARING THE FILE IS STRICTLY PROHIBITED.
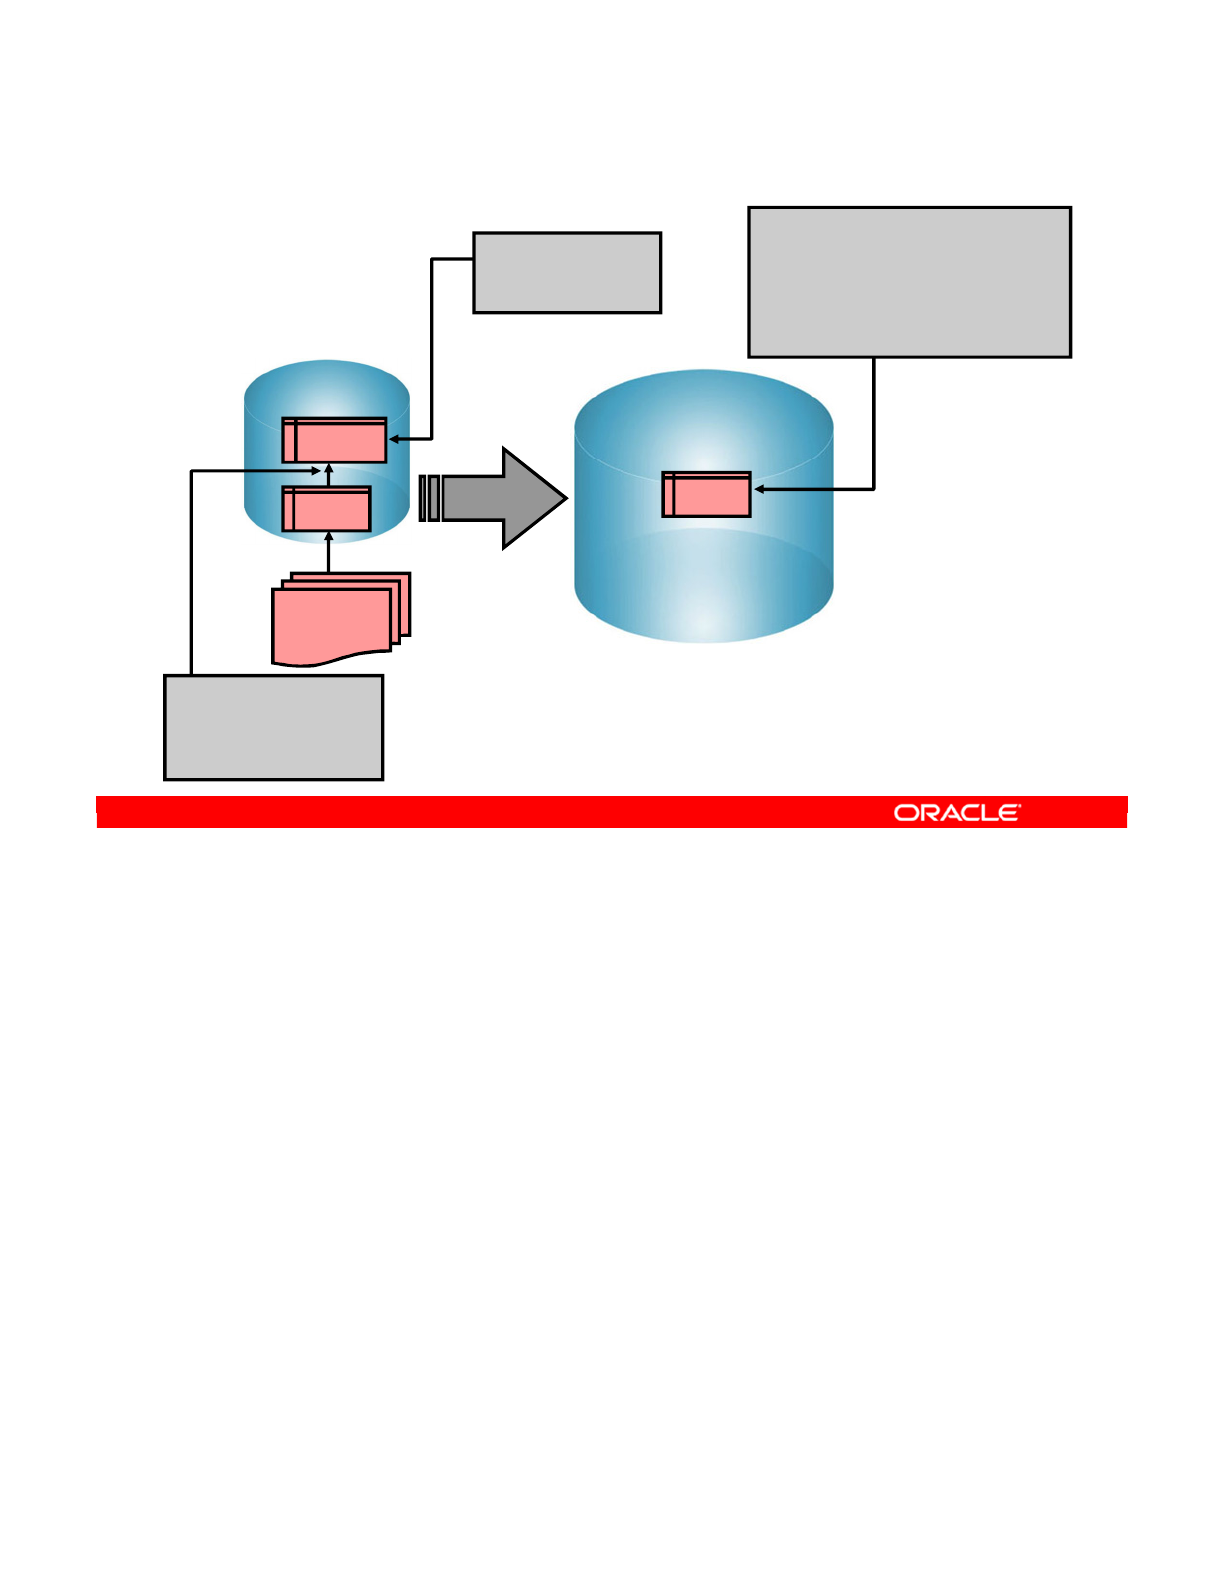
This scenario may look familiar from previous lessons. Here, you integrate sales statistics
from two tables on a Sybase source server to an Oracle target. You have one filter, two joins,
and two mappings. One join links the ORDERS table to the LINES of each order. The other join
updates the ORDERS table from a CORRECTIONS file. However, the actual data and how it is
transformed is not very important for the purpose of this lesson.
Note: The labels “Sybase” and “Oracle” are used here for example purposes. Source and
Target technologies can be virtually anything, as long as there is a SQL-enabled Staging area
between them.
Oracle Data Integrator 11g: Integration and Administration 9 - 21
Copyright © 2012, Oracle and/or its affiliates. All rights reserved.
The Scenario
About the interface
Source (Sybase)
ORDERS
LINES
CORRECTIONS
File
Target (Oracle)
SALES
Filter:
- ORDERS.STATUS=
‘CLOSED’…
Mapping:
- SALES = SUM(LINES.AMOUNT) +
CORRECTION.VALUE.
- SALES_REP =
ORDERS.SALES_REP_ID
…
Join:
- ORDERS.ORDER_ID =
LINES.ORDER_ID
…
Oracle University and (Oracle Corporation) use only.
These eKit materials are to be used ONLY by you for the express purpose SELF STUDY. SHARING THE FILE IS STRICTLY PROHIBITED.
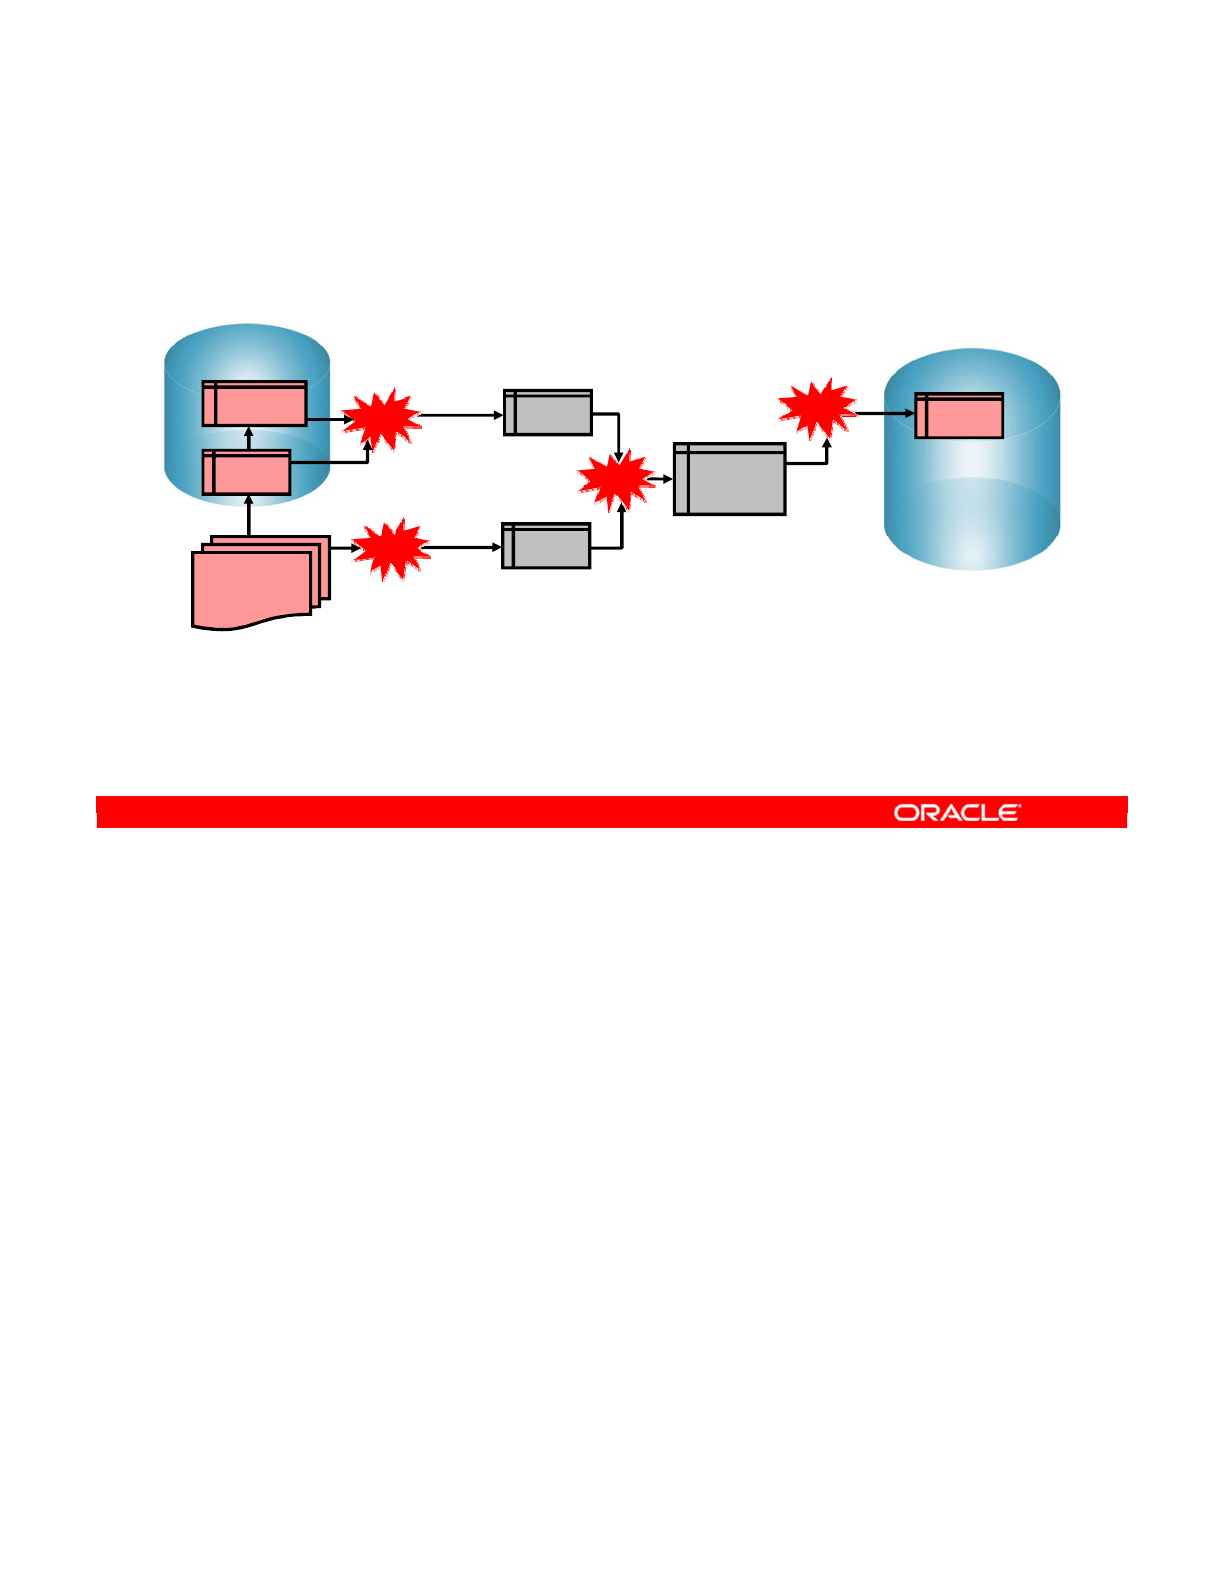
The following sequence of operations is more or less unavoidable to implement this
integration. However, you have some latitude in controlling how and where they are
performed.
•First, the two orders tables must be extracted and joined. The constraint that orders
must be closed is applied here.
•Second, data from the corrections file must be extracted and transformed into the
correct format. Now, data from these two sources must be joined and transformed into a
temporary table, I$_SALES. This temporary table looks identical to the target SALES
table.
•Lastly, the data from this table must be copied to the Oracle server. You can also do a
data check, or flow control, here.
Oracle Data Integrator 11g: Integration and Administration 9 - 22
Copyright © 2012, Oracle and/or its affiliates. All rights reserved.
The Basic Process
Target (Oracle)
SALES
Transform and
integrate
I$_SALES
Source (Sybase)
ORDERS
LINES
CORRECTIONS
File
C$_0
Extract/Join/
Transform
C$_1
Extract/Transform
Join/Transform
1
2
3
4
Sequence of operations
Oracle University and (Oracle Corporation) use only.
These eKit materials are to be used ONLY by you for the express purpose SELF STUDY. SHARING THE FILE IS STRICTLY PROHIBITED.

Now look at the first of the three factors that structure the flow. This is the most important:
choosing where to put the Staging area.
Oracle Data Integrator 11g: Integration and Administration 9 - 23
Copyright © 2012, Oracle and/or its affiliates. All rights reserved.
Selecting a Staging Area
Oracle University and (Oracle Corporation) use only.
These eKit materials are to be used ONLY by you for the express purpose SELF STUDY. SHARING THE FILE IS STRICTLY PROHIBITED.
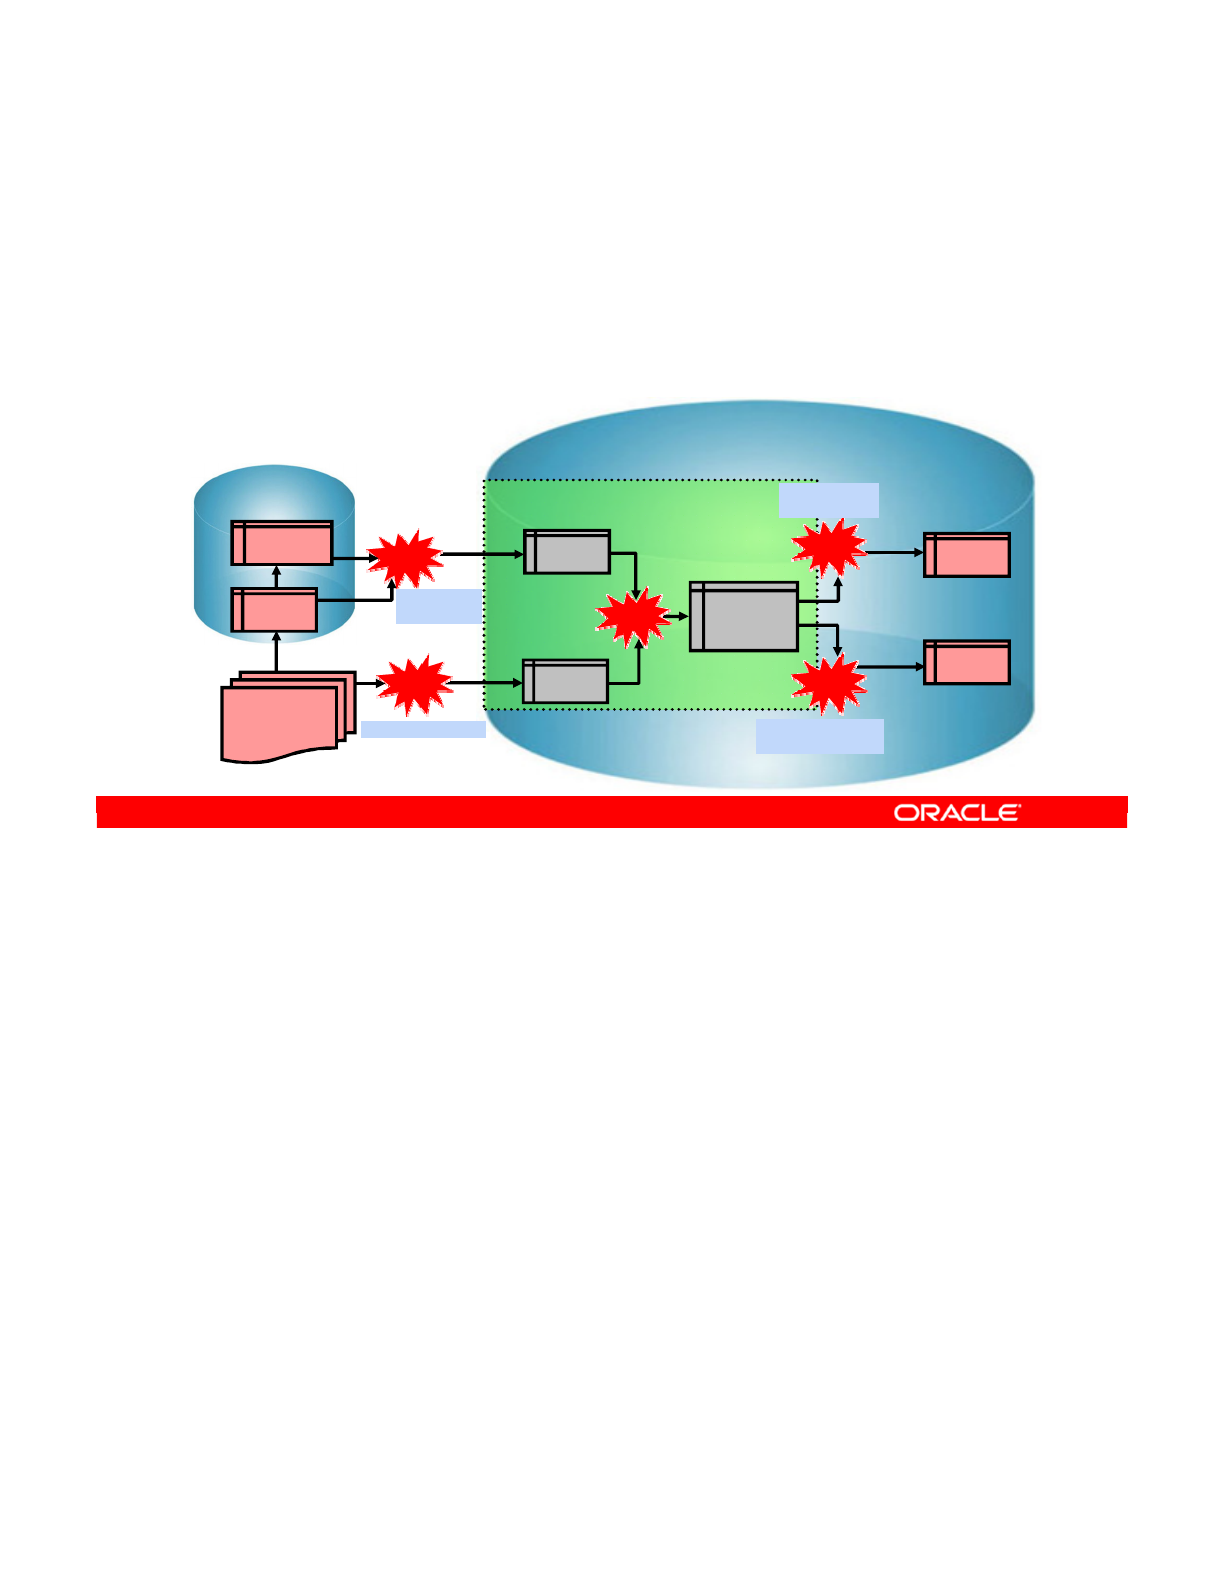
The Staging area is where most of the transformation and error checking is usually
performed. After those tasks are performed, you just copy, or load, the data into the target
server.
The Staging area is a special area that you create when you set up a database in ODI. ODI
creates temporary tables in the Staging area, and uses them to perform data transformation.
You can place the Staging area on your source server, your target server, or another server
altogether. However, the best place for the Staging area is usually on the target server. This
gives you the greatest scope for data consistency checking, and minimizes network traffic.
You now look at some of the consequences of different choices.
Oracle Data Integrator 11g: Integration and Administration 9 - 24
Copyright © 2012, Oracle and/or its affiliates. All rights reserved.
The Purpose of a Staging Area
•A Staging area is a separate, dedicated area in an RDBMS
where ODI creates its temporary objects and executes
some of your transformation rules.
•You usually place the Staging area on the target data
server.
Target (Oracle)
Staging AREA
The language is SQL
SALES
ERRORS
Source (Sybase)
ORDERS
LINES
CORRECTIONS
File
TEMP_1
TEMP_2
Join/Transform
TEMP_
SALES
1
2
3
4
5
Extract/Transform
Transform and
integrate
Check constraints/
Isolate errors
Extract/Join/
Transform
Oracle University and (Oracle Corporation) use only.
These eKit materials are to be used ONLY by you for the express purpose SELF STUDY. SHARING THE FILE IS STRICTLY PROHIBITED.

Oracle Data Integrator 11g: Integration and Administration 9 - 25
Copyright © 2012, Oracle and/or its affiliates. All rights reserved.
Placing the Staging Area
•The Staging area may be located on:
–The Oracle target database (default)
–A third RDBMS database server
–The Sybase source database
•The Staging area cannot be placed on the file source data
server.
–This data server is not an RDBMS.
Oracle University and (Oracle Corporation) use only.
These eKit materials are to be used ONLY by you for the express purpose SELF STUDY. SHARING THE FILE IS STRICTLY PROHIBITED.

You must select an RDBMS technology for the Staging area. Other data servers, such as
files, message-oriented middleware (MOM), Lightweight Directory Access Protocol (LDAP), or
online analytical processing (OLAP) cannot be used this way. If the target of your interface is
a nonrelational technology, you must move the Staging area to another schema. Depending
on your interface, you may want to use either the source server or another server entirely.
Oracle Data Integrator 11g: Integration and Administration 9 - 26
Copyright © 2012, Oracle and/or its affiliates. All rights reserved.
Important Note
•Only those schemas that are located on RDBMS
technologies can act as the Staging area; files, MOM,
LDAP, and OLAP databases cannot.
•When the target of the interface is a non-RDBMS
technology, the Staging area must be moved to another
schema.
Oracle University and (Oracle Corporation) use only.
These eKit materials are to be used ONLY by you for the express purpose SELF STUDY. SHARING THE FILE IS STRICTLY PROHIBITED.
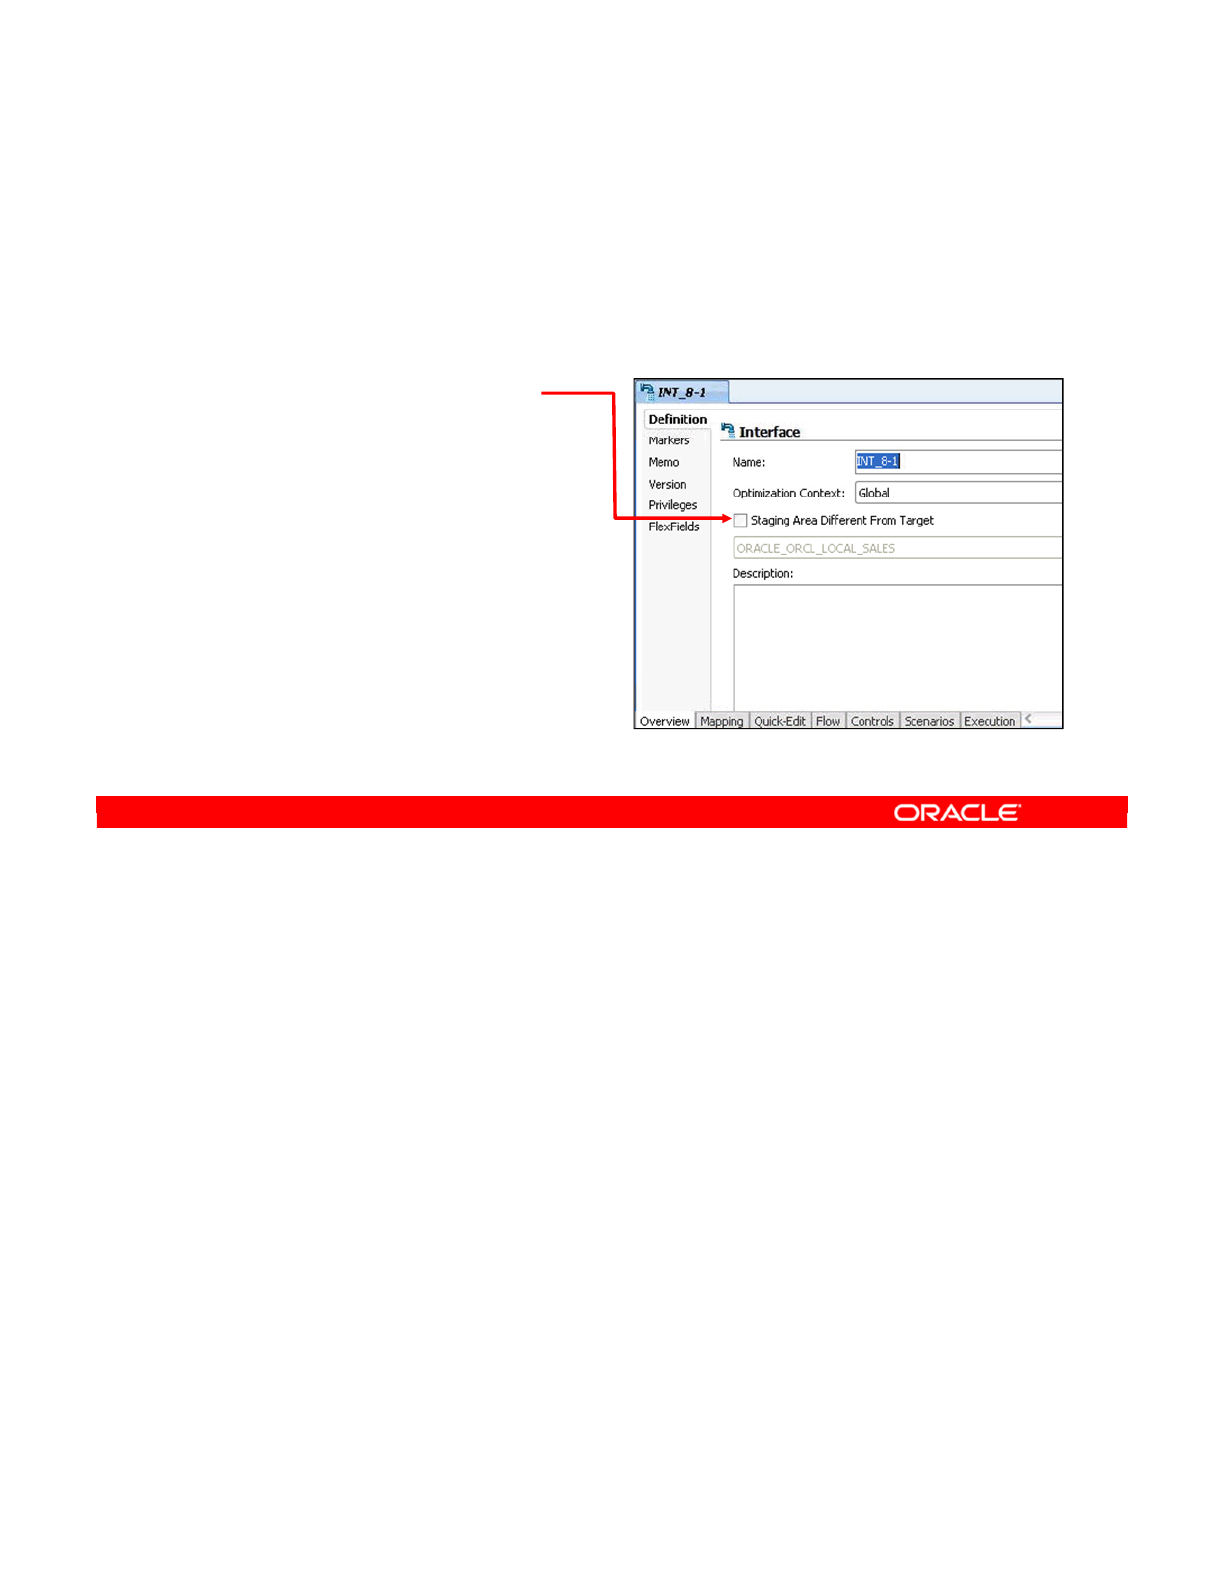
Before you select a logical schema in step 3, you must first define the logical schema in
Topology Manager.
In step 4, see how the new flow takes this change into account. Notice also how all
transformations and joins are performed on the Staging area. If the Staging area is not the
target, the integration to the target server becomes a simple copy.
Oracle Data Integrator 11g: Integration and Administration 9 - 27
Copyright © 2012, Oracle and/or its affiliates. All rights reserved.
How to Specify the Staging Area
1. Click the interface’s Definition tab.
2. To place the Staging area on the target, deselect the
Staging Area Different From Target check box.
3. Otherwise, select that
check box, and then select
the logical schema that will
be used as the Staging
area.
4. Click the Flow tab to see
the new flow.
Oracle University and (Oracle Corporation) use only.
These eKit materials are to be used ONLY by you for the express purpose SELF STUDY. SHARING THE FILE IS STRICTLY PROHIBITED.

The second major factor in structuring your data flow is configuring filters, joins, mappings,
and lookups. These small changes can have a big effect on the performance of your interface.
Oracle Data Integrator 11g: Integration and Administration 9 - 28
Copyright © 2012, Oracle and/or its affiliates. All rights reserved.
Configuring Filters, Joins,
Mappings, and Lookups
Oracle University and (Oracle Corporation) use only.
These eKit materials are to be used ONLY by you for the express purpose SELF STUDY. SHARING THE FILE IS STRICTLY PROHIBITED.

There are several important options that apply to filters, joins, and mappings.
Deselecting the Active Mapping check box disables the filter, join, and mapping. This has the
same effect as deleting it, except that you can restore it later.
By default, the Insert and Update check boxes are enabled for mappings. This means that the
target column receives a value when the datastore receives data by either the INSERT or
UPDATE statements. However, by deselecting the Update option, you can leave the current
value unmodified during update statements. This is useful for “creation date” fields.
Similarly, you can deselect the Insert option to always insert a NULL value. This may be
useful for seeing columns that have been set once, but never updated.
The update key that is used for UPDATE statements is a combination of a number of columns
on the target datastore. You can select the Key check box for each column that you want to
use. This will be covered in detail in the following slides.
Lastly, you can tweak the flow of your interface by changing the execution location of the
filters, joins, mappings, and lookups. For example, you can specify that a join be performed
on the Staging area and not on the source. This is important when large amounts of data are
involved. If a join returns very few rows, it is best to perform it near the source data. If a join
produces many rows—for example, a cross-join, or a Cartesian product—it is best to perform
it later. For lookups, you can choose between executing at the source or a staging area.
Oracle Data Integrator 11g: Integration and Administration 9 - 29
Copyright © 2012, Oracle and/or its affiliates. All rights reserved.
Options for Filters, Joins, Mappings, and Lookups
•Active Mapping:
–When deselected, the filter, join, and mapping are disabled
for this interface.
•Enable mapping for update and/or insert.
–It allows mappings to apply only to updates or inserts.
–By default, both insert and update are enabled.
•Select the update key by selecting the Key check box.
•Lookup options:
–SQL left-outer join in the from clause
–SQL expression in the select clause
•Change the execution location of the filter, join, mapping,
or lookup.
Oracle University and (Oracle Corporation) use only.
These eKit materials are to be used ONLY by you for the express purpose SELF STUDY. SHARING THE FILE IS STRICTLY PROHIBITED.
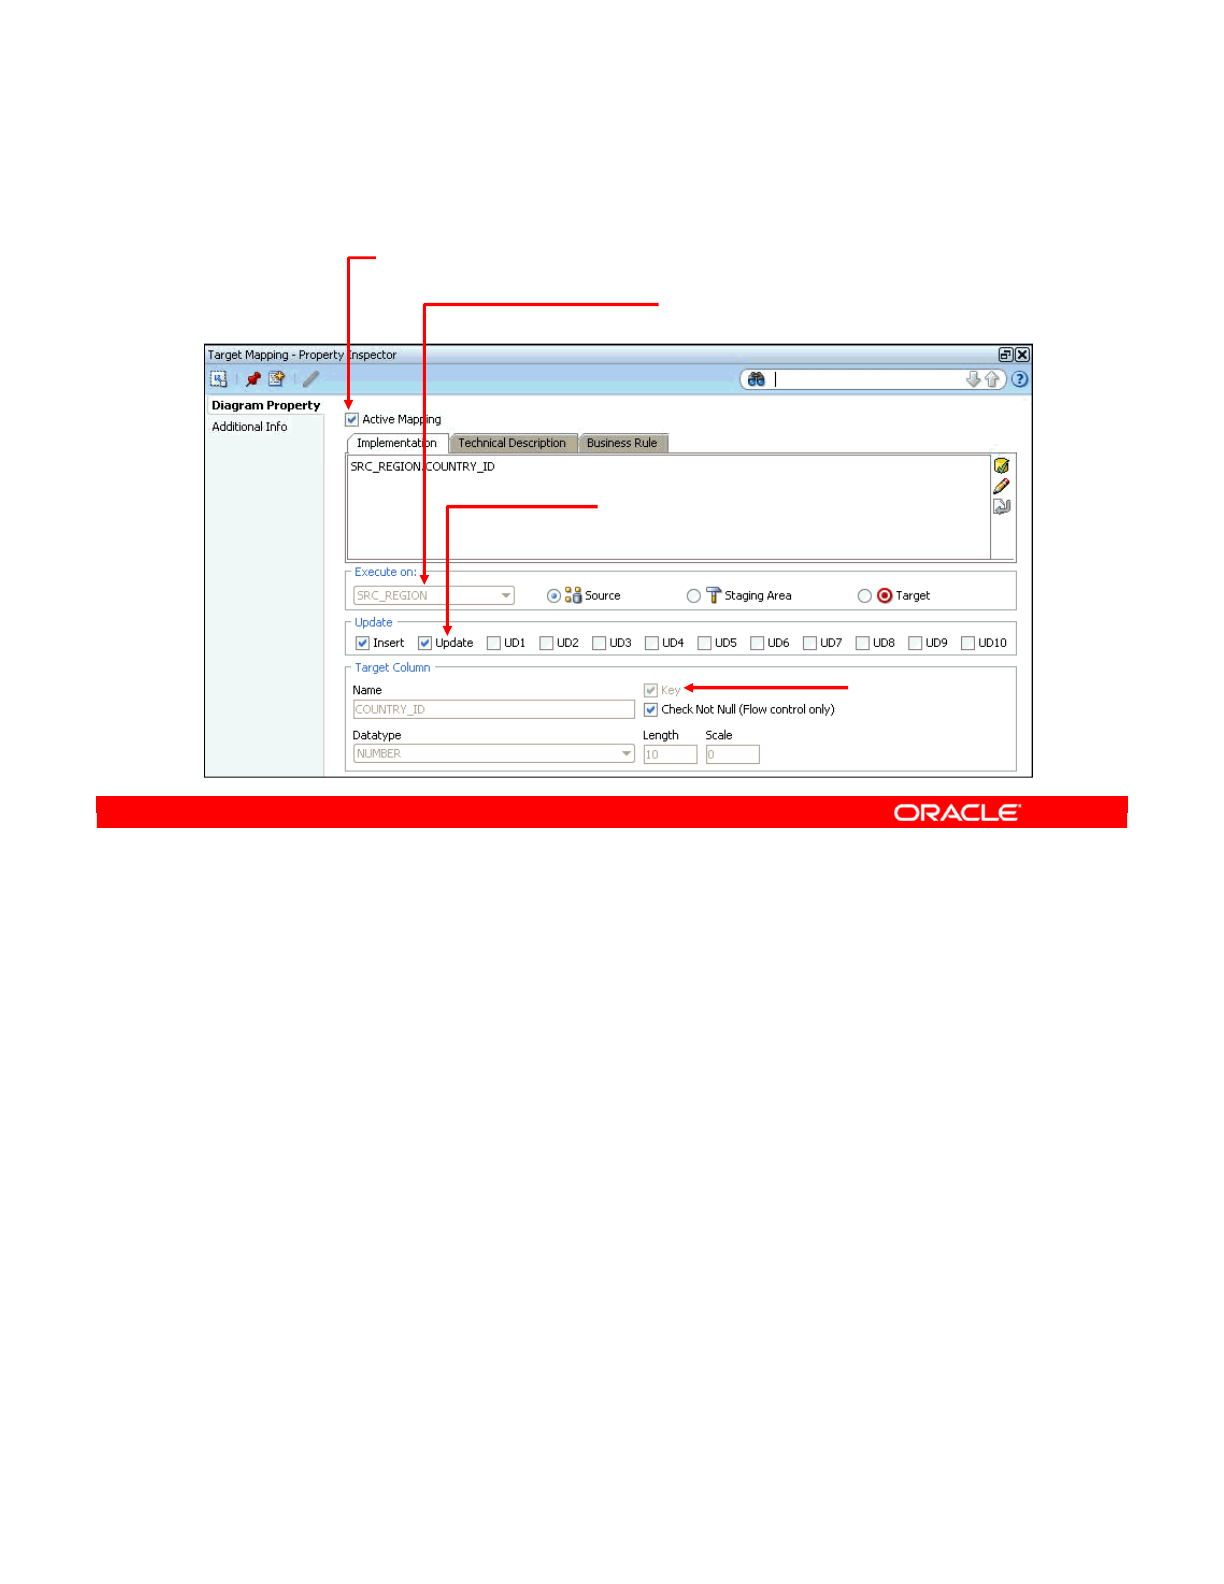
Note where the options just described appear in the Property Inspector. These options appear
in the Diagram Property tab when you select a filter, join, or mapping.
The Active Mapping check box is above the box for the transformation’s expression.
Each choice of execution location is displayed next to the icon representing it in the “Execute
on” box. Throughout the interface diagram and flow diagram, these icons are used to
represent the locations.
The Insert and Update options are displayed as check boxes. The other check boxes—UD1,
UD2, and so on—behave in a similar way but are used by specialized knowledge modules.
Lastly, the check box that specifies whether a column is part of the update key is found next to
the Name of the column.
Options for lookups appear in the lookup creation wizard.
Oracle Data Integrator 11g: Integration and Administration 9 - 30
Copyright © 2012, Oracle and/or its affiliates. All rights reserved.
Setting Options for Filters, Joins, Mappings, and
Lookups
Activate/Deactivate
For mappings, filters, joins, or lookups
Execution Location
For mappings, filters, joins, or lookups
Insert/Update
For mappings
Part of the
Update Key
For target columns
(mappings)
Oracle University and (Oracle Corporation) use only.
These eKit materials are to be used ONLY by you for the express purpose SELF STUDY. SHARING THE FILE IS STRICTLY PROHIBITED.
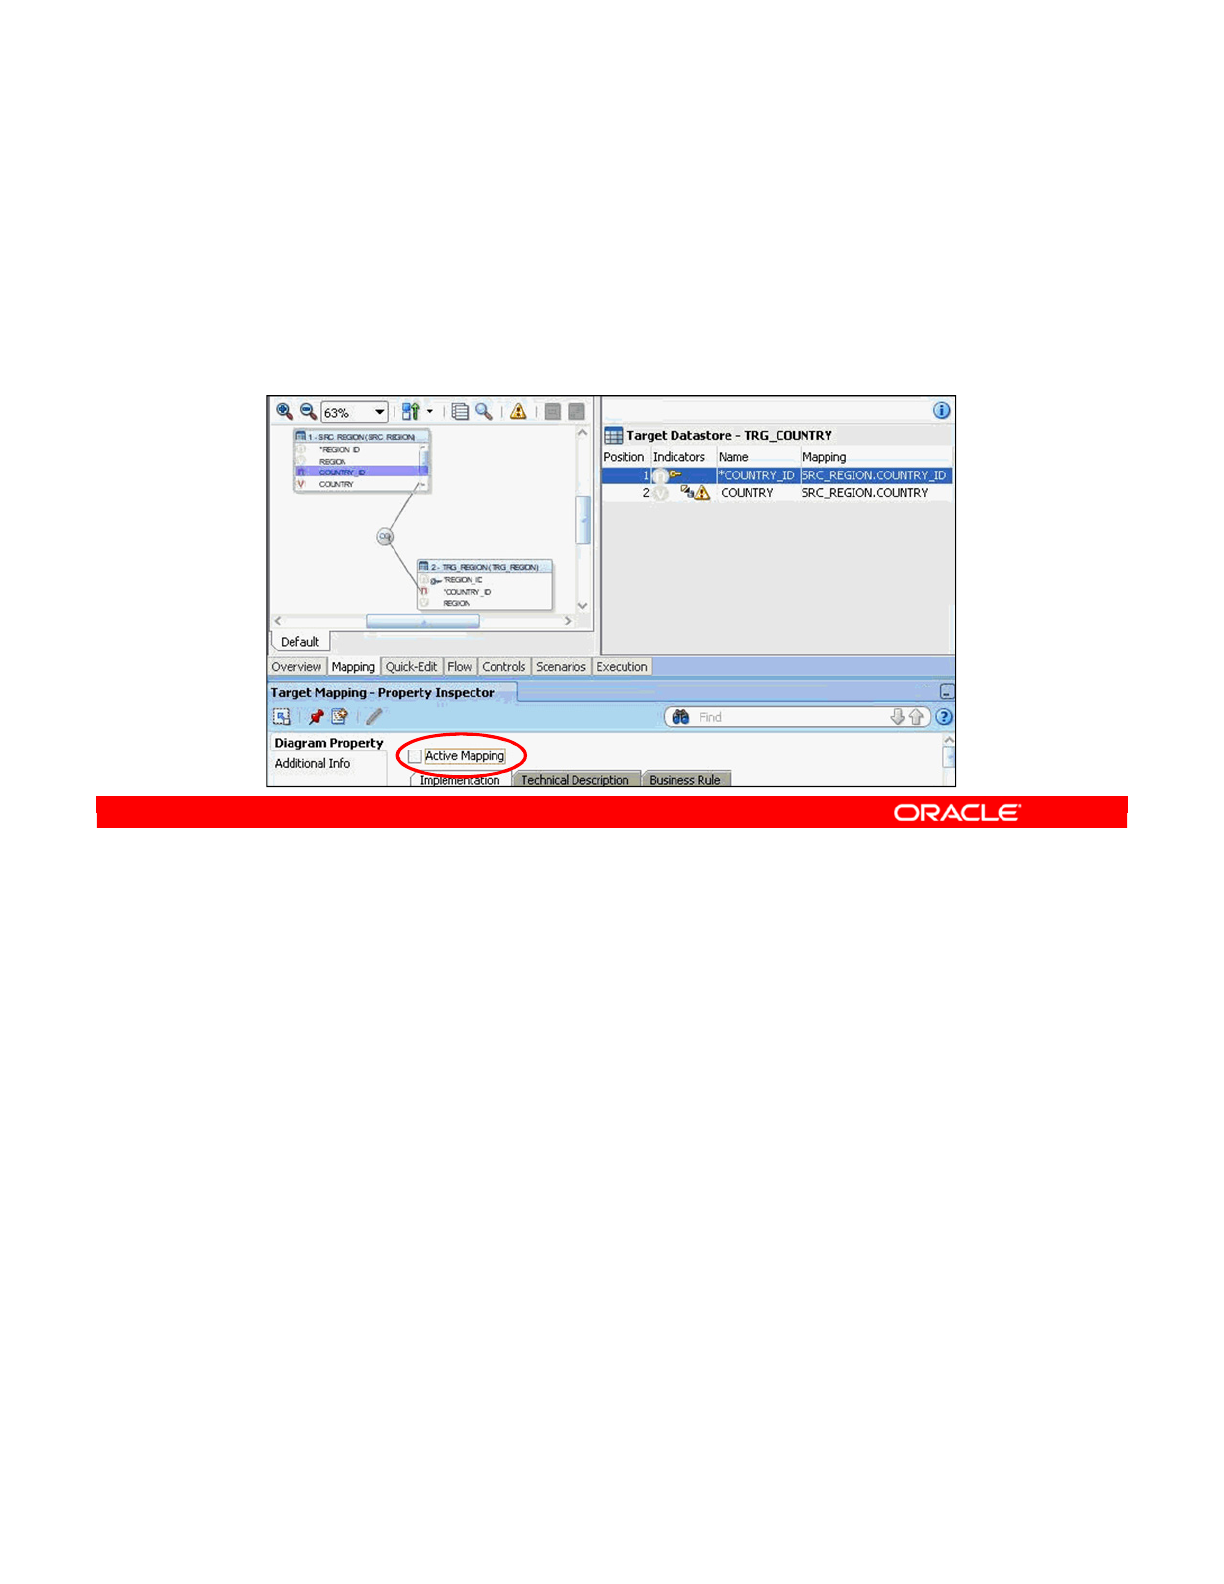
To disable a transformation:
1. Open the appropriate interface.
2. Select the filter, join, mapping, or lookup.
3. In the Diagram Property panel, deselect the Active option that appears: Active Mapping,
“Active Clause for joins,” “Active Clause for lookups”, or Active Filter.
Note: Disabling a mapping, join, or filter has the same effect as deleting it. However, ODI may
not give you any warnings at design time. At run time, a number of problems can appear. For
example, an inactive mapping may cause null data to be inserted into the target. An inactive
filter may cause unwanted data to be processed in the flow.
Creating an interface with no active mappings does not work because the knowledge
modules assume at least one mapping. You get run-time errors.
Oracle Data Integrator 11g: Integration and Administration 9 - 31
Copyright © 2012, Oracle and/or its affiliates. All rights reserved.
How to Disable a Transformation
1. Open the interface.
2. Select the filter, join, or mapping that you want to edit.
3. Deselect the Active Mapping, Active Filter, or Active
Clause for joins, or Active Clause for lookups check boxes.
Oracle University and (Oracle Corporation) use only.
These eKit materials are to be used ONLY by you for the express purpose SELF STUDY. SHARING THE FILE IS STRICTLY PROHIBITED.
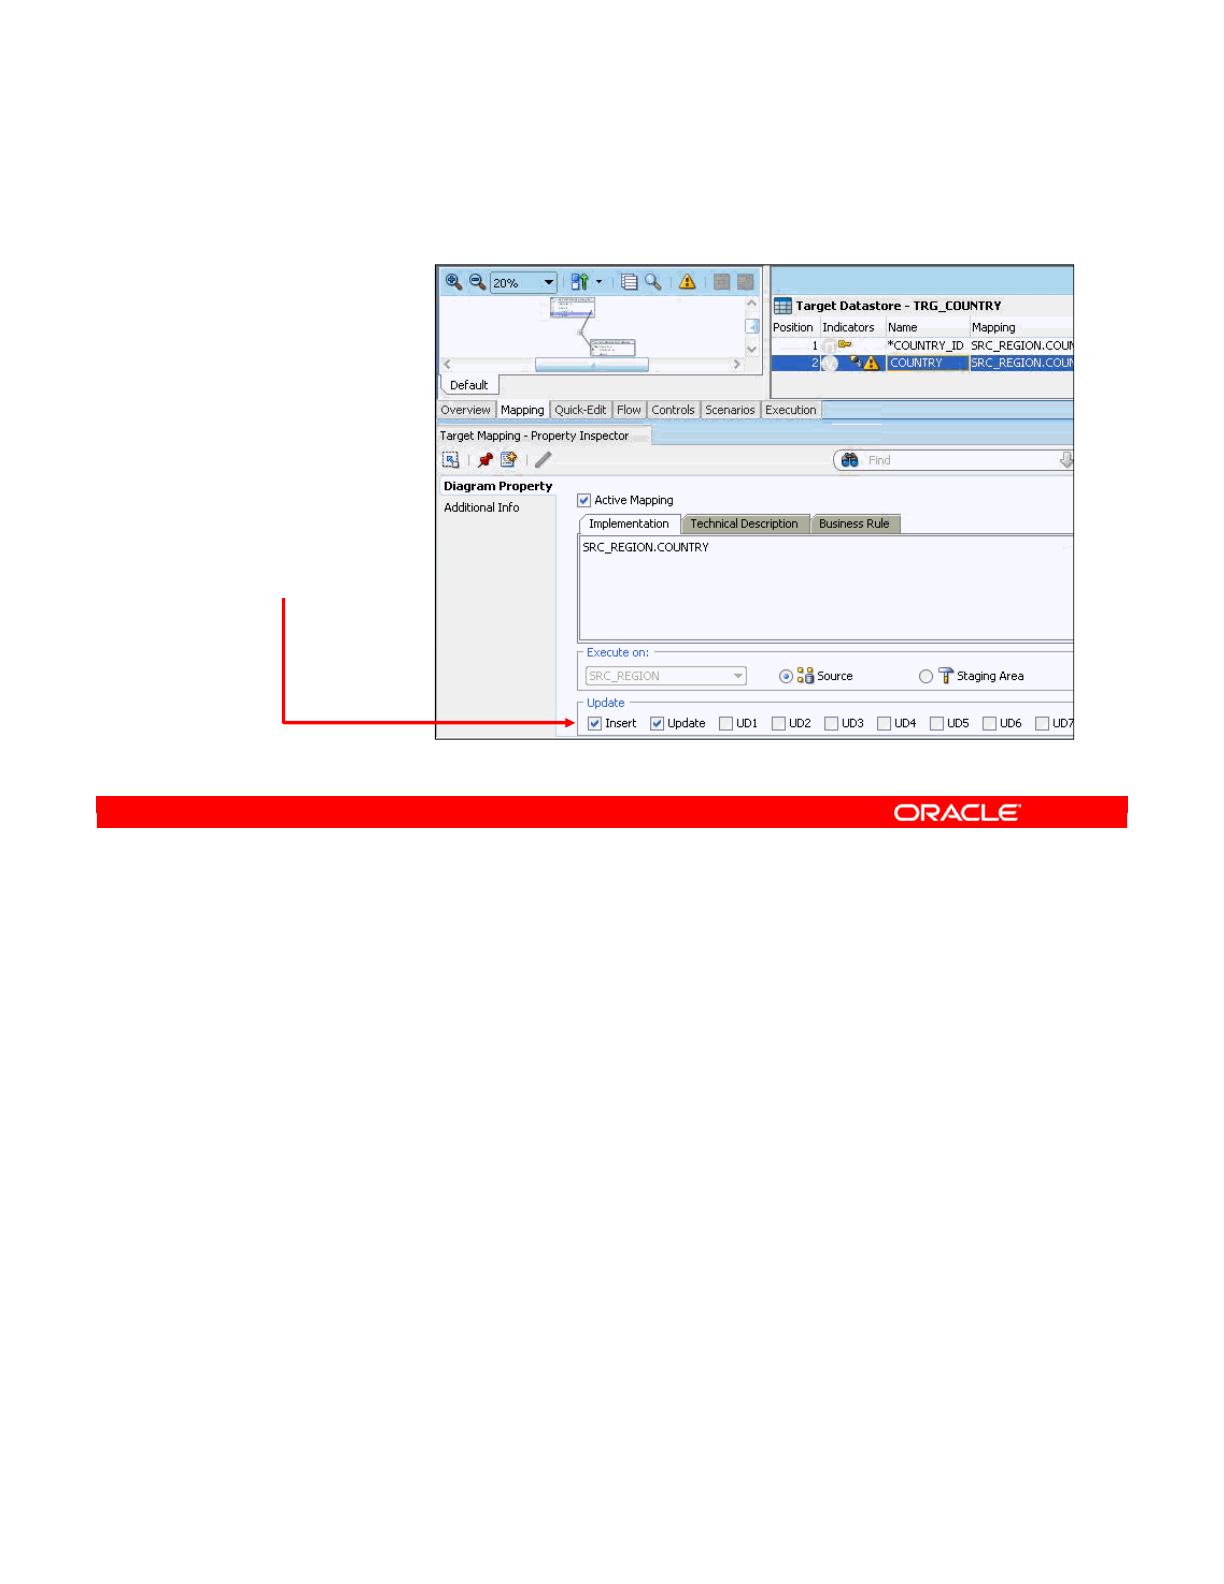
To enable a mapping for inserts or updates, perform the following:
1. Open the relevant interface.
2. Select the mapping that you want to edit.
3. In the Update option group on the Diagram Property panel, select either Insert or
Update. If neither option is selected, no data will be transferred. This is rarely useful.
In addition to populating a target directly from a source, you can use a variety of statements.
For example, instead of using the source column SRC_CUSTOMER.DEAR directly, you can use
the CASE statement to change the codes into the respective values while moving the data to
the target. The value 0 in the source datastore can be transformed to 'Mr.' in the target:
CASE
WHEN SRC_CUSTOMER.DEAR = 0 THEN 'Mr.'
WHEN SRC_CUSTOMER.DEAR = 1 THEN 'Ms.'
WHEN SRC_CUSTOMER.DEAR = 2 THEN 'Mrs.’
ELSE NULL
END
Oracle Data Integrator 11g: Integration and Administration 9 - 32
Copyright © 2012, Oracle and/or its affiliates. All rights reserved.
How to Enable a Mapping for Inserts or Updates
1. Open the
interface.
2. Select the
mapping you
want to edit.
3. Select the
Insert and/or
Update check
boxes.
Oracle University and (Oracle Corporation) use only.
These eKit materials are to be used ONLY by you for the express purpose SELF STUDY. SHARING THE FILE IS STRICTLY PROHIBITED.

Now take a closer look at how to choose the execution location of your transformations.
Oracle Data Integrator 11g: Integration and Administration 9 - 33
Copyright © 2012, Oracle and/or its affiliates. All rights reserved.
Execution Location
Oracle University and (Oracle Corporation) use only.
These eKit materials are to be used ONLY by you for the express purpose SELF STUDY. SHARING THE FILE IS STRICTLY PROHIBITED.

Be aware of the consequences of selecting an execution location. In particular, the execution
location determines the syntax used by transformation rules and the feature set available.
For example, for operations performed on a source schema, the syntax and functionality of
that source technology are available.
This note should sound familiar because it was stated earlier: “The choice of Staging area
determines the syntax used by all mappings, filters, and joins executed there.” Now you see
the general principle: The technology of the location—source, Staging area, or target—of any
transformation determines both the syntax to be used and the feature set available.
Note: Exercise care when changing the execution location of a transformation or moving the
location of the Staging area. You must double-check that the syntax of the transformations
you defined is still valid on the new configuration.
Take the example of performing a full outer join on the Staging area. When the Staging area
is on Microsoft SQL Server, the full outer join works fine. However, the Staging area has now
been moved onto a Hyperion SQL machine. Therefore, the full outer join is no longer valid
and causes an error in ODI.
Oracle Data Integrator 11g: Integration and Administration 9 - 34
Copyright © 2012, Oracle and/or its affiliates. All rights reserved.
Execution Location and Syntax
•The execution location determines the syntax and feature
set that can be used in transformation rules.
•The technology of the given location is used.
–For example: A filter executed on the source uses the syntax
and feature set of the source technology.
Oracle University and (Oracle Corporation) use only.
These eKit materials are to be used ONLY by you for the express purpose SELF STUDY. SHARING THE FILE IS STRICTLY PROHIBITED.

You may want to change the execution location of a join, filter, or mapping because of
performance reasons or ODI restrictions.
•If the default server is overloaded, you may want to shift as much processing onto other
servers as possible.
•You can improve performance by transferring the lesser amount of data on the network
(reduce the amount of data on the source, expand on the target). For instance, use
substring on the source and concat on the target.
•Transformations must be performed on a source or in the Staging area. You can place
the Staging area on the target server if required.
Oracle Data Integrator 11g: Integration and Administration 9 - 35
Copyright © 2012, Oracle and/or its affiliates. All rights reserved.
Why Change the Execution Location?
You may need to change the execution location if:
•The technology at the current location does not have the
features required
–Files, Java Message Service (JMS), and other nonrelational
data sources do not support transformations.
–A required function is not available.
•You want to achieve better performance
–The default server is overloaded.
–A different server has a better database engine.
•ODI does not allow this location
–It is not possible to execute transformations on the target.
Oracle University and (Oracle Corporation) use only.
These eKit materials are to be used ONLY by you for the express purpose SELF STUDY. SHARING THE FILE IS STRICTLY PROHIBITED.
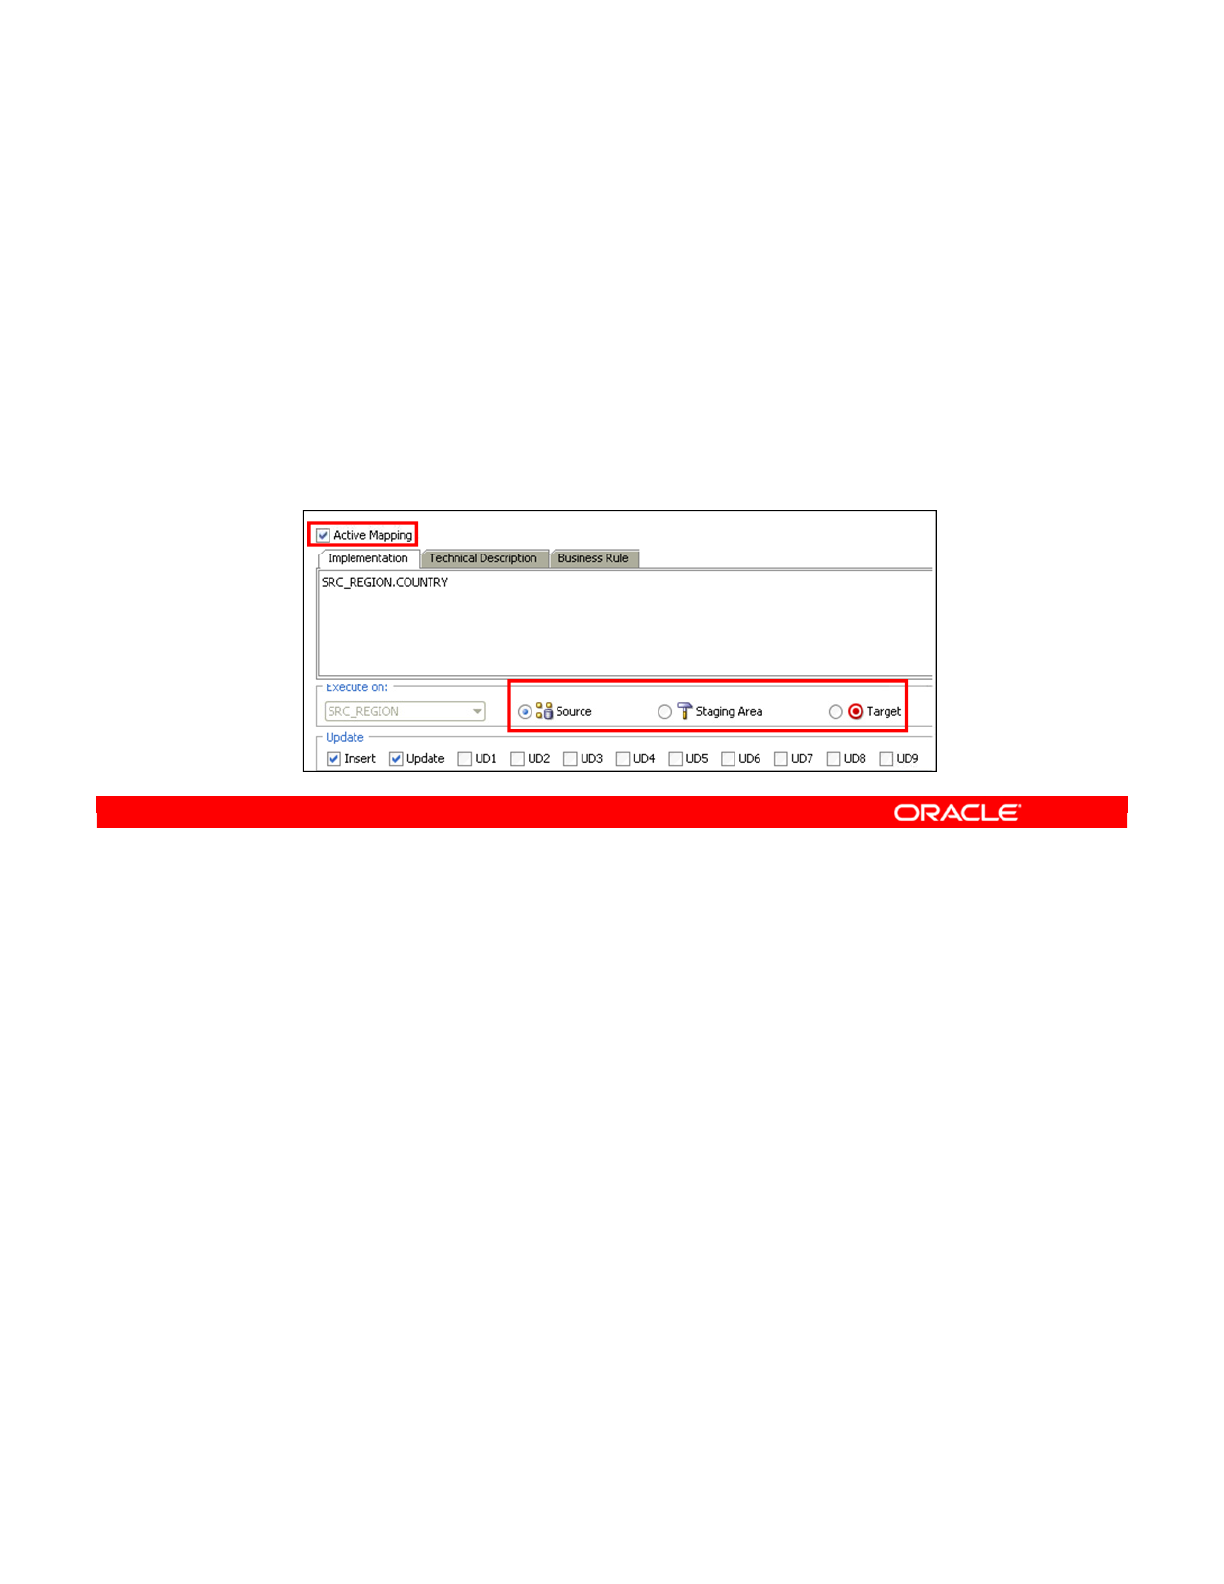
To change where a filter, join, or mapping is executed, perform the following:
1. Open the interface.
2. Select the filter, join, or mapping that you want to modify.
3. In the Properties panel, select Source, Staging Area, or Target. Depending on the
technologies, you may be unable to select one or more. If you cannot select any option,
you probably need to set the transformation to Active.
Oracle Data Integrator 11g: Integration and Administration 9 - 36
Copyright © 2012, Oracle and/or its affiliates. All rights reserved.
How to Change the Execution Location
1. Open the interface.
2. Select the filter, join, or mapping to edit.
3. Select an execution location from the Diagram Property
panel.
–All execution locations are not always possible.
–Select Active Mapping.
Oracle University and (Oracle Corporation) use only.
These eKit materials are to be used ONLY by you for the express purpose SELF STUDY. SHARING THE FILE IS STRICTLY PROHIBITED.
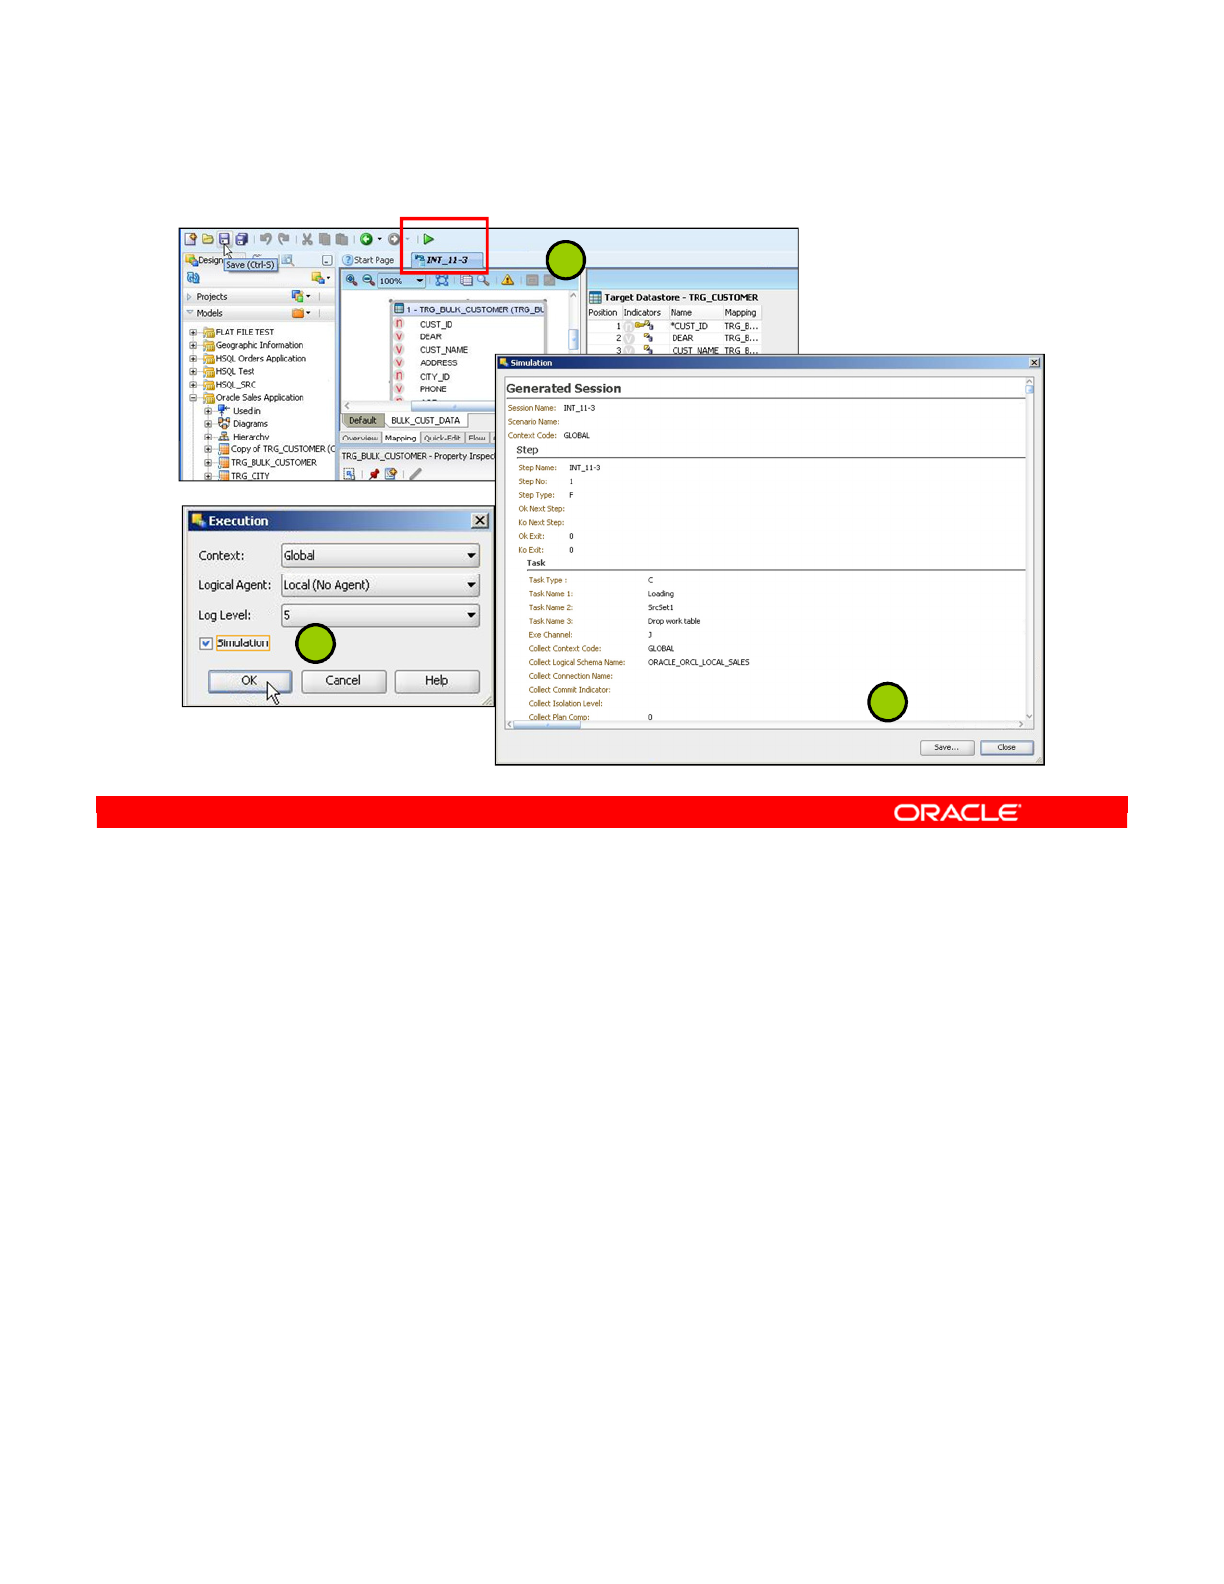
In Oracle Data Integrator you have the possibility at design time to simulate an execution.
Simulating an execution generates and displays the code corresponding to the execution
without running this code. Execution simulation provides reports suitable for code review.
To simulate an execution:
1. In the Project view of the Designer Navigator, select the object you want to execute,
right-click and select Execute. Alternatively, if your object is open, click Execute button.
2. In the Execution dialog box, set the execution parameters and select Simulation.
3. Click OK. The Simulation report is displayed. You can click Save to save the report as
an .xml or .html file.
Note: One limitation of Simulation is that if you have code that executes conditionally, it is
likely that you will not see the results here.
Oracle Data Integrator 11g: Integration and Administration 9 - 37
Copyright © 2012, Oracle and/or its affiliates. All rights reserved.
ODI Interface Execution Simulation
2
1
3
Oracle University and (Oracle Corporation) use only.
These eKit materials are to be used ONLY by you for the express purpose SELF STUDY. SHARING THE FILE IS STRICTLY PROHIBITED.

You have learned how to set up the flow in ODI. However, to make the selected flow
physically possible, you need to select the knowledge module (KM) appropriately. This is the
final major factor in structuring your data flow.
Oracle Data Integrator 11g: Integration and Administration 9 - 38
Copyright © 2012, Oracle and/or its affiliates. All rights reserved.
Selecting the Knowledge Module
Oracle University and (Oracle Corporation) use only.
These eKit materials are to be used ONLY by you for the express purpose SELF STUDY. SHARING THE FILE IS STRICTLY PROHIBITED.

The basic questions to ask before selecting a knowledge module for a given step of your flow
are as follows:
Is the processing taking place between two data servers or within one data server? In the first
case, you need a knowledge module capable of performing data transfer. There are two types
of these transfers: before integration or at integration.
•“Before integration” means processing between a source server and the Staging area. In
this case, you must use an LKM specific to the two technologies, for example, an LKM
that transfers data from an Oracle server to a SQL Server. Generic knowledge modules
can do this, but a specific module is better if one exists.
•“At integration” means processing between the Staging area and the target, if these are
different. You must use a multiple-technology IKM, similar to the previous situation.
If, on the other hand, the processing for a step happens within one server, the situation is
simple. All the processing is performed by that data server. You just need a single-technology
IKM to perform the integration.
Oracle Data Integrator 11g: Integration and Administration 9 - 39
Copyright © 2012, Oracle and/or its affiliates. All rights reserved.
Which KMs for Which Flow?
•If processing happens between two data servers, a data
transfer KM is required.
–Before integration (Source > Staging Area)
—
Requires a Loading Knowledge Module (LKM), which is always
multitechnology
–At integration (Staging Area > Target)
—
Requires a multitechnology Integration Knowledge Module
(IKM)
•If processing happens within a data server, it is performed
entirely by the server.
–A single-technology IKM is required.
–No data transfer is performed.
Oracle University and (Oracle Corporation) use only.
These eKit materials are to be used ONLY by you for the express purpose SELF STUDY. SHARING THE FILE IS STRICTLY PROHIBITED.
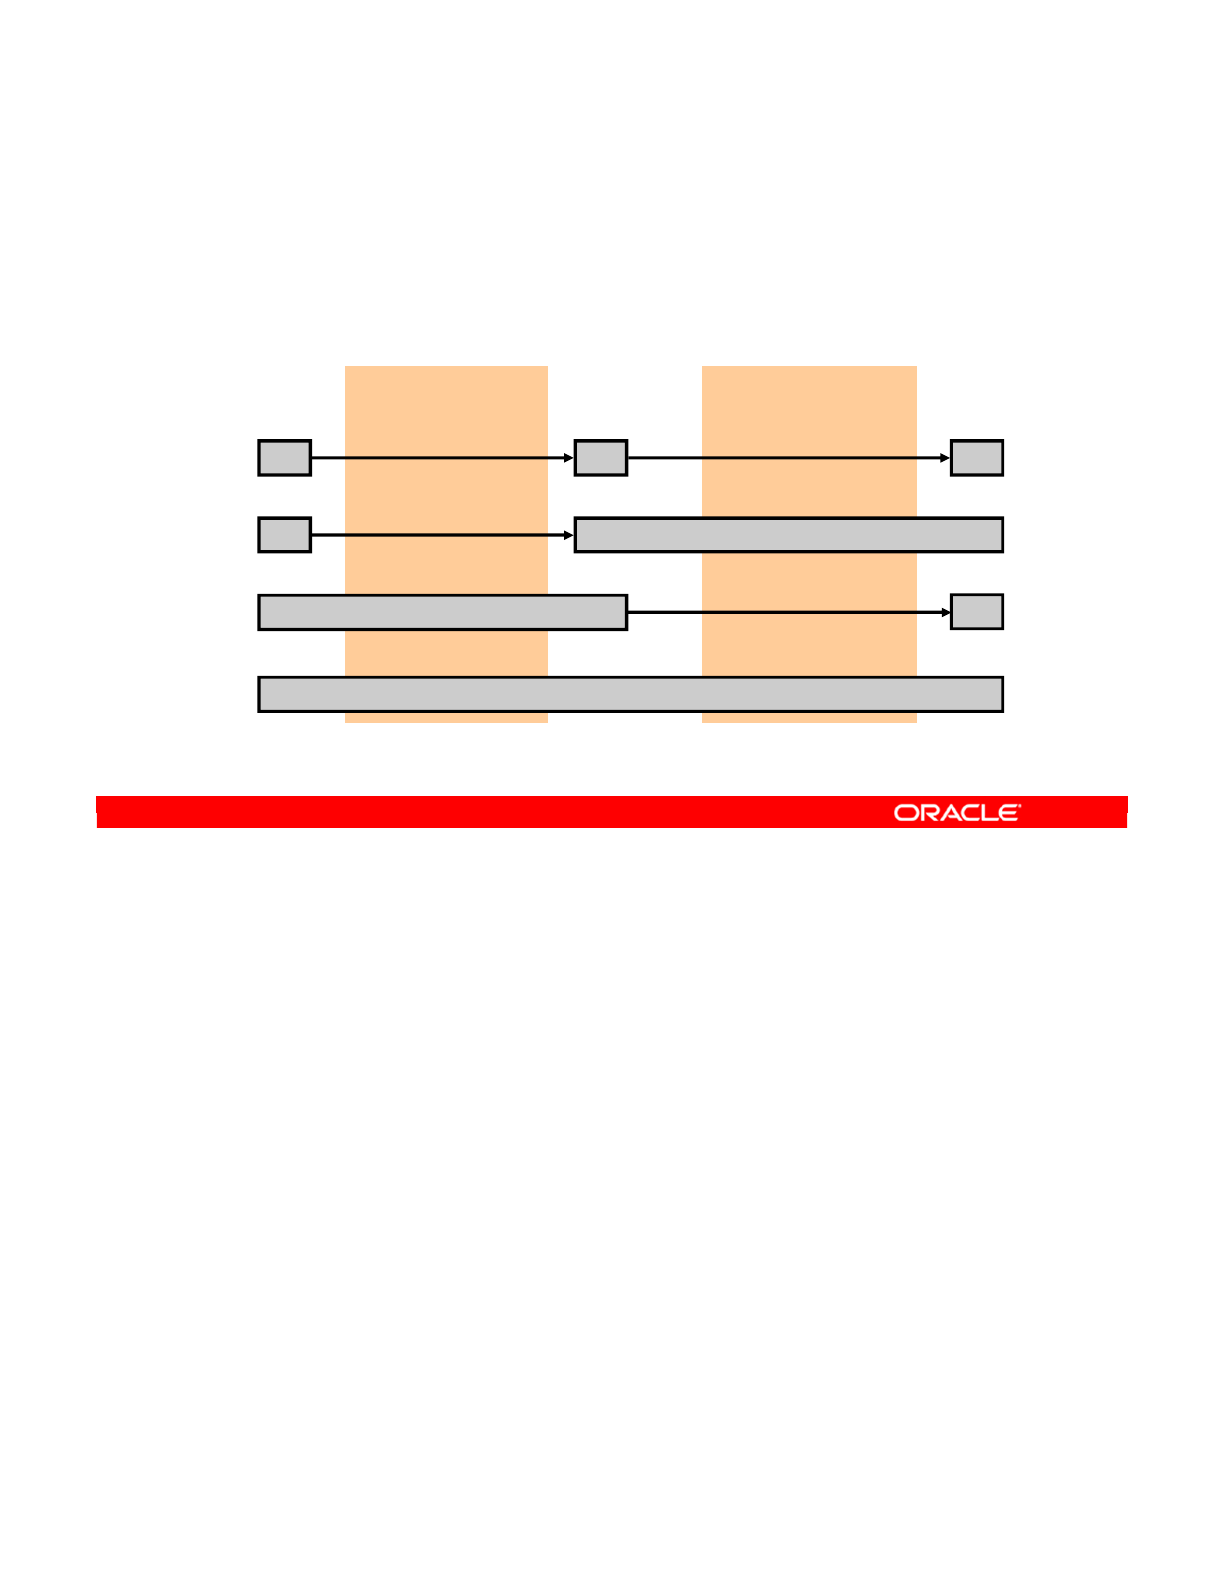
You can now see the rules described in a visual form in the slide. Note the four possible
groupings of source, staging area, and target server. This graphic assumes that only one
source server exists. Note also that the phase between the source and staging area is called
the loading phase and the phase between the staging area and the target is called the
integration phase. In the ETL model, the loading phase corresponds to “extract,” the staging
area is where “transformation” happens, and the integration phase corresponds to “load.”
In the first arrangement, the three servers are separate. You describe the staging area as
being on a “third server.” You need a multiple-technology LKM appropriate to the technologies
of the source and staging area. You also need a multiple-technology IKM to be able to take
data from the staging area to the target.
If your staging area is on the target server, you need only a single-technology IKM.
If the staging area is on the source server, you do not need an LKM at all, but you need a
multiple-technology IKM to transfer the data to the server. Note that if you have more than one
source on different data servers, you need multiple-technology LKMs to collect data from the
other sources.
Lastly, if the staging area, source, and target are all on the same data server, you do not need
an LKM. A single-technology IKM is sufficient.
Oracle Data Integrator 11g: Integration and Administration 9 - 40
Copyright © 2012, Oracle and/or its affiliates. All rights reserved.
Target
Which KMs for Which Flow?
Four possible arrangements:
Source
Integration phaseLoading phase
Multitech LKM Multitech IKM
Staging Area on target
Multitech LKM Single-tech IKM
Staging Area on source
Multitech IKM
(No LKM needed)
Source, Staging area, and target in the same location
Single-tech IKM
(No LKM needed)
Staging Area
Oracle University and (Oracle Corporation) use only.
These eKit materials are to be used ONLY by you for the express purpose SELF STUDY. SHARING THE FILE IS STRICTLY PROHIBITED.

You should know some features of working with knowledge modules. Knowledge modules
sometimes skip unnecessary operations, such as creating temporary tables. Also, some types
of knowledge modules lack certain features. This may affect the way you implement your data
quality control. For example, IKMs that perform data transfer cannot perform flow control.
Similarly, IKMs that write to files or other nonrelational datastores cannot perform static
control. Lastly, all KMs have options that can be configured to modify their behavior. For
example, most LKMs have the DELETE_TEMPORARY_OBJECTS option. Disabling this option
enables you to see the temporary tables even after a successful execution. This information is
covered in detail later.
ODI 11.1.1.6 introduces Global Knowledge Modules (KMs) allowing specific KMs to be
shared across multiple projects. In previous versions of ODI, Knowledge Modules were
always specific to a Project and could only be used within the project into which they were
imported. Global KMs are listed in the Designer Navigator in the Global Objects accordion.
Oracle Data Integrator 11g: Integration and Administration 9 - 41
Copyright © 2012, Oracle and/or its affiliates. All rights reserved.
More About KMs
•KMs can skip certain operations.
–Unnecessary temporary tables are not created.
•Some KMs lack certain features.
–Multiple-technology IKMs cannot perform flow control.
–IKMs to File, JMS, and so on do not support static control.
•All KMs have configurable options.
•KMs can be specified as “Global,” allowing them to be
shared across multiple projects.
Oracle University and (Oracle Corporation) use only.
These eKit materials are to be used ONLY by you for the express purpose SELF STUDY. SHARING THE FILE IS STRICTLY PROHIBITED.

Often, you have to select a knowledge module for a certain task. To select the knowledge
module, you have to know how to find the right one in a list. Fortunately, the knowledge
modules that come with ODI are named according to a system.
The name of a loading knowledge module consists of the name of the source technology, the
word “to,” and then the name of the target technology. If the loading method is important, it
appears in parentheses afterward. For example, the module that bulk-loads files into MS SQL
is called “File to MSSQL (BULK).”
For single-technology IKMs, the name is the name of the technology, followed by the
integration strategy, optionally followed by the method.
For example, “SQL Incremental Update” populates a generic SQL datastore by using the
incremental update method. For multiple-technology modules, both technologies are
mentioned. An example is “SQL to SQL Append,” which transfers data between two different
generic SQL datastores by using the append method.
When you see the word “SQL” in a knowledge module name, it can be used on any
technology that supports the SQL-89 syntax. In many cases, a more specific knowledge
module is preferred.
Oracle Data Integrator 11g: Integration and Administration 9 - 42
Copyright © 2012, Oracle and/or its affiliates. All rights reserved.
Identifying IKMs and LKMs
•Naming conventions:
–LKM <source tech> to <target tech> [(<method>)]
–IKM <tech1> [to <tech2>] <strategy> [(<method>)]
—
[to <tech2>] indicates a multiple-technology IKM.
•The technology name “SQL” stands for any SQL-enabled
technology.
–It can be used for most technologies that support the SQL-89
syntax.
Oracle University and (Oracle Corporation) use only.
These eKit materials are to be used ONLY by you for the express purpose SELF STUDY. SHARING THE FILE IS STRICTLY PROHIBITED.

You saw the reference to two terms used in naming knowledge modules: method and
strategy.
In this context, a method is a specific tool or means that ODI uses to transfer or manipulate
data. It can be a bulk-loading tool supplied by a database vendor, such as SQL*LOADER for
Oracle. It can also be a method contained in the database that allows special types of data
transfers. For example, the LKM “MSSQL to MSSQL (LINKED SERVERS)” uses the “linked
server” feature of the SQL Server to load data.
A strategy is not specific to a technology. It determines whether checks, updates, and inserts
are performed.
An “Append” is a simple strategy: Rows are inserted.
A “Control Append” performs a data validity check or “flow control,” before inserting. With
Control Append, you use CKM to check constraints.
The “Incremental Update” strategy performs inserts if rows do not exist, or updates if they do.
It typically also performs flow control.
“Slowly Changing Dimensions” knowledge modules are more specialized. They let you define
particular columns, which, if changed, trigger the addition of a new row in the datastore.
Oracle Data Integrator 11g: Integration and Administration 9 - 43
Copyright © 2012, Oracle and/or its affiliates. All rights reserved.
IKMs and LKMs: Strategies and Methods
•<method> is the physical means used to transfer the data.
–Database loader to perform transfers
–Database-specific method to merge data
•<strategy> is the general technique used to integrate data
into a target.
–Append or control append
–Incremental update
–Slowly changing dimensions
Oracle University and (Oracle Corporation) use only.
These eKit materials are to be used ONLY by you for the express purpose SELF STUDY. SHARING THE FILE IS STRICTLY PROHIBITED.
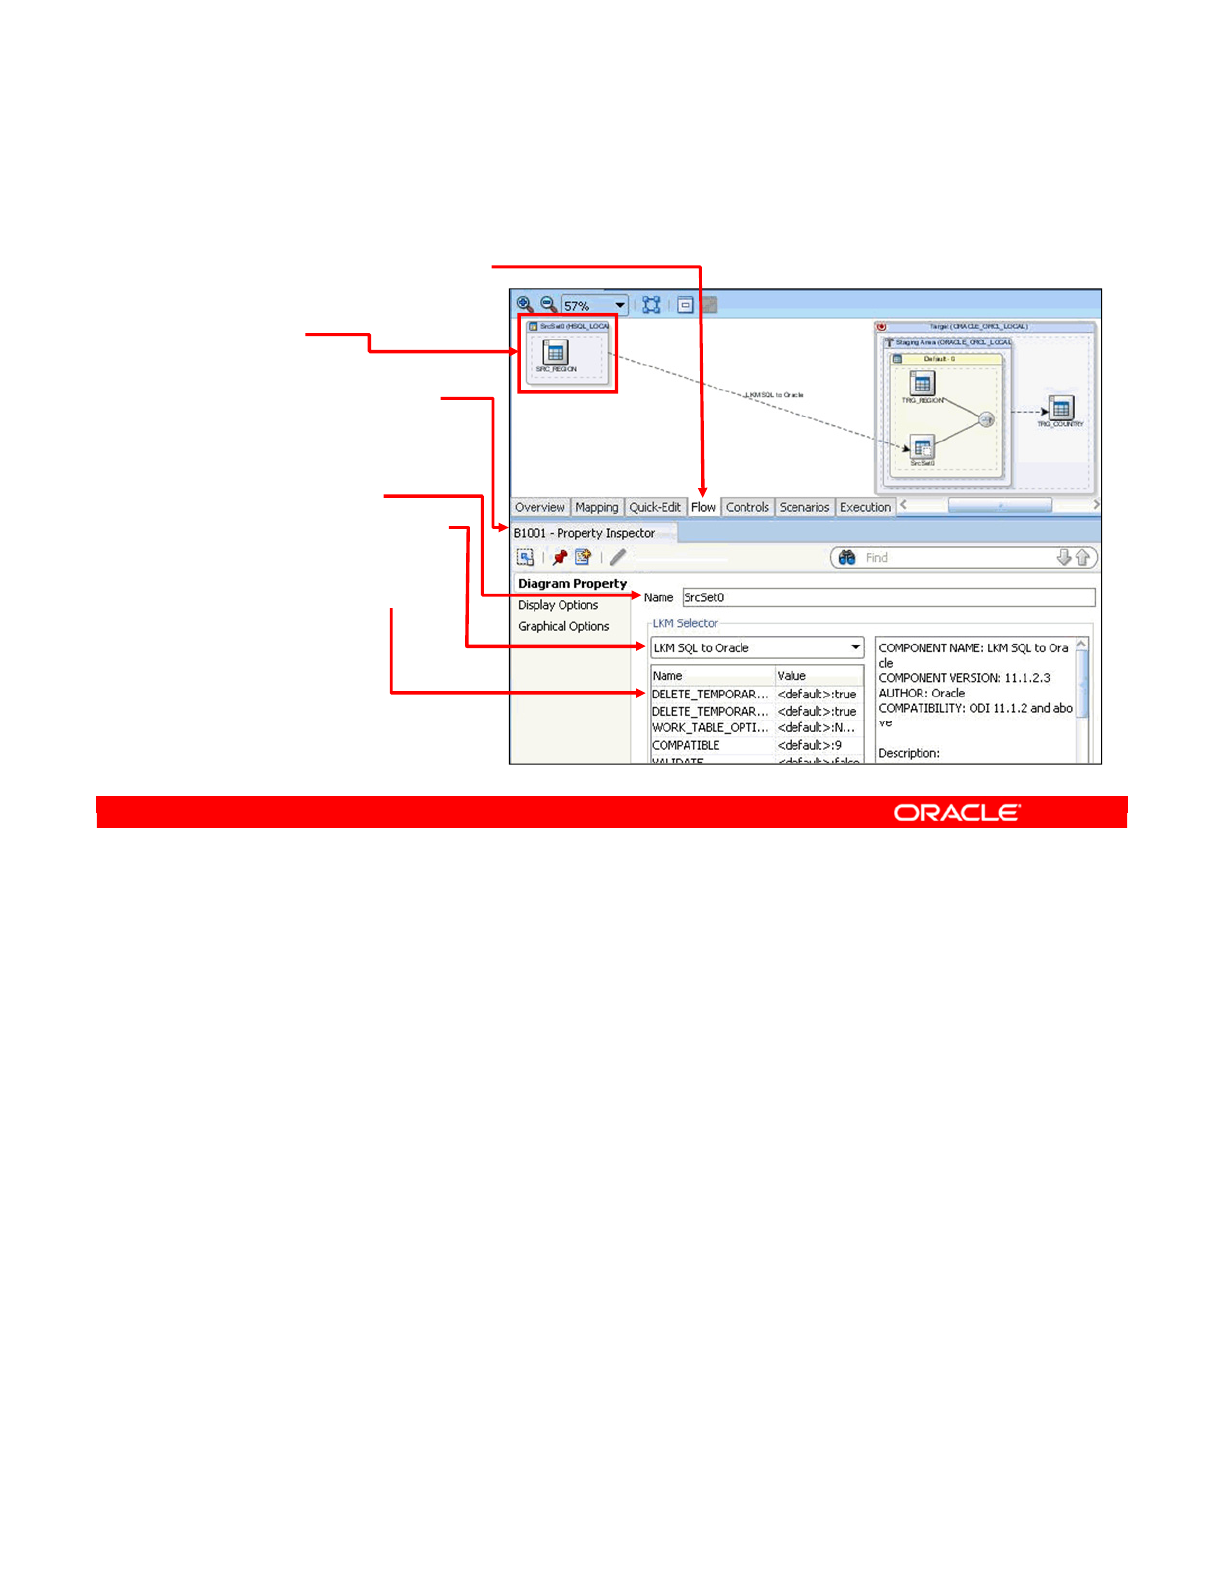
Having decided which loading knowledge module to use, you need to set it in ODI. To do so,
perform the following:
1. Click the Flow tab in the interface window.
2. Select the source set. A source set is a group of joined source datastores located in a
server from which you want to extract the data. This appears as a box called, for
example, SS_1. You now see the knowledge module Property panel.
3. Optionally, change the name of the source set on the Flow tab from, for example,
“SrcSet0,” to something more meaningful like “Source Region”, for documentation
purposes.
4. Now, select your LKM from the drop-down list.
5. Set the LKM’s options.
Note: ODI can, in many cases, select a default knowledge module. However, this may not be
the best one for the job. For this reason, ODI highlights the relevant source set or datastore
with an orange cross. If you have not chosen a KM, you will see a red cross (X).
Oracle Data Integrator 11g: Integration and Administration 9 - 44
Copyright © 2012, Oracle and/or its affiliates. All rights reserved.
How to Specify an LKM
1. Click the Flow tab.
2. Select the source
set.
3. The KM Property
Inspector opens.
4. Change the name
of the source set
(optional).
5. Select an LKM.
6. Modify the
LKM’s options.
Oracle University and (Oracle Corporation) use only.
These eKit materials are to be used ONLY by you for the express purpose SELF STUDY. SHARING THE FILE IS STRICTLY PROHIBITED.

The process for specifying an IKM is similar.
1. Click the interface’s Flow tab.
2. Click the target this time. As with the LKM, the knowledge module’s Property panel
opens.
3. You may want to select or deselect the Distinct Rows check box. Selecting it means that
only rows that are different (not duplicates) are manipulated. This effectively means a
SELECT DISTINCT is used instead of SELECT. This does not prevent duplicates from
occurring in your target data, if there are rows that exist in both source and target data.
4. Then, select an IKM from the drop-down list.
5. Configure the IKM’s options as necessary. The list of KM options enables you to tweak
the behavior of the KM. For example, you can recycle errors into the flow or avoid
deleting the temporary tables. The next slide provides some examples.
In general, the default options behave the way you expect them to. The only ones you need to
use frequently are FLOW_CONTROL and STATIC_CONTROL.
Note: The options available are entirely determined by the individual KM. For example, an
IKM specific to a particular technology may have options that enable you to take advantage of
the features of that technology.
Oracle Data Integrator 11g: Integration and Administration 9 - 45
Copyright © 2012, Oracle and/or its affiliates. All rights reserved.
How to Specify an IKM
1. Click the Flow
tab.
2. Select the Target
set.
The KM property
Inspector opens.
3. Select/Deselect
Distinct Rows.
4. Select an IKM.
5. Set the IKM’s
options.
Oracle University and (Oracle Corporation) use only.
These eKit materials are to be used ONLY by you for the express purpose SELF STUDY. SHARING THE FILE IS STRICTLY PROHIBITED.
Some of the typical options are as follows:
•INSERT and UPDATE are two options that apply to many IKMs. If you turn off INSERT,
no rows will be added, but rows may still be updated, if applicable. Turning off UPDATE
does the reverse. Typically, the “Incremental Update” IKMs have both options, whereas
the “Append” IKMs have only the INSERT option.
•COMMIT causes ODI to generate COMMIT statements between inserts. Sometimes it is
useful to turn this option off, to cause several steps to happen in the same transaction.
One use of this is to delay the execution of triggers on Microsoft SQL Server.
•FLOW CONTROL specifies whether data is checked for correctness before integration.
This option enforces the constraints that you defined in ODI, such as uniqueness,
reference, and conditional constraints. Only single-technology IKMs have this option.
•STATIC CONTROL specifies whether data is checked for correctness after being
loaded. This option performs almost the same checks as the “flow control” option, but on
the data that has been integrated.
•TRUNCATE DELETE ALL and DELETE TEMPORARY OBJECTS enable you to specify
your preferences for truncating or deleting target data and temporary objects.
Oracle Data Integrator 11g: Integration and Administration 9 - 46
Copyright © 2012, Oracle and/or its affiliates. All rights reserved.
Common KM Options
The following options appear in most KMs:
INSERT UPDATE Should data be inserted/updated in the target?
COMMIT Should the interface commit the insert/updates?
If “no,” a transaction can span several interfaces.
FLOW CONTROL
STATIC CONTROL
Should data in the flow be checked?
Should data in the target be checked after the execution of
the interface?
TRUNCATE
DELETE ALL
Should the target data be truncated or deleted before
integration?
DELETE TEMPORARY
OBJECTS
Should temporary tables and views be deleted or kept for
debugging purposes?
Oracle University and (Oracle Corporation) use only.
These eKit materials are to be used ONLY by you for the express purpose SELF STUDY. SHARING THE FILE IS STRICTLY PROHIBITED.
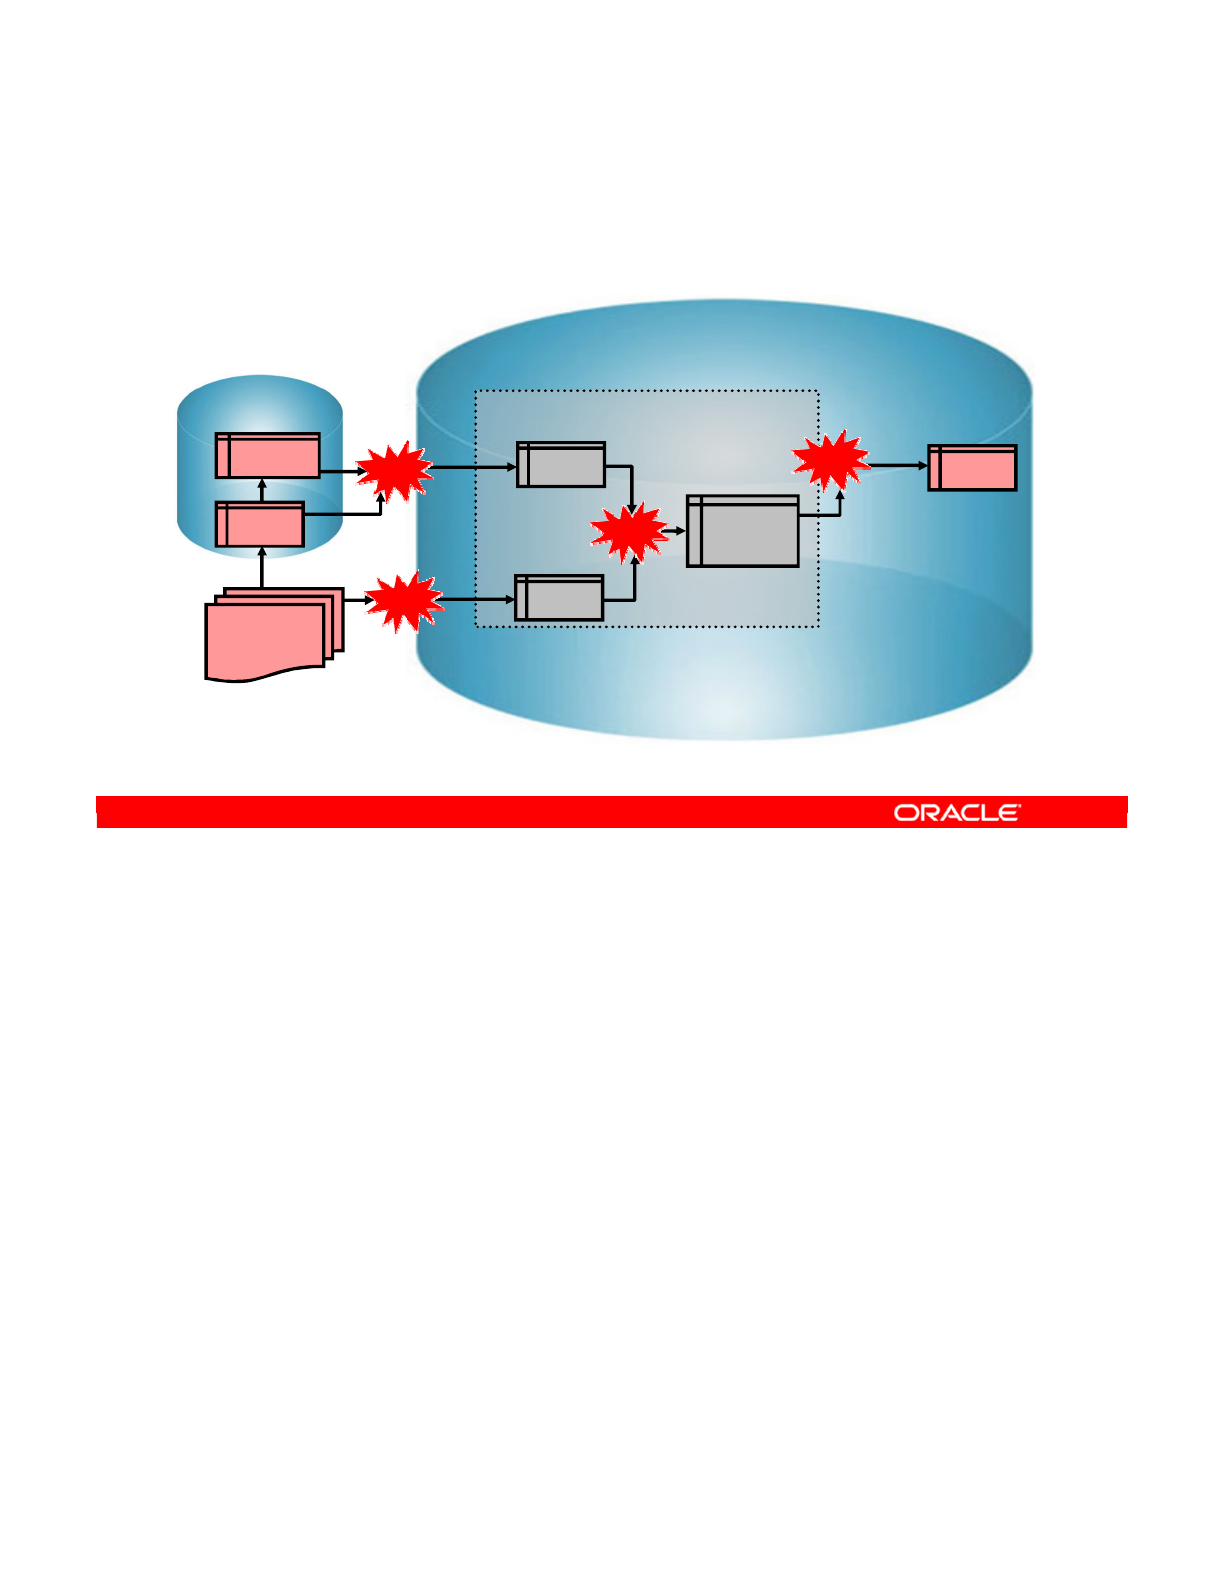
You now return to the example scenarios to see which knowledge modules you should use. In
this version, you have the Staging area on the target (Oracle) server.
LKM_1 transfers data from the Sybase source to the Staging area on the Oracle server. If
there is a specific “Sybase to Oracle” LKM with special capabilities, you can use that.
However, the standard “SQL to Oracle” LKM works fine.
LKM_2 extracts data from the corrections file and loads it into the Staging area on the Oracle
server. Here, you take advantage of the Oracle SQL*LOADER bulk-loading tool. Thus, you
use the specific LKM called “File to Oracle (SQLLDR).” This is a classic example of a
multiple-technology knowledge module—it is specific to two technologies: file data sources
and Oracle.
Now that data is loaded on the Staging area, you need to integrate it. Here, because the
integration happens within one server, you need a single-technology knowledge module.
In the scenario, you do not want to delete and repopulate the SALES table. Instead, you want
to update it. Therefore, you choose the “Oracle Incremental Update” IKM, which is used twice.
The first time, it joins the loaded data into a temporary table, I$_SALES. This temporary table
has a structure identical to the target SALES table. Then, it checks all constraints on the
temporary table (flow control). Next, it performs the “incremental update” into the target table.
Oracle Data Integrator 11g: Integration and Administration 9 - 47
Copyright © 2012, Oracle and/or its affiliates. All rights reserved.
Flow: Example 1
Using the target as the Staging area
Target (Oracle)
Staging Area
SALES
Source (Sybase)
ORDERS
LINES
CORRECTIONS
File
C$_0
LKM SQL to
Oracle
C$_1
LKM File to
Oracle (SQLLDR)
I$_SALES
IKM Oracle
Incremental Update
LKM_1
LKM_2
IKM_1
IKM_1
IKM Oracle
Incremental Update
Oracle University and (Oracle Corporation) use only.
These eKit materials are to be used ONLY by you for the express purpose SELF STUDY. SHARING THE FILE IS STRICTLY PROHIBITED.
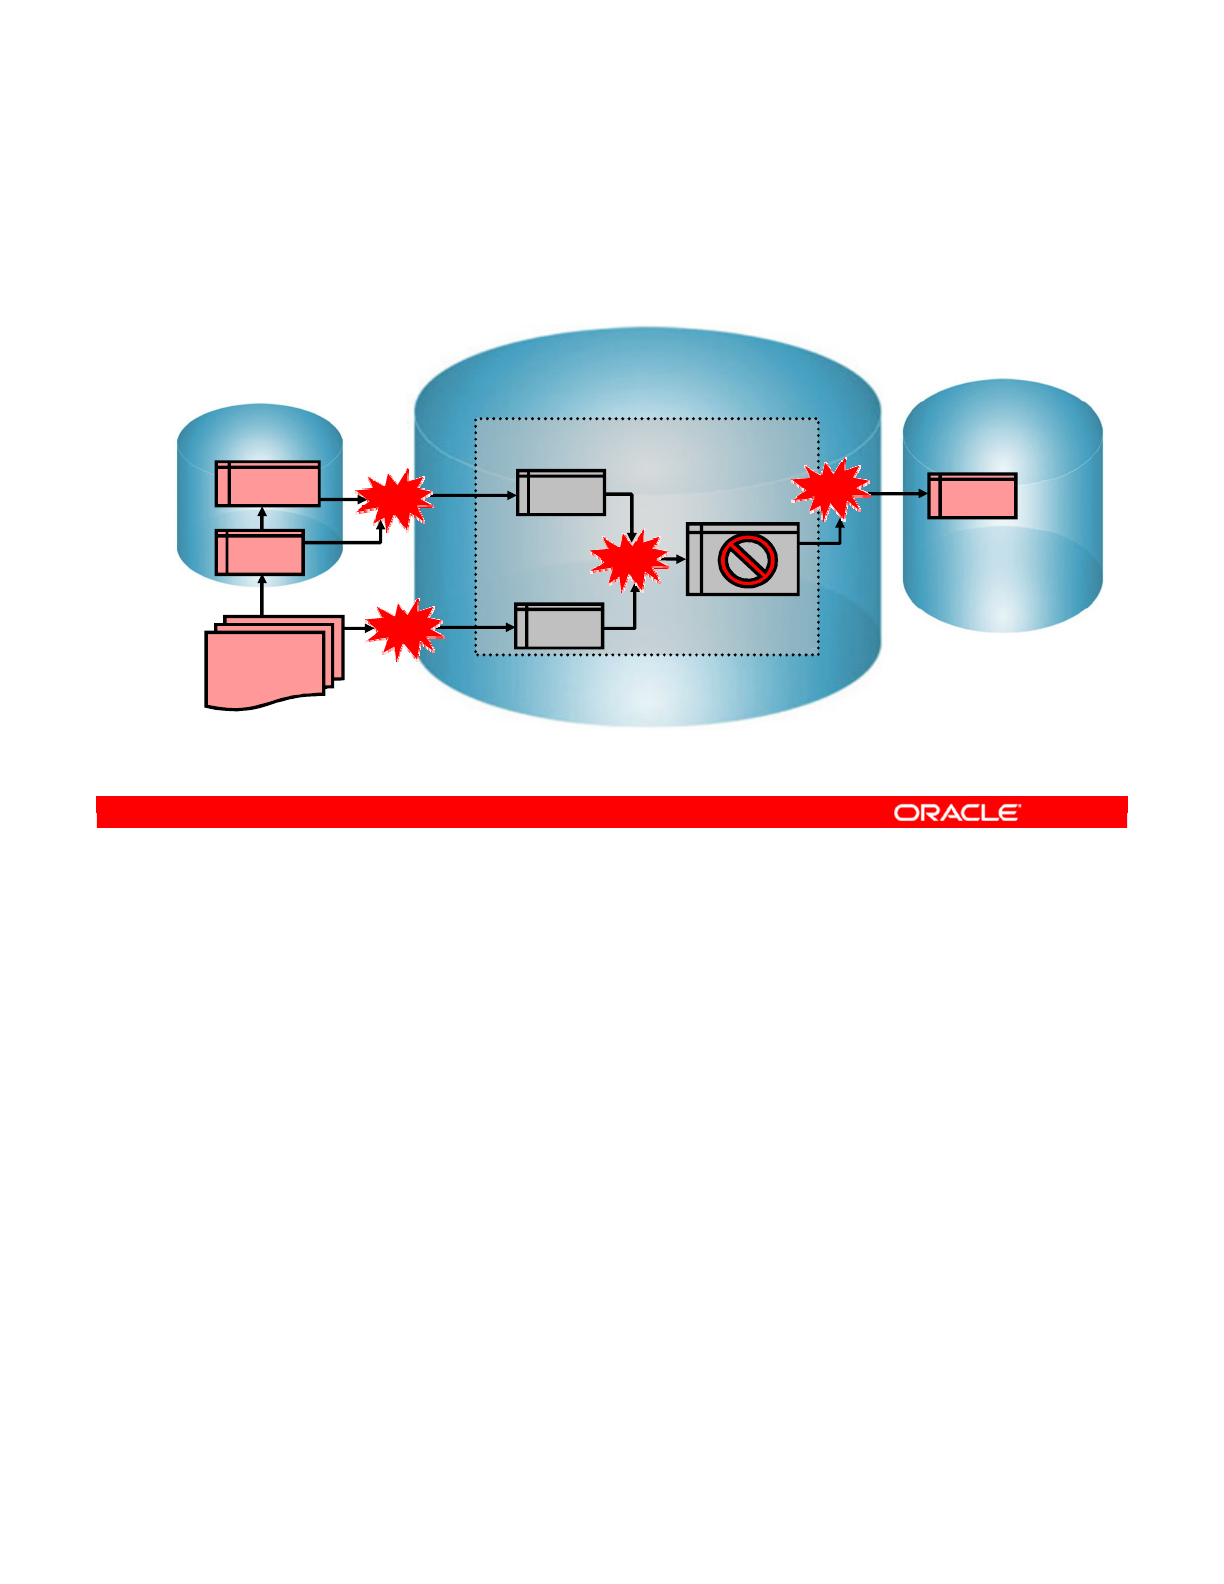
This is the second example flow with the same source and target. Here, you add a staging
area.
LKM_1 is no longer transferring data to the Oracle server, so you use the generic “SQL to
SQL” LKM. This is still, technically, a “multiple-technology” loading knowledge module: it
transfers data between two technologies, which happen to be the same.
LKM_2 can no longer benefit from the Oracle bulk loader because you are loading the file into
a non-Oracle staging area. Thus, you use the generic “File to SQL” LKM.
Now the integration takes place differently. It was mentioned earlier that flow control cannot
be performed by multiple-technology IKMs. This is the same as saying that flow control can
take place only on the target server. You can see why now: all conditions, primary keys, and
foreign keys are defined on the Oracle server. In addition, the foreign keys refer to tables that
exist only on the Oracle server. Similarly, you cannot test a primary key violation because all
the rows that you need to test against are also on the Oracle server. This explains why it is
preferable, whenever possible, to put the Staging area on the target.
Remember, flow control will not occur. Therefore, it is pointless to store data in the temporary
table I$. In this case, the temporary table will not be created.
IKM_1 now becomes a simple “SQL to SQL Append” without a check. You cannot use the
incremental update that you used previously. This means that the target SALES table must be
empty or contain no duplicates with the new data.
Oracle Data Integrator 11g: Integration and Administration 9 - 48
Copyright © 2012, Oracle and/or its affiliates. All rights reserved.
Flow: Example 2
Using a third server as the Staging area
Target (Oracle)
Staging area
Staging Area
SALES
Source (Sybase)
ORDERS
LINES
CORRECTIONS
File
C$_0
LKM SQL to
Oracle
C$_1
LKM File to SQL
IS_SALES
IKM SQL to SQL
Append
LKM_1
LKM_2
IKM_1
IKM_1
IKM SQL to SQL
Append
Oracle University and (Oracle Corporation) use only.
These eKit materials are to be used ONLY by you for the express purpose SELF STUDY. SHARING THE FILE IS STRICTLY PROHIBITED.
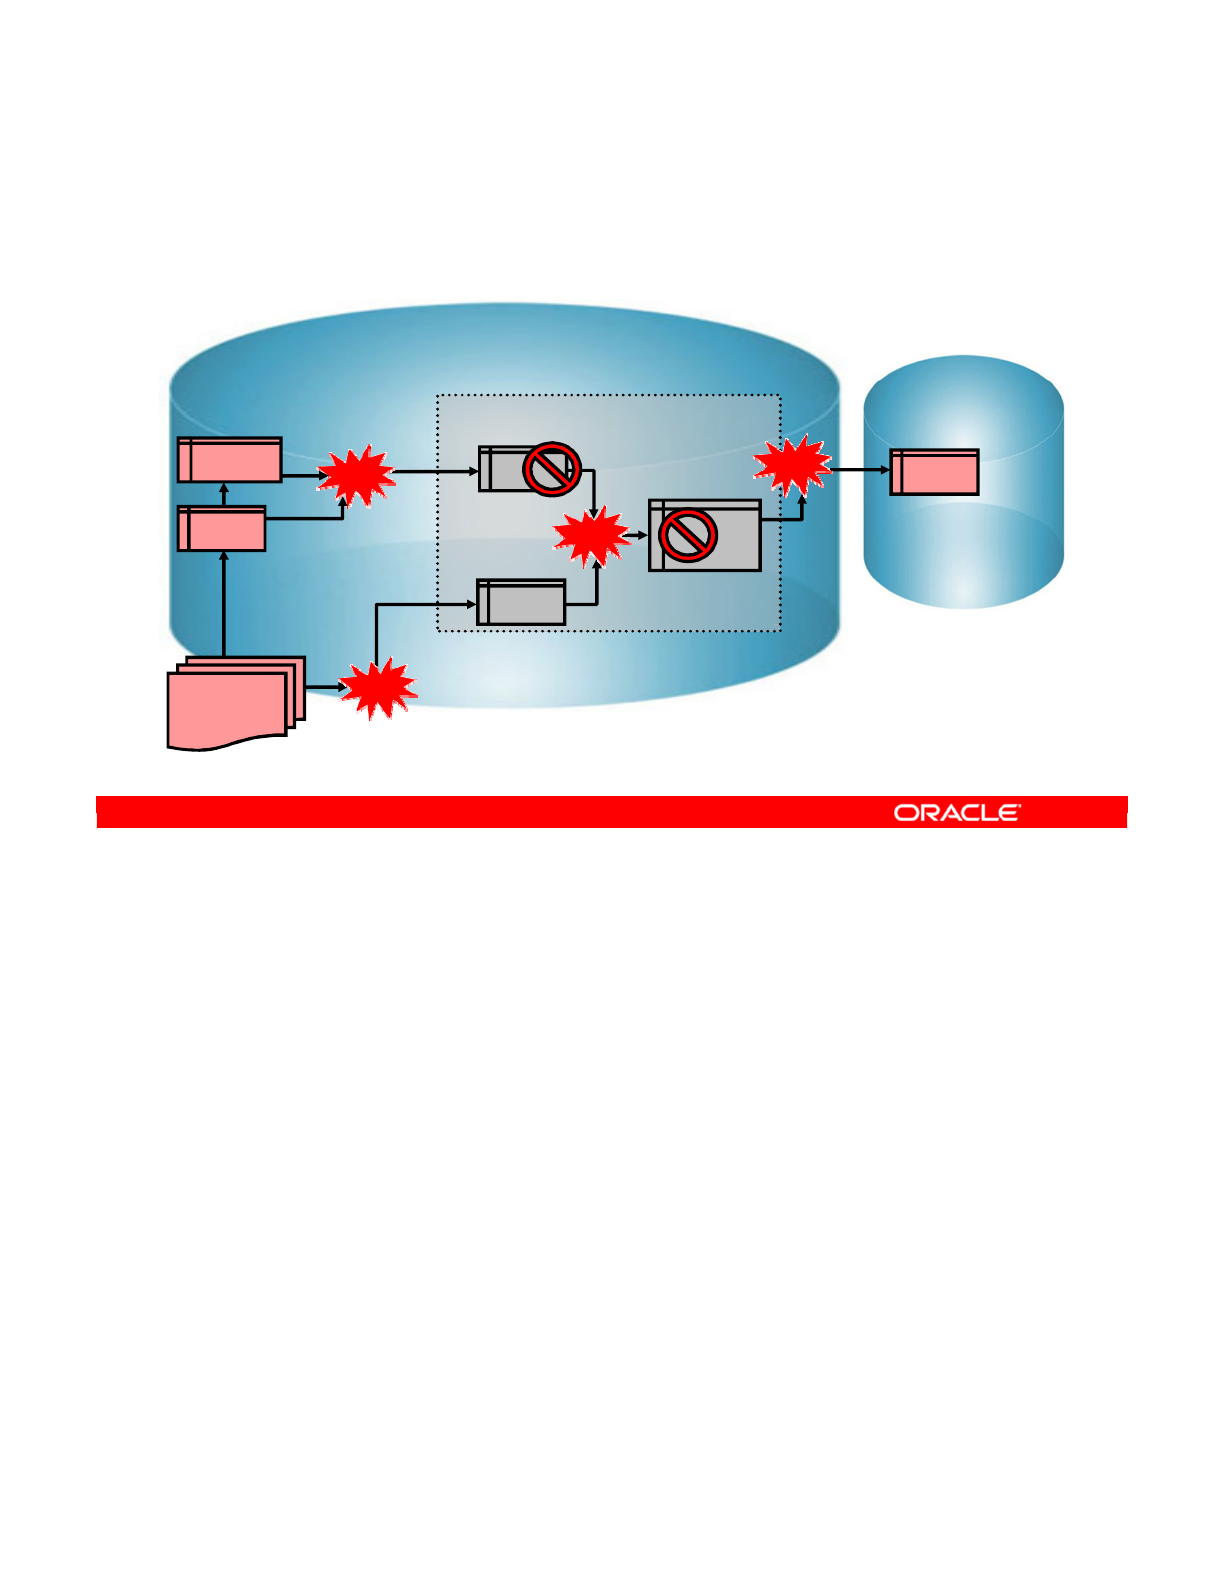
In the final configuration, the Staging area is on the Sybase source server. This location
eliminates the need for a loading phase for the ORDERS and LINES tables.
Therefore, the first step now is to load the CORRECTIONS file onto the Sybase server. You
use the “File to SQL” LKM to perform this step.
Then, you can immediately begin joining all the tables. You do not have to create a temporary
table for the ORDERS and LINES table because they are on the same server. Therefore, the
“SQL to SQL Append” IKM eliminates this step.
As in the previous case, no flow control can be performed. Because it is pointless to create a
temporary integration table, this step is eliminated as well.
Thus, the actual flow becomes quite simple. The file data is loaded into a temporary table on
the source server. Then, the CORRECTIONS data is joined with the ORDERS and LINES tables
directly into the SALES table on the target server.
Oracle Data Integrator 11g: Integration and Administration 9 - 49
Copyright © 2012, Oracle and/or its affiliates. All rights reserved.
Flow: Example 3
Using the source as the Staging area
Target (Oracle)
Staging Area
SALES
Source (Sybase)
ORDERS
LINES
CS_0
IKM SQL to
SQL Append
CS_1
LKM File to SQL
IS_SALES
IKM SQL to SQL
Append
IKM_1
IKM_1
IKM_1
IKM SQL to
SQL Append
CORRECTIONS
File
LKM_1
Oracle University and (Oracle Corporation) use only.
These eKit materials are to be used ONLY by you for the express purpose SELF STUDY. SHARING THE FILE IS STRICTLY PROHIBITED.

Answer: d
Explanation: To create a valid flow, all source datastores must be directly or indirectly joined
in ODI.
Oracle Data Integrator 11g: Integration and Administration 9 - 50
Copyright © 2012, Oracle and/or its affiliates. All rights reserved.
Quiz
Which of the following statements is not true?
a. Filters defined on the datastores in their models are
automatically copied into the diagram.
b. When you use a left outer join to combine two tables, all
the rows from the left table are included in the results. ODI
can generate native or standard SQL code.
c. ODI automatically rearranges a right outer join to be a left
outer join, if possible, for readability.
d. In ODI, it is not necessary for all source datastores to be
directly or indirectly joined.
Oracle University and (Oracle Corporation) use only.
These eKit materials are to be used ONLY by you for the express purpose SELF STUDY. SHARING THE FILE IS STRICTLY PROHIBITED.

Oracle Data Integrator 11g: Integration and Administration 9 - 51
Copyright © 2012, Oracle and/or its affiliates. All rights reserved.
Summary
In this lesson, you should have learned how to:
•Design ODI Interfaces with multiple-source datastores
•Create joins and lookups, and filter data
•Define the flow in ODI Interface
•Specify ODI Interface Staging area and execution location
•Select knowledge modules
Oracle University and (Oracle Corporation) use only.
These eKit materials are to be used ONLY by you for the express purpose SELF STUDY. SHARING THE FILE IS STRICTLY PROHIBITED.

Oracle Data Integrator 11g: Integration and Administration 9 - 52
Copyright © 2012, Oracle and/or its affiliates. All rights reserved.
Checklist of Practice Activities
1-1: Logging In and Using Help
2-1: Creating Users and Repositories and Logging In
3-1: Creating an ODI Agent for Orchestrating Execution of ODI Objects
4-1: Defining the Topology
5-1: Setting Up a New ODI Project
6-1: Creating a Model
7-1: Checking Data Quality in the Model
8-1: ODI Interface: Simple Transformations
9-1: ODI Interface: Complex Transformations
9-2: ODI Interface: Implementing Lookup
10-1: ODI Interface: Exporting a Flat File to a Relational Table
11-1: Using Native Sequences with ODI Interface
11-2: Using Temporary Indexes
11-3: Using Data Sets with ODI Interface
12-1: Using Temporary ODI Interfaces
12-2: Developing a New Knowledge Module
13-1: Creating an ODI Procedure
14-1: Creating an ODI Package
14-2: Using ODI Package with Variables and User Functions
15-1: Creating and Scheduling an ODI Scenario
16-1: Using Load Plans
17-1: Working with ODI Versions
18-1: Enforcing Data Quality with ODI Interface
19-1: Implementing Changed Data Capture
20-1: Setting Up ODI Security
20-2: Integrating with Enterprise Manager and Using ODI Console
21-1: Executing an ODI Scenario Through the ODI Public Web Service
Oracle University and (Oracle Corporation) use only.
These eKit materials are to be used ONLY by you for the express purpose SELF STUDY. SHARING THE FILE IS STRICTLY PROHIBITED.
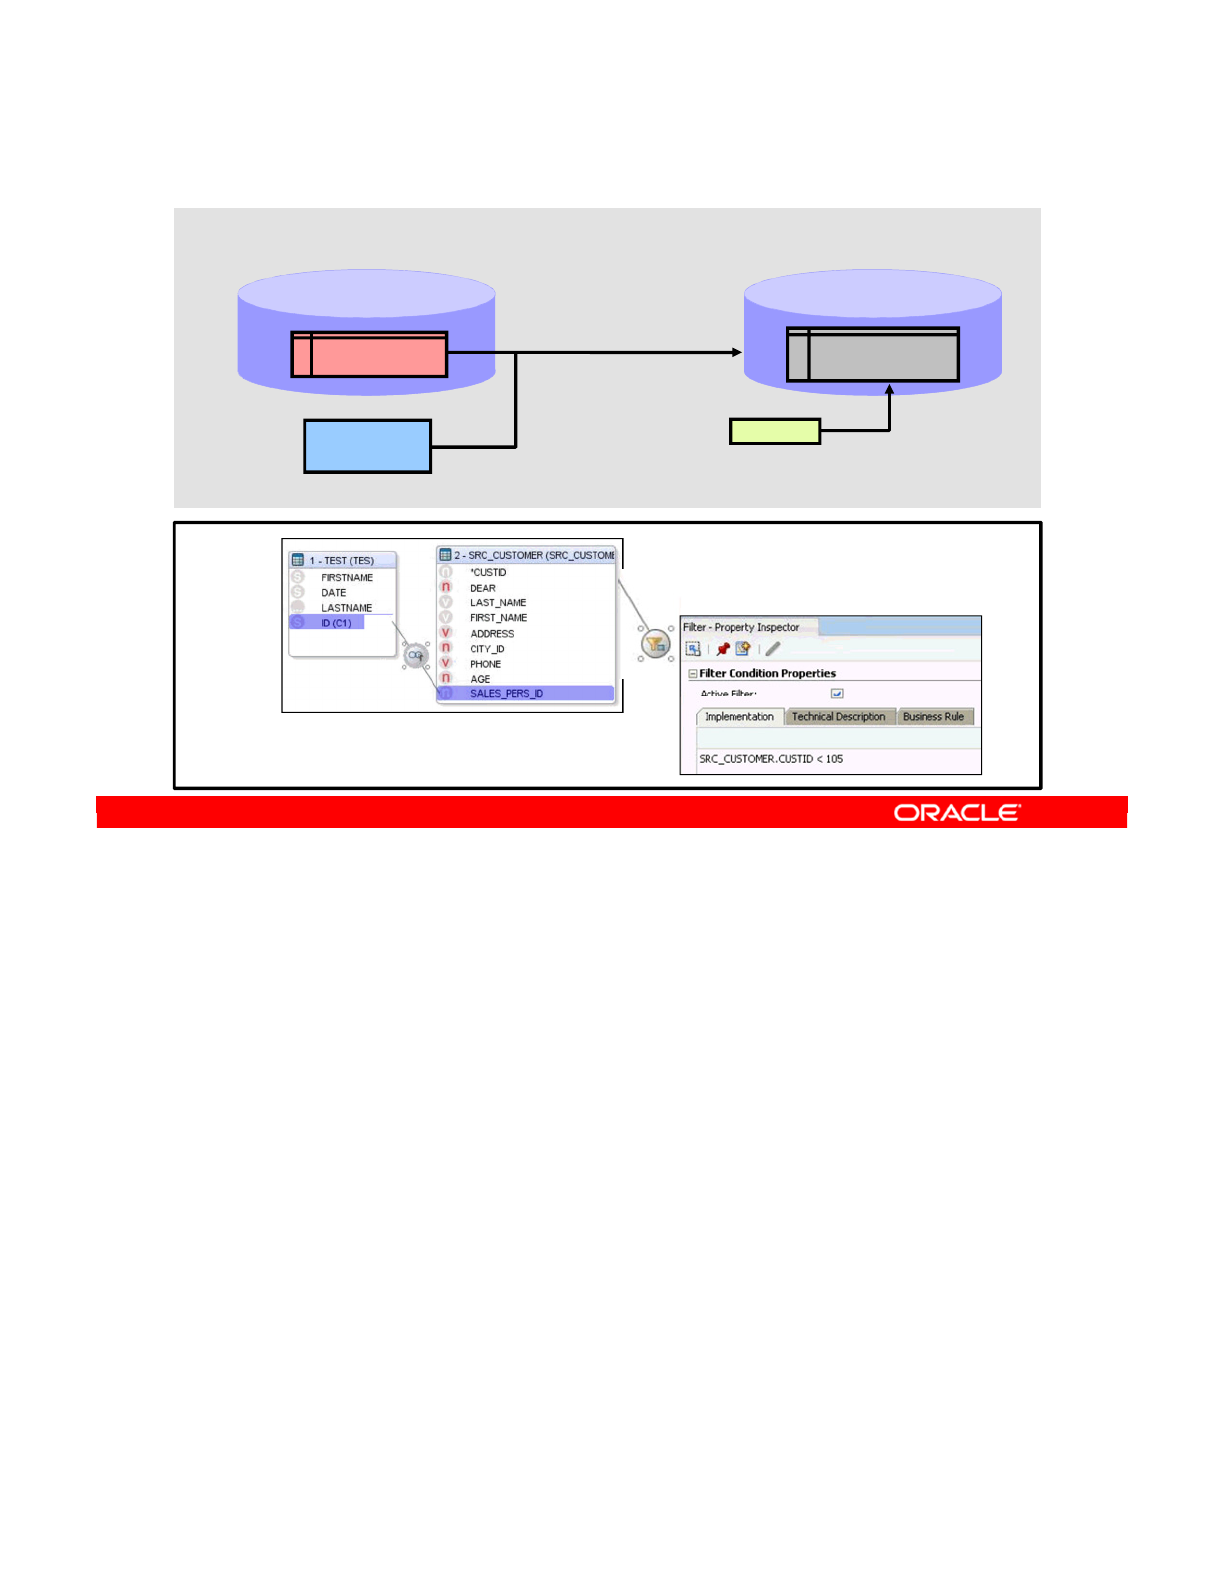
In previous practices, you learned how to create a simple ODI interface.
In this practice, you create the more complex interface INT_9-1, loading the TRG_CUSTOMER
datastore in the Oracle Sales Application model with the content of the SRC_CUSTOMER table
from the HSQL_SRC model, and the content of the SRC_SALES_PERSON flat file in the Flat
File Test model. In this interface, flow control is activated, constraints in the target table are
checked, and you apply filtering to retrieve only customers with CUST_ID < 105. In addition,
you populate the update date (UPD_DATE) column with the System date in the mapping
implementation field.
Oracle Data Integrator 11g: Integration and Administration 9 - 53
Copyright © 2012, Oracle and/or its affiliates. All rights reserved.
Practice 9-1: Overview
Create interface INT_9-1
Flat File Test
model
SRC_SALES_PERSON
SYSDATE
•Supply SYSDATE for
the update date
SRC_CUSTOMER
HSQL_SRC
model Oracle Sales Application
model
TRG_CUSTOMER
UPD_DATE
•Flow control activated
•Constraints in target table
are checked
•Filter to retrieve only
customers with
CUSTID < 105
Oracle University and (Oracle Corporation) use only.
These eKit materials are to be used ONLY by you for the express purpose SELF STUDY. SHARING THE FILE IS STRICTLY PROHIBITED.
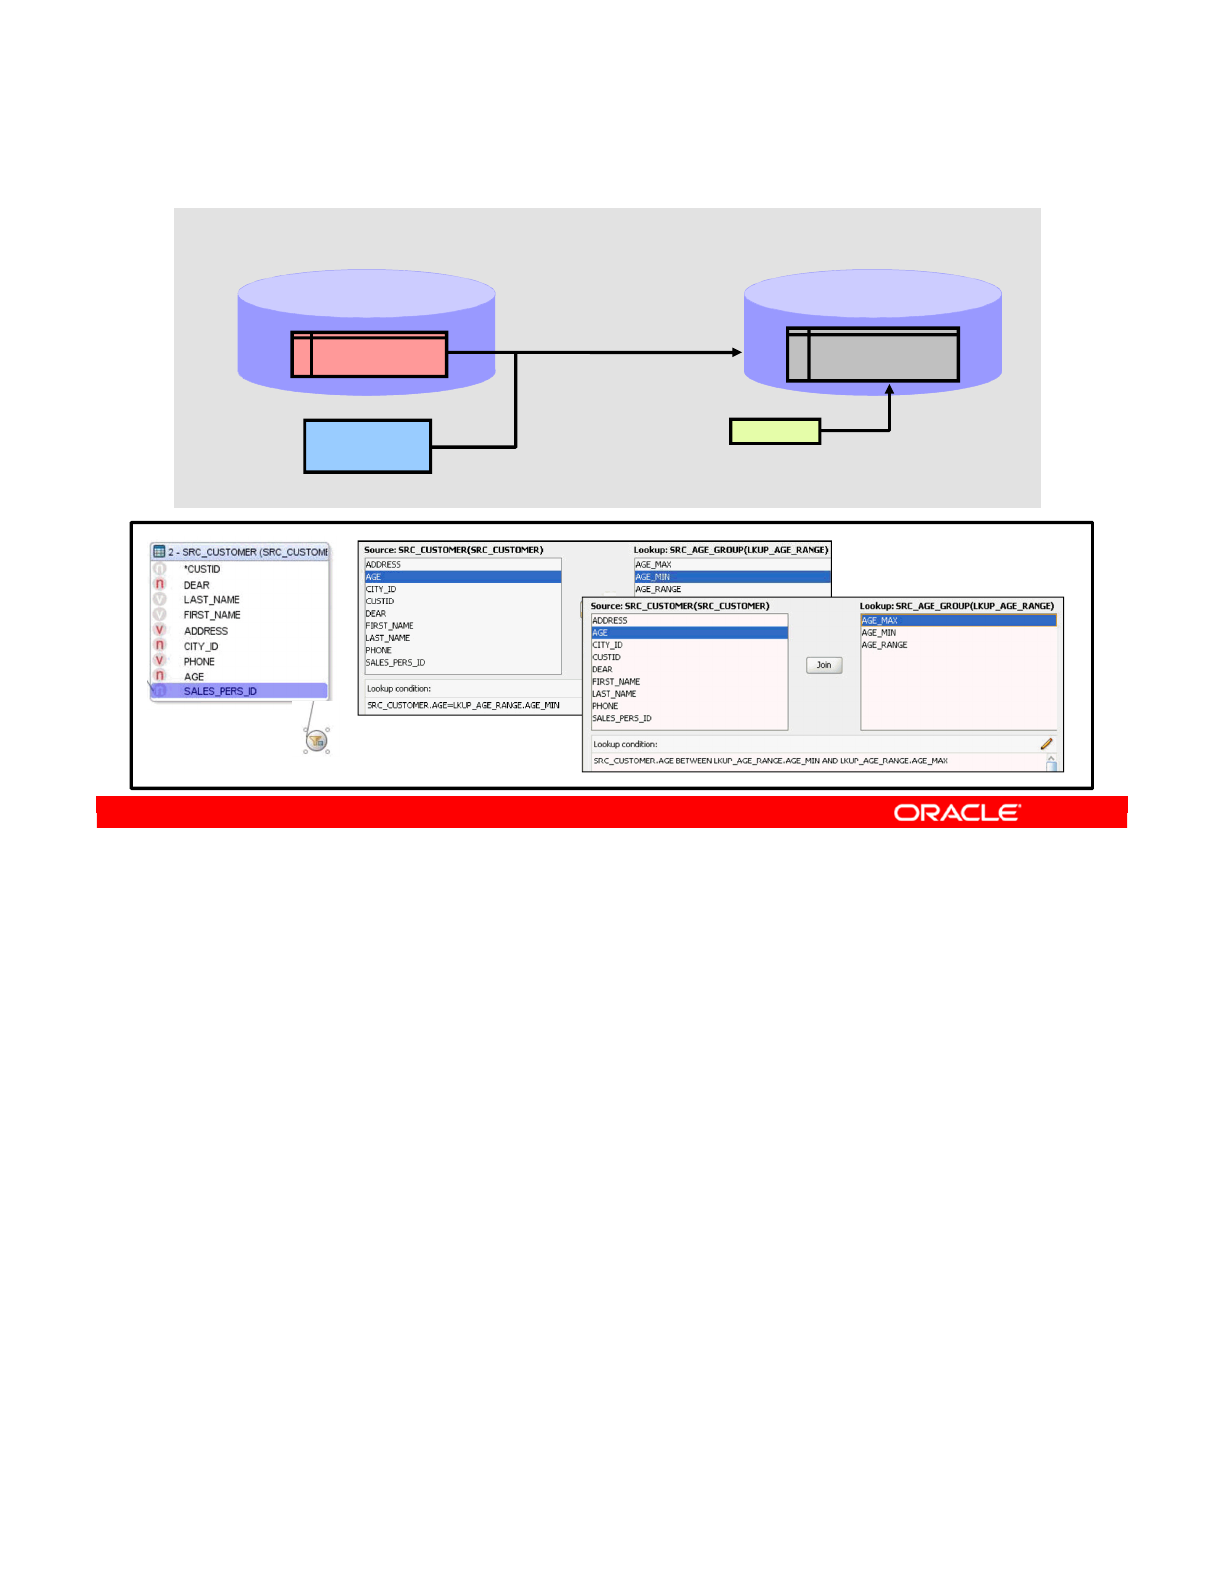
In the previous practices, you created an interface with several sources to load the
TRG_CUSTOMER datastore in the Oracle Sales Application model with the content of
SRC_CUSTOMER table and the SRC_SALES_PERSON files from different models. Now you
implement the lookup to load data in the target according to the age range provided in the
lookup table.
Oracle Data Integrator 11g: Integration and Administration 9 - 54
Copyright © 2012, Oracle and/or its affiliates. All rights reserved.
Practice 9-2: Overview
•Lookup to load data
according to age range
provided in lookup table
Create interface INT_9-2
Flat File Test
model
SRC_SALES_PERSON
SYSDATE
•Supply SYSDATE for
the update date
SRC_CUSTOMER
HSQL_SRC
model Oracle Sales Application
model
TRG_CUSTOMER
UPD_DATE
•Flow control activated
•Constraints in target table
are checked
•Filter to retrieve only
customers with
CUSTID < 105
Oracle University and (Oracle Corporation) use only.
These eKit materials are to be used ONLY by you for the express purpose SELF STUDY. SHARING THE FILE IS STRICTLY PROHIBITED.

Copyright © 2012, Oracle and/or its affiliates. All rights reserved.
Interfaces: Monitoring and Debugging
Oracle University and (Oracle Corporation) use only.
These eKit materials are to be used ONLY by you for the express purpose SELF STUDY. SHARING THE FILE IS STRICTLY PROHIBITED.

Oracle Data Integrator 11g: Integration and Administration 10 - 2
Copyright © 2012, Oracle and/or its affiliates. All rights reserved.
Objectives
After completing this lesson, you should be able to:
•Describe what happens at run time
•Monitor the execution of interfaces
•Troubleshoot run-time errors in interfaces
•Prevent errors by following the best practices when
designing interfaces
Oracle University and (Oracle Corporation) use only.
These eKit materials are to be used ONLY by you for the express purpose SELF STUDY. SHARING THE FILE IS STRICTLY PROHIBITED.

You now look at how to use the Operator Navigator to monitor the execution of an interface.
Through Operator Navigator, you can see the session that was created to run the interface,
and see how the interface is broken down into smaller steps. The details of how ODI executes
your interface are now revealed.
Oracle Data Integrator 11g: Integration and Administration 10 - 3
Copyright © 2012, Oracle and/or its affiliates. All rights reserved.
Monitoring Interfaces
Using the Operator Navigator
Oracle University and (Oracle Corporation) use only.
These eKit materials are to be used ONLY by you for the express purpose SELF STUDY. SHARING THE FILE IS STRICTLY PROHIBITED.
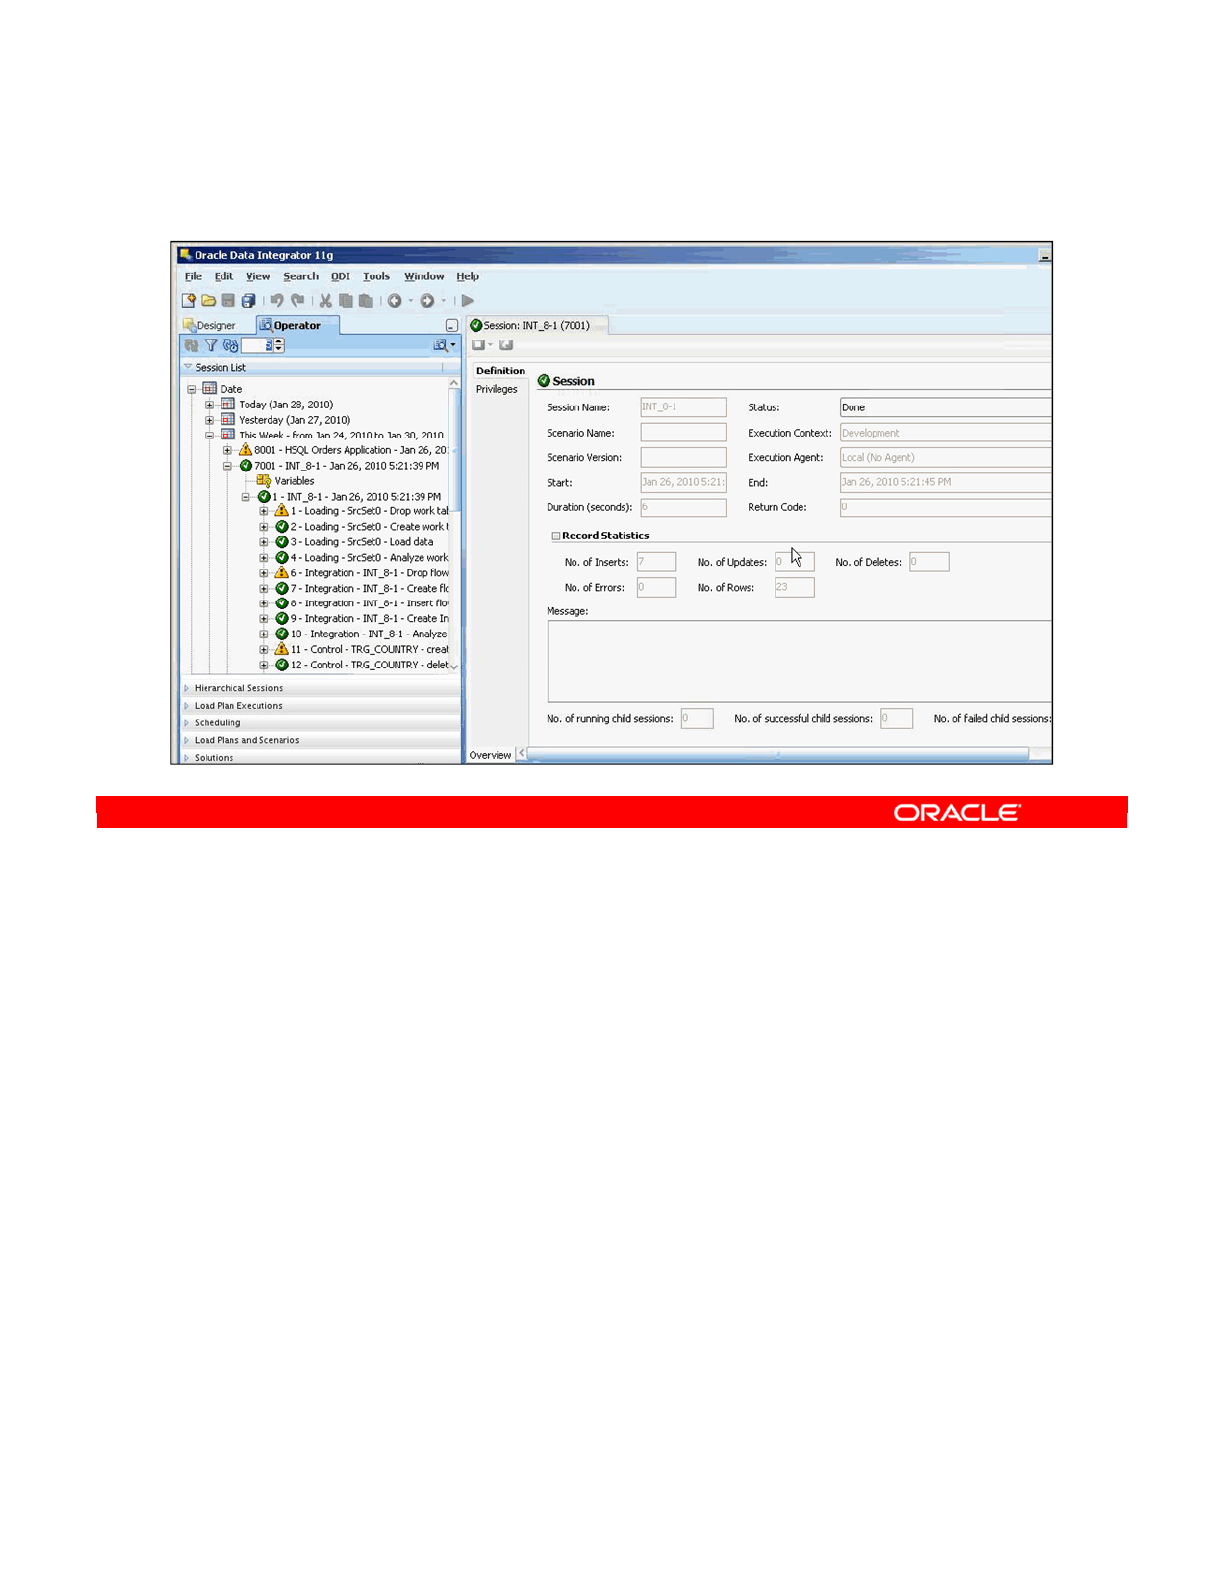
In the Operator Navigator, you may have different sessions available for examination. To help
find the one you want, sessions are sorted in different ways in the tree view: by the date of
execution, the physical agent used, the name of the session (sessions), the current state of
execution, or by keywords. Alternatively, you can see all executions together. Different
Operator views show the same information in slightly different formats.
On the toolbar, you can launch other ODI modules (Designer, Topology, and so on). You can
manually refresh the session list or set it to automatic refresh. To remove all stored sessions,
you can purge the log, and you can also see the schedule. Navigation buttons such as Back
and Forward are helpful for quickly comparing two similar execution logs.
The property window shows you the properties of any object in the Session List. Double-
clicking an item opens its property window.
Oracle Data Integrator 11g: Integration and Administration 10 - 4
Copyright © 2012, Oracle and/or its affiliates. All rights reserved.
Operator Navigator: Viewing the Log
Property
window
Tree
view
Oracle University and (Oracle Corporation) use only.
These eKit materials are to be used ONLY by you for the express purpose SELF STUDY. SHARING THE FILE IS STRICTLY PROHIBITED.

Operator Navigator serves primarily to show the execution log of the interfaces that you
launched. Other items, such as packages, are also visible, but those are not covered in this
lesson.
Whenever you execute an interface, you create a session. You must, therefore, find the
session in Operator Navigator that corresponds to the time you launched your interface.
In Operator Navigator, you can stop, edit, and restart sessions. This flexibility enables you to
fix a problem in a session and continue without having to relaunch the interface from
Designer.
Oracle Data Integrator 11g: Integration and Administration 10 - 5
Copyright © 2012, Oracle and/or its affiliates. All rights reserved.
Using Operator Navigator
•Operator Navigator shows the execution log.
•Each interface launched is displayed as a session.
–State shown: Finished, Running, and Waiting
•Operator Navigator enables you to stop, edit, and restart
sessions.
Oracle University and (Oracle Corporation) use only.
These eKit materials are to be used ONLY by you for the express purpose SELF STUDY. SHARING THE FILE IS STRICTLY PROHIBITED.
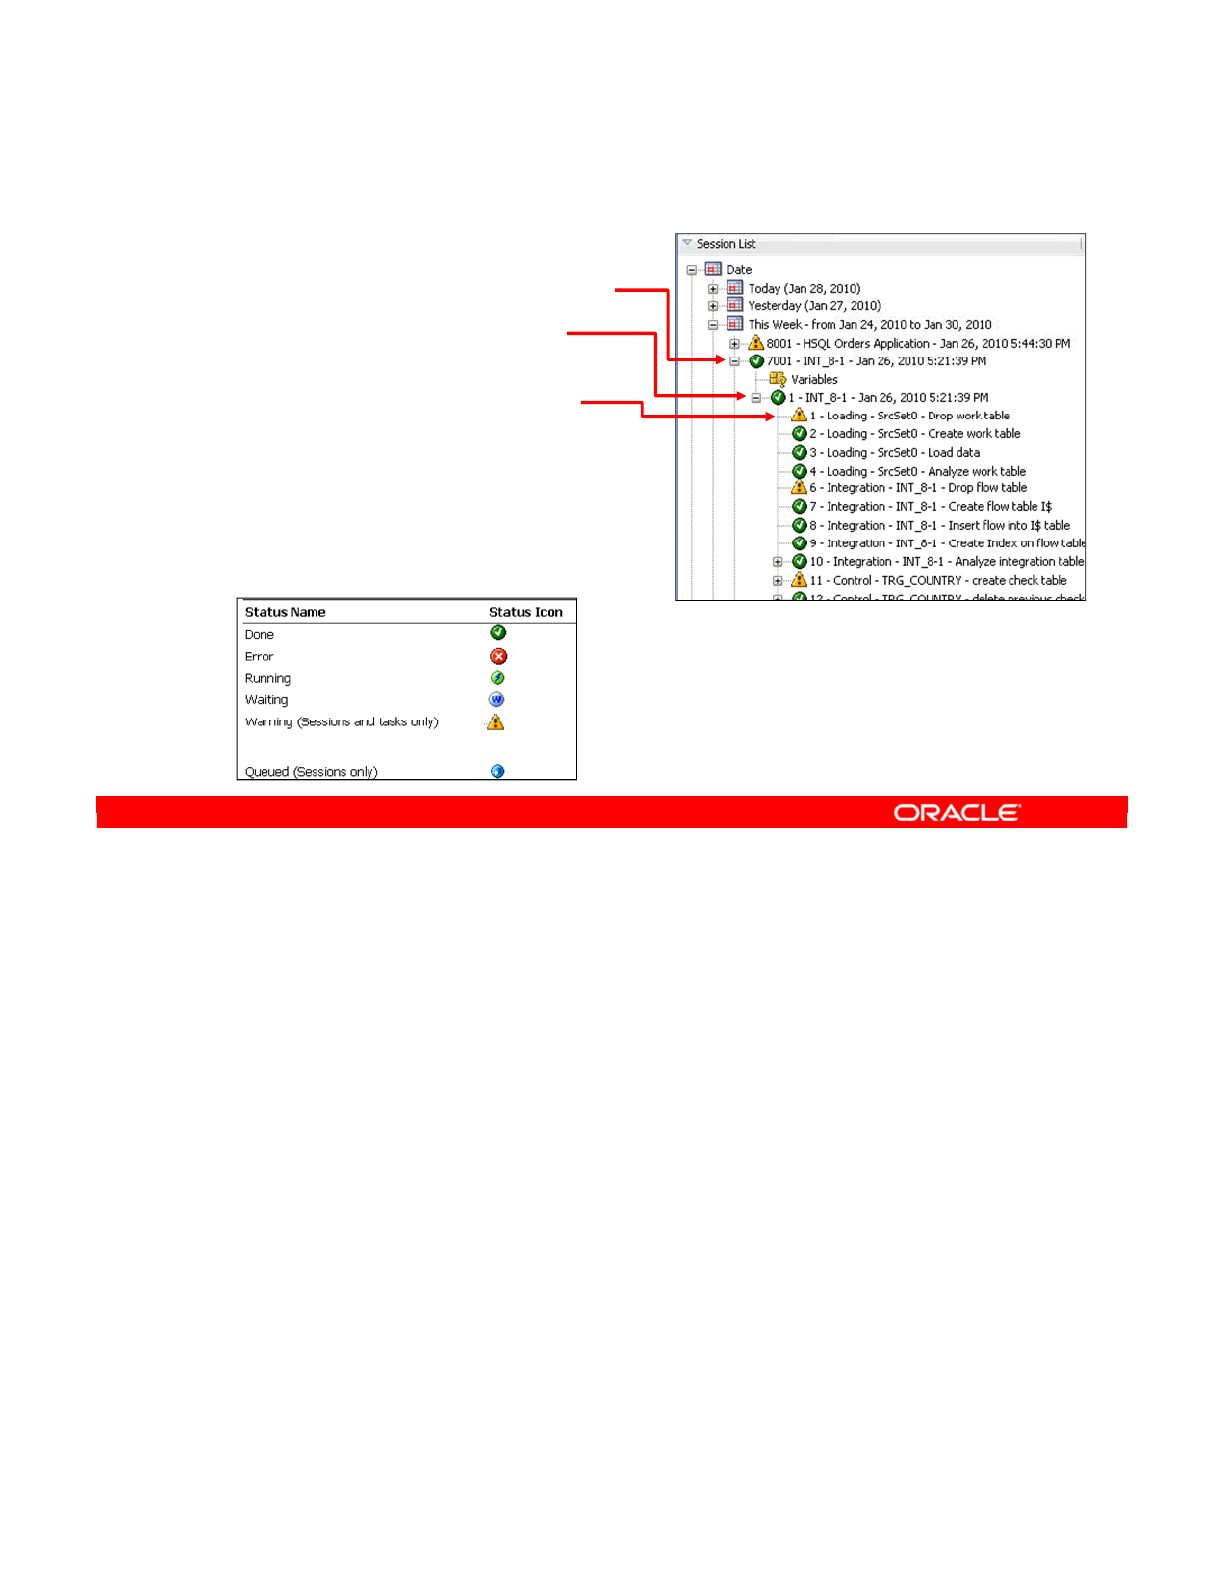
Every time an interface is executed, a session is created. However, a session can actually
execute several interfaces in sequence (known as a package). Thus in a session, an interface
corresponds to just one step. However, moving data around to execute an interface is a
complicated process. This process is made up of tasks. A task may consist of retrieving data
from a table, writing to a file, creating a temporary table, or cleaning up. The series of tasks is
determined entirely by the knowledge modules that you have chosen.
Each task has one state at any given moment: Running, Waiting, Done, Error, or Warning.
There can also be, at most, only one task in Running state in a given session at any given
moment. The states of the tasks in a step then determine the state of the step: If all tasks are
Done, the step is Done. A task can be completed with constraint errors. If a task has an Error,
that step is in the Error state, and so on. Similarly, the states of the steps determine the state
of the session as a whole.
You can see the details of a session, step, or task by double-clicking it.
Oracle Data Integrator 11g: Integration and Administration 10 - 6
Copyright © 2012, Oracle and/or its affiliates. All rights reserved.
Sessions, Steps, Tasks: The Hierarchy
•Sessions are made up of:
–Steps: One interface
—
Tasks: One command
or statement
•A session, step, or task has
one state at any given moment.
•Double-click a session, step,
or task to display its details.
Oracle University and (Oracle Corporation) use only.
These eKit materials are to be used ONLY by you for the express purpose SELF STUDY. SHARING THE FILE IS STRICTLY PROHIBITED.
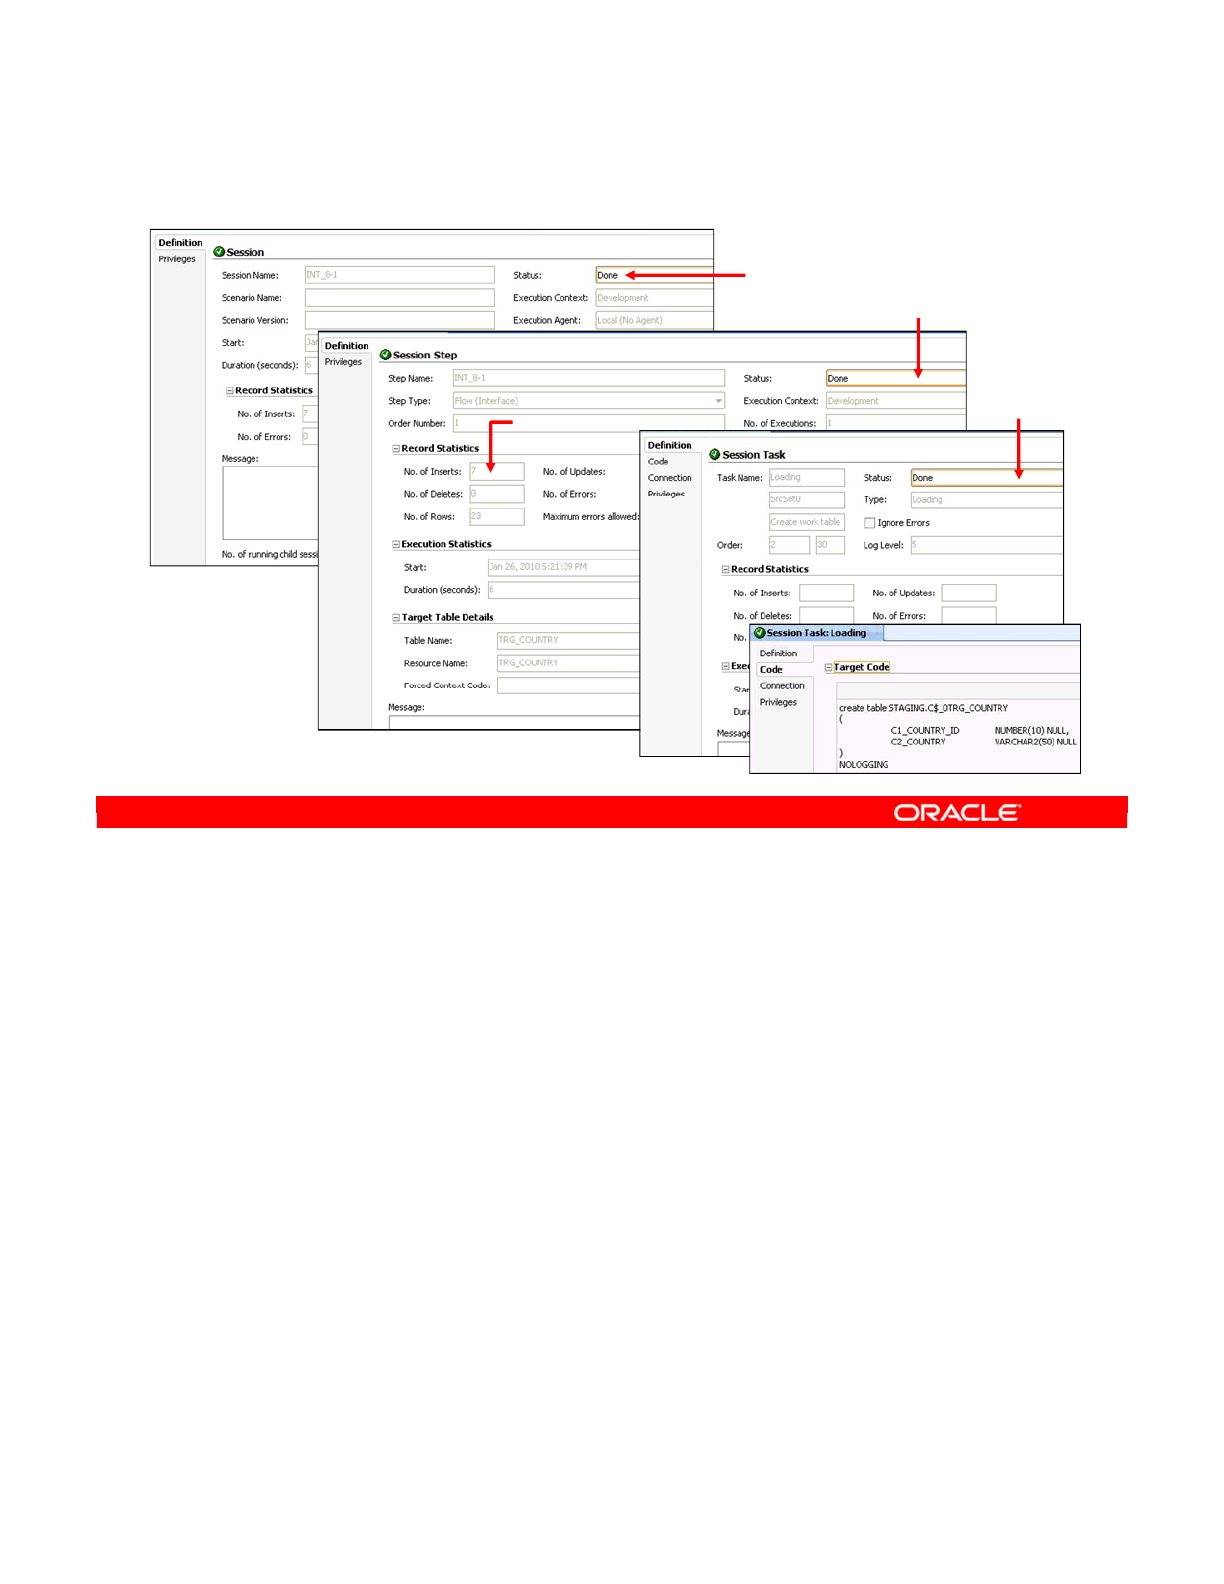
When you double-click a session step, you see its details. You can see and change the
session state on the Execution tab. You can put the session into the Waiting state to make it
run when you restart the session. You can also see any relevant error messages and the
number of rows processed so far.
When you double-click a session task, you see a similar window. On the Description tab, you
can see the actual code executed. This is very useful for diagnosing advanced problems.
Note: To prevent the repository from getting too large, you should regularly purge the log.
You can do this by clicking the Purge Log button in Operator Navigator. You can also purge
the log automatically by using the OdiPurgeLog tool.
Oracle Data Integrator 11g: Integration and Administration 10 - 7
Copyright © 2012, Oracle and/or its affiliates. All rights reserved.
Viewing Details of Sessions, Steps, and Tasks
Code executed
Status
state
Session
state
Task
state
# rows
processed
Error
msg.
Oracle University and (Oracle Corporation) use only.
These eKit materials are to be used ONLY by you for the express purpose SELF STUDY. SHARING THE FILE IS STRICTLY PROHIBITED.

You need to check the progress of an interface frequently. To do so, perform the following:
1. Find the session in which the interface was launched. As you know, you can sort the
sessions in many ways to achieve this. If there are not many sessions, it is often easiest
to use the All Sessions tree node. Then, the most recent session is at the top.
2. Then, double-click the session to view its properties.
3. If the state is not Error, look at the number of rows that have been processed. Consider
how many valid and erroneous rows you expected.
4. If the state is Error, or the number of rows processed is not what you expected, start
troubleshooting. This will be covered in the next few slides.
Oracle Data Integrator 11g: Integration and Administration 10 - 8
Copyright © 2012, Oracle and/or its affiliates. All rights reserved.
How to Monitor Execution of an Interface
1. In Operator Navigator, locate the interface session (by
name or date).
2. Check the session state.
3. If there is no error, check the number of processed rows in
the details.
4. If there is an error, start troubleshooting.
Oracle University and (Oracle Corporation) use only.
These eKit materials are to be used ONLY by you for the express purpose SELF STUDY. SHARING THE FILE IS STRICTLY PROHIBITED.
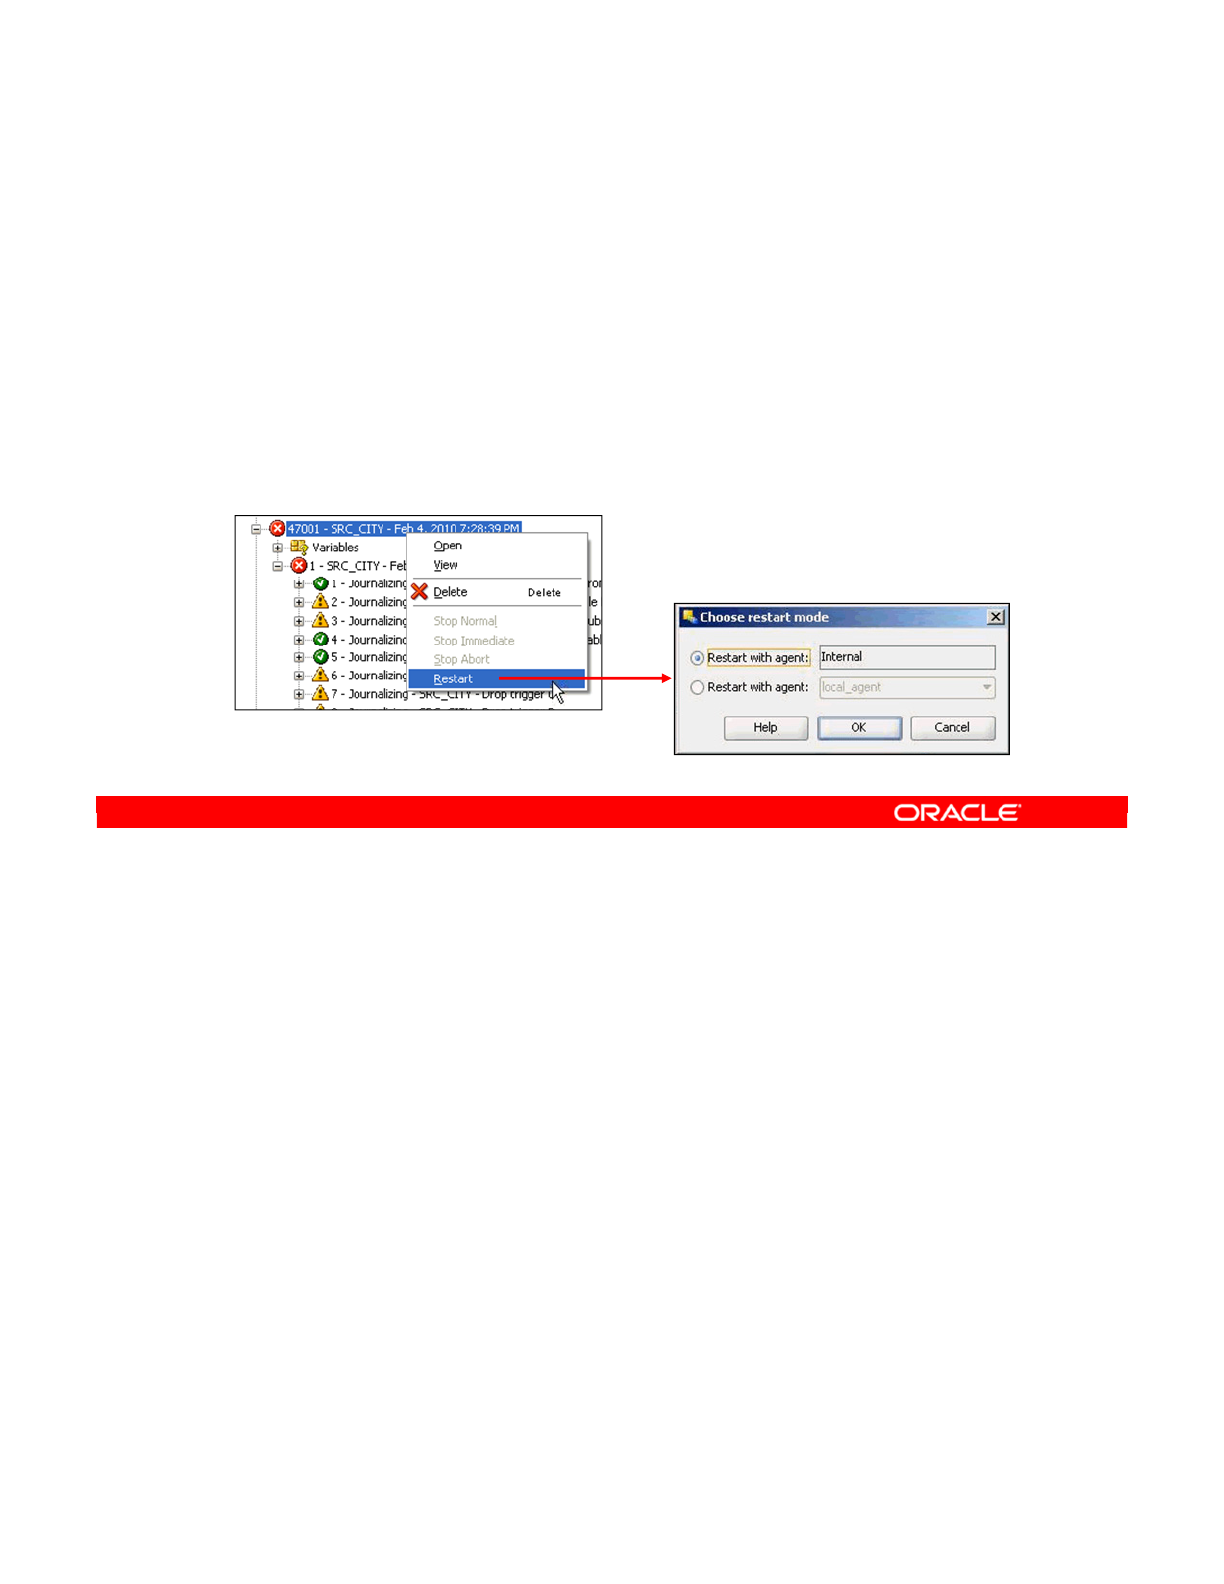
The general process is as follows:
1. Finding the error is usually straightforward. You open Operator Navigator, find the
session in error, the step in state Error, and finally the task in error.
2. Then you look at the code generated by ODI. To do this, double-click the task and click
the Description tab. The code is usually in SQL and is dependent on the knowledge
modules used by the interface.
3. Fixing the generated code often takes the most time. You must have a solid
understanding of how ODI works and how the relevant technologies work. You can
enter directly into the code box to make the changes. Click the Apply or OK button when
finished. Then, right-click the session and select Restart. Refresh the Session List to
check if your error has been resolved. If it has not been refreshed, you can keep making
further changes and restarting the session.
4. When you have fixed the error in the generated code, you should update the interface to
take the change into account. Otherwise, the next time you execute the interface, the old
code with the error is generated again.
The next four slides examine this four-step process in detail.
Oracle Data Integrator 11g: Integration and Administration 10 - 9
Copyright © 2012, Oracle and/or its affiliates. All rights reserved.
How to Troubleshoot a Session
1. Find the error.
2. Review the generated code.
3. Fix the generated code, then restart the session.
–Repeat as needed until there is no error.
4. Fix the interface.
Oracle University and (Oracle Corporation) use only.
These eKit materials are to be used ONLY by you for the express purpose SELF STUDY. SHARING THE FILE IS STRICTLY PROHIBITED.
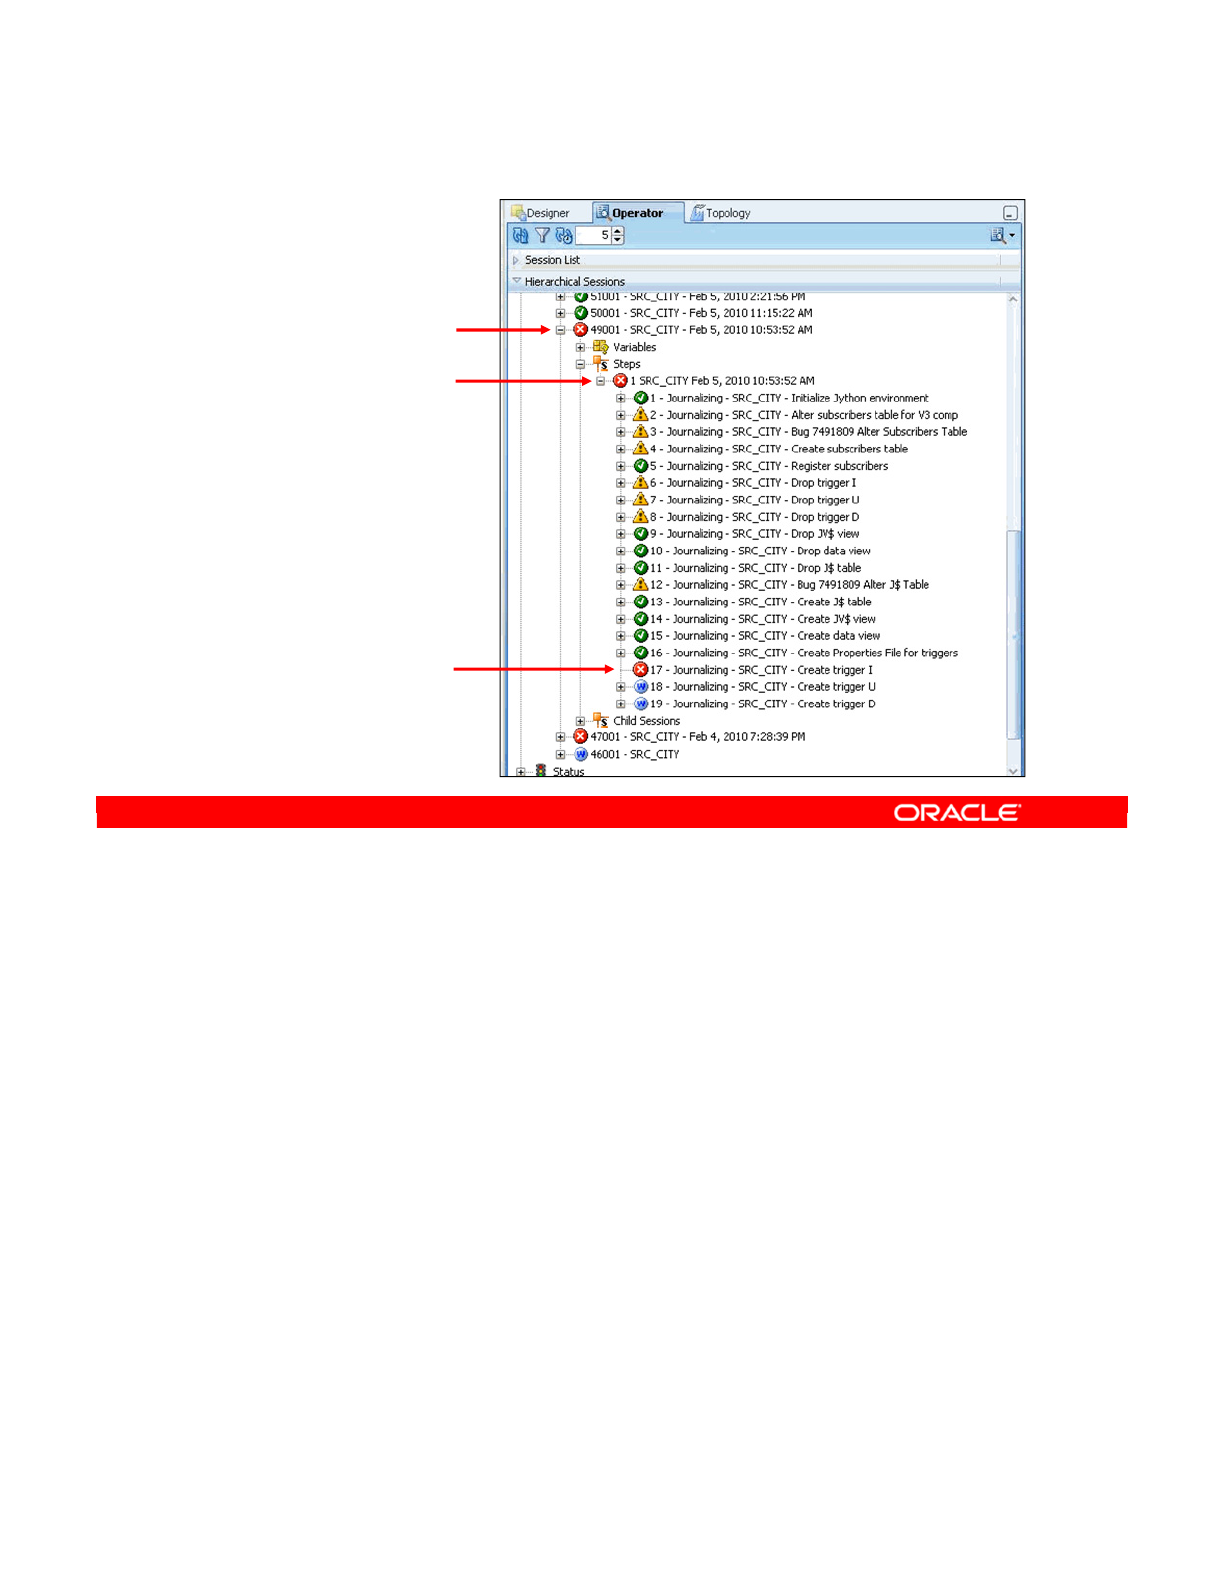
To find the error, you have to locate the task that has the error icon next to it. This task is
found in a step with an error icon. This step is found in the session that is in error.
Double-click the task to see the generated code.
Oracle Data Integrator 11g: Integration and Administration 10 - 10
Copyright © 2012, Oracle and/or its affiliates. All rights reserved.
1. Identifying the Error
Session in error
Step in error
Task in error: Double-click
Oracle University and (Oracle Corporation) use only.
These eKit materials are to be used ONLY by you for the express purpose SELF STUDY. SHARING THE FILE IS STRICTLY PROHIBITED.
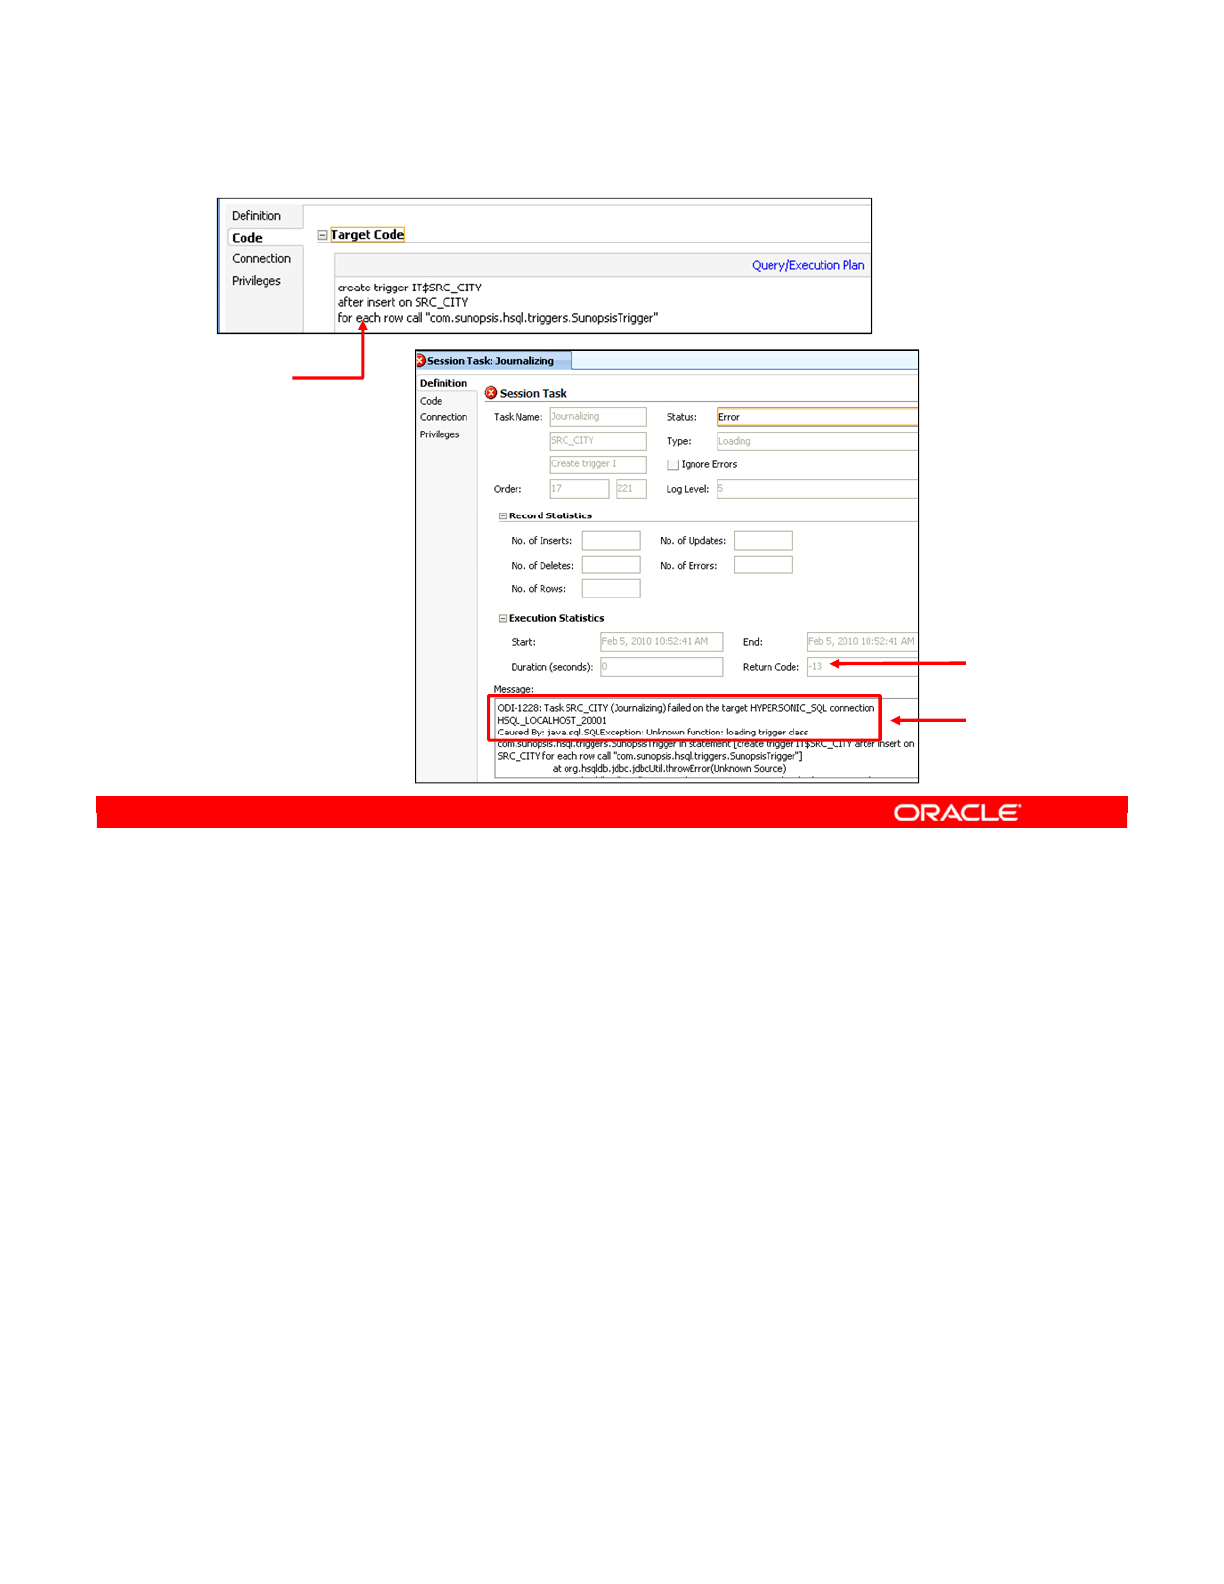
In the Task window, click the Code tab to see the generated code.
To see the results of the error, click the Definition tab. Double-check the Default Connection.
In most simple cases, it is the target server. Similarly, double-check the Loading Connection
to ensure that it corresponds to the correct source server. The Return Code shows the error
code generated, usually by the DBMS server. Finally, the error message itself is displayed.
The code and message are also visible in the step and session windows. You see what the
terms “Loading” and “Default” refer to shortly.
Oracle Data Integrator 11g: Integration and Administration 10 - 11
Copyright © 2012, Oracle and/or its affiliates. All rights reserved.
2. Reviewing the Code
Error code
Error
message
Generated
code
Oracle University and (Oracle Corporation) use only.
These eKit materials are to be used ONLY by you for the express purpose SELF STUDY. SHARING THE FILE IS STRICTLY PROHIBITED.

To fix the code and restart the session, perform the following:
1. Make a change to the code in the task window. You may want to copy and paste the
code into an external tool, such as SQL Plus, SQL Analyzer, or Squirrel. Squirrel is
provided with ODI.
2. Select the node corresponding to the session that this task belongs to. You can also
click the parent-level button on the toolbar twice to do this.
3. Right-click the session and select Restart. The session is now relaunched in the
background. The task that had the error is the first task to be executed.
Refresh the window to see the results.
Note: Data already loaded in staging tables can be used as part of the debugging process.
Oracle Data Integrator 11g: Integration and Administration 10 - 12
Copyright © 2012, Oracle and/or its affiliates. All rights reserved.
3. How to Fix the Code and Restart the Session
1. Edit the code in the task.
–You can copy and paste the code into an external SQL
analysis tool, if required.
2. Select the session node.
3. Right-click and select Restart.
–The session restarts.
Oracle University and (Oracle Corporation) use only.
These eKit materials are to be used ONLY by you for the express purpose SELF STUDY. SHARING THE FILE IS STRICTLY PROHIBITED.

Manually fixing the code can be useful for quickly getting your interface to work. However, if
you want to use this interface again later, you must update it to fix the original problem. If you
do not update the interface, when you execute your interface again, the same error is
generated as before.
Also, some errors cannot be fixed by editing the generated code. For example, you may have
the wrong choice of knowledge modules, execution location, or target or source data stores.
In these cases, you must fix the problem at the interface level.
Oracle Data Integrator 11g: Integration and Administration 10 - 13
Copyright © 2012, Oracle and/or its affiliates. All rights reserved.
4. Fixing the Interface
•Manually fixing the code is not always the solution.
•You may need to go back to the interface.
–Fixing code in the Operator has no impact on the interface.
–Corrections will have to be made to the interface in
Designer.
Oracle University and (Oracle Corporation) use only.
These eKit materials are to be used ONLY by you for the express purpose SELF STUDY. SHARING THE FILE IS STRICTLY PROHIBITED.

The generated code effectively has two halves. The part that is usually executed on the target
is referred to as the default connection. The code to create worktables and populate the target
tables appears here. Every command has code in this part. Some commands also take data
from a loading connection. The code to SELECT data from source tables appears here.
This means that the target part of a mapping always appears in an INSERT statement. The
source part appears in a SELECT statement.
Join conditions, such as SRC_ORDERS.CUST_ID=SRC_CUSTOMER.CUSTID, appear in the
WHERE clauses. Similarly, filters such as CUSTOMER.AGE > 20 appear in the WHERE clauses.
The rest of the code, including immediate steps such as creating worktables, is generated by
the knowledge modules used in the interface. The design of your interface determines how
this happens.
The information on the Connection tab is useful in showing the source/target connections
being used for that task.
Oracle Data Integrator 11g: Integration and Administration 10 - 14
Copyright © 2012, Oracle and/or its affiliates. All rights reserved.
Keys to Reviewing the Generated Code
•Code structure:
–The code always has at least one command on the output
(default) connection and sometimes on a Loading
connection, such as SELECT… INSERT.
•Mappings appear in the column lists for SELECT or
INSERT statements.
•Joins and filters appear in the WHERE clauses.
•SQL will be generated in the SELECT clause or WHERE
clause depending on the lookup type.
•The rest of the code is generated from the selected
knowledge modules and depends entirely on the interface
design.
Oracle University and (Oracle Corporation) use only.
These eKit materials are to be used ONLY by you for the express purpose SELF STUDY. SHARING THE FILE IS STRICTLY PROHIBITED.

Troubleshooting a Session
If a problem occurs with a session, you want to troubleshoot it. Troubleshooting a session
usually means finding the problem and modifying the generated code. You then check that
your change has fixed the problem, then update the original interface. Though this is not the
only method for troubleshooting, it is a good way of learning more about ODI. It is also more
efficient than constantly re-executing the interface.
Oracle Data Integrator 11g: Integration and Administration 10 - 15
Copyright © 2012, Oracle and/or its affiliates. All rights reserved.
Working with Errors
Oracle University and (Oracle Corporation) use only.
These eKit materials are to be used ONLY by you for the express purpose SELF STUDY. SHARING THE FILE IS STRICTLY PROHIBITED.

A variety of errors can occur, depending on the technologies, the knowledge modules, and
even the operating systems involved. However, knowing the symptoms of some common
errors helps you diagnose them. For example:
•A syntax error in a mapping, join, or filter means that the generated SQL code was not
valid. You may see “Column does not exist,” “Syntax error,” or something similar as the
error. The possible reasons are mistyped column names or invalid SQL entered as the
expression. Use the Check Expression button wherever possible to minimize these
errors.
•An incorrect execution location means making the wrong choice of Source, Target, or
Staging Area in the interface window. The result may be a valid SQL clause that cannot
be executed, as it is on the wrong server. The result can be subtler: poor performance if
code intended for a powerful server is executed on a desktop machine.
•Selecting an incorrect execution context means, for example, executing an interface in
the “production” environment instead of the “development” environment. The symptoms
include errors about not being able to reach certain data servers, or tables, files, or
resources on those servers.
Oracle Data Integrator 11g: Integration and Administration 10 - 16
Copyright © 2012, Oracle and/or its affiliates. All rights reserved.
Common Errors and Symptoms
•Syntax error in mapping, join, or filter:
–Obvious error appears in a SELECT/INSERT or WHERE
clause
–“Column does not exist”
–“Syntax error”
•Incorrect execution location for mapping, join, or filter:
–A valid clause cannot be executed.
–A clause is located at the wrong place (source/target), or
needs to be performed in another command to work
properly.
•Incorrect execution context or incorrect agent chosen:
–Data servers unreachable (table/files/resources do not exist)
–“Table not found”
•Incorrect KM chosen:
–The statements are entirely irrelevant for the situation or
have an inappropriate syntax for the technology.
Oracle University and (Oracle Corporation) use only.
These eKit materials are to be used ONLY by you for the express purpose SELF STUDY. SHARING THE FILE IS STRICTLY PROHIBITED.

•You may also have chosen an incorrect KM in the interface window. This can cause
statements irrelevant to your situation to be generated. Also, syntax inappropriate for the
technology may be generated. For example, if you selected a Java Message Service
(JMS) KM to populate a data store on an Oracle server, you end up with bad syntax. ODI
cannot always prevent this type of mistake. For best results, start with the “Generic SQL”
KMs in any new environment because they are designed to work on any server. After your
interface works, you may want to use a more specialized KM for performance.
Oracle Data Integrator 11g: Integration and Administration 10 - 17
Oracle University and (Oracle Corporation) use only.
These eKit materials are to be used ONLY by you for the express purpose SELF STUDY. SHARING THE FILE IS STRICTLY PROHIBITED.
When you see a “Java exception,” it is usually not an error in ODI. Read the text of the error
message first to see whether a problem in your interface caused the error. In many cases, the
error actually comes from a database server. It may be as simple as a violation of an integrity
constraint, caused by duplicate rows.
Oracle Data Integrator 11g: Integration and Administration 10 - 18
Copyright © 2012, Oracle and/or its affiliates. All rights reserved.
Important Note
Java exceptions are not always ODI errors.
•Example:
-28 : S0022 : java.sql.SQLException:
Column not found: C1_REGION_ID in statement
[select SRC_REGION.REGION_ID + C1_REGION_ID,
SRC_REGION.COUNTRY_ID C2_COUNTRY_ID,
SRC_REGION.REGION C3_REGION
from SRC_REGION SRC_REGION where (1=1)]
Oracle University and (Oracle Corporation) use only.
These eKit materials are to be used ONLY by you for the express purpose SELF STUDY. SHARING THE FILE IS STRICTLY PROHIBITED.

Some tips for reducing errors are as follows:
•For best results, use the Expression Editor to write expressions for joins, filters, and
mappings. This ensures that the column names and database functions you use exist in
the technology.
•Before you execute an interface, double-check your joins and mappings. Ensure that
your knowledge modules are correct. It is faster to detect the error before executing than
checking for the result in Operator.
•Click the Error button at the top of the interface window frequently. This informs you
about any obvious errors in your diagram.
•When the configuration of your interface enables it, use the Check Expression button to
check that your SQL is valid.
•Similarly, test your joins and filters by right-clicking and selecting Data. This is helpful.
•Changing the execution location of mappings, filters, or joins can have a big impact on
the generated code. Be very cautious until you understand the consequences. The
same applies to changing the knowledge modules used.
•The best practice is to use ODI’s built-in data quality tools. For example, apply a static
control to source data and flow control for the reverse.
Oracle Data Integrator 11g: Integration and Administration 10 - 19
Copyright © 2012, Oracle and/or its affiliates. All rights reserved.
Tips for Preventing Errors
•Use the Expression Editor.
•Review your interfaces before execution.
•Use the Error button on the interfaces.
•Check the syntax of mappings, filter, and joins, if possible.
•Test your joins and filters from the diagram, if possible.
•Do not change the execution location of mappings, filters,
joins, or the selected KMs, unless you know the impact of
the change.
•Use Static Control and Flow Control for data quality.
Oracle University and (Oracle Corporation) use only.
These eKit materials are to be used ONLY by you for the express purpose SELF STUDY. SHARING THE FILE IS STRICTLY PROHIBITED.
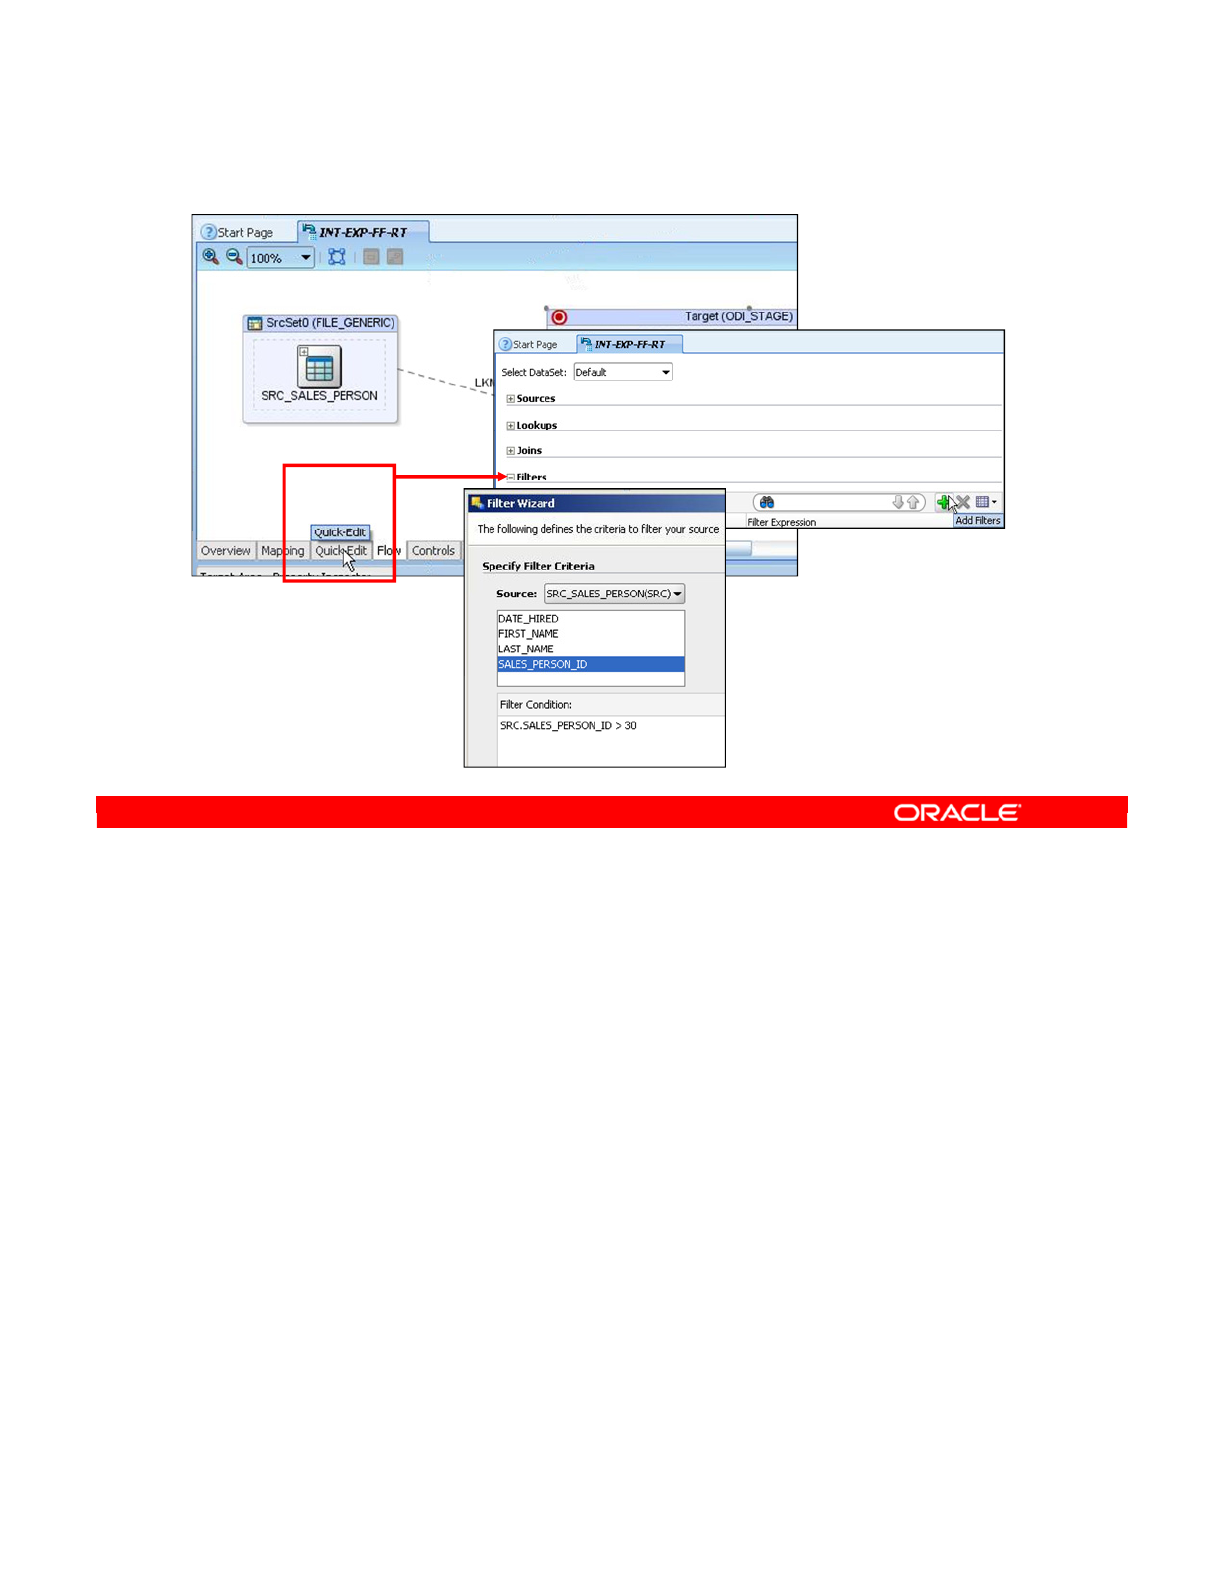
You can use the Quick-Edit Editor to perform the same actions as on the Mapping tab of the
Interface Editor, in a nongraphical form:
•Adding and Removing a Component
•Editing a Component
•Adding, Removing, and Configuring Datasets
•Changing the Target DataStore
The properties of the following components are displayed in tabular form and can be edited in
the Quick-Edit Editor:
•Sources
•Lookups
•Joins
•Filters
•Mappings
Note that components already defined on the Mapping tab of the Interface Editor are
displayed in the Quick-Edit Editor and that the components defined in the Quick-Edit Editor
will also be reflected in the Mapping tab. In this example, the Quick Editor is used to enable
filtering rows with Sales_Person_ID > 30.
Oracle Data Integrator 11g: Integration and Administration 10 - 20
Copyright © 2012, Oracle and/or its affiliates. All rights reserved.
Using Quick-Edit Editor
Oracle University and (Oracle Corporation) use only.
These eKit materials are to be used ONLY by you for the express purpose SELF STUDY. SHARING THE FILE IS STRICTLY PROHIBITED.

Answer: b
Explanation: Some errors cannot be fixed by editing the generated code. For example, you
may have the wrong choice of knowledge modules, execution location, or target or source
datastores. In these cases, you must fix the problem at the interface level.
Oracle Data Integrator 11g: Integration and Administration 10 - 21
Copyright © 2012, Oracle and/or its affiliates. All rights reserved.
Quiz
You can always fix the error by correcting the code manually.
a. True
b. False
Oracle University and (Oracle Corporation) use only.
These eKit materials are to be used ONLY by you for the express purpose SELF STUDY. SHARING THE FILE IS STRICTLY PROHIBITED.

Answer: d
Explanation: An incorrect execution location means making the wrong choice of Source,
Target, or Staging Area in the interface window. The result may be a valid SQL clause that
cannot be executed because it is on the wrong server. The result can be subtle: poor
performance if the code intended for a powerful server is executed on a desktop machine.
Oracle Data Integrator 11g: Integration and Administration 10 - 22
Copyright © 2012, Oracle and/or its affiliates. All rights reserved.
Quiz
Which of the following is the symptom of a wrong choice of the
execution location?
a. Errors about not being able to reach certain data servers,
or tables, files, or resources on those servers
b. Out of memory statements have been generated
c. “Column does not exist” or “Syntax error” errors
d. A valid SQL clause that cannot be executed because it is
on the wrong server, or poor performance if the code
intended for a powerful server is executed on a desktop
machine
Oracle University and (Oracle Corporation) use only.
These eKit materials are to be used ONLY by you for the express purpose SELF STUDY. SHARING THE FILE IS STRICTLY PROHIBITED.

Oracle Data Integrator 11g: Integration and Administration 10 - 23
Copyright © 2012, Oracle and/or its affiliates. All rights reserved.
Summary
In this lesson, you should have learned how to:
•Describe what happens at run time
•Monitor the execution of interfaces
•Troubleshoot run-time errors in interfaces
•Prevent errors by following the best practices when
designing the interface
Oracle University and (Oracle Corporation) use only.
These eKit materials are to be used ONLY by you for the express purpose SELF STUDY. SHARING THE FILE IS STRICTLY PROHIBITED.

Oracle Data Integrator 11g: Integration and Administration 10 - 24
Copyright © 2012, Oracle and/or its affiliates. All rights reserved.
Checklist of Practice Activities
1-1: Logging In and Using Help
2-1: Creating Users and Repositories and Logging In
3-1: Creating an ODI Agent for Orchestrating Execution of ODI Objects
4-1: Defining the Topology
5-1: Setting Up a New ODI Project
6-1: Creating a Model
7-1: Checking Data Quality in the Model
8-1: ODI Interface: Simple Transformations
9-1: ODI Interface: Complex Transformations
9-2: ODI Interface: Implementing Lookup
10-1: ODI Interface: Exporting a Flat File to a Relational Table
11-1: Using Native Sequences with ODI Interface
11-2: Using Temporary Indexes
11-3: Using Data Sets with ODI Interface
12-1: Using Temporary ODI Interfaces
12-2: Developing a New Knowledge Module
13-1: Creating an ODI Procedure
14-1: Creating an ODI Package
14-2: Using ODI Package with Variables and User Functions
15-1: Creating and Scheduling an ODI Scenario
16-1: Using Load Plans
17-1: Working with ODI Versions
18-1: Enforcing Data Quality with ODI Interface
19-1: Implementing Changed Data Capture
20-1: Setting Up ODI Security
20-2: Integrating with Enterprise Manager and Using ODI Console
21-1: Executing an ODI Scenario Through the ODI Public Web Service
Oracle University and (Oracle Corporation) use only.
These eKit materials are to be used ONLY by you for the express purpose SELF STUDY. SHARING THE FILE IS STRICTLY PROHIBITED.

In this practice, you first use Topology Navigator to define physical and logical schemas for a
flat file source.
You then use Designer Navigator to create a project within which you define a flat file source
model. In the model, you create the SRC_SALES_PERSON data store that points to a
SRC_SALES_PERSON.TXT text file. You perform reverse-engineering to derive formatting
information (fixed length positions and data types) from the text file.
Next you use SQL Developer to create the ODI_STAGE schema and TRG_SALES_PERSON
table in the RDBMS. (This schema and table will host the ODI target data store in a target
model that you will define next in ODI.)
You then return to Topology Navigator to define the ODI_STAGE data server, physical
schema, and logical schema for the relational target.
You then return to Designer Navigator to create the target model Oracle_RDMBS1.You
reverse-engineer the model and check the populated TRG_SALES_PERSON table that you
created earlier in the RDBMS.
Finally, you create a new ODI interface to perform the source flat file to target RDBMS table
data population.
Oracle Data Integrator 11g: Integration and Administration 10 - 25
Copyright © 2012, Oracle and/or its affiliates. All rights reserved.
Practice 10-1: Overview
Exporting a Flat File to a Relational Table
1. In Topology Navigator, define FILE_GENERIC.C:\labs\Files\Flat_files
physical schema.
2. In Topology Navigator, define FLAT_FILES_SRC logical schema.
3. In Designer Navigator, create the Export-FF-RT project.
4. In Designer Navigator, create the Flat File1 source model.
a. Create SRC_SALES_PERSON data store
b. Point to resource: C:\labs\Files\Flat_files\SRC_SALES_PERSON.TXT
c. Reverse-engineer and format the data (fixed length positions, data types).
5. In SQL Developer, create the RDBMS schema ODI_STAGE to host
the ODI target data store.
6. In SQL Developer, create the TRG_SALES_PERSON table to serve as
ODI data store for the target model.
7. In Topology Navigator, create the ODI target data server ODI_STAGE,
physical schema ODI_STAGE, and logical schema ODI_STAGE.
8. In Designer Navigator, create the ODI target model Oracle_RDBMS1.
9. Reverse-engineer the model and
check the populated
TRG_SALES_PERSON
data store table.
10. Create a new ODI interface to
perform flat file to RDBMS table
transformation.
Oracle University and (Oracle Corporation) use only.
These eKit materials are to be used ONLY by you for the express purpose SELF STUDY. SHARING THE FILE IS STRICTLY PROHIBITED.

Oracle University and (Oracle Corporation) use only.
These eKit materials are to be used ONLY by you for the express purpose SELF STUDY. SHARING THE FILE IS STRICTLY PROHIBITED.

Copyright © 2012, Oracle and/or its affiliates. All rights reserved.
Designing Interfaces: Advanced Topics 1
Oracle University and (Oracle Corporation) use only.
These eKit materials are to be used ONLY by you for the express purpose SELF STUDY. SHARING THE FILE IS STRICTLY PROHIBITED.

Oracle Data Integrator 11g: Integration and Administration 11 - 2
Copyright © 2012, Oracle and/or its affiliates. All rights reserved.
Objectives
After completing this lesson, you should be able to:
•Use business rules, variables, and set-based operators
with ODI Interfaces
•Use data sets and sequences, including native sequences,
with ODI Interfaces
Oracle University and (Oracle Corporation) use only.
These eKit materials are to be used ONLY by you for the express purpose SELF STUDY. SHARING THE FILE IS STRICTLY PROHIBITED.

Overview
In this section, you get a quick overview of the various types of business rules that can be
implemented in Oracle Data Integrator (ODI). These rules will be covered in greater detail
subsequently.
Oracle Data Integrator 11g: Integration and Administration 11 - 3
Copyright © 2012, Oracle and/or its affiliates. All rights reserved.
Working with
Business Rules
Oracle University and (Oracle Corporation) use only.
These eKit materials are to be used ONLY by you for the express purpose SELF STUDY. SHARING THE FILE IS STRICTLY PROHIBITED.

Three main types of business rules can be defined in interfaces:
•Mappings define the way in which one or more source columns are combined and
transformed to produce a value for a target column.
•A filter reduces the amount of data incorporated into the interface by specifying a rule
that must be satisfied by each line.
•Joins link several source data stores by specifying how one data store relates to one or
more data stores.
Each of these business rules is expressed as SQL code that is dependent on the given
technology. This SQL code can then use other types of ODI objects.
Variables and sequences are two ways of storing individual values that can be used by your
interface. The difference is that sequences must be numeric and are automatically
incremented each time they are accessed.
User-defined functions enable you to encapsulate commonly used functionality in a macro.
Substitution methods are defined in the Sunopsis API. They provide the functionality, such as
accessing names of tables or columns, session information, or even generating complete
SQL statements.
Oracle Data Integrator 11g: Integration and Administration 11 - 4
Copyright © 2012, Oracle and/or its affiliates. All rights reserved.
Business Rules in Interfaces
•The following business rules are defined in interfaces:
–Mappings
–Filters
–Joins
•ODI provides the following additional objects:
–Variables and sequences
–User-defined functions
–Substitution methods
Oracle University and (Oracle Corporation) use only.
These eKit materials are to be used ONLY by you for the express purpose SELF STUDY. SHARING THE FILE IS STRICTLY PROHIBITED.
Mappings may include any type of clause allowed in SQL languages:
•Constant string values should be enclosed within quotation marks. This is generally not
necessary for numbers.
•Source columns should be prefixed with the data store alias. For best results, use the
Expression Editor to drag source columns.
•All database functions provided by the DBMS running the interface’s generated code
can be used in the mapping. This includes aggregate functions, such as MIN, MAX, or
Average. For these functions, ODI automatically manages the generation of GROUP BY
clauses.
•Any combination of constants, columns, DBMS, or aggregate functions is allowed in
mapping.
Oracle Data Integrator 11g: Integration and Administration 11 - 5
Copyright © 2012, Oracle and/or its affiliates. All rights reserved.
Business Rule Elements
The following types of clauses are available to implement
business rules:
Value
String values should be enclosed with quotation marks:
‘USA’, ‘1 Jan 2000’. Numbers do not need quotation marks: 10
Source Column
Drag a column or use the Expression Editor. It is prefixed with the
datastore alias.
DBMS Function
Use the Expression Editor for the list of allowed functions and
operators.
DBMS Aggregate MAX()
,
MIN()
, and so on. ODI automatically generates the
GROUP
BY
clause.
Combination
Any combination of clauses is allowed:
SRC_SALES_PERSON.FIRST_NAME || ' ' ||
UPPER(SRC_SALES_PERSON.LAST_NAME)
Oracle University and (Oracle Corporation) use only.
These eKit materials are to be used ONLY by you for the express purpose SELF STUDY. SHARING THE FILE IS STRICTLY PROHIBITED.
The elements are common to almost all database engines in one form or the other. However,
a number of elements are specific to ODI. These are the focus of this lesson.
•You can refer to the current value of a variable by inserting its name preceded by the
number sign. You will also see the use of binding mode.
•Sequences are used in a similar way, with the name preceded by the number sign or
colon.
•The only difference between user functions and DBMS functions is that user functions
are substituted by native database code at run time.
Oracle Data Integrator 11g: Integration and Administration 11 - 6
Copyright © 2012, Oracle and/or its affiliates. All rights reserved.
More Elements
Other ODI-specific elements include:
Variables
They may be specified either in substitution mode #<variable> or in
binding mode :<variable>.
Sequences
They may be specified in either substitution mode #<sequence> or in
binding mode :<sequence>.
User functions
They are used in the same way as DBMS functions, but replaced at
code generation by their implementation.
Oracle University and (Oracle Corporation) use only.
These eKit materials are to be used ONLY by you for the express purpose SELF STUDY. SHARING THE FILE IS STRICTLY PROHIBITED.
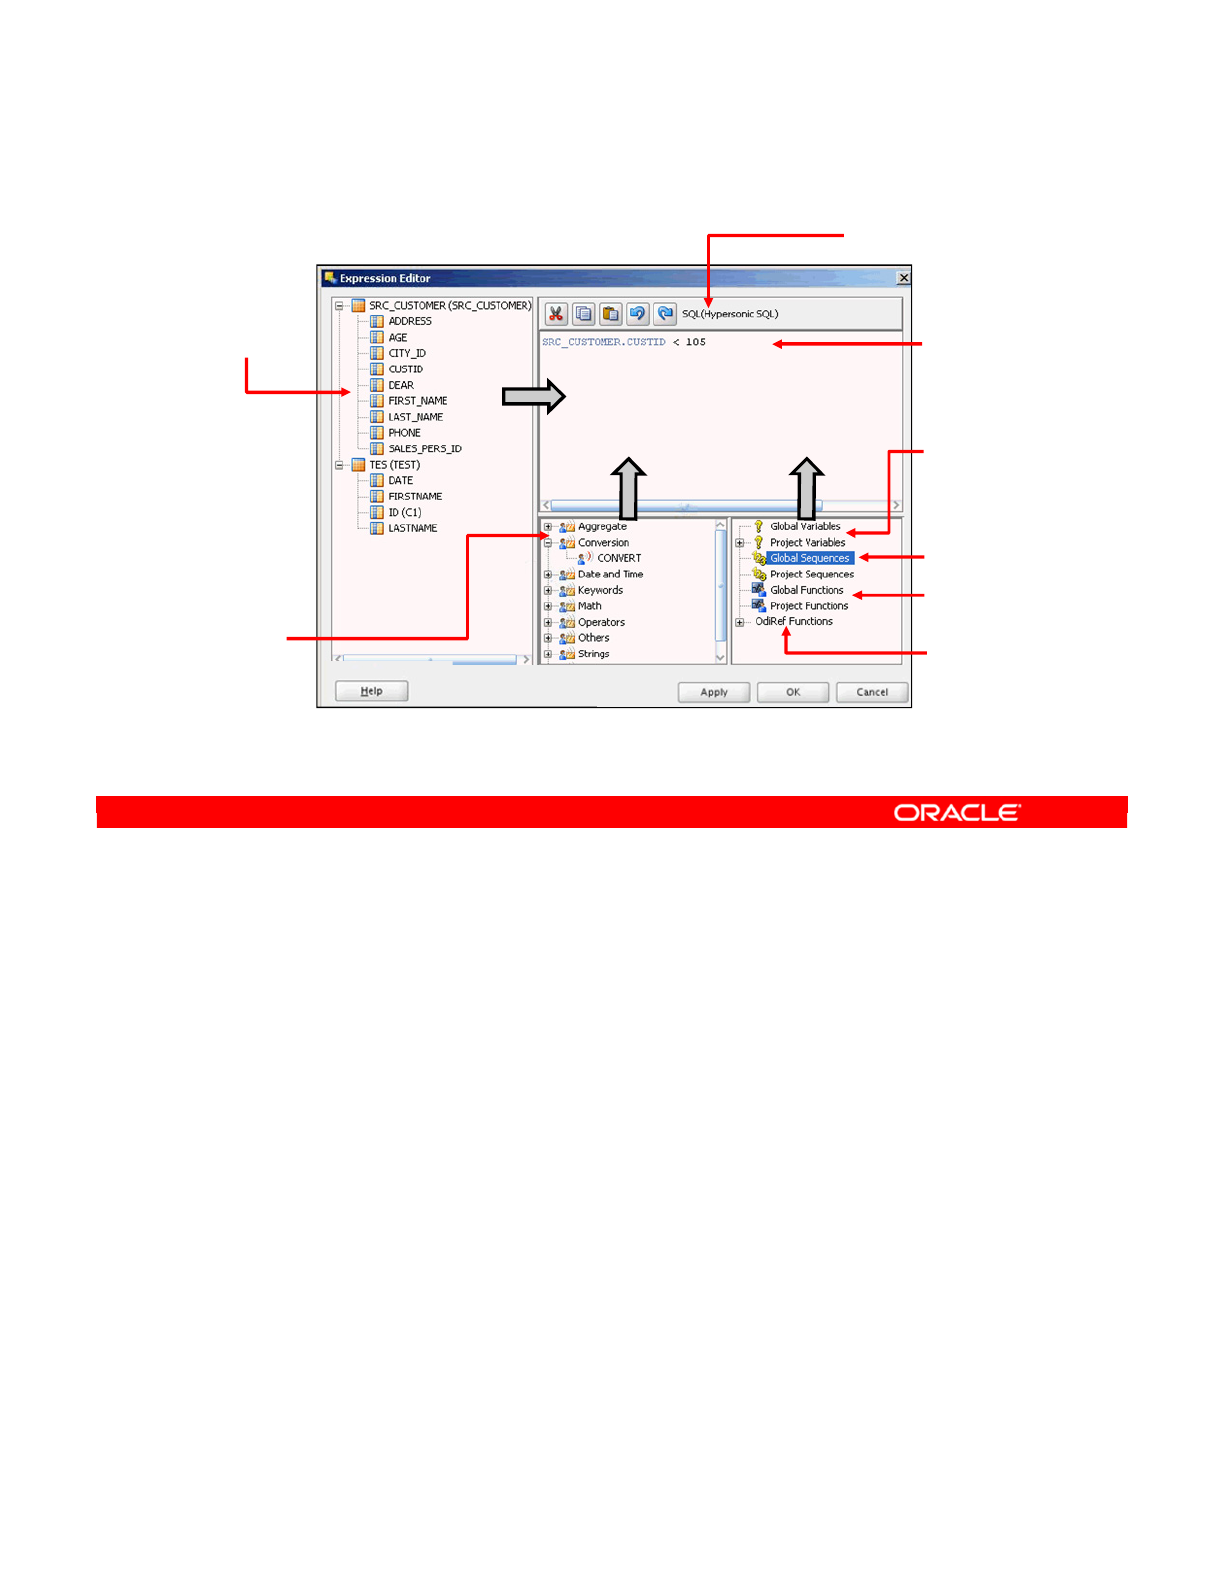
The area at the top right is where you can edit the code for your expression. Your code is
colored according to the syntax of the technology. Recognized database functions, ODI
objects, models, or columns are highlighted specially. Thus, if you make a mistake, you know
it immediately because of the absence of highlighting.
Above the code box is the toolbar. This contains the normal cut, copy, paste, undo, and redo
tools. However, the toolbar also displays the relevant language and technology. This is very
important because many of the elements shown depend on this technology. You must also
ensure that the code you write is valid for the syntax of the language it is in.
The pane at the left contains all source data stores and columns that are used in an interface.
When you drag a column name into the code box, it is automatically prefixed with the alias of
the data store. When the Expression Editor is launched outside an interface, this pane is
empty.
The language elements pane at the bottom contains a list of all the database functions that
are known to be supported for this technology. When you drag these functions into the code
box, the correct number of arguments is automatically written.
Oracle Data Integrator 11g: Integration and Administration 11 - 7
Copyright © 2012, Oracle and/or its affiliates. All rights reserved.
The Expression Editor
Drag items into the Code box or double-click them.
Tool bar
Cut, Copy, Paste, Undo, Redo
Indicates the language in use
and the relevant technology
Code
Implementation
of the business
rule
Variables
Project and global
Sequences
Project and global
User functions
Project and global
Substitution
methods
odiRef API
Language
elements
Database
functions
available for the
given technology
Source
datastores
Columns are
automatically
prefixed with
table aliases.
Oracle University and (Oracle Corporation) use only.
These eKit materials are to be used ONLY by you for the express purpose SELF STUDY. SHARING THE FILE IS STRICTLY PROHIBITED.

At the bottom right, all the available ODI objects are displayed, including variables,
sequences, and user functions. These objects are all grouped separately according to scope.
The substitution methods available through the odiRef API are similarly visible.
Remember that you can drag all these items into the code box to quickly build an expression.
You can also double-click items to add them to the current location in the edit box.
Note: Use the Expression Editor wherever possible to avoid making common mistakes in
your code. It is particularly useful in complex mappings. You may forget to include the alias of
a data store, attempt to use a database function that does not exist on the chosen technology,
or attempt to use a user function that has not been defined on this technology. The
Expression Editor helps avoid these kinds of mistakes.
Oracle Data Integrator 11g: Integration and Administration 11 - 8
Oracle University and (Oracle Corporation) use only.
These eKit materials are to be used ONLY by you for the express purpose SELF STUDY. SHARING THE FILE IS STRICTLY PROHIBITED.

A variable holds a specific value that can be inserted into your code at run time.
Note: This lesson does not have a hands-on practice using variables. A hands-on practice
using variables will be performed in Lesson 14, in which you will use variables in packages.
Oracle Data Integrator 11g: Integration and Administration 11 - 9
Copyright © 2012, Oracle and/or its affiliates. All rights reserved.
Using Variables
Oracle University and (Oracle Corporation) use only.
These eKit materials are to be used ONLY by you for the express purpose SELF STUDY. SHARING THE FILE IS STRICTLY PROHIBITED.

Accessing the value of a variable in SQL expressions can be useful. To do this, you must
prefix the name of the variable.
•For global variables, use the word GLOBAL, followed by a period, followed by the name
of the variable.
•For project variables, use the project code, followed by a period, followed by the name
of the variable. You see the project code for a given project by double-clicking the
project in the Projects window.
For best practice, use the Expression Editor by clicking the icon next to every expression box.
The Expression Editor automatically adds the correct prefix for a given variable. Select the
name of the variable from the Global Variables or Projects Variables trees in the Expression
Editor.
Oracle Data Integrator 11g: Integration and Administration 11 - 10
Copyright © 2012, Oracle and/or its affiliates. All rights reserved.
Using a Variable in Code
•A variable is prefixed according to its scope:
–Global variable: GLOBAL.<variable_name>
–Project variable: <project_code>.<variable_name>
•Tip: Use the Expression Editor to avoid mistakes in the
names of variables.
•Variables are used either by string substitution or by
parameter binding.
–Substitution: #<project_code or GLOBAL>.<variable_name>
–Binding: :<project_code or GLOBAL>.<variable_name>
Oracle University and (Oracle Corporation) use only.
These eKit materials are to be used ONLY by you for the express purpose SELF STUDY. SHARING THE FILE IS STRICTLY PROHIBITED.

There are two different ways in which the value of the variable can be incorporated into the code
that is executed by the server.
•String substitution is the simplest, and usually, the preferable way. It works for all
technologies. ODI replaces the text that refers to the variable with the actual value and
sends it to the server.
•However, there is another method, called parameter binding. This method works only for
SQL commands sent to databases. In this method, ODI sends only the statement, and
then the parameters.
Wherever the name of the variable is used, you must prefix it with a symbol that specifies the
method of use. For string substitution, prefix a number sign to the project code or the word
GLOBAL. To use parameter binding, prefix a colon instead.
Oracle Data Integrator 11g: Integration and Administration 11 - 11
Oracle University and (Oracle Corporation) use only.
These eKit materials are to be used ONLY by you for the express purpose SELF STUDY. SHARING THE FILE IS STRICTLY PROHIBITED.
The string substitution method works in every situation and is very often the correct choice.
Because the variable name is replaced by its value, you must generally enclose nonnumeric
values within single quotation marks. However, do not use quotation marks with numeric
values. In general, you should always think about what makes sense for the language of the
technology. For example, if your variable contains a single quotation mark and you enclose
the variable name within single quotation marks, you probably break the syntax rules for the
language.
The parameter binding method, however, is sometimes useful. It can be used only for clauses
written in SQL. That is, it cannot be used in files, the Lightweight Directory Access Protocol
(LDAP) directories, and so on. However, it can avoid certain problems encountered in SQL
when values contain single quotation marks, which can conflict with the syntax of strings. This
method forces the database server to prepare an execution plan without the actual value. This
is generally less efficient than sending the complete statement.
However, if the same statement is to be sent many times, the DBMS may be able to optimize
the performance of the statement. In this case, it may be more efficient than text substitution.
The best practice is to avoid using parameter binding until you are familiar with the two
methods.
Oracle Data Integrator 11g: Integration and Administration 11 - 12
Copyright © 2012, Oracle and/or its affiliates. All rights reserved.
Binding Versus Substitution
•Substitution:
–Is correct in most cases
–The variable is replaced by its value before execution.
—
You must use single quotation marks for nonnumeric values.
SELECT * FROM MYTABLE WHERE NAME LIKE
‘#GLOBAL.PATTERN’
•Binding:
–Works only for SQL clauses
–The statement is prepared in the DBMS without the value,
then the value is sent for processing.
–It may be used for DBMSs that optimize repeated statements
with different parameter values.
Oracle University and (Oracle Corporation) use only.
These eKit materials are to be used ONLY by you for the express purpose SELF STUDY. SHARING THE FILE IS STRICTLY PROHIBITED.

Note that the names of variables are case-sensitive. That is, uppercase and lowercase letters
are distinguished. You may want to establish a convention, such as always using uppercase
letters when declaring and using variable names.
Oracle Data Integrator 11g: Integration and Administration 11 - 13
Copyright © 2012, Oracle and/or its affiliates. All rights reserved.
Note: Case Sensitivity
•Variable names are case-sensitive.
•For example, YEAR, Year, and year are three different
variables.
Oracle University and (Oracle Corporation) use only.
These eKit materials are to be used ONLY by you for the express purpose SELF STUDY. SHARING THE FILE IS STRICTLY PROHIBITED.
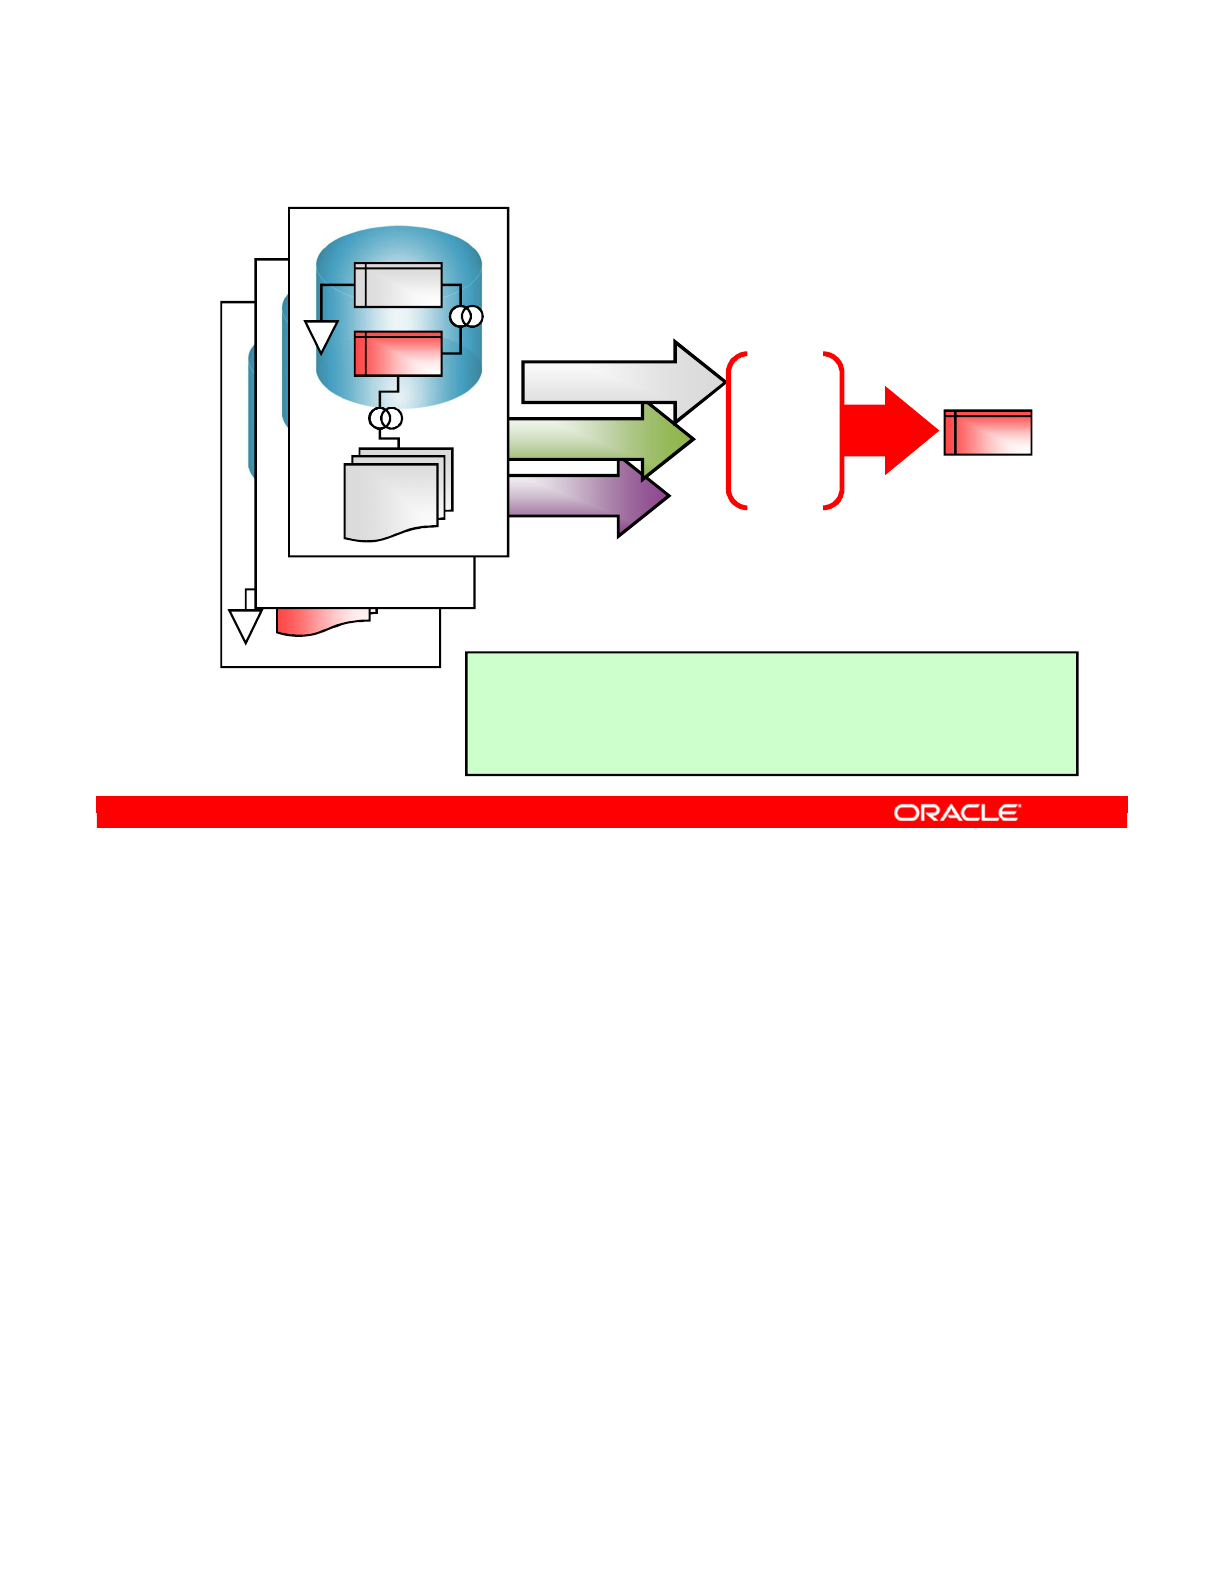
A data set represents the data flow coming from a group of joined and filtered source data
stores. Each data set includes the target mappings for this group of sources. Several data
sets can be merged into the interface target data store by using set-based operators such as
Union and Intersect. The support for data sets, as well as the set-based operators supported,
depends on the capabilities of the staging area’s technology.
Benefits of using data sets:
•Accelerates the interface design
•Reduces the number of interfaces needed to merge several data flows into the same
target data store
Oracle Data Integrator 11g: Integration and Administration 11 - 14
Copyright © 2012, Oracle and/or its affiliates. All rights reserved.
Data Sets and Set-Based Operators
SALES
ORDERS1
LINES
CORRECTIONS
File
ORDERS2
LINES
MYORD03
LINES
CORRECTIONS
File2
UNION
INTERSECT
MINUS
•Merge several data flows into one
target
•Mappings and diagrams are per
data flow
Faster design
Better performance
•Union vs. incremental update
•A data set represents the data flow that comes from a group of joined and
filtered source datastores.
•Each data set includes the target mappings for this group of sources.
•Several data sets can be merged into the interface target datastore by
using set-based operators such as Union and Intersect.
Oracle University and (Oracle Corporation) use only.
These eKit materials are to be used ONLY by you for the express purpose SELF STUDY. SHARING THE FILE IS STRICTLY PROHIBITED.

This use of data sets accelerates the interface design and reduces the number of interfaces
needed to merge several data flows into the same target data store.
You can add, remove, and order the data sets of an interface and define the operators
between them in the DataSets Configuration dialog box. Note that the set-based operators
are always executed on the staging area.
When designing the integration interface, the mappings for each data set must be consistent.
This means that each data set must have the same number of target columns mapped.
Oracle Data Integrator 11g: Integration and Administration 11 - 15
Copyright © 2012, Oracle and/or its affiliates. All rights reserved.
Flow with Multiple Data Sets
DataSet1 –Lines
DataSet0 - Orders
SS_0 (1): MSSQL_CRM
COUNTRY
CUSTOMER
REGION
ORDERS
Staging: MEMORY_ENGINE
-
-
SS_1 (2): DB2_HSCM
-
CITY
ORDER_LINES
CURRENCY
PRODUCTS
PERSON
C$ (SS0)
C$ (SS1)
EMPLOYEE
-
LKM SQL to
Oracle
(LOAD)
LKM DB2 to Oracle
(LOAD)
IKM SQL to SQL
Append
SS_2 (3): DB2_HSCM
-
BOOKINGS
PRODUCTS
DataSet2 - Bookings
C$ (SS0)
EMPLOYEE
LKM DB2 to
Oracle
(LOAD)
UNION ALL
-
-
MINUS
Target: ORACLE_SERVER1
SALES_FACT
Oracle University and (Oracle Corporation) use only.
These eKit materials are to be used ONLY by you for the express purpose SELF STUDY. SHARING THE FILE IS STRICTLY PROHIBITED.
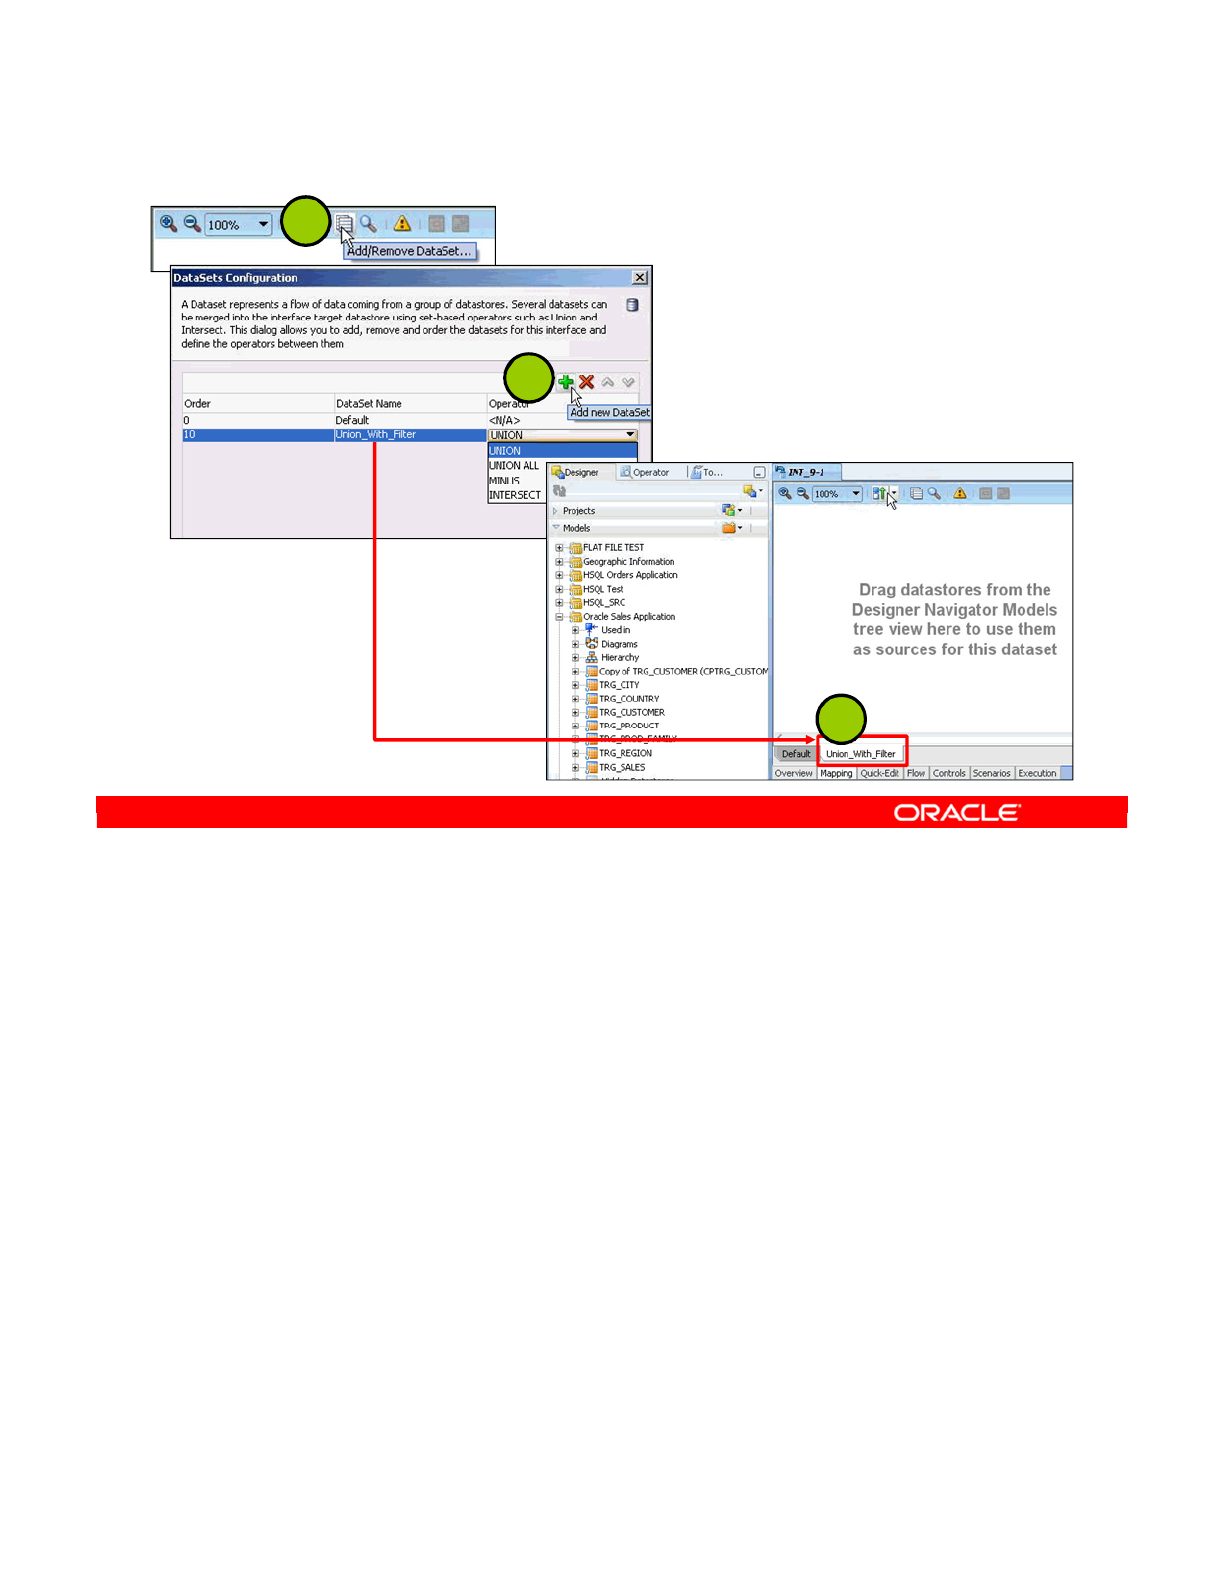
To create a new data set:
1. In the Source Diagram toolbar, click Add /Remove DataSet to display the DataSets
Configuration dialog box.
2. Click Add new DataSet. A new line is added for the new data set at the bottom of the
list.
3. In the DataSet Name field, give the name of the new data set. This name will be
displayed in the data set tab.
4. In the Operator field, select the set-based operator for your data set. Repeat steps 2
through 4 if you want to add more data sets.
5. Click Close.
Oracle Data Integrator 11g: Integration and Administration 11 - 16
Copyright © 2012, Oracle and/or its affiliates. All rights reserved.
Defining a Data Set
1
2
3
Oracle University and (Oracle Corporation) use only.
These eKit materials are to be used ONLY by you for the express purpose SELF STUDY. SHARING THE FILE IS STRICTLY PROHIBITED.

This slide offers guidelines for using set-based operators successfully.
Oracle Data Integrator 11g: Integration and Administration 11 - 17
Copyright © 2012, Oracle and/or its affiliates. All rights reserved.
Using Set-Based Operators
•Make sure that your Technology supports set-based
operators.
–Check Support Set Operators.
–List of Operators: INTERSECT, UNION, UNION ALL,
MINUS
•In your interface, add several data sets:
–Save before adding data sets
–Share the same target structure
–Order counts for precedence
•Select an IKM that supports data sets
–Data sets are merged from the Staging area
Oracle University and (Oracle Corporation) use only.
These eKit materials are to be used ONLY by you for the express purpose SELF STUDY. SHARING THE FILE IS STRICTLY PROHIBITED.

ODI sequences are primarily intended to replace the missing functionality in certain database
engines. They function in the same way as a variable that is automatically incremented each
time it is accessed. ODI sequences are mostly used to provide similar functionality as identity
columns.
This section explains how to configure your flow to force data to pass through the agent, and
how to populate identity columns.
Oracle Data Integrator 11g: Integration and Administration 11 - 18
Copyright © 2012, Oracle and/or its affiliates. All rights reserved.
Using Sequences
Oracle University and (Oracle Corporation) use only.
These eKit materials are to be used ONLY by you for the express purpose SELF STUDY. SHARING THE FILE IS STRICTLY PROHIBITED.

Oracle Data Integrator sequences are intended to map native sequences from RDBMS
engines, or to simulate sequences when they do not exist in the RDBMS engine. A sequence
can be created as a global sequence or in a project. Global sequences are common to all
projects, whereas project sequences are available only in the project where they are defined.
Oracle Data Integrator supports three types of sequences:
•Standard sequences, whose current values are stored in the Repository
•Specific sequences, whose current values are stored in an RDBMS table cell. Oracle
Data Integrator reads the value, locks the row (for concurrent updates) and updates the
row after the last increment.
•Native sequence, that maps a RDBMS-managed sequence
Oracle Data Integrator 11g: Integration and Administration 11 - 19
Copyright © 2012, Oracle and/or its affiliates. All rights reserved.
Types of Sequences
•Native sequences
•Standard sequences
•Specific sequences
Oracle University and (Oracle Corporation) use only.
These eKit materials are to be used ONLY by you for the express purpose SELF STUDY. SHARING THE FILE IS STRICTLY PROHIBITED.

Oracle Data Integrator now provides support for a new type of sequence that directly maps to
database-defined sequences. When created, these sequences can be picked from a list
retrieved from the database. Native sequences are used as regular Oracle Data Integrator
sequences, and the code generation automatically handles technology-specific syntax for
sequences.
This feature simplifies the use of native sequences in all expressions, and enables cross-
references when using such sequences.
Oracle Data Integrator 11g: Integration and Administration 11 - 20
Copyright © 2012, Oracle and/or its affiliates. All rights reserved.
Support for Native Sequences
•In Technology > Definition
–Select Supports Native Sequence.
–Local Sequence Mask: %SCHEMA.%OBJECT
•In Technology > SQL, set the Native Sequence Reverse
SQL Query:
SELECT SEQUENCE_NAME FROM ALL_SEQUENCES WHERE
SEQUENCE_OWNER=:SCHEMA
Oracle University and (Oracle Corporation) use only.
These eKit materials are to be used ONLY by you for the express purpose SELF STUDY. SHARING THE FILE IS STRICTLY PROHIBITED.
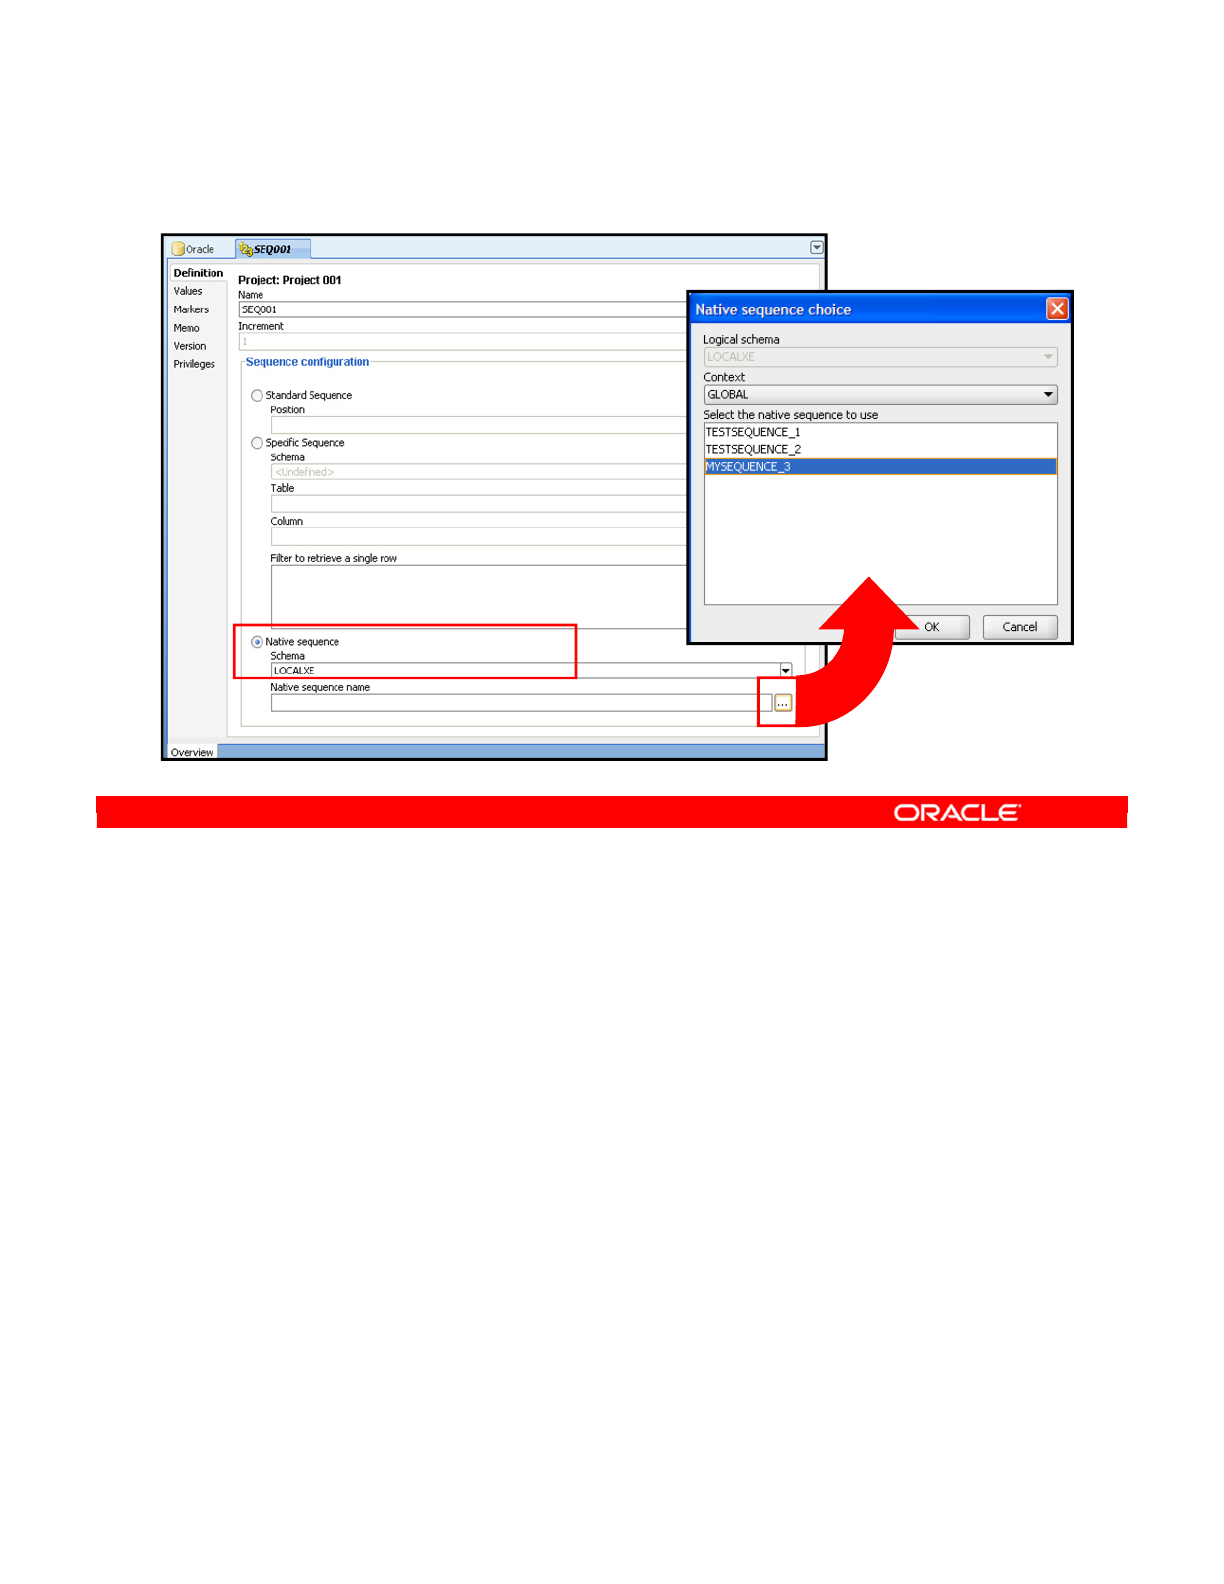
1. In the “sequence definition” tab, in the “Sequence configuration” area, click Native
Sequence.
2. In the “Native sequence name” field, click the ellipsis button and select a native
sequence to use.
Oracle Data Integrator 11g: Integration and Administration 11 - 21
Copyright © 2012, Oracle and/or its affiliates. All rights reserved.
Creating a Native Sequence
Oracle University and (Oracle Corporation) use only.
These eKit materials are to be used ONLY by you for the express purpose SELF STUDY. SHARING THE FILE IS STRICTLY PROHIBITED.

Referring to a sequence in code, such as a SQL expression, is the same as for variables,
except that the name of the sequence must be followed by the word _NEXTVAL. _NEXTVAL
specifies that the sequence should be incremented, and then the new value should be
returned.
Unlike variables, you do not need to specify the scope of a sequence when you use it. Thus,
to refer to a sequence, use the hash or pound sign, the name of the sequence, an
underscore, and the word NEXTVAL. Like variables, you can specify binding by using a colon
instead of the pound or hash (#) sign.
You should note the difference between ODI sequences and native sequences. For example,
to refer to a native Oracle sequence, you do not specify either substitution or binding, as
Oracle manages the sequence. All you need to do is call it with the Oracle syntax, that is, the
sequence name followed by a period and NEXTVAL.
Oracle Data Integrator 11g: Integration and Administration 11 - 22
Copyright © 2012, Oracle and/or its affiliates. All rights reserved.
Referring to Sequences
•Standard sequences
–In code, the sequence name is followed by _NEXTVAL.
—
This increments the sequence, and then retrieves
the new value.
–You do not need to specify the scope.
–Substitution versus binding:
—
Substitution: #<sequence_name>_NEXTVAL
—
Binding: :<sequence_name>_NEXTVAL
•Native sequences
–<sequence_name>.NEXTVAL
Oracle University and (Oracle Corporation) use only.
These eKit materials are to be used ONLY by you for the express purpose SELF STUDY. SHARING THE FILE IS STRICTLY PROHIBITED.

You must realize that ODI sequences are updated by the ODI Agent. This updating does not
happen on the database itself. Thus, if a rule is performed entirely within a DBMS, any ODI
sequences are not updated. If you want them to be updated, you should restructure your flow
to pass through the agent.
Oracle Data Integrator 11g: Integration and Administration 11 - 23
Copyright © 2012, Oracle and/or its affiliates. All rights reserved.
Note: Sequences Updated by Agent
•An ODI Standard sequence is incremented by the agent
each time it processes a row affected by this sequence.
•When a rule is entirely processed within a DBMS, Oracle
Data Integrator sequences in this rule are not incremented.
Oracle University and (Oracle Corporation) use only.
These eKit materials are to be used ONLY by you for the express purpose SELF STUDY. SHARING THE FILE IS STRICTLY PROHIBITED.

The problem is that you want to use a native or ODI sequence in mapping. In particular, you
want the sequence to generate a new value for each row that is processed. This is a rather
complex situation, but can be handled in ODI. You have to ensure that the ODI Agent
executes the rows individually. Also, you want to generate a sequence value only once for a
row, so you avoid performing updates on the column. The general solution is as follows:
•First, set the mapping to be executed on the target. This means that the sequence value
is generated only when the row is being inserted into the target table. This prevents the
sequence value from being incremented unnecessarily.
•Next, set the column to be used only in inserts and not in updates. To do this, select the
target column and select the Insert check box. Deselect the Update check box.
•You should also ensure that the column is not part of any unique key used in flow
control. This is important because when any flow control is performed, the column
shows no value.
•Similarly, deselect the Not Null check box for the column.
•Lastly, the column must not be part of an update key if you are using an Incremental
Update IKM. So, click the name of the target table and select an update key that does
not include this column. If necessary, set the update key to <Undefined> and manually
select some other columns.
Oracle Data Integrator 11g: Integration and Administration 11 - 24
Copyright © 2012, Oracle and/or its affiliates. All rights reserved.
Using Standard Sequences in Mappings Correctly
To generate a new sequence value for each row, your mapping
should meet the following conditions:
•Mapping must be executed on the target.
•The column must be set for insert but not update.
•Unique keys must be checked in the flow not
containing the column.
•The Not Null check box must be deselected for the
column.
•The column must not be part of the update key.
Oracle University and (Oracle Corporation) use only.
These eKit materials are to be used ONLY by you for the express purpose SELF STUDY. SHARING THE FILE IS STRICTLY PROHIBITED.

If you are using an ODI sequence, you have a few more things to check.
•You must use the sequence in binding mode. This is the mode that is automatically
chosen by the Expression Editor.
•The last step is the most difficult part. You must ensure that the flow configuration forces
all data to pass through the agent in the integration phase. The simplest way to do this is
to select a multiple-technology IKM. These IKMs typically use the agent to read data
from one server, and then write it out on another. This is what you want.
•Avoid an IKM that uses an advanced mechanism for transferring data directly, such as
linked servers or an export/import.
•To double-check that the IKM is appropriate, execute the interface and open the session
in Operator. Locate the step at the end that inserts rows into the target table. If it is split
into a SELECT half and an INSERT half, the data is passing through the agent. If it is
one continuous INSERT…SELECT command, the data is being transferred directly. This
means that you will have only one new sequence value for the entire session.
Oracle Data Integrator 11g: Integration and Administration 11 - 25
Copyright © 2012, Oracle and/or its affiliates. All rights reserved.
Using ODI Standard Sequences in Mappings
In addition, if using an ODI Standard sequence:
•Use the sequence in the mapping in binding mode
•Modify the flow to force the integration phase to pass all
data through the agent
–Use a multiple-technology “append” or “control append” IKM.
–There should be a SELECT / INSERT command, rather than
an INSERT… SELECT.
Oracle University and (Oracle Corporation) use only.
These eKit materials are to be used ONLY by you for the express purpose SELF STUDY. SHARING THE FILE IS STRICTLY PROHIBITED.

A similar situation arises when you want to populate a table that has a native identity column
defined on it in the database. You must be careful not to attempt to populate the column
directly because the database will most certainly prevent this and throw an error. You must
also be careful not to attempt to use the column as an update key because it does not usually
contain any information. You proceed as follows:
•First, ensure that no mapping is defined on the column. Clear the mapping expression
box, and deselect the Active Mapping, the Update, and the Insert check boxes.
•Deselect the Not Null check box. When you insert data, this column will certainly be
empty. Therefore, selecting the Not Null check box creates spurious errors.
•Ensure that no primary or alternate keys reference the column. The keys prevent flow
control from working properly. This is because flow control takes place on the staging
area where the identity column is blank. It is, therefore, unsuitable as a primary or
alternate key.
•If you use an “Incremental Update” IKM, ensure that the column is not part of the update
key. Check that the Key check box on the column is not selected. Also check that the
update key defined for the target is not a primary or alternate key that references this
column.
Oracle Data Integrator 11g: Integration and Administration 11 - 26
Copyright © 2012, Oracle and/or its affiliates. All rights reserved.
Populating Native Identity Columns
Your interface should be as follows:
•No mapping for the identity column
–Clear the expression box.
–Deselect the Active Mapping, Update, and Insert check
boxes.
•Identity column’s Not Null check box deselected
•No primary or alternate keys that reference the column
–Applies only if using flow control
•Identity column not part of the update key
–Applies only if using “Incremental Update” IKMs
Oracle University and (Oracle Corporation) use only.
These eKit materials are to be used ONLY by you for the express purpose SELF STUDY. SHARING THE FILE IS STRICTLY PROHIBITED.

By definition, ODI sequences are not as fast as DBMS sequences because each row must
pass by the agent.
Oracle Data Integrator 11g: Integration and Administration 11 - 27
Copyright © 2012, Oracle and/or its affiliates. All rights reserved.
Note
•ODI sequences are not as fast as DBMS sequences.
•DBMS sequences should be used wherever possible.
Oracle University and (Oracle Corporation) use only.
These eKit materials are to be used ONLY by you for the express purpose SELF STUDY. SHARING THE FILE IS STRICTLY PROHIBITED.
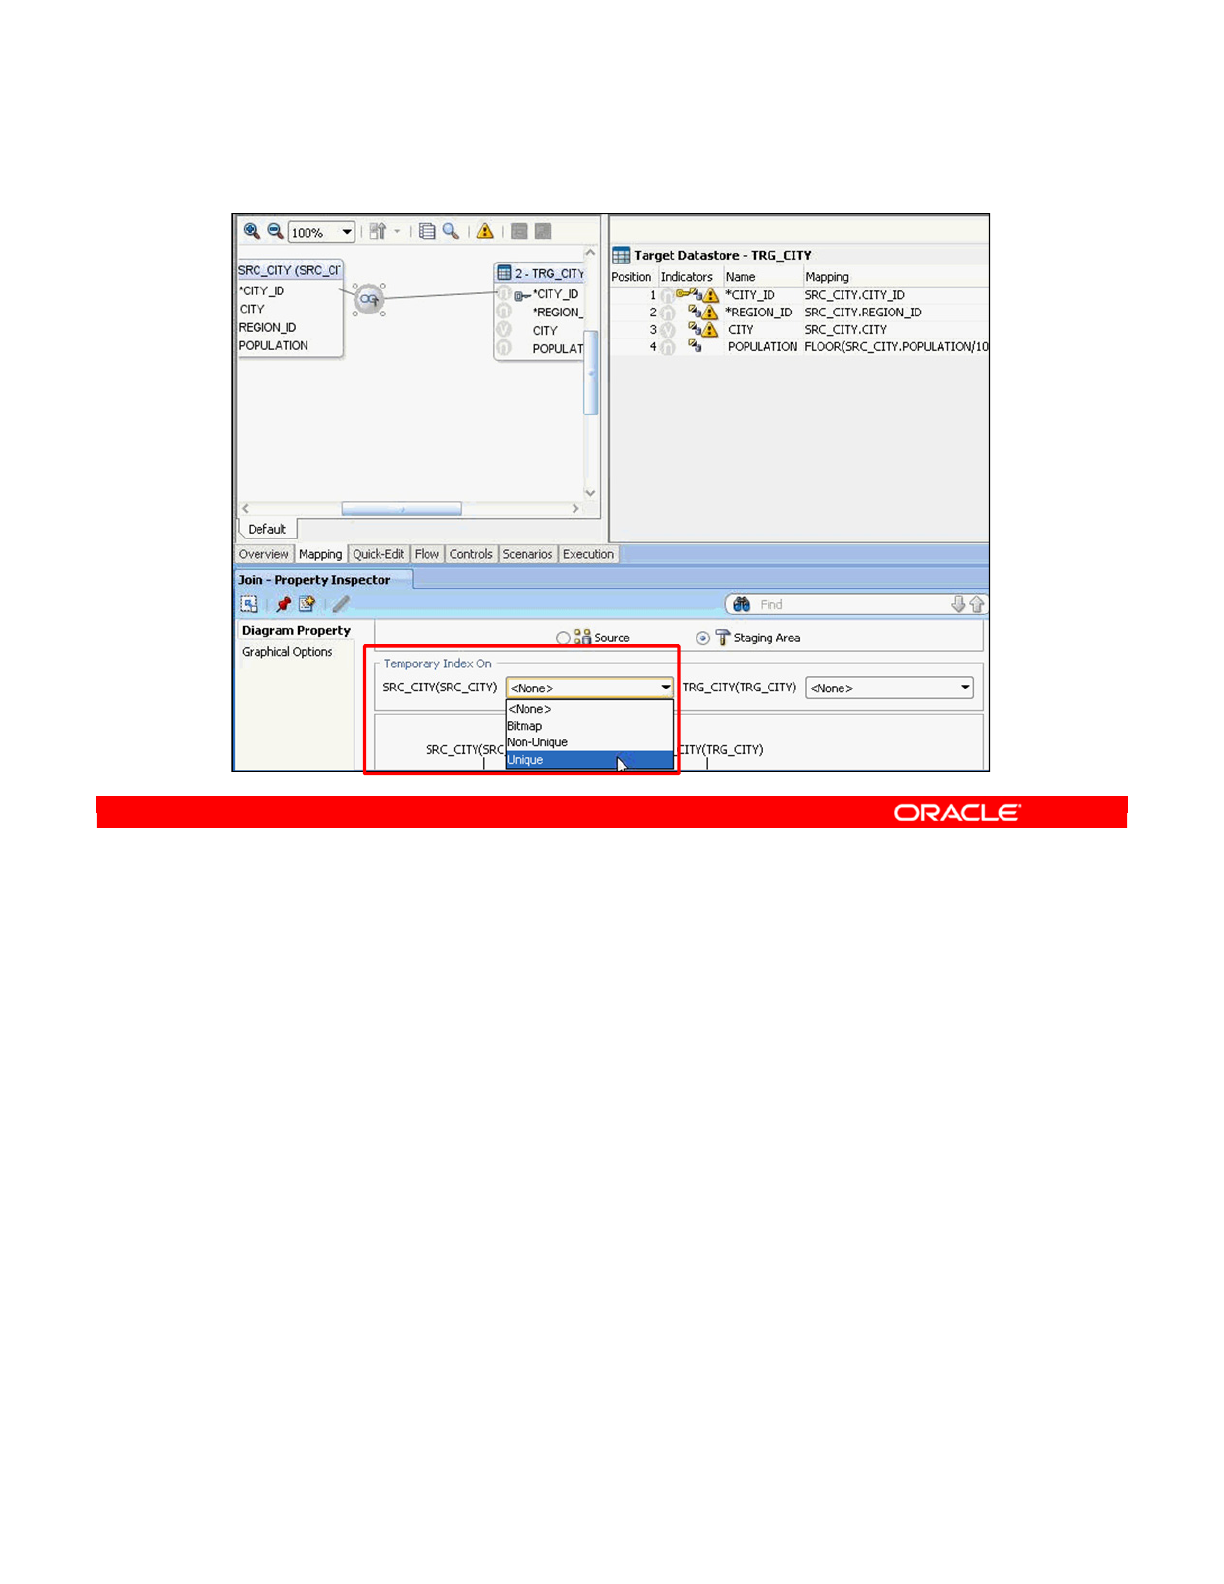
If you are creating joins or filters on source tables, you can have Oracle Data Integrator
automatically generate temporary indexes for optimizing the execution of these joins or filters.
The user selects the type of index that needs to be created in the list of index types for the
technology. Knowledge modules automatically generate the code for handling indexes
creation before executing the join and filters, as well as deletion after usage.
This feature provides automated optimization of join and filter execution, and enables better
performances for integration interfaces.
Oracle Data Integrator 11g: Integration and Administration 11 - 28
Copyright © 2012, Oracle and/or its affiliates. All rights reserved.
Automatic Temporary Index Management
Oracle University and (Oracle Corporation) use only.
These eKit materials are to be used ONLY by you for the express purpose SELF STUDY. SHARING THE FILE IS STRICTLY PROHIBITED.
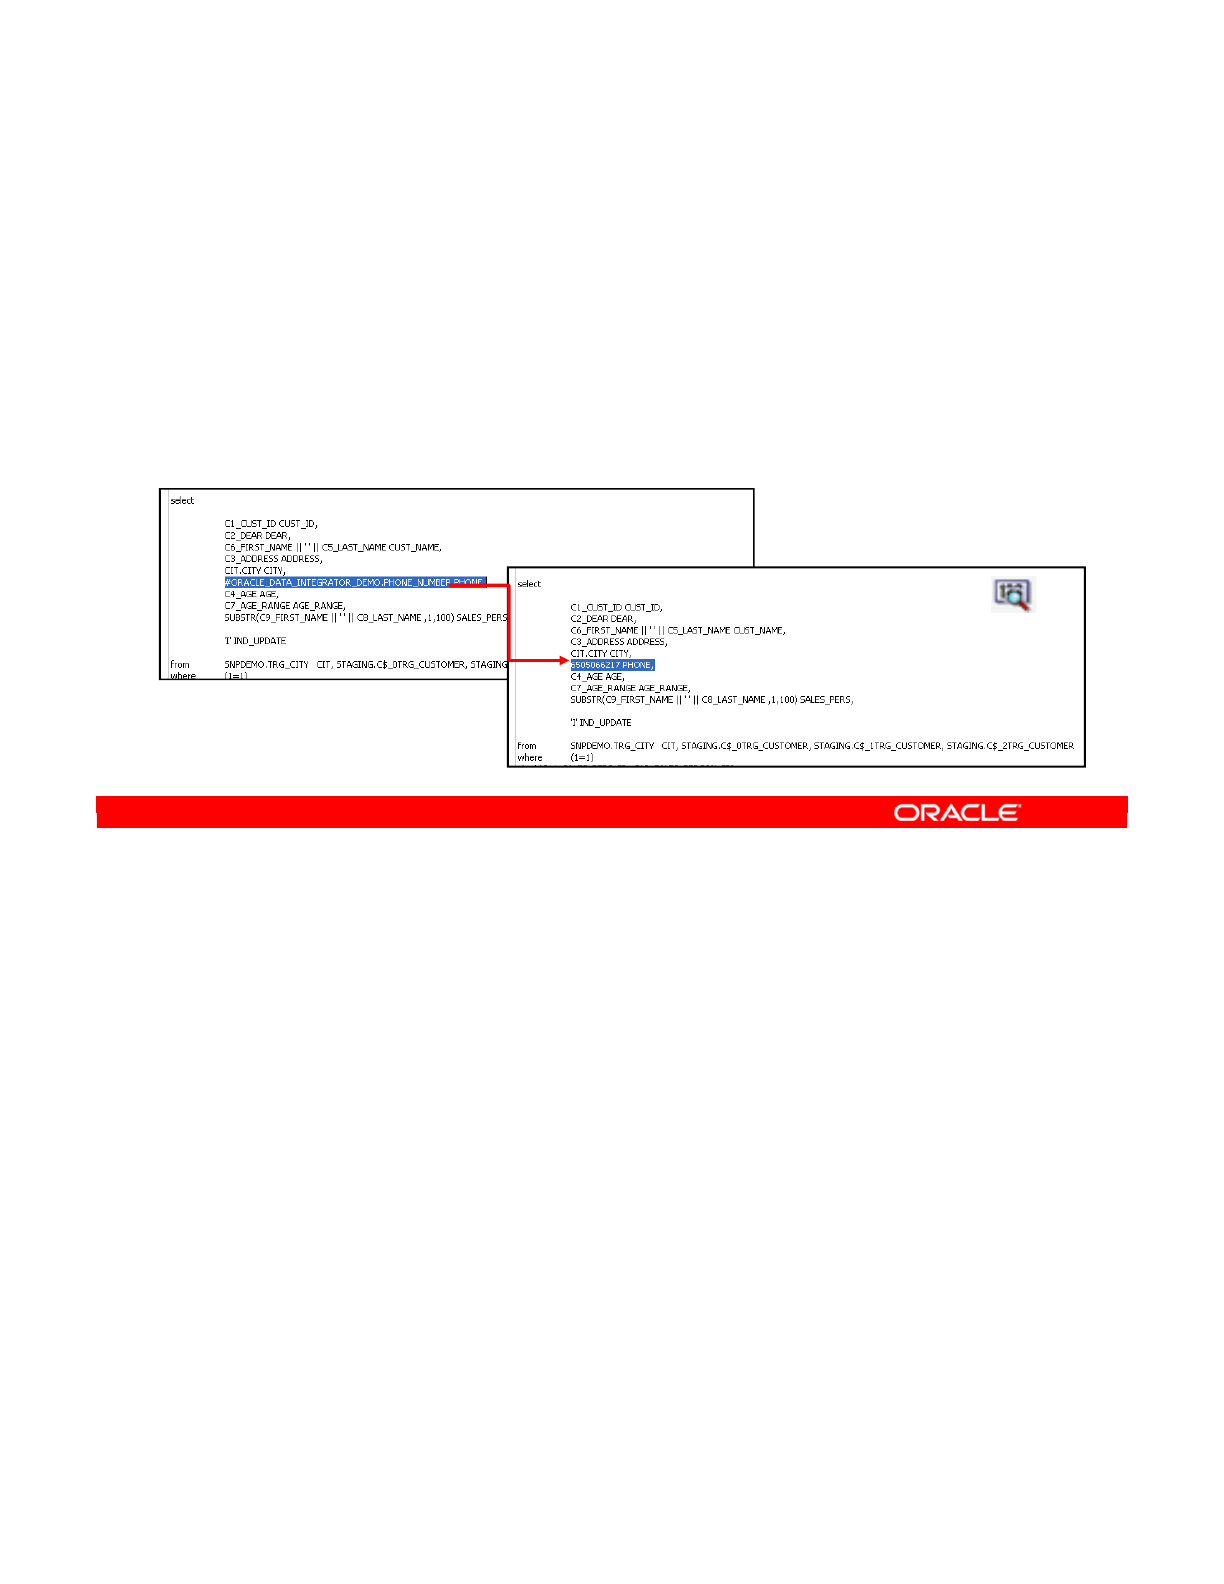
Customers use variables and sequences extensively in their ODI processes. Until the ODI
11.1.1.6 release, it was not possible to see the actual values of variables and sequences at
run time.
The new Tracking Variables and Sequences feature allows end users to see the actual values
of variables and sequences at execution time, making it easier to troubleshoot ODI sessions.
At execution time, you can view or hide the actual values in the Step or Task code using the
Show/Hide Values button.
Bind variables are not resolved.
Oracle Data Integrator 11g: Integration and Administration 11 - 29
Copyright © 2012, Oracle and/or its affiliates. All rights reserved.
Tracking Variables and Sequences
•You can track the actual values of variables and
sequences at run time.
•This feature allows you to see the actual values of
variables and sequences at execution time, making it
easier to troubleshoot ODI sessions.
Actual value of variable
Show/Hide
values button
Variable
Oracle University and (Oracle Corporation) use only.
These eKit materials are to be used ONLY by you for the express purpose SELF STUDY. SHARING THE FILE IS STRICTLY PROHIBITED.
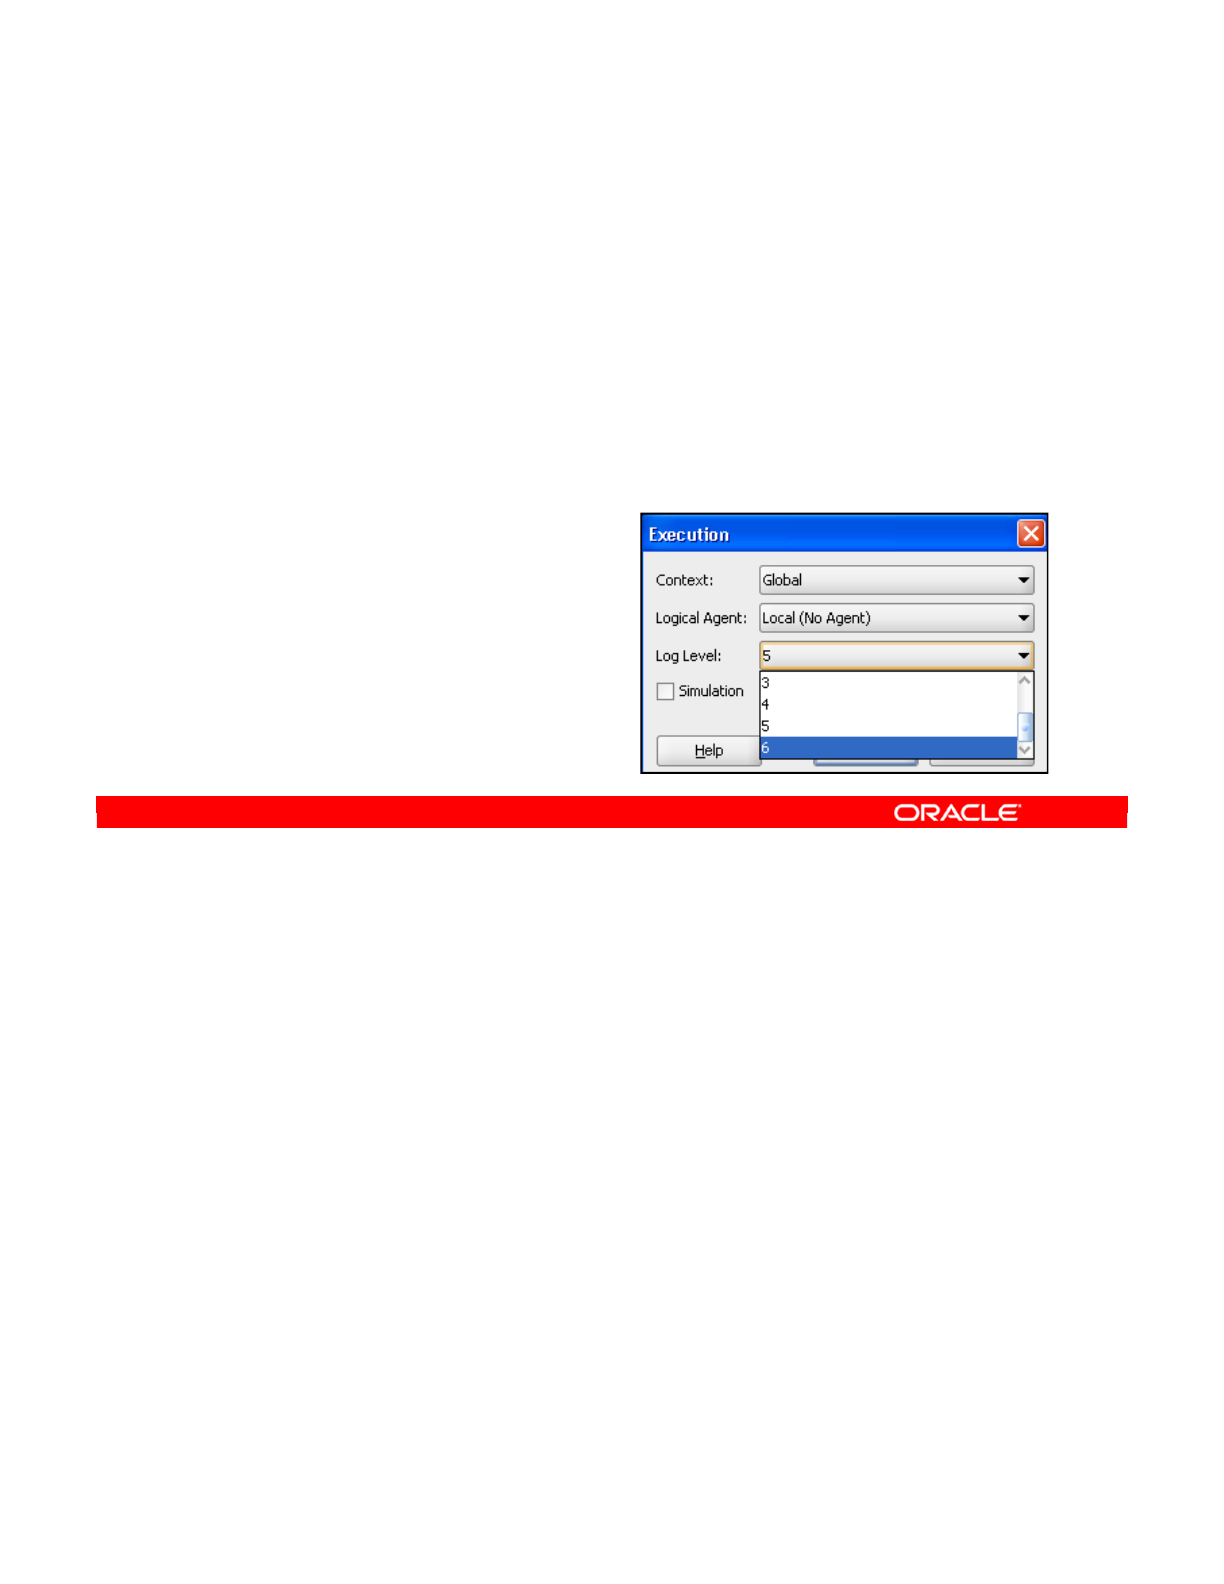
A new log level, Level 6, has been introduced. It will have the same behavior as Level 5, but
with the addition of variable tracking.
The new log level will be available for an execution invoked against any object type that can
be executed from the ODI Studio (for example, Interfaces, Packages, Scenarios, Load Plans).
Log Level 6 is only available for starting or restarting a session. It will not be available as a
design setting in any of the editors as it may have a performance impact.
Oracle Data Integrator 11g: Integration and Administration 11 - 30
Copyright © 2012, Oracle and/or its affiliates. All rights reserved.
How Variable and Sequence Tracking Works
•A new log level has been introduced: Level 6, which will
have the same behavior as Level 5, but with the addition of
variable tracking.
•Set Log Level to 6 in order to track Variable and Sequence
values at runtime.
•Note that tracking variable
and sequence values will
have a performance impact.
Oracle University and (Oracle Corporation) use only.
These eKit materials are to be used ONLY by you for the express purpose SELF STUDY. SHARING THE FILE IS STRICTLY PROHIBITED.
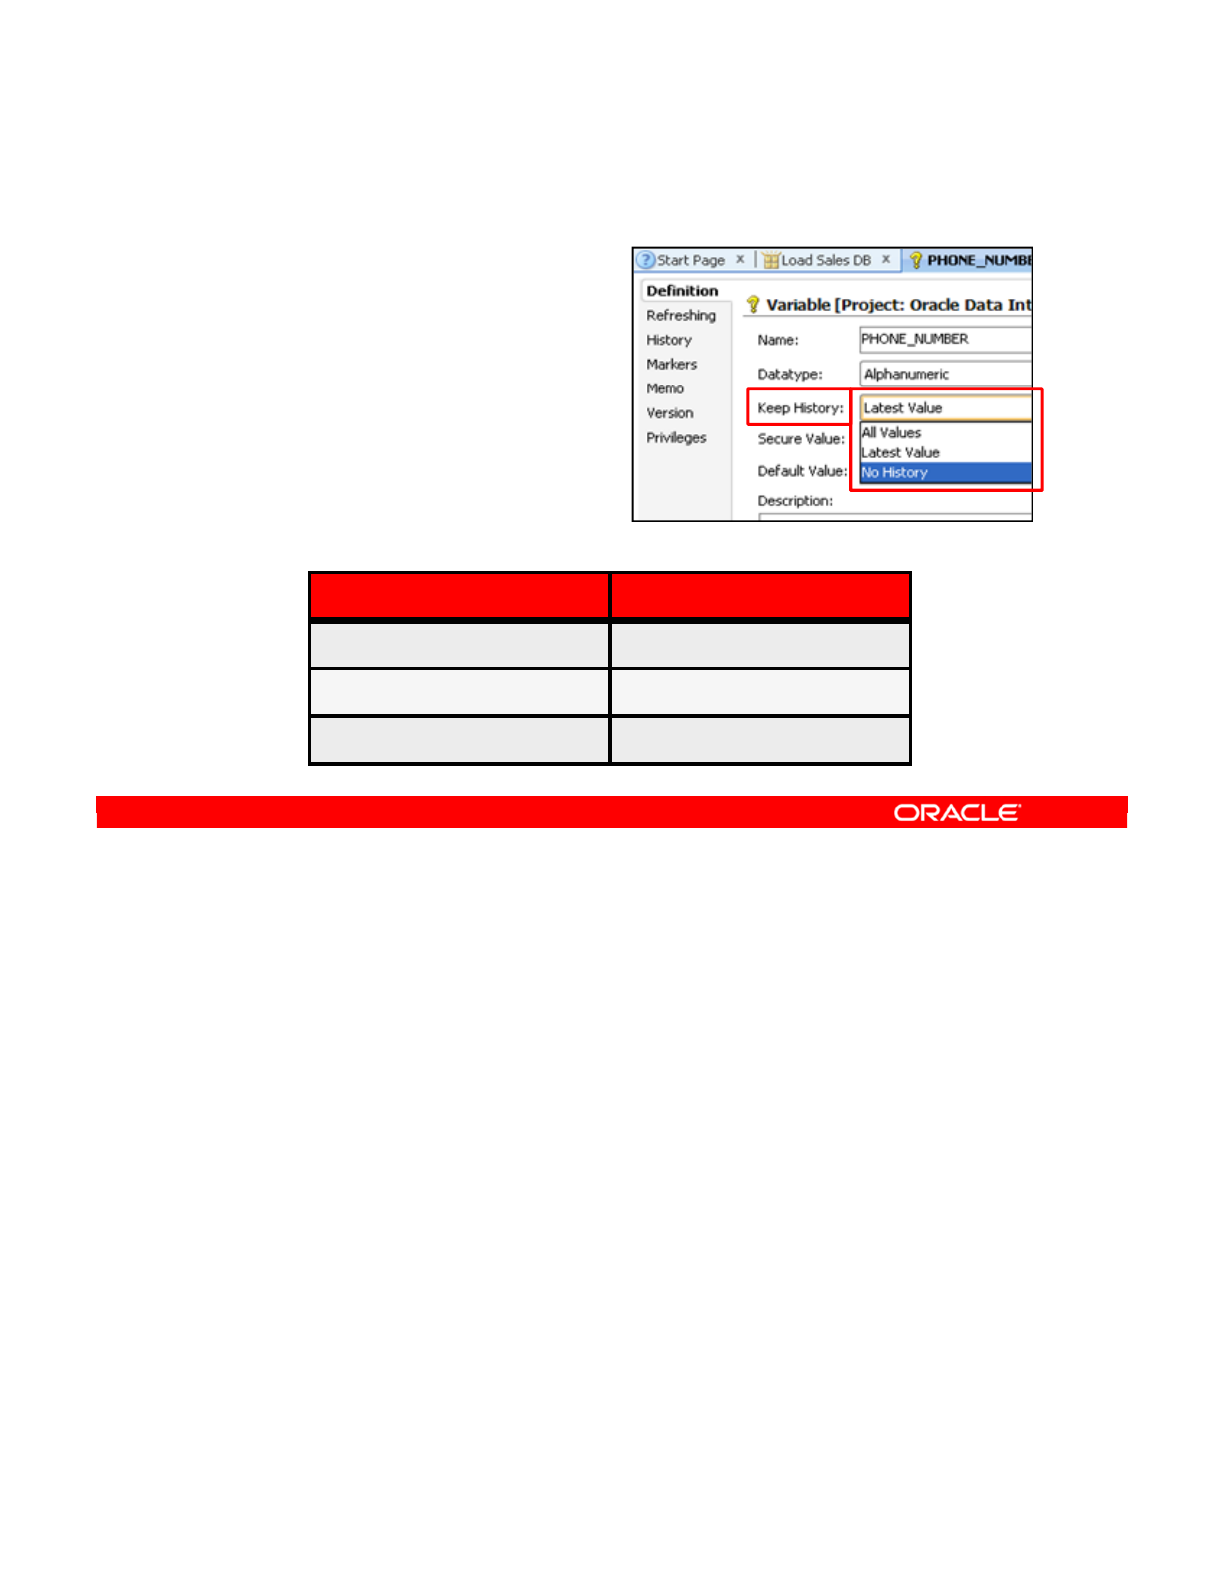
Variable values can be hidden by using the Secure Value check box. If Secure Value is
selected:
•The variable will never be tracked: it will be displayed unresolved in the source or target
code, it will not be tracked in the repository, and it will not be “historized.”
•The Keep History parameter is automatically set to No History and cannot be edited.
•Variables storing passwords in Topology are not resolved.
Oracle Data Integrator 11g: Integration and Administration 11 - 31
Copyright © 2012, Oracle and/or its affiliates. All rights reserved.
New Variable Actions
•The Action field,
when displaying a variable,
has been renamed as
Keep History.
•The Action values have
also been renamed.
See the table below:
Old Text New Text
Historize All Values
Latest Value Latest Value
Not Persistent No History
Oracle University and (Oracle Corporation) use only.
These eKit materials are to be used ONLY by you for the express purpose SELF STUDY. SHARING THE FILE IS STRICTLY PROHIBITED.
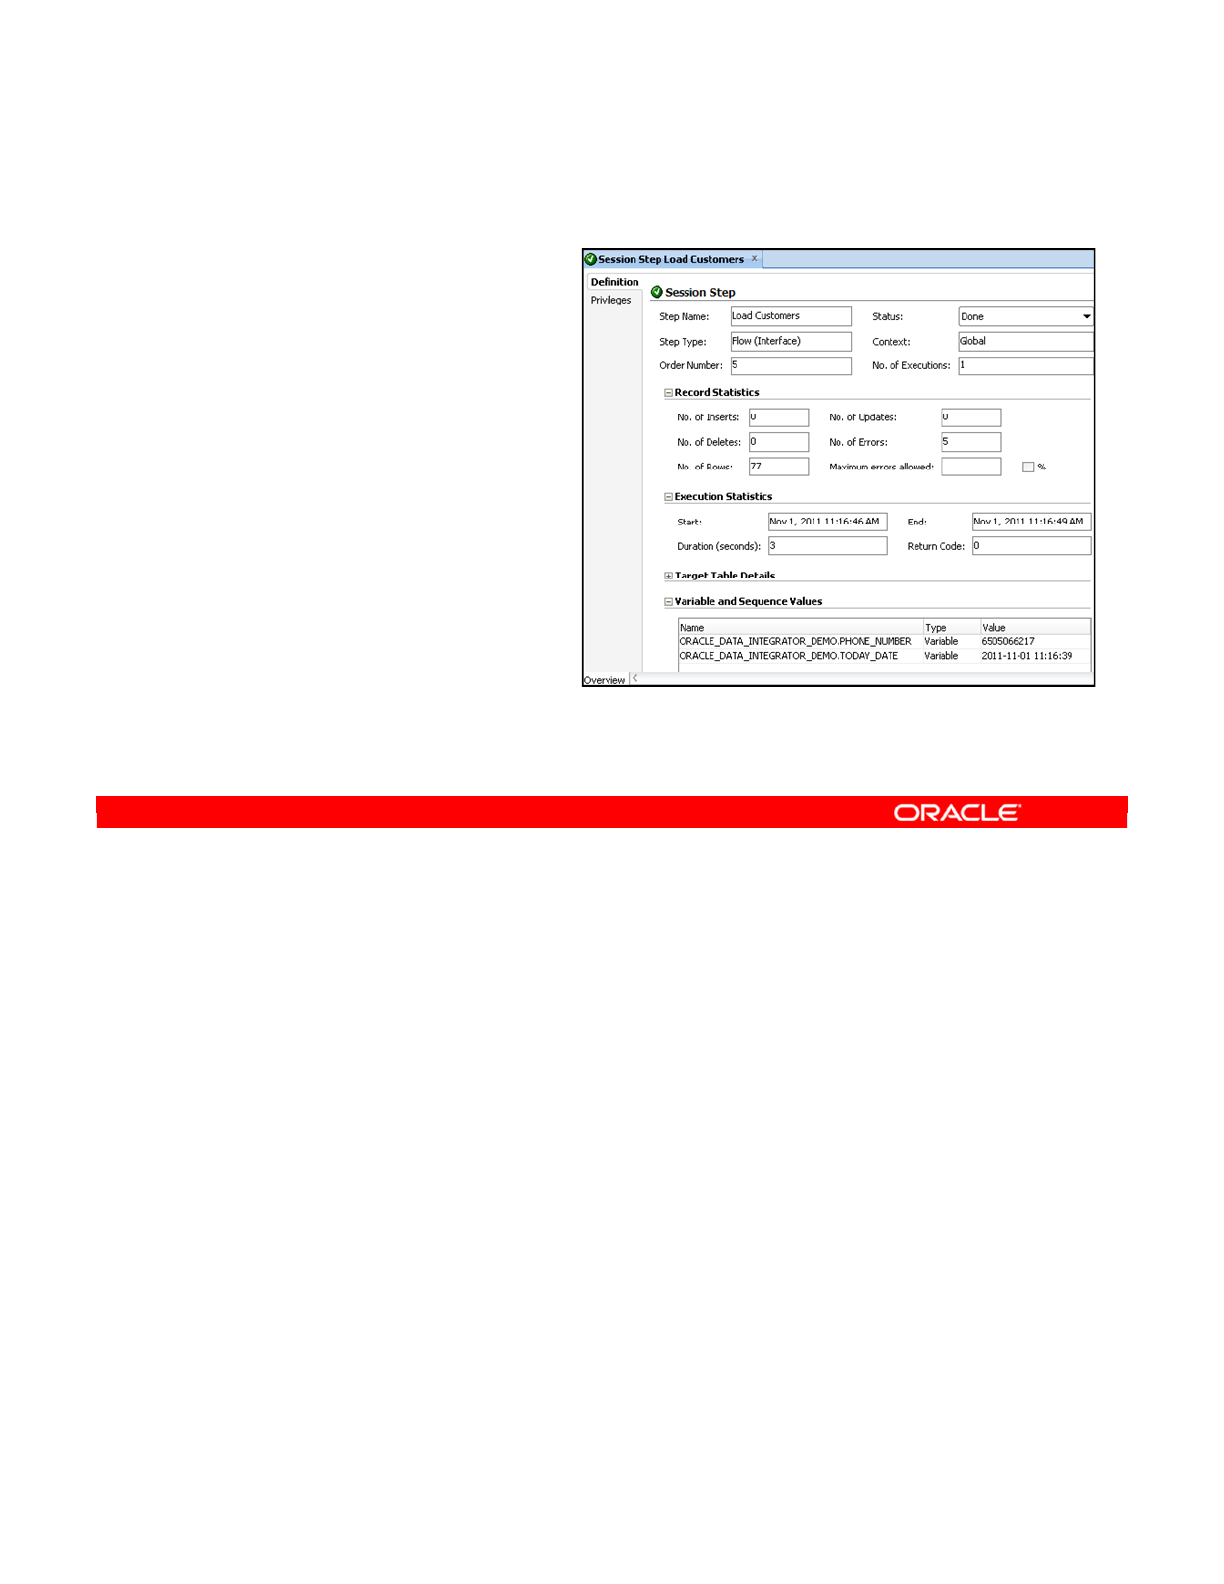
The Start and End value of a Sequence is displayed, as a Sequence can have multiple values
in the same session.
The functionality described previously is also available through the ODI Console:
•Setting Log Level to 6 during execution time
•Viewing Variable and Sequence Values at the Session Step and Task level
•Show Values button at the Code panel level
Activating Variable and Sequence tracking can also be done from the command line, using
OdiStartScen or the OdiInvoke Web Service.
Oracle Data Integrator 11g: Integration and Administration 11 - 32
Copyright © 2012, Oracle and/or its affiliates. All rights reserved.
Definition Tab of Session Step or Session Task
•Variable and Sequence
values are displayed in
the Definition panel of
Session Step or Task
Step in Operator.
•Expand Variable and
Sequence Values
node to display them.
•Bind variables
(:MY_VAR) are also
tracked.
Oracle University and (Oracle Corporation) use only.
These eKit materials are to be used ONLY by you for the express purpose SELF STUDY. SHARING THE FILE IS STRICTLY PROHIBITED.

Answer: b
Explanation: ODI sequences are updated by the ODI Agent. This updating does not happen
on the database itself. Thus, if a rule is not performed entirely within a DBMS, all ODI
sequences are not updated. If you want them to be updated, you should restructure your flow
to pass through the agent.
Oracle Data Integrator 11g: Integration and Administration 11 - 33
Copyright © 2012, Oracle and/or its affiliates. All rights reserved.
Quiz
Which of the following statements is not true?
a. You should use native DBMS sequences wherever
possible.
b. If a rule is performed entirely within a DBMS, all ODI
sequences are automatically updated.
Oracle University and (Oracle Corporation) use only.
These eKit materials are to be used ONLY by you for the express purpose SELF STUDY. SHARING THE FILE IS STRICTLY PROHIBITED.

Oracle Data Integrator 11g: Integration and Administration 11 - 34
Copyright © 2012, Oracle and/or its affiliates. All rights reserved.
Summary
In this lesson, you should have learned how to:
•Use business rules, variables, and set-based operators
with ODI Interfaces
•Use data sets and sequences, including native sequences,
with ODI Interfaces
Oracle University and (Oracle Corporation) use only.
These eKit materials are to be used ONLY by you for the express purpose SELF STUDY. SHARING THE FILE IS STRICTLY PROHIBITED.

Oracle Data Integrator 11g: Integration and Administration 11 - 35
Copyright © 2012, Oracle and/or its affiliates. All rights reserved.
Checklist of Practice Activities
1-1: Logging In and Using Help
2-1: Creating Users and Repositories and Logging In
3-1: Creating an ODI Agent for Orchestrating Execution of ODI Objects
4-1: Defining the Topology
5-1: Setting Up a New ODI Project
6-1: Creating a Model
7-1: Checking Data Quality in the Model
8-1: ODI Interface: Simple Transformations
9-1: ODI Interface: Complex Transformations
9-2: ODI Interface: Implementing Lookup
10-1: ODI Interface: Exporting a Flat File to a Relational Table
11-1: Using Native Sequences with ODI Interface
11-2: Using Temporary Indexes
11-3: Using Data Sets with ODI Interface
12-1: Using Temporary ODI Interfaces
12-2: Developing a New Knowledge Module
13-1: Creating an ODI Procedure
14-1: Creating an ODI Package
14-2: Using ODI Package with Variables and User Functions
15-1: Creating and Scheduling an ODI Scenario
16-1: Using Load Plans
17-1: Working with ODI Versions
18-1: Enforcing Data Quality with ODI Interface
19-1: Implementing Changed Data Capture
20-1: Setting Up ODI Security
20-2: Integrating with Enterprise Manager and Using ODI Console
21-1: Executing an ODI Scenario Through the ODI Public Web Service
Oracle University and (Oracle Corporation) use only.
These eKit materials are to be used ONLY by you for the express purpose SELF STUDY. SHARING THE FILE IS STRICTLY PROHIBITED.
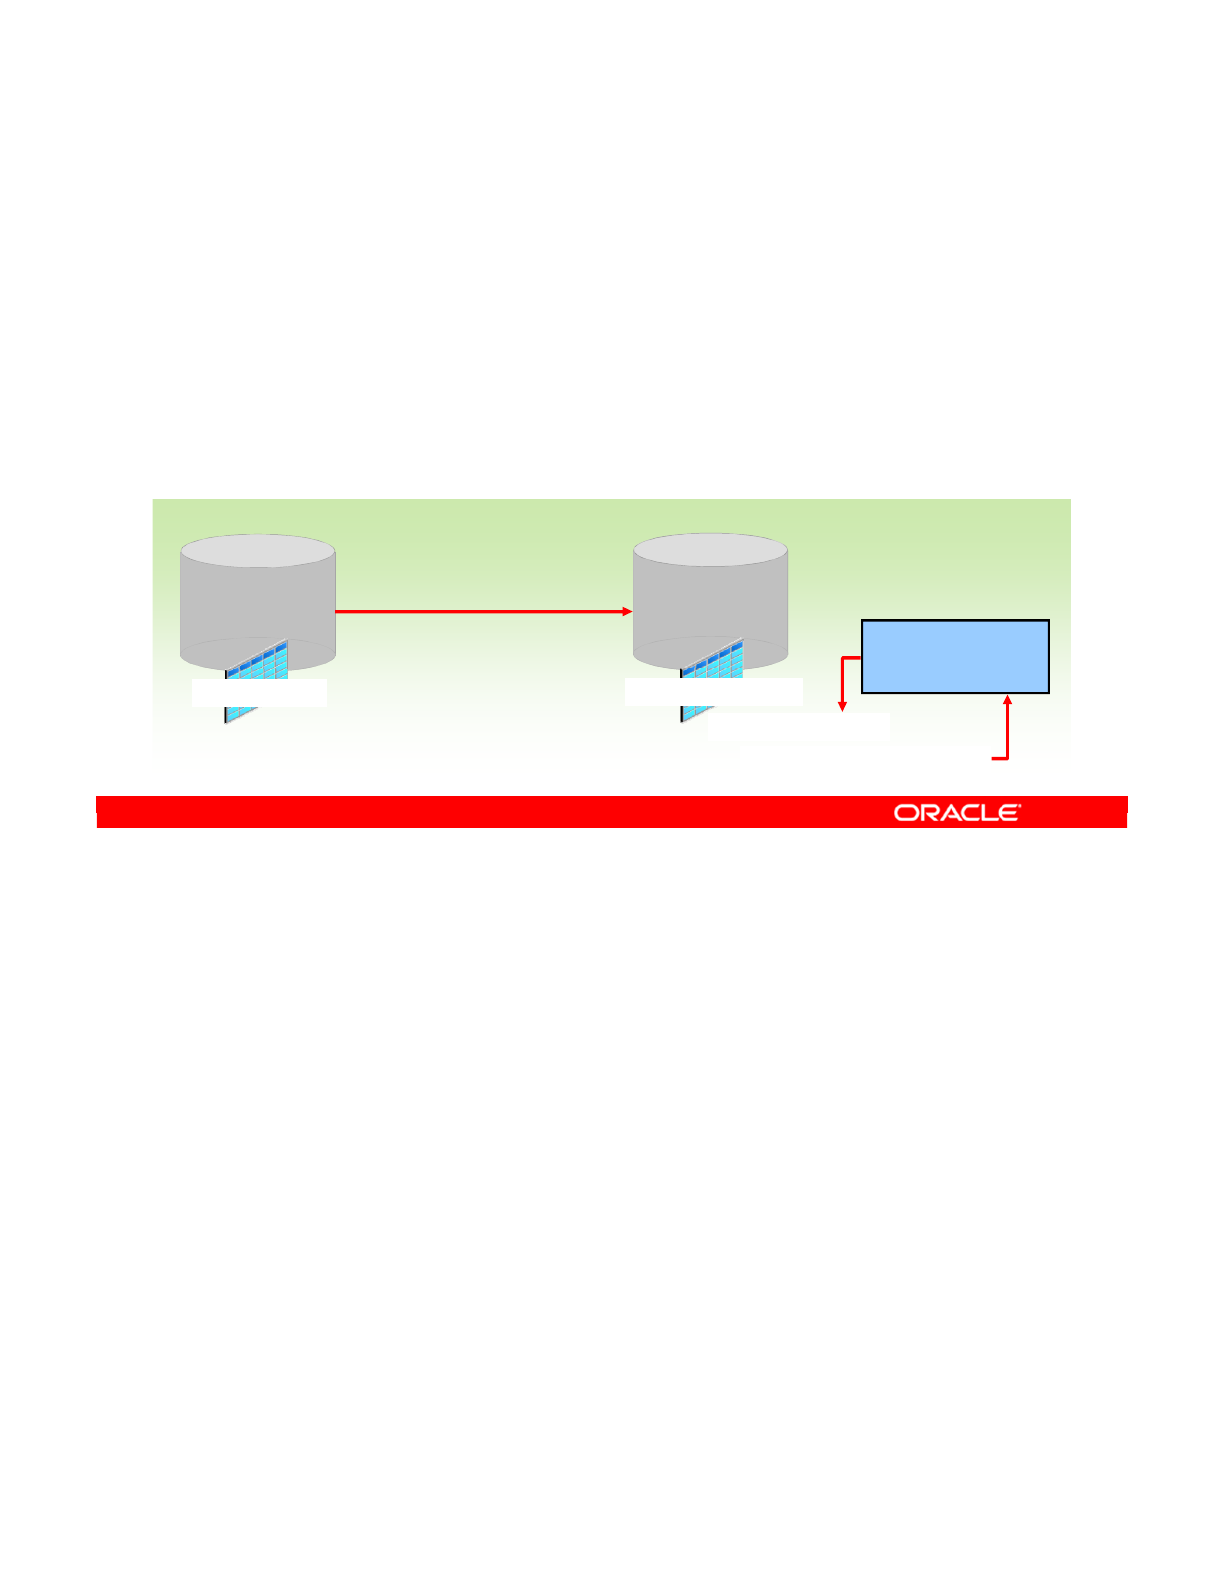
In this practice, you first use ODI to define the procedure Create_ORCL_SEQ_FAM_ID. You
then execute this procedure, which creates the sequence SEQ_FAMILY_ID in the RDBMS.
Next, you use ODI to create an ODI definition of the native sequence you just created in the
RDBMS, using the same name, SEQ_FAMILY_ID.
Finally, you create and execute the interface INT-11-1 to load the TRG_PROD_FAMILY
target table by using the new native sequence to generate ID numbers for that table.
Note: This lesson does not have a hands-on practice using variables. A hands-on practice
using variables will be performed in Lesson 14, in which you will use variables in packages.
Oracle Data Integrator 11g: Integration and Administration 11 - 36
Copyright © 2012, Oracle and/or its affiliates. All rights reserved.
Practice 11-1: Overview
1. In ODI, create the procedure
Create_ORCL_SEQ_FAM_ID and execute it to create the
sequence SEQ_FAMILY_ID in the RDBMS.
2. In ODI, create the native sequence SEQ_FAMILY_ID.
3. Create and execute the interface INT-11-1 to load the
TRG_PROD_FAMILY target table by using the native
sequence to generate ID numbers for that table.
Model
Oracle
Sales
Application
Target
TRG_PROD_FAMILY
Source
LKM SQL to Oracle
INT-11-1 Interface
FAMILY_ID column
:SEQ_FAMILY_ID_NEXTVAL
Model
HSQL_SRC
SRC_PRODUCT
Use sequence to
generate index on
FAMILY_ID column.
Oracle University and (Oracle Corporation) use only.
These eKit materials are to be used ONLY by you for the express purpose SELF STUDY. SHARING THE FILE IS STRICTLY PROHIBITED.
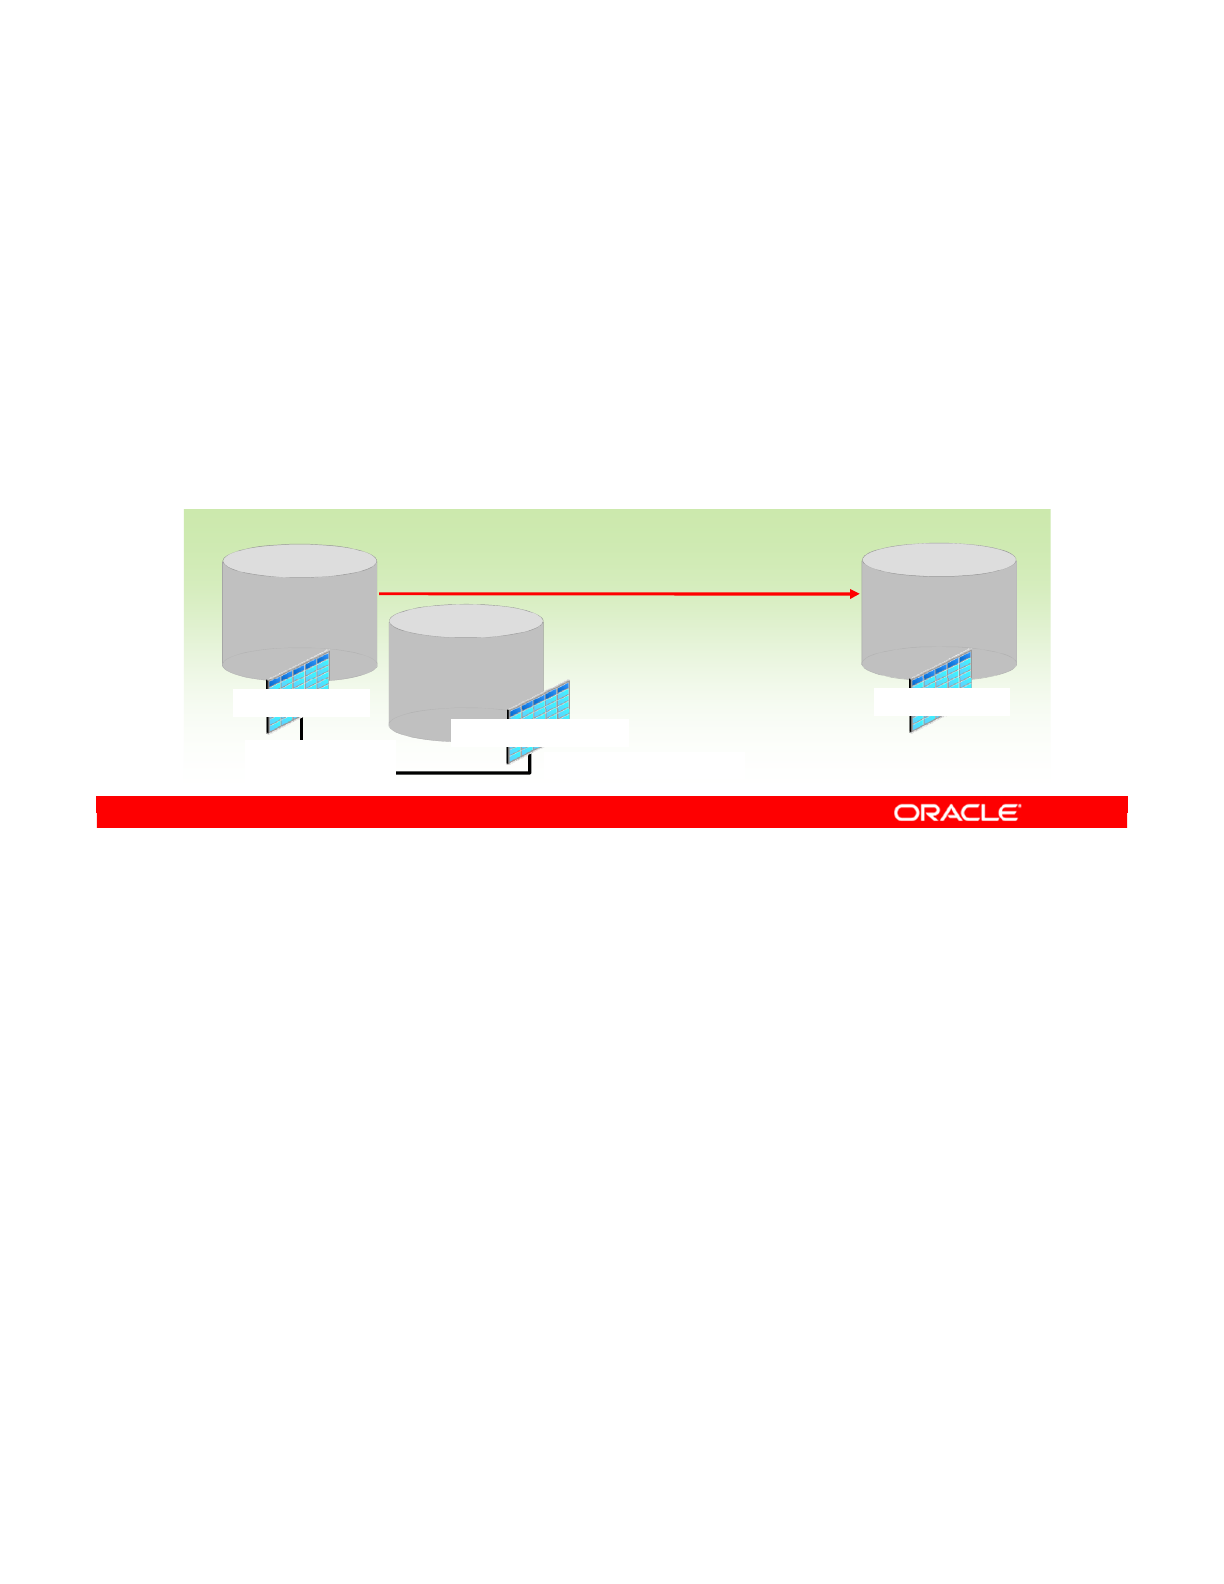
In the previous practice, TRG_PROD_FAMILY was a target table. In this practice,
TRG_PROD_FAMILY serves as one of the source tables.
First, you create a new ODI interface, INT-11-2 to load data into the TRG_PRODUCT target
data store table in the Oracle Sales Application model. You specify the source tables as
SRC_PRODUCT from the HSQL_SRC model, and TRG_PROD_FAMILY from the Oracle Sales
Application model.
TRG_PROD_FAMILY will be used as a lookup table to obtain the ID number generated by the
previous lesson’s interface, which used a sequence to populate the ID number.
For the lookup, you create a temporary index to join SRC_PRODUCT and TRG_PROD_FAMILY
in their FAMILY_NAME column.
Finally, you execute the interface, view the source code, and examine the inserted rows in the
TRG_PRODUCT target data store.
Oracle Data Integrator 11g: Integration and Administration 11 - 37
Copyright © 2012, Oracle and/or its affiliates. All rights reserved.
Practice 11-2: Overview
1. Create an ODI interface, INT-11-2, to load data into the
TRG_PRODUCT target table from two source tables.
2. Use source table TRG_PROD_FAMILY as a lookup table to
obtain the ID number (populated by a sequence in the
previous practice’s interface).
3. For the lookup, create a temporary index to join the two
source tables on the FAMILY_NAME column.
INT-11-2 Interface
Model
Oracle
Sales
Application
Target
TRG_PRODUCT
Sources
Model
HSQL_SRC Model
Oracle
Sales
Application
Create a unique index
LKM SQL to Oracle
TRG_PROD_FAMILY
SRC_PRODUCT
Create a join on
FAMILY_NAME
Oracle University and (Oracle Corporation) use only.
These eKit materials are to be used ONLY by you for the express purpose SELF STUDY. SHARING THE FILE IS STRICTLY PROHIBITED.
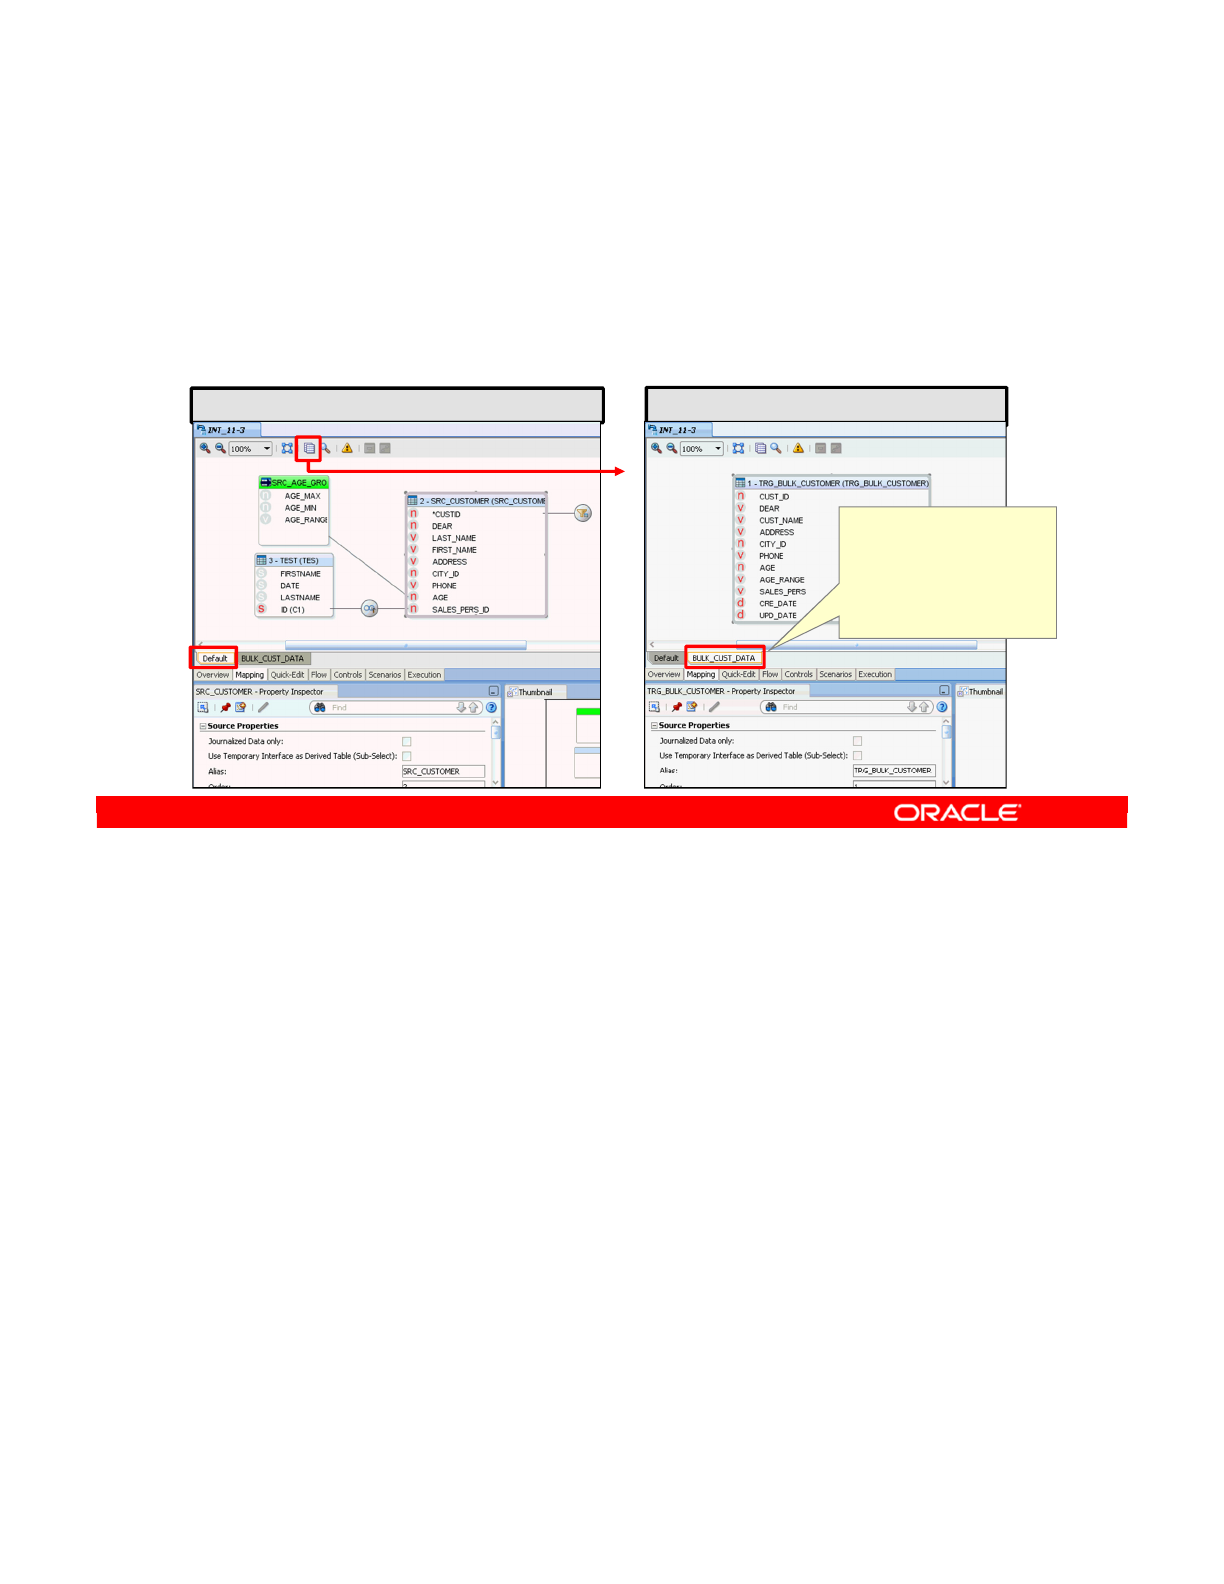
In this practice, you add a new data set to an interface. Building upon the interface INT_9-2
you created in Lesson 9, you will add a bulk feed of customer data from another system by
adding another data set.
First, you make a copy of interface INT_9-2, naming the copy as INT_11-3. This copy
includes the default data set you defined in INT_9-2.
Now you create a new data set, naming it BULK_CUST_DATA. For its source, you specify the
TRG_BULK_CUSTOMER datastore from the Oracle Sales Application model.
You specify the UNION operator to unite this new source of data with the default data set you
specified in INT_9-2.
Next, you perform execution simulation to preview the code that will be used for this new data
set with the UNION operator.
Finally, you execute the interface and verify the rows inserted into the target table.
Note: If you reverse-engineered your Oracle Sales Application model using the Production
context, you will not have the TRG_BULK_CUSTOMER datastore in your model. Rerun standard
reverse-engineering using the Development context to pull the metadata on that table from
the SALES_DEV physical schema.
Oracle Data Integrator 11g: Integration and Administration 11 - 38
Copyright © 2012, Oracle and/or its affiliates. All rights reserved.
Practice 11-3: Overview
1. Create a duplicate of interface INT_9-2 as INT_11-3.
2. Add a second dataset, BULK_CUST_DATA.
3. For the source, specify the TRG_BULK_CUSTOMER data
store from the Oracle Sales Application model.
Default dataset copied from interface INT_9-2
Add dataset
New dataset BULK_CUST_DATA
Specify the UNION
operator to unite the
new source of data
with the default
dataset.
Oracle University and (Oracle Corporation) use only.
These eKit materials are to be used ONLY by you for the express purpose SELF STUDY. SHARING THE FILE IS STRICTLY PROHIBITED.
