Oracle Database 10g OCP Certification All In One Exam Guide
Oracle%20Database%2010g%20OCP%20Certification%20All-in-One%20Exam%20Guide
User Manual:
Open the PDF directly: View PDF ![]() .
.
Page Count: 892 [warning: Documents this large are best viewed by clicking the View PDF Link!]

All-in-1 / Oracle Database 10g OCP Certification All-in-One / Watson & Bersinic / 5790-3 /Chapter 1
blind folio: P
PART I
Oracle Database 10g
Administrative I Exam
■ Chapter 1 Basic Oracle Concepts
■ Chapter 2 Installing Oracle Database 10g
■ Chapter 3 Creating an Oracle Database
■ Chapter 4 Interfacing with the Oracle Database
■ Chapter 5 Managing Oracle Processes
■ Chapter 6 Managing Oracle Storage Structures
■ Chapter 7 Administering Users
■ Chapter 8 Managing Database Objects
■ Chapter 9 Manipulating Database Data
■ Chapter 10 Programming Oracle with PL/SQL
■ Chapter 11 Securing the Database
■ Chapter 12 Confi guring Oracle Networking
■ Chapter 13 Managing Shared Servers
■ Chapter 14 Managing Database Performance
■ Chapter 15 Monitoring Oracle
■ Chapter 16 Managing Undo
■ Chapter 17 Dealing with Locking
■ Chapter 18 Confi guring the Database for Backup and Recovery
■ Chapter 19 Backing Up Oracle Databases
■ Chapter 20 Recovering Oracle Databases
■ Chapter21 Managing Globalization in Oracle Databases
ch01.indd 1ch01.indd 1 6/17/2005 4:39:32 PM6/17/2005 4:39:32 PM

All-in-1 / Oracle Database 10g Certification All-in-One / Meyers / 5790-3 / Chapter 23
blind folio: PB
All-in-1 / Oracle Database 10g Certification All-in-One / Meyers / 5790-3 / Chapter 23
blind folio: PB
ch01.indd 2ch01.indd 2 6/17/2005 4:39:57 PM6/17/2005 4:39:57 PM

All-in-1 / Oracle Database 10g Certification All-in-One / Meyers / 5790-3 / FM
blind folio: PB
All-in-1 / Oracle Database 10g OCP Certification / Watson & Bersinic / 5790-3 /Chapter 1
CHAPTER 1
Basic Oracle Concepts
In this chapter you will learn
• What a database is and what makes a database relational
• What SQL is
• Which database objects are supported in Oracle 10g
• What a database administrator does
• How the Oracle database fits into the Oracle product family
3
ch01.indd 3ch01.indd 3 6/17/2005 4:39:58 PM6/17/2005 4:39:58 PM

All-in-1 / Oracle Database 10g Certification All-in-One / Meyers / 5790-3 /Chapter 23
Oracle Database 10g OCP Certification All-in-One Exam Guide
4
Someone once said that the best place to start is at the beginning. With Oracle, that
means understanding where the idea of a relational database management system
(RDBMS) came from and what a database is—in computer and everyday terms. Even
though the material presented here may not be directly tested on the exam, this is
assumed knowledge, however, so a quick read is probably a good idea.
Introduction to Databases
and the Relational Model
In one form or another, databases have always been around, though their exact shape
was not always easily recognizable. As long as some form of data had to be stored,
there was always a method of storing it.
Databases, in their most simple form, are a mechanism for storing data. The data
can be logical, like the values stored in a computer program, or may be physical, like
a file or receipt. You probably have databases in existence all around you, but you
may not see them as such. For example, the shoebox in which you’ve placed your tax
receipts for the accountant is a database of your annual expenses. When you open a
file cabinet and take out a folder, you are accessing a database. The content of the file
folder is your data (e.g., your credit card statements, your bank statements, invoices,
purchase orders, etc.). The file cabinet and drawers are your data storage mechanisms.
Before the advent of computers, all data was stored in some easily recognizable
physical form. The introduction of computers simply changed the data from a physical
form that you can touch and feel to a digital form that is represented by a series of 1’s
and 0’s. Does the information that you display for an expense report on the computer
screen differ greatly from the same information in the hard-copy version of the expense
form? Perhaps the information is laid out differently than on the screen, but the key
elements—who was paid, what amount, how much was the tax, what was the purpose
of the expense, and so on—are all the same.
In looking at a database and its most basic set of characteristics, the following
points hold true:
• A database stores data. The storage of data can take a physical form, such as
a filing cabinet or a shoebox.
• Data is composed of logical units of information that have some form of
connection to each other. For example, a genealogical database stores
information on people as they are related to each other (parents, children, etc.).
• A database management system (DBMS) provides a method to easily retrieve,
add, modify, or remove data. This can be a series of filing cabinets that are
properly indexed, making it easy to find and change what you need, or a
computer program that performs the same function.
ch01.indd 4ch01.indd 4 6/17/2005 4:39:58 PM6/17/2005 4:39:58 PM

All-in-1 / Oracle Database 10g OCP Certification All-in-One / Watson & Bersinic / 5790-3 /Chapter 1
PB
Chapter 1: Basic Oracle Concepts
5
PART I
When data began to move from a physical form to a logical form using computers,
different theoretical versions of systems to manage data evolved. Some of the more
common database management systems in use over the last 50 years include the
hierarchical, network, and relational. Oracle is a relational database management system
(RDBMS).
The Relational Model of Databases
The relational model for database management systems was proposed in the June
1970 issue of Communications of the ACM—the Association of Computing Machinery
journal—by Dr. E.F. Codd, an IBM researcher, in a paper called “A Relational Model
of Data for Large Shared Data Banks.” For its time it was a radical departure from
established principles because it stated that tables that have related data need not
know where the related information is physically stored. Unlike previous database
models, including the hierarchical and network models, which used the physical
location of a record to relate information between two sets of data, the relational
model stated that data in one table needed to know only the name of the other table
and the value on which it is related. It was not necessary for data in one table to keep
track of the physical storage location of the related information in another.
NOTE The full text of Dr. E.F. Codd’s paper “A Relational Model of Data for
Large Shared Data Banks” can be found in the classics section of the ACM
web site at www.acm.org/classics/nov95/toc.html.
The relational model broke all data down into collections of objects or relations
that store the actual data (i.e., tables). It also introduced a set of operators to act on
the related objects to produce other objects (i.e., join conditions to produce a new
result set). Finally, the model proposed that a set of elements should exist to ensure
data integrity so that the data would be consistent and accurate (i.e., constraints). Codd
proposed a set of twelve rules that would allow designers to determine if the database
management system satisfied the requirements of the relational model. Although no
database today satisfies all twelve rules (because the database would run very slowly if
it did, since theory is not always the same as practice), it is generally accepted that any
RDBMS should comply with most of them.
The essence of the relational model is that data is made up of a set of relations.
These relations are implemented as two-dimensional tables with rows and columns
as shown in Figure 1-1. In this example, the Customers table stores information about
clients we deal with—their customer ID, their company name, their address, and so on.
The Orders table stores information about the client orders (but not the order line
items—these are in another table), including the order data, the method of payment,
the order date, and the ship date. The CustomerID column in both tables provides the
relationship between the two tables and is the source of the relation. The tables
themselves are stored in a database that resides on a computer. The physical locations
of the tables need not be known—only their names.
ch01.indd 5ch01.indd 5 6/17/2005 4:39:58 PM6/17/2005 4:39:58 PM

All-in-1 / Oracle Database 10g Certification All-in-One / Meyers / 5790-3 /Chapter 23
Oracle Database 10g OCP Certification All-in-One Exam Guide
6
For a database to be considered relational, and because the physical location of
rows is not something that a user querying data needs to know, the table must allow
for each row to be uniquely identified. The column (or set of columns) that uniquely
identifies a row is known as the primary key. Each table in a relational database
(according to database theory) must have a primary key. In this way, you are certain
that the specific value appears only once in the table. In Figure 1-1, the CustomerID
column of the Customers table is a primary key, ensuring that each CustomerID
appears only once in the table. For the Orders table, the OrderID is the primary key.
When relating tables together (the whole point of a relational database), the value
of a primary key column in one table can be placed in a column in another table. The
column in the second table holding the value is known as the foreign key. A foreign key
states that the value in this column for a row exists in another table and must continue
to exist, or else the relationship is broken. In Figure 1-1, the CustomerID column of
the Orders table is a foreign key to the CustomerID column in the Customers table.
In order for the relationship to be valid, any value placed in the CustomerID column
of the Orders table must already exist in the CustomerID column of the Customers
table. In other words, in order for a client to place an order, we need to know some
basic information about them. If we don’t have this information, the customer cannot
place an order. Oracle enforces the primary key–foreign key relationship through the
use of database constraints.
Figure 1-1
The Customers
and Orders tables
are related by
CustomerID.
ch01.indd 6ch01.indd 6 6/17/2005 4:39:59 PM6/17/2005 4:39:59 PM

All-in-1 / Oracle Database 10g OCP Certification All-in-One / Watson & Bersinic / 5790-3 /Chapter 1
PB
Chapter 1: Basic Oracle Concepts
7
PART I
SQL: The Structured Query Language
All of the relations in a relational database are managed by a relational database
management system. As indicated earlier, an RDBMS allows you to manipulate
relational tables and their contents. It provides a language that allows you to create,
modify, and remove objects in the database, as well as add, change, and delete data.
The language that Oracle uses is the Structured Query Language, or SQL. SQL was
originally developed by IBM, for whom E.F. Codd worked, and was first called
Structured English Query Language (or SEQUEL, for short). The name has been
shortened to Structured Query Language, or SQL, but it is still pronounced sequel.
SQL is actually a collection of several different “languages,” each designed for
a particular purpose. It is made up of the following:
• Data definition language (DDL) DDL is used to create and modify
database objects. DDL statements include CREATE, ALTER, DROP, RENAME,
and TRUNCATE. If you need to add a new table to the database, you use the
CREATE TABLE statement to perform this task. To remove an index, you use
the DROP INDEX statement, and so on.
• Data manipulation language (DML) DML is used to modify data in tables
in the database. DML statements include INSERT, UPDATE, and DELETE, as
well as extensions to control transactions in the database, including COMMIT,
ROLLBACK, and SAVEPOINT. The SELECT statement used to query data in
the database is not technically considered a DML command, although it is
sometimes included with the definition of DML because it deals with the
retrieval of data.
• Data control language (DCL) DCL is used to configure security to perform
database tasks and manipulate database objects. DCL statements include GRANT
and REVOKE. Permissions can be granted to allow a user to perform a task
such as creating a table, or to manipulate or query data, as by performing an
insert into a table in the database.
Another characteristic of an RDBMS is that tables in a relational database do not
have their relationship represented by data in one table storing the physical location
of the data in a related table. As you can see in Figure 1-1, the Customers table and
the Orders table are related by the data that exists in the CustomerID column of both
tables. The physical location on disk of each table does not factor into the relationship
between them. As long as a user querying the two tables knows the column that
relates them, he/she is able to formulate a SQL statement that will extract the data
satisfying the condition of that relationship (also known as the “join condition”).
Should one of the tables be moved to a different hard disk used to store data in the
database, the relationship will still hold true.
A third characteristic of an RDBMS is that the language used to manipulate the
database has a rich and varied set of operators that can be used to manipulate the
data and explore the relationships between the various tables. The SQL language
allows you to determine, through the proper use of operators, data that is related
ch01.indd 7ch01.indd 7 6/17/2005 4:39:59 PM6/17/2005 4:39:59 PM

All-in-1 / Oracle Database 10g Certification All-in-One / Meyers / 5790-3 /Chapter 23
Oracle Database 10g OCP Certification All-in-One Exam Guide
8
between tables, data where the relationship does not hold true, and much more. The
SQL language in its pure form does not, however, have any procedural elements of a
programming language such as loops, conditional logic, and the use of variables. Oracle
has extended SQL to include these elements through PL/SQL, a proprietary set of
language elements that can be used to create stored procedures, triggers, and other
subprograms.
RDBMSs have become popular in part for the preceding reasons. Nothing stays
static for long in the database world. Oracle, the first commercially available relational
database management system, has extended its database capabilities to support object
features.
Object Relational Database Management System
(ORDBMS)
Releases of Oracle prior to Oracle 8 were RDBMSs; that is, they followed the relational
model and complied with its requirements, and often improved upon them. With
the introduction of Oracle 8, Oracle was considered an object relational database
management system—something that is even more true with Oracle 10g. An ORDBMS
complies with the relational model but also extends it to support the newer object
relational database model introduced in the 1980s.
An ORDBMS is characterized by a number of additional features, including these:
• Support for user-defined datatypes This means that users can create their
own datatypes based upon the standard Oracle datatypes or other user-defined
datatypes. This feature allows for more accurate mapping of business objects
to database features and can reduce the time it takes to maintain databases
after they have been implemented.
• Support for multimedia and other large objects Oracle 8 and subsequent
releases up to 10g have full support for binary large objects, or BLOBs. This
means that it is possible to store large amounts of information such as video
clips, images, and large amounts of text in the column of a row. Even though
earlier releases of Oracle had a similar feature, it lacked functionality and was
not implemented in a way that conformed to object relational standards. The
current implementation is much improved.
• Full compatibility with relational database concepts Even though object
extensions have been added to Oracle, in order for it to remain an ORDBMS,
it needs to conform to the requirements of an RDBMS. Because of Oracle’s
strong legacy as an RDBMS, its object features can be leveraged along with the
relational features to provide robust solutions.
The one thing that defines Oracle as an ORDBMS is its capability to allow you
to create a user-defined datatype, which becomes an object in Oracle. For example,
if you wanted to use a common definition for a telephone number in several tables
(Customers, Suppliers, Employees, etc.) and wanted to be sure that any changes to
its characteristics would be inherited by all tables using it, you could create a new
ch01.indd 8ch01.indd 8 6/17/2005 4:39:59 PM6/17/2005 4:39:59 PM

All-in-1 / Oracle Database 10g OCP Certification All-in-One / Watson & Bersinic / 5790-3 /Chapter 1
PB
Chapter 1: Basic Oracle Concepts
9
PART I
datatype called “PhoneNumber” with the proper characteristics and then create the
tables using the PhoneNumber datatype as one of the column definitions. If the rules
for area codes, for example, changed, you could modify the attributes and methods of
the PhoneNumber datatype and all tables would inherit the change.
Database Objects
Every RDBMS needs to support a minimum number of database objects in order to
comply with the basic requirements for a relational database. Oracle supports these
and many more. This chapter presents only a listing of those objects, while subsequent
chapters will allow you to create and manipulate many of these objects.
Oracle’s collection of database objects includes all of those that are needed for
it to be called a relational database (tables, views, constraints, etc.) as well as others
that go beyond what is required and are included because they provide additional
functionality (packages, object types, synonyms, sequences, etc.). The full list of
database objects that Oracle 10g supports appears in Table 1-1.
Table 1-1 Oracle 10g Database Objects
Object Description
Table A collection of columns and rows representing a single entity (e.g., customers,
orders, employees, etc.).
Column A single attribute of an entity stored in a table. A column has a name and a
datatype. A table may have, and typically does have, more than one column as
part of its definition.
Row A single instance of an entity in a table, including all columns. For example,
a student row will store all information about a single student, such as that
student’s ID, name, and address.
Cell The term cell is used to refer to the intersection of a single column in a single
row. For example, the CompanyName column for CustomerID 10002 in our
example would be a cell holding that data—Bradley Systems.
Constraint A database object that is used to enforce simple business rules and database
integrity. Examples of constraints are PRIMARY KEY, FOREIGN KEY, NOT
NULL, and CHECK.
View A view is a logical projection of data from one or more tables as represented
by a SQL statement stored in the database. Views are used to simplify
complex and repetitive SQL statements by assigning those statements a name
in the database.
Index An index is a database object that helps speed up retrieval of data by
storing logical pointers to specific key values. By scanning the index, which is
organized in either ascending or descending order according to the key value,
you are able to retrieve a row quicker than by scanning all rows in a table.
ch01.indd 9ch01.indd 9 6/17/2005 4:39:59 PM6/17/2005 4:39:59 PM

All-in-1 / Oracle Database 10g Certification All-in-One / Meyers / 5790-3 /Chapter 23
Oracle Database 10g OCP Certification All-in-One Exam Guide
10
Table 1-1 Oracle 10g Database Objects (continued)
Object Description
Index-
organized table
A table whose physical storage is organized like an index. Unlike a regular
table, where rows are inserted in no particular order and querying all rows
will retrieve the data in random order, index-organized tables store data
organized according to the primary key defined on the table. The difference
between a table (referred to as storing data on a heap) and an index-
organized table is like the difference between storing all of your receipts in
a shoebox (i.e., in no specific order) and storing it chronologically according
to the date the expense was incurred. Taking the receipts out of the shoebox
will result in no specific logic in their retrieval, while doing the same when the
receipts are organized chronologically will allow you to predict that the June 2
receipt will appear before the August 1 receipt.
Partition Tables in Oracle 10g can be cut into pieces for more efficient physical storage.
A partition (or subpartition) holds a subset of the table’s data, typically on
a separate physical disk, so that data retrieval is quicker either by allowing
reads from more than one physical disk simultaneously (multipartition parallel
reads) or by not reading a partition’s data at all if it
is not required to satisfy the query (partition elimination).
Cluster A storage mechanism object that allows rows from more than one table to be
physically stored together for quicker retrieval. For example, if you store the
Order information (customer, payment info, delivery details, etc.) in one table
and the line items (item, cost, sale price, quantity, etc.) in a different table,
you will need to perform at least two reads to retrieve information about an
order: one for the order info and the second for line item info. Creating both
tables on the cluster organized by the order ID will allow Oracle to place the
order and line item data for the same order ID on the same physical block,
thereby reducing retrieval of that order’s information to a single read. The
downside of clusters is that they force you to preallocate a certain portion
or all of the disk space they require when rows are added or the cluster is
created.
Sequence A sequence allows you to create and increment a counter that can be used
to generate numerical values to be used as primary key values for a table.
Synonym As in the English language, a synonym is another name for an existing object.
Synonyms are used in Oracle as shorthand for objects with long names, or
to make it easier to remember a specific object.
Stored
procedure
A stored procedure is a collection of SQL and PL/SQL statements that
perform a specific task, such as to insert a row into a table or to update data.
Trigger A trigger is a special kind of stored procedure that cannot be invoked
manually but rather is automatically invoked whenever an action is performed
on a table. Triggers can be associated with a table and a corresponding action
such as INSERT, UPDATE, or DELETE as well as system events such as user
logon and logoff, or database STARTUP and SHUTDOWN.
Function A function is a stored program that must return a value. Unlike stored
procedures, which can have parameters passed to them and do not need
to return any value as output, a function must return a value.
ch01.indd 10ch01.indd 10 6/17/2005 4:40:00 PM6/17/2005 4:40:00 PM

All-in-1 / Oracle Database 10g OCP Certification All-in-One / Watson & Bersinic / 5790-3 /Chapter 1
PB
Chapter 1: Basic Oracle Concepts
11
PART I
Oracle also includes other objects that are beyond the scope of this book, including
dimensions, directories, materialized views, and more. These objects are created for a
specific purpose such as to facilitate data warehousing and their full coverage is beyond
the scope of this book.
Each object in an Oracle database is owned by a user. A user defined in an Oracle
database does not have to own any objects, but those that do are known as schema
users. A schema is a collection of all objects owned by a particular user, including tables,
indexes, views, and so on.
The Oracle Data Dictionary
As you may well imagine, a database may contain hundreds and even thousands of
objects. Keeping track of all this information is the job of the Oracle data dictionary. A
data dictionary in any database contains metadata information. Metadata is “data about
data,” or a set of tables and other database objects that store information about your
own tables and database objects.
The data dictionary in Oracle is a set of tables, called base tables, which contain
the most basic information about user-created database objects. These base tables are
owned by an Oracle user called SYS, which is created when the database itself is created.
The base tables are never accessed directly, as their names are cryptic by design to
discourage users from querying and modifying them. To make it easier to access the
data dictionary and get information on objects in the database, a series of views are
created during the database creation process. These views are commonly referred to
as data dictionary views.
Oracle has three sets of data dictionary views. They are as follows:
• USER_ views These views allow users to get information on objects that are
in their schema (i.e., objects that they have created and own).
Table 1-1 Oracle 10g Database Objects (continued)
Object Description
Package A package is a collection of stored procedures and functions grouped under
a common name. This allows you to logically group all program elements for
a particular part of the database under a single name for maintenance and
performance reasons.
User-defined
datatype
A user-defined datatype is a database object that can be used in any table or
another object definition. Using user-defined datatypes allows you to ensure
consistency between tables and also lets you apply methods (i.e., actions that
can be performed by the object) as part of the definition.
BLOB A BLOB is a binary large object used to store video, images, and large amounts
of text. BLOBs are defined as a column in a table and can be one of several
datatypes: BLOB, CLOB, NCLOB, or BFILE.
ch01.indd 11ch01.indd 11 6/17/2005 4:40:00 PM6/17/2005 4:40:00 PM

All-in-1 / Oracle Database 10g Certification All-in-One / Meyers / 5790-3 /Chapter 23
Oracle Database 10g OCP Certification All-in-One Exam Guide
12
• ALL_ views These views allow users to get information on objects that they
own or that they have been given access to. The ALL_ views contain a subset
of the information presented in the USER_ views for the same object and
allow users to find out what other objects they are allowed to reference or
manipulate in the database, in addition to the objects that they own.
• DBA_ views The DBA_ views, designed to be used by the database
administrator (DBA) of the database, provide a full set of information for
objects in the database, i.e., any object created by any user. Normal users
do not have access to these views, as special privileges are needed to SELECT
from them.
As you delve further in this book, you will be introduced to many DBA_ views
to help you in your duties as a database administrator. But, what does a database
administrator do in the Oracle world?
Responsibilities of a Database Administrator
One of my colleagues likes to comment that users of the databases for which he is
responsible think they control the databases. The reality, as he quite correctly puts it
(if in a control-freakish sort of way), is quite different. As a DBA, he can do whatever
he wants in any database he is responsible for, so he’s the one with control. Database
administrators do have a great deal of power, but it is important to remember that
with great power also comes great responsibility. Ultimately, the success and failure
of a database to respond to user requirements and satisfy corporate objectives rests
with the DBA. The DBA must take the blame and the praise for good or bad database
management.
The kinds of tasks DBAs in the Oracle world are responsible for include the
following:
• Sizing and evaluating server hardware As the individual responsible for the
smooth operation of databases in your organization, you will be called upon
to suggest the configuration of the server that will be used to run Oracle. Your
experience will play a key role here in determining the amount of memory,
hard disk, CPU, and other resources required to support the target database’s
operations. Understanding the architecture of Oracle and the data needs of
the business and the application will help you perform this task.
• Installing Oracle software and updates After you buy the software, the first
thing you need to do is bring it up. Installation of the Oracle software on the
target platform is the job of the DBA. It usually involves more than putting in
the CD and answering the prompts of the setup program because Oracle is a
very powerful system comprising a complex piece of software that has many
hooks and interactions with the operation system. Ensuring that the software
is installed and working properly is a key to being a successful DBA.
ch01.indd 12ch01.indd 12 6/17/2005 4:40:00 PM6/17/2005 4:40:00 PM

All-in-1 / Oracle Database 10g OCP Certification All-in-One / Watson & Bersinic / 5790-3 /Chapter 1
PB
Chapter 1: Basic Oracle Concepts
13
PART I
• Planning and designing the database structure Once the software is
installed, you need to make sure that the layout of the physical data structures
and logical elements of Oracle is done in an optimal way. If this is not the
case, performance will suffer and users will make their displeasure known.
If you have properly sized the hardware, this should be an easy task, since
you should have taken the database size and structure into account; if you
inherited the environment, you may need to use your expertise to determine
the optimal configuration.
• Creating databases As you will see in Chapter 3, this is a somewhat
anticlimactic task. Creation of the database is the first step to administering it.
Although relatively straightforward, the process can run into problems; with
experience, however, you should grow well equipped to fix these problems.
• Backing up databases and implementing other ways to safeguard the data
Once a database is in production and users are connecting to it, they may not
take it well if the database becomes unavailable. Even worse, if data is lost it
could mean lost productivity, sales, and customers. Ensuring that a database
is always available to users, that data loss is minimized, and that recovery is
quick and complete is perhaps one of the most important responsibilities of
the DBA.
• Creating and maintaining database users Once a new user needs to
gain access to the database or when the requirements and permissions of
another user change, the DBA must be able to make the necessary security
modifications to ensure appropriate access. In some cases, application
developers may not make use of Oracle’s built-in security fully, so being able
to recognize these situations and take appropriate action is also necessary.
• Implementing application and database designs Organizations may
purchase third-party software applications or hire database architects to
design a database to suit a specific database requirement when in-house
expertise is lacking. However, the actual implementation of these designs
will be undertaken by the DBA, since the DBA will be responsible for
ensuring that the database continues to work properly after the software
vendor or database architect leaves.
• Restoring and recovering databases Sometimes things go wrong. Hardware
fails, users improperly modify or delete data, or a natural disaster or some
other calamity befalls the data center. Being able to recover from a variety of
scenarios is critical. This is when the fault tolerance disaster recovery strategy
is tested for real—but it should also be tested in mock scenarios to ensure it
works. The DBA is the one that is answerable for their success or failure.
• Monitoring and tuning database performance In Star Trek: The Next
Generation there is an episode where the Enterprise assists a stranded vessel.
The vessel’s occupants are somewhat lacking in both engineering and
communication skills, but they do ask Captain Picard and Giordi to make
us go fast. Your users will frequently comment that the database is not fast
ch01.indd 13ch01.indd 13 6/17/2005 4:40:01 PM6/17/2005 4:40:01 PM

All-in-1 / Oracle Database 10g Certification All-in-One / Meyers / 5790-3 /Chapter 23
Oracle Database 10g OCP Certification All-in-One Exam Guide
14
enough. Keeping those comments to a minimum and solving performance
problems when (or before) they occur will reduce your stress level and
increase job satisfaction.
As you can tell, the duties of a DBA are wide and varied. It is an exciting position
whose goal can sometimes be summed up in one phrase: reduce the number of times
the phone rings in a day. If you get a lot of phone calls from users or management,
this is probably not a good sign and can make your day an unhappy one. Well-tuned
databases on appropriate hardware with good disaster recovery and backup strategies
will reduce your phone calls, make happy users, and increase your job satisfaction.
Sounds simple, right?
The Oracle Product Family
As an Oracle database administrator, you may be responsible for a database that is
actually part of another Oracle product or that complements or is relied upon by that
other product. Oracle has long since become more than just a database company—
though the Oracle database is at the heart of what Oracle Corporation does best. In
addition to the database, Oracle Corporation also offers these products, among others:
• Oracle E-Business Suite Also referred to as Oracle Applications, the
E-Business Suite is the premier enterprise resource planning (ERP) suite
in the industry. Encompassing many modules, including financials, human
resources, distribution, manufacturing, and many others, the E-Business
Suite allows organizations to leverage Oracle technology to better run their
businesses and increase profitability and customer satisfaction. Oracle
E-Business Suite makes use of the Oracle database, Application Server,
and Developer Suite to run and enhance the application.
• Oracle Collaboration Suite One of Oracle’s newest products, Collaboration
Suite encompasses e-mail, fax, calendaring, web conferencing, a files repository,
voice mail, and other modules to provide a single integrated platform for an
organization’s collaboration and communication infrastructure. Like Oracle
E-Business Suite, Collaboration Suite also incorporates the Oracle database
and Application Server as its foundation.
• Oracle Application Server A Java 2 Enterprise Edition (J2EE)–certified
server platform, Oracle Application Server integrates everything you
need to deploy and develop web-based applications. Oracle Application
Server includes a portal server and tools to develop portlets, Web Services
capabilities, content management, support for forms-based applications
using Oracle Forms, reporting using Oracle Reports, development using
PL/SQL or Java, and many other features. It also includes the capability to
configure and use a single sign-on server that interfaces with other third-
party directory services such as Microsoft’s Active Directory, Novell’s NDS,
and Sun’s iPlanet.
ch01.indd 14ch01.indd 14 6/17/2005 4:40:01 PM6/17/2005 4:40:01 PM

All-in-1 / Oracle Database 10g OCP Certification All-in-One / Watson & Bersinic / 5790-3 /Chapter 1
PB
Chapter 1: Basic Oracle Concepts
15
PART I
• Oracle Developer Suite If you need to develop applications for the Oracle
database or Application Server, Oracle Developer Suite provides tools for the
development of Java, PL/SQL, business intelligence, data warehousing, and
other applications.
• Oracle Consulting When you need assistance in your Oracle deployment,
Oracle Consulting can provide the expertise and individuals to help your
projects succeed.
• Oracle University The training of customers and partners on Oracle products
and technologies is the responsibility of Oracle University and its partners.
Instructor-led and online courses are available.
More information on the products available from Oracle Corporation can be
found on the Oracle web site at www.oracle.com.
Chapter Review
In this chapter you learned a bit about the history of the relational database management
system (RDBMS) concept. You also learned that SQL is actually three languages: a
data control language (DCL) for managing permissions on database objects, a data
definition language (DDL) for creating and managing those objects, and a data
manipulation language (DML) for adding, updating, or deleting data from the database,
as well as controlling those transactions. You saw what objects may appear in an
Oracle 10g database and read a brief description of each object, and you were briefed
on your responsibilities as a database administrator. Finally, you learned that Oracle
is not just a database company but one with a wealth and breadth of products and
services. At this point, you’re ready to start working with Oracle (after a few questions).
Questions
1. You need to recommend a platform for the deployment of your web-based
application written in Java. You need to make the management of web
page content easy as well as integrate security with your Active Directory
infrastructure. Which Oracle product will satisfy your requirements? (Choose
the best answer.)
A. Oracle Database
B. Oracle Application Server
C. Oracle Collaboration Suite
D. Oracle E-Business Suite
E. Oracle Developer Suite
2. For which of the following types of information stored in a database would
the use of a sequence be appropriate? (Choose two correct answers.)
ch01.indd 15ch01.indd 15 6/17/2005 4:40:01 PM6/17/2005 4:40:01 PM

All-in-1 / Oracle Database 10g Certification All-in-One / Meyers / 5790-3 /Chapter 23
Oracle Database 10g OCP Certification All-in-One Exam Guide
16
A. Invoice line item
B. Invoice number
C. Employee name
D. Atomic element
E. Customer identifier
3. What is a key benefit to making use of user-defined datatypes in Oracle?
(Choose the best answer.)
A. Ability to rename Oracle built-in datatypes
B. Inheritance
C. Polymorphism
D. Consistency of similar data structures across multiple tables
E. Easier maintenance of databases
4. Your organization has outgrown its hosted e-mail system. You also need to
implement web conferencing. Development of an interface to your in-house
telephone system will take place and needs to be integrated with a new voice
mail platform. Your developers are versed in Java on a Linux platform. Which
Oracle product provides the best fit for your organization’s requirements?
(Choose the best answer.)
A. Oracle Database
B. Oracle Application Server
C. Oracle Collaboration Suite
D. Oracle E-Business Suite
E. Oracle Developer Suite
5. Which of the following is not typically a responsibility of an Oracle database
administrator? (Choose the best answer.)
A. Creating new users
B. Creating database objects
C. Installing Oracle software
D. Application development to manipulate database data
E. Backing up the database
ch01.indd 16ch01.indd 16 6/17/2005 4:40:01 PM6/17/2005 4:40:01 PM

All-in-1 / Oracle Database 10g OCP Certification All-in-One / Watson & Bersinic / 5790-3 /Chapter 1
PB
Chapter 1: Basic Oracle Concepts
17
PART I
Answers
1. B. Oracle Application Server provides a Java 2 Enterprise Edition (J2EE)–
certified server for deploying your web-based application. It also includes
a portal server for creating new content and a content management server
for managing changes to content. Finally, the Oracle Internet Directory
component allows for integration with third-party directory services to
provide single sign-on functionality.
2. B and E. A sequence is an automatically generated chronological number,
ideal for invoice numbers or unique identifiers for database data, such as a
customer ID. Because a sequence is numeric in nature, it is not appropriate
for text-based data such as an order line item, employee name, or atomic
element.
3. D. Using a user-defined datatype, you can ensure that the same data is always
stored the same way in all tables. In other words, a phone number will
always have a consistent structure no matter what table it is in. It can make
maintenance of the database easier as well, but this is a secondary benefit.
4. C. Oracle Collaboration Suite provides e-mail, fax, and voice mail
functionality, as well as web conferencing, calendaring, and other features.
Because it also includes Oracle Application Server, it is the perfect product for
the development and deployment of a custom application to interface with
the phone system.
5. D. The development of the application that will interface with the database
and manipulate the data within it is not something that a DBA does. This task
is performed by an application developer. The DBA is responsible for all other
tasks listed in the question, including database security, software installation,
backup and recovery, and the creation and management of database objects.
ch01.indd 17ch01.indd 17 6/17/2005 4:40:01 PM6/17/2005 4:40:01 PM

All-in-1 / Oracle Database 10g Certification All-in-One / Meyers / 5790-3 / Chapter 23
blind folio: PB
ch01.indd 18ch01.indd 18 6/17/2005 4:40:02 PM6/17/2005 4:40:02 PM

All-in-1 / Oracle Database 10g OCP Certification All-in-One / Watson, Bersinic / 5790-3
CHAPTER 2
Installing Oracle Database 10g
In this chapter you will learn how to
• Identify system requirements
• Use Optimal Flexible Architecture
• Install software with the Oracle Universal Installer
• Identify and configure commonly used environment variables
1
ch02.indd 1ch02.indd 1 6/29/2005 9:55:19 AM6/29/2005 9:55:19 AM

All-in-1 / Oracle Database 10g OCP Certification All-in-One / Watson, Bersinic / 5790-3
Oracle Database 10g OCP Certification All-in-One Exam Guide
2
Understanding how a database works is a good starting point, but you actually need
to get the software installed in order to see the real thing in action. Ironically, installing
the software need not mean that you even create a database. Installing the Oracle 10g
database software means that you now have the tools to create and manage databases
at your disposal.
Oracle System Requirements
In order for Oracle 10g database software to be installed on a computer, you need to
ensure that all the prerequisites are met. Oracle, because it runs on so many platforms,
requires various forms of other software to be configured in order for it to work
properly. This includes additional packages on Linux systems, specific services
and software on Windows, kernel parameter sizing on Unix-based systems or any
combination of these, as well as other, platform-specific environment settings and
prerequisites.
Table 2-1 lists the minimum and recommended system requirements across most
Oracle platforms. Notice that the CPU type and speed are not listed. This is because the
operating system you are running will already determine which CPUs are supported.
Oracle will work on the CPUs supported by the operating system you intend to run
the software on. For a more specific list of system requirements, you should refer
to the operating system–specific installation guide found on the installation CD or
on the Oracle Technology Network (OTN) web site (www.oracle.com/technology/
documentation/database10g.html).
As a general rule, the more RAM you have in the computer, the better it is for
Oracle. RAM is the one resource that provides the best bang for the buck when it comes
to performance of an Oracle database. If you plan on running many databases on the
same server, increase the amount of RAM in the server to allow for smooth operation
of all instances.
System Requirement Minimum Recommended
Random Access Memory
(RAM)
512MB 1GB
Swap / Page File Space 1GB Twice the size of RAM
Temp Space (/tmp or \TEMP) 400MB 1GB
Disk Space 1.5GB for Oracle software
1.5GB for starter database
1.5GB for Oracle software
1.5GB for starter database
Operating system and version As specified in Oracle docs As specified in Oracle docs
Table 2-1 Minimum and Recommended System Requirements for the Oracle 10g Database
ch02.indd 2ch02.indd 2 6/29/2005 9:55:55 AM6/29/2005 9:55:55 AM

All-in-1 / Oracle Database 10g OCP Certification All-in-One / Watson, Bersinic / 5790-3
Chapter 2: Installing Oracle Database 10g
3
PART I
EXAM TIP Oracle always recommends more RAM be available than specified
in the system requirements. This avoids performance problems like paging and
swapping due to lack of resources.
In terms of disk space, if you plan on having your databases grow, you should
allocate additional disk space. The current thinking is disk is cheap, so add more space
as needed to support the size of databases you plan on running. Adding more disk
space can also allow you to more efficiently allocate that disk space for Oracle and
take advantage of striping or other techniques to further improve performance.
Oracle 10g database is supported on many different operating systems and
hardware platforms. While Linux and Windows may be the two most popular
choices these days, Oracle is also available for Solaris, IBM AIX, HP-UX, HP (formerly
Compaq) Tru64, and IBM z/OS (OS/390), as well as both 64-bit (AMD and Itanium)
and 32-bit variants of Windows and Linux. When deciding on a specific version of
an operating system, it is important to check Oracle’s MetaLink support site (http://
metalink.oracle.com) to ensure that your version of the operating system and platform
is on the certified list. Oracle supports only certified versions of the operating system.
For example, running Oracle on Red Hat’s Fedora Project Linux is not officially
supported, but Red Hat Linux Enterprise Edition AS and ES are supported. Always
verify, either through the documentation or by checking on the Certify and Availability
link on MetaLink, that you are installing Oracle on a supported platform.
EXAM TIP The most up-to-date list of supported operating systems and
versions can be found on Oracle’s MetaLink support site.
Optimal Flexible Architecture
With the release of Oracle 8, Oracle introduced Optimal Flexible Architecture, or OFA.
OFA is a method of naming mount points and directories and of organizing datafiles
and database components to make it easy for a DBA to locate files and administer
the database. The Oracle Universal Installer, when creating a starter database, will
conform to OFA rules in the creation of that database. Furthermore, the Oracle
Universal Installer will create a file and directory structure that will make compliance
with OFA easy to achieve in the creation of additional databases using the Database
Configuration Assistant.
The Optimal Flexible Architecture was developed by Oracle’s consulting services
to make the performance and monitoring of Oracle databases easier. OFA specifies
that at least three sets of directories should be used to reduce contention and provide
good performance. One set of directories will be used to store Oracle binary files such
as the Oracle executables themselves, as well as associated support files that should
normally not be changed. A second set of directories will be used to store controlfiles,
ch02.indd 3ch02.indd 3 6/29/2005 9:55:56 AM6/29/2005 9:55:56 AM

All-in-1 / Oracle Database 10g OCP Certification All-in-One / Watson, Bersinic / 5790-3
Oracle Database 10g OCP Certification All-in-One Exam Guide
4
redo log files, and other administrative files such as the parameter file for each database
on the computer. Finally, a third set of directories will be used to store all the data files.
Each set of directories should be on a separate physical hard disk, and further manual
optimization may also be required to ensure good performance.
While OFA is not perfect, it does provide the basis for good performance and
easier administration, including:
• A structured approach for locating the various files that are required and used
by Oracle. This structured approach, when followed, will allow any DBA to
easily become familiar with any database and server that they are asked to
administer.
• Easier administration of databases while performing such tasks as backing
up and restoring databases because of a familiar file and directory structure.
If you need to create additional data files, you will also be able to figure out
where to put the file by adhering to the OFA structure.
• Because the OFA configuration will make use of multiple physical disks on
the computer, this will allow for improved performance of the databases that
use it by reduced disk contention for datafiles, binary files, and redo log files.
While simply adhering to OFA principles is not enough to guarantee optimal
performance for your databases and server, it will provide a starting point for
further performance monitoring and tuning.
• If you have multiple Oracle homes on the same computer or are running
multiple versions of Oracle on the same computer, each version can adhere to
OFA principles and thereby make it less likely that files required by one version
of Oracle, or one Oracle package, will overwrite those of another version or
package. OFA helps to separate potentially conflicting files, thereby making
administration easier and contention less likely.
Directory and Mount Point Syntax
One of the things that makes OFA work well is a common naming scheme for mount
points and directories (folders). Using a common naming methodology helps make
it easier to organize and locate resources. The Oracle Database Configuration Assistant
(DBCA) will create many of the OFA components when it is used to create a database
in Oracle 10g. The Oracle Universal Installer used to install Oracle software will also
create OFA-compliant structures within the mount points and directories you indicate
as the base of the Oracle installation (ORACLE_BASE).
Recommendations for OFA-compliant naming scheme on a Linux/Unix platform
include:
• Name all mount points using a combination of a common string constant
and a variable value in the form /pm, where p is a string constant and m is a
variable value. For example, /u01, /u02, /u03, etc., or /ora01, /ora02, /ora03
would be good choices. Using this convention makes it easy to add additional
mount points that adhere to the naming convention.
ch02.indd 4ch02.indd 4 6/29/2005 9:55:57 AM6/29/2005 9:55:57 AM

All-in-1 / Oracle Database 10g OCP Certification All-in-One / Watson, Bersinic / 5790-3
Chapter 2: Installing Oracle Database 10g
5
PART I
• Within the mount points, name directories where Oracle software is installed
in the form /pm/h/u/product/v, where /pm is the mount point as indicated in
the preceding point, h is a standard directory name indicating a purpose such as
app or db or home, u is the name of the owner of the directory (since multiple
operating system users can install and own Oracle software), product is a literal,
and v specifies the product version installed in the directory. For example, the
location of the Oracle 10g database owned by an operating system user called
“oracle” could be /u02/db/oracle/product/10.1.0. The location of an Oracle 10g
Application Server installation could be /u01/app/oracle/product/9.0.4, or an
Oracle 8i database could be /u01/db/oracle/product/8.1.7.
• Within the directory structure you would create an admin directory and
additional subdirectories within the admin directory for storing specific file
types used by Oracle. The full pathname would be /pm/h/admin/d/a, where
admin is a literal, d is the SID (system identifier or name) of the database,
and a is a subdirectory for a specific administrative file type. The common
administration directories are shown in Table 2-2.
Subdirectory
Name Purpose Example
adhoc Ad hoc SQL and PL/SQL scripts for
the database
/u02/db/admin/ocp10g/adhoc
arch Location of archived redo log files /u02/db/admin/ocp10g/arch
adump Location of audit files—need to set
AUDIT_FILE_DEST parameter first
/u02/db/admin/ocp10g/adump
bdump Location of background process
trace files and the alert log file. Set
with the BACKGROUND_DUMP_
DEST parameter
/u02/db/admin/ocp10g/bdump
cdump Core dump file location. Set with the
CORE_DUMP_DEST parameter
/u02/db/admin/ocp10g/cdump
create Location of scripts used to create
the database. DBCA places scripts
in this location when you use it to
create a new database
/u02/db/admin/ocp10g/create
exp Recommended location of database
export files created by the Export
utility or Oracle Data Pump
/u02/db/admin/ocp10g/exp
logbook Location of database history and
status log files
/u02/db/admin/ocp10g/logbook
pfile The parameter files used to start the
database is placed here
/u02/db/admin/ocp10g/pfile
udump User process trace files are located
here. Set with the USER_DUMP_
DEST parameter
/u02/db/admin/ocp10g/udump
Table 2-2 OFA-Compliant Administrative Directories and Their Contents
ch02.indd 5ch02.indd 5 6/29/2005 9:55:57 AM6/29/2005 9:55:57 AM

All-in-1 / Oracle Database 10g OCP Certification All-in-One / Watson, Bersinic / 5790-3
Oracle Database 10g OCP Certification All-in-One Exam Guide
6
EXAM TIP The structure of the administrative directories of OFA is
important for the effective administration of Oracle, and Oracle strongly
recommends that it be used. DBAs are assumed to know the parameters
to set in Oracle to ensure that the appropriate files are located in the
OFA directory structure.
The naming of the mount points and directories is not enforced by Oracle. Rather,
it is strongly recommended that you follow the recommendations to make it easier
for you to identify what is installed on your computer’s hard drive. In a Windows
environment, the syntax is similar, though you could use drive letters for the mount
points or mount the partition in an empty NTFS folder that serves as the base of your
Oracle installation.
File-Naming Syntax
The final piece of a naming strategy needs to deal with the files located in the
directories. For Oracle’s data files, redo log files and controlfiles, the naming strategy
starts with a directory naming component—the root of your database file structure
(as opposed to the admin files outlined in the preceding section). The root of the
datafile structure is a directory in the form /pm/q/d, where pm is the mount point,
q is a literal indicating that the directory contains Oracle database data (e.g., “oradata”
or “oracle”), and d is the name of the database sourced either from the DB_NAME
parameter (recommended) or the ORACLE_SID environment variable. Examples
include /u03/oradata/ocp10g and /u01/ORACLE/mydb.
It is possible, and quite common, to have data for a database on multiple mount
points to spread the I/O workload across multiple physical disks and thereby provide
better performance. For this reason, you will probably see the same directory name
corresponding to a database on several mount points, such as /u02/oradata/ocp10g
and /u03/oradata/ocp10g. This method can also be used to separate different Oracle
database file types. These file types, and recommended naming convention are
outlined in Table 2-3.
File Type Purpose Naming Convention
Controlfiles Used to store information about the
database, its files, and their status.
As control.ctl or controlnn.ctl, where
nn is a number (control01.ctl)
Redo log files Store a record of changes to
database data as they occur.
As redonn.log, where nn is a number
(redo01.log)
Datafiles Store database data. As tablespacenamenn.dbf, where
tablespacename is the name of the
logical Oracle database storage
structure and nn is a number
(“system01.dbf” or “undo01.dbf”)
Table 2-3 Recommended Naming Conventions for Oracle Database Files
ch02.indd 6ch02.indd 6 6/29/2005 9:55:58 AM6/29/2005 9:55:58 AM

All-in-1 / Oracle Database 10g OCP Certification All-in-One / Watson, Bersinic / 5790-3
Chapter 2: Installing Oracle Database 10g
7
PART I
An important point to remember is that only Oracle database files indicated in
Table 2-3 should be stored in the OFA-compliant database file location. Storing other
files makes it harder to keep track of which file is where. The administrative directory
structure is used to store the other files used by an Oracle database and instance,
whereas the database file location is used to store all files related to the Oracle database
during normal operation—the control, redo log, and datafiles.
Installing Oracle Using
the Oracle Universal Installer
Now that you are familiar with OFA and have decided upon the directory structure
to be used for your Oracle installation, you can get the CDs out and are almost
ready to install Oracle on your computer. Because Oracle is a complex piece of software
running on many different operating systems, CPU architectures, and storage systems,
additional requirements will need to be verified and tasks completed in order to ensure
a successful installation.
Operating System Preparation
One of the first things you should do before installing the Oracle database software
is to read the appropriate installation guide for your operating system and platform.
These can be found on the Oracle Technology Network in the product documentation
section for Oracle 10g database (www.oracle.com/technology/documentation/
database10g.html). It is always a good idea to review the specific tasks that need to
be performed on your environment because kernel parameters, other systems settings,
and prerequisite software differ by platform. However, a couple of things are similar
across all platforms.
NOTE If you are installing Oracle on Linux, a special section of the OTN web
site located at www.oracle.com/technology/tech/linux/install/index html deals
with installing Oracle on Linux. Another good Linux resource is Werner
Pushitz’s Linux Page at www.puschitz.com (also linked from the OTN web
site). Oracle-Base (www.oracle-base.com) is a good resource for Linux and other
operating systems, as well as other Oracle product installation assistance.
Creating the User and Groups for Oracle
One of the first things you need to do before installing Oracle Database 10g is to
create an operating system user and group that will own the Oracle software. The
methods used depend on the operating system, but you should create at least one
user (called oracle from here on in) and two groups, one to own the Oracle installation
(oinstall will be used) and another to which users can be added for administering
Oracle (dba is a commonly used group name).
ch02.indd 7ch02.indd 7 6/29/2005 9:55:59 AM6/29/2005 9:55:59 AM

All-in-1 / Oracle Database 10g OCP Certification All-in-One / Watson, Bersinic / 5790-3
Oracle Database 10g OCP Certification All-in-One Exam Guide
8
For a Linux-based computer, you could issue the following commands while
logged in as the root user to create the groups and users, as well as specifying the group
ID and user ID values, the user’s default home directory (-d /home/oracle) and
the shell for the user (-s /bin/bash):
groupadd -g 500 oinstall
groupadd -g 501 dba
useradd -u 500 -g oinstall -G dba -d /home/oracle oracle -s /bin/bash
On Linux, in order to install Oracle you must log in as the oracle user. You will
also need the root user to perform some configuration of the operating system, so
make sure you know the root password or can have someone perform those tasks
when needed. You cannot complete an install on Unix or Linux without performing
the root-level operations.
NOTE If you will be installing Oracle on Linux and need some information
on Linux commands, a couple of articles of value can be found at the Linux
Technology Center on Oracle’s web site: www.oracle.com/technology/tech/
linux/index.html.
In Windows environments the DBA group needs to be a local group on the
computer where Oracle is being installed and must be called ORA_DBA. It is important
to note that you need not create this group before you install Oracle; it can be, and
often is, created after Oracle is already installed. The only user requirement for
installing Oracle on Windows is that the person installing the software must be logged
in to the computer as a user that is a member of the local Administrators group.
Setting the Environment
In order for Oracle to operate properly after it is installed, a number of environment
variables need to be configured for the oracle user. In Windows environments these
requirements are automatically taken care of by Registry entries that Oracle creates
when the software is installed, but in Unix and Linux these environment variables
need to be configured manually. While no environment variables need to be configured
when you are installing Oracle Database 10g and Oracle indicates that none should
be set before starting the installation, setting them can ensure that Oracle performs
properly during and after the install.
These are some variables that you may wish to set beforehand:
EXAM TIP You should be very familiar with these environment variables and
their uses.
• ORACLE_BASE The root of an OFA-complaint Oracle directory structure
for installation of all products on the computer. This environment variable
specifies the directory where all Oracle products are installed on the computer,
such as /opt/oracle.
ch02.indd 8ch02.indd 8 6/29/2005 9:56:00 AM6/29/2005 9:56:00 AM

All-in-1 / Oracle Database 10g OCP Certification All-in-One / Watson, Bersinic / 5790-3
Chapter 2: Installing Oracle Database 10g
9
PART I
• ORACLE_HOME The home directory of the current Oracle installation.
Typically specifies a directory under the path indicated by ORACLE_BASE
such as $ORACLE_BASE/product/10.1.0 on a Linux or Unix system.
• ORACLE_SID The identifier of the Oracle instance that you will connect to
or create. In most environments it must be eight characters or less, beginning
with a letter and containing letters and numbers. In Real Application Cluster
environments it must be five characters or less. The default initial instance
name is ORCL, though the ORACLE_SID must always be set to connect to
an instance locally.
• NLS_LANG Specifies the globalization settings for the Oracle installation in
the form language_territory.character_set. The default value for NLS_LANG is
“American_America.US7ASCII” in all environments except Windows, where
this value is set to the regional settings specified for the operating system and
keyboard setting.
NOTE If the keyboard setting in Windows is non-US English, then this will
also cause Oracle to set the NLS_SORT value to be set to other than binary,
thereby reducing optimizer effectiveness on character-based indexes. More
information on how NLS_LANG and other NLS-related parameters work
can be found in Chapter 21.
• DISPLAY On Unix environments you need to indicate to the Oracle
Universal Installer where to send graphical screen displays. The default
behavior is to inherit the value of the DISPLAY environment variable from
the operating system and send all output there. If you want to redirect the
graphical display to an X Window terminal or some other location, you will
need to set the DISPLAY environment variable in the form hostname:display,
such as opus01.haunting.com:1.0. The user installing Oracle must have
permissions to write to the display as well, which can be set using the
xhost command in Unix-based environments.
NOTE To allow all users to write to a specific DISPLAY, the root user can
issue the command xhost + to remove any security restrictions on that
display. This is a security risk and should not be used as a permanent solution.
Check the Linux/Unix documentation for more details on the proper usage
of the xhost command.
EXAM TIP Understanding how to set the DISPLAY environment variable and
use it during installation is worthwhile knowledge for the exam.
ch02.indd 9ch02.indd 9 6/29/2005 9:56:00 AM6/29/2005 9:56:00 AM

All-in-1 / Oracle Database 10g OCP Certification All-in-One / Watson, Bersinic / 5790-3
Oracle Database 10g OCP Certification All-in-One Exam Guide
10
Before starting the installation of Oracle on Unix-based systems, it is a good idea
to at least set the value of the ORACLE_HOME environment variable as the oracle
user to tell Oracle where the software is to be installed and to create the directory
path, as follows:
mkdir -p /opt/oracle/product/10.1.0
ORACLE_HOME=/opt/oracle/product/10.1.0 ; export ORACLE_HOME
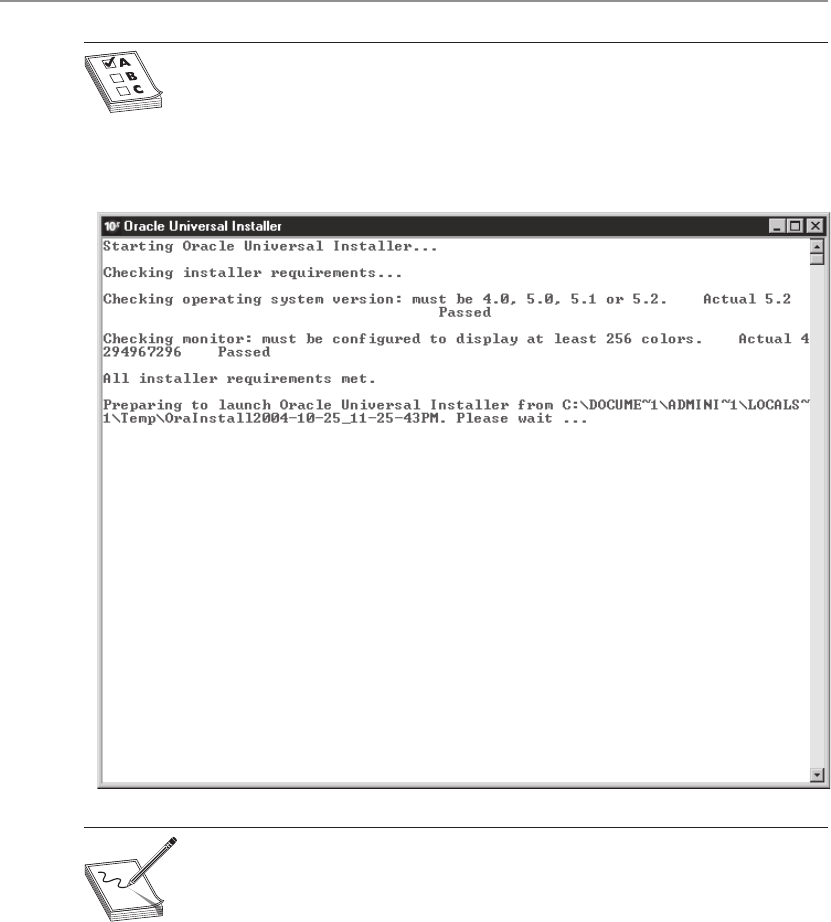
Installing Oracle Software
Oracle is installed on all platforms by running the Oracle Universal Installer (OUI).
This program is automatically invoked when you insert CD-ROM 1 of the installation
media for Oracle Database 10g in the CD drive. You can also start it by issuing the
runInstaller command from the CD-ROM on Unix-based systems or setup.exe
from the root of the CD-ROM in Windows.
The Oracle Universal Installer
The Oracle Universal Installer is a Java-based application that looks and feels the same
on all platforms. It includes a number of characteristics and features that facilitate a
robust installation and configuration set:
• Java-based design The Oracle Universal Installer is written in Java and looks
and feels the same on any Oracle platform.
• Dependency checking When you use OUI to install products on your
computer, it will automatically check to see which other products might
also need to be installed in order for your choice to function properly. The
Universal Installer will then determine if the required components are
already on the computer and select any it requires for installation.
• Multiple Oracle home support OUI will keep track of all the Oracle
home directories that exist on the target computer. Multiple Oracle homes
are required if you want to install the Oracle database, Application Server,
and other Oracle products and versions on the same computer. The Oracle
Universal Installer will ensure that each product that requires a separate
Oracle home will have it created and will keep track of which products and
versions are installed where.
• National language/globalization support When installing Oracle software,
the Universal Installer will check to see what the computer’s regional/
globalization settings are and configure itself to adhere to these settings. It
will also do the same for the software that is being installed to ensure that
the interactive experience that the user is expecting is delivered.
• Web-based installation When you are prompted by the Oracle Universal
Installer for the location of the software that you are installing, you can specify
a physical or network disk location, or a URL where the files can be found.
This allows you to create web pages that would be used to invoke the OUI and
ch02.indd 10ch02.indd 10 6/29/2005 9:56:01 AM6/29/2005 9:56:01 AM

All-in-1 / Oracle Database 10g OCP Certification All-in-One / Watson, Bersinic / 5790-3
Chapter 2: Installing Oracle Database 10g
11
PART I
then point users to a server close to them that contains the package files for
the application being installed. This can make large-scale deployments easier.
• Unattended installation The Oracle Universal Installer can be invoked from
the command line and passed the name of a response file that has all the
parameters required for the installation to proceed, as in this example:
runInstaller -responsefile
respfile
[-silent] [-nowelcome]
The -nowelcome command-line option tells the Oracle Universal Installer
not to display the welcome screen when started. The default is to display
the Oracle Universal Installer welcome screen. The -silent option tells the
Oracle Universal Installer not to tell the user what is happening during the
installation but to simply perform all of the tasks specified in the response file.
• Intelligent uninstallation Once you install the product using the Universal
Installer, it keeps a record of the installation and allows you to uninstall a
portion of the product or the product in its entirety. While performing an
uninstall the Universal Installer will prompt you if you need to uninstall
additional components, or if the uninstall will cause other products to fail,
such that they must also be removed or the specific portion of the uninstall
affecting them cancelled.
• Support for user-defined packages The Universal Installer allows you to
add your own components to the list of packages to be installed when it is
invoked. In this way you can install the Oracle server software and your own
software at the same time. Furthermore, if specific utilities need to run during
the installation process, the Universal Installer allows you to invoke them
automatically from your installation script.
Installing Oracle Database 10g
The first thing that happens is that OUI performs a number of system checks to ensure
that your computer is properly configured for Oracle and that you are logged in as a
user with the appropriate privileges to perform the installation.
The tests that are to be performed are stored in a file called oraparam.ini located
in the install directory of the first CD-ROM. It is possible to copy that file to another
location and then make changes to the system prerequisite checks or other actions if
you are familiar with editing its contents, though this is not recommended for users
new to Oracle and OUI. You can then manually invoke the installer from the command
line indicating which parameter file to use, as in the following example:
/mnt/cdrom/runInstaller -parameterFile /home/oracle/oraparam.ini
If you do not want the Oracle Universal Installer to perform any system checks,
you can invoke it with the following command line:
/mnt/cdrom/runInstaller -ignoreSysPrereqs
In both of these examples /mnt/cdrom is the path to the CD-ROM root in a Red
Hat Linux environment, and all commands and parameters are case sensitive.
ch02.indd 11ch02.indd 11 6/29/2005 9:56:02 AM6/29/2005 9:56:02 AM
All-in-1 / Oracle Database 10g OCP Certification All-in-One / Watson, Bersinic / 5790-3
Oracle Database 10g OCP Certification All-in-One Exam Guide
12
EXAM TIP You should be familiar with at least the two runInstaller
parameters indicated here and what they do.
After the system checks have been performed and passed (if things were not
properly configured, OUI will raise an error and advise you of corrective action),
the OUI welcome screen is displayed. Click Next to proceed.
NOTE The Oracle Installer on Windows has a Basic Installation option, in
which it installs everything in a default location and optionally creates a starter
database. If you choose this option, you will not be prompted for the other
items discussed in the text that follows. Choosing the Advanced Installation
option will prompt you for the items described herein.
If you are installing Oracle on a Unix-based system, you will next be asked to
provide the location of the Oracle installation inventory used by the Oracle Universal
Installer to keep track of the Oracle products installed on the computer, as well as the
operating system group to be used to install Oracle products—the oinstall group
referred to earlier. The default location for the inventory is $ORACLE_BASE/
oraInventory if the ORACLE_BASE environment variable is set; otherwise, another
ch02.indd 12ch02.indd 12 6/29/2005 9:56:02 AM6/29/2005 9:56:02 AM

All-in-1 / Oracle Database 10g OCP Certification All-in-One / Watson, Bersinic / 5790-3
Chapter 2: Installing Oracle Database 10g
13
PART I
location will be indicated. Specify the inventory path and Oracle installation group
and then click Next to continue.
EXAM TIP You should be familiar with the workings of OUI on Unix-based
platforms and the importance of the inventory location and files.
For Unix/Linux-based installations you will be prompted to run a script—
orainstRoot.sh—as root from the Oracle inventory directory you specified earlier.
This script needs to be run the first time any Oracle product is installed on a server.
It will create the inventory points file called oraInst.loc, usually at the location
specified by ORACLE_BASE—e.g., /opt/oracle/oraInst.loc—with a link to a file with
the same name in the /etc directory on a Linux system. You will need to connect to
your server as root (or open a terminal window in your X Window session and su
to root) and run this script that creates additional directories and sets appropriate
ownership and permissions on files. The contents of the script will be similar to this
code listing:
#!/bin/sh
INVPTR=/etc/oraInst.loc
INVLOC=/opt/oracle/oraInst.loc
GRP=oinstall
PTRDIR="`dirname $INVPTR1";
#Create the software inventory location pointer file
if [ ! -d "$PTRDIR" ] ; then
mkdir -p $PTRDIR
fi
echo "Creating the Oracle inventory pointer file ($INVPTR";
echo inventory_loc=$INVLOC > $INVPTR
echo inst_group=$GRP >\> $INVPTR
chmod 664 $INVPTR
# Create the Oracle inventory directory if it does not exist
if [ ! -d "$INVLOC" ] ; then
echo "Creating the Oracle inventory directory ($INVLOC)";
mkdir -p $INVLOC
chmod 775 $INVLOC
fi
echo "Changing groupname of $INVLOC to oinstall.";
chgrp oinstall $INVLOC
if [ $? != 0 ] ; then
echo "WARNING: chgrp of $INVLOC to oinstall failed!";
fi
After clicking OK to acknowledge that the script has been run successfully, you are
then asked to confirm the source of the installation media and the destination Oracle
home name and path. If you preset ORACLE_HOME, the destination path will be
filled in and a suggested name for the Oracle home will be displayed. The Oracle home
name and location will be placed by OUI into a file called /etc/oratab, which lists all
the Oracle homes for all products installed by OUI as well as any manually added
entries. This allows OUI to determine which products are found on the computer.
ch02.indd 13ch02.indd 13 6/29/2005 9:56:03 AM6/29/2005 9:56:03 AM
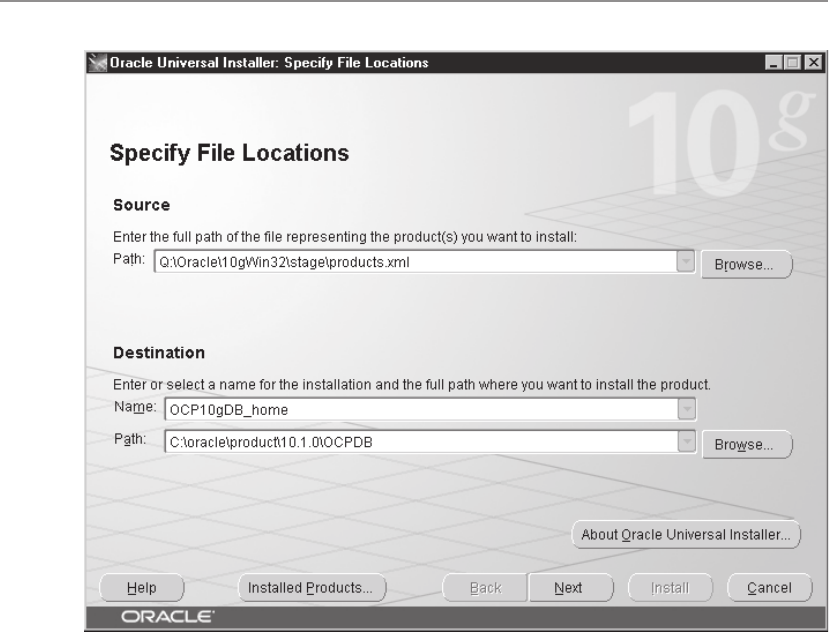
All-in-1 / Oracle Database 10g OCP Certification All-in-One / Watson, Bersinic / 5790-3
Oracle Database 10g OCP Certification All-in-One Exam Guide
14
Clicking Next takes you to the product selection screen, allowing you to choose
which edition of Oracle Database 10g to install on the computer. The default is
Enterprise Edition, which includes such enterprise-level features as Oracle Data Guard
(for the creation, management, and monitoring of standby databases for quick failover),
several features that extend the security of Oracle databases (Oracle Advanced Security,
Oracle Label Security, Enterprise User Security, Virtual Private Database, N-tier
authentication, and Fine-Grained Auditing and Access Control), and some additional
features to support enterprise data warehousing (Oracle Partitioning, Oracle OLAP,
Transportable Tablespaces, and others). You can also select Custom, allowing you
to choose components and features to install. You should always choose only the
database edition you are licensed for and install only the features that your
organization is licensed for. Make your choice and then click Next.
ch02.indd 14ch02.indd 14 6/29/2005 9:56:04 AM6/29/2005 9:56:04 AM
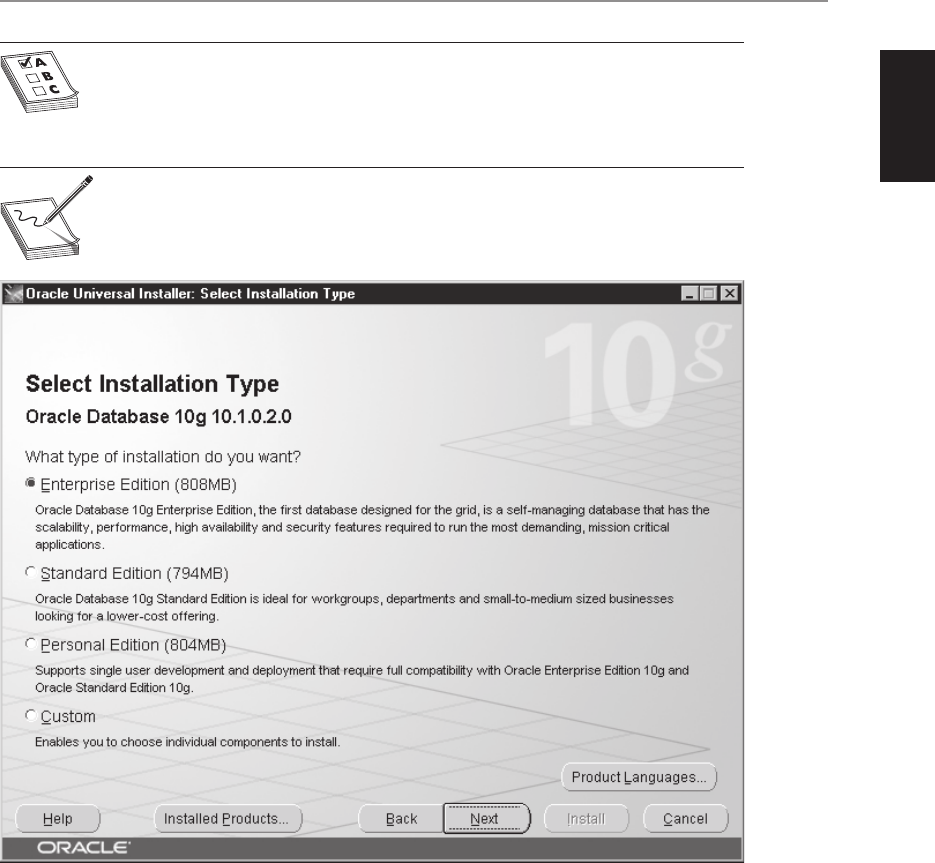
All-in-1 / Oracle Database 10g OCP Certification All-in-One / Watson, Bersinic / 5790-3
Chapter 2: Installing Oracle Database 10g
15
PART I
NOTE A Personal Edition of Oracle is also available. It includes all of the
features of the Enterprise Edition and is designed for software development
on a personal workstation.
EXAM TIP A good understanding of the different editions of Oracle Database
10g is required for the exam.
You will now have the option to create a starter database to use with Oracle or
to bypass this option. You can always create a database later, but creating it during
installation speeds up the process. Three preconfigured templates for a new database,
ch02.indd 15ch02.indd 15 6/29/2005 9:56:05 AM6/29/2005 9:56:05 AM
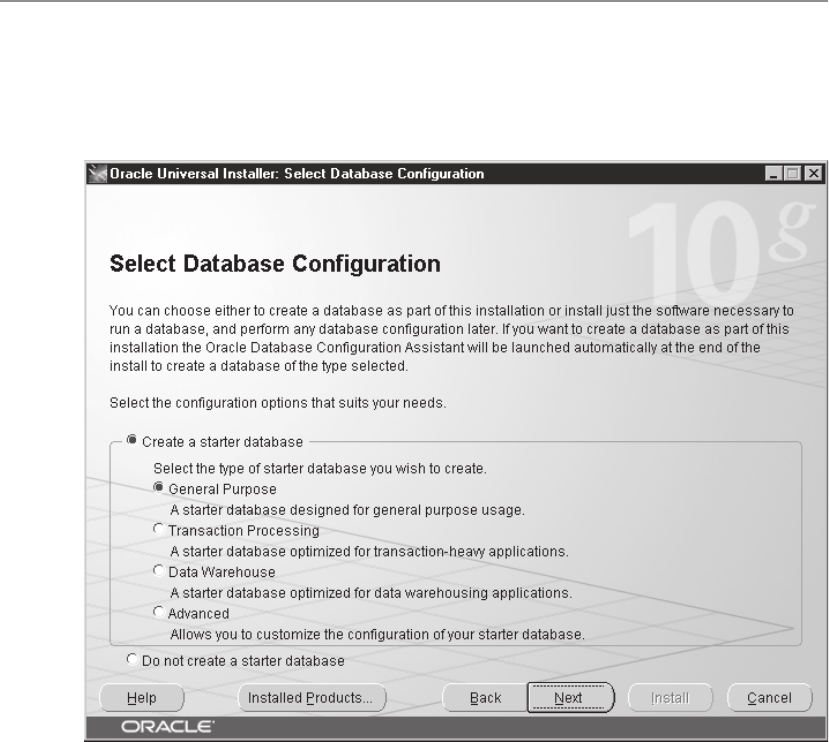
All-in-1 / Oracle Database 10g OCP Certification All-in-One / Watson, Bersinic / 5790-3
Oracle Database 10g OCP Certification All-in-One Exam Guide
16
which include database files, make the creation process quick, but you also have the
option to create a custom database, which takes longer and will create the datafiles
according to settings you specify. Make your selection and then click Next.
If you decided to create a starter database, you will be prompted for the global
database name in the format database.domain and the database SID (or system
identifier) of one to eight characters starting with a letter. Defaults will be presented
for these as well as for the character set to be used for the database (for which
guidelines for making a good choice will be provided in Chapter 3). You will also
ch02.indd 16ch02.indd 16 6/29/2005 9:56:06 AM6/29/2005 9:56:06 AM
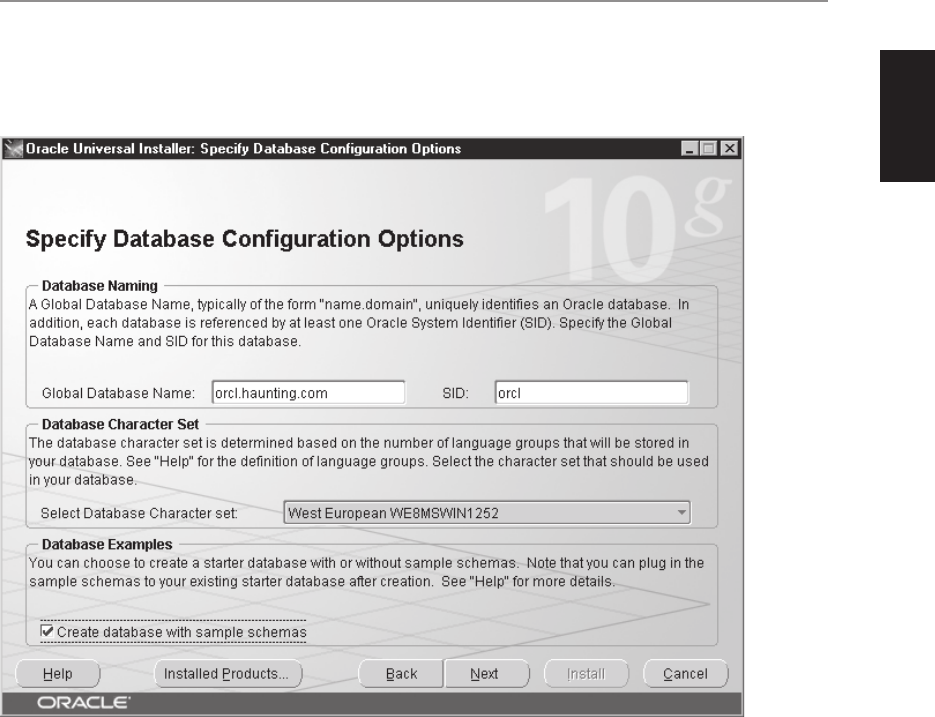
All-in-1 / Oracle Database 10g OCP Certification All-in-One / Watson, Bersinic / 5790-3
Chapter 2: Installing Oracle Database 10g
17
PART I
be asked whether or not to include sample schemas in the database. Make your
choices and then click Next.
If you installed the agent for the Oracle Enterprise Manager Grid Control on the
computer prior to installing Oracle Database 10g, you will have the option to use it
for the management of this database; if not, you can select the Database Control to
manage this database and instance. You also can specify an SMTP e-mail server and
administrator e-mail address for notifications to be sent to. Click Next to continue.
ch02.indd 17ch02.indd 17 6/29/2005 9:56:06 AM6/29/2005 9:56:06 AM
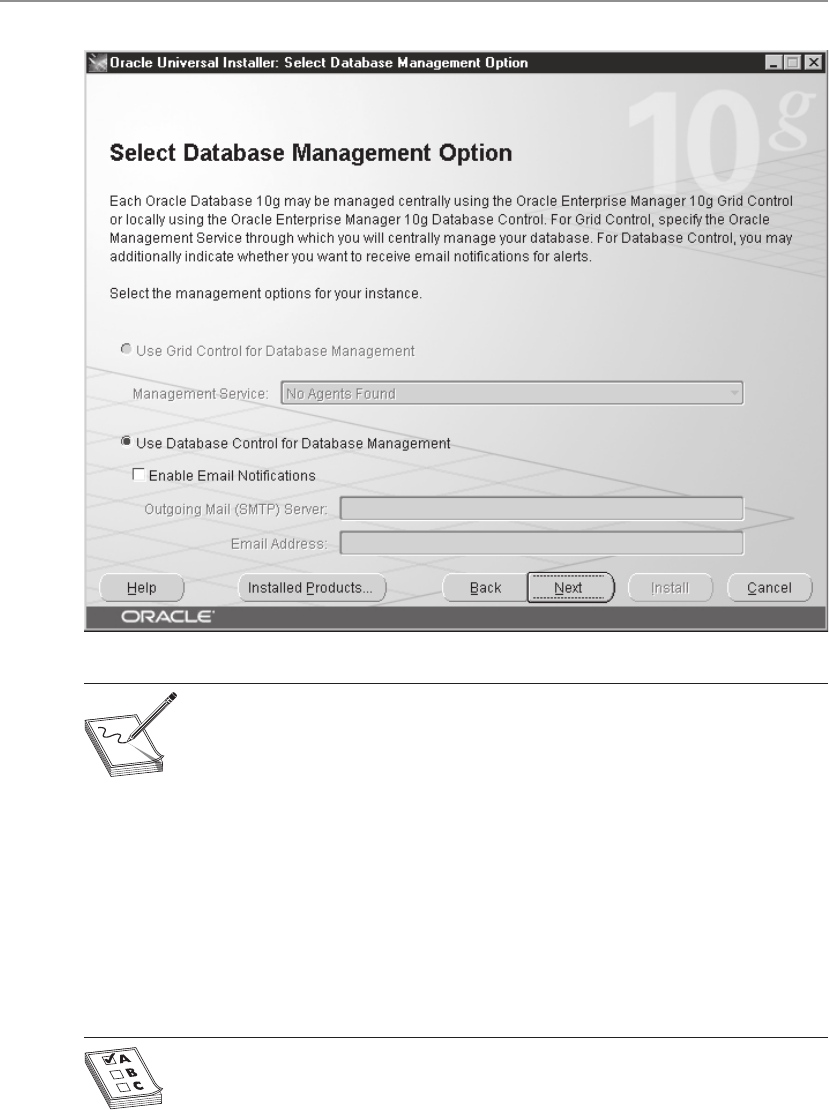
All-in-1 / Oracle Database 10g OCP Certification All-in-One / Watson, Bersinic / 5790-3
Oracle Database 10g OCP Certification All-in-One Exam Guide
18
NOTE Enterprise Manager Grid Control provides enterprise-wide
management of Oracle databases and other Oracle products—see www
.oracle.com/enterprise_manager/index.html for more information. A thorough
discussion is beyond the scope of the exam and the book.
The next screen will ask you how you want to store the database files: on the local
file system using Automated Storage Management (ASM), whereby Oracle creates and
manages the database files itself, providing striping and mirroring capabilities, or by
using raw devices or partitions dedicated to Oracle—an advanced method. The easiest
choice is always the local file system, though ASM has benefits worth considering,
so a review of the Oracle Database Administrators Guide on setting up ASM may be
worthwhile. You can find this manual on one of the CDs you were shipped or
on OTN.
EXAM TIP Oracle datafiles can be stored using three methods: file system,
ASM, and raw devices. The file system option also includes Oracle Cluster File
System and third-party disk storage arrays.
ch02.indd 18ch02.indd 18 6/29/2005 9:56:07 AM6/29/2005 9:56:07 AM
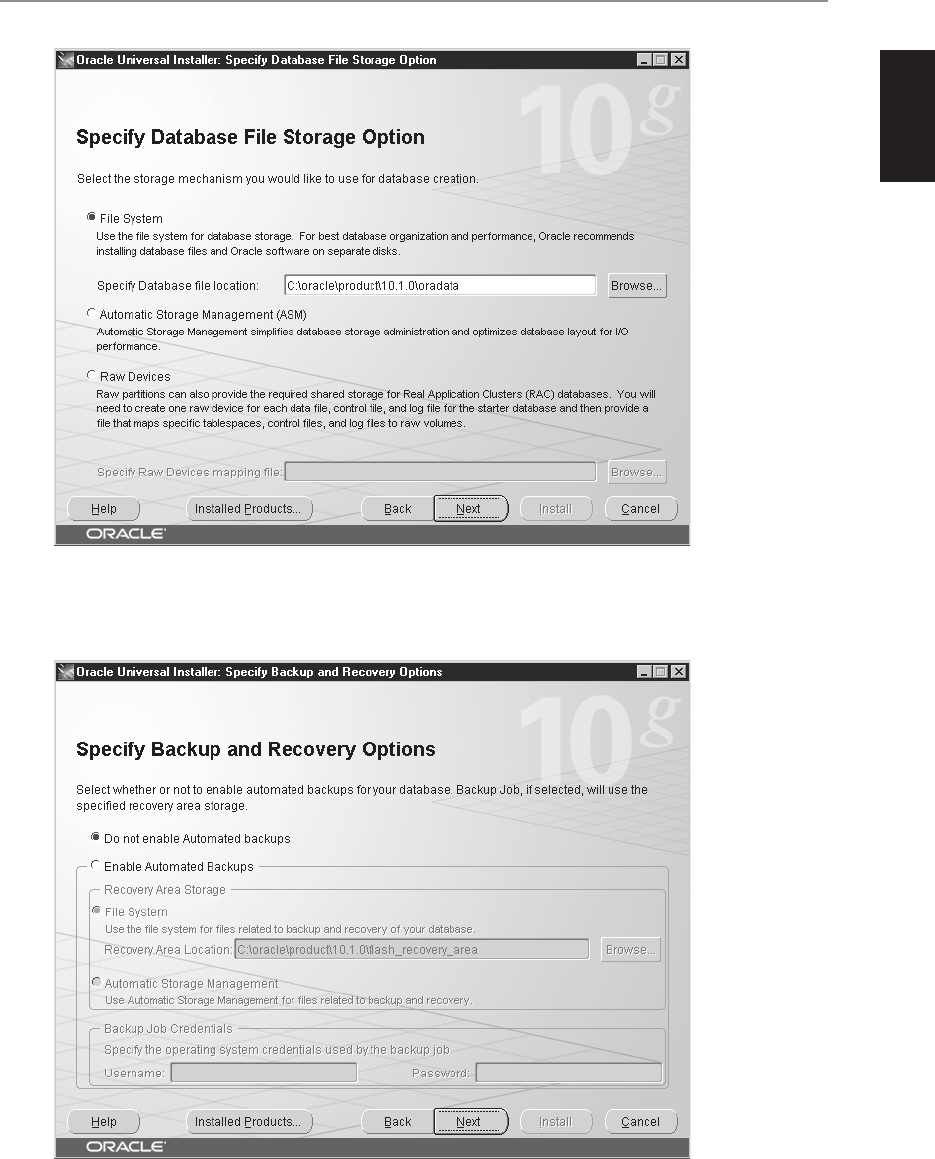
All-in-1 / Oracle Database 10g OCP Certification All-in-One / Watson, Bersinic / 5790-3
Chapter 2: Installing Oracle Database 10g
19
PART I
You next have the option to enable automatic backups. Typically it is a better idea
to configure backups after you have properly added objects to your database and have
it working as needed, so click Next on this screen to continue.
ch02.indd 19ch02.indd 19 6/29/2005 9:56:08 AM6/29/2005 9:56:08 AM
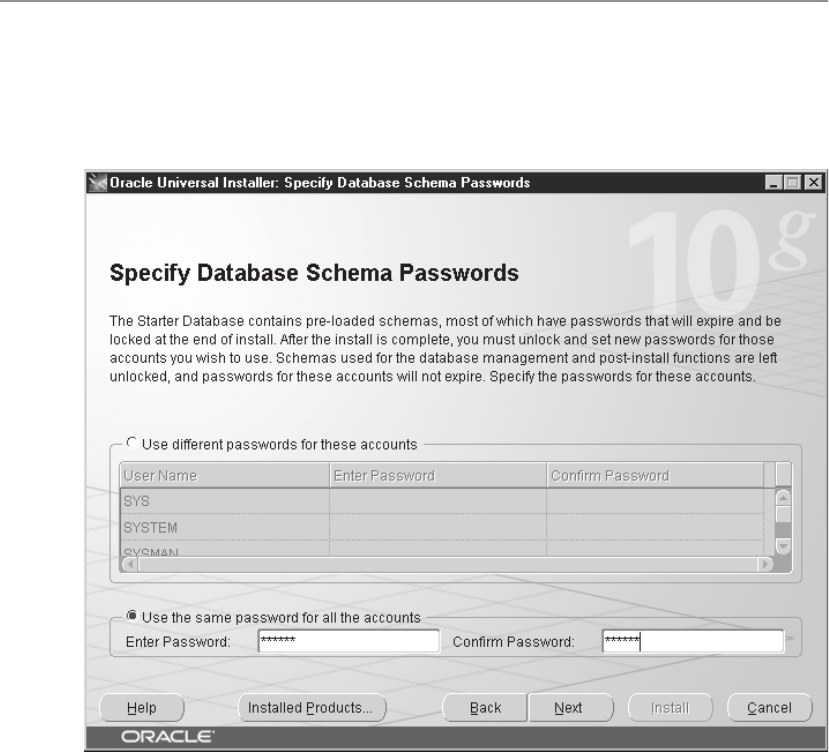
All-in-1 / Oracle Database 10g OCP Certification All-in-One / Watson, Bersinic / 5790-3
Oracle Database 10g OCP Certification All-in-One Exam Guide
20
On the screen displayed you will need to specify the passwords for the Oracle
users created initially. You can specify individual passwords for each user—the default
and recommended method—or a single password for each of the accounts listed.
Enter the appropriate passwords and confirm them and then click Next.
The next screen to appear is the Summary screen, which is also the screen you
would see if you did not choose to create a database but simply decided to install
Oracle. Review the actions that are going to be performed to make sure they are correct
and then click Install. You can always click the Back button and make changes if you
find incorrect entries on the Summary screen.
ch02.indd 20ch02.indd 20 6/29/2005 9:56:09 AM6/29/2005 9:56:09 AM
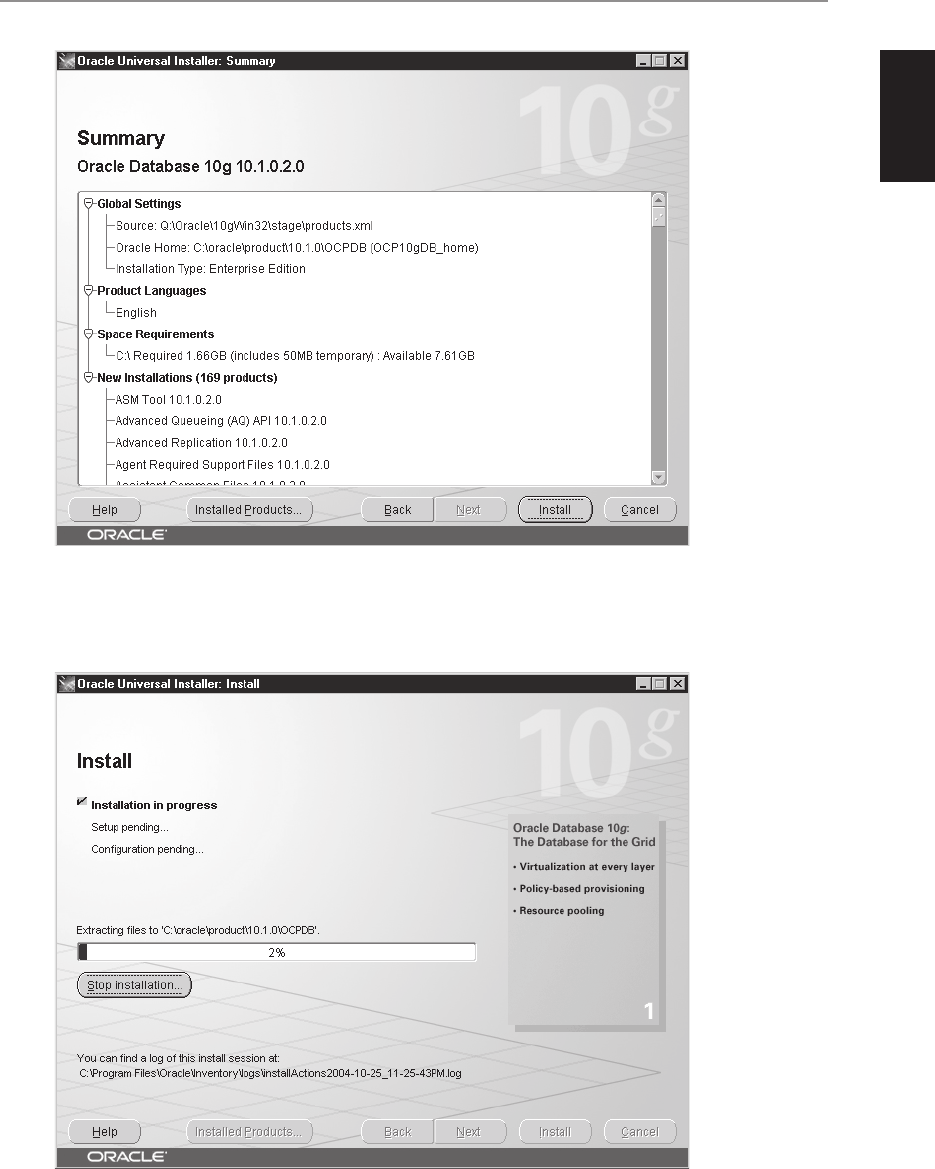
All-in-1 / Oracle Database 10g OCP Certification All-in-One / Watson, Bersinic / 5790-3
Chapter 2: Installing Oracle Database 10g
21
PART I
The Oracle Universal Installer starts the installation process and presents a status
bar indicating how far along the installation is. You will also be presented with
information on the location of the installation logfile at the bottom of the window
so that you can check for any errors that may have occurred.
ch02.indd 21ch02.indd 21 6/29/2005 9:56:10 AM6/29/2005 9:56:10 AM
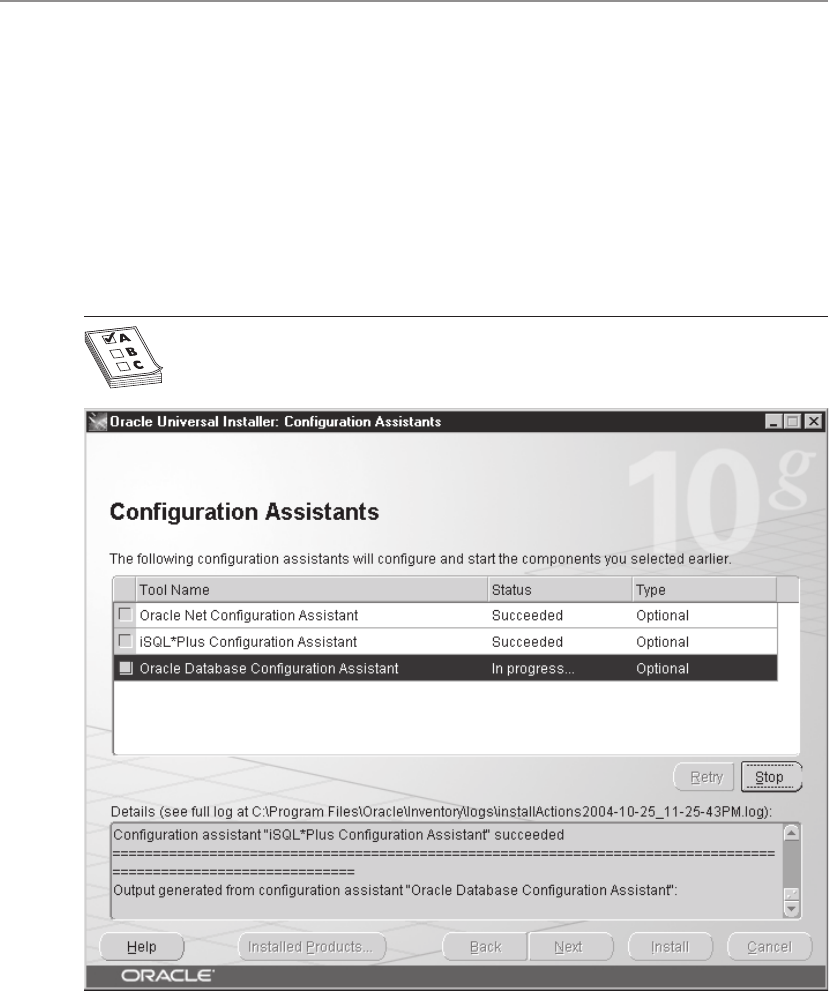
All-in-1 / Oracle Database 10g OCP Certification All-in-One / Watson, Bersinic / 5790-3
Oracle Database 10g OCP Certification All-in-One Exam Guide
22
When the installation is ready to configure the database, and only if you selected
a starter database, various configuration assistants will be launched individually
including the iSQL*Plus Configuration Assistant (for configuring the Oracle Containers
for Java—OC4J—instance used to connect to the Oracle database), the Oracle Net
Configuration Assistant (NETCA) to set up basic networking for the Oracle database,
and the Oracle Database Configuration Assistant (DBCA) to actually perform the
configuration of the database you selected for installation. You will be provided with
a screen to notify you which assistants are being launched and their status. At their
completion Oracle will specify if they succeeded or not, in which case you can retry
the ones that failed, and then the install is complete.
EXAM TIP Be familiar with what each configuration assistant does.
Once the Oracle Database Configuration Assistant has completed, you will be
provided with information on the URL for the Oracle Enterprise Manager web site and
have the option to unlock other user accounts in the database. Click OK to complete
the database configuration.
ch02.indd 22ch02.indd 22 6/29/2005 9:56:11 AM6/29/2005 9:56:11 AM
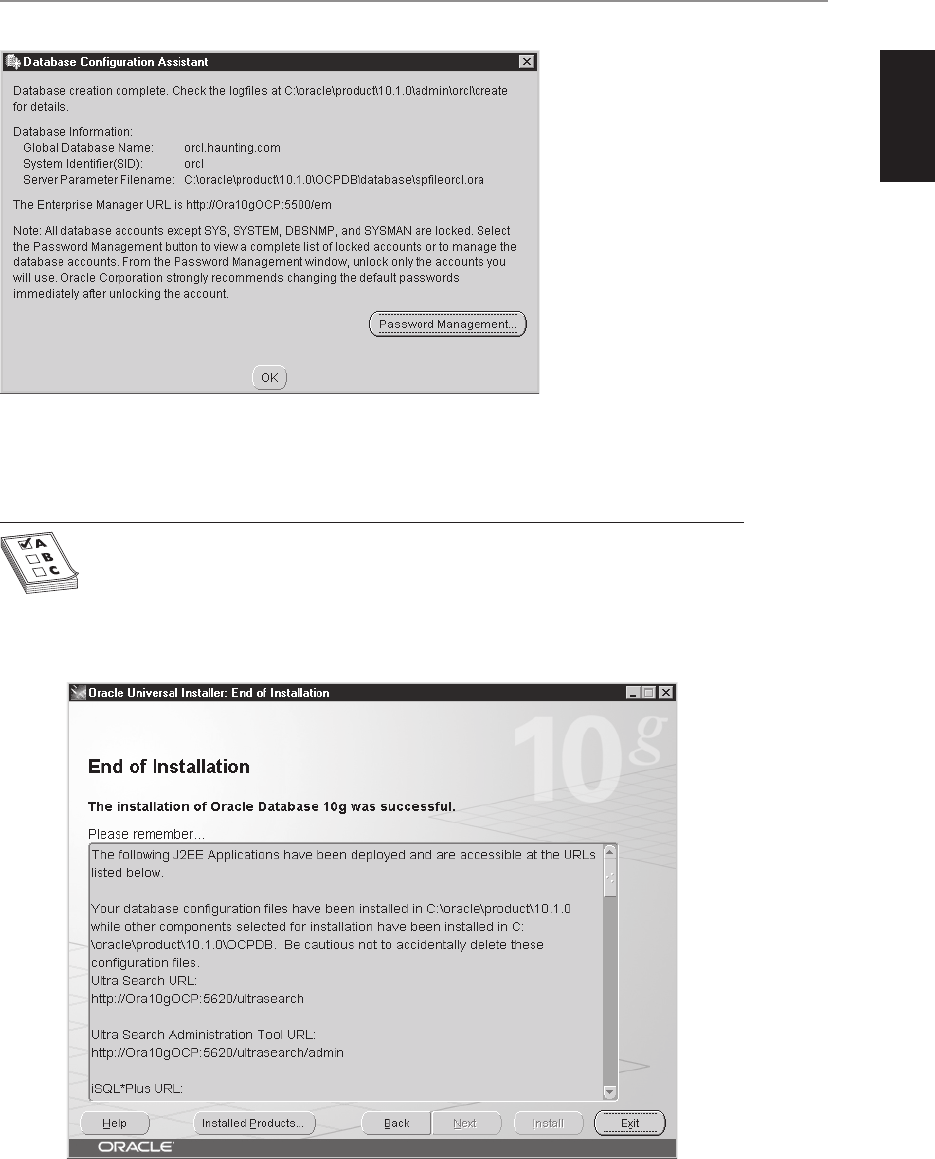
All-in-1 / Oracle Database 10g OCP Certification All-in-One / Watson, Bersinic / 5790-3
Chapter 2: Installing Oracle Database 10g
23
PART I
On Unix/Linux
platforms you will also
be asked to run a script
called root.sh as the
user root. This script
is located in ORACLE_
HOME directory and
populates the /etc/
oratab file with
information on the
Oracle homes and
database instances
on the computer. This
information is used
by Oracle Enterprise
Manager and other administrative components to determine where databases are
located, and whether or not they should be automatically started when the operating
system starts. In Windows this information is located in the Registry, and no script
needs to be run.
EXAM TIP Understand the importance, location, and contents of the
oratab file.
The final screen will provide a summary of all URLs for the various products
installed, including iSQL*Plus, Oracle Enterprise Manager, and Ultra Search. Make
a note of these and then click Exit to complete the installation.
ch02.indd 23ch02.indd 23 6/29/2005 9:56:11 AM6/29/2005 9:56:11 AM

All-in-1 / Oracle Database 10g OCP Certification All-in-One / Watson, Bersinic / 5790-3
Oracle Database 10g OCP Certification All-in-One Exam Guide
24
Exercise 2-1: Installing Oracle Database 10g
In this exercise you will install Oracle Database 10g on your computer and create
the starter database. You can perform this task on either a Windows or Linux-based
computer. Remember to create the user and group accounts and verify the system
requirements prior to starting the installation. If you do not have the software, you
can download Oracle Database 10g for your platform from the Oracle Technology
Network (http://otn.oracle.com).
NOTE Unix and Linux will be used interchangeably in this book. You should
assume that when one is mentioned, both are included.
1. Log on to your computer as the oracle user (on Linux) or a user that is a
member of the Administrators group on Windows.
2. Insert the Oracle Database 10g CD-ROM in the CD-ROM drive. The install
program should start automatically. If not, execute setup.exe (Windows)
or runInstaller from the root of the CD drive to invoke it.
3. If you are on Windows, choose the Advanced Installation option and click
Next; for Linux click Next on the Welcome screen.
4. If you are installing on Linux, you will be asked to confirm the location of
the inventory directory and the install group. Verify the information presented
and click Next.
5. If you are installing on Linux and are asked to run a script as root, launch
a new terminal window and run the script and then click Continue.
6. Verify the source and destination file locations in the Specify File Locations
screen. Enter a name for the Oracle home (16 characters or less) and then
click Next.
7. When prompted for the edition of Oracle to install, choose Enterprise Edition
and then click Next.
8. The Oracle Universal Installer will perform prerequisite checks. If there are
any errors, correct them and then click Next.
9. On the Select Database Configuration screen select a General Purpose starter
database and then click Next.
10. Enter a database name and SID. Choose a database name in the format
database.domain such as orcl.haunting.com and a SID name of ORCL. Leave
the character set and other choices as is and click Next to continue.
11. When prompted whether to use the Database Control or Grid Control
to manage the database, select Database Control and click Next.
12. On the File Storage Option screen, choose File System as the storage type
and a path for the datafiles, or leave the default and click Next.
ch02.indd 24ch02.indd 24 6/29/2005 9:56:12 AM6/29/2005 9:56:12 AM
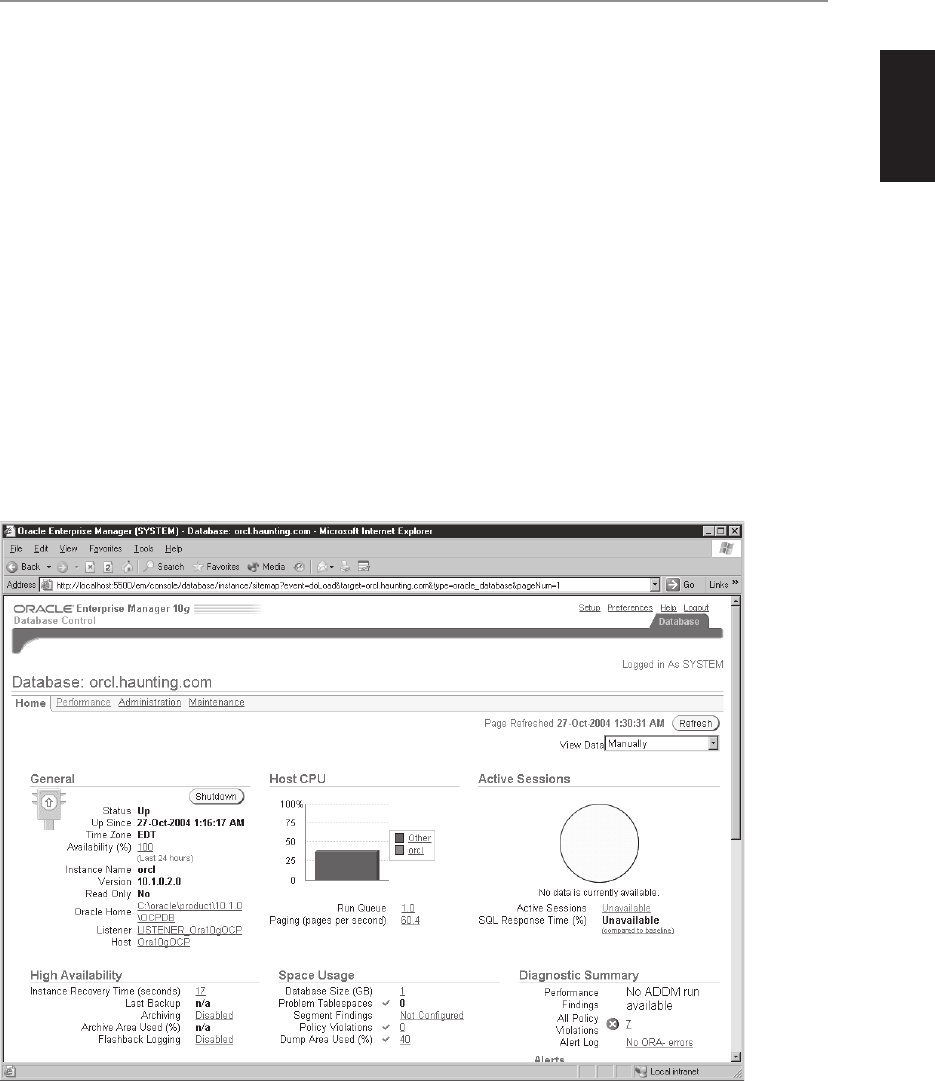
All-in-1 / Oracle Database 10g OCP Certification All-in-One / Watson, Bersinic / 5790-3
Chapter 2: Installing Oracle Database 10g
25
PART I
13. On the Backup and Recovery screen leave the default of no backups and
click Next.
14. Select “Use the same password for all accounts” on the following screen and
enter and confirm a password you will easily remember, such as “oracle.”
Then click Next.
15. Verify the installation parameters on the Summary screen and then click
Install to begin the installation of Oracle Database 10g.
16. Monitor the installation on the following screen and then review activity
as the configuration assistants are launched. This may take some time to
complete. Acknowledge the completion of the Database Configuration
Assistant by clicking OK on the dialog box presented and then review the
information on ports configured. Click Exit to end the Oracle Universal
Installer.
17. Start your web browser and navigate to http://localhost:5500/em to connect
to the Enterprise Manager web site. Enter a username of SYSTEM with the
password you specified in Step 14 and then click Login, acknowledge the
licensing screen by clicking “I Agree” to display the EM web site for your
database.
18. Close your browser. Congratulations—you have successfully installed Oracle
Database 10g on your computer.
ch02.indd 25ch02.indd 25 6/29/2005 9:56:13 AM6/29/2005 9:56:13 AM

All-in-1 / Oracle Database 10g OCP Certification All-in-One / Watson, Bersinic / 5790-3
Oracle Database 10g OCP Certification All-in-One Exam Guide
26
Post-Installation Tasks
If you installed Oracle on Windows, the Registry will have information on the path,
environment variables, and other settings that need to be configured in order to run
and manage the Oracle database on the computer. For Unix-based systems it is
necessary to configure the oracle user’s environment to administer and manage Oracle.
One of the easiest ways to do this is to create a shell script or modify the user’s login
script with the appropriate settings.
The required settings include configuring ORACLE_HOME, ORACLE_BASE,
ORACLE_SID, PATH, and other environment variables with the appropriate values.
The following is a sample of a Linux .bash_profile login script used for the BASH shell
with the appropriate settings to be used to manage the ORCL database created in the
previous exercise. You can use it is as template to modify your own file.
# Oracle Settings
TMP=/tmp; export TMP
TMPDIR=$TMP; export TMPDIR
ORACLE_BASE=/opt/oracle; export ORACLE_BASE
ORACLE_HOME=$ORACLE_BASE/product/10.1.0/orcl; export ORACLE_HOME
ORACLE_SID=ORCL; export ORACLE_SID
PATH=$ORACLE_HOME/bin:/usr/sbin:$PATH; export PATH
LD_LIBRARY_PATH=$ORACLE_HOME/lib:/lib:/usr/lib; export LD_LIBRARY_PATH
CLASSPATH=$ORACLE_HOME/JRE:$ORACLE_HOME/jlib:$ORACLE_HOME/rdbms/jlib; export
CLASSPATH
LD_ASSUME_KERNEL=2.4.1; export LD_ASSUME_KERNEL
ulimit -u 16384 -n 65536
Chapter Review
Oracle Database 10g can be installed on many platforms, including Windows, Linux,
and several varieties of Unix, as well as others. The Oracle Universal Installer is used
to perform the installation and provides a similar interface on all Oracle platforms.
Before installing Oracle, you will need to ensure your target computer and operating
system satisfy the prerequisites, as well as perform some preconfiguration tasks.
Optimal Flexible Architecture is a set of standard directory and file naming
conventions, as well as directory structures to make management of Oracle databases
easier. Though using an OFA-compliant directory and file naming method is not
enforced, it is strongly recommended to make your life easier.
Oracle Database 10g software is available in several editions, with Enterprise Edition
providing all of the features and functions, while Standard Edition lacks some of the
more advanced features such as Oracle OLAP and high-availability architecture.
Even though you have purchased the Enterprise Edition, you may not be licensed to
use the additional-cost features, such as Oracle Advanced Security, Oracle Partitioning,
or Oracle Data Mining.
Questions
1. You are asked to describe the benefits of the Oracle Universal Installer to your
manager. Which of the following are key features of OUI? (Choose all correct
answers.)
ch02.indd 26ch02.indd 26 6/29/2005 9:56:14 AM6/29/2005 9:56:14 AM

All-in-1 / Oracle Database 10g OCP Certification All-in-One / Watson, Bersinic / 5790-3
Chapter 2: Installing Oracle Database 10g
27
PART I
A. OUI performs identically on all platforms on which Oracle runs.
B. Web-based deployments can be performed using OUI.
C. OUI is written using a .NET-based language ideal for Windows platforms.
D. OUI is a text-based application not requiring a graphical display.
E. Unattended installations can be performed using OUI.
2. The oratab file contains the following information. (Choose two correct
answers.)
A. A list of all Oracle products installed on the computer
B. A list of all database instances and Oracle homes installed on the
computer
C. Version-specific information about each Oracle product and database
on the computer
D. Startup information for database instances on the computer
E. Information to help Enterprise Manager manage Oracle databases on the
computer
3. When installing Oracle on Unix-based systems, which of the following must
you create before starting the installation? (Choose three correct answers.)
A. The root user account
B. The oracle user account
C. The oracle group account
D. The oinstall user account
E. The oinstall group account
F. The dba group account
4. Installing Oracle on a Windows computer requires that you be logged in as
whom? (Choose the best answer.)
A. The oracle user
B. A user that is a member of the Domain Admins group
C. A user that is a member of the oinstall group
D. A user that is a member of the local Administrators group
E. Any user with login privileges on the computer
5. Which of the following environment variables must be set on Unix-based
computers before starting to install Oracle software? (Choose all correct
answers.)
A. ORACLE_HOME
B. ORACLE_BASE
C. ORACLE_SID
D. LD_LIBRARY_PATH
ch02.indd 27ch02.indd 27 6/29/2005 9:56:15 AM6/29/2005 9:56:15 AM

All-in-1 / Oracle Database 10g OCP Certification All-in-One / Watson, Bersinic / 5790-3
Oracle Database 10g OCP Certification All-in-One Exam Guide
28
E. All of the above
F. None of the above
6. When deciding between Enterprise Edition and Standard Edition of Oracle
software, which of the following needed features would require that you
purchase and install Enterprise Edition? (Choose two correct answers.)
A. Real Application Clusters
B. N-tier authentication
C. Support of multiple CPUs on the server platform
D. Oracle Enterprise Manager Database Control
E. The ability to partition data in the database
7. Which of the following paths are consistent with Optimal Flexible
Architecture? (Choose all correct answers.)
A. /opt/oracle/ocsdb
B. /opt/oracle/product/10.1.0/ocsdb
C. /opt/oracle/admin/ocsdb/bdump
D. /oracle/mydb
E. /opt/oracle/admin/bdump
8. You are deciding on whether or not to implement Optimal Flexible
Architecture for your Oracle installation. What are some of the considerations
in favor of using OFA? (Choose all correct answers.)
A. It provides a standardized directory structure, making files easier to find.
B. It provides a standardized naming convention for Oracle executable files.
C. It automatically spreads Oracle files across multiple disks when creating a
new database using a standard directory structure.
D. It makes all Oracle installations appear similar, reducing learning curves
for database administration of many servers.
E. It is required by Oracle.
9. You are installing Oracle Database 10g on a computer with the Red Hat
Enterprise Linux ES 4 operating system. You are certain that the Oracle
Universal Installer system check will fail on this operating system, but you
want to install Oracle anyway. How would you invoke the OUI and force it
not to perform system checks? (Choose the best answer.)
A. setup -ignorePreReqs
B. setup -ignorePrereqs
C. runInstaller -ignoreSysPrereqs
D. runInstaller -ignoreSysprereqs
E. runInstaller -bypassPrereqs
F. setup -bypassPrereqs
ch02.indd 28ch02.indd 28 6/29/2005 9:56:15 AM6/29/2005 9:56:15 AM

All-in-1 / Oracle Database 10g OCP Certification All-in-One / Watson, Bersinic / 5790-3
Chapter 2: Installing Oracle Database 10g
29
PART I
10. If you wanted to modify the file used by the Oracle Universal Installer with
system prerequisite information, which file would you modify? (Choose the
best answer.)
A. oraparam.ini
B. oraparam.ora
C. oraparam.ins
D. sysprereqs.ini
E. sysprereqs.ora
F. sysprereqs.ins
Answers
1. A, B, and E. Oracle Universal Installer is a graphical Java-based (not .NET-
based) application that runs identically on all Oracle platforms. It allows the
source location to be a URL, thereby allowing for web-based deployments,
and it can be run unattended for silent installations.
2. B and D. The oratab file on a Unix-based system includes a list of database
instances installed on the computer and an indicator whether or not the
instance should be automatically started when the computer is booted. It does
not contain a list of installed Oracle products (that’s in the installer inventory
location), any version-specific Oracle information, or Enterprise Manager
configuration details.
3. B, E, and F. Installing Oracle on a Linux-based computer requires that you
create the oracle user, and the oinstall (to own the Oracle installation
information) and dba (for database administration) groups prior to starting
the installation. The root user is created when you install the operating
system, though that user is required to complete parts of the installation.
4. D. Installing Oracle on a Windows computer requires that you be logged in as
a member of the local Administrators group. If you are logged in as a member
of the Domain Admins group, you will also be able to install Oracle but will
also have more privileges than needed, which may compromise security. The
oinstall group and the oracle user are needed in Unix-based environments.
5. F. None of the environment variables must be set for Oracle to be installed
on a Unix-based computer. However, in order to manage and administer
the database, the ORACLE_HOME, ORACLE_SID and LD_LIBRARY_PATH
variables may need to be set.
6. B and E. If you want to use N-tier authentication and partition table data
in your database, you must install and purchase Enterprise Edition. All of
the other features (RAC, multiple CPU support, and the Enterprise Manager
Database Control) are available in Standard Edition.
7. B and C. While Oracle does not require you to use OFA, when you decide to
use OFA the path and file naming conventions do set rules for usage. Only
ch02.indd 29ch02.indd 29 6/29/2005 9:56:16 AM6/29/2005 9:56:16 AM

All-in-1 / Oracle Database 10g OCP Certification All-in-One / Watson, Bersinic / 5790-3
Oracle Database 10g OCP Certification All-in-One Exam Guide
30
“/opt/oracle/product/10.1.0/ocsdb” for an ORACLE_HOME path and “/opt/
oracle/admin/ocsdb/bdump” for a background dump and log destination
adhere to the naming conventions specified by OFA.
8. A and D. OFA is targeted at making administration of Oracle databases easier
by making Oracle files easier to find on any platform and file system. In order
to do this, it provides a standardized directory structure for Oracle installations
that makes all Oracle installations similar, reducing learning curves for
administrators. It is not required by Oracle, but highly recommended. OFA
does not automatically spread files across multiple drives, nor does it provide
a naming convention for Oracle executable files, but only Oracle data, redo,
control, and other files attached to a database instance.
9. C. The runInstaller -ignoreSysPrereqs command will invoke OUI
on a Linux computer, telling it not to check system prerequisites before
performing the installation. OUI parameters are case-sensitive, making answer
D incorrect, while “setup” is the command to invoke OUI on a Windows
platform.
10. A. The oraparam.ini file contains the system prerequisite information used by
OUI to verify the operating system and other requirements for installation.
ch02.indd 30ch02.indd 30 6/29/2005 9:56:16 AM6/29/2005 9:56:16 AM

All-in-1 / Oracle Database 10g Certification All-in-One / Watson & Bersinic / 5790-3 /Chapter 3
CHAPTER 3
Creating an Oracle Database
In this chapter you will learn how to
• Create an Oracle database
• Explain the Oracle database architecture
• Explain the instance architecture
• Use the management framework
• Use DBCA to create a database
• Use DBCA to configure a database
• Use DBCA to drop a database
• Use DBCA to manage templates
1
ch03.indd 1ch03.indd 1 5/18/2005 11:10:41 AM5/18/2005 11:10:41 AM
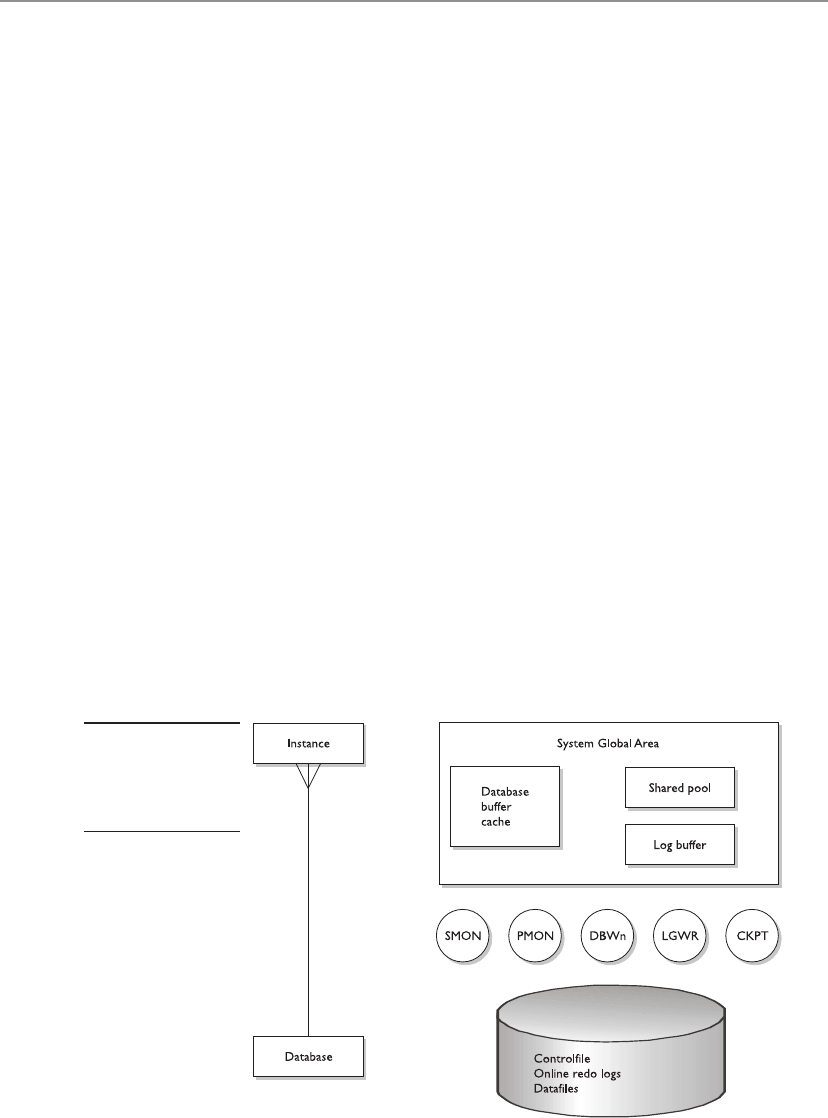
Oracle Database OCP 10g Certification All-in-One Exam Guide
2
All-in-1 / Oracle Database 10g Certification All-in-One / Watson & Bersinic / 5790-3 /Chapter 3
This chapter goes through the theory and practice of creating a database: a review of
the Oracle server architecture, followed by the mechanics of database creation with a
look at the relevant tools, both GUI and command line, and the management options.
But one immediate objective is to demystify the process. Creating a database is not a
big deal. You can create twenty databases during a tea break (and you may well have
to do this if you are, for example, supporting an IT teaching institution) once you
understand what is required and have prepared appropriate scripts. Furthermore, do
not worry about getting it right. Hardly anything is fixed at database creation time. It
certainly makes sense to think about how your database will be structured, its purpose
and environment, at creation time, but (with one exception) everything can be changed
afterward. As a general rule, keep things as simple as possible at this stage. Get the
thing created and working first, worry about configuring it for use later.
Architecture of the Oracle Server
An Oracle server consists of two entities: the instance and the database (as shown in
Figure 3-1). They are separate, but connected. During the creation process, the instance
is created first, and then the database. In a typical single instance environment the
relationship of instance to database is one-to-one, a single instance connected to a
single database, but always bear in mind that the relationship may be many-to-one:
multiple instances on different computers opening a common database on a shared
disk system. This is known as Real Application Clusters, or RAC. RAC gives amazing
capabilities for performance, fault tolerance, and scalability (and possibly cost savings)
and is integral to the Oracle’s concept of the grid. With previous releases RAC (or its
precursor, Oracle Parallel Server) was an expensive add-on, but with Database release 10g
Standard Edition, RAC is bundled. This is an indication of how much Oracle Corporation
Figure 3-1
The instance and
the database:
memory structures,
processes, and files
ch03.indd 2ch03.indd 2 5/18/2005 11:10:54 AM5/18/2005 11:10:54 AM

Chapter 3: Creating an Oracle Database
3
PART I
All-in-1 / Oracle Database 10g Certification All-in-One / Watson & Bersinic / 5790-3 /Chapter 3
wants to push users toward the RAC environment. Standard Edition RAC is limited to
computers with no more than two CPUs, and a maximum of four computers in the
cluster, but even that gives access to a phenomenally powerful environment. RAC is
an extra cost option for the Enterprise Edition, where the scalability becomes effectively
limitless: bounded only by the capacities of the underlying operating system and
hardware. It is also possible for one instance, through database links, to connect to
multiple databases. For the most part, you will be dealing with the most common
environment in this book: one instance on one computer, opening a database stored
on local disks.
The instance consists of memory structures and processes. Its existence is transient,
in your RAM and on your CPU(s). The database consists of physical files, on disk.
Thus the lifetime of the instance is only as long as it exists in memory—it can be
started and stopped. By contrast, the database, once created, persists indefinitely—
until you deliberately delete the files that compose it. Within the physical structures
of the database, which our system administrators see, are the logical structures that
our end users (developers, business analysts, data warehouse architects, etc.) see. The
Oracle architecture guarantees abstraction of the logical from the physical: there is
no way that a programmer can determine where, physically, a bit of data is located.
He/she addresses only logical structures, such as tables. Similarly, it is impossible for
a system administrator to know what bits of data are in any physical structure: all he
can see is the operating system files, not what is within them. Only you, the database
administrator, is permitted (and required) to see both sides of the story. The data
dictionary, which contains metadata describing the whole server, manages the
relationship between physical and logical structures. Creating the data dictionary is
an integral part of database creation. The final stages of the creation process make the
newly created database usable, by generating various views and PL/SQL packages, and
manageable, by generating the Enterprise Manager Database Control facility.
The Instance: Memory Structures and Processes
An Oracle instance consists of a block of shared memory known as the System Global
Area, or SGA, and a number of processes. At a minimum, the SGA will contain three
data structures: the shared pool, the database buffer cache, and the log buffer. It may,
optionally, also contain a large pool, a Java pool, and a streams pool. Some of these
SGA structures are fixed in size when you start the instance; others can be changed
dynamically. But none are fixed at database creation time: you can stop the instance
and restart it whenever you please, with a totally different memory configuration. You
should remember, though, that if you are continually making memory configuration
changes on a live system and those changes are of a type that requires the instance to
be shut down, incurring downtime, your end users will not be happy with you.
EXAM TIP Remember the three required elements of the SGA: the shared
pool, the database buffer cache, and the log buffer.
ch03.indd 3ch03.indd 3 5/18/2005 11:10:55 AM5/18/2005 11:10:55 AM

Oracle Database OCP 10g Certification All-in-One Exam Guide
4
All-in-1 / Oracle Database 10g Certification All-in-One / Watson & Bersinic / 5790-3 /Chapter 3
The shared pool is further subdivided into a number of other structures. This
book will only briefly mention two of the shared pool components: the library
cache and the data dictionary cache. The library cache is a memory area for storing
recently executed code, in its parsed form. Parsing is the conversion of code written
by programmers into something executable, and it is a slow process that Oracle does
on demand. By caching parsed code in the shared pool so that it can be reused without
reparsing, performance can be greatly improved. The data dictionary cache stores
recently used object definitions: descriptions of tables, indexes, users, and other
metadata definitions. Keeping such definitions in memory, rather than having to
read them repeatedly from the data dictionary on disk, enhances performance.
The database buffer cache is Oracle’s work area for executing SQL. Users don’t ever
update data on disk. They copy data into the database buffer cache and update it there,
in memory. Ideally, all the data that is frequently accessed will be in the database buffer
cache, therefore minimizing the need for disk I/O.
The log buffer is a very small memory structure used as a short-term staging area
for all changes that are applied to data in the database buffer cache. Chapter 9 will
describe in detail how the log buffer and the database buffer cache are used when SQL
statements retrieve and manipulate data.
The large pool is an optional area that, if created, will be used automatically by
various processes that would otherwise take memory from the shared pool. You will
be introduced to one of its main uses in Chapter 13 in the discussion on shared (or
multithreaded) servers. The Recovery Manager, RMAN, covered in later chapters, will
also use the large pool for its disk and tape I/O slave processes.
The Java pool is required only if your application is going to run Java stored
procedures within the database: it is used for the heap space needed to instantiate
the Java objects. However, a number of Oracle options are written in Java, so the
Java pool is considered standard nowadays.
The streams pool is used by Oracle streams, an advanced tool that is beyond the
scope of the exam or this book.
TIP The sizing of SGA memory structures is critical for performance. In
general, they should be large enough, but not too large. In addition to wasted
memory, performance can degrade if too much memory is assigned to the
SGA components.
Along with its SGA, the instance will also have, at a minimum, five processes: the
system monitor, SMON; the process monitor, PMON; the database writer, DBWn (you
may have up to ten of these); the log writer, LGWR; and the checkpoint process, CKPT.
These are known as “background” processes, because they always exist while the instance
is running, whether or not any sessions are actually logged onto the instance, or indeed
even if a database has not yet been created or opened.
SMON’s major function is opening the database: enabling the connection between
the instance and a database. Chapter 5 will detail how it does this. During normal
running, it carries out a number of monitoring and tidying-up operations.
ch03.indd 4ch03.indd 4 5/18/2005 11:10:55 AM5/18/2005 11:10:55 AM

Chapter 3: Creating an Oracle Database
5
PART I
All-in-1 / Oracle Database 10g Certification All-in-One / Watson & Bersinic / 5790-3 /Chapter 3
PMON looks after user sessions, taking appropriate action if a session gets into
trouble. For instance, if a user’s PC reboots while the user is logged on to the database,
PMON will detect this and tidy up whatever work the user had in progress.
The DBWn process or processes (by default, an instance will have one database
writer per eight CPUs) is responsible for all writing to datafiles. Remember, no sessions
ever update data on disk; they update only data in the database buffer cache: all updates
are then funneled through the DBWn to disk. In general, DBWn writes as little and as
rarely as possible. The assumption is that disk I/O is bad for performance, so Oracle
keeps it to a minimum.
The LGWR propagates all changes applied to data in the database buffer cache to
the online redo log files on disk. In contrast with DBWn, this disk write activity is
done as near as possible in real time—and when you issue the COMMIT statement,
it really is done in real time: it immediately flushes the changes from their small and
temporary staging area, the log buffer in the SGA, to the online redo log files on disk.
This is to ensure that all users’ work is saved so that, in the event of damage to the
database’s datafiles, the changes can be applied to a restored backup. In this manner
(as is covered in later chapters), Oracle can guarantee that data will never be lost.
The CKPT process is responsible for ensuring that, from time to time, the instance
is synchronized with the database. In principle, the database is always out of date: there
will be changes that have been applied in memory that have not yet been written to
the datafiles by DBWn (though the changes themselves will have been streamed out
to the online redo log files by LGWR as they happen). There are occasions when it
is necessary to force a write of all changed data from the database buffer cache to
the datafiles, to bring the database right up-to-date. The CKPT process controls the
frequency of this.
EXAM TIP Remember the five required background processes: system monitor,
process monitor, database writer, log writer, and checkpoint process.
There are also a number of optional background processes (far more with 10g than
with previous releases), some of which you will see in later chapters. Some of the
background processes can be tuned. For example, you can decide how many database
writer processes to launch, and you can (to a certain extent) control how frequently
they will write changed data bocks from the database buffer cache to the datafiles. You
do not need to consider this at database creation time: you can sort such things out
later, always bearing in mind that some changes will require downtime.
The Database: Physical Structures
Three file types make up an Oracle database, along with a few others that exist
externally to the database and, strictly speaking, are optional. The required files are
the controlfiles, the online redo log files, and the datafiles. The external files are the
initialization parameter file, the password file, and archived redo log files.
ch03.indd 5ch03.indd 5 5/18/2005 11:10:55 AM5/18/2005 11:10:55 AM

Oracle Database OCP 10g Certification All-in-One Exam Guide
6
All-in-1 / Oracle Database 10g Certification All-in-One / Watson & Bersinic / 5790-3 /Chapter 3
Every database has one controlfile, but a good DBA will always create multiple copies
of the controlfile so that if one copy is damaged, the database itself will survive. If all
copies of the controlfile are lost, it is possible (though perhaps awkward) to recover,
but you should never find yourself in that situation. You don’t have to worry about
keeping multiplexed copies of the controlfile synchronized—Oracle will take care of
that. The controlfile is small, but vital. It contains pointers to the rest of the database:
the locations of the online redo log files and of the datafiles. It also stores information
required to maintain database integrity: various critical sequence numbers and
timestamps, for example. If you use the Recovery Manager, RMAN, then some backup
information will also be stored in the controlfile. The controlfile will usually be no
more than a few megabytes big, but you can’t survive without it. Its maintenance is
automatic; your only control is how many copies to have, and where to put them. If
you get the number of copies, or their location, wrong at creation time, you can add
or remove copies later, or move them around—but you should bear in mind that any
such operations will require downtime.
Every database has at least two online redo log files, but as with the controlfile, a
good DBA creates multiple copies of each online redo log file. The online redo logs
store a continuous chain in chronological order of every change applied to the database.
This will be the bare minimum of information required to reconstruct, or redo, changes.
The redo log consists of groups of redo log files, each file being known as a member.
Oracle requires at least two groups of at least one member each to function. You may
create more than two groups for performance reasons, and more than one member
per group for safety. The requirement for a minimum of two groups is in order that
one group can accept the current changes while the other group is being backed up
(or “archived,” to use the correct term). One of the groups is the “current” group:
changes are written to the current logfile group by LGWR. As user sessions update
data in the database buffer cache, they also write out the minimal changes to the redo
log buffer. LGWR continually flushes this buffer to the current online log group. Redo
log files are fixed size; therefore, eventually the file members making up the current
group will fill. LGWR will then perform what is called a log switch. It makes the second
group current, and starts writing to that. If your database is configured appropriately,
you will then archive (back up) the logfile members making up the first group. When
the second group fills, LGWR will switch back to the first group, making it current,
and overwriting it. Thus, the online redo log groups (and therefore the members
making them up) are used in a circular fashion.
As with the controlfile, if you have multiple members per group (and you should!)
you don’t have to worry about keeping them synchronized. LGWR will ensure that it
writes to all of them, in parallel, thus keeping them identical. If you lose one member
of a group, as long as you have a surviving member, the database will continue to
function.
The size and number of your online redo log file groups is a matter of tuning.
In general, you will choose a size appropriate to the amount of activity you anticipate.
A very busy database will require larger members than a largely static database. The
number of members per group will depend on what level of fault tolerance is deemed
appropriate. However, you don’t have to worry about this at database creation time.
ch03.indd 6ch03.indd 6 5/18/2005 11:10:55 AM5/18/2005 11:10:55 AM

Chapter 3: Creating an Oracle Database
7
PART I
All-in-1 / Oracle Database 10g Certification All-in-One / Watson & Bersinic / 5790-3 /Chapter 3
You can move your online redo log files around, add or drop them, and create ones
of different sizes as you please at any time later on. Such operations are performed
“online” and don’t require downtime; therefore, they are transparent to the end users.
The third file type making up a database is the datafile. At a minimum, you must
have two datafiles, to be created at database creation time. With previous releases of
Oracle, you could create a database with only one datafile—10g requires two. You will,
however, have many more than that when your database goes live, and you will usually
create a few more to begin with.
Datafiles are the repository for data. Their sizes and number are effectively unlimited.
A small database, of only a few gigabytes, might have just half a dozen datafiles of only
a few hundred megabytes each. A larger database could have thousands of datafiles,
whose size is limited only by the capabilities of the host operating system and hardware.
The datafiles are the physical structures visible to the system administrators.
Logically, they are the repository for the segments containing user data that the
programmers see, and also for the segments that make up the data dictionary. Datafiles
can be renamed, resized, moved, added, or dropped at any time in the lifetime of the
database, but remember that some operations on some datafiles may require downtime.
Logical Structures: Tablespaces and Segments
The physical structures that make up a database are visible as operating system files
to your system administrators. Your users see logical structures such as tables. Oracle
uses the term “segment” to describe any structure that contains data. Your typical
segment is a table, containing rows of data, but there are more than a dozen possible
segment types in an Oracle database. Of particular interest (for exam purposes) are
table segments, index segments, and undo segments, all of which are investigated
in detail in later chapters. For now, you don’t need to know more than that tables
contain rows of information; that indexes are a mechanism for giving fast access
to any particular row; and that undo segments are data structures used for storing
information that might be needed to reverse, or roll back, any transactions that you
do not wish to make permanent.
System administrators see physical datafiles; programmers see logical segments.
Oracle abstracts the logical storage from the physical storage by means of the tablespace.
A tablespace is logically a collection of one or more segments, and physically a collection
of one or more datafiles. Put in terms of relational analysis, there is a many-to-many
relationship between segments and datafiles: one table may be cut across many
datafiles; one datafile may contain bits of many tables. By inserting the tablespace
entity between the segments and the files, Oracle resolves this many-to-many
relationship.
A number of segments must be created at database creation time: these are the
segments that make up the data dictionary. These segments are stored in two tablespaces,
called SYSTEM and SYSAUX. The SYSAUX tablespace is new with 10g: in previous
releases, the whole of the data dictionary went into SYSTEM. The database creation
process must create at least these two tablespaces, with at least one datafile each, to
store the data dictionary.
ch03.indd 7ch03.indd 7 5/18/2005 11:10:56 AM5/18/2005 11:10:56 AM

Oracle Database OCP 10g Certification All-in-One Exam Guide
8
All-in-1 / Oracle Database 10g Certification All-in-One / Watson & Bersinic / 5790-3 /Chapter 3
EXAM TIP The SYSAUX tablespace must be created at database creation
time in Oracle 10g. If you do not specify it, one will be created by default.
The Data Dictionary
The data dictionary is metadata: data about data. It describes the database, both
physically and logically, and its contents. User definitions, security information,
integrity constraints, and (with release 10g) performance monitoring information
are all part of the data dictionary. It is stored as a set of segments in the SYSTEM
and SYSAUX tablespaces.
In many ways, the segments that make up the data dictionary are segments like
any other: just tables and indexes. The critical difference is that the data dictionary
tables are generated at database creation time, and you are not allowed to access
them directly. There is nothing to stop an inquisitive DBA from investigating the data
dictionary directly, but if you do any updates to it, you may cause irreparable damage
to your database, and certainly Oracle Corporation will not support you. Creating a
data dictionary is part of the database creation process. It is maintained subsequently
by data definition language commands. When you issue the CREATE TABLE command,
you are in fact inserting rows into data dictionary tables, as you are with commands
such as CREATE USER or GRANT.
To query the dictionary, Oracle provides a set of views. The views come in three
forms, prefixed DBA_, ALL_, or USER_. Most of the views come in all three forms.
Any view prefixed USER_ will be populated with rows describing objects owned by the
user querying the view, so no two people will see the same contents. If user SCOTT
queries USER_TABLES, he will see information about his tables; if you query USER_
TABLES, you will see information about your tables. Any view prefixed ALL_ will be
populated with rows describing objects to which you have access. Thus ALL_TABLES
will contain rows describing your own tables, plus rows describing tables belonging
to anyone else that you have been given permission to see. Any view prefixed DBA_
will have rows for every object in the database, so DBA_TABLES will have one row for
every table in the database, no matter who created it. These views are created as part
of the database creation process, along with a large number of PL/SQL packages that
are provided by Oracle to assist database administrators in managing the database
and programmers in developing applications. PL/SQL code is also stored in the data
dictionary.
EXAM TIP Which view will show you all the tables in the database? Remember
that the answer is DBA_TABLES, not ALL_TABLES.
ch03.indd 8ch03.indd 8 5/18/2005 11:10:56 AM5/18/2005 11:10:56 AM

Chapter 3: Creating an Oracle Database
9
PART I
All-in-1 / Oracle Database 10g Certification All-in-One / Watson & Bersinic / 5790-3 /Chapter 3
Management Tools
Oracle database 10g provides two management environments: Enterprise Manager
Database Control and Enterprise Manager Grid Control. Both are optional, but Oracle
strongly advises you to use one or the other. Grid control is more complicated, and
more capable. To use Grid Control, you must have already installed it somewhere on
your network and installed the Grid Control Management agent on the computer
where you are creating the database. You are going to create Database Control in this
exercise, which is implemented as a set of tables and procedures within the database,
generated at database creation time. Throughout this book, and for the purposes of
the exam, Database Control is the tool to be used. Grid Control is undoubtedly more
powerful, but it is not necessary in a straightforward environment; it also has licensing
implications.
There are also numerous third-party products you can buy (and a few that you can
download free of charge) to assist you in managing the Oracle environment. By all
means investigate these, but Enterprise Manager in one of its two forms is Oracle’s
approved tool.
External Files
The remaining topic to cover before creating a database is the three file types that exist
externally to the database: the parameter file, the password file, and the archive log files.
The parameter file defines the instance. You already know that an instance consists
of memory structures and processes. The instance parameters specified in the parameter
file control, among other things, how big the various memory structures should be,
and how the background processes will behave. They also set certain limits, such as
how many user sessions are permitted to log on to the instance concurrently. There
are defaults for all parameters except one: DB_NAME, the name of the database to
which the instance will connect. With this exception it is possible to start an instance
relying totally on defaults, but such an instance will be useless for any practical
purpose. Many parameters are dynamic, meaning that their values can be changed
while the instance is running and the database is open, but some are fixed at instance
startup. With one exception, all parameters can be changed subsequent to database
creation by closing the database, shutting down the instance, editing the parameter
file, and starting up again. The one exception is DB_BLOCK_SIZE, more on which
later. You must create a parameter file and use it to build an instance in memory
before creating a database.
TIP Parameters are divided into “basic” and “advanced.” You will usually need
to set the two dozen or so basic parameters, but the advanced ones (of which
there are over two hundred) can often be left at default.
ch03.indd 9ch03.indd 9 5/18/2005 11:10:57 AM5/18/2005 11:10:57 AM

Oracle Database OCP 10g Certification All-in-One Exam Guide
10
All-in-1 / Oracle Database 10g Certification All-in-One / Watson & Bersinic / 5790-3 /Chapter 3
There are two types of parameter files: the old-fashioned static parameter file
(usually called init/SID/.ora, where /SID/ is the name of the instance) and the dynamic
parameter file introduced with release 9i (called spfileSID.ora). A static parameter file
is a simple text file that you create and edit with any ASCII editor you please, typically
Notepad on Windows, or vi on Unix. It is read only once by the instance, at startup
time. The dynamic parameter file is a binary file that is maintained and edited by
Oracle itself, in response to commands you issue.
The password file causes much confusion in the Oracle world, particularly among
computer auditors who do not understand its purpose. The problem it addresses is
how to authenticate a user when the database is not open, or indeed before the database
has even been created or an instance started. Users are nothing more than rows in a
table in the data dictionary. You can see them and their encrypted passwords by querying
the data dictionary view DBA_USERS. When you create a user, as you will in Chapter 7,
you are simply inserting rows into the data dictionary. Now, it is a simple fact in the
Oracle environment that if you have the privileges that let you start an instance and
subsequently open or create a database, you can do absolutely anything within that
database. It is therefore vitally important that Oracle should authenticate you, before
letting you connect as such a user. But if the database is not already created and open,
how can Oracle query the data dictionary to validate your username and password,
and thus work out who you are and what you are allowed to do? To resolve this
paradox, Oracle has provided two means of authentication that are not data dictionary
based and therefore do not require the database to be open, or even to exist. These are
operating system authentication and password file authentication.
For operating system authentication, Oracle delegates responsibility for identifying
a user to the host operating system. At installation time (not database creation time!)
you specified an operating system group name that would own the Oracle software,
defaulting to dba on Unix, ORA_DBA on Windows. If you are logged on to the
computer hosting the Oracle installation as a member of that group, then you will be
allowed to connect (using appropriate syntax) to an instance, start it up, and open or
create a database without any username/password prompt. Clearly, this relies totally
on your operating system being secure, which it should be: that is out of Oracle’s control
and relies on decent system administration. But this mechanism can’t work if you are
connecting to the instance remotely, across a network: you will never actually log on
to the operating system of the machine hosting the Oracle server, only to the machine
where you are working. This is where the password file comes in: it is an operating
system file, with usernames and passwords encrypted within it, that exists independently
of the database. Using appropriate syntax, you can connect to an instance, respond to
a prompt with a username/password combination that exists in the password file, start
the instance, and open an existing database or create a new one. If you do not need to
start the instance and open the database across a network but you can always log on
to the computer hosting the Oracle installation, then a password file is not strictly
necessary because you can use operating system authentication instead. However, for
practical purposes, you will always have one.
ch03.indd 10ch03.indd 10 5/18/2005 11:10:57 AM5/18/2005 11:10:57 AM

Chapter 3: Creating an Oracle Database
11
PART I
All-in-1 / Oracle Database 10g Certification All-in-One / Watson & Bersinic / 5790-3 /Chapter 3
Archive log files will be dealt with in detail in later chapters. They are copies of
filled online redo log files: as the online logs are filled with changes, they should be
copied to one or more destinations as archived logs, thus giving you a complete history
of all changes applied to the database. While it is not an Oracle requirement to archive
your online redo logs, in virtually all live installations it will certainly be a business
requirement, as it is the archive logs that guarantee the impossibility of losing data.
Creating a Database
To create a database, there are a number of steps that must be followed in the correct
order:
1. Create a parameter file and a password file.
2. Use the parameter file to build an instance in memory.
3. Issue the CREATE DATABASE command. This will generate, at a minimum,
a controlfile; two online redo log files; two datafiles for the SYSTEM and
SYSAUX tablespaces, and a data dictionary.
4. Run SQL scripts to generate the data dictionary views and the supplied PL/SQL
packages.
5. Run SQL scripts to generate Enterprise Manager Database Control, along with
any options (such as Java) that the database will require.
On Windows systems, there is an additional step because Oracle runs as a Windows
service. Oracle provides a utility, ORADIM.EXE, to assist you in creating this service.
EXAM TIP You can create a database with two words, CREATE DATABASE.
There are defaults for everything.
These steps can be executed interactively from the SQL*Plus prompt or through
a GUI tool, the Database Configuration Assistant (DBCA). Alternatively, you can
automate the process by using scripts or a DBCA response file. Whatever platform you
are running on, the easiest way to create a database is through the DBCA. You may
well have run this as part of the installation. It will give you prompts that walk you
through the whole process. It first creates a parameter file and a password file, and
then it generates scripts that will start the instance, create the database, and generate
the data dictionary, the data dictionary views, and Enterprise Manager Database Control.
Alternatively, you can create the parameter file and the password file by hand and
then do the rest from a SQL*Plus session. Many DBAs combine the two techniques:
they use DBCA to generate the files and scripts and then look at them and perhaps
edit them before running them from SQL*Plus.
ch03.indd 11ch03.indd 11 5/18/2005 11:10:57 AM5/18/2005 11:10:57 AM

Oracle Database OCP 10g Certification All-in-One Exam Guide
12
All-in-1 / Oracle Database 10g Certification All-in-One / Watson & Bersinic / 5790-3 /Chapter 3
DBCA is written in Java; it is therefore the same on all platforms. The only variation
is that on Microsoft Windows you must be sitting in front of the machine where you
are running it, because that is where the DBCA windows will open. On Unix, you run
DBCA on the machine where you wish to create the database, but you can launch and
control it from any machine that has an X server to display the DBCA windows. This
is standard for the X Window System: you set an environment variable DISPLAY to
tell the program where to send the windows it opens. For example,
export DISPLAY=10.10.10.65:0.0
will redirect all X windows to the machine identified by IP address 10.10.10.65, no
matter which machine you are actually running DBCA on.
Exercise 3-1: Creating a Database with Database
Configuration Assistant
In this exercise, you will first use DBCA to create a database and then inspect and
interpret the scripts that it generates.
1. Log on to your computer as a member of the group that owns the Oracle
software. By default, this will be the group dba on Unix, ORA_DBA on Windows.
2. Confirm that your ORACLE_HOME is set to point to the directory where your
software is installed. On Unix, run
echo $ORACLE_HOME
On Windows, it will be the registry variable that was set at installation time.
3. Confirm that your search path includes the directory bin within your Oracle
home. On Unix, display your search path with
echo $PATH
On Windows,
echo %PATH%
One additional required variable for Unix is DISPLAY. This must point to the
terminal on which you are working. Show it with
echo $DISPLAY.
If you are working on the machine where you want to create the database,
a suitable setting might be
export DISPLAY=127.0.0.1:0.0
4. Launch DBCA. On Unix it is called dbca; on Windows it is dbca.bat. It is located
in your ORACLE_HOME/bin directory, which must be in your search path.
ch03.indd 12ch03.indd 12 5/18/2005 11:10:57 AM5/18/2005 11:10:57 AM
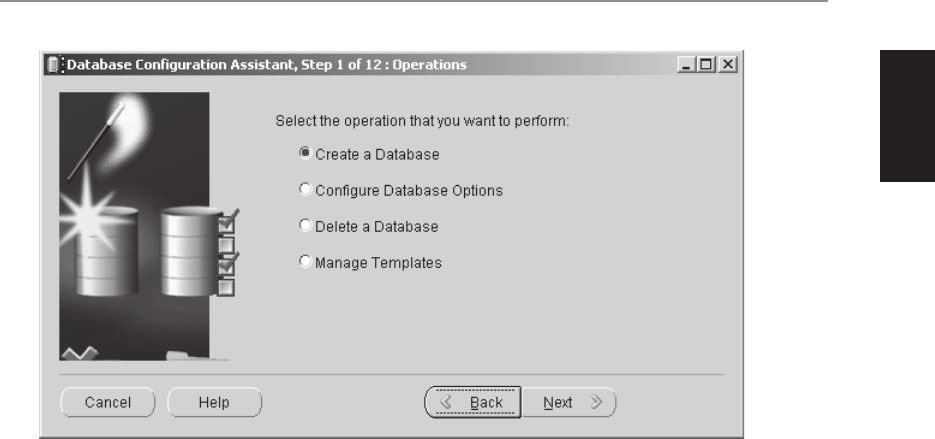
Chapter 3: Creating an Oracle Database
13
PART I
All-in-1 / Oracle Database 10g Certification All-in-One / Watson & Bersinic / 5790-3 /Chapter 3
5. Respond to the prompts as follows:
a. At the prompt “Select the operation you wish to perform,” type Create
a database and click Next.
b. At the prompt “Select a template,” type Custom database and click Next.
c. Type ocp10g for both the Global database name and the SID, and then
click Next.
d. Select the checkboxes for “Configure the database with enterprise manager”
and “Use database control for database management,” but not the
checkbox for “Use grid control for database management,” and click Next.
e. Do not select the checkboxes for “Enable email notification” or “Enable
daily backup.” Click Next.
f. Select the checkbox for “Use the same password for all accounts” and enter
the password as ORACLE. Enter it again to confirm, and click Next.
g. Select “file system” as the storage mechanism, and click Next.
h. Select “Use file locations from template” as the location for the database
files, and click Next.
i. Select the checkbox for “Specify flash recovery area” but not the checkbox
for “Enable archiving,” and click Next.
j. De-select the checkboxes for “Oracle text,” “Oracle OLAP,” and “Oracle
spatial.” Select the check box for “Enterprise Manager Repository.” In
“Standard Database Components,” de-select everything. Click Next.
ch03.indd 13ch03.indd 13 5/18/2005 11:10:58 AM5/18/2005 11:10:58 AM
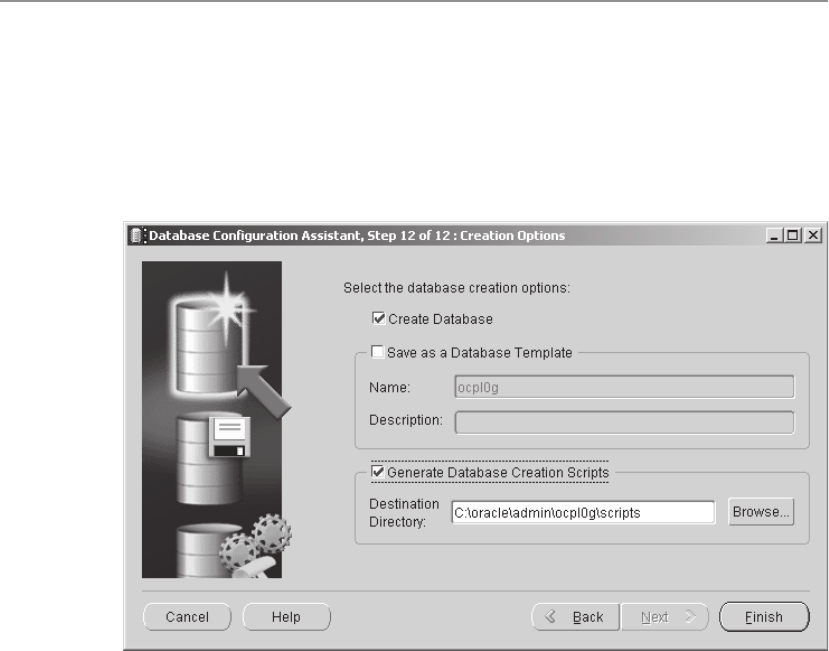
Oracle Database OCP 10g Certification All-in-One Exam Guide
14
All-in-1 / Oracle Database 10g Certification All-in-One / Watson & Bersinic / 5790-3 /Chapter 3
k. Leave the Memory, Sizing, Character Sets, and Connection Mode on defaults,
and click Next.
l. Leave the Database Storage on defaults, and click Next.
m. Select the check boxes for “Create database” and “Generate database
creation scripts,” de-select the checkbox for “Save as a database template.”
Click Next.
The final screen shows the details of the instance and the database that will be
created. Depending on the speed of your computer, creation as suggested in this
exercise (excluding all options) may take from fifteen to forty minutes.
The Database Creation Scripts
While the database is creating, take a look at database creation scripts that DBCA
generated. DBCA will tell you where they are—typically, in the admin/<dbname>/
scripts directory (where <dbname> is the name of the database you are creating)
beneath the directory where you installed Oracle. The init.ora file should look
something like this:
############################################################################
# Copyright (c) 1991, 2001, 2002 by Oracle Corporation
############################################################################
###########################################
# Cache and I/O
###########################################
ch03.indd 14ch03.indd 14 5/18/2005 11:10:58 AM5/18/2005 11:10:58 AM

Chapter 3: Creating an Oracle Database
15
PART I
All-in-1 / Oracle Database 10g Certification All-in-One / Watson & Bersinic / 5790-3 /Chapter 3
db_block_size=8192
db_cache_size=25165824
db_file_multiblock_read_count=16
###########################################
# Cursors and Library Cache
###########################################
open_cursors=300
###########################################
# Database Identification
###########################################
db_domain=""
db_name=ocp10g
###########################################
# Diagnostics and Statistics
###########################################
background_dump_dest=C:\oracle\admin\ocp10g\bdump
core_dump_dest=C:\oracle\admin\ocp10g\cdump
user_dump_dest=C:\oracle\admin\ocp10g\udump
###########################################
# File Configuration
###########################################
control_files=("C:\oracle\oradata\ocp10g\control01.ctl",
"C:\oracle\oradata\ocp10g\control02.ctl",
"C:\oracle\oradata\ocp10g\control03.ctl")
db_recovery_file_dest=C:\oracle\flash_recovery_area
db_recovery_file_dest_size=2147483648
###########################################
# Job Queues
###########################################
job_queue_processes=10
###########################################
# Miscellaneous
###########################################
compatible=10.1.0.2.0
###########################################
# Pools
###########################################
java_pool_size=0
large_pool_size=8388608
shared_pool_size=83886080
###########################################
# Processes and Sessions
###########################################
processes=150
###########################################
# Security and Auditing
###########################################
remote_login_passwordfile=EXCLUSIVE
###########################################
# Sort, Hash Joins, Bitmap Indexes
###########################################
pga_aggregate_target=25165824
sort_area_size=65536
###########################################
# System Managed Undo and Rollback Segments
###########################################
undo_management=AUTO
undo_tablespace=UNDOTBS1
ch03.indd 15ch03.indd 15 5/18/2005 11:10:58 AM5/18/2005 11:10:58 AM

Oracle Database OCP 10g Certification All-in-One Exam Guide
16
All-in-1 / Oracle Database 10g Certification All-in-One / Watson & Bersinic / 5790-3 /Chapter 3
Note that this is a static parameter file. Later in the process, it can be converted
to a dynamic parameter file. These are the parameters that will be used to build the
instance in memory. Two to emphasize at this point are DB_BLOCK_SIZE and
CONTROL_FILES. DB_BLOCK_SIZE determines the size of the buffers in the database
buffer cache. When the instance is instructed to create a database, this size will also be
used to format the datafiles that make up the SYSTEM and SYSAUX tablespaces. It can
never be changed after database creation. CONTROL_FILES is the pointer that allows
the instance to find the database controlfile, including all the multiplexed copies. At
this stage in our exercise, the controlfile does not exist: this parameter will tell the
instance where to create it. Some of the other parameters are self-explanatory, but
eventually you must refer to the Oracle Documentation Library (the volume you need
is titled “Reference”) and read up on all of them. All!
EXAM TIP You can never change your database block size parameter after
creation. All other parameters can be adjusted later.
The next file to inspect is ocp10g.bat (it will be a shell script on Unix):
mkdir C:\oracle\admin\ocp10g\bdump
mkdir C:\oracle\admin\ocp10g\cdump
mkdir C:\oracle\admin\ocp10g\create
mkdir C:\oracle\admin\ocp10g\pfile
mkdir C:\oracle\admin\ocp10g\udump
mkdir C:\oracle\flash_recovery_area
mkdir C:\oracle\oradata\ocp10g
mkdir C:\oracle\product\10.1.0\Db_1\database
set ORACLE_SID=ocp10g
C:\oracle\product\10.1.0\Db_1\bin\oradim.exe -new -sid OCP10G
-startmode manual -spfile
C:\oracle\product\10.1.0\Db_1\bin\oradim.exe -edit -sid OCP10G
-startmode auto -srvcstart system
C:\oracle\product\10.1.0\Db_1\bin\sqlplus /nolog
@C:\oracle\admin\ocp10g\scripts\ocp10g.sql
The script creates some directories, sets the ORACLE_SID environment variable,
and then (because this example is Windows) uses the ORADIM.EXE utility to create
the Windows service for the instance and put it on automatic start. Then it launches
SQL*Plus and runs a SQL script called ocp10g.sql:
set verify off
PROMPT specify a password for sys as parameter 1;
DEFINE sysPassword = &1
PROMPT specify a password for system as parameter 2;
DEFINE systemPassword = &2
PROMPT specify a password for sysman as parameter 3;
DEFINE sysmanPassword = &3
PROMPT specify a password for dbsnmp as parameter 4;
DEFINE dbsnmpPassword = &4
host C:\oracle\product\10.1.0\Db_1\bin\orapwd.exe
file=C:\oracle\product\10.1.0\Db_1\database\PWDocp10g.ora
password=&&sysPassword force=y
ch03.indd 16ch03.indd 16 5/18/2005 11:10:59 AM5/18/2005 11:10:59 AM

Chapter 3: Creating an Oracle Database
17
PART I
All-in-1 / Oracle Database 10g Certification All-in-One / Watson & Bersinic / 5790-3 /Chapter 3
@C:\oracle\admin\ocp10g\scripts\CreateDB.sql
@C:\oracle\admin\ocp10g\scripts\CreateDBFiles.sql
@C:\oracle\admin\ocp10g\scripts\CreateDBCatalog.sql
@C:\oracle\admin\ocp10g\scripts\emRepository.sql
@C:\oracle\admin\ocp10g\scripts\postDBCreation.sql
This script prompts for some passwords, already provided when you ran the DBCA.
Then it calls the ORAPWD.EXE utility to create an external password file (the utility is
orapwd on Unix). Then it calls another five SQL scripts. First, CreateDB.sql:
connect SYS/&&sysPassword as SYSDBA
set echo on
spool C:\oracle\product\10.1.0\Db_1\assistants\dbca\logs\CreateDB.log
startup nomount pfile="C:\oracle\admin\ocp10g\scripts\init.ora";
CREATE DATABASE "ocp10g"
MAXINSTANCES 8
MAXLOGHISTORY 1
MAXLOGFILES 16
MAXLOGMEMBERS 3
MAXDATAFILES 100
DATAFILE 'C:\oracle\oradata\ocp10g\system01.dbf' SIZE 300M
REUSE AUTOEXTEND ON NEXT 10240K MAXSIZE UNLIMITED
EXTENT MANAGEMENT LOCAL
SYSAUX DATAFILE 'C:\oracle\oradata\ocp10g\sysaux01.dbf' SIZE 120M REUSE
AUTOEXTEND ON NEXT 10240K MAXSIZE UNLIMITED
DEFAULT TEMPORARY TABLESPACE TEMP TEMPFILE
'C:\oracle\oradata\ocp10g\temp01.dbf' SIZE 20M REUSE AUTOEXTEND ON
NEXT 640K MAXSIZE UNLIMITED
UNDO TABLESPACE "UNDOTBS1" DATAFILE 'C:\oracle\oradata\ocp10g\undotbs01.dbf'
SIZE 200M REUSE AUTOEXTEND ON NEXT 5120K MAXSIZE UNLIMITED
CHARACTER SET WE8MSWIN1252
NATIONAL CHARACTER SET AL16UTF16
LOGFILE GROUP 1 ('C:\oracle\oradata\ocp10g\redo01.log') SIZE 10240K,
GROUP 2 ('C:\oracle\oradata\ocp10g\redo02.log') SIZE 10240K,
GROUP 3 ('C:\oracle\oradata\ocp10g\redo03.log') SIZE 10240K
USER SYS IDENTIFIED BY "&&sysPassword" USER SYSTEM IDENTIFIED BY
"&&systemPassword";
spool off
The script connects to the instance, using the syntax for password file authentication.
Then the STARTUP NOMOUNT command builds the instance in memory, using the
static parameter file you saw earlier. The significance of “NOMOUNT” will be dealt
with in Chapter 5; for now, let it suffice that it is necessary, as there is no database to
mount and open. And then at last we get the CREATE DATABASE command, which
continues to the end of the file. The first section sets some overall limits for the
database. They can all be changed subsequently, but if they are clearly inappropriate,
it is a good idea to change them now, before creation. Two datafile specifications
follow: these are the files that will be used for the SYSTEM and SYSAUX tablespaces.
Next come specifications for a TEMPORARY tablespace and an UNDO tablespace
(more on this in Chapter 16). Then a character set is specified. Until version 9i of the
database, there was no method for changing the database character set after creation:
it was therefore vital to get this right. With 9i and 10g, it is possible to change it later,
but this is not an operation to embark on lightly—and in fact may not be feasible.
ch03.indd 17ch03.indd 17 5/18/2005 11:10:59 AM5/18/2005 11:10:59 AM

Oracle Database OCP 10g Certification All-in-One Exam Guide
18
All-in-1 / Oracle Database 10g Certification All-in-One / Watson & Bersinic / 5790-3 /Chapter 3
Get it right now! This area will be covered in detail in Chapter 21. Finally comes the
specification for three online logfile groups, each consisting of one member, and the
passwords for database users SYS and SYSTEM are initialized.
TIP Be sure to change the passwords for all the standard users before the
database goes live. You would be amazed at the number of live systems where
this is not done.
This one file will create a database. After its successful execution, you will have an
instance running in memory, and a database consisting of a controlfile and copies as
specified by the CONTROL_FILES initialization parameter, and the datafiles and redo
logs specified in the CREATE DATABASE command. A data dictionary will have been
generated. But although the database has been created, it is unusable. The remaining
scripts called by ocp10g.sql make the database usable:
• CreateDBfiles.sql creates another tablespace, to be used as a default storage
location for user data.
• CreateDBcatalog.sql generates the data dictionary views and the PL/SQL
supplied packages.
• emRepository.sql generates the Enterprise Manager Database Control tool.
• postDBcreation.sql tidies everything up.
And that’s all there is to it: run DBCA, follow the prompts, and wait for it to finish.
As a test, from an operating system prompt, set your ORACLE_SID environment
variable and log on to your new database. For Windows,
C:\>
C:\>set ORACLE_SID=ocp10g
C:\>sqlplus sys/oracle as sysdba
SQL*Plus: Release 10.1.0.2.0 - Production on Sun Jul 25 12:34:14 2004
Copyright (c) 1982, 2004, Oracle. All rights reserved.
Connected to:
Oracle Database 10g Enterprise Edition Release 10.1.0.2.0 - Production
With the Partitioning, OLAP and Data Mining options
SQL> select name,open_mode from v$database;
NAME OPEN_MODE
--------- ----------
OCP10G READ WRITE
SQL>
DBCA Additional Functions
The opening screen of DBCA gives you four options:
• Create A Database
• Configure Database Options
ch03.indd 18ch03.indd 18 5/18/2005 11:10:59 AM5/18/2005 11:10:59 AM

Chapter 3: Creating an Oracle Database
19
PART I
All-in-1 / Oracle Database 10g Certification All-in-One / Watson & Bersinic / 5790-3 /Chapter 3
• Delete A Database
• Manage Templates
Configure Database Options helps you change the configuration of a database
you have already created. In Exercise 3-1, you de-selected all the options; this was to
make the creation as quick and simple as possible.
TIP By de-selecting all the options, particularly those for “standard database
components,” creation time is reduced dramatically.
If you decide subsequently to install some optional features, such as Java or OLAP,
running DBCA again is the simplest way to do it. An alternative method is to run the
scripts to install the options by hand, but these are not always fully documented and
it is possible to make mistakes; DBCA is better.
The Delete A Database radio button will prompt you for which database you wish
to delete, and then give you one more chance to back out before it deletes all the files
that make up the database and (for a Windows system) invokes ORADIM.EXE to delete
the service as well.
Finally, you manage templates to store database definitions for use later. Remember
that in the exercise, you chose to create a “custom” database. A custom database is not
preconfigured; you chose it in order to see all the possibilities as you worked your way
through DBCA. But apart from “custom,” there were options for “data warehouse,”
“general purpose,” and “transaction processing.” If you take any of these, you’ll be
presented with an abbreviated version of the DBCA prompts that will create a database
with different defaults, at least partly optimized for decision support systems (DSS, the
data warehouse option), online transaction processing systems (OLTP, the transaction
processing option), or mixed workload (the general purpose option). The final question
when you created your database gave you the possibility of saving it as a template, that
is, not to create it at all, but to save the definition for future use. DBCA will let you
manage templates, either the presupplied ones or ones you create yourself, by copying,
modifying, or deleting them. Templates can be extremely useful if you are in a position
where you are frequently creating and re-creating databases that are very similar.
Chapter Review
This chapter began with a detailed description of the Oracle server architecture. A
thorough understanding of this is essential for further progress. You must be familiar
with the elements that make up an instance and a database: the memory structures,
the processes, and the file types. Then there was a brief look at the purpose and contents
of the data dictionary, and a brief discussion of the logical storage of segments within
tablespaces. Finally you used the DBCA to create a database, and you walked through
the various scripts and commands it generated for this purpose.
ch03.indd 19ch03.indd 19 5/18/2005 11:10:59 AM5/18/2005 11:10:59 AM

Oracle Database OCP 10g Certification All-in-One Exam Guide
20
All-in-1 / Oracle Database 10g Certification All-in-One / Watson & Bersinic / 5790-3 /Chapter 3
Questions
1. Which of the following memory structures are required, rather than optional,
parts of the SGA? (Choose three answers.)
A. Database buffer cache
B. Java pool
C. Large pool
D. Redo log buffer
E. Shared pool
F. Streams pool
2. You are creating a database. Put these steps in the correct sequence:
A. Build the data dictionary.
B. Create a parameter file.
C. Create the data dictionary views.
D. Issue the CREATE DATABASE command.
E. Issue the STARTUP NOMOUNT command.
3. If you do not specify a SYSAUX datafile on your CREATE DATABASE command,
what will happen? (Choose the best answer.)
A. The command will fail because SYSAUX is a required tablespace.
B. The command will succeed, but you must add a SYSAUX tablespace after
database creation.
C. The command will succeed, and a default SYSAUX tablespace will be
created for you.
D. The command will succeed, but the whole data dictionary will be in the
SYSTEM tablespace.
4. Which of the following can never be changed after database creation? (Choose
the best answer.)
A. Database block size
B. Database character set
C. Database name
D. None of the above: nothing is fixed at database creation time
5. Which of the following is required to create a database? (Choose the best
answer.)
A. The operating system’s root (for Unix/Linux) or Administrator (for Windows)
password
B. Execute permission on the DBCA
ch03.indd 20ch03.indd 20 5/18/2005 11:11:00 AM5/18/2005 11:11:00 AM

Chapter 3: Creating an Oracle Database
21
PART I
All-in-1 / Oracle Database 10g Certification All-in-One / Watson & Bersinic / 5790-3 /Chapter 3
C. At least as much RAM as the size of the SGA
D. None of the above
6. On Unix/Linux, you launch the DBCA, and nothing happens. What could be
the cause of this? (Choose the best answer.)
A. You are not a member of the dba group.
B. Your DISPLAY variable is not set to your terminal’s address.
C. You have not set your DISPLAY variable.
D. You have not set your ORACLE_SID variable.
7. Which of the following files are optional? (Choose three answers.)
A. Online redo log files
B. Parameter file
C. Password file
D. SYSAUX tablespace datafile
E. SYSTEM tablespace datafile
F. UNDO tablespace datafile
8. If you do not specify an UNDO tablespace on your CREATE DATABASE
command, what will happen? (Choose the best answer.)
A. The command will fail because an UNDO tablespace is required.
B. The command will succeed, and a default UNDO tablespace will be
created for you.
C. The command will succeed, but you must create an UNDO tablespace later.
D. The command will succeed, and you may create an UNDO tablespace later.
9. You have created a database but cannot connect to it with Database Control.
What could be the cause of this? (Choose the best answer.)
A. You are not being authenticated by the operating system, or by password
file authentication.
B. You have not run the scripts to create Database Control.
C. Grid control is a prerequisite for Database Control.
D. You are not licensed to use Database Control.
10. When does the data dictionary get created? (Choose the best answer.)
A. When you create a database
B. When you run the post-creation scripts catalog.sql and catproc.sql, called
by CreateDBcatalog.sql
C. When the SYSTEM and SYSAUX tablespaces are created
D. It does not need to be created; it is always available as part of the instance
ch03.indd 21ch03.indd 21 5/18/2005 11:11:00 AM5/18/2005 11:11:00 AM

Oracle Database OCP 10g Certification All-in-One Exam Guide
22
All-in-1 / Oracle Database 10g Certification All-in-One / Watson & Bersinic / 5790-3 /Chapter 3
11. Which of the following processes are optional? (Choose three answers.)
A. Archive process
B. Checkpoint process
C. Database listener
D. Grid Control Management Agent
E. Log writer
F. Process monitor
12. You created a database with two online redo log file groups, one member each.
What must you do to provide fault tolerance? (Choose the best answer.)
A. Add two more groups, to mirror the first two.
B. Add one more member to each group.
C. You can do nothing; these characteristics are fixed at creation time.
D. You need do nothing; the second group already mirrors the first.
13. Which data dictionary view will show you all the tables in the database?
(Choose the correct answer.)
A. ALL_TABLES
B. DBA_TABLES
C. USER_TABLES
D. None. To see all the tables, you must query the data dictionary directly.
14. Which of the following is not stored in the data dictionary? (Choose the best
answer.)
A. User definitions
B. Supplied PL/SQL packages
C. Data dictionary views
D. None; they are all stored in the data dictionary
15. You de-selected the Oracle Java Virtual Machine when running DBCA, but you
later wish to install it. What must you do? (Choose the best answer.)
A. Create the Java pool in the database.
B. Run scripts to create the JVM.
C. Drop the database and re-create it with the JVM.
D. Start the JVM background process.
ch03.indd 22ch03.indd 22 5/18/2005 11:11:00 AM5/18/2005 11:11:00 AM

Chapter 3: Creating an Oracle Database
23
PART I
All-in-1 / Oracle Database 10g Certification All-in-One / Watson & Bersinic / 5790-3 /Chapter 3
Answers
1. A, D, and E. The remaining components are optional: a Java pool is required
only if you are going to run Java; the large pool is a performance option; the
streams pool is needed only if you using streams, an advanced option.
2. B, E, D, A, and C. You can’t start up an instance until you have created a
parameter file to define it. Then the CREATE DATABASE command will
create your data dictionary. Only then can you run scripts to make the
database usable.
3. C. The SYSAUX tablespace is needed at creation time; if you don’t specify it,
Oracle will create one for you.
4. A. This is the only setting that can never be changed without re-creation. Of
course, there are plenty of other things that are very awkward to change.
5. D. The operating system root password may be required at installation time,
but it isn’t needed for creation. DBCA may be nice, but you don’t have to
use it. RAM is largely irrelevant; Oracle doesn’t care if it is running in main
memory or virtual memory.
6. B. With DISPLAY pointing to the wrong place, your X windows will appear
there—where you can’t see them. A and C will cause errors, and D is irrelevant;
it gets set while running DBCA.
7. B, C, and F. You can add an UNDO tablespace later. The password file may
be a practical necessity but is certainly not required. The parameter file is
optional if you are using a static parameter file; you can delete it after starting
the instance (though you wouldn’t want to).
8. D. Unlike the SYSAUX tablespace, an UNDO tablespace really is optional,
though as you’ll see, it is a great performance and manageability feature.
9. B. The scripts to create the Enterprise Manager repository must be run before
you can use Database Control.
10. A. Creation of a data dictionary is, more than anything else, what happens
when you issue the CREATE DATABASE command.
11. A, C, and D. A listener may be needed for practical purposes (or users won’t
be able to connect), but it is optional. Archiving is also optional, though a
very good idea. The Grid Control Agent is, of course, needed only if you want
to use Grid Control.
12. B. Online redo log fault tolerance is provided by having multiple members
per group.
13. B. This is a classic OCP trick question, pointing out that the names of the
views are possibly ambiguous.
14. D. The catch here is that PL/SQL packages are stored in the data dictionary,
even though they are owned by database users.
15. B. Though you could, of course, do it through DBCA—much simpler. A is
the trick answer: you need a Java pool to run Java, not to create the JVM.
ch03.indd 23ch03.indd 23 5/18/2005 11:11:00 AM5/18/2005 11:11:00 AM

All-in-1 / Oracle Database 10g Certification All-in-One / Meyers / 5790-3 / Chapter 23
blind folio: 24
ch03.indd 24ch03.indd 24 5/18/2005 11:11:01 AM5/18/2005 11:11:01 AM

All-in-1 / Oracle Database 10g OCP Certification All-in-One / Watson, Bersinic / 5790-3
CHAPTER 4
Interfacing with the
Oracle Database
In this chapter you will learn how to
• Use SQL*Plus and iSQL*Plus to access Oracle Database 10g
• Use SQL*Plus and iSQL*Plus to describe the logical structure of tables
• Use SQL to query, manipulate, and define data using SELECT, UPDATE/INSERT/
DELETE, and CREATE/ALTER/DROP
• Identify common database interfaces
• Describe a database transaction
1
ch04.indd 1ch04.indd 1 6/30/2005 4:05:03 PM6/30/2005 4:05:03 PM

All-in-1 / Oracle Database 10g OCP Certification All-in-One / Watson, Bersinic / 5790-3
Oracle Database 10g OCP Certification All-in-One Exam Guide
2
After you have installed the Oracle Database 10g software and created a database,
the next logical step is to be able to query the database for data. While querying the
metadata (data about the data) in the database may seem a good starting point, the
real value is in populating the database with data useful to your organization using
data structures such as tables and views that logically make sense to your enterprise.
The key language that you will use in doing all these tasks is SQL, the Structured Query
Language. In order to interface with the database, you will make use of one or more
Oracle tools built for that task: SQL*Plus, iSQL*Plus (a web-based version of SQL*Plus),
or a third-party tool. This chapter will provide you with information on SQL as well
as the tools to make effective use of it.
Using SQL
SQL was developed by IBM in the 1970s as a way to query relational data that can be
used by individuals other than programmers. It was originally called Structured English
Query Language (or SEQUEL for short), but eventually the English was dropped and
we have SQL. SQL can be broken down into three basic sections or “languages”: Data
Definition Language (DDL), data control language (DCL), and the Data Manipulation
Language (DML).
DDL statements do not deal with data directly; rather, they deal with the objects
that hold and provide access to data. When you want to add, modify, or remove any
object in the database (such as a table, a view, or an index), you must do so using a
DDL statement. DDL includes all CREATE, ALTER, and DROP statements. Database
creation begins with DDL statements; they build the entire framework of tables and
constraints that will become the structure of the database. Before data can be added,
you must have some place to add it to. Your users, normally, will not issue DDL
statements, but you as a database administrator (DBA) and your database developers
will perform them.
EXAM TIP The three key DDL statements are CREATE, ALTER, and DROP.
They are used to add, change, and remove objects from the database.
Database access is controlled by the data control language. Once an account is
created for a user, that user can be given permission on the database using the GRANT
statement or it can be taken away using the REVOKE statement. These two statements
form the core of the DCL.
Two types of permissions can be granted and revoked: system and object permissions.
System permissions enable a user to perform action on the database. Performing such
activities as creating a table or index, or backing up the database, requires system
permissions. Object permissions are applied to particular objects in the database, and
these permissions may change depending on the type of object. For example, you
ch04.indd 2ch04.indd 2 6/30/2005 4:05:36 PM6/30/2005 4:05:36 PM

All-in-1 / Oracle Database 10g OCP Certification All-in-One / Watson, Bersinic / 5790-3
Chapter 4: Interfacing with the Oracle Database
3
PART I
could grant a particular user the permission to issue SELECT, INSERT, or UPDATE
commands against a table, but an EXECUTE permission on a stored procedure. DCL
statements are, for the most part, the job of the DBA. It is his or her job to create user
accounts for every user and to assign those accounts the appropriate permissions.
EXAM TIP DCL statements are GRANT and REVOKE, which can be used to
add or remove permissions for a user or role. System and object permissions
are available. Object permissions can differ, depending on the type of object.
DML statements deal directly with data. Any manipulation or retrieval of data
requires a DML statement. The key elements of the DML are SELECT, INSERT, UPDATE,
and DELETE. These commands enable you to retrieve data from a table, add new data
to a table, modify existing data, and delete rows from a table. DML also includes
transactional control language elements consisting of COMMIT, ROLLBACK, and
SAVEPOINT. These language elements help control the execution of DML statements
by grouping them together into transactions. DML statements are the most common
type of interaction with the database. It is the level of SQL that your users will be
working in almost exclusively.
EXAM TIP This chapter will provide an overview of SQL and some of the key
elements of the SQL language used by Oracle. The exam will test your ability
to write correct SQL syntax, so you should review the Oracle Database 10g
documentation for additional information on programming in SQL. SQL is a
vast topic that cannot be adequately covered in a single chapter and has had
thick books written about how to best make use of it.
The SELECT Statement
All SQL queries begin with the SELECT statement. This statement enables you to retrieve
all data or only certain columns and rows in a table. It can also return data from more
than one table. It enables you not only to retrieve data, but also to perform calculations
on existing data and return the results of these calculations. The basic SELECT statement
requires two elements: the select list and a FROM clause. This specifies what columns
to retrieve and from where. Here is the basic format:
SELECT [DISTINCT] {* | column,[expression], . . . }
FROM table;
The select list can contain either the asterisk or a list of column names or expressions.
The select list dictates what is returned by the query. The asterisk is simply shorthand,
meaning all columns. For example, to retrieve information on all users in the database,
you can issue the following SQL statement—the semicolon (;) is a line terminator:
SELECT * FROM DBA_USERS;
ch04.indd 3ch04.indd 3 6/30/2005 4:05:37 PM6/30/2005 4:05:37 PM

All-in-1 / Oracle Database 10g OCP Certification All-in-One / Watson, Bersinic / 5790-3
Oracle Database 10g OCP Certification All-in-One Exam Guide
4
To list all users and their account lockout statuses, you can use an expression in the
SELECT list and concatenate two columns in the table to provide the result, as well as
alias the resulting column name, as in this example:
SELECT USERNAME || ' is ' || ACCOUNT_STATUS AS "User and Status" FROM DBA_USERS;
Limiting Rows Returned with the WHERE Clause
In all of the examples so far, the queries have limited which columns have been
returned but have returned all rows in the table, but most of the time database queries
return a specific set of data required by the user. For example, an order entry person
taking an order on the phone will want to know the price of the specific product the
customer is asking about instead of the price of all products. In SQL, you limit the
number of rows returned with the use of a WHERE clause. In a SELECT statement,
the WHERE clause is always placed after the FROM clause:
SELECT [DISTINCT] {* | column,[expression], . . . }
FROM table;
[WHERE condition1 [{AND | OR [NOT]} condition2 . . .] ]
The conditions of a WHERE clause consist of two expressions compared by an
operator such as equal (=), not equal (<>), less than (<), or greater than (>), along
with other operators such as BETWEEN, LIKE, and IN. When SQL processes the
WHERE clause, it tests the value of each row in a column (or the result of each row in
an expression) against a particular value. The query includes only rows that meet the
condition in the result set. For example, to return the number of tables in the database
owned by the user SYSMAN, a DBA could issue the following query:
SELECT COUNT(*) FROM DBA_TABLES WHERE OWNER = 'SYSMAN';
When you refer to character and date values in a WHERE clause, you must enclose
them in single quotes. Numeric data does not require single quotes. If you omit the
single quotes, Oracle attempts to interpret the value as a database object, and you
will most likely receive an error. Furthermore, when using comparison operators
with character data, you should always remember that Oracle is case-sensitive when
performing character comparisons. These two queries will result in different sets of
data returned—one with the rows and the other with no rows—just because of the
difference in case for the value being retrieved:
SELECT COUNT(*) FROM DBA_OBJECTS WHERE OWNER='SYSMAN';
COUNT(*)
----------
1263
SELECT COUNT(*) FROM DBA_OBJECTS WHERE OWNER='sysman';
COUNT(*)
----------
0
ch04.indd 4ch04.indd 4 6/30/2005 4:05:37 PM6/30/2005 4:05:37 PM

All-in-1 / Oracle Database 10g OCP Certification All-in-One / Watson, Bersinic / 5790-3
Chapter 4: Interfacing with the Oracle Database
5
PART I
An important point to remember is that Oracle is not case sensitive when it comes
to the SQL syntax itself, just when comparing character values. Issuing the following
commands will always result in the same data being retrieved:
SELECT COUNT(*) FROM DBA_OBJECTS WHERE OWNER='SYSMAN';
COUNT(*)
----------
1263
select count(*) from dba_objects where owner='SYSMAN';
COUNT(*)
----------
1263
Eliminating Duplicates in the Result Set
When you issue a SELECT statement, Oracle returns all rows that match the query.
What if, however, you wanted a list only of all the users who own database objects?
To create such a list, you have to use the DISTINCT keyword. When you include this
keyword, Oracle sorts the result set and then returns only the first occurrence of each
value returned by the query. To use the DISTINCT keyword, you place it in the SELECT
list after the SELECT keyword. For example, to display the list of users who own objects
in the database, you would issue the following command with the displayed result:
SQL> SELECT DISTINCT owner FROM DBA_OBJECTS;
OWNER
------------------------------
DBSNMP
OUTLN
PUBLIC
SYS
SYSMAN
SYSTEM
WMSYS
7 rows selected.
If, on the other hand, you omitted the DISTINCT keyword, you would get a much
larger number of rows (several thousand, in fact). It is important to remember that
the DISTINCT keyword applies to the entire SELECT list. If you specify more than one
column or expression in the SELECT list, the DISTINCT keyword will return the unique
occurrences of the combination of all columns in the SELECT list. For example, issuing
the following command will return the unique combination of owner and object_type
from DBA_OBJECTS and return many more rows than the seven in the previous query:
SELECT DISTINCT owner, object_type FROM DBA_OBJECTS;
EXAM TIP DISTINCT will apply to the whole set of columns or expressions
on the SELECT list.
ch04.indd 5ch04.indd 5 6/30/2005 4:05:38 PM6/30/2005 4:05:38 PM

All-in-1 / Oracle Database 10g OCP Certification All-in-One / Watson, Bersinic / 5790-3
Oracle Database 10g OCP Certification All-in-One Exam Guide
6
Retrieving Data from More Than One Table
All SQL queries require two elements: a SELECT list specifying what to retrieve and
a FROM clause specifying where to retrieve those items from. In all of the previous
examples only one table is referenced in the FROM clause, but it is possible to include
more than one table in the FROM clause of a query and then specify how the tables
are related to form a join.
It is important to understand how to work with joins, not just because it is required
for the exam, but because the majority of queries used in the real world will include
joins. Even for DBAs it is necessary to write joins to extract data from Oracle’s data
dictionary. For example, if you wanted to retrieve a list of tablespaces and the names of
their associated datafiles, you would need to write a query joining DBA_TABLESPACES
and DBA_DATA_FILES.
Writing a join requires more than just a SELECT list and a FROM clause; it also
requires a join condition. A join condition is a way to equate specific rows in one
table with specific rows in another table. This condition is most often a primary key/
foreign key pair and is expressed in the WHERE clause (in all versions of Oracle) or
in the ANSI JOIN syntax available in Oracle 9i and Oracle 10g. Therefore the join that
would retrieve a list of tablespaces and their associated datafiles can be written two
ways, as follows:
SELECT DBA_DATA_FILES.tablespace_name, file_name
FROM DBA_TABLESPACES, DBA_DATA_FILES
WHERE DBA_TABLESPACES.TABLESPACE_NAME=DBA_DATA_FILES.TABLESPACE_NAME;
SELECT DBA_TABLESPACES.tablespace_name, file_name
FROM DBA_TABLESPACES JOIN DBA_DATA_FILES
ON DBA_TABLESPACES.TABLESPACE_NAME = DBA_DATA_FILES.TABLESPACE_NAME;
The advantage of using the ANSI JOIN syntax is that it is easier to read and clearly
specifies the join condition. You can also add a WHERE clause to further narrow down
the query, while in the first syntax the WHERE clause and join condition are in the
same place: the WHERE clause.
EXAM TIP Oracle supports both the classic join syntax and the preferred
ANSI join syntax.
Notice that the column tablespace_name in the SELECT list had to be qualified
in both SQL statements, but the parent table could be either of the joined tables. This
is because Oracle needs to be told which specific instance of the tablespace_name
column you want to display because there are two, one in each table being joined. If
you do not qualify the column name with the parent table name Oracle encounters
ch04.indd 6ch04.indd 6 6/30/2005 4:05:39 PM6/30/2005 4:05:39 PM

All-in-1 / Oracle Database 10g OCP Certification All-in-One / Watson, Bersinic / 5790-3
Chapter 4: Interfacing with the Oracle Database
7
PART I
an ambiguous reference and returns an error. However, if a column appears in only
one table in the join, it does not need to be qualified, as is the case with the file_
name column, since it exists only in the DBA_DATA_FILES table.
Another important thing to remember about joins is that the columns in the join
condition do not need to be in the SELECT list; they can serve only to link the tables
together. In fact, the join condition need not be specified at all, in which case you get
what is known as a CROSS JOIN or Cartesian product where all rows in the first table
are joined to all rows in the second table. While you may not think that this is useful,
and in most cases it serves to simply cause excessive work for Oracle, cross-joins are
very handy in data warehousing, where many tables are being related.
Not all joins are simple equijoins (joins whose join condition is based on the =
operator) like the examples just shown. There are different join types that can return
all matching data (inner joins, which can be equijoins or use other operators), more
than the matching data (outer joins), and even data in two tables that is not related—
i.e. the unrelated items—an extension of the outer join called the outer theta join. In
the ANSI JOIN syntax you also have a NATURAL JOIN, which matches column names
in the tables being related and then attempts to perform an equijoin based upon all
matching column names in both tables. Finally, a SELECT statement can include more
than one join so that it is possible to relate several tables in a single SQL statement.
NOTE For more information on joins and join syntax, refer to the Oracle 10g
SQL Reference documentation in the Oracle 10g documentation library that can
be found at www.oracle.com/technology/documentation/database10g.html.
Sorting and Grouping Data
When you issue a SELECT statement in SQL, you receive a result set that contains all
data in the table or tables that match the query. However, the order in which that data
is returned is completely random. It is conceivably possible to issue the same query
ten times and receive the same data back in ten different orders. When you want the
data returned in a specific order, you must use the ORDER BY statement. With this
statement, you specify the columns or expression that you want as the basis of your
ordering. You can also specify whether you want the data sorted in ascending order
(lowest to highest) or descending order (highest to lowest). You can order by a column
of any datatype except for the large object datatypes (that is, CLOB, NCLOB, BLOB,
BFILE, RAW, LONGRAW, and LONG). The default for character columns is to sort
alphabetically in ascending order. To retrieve a list of tablespaces in alphabetical order
and the associated datafiles, you can issue a query like this:
SELECT DBA_TABLESPACES.tablespace_name, file_name
FROM DBA_TABLESPACES JOIN DBA_DATA_FILES
ON DBA_TABLESPACES.TABLESPACE_NAME = DBA_DATA_FILES.TABLESPACE_NAME
ORDER BY DBA_TABLESPACES.TABLESPACE_NAME;
ch04.indd 7ch04.indd 7 6/30/2005 4:05:40 PM6/30/2005 4:05:40 PM

All-in-1 / Oracle Database 10g OCP Certification All-in-One / Watson, Bersinic / 5790-3
Oracle Database 10g OCP Certification All-in-One Exam Guide
8
EXAM TIP The ORDER BY clause must always appear last in the SQL
statement. You can order by any valid expression, such as a formula or
calculation applied against the data.
To make things more interesting, the expression in the ORDER BY clause need not
be in the SELECT list, JOIN condition, or WHERE clause. The data can be sorted using
any valid expression and even columns not referenced in the query, such as this example,
which sorts the output according to the size of the datafiles from largest to smallest:
SELECT DBA_TABLESPACES.tablespace_name, file_name
FROM DBA_TABLESPACES JOIN DBA_DATA_FILES
ON DBA_TABLESPACES.TABLESPACE_NAME = DBA_DATA_FILES.TABLESPACE_NAME
ORDER BY DBA_DATA_FILES.BYTES DESC;
Manipulating Data Using INSERT, UPDATE, and DELETE
The Oracle engine controls all access to the database and its data. This means that
when you want to place or modify data in a table, you must instruct Oracle to make
those changes for you. This is achieved through the INSERT, UPDATE, and DELETE
statements. Because storing and manipulating data is the key function of an Oracle
database, it is important to have a full understanding of how to issue these statements
to work with and manage an Oracle database.
The INSERT Statement
In order to get data into tables, you must issue the correct DML statement. To add data
to a table, you use the INSERT statement. The basic syntax for an INSERT statement is
as follows:
INSERT INTO table [(column, [column . . . ])]
VALUES (value [, value . . . ]);
You can insert data into only one table at a time using the INSERT statement. Thus,
you can include only one table name in the INSERT statement. The VALUES keyword
is followed by a list of values that are entered into the table in the same order as the
columns for that table. When you are inserting character data or date data into a table,
you must enclose this information in single quotes. Numeric data does not require
single quotes. If you do not want to specify a value for a column in the table, you can
assign it null by using the keyword NULL in place of data. NULL is the absence of a
value and can be specified for any column that a NOT NULL constraint is not defined on.
NOTE NULL is a state of a column. A column can be NULL, in which case it
does not have a value, or NOT NULL, if a value exists. When defining a table, it
is possible to indicate whether a column must have a value or not by using the
keywords NOT NULL or NULL, respectively, after the name and datatype of
the column have been specified. Chapter 8 will provide more information on
creating and managing tables.
ch04.indd 8ch04.indd 8 6/30/2005 4:05:40 PM6/30/2005 4:05:40 PM

All-in-1 / Oracle Database 10g OCP Certification All-in-One / Watson, Bersinic / 5790-3
Chapter 4: Interfacing with the Oracle Database
9
PART I
If you plan to enter data into fewer columns than are defined for the table, you must
include a column list after the table name. This list specifies the column or columns
that you want to insert data into, and the order in which those columns appear in the
VALUES list.
NOTE Oracle provides syntax allowing the insertion of data into more than one
table using conditional logic. The INSERT ALL and INSERT FIRST statements
can be used to add data to more than one table or the first table matching the
criteria, something very useful in data warehousing environments where data
loads are frequently performed.
The UPDATE Statement
In a transaction-oriented database such as an order entry system or an airline reservation
system, data is constantly changing—shipping dates are added to orders, passengers
change seat assignments, flights are rescheduled, and so on. To modify data after a
row has been inserted into a table, you must use the UPDATE statement. The basic
syntax for the UPDATE statement follows:
UPDATE table
SET column = value [, column = value, . . . ]
[WHERE condition];
It is possible to modify more than one column with a single UPDATE statement;
however, you can update only one table at time. The WHERE condition in an UPDATE
statement controls which rows are updated. An UPDATE statement updates all rows
that match the WHERE condition. If the WHERE clause is omitted, all rows in the
table are modified.
NOTE Oracle 10g also includes a MERGE INTO statement that allows you
to update data in one table when matching data is found and INSERT data
into another table when no match is found. This is also known as an UPSERT
(UPDATE and INSERT). In fact, Oracle 10g enhanced the MERGE statement
to allow conditional and optional extension clauses. The enhancements allow
conditional updates and inserts and an optional delete clause when updating
data (e.g., refresh existing row or delete obsolete row).
The DELETE Statement
Many databases will need to allow data to be removed as part of transactional
processing, or to reduce the size of tables by taking data no longer needed out of the
table. To remove a row from a table, you use the DELETE command. The basic syntax
for the DELETE statement is as follows:
DELETE [FROM] table
[WHERE condition];
ch04.indd 9ch04.indd 9 6/30/2005 4:05:41 PM6/30/2005 4:05:41 PM

All-in-1 / Oracle Database 10g OCP Certification All-in-One / Watson, Bersinic / 5790-3
Oracle Database 10g OCP Certification All-in-One Exam Guide
10
As with the UPDATE statement, the WHERE clause is used to control which rows
are affected by the DELETE statement. If you omit the WHERE clause, the DELETE
statement removes all rows from the table. If this is not your intention, you may remove
data that others need and cause some work for yourself to recover the missing data.
Luckily, there are commands in Oracle that determine whether or not to save your
changes.
EXAM TIP INSERT, UPDATE, and DELETE are always applied against data
in one and only one table.
Transaction Control
Each DML statement in Oracle is a single operation that affects one or more rows.
However, Oracle does not automatically save the changes you made, because it may
be necessary for more than one INSERT, UPDATE, or DELETE statement to be executed
for the data to be in a consistent and logical state. For example, consider the steps
involved in a bank transfer, which requires that you reduce the balance of the source
account and increase the balance of the target account in order for the transfer to be
valid. If the statement reducing the balance of the source account succeeds and the
second statement increasing the balance of the target account fails, there is a problem—
someone is out some money. With a transaction, you can group these two operations
into a single action. Transactions do more than just group statements together; they
also ensure the logical consistency of the database and your data.
Transactional control in Oracle has been designed to meet the ACID test first
suggested by Jim Gray and Andreas Reuter. ACID stands for “Atomicity,” “Consistency,”
“Isolation,” and “Durability,” as defined here:
• Atomicity The entire transaction must commit as a unit, or not at all.
• Consistency The transaction must follow some logical rules. In the account
transfer example, you are moving money from one location to another.
Consistency, in this case, requires that money not be created or destroyed.
It must be moved, and the amount credited must be the amount debited.
• Isolation The process carrying out the transaction must have absolute
control over all of the elements it is affecting. Oracle provides a concurrent
environment through a locking mechanism. While a process has a row locked,
it cannot be modified by another process. However, via the read consistency
mechanism, other processes can see the data in the column before it was
modified until the changes are committed to the database. This is achieved
in Oracle through the use of the undo or rollback segment, which will be
discussed in Chapter 16.
• Durability Durability means that after a transaction completes (or commits),
the data must remain that way and will be visible to all users. If changes need
to be made, another transaction will need to be initiated.
ch04.indd 10ch04.indd 10 6/30/2005 4:05:42 PM6/30/2005 4:05:42 PM

All-in-1 / Oracle Database 10g OCP Certification All-in-One / Watson, Bersinic / 5790-3
Chapter 4: Interfacing with the Oracle Database
11
PART I
Oracle does not commit a transaction and make changes permanent unless
instructed to do so. For this reason, several commands exist to control transactions.
A transaction implicitly starts when the DML statement is executed. It is not terminated
until it is either committed or rolled back.
In Oracle SQL, you can explicitly control the end of a transaction using the COMMIT
and ROLLBACK commands. When you issue a COMMIT statement, the changes made
by the DML statement become permanent. When you issue a ROLLBACK, the changes
are reversed. The advantage of this system is that it is possible to verify an operation
before committing it. When you query the table that you have modified, Oracle
displays the results of all DML statements within the transaction. These changes are
not visible to other users until you either commit or roll back the transaction. This
provides isolation. You can issue several DML statements, realize that you have made
a mistake, and undo your actions without other users being aware of the change. To
undo the changes, you simply issue a ROLLBACK statement.
EXAM TIP The first DML statement issued starts a transaction. A transaction
ends when a COMMIT or ROLLBACK is encountered, or an implicit COMMIT
or ROLLBACK takes place. Implicit commits take place when the connection
to the server is terminated normally, such as exiting a program. An implicit
rollback takes place if the connection to the database is aborted for any reason.
At times, however, you may not want to roll back the entire transaction. For instance,
you may want to verify each step of a multistep transaction and roll back individual
steps. This level of transactional control can be achieved with the use of savepoints.
Savepoints are named markers within the transaction that can be used as the target
for a rollback. You set savepoints with the following syntax:
SAVEPOINT name;
After the savepoint is set, you can roll back to that point by including the TO
operator and the name of the savepoint. After you issue a ROLLBACK TO statement,
all DML statements before the savepoint are committed and all changes after the
savepoint are rolled back. Also, all savepoints are erased and the current transaction
is ended. If you want to make further changes, you must start a new transaction by
issuing a DML statement.
Locking
Part of the ACID test was isolation, which implies that while a transaction is being
processed, no other user can make changes to the data that is the subject of the
transaction. Oracle controls this isolation with the use of locks. There are two types
of locks in Oracle: shared locks and exclusive locks.
Shared locks are acquired when you issue a SELECT statement. Oracle locks the
table to ensure that no one modifies its structure while you are using its data, but it
does not place any locks on the rows being queried. Shared locks do not prevent other
users from reading or modifying the data in the table, only from making changes to the
ch04.indd 11ch04.indd 11 6/30/2005 4:05:43 PM6/30/2005 4:05:43 PM

All-in-1 / Oracle Database 10g OCP Certification All-in-One / Watson, Bersinic / 5790-3
Oracle Database 10g OCP Certification All-in-One Exam Guide
12
table’s structure using the ALTER TABLE command or from dropping the table using
the DROP TABLE command. Multiple users can acquire share locks on the same data.
EXAM TIP SELECT statements apply no locks to the rows being queried.
Exclusive locks are acquired when you issue a DML statement, and they are acquired
for each row being modified. The exclusive lock prevents other users from acquiring
exclusive locks on the data you are working with as part of your transaction until you
issue a COMMIT or ROLLBACK statement. This prevents two users from attempting to
update the same data at the same time. When a user attempts to update data that is
locked by another user, the user must wait until the lock is removed.
NOTE Oracle allows you to manually perform locking of a table using the
LOCK TABLE command. As a general rule, applying your own manual locks is
a bad idea because it will probably apply more locks on the data than Oracle
would itself and therefore slow down processing. As a general rule, never apply
locks manually.
Data Definition Language
Before you can add data to a table, you need to create the table in the database. data
definition language (DDL) commands are used to create, modify, and remove objects
from a database. The three key DDL commands are:
• CREATE The CREATE statement adds a new object to the database. You use
it to create new tables, views, stored procedures, and other objects. In order for
the CREATE command to succeed, no other object with the same name can
exist in the schema.
• ALTER The ALTER statement is used to change the characteristics of tables,
indexes, and other objects in the database. The ALTER statement does not
apply to all objects in the database.
• DROP The DROP statement is used to remove objects from the database.
When used on tables, it also gets rid of any data that existed in the table. Once
dropped, the referenced object is no longer available and any commands that
attempt to make use of it will return an error.
NOTE Creating, modifying, and dropping database objects will be covered in
more detail in Chapter 8.
ch04.indd 12ch04.indd 12 6/30/2005 4:05:44 PM6/30/2005 4:05:44 PM

All-in-1 / Oracle Database 10g OCP Certification All-in-One / Watson, Bersinic / 5790-3
Chapter 4: Interfacing with the Oracle Database
13
PART I
Names of objects in Oracle must follow certain rules; for instance, all object names
must begin with a letter; may be from 1 to 30 characters in length; and may contain
letters, numbers, the underscore character (_), the dollar sign symbol ($), or the pound
sign symbol (#). Object names cannot be the same as any Oracle reserved word. Oracle
reserved words include most commands (for example, SELECT, INSERT, DROP, GRANT),
as well as the names of functions, and other language constructs. The complete list of
Oracle reserved words can be found in the SQL Reference Manual. If you do not follow
the rules and attempt to create an object, Oracle will generate an error.
An object name must not be the same as the name of another object owned by the
same user. When you attempt to create an object with the same name as another in
the same schema, Oracle generates an error. The names of objects in Oracle are case
insensitive, so if you use uppercase only, lowercase only, or mixed case when you create
an object, Oracle always returns the object name in uppercase.
Database, System, and Session Management Commands
Oracle also includes a number of special commands that are used to manage the
instance, database, or user session. These include the ALTER DATABASE, ALTER
SYSTEM, ALTER SESSION, and other commands.
The ALTER DATABASE command is used to make changes to the database as a
whole or a part of it. For example, you can use the ALTER DATABASE command to
indicate that one or more datafiles are the target of a backup, or to change the state
of the database from one mode to another.
The ALTER SYSTEM command is used to change the state of the running instance.
It can be used to change the values of Oracle initialization parameters either dynamically
or in the SPFILE. The ALTER SYSTEM command can also be used to allow only database
administrators to connect to the instance, as well as many other options.
The ALTER SESSION command allows a user to change the properties of his or her
session. For example, provided the user has permissions to issue the command, it can
be used to increase the amount of memory that is available for sorting or whether or not
parallel executions can be used on queries, or how date and other data will be output.
Understanding PL/SQL
While SQL is a great language for retrieving data from a database and for adding, making
changes to, or deleting the data, it does lack some important programming constructs.
For example, SQL does not have any provisions to control execution flow or to store
data in variables for later reuse or to perform specific actions if an error takes place.
Oracle’s solution to this problem was PL/SQL, which stands for Procedural Language
Extensions to SQL.
Before the integration of the PL/SQL language in Oracle, applications were limited
in how they could retrieve and manipulate database information. The two methods
were to send a number of SQL statements to the server in a script file from an interactive
tool like SQL*Plus or to embed those statements into a language precompiler called
ch04.indd 13ch04.indd 13 6/30/2005 4:05:44 PM6/30/2005 4:05:44 PM

All-in-1 / Oracle Database 10g OCP Certification All-in-One / Watson, Bersinic / 5790-3
Oracle Database 10g OCP Certification All-in-One Exam Guide
14
Pro*C. The latter provided the desired processing power but was not trivial to implement.
It took several lines of code to explain how to connect to the database, what statement
to run, and how to use the results from that statement. There were also differences in
the datatypes available in SQL and the precompiled language. PL/SQL addresses the
limitations of both of these methods.
PL/SQL code must be written in specific pieces called blocks. Because PL/SQL is
a compiled language, these blocks must be processed by a compiler before they can
execute. Compilation is the process of checking to ensure that the objects referred to
in the code exist and that the statements have a valid syntax. After this process is
completed, the code can then run, but it must run within a PL/SQL engine. The PL/SQL
engine is not a separate product from the Oracle server, but an integral part of the
Oracle database that takes a PL/SQL block and executes it.
PL/SQL blocks come in two varieties: anonymous blocks and named blocks.
Anonymous PL/SQL blocks are pieces of PL/SQL code that have no header with a name.
As such, you send them to the PL/SQL engine through an interactive tool like SQL*Plus,
and they run once. Remember that PL/SQL is a compiled language, so the block is
compiled, is run, and then disappears. If you want to run it again, you have to send
the entire block to the engine again, where it once again is compiled, is run, and then
disappears. These anonymous blocks can be saved to script files in the operating system
to make re-running them easier.
A named block can be “called” one or more times by its name. For this reason, the
named blocks are often used to implement modularity within a program. The program
can be broken down into several modules or subprograms, which can be called one
or more times. There are four types of named subprograms in Oracle: procedures,
functions, packages, and triggers. Procedures and functions are subprograms that can
be created as objects in the database, in the schema of their owner. When this happens,
they are called stored subprograms. The advantage of using stored subprograms is that they
are compiled at creation time and then can be run many times without the processing
overhead of recompiling. A package is a collection of procedures and functions and
cannot be invoked by its name, but the individual subprograms within the package
(the procedures or functions) can be called individually as long as they are preceded
by the package name. Triggers are blocks of code that are automatically invoked when
the triggering action takes place, such as inserting a row into a table or the user logging
on to the database or a system error occurring.
All PL/SQL blocks have the same structure, including a declaration section for
declaring variables and other identifiers (the DECLARE keyword starts this section),
an executable section for the code to be run (BEGIN keyword), an exception section
for trapping errors (EXCEPTION), and a block terminator indicated by the END
keyword. Only the BEGIN and END (and the code between them) are required elements
of an anonymous PL/SQL block.
EXAM TIP A valid PL/SQL block requires only BEGIN and END statements
and at least one line of valid code between them.
ch04.indd 14ch04.indd 14 6/30/2005 4:05:45 PM6/30/2005 4:05:45 PM

All-in-1 / Oracle Database 10g OCP Certification All-in-One / Watson, Bersinic / 5790-3
Chapter 4: Interfacing with the Oracle Database
15
PART I
Each line of a PL/SQL block is terminated by a semicolon, and the entire block
is treated by Oracle as a unit of execution, meaning it is run and completed and the
results are then sent to the calling program or client tool. A sample of an anonymous
PL/SQL block is as follows:
DECLARE
Val1 NUMBER := 5;
Val2 NUMBER := 2;
TheAnswer NUMBER;
BEGIN
TheAnswer := Val1 + Val2;
DBMS_OUTPUT.PUT_LINE('The answer is ' || TheAnswer);
EXCEPTION
WHEN ZERO_DIVIDE THEN
DBMS_OUTPUT.PUT_LINE('Cannot divide by zero!');
END;
Named PL/SQL blocks have a similar structure but allow the passing of parameters
into the block and, optionally, can return values back to the calling program. Functions
must always return a value and specify a return type, whereas procedures and triggers
do not need to. An example of the preceding anonymous PL/SQL block as a procedure
is as shown next. Note that the DECLARE keyword is not required as the declaration
section is assumed to follow the procedure name and parameter definition.
CREATE OR REPLACE PROCEDURE Add_Nums (Val1 IN NUMBER, Val2 IN NUMBER)
AS
TheAnswer NUMBER;
BEGIN
TheAnswer := Val1 + Val2;
DBMS_OUTPUT.PUT_LINE('The answer is ' || TheAnswer);
EXCEPTION
WHEN ZERO_DIVIDE THEN
DBMS_OUTPUT.PUT_LINE('Cannot divide by zero!');
END;
To invoke the procedure and pass it the numbers to add, you would issue the
following commands in SQL*Plus, iSQL*Plus, or another client query tool that
supports Oracle:
execute Add_Nums(10,2);
Chapter 10 will provide greater insight into how to program PL/SQL to access and
manipulate Oracle databases.
Query Tools in Oracle 10g
Oracle provides two key tools to send commands to the database to query its contents,
create objects, administer the database and instance, and perform other manipulation:
SQL*Plus and iSQL*Plus. SQL*Plus is a command-line tool executed on a client
computer and is installed when the Oracle client software is installed; iSQL*Plus runs
on the same computer as the database instance and is started as a service or background
ch04.indd 15ch04.indd 15 6/30/2005 4:05:46 PM6/30/2005 4:05:46 PM

All-in-1 / Oracle Database 10g OCP Certification All-in-One / Watson, Bersinic / 5790-3
Oracle Database 10g OCP Certification All-in-One Exam Guide
16
process on the host. Users access iSQL*Plus using Internet Explorer or any other
supported web browser.
SQL*Plus
SQL*Plus is a tool with a number of features that can enhance development. The
capability to save commands and use variables enables you to save and reuse common
SQL statements. The capability to customize your environment and format your output
enables you to write reports without purchasing a separate reporting tool. It is the main
tool used to start up and shut down a database instance, and it includes a set of
commands for managing the SQL*Plus environment as well as some useful shortcuts,
such as the DESCRIBE SQL*Plus command to display the structure of a database object.
In SQL*Plus your last executable SQL statement or PL/SQL block is saved in a
buffer that can be accessed and modified using the EDIT SQL*Plus command or other
statements. You can use substitution variables in SQL statements and PL/SQL blocks
to dynamically specify values for those variables when you execute the SQL statement.
SQL*Plus also includes a set of commands that enables you to save commands to script
files on disk, which can later be executed. You can also use the SPOOL SQL*Plus
command to store the results of executions for logging or other purposes.
SQL*Plus includes a number of options for the SET command that allows you to
configure your SQL*Plus environment so that it is best suited for you or affect how
output is displayed. Those commands can be saved in a file called login.sql and will
be executed whenever you start SQL*Plus to configure your SQL*Plus environment
properly. The SHOW SQL*Plus command can be used to display the current settings.
SQL*Plus also includes a set of commands that enable you to format your output and
create formatted reports. Furthermore, the DBA can restrict the commands that users
can execute in SQL*Plus by adding entries to the PRODUCT_USER_PROFILE table,
which is owned by the SYSTEM schema.
In Windows environments there are two versions of SQL*Plus: the graphical one
invoked from the Oracle program group when you install the Oracle software (called
SQLPLUSW.EXE) and the command-line version also available on all Oracle platforms
and invoked using the command sqlplus.
Exercise 4-1: Working with SQL*Plus
In this exercise you will invoke SQL*Plus from your Oracle host and execute and
format a few queries.
1. Log on to your computer as the oracle user, i.e., the user who owns the Oracle
software.
2. Invoke SQL*Plus from the command line by issuing the following command:
$ sqlplus /nolog
3. Within SQL*Plus, connect to the default database instance as the user system
with the appropriate password.
SQL> connect system/oracle
ch04.indd 16ch04.indd 16 6/30/2005 4:05:47 PM6/30/2005 4:05:47 PM

All-in-1 / Oracle Database 10g OCP Certification All-in-One / Watson, Bersinic / 5790-3
Chapter 4: Interfacing with the Oracle Database
17
PART I
4. Describe the structures of the DBA_TABLESPACES and DBA_DATA_FILES tables.
SQL> desc DBA_TABLESPACES;
SQL> desc dba_data_files;
5. Display the list of all tablespaces and their associated datafiles.
SQL> SELECT DBA_TABLESPACES.tablespace_name, file_name
2 FROM DBA_TABLESPACES JOIN DBA_DATA_FILES
3 ON DBA_TABLESPACES.TABLESPACE_NAME = DBA_DATA_FILES.TABLESPACE_NAME;
6. Format the output of the filename to be 55 characters wide and the tablespace
name to be 20 characters long, and then reissue the query.
SQL> col file_name format a55
SQL> col tablespace_name format a20
SQL> SELECT DBA_TABLESPACES.tablespace_name, file_name
2 FROM DBA_TABLESPACES JOIN DBA_DATA_FILES
3 ON DBA_TABLESPACES.TABLESPACE_NAME = DBA_DATA_FILES.TABLESPACE_NAME
7. Return a list of all users who own objects in the database, with each user
name appearing only once.
SQL> SELECT DISTINCT owner FROM DBA_OBJECTS;
8. Exit SQL*Plus.
SQL> exit;
iSQL*Plus
If you do not want to install the Oracle 10g client software on your computer (because
it does take up a lot of disk space), there is a way to send queries to the database as well
as execute scripts and do most things that you can do with SQL*Plus. This is by starting
and using iSQL*Plus running on the Oracle server computer and then connecting to it
using a web browser. Each installation of the Oracle 10g database will have iSQL*Plus
available, though it needs to be started on the server first.
To start iSQL*Plus on a Linux system, log in to the computer where Oracle is
installed as the oracle user, i.e., the owner of the Oracle installation, and while ensuring
that the PATH includes $ORACLE_HOME/bin, issue the command
isqlplusctl start
If you want to stop iSQL*Plus on Linux, issue the command
isqlplusctl stop
On Windows systems iSQL*Plus runs as a service and can be started and stopped
using the Services Microsoft Management Console (MMC) snap-in as shown in
Figure 4-1. You can still use the isqlplusctl command to stop and start the service
and check its status.
The best way to determine if iSQL*Plus is running, as well as to make use of it, is
to connect to it using a web browser and then specify the URL in the form http://
<server>:<port>/isqlplus, where server is the name or IP address of the
computer on which Oracle is running and port is the TCP port number on which
ch04.indd 17ch04.indd 17 6/30/2005 4:05:47 PM6/30/2005 4:05:47 PM
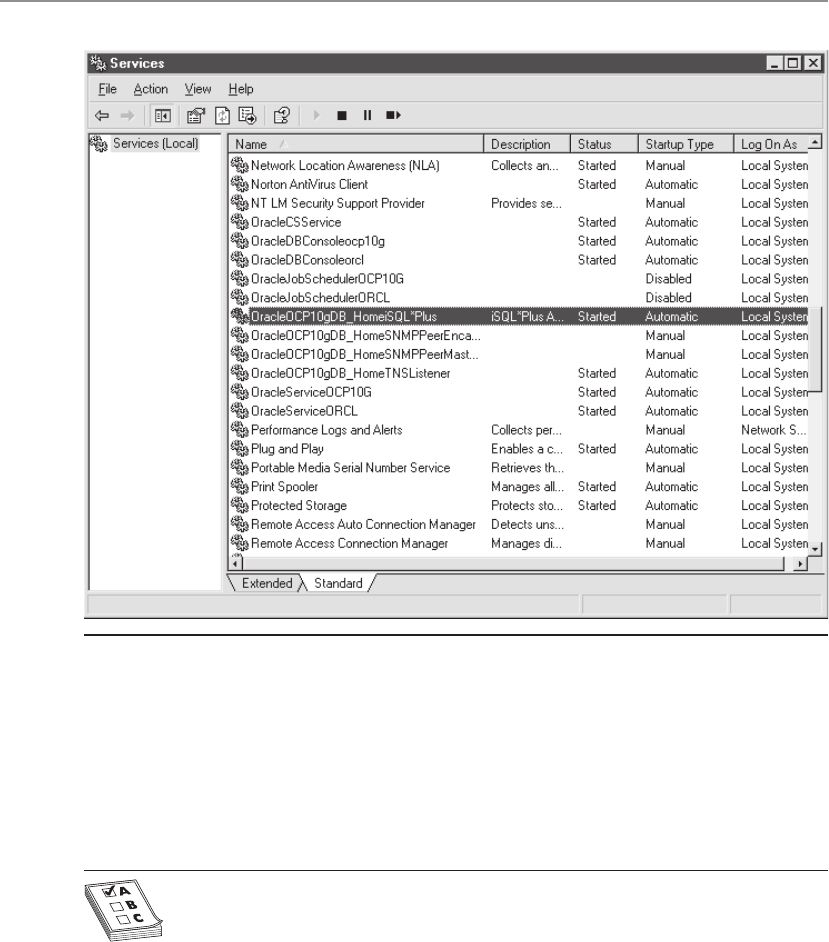
All-in-1 / Oracle Database 10g OCP Certification All-in-One / Watson, Bersinic / 5790-3
Oracle Database 10g OCP Certification All-in-One Exam Guide
18
iSQL*Plus is listening—usually 5560, as shown in Figure 4-2. If the Oracle Universal
Installer detects that port 5560 is already in use, it will go to the next higher available
port until it finds one that is free (5561, 5562, etc.). To determine what port is being
used, you can always check the contents of the portlist.ini file in $ORACLE_HOME/
install.
EXAM TIP The default port number where iSQL*Plus is installed is 5560.
Figure 4-1 Startup and shutdown of iSQL*Plus is managed using the Services MMC snap-in in
Windows.
ch04.indd 18ch04.indd 18 6/30/2005 4:05:48 PM6/30/2005 4:05:48 PM
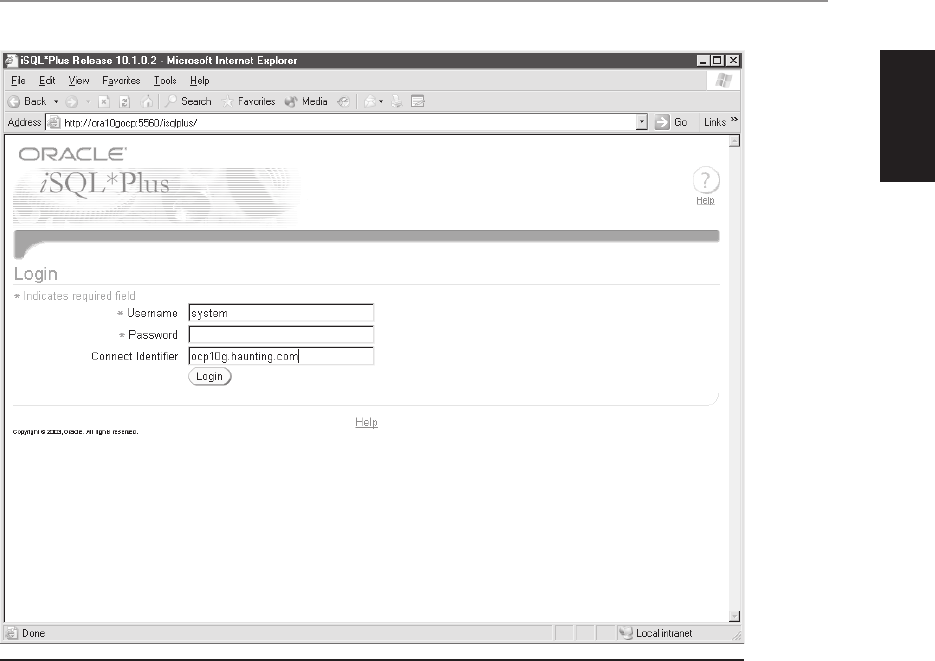
All-in-1 / Oracle Database 10g OCP Certification All-in-One / Watson, Bersinic / 5790-3
Chapter 4: Interfacing with the Oracle Database
19
PART I
Once you have connected to iSQL*Plus, you need to specify an Oracle database
username, password, and connect string. The connect string is the database you want
to query and must be resolvable by the Oracle networking components of the computer
where iSQL*Plus is running. If you leave the connect string blank, an attempt to connect
to the default instance will be made, if one is defined. Once connected, you can issue
and execute queries, load and run scripts, and save the commands to history for later
recall or in a script from the main iSQL*Plus workspace shown in Figure 4-3.
Figure 4-2 Use a web browser to connect to iSQL*Plus at the appropriate server port.
ch04.indd 19ch04.indd 19 6/30/2005 4:05:49 PM6/30/2005 4:05:49 PM
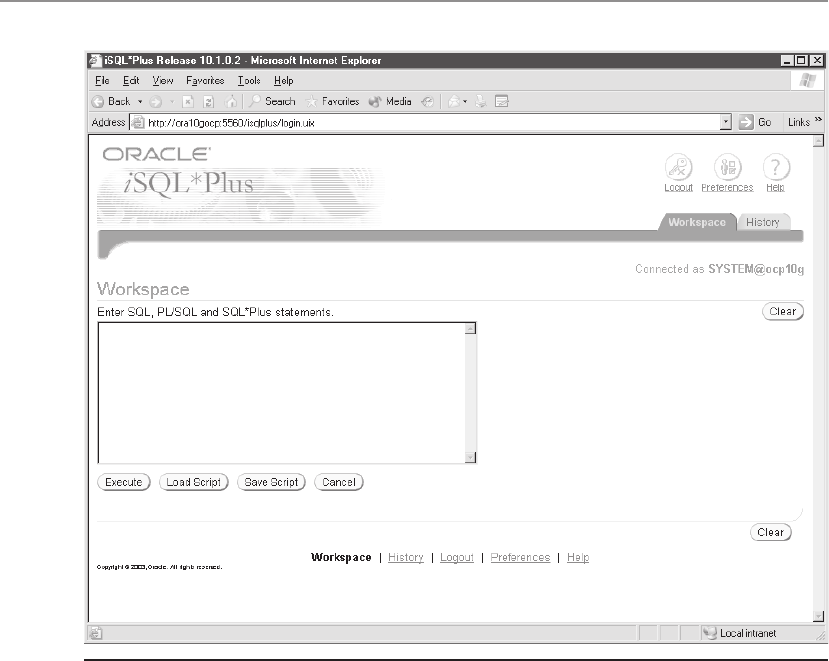
All-in-1 / Oracle Database 10g OCP Certification All-in-One / Watson, Bersinic / 5790-3
Oracle Database 10g OCP Certification All-in-One Exam Guide
20
Exercise 4-2: Working with iSQL*Plus
In this exercise you will connect to iSQL*Plus on your Oracle host using a browser
and execute and format a few queries.
1. Start a web browser and connect to the iSQL*Plus URL on your Oracle
database server, specifying the appropriate port number and machine name.
Figure 4-3 The iSQL*Plus main screen allows you to execute queries against the database.
ch04.indd 20ch04.indd 20 6/30/2005 4:05:50 PM6/30/2005 4:05:50 PM
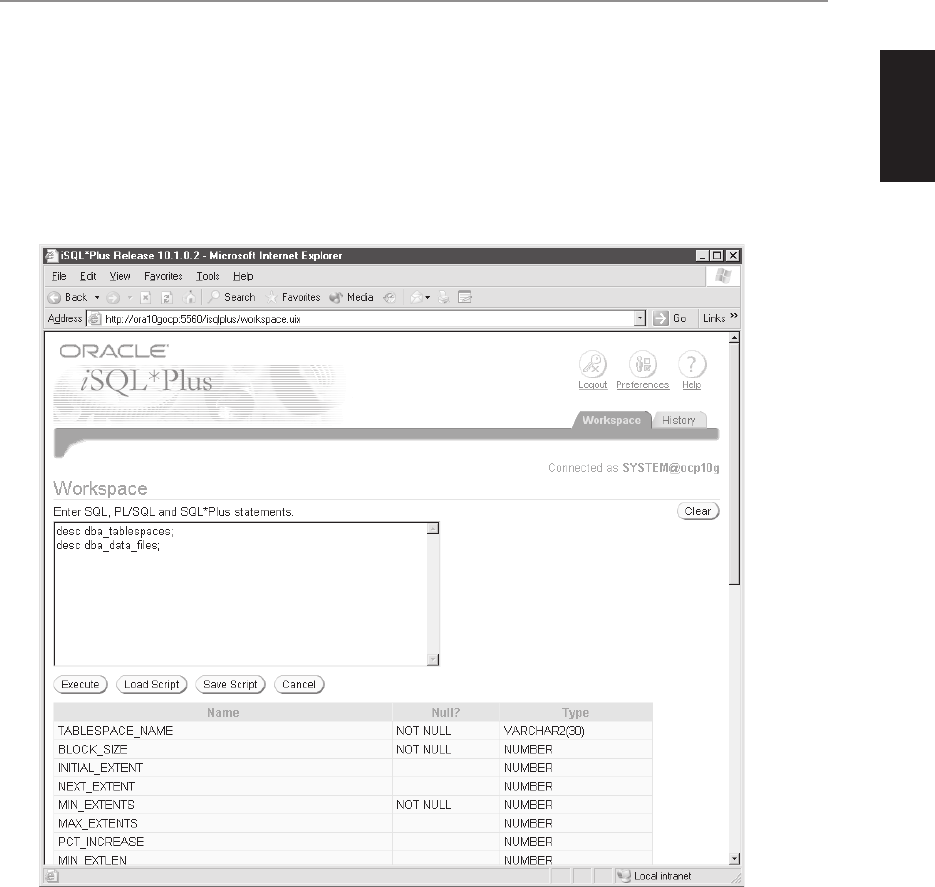
All-in-1 / Oracle Database 10g OCP Certification All-in-One / Watson, Bersinic / 5790-3
Chapter 4: Interfacing with the Oracle Database
21
PART I
2. At the iSQL*Plus logon, enter SYSTEM as the username and the password you
assigned as the password. Leave the Connect Identifier blank. Click the Login
button to log on.
3. In iSQL*Plus, enter the command to describe the DBA_TABLESPACES table,
and then click Execute. Do the same for the DBA_DATA_FILES table. (Hint:
You can enter both commands and then click Execute to see both results at
the same time.)
ch04.indd 21ch04.indd 21 6/30/2005 4:05:50 PM6/30/2005 4:05:50 PM
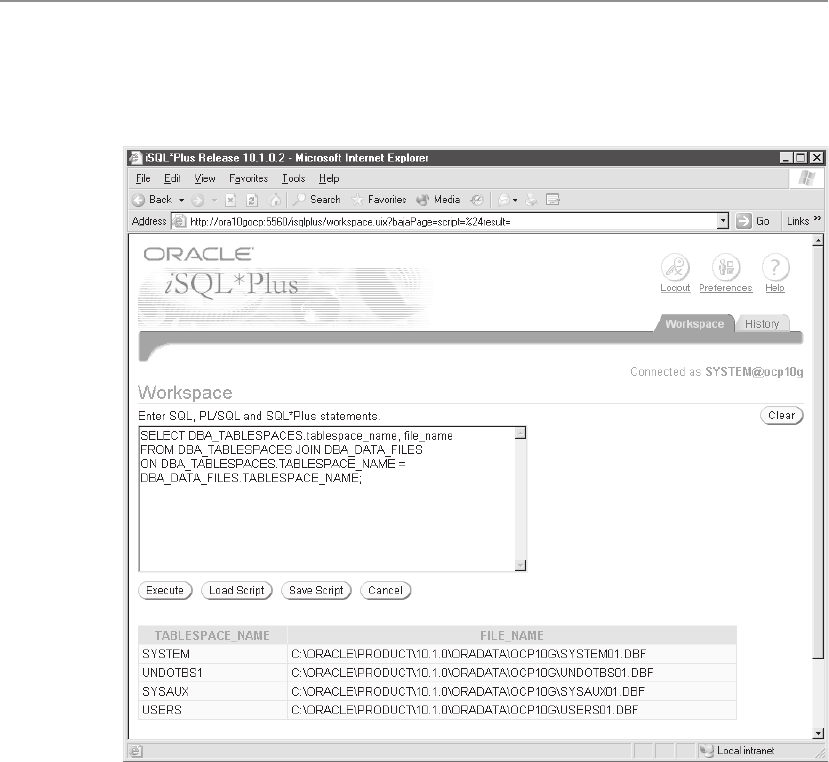
All-in-1 / Oracle Database 10g OCP Certification All-in-One / Watson, Bersinic / 5790-3
Oracle Database 10g OCP Certification All-in-One Exam Guide
22
4. Click Clear to remove the previous commands and results, and then enter the
SQL command to display a list of all tablespaces and their associated data
files. Then click Execute.
ch04.indd 22ch04.indd 22 6/30/2005 4:05:51 PM6/30/2005 4:05:51 PM
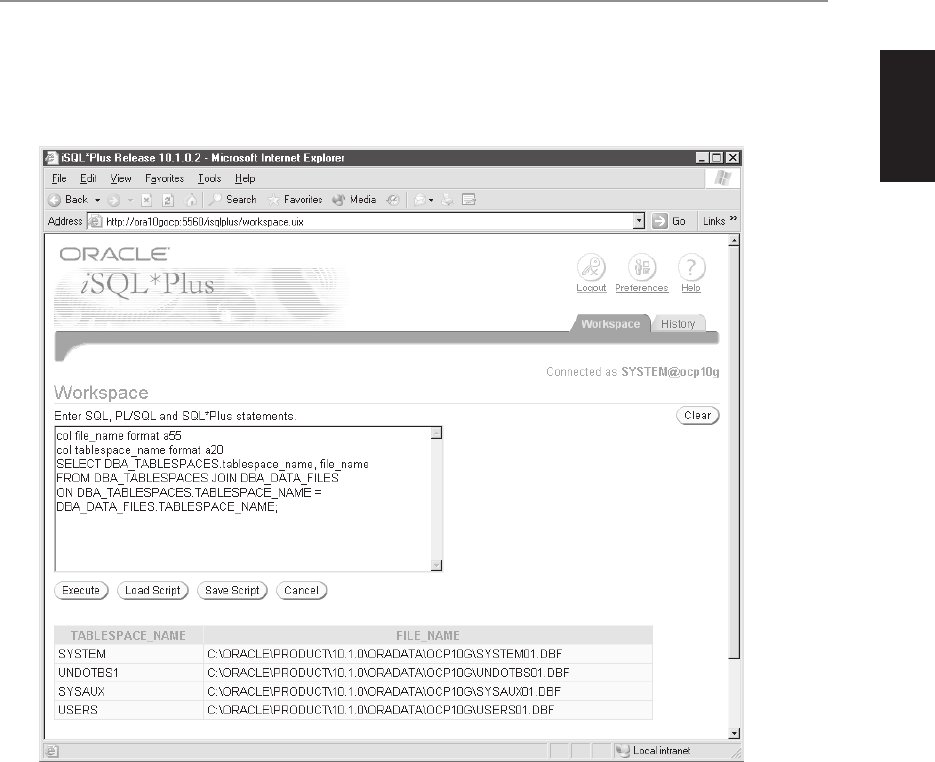
All-in-1 / Oracle Database 10g OCP Certification All-in-One / Watson, Bersinic / 5790-3
Chapter 4: Interfacing with the Oracle Database
23
PART I
5. Modify the command to format the output of the filename to be 55 characters
wide and the tablespace name to be 20 characters long. Then reissue the
query.
ch04.indd 23ch04.indd 23 6/30/2005 4:05:52 PM6/30/2005 4:05:52 PM
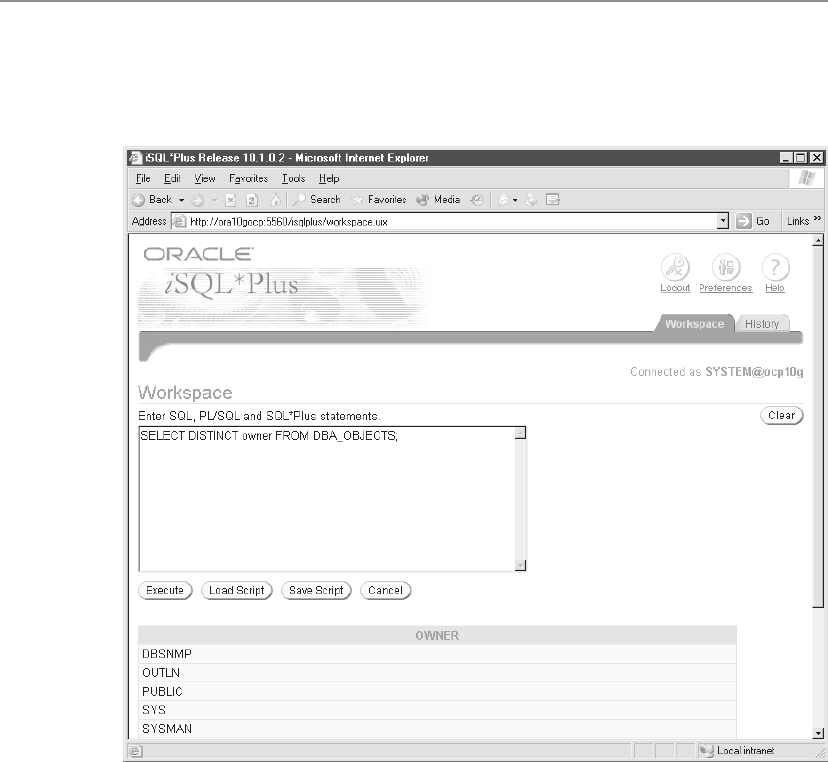
All-in-1 / Oracle Database 10g OCP Certification All-in-One / Watson, Bersinic / 5790-3
Oracle Database 10g OCP Certification All-in-One Exam Guide
24
6. Clear out the previous results and then enter a command to return a list of
all users who own objects in the database, with each username appearing
only once.
ch04.indd 24ch04.indd 24 6/30/2005 4:05:53 PM6/30/2005 4:05:53 PM
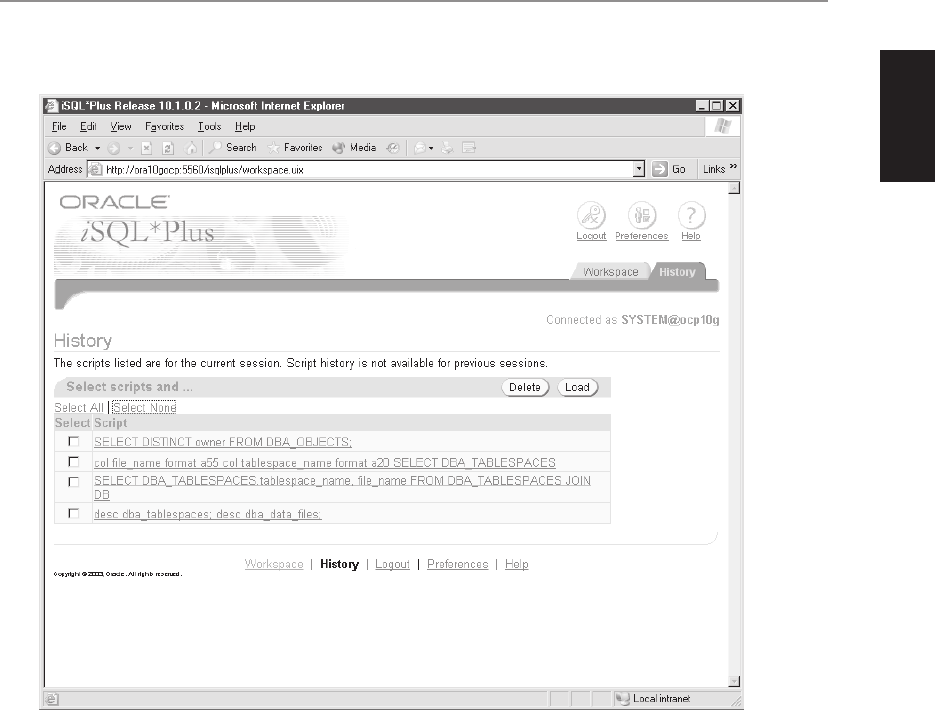
All-in-1 / Oracle Database 10g OCP Certification All-in-One / Watson, Bersinic / 5790-3
Chapter 4: Interfacing with the Oracle Database
25
PART I
7. Click the History tab to view your session history.
8. Click Logout on the top right to end your iSQL*Plus session.
ch04.indd 25ch04.indd 25 6/30/2005 4:05:53 PM6/30/2005 4:05:53 PM

All-in-1 / Oracle Database 10g OCP Certification All-in-One / Watson, Bersinic / 5790-3
Oracle Database 10g OCP Certification All-in-One Exam Guide
26
Other Methods to Interface
with the Oracle Database
SQL*Plus and iSQL*Plus are not the only methods to interface with the Oracle database
and manipulate the objects within it. Oracle databases can be accessed using Java and
JDBC, programmatically using the Oracle Call Interface (OCI) application programming
interface (API) and several other object interfaces and APIs, as well as by writing SQL
statements in your 3GL code and then using precompilers like Pro*C++ to produce
valid run-time calls.
Java in Oracle
Java is an industry-standard object-oriented programming language developed by
Sun Microsystems. One of its major strengths is the ability to write programs on
one supported Java platform, such as Windows, and have that code execute on other
supported Java platforms. This is possible because Java includes a concept of a Java
Virtual Machine, or JVM, which executes the code. The JVM runs on the target operating
system but presents the same objects to the Java application, meaning that the
programmer does not have to worry about programming for Windows or Unix—
only about programming for the JVM.
Oracle has provided Java support since Oracle 8 and continues to enhance the Java
capabilities of the database. Oracle 10g includes a JVM in the database (as did Oracle 8,
8i, and 9i) and allows you to program stored procedures and functions in Java that can
be called from PL/SQL, and vice versa, by using Java Database Connectivity (JDBC).
This provides the ability to make use of Java code and PL/SQL code interchangeably
within the same database, and it is something that Oracle itself does. The JVM is
installed and configured in the database when you create the database using the
Database Configuration Assistant or run the appropriate scripts.
EXAM TIP Oracle Database 10g includes a Java VM used to execute Java
stored procedures and functions stored in the database. JDBC is used by
the built-in JVM to manipulate database data.
Oracle Call Interface (OCI)
If you want to write C code in the same API that many of the Oracle tools and other
programs are written in, you can make use of the Oracle Call Interface (OCI). OCI is
a relatively low-level and complex API for advanced C and C++ programmers. Its main
advantage is that it provides precise control over what is sent to Oracle and how the
results are interpreted, and provides the best performance. In fact, all other Oracle APIs
are built on top of OCI and make extensive use of it. Programming using OCI is the
most efficient way to make use of third-generation languages (3GLs) like C and C++
for interfacing with Oracle.
ch04.indd 26ch04.indd 26 6/30/2005 4:05:54 PM6/30/2005 4:05:54 PM

All-in-1 / Oracle Database 10g OCP Certification All-in-One / Watson, Bersinic / 5790-3
Chapter 4: Interfacing with the Oracle Database
27
PART I
EXAM TIP OCI is the fastest but the most difficult API to write Oracle
applications in.
Other APIs
Oracle does not exist in a vacuum and needs to provide programmers with methods to
interface with Oracle that make the most sense in their environments. For this reason,
a number of other APIs are released and supported by Oracle, including these:
• Java Database Connectivity (JDBC) Oracle exposes the database for access
by Java-based programs using JDBC. This means that developers can write
programs in Java and query and manipulate Oracle databases by making a
thin-client JDBC connection to Oracle. In fact, running Java stored procedures
and functions in the Oracle JVM also makes use of JDBC to connect to the
SQL engine within the Oracle database.
• Pro*C/C++ and Pro*/COBOL Before the advent of PL/SQL and from
the earliest days of the Oracle database, programmers had embedded SQL
statements within their C or COBOL code and then run that code through
a precompiler to produce code that would include run-time library calls for
database access and compile properly with the C, C++, or COBOL compiler
they were using. Pro*C/C++ and Pro*COBOL continue to be valid ways to
embed SQL statements in 3GLs.
• Oracle C++ Call Interface (OCCI) C++ provides an object-oriented approach
to programming, and OCCI provides object-oriented access to the Oracle
database for C++ programmers. OCCI exposes many of the low-level functions
of OCI while being easier for C++ programmers to work with than Pro*C++.
• Open Database Connectivity (ODBC) ODBC is a standard developed by
Microsoft in the late 1980s to provide generic database access. It is still widely
used by many programmers in Microsoft-centric organizations, though faster
methods like .NET managed providers exist. In order to make use of ODBC
to access an Oracle database, the Oracle 10g networking components must be
installed on the computer running the ODBC-based application.
• Oracle Data Provider for .NET (ODP.NET) With the introduction of Visual
Studio .NET, Microsoft also changed the way database access was handled in
.NET-based applications. ODP.NET is a managed provider for Oracle database
access that can be used in applications developed to the Microsoft .NET
Framework.
• Oracle Objects for OLE (OO4O) Before .NET Microsoft Windows
applications were written to take advantage of Object Linking and Embedding
(OLE). OO4O allows for access to data stored in an Oracle database from pre-
ch04.indd 27ch04.indd 27 6/30/2005 4:05:55 PM6/30/2005 4:05:55 PM

All-in-1 / Oracle Database 10g OCP Certification All-in-One / Watson, Bersinic / 5790-3
Oracle Database 10g OCP Certification All-in-One Exam Guide
28
.NET languages such as Visual Basic 6 or from any Microsoft-based scripting
language such as Active Server Pages (ASP) or Visual Basic for Applications (VBA).
EXAM TIP Developers using the Windows platform can program applications
to access Oracle data using ODP.NET, OO4O, and ODBC, as well as any of
the other APIs mentioned.
Oracle continues to enhance the methods that can be used to interface to the
database and also has added support for access to Oracle data using FTP, HTTP, and
Web Distributed Authoring and Versioning (WebDAV) when the XML DB feature of
Oracle is installed and configured.
Chapter Review
Oracle provides a number of mechanisms to interact with the database and its data,
including the SQL language, PL/SQL, Java, and other lower-level APIs such as OCI,
OO4O, and ODP.NET, to name a few.
SQL is composed of three languages: DDL for creating and managing objects; DCL
for granting and revoking permissions; and DML for adding, changing, and deleting
data. Transaction control statements, including COMMIT and ROLLBACK, are used to
control how data is saved to the database. SAVEPOINTs can be used to logically break a
transaction into subparts that can be committed should later parts of the transaction fail.
PL/SQL contains language elements allowing a programmer to define variables
and other identifiers, perform looping, conditionally execute statements according to
the results of previous executions or the values of variables, and take advantage of other
features familiar to programmers of any language. It is the foundation for programming
powerful applications for Oracle. PL/SQL requires a PL/SQL engine for execution,
which exists in the Oracle 10g database.
When executing queries against the database or PL/SQL blocks, you can make use
of SQL*Plus on the client computer or iSQL*Plus using a web browser and connecting
to the database server. Both provide similar functionality, but iSQL*Plus does not
require that Oracle client software be installed on your computer.
Java can also be used to program database applications for Oracle. Oracle includes
a Java Virtual Machine, allowing developers to create and execute Java procedures and
functions in the database. JDBC is used to access and manipulate database data
from Java.
Lower-level APIs can also be used to program applications that access an Oracle
database. The Oracle Call Interface (OCI) is the fastest and most complicated of these;
others include OO4O, ODP.NET, and ODBC, as well as precompilers such as Pro*C/
C++ and Pro*COBOL.
ch04.indd 28ch04.indd 28 6/30/2005 4:05:56 PM6/30/2005 4:05:56 PM

All-in-1 / Oracle Database 10g OCP Certification All-in-One / Watson, Bersinic / 5790-3
Chapter 4: Interfacing with the Oracle Database
29
PART I
Questions
1. You want to create an anonymous PL/SQL block to access data in your database
based upon the value of a variable. In which section of the PL/SQL block would
you need to define the variable? (Choose the best answer.)
A. Declaration section
B. Definition section
C. Includable section
D. Executable section
E. Exception section
2. Which of the following APIs can you use to program an application on the
Windows platform to access an Oracle database? (Choose all correct answers.)
A. PL/SQL
B. Oracle Objects for OLE
C. Oracle Call Interface
D. Java
E. Oracle Data Provider for .NET
3. Given the following SQL statement, which line of code will cause the statement
to fail? (Choose the best answer.)
1 SELECT LastName, FirstName, Email
2 FROM Customers, EmailUsers
3 ON Customers.UserName = EmailUsers.UserName
4 ORDER BY LastName ASC
A. 1
B. 2
C. 3
D. 4
E. The statement will succeed
4. You need a mechanism to import data into Oracle from a legacy application
and, using a value in one of the columns in the source data, add the row to
one of several tables in your database. Which of the following can you use
to satisfy your requirements? (Choose two correct answers.)
A. PL/SQL
B. MERGE INTO
C. UPSERT
D. INSERT
E. INSERT ALL
F. INSERT FIRST
ch04.indd 29ch04.indd 29 6/30/2005 4:05:56 PM6/30/2005 4:05:56 PM

All-in-1 / Oracle Database 10g OCP Certification All-in-One / Watson, Bersinic / 5790-3
Oracle Database 10g OCP Certification All-in-One Exam Guide
30
5. Which of the following is not a valid SQL command? (Choose all correct
answers.)
A. SELECT
B. COLUMN
C. ROLLBACK
D. DESCRIBE
E. SAVEPOINT
6. Which of the following SQL statements will cause a transaction to be started?
(Choose two correct answers.)
A. INSERT
B. SELECT
C. COMMIT
D. SAVEPOINT
E. DELETE
F. ROLLBACK
7. You issue the following SQL statement against your database to change the
price of SKU 347711 from $90.75 to $99.75 without committing the change.
At the same time another user queries the value of the same SKU. What will
the result of that user’s query be?
UPDATE Products SET MSRP = 99.75 WHERE SKU=347711
A. $90.75
B. $99.75
C. The user will wait until you commit your transaction before being
displayed a value
D. Oracle will return the error “ORA-20001: Current row locked by another
process”
8. You attempt to connect to iSQL*Plus on your Oracle database server running
on Linux and receive an error in your browser that the page cannot be opened.
You suspect that iSQL*Plus is not started on the database server. Which of the
following commands can you use to start the process? (Choose the best answer.)
A. emctl start isqlplus
B. emctl startup isqlplus
C. isqlplusctl startup
D. isqlplusctl start
E. isqlplus start
ch04.indd 30ch04.indd 30 6/30/2005 4:05:57 PM6/30/2005 4:05:57 PM

All-in-1 / Oracle Database 10g OCP Certification All-in-One / Watson, Bersinic / 5790-3
Chapter 4: Interfacing with the Oracle Database
31
PART I
9. Which of the following make it possible for Java procedures created and
compiled in the Oracle 10g database to access data in the same database?
(Choose the best answer.)
A. Java Virtual Machine
B. JDBC
C. PL/SQL engine
D. SQL engine
E. Java procedures cannot access database data in Oracle
10. On which line will the following PL/SQL block fail? (Choose the best answer.)
1 DECLARE
2 vNum NUMBER := 100;
3 BEGIN
4 vNum = vNum / 10;
5 END;
A. 1
B. 2
C. 3
D. 4
E. 5
F. The statement will succeed
Answers
1. A. You need to define all variables in your anonymous PL/SQL block following
the DECLARE keyword in the declaration section of the PL/SQL block. The
definition and includable sections do not exist. The executable section starts
with the BEGIN keyword and includes the code being executed. The exception
section is used to trap for expected errors in the code and starts with the
EXCEPTION keyword.
2. B, C, and E. Any of the APIs available for Oracle can be used to program a
Windows application to access Oracle data, including OO4O, OCI, ODP.NET,
ODBC, and JDBC. You can also use precompilers to embed SQL code in your
3GL code. PL/SQL and Java are not APIs but programming languages and are
therefore incorrect, since the question asked you to identify the APIs.
3. C. This SQL statement mixes classic join syntax with ANSI join syntax, making
it invalid. The ON keyword can be used only in ANSI join syntax and must be
preceded by the JOIN keyword between the table names. In classic join syntax
the WHERE clause is used to specify the join condition and the ON keyword
is invalid.
ch04.indd 31ch04.indd 31 6/30/2005 4:05:57 PM6/30/2005 4:05:57 PM

All-in-1 / Oracle Database 10g OCP Certification All-in-One / Watson, Bersinic / 5790-3
Oracle Database 10g OCP Certification All-in-One Exam Guide
32
4. A and F. Because you need to add data to one of several tables, you need to
perform conditional logic on each of the rows in the source table as they
are read and then insert that row into the appropriate table. PL/SQL is a
programming language with conditional logic capabilities and can be used to
perform this task. You can also use the INSERT FIRST statement, which will
add the data to the first table matching the conditions specified. INSERT ALL
may insert data into more than one table, since all conditions are evaluated,
whereas INSERT cannot perform any conditional logic. MERGE INTO performs
an UPDATE and INSERT based upon data in an existing table, and there is no
UPSERT statement in Oracle SQL.
5. B and D. COLUMN and DESCRIBE are not valid SQL statements but are valid
SQL*Plus and iSQL*Plus commands to format the display of a column or
provide information on the structure of a database object. SELECT, ROLLBACK,
and SAVEPOINT are valid SQL commands in Oracle.
6. A and E. A transaction is started by any valid DML statement, including INSERT,
UPDATE, and DELETE. A SELECT statement will execute a query against the
database but not start a transaction. ROLLBACK and COMMIT will end a
transaction but start another one. SAVEPOINT defines a named marker in
your transaction that allows data before it to be committed and following it
to be rolled back when the ROLLBACK TO savepoint statement is issued.
7. A. Oracle allows users to query the database even if changes to the data being
queried are in process. The values returned will be those committed to the
database at the time the query was issued, which in this case is $90.75, since
the UPDATE was not yet committed.
8. D. The command to start iSQL*Plus on a Unix environment is isqlplusctl
start. The emctl command is used to start Oracle Enterprise Manager and
its controls and cannot be used to start iSQL*Plus. C and E are not correct
syntax for starting iSQL*Plus.
9. B. Java Database Connectivity is used by Java procedures and functions created
in the Oracle database to access the database data. The Java code will run in
the JVM and then make JDBC calls for database data. The PL/SQL engine is
not involved with Java in Oracle. The SQL engine is what JDBC uses to parse
and execute the queries and send the results back to the Java code in the JVM.
10. D. The assignment operator in PL/SQL is := and not just the equal sign. The
equal sign (=) is a comparison operator. The rest of the PL/SQL block is valid.
ch04.indd 32ch04.indd 32 6/30/2005 4:05:58 PM6/30/2005 4:05:58 PM

All-in-1 / Oracle Database 10g Certification All-in-One / Watson & Bersinic/ 5790-3 /Chapter 5
CHAPTER 5
Managing Oracle Processes
In this chapter you will learn how to
• Control the database
• Start and stop iSQL*Plus
• Start and stop Enterprise Manager Database Control
• Start and stop the Oracle Listener
• Start up and shut down Oracle Database 10g
• Describe startup and shutdown options for the Oracle database
• Handle parameter files
• Locate and view the database alert log
1
ch05.indd 1ch05.indd 1 5/18/2005 11:19:07 AM5/18/2005 11:19:07 AM

Oracle Database 10g OCP Certification All-in-One Exam Guide
2
All-in-1 / Oracle Database 10g Certification All-in-One / Meyers / 5790-3 /Chapter 23
A number of processes are required for an Oracle server to be working, and usable. To
begin with, you need a user process. This is the process that the end user runs: in the
last chapter, you saw SQL*Plus and iSQL*Plus, but of course for a production system
with a full user interface, the user process will be much more complicated than either
of those. Then there is the management process, in our case Database Control; the
Database Listener, a process that responds to connection requests from remote user
processes; and finally, the background processes that make up the instance itself. In
this chapter, you will go through starting these processes and then look at how the
database itself is opened for use.
Starting SQL*Plus
This couldn’t be simpler. SQL*Plus is just an elementary process for issuing ad hoc
SQL commands to a database. It is a client/server tool. On Windows systems, you
have a choice between the character-based version, SQLPLUS.EXE, and the graphical
version, SQLPLUSW.EXE. Both can be launched from a command prompt, or the
standard installation of Oracle will have created a shortcut to SQLPLUSW.EXE in your
Start menu. On Unix, there is just the one version, called sqlplus. On either operating
system you will find the executable program in your ORACLE_HOME/bin directory.
A variation you need to be aware of is the NOLOG switch. By default, the
SQL*Plus program immediately prompts you for an Oracle username, password,
and database connect string. This is fine for regular end users, but it is useless for
database administrators because it requires that the database be already open. To
launch SQL*Plus without a login prompt, use the /NOLOG switch:
sqlplus /nolog
or for the Windows GUI version:
sqlplus w /nolog
This will give you a SQL prompt, from which you can connect with a variety of syntaxes,
to be detailed in the sections that follow.
Starting iSQL*Plus
The iSQL*Plus program is a graphical version of SQL*Plus that runs as an Application
Server service. End users connect to it from a browser, such as Internet Explorer.
Conceptually, it is identical to SQL*Plus: it is a user process for issuing ad hoc SQL. The
difference is that whereas the SQL*Plus user process is a single process on the client
machine, iSQL*Plus divides the user process into two layers: a user interface layer
running in the user’s browser, which handles the bare bones of the graphical user
interface (local window management, tracking mouse movements, keyboard control,
and so on), and the application layer, which runs (typically) on a central server. It is
ch05.indd 2ch05.indd 2 5/18/2005 11:19:15 AM5/18/2005 11:19:15 AM
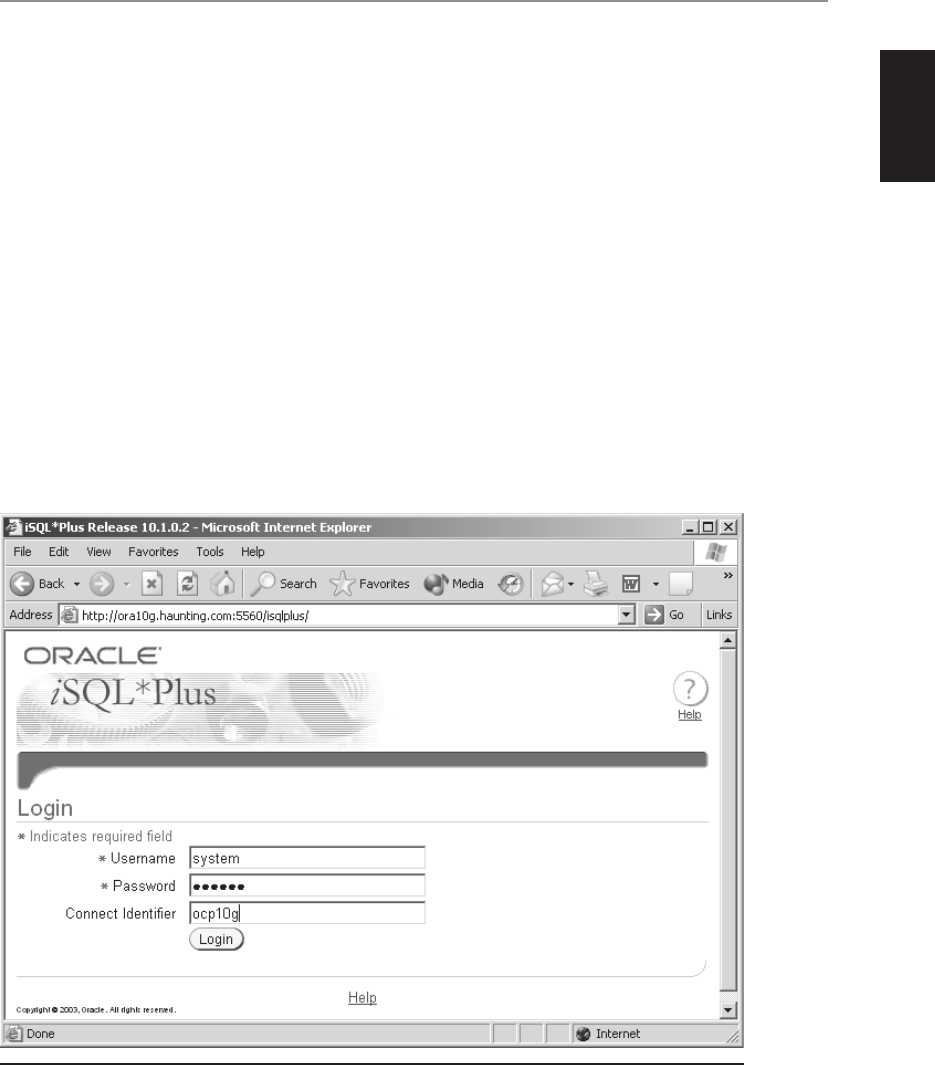
Chapter 5: Managing Oracle Processes
3
PART I
All-in-1 / Oracle Database 10g Certification All-in-One / Watson & Bersinic/ 5790-3 /Chapter 5
this application layer product that we need to launch. Once running, it can be used by
any browser anywhere. On Unix or Windows, launch the iSQL*Plus server with
isqlplusctl start
and stop it with
isqlplusctl st op
Alternatively, on Windows, you can start the iSQL*Plus server as a service, either
through the Windows or from the command line with net start.
To contact iSQL*Plus, issue the URL
http ://<h ostname.domain>:<port>/isqlplus
GUI as shown in Figure 5-1, where <hostname.domain> is the address of the
machine hosting your Oracle installation, and <port> is the IP port on which
the iSQL*Plus server is listening. By default, this will be port 5560, but if your
installation is nonstandard, it may be something different. Check the file
portlist.ini in your ORACLE_HOME/install directory to see which port was
Figure 5-1 The iSQL*Plus logon screen—note the URL.
ch05.indd 3ch05.indd 3 5/18/2005 11:19:16 AM5/18/2005 11:19:16 AM

Oracle Database 10g OCP Certification All-in-One Exam Guide
4
All-in-1 / Oracle Database 10g Certification All-in-One / Meyers / 5790-3 /Chapter 23
selected by the installer at install time. The iSQL*Plus tool is in fact implemented as
a stand-alone OC4J application. (OC4J, Oracle Components for Java 2 Enterprise
Edition, is Oracle’s run-time environment for Java, normally shipped as part of the
Application Server.)
TIP Note that iSQL*Plus is a little more effort to start than SQL*Plus, but it
can be vastly more convenient to use. For example, column formatting is much
better. Furthermore, you do not need a single line of Oracle code installed on
your client machine; all you need is a browser.
Starting the Database Listener
You will look at the Database Listener in much greater detail in Chapter 12, but for
now, be content with just stopping and starting it, and checking its status. From the
command line, use the Listener Control utility:
lsnrctl start <listener_name>
lsnrctl stop <listener_name>
lsnrctl status <listener_name>
The <listener_name> will default to LISTENER, and unless you have created additional
listeners with different names, this will be fine, so you can leave it out.
Alternatively, if you have Database Control running, you can use it to control the
listener instead of using the command-line utility. From the Database home page, click
the listener name to go to the listener’s home page and stop or start it from there. Finally,
if you are using Windows, you can control the listener as a Windows service.
If your Database Listener is not running, no clients will be able to connect unless
they are logged on to the server machine and are running their user process there,
locally to the database. In particular, Database Control will not be able to connect to
the database if the listener is not running. However, note that if you stop the listener,
this will not affect already established sessions; it will mean only that no new sessions
can be established.
Starting the Database Control Daemon
Enterprise Manager Database Control is an alternative to Enterprise Manager Grid
Control. Unlike Grid Control, Database Control is limited to administering one
database at a time, whereas Grid Control can be used to manage numerous databases
at once, as well as application servers. Database Control is a web tool, consisting of
tables and procedures within the database (you created these as part of the database
creation process) and an OC4J application running on your database server. If there
are multiple databases on the same server, you will need one running instance of the
OC4J program for each one. You will contact them on a different port for each
ch05.indd 4ch05.indd 4 5/18/2005 11:19:16 AM5/18/2005 11:19:16 AM
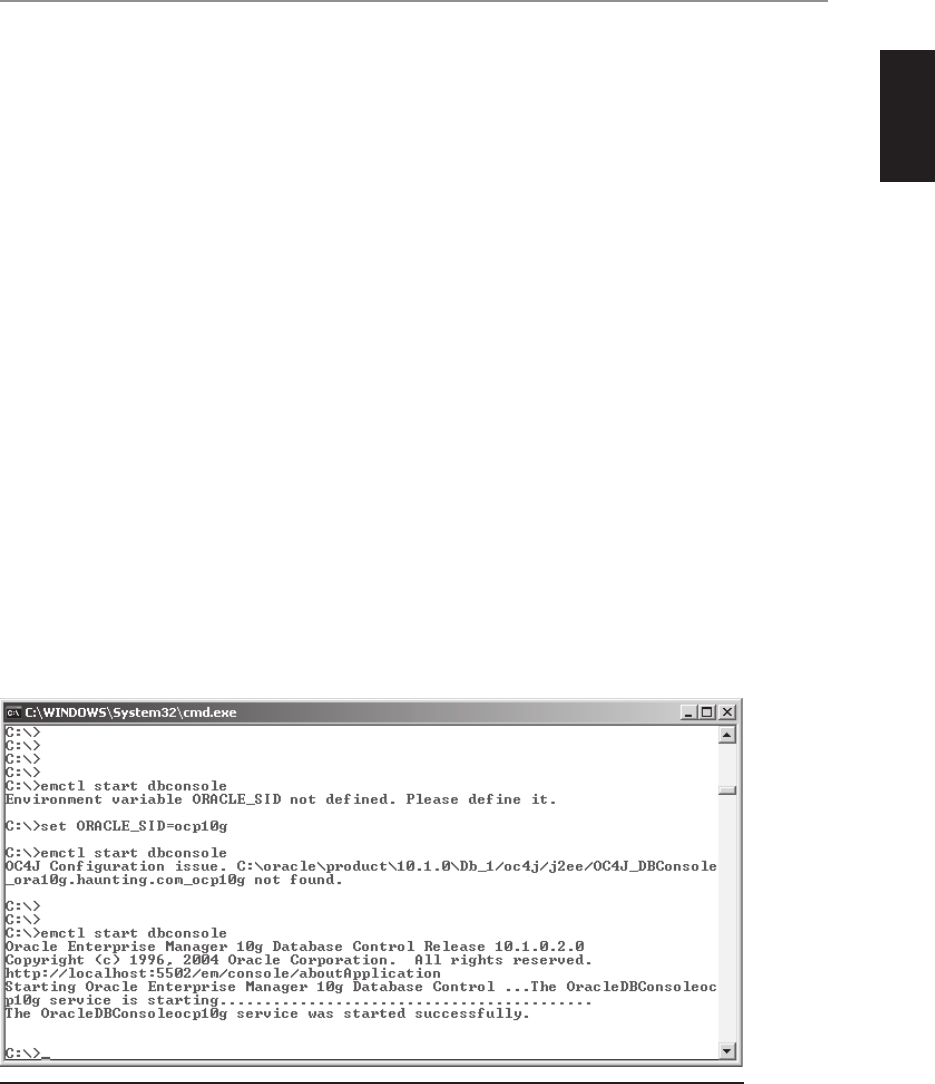
Chapter 5: Managing Oracle Processes
5
PART I
All-in-1 / Oracle Database 10g Certification All-in-One / Watson & Bersinic/ 5790-3 /Chapter 5
database. As with iSQL*Plus, your browser provides the user interface: the local window
management and so on.
To start the Database Control process, whatever your platform, use the emctl utility:
emctl start dbconsole
and to stop the daemon or see if it is running,
emctl sto p dbconsole
emctl stat us dbconsole
Alternatively, on Windows where emctl runs as a service, if you wish you can control
it from the Services MMC snap-in, or the Computer Management MMC console.
However, there are some possible complications, as shown in Figure 5-2.
First, if there are multiple databases on your server, you must set the ORACLE_
SID environment variable before starting Database Control. Second, Database Control
does not like DHCP, or any other reason for changing the address of the server. Of
course, this is not a problem for production systems, but it can be very annoying if
you are using a laptop that is sometimes connected to a network and sometimes
not. For this example in the figure, the database called ocp10g (there was already a
database called orcl10g on the computer) was created while not attached to a network.
Database Control therefore used a directory named after the localhost for its
configuration data. Then the computer connected to a network, picked up a DHCP-
issued address, and the user tried to start the dbconsole. As you can see, the first
attempt to start dbconsole failed because the user had not set his ORACLE_SID
environment variable. He fixed that and tried again; it then failed because Database
Control next looked for its configuration information in a nonexistent directory
whose name was derived from the newly acquired IP address. Then the user unplugged
Figure 5-2 Some dbconsole startup problems
ch05.indd 5ch05.indd 5 5/18/2005 11:19:16 AM5/18/2005 11:19:16 AM
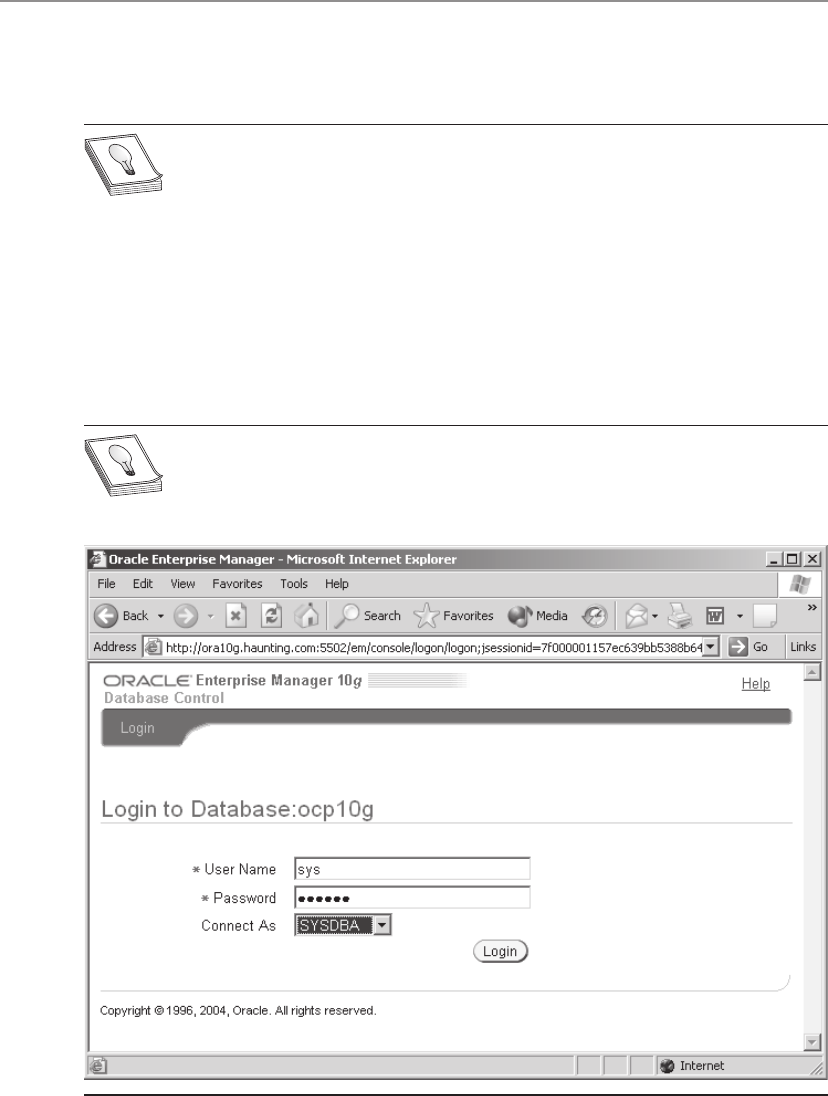
Oracle Database 10g OCP Certification All-in-One Exam Guide
6
All-in-1 / Oracle Database 10g Certification All-in-One / Meyers / 5790-3 /Chapter 23
the network lead, and dbconsole started successfully. Your server should be configured
with a static IP address to avoid this problem.
TIP An undocumented environment variable, EMHOSTNAME, may help
with changing an IP address. Set it to point to your local machine name before
creating any databases, and then dbconsole should always look for
that directory name for its config data.
Once the process is running, you contact it with the URL
http://<host.domain>:<port>/em
where <host.domain> is the address of your database server, as shown in Figure 5-3.
The port will default to 5500 for your first database on the computer, 5501 for your
second, and so on. If in any doubt, check the portlist.ini file as you did for iSQL*Plus.
TIP There is a link in Database Control to navigate to iSQL*Plus.
Figure 5-3 Database Control logon, showing the SYSDBA privilege selected. Note the URL.
ch05.indd 6ch05.indd 6 5/18/2005 11:19:17 AM5/18/2005 11:19:17 AM

Chapter 5: Managing Oracle Processes
7
PART I
All-in-1 / Oracle Database 10g Certification All-in-One / Watson & Bersinic/ 5790-3 /Chapter 5
Database Startup and Shutdown
To be precise, one does not start or stop a database: an instance may be started and
stopped; a database is mounted and opened, and then dismounted and closed. This
can be done from either SQL*Plus, using the STARTUP and SHUTDOWN commands,
or through Database Control. The alert log will give details of all such operations.
Connecting with an Appropriate Privilege
Ordinary users cannot start up or shut down a database. This is because an ordinary
user is authenticated against the data dictionary, and it is logically impossible for an
ordinary user to start up (or create) a database, since the data dictionary cannot be
read until the database is open. You must therefore connect with some form of external
authentication, as discussed in Chapter 3: you must be authenticated either by the
operating system, as being a member of the group that owns the Oracle software,
or by giving a username/password combination that exists in the external password
file. You tell Oracle that you wish to use external authentication by using appropriate
syntax in the CONNECT command that you give in your user process. If you are
using Database Control, it is easy: in the Connect As combo box you select either
SYSOPER or SYSDBA (the difference will be defined shortly).
Database Control does not give you the option of using operating system
authentication. This is because it always connects via a listener, as though it were
a remote process. If your listener is not running or does not recognize the database
you wish to connect to, you will not be able to use Database Control. If you are
using SQL*Plus, the syntax of the CONNECT command tells Oracle what type
of authentication you wish to use: the default of data dictionary authentication
(“Normal” in Database Control parlance), password file, or operating system.
These are the possibilities:
connect user/pass[@db]
connect user/pass[@db] as sysdba
connect user/pass[@db] as sysoper
connect / as sysdba
connect / as sysoper
The first example is normal, data dictionary, authentication. Oracle will validate
the username/password combination against values stored in the data dictionary. The
database must be open. Anyone connecting with this syntax cannot—no matter who
he is—issue startup or shutdown commands. The second two examples instruct Oracle
to go to the external password file to validate the username/password combination.
The last two examples use operating system authentication: Oracle will go to the host
operating system and check whether the operating system user running SQL*Plus is a
member of the operating system group that owns the Oracle software, and if the user
passes this test, he will be logged on as SYSDBA or SYSOPER without any need to give
a username and password. A user connecting with any of the bottom four syntaxes will
be able to issue startup and shutdown commands and will be able to connect no matter
what state the database is in—it may not even have been created yet. Note that the first
ch05.indd 7ch05.indd 7 5/18/2005 11:19:17 AM5/18/2005 11:19:17 AM
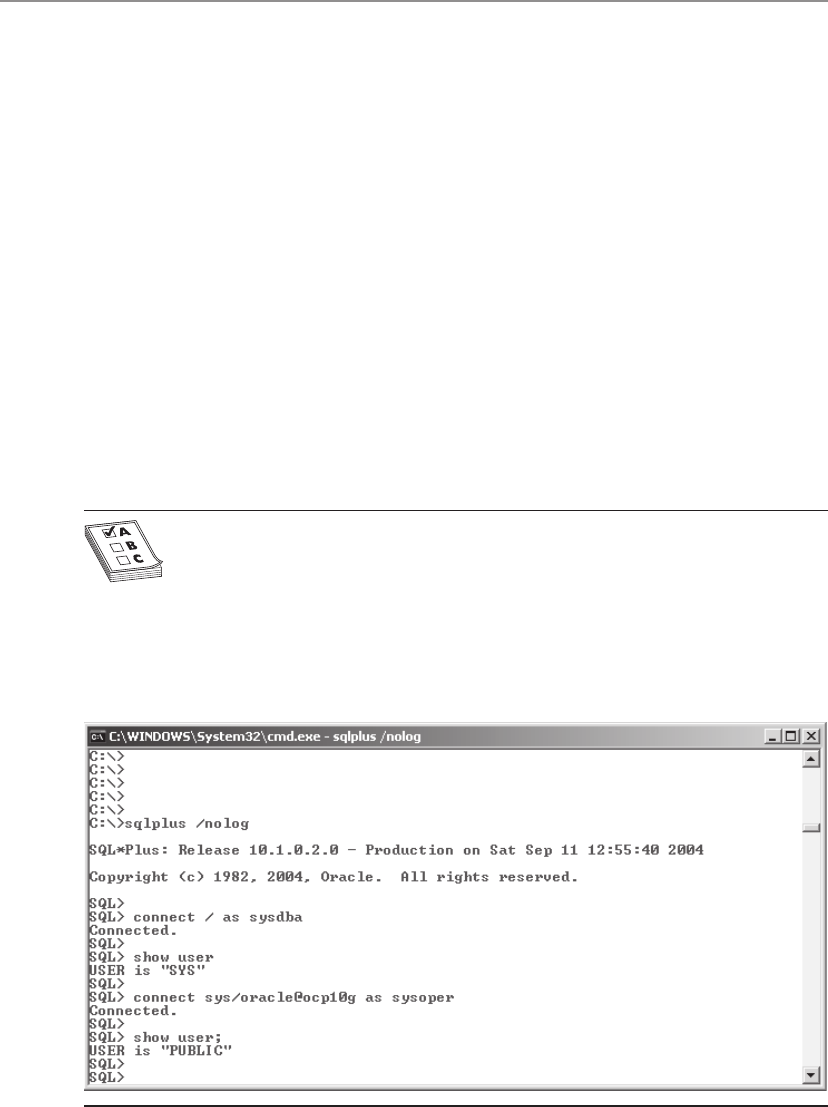
Oracle Database 10g OCP Certification All-in-One Exam Guide
8
All-in-1 / Oracle Database 10g Certification All-in-One / Meyers / 5790-3 /Chapter 23
three examples can include a database connect string: this is necessary if the connection
is to be made across a network. Naturally, this is not an option for operating system
authentication, because operating system authentication relies on the user’s being
logged on to the machine hosting the Oracle server: he must either be working on
it directly or have logged in to it with telnet or some similar utility.
SYSOPER and SYSDBA
These are special privileges with special capabilities. They can be enabled only when
users are connecting with an external authentication method. SYSOPER has the ability
to issue these commands:
STARTUP
SHUTDOWN
ALTER DATABASE [MOUNT | OPEN | CLOSE | DISMOUNT]
ALTER [DATABASE | TABLESPACE] [BEGIN | END] BACKUP
RECOVER
The SYSDBA privilege encompasses all of these commands but in addition has
the ability to create a database, to do an incomplete recovery, and to create other
SYSOPER and SYSDBA users.
EXAM TIP SYSDBA and SYSOPER are not users; they are privileges that can
be granted to users. By default, only user SYS has these privileges.
You may be wondering what Oracle user you are actually logging on as when you
use operating system authentication. To find out, from a SQL*Plus prompt connect
using the operating system authentication syntax just shown and then issue the show
user command, as in Figure 5-4.
Figure 5-4 Use of external authentication
ch05.indd 8ch05.indd 8 5/18/2005 11:19:17 AM5/18/2005 11:19:17 AM

Chapter 5: Managing Oracle Processes
9
PART I
All-in-1 / Oracle Database 10g Certification All-in-One / Watson & Bersinic/ 5790-3 /Chapter 5
As you see, use of the SYSDBA privilege logs you on to the instance as user SYS, the
most powerful user in the database and the owner of the data dictionary. Use of the
SYSOPER privilege connects you as a user PUBLIC. PUBLIC is not a user in any normal
sense but a notional user with administration privileges but (by default) no privileges
that let him see or manipulate data. You should connect with either of these privileges
only when you need to carry out procedures that no normal user can do.
Startup
Remember that the instance and the database are separate entities: they can exist
independently of each other. The startup process is therefore staged: first you build
the instance in memory, second you enable a connection to the database by mounting
it, and third you open the database for use. At any moment, a database will be in one
of four states:
• SHUTDOWN
• NOMOUNT
• MOUNT
• OPEN
When the database is in SHUTDOWN mode, all files are closed and the instance
does not exist. In the NOMOUNT mode, the instance has been built in memory (the
SGA has been created and the background processes started, according to whatever
is specified in its parameter file) but no connection has been made to a database.
It is indeed possible that the database does not yet exist. In MOUNT mode, the
instance locates and reads the database control file. In OPEN mode, all database
files are located and opened and the database is made available for use by end users.
The startup process is staged: whenever you issue a startup command, it will go
through these stages. It is possible to stop the startup part way. For example, if your
control file is damaged, or a multiplexed copy is missing, you will not be able to
mount the database, but by stopping in NOMOUNT mode, you may be able to
repair the damage. Similarly, if there are problems with any datafiles or redo log
files, you may be able to repair them in MOUNT mode before transitioning the
database to OPEN mode.
At any stage, how does the instance find the files it needs, and exactly what happens?
Start with NOMOUNT. When you issue a startup command, Oracle will attempt to
locate a parameter file. There are three default filenames. On Unix they are
$ORACLE_HOME/dbs/spfile<SID>.ora
$ORACLE_HOME/dbs/spfile.ora
$ORACLE_HOME/dbs/init<SID>.ora
and on Windows,
%ORACLE_HOME %\database \SPFILE<SID>.ORA
%ORACLE_HOME %\database \SPFILE.ORA
%ORACLE_HOME %\database \INIT<SID>.ORA
ch05.indd 9ch05.indd 9 5/18/2005 11:19:18 AM5/18/2005 11:19:18 AM

Oracle Database 10g OCP Certification All-in-One Exam Guide
10
All-in-1 / Oracle Database 10g Certification All-in-One / Meyers / 5790-3 /Chapter 23
TIP The spfile<SID>.ora file is undoubtedly the most convenient file to
use as your parameter file. Normally, you will use spfile.ora only in a RAC
environment, where one file may be used to start several instances. You will
use an init<SID>.ora file only if for some reason you need to make manual
edits: spfiles are binary files and cannot be edited by hand.
In all cases, <SID> refers to the name of the instance which the parameter file will
start. This search order is important! Oracle will work its way down the list, using the
first file it finds and ignoring the rest. If none of them exist, the instance will not start.
The only files used in NOMOUNT mode are the parameter file and the alert log. The
parameters in the parameter file are used to build the SGA in memory and to start the
background processes. Entries will be written out to the alert log describing this process.
Where is the alert log? In the location given by the BACKGROUND_DUMP_DEST
parameter. If the log already exists, it will be appended to. Otherwise, it will be created.
If any problems occur during this stage, trace files may also be generated in the same
location.
EXAM TIP An “init” file is known as a “static” parameter file, because it
is read only once, at instance startup. An “spfile” is known as a “dynamic”
parameter file, because Oracle continuously reads and updates it while the
instance is running.
Once the instance is successfully started in NOMOUNT mode, it may be transitioned
to MOUNT mode by reading the controlfile. It locates the controlfile by using the
CONTROL_FILES parameter, which it knows from having read the parameter file used
when starting in NOMOUNT mode. If the controlfile (or any multiplexed copy of it) is
damaged or missing, the database will not mount and you will have to take appropriate
action before proceeding further. All copies of the controlfile must be available and
identical if the mount is to be successful.
As part of the mount, the names and locations of all the datafiles and online
redo logs are read from the controlfile, but Oracle does not yet attempt to find them.
This happens during the transition to OPEN mode. If any files are missing or damaged,
the database will remain in MOUNT mode and cannot be opened until you take
appropriate action. Furthermore, even if all the files are present, they must be
synchronized before the database opens. If the last shutdown was orderly, with all
database buffers in the database buffer cache being flushed to disk by DBWn, then
everything will be synchronized: Oracle will know that all committed transactions
are safely stored in the datafiles, and that no uncommitted transactions are hanging
about waiting to be rolled back. However, if the last shutdown was disorderly (such
as a power cut, or the server being rebooted), then Oracle must repair the damage.
(You will go into the mechanism for this in Chapter 20.) The process that mounts
and opens the database (and carries out repairs, if the previous shutdown was
disorderly) is the SMON. Only after the database has been successfully opened
will Oracle permit user sessions to be established.
ch05.indd 10ch05.indd 10 5/18/2005 11:19:18 AM5/18/2005 11:19:18 AM

Chapter 5: Managing Oracle Processes
11
PART I
All-in-1 / Oracle Database 10g Certification All-in-One / Watson & Bersinic/ 5790-3 /Chapter 5
Shutdown should be the reverse of startup. During an orderly shutdown, the
database is first closed and then dismounted, and finally the instance is stopped.
During the close phase, all sessions are terminated: active transactions are rolled back
by PMON, completed transactions are flushed to disk by DBWn, and the datafiles and
redo log files are closed. During the dismount, the controlfile is closed. Then the
instance is stopped by deallocating the SGA and terminating the background processes.
Now look at the syntax for startup and shutdown, beginning with how to connect.
Exercise 5-1: Starting Up and Shutting Down
Your Database with SQL*Plus
Use SQL*Plus to start and stop the database. Alternatively, if your database is already
running, stop it and then restart it with SQL*Plus. If you are working on Windows,
make sure that the Windows service is running. It will be called
OracleServiceOCP10g
if your instance is called OCP10g. Start it through the Windows GUI, or from a
command prompt with
net start OracleServiceOCP10g
The sequence of SQL*Plus commands is shown in Figure 5-5.
TIP The Windows service may be configured to start the instance and open
the database whenever you start the service. You can control this with the
Registry variable ORA_OCP10G_AUTOSTART, setting it to TRUE or FALSE.
1. Launch SQL*Plus, using the /nolog switch.
sqlplusw /nolog
2. Connect with operating system authentication.
connect / as sysdba
3. Start the instance only.
startup nomount;
4. Mount the database.
alter database mount;
5. Open the database.
alter database open;
6. Shut down, using the immediate option.
shutdown immediate;
7. Connect with password file authentication.
connect sys/oracle as sysdba;
ch05.indd 11ch05.indd 11 5/18/2005 11:19:18 AM5/18/2005 11:19:18 AM
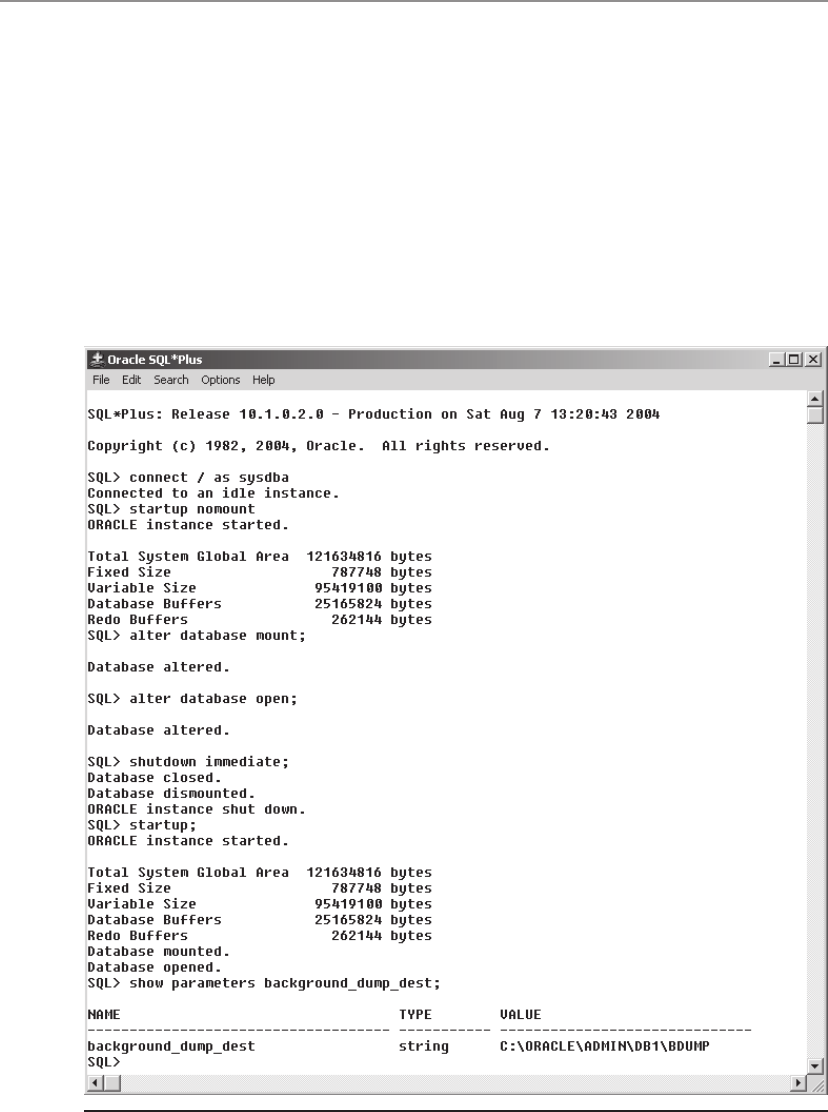
Oracle Database 10g OCP Certification All-in-One Exam Guide
12
All-in-1 / Oracle Database 10g Certification All-in-One / Meyers / 5790-3 /Chapter 23
8. Perform a complete startup, with one command.
startup;
9. Show the BACKGROUND_DUMP_DEST parameter.
show para meter background_d ump_dest;
10. Navigate to the directory identified by the BACKGROUND_DUMP_DEST
parameter. In it you will find your alert log, called alert_<SID>.log.
11. Open the alert log with any editor you wish and look at the last few dozen
lines. You will see a history of the startup and shutdown commands, as well
as information about the starting and stopping of the various background
processes and a listing of the nondefault parameters read from the parameter
file and used to build the instance in memory.
Figure 5-5 Startup/shutdown exercise
ch05.indd 12ch05.indd 12 5/18/2005 11:19:19 AM5/18/2005 11:19:19 AM

Chapter 5: Managing Oracle Processes
13
PART I
All-in-1 / Oracle Database 10g Certification All-in-One / Watson & Bersinic/ 5790-3 /Chapter 5
Shutdown
There are options that may be used on the shutdown command:
shutdown [normal | transactional | immediate | abort]
• Normal This is the default. No new user connections will be permitted,
but all current connections are allowed to continue. Only once all users
have (voluntarily!) logged off will the database actually shut down.
TIP Typically, a normal shutdown is useless: there is always someone logged
on, even if it is only Database Control itself.
• Transactional No new user connections are permitted; existing sessions that
are not in a transaction will be terminated; sessions currently in a transaction
are allowed to complete the transaction and will then be terminated. Once all
sessions are terminated, the database will shut down.
• Immediate No new sessions are permitted, and all currently connected
sessions are terminated. Any active transactions are rolled back, and the
database will then shut down.
• Abort As far as Oracle is concerned, this is the equivalent of a power cut.
The instance terminates immediately. Nothing is written to disk; no file
handles are closed; there is no attempt to terminate transactions that may
be in progress in any orderly fashion.
TIP Using shutdown abort will not damage the database but will leave it in
an inconsistent state; therefore, some operations (such as backups) are not
advisable after an abort.
The “normal,” “immediate,” and “transactional” shutdown modes are usually
referred to as “clean,” “consistent,” or “orderly” shutdowns. After all sessions are
terminated, PMON will roll back any incomplete transactions. Then a checkpoint is
issued (remember the CKPT process from Chapter 3?), forcing the DBWn process to
write all updated data from the database buffer cache down to the datafiles. LGWR
also flushes any change vectors still in memory to the logfiles. Then the file headers
are updated, and the file handles closed. This means that the database is in a
“consistent” state: all committed transactions are in the datafiles, there are no
uncommitted transactions hanging about that need to be rolled back, and all
datafiles and logfiles are synchronized.
The “abort” mode, often referred to as a “disorderly” shutdown, leaves the database
in an “inconsistent” state: it is quite possible that committed transactions have been
lost, because they existed only in memory and DBWn had not yet written them to the
datafiles. Equally, there may be uncommitted transactions in the datafiles that have
ch05.indd 13ch05.indd 13 5/18/2005 11:19:19 AM5/18/2005 11:19:19 AM

Oracle Database 10g OCP Certification All-in-One Exam Guide
14
All-in-1 / Oracle Database 10g Certification All-in-One / Meyers / 5790-3 /Chapter 23
not yet been rolled back. This is the definition of a corrupted database: it may be
missing committed transactions, or storing uncommitted transactions. These corruptions
must be repaired by instance recovery. It is exactly as though the database server had
been switched off, or perhaps rebooted, while the database was running.
Instance Recovery
You will find a full treatment of instance recovery in Chapter 20. For now, accept
that the mechanisms of rollback and redo make it impossible to corrupt an Oracle
database. DBAs do not say this just because they happen to work with Oracle; they
say it because it is a fact. You can do horrible things to Oracle databases, but you
will never manage to corrupt one. The mechanism of instance recovery absolutely
guarantees that the database cannot be corrupted: committed transactions will
always be reinstated; uncommitted transactions will always be backed out. If for
some reason (always involving damage to disk files, which is out of Oracle’s control)
the instance recovery fails, then the database will not open until you have repaired
the damaged files through the restore and recover routines that we deal with in later
chapters. This impossibility of corruption is why people buy the Oracle database,
and likewise why it isn’t cheap.
EXAM TIP If Oracle detects that instance recovery is necessary, it will happen
automatically. There is no way to initiate it (or to cancel it) manually.
When an instance attempts to open a database, the SMON process checks the state
of the datafiles and of the online redo log files. If the shutdown was disorderly, the
fact will be immediately apparent at this time, and SMON will initiate the instance
recovery process. Only once this has completed will the database open. Conversely, if
the shutdown was orderly, SMON will detect this and open the database immediately.
Thus you can always guarantee that an opened database has no corruptions, but the
shutdown method chosen determines when corruptions are repaired.
With an orderly shutdown (normal, transactional, or immediate), any possible
problems are fixed during the shutdown: incomplete transactions are rolled back,
committed transactions are saved. The shutdown may take some considerable time
as this is done, but the startup will be fast. With a disorderly shutdown (an abort, or
perhaps a hardware failure or operating system crash) the shutdown is instantaneous,
but the startup will be delayed while any problems are fixed by the instance recovery.
It is possible to tune the speed of the shutdown/startup cycle, which will impact on
the mean-time-to-recover, or MTTR, after a failure. The MTTR will often be specified
in service level agreements.
ch05.indd 14ch05.indd 14 5/18/2005 11:19:19 AM5/18/2005 11:19:19 AM

Chapter 5: Managing Oracle Processes
15
PART I
All-in-1 / Oracle Database 10g Certification All-in-One / Watson & Bersinic/ 5790-3 /Chapter 5
Exercise 5-2: Starting Up and Shutting Down
Your Database with Database Control
As in Exercise 5-1, become familiar with starting and stopping the instance and
opening and closing the database.
1. Ensure that your Database Listener and Database Control processes are
running, by entering
lsnrctl status
emctl status dbconsole
from an operating system prompt.
2. Launch your browser, and contact Database Control with the appropriate
URL, such as
http://127.0.0.1:5501/ em
3. Log on as in Figure 5-3. Click the SHUTDOWN button. Type in both operating
system credentials and database credentials, as shown in Figure 5-6, and click OK.
TIP On Windows, the operating system account you use must have been
granted the “Logon as a Batch Job” privilege. Note that by default, not even
the Windows Administrator account has this privilege! Refer to your Windows
documentation on how to grant this privilege; there are changes with different
releases. On both Windows and Unix, the account should be a member of the
group that owns the Oracle software.
4. Click Yes for an immediate shutdown. Note that the Advanced Options tab
gives a choice of all four shutdown modes.
5. Refresh your browser (it may take a few moments) and you will see the screen
shown in Figure 5-7.
6. Click Startup, and enter credentials as in Figure 5-6.
7. Click Yes to accept the default startup mode, which is “open.”
TIP When you start and stop the database, Database Control does
sometimes get confused about whether the database is actually up or down.
This is perhaps hardly surprising, when you consider that a large part of
Database Control actually resides within the database itself. If you realize
(and it will be obvious) that this has happened, simply stop and start the
dbconsole process with emctl, and reconnect with your browser.
ch05.indd 15ch05.indd 15 5/18/2005 11:19:20 AM5/18/2005 11:19:20 AM
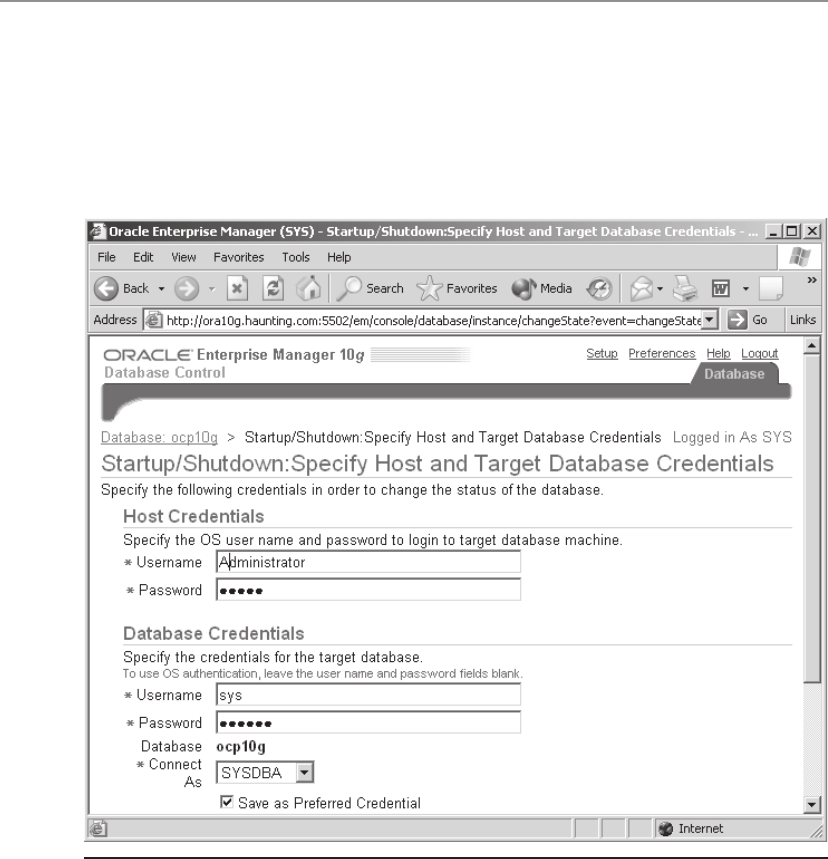
Oracle Database 10g OCP Certification All-in-One Exam Guide
16
All-in-1 / Oracle Database 10g Certification All-in-One / Meyers / 5790-3 /Chapter 23
8. When the database has opened, dbconsole will present you with a login
screen. Log in as user SYSTEM.
9. From the database home page, take the Alert Log Content link in the
Related Links section at the bottom of the page and examine the contents
of the alert log.
Figure 5-6 Oracle and OS credentials in dbconsole
ch05.indd 16ch05.indd 16 5/18/2005 11:19:20 AM5/18/2005 11:19:20 AM
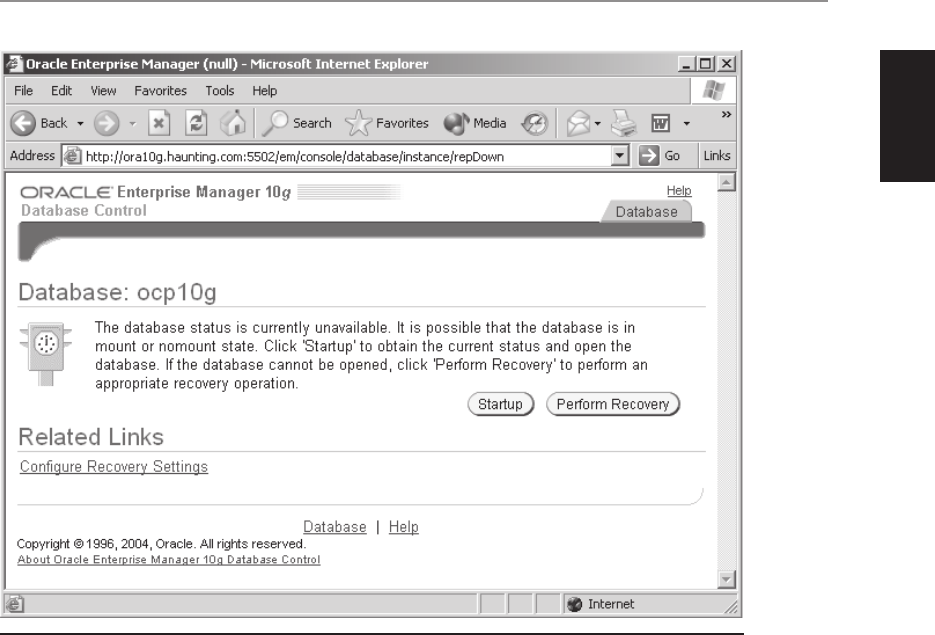
Chapter 5: Managing Oracle Processes
17
PART I
All-in-1 / Oracle Database 10g Certification All-in-One / Watson & Bersinic/ 5790-3 /Chapter 5
The Initialization File
In Chapter 3, you saw a static initialization parameter file, init<SID>.ora. This was the
only type of initialization file supported until release 9i of the Oracle database, but
from 9i onward if you wish you can use a dynamic initialization file, spfile<SID>.ora.
Most database administrators prefer to work with the dynamic file, and if you created
your database with DBCA, your static file will have been converted to a dynamic file
at the end of the creation process by the script postDBCreation.sql. If you examine
this script, the conversion process is self-explanatory.
To view parameters, a static file can be inspected with any text editor you please,
but a dynamic spfile can be inspected only from within the Oracle environment: it
contains nonprintable characters and should never be edited by hand.
Figure 5-7 The dbconsole startup screen
ch05.indd 17ch05.indd 17 5/18/2005 11:19:20 AM5/18/2005 11:19:20 AM

Oracle Database 10g OCP Certification All-in-One Exam Guide
18
All-in-1 / Oracle Database 10g Certification All-in-One / Meyers / 5790-3 /Chapter 23
Exercise 5-3: Viewing Parameters
with Database Control
In this exercise, you will look at your parameter settings and distinguish between the
basic and advanced parameters.
1. Launch your browser, and log on to your instance through Database Control.
2. From the database home page, take the Administration tab.
3. In the Instance section, take the All Initialization Parameters link.
4. Inspect the values of the parameters used to control your instance. Note that
of the more than two hundred and fifty parameters, less than thirty are classed
as “basic.”
Chapter Review
In this chapter you’ve gone through the details of launching the various processes
involved in an Oracle database and its management. Remember that we have not
covered the Grid Control—that is beyond the scope of this book, and of the examination.
The database itself doesn’t have any processes: it is simply a set of files. The processes
are part of the instance, and you start them with a STARTUP command, issued from
SQL*Plus, or through Database Control. The instance is defined by parameters in an
initialization parameter file. The instance then attaches to a database: first it mounts
the database, by reading the controlfile, and then it opens the database, by reading the
datafiles and redo log files. In addition to starting the instance (and preferably before
you start it), you must also start the Database Listener. Without a listener, you will not
be able to connect with Database Control. The control processes are either Database
Control, which requires you to start the OC4J engine within which it runs, or SQL*Plus,
which runs as a self-contained program. An alternative to SQL*Plus is iSQL*Plus, an
application server process that lets you connect to a database from a browser.
Questions
1. Which of the following commands will start the iSQL*Plus server process?
(Choose the best answer.)
A. emctl start isqlplus
B. isqlplusctl start
C. isqlplus /nolog
D. lsnrctl start isqlplus
2. You issued the URL http://127.0.0.1:5500/em and received an error. What
could be the problem? (Choose three answers.)
A. You have not started the Database Listener.
ch05.indd 18ch05.indd 18 5/18/2005 11:19:21 AM5/18/2005 11:19:21 AM

Chapter 5: Managing Oracle Processes
19
PART I
All-in-1 / Oracle Database 10g Certification All-in-One / Watson & Bersinic/ 5790-3 /Chapter 5
B. You have not started the dbconsole.
C. The dbconsole is running on a different port.
D. You are not logged onto the database server node.
E. You have not started the Grid Control agent.
F. You have not started the database.
3. Which files must be synchronized for a database to open? (Choose the best
answer.)
A. Datafiles, online redo log files, and the controlfile
B. The parameter file and the password file
C. All the multiplexed controlfile copies
D. None. SMON will synchronize all files by instance recovery after opening
the database.
4. During the transition from NOMOUNT to MOUNT mode, which file or files
are required? (Choose the best answer.)
A. Parameter file
B. Controlfiles
C. Online redo logs
D. Datafiles
E. All of the above
5. You shut down your instance with SHUTDOWN IMMEDIATE. What will
happen on the next startup? (Choose the best answer.)
A. SMON will perform automatic instance recovery.
B. You must perform manual instance recovery.
C. PMON will roll back uncommitted transactions.
D. The database will open without recovery.
6. You have created two databases on your computer and want to use Database
Control to manage them. Which of the following statements are correct?
(Choose two answers.)
A. You cannot use Database Control, because it can manage only one
database per computer.
B. You must use Grid Control, as you have multiple databases on the
computer.
C. You must start one OC4J process and contact it on different ports for each
database.
D. You must start one OC4J instance per database.
E. You must set the ORACLE_SID variable appropriately before starting an
OC4J instance.
ch05.indd 19ch05.indd 19 5/18/2005 11:19:21 AM5/18/2005 11:19:21 AM

Oracle Database 10g OCP Certification All-in-One Exam Guide
20
All-in-1 / Oracle Database 10g Certification All-in-One / Meyers / 5790-3 /Chapter 23
7. You issue the command SHUTDOWN, and it seems to hang. What could be
the reason? (Choose the best answer.)
A. You are not connected as SYSDBA or SYSOPER.
B. There are other sessions logged on.
C. You have not connected with operating system or password file
authentication.
D. There are active transactions in the database; when they complete, the
SHUTDOWN will proceed.
8. What action should you take after terminating the instance with SHUTDOWN
ABORT? (Choose the best answer.)
A. Back up the database immediately.
B. Open the database and perform database recovery.
C. Open the database and perform instance recovery.
D. None, but some transactions may be lost.
E. None. Recovery will be automatic.
9. Using Database Control, you stop the Database Listener. Which of the
following statements is true? (Choose the best answer.)
A. Database Control will no longer be able to manage the database.
B. Existing sessions will be terminated.
C. No new sessions can be established.
D. You must restart the listener with the lsnrctl utility.
10. Database Control is a multitier web application. Which tier is responsible for
window management? (Choose the best answer.)
A. The dbconsole middle tier
B. The procedures within the database tier
C. The client browser
D. The OC4J application runtime environment
Answers
1. B. The emctl command is used to start the dbconsole, lsnrctl is used to start
database listeners, and isqlplus from a command line won’t do anything.
2. B, C, and D. Any of these could be a reason. A, E, and F are related to other
processes.
3. A. These are the three file types that make up a database: datafiles, online
redo log files, and the controlfile.
ch05.indd 20ch05.indd 20 5/18/2005 11:19:22 AM5/18/2005 11:19:22 AM

Chapter 5: Managing Oracle Processes
21
PART I
All-in-1 / Oracle Database 10g Certification All-in-One / Watson & Bersinic/ 5790-3 /Chapter 5
4. B. Remember which files are read at each stage: the parameter file at NOMOUNT,
the online redo log files and the datafiles at OPEN.
5. D. This holds true because IMMEDIATE is a clean shutdown.
6. D and E. D is correct because one OC4J can only support one Database Control
process to manage one database, and E is correct because without this the emctl
utility will not know which OC4J to start.
7. B. This answer is correct because the default shutdown mode is NORMAL,
which will wait for all sessions to log off.
8. E. It is vital to remember this! After a crash, or an abort, recovery is automatic
and unstoppable. No data is ever lost, and you need take no action at all.
9. C. Without a listener there is no way to launch the server process needed for
a session.
10. C. Your local window management is done by your local browser. The other
answers refer to processes that reside on the application server tier (A and D),
or within the database (B).
ch05.indd 21ch05.indd 21 5/18/2005 11:19:22 AM5/18/2005 11:19:22 AM

All-in-1 / Oracle Database 10g Certification All-in-One / Meyers / 5790-3 / Chapter 23
blind folio: 22
ch05.indd 22ch05.indd 22 5/18/2005 11:19:22 AM5/18/2005 11:19:22 AM

All-in-1 / Oracle Database 10g OCP Certification All-in-One / Watson, Bersinic / 5790-3
CHAPTER 6
Managing Oracle Storage
Structures
In this chapter you will learn how to
• Define the purpose of tablespaces and datafiles
• Create tablespaces
• Manage tablespaces (alter, drop, generate DDL, take offline, put online, add datafiles,
make read-only or read/write)
• Obtain tablespace information from Enterprise Manager and the data dictionary
• Drop tablespaces
• Describe the default tablespace
1
ch06.indd 1ch06.indd 1 6/30/2005 9:58:36 AM6/30/2005 9:58:36 AM
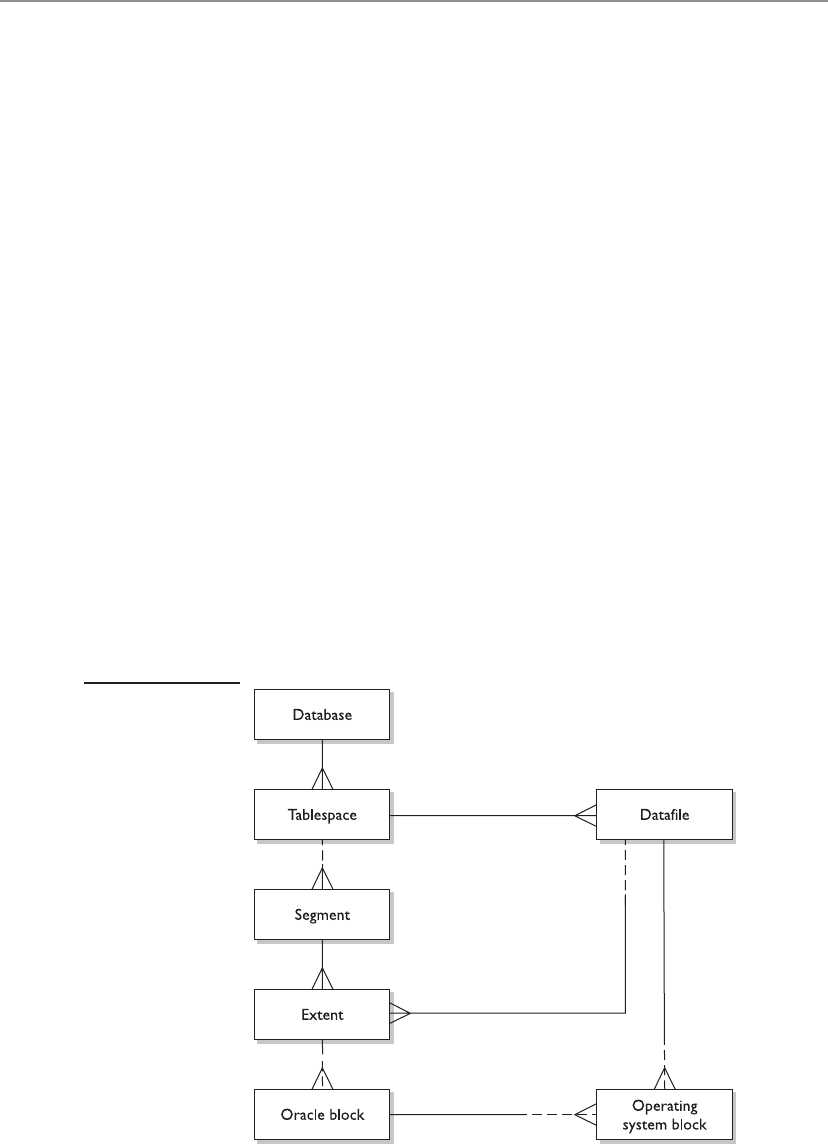
All-in-1 / Oracle Database 10g OCP Certification All-in-One / Watson, Bersinic / 5790-3
Oracle Database 10g OCP Certification All-in-One Exam Guide
2
You have now created a database and know how to manage the instance to get access
to the database data. The next logical step is to create storage structures in the database
to hold your data and to ensure that those storage structures are managed efficiently.
You don’t want to overallocate disk space, and you don’t want to underallocate.
Furthermore, you want to ensure that the use of disk space is as efficient as possible
for the type of database you will be managing and the disk resources available to
you. Understanding how Oracle manages storage, both logically and physically, and
understanding the different components involved in storing Oracle database data are
some of the key concepts any DBA must master.
Oracle Storage Basics: Tablespaces and Datafiles
Storage in an Oracle database has two distinct “sides”: physical and logical. Physical
storage is how the storage components that make up an Oracle database at the
operating system level are seen, normally, as a series of datafiles. Logical storage is how
Oracle internally manages the objects that are stored in the database. The logical and
physical storage structures in Oracle and their relationships can be expressed as
a model shown in Figure 6-1.
Looking at the model of Oracle storage, a few key elements can be discerned, such
as these:
• Every database must consist of one or more tablespaces. Every tablespace must
belong to one and only one database.
• Every tablespace must consist of one or more datafiles. Each datafile must
belong to one and only one tablespace.
Figure 6-1
Entity-relationship
model of Oracle
database storage
structures
ch06.indd 2ch06.indd 2 6/30/2005 9:59:09 AM6/30/2005 9:59:09 AM

All-in-1 / Oracle Database 10g OCP Certification All-in-One / Watson, Bersinic / 5790-3
Chapter 6: Managing Oracle Storage Structures
3
PART I
• Every datafile must consist of one or more operating system blocks. Each operating
system block may belong to one and only one datafile.
• Every tablespace may contain one or more segments. Every segment must exist
in one and only one tablespace.
• Every segment must consist of one or more extents. Each extent must belong
to one and only one segment.
• Every extent must consist of one or more Oracle blocks. Each Oracle block may
belong to one and only one extent.
• Every extent must be located in one and only one datafile. The space in the
datafile may be allocated as one or more extents.
• Every Oracle block must consist of one or more operating system blocks. Every
operating system block may be part of one and only one Oracle block.
EXAM TIP It is important to be clear on the physical and logical makeup of an
Oracle database. Be familiar with the terms used in both.
Physical Storage Structures
The physical structure is what the operating system sees when “looking” at an Oracle
database. Oracle physical storage is quite simple to understand and see: it is a collection
of one or more datafiles. It is also possible for Oracle to make use of raw devices
(partitions of a hard disk not managed by the operating system), but doing so
introduces complexity when it comes to backup and recoverability. It is also possible
for Oracle to manage physical storage itself through something called Automated
Storage Management, or ASM, in which case the operating system is also not involved.
However, by and large, most Oracle physical storage is made up of operating system
datafiles.
Each datafile is composed of operating system blocks and is created on a disk
partition or volume, all managed by the host operating system. This is the most
common scenario and one that you will encounter most frequently.
Oracle Datafiles
Datafiles are operating system files that hold Oracle data. When you create a database,
a number of datafiles are created to hold the data dictionary and the SYSAUX
tablespace data, along with any other tablespaces you decided to create at that time.
The datafiles consist of the header and the space that can be used to allocate extents
to segments. In effect, most datafiles have three parts: the header, the extents (allocated
space), and free (unallocated space).
The header of a datafile identifies it as part of a database and stores specifics of
that datafile: which tablespace it belongs to and the last checkpoint performed. This
way, Oracle can check that all files are synchronized when it starts up. If it detects that
one of the files is older than the rest (or all files are older than the controlfile), it will
ch06.indd 3ch06.indd 3 6/30/2005 9:59:10 AM6/30/2005 9:59:10 AM

All-in-1 / Oracle Database 10g OCP Certification All-in-One / Watson, Bersinic / 5790-3
Oracle Database 10g OCP Certification All-in-One Exam Guide
4
assume that the file was restored from a backup and initiate recovery. The rest of the
datafile consists of extents and free space, the management of which is performed by
creating, dropping, and altering the logical storage components of Oracle: segments.
Each Oracle datafile belongs to one and only one tablespace and is made up of
operating system blocks. As you will see later in this chapter, it is possible to specify
growth characteristics for datafiles and resize them either manually or automatically.
You can also take a datafile offline, making its contents unavailable, provided it does
not belong to the SYSTEM tablespace.
Operating System Blocks
Operating system blocks are the minimum allocation unit for the file system. Each file
system has its own minimum and default sizes, which often vary with the hard disk
geometry and size, as well as the file system used to format the drive. Most systems
will allow you to configure the block size when formatting the drive. It is a good idea
to keep the operating system block size the same as the Oracle block size. So, if you
are planning to add a drive in order to keep Oracle datafiles on it, and your database
block size is 8KB, you may want to format the drive using 8KB blocks. However,
because Oracle Database 10g allows you to create tablespaces with differing block
sizes, you may want to ensure that the operating system block size is the same size as
the largest database block. This way, for every Oracle I/O request the operating system
needs to retrieve only one block.
Logical Storage Structures
As a DBA, you will be spending a great deal of your time looking at database storage
from the logical point of view. You will be creating and managing tablespaces, segments,
and extents and ensuring that the Oracle block size is efficiently configured for your
database. The logical structure of the database is the left side of the model in Figure 6-1.
The database is the highest and final unit of organization for Oracle. It is self-
contained and consists of at least three tablespaces (preferably more) in Oracle 10g
(up from one in previous releases). In order to access database data, an instance must
be started.
Tablespaces
Within a database the tablespace is the largest storage structure. A database in Oracle
10g must have at least three tablespaces: SYSTEM, SYSAUX, and one undo tablespace.
These are created when you create the database; you create others for a specific purpose
in order to manage your database objects and ensure the instance and database perform
well. You should also create at least one additional tablespace for specific data: a
temporary tablespace to hold temporary objects created when a sort takes place and
cannot be completely performed in memory.
Tablespace Types Tablespaces can be classified using many different criteria,
the first of which is based upon the type of objects the tablespace stores: SYSTEM or
non-SYSTEM. In Oracle 10g two tablespaces make up the SYSTEM type: SYSTEM and
SYSAUX. All other tablespaces are classified as non-SYSTEM.
ch06.indd 4ch06.indd 4 6/30/2005 9:59:11 AM6/30/2005 9:59:11 AM

All-in-1 / Oracle Database 10g OCP Certification All-in-One / Watson, Bersinic / 5790-3
Chapter 6: Managing Oracle Storage Structures
5
PART I
EXAM TIP Oracle Database 10g has two tablespaces that are considered part
of the system: SYSTEM and SYSAUX. Previous releases of Oracle required only
a SYSTEM tablespace.
The SYSTEM tablespace contains the data dictionary—internal tables that describe
the structure of the database itself, all of the objects in it, users, roles, and privileges.
When a user issues a query or a DML statement, the data dictionary is used in order
to verify the user’s permissions and find the data that belongs to the segment being
queried or changed. When a DDL statement is processed, the internal tables are
modified in order to reflect the change: CREATE, ALTER, or DROP. The SYSTEM
tablespace also contains the SYSTEM undo or rollback segment (also called SYSTEM),
which can be used only for operations on objects stored in the SYSTEM tablespace.
User objects should be kept out of the SYSTEM tablespace in order to keep it
operating efficiently.
EXAM TIP The SYSTEM tablespace is the location of the data dictionary in an
Oracle database. The database cannot operate without a SYSTEM tablespace.
The SYSAUX tablespace is also considered a SYSTEM tablespace and is used to
store statistical and other information that used to be kept in the SYSTEM tablespace
in previous versions.
After you create the database, you will need to create additional tablespaces to
store your data. The number of tablespaces you create and what is stored within them
depend on what your database will be used for and the amount of data. Here are
some of the guidelines to follow when creating additional tablespaces and to help
with performance:
• Separate data that will participate in resource contention For example, a
table and its indexes will normally be accessed simultaneously during inserts
and updates, so to prevent a bottleneck, it is best to place them on different
hard drives. One way to do this is to create different tablespaces—DATA
and INDEX—to hold the data and then place each tablespace’s datafiles on
a different hard disk. This way, you can update both the table and its index
simultaneously and not risk resource contention.
• Separate objects that have different storage requirements Keeping small
tables and large tables on different tablespaces will provide better space
management and performance. While extent management can be largely
automated in Oracle 10g, there is no reason to make Oracle’s job more
difficult by placing dissimilar objects on the same tablespace.
• Store different partitions in different tablespaces One of the benefits of
partitioning your data is to gain performance improvements for queries. Place
each partition on a separate tablespace and, preferably, each tablespace’s
datafiles on a separate hard disk. In this way Oracle can read data from more
than one hard disk at the same time when satisfying the query.
ch06.indd 5ch06.indd 5 6/30/2005 9:59:11 AM6/30/2005 9:59:11 AM

All-in-1 / Oracle Database 10g OCP Certification All-in-One / Watson, Bersinic / 5790-3
Oracle Database 10g OCP Certification All-in-One Exam Guide
6
Tablespace Contents A tablespace can store one of three types of segments:
permanent, temporary, and undo. Permanent segments are what you expect to find
in a database, such as a table or index. Temporary segments are those that exist for a
short time and are then overwritten, such as a sort operation. Undo segments hold
the before image of the data being modified so that other users can still have their
queries answered even if the data is in the process of being changed.
EXAM TIP Tablespaces can store one of three types of objects: permanent
objects such as tables and indexes; temporary segments such as sort segments
and temporary table data; and undo data used for transaction rollback or
flashback queries.
When you create a user in Oracle, you specify the default tablespace that will be
used to store extents for any segment the user creates, as well as a temporary tablespace
to store temporary segments, although a global temporary tablespace defined for the
database can be used as well.
All users share the undo tablespace, which is set by the DBA. To determine what
the users’ default and temporary tablespaces are, you can issue this query:
SQL> SELECT username, default_tablespace, temporary_tablespace
2 FROM DBA_USERS;
USERNAME DEFAULT_TABLESPACE TEMPORARY_TABLESPACE
-------------------- ------------------------- -------------------------
SYS SYSTEM TEMP
SYSTEM SYSTEM TEMP
OUTLN SYSTEM TEMP
DBSNMP SYSAUX TEMP
SYSMAN SYSAUX TEMP
MGMT_VIEW SYSAUX TEMP
WK_TEST SYSAUX TEMP
MDSYS SYSAUX TEMP
ORDSYS SYSAUX TEMP
CTXSYS SYSAUX TEMP
ANONYMOUS SYSAUX TEMP
EXFSYS SYSAUX TEMP
DMSYS SYSAUX TEMP
WMSYS SYSAUX TEMP
XDB SYSAUX TEMP
WKPROXY SYSAUX TEMP
ORDPLUGINS SYSAUX TEMP
SI_INFORMTN_SCHEMA SYSAUX TEMP
OLAPSYS SYSAUX TEMP
WKSYS SYSAUX TEMP
MDDATA USERS TEMP
DIP USERS TEMP
SCOTT USERS TEMP
Tablespaces in Databases Created with the Database Configuration
Assistant A typical example of tablespaces that exist in most databases can
be ascertained by looking at the tablespaces created when you use the Database
Configuration Assistant. The DBCA will create a database with the following
tablespaces, as shown in Figure 6-2.
ch06.indd 6ch06.indd 6 6/30/2005 9:59:12 AM6/30/2005 9:59:12 AM
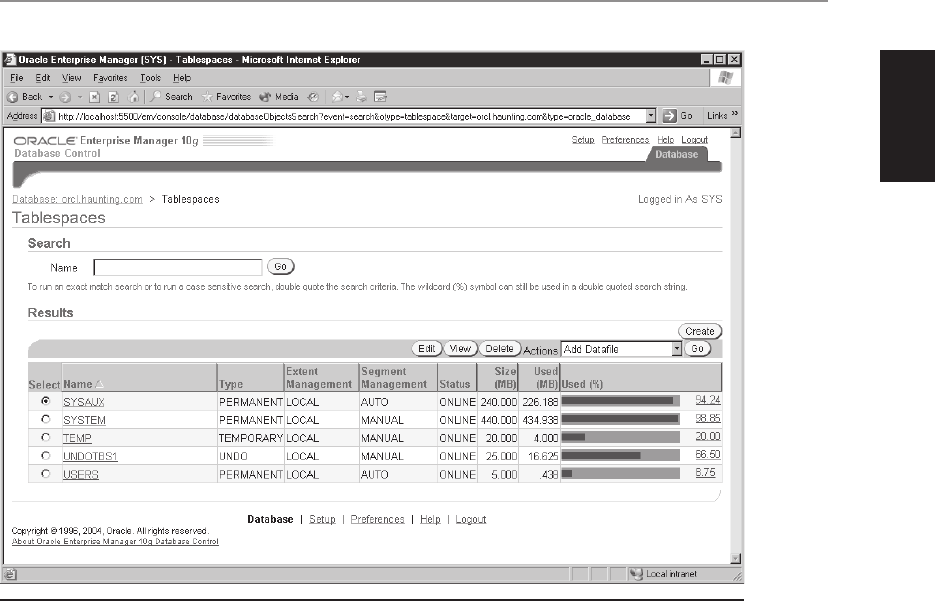
All-in-1 / Oracle Database 10g OCP Certification All-in-One / Watson, Bersinic / 5790-3
Chapter 6: Managing Oracle Storage Structures
7
PART I
• SYSTEM Used to store the Oracle data dictionary and all objects in the SYS
schema. Access to these objects is restricted to the user SYS and others that
have been granted the DBA role, by default. Every database must have a
SYSTEM tablespace.
• SYSAUX The SYSAUX tablespace was introduced in Oracle Database 10g
to store objects not owned by SYS but required in order for the database to
function. In previous releases of Oracle these were stored in the SYSTEM
tablespace; they include Oracle Enterprise Manager components, among
others. Every Oracle 10g database must have a SYSAUX tablespace.
• TEMP Used to store temporary objects and their data. Examples of these
include the data portion of a global temporary table and sort segments created
when a sort cannot be completely performed in memory. Every database should
have a temporary tablespace, though it is not required, and one should be
designated as the default temporary tablespace to be assigned to users if one
is not specified when the user is created. Temporary tablespaces consist of
tempfiles instead of datafiles. If no temporary tablespace is created, then
temporary segments are created in the SYSTEM tablespace by default—a bad
idea from a performance perspective.
Figure 6-2 Tablespaces in a database created by the Database Configuration Assistant
ch06.indd 7ch06.indd 7 6/30/2005 9:59:12 AM6/30/2005 9:59:12 AM

All-in-1 / Oracle Database 10g OCP Certification All-in-One / Watson, Bersinic / 5790-3
Oracle Database 10g OCP Certification All-in-One Exam Guide
8
• UNDOTBS1 Used to store undo information for the database. Undo is data
kept in the database to allow users to read rows that are in the process of
being changed but whose transactions have not yet committed. This allows
any user needing to get a read-consistent image of the data to avoid being
held up by people changing the data. An undo tablespace is required in each
database.
• USERS When a database user creates a segment, its data needs to be stored
in a tablespace. The USERS tablespace serves this purpose. You can create
additional tablespaces and allow users to store their segments in them, but
one tablespace needs to be made the default users’ tablespace, which the
USERS tablespace is for nonsystem (i.e., not SYS or SYSTEM) users.
If you decided to load the example schemas when you created the database with
DBCA, you will also have an EXAMPLE tablespace that stores those segments in the
example schemas.
Segments
Within a tablespace, space is allocated to segments. A segment is an object in the
database that requires storage, such as a table or an index. A view, on the other hand,
is not a segment, since it does not store data; it is just a prewritten query that allows
easy access to data stored in tables. Oracle allows you to create many different segment
types. A query against the DBA_SEGMENTS view will display a list of segments created
in the database, as follows:
SQL> SELECT DISTINCT segment_type FROM DBA_SEGMENTS;
SEGMENT_TYPE
------------------
CLUSTER
INDEX
INDEX PARTITION
LOB PARTITION
LOBINDEX
LOBSEGMENT
NESTED TABLE
ROLLBACK
TABLE
TABLE PARTITION
TYPE2 UNDO
This query shows only the segment types that exist in your database, not all
possible types. How to manage many (but not all) of the segment types listed will
be the discussion of several future chapters.
EXAM TIP Any object requiring storage in a database is classified as
a segment.
ch06.indd 8ch06.indd 8 6/30/2005 9:59:13 AM6/30/2005 9:59:13 AM

All-in-1 / Oracle Database 10g OCP Certification All-in-One / Watson, Bersinic / 5790-3
Chapter 6: Managing Oracle Storage Structures
9
PART I
Extents
When space is allocated for segments in a tablespace, it is allocated an extent at a time.
A segment consists of one or more extents, and when a segment (e.g., a table or an
index) is created, at least one extent is allocated at creation time. Extents are made
of contiguous data blocks and can be managed either manually by the DBA or
automatically by Oracle, depending upon the conditions specified by the DBA, or
Oracle defaults. Extents are created in the datafiles belonging to the tablespace on
which the segment is defined. A segment can exist in only one tablespace, and an
extent exists in a datafile belonging to the tablespace.
Extent Management in Tablespaces When you create a tablespace, you can
specify whether extents should be locally managed or dictionary-managed. Locally
managed extents are more efficient and are recommended for all database data. In a
tablespace where extents are locally managed, free extents are stored in a bitmap in
the tablespace. Each bit in the bitmap represents a single database block or a multiple
of database blocks if extent management has been configured to be of a uniform size
or automatic. As an extent is allocated to a segment or freed up because a segment was
dropped, truncated, or resized, the bitmap is updated to reflect the change.
EXAM TIP Extents are a collection of contiguous blocks allocated to a
segment. Extents can be managed locally in the tablespace (preferred) or
in the dictionary (for backward compatibility).
Dictionary-managed tablespaces are the historical way of managing extents and
require any allocation or deallocation of an extent to update a table in the data
dictionary. This means that any time an extent is allocated to a table, the data dictionary
must be touched to record the change. When a table is dropped or truncated, the
data dictionary must be changed. Because of the amount of work required on the data
dictionary when using dictionary-managed extents, they are no longer recommended
and exist primarily for backward compatibility. All tablespaces should be created with
local extent management.
NOTE You can use Enterprise Manager or the DBMS_SPACE_ADMIN
.TABLESPACE_MIGRATE_TO_LOCAL procedure to migrate a dictionary-
managed tablespace to local extent management.
Database Blocks
A database block is the minimum unit of I/O in the database. When the database
needs to read data, it cannot read just one row; it must read the entire block. The
same happens with writing: even if only one row in a block is changed, the DBWn
process has to write the entire block during the checkpoint. When a database is
created, the default block size for tablespaces is specified. It is possible to have more
than one block size specified for a database, but a tablespace and its datafiles will
ch06.indd 9ch06.indd 9 6/30/2005 9:59:14 AM6/30/2005 9:59:14 AM

All-in-1 / Oracle Database 10g OCP Certification All-in-One / Watson, Bersinic / 5790-3
Oracle Database 10g OCP Certification All-in-One Exam Guide
10
always only have one database block size. In other words, you specify the block size
for the tablespace when you create it, or assume the database default. For a different
tablespace you can specify a different block size. You cannot change the block size for
a tablespace once it is created, except by dropping and re-creating it (and possibly
losing all the tablespace contents).
Creating and Managing Tablespaces
There are two ways to create a tablespace in Oracle: using Oracle Enterprise Manager
(OEM) or by issuing the CREATE TABLESPACE command in SQL*Plus or iSQL*Plus.
The end result is the same, since OEM will send the appropriate command to the
database to perform the operation.
The CREATE TABLESPACE Command
The CREATE TABLESPACE and CREATE TEMPORARY TABLESPACE commands allow
you to create a tablespace using SQL*Plus or iSQL*Plus. Alternatively, you can create
a tablespace from Enterprise Manager, which provides a nice point-and-click interface,
and then optionally view the command sent to the Oracle server before it is executed.
The overall syntax of the command is somewhat complex because of the number
of options available, but we will break it down into manageable chunks.
CREATE [BIGFILE | SMALLFILE] [TEMPORARY] TABLESPACE tablespace name
DATAFILE datafile spec | TEMPFILE tempfile spec
[MINIMUM EXTENT minimum extent size]
[BLOCKSIZE blocksize]
[[COMPRESS|NOCOMPRESS] DEFAULT STORAGE (default storage clause)]
[LOGGING|NOLOGGING]
[FORCE LOGGING]
[ONLINE|OFFLINE]
[EXTENT MANAGEMENT DICTIONARY |
LOCAL [AUTOALLOCATE|UNIFORM SIZE size]]
[SEGMENT SPACE MANAGEMENT MANUAL|AUTO]
[FLASHBACK ON|OFF]
To create a tablespace, all you need is the name of the tablespace and the datafile
specification; all other settings are left at Oracle defaults, as in this example:
CREATE TABLESPACE default_demo
DATAFILE '$ORACLE_BASE/oradata/default_demo01.dbf' SIZE 10M;
This one command did everything: physically created the datafile, created the
tablespace, updated the controlfile and the data dictionary, and set all the defaults
for the new tablespace.
NOTE If the datafile already exists on disk, the creation of the tablespace
will fail. You can specify the REUSE parameter to the datafile specification to
instruct Oracle to overwrite any file with the same name as the datafile you
want to create. This is useful when re-creating tablespaces that you dropped.
ch06.indd 10ch06.indd 10 6/30/2005 9:59:14 AM6/30/2005 9:59:14 AM
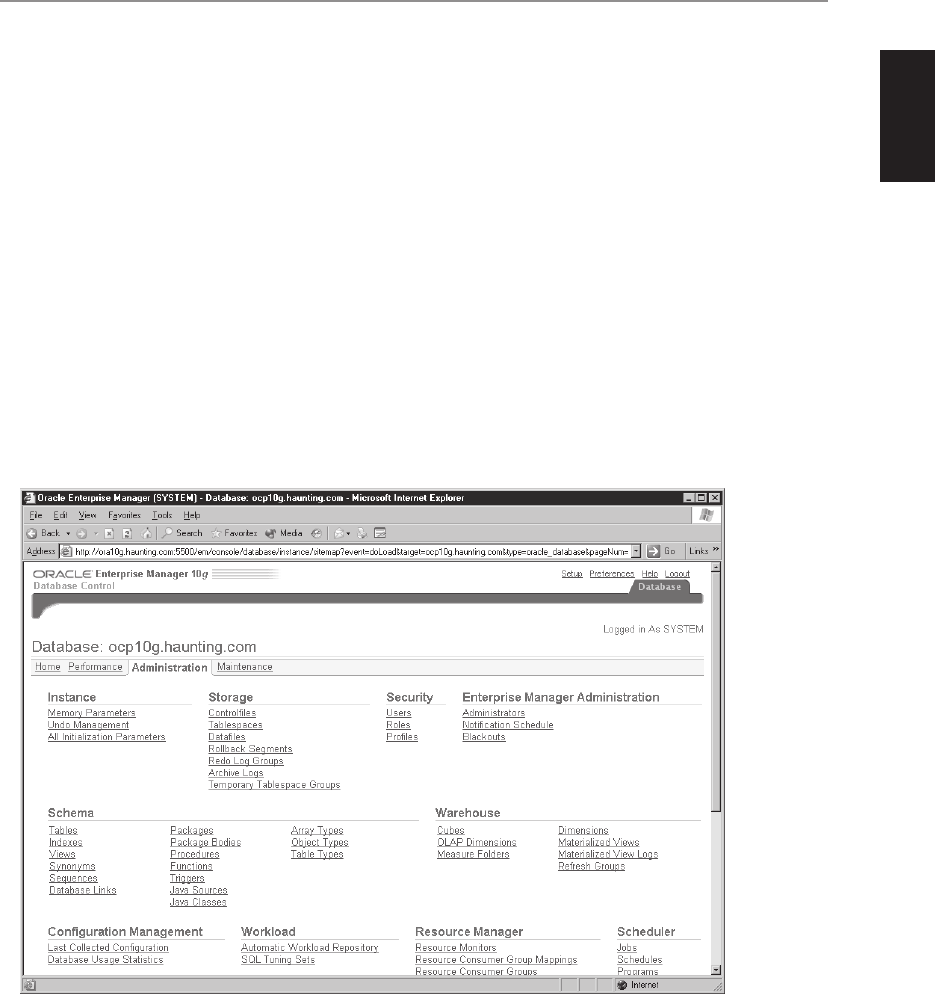
All-in-1 / Oracle Database 10g OCP Certification All-in-One / Watson, Bersinic / 5790-3
Chapter 6: Managing Oracle Storage Structures
11
PART I
Perhaps the best way to create a tablespace in Oracle 10g is to use Enterprise
Manager. With EM you can create a tablespace with an easy interface and also learn
about the syntax to do so by displaying the SQL code to perform the action.
Exercise 6-1: Using Enterprise Manager
to Create a Tablespace
In this exercise you will connect to Enterprise Manager and create a tablespace in your
database.
1. Start a web browser and connect to the Enterprise Manager URL on your Oracle
database server, specifying the appropriate port number and machine name.
2. Log in to your database as the user SYSTEM with the appropriate password.
If you receive the licensing information page, click I Agree to continue.
3. On the Enterprise Manager main page, click the Administration hyperlink
to display the Administration page.
4. Click the Tablespaces hyperlink under Storage to display the current
tablespaces in the database and their space utilization.
5. To create a new tablespace, click Create on the right side to bring up the
Create Tablespace screen.
ch06.indd 11ch06.indd 11 6/30/2005 9:59:15 AM6/30/2005 9:59:15 AM
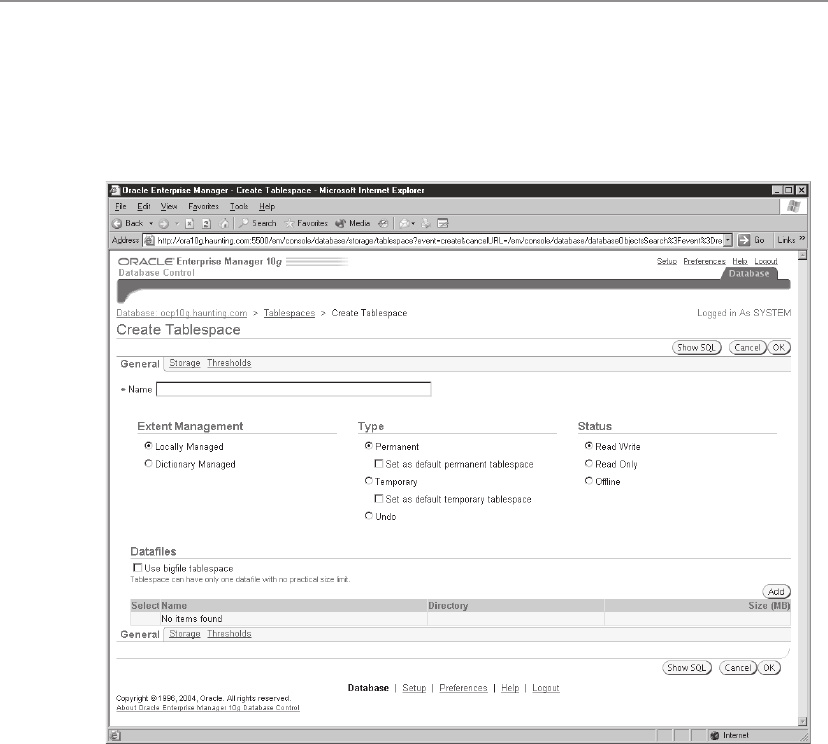
All-in-1 / Oracle Database 10g OCP Certification All-in-One / Watson, Bersinic / 5790-3
Oracle Database 10g OCP Certification All-in-One Exam Guide
12
6. In the Name text box, enter the name of the tablespace you want to create,
OCP10gData, for example. You will notice that you also have a number of
selections to make regarding the tablespace characteristics, including extent
management (local or dictionary), tablespace type (permanent, temporary,
or undo), and status (read/write, read-only, or offline).
Permanent tablespaces are the default and can be used to hold segment data
such as tables, indexes, and clusters. The majority of the tablespaces you
create will be of the Permanent variety. If you select the Set As Default check
box for the tablespace, any user created in the database that does not have a
default tablespace specified at creation time will be assigned this tablespace
as his default tablespace. Any segments the user creates will occupy space on
this tablespace by default, unless a different tablespace is specified when the
object is created.
Status determines the initial state of the tablespace after creation. Read/write
means that objects can be created and otherwise modified on the tablespace
and its contents can change. Read-only means that it cannot be written to,
and offline means that the contents of the tablespace are not available. When
creating a tablespace, it is best to choose Read Write; you can always change
the status later.
Leave your tablespace at the default values of Locally Managed, Permanent,
and Read Write.
ch06.indd 12ch06.indd 12 6/30/2005 9:59:16 AM6/30/2005 9:59:16 AM
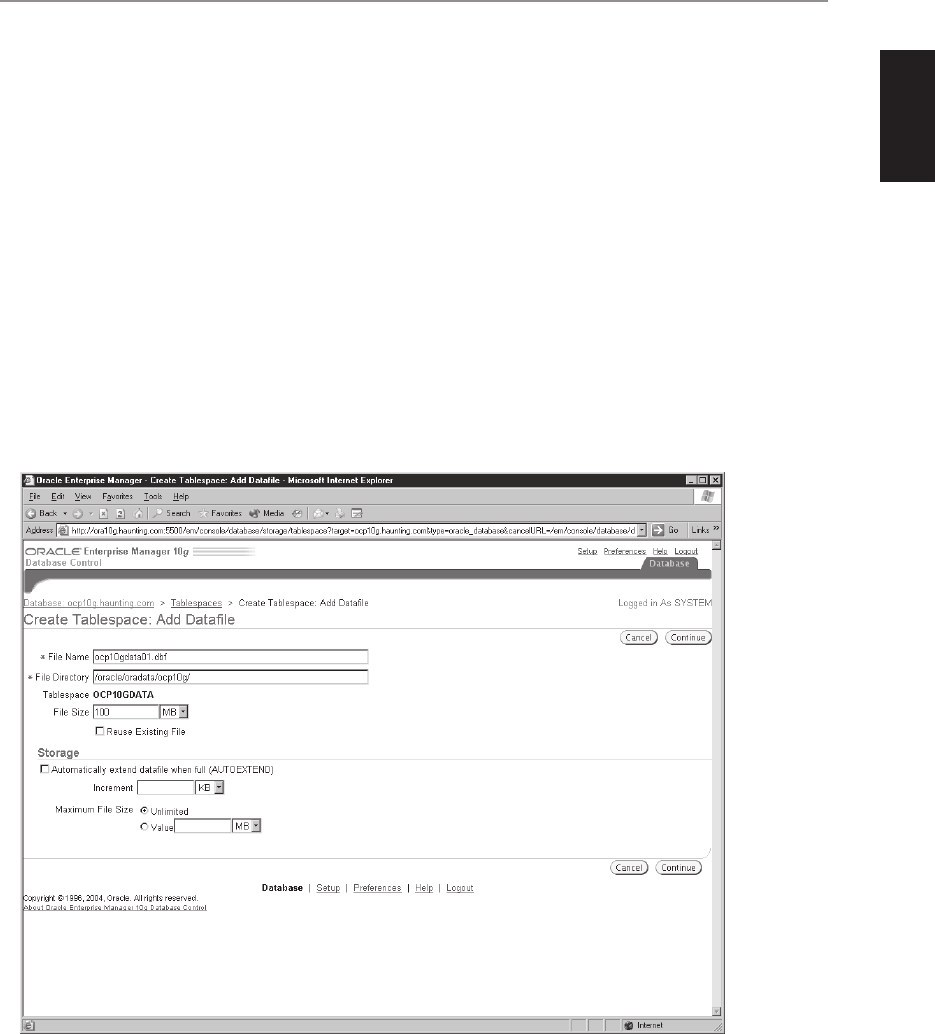
All-in-1 / Oracle Database 10g OCP Certification All-in-One / Watson, Bersinic / 5790-3
Chapter 6: Managing Oracle Storage Structures
13
PART I
7. Under the Datafiles heading you have the option to add one or more datafiles
to the tablespace. If you select the Use Bigfile Tablespace check box, your
tablespace can have only one datafile whose size limit is as large as the
file system will allow. Bigfile tablespaces cannot be dictionary-managed.
Leave the Use Bigfile Tablespace option unchecked and then click Add to
bring up the Add Datafile page.
8. On the Add Datafile page, enter the name of the datafile for the tablespace
and verify that the location provided is appropriate. Enterprise Manager will
display the default location for datafiles according to OFA guidelines, typically
the directory pointed to by the location $ORACLE_BASE/oradata/<db_name>.
You also need to specify a file size or accept the default value. Under Storage
you can specify whether or not to automatically grow the file (AUTOEXEND)
when it becomes full as well as how much to grow it by and whether or not
to specify a maximum size the file can grow to. Autoextend allows you to
automate file growth while at the same time optionally providing a limit
on the growth so that a file does not occupy all available disk space.
Leave the datafile size at the default of 100MB and specify autogrowth
in increments of 50MB up to a maximum size of 500MB. Click Continue
when done.
ch06.indd 13ch06.indd 13 6/30/2005 9:59:17 AM6/30/2005 9:59:17 AM
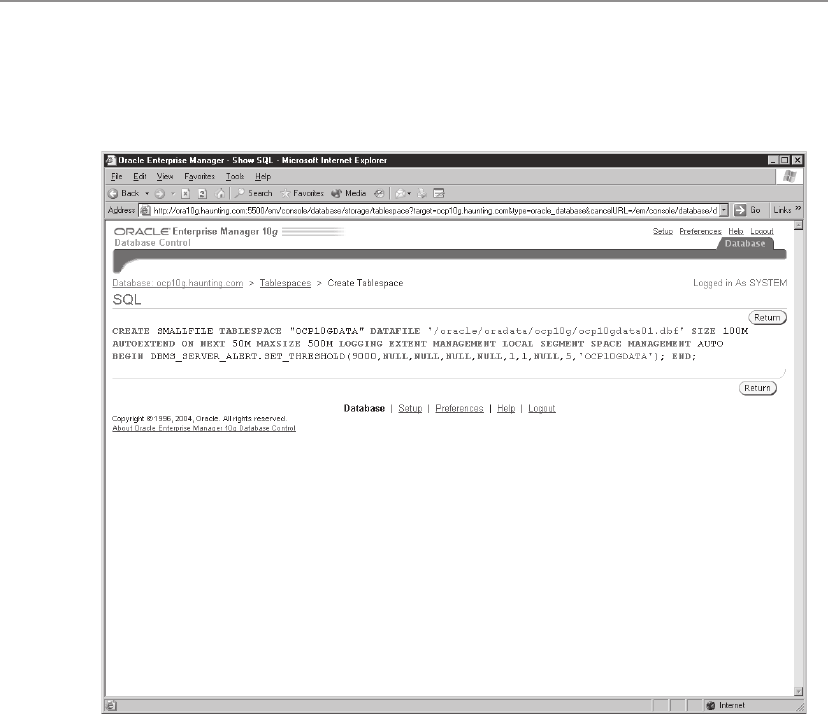
All-in-1 / Oracle Database 10g OCP Certification All-in-One / Watson, Bersinic / 5790-3
Oracle Database 10g OCP Certification All-in-One Exam Guide
14
9. On the Create Tablespace page, click Show SQL to display the SQL commands
that will be sent to the database to create the tablespace. Click Return when
done reviewing the code.
10. Click the Storage hyperlink to display the Storage Options page. Because you
specified that the tablespace will be locally managed, here you can specify
whether extent allocation will be automatically handled by Oracle based
upon the data stored on the tablespace, in which case you cannot control
extent sizing. If you want to make all extents the same size, you can specify
Uniform sizing, which defaults to extent sizes of 1MB. Uniform sizing makes
sense for temporary tablespaces and for those tablespaces where the data
being stored is of the same row size (i.e., all large rows or all small rows,
etc.). You cannot use automatic extent allocation for temporary tablespaces.
ch06.indd 14ch06.indd 14 6/30/2005 9:59:18 AM6/30/2005 9:59:18 AM
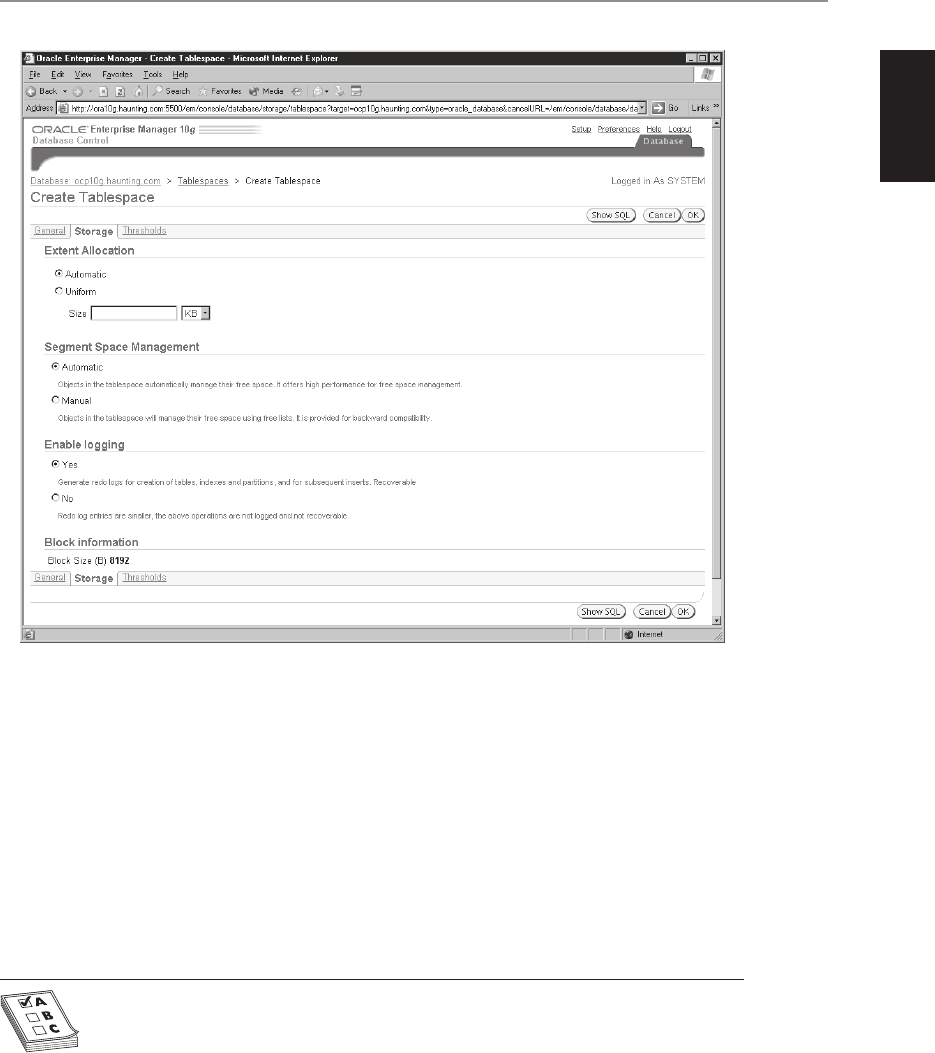
All-in-1 / Oracle Database 10g OCP Certification All-in-One / Watson, Bersinic / 5790-3
Chapter 6: Managing Oracle Storage Structures
15
PART I
The second option on this screen deals with the way that space will be
managed within the segment. With automatic segment space management
Oracle will use bitmaps to determine which blocks are free and which contain
large amounts of data. The amount of space that exists for inserting rows will
be automatically tracked by the bitmap containing all blocks allocated to the
segment. This is an efficient method that frees the DBA from setting segment
space management parameters manually. Using manual space management
requires the DBA or the creator of the segment to specify values for the
PCTFREE, PCTUSED, FREELISTS, and FREELIST GROUPS parameters when
creating the object and maintaining them as the volume of segment data
increases.
EXAM TIP PCTFREE, PCTUSED, FREELISTS, and FREELIST GROUPS can be
set only for dictionary-managed tablespaces.
ch06.indd 15ch06.indd 15 6/30/2005 9:59:18 AM6/30/2005 9:59:18 AM

All-in-1 / Oracle Database 10g OCP Certification All-in-One / Watson, Bersinic / 5790-3
Oracle Database 10g OCP Certification All-in-One Exam Guide
16
The last section requires you to specify whether changes made to segments
in the tablespace should be logged to the redo log files (LOGGING) or not
(NOLOGGING). While you can specify this parameter when you create the
segment, if you do not, the segment will inherit it from the tablespace. If you
specify NOLOGGING, then it may not be possible to recover segments in the
tablespace in the event of failure.
If you created a dictionary-managed tablespace, you would also need to
specify default storage parameters using the DEFAULT STORAGE clause of
the CREATE TABLESPACE command. Table 6-1 lists the parameters of the
DEFAULT STORAGE clause and their values.
Specify automatic extent management, automatic segment management, and
logging for the tablespace.
Setting Description
MINEXTENTS The number of extents each segment will be created
with, which defaults to the minimum of 1.
MAXEXTENTS The maximum number of extents a segment will be
allocated if necessary. The default value depends on
the DB_BLOCK_SIZE setting, while the maximum
is UNLIMITED. Avoid setting MAXEXTENTS to
UNLIMITED, as this will allow a segment to take all
the available space in the tablespace and can disrupt
normal operation of the database.
INITIAL Allows you to specify the size of the first extent for
the segment in bytes (use K or M as suffixes to the
numeric value to specify KB or MB). The default is 5
database blocks, with a minimum of 2 database blocks.
NEXT Specifies the size of the second or subsequent extents
in bytes, KB or MB.
PCTINCREASE Specifies how much bigger to make the third extent
compared to the second extent, the fourth compared
to the third, etc., as a percentage. For example, if
PCTINCREASE is set to 20, the INITIAL and NEXT
are set to 100K, the third extent will be 120K, the
fourth, 144K, etc., rounded up to the next multiple
of DB_BLOCK_SIZE. If PCTINCREASE is set to 0,
SMON will not automatically coalesce the free space
in the tablespace.
Table 6-1
DEFAULT
STORAGE
Parameters
for Dictionary-
Managed
Tablespaces
ch06.indd 16ch06.indd 16 6/30/2005 9:59:19 AM6/30/2005 9:59:19 AM

All-in-1 / Oracle Database 10g OCP Certification All-in-One / Watson, Bersinic / 5790-3
Chapter 6: Managing Oracle Storage Structures
17
PART I
11. Click the Thresholds hyperlink to bring up the Thresholds page. Thresholds
allow you to have Enterprise Manager warn you when space in the tablespace
is getting used up. You can specify thresholds for the database, specify them
for the individual tablespace, or disable them for the tablespace. Thresholds
will be covered in more detail in Chapter 15. Leave the current settings at the
default values and then click OK to create the tablespace.
12. After a short delay, you will be presented with the Tablespaces page of Enterprise
Manager, shown next, where the tablespace you just created is listed. You can
also create more tablespaces or manage the ones that are there.
ch06.indd 17ch06.indd 17 6/30/2005 9:59:20 AM6/30/2005 9:59:20 AM
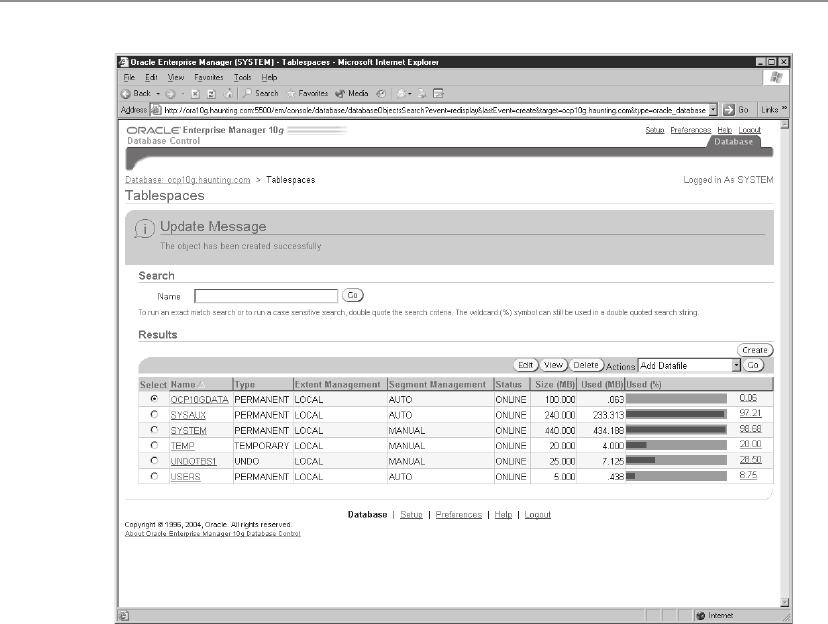
All-in-1 / Oracle Database 10g OCP Certification All-in-One / Watson, Bersinic / 5790-3
Oracle Database 10g OCP Certification All-in-One Exam Guide
18
Modifying Tablespaces
Since databases generally are not static, you will from time to time need to make
changes to the tablespaces you created. These can be common tasks such as adding
datafiles to a tablespace or increasing the size of existing datafiles, taking a tablespace
offline for maintenance or recovery purposes, or changing the mode from read/write
to read-only or vice versa. All of these tasks can be accomplished from the command
line using the ALTER TABLESPACE command or using Enterprise Manager. You can
also rename a tablespace if needed, but this is generally not recommended after
segments have been created on it.
Exercise 6-2: Using Enterprise Manager
to Alter a Tablespace
In this exercise you will connect to Enterprise Manager and change the characteristics
of the tablespace you created in the previous exercise.
1. Start a web browser and connect to the Enterprise Manager URL on your Oracle
database server specifying the appropriate port number and machine name.
2. Log in to your database as the user SYSTEM with the appropriate password.
If you receive the licensing information page, click I Agree to continue.
ch06.indd 18ch06.indd 18 6/30/2005 9:59:21 AM6/30/2005 9:59:21 AM
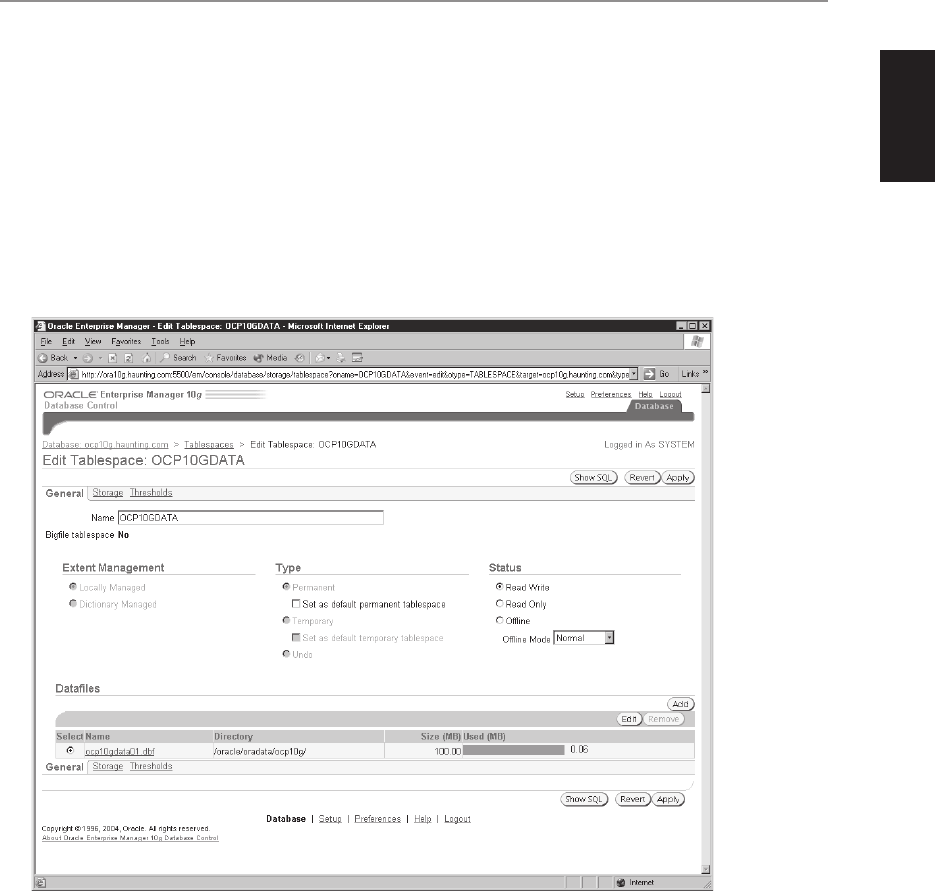
All-in-1 / Oracle Database 10g OCP Certification All-in-One / Watson, Bersinic / 5790-3
Chapter 6: Managing Oracle Storage Structures
19
PART I
3. On the Enterprise Manager main page, click the Administration hyperlink
to display the Administration page.
4. Click the Tablespaces hyperlink under Storage to display the current
tablespaces in the database and their space utilization.
5. Select the tablespace created in the preceding exercise (OCP10GDATA, for
example) and then click Edit to display the Edit Tablespace page. Note that
the majority of options are grayed out except for the check box to make this
the default tablespace for the database, and the various status options. This is
because the extent management and type of tablespace cannot be modified after
creation time; you must drop and then re-create the tablespace to change these.
The normal mode of operation of a tablespace is read/write, meaning that
objects can be created on the tablespace and their contents modified—data
inserted, updated, or deleted. Making a tablespace read-only does not allow any
changes to segment data on the tablespace but does allow SELECT statements
to be executed against it. The read-only status of a tablespace does not prevent
dropping objects created on the tablespace, since the object definition is not
stored on the tablespace but rather in the data dictionary. Think of this as
similar to the phone company changing your phone number—they have to
come to the house to install the phones, but to change your phone number
all they have to do is modify an entry at the central office to specify which
number will cause your phone at home to ring.
ch06.indd 19ch06.indd 19 6/30/2005 9:59:22 AM6/30/2005 9:59:22 AM
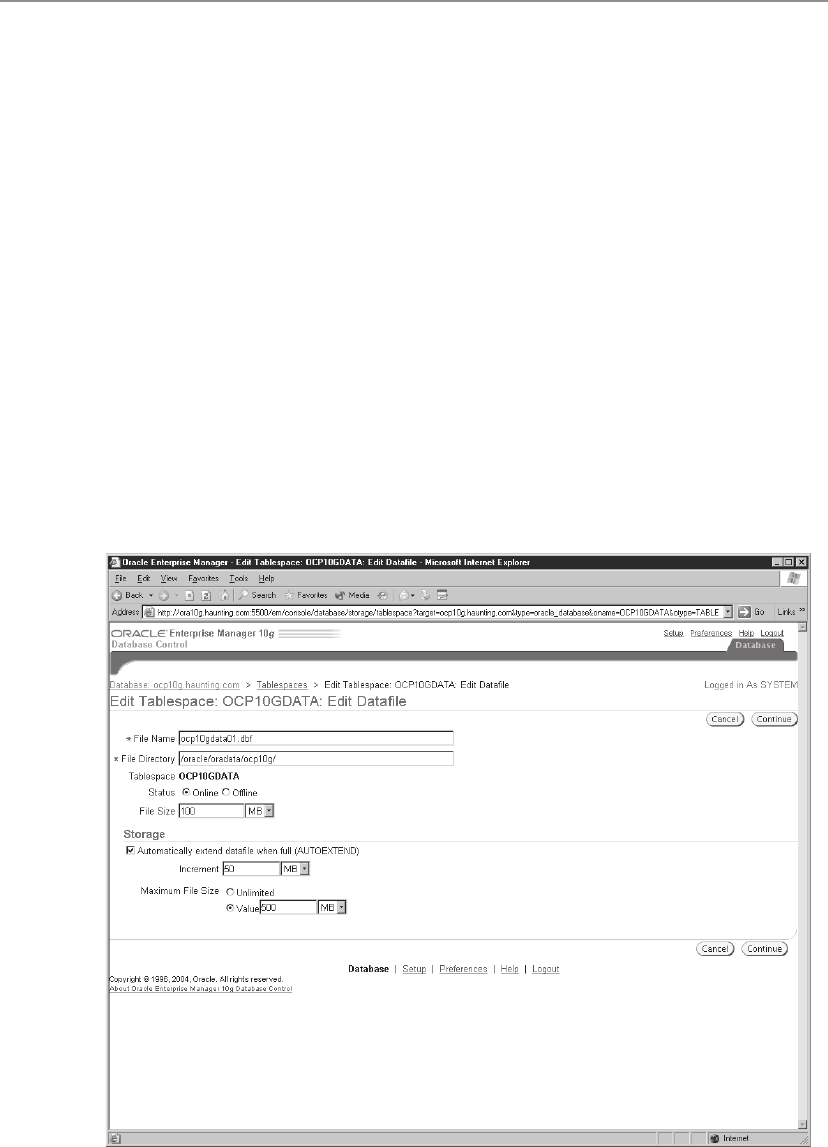
All-in-1 / Oracle Database 10g OCP Certification All-in-One / Watson, Bersinic / 5790-3
Oracle Database 10g OCP Certification All-in-One Exam Guide
20
6. Click the drop-down list box next to Offline Mode to display the four
available modes. Taking a tablespace offline makes its contents unavailable
until the tablespace is brought back online, but taking a tablespace offline
should be done gracefully to prevent having to perform recovery when the
tablespace is brought online. The NORMAL and IMMEDIATE options will
issue a checkpoint before taking all datafiles belonging to the tablespace
offline, although the IMMEDIATE option cannot be used if the database is
in noarchivelog mode. Using the TEMPORARY option will gracefully take
the datafiles offline and not require recovery unless one of the datafiles was
already offline due to media failure, in which case recovery will be needed.
FOR RECOVER is deprecated and should not be used; it is included for
backward compatibility.
7. If you want to add a datafile to the tablespace, you can click Add. For now
click Edit to display the Edit Datafile page. Notice that you can change the
size of the datafile by entering a new value. You can specify a value smaller
or larger than the existing file size, but no smaller than the amount of data
physically in the file; otherwise, you receive the “ORA-03297: file contains
used data beyond requested RESIZE value” error. You can also change
autogrowth characteristics, rename the datafile, or change its location.
Decrease the size of the datafile to 50MB and click Continue.
ch06.indd 20ch06.indd 20 6/30/2005 9:59:23 AM6/30/2005 9:59:23 AM
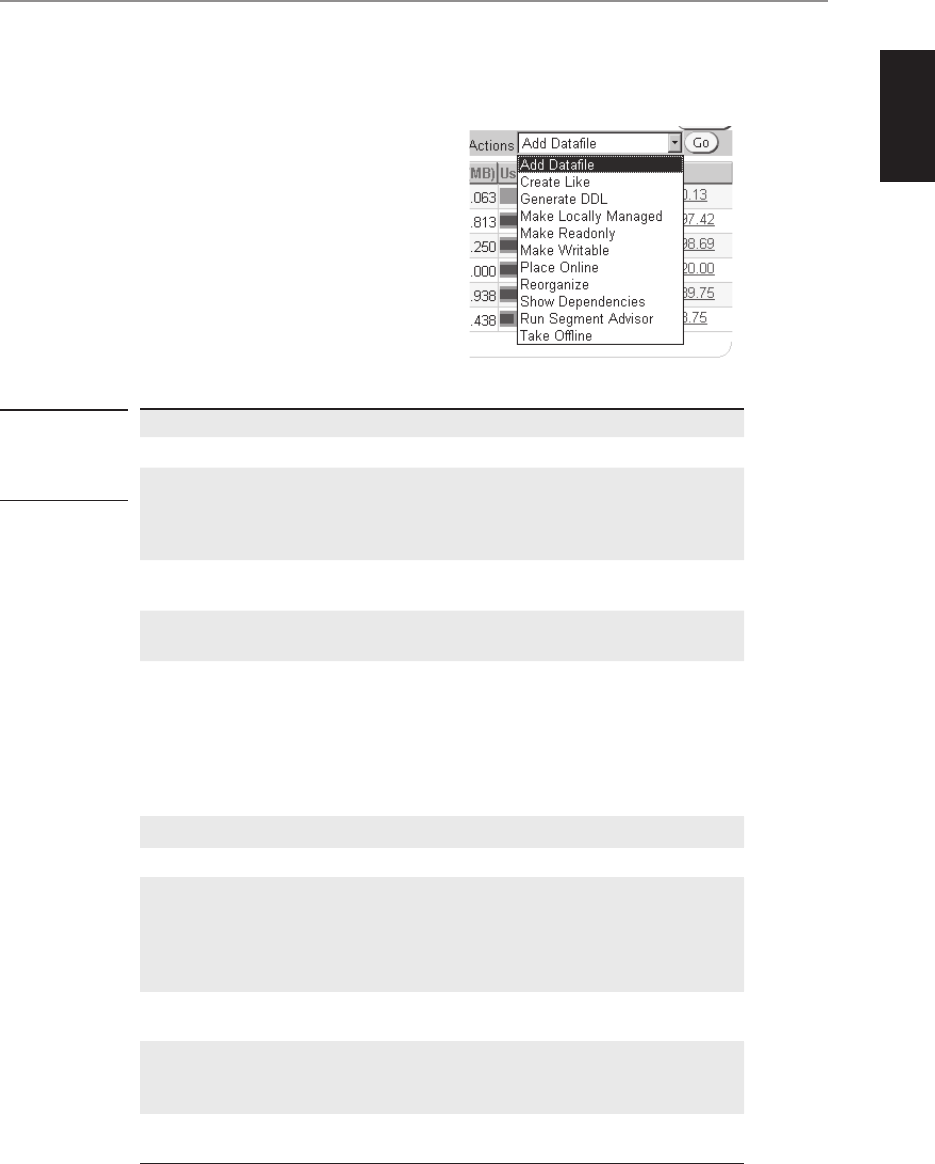
All-in-1 / Oracle Database 10g OCP Certification All-in-One / Watson, Bersinic / 5790-3
Chapter 6: Managing Oracle Storage Structures
21
PART I
8. Click Show SQL to display the SQL code required to make your changes, as in
this code listing example, and then click Return:
ALTER DATABASE DATAFILE '/oracle/oradata/ocp10g/ocp10gdata01.dbf' RESIZE 50M
9. Click Apply to save your changes.
10. Click the Tablespaces hyperlink at the top
of the Enterprise Manager page to display
the list of tablespaces in the database.
11. Click the drop-down list box next to Actions
to display the list of available actions.
Actions are activities that can be performed
on the selected tablespace. They are
described in more detail in Table 6-2.
12. Close Enterprise Manager.
Action Description
Add Datafile Allows you to add another datafile to the tablespace.
Create Like Uses the selected tablespace as a template for another
tablespace. Characteristics such as extent and segment
management, datafile location, and size are copied to the
new tablespace.
Generate DDL Displays a page with the generated SQL statement used
to re-create the tablespace.
Make Locally
Managed
Converts a dictionary-managed tablespace to a locally
managed tablespace.
Make Read Only Makes a read/write tablespace read-only. Current
transactions are allowed to complete, but no new
transactions can be started on segment data in the
tablespace. Also forces a checkpoint to update the
controlfile and datafile headers. This action cannot
be performed on UNDO, SYSTEM, and SYSAUX
tablespaces.
Make Writable Allows writes on tablespace segment data.
Place Online Brings a currently offline tablespace online.
Reorganize Starts the Reorganization Wizard of Enterprise Manager
to allow you to move objects around to make space
utilization more efficient. This process can severely
impact performance of tablespace data and should be
performed during off-hours.
Show
Dependencies
Lists objects dependent on this tablespace (i.e., segments
created on it) or objects the tablespace is dependent upon.
Run Segment
Advisor
Segment Advisor allows you to determine if segments on
the tablespace have space available to be reclaimed for
use by other objects.
Take Offline Takes a tablespace offline. Cannot be performed on the
SYSTEM or SYSAUX tablespace.
Table 6-2
Available
Tablespace
Actions
ch06.indd 21ch06.indd 21 6/30/2005 9:59:23 AM6/30/2005 9:59:23 AM

All-in-1 / Oracle Database 10g OCP Certification All-in-One / Watson, Bersinic / 5790-3
Oracle Database 10g OCP Certification All-in-One Exam Guide
22
Dropping Tablespaces
The DROP TABLESPACE command allows you to drop an existing tablespace in
the database. To perform this action, you must have the DROP TABLESPACE system
privilege. You can then issue the following command:
DROP TABLESPACE OCP10GDATA;
If there are objects in the tablespace, you will get the following error:
DROP TABLESPACE OCP10GDATA
*
ORA-01549: tablespace not empty, use INCLUDING CONTENTS option
If there are foreign key constraints that depend on tables on the tablespace, you
can modify the syntax to drop those links too by using the following syntax:
DROP TABLESPACE OCP10GDATA INCLUDING CONTENTS CASCADE CONSTRAINTS;
EXAM TIP Tablespaces can be dropped only if they contain no permanent
objects, unless the INCLUDING CONTENTS and CASCADE CONSTRAINTS
parameters are specified.
The result of dropping a tablespace is that any reference to it is erased from the
data dictionary and the controlfile of the database. The datafile is not actually deleted,
so you will need to do that manually (though Enterprise Manager can be used to do
that step as well).
EXAM TIP Dropping a tablespace from the command line does not remove
the datafile from disk. Deleting a tablespace using Enterprise Manager provides
the option to also delete the datafile.
Exercise 6-3: Using Enterprise Manager
to Drop a Tablespace
In this exercise you will connect to Enterprise Manager and drop the tablespace you
created earlier.
1. Start a web browser and connect to the Enterprise Manager URL on your Oracle
database server, specifying the appropriate port number and machine name.
2. Log in to your database as the user SYSTEM with the appropriate password.
If you receive the licensing information page, click I Agree to continue.
3. On the Enterprise Manager main page, click the Administration hyperlink
to display the Administration page.
4. Click the Tablespaces hyperlink under Storage to display the current
tablespaces in the database and their space utilization.
ch06.indd 22ch06.indd 22 6/30/2005 9:59:24 AM6/30/2005 9:59:24 AM
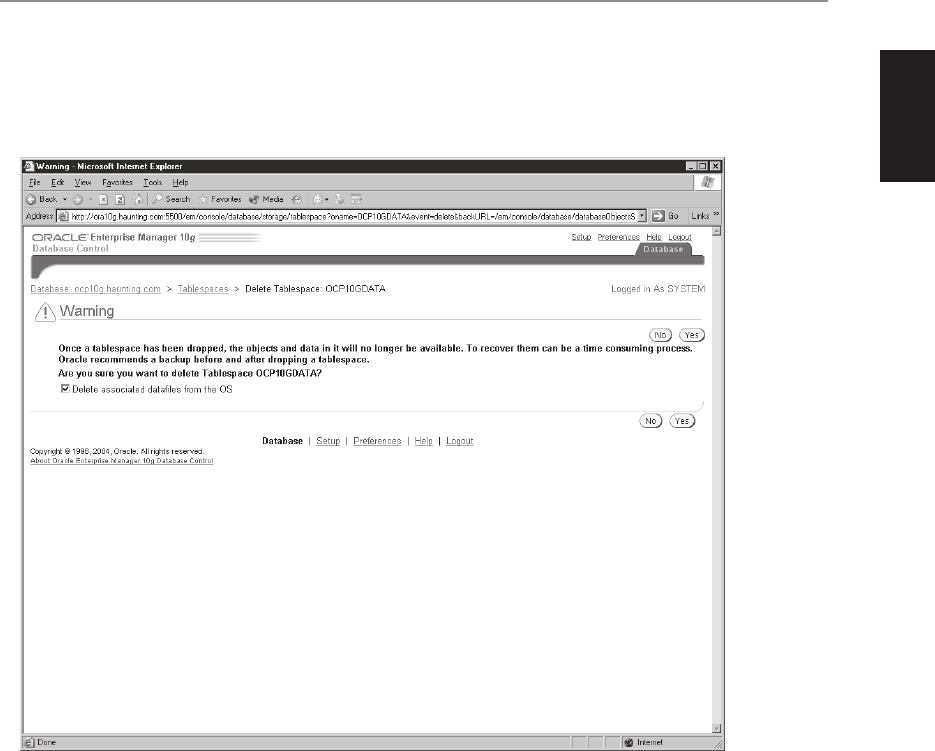
All-in-1 / Oracle Database 10g OCP Certification All-in-One / Watson, Bersinic / 5790-3
Chapter 6: Managing Oracle Storage Structures
23
PART I
5. Select the tablespace created in Exercise 6-1 (OCP10GDATA, for example)
and then click Delete to display the Delete Tablespace warning page. Read the
warning and note that a backup should always be performed before deleting
a tablespace in case you want to get the data back.
6. Ensure that the Delete Associated Datafiles From The OS check box is checked,
and then click Yes to delete the tablespace.
7. Notice that the tablespace is no longer listed on the Tablespaces page. Verify
at the operating system to ensure that the datafile is also removed.
8. Close Enterprise Manager.
Viewing Tablespace Information
The easiest way to view tablespace information is by using Enterprise Manager—
selecting a tablespace and then clicking the View button is the best way to get full
information on a tablespace. Oracle also includes a number of data dictionary and
dynamic performance views that can be used to gather information on tablespaces.
To get a list of tablespaces in the database and their characteristics, you can use the
DBA_TABLESPACES or V$TABLESPACE views. The DBA_TABLESPACES view provides
information on tablespace storage characteristics not found in V$TABLESPACE.
ch06.indd 23ch06.indd 23 6/30/2005 9:59:25 AM6/30/2005 9:59:25 AM

All-in-1 / Oracle Database 10g OCP Certification All-in-One / Watson, Bersinic / 5790-3
Oracle Database 10g OCP Certification All-in-One Exam Guide
24
For a list of datafiles, you can query the DBA_DATA_FILES view or the V$DATAFILE
view. The DBA_DATA_FILES view will list the name of the tablespace to which the
datafile belongs, whereas V$DATAFILE lists only the tablespace number, which must
be joined to V$TABLESPACE to get the tablespace name, but V$DATAFILE provides
more details on the file status.
EXAM TIP The V$TABLESPACE, V$DATAFILE, and V$TEMPFILE views can be
queried when the database is in a MOUNT state.
For temporary tablespaces, you can query the V$TEMPFILE and DBA_TEMP_FILES
views to get a list of tempfiles and their storage characteristics.
Chapter Review
A database has a physical structure and a logical structure. From the physical point
of view, the database consists of datafiles built out of operating system blocks. The
logical representation of a database consists of tablespaces, which contain segments
built out of extents. The smallest logical unit in the database is the database block.
A tablespace is the link between the physical and logical structures of a database.
By using tablespaces, we can control the location of data and administer parts of the
database separately.
A segment is an object that is allocated space in the datafiles. There are different
types of segments: tables, indexes, rollback, temporary, and many others. A segment
can be located in only one tablespace.
An extent is the unit of space allocation in a tablespace. An extent is a group of
contiguous blocks and must exist in one datafile. Different extents belonging to the
same segment can be located in different datafiles belonging to the same tablespace.
Multiple segments cannot share an extent in Oracle.
A database block is the minimum unit of I/O within the database. The size of all
blocks in the database is set at its creation and cannot be changed.
Tablespaces can be of different types: SYSTEM or non-SYSTEM, permanent or
temporary, locally managed or dictionary-managed.
Tablespaces can contain permanent objects or temporary objects. Temporary
objects are segments created for sort operations and temporary tables.
Tablespaces are created using the CREATE TABLESPACE command, either from the
command line or using Enterprise Manager. When creating a tablespace, you need to
specify the datafiles it will use, extent management characteristics, storage settings for
the segments created in it, and whether it can be written to.
Datafiles can extend automatically if necessary by using the AUTOEXTEND clause
in the datafile definition. When using AUTOEXTEND, make sure that you specify
NEXT (how much the file will grow by) and MAXSIZE (the maximum size it will grow
to) values so that a file does not occupy all available disk space.
You can increase the size of an existing tablespace by increasing the size of an
existing datafile or adding new ones. You can make a tablespace unavailable by taking
it offline using the ALTER TABLESPACE command. A tablespace that contains static or
ch06.indd 24ch06.indd 24 6/30/2005 9:59:26 AM6/30/2005 9:59:26 AM

All-in-1 / Oracle Database 10g OCP Certification All-in-One / Watson, Bersinic / 5790-3
Chapter 6: Managing Oracle Storage Structures
25
PART I
historical data should be made Read Only by using the ALTER TABLESPACE command.
Read-only tablespaces do not need to be backed up regularly, and most changes to
data are prevented. You can, however, drop an object located in a read-only tablespace.
If you no longer need a tablespace, it can be dropped. Dropping the tablespace
does not delete the operating system files, but it does remove the tablespace from the
controlfile and from the data dictionary. If the tablespace contains objects, you need
to use the DROP TABLESPACE ... INCLUDING CONTENTS command.
In order to view information on your tablespaces and datafiles, you can use the
DBA_TABLESPACES, DBA_DATA_FILES, and DBA_TEMP_FILES views. When the
database is not open, you can query the V$TABLESPACE, V$DATAFILE and
V$TEMPFILE views.
Questions
1. Which line of code will cause the following SQL statement to fail? (Choose
the best answer.)
1 CREATE BIGFILE TABLESPACE OCP10gDATA
2 DATAFILE '/oracle/ocp10gdata/ocp10gdata02.dbf'
3 EXTENT MANAGEMENT LOCAL
4 FREELISTS 5
5 NOLOGGING;
A. 1
B. 2
C. 3
D. 4
E. 5
F. The statement will succeed
2. You have mounted the database but did not open it. Which views do you
need to query if you need the locations of all datafiles and the names of
the tablespaces they belong to? (Choose all correct answers.)
A. V$DATAFILE
B. DBA_DATA_FILES
C. V$TABLESPACE
D. DBA_TABLESPACES
E. V$TEMPFILE
F. DBA_TEMP_FILES
G. V$UNDOFILE
3. You attempt to create a tablespace but receive an error that the datafile for the
tablespace cannot be created. The size of the datafile you wanted to create is
3GB, and you specified the SMALLFILE option for the tablespace. You verify
that the operating system directory where the file will reside is owned by the
same user as Oracle and the user has full read/write permissions. You are logged
ch06.indd 25ch06.indd 25 6/30/2005 9:59:26 AM6/30/2005 9:59:26 AM

All-in-1 / Oracle Database 10g OCP Certification All-in-One / Watson, Bersinic / 5790-3
Oracle Database 10g OCP Certification All-in-One Exam Guide
26
in to the database as the user SYSTEM, and there is plenty of disk space on the
hard drive. What is the likely cause of the error? (Choose the best answer.)
A. You cannot create a file larger than 2GB in an Oracle database when
specifying SMALLFILE.
B. The operating system cannot create a file larger than 2GB.
C. You must specify the WITH OVERWRITE option for the datafile
specification.
D. You must specify the REUSE option for the datafile specification.
E. You must specify the AUTOEXEND option for the datafile specification.
4. You want to be able to re-create a tablespace quickly in case of failure but do
not have the SQL code to perform the operation. What is the best way to
determine which SQL statement will properly re-create the tablespace with
all options correctly set? (Choose the best answer.)
A. Use the Generate DDL option of iSQL*Plus.
B. Use the Generate DDL option of Enterprise Manager.
C. Use the Create Like option of iSQL*Plus.
D. Use the Create Like option of Enterprise Manager.
E. Query the CODE column of the V$TABLESPACE view.
F. Query the TEXT column of the DBA_TABLESPACES view.
5. Which line of code will cause the following SQL statement to fail? (Choose
the best answer.)
1 CREATE BIGFILE TABLESPACE OCP10gDATA
2 DATAFILE '/oracle/ocp10gdata/ocp10gdata02.dbf'
3 EXTENT MANAGEMENT DICTIONARY
4 FREELISTS 5
5 NOLOGGING;
A. 1
B. 2
C. 3
D. 4
E. 5
F. The statement will succeed
6. You determine that a datafile belonging to your ARCHIVE2002 tablespace
is too large. You want to reduce the size of the datafile so that disk space is
not wasted. This tablespace will not have any data added to it. When you
use Enterprise Manager to reduce the size of the datafile belonging to the
tablespace, you receive an error. What is the most likely cause? (Choose
the best answer.)
A. You cannot reduce the size of datafiles in Oracle.
B. You cannot reduce the size of datafiles using Enterprise Manager.
ch06.indd 26ch06.indd 26 6/30/2005 9:59:27 AM6/30/2005 9:59:27 AM

All-in-1 / Oracle Database 10g OCP Certification All-in-One / Watson, Bersinic / 5790-3
Chapter 6: Managing Oracle Storage Structures
27
PART I
C. You do not have sufficient permissions to reduce the size of the file.
D. The file does not exist.
E. The file contains data beyond the size you want to reduce the file to.
7. You issue the following command to drop a tablespace and receive an error
indicating that the tablespace cannot be dropped. What is the likely cause?
(Choose the best answer.)
DROP TABLESPACE SYSAUX INCLUDING CONTENTS CASCADE CONSTRAINTS;
A. System tablespaces cannot be dropped.
B. You do not have permissions to drop the SYSAUX tablespace.
C. Objects in other tablespaces depend on objects in the tablespace being
dropped.
D. You cannot drop objects in the tablespace that you did not create.
E. The command should succeed.
8. You want to change extent management on your DATA09 tablespace from local
to dictionary to match the other tablespaces in the DATA01–DATA08 range.
Which method can be used to make this change? (Choose the best answer.)
A. DBMS_SPACE_ADMIN.TABLESPACE_DICTIONARY_MANAGED
B. DBMS_SPACE_ADMIN.TABLESPACE_MIGRATE_TO_DICITONARY
C. Enterprise Manager
D. ALTER TABLESPACE DATA09 EXTENT MANAGEMENT DICTIONARY
E. You cannot convert a locally managed tablespace to dictionary
management
9. What permissions are required to create a tablespace? (Choose all correct
answers.)
A. CREATE TABLESPACE
B. MANAGE DATABASE
C. DBA
D. SYSDBA
E. SYSOPER
10. What types of segments can tablespaces in Oracle Database 10g store?
(Choose all correct answers.)
A. Tables
B. Sort segments
C. Redo segments
D. Undo segments
E. DBA segments
F. Clusters
ch06.indd 27ch06.indd 27 6/30/2005 9:59:27 AM6/30/2005 9:59:27 AM

All-in-1 / Oracle Database 10g OCP Certification All-in-One / Watson, Bersinic / 5790-3
Oracle Database 10g OCP Certification All-in-One Exam Guide
28
Answers
1. D. When specifying local extent management in the creation of a tablespace,
you cannot specify a dictionary-managed segment storage parameter as well.
FREELISTS can be specified only when extent management is dictionary,
so that part of the CREATE TABLESPACE statement would cause the entire
statement to fail.
2. A, C, and E. Because the database is not yet in an OPEN state, any of the
DBA_ data dictionary views are not yet accessible; they can be queries only
when the database is in an open state. The V$TABLESPACE view will provide
you a list of tablespaces. The V$DATAFILE and V$TEMPFILE views can be
joined to the V$TABLESPACE view using the TS# column to retrieve a list
of all tablespaces and their datafiles. There is no V$UNDOFILE view.
3. D. The most likely reason that you are receiving an error on the creation of
the datafile for the tablespace is that a file with that name already exists. To
correct this, you must specify the REUSE option on the datafile specification
to have Oracle overwrite the existing file (or delete the file manually from the
hard disk). Neither Oracle nor the operating system will prevent a file of 3GB
being created for a SMALLFILE tablespace.
4. B. The Generate DDL option of Enterprise Manager will generate the SQL
code to re-create the selected tablespace. You can then cut and paste this into
a SQL script for later execution. There is no Generate or Create Like option
in iSQL*Plus, and the Create Like option of Enterprise Manager will display
a new page to enter the name of a tablespace with the same parameters as
the one selected. There is no CODE column in the V$TABLESPACE or TEXT
column in DBA_TABLESPACES.
5. C. In order to create a BIGFILE tablespace, you must specify local extent
management and automatic segment space management. You cannot create
a dictionary-managed BIGFILE tablespace.
6. E. Oracle allows you to reduce the size of datafiles, and this can be
accomplished from the command line or using Enterprise Manager. If
you are able to change the size of the file in Enterprise Manager, you have
the necessary permissions to perform the action. The most likely reason
you are unable to perform the action is that more data exists in the datafile
than the size you want to reduce it to. Specify a larger value and try again.
7. A. SYSAUX is a system tablespace and cannot be dropped. The same holds
true for the SYSTEM tablespace.
8. E. Once a tablespace is made locally managed, it is not possible to convert
it to a dictionary-managed tablespace. There is no command or Enterprise
Manager option to perform the change.
ch06.indd 28ch06.indd 28 6/30/2005 9:59:28 AM6/30/2005 9:59:28 AM

All-in-1 / Oracle Database 10g OCP Certification All-in-One / Watson, Bersinic / 5790-3
Chapter 6: Managing Oracle Storage Structures
29
PART I
9. A and C. You must be granted either the CREATE TABLESPACE system
permission or the DBA role to create a tablespace. There is no MANAGE
DATABASE permission. The SYSOPER and SYSDBA roles provide permissions
for managing the instance and database but do not specifically grant the
holder the permission to create a tablespace.
10. A, B, D, and F. Tablespaces in Oracle can store tables, clusters (both are types
of permanent segments, which also include indexes, partitions, and others),
undo segments, and sort segments (a type of temporary segment). Redo
segments and DBA segments do not exist. Redo is stored in the redo log files.
ch06.indd 29ch06.indd 29 6/30/2005 9:59:28 AM6/30/2005 9:59:28 AM

All-in-1 / Oracle Database 10g OCP Certification All-in-One / Watson, Bersinic / 5790-3
ch06.indd 30ch06.indd 30 6/30/2005 9:59:29 AM6/30/2005 9:59:29 AM

All-in-1 / Oracle Database 10g OCP Certification All-in-One / Watson, Bersinic / 5790-3
CHAPTER 7
Administering Database Users
In this chapter you will learn how to
• Create and manage database user accounts
• Create and manage roles
• Grant and revoke privileges
• Control resource usage by users
1
ch07.indd 1ch07.indd 1 6/30/2005 5:00:42 PM6/30/2005 5:00:42 PM

All-in-1 / Oracle Database 10g OCP Certification All-in-One / Watson, Bersinic / 5790-3
Oracle Database 10g OCP Certification All-in-One Exam Guide
2
As a database administrator, you must ensure that individuals that need access to
the database have the appropriate level of permission. This means creating users in
the database to allow individuals to connect to the instance, as well as granting the
appropriate system permissions to let users create and manage objects. Once a user
creates an object, he can then grant others permissions to manipulate those objects;
the DBA need not be involved in managing permissions to an individual user’s objects.
Finally, you want to ensure that no user can consume all database resources when
issuing an errant SQL statement or by other means.
Creating and Managing Database Users
In order for anyone to be able to access the database, that person needs to be
authenticated by Oracle as a valid database user. Applications can be configured to
require each individual needing access to have a separate database account, or the
application itself can connect to the database as a common user and handle application-
level permissions internally. No matter which method is chosen, at least one database
user will need to be created in the database to allow data manipulation.
Users and Schemas
When you create a database, depending on what options you have selected, a number
of database users will be created but will be locked by default. Two database users are
always created and are always unlocked: SYS and SYSTEM. The SYS user owns the data
dictionary and all of its associated objects. The user SYSTEM has access to all objects
in the database. The distinction between a user owning objects and a user only having
access to objects that are owned by another user is an important one in Oracle.
Any user that has been given the permission to create objects and does so is said
to own a schema. The schema is a collection of all objects that are owned by a user.
The schema has the same name as the user. For example, if a database user called John
created a table called Customers, John has now also created his schema and will be
schema owner of the “John” schema. Anyone wanting to query the new table in John’s
schema can prefix the table name with the schema name and query the data as JOHN
.CUSTOMERS (assuming John has granted them permissions to do so). If Damir wants
to query the JOHN.CUSTOMERS table, he may do so if he has permissions. Damir does
not have to be a schema owner like John, just a database user. In fact, the majority of
users in a database are not schema owners (i.e., they do not own database objects)
but are simply users accessing other schemas.
EXAM TIP Any user that has created a database object (view, table, etc.)
owns a schema and is considered a schema user.
ch07.indd 2ch07.indd 2 6/30/2005 5:01:15 PM6/30/2005 5:01:15 PM

All-in-1 / Oracle Database 10g OCP Certification All-in-One / Watson, Bersinic / 5790-3
Chapter 7: Administering Database Users
3
PART I
To relate the concept of schema users and non-schema users to a real-world example,
think of it as being similar to your still living with your parents. Your parents own the
house that you live in, just as an Oracle user owns a schema. They allow you to live in
the house (with or without cost), which makes you the non-schema user, since you
do not own the house. In fact, they have given you permission to access objects in the
house (your room, the bathroom, the kitchen, and—most important—the fridge),
much as a schema owner grants privileges to other Oracle users to access a table or
other object. The schema owner always has the option to revoke any privileges granted
to objects in the database, just as a parent may have the option to kick you out of the
house if you overstay your welcome.
Creating Users
Gaining access to an Oracle database requires that you have a user account in the
database, which is created for you by the DBA. The DBA is an Oracle user who has
been granted all permissions in the database because he owns the database. The user
SYS in Oracle has that power and has also granted it to the SYSTEM user by granting
SYSTEM the DBA role (roles will be explained in the next section of this chapter). SYS
can also grant this authority to other Oracle users, so that not everyone needs to know
the SYS or SYSTEM password. The password for the SYS user is always “change_on_
install” by default, and for user SYSTEM, it is “manager” if you create the database from
the command line using the CREATE DATABASE statement. If you use the Database
Configuration Assistant to create a database, you will be prompted to specify passwords
other than the default for these users. In any case, ensure that the default passwords
are not the ones used for SYS or SYSTEM; otherwise, you are making a hacker’s job
rather easy.
EXAM TIP Oracle Database 10g databases will typically have many more
users besides SYS and SYSTEM defined when the database is created. The
majority of these users will have their accounts locked and will need to be
manually unlocked by the DBA or when running DBCA.
The command that creates a user in Oracle is the CREATE USER command. The
syntax for this command is listed here, while Table 7-1 provides additional information
on the various parameters for the CREATE USER command listed in the syntax.
CREATE USER username
IDENTIFIED [BY password | EXTERNALLY | GLOBALLY AS extname]
[DEFAULT TABLESPACE tablespacename]
[TEMPORARY TABLESPACE tablespacename]
[ACCOUNT LOCK | UNLOCK]
[PROFILE profilename | DEFAULT]
[PASSWORD EXPIRE]
[QUOTA num [K|M] | UNLIMITED ON tablespace
[QUOTA num [K|M] | UNLIMITED ON tablespace] ... ]
ch07.indd 3ch07.indd 3 6/30/2005 5:01:16 PM6/30/2005 5:01:16 PM

All-in-1 / Oracle Database 10g OCP Certification All-in-One / Watson, Bersinic / 5790-3
Oracle Database 10g OCP Certification All-in-One Exam Guide
4
You can also use Oracle Enterprise Manager to create a user, as well as see the
syntax to perform the action. Enterprise Manager also allows the creation of users
with similar settings as an already-existing database user.
Parameter Description
username The name of the user to be created. The name must be specified and must be unique
within the database. A username can be up to 30 characters long and must adhere to
Oracle naming conventions (starts with a letter and may contain numbers; letters; or
the symbols #, _, or $).
IDENTIFIED Specifies how the user will have their authenticity validated. The three methods include:
—BY password, where password represents a DBA-specified password of up to 30
characters. The database will check the credentials provided by the user against the
username and passwords in the data dictionary and deny or grant access, depending
upon whether or not a match is found.
—EXTERNALLY, where the username will be authenticated by the operating system
of the computer on which the database is running and Oracle will allow access if the
operating system authenticates the user. In order to configure this type of authentication,
some additional processes are involved.
—GLOBALLY AS extname, where the username and password will be passed to
the extname service for logon validation. This type of authentication requires external
authentication mechanisms, such as a RADIUS server.
DEFAULT
TABLESPACE
The name of a tablespace that will be used to store segments created by the user if no
tablespace is specified at object creation time. If the DEFAULT TABLESPACE parameter
is not specified at user creation time, the tablespace configured at the database level
to be the database default tablespace will be used. If no database default tablespace is
configured, this parameter defaults to SYSTEM. It is strongly recommended that you
always specify a DEFAULT TABLESPACE for the user and assign the user a quota on
this tablespace if you expect her to create segments.
TEMPORARY
TABLESPACE
The name of a tablespace that will be used to store temporary segments, such as sort
segments. If the TEMPORARY TABLESPACE parameter is not specified at user creation
time, the tablespace configured at the database level to be the database temporary
tablespace will be used. If no database temporary tablespace is configured, this parameter
defaults to SYSTEM. It is strongly recommended that you specify a TEMPORARY
TABLESPACE for the user.
ACCOUNT
LOCK |
UNLOCK
Allows you to explicitly lock or unlock a user account at creation time. The default for
this parameter is UNLOCK, which means that a user can connect to the instance as soon
as the account is created and the appropriate privileges granted.
PROFILE Specifies the profile that will be assigned to the user. The profile will determine password
management and, optionally, resource limits that will apply to the user. If this parameter is
not specified, or if the keyword DEFAULT is used, the user will be assigned the DEFAULT
profile.
PASSWORD
EXPIRE
This parameter allows you to automatically expire the user’s password at creation time,
forcing them to change the password the first time a successful connection to the instance
is established. The default behavior is not to expire the user’s password, though use of
this parameter is recommended.
QUOTA Lets you configure a quota for the user on tablespaces in the database. The quota is
specified in bytes, kilobytes (K), or megabytes (M). You should specify a quota on the user’s
DEFAULT TABLESPACE if you expect the user to create segments. You should not specify
an UNLIMITED quota on a tablespace for a regular user.
Table 7-1 CREATE USER Command Parameters
ch07.indd 4ch07.indd 4 6/30/2005 5:01:17 PM6/30/2005 5:01:17 PM
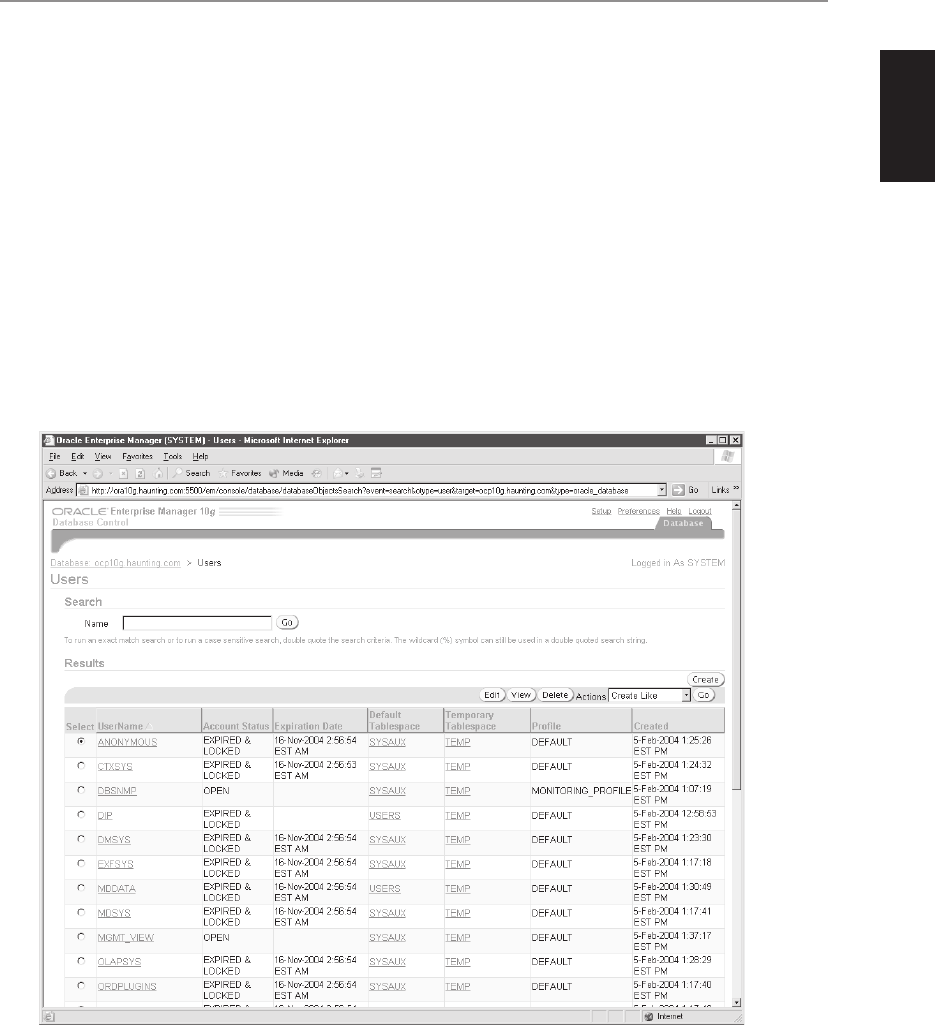
All-in-1 / Oracle Database 10g OCP Certification All-in-One / Watson, Bersinic / 5790-3
Chapter 7: Administering Database Users
5
PART I
Exercise 7-1: Using Enterprise Manager
to Create a Database User
In this exercise you will connect to Enterprise Manager and create a database user.
1. Start a web browser and connect to the Enterprise Manager URL on your
Oracle database server, specifying the appropriate port number and machine
name.
2. Log in to your database as the user SYSTEM with the appropriate password.
If you receive the licensing information page, click I Agree to continue.
3. On the Enterprise Manager main page, click the Administration hyperlink
to display the Administration page.
4. Click the Users hyperlink under Security to display the users currently defined
in the database and their statuses and parameters.
ch07.indd 5ch07.indd 5 6/30/2005 5:01:17 PM6/30/2005 5:01:17 PM
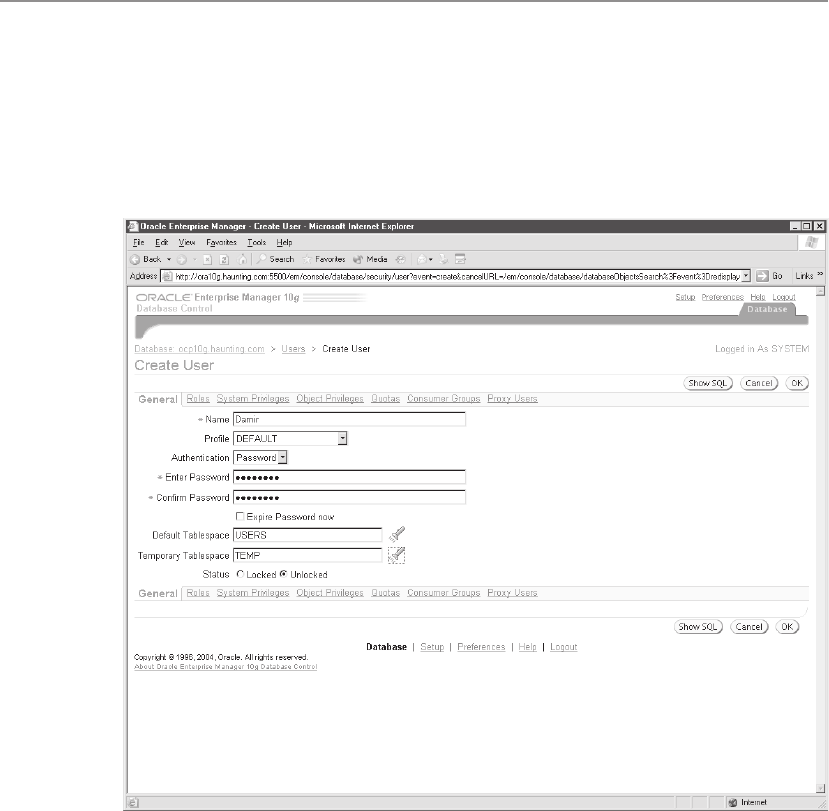
All-in-1 / Oracle Database 10g OCP Certification All-in-One / Watson, Bersinic / 5790-3
Oracle Database 10g OCP Certification All-in-One Exam Guide
6
5. Click Create to display the Create User page.
6. Enter values for the parameters required, including a username and a password,
confirming the password of your choice. Choose a default tablespace (use
USERS if it exists; otherwise, use the flashlight to select a tablespace in the
database) and a temporary tablespace (use TEMP if it exists), and ensure
that the status is Unlocked and Expire Password Now is unchecked.
7. Click Show SQL to display the code for creating the user. Notice the
“GRANT CONNECT TO <username>” portion of the code. This grants
the user the CONNECT role, which allows him to connect to the instance.
Without the CONNECT role granted, the user would get an error when
attempting to connect to the instance. Creating a user account by itself
does not grant the user permission to connect to the instance and access
the database.
ch07.indd 6ch07.indd 6 6/30/2005 5:01:18 PM6/30/2005 5:01:18 PM
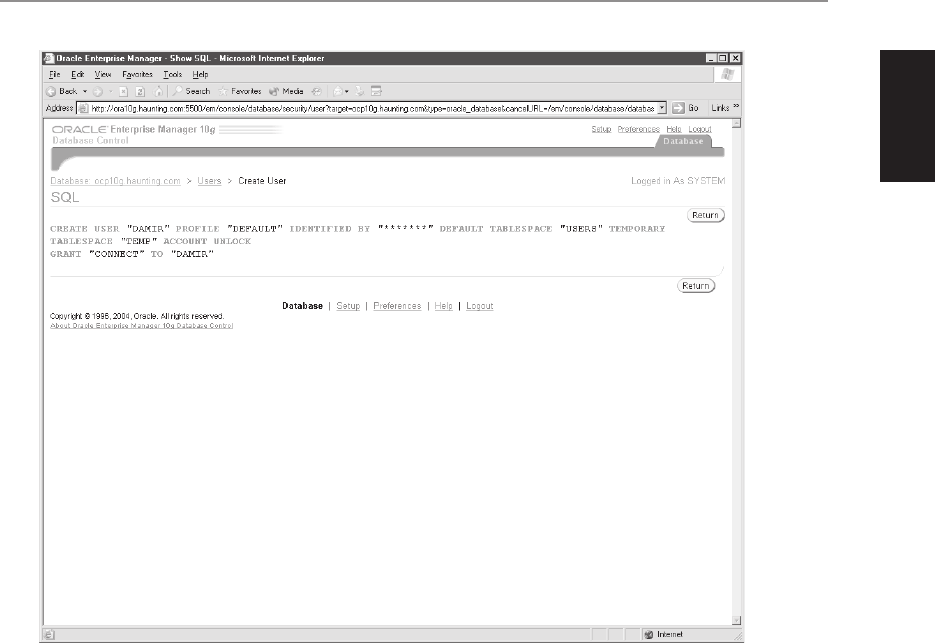
All-in-1 / Oracle Database 10g OCP Certification All-in-One / Watson, Bersinic / 5790-3
Chapter 7: Administering Database Users
7
PART I
8. Click Return to return to the Create User page.
9. Click OK to create the User. You should be returned to the list of users with
your user now visible in the list. Verify this and then close Enterprise Manager.
Modifying User Properties
While it is possible to have users never change anything for the duration of their
existence in the database, this is probably not a good security practice, nor is it likely.
Users may forget their password, or you may need to specify a different tablespace as
the user’s default tablespace, or grant new quotas or increased quotas for the user’s
objects, or lock out a user temporarily. The ALTER USER command can be used to
accomplish these tasks. Its syntax is as follows:
ALTER USER username
IDENTIFIED [BY password | EXTERNALLY | GLOBALLY AS extname]
[DEFAULT TABLESPACE tablespacename]
[TEMPORARY TABLESPACE tablespacename]
[ACCOUNT LOCK | UNLOCK]
[PROFILE profilename]
[PASSWORD EXPIRE]
[QUOTA num [K|M] | UNLIMITED ON tablespace
[QUOTA num [K|M] | UNLIMITED ON tablespace] ... ]
ch07.indd 7ch07.indd 7 6/30/2005 5:01:19 PM6/30/2005 5:01:19 PM

All-in-1 / Oracle Database 10g OCP Certification All-in-One / Watson, Bersinic / 5790-3
Oracle Database 10g OCP Certification All-in-One Exam Guide
8
As you can see, the syntax hardly varies from that of the CREATE USER command.
The options available are the same. Perhaps one of the most useful features of the
ALTER USER command is that a database user can also issue this command to change
their password, as follows:
ALTER USER Damir IDENTIFIED BY newpassword;
EXAM TIP All user properties except the username can be modified using
the ALTER USER command.
Note that the password itself is not masked when the command is issued. If you
want the password masked, you can use the Edit User page in Enterprise Manager
to change a user’s password, though this is not a method the user himself could use.
Enterprise Manager can also be used to perform any other action in modifying a
user, such as assigning a quota.
Dropping Users
If you guessed that the DROP USER command is the one that removes a user from a
database, you would be correct. However, the syntax is not as simple as “DROP USER
username” because of the possibility that the user may have a schema. If a user owns
objects in the database, his account cannot be dropped, because other users may depend
on the objects in that schema. The syntax of the DROP USER command is as follows:
DROP USER username [CASCADE]
Oracle prevents you from dropping a user from a database whose schema contains
objects. This is to ensure that objects created by one user and depended upon by
another user’s objects are not inadvertently removed from the database. Since the user
and the schema are linked, dropping the user will also drop the schema. Oracle does
not allow you to drop both the user and the schema, unless you specify the CASCADE
option on the DROP USER command.
Using the CASCADE option will drop all objects, as well as any data contained in
tables, that the user owns (i.e., that are in the user’s schema). This can have drastic side
effects in the database if not planned properly. It is always recommended that before
dropping a user, you determine if the user owns any objects in the database, and if so,
drop the objects after verifying that they are not depended upon by other users.
EXAM TIP To drop a schema user, you must specify the CASCADE option
of the DROP USER command or, preferably, drop the user’s objects first and
then drop the user.
ch07.indd 8ch07.indd 8 6/30/2005 5:01:20 PM6/30/2005 5:01:20 PM

All-in-1 / Oracle Database 10g OCP Certification All-in-One / Watson, Bersinic / 5790-3
Chapter 7: Administering Database Users
9
PART I
To find out which objects are owned by a user you wish to drop, you can query
the DBA_OBJECTS view. If you get zero rows returned, as in the following example,
you can safely drop the user:
SQL> SELECT OBJECT_NAME, OBJECT_TYPE FROM DBA_OBJECTS
2 WHERE OWNER='DAMIR';
no rows selected
On the other hand, if you do get a list of objects back, you should also query
the DBA_DEPENDENCIES view to determine which objects are dependent on those
owned by the user you wish to drop.
Granting and Revoking Privileges
Once you have created user accounts in Oracle, you will need to allow those users to
perform certain actions in the database or to access and manipulate objects in the
database. This is accomplished through the granting and revoking of different privileges
(or permissions). Oracle has two different types of privileges that can be granted:
system privileges and object privileges. System privileges allow a user to perform
certain database actions, such as create a table, or create an index, or even connect to
the instance. Object privileges allow a user to manipulate objects, as by reading data
through a view, executing a stored procedure, or changing data in a table. System
privileges are granted to and revoked from users by the DBA, while object privileges
are granted to and revoked from users by the owner of the object.
System Privileges
Oracle 10g has well over one hundred system privileges that can be granted to users,
of which some of the most common are listed in Table 7-2. These privileges include
the capability to create various database objects, modify the configuration of the
database, and many more. The right to grant these privileges is restricted to the DBA
by default, though these permissions can be granted to other users as well.
Granting System Privileges
You can grant system privileges either using the command line or through Oracle
Enterprise Manager. The syntax for assigning system privileges is as follows:
GRANT privilege [, privilege, ...]
TO username [, username, ...]
[WITH ADMIN OPTION];
As you can see by this syntax, it is possible to grant multiple privileges to multiple
users at the same time. The privileges granted to a user are immediately available to
the user. This means that the user does not need to disconnect from the instance and
log in again in order for the privilege change to take effect. Simply granting the
privilege lets the user make use of it right away.
ch07.indd 9ch07.indd 9 6/30/2005 5:01:21 PM6/30/2005 5:01:21 PM

All-in-1 / Oracle Database 10g OCP Certification All-in-One / Watson, Bersinic / 5790-3
Oracle Database 10g OCP Certification All-in-One Exam Guide
10
For example, if you want to allow Damir to create tables, views, triggers, indexes,
synonyms, and sequences in his schema, you can issue the following command:
GRANT CREATE TABLE, CREATE VIEW, CREATE SYNONYM,
CREATE SEQUENCE, CREATE TRIGGER, CREATE INDEX
TO Damir;
Privilege Description
CREATE SESSION Allows the grantee to connect to the database instance. After creating
a new user, you need to grant the CREATE SESSION privilege;
otherwise, the user will not be able to connect.
CREATE TABLE Allows the grantee to create a table in her schema.
CREATE VIEW Allows the grantee to create a view in her schema.
CREATE SYNONYM Allows the grantee to create a private synonym in her schema.
CREATE PUBLIC
SYNONYM
Allows the grantee to create a synonym in the SYS schema that can
be used by any user in the database.
CREATE
PROCEDURE
Allows the grantee to create a stored procedure or function in her
schema.
CREATE SEQUENCE Allows the grantee to create a sequence in her schema.
CREATE TRIGGER Allows the grantee to create a trigger in her schema on a table in her
schema.
CREATE USER Allows the grantee to create another user in the database and specify
the password and other settings at creation time.
ALTER USER Allows the grantee who has been granted the privilege to modify the
user information of another user in the database, including changing the
user’s password.
DROP ANY TABLE Allows the grantee to drop any table in any schema in the database.
ALTER ANY TABLE Allows the grantee to alter any table in any schema in the database.
BACKUP ANY TABLE Allows the grantee to make a copy of any table in the database using
the Export utility (exp).
SELECT ANY TABLE Allows the grantee to issue a SELECT statement against any table
in the database, whether or not permissions to the table have been
explicitly granted to the grantee performing the action.
INSERT ANY TABLE Allows the grantee to issue an INSERT statement against any table
in the database, whether or not permissions to the table have been
explicitly granted to the grantee performing the action.
UPDATE ANY TABLE Allows the grantee to issue an UPDATE statement against any table
in the database, whether or not permissions to the table have been
explicitly granted to the grantee performing the action.
DELETE ANY TABLE Allows the grantee to issue a DELETE statement against any table
in the database, whether or not permissions to the table have been
explicitly granted to the grantee performing the action.
Table 7-2 Commonly Granted System Privileges in Oracle 10g
ch07.indd 10ch07.indd 10 6/30/2005 5:01:21 PM6/30/2005 5:01:21 PM

All-in-1 / Oracle Database 10g OCP Certification All-in-One / Watson, Bersinic / 5790-3
Chapter 7: Administering Database Users
11
PART I
Just because a user has been granted a system privilege does not always mean that
the user can exercise that privilege, as evident by this error indicating an insufficient
quota for Damir on the USERS tablespace when Damir tries to connect to the instance
and create a table:
SQL> connect Damir/newpass1@ocp10g.haunting.com
Connected.
SQL> CREATE TABLE DamirTable
2 (DamirID number,
3 Name varchar2(40));
CREATE TABLE DamirTable
*
ERROR at line 1:
ORA-01950: no privileges on tablespace 'USERS'
WITH ADMIN OPTION When a user is granted a system privilege, the grantor
(i.e., the person granting the privilege, typically the DBA) also has the option to allow
the grantee (the person receiving the privilege, typically the user) to grant the same
privilege to other users. If this is the result desired, the grantor can grant the privilege
using the WITH ADMIN OPTION. When privileges are granted WITH ADMIN OPTION,
this means that the grantor has decided that the grantee can be fully trusted by him as
well as by the user that granted him the system privilege in the first place. In essence
all users holding a system privilege WITH ADMIN OPTION are considered equal and
can grant and revoke that privilege from anyone, including the person who granted it
to them in the first place.
EXAM TIP The WITH ADMIN OPTION allows you to grant your grantee the
ability to grant system privileges to other users.
Exercise 7-2: Using Enterprise Manager
to Grant System Privileges
In this exercise you will connect to Enterprise Manager and create additional database
users and grant them system privileges.
1. Start a web browser and connect to the Enterprise Manager URL on your Oracle
database server, specifying the appropriate port number and machine name.
2. Log in to your database as the user SYSTEM with the appropriate password.
If you receive the licensing information page, click I Agree to continue.
3. On the Enterprise Manager main page, click the Administration hyperlink
to display the Administration page.
4. Click the Users hyperlink under Security to display the users currently defined
in the database and their statuses and parameters.
ch07.indd 11ch07.indd 11 6/30/2005 5:01:22 PM6/30/2005 5:01:22 PM
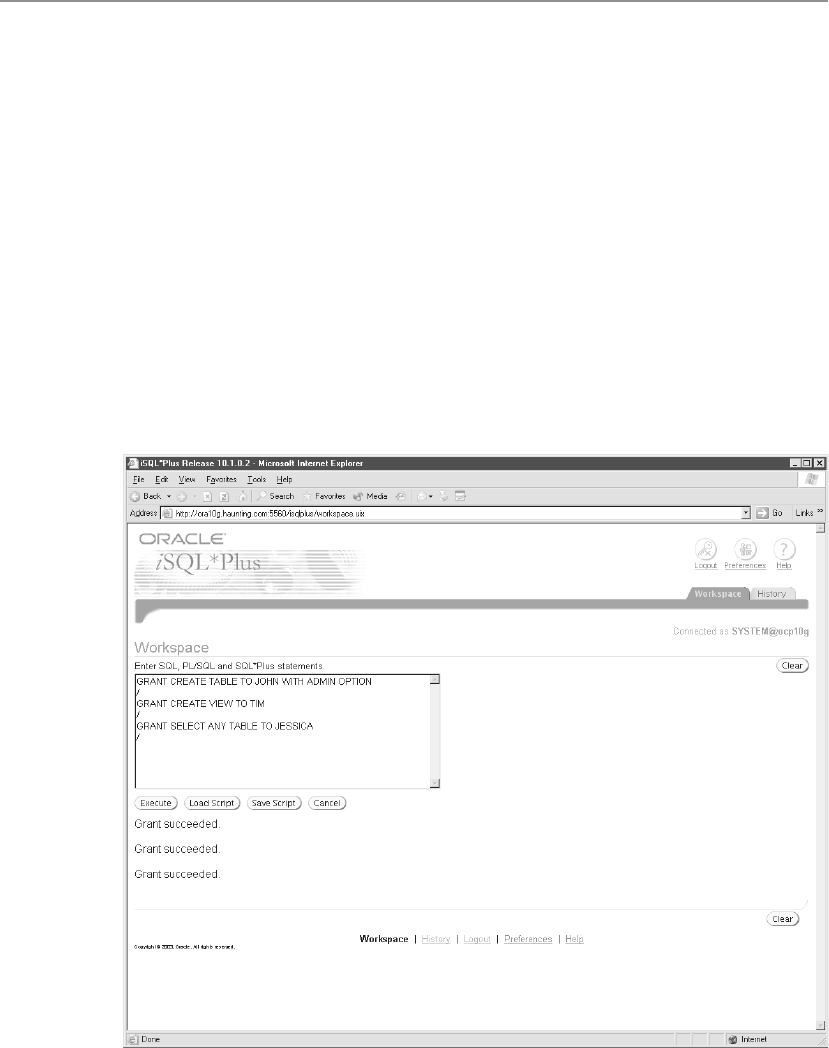
All-in-1 / Oracle Database 10g OCP Certification All-in-One / Watson, Bersinic / 5790-3
Oracle Database 10g OCP Certification All-in-One Exam Guide
12
5. Click Create to display the Create User page.
6. Fill in the values to create a new user called John with a password of “oracle,”
a default tablespace of USERS, and a temporary tablespace of TEMP. Ensure
that the account is not locked and that the password is not set to expire; then
click OK to create the user.
7. Create two additional users—Tim and Jessica—with the same settings as John.
8. Open another browser window and connect to iSQL*Plus for your database
instance and log in as the user SYSTEM with the appropriate password.
9. Enter the following SQL statements in the Workspace window and then click
Execute to run them:
GRANT CREATE TABLE TO JOHN WITH ADMIN OPTION
/
GRANT CREATE VIEW TO TIM
/
GRANT SELECT ANY TABLE TO JESSICA
/
ch07.indd 12ch07.indd 12 6/30/2005 5:01:22 PM6/30/2005 5:01:22 PM
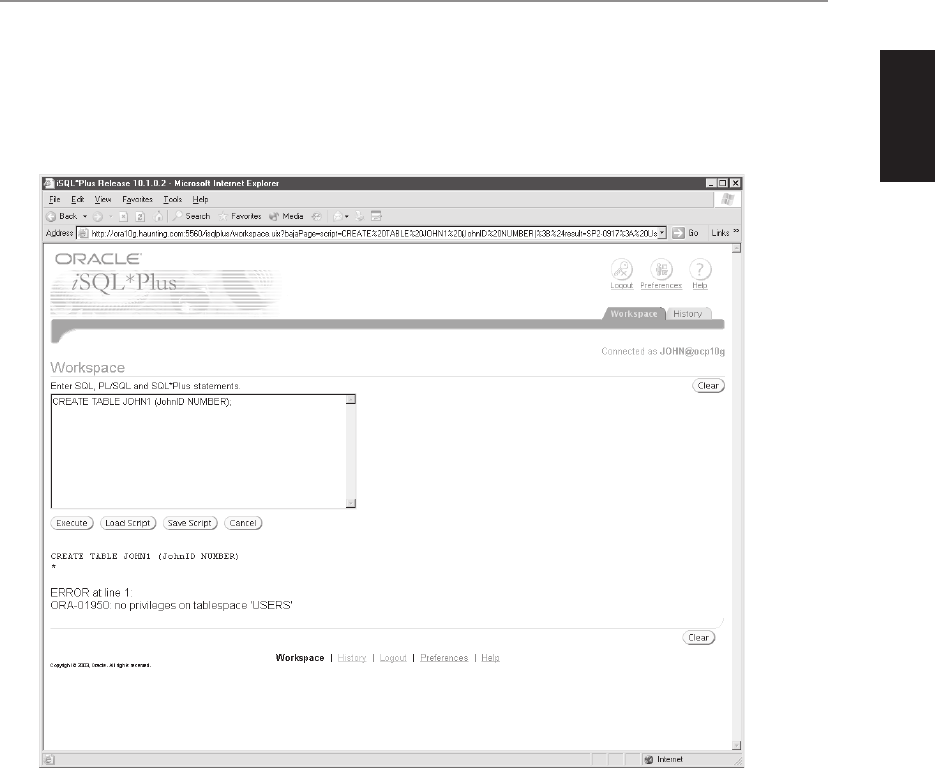
All-in-1 / Oracle Database 10g OCP Certification All-in-One / Watson, Bersinic / 5790-3
Chapter 7: Administering Database Users
13
PART I
10. Log out from iSQL*Plus and then log in as John with the appropriate password.
11. Issue the following command to create a table and notice the error you receive
due to an absence of quota on the tablespace:
CREATE TABLE JOHN1 (JohnID NUMBER);
12. Go back to Enterprise Manager and select the user John in the user list; then
click Edit.
13. Click the Quotas hyperlink for the user, and then for the Users tablespace
select Value from the Quota drop-down. Enter 50 in the Value column to
grant the user John a 50MB quota on the Users tablespace, as shown next,
and then click Apply.
ch07.indd 13ch07.indd 13 6/30/2005 5:01:23 PM6/30/2005 5:01:23 PM
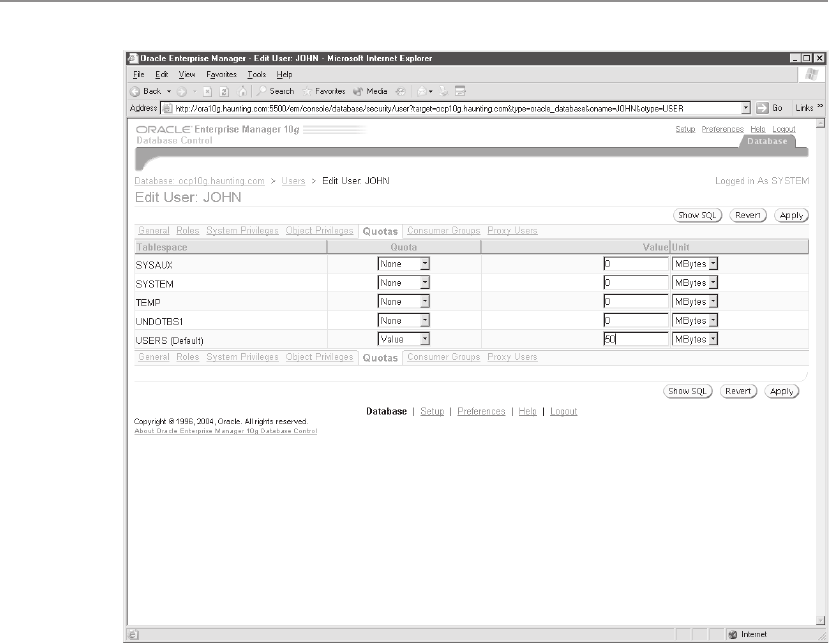
All-in-1 / Oracle Database 10g OCP Certification All-in-One / Watson, Bersinic / 5790-3
Oracle Database 10g OCP Certification All-in-One Exam Guide
14
14. Modify the quota for the Users tablespace for users Tim and Jessica to also
be 50MB.
15. In iSQL*Plus connected as John, attempt to re-create the John1 table again.
Notice that the command succeeded, since John now has a quota on the
Users tablespace.
16. Insert some data into the John1 table by issuing the following commands
in iSQL*Plus and then clicking Execute:
INSERT INTO JOHN1 VALUES (100);
INSERT INTO JOHN1 VALUES (101);
INSERT INTO JOHN1 VALUES (102);
INSERT INTO JOHN1 VALUES (103);
INSERT INTO JOHN1 VALUES (104);
COMMIT;
ch07.indd 14ch07.indd 14 6/30/2005 5:01:24 PM6/30/2005 5:01:24 PM
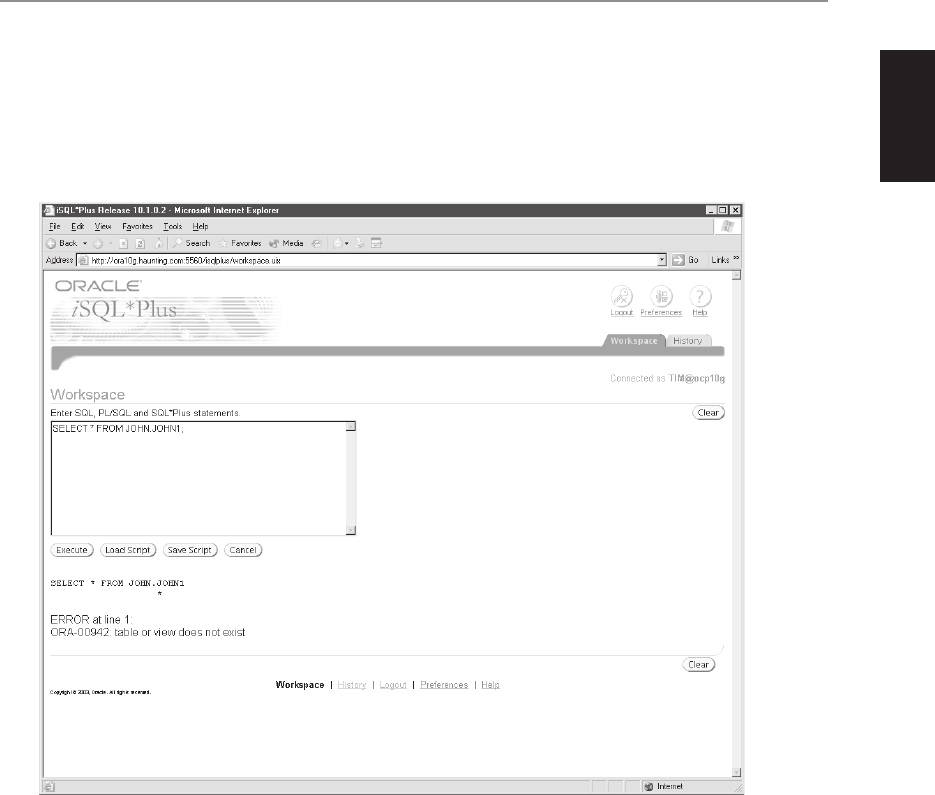
All-in-1 / Oracle Database 10g OCP Certification All-in-One / Watson, Bersinic / 5790-3
Chapter 7: Administering Database Users
15
PART I
17. Issue the command GRANT CREATE TABLE TO TIM to allow Tim to create
tables, and then click Execute.
18. Log out from iSQL*Plus as John and log in as Tim.
19. Attempt to query data in the John1 table. Notice the error indicating that the
object cannot be found, which really means you don’t have permissions.
20. Issue the same CREATE TABLE JOHN1 command as previously while
connected as Tim. Notice that it is possible to create two tables called
John1 as long as they are in different schemas.
21. Log out of iSQL*Plus and log in again as Jessica.
ch07.indd 15ch07.indd 15 6/30/2005 5:01:25 PM6/30/2005 5:01:25 PM
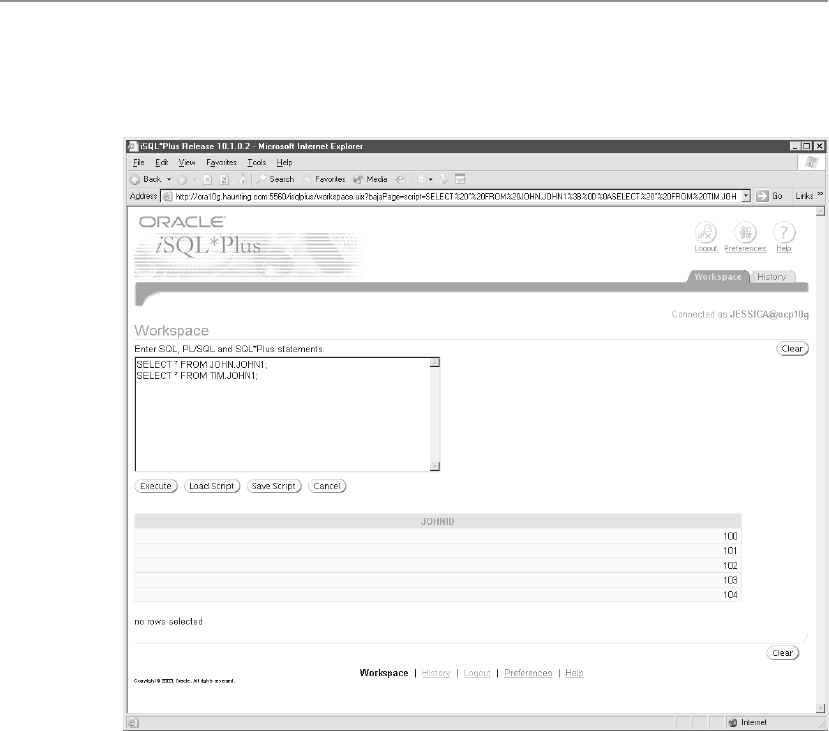
All-in-1 / Oracle Database 10g OCP Certification All-in-One / Watson, Bersinic / 5790-3
Oracle Database 10g OCP Certification All-in-One Exam Guide
16
22. Attempt to query the John1 tables in both the John and Tim schemas. Notice
that you can perform these actions, since Jessica has been granted the SELECT
ANY TABLE privilege.
23. In Enterprise Manager, select Jessica and click View to display information on
Jessica’s user account and the privileges granted to her.
ch07.indd 16ch07.indd 16 6/30/2005 5:01:26 PM6/30/2005 5:01:26 PM
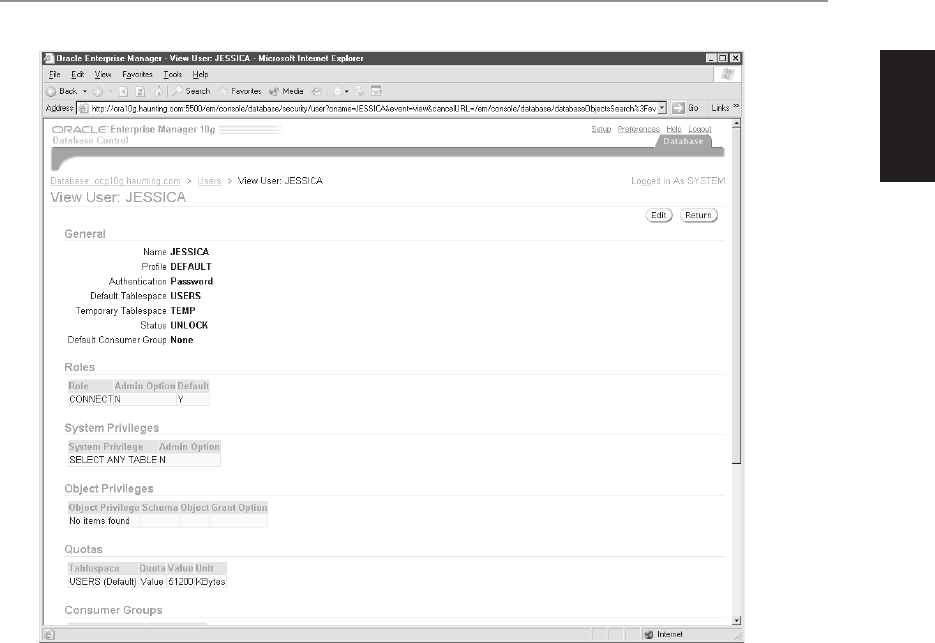
All-in-1 / Oracle Database 10g OCP Certification All-in-One / Watson, Bersinic / 5790-3
Chapter 7: Administering Database Users
17
PART I
24. Log out of iSQL*Plus and Enterprise Manager.
Revoking System Privileges
If you do not want anyone to continue to have a system privilege granted to them,
you can use the REVOKE command or Enterprise Manager to remove the privileges
granted. The syntax of the REVOKE command to revoke system privileges is very
ch07.indd 17ch07.indd 17 6/30/2005 5:01:27 PM6/30/2005 5:01:27 PM

All-in-1 / Oracle Database 10g OCP Certification All-in-One / Watson, Bersinic / 5790-3
Oracle Database 10g OCP Certification All-in-One Exam Guide
18
similar to that of granting it and can be used to revoke one or more privileges from
one or more users/grantees, as follows:
REVOKE privilege [, privilege, ...]
FROM username [, username, ...];
It is important to note one side effect when the WITH ADMIN OPTION is specified
at the time a system privilege is granted. While the DBA may revoke the privilege granted
to the user WITH ADMIN OPTION, if the user has granted that same privilege to others,
it is not removed from those users that were granted the privilege. For example, if you
give the key to your car to a friend and tell him that it is alright to make copies of the
key, when you ask for the key back from your friend, you cannot, at the same time, get
back all copies that were made by him and given to others. In order to get the other
copies of the key back, you need to find out who has them. Similarly, in Oracle you
need to query the data dictionary to determine which other users were granted the
permission being revoked by the user from which it is being revoked.
EXAM TIP Revoking system privileges from a user will not cascade to anyone
the revokee granted the same system privilege if he had been granted the
privilege WITH ADMIN OPTION.
Determining System Privileges Granted
If you want to find out which system privileges you have been granted, you can query
the DBA_SYS_PRIVS (for all system privileges granted to all users) and USER_SYS_
PRIVS (for system privileges granted to the currently logged-on user) data dictionary
views. These views will let you see which privileges you have been granted and whether
or not they have been granted WITH ADMIN OPTION. Only those system privileges
that have been granted will appear on the list. Any privileges that have been revoked
will not be listed, as Oracle does not keep track of permissions denied a user. The
default for Oracle is to deny all actions except those explicitly granted; therefore, only
those explicitly granted are listed.
To determine which privileges have been granted to individual users, you can use
Enterprise Manager to display the user information, including privileges and quotas.
Object Privileges
Users in Oracle can also be granted object privileges. Object privileges allow a user to
manipulate data in the database or perform an action on an object, such as executing
a stored procedure. Unlike system privileges, which are granted by the DBA, object
privileges need to be granted by the owner of the object.
Granting Object Privileges
The syntax to assign object privileges is as follows:
ch07.indd 18ch07.indd 18 6/30/2005 5:01:28 PM6/30/2005 5:01:28 PM

All-in-1 / Oracle Database 10g OCP Certification All-in-One / Watson, Bersinic / 5790-3
Chapter 7: Administering Database Users
19
PART I
GRANT privilege [,privilege, ...] | ALL [(column[, column, ...])]
ON objectname
TO user | role | PUBLIC
[WITH GRANT OPTION];
The major difference in the syntax between system and object privileges is that the
keyword ON needs to be specified to determine which object the privileges apply to.
Furthermore, object privileges for views and tables can also specify which column of
the view or table they should be applied to. The keyword ALL specifies that all privileges
that apply to the object should be granted. The privilege can be granted to a user, a role
(to be discussed later), or the keyword PUBLIC, which means all users in the database.
EXAM TIP Object privileges are granted by the owner of the object.
The types of privileges that can be granted depend on the object that they are being
granted on. For example, it makes no sense to grant the SELECT privilege to a stored
procedure, while the SELECT privilege makes perfect sense on a table. The object
privileges that can be granted and the object they can be granted to are outlined in
Table 7-3. For example, you cannot issue an ALTER VIEW command, so therefore the
ALTER privilege cannot apply to a view, and so on.
One privilege that requires a bit of an explanation is the REFERENCES privilege.
The REFERENCES privilege is one that can be granted to a user to create a FOREIGN
KEY on a column of a table. By granting the user the REFERENCES privilege, you do
not need to allow the user to be able to see that data, as they would with the SELECT
privilege, but are only allowing them to reference the data in the FOREIGN KEY. The
SELECT permission alone is not sufficient to create a FOREIGN KEY or view that
references a column in the table; the REFERENCES permission is also required. Even
if the user has the SELECT permission on the table, the creation of a FOREIGN KEY or
view will fail without the REFERENCES permission.
Privilege Granted On
SELECT Table, view, sequence
INSERT Table, view
UPDATE Table, view
DELETE Table, view
ALTER Table, sequence
INDEX Table
REFERENCES Table
EXECUTE Procedure, function, package
Table 7-3
Privileges and
the Objects
They Can Be
Granted On
ch07.indd 19ch07.indd 19 6/30/2005 5:01:28 PM6/30/2005 5:01:28 PM

All-in-1 / Oracle Database 10g OCP Certification All-in-One / Watson, Bersinic / 5790-3
Oracle Database 10g OCP Certification All-in-One Exam Guide
20
NOTE It is generally not recommended, and often frowned upon, to grant
object privileges at the column level. The management of many column-level
privileges can become quite time consuming, as well as confusing. Generally,
it is recommended that when you need to assign privileges to only certain
columns of a table, you should create a view including only those columns and
grant the appropriate permission on the view itself. This way, if you drop the
view or remove permission from the view for a user, the management is easier
and cleaner.
WITH GRANT OPTION Similar to the WITH ADMIN OPTION of system
privileges, the WITH GRANT OPTION on object privileges allows a user granted
the privilege to grant it to someone else. The reason for doing this is to minimize the
administrative burden of granting object privileges.
Revoking Object Privileges
Revoking object privileges has similar syntax to granting them, as follows:
REVOKE privilege [,privilege, ...] | ALL [(column[, column, ...])]
ON objectname
FROM user | role | PUBLIC
[CASCADE CONSTRAINTS];
Unlike the WITH ADMIN OPTION for system privileges, if an object privilege is
revoked from a user to whom it was granted WITH GRANT OPTION, that privilege
would also be removed from anyone that user granted the privilege to. For example,
if Damir granted John the SELECT privilege on the DAMIR.JOHN1 table WITH GRANT
OPTION, and John then granted the SELECT privilege to Tim, then if Damir issued
the command REVOKE SELECT ON DAMIR.JOHN1 FROM JOHN, Tim would also
no longer have the privilege. This is because when object privileges are revoked, the
revoke also cascades to anyone that the privilege was granted to by the user from
whom it is being revoked.
EXAM TIP Object privileges revoked from a user to whom they were granted
WITH GRANT OPTION will also be revoked from anyone the revokee
granted them to; i.e., the revoke will cascade.
The CASCADE CONSTRAINTS option of the REVOKE command for object
privileges is needed in those situations where a user has been granted REFERENCES
permission on a table in your schema, and they have used this privilege to create a
table with a FOREIGN KEY constraint depending upon the table you own. Attempting
to revoke the REFERENCES privilege will generate an error:
ORA-01981: CASCADE CONSTRAINTS must be specified to perform this revoke
To correct the problem, simply reissue the command using the CASCADE
CONSTRAINTS option. When using the CASCADE CONSTRAINTS option of the
ch07.indd 20ch07.indd 20 6/30/2005 5:01:29 PM6/30/2005 5:01:29 PM

All-in-1 / Oracle Database 10g OCP Certification All-in-One / Watson, Bersinic / 5790-3
Chapter 7: Administering Database Users
21
PART I
REVOKE command for object privileges, verify that any FOREIGN KEY created in
another schema referencing the table is no longer required. One of the things you do
not want to do is break the database and invite inconsistent data by simply revoking
an object privilege. If you do get the ORA-01981 error, query the data dictionary to
determine which objects are referencing the table and notify those table’s owners of
your intentions prior to performing the action.
Determining the Object Privileges Granted
As for system privileges, Oracle also allows a user to determine which object privileges
have been granted to him/her by querying the data dictionary, or by using Enterprise
Manager. These are some of the data dictionary views that can be used to determine
which privileges have been granted to a user or granted by the user:
• USER_TAB_PRIVS_MADE Object privileges the user has granted to others
on his schema objects
• USER_TAB_PRIVS_RECD Privileges granted to the user to objects in other
schemas
• ALL_TAB_PRIVS_MADE Object privileges the user has granted to others on
his and other schema objects
• ALL_TAB_PRIVS_RECD Privileges granted to the user to objects in his and
other schemas
• USER_COL_PRIVS_MADE Column privileges granted by the user to tables
in his schema
• USER_COL_PRIVS_RECD Column privileges granted to the user to columns
in tables in other schemas
• ALL_COL_PRIVS_MADE Column privileges granted by the user to tables in
his and other schemas
• ALL_COL_PRIVS_RECD Column privileges granted to the user to columns
in tables in his and other schemas
Exercise 7-3: Using Enterprise Manager
to Grant Object Privileges
In this exercise you will connect to Enterprise Manager and grant and revoke privileges
to users on schema objects and then test the results.
1. Start a web browser and connect to the Enterprise Manager URL on your Oracle
database server, specifying the appropriate port number and machine name.
2. Log in to your database as the user SYSTEM with the appropriate password.
If you receive the licensing information page, click I Agree to continue.
ch07.indd 21ch07.indd 21 6/30/2005 5:01:29 PM6/30/2005 5:01:29 PM
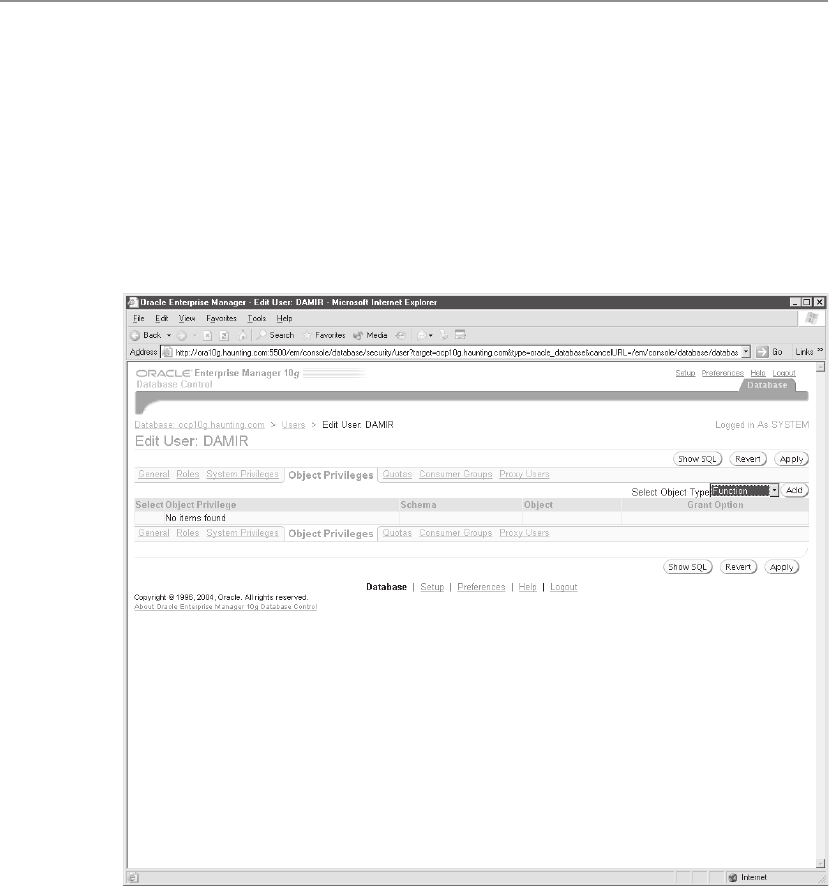
All-in-1 / Oracle Database 10g OCP Certification All-in-One / Watson, Bersinic / 5790-3
Oracle Database 10g OCP Certification All-in-One Exam Guide
22
3. On the Enterprise Manager main page, click the Administration hyperlink
to display the Administration page.
4. Click the Users hyperlink under Security to display the users currently defined
in the database and their statuses and parameters.
5. Click the user Damir created in a pervious exercise to bring up the Edit
User page.
6. Click the Object Privileges hyperlink to display the existing list of object
privileges granted to the user. The list should be empty.
ch07.indd 22ch07.indd 22 6/30/2005 5:01:30 PM6/30/2005 5:01:30 PM
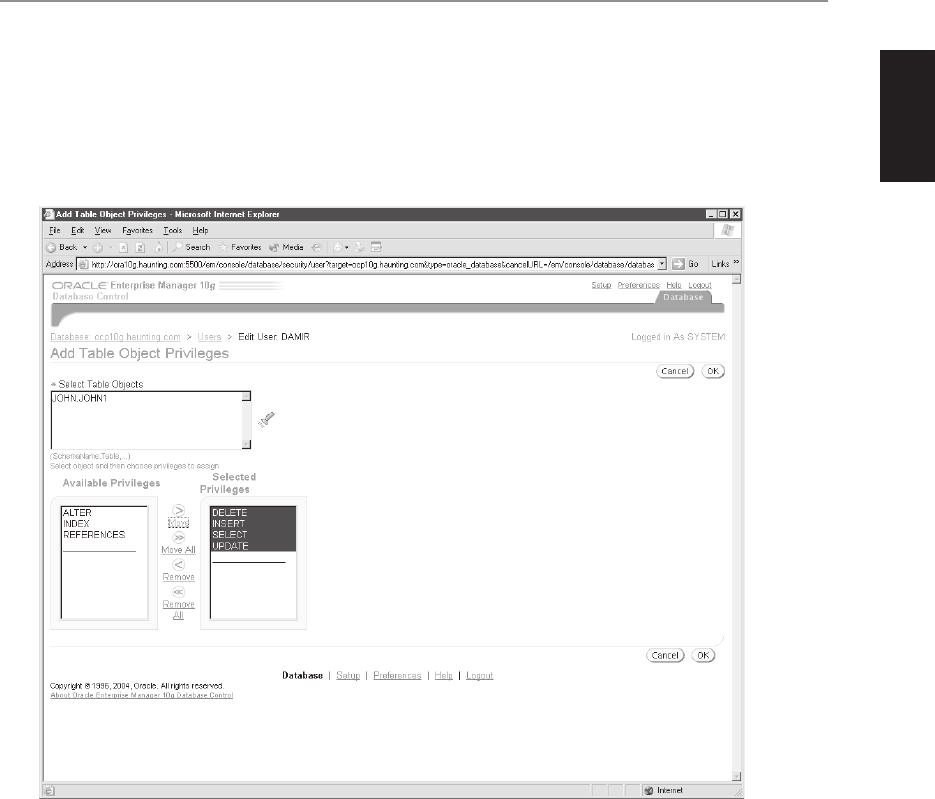
All-in-1 / Oracle Database 10g OCP Certification All-in-One / Watson, Bersinic / 5790-3
Chapter 7: Administering Database Users
23
PART I
7. On the Select Object Type drop-down list box, select Table and then click Add
to display the Add Table Object privilege page.
8. Enter JOHN.JOHN1 as the table name (or use the flashlight to find the table
in the data dictionary) and choose the SELECT, INSERT, UPDATE, and DELETE
privileges from the list; then click Move.
ch07.indd 23ch07.indd 23 6/30/2005 5:01:31 PM6/30/2005 5:01:31 PM
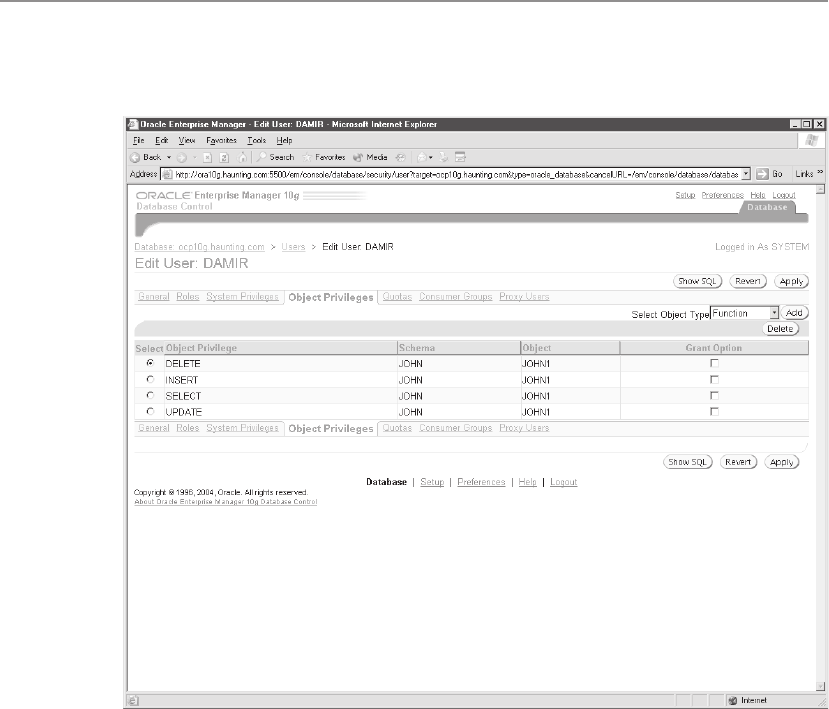
All-in-1 / Oracle Database 10g OCP Certification All-in-One / Watson, Bersinic / 5790-3
Oracle Database 10g OCP Certification All-in-One Exam Guide
24
9. Click OK to save your changes and display the updated list of object
privileges.
10. For the SELECT privilege check the check box under the Grant Option heading
and then click Show SQL to display the SQL code to grant the privileges.
ch07.indd 24ch07.indd 24 6/30/2005 5:01:32 PM6/30/2005 5:01:32 PM

All-in-1 / Oracle Database 10g OCP Certification All-in-One / Watson, Bersinic / 5790-3
Chapter 7: Administering Database Users
25
PART I
11. Click Return and then Apply to save your changes.
12. Invoke a browser and connect to iSQL*Plus and the database as DAMIR with
the appropriate password.
13. Issue the command SELECT * FROM JOHN.JOHN1 to make sure you can
query the table you have just been granted privileges on. Also insert a row
into the table, and delete and update a row to test all privileges.
ch07.indd 25ch07.indd 25 6/30/2005 5:01:32 PM6/30/2005 5:01:32 PM

All-in-1 / Oracle Database 10g OCP Certification All-in-One / Watson, Bersinic / 5790-3
Oracle Database 10g OCP Certification All-in-One Exam Guide
26
14. Issue the command GRANT SELECT ON JOHN.JOHN1 TO TIM and verify
that it succeeds.
15. Attempt to grant the INSERT privilege on the JOHN.JOHN1 table and review
the error you receive.
16. From a different browser window and in another iSQL*Plus session, connect
as Tim and attempt to query the JOHN.JOHN1 table.
17. As Tim, issue the command CREATE VIEW JOHN1VIEW AS SELECT * FROM
JOHN.JOHN1. Remember that Tim has previously been granted the CREATE
VIEW system privilege.
18. Issue the command SELECT * FROM JOHN1VIEW and see that all the data
from the JOHN.JOHN1 table appears.
19. Attempt to insert a row in the JOHN.JOHN1 table. Notice the “ORA-01031:
insufficient privilege” error message.
20. Log out of iSQL* Plus as Tim and log in as John with the appropriate password.
21. Issue the command REVOKE ALL ON JOHN.JOHN1 FROM DAMIR.
22. In the iSQL*Plus session where you are logged in as Damir, attempt to select
from the JOHN.JOHN1 table. Notice the “ORA-00942: table or view does not
exist” error.
23. Log out as Damir, log in to iSQL*Plus as Tim, and then attempt to query
the JOHN1VIEW view. Notice the message indicating the view has an error.
Attempt to SELECT from the JOHN.JOHN1 table and notice the error.
24. Issue the command DROP VIEW JOHN1VIEW.
25. Close all iSQL*Plus and Enterprise Manager sessions.
Creating and Managing Roles
Up to this point you have seen how to assign permissions to other users. In small
environments assigning permissions directly to users may be sufficient, especially if
new users need to be created in the database only occasionally. However, in more
complex or larger environments, or those where users are added and deleted frequently,
Oracle provides a mechanism to group permissions together and then assign the
whole group of permissions to a user: the ROLE.
A role is a container that holds privileges. The main benefit of a role is that it
simplifies the process of granting privileges to users. To make the process efficient, a
DBA creates a role and then grants all of the privileges required by a user to perform
a task to the role. If another user comes along that needs to perform the same task,
instead of granting that user the permission explicitly, the DBA grants the user the
role. Any privileges that have been granted to a role that has been granted to a user
automatically apply to the user. Similarly, if you need to grant new privileges to users
or revoke existing privileges from users, and if these were granted to a role rather than
users, you need to grant or revoke the privileges only once—at the role level—instead
ch07.indd 26ch07.indd 26 6/30/2005 5:01:33 PM6/30/2005 5:01:33 PM

All-in-1 / Oracle Database 10g OCP Certification All-in-One / Watson, Bersinic / 5790-3
Chapter 7: Administering Database Users
27
PART I
of numerous times. Furthermore, those privileges granted will be automatically active
once the grant or revoke takes place. Changes to role privileges are dynamically modified
for all users holding the role.
When you grant privileges to users, those privileges will be available no matter
how the user accesses the database. This means that someone using a front-end client
application that presents preconfigured forms may need the same level of privileges as
someone connecting to the instance using iSQL*Plus and performing interactive queries.
The problem with this is that a user of the front-end application could also connect
to the instance and perform deletes, or other data manipulation, that may be more
controlled through the front-end application. Roles, which can be selectively enabled
and disabled, allow you to provide the user with additional privileges by enabling
them when the user is using the front-end application, but not allow the user to have
the same set of privileges if they connect to the instance using iSQL*Plus.
EXAM TIP Roles are containers for privileges or other roles and can be
authenticated externally.
Roles, in a similar fashion to database users, can be authenticated by the operating
system instead of the Oracle server. Creating roles that are authenticated by the operating
system allows you to create groups at the OS level and map their membership to roles
in the database, and grant those individuals that are members of an OS group additional
privileges. This can also allow you to have individuals who just joined your company,
or have been moved into new positions within the organization, that have been granted
certain group membership by the system administrator automatically inherit database
privileges that can allow them to do their job (and you did not have to do anything).
Of course, the other edge of this sword means that you, as a DBA, have now lost some
control over who can perform certain actions in the database. In other words, having
roles authenticated by the OS can be both good and bad, depending on how it is
implemented.
When you revoke an object privilege from a user in Oracle, if that user was granted
the privilege WITH GRANT OPTION, anyone that the user granted the privilege to
will also have it revoked. With roles, there are no cascading revokes for object privileges
granted to roles, because you cannot grant object privileges to a role WITH GRANT
OPTION; the syntax is not allowed. However, you can grant a system privilege, or
another role, to a role WITH ADMIN OPTION. Doing so allows anyone granted the
role to grant those system privileges or roles to others.
Finally, the evaluation of roles by the database takes less work than evaluating
privileges assigned to users directly. This means—in a nutshell—that roles provide
better performance than granting privileges directly to users. This is because the
privileges granted to a role can be cached in the data dictionary cache when they are
first used and do not need to be reloaded, unless flushed out, the next time a user
who has been assigned the role makes use of the privileges. Individual user privileges
must be checked against the data dictionary each time a command is sent to the
server, and will be cached only if they are frequently used.
ch07.indd 27ch07.indd 27 6/30/2005 5:01:34 PM6/30/2005 5:01:34 PM

All-in-1 / Oracle Database 10g OCP Certification All-in-One / Watson, Bersinic / 5790-3
Oracle Database 10g OCP Certification All-in-One Exam Guide
28
Predefined Roles
Every Oracle 10g database, once created and once the CATPROC.SQL and CATALOG
.SQL scripts are run, will include a number of predefined roles. Some of these still exist
for backward compatibility with previous versions, whereas some are there to ease
administration and to provide the DBA with the necessary privileges to do his/her job.
In fact, the DBA gets all of the privileges required to manage the database through a
predefined role called, ironically enough, “DBA.” Table 7-4 lists the predefined roles in
an Oracle 10g database. Other roles will be created as you install additional database
options or functionality.
In your database you may also find that other roles are created. They are most
likely there because you have enabled certain database functionality. For example, if
your database will host a Recovery Catalog to be used by Recovery Manager for storing
information about backup and restore operations, you may find that your database
Role Privileges Granted
DBA Almost all system privileges and some roles
SELECT_CATALOG_ROLE Object privileges on the data dictionary. No system privileges
EXECUTE_CATALOG_ROLE Object privileges on data dictionary packages, procedures and
functions
DELETE_CATALOG_ROLE DELETE ON SYS.AUD$
DELETE ON SYS.FGA_LOG$
EXP_FULL_DATABASE Privileges to query any table or sequence, execute any
procedure or type, and modify data dictionary objects when
exporting data from the database
IMP_FULL_DATABASE Privileges to create any object in any schema in the database,
except the SYS schema when performing an import
CONNECT ALTER SESSION
CREATE CLUSTER
CREATE DATABASE LINK
CREATE SEQUENCE
CREATE SESSION
CREATE SYNONYM
CREATE TABLE
CREATE VIEW
RESOURCE CREATE CLUSTER
CREATE INDEXTYPE
CREATE OPERATOR
CREATE PROCEDURE
CREATE SEQUENCE
CREATE TABLE
CREATE TRIGGER
CREATE TYPE
UNLIMITED TABLESPACE (when granted)
Table 7-4 Sample List of Predefined Roles in Oracle 10g and the Permissions Granted to Them
ch07.indd 28ch07.indd 28 6/30/2005 5:17:47 PM6/30/2005 5:17:47 PM

All-in-1 / Oracle Database 10g OCP Certification All-in-One / Watson, Bersinic / 5790-3
Chapter 7: Administering Database Users
29
PART I
includes the RECOVERY_CATALOG_OWNER role. If you use Oracle Enterprise Manager,
you may also have an OEM_MONITOR role created, and so on. The number of
predefined roles depends on the features selected and enabled.
If you find that these roles meet your needs, then you should make use of them.
However, if you find that they do not provide all the functionality required, or they
give away too many privileges, like CONNECT and RESOURCE, then do not use them
but create your own roles and assign them the privileges you want users to have.
EXAM TIP The CONNECT role is automatically granted to a user when
the user is created with Enterprise Manager. Be aware of the privileges this
provides the user.
Creating Roles
Like most other security-related items in Oracle, you can create roles from the command
line using iSQL*Plus or with Enterprise Manager. In order to create a role, you must
have been assigned the CREATE ROLE system privilege, or the DBA role. The syntax
for the CREATE ROLE command is
CREATE ROLE rolename
[NOT IDENTIFIED | IDENTIFIED
BY password | EXTERNALLY | GLOBALLY];
Role Privileges Granted
AQ_ADMINISTRATOR_ROLE Object privileges on Advanced Queuing objects
CREATE EVALUATION CONTEXT
CREATE RULE
CREATE RULE SET
DEQUEUE ANY QUEUE
ENQUEUE ANY QUEUE
MANAGE ANY QUEUE
AQ_USER_ROLE EXECUTE ON SYS.DBMS_AQ
EXECUTE ON SYS.DBMS_AQIN
EXECUTE ON SYS.DBMS_AQJMS_INTERNAL
EXECUTE ON SYS.DBMS_TRANSFORM
SCHEDULER_ADMIN CREATE ANY JOB
CREATE JOB
EXECUTE ANY CLASS
EXECUTE ANY PROGRAM
MANAGE SCHEDULE
(All are granted WITH ADMIN OPTION)
PUBLIC No special permissions, but when permissions are granted
to PUBLIC, all users inherit those permissions
Table 7-4 Sample List of Predefined Roles in Oracle 10g and the Permissions Granted to Them
(continued)
ch07.indd 29ch07.indd 29 6/30/2005 5:18:20 PM6/30/2005 5:18:20 PM

All-in-1 / Oracle Database 10g OCP Certification All-in-One / Watson, Bersinic / 5790-3
Oracle Database 10g OCP Certification All-in-One Exam Guide
30
The name of each role must be unique in the database and cannot be the same as
that of an existing user, since users and roles are both stored in the same place in the
data dictionary. When you issue the CREATE ROLE command, the default is to create
a role with the name specified and not require any authentication to have the role
enabled for the user. However, if you want to enable the role through an application,
you can specify a password for the role by using the IDENTIFIED BY clause followed
by the password.
You can also have the role IDENTIFIED EXTERNALLY, which means that the user
must be a member of an operating system group with a name that corresponds to the
role in order for it to be enabled. In order for roles to be authenticated by the operating
system, you need to set the Oracle initialization parameter OS_ROLES to TRUE (the
default is FALSE). Once you have decided that you want to support roles that are
IDENTIFIED EXTERNALLY, you will need to create groups on the server where the
database resides with a naming convention as follows:
ora_<SID>_<ROLE>[_[d][a]]
The naming convention is used to ensure that the proper group membership can
be assigned at the OS level to users that need the roles. The parts that make up the
group name have these meanings:
• <SID> The value of the ORACLE_SID parameter for the instance to which
the user will be connecting. It should ideally be the same as the name of the
database. On Windows this value is not case sensitive; it is case sensitive on
most other platforms.
• <ROLE> The name of the role you created in the database to be IDENTIFIED
EXTERNALLY. In order for operating system authentication to work, the role
must still be created in the database, as well as the group being created at the
operating system.
• d Indicates that the role specified by the <ROLE> portion will be a default
role for the user. If either a or d, or both, are specified, they must be preceded
by an underscore.
• a Indicates that the role specified by the <ROLE> portion will be granted to
the user WITH ADMIN OPTION. If either a or d, or both, are specified, they
must be preceded by an underscore.
For example, if you create a role in the OCP10G database called JuniorAdmin that
will be identified externally, and if you want that role to be the default role for some
users and the default role but granted WITH ADMIN OPTION to others, you would
create two groups at the OS level called “ora_OCP10G_JuniorAdmin_d” and “ora_
OCP10G_JuniorAdmin_da.”
Modifying Roles
Once a role is created, its authentication method can be changed after the fact using
Enterprise Manager or by issuing the ALTER ROLE command:
ch07.indd 30ch07.indd 30 6/30/2005 5:01:36 PM6/30/2005 5:01:36 PM

All-in-1 / Oracle Database 10g OCP Certification All-in-One / Watson, Bersinic / 5790-3
Chapter 7: Administering Database Users
31
PART I
ALTER ROLE rolename
[NOT IDENTIFIED | IDENTIFIED
BY password | EXTERNALLY | GLOBALLY];
Changes to role permissions or who it is granted to are done using the standard
GRANT and REVOKE commands.
Granting and Revoking Permissions for Roles
You grant permissions to roles just as you grant them to users: using Enterprise Manager
or the GRANT command. Permissions are revoked the same way as well: using the
REVOKE command. The syntax for granting system permissions to roles is as follows:
GRANT system_priv [, system_priv, ...]
TO role | PUBLIC [, role | PUBLIC, ...]
[WITH ADMIN OPTION];
For granting object privileges to roles the syntax is as follows:
GRANT ALL [PRIVILEGES] | object_priv [(column, column, ...)]
[, object_priv [(column, column, ...(] , ...]
ON [schema_name.]object_name
TO role | PUBLIC [, role | PUBLIC, ...];
Notice that you cannot grant object privileges WITH GRANT OPTION to roles, but
you can grant system privileges WITH ADMIN OPTION.
To revoke system and object privileges from roles, the syntax is similar to revoking
those same privileges from a user. For system privileges:
REVOKE system_priv | role_name [, system_priv | role_name, ...]
FROM role | PUBLIC [,role | PUBLIC, ...];
And for object privileges:
REVOKE ALL [PRIVILEGES] | object_priv [, object_priv, ...]
ON [schema_name.]object_name
FROM role | PUBLIC [,role | PUBLIC, ...]
[CASCADE CONSTRAINTS]
Granting and Revoking Roles for Users
Once you have created a role and granted the role its further roles, along with the object
and system privileges desired, you next need to assign the role to users that you want
to inherit all the privileges that the role has. To do so, you use the GRANT command
or Oracle Enterprise Manager. The syntax of the GRANT command to grant roles to
users (as well as other roles) is
GRANT role_name [, role_name, ...]
TO user_name | role | PUBLIC [, user_name | role | PUBLIC, ...]
[WITH ADMIN OPTION];
ch07.indd 31ch07.indd 31 6/30/2005 5:01:36 PM6/30/2005 5:01:36 PM

All-in-1 / Oracle Database 10g OCP Certification All-in-One / Watson, Bersinic / 5790-3
Oracle Database 10g OCP Certification All-in-One Exam Guide
32
If you grant a role WITH ADMIN OPTION, you are allowing the user to whom
you are granting the role to also grant the role (and all its associated privileges) to
others. In order to grant a role to a user or another role, you need to be the owner of
the role (i.e., you are the user that issued the CREATE ROLE command) or have been
granted the GRANT ANY ROLE privilege by the DBA.
Just as you can grant a role to a user, you can also revoke the role to remove all of
the role’s privileges from the user using the REVOKE command or Oracle Enterprise
Manager. The syntax of the REVOKE command is again similar to what you have seen
previously, as follows:
REVOKE role_name [, role_name, ...]
FROM user_name | role | PUBLIC [, user_name | role | PUBLIC, ...];
If you revoke the role from a user, the role’s permissions will not be immediately
taken away from the user, unless the user disconnects from the instance or disables
the role. However, the user will not be able to reenable the role on the next connection
attempt or by using the SET ROLE command once it has been revoked.
Setting a User’s Default Roles
Once you grant a role to a user, it is automatically configured to be a default role. This
means that when the user connects to the instance, the role will automatically be
enabled for the user and any privileges that the role has been granted will be available
to the user. However, if you want some of the roles granted to the user to be active
only when the user connects to the instance, you need to modify the set of default
roles that are automatically enabled.
EXAM TIP All roles granted to a user are considered the user’s default
roles unless otherwise specified by the ALTER USER command or Enterprise
Manager.
The ALTER USER command, or Oracle Enterprise Manager, can be used to manage
a user’s default roles. The syntax of the ALTER USER command to manage a user’s
default role list is as follows:
ALTER USER username DEFAULT ROLE
role [, role, ...] | ALL [EXCEPT role [, role, ...]] | NONE;
If you do not want Oracle to enable all roles that a user has been granted, you must
use the ALTER USER command to disable any roles that you do not want the user to
have when they connect to the instance. You can then programmatically enable the
roles or have the user issue the SET ROLE command to enable those roles that you
disabled by default.
If you grant the user a role that requires a password, and if you make that role a
default role, the user will not be required to enter a password in order to make use of
ch07.indd 32ch07.indd 32 6/30/2005 5:01:37 PM6/30/2005 5:01:37 PM

All-in-1 / Oracle Database 10g OCP Certification All-in-One / Watson, Bersinic / 5790-3
Chapter 7: Administering Database Users
33
PART I
the privileges granted to the role. In essence, making a role that has a password a
default role for the user bypasses the password requirement. In this way some users
may have the role and its privileges when they connect, by default, while other users
will be required to enable the role manually and specify a password in order to access
the privileges granted the role.
You can also disable all roles that have been assigned to the user by using the NONE
option when specifying which roles are default roles. After doing so, all roles granted
to the user will be disabled and will need to be enabled using the SET ROLE command.
The user will have only the capability to perform actions according to those system and
object privileges that have been assigned directly to him/her, or to PUBLIC.
Enabling and Disabling Roles
One of the major benefits of roles is the ability to selectively grant and revoke a set of
privileges by enabling and disabling roles that contain them. While a user is connected
to the instance, your application (typically) can issue the SET ROLE command, or
execute the DBMS_SESSION.SET_ROLE package procedure, to enable or disable roles
dynamically. A role that was created with a password will need to have the password
specified when it is enabled. This allows you to further control the enabling of roles
by users by ensuring that roles are enabled only while a particular application is being
used to connect to the database. The syntax for the SET ROLE command is as follows:
SET ROLE ALL [EXCEPT role_name [,role_name]] | NONE |
role_name [IDENTIFIED BY password] [, role_name [IDENTIFIED BY password, ...];
If you want to disable a role for a user, you need to issue the SET ROLE command,
or execute the DBMS_SESSION.SET_ROLE procedure a second time, omitting the role
that you do not want the user to have enabled. In other words, there is no “UNSET
ROLE” command or its equivalent.
Dropping Roles
If you no longer need a role that you have been using, you can drop it from the database
by issuing the DROP ROLE command, or by using Oracle Enterprise Manager. In order
to drop a role, you must be the user who created the role, have been granted the DROP
ANY ROLE system privilege, or have been granted the role WITH ADMIN OPTION. If
any of these is not true, the command will fail and the role will not be dropped. The
syntax of the DROP ROLE command is as follows:
DROP ROLE role_name;
When you drop a role, any user or role to which the role being dropped has been
granted will have it revoked at the time the role is dropped. Any privileges that the
role granted its holders will also be revoked at the time the role is dropped.
ch07.indd 33ch07.indd 33 6/30/2005 5:01:37 PM6/30/2005 5:01:37 PM
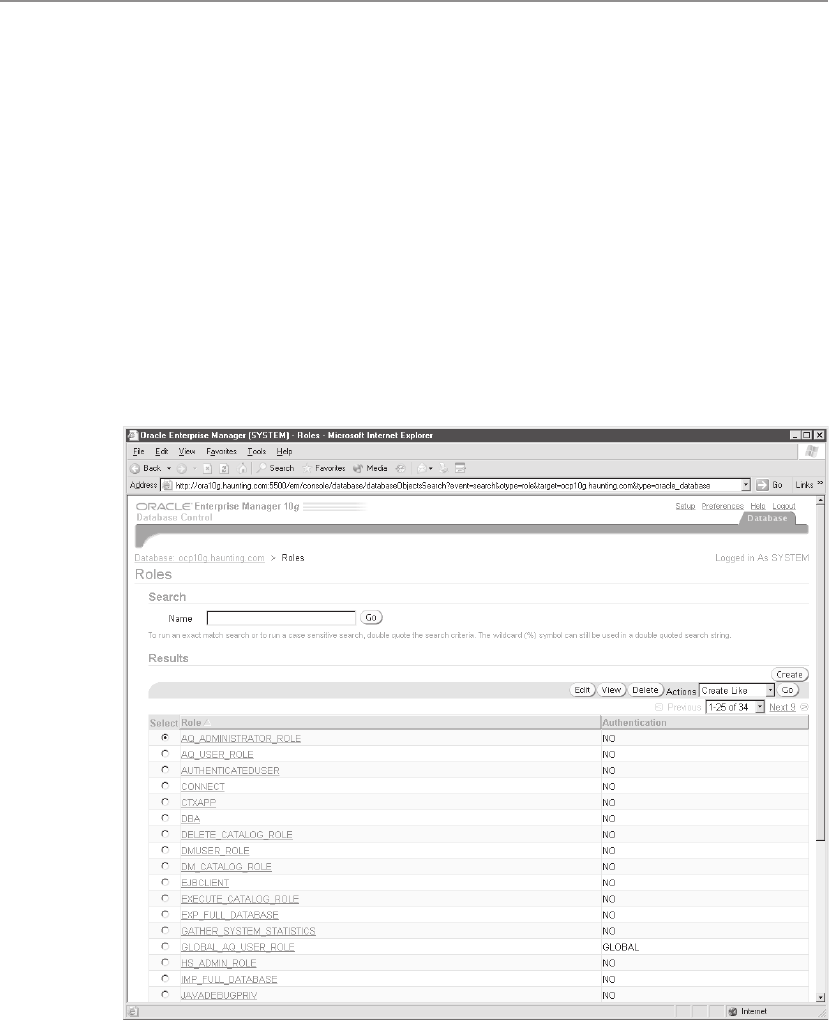
All-in-1 / Oracle Database 10g OCP Certification All-in-One / Watson, Bersinic / 5790-3
Oracle Database 10g OCP Certification All-in-One Exam Guide
34
Exercise 7-4: Using Enterprise Manager
to Create and Manage Roles
In this exercise you will connect to Enterprise Manager and create a role, assign it
permissions, grant the role to a user, and then test the results.
1. Start a web browser and connect to the Enterprise Manager URL on your Oracle
database server, specifying the appropriate port number and machine name.
2. Log in to your database as the user SYSTEM with the appropriate password.
If you receive the licensing information page, click I Agree to continue.
3. On the Enterprise Manager main page, click the Administration hyperlink
to display the Administration page.
4. Click the Roles hyperlink under Security to display the roles currently defined
in the database and their statuses and parameters.
ch07.indd 34ch07.indd 34 6/30/2005 5:01:38 PM6/30/2005 5:01:38 PM
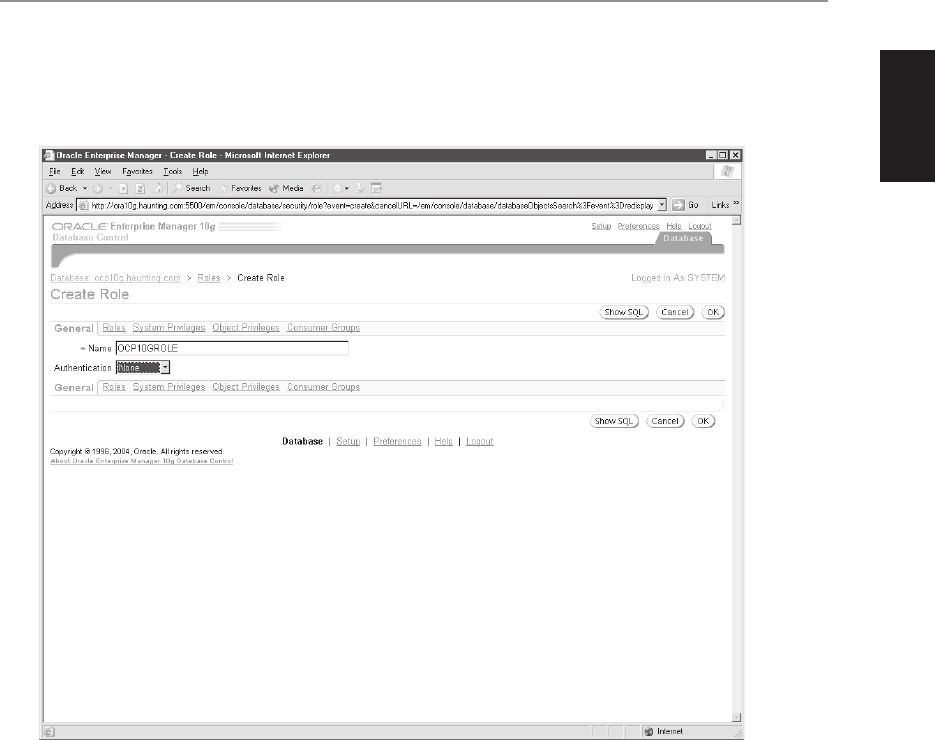
All-in-1 / Oracle Database 10g OCP Certification All-in-One / Watson, Bersinic / 5790-3
Chapter 7: Administering Database Users
35
PART I
5. Click Create to display the Create Role page.
6. Enter OCP10GROLE as the role name and then expand the Authentication
drop-down list box and select None.
7. Click the Object Privileges hyperlink and grant the role OCP10GROLE all
permissions on the JOHN.JOHN1 table.
8. Click System Privileges and grant the role OCP10GROLE the CREATE VIEW
privilege.
ch07.indd 35ch07.indd 35 6/30/2005 5:01:39 PM6/30/2005 5:01:39 PM
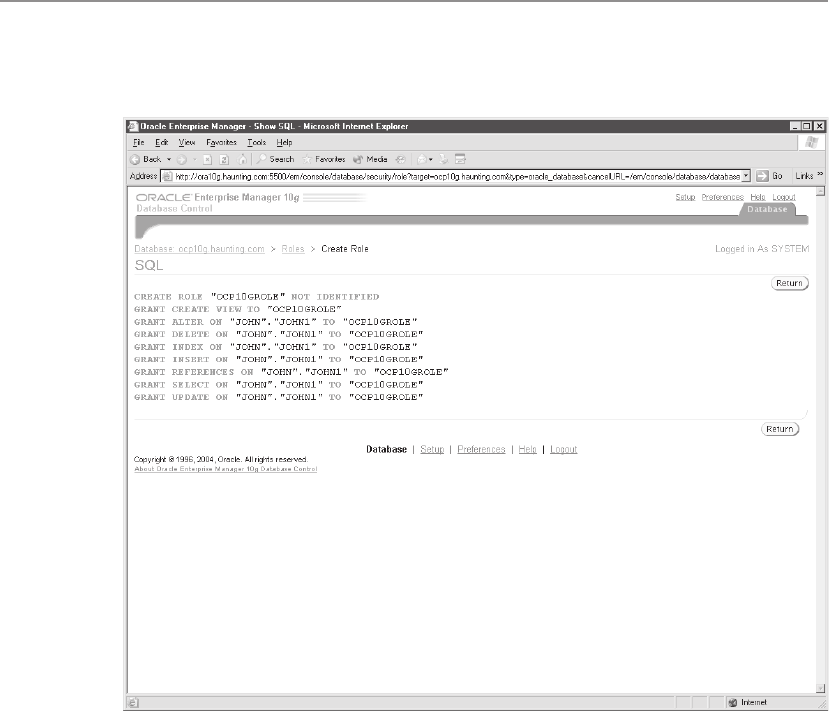
All-in-1 / Oracle Database 10g OCP Certification All-in-One / Watson, Bersinic / 5790-3
Oracle Database 10g OCP Certification All-in-One Exam Guide
36
9. Click Show SQL to display the SQL code to create the role and grant it
privileges.
10. Click Return and then OK to create the role OCP10GROLE.
11. Click the database hyperlink at the top left of the page, then Administration,
then Users, and then the user Tim.
12. Verify that Tim does not have permissions on the JOHN.JOHN1 table by
invoking iSQL*Plus in another browser session and issue a SELECT statement
to query the table.
13. In Enterprise Manager, grant Tim the role OCP10GROLE.
14. In iSQL*Plus, log out and then log in as Tim and verify that you can SELECT
from the JOHN.JOHN1 table.
15. Exit Enterprise Manager and iSQL*Plus.
ch07.indd 36ch07.indd 36 6/30/2005 5:01:40 PM6/30/2005 5:01:40 PM

All-in-1 / Oracle Database 10g OCP Certification All-in-One / Watson, Bersinic / 5790-3
Chapter 7: Administering Database Users
37
PART I
Using Profiles to Control Resource Usage
One aspect of the Oracle security domain deals with ensuring that password management
and account lockout policies for the database are adhered to. These may be set at the
enterprise level and need to be enforced at the database level. Furthermore, as a DBA,
you may need to ensure that a database is available to all users and that no one user
is able to invoke a SELECT statement that performs a large query and consumes all
system resources, as an example. The creation and management of account lockout
and password policies, as well as limiting resource usage for a user’s session or an
individual SQL statement, is handled in Oracle by the use of profiles.
A profile is an Oracle object that allows you to set both password management and
resource limits. In every Oracle database a single profile is created when you create the
database. This profile, called DEFAULT, places no limits on password and account
lockout, or on resource utilization. You can change the settings of the DEFAULT profile
to conform to your requirements, and they will then be applied to all users in the
database assigned the DEFAULT profile.
A database administrator may create additional profiles dealing with password or
account lockout issues, resource management settings, or both. Once created, a profile
can be assigned to a user account as it is created, or it can be assigned to the user with
the ALTER USER command. Any settings in the profile will then apply to the user the
next time he/she connects to the database. A user may have only one profile active at one
time, so you need to ensure that the settings within the profile match the requirements
of each user.
When deciding to make use of profiles, it is important to understand what settings
are always applied and which require that you change your database and instance
configuration. Because of the very nature of security requirements, Oracle ensures that
password management and account lockout settings in profiles are always enforced.
Any settings dealing with security policy are considered important enough that simply
configuring them enables them. The utilization of system resources, such as CPU and
disk I/O, is not automatically enforced by Oracle. In order to have these aspects of a
profile limit a user’s actions, you need to enable them by setting them in the parameter
file (SPFILE or INIT.ORA file) or by changing the value of the RESOURCE_LIMIT
initialization parameter to TRUE with the ALTER SYSTEM command.
EXAM TIP Resource limits are enforced only when the RESOURCE_LIMIT
system initialization parameter is set to TRUE. It is FALSE by default.
Resource Limits Enforceable Using Profiles
Oracle profiles also allow you to limit the use of system resources by a user. The limit
can be specified for the session (known as a per session limit) or for a single SQL
statement (known as a per call limit). Table 7-5 lists the resource limits that can be
enforced in Oracle 10g.
ch07.indd 37ch07.indd 37 6/30/2005 5:01:41 PM6/30/2005 5:01:41 PM

All-in-1 / Oracle Database 10g OCP Certification All-in-One / Watson, Bersinic / 5790-3
Oracle Database 10g OCP Certification All-in-One Exam Guide
38
Setting Description
CPU_PER_SESSION The total CPU time, measured in hundredths of a second, that a user
is allowed to consume during a session. Once the limit is reached,
the user’s session is terminated with an Oracle server error message.
To reset this limit, the user needs to disconnect from the instance
and connect again.
CPU_PER_CALL The total CPU time, measured in hundredths of a second, that a user
is allowed to consume for a single SQL statement. Once the limit is
reached, the SQL statement is aborted and the transaction it is
a part of is rolled back. The user’s session remains connected.
The limit is reset on every call to the database.
SESSIONS_PER_USER The maximum number of concurrent sessions that a user may have
at one time.
CONNECT_TIME The maximum amount of time, specified in minutes, that a user may
remain connected to the instance.
IDLE_TIME The maximum amount of time, specified in minutes, that a user’s
session may remain connected to the instance while not performing
any database activity.
LOGICAL_READS_PER_
SESSION
The number of blocks (both physical—from disk—and logical—
from the database buffer cache) that the user is allowed to read
during their session. Once the number of blocks specified by this
parameter are read, the user will need to start another session in
order to access data in the database.
LOGICAL_READS_PER_
CALL
The number of blocks (both physical—from disk—and logical—from
the database buffer cache) that the user is allowed to read when
executing a SQL statement. Once the number of blocks specified by
this parameter are read, the SQL statement will be terminated and
any transaction that it is a part of will be rolled back.
PRIVATE_SGA In a Multi-Threaded Server (MTS) environment, this parameter
specifies the maximum number of bytes that a user’s session can
occupy in the SGA.
If you are not connected to the database instance with an MTS
connection, this parameter is ignored.
COMPOSITE_LIMIT Specifies a numerical value that is the weighed average of four
resource limits:
CPU_PER_SESSION
CONNECT_TIME
LOGICAL_READS_PER_SESSION
PRIVATE_SGA
Setting COMPOSITE_LIMIT will allow Oracle to monitor all four
of these parameter values; when the combination of all exceeds the
value specified by COMPOSITE_LIMIT, the user’s session will be
terminated.
Table 7-5 Profile Resource Limits
ch07.indd 38ch07.indd 38 6/30/2005 5:01:41 PM6/30/2005 5:01:41 PM

All-in-1 / Oracle Database 10g OCP Certification All-in-One / Watson, Bersinic / 5790-3
Chapter 7: Administering Database Users
39
PART I
Creating, Altering, and Dropping Profiles
You can create, alter, and drop profiles using the CREATE PROFILE, ALTER PROFILE,
and DROP PROFILE commands or by using Oracle Enterprise Manager. Profiles, once
created, are not used until they are assigned to users. Once a profile is created, its limits
can be modified and then those changes will apply to all users assigned the profile the
next time the users connect to the server (i.e., the changes are not applied to any logged-
on users). Dropping a profile requires that no users be assigned the profile, unless the
CASCADE option is specified. If you use the CASCADE option of the DROP PROFILE
command, users to whom the profile was assigned will automatically have the default
profile assigned.
To create a profile, issue the CREATE PROFILE command, whose syntax is as follows
when dealing with resource limits. Password limits will be discussed in Chapter 11 and
are not shown here.
CREATE PROFILE profile_name LIMIT
[SESSIONS_PER_USER value]
[CPU_PER_SESSION value]
[CPU_PER_CALL value]
[CONNECT_TIME value]
[IDLE_TIME value]
[LOGICAL_READS_PER_SESSION value]
[LOGICAL_READS_PER_CALL value]
[COMPOSITE_LIMIT value]
[PRIVATE_SGA bytes [K|M]]
You can specify the keyword UNLIMITED for any profile limit to not have any
limitation imposed for that resource. Specifying the keyword DEFAULT for any limit
when creating or altering a profile will assign the value of the DEFAULT profile for the
resources. This way, you can have some limits specific to a profile and others at the
same value for all users. If the DEFAULT profile imposes a limit, specifying DEFAULT
for the profile you are creating will impose the same limit.
To modify a profile, you issue the ALTER PROFILE command, whose options are
the same as the CREATE PROFILE command. As indicated earlier, any changes to the
profile limits do not take effect until the next time the user to whom the profile applies
logs on. Any existing user session will not be affected by the profile change.
The DROP PROFILE command deletes a profile and optionally, if the CASCADE
option is specified, assigns the DEFAULT profile to any users for whom the profile was
active when it was dropped. The syntax of the DROP PROFILE command is
DROP PROFILE profile_name [CASCADE]
You cannot drop the DEFAULT profile, since it must exist in the database. You also
should not drop the MONITORING_PROFILE, because it is needed by Oracle to perform
system monitoring functions in the database.
If you want to determine the currently configured profile values, you can query the
DBA_PROFILES data dictionary view or use Enterprise Manager to display the
information.
ch07.indd 39ch07.indd 39 6/30/2005 5:01:42 PM6/30/2005 5:01:42 PM

All-in-1 / Oracle Database 10g OCP Certification All-in-One / Watson, Bersinic / 5790-3
Oracle Database 10g OCP Certification All-in-One Exam Guide
40
Assigning Profiles to Users
Users are assigned profiles when they are either created or altered via the command
interface or Enterprise Manager. You can use the ALTER USER command at any time to
assign a profile to an existing user. Only one profile is active for a user at any time, so
it is not possible for a user to be assigned more than one profile. The profile limits
apply each time the user connects to the instance and creates a session, and they are
enforced for the duration of the session.
EXAM TIP A user has only one profile active at any time.
To assign a profile called DBA_PROFILE to the user John, who already exists in the
database, you can issue the following command:
ALTER USER JOHN PROFILE DBA_PROFILE
If you create a new user called Stephen and want to assign him the DBA_PROFILE,
you can issue the following command:
CREATE USER STEPHEN IDENTIFIED BY ORACLE PROFILE DBA_PROFILE
Exercise 7-5: Using Enterprise Manager
to Create and Manage Profiles
In this exercise you will connect to Enterprise Manager and create a profile, assign
resource limits to it, assign the profile to a user, view profile information, and test the
results.
1. Start a web browser and connect to the Enterprise Manager URL on your Oracle
database server, specifying the appropriate port number and machine name.
2. Log in to your database as the user SYSTEM with the appropriate password.
If you receive the licensing information page, click I Agree to continue.
3. On the Enterprise Manager main page, click the Administration hyperlink
to display the Administration page.
ch07.indd 40ch07.indd 40 6/30/2005 5:01:42 PM6/30/2005 5:01:42 PM
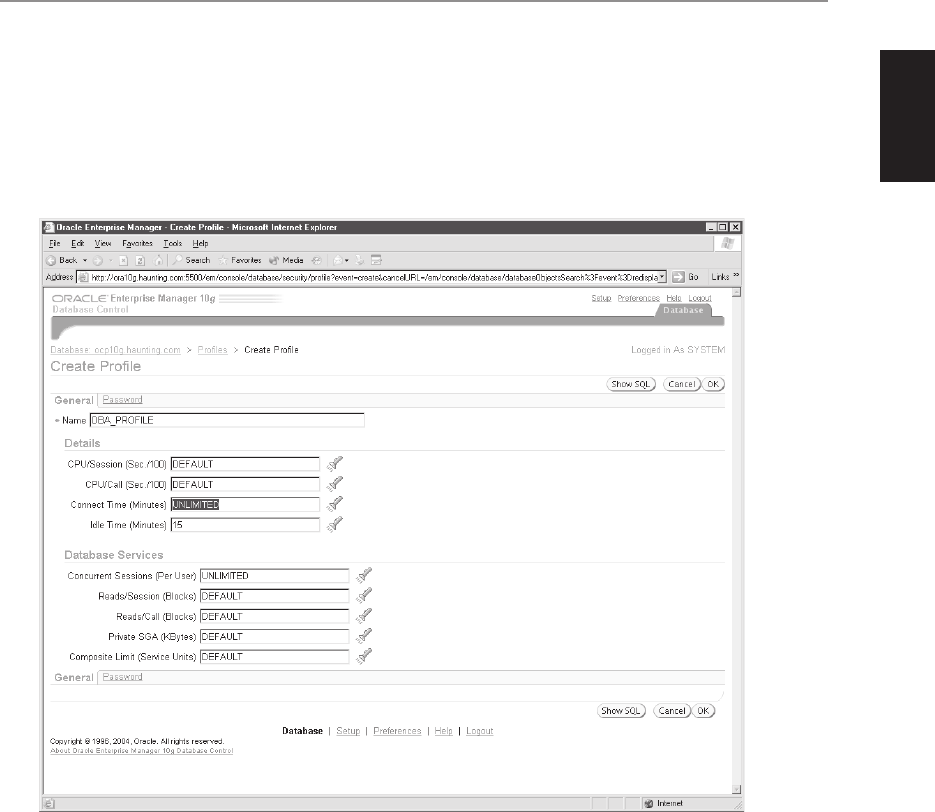
All-in-1 / Oracle Database 10g OCP Certification All-in-One / Watson, Bersinic / 5790-3
Chapter 7: Administering Database Users
41
PART I
4. Click the Profiles hyperlink under Security to display the profiles currently
defined in the database. There should be two: DEFAULT and MONITORING_
PROFILE.
5. Click Create to create a new profile called DBA_PROFILE and assign it a connect
time value of UNLIMITED, an idle time of 15 minutes, and a concurrent
sessions value of UNLIMITED. Leave all other settings at the value of DEFAULT.
ch07.indd 41ch07.indd 41 6/30/2005 5:01:43 PM6/30/2005 5:01:43 PM
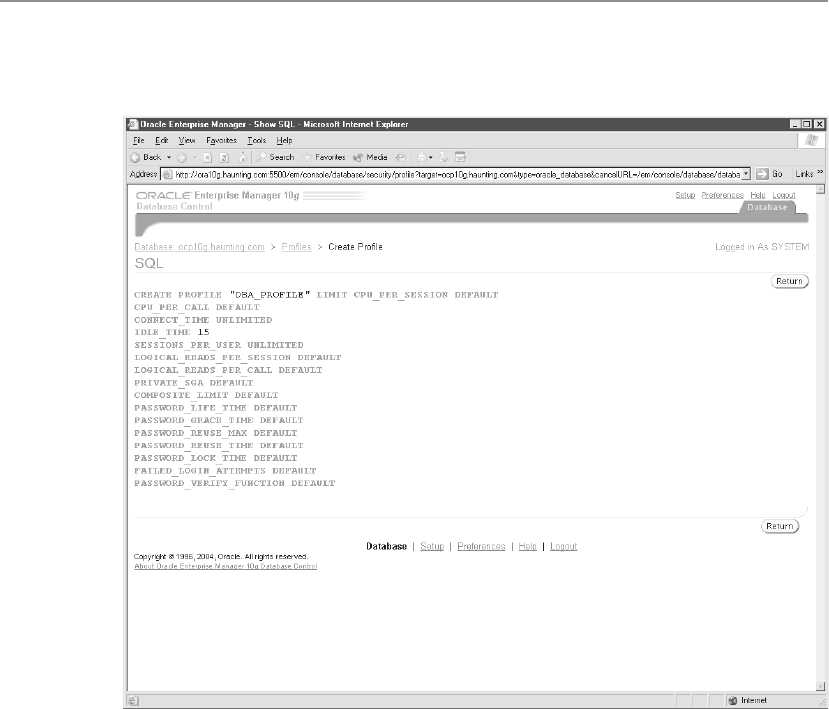
All-in-1 / Oracle Database 10g OCP Certification All-in-One / Watson, Bersinic / 5790-3
Oracle Database 10g OCP Certification All-in-One Exam Guide
42
6. Click Show SQL to view the SQL code to perform the action and then click
Return and then OK to create the profile.
7. On the profile list page, select DEFAULT and then click Edit. Modify the value
of the default profile to specify a connect time of 600 minutes, an idle time of 30
minutes, and a concurrent sessions value of 1. Then click Apply to save your
changes. Click the Profiles hyperlink to return to the list of profiles.
ch07.indd 42ch07.indd 42 6/30/2005 5:01:44 PM6/30/2005 5:01:44 PM
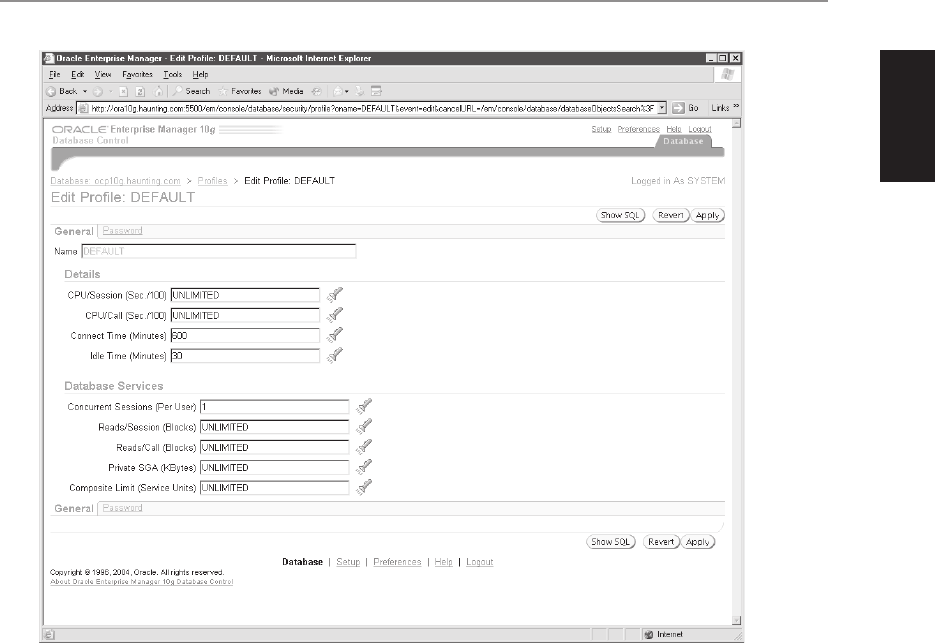
All-in-1 / Oracle Database 10g OCP Certification All-in-One / Watson, Bersinic / 5790-3
Chapter 7: Administering Database Users
43
PART I
8. Open another browser window and connect to the instance using iSQL*Plus
as the user John with the appropriate password.
9. Open another browser window and once again attempt to connect to the
instance using iSQL*Plus as John. Notice that you do not receive an error
message and John is able to connect. That is because resource limits have not
been configured to be enforced on this instance. Log out of iSQL*Plus as John
but keep the browser window open.
ch07.indd 43ch07.indd 43 6/30/2005 5:01:44 PM6/30/2005 5:01:44 PM
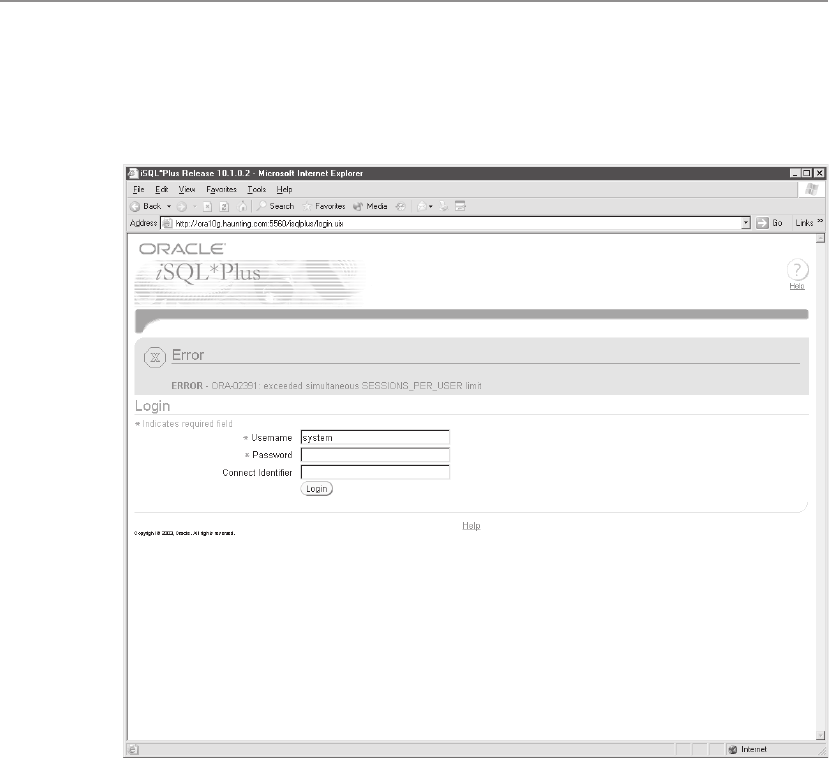
All-in-1 / Oracle Database 10g OCP Certification All-in-One / Watson, Bersinic / 5790-3
Oracle Database 10g OCP Certification All-in-One Exam Guide
44
10. In another browser window, connect to the instance using iSQL*Plus as SYSTEM
with the appropriate password and issue the command ALTER SYSTEM SET
RESOURCE_LIMIT=TRUE. Attempt to log in as John for the second time.
Notice the error you receive now.
11. As user SYSTEM turn off resource limits by issuing the command ALTER
SYSTEM SET RESOURCE_LIMIT=FALSE and close that iSQL*Plus session.
Also log out of all other iSQL*Plus sessions and return to the Enterprise
Manager console.
12. Navigate to the Administration page in Enterprise Manager and click Users
under Security.
ch07.indd 44ch07.indd 44 6/30/2005 5:01:45 PM6/30/2005 5:01:45 PM
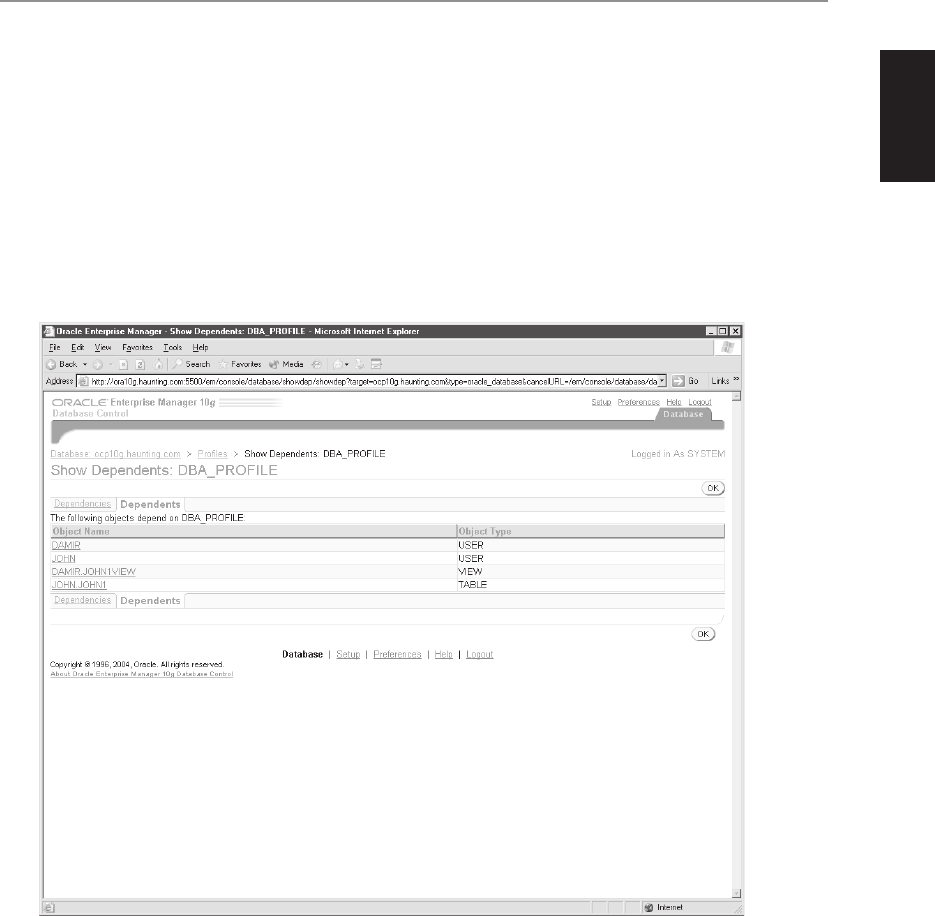
All-in-1 / Oracle Database 10g OCP Certification All-in-One / Watson, Bersinic / 5790-3
Chapter 7: Administering Database Users
45
PART I
13. Click the user Damir and on the Edit User page select the drop-down list box
next to Profile and assign Damir the DBA_PROFILE. Then click Apply. Return
to the Users page and edit the user John, assigning him the DBA_PROFILE.
14. Return to the Administration page and then select Profiles under Security.
Select the DBA_PROFILE and in the Actions drop-down list box select Show
Dependencies. Then click Go.
15. On the Show Dependents page, click the Dependents hyperlink to see which
users have been assigned the DBA_PROFILE (the objects that these users own
will also be displayed as part of the dependency tree). Click OK to return to
the Profiles page.
ch07.indd 45ch07.indd 45 6/30/2005 5:01:46 PM6/30/2005 5:01:46 PM
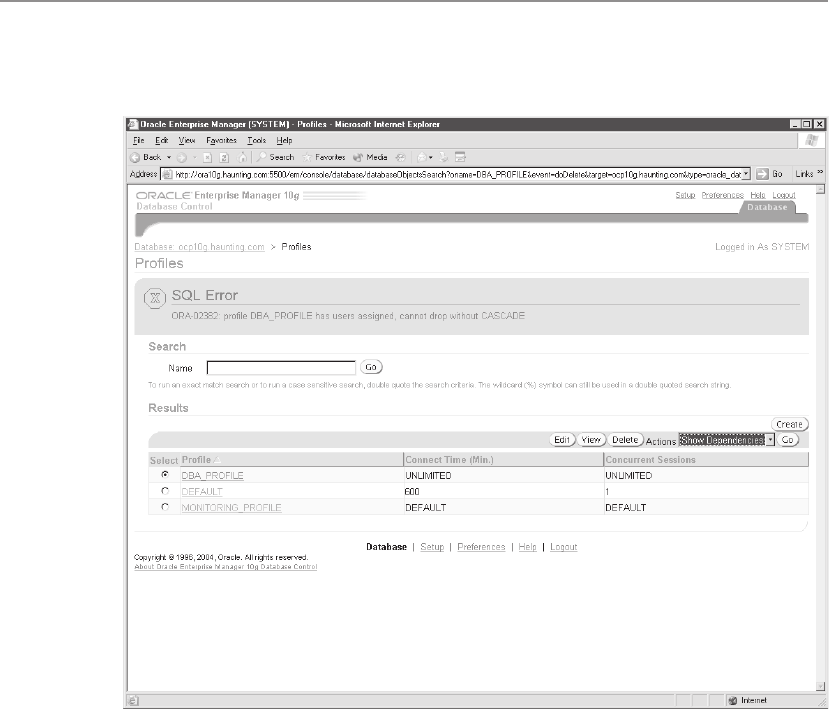
All-in-1 / Oracle Database 10g OCP Certification All-in-One / Watson, Bersinic / 5790-3
Oracle Database 10g OCP Certification All-in-One Exam Guide
46
16. Select DBA_PROFILE and then click Delete. Notice the error you receive,
indicating that the profile cannot be dropped, since it is assigned to users.
17. In another browser window, invoke iSQL*Plus, connect to the instance as
SYSTEM, and issue the command DROP PROFILE DBA_PROFILE CASCADE.
Then exit iSQL*Plus.
18. In Enterprise Manager, navigate to the Users page for Damir and John and
notice that the DEFAULT profile is now assigned to the users. Exit Enterprise
Manager when done.
Chapter Review
In order for an individual to access database data a user account must be created for
him and appropriate privileges assigned. Database administrators can use the CREATE
USER command or Enterprise Manager to create and manage user accounts and assign
ch07.indd 46ch07.indd 46 6/30/2005 5:01:47 PM6/30/2005 5:01:47 PM

All-in-1 / Oracle Database 10g OCP Certification All-in-One / Watson, Bersinic / 5790-3
Chapter 7: Administering Database Users
47
PART I
them privileges, a default tablespace, a temporary tablespace, quotas, and profiles.
Users who have been granted permission to create objects are called “schema users,”
since the collection of objects they create is considered their “schema.”
Two kinds of privileges exist in Oracle: system privileges, which allow you to
perform an action such as create a table or drop an index, and object privileges, which
allow you to manipulate objects, for instance, to SELECT from a table or EXECUTE a
procedure. System privileges are granted by the DBA role and anyone who has had
them granted WITH ADMIN OPTION. Object privileges are granted by the owner of
the object and anyone granted those permissions WITH GRANT OPTION. Privileges
can be revoked using the REVOKE command and, for object privileges only, will also
be revoked from anyone the revokee granted them to.
In many environments it is preferable to create roles to hold both system and object
privileges that need to be assigned to users. Permission assignment is simplified because
only the role needs to be granted to a user. Any permission changes on the role
automatically are changed for all users holding the role. A user may have several roles
active at one time and may have other roles made active during a session using the
SET ROLE command or the DBMS_SESSION.SET_ROLE package procedure.
Profiles allow a DBA to control resource usage by users when activated with the
RESOURCE_LIMIT initialization parameter. A user may have only one profile active
at a time, and any profile changes do not take effect until a user assigned the profile
creates a new session on the instance. If a profile is dropped using the CASCADE option,
the DEFAULT profile, which must exist, is assigned to all users.
Questions
1. You have created a new user called George. You have assigned George the
RESTRICTED_ACCESS user profile. The profile settings have all limits
configured as DEFAULT except for a concurrent sessions limit whose value is
set to 1. George asks you to help with a problem, and when you arrive at his
desk, you notice that he has several SQL*Plus sessions open, all of which are
connected to the instance with his user account. You suspect that your profile
limits are not being enforced. Which of the following should you investigate
to determine the cause of the problem? (Choose two correct answers.)
A. DBA_USER_LIMITS table
B. RESOURCE_LIMIT initialization parameter
C. DBA_PROFILE_LIMITS data dictionary view
D. DBA_PROFILES data dictionary view
E. V$LIMITS dynamic performance view
ch07.indd 47ch07.indd 47 6/30/2005 5:01:48 PM6/30/2005 5:01:48 PM

All-in-1 / Oracle Database 10g OCP Certification All-in-One / Watson, Bersinic / 5790-3
Oracle Database 10g OCP Certification All-in-One Exam Guide
48
2. Which line of code will cause the following SQL statement to fail? (Choose
the best answer.)
1 CREATE USER Sam
2 IDENTIFIED EXTERNALLY BY $amP@ssw0rd
3 DEFAULT TABLESPACE Users
4 TEMPORARY TABLESPACE User_Temp
5 QUOTA 2048MB ON APPS_DATA
A. 1
B. 2
C. 3
D. 4
E. 5
F. The statement will succeed
3. You have been asked to provide additional information to your manager on
how system privileges can be assigned and behave. Which of the following
statements about system privileges are true? (Choose all correct answers.)
A. System privileges can be granted to others if you use the WITH ADMIN
OPTION.
B. System privileges can be granted to others if you use the WITH GRANT
OPTION.
C. Only the DBA can grant system privileges, since the DBA owns the database.
D. System privileges can be granted only by the owner of the database.
E. When revoked for a user, system privileges will also be revoked for any
user to whom that revokee granted them.
F. When revoked for a user, system privileges will not be revoked for any user
to whom that revokee granted them.
4. How would a user change his active profile? (Choose the best answer.)
A. ALTER USER SET PROFILE=NewProfile
B. ALTER SYSTEM SET PROFILE=NewProfile
C. ALTER SESSION SET PROFILE=NewProfile
D. ALTER DATABASE SET PROFILE=NewProfile
E. A user cannot change his active profile
5. If you create a profile and specify limits for only some of the profile settings,
what value will be automatically assigned to any resource limit you do not
include in your CREATE PROFILE statement? (Choose the best answer.)
A. DEFAULT
B. 0
C. UNLIMITED
ch07.indd 48ch07.indd 48 6/30/2005 5:01:48 PM6/30/2005 5:01:48 PM

All-in-1 / Oracle Database 10g OCP Certification All-in-One / Watson, Bersinic / 5790-3
Chapter 7: Administering Database Users
49
PART I
D. UNKNOWN
E. You must specify a value for all profile limits
6. If you do not specify a TEMPORARY TABLESPACE when creating a new user
account, what will be the value of this parameter when the user is created?
(Choose the best answer.)
A. SYSTEM
B. TEMP
C. NULL
D. Database default temporary tablespace
E. You must specify a value for TEMPORARY TABLESPACE
7. Which of the following commands can a new user called Anthony issue after
successfully connecting to the instance and establishing a user session? (Choose
all correct answers.)
A. ALTER USER Anthony PASSWORD EXPIRE;
B. ALTER USER Anthony QUOTA 2M ON SYSTEM;
C. ALTER USER Anthony ACCOUNT LOCK;
D. ALTER USER Anthony TEMPORARY TABLESPACE TEMP;
E. ALTER USER Anthony IDENTIFIED BY NEWPASS;
8. While passing by Benjamin’s desk, you notice that he is using SQL*Plus to
query data in your TempOrders table. You did not grant Benjamin privileges
to issue SELECT statements against your TempOrders table. Why is Benjamin
able to query your table? (Choose all correct answers.)
A. A user to whom you granted the SELECT privilege on the table also granted
it to Benjamin.
B. Benjamin is a DBA and can query any table in the database.
C. You granted Benjamin the UPDATE privilege on the TempOrders table,
which automatically grants the SELECT privilege.
D. Benjamin has been granted the SELECT ANY TABLE privilege by the DBA.
E. Benjamin has been granted the SELECT privilege on your TempOrders
table by a user to whom you granted the SELECT privilege WITH ADMIN
OPTION.
9. Which of the following statements will fail when granting privileges to the
role QueryRole? (Choose the best answer.)
A. GRANT CONNECT TO QueryRole;
B. GRANT CONNECT TO QueryRole WITH ADMIN OPTION;
C. GRANT SELECT ON Orders TO QueryRole;
D. GRANT SELECT ON Orders TO QueryRole WITH GRANT OPTION;
E. GRANT DBA TO QueryRole WITH ADMIN OPTION;
ch07.indd 49ch07.indd 49 6/30/2005 5:01:49 PM6/30/2005 5:01:49 PM

All-in-1 / Oracle Database 10g OCP Certification All-in-One / Watson, Bersinic / 5790-3
Oracle Database 10g OCP Certification All-in-One Exam Guide
50
10. When creating a user using Enterprise Manager instead of the CREATE USER
statement, which additional privileges are granted to the user? (Choose the
best answer.)
A. SELECT_CATALOG_ROLE
B. SYSDBA
C. CONNECT
D. RESOURCE
E. DBA
Answers
1. B and D. You can query the DBA_PROFILES data dictionary view to determine
the settings of all profiles in the database, including the one George is supposed
to have assigned to him. The RESOURCE_LIMIT initialization parameter must
be set to TRUE for the concurrent sessions limit to be enforced, so you need
to verify this setting in the running instance and in the SPFILE. DBA_USER_
LIMITS, DBA_PROFILE_LIMITS, and V$LIMITS views do not exist.
2. B. When you create a user, you can specify at most one authentication
method. This SQL statement specified both EXTERNALLY and password
(BY $amP@ssw0rd) authentication at the same time, which would generate
an error when the command was executed.
3. A and F. If you have been granted a system privilege WITH ADMIN OPTION,
you can also grant the same privilege to others and specify the WITH ADMIN
OPTION. The WITH GRANT OPTION applies to object privileges and not
system privileges. If system privileges are revoked for a user to whom they
were granted WITH ADMIN OPTION, they will not be revoked for other
users to whom the revoke granted them; there are no cascading revokes for
system privileges. The DBA is a role and is not the only one that can grant
system privileges, and neither is the user SYS (the database owner), in that
anyone holding the DBA role can grant them, since the DBA role has system
privileges granted to it WITH ADMIN OPTION.
4. E. A user cannot himself change his active profile. Only the DBA can modify
a user’s profile or the profile limits.
5. A. If you do not specify a value for a limit in your profile, it will automatically
be assigned the value of DEFAULT. This means that Oracle will enforce whatever
value exists for the limit in the DEFAULT profile.
6. D. The currently defined database default temporary tablespace will be assigned
to the user if you do not specify a TEMPORARY TABLESPACE for the user. If
no database default temporary tablespace is defined, the user will be assigned
SYSTEM as the temporary tablespace.
ch07.indd 50ch07.indd 50 6/30/2005 5:01:50 PM6/30/2005 5:01:50 PM

All-in-1 / Oracle Database 10g OCP Certification All-in-One / Watson, Bersinic / 5790-3
Chapter 7: Administering Database Users
51
PART I
7. E. Anthony, like any new user who has been configured with password
authentication, has the ability to change his password at any time. No other
changes to the user account are allowed to be performed by the user himself.
8. B and D. Benjamin can query your TempOrders table only if he is a DBA, who
automatically has the SELECT ANY TABLE privilege, or if Benjamin has been
granted the SELECT ANY TABLE privilege by the DBA. Another user to whom
you only granted the SELECT privilege could not grant it to Benjamin unless
you specified the WITH GRANT OPTION. Granting the UPDATE privilege on
the table does not automatically grant the SELECT privilege.
9. D. It is not possible to grant object privileges to roles WITH GRANT OPTION,
so this statement will fail. All other statements will succeed, assuming you
have the privileges required to perform the operation.
10. C. Using Enterprise Manager to create a user will automatically grant the user
the CONNECT role, which includes the CREATE SESSION privilege, so the
user is able to connect to the instance right away. This role also includes the
privileges to create tables, views, synonyms, sequences, and other database
objects, which may or may not be desired for all users.
ch07.indd 51ch07.indd 51 6/30/2005 5:01:50 PM6/30/2005 5:01:50 PM

All-in-1 / Oracle Database 10g OCP Certification All-in-One / Watson, Bersinic / 5790-3
ch07.indd 52ch07.indd 52 6/30/2005 5:01:51 PM6/30/2005 5:01:51 PM

All-in-1 / Oracle Database 10g OCP Certification All-in-One / Watson, Bersinic / 5790-3/Ch8
CHAPTER 8
Managing Database Objects
In this chapter you will learn how to
• Create and modify tables
• Define constraints
• View the attributes of a table
• View the contents of a table
• Create indexes and views
• Name database objects
• Select appropriate datatypes
• Create and use sequences
1
ch08.indd 1ch08.indd 1 7/11/2005 3:05:53 PM7/11/2005 3:05:53 PM

All-in-1 / Oracle Database 10g OCP Certification All-in-One / Watson, Bersinic / 5790-3
Oracle Database 10g OCP Certification All-in-One Exam Guide
2
In a typical database, the greater part of the data is stored in tables. This chapter covers
the syntax for creating tables with columns of various datatypes, and also creating some
associated objects: the constraints that guarantee that the rows inserted into tables
conform to certain business rules; the indexes that enhance the performance of
retrieving rows from tables; and the views that can conceal the underlying table
structures from end users. Finally, you will see how to create sequences: data structures
that can deliver numbers that are guaranteed to be unique.
All these objects are stored in schemas: a schema is associated with a user—create
a user, and a schema is automatically created.
Bear in mind that the topics covered in this chapter are very large, and that this is
only a superficial introduction.
Users, Schemas, and Schema Objects
A user is a person, uniquely identified by username, who exists within the database.
Chapter 7 covered the techniques for creating users and giving them the privileges that
allow them to connect to the database, and then create and use objects. When a user
is created, a schema is created too. A schema consists of the objects owned by a user;
initially, it will be empty. As far as SQL is concerned, a schema is nothing more than
a container for tables, views, code, and other database elements.
Users and Schemas
Some schemas will always be empty: the user will never create any objects, because he
does not need to and (if he is set up correctly) will not have the necessary privileges
anyway. Users such as this will have been granted permissions, either through direct
privileges or through roles, to use code and access data in other schemas, owned by
other users. Other users may be the reverse of this: they will own many objects but
will never actually log on to the database. They need not even have been granted the
CREATE SESSION privilege, so the account is effectively disabled (or indeed it can be
locked); these schemas are used as repositories for code and data, accessed by others.
Schema objects are objects with an owner. The unique identifier for an object of a
particular type is not its name; it is its name, prefixed with the name of the schema to
which it belongs. Thus the table HR.REGIONS is a table called REGIONS that is owned
by user HR. There could be another table SYSTEM.REGIONS that would be a completely
different table (perhaps different in both structure and contents) owned by user
SYSTEM and residing in his schema.
A number of users (and their associated schemas) are created automatically at
database creation time. Principal among these are SYS and SYSTEM. User SYS owns
the data dictionary: a set of tables (in the SYS schema) that define the database and its
contents. SYS also owns several hundred PL/SQL packages: code that is provided for
the use of the Oracle kernel, database administrators, and developers. Objects in the
SYS schema should never be modified with DML commands. If you were to execute
DML against the data dictionary tables, you would run the risk of corrupting the data
dictionary, with disastrous results. You update the data dictionary by running DDL
ch08.indd 2ch08.indd 2 7/11/2005 3:06:28 PM7/11/2005 3:06:28 PM

All-in-1 / Oracle Database 10g OCP Certification All-in-One / Watson, Bersinic / 5790-3
Chapter 8: Managing Database Objects
3
PART I
commands (such as CREATE TABLE), which provide a layer of abstraction between
you and the data dictionary itself. The SYSTEM schema stores various additional objects
used for administration and monitoring.
Depending on the options selected during database creation, there may be more
users created, perhaps up to thirty in total. These users are used for storing the code
and data required by various options. For example, the user MDSYS stores the objects
used by Oracle Spatial, an option that extends the capabilities of the Oracle database
to manage geographical information.
Naming Schema Objects
A schema object is an object that is owned by a user. The database will also contain
non-schema objects: these may be objects that have nothing to do with users, such as
tablespaces, or in some cases they are objects owned by SYS and directly accessible by
all users; examples of the latter include public synonyms and public database links
that can be used by all users regardless of privileges.
To view schema objects through database control, take the appropriate link for the
type of object of interest from the Schema section in the Administration window, as
in Figure 8-1, and you will be prompted for various search criteria.
All schema object names must conform to certain rules:
• The name may be from one to thirty characters long, with the exception
of database link names, which may be up to 128 characters long.
• Reserved words (such as SELECT) cannot be used as object names.
• All names must begin with a letter from A through Z.
• Names can only use letters, numbers, the underscore (_), the dollar sign ($),
or the hash symbol (#).
• Lowercase letters will be converted to uppercase.
By enclosing the name within double quotes, all these rules (with the exception of
the length) can be broken, but to get to the object subsequently, it must always be
specified with double quotes, as in the examples in Figure 8-2. Note that the same
restrictions apply to column names.
Although tools such as SQL*Plus will automatically convert lowercase letters to
uppercase, unless the name is enclosed within double quotes, remember that object
names are always case sensitive. In this example, the two tables are completely different:
ocp10g> create table lower(c1 date);
Table created.
ocp10g> create table "lower"(col1 varchar(2));
Table created.
ocp10g> select table_name from dba_tables where
2 lower(table_name) = 'lower';
TABLE_NAME
------------------------------
lower
LOWER
ch08.indd 3ch08.indd 3 7/11/2005 3:06:28 PM7/11/2005 3:06:28 PM
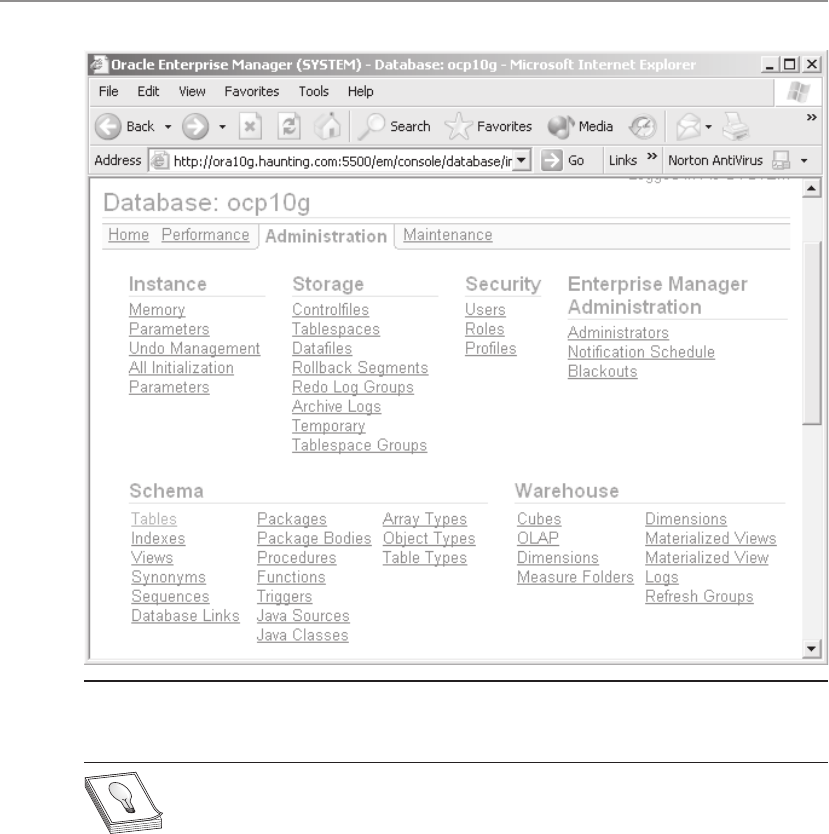
All-in-1 / Oracle Database 10g OCP Certification All-in-One / Watson, Bersinic / 5790-3
Oracle Database 10g OCP Certification All-in-One Exam Guide
4
TIP While it is possible to use lowercase names and nonstandard characters
(even spaces), it is considered bad practice, because of the confusion it can
cause.
Object Namespaces
It is often said that the unique identifier for an object is the object name, prefixed
with the schema name. While this is generally true, for a full understanding of naming
it is necessary to introduce the concept of a namespace. A namespace defines a group
of object types, within which all names must be uniquely identified—by schema and
name. Objects in different namespaces can share the same name.
Figure 8-1 Schema objects manageable with Database Control
ch08.indd 4ch08.indd 4 7/11/2005 3:06:29 PM7/11/2005 3:06:29 PM
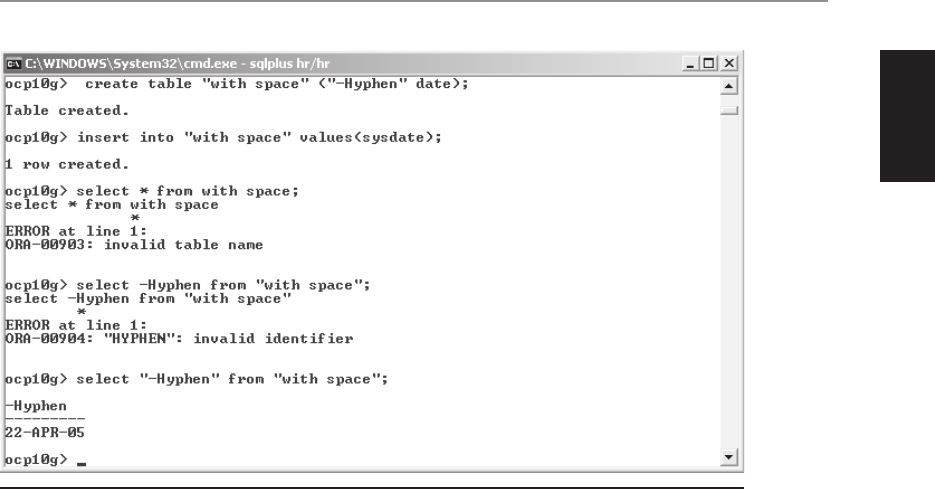
All-in-1 / Oracle Database 10g OCP Certification All-in-One / Watson, Bersinic / 5790-3
Chapter 8: Managing Database Objects
5
PART I
These object types all share the same namespace:
• Tables
• Views
• Sequences
• Private synonyms
• Stand-alone procedures
• Stand-alone stored functions
• Packages
• Materialized views
• User-defined types
Thus it is impossible to create a view with the same name as a table; at least, it
is impossible if they are in the same schema. And once created, SQL statements can
address a view as though it were a table. The fact that tables, views, and private synonyms
share the same namespace means that you can set up several layers of abstraction
between what the users see and the actual tables, which can be invaluable for both
security and for simplifying application development.
Figure 8-2 Using double quotes to use nonstandard names
ch08.indd 5ch08.indd 5 7/11/2005 3:06:30 PM7/11/2005 3:06:30 PM

All-in-1 / Oracle Database 10g OCP Certification All-in-One / Watson, Bersinic / 5790-3
Oracle Database 10g OCP Certification All-in-One Exam Guide
6
These object types each have their own namespace:
• Indexes
• Constraints
• Clusters
• Database triggers
• Private database links
• Dimensions
Thus it is possible for an index to have the same name as a table, even within the
same schema.
Datatypes
When creating tables, each column must be assigned a datatype, which determines
the nature of the values that can be inserted into the column. These datatypes are also
used to specify the nature of the arguments for PL/SQL procedures and functions.
When selecting a datatype, you must consider the data that you need to store and the
operations you will want to perform upon it. It may be possible to change a column
to a different datatype after creation, but this is not always easy. Space is also a
consideration: some datatypes are fixed length, taking up the same number of bytes no
matter what data is actually in them; others are variable. If a column is not populated,
then Oracle will not give it any space at all; if you later update the row to populate the
column, then the row will get bigger, no matter whether the datatype is fixed length
or variable. Tables 8-1 through 8-4 describe the various internal datatypes, grouped by
character data, numeric data, date-time data, and large objects.
Datatype Description
VARCHAR2 Variable-length character data from 1 byte to 4KB. The data is stored in the
database character set.
NVARCHAR2 As VARCHAR2, but the data is stored in the alternative national language
character set: one of the permitted Unicode character sets.
CHAR Fixed-length data in the database character set. If the data is not the length
of the column, then it will be padded with spaces.
RAW Variable-length binary data from 1 byte to 2KB. Unlike the CHAR and
VARCHAR datatypes, RAW data is not converted by Oracle Net from the
database’s character set to the user process’s character set on select or the
other way on insert.
Table 8-1 Datatypes for Alphanumeric Data
ch08.indd 6ch08.indd 6 7/11/2005 3:06:31 PM7/11/2005 3:06:31 PM

All-in-1 / Oracle Database 10g OCP Certification All-in-One / Watson, Bersinic / 5790-3
Chapter 8: Managing Database Objects
7
PART I
TIP For ISO/ANSI compliance, you can specify a VARCHAR datatype, but any
columns of this type will be automatically converted to VARCHAR2.
Oracle provides a range of type-casting functions for converting between datatypes,
and in some circumstances it will do automatic type casting. Figure 8-3 illustrates both
techniques.
Datatype Description
NUMBER Numeric data for which you can specify precision and scale. The precision can
range from to 1 to 38, and the scale can range from –84 to 127.
FLOAT This is an ANSI datatype, for floating-point numbers with precision of 126
binary (or 38 decimal). Oracle also provides BINARY_FLOAT and BINARY_
DOUBLE as alternatives.
INTEGER Equivalent to NUMBER, with scale zero.
Table 8-2 Datatypes for Numeric Data, All Variable Length
Datatype Description
DATE This is either length zero, if the column is empty, or 7 bytes.
All DATE data includes century, year, month, day, hour, minute,
and second. The valid range is from January 1, 4712 B.C. to
December 31, 9999 A.D.
TIMESTAMP This is length zero if the column is empty, or up to 11 bytes
depending on the precision specified. Similar to DATE, but
with precision of up to nine decimal places for the seconds,
six places by default.
TIMESTAMP WITH TIMEZONE As TIMESTAMP, but the data is stored with a record kept of
the time zone to which it refers. The length may be up to
13 bytes depending on precision. This datatype lets Oracle
determine the difference between two times by normalizing
them to UTC, even if the times are for different time zones.
TIMESTAMP WITH LOCAL
TIMEZONE
As TIMESTAMP, but the data is normalized to the database
time zone on saving. When retrieved, it is normalized to the
time zone of the user process selecting it.
INTERVAL YEAR TO MONTH Used for recording a period in years and months between
two DATEs or TIMESTAMPs.
INTERVAL DAY TO SECOND Used for recording a period in days and seconds between
two DATEs or TIMESTAMPs.
Table 8-3 Datatypes for Date and Time Data, All Fixed Length
ch08.indd 7ch08.indd 7 7/11/2005 3:06:31 PM7/11/2005 3:06:31 PM
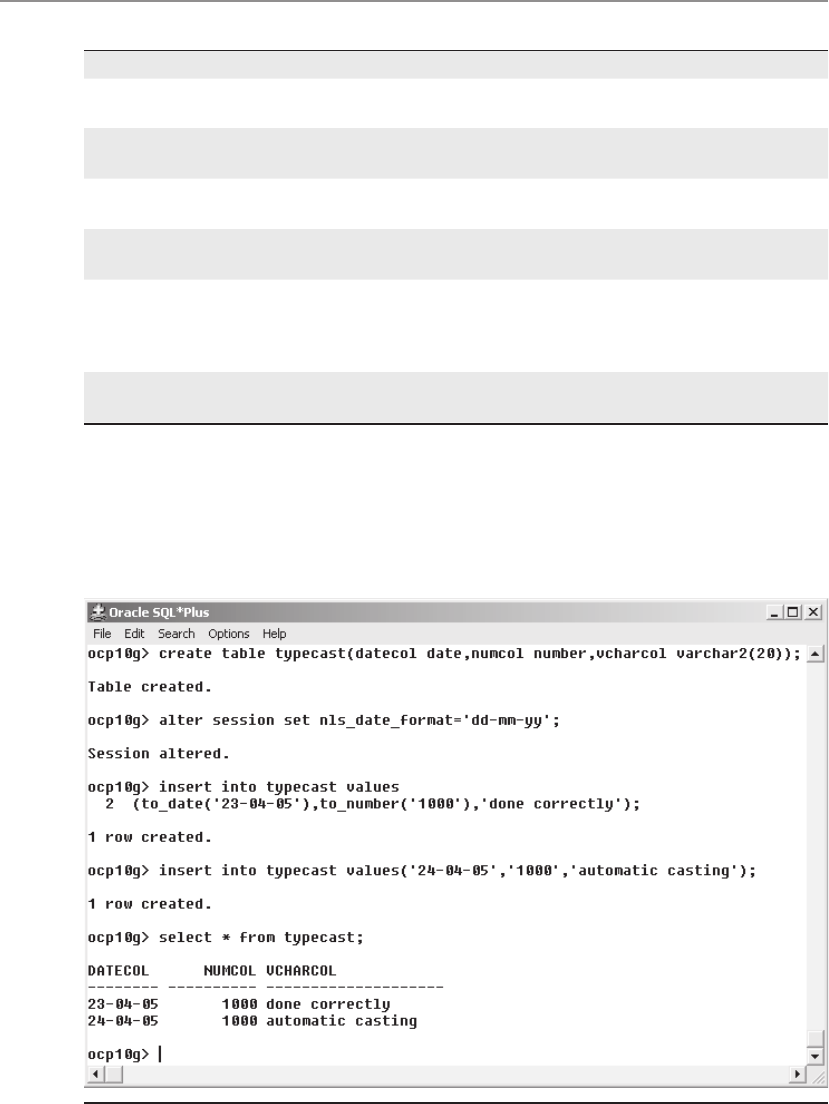
All-in-1 / Oracle Database 10g OCP Certification All-in-One / Watson, Bersinic / 5790-3
Oracle Database 10g OCP Certification All-in-One Exam Guide
8
In the example shown in the figure, the first insert uses type-casting functions to
convert the character data entered to the datatypes specified for the table columns.
The second insert attempts to insert character strings into all three columns, but the
Datatype Description
CLOB Character data stored in the database character set, size effectively unlimited:
4GB multiplied by the database block size.
NCLOB As CLOB, but the data is stored in the alternative national language character
set: one of the permitted Unicode character sets.
BLOB As CLOB, but binary data that will not undergo character set conversion by
Oracle Net.
BFILE A locator pointing to a file stored on the operating system of the database
server. The size of the files is limited to 4GB.
LONG Character data in the database character set, up to 2GB. All the functionality
of LONG (and more) is provided by CLOB; LONGs should not be used in
a modern database, and if your database has any columns of this type, they
should be converted to CLOB.
LONG RAW As LONG, but binary data that will not be converted by Oracle Net. Any
LONG RAW columns should be converted to BLOBs.
Table 8-4 Large Object Datatypes
Figure 8-3 Use of type-casting functions and automatic type casting
ch08.indd 8ch08.indd 8 7/11/2005 3:06:32 PM7/11/2005 3:06:32 PM

All-in-1 / Oracle Database 10g OCP Certification All-in-One / Watson, Bersinic / 5790-3
Chapter 8: Managing Database Objects
9
PART I
insert still succeeds because Oracle can convert datatypes automatically if necessary,
and if the format of the data is suitable.
TIP Do not rely on automatic type casting. It can impact on performance and
may not always work. The Oracle environment is strongly typed, and your
programmers should respect this.
Creating Tables
The syntax for creating a table requires giving the table a name (which must be unique
within the schema to which the table belongs) and specifying one or more columns, each
with a datatype. It is also possible to specify constraints when creating a table;
alternatively, constraints can be added later. There are many examples in this book of
creating tables from the SQL*Plus command line (there have already been two examples
in this chapter!) but it can also be done through Database Control. Database Control
provides a fully functional menu-driven interface for creating and editing table structures,
and also for managing the constraints, indexes, and views that will be based on the tables.
The CREATE TABLE command can be quite complex (when you look it up in the
“SQL Reference” volume of the Documentation Library, you will see that it takes up 72
pages) and includes a vast range of options for specifying physical and logical attributes.
Most of the examples given in this book are very simple; this is a little more complicated:
ocp10g> create table emp
2 (empno number(6)
3 constraint emp_empno_pk primary key
4 using index
5 create index emp_empno_pk on emp(empno) tablespace idx_ts),
6 firstname varchar2(20),
7 lastname varchar2(25)
8 constraint emp_last_name_nn not null,
9 hire_date date default sysdate,
10 salary number(8,2),
11 managerid number(6)
12 constraint emp_managerid_fk references emp(empno),
13 deptno number(4)
14 constraint emp_deptno_fk references dept(deptno),
15 photo blob,
16 resume clob,
17 email varchar2(25),
18 constraint emp_salary_min check (salary >= 0),
19 constraint emp_email_uk unique (email))
20 lob (photo, resume) store as
21 (tablespace example chunk 4096);
Table created.
Lines 2, 3, 4, and 5 define a numeric column EMPNO, which is to be used as a
primary key. Rather than letting Oracle create the primary key index using its defaults,
the USING INDEX clause can specify a full index creation command.
ch08.indd 9ch08.indd 9 7/11/2005 3:06:33 PM7/11/2005 3:06:33 PM
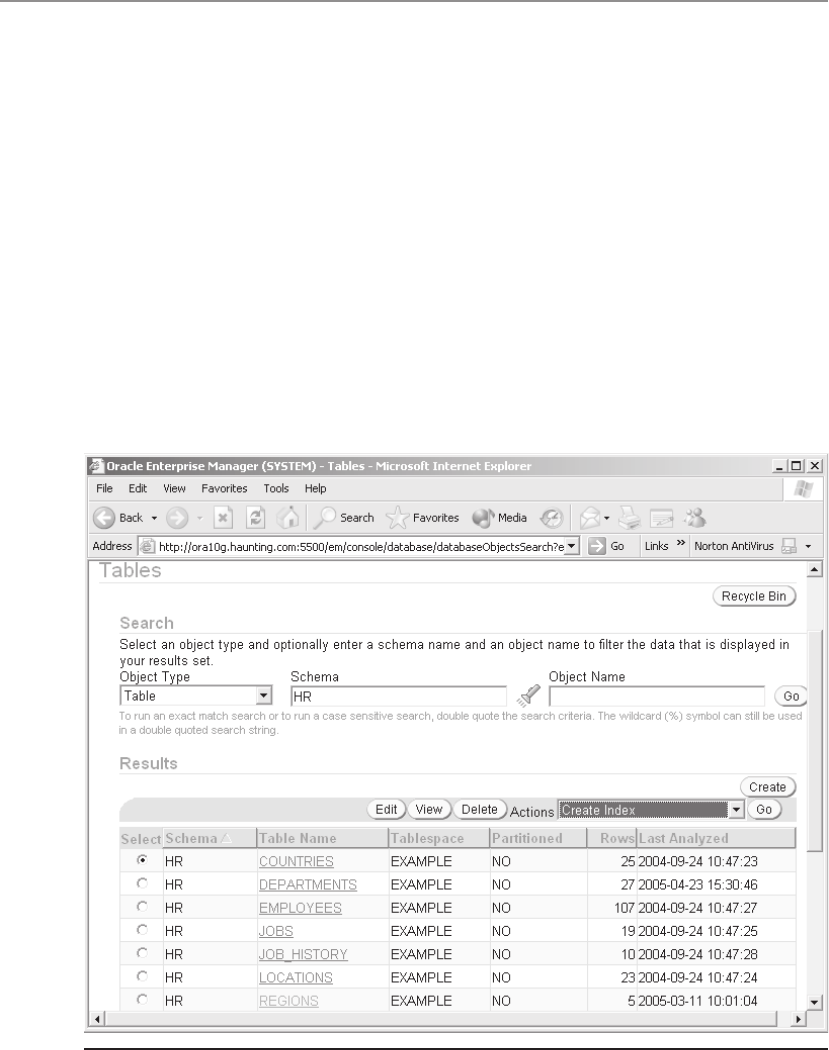
All-in-1 / Oracle Database 10g OCP Certification All-in-One / Watson, Bersinic / 5790-3
Oracle Database 10g OCP Certification All-in-One Exam Guide
10
Lines 7 and 8 demonstrate creating a NOT NULL constraint.
Line 9 creates a column with a default value to be applied at insert time, if the
column is not populated by the INSERT statement.
Line 10 creates a numeric column with a precision of two decimal places.
Lines 11 and 12 create a column with a self-referencing foreign key constraint:
each employee must have a valid manager, who is also an employee. Constraints of
this nature can impact on the order in which rows can be inserted. Lines 13 and 14
create a foreign key constraint to a different table.
Lines 15 and 16 create two large object columns.
Lines 18 and 19 demonstrate creating constraints on columns defined earlier. The
UNIQUE constraint will force the creation of an index, using defaults.
Finally, lines 20 and 21 specify some storage options for the large objects.
To reach the table management window of Database Control, from the database
home page take the Administration tab, then the Tables link in the Schema section.
Enter whatever search criteria are needed to locate the table of interest, and then open
the Actions drop-down box to see what possibilities are available, as in Figure 8-4.
Figure 8-4 The Database Control Tables window
ch08.indd 10ch08.indd 10 7/11/2005 3:06:34 PM7/11/2005 3:06:34 PM

All-in-1 / Oracle Database 10g OCP Certification All-in-One / Watson, Bersinic / 5790-3
Chapter 8: Managing Database Objects
11
PART I
These are the actions:
• CREATE LIKE Create a new table based on the same structure as the selected
table.
• CREATE INDEX Define and generate an index on the table.
• CREATE SYNONYM Create a logical name, or alias, that can be used as
a pseudonym for the table.
• CREATE TRIGGER Create a block of PL/SQL code that will run
automatically whenever DML is executed against the table.
• GATHER STATISTICS Analyze the contents of the table, to gather statistics
to be used by the optimizer to work out how best to access the table.
• GENERATE DDL Reverse-engineer the table’s structure, to generate a CREATE
TABLE statement that could be used to re-create the table.
• GRANT PRIVILEGES Give users permission to read or alter the data in
the table.
• REORGANIZE Run a wizard to go through the process of reorganizing the
data in a table to move the table, or to change its structure.
• RUN SEGMENT ADVISOR Use the advisor to generate a recommendation
for whether the table should be shrunk.
• SHRINK SEGMENT Use the online reorganization tool to reclaim wasted
space from a segment.
• SHOW DEPENDENCIES Display all the objects that are in some way related
to the table and could therefore be affected by any action on the table.
• VIEW DATA Run a wizard to assist with querying and displaying the contents
of the table.
• FLASHBACK TABLE Reverse all DML operations against the table, in reverse
chronological order, to take the table back to a previous state.
• FLASHBACK BY ROW VERSIONS Query historical data, to display previous
versions of rows.
Creating Constraints
Table constraints are a means by which the database can enforce business rules and
guarantee that the data conforms to the entity-relationship model determined by the
system’s analysis that defines the application data structures. For example, the business
analysts of your organization may have decided that every customer and every invoice
must be uniquely identifiable by number; that no invoices can be issued to a customer
before he has been inserted; and that every invoice must have a valid date and a value
ch08.indd 11ch08.indd 11 7/11/2005 3:06:34 PM7/11/2005 3:06:34 PM

All-in-1 / Oracle Database 10g OCP Certification All-in-One / Watson, Bersinic / 5790-3
Oracle Database 10g OCP Certification All-in-One Exam Guide
12
greater than zero. These would be implemented by creating primary key constraints
on the CUSTOMER_NUMBER column of the CUSTOMERS table and the INVOICE_
NUMBER column of the INVOICES table, a foreign key constraint on the INVOICES
table referencing the CUSTOMERS table, a not-null constraint on the INVOICE_DATE
column of the INVOICES table (the DATE datatype will itself ensure that any dates are
valid automatically—it will not accept invalid dates), and a check constraint on the
AMOUNT column on the INVOICES table.
If any DML is executed against a table with constraints defined, if the DML violates
a constraint then the whole statement will be rolled back automatically. If the statement
is part of a multistatement transaction, then the statements that have already succeeded
will remain intact, but uncommitted.
These constraints are supported by Oracle:
• UNIQUE No two rows can have the same value for a UNIQUE column.
However, NULL values are permitted; indeed, multiple rows can have NULL
values.
• NOT NULL The column must have a value.
• PRIMARY KEY The primary key is the means of locating a row: the value
must be both UNIQUE and NOT NULL.
• CHECK A CHECK constraint can be used to enforce simple rules, such
as ranges of values. The internal implementation of NOT NULL is in fact
a preconfigured CHECK constraint.
Exercise 8-1: Creating Tables and Constraints
Use Database Control to create two tables with constraints, and validate the structures
with SQL*Plus.
1. Connect to your database as user SYSTEM using Database Control.
2. From the database home page, take the Administration tab, and then the Tables
link in the Schema section. Click Create.
3. On the Create Table: Table Organization window, select the Standard, Heap
Organized radio button, and click Continue.
4. On the Create Table window, enter the name CUSTOMERS, and define two
columns, as in Figure 8-5.
ch08.indd 12ch08.indd 12 7/11/2005 3:06:35 PM7/11/2005 3:06:35 PM
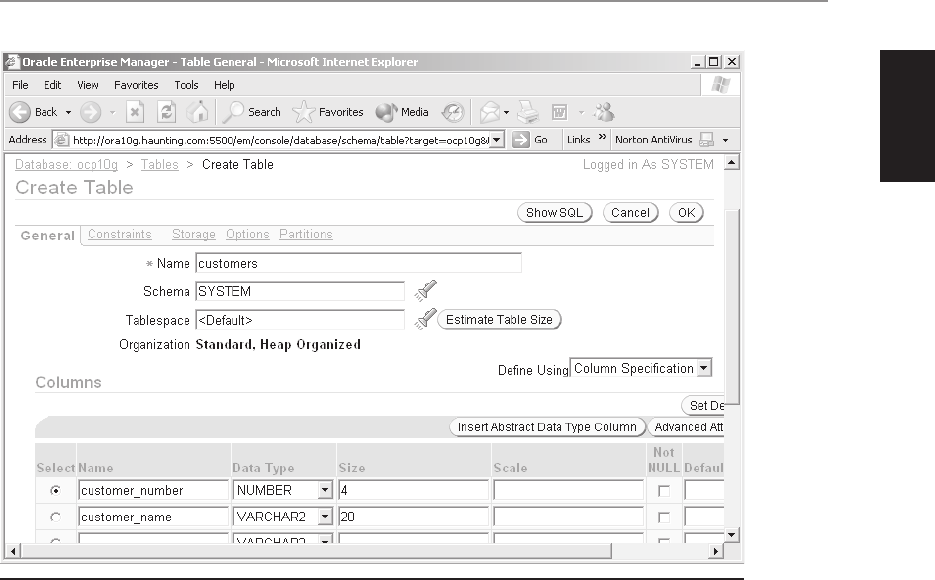
All-in-1 / Oracle Database 10g OCP Certification All-in-One / Watson, Bersinic / 5790-3
Chapter 8: Managing Database Objects
13
PART I
5. Create a second table, INVOICES, as in Figure 8-6. Note that the Not Null check
box has been selected for the INVOICE_DATE column.
6. To add a primary key constraint to the CUSTOMERS table, navigate to the Tables
window as in Step 2, and search for the table called CUSTOMERS. Select it,
and click Edit. Select the Constraints tab.
7. Select PRIMARY from the drop-down box, and click Add.
8. Choose CUSTOMER_NUMBER as the column on which to base the constraint,
leave all other options on default, and click OK, as in Figure 8-7. Click Apply
to create the constraint.
Figure 8-5 Creating the CUSTOMERS table
ch08.indd 13ch08.indd 13 7/11/2005 3:06:35 PM7/11/2005 3:06:35 PM
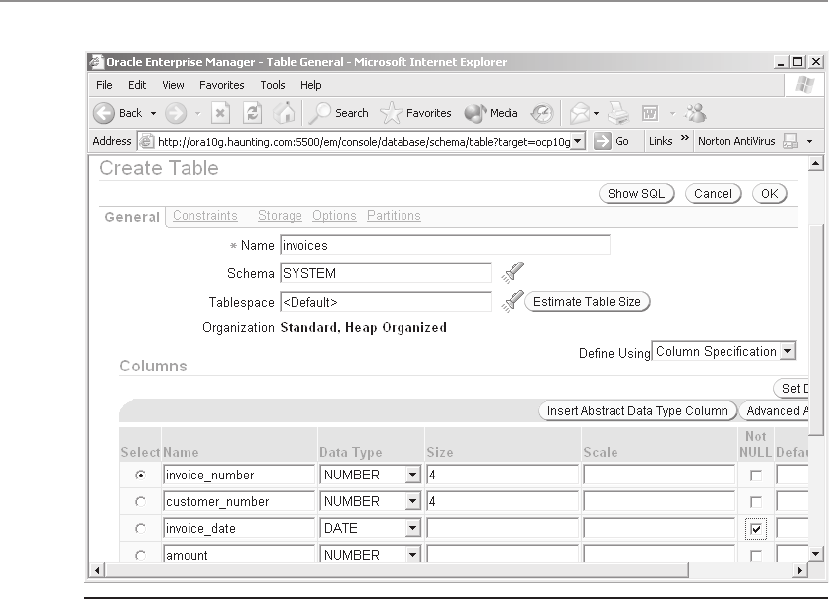
All-in-1 / Oracle Database 10g OCP Certification All-in-One / Watson, Bersinic / 5790-3
Oracle Database 10g OCP Certification All-in-One Exam Guide
14
9. Repeat the process to add a primary key constraint to the INVOICES table, using
the INVOICE_NUMBER column.
10. To add the foreign key constraint connecting INVOICES to CUSTOMERS, fill
in the Add FOREIGN Constraint window as in Figure 8-8. Click Apply to create
the constraint.
11. To add the check constraint ensuring that the AMOUNT is greater than zero,
fill in the Add CHECK Constraint window as in Figure 8-9. Click OK and Apply.
12. Connect to your database as user SYSTEM with SQL*Plus.
Figure 8-6 The INVOICES table
ch08.indd 14ch08.indd 14 7/11/2005 3:06:36 PM7/11/2005 3:06:36 PM
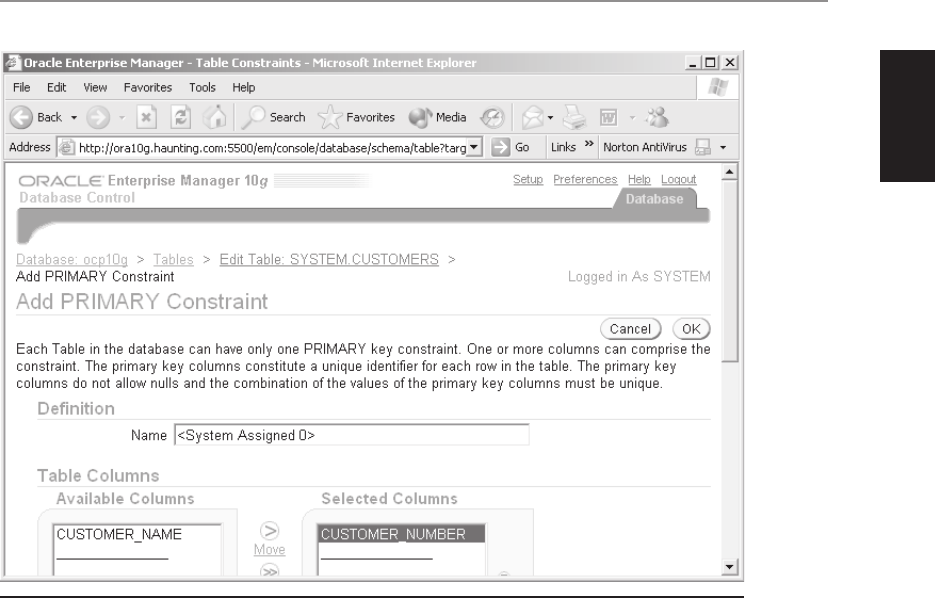
All-in-1 / Oracle Database 10g OCP Certification All-in-One / Watson, Bersinic / 5790-3
Chapter 8: Managing Database Objects
15
PART I
13. Insert some valid data as follows:
insert into customers values(1,'John');
insert into customers values(2,'Damir');
insert into invoices values(10,1,sysdate,100);
insert into invoices values(11,2,sysdate,200);
commit;
14. Demonstrate the effectiveness of the constraints by attempting to insert some
data that violates them, such as
ocp10g> insert into customers values(1,'McGraw');
ocp10g> insert into invoices values (30,3,sysdate,50);
ocp10g> insert into invoices values(10,1,sysdate,0);
Figure 8-7 Adding a primary key constraint
ch08.indd 15ch08.indd 15 7/11/2005 3:06:37 PM7/11/2005 3:06:37 PM
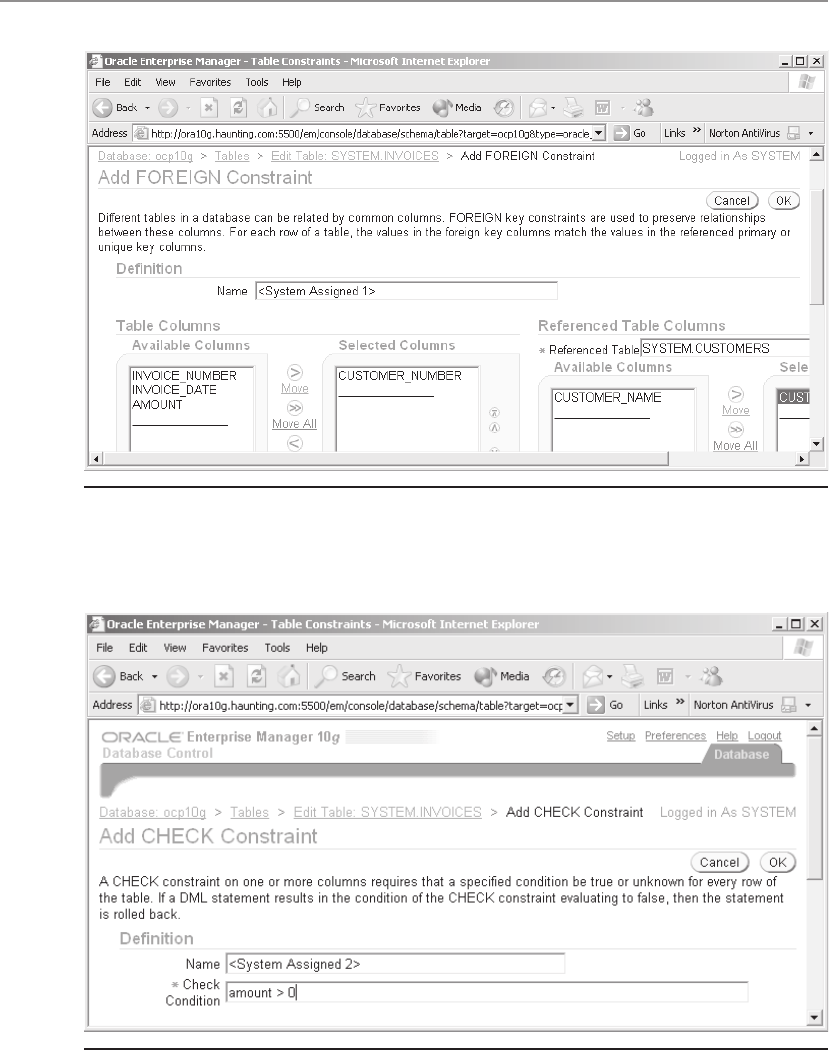
All-in-1 / Oracle Database 10g OCP Certification All-in-One / Watson, Bersinic / 5790-3
Oracle Database 10g OCP Certification All-in-One Exam Guide
16
Figure 8-8 Adding a foreign key constraint
Figure 8-9 Adding a check constraint
ch08.indd 16ch08.indd 16 7/11/2005 3:06:38 PM7/11/2005 3:06:38 PM

All-in-1 / Oracle Database 10g OCP Certification All-in-One / Watson, Bersinic / 5790-3
Chapter 8: Managing Database Objects
17
PART I
Creating Indexes
Indexes have a dual purpose: to enhance the performance of retrieving rows, and to
enforce constraints. When you define a unique or primary key constraint on a column
(or on a number of columns), Oracle will check whether an index already exists on the
column(s), and if it does not, an index will be created for you.
Indexes can be based on one column, on several columns, or on functions applied
to columns: there are no restrictions regarding datatype or column order. A table can
have any number of indexes, and they are maintained automatically to keep them
synchronized with the table.
When deciding on your indexing strategy, you must consider the nature of access
to the data. As a general rule, indexes will improve performance of retrieving individual
rows but will tend to reduce the performance of executing DML against them. So indexes
will help SELECT statements but hinder INSERT statements. They will assist with finding
rows to be updated or deleted but will work against the efficiency of actually doing
the UPDATE or DELETE. It is not necessary for programmers to know the name of an
index, or even that it exists. For all retrieval operations, the Oracle optimizer will make
an intelligent decision about whether or not to use any available indexes, but for DML
it has no choice: indexes must always be maintained.
To create an index from the command line, use the CREATE INDEX command.
For example, to index the CUSTOMER_NAME column of the CUSTOMERS table
used in the previous exercise, you could use this command:
ocp10g> create index name_idx on customers(customer_name);
Alternatively, it can be done through Database Control as in Figure 8-10.
To see what indexes exist on a table, query the DBA_INDEXES data dictionary view:
ocp10g> select index_name from dba_indexes where owner='SYSTEM'
2 and table_name='CUSTOMERS';
INDEX_NAME
------------------------------
NAME_IDX
SYS_C0010004
The first index listed is that created on the CUSTOMER_NAME column. The second,
SYS_C0010004, is the index created automatically by Oracle when the primary key
constraint on the CUSTOMER_NUMBER column was defined. Primary key constraints
require an index, and if one does not exist, one is created for you, with a system-
generated name.
TIP System-generated names are cryptic; therefore, DBAs typically provide
descriptive names, which help during the investigation of constraint violations
and other error conditions.
ch08.indd 17ch08.indd 17 7/11/2005 3:06:39 PM7/11/2005 3:06:39 PM
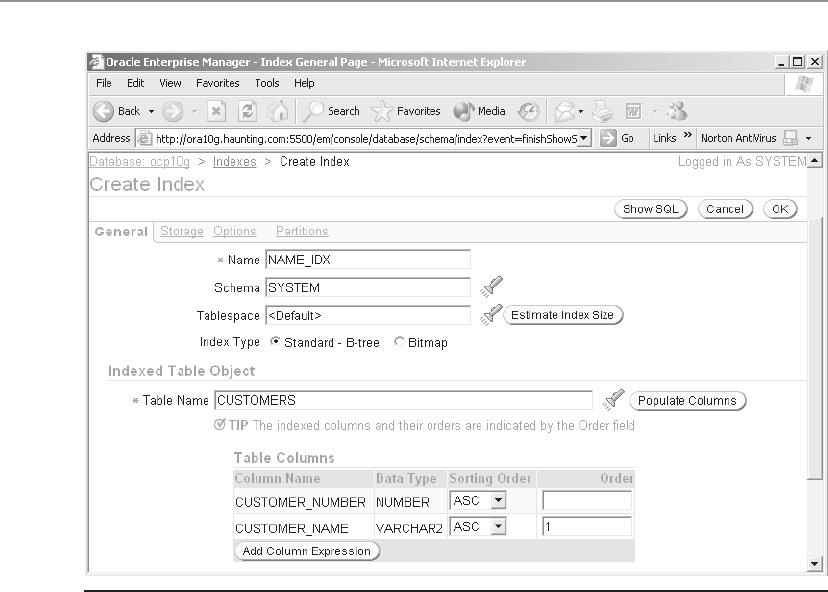
All-in-1 / Oracle Database 10g OCP Certification All-in-One / Watson, Bersinic / 5790-3
Oracle Database 10g OCP Certification All-in-One Exam Guide
18
Creating Views
A view is a means of presenting data to your users. Rather than having your programmers
address actual tables, they can address views instead. This can shield them from the
complexities of the underlying data structures and can also be used for security: the
views can conceal certain rows or columns. The tables on which a view is based are
referred to as either the “detail” tables or the “base” tables.
A view is in fact a query—a SELECT statement stored within the data dictionary.
Whenever a user addresses a view, using the same syntax as to address a table, the query
runs to generate a result set, and the user’s statement executes against this set. Note
that there are no performance benefits. In order to simplify data access, a view might
join many tables and perform aggregations or sorts to produce a simple result set; this
will take some time, and it must be done every time the view is queried.
Whether or not DML statements can be executed against a view depends on how
complicated is the query on which the view is based.
Figure 8-10 Creating an index on the CUSTOMER_NAME column
ch08.indd 18ch08.indd 18 7/11/2005 3:06:39 PM7/11/2005 3:06:39 PM

All-in-1 / Oracle Database 10g OCP Certification All-in-One / Watson, Bersinic / 5790-3
Chapter 8: Managing Database Objects
19
PART I
For example, a simple view defined by a query against just one detail table can be
used for DML:
ocp10g> create view emp_30 as
2 select * from employees where department_id=30;
View created.
ocp10g> select first_name,last_name from emp_30;
FIRST_NAME LAST_NAME
-------------------- -------------------------
Den Raphaely
Alexander Khoo
Shelli Baida
3 rows selected.
ocp10g> delete from emp_30 where last_name='Raphaely';
1 row deleted.
A more complex view cannot support DML, as is the case with this example, which
joins two tables and performs an aggregation:
ocp10g> create view dept_sal as
2 select department_name,sum(salary) tot_sal from departments
3 join employees using(department_id) group by department_name;
View created.
ocp10g> select * from dept_sal;
DEPARTMENT_NAME TOT_SAL
------------------------------ ----------
Accounting 20300
Administration 4400
Purchasing 13900
Sales 304500
Shipping 156400
5 rows selected.
ocp10g> update dept_sal set tot_sal=tot_sal*1.1;
update dept_sal set tot_sal=tot_sal*1.1
*
ERROR at line 1:
ORA-01732: data manipulation operation not legal on this view
TIP By creating INSTEAD OF triggers on views, your programmers can convert
unexecutable DML commands against complex views into executable DML
against the detail tables.
Views can also be created and edited through Database Control, as in Figure 8-11.
Views can be created from detail tables in any schemas, providing that the owner
of the view has been granted privileges to see the tables. Then the owner of the view
can grant other users permission to see the view. This establishes a layer of abstraction
between users and the tables that is useful for security: users can only ever get to data
through views, and need not be given permissions against the tables themselves.
ch08.indd 19ch08.indd 19 7/11/2005 3:06:40 PM7/11/2005 3:06:40 PM
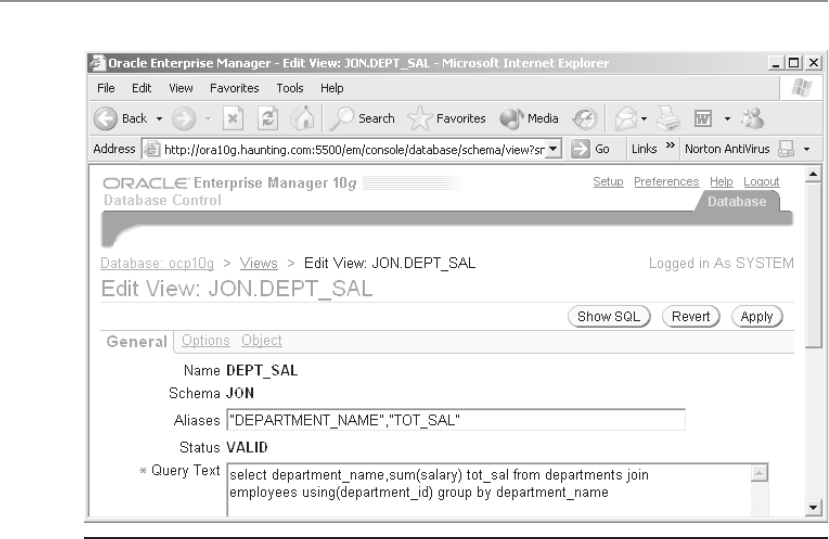
All-in-1 / Oracle Database 10g OCP Certification All-in-One / Watson, Bersinic / 5790-3
Oracle Database 10g OCP Certification All-in-One Exam Guide
20
Creating and Using Sequences
There are many cases in a typical database system where unique numbers are required.
Typically, this is for primary key values. For instance, the business analysts of a sales
organization may have decided that every invoice issued must have a unique invoice
number. Relying on the data entry staff to supply unique numbers is impractical, so
the database must generate them instead. A sequence is defined with a starting point
and an increment, both defaulting to one.
To read a value from the sequence (which will cause it to increment, ready for the
next usage—either by the same session or any other session), use the NEXTVAL pseudo-
column:
ocp10g> create sequence inv_nos start with 1 increment by 1;
Sequence created.
ocp10g> select inv_nos.nextval from dual;
NEXTVAL
----------
1
ocp10g> select inv_nos.nextval from dual;
NEXTVAL
----------
2
Figure 8-11 Editing the DEPT_SAL view with Database Control
ch08.indd 20ch08.indd 20 7/11/2005 3:06:40 PM7/11/2005 3:06:40 PM

All-in-1 / Oracle Database 10g OCP Certification All-in-One / Watson, Bersinic / 5790-3
Chapter 8: Managing Database Objects
21
PART I
Selecting the NEXTVAL from a sequence will increment it automatically; there is
no way to roll back this increment, and it is immediately visible to all other sessions
that may be selecting from the same sequence. This means that there will be gaps in
the sequence of numbers used.
TIP You can increase the performance of sequences by using the CACHE
clause when you create them, but this can result in more gaps. This is of
no significance to the database, but some auditors get upset about gaps in
sequences.
Exercise 8-2: Using Constraints, Views,
and Sequences
Create a sequence to generate unique invoice numbers, and create a view to join your
INVOICES and CUSTOMERS tables.
1. Connect to your database as user SYSTEM using SQL*Plus.
2. Create a sequence. Since the previous exercise issued invoice numbers 10 and
11, start the sequence at 12.
ocp10g> create sequence inv_nos start with 12;
3. Use the sequence to enter new invoices, with unique numbers.
ocp10g> insert into invoices values (inv_nos.nextval,1,sysdate,150);
ocp10g> insert into invoices values (inv_nos.nextval,2,sysdate,250);
4. Create a view to display invoices with the customers’ names, and select
from it.
ocp10g> create view cust_inv as
2 select invoice_number,customer_name,amount from
3 invoices join customers using (customer_number);
View created.
ocp10g> select * from cust_inv;
INVOICE_NUMBER CUSTOMER_NAME AMOUNT
-------------- -------------------- ----------
10 John 100
11 Damir 200
12 John 150
13 Damir 250
5. Tidy up.
ocp10g> drop table invoices;
ocp10g> drop table customers;
ocp10g> drop view cust_inv;
ocp10g> drop sequence inv_nos;
Note that there is no need to drop any constraints or indexes: they are dropped
automatically along with the tables.
ch08.indd 21ch08.indd 21 7/11/2005 3:06:41 PM7/11/2005 3:06:41 PM

All-in-1 / Oracle Database 10g OCP Certification All-in-One / Watson, Bersinic / 5790-3
Oracle Database 10g OCP Certification All-in-One Exam Guide
22
Chapter Review
This chapter has introduced tables, along with the commonly used associated objects:
constraints, indexes, and views. Also shown were sequences, typically used for generating
unique values for inserts into primary key–constrained columns. All these objects
are “schema” objects, meaning that they must belong to a user; they cannot exist
independently. A schema object must have a unique name within its namespace and
schema; some objects, such as indexes, have their own namespace; others, such as
tables and views, share a namespace.
Tables are defined with one or more columns, which can be any of Oracle’s
supported internal datatypes. Oracle is a strongly typed environment, and datatypes
must match; however, in some circumstances Oracle can do automatic type casting to
avoid errors when users attempt, for example, to insert a numeric value into a character
column.
Constraints are defined on tables to enforce business rules. Unique and primary
key constraints are enforced through the use of indexes: if an index does not exist on
the constrained column(s), one will be created for you. You can also create additional
indexes to enhance performance.
In many cases, the table structure within a database may be overly complex. Views
can conceal these complexities by presenting the data in a simplified form. Some views
can be treated exactly as though they were tables; others can only be selected from, DML
being impossible. Views are also invaluable for security: users can be granted permissions
against views, without being granted permissions against their detail (or “base”) tables.
Questions
1. Which of these statements will fail because the table name is not legal?
(Choose two answers.)
A. create table "SELECT" (col1 date);
B. create table "lower case" (col1 date);
C. create table number1 (col1 date);
D. create table 1number(col1 date);
E. create table update(col1 date);
2. Several object types share the same namespace and therefore cannot have the
same name in the same schema. Which of the following object types is not in
the same namespace as the others? (Choose the best answer.)
A. Index
B. PL/SQL stored procedure
C. Synonym
D. Table
E. View
ch08.indd 22ch08.indd 22 7/11/2005 3:06:42 PM7/11/2005 3:06:42 PM

All-in-1 / Oracle Database 10g OCP Certification All-in-One / Watson, Bersinic / 5790-3
Chapter 8: Managing Database Objects
23
PART I
3. Which of the following is not supported by Oracle as an internal datatype?
(Choose the best answer.)
A. CHAR
B. FLOAT
C. INTEGER
D. STRING
4. You need to record date/time values, with a precision of one second. What
would be a suitable datatype for a single column to store this information?
A. DATE
B. TIMESTAMP
C. Either DATE or TIMESTAMP
D. You must develop your own user defined datatype, because the internal
types store either the date or the time.
5. Which types of constraint require an index? (Choose all that apply.)
A. CHECK
B. NOT NULL
C. PRIMARY KEY
D. UNIQUE
6. A transaction consists of two statements. The first succeeds, but the second
(which updates several rows) fails part way through because of a constraint
violation. What will happen? (Choose the best answer.)
A. The whole transaction will be rolled back.
B. The second statement will be rolled back completely, and the first will
be committed.
C. The second statement will be rolled back completely, and the first will
remain uncommitted.
D. Only the one update that caused the violation will be rolled back;
everything else will be committed.
E. Only the one update that caused the violation will be rolled back;
everything else will remain uncommitted.
7. Which of the following statements is correct about indexes? (Choose the best
answer.)
A. An index can be based on multiple columns of a table, but the columns
must be of the same datatype.
B. An index can be based on multiple columns of a table, but the columns must
be adjacent and specified in the order that they are defined in the table.
C. An index cannot have the same name as a table, unless the index and the
table are in separate schemas.
D. None of the above statements is correct.
ch08.indd 23ch08.indd 23 7/11/2005 3:06:42 PM7/11/2005 3:06:42 PM

All-in-1 / Oracle Database 10g OCP Certification All-in-One / Watson, Bersinic / 5790-3
Oracle Database 10g OCP Certification All-in-One Exam Guide
24
8. For what purposes might you choose to create views? (Choose two answers.)
A. To enhance security
B. To present data in a simple form
C. To improve performance
D. To save result sets of commonly executed queries
9. You insert a row using a sequence INV_NOS and then roll back the insert,
as follows:
ocp10g> insert into invoices values (inv_nos.nextval,1,sysdate,150);
1 row created.
ocp10g> rollback;
Rollback complete.
Before this transaction, the sequence was at value 10. What will be the next
value it will issue? (Choose the best answer.)
A. 10
B. 11
C. 12
D. It depends on how the sequence was created
Answers
1. D and E. D violates the rule that a table name must begin with a letter, and E
violates the rule that a table name cannot be a reserved word. Both rules can
be bypassed by using double quotes.
2. A. Indexes have their own namespace.
3. D. There is no STRING datatype.
4. C. Both DATE and TIMESTAMP columns always record the date and the time
to a precision of at least one second.
5. C and D. These are enforced with indexes, which will be created automatically
if they do not exist.
6. C. SQL is a set-oriented language: it is impossible for a statement to be partially
completed. Transactions can be incomplete, but COMMIT is all or nothing.
7. D. None of these are restrictions on index creation.
8. A and B. Views are about usability, not performance. D applies to materialized
views, not to views per se.
9. D. The sequence will have been incremented, and the increment does not
get rolled back, but you do not know what the next value will be, unless you
know what STEP was defined when the sequence was created.
ch08.indd 24ch08.indd 24 7/11/2005 3:06:43 PM7/11/2005 3:06:43 PM

All-in-1 / Oracle Database 10g Certification All-in-One / Meyers / 5790-3 /Chapter 23
CHAPTER 9
Manipulating Database Data
In this chapter you will learn how to
• Manipulate data through SQL using INSERT, UPDATE, and DELETE
• Use Data Pump to export data
• Use Data Pump to import data
• Load data with SQL Loader
• Create directory objects
1
ch09.indd 1ch09.indd 1 6/29/2005 12:16:57 PM6/29/2005 12:16:57 PM

Oracle Database 10g OCP Certification All-in-One Exam Guide
2
All-in-1 / Oracle Database 10g Certification All-in-One / Watson & Bersinic / 5790-3 /Chapter 9
Chapter 4 offers a brief look at the SQL syntax for the SELECT, INSERT, UPDATE, and
DELETE commands but doesn’t go into what actually happens in memory and on disk
when these commands are executed. Similarly, Chapter 8 shows the syntax for creating
tables but doesn’t look at how data is actually entered into and retrieved from them.
This chapter will make good these gaps by walking through the whole process, including
the generation of undo (which enables the rollback command) and of redo (which
enables commit and recovery operations). As a precursor for this, you will review some
of the principles of a relational database to which all databases (not just Oracle’s) must
conform. Then the chapter finishes with a look at the tools provided by Oracle for bulk
data loading and unloading operations: Data Pump and SQL*Loader.
Database Transactions
This is not the place to go into detail on the relational database transactional paradigm—
there are any number of academic texts on this, and there is not enough space to cover
this topic in a practical guide—but a quick review of transaction theory is necessary
before looking at how Oracle has implemented transaction management and the data
manipulation language (DML). Oracle’s mechanism for transactional integrity combines
undo segments and redo log files: this mechanism is undoubtedly the best of any
database yet developed, and it conforms perfectly to the international standards for
data processing. Other database vendors comply with the same standards with their
own mechanisms, but with varying levels of effectiveness. In brief, any relational
database must be able to pass the ACID test.
A Is for Atomicity
The principle of atomicity states that all parts of a transaction must complete, or none of
them. For example, if your business analysts have said that every time you change an
employee’s salary you must also change his grade, then the “atomic” transaction will
consist of two updates. The database must guarantee that both go through, or neither. If
only one of the updates were to succeed, you would have an employee on a salary that
was incompatible with his grade: a data corruption, in business terms. If anything
(anything at all!) goes wrong before the transaction is complete, the database itself must
guarantee that any parts that did go through are reversed: this must happen automatically.
But although an atomic transaction sounds small (like an atom), it could be
enormous. To take another example, it is logically impossible for the nominal ledger
of an accounting package to be half in August and half in September: the end-of-month
rollover is therefore (in business terms) one atomic transaction, which may affect
millions of rows in thousands of tables and take hours to complete (or to roll back,
if anything goes wrong).
The rollback of an incomplete transaction may be manual (as when you issue the
ROLLBACK command), but it must be automatic and unstoppable in the case of an
error. Oracle guarantees atomicity absolutely through the use of undo segments, dealt
with in detail in Chapter 16.
ch09.indd 2ch09.indd 2 6/29/2005 12:17:32 PM6/29/2005 12:17:32 PM

Chapter 9: Manipulating Database Data
3
PART I
All-in-1 / Oracle Database 10g Certification All-in-One / Watson & Bersinic / 5790-3 /Chapter 9
C Is for Consistency
The principle of consistency states that the results of a query must be consistent with
the state of the database at the time the query started. Imagine a simple query that
averages the value of a column of a table. If the table is large, it will take many minutes
to pass through the table. If other users are updating the column while the query is in
progress, should the query include the new or the old values? Should it include rows
that were inserted or deleted after the query started? The principle of consistency
requires that the database ensure that changed values are not seen by the query: it will
give you an average of the column as it was when the query started, no matter how
long the query takes or what other activity is occurring on the tables concerned.
Through the use of undo segments Oracle guarantees that if a query succeeds, the
result will be consistent. However, if your undo segments are incorrectly configured,
the query may not succeed: a famous Oracle error, “ORA-1555 snapshot too old,” is
raised. This used to be an extremely difficult problem to fix with earlier releases of the
database, but from release 9i onward you should always be able to avoid it.
I Is for Isolation
The principle of isolation states that an incomplete (that is, uncommitted) transaction
must be invisible to the rest of the world. While the transaction is in progress, only the
one session that is executing the transaction is allowed to see the changes: all other
sessions must see the unchanged data, not the new values. The logic behind this is, first,
that the full transaction might not go through (remember the principle of atomicity?)
and that therefore no other users should be allowed to see changes that might be
reversed. And second, during the progress of a transaction the data is (in business terms)
incoherent: there is a short time when the employee has had his salary changed, but not
his grade. Transaction isolation requires that the database must conceal transactions
in progress from other users: they will see the preupdate version of the data until the
transaction completes, when they will see all the changes as a consistent set. Again,
Oracle guarantees transaction isolation through use of undo segments.
D Is for Durability
The principle of durability states that once a transaction completes with a COMMIT, it
must be impossible for the database to lose it. During the time that the transaction is
in progress, the principle of isolation requires that no one (other than the session
concerned) can see the changes it has made so far. But the instant the transaction
completes, it must be broadcast to the world, and the database must guarantee that the
change is never lost: a relational database is not allowed to lose data. Oracle fulfils this
requirement through the use of logfiles. Logfiles come in two forms: online redo log
files, and archive redo log files. These are dealt with in detail in Chapter 18. For now,
remember that it is impossible for a properly configured Oracle database to lose data.
Of course, data can be lost through user error: inappropriate DML, or dropping objects.
But as far as Oracle and the DBA are concerned, such events are transactions like any
other: according to the principle of durability, they are absolutely nonreversible.
ch09.indd 3ch09.indd 3 6/29/2005 12:17:32 PM6/29/2005 12:17:32 PM

Oracle Database 10g OCP Certification All-in-One Exam Guide
4
All-in-1 / Oracle Database 10g Certification All-in-One / Watson & Bersinic / 5790-3 /Chapter 9
TIP If a database ever loses data, Management’s first, and fully justified,
reaction is to fire the DBA. Everyone knows that a properly configured
Oracle database won’t lose data; therefore, it must be the administrator’s
fault. Careers have been broken for this reason.
Executing SQL statements
The whole of the SQL language is only a dozen or so commands. The ones we are
concerned with here are
• SELECT
• INSERT
• UPDATE
• DELETE
• COMMIT
• ROLLBACK
Remember that from release 9i Oracle has included a very efficient and powerful
MERGE command, but since the end result of a merge is identical to a combination
of INSERT, UPDATE, and DELETE, there is no need to discuss it here.
Executing a SELECT Statement
The SELECT command retrieves data. A SELECT statement is executed in stages: the
server process executing the statement will first check whether the blocks containing
the data required are already in memory, in the database buffer cache. If they are, then
execution can proceed immediately. If they are not, the server must locate them on
disk and copy them into the database buffer cache.
EXAM TIP Always remember that server processes read blocks from datafiles
into the database buffer cache, but DBWn writes blocks from the database
buffer cache to the datafiles.
Once the data blocks required for the query are in the database buffer cache, any
further processing (such as sorting or aggregation) is carried out in the PGA of the
session. When the execution is complete, the result set is returned to the user process.
How does this relate to the ACID test? For read consistency, if the query encounters
a block that has been changed since the time at which the query started, the server
process will go to the undo segment that protected the change, locate the old version
of the data, and (for the purposes of the current query only) roll back the change.
Thus any changes initiated after the query commenced will not be seen. Clearly, if the
data needed to do this rollback is no longer in the undo segments, this mechanism
will not work. That is when you get “ORA-1555: snapshot too old.”
ch09.indd 4ch09.indd 4 6/29/2005 12:17:33 PM6/29/2005 12:17:33 PM

Chapter 9: Manipulating Database Data
5
PART I
All-in-1 / Oracle Database 10g Certification All-in-One / Watson & Bersinic / 5790-3 /Chapter 9
Executing an Update Statement
For any DML operation, it is necessary to work on both data blocks and undo blocks,
and also to generate redo: the A, C, and I of the ACID test require generation of undo;
the D requires generation of redo.
EXAM TIP Remember, “undo” is not the opposite of “redo”! Redo protects
all block changes, no matter whether it is a change to a block of a table segment,
an index segment, or an undo segment. As far as redo is concerned, an undo
segment is just another segment, and any changes to it must be made durable.
The first step in executing DML is the same as executing SELECT: the required
blocks must be found in memory or copied into memory from disk. The only change
is that an empty (or expired—more of that in Chapter 16) block of an undo segment
is needed too. From then on, things are a bit more complicated.
First, locks must be placed on any rows and associated index keys that will be
affected by the operation. This process is covered in Chapter 17.
Then the redo is generated: the server process writes to the log buffer the changes
that are going to be applied to the data blocks. This generation of redo is applied to
both table block changes and undo block changes: if a column is to be updated, then
the new value of the column is written to the log buffer (which is the change that will
be applied to the table block), and also the old value (which is the change that will be
applied to the undo block). If the column is part of an index key, then the changes to
be applied to the index are also written to the log buffer, together with an undo block
change to protect the index changes.
Having generated the redo, the update is carried out in the database buffer cache:
the block of table data is updated with the new version of the changed column, and the
old version of the changed column is written to the block of an undo segment. From
this point until the update is committed, all queries from other sessions addressing the
changed row will be redirected to the undo data. Only the session that is doing the
update will see the actual current version of the row in the table block. The same
principle applies to any associated index changes.
As a simple example, consider this statement:
update emp set sal=sal*1.1 where empno=7934;
To execute this statement, the block of table data containing the row for employee
number 7934 (and possibly several other rows too, if the rows are smaller than the
block) is copied into the database cache and a block of an undo segment is copied
into the cache. Then your server process writes to the log buffer the old version of the
sal column (which is the change to be applied to the block of undo) and the new
version of the sal column (which is the change to be applied to the block of table
data). Finally, the blocks themselves are updated. And remember that because SQL
is a set-oriented language, if there were many rows in the emp table with the same
empno, they would all be updated by the one statement. But because empno will be
a primary key, that can’t happen.
ch09.indd 5ch09.indd 5 6/29/2005 12:17:34 PM6/29/2005 12:17:34 PM

Oracle Database 10g OCP Certification All-in-One Exam Guide
6
All-in-1 / Oracle Database 10g Certification All-in-One / Watson & Bersinic / 5790-3 /Chapter 9
Executing Insert and Delete Statements
Conceptually, INSERT and DELETE are managed in the same fashion as an UPDATE.
Redo generation is exactly the same: all changes to be made to data and undo blocks
are first written out to the log buffer. The difference is in the amount of undo generated.
When a row is inserted, the only undo generated consists of writing out the new rowid
to the undo block. This is because to roll back an INSERT, the only information Oracle
requires is the rowid, so that a
delete from <table> where rowid=<rowid of the new row>
statement can be executed. For a DELETE, the whole row is written to the undo block,
so that the deletion can be rolled back if need be by inserting the complete row back
into the table.
A more normal DELETE statement might be
delete from emp where empno=7934;
which will delete the one row (if 7934 really is unique) from the table, writing it out
to the undo block as it does it.
TIP Always include a WHERE clause in any UPDATE (or DELETE) statement;
otherwise, you will UPDATE (or DELETE) every row in the table.
Executing a Rollback
Remember that if anything goes wrong, rollback of transactions in progress is completely
automatic, carried out by background processes. For example, if the session that
initiated the transaction fails (perhaps the PC running the user process reboots, or
the network link goes down), then the PMON will detect that there is a problem,
and roll back the transaction. If the server reboots, then on startup SMON will detect
the problem and initiate a rollback. A manual rollback requires the user to issue the
ROLLBACK command. But however the rollback is initiated, the mechanism is identical:
in the case of an UPDATE, the pre-update versions of the columns are copied from the
undo block back to the table blocks. To roll back an INSERT, Oracle retrieves the rowid
of the inserted row from the undo block and uses it as the key for a delete on the table.
To roll back a DELETE, Oracle constructs a complete insert statement from the data in
the undo block. Thus, Oracle’s implementation of the ROLLBACK command is to use
undo data to construct and execute another statement that will reverse the effect of
the first statement.
TIP A rollback will itself generate more redo as it executes, perhaps rather
more than the original statement.
ch09.indd 6ch09.indd 6 6/29/2005 12:17:35 PM6/29/2005 12:17:35 PM

Chapter 9: Manipulating Database Data
7
PART I
All-in-1 / Oracle Database 10g Certification All-in-One / Watson & Bersinic / 5790-3 /Chapter 9
If you do omit a WHERE clause—as by saying delete from emp;—and so
delete all of the several million rows in the table, you can roll back the changes. During
the deletion, your server process will have copied the rows to an undo segment as it
deleted them from the table: ROLLBACK will insert them back into the table, and no
one will ever know you made the mistake. Unless, of course, you typed COMMIT....
Executing a Commit
Commit processing is where many people (and even some experienced DBAs) show an
incomplete, or indeed completely inaccurate, understanding of the Oracle architecture.
When you say COMMIT, all that happens physically is that LGWR flushes the log buffer
to disk. DBWn does absolutely nothing. This is one of the most important performance
features of the Oracle database.
To make a transaction durable, all that is necessary is that the changes that make
up the transaction be on disk: there is no need whatsoever for the actual data to be on
disk. If the changes are on disk, in the form of multiplexed redo log files, then in the
event of damage to the database the transaction can be reinstantiated by restoring the
datafiles from a backup taken before the damage occurred and applying the changes
from the redo log. This process is covered in detail in later chapters; for now, just hang
on to the fact that a COMMIT involves nothing more than flushing the log buffer to
disk, and flagging the transaction as complete.
This is why a transaction involving millions of updates in thousands of tables over
many minutes or hours can be committed in a fraction of a second. Because LGWR
writes in very nearly real time, virtually all the transaction’s changes are on disk already.
When you say COMMIT, LGWR actually does write in real time: your session will hang
until the write is complete. This delay will be the length of time it takes to flush the
last bit of redo from the log buffer to disk, which will take only milliseconds. Your
session is then free to continue, and from then on all other sessions will no longer
be redirected to the undo blocks when they address the changed table, unless the
principle of consistency requires it.
EXAM TIP What does DBWn do when you say commit? Absolutely nothing.
Having said that DBWn has nothing to do with commit processing, it does of
course write changed, or “dirty,” blocks to disk—eventually. The algorithm used is
intended to ensure that while changed blocks do get to disk, they will not be written
so quickly as to impact on normal working. If DBWn never wrote blocks to disk, there
would be a huge amount of work for it to do when a checkpoint was finally needed.
The exception is when a checkpoint is issued: these are the rare occasions (typically,
only during an orderly shutdown of the database and instance) when CKPT instructs
DBWn to write all dirty blocks to the datafiles.
ch09.indd 7ch09.indd 7 6/29/2005 12:17:36 PM6/29/2005 12:17:36 PM

Oracle Database 10g OCP Certification All-in-One Exam Guide
8
All-in-1 / Oracle Database 10g Certification All-in-One / Watson & Bersinic / 5790-3 /Chapter 9
EXAM TIP In normal running, DBWn writes only a few dirty buffers to disk;
when a checkpoint is signaled, it writes all dirty buffers to disk.
Where there is often confusion is that the stream of redo written out to the redo log
files by LGWR will contain changes for both committed and uncommitted transactions.
Furthermore, at any given moment DBWn may or may not have written out changed
blocks of data segments or undo segments to the datafiles for both committed and
uncommitted transactions. So in principle, your database on disk is corrupted: the
datafiles may well be storing uncommitted work and be missing committed changes.
But in the event of a crash, the stream of redo on disk always has enough information
to reinstantiate any committed transactions that are not in the datafiles (by use of the
changes applied to data blocks), and to reinstantiate the undo segments (by use of the
changes applied to undo blocks) needed to roll back any uncommitted transactions
that are in the datafiles.
DDL and Transaction Control
The COMMIT and ROLLBACK statements apply only to DML. You cannot roll back a
DDL statement: once executed, it is immediately durable. If it were possible to see the
source code for (for example) the CREATE TABLE command, it would be obvious why.
When you create a table, you are in fact doing a transaction against some data dictionary
tables: at the very least, you are inserting a row into SYS.TAB$, a data dictionary table
with one row to define every table in the database, and one or more rows into SYS.COL$,
a data dictionary table with one row for the definition of every column of every table
in the database. Then the command concludes with a COMMIT. This is to protect the
data dictionary: if the COMMIT were not built into the CREATE TABLE command, the
possibility of an incomplete transaction would arise, and an incomplete transaction
in the data dictionary could have appalling side effects.
The So-Called “Auto-Commit”
To conclude this discussion of commit processing, it is necessary to remove any
confusion about what is often called “auto-commit,” or sometimes “implicit commit.”
You will often hear it said that in some situations Oracle will “auto-commit.” One of
these situations is when doing DDL, as just described; another is when you exit from
a user process such as SQL*Plus.
Quite simply, there is no such thing as an automatic commit. When you execute
a DDL statement, a perfectly normal COMMIT is included in the source code that
implements the DDL command. But what about when you exit from your user process?
If you are using SQL*Plus on a Windows terminal (never mind what operating system
the database server is running) and you issue a DML statement followed by an “exit,”
your transaction will be committed. This is because a COMMIT statement is built into
the SQL*Plus “exit” command: if we could see the source code, it would be obvious.
But what if you click in the top-right corner of the SQL*Plus window? The window will
ch09.indd 8ch09.indd 8 6/29/2005 12:17:37 PM6/29/2005 12:17:37 PM

Chapter 9: Manipulating Database Data
9
PART I
All-in-1 / Oracle Database 10g Certification All-in-One / Watson & Bersinic / 5790-3 /Chapter 9
close, and if you log in again, you will see that the transaction has been rolled back. This
is because the programmers who wrote SQL*Plus for Microsoft Windows included a
ROLLBACK statement in the code that is executed when you close the window. By
contrast, if you are using the X Window version of SQL*Plus, you will find that closing
the window commits the transaction. So whether you get an “auto-commit” when you
exit from a program in various ways is entirely dependent on how your programmers
wrote the exit code. The Oracle server will simply do what it is told to do.
Of course, a disorderly exit from the user process, such as killing it with an operating
system utility, will be detected by PMON, and an active transaction will always be
rolled back.
Exercise 9-1: Transaction Isolation,
Read Consistency, and COMMIT
It is time to experiment with some SQL commands, and particularly to illustrate
some aspects of transaction control. For this exercise, open two SQL*Plus sessions
(or iSQL*Plus if you prefer), log on as the same user in both sessions, and run the
commands that follow in the two sessions.
In Your First Session In Your Second Session
create table t1 as select *
from all users;
select count(*) from t1; select count(*) from t1;
Results are the same in both sessions.
delete from t1;
select count(*) from t1; select count(*) from t1;
Results differ because of the principle of isolation.
rollback;
select count(*) from t1; select count(*) from t1;
Results are the same in both sessions.
delete from t1;
select count(*) from t1; select count(*) from t1;
create view v1 as select * from
t1;
select count(*) from t1; select count(*) from t1;
rollback;
select count(*) from t1; select count(*) from t1;
Oh dear! The DDL statement committed the transaction, so it can’t be rolled back.
drop view v1;
drop table t1;
ch09.indd 9ch09.indd 9 6/29/2005 12:17:38 PM6/29/2005 12:17:38 PM

Oracle Database 10g OCP Certification All-in-One Exam Guide
10
All-in-1 / Oracle Database 10g Certification All-in-One / Watson & Bersinic / 5790-3 /Chapter 9
DML and Integrity Constraints
By default, integrity constraints are always enforced during DML, at statement execution
time. When an integrity constraint is violated by a statement, the whole statement
is rolled back. For example, a statement that attempts to update many rows might
successfully update a number of rows but then hit a problem: execution will cease,
and the successful updates already carried out by the statement will be reversed. It
makes no difference what the problem is. For instance, it could be an integrity constraint
or perhaps a space problem.
EXAM TIP If one statement in a multistatement transaction violates a
constraint, only that one statement is rolled back; the rest of the transaction
remains intact and uncommitted.
The various constraint errors that can be raised by the various DML statements are
summarized next, with examples of the messages.
Constraint Possible Errors
Foreign key INSERT and UPDATE on the child table: the value must exist in the parent table.
Error:
ORA-02291: integrity constraint (SCOTT.FK_DEPTNO) violated - parent key
not found
UPDATE and DELETE on the parent table: there must be no dependent rows in
the child table.
Error:
ORA-02292: integrity constraint (SCOTT.FK_DEPTNO) violated - child
record found
Not null INSERT and UPDATE: cannot insert without a value, or modify the value to null.
Error:
ORA-01400: cannot insert NULL into (“SCOTT”.“EMP”.“EMPNO”)
Unique INSERT and UPDATE: cannot have any value that already exists in the table.
Multiple nulls are permitted.
Error:
ORA-00001: unique constraint (SCOTT.PK_DEPT) violated
Primary key Equivalent to a unique constraint modified with a not-null constraint: both
sets of rules apply.
Error: Same as for unique
TIP Programmers should trap these errors in their exceptions clauses and
take appropriate action to deal with the problem.
ch09.indd 10ch09.indd 10 6/29/2005 12:17:39 PM6/29/2005 12:17:39 PM

Chapter 9: Manipulating Database Data
11
PART I
All-in-1 / Oracle Database 10g Certification All-in-One / Watson & Bersinic / 5790-3 /Chapter 9
Data Pump
In the normal course of events, ordinary SELECT and DML commands are used to
extract data from the database and to insert data into it, but there are occasions when
you will need a much faster method for bulk operations. There are many reasons why
it may be desirable to extract large amounts of data and the associated object definitions
from a database in a form that will allow them to be easily loaded into another. One
obvious purpose is backup, but there are others, such as archiving of historical data
before deleting it from the live system, or to transfer data between production and test
environments, or between an online system and a data warehouse.
Historically, Oracle provided the Export and Import utilities. These were effective
(and they are still available with release 10g), but they suffer from the limitation of
being client/server tools: they are just user processes, like any other. The Export utility
connects to the database via a server process and issues SELECT statements: the data
retrieved by the server process is passed back to the Export user process, where it is
formatted and written out to a disk file. Similarly, the Import utility user process logs
onto the instance via a server process and then reads the disk file produced by Export
and constructs DDL and insert statements to create tables and other objects and load
the data into them. Release 10g introduces the Data Pump facility. Functionally, the
results are the same as the old Export/Import utilities: large amounts of data can be
extracted from one database and transferred into another. But the implementation is
totally different, and far superior. Note also that the Data Pump and Export/Import
dump file formats are completely different. Data Pump export command-line options
are shown in Figure 9-1.
Data Pump Architecture
Data Pump is a server-side utility. You initiate Data Pump jobs from a user process,
either SQL*Plus or through Enterprise Manager, but all the work is done by server
processes. This improves performance dramatically over the old Export/Import utilities,
because the Data Pump processes running on the server have direct access to the
datafiles and the SGA; they do not have to go via a session. Also, it is possible to launch
a Data Pump job and then detach from it, leaving it running in the background. You
can reconnect to the job to monitor its progress at any time.
There are a number of processes involved in a Data Pump job, two queues, a number
of files, and one table. First, the processes.
The user processes are expdp and impdp (for Unix) or expdp.exe and impdp.exe
(Windows). These are used to launch, control, and monitor Data Pump jobs.
Alternatively, there is an Enterprise Manager interface, which will be described later.
The expdp or impdp user process establishes a session against the database through
ch09.indd 11ch09.indd 11 6/29/2005 12:17:40 PM6/29/2005 12:17:40 PM

Oracle Database 10g OCP Certification All-in-One Exam Guide
12
All-in-1 / Oracle Database 10g Certification All-in-One / Watson & Bersinic / 5790-3 /Chapter 9
a normal server process. This session then issues commands to control and monitor
Data Pump jobs. When a Data Pump job is launched, at least two processes are started:
a Data Pump Master process (the DMnn) and one or more worker processes (named
DWnn). If multiple Data Pump jobs are running concurrently, each will have its own
DMnn process and its own DWnn processes. As the name implies, the master process
controls the workers. If you have enabled parallelism, then each DWnn may make use
of two or more parallel execution servers (named Pnnn.)
Figure 9-1 Data Pump export command-line options
ch09.indd 12ch09.indd 12 6/29/2005 12:17:41 PM6/29/2005 12:17:41 PM

Chapter 9: Manipulating Database Data
13
PART I
All-in-1 / Oracle Database 10g Certification All-in-One / Watson & Bersinic / 5790-3 /Chapter 9
Two queues are created for each Data Pump job: a control queue and a status
queue. The DMnn divides up the work to be done and places individual tasks that
make up the job on the control queue. The worker processes pick up these tasks and
execute them, perhaps making use of parallel execution servers. This queue operates
on a deliver-exactly-once model: messages are enqueued by the DMnn and dequeued
by the worker that picks them up. The status queue is for monitoring purposes: the
DMnn places messages on it describing the state of the job. This queue operates on a
publish-and-subscribe model: any session (with appropriate privileges) can query the
queue to monitor the job’s progress.
The files generated by Data Pump come in three forms: SQL files, dump files,
and log files. SQL files are DDL statements describing the objects included in the job.
You can choose to generate them (without any data) as an easy way of getting this
information out of the database, perhaps for documentation purposes or as a set of
scripts to re-create the database. Dump files contain the exported data. This is formatted
with XML tags. The use of XML means that there is a considerable overhead in dump
files for describing the data. A small table like the REGIONS table in the HR sample
schema will generate a 94KB dump file, but while this overhead may seem
disproportionately large for a tiny table like that, it becomes trivial for larger tables.
The log files describe the history of the job run.
EXAM TIP Remember the three Data Pump file types: SQL files, log files,
and dump files.
Finally, there is the control table. Created for you by the DMnn when you launch
a job, it is used both to record the job’s progress and to describe it. It is included in
the dump file as the final item of the job.
Directories
Data Pump reads and writes files in an Oracle directory. An Oracle directory gives a
layer of abstraction between the user and the operating system: you as DBA create
a directory within the database, which points to a physical path within the operating
system file system. Directories can be created either from a SQL*Plus prompt as shown
in Figure 9-2 or from within Database Control. To see information about directories,
query the view DBA_DIRECTORIES. Each directory has a name, an owner, and the
physical path to which it refers. Note that Oracle does not verify whether the path
exists when you create the directory—if it does not, or if the operating system user
who owns the Oracle software does not have permission to read and write to it, you
will only get an error when you actually use Data Pump. Having created a directory,
you must give the Oracle user who will be running Data Pump permission to read
and write to it, just as your system administrators must give the operating system user
permission to read and write to the physical path.
ch09.indd 13ch09.indd 13 6/29/2005 12:17:42 PM6/29/2005 12:17:42 PM
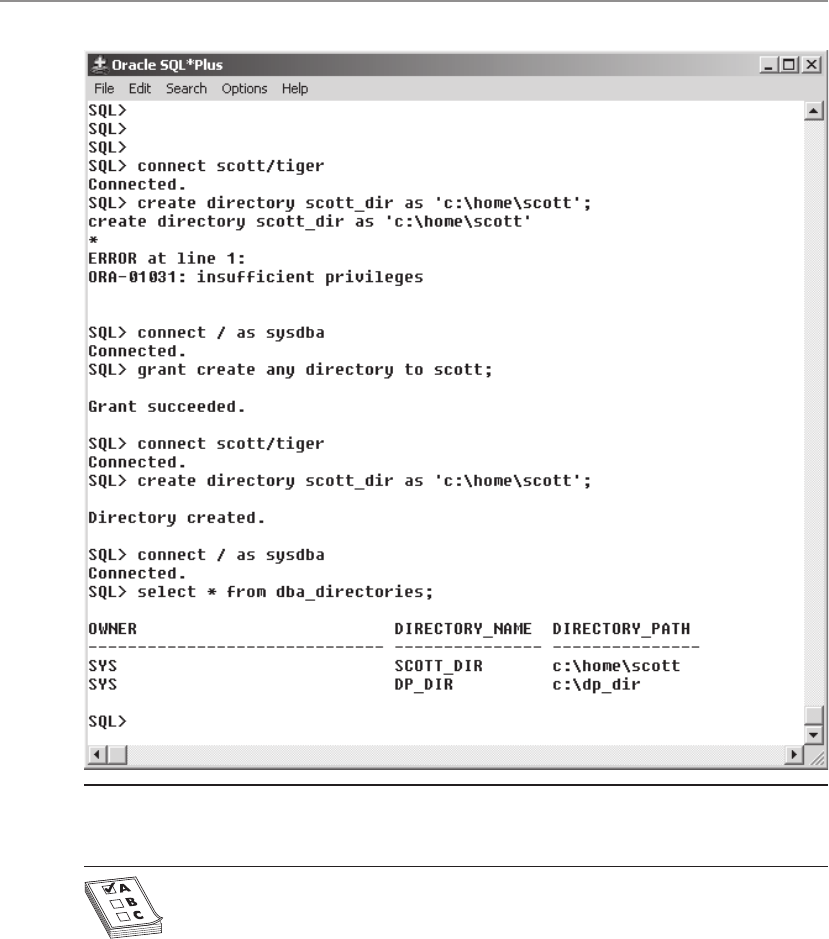
Oracle Database 10g OCP Certification All-in-One Exam Guide
14
All-in-1 / Oracle Database 10g Certification All-in-One / Watson & Bersinic / 5790-3 /Chapter 9
EXAM TIP Oracle directories are always owned by user SYS, but to create
them, you must have been granted the appropriate privilege, CREATE
DIRECTORY.
Directories can be contrasted with the initialization parameter UTL_FILE_DIR. This
is a parameter that allows Oracle, through PL/SQL procedures, to write to the file system
of the database server machine, but it is a far cruder method: it is not possible to grant
permissions within Oracle on UTL_FILE_DIR directories. Thus, if the parameter is set to
UTL_FILE_DIR=/tmp
Figure 9-2 Creating directories from the command line
ch09.indd 14ch09.indd 14 6/29/2005 12:17:42 PM6/29/2005 12:17:42 PM

Chapter 9: Manipulating Database Data
15
PART I
All-in-1 / Oracle Database 10g Certification All-in-One / Watson & Bersinic / 5790-3 /Chapter 9
then any Oracle user can completely fill your /tmp directory. Furthermore, if it is set to
UTL_FILE_DIR=*
then anyone can write to any directory that the Oracle owner has permission on, which
is a shocking security risk.
TIP Writing to the UTL_FILE_DIR is usually done with the PL/SQL package
UTL_FILE. Make sure that execute permissions on this package are strictly
limited.
Direct Path or External Table Path?
Data Pump has two methods for loading and unloading data: the direct path, and the
external table path. The direct path bypasses the database buffer cache. For an export,
Data Pump reads the datafiles directly from disk, extracts and formats the content, and
writes it out as a dump file. For an import, Data Pump reads the dump file, uses its
content to assemble blocks of table data, and writes them directly to the datafiles. The
write is above the “high-water mark” of the table. The high-water mark is a marker in
the table above which no data has ever been written. Once the load is complete, Data
Pump shifts the high-water mark up to include the newly written blocks, and the rows
within them are then visible to other users. This is the equivalent of a COMMIT. No
undo is generated, and if you wish, you can switch off the generation of redo as well.
Direct path is therefore extremely fast, and furthermore, it should have no impact on
your end users because interaction with the SGA is kept to a minimum.
The external table path uses the database buffer cache. Even though Data Pump is
manipulating files that are external to the database, it uses the database buffer cache
as though it were reading and writing an internal table. For an export, Data Pump reads
blocks from the datafiles into the cache through a normal SELECT process. From there,
it formats the data for output to a dump file. During an import, Data Pump constructs
standard insert statements from the content of the dump file and executes them by
reading blocks from the datafiles into the cache, where the insert is carried out in the
normal fashion. As far as the database is concerned, external table Data Pump jobs look
like absolutely ordinary (though perhaps rather large) SELECT or INSERT operations.
Both undo and redo are generated, as they would be for any normal DML statement.
Your end users may well complain while these jobs are in progress! Commit processing
is absolutely normal.
So what determines whether Data Pump uses the direct path or the external table
path? You as DBA have no control: Data Pump itself makes the decision according to
the complexity of the objects. Only simple structures, such as heap tables without
active triggers, can be processed through the direct path; more complex objects such
as clustered tables force Data Pump to use the external table path because it requires
interaction with the SGA in order to resolve the complexities. In either case, the dump
file generated is identical.
ch09.indd 15ch09.indd 15 6/29/2005 12:17:43 PM6/29/2005 12:17:43 PM

Oracle Database 10g OCP Certification All-in-One Exam Guide
16
All-in-1 / Oracle Database 10g Certification All-in-One / Watson & Bersinic / 5790-3 /Chapter 9
EXAM TIP The external table path insert uses a regular commit, like any
other DML statement. A direct path insert does not use a commit: it simply
shifts the high-water mark of the table to include the newly written blocks.
Using Data Pump in Network Mode
It is possible to use Data Pump to transfer data from one database to another, without
staging the data on disk at all. Consider this example of launching Data Pump from
the command-line utility impdp:
impdp userid=scott/tiger tables=dept,emp network_link=L1 directory=dp_dir
This command will launch a Data Pump export against the local database, logging
on as user SCOTT with password TIGER. The Data Pump job will then read two tables,
DEPT and EMP, in SCOTT’s schema and transfer them across the network to the database
identified by the database link L1, where a Data Pump import job will insert the data.
The export and the import processes will run concurrently, the one feeding the other.
Note that even though the data is never written out as an operating system file, it is
still necessary to specify a directory, in order that Data Pump can write out logging
information.
TIP A database link defines a path to a remote database.
Exercise 9-2: Using Data Pump Export Through
Enterprise Manager Database Control
This exercise will create a table and export it using the Database Control interface to
Data Pump.
1. Create a directory to be used by Data Pump. For example, from a command
prompt,
md c:\dp_dir
2. Using SQL*Plus, log on to your instance as user SYSTEM and create a table to
be used for testing Data Pump.
create table dp_test as select * from all_users;
select count * from dp_test;
ch09.indd 16ch09.indd 16 6/29/2005 12:17:44 PM6/29/2005 12:17:44 PM
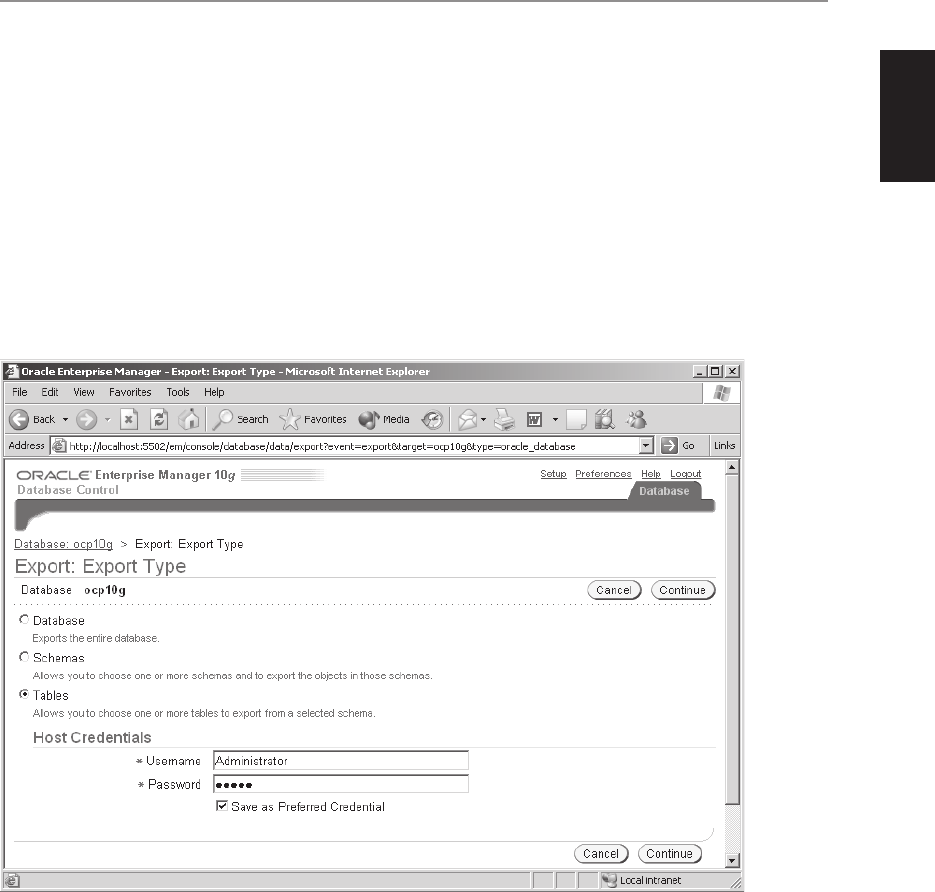
Chapter 9: Manipulating Database Data
17
PART I
All-in-1 / Oracle Database 10g Certification All-in-One / Watson & Bersinic / 5790-3 /Chapter 9
3. Still within SQL*Plus, create the Oracle directory to be used by Data Pump
and grant all users permission to read and write to the directory.
create directory dp_dir as 'c:\dp_dir';
grant all on directory dp_dir to public;
exit;
4. Log on to Database Control as user SYSTEM.
5. From the database home page, click the Maintenance tab.
6. In the Utilities section, click the Export To Files link.
7. On the Export: Export Type window shown here, select Tables and enter an
operating system username and password with read/write permissions on the
directory specified in Step 3.
ch09.indd 17ch09.indd 17 6/29/2005 12:17:45 PM6/29/2005 12:17:45 PM
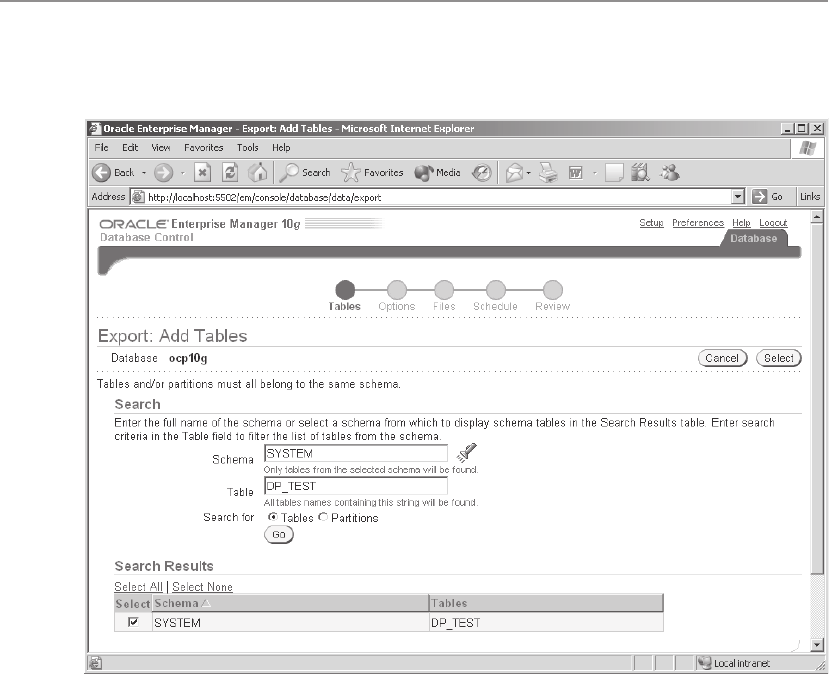
Oracle Database 10g OCP Certification All-in-One Exam Guide
18
All-in-1 / Oracle Database 10g Certification All-in-One / Watson & Bersinic / 5790-3 /Chapter 9
8. On the Export: Add Tables window shown here, click Add, and specify
SYSTEM as the schema and “DP_TEST” as the table. Click Select and Next.
9. On the Export: Options window, choose the directory DP_DIR as the location
for the logfile, and click Next.
10. On the Export: Files window, choose the directory DP_DIR as the location
and click Finish.
11. In the Export: Review window shown next, take a look at the script that has
been generated to see how you would run the job using the Data Pump API,
and click Submit Job.
ch09.indd 18ch09.indd 18 6/29/2005 12:17:46 PM6/29/2005 12:17:46 PM
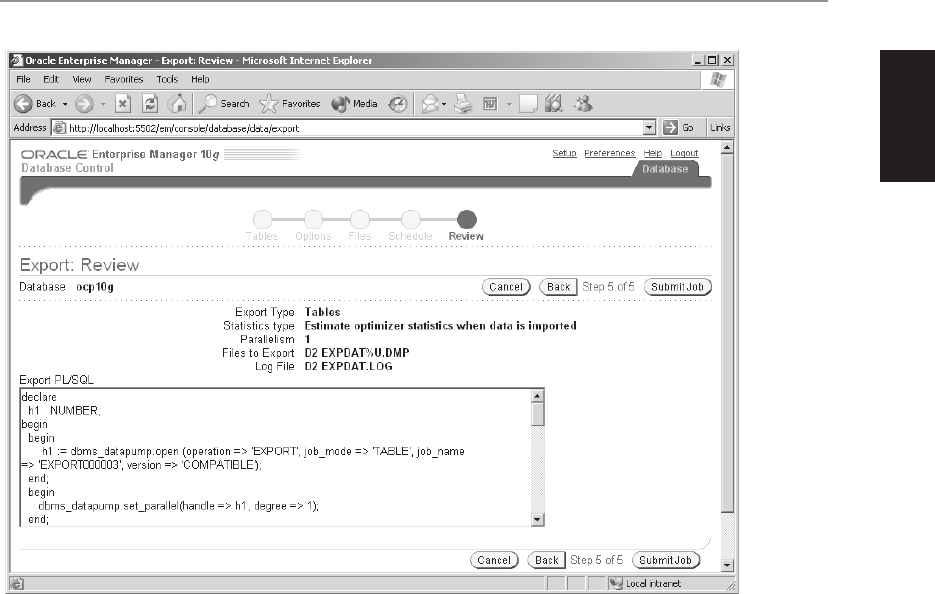
Chapter 9: Manipulating Database Data
19
PART I
All-in-1 / Oracle Database 10g Certification All-in-One / Watson & Bersinic / 5790-3 /Chapter 9
12. On the Status window, click OK.
13. From an operating system prompt, navigate to the directory specified in Step
3. There will be a file EXPDAT01.DMP, which is the export dump file, and a
logfile, EXPDAT.LOG. Examine the logfile to check that the job did complete
successfully.
Exercise 9-3: Using Data Pump Import
Through impdp
This exercise will use the command-line utility impdp to bring the exported table
back into the database with Data Pump.
1. Log in to the instance as user SYSTEM through SQL*Plus, and drop the table
created in Exercise 9-2:
drop table dp_test;
exit;
2. From an operating system prompt, issue this command:
impdp userid=system/oracle dumpfile=expdat01.dmp directory=dp_dir
3. When the import has completed, connect to the instance with SQL*Plus as
SYSTEM and confirm that the table has been imported successfully.
select count(*) from dp_test;
ch09.indd 19ch09.indd 19 6/29/2005 12:17:46 PM6/29/2005 12:17:46 PM

Oracle Database 10g OCP Certification All-in-One Exam Guide
20
All-in-1 / Oracle Database 10g Certification All-in-One / Watson & Bersinic / 5790-3 /Chapter 9
SQL*Loader
Data Pump reads and writes files in an Oracle proprietary format: it is used to transfer
data into and out of, or between, Oracle databases. But in many cases you will be faced
with a need to do a bulk upload of datasets generated from some third-party system.
This is where SQL*Loader comes in. The input files may be generated by anything, but
so long as the layout conforms to something that SQL*Loader can understand, it will
upload the data successfully. Your task as DBA is to configure a SQL*Loader controlfile
that can interpret the contents of the input datafiles; SQL*Loader will then insert the
data, either using direct path or via the database buffer cache, in a similar fashion to
Data Pump. The crucial differences are, first, that SQL*Loader can read any file no
matter what its source, and second, that it is a user process like any other; unlike Data
Pump, it is not a server-side utility. It establishes a session against the instance and the
database via a server process.
SQL*Loader uses a number of files. The input datafiles are the source data that it
will upload into the database. These must conform to an agreed format. The controlfile
is a text file written by the DBA with directives telling SQL*Loader how to interpret the
contents of the input files, and what to do with the rows it extracts from them. Logfiles
summarize the success (or otherwise) of the job, while detailing any errors. Rows
extracted from the input files may be rejected by SQL*Loader (perhaps because they
do not conform to the format expected by the controlfile) or by the database (for
instance, insertion might violate an integrity constraint); in either case, they are written
out to a bad file. If rows are successfully extracted from the input but rejected because
they did not match some record selection criterion, they are written out to a reject file.
SQL*Loader command-line options are shown in Figure 9-3.
The SQL*Loader Controlfile
The controlfile is a text file instructing SQL*Loader on how to process the input
datafiles. It is possible to include the actual data to be loaded on the controlfile, but
you would not normally do this; usually, you will create one controlfile and reuse it,
on a regular basis, with different input datafiles. The formats that SQL*Loader can
understand are fixed record format, variable record format, and stream record format.
Remember that the examples following are very simple: the variety of input formats
that SQL*Loader can understand is limited only by your ingenuity in constructing a
controlfile.
The fixed record format is the most straightforward, as well as the fastest to process.
Each row of data is a fixed length, terminated with a carriage return character. Within the
rows, you use some character as a field delimiter. A fixed record controlfile such as this,
load data
infile 'fixed.dat' "fix 15"
into table names
fields terminated by ','
(first,last)
ch09.indd 20ch09.indd 20 6/29/2005 12:17:47 PM6/29/2005 12:17:47 PM
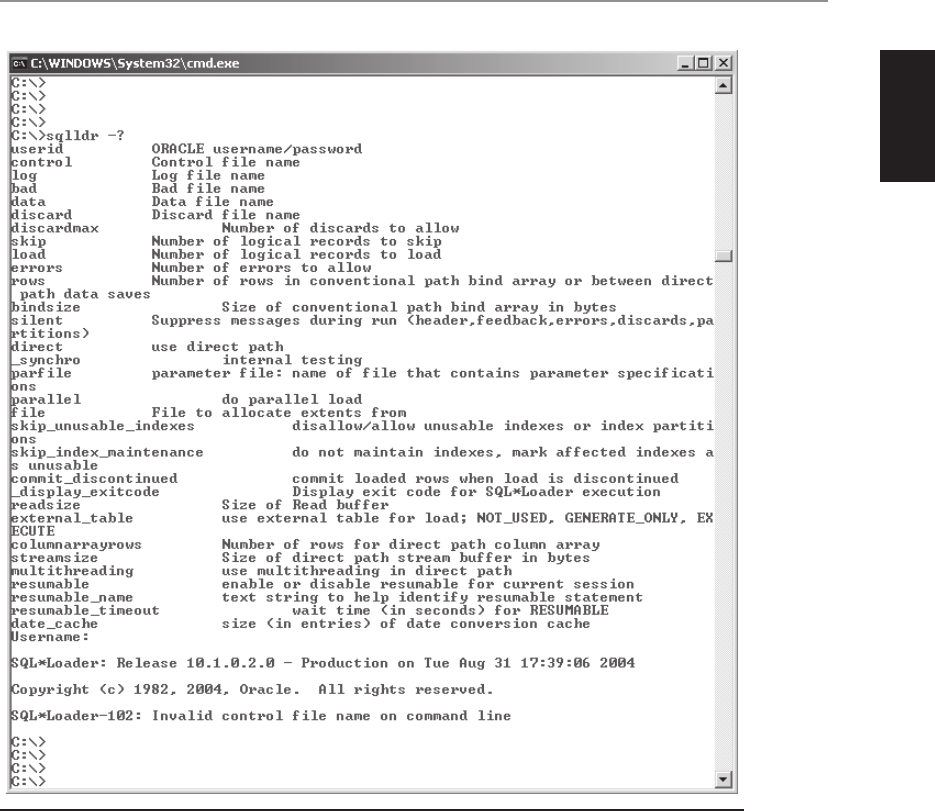
Chapter 9: Manipulating Database Data
21
PART I
All-in-1 / Oracle Database 10g Certification All-in-One / Watson & Bersinic / 5790-3 /Chapter 9
will read the file fixed.dat, parse it into rows 15 bytes long (note that the 15 bytes
must include one for the carriage return row terminator), divide the rows into two
fields, and insert them into the columns “first” and “last” of the table “names.”
A matching input datafile, called test.dat, could be
John,Watsonaaa
Damir,Bersinic
McGraw,Hillaaa
Figure 9-3 The SQL*Loader command-line options
ch09.indd 21ch09.indd 21 6/29/2005 12:17:48 PM6/29/2005 12:17:48 PM

Oracle Database 10g OCP Certification All-in-One Exam Guide
22
All-in-1 / Oracle Database 10g Certification All-in-One / Watson & Bersinic / 5790-3 /Chapter 9
Variable records include an entry at the head of each row to state how long the row
is. The length of this entry is included in the controlfile. The controlfile might be
load data
infile 'names.dat' "var 3"
into table names
fields terminated by ','
(first,last)
and a matching datafile would be
012John,Watson
015Damir,Bersinic
012McGraw,Hill
Note that the length of each row is a three-digit number, as specified in the
controlfile, and must include a character for the carriage return. Variable record
format is not as fast as fixed format but is faster than stream format.
Stream format requires SQL*Loader to do the most work. Rather than being given
any information about the length of the rows, SQL*Loader must scan each row for
the record terminator. This is the most flexible format but also the slowest to process.
The controlfile might be
load data
infile 'names.dat' "str '\n'"
into table names
fields terminated by ','
(first,last)
Note the use of the newline character, specified as “\n”. If you are familiar with the C
programming language, that will not be new. If not, note that a number of nonprintable
characters, such as the newline character, can be specified in this way: a leading
backslash, then a letter used to indicate the nonprintable character. The combination
“\n” is the most commonly used row delimiter (it indicates a line break), but tabs
or form feed characters can be used as well. A matching datafile for the preceding
controlfile might take the form
John,Watson
Damir,Bersinic
McGraw,Hill
As you can see, this format of input datafile is the easiest to generate. But it is also the
slowest to process.
TIP It may be very difficult to get a controlfile right, but once you have it, you
can use it repeatedly, with different input datafiles for each run. It is then the
responsibility of the feeder system to produce input datafiles that match your
controlfile, rather than the other way around.
ch09.indd 22ch09.indd 22 6/29/2005 12:17:49 PM6/29/2005 12:17:49 PM

Chapter 9: Manipulating Database Data
23
PART I
All-in-1 / Oracle Database 10g Certification All-in-One / Watson & Bersinic / 5790-3 /Chapter 9
It is necessary to study the Utilities Manual for a full description of all the formatting
capabilities of SQL*Loader, but in general you can assume that it is possible to construct
a controlfile that will understand just about any input datafile. However, do not think
that it is always easy.
Loading Methods
As with Data Pump, it is possible to use either a direct path or a conventional path
for loading data into database tables. But also as with Data Pump, there are restrictions.
Unlike when using Data Pump, you must tell SQL*Loader to use the direct path:
add the keyword DIRECT to the controlfile or optionally specify DIRECT=Y on the
SQL*Loader command line. Remember that a conventional load is a straightforward
insert, whereas for a direct load, the server process supporting the SQL*Loader session
assembles blocks in memory and writes them directly to the datafiles, bypassing the
database buffer cache. Here is a comparison of direct and conventional loads:
Conventional Path Load Direct Path Load
Uses COMMIT to make the
insert permanent
Uses a “data save” to include the new blocks in the table
Generates undo and redo Does not generate undo, and redo generation is optional
All constraints enforced Only primary key, unique, and not-null constraints enforced
Insert triggers fire Insert triggers do not fire
Works for all tables Can be used only for heap tables
No table locks Table is locked for DML during the duration of the load
TIP Direct Path loading is fast, but it has limitations!
Exercise 9-4: Using SQL*Loader
This exercise will insert some more rows into the table created in Exercise 9-2.
1. Using a text editor (such as Windows Notepad), create a SQL*Loader
controlfile, called STREAMIN.CTL, as follows:
load data
infile 'STREAMIN.DAT' "str \n"
append
into table dp_test
fields terminated by ','
(username,user_id)
Note that the “append” keyword allows SQL*Loader to insert into a table that
already contains rows.
ch09.indd 23ch09.indd 23 6/29/2005 12:17:49 PM6/29/2005 12:17:49 PM

Oracle Database 10g OCP Certification All-in-One Exam Guide
24
All-in-1 / Oracle Database 10g Certification All-in-One / Watson & Bersinic / 5790-3 /Chapter 9
2. Using a text editor as before, create the input datafile, to be called STREAMIN
.DAT, as follows:
John,100
Damir,200
McGraw,9999
3. From an operating system prompt, issue this command:
sqlldr userid=system/oracle control=STREAMIN.CTL
4. Log in to your instance with SQL*Plus, and confirm that the three new rows
have been inserted into the table:
select * from dp_test
Chapter Review
In this chapter you learned the internal mechanisms that Oracle uses to ensure
transactional consistency, according to the requirements of the relational database
model, and looked at what actually happens, in memory and on disk, when SQL
statements are executed. Following this investigation on executing individual DML
statements, you saw how the Data Pump and SQL*Loader utilities can be used for
bulk operations.
Questions
1. You issue a COMMIT command. Which of the following statements is correct?
(Choose two correct answers.)
A. DBWn writes the changed blocks to the datafiles.
B. LGWR writes the changes to the logfiles.
C. CKPT synchronizes the database buffer cache with the datafiles.
D. The transaction is made durable.
E. The transaction can be rolled back.
2. You issue an UPDATE command, and then a COMMIT. Put the following
actions in the correct order:
A. Data blocks are copied from the datafiles into the database buffer cache.
B. Data blocks in the cache are updated.
C. The log buffer is updated.
D. The changed blocks are flushed to disk.
E. The log buffer is flushed to disk.
3. User JOHN updates some rows and asks user DAMIR to log in and check the
changes before he commits them. Which of the following statements is true?
(Choose the best answer.)
ch09.indd 24ch09.indd 24 6/29/2005 12:17:50 PM6/29/2005 12:17:50 PM

Chapter 9: Manipulating Database Data
25
PART I
All-in-1 / Oracle Database 10g Certification All-in-One / Watson & Bersinic / 5790-3 /Chapter 9
A. DAMIR can see the changes but cannot alter them because JOHN will have
locked the rows.
B. DAMIR will not be able to see the changes.
C. JOHN must commit the changes, so that DAMIR can see them and if
necessary roll them back.
D. JOHN must commit the changes so that DAMIR can see them, but only
JOHN can roll them back.
4. User JOHN updates some rows but does not commit the changes. User
DAMIR queries the rows that JOHN updated. Which of the following
statements is true? (Choose three correct answers.)
A. DAMIR’s query will be redirected to the redo logs to show the original
version of the rows.
B. DAMIR’s session will roll back JOHN’s changes to show the original
version of the rows.
C. JOHN must commit the changes before DAMIR can see them.
D. DAMIR cannot see the rows that were updated, because they will be
locked.
E. If DAMIR’s query started after JOHN’s update, the principle of read
consistency means that he cannot see JOHN’s changes.
F. If DAMIR’s query started after JOHN’s update, the principle of isolation
means that he cannot see JOHN’s changes.
5. You are using Data Pump to upload rows into a table, and you wish to use
the direct path. Which of the following statements is correct? (Choose three
answers.)
A. You must include the “DIRECT” keyword in the Data Pump controlfile.
B. This is not possible if the table is in a cluster.
C. You must disable insert triggers on the table first.
D. You must enable insert triggers on the table first.
E. You have no control over this; Data Pump will use the direct path
automatically if it can.
F. Direct path is slower than the external table path because it doesn’t cache
data in memory.
6. You issue an INSERT command and then attempt to SELECT the rows you
inserted before committing them. Which of the following is true? (Choose the
best answer.)
A. You must commit the insert before you can see the rows.
B. You will see the new rows, even though they are uncommitted.
ch09.indd 25ch09.indd 25 6/29/2005 12:17:50 PM6/29/2005 12:17:50 PM

Oracle Database 10g OCP Certification All-in-One Exam Guide
26
All-in-1 / Oracle Database 10g Certification All-in-One / Watson & Bersinic / 5790-3 /Chapter 9
C. You must terminate the transaction with a COMMIT or ROLLBACK before
you can issue a SELECT statement.
D. You will see the new rows because your session will read them from an
undo segment.
7. You issue an INSERT statement, and it fails with the message “ORA-02291:
integrity constraint (HR.EMP_DEPT_FK) violated - parent key not found.”
Which of the following statements is true? (Choose the best answer.)
A. The transaction will have been rolled back.
B. The statement will have been rolled back.
C. You must create an index on the parent table before you can find parent keys.
D. All of the above are correct.
8. Which of the following is not a Data Pump file type? (Choose the best answer.)
A. Dump file
B. Logfile
C. Controlfile
D. SQL file
9. You launch a Data Pump export job to export a number of tables, which runs
for several hours. Which of the following is true? (Choose the best answer.)
A. The tables being exported will be locked throughout the run.
B. Transactions against the tables committed during the run will be included
in the export.
C. Transactions against the tables (committed or not) during the run will not
be included in the export.
D. SQL executed against the tables during the run will be written out to
a SQL file.
E. The DDL describing the tables will be written out to a SQL file.
10. Using SQL*Loader, place these file formats in order of speed to process, from
slowest to fastest:
A. Fixed record format
B. Stream record format
C. Variable record format
11. You want to transfer a large amount of data from one database to another: both
databases are on the same machine. What should be the quickest method?
(Choose the best answer.)
A. Use the Export/Import utilities.
B. Use Data Pump to write out the data, and a SQL*Loader direct load to
bring it in.
ch09.indd 26ch09.indd 26 6/29/2005 12:17:51 PM6/29/2005 12:17:51 PM

Chapter 9: Manipulating Database Data
27
PART I
All-in-1 / Oracle Database 10g Certification All-in-One / Watson & Bersinic / 5790-3 /Chapter 9
C. Use Data Pump in network mode.
D. Use Data Pump export to write out the data and then Data Pump import
to read it in.
12. Which of the following is not a SQL*Loader file? (Choose one answer.)
A. Bad file
B. Controlfile
C. Discard file
D. Good file
E. Logfile
13. You create a directory with the statement
create directory dp_dir as 'c:\tmp';
but when you try to use it with Data Pump, there is an error. Which of the
following could be true? (Choose three answers.)
A. The Oracle software owner has no permissions on c:\tmp.
B. The Oracle database user has no permissions on dp_dir.
C. The path c:\tmp does not exist.
D. The path c:\tmp must exist, or the “create directory” statement would have
failed.
E. If you use Data Pump in network mode, then there will be no need for a
directory.
F. Issuing the command grant all on ‘c:\tmp’ to public; may
solve some permission problems.
14. You launch a Data Pump job with expdp and then exit from the session.
Which of the following is true? (Choose two answers.)
A. The job will terminate.
B. The job will continue running in the background.
C. You cannot monitor the job once you have exited.
D. You can reattach to the job to monitor it.
E. The job will pause but can be restarted.
15. You run SQL*Loader on your PC, to insert data into a remote database. Which
of the following is true? (Choose the best answer.)
A. The input datafiles must be on your PC.
B. The input datafiles must be on the server.
C. Direct load is possible only if the input datafiles are on the server.
D. Direct load is only possible if you run SQL*Loader on the server, not on
the PC.
ch09.indd 27ch09.indd 27 6/29/2005 12:17:52 PM6/29/2005 12:17:52 PM

Oracle Database 10g OCP Certification All-in-One Exam Guide
28
All-in-1 / Oracle Database 10g Certification All-in-One / Watson & Bersinic / 5790-3 /Chapter 9
Answers
1. B and D. When you say commit, LGWR flushes the log buffer to disk, and the
transaction is made durable.
2. A, C, B, E, and D. Remember that everything happens in memory first, and
that your server process writes to the log buffer before writing the database
buffer cache. Then on commit, the log buffer is flushed to disk. The data
blocks may not be written for some time.
3. B. The principle of isolation means that only JOHN can see his uncommitted
transaction; DAMIR will not be able to see the changes.
4. B, C, and F. B is correct because that is how Oracle provides transaction
isolation. C is correct, again, because of isolation being maintained until
commit. F is correct because the principle of isolation, not read consistency,
means that DAMIR cannot see JOHN’s changes.
5. B, C, and E. B and C are correct because these are two of the limitations. E is
correct because this is a feature of Data Pump.
6. B. A session can always see its own transactions, committed or not.
7. B. The statement that throws an error is rolled back automatically; the rest of
the transaction remains intact and uncommitted.
8. C. The controlfile is wrong: it is used for SQL*Loader, not Data Pump. The
other three file types are those that Data Pump can generate.
9. C. Transactions against the affected tables during a long-running Data Pump
export job will not be included in the export file: the job is protected from
any changes.
10. A, C, and B. This is the correct order because SQL*Loader will process fixed-
length record format faster than variable-length record format or stream
record format.
11. C. Using Data Pump in network mode avoids the need to stage data on disk:
there is no reason not to use it when the databases are on the same machine.
12. D. The “good file” is not a SQL*Loader file. SQL*Loader does not produce a
file like this—only the other four.
13. A, B, and C. A and B could be reasons: remember to distinguish between the
operating system user who owns the software, and the Oracle user who only
exists within the database. C could also be a reason: at directory creation time,
Oracle does not check that the physical path is valid.
14. B and D. Data Pump jobs run independently of the session that launched
them, making it possible to disconnect from the job and then to reconnect for
monitoring purposes.
15. A. The input datafiles must be on your PC, because it is the SQL*Loader user
process that reads the input datafiles.
ch09.indd 28ch09.indd 28 6/29/2005 12:17:53 PM6/29/2005 12:17:53 PM

All-in-1 / Oracle Database 10g OCP Certification All-in-One / Watson, Bersinic / 5790-3/Ch10
CHAPTER 10
Programming Oracle
with PL/SQL
In this chapter you will learn how to
• Identify PL/SQL objects
• Describe triggers and triggering events
• Identify configuration options that affect PL/SQL performance
1
ch10.indd 1ch10.indd 1 7/11/2005 3:33:26 PM7/11/2005 3:33:26 PM

All-in-1 / Oracle Database 10g OCP Certification All-in-One / Watson, Bersinic / 5790-3
Oracle Database 10g OCP Certification All-in-One Exam Guide
2
PL/SQL is a programming language developed specifically for the Oracle database. It
extends the SQL language by providing procedural structures, and facilities for generating
user interface code. Theoretically, a database administrator may not need to be an
expert in PL/SQL; programming work should be done by the development staff. But
in practice, the more PL/SQL a DBA knows, the better. At the very least, you will need
to be able to identify PL/SQL objects that have problems (as is detailed in Chapter 14).
Furthermore, at most Oracle installations, the DBA will be expected to assist programmers
with writing code and when necessary to create PL/SQL objects as well.
Programming Languages and the Oracle Database
The Oracle database, like all ISO-compliant relational databases, supports the use
of Structured Query Language, or SQL. SQL is a set-oriented language designed for
retrieving and manipulating data in a client/server environment. It is very efficient at
this, but there are many occasions when your programmers will want to manipulate
rows one at a time, rather than in groups. Also, SQL does not have any facilities for
designing user interfaces. By contrast, procedural languages can manipulate individual
rows. They have commands that will allow navigation from one row to another, and
can include flow control structures.
SQL and Procedural Languages
To combine the advantages of SQL’s set-oriented structures with the control facilities
of a procedural language, your programmers need to use a language with elements of
both. The universally accepted approach is to embed SQL commands in procedural
code. There are two approaches to this. The pure client/server approach is to run the
procedural code on a client machine (either a user’s terminal or an application server)
and send the SQL commands it generates to the database server for execution. An
alternative is to run the procedural code, as well as the SQL, within the database. In
some ways, the second approach is more efficient: there is no network overhead, and all
the code is centrally stored and managed. But it means that the language is proprietary:
it will run within the database that is designed to run it, and nowhere else. A second
possible problem is that all the processing workload is concentrated within the database.
PL/SQL is Oracle’s proprietary third-generation language, which runs within the
database. You can use it to retrieve and manipulate data with SQL, while using procedural
constructs such as IF...THEN...ELSE or FOR or WHILE. The PL/SQL code can be stored
on a client machine and sent to the server for execution (this is known as “anonymous”
PL/SQL), or it can be stored within the database as a named block of code.
From release 8i of the Oracle database, it is also possible to use Java within the
database. Like PL/SQL, Java can be used to provide a blend of procedural code with
SQL statements. Since Java can run either on a client machine (typically, an application
server) or within the database, it gives you the option of distributing the processing
workload—at the cost of increased network traffic. And unlike PL/SQL, it is a
nonproprietary industry standard: if your application is written in Java, it should be
ch10.indd 2ch10.indd 2 7/11/2005 3:33:56 PM7/11/2005 3:33:56 PM

All-in-1 / Oracle Database 10g OCP Certification All-in-One / Watson, Bersinic / 5790-3
Chapter 10: Programming Oracle with PL/SQL
3
PART I
portable to any Java-compliant database. But Java is a much lower-level language and
will often have a longer development cycle.
The choice of language is dependent on many factors, but PL/SQL should always
be considered in the Oracle environment. It is a very quick and easy language to work
with, and all DBAs should be familiar with it—if only to assist programmers.
Stored and Anonymous PL/SQL
PL/SQL runs within the database, but it can be stored on either the client or the
server. PL/SQL code can also be entered interactively from a SQL*Plus prompt. Stored
PL/SQL is loaded into the database and stored within the data dictionary as a named PL/
SQL object. When it is saved to the database, it is compiled: the compilation process
checks for syntactical errors and also picks up errors relating to the data objects the code
addresses. This saves time when the code is actually run and means that programmers
should pick up errors at compilation time, before users hit them. Code stored remotely,
or ad hoc code issued at the SQL*Plus prompt, is compiled dynamically: this impacts
on performance and also raises the possibility that unexpected errors might occur.
Figure 10-1 shows an example of running an anonymous PL/SQL block and of
creating and running a stored procedure. The anonymous block in the figure creates
a variable called INCREASE with the DECLARE statement and sets it to 10. Then the
Figure 10-1 Anonymous and stored PL/SQL
ch10.indd 3ch10.indd 3 7/11/2005 3:33:57 PM7/11/2005 3:33:57 PM

All-in-1 / Oracle Database 10g OCP Certification All-in-One / Watson, Bersinic / 5790-3
Oracle Database 10g OCP Certification All-in-One Exam Guide
4
procedural code (within the BEGIN...END statements) uses the variable within a SQL
statement that updates the sal column of the emp table.
The second example in the figure creates a procedure called INC_SAL, stored within
the data dictionary. It takes a numeric argument called INCREASE and uses this in a
SQL UPDATE statement. Then the procedure is invoked with the EXECUTE command,
passing in a value for the argument.
These examples are very simple, but they should illustrate how anonymous PL/SQL
runs just once and therefore must be compiled at execution time, whereas stored
PL/SQL can be compiled in advance and then executed many times.
TIP Anonymous PL/SQL is less efficient than stored PL/SQL and also causes
problems with source code management, as the code may be distributed across
many machines.
PL/SQL Objects
There are five types of PL/SQL object:
• Procedure
• Function
• Package
• Package body
• Trigger
All of these are schema objects stored within the data dictionary. PL/SQL can also
be used to create object types and the methods to manipulate them, but this is beyond
the scope of the OCP examination.
Procedures, Functions, and Packages
Procedures and functions carry out user-defined actions. Packages are collections
of procedures and functions, grouped together for manageability. To create these
PL/SQL objects, you can use Enterprise Manager Database Control, SQL*Plus, or a
tool specifically designed for generating PL/SQL code, such as Oracle’s Procedure
Builder or various third-party products.
TIP SQL*Plus and Database Control are only suitable for small-scale PL/SQL
development. For real work, your programmers will need a proper IDE
(interactive development environment) tool that will assist with syntax
checking, debugging, and source code management.
ch10.indd 4ch10.indd 4 7/11/2005 3:33:58 PM7/11/2005 3:33:58 PM
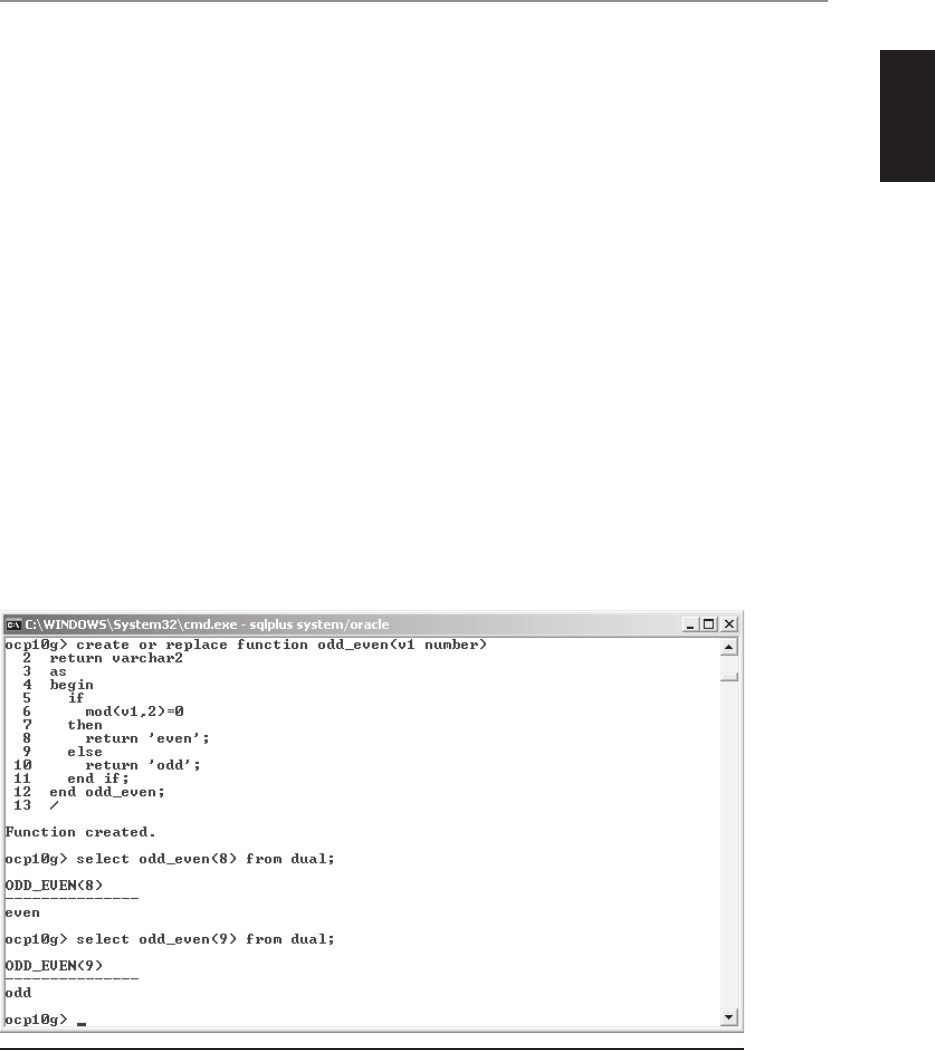
All-in-1 / Oracle Database 10g OCP Certification All-in-One / Watson, Bersinic / 5790-3
Chapter 10: Programming Oracle with PL/SQL
5
PART I
Procedures and Functions
A procedure is a block of code that carries out some action. It can, optionally, be defined
with a number of arguments. These arguments are replaced with the actual parameters
given when the procedure is invoked. The arguments can be IN arguments, meaning
that they are used to pass data into the procedure, or OUT arguments, meaning that
they are modified by the procedure and after execution the new values are passed out
of the procedure. Arguments can also be IN-OUT, where the one variable serves both
purposes. Within a procedure, you can define any number of variables that, unlike the
arguments, are private to the procedure. To run a procedure, either call it from within
a PL/SQL block or use the interactive EXECUTE command.
A function is similar in concept to a procedure, but it does not have OUT arguments
and cannot be invoked with the EXECUTE command. It returns a single value, with
the RETURN statement.
Anything that a function can do, a procedure could also do. Functions are generally
used to support specific operations: small code blocks, that will be used many times.
Procedures are more commonly used to divide code into modules, and may contain
long and complex processes.
Figure 10-2 shows an example of creating and invoking a function. The first line is
an instruction to create the function, or if it already exists, to overwrite it. The function
takes one numeric argument and will return a varchar2 value. Within the BEGIN...END
is the procedural code, which includes the flow control construct IF…THEN...ELSE…
END IF.
Figure 10-2 Creating and using a function with SQL*Plus
ch10.indd 5ch10.indd 5 7/11/2005 3:33:58 PM7/11/2005 3:33:58 PM
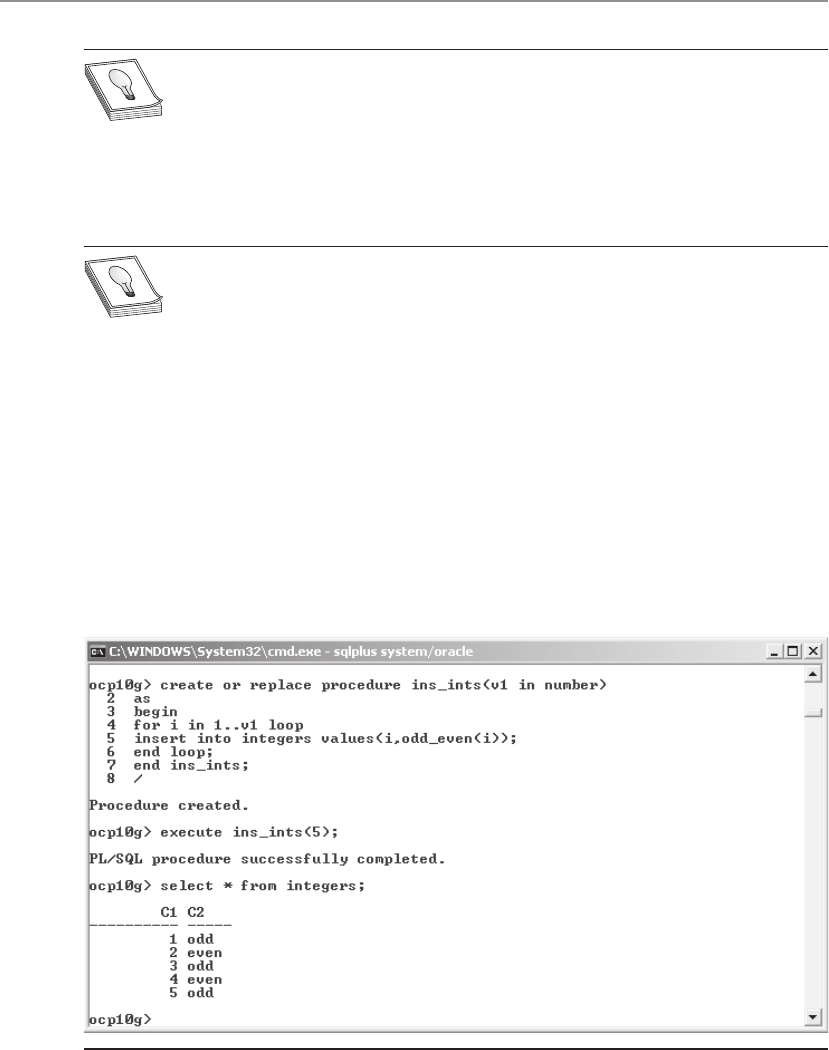
All-in-1 / Oracle Database 10g OCP Certification All-in-One / Watson, Bersinic / 5790-3
Oracle Database 10g OCP Certification All-in-One Exam Guide
6
TIP If you use CREATE, rather than CREATE OR REPLACE, you will have
to drop the object first if it already exists.
Figure 10-3 shows an example of creating and invoking a procedure. The procedure
uses a looping construct to call a statement a variable number of times, dependent on
the value of the parameter passed to the IN argument.
TIP Some people get very upset about terminology. To summarize, an
“argument” is the variable defined when you create a function or procedure;
a “parameter” is the value passed to the argument when you run the function
or procedure.
Packages
To group related procedures and functions together, your programmers create packages.
A package consists of two objects: a specification and a body. A package specification
lists the functions and procedures in the package, with their call specifications: the
arguments and their datatypes. It can also define variables and constants accessible
to all the procedures and functions in the package. The package body contains the
PL/SQL code that implements the package: the code that creates the procedures and
functions.
Figure 10-3 Creating and executing a procedure with SQL*Plus
ch10.indd 6ch10.indd 6 7/11/2005 3:33:59 PM7/11/2005 3:33:59 PM

All-in-1 / Oracle Database 10g OCP Certification All-in-One / Watson, Bersinic / 5790-3
Chapter 10: Programming Oracle with PL/SQL
7
PART I
To create a package specification, use the CREATE PACKAGE command. For
example,
ocp10g> create or replace package numbers
2 as
3 function odd_even(v1 number) return varchar2;
4 procedure ins_ints(v1 in number);
5 end numbers;
6 /
Package created.
Then to create the package body, use the CREATE OR REPLACE PACKAGE BODY
statement to create the individual functions and procedures.
Several hundred PL/SQL packages are provided as standard with the Oracle database.
Many are documented in the “PL/SQL Packages and Types Reference” manual. These
supplied packages are, for the most part, created when you create a database. Some of
them are for the use of the database administrator (such as the DBMS_WORKLOAD_
REPOSITORY package, which lets you manage the Automatic Workload Repository);
others are for your developers (such as the DBMS_OUTPUT package, that lets them
write to a session’s user process).
To invoke a packaged procedure, you must prefix the procedure name with the
package name. For example,
ocp10g> exec dbms_output.put_line('message to the user');
will run the PUT_LINE procedure in the DBMS_OUTPUT package.
Exercise 10-1: Creating and Using Functions,
Procedures, and Packages
Use Database Control to create PL/SQL objects and execute them from SQL*Plus.
1. Connect to your database as user SYSTEM using SQL*Plus.
2. Create a table to be used for this exercise.
ocp10g> create table integers (c1 number,c2 varchar2(5));
3. Connect to your database as user SYSTEM using Database Control.
4. From the database home page, take the Administration tab and then the
Packages link in the Schema section. Click Create.
5. In the Create Package window, enter NUMBERS as the package name, and the
source code for the package as in Figure 10-4. Click OK to create the package.
6. From the database home page, take the Administration tab and then the Package
bodies link in the Schema section. Click Create.
7. In the Create Package Body window, enter NUMBERS as the package name,
and the source code for the package body as in Figure 10-5. Click OK to create
the package body.
ch10.indd 7ch10.indd 7 7/11/2005 3:34:00 PM7/11/2005 3:34:00 PM
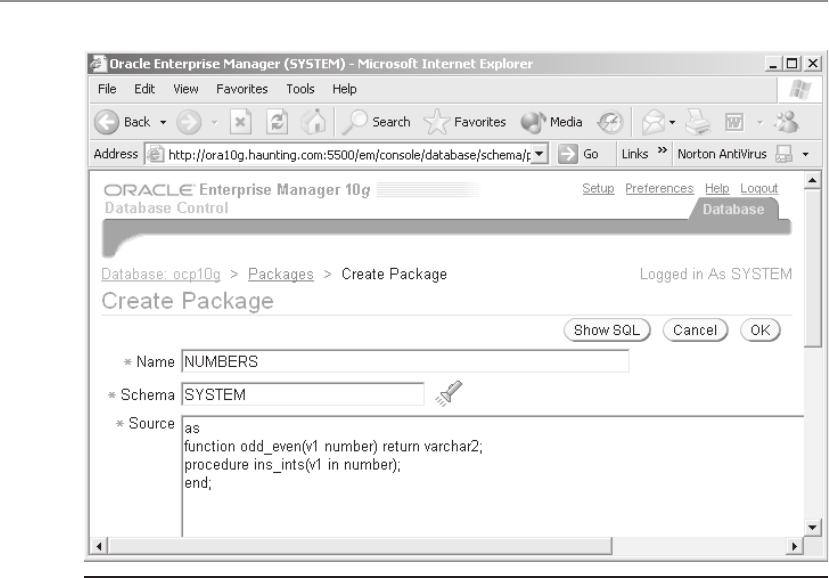
All-in-1 / Oracle Database 10g OCP Certification All-in-One / Watson, Bersinic / 5790-3
Oracle Database 10g OCP Certification All-in-One Exam Guide
8
8. In your SQL*Plus session, describe the package, execute the procedure, and
check the results.
ocp10g> desc numbers;
PROCEDURE INS_INTS
Argument Name Type In/Out Default?
------------------------- ------------------ ------ --------
V1 NUMBER IN
FUNCTION ODD_EVEN RETURNS VARCHAR2
Argument Name Type In/Out Default?
------------------------- ------------------ ------ --------
V1 NUMBER IN
ocp10g> execute numbers.ins_ints(5);
PL/SQL procedure successfully completed.
ocp10g> select * from integers;
C1 C2
---------- -----
1 odd
2 even
3 odd
4 even
5 odd
5 rows selected.
Figure 10-4 Creating a package specification with Database Control
ch10.indd 8ch10.indd 8 7/11/2005 3:34:00 PM7/11/2005 3:34:00 PM
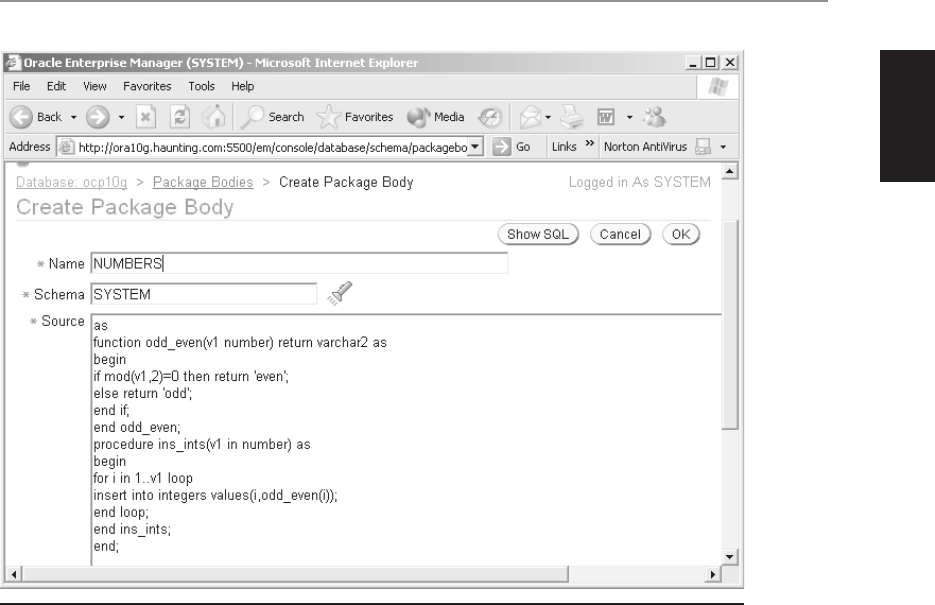
All-in-1 / Oracle Database 10g OCP Certification All-in-One / Watson, Bersinic / 5790-3
Chapter 10: Programming Oracle with PL/SQL
9
PART I
Database Triggers
Database triggers are a special category of PL/SQL object, in that they cannot be invoked
manually. A trigger runs (or “fires”) automatically when a particular action is carried out
or a certain situation arises; this is the triggering event. There are a number of possible
triggering events. For many of them, the trigger can be configured to fire either before
or after the event. It is also possible to have both before and after triggers defined for
the same event. The DML triggers, which fire when rows are inserted, updated, or
deleted, can be configured to fire once for each affected row, or once per statement
execution.
All triggers have one factor in common: their execution is completely beyond the
control of the user who caused the triggering event. He may not even know that the
trigger fired. This makes triggers admirably suited to auditing user actions, as will be
described in Chapter 11. These are the more commonly used triggering events:
• Execution of INSERT, UPDATE, and DELETE DML commands
• Execution of CREATE, DROP, ALTER, and TRUNCATE DDL commands
Figure 10-5 Creating a package body with Database Control
ch10.indd 9ch10.indd 9 7/11/2005 3:34:01 PM7/11/2005 3:34:01 PM

All-in-1 / Oracle Database 10g OCP Certification All-in-One / Watson, Bersinic / 5790-3
Oracle Database 10g OCP Certification All-in-One Exam Guide
10
• Session logon and logoff
• Database startup and shutdown
• Suspension of a statement because of a space problem
• Detection of a server error
Note that there is no such thing as a trigger on SELECT, though in Chapter 11 you
will see how fine-grained auditing (FGA) can be used to produce a similar effect.
There are numerous uses for triggers. Here are some examples:
• Auditing users’ actions A trigger can capture full details of what was done
and who did it, and write them out to an audit table.
• Executing complex edits An action on one row may, in business terms,
require a number of associated actions on other tables. The trigger can perform
these automatically.
• Security A trigger can check the time, the user’s IP address, the program he is
running, and any other factors that should limit what s/he can do.
• Enforcing complex constraints An action may be fine in terms of the
constraints on one table, but may need to be validated against the contents
of several other tables.
Consider an HR system. Before an employee is deleted from the current employees’
table, it is necessary to transfer all his details from a number of tables to archive tables.
This could be enforced by creating a trigger as follows:
create or replace trigger archive_emp
before delete on current_emps
for each row
begin
archive_emp(:old.employee_id);
end;
Whenever any session deletes rows from the CURRENT_EMPS table, before each row
is actually deleted the procedure ARCHIVE_EMP will execute, taking the EMPLOYEE_ID
of the row being deleted as its parameter. This procedure will do whatever is necessary
to archive an employee’s data. This illustrates an important point: it is generally
considered good practice to keep triggers small, and to do the bulk of the work with
a stored procedure.
EXAM TIP It is impossible to run a trigger by any means other than its
triggering event.
ch10.indd 10ch10.indd 10 7/11/2005 3:34:01 PM7/11/2005 3:34:01 PM

All-in-1 / Oracle Database 10g OCP Certification All-in-One / Watson, Bersinic / 5790-3
Chapter 10: Programming Oracle with PL/SQL
11
PART I
Exercise 10-2: Using DML Triggers
Create a trigger to validate data, before committing it.
1. Connect to your database as user SYSTEM using SQL*Plus.
2. Create a trigger on the INTEGERS table as follows:
ocp10g> create or replace trigger oe_check
2 after insert or update on integers
3 for each row
4 begin
5 if mod(:new.c1,2)=0 then
6 dbms_output.put_line(:new.c1||' is even');
7 else
8 dbms_output.put_line(:new.c1||' is odd');
9 end if;
10 end;
11 /
Trigger created.
3. Enable printing to the screen for your SQL*Plus session.
ocp10g> set serveroutput on;
4. Test the effect of the trigger as follows:
ocp10g> insert into integers values(2,'odd');
2 is even
1 row created.
ocp10g> rollback;
Rollback complete.
ocp10g> insert into integers values(3,'odd');
3 is odd
1 row created.
ocp10g> commit;
Commit complete.
Note that because triggers fire as part of the transaction, it is possible to roll
back the incorrect insertion.
5. Connect to your database as user SYSTEM using Database Control.
6. From the database home page, take the Administration tab and then the
Triggers link in the Schema section.
7. In the Search window, select Object Type as Trigger, Schema as SYSTEM, and
Object Name as OE_CHECK. Then click Go.
8. Click View to see the source code of the trigger, as in Figure 10-6. Note that
it is “Valid,” meaning that it has compiled correctly, and “Enabled,” meaning
that it will fire.
9. Tidy up.
ocp10g> drop trigger oe_check;
ocp10g> drop table integers;
ocp10g> drop package numbers;
ch10.indd 11ch10.indd 11 7/11/2005 3:34:02 PM7/11/2005 3:34:02 PM
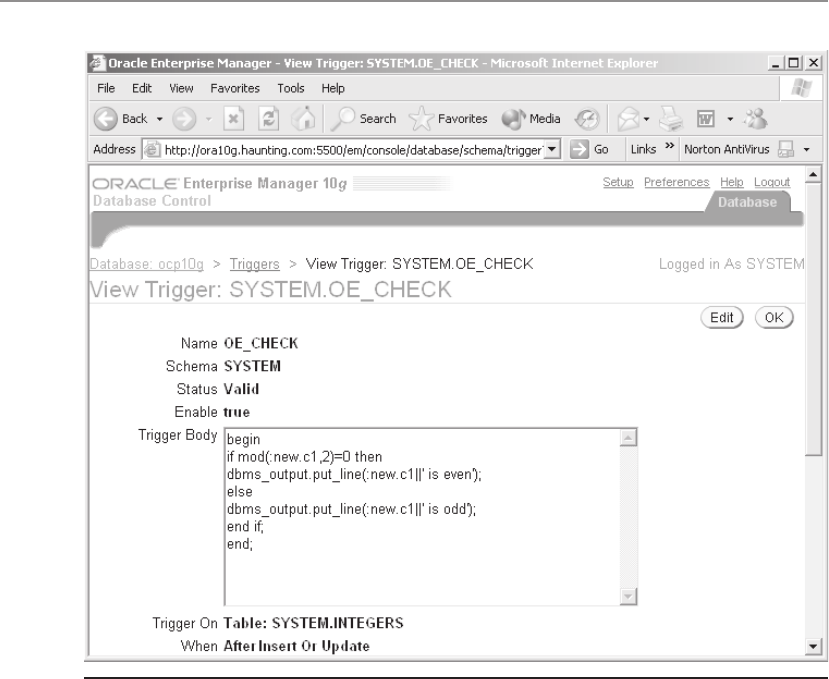
All-in-1 / Oracle Database 10g OCP Certification All-in-One / Watson, Bersinic / 5790-3
Oracle Database 10g OCP Certification All-in-One Exam Guide
12
Instance Parameters for PL/SQL
The performance of PL/SQL code can be influenced by some instance parameters:
• PLSQL_V2_COMPATIBILITY, default FALSE Setting this to TRUE forces
Oracle to allow some abnormal behavior that was legal in earlier releases.
Use this only if it is necessary for backward compatibility.
• PLSQL_DEBUG, default FALSE Setting this to true forces Oracle to compile
PL/SQL in a manner that will store additional information that may assist with
debugging. This would not normally be set on a production system.
• PLSQL_OPTIMIZE_LEVEL, default 2 Level 2, the highest, enables the use of
all the compiler’s optimization features; this gives the best run-time performance
Figure 10-6 Displaying a trigger with Database Control
ch10.indd 12ch10.indd 12 7/11/2005 3:34:02 PM7/11/2005 3:34:02 PM

All-in-1 / Oracle Database 10g OCP Certification All-in-One / Watson, Bersinic / 5790-3
Chapter 10: Programming Oracle with PL/SQL
13
PART I
but perhaps increases compilation time. Lower settings (0 or 1) will result in
quicker compilation but possibly slightly degraded execution. If the production
system is doing a large amount of compilation (anonymous PL/SQL, for
example), then it might be necessary to change this.
• PLSQL_WARNINGS, default DISABLE:ALL This controls which messages
should be displayed by the PL/SQL compiler. Other settings will cause the
compiler to generate messages that may be of value when debugging code.
This would not normally be set on a production system.
• PLSQL_CODE_TYPE, default INTERPRETED The default setting means that
PL/SQL code is compiled only down to byte code. Then when invoked, this is
interpreted. Setting this to NATIVE, in conjunction with the parameter that
follows, instructs Oracle to precompile the PL/SQL code to C code, and then
to compile and link this with the C compiler and linker provided by your
server’s operating system. This may improve performance.
• PLSQL_NATIVE_LIBRARY_DIR, default NULL Specifies the operating system
path to store the dynamic link libraries that are generated by native PL/SQL
compilation.
In most cases, the default settings for all these instance parameters will be suitable.
On a production system, you may wish to consider setting the PLSQL_CODE_TYPE
to NATIVE; this is in fact recommended for Oracle E-Business Suite running in a 10g
database. Details of how to do this are given in the PL/SQL Users Guide and Reference
manual.
Chapter Review
PL/SQL is a proprietary language for use with an Oracle database. It provides procedural
constructs that can be used in conjunction with SQL statements. PL/SQL is usually used
to write stored procedures and functions: these are compiled and stored within the data
dictionary of the database and for ease of management can be grouped into packages.
A package consists of a package specification, which publishes the call specifications
of the procedures and functions, and a package body, which implements them.
A special type of PL/SQL object is the trigger. Triggers are PL/SQL code blocks that
cannot be invoked on demand: they run automatically when their triggering event
occurs.
The default mode for running PL/SQL is through an interpreter. It is compiled down
to byte code, but no further. If you wish, and if you have a C compiler and a linker
available, you can convert your PL/SQL code to C code, compile and link it, and save
it as a dynamically linkable shared object library.
ch10.indd 13ch10.indd 13 7/11/2005 3:34:03 PM7/11/2005 3:34:03 PM

All-in-1 / Oracle Database 10g OCP Certification All-in-One / Watson, Bersinic / 5790-3
Oracle Database 10g OCP Certification All-in-One Exam Guide
14
Questions
1. Which of the following, if any, can be PL/SQL objects? (Choose all that apply.)
A. Constraints
B. Functions
C. Package bodies
D. Package specifications
E. Procedures
F. Sequences
G. Triggers
H. Views
2. Which of the following PL/SQL objects can be invoked with the EXECUTE
command? (Choose the best answer.)
A. Functions
B. Packages
C. Procedures
D. Triggers
E. All of the above
3. Where does PL/SQL code run? (Choose the best answer.)
A. Within the session’s user process
B. Within the data dictionary
C. Within the instance
D. It depends on whether the PL/SQL is anonymous or stored
4. Which PL/SQL object types can be packaged? (Choose all that apply.)
A. Anonymous PL/SQL blocks
B. Functions
C. Procedures
D. Triggers
5. When PL/SQL is compiled, where is the resulting code stored? (Choose the
best answer.)
A. In the data dictionary
B. As an operating system file
C. In the default tablespace of the user who owns the code
D. It depends on the PLSQL_CODE_TYPE parameter
ch10.indd 14ch10.indd 14 7/11/2005 3:34:04 PM7/11/2005 3:34:04 PM

All-in-1 / Oracle Database 10g OCP Certification All-in-One / Watson, Bersinic / 5790-3
Chapter 10: Programming Oracle with PL/SQL
15
PART I
Answers
1. B, C, D, E, and G. All these are created with PL/SQL; the others, with SQL.
2. C. Only procedures can be invoked with the EXECUTE command. Functions
are called by other statements, and triggers fire automatically. Packages can’t
be executed at all, unlike the procedures and functions they contain.
3. C. PL/SQL runs within the instance. It may be invoked by a user process, and
it is stored in the data dictionary. Whether the code is anonymous or stored,
it still runs in the instance.
4. B and C. Packages consist of one or more procedures and functions. Anonymous
blocks must be converted to procedures before they can be packaged, and
while triggers can call packaged code, they cannot themselves be included
within a package.
5. D. It depends on the PLSQL_CODE_TYPE setting. Native compiled code is
stored in an operating system file, while interpreted code is stored in the data
dictionary.
ch10.indd 15ch10.indd 15 7/11/2005 3:34:04 PM7/11/2005 3:34:04 PM

All-in-1 / Oracle Database 10g OCP Certification All-in-One / Watson, Bersinic / 5790-3 Blind folio p. 16
ch10.indd 16ch10.indd 16 7/11/2005 3:34:05 PM7/11/2005 3:34:05 PM

All-in-1 / Oracle Database 10g OCP Certification All-in-One / Watson, Bersinic / 5790-3/Ch11
CHAPTER 11
Securing the Oracle Database
In this chapter you will learn how to
• Apply the principal of least privilege
• Manage default user accounts
• Implement standard password security features
• Audit database activity
• Register for security updates
1
ch11.indd 1ch11.indd 1 7/11/2005 3:51:54 PM7/11/2005 3:51:54 PM

All-in-1 / Oracle Database 10g OCP Certification All-in-One / Watson, Bersinic / 5790-3
Oracle Database 10g OCP Certification All-in-One Exam Guide
2
The safest principle to follow when determining access to computer systems is that of
“least privilege”: no one should have access to anything beyond the absolute minimum
needed to perform their work, and anything not specifically allowed is forbidden. The
Oracle database conforms to this, in that by default no one can do anything at all with
the exception of the two users SYS and SYSTEM. No other users can even connect, not
even those created by the standard database creation routines.
Once users are given permission to connect and to see and manipulate data, the
database provides facilities for controlling passwords and for tracking what people
are doing. But before going into that, there are certain “best practices” that should be
applied to tighten up the default security levels.
Adjusting Default Security Settings
A database created with the Database Configuration Assistant, DBCA, will, depending
on the options selected, have more than a dozen user accounts. Access to these accounts
must be controlled—by default, there is no access to most of them. The user accounts
you create subsequent to database creation should have their privileges restricted: by
default, they may have capabilities that you are not expecting. It is vital to control these
if there is any possibility of users connecting with tools (such as SQL*Plus) that let
them issue ad hoc SQL and PL/SQL commands.
Default Users
To see the users in your database and the status of the accounts, query the DBA_
USERS view:
ocp10g> select username,account_status from dba_users;
USERNAME ACCOUNT_STATUS
-------------------- --------------------------------
SYS OPEN
SYSTEM OPEN
OUTLN EXPIRED & LOCKED
DIP EXPIRED & LOCKED
DBSNMP OPEN
WMSYS EXPIRED & LOCKED
EXFSYS EXPIRED & LOCKED
SI_INFORMTN_SCHEMA EXPIRED & LOCKED
ORDPLUGINS EXPIRED & LOCKED
ORDSYS EXPIRED & LOCKED
MDSYS EXPIRED & LOCKED
DMSYS EXPIRED & LOCKED
CTXSYS EXPIRED & LOCKED
XDB EXPIRED & LOCKED
ANONYMOUS EXPIRED & LOCKED
OLAPSYS EXPIRED & LOCKED
MDDATA EXPIRED & LOCKED
WKPROXY EXPIRED & LOCKED
WKSYS EXPIRED & LOCKED
WK_TEST EXPIRED & LOCKED
SYSMAN OPEN
<output truncated...>
ch11.indd 2ch11.indd 2 7/11/2005 3:52:26 PM7/11/2005 3:52:26 PM

All-in-1 / Oracle Database 10g OCP Certification All-in-One / Watson, Bersinic / 5790-3
Chapter 11: Securing the Database
3
PART I
With the exception of four users, all the users created by DBCA have their accounts
marked as EXPIRED & LOCKED. “Expired” refers to the password: the first time a user
logs on to the database with that username, he will be prompted to change the password.
“Locked” means that it is impossible to connect with that account anyway; it must be
unlocked before it can be used.
The passwords for the usable default accounts (SYS, SYSTEM, DBSNMP, and
SYSMAN) are set at database creation time. This was covered in Chapter 3. The other
accounts have well-known passwords: they are the same as the username. If you decide
to unlock the accounts, you will be forced to change the password immediately, as in
Figure 11-1.
TIP The DBSNMP and SYSMAN accounts are for the use of Enterprise
Manager, either Grid Control or Database Control. To change their
passwords, you must use the emctl utility.
It should only be necessary to unlock a default account in exceptional circumstances.
These accounts are used to store data and code required by certain options within the
database, not for users to connect to. For example, the MDSYS schema stores the objects
required by the Oracle Spatial option, which extends the capabilities of the database
to manage geographical information. Users can make use of the spatial option without
needing to connect to the schema.
TIP Even the demonstration schemas (HR, OE, and so on) are locked after
you create them.
Figure 11-1 Opening a default account for use
ch11.indd 3ch11.indd 3 7/11/2005 3:52:26 PM7/11/2005 3:52:26 PM

All-in-1 / Oracle Database 10g OCP Certification All-in-One / Watson, Bersinic / 5790-3
Oracle Database 10g OCP Certification All-in-One Exam Guide
4
When you create accounts for your users, always check whether they are actually
needed for connections, or whether they are only to be used for storing data. In many
systems, there will be hardly any accounts that must be opened for logon. For example,
in an Oracle 11i E-Business Suite database, it may be that only two accounts (APPS and
APPLSYSPUB) are actually used for connections. The numerous other accounts (GL,
AR, AP, and dozens more) may be used only for storing application data. In this type
of application environment, you delegate responsibility for security to the application.
If your database was created from the SQL*Plus command line, security may be
much weaker than using DBCA. For example, the SYS and SYSTEM passwords may be on
the very well-known defaults of CHANGE_ON_INSTALL and MANAGER respectively.
On a frightening number of production systems, these defaults are never changed.
Public Privileges
There is a pseudo-user called PUBLIC. Any privileges granted to PUBLIC have, in effect,
been granted to every user; every account you create will have access to these privileges.
By default, the public user has a large number of privileges. In particular, he has execute
permission on a number of PL/SQL utility packages, as shown in Figure 11-2.
Figure 11-2 Privileges granted to PUBLIC
ch11.indd 4ch11.indd 4 7/11/2005 3:52:27 PM7/11/2005 3:52:27 PM

All-in-1 / Oracle Database 10g OCP Certification All-in-One / Watson, Bersinic / 5790-3
Chapter 11: Securing the Database
5
PART I
You should always consider revoking the execution privileges on the UTL packages,
though remember that application software may assume that the privilege is there.
Revoke the privilege as follows:
SQL> revoke execute on utl_file from public;
These are some of the more dangerous packages listed in Figure 11-2:
• UTL_FILE This allows users to read and write any file and directory that
is accessible to the operating system user under whose identity the Oracle
processes are running. This includes all the database files and the ORACLE_
HOME directory. On Windows systems, this is particularly dangerous, as
many Windows databases run with Administrator privileges. The package is to
a certain extent controlled by the UTL_FILE_DIR instance parameter, discussed
in a following section.
• UTL_TCP This allows users to open TCP ports on the server machine for
connections to any accessible address on the network. The interface provided
in the package only allows connections to be initiated by the PL/SQL program;
it does not allow the PL/SQL program to accept connections initiated outside
the program. Nonetheless, it does allow malicious users to use your database
as the starting point for launching attacks on other systems, or for transmitting
data to unauthorized recipients.
• UTL_SMTP Written using UTL_TCP calls, this package lets users send mail
messages. It is restricted by the UTL_SMTP_SERVER instance parameter, which
gives the address of the outgoing mail server, but even so, you probably do not
want your database to be used for exchange of mail messages without your
knowledge.
• UTL_HTTP This too is written with UTL_TCP calls. It allows users to send
HTTP messages and receive responses, in effect, converting your database into
a web browser.
Always remember that, by default, these packages are available to absolutely
anyone who has a logon to your database, and furthermore that your database may
have a number of well-known accounts with well-known passwords.
Security Critical Instance Parameters
Some parameters are vital to consider for securing the database. The defaults are usually
fine, but in some circumstances (for which there should always be a good business
case), you may need to change them. All of the parameters described here are static:
you must restart the instance for a change to take effect. This is intended to give extra
security, as it reduces the likelihood that they can be changed temporarily to an
inappropriate setting without the DBA being aware of it.
ch11.indd 5ch11.indd 5 7/11/2005 3:52:27 PM7/11/2005 3:52:27 PM

All-in-1 / Oracle Database 10g OCP Certification All-in-One / Watson, Bersinic / 5790-3
Oracle Database 10g OCP Certification All-in-One Exam Guide
6
UTL_FILE_DIR
The UTL_FILE_DIR instance parameter defaults to NULL and is therefore not a security
problem. But if you need to set it, take care. This parameter gives PL/SQL access to the
file system of the server machine, through the UTL_FILE supplied package. The package
has procedures to open a file (either a new file or an existing one) and read from and
write to it. The only limitation is that the directories listed must be accessible to the
Oracle owner.
The difficulty with this parameter is that, being set at the instance level, it offers
no way to allow some users access to some directories and other users access to other
directories. All users with execute permission on the UTL_FILE package have access to
all the directories listed in the UTL_FILE_DIR parameter.
The parameter takes a comma-separated list of directories and is static. To set it,
follow the syntax in this example, which gives access to two directories, and restart the
instance:
SQL> alter system set utl_file_dir='/oracle/tmp','/oracle/interface' scope=spfile;
TIP The UTL_FILE_DIR parameter can include wildcards. Never set it to '*',
because that will allow all users access to everything that the database owner
can see, including the ORACLE_HOME and all the database files.
REMOTE_OS_AUTHENT and OS_AUTHENT_PREFIX
The REMOTE_OS_AUTHENT instance parameter defaults to FALSE. This controls
whether a user can connect to the database from a remote computer without the need
to give a password. The reasons for wanting to do this have largely disappeared with
modern computer systems, but the capability is still there.
In the days before all users had intelligent terminals, such as PCs, it was customary
for users to log on directly to the database server machine, and therefore to be
authenticated by the server’s operating system. They would then launch their user process
on the server machine and connect to the database. In order to avoid the necessity for
users to provide usernames and passwords twice (once for the operating system logon,
and again for the database logon), it was common to create the Oracle users with this
syntax:
SQL> create user jon identified externally;
This delegates responsibility for authentication to the server’s operating system.
Any person logged on to the server machine as operating system user “jon” will be
able to connect to the database without the need for any further authentication:
$ sqlplus /
Connected to:
Oracle Database 10g Enterprise Edition Release 10.1.0.2.0 - Production
With the Partitioning, OLAP and Data Mining options
ch11.indd 6ch11.indd 6 7/11/2005 3:52:28 PM7/11/2005 3:52:28 PM

All-in-1 / Oracle Database 10g OCP Certification All-in-One / Watson, Bersinic / 5790-3
Chapter 11: Securing the Database
7
PART I
SQL> show user;
USER is "JON"
SQL>
This is secure, as long as your server’s operating system is secure. As networking
became more widespread, it became common to separate the user process workload
from the server process workload by having users log on to a different machine dedicated
to running user processes, which would connect to the server over Oracle Net (or
SQL*Net, as it was then known). Since the user no longer logs on to the server’s
operating system, external authentication can’t be used—unless you use the
REMOTE_OS_AUTHENT parameter. Setting this to TRUE means that user JON can
connect without a password from any machine where he is logged on as operating
system user “jon.” This is only secure as long as no one has access to the network
from a machine with an insecure operating system (such as a PC).
TIP It is generally considered to be bad practice to enable remote operating
system authentication.
The OS_AUTHENT_PREFIX instance parameter is related to external authentication,
either local or remote. It specifies a prefix that must be applied to the operating system
username before it can be mapped onto an Oracle username. The default is “OPS$”.
In the preceding example, it is assumed that this parameter has been cleared, with
SQL> alter system set os_authent_prefix='' scope=spfile;
Otherwise, the Oracle username would have had to be OPS$JON.
O7_DICTIONARY_ACCESSIBILITY
The O7_DICTIONARY_ACCESSIBILITY instance parameter controls the effect of
granting object privileges with the ANY keyword. It defaults to FALSE. You can give
user JON permission to see any table in the database with
SQL> grant select any table to jon;
but do you want him to be able to see the data dictionary tables as well as the user
tables? Probably not; some of them contain sensitive data, such as unencrypted
passwords or source code that should be protected.
O7_DICTIONARY_ACCESSIBILITY defaults to false, meaning that the ANY privileges
exclude objects owned by SYS, thus protecting the data dictionary; JON can see all the
user data, but not objects owned by SYS. If you change the parameter to TRUE, then
ANY really does mean ANY, and JON will be able to see the data dictionary as well as
all user data.
It is possible that some older application software may assume that the ANY
privileges include the data dictionary, as was always the case with release 7 of the
ch11.indd 7ch11.indd 7 7/11/2005 3:52:28 PM7/11/2005 3:52:28 PM

All-in-1 / Oracle Database 10g OCP Certification All-in-One / Watson, Bersinic / 5790-3
Oracle Database 10g OCP Certification All-in-One Exam Guide
8
Oracle database (hence the name of the parameter). If so, you have no choice but to
change the parameter to TRUE until the software is patched up to current standards.
TIP Data dictionary accessibility is sometimes a problem for application
installation routines. You may have to set O7_DICTIONARY_ACCESSIBILITY
to true while installing a product, and then be able to put it back on default
when the installation is finished.
If you have users who really do need access to the data dictionary, rather than
setting O7_DICTIONARY_ACCESSIBILITY to true, consider granting them the SELECT
ANY DICTIONARY privilege. This will let them see the data dictionary and dynamic
performance views, but they will not be able to see any user data—unless you have
specifically granted them permission to do so. This might apply, for example, to the
staff of an external company you use for database administration support: they need
access to all the data dictionary information, but they have no need to view your
application data.
REMOTE_LOGIN_PASSWORDFILE
The remote REMOTE_LOGIN_PASSWORDFILE instance parameter controls whether
it is possible to connect to the instance as a user with the SYSDBA privilege over the
network. With this parameter on its default of NONE, the only way to get a SYSDBA
connection is to log on to the operating system of the server machine as a member of
the operating system group that owns the Oracle software. This is absolutely secure—
as long as your server operating system is secure, which it should be.
Setting this parameter to either EXCLUSIVE or SHARED gives users another way in:
even if they are not logged on to the server as a member of the Oracle software owning
group, or even if they are coming in across the network, they can still connect as SYSDBA
if they know the appropriate password. The passwords are embedded, in encrypted form,
in an operating system file in the Oracle home directory: $ORACLE_HOME/dbs on
Unix, or %ORACLE_HOME%\database on Windows. A setting of SHARED means that
all instances running of the same Oracle home directory will share a common password
file. This will have just one password within it for the SYS user that is common to all
the instances. EXCLUSIVE means that the instance will look for a file whose name
includes the instance name: PWD<SID>.ora on Windows, orapw<SID> on Unix, where
<SID> is the instance name. This file will have instance-specific passwords.
The password file is initially created by running the orapwd utility from an operating
system prompt. This will create the file and embed within it a password for the SYS user.
Subsequently, you can add other users’ passwords to the file, thus allowing them to
connect as SYSDBA or SYSOPER as well. Review the scripts in Chapter 3 for an example
of the syntax for creating a password file. To add another user to the file, grant him
either the SYSDBA or SYSOPER privilege, as in Figure 11-3. The V$PWFILE_USERS
view shows you which users have their passwords entered in the password file, and
whether they have the SYSOPER privilege, the SYSDBA privilege, or both.
ch11.indd 8ch11.indd 8 7/11/2005 3:52:29 PM7/11/2005 3:52:29 PM
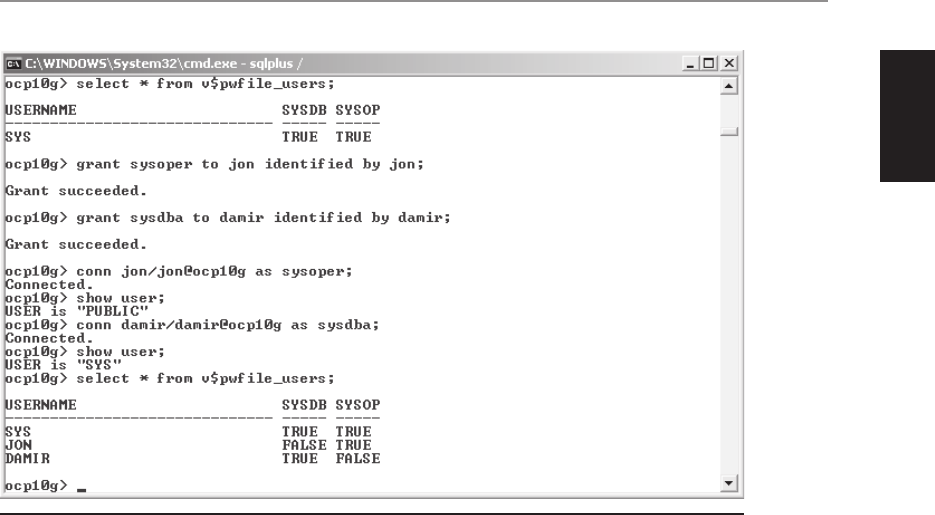
All-in-1 / Oracle Database 10g OCP Certification All-in-One / Watson, Bersinic / 5790-3
Chapter 11: Securing the Database
9
PART I
Note that when connecting as SYSDBA, even though you use a username and
password, you end up connected as user SYS; when connecting as SYSOPER, you are
in fact connected as the PUBLIC user.
Password Profiles
Most organizations will have a security policy that has rules for, among other things,
password and account management. If your organization does not have such a policy,
someone should be writing one—perhaps it should be you. The security policy will be
driven by business requirements, but also by legal necessities that will vary from one
country to another and according to the business environment.
In many cases the security of an application will be controlled by the application
itself, in which case the DBA will have little control of it: the principle of least privilege
should be applied by the application designers. But it is always necessary to control
what users can do if they can connect directly with their own schema usernames with
user processes (such as SQL*Plus) that allow them freedom to issue ad hoc SQL and
PL/SQL calls. To assist with managing database username security, a standard feature
of the Oracle database is user profiles.
Profiles can also be used to limit resource usage, shown as the kernel limits in the
next section. To enable resource profiles, the instance parameter RESOURCE_LIMIT must
be set to TRUE. Password profiles are always enabled, irrespective of this parameter.
Figure 11-3 Managing the password file with SQL*Plus
ch11.indd 9ch11.indd 9 7/11/2005 3:52:30 PM7/11/2005 3:52:30 PM

All-in-1 / Oracle Database 10g OCP Certification All-in-One / Watson, Bersinic / 5790-3
Oracle Database 10g OCP Certification All-in-One Exam Guide
10
Password Profile Limits
The password profile facility is being used in all databases whether you know it or not.
Every user (even SYS) is assigned to a profile: by default, to the profile called DEFAULT.
To confirm this, issue this query:
SQL> select username,profile from dba_users;
You will see that all users are assigned to a profile called DEFAULT. The DEFAULT
profile has, by default, no limits, as is shown by this query against the DBA_PROFILES
view:
ocp10g> select * from dba_profiles where profile ='DEFAULT';
PROFILE RESOURCE_NAME RESOURCE LIMIT
---------- ------------------------- -------- ----------
DEFAULT COMPOSITE_LIMIT KERNEL UNLIMITED
DEFAULT SESSIONS_PER_USER KERNEL UNLIMITED
DEFAULT CPU_PER_SESSION KERNEL UNLIMITED
DEFAULT CPU_PER_CALL KERNEL UNLIMITED
DEFAULT LOGICAL_READS_PER_SESSION KERNEL UNLIMITED
DEFAULT LOGICAL_READS_PER_CALL KERNEL UNLIMITED
DEFAULT IDLE_TIME KERNEL UNLIMITED
DEFAULT CONNECT_TIME KERNEL UNLIMITED
DEFAULT PRIVATE_SGA KERNEL UNLIMITED
DEFAULT FAILED_LOGIN_ATTEMPTS PASSWORD UNLIMITED
DEFAULT PASSWORD_LIFE_TIME PASSWORD UNLIMITED
DEFAULT PASSWORD_REUSE_TIME PASSWORD UNLIMITED
DEFAULT PASSWORD_REUSE_MAX PASSWORD UNLIMITED
DEFAULT PASSWORD_VERIFY_FUNCTION PASSWORD NULL
DEFAULT PASSWORD_LOCK_TIME PASSWORD UNLIMITED
DEFAULT PASSWORD_GRACE_TIME PASSWORD UNLIMITED
16 rows selected.
The kernel limitations are to do with how much processing capacity a session is
allowed to consume, and are of no concern here. It is the password limits that are
relevant to security:
• FAILED_LOGIN_ATTEMPTS After this number of consecutive connect
requests with an incorrect password, the account will be locked. This will
prevent hackers from trying numerous common passwords in an attempt
to guess the correct one. The counter is reset after a successful connection.
• PASSWORD_LOCK_TIME The number of days for which the account will be
locked if the FAILED_LOGIN_ATTEMPTS limit is reached. If days are unsuitable
as units, use appropriate arithmetic. For instance, one day has one thousand
four hundred and forty minutes, so setting the PASSWORD_LOCK_TIME
to (30/1440) is equivalent to thirty minutes; enough to foil a hacker who is
throwing a dictionary at your database, without inconveniencing forgetful
users too much.
• PASSWORD_LIFE_TIME The number of days that will pass before the user
is prompted to change his password.
ch11.indd 10ch11.indd 10 7/11/2005 3:52:30 PM7/11/2005 3:52:30 PM

All-in-1 / Oracle Database 10g OCP Certification All-in-One / Watson, Bersinic / 5790-3
Chapter 11: Securing the Database
11
PART I
• PASSWORD_GRACE_TIME The number of days following a successful login
after the expiration of PASSWORD_LIFE_TIME. The grace time starts after the
login, even if the password has already expired.
• PASSWORD_REUSE_TIME The time in days that must elapse before a
password can be reused. This prevents users from bypassing the PASSWORD_
LIFE_TIME limit setting by “changing” their password to what it was in the
first place.
• PASSWORD_REUSE_MAX The number of times that a password can be
reused, irrespective of the PASSWORD_REUSE_TIME setting.
• PASSWORD_VERIFY_FUNCTION As detailed in the next section, this is a
PL/SQL function that will perform complexity checks (or any other checks
that may be needed) whenever a password is changed.
When setting these limits, you must consider them together: there is little point in
setting a PASSWORD_LOCK_TIME unless you also set FAILED_LOGIN_ATTEMPTS.
In addition to using profiles to expire passwords and lock accounts automatically, you
can also do it manually:
SQL> alter user jon password expire;
will generate a prompt to change password the next time user JON logs in, and
SQL> alter user jon account lock;
will lock JON’s account immediately. Neither command will affect JON’s session(s)
if he is currently connected.
The Password Verify Function
Any user can change his password at any time—or an administrator can change it for
him. A password profile can include a reference to a PL/SQL function, known as the
password verify function. This is a function that will execute whenever a user with that
profile changes his password or has it changed by an administrator. The function must
reside in the SYS schema and accept three arguments: the username, the new password,
and the old password. It must return TRUE or FALSE; if it returns FALSE, the password
change is rejected.
A demonstration function is provided as part of the standard Oracle installation.
To create it, connect as SYS and run a script. On Unix,
SQL> @?/rdbms/admin/utlpwdmg.sql
or on Windows,
SQL> @?\rdbms\admin\utlpwdmg.sql
ch11.indd 11ch11.indd 11 7/11/2005 3:52:31 PM7/11/2005 3:52:31 PM

All-in-1 / Oracle Database 10g OCP Certification All-in-One / Watson, Bersinic / 5790-3
Oracle Database 10g OCP Certification All-in-One Exam Guide
12
The script is well documented; before running it, you should study it to check
whether it really does meet your requirements. If not, create your own script to fit
your needs. The function it creates performs these checks on the new password and
will reject the change if it fails any of them:
• The password may not be the same as the username. The check is not case
sensitive; the username and password are converted to lowercase before the
comparison.
• The password must be at least four characters long.
• The password, again converted to lowercase, is checked against a hard-coded
list of half a dozen commonly used passwords. This list is certainly inadequate
for production systems. If you have rules regarding common passwords, you
may have to adjust the code to point to an appropriately populated table.
• The password is checked to ensure that it contains at least one digit, one upper-
or lowercase letter, and one punctuation mark. The punctuation marks are a
hard-coded list.
• The password must contain at least three characters that are different from the
old password, or be at least three characters longer. The check is based on the
position of the characters in the string.
The script will also adjust the default profile to enable use of the verify function
that it creates, and set some password limits. Again, you must check the script before
running it to ensure that it really does meet your requirements.
Creating, Assigning, and Modifying Password Profiles
Determining the password policy for your organization is not part of the DBA’s role.
The requirements will be dependent on the business and legal needs and may well be
detailed by your computer auditors, or a security group. In many cases, the security
policy will be enforced at the application level, but in an environment where it is
possible for users to connect to the database using Oracle usernames, password profiles
are the tool to implement the policy.
Since all users are automatically assigned to the profile called DEFAULT, the quickest
way to implement a security policy is to alter the DEFAULT profile. Then all users will
pick up the changes at their next login. This is what the UTLPWDMG.SQL script
described previously does. The final command in the script is
ALTER PROFILE DEFAULT LIMIT
PASSWORD_LIFE_TIME 60
PASSWORD_GRACE_TIME 10
PASSWORD_REUSE_TIME 1800
PASSWORD_REUSE_MAX UNLIMITED
FAILED_LOGIN_ATTEMPTS 3
PASSWORD_LOCK_TIME 1/1440
PASSWORD_VERIFY_FUNCTION verify_function;
ch11.indd 12ch11.indd 12 7/11/2005 3:52:31 PM7/11/2005 3:52:31 PM

All-in-1 / Oracle Database 10g OCP Certification All-in-One / Watson, Bersinic / 5790-3
Chapter 11: Securing the Database
13
PART I
Running this command will generate a “change password” prompt for all users
after sixty days, with an additional ten days to make the change before the account is
locked. Passwords cannot be reused for another eighteen hundred days. After three
consecutive incorrect passwords, the account will be locked for one minute. Any password
change will be checked by a function called SYS.VERIFY_FUNCTION.
Applying one profile to all users may not be a suitable solution. For example, it is
not uncommon to have a public account on a database with a well-known password
with very restricted privileges: perhaps it can search a catalog of products, or a telephone
directory, but do nothing more. This account would need a profile with no limits. Other
users with higher levels of access might require tighter controls. In such an environment,
you must create multiple profiles and assign different users to them. The different
profiles can even have different verify functions.
Profiles can be created, modified, assigned to users, and dropped using SQL*Plus
commands or with Database Control. From SQL*Plus, use the commands
CREATE PROFILE...;
ALTER PROFILE...;
DROP PROFILE...;
to manage profiles, and
ALTER USER <username> PROFILE <profilename>;
to assign a profile to a user.
Exercise 11-1: Creating and Using
Password Profiles
Create a profile with strict limits, and assign a user to it. Demonstrate the effect.
1. Connect to your database as user SYSTEM with Database Control.
2. From the database home page, take the Administration tab and then the Profiles
link in the Security section.
3. Click Create to reach the Create Profile window, and enter STRICT as the profile
name. Take the Password link to reach the password controls window.
4. Set limits for your STRICT profile as in Figure 11-4. Users assigned to this profile
will have to change their passwords after two weeks, and they will have three
days to do so. A password can only ever be used once, and after two failed login
attempts the account will be locked—but only for one minute.
5. Click Show SQL, examine the CREATE PROFILE command being generated,
and click Return.
6. Click OK to create the profile.
7. Return to the Administration page of Database Control, and take the Users link
in the Security section.
ch11.indd 13ch11.indd 13 7/11/2005 3:52:32 PM7/11/2005 3:52:32 PM
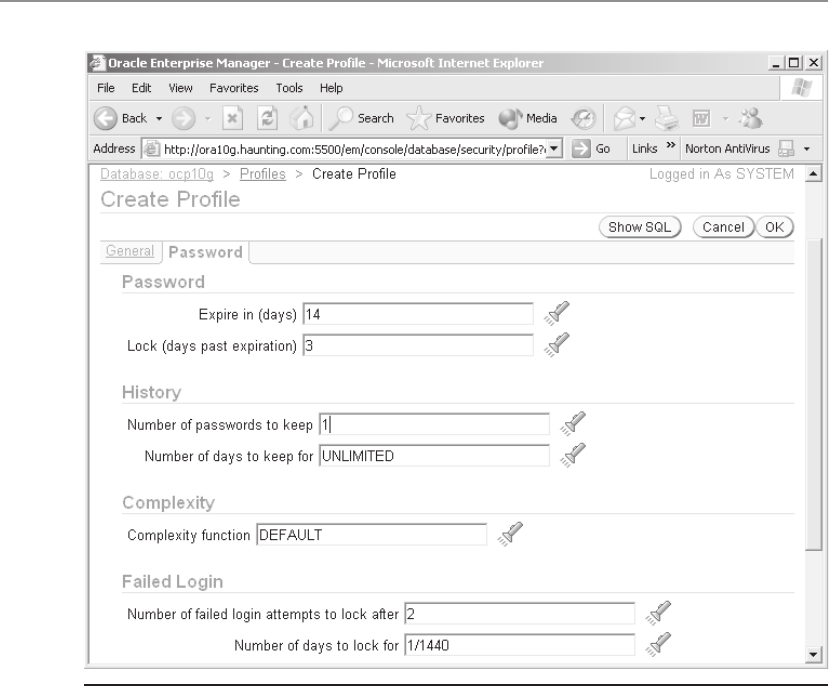
All-in-1 / Oracle Database 10g OCP Certification All-in-One / Watson, Bersinic / 5790-3
Oracle Database 10g OCP Certification All-in-One Exam Guide
14
8. On the Users window, find the SYSTEM user, select his radio button, and click
Edit.
9. In the Edit User: SYSTEM window, select the STRICT profile and expire the
password, as in Figure 11-5.
10. Click Show SQL, examine the ALTER USER command being generated, and
click Return.
11. Click Apply to make the change.
12. Connect to your database as user SYSTEM using SQL*Plus. Note that you
immediately receive a warning that the password has expired, and that you
are already in the “grace” period of three days.
Figure 11-4 Setting password limits with Database Control
ch11.indd 14ch11.indd 14 7/11/2005 3:52:32 PM7/11/2005 3:52:32 PM
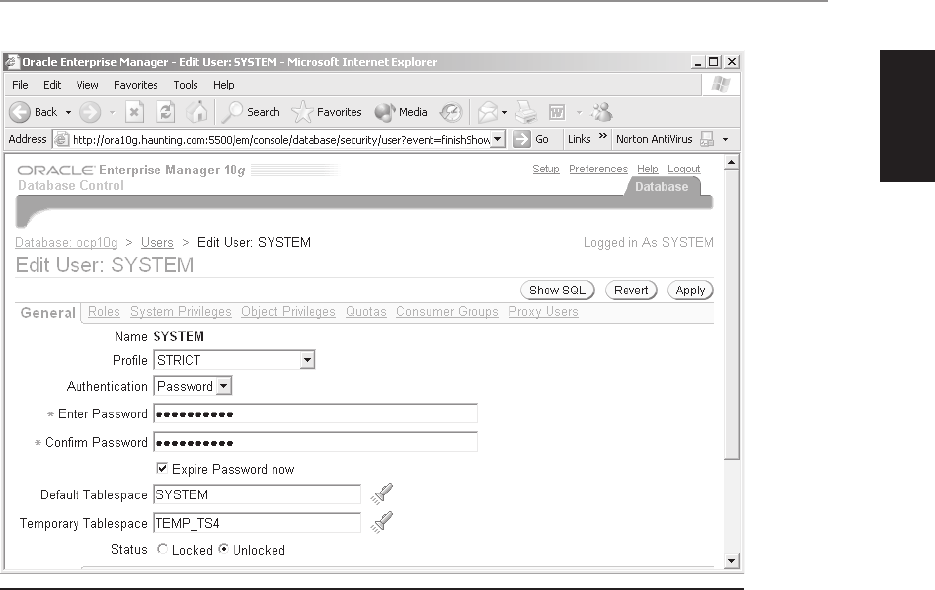
All-in-1 / Oracle Database 10g OCP Certification All-in-One / Watson, Bersinic / 5790-3
Chapter 11: Securing the Database
15
PART I
13. Attempt to change the password to the value it is already (in the example here,
it is ORACLE) with
SQL> alter user system identified by oracle;
You will receive an error,
ORA-28007: the password cannot be reused
14. Enter a different password. (Remember it!) For the following examples, it was
set to MANAGER.
15. Attempt to connect three times with the wrong password. At the third attempt,
you will be told that the account is locked, as in Figure 11-6. Wait at least one
minute, and then connect with the correct password.
16. Tidy up by assigning SYSTEM back to the default profile and dropping the
STRICT profile.
SQL> alter user system profile default;
SQL> drop profile strict;
Figure 11-5 Assigning a user to a profile with Database Control
ch11.indd 15ch11.indd 15 7/11/2005 3:52:33 PM7/11/2005 3:52:33 PM
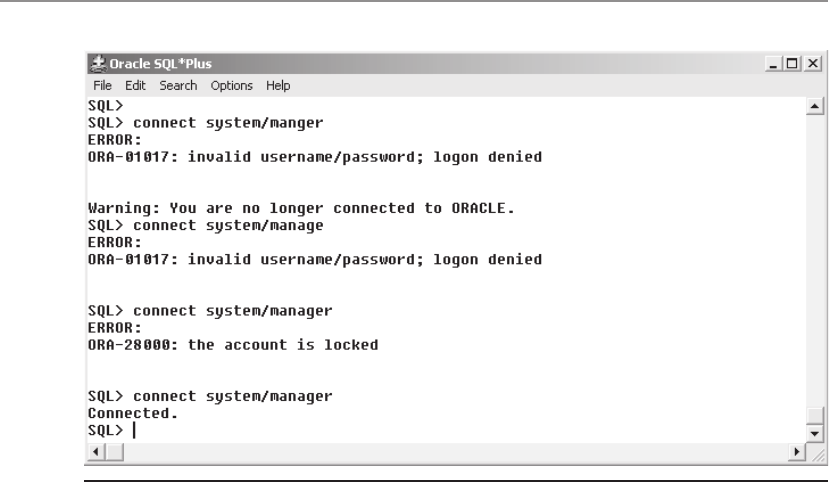
All-in-1 / Oracle Database 10g OCP Certification All-in-One / Watson, Bersinic / 5790-3
Oracle Database 10g OCP Certification All-in-One Exam Guide
16
Auditing
No matter how good your security policies are, there will be occasions when a policy
is not enough. You will have to accept that users have privileges that could be dangerous.
All you can do is monitor their use of those privileges and track what they are actually
doing with them. The most extreme example of this is you, the database administrator.
Anyone with the SYSDBA privilege can do anything within the database. For your
employers to have confidence that you are not abusing this power (which cannot be
revoked, or you couldn’t do your job), it is necessary to audit all SYSDBA activity. For
normal users, you may also wish to track what they are doing. You may not be able to
prevent them from breaking company rules on access to data, but you can track the
fact that they did it.
Apart from SYSDBA auditing, Oracle provides three auditing techniques:
• Database auditing can track the use of certain privileges, the execution of certain
commands, access to certain tables, or logon attempts.
• Value-based auditing uses database triggers. Whenever a row is inserted, updated,
or deleted, a block of PL/SQL code will run that can (among other things)
record complete details of the event.
• Fine-grained auditing allows tracking access to tables according to which rows
(or which columns of the rows) were accessed. It is much more precise than
either database auditing or value-based auditing, and it can limit the number
of audit records generated to only those of interest.
Figure 11-6 An account locked by use of a profile
ch11.indd 16ch11.indd 16 7/11/2005 3:52:34 PM7/11/2005 3:52:34 PM

All-in-1 / Oracle Database 10g OCP Certification All-in-One / Watson, Bersinic / 5790-3
Chapter 11: Securing the Database
17
PART I
TIP Auditing of any type increases the amount of work that the database must
do. In order to limit this workload, you should focus your auditing closely and
not track events of minimal significance.
Auditing SYSDBA Activity
There is an instance parameter AUDIT_SYS_OPERATIONS. If it is set to TRUE (the
default is FALSE), then every statement issued by a user connected AS SYSDBA or AS
SYSOPER is written out to the operating system’s audit trail. This gives a complete
record of all work done by the DBA. Clearly, the audit trail must be protected: if it
were possible for the DBA to delete the audit records, there would be no point in
creating them.
This brings up the question of “separation of duties.” Your system needs to be
configured in such a way that the DBA has no access to the audit records that track his
activity: they should be accessible only to the computer’s system administrator. If the
DBA were also the system administrator, then the auditing would be useless. For this
reason, a decent computer auditor will always state that the DBA must not have the
Unix “root” password (or the Windows “Administrator” password), and the system
administrator must not have the Oracle SYSDBA password.
The destination of the SYS audit records is platform specific. On Windows, it is the
Windows Application Log; on Unix it is controlled by the AUDIT_FILE_DEST
parameter. This parameter should point to a directory on which the Oracle owner has
write permission (so that the audit records can be written by the instance) but the Unix
ID used by the DBA does not, so that he cannot adjust the audit records by hand.
Database Auditing
Before setting up database auditing, an instance parameter must be set: AUDIT_TRAIL.
This has four possible values:
• NONE (or FALSE) Database auditing is disabled, no matter what auditing
you attempt to configure.
• OS Audit records will be written to the operating system’s audit trail: the
Application Log on Windows, or the AUDIT_FILE_DEST directory on Unix.
• DB (or TRUE) The audit records are written to a data dictionary table,
SYS.AUD$. There are views that let you see the contents of this table.
• DB_EXTENDED As DB, but including information on the SQL statements
with bind variables that generated the audit records.
Having set the AUDIT_TRAIL parameter, you can use database auditing to capture
login attempts, use of system and object privileges, and execution of SQL commands.
Furthermore, you can specify whether to audit these events when they succeeded, when
they failed because of permissions, or both. Auditing commands that did not succeed
can be particularly valuable: any records produced will tell you that users are attempting
to break their access rights.
ch11.indd 17ch11.indd 17 7/11/2005 3:52:35 PM7/11/2005 3:52:35 PM

All-in-1 / Oracle Database 10g OCP Certification All-in-One / Watson, Bersinic / 5790-3
Oracle Database 10g OCP Certification All-in-One Exam Guide
18
Database auditing is configured using the AUDIT command.
Use of privileges can be audited with, for example,
ocp10g> audit create any trigger;
ocp10g> audit select any table by session;
Your programmers may have been granted the CREATE ANY TRIGGER privilege
because they will be creating triggers on other schemas’ tables as part of their work,
but it is a dangerous privilege that could be used maliciously. So you certainly need
to know when they use it. Similarly, some staff will need the SELECT ANY TABLE and
UPDATE ANY TABLE privileges in order to sort out problems with transactions that
have gone wrong, but whenever they use these privileges, a record must be kept so
that they will be deterred from accessing data unless they have a legitimate reason. In
general, the ANY privileges should be restricted and granted only under exceptional
circumstances.
By default, auditing will generate an audit record for every occurrence of the event.
This is equivalent to appending BY ACCESS to the AUDIT command. Appending the
keywords BY SESSION to the AUDIT command will restrict the audit output to only
one record per logon, no matter how often the audit condition is met.
Auditing can also be object-oriented:
ocp10g> audit insert on ar.hz_parties whenever successful;
ocp10g> audit all on ar.ra_interface_lines_all;
The first of these examples will generate audit records whenever a row is inserted in the
named table. The WHENEVER SUCCESSFUL keywords restrict audit records to those
where the operation succeeded; the alternative syntax is WHENEVER NOT SUCCESSFUL.
By default, all operations (successful or not) are audited. The second example will audit
all DDL statements executed against the named table.
Logons are audited with AUDIT SESSION. For example,
ocpt10g> audit session whenever not successful;
Session auditing records each connection to the database. The NOT SUCCESSFUL
keywords restrict the output to only failed attempts. This can be particularly useful:
recording failures will indicate if attempts are being made to break into the database.
If auditing is to the operating system (because the AUDIT_TRAIL parameter is set
to OS), then view the files created in the operating system audit trail to see the results
of the audits. If it is to the data dictionary (AUDIT_TRAIL=DB), then you can see the
entries through data dictionary views. The critical view is the DBA_AUDIT_TRAIL view.
This will show all audit trail entries, no matter what type of audit it was; of necessity,
the view is very generic, and not all columns will be populated for each audit trail entry.
Table 11-1 is an extract from the Oracle Database 10g Reference, describing the view.
The other audit views (DBA_AUDIT_OBJECT, DBA_AUDIT_STATEMENT, and
DBA_AUDIT_SESSION) each show a subset of the DBA_AUDIT_TRAIL view, only
displaying certain audit records and the columns relevant to them.
ch11.indd 18ch11.indd 18 7/11/2005 3:52:35 PM7/11/2005 3:52:35 PM

All-in-1 / Oracle Database 10g OCP Certification All-in-One / Watson, Bersinic / 5790-3
Chapter 11: Securing the Database
19
PART I
Table 11-1 The Columns of the DBA_AUDIT_TRAIL View from the Oracle Database 10g Reference
Manual
Column Description
OS_USERNAME Operating system login username of the user whose actions were
audited
USERNAME Name (not ID number) of the user whose actions were audited
USERHOST Client host machine name
TERMINAL Identifier of the user’s terminal
TIMESTAMP Date and time of the creation of the audit trail entry (date and time of
user login for entries created by AUDIT SESSION) in the local database
session time zone
OWNER Creator of the object affected by the action
OBJ_NAME Name of the object affected by the action
ACTION Numeric action type code. The corresponding name of the action type
is in the ACTION_NAME column
ACTION_NAME Name of the action type corresponding to the numeric code in the
ACTION column
NEW_OWNER Owner of the object named in the NEW_NAME column
NEW_NAME New name of the object after a RENAME or the name of the underlying
object
OBJ_PRIVILEGE Object privileges granted or revoked by a GRANT or REVOKE statement
SYS_PRIVILEGE System privileges granted or revoked by a GRANT or REVOKE statement
ADMIN_OPTION Indicates whether the role or system privilege was granted with the
ADMIN option
GRANTEE Name of the grantee specified in a GRANT or REVOKE statement
AUDIT_OPTION Auditing option set with the AUDIT statement
SES_ACTIONS Session summary (a string of 16 characters, one for each action type
in the order ALTER, AUDIT, COMMENT, DELETE, GRANT, INDEX,
INSERT, LOCK, RENAME, SELECT, UPDATE, REFERENCES, and
EXECUTE. Positions 14, 15, and 16 are reserved for future use. The
characters are:
- (None)
S (Success)
F (Failure)
B (Both)
LOGOFF_TIME Date and time of user logoff
LOGOFF_LREAD Logical reads for the session
LOGOFF_PREAD Physical reads for the session
LOGOFF_LWRITE Logical writes for the session
LOGOFF_DLOCK Deadlocks detected during the session
ch11.indd 19ch11.indd 19 7/11/2005 3:52:36 PM7/11/2005 3:52:36 PM

All-in-1 / Oracle Database 10g OCP Certification All-in-One / Watson, Bersinic / 5790-3
Oracle Database 10g OCP Certification All-in-One Exam Guide
20
Table 11-1 The Columns of the DBA_AUDIT_TRAIL View from the Oracle Database 10g Reference
Manual (continued)
Column Description
COMMENT_TEXT Text comment on the audit trail entry, providing more information about
the statement audited
Also indicates how the user was authenticated. The method can be one
of the following:
DATABASE—Authentication was done by password
NETWORK—Authentication was done by Oracle Net Services or the
Advanced Security option
PROXY—Client was authenticated by another user; the name of the
proxy user follows the method type
SESSIONID Numeric ID for each Oracle session
ENTRYID Numeric ID for each audit trail entry in the session
STATEMENTID Numeric ID for each statement run
RETURNCODE Oracle error code generated by the action. Some useful values:
0—Action succeeded
2004—Security violation
PRIV_USED System privilege used to execute the action
CLIENT_ID Client identifier in each Oracle session
SESSION_CPU Amount of CPU time used by each Oracle session
EXTENDED_
TIMESTAMP
Timestamp of the creation of the audit trail entry (timestamp of user
login for entries created by AUDIT SESSION) in UTC (Coordinated
Universal Time) time zone
PROXY_
SESSIONID
Proxy session serial number, if an enterprise user has logged in through
the proxy mechanism
GLOBAL_UID Global user identifier for the user, if the user has logged in as an
enterprise user
INSTANCE_
NUMBER
Instance number as specified by the INSTANCE_NUMBER initialization
parameter
OS_PROCESS Operating system process identifier of the Oracle process
TRANSACTIONID Transaction identifier of the transaction in which the object is accessed
or modified
SCN System change number (SCN) of the query
SQL_BIND Bind variable data of the query
SQL_TEXT SQL text of the query
ch11.indd 20ch11.indd 20 7/11/2005 3:52:37 PM7/11/2005 3:52:37 PM

All-in-1 / Oracle Database 10g OCP Certification All-in-One / Watson, Bersinic / 5790-3
Chapter 11: Securing the Database
21
PART I
Value-Based Auditing
The database auditing described previously can catch the fact that a command was
executed against a table, but not necessarily the rows that were affected. For example,
issuing AUDIT INSERT ON HR.EMPLOYEES will cause an audit record to be generated
whenever a row is inserted into the named table, but the record will not include the
actual values of the row that was inserted. On occasion, you may want to capture these.
This can be done by using database triggers.
A database trigger is a block of PL/SQL code that will run automatically whenever
an insert, update, or delete is executed against a table. This trigger can do almost
anything; in particular, it can write out rows to other tables. These rows will be part
of the transaction that caused the trigger to execute, and will be committed when the
rest of the transaction is committed. There is no way that a user can prevent the trigger
from firing: if you update a table with an update trigger defined, that trigger will execute.
Consider this trigger creation statement:
ocp10g> CREATE OR REPLACE TRIGGER system.creditrating_audit
2 AFTER UPDATE OF creditrating
3 ON oe.customers
4 REFERENCING NEW AS NEW OLD AS OLD
5 FOR EACH ROW
6 BEGIN
7 IF :old.creditrating != :new.creditrating THEN
8 INSERT INTO system.creditrating_audit
9 VALUES (sys_context('userenv','os_user'), sysdate,
10 sys_context('userenv','ip_address'),
11 :new.cust_id ||' credit rating changed from
12 '||:old.creditrating||
13 ' to '||:new.creditrating);
14 END IF;
15 END;
16 /
The first line names the trigger, which is in the SYSTEM schema. Lines 2 and 3 give
the rule that determines when the trigger will execute: every time the CREDITRATING
column of a row in OE’s CUSTOMERS table is updated. There could be separate row-
level triggers defined to manage inserts and deletes, or actions on other columns. Line 7
supplies a condition: if the CREDITRATING column were not actually changed, then
the trigger will exit without doing anything. But if the CREDITRATING column were
updated, then a row is inserted into another table designed for trapping audit events.
Lines 9 and 10 use the SYS_CONTEXT function to record the user’s operating system
username and the IP address of the terminal he was using when he executed the update.
Lines 11, 12, and 13 record the employee number of the row updated, and the old and
new values of the CREDITRATING column. Database auditing as described previously
could have captured all this information, except for the actual values: which employee
was updated, and what the change actually was.
ch11.indd 21ch11.indd 21 7/11/2005 3:52:38 PM7/11/2005 3:52:38 PM

All-in-1 / Oracle Database 10g OCP Certification All-in-One / Watson, Bersinic / 5790-3
Oracle Database 10g OCP Certification All-in-One Exam Guide
22
TIP Auditing through triggers is a much slower process than database
auditing, but it does give you more information.
Fine-Grained Auditing (FGA)
Database auditing can capture all accesses to a table, whether SELECT or DML
operations. But it cannot distinguish between rows, even though it might well be that
only some rows contain sensitive information. Using database auditing, you may have
to sift through a vast number of audit records to find the few that have significance.
Fine-grained auditing, or FGA, can be configured to generate audit records only when
certain rows are accessed, or when certain columns of certain rows are accessed. It can
also run a block of PL/SQL code when the audit condition is breached.
FGA is configured with the package DBMS_FGA. To create an FGA audit policy,
use the ADD_POLICY procedure, which takes these arguments:
Argument Description
OBJECT_SCHEMA The name of the user who owns the object to be audited. This
defaults to the user who is creating the policy.
OBJECT_NAME The name of the table to be audited.
POLICY_NAME Every FGA policy created must be given a unique name.
AUDIT_CONDITION An expression to determine which rows will generate an audit
record. If left NULL, access to any row is audited.
AUDIT_COLUMN A list of columns to be audited. If left NULL, then access to any
column is audited.
HANDLER_SCHEMA The username that owns the procedure to run when the audit
condition is met. Default is the user who is creating the policy.
HANDLER_MODULE A PL/SQL procedure to execute when the audit condition is met.
ENABLE By default, this is TRUE: the policy will be active and can be
disabled with the DISABLE_POLICY procedure. If FALSE, then the
ENABLE_POLICY procedure must be used to activate the policy.
STATEMENT_TYPES One or more of SELECT, INSERT, UPDATE, or DELETE to define
which statement types should be audited. Default is SELECT only.
AUDIT_TRAIL Controls whether to write out the actual SQL statement and its
bind variables to the FGA audit trail. The default is to do so.
AUDIT_COLUMN_OPTS Determines whether to audit if a statement addresses any or all
of the columns listed in the AUDIT_COLUMNS argument. Options
are DBMS_FGA.ANY_COLUMNS, the default, or DBMS_FGA_
ALL_COLUMNS.
The other DBMS_FGA procedures are to enable, disable, or drop FGA policies.
To see the results of fine-grained auditing, query the DBA_FGA_AUDIT_TRAIL view:
ch11.indd 22ch11.indd 22 7/11/2005 3:52:38 PM7/11/2005 3:52:38 PM

All-in-1 / Oracle Database 10g OCP Certification All-in-One / Watson, Bersinic / 5790-3
Chapter 11: Securing the Database
23
PART I
ocp10g> desc dba_fga_audit_trail;
Name Null? Type
----------------------------- -------- ---------------------------
SESSION_ID NOT NULL NUMBER
TIMESTAMP DATE
DB_USER VARCHAR2(30)
OS_USER VARCHAR2(255)
USERHOST VARCHAR2(128)
CLIENT_ID VARCHAR2(64)
EXT_NAME VARCHAR2(4000)
OBJECT_SCHEMA VARCHAR2(30)
OBJECT_NAME VARCHAR2(128)
POLICY_NAME VARCHAR2(30)
SCN NUMBER
SQL_TEXT NVARCHAR2(2000)
SQL_BIND NVARCHAR2(2000)
COMMENT$TEXT VARCHAR2(4000)
STATEMENT_TYPE VARCHAR2(7)
EXTENDED_TIMESTAMP TIMESTAMP(6) WITH TIME ZONE
PROXY_SESSIONID NUMBER
GLOBAL_UID VARCHAR2(32)
INSTANCE_NUMBER NUMBER
OS_PROCESS VARCHAR2(16)
TRANSACTIONID RAW(8)
STATEMENTID NUMBER
ENTRYID NUMBER
Exercise 11-2: Enabling Auditing
Enable both database auditing and fine-grained auditing, and use data dictionary views
to see the results.
1. Connect to your database as SYSDBA using SQL*Plus.
2. Set the AUDIT_TRAIL instance parameter to enable auditing to the data
dictionary. As this is a static parameter, you must use the SCOPE clause
and restart the instance.
ocp10g> conn / as sysdba
Connected.
ocp10g> alter system set audit_trail=db scope=spfile;
System altered.
ocp10g> startup force;
3. Connect to your database as user SYSTEM using SQL*Plus.
4. Create a table and insert some rows as follows:
ocp10g> create table audit_test(name varchar2(10),salary number);
ocp10g> insert into audit_test values('McGraw',100);
ocp10g> insert into audit_test values('Hill',200);
5. Enable database auditing of access to the table.
ocp10g> audit select, update on system.audit_test;
ch11.indd 23ch11.indd 23 7/11/2005 3:52:39 PM7/11/2005 3:52:39 PM

All-in-1 / Oracle Database 10g OCP Certification All-in-One / Watson, Bersinic / 5790-3
Oracle Database 10g OCP Certification All-in-One Exam Guide
24
6. Execute some statements against the table.
ocp10g> select * from audit_test;
ocp10g> update audit_test set salary=50 where name='McGraw';
7. Query the DBA_AUDIT_TRAIL view to see the results of the auditing.
ocp10g> select username, userhost, os_username,
ses_actions, obj_name from dba_audit_trail;
USERNAME USERHOST OS_USERNAME SES_ACTIONS OBJ_NAME
-------- ------------- ----------- ---------------- ----------
SYSTEM WORKGROUP\PC1 PC1\Guest ---------SS----- AUDIT_TEST
This shows that the Oracle user SYSTEM, while logged onto a machine called
PC1 in the Windows workgroup called WORKGROUP as the local Windows
user Guest, executed one or more SELECT and UPDATE statements successfully
against the table called AUDIT_TEST. To decode the SES_ACTIONS column, refer
to the documentation extract in the preceding section that describes the view.
8. Create an FGA policy to capture all SELECTs against the AUDIT_TEST table
that read the SALARY column, if the salary retrieved is greater than 100, with
this procedure call:
ocp10g> exec dbms_fga.add_policy(-
> object_schema=>'system',-
> object_name=>'audit_test',-
> policy_name=>'high_sal',-
> audit_condition=>'salary > 100',-
> audit_column=>'salary',-
> statement_types=>'select');
9. Run some queries against the table.
ocp10g> select * from audit_test;
ocp10g> select salary from audit_test where name='Hill';
ocp10g> select salary from audit_test where name='McGraw';
ocp10g> select name from audit_test;
10. Query the fine-grained audit trail.
ocp10g> select os_user,db_user,sql_text from dba_fga_audit_trail;
OS_USER DB_USER SQL_TEXT
------------ ------- -------------------------------------
ORA10G\Guest SYSTEM select * from audit_test
ORA10G\Guest SYSTEM select salary from audit_test where
name='Hill'
Note that only the first and second queries from Step 9 generated audit
records, and that the actual statement used can be retrieved.
11. Tidy up by canceling the database auditing, dropping the FGA policy, and
dropping the table.
ocp10g> noaudit select,update on system.audit_test;
ocp10g> exec dbms_fga.drop_policy(object_name=>'audit_test',-
> policy_name=>'high_sal');
ocp10g> drop table audit_test;
ch11.indd 24ch11.indd 24 7/11/2005 3:52:39 PM7/11/2005 3:52:39 PM

All-in-1 / Oracle Database 10g OCP Certification All-in-One / Watson, Bersinic / 5790-3
Chapter 11: Securing the Database
25
PART I
Security Updates
Oracle Corporation issues regular security updates. These are usually in the form of
patches that you must apply to your Oracle software. Wherever possible, patches should
be installed as patch sets. A patch set is a collection of patches that you install with
the Oracle Universal Installer; it will have been through thorough integration testing,
and the installation will update the version numbers of the components being patched.
In exceptional cases when you cannot wait for a patch set to be issued, you may need
to install an interim patch; this is installed with the OPatch utility. Generally speaking,
it should not be necessary to install interim patches.
To assist with identifying and downloading patches, you can use Database Control.
The Enterprise Manager repository stores critical patch advisory information, which
can be automatically refreshed so that you will be informed whenever a new security
patch is released.
From the database home page, take the Oracle Metalink Credentials link in the
Critical Patch Advisories section. This will take you to the Patching Setup window, where
you can enter your Metalink credentials. Once you have done this, the Enterprise
Manager job Refresh From Metalink will run automatically, by default once a day.
This job is configured by the Scheduler, to be described in Chapter 36.
Chapter Review
Security for all computer systems should be managed by the principle of “least privilege”:
give users the bare minimum of permissions they need to do their jobs. A first step for
this in the Oracle environment is limiting the CONNECT capability, and the privileges
granted to the PUBLIC user.
Having determined which users must connect, force them to change passwords
in accordance with whatever policy is in place in your organization. If users can only
connect through an application, the application should take care of this, but if it
is possible for users to connect directly, then the password profile facility will help
enforce such policies within the database.
In many cases, limiting access rights is not enough: you will have to accept that
users do have permissions that could be abused. This is where auditing comes in: you
accept the fact that users must be able to see and manipulate data as part of their work,
but through auditing you track the work they are doing. This means that if a user does
go beyond the limits of what he is meant to do, you can identify that this is happening
and take appropriate action.
The database provides three forms of auditing. Database auditing can track access
to objects, use of privileges, and logins; but it does not capture the actual statements
issued. Database triggers execute whenever a DML operation is executed against a table:
they can capture full details of the DML operation. But they cannot track SELECT
statements. Fine-grained auditing has elements of both database auditing and auditing
with triggers: it can capture actual statements, and it works for SELECT as well as for DML.
ch11.indd 25ch11.indd 25 7/11/2005 3:52:40 PM7/11/2005 3:52:40 PM

All-in-1 / Oracle Database 10g OCP Certification All-in-One / Watson, Bersinic / 5790-3
Oracle Database 10g OCP Certification All-in-One Exam Guide
26
Questions
1. A user complains that he cannot connect, though he is certain he is using the
correct password. You query the DBA_USERS views, and see that his account
has a STATUS of EXPIRED & LOCKED. What does this mean? (Choose the
best answer.)
A. The account is locked because the password has expired.
B. You can reset the password to unlock the account.
C. If you unlock the account, the user will be able to log in if the password
grace period has not expired.
D. The account has expired and must be unlocked to reactivate it.
2. Under what circumstances could you set the REMOTE_LOGIN_PASSWORDFILE
instance parameter to EXCLUSIVE? (Choose two correct answers.)
A. You will need a SYSDBA connection when you are logged on to a machine
other than the server.
B. You want to disable operating system authentication.
C. You want to add users to the password file.
D. You want to prevent other users from being added to the password file.
3. Password profiles can enforce policies on password management. Which of the
following statements, if any, are correct? (Choose all that apply.)
A. Profiles can prevent a user from changing his password.
B. A profile can be used to configure an account that you can connect to without
a password.
C. Profiles can be used to track password changes.
D. Profiles can control how long an account is locked for following repeated
failed logins.
E. The FAILED_LOGIN_ATTEMPTS profile limit will lock an account only
if the failed login attempts are consecutive.
F. The PASSWORD_GRACE_TIME profile limit controls the number of days
before password expiration during which you will be prompted to change
your password.
4. If you want a block of PL/SQL code to run whenever certain data is accessed
with SELECT, what auditing technique could you use? (Choose the best answer.)
A. Database auditing
B. Fine-grained auditing
C. Database triggers
D. You cannot do this
ch11.indd 26ch11.indd 26 7/11/2005 3:52:40 PM7/11/2005 3:52:40 PM

All-in-1 / Oracle Database 10g OCP Certification All-in-One / Watson, Bersinic / 5790-3
Chapter 11: Securing the Database
27
PART I
5. What is necessary to audit actions done by a user connected with the SYSDBA
privilege? (Choose the best answer.)
A. Set the AUDIT_SYS_OPERATIONS instance parameter to TRUE.
B. Use database auditing to audit use of the SYSDBA privilege.
C. Set the REMOTE_LOGIN_PASSWORDFILE instance parameter to NONE,
so that SYSDBA connections can only be made with operating system
authentication. Then set the AUDIT_TRAIL parameter to OS, and make
sure that the DBA does not have access to it.
D. This is not possible: any user with SYSDBA privilege can always bypass the
auditing mechanisms.
Answers
1. C. “Expired” refers to the password; “Locked” refers to the account. These are
managed independently, so if you unlock the account the password will still
be expired—but if the password’s grace period is still in effect, which starts
after the first successful login after the password expires, the user will be able
to connect.
2. A and C. Enabling a password file (with EXCLUSIVE or SHARED) means
that you can administer the database remotely, and (unlike SHARED) an
EXCLUSIVE file can have names other than SYS added to it.
3. D and E. The profile directive PASSWORD_LOCK_TIME controls how long an
account is locked following repeated failed logins, but they must be consecutive
failed logins to cause the account to lock.
4. B. Fine-grained auditing can be used to give an effect similar to a trigger
on SELECT statements.
5. A. This is all that is necessary: all statements issued as SYSDBA will then go
to the operating system audit trail.
ch11.indd 27ch11.indd 27 7/11/2005 3:52:41 PM7/11/2005 3:52:41 PM

All-in-1 / Oracle Database 10g OCP Certification All-in-One / Watson, Bersinic / 5790-3 Blind folio p. 28
ch11.indd 28ch11.indd 28 7/11/2005 3:52:41 PM7/11/2005 3:52:41 PM

All-in-1 / Oracle Database 10g Certification All-in-One / Watson & Bersinic / 5790-3 /Chapter 12
CHAPTER 12
Configuring Oracle Networking
In this chapter you will learn how to
• Use Database Control to create additional listeners
• Use Database Control to create Oracle Net service aliases
• Use Database Control to configure connect-time failover
• Use Listener features
• Use the Oracle Net Manager to configure client and middle-tier connections
• Use tnsping to test Oracle Net connectivity
• Describe Oracle Net services
• Describe Oracle Net names resolution methods
1
ch12.indd 1ch12.indd 1 6/27/2005 10:06:49 AM6/27/2005 10:06:49 AM

Oracle Database 10g OCP Certification All-in-One Exam Guide
2
All-in-1 / Oracle Database 10g Certification All-in-One / Watson & Bersinic / 5790-3 /Chapter 12
Networking is an integral part of the client/server database architecture that is
fundamental to all modern relational databases. The Oracle database had the potential
for client/server computing from the beginning (the first release, in 1978, made a
separation between the Oracle code and the user code), but it was only with version 4
in 1984 that Oracle introduced interoperability between PC and server. True client/
server support came with version 5, in 1986. This chapter introduces the Oracle Net
services. Oracle Net was previously known as Sqlnet, and you will still hear many DBAs
refer to it as such. But before going into the detail of Oracle Net, this chapter has a
review of how Oracle implements the client/server paradigm: a full understanding of
this is essential if one is to appreciate what Oracle Net is doing for you.
Oracle’s Implementation
of the Client/Server Paradigm
There are many layers between the user and the database. In the Oracle environment,
no user ever has direct access to the database—nor does the process that he is running.
Client/server architecture guarantees that all access to data is controlled by the server.
A user interacts with a user process: this is the software that he runs on his local
terminal. For example, it could be Microsoft Access plus an ODBC driver on a Windows
PC; it could be something written in C and linked with the Oracle Call Interface (or
OCI) libraries; it could even be our old friend SQL*Plus. Whatever it is, the purpose
of the user process is to prompt the user to enter information that the process can use
to generate SQL statements. In the case of SQL*Plus, the process merely waits for you to
enter a SQL statement or SQL*Plus command; a more sophisticated user process will
paint a proper data entry screen, validate your input, and then, when you click the
Submit button, construct the statement and send it off to the server process.
The server process is a process running on the database server machine that executes
the SQL it receives from the user process. This is your basic client/server split: a user
process generating SQL, a server process executing it. The execution of a SQL statement
goes through four stages: parse, bind, execute, and fetch.
In the parse phase your server process works out what the statement actually means,
and how best to execute it. Parsing involves interaction with the shared pool of the
instance: shared pool memory structures are used to convert the SQL into something
that is actually executable.
In the bind phase, any variables are expanded to literal values. Then the execute
phase will require more use of the instance’s SGA, and possibly of the database.
During the execution of a statement, data in the database buffer cache will be read
or updated and changes written to the redo log buffer, but if the relevant blocks are not
in the database buffer cache, your server process will read them from the datafiles. This
is the first point in the execution of a statement where the database itself is involved;
ch12.indd 2ch12.indd 2 6/27/2005 10:07:20 AM6/27/2005 10:07:20 AM
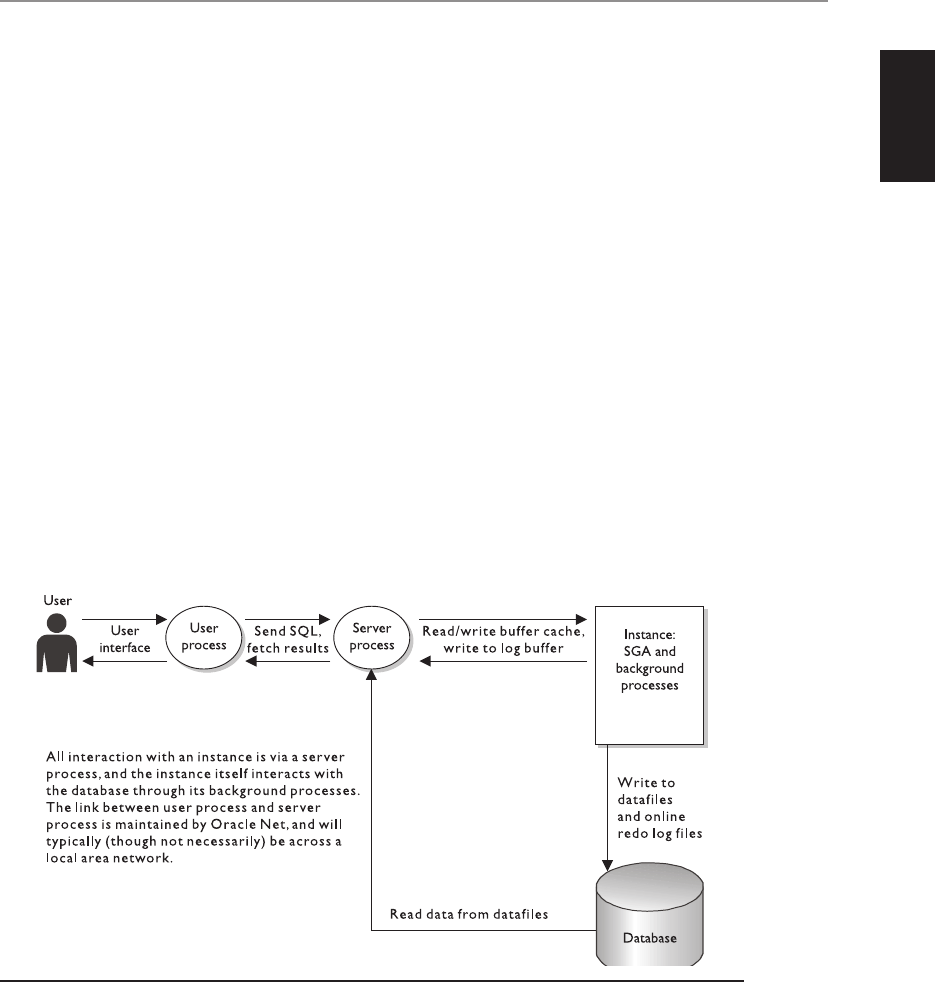
Chapter 12: Configuring Oracle Networking
3
PART I
All-in-1 / Oracle Database 10g Certification All-in-One / Watson & Bersinic / 5790-3 /Chapter 12
all the work so far has occurred in the instance. Chapter 9 covered in full detail how the
instance interacts with the database via its background processes, the LGWR and the
DBWn, to write information from the instance memory to the database. And finally,
the fetch phase of the execution cycle is where the server process sends the result set
generated by the statement’s execution back to the user process, which should then
format it for display.
Oracle Net provides the mechanism for launching a server process to execute code
on behalf of a user process. This is establishing a session. Then Oracle Net is responsible
for maintaining the session: transmitting SQL from user process to server process, and
fetching results from the server process back to the user process through the sequence
shown in Figure 12-1.
So to summarize, a user interacts with a user process; a user process interacts with
a server process, via Oracle Net; a server process interacts with the instance; and the
instance, via its background processes, interacts with the database. Your client/server
split is between the user process generating SQL and the server process executing it.
This split will usually be physical as well as logical: there will be a local area network
between the machines hosting the user processes and the machine hosting the server
side. But it is quite possible for this link to be wide area, or conversely to run the user
processes on the server machine. Oracle Net is responsible for establishing a session,
and then for the ongoing communication between the user process and the server
process.
Figure 12-1 The database is protected from users by several layers of segregation.
ch12.indd 3ch12.indd 3 6/27/2005 10:07:21 AM6/27/2005 10:07:21 AM

Oracle Database 10g OCP Certification All-in-One Exam Guide
4
All-in-1 / Oracle Database 10g Certification All-in-One / Watson & Bersinic / 5790-3 /Chapter 12
A Word on Oracle Net
and Communication Protocols
Oracle Net is a layered protocol: it runs on top of whatever communications protocol
is supported by your operating system. Historically, Sqlnet could work with all the
popular protocols (with the exception of NETBIOS/NETBEUI, which has too limited
functionality to be used for large database systems), but in release 10g Oracle’s network
support is limited to TCP, Named Pipes (or NMP), and the new Sockets Direct Protocol
(or SDP) over InfiniBand high-speed networks. The secure sockets variants of these
protocols can also be used. All operating systems also have an Inter-Process
Communication (or IPC) protocol proprietary to the operating system—this is also
available to Oracle Net for local connections where the user process is on the same
machine as the server.
This layering of Oracle Net on top of whatever is provided by your operating
system gives Oracle platform independence. You as DBA do not need to know anything
about the underlying network: you configure Oracle Net to use whatever protocol has
been configured by your network administrators, and you need not concern yourself
with what is happening beneath. TCP is, for better or worse, undoubtedly the most
popular protocol worldwide, so that is the one used in the examples that follow.
With regard to conformance with the Open Systems Interconnection (or OSI)
seven-layer model to which all IT vendors are supposed to comply, Oracle Net maps
onto layers five, six, and seven: the session, presentation, and application layers. The
protocol adapters installed with the standard Oracle installation provide the crossover
to layer four, the transport layer, provided by your operating system. Thus Oracle Net
is responsible for establishing sessions between end systems once TCP (or whatever
else you are using) has established a layer four connection. The presentation layer
functions are handled by the Oracle Net Two-Task Common (or TTC) layer. TTC is
responsible for any conversions necessary when data is transferred between the user
process and the server process, such as character set changes. Then the application
layer functions are the user and server processes themselves.
Establishing a Session
When a user, through his user process, wishes to establish a session against an instance,
he will issue a command something like
SQL> CONNECT SCOTT/TIGER@OCP10G
Of course, if he is using a properly written user interface, he won’t type in those words—
he will be prompted to enter the details into a logon screen—but one way or another
that is the command the user process will generate. It is now time to go into what
ch12.indd 4ch12.indd 4 6/27/2005 10:07:22 AM6/27/2005 10:07:22 AM

Chapter 12: Configuring Oracle Networking
5
PART I
All-in-1 / Oracle Database 10g Certification All-in-One / Watson & Bersinic / 5790-3 /Chapter 12
actually happens when that command is processed. First, break down the command
into its components. There is a database username (“SCOTT”), followed by a database
password (“TIGER”), and the two are separated by a “/” as a delimiter. Then there is
an “@” symbol, followed by a connect string, “OCP10G”. The “@” symbol is an
indication to the user process that a network connection is required. If the “@” and
the connect string are omitted, then the user process will assume that the instance you
wish to connect to is running on the local machine, and that the always-available IPC
protocol can be used. If the “@” and a connect string are included, then the user
process will assume that you are requesting a network connection to an instance on
a remote machine—though in fact, you could be bouncing off the network card and
back to the machine you are logged on to.
Connecting to a Local Instance
Even when you connect to an instance running on your local machine, you still use
Oracle Net. All Oracle sessions use a network protocol, but for a local connection
the protocol is IPC: this is the protocol provided by your operating system that will
allow processes to communicate within the host machine. This is the only type of
connection that does not require a listener; indeed, local connections do not require
any configuration at all. The only information needed is to tell your user process which
instance you want to connect to. Remember that there could be several instances
running on your local computer. You give the process this information through an
environment variable. Figure 12-2 shows examples of this in Linux; Figure 12-3 is
the same thing on Windows.
Name Resolution
When connecting using Oracle Net, the first stage is to work out exactly what you
want to connect to. This is the process of name resolution. If your connect statement
includes the connect string “@OCP10g”, Oracle Net has to work out what is meant by
“OCP10g”. This means that the string has to be resolved into four pieces of information:
the protocol you want to use (in modern times, one can usually assume that this is TCP),
the IP address on which the database listener is running, the port that the listener is
monitoring for incoming connection requests, and the name of the instance (which
need not be the same as the connect string) to which you wish to connect. There are
variations: rather than an IP address, the connect string can include a hostname, which
then gets further resolved to an IP address by a DNS server. Rather than specifying an
instance by name, the connect string can include the name of a “service,” which (in a
RAC environment) could be made up of a number of instances. You can configure a
number of ways of resolving connect strings to address and instance names, but one
way or another the name resolution process gives your user process enough information
to go across the network to a database listener, and request a connection to a particular
instance.
ch12.indd 5ch12.indd 5 6/27/2005 10:07:22 AM6/27/2005 10:07:22 AM
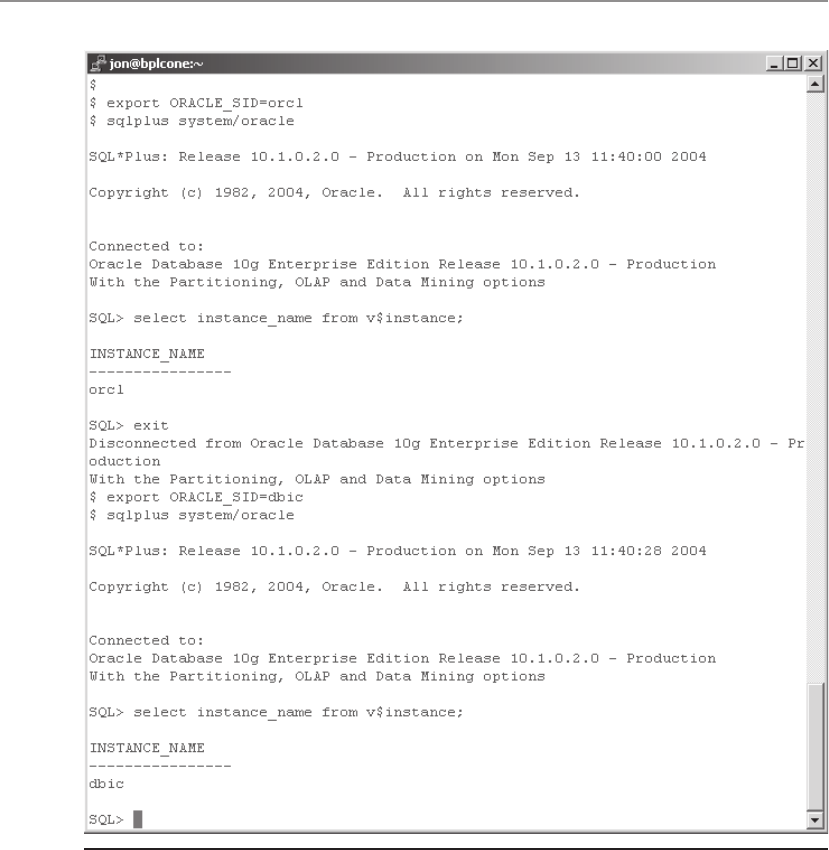
Oracle Database 10g OCP Certification All-in-One Exam Guide
6
All-in-1 / Oracle Database 10g Certification All-in-One / Watson & Bersinic / 5790-3 /Chapter 12
Launching a Server Process
The database listener, running on the server machine, uses one or more protocols to
monitor one or more ports on one or more network interface cards for incoming
connection requests. You can further complicate matters by running multiple listeners
on one machine, and any one listener can accept connection requests for a number of
instances. When it receives a connect request, the listener must first validate whether
the instance requested is actually available. Assuming that it is, the listener will launch
Figure 12-2 Local database connections—Linux
ch12.indd 6ch12.indd 6 6/27/2005 10:07:23 AM6/27/2005 10:07:23 AM
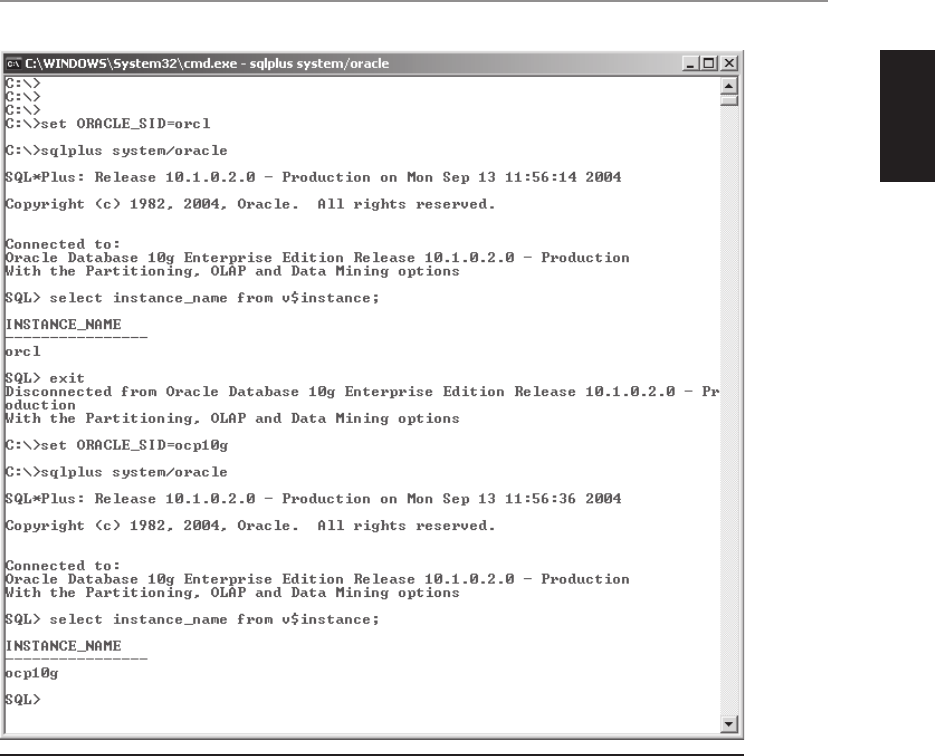
Chapter 12: Configuring Oracle Networking
7
PART I
All-in-1 / Oracle Database 10g Certification All-in-One / Watson & Bersinic / 5790-3 /Chapter 12
a new server process to service the user process. Thus if you have a thousand users
logging on concurrently to your instance, you will be launching a thousand server
processes. This is known as the “dedicated server” architecture, where each user process
is given a server process, dedicated to its session (in the next chapter you’ll see the
“shared server” alternative).
In the TCP environment, each dedicated server process launched by a listener will
acquire a unique TCP port number. This will be assigned at process startup time by
your operating system’s port mapping algorithm. The port number gets passed back
to the user process by the listener (or on some operating systems the socket already
opened to the listener is transferred to the new port number), and the user process
can then communicate directly with its server process. The listener has now completed
Figure 12-3 Local database connections—Windows
ch12.indd 7ch12.indd 7 6/27/2005 10:07:23 AM6/27/2005 10:07:23 AM

Oracle Database 10g OCP Certification All-in-One Exam Guide
8
All-in-1 / Oracle Database 10g Certification All-in-One / Watson & Bersinic / 5790-3 /Chapter 12
its work and waits for the next connect request. If the listener is not running, no new
server processes can be launched, but this will not affect any existing sessions that have
already been established.
Creating and Managing a Listener
A listener is defined in a file: the listener.ora file whose default location is in the
ORACLE_HOME/network/admin directory. As a minimum, the listener.ora file must
include a section for one listener that states its name and the protocol and listening
address it will use. You can configure several listeners in the one file, but they must
all have different names and addresses.
As with other files used to configure Oracle Net, this file can be very fussy about
seemingly trivial points of syntax, such as case sensitivity, white spaces, and
abbreviations. For this reason, many DBAs do not like to edit it by hand (though
there is no reason not to). Oracle provides three graphical tools to manage Oracle
Net: Database Control, the Net Manager, and the Net Configuration Assistant. There
is considerable overlap between the functionality of these tools, though there are a
few things that can be done only in one or the other.
Exercise 12-1: Creating a Listener
with Database Control
In this exercise, you will create a new listener using Database Control, and inspect the
listener.ora file.
1. In your browser, connect to Database Control and log in to your instance
as user SYSTEM with the SYSDBA privilege.
2. From the database home page, in the General section select the link
LISTENER_<hostname>, where <hostname> is the name of your computer.
3. Select the Net Services Administration link in the Related Links section.
4. Choose Listeners from the Administer drop-down box and click Go.
5. Click Create.
6. Enter an operating system username and password.
7. Enter LIST2 as the listener name.
8. Add a listening address:
Protocol: TCP
Port: 1522 (or any other available port)
Host: Your computer name
9. Click OK to save the new listener definition.
ch12.indd 8ch12.indd 8 6/27/2005 10:07:24 AM6/27/2005 10:07:24 AM
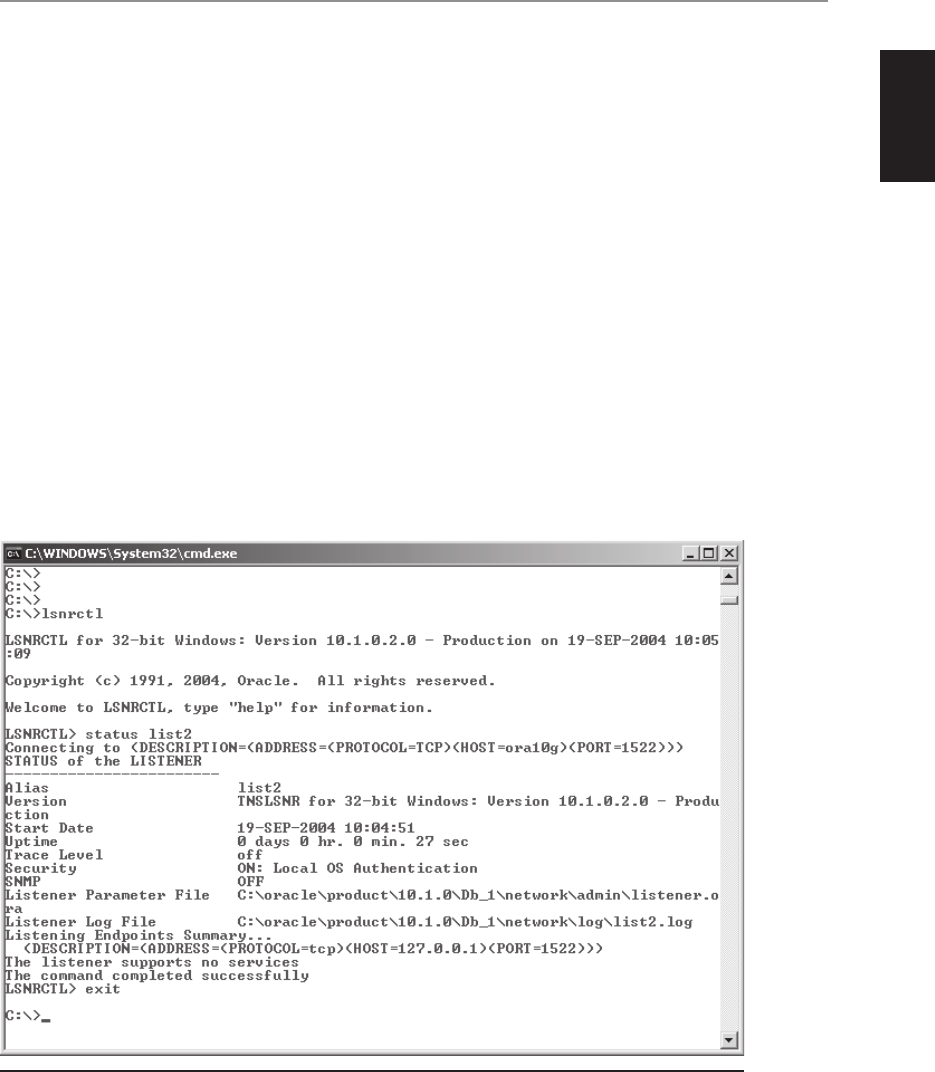
Chapter 12: Configuring Oracle Networking
9
PART I
All-in-1 / Oracle Database 10g Certification All-in-One / Watson & Bersinic / 5790-3 /Chapter 12
10. To start the new listener, select Start/Stop from the Actions drop-down list
and click Go.
11. From an operating system prompt, navigate to your ORACLE_HOME/network/
admin directory. This will be something like
c:\oracle\product\10.1.0\db_1\NETWORK\ADMIN
on Windows, or
/oracle/product/10.1.0/db_1/network/admin
on Unix. There, inspect the file listener.ora. The contents will resemble
# listener.ora Network Configuration File:
C:\oracle\product\10.1.0\Db_1\NETWORK\ADMIN\listener.ora
# Generated by Oracle configuration tools.
LISTENER =
(DESCRIPTION =
(ADDRESS = (PROTOCOL = TCP)(HOST = ora10g)(PORT = 1521))
)
LIST2 =
(DESCRIPTION =
(ADDRESS = (PROTOCOL = TCP)(HOST = ora10g)(PORT = 1522))
)
12. To confirm that your new listener is running, from an operating system prompt
run the lsnrctl utility, as in Figure 12-4.
Figure 12-4 Use of the lsnrctl utility
ch12.indd 9ch12.indd 9 6/27/2005 10:07:25 AM6/27/2005 10:07:25 AM

Oracle Database 10g OCP Certification All-in-One Exam Guide
10
All-in-1 / Oracle Database 10g Certification All-in-One / Watson & Bersinic / 5790-3 /Chapter 12
Database Registration
A listener is necessary to spawn server processes against an instance. In order to do this,
it needs to know what instances are available on the computer on which it is running.
A listener finds out about instances by the process of “registration.”
EXAM TIP The listener and the instance must be running on the same
computer, unless you are using RAC. In a RAC environment, any listener on
any computer in the cluster can connect you to any instance on any computer.
There are two methods for registering an instance with a database: static and
dynamic registration. For static registration, you hard-code a list of instances in the
listener.ora file. Dynamic registration means that the instance itself, at startup time,
locates a listener and registers with it.
Static Registration
As a general rule, dynamic registration is a better option, but there are circumstances
when you will resort to static registration. Dynamic registration was introduced with
release 8i, but if you have older databases that your listener must connect users to,
you will have to register them statically. Also, some applications may require static
registration: typically, management tools. To register an instance statically, take the
Static Database Registration link within Database Control, and enter the name of the
service, the name of the instance, and the location of the ORACLE_HOME directory
for that instance, as shown in Figure 12-5. In a simple, single-instance, environment
the service name and the instance name will often be the same, but if you are in any
doubt about this, log in to your instance using SQL*Plus and check the values of the
parameters INSTANCE_NAME and SERVICE_NAMES by querying the V$PARAMETER
view as shown in Figure 12-6.
If SERVICE_NAMES was not set in your parameter file, it will have defaulted to
the INSTANCE_NAME suffixed with the DB_DOMAIN. The default for DB_DOMAIN
is NULL.
TIP In previous releases, the default for DB_DOMAIN was “.world”. This is
not a very helpful default. It is common practice either to set it to null (which
is the 10g default) or to set it to the name of the host on which the instance
is running.
Dynamic Instance Registration
This is the preferred method by which an instance will register with a listener. There
is an initialization parameter LOCAL_LISTENER, which tells the instance the network
ch12.indd 10ch12.indd 10 6/27/2005 10:07:25 AM6/27/2005 10:07:25 AM
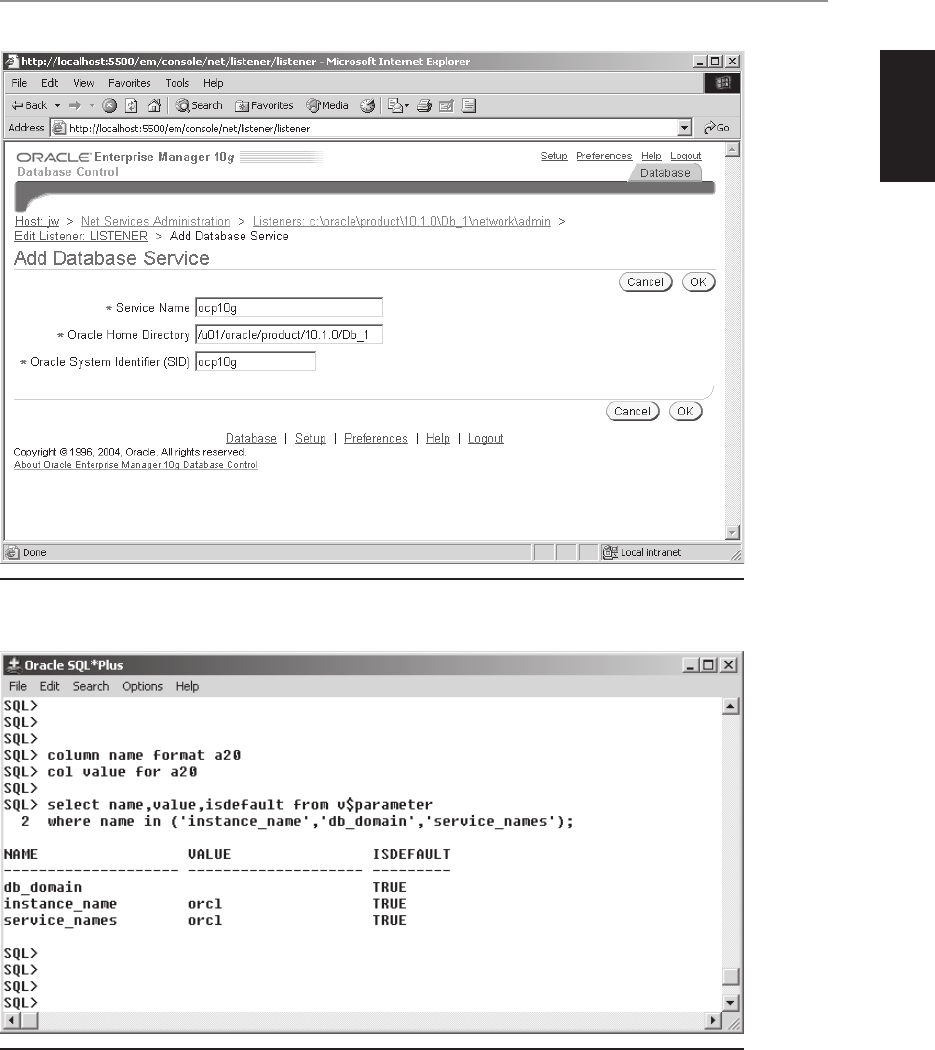
Chapter 12: Configuring Oracle Networking
11
PART I
All-in-1 / Oracle Database 10g Certification All-in-One / Watson & Bersinic / 5790-3 /Chapter 12
Figure 12-5 Static instance registration with Database Control
Figure 12-6 Confirming your instance and service names
ch12.indd 11ch12.indd 11 6/27/2005 10:07:26 AM6/27/2005 10:07:26 AM

Oracle Database 10g OCP Certification All-in-One Exam Guide
12
All-in-1 / Oracle Database 10g Certification All-in-One / Watson & Bersinic / 5790-3 /Chapter 12
address that it should contact to find a listener with which to register. At instance
startup time, the PMON process will use this parameter to locate a listener and
inform it of the INSTANCE_NAME and SERVICE_NAMES. At any time subsequent
to instance startup, you can force a re-registration by executing the command
SQL> alter system register;
TIP You will need to re-register your instance with the listener with “alter
system” if you have restarted the listener, or if you started the database
instance before starting the listener.
Dynamic registration is a better option than static registration because it ensures
that only running instances are registered with the listener, and also that there are no
errors in the instance and service names. It is all too easy to make mistakes here,
particularly if you are editing the listener.ora file by hand. Also, when the instance
shuts down, it will de-register from the listener automatically.
From release 9i onward, dynamic registration requires no configuration at all if
your listener is running on the default port, 1521. All instances will automatically
look for a listener on the localhost on that port and register themselves if they find
one. However, if your listener is not running on the default port, you must specify
where the listener is by setting the parameter local_listener and re-registering, for
example,
SQL> alter system set local_listener=list2;
SQL> alter system register;
In this example, the local_listener has been specified by name. This name needs
to be resolved into an address in order for the instance to find the listener and register
itself; you’ll see how to do this soon, but first take a more detailed look at the listener
control utility, lsnrctl.
The Listener Control Utility
You can start and stop listeners through Database Control, but there is also a command-
line utility, lsnrctl (lsnrctl.exe on Windows). You can run lsnrctl commands directly
from an operating system prompt as in Figure 12-7, or through a simple user interface
as in Figure 12-8. For all the commands, you must specify the name of the listener, if
it is not the default name of LISTENER. The following figures show how to check the
status of a listener and to stop and start it, issuing the commands either from the
operating system prompt or from within the user interface.
ch12.indd 12ch12.indd 12 6/27/2005 10:07:27 AM6/27/2005 10:07:27 AM
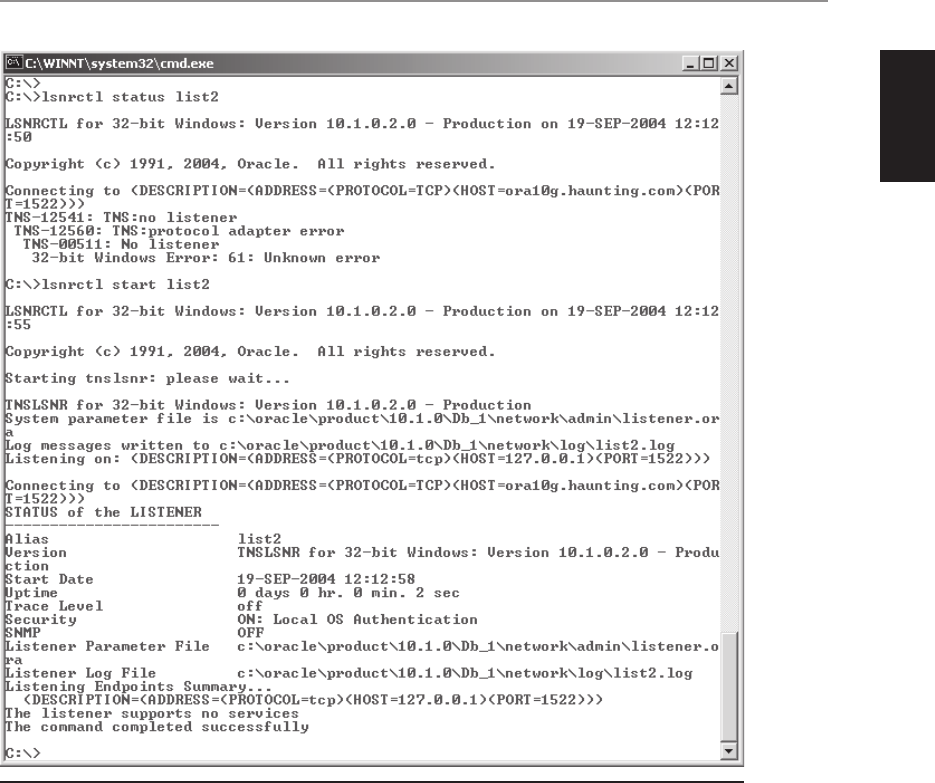
Chapter 12: Configuring Oracle Networking
13
PART I
All-in-1 / Oracle Database 10g Certification All-in-One / Watson & Bersinic / 5790-3 /Chapter 12
Note that the status command always tells you the address on which the listener is
accepting connection requests, the name and location of the listener.ora file that defines
the listener, and the name and location of the logfile for the listener. Also, in the
examples in the figures, the listener LIST2 “supports no services.” This is because
there are no services statically registered in the listener.ora file for that listener, and
Figure 12-7 Using lsnrctl commands from the operating system prompt to check the status and
then starting the listener LIST2
ch12.indd 13ch12.indd 13 6/27/2005 10:07:28 AM6/27/2005 10:07:28 AM
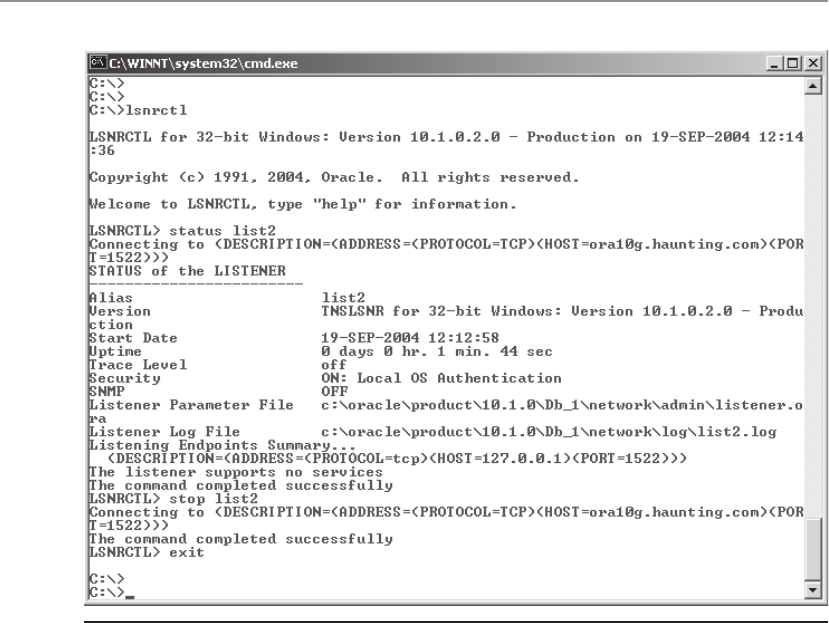
Oracle Database 10g OCP Certification All-in-One Exam Guide
14
All-in-1 / Oracle Database 10g Certification All-in-One / Watson & Bersinic / 5790-3 /Chapter 12
no instances have dynamically registered either. Figure 12-9 uses both the status and
services commands to show the state of the listener after an instance has registered
dynamically.
In Figure 12-9, the output of the status command tells you that the listener supports
two services: orcl and orclXDB. The orcl service is the regular database service: this
listener is prepared to launch server processes for sessions against the orcl service. But
what does the orcl service actually consist of? That is shown by the output of the services
command, which shows you that the orcl service consists of one instance, also called
orcl. In a RAC environment, it would be possible for one service to consist of multiple
instances.
The second service shown, orclXDB, is the XML database service—an advanced
feature provided as standard with a 10g database.
Figure 12-8 Using the lsnrctl user interface to check the status and then stopping the listener LIST2
ch12.indd 14ch12.indd 14 6/27/2005 10:07:28 AM6/27/2005 10:07:28 AM
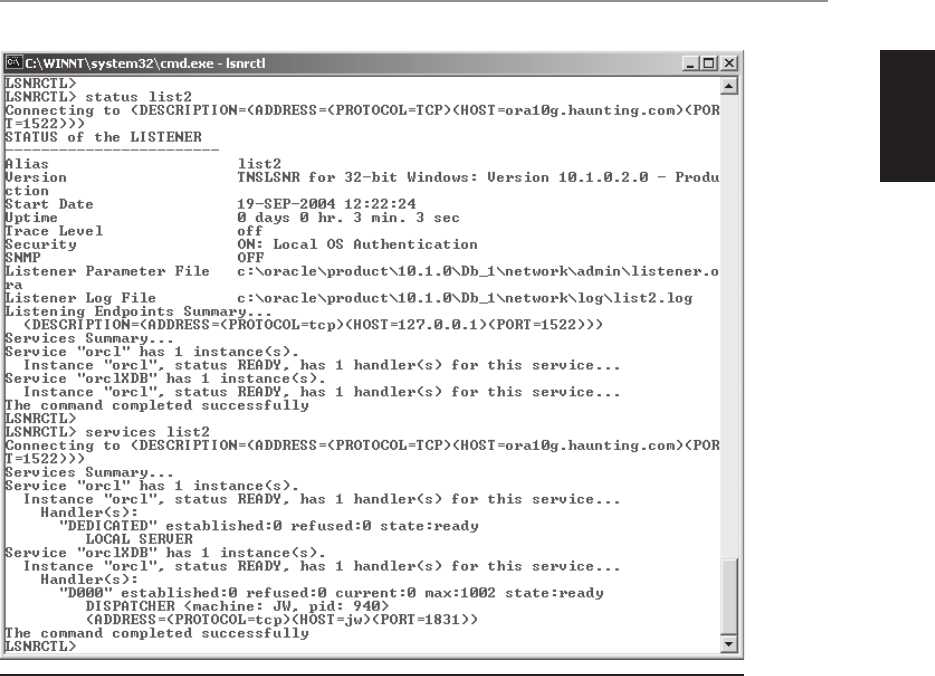
Chapter 12: Configuring Oracle Networking
15
PART I
All-in-1 / Oracle Database 10g Certification All-in-One / Watson & Bersinic / 5790-3 /Chapter 12
Techniques for Name Resolution
At the beginning of this chapter you saw that to establish a session against an instance,
your user process must issue a connect string. That string resolves to the address of a
listener and the name of an instance or service. In the discussion of dynamic instance
registration, you saw again the use of a logical name for a listener, which needs to be
resolved into a network address in order for an instance to find a listener with which
to register. Oracle provides four methods of name resolution: Easy Connect, local
naming, directory naming, and external naming. It is probably true to say that the
majority of Oracle sites use local naming, but there is no question that directory
naming is the best method for a large and complex installation.
Figure 12-9 The services command gives fuller information than the status command.
ch12.indd 15ch12.indd 15 6/27/2005 10:07:29 AM6/27/2005 10:07:29 AM

Oracle Database 10g OCP Certification All-in-One Exam Guide
16
All-in-1 / Oracle Database 10g Certification All-in-One / Watson & Bersinic / 5790-3 /Chapter 12
Easy Connect
The Easy Connect name resolution method is new with release 10g. It is very easy to
use; it requires no configuration at all. But it is limited to one protocol: TCP. The other
name resolution methods can use any of the other supported protocols, such as TCP
with secure sockets, or Named Pipes. Another limitation is that Easy Connect cannot
be used with any of Oracle Net’s more advanced capabilities, such as load balancing
or connect-time failover across different network routes. It is fair to say that Easy
Connect is a method you as DBA will find very handy to use, but that it is not a
method of much use to your end users. Easy Connect is enabled by default. You
invoke it with a syntax such as this as your connect string:
SQL> connect scott/tiger@ora10g.haunting.com:1522/ocp10g
In this example, SQL*Plus will use TCP to go to port 1522 on the IP address ora10g
.haunting.com. Then if there is a listener running on that port and address, it will ask
the listener to spawn a server process against an instance that is part of the service
ocp10g. Easy Connect can be made even easier:
SQL> connect scott/tiger@ora10g.haunting.com
will also work, but only if the listener is using port 1521, and the service name registered
with the listener is ora10g.haunting.com: the same as the computer name.
Local Naming
With local naming the user supplies an alias, known as an Oracle Net service alias, for
the connect string, and the alias is resolved by a local file into the full network address
(protocol, address, port, and service or instance name.) This local file is the infamous
tnsnames.ora file that has caused DBAs much grief over the years. Consider this example
of a tnsnames.ora file:
ocp10g =
(DESCRIPTION =
(ADDRESS_LIST =
(ADDRESS = (PROTOCOL = TCP)(HOST = ora10g.haunting.com)(PORT = 1521))
)
(CONNECT_DATA =
(service_name = ocp10g)
)
)
test =
(DESCRIPTION =
(ADDRESS_LIST =
(ADDRESS = (PROTOCOL = TCP)(HOST = serv2.haunting.com)(PORT = 1521))
)
(CONNECT_DATA =
(sid = testdb)
)
)
ch12.indd 16ch12.indd 16 6/27/2005 10:07:30 AM6/27/2005 10:07:30 AM

Chapter 12: Configuring Oracle Networking
17
PART I
All-in-1 / Oracle Database 10g Certification All-in-One / Watson & Bersinic / 5790-3 /Chapter 12
This tnsnames.ora file has two Oracle Net service aliases defined within it: ocp10g
and test. These aliases are what your users will provide in their connect statements.
The first entry, ocp10g, simply says that when the connect string “@ocp10g” is issued,
your user process should use the TCP protocol to go to the machine ora10g.haunting
.com, contact it on port 1521, and ask the listener monitoring that port to establish
a session against the instance with the service name ocp10g. The second entry, test,
directs users to a listener on a different machine and asks for a session against the
instance called testdb.
TIP There need be no relationship between the alias, the service name, and
the instance name, but for the sake of your sanity you will usually keep them
the same.
Local naming supports all protocols and all the advanced features of Oracle Net,
but maintaining tnsnames.ora files on all your client machines can be an extremely
time-consuming task. The tnsnames.ora file is also notoriously sensitive to apparently
trivial variations in layout. Using the GUI configuration tools will help avoid such
problems.
Directory Naming
Directory naming points the user toward an LDAP directory server to resolve aliases.
LDAP (the Lightweight Directory Protocol) is a widely used standard that Oracle (and
other mainstream software vendors) is encouraging organizations to adopt. To use
directory naming, you must first install and configure a directory server somewhere
on your network. Oracle provides an LDAP server (the Oracle Internet Directory) as
part of the Oracle Application Server, but you do not have to use that; if you already
have a copy of Microsoft Active Directory, that will be perfectly adequate. IBM and
Novell also sell directory servers conforming to the LDAP standard.
Like local naming, directory naming supports all Oracle Net features, but unlike
local naming, it offers a central repository, the directory server, for all your name
resolution details. This is much easier to maintain than many tnsnames.ora files
distributed across your whole user community.
External Naming
External naming is conceptually similar to directory naming, but it uses third-party
naming services such as Sun’s Network Information Services (NIS+) or the Cell Directory
Services (CDS) that are part of the Distributed Computing Environment (DCE).
ch12.indd 17ch12.indd 17 6/27/2005 10:07:30 AM6/27/2005 10:07:30 AM
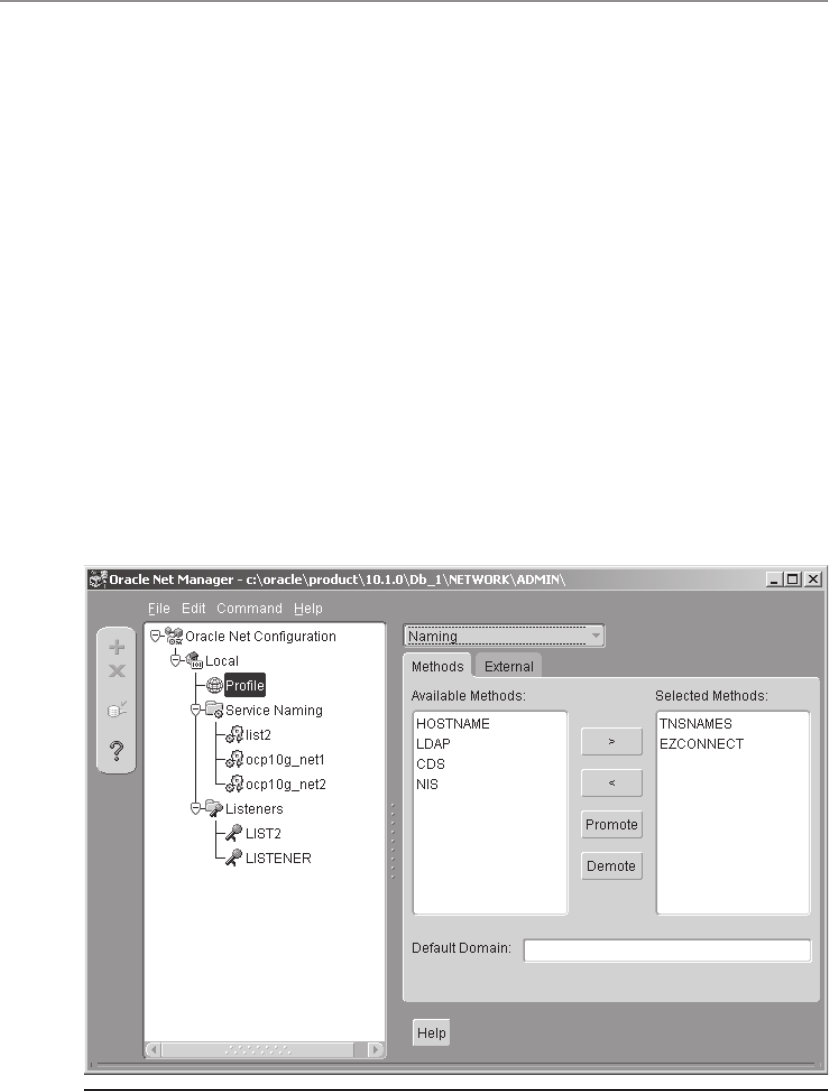
Oracle Database 10g OCP Certification All-in-One Exam Guide
18
All-in-1 / Oracle Database 10g Certification All-in-One / Watson & Bersinic / 5790-3 /Chapter 12
Configuring Service Aliases
Having decided what name resolution method to use, your next task is to configure
the clients to use it. You can do this through Database Control, but since Database
Control is a server-side process, you can only use it to configure clients running on
the database server. An alternative is to use the Net Manager, a stand-alone Java utility
shipped with all the Oracle client-side products.
To launch the Net Manager, run netmgr from a Unix prompt, or on Windows you
will find it on the Start menu.
The Net Manager menu tree has three branches. The Profile branch is used to set
options that may apply to both the client and the server sides of Oracle Net and can
be used to influence the behavior of all Oracle Net connections. This is where, for
example, you can configure detailed tracing of Oracle Net sessions. The Service Naming
branch is used to configure client-side name resolution, and the Listeners branch is
used to configure database listeners.
When you take the Profile branch as shown in Figure 12-10, you are in fact
configuring a file called sqlnet.ora. This file exists in your ORACLE_HOME/network/
admin directory. It is optional—there are defaults for every sqlnet.ora directive—but
you will usually configure it, if only to select the name resolution method.
In the Profile branch, you will see all the available naming methods, with two
(TNSNAMES and EZCONNECT) selected by default: these are Local Naming and Easy
Figure 12-10 Net Manager’s Profile editor
ch12.indd 18ch12.indd 18 6/27/2005 10:07:31 AM6/27/2005 10:07:31 AM

Chapter 12: Configuring Oracle Networking
19
PART I
All-in-1 / Oracle Database 10g Certification All-in-One / Watson & Bersinic / 5790-3 /Chapter 12
Connect. The external methods are NIS and CDS. LDAP is Directory Naming, and
HOSTNAME is a previous version of Easy Connect that is retained for backward
compatibility.
Then you need to configure the individual Oracle Net service aliases. This is done in
the Service Naming branch, which in fact creates or edits the Local Naming tnsnames.ora
file that resides in your ORACLE_HOME/network/admin directory. If you are fortunate
enough to be using Directory Naming, you do not need to do this: choosing LDAP in
the Profile as your naming method is enough.
Exercise 12-2: Creating an Oracle
Net Service Alias
Use the Net Manager to create and test an Oracle Net service alias. This alias will connect
you to your database through the listener LIST2 that you configured in Exercise 12-1.
1. Launch the Net Manager. On Unix, run netmgr from an operating system
prompt. On Windows, it will be on the Start menu, in Oracle’s Configuration
and Migration Tools submenu.
2. Highlight the Service Branch, and click the “+” symbol on the left of the window
to add a new alias.
3. Enter ocp10g_1522 as the Net Service Name, and click Next.
4. Select TCP/IP as the protocol, and click Next.
5. Enter the name of your server machine as the Host Name and 1522 as the
Port Number, and click Next.
6. Enter ocp10g as the Service Name, and click Next.
7. Click the Test button. This will attempt to connect using the alias you have
created. The test should fail, because even though the newly created alias does
resolve to the address of the listener LIST2, the listener does not have your
instance registered.
8. Close the Test window, and from the File menu select Save Network
Configuration. Note the directory path at the top of Net Manager’s window:
this is where the Oracle Net files will be saved.
Exercise 12-3: Configuring Dynamic
Service Registration
In this exercise you will set the local_listener parameter for your instance so that it
will register with your nondefault listener LIST2. Then check that the registration has
occurred and test the connection you created in Exercise 12-2. Finally, put everything
back to normal.
ch12.indd 19ch12.indd 19 6/27/2005 10:07:31 AM6/27/2005 10:07:31 AM

Oracle Database 10g OCP Certification All-in-One Exam Guide
20
All-in-1 / Oracle Database 10g Certification All-in-One / Watson & Bersinic / 5790-3 /Chapter 12
1. Using SQL*Plus, connect to your instance as user SYSTEM, and issue the
commands
SQL> alter system set local_listener='ocp10g_1522';
SQL> alter system register;
2. From an operating system prompt, use lsnrctl to check that your instance has
registered dynamically with your list2 listener.
C:\> lsnrctl services list2
3. Test the alias by connecting using SQL*Plus.
SQL> connect system/oracle@ocp10g_1522;
4. Reset your instance to use the default listener by putting the local_listener
parameter back to default, and re-register it.
SQL> alter system set local_listener='';
SQL> alter system register;
Advanced Connection Options
Network connectivity is critical for making your database available to your users, and
your network administrators may well have configured redundancy in the network; if
so, Oracle Net can take advantage of this. Consider an environment where your database
server is dual homed: it has two network interface cards, on two different subnets. This
means that there are two routes by which user processes can connect to the instance.
You should then configure Oracle Net such that all incoming connection requests will
be load-balanced across the two routes. Furthermore, if one route is unavailable (perhaps
there is a routing problem, or the network interface card is down), you need to ensure
that all connection requests are sent through the surviving route.
First, you will need to configure the listeners to monitor both network cards. You
may do this either by configuring one listener with two listening addresses, or by
creating a second listener to monitor the second address. Then connect-time fault
tolerance and load balancing are configured on the client side, by setting up the service
alias appropriately. Consider this example of a tnsnames.ora file:
ocp10g_net1 =
(DESCRIPTION =
(ADDRESS_LIST =
(ADDRESS = (PROTOCOL = TCP)(HOST = ora10g_net1.haunting.com)(PORT = 1521))
)
(CONNECT_DATA =
(service_name = ocp10g)
)
)
ocp10g_net2 =
(DESCRIPTION =
(ADDRESS_LIST =
(ADDRESS = (PROTOCOL = TCP)(HOST = ora10g_net2.haunting.com)(PORT = 1521))
)
(CONNECT_DATA =
(service_name = ocp10g)
ch12.indd 20ch12.indd 20 6/27/2005 10:07:32 AM6/27/2005 10:07:32 AM

Chapter 12: Configuring Oracle Networking
21
PART I
All-in-1 / Oracle Database 10g Certification All-in-One / Watson & Bersinic / 5790-3 /Chapter 12
)
)
ocp10g_either =
(DESCRIPTION =
(ADDRESS_LIST =
(load_balance=on)
(failover=on)
(ADDRESS = (PROTOCOL = TCP)(HOST = ora10g_net1.haunting.com)(PORT = 1521))
(ADDRESS = (PROTOCOL = TCP)(HOST = ora10g_net2.haunting.com)(PORT = 1521))
)
(CONNECT_DATA =
(service_name = ocp10g)
)
)
The service alias ocp10g_net1 requests a connection to the service ocp10g via the
IP address for ora10g_net1.haunting.com. Alias ocp10g_net2 requests the same service,
but via a different IP address. But the service alias ocp10g_either includes both addresses
in its address_list. Note the directives load_balance=on and fail_over=on. The first of
these instructs the user process to select one address randomly. This will result in half
your users hitting the database server through one address, and half through the other:
the network load will be evenly balanced across your database server’s two network
cards. The second directive instructs the user process to try the other address if the first
one it randomly selected fails, thus giving you fault tolerance as well as load balancing.
You can configure aliases such as this manually, or through the Database Control or
Net Manager tools, as shown in Figure 12-11.
Another common network problem is security and firewalls. Oracle provides
a utility, the Connection Manager, that can act as a proxy server. It is a specialized
listener that will (typically) run on a firewall bastion host. It will accept Oracle Net
connection requests from the external network and forward them to a database server
on the internal network. All traffic for connections established in this manner is
subsequently routed through the Connection Manager. To configure use of such
a system, create a service alias such as this:
ocp10g_from_outside =
(DESCRIPTION =
(ADDRESS_LIST =
(source_route=on)
(ADDRESS = (PROTOCOL = TCP)(HOST = firewall.haunting.com)(PORT = 1521))
(ADDRESS = (PROTOCOL = TCP)(HOST = ora10g.haunting.com)(PORT = 1521))
)
(CONNECT_DATA =
(service_name = ocp10g)
)
)
This example shows an alias ocp10g_from_outside that is intended to be used by
users coming into your systems from the Internet. It includes the directive source_
route=on. This instructs the user process to go to the first address in the list, which
is the address of a Connection Manager running on your firewall. The Connection
Manager will then forward the connection to the listener identified by the second
ch12.indd 21ch12.indd 21 6/27/2005 10:07:32 AM6/27/2005 10:07:32 AM
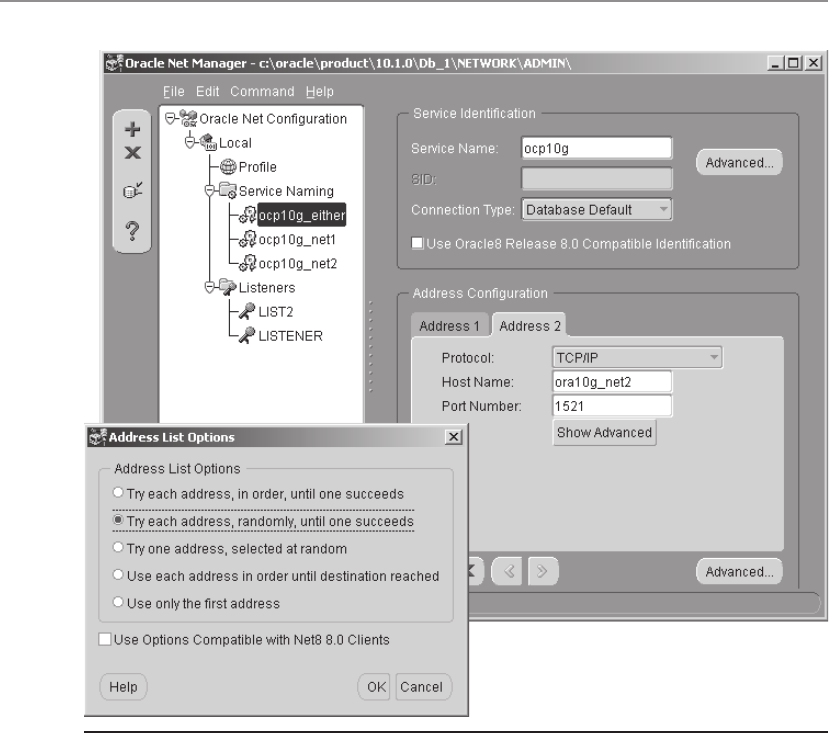
Oracle Database 10g OCP Certification All-in-One Exam Guide
22
All-in-1 / Oracle Database 10g Certification All-in-One / Watson & Bersinic / 5790-3 /Chapter 12
address, which is your database server on your intranet. Then the Connection Manager
will proxy all traffic to and fro.
As with load balancing and fault tolerance, you can create an alias like this by editing
the tnsnames.ora file by hand, or through the GUI tools. In Figure 12-11, you would
select “Use each address in order until destination reached” to achieve this result.
Testing Your Oracle Net Connections
Of course, you can test your connections by using SQL*Plus and attempting to log on
through an alias. But Oracle provides two utilities specifically for testing. You have
already seen one: the Test command within the Net Manager. You are prompted to
use this whenever you create a service alias, or you can invoke it by highlighting an
Figure 12-11 Using Net Manager to configure connect time fault tolerance and load balancing
ch12.indd 22ch12.indd 22 6/27/2005 10:07:33 AM6/27/2005 10:07:33 AM
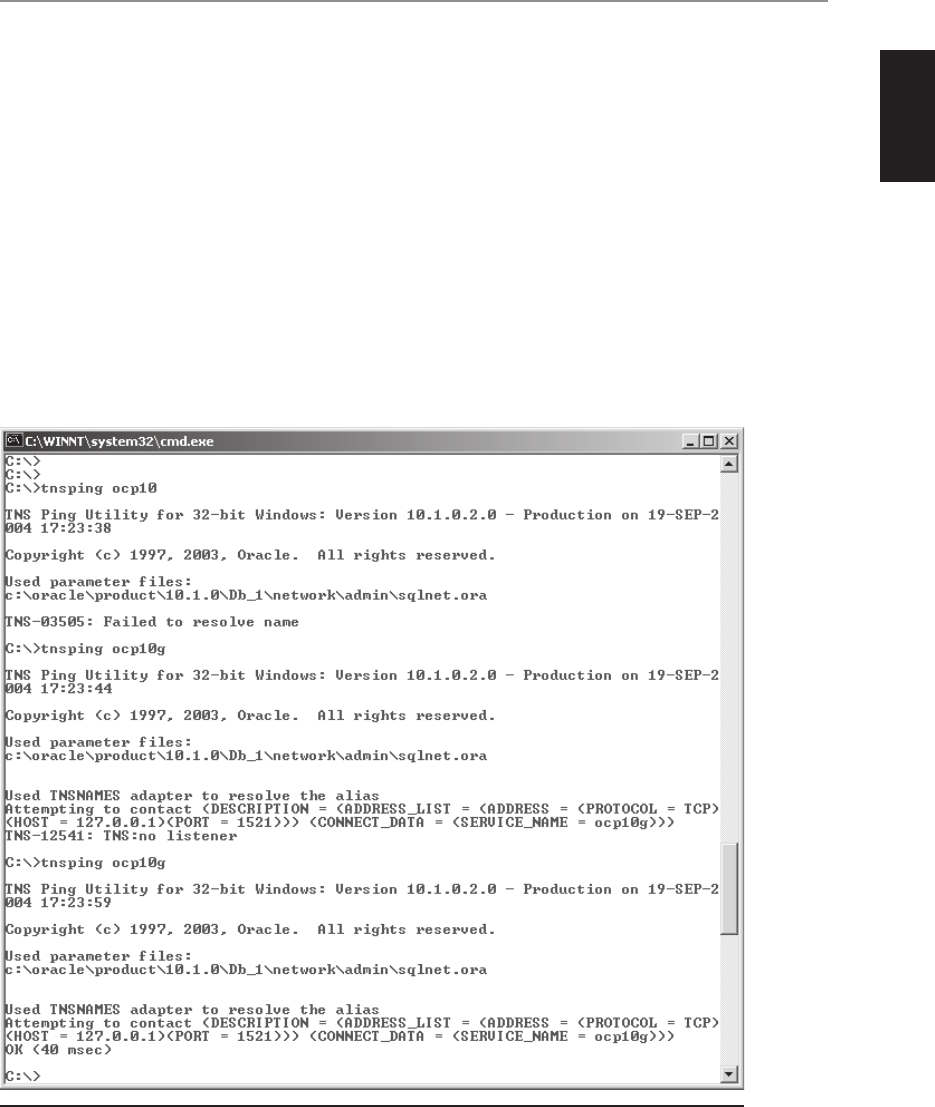
Chapter 12: Configuring Oracle Networking
23
PART I
All-in-1 / Oracle Database 10g Certification All-in-One / Watson & Bersinic / 5790-3 /Chapter 12
alias and selecting Test Service from the Command drop-down menu. The Net Manager
test does an end-to-end check: from the client machine where you are running Net
Manager it will attempt to log on to the instance, thus confirming that the alias is
syntactically correct; that the alias does resolve to the address of a listener; that the
listener is running and does know about the service requested; that the instance making
up that service is running; that the database the service connects to is open. When
attempting a logon, the Net Manager test will use the username/password SCOTT/
TIGER, the old demonstration database user. If SCOTT does not exist in your database,
the test will fail with an error to that effect—do not worry about this; the fact that the
database could respond with an error is proof enough that you can connect to it.
The second test is the command-line utility tnsping (it is tnsping.exe on Windows).
Unlike the Net Manager test, tnsping only tests connectivity as far as the listener.
The first test in Figure 12-12 failed because the alias used could not be resolved:
it does not exist in the tnsnames.ora file. The second test corrects the alias, but fails
because the listener is not running. Then after starting the listener, the third test succeeds.
Figure 12-12 Test results for tnsping
ch12.indd 23ch12.indd 23 6/27/2005 10:07:34 AM6/27/2005 10:07:34 AM

Oracle Database 10g OCP Certification All-in-One Exam Guide
24
All-in-1 / Oracle Database 10g Certification All-in-One / Watson & Bersinic / 5790-3 /Chapter 12
EXAM TIP The tnsping utility does a handshake with the listener but does
not test whether the instance is running and the database is open. Only the
Net Manager test does that.
Chapter Review
This chapter has covered the theory behind Oracle Net and how to configure client/
server connections. You have seen how Oracle Net is controlled by a set of files: the
server-side listener.ora file, which defines listeners, and the client-side tnsnames.ora
file, which provides a name resolution capability for the most commonly used name
resolution method: local naming. There is also the sqlnet.ora file, an optional file for
either the client or server side. There are graphical configuration tools for managing
Oracle Net, which you are strongly advised to use in order to avoid problems with
connectivity that can be very difficult to resolve. Finally, you saw some of the more
advanced capabilities of Oracle Net, and the testing tools to test Oracle Net connections.
Questions
1. Which protocols can Oracle Net 10g use? (Choose four answers.)
A. TCP
B. UDP
C. SPX/IPX
D. SDP
E. TCP with secure sockets
F. Named Pipes
G. LU6.2
H. NetBIOS/NetBEUI
2. Where is the division between the client and the server in the Oracle
environment? (Choose the best answer.)
A. Between the instance and the database
B. Between the user and the user process
C. Between the server process and the instance
D. Between the user process and the server process
E. The client/server split varies depending on the stage of the execution cycle
3. Which of the following statements about listeners is correct? (Choose the best
answer.)
A. A listener can connect you to one instance only.
B. A listener can connect you to one service only.
ch12.indd 24ch12.indd 24 6/27/2005 10:07:35 AM6/27/2005 10:07:35 AM

Chapter 12: Configuring Oracle Networking
25
PART I
All-in-1 / Oracle Database 10g Certification All-in-One / Watson & Bersinic / 5790-3 /Chapter 12
C. Multiple listeners can share one network interface card.
D. An instance will accept connections only from the listener specified on the
LOCAL_LISTENER parameter.
4. You have decided to use local naming. Which files must you create on the
client machine? (Choose the best answer.)
A. tnsnames.ora and sqlnet.ora
B. listener.ora only
C. tnsnames.ora only
D. listener.ora and sqlnet.ora
E. None. You can rely on defaults if you are using TCP and your listener is
running on port 1521.
5. If you stop your listener, what will happen to sessions that connected through
it? (Choose the best answer.)
A. They will continue if you have configured failover.
B. They will not be affected in any way.
C. They will hang until you restart the listener.
D. You cannot stop a listener if it is in use.
E. The sessions will error out.
6. If you stop a Connection Manager, what will happen to sessions that connected
through it? (Choose the best answer.)
A. They will continue if you have configured failover.
B. They will not be affected in any way.
C. You cannot stop a Connection Manager if it is in use.
D. The sessions will error out.
7. If you are running your user process on the same machine as the instance you
wish to connect to, which of the following is correct? (Choose two answers.)
A. You do not need to go via a listener.
B. You can only use the IPC protocol.
C. You cannot use the IPC protocol.
D. You do not need to use Oracle Net at all.
E. You do not need to configure Oracle Net at all.
8. Your organization has many databases on many servers, and a large number
of users. The network environment is always changing. What would be the
best naming method to use? (Choose the best answer.)
A. Easy Connect, because it means that you don’t have to maintain tnsnames
.ora files.
B. Directory naming, because it centralizes the naming information.
ch12.indd 25ch12.indd 25 6/27/2005 10:07:35 AM6/27/2005 10:07:35 AM

Oracle Database 10g OCP Certification All-in-One Exam Guide
26
All-in-1 / Oracle Database 10g Certification All-in-One / Watson & Bersinic / 5790-3 /Chapter 12
C. Local naming, because each user can maintain his own configuration files
locally.
D. External naming, because you can rely on a third-party product to maintain
the configuration information.
9. Your server is using a European character set, and your client is using an
American character set. How will Oracle Net handle this? (Choose the best
answer.)
A. It cannot; you must change the character set of the database or of the client.
B. The underlying network protocol will handle the conversion.
C. Oracle Net will handle the conversion.
D. The application software must do any necessary conversion.
10. Why might you set up multiple listeners for one instance? (Choose the best
answer.)
A. You can’t; there can be only one local listener.
B. To provide fault tolerance and load balancing.
C. If the listeners are on separate computers, you will get better performance.
D. To spread the workload of maintaining sessions across several processes.
11. The tnsping utility reports that an alias is fine, but you can’t connect with
SQL*Plus. What might be the reason? (Choose two answers.)
A. You are using a bad username/password combination, but tnsping tested
with a correct one.
B. The listener is running, but the instance isn’t.
C. The database is in mount mode.
D. SQL*Plus is using one name resolution method; tnsping is using another.
12. Which configuration tools can be used to start a listener? (Choose two answers.)
A. Database Control
B. The Net Manager
C. The lsnrctl utility
D. SQL*Plus
13. Consider this tnsnames.ora file:
test =
(description =
(address_list =
(address = (protocol = tcp)(host = serv2)(port = 1521))
)
(connect_data =
(service_name = prod)
)
)
prod =
(description =
ch12.indd 26ch12.indd 26 6/27/2005 10:07:36 AM6/27/2005 10:07:36 AM

Chapter 12: Configuring Oracle Networking
27
PART I
All-in-1 / Oracle Database 10g Certification All-in-One / Watson & Bersinic / 5790-3 /Chapter 12
(address_list =
(address = (protocol = tcp)(host = serv1)(port = 1521))
)
(connect_data =
(service_name = prod)
)
)
dev =
(description =
(address_list =
(address = (protocol = tcp)(host = serv3)(port = 1521))
)
(connect_data =
(service_name = prod)
)
)
Which of the following statements is correct? (Choose the best answer.)
A. All the aliases will connect to the same service.
B. The aliases will all go to different services.
C. The first and third aliases will fail, because the alias name doesn’t match
the service name.
D. There will be a port conflict, because all aliases use the same port.
E. None of the above.
14. Consider this line from a listener.ora file:
l1=(description=(address=(protocol=tcp)(host=serv1)(port=1521)))
What will happen if you issue this connect string:
connect scott/tiger@l1
A. You will be connected to the instance l1.
B. You will be connected to an instance only if dynamic instance registration
is working.
C. You can’t tell; it depends on how the client side is configured.
D. If you are logged on to the server machine, IPC will connect you to the
local instance.
E. The connection will fail if the listener is not started.
15. Consider these four initialization parameters:
instance_name=PRD
db_name=PROD
db_domain=WORLD
local_listener=''
service_names=production
What service name will be registered with a listener on port 1521? (Choose
the best answer.)
A. PRD.WORLD
B. PROD.WORLD
C. production
D. None, because the local_listener parameter has been disabled.
ch12.indd 27ch12.indd 27 6/27/2005 10:07:36 AM6/27/2005 10:07:36 AM

Oracle Database 10g OCP Certification All-in-One Exam Guide
28
All-in-1 / Oracle Database 10g Certification All-in-One / Watson & Bersinic / 5790-3 /Chapter 12
Answers
1. A, D, E, and F. The four protocols supported by Oracle Net 10g are TCP, SDP,
TCP with secure sockets, and Named Pipes. Previous releases supported other
protocols.
2. D. The client/server split is between user process and server process.
3. C. One network interface card can support many listeners, provided they use
different ports.
4. C. The only required file is tnsnames.ora.
5. B. A listener establishes connections; it does not maintain them. Therefore B
is correct, and the others are wrong.
6. D. A Connection Manager is responsible for maintaining connections: all
traffic goes through it. So D is correct because the sessions will fail.
7. A and E. All connections use Oracle Net, but they need not use a network and
for local connections you need do no configuration.
8. B. Directory naming is intended for exactly the environment described and is
the best answer.
9. C. Character set conversion is done by the Two-Task Common layer of Oracle
Net.
10. B. Multiple listeners can provide connect-time fault tolerance and load balancing.
11. B and C. The tnsping utility tests only the handshake between user process
and listener, not the onward connection to the instance, so B and C are both
possibilities.
12. A and C. Listeners can be started with Database Control or the lsnrctl utility.
13. B. Each alias specifies a different host.
14. C. You have no idea what will happen, without knowing how the client is
configured.
15. C. The SERVICE_NAMES parameter is used to register the instance.
ch12.indd 28ch12.indd 28 6/27/2005 10:07:37 AM6/27/2005 10:07:37 AM

All-in-1 / Oracle Database 10g OCP Certification All-in-One / Watson, Bersinic / 5790-3, Ch 13
CHAPTER 13
Managing Shared Servers
In this chapter you will learn how to
• Configure Oracle shared servers
• Identify when to use Oracle shared servers
• Monitor shared servers
• Describe the shared server architecture
1
ch13.indd 1ch13.indd 1 6/17/2005 4:58:27 PM6/17/2005 4:58:27 PM
All-in-1 / Oracle Database 10g OCP Certification All-in-One / Watson, Bersinic / 5790-3
Oracle Database 10g OCP Certification All-in-One Exam Guide
2
Chapter 12 went through the dedicated server architecture, which is the default
Oracle configuration: for each session against an instance, the listener will spawn
a server process. The alternative is the shared server architecture: rather than spawning
server processes on demand for each session, you prespawn a small number of server
processes, to be shared by all your database sessions. This chapter will explain the
shared server architecture, teach you how to configure and monitor it, and give some
guidelines on when to use it. Always remember that shared server is an option that
you only use if you have to—there are many installations where it is not applicable,
but it is a feature that all DBAs should be aware of and is considered important for
examination purposes.
The Limitations of the Dedicated
Server Architecture
The standard dedicated server architecture requires that the database listener should
spawn a dedicated server process for each concurrent connection to the instance. These
server processes will persist until the session is terminated. You can see the processes
being launched and terminated at the operating system level. On Unix, use the ps
command to display them, as in Figure 13-1.
Figure 13-1 Using ps and grep to display all the processes that are part of the instance called
ocp10g
ch13.indd 2ch13.indd 2 6/17/2005 4:58:40 PM6/17/2005 4:58:40 PM

All-in-1 / Oracle Database 10g OCP Certification All-in-One / Watson, Bersinic / 5790-3
Chapter 13: Managing Shared Servers
3
PART I
Each oracleocp10g process is an Oracle dedicated server; the other processes are
the background processes that make up the instance. Two of the server processes, with
process ID numbers 6981 and 7003, include “(LOCAL=NO),” which is an indication
that the server process is servicing a remote user process. The other server process,
number 6276, says “(DESCRIPTION=(LOCAL=YES) (ADDRESS=(PROTOCOL=beq))),”
which is an indication that the user process is running on the same machine as the
server and did not come in through a listener. If you launch some more SQL*Plus
sessions, locally or remote, you will see more server processes appearing on the ps
listing.
On Windows, the server processes are not actual operating system processes; they
are threads within the single oracle.exe process, but the principle is exactly the same.
Within your Windows Task Manager, if you choose to display the thread count (on
the Processes tab, click View | Select Columns | Thread Count), you will see that the
number of threads increases by one for each concurrent logon. If you have the Windows
Resource Kit, or some similar tool, you can look inside the oracle.exe file for more
detailed information on the names of the threads being launched, similar to that
displayed by the Unix ps command.
TIP Some DBAs refer to server processes as “shadow” processes.
As more users log on to your instance, more server processes get launched. This is
not a problem as far as Oracle is concerned. The database listener can launch as many
processes as required, though there may be limits on the speed with which it can launch
them. If you have a large number of concurrent connection requests, your listener will
have to queue them up. You can avoid this by running multiple listeners on different
ports and load-balancing between them. Then once the sessions are established, there
is no limit to the number that PMON can manage. But your operating system may well
have limits on the number of processes that it can support, limits to do with context
switches and with memory.
A computer can only do one thing at a time, unless it is an SMP machine, in
which case each CPU can only do one thing at a time. The operating system simulates
concurrent processing by using an algorithm to share CPU cycles across all the currently
executing processes. This algorithm, often referred to as a time-slicing or time-sharing
algorithm, takes care of allocating a few CPU cycles to each process in turn. Switching
one process off CPU in order to put another process on CPU is called a context switch.
Context switches are very expensive: the operating system has to do a lot of work to
restore the state of each process as it is brought onto CPU and then save its state when
it is switched off the CPU. As more users connect to the instance, the operating system
has to context-switch between more and more server processes. Depending on your
operating system, this can cause a severe degradation in performance. A decent
mainframe operating system can context-switch between tens of thousands of processes
without problems, but newer (and simpler) operating systems such as Unix and
ch13.indd 3ch13.indd 3 6/17/2005 4:58:41 PM6/17/2005 4:58:41 PM

All-in-1 / Oracle Database 10g OCP Certification All-in-One / Watson, Bersinic / 5790-3
Oracle Database 10g OCP Certification All-in-One Exam Guide
4
Windows may not be good at running thousands, or even just hundreds, of concurrent
processes. This is very much platform specific, but performance may degrade dramatically
because a large proportion of the computer’s processing capacity is taken up with
managing the context switches, leaving a relatively small amount of processing capacity
available for actually doing work.
There may also be memory problems as more sessions are established. The actual
server processes themselves are not an issue, because all modern operating systems
use shared memory when the same process is loaded more than once. So launching
a thousand server processes should take no more memory than launching one. The
problem comes with the Program Global Area, or PGA. The PGA is a block of memory
associated with each server process, to maintain the state of the session and as a work
area for operations such as sorting rows. Clearly, the PGAs cannot be in shared memory:
they contain data unique to each session. This is why your system may begin to swap
as more users log on: each session will require its own PGA.
So in the dedicated server environment, performance may degrade if your operating
system has problems managing a large number of concurrent processes, and the
problem will be exacerbated if your server machine has insufficient memory. Note
that it doesn’t really matter whether the sessions are actually doing anything or not.
Even if the sessions are idle, the operating system must still bring them on and off
CPU and possibly page the appropriate PGA into main memory from swap files,
according to its time-slicing algorithm. There comes a point when, no matter what
you do in the way of hardware upgrades, performance begins to degrade because of
operating system inefficiencies in managing context switches and paging. These are
not Oracle’s problems, but to overcome them Oracle offers the option of the shared
server architecture. This allows a large number of user processes to be serviced by a
relatively small number of shared server processes, thus reducing dramatically the
number of processes that the server’s operating system has to manage. As a fringe
benefit, memory usage may also reduce.
The Shared Server Architecture
One point to emphasize immediately is that shared server (known as the multithreaded
server, or MTS, in earlier releases) is implemented purely on the server side. The user
process and the application software have no way of telling that anything has changed.
The user process issues a connect string that must resolve to the address of a listener
and the name of a service (or of an instance). In return, it will receive the address of a
server-side process that it will think is a dedicated server. It will then proceed to send
SQL statements and receive back result sets: as far as the user process is concerned,
absolutely nothing has changed. But the server side is very different.
Shared server is implemented by additional processes that are a part of the instance.
They are background processes, launched at instance startup time. There are two new
process types, dispatchers and shared servers. There are also some extra queue memory
structures within the SGA, and the database listener modifies its behavior for shared
server. When an instance that is configured for shared server starts up, in addition to
ch13.indd 4ch13.indd 4 6/17/2005 4:58:41 PM6/17/2005 4:58:41 PM

All-in-1 / Oracle Database 10g OCP Certification All-in-One / Watson, Bersinic / 5790-3
Chapter 13: Managing Shared Servers
5
PART I
the usual background processes, one or more dispatcher processes also start. The
dispatchers, like any other TCP process, run on a unique TCP port allocated by your
operating system’s port mapper: they contact the listener and register with it, using the
LOCAL_LISTENER parameter (remember that from Chapter 12?) to locate the listener.
One or more shared server processes also start. These are conceptually similar to a
normal dedicated server process, but they are not tied to one session. They will receive
SQL statements, parse and execute them, and generate a result set—but they will not
receive the SQL statements directly from a user process; they will read them from a
queue that will be populated with statements from any number of user processes.
Similarly, the shared servers don’t fetch result sets back to a user process directly;
instead, they put the result sets onto a response queue.
The next question is, how do the user-generated statements get onto the queue
that is read by the server processes, and how do results get fetched to the users? This
is where the dispatchers come in. When a user process contacts a listener, rather than
launching a server process and connecting it to the user process, the listener passes
back the address of a dispatcher. If there is only one dispatcher, the listener will connect
it to all the user processes. If there are multiple dispatchers, the listener will load-
balance incoming connection requests across them, but the end result is that many
user processes will be connected to each dispatcher. Each user process will be under
the impression that it is talking to a dedicated server process, but it isn’t; it is sharing
a dispatcher with many other user processes. At the network level, many user processes
will have connections mutexed through the one port used by the dispatcher.
EXAM TIP A session’s connection to a dispatcher persists for the duration
of the session, unlike the connection to the listener, which is transient.
When a user process issues a SQL statement, it is sent to the dispatcher. The
dispatcher puts all the statements it receives onto a queue. This queue is called the
“common” queue, because all dispatchers share it. No matter which dispatcher a user
process is connected to, all statements end up on the common queue.
All the shared server processes monitor the common queue. When a statement
arrives on the common queue, the first available shared server picks it up. From that
point on execution proceeds through the usual parse-bind-execute cycle, but when it
comes to the fetch phase, it is impossible for the shared server to fetch the result set
back to the user process because there is no connection between the user process and
the shared server. So instead, the shared server puts the result set onto a response queue
that is specific to the dispatcher that received the job in the first place. Each dispatcher
monitors its own response queue, and whenever any results are put on it, the dispatcher
will pick them up and present them back to the user process that originally issued the
statement.
EXAM TIP There is a common input queue shared by all dispatchers, but each
dispatcher has its own response queue.
ch13.indd 5ch13.indd 5 6/17/2005 4:58:41 PM6/17/2005 4:58:41 PM

All-in-1 / Oracle Database 10g OCP Certification All-in-One / Watson, Bersinic / 5790-3
Oracle Database 10g OCP Certification All-in-One Exam Guide
6
A result of the mechanism of dispatchers and queues is that any statement from any
user process could be executed by any available shared server. This raises the question
of how the state of the session can be maintained. It would be quite possible for a user
process to issue, for example, a SELECT FOR UPDATE, a DELETE, and a COMMIT. In
a normal dedicated server connection, this isn’t a problem, because the PGA (which is
tied to the one server process that is managing the session) stores information about
what the session was doing, and therefore the dedicated server will know what to
COMMIT and what locks to release. The PGA for a dedicated server session will store
the session’s session data, its cursor state, its sort space, and its stack space. But in the
shared server environment, each statement might be picked off the common queue
by a different shared server process, which will have no idea what the state of the
transaction is. To get around this problem, a shared server session stores most of the
session data in the shared pool, rather than in the PGA. Then whenever a shared server
picks a job off the common queue, it will go to the SGA and connect to the appropriate
block of memory to find out the state of the session. The memory used in the SGA
for each shared server session, known as the User Global Area (UGA), includes all of
what would have been in a PGA with the exception of the session’s stack space. This is
where the memory saving will come from. Oracle can manage memory in the shared
pool much more effectively than it can in many separate PGAs.
EXAM TIP In shared server, what PGA memory structure does not go into
the SGA? The stack space.
Configuring Shared Server
Being a server-side capability, shared server entails no client configuration at all beyond
perfectly normal client-side Oracle Net, as detailed in Chapter 12. On the server side,
shared server has nothing to do with the database—only the instance. The listener will
be automatically configured for shared server through dynamic instance registration.
It follows that shared server is configured through instance initialization parameters.
Only one is required, though there are a few optional ones as well. The shared server
parameters are shown in Table 13-1.
TIP Advanced or not, you should always set SHARED_SERVERS,
DISPATCHERS, and LARGE_POOL_SIZE if you are using shared server.
And you should always set PROCESSES and SESSIONS in any case. You
must also set LOCAL_LISTENER if your listener is not using port 1521.
The first parameter to consider is SHARED_SERVERS. This controls the number
of shared servers that will be launched at instance startup time. Shared server uses a
queuing mechanism, but the ideal is that there should be no queuing: there should
always be a server process ready and waiting for every job that is put on the common
queue by the dispatchers. Therefore, SHARED_SERVERS should be set to the maximum
ch13.indd 6ch13.indd 6 6/17/2005 4:58:41 PM6/17/2005 4:58:41 PM

All-in-1 / Oracle Database 10g OCP Certification All-in-One / Watson, Bersinic / 5790-3
Chapter 13: Managing Shared Servers
7
PART I
number of concurrent requests that you expect. But if there is a sudden burst of activity,
you don’t have to worry too much, because Oracle will launch additional shared servers,
up to the value specified for MAX_SHARED_SERVERS. By default, SHARED_SERVERS
is 1 if DISPATCHERS is set. MAX_SHARED_SERVERS defaults to one-eighth of the
PROCESSES parameter.
The DISPATCHERS parameter controls how many dispatcher processes to launch
at instance startup time, and how they will behave. This is the only required parameter.
There are many options for this parameter, but usually two will suffice: how many to
start, and what protocol they should listen on. Among the more advanced options are
ones that allow you to control the port and network card on which the dispatcher will
listen, and the address of the listener(s) with which it will register, but usually you can
let your operating system’s port mapper assign a port, and use the LOCAL_LISTENER
parameter to control which listener the dispatcher(s) will register with. MAX_
DISPATCHERS sets an upper limit to the number of dispatchers you can start, but
unlike shared servers, Oracle will not start extra dispatchers on demand. You can,
however, launch additional dispatchers at any time up to this limit.
LOCAL_LISTENER is a parameter you saw with regard to dynamic instance
registration. It tells the instance the address of a listener that it should register with.
In the shared server environment, the dispatchers will also use this parameter to
register themselves; otherwise, the listener would not know where the dispatchers
were. During the lifetime of the instance, the dispatchers continually update the local
listener with data on how many sessions they are servicing, so that the listener can
always direct a new incoming connection request to the least busy dispatcher.
The LARGE_POOL_SIZE parameter is not required, but you should always set it.
A large part of a session’s PGA, known as the UGA, is stored in the SGA if the session
is coming in through the shared server mechanism. By default, the UGAs for all your
Parameter Required for Shared Server? Basic or Advanced?
SHARED_SERVERS No Basic
DISPATCHERS Yes Advanced
MAX_SHARED_SERVERS No Advanced
MAX_DISPATCHERS No Advanced
LOCAL_LISTENER No Advanced
LARGE_POOL_SIZE No Advanced
CIRCUITS No Advanced
SHARED_SERVER_
SESSIONS
No Advanced
PROCESSES No Basic
SESSIONS No Basic
Table 13-1 Instance Parameters for Shared Server
ch13.indd 7ch13.indd 7 6/17/2005 4:58:42 PM6/17/2005 4:58:42 PM

All-in-1 / Oracle Database 10g OCP Certification All-in-One / Watson, Bersinic / 5790-3
Oracle Database 10g OCP Certification All-in-One Exam Guide
8
sessions go into the shared pool. If you have many shared server sessions, this will put
a lot of strain on the shared pool, both in terms of memory demand and management
as memory is being allocated and deallocated on demand. But if you specify the LARGE_
POOL_SIZE parameter, you create a separate area of memory in the SGA that will be
used for the UGAs instead of the shared pool. This will take a lot of strain off the
shared pool.
The CIRCUITS and SHARED_SERVER_SESSIONS parameters limit how many
users are allowed to connect through the shared servers. A circuit is one connection
to a dispatcher and will usually map onto one session, but if your programmers are
writing code using appropriate OCI calls, they can channel several logical sessions
through one physical circuit. By default, there are no limits on the number of circuits
or shared server sessions.
Finally, two more basic parameters: The SESSIONS and PROCESSES parameters
are not necessarily related to shared server, but this is an appropriate time to discuss
them. The PROCESSES parameter sets a limit on the number of operating system
processes (or threads on Windows) that can connect to the SGA. This total must be
large enough to allow for the background processes and all dedicated server processes.
Shared servers and dispatchers also count against the total. So in a dedicated server
environment, this is one way of limiting the number of concurrent connections.
SESSIONS is applied at the Oracle level rather than the operating system level; it
limits the number of concurrent logons to the instance, irrespective of whether each
logon is through a dedicated server or through a shared server.
TIP The defaults for SESSIONS and PROCESSES are not suitable for most
modern databases. You should always consider how many concurrent users
you expect, and set them appropriately.
Exercise 13-1: Configuring and Verifying
Shared Server
In this exercise, you will convert your instance to use shared server, and demonstrate
that it is working.
1. Log on to your instance with SQL*Plus, and issue the following commands
to set parameters to enable the shared server:
alter system set dispatchers='(protocol=tcp)(dispatchers=2)' scope=spfile;
alter system set shared_servers=3 scope=spfile;
startup force;
2. Issue this query to confirm that the dispatchers and shared servers have
started:
select program from v$process;
ch13.indd 8ch13.indd 8 6/17/2005 4:58:42 PM6/17/2005 4:58:42 PM
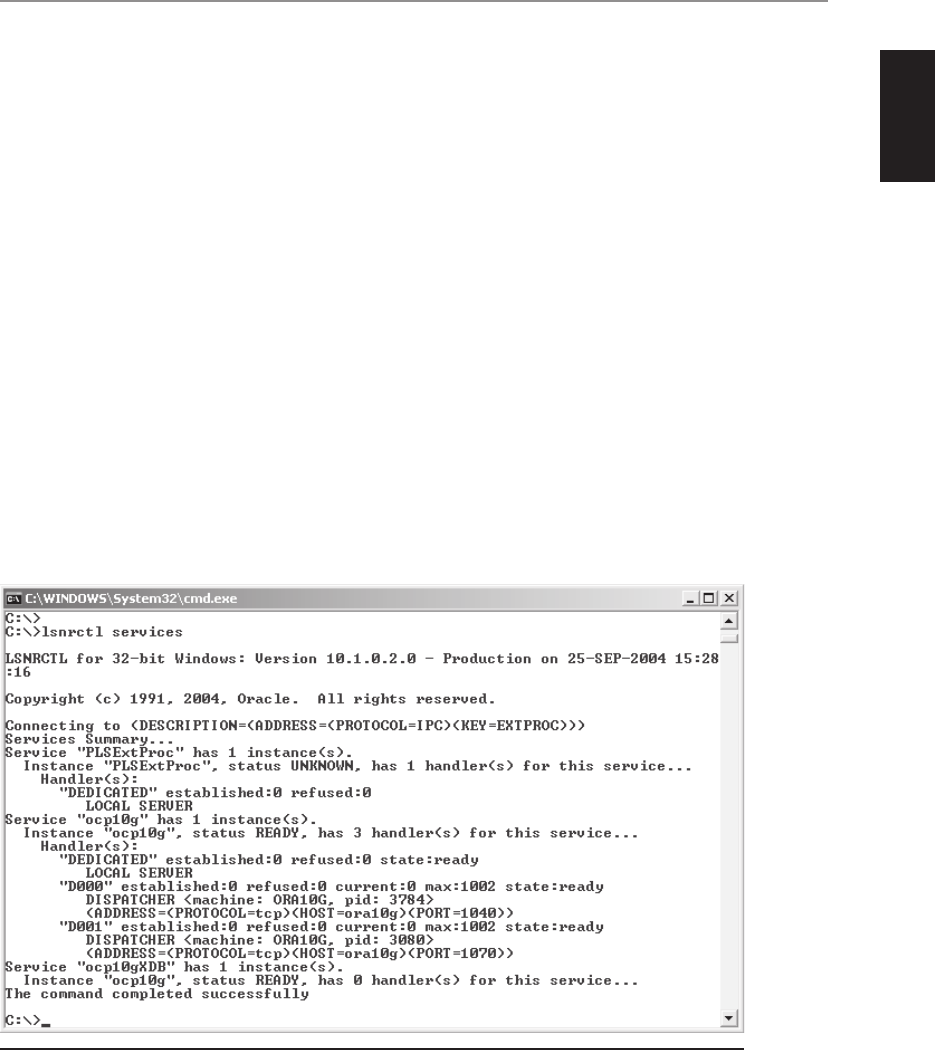
All-in-1 / Oracle Database 10g OCP Certification All-in-One / Watson, Bersinic / 5790-3
Chapter 13: Managing Shared Servers
9
PART I
Note that there are two processes, d000 and d001, that are the two
dispatchers, and three shared server processes, s000, s001, and s002.
3. Use lsnrctl to confirm that the dispatchers have registered with your listener:
from an operating system prompt, enter
lsnrctl services
The output will resemble that in Figure 13-2.
Note that the two dispatchers have registered themselves but have not yet
established any sessions.
4. Launch a new SQL*Plus session, and log on to your instance through the
listener.
sqlplus system/oracle@ocp10g
5. Query V$CIRCUIT to confirm that your connection has been established
as a circuit: a connection through a shared server.
select dispatcher,saddr,circuit from v$circuit;
One row will be returned, showing which dispatcher your new session has
come through and the session address.
6. Repeat Steps 4 and 5 several times until you have a number of concurrent
sessions, and observe how the new connections are balanced across the two
dispatchers.
Figure 13-2 Dispatchers registered with a database listener
ch13.indd 9ch13.indd 9 6/17/2005 4:58:42 PM6/17/2005 4:58:42 PM

All-in-1 / Oracle Database 10g OCP Certification All-in-One / Watson, Bersinic / 5790-3
Oracle Database 10g OCP Certification All-in-One Exam Guide
10
Monitoring the Shared Server
There are a number of views that will inform you of the state of your shared server
environment.
V$CIRCUIT will have one row for each current connection through the shared
server. The column CIRCUIT is the unique identifier, and there are join columns to
V$SESSION (column SADDR) and V$DISPATCHER (column DISPATCHER) that will
let you map sessions to dispatchers.
V$SHARED_SERVER will tell you the status of each shared server process. Perhaps
the most useful columns are IDLE and BUSY, which show how much time each process
has spent actually servicing requests rather than waiting for jobs to arrive on the
common queue.
V$DISPATCHER has one row per dispatcher. Again, the key columns are IDLE and
BUSY.
V$SHARED_SERVER_MONITOR has just one row, showing the maximum number
of connections and sessions (usually these figures will be the same) that have ever
come through the shared server. Also, there are figures for how many shared server
processes have been launched dynamically. If this figure is greater than zero, clearly
you did not start enough in the first place.
The final view is V$QUEUE. This will have one row for the common queue, and
one row for each dispatcher’s response queue. The critical column is QUEUED, which
shows the number of items on the queues right now. Remember that the ideal is no
queuing. If there are items on the common queue, that indicates that you do not have
enough shared servers to clear it, and if there are items on the response queues, that
indicates that your dispatchers are overloaded.
TIP There is a view V$MTS, provided for backward compatibility, which is
identical to V$SHARED_SERVER_MONITOR and a lot shorter to type.
When to Use the Shared Server
You will not find a great deal of hard advice in the Oracle documentation on when to
use shared server, or how many dispatchers and shared servers you’ll need. The main
point to hang on to is that shared server is a facility you use because there is a need for
it. It increases scalability when there are hundreds or thousands of concurrent users, at
the cost of increasing the number of CPU cycles needed for any one statement execution,
because it has to go via queues. But overall, the scalability of your system will increase
dramatically because the efficiency of the operating system will be greatly improved.
You will be able to put many more requests per second through the instance, because
ch13.indd 10ch13.indd 10 6/17/2005 4:58:42 PM6/17/2005 4:58:42 PM

All-in-1 / Oracle Database 10g OCP Certification All-in-One / Watson, Bersinic / 5790-3
Chapter 13: Managing Shared Servers
11
PART I
the operating system will not have to spend such a large proportion of CPU time on
context switches.
TIP It is often said that you should think about using shared server when
your number of concurrent connections is in the low hundreds. If you have
less than one hundred concurrent connections, you almost certainly don’t
need it. But if you have more than a thousand, you probably do. The critical
factor is whether your operating system performance is beginning to degrade
because of excessive context switches.
What Applications Are Suitable for Shared Server?
Consider an OLTP environment, such as hundreds of telephone operators in a call
center. Each operator may spend one or two minutes per call, collecting the caller
details and entering them into the user process. Then when s/he clicks the Submit
button, the user process constructs an insert statement and sends it off to the server
process. The server process might go through the whole parse/bind/execute/fetch cycle
for the statement in just a few hundredths of a second. Clearly, no matter how fast the
clerks work, their server processes are idle 99.9 percent of the time. But the operating
system still has to switch all those processes on and off CPU, according to its time-
sharing algorithm. By contrast, consider a data warehouse environment. Here, users
submit queries that may run for a long time. The batch uploads of data will be equally
long running. Whenever one of these large jobs is submitted, the server process for
that session could be working flat out for hours on just one statement.
It should be apparent that shared server is ideal for managing many sessions doing
short transactions, where the bulk of the work is on the client side of the client/server
divide. In these circumstances, one shared server will be able to service dozens of
sessions. But for batch processing work, dedicated servers are much better. If you submit
a large batch job through a shared server session, it will work, but it will tie up one of
the processes from your small pool of shared server processes for the duration of the
job, leaving all your other users to compete for the remaining shared servers. The amount
of network traffic involved in batch uploads from a user process and in fetching large
result sets back to a user process will also cause contention for dispatchers.
A second class of operations that are better done through a dedicated server is
database administration work. Index creation, table maintenance operations, and
backup and recovery work through the Recovery Manager (covered in later chapters)
will perform much better through a dedicated server. And it is logically impossible to
issue startup or shutdown commands through a shared server: the shared servers are
part of the instance and thus not available at the time you issue a startup command.
So the administrator should always have a dedicated server connection.
ch13.indd 11ch13.indd 11 6/17/2005 4:58:43 PM6/17/2005 4:58:43 PM
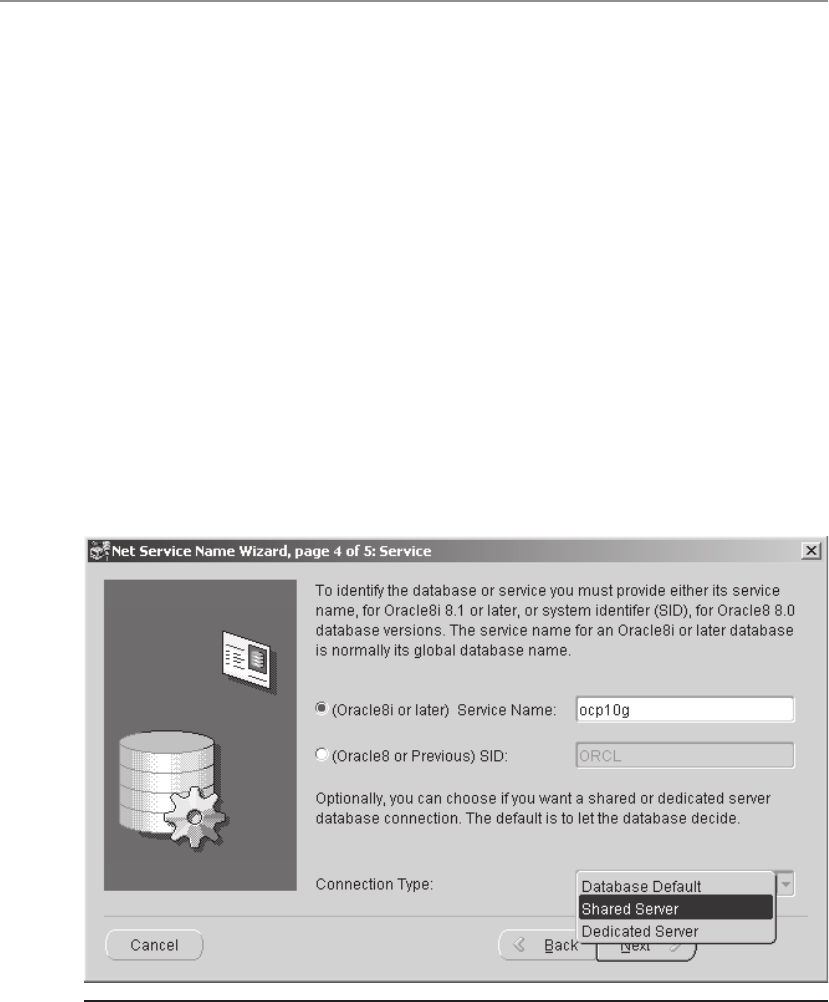
All-in-1 / Oracle Database 10g OCP Certification All-in-One / Watson, Bersinic / 5790-3
Oracle Database 10g OCP Certification All-in-One Exam Guide
12
How to Control Use of Shared Servers
If you are running your user process locally on the server machine, you can bypass the
shared server simply by using a direct connection. From a SQL*Plus prompt, issue the
command
SQL> connect sys/oracle as sysdba
and you will get a dedicated server, because you have not specified a network alias that
would go via a listener. All local connections, not just yours as sysdba, will do this. But
most of your users will be coming in across a network through a listener.
An application has no way of controlling whether it is using a shared server or a
dedicated server, but as DBA you can control this through Oracle Net. If dispatchers
and shared servers are available, by default every connection through the listener will
use them. This default can be overridden by the connection details you specify in the
client side tnsnames.ora file, configured either by hand or through the Net Manager
as in Figure 13-3.
Note that choosing a connection type is an example of something that can be done
if you are using local or directory naming, but not with Easy Connect. Easy Connect
will always use shared server if it is available.
Figure 13-3 Selecting the connection type in the Net Manager
ch13.indd 12ch13.indd 12 6/17/2005 4:58:43 PM6/17/2005 4:58:43 PM

All-in-1 / Oracle Database 10g OCP Certification All-in-One / Watson, Bersinic / 5790-3
Chapter 13: Managing Shared Servers
13
PART I
Exercise 13-2: Configuring a Client
to Choose the Connection Type
In this exercise, create two new service aliases, one specifying dedicated server, the
other specifying shared server. Test the effect, and then put your instance back to
dedicated server only.
1. Using whatever text editor you wish, open your tnsnames.ora file in your
ORACLE_HOME/network/admin directory.
2. Substituting your server’s hostname for the HOST, add these two entries to
your tnsnames.ora file:
ocp10g_ded =
(DESCRIPTION =
(ADDRESS_LIST =
(ADDRESS = (PROTOCOL = TCP)(HOST = ora10g.haunting.com)(PORT = 1521))
)
(CONNECT_DATA =
(SERVER = DEDICATED)
(SERVICE_NAME = ocp10g)
)
)
ocp10g_mts =
(DESCRIPTION =
(ADDRESS_LIST =
(ADDRESS = (PROTOCOL = TCP)(HOST = ora10g.haunting.com)(PORT = 1521))
)
(CONNECT_DATA =
(SERVER = SHARED)
(SERVICE_NAME = ocp10g)
)
)
Note that both aliases request the same service, ocp10g, but that the connect_
data sections demand either a dedicated server (alias ocp10g_ded) or a
connection through a shared server (alias ocp10g_mts).
3. At the operating system level, note how many processes there are in your
instance. On Unix, use ps as in previous Figure 13-1. On Windows, use the
Task Manager to display the number of threads in the oracle.exe process.
4. Launch a SQL*Plus session through a dedicated server.
SQL> connect system/oracle@ocp10g_ded
5. Repeat Step 3, and note that an extra server process (or thread) has been
started.
6. Launch a SQL*Plus session through a shared server.
SQL> connect system/oracle@ocp_10g_mts
ch13.indd 13ch13.indd 13 6/17/2005 4:58:43 PM6/17/2005 4:58:43 PM

All-in-1 / Oracle Database 10g OCP Certification All-in-One / Watson, Bersinic / 5790-3
Oracle Database 10g OCP Certification All-in-One Exam Guide
14
7. Repeat Step 3, and note that the process (or thread) count has not changed.
8. Return your instance to dedicated server only, and restart it.
connect / as sysdba;
alter system set dispatchers=‘‘ scope=spfile;
alter system set shared_servers=0 scope=spfile;
startup force;
Chapter Review
The shared server is an advanced option that many databases will never need to use,
but if you do need it, the benefits can be immense. By use of initialization parameters,
you instruct the instance to launch one or more dispatchers and shared server processes.
The dispatchers register with a listener, and the listener will then concurrently connect
many user processes to each dispatcher. The user processes submit statements to the
dispatchers, which put them on a common queue that is serviced by a pool of shared
servers. After executing the statements, the shared servers put the result set on a response
queue, which the dispatcher then fetches back to the user process.
Questions
1. Which of these memory structures is not stored in the SGA for a shared server
session? (Choose the best answer.)
A. Cursor state
B. Sort space
C. Stack space
D. Session data
2. Match the object to the function:
Object Function
A. Common queue a. Connects users to dispatchers
B. Dispatcher b. Stores jobs waiting for execution
C. Large pool c. Executes SQL statements
D. Listener d. Stores results waiting to be fetched
E. Response queue e. Receives statements from user processes
F. Shared server f. Stores UGAs accessed by all servers
3. Which of the following is incorrect about memory usage? (Choose the best
answer.)
A. For dedicated server sessions, the server processes will not use shared
memory.
B. PGA memory is always outside the system global area.
ch13.indd 14ch13.indd 14 6/17/2005 4:58:43 PM6/17/2005 4:58:43 PM

All-in-1 / Oracle Database 10g OCP Certification All-in-One / Watson, Bersinic / 5790-3
Chapter 13: Managing Shared Servers
15
PART I
C. Shared server queues are created in the large pool, if a large pool has been
defined. Otherwise, they are in the shared pool.
D. For shared server sessions, UGAs are always stored in the SGA.
4. Which of the following statements are true about dispatchers? (Choose two
answers.)
A. Dispatchers don’t handle the work of users’ requests; they only interface
between user processes and queues.
B. Dispatchers share a common response queue.
C. Dispatchers load-balance connections between themselves.
D. Listeners load-balance connections across dispatchers.
E. You can terminate a dispatcher, and established sessions will continue.
5. Which of the following statements about shared servers are true? (Choose
the best answer.)
A. All statements in a multistatement transaction will be executed by the
same server.
B. If one statement updates multiple rows, the work may be shared across
several servers.
C. The number of shared servers is fixed by the SHARED_SERVERS parameter.
D. Oracle will spawn additional shared servers on demand.
6. You can monitor the shared server environment through a number of views.
Which of the following statements is correct? (Choose two correct answers.)
A. You can monitor how busy your shared servers are by querying
V$SHARED_SERVER_MONITOR.
B. V$PROCESS will have a row for each shared server.
C. V$PROCESS will have a row for each dispatcher.
D. V$CIRCUIT will show you how busy each shared server session is.
7. You query V$QUEUE and see that that the common queue has no messages
waiting, but the response queues do. What action should you take? (Choose
the best answer.)
A. You need do nothing; queuing is a normal part of shared server operation.
B. You should consider adding more shared servers.
C. You should consider adding more dispatchers.
D. You should create a large pool, to relieve the strain on the shared pool.
8. After configuring shared server, you find that there are still dedicated servers
being spawned. What might be the reason for this? (Choose the best answer.)
A. Your users are making local connections.
B. The application is demanding dedicated servers.
ch13.indd 15ch13.indd 15 6/17/2005 4:58:43 PM6/17/2005 4:58:43 PM

All-in-1 / Oracle Database 10g OCP Certification All-in-One / Watson, Bersinic / 5790-3
Oracle Database 10g OCP Certification All-in-One Exam Guide
16
C. Large batch jobs are being run.
D. Oracle has spawned dedicated servers, because you set the SHARED_
SERVER parameter too low.
9. If you have multiple listeners, what will your dispatchers do? (Choose two
answers.)
A. All dispatchers will dynamically register with all listeners, automatically,
if they are running on port 1521.
B. Dispatchers can register with only one listener; otherwise, load balancing
would not be possible.
C. The dispatchers will load-balance themselves across the listeners.
D. The dispatchers will register with whatever listener is nominated in the
LOCAL_LISTENER parameter.
E. You can control which listener each dispatcher will register with.
10. Your database is used for a mixture of OLTP, DSS, and batch processing.
Would you advise use of shared server? (Choose the best answer.)
A. Yes, but only for the OLTP work.
B. Yes, if the batch and DSS users come though a different dispatcher from
the OLTP users.
C. No, because the mixed workload will cause problems.
D. No, unless the work can be partitioned such that the OLTP work is in the
day and the batch and DSS work at night to avoid contention.
11. There is one required parameter for shared server. Which is it?
A. DISPATCHERS
B. LARGE_POOL_SIZE
C. PROCESSES
D. SESSIONS
E. SHARED_SERVERS
12. Which of the following operations cannot be done through a shared server
connection? (Choose the best answer.)
A. Backup and restore
B. Shutdown and startup
C. Physical operations, such as creating data files
D. Large batch jobs
E. Index creation
ch13.indd 16ch13.indd 16 6/17/2005 4:58:44 PM6/17/2005 4:58:44 PM

All-in-1 / Oracle Database 10g OCP Certification All-in-One / Watson, Bersinic / 5790-3
Chapter 13: Managing Shared Servers
17
PART I
13. Which of the following is correct regarding memory usage? (Choose the best
answer.)
A. Overall memory demand should decrease because the number of server
processes will be reduced when using the shared server option.
B. Overall memory demand should decrease if you change to shared server,
because you can reduce the size of the SGA.
C. You should increase the size of the SGA if you convert to shared server.
D. Implementing shared server will reduce the size of sessions’ UGAs.
14. You have many sessions connected to one dispatcher. What is happening
at the network level?
A. Each session connects to the dispatcher on a unique TCP port.
B. All the sessions connect to the dispatcher on one TCP port.
C. The initial connection is always to one port; then the established
connection is on a unique port.
D. The connections are made and broken on demand, through a queuing
mechanism.
15. You want to ensure that you have a dedicated server connection. Which of the
following connection methods will give you this? (Choose two answers.)
A. Using Easy Connect, because it can’t use advanced features such as shared
server
B. Making a local connection that bypasses the listener
C. Embedding the SERVER=DEDICATED directive in the service alias you use
D. Connecting AS SYSDBA, which will always give a dedicated connection so
that you can issue startup and shutdown commands
Answers
1. C. The stack space is not stored in the SGA.
2. A-b. The common queue is shared for all statements.
B-e. The dispatchers receive statements from user processes.
C-f. If created, the large pool is where the UGAs are stored.
D-a. The listener establishes sessions by connecting users to dispatchers.
E-d. Each dispatcher has its own response queue for result sets.
F-c. Shared servers execute statements as normal.
3. C. This the correct answer, because it confuses memory used for queues with
memory used for UGAs.
ch13.indd 17ch13.indd 17 6/17/2005 4:58:44 PM6/17/2005 4:58:44 PM

All-in-1 / Oracle Database 10g OCP Certification All-in-One / Watson, Bersinic / 5790-3
Oracle Database 10g OCP Certification All-in-One Exam Guide
18
4. A and D. Dispatchers are the intermediaries between user processes and
queues, and listeners will load-balance incoming connection requests across
dispatchers.
5. D. This statement is the correct answer, though ideally you will have set
SHARED_SERVERS high enough to satisfy the demand.
6. B and C. V$PROCESS does have an entry for every process, though you would
normally use V$DISPATCHER and V$SHARED_SERVER if those were the
processes you were interested in.
7. C. If responses are backing up, this implies that the dispatchers are too busy
to clear their queues promptly.
8. A. This is the only possible reason, unless you, the DBA, have configured
client-side Oracle Net to request dedicated sessions.
9. D and E. The dispatchers will by default register with the listener specified by
the LOCAL_LISTENER parameter, but you can override this when you set the
DISPATCHERS parameter.
10. A. Shared server is generally not recommended for work that may entail long
running statements, but is excellent for the short queries and transactions
typical of OLTP sessions.
11. A. This is the correct answer, but you should always configure the other
parameters as well.
12. B. This is the only correct answer because shutdown and startup cannot be
executed via the shared server.
13. C. You will need to increase the SGA, to provide space for the session UGAs—
stored in the shared pool, or (preferably) in the large pool.
14. B. All sessions are mutexed through one port.
15. B and C. Bypassing the listener will always result in a dedicated server process
being launched, or you can demand this in your TNS connection details.
ch13.indd 18ch13.indd 18 6/17/2005 4:58:44 PM6/17/2005 4:58:44 PM

All-in-1 / Oracle Database 10g Certification All-in-One / Watson & Bersinic / 5790-3 /Chapter 14
CHAPTER 14
Managing Database
Performance
In this chapter you will learn how to
• Troubleshoot invalid and unusable objects
• Gather optimizer statistics
• View performance metrics
• React to performance issues
1
ch14.indd 1ch14.indd 1 7/1/2005 10:02:26 AM7/1/2005 10:02:26 AM

Oracle Database 10g OCP Certification All-in-One Exam Guide
2
All-in-1 / Oracle Database 10g Certification All-in-One / Watson & Bersinic / 5790-3
Performance monitoring can take two general forms: reactive or proactive. The “reactive”
approach means taking some action when or after a problem manifests itself; “proactive”
means to identify pending issues before they become problems. Clearly, proactive
monitoring is the ideal technique to minimize the impact of problems on end users,
but reactive monitoring is also necessary in many cases. Chapter 15 goes through the
use of the server alert system and the Automatic Database Diagnostic Monitor to assist
with proactive monitoring, while this chapter concentrates on identifying problems
after they have occurred.
Two types of problems are addressed: objects that have become useless, and drops
in performance. Procedural objects, views, materialized views, and indexes can be
invalidated if the objects to which they refer are changed in certain ways; when this
happens, this should be detected and fixed. Performance of SQL statements is critically
dependent on statistics that the optimizer uses to design efficient execution plans.
Collection of statistics can be manual or automatic.
If, after gathering statistics, performance is still an issue, then various metrics can
be used to drill down to the cause of the problem.
Invalid Objects
Stored PL/SQL is code stored and compiled within the data dictionary, as PL/SQL
objects. This code can take these forms:
• Procedures
• Functions
• Triggers
• Packages
• Object types
Most, if not all, of these procedural objects will refer to data objects, such as tables.
When a procedural object is compiled, the compiler checks the data objects to which
it refers in order to confirm that their definition is correct for the code and whether
the privileges are appropriate.
For example, if the code refers to a column, the column must exist or the code will
not compile. If any of the data objects to which a procedural object refers change after
the procedural object has been compiled, then the procedure will be marked INVALID.
Procedural objects may also be invalid for more mundane reasons: perhaps the
programmer made a simple syntactical mistake. In that case, the object will be created
INVALID and will be useless.
The same situation can occur with views. When created they may be fine, but they
will be invalidated if the tables on which they are based have their definitions changed.
EXAM TIP Oracle will always attempt to recompile invalid PL/SQL objects
and views automatically, but this may not succeed. You do not have to do it
manually—though it may be advisable to do so.
ch14.indd 2ch14.indd 2 7/1/2005 10:02:58 AM7/1/2005 10:02:58 AM
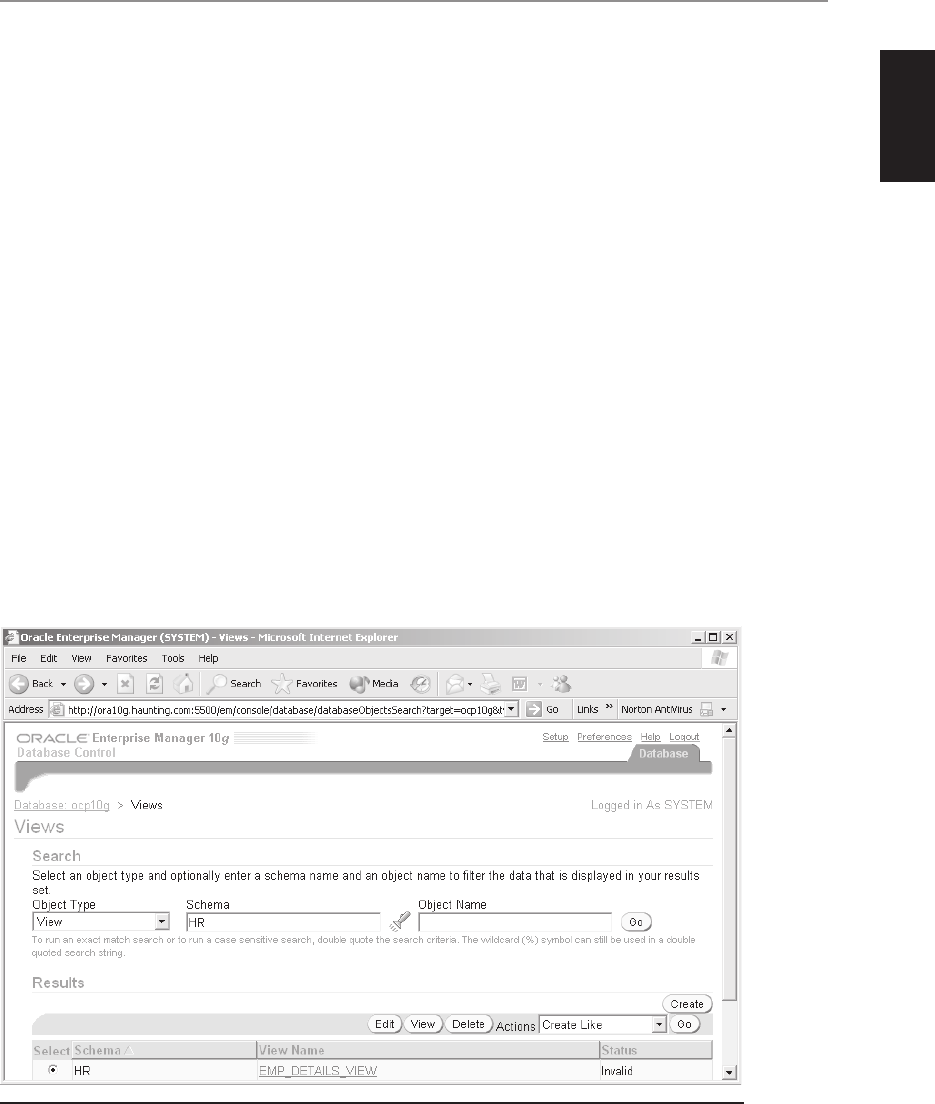
Chapter 14: Managing Database Performance
3
PART I
All-in-1 / Oracle Database 10g Certification All-in-One / Watson & Bersinic / 5790-3
Identifying Invalid Objects
Objects can be created invalid because of programmer error, or they can become
invalid some time after creation. The view DBA_OBJECTS (and the derived views
ALL_OBJECTS and USER_OBJECTS) has a column, STATUS, which should ideally
always be VALID. To identify all invalid objects in the database, as user SYSTEM or
another privileged user run the query
SQL> select owner,object_name,object_type from dba_objects where
status=’INVALID’;
If any objects are listed by this query, the first question to ask is whether the object
was ever valid. It may never have worked and not be needed, in which case the best
thing to do may be to drop it. But if, as is likely, you do not know if the object was ever
valid, then a sensible first step is to attempt to compile it. The first time an invalid
object is accessed, Oracle will attempt to compile it automatically, but if the compilation
fails, the user will receive an error. Clearly, it is better for the DBA to compile it first;
then, if there is an error, he can try to fix it before a user notices. Even if the object does
compile when it is accessed, there may be a delay while the compilation takes place;
it is better for perceived performance if this delay is taken by the DBA in advance.
Invalid objects can also be displayed through Database Control. From the database
home page, take the Administration tab, and then select whatever object type you are
interested in from the Schema section. All the objects of that type will be displayed, as
in Figure 14-1, with the status.
Figure 14-1 The status of a view, displayed by Database Control
ch14.indd 3ch14.indd 3 7/1/2005 10:02:59 AM7/1/2005 10:02:59 AM

Oracle Database 10g OCP Certification All-in-One Exam Guide
4
All-in-1 / Oracle Database 10g Certification All-in-One / Watson & Bersinic / 5790-3
Repairing Invalid Objects
To compile procedural objects, use the ALTER...COMPILE; command. For example,
SQL> alter procedure hr.add_reg compile;
will attempt to compile the procedure ADD_REG in the HR schema, and
SQL> alter view rname compile;
will compile the view RNAME. If the compilation succeeds, you have no further
problems. If it fails, then you need to work out why. If a procedure does not compile,
use the SQL*Plus command SHOW ERRORS to see why not. (Unfortunately, SHOW
ERRORS is not supported for views.)
Often a useful starting point in identifying the cause of compilation errors is to
use the DBA_DEPENDENCIES view, described here:
ocp10g> desc dba_dependencies;
Name Null? Type
--------------------------------- -------- -------------
OWNER NOT NULL VARCHAR2(30)
NAME NOT NULL VARCHAR2(30)
TYPE VARCHAR2(17)
REFERENCED_OWNER VARCHAR2(30)
REFERENCED_NAME VARCHAR2(64)
REFERENCED_TYPE VARCHAR2(17)
REFERENCED_LINK_NAME VARCHAR2(128)
DEPENDENCY_TYPE VARCHAR2(4)
For every object, identified by NAME, there will be rows for each object on which it
depends. For example, if a view retrieves columns from a dozen tables, they will each
be listed as a REFERENCED_NAME. If a view does not compile, then investigating
these tables would be sensible.
There will be occasions when you are faced with the need to recompile hundreds
or thousands of invalid objects. Typically, this occurs after an upgrade to an application,
or perhaps after applying patches. Rather than recompiling them individually, use the
supplied utility script. On Unix,
SQL> @?/rdbms/admin/utlrp
or on Windows,
SQL> @?\rdbms\admin\utlrp
This script, which should be run when connected AS SYSDBA, will attempt to compile
all invalid objects. If after running it there are still some invalid objects, you can assume
that they have problems that should be addressed individually.
You can also recompile objects with Database Control. Having identified an INVALID
object, as in Figure 14-1, click Edit to reach a window with a Compile button.
ch14.indd 4ch14.indd 4 7/1/2005 10:03:00 AM7/1/2005 10:03:00 AM

Chapter 14: Managing Database Performance
5
PART I
All-in-1 / Oracle Database 10g Certification All-in-One / Watson & Bersinic / 5790-3
Exercise 14-1: Repairing Invalid Objects
Create some objects, force them to go invalid, and fix the problem.
1. Using SQL*Plus, connect to your database as user SYSTEM.
2. Create a user to be used for this exercise; grant him the DBA privilege.
SQL> grant dba to testuser identified by testuser;
3. Connect as TESTUSER, and create some objects.
SQL> conn testuser/testuser
Connected.
ocp10g> create table testtab(n1 number,d1 date);
Table created.
ocp10g> insert into testtab values(1,sysdate);
1 row created
ocp10g> create or replace view v1 as select d1 from testtab;
View created.
ocp10g> create or replace procedure p1 as
2 cnt number;
3 begin
4 select count(*) into cnt from testtab;
5 end;
6 /
Procedure created.
4. Confirm the status of the objects.
SQL> select object_name,object_type,status from user_objects;
They will all have the STATUS of VALID.
5. Perform a DDL command on the table.
SQL> alter table testtab drop column d1;
6. Re-run the query from Step 4. Note that both the procedure and the view are
now INVALID.
7. Re-compile the procedure:
SQL> alter procedure p1 compile;
Procedure altered.
This succeeds, because dropping a column does not mean that the procedure
(which does not actually reference any columns by name) cannot run.
8. Re-compile the view.
ocp10g> alter view v1 compile;
Warning: View altered with compilation errors.
This fails, because a column on which the view is based no longer exists.
9. To diagnose the problem, query the DBA_DEPENDENCIES view.
ocp10g> select referenced_name,referenced_owner,referenced_type
from user_dependencies where name='V1';
REFERENCED_NAME REFERENCED_OWNER REFERENCED_TYPE
-------------------- -------------------- -----------------
TESTTAB TESTUSER TABLE
D1 TESTUSER NON-EXISTENT
ch14.indd 5ch14.indd 5 7/1/2005 10:03:01 AM7/1/2005 10:03:01 AM

Oracle Database 10g OCP Certification All-in-One Exam Guide
6
All-in-1 / Oracle Database 10g Certification All-in-One / Watson & Bersinic / 5790-3
This shows that the view refers to a table, TESTTAB, and a nonexistent object
called D1.
10. To pinpoint the exact problem, retrieve the code on which the view is based.
ocp10g> select text from user_views where view_name='V1';
TEXT
----------------------------------------
select d1 from testtab
The problem is now apparent: the view references a valid table, but the column
it needs no longer exists.
11. To fix the problem, add the column back to the table and recompile.
ocp10g> alter table testtab add (d1 date);
Table altered.
ocp10g> alter view v1 compile;
View altered.
12. Confirm that all the objects are now valid by re-running the query from Step 4.
13. Tidy up by dropping view and procedure (the table will be used in the next
exercise).
SQL> drop view v1;
SQL> drop procedure p1;
Unusable Indexes
If a procedural object, such as a stored PL/SQL function or a view, becomes invalid,
the DBA does not necessarily have to do anything: the first time it is accessed, Oracle
will attempt to recompile it, and this may well succeed. But if an index becomes
unusable for any reason, it must always be repaired explicitly before it can be used.
An index consists of the index key values, sorted into order, each with the relevant
rowid. The rowid is the physical pointer to the location of the row to which the index
key refers. If the rowids of the table are changed, then the index will be marked as
unusable. This could occur for a number of reasons. Perhaps the most common is
that the table has been moved, with the ALTER TABLE...MOVE command. This will
change the physical placement of all the rows, and therefore the index entries will be
pointing to the wrong place. Oracle will be aware of this and will therefore not permit
use of the index.
Identifying Unusable Indexes
In earlier releases of the Oracle database, it was more than likely that users would detect
unusable indexes because their sessions would return errors. When executing SQL
statements, if the session attempted to use an unusable index it would immediately
return an error, and the statement would fail. Release 10g of the database changes this
behavior. If a statement attempts to use an unusable index, the statement will revert
to an execution plan that does not require the index. Thus, statements will always
succeed—but perhaps at the cost of greatly reduced performance. This behavior is
ch14.indd 6ch14.indd 6 7/1/2005 10:03:01 AM7/1/2005 10:03:01 AM
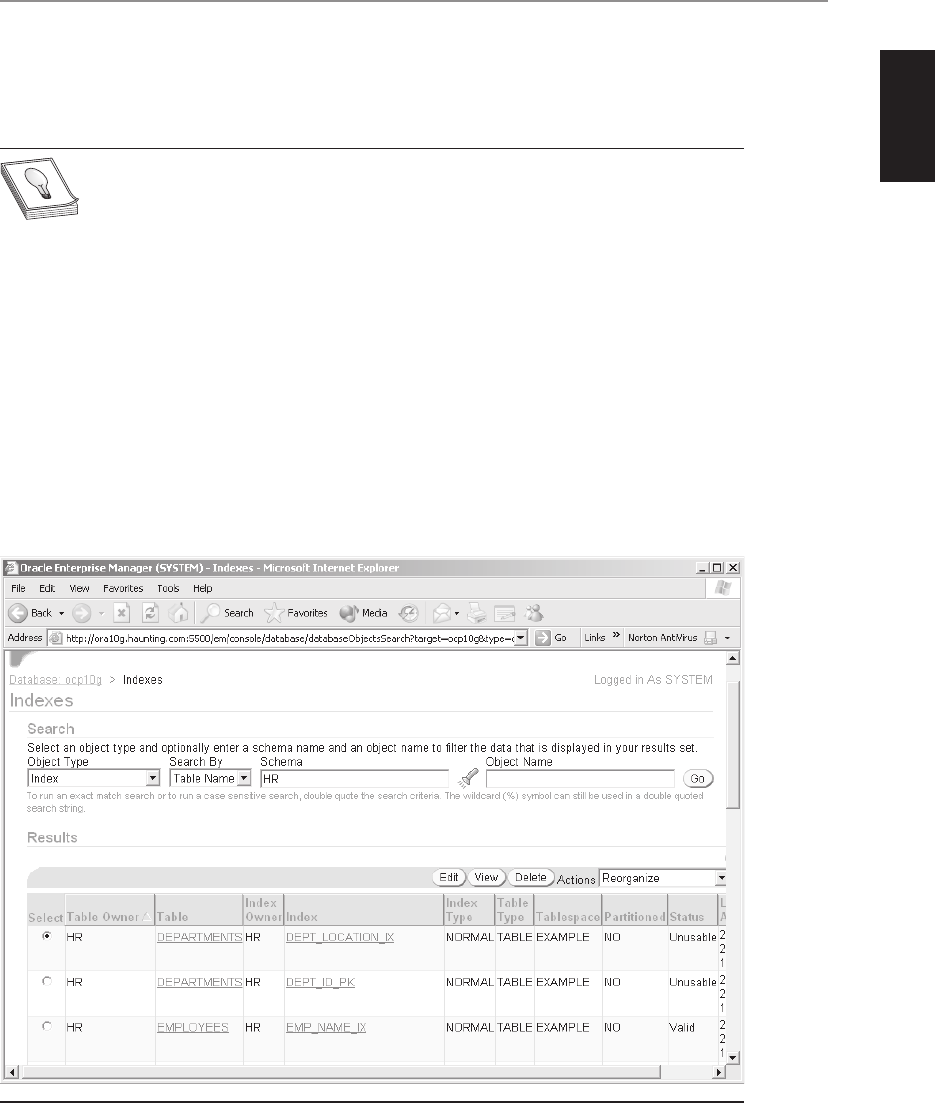
Chapter 14: Managing Database Performance
7
PART I
All-in-1 / Oracle Database 10g Certification All-in-One / Watson & Bersinic / 5790-3
controlled by the instance parameter SKIP_UNUSABLE_INDEXES, which defaults to
TRUE. The exception to this is if the index is necessary to enforce a constraint: if the
index on a primary key column becomes unusable, the table will be locked for DML.
TIP If you wish your database to react as earlier releases, where unusable
indexes would cause errors, issue the command ALTER SYSTEM SET SKIP_
UNUSABLE_INDEXES=FALSE;
To detect indexes which have become unusable, query the DBA_INDEXES view:
SQL> select owner, index_name from dba_indexes where status='UNUSABLE';
The status of indexes is also displayed by Database Control, as in Figure 14-2.
Repairing Unusable Indexes
Indexes are marked unusable if the rowid pointers are no longer correct. To repair the
index, it must be re-created with the ALTER INDEX...REBUILD command. This will
make a pass through the table, generating a new index with correct rowid pointers
for each index key. When the new index is completed, the original unusable index
is dropped.
Figure 14-2 Index status as shown by Database Control
ch14.indd 7ch14.indd 7 7/1/2005 10:03:02 AM7/1/2005 10:03:02 AM

Oracle Database 10g OCP Certification All-in-One Exam Guide
8
All-in-1 / Oracle Database 10g Certification All-in-One / Watson & Bersinic / 5790-3
TIP While an index rebuild is in progress, additional storage space is required.
The syntax of the REBUILD command has several options. The more important
ones are TABLESPACE, ONLINE, and NOLOGGING. By default, the index will be
rebuilt within its current tablespace, but by specifying a table space with the TABLESPACE
keyword, it can be moved to a different one. Also by default, during the course of the
rebuild the table will be locked for DML. This can be avoided by using the ONLINE
keyword. The NOLOGGING keyword instructs Oracle not to generate redo for the
index rebuild operation. This will make the rebuild proceed much faster, but it does
mean that the tablespace containing the index should be backed up immediately.
Until the tablespace is backed up, the index will not survive media damage requiring
use of restore and recovery.
EXAM TIP Enabling NOLOGGING disables redo generation only for the index
rebuild. All subsequent DML against the index will generate redo as normal.
As an alternative to rebuilding unusable indexes with SQL*Plus, you can use
Database Control. In the Indexes window, select Reorganize in the Actions drop-down
box, as shown in Figure 14-2. Then in the Reorganize Objects: Options window you
can select options equivalent to the keywords available at the SQL*Plus prompt.
TIP Rebuilding indexes may also be necessary as part of normal database
maintenance. Indexes become inefficient with time, particularly if there are
many deletions, or updates that affect the key values of rows.
Exercise 14-2: Repairing Unusable Indexes
Create indexes, force them to become unusable, and repair them using SQL*Plus and
Database Control.
1. In your SQL*Plus session, connect as TESTUSER and create two indexes.
SQL> create index d1_idx on testtab(d1);
SQL> create index n1_idx on testtab(n1);
2. Confirm the index creation and status. Both will be VALID.
SQL> select index_name,status from user_indexes;
3. Move the table.
SQL> alter table testtab move;
4. Run the query from Step 2 again. The move of the table, which changed any
rowids, will have rendered the indexes unusable, as shown in Figure 14-3.
5. Rebuild one index, using the NOLOGGING and ONLINE options.
SQL> alter index n1_idx rebuild online nologging;
ch14.indd 8ch14.indd 8 7/1/2005 10:03:03 AM7/1/2005 10:03:03 AM

Chapter 14: Managing Database Performance
9
PART I
All-in-1 / Oracle Database 10g Certification All-in-One / Watson & Bersinic / 5790-3
6. Connect to your database as user SYSTEM using Database Control.
7. From the database home page, take the Administration tab and then the
Indexes link in the Schema section.
8. In the Search section of the Indexes window, enter TESTUSER as the Schema,
and click Go. This will show the two indexes on the TESTTAB table, one of
which, D1_IDX, is still unusable.
9. Select the radio button for the unusable index, select Reorganize in the
Actions drop-down box, and click Go to launch the Reorganize Objects
Wizard.
10. Click Next, leave all the options on default, and click Next again to generate
the reorganization script and reach the Impact Report window, shown in
Figure 14-4. This should confirm that there is sufficient free space for the
operation to proceed. Click Next to proceed.
11. On the Reorganize Objects: Schedule window, leave everything on default to
run the job immediately, and click Next to reach the Review window.
12. In the Review window, click Submit Job to rebuild the index.
13. In your SQL*Plus session, confirm that the index is now valid by running the
query from Step 2.
Figure 14-3 Indexes becoming unusable
ch14.indd 9ch14.indd 9 7/1/2005 10:03:03 AM7/1/2005 10:03:03 AM
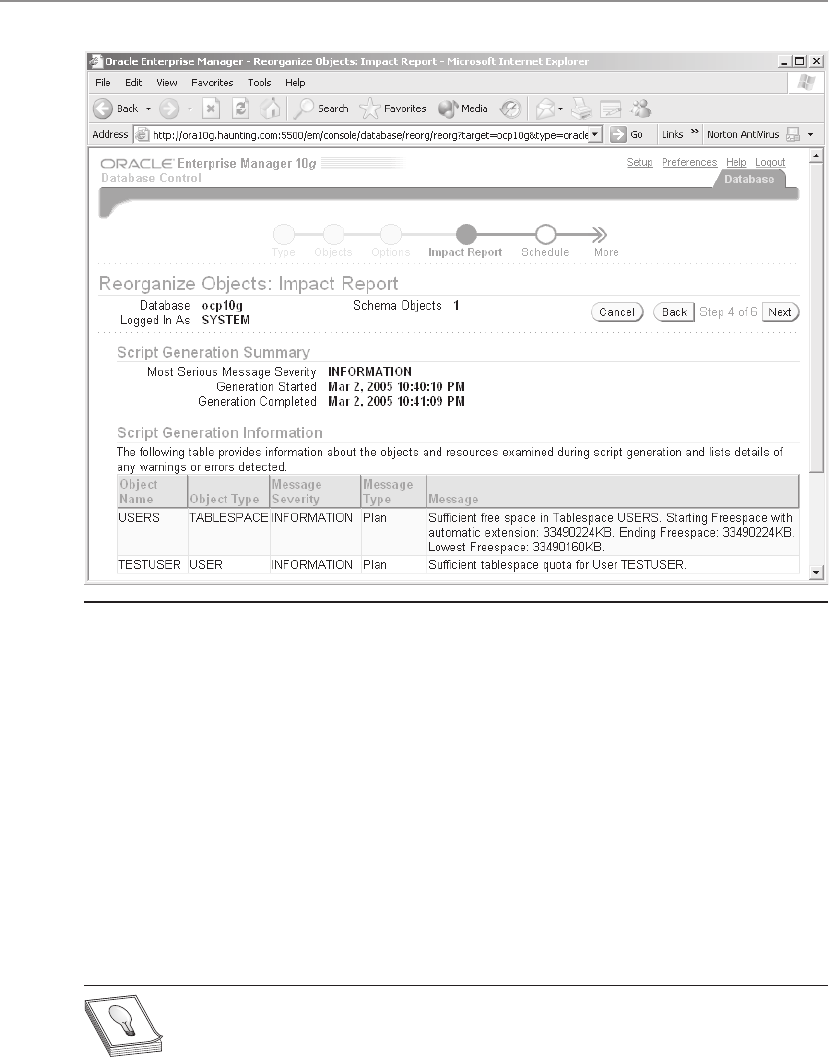
Oracle Database 10g OCP Certification All-in-One Exam Guide
10
All-in-1 / Oracle Database 10g Certification All-in-One / Watson & Bersinic / 5790-3
Optimizer Statistics
Any one SQL statement may be executable in a number of different ways. For example,
it may be possible to join tables in different orders; there may be a choice of whether
to use indexes or table scans; or some execution methods may be more intensive in
their use of disk I/O as against CPU resources.
The choice of execution plan is critical for performance. In an Oracle database, the
standard behavior is for execution plans to be developed dynamically by the optimizer.
The optimizer relies heavily on statistics to evaluate the effectiveness of many
possible execution plans and to choose which plan to use. For good performance, it is
vital that these statistics be accurate. There are many types of statistics, but chief among
these are the object statistics that give details of the tables that the SQL statements
address.
TIP Statistics are not relevant to PL/SQL, only to SQL, so analysis will not
improve PL/SQL performance. But most PL/SQL will include calls to SQL
statements: statistics are as important for these statements as for any others.
Figure 14-4 The impact analysis of an index rebuild operation
ch14.indd 10ch14.indd 10 7/1/2005 10:03:04 AM7/1/2005 10:03:04 AM

Chapter 14: Managing Database Performance
11
PART I
All-in-1 / Oracle Database 10g Certification All-in-One / Watson & Bersinic / 5790-3
Object Statistics
Analyzing a table gathers statistics on the table that will be of use to the optimizer.
The statistics, visible in the DBA_TABLES view, include
• The number of rows in the table
• The number of blocks (used and never used) allocated to the table
• The amount of free space in the blocks that are being used
• The average length of each row
• The number of “chained” rows—rows cut across two or more blocks, either
because they are very long or because of poor storage settings
Apart from statistics regarding the table as a whole, each column of the table is
also analyzed. Column statistics are visible in the DBA_TAB_COLUMNS view and
include
• The number of distinct values
• The highest and lowest values
• The number of nulls
• The average column length
When a table is analyzed, its indexes are also examined. The statistics on indexes
are shown on the DBA_INDEXES view and include
• The depth of the index tree
• The number of distinct key values
• The clustering factor—how closely the natural order of the rows follows the
order of the index keys
These statistics, which are stored within the data dictionary, give the optimizer the
information it needs to make vital decisions about how best to execute SQL statements.
If statistics are missing or incorrect, performance may degrade dramatically.
It is also possible to gather statistics on indexes. These are displayed in the
INDEX_STATS view; they include
• The number of index entries referring to extant rows
• The number of index entries referring to deleted rows
This information is of value because of the manner in which indexes are
maintained: when rows are deleted, the index keys remain; after a prolonged period,
indexes can become inefficient due to the amount of space occupied by these
references to deleted rows.
ch14.indd 11ch14.indd 11 7/1/2005 10:03:05 AM7/1/2005 10:03:05 AM
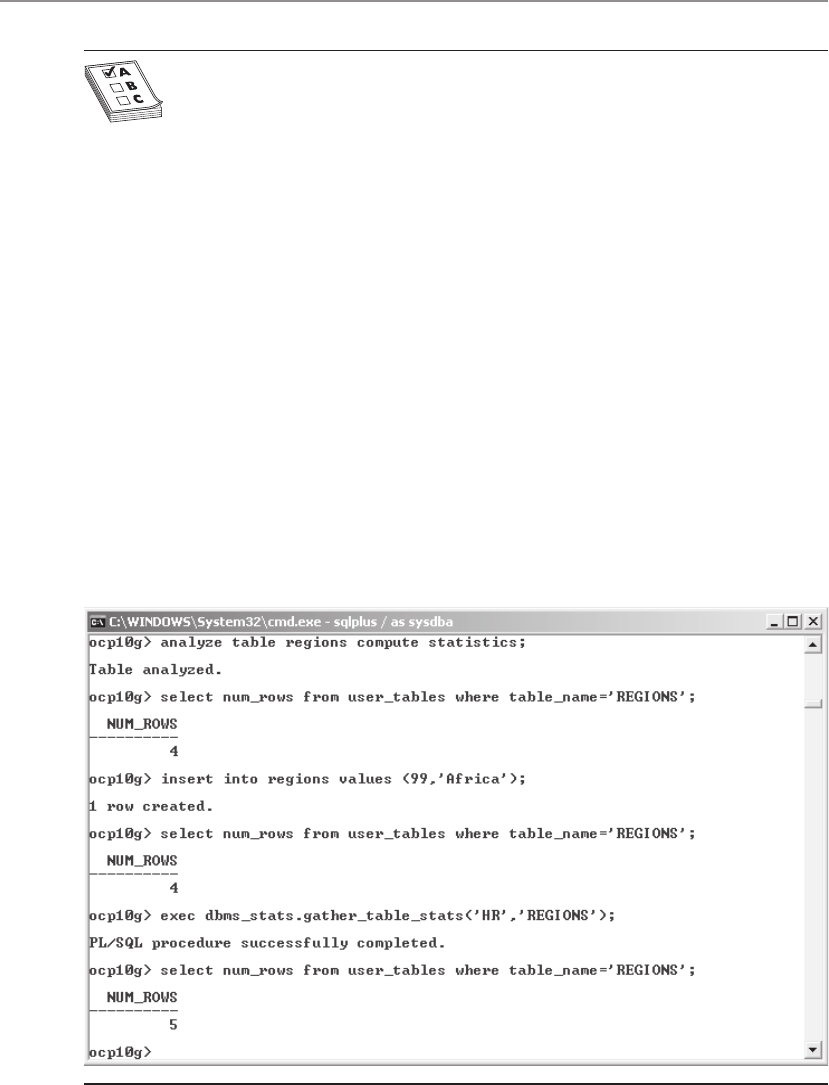
Oracle Database 10g OCP Certification All-in-One Exam Guide
12
All-in-1 / Oracle Database 10g Certification All-in-One / Watson & Bersinic / 5790-3
EXAM TIP In addition to the table statistics shown in DBA_TABLES, the
index and column statistics in DBA_INDEXES and DBA_TAB_COLUMNS
are also gathered whenever you analyze a table.
Gathering Statistics
Object statistics are not real-time: they are static, which means that they become out
of date as DML operations are applied to the tables. It is therefore necessary to gather
statistics regularly, to ensure that the optimizer always has access to statistics that
reflect reasonably accurately the current state of the database. Statistics can be gathered
manually, or the process can be automated. Manual statistics gathering can be done
either with the ANALYZE command or by executing procedures in the DBMS_STATS
package, as in Figure 14-5, or else through Database Control.
In Figure 14-5, first the table REGIONS is analyzed, using the ANALYZE command.
The keywords COMPUTE STATISTICS instruct Oracle to analyze the whole table, not
just a proportion of it. The following query shows that there are four rows in the table.
Then there is a row inserted, but the statistics haven’t been updated in real time:
the number of rows is incorrect, until the table is analyzed again, this time with the
DBMS_STATS.GATHER_TABLE_STATS procedure. There are numerous arguments that
can be supplied to the GATHER_TABLE_STATS procedure to control what it does; this
is the simplest form of its use.
Figure 14-5 Gathering statistics from the SQL*Plus prompt
ch14.indd 12ch14.indd 12 7/1/2005 10:03:06 AM7/1/2005 10:03:06 AM

Chapter 14: Managing Database Performance
13
PART I
All-in-1 / Oracle Database 10g Certification All-in-One / Watson & Bersinic / 5790-3
Gathering statistics will improve performance, but the actual gathering may
impose a strain on the database that will have a noticeable effect on performance
while the analysis is in progress. This paradoxical situation raises two questions. First,
how frequently should statistics be gathered? The more frequently this is done, the
better performance may be—but if it is done more frequently than necessary,
performance will suffer needlessly. Second, what proportion of an object needs to be
analyzed to gain an accurate picture of it? Analyzing a huge table may be a long and
resource-intensive process; it may well be that analyzing a representative sample of
the object would be enough for the optimizer and would not impose such a strain
on the database.
TIP The DBMS_STATS procedures can take many arguments to influence the
depth of the analysis, far more than the older ANALYZE command.
You can also manually gather statistics through Database Control. To analyze a
table, select Tables from the Schema section in the Administration window, choose
the table, and take the Gather Statistics option in the Actions drop-down box. You
will receive a warning stating that “Oracle recommends you to use automated tasks
to generate statistics regularly within maintenance windows.” This is a strong hint
that Oracle Corporation believes you should automate the gathering of statistics,
rather than gathering them on an ad hoc basis. If the database was created with the
Database Configuration Assistant, or DBCA, automatic statistics gathering will have
been configured, as a job managed by the Scheduler. The Scheduler will be described
in detail in Chapter 36.
Alternatively, you can launch the Gather Statistics Wizard by taking the Maintenance
tab from the database home page, and the Gather Statistics link in the Utilities
section. You will, however, receive the same warning. The wizard prompts you
through the process of setting the various options for what and how to analyze, and
when to run the task. It finally shows you the procedure call that will be used.
The example in Figure 14-6 shows the use of the GATHER_SCHEMA_STATS
procedure, which will analyze all the objects belonging to one user. Taking the
arguments in turn,
• OWNNAME specifies the schema to be analyzed.
• ESTIMATE_PERCENT controls how much of the tables to analyze. The setting
given instructs Oracle to make an intelligent guess at the amount needed for
a meaningful sample.
• GRANULARITY refers to how best to analyze objects consisting of a number of
subobjects, such as a table that is divided into partitions. The setting given lets
Oracle decide.
• BLOCK_SAMPLE determines whether the table should be sampled by row
or by block. The default, by row, is more accurate but possibly more time
consuming.
ch14.indd 13ch14.indd 13 7/1/2005 10:03:06 AM7/1/2005 10:03:06 AM

Oracle Database 10g OCP Certification All-in-One Exam Guide
14
All-in-1 / Oracle Database 10g Certification All-in-One / Watson & Bersinic / 5790-3
• CASCADE controls whether to analyze any dependent objects, such as the
indexes of tables.
• DEGREE controls the number of parallel execution servers to use for the task.
The setting given lets the optimizer decide on the best number.
• METHOD_OPT controls for which columns to build up histograms, and how
many buckets they should have. The setting given lets Oracle decide.
• OPTIONS determines which objects to analyze. The setting given instructs Oracle
to analyze all objects that have no statistics, and also all objects where
Oracle considers the statistics to be out-of-date.
This example illustrates that you can delegate all decisions on what needs to be
analyzed, in what way, and to what depth to Oracle itself. If a command such as the
one just described is run sufficiently frequently, it should ensure that the optimizer
always has the statistics it needs, without overburdening the database by gathering
statistics unnecessarily.
Figure 14-6 A DBMS_STATS procedure call generated by the Gather Statistics Wizard
ch14.indd 14ch14.indd 14 7/1/2005 10:03:07 AM7/1/2005 10:03:07 AM
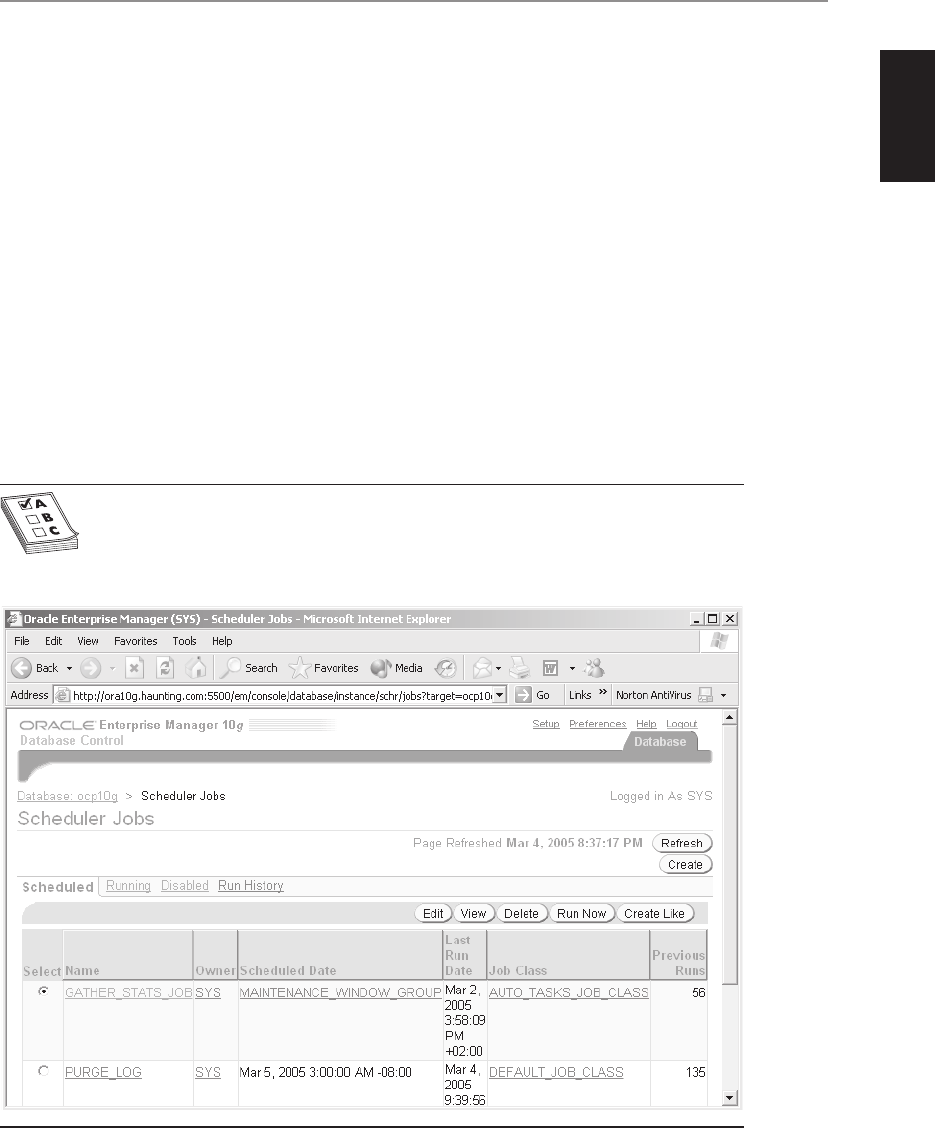
Chapter 14: Managing Database Performance
15
PART I
All-in-1 / Oracle Database 10g Certification All-in-One / Watson & Bersinic / 5790-3
The remaining point to consider is how frequently to run the command. The
automatic statistics gathering configured by the DBCA will do this every weekday
night, and again at the weekend. To see the job details, you must connect to Database
Control as user SYS as SYSDBA. From the database home page, take the Administration
tab, and then the Jobs link in the Scheduler section to see the page shown in Figure 14-7.
The GATHER_STATS_JOB shown in the figure will run the procedure DBMS_
STATS.GATHER_STATS_JOB_PROC. This is a procedure specially designed for running
automatically through the Scheduler. It will analyze the whole database, using
automation options similar to those described for earlier Figure 14-6, and in addition
it will analyze the objects that Oracle considers to be most in need of analysis first.
The schedule it will run on, the MAINTENANCE_WINDOW_GROUP, instructs
the Scheduler to run the job every night and weekend, during the preconfigured
WEEKEND_WINDOW and WEEKNIGHT_WINDOW windows. The job will run with
a priority, controlling its use of system resources, determined by the AUTO_TASKS_
JOB_CLASS, which should ensure that it does not impact adversely on other users.
Full details of how the Scheduler can be configured (including the use of Windows
and Job Classes) will be given in Chapter 36.
EXAM TIP Object statistics are not real-time: they are static until refreshed
by a new analysis. If this is not done with sufficient frequency, they will grow
seriously out-of-date and the optimizer may consequently develop inappropriate
execution plans.
Figure 14-7 The jobs configured to run by SYS
ch14.indd 15ch14.indd 15 7/1/2005 10:03:08 AM7/1/2005 10:03:08 AM
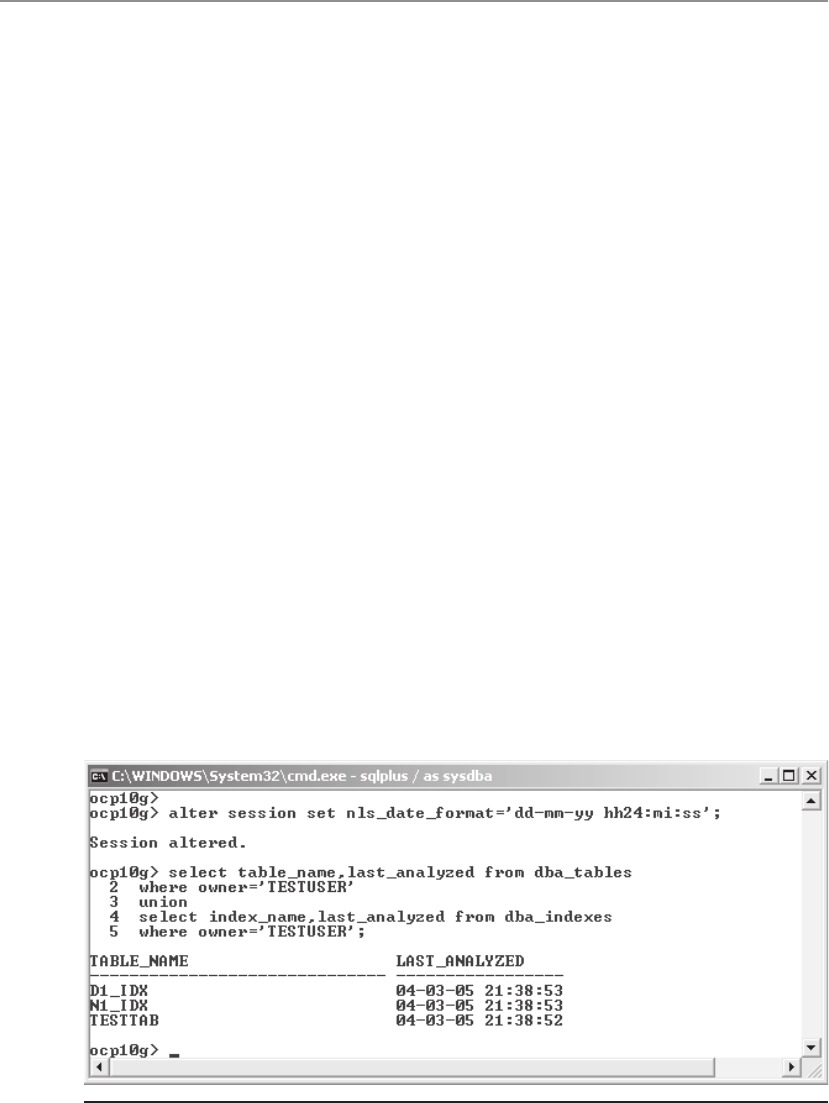
Oracle Database 10g OCP Certification All-in-One Exam Guide
16
All-in-1 / Oracle Database 10g Certification All-in-One / Watson & Bersinic / 5790-3
Exercise 14-3: Automating Statistics Collection
Create a scheduled job to gather statistics on the TESTTAB table. The job will carry out
a complete analysis of the table and its indexes, and also develop histograms on the
columns used as index keys.
1. Connect to your database as user TESTUSER using Database Control.
2. Take the Administration tab, then the Jobs link in the Scheduler section to
reach the Scheduler Jobs window.
3. Click Create to reach the Create Job window. In the General section, enter the
Name as Analyze testtab, and leave everything else on default.
4. In the Command section, replace the sample code with this:
begin
dbms_stats.gather_table_stats(
ownname=>'TESTUSER',
tabname=>'TESTTAB',
estimate_percent=>100,
cascade=>true,
method_opt=>'for all indexed columns size auto');
end;
5. Take the Schedule link to reach the Schedule window. Leave everything on
default, to run the job once only right away, and return to the Scheduler Jobs
window.
6. Take the Run History link, and you will see that the job has succeeded.
7. In your SQL*Plus session, set your NLS_DATE_FORMAT session parameter
to show the full time and confirm that statistics were indeed collected, as in
Figure 14-8.
8. Tidy up by connecting as user SYSTEM and dropping the TESTUSER schema.
SQL> drop user 'TESTUSER' cascade;
Figure 14-8 Verifying statistics collection
ch14.indd 16ch14.indd 16 7/1/2005 10:03:09 AM7/1/2005 10:03:09 AM
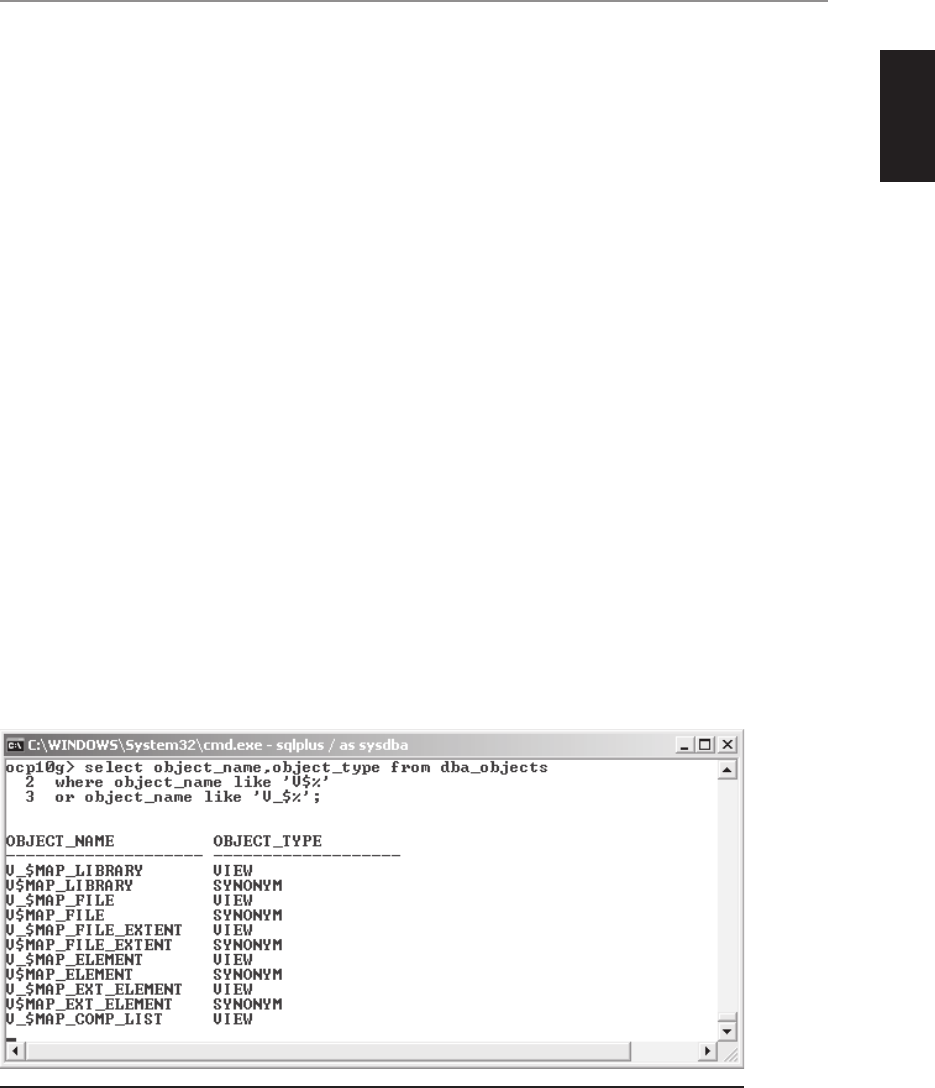
Chapter 14: Managing Database Performance
17
PART I
All-in-1 / Oracle Database 10g Certification All-in-One / Watson & Bersinic / 5790-3
Performance Metrics
Oracle collects hundreds of performance metrics. These are accumulated as statistics
in memory and periodically flushed to the data dictionary, from which they can be
analyzed by various Advisors. The mechanism for this and a description of the
capabilities of the advisors appear in Chapter 15. But it is also possible to view the
performance metrics interactively: querying various dynamic performance views will
show you the real-time values of statistics, and by using Database Control, you can
see them converted into more meaningful graphics.
Remember that in the Oracle environment a distinction is made between “statistics”
and “metrics.” A statistic is a raw figure, which may be useless in itself. A metric is
a statistic converted into something meaningful. For example, the number of disk
reads carried out by the instance is a statistic that does not convey any performance
monitoring information, but the number of disk reads per transaction or per second
is a useful metric.
Viewing Statistics with the Dynamic Performance Views
There are more than three hundred dynamic performance views. You will often hear
them referred to as the “Vee dollar” views, because their names are prefixed with “V$”.
In fact, the “Vee dollar” views are not views at all; they are synonyms for views that are
prefixed with “V_$”, as shown in Figure 14-9.
The dynamic performance views give access to a phenomenal amount of information
about the instance, and (to a certain extent) about the database. The majority of the
views are populated with information from the instance, the remainder are populated
from the controlfile. All of them give real-time information. Dynamic performance
views that are populated from the instance, such as V$INSTANCE or V$SYSSTAT, are
Figure 14-9 The V$ views
ch14.indd 17ch14.indd 17 7/1/2005 10:03:10 AM7/1/2005 10:03:10 AM

Oracle Database 10g OCP Certification All-in-One Exam Guide
18
All-in-1 / Oracle Database 10g Certification All-in-One / Watson & Bersinic / 5790-3
available at all times, even when the instance is in NOMOUNT mode. Dynamic
performance views that are populated from the controlfile, such as V$DATABASE
or V$DATAFILE, cannot be queried unless the database has been mounted, which
is when the controlfile is read. By contrast, the data dictionary views (prefixed DBA,
ALL, or USER) can only be queried after the database—including the data dictionary—
has been opened.
EXAM TIP Dynamic performance views are populated from the instance or
the controlfile; DBA_, ALL_, and USER_ views are populated from the data
dictionary.
The dynamic performance views are created at startup, updated during the lifetime
of the instance, and dropped at shutdown. This means that they will contain values
that have been accumulated since startup time: if your database has been open for
six months nonstop, they will have data built up over that period. After a shutdown/
startup, they will start from the beginning again. While the totals may be interesting,
they will not tell you anything about what happened during certain defined periods,
when there may have been performance issues. For this reason, it is generally true that
the dynamic performance views give you statistics, not metrics. The conversion of these
statistics into metrics is a skilled and sometimes time-consuming task, made much
easier by the self-tuning and monitoring capabilities of release 10g of the database.
As an example of a dynamic performance view, you cannot do better than V$SYSSTAT,
described here:
ocp10g> desc v$sysstat;
Name Null? Type
--------------------------------- -------- -------------
STATISTIC# NUMBER
NAME VARCHAR2(64)
CLASS NUMBER
VALUE NUMBER
STAT_ID NUMBER
This shows over three hundred statistics that are fundamental to monitoring activity:
ocp10g> select name, value from v$sysstat;
NAME VALUE
------------------------------ ----------
logons cumulative 356
logons current 34
opened cursors cumulative 154035
opened cursors current 5490
user commits 2502
user rollbacks 205
user calls 37574
recursive calls 6446648
recursive cpu usage 39263
session logical reads 4613746
session stored procedure space 0
<output truncated...>
ch14.indd 18ch14.indd 18 7/1/2005 10:03:10 AM7/1/2005 10:03:10 AM

Chapter 14: Managing Database Performance
19
PART I
All-in-1 / Oracle Database 10g Certification All-in-One / Watson & Bersinic / 5790-3
Another critical view is V$SYSTEM_WAIT_CLASS, which summarizes the various
categories of problems that can cause sessions, or the whole database, to run slowly:
ocp10g> select wait_class,time_waited from v$system_wait_class
2 order by time_waited;
WAIT_CLASS TIME_WAITED
-------------------- -----------
Network 32
Application 44
Configuration 1545
Concurrency 4825
Commit 5212
Other 10483
System I/O 41787
User I/O 102743
Idle 13087012
This query shows that the worst problems since the instance started have been
“Idle” events. These are not problems: they are events such as server processes waiting
to receive SQL statements from user processes. The worst real problem is disk I/O
caused by user sessions, followed by disk I/O by the instance itself.
Viewing Metrics with Database Control
The Database Control interface converts statistics to metrics. To reach the metrics display,
take the All Metrics link in the Related Links section of the database home page. From
there, take the link for the area of interest and drill down to the individual metric. For
example, in the preceding query you can see that there have been 2502 commits by
user sessions. But this figure is since the instance was started; it says nothing about the
rate of activity. Figure 14-10 shows the metric, User Commits (per second): this gives
more useful information, in this case, that activity has fallen off dramatically in the
last ten minutes.
Reacting to Performance Issues
In an ideal world, you would not react to performance issues; you would have anticipated
them before they occurred. In practice, though, all database administrators rely to a
certain extent on real-time figures to identify problem areas. Database Control provides
an extremely simple interface to diagnose causes of performance problems. From the
database home page, take the Performance tab, as in Figure 14-11. This will show a set
of five graphs, correlating activity against time:
• The run queue length, which indicates whether the server machine’s CPU
resources are being strained
• The paging rate, which will increase if the server is short of memory
• The count of database sessions waiting, and why
ch14.indd 19ch14.indd 19 7/1/2005 10:03:11 AM7/1/2005 10:03:11 AM
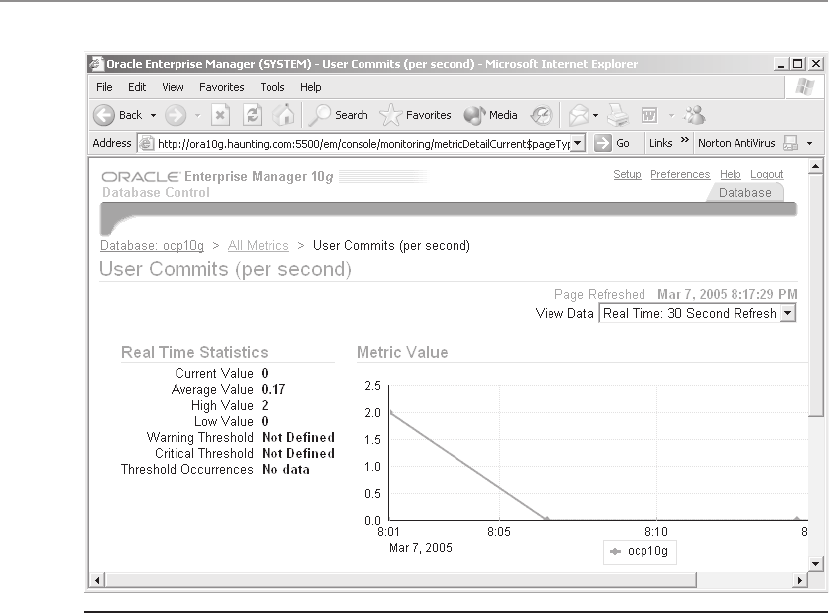
Oracle Database 10g OCP Certification All-in-One Exam Guide
20
All-in-1 / Oracle Database 10g Certification All-in-One / Watson & Bersinic / 5790-3
• The number of logins and transactions per second
• The number of physical reads and amount redo generated by second
Of these, the first and last pairs are informative, but it is the middle graph, of
sessions waiting, that is diagnostic. The waiting sessions are grouped into color-coded
classes showing why the sessions are waiting. In the figure, the worst problems can
immediately be seen as user I/O and system I/O. Taking the link for any one class will
generate a graph breaking down the figure into individual wait events. For instance,
the user I/O wait class is divided into I/O related to table scans and I/O related to
index lookups.
Having identified the problem areas, the next step is to resolve them. For this, the
advisors described in the next chapter will be of great assistance.
Figure 14-10 A real-time metric, viewed with Database Control
ch14.indd 20ch14.indd 20 7/1/2005 10:03:11 AM7/1/2005 10:03:11 AM
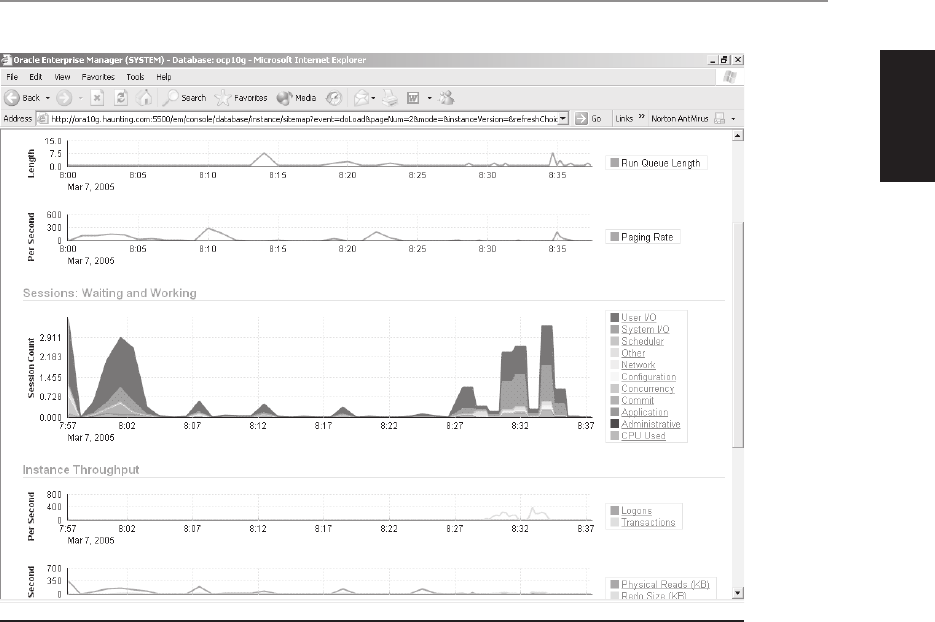
Chapter 14: Managing Database Performance
21
PART I
All-in-1 / Oracle Database 10g Certification All-in-One / Watson & Bersinic / 5790-3
Chapter Review
Objects can become not valid. PL/SQL procedural objects will become INVALID if the
objects on which they depend are changed. Indexes will become UNUSABLE if the
tables they are based on undergo certain operations. In either case, you can ignore the
problem and the application may continue to function. But it may run with reduced
performance as objects are compiled dynamically, and as the optimizer resorts to full
table scans rather than index lookups. It is also possible that the application will fail if
the procedural objects do not recompile successfully, or if the indexes are needed to
enforce constraints. These damaged objects should be identified and fixed before their
state impacts on end users.
When the optimizer develops execution plans, it relies heavily on statistics. Object
statistics give the optimizer the information it needs to determine the most efficient
Figure 14-11 Performance metrics displayed graphically
ch14.indd 21ch14.indd 21 7/1/2005 10:03:12 AM7/1/2005 10:03:12 AM

Oracle Database 10g OCP Certification All-in-One Exam Guide
22
All-in-1 / Oracle Database 10g Certification All-in-One / Watson & Bersinic / 5790-3
way to execute a statement. You should gather statistics regularly, either by invoking
the commands interactively or by using a scheduled job. Failure to do this will result
in performance degradation, as the optimizer develops execution plans that are not
appropriate to the current state of the data.
Oracle gathers hundreds of statistics. Interpreting these requires converting them
into metrics. A metric is a meaningful figure that relates statistics to each other, or to
time; metrics are what you need for tuning. The hundreds of dynamic performance
views accumulate statistics from the time the instance starts; they are cleared on
shutdown. Database Control can show these statistics converted into metrics, which
are the starting point for problem resolution and tuning.
Questions
1. If you create a table and a procedure that refers to it, and then change the
definition of the table, what will happen when you try to run the procedure?
(Choose the best answer.)
A. The procedure will recompile automatically and run successfully.
B. The procedure will fail until you recompile it.
C. The procedure will run with reduced performance until you analyze
the table.
D. The procedure may or may not compile, depending on the nature
of the change.
2. If a SELECT statement attempts to use an UNUSABLE index, what will
happen? (Choose the best answer.)
A. The statement will fail.
B. The statement will succeed, but at reduced performance.
C. The index will be rebuilt automatically if possible.
D. It depends on the SKIP_UNUSABLE_INDEXES parameter.
3. You determine that an index is unusable, and decide to rebuild it. Which of
the following statements, if any, are correct? (Choose all that apply.)
A. The NOLOGGING and ONLINE keywords cannot be used together when
rebuilding the index.
B. A rebuild may require double the disk space while it is in progress.
C. If you do not use the ONLINE keyword during a rebuild, the table will be
unavailable for SELECT and DML statements.
D. The NOLOGGING keyword applied to a rebuild means that DML against
the index will not generate redo.
ch14.indd 22ch14.indd 22 7/1/2005 10:03:13 AM7/1/2005 10:03:13 AM

Chapter 14: Managing Database Performance
23
PART I
All-in-1 / Oracle Database 10g Certification All-in-One / Watson & Bersinic / 5790-3
4. You can analyze an index with the ANALYZE INDEX command, or with
the DBMS_STATS.GATHER_INDEX_STATS procedure. Which view will be
populated after this? (Choose the best answer.)
A. INDEX_STATS
B. DBA_INDEXES
C. DBA_IND_COLUMNS
D. DBA_INDEX_STATS
5. Object statistics are gathered and become out of date. What will cause them to
be gathered again? (Choose two correct answers.)
A. The optimizer can be configured to gather statistics automatically when it
considers them out of date.
B. You can configure a Scheduler job to gather statistics automatically.
C. You can always force the gathering of statistics by using the ANALYZE
command.
D. Applying the GATHER AUTO option to the DBMS_STATS.GATHER_
DATABASE_STATS procedure will force collection of statistics for all objects.
6. From where are dynamic performance views populated? (Choose all correct
answers.)
A. The instance
B. The controlfile
C. The data dictionary
D. The Automatic Workload Repository
7. When you shut down an instance, what happens to the information in the
dynamic performance views? (Choose the best answer.)
A. It is lost.
B. It is saved to the Automatic Workload Repository by the MMON process.
C. It is saved to the controlfile.
D. It depends on the method of shutdown: a crash or SHUTDOWN ABORT
will lose it; otherwise, it will be saved.
8. If a primary key index becomes unusable, what will the effect be upon an
application that uses it? (Choose the best answer.)
A. SELECT will succeed, but perhaps at reduced performance.
B. DML commands will succeed, but perhaps at reduced performance.
C. The primary key constraint can no longer be enforced.
D. All of the above.
ch14.indd 23ch14.indd 23 7/1/2005 10:03:14 AM7/1/2005 10:03:14 AM

Oracle Database 10g OCP Certification All-in-One Exam Guide
24
All-in-1 / Oracle Database 10g Certification All-in-One / Watson & Bersinic / 5790-3
Answers
1. D. Oracle will attempt to recompile automatically, but this may or may not
succeed.
2. D. The instance parameter SKIP_UNUSABLE_INDEXES controls this behavior.
Depending on this, the statements will either fail or run by resorting to full
table scans.
3. B. A rebuild needs space for both the old and the new index while it is in
progress.
4. B. This view could also have been populated by analyzing the table on which
the index is based.
5. B and C. The Scheduler can be configured to run a statistics gathering job
automatically, or the statistics can be gathered interactively at any time.
6. A and B. Dynamic performance views are populated from either the instance
or the controlfile.
7. A. Information in the dynamic performance views exists only for the lifetime
of the instance: it is lost on shutdown, no matter how it occurs.
8. A. If the SKIP_UNUSABLE_INDEXES instance parameter is on default, then
SELECT statements will still succeed, by resorting to full table scans. Most
DML statements will fail in this situation. The only exception is UPDATE
statements that do not affect the key columns.
ch14.indd 24ch14.indd 24 7/1/2005 10:03:14 AM7/1/2005 10:03:14 AM

All-in-1 / Oracle Database 10g Certification All-in-One / Watson & Bersinic / 5790-3 /Chapter 15
CHAPTER 15
Monitoring Oracle
In this chapter you will learn how to
• Set warning and critical alert thresholds
• Collect and use baseline metrics
• Use tuning and diagnostic advisors
• Use the Automatic Database Diagnostic Monitor (ADDM)
• Manage the Automatic Workload Repository
• Describe server-generated alerts
1
ch15.indd 1ch15.indd 1 7/8/2005 3:04:16 PM7/8/2005 3:04:16 PM

Oracle Database 10g OCP Certification All-in-One Exam Guide
2
All-in-1 / Oracle Database 10g Certification All-in-One / Meyers / 5790-3
The manageability infrastructure provided with Oracle Database 10g can be used to
automate a significant amount of the database administrator’s day-to-day work. With
earlier releases, monitoring the database in order to pick up developing problems
before they become critical took much time. Identifying and diagnosing performance
issues was not only time-consuming but also required much skill. Use of the alert
system and the diagnostic advisors, installed as standard in every 10g database, frees
the DBA from the necessity of devoting a large mount of effort to this work.
Throughout all the discussions of tuning, remember that tuning relies on the use
of metrics. A metric is a statistic converted into something meaningful. An example of
a statistic is the number of disk reads. This by itself is useless; what you need to know
is the number of disk reads per second, or perhaps per statement. In earlier releases of
the database, it was the DBA who has to convert statistics into metrics; now much of
this work is done for you, by the advisors.
The graphical interface to the advisors, accessed through Database Control, is
covered in this chapter. There are also APIs and views that an experienced DBA may
wish to use instead; these are described in later chapters. At the heart of all the tools,
both graphical and otherwise, is the Automatic Workload Repository, or AWR.
The Automatic Workload Repository
Oracle collects a vast amount of statistical information regarding performance and
activity. This information is accumulated in memory and periodically written to disk:
to the tables that make up the AWR. Eventually, it is aged out and overwritten.
Gathering Statistics
The level of statistics gathered is controlled by the instance parameter STATISTICS_
LEVEL. This can be set to BASIC, or to TYPICAL (which is the default), or to ALL. The
TYPICAL level will force the collection of all the statistics that are needed for normal
tuning, without collecting any whose collection would impact adversely on performance.
The BASIC level will disable virtually all statistics, with no appreciable performance
benefit. The ALL level will collect extremely detailed statistics on SQL statement
execution: these may occasionally be necessary if you are doing advanced SQL statement
tuning, but they may cause a slight performance drop while being collected.
TIP During normal running, leave the STATISTICS_LEVEL on TYPICAL, the
default.
Statistics are accumulated in memory, in data structures within the SGA. There is
no performance impact to this, because the statistics merely reflect what the instance
is doing anyway. Periodically (by default, once an hour) they are flushed to disk, to
the AWR. This is known as a “snapshot.” The flushing to disk is done by a background
process: the manageability monitor, or MMON. This use of a background process is
ch15.indd 2ch15.indd 2 7/8/2005 3:04:50 PM7/8/2005 3:04:50 PM

Chapter 15: Monitoring Oracle
3
PART I
All-in-1 / Oracle Database 10g Certification All-in-One / Meyers / 5790-3
the key to the efficiency of the statistics collection process. In earlier releases of the
database, accessing performance tuning statistics was only possible by running queries
against various views—the V$ views. Populating these views was an expensive process.
The DBA had to launch a session against the database and then issue a query. The query
forced Oracle to extract data from the SGA and present it to the session in a view. This
approach is still possible—all the old views, and many more, are still available—but
the AWR approach is far more efficient.
The MMON has direct access to the memory structures that make up the SGA, and
therefore the statistics within them. It can extract data from the SGA without the need
to go via a session. The only overhead is the actual writing of the data to the AWR. By
default this occurs only once an hour and should not therefore have a noticeable
effect on run-time performance.
EXAM TIP Statistics are saved as a snapshot to the AWR by the MMON
process, by default every sixty minutes.
The Size and Location of the AWR
The AWR is a set of tables located in the SYSAUX tablespace; these tables cannot be
relocated. They exist in the SYSMAN schema. You can log on to the database as user
SYSMAN, but this should never be necessary because Oracle Corporation does not
support access to the AWR tables with SQL*Plus, or indeed with any tools other than
the various APIs provided in the form of DBMS packages or through various views.
The most straightforward way to access AWR information is through Database Control.
Snapshots are kept in the AWR, by default, for seven days. This period is configurable.
As a rough guide for sizing, if the snapshot collection is left on every hour and the
retention time is left on seven days, then the AWR may well require between 200MB
and 300MB of space in the SYSAUX tablespace. But this figure is highly variable and
will to a large extent depend on the number of sessions.
To administer the AWR with Database Control, take the Administration tab from
the database home page, and then the Automatic Workload Repository link in the
Workload section. The Automatic Workload Repository window, as in Figure 15-1,
shows the current settings and lets you adjust them.
Adjusting the AWR settings to save snapshots more frequently will make problem
diagnosis more precise. If the snapshots are several hours apart, you may miss peaks
of activity (and consequent dips in performance). But gathering snapshots too
frequently will increase the size of the AWR and could possibly impact on performance
due to the increased workload of collecting and saving the information.
EXAM TIP The AWR is located in the SYSAUX tablespace and cannot be
relocated to anywhere else.
ch15.indd 3ch15.indd 3 7/8/2005 3:04:50 PM7/8/2005 3:04:50 PM
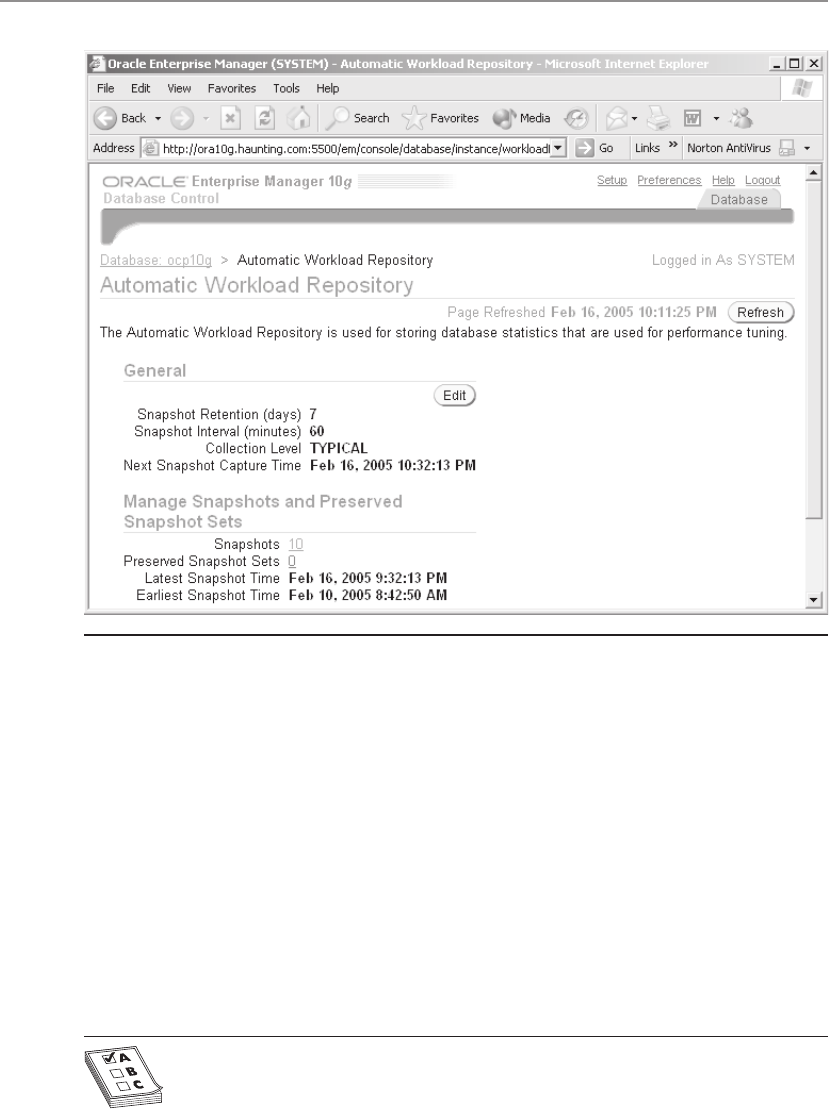
Oracle Database 10g OCP Certification All-in-One Exam Guide
4
All-in-1 / Oracle Database 10g Certification All-in-One / Meyers / 5790-3
Preserving Snapshots
Snapshots are purged after a certain period, by default, after seven days. For long-term
tuning, it is necessary to keep snapshots over a longer period. You may, for example,
want to keep the snapshots collected during each month-end processing run, so that
you can compare the performance of the month-end batch jobs over a year. To do
this, take the link next to “Preserved snapshot sets” in Figure 15-1. You will be presented
with a list of all the snapshots currently in the AWR; choose the ones you wish to keep
indefinitely.
Creating preserved snapshots means that you can always compare current performance
with performance at a point in the past. This is vital for proper trend analysis. The
reports themselves are kept by default for thirty days, but if you preserve the snapshots,
you can always regenerate the reports.
EXAM TIP By default, AWR snapshots are kept for a week and ADDM
reports for thirty days.
Figure 15-1 The AWR administration window
ch15.indd 4ch15.indd 4 7/8/2005 3:04:51 PM7/8/2005 3:04:51 PM

Chapter 15: Monitoring Oracle
5
PART I
All-in-1 / Oracle Database 10g Certification All-in-One / Meyers / 5790-3
The Diagnostic and Tuning Advisors
The database comes preconfigured with a set of advisors. First among these is the
Automatic Database Diagnostic Monitor, or ADDM. Studying ADDM reports, which
are generated automatically whenever an AWR snapshot is taken, will usually be a
regular part of the DBA’s routine. The ADDM reports are of great value in themselves
and will highlight problems within the database and suggest solutions, but in many
cases, its recommendations will include suggesting that you run one or more other
advisors. These advisors must be invoked manually, but they can give much more
precise diagnostic information and advice than the ADDM.
To use the advisors, in Database Control take the Advisor Central link in the
Related Links section. The Advisor Central window gives you the options of viewing
the results of previous advisor tasks, or of using any of the seven advisors:
• The Automatic Database Diagnostic Monitor (the ADDM)
• The SQL Tuning Advisor
• The SQL Access Advisor
• The Memory Advisor
• The Mean Time to Recover (MTTR) Advisor
• The Segment Advisor
• The Undo Advisor
At this stage, it is only necessary to study the ADDM. The other advisors will be
dealt with in detail in later chapters.
The Automatic Database Diagnostic Monitor
The ADDM is run automatically by the MMON whenever a snapshot is taken. As with
all the advisors, it takes statistics and other information from the AWR. The automatically
generated ADDM reports always cover the period between the current snapshot and
the previous one, so by default, you will have access to reports covering every hour.
You can invoke the ADDM manually to generate a report covering the period between
any two snapshots, if you want to span a greater period. The ADDM is triggered by
automatic snapshots and also if you gather a snapshot manually. The reports are purged
by default after thirty days.
EXAM TIP The ADDM is launched by MMON whenever a snapshot is
gathered.
To view the ADDM reports, take the Advisor Central link from the database home
page. The Advisor Central window will show you the most recent runs of each advisor,
as in Figure 15-2.
ch15.indd 5ch15.indd 5 7/8/2005 3:04:52 PM7/8/2005 3:04:52 PM
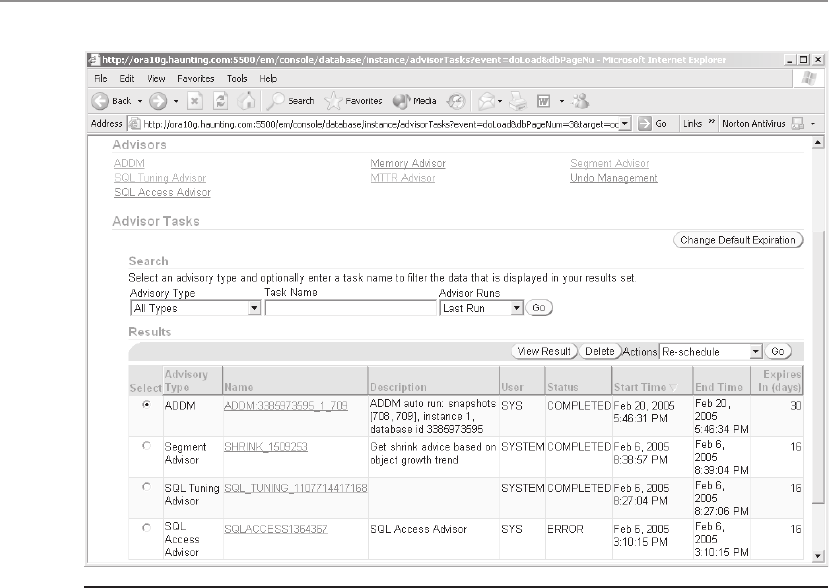
Oracle Database 10g OCP Certification All-in-One Exam Guide
6
All-in-1 / Oracle Database 10g Certification All-in-One / Meyers / 5790-3
Select the report’s radio button and click View Report to see the summary report,
as in Figure 15-3. Drill down to the individual recommendations for precise advice.
The ADDM will often recommend running another advisor. In the preceding
example, selecting the fourth recommendation, for segment tuning, gives the result
shown in Figure 15-4.
The SQL Tuning and Access Advisors
A basic principle of performance tuning is to start at the beginning. This means that
performance should be considered from the very beginning of the system development
cycle, with the business analysis that determines the business processes to be automated.
Performance also needs to be considered subsequently, during both the systems analysis
that generates an ideal model and the system design that represents a compromise,
adapting the ideal model to circumstances. Then the program designers should keep
performance in mind when writing in code. In a perfect world, the DBA would be
involved in all these stages, but frequently you will be asked to manage a system that
is already completed. It will therefore be too late to influence the analysis and design
stages, but you can still detect problems and possibly fix them by identifying high-
Figure 15-2 The Advisor Central
ch15.indd 6ch15.indd 6 7/8/2005 3:04:52 PM7/8/2005 3:04:52 PM
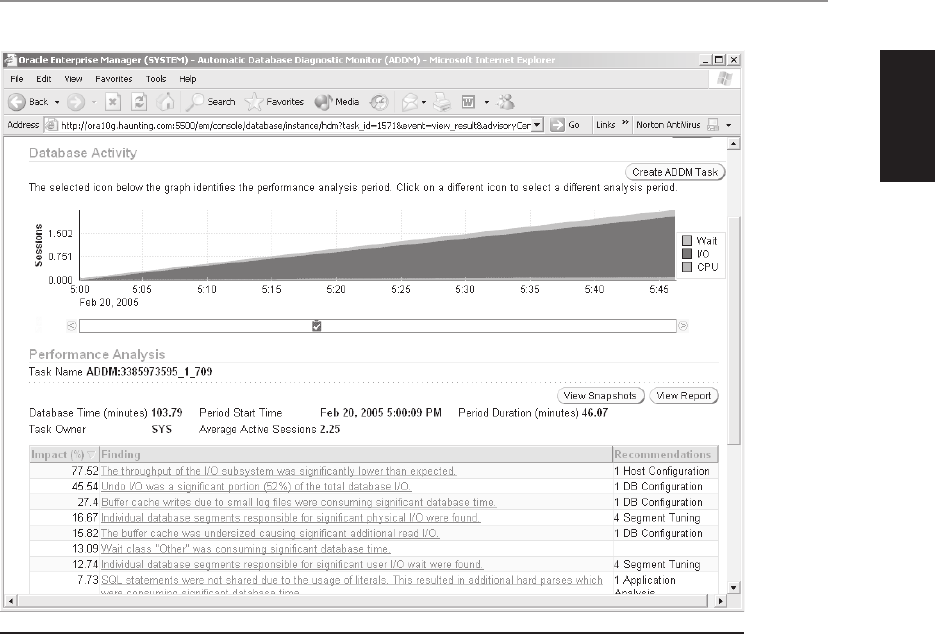
Chapter 15: Monitoring Oracle
7
PART I
All-in-1 / Oracle Database 10g Certification All-in-One / Meyers / 5790-3
Figure 15-3 The ADDM report summary
load SQL and suggesting improvements. The SQL Tuning Advisor is your tool for
doing this.
The SQL Tuning Advisor takes as its input a set of one or more SQL statements
and investigates their structure and manner of execution. Known as a SQL Tuning Set,
this can be created from the SQL recently executed, SQL stored in the AWR snapshots,
or a hypothetical workload. The advice may include
• Gathering optimizer statistics on the objects addressed
• Generating SQL profiles, with statistics on statement execution
• Changing the code to use more efficient SQL constructs
• Rewriting the code to remove possible design errors
The SQL Access Advisor also takes SQL Tuning Sets as its input. It investigates
whether the SQL execution performance could be improved by adding indexes or
materialized views, and also whether some indexes and materialized views are in fact
a hindrance and should be dropped. In general, indexes and materialized views will
improve the performance of SELECT statements, but it is possible that maintaining
ch15.indd 7ch15.indd 7 7/8/2005 3:04:53 PM7/8/2005 3:04:53 PM
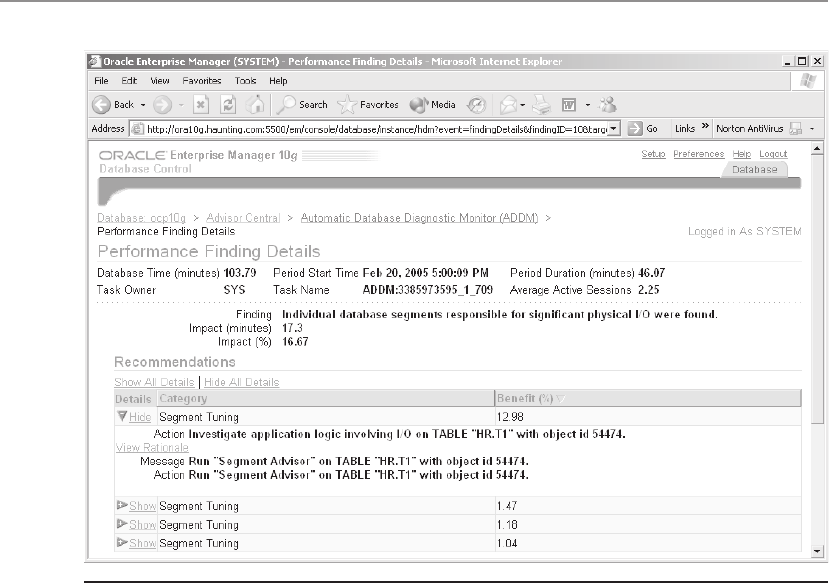
Oracle Database 10g OCP Certification All-in-One Exam Guide
8
All-in-1 / Oracle Database 10g Certification All-in-One / Meyers / 5790-3
them will be detrimental for DML commands. Indexes enhance performance by
giving faster access to individual rows, obviating the need for full table scans. Materialized
views enhance performance by, in effect, pre-running all or part of a query. When
working out how best to execute a statement, the optimizer will look at the structure
of the objects and their statistics and make an intelligent decision about whether to
use any available indexes and materialized views. The SQL Access Advisor goes further
than this: it estimates whether performance could be improved by creating additional
indexes and materialized views, and it also can recommend dropping ones that exist
but are not being used.
The Memory Advisors
There are graphical advisors that will predict the effect of varying the amount of
memory allocated to the database buffer cache and the shared pool, and also the total
amount of memory available for the PGAs of all the database sessions. The buffer
cache advisor, which graphs expected disk reads against the size of the cache, is shown
in Figure 15-5.
Figure 15-4 A recommendation to invoke another advisor
ch15.indd 8ch15.indd 8 7/8/2005 3:04:54 PM7/8/2005 3:04:54 PM
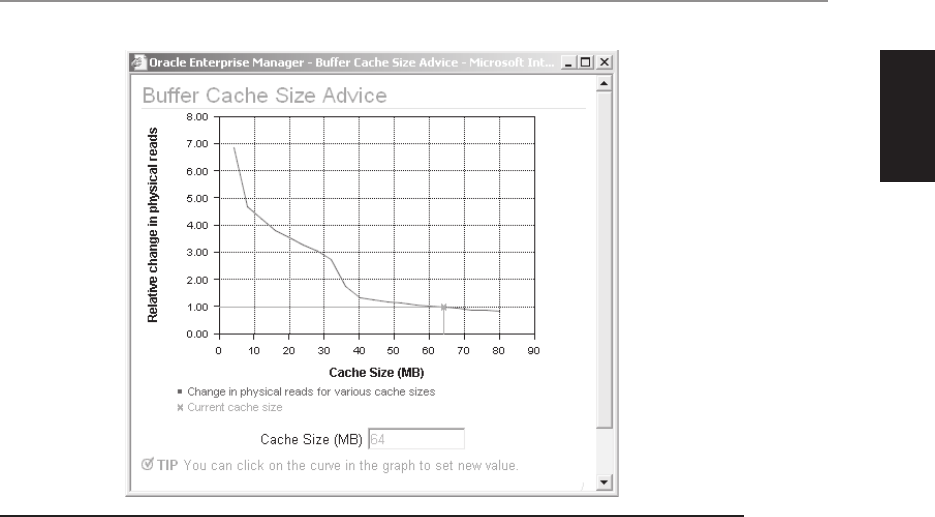
Chapter 15: Monitoring Oracle
9
PART I
All-in-1 / Oracle Database 10g Certification All-in-One / Meyers / 5790-3
In this example, the buffer cache is currently 64MB. The curve shows that increasing
it would produce only a marginal reduction in disk reads. It could even be reduced by
a few megabytes without disk reads increasing too much, but to reduce it below 40MB
would be disastrous.
A result like this is typical for the memory advisors: as more memory is allocated
to an SGA structure or to the PGA, performance will improve, but with diminishing
returns. If it is necessary to reduce memory usage, perhaps because the system is
swapping, then memory can be saved—but if you go too far, performance will degrade.
The Mean Time to Recover Advisor
After an instance crash, such as a power cut or the server being rebooted without
shutting down the database, the instance must be recovered. This recovery process,
detailed in Chapter 18, is completely automatic. For now, let it suffice that the recovery
process ensures that no matter what is happening in the database, it is impossible to
corrupt it by crashing the instance. You can switch off the server while hundreds of
users are logged on and executing statements, and the database will not be affected:
the instance recovery process will repair any damage. But while the instance will always
be recovered, it may take a considerable time. This is the Mean Time to Recover (MTTR).
The MTTR will often be built into service level agreements. It can be controlled by
the instance parameter FAST_START_RECOVERY_TARGET, set in seconds. In general,
the shorter the time this parameter is set to, the quicker it will be to open the database
Figure 15-5 The buffer cache advisor
ch15.indd 9ch15.indd 9 7/8/2005 3:04:55 PM7/8/2005 3:04:55 PM

Oracle Database 10g OCP Certification All-in-One Exam Guide
10
All-in-1 / Oracle Database 10g Certification All-in-One / Meyers / 5790-3
after a crash, but the worse online performance will be. The problem is that in order
to minimize recovery time, Oracle must write more data to disk than it would do
otherwise: this may impact adversely on performance.
The decision on the required MTTR is not one for the DBA to make; it is determined
by business requirements. However, it is possible for the DBA to show what the effect
will be of a particular MTTR target in terms of additional disk I/O. The MTTR Advisor
graphs the expected change in disk I/O against various settings for the FAST_START_
RECOVERY_TARGET instance parameter.
The Segment Advisor
Segments grow automatically. As rows are inserted into table segments and index keys
inserted into index segments, the segments fill, and then Oracle will allocate more
extents as necessary. Segments do not shrink automatically.
DML operations on the rows in table segments, such as DELETE and possibly
UPDATE, cause blocks within the segment to empty, as rows are removed or reduced
in size. This space that is freed up will be reused by subsequent INSERT commands,
but it is still possible for a table to end up occupying far more space than is needed
for its current contents. DML on rows will also affect the associated index segments,
and the effects may be worse than on table segments. The algorithms that Oracle
applies to reuse space in index segments can result in large amounts of wasted space
that cannot be reused.
The Segment Advisor will inspect segments and determine whether the amount of
space allocated to the segment that is not being used is sufficiently great that the
SHRINK SPACE operation could be usefully applied to it. The algorithms used do not
rely purely on the amount of “wasted” space: they also take account of the pattern of
activity on the segment. If, for example, history shows that a table frequently has a large
number of rows inserted and then deleted, the Advisor may not necessarily recommend
that it should be shrunk: just because there is unused space in the segment now, the
Advisor knows that it could be needed again. This is possible because the Advisor has
access to the AWR, which will have such historical information.
The Undo Advisor
Undo data is generated by all DML commands. The length of time that the undo data
is retained for is, at a minimum, the length of the transaction. It will, however,
frequently be necessary to store undo data for some considerable time after the
transaction has finished. This is to satisfy the need for consistent reads: the C of the
ACID test. This requirement is determined by the length of the longest-running
queries executed against the database. In order to prevent the “ORA-1555: snapshot
too old” error, the undo tablespace must be large enough to retain enough undo data
to prevent this. If you intend to make use of the Flashback Query capability of the
database (which will be detailed in Chapter 29), it may be necessary to retain undo
data for considerably longer.
ch15.indd 10ch15.indd 10 7/8/2005 3:04:55 PM7/8/2005 3:04:55 PM

Chapter 15: Monitoring Oracle
11
PART I
All-in-1 / Oracle Database 10g Certification All-in-One / Meyers / 5790-3
The algorithm to size the undo tablespace is based on the rate of undo generation
per second and the number of seconds of data it is necessary to store to meet the
requirements of long-running queries, and possibly the use of Flashback Query. The
Undo Advisor shows a graph of the necessary size of the undo tablespace for various
undo retention times.
Exercise 15-1: Generating an ADDM Report
Gather an AWR snapshot, simulate a workload, gather another snapshot, and view the
ADDM report.
1. Connect to your database as user SYSTEM with SQL*Plus.
2. Force the creation of an AWR snapshot.
SQL> exec dbms_workload_repository.create_snapshot;
3. Simulate a workload by creating a table and running this anonymous PL/SQL
block to generate some activity:
SQL> create table tmptab as select * from all_objects;
SQL> begin
2 for i in 1..10 loop
3 insert into tmptab select * from all_objects;
4 delete from tmptab;
5 end loop;
6 commit;
7 /
4. Repeat the command from Step 2 to generate another snapshot.
5. Connect to your database as user SYSTEM using Database Control.
6. Take the Advisor Central link in the Related Links section on the database
home page. The first report listed will be the ADDM report generated as a
result of the snapshot, as in Figure 15-6.
7. Select the radio button for the latest ADDM report, and click View Result.
The report should resemble Figure 15-7.
8. Study the report. In the example, the worst problem (as shown in the graph)
is disk I/O; the findings at the bottom of the screen show the causes of this
I/O problem. Double-click the findings links for further details.
NOTE Your results may differ from those in the example, depending on your
database configuration; if the report shows no problems, edit the code in
Step 3 to force more activity, and repeat the exercise.
9. Tidy up by dropping the TMPTAB table.
SQL> drop table tmptab;
ch15.indd 11ch15.indd 11 7/8/2005 3:04:56 PM7/8/2005 3:04:56 PM
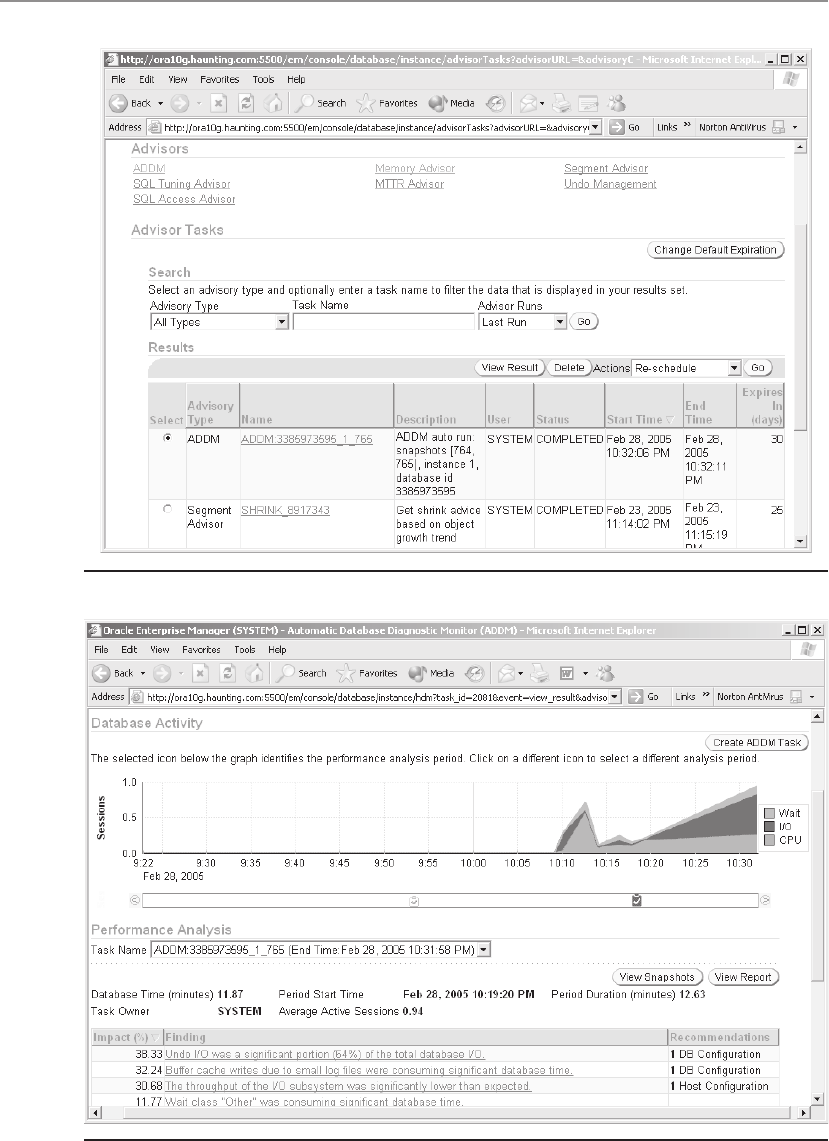
Oracle Database 10g OCP Certification All-in-One Exam Guide
12
All-in-1 / Oracle Database 10g Certification All-in-One / Meyers / 5790-3
Figure 15-6 Advisor Central
Figure 15-7 An ADDM report
ch15.indd 12ch15.indd 12 7/8/2005 3:04:57 PM7/8/2005 3:04:57 PM

Chapter 15: Monitoring Oracle
13
PART I
All-in-1 / Oracle Database 10g Certification All-in-One / Meyers / 5790-3
Server-Generated Alerts
A large amount of a DBA’s work has always involved monitoring the database to pick
up potential problems before they become serious. This proactive monitoring is far
better for your user community than reactive monitoring, where you wait for a
problem to arise before addressing it. Previous releases of the database did provide
tools to assist with monitoring, but they were client/server tools: they connected to
the database through a server process, as does any other session. Release 10g comes
with a server-based alert system designed to assist you with proactive monitoring by
taking over the task of monitoring and informing you of problems. It is installed and
enabled automatically; all you have to do is configure it.
The Alert System Architecture
A 10g database monitors itself. The manageability monitor, the MMON background
process, observes the instance and the database. If certain metrics deviate excessively
from expected levels, the MMON will raise an alert. The alerts raised by the MMON
are placed on a queue, the ALERT_QUE in the SYS schema.
Queues are implemented by the Advanced Queueing option. Queues are a
mechanism for sessions or processes to communicate with each other. One process
can enqueue a message (write it to the queue), and another process can de-queue the
message (read it from the queue). Depending on options used, the de-queueing can
either remove the message from the queue or leave it there for another process to read
as well.
To see alert messages, you must subscribe to the alert queue. You can use the
advanced queueing API (the DBMS_AQ package) to write your own routines for
viewing alerts, but the easiest way to view alerts is through Database Control, which
subscribes to the queue automatically.
Alerts are of two forms: threshold, or stateful, and non-threshold, or stateless.
Threshold alerts must be configured by setting values for some metric to be monitored,
such as the percentage of space used in a tablespace. When this threshold is crossed,
the alert will be raised and will persist until some action is taken (such as adding
space to the tablespace) to cause the metric to drop below the triggering value. The
non-threshold alerts are triggered by an event that happens but does not persist, such
as an “ORA-1555: snapshot too old” error.
EXAM TIP Alerts are sent by the MMON background process and displayed
by Database Control.
Setting Thresholds
To configure the settings for the threshold alerts, navigate to the Manage Metrics
window in Database Control, as in Figure 15-8.
ch15.indd 13ch15.indd 13 7/8/2005 3:04:58 PM7/8/2005 3:04:58 PM
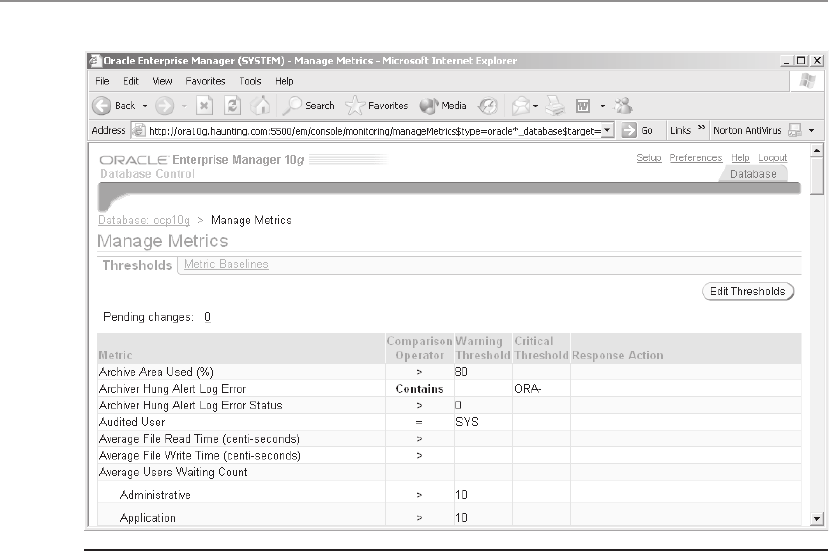
Oracle Database 10g OCP Certification All-in-One Exam Guide
14
All-in-1 / Oracle Database 10g Certification All-in-One / Meyers / 5790-3
Some alerts are preconfigured with thresholds; others must be set before they will
be enabled. For example, the “Tablespace percent full” alert is by default set to send a
warning alert when a tablespace reaches 85 percent full and a critical alert when it
reaches 97 percent full, but the “Average File Read Time” alert is not configured by
default; as shown in Figure 15-8, it is null unless you set it. To change a threshold,
click Edit Thresholds, and set whatever values are appropriate for a warning and a
critical alert to be raised.
Using Baselines
Rather than comparing metrics to values you have chosen by hand, you can allow
Oracle to raise alerts based on deviations from a time when performance was known
to be acceptable. This saves the necessity of working out what the thresholds should
be. To do this, create a “baseline.” To use baselines,
1. From the database home page, take the Manage Metrics link in the Related
Links section and then the Metric Baselines link. Click Create.
2. Specify a date and hour when performance and workload were normal, as
shown in Figure 15-9, provide warning and critical percentage deviations
from this norm, and click Go to display all the metrics that can be used for
comparisons. Deselect the ones you are not concerned with.
Figure 15-8 The alert thresholds
ch15.indd 14ch15.indd 14 7/8/2005 3:04:58 PM7/8/2005 3:04:58 PM
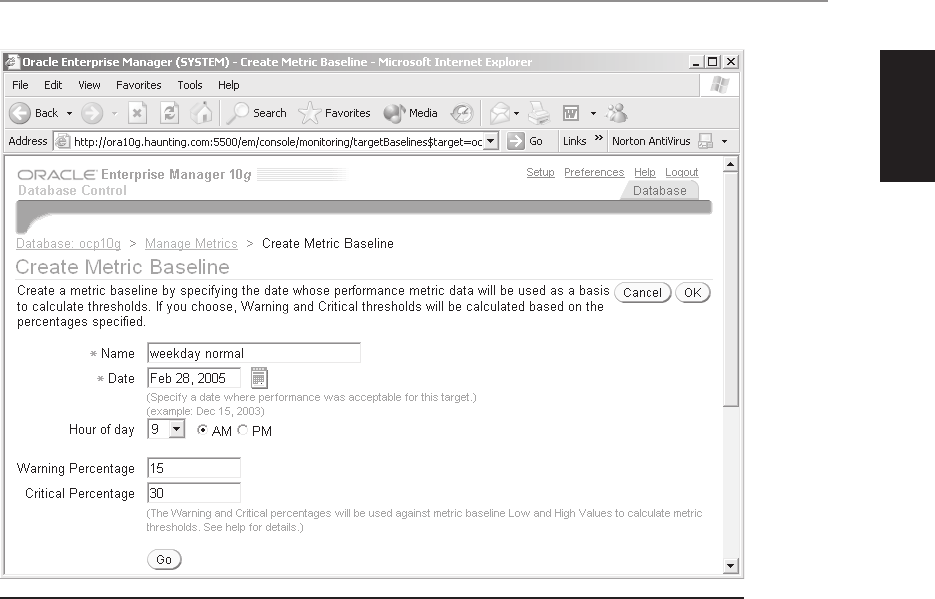
Chapter 15: Monitoring Oracle
15
PART I
All-in-1 / Oracle Database 10g Certification All-in-One / Meyers / 5790-3
3. Click OK to save the baseline.
4. To copy the thresholds from the baseline to the Edit Thresholds window,
select the baseline and click Copy Thresholds From Metric Baseline.
Exercise 15-2: Configuring Alerts
Configure the “User Commits (per second)” alert, and monitor it being raised.
1. Connect to your database with Database Control as user SYSTEM.
2. From the database home page, take the Manage Metrics link in the Related
Links section.
3. Click Edit Thresholds to reach the Edit Thresholds window.
4. Scroll down to the “User Commits (per second)” alert, and set the warning
and critical values to 1 and 4. These are artificially low thresholds that it will
be simple to cross. Click OK to save this change.
Figure 15-9 Creating a baseline
ch15.indd 15ch15.indd 15 7/8/2005 3:04:59 PM7/8/2005 3:04:59 PM

Oracle Database 10g OCP Certification All-in-One Exam Guide
16
All-in-1 / Oracle Database 10g Certification All-in-One / Meyers / 5790-3
5. Connect to your database as user SYSTEM with SQL*Plus, and issue the
COMMIT command a few times quickly.
SQL> commit;
Commit complete.
SQL> /
Commit complete.
SQL> /
Commit complete.
SQL> /
Commit complete.
6. In your Database Control session, within a few seconds you will see that the
alert has been raised.
7. Tidy up by returning to the Edit Thresholds window and clearing the
threshold values.
Chapter Review
This chapter has introduced some of the self-management capabilities of the database:
the Automatic Database Diagnostic Monitor (ADDM), the various advisors, and the
server alert system. All of these will be revisited in later chapters.
Central to the self-management capability is the Automatic Workload Repository
(AWR). This is a store of statistical information regarding performance and activity. It
is populated automatically by “snapshots” of information, gathered from the instance
at regular intervals by the MMON process. Whenever a snapshot is taken, MMON also
runs the ADDM to generate a report.
The server alert system is also implemented by MMON: it will monitor the instance
and the database and if certain metrics cross certain thresholds, it will raise an alert
message via a queueing system. These alerts can be seen through Database Control.
Questions
1. Classify the following measures as being statistics or metrics. There are three
of each.
A. Tablespace used, megabytes
B. Tablespace space used, percentage
C. Disk reads since instance startup
D. User rollbacks per second
E. Maximum concurrent sessions
F. Redo generated per transaction
2. Where is the Automatic Workload Repository stored? (Choose the best answer.)
A. In the SYSAUX tablespace
B. In the SYSTEM tablespace
ch15.indd 16ch15.indd 16 7/8/2005 3:05:00 PM7/8/2005 3:05:00 PM

Chapter 15: Monitoring Oracle
17
PART I
All-in-1 / Oracle Database 10g Certification All-in-One / Meyers / 5790-3
C. In the System Global Area
D. You can choose the location at database creation time and relocate it
subsequently.
3. When are AWR snapshots taken? (Choose the best answer.)
A. Every hour
B. Every ten minutes
C. On demand
D. By a regular schedule, and on demand
4. Which process generates ADDM reports? (Choose the best answer.)
A. Database Control
B. MMON, the manageability monitor
C. SMON, the system monitor
D. RMAN, the Recovery Manager
5. For how long are AWR snapshots and ADDM reports retained? (Choose the
best answer.)
A. By default, both snapshots and reports are kept for thirty days, unless
purged earlier or flagged for retention.
B. Snapshots are kept until purged, reports are not stored; they are generated
on demand.
C. By default, snapshots are kept for seven days, and reports for 30 days.
D. Snapshots are stored in the SGA and are dropped on shutdown. Reports
are stored until purged in the AWR.
6. Which process raises alerts? (Choose the best answer.)
A. MMON, the manageability monitor
B. Database Control
C. The server process that detects the problem
D. SMON, the system monitor
7. Database release 10g ships with a number of advisors. Match the advisors,
a to d, listed below with a function, A to D.
Advisor Function
a. Memory Advisor A. Recommendations on creating segments
b. Segment Advisor B. Advice on shrinking objects that are wasting space
c. SQL Access Advisor C. Predictions of the space needed to retain expired
undo data for a period of time
d. Undo Advisor D. Advice on how best to size certain SGA
components
ch15.indd 17ch15.indd 17 7/8/2005 3:05:00 PM7/8/2005 3:05:00 PM

Oracle Database 10g OCP Certification All-in-One Exam Guide
18
All-in-1 / Oracle Database 10g Certification All-in-One / Meyers / 5790-3
8. What are the default warning and critical alert levels for the “Tablespace
percent full” alert? (Choose the best answer.)
A. This alert is disabled until you set the thresholds
B. 85% and 97%
C. 85% and 100%
D. 97% and 10%
9. Some alerts are stateful, meaning they persist until cleared; others are cleared
immediately. Which of the following, if any, are stateless? (Choose all that apply.)
A. Snapshot too old
B. Tablespace full
C. Database down
D. User commits per second
10. With regard to the collection of monitoring information, put these steps in
the correct order:
A. Data accumulates in the SGA.
B. MMON generates an ADDM report.
C. MMON writes data to the AWR.
D. Reports are purged.
E. Snapshots are purged.
Answers
1. A statistic is a raw figure; a metric is a statistic related to another statistic. So
the statistics are A, C, and E, none of which have significance by themselves.
The metrics are B, which compare space used to total space; D, which relates
the number of rollbacks to time; and F, which correlates the number of redo
writes with the number of transactions.
2. A. The AWR is in the SYSAUX tablespace, not the SYSTEM tablespace. The SGA
is only a temporary store of statistics that will be transferred to the AWR, and
it cannot be relocated.
3. D. The default schedule for AWR snapshots is every hour, but this can be
changed. You can also request a snapshot at any time.
4. B. ADDM reports are generated by MMON whenever a snapshot is taken.
Database Control is used for viewing the reports. SMON does monitor the
instance but it does not report on it. RMAN, the Recovery Manager, has
nothing to do with ADDM.
5. C. AWR snapshots are retained for seven days, ADDM reports for 30 days.
These defaults can be changed.
ch15.indd 18ch15.indd 18 7/8/2005 3:05:01 PM7/8/2005 3:05:01 PM

Chapter 15: Monitoring Oracle
19
PART I
All-in-1 / Oracle Database 10g Certification All-in-One / Meyers / 5790-3
6. A. MMON raises alerts. Database Control and your server process report
alerts; they don’t raise them. And in spite of its name, SMON has nothing to
do with the alert system.
7. a-D. The Memory Advisor predicts the effect of changing the instance
parameters that control the size of SGA components.
b-B. The Segment Advisor inspects segments and reports on whether they have
a significant amount of wasted space.
c-A. The Access Advisor can recommend creating (or dropping) indexes and
materialized views.
d-C. The Undo Advisor calculates the undo space needed to meet various
undo retention targets.
8. B. 85% and 97% are the database defaults for warning and critical alerts on
tablespace usage.
9. A. The only correct answer is snapshot too old. This occurs, and is gone.
10. A, C, B, E, D.
ch15.indd 19ch15.indd 19 7/8/2005 3:05:01 PM7/8/2005 3:05:01 PM

All-in-1 / Oracle Database 10g Certification All-in-One / Meyers / 5790-3 / Blind Folio p.20
ch15.indd 20ch15.indd 20 7/8/2005 3:05:02 PM7/8/2005 3:05:02 PM

All-in-1 / Oracle Database 10g OCP Certification All-in-One / Watson, Bersinic / 5790-3, Ch16
CHAPTER 16
Undo Management
In this chapter you will learn how to
• Monitor and administer undo
• Configure undo retention
• Guarantee undo retention
• Use the Undo Advisor
• Describe the relationship between undo and transactions
• Size the undo tablespace
1
ch16.indd 1ch16.indd 1 6/20/2005 10:54:41 AM6/20/2005 10:54:41 AM

All-in-1 / Oracle Database 10g OCP Certification All-in-One / Watson, Bersinic / 5790-3
Oracle Database 10g OCP Certification All-in-One Exam Guide
2
Chapter 9 describes what happens in memory and on disk when you execute INSERT,
UPDATE, or DELETE statements: the manner in which changed data is written to blocks
of table and index segments and the old version of the data is written out to blocks of
an undo segment. It also covered the theory behind this, summarized as the ACID test
that every relational database must pass. In this chapter you will see the practicalities
of how undo data is managed. But first, a review of the purpose of undo.
Undo Data: Why and What Is It?
Undo data is the information needed to reverse the effects of DML statements. It is
often referred to as “rollback data,” but try to avoid that term. In earlier releases of
Oracle, the terms “rollback data” and “undo data” were used interchangeably, but
from 9i onward they are different. Whenever a transaction changes data, the pre-update
version of the data is written out to a rollback segment or to an undo segment. The
difference is crucial. Rollback segments can still exist, but with release 9i of the database
Oracle introduced the undo segment as an alternative. Oracle strongly advises that all
databases should use undo segments—rollback segments are retained for backward
compatibility, but they are not referenced in the OCP exam and are therefore not
covered in this book. But even though “rollback” as a noun should no longer be used
in the Oracle environment, “roll back” as a verb is as relevant as ever.
To roll back a transaction means to use data from the undo segments to construct
an image of the data as it was before the transaction occurred. This is usually done
automatically to satisfy the requirements of the ACID test, but the flashback capability
(introduced with 9i and greatly enhanced with 10g) leverages the power of the undo
mechanism by giving you the option of querying the database as it was at some time
in the past. (Flashback through use of undo segments is detailed in Chapter 29.) And
of course, any user can use the ROLLBACK command interactively to back out any DML
statements that s/he has issued and not committed.
The ACID test requires, first, that Oracle keep pre-update versions of data in order
that incomplete transactions can be reversed, either automatically in the case of an
error or on demand through the use of the ROLLBACK command. This type of rollback
is permanent and published to all users. Second, for read consistency, the database
must be able to present a query with a version of the database as it was at the time the
query started. The server process running the query will go to the undo segments and
construct what is called a “read consistent” image of the blocks being queried, if they
were changed after the query started. This type of rollback is temporary and visible only
to the session running the query. Third, undo segments are also used for transaction
isolation. This is perhaps the most complex use of undo data. The principle of isolation
requires that no transaction can be in any way dependent upon another, incomplete,
transaction. In effect, even though a multiuser database will have many transactions
in progress at once, the end result must be as though the transactions were executing
one after another. The use of undo data combined with row and table locks (you will
see how locking is implemented in Chapter 17) guarantees transaction isolation: the
impossibility of incompatible transactions. Even though several transactions may be
ch16.indd 2ch16.indd 2 6/20/2005 10:54:55 AM6/20/2005 10:54:55 AM
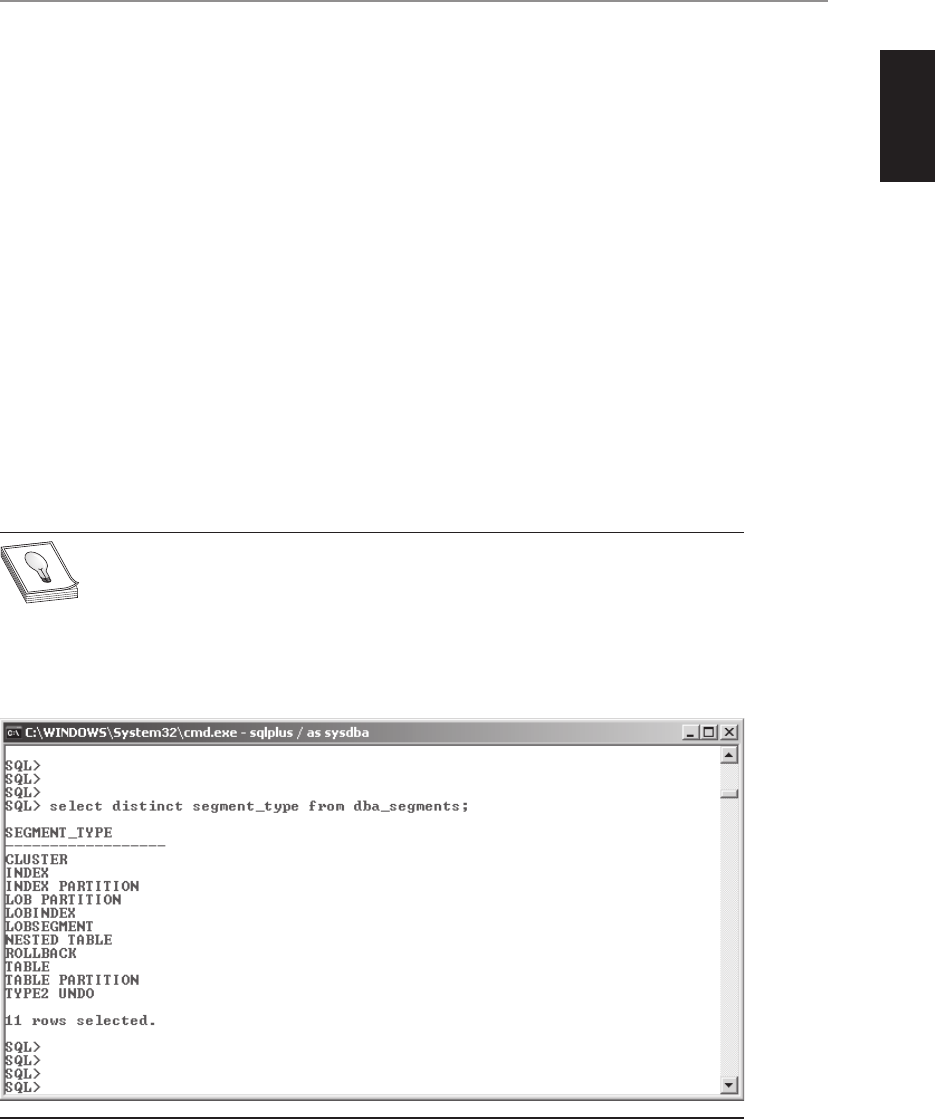
All-in-1 / Oracle Database 10g OCP Certification All-in-One / Watson, Bersinic / 5790-3
Chapter 16: Undo Management
3
PART I
running concurrently, isolation requires that the end result must be as if the transactions
were serialized.
From 9i onward, undo data can also be used for flashback queries. This is a
completely optional but very powerful tool that allows users to query a past image
of the database. You will see some uses of this in Chapter 29. For flashback queries,
undo data is used to construct a version of one or more tables as they were at some
previous time by applying undo data. As with rollback for the purposes of consistency,
rollback for flashback purposes is only temporary, and visible only to the session
concerned.
As a final word on “rollback” as opposed to “undo,” observe the results of a query
against DBA_SEGMENTS as shown in Figure 16-1. This shows that within the database
there are one or more segments of type ROLLBACK, and one or more of type TYPE2
UNDO. So rollback segments do still exist in a 10g database, but for only one purpose.
Undo segments can exist only in an undo tablespace; this is one of their features. But
at database creation time, there may not be an undo tablespace. Therefore, at creation
time, Oracle creates a single old-fashioned rollback segment in the SYSTEM tablespace,
along with the data dictionary. This is used during database creation, but never in
normal running. All user transactions will use undo segments, listed in DBA_SEGMENTS
as segment_type TYPE2 UNDO.
TIP If you ask Oracle Product Development “What is a TYPE1 UNDO
segment?” the reply will be, “That’s a ROLLBACK segment.”
If your database has been converted to use undo segments and automatic undo
management, any existing rollback segments will be in offline mode and cannot be
set online, so you might as well get rid of them. Use of undo segments is incompatible
Figure16-1 Segment types within a 10g database
ch16.indd 3ch16.indd 3 6/20/2005 10:54:55 AM6/20/2005 10:54:55 AM

All-in-1 / Oracle Database 10g OCP Certification All-in-One / Watson, Bersinic / 5790-3
Oracle Database 10g OCP Certification All-in-One Exam Guide
4
with use of rollback segments: it is one or the other, depending on the setting of the
UNDO_MANAGEMENT parameter.
Undo Tablespaces
Starting with the Oracle9i release, the management of undo data, by means of the
new segment type “undo,” can be completely automatic. The only control you as
DBA have is whether to use undo segments rather than rollback segments, and if so
which tablespace to keep them in, and how big this tablespace should be. The size
of the tablespace will determine how much undo data is actually kept—a topic
discussed later in this chapter.
One feature of undo segments is that they can exist only in a tablespace created
specially for that purpose, whereas rollback segments could be created in any tablespace.
You will always create an undo tablespace, possibly at database creation time. You may
well create more than one, but if you do, only one of them will be used at any given
moment. The only exception to this rule is a RAC database, where each instance opening
the clustered database will use its own undo tablespace. You can create an undo
tablespace from the SQL*Plus command line, through Database Control.
EXAM TIP There may be multiple undo tablespaces in a database, but only
one is active at a given point in time.
An undo tablespace is in many ways a tablespace like any other, but there are some
limitations. It must be created as permanent, locally managed, with automatic extent
allocation (remember these attributes from Chapter 6?). After creation, management
commands are generally limited to physical operations. You can add, move, or resize
datafiles in an undo tablespace, but you cannot, for example, make an undo tablespace
read-only. If it is the active undo tablespace, you cannot take it offline or drop it.
Exercise 16-1: Creating an Undo Tablespace
with Database Control
Use Database Control to create an undo tablespace, and verify the configuration from
SQL*Plus.
1. Connect to your instance as user SYSTEM with Database Control.
2. From the Maintenance tab in the Storage section, take the Tablespaces link.
3. Click Create.
4. Enter UNDO2 as the tablespace name, and set the radio buttons to Extent
Management “Locally Managed,” Type “Undo,” and Status “Read Write.”
5. At the bottom of the screen, click Add to specify a datafile.
ch16.indd 4ch16.indd 4 6/20/2005 10:54:55 AM6/20/2005 10:54:55 AM

All-in-1 / Oracle Database 10g OCP Certification All-in-One / Watson, Bersinic / 5790-3
Chapter 16: Undo Management
5
PART I
6. Enter UNDO2-01.DBF as the File Name, leave everything else on default,
and click Continue.
7. On the Create Tablespace screen, click Show SQL, and study the statement
used to create your undo tablespace. Click Return to return to the Create
Tablespace screen, and click OK to create the tablespace.
8. Connect to your instance as user SYSTEM through SQL*Plus.
9. Run this query, which will return one row for each tablespace in your
database:
select tablespace_name,contents,retention from dba_tablespaces;
and note that your new tablespace has contents UNDO, meaning that it can
only be used for undo segments, and that retention is NOGUARANTEE, a
topic covered shortly.
10. Run this query, which will return one row for each rollback or undo segment
in your database:
select tablespace_name, segment_name, status from dba_rollback_segs;
and note that a number of undo segments have been created automatically
in your new undo tablespace, but that they are all offline. Also note that the
names of the automatic undo segments are in the form of “_SYSSMUn$,”
where n is the undo segment number (usn).
Transactions and Undo Segments
When a transaction starts, Oracle will assign it to one (and only one) undo segment.
Any one transaction can be protected by only one undo segment; it is not possible for
the undo data generated by one transaction to cut across multiple undo segments. This
is not a problem, because undo segments are not fixed in size. So if a transaction does
manage to fill its undo segment, Oracle will automatically add another extent to the
segment so that the transaction can continue. It is possible for multiple transactions
to share one undo segment, but in normal running this should not occur. A tuning
problem common with rollback segments was estimating how many rollback segments
would be needed to avoid excessive interleaving of transactions within rollback segments
without creating so many as to waste space. One feature of undo management is that
Oracle will automatically generate new undo segments on demand, in an attempt to
ensure that it is never necessary for transactions to share undo segments. If Oracle has
found it necessary to extend its undo segments or to generate additional segments, when
the workload drops Oracle will shrink and drop the segments, again automatically.
EXAM TIP No transaction can ever cut across multiple undo segments.
As a transaction updates table or index data blocks, the information needed to
roll back the changes is written out to blocks of the assigned undo segment. Oracle
ch16.indd 5ch16.indd 5 6/20/2005 10:54:56 AM6/20/2005 10:54:56 AM
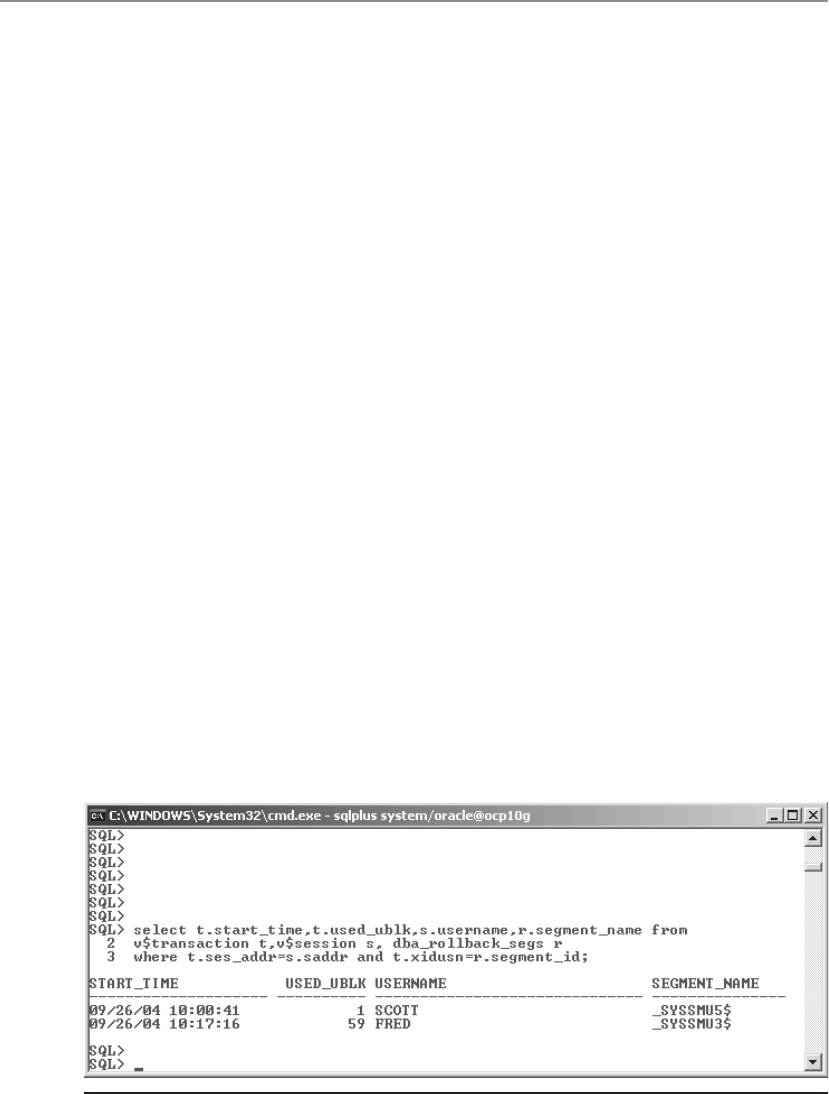
All-in-1 / Oracle Database 10g OCP Certification All-in-One / Watson, Bersinic / 5790-3
Oracle Database 10g OCP Certification All-in-One Exam Guide
6
guarantees absolutely the A, for atomicity, of the ACID test, meaning that all the undo
data must be retained until a transaction commits. By default, Oracle does not however
guarantee the C, for consistency, of the ACID test. Oracle guarantees consistency to
the extent that if a query succeeds, the results will be consistent with the state of the
database at the time the query started—but it does not guarantee that the query will
actually succeed. This means that undo data can be divided into two parts. “Active”
undo is undo data that might be needed to roll back transactions in progress. This data
can never be overwritten, until the transaction completes. “Expired” undo is undo data
from committed transactions that Oracle is no longer obliged to store—though it might
be needed for consistent reads, if there are any long-running queries in progress. This
data can be overwritten if Oracle needs the space for another active transaction.
The fact that undo information expires on commit means that undo segments can
be used in a circular fashion. Eventually, the whole of the undo tablespace will be filled
with undo data, so when a new transaction starts, or a running transaction generates
some more undo, the undo segment will “wrap” around, and the oldest undo data
within it will be overwritten—always assuming that this oldest data is not part of a
long-running uncommitted transaction, in which case it would be necessary to extend
the undo segment instead.
With the old, manually managed rollback segments, a critical part of tuning was
to control which transactions were protected by which rollback segments. A rollback
segment might even be created and brought online specifically for one transaction.
Automatically managed undo segments make all of that unnecessary, because you as
DBA have no control over which undo segment will protect any one transaction. Don’t
worry about this; Oracle does a better job than you ever could. But if you wish, you can
still find out which segment has been assigned to each transaction by querying the view
V$TRANSACTION, which has join columns to V$SESSION and DBA_ROLLBACK_SEGS
as shown in Figure 16-2, thus letting you build up a complete picture of transaction
activity in your database: how many transactions there are currently running, who is
running them, which undo segments are protecting those transactions, when the
transactions started, and how many blocks of undo each transaction has generated.
Figure 16-2 Query showing details of transactions in progress
ch16.indd 6ch16.indd 6 6/20/2005 10:54:56 AM6/20/2005 10:54:56 AM

All-in-1 / Oracle Database 10g OCP Certification All-in-One / Watson, Bersinic / 5790-3
Chapter 16: Undo Management
7
PART I
Managing Undo
A major feature of undo segments is that they are managed automatically, but you must
set the limits within which Oracle will do its management. After considering the nature
and volume of activity in your database, you set certain instance parameters and adjust
the size of your undo tablespace in order to achieve your objectives.
Error Conditions Related to Undo
The principles are simple: first, there should always be sufficient undo space to allow
all transactions to continue, and second, there should always be sufficient undo data
for all queries to succeed. The first principle requires that your undo tablespace be
large enough to accommodate the worst case for undo demand. It should have enough
space allocated for the worst case—the peak usage of active, or unexpired, undo data
generated by your transaction workload. Note that this might not be during the peak
number of concurrent transactions; it could be that during normal running you have
many small transactions, but the total undo they generate might be less than that
generated by a single end-of-month batch job. The second principle requires that there
be additional space in the undo tablespace to store expired undo data that might be
needed for read consistency, so that long-running queries will not fail with a famous
Oracle error ORA-1555, snapshot too old.
If a transaction runs out of undo space, it will fail with the error ORA-30036, unable
to extend segment in undo tablespace. The statement that hit the problem is rolled
back, but the rest of the transaction remains intact and uncommitted. The algorithm
that assigns space within the undo tablespace to undo segments means that this error
condition will arise only if the undo tablespace is absolutely full of unexpired undo
data. If a query fails on consistent read with “snapshot too old,” it means that the
query hit a block that had been changed since the query started, but when it went
to the undo segment to find the pre-update version of the data, that bit of undo data
had been overwritten.
Parameters for Undo Management
and Retention Guarantee
There are three initialization parameters controlling undo: UNDO_MANAGEMENT,
UNDO_TABLESPACE, and UNDO_RETENTION.
UNDO_MANAGEMENT defaults to “manual,” meaning that Oracle will not use
undo segments at all. This is for backward compatibility, and if you use this, you will
have to do a vast amount of work creating and tuning rollback segments. Don’t do it.
Oracle strongly advises setting this parameter to “auto” to enable automatic undo
management through the use of undo segments. In this case, DBAs relinquish undo
segment management to Oracle. This parameter is static, meaning that if it is changed,
the change will not come into effect until the instance is restarted. The other parameters
are dynamic—they can be changed while the instance is running.
ch16.indd 7ch16.indd 7 6/20/2005 10:54:56 AM6/20/2005 10:54:56 AM

All-in-1 / Oracle Database 10g OCP Certification All-in-One / Watson, Bersinic / 5790-3
Oracle Database 10g OCP Certification All-in-One Exam Guide
8
If you are using UNDO_MANAGEMENT=AUTO, you must also specify UNDO_
TABLESPACE. This parameter nominates a tablespace, which must have been created
as an undo tablespace, as the active undo tablespace. All the undo segments within it
will be brought online (that is, made available for use) automatically.
TIP Having several undo tablespaces available enables you to switch and use
a different tablespace with a different sizing configuration for OLTP or batch
purposes.
Finally, UNDO_RETENTION, set in seconds, is usually optional. It specifies a
target for keeping expired undo data. If, for example, your longest running query is
thirty minutes, you would set this parameter to 1800. Oracle will then attempt to
keep all undo data for at least 1800 seconds, and your query should therefore never
fail with ORA-1555. If, however, you do not set this parameter, or if you set it to zero,
Oracle will still keep data for as long as it can anyway. The algorithm controlling which
expired undo data is overwritten first will always choose to overwrite the oldest bit of
data; therefore, UNDO_RETENTION is always at the maximum allowed by the size of
the tablespace.
TIP Some queries can be very long-running indeed. Queries lasting several
hours to days are not unheard of. You will need an undo tablespace the size
of Jupiter if you are going to run such queries successfully during normal
transaction processing. You may want to consider limiting the DML workload
during long reporting runs.
Where the UNDO_RETENTION parameter is not optional is if you have configured
guaranteed undo retention. The default mode of operation for undo is that Oracle will
favor transactions over queries. If the sizing of the undo tablespace is such that a choice
has to be made between the possibility of a query failing with ORA-1555 and the
certainty of a transaction failing with ORA-30036, Oracle will choose to let the transaction
continue by overwriting committed undo data that a query might need. In other words,
the UNDO_RETENTION is only a target that Oracle will try to achieve. But there may
be circumstances when successful queries are considered more important than successful
transactions. An example might be the end-of-month billing run for a utilities company,
when it might be acceptable for transactions to be blocked for a few hours while the
reports are generating. Another case is if you are making use of flashback queries, which
rely on undo data. This is covered in Chapter 29.
With the 10g release, there is an option to guarantee undo retention. This means
that undo data will never be overwritten until the time specified by the UNDO_
RETENTION parameters has passed. Retention guarantee is enabled at the tablespace
level via the Retention Guarantee clause. This attribute can be specified at undo
tablespace creation time, or an undo tablespace can be altered later to enable it. Once
you activate an undo tablespace for which a retention guarantee has been specified,
all queries will complete successfully, provided they finish within the undo retention
time; you will never have “snapshot too old” errors again. The downside is that
ch16.indd 8ch16.indd 8 6/20/2005 10:54:56 AM6/20/2005 10:54:56 AM

All-in-1 / Oracle Database 10g OCP Certification All-in-One / Watson, Bersinic / 5790-3
Chapter 16: Undo Management
9
PART I
transactions may fail for lack of undo space because Oracle cannot overwrite committed
undo data until the retention time has passed.
EXAM TIP You can alter a tablespace to guarantee undo retention from
SQL*Plus, but not through Database Control.
A database might have one tablespace used in normal operations where undo
retention is not guaranteed, and another to be used during month-end reporting
where retention is guaranteed. Such a system could be set up as shown in Figure 16-3.
Sizing and Monitoring the Undo Tablespace
The undo tablespace should be large enough to store the worst case of all the undo
generated by concurrent transactions, which will be active undo, plus enough expired
undo to satisfy the longest-running query. In an advanced environment, you may
also have to add space to allow for flashback queries as well. The algorithm is simple:
calculate the rate at which undo is being generated at your peak workload, and
multiply by the length of your longest query.
There is a view, V$UNDOSTAT, that will tell you all you need to know. There is
also an advisor within Database Control that will present the information in an
immediately comprehensible way.
Figure 16-4 shows the undo management screen of Database Control. To reach
this, take the Administration tab from the database home page, and then the Undo
Management link in the Instance section. The configuration section of the screen shows
that the undo tablespace currently in use is called UNDOTBS1, and it is 25MB big.
Figure 16-3 Undo management from the command line
ch16.indd 9ch16.indd 9 6/20/2005 10:54:57 AM6/20/2005 10:54:57 AM
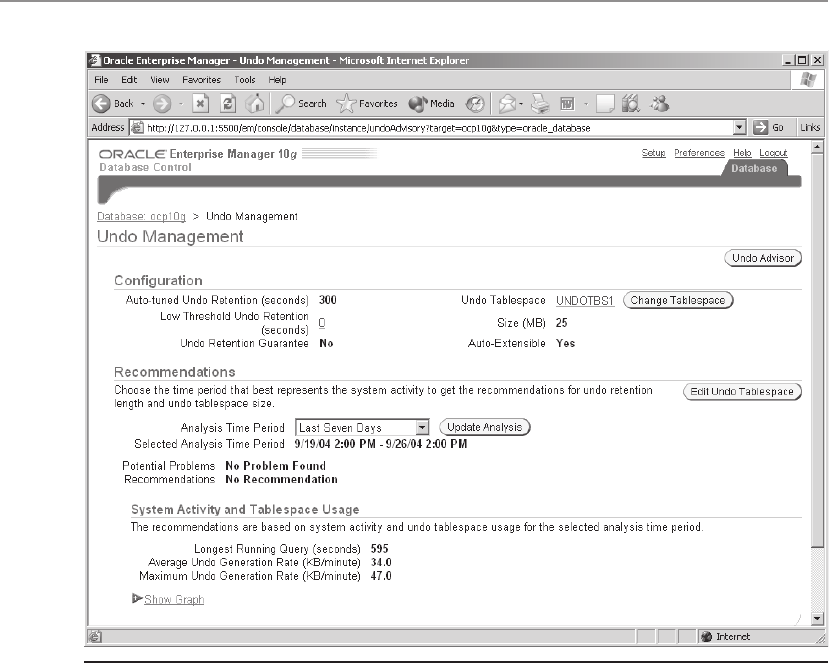
All-in-1 / Oracle Database 10g OCP Certification All-in-One / Watson, Bersinic / 5790-3
Oracle Database 10g OCP Certification All-in-One Exam Guide
10
Undo guarantee has not been set, but the datafile(s) for the tablespace is auto-
extensible. Making your undo datafiles auto-extensible will ensure that transactions
will never run out of space, but Oracle will not extend them merely to meet the undo
retention target. However, you should not rely on the auto-extend capability: your
tablespace should be the correct size to begin with. The Change Tablespace button
will issue an ALTER SYSTEM command to activate an alternative undo tablespace.
The System Activity and Tablespace Usage section of the screen tells you that the
peak rate for undo generation was only 47KB per minute, and the longest running
query was 595 seconds. It follows that the minimum size of the undo tablespace to
prevent errors would be, in bytes,
47000 / 60 * 595 = 466083
or less than half a megabyte. If the current size were less than that, this would be
pointed out in the Recommendations section.
To view the undo advisor, click Advisor.
Figure 16-4 Undo management through Database Control
ch16.indd 10ch16.indd 10 6/20/2005 10:54:57 AM6/20/2005 10:54:57 AM
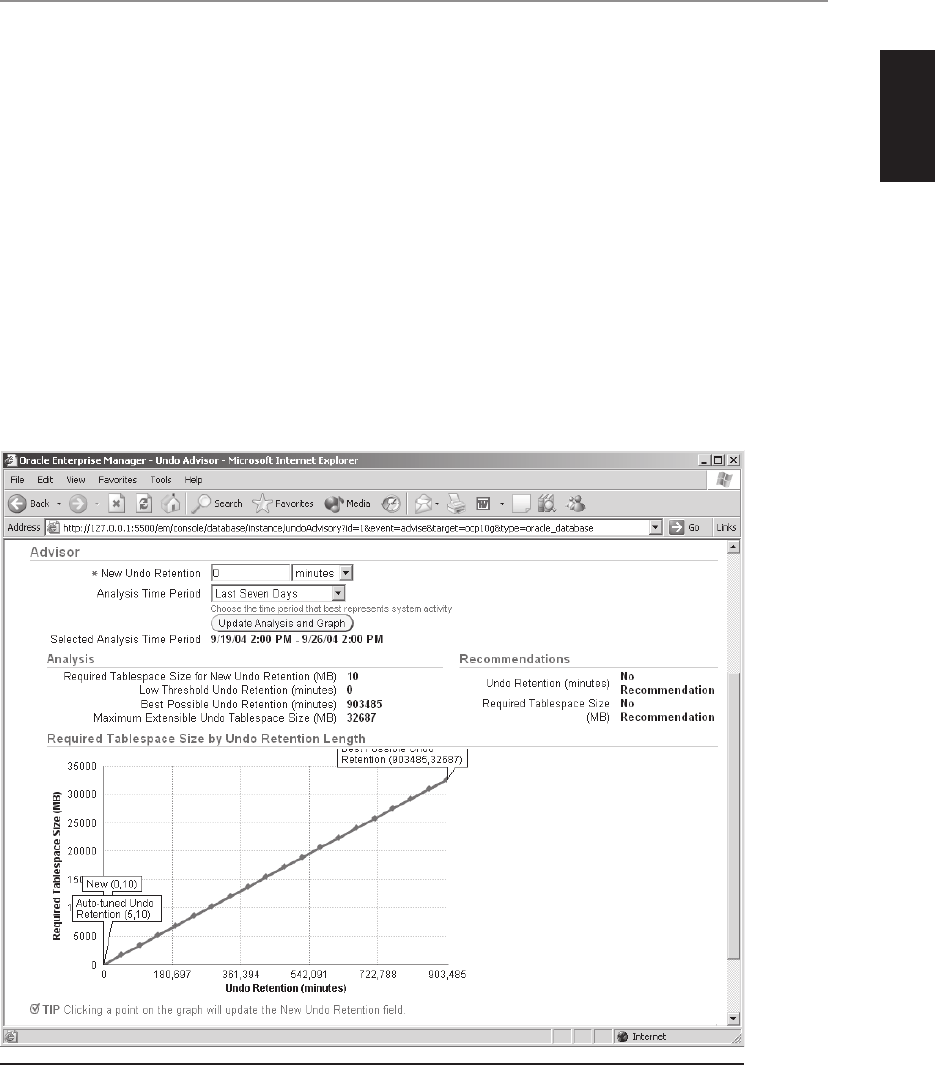
All-in-1 / Oracle Database 10g OCP Certification All-in-One / Watson, Bersinic / 5790-3
Chapter 16: Undo Management
11
PART I
The graph in Figure 16-5 projects the length of time for which undo could be
stored against the size of the undo tablespace, given the (extremely low) rate of undo
generation seen on the previous screen. For example, the graph shows that if you were
to increase the size of the undo tablespace to 20GB, it could store undo data going
back 542,091 minutes (about a year, which should be enough for anyone).
To obtain comparable information through SQL*Plus, query the V$UNDOSTAT
view.
Dropping and Shrinking Undo Segments
When an undo tablespace is created, Oracle will create a pool of undo segments within
it. If the number of concurrent transactions exceeds the number of segments in this
pool, Oracle will create more. Also, if a transaction’s undo data exceeds the size of its
undo segment, the segment will be extended. In normal running, if the undo tablespace
is under space pressure, Oracle will automatically transfer extents of expired undo data
from one undo segment to another if necessary, to ensure that undo segments do have
Figure 16-5 Database Control’s undo advisor
ch16.indd 11ch16.indd 11 6/20/2005 10:54:57 AM6/20/2005 10:54:57 AM

All-in-1 / Oracle Database 10g OCP Certification All-in-One / Watson, Bersinic / 5790-3
Oracle Database 10g OCP Certification All-in-One Exam Guide
12
enough space for the active undo being generated by currently running transactions.
An additional mechanism for resizing, and indeed dropping, undo segments is driven
by the system monitor process, SMON. Once every twenty-four hours, SMON will
inspect the undo tablespaces and drop segments that were created to satisfy a peak
demand but are no longer needed. At the same time, any excessively large segments
will be shrunk.
Exercise 16-2: Monitoring Undo with SQL*Plus
Use SQL*Plus to monitor undo generation, long queries, and undo errors.
1. Connect to your instance with SQL*Plus as user SYSTEM.
2. Set up your session for displaying dates conveniently.
SQL> alter session set nls_date_format='dd-mm-yy:hh24:mi:ss';
3. Query V$UNDOSTAT as follows:
SQL> select begin_time, end_time, undoblks, maxquerylen, ssolderrcnt,
nospaceerrcnt from v$undostat;
4. Interpret the results of the query. Note that the view has one row per ten-
minute interval, showing you how much undo was generated, in blocks; how
long the longest query was, in seconds; and whether there were any “snapshot
too old” errors, or errors from transactions running out of undo space.
5. Calculate the minimum necessary size in bytes for your undo tablespace that
will prevent errors, given your current activity data, with this query:
select
(select max(undoblks)/600 * max(maxquerylen) from v$undostat)
*
(select value from v$parameter where name='db_block_size')
from dual;
Chapter Review
Undo management was, with releases prior to 9i, one of the most taxing problems
facing database administrators. From 9i onward, you have the option of using automatic
undo management. This is an option Oracle strongly recommends. Undo management
is implemented by setting initialization parameters: UNDO_MANAGEMENT=AUTO
will enable automatic management of undo segments, which are created and managed
automatically in an undo tablespace nominated by the parameter UNDO_TABLESPACE.
The problems to be addressed are transactions running out of space for their undo
data, and queries failing because expired undo data has been overwritten. Both of
these problems should be mitigated by sizing the undo tablespace appropriately in
conjunction with proper initialization parameter configuration. The information you
need to calculate the necessary size of your undo tablespace is available in views, or
through Database Control.
ch16.indd 12ch16.indd 12 6/20/2005 10:54:58 AM6/20/2005 10:54:58 AM

All-in-1 / Oracle Database 10g OCP Certification All-in-One / Watson, Bersinic / 5790-3
Chapter 16: Undo Management
13
PART I
Questions
1. If an undo segment fills up, what will happen? (Choose the best answer.)
A. Another undo segment will be created automatically.
B. The undo segment will increase in size.
C. The undo tablespace will extend, if its datafiles are set to auto-extend.
D. Transactions will continue in a different undo segment.
2. When a DML statement executes, what happens? (Choose the best answer.)
A. Both the data and the undo blocks on disk are updated, and the changes
are written out to the redo stream.
B. The old version of the data is written to an undo segment, and the new
version is written to the data segments and the redo log buffer.
C. Both data and undo blocks are updated, and the updates also go to the
log buffer.
D. The redo log buffer is updated with information needed to redo the
transaction, and the undo blocks are updated with information needed
to reverse the transaction.
3. You have decided to implement automatic undo management. Which of these
steps is optional? (Choose two answers.)
A. Set the parameter UNDO_MANAGEMENT.
B. Create an undo tablespace.
C. Restart the instance.
D. Set the parameter UNDO_RETENTION.
E. Take any rollback segments offline.
4. Which of the following statements are correct about undo? (Choose three
answers.)
A. One undo segment can protect many transactions.
B. One transaction can use many undo segments.
C. One database can have many undo tablespaces.
D. One instance can have many undo tablespaces.
E. One undo segment can be cut across many datafiles.
F. Undo segments and rollback segments cannot coexist.
5. Even though you are using automatic undo segments, users are still getting
“snapshot too old” errors. What could you do? (Choose three answers.)
A. Increase the UNDO_RETENTION parameter.
B. Set the RENTENTION_GUARANTEE parameter.
ch16.indd 13ch16.indd 13 6/20/2005 10:54:58 AM6/20/2005 10:54:58 AM

All-in-1 / Oracle Database 10g OCP Certification All-in-One / Watson, Bersinic / 5790-3
Oracle Database 10g OCP Certification All-in-One Exam Guide
14
C. Tune the queries to make them run faster.
D. Increase the size of the undo tablespace.
E. Use Database Control to enable retention guarantee.
F. Use SQL*Plus to enable retention guarantee.
G. Increase the size of your undo segments.
6. Your undo tablespace has ten undo segments, but during a sudden burst of
activity you have twenty concurrent transactions. What will happen? (Choose
the best answer.)
A. Oracle will create another ten undo segments.
B. The transactions will be automatically balanced across the ten undo
segments.
C. Ten transactions will be blocked until the first ten commit.
D. What happens will depend on your UNDO_RETENTION setting.
7. Which view will help you decide how much undo space is needed to protect
your transaction workload? (Choose the best answer.)
A. V$TRANSACTION
B. V$UNDOSTAT
C. V$UNDO_ADVICE
D. V$UNDO_ADVISOR
E. DBA_ROLLBACK_SEGS
8. Which view will tell you about your undo segments? (Choose the best
answer.)
A. V$UNDOSTAT
B. DBA_ROLLBACK_SEGS
C. DBA_UNDO_SEGS
D. V$UNDO_TABLESPACE
9. Your users are reporting “ORA-1555: snapshot too old” errors. What might
be the cause of this? (Choose the best answer.)
A. You are not generating snapshots frequently enough.
B. The undo data is too old.
C. Relevant undo data is not available for user transactions.
D. Your undo tablespace is retaining data for too long.
10. You want to ensure that both long-running queries and large transactions will
always succeed. How should you set up undo? (Choose the best answer.)
A. Assign transactions to one undo tablespace, and queries to another.
ch16.indd 14ch16.indd 14 6/20/2005 10:54:58 AM6/20/2005 10:54:58 AM

All-in-1 / Oracle Database 10g OCP Certification All-in-One / Watson, Bersinic / 5790-3
Chapter 16: Undo Management
15
PART I
B. Enable the retention guarantee setting for your undo tablespace.
C. Enable auto-extend on the undo tablespace datafiles.
D. This situation may be impossible to resolve.
11. First, user JOHN initiates a query. Second, user DAMIR updates a row that
will be included in the query. Third, JOHN’s query completes. Fourth,
DAMIR commits his change. Fifth, JOHN runs his query again. Which of the
following statements are correct? (Choose three answers.)
A. The principle of consistency means that both of JOHN’s queries will return
the same result set.
B. When DAMIR commits, the undo data is flushed to disk.
C. When DAMIR commits, the undo becomes inactive.
D. JOHN’s first query will use undo data.
E. JOHN’s second query will use undo data.
F. The results of the two queries will be different.
12. Your undo tablespace consists of one datafile on one disk, and transactions
are failing for lack of undo space. The disk is full. You have enabled retention
guarantee. Any of the following options could solve the problem, but which
would cause downtime for your users? (Choose the best answer.)
A. Create another, larger, undo tablespace and use alter system set
undo_tablespace=... to switch to it.
B. Move the datafile to a disk with more space, and use alter database
resize datafile... to make it bigger.
C. Reduce the undo_retention setting with alter system set undo_
retention=....
D. Disable retention guarantee with alter tablespace...retention
guarantee.
13. Your undo tablespace has ten undo segments. What will happen if more than
ten users start transactions concurrently? (Choose the best answer.)
A. Automatic undo management will manage the interleaving of the
transactions’ undo data in the ten segments.
B. Additional undo segments will be created, automatically.
C. All the transactions will run, unless you have set retention guarantee.
D. Only ten transactions will run; the others will be queued.
E. Only ten transactions will run; the others will fail for lack of undo space.
ch16.indd 15ch16.indd 15 6/20/2005 10:54:58 AM6/20/2005 10:54:58 AM

All-in-1 / Oracle Database 10g OCP Certification All-in-One / Watson, Bersinic / 5790-3
Oracle Database 10g OCP Certification All-in-One Exam Guide
16
14. Examine this query and result set:
SQL> select BEGIN_TIME,END_TIME,UNDOBLKS,MAXQUERYLEN from V$UNDOSTAT;
BEGIN_TIME END_TIME UNDOBLKS MAXQUERYLEN
----------------- ----------------- ---------- -----------
02-10-04:11:35:55 02-10-04:11:41:33 14435 29
02-10-04:11:25:55 02-10-04:11:35:55 120248 296
02-10-04:11:15:55 02-10-04:11:25:55 137497 37
02-10-04:11:05:55 02-10-04:11:15:55 102760 1534
02-10-04:10:55:55 02-10-04:11:05:55 237014 540
02-10-04:10:45:55 02-10-04:10:55:55 156223 1740
02-10-04:10:35:55 02-10-04:10:45:55 145275 420
02-10-04:10:25:55 02-10-04:10:35:55 99074 120
The block size of the undo tablespace is 4KB. Which of the following would
be the optimal size for the undo tablespace? (Choose the best answer.)
A. 1GB
B. 2GB
C. 3GB
D. 4GB
15. Which 0f the following could be a contributing factor to “snapshot too old”
errors? (Choose the best answer.)
A. Long-running transactions
B. Too low a setting for UNDO_RETENTION
C. Use of “set transaction read only”
D. All of the above
Answers
1. B. Undo segments increase in size on demand, according to the volume of
undo data being generated by the transaction.
2. C. Both data and undo blocks are updated, and the updates also go to the log
buffer. As far as the mechanism of redo is concerned, an undo segment is just
another segment, and changes to it must be protected in the same way that
changes to data segments are protected.
3. D and E. The parameter UNDO_RETENTION is not required, nor is it
necessary to take any rollback segments offline—they will be off-lined
automatically. In fact, you would usually drop any rollback segments
completely.
4. A, C, and E. It is possible for one undo segment to protect many transactions,
though Oracle will try to prevent it. It is also true that one database can have
many undo tablespaces, though only one tablespace will be made active at
any moment by the instance. And like any other segment, an undo segment
may have extents in any of the datafiles that make up its tablespace.
ch16.indd 16ch16.indd 16 6/20/2005 10:54:58 AM6/20/2005 10:54:58 AM

All-in-1 / Oracle Database 10g OCP Certification All-in-One / Watson, Bersinic / 5790-3
Chapter 16: Undo Management
17
PART I
5. C, D, and F. It may be helpful to do any of these things, though tuning the
queries is probably the best first step. If that cannot be done, then make the
undo tablespace larger. If there are still problems, consider using retention
guarantee—though that may impact DML work.
6. A. Oracle will create as many undo segments as needed for concurrent
transactions.
7. B. It is V$UNDOSTAT that shows the amount of undo being generated per
second and the length of your queries.
8. B. DBA_ROLLBACK_SEGS is the view that tells you about your undo
segments: both the online segments in the active undo tablespace, and the
offline segments in any inactive undo tablespace. It will also have details of
any rollback segments that may exist in the database.
9. C. If a session requires undo data for read consistency, and that data is no
longer available in the undo tablespace because it has been overwritten, then
the session will receive an ORA-1555 error and the statement will fail.
10. D. Unfortunately, these two needs may be impossible to reconcile. The only
solution may be to address the business processes that cause this situation to
arise.
11. C, D, and F. Undo becomes inactive once the transaction completes, though
it may be needed for read consistency (C). Also, JOHN’s first query must
not see DAMIR’s changes (D). And by default, Oracle does not provide read
consistency across a series of SELECT statements—so the two queries will give
different results (F).
12. B. This is the only option that would cause downtime, because you can’t
move a datafile without taking it offline. All the other operations can be done
during normal running.
13. B. Oracle will create undo segments as needed for concurrent transactions
in an attempt to ensure that it is never necessary for transactions to share an
undo segment.
14. C. To calculate, take the largest figure for UNDOBLKS, divide by 600 to get the
rate of undo generation in blocks per second, multiply by the block size, and
multiply by the largest figure for MAXQUERYLEN.
15. C. “Set transaction read only” for a series of statements will require extensive
use of undo data.
ch16.indd 17ch16.indd 17 6/20/2005 10:54:59 AM6/20/2005 10:54:59 AM

All-in-1 / Oracle Database 10g OCP Certification All-in-One / Watson, Bersinic / 5790-3/ blind folio p.18
ch16.indd 18ch16.indd 18 6/20/2005 10:54:59 AM6/20/2005 10:54:59 AM

All-in-1 / Oracle Database 10g Certification All-in-One / Watson & Bersinic / 5790-3 /Chapter 23
CHAPTER 17
Dealing with Locking
In this chapter you will learn how to
• Detect and resolve lock conflicts
• Manage deadlocks
• Describe the relationship between transactions and locks
• Explain lock modes within the Oracle Database 10g
1
ch17.indd 1ch17.indd 1 7/6/2005 12:00:32 PM7/6/2005 12:00:32 PM

Oracle Database 10g OCP Certification All-in-One Exam Guide
2
All-in-1 / Oracle Database 10g Certification All-in-One / Watson & Bersinic / 5790-3/Chapter 17
In any multiuser database application it is inevitable that, eventually, two users will
wish to work on the same row at the same time. This is a logical impossibility, and the
database must ensure that it is a physical impossibility. The principle of transaction
isolation—the I of the ACID test—requires that the database guarantee that one
session cannot see or be affected by another session’s transaction until the transaction
has completed. To accomplish this, the database must serialize concurrent access to
data; it must ensure that even though multiple sessions have requested access to the
same rows, they actually queue up and take turns.
Serialization of concurrent access is accomplished by record and table locking
mechanisms. Locking in an Oracle database is completely automatic. Generally
speaking, problems only arise if software tries to interfere with the automatic locking
mechanism, or if programmers write poor code.
Shared and Exclusive Locks
The standard level of locking in an Oracle database guarantees the highest possible
level of concurrency. This means that if a session is updating one row, the one row is
locked, and nothing else. Furthermore, the row is locked only to prevent other sessions
from updating it; other sessions can read it at any time. The lock is held until the
transaction completes, either with a COMMIT or a ROLLBACK. This is an “exclusive”
lock: the first session to request the lock on the row gets it, and any other sessions
requesting write access must wait. Read access is permitted, though if the row has
been updated by the locking session, as will usually be the case, then any reads will
involve the use of undo data to make sure that reading sessions do not see any
uncommitted changes.
Only one session can take an exclusive lock on a row, or a whole table, at a time,
but “shared” locks can be taken on the same object by many sessions. It would not
make any sense to take a shared lock on one row, because the only purpose of a row
lock is to gain the exclusive access needed to modify the row. Shared locks are taken
on whole tables, and many sessions can have a shared lock on the same table. The
purpose of taking a shared lock on a table is to prevent another session from acquiring
an exclusive lock on the table: you cannot get an exclusive lock if anyone else already
has a shared lock. Exclusive locks on tables are required to execute DDL statements.
You cannot issue a statement that will modify an object (for instance, dropping a
column of a table) if any other session already has a shared lock on the table.
To execute DML on rows, a session must acquire exclusive locks on the rows to
be changed, and shared locks on the tables containing the rows. If another session
already has exclusive locks on the rows, the session will hang until the locks are
released by a COMMIT or a ROLLBACK. If another session already has a shared lock
on the table and exclusive locks on other rows, that is not a problem. An exclusive
lock on the table would be, but the default locking mechanism does not lock whole
tables unless this is necessary for DDL statements.
ch17.indd 2ch17.indd 2 7/6/2005 12:01:06 PM7/6/2005 12:01:06 PM

Chapter 17: Dealing with Locking
3
PART I
All-in-1 / Oracle Database 10g Certification All-in-One / Watson & Bersinic / 5790-3/Chapter 17
TIP It is possible to demand an exclusive lock on a whole table, but this has
to be specifically requested, and programmers should have a good reason for
doing it.
DML and DDL Locks
All DML statements require at least two locks: an exclusive lock on each row affected,
and a shared lock on the table containing the row. The exclusive lock prevents another
session from interfering with the row, and the shared lock prevents another session
from changing the table definition with a DDL statement. These locks are requested
automatically. If a DML statement cannot acquire the exclusive row locks it needs,
then it will hang until it gets them.
To execute DDL commands requires an exclusive lock on the object concerned.
This cannot be obtained until all DML transactions against the table have finished,
thereby releasing both their exclusive row locks and their shared table locks. The
exclusive lock required by any DDL statement is requested automatically, but if it
cannot be obtained—typically, because another session already has the shared lock
granted for DML—then the statement will terminate with an error immediately.
Exercise 17-1: Automatic and Manual Locking
Demonstrate the effect of automatic shared and exclusive locks, using DML and DDL
commands.
1. Connect to your database with SQL*Plus as user SYSTEM.
2. Create a table, and insert a row into it.
ocp10g> create table t1(c1 number);
Table created.
ocp10g> insert into t1 values(1);
1 row created.
ocp10g> commit;
Commit complete.
3. Open a second session, again connecting with SQL*Plus as user SYSTEM.
4. In session 1, issue a DML command that will take an exclusive lock on the
row and a shared lock on the table.
ocp10g> update t1 set c1=2 where c1=1;
1 row updated.
5. In session 2, issue a DDL statement against the table.
ocp10g> alter table t1 add (c2 date);
alter table t1 add (c2 date)
*
ERROR at line 1:
ORA-00054: resource busy and acquire with NOWAIT specified
The attempt to add a column to the table fails, because the exclusive table
lock necessary for a DDL statement conflicts with the shared lock already
ch17.indd 3ch17.indd 3 7/6/2005 12:01:07 PM7/6/2005 12:01:07 PM

Oracle Database 10g OCP Certification All-in-One Exam Guide
4
All-in-1 / Oracle Database 10g Certification All-in-One / Watson & Bersinic / 5790-3/Chapter 17
granted for a DML statement. Note that whereas a DML statement will wait
and continually retry until it gets its lock (in other words, it hangs), DDL
statements terminate immediately with an error.
6. In session 1, commit the transaction.
ocp10g> commit;
Commit complete.
7. In session 2, repeat Step 5. This time it will succeed because there are no
shared DML locks blocking the exclusive DDL lock.
8. In session 1, lock the whole table.
ocp10g> lock table t1 in exclusive mode;
Table(s) Locked.
9. In session 2, insert a row. The session will hang.
ocp10g> insert into t1 values (1,sysdate);
10. In session 1, release the table lock by issuing a COMMIT. Note that a
ROLLBACK would do just as well.
ocp10g> commit;
Commit complete.
11. Session 2 will now be released, and the insert will complete; issue a COMMIT
to terminate the transaction and release the row exclusive lock.
12. Leave both sessions open; they will be used in later exercises.
The Enqueue Mechanism
Requests for locks are queued. If a session requests a lock and cannot get it because
another session already has the row or object locked, the session will wait. It may be
that several sessions are waiting for access to the same row or object; in that case,
Oracle will keep track of the order in which the sessions requested the lock. When the
session with the lock releases it, the next session will be granted it, and so on. This is
known as the “enqueue” mechanism.
If you do not want a session to queue up if it cannot get a lock, the only way to
avoid this is to use the WAIT or NOWAIT clause of the SELECT...FOR UPDATE
command. A normal SELECT will always succeed, because SELECT does not require
any locks, but a DML statement will hang. The SELECT...FOR UPDATE command will
select rows and lock them in exclusive mode. If any of the rows are locked already, the
SELECT...FOR UPDATE statement will be queued and the session will hang until the
locks are released, just as a DML statement would. To avoid sessions hanging, use
either SELECT...FOR UPDATE NOWAIT or SELECT...FOR UPDATE WAIT <n>, where
<n> is a number of seconds. Having obtained the locks with either of the SELECT...
FOR UPDATE options, you can then issue the DML commands with no possibility
of the session hanging.
ch17.indd 4ch17.indd 4 7/6/2005 12:01:07 PM7/6/2005 12:01:07 PM

Chapter 17: Dealing with Locking
5
PART I
All-in-1 / Oracle Database 10g Certification All-in-One / Watson & Bersinic / 5790-3/Chapter 17
Exercise 17-2: The SELECT...FOR UPDATE Command
Use the SELECT...FOR UPDATE command to control enqueue waits.
1. In your first SQL*Plus session, select and lock both the rows in the T1 table.
ocp10g> select * from t1 for update;
C1 C2
---------- ---------
2
1 09-FEB-05
2. In your second session, attempt to lock the rows, but use the NOWAIT
keyword to terminate the statement immediately if the locks cannot be
obtained.
ocp10g> select * from t1 for update nowait;
select * from t1 for update nowait
*
ERROR at line 1:
ORA-00054: resource busy and acquire with NOWAIT specified
The statement fails immediately, and the session can continue.
3. In your second session, try to lock the rows again but specify a time-out of ten
seconds.
ocp10g> select * from t1 for update wait 10;
select * from t1 for update wait 10
*
ERROR at line 1:
ORA-30006: resource busy; acquire with WAIT timeout expired
The session hangs for ten seconds before the statement fails and the session
is freed.
4. Repeat Step 3, but before the ten seconds expire issue a COMMIT in your first
session. Session 2 will then continue.
ocp10g> select * from t1 for update wait 10;
C1 C2
---------- ---------
2
1 09-FEB-05
5. Release the locks obtained by session 2 by issuing a COMMIT.
Lock Contention
When a session requests a lock on a row or object and cannot get it because another
session has an exclusive lock on the row or object, it will hang. This is lock contention,
and it can cause the database performance to deteriorate appallingly as all the sessions
queue up waiting for locks. Some lock contention may be inevitable, as a result of
normal activity: the nature of the application may be such that different users will
require access to the same data. But in many cases, lock contention is caused by
program and system design.
ch17.indd 5ch17.indd 5 7/6/2005 12:01:08 PM7/6/2005 12:01:08 PM

Oracle Database 10g OCP Certification All-in-One Exam Guide
6
All-in-1 / Oracle Database 10g Certification All-in-One / Watson & Bersinic / 5790-3/Chapter 17
The Oracle database provides utilities for detecting lock contention, and it is also
possible to solve the problem in an emergency. A special case of lock contention is the
“deadlock,” which is always resolved automatically by the database itself.
TIP Lock contention is a common reason for an application that performs
well under testing to grind to a halt when it goes into production and the
number of concurrent users increases.
The Causes of Lock Contention
It may be that the nature of the business is such that users do require write access to
the same rows at the same time. If this is a limiting factor in performance of the
system, the only solution is business process re-engineering, to develop a more
efficient business model. But although some locking is a necessary part of business
data processing, there are some faults in application design that can exacerbate the
problem.
Long-running transactions will cause problems. An obvious case is where a user
updates a row and then does not commit the change. Perhaps s/he even goes off to
lunch, leaving the transaction unfinished. You cannot stop this from happening if
users have access to the database with tools such as SQL*Plus, but it should never
occur with well-written software. The application should take care that a lock is only
imposed just before an update occurs, and released (with a COMMIT or ROLLBACK)
immediately afterward.
Poorly written batch processes can also cause problems, if they are coded as long
transactions. Consider the case of an accounting suite nominal ledger: it is a logical
impossibility in accountancy terms for the ledger to be partly in one period and partly
in another, so the end-of-month rollover to the next period is one business transaction.
This transaction may involve updating millions of rows in thousands of tables and
take hours to complete. If the rollover routine is coded as one transaction with a
COMMIT at the end, millions of rows will be locked for hours, but in accountancy
terms, this is what should happen. Good program design would avoid the problem
by updating the rows in groups, with regular commits, but the programmers will also
have to take care of simulating read consistency across transactions and handling the
situation where the process fails part way through. If it were one transaction, this
wouldn’t be a problem: the database would roll it back. If it is many small transactions,
they will have to manage a ledger that is half in one period and half in another. These
considerations should not be a problem: your programmers should bear in mind that
long transactions impact on the usability of the system, and design their systems
accordingly.
Third-party user process products may impose excessively high locking levels. For
example, some application development tools always do a SELECT...FOR UPDATE to
avoid the necessity of re-querying the data and checking for changes. Some other
products cannot do row-level locking: if a user wants to update one row, the tool locks
a group of rows—perhaps dozens or even hundreds. If your application software is
ch17.indd 6ch17.indd 6 7/6/2005 12:01:08 PM7/6/2005 12:01:08 PM

Chapter 17: Dealing with Locking
7
PART I
All-in-1 / Oracle Database 10g Certification All-in-One / Watson & Bersinic / 5790-3/Chapter 17
written with tools such as these, the Oracle database will simply do what it is told to
do: it will impose numerous locks that are unnecessary in business terms. If you
suspect that the software is applying more locks than necessary, investigate whether
it has configuration options to change this behavior.
Finally, make sure your programmers are aware of the capabilities of the database.
A common problem is repeatable reads. Consider this example:
ocp10g> select * from regions;
REGION_ID REGION_NAME
---------- -------------------------
1 Europe
2 Americas
3 Asia
4 Middle East and Africa
ocp10g> select count(*) from regions;
COUNT(*)
----------
5
How can this be possible? The first query (the detail report) shows four rows, and
then the second query (the summary report) shows five. The problem is that during
the course of the first query, another session inserted and committed the fifth row.
One way out of this would be to lock the tables while running the reports, thus
causing other sessions to hang. A more sophisticated way would be to use the SET
TRANSACTION READ ONLY statement. This will guarantee (without imposing any
locks) that the session does not see any DML on any tables, committed or not, until it
terminates the read-only transaction with a COMMIT or ROLLBACK. The mechanism
is based on use of undo segments and is the same as that used for Flashback Query,
detailed in Chapter 29.
Detecting Lock Contention
To reach the Database Control lock manager, take the Performance tab from the
database home page, and then the Database Locks link in the Additional Monitoring
Links section. Figure 17-1 shows the Database Locks window, with Blocking Locks
selected. There may be any number of locks within the database, but it is usually only
the locks that are causing sessions to hang that are of interest. These are known as
blocking locks.
In the figure, there is one problem. Session number 138, logged on as user HR, is
holding an exclusive lock on one or more rows of the table HR.REGIONS. This session
is not hanging; it is operating normally. But session number 162, logged on as user
SYSTEM, is blocked; it is waiting for an exclusive lock on one or more of the rows
locked by session 138. Session 162 is hanging at this moment, and it will continue to
hang until session 138 releases its locks by terminating its transaction with a COMMIT
or a ROLLBACK.
ch17.indd 7ch17.indd 7 7/6/2005 12:01:09 PM7/6/2005 12:01:09 PM

Oracle Database 10g OCP Certification All-in-One Exam Guide
8
All-in-1 / Oracle Database 10g Certification All-in-One / Watson & Bersinic / 5790-3/Chapter 17
Resolving Lock Contention
Lock contention is a natural consequence of many users accessing the same data
concurrently. The problem can be exacerbated by badly designed software, but in
principle lock contention is part of normal database activity. It is therefore not
possible for the DBA to resolve it completely; s/he can only identify that it is a
problem, and suggest to system and application designers that they bear in mind the
impact of lock contention when designing data structures and programs.
In an emergency, however, it is possible for the DBA to solve the problem by
terminating the session, or sessions, that are holding too many locks for too long.
When a session is terminated forcibly, any locks it holds will be released as its active
transaction is rolled back. The blocked sessions will then become free and can
continue.
To terminate a session, use either Database Control or the ALTER SYSTEM KILL
SESSION command. In the preceding example, if you decided that the HR session is
holding its lock for an absurd period of time, you would select the radio button for
the session and click the KILL SESSION button. HR’s transaction will be rolled back,
and SYSTEM’s session will then be able to take the lock(s) it requires and continue
working.
Figure 17-1 Showing locks with Database Control
ch17.indd 8ch17.indd 8 7/6/2005 12:01:09 PM7/6/2005 12:01:09 PM

Chapter 17: Dealing with Locking
9
PART I
All-in-1 / Oracle Database 10g Certification All-in-One / Watson & Bersinic / 5790-3/Chapter 17
Exercise 17-3: Detecting and Resolving
Lock Contention
Use Database Control to detect a locking problem, and resolve it with SQL*Plus.
1. Using your first session, lock all the rows in the T1 table.
ocp10g> select * from t1 for update;
C1 C2
---------- ---------
2
1 09-FEB-05
2. In your second session, attempt to update a row.
ocp10g> update t1 set c2=sysdate where c1=2;
The session will hang.
3. Connect to your database as user SYSTEM with Database Control.
4. Navigate to the Database Locks window by taking the Performance tab from
the database home page and then the Database Locks link in the Additional
Monitoring Links section.
5. Observe that the second session is shown as waiting for an EXCLUSIVE lock.
This will be the hanging session. The first session is the one holding the lock
that is causing the problem.
6. Note the Session ID and Session Serial Number of the blocking session—138
and 6 in the example in Figure 17-1.
7. Launch a third SQL*Plus session and connect as user SYSTEM.
8. In your third session, issue this command, substituting your blocking
session’s session and serial number:
ocp10g> alter system kill session '138,6';
System altered.
9. Note that in your second session, the update has now succeeded.
10. In your first session, issue any statement you please; you will get the message
“ORA-00028: your session has been killed,” indicating that you have been
forcibly disconnected.
Deadlocks
It is possible to construct a scenario where two sessions block each other in such
a fashion that both will hang, each waiting for the other to release its lock. This is
known as a deadlock. Deadlocks are not the DBA’s problem; they are caused by bad
program design and are resolved automatically by the database itself. Information
regarding deadlocks is written out to the alert log, with full details in a trace file; as
part of your daily monitoring, you will pick up the occurrence of deadlocks and
inform your developers that they are happening.
ch17.indd 9ch17.indd 9 7/6/2005 12:01:10 PM7/6/2005 12:01:10 PM

Oracle Database 10g OCP Certification All-in-One Exam Guide
10
All-in-1 / Oracle Database 10g Certification All-in-One / Watson & Bersinic / 5790-3/Chapter 17
If a deadlock occurs, both sessions will hang, but only for a brief moment. One of
the sessions will detect the deadlock within seconds, and it will roll back the
statement that caused the problem. This will free up the other session, returning the
message “ORA-00060: Deadlock detected.” This message must be trapped by your
programmers in their exceptions clauses, which should take appropriate action.
EXAM TIP You can do nothing about deadlocks other than report them; they
are resolved automatically by the database.
It must be emphasized that deadlocks are a program design fault. They occur
because the code attempts to do something that is logically impossible. Well-written
code will always request locks in a sequence that cannot cause deadlocks to occur, or
will test whether incompatible locks already exist before requesting them.
Exercise 17-4: Automatic Deadlock Resolution
Using the first and second sessions you have open from previous exercises, force a
deadlock, and observe the reporting through trace files.
1. In your first session, lock a row with an update statement.
ocp10g> update t1 set c2=sysdate where c1=1;
1 row updated.
2. In your second session, lock the other row.
ocp10g> update t1 set c2=sysdate where c1=2;
1 row updated.
3. In your first session, request a lock on the row already locked by the second
session, by issuing the statement in Step 2. The session will hang.
4. In your second session, issue the statement in Step 1, to complete the
construction of the deadlock by requesting a lock on the row already locked
by your first session.
5. Within a second or two, your first session will come free with an ORA-00060
message.
ocp10g> update t1 set c2=sysdate where c1=2;
update t1 set c2=sysdate where c1=2
*
ERROR at line 1:
ORA-00060: deadlock detected while waiting for resource
Note that the other session is still hanging.
6. Open your alert log with any editor you please (remember, it is located in
the directory specified by the BACKGROUND_DUMP_DEST instance
parameter, and named alert_<instance name>.log) The final entry
will resemble this:
Mon Feb 14 09:27:03 2005
ORA-00060: Deadlock detected. More info in file
/oracle/product/10.1.0/admin/ocp10g/udump/ocp10g_ora_420.trc.
ch17.indd 10ch17.indd 10 7/6/2005 12:01:11 PM7/6/2005 12:01:11 PM

Chapter 17: Dealing with Locking
11
PART I
All-in-1 / Oracle Database 10g Certification All-in-One / Watson & Bersinic / 5790-3/Chapter 17
7. Open the trace file listed. Note that it is in the directory specified by the
USER_DUMP_DEST instance parameter. It will include information such as
*** 2005-02-14 09:27:03.242
*** ACTION NAME:() 2005-02-14 09:27:03.212
*** MODULE NAME:(SQL*Plus) 2005-02-14 09:27:03.212
*** SERVICE NAME:(SYS$USERS) 2005-02-14 09:27:03.212
*** SESSION ID:(133.26) 2005-02-14 09:27:03.212
DEADLOCK DETECTED
Current SQL statement for this session:
update t1 set c2=sysdate where c1=2
The following deadlock is not an ORACLE error. It is a
deadlock due to user error in the design of an application
or from issuing incorrect ad-hoc SQL. The following
information may aid in determining the deadlock:
8. Interpret the deadlock information: it gives the statement that caused the
problem, as well as information on which program module caused the problem.
In particular, note the phrase “The following deadlock is not an ORACLE error.
It is a deadlock due to user error in the design of an application or from
issuing incorrect ad-hoc SQL.” This places the responsibility squarely on the
programmers, which is where it belongs.
9. Tidy up: issue a commit in all sessions, and drop the table.
Chapter Review
Locking is implemented by the enqueue mechanism, which tracks what locks have
been requested, and the order in which they were requested. Sessions will hang while
waiting for an enqueue.
Row and table locking can be completely automatic in the Oracle environment. The
default level of locking delivers the highest possible level of concurrency: individual
rows are locked exclusively, which is necessary for transaction integrity, and tables are
only ever locked in shared mode, in order to protect the structure of the objects being
manipulated. Programmers can impose higher levels of locking if they wish; whole
tables can be locked indefinitely.
Locks are a part of normal DML activity and should not be a problem, but if
a lock persists for an undue period, the contention may cause problems. To resolve
lock contention, you can kill the session holding the locks. A special case of lock
contention is the deadlock. This should never occur: it is caused by poor programming
that sets up a logically impossible situation. Oracle itself will resolve deadlocks by
rolling back one of the statements that caused it.
Questions
1. Which of the following commands will impose one (or more) exclusive row
lock(s)? (Choose all that apply.)
A. ALTER TABLE EMP ADD COLUMN DOB(DATE);
B. UPDATE EMP SET SAL=SAL*1.1;
ch17.indd 11ch17.indd 11 7/6/2005 12:01:11 PM7/6/2005 12:01:11 PM

Oracle Database 10g OCP Certification All-in-One Exam Guide
12
All-in-1 / Oracle Database 10g Certification All-in-One / Watson & Bersinic / 5790-3/Chapter 17
C. UPDATE EMP SET SAL=SAL*1.1 WHERE EMPNO=7839;
D. SELECT * FROM EMP WHERE EMPNO=7839 FOR UPDATE;
E. DROP TABLE EMP;
F. CREATE INDEX ENAME_IDX ON EMP(ENAME);
2. Study the following sequence:
ocp10g> select * from emp where empno=7839 for update nowait;
select * from emp where empno=7839 for update nowait
*
ERROR at line 1:
ORA-00054: resource busy and acquire with NOWAIT specified
What best describes the situation? (Choose the best answer.)
A. The row for employee number 7839 is already locked exclusively, and your
session will hang until the lock is released.
B. The NOWAIT keyword cannot be combined with an UPDATE.
C. Another session has an exclusive lock either on the row for employee 7839
or on the whole EMP table.
D. There is already a shared lock on the row for employee 7839, which is
incompatible with the share mode lock required by SELECT...FOR UPDATE.
3. If several sessions request an exclusive lock on the same row, what will
happen? (Choose the best answer.)
A. The first session to request the lock will get an exclusive lock; the others
will be granted shared locks.
B. The first session will get an exclusive lock. When it releases the lock, an
exclusive lock will be granted randomly to one of the other sessions.
C. Oracle will keep track of the order in which each session requested the
exclusive lock, and pass it on as sessions release the lock.
D. A session cannot request an exclusive lock on a row if another session
already has an exclusive lock on it.
4. Which of the following statements is correct regarding deadlocks? (Choose
the best answer.)
A. Deadlocks cannot happen in an Oracle database; they are prevented
automatically.
B. Deadlocks can happen in an Oracle database, but they are resolved
automatically.
C. If a deadlock occurs, it is the programmer’s responsibility to resolve it, not
the DBA’s.
D. A deadlock can be resolved by killing the sessions that locked each other.
ch17.indd 12ch17.indd 12 7/6/2005 12:01:12 PM7/6/2005 12:01:12 PM

Chapter 17: Dealing with Locking
13
PART I
All-in-1 / Oracle Database 10g Certification All-in-One / Watson & Bersinic / 5790-3/Chapter 17
5. If a session issues a single-row UPDATE command and hangs because the row
concerned is locked by another session, for how long will it hang? (Choose
the best answer.)
A. It will not hang at all if the NOWAIT keyword was specified.
B. It will hang until the locking session terminates its transaction, unless
WAIT <n> was specified, where <n> is a number of seconds.
C. It will hang until the locking session releases its lock by issuing another
DML statement.
D. It will not hang; it will take a shared lock and continue to work by using
undo data.
E. None of the above is correct.
Answers
1. B, C, and D. All DML commands require exclusive row locks, and all DDL
commands require exclusive table locks.
2. C. SELECT...FOR UPDATE requests an exclusive row lock, which will fail if
another session already has an exclusive row lock on the row, or if the whole
table is locked. The first choice is wrong because it describes the behavior if
the NOWAIT option were not used; the second is wrong because SELECT...
FOR UPDATE is actually the only case where NOWAIT can be used. Finally,
SELECT...FOR UPDATE requires an exclusive lock, not a shared lock.
3. C. The enqueue mechanism tracks the order in which locks were requested.
4. B. Deadlocks are resolved by the database automatically. The third choice is
correct insofar as deadlocks are usually a programming fault, but wrong
because no one needs to resolve them. Finally, no session need be killed; it
is only necessary to roll back a statement.
5. E. None of the answers is correct. Both A and B are wrong because WAIT and
NOWAIT can only be applied to SELECT statements. C is wrong because
another DML statement will not release a lock; only COMMIT or ROLLBACK
will do that. D is wrong because DML cannot use undo data; the answer
would be correct if it were a SELECT statement.
ch17.indd 13ch17.indd 13 7/6/2005 12:01:13 PM7/6/2005 12:01:13 PM

All-in-1 / Oracle Database 10g Certification All-in-One / Meyers / 5790-3
ch17.indd 14ch17.indd 14 7/6/2005 12:01:13 PM7/6/2005 12:01:13 PM

All-in-1 / Oracle Database 10g OCP Certification All-in-One / Watson, Bersinic / 5790-3/ Ch 18
CHAPTER 18
Configuring the Database
for Backup and Recovery
In this chapter you will learn how to
• Describe the basics of database backup, restore, and recovery
• Identify the types of failure that may occur in an Oracle database
• Describe ways to tune instance recovery
• Identify the importance of checkpoints, redo logfiles, and archived logfiles
• Configure archivelog mode
• Configure a database for recoverability
1
ch18.indd 1ch18.indd 1 6/20/2005 11:24:01 AM6/20/2005 11:24:01 AM

All-in-1 / Oracle Database 10g OCP Certification All-in-One / Watson, Bersinic / 5790-3
Oracle Database 10g OCP Certification All-in-One Exam Guide
2
Perhaps the most important aspect of a database administrator’s job is to ensure that
the database does not lose data. The mechanisms of redo and undo ensure that it is
absolutely impossible to corrupt the database no matter what the DBA does, or does
not do. After working through the section of this chapter headed “Instance Recovery”
you will be able to prove this. However, it is possible for an Oracle database to lose
data if the DBA does not take appropriate precautions. From release 9i onward, an
Oracle database can be configured so that no matter what happens the database
will never lose a single row of committed data. It is also possible to configure an
environment for 100 percent availability. This chapter will go through the concepts
behind Oracle’s backup and recovery mechanisms: the enabling structure within
which you will configure whatever level of data security and availability is demanded
by your organization. But first, a summary of what you are trying to achieve with your
backup and recovery strategy.
Backup and Recovery Issues
This is an area where the DBA cannot work in isolation. The amount of downtime and
data loss that an organization can stand is a matter for the business analysts, not the DBA.
The business analysts in conjunction with the end users will determine the requirement,
and the DBA will then configure the database appropriately. To do this, s/he will require
the cooperation of the system administrators and other support staff. Sometimes there
will be budget constraints to consider: a zero data loss and hundred percent uptime
environment will be far more expensive to configure than an environment that does
not have such guarantees. Performance may also tend to degrade as the uptime and
data loss requirements become more demanding.
The end result of considering the business requirements, performance, and financial
considerations is often a compromise. It is vitally important that this be documented,
usually in the form of a service level agreement that details exactly what is being done,
and what the effects will be of various types of failure. For the DBA, there is no such
thing as “good” or “bad” database administration in this environment; there is only
whether the procedures s/he is following confirm to the service level agreement, or not.
This protects the DBA from criticism (you can’t be fired for doing what it has been
agreed that you will do) and guarantees the end users the level of service that they
have agreed they require. The three areas of a service level agreement relevant to backup
and recovery are the mean time between failures (the MTBF), the mean time to recover
(the MTTR), and loss of data. Your objective as DBA is to increase the MTBF while
reducing the MTTR and data loss.
MTBF refers to how frequently the database becomes unavailable. For some
organizations, the database must be available all the time. Real-time systems, such as
satellite flight control or process control in an oil refinery, must run all the time; even
a few minutes failure can be catastrophic. Oracle provides two advanced options that
can contribute to 100 percent availability: RAC and Streams. A RAC, or clustered,
database consists of one physical database opened by multiple instances on multiple
ch18.indd 2ch18.indd 2 6/20/2005 11:24:14 AM6/20/2005 11:24:14 AM

All-in-1 / Oracle Database 10g OCP Certification All-in-One / Watson, Bersinic / 5790-3
Chapter 18: Configuring the Database for Backup and Recovery
3
PART I
computers. If any one computer or instance fails, the database remains open for use
through a surviving instance. RAC protects against hardware, operating system, and
software failure. The Streams environment consists of two or more databases on separate
computers, which may be geographically widely separated. The Streams mechanism
takes care of keeping the two databases synchronized, in real time if necessary. Users
can connect to either, and changes made on each database are published to the other
database. If one database becomes unavailable for any reason, work can continue on
the other. Streams goes further than RAC for fault tolerance, because it protects against
disk and network failure as well as hardware, operating system, and software failure.
MTTR refers to the length of downtime following a failure. For many organizations,
this is actually more significant than losing data. For example, every minute that the
billing system for a telco is unavailable could mean subscribers are getting free cell
phone calls, and extended downtime could cost a lot more money than losing a few
minutes of data. Clearly the ideal is to have the system available all the time, but when
it does fail, it is your duty to bring it back up with minimal delay. A critical part of
reducing MTTR is practice. When a database crashes, you will be under enormous
pressure to open it as soon as possible. It is vital to be prepared. You do not want to
be looking up things in manuals before taking appropriate action. Practice, practice,
practice—if you can’t test recovery on a live system, test on a backup system. Run
simulations of all possible types of failure, and prepare for all eventualities.
The third objective is to minimize data loss. Some organizations cannot stand any
data loss whatsoever. For example, a stock trading system must not lose a trade. It might
be preferable to have no trades taking place—temporarily close the exchange—than to
take the risk of losing a transaction. In other environments it may be acceptable to lose
a few hours of data, but make sure that this is documented. From release 9i onward,
an Oracle database can be configured for zero data loss, under any circumstances
whatsoever. This is done through Data Guard. In a Data Guard system the live database,
known as the primary, is protected by one or more standby databases. The standby is
continually updated with all the changes applied to the primary. These changes can
be propagated in real time if necessary.
These three advanced options—RAC, Streams, and Data Guard—all have
performance implications (which may be for better or for worse, depending on how
things are set up and what the objective is) and should not be embarked upon lightly.
They are beyond the scope of the OCP examination, but knowledge of them is required
for Oracle University’s more advanced qualifications.
Any fault-tolerant environment will rely heavily on hardware redundancy. This
is where you cannot work independently of the system administrators. If a datafile
becomes unavailable because of a disk failure, your database will also (at least partially)
become unavailable. Your objective of increasing the MTBF must be aligned with your
system administrators’ targets for disk redundancy and replacement. Similarly, you are
totally dependent on the network. If your users cannot connect, they will not care
whether the reason is that a router has failed. Your targets for the database must be set
with the whole IT environment in mind, and the service level agreements must make
this clear. Your role as DBA is to ensure that you can meet the agreed standards for
uptime and data loss, no matter what the nature of the failure.
ch18.indd 3ch18.indd 3 6/20/2005 11:24:14 AM6/20/2005 11:24:14 AM

All-in-1 / Oracle Database 10g OCP Certification All-in-One / Watson, Bersinic / 5790-3
Oracle Database 10g OCP Certification All-in-One Exam Guide
4
TIP You will find that the DBA is expected to know about everything. Not
just the database, but also the hardware, the network, the operating system,
the programming language, and the application. Sometimes only the DBA can
see the totality of the environment, but no one can know it all; so work with
the appropriate specialists, and build up a good relationship with them.
Categories of Failures
Failures can be divided into a few broad categories. For each type of failure, there
will be an appropriate course of action to resolve it. Each type of failure may well
be documented in a service level agreement; certainly the steps to be followed
should be documented in a procedures manual.
Statement Failure
An individual SQL statement can fail for a number of reasons, not all of which are
within the DBA’s domain—but even so, s/he must be prepared to fix them. The first
level of repair will be automatic. Whenever a statement fails, the server process
executing the statement will detect the problem and roll back the statement. Remember
that a statement might attempt to update many rows and fail part way through
execution; all the rows that were updated before the failure will have their changes
reversed through use of undo. This will happen automatically. If the statement is part
of a multistatement transaction, all the statements that have already succeeded will
remain intact, but uncommitted. Ideally, the programmers will have included exception
clauses in their code that will identify and manage any problems, but there will always
be some errors that get through the error handling routines. As shown in Figure 18-1,
there are four common causes of statement failure: invalid data, insufficient privileges,
space allocation problems, and logic errors. You will read about each of them next.
A common cause of statement failure is invalid data, usually a format or integrity
constraint violation. A well-written user process will avoid format problems, such as
attempting to insert character data into a numeric field, but they can often occur when
doing batch jobs with data coming from a third-party system. Oracle itself will try to
solve formatting problems by doing automatic type casting to convert data types on
the fly, but this is not very efficient and shouldn’t be relied upon. Constraint violations
will be detected, but Oracle can do nothing to solve them. Clearly, problems caused
by invalid data are not the DBA’s fault, but you must be prepared to deal with them
by working with the users to validate and correct the data, and with the programmers
to try to automate these processes.
A second class of non–DBA related statement failures consists of logic errors in
the application. Programmers may well develop code that in some circumstances is
impossible for the database to execute. A perfect example is the deadlock that you
saw in the last chapter. A deadlock is not a database error; it is an error caused by
programmers writing code that permits an impossible situation to arise. Another
example would be if the application attempts to insert a child row before the parent row.
ch18.indd 4ch18.indd 4 6/20/2005 11:24:14 AM6/20/2005 11:24:14 AM
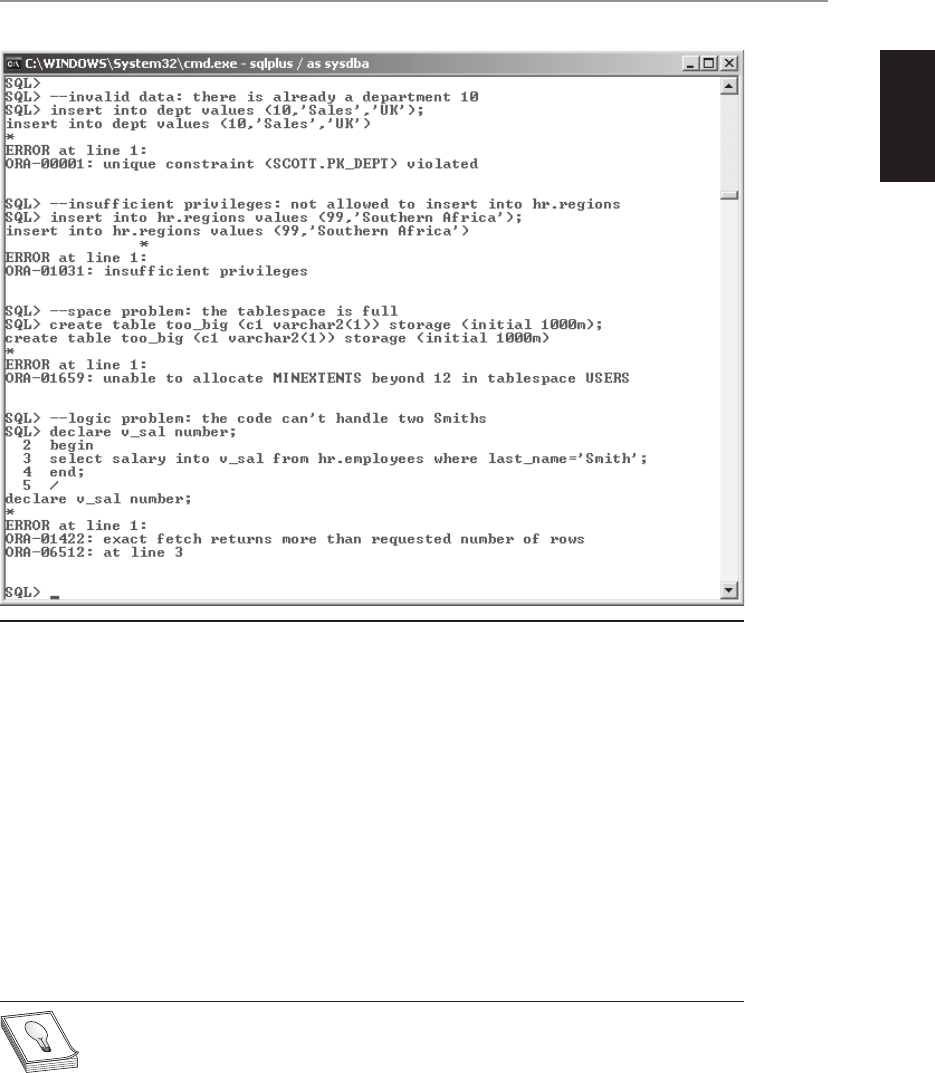
All-in-1 / Oracle Database 10g OCP Certification All-in-One / Watson, Bersinic / 5790-3
Chapter 18: Configuring the Database for Backup and Recovery
5
PART I
Space management problems are frequent, but they should never occur. A good DBA
will monitor space usage proactively and take action before problems arise. Space-
related causes of statement failure include inability to extend a segment because the
tablespace is full; running out of undo space; insufficient temporary space when
running queries that use disk sorts; a user hitting his quota limit; or an object hitting
its maximum extents limit. Database Control includes the undo advisor, the segment
advisor, the Automatic Database Diagnostic Monitor, and the alert mechanism, all
described in previous chapters, which will help to pick up space-related problems before
they happen. The effect of space problems that slip through can perhaps be alleviated
by setting datafiles to auto-extend, or by enabling resumable space allocation (as
detailed in Chapter 32), but ideally, space problems should never arise in the first place.
TIP Issue the command alter session enable resumable, and
from then on the session will not signal errors on space problems but instead
hang until the problem is fixed. You can enable resumable for the whole instance
with the RESUMABLE_TIMEOUT parameter.
Figure 18-1 Examples of statement failures
ch18.indd 5ch18.indd 5 6/20/2005 11:24:15 AM6/20/2005 11:24:15 AM

All-in-1 / Oracle Database 10g OCP Certification All-in-One / Watson, Bersinic / 5790-3
Oracle Database 10g OCP Certification All-in-One Exam Guide
6
Statements may fail because of insufficient privileges. Remember from Chapter 7
how privileges let a user do certain things, such as select from a table or execute a
piece of code. When a statement is parsed, the server process checks whether the user
executing the statement has the necessary permissions. This type of error indicates
that the security structures in place are inappropriate, and the DBA (in conjunction
with the organization’s security manager) should grant appropriate system and object
privileges.
EXAM TIP Remember that there are four common causes of statement
failure: invalid data, insufficient privileges, space allocation problems, and
logic errors.
User Process Failure
A user process may fail for any number of reasons, including the user exiting
abnormally instead of logging out, the terminal rebooting, or the program causing
an address violation. Whatever the cause of the problem, the outcome is the same.
The PMON background process periodically polls all the server processes to ascertain
the state of the session. If a server process reports that it has lost contact with its user
process, PMON will tidy up. If the session was in the middle of a transaction, PMON
will roll back the transaction and release any locks. Then it will terminate the server
process and release the PGA back to the operating system.
This type of problem is beyond the DBA’s control, but s/he should watch for any
trends that might indicate a lack of user training, poorly written software, or perhaps
network or hardware problems.
Network Failure
In conjunction with the network administrators, it should be possible to configure
Oracle Net such that there is no single point of failure. The three points to consider
are listeners, network interface cards, and routes.
A database listener is unlikely to crash, but there are limits to the amount of work
that one listener can do. A listener can service only one connect request at once, and
it does take an appreciable amount of time to launch a server process and connect it
to a user process. If your database experiences high volumes of concurrent connection
requests, users may receive errors when they try to connect. You can avoid this by
configuring multiple listeners (each on a different address/port combination) and
using connect-time load balancing, as discussed in Chapter 12, to spread the workload
across them all.
At the operating system and hardware levels, network interfaces can fail. Ideally,
your server machine will have at least two network interface cards, for redundancy as
well as performance. Create at least one listener for each card.
Routing problems or localized network failures can mean that even though the
database is running perfectly, no one can connect to it. If your server has two or more
ch18.indd 6ch18.indd 6 6/20/2005 11:24:15 AM6/20/2005 11:24:15 AM

All-in-1 / Oracle Database 10g OCP Certification All-in-One / Watson, Bersinic / 5790-3
Chapter 18: Configuring the Database for Backup and Recovery
7
PART I
network interface cards, they should ideally be connected to physically separate subnets.
Then on the client side configure connect-time fault tolerance as well as load balancing,
as described in Chapter 12. This step not only balances the network traffic across all
available routes and devices but also permits the user processes to try a series of routes
until they find one that is working.
TIP The network fault tolerance for a single-instance database is only at
connect time; a failure later on will disrupt currently connected sessions, and
they will have to reconnect. In a RAC environment, it is possible for a session
to fail over to a different instance, and the user may not even notice.
User Errors
Historically, user errors were undoubtedly the worst errors to manage. Release 10g of
the database improves the situation dramatically. The problem is that user errors are
not errors as far as the database is concerned. Imagine a conversation on these lines:
User: “I forgot to put a WHERE clause on my UPDATE statement, so I’ve just
updated a million rows instead of one.”
DBA: “Did you say COMMIT?”
User: “Oh, yes.”
DBA: “Um....”
As far as Oracle is concerned, this is a transaction like any other. The “D” for
“Durable” of the ACID test states that once a transaction is committed, it must be
immediately broadcast to all other users and be absolutely nonreversible. But at least
with DML errors such as the one dramatized here, the user does get the chance to roll
back his statement if he realizes that it was wrong before committing. But DDL
statements don’t give you that option. For example, if a programmer drops a table when
he thinks he is logged onto the test database but is actually logged onto the production
database, there is a COMMIT built into the DROP TABLE command. That table is gone;
you can’t roll back DDL.
The ideal solution to user errors is to prevent them from occurring in the first place.
This is partly a matter of user training, but more especially of software design: no user
process should ever let a user issue an UPDATE statement without a WHERE clause.
But even the best-designed software cannot prevent users from issuing SQL that is
inappropriate to the business. Everyone makes mistakes. Oracle provides a number of
ways whereby you as DBA may be able to correct user errors, but this is often extremely
difficult—particularly if the error isn’t reported for some time. The possible techniques,
dealt with in detail in later chapters, are flashback query (see Chapter 29), flashback
drop (also Chapter 29), the Log Miner, incomplete recovery (as in Chapter 27), and
the Flashback Database (Chapter 28).
Flashback query is running a query against a version of the database as it existed at
some time in the past. The read-consistent version of the database is constructed, for
ch18.indd 7ch18.indd 7 6/20/2005 11:24:15 AM6/20/2005 11:24:15 AM
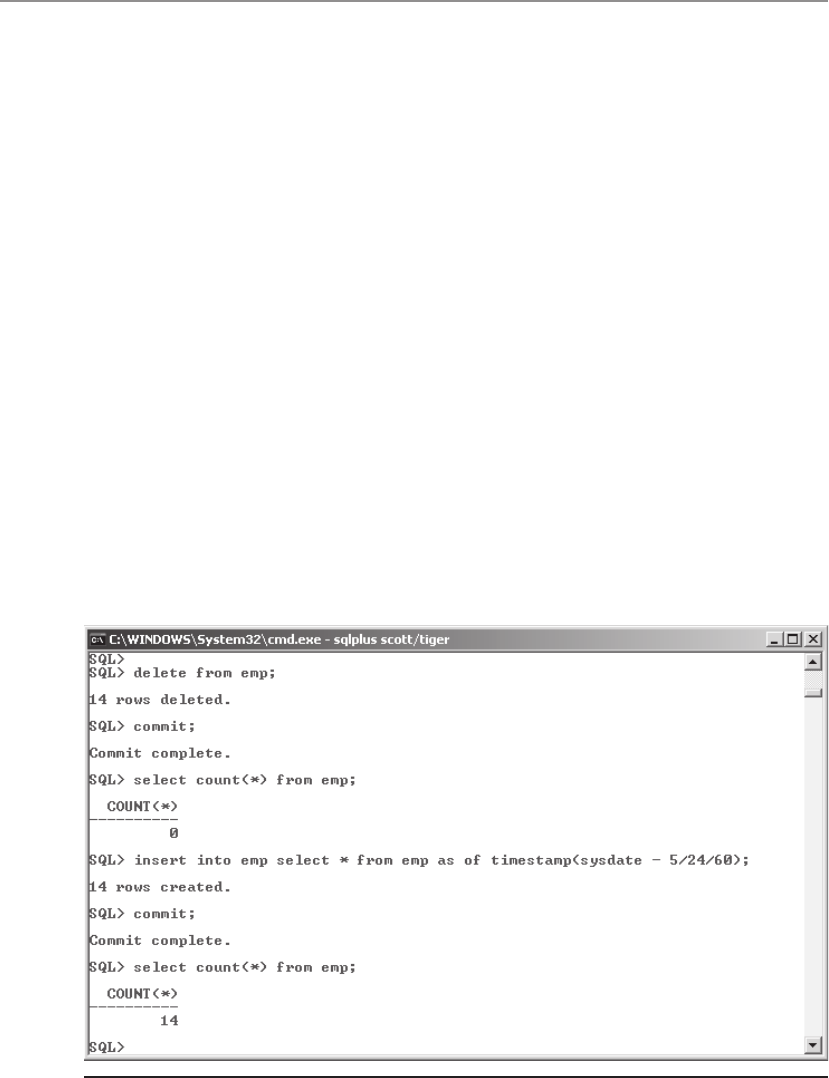
All-in-1 / Oracle Database 10g OCP Certification All-in-One / Watson, Bersinic / 5790-3
Oracle Database 10g OCP Certification All-in-One Exam Guide
8
your session only, through the use of undo data. Figure 18-2 shows one of many uses
of flashback query. The user has “accidentally” deleted every row in the EMP table and
committed the delete. Then s/he retrieves the rows by querying a version of the table
as it was five minutes previously.
Flashback drop reverses the effect of a DROP TABLE command, as shown in
Figure 18-3. In previous releases of the database, a DROP command did what it says:
it dropped all references to the table from the data dictionary. There was no way to
reverse this. Even flashback query would fail, because the flashback query mechanism
does need the data dictionary object definition. But in release 10g the implementation
of the DROP command has changed: it no longer drops anything; it just renames the
object so that you will never see it again, unless you specifically ask to.
The Log Miner is an advanced tool that extracts information from the online and
archived redo logs. Redo includes all changes made to data blocks. By extracting the
changes made to blocks of table data, it is possible to reconstruct the changes that
were made—thus, redo can be used to bring a restored backup forward in time. But
the redo stream also has all the changes made to undo blocks, and it is therefore
possible to construct the changes that would be needed to reverse transactions, even
though they have been committed. Conceptually, the Log Miner is similar to flashback
query: the information to reverse a change is constructed from undo data, but whereas
flashback query uses undo data that is currently in the undo segments, Log Miner
extracts the undo data from the redo logs. This means that Log Miner can go back in
time indefinitely, if you have copies of the relevant logs. By contrast, flashback query
can go back only as far as your undo tablespace will allow.
Figure 18-2 Correcting user error with flashback query
ch18.indd 8ch18.indd 8 6/20/2005 11:24:15 AM6/20/2005 11:24:15 AM

All-in-1 / Oracle Database 10g OCP Certification All-in-One / Watson, Bersinic / 5790-3
Chapter 18: Configuring the Database for Backup and Recovery
9
PART I
Incomplete recovery and flashback database are much more drastic techniques for
reversing user errors. With either approach, the whole database is taken back in time
to before the error occurred. The other techniques just described let you reverse one
bad transaction, while everything else remains intact. But if you ever do an incomplete
recovery or a flashback of the whole database, you will lose all the work done from
time you go back to—not just the bad transaction.
Media Failure
Media failure means damage to disks, and therefore the files stored on them. This is
not your problem—but you must be prepared to deal with it. The point to hang on
to is that damage to any number of any files is no reason to lose data. With release 9i
and later, you can survive the loss of any and all of the files that make up a database
without losing any committed data—if you have configured the database appropriately.
Prior to 9i, complete loss of the machine hosting the database could result in loss of
data; the Data Guard facility, not covered in the OCP curriculum, can even protect
against that.
Included in the category of “media failure” is a particular type of user error: system
or database administrators accidentally deleting files. This is not as uncommon as one
might think (or hope).
TIP On Unix, the rm command has been responsible for any number of
appalling mistakes. You might want to consider, for example, aliasing the rm
command to rm –i to gain a little peace of mind.
Figure 18-3 Correcting user error with flashback drop
ch18.indd 9ch18.indd 9 6/20/2005 11:24:16 AM6/20/2005 11:24:16 AM

All-in-1 / Oracle Database 10g OCP Certification All-in-One / Watson, Bersinic / 5790-3
Oracle Database 10g OCP Certification All-in-One Exam Guide
10
When a disk is damaged, one or more of the files on it will be damaged, unless
the disk subsystem itself has protection through RAID. Remember that a database
consists of three file types: the controlfile, the online redo logs, and the datafiles. The
controlfile and the online logs should always be protected through multiplexing. If
you have multiple copies of the controlfile on different disks, then if any one of them
is damaged you will have a surviving copy. Similarly, multiple copies of each online
redo log mean that you can survive the loss of any one. Datafiles can’t be multiplexed
(other than through RAID, at the hardware level); therefore, if one is lost, the only
option is to restore it from a backup. This introduces the concept of “recovery.” The
restored backup will be out-of-date; “recovery” means applying changes extracted from
the redo logs (both online and archived) to bring it forward to the state it was in at
the time the damage occurred.
Recovery requires the use of archived redo logs. These are the copies of online redo
logs, made after each log switch. After restoring a datafile from backup, the changes to
be applied to it to bring it up-to-date are extracted, in chronological order, from the
archive logs generated since the backup was taken. Clearly, you must look after your
archive logs because if any are lost, the recovery process will fail. Archive logs are
initially created on disk, and because of the risks of losing disk storage, they, just like
the controlfile and the online logfiles, should be multiplexed: two or more copies on
different devices.
So to protect against media failure, you must have multiplexed copies of the
controlfile, the online redo logfiles, and the archive redo logfiles. You will also take
backups of the controlfile, the datafiles, and the archive logfiles. You do not back up
the redo logs; they are, in effect, backed up when they are copied to the archive logs.
Datafiles cannot be protected by multiplexing; they need to be protected by hardware
redundancy: either conventional RAID systems or Oracle’s own Automatic Storage
Management (ASM) detailed in Chapter 33.
Instance Failure
An instance failure is a disorderly shutdown of the instance, popularly referred to as
a crash. This could be caused by a power cut, by switching off or rebooting the server
machine, or by any number of critical hardware problems. In some circumstances
one of the Oracle background processes may fail; this will also trigger an immediate
instance failure. Functionally, the effect of an instance failure, for whatever reason, is the
same as issuing the SHUTDOWN ABORT command. You may hear people talking about
“crashing the database” when they mean issuing a SHUTDOWN ABORT command.
After an instance failure, the database may well be missing committed transactions
and storing uncommitted transactions. This is the definition of a corrupted database.
This situation arises because the server processes work in memory: they update blocks
of data and undo segments in the database buffer cache, not on disk. DBWn then,
eventually, writes the changed blocks down to the datafiles. The algorithm that DBWn
uses to select which dirty buffers to write is oriented toward performance, and it results
in the blocks that are least active getting written first; after all, there would be little
point in writing a block that is getting changed every second. But this means that at
ch18.indd 10ch18.indd 10 6/20/2005 11:24:16 AM6/20/2005 11:24:16 AM

All-in-1 / Oracle Database 10g OCP Certification All-in-One / Watson, Bersinic / 5790-3
Chapter 18: Configuring the Database for Backup and Recovery
11
PART I
any given moment there may well be committed transactions that are not yet in the
datafiles and uncommitted transactions that have been written: there is no correlation
between a COMMIT and a write to the datafiles. But of course, all the changes that
have been applied to both data and undo blocks are already in the redo logs.
Remember the description of commit processing detailed in Chapter 9: when you
say COMMIT, all that happens is that LGWR flushes the log buffer to the current online
redo logfiles. DBWn does absolutely nothing on COMMIT. So for performance reasons,
DBWn writes as little as possible as rarely as possible; this means that the database is
always out-of-date. But LGWR writes with a very aggressive algorithm indeed. It writes
as nearly as possible in real time, and when you (or anyone else) say COMMIT, it really
does write in real time. This is the key to instance recovery. Oracle accepts the fact that
the database will be corrupted after an instance failure, but there will always be enough
information in the redo log stream on disk to correct the damage.
Instance Recovery
The rules to which a relational database must conform, as formalized in the ACID test,
require that it may never lose a committed transaction, and never show an uncommitted
transaction. Oracle conforms to the rules perfectly. If the database is corrupted, Oracle
will detect the fact and perform instance recovery to remove the corruptions. It will
reconstitute any committed transactions that had not been saved to the datafiles at
the time of the crash, and it will roll back any uncommitted transactions that had been
written to the datafiles. This instance recovery is completely automatic; you can’t stop it,
even if you want to. If the instance recovery fails, which will only happen if there is media
failure as well as an instance failure, you cannot open the database until you have used
media recovery techniques to restore and recover the damaged files. The final step of
media recovery is automatic instance recovery.
The Mechanics of Instance Recovery
Because instance recovery is completely automatic, it can be dealt with fairly quickly,
unlike media recovery, which will take several chapters. In principle, instance recovery
is nothing more than using the contents of the online logfiles to rebuild the database
buffer cache to the state it was in before the crash. This will replay all changes extracted
from the redo logs that refer to blocks that had not been written to disk at the time
of the crash. Once this has been done, the database can be opened. At that point, the
database is still corrupted, but there is no reason not to allow users to connect, because
the instance (which is what users see) has been repaired. This phase of recovery, known
as the roll forward, reinstates all changes: changes to data blocks and changes to undo
blocks, for both committed and uncommitted transactions. Each redo record has the
bare minimum of information needed to reconstruct a change: the block address, and
the new values. During roll forward, each redo record is read, the appropriate block is
loaded from the datafiles into the database buffer cache, and the change is applied.
Then the block is written back to disk.
ch18.indd 11ch18.indd 11 6/20/2005 11:24:16 AM6/20/2005 11:24:16 AM

All-in-1 / Oracle Database 10g OCP Certification All-in-One / Watson, Bersinic / 5790-3
Oracle Database 10g OCP Certification All-in-One Exam Guide
12
Once the roll forward is complete, it is as though the crash had never occurred.
But at that point, there will be uncommitted transactions in the database—these must
be rolled back, and Oracle will do that automatically in the rollback phase of instance
recovery. However, that happens after the database has been opened for use. If a user
connects and hits some data that needs to be rolled back but hasn’t yet been, this is
not a problem; the roll forward phase will have populated the undo segment that was
protecting the uncommitted transaction, so the server can roll back the change in the
normal manner for read consistency.
Instance recovery is automatic, and unavoidable, so how do you invoke it? By
issuing a STARTUP command. Remember from Chapter 5, on starting an instance, the
description of how SMON opens a database. First, it reads the controlfile when the
database transitions to mount mode. Then in the transition to open mode, SMON
checks the file headers of all the datafiles and online redo logfiles. At this point, if
there had been an instance failure, it is apparent because the file headers are all out
of sync. So SMON goes into the instance recovery routine, and the database is only
actually opened after the roll forward phase has completed.
TIP You never have anything to lose by issuing a STARTUP command. After any
sort of crash, try a STARTUP and see how far it gets. It might get all the way.
The Impossibility of Database Corruption
It should now be apparent that there is always enough information in the redo log
stream to reconstruct all work done up to the point at which the crash occurred, and
furthermore that this includes reconstructing the undo information needed to roll
back transactions that were in progress at the time of the crash. But for the final proof,
consider this scenario.
User JOHN has started a transaction. He has updated one row of a table with some
new values, and his server process has copied the old values to an undo segment. But
before these updates were done, his server process wrote out the changes to the log
buffer. User DAMIR has also started a transaction. Neither has committed; nothing has
been written to disk. If the instance crashed now, there would be no record whatsoever
of either transaction, not even in the redo logs. So neither transaction would be
recovered, but that is not a problem. Neither was committed, so they should not
be recovered: uncommitted work must never be saved.
Then user JOHN commits his transaction. This triggers LGWR to flush the log
buffer to the online redo logfiles, which means that the changes to both the table
and the undo segments for both JOHN’s transaction and DAMIR’s transaction are now
in the redo logfiles, together with a commit record for JOHN’s transaction. Only when
the write has completed is the “commit complete” message returned to JOHN’s user
process. But there is still nothing in the datafiles. If the instance fails at this point, the
roll forward phase will reconstruct both the transactions, but when all the redo has
ch18.indd 12ch18.indd 12 6/20/2005 11:24:16 AM6/20/2005 11:24:16 AM

All-in-1 / Oracle Database 10g OCP Certification All-in-One / Watson, Bersinic / 5790-3
Chapter 18: Configuring the Database for Backup and Recovery
13
PART I
been processed, there will be no commit record for DAMIR’s update; that signals SMON
to roll back DAMIR’s change, but leave JOHN’s in place.
But what if DBWR has written some blocks to disk before the crash? It might be
that JOHN (or another user) was continually requerying his data, but that DAMIR had
made his uncommitted change and not looked at the data again. DBWn will therefore
decide to write DAMIR’s changes to disk in preference to JOHN’s; DBWn will always
tend to write inactive blocks rather than active blocks. So now, the datafiles are storing
DAMIR’s uncommitted transaction but missing JOHN’s committed transaction. This is
as bad a corruption as you can have. But think it through. If the instance crashes now—
a power cut, perhaps, or a shutdown abort—the roll forward will still be able to sort
out the mess. There will always be enough information in the redo stream to reconstruct
committed changes; that is obvious, because a commit isn’t completed until the write
is done. But because LGWR flushes all changes to all blocks to the logfiles, there will
also be enough information to reconstruct the undo segment needed to roll back
DAMIR’s uncommitted transaction.
So to summarize, because LGWR always writes ahead of DBWn, and because it
writes in real time on commit, there will always be enough information in the redo
stream to reconstruct any committed changes that had not been written to the datafiles,
and to roll back any uncommitted changes that had been written to the datafiles. This
instance recovery mechanism of redo and rollback makes it absolutely impossible to
corrupt an Oracle database.
EXAM TIP Can a SHUTDOWN ABORT corrupt the database? Absolutely
not! It is impossible to corrupt the database. Nonetheless, it is not good
practice.
Tuning Instance Recovery
A critical part of many service level agreements is the MTTR, the mean time to recover
after various events. Instance recovery guarantees no corruption, but it may take a
considerable time to do its roll forward before the database can be opened. This time
is dependent on two factors: how much redo has to be read, and how many read/write
operations will be needed on the datafiles as the redo is applied. Both these factors
can be controlled by checkpoints.
A checkpoint guarantees that as of a particular time, all data changes made up to a
particular SCN, or System Change Number, have been written to the datafiles by DBWn.
In the event of an instance crash, it is only necessary for SMON to replay the redo
generated from the last checkpoint position. All changes, committed or not, made
before that position are already in the datafiles; so clearly, there is no need to use redo
to reconstruct the transactions committed prior to that. Also, all changes made by
uncommitted transactions prior to that point are also in the datafiles, so there is no
need to reconstruct undo data prior to the checkpoint position either; it is already
available in the undo segment on disk for the necessary rollback.
ch18.indd 13ch18.indd 13 6/20/2005 11:24:17 AM6/20/2005 11:24:17 AM

All-in-1 / Oracle Database 10g OCP Certification All-in-One / Watson, Bersinic / 5790-3
Oracle Database 10g OCP Certification All-in-One Exam Guide
14
The more up-to-date the checkpoint position is, the faster the instance recovery. If
the checkpoint position is fully up-to-date, no roll forward will be needed at all; the
instance can open immediately and go straight into the rollback phase. But there is
a heavy price to pay for this. To advance the checkpoint position, DBWn must write
changed blocks to disk. Excessive disk I/O will cripple performance. But on the other
hand, if you let DBWn get too far behind, so that after a crash SMON has to process
hundreds of megabytes of redo and do millions of read/write operations on the
datafiles, the MTTR following an instance failure can stretch into hours.
Tuning instance recovery time used to be largely a matter of experiment and
guesswork. It has always been easy to tell how long the recovery actually took: just
look at your alert log, and you will see the time when the STARTUP command was
issued and the time that the startup completed, with information about how many
blocks of redo were processed, but until release 9i of the database it was almost
impossible to calculate in advance. Version 9i introduced a new parameter, FAST_
START_MTTR_TARGET, that makes controlling instance recovery time a trivial exercise.
You specify it in seconds, and Oracle will then ensure that DBWn writes out blocks at
a rate sufficiently fast that if the instance crashes, the recovery will take no longer than
that number of seconds. So the smaller the setting, the harder DBWn will work in an
attempt to minimize the gap between the checkpoint position and real time. But note
that it is only a target—you can set it to an unrealistically low value, which, no matter
what DBWn does, is impossible to achieve. Database Control also provides an MTTR
advisor, which will give you an idea of how long recovery would take if the instance
failed. More detailed information can be obtained from the view V$INSTANCE_
RECOVERY.
Exercise 18-1: Instance Recovery and the MTTR
This exercise demonstrates the effect of checkpointing on the MTTR following an
instance failure.
1. Using SQL*Plus, connect as user SYSTEM.
2. Disable checkpoint tuning by setting the FAST_START_MTTR_TARGET
parameter to zero.
SQL> alter system set fast_start_mttr_target=0;
3. Simulate a workload by creating a table and starting a transaction.
SQL> create table t1 as select * from all_objects where 1=2;
SQL> insert into t1 select * from all_objects;
4. Run a query to see how much work would be required to recover the instance
if it crashed right now.
SQL> select RECOVERY_ESTIMATED_IOS, ACTUAL_REDO_BLKS, ESTIMATED_MTTR
from v$instance_recovery;
The query shows how many read/write operations would be required on the
datafiles and how many blocks on redo would have to be processed during
ch18.indd 14ch18.indd 14 6/20/2005 11:24:17 AM6/20/2005 11:24:17 AM

All-in-1 / Oracle Database 10g OCP Certification All-in-One / Watson, Bersinic / 5790-3
Chapter 18: Configuring the Database for Backup and Recovery
15
PART I
an instance recovery. The ESTIMATED_MTTR column shows, in seconds, how
long the recovery would take.
5. Commit the transaction, and re-run the query from Step 2. Note that nothing
much has changed: COMMIT has no effect on DBWn and will not advance
the checkpoint position.
6. Issue a manual checkpoint.
SQL> alter system checkpoint;
This may take a few seconds to complete, as DBWn flushes all changed blocks
to disk.
7. Re-run the query from Step 2. Note that the RECOVERY_ESTIMATED_IOS and
ACTUAL _REDO_BLKS columns have dropped substantially, perhaps to zero.
The ESTIMATED_MTTR column may not have reduced, because this column
is not updated in real time.
8. Tidy up by dropping the table.
SQL> drop table t1;
The MTTR Advisor
Database Control has an interface to the FAST_START_MTTR_TARGET parameter, and
to the V$INSTANCE_RECOVERY view. From the database home page, take the Advisor
Central link and then the MTTR advisor to get a window that displays the current
estimated recovery time and gives the option of resetting the parameter (see Figure 18-4).
Configuring a Database for Recoverability
To guarantee maximum recoverability for a database, the controlfiles must be
multiplexed; the online redo logs must be multiplexed; the database must be running
in archivelog mode, with the archive logfiles also multiplexed; and finally there must
be regular backups, which are the subject of Chapter 19, with more detail in Chapter 24.
Protecting the Controlfile
The controlfile is small, but vital. It is used to mount the database, and while the
database is open, the controlfile is continually being read and written. If the controlfile
is lost, it is possible to recover; but this is not always easy, and you should never be in
that situation, because there should always be at least two copies of the controlfile, on
different physical devices.
EXAM TIP You can have up to eight multiplexed copies of the controlfile.
ch18.indd 15ch18.indd 15 6/20/2005 11:24:17 AM6/20/2005 11:24:17 AM
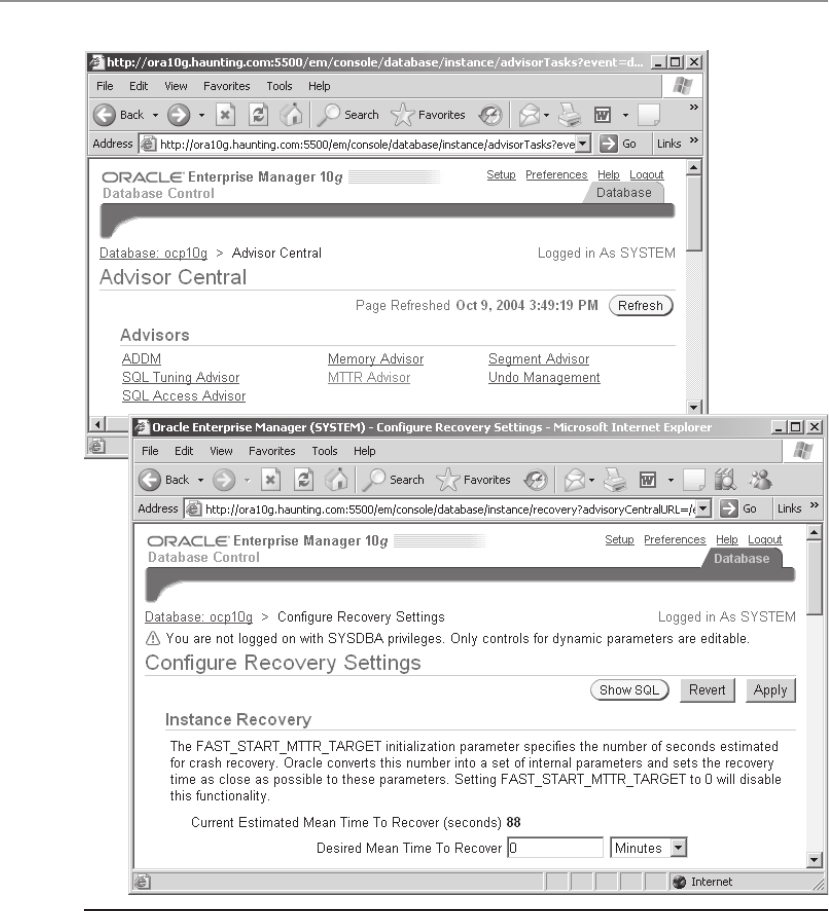
All-in-1 / Oracle Database 10g OCP Certification All-in-One / Watson, Bersinic / 5790-3
Oracle Database 10g OCP Certification All-in-One Exam Guide
16
In an ideal world, not only will each copy of the controlfile be on a different disk,
but each of the disks will be on a different channel and controller if your hardware
permits this. However, even if your database is running on a computer with just one
disk (on a small PC, for instance) you should still multiplex the controlfile to different
directories. There is no general rule saying that two copies is too few, or eight copies is
Figure 18-4 The MTTR advisor
ch18.indd 16ch18.indd 16 6/20/2005 11:24:18 AM6/20/2005 11:24:18 AM

All-in-1 / Oracle Database 10g OCP Certification All-in-One / Watson, Bersinic / 5790-3
Chapter 18: Configuring the Database for Backup and Recovery
17
PART I
too many, but there will be rules set according to the business requirements for fault
tolerance.
TIP Your organization will have standards, such as “every production database
will have three controlfiles on three different disks.” If your organization does
not have such standards, someone should agree and write them. If necessary,
you should.
Provided that the controlfile is multiplexed, recovering from media damage that
results in the loss of a controlfile is a trivial matter. Oracle ensures that all copies of
the controlfile are identical, so just copy a surviving controlfile over the damaged or
missing one. But damage to a controlfile does result in downtime. The moment that
Oracle detects that a controlfile is damaged or missing, the instance will terminate
immediately with an instance failure.
If you create a database with the DBCA, by default you will have three controlfiles,
which is probably fine; but they will all be in the same directory, which is not so good.
To move or add a controlfile, first shut down the database. No controlfile operations
can be done while the database is open. Second, use an operating system command
to move or copy the controlfile. Third, edit the CONTROL_FILES parameter to point
to the new locations. If you are using a static initSID.ora parameter file, just edit it
with any text editor. If you are using a dynamic spfileSID.ora parameter file, start up
the database in NOMOUNT mode, and issue an alter system set control_
files=... command as shown in Figure 18-5. Fourth, open the database as normal.
TIP There are no restrictions on naming for controlfile copies other than
whatever is a legal name for your operating system, but you should adhere
to some standard. Your organization may well have a standard for this already.
Protecting the Online Redo Log Files
Remember that an Oracle database requires at least two online redo logfile groups to
function, so that it can switch between them. You may need to add more groups for
performance reasons, but two are required. Each group consists of one or more members,
which are the physical files. Only one member per group is required for Oracle to
function, but at least two members per group are required for safety.
TIP Always have at least two members in each logfile group, for security. This
is not just data security; it is job security, too.
The one thing that a DBA is not allowed to do is to lose all copies of the current
online logfile group. If that happens, you will lose data. The only way to protect
against data loss when you lose all members of the current group is to configure a
ch18.indd 17ch18.indd 17 6/20/2005 11:24:18 AM6/20/2005 11:24:18 AM
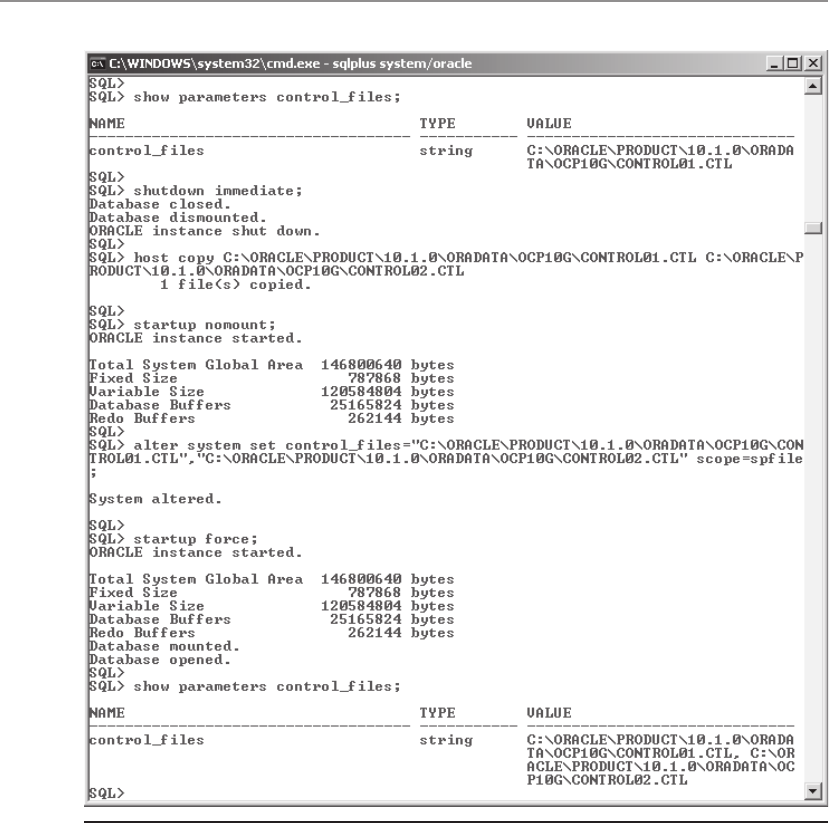
All-in-1 / Oracle Database 10g OCP Certification All-in-One / Watson, Bersinic / 5790-3
Oracle Database 10g OCP Certification All-in-One Exam Guide
18
Data Guard environment for zero data loss, which is not a trivial exercise. Why is it so
critical that you do not lose all members of the current group? Think about instance
recovery. After a crash, SMON will use the contents of the current online logfile group
for roll forward recovery, to repair any corruptions in the database. If the current online
logfile group is not available, perhaps because it was not multiplexed and media damage
has destroyed the one member, then SMON cannot do this. And if SMON cannot
correct corruptions with roll forward, you cannot open the database.
Figure 18-5 Multiplexing the controlfile
ch18.indd 18ch18.indd 18 6/20/2005 11:24:18 AM6/20/2005 11:24:18 AM
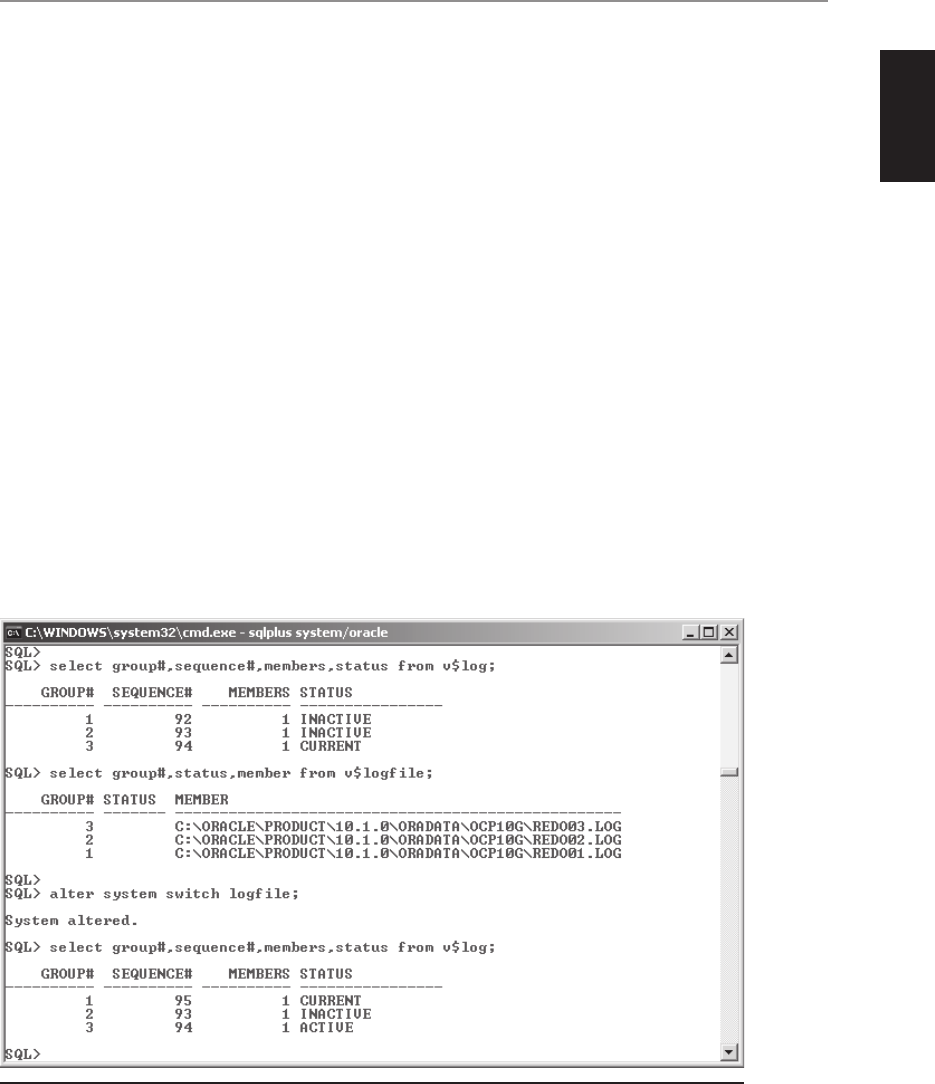
All-in-1 / Oracle Database 10g OCP Certification All-in-One / Watson, Bersinic / 5790-3
Chapter 18: Configuring the Database for Backup and Recovery
19
PART I
Just as with multiplexed copies of the controlfile, the multiple members of a
logfile group should ideally be on separate disks, on separate controllers. But when
considering disk strategy, think about performance as well as fault tolerance. In the
discussion of commit processing in Chapter 9, it was made clear that when a COMMIT
is issued, the session will hang until LGWR has flushed the log buffer to disk. Only
then is “commit complete” returned to the user process, and the session allowed to
continue. This means that writing to the online redo logfiles is one of the ultimate
bottlenecks in the Oracle environment: you cannot do DML faster than LGWR can
flush changes to disk. So on a high-throughput system, make sure that your redo logfiles
are on your fastest disks served by your fastest controllers. Related to this, try not to
put any datafiles on the same devices; if the one LGWR process has to compete for
disk I/O resources with DBWn and many server processes, performance may degrade.
If a member of a redo logfile group is damaged or missing, the database will remain
open if there is a surviving member. This contrasts with the controlfile, where damage
to any copy will crash the database immediately. Similarly, groups can be added or
removed and members of groups can be added or moved while the database is open,
as long as there are always at least two groups, and each group has at least one valid
member.
If you create a database with DBCA, by default you will have three groups, but
they will have only one member each. You can add more members (or indeed whole
groups) either through Database Control or from the SQL*Plus command line. There
are two views that will tell you the state of your redo logs. V$LOG will have one row per
group, and V$LOGFILE will have one row per logfile member. Examine Figure 18-6.
Figure 18-6 Online redo log configuration
ch18.indd 19ch18.indd 19 6/20/2005 11:24:19 AM6/20/2005 11:24:19 AM

All-in-1 / Oracle Database 10g OCP Certification All-in-One / Watson, Bersinic / 5790-3
Oracle Database 10g OCP Certification All-in-One Exam Guide
20
The first query shows that this database has three logfile groups. The current group—
the one LGWR is writing to at the moment—is group 3; the other groups are inactive,
meaning first that the LGWR is not writing to them and second that in the event of an
instance failure, SMON would not require them for instance recovery. In other words,
the checkpoint position has advanced into group 3. The SEQUENCE# column tells us
that there have been 94 log switches since the database was created. This number is
incremented with each log switch. The MEMBERS column shows that each group
consists of only one member—seriously bad news, which should be corrected as soon
as possible.
The second query shows the individual online redo logfiles. Each file is part of one
group, identified by GROUP#, and has a unique name. The STATUS column should
always be null, as shown. If the member has not yet been used, typically because the
database has only just been opened and no log switches have occurred, the status will
be STALE; this will be there only until the first log switch. If the status is INVALID,
either the member has just been created (in which case it will clear after a log switch
into it) or you have a problem.
TIP As with the controlfile, Oracle does not enforce any naming convention
for logfiles, but most organizations will have standards for this.
Then there is an
alter system switch logfile;
command to force a log switch, which would happen automatically eventually if
there were any DML in progress once the current group was full. The log switch, either
automatic or manual, causes the LGWR to start writing out redo data to the next online
logfile group.
The last query shows that after the log switch, group 1 is now the current group that
LGWR is writing to at log switch sequence number 95. The previously current group,
group 3, has status ACTIVE. This means that it would still be needed by SMON for
instance recovery if the instance failed now. In a short time, as the checkpoint position
advances, it will become INACTIVE. Issuing an
alter system checkpoint;
command would force the checkpoint position to come up-to-date, and group 3 would
then be inactive immediately.
The number of members per group is restricted by settings in the controlfile,
determined at database creation time. Turn back to Chapter 3 and the CREATE
DATABASE command called by the CreateDB.sql script; the MAXLOGFILES directive
limits the number of groups that this database can have, and the MAXLOGMEMBERS
directive limits the maximum number of members of each group. The DBCA defaults
for these (16 and 3 respectively) may well be suitable for most databases, but if they
ch18.indd 20ch18.indd 20 6/20/2005 11:24:19 AM6/20/2005 11:24:19 AM

All-in-1 / Oracle Database 10g OCP Certification All-in-One / Watson, Bersinic / 5790-3
Chapter 18: Configuring the Database for Backup and Recovery
21
PART I
prove to be inappropriate, it is possible to re-create the controlfile with different values.
However, as with all controlfile operations, this will require downtime.
Exercise 18-2: Multiplexing the Redo Log
This exercise will add a member to each online redo log group through Database
Control and then confirm the addition from SQL*Plus. The assumption is that there
is currently only one member per group, and that you have three groups; if your groups
are configured differently, adjust the instructions accordingly.
1. Using Database Control, log on as user SYSTEM.
2. From the database home page, take the Administration tab, and then the Redo
Log Groups link in the Storage section.
3. Select the first group, and click Edit.
4. In the Redo Log Members section, click Add. The Add Redo Log Member page
appears.
5. Enter a filename REDO01b.LOG for the new member for group 1.
6. Click Continue.
7. Click Show SQL and study the command that will be executed, and then click
Return.
8. Click Apply to execute the command—or Revert if you would rather return to
Step 4.
9. Take the Redo Log Groups link at the top of the screen to the Redo Log
Groups window, and repeat Steps 3–8 for the other groups.
10. Using SQL*Plus, connect as user SYSTEM and issue these queries to confirm
the creation of the new members:
SQL> select group#,sequence#,members,status from v$log;
SQL> select group#,status,member from v$logfile;
The result will show the new members with status INVALID. This is not a
problem; it happens merely because they have never been used.
11. Issue the following command three times, to cycle through all your logfile
groups:
SQL> alter system switch logfile;
12. Reissue the second query in Step 10 to confirm that the status of all your
logfile group members is now null.
Archivelog Mode and the Archiver Process
Oracle guarantees that your database is never corrupted, through the use of the online
redo logfiles to repair any corruptions caused by an instance failure. This is automatic,
ch18.indd 21ch18.indd 21 6/20/2005 11:24:19 AM6/20/2005 11:24:19 AM

All-in-1 / Oracle Database 10g OCP Certification All-in-One / Watson, Bersinic / 5790-3
Oracle Database 10g OCP Certification All-in-One Exam Guide
22
and unavoidable. But to guarantee no loss of data following a media failure, it is
necessary to have a record of all changes applied to the database since the last backup
of the database; this is not enabled by default. The online redo logfiles are overwritten
as log switches occur; the transition to archivelog mode ensures that no online redo
logfile is overwritten unless it has been copied as an archive log first. Thus there will
be a series of archive logfiles that represent a complete history of all changes ever
applied to the database. If a datafile is damaged at any time, it will then be possible to
restore a backup of the datafile and apply the changes from the archive log redo stream
to bring it up-to-date. By default, a database is created in noarchivelog mode; this means
that online redo logfiles are overwritten by log switches with no copy being made
first. It is still impossible to corrupt the database, but data could be lost if the datafiles
are damaged by media failure. Once the database is transitioned to archivelog mode,
it is impossible to lose data as well—provided that all the archive logfiles generated
since the last backup are available.
Once a database is converted to archivelog mode, a new background process will
start, automatically. This is the archiver process, ARCn. By default Oracle will start two
of these processes, but you can have up to ten. In earlier releases of the database it was
necessary to start this process either with a SQL*Plus command or by setting the
initialization parameter LOG_ARCHIVE_START, but a 10g instance will automatically
start the archiver if the database is in archivelog mode.
TIP In archivelog mode, recovery is possible with no loss of data up to and
including the last commit. Most production databases are run in archivelog
mode.
The archiver will copy the online redo logfiles to an archive logfile after each log
switch, thus generating a continuous chain of logfiles that can be used for recovering
a backup. The name and location of these archive logfiles is controlled by initialization
parameters. For safety the archive logfiles can be multiplexed, just as the online logfiles
can be multiplexed, but eventually, they should be migrated to offline storage, such as
a tape library. The Oracle instance takes care of creating the archive logs with the ARCn
process, but the migration to tape must be controlled by the DBA, either through
operating system commands or by using the Recovery Manager utility RMAN (described
in later chapters) or another third-party backup software package.
The transition to archivelog mode can be done only while the database is in mount
mode after a clean shutdown, and it must be done by a user with a SYSDBA connection.
It is also necessary to set the initialization parameters that control the names and
locations of the archive logs generated. Clearly, these names must be unique, or archive
logs could be overwritten by other archive logs. To ensure unique filenames, it is
possible to embed variables such as the log switch sequence number in the archive
logfile names (see Table 18-1).
The minimum archiving necessary to ensure that recovery from a restored backup
will be possible is to set one archive destination. But for safety, it will usually be a
ch18.indd 22ch18.indd 22 6/20/2005 11:24:19 AM6/20/2005 11:24:19 AM

All-in-1 / Oracle Database 10g OCP Certification All-in-One / Watson, Bersinic / 5790-3
Chapter 18: Configuring the Database for Backup and Recovery
23
PART I
requirement to multiplex the archive logfiles by specifying two or more destinations,
ideally on different disks served by different controllers. From 9i onward, it is possible
to specify up to ten archive destinations, giving you ten copies of each filled online redo
logfile. This is perhaps excessive for safety. One archive destination? Good idea. Two
destinations? Sure, why not. But ten? This is to do with Data Guard. For the purposes
of this book and the OCP exam, an archive log destination will always be a directory
on the machine hosting the database, and two destinations on local disks will usually
be sufficient. But the destination can be an Oracle Net alias, specifying the address of
a listener on a remote computer. This is the key to zero data loss: the redo stream can
be shipped across the network to a remote database, where it can be applied to give a
real-time backup. Furthermore, the remote database can (if desired) be configured and
opened as a data warehouse, meaning that all the query processing can be offloaded
from the primary database to a secondary database optimized for such work.
Exercise 18-3: Transition the Database
to Archivelog Mode
Convert your database to archivelog mode, and set parameters to enable archiving to
two destinations. The instructions for setting parameters in Step 3 assume that you are
using a dynamic spfile; if your instance is using a static pfile, make the edits manually
instead.
1. Create two directories with appropriate operating system commands. For
example, on Windows,
c:\> md c:\oracle\archive1
c:\> md c:\oracle\archive2
or on Unix,
$ mkdir /oracle/archive1
$ mkdir /oracle/archive2
2. Connect with SQL*Plus as user SYS with the SYSDBA privilege.
SQL> connect / as sysdba
Variable Description
%d A unique database identifier, necessary if multiple databases are being archived
to the same directories.
%t The thread number, visible as the THREAD# column in V$INSTANCE. This is
not significant, except in a RAC database.
%r The incarnation number. This is important if an incomplete recovery has been
done, as described in Chapter 27.
%s The log switch sequence number. This will guarantee that the archives from any
one database do not overwrite each other.
Table 18-1 Variables That May Be Used to Embed Unique Values in Archive Log File Names
ch18.indd 23ch18.indd 23 6/20/2005 11:24:20 AM6/20/2005 11:24:20 AM

All-in-1 / Oracle Database 10g OCP Certification All-in-One / Watson, Bersinic / 5790-3
Oracle Database 10g OCP Certification All-in-One Exam Guide
24
3. Set the parameters to nominate two destination directories created in Step 1
and to control the archive logfile names. Note that it is necessary to include
a trailing slash character on the directory names (a backslash on Windows).
SQL> alter system set log_archive_dest_1='location=/oracle/archive1/' scope=spfile;
SQL> alter system set log_archive_dest_2='location=/oracle/archive2/' scope=spfile;
SQL> alter system set log_archive_format='arch_%d_%t_%r_%s.log' scope=spfile;
4. Shut down the database cleanly.
SQL> shutdown immediate;
5. Start up in mount mode.
SQL> startup mount;
6. Convert the database to archivelog mode.
SQL> alter database archivelog;
7. Open the database.
SQL> alter database open;
8. Confirm that the database is in archivelog mode and that the archiver is
running with these two queries.
SQL> select log_mode from v$database;
SQL> select archiver from v$instance;
9. Force a log switch.
SQL> alter system switch logfile;
10. The log switch will have forced an archive to both the destinations. Confirm
this from within the Oracle environment with this query:
SQL> select name from v$archived_log;
and then from an operating system prompt confirm that the files listed by this
query were in fact created.
Chapter Review
This chapter covered the concepts and architecture that underpin Oracle’s recovery
capabilities. A thorough understanding of this is essential before proceeding to the
details of backup and recovery techniques. You have seen the various types of failure
that can occur, and how the database and the DBA manage them. In particular, the
instance recovery mechanism makes it absolutely impossible to corrupt an Oracle
database. Then the mechanism of archiving makes it impossible to lose data, provided
that you do not lose your current, unarchived, online redo logfile group, and that you
have adequate backups. To protect the online redo logs, you should multiplex them
onto different disks. It is also good practice to multiplex the controlfile and the archive
logfiles.
ch18.indd 24ch18.indd 24 6/20/2005 11:24:20 AM6/20/2005 11:24:20 AM

All-in-1 / Oracle Database 10g OCP Certification All-in-One / Watson, Bersinic / 5790-3
Chapter 18: Configuring the Database for Backup and Recovery
25
PART I
Questions
1. Which of the following files should be multiplexed, for safety? (Choose two
answers).
A. Archive logfiles
B. Controlfile
C. Initialization file
D. System tablespace datafiles
2. You want to add a controlfile copy. Which of these sequences is correct and
sufficient? (Choose the best answer.)
A. Copy the controlfile, and issue an alter system... command to
change the CONTROL_FILES parameter.
B. Mount the database to read the controlfile, and issue an alter
database... command to add a new copy.
C. Copy the controlfile, shut down the database, start up in nomount mode,
issue an alter system... command to change the CONTROL_FILES
parameter, and open the database.
D. Start up in nomount mode, copy the controlfile, issue an alter
system... command to change the CONTROL_FILES parameter, and
open the database.
E. Issue an alter system... command to change the CONTROL_FILES
parameter, shut down the database, copy the controlfile, and start up the
database.
3. You want to multiplex a redo log group. Will this involve downtime? (Choose
the best answer.)
A. Yes, because logfiles can’t be manipulated while the database is open.
B. No, you can always reconfigure logfiles online.
C. No, if your database is in archivelog mode.
D. Yes, because database logging is controlled by static parameters.
4. If an online logfile gets damaged, what might happen next? (Choose the best
answer.)
A. The instance will terminate as soon as the corruption is detected.
B. The instance will continue to run, if the group is multiplexed.
C. If you have more than two surviving logfile groups, the instance will
continue to run.
D. The instance will terminate, unless you are in archivelog mode.
ch18.indd 25ch18.indd 25 6/20/2005 11:24:20 AM6/20/2005 11:24:20 AM

All-in-1 / Oracle Database 10g OCP Certification All-in-One / Watson, Bersinic / 5790-3
Oracle Database 10g OCP Certification All-in-One Exam Guide
26
5. If your database is in archivelog mode, how can you force an archive?
A. Issue an alter database switch logfile command.
B. Issue an alter system switch logfile command.
C. Issue an alter system log_archive_start command.
D. There is no command to force an archive; they happen automatically.
6. You are concerned that performance is poor. What might you do to address
this? (Choose two answers.)
A. Increase the FAST_START_MTTR_TARGET setting.
B. Reduce the FAST_START_MTTR_TARGET setting.
C. Carry out manual checkpoints, to advance the checkpoint position.
D. Give each logfile group its own disk, to avoid contention between groups.
E. Ensure that members of the same redo group are on separate disks.
F. Take the database out of archivelog mode.
7. After a crash, you issue a STARTUP command. Put the events that follow in
the correct order:
A. Normal users can connect.
B. SMON carries out roll forward.
C. SMON performs rollback.
D. The instance starts in nomount mode.
E. The database is mounted.
F. The database is opened.
8. Which of the following circumstances could result in a corrupted database?
(Choose the best answer.)
A. Loss of all copies of the current logfile group
B. Loss of all copies of the controlfile
C. A crash during an instance recovery
D. Loss of the system tablespace and the undo tablespace
E. None. It is impossible to corrupt an Oracle database.
9. Neither your controlfile, nor your online logs, nor your archive logs are
multiplexed. To multiplex them, which will require downtime? (Choose the
best answer.)
A. Archive logs
B. Controlfile
C. Redo logs
D. None. All these operations can be done online.
ch18.indd 26ch18.indd 26 6/20/2005 11:24:20 AM6/20/2005 11:24:20 AM

All-in-1 / Oracle Database 10g OCP Certification All-in-One / Watson, Bersinic / 5790-3
Chapter 18: Configuring the Database for Backup and Recovery
27
PART I
10. You are using SQL*Plus from a PC, and the PC reboots while you are in the
middle of a transaction. What will happen at the server side? (Choose the best
answer.)
A. Your server process will detect the problem and roll back the transaction.
B. SMON will detect the problem and roll back the transaction.
C. PMON will detect the problem and roll back the transaction.
D. The SQL*Plus auto-commit will commit your transaction.
E. The statement you were executing will be rolled back, but the rest of the
transaction will remain intact.
11. On querying V$LOG, you see that you have one logfile group whose status is
“ACTIVE.” Which of the following statements are true? (Choose two answers.)
A. This is the group to which LGWR is writing redo.
B. In the event of a crash, SMON would use this group for recovery.
C. The group has not yet been archived.
D. Completing a checkpoint would change the status to null.
E. This group was in use before the last log switch.
12. While executing a multirow update statement, you hit a constraint violation.
What will happen next?
A. The update that hit the problem will be rolled back, but the rest of the
statement will remain intact.
B. The whole statement will be rolled back.
C. The whole transaction will be rolled back.
D. It depends on whether you have issued the alter session enable
resumable command.
13. From the following table, match the appropriate solution to each possible
problem.
Problem Solution
A. Accidentally dropping a table a. Mirroring with RAID
B. Committing a bad transaction b. Enable resumable
C. Datafiles filling up c. Flashback drop
D. Deleting a datafile d. Flashback query
E. Losing a disk e. Restore and recover
F. Omitting a “where” clause on a delete f. Rollback
ch18.indd 27ch18.indd 27 6/20/2005 11:24:20 AM6/20/2005 11:24:20 AM

All-in-1 / Oracle Database 10g OCP Certification All-in-One / Watson, Bersinic / 5790-3
Oracle Database 10g OCP Certification All-in-One Exam Guide
28
14. A multiplexed copy of the controlfile gets damaged while the instance is shut
down. Which of the following statements is true? (Choose the best answer.)
A. The database can be opened immediately if there is a surviving copy of the
controlfile.
B. In mount mode, you can change the CONTROL_FILES parameter to remove
the reference to the damaged copy of the controlfile, and then open the
database.
C. You can replace the damaged file with a surviving copy of the controlfile
and then open the database.
D. After restoring the controlfile, SMON will recover it as part of the instance
recovery process.
15. The MTTR advisor will tell you.... (Choose two answers.)
A. The estimated MTTR
B. The value of the FAST_START_MTTR_TARGET parameter
C. What the FAST_START_MTTR_TARGET should be set to
D. How the MTTR will change, depending on the rate of redo generation
E. How many I/Os on datafiles and how much redo would be processed
in the event of an instance failure
Answers
1. A, B. You can, and should, also multiplex your online redo logfiles. You can’t
multiplex the initialization file or any datafiles, except through hardware
mirroring techniques.
2. E. Physical operations on the controlfile may be carried out only while
the database is closed, and note that because the CONTROL_FILES
parameter is static, the “alter system...” command must specify “...
scope=spfile”.
3. B. The online redo log can always be managed while the database is open
(unlike the controlfile).
4. B. As long as there is at least one surviving member of each online redo logfile
group, the database can remain open. It will terminate only if every member
of a group is damaged—or if the only member of a non-multiplexed group is
damaged.
5. B. A log switch will force an archive, and you effect a log switch with alter
system..., not alter database....
6. A and E. You must ensure that members of the same redo group are on separate
disks to avoid the contention that arises between members of the same group.
ch18.indd 28ch18.indd 28 6/20/2005 11:24:21 AM6/20/2005 11:24:21 AM

All-in-1 / Oracle Database 10g OCP Certification All-in-One / Watson, Bersinic / 5790-3
Chapter 18: Configuring the Database for Backup and Recovery
29
PART I
Increasing the FAST_START_MTTR_TARGET setting may also help, by reducing
the pressure on DBWn, though instance recovery times may suffer.
7. D, E, B, F, A, C. The roll forward is done in mount mode, then the rollback
is done after the database is opened for use.
8. E. It is impossible to corrupt an Oracle database: the mechanism of undo and
redo guarantees that incomplete transactions will always be rolled back and
that committed transactions will always survive.
9. B. It is only the controlfile that cannot be manipulated while the database
is open.
10. C. A part of PMON’s role is to detect this exact type of problem and to tidy up
after a session fails because of problems with the user process.
11. B and E. The checkpoint position has not yet advanced through the ACTIVE
group and on to the CURRENT group; therefore both groups would be needed
in the event of a recovery being necessary. Generally, the only ACTIVE group
will be that in use just prior to the last switch.
12. B. The whole statement will be rolled back, but any earlier statements in the
transaction remain intact and uncommitted.
13. A-c; B-d; C-b; D-e; E-a; F-f
14. C. All copies of the controlfile are identical, so you can replace the damaged
file with a surviving copy of the controlfile and then open the database.
15. A and B. The mean-time-to-recover advisor tells you how long it would take
to open the database if it were to crash right now, and the current setting of
the FAST_START_MTTR_TARGET instance parameter. Ideally, the former will
always be less than the latter.
ch18.indd 29ch18.indd 29 6/20/2005 11:24:21 AM6/20/2005 11:24:21 AM

All-in-1 / Oracle Database 10g OCP Certification All-in-One / Watson, Bersinic / 5790-3/ blind folio 30
ch18.indd 30ch18.indd 30 6/20/2005 11:24:21 AM6/20/2005 11:24:21 AM

All-in-1 / Oracle Database 10g OCP Certification All-in-One / Watson, Bersinic / 5790-3
CHAPTER 19
Backing Up an Oracle
Database
In this chapter you will learn how to
• Create consistent database backups
• Back up your database without shutting it down
• Create incremental backups
• Automate database backups
• Monitor the flash recovery area
• Describe the difference between image copies and backup sets
• Describe the different types of database backups
• Back up a controlfile to trace
• Manage backups
1
ch19.indd 1ch19.indd 1 7/6/2005 11:52:38 AM7/6/2005 11:52:38 AM

All-in-1 / Oracle Database 10g OCP Certification All-in-One / Watson, Bersinic / 5790-3
Oracle Database 10g OCP Certification All-in-One Exam Guide
2
The second part of the OCP curriculum goes into great detail on backup and recovery
options and techniques. For the first exam, it is only necessary to be familiar with
some theory and with basic use of Database Control to carry out a backup, as described
in this chapter, and simple restore and recovery, as described in Chapter 20. But as
you study this material, remember that there is much more information to come.
Backup Tools
Backups can be made using straightforward operating system utilities, such as copy or
WinZip on Windows, or cp, tar, or cpio on Unix. However, Oracle strongly recommends
the use of the Recovery Manager, RMAN. RMAN is now in its fourth generation.
Originally introduced with release 8.0—and perfectly functional then—it has been
substantially enhanced through releases 8i, 9i, and now 10g. A persistent problem
with RMAN was the user interface, but it is fair to say that all UI problems have been
fixed in 10g. In later chapters you will see some advanced features that are better
accessed from the RMAN command line, but basic backup and recovery can now
be done through the Database Control RMAN interface.
One particular feature of RMAN is its integration with third-party tape libraries.
Large computer installations will have one or more tape robots. These are very
expensive pieces of equipment that may be fitted with many tape drives and storage
for thousands of tape cartridges. The tape robot will be controlled by software capable
of automatically locating and loading tapes as needed for any backup and restore
operation. The ideal situation is that the physical realities of device drivers, tape
cartridge locations, filenames, and so on be completely invisible to anyone making
use of the tape library; RMAN can provide this abstraction, provided that your system
administrators installed the appropriate drivers, which will be supplied by the
manufacturer of the tape library. Thus RMAN can be integrated with all the popular
tape library control systems, such as those sold by Compaq, IBM, or Veritas, to give
the DBA complete control of the tape library, without him needing to know anything
about it.
RMAN can back up datafiles, the controlfile, archive logs, and the server parameter
file (the spfile). The backups can go to disk or tape. There is a fully functional and
platform-independent scripting language, as well as a published API.
To conclude this discussion, Oracle provides backup and recovery capabilities
using standard operating system commands, or using RMAN—but RMAN is the
recommended tool and the one this book and the OCP exam focus on. RMAN
can be used as a transparent interface to a third-party tape library control system,
allowing you to automate completely the backup and recovery process. There are
both command-line and graphical interfaces to RMAN; at this point, you will study
the graphical interface provided by Database Control. The command-line interface
will come later.
Concepts and Terminology
There are many options for your backup and recovery strategy, some of which are
available only through RMAN backups, while others are available when using
operating commands as well. Furthermore, some options are available only if your
ch19.indd 2ch19.indd 2 7/6/2005 11:53:10 AM7/6/2005 11:53:10 AM

All-in-1 / Oracle Database 10g OCP Certification All-in-One / Watson, Bersinic / 5790-3
Chapter 19: Backing Up an Oracle Database
3
PART I
database is running in archivelog mode. But first, a summary of the various concepts
and terms used in the Oracle environment to describe different types of backups.
Whole or Partial Backups
The first choice to be made is whether a backup should be of the entire database, or
just a part of it. A whole backup is a backup of all the datafiles, the controlfile, and (if
you are using it) the spfile. Remember that as all multiplexed copies of the controlfile
are identical, it is necessary to back up only one of them. You do not back up the online
redo logs! Online redo log files are protected by multiplexing, and optionally, by
archiving. Also, note that only datafiles for permanent tablespaces can be backed up.
The tempfiles used for your temporary tablespaces cannot be backed up by RMAN,
nor can they be put into backup mode for an operating system backup.
A partial backup will include one or more datafiles and/or the controlfile. A partial
backup will, inevitably, not be synchronized with the rest of the database. It is a copy
of just a part of the database, at a particular moment in time. If it is ever necessary to
restore a file from a partial backup, it will have to be synchronized with the rest of the
database before it can be used. This means applying changes from the archived and
online redo log files to bring it up to date.
EXAM TIP Partial backups are valid only if your database is in archivelog
mode.
Whole or partial backups can be made with RMAN or with operating system
commands, while the database is open or closed. But if a partial backup is to be
valid—whichever tool you use—the database must be running in archivelog mode.
Partial backups of a database in noarchivelog mode are useless, except for very specific
purposes such as transporting datafiles to a different database. As a general rule, if
your database is not running in archivelog mode, you must always do whole backups.
Full or Incremental Backups
A full backup, which may be whole or partial, is a complete copy of one or more
datafiles. Every block of the datafile is backed up. An incremental backup is a backup
of just some of the blocks of a datafile: only the blocks that have been changed or
added since the last full backup will be included. This is an example of where RMAN
is superior to operating system utilities. RMAN is an Oracle product and is therefore
capable of identifying changes within datafiles. Whenever a block is updated, the
SCN of the change is embedded in the block header; this means that RMAN can
determine which blocks have changed since the last full backup was done. So far as
the operating system is concerned, if there has been any change to the file—perhaps
just one block out of millions—then the file has been updated, and the whole thing
must be backed up.
EXAM TIP Incremental backups can be done only with RMAN, not with
operating system commands.
ch19.indd 3ch19.indd 3 7/6/2005 11:53:11 AM7/6/2005 11:53:11 AM

All-in-1 / Oracle Database 10g OCP Certification All-in-One / Watson, Bersinic / 5790-3
Oracle Database 10g OCP Certification All-in-One Exam Guide
4
Incremental backups will generally be much smaller than full backups, and they
may be significantly faster. Either way, the strain on your tape I/O systems will be
much reduced. Many system administrators try to avoid incremental backups because
in the event of a restore operation they have to ensure that the correct full backup is
located, and then the appropriate incremental backups applied. The bookkeeping
necessary to keep track of a system of full and incremental backups can be awkward
to maintain. RMAN makes this process completely automatic. There is no need to
track which tapes contain which full or incremental backup—RMAN knows, and if
it is linked to a tape library, it will load the appropriate tapes and extract and apply
the appropriate backups without any user intervention at all.
Incremental backups can be done whether the database is open or closed, and
whether it is in archivelog or noarchivelog mode. But they can be done only by RMAN.
TIP A number of third-party products claim to be able to back up Oracle
databases. In most cases, they make use of RMAN.
Offline or Online Backups
An offline backup is a backup taken while the database is closed. You may hear offline
backups referred to as “closed,” “cold,” or “consistent” backups. The term “closed” is
self-explanatory, and “cold” is just slang, but “consistent” requires an understanding
of the Oracle architecture. For a datafile to be consistent, every block in the datafile
must have been checkpointed and closed. In normal running, the datafiles are
inconsistent: a number of blocks will have been copied into the database buffer cache,
updated, and not yet written back to disk. The datafile itself, on disk, is therefore not
consistent with the real-time state of the database; some parts of it will be out of date.
To make a datafile consistent, all changed blocks must be flushed to disk, and the
datafile closed. As a general rule, this happens only when the database is shut down
cleanly, with the IMMEDIATE, TRANSACTIONAL, or NORMAL shutdown options.
An online backup is a backup taken while the database is in use. Other terms for
online backups are “open,” “hot,” or “inconsistent” backups. A datafile that is backed
up online will not be synchronized with any particular SCN, nor is it synchronized
with the other datafiles or the controlfile. It is backed up while it is in use: being read
from by server processes, and written to by DBWn.
Online backups can be whole or partial, be full or incremental, and be carried
out with RMAN or with operating system commands. But they can only be done if
the database is in archivelog mode. There is absolutely no reason to take the database
down for backups. Provided you are running in archivelog mode, online backups are
all you will ever need. Online backups are the key to Oracle’s capability to run nonstop
for months or even years and vital to meeting MTBF targets. There may be a performance
drop during an online backup because of the additional disk activity, but apart from
that there is no reason for your user community to know anything about it.
Online backups can be done with operating system commands, but this is another
case where RMAN is a superior tool. Consider what actually happens if you copy a file
ch19.indd 4ch19.indd 4 7/6/2005 11:53:12 AM7/6/2005 11:53:12 AM

All-in-1 / Oracle Database 10g OCP Certification All-in-One / Watson, Bersinic / 5790-3
Chapter 19: Backing Up an Oracle Database
5
PART I
with an operating system utility while the file is in use. Take an example where the
operating system block size is 512 bytes (the default on many Unix and Windows
systems) but the Oracle block size, as determined by the DB_BLOCK_SIZE parameter,
is 8KB. Each Oracle block will comprise sixteen operating system blocks.
In this scenario, you initiate an operating system copy, perhaps using the Windows
copy command. If the file is many megabytes big, this copy will take several seconds
or minutes to complete, and during that time it is more than likely that DBWn will
flush some changed blocks from the database buffer cache to the datafile; the file is
being changed while it is being copied. The granularity of the operating system copy is
the operating system block, but the granularity of the DBWn write is the Oracle block.
It is thus possible that the copy command will take the first part of an Oracle block,
then DBWn will overwrite the whole Oracle block, and finally the copy command
will take the remaining part of the Oracle block. Thus the output file produced by the
copy will include what is called a “fractured” block: parts of it will represent different
versions. Such a block is completely useless: you have a data corruption.
If you are using operating system utilities to perform online backups, you avoid
this problem by putting the tablespace containing the datafile into backup mode,
with an ALTER TABLESPACE…BEGIN BACKUP command, for the duration of the
copy, as shown in Figure 19-1. From that point on, whenever a server process updates
a block in the database buffer cache, rather than writing out the minimal change to
the log buffer, it will write out the complete block image to the log buffer. This block
image will be read-consistent. Then if it is ever necessary to restore the datafile, any
fractured blocks can be replaced with a read-consistent image of the block extracted
from the redo logs. Thus you accept that an online backup will have fractured blocks,
but Oracle can repair them if necessary. The downside of this is that the rate of redo
generation may accelerate astronomically while the tablespace is in backup mode: one
whole block, perhaps 16KB, for each change, instead of just a few bytes. You may find
that you are log-switching thirty times an hour rather than thirty times a day when
you put tablespaces into backup mode, with a consequent drop in performance.
By contrast, online backups with RMAN do not have this problem. RMAN is an
Oracle tool and can therefore be aware of what is happening. If RMAN detects that
DBWn has updated a block while it was being copied—which is obvious, because
the block header SCN will have changed—RMAN will try again, until it gets a read-
consistent image of the block.
EXAM TIP Online backups can only be done if your database is running in
archivelog mode.
Online backups can be full or incremental, and they can be done with operating
system utilities or RMAN—but there is no doubt that RMAN is superior. Furthermore,
online backups can only be done if the database is in archivelog mode. Whichever
tool you choose, an online backup will not be synchronized with any particular SCN,
nor with the other datafiles and the controlfiles. Online and archived redo log files
will always be needed to bring a restored online backup into synchronization with
the rest of the database.
ch19.indd 5ch19.indd 5 7/6/2005 11:53:12 AM7/6/2005 11:53:12 AM
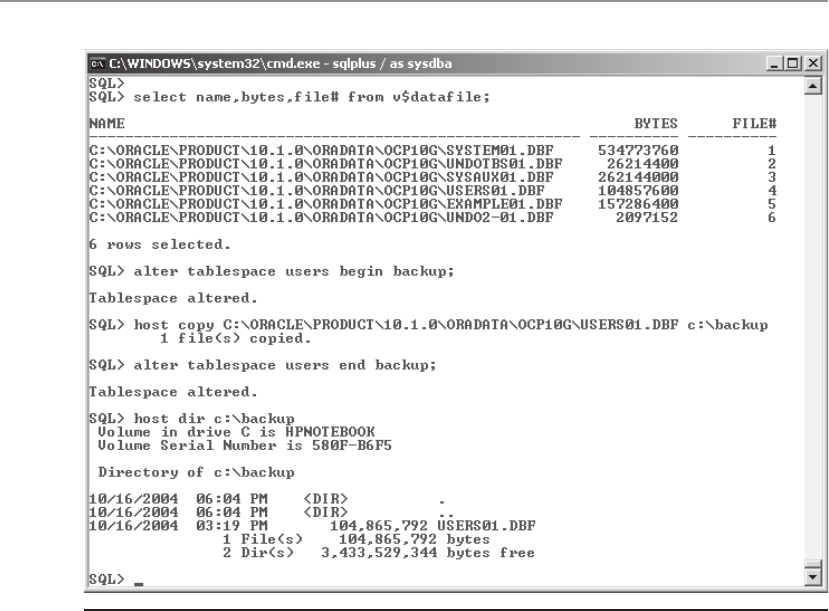
All-in-1 / Oracle Database 10g OCP Certification All-in-One / Watson, Bersinic / 5790-3
Oracle Database 10g OCP Certification All-in-One Exam Guide
6
Image Copies or Backup Sets
The final terms to become familiar with before looking at the mechanics of backing
up are image copies and backup sets. An image copy is a backup of a file that is byte
for byte the same as the source file. Clearly, an image copy cannot be an incremental
backup, nor can it be made to a tape device; in either of these cases, the output file
would not be the same as the input file. When taking backups with operating system
utilities, unless you use utilities that compress the data or stream it directly to tape,
the output files will be image copies. Image copies can be made of datafiles, the
controlfile, and the archived logs while the database is open or closed, but as ever,
you do not back up the online logs.
A backup set is a proprietary structure generated by RMAN. It is a logical structure
consisting of one or more physical files, known as pieces, which contains one or more
database files, which may be datafiles, controlfiles, or archive log files. These three
different file types can be combined in one backup set if you wish. The backup set
format can be decoded only by RMAN. Thus, once you commit to using RMAN to
produce backup sets, you can only ever restore by using RMAN to extract files from
your backup sets. However, RMAN can also make image copies. RMAN-generated
Figure19-1 Online backup with operating system utilities
ch19.indd 6ch19.indd 6 7/6/2005 11:53:13 AM7/6/2005 11:53:13 AM
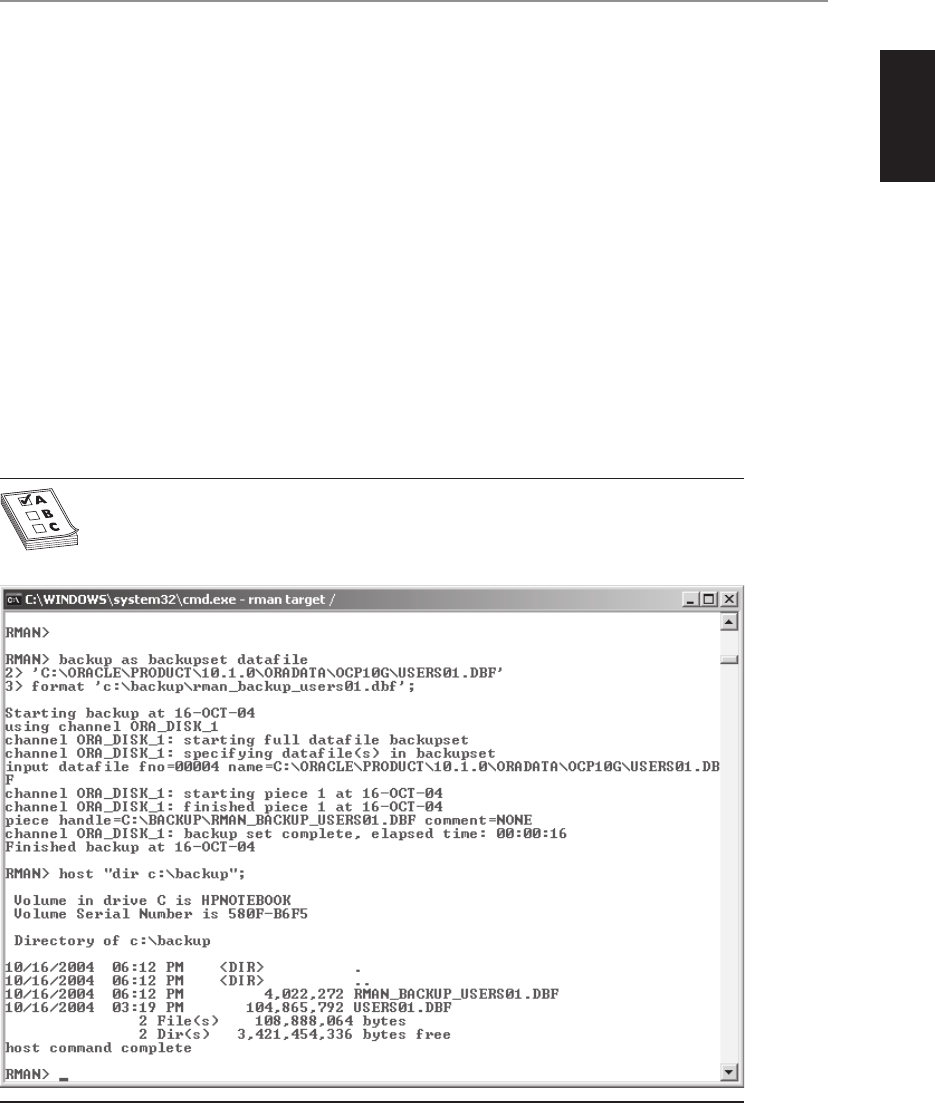
All-in-1 / Oracle Database 10g OCP Certification All-in-One / Watson, Bersinic / 5790-3
Chapter 19: Backing Up an Oracle Database
7
PART I
image copies of datafiles, controlfiles, or archive logs will be indistinguishable from
image copies made with an operating system command, and if for some reason you
want to restore them using operating system commands rather than RMAN, you can
do so. Figure 19-2 shows an example of creating a backup set with RMAN.
RMAN backup sets have a number of advantages over image copies, whether you
generate the image copies with RMAN or not. Unlike image copies, backup sets can
hold incremental backups. But even for a full backup, the pieces that make up the
backup set will usually be significantly smaller than image copies. This is because
a backup set never contains empty blocks. As RMAN passes through the datafiles, it
simply skips blocks that have never been used. A related advantage is that if you wish,
you can enable data compression within a backup set. This compression will normally
be more efficient than using whatever compression is provided by your operating
system or your tape library, because the compression algorithms are optimized for
Oracle data formats. Also, RMAN can stream backup sets directly to tape, if you have
installed the RMAN drivers for your tape library. This avoids the need to stage the data
on disk. While it may be nice to have a disk-based backup because of speed of restore,
for large systems it is usually impractical.
EXAM TIP Image copies can go only to disk. Backup sets can go to disk
or tape.
Figure 19-2 Online backup to a backup set; note the output file size
ch19.indd 7ch19.indd 7 7/6/2005 11:53:13 AM7/6/2005 11:53:13 AM

All-in-1 / Oracle Database 10g OCP Certification All-in-One / Watson, Bersinic / 5790-3
Oracle Database 10g OCP Certification All-in-One Exam Guide
8
Both image copies and backup sets of datafiles, controlfile, and archive logs can be
online or offline; whole or partial; full or incremental; and made in both archivelog
and noarchivelog modes—but backup sets can be generated or restored from only
by RMAN.
RMAN Settings
Database Control includes a graphical interface for RMAN that takes you through
the process of configuring general settings that will apply to every backup taken, and
then settings specific to each backup. There is also an interface to Oracle’s scheduling
mechanism, which can be used to establish a regular series of backups, such as a whole
backup once a week and incremental backups with archive log files once a day. RMAN
will run out of the box with no configuration whatsoever, but generally you will adjust
a number of settings to your own requirements. For example, the default backup
destination is to a disk directory, which may not be suitable. To reach the RMAN
interface, from the Database Control database home page take the Maintenance tab
and then the Configure Backup Settings link in the Backup/Recovery section to reach
the Configure Backup Settings window, which has three tabs: Device, Backup Set, and
Policy.
Device Settings
The options for disk backups are the degree of parallelism, the target directory, and
whether to generate backup sets or image copies. Parallelism defaults to 1; this means
that the RMAN process (which in many ways is a user process like any other) will
spawn just one server process, known as a channel, to actually create the backup.
When selecting a degree of parallelism, points to consider are the number of CPUs
and the nature of the disk subsystem. There would be little point in launching
numerous channels on a single CPU system with one disk. Even on multiple-CPU
computers with striped file systems, you should still be wary of the impact on other
users: for an offline backup, you will want the backup to proceed as fast as possible,
but for online backups it may be better to slow down the backup in order to limit
the amount of resources it will consume. The disk backup location can be any
directory; if left blank, it will default to whatever is set by the DB_RECOVERY_FILE_
DEST parameter, which will itself have defaulted to the flash_recovery_area directory in
your ORACLE_HOME. The next option is whether to generate image copies or backup
sets, and if backup sets, then whether to compress the data.
The options for tape backups specify the number of tape drives, any options
specific to a tape library, and whether to compress the backup sets. Remember that
it is impossible to generate image copies to tape; a tape file is simply not the same as
a disk file, so image copies are not an option. Specifying the number of tape drives is
equivalent to specifying the degree of parallelism for a disk backup. Your tape library
may have a number of drives, and you can choose whether to use some or all of them.
This is a matter for negotiation with the system administrators. A tape library is a very
expensive piece of equipment, and it may well not be used exclusively for Oracle
ch19.indd 8ch19.indd 8 7/6/2005 11:53:14 AM7/6/2005 11:53:14 AM

All-in-1 / Oracle Database 10g OCP Certification All-in-One / Watson, Bersinic / 5790-3
Chapter 19: Backing Up an Oracle Database
9
PART I
backups. The system administrators may not be pleased with you if take control of
the whole thing, leaving no drives available for other operations that are not related
to Oracle.
TIP: There can be political problems with using RMAN. Traditionally, it has
been the system administrators who do backups, but with RMAN much of
that responsibility transfers to the DBA. Be careful of appearing to take over
the system administrators’ job.
Then whether you are doing tape or disk backups, in the Host Credentials section
you must specify an operating system logon to the machine hosting the database. This
is because the RMAN channel(s) will have to assume an operating system identity in
order to read and write to the backup destination, be it a directory or a tape library.
The operating system identity you give will have to be configured by your system
administrators with appropriate permissions on the devices.
Having set up the host credentials, you can test the configuration by clicking
the Test Disk Backup and Test Tape Backup buttons. These will check that the devices
actually exist, and that using the provided host logon, RMAN can read and write
to them.
Backup Set Settings
The first option on the Backup Set Settings tab is the Maximum Backup Piece Size. By
default, this is unlimited: the whole backup set will be stored physically in one piece,
or file. The size of a backup set cannot be known until the backup is actually known,
because RMAN does not back up unused blocks. Use of compression and incrementals
makes the size even less predictable. A single file might well be inconveniently large if
you are backing up many datafiles and archive logs. For disk backups, your operating
system may have limits on the maximum file size, and for tape backups there will
certainly be limits on the size of the tape cartridges. In discussion with your system
administrators, the maximum piece size needs to be set to something that can be
managed sensibly.
You can also specify multiplexing of backup sets, by specifying multiple copies.
RMAN will then create multiple copies of each backup set. If your backup destinations
are not protected by RAID (in the case of disk backups) or tape mirroring (in the case
of tape backups), this gives you an extra level of security.
Policy Settings
The first option on the Policy Settings tab is whether to back up the controlfile and
the server parameter (spfile) file whenever a backup of anything else is taken. This is
generally considered to be good policy. These are small files, and you can never have
too many copies of them. By enabling this auto-backup capability, you can be certain
that you will always have an up-to-date copy of these two critical files. The default
destination is the DB_RECOVERY_FILE_DEST parameter.
ch19.indd 9ch19.indd 9 7/6/2005 11:53:15 AM7/6/2005 11:53:15 AM
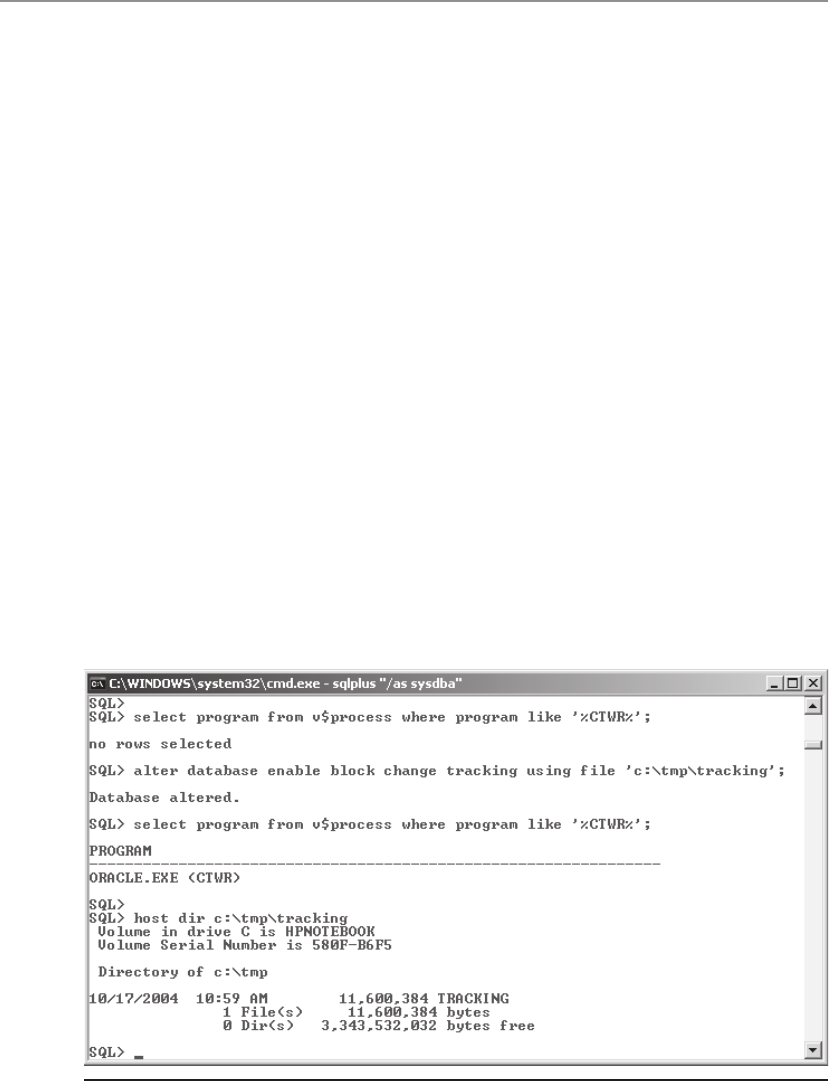
All-in-1 / Oracle Database 10g OCP Certification All-in-One / Watson, Bersinic / 5790-3
Oracle Database 10g OCP Certification All-in-One Exam Guide
10
The next option is whether to optimize backups by excluding files that have not
changed since the last backup. In practice, this means that any datafiles that are offline
or flagged as read-only will be backed up only once and should therefore reduce the
time and volume of subsequent backup operations.
Then there is an option “Enable block change tracking for faster incremental
backups.” This is a new feature of release 10g that can have a huge impact on the time
an incremental backup will take. In earlier releases, incremental backups would be
much smaller than full backups, but they were not necessarily any faster. This was
because RMAN would still have to read the whole datafile in order to determine
which blocks had been changed. By checking this option, you start the Change Tracking
Writer (or CTWR) background process. This process will write out to a block change
tracking file the address of every block that is updated. Then when doing an incremental
backup, RMAN can read this file to determine which blocks actually need to be backed
up. These blocks can be read with direct access rather than full file scans, thus
dramatically reducing the disk I/O workload. This capability can also be initiated
from the SQL*Plus command line with an ALTER DATABASE command as shown
in Figure 19-3.
The Tablespaces Excluded From Whole Database Backup section lets you
nominate one or more tablespaces that should not be backed up during a whole
backup operation. Suitable candidates for this would be read-only tablespaces, or
perhaps tablespaces whose contents can be easily re-created by means other than a
restore. These might be tablespaces containing tables of temporary data, or data that
is regularly reloaded through batch operations, or even tablespaces dedicated to
indexes that can be regenerated quickly.
Figure 19-3 Enabling block change tracking for fast incremental backups
ch19.indd 10ch19.indd 10 7/6/2005 11:53:15 AM7/6/2005 11:53:15 AM

All-in-1 / Oracle Database 10g OCP Certification All-in-One / Watson, Bersinic / 5790-3
Chapter 19: Backing Up an Oracle Database
11
PART I
Finally, there is the Retention Policy section. RMAN can automatically remove
backups that it considers no longer necessary, according to a backup retention policy.
The default retention policy is that RMAN will make sure that it has one copy of
everything: all the datafiles and each archive log. Using various RMAN commands
that are dealt with in detail later, you can list the objects that RMAN thinks need
to be backed up (by default, those that have never been backed up, not even once)
or instruct RMAN to delete all backups that it considers redundant (by default, all
those where there is at least one more recent backup). A more sophisticated retention
policy option is the recovery window policy, where RMAN will make sure that it
has sufficient whole backups, incremental backups, and archivelog backups to
restore the database and recover it to any point in time in the past, by default,
thirty-one days.
Scheduling Automatic Backups
From the Database Control database home page, take the Maintenance tab
and then the Schedule Backup link in the Backup/Recovery section to reach the
Schedule Backup: Strategy window shown in Figure 19-4. Database Control can
establish a backup schedule using exclusively default settings; this is known as
the Oracle Suggested backup strategy. It will consist of a whole online backup
(assuming that your database is in archivelog mode; otherwise, the database will
have to be shut down) to the default disk destination, and then incremental backups,
also to disk, from then on. These backups will be scheduled to occur overnight.
Alternatively, you can choose to create a customized backup strategy, specifying
what to back up, where the backups should go, and when and how frequently
to make them.
Exercise 19-1: Running a Whole
Database Backup
Using Database Control, perform a full, whole, online backup of your database:
1. Connect using Database Control as user SYSTEM. From the database home
page, take the Schedule Backup link in the Maintenance section to reach the
Schedule Backup: Strategy window.
2. In the Backup Strategy drop-down box, select Customized and click the Whole
Database radio button. In the Host Credentials section, enter an operating
system username and password. Click Next to reach the Schedule Backup:
Options window.
3. Leave everything on defaults: a full, online backup with all archive logs.
Click Next to reach the Schedule Backup: Settings window.
ch19.indd 11ch19.indd 11 7/6/2005 11:53:16 AM7/6/2005 11:53:16 AM
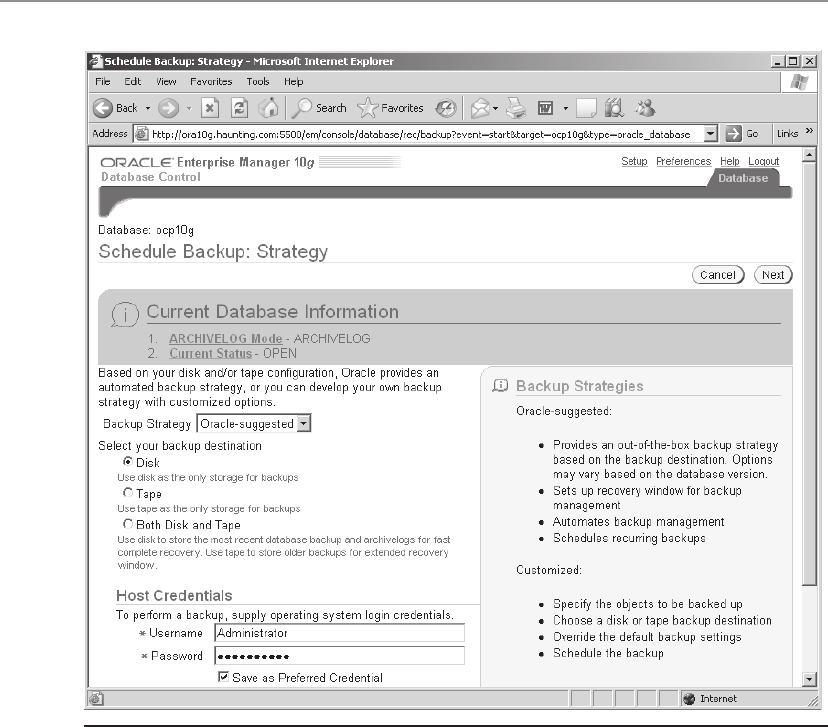
All-in-1 / Oracle Database 10g OCP Certification All-in-One / Watson, Bersinic / 5790-3
Oracle Database 10g OCP Certification All-in-One Exam Guide
12
4. Leave everything on default to schedule a disk backup to your flash
recovery area directory. Click Next to reach the Schedule Backup:
Schedule window.
5. Leave everything on default to run the backup immediately as a one-off job.
Click Next to reach the Schedule Backup: Review window.
6. Click the Submit Job button to launch the backup.
7. Click the View Job button to check how the job is running (see Figure 19-5),
and then refresh the browser window to monitor progress.
Figure 19-4 The Schedule Backup: Strategy window of Database Control
ch19.indd 12ch19.indd 12 7/6/2005 11:53:16 AM7/6/2005 11:53:16 AM
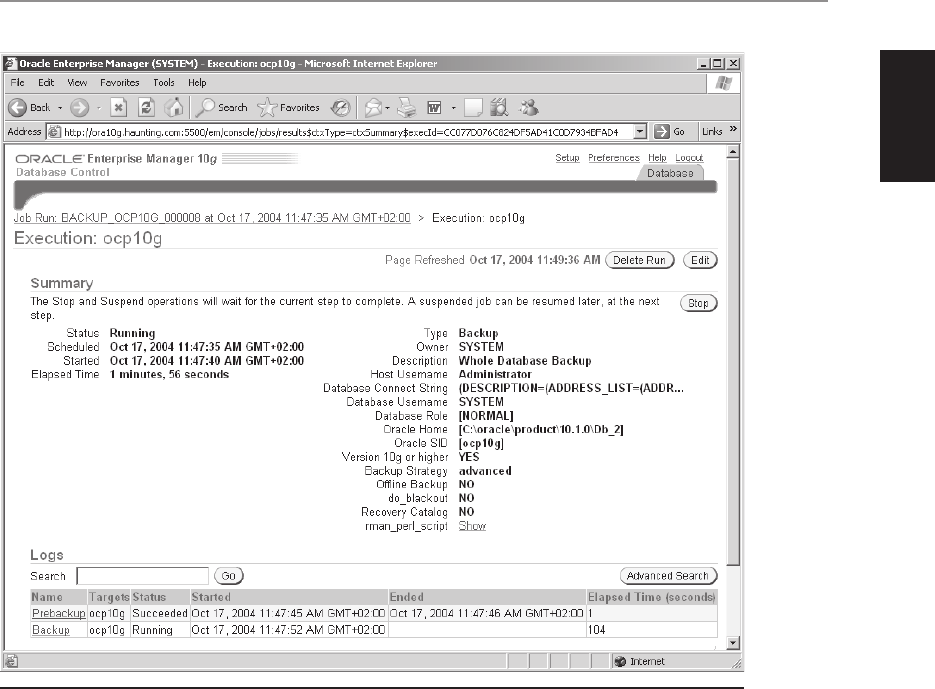
All-in-1 / Oracle Database 10g OCP Certification All-in-One / Watson, Bersinic / 5790-3
Chapter 19: Backing Up an Oracle Database
13
PART I
Controlfile Backup
You have already seen that the controlfile can be backed up as part of a whole database
backup and can also be included in any datafile partial backup or archivelog backup.
But the controlfile is sufficiently important that another backup option should also be
taken regularly. This is the backup to trace. If all copies of the controlfile are destroyed
(which, of course, should never happen if your multiplexing strategy is adequate),
then rather than restoring a backup of the controlfile, it will sometimes be easier to
re-create the controlfile. Furthermore, if any of the settings within the controlfile need
to be changed, you may want to re-create it anyway. Such settings include the limits
defined at database creation time, such as the maximum number of datafiles that the
database can ever have. The backup to trace will generate a controlfile creation script
with the CREATE CONTROLFILE command, which can either be run as written or
Figure 19-5 Backup job in progress
ch19.indd 13ch19.indd 13 7/6/2005 11:53:17 AM7/6/2005 11:53:17 AM

All-in-1 / Oracle Database 10g OCP Certification All-in-One / Watson, Bersinic / 5790-3
Oracle Database 10g OCP Certification All-in-One Exam Guide
14
edited if any settings need adjusting. The syntax of the CREATE CONTROLFILE
command is very similar to that of the CREATE DATABASE command.
The BACKUP CONTROLFILE TO TRACE command from SQL*Plus, or the
Database Control option, will create a file in the directory specified by the USER_
DUMP_DEST parameter. You should rename this file to something meaningful (such
as create_controlfile_17-10-2004.sql) and copy it to somewhere safe. Ideally, a new
trace file should be generated and saved after every structural change to the database.
So whenever you add or rename any datafiles or online redo log files, or you create or
drop a tablespace, you should back up the controlfile to trace again.
To back up the controlfile through Database Control, from the database home
page take the Administration tab. In the Storage section, take the Controlfiles link,
and then click the Backup To Trace button.
Exercise 19-2: Backing Up the Controlfile
to Trace with SQL*Plus
Using SQL*Plus, perform a controlfile backup-to-trace, and inspect the generated file.
1. Connect with SQL*Plus as user SYSTEM.
2. Issue this command:
SQL> alter database backup controlfile to trace;
3. Locate your user dump destination.
SQL> show parameters user_dump_dest;
4. From an operating system prompt, change to the user dump destination
directory.
5. Identify the newest file in the directory. For example, on Windows use
dir /od
or on Unix,
ls -ltr
The newly generated trace fi le will be the last fi le listed.
6. Open the trace file with any editor you please and study the contents. The
critical section is the CREATE CONTROLFILE command, which will resemble
this:
CREATE CONTROLFILE REUSE DATABASE "OCP10G" NORESETLOGS ARCHIVELOG
MAXLOGFILES 16
MAXLOGMEMBERS 3
MAXDATAFILES 100
MAXINSTANCES 8
MAXLOGHISTORY 454
LOGFILE
GROUP 1 (
'C:\ORACLE\PRODUCT\10.1.0\ORADATA\OCP10G\REDO01.LOG',
'C:\ORACLE\PRODUCT\10.1.0\ORADATA\OCP10G\REDO01B.LOG'
) SIZE 10M,
GROUP 2 (
'C:\ORACLE\PRODUCT\10.1.0\ORADATA\OCP10G\REDO02.LOG',
'C:\ORACLE\PRODUCT\10.1.0\ORADATA\OCP10G\REDO02B.LOG'
) SIZE 10M,
GROUP 3 (
ch19.indd 14ch19.indd 14 7/6/2005 11:53:18 AM7/6/2005 11:53:18 AM
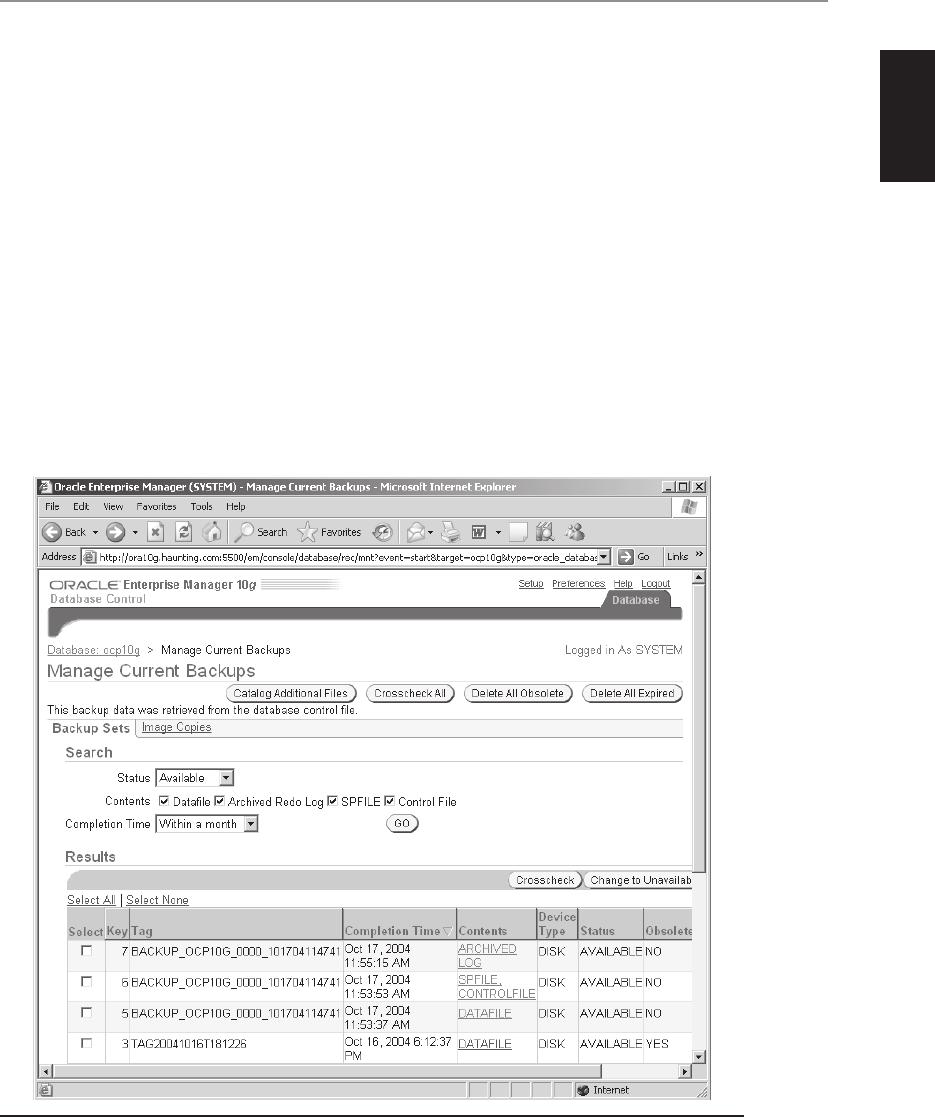
All-in-1 / Oracle Database 10g OCP Certification All-in-One / Watson, Bersinic / 5790-3
Chapter 19: Backing Up an Oracle Database
15
PART I
'C:\ORACLE\PRODUCT\10.1.0\ORADATA\OCP10G\REDO03.LOG',
'C:\ORACLE\PRODUCT\10.1.0\ORADATA\OCP10G\REDO03B.LOG'
) SIZE 10M
-- STANDBY LOGFILE
DATAFILE
'C:\ORACLE\PRODUCT\10.1.0\ORADATA\OCP10G\SYSTEM01.DBF',
'C:\ORACLE\PRODUCT\10.1.0\ORADATA\OCP10G\UNDOTBS01.DBF',
'C:\ORACLE\PRODUCT\10.1.0\ORADATA\OCP10G\SYSAUX01.DBF',
'C:\ORACLE\PRODUCT\10.1.0\ORADATA\OCP10G\USERS01.DBF',
'C:\ORACLE\PRODUCT\10.1.0\ORADATA\OCP10G\EXAMPLE01.DBF',
'C:\ORACLE\PRODUCT\10.1.0\ORADATA\OCP10G\UNDO2-01.DBF'
CHARACTER SET WE8MSWIN1252
;
Managing RMAN Backups
RMAN knows what backups it has made and where it has put them. You can find out
too. From the Maintenance tab on the database home page, take the Manage Current
Backups link in the Backup/Recovery section to bring up the page shown in Figure 19-6.
Figure 19-6 Manage Current Backups with Database Control
ch19.indd 15ch19.indd 15 7/6/2005 11:53:19 AM7/6/2005 11:53:19 AM

All-in-1 / Oracle Database 10g OCP Certification All-in-One / Watson, Bersinic / 5790-3
Oracle Database 10g OCP Certification All-in-One Exam Guide
16
The figure shows summary information of four backup sets, identified by keys 3, 5,
6, and 7. Backup sets 5 and 6 together make a whole backup: datafiles, controlfile,
and spfile. This is an example of how the Database Control interface gives different
results from using RMAN from the command line: Database Control will not mix
file types in one backup set, but from the command line this is possible. Backup
set 3, which was made earlier, contains one or more datafiles. Note that the column
“Obsolete” marks backup set 3 as being obsolete; this is because the default retention
policy requires only one copy of each object, so the whole backup rendered the earlier
partial backup redundant. The column “Pieces” (not shown on the figure because of
scrolling; it is off to the right) gives details of the physical files that make up each
backup set.
The buttons across the top of the window give access to RMAN’s maintenance
commands. Catalog Additional Files lets you tell RMAN about backups made with
operating system utilities. It is thus possible to have a backup strategy that mixes
operating system backups with RMAN backups. Crosscheck All instructs RMAN to
check that the backup sets and image copies it has created are in fact still available.
It might be, for example, that your tape library automatically deletes files that are
a certain age. If this happens, RMAN needs to know about it. During a cross-check,
RMAN will read all the tape and disk directories to confirm that the pieces it put
there really do still exist; it will not actually read the files and check that they are
valid. Related to this is Delete All Expired, which will remove all references to any
backups that the cross-check found to be missing. Delete All Obsolete will delete
all the backups that are no longer required according to the retention policy. In
Figure 19-6, this would mean the backup with key 3.
The Default Backup Destination
The flash recovery area is disk-based storage that Oracle 10g can use as a default
location for all recovery-related data. This data can include multiplexed copies of the
controlfile and online redo log files; an archive log destination; RMAN backup sets
and image copies; and flashback logs, which are to be detailed in Chapter 28. The
flash recovery area is controlled by two parameters: DB_RECOVERY_FILE_DEST and
DB_RECOVERY_FILE_DEST_SIZE. Neither parameter has a default value, though if
you create your database with DBCA, DBCA will set DB_RECOVERY_FILE_DEST to
the flash_recovery_area directory in your ORACLE_HOME, and DB_RECOVERY_
FILE_DEST_SIZE to two gigabytes. Both parameters are dynamic: you can change
the flash recovery areas to another directory at any time, and you can also change the
maximum size that it is allowed to grow to.
Once the volume of data written to the flash recovery area has reached the size
specified, you may have problems. For example, if the flash recovery area is full and
a log switch requires an archive to the flash recovery area, then the archive operation
will fail. Eventually, this will cause your whole database to hang. Remember that in
archivelog mode, Oracle is not allowed to overwrite an online log file that has not
been archived. It is therefore important to monitor the flash recovery area; you can
do this with Database Control as shown in Figure 19-7.
ch19.indd 16ch19.indd 16 7/6/2005 11:53:19 AM7/6/2005 11:53:19 AM
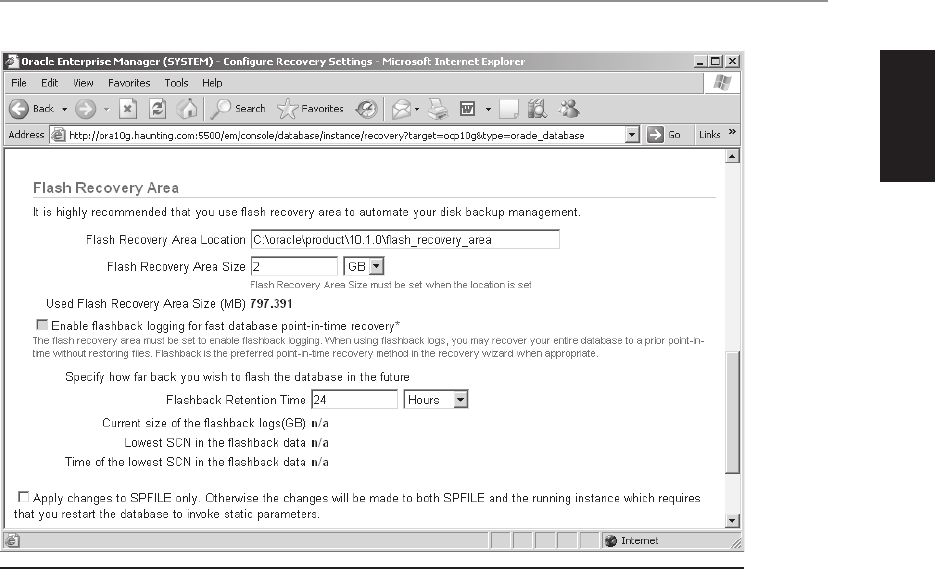
All-in-1 / Oracle Database 10g OCP Certification All-in-One / Watson, Bersinic / 5790-3
Chapter 19: Backing Up an Oracle Database
17
PART I
The same information can be obtained by querying the view V$RECOVERY_FILE_
DEST, as follows:
SQL> select * from v$recovery_file_dest;
NAME SPACE_LIMIT SPACE_USED
--------------------------------------------- ----------- ----------
SPACE_RECLAIMABLE NUMBER_OF_FILES
----------------- ---------------
C:\oracle\product\10.1.0\flash_recovery_area 2147483648 836124672
4268032 5
This query shows the location of the flash recovery area, and that its maximum
size is two gigabytes, of which about eight hundred megabytes are being used.
There are just five files in the recovery area, but some of them are redundant. These
redundant files are taking up about four megabytes of space, which can be
overwritten if necessary. As files in the flash recovery area become redundant,
they will be replaced by newer files as the space is needed. Both RMAN and the
archiver process are intelligent enough to realize when a file in the flash recovery
area is no longer needed and can be overwritten.
Figure 19-7 Monitoring the flash recovery area with Database Control
ch19.indd 17ch19.indd 17 7/6/2005 11:53:20 AM7/6/2005 11:53:20 AM

All-in-1 / Oracle Database 10g OCP Certification All-in-One / Watson, Bersinic / 5790-3
Oracle Database 10g OCP Certification All-in-One Exam Guide
18
Chapter Review
This chapter is a basic introduction to the use of RMAN for backup. There is much
more to come. RMAN is Oracle’s recommended tool for backup and restore. If you
wish, you can use operating system utilities as well or instead; however, RMAN is
superior in many respects, particularly if it is integrated with an automated tape
library. Backups can be online or offline, whole or partial, and (provided they are
done with RMAN) full or incremental. All these options are available if the database
is in archivelog mode, but in noarchivelog mode you are restricted to offline whole
backups.
RMAN can back up datafiles, the controlfile, archivelogs, and the spfile. You never
back up online log files. The controlfile requires special consideration for backup and
restore, and there is a separate command to back it up: the ALTER DATABASE BACKUP
CONTROLFILE command.
RMAN’s default destination is the flash recovery area. If you decide to use this
default, you must monitor the usage to ensure that there is adequate space, particularly
if you are also archiving to it.
Questions
1. What file types can be backed up by RMAN? (Choose four answers.)
A. Archive log files
B. Controlfile
C. Dynamic parameter file
D. Online log files
E. Password file
F. Permanent tablespace datafiles
G. Static parameter file
H. Temporary tablespace tempfiles
2. If your database is in noarchivelog mode, which of the following is possible?
(Choose the best answer.)
A. Online backups
B. Partial backups
C. Incremental backups
D. All of the above, but only if you use RMAN
3. Why are RMAN backup sets smaller than image copies? (Choose the
best answer.)
A. They always use compression.
B. They never include empty blocks.
ch19.indd 18ch19.indd 18 7/6/2005 11:53:21 AM7/6/2005 11:53:21 AM

All-in-1 / Oracle Database 10g OCP Certification All-in-One / Watson, Bersinic / 5790-3
Chapter 19: Backing Up an Oracle Database
19
PART I
C. They do not include tempfiles.
D. They can be written directly to tape.
4. Which of the following statements is true about putting multiple files in one
backup set? (Choose three answers.)
A. Each file will be stored in its own piece.
B. The files in one set must be of the same type.
C. You can place a limit on the size of the pieces.
D. You can place a limit on the size of the backup set.
E. It is impossible to predict the size of the backup set.
F. You cannot store full and incremental backups in one set.
5. You are configuring RMAN backup settings in Database Control. Which of the
following is true? (Choose the best answer.)
A. The degree of parallelism cannot be greater than the number of CPUs.
B. The host credentials must be the login for the Oracle owner.
C. You must enable block change tracking if you want to do incremental
backups.
D. You can specify that backup sets should be compressed.
6. You need to back up the controlfile. What will work? (Choose the best
answer.)
A. Unless you are in archivelog mode, RMAN cannot include it in a
backup set.
B. The ALTER DATABASE BACKUP CONTROLFILE TO TRACE command
will make an image copy of the controlfile.
C. You cannot back up the controlfile; it is protected by multiplexing.
D. None of the above.
7. What is the “Oracle Suggested” backup strategy? (Choose the best answer.)
A. Full backup once a week, partial backup once a day
B. Image copies once a week, incrementals every day
C. Whole backup once a week, incrementals and archive logs every day
D. One whole backup, incrementals thereafter
8. Which tablespaces can safely be excluded from RMAN backups? (Choose the
best answer.)
A. Temporary tablespaces
B. Undo tablespaces
C. Read-only tablespaces
D. Index tablespaces
ch19.indd 19ch19.indd 19 7/6/2005 11:53:21 AM7/6/2005 11:53:21 AM

All-in-1 / Oracle Database 10g OCP Certification All-in-One / Watson, Bersinic / 5790-3
Oracle Database 10g OCP Certification All-in-One Exam Guide
20
9. What is true about the cross-check command? (Choose the best answer.)
A. A cross-check will check the validity of the backup pieces.
B. A cross-check will delete references to files that no longer exist.
C. A cross-check will verify the existence of backup set pieces.
D. Cross-checking works only with backup sets, not image copies.
10. If you instruct RMAN to optimize backups, what is the result? (Choose the
best answer.)
A. Datafiles will be backed up only if the retention policy requires it.
B. Datafiles will be backed up only if they have been changed since the last
backup.
C. Optimization cannot be used with incrementals.
D. Optimization will have no effect on archivelog backups.
11. Your flash recovery area is full, and you are using it both for backups and as
your archive log destination. What will happen? (Choose the best answer.)
A. The database will hang when the flash recovery area is full.
B. If you have set it to auto-extend, you will not have a problem.
C. You cannot resize the flash recovery area online.
D. The effect will depend on your RMAN retention policy.
12. You want to make a consistent backup. How can you do this? (Choose the
best answer.)
A. You can do this online, if the database is in archivelog mode.
B. You must close the database first.
C. You can do this with operating system commands, if you put the
tablespaces into backup mode first.
D. Perform a full, whole, backup and then apply incrementals to
synchronize it.
13. What must you do before you can use RMAN with a tape library? (Choose the
best answer.)
A. Install the tape library driver supplied by Oracle.
B. Migrate all your disk backups to tape.
C. Obtain the appropriate driver from your hardware vendor.
D. Transition the database to archivelog mode.
14. Which of the following types of backup can only be done with RMAN, not
with operating system commands? (Choose the best answer.)
A. Cold
B. Full
ch19.indd 20ch19.indd 20 7/6/2005 11:53:22 AM7/6/2005 11:53:22 AM

All-in-1 / Oracle Database 10g OCP Certification All-in-One / Watson, Bersinic / 5790-3
Chapter 19: Backing Up an Oracle Database
21
PART I
C. Hot
D. Incremental
E. Partial
F. Whole
15. Which is the best description of a backup that RMAN would consider to be
expired? (Choose the best answer.)
A. A backup that is no longer needed according to the retention policy
B. A backup in the flash recovery area that can be overwritten
C. A backup that has failed on cross-check
D. A backup that has become invalid
Answers
1. A, B, C, and F. Of the file types listed, these are the only files RMAN can back-
up. Note that it can also bac-kup the spfile, and its own backup sets.
2. C. Incremental backups are possible in noarchivelog mode, but of course only
with RMAN. Partial or online backups cannot be done, no matter what tool
you use.
3. B. RMAN skips empty blocks as it backs up datafiles.
4. C, E, and F. You can decide the size through a setting in the Database
Control Configure Backup Settings window. You can’t predict the size of the
backup set because the skipping of unused blocks makes the output set size
undeterminable. And the syntax does not permit storing full and incremental
backups in one set.
5. D. Compression is available as a Device Setting option in the Configure
Backup Settings window, which will be applied as a default to all backup
operations; it can be overridden for any particular backup.
6. D. None of the preceding choices are correct. A is wrong, because you can
always make offline backups. B is wrong because the ALTER DATABASE
BACKUP CONTROLFILE TO TRACE command will make a trace file, not an
image copy. C is wrong because you can and should back up the controlfile;
it is online logs that cannot be backed up.
7. D. The Oracle Suggested strategy follows default settings, which call for a whole
backup every weekend followed by incremental backups every weekday night.
8. C. Tablespaces, such as read-only tablespaces that have not changed since the
last backup, can safely be excluded from regular backups, though they must
be backed up once.
ch19.indd 21ch19.indd 21 7/6/2005 11:53:22 AM7/6/2005 11:53:22 AM

All-in-1 / Oracle Database 10g OCP Certification All-in-One / Watson, Bersinic / 5790-3
Oracle Database 10g OCP Certification All-in-One Exam Guide
22
9. C. During a cross-check, RMAN will read all the tape directories to confirm
that the pieces exist, and for disk backups, it will read the file headers. In
neither case will it scan the files themselves to confirm that they are actually
valid.
10. B. Optimization consists in backing up only files that have changed. This
works independently of the retention policy and the full/incremental
distinction.
11. D. It may well be that there are files that RMAN considers to be obsolete,
in which case they will be overwritten as required.
12. B. A consistent backup is one made with the datafiles closed.
13. C. It is the tape library vendor who supplies the driver, not Oracle.
14. D. Incrementals are an RMAN-only capability; all the others can be done with
operating system utilities.
15. C. If a cross-check finds that a backup is missing, it will be marked as expired.
ch19.indd 22ch19.indd 22 7/6/2005 11:53:23 AM7/6/2005 11:53:23 AM

All-in-1 / Oracle Database 10g OCP Certification All-in-One / Watson, Bersinic / 5790-3
CHAPTER 20
Recovering Oracle Databases
In this chapter you will learn how to
• Recover from loss of a controlfile
• Recover from loss of a redo logfile
• Recover from loss of a system-critical datafile
• Recover from loss of a nonsystem-critical datafile
1
ch20.indd 1ch20.indd 1 6/16/2005 2:56:23 PM6/16/2005 2:56:23 PM

All-in-1 / Oracle Database 10g OCP Certification All-in-One / Watson, Bersinic / 5790-3
Oracle Database 10g OCP Certification All-in-One Exam Guide
2
It is impossible to corrupt an Oracle database. The mechanism of instance recovery,
where redo and undo are used to return the database to a consistent state after an
instance failure, guarantees that. It is, however, possible to lose data following media
failure—if the DBA has not taken appropriate precautions. The precautions are simple:
to run the database in archivelog mode; to multiplex the controlfile, the online logfiles,
and the archive logfiles; and to back up datafiles and archivelog files. Following media
failure, the backups and the archivelogs can be used to recover the database up to the
point of the failure, without loss of even one committed row of data. But whereas
instance recovery is automatic—indeed, unavoidable—media recovery is a manual
process. This chapter will go through elementary recovery techniques. More advanced
techniques, applicable to more complex problems, will be covered in later chapters.
Recovery Structures and Processes
Following media failure, there are different techniques for recovery, depending on
which files were damaged. The database consists of three file types: the controlfile,
the online redo logfiles, and the datafiles. Recovery from damage to the controlfile
or the online redo logfiles is a trivial exercise, provided that they were multiplexed.
Recovery from damage to one or more datafiles is more complex, but still
straightforward.
A damaged controlfile can be replaced with a multiplexed copy or re-created with
a CREATE CONTROLFILE command. In extreme circumstances, it can be restored
from a backup, but this should never be necessary following media failure, if you have
followed a suitable multiplexing strategy.
A damaged online redo logfile can be regenerated. Oracle provides an ALTER
DATABASE CLEAR LOGFILE GROUP # command (where # is the number of the group
with a damaged member), which will delete and re-create the members of a logfile group.
If the database is running in archivelog mode (and it should be), the logfile group must
have been archived before Oracle will permit execution of the clear logfile command.
This is because clearing an unarchived logfile group would mean that the archivelog
stream would be missing one logfile, and therefore that recovery would not be possible.
There is a variation on the command, ALTER DATABASE CLEAR UNARCHIVED
LOGFILE GROUP #, which will delete and re-create a logfile even if it has not been
successfully archived, but after executing this command it is absolutely vital to perform
a whole database backup.
A damaged datafile requires use of backups and archivelogs. Following media
failure resulting in damage to a datafile, there are two options for recovery: complete
recovery, meaning no loss of data, and incomplete recovery, where you deliberately
lose work by stopping the recovery process before it has completed. Incomplete
recovery is an advanced procedure dealt with in Chapter 27. Complete recovery is
a two-stage process. First, the damaged file must be restored from a backup. Second,
the restored file must be recovered, by using redo information in the archivelogs to
bring it forward in time until it is synchronized with the rest of the database.
ch20.indd 2ch20.indd 2 6/16/2005 2:56:36 PM6/16/2005 2:56:36 PM

All-in-1 / Oracle Database 10g OCP Certification All-in-One / Watson, Bersinic / 5790-3
Chapter 20: Recovering Oracle Databases
3
PART I
EXAM TIP In the Oracle environment, “restore” means to replace a damaged
or missing file with a backup; “recover” means to synchronize the file with the
rest of the database by use of archivelogs.
Since online redo logs are never backed up by RMAN, RMAN cannot be used to
recover from damage to them; repairing online logfiles damaged by media failure
can by done only with SQL*Plus, or through Database Control. The controlfile and
datafiles can be restored and recovered by RMAN; indeed, if you backed them up into
backup sets, RMAN is your only option.
To open a database, all the controlfile copies, at least one member of each online
logfile group, and all the online datafiles must be present and synchronized. If,
during a startup, SMON finds that this is not the case, the startup will not complete.
If a controlfile copy is damaged or missing, the startup will stop in NOMOUNT mode.
A message is written out to the alert log detailing which copy (or copies) of the
controlfile is damaged. Assuming that the controlfiles are fine, SMON proceeds to
open the database. During this phase, it checks the headers of all the online datafiles.
If any are missing or damaged, appropriate error messages are written out to the alert
log, and the database remains in mount mode. If all the online files are present and
not damaged, but one or more of them are not synchronized, SMON will attempt to
synchronize them by using the online redo logs. This is the process of instance recovery,
detailed in Chapter 18, and will happen automatically. If the online logs required are
not available, then the database cannot be opened. If one or more datafiles have been
restored from a backup, they will almost certainly be so far out-of-date that the online
redo logs will not go far enough back in time to recover them: this is when you must
use archive logfiles for the recovery, which is a procedure that must be initiated
manually—from SQL*Plus if you are backing up with operating system commands,
or with RMAN if (as Oracle strongly advises) you have committed to using RMAN for
your backups.
If the media damage occurs while the database is open, the effect will depend on
which files were affected. Damage to any controlfile copy will result in the instance
terminating immediately. Damage to a datafile that is part of the SYSTEM tablespace
or the active undo tablespace will have the same effect. But damage to an online log
will not terminate the instance, as long as there is a surviving member of the logfile
group. In fact, the instance will continue to function, and your end users will not even
notice. But error messages will be written out to the alert log, and the situation should
be corrected without delay; such corrections can and should be done online, while
people continue to work. Damage to a datafile that is part of a tablespace other than
SYSTEM or the active undo tablespace will also not result in an instance failure, but
clearly the end users may have problems, because a part of the database will be missing.
How your application will react to this is unpredictable—it will depend completely
on how the application is structured. The restore and recovery of damaged datafiles
can be done online, provided that they are not datafiles belonging to SYSTEM or
the undo tablespace. Finally, damage to the tempfiles that make up your temporary
tablespaces may not be noticed by the end users at all. Oracle does not validate the
ch20.indd 3ch20.indd 3 6/16/2005 2:56:36 PM6/16/2005 2:56:36 PM

All-in-1 / Oracle Database 10g OCP Certification All-in-One / Watson, Bersinic / 5790-3
Oracle Database 10g OCP Certification All-in-One Exam Guide
4
existence of tempfiles until they are needed, and a well-tuned database may never
need them. This means that tempfiles can be missing for some time before there is
any noticeable effect. It also means that a damaged tempfile can be dropped and
re-created at any time, unless it happens to be in use at that moment.
As with backups, a restore can be done with RMAN or with operating system
utilities. But if your RMAN backups were to backup sets, rather than as image copies,
the restore can be done only with RMAN: there is no other way to extract datafiles
from a backup set. Recovery after a restore can be carried out with SQL*Plus commands
or with RMAN, but the same restriction applies: only RMAN can extract archivelogs
from a backup set.
Recovery from Media Failure
Restore and recovery following media failure is covered in much greater detail in later
chapters and the second OCP examination, but it is necessary to know the rudiments
of recovery from simple problems for the first examination too. These simple problems
are loss of one copy of a multiplexed controlfile and an online redo logfile, and
complete recovery following loss of critical and noncritical datafiles.
Recovery from Loss of a Multiplexed Controlfile
As long as a surviving multiplexed copy of the controlfile exists, recovery from loss of
a controlfile is simple. Just replace it with a surviving copy of the controlfile. To restore
the damaged or missing controlfile copy from a backup would be useless in these
circumstances, because all copies of the controlfile must be identical; clearly, a restored
copy would not be synchronized with the surviving copies, nor with the rest of the
database.
Virtually the moment the damage occurs, the instance will terminate. As ever, the
DBA’s first reaction to a crashed instance should be to attempt a startup. This will fail,
in NOMOUNT mode, with an appropriate error message. The alert log will state which
controlfile copy is missing, and also—in the section listing the nondefault initialization
parameters—how many controlfiles there actually are, and where they are. At this
point, you have three options. First, you could edit the parameter file to remove the
reference to the missing or damaged controlfile, as shown in Figure 20-1.
This is fine, but your database will now be running on one fewer multiplexed
copies, which will presumably be in breach of your security guidelines. A better option
is therefore to replace the damaged file with a copy made from a surviving copy or
indeed to change the CONTROL_FILES initialization parameter to replace the
reference to the damaged file with a reference to a brand new file, and copy the
surviving controlfile to that.
EXAM TIP Recovering from loss of a controlfile will entail downtime. It
cannot be done online.
ch20.indd 4ch20.indd 4 6/16/2005 2:56:36 PM6/16/2005 2:56:36 PM
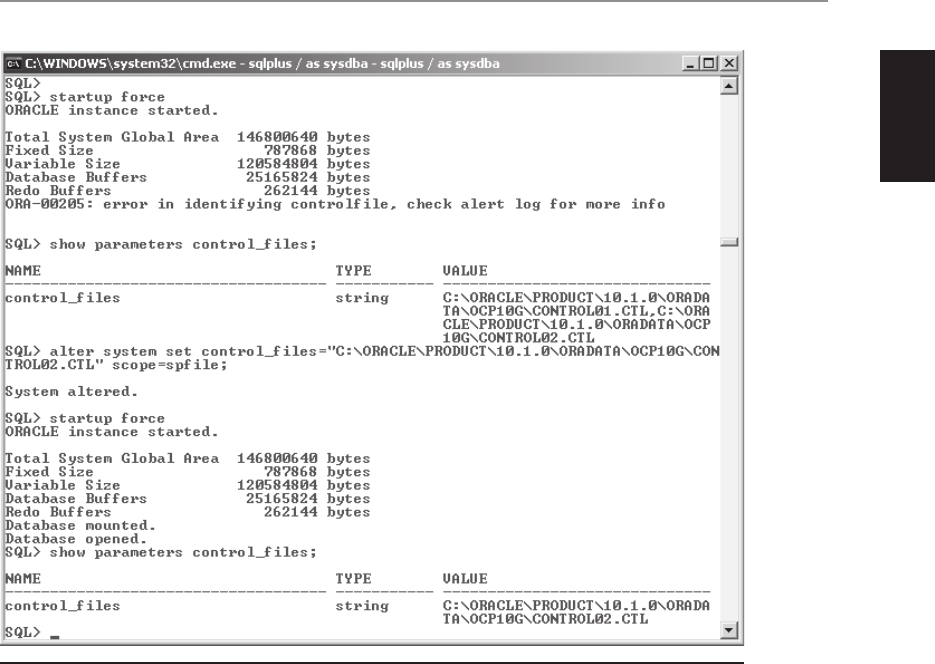
All-in-1 / Oracle Database 10g OCP Certification All-in-One / Watson, Bersinic / 5790-3
Chapter 20: Recovering Oracle Databases
5
PART I
Exercise 20-1: Recovering from Loss
of a Controlfile
In this exercise, you will simulate the loss of a multiplexed controlfile and replace
it with a copy.
1. Connect to your database with SQL*Plus, and ensure that your controlfile
is multiplexed with this query:
SQL> select * from v$controlfile;
This query must return at least two rows. If it does not, multiplex your
controlfile by following the instructions given in Chapter 18, illustrated
in Figure 18-5.
2. Simulate damage to a controlfile by crashing the database and renaming
one of your controlfiles. Note that on Windows you may have to stop the
Figure 20-1 Removing the reference to a damaged controlfile
ch20.indd 5ch20.indd 5 6/16/2005 2:56:37 PM6/16/2005 2:56:37 PM

All-in-1 / Oracle Database 10g OCP Certification All-in-One / Watson, Bersinic / 5790-3
Oracle Database 10g OCP Certification All-in-One Exam Guide
6
Windows service before Windows will let you rename the file, and start it
again afterward.
3. Issue a startup command. The startup will stop in nomount mode, with an
“ORA-00205: error in identifying controlfile, check alert log for more info”
error message.
4. Copy your surviving controlfile to the name and location of the file you
renamed.
5. Issue another startup command, which will be successful.
TIP Many DBAs do not like to copy a surviving controlfile over a damaged
one, because it is all too easy to copy accidentally the damaged controlfile
over the surviving one. It is safer to copy the surviving controlfile to a new file,
and edit the control_files parameter to change the reference to the damaged
file to the new file.
Recovery from Loss of a Multiplexed
Online Redo Log File
Provided that the online redo logfiles are multiplexed, loss of one member will not
cause any downtime, but there will be messages in the alert log telling you that there
is a problem. If you can stand the downtime, you can shut down the database and
copy a surviving member of the group over the damaged or missing member, but
clearly this is not an option if the database is to remain open.
For open recovery, use the ALTER DATABASE CLEAR LOGFILE command to delete
the existing files (or at least, those that still exist) and create new ones as shown in
Figure 20-2. This can be done only if the logfile is inactive. If you attempt to clear the
current logfile group, or the previous one that is still active, you will receive an error.
Furthermore, if the database is in archivelog mode, the logfile group must have been
archived.
EXAM TIP Recovery from loss of a multiplexed online redo logfile can
be done while the database is open, and therefore does not entail any
downtime.
Exercise 20-2: Recovering a Lost Multiplexed
Online Log File
This exercise will simulate loss of a logfile member and then, while the database is
open, diagnose the problem and clear it.
ch20.indd 6ch20.indd 6 6/16/2005 2:56:37 PM6/16/2005 2:56:37 PM
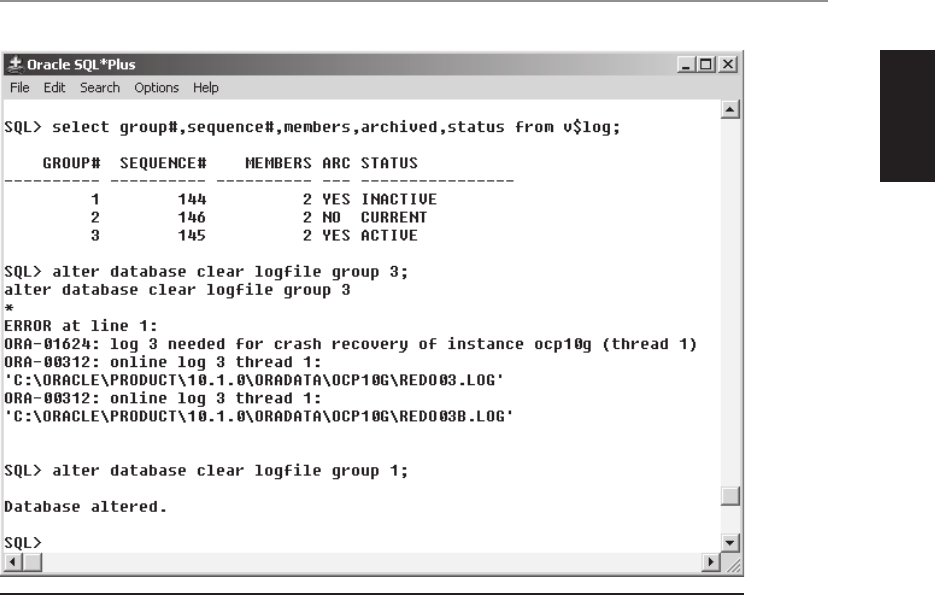
All-in-1 / Oracle Database 10g OCP Certification All-in-One / Watson, Bersinic / 5790-3
Chapter 20: Recovering Oracle Databases
7
PART I
1. Using SQL*Plus, connect to your database as user SYS with SYSDBA privilege.
SQL> connect / as sysdba;
2. Observe the state of your online logs with the following query:
SQL> select group#,status,member from v$logfile order by group#;
GROUP# STATUS MEMBER
----------------------------------------------------------------------
1 C:\ORACLE\PRODUCT\10.1.0\ORADATA\OCP10G\REDO01.LOG
1 C:\ORACLE\PRODUCT\10.1.0\ORADATA\OCP10G\REDO01B.LOG
2 C:\ORACLE\PRODUCT\10.1.0\ORADATA\OCP10G\REDO02.LOG
2 C:\ORACLE\PRODUCT\10.1.0\ORADATA\OCP10G\REDO02B.LOG
3 C:\ORACLE\PRODUCT\10.1.0\ORADATA\OCP10G\REDO03.LOG
3 C:\ORACLE\PRODUCT\10.1.0\ORADATA\OCP10G\REDO03B.LOG
Confirm that you do have at least two members of each group and that all the
members have the STATUS column on NULL, as in the example here. If any
groups do not have two members, multiplex them immediately by following
the instructions given in Chapter 18, Exercise 18-2. If any members do not
have a STATUS of NULL, execute the command
SQL> alter system switch logfile;
a few times to cycle through the groups, and then re-run the query.
Figure 20-2 Clearing a logfile group with SQL*Plus
ch20.indd 7ch20.indd 7 6/16/2005 2:56:37 PM6/16/2005 2:56:37 PM

All-in-1 / Oracle Database 10g OCP Certification All-in-One / Watson, Bersinic / 5790-3
Oracle Database 10g OCP Certification All-in-One Exam Guide
8
3. Shut down the database:
SQL> shutdown immediate;
4. Using an operating system command, simulate media failure by deleting one
of the members. For example, on Windows,
SQL> host del C:\ORACLE\PRODUCT\10.1.0\ORADATA\OCP10G\REDO01.LOG
or on Unix,
SQL> host rm /oracle/product/10.1.0/oradata/ocp10g/redo01.log
5. Start up the database and simulate user activity by performing a few log
switches.
SQL> startup;
SQL> alter system switch logfile;
SQL> alter system switch logfile;
SQL> alter system switch logfile;
6. Check the state of your logfile members.
SQL> select group#,status,member from v$logfile order by group#;
GROUP# STATUS MEMBER
----------------------------------------------------------------------
1 INVALID C:\ORACLE\PRODUCT\10.1.0\ORADATA\OCP10G\REDO01.LOG
1 C:\ORACLE\PRODUCT\10.1.0\ORADATA\OCP10G\REDO01B.LOG
2 C:\ORACLE\PRODUCT\10.1.0\ORADATA\OCP10G\REDO02.LOG
2 C:\ORACLE\PRODUCT\10.1.0\ORADATA\OCP10G\REDO02B.LOG
3 C:\ORACLE\PRODUCT\10.1.0\ORADATA\OCP10G\REDO03.LOG
3 C:\ORACLE\PRODUCT\10.1.0\ORADATA\OCP10G\REDO03B.LOG
Note that the missing file is now marked as being INVALID.
7. Connect to your database as user SYSTEM, using Database Control.
8. From the database home page, take the Administration tab, and then the Redo
Logs link in the Storage section to bring up the window shown in Figure 20-3.
9. If the group with the problem (group number 1 in the example shown) is
not INACTIVE, use the Switch Logfile choice in the Actions drop-down list
and click Go to force log switches until it is inactive.
10. Clear the logfile group by selecting its radio button using the Clear Logfile
choice in the Actions drop-down list, and clicking Go.
11. In your SQL*Plus session, confirm that the problem has been fixed.
SQL> select group#,status,member from v$logfile order by group#;
GROUP# STATUS MEMBER
---------- ------- ----------------------------------------------------
1 C:\ORACLE\PRODUCT\10.1.0\ORADATA\OCP10G\REDO01.LOG
1 C:\ORACLE\PRODUCT\10.1.0\ORADATA\OCP10G\REDO01B.LOG
2 C:\ORACLE\PRODUCT\10.1.0\ORADATA\OCP10G\REDO02.LOG
2 C:\ORACLE\PRODUCT\10.1.0\ORADATA\OCP10G\REDO02B.LOG
3 C:\ORACLE\PRODUCT\10.1.0\ORADATA\OCP10G\REDO03.LOG
3 C:\ORACLE\PRODUCT\10.1.0\ORADATA\OCP10G\REDO03B.LOG
ch20.indd 8ch20.indd 8 6/16/2005 2:56:38 PM6/16/2005 2:56:38 PM

All-in-1 / Oracle Database 10g OCP Certification All-in-One / Watson, Bersinic / 5790-3
Chapter 20: Recovering Oracle Databases
9
PART I
Recovery from Loss of Datafiles
Media failure resulting in damage to one or more datafiles requires use of restore and
recover routines: a backup of the datafile must be restored, and then archive redo logs
applied to it to synchronize it with the rest of the database. There are various options
available, depending on whether the database is in archivelog mode or not, and
whether the file damaged is one that is critical to Oracle’s running or a noncritical
file containing “only” user data.
Recovery of Datafiles in Noarchivelog Mode
There is no concept of recovery when in noarchivelog mode, because the archivelog
files needed for recovery do not exist. Therefore, only a restore can be done. But if
a restored datafile is not synchronized with the rest of the database by application of
Figure 20-3 Redo logs, as shown in Database Control
ch20.indd 9ch20.indd 9 6/16/2005 2:56:38 PM6/16/2005 2:56:38 PM

All-in-1 / Oracle Database 10g OCP Certification All-in-One / Watson, Bersinic / 5790-3
Oracle Database 10g OCP Certification All-in-One Exam Guide
10
archive redo logfiles, it cannot be opened. The only option when in noarchivelog
mode is therefore to restore the whole database: all the datafiles, and the controlfile.
Provided that all these files are restored from a whole offline backup, after the restore
you will have a database where all these files are synchronized, and thus a database
that can be opened. But you will have lost all the work done since the backup was
taken.
Once the full restore has been done, the database will still be missing its online
redo logfiles, because they were never backed up. For this reason, the post-restore
startup will fail, with the database being left in mount mode. While in mount mode,
issue ALTER DATABASE CLEAR LOGFILE GROUP <group number> commands to re-
create all the logfile groups. Then open the database. If you do the restore through the
Database Control interface to RMAN, this process will be fully automatic.
In noarchivelog mode, loss of any one of possibly hundreds of datafiles can be
corrected only by a complete restore of the last backup. The whole database must be
taken back in time, with the loss of user’s work. Furthermore, that last backup must
have been a whole, offline backup, which will have entailed downtime. It should by
now be apparent that the decision to operate your database in noarchivelog mode
should not be taken lightly.
EXAM TIP If in noarchivelog mode, your only option following loss of
a datafile is a whole database restore. There can be no recovery.
Recovery of a Noncritical File in Archivelog Mode
In an Oracle database, the datafiles that make up the SYSTEM tablespace and the
currently active undo tablespace (as specified by the UNDO_TABLESPACE parameter)
are considered to be “critical.” Damage to any of these will result in the instance
terminating immediately. Furthermore, the database cannot be opened again until the
damage has been repaired by a restore and recover exercise. Damage to the other
datafiles, which make up tablespaces for user data, will not as a rule result in the
instance crashing. Oracle will take the damaged files offline, making their contents
inaccessible, but the rest of the database should remain open. How your application
software will react to this will depend on how it is structured and written.
TIP Is it safe to run your application with part of the database unavailable?
This is a matter for discussion with your developers and business analysts,
and an important point to consider when deciding on how to spread your
segments across tablespaces.
If your backups were done with RMAN, the restore and recovery operation of a
damaged datafile will be completely automatic. RMAN will carry out the restore in the
most efficient manner possible, making intelligent use of full and incremental backups
and then applying the necessary archivelogs. If RMAN is linked to a tape library, it will
load the tapes automatically to extract the files it needs.
ch20.indd 10ch20.indd 10 6/16/2005 2:56:38 PM6/16/2005 2:56:38 PM

All-in-1 / Oracle Database 10g OCP Certification All-in-One / Watson, Bersinic / 5790-3
Chapter 20: Recovering Oracle Databases
11
PART I
The restore and complete recovery of a datafile can succeed only if all the archive
logfiles generated since the last backup of the datafile are available. Either they must
still be on disk in the archivelog destination directories, or if they have been migrated
to tape, they will be restored during the recovery operation. RMAN will do the extract
from a backup set and restore to disk automatically. If for some reason an archive
logfile is missing or corrupted, the recovery will fail, but since archivelog destinations
and RMAN backup sets can and should be multiplexed, you should never find yourself
in this situation. If you do, the only option is a complete restore, and an incomplete
recovery up to the missing archive, as described in Chapter 27, which will mean loss
of all work done subsequently.
Exercise 20-3: Recovering from Loss
of a Noncritical Datafile
First, create a tablespace and a segment within it, and back it up. Then simulate
damage to the datafile. Diagnose the problem, and resolve it. The database will stay
open for use throughout the whole exercise. At various points you will be asked to
supply host operating system credentials, if you have not saved them in previous
exercises: give a suitable Windows or Unix login, such as the Oracle owner.
1. Connect to your database as user SYSTEM using SQL*Plus, and create a
tablespace. For example, on Windows,
SQL> create tablespace noncrit
2 datafile 'C:\ORACLE\PRODUCT\10.1.0\ORADATA\OCP10G\noncrit.dbf' size 2m;
or on Unix,
SQL> create tablespace noncrit
2 datafile '/oracle/product/10.1.0/oradata/ocp10g/noncrit.dbf' size 2m;
2. Create a table within the new tablespace and insert a row into it.
SQL> create table ex203 (c1 date) tablespace noncrit;
SQL> insert into ex203 values(sysdate);
SQL> commit;
3. Using Database Control, connect to your database as user SYSTEM.
4. From the database home page, take the Maintenance tab, then the Schedule
Backup link in the Backup/Recovery section.
5. In the Schedule Backup: Strategy window, select Customized in the Backup
Strategy drop-down box.
6. Select the Tablespaces radio button, and click Next.
7. In the Schedule Backup: Tablespaces window, click Add.
8. In the Tablespaces: Available Tablespaces window, select the radio button
for your new NONCRIT tablespace, and click Select.
9. In the Schedule Backup: Tablespaces window, click Next.
10. In the Schedule Backup: Options window, leave everything on defaults
and click Next.
ch20.indd 11ch20.indd 11 6/16/2005 2:56:38 PM6/16/2005 2:56:38 PM

All-in-1 / Oracle Database 10g OCP Certification All-in-One / Watson, Bersinic / 5790-3
Oracle Database 10g OCP Certification All-in-One Exam Guide
12
11. In the Schedule Backup: Settings window, leave everything on defaults
and click Next.
12. In the Schedule Backup: Schedule window, leave everything on defaults
and click Next to schedule an immediate backup.
13. In the Schedule Backup: Review click Submit to run the backup.
14. Simulate a disk failure by corrupting the new datafile. On Windows, open
the file with Windows Notepad, delete a few lines from the beginning of the
file, and save it; it is important to use Notepad because it is one of the few
Windows utilities that will ignore the file lock that Oracle places on datafiles.
On Unix you can use any editor you please, such as vi. Make sure that the
characters deleted are at the start of the file, to ensure that the file header is
damaged.
15. Confirm that the file is damaged by attempting to query the table:
SQL> select * from ex203;
select * from ex203
*
ERROR at line 1:
ORA-01578: ORACLE data block corrupted (file # 7, block # 9)
ORA-01110: data file 7:
'C:\ORACLE\PRODUCT\10.1.0\ORADATA\OCP10G\NONCRIT.DBF'
If the damage is not yet apparent, repeat Step 14 until it is.
16. In your Database Control session, take the Maintenance tab from the database
home page, and then the Perform Recovery link in the Backup/Recovery section.
17. In the Perform Recovery: Type window, select Datafiles in the Object Type
drop-down box, and click Next.
18. In the Perform Recovery: Datafiles window, the new datafile will be listed.
Select it, and click Next.
19. In the Perform Recovery: Review window shown in Figure 20-4, leave
everything on defaults and click Submit.
20. When the operation has completed, return to your SQL*Plus prompt and
bring the file online, specifying it by name or by number.
SQL> alter database datafile 7 online;
21. Confirm that the tablespace and the tables within it are now usable, with
no loss of data.
SQL> select * from ex203;
C1
---------
21-OCT-04
22. Tidy up the database.
SQL> drop tablespace noncrit including contents and datafiles;
ch20.indd 12ch20.indd 12 6/16/2005 2:56:39 PM6/16/2005 2:56:39 PM
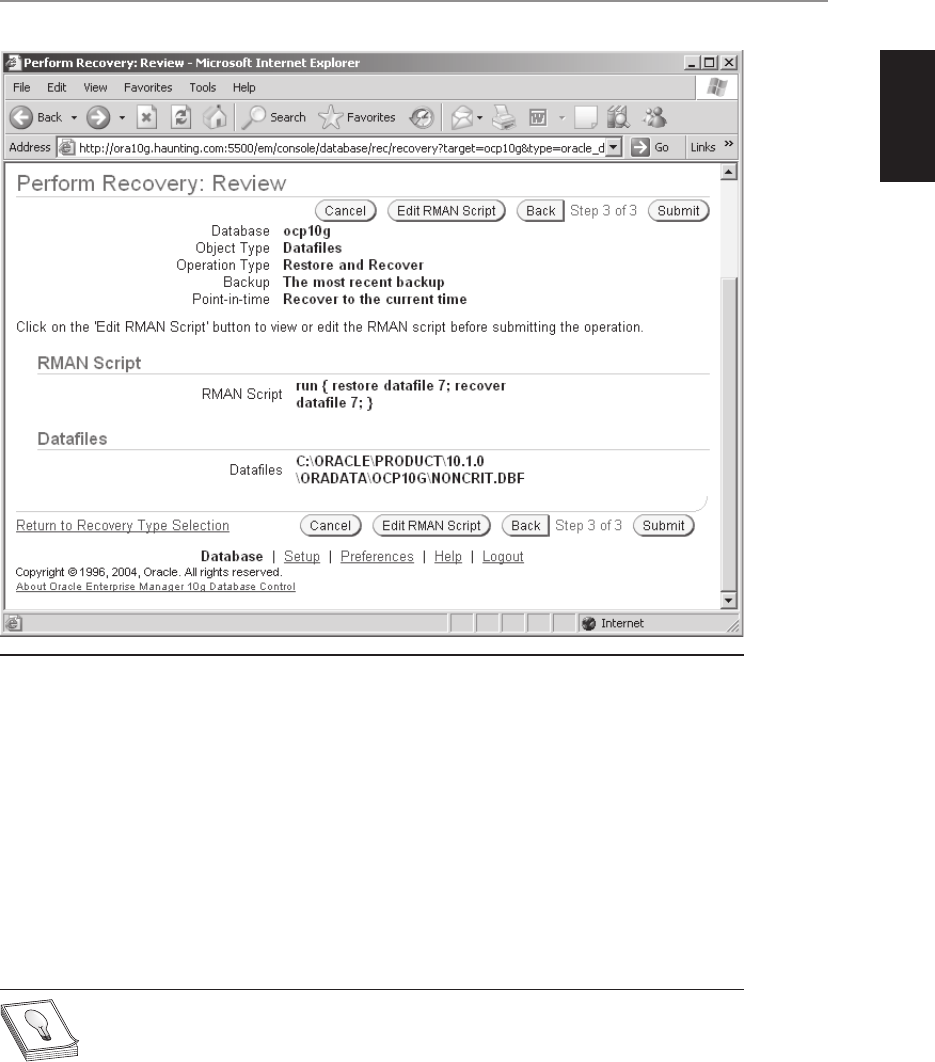
All-in-1 / Oracle Database 10g OCP Certification All-in-One / Watson, Bersinic / 5790-3
Chapter 20: Recovering Oracle Databases
13
PART I
Recovering from Loss of a Critical Datafile
The datafiles that make up the SYSTEM and currently active undo tablespace are
considered critical by Oracle, meaning that it is not possible to keep the database
open if they are damaged. If any portion of the SYSTEM tablespace were not available,
parts of the data dictionary would be missing. Oracle cannot function without a
complete data dictionary. If parts of the undo tablespace were not available, it would
be possible that undo data required for maintaining transactional integrity and
isolation would not be available, and Oracle can’t take that chance either. Therefore,
damage to these datafiles will cause the instance to terminate immediately.
TIP The critical datafiles should be on disk systems with hardware redundancy,
such as RAID level 1 disk mirroring, so that in the case of media failure the
files will survive and the database will remain open.
Figure 20-4 RMAN datafile restore and recover, with Database Control
ch20.indd 13ch20.indd 13 6/16/2005 2:56:39 PM6/16/2005 2:56:39 PM

All-in-1 / Oracle Database 10g OCP Certification All-in-One / Watson, Bersinic / 5790-3
Oracle Database 10g OCP Certification All-in-One Exam Guide
14
If the database does crash because of damage to critical datafiles, as ever, the first
action is to attempt a startup. This will stop in mount mode, with error messages
written to the alert log showing the extent of the damage. To recover, follow the same
routine as that for a noncritical file, and then open the database. The restore and
recover process is identical to that for a noncritical file, but it must be carried out in
mount mode.
EXAM TIP Loss of a critical datafile will not mean loss of data, but it will
mean loss of time.
Chapter Review
This chapter is a basic introduction to recovery techniques. First you saw how to
recover from loss of a multiplexed controlfile; this is a simple exercise, but it does
involve downtime. Second, you saw how to recover from the loss of a multiplexed
online redo logfile. This is also simple; and furthermore, it does not involve any
downtime at all. Third, you saw the use of RMAN through Database Control to
restore and recover datafiles. This is a more complex exercise, but the GUI tool
makes it straightforward. If the files are noncritical, the database can remain open
and available for use, though segments with extents in the affected files will not be
available until the restore and recover is complete and the files are brought back online.
And as a final word, always remember that loss or damage to files resulting from
media failure is never a reason to lose data—if the database has been suitably protected
by file multiplexing, archiving, and backups.
Questions
1. Loss of which of these files will cause an open database to crash? (Choose
three answers.)
A. A multiplexed controlfile
B. A multiplexed online logfile
C. A multiplexed archive logfile
D. An active undo tablespace datafile
E. An active temporary tablespace tempfile
F. A datafile from the SYSAUX tablespace
G. A datafile from the SYSTEM tablespace
H. A datafile containing critical user data
2. Loss of which of these files will prevent the database from opening? (Choose
five answers.)
ch20.indd 14ch20.indd 14 6/16/2005 2:56:39 PM6/16/2005 2:56:39 PM

All-in-1 / Oracle Database 10g OCP Certification All-in-One / Watson, Bersinic / 5790-3
Chapter 20: Recovering Oracle Databases
15
PART I
A. A multiplexed controlfile
B. A multiplexed online logfile
C. A multiplexed archive logfile
D. An active undo tablespace datafile
E. An active temporary tablespace tempfile
F. A datafile from the SYSAUX tablespace
G. A datafile from the SYSTEM tablespace
H. A datafile containing user data
3. A copy of a multiplexed controlfile is damaged. What should you do?
(Choose the best answer.)
A. Replace it with a surviving copy.
B. Restore it with RMAN.
C. Restore it with operating system commands.
D. Re-create it with the CREATE CONTROLFILE command.
4. How could you diagnose problems with a multiplexed online logfile group
member? (Choose the best answer.)
A. Query the V$LOG view.
B. Query the V$LOGFILE view.
C. Query the V$LOGFILE_MEMBER view.
D. You do not need to diagnose it; the instance will crash when the problem
occurs.
5. You issue the command ALTER DATABASE CLEAR LOGFILE GROUP 2 and
it fails with the message “ORA-01624: log 2 needed for crash recovery of
instance ocp10g (thread 1).” What could be an explanation for this? (Choose
the best answer.)
A. Logfile group 2 has not been archived.
B. Logfile group 2 is being used for recovery.
C. Logfile group 2 is active.
D. The group is not multiplexed.
6. Your database is in noarchivelog mode, and you lose a noncritical datafile.
What can you do to minimize loss of data?
A. Restore the one damaged file, and leave the rest of the database up-to-date.
B. Restore all the datafiles, but leave the controlfile up-to-date.
C. Restore the whole database, and clear the online redo logs.
D. Restore the one damaged file, and apply the online redo logs.
ch20.indd 15ch20.indd 15 6/16/2005 2:56:39 PM6/16/2005 2:56:39 PM

All-in-1 / Oracle Database 10g OCP Certification All-in-One / Watson, Bersinic / 5790-3
Oracle Database 10g OCP Certification All-in-One Exam Guide
16
7. In noarchivelog mode, what restore and recover options are available to you?
(Choose two answers.)
A. Whole database restore
B. Partial restore
C. Online restore of noncritical datafiles
D. Offline restore of critical datafiles
E. Automatic recovery after an instance crash
8. In archivelog mode, which of the following could result in loss of data?
A. Loss of a nonmirrored datafile that is part of the SYSTEM tablespace
B. Loss of a nonmirrored datafile that is part of the active undo tablespace
C. Loss of a nonmultiplexed archivelog and a noncritical datafile
D. Loss of a member from two or more multiplexed online logfile groups
9. Which of the following operations require a database shutdown?
A. Recovering from loss of a multiplexed controlfile in archivelog mode
B. Recovering from loss of a multiplexed online redo logfile in
noarchivelog mode
C. Restore and recovery of the SYSAUX tablespace
D. None of the above
10. You have backed up your datafiles and controlfile into a backup set, but your
archivelogs have not been backed up. If you need to restore and recover a
datafile, which of the following routines would work? (Choose two answers.)
A. Restore with RMAN, recover with SQL*Plus.
B. Restore and recover with RMAN.
C. Restore with operating system utilities, recover with SQL*Plus.
D. Restore with operating system utilities, recover with RMAN.
E. Restore and recover with SQL*Plus.
11. If media damage destroys a datafile, what will the effect be at the next startup?
A. The startup will stop in nomount mode.
B. The startup will stop in mount mode.
C. It depends on whether the file is part of critical tablespace or a user
tablespace.
D. It depends on whether the database is in archivelog mode.
12. After a whole restore of a database in noarchivelog mode, what must be done
before the database can be opened?
A. The database must be recovered.
B. The instance must be recovered.
ch20.indd 16ch20.indd 16 6/16/2005 2:56:39 PM6/16/2005 2:56:39 PM

All-in-1 / Oracle Database 10g OCP Certification All-in-One / Watson, Bersinic / 5790-3
Chapter 20: Recovering Oracle Databases
17
PART I
C. The online logs must be cleared.
D. The database can be opened now, but work will have been lost.
13. You issue an ALTER DATABASE CLEAR LOGFILE GROUP 3 command and
receive the message “ORA-00350: log 3 of instance ocp10g (thread 1) needs to
be archived.” What could be a cause of this? (Choose two answers.)
A. The database is not in archivelog mode.
B. The first multiplexed copy of group 3 needs to be archived.
C. If the instance crashed, this group would be needed for instance recovery.
D. An archivelog destination is full.
E. The archiver process has failed.
14. During a recovery, it becomes apparent that an archivelog is missing. What
will be the result?
A. The recovery will succeed, but some data will be missing.
B. The recovery will fail.
C. The recovery will continue, if the damaged file was not from the SYSTEM
tablespace or the active undo tablespace.
D. You must issue an ALTER DATABASE CLEAR ARCHIVE LOG FILE
command to regenerate the missing archive.
15. Which of the following is correct about using image copies for restore?
(Choose the best answer.)
A. You can restore them only with operating system utilities.
B. You can restore them only with RMAN.
C. If they were directed to tape, you can restore them only with RMAN.
D. You can restore them with either RMAN or operating system utilities.
E. Image copies can be used only for whole database restore.
Answers
1. A, D, and G. Loss of these types of files will typically cause the instance
to terminate. The instance will survive the loss of the other file types.
2. A, D, F, G, and H. For an instance to open, all controlfile copies and online
datafiles (no matter what tablespace they are a part of) must be available and
synchronized.
3. A. It is fine to replace the damaged copy with a surviving copy, because all
copies are bound to be identical. Note that B and C cannot be applied to one
copy: they would replace all the copies, and then recovery would be necessary
to synchronize them with the rest of the database. D is possible, but again it
would apply to all copies and is not necessary. So all techniques could work,
but A is the best in these circumstances.
ch20.indd 17ch20.indd 17 6/16/2005 2:56:40 PM6/16/2005 2:56:40 PM

All-in-1 / Oracle Database 10g OCP Certification All-in-One / Watson, Bersinic / 5790-3
Oracle Database 10g OCP Certification All-in-One Exam Guide
18
4. B. This is the view that will point out an invalid logfile.
5. C. This is the error generated if you attempt to clear a logfile group before
it has become inactive.
6. C. This is your only option for a database running in noarchivelog mode.
There is no possibility of recovery, because the redo logs needed are not
being archived before they are overwritten by log switches.
7. A and E. In noarchivelog mode, restoring the whole database is the only
option. B, C, and D require the database to be in archivelog mode. Instance
recovery is always enabled, no matter what mode the database is running in.
8. C. Given the loss of these files, the restore would work, but the recovery
would fail.
9. A. Any controlfile operation needs downtime.
10. A and B. These options are both possible. You must use RMAN to extract files
from a backup set, but if the archivelogs are still on disk they can be applied
with either RMAN or SQL*Plus.
11. B. This will be the case with any missing or damaged datafiles, whether critical
or not.
12. C. This will re-create the online logs; only then can D be done. Neither A
nor B is necessary after a whole offline backup, which is the only option for
noarchivelog mode.
13. D and E. Either one of these conditions could cause this error, because they
will cause the archiving to fail.
14. B. This should never happen, though, if you have multiplexed archivelog
destinations as you should.
15. D. Image copies don’t require the special capabilities of RMAN because they
are identical to a copy made with an operating system command.
ch20.indd 18ch20.indd 18 6/16/2005 2:56:40 PM6/16/2005 2:56:40 PM

All-in-1 / Oracle Database 10g OCP Certification All-in-One / Watson, Bersinic / 5790-3
CHAPTER 21
Managing Globalization
in Oracle Databases
In this chapter you will learn how to
• Customize language-dependent behavior for the database
and individual sessions
• Specify different linguistic sorts for queries
• Use datetime datatypes
• Query data using case-insensitive and accent-insensitive searches
• Obtain Globalization support configuration information
1
ch21.indd 1ch21.indd 1 6/16/2005 3:33:57 PM6/16/2005 3:33:57 PM

All-in-1 / Oracle Database 10g OCP Certification All-in-One / Watson, Bersinic / 5790-3
Oracle Database 10g OCP Certification All-in-One Exam Guide
2
The Oracle database has many capabilities grouped under the term “Globalization”
that will assist a DBA who must consider users of different nationalities. Globalization
was known as National Language Support, or NLS, in earlier releases (you will still
see the NLS acronym in several views and parameters), but Globalization is more
than linguistics: it is a comprehensive set of facilities for managing databases that
must cover a wide range of languages, time zones, and cultural variations.
The Need for Globalization
Large database systems, and many small ones too, will usually have a user community
that is distributed geographically, temporally, and linguistically. Consider a database
hosted in Johannesburg, South Africa, with end users scattered throughout sub-Saharan
Africa. Different users will be expecting data to be presented to them in Portuguese,
French, and English, at least. They will be in three different time zones. They will have
different standards for the formats of dates and numbers. The situation becomes even
more complex when the application is running in a three-tier environment: you may
have a database in one location, several geographically distributed application servers,
and users further distributed from the application servers.
It is possible for a lazy DBA to ignore Globalization completely. Typically, such
a DBA will take United States defaults for everything—and then let the programmers
sort it out. But this is putting an enormous amount of work onto the programmers,
and they may not wish to do it either. The result is an application that works but
is detested by a proportion of its users. But there is more to this than keeping
people happy: there may well be financial implications too. Consider two competing
e-commerce sites, both trying to sell goods all over the world. One has taken the
trouble to translate everything into languages applicable to each customer; the other
insists that all customers use American English. Which one is going to receive the
most orders? Furthermore, dates and monetary formats can cause dreadful confusion
when different countries have different standards. Such problems can be ignored or
resolved programmatically, but a good DBA will attempt to resolve them through the
facilities provided as standard within the database.
Globalization Capabilities
Globalization is a lot more than language support, though languages are certainly
a major part of it. Globalization also covers aspects of data presentation, calendars,
dates, and much more. Perhaps the most important aspect is how data is actually
stored in the database: the character set used.
Character Sets
The data stored in a database must be coded into a character set. A character set is a
defined encoding scheme for representing characters as a sequence of bits. Some
products use the character sets provided by the host operating system. For example,
ch21.indd 2ch21.indd 2 6/16/2005 3:34:13 PM6/16/2005 3:34:13 PM

All-in-1 / Oracle Database 10g OCP Certification All-in-One / Watson, Bersinic / 5790-3
Chapter 21: Managing Globalization in Oracle Databases
3
PART I
Microsoft Word does not have its own character sets; it uses those provided by the
Windows operating system. Other products provide their own character sets and
are thus independent of whatever is provided by the host operating system. Oracle
products fall into the latter group: they ship with their own character sets, which is
one reason why Oracle applications are the same on all platforms, and why clients
and servers can be on different platforms.
A character set consists of a defined number of distinct characters. The number of
characters that a character set can represent is limited by the number of bits the character
set uses for each character. A single-byte character set will use only one byte per
character: eight bits, though some single-byte character sets restrict this even further
by using only seven of the eight bits. A multibyte character set uses one, two, or even
three bytes for each character. The variations here are whether the character set is fixed-
width (for example, always using two bytes per character) or variable width (where
some characters will be represented in one byte, other characters in two or more).
How many characters are actually needed? Well, as a bare minimum, you need
upper- and lowercase letters, the digits 0 through 9, a few punctuation marks, and
some special characters to mark the end of a line, or a page break, for instance. A
seven-bit character set can represent a total of 128 (27) characters. It is simply not
possible to get more than that number of different bit patterns if you have only seven
bits to play with. Seven-bit character sets are just barely functional for modern computer
systems, but they are usually inadequate. They provide the characters just named, but
very little else. If you need to do simple things like using box drawing characters, or
printing a name that includes a letter with an accent, you may find that you can’t do
it with a seven-bit character set. Anything more advanced, such as storing and displaying
data in Arabic or Chinese script, will be totally out of the question. Unfortunately,
Oracle’s default character sets are seven-bit ASCII or seven-bit EBCDIC, depending
on the platform: even such widely used languages as French and Spanish cannot be
written correctly in these character sets. This is a historical anomaly, dating back to
the days when these character sets were pretty much the only ones in use. Eight-bit
character sets can represent 256 (28) different characters. These will typically be
adequate for any Western European language–based system, though perhaps not
for some Eastern European languages, and definitely not for many Asian languages.
For these more complex linguistic environments, it is necessary to use a multibyte
character set.
Unicode character sets deserve a special mention. The Unicode standards are an
international standard for character encoding, which is intended to include every
character that will ever be required by any computer system. Currently, Unicode has
defined more than thirty-two thousand characters. And for completeness, the acronym
ASCII is for American Standard Code for Information Interchange, and EBCDIC
is Extended Binary Coded Decimal Interchange Code. EBCDIC was developed by
IBM (International Business Machines) and is not usually used outside the IBM
environment. More acronyms to note are ISO, for the International Standards
Organization, and ANSI, for the American National Standards Institute.
ch21.indd 3ch21.indd 3 6/16/2005 3:34:13 PM6/16/2005 3:34:13 PM

All-in-1 / Oracle Database 10g OCP Certification All-in-One / Watson, Bersinic / 5790-3
Oracle Database 10g OCP Certification All-in-One Exam Guide
4
Oracle 10g ships with more than 250 character sets. Table 21-1 includes just a few
examples.
Language Support
The number of languages supported by Oracle depends on the platform, release, and
patch level of the product. To determine the range available on any one installation,
query the view V$NLS_VALID_VALUES, as follows:
Encoding Scheme Example Character Sets
Single-byte seven-bit US7ASCII. This is the default for Oracle on non-IBM
systems.
YUG7ASCII. Seven-bit Yugoslavian, a character set suitable
for the languages used in much of the Balkans.
Single-byte eight-bit WE8ISO8859P15. A Western European eight-bit ISO
standard character set, which includes the Euro symbol
(unlike WE8ISO8859P1).
WE8DEC. Developed by Digital Equipment Corporation,
widely used in the DEC (or Compaq) environment in
Europe.
I8EBCDIC1144. An EBCDIC character set specifically
developed for Italian.
Fixed-width multibyte AL16UTF16. This is a Unicode two-byte character set,
and the only fixed-width Unicode character set supported
by 10g.
Varying-width single-byte UTF8. A Unicode character set, where characters may
be from one to four bytes. UTF8 is a standard on Unix
systems.
Varying-width multibyte JA16SJIS. Shift-JIS, a Japanese character set, where a shift-
out control code is used to indicate that the following
bytes are double-byte characters. A shift-in code switches
back to single-byte characters.
ZHT16CCDC. A traditional Chinese character set,
where the most significant bit of the byte is used to
indicate whether the byte is a single character or part of a
multibyte character.
AL32UTF8. A Unicode varying-width character set.
Table 21-1 Some of the Oracle 10g Character Sets
ch21.indd 4ch21.indd 4 6/16/2005 3:34:14 PM6/16/2005 3:34:14 PM

All-in-1 / Oracle Database 10g OCP Certification All-in-One / Watson, Bersinic / 5790-3
Chapter 21: Managing Globalization in Oracle Databases
5
PART I
SQL> select * from v$nls_valid_values where parameter='LANGUAGE';
PARAMETER VALUE
------------------------------ ------------------------------
LANGUAGE AMERICAN
LANGUAGE GERMAN
LANGUAGE FRENCH
LANGUAGE CANADIAN FRENCH
<output abbreviated...>
LANGUAGE LATIN SERBIAN
LANGUAGE CYRILLIC UZBEK
LANGUAGE LATIN UZBEK
LANGUAGE CYRILLIC KAZAKH
65 rows selected.
The language used will determine the language for error messages and also set
defaults for date language and sort orders. The defaults are shown here:
Variable Default Purpose
NLS_LANGUAGE AMERICAN Language for messages
NLS_DATE_LANGUAGE AMERICAN Used for day and month names
NLS_SORT BINARY Linguistic sort sequence
The default sort order—binary—is poor. Binary sorting may be acceptable for
a seven-bit character set, but for character sets of eight bits or more the results are
often inappropriate. For example, the ASCII value of a lowercase letter a is 97, and
a lowercase letter z is 122. So a binary sort will place a before z, which is fine. But
consider diacritic variations: a lowercase letter a with an umlaut, ä, is 132, which is
way beyond z; so the binary sort order will produce “a,z,ä”—which is wrong in any
language. The German sort order would give “a,ä,z”—which is correct. (Figure 21-1
illustrates how a sort order is affected by the language setting.) Oracle provides many
possible sort orders; there should always be one that will fit your requirements. Again,
query V$NLS_VALID_VALUES to see what is available:
SQL> select * from v$nls_valid_values where parameter='SORT';
PARAMETER VALUE
------------------------------ ------------------------------
SORT BINARY
SORT WEST_EUROPEAN
SORT XWEST_EUROPEAN
SORT GERMAN
<output abbreviated...>
SORT SCHINESE_RADICAL_M
SORT JAPANESE_M
SORT KOREAN_M
87 rows selected.
ch21.indd 5ch21.indd 5 6/16/2005 3:34:14 PM6/16/2005 3:34:14 PM
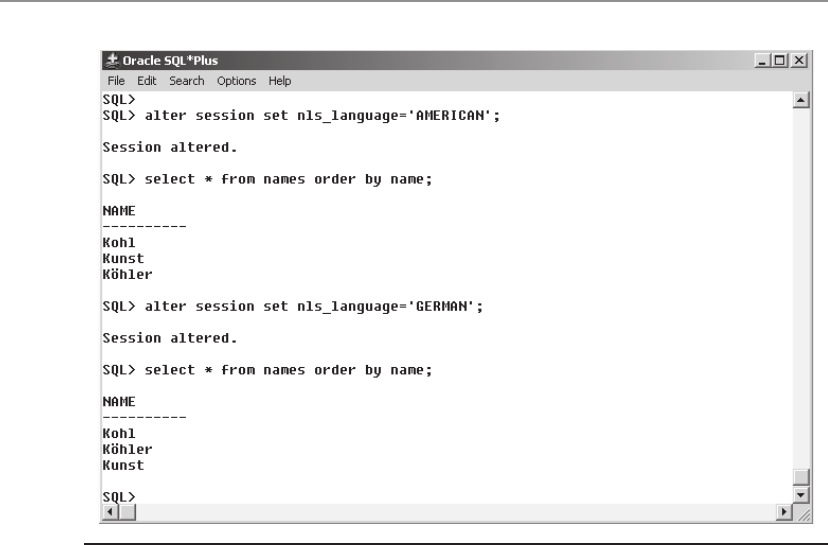
All-in-1 / Oracle Database 10g OCP Certification All-in-One / Watson, Bersinic / 5790-3
Oracle Database 10g OCP Certification All-in-One Exam Guide
6
Territory Support
The territory selected sets a number of Globalization defaults. To determine the
territories your database supports, again query V$NLS_VALID_VALUES:
SQL> select * from v$nls_valid_values where parameter='TERRITORY';
PARAMETER VALUE
------------------------------ ------------------------------
TERRITORY AMERICA
TERRITORY UNITED KINGDOM
TERRITORY GERMANY
<output abbreviated...>
TERRITORY SERBIA AND MONTENEGRO
TERRITORY ARGENTINA
TERRITORY ECUADOR
TERRITORY PHILIPPINES
96 rows selected.
The territory selection sets defaults for day and week numbering, credit and debit
symbols, date formats, decimal and group numeric separators, and currency symbols.
Some of these can have profound effects on the way your application software will
behave.
For example, in the U.S. the decimal separator is a point (.), but in Germany and
many other countries it is a comma (,). Consider a number such as “10,001”. Is this
ten thousand and one, or ten and one thousandth? You certainly need to know. Of
equal importance is day of the week numbering. In the U.S., Sunday is day 1 and
Figure 21-1 Linguistic sorting
ch21.indd 6ch21.indd 6 6/16/2005 3:34:14 PM6/16/2005 3:34:14 PM
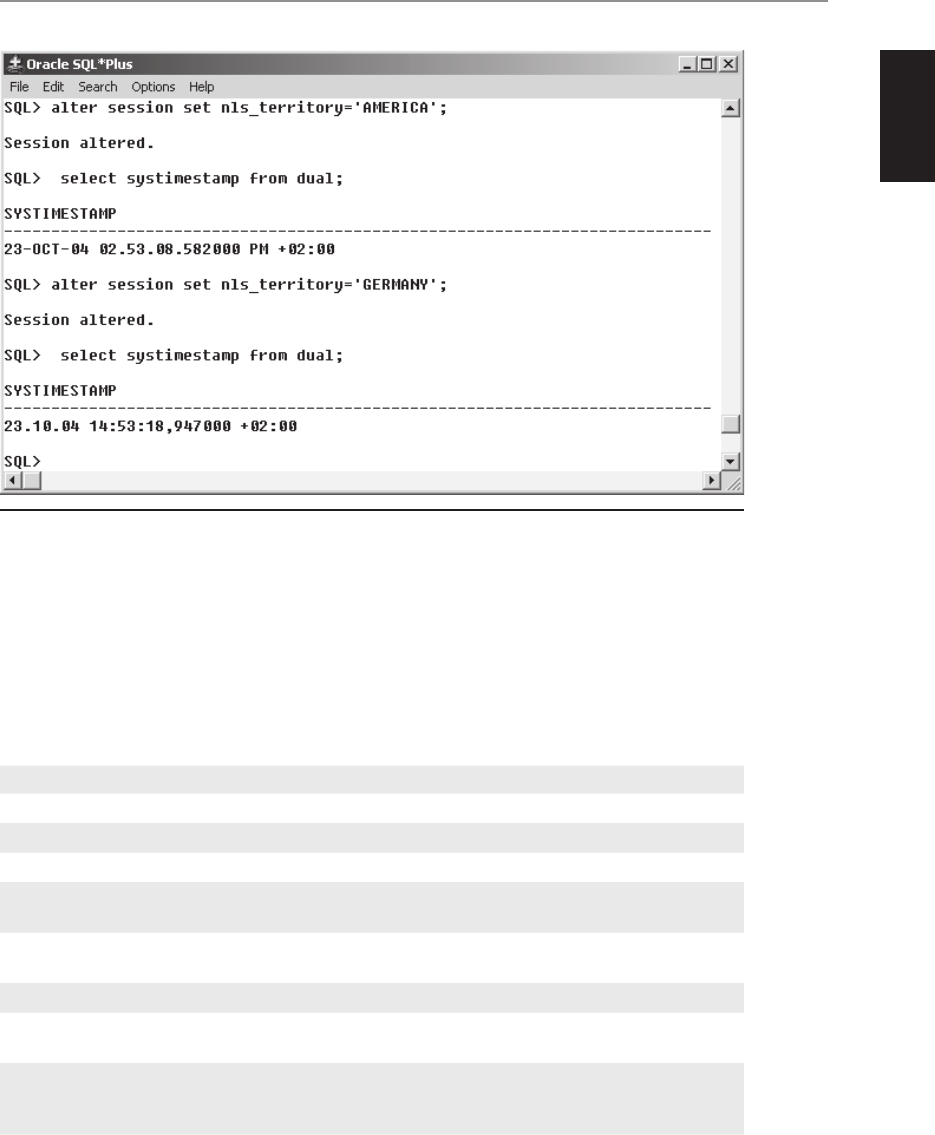
All-in-1 / Oracle Database 10g OCP Certification All-in-One / Watson, Bersinic / 5790-3
Chapter 21: Managing Globalization in Oracle Databases
7
PART I
Saturday is day 7, but in Germany (and indeed in most of Europe) Monday (or
Montag, to take the example further) is day 1 and Sunday (Sonnabend) is day 7. If
your software includes procedures that will run according to the day number, the
results may be disastrous if you do not consider this. Figure 21-2 illustrates some
other territory-related differences in time settings.
These are the defaults for territory-related settings:
Variable Default / Purpose
NLS_TERRITORY AMERICA / Geographical location
NLS_CURRENCY $ / Local currency symbol
NLS_DUAL_CURRENCY $ / A secondary currency symbol for the territory
NLS_ISO_CURRENCY AMERICA / Indicates the ISO territory currency
symbol
NLS_DATE_FORMAT DD-MM-RR / Format used for columns
of datatype DATE
NLS_NUMERIC_CHARACTERS ., / Decimal and group delimiters
NLS_TIMESTAMP_FORMAT DD-MM-RRHH.MI.SSXFF AM / Format used for
columns of datatype TIMESTAMP
NLS_TIMESTAMP_TZ_FORMAT DD-MM-RRHH.MI.SSXFF AM TZR / Format
used for columns of datatype TIMESTAMP WITH
LOCAL TIMEZONE
Figure 21-2 Date and time formats, on the twenty-third day of October in the early afternoon in a
time zone two hours ahead of Greenwich
ch21.indd 7ch21.indd 7 6/16/2005 3:34:14 PM6/16/2005 3:34:14 PM
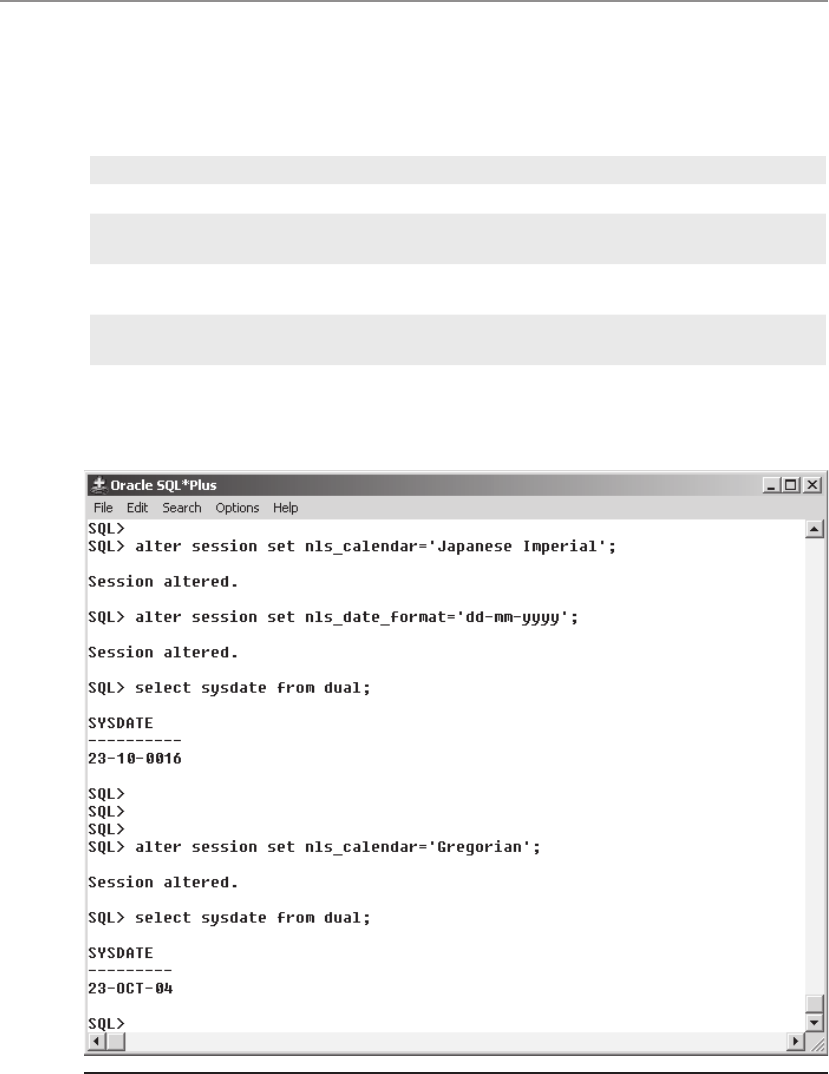
All-in-1 / Oracle Database 10g OCP Certification All-in-One / Watson, Bersinic / 5790-3
Oracle Database 10g OCP Certification All-in-One Exam Guide
8
Other NLS Settings
Apart from the language and territory-related settings just described, there are a few
more advanced settings that are less likely to cause problems:
Variable Default / Purpose
NLS_CALENDAR Gregorian / Allows use of alternative calendar systems
NLS_COMP BINARY / The alternative of ANSI compares letters
using their NLS value, not the numeric equivalent
NLS_LENGTH_SEMANTICS BYTE / Allows one to manipulate multibyte characters
as complete characters rather than bytes
NLS_NCHAR_CONV_EXCP FALSE / Limits error messages generated when
converting between VARCHAR2 and NVARCHAR
Figure 21-3 illustrates switching to the Japanese imperial calendar, with an
associated effect on the date display.
Figure 21-3 Use of the Japanese Imperial calendar, counting years from the ascension of Emperor
Akihito to the throne
ch21.indd 8ch21.indd 8 6/16/2005 3:34:15 PM6/16/2005 3:34:15 PM

All-in-1 / Oracle Database 10g OCP Certification All-in-One / Watson, Bersinic / 5790-3
Chapter 21: Managing Globalization in Oracle Databases
9
PART I
Using Globalization Support Features
Globalization can be specified at any and all of five levels:
• The database
• The instance
• The client environment
• The session
• The statement
The levels are listed in ascending order of priority. Thus, instance settings take
precedence over database settings, and so on. An individual statement can control
its own Globalization characteristics, thus overriding everything else.
EXAM TIP Remember the precedence of the various points where
Globalization settings can be specified. On the server side, instance settings
take precedence over database settings, but all the server settings can be
overridden on the client side: first by the environment, then at the session
and statement levels.
Choosing a Character Set
At database creation time, choice of character set is one of the two most important
decisions you make. In Chapter 3, as you learned how to create a database, you were
told that two points are vital to get right at creation time; everything else can be changed
later. Those two were the DB_BLOCK_SIZE parameter, which can never be changed,
and the database character set, which it may be possible but not necessarily practicable
to change. The difficulty with the DB_BLOCK_SIZE is that this parameter is used as
the block size for the SYSTEM tablespace. You can’t change that without re-creating the
data dictionary: in other words, creating a new database. The database character set is
used to store all the data in columns of type VARCHAR2, CLOB, CHAR, and LONG. If
you change it, you may well destroy all the data in your existing columns of these types.
It is therefore vital to select, at creation time, a character set that will fulfill all your
needs, present and future. For example, if you are going to have data in French or
Spanish, a Western European character set is needed. If you are going to have data in
Russian or Czech, you should choose an Eastern European character set. But what
if you may have both Eastern and Western European languages? Furthermore, what if
you anticipate a need for Korean or Thai as well? Oracle provides two solutions to the
problem: the National Character Set, and the use of Unicode.
The National Character Set was introduced with release 8.0 of the database. This is
a second character set, specified at database creation time, which is used for columns
of datatype NVARCHAR2, NCLOB, and NCHAR. So if the DBA anticipated that most
of his information would be in English but that some would be Japanese, he could
select a Western European character set for the database character set, and a Kanji
character set as the National Character Set. With release 9i, the rules changed: from
then on, the National Character Set can only be Unicode. This should not lead to
ch21.indd 9ch21.indd 9 6/16/2005 3:34:15 PM6/16/2005 3:34:15 PM

All-in-1 / Oracle Database 10g OCP Certification All-in-One / Watson, Bersinic / 5790-3
Oracle Database 10g OCP Certification All-in-One Exam Guide
10
any drop in functionality, because the promise of Unicode is that it can encode any
character. Two Unicodes are supported as the National Character Set: AL16UTF16
and UTF8. AL16UTF16 is a fixed-width, two-byte character set, and UTF8 is a variable-
width character set. The choice between the two is a matter of space efficiency and
performance, related to the type of data you anticipate storing in the NVARCHAR2
and NCLOB columns.
It may well be that the majority of the data could in fact be represented in one
byte, and only a few characters would need multiple bytes. In that case, AL16UTF16
will nearly double the storage requirements—quite unnecessarily, because one of the
two bytes per character will be packed with zeros. This not only wastes space but also
impacts on disk I/O. UTF8 will give a huge space saving. But if the majority of the data
cannot be coded in one byte, then UTF8 becomes much less efficient because the
multibyte characters must be assembled, at run time, from a number of single bytes,
with a consequent performance hit. Also, UTF8 will often need three or even four
bytes to store a character that AL16UTF16 can encode in two.
The second possibility for a fully multilingual database is to use Unicode as the
actual database character set. The supported options are UTF8 and AL32UTF8, which
are both variable-width multibyte character sets.
TIP A Unicode database may make life simpler for developers, because they
do not have to worry about which columns to read and write, but there can
be performance implications.
The only limitation on the database character set is that it must have either
US7ASCII or EBCDIC as a subset. This is because the database character set is used
to store SQL and PL/SQL source code, which is written in these characters.
Both the database character set and the National Character Set are specified in
the CREATE DATABASE command, as shown in the example script shown in the
section “The Database Creation Scripts” in Chapter 3. The defaults are US7ASCII
and AL16UTF16. If you create a database using DBCA, DBCA will provide a default
for the database character set, which it will pick up from the character set of the host
operating system where you are running DBCA. This may be more appropriate than
the seven-bit Oracle default, but remember that your clients may be using terminals
with a different operating system from the database server. In the Chapter 3 example
this is WE8MSWIN1252, a Microsoft Windows eight-bit Western European character
set. This was selected by DBCA because it was running on a PC with the Windows
“Regional and Language Options” set to “English (US).”
Changing Character Sets
There are many occasions when DBAs have wished that they could change the database
character set. Typically, this is because the database was created using the default of
US7ASCII, and later on a need arises for storing information using characters not
included in that character set, such as a French name. Prior to release 9i there was no
supported technique for changing the character set. From 9i onward, there is a supported
technique, but there is no guarantee that it will work. It is your responsibility as DBA
ch21.indd 10ch21.indd 10 6/16/2005 3:34:15 PM6/16/2005 3:34:15 PM

All-in-1 / Oracle Database 10g OCP Certification All-in-One / Watson, Bersinic / 5790-3
Chapter 21: Managing Globalization in Oracle Databases
11
PART I
to carry out thorough checks that the change will not damage the data. The problem
is simply that a change of character set does not reformat the data currently in the
datafiles, but it will change the way the data is presented. For example, if you were to
convert from a Western European character set to an Eastern European character set,
many of the letters with the accents common in Western languages would then be
interpreted as Cyrillic characters, with disastrous results.
There are two tools provided to assist with deciding on character set change: the
Database Character Set Scanner and the Language and Character Set File Scanner.
These are independently executable utilities, csscan and lcsscan on Unix, csscan.exe
and lcsscan.exe on Windows.
The Database Character Set Scanner will log on to the database and make a pass
through the datafiles, generating a report of possible problems. For example,
csscan system/manager full=y tochar=utf8
This command will connect to the database as user SYSTEM and scan through all the
datafiles to check if conversion to UTF8 would cause any problems. A typical problem
when going to UTF8 is that a character that was encoded in one byte in the original
character set will require two bytes in UTF8, so the data might not fit in the column
after the change. The scanner will produce a comprehensive report listing every row
that will have problems with the new character set. You must then take appropriate
action to fix the problems before the conversion, if possible.
TIP You must run the csminst.sql script to prepare the database for running
the character set scanner.
The Language and Character Set File Scanner is a utility that will attempt to identify
the language and character set used for a text file. It will function on plain text only;
if you want to use it on, for example, a word processing document, you will have to
remove all the control codes first. This scanner may be useful if you have to upload
data into your database and do not know what the data is. The tool scans the file
and applies a set of heuristics to make an intelligent guess about the language and
character set of the data.
Having determined whether it is possible to change the character set without
damage, execute the command ALTER DATABASE CHARACTER SET... to make the
change. The equivalent command to change the National Character Set is ALTER
DATABASE NATIONAL CHARACTER SET.... The only limitation with this command
is that the target character set must be a superset of the original character set, but that
does not guarantee that there will be no corruptions. That is the DBA’s responsibility.
Globalization Within the Database
The database’s Globalization settings are fixed at creation time, according to the
instance parameter settings in effect when the CREATE DATABASE command
was issued and the character set was specified. They are visible in the view NLS_
DATABASE_PARAMETERS as shown in Figure 21-4.
ch21.indd 11ch21.indd 11 6/16/2005 3:34:15 PM6/16/2005 3:34:15 PM
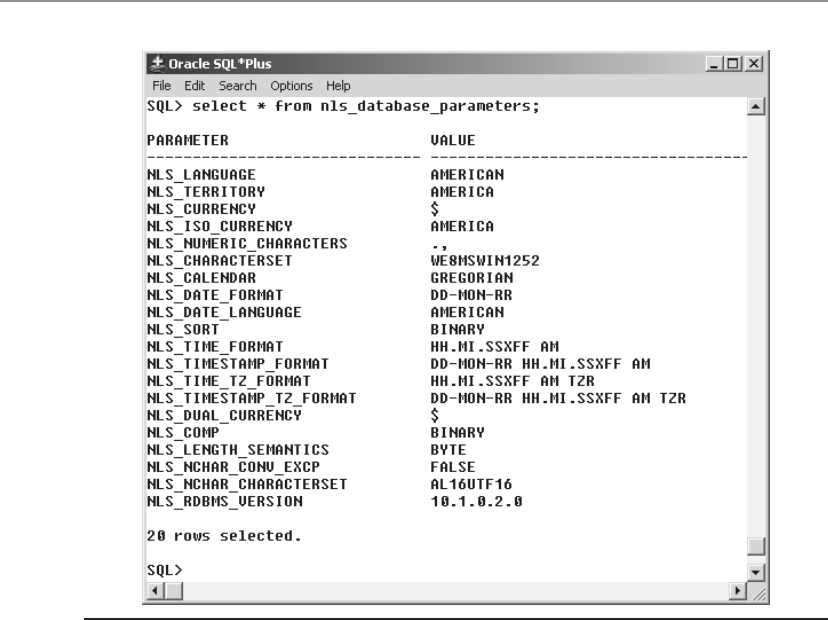
All-in-1 / Oracle Database 10g OCP Certification All-in-One / Watson, Bersinic / 5790-3
Oracle Database 10g OCP Certification All-in-One Exam Guide
12
Globalization at the Instance Level
Instance parameter settings will override the database settings. In a RAC environment,
it is possible for different instances to have different settings, so that, for example,
European and U.S. users could each log on to the database through an instance
configured appropriately to their different needs. The settings currently in effect are
exposed in the view NLS_INSTANCE_PARAMETERS, which has the same rows as
NLS_DATABASE_PARAMETERS except for three rows to do with character sets and
RDBMS version that do not apply to an instance.
The Globalization instance parameters can be changed like any others, but as they
are all static, it is necessary to restart the instance before any changes come into effect.
Client-Side Environment Settings
When an Oracle user process starts, it inspects the environment within which it is
running to pick up Globalization defaults. This mechanism means that it is possible
for users who desire different Globalization settings to configure their terminals
appropriately to their needs, and then Oracle will pick up and apply the settings
automatically, without the programmers or the DBA having to take any action. This
feature should be used with care, as it can cause confusion because it means that the
application software may be running in an environment that the programmers had
Figure 21-4 Database Globalization settings
ch21.indd 12ch21.indd 12 6/16/2005 3:34:16 PM6/16/2005 3:34:16 PM

All-in-1 / Oracle Database 10g OCP Certification All-in-One / Watson, Bersinic / 5790-3
Chapter 21: Managing Globalization in Oracle Databases
13
PART I
not anticipated. The internal implementation of this is that the user process reads the
environment variables and then generates a series of ALTER SESSION commands to
implement them.
The key environment variable is NLS_LANG. The full specification for this is a
language, a territory, and a character set. To use French as spoken in Canada with a
Western European character set, an end user could set it to
NLS_LANG=FRENCH_CANADA.WEISO8859P1
and then, no matter what the database and instance Globalization is set to, his user
process will then display messages and format data according to Canadian French
standards. When the user sends data to the server, he will enter it using Canadian
French conventions, but the server will then store it in the database according to the
database Globalization settings. The three elements (language, territory, and character
set) of NLS_LANG are all optional.
TIP The DBA has absolutely no control over what end users do with the
NLS_LANG environment variable. If the application is Globalization sensitive,
the programmers should take this into account and control Globalization
within the session instead.
The conversion between server-side and client-side Globalization settings is done
by Oracle Net. In terms of the OSI seven-layer model, briefly described in Chapter 12,
any required conversion is a layer 6 (presentation layer) function that is accomplished
by Oracle Net’s Two-Task Common layer. Some conversion is perfectly straightforward
and should always succeed. This is the case with formatting numbers, for instance.
Other conversions are problematic. If the client and the server are using different
character sets, it may not be possible for data to be converted. An extreme case would
be a client process using a multibyte character set intended for an Oriental language,
and a database created with US7ASCII. There is no way that the data entered on the
client can be stored correctly in the much more limited character set available within
the database, and data loss and corruption are inevitable.
Exercise 21-1: Making Globalization and Client
Environment Settings
This exercise will demonstrate how you, acting as an end user, can customize your
environment, in order to affect your Oracle sessions.
1. From an operating system prompt, set the NLS_LANG variable to Hungarian,
and also adjust the date display from the default. Using Windows,
C:\>set NLS_LANG=Hungarian
C:\>set NLS_DATE_FORMAT=Day dd Month yyyy
or on Unix,
$ export NLS_LANG=Hungarian
$ export NLS_DATE_FORMAT=Day dd Month yyyy
ch21.indd 13ch21.indd 13 6/16/2005 3:34:16 PM6/16/2005 3:34:16 PM
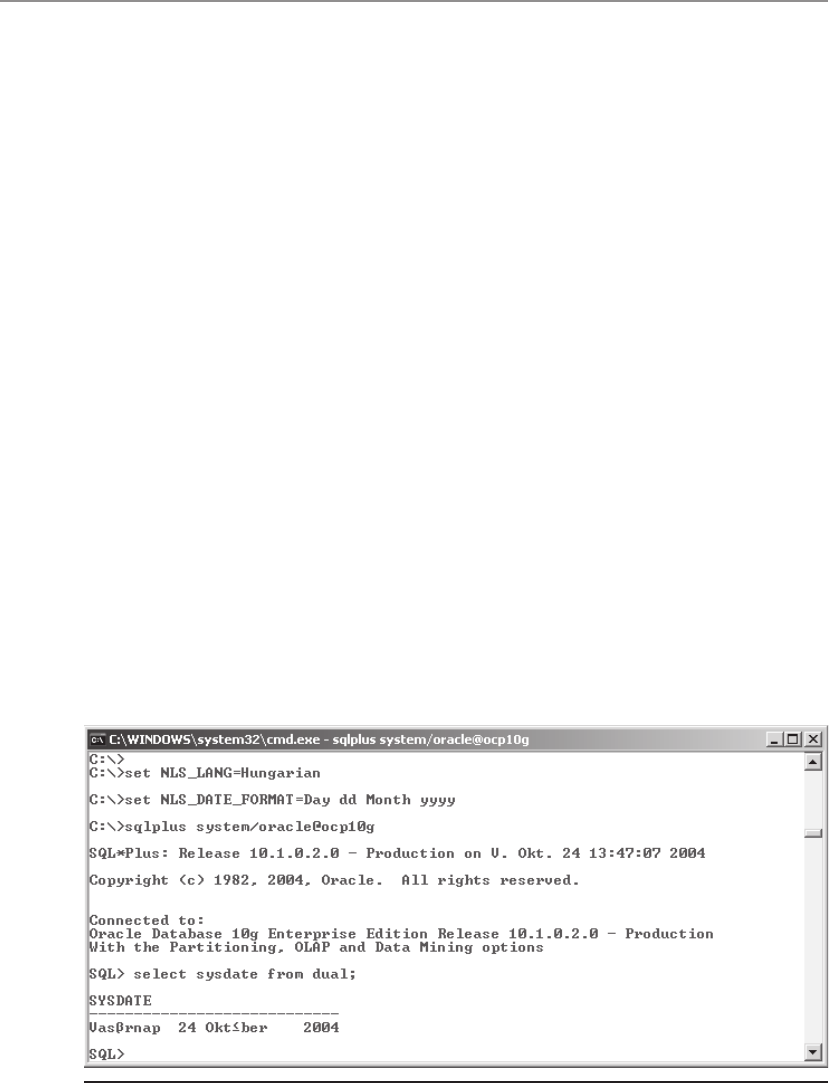
All-in-1 / Oracle Database 10g OCP Certification All-in-One / Watson, Bersinic / 5790-3
Oracle Database 10g OCP Certification All-in-One Exam Guide
14
2. From the same operating system session, launch SQL*Plus and connect as
user SYSTEM.
3. Display the current date with
SQL> select sysdate from dual;
Figure 21-5 shows the complete sequence of steps. Note that in the figure there is a
problem with the display of one character in the month name. This is an example of
a character used in Eastern European languages that cannot be displayed correctly by a
Western European character set.
Session-Level Globalization Settings
Once connected, users can issue ALTER SESSION commands to set up their
Globalization preferences. Normally this would be done programmatically, perhaps
by use of a logon trigger. The application will determine who the user is and configure
the environment accordingly. An alternative to ALTER SESSION is the supplied
package DBMS_SESSION. The following examples will each have the same effect:
SQL> alter session set nls_date_format='dd.mm.yyyy';
Session altered.
SQL> execute dbms_session.set_nls('nls_date_format','''dd.mm.yyyy''');
PL/SQL procedure successfully completed.
Specifications at the session level take precedence over the server-side database
and instance settings and will also override any attempt made by the user to configure
his session with environment variables. The Globalization settings currently in effect
for your session are shown in the V$NLS_PARAMETERS view. The same information,
with the exception of the character sets, is shown in the NLS_SESSION_PARAMETERS
view.
Figure 21-5 Controlling Globalization with client environment settings
ch21.indd 14ch21.indd 14 6/16/2005 3:34:16 PM6/16/2005 3:34:16 PM
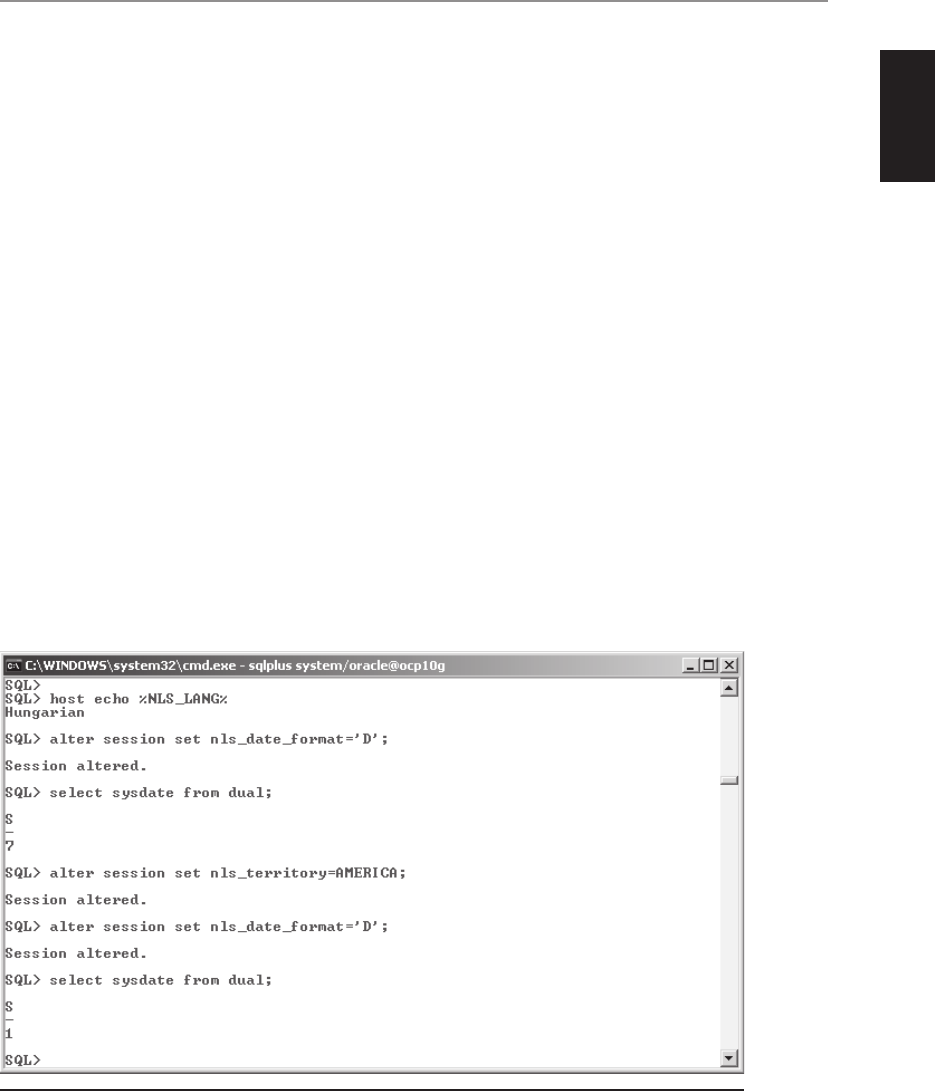
All-in-1 / Oracle Database 10g OCP Certification All-in-One / Watson, Bersinic / 5790-3
Chapter 21: Managing Globalization in Oracle Databases
15
PART I
Exercise 21-2: Controlling Globalization
Within the Session
For this exercise, it is assumed that you have completed Exercise 21-1 and that you are
working in the same SQL*Plus session. You will demonstrate how European and U.S.
standards can cause confusion.
1. Confirm that your NLS_LANG environment variable is set to a European
language. On Windows,
SQL> host echo %NLS_LANG%
or on Unix,
SQL> host echo $NLS_LANG
2. Set your date display to show the day number:
SQL> alter session set nls_date_format='D';
3. Display the number of today’s day:
SQL> select sysdate from dual;
4. Change your territory to the U.S., and again set the date display format:
SQL> alter session set nls_territory=AMERICA;
SQL> alter session set nls_date_format='D';
5. Issue the query from Step 3 again, and note that the day number has changed
with the shift of environment from Europe to America.
Figure 21-6 shows the complete sequence.
Figure 21-6 Controlling Globalization within a session
ch21.indd 15ch21.indd 15 6/16/2005 3:34:17 PM6/16/2005 3:34:17 PM
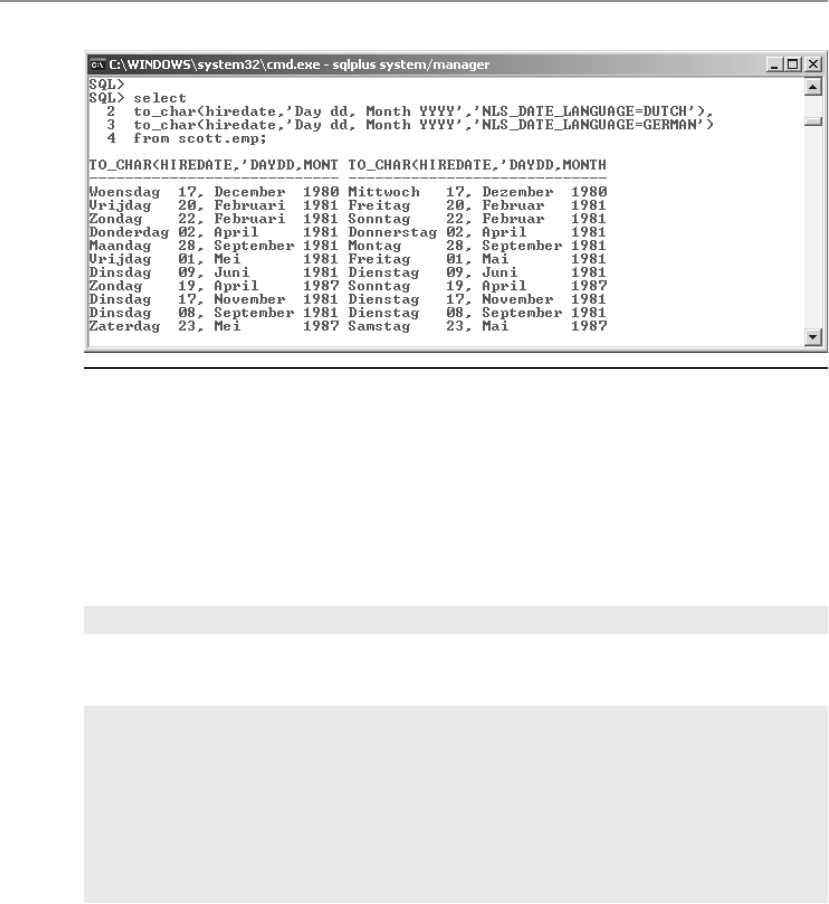
All-in-1 / Oracle Database 10g OCP Certification All-in-One / Watson, Bersinic / 5790-3
Oracle Database 10g OCP Certification All-in-One Exam Guide
16
Statement Globalization Settings
The tightest level of control over Globalization is to manage it programmatically, within
each statement. This entails using NLS parameters in SQL functions. Figure 21-7 shows
an example.
The SQL functions to consider are the typecasting functions that convert between
datatypes. Depending on the function, various parameters may be used.
Function Globalization Parameters
TO_DATE NLS_DATE_LANGUAGE
NLS_CALENDAR
TO_NUMBER NLS_NUMERIC_CHARACTERS
NLS_CURRENCY
NLS_DUAL_CURRENCY
NLS_ISO_CURRENCY
NLS_CALENDAR
TO_CHAR, TO_NCHAR NLS_DATE_LANGUAGE
NLS_NUMERIC_CHARACTERS
NLS_CURRENCY
NLS_DUAL_CURRENCY
NLS_ISO_CURRENCY
NLS_CALENDAR
Figure 21-7 Using NLS parameters in SQL functions
ch21.indd 16ch21.indd 16 6/16/2005 3:34:17 PM6/16/2005 3:34:17 PM

All-in-1 / Oracle Database 10g OCP Certification All-in-One / Watson, Bersinic / 5790-3
Chapter 21: Managing Globalization in Oracle Databases
17
PART I
Numbers, dates, and times can have a wide range of format masks applied for
display. Within numbers, these masks allow embedding group and decimal separators,
and the various currency symbols; dates can be formatted as virtually any combination
of text and numbers; times can be shown with or without time zone indicators and as
AM/PM or twenty-four hours.
Linguistic Sorting and Selection
Oracle’s default sort order is binary. The strings to be sorted are read from left to right,
and each character is reduced to its numeric ASCII (or EBCDIC) value. The sort is done
in one pass. This may be suitable for American English, but it will give incorrect results
for other languages. Obvious problems are diacritics such as ä or à and diphthongs
like æ, but there are also more subtle matters. For example, in traditional Spanish,
ch is a character in its own right that comes after c; thus the correct order is “Cerveze,
Cordoba, Chavez.” To sort this correctly, the database must inspect the following
character as well as the current character, if the current character is a c.
TIP As a general rule, it is safe to assume that Oracle can handle just about
any linguistic problem, but that you as DBA may not be competent to
understand it. You will need an expert in whatever languages you are working
in to advise.
Linguistic sorting means that rather than replacing each character with its numeric
equivalent, Oracle will replace each character with a numeric value that reflects its
correct position in the sequence appropriate to the language in use. There are some
variations here, depending on the complexity of the environment.
A monolingual sort makes two passes through the strings being compared. The
first pass is based on the “major” value of each character. The major value is derived
by removing diacritic and case differences. In effect, each letter is considered as
uppercase with no accents. Then a second comparison is made, using the “minor”
values, which are case and diacritic sensitive. Monolingual sorts are much better than
binary but are still not always adequate. For French, for example, Oracle provides the
monolingual FRENCH sort order, and the multilingual FRENCH_M, which may be
better if the data is not exclusively French.
A technique that may remove confusion is to use Oracle’s case and diacritic-
insensitive sort options. For example, you may wish to consider these variations
on a Scottish name as equivalent:
MacKay
Mackay
MACKAY
To retrieve all three with one query, first set the NLS_SORT parameter to
GENERIC_BASELETTER as shown in Figure 21-8. This will ignore case and diacritic
variations. Then set the NLS_COMP parameter away from the default of BINARY to
ANSI. This instructs Oracle to compare values using the NLS_SORT rules, not the
numeric value of the character. The GENERIC_BASELETTER sort order will also
ch21.indd 17ch21.indd 17 6/16/2005 3:34:17 PM6/16/2005 3:34:17 PM
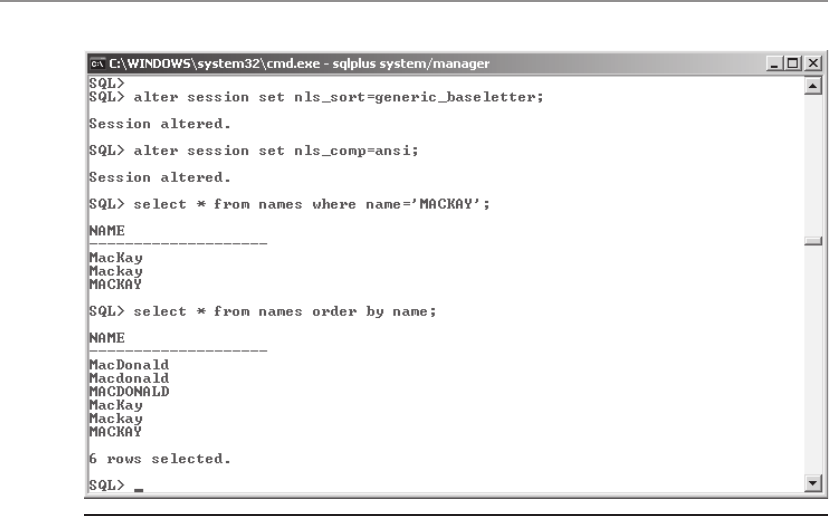
All-in-1 / Oracle Database 10g OCP Certification All-in-One / Watson, Bersinic / 5790-3
Oracle Database 10g OCP Certification All-in-One Exam Guide
18
“correct” what may appear to some as incorrect ordering. A more complex example
would require equating “McKay” with “MacKay”; that would require the Locale Builder.
Similarly, all the sort orders can be suffixed with _AI or _CI for accent-insensitive
and case-insensitive sorting. For example,
SQL> alter session set nls_sort=FRENCH_CI;
will ignore upper- and lowercase variations but will still handle accented characters
according to French standards.
The Locale Builder
The Globalization support provided as standard by Oracle 10g is phenomenal, but
there may be circumstances that it cannot handle. The Locale Builder is a graphical
tool that can create a customized Globalization environment, by generating definitions
for languages, territories, character sets, and linguistic sorting.
As an example, Oracle does not provide out-of-the-box support for Afrikaans;
you could create a customized Globalization to fill this gap, which might combine
elements of Dutch and English standards with customizations common in Southern
Africa such as ignoring the punctuation marks or spaces in names like O’Hara or Du
Toit. To launch the Locale Builder, run
$ORACLE_HOME/nls/lbuilder/lbuilder
Figure 21-8 Case and accent insensitivity
ch21.indd 18ch21.indd 18 6/16/2005 3:34:17 PM6/16/2005 3:34:17 PM
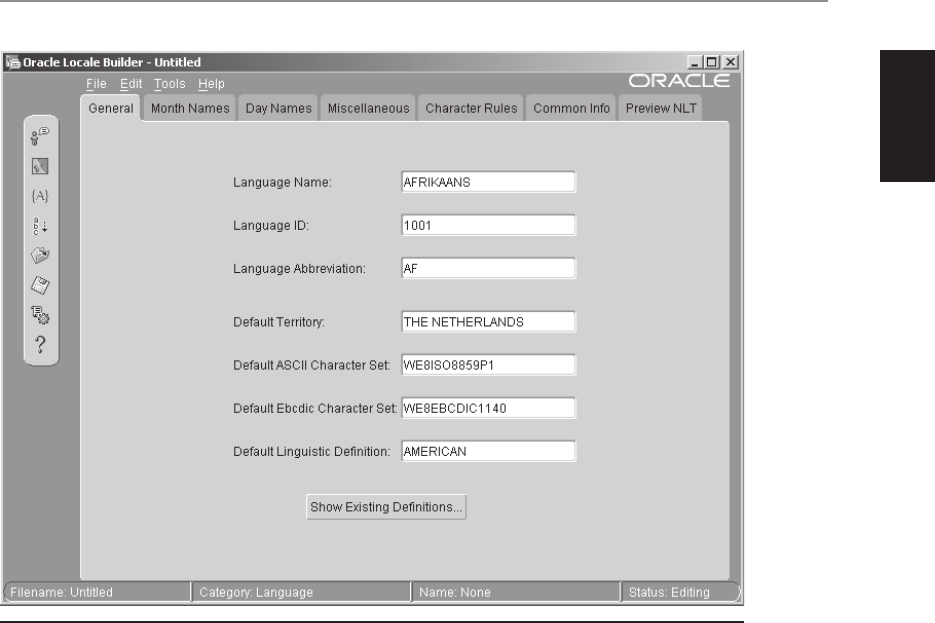
All-in-1 / Oracle Database 10g OCP Certification All-in-One / Watson, Bersinic / 5790-3
Chapter 21: Managing Globalization in Oracle Databases
19
PART I
on Unix, or
%ORACLE_HOME%\nls\lbuilder\lbuilder.bat
on Windows to view the dialog box shown in Figure 21-9.
Using Time Zones
Businesses, and therefore databases, must work across time zones. From release 9i
onward, the Oracle environment can be made time zone aware. This is done by
specifying a time zone in which the database operates, and then using the TIMESTAMP
WITH TIME ZONE and TIMESTAMP WITH LOCAL TIME ZONE datatypes. The former
will be not be normalized to the database time zone when it is stored, but it will have
a time zone indicator to show the zone to which it refers. The latter is normalized to
the database time zone on storage but is subsequently converted to the client time
zone on retrieval. The usual DATE and TIMESTAMP datatypes are always normalized
33to the database time zone on storage and displayed unchanged when selected.
Figure 21-9 Creating a locale with the Locale Builder
ch21.indd 19ch21.indd 19 6/16/2005 3:34:18 PM6/16/2005 3:34:18 PM

All-in-1 / Oracle Database 10g OCP Certification All-in-One / Watson, Bersinic / 5790-3
Oracle Database 10g OCP Certification All-in-One Exam Guide
20
As an example of when time zone processing is important, consider an e-mail
database hosted in London, set to Greenwich Mean Time, GMT. A user in Harare
(which is two hours ahead of GMT) sends an e-mail at his local time of 15:00; the
mail is addressed to two recipients, one in Paris (Central European Time, CET: one
hour ahead of GMT with daylight saving time in effect in the Northern hemisphere
summer) and the other in Bogotá (which is five hours behind GMT). How do you
ensure that the recipients and the sender will all see the mail as having been sent
correctly according to their local time zone? If the column denoting when the mail
was sent is of datatype TIMESTAMP WITH LOCAL TIME ZONE, then when the mail
is received by the database, the time will be normalized to GMT: it will be saved as
13:00. Then when the Bogotá user retrieves it, the time will be adjusted to 08:00 by
his user process. When the Paris user retrieves the mail, he will see it as having been
sent at either 14:00 or 15:00, depending on whether the date it was sent was in the
period between March and October when daylight saving time is in effect. It is possible
to do this type of work programmatically, but it requires a great deal of work as well
as knowledge of all time zones and any local quirks for daylight saving. The database
can do it all for you.
The database time zone can be set at creation time in the CREATE DATABASE
command and adjusted later with ALTER DATABASE SET TIME_ZONE=.... If not set,
it defaults to the time zone picked up from the host operating system at the time of
creation. The client time zone defaults to that of the client operating system, or it can
be set with the environment variable ORA_STDZ. Within a session, the time zone can
be set with ALTER SESSION SET TIME_ZONE=.... Time zones can always be specified
by full name, by abbreviated name, or as a fixed offset, in hours and minutes, from
GMT. The last option cannot take account of daylight saving time adjustments. The
list of supported time zones is displayed in V$TIMEZONE_NAMES.
Exercise 21-3: Making Time Zone Adjustments
Confirm and adjust your current time zone, using appropriate datatypes. Test the
results using appropriate formatting masks.
1. Using SQL*Plus, connect to your instance as user SYSTEM.
2. Identify the database time zone with this query:
SQL> select value from v$database properties where property='DBTIMEZONE';
and note the result.
3. Create a table as follows:
SQL> create table times (date_std date, date_tz timestamp with time zone,
date_ltz timestamp with local time zone);
4. View the list of supported time zones with this query:
SQL> select * from $timezone_names;
ch21.indd 20ch21.indd 20 6/16/2005 3:34:18 PM6/16/2005 3:34:18 PM

All-in-1 / Oracle Database 10g OCP Certification All-in-One / Watson, Bersinic / 5790-3
Chapter 21: Managing Globalization in Oracle Databases
21
PART I
5. Adjust your session time zone to something other than the database time
zone, for example,
SQL> alter session set time_zone='Pacific/Tahiti';
6. Set your timestamp with time zone format to twenty-four-hour clock, with
abbreviated time zone names with daylight saving variations.
SQL> alter session set nls_timestamp_tz_format='YYYY-MM-DD HH24:MI:SS TZD';
7. Set your timestamp format to twenty-four-hour clock.
SQL> alter session set nls_timestamp_format='YYYY-MM-DD HH24:MI:SS';
8. Set your date format to twenty-four-hour clock.
SQL> alter session set nls_date_format='YYYY-MM-DD HH24:MI:SS';
9. Insert a row into the table created in Step 3.
SQL> insert into times values('2004-10-26 15:00:00',
'2004-10-26 15:00:00 PDT','2004-10-26 15:00:00');
10. Display the times.
SQL> select * from times;
Note that all times read 15:00.
11. Switch your session to the database time zone.
SQL> alter session set time_zone=DBTIMEZONE;
12. Repeat the query from Step 9, and note that the TIMESTAMP WITH LOCAL
TIMEZONE has been adjusted to reflect that your session is now in a different
zone.
13. Tidy up.
SQL> drop table times;
Chapter Review
Globalization capabilities allow you as DBA to customize the Oracle environment to
take account of national language and culture variations. This is virtually essential in
the modern world, where a database must present data in a variety of formats to suit
a range of end users. Globalization parameters can be set at any of five levels: the
database, the instance, the client environment, the session, and the statement.
The Globalization settings will influence, among other things, the languages
for messages, sort orders, date formats, calendars, names of days and months, and
numeric formats. Of vital importance is the choice of character sets, of which there
are two. The database character set is used for VARCHAR2, CLOB, CHAR, and
LONG columns; the National Character Set is used for NVARCHAR2, NCLOB, and
NCHAR columns.
A related topic is time zones. These can now be specified for the database and per
session, without ambiguity, if appropriate datatypes are used.
ch21.indd 21ch21.indd 21 6/16/2005 3:34:18 PM6/16/2005 3:34:18 PM

All-in-1 / Oracle Database 10g OCP Certification All-in-One / Watson, Bersinic / 5790-3
Oracle Database 10g OCP Certification All-in-One Exam Guide
22
Questions
1. Your database was created with US7ASCII as the database character set, and
you later find that this is inadequate. What can you do? (Choose the best
answer.)
A. Re-create the database.
B. Issue an alter database character set... command.
C. Issue an alter system character set... command.
D. Generate a create controlfile... command, edit it to specify
a different character set, and re-create the controlfile.
2. What are the options for the National Character Set?
A. None. It must be AL16UTF16.
B. It can be any Unicode character set.
C. It can be either AL16UTF16 or UTF8.
D. It can be any character set you require.
3. Match each character set with a type:
Character Set Type
A. AL16UTF16 a. Seven-bit single-byte
B. US7ASCII b. Eight-bit single-byte
C. UTF8 c. Fixed-width multibyte
D. WE8ISO8859P15 d. Variable-width multibyte
4. Which statements are correct about the TIMESTAMP WITH LOCAL TIME
ZONE datatype? (Choose two answers.)
A. Data is saved with a local time zone indicator.
B. Data is normalized to the database time zone when it is saved.
C. On retrieval, data is normalized to the retrieving client’s time zone.
D. On retrieval, data is normalized to the time zone of the client that entered it.
5. Globalization can be set at various levels. Put these in order of precedence,
lowest first:
A. Client environment
B. Database settings
C. Instance parameters
D. Session parameters
E. Statements
ch21.indd 22ch21.indd 22 6/16/2005 3:34:18 PM6/16/2005 3:34:18 PM

All-in-1 / Oracle Database 10g OCP Certification All-in-One / Watson, Bersinic / 5790-3
Chapter 21: Managing Globalization in Oracle Databases
23
PART I
6. The NLS_LANGUAGE and NLS_TERRITORY parameters set defaults for
a number of other Globalization parameters. Which of the following is
controlled by NLS_LANGUAGE, and which by NLS_TERRITORY? (Two each.)
A. NLS_DATE_LANGUAGE
B. NLS_DATE_FORMAT
C. NLS_NUMERIC_CHARACTERS
D. NLS_SORT
7. Choose the best description of the Character Set Scanner tool:
A. It scans character sets to assess their suitability for a particular language.
B. It scans files to determine the language and character set of the data
in them.
C. It scans datafiles to determine whether the character set can be changed.
D. It reports on problems a character set change would cause.
8. If the database and the user process are using different character sets, how
does data get converted?
A. Data is not converted, which is why there may be corruptions if the
character sets are incompatible.
B. On data entry, the instance converts data to the database character set.
On retrieval, the user process converts to the client character set.
C. Oracle Net will convert, in both directions.
D. It depends on various NLS parameters.
9. The database is set to GMT. A client in Buenos Aires (three hours behind
GMT) executes these statements at 10:00:00 local time:
create table times(c1 timestamp,
c2 timestamp with local time zone);
insert into times values(to_timestamp('10:00:00'),
to_timestamp('10:00:00'));
commit;
A client in Nairobi (three hours ahead of GMT) executes these statements at
18:00:00 local time:
alter session set nls_timestamp_format='hh24:mi:ss';
select * from times;
What will the Nairobi user see for the columns c1 and c2?
A. 10:00:00 and 16:00:00
B. 13:00:00 and 16:00:00
C. 13:00:00 and 10:00:00
D. 10:00:00 and 13:00:00
ch21.indd 23ch21.indd 23 6/16/2005 3:34:19 PM6/16/2005 3:34:19 PM

All-in-1 / Oracle Database 10g OCP Certification All-in-One / Watson, Bersinic / 5790-3
Oracle Database 10g OCP Certification All-in-One Exam Guide
24
10. Study the result of this query:
SQL> select * from dates;
C1
--------
03-04-05
C1 is a date-type column. How could you determine what the date returned
actually means? (Choose two answers.)
A. Query NLS_DATABASE_PARAMETERS.
B. Query NLS_INSTANCE_PARAMETERS.
C. Query NLS_SESSION_PARAMETERS.
D. Set your NLS_DATE_FORMAT to a known value, and re-run the query.
E. Change the query to use TO_CHAR with an NLS parameter.
11. How can you prevent users from causing confusion with, for instance, date
and time formats by setting local
globalization environment variables?
A. You can’t; the users have control over this.
B. Write logon triggers to set the session environment.
C. Set instance Globalization parameters to override client-side settings.
D. Configure Oracle Net to convert all data sent to and from the database
appropriately.
12. Which view will tell you what languages can be supported by your
installation? (Choose the best answer.)
A. NLS_DATABASE_PARAMETERS
B. NLS_INSTANCE_PARAMETERS
C. V$NLS_VALID_VALUES
D. V$NLS_LANGUAGES
13. You want to make the order in which sorted names are returned independent
of whether the names include accented characters, upper- and lowercase
characters, punctuation marks, or spaces. How can you do this? (Choose
the best answer.)
A. Set the sort order to GENERIC_BASELETTER, which will ignore such
variations.
B. Use the _AI and _CI versions of any of the supported sort orders.
C. Use the Locale Builder to design a custom sort order.
D. This cannot be done.
ch21.indd 24ch21.indd 24 6/16/2005 3:34:19 PM6/16/2005 3:34:19 PM

All-in-1 / Oracle Database 10g OCP Certification All-in-One / Watson, Bersinic / 5790-3
Chapter 21: Managing Globalization in Oracle Databases
25
PART I
Answers
1. B. Use this command, but test with the character set scanner first.
2. C. Either of these Unicode sets is currently allowed.
3. A-c; B-a; C-d; D-b
4. B and C. This is the datatype that fully normalizes times to and from
the database.
5. The correct order is B, C, A, D, E. Instance parameters override the database
parameters, and then on the client-side environment variables can be
overridden by ALTER SESSION commands, and then by individual statements.
6. A and D. NLS_DATE_LANGUAGE and NLS_SORT are the two parameters
controlled by the NLS_LANGUAGE. The others are two of several controlled
by NLS_TERRITORY.
7. D. It will, for instance, report if a changed encoding would prevent data from
fitting into a column.
8. C. Oracle Net will do the conversion to the best of its ability.
9. B. The database will normalize the time 10:00:00 from the local time zone
at the point of entry, GMT+3, to the database time zone, GMT. Thus both
times are saved as 13:00:00 GMT. For retrieval, the timestamp column will be
displayed as saved, 13:00:00, but the timestamp with local time zone column
will adjust the time to that of the time zone of the client retrieving the data,
which is GMT+3.
10. C and D. NLS_SESSION_PARAMETERS will show the format used so that you
can interpret the output of the query correctly, or you could set the format to a
sensible value and re-run the query.
11. B. The best option is to write logon triggers, which will prevent any possible
confusion caused by the client configuration.
12. C. This view will show you the full range of supported languages, as well as all
other globalization options.
13. C. To remove punctuation marks and spaces as well, you will need to create
your own variation with the Locale Builder.
ch21.indd 25ch21.indd 25 6/16/2005 3:34:19 PM6/16/2005 3:34:19 PM

All-in-1 / Oracle Database 10g OCP Certification All-in-One / Watson, Bersinic / 5790-3
ch21.indd 26ch21.indd 26 6/16/2005 3:34:19 PM6/16/2005 3:34:19 PM

All-in-1 / Oracle Database 10g OCP Certification All-in-One / Watson, Bersinic / 5790-3PB
PART II
Oracle Database 10g
Administrative II Exam
■ Chapter 22 Configuring Security for the Listener
■ Chapter 23 Getting Started with Oracle Recovery Manager (RMAN)
■ Chapter 24 Using RMAN to Back Up Oracle Databases
■ Chapter 25 Diagnosing Oracle Database Issues
■ Chapter 26 Recovering from Noncritical Losses
■ Chapter 27 Incomplete Database Recovery
■ Chapter 28 Using Flashback Database
■ Chapter 29 Recovering from User Errors
■ Chapter 30 Detecting and Recovering from Database Corruption
■ Chapter 31 Tools for Oracle Database 10g Tuning
■ Chapter 32 Monitoring and Managing Storage
■ Chapter 33 Managing Storage with Automatic Storage Management
■ Chapter 34 Monitoring and Managing Memory
■ Chapter 35 Managing Oracle Database Resources
■ Chapter 36 Automating Administrative Tasks
ch22.indd 1ch22.indd 1 6/17/2005 10:57:00 AM6/17/2005 10:57:00 AM
All-in-1 / Oracle Database 10g OCP Certification All-in-One / Watson, Bersinic / 5790-3
ch22.indd 2ch22.indd 2 6/17/2005 10:57:16 AM6/17/2005 10:57:16 AM

All-in-1 / Oracle Database 10g OCP Certification All-in-One / Watson, Bersinic / 5790-3
CHAPTER 22
Configuring Security
for the Listener
In this chapter you will learn how to
• Secure the listener
• Remove the default EXTPROC entry
• Add a separate listener to handle external procedure calls
3
ch22.indd 3ch22.indd 3 6/17/2005 10:57:17 AM6/17/2005 10:57:17 AM

All-in-1 / Oracle Database 10g OCP Certification All-in-One / Watson, Bersinic / 5790-3
Oracle Database 10g OCP Certification All-in-One Exam Guide
4
Chapter 12 covers basic listener configuration: how to create a listener process that
will monitor one or more ports on one or more network addresses for incoming
connection requests and spawn server processes against one or more instances.
This chapter covers three advanced features of the listener: First, how to control
administrative access. Second, how to configure the listener to reject connection
requests from unauthorized sources. And third, how to set up a listener to run
external procedures. These are programs written in C and invoked from a normal
database session. In order to understand this capability, you will also read a brief
discussion of how to create an external procedure, though this would normally be
the responsibility of programmers, not the DBA.
Securing the Listener
Some of the listener control administration commands are protected against
execution by unauthorized users. Others are not; any user with execute permissions
on the lsnrctl executable can run them. To display the common administration
commands, run lsnrctl help from an operating system prompt. The commands
are shown in the following table:
Command Protected?
Change_Password Yes
Exit No
Quit No
Reload Yes
Save_Config Yes
Services Yes
Set Varies according to the parameter being set
Show Yes
Start No
Status Yes
Stop Yes
Trace Yes
Version No
Listener Operating System Authentication
The default security for listener administrative commands is based on operating
system user ID. Anyone logged on to the server machine as the user who started the
listener has full access to it, including the ability to stop it. By default, no one else can
do so. This form of security is always enabled and will take precedence over password
security. Thus, even if you do not know the listener password, you can still administer
ch22.indd 4ch22.indd 4 6/17/2005 10:57:17 AM6/17/2005 10:57:17 AM

All-in-1 / Oracle Database 10g OCP Certification All-in-One / Watson, Bersinic / 5790-3
Chapter 22: Configuring Security for the Listener
5
PART II
the listener if you know the operating system password of the user who started it. This
is exactly analogous to operating system authentication for a SYSDBA connection to a
database, which will bypass password file authentication.
Listener Password Authentication
Setting a listener password provides an additional authentication method for giving
permission to execute the protected commands, such as STOP. It may well be that the
listener is started by scripts running under the operating system ID of the Oracle owner,
and that you do not wish to give this login username/password to the junior DBAs. In
order to allow them to administer the listener, set a password for it.
Listener passwords can be enabled and set through the Net Manager GUI, through
Database Control, with the lsnrctl utility, or by editing the listener.ora file by hand. The
last option will not encrypt the password, so it should be used only if the purpose of
the password is to prevent mistakes rather than to prevent malicious interference.
To set a password with Database Control, take the Listener link from the database
home page, and navigate to the Authentication page as shown in Figure 22-1. Figure 22-2
illustrates how to make the same setting using the Net Manager.
Figure 22-1 Setting a listener password with Database Control
ch22.indd 5ch22.indd 5 6/17/2005 10:57:18 AM6/17/2005 10:57:18 AM
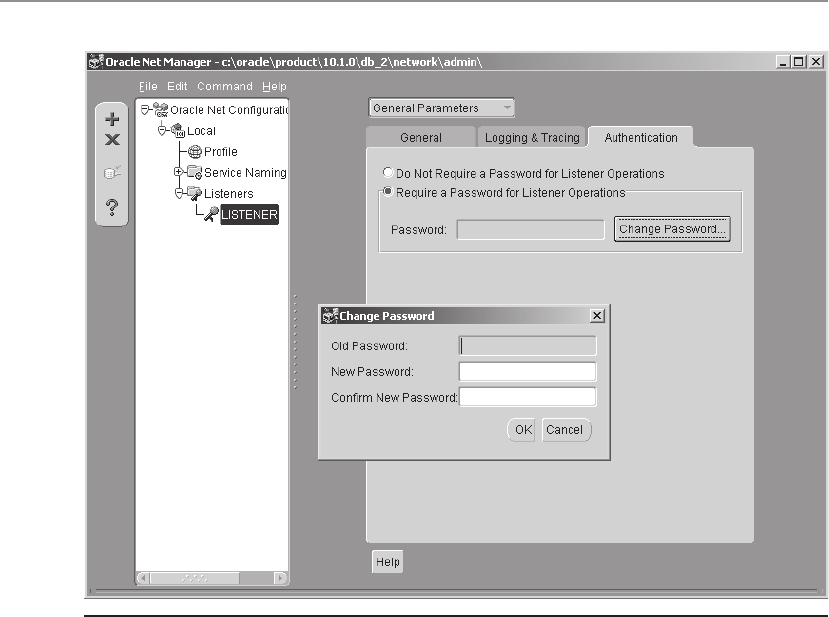
All-in-1 / Oracle Database 10g OCP Certification All-in-One / Watson, Bersinic / 5790-3
Oracle Database 10g OCP Certification All-in-One Exam Guide
6
Exercise 22-1: Setting a Listener Password
with lsnrctl
Enable password authentication for a listener, using the lsnrctl command-line utility.
This exercise assumes that your listener is the default listener, named LISTENER.
1. From an operating system prompt, launch the lsnrctl utility. On Windows,
C:\> lsnrctl
or Unix,
$ lsnrctl
2. Check the status of the listener, and if it is not running, start it. For example,
on Windows,
C:\>lsnrctl
LSNRCTL for 32-bit Windows: Version 10.1.0.2.0 - Production on
24-JAN-2005 13:06:55
Copyright (c) 1991, 2004, Oracle. All rights reserved.
Figure 22-2 Setting a password with the Net Manager
ch22.indd 6ch22.indd 6 6/17/2005 10:57:18 AM6/17/2005 10:57:18 AM

All-in-1 / Oracle Database 10g OCP Certification All-in-One / Watson, Bersinic / 5790-3
Chapter 22: Configuring Security for the Listener
7
PART II
Welcome to LSNRCTL, type "help" for information.
LSNRCTL> status
Connecting to (DESCRIPTION=(ADDRESS=(PROTOCOL=TCP)(HOST=ora10g)(PORT=1521)))
TNS-12541: TNS:no listener
TNS-12560: TNS:protocol adapter error
TNS-00511: No listener
32-bit Windows Error: 61: Unknown error
LSNRCTL> start
Starting tnslsnr: please wait...
3. Choose a password (in the example that follows, it is “pass,” but this is not
displayed) and apply it as shown here. As there is no password currently, press
ENTER when prompted for the old password.
LSNRCTL>
LSNRCTL> change_password
Old password:
New password:
Reenter new password:
Connecting to (DESCRIPTION=(ADDRESS=(PROTOCOL=TCP)(HOST=ora10g)(PORT=1521)))
Password changed for LISTENER
The command completed successfully
LSNRCTL>
4. Save the password to the listener.ora file.
LSNRCTL>
LSNRCTL> save_config
Connecting to (DESCRIPTION=(ADDRESS=(PROTOCOL=TCP)(HOST=ora10g)(PORT=1521)))
Saved LISTENER configuration parameters.
Listener Parameter File c:\oracle\product\10.1.0\db_2\network\
admin\listener.ora
Old Parameter File c:\oracle\product\10.1.0\db_2\network\admin\
listener.bak
The command completed successfully
LSNRCTL>
5. Set your lsnrctl session to use the password, and confirm that you can stop
the listener.
LSNRCTL>
LSNRCTL> set password pass
The command completed successfully
LSNRCTL> stop
Connecting to (DESCRIPTION=(ADDRESS=(PROTOCOL=TCP)(HOST=ora10g)(PORT=1521)))
The command completed successfully
LSNRCTL>
6. Exit from lsnrctl, use an editor to open the listener.ora file, and observe the
encrypted password.
LISTENER =
(DESCRIPTION =
(ADDRESS = (PROTOCOL = TCP)(HOST = ora10g)(PORT = 1521))
)
#----ADDED BY TNSLSNR 06-NOV-2004 18:31:37---
PASSWORDS_LISTENER = 1AB3AFF023F1126C
#--------------------------------------------
ch22.indd 7ch22.indd 7 6/17/2005 10:57:18 AM6/17/2005 10:57:18 AM

All-in-1 / Oracle Database 10g OCP Certification All-in-One / Watson, Bersinic / 5790-3
Oracle Database 10g OCP Certification All-in-One Exam Guide
8
Controlling Database Access
The default listener configuration places no limits at all on who can connect to the
database server: all security must be managed within the database or the application.
There will be many cases where it is desirable to limit access to users connecting from
certain machines or subnets. This can of course be done by a well-configured firewall,
but such restrictions can also be enforced by the listener itself.
TIP If your firewall is not capable of proxying Oracle Net traffic securely, then
the Oracle Net Connection Manager can be used as a proxy server instead.
The Connection Manager is not installed by default; you have to select it in a
“custom” installation.
Controlling access to a listener is done through configuring Oracle Net profiles,
which are in fact a set of directives in the sqlnet.ora file on the server machine.
Remember from Chapter 12 that the sqlnet.ora file is optional on both the client
side and the server side; listener security is a case where it becomes necessary. The
directives are as follows:
• TCP.VALIDNODE_CHECKING
• TCP.EXCLUDED_NODES
• TCP.INVITED_NODES
Once TCP.VALIDNODE_CHECKING is changed to YES from its default of NO, the
other directives are enabled. In practice, it is necessary to set only one of them. If any
node is listed in TCP.INVITED_NODES, then all other nodes are implicitly excluded;
if any node is listed in TCP.EXCLUDED_NODES, then all other nodes are implicitly
invited. If both directives are set and there is a conflict, then the TCP.INVITED_NODES
list takes precedence.
The invited and excluded nodes can be listed by name or by IP address, but the
syntax does not permit wildcards; each node must be listed individually. For this
reason, access control by the listener is most useful in a three-tier environment, where
all the sessions are spawned from a small number of application servers with fixed IP
addresses. Listing these in the TCP.INVITED_NODES list will ensure that no users can
bypass the application servers and make client/server connections to the database.
A large client base of PC terminals using dynamically acquired IP addresses cannot
easily be controlled in this manner. Note that this mechanism applies only to TCP.
Connections from user processes running on the server machine using IPC will always
be accepted. The profile can be created either with the Net Manager GUI as shown in
Figure 22-3 or by editing the sqlnet.ora file directly.
The directives in sqlnet.ora will be
TCP.VALIDNODE_CHECKING = YES
TCP.INVITED_NODES = (as1.haunting.com, as2.haunting.com)
ch22.indd 8ch22.indd 8 6/17/2005 10:57:19 AM6/17/2005 10:57:19 AM
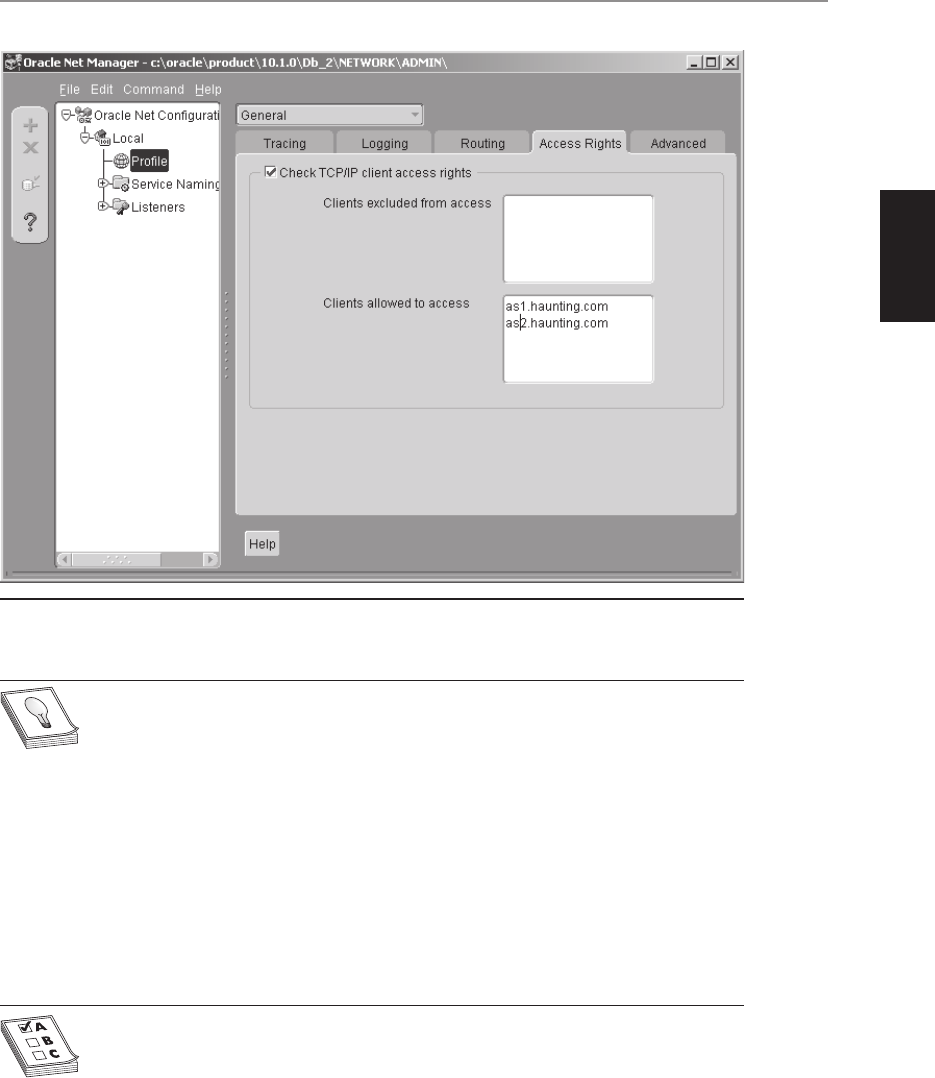
All-in-1 / Oracle Database 10g OCP Certification All-in-One / Watson, Bersinic / 5790-3
Chapter 22: Configuring Security for the Listener
9
PART II
TIP The Connection Manager gives greater control over access, including use
of wildcards in both hostnames and IP addresses.
External Procedures
Oracle stored procedures can be written in either PL/SQL or Java. Usually, one or the
other of these languages is adequate for any processing that may be required, but there
are occasions when developers will wish to use another language. Oracle supports the
use of C as a development tool for procedures to be run on the database server and
invoked by sessions using the same syntax as that used for invoking a normal PL/SQL
procedure.
EXAM TIP External procedures must be written in C. User process software,
linked with the OCI libraries, can be written in C or in C++.
Figure 22-3 Using Net Manager to limit access to the database
ch22.indd 9ch22.indd 9 6/17/2005 10:57:19 AM6/17/2005 10:57:19 AM

All-in-1 / Oracle Database 10g OCP Certification All-in-One / Watson, Bersinic / 5790-3
Oracle Database 10g OCP Certification All-in-One Exam Guide
10
A typical reason for using C would be performance. Neither PL/SQL nor Java
stored procedures are directly executable by the operating system; a large element of
interpretation is required when stored procedures are invoked. Functions written in C
can be compiled down to object code and linked, cutting out the interpretation phase
and also making many operations, such as jumps, much quicker.
TIP It is possible to convert your PL/SQL code to C and then compile and
link it, which may give great performance gains. This is the “native compilation”
technique, enabled through the PLSQL_CODE_TYPE initialization parameter.
Dynamic link libraries must be dynamically linked to something before the code
in them can execute. This is where the listener takes on a special role. Usually, a listener
launches server processes. Through the external procedure mechanism, it can also
launch a process known as the external procedure agent. This agent has only one
function: to dynamically link and run external procedures, in response to invocations
by database users.
Creating an External Procedure
There are three steps in creating an external procedure:
• Write, compile, and link the C function.
• Create an Oracle library.
• Create a PL/SQL procedure to call the C function.
The C function itself must be created by the programmers like any other C function.
Then it needs to be compiled and linked to the operating system as a shared object
library. The result will be a file suffixed according to the conventions of the operating
system: .DLL for Windows, or .so for Solaris, or .sl for HP-UX. Take this file and save it
to a suitable directory on the database server.
To inform Oracle of the shared object library’s existence, issue a CREATE LIBRARY
command, such as
SQL> create library util_lib as '/OR/newlib/c_utils.so';
on Unix or
SQL> create library util_lib as 'd:\or\newlib\c_utils.dll';
on Windows, which will create a logical pointer, UTIL_LIB, to the physical file
delivered by the programmers. In this example, the library resides on the same
machine as the database.
ch22.indd 10ch22.indd 10 6/17/2005 10:57:19 AM6/17/2005 10:57:19 AM

All-in-1 / Oracle Database 10g OCP Certification All-in-One / Watson, Bersinic / 5790-3
Chapter 22: Configuring Security for the Listener
11
PART II
TIP It is possible to create a library that points to a file on a remote machine
by specifying an AGENT after the filename, where the AGENT is a database
link. This would allow you to offload some of the processing from the database
server machine to another machine, which might be better optimized for
running the external procedures.
Finally, the PL/SQL procedure that will invoke the C function is needed:
SQL> create or replace procedure util1 (p1 in out number)
as
language C
name c_util1
library util_lib
parameters (p1 by reference);
This PL/SQL procedure can be invoked like any other procedure. It will accept the
in/out numeric argument P1 and pass this through by reference to the C function
c_util1 in the shared object library referred to by UTIL_LIB. The C function will
receive the argument as a pointer, do whatever it has to do, and then return control to
PL/SQL. The PL/SQL session will then have access to the changed value of the parameter.
The External Procedure Agent
The external procedure agent is an executable file in the ORACLE_HOME/bin directory,
called extproc on Unix and extproc.exe on Windows. It is launched on demand by the
listener. When an external procedure is invoked by a PL/SQL procedure, the agent will
convert the PL/SQL calls into C calls, load the shared library, and execute the function
requested. It will raise any exceptions that might occur and return exceptions or
arguments back to the PL/SQL environment.
The agent offers some built-in security. By default, the agent can load shared libraries
only from the ORACLE_HOME/lib directory, which should be tightly controlled.
Otherwise, it would be possible for a malicious user to write a PL/SQL procedure that
would invoke C procedures from any of the standard shared libraries available on the
server’s operating system. It is good practice to restrict the shared libraries that the
agent can load by nominating them in the listener.ora file, as shown next.
Configuring the Listener to Launch the Agent
The listener needs to be configured to accept calls to launch the external procedure
agent. The mechanism is similar to launching a server process: the agent is launched
on demand, one agent per session, and will remain active for the lifetime of the
session. Thus, no matter how many external procedure calls are made, the agent has
to be launched only once per session. The operating system will use shared memory
for the agent, so there will be no memory overhead to launching one agent for each
session that requires one, but there will be an impact on the number of processes that
the operating system has to manage.
ch22.indd 11ch22.indd 11 6/17/2005 10:57:19 AM6/17/2005 10:57:19 AM
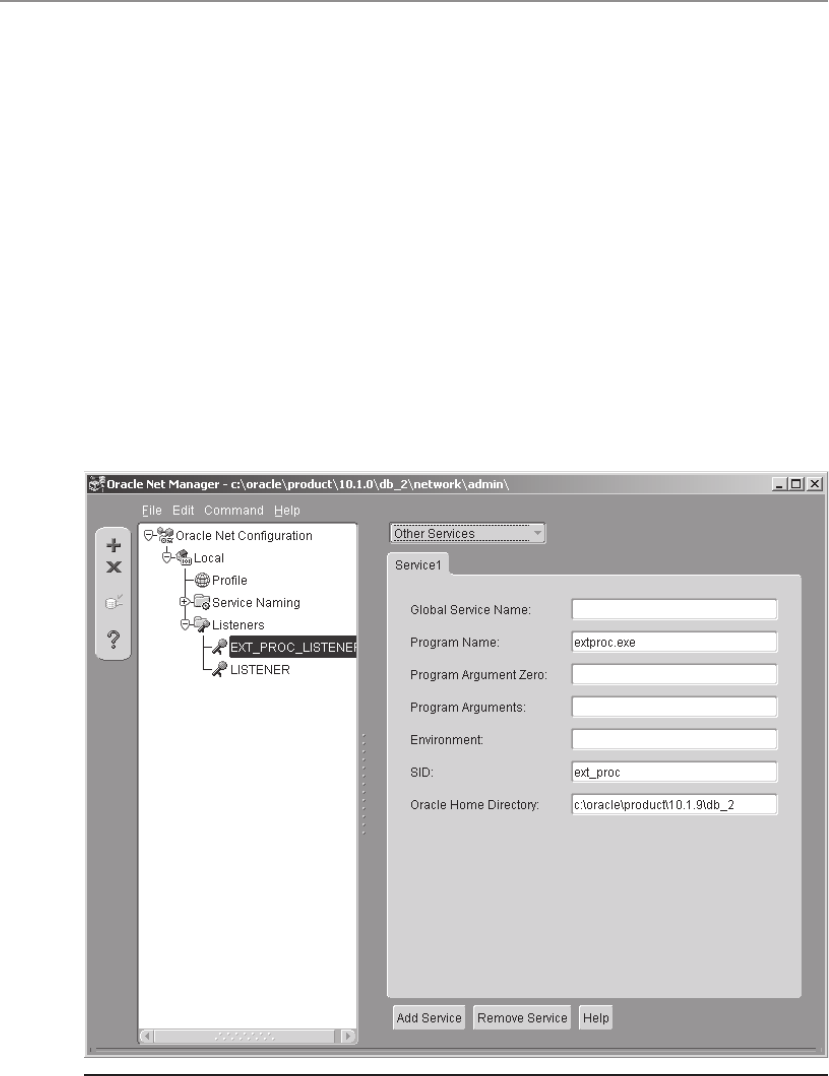
All-in-1 / Oracle Database 10g OCP Certification All-in-One / Watson, Bersinic / 5790-3
Oracle Database 10g OCP Certification All-in-One Exam Guide
12
Just as a database instance must be registered with a listener if a listener is to launch
sessions against it, the external procedure agent must also be registered with a listener.
Unfortunately this can’t be done automatically, as with dynamic instance registration;
you will have to configure the listener.ora file, either through the Net Manager GUI as
shown in Figure 22-4, through Database Control, or by editing it by hand.
The listener configured in the figure would appear in the listener.ora file as follows:
EXT_PROC_LISTENER =
(DESCRIPTION =
(ADDRESS = (PROTOCOL = IPC)(KEY = ext_proc1))
)
SID_LIST_EXT_PROC_LISTENER =
(SID_LIST =
(SID_DESC =
(PROGRAM = extproc.exe)
(SID_NAME = ext_proc)
(ORACLE_HOME = c:\oracle\product\10.1.9\db_2)
)
)
Figure 22-4 Configuring an external procedure agent through the Net Manager
ch22.indd 12ch22.indd 12 6/17/2005 10:57:20 AM6/17/2005 10:57:20 AM

All-in-1 / Oracle Database 10g OCP Certification All-in-One / Watson, Bersinic / 5790-3
Chapter 22: Configuring Security for the Listener
13
PART II
The listener has a name, EXT_PROC_LISTENER in the example. It is perfectly
possible to add an external procedure service to the SID list of an existing listener, but
it is generally considered good security policy to create a separate listener, with its own
listening address(es), specifically for launching external procedures. This listener is
only listening on the IPC protocol, so there is no way it can be contacted by any
process not running on the database server machine. It is not possible to invoke an
external procedure by any other protocol. The IPC “key,” which by analogy with TCP
is the “port,” is called ext_proc1. This must be unique for all IPC services on the server.
A hard-coded SID list for the listener is also essential, because external procedure
agents cannot register themselves in the manner that database instances can.
The SID list specifies that requests for the ext_proc service will be routed through
to the program extproc.exe. The listener then needs to be started in the normal manner,
but you may want to start it using an operating system ID other than that of the Oracle
owner. The external procedure agents launched by the listener will run with the
operating system ID and permissions of the user who started the listener. Security will
be considerably improved if you create an operating system user for this purpose with
the bare minimum of permissions needed: execute on lsnrctl, the extproc program,
and the dynamic link libraries to be loaded, and read (but not write) on listener.ora.
Once a listener has been configured, the client side of Oracle Net needs to be set
up so that the server processes can find it when they want to run an external procedure.
This will typically be done by inserting an entry in the tnsnames.ora file on the database
server. Again, this can be done through the Net Manager or by hand:
EXTPROC_CONNECTION_DATA =
(DESCRIPTION =
(ADDRESS_LIST =
(ADDRESS = (PROTOCOL = IPC)(Key = EXTPROC1))
)
(CONNECT_DATA =
(SID = ext_proc)
)
)
The connection string alias is EXTPROC_CONNECTION_DATA. There is no
choice about this: this is the alias that Oracle will always look for to find the address
of the external procedure listener. The address is the IPC key EXTPROC1, which must
match the listening address specified on the listener configuration file. Then the SID
is ext_proc, which the listener will map on to the executable extproc.exe.
EXAM TIP When configuring external procedure services, you can choose
the key and the SID name, and you can even nominate your own process
to launch, but you must use the IPC protocol and the TNS alias must be
EXTPROC_CONNECTION_DATA.
For security, it is advisable to limit the dynamic link libraries that can be run
as external procedures. The default security is that the libraries must reside in the
ORACLE_HOME/lib directory on Unix or the ORACLE_HOME\bin directory on
ch22.indd 13ch22.indd 13 6/17/2005 10:57:20 AM6/17/2005 10:57:20 AM

All-in-1 / Oracle Database 10g OCP Certification All-in-One / Watson, Bersinic / 5790-3
Oracle Database 10g OCP Certification All-in-One Exam Guide
14
Windows. This is better than having no security at all, but it is still somewhat
dangerous. It is good practice to nominate the libraries with an additional directive
in the SID_DESC section of the listener.ora file; for example,
(SID_DESC =
(PROGRAM = extproc)
(SID_NAME = ext_proc)
(ENVS="EXTPROC_DLLS=ONLY:/or/newlib/c_utils.so:/or/newlib/more_utils.so")
)
will restrict external procedures to referencing functions in the two named files.
Summary of Responsibilities and Flow Control
These are the essential components for running external procedures:
• The database Responsible for storing information required to locate and
execute an external procedure. Both the library alias and the call specification
are stored as database objects.
• The session The users’ database sessions are responsible for initiating the
calls to the external procedures.
• The listener Listens for external procedure requests from database sessions
and launches the external procedure agent processes, one per session.
• The external procedure agent Accepts information (arguments, name and
location of the library) from the session; loads the shared libraries as required;
executes the C functions.
• The user-provided compiled and linked shared library Contains the
functions that implement the desired functionality.
• The library alias Records the physical name and location of the shared
library, storing it within the database as a library object.
• The external procedure call specification Provides a description of the
procedure, including its PL/SQL name and arguments; the library alias; and
the C function that implements the procedure. This is stored within the
database as a PL/SQL stored procedure.
This is the sequence of events:
• The user invokes the PL/SQL call specification via the EXECUTE command,
or any other means.
• The session examines the call specification and finds the name of the shared
library and the function within it that implement the procedure, and the
number and type of the arguments.
• The session uses the service name EXTPROC_CONNECTION_DATA to look up
the Oracle Net connection details to contact the external procedure listener.
ch22.indd 14ch22.indd 14 6/17/2005 10:57:20 AM6/17/2005 10:57:20 AM

All-in-1 / Oracle Database 10g OCP Certification All-in-One / Watson, Bersinic / 5790-3
Chapter 22: Configuring Security for the Listener
15
PART II
• The listener spawns an external procedure agent process to service the request,
and returns the address of the new agent to the session.
• The session sends the agent the name of the shared library, the name of the
C function within it to run, and the arguments (converted from PL/SQL
datatypes to C datatypes).
• The external procedure agent loads the shared library, invokes the C function,
converts any returned data to the corresponding PL/SQL datatypes, and
returns the data to the session.
Exercise 22-2: Creating a Listener for External
Procedure Calls
Create a dedicated listener for servicing external procedure calls, using Database
Control.
1. Connect to your database as user SYSTEM using Database Control.
2. Click the Listener link in the General section of the database home page, and
then the Net Services Administration link under Related Links to reach the Net
Services Administration window.
3. Select Listeners in the Administer drop-down box, and click Go to reach the
Host Login window.
4. Enter a suitable operating system username and password, and click Login to
reach the Listeners window.
5. Click Create to reach the Create Listener window.
6. Enter a sensibly descriptive listener name, such as CALLOUT_LISTENER, and
click Add in the Addresses section to reach the Add Address window.
7. Select IPC in the Protocol drop-down box, and then provide a key, such as
EXTPROC1 (this key must be unique on the machine) and click OK to return
to the Create Listener window.
8. Click the Other Services link in the General section and then Add to reach the
Create Other Service window.
9. Enter extproc as the program name and PLSextproc as the Oracle System
Identifier (SID), and enter your Oracle home directory. Then click OK to
return to the Create Listener window.
10. Click OK to create the listener.
11. Select the radio button for your new listener and Start/Stop in the Actions
drop-down box. Click Go and then OK to confirm.
12. When the listener has started, take the View Details link to see the output
of the startup command as shown in Figure 22-5.
ch22.indd 15ch22.indd 15 6/17/2005 10:57:20 AM6/17/2005 10:57:20 AM
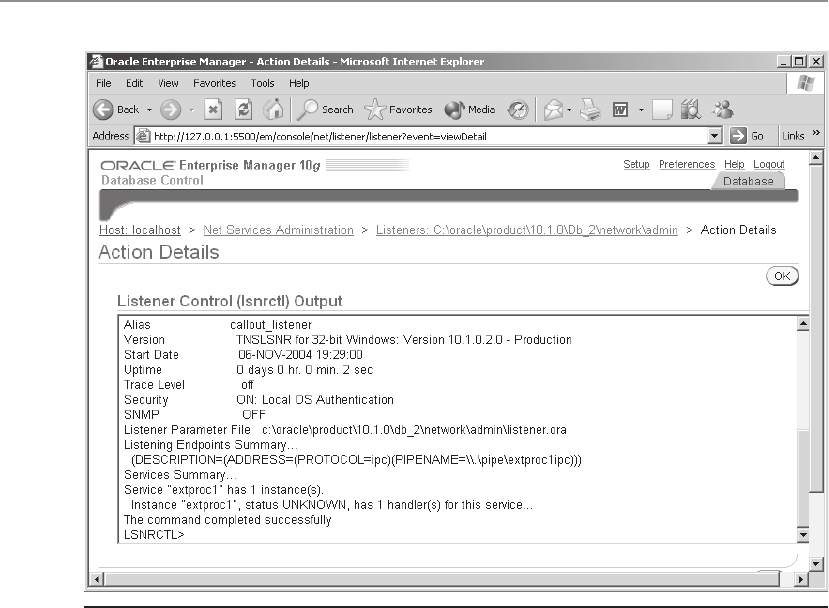
All-in-1 / Oracle Database 10g OCP Certification All-in-One / Watson, Bersinic / 5790-3
Oracle Database 10g OCP Certification All-in-One Exam Guide
16
Chapter Review
This chapter covered some advanced features of Oracle Net. First, in order to prevent
unauthorized listener administration—which can be either accidental (if there are
multiple DBAs working on one machine) or malicious—some listener control
commands can be protected by a password. Enabled by default is operating system
authentication, meaning that only the operating system user who started a listener
can stop it. Setting a password means that anyone can control the listener, provided
s/he knows the password.
Second, by default, a listener will connect a user from any node to the database;
all security must be handled by the database server itself. You can set up access control
within the listener, by coding a list of nodes from which sessions are permitted or
rejected. This mechanism is very simple—it cannot use wildcards, for example—but
very effective if all the connections should come from a few addresses, as would be
the case in an application server environment.
Third, you saw how it is possible for a user to run code written in C as though it
were a normal PL/SQL procedure. This is done through Oracle Net, by configuring a
listener to launch an agent that can load and run external dynamic link libraries.
Figure 22-5 Successful start of an external procedure listener
ch22.indd 16ch22.indd 16 6/17/2005 10:57:21 AM6/17/2005 10:57:21 AM

All-in-1 / Oracle Database 10g OCP Certification All-in-One / Watson, Bersinic / 5790-3
Chapter 22: Configuring Security for the Listener
17
PART II
Questions
1. Of these four lsnrctl commands, which can be executed by anyone, regardless
of whether any security can be configured? (Choose two answers.)
A. Start
B. Status
C. Stop
D. Version
2. Any of several tools can be used to set a listener password, but it might not
be encrypted. Which of the following will encrypt the password? (Choose the
best answer.)
A. Enterprise Manager Database Control
B. The lsnrctl utility
C. The Net Manager
D. All of the above
For the next two questions, examine these entries in the server-side
sqlnet.ora file:
tcp.validnode_checking=yes
tcp.invited_nodes=pc1.haunting.com,pc2.haunting.com
tcp.excluded_nodes=pc2.haunting.com,pc3.haunting.com
3. A user working on pc2.haunting.com attempts to connect. What will happen?
(Choose the best answer.)
A. The session will be established by the listener.
B. The session will be rejected by the listener.
C. It will depend on whether the tcp.invited_nodes directive is before or after
the tcp.excluded_nodes directive.
D. The listener would not have started up because of the conflicting entries.
4. A user working on pc5.haunting.com attempts to connect. What will happen?
(Choose the best answer.)
A. The session will be established by the listener.
B. The session will be rejected by the listener.
C. The listener would not have started up because of the conflicting entries.
5. If your user community is connecting from PCs using dynamically acquired IP
addresses on the class C subnet 10.10.10.*, how can you best limit access
to those PCs only? (Choose the best answer.)
A. Set the tcp.invited_nodes directive to 10.10.10.*
B. Use a Connection Manager to filter requests.
C. List all 256 addresses on the subnet as tcp.invited_nodes.
D. You can’t; access control can only work with static addresses.
ch22.indd 17ch22.indd 17 6/17/2005 10:57:21 AM6/17/2005 10:57:21 AM

All-in-1 / Oracle Database 10g OCP Certification All-in-One / Watson, Bersinic / 5790-3
Oracle Database 10g OCP Certification All-in-One Exam Guide
18
6. What language(s) can be used to write external procedures? (Choose the
best answer.)
A. C
B. C++
C. Java
D. PL/SQL
E. Any of the above
7. When will an external procedure agent be launched? (Choose the best answer.)
A. The first time any user invokes an external procedure, the listener will
launch an agent to use for all subsequent calls by all sessions.
B. The first time a user invokes an external procedure, the listener will launch
an agent to use for all subsequent calls by that session.
C. An agent will be launched for each call made, by any session.
D. The agent will be launched when the external procedure listener is first
started.
8. Information needed to run external procedures is stored on different places.
Match the following items to storage places.
Item Storage Place
A. The C function a. The database
B. The datatypes of the arguments b. The dynamic link library
C. The dynamic link library c. The library object
D. The library object d. The listener.ora file
E. The location of the dynamic link library e. The PL/SQL call specification
F. The name of the agent f. The server’s file system
G. The PL/SQL call specification
9. Which protocol(s) can be used to contact a listener for launching an external
procedure agent? (Choose the best answer.)
A. IPC
B. TCP
C. TCP with secure sockets
D. Named Pipes
E. All of the above
10. When running an external procedure, place these steps in the correct sequence:
A. The agent executes the external procedure.
B. The agent loads the library.
ch22.indd 18ch22.indd 18 6/17/2005 10:57:21 AM6/17/2005 10:57:21 AM

All-in-1 / Oracle Database 10g OCP Certification All-in-One / Watson, Bersinic / 5790-3
Chapter 22: Configuring Security for the Listener
19
PART II
C. The listener launches an agent.
D. The request is passed to the listener.
E. The server process executes a PL/SQL procedure, and looks up
a library alias.
F. The user process invokes a PL/SQL procedure.
Answers
1. A and D. Neither Version nor (perhaps surprisingly) Start are protected.
2. D. The one technique that will not encrypt the password is editing the
listener.ora file by hand.
3. A. If both the tcp.invited_nodes and tcp.excluded_nodes directives are
present, then tcp.excluded_nodes is ignored by the listener.
4. B. If the tcp.invited_nodes directive is present, than all nodes not specifically
listed are blocked.
5. B. In an environment like this, the Connection Manager is the best option.
C would work but would be impossibly clumsy.
6. A. C, and not C++, is the only supported language.
7. B. Each session will get its own agent, launched when the session first invokes
an external procedure.
8. A-b. The programmers produce a library file containing the executable code.
B-e. The PL/SQL call specification details both the PL/SQL datatypes and the
C datatypes.
C-f. The library is just a file, stored in the file system on the server machine.
D-a. An Oracle library is a database object, stored in the data dictionary.
E-c. The physical location of the library file is stored as a library object.
F-d. The agent is the PROGRAM specified in the SID_DESC in listener.ora.
G-a. Like any other stored procedure, the PL/SQL specification is a procedural
object stored in the data dictionary.
9. A. IPC is currently the only supported protocol.
10. The sequence is F, E, D, C, B, A.
ch22.indd 19ch22.indd 19 6/17/2005 10:57:21 AM6/17/2005 10:57:21 AM

All-in-1 / Oracle Database 10g OCP Certification All-in-One / Watson, Bersinic / 5790-3
ch22.indd 20ch22.indd 20 6/17/2005 10:57:22 AM6/17/2005 10:57:22 AM

All-in-1 / Oracle Database 10g OCP Certification All-in-One / Watson, Bersinic / 5790-3/Ch23
CHAPTER 23
Getting Started with Oracle
Recovery Manager (RMAN)
In this chapter you will learn how to
• Configure database parameters that affect RMAN operations
• Change RMAN default settings with CONFIGURE
• Manage RMAN’s persistent settings
• Start RMAN utility and allocate channels
1
ch23.indd 1ch23.indd 1 7/11/2005 4:05:13 PM7/11/2005 4:05:13 PM

All-in-1 / Oracle Database 10g OCP Certification All-in-One / Watson, Bersinic / 5790-3
Oracle Database 10g OCP Certification All-in-One Exam Guide
2
Elementary use of the Recovery Manager, RMAN, is described in Chapters 19 and 20.
For the second of the two OCP examinations you must demonstrate much greater
knowledge of RMAN than that. This is the first of several chapters that go into RMAN
to the necessary depth. It details the architecture of the RMAN environment, including
its relationship with third-party backup solutions and automated tape robots and with
the flash recovery area, and how to configure various options. But first, a summary of
RMAN’s capabilities.
Recovery Manager Features
It is possible to recover from any disaster without any loss of data if you have a backup
of your datafiles and copies of all the archive logs made since the backup was taken.
The one exception to this rule is if you lose all copies of the current online redo log
file. This should never happen if it is adequately multiplexed—and by configuring
Data Guard for zero data loss, even this eventuality can be survived. However, if done
manually through operating system and SQL*Plus commands, restore and recovery
can be an extremely awkward process. RMAN automates the whole cycle of backup,
restore, and recovery through its scripting language and its integration with Database
Control. There is no question that RMAN is a better tool for backup and recovery than
the alternative user-managed backup techniques. Oracle Corporation strongly advises
all users to make use of RMAN.
The objects that RMAN can back up are whole databases, or individual tablespaces
and datafiles. The controlfile and the spfile can also be included, as can the archive
logs. The only part of the database that is not backed up is the online redo log files:
these are protected by multiplexing. These backups can be image copies (where the
output file is byte for byte the same as the input file) or backup sets. The backup set
is a proprietary format that can be streamed directly to tape and optionally compressed.
By combining the use of image copies and backup sets, RMAN can give you an
extraordinarily fast recovery. For instance, the first level of backup can be to a disk
copy, which is then updated with incremental backup sets and migrated to tape-based
backup sets as a second level of backup. RMAN will then select the fastest possible
means of restore and recovery from all the available backups.
RMAN can also do things that cannot be done with operating system and SQL*Plus
commands. It can do incremental backups, which reduce the volume of backup data
dramatically. It can even apply incrementals to whole backups, in effect bringing them
forward in time to reduce the recovery time if it is ever needed. The time for an
incremental backup may also be much reduced when compared to a full backup. The
granularity of a restore and recover operation is the datafile when using traditional
methods; the granularity of an RMAN restore and recover can be just one corrupted
datafile block. This can reduce the MTTR significantly. Indeed, by using block-level
media recovery, it may be possible to detect and repair damage without any downtime
at all. Associated with this is corrupt block detection: RMAN will validate the contents
of blocks as it scans them, meaning that you may become aware of problems before
your end users notice.
ch23.indd 2ch23.indd 2 7/11/2005 4:05:45 PM7/11/2005 4:05:45 PM

All-in-1 / Oracle Database 10g OCP Certification All-in-One / Watson, Bersinic / 5790-3
Chapter 23: Getting Started with Oracle Recovery Manager (RMAN)
3
PART II
Most IT sites will have an automated tape library: a robot system with one or more
tape drives capable of storing many tape cartridges. Some are of very limited capacity,
with one drive and storage for a dozen cartridges, but others are much more powerful:
perhaps a dozen drives and storage for hundreds or thousands of cartridges. Such
devices are not cheap—they may have a six-figure price tag—but they are extremely
capable. To exploit the full power of RMAN, it needs to be integrated with a tape
library. Then the whole backup and recovery cycle can be wholly delegated to RMAN.
It will take control of the library and load, read, write, and clear tapes as necessary.
The combination of RMAN and a tape library means that the backup routines can
run unattended indefinitely, while you can have absolute confidence in the ability
to recover from any disaster.
TIP There are, not infrequently, political problems with the use of RMAN. In
many IT installations, it is the system administrators who are responsible for
backups. But RMAN transfers that responsibility to the DBAs. You will have
to work closely with your system administrators and be aware that they may
consider you to be encroaching on their domain.
Recovery Manager Components
The Recovery Manager tool consists of a number of components, some required and
some optional. Following an absolutely standard installation of the Oracle software
and the creation of a database, it is possible to run the RMAN executable and perform
a backup with just two words: BACKUP DATABASE. This will perform a full backup,
hot or cold, relying completely on defaults. But to exploit the full power of RMAN,
you will certainly need to configure it, and to consider using some of the optional
components.
The RMAN Executable
The interactive tool used to manage RMAN is rman.exe on Windows or rman on Unix,
in the ORACLE_HOME/bin directory. This provides a command-line interface to RMAN.
In some ways it is a user process like any other. It connects to a database via a listener
and a server process, prompts for commands from the user, and sends them to the
instance for execution. The executable can be run from the same ORACLE_HOME as
the database that is being backed up, or it can be run from another computer anywhere
on the network, provided that the versions of the RMAN executable and the target
database match.
An alternative user interface tool is to use Database Control, which gives a graphical
interface. Whichever interface you use, you are in fact invoking PL/SQL procedures.
RMAN is implemented with the package DBMS_BACKUP_RESTORE. This package is
kernelized, meaning that it is part of the instance itself. This is a very significant feature:
you do not need to have an open database in order to use RMAN. Normal PL/SQL stored
procedures are stored within the data dictionary, so if the database isn’t open, you can’t
ch23.indd 3ch23.indd 3 7/11/2005 4:05:46 PM7/11/2005 4:05:46 PM

All-in-1 / Oracle Database 10g OCP Certification All-in-One / Watson, Bersinic / 5790-3
Oracle Database 10g OCP Certification All-in-One Exam Guide
4
get to them. Because the RMAN procedures are part of the kernel, they are always
available so long as the instance exists in memory. This means that even if the database
is so severely damaged that you cannot even mount it—because you have lost all your
controlfiles—the RMAN executable will still have access to the procedures it needs to
carry out a restore operation.
TIP Ensure that the RMAN executable version matches the version of the
target database that is being backed up, but the RMAN executable doesn’t
have to be the same release as the catalog database.
The Target Databases
The “target” is the database that you intend to back up, or to restore and recover. The
RMAN executable can connect to only one target at a time; if you are running multiple
databases, you connect to each in turn. The controlfile of the target stores information
that RMAN needs. RMAN reads the controlfile to determine the physical structure of
the database: the location of the datafiles to be backed up. Also stored in the controlfile
are details of archived logs, which RMAN must also back up. RMAN itself writes to the
target database controlfile details of the backups that it has performed, so that in the
event a restore and recovery are necessary, the information on the location of the
backups will be available. If the target database is completely destroyed, including all
copies of the controlfile, it will still be possible for RMAN to restore it, provided that
RMAN has been configured appropriately.
Server Processes and Channels
RMAN connects to an instance through a normal server session and process, which
invokes the PL/SQL procedures. But there are more server processes than that.
Whenever a backup or restore operation is initiated, at least one “channel” will be
launched. A channel is a server process that does the work of copying files. By launching
multiple channels, backup and restore operations can be parallelized. Note that the
RMAN executable and its session does not itself perform the backup: it is a control
process that invokes PL/SQL procedures in the target database that will launch
additional server processes, the channels, on the target server to do the work. These
channel processes are of two types: disk channels that are capable of backing up to (or
restoring from) disk destinations, and System Backup to Tape (known as SBT) channels
that are capable of working with tape devices, such as an automated tape library.
Channels can be launched manually using the ALLOCATE CHANNEL command,
or RMAN can launch channels automatically according to preconfigured defaults.
A third type of server process is the polling process. This is launched automatically
whenever a backup or restore operation is running. The polling process monitors and
reports on the progress of the operation.
ch23.indd 4ch23.indd 4 7/11/2005 4:05:46 PM7/11/2005 4:05:46 PM

All-in-1 / Oracle Database 10g OCP Certification All-in-One / Watson, Bersinic / 5790-3
Chapter 23: Getting Started with Oracle Recovery Manager (RMAN)
5
PART II
The RMAN Repository
The repository is a store of metadata about the target database and its backups. It
contains details of the physical structure of the database: the locations of the datafiles;
details of all the backups that have been made; and RMAN’s persistent configuration
settings. The repository is always stored in the controlfile of the target database, and
optionally in a Recovery Catalog as well.
If the repository is lost, then RMAN is crippled. Your backups will be fine, but
RMAN won’t know where they are. However, it should still be possible to rebuild the
repository and continue to work, provided appropriate precautions have been taken.
The Recovery Catalog
RMAN’s repository is always written to the target database’s controlfile, but it can also
be written out to a separate Oracle database. This database is known as the Recovery
Catalog. Using RMAN with a Recovery Catalog enhances its capabilities substantially.
First, and perhaps most important, with a Recovery Catalog you are no longer
dependent upon the target database controlfile. What if all copies of the controlfile
are destroyed? Your backups are perfect, but without a repository, RMAN will never be
able to find them. In fact, it may be possible to survive this situation: you can instruct
RMAN to scan your backup devices and locate and identify any backups, but a far
preferable situation is to have the repository always available in a Recovery Catalog
database, on a separate machine from the target.
Second, the Recovery Catalog can store RMAN scripts. Without a Recovery Catalog,
you can still use scripts but they have to be stored as operating system files on the
machine where you are running the RMAN executable.
Third, if you are supporting many databases, one Recovery Catalog can be used to
store metadata about all of them. It becomes a centralized repository of all your backup
and restore information. Note that one Catalog can be used with databases on any
platform. You could, for example, run the RMAN executable on a Windows PC and
connect to a Recovery Catalog in a database on a Unix host, and then connect to a
series of target databases on Windows, Unix, VMS, and any other platform.
And last, there is no limit to the length of time for which a Recovery Catalog can
retain this metadata. The controlfile-based repository will retain data for only the time
specified by the instance parameter CONTROL_FILE_RECORD_KEEP_TIME. This
defaults to just seven days. You can certainly increase the value of this parameter, but
to increase it to, for example, several months would be to use the controlfile for a
purpose for which it was never intended: it is meant to be a store of currently relevant
information, not a long-term storage place.
The Recovery Catalog database will usually not be a particularly large or busy
database, and it will not have very demanding resource requirements, but it will
improve RMAN functionality significantly.
ch23.indd 5ch23.indd 5 7/11/2005 4:05:47 PM7/11/2005 4:05:47 PM

All-in-1 / Oracle Database 10g OCP Certification All-in-One / Watson, Bersinic / 5790-3
Oracle Database 10g OCP Certification All-in-One Exam Guide
6
Media Management Library
The full power of RMAN can be exploited only if you associate it with an automated
tape robot, which can manage your library of tape cartridges. Given such a library,
RMAN can automate completely the backup and restore cycle. To use a tape library,
the Oracle instance must be linked to a device driver supplied by the vendor of the
library. With earlier releases this required relinking the Oracle executables, but from
release 9i onward the tape library driver is dynamically linked. The driver will come
with instructions on how to link it. Once a Media Management Library driver has
been linked to Oracle, you can launch channels of type SBT_TAPE, which will be able
to use the tape library and indeed control it completely.
RMAN can work with all the mainstream tape library devices and software, such
as those supplied by IBM, Veritas, or Hewlett Packard. The Oracle Backup Solutions
Program (or BSP) certifies third-party products as being compatible with RMAN; any
vendor who is a member of the Oracle BSP can supply a fully supported backup
solution.
When using a tape library, you will encounter some product-specific variations in
the way that channels must be configured. For example, if using an Omniback library,
you must supply certain parameters, as in this example of an RMAN command to
back up the whole database:
run {
allocate channel 'omni_0' type 'sbt_tape'
parms 'ENV=(OB2BARTYPE=Oracle8,OB2APPNAME=ocp10g,OB2BARLIST=test1)';
allocate channel 'omni_1' type 'sbt_tape'
parms 'ENV=(OB2BARTYPE=Oracle8,OB2APPNAME=ocp10g,OB2BARLIST=test1)';
backup incremental level 0 filesperset 1
format 'test1<ocp10g_%s:%t:%p>.dbf'
database;
}
This RMAN command allocates two channels, named omni_0 and omni_1, of type
sbt_tape and uses them to back up the database. The incremental level is zero, meaning
back up everything. The number of files per set is one, which instructs RMAN to place
each input file in its own backup set; this is a requirement for Omniback. The format
string generates unique names for each output file. The product-specific items are
the parameters set for each channel, on the lines beginning “parms.” These set the
environment that is required by the Omniback library. These are the OB2BARTYPE
parameters, which must be set to “Oracle8”. This sounds wrong, but the Omniback
Oracle driver was written for release 8 and has not been updated since. The
OB2APPNAME must be set to the name of the database, and OB2BARLIST must
be set to the name of the script itself. But as this example shows, for the most part
RMAN is platform independent and you need not concern yourself with the details
of the tape library.
The Auxiliary Database
In normal usage, RMAN will work with a target database, and (if you have created it)
a Recovery Catalog database. In some circumstances, you may wish to use an auxiliary
ch23.indd 6ch23.indd 6 7/11/2005 4:05:47 PM7/11/2005 4:05:47 PM

All-in-1 / Oracle Database 10g OCP Certification All-in-One / Watson, Bersinic / 5790-3
Chapter 23: Getting Started with Oracle Recovery Manager (RMAN)
7
PART II
database as well. An auxiliary database is a new database created by RMAN, from a
backup of the target database.
An auxiliary database could be created in order to copy the target, for example,
to create a test or development database identical to the production system. Such a
database would be a complete restore.
It is also possible to create an auxiliary that is a subset of the target. This is necessary
if you want to carry out what is called a tablespace point-in-time recovery, or TSPITR.
This is a technique whereby just one tablespace can be taken back in time, without
affecting the rest of the database. The auxiliary database is created and used as a
temporary storage area while the operation is in progress.
Finally, an auxiliary database can be created to be used as a standby database. A
standby database is a copy of the production database on a remote machine that is
continuously updated with the redo generated by the production database. Then, in
the event of a disaster, you can switch over to the standby database without any loss
of data and minimal downtime.
The Flash Recovery Area
The flash recovery area is a disk destination that is used by Oracle as a storage location
for all recovery- and fault tolerance–related files. RMAN will use it as a default location
for backups. Remember that the flash recovery area is not intended for RMAN’s
exclusive use; it is also, typically, used for multiplexed online logfiles, for a controlfile
copy, and as an archive log destination.
The advantage of directing RMAN backups to the flash recovery area is that Oracle
can manage space in the recovery area very effectively: when it fills up, Oracle will
automatically delete any files within it that are obsolete, according to whatever rules
for obsolescence you establish.
Configuring RMAN
Using RMAN can be trivially simple. The out-of-the-box configuration will carry out
a perfect hot backup with just six words, as in this Unix example:
$ rman
Recovery Manager: Release 10.1.0.2.0 - Production
Copyright (c) 1995, 2004, Oracle. All rights reserved.
RMAN> connect target
connected to target database: OCP10G (DBID=3385973595)
RMAN> backup database;
Starting backup at 11-NOV-04
using target database controlfile instead of Recovery Catalog
allocated channel: ORA_DISK_1
channel ORA_DISK_1: sid=146 devtype=DISK
channel ORA_DISK_1: starting full datafile backupset
channel ORA_DISK_1: specifying datafile(s) in backupset
input datafile fno=00001 name=/oracle/product/10.1.0/oradata/opc10g/system01.dbf (xxx)
<output abbreviated...> (xxx)
channel ORA_DISK_1: starting piece 1 at 11-NOV-04
channel ORA_DISK_1: finished piece 1 at 11-NOV-04
ch23.indd 7ch23.indd 7 7/11/2005 4:05:48 PM7/11/2005 4:05:48 PM

All-in-1 / Oracle Database 10g OCP Certification All-in-One / Watson, Bersinic / 5790-3
Oracle Database 10g OCP Certification All-in-One Exam Guide
8
piece handle=/oracle/product/10.1.0/flash_recovery_area/ocp10g/backupset/2004_
11_11/O1_MF_NNNDF_TAG20041111T183217_0S750KOL_.BKP comment=NONE
channel ORA_DISK_1: backup set complete, elapsed time: 00:10:15
Finished backup at 11-NOV-04
RMAN> exit
Recovery Manager complete.
$
To try this example, from an operating system prompt run the RMAN executable
by entering rman. Then from the RMAN prompt, enter connect target. This will use
operating system authentication to connect you to the local database as user SYS. Then
the backup database; command instructs RMAN to carry out a complete backup of
the database. When the backup is complete, exit returns you to the operating system
prompt. This six-word backup runs entirely on defaults. Two defaults to note are the
channel allocation and the use of the flash recovery area. One channel is launched, of
type disk, and the output file is one piece, in a directory within the flash recovery area.
This backup is absolutely reliable, but in practice you will always configure RMAN to
your own requirements.
Environment Variables and Instance Parameters
The RMAN executable will pick up some settings from the operating system
environment in which you launch it. In the preceding example, the date is displayed
as “11-NOV-04”. If there were an environment variable set as follows,
nls_date_format=dd-mm-yy hh24:mi:ss
then the date would be displayed as, for instance, “11-11-04 18:26:59”. This use of
date/time formats is not merely of significance for the display of RMAN’s output; it
will also be used as the format mask for date/time parameters for operations such as
restore and recover.
Another environment variable of significance is NLS_LANG. This can be used to
inform RMAN of the database character set. If the database is mounted or open, this
doesn’t matter; RMAN will read the controlfile to find out what the character set is.
But if the database is only in nomount mode, then RMAN will assume the default
of US7ASCII, which may not be correct. To avoid possible problems, set the variable
before launching RMAN. For example,
$ export NLS_LANG=american_america.we8iso8859p15
on Unix, or
C:> set NLS_LANG=american_america.we8iso8859p15
on Windows.
Within the instance, three parameters may be of significance.
CONTROL_FILE_RECORD_KEEP_TIME will limit the number of days that the
target database’s controlfile will “remember” information about archive logs generated
and RMAN backups made. If you are using a Recovery Catalog, this is not so important.
As long as information is transferred from the controlfile into the Catalog before it
ch23.indd 8ch23.indd 8 7/11/2005 4:05:48 PM7/11/2005 4:05:48 PM

All-in-1 / Oracle Database 10g OCP Certification All-in-One / Watson, Bersinic / 5790-3
Chapter 23: Getting Started with Oracle Recovery Manager (RMAN)
9
PART II
gets overwritten in the controlfile, everything will be fine. The default of seven days
will usually be adequate in these circumstances: the information will be transferred
(using the RESYNC CATALOG command) whenever RMAN connects to the target,
which will generally be much more frequently than seven days. But if you are not
using a Recovery Catalog, then this parameter must be changed to a greater value.
DB_RECOVERY_FILE_DEST and DB_RECOVERY_FILE_DEST_SIZE control the
location and maximum size of the flash recovery area. If these parameters are defined,
they set the default location for RMAN backups and for archive logs. The flash recovery
area must be monitored to make sure that it does not fill up. RMAN can apply
retention policies to files in the recovery area, and it can overwrite files it considers
to be obsolete if it needs to, but if the flash recovery area does fill up, then archiving
will fail and this will eventually cause the database to hang.
Connecting to Databases
The RMAN executable can connect to local databases (either targets or the Recovery
Catalog) or to remote databases using an Oracle Net connect string. Consider some
examples of syntax:
C:\> rman target sys/oracle@ocp10g catalog rman/rman@catdb
This example runs the executable on a Windows machine and connects to a target
identified by the alias “ocp10g” as user SYS (password ORACLE), while connecting
concurrently to a Recovery Catalog identified by the alias “catdb” as user rman
(password RMAN). The connection to a target will generally need to be as a user
with the SYSDBA, or at least the SYSOPER, privilege. This is because it may well be
necessary to issue STARTUP or SHUTDOWN commands. The connection to the
Recovery Catalog must be as the user who owns the Recovery Catalog schema. The
same result could be achieved as follows:
C:\>rman
Recovery Manager: Release 10.1.0.2.0 - Production
Copyright (c) 1995, 2004, Oracle. All rights reserved.
RMAN> connect target sys/oracle@ocp10g
connected to target database: OCP10G (DBID=3385973595)
RMAN> connect catalog rman/rman@catdb
connected to Recovery Catalog database
RMAN>
It is also possible to invoke RMAN from the operating system command line with
a script of RMAN commands. When the script completes, RMAN will terminate and
return control to the operating system shell. This is a technique you can use to schedule
a backup with the Unix cron command, or the Windows AT command. On Unix,
$ rman target / log /logs/rman.log append cmdfile=/scripts/rman_script.rcv
will launch the RMAN executable and connect to a local database as a target, whichever
is specified by the ORACLE_SID environment variable: the first forward slash is the
instruction to do this. The output of the RMAN session will be written to the file
ch23.indd 9ch23.indd 9 7/11/2005 4:05:49 PM7/11/2005 4:05:49 PM

All-in-1 / Oracle Database 10g OCP Certification All-in-One / Watson, Bersinic / 5790-3
Oracle Database 10g OCP Certification All-in-One Exam Guide
10
/logs/rman.log, appending to it if the file already exists; if the log were not specified,
the output would go to the standard output device. Then the script /scripts/rman_
script.rcv will run. This will be a series of RMAN commands. This example does
not use a Recovery Catalog. The default mode of operation for RMAN is not to use
a Recovery Catalog, but it is possible to specify this explicitly:
$ rman target / nocatalog
will connect without a Recovery Catalog to a local database target as user SYS with
operating system authentication, and
c:\> rman
RMAN> connect target sys/oracle@ocp10g nocatalog
will do the same but over a network connection, using password file authentication.
The “nocatalog” keyword gives compatibility with earlier releases, when it was not
enabled by default, and also makes your scripts self-documenting.
TIP In RMAN, you cannot abbreviate the “connect” command to “conn,”
as you can in SQL*Plus. Try it—you will get an error.
Configuring Persistent Settings
RMAN comes preconfigured with default settings that will work, but probably not in
exactly the way you want. It is possible to control everything in your RMAN sessions
with scripts or with sequences of interactive commands that will override these default
settings, but usually you will want to reconfigure the defaults so that they are, in
general, applicable to most of your work. This will make the scripts and sequences
much simpler from then on. You do this by configuring persistent settings for your
target databases. Each target has its own set of persistent settings: they are stored in
the target database repository: in the target’s controlfile and (optionally) in the
Recovery Catalog.
To see the current default settings for a target, use the SHOW command. In
Figure 23-1, the RMAN executable is launched on a Windows machine, and then
a connection is made to the local database. The SHOW ALL command displays the
current settings, all of which are on the installation defaults, as is indicated by the
“# default” suffix on every line.
Some out-of-the-box defaults are particularly important. First, the RETENTION
POLICY is set to REDUNDANCY 1. This means that RMAN will always attempt to
have one copy of every datafile and archive log. Second, DEFAULT DEVICE TYPE is
DISK. Unless specified otherwise, all backups will go to a disk directory, not to any
tape device. Third, DEVICE TYPE DISK PARALLELISM 1 BACKUP TYPE TO
BACKUPSET says that when backing up to disk, only one channel will be used, and
that the backup will be to the proprietary backup set format, not to an image copy.
ch23.indd 10ch23.indd 10 7/11/2005 4:05:49 PM7/11/2005 4:05:49 PM
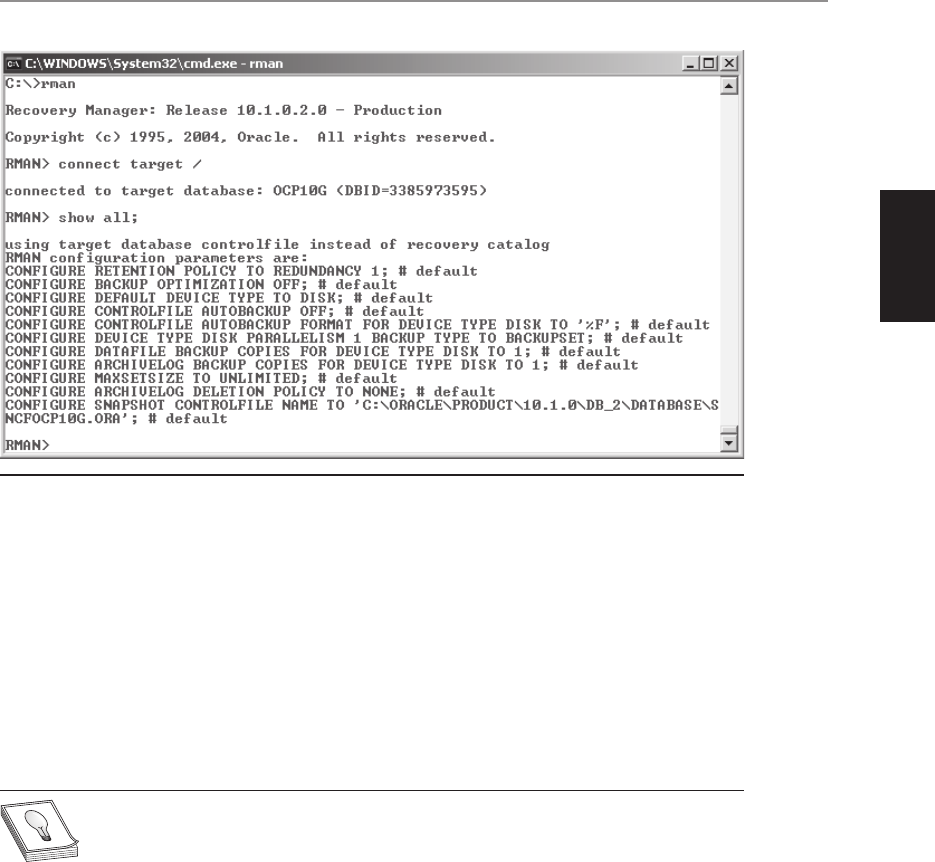
All-in-1 / Oracle Database 10g OCP Certification All-in-One / Watson, Bersinic / 5790-3
Chapter 23: Getting Started with Oracle Recovery Manager (RMAN)
11
PART II
To change a default, use the CONFIGURE command:
RMAN> CONFIGURE DEFAULT DEVICE TYPE TO sbt_tape;
new RMAN configuration parameters:
CONFIGURE DEFAULT DEVICE TYPE TO 'SBT_TAPE';
new RMAN configuration parameters are successfully stored
RMAN>
From now on, all backups will be directed to the tape library, unless specified otherwise
in the individual backup command.
TIP The output of SHOW is formatted as a script. You can copy/paste the
lines, edit them, and then execute them.
Channel Allocation
A channel is a process launched on the target by RMAN for the purpose of transferring
data to and from a backup device. At least one channel must be allocated before a
backup or restore command can be executed. Channels are of two types: disk channels
that can work with disk directories and SBT channels that can work with tape devices.
The SBT interface provides a layer of abstraction between RMAN and the tape device
itself; if the device driver has been correctly installed, then RMAN can use the tape
device without needing to know anything about its characteristics.
Figure 23-1 The preconfigured RMAN default persistent settings
ch23.indd 11ch23.indd 11 7/11/2005 4:05:50 PM7/11/2005 4:05:50 PM
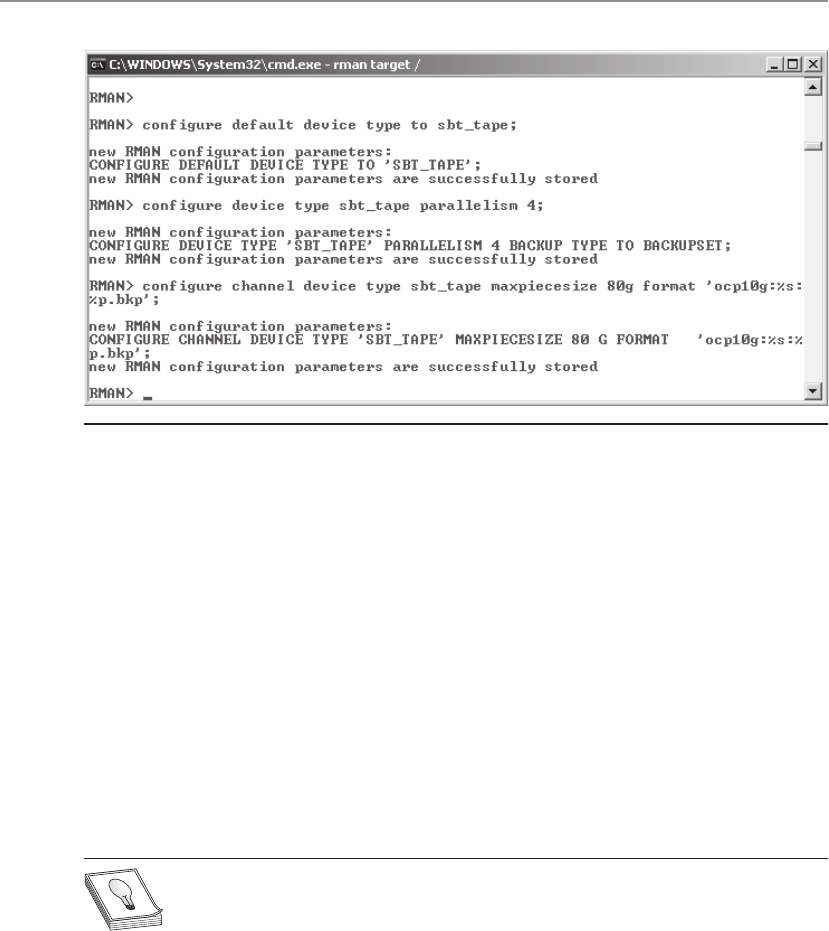
All-in-1 / Oracle Database 10g OCP Certification All-in-One / Watson, Bersinic / 5790-3
Oracle Database 10g OCP Certification All-in-One Exam Guide
12
Channels can be allocated for each backup and recovery operation, or they can
be configured with default settings to be applied to all operations, unless specifically
overridden.
In Figure 23-2, first the default device is changed from disk to tape. From this
point on, all backups will go to the tape library. Note that RMAN automatically sets
the backup type to BACKUPSET, as it is impossible to write image copies to tape.
Then the degree of parallelism for tape backup is set to 4. This means that four tape
channels will be allocated automatically. The optimum degree of parallelism can be
set only after discussion with the system administrators, but clearly it will be related
to the number of tape drives available. The maximum size of a backup piece is then
restricted to 80GB. This might be related to the capacity of the tape cartridges. The
names of the pieces—the actual physical files produced—are defined by the FORMAT
specification, which includes the variables %s and %p that will generate unique
names based on the backup set number and the piece number within the set.
TIP Set numbers continually increment for each target. Piece numbers start
at 1 for each set and increment from there.
All the configured defaults can be overridden for any RMAN operation, but
configuring sensible defaults means that the scripts you write later can be much
more brief and simple than they would be otherwise.
The channel control options are as follows:
• CONNECT is an Oracle Net connect string. Unlikely to be of relevance in a
single-instance environment, this option is useful for clustered databases. The
instance to which the RMAN executable connects need not be the instance
Figure 23-2 Configuring channel defaults
ch23.indd 12ch23.indd 12 7/11/2005 4:05:51 PM7/11/2005 4:05:51 PM

All-in-1 / Oracle Database 10g OCP Certification All-in-One / Watson, Bersinic / 5790-3
Chapter 23: Getting Started with Oracle Recovery Manager (RMAN)
13
PART II
against which the channel is launched. Thus, for a RAC database, you can
spread the load of backups across all your instances.
• DURATION controls the amount of time for the job, specified in hours and
minutes. It can also influence the speed with which it will run, by using one
of the following additional keywords: MINIMIZE TIME specifies that the
backup will run at full speed, perhaps finishing before the duration is over.
This would normally be used for tape backups, because it is generally advisable
to stream to tapes as fast as possible. MINIMIZE LOAD will monitor the backup
speed and reduce it if it seems likely that it will finish before the duration
is over. This would be used for disk backups, to reduce the impact on users
caused by very high rates of disk I/O. PARTIAL allows RMAN to terminate a
backup that has not completed within the DURATION without signaling an
error; normal behavior would be to terminate the backup with an error report.
• FORMAT fixes the path and filename for the backup pieces or image copies
created by the channel. A number of variables can be used to generate unique
filenames.
• MAXOPENFILES limits the number of input files that RMAN can open at
once. The default is 8.
• MAXPIECESIZE, specified in bytes (default), kilobytes (K), megabytes (M),
or gigabytes (G), restricts the size of the pieces into which a backup set is
divided. The size of a backup set is hard to predict with any certainty because
of compression, incrementals, and the fact that empty blocks are never
included. Clearly, this is meaningless for an image copy backup. Related
to this is CONFIGURE MAXSETSIZE, which will apply to all channels.
• PARMS can be used to set whatever variables are needed for an SBT_TAPE
channel.
The DEVICE TYPE configuration can set, for your tape and disk channels, the default
degree of parallelism—or how many channels to launch—and the type of backup to
generate. This may be the standard BACKUPSET, as in Figure 23-2, COMPRESSED
BACKUPSET, or (for disk channels) COPY, which will generate image copies.
What RMAN Will Back Up
Each backup operation will specify the objects to be backed up. If the objects are one
or more datafiles, tablespaces, or archive logs, then RMAN will do exactly what it is
told to do. But if the object is the whole database, then you can configure certain
exclusions and optimization, to reduce the volume and time of the backups. There
is also a very special feature you can enable: the controlfile auto-backup.
Some tablespaces do not need backing up regularly. These may be tablespaces
with noncritical data (training systems, perhaps) or data that it is simpler to re-create
than to restore and recover (such as tablespaces devoted solely to indexes, if they are
not too large). There may also be read-only and offline tablespaces; these are static
and need be backed up only once. RMAN can handle these exceptions to the full
ch23.indd 13ch23.indd 13 7/11/2005 4:05:51 PM7/11/2005 4:05:51 PM
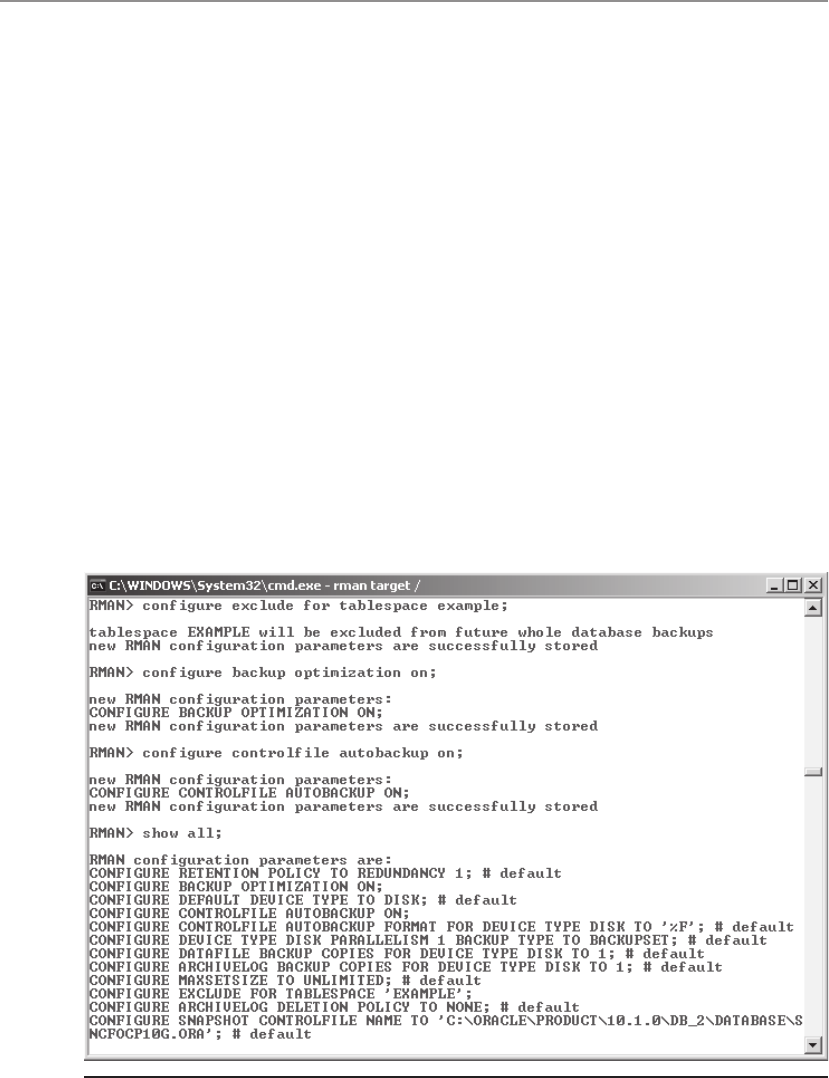
All-in-1 / Oracle Database 10g OCP Certification All-in-One / Watson, Bersinic / 5790-3
Oracle Database 10g OCP Certification All-in-One Exam Guide
14
backup with the EXCLUDE directive, which takes a list of objects to ignore, and
backup optimization, which will ignore objects that are still identical to the state
they were in at the last backup.
In Figure 23-3, first the tablespace EXAMPLE is nominated as a tablespace to
be omitted during a whole database backup. Then backup optimization is enabled,
which lets RMAN decide to omit any objects that have not changed since the last
backup. This will usually mean that read-only and offline tablespaces as well as
archive logs are not backed up repeatedly. Finally, controlfile auto-backup is enabled.
The SHOW ALL command confirms the changes. Note that the #default comment
has been removed from the relevant settings.
The controlfile auto-backup is vital if you are not using a Recovery Catalog. The
RMAN repository is stored in the target database controlfile, so what will happen if all
copies of the controlfile are destroyed? This is not a problem with a Recovery Catalog,
but without one RMAN is now crippled. The backups needed for a complete restore
and recovery may all exist, but RMAN will not be able to find them. By default RMAN
will always back up the controlfile whenever you back up the system tablespace, and
by adding the keywords INCLUDE CURRENT CONTROLFILE, it can be included in
every other backup as well. However, to restore it you will still need a current controlfile
and therefore a mountable database, in order for RMAN to read its repository and
locate the backup.
Figure 23-3 Configuring exclusions, optimization, and controlfile auto-backup
ch23.indd 14ch23.indd 14 7/11/2005 4:05:52 PM7/11/2005 4:05:52 PM

All-in-1 / Oracle Database 10g OCP Certification All-in-One / Watson, Bersinic / 5790-3
Chapter 23: Getting Started with Oracle Recovery Manager (RMAN)
15
PART II
Enabling the auto-backup avoids this problem. It instructs RMAN always to back
up the controlfile as part of any backup operation; RMAN will generate in image form
a file with a well-known name and place it in a well-known directory.
It will then be possible to restore it with the command RESTORE CONTROLFILE
FROM AUTOBACKUP, which can be executed in NOMOUNT mode. Remember that
RMAN is implemented with kernelized PL/SQL procedures and so is available in
NOMOUNT mode. If the controlfile is gone, NOMOUNT is as far as Oracle can get.
This command will search for the well-known filename without the need for any
repository, and restore it. The well-known filename is based on the DBID and by
default is stored in the flash recovery area.
TIP It is possible to change the well-known filename to something not so well
known with CONFIGURE CONTROLFILE AUTOBACKUP FORMAT, but if
that is done, you will have to record the change and direct RMAN toward it
if a restore is ever needed.
Once an autobackup of the controlfile has been located and restored, it will be
possible to mount the database and RMAN can then bootstrap itself up and do a
normal full restore and recover. Thus it is possible to restore the whole database,
even if the RMAN repository has been lost.
Configuring Retention of Backups
The default configuration is REDUNDANCY 1. This means that RMAN will always
attempt to have one backup (image copy or in a backup set) of every datafile, every
archive log, and the controlfile. It does not ever attempt to back up temporary files
or online redo logs. The DELETE OBSOLETE command will delete any backups that
are considered to be no longer necessary according to the retention policy.
There are two options for retention policy. Configuring a redundancy level instructs
RMAN to keep multiple backups of each object, but it does not take account of when
the backup was made. For example, if redundancy is set to 4, and if one tablespace is
backed up every 6 hours (not unreasonable, if MTTR is considered vital) and another
is backed up once a week (perhaps because the data is largely static, and MTTR is not
so significant), then the oldest backup of the first tablespace will be only one day
old, but that of the other tablespace will be nearly a month old. The implication for
an incomplete point-in-time recovery is that it will not in fact be possible to do an
incomplete recovery further back than one day, because there will be no backup of
the second tablespace, which is older than that. An extra, unscheduled, backup will
distort the situation further. Another problem with a redundancy-based retention
policy is that it does not permit RMAN ever to delete an archive log backup. The
alternative is to configure the retention policy to a recovery window, with, for example,
RMAN> configure retention policy to recovery window of 30 days;
ch23.indd 15ch23.indd 15 7/11/2005 4:05:53 PM7/11/2005 4:05:53 PM

All-in-1 / Oracle Database 10g OCP Certification All-in-One / Watson, Bersinic / 5790-3
Oracle Database 10g OCP Certification All-in-One Exam Guide
16
From this point on, RMAN will attempt to ensure that it always has sufficient
datafile and archive log backups to do an incomplete recovery to any point in the last
month, and that it is permitted to delete any backups that become obsolete as time
passes. There will always be at least one backup of every datafile that is at least thirty
days old, plus the archive logs needed to recover it.
It is possible to configure the retention policy to NONE, which disables the
automatic deletion of backups because none are ever considered obsolete. To set
the policy back to the default of REDUNDANCY 1, use the CLEAR command:
RMAN> configure retention policy clear;
Overriding Configured Defaults
Using the CONFIGURE command to set up RMAN to work the way you will usually
want it to work is very useful. It is the out-of-the-box default configuration that makes
it possible to back up the whole database with two words: BACKUP DATABASE. But
there will be times when you want to set your own rules for an individual backup
operation. Consider this command:
RMAN> run{
allocate channel d1 type disk format '/u06/backups/example1.bkp';
allocate channel d2 type disk format '/u06/backups/example2.bkp';
backup as compressed backupset
tablespace example include current controlfile;}
This command launches two disk channels, even though RMAN might be
configured to launch four tape channels. The names of the pieces are hard-coded,
overriding whatever default has been configured for disk channels. Then the backup
type is a compressed backup set, though image copies might well have been configured
as the norm for disk backups. The content of the backup is all the datafiles making up
the EXAMPLE tablespace, whether or not this is normally excluded. Finally, the backup
set will include the controlfile, irrespective of the auto-backup setting.
To override the retention policy, specify this when making the backup. For example,
RMAN > backup datafile 7 keep until time "sysdate+90" nologs;
This will instruct RMAN not to consider the backup eligible for deletion for at least
ninety days, irrespective of the retention policy. The NOLOGS keyword does, however,
permit RMAN to remove the archive logs that would be needed to recover the backup.
Exercise 24-1: Configuring RMAN
Use the Database Control interface to RMAN to configure settings and then clear
them from the command-line interface.
1. Connect to your database as user SYSTEM with Database Control.
2. Take the Maintenance tab from the database home page, and then the
Configure Backup Settings link in the Backup/Recovery section.
ch23.indd 16ch23.indd 16 7/11/2005 4:05:53 PM7/11/2005 4:05:53 PM
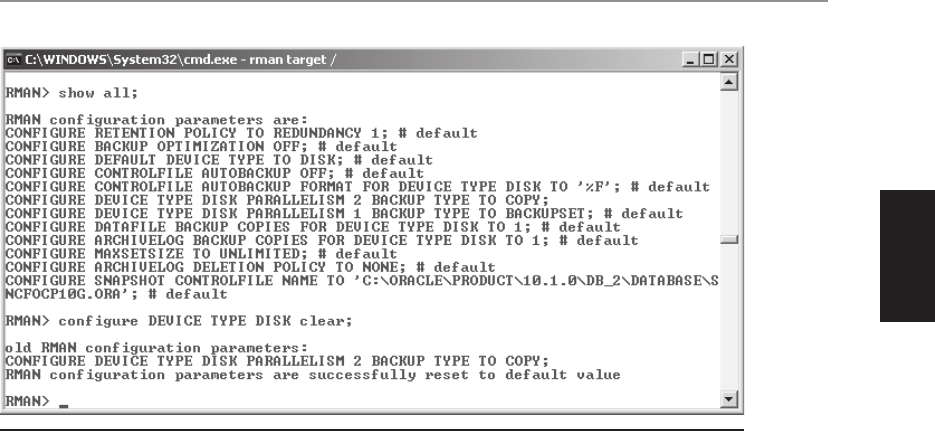
All-in-1 / Oracle Database 10g OCP Certification All-in-One / Watson, Bersinic / 5790-3
Chapter 23: Getting Started with Oracle Recovery Manager (RMAN)
17
PART II
3. In the Disk Settings section, enter 2 in the Parallelism box, and then select the
Image Copy radio button to change from the disk defaults of one channel and
backup sets.
4. In the Host Credentials section, enter an operating system username and
password, if one is not already saved as preferred credentials.
5. Click the OK button to save the changes.
6. From an operating system prompt, launch the RMAN executable and connect
in the default NOCATALOG mode, using operating system authentication.
rman target /
7. Use the SHOW ALL command to display the currently configured settings,
and return the disk channel settings to default with the CLEAR command,
as in Figure 23-4.
8. Use SHOW ALL again to confirm that the DEVICE TYPE DISK channel settings
are back on default.
Chapter Review
This chapter began by summarizing RMAN’s capabilities. It should be clear that
RMAN is a better tool for backup and recovery than user-managed backups, but to
exploit RMAN’s capabilities to the full, it is necessary to use it with a Recovery Catalog
database and an automated tape library. RMAN consists of a number of components,
some of which are optional, but the principles are simple: the RMAN executable
Figure 23-4 Showing and clearing configured defaults
ch23.indd 17ch23.indd 17 7/11/2005 4:05:54 PM7/11/2005 4:05:54 PM

All-in-1 / Oracle Database 10g OCP Certification All-in-One / Watson, Bersinic / 5790-3
Oracle Database 10g OCP Certification All-in-One Exam Guide
18
connects to a target database and launches channel processes to back it up to tape
or disk. The backup files can be image copies of the files, or proprietary format
backup sets, optionally, compressed. To make RMAN simple to use, the CONFIGURE
command sets defaults for all backup and recovery operations, but these defaults can
of course be overridden whenever desired.
Questions
1. After you issue the command
CONFIGURE RETENTION POLICY CLEAR;
what will the retention policy be set to? (Choose the best answer.)
A. There will be no retention policy.
B. Retention policy will be REDUNDANCY 1.
C. Retention policy will be RECOVERY WINDOW OF 7 DAYS.
D. Retention policy will depend on the CONTROL_FILE_RECORD_KEEP_
TIME.
2. If a connection is made with the RMAN executable with
rman target /
where will it look for its repository? (Choose the best answer.)
A. The target database’s parameter file only
B. The target database’s controlfile only
C. The Recovery Catalog only
D. The Recovery Catalog and the target database’s parameter file
E. The Recovery Catalog and the target database’s controlfile only
3. Which is an optional location for the RMAN repository? (Choose the
best answer.)
A. The target database controlfile
B. The Recovery Catalog controlfile
C. The Recovery Catalog database
D. The target database parameter file
4. Match the component (A to I) to the description (a to i).
A. Auxiliary database
B. Disk channel
C. Flash recovery area
D. Recovery Catalog
E. RMAN repository
ch23.indd 18ch23.indd 18 7/11/2005 4:05:54 PM7/11/2005 4:05:54 PM

All-in-1 / Oracle Database 10g OCP Certification All-in-One / Watson, Bersinic / 5790-3
Chapter 23: Getting Started with Oracle Recovery Manager (RMAN)
19
PART II
F. RMAN executable
G. SBT channel
H. Tape library driver
I. Target database
a. Database to be backed up by RMAN
b. Database to be created by RMAN
c. Default location for backups
d. Optional store of RMAN metadata
e. Process that can control tape devices
f. Process that writes to disks
g. Process that writes to tapes
h. Required store of RMAN metadata
i. RMAN controlling process
5. The parameter CONTROL_FILE_RECORD_KEEP_TIME determines how
frequently information in the controlfile is overwritten. What is the default
value? (Choose the best answer.)
A. 1 day
B. 5 days
C. 7 days
D. 30 days
6. Which of the following tablespaces could sensibly be excluded from
whole online database backups with the CONFIGURE EXCLUDE FOR
TABLESPACE... command? (Choose the best answer.)
A. A user data tablespace, which must be kept online for 24 × 7 availability
B. Temporary tablespaces
C. A permanent tablespace used for read-only data
D. A tablespace used for undo segments
7. Which of the following processes carries out the backup operations? (Choose
the best answer.)
A. The RMAN executable
B. A channel launched against the Recovery Catalog, if RMAN is using a
Recovery Catalog; otherwise, a channel launched against the target
database
C. Always a channel launched against the target database
D. A tape channel launched by the tape library, if one is being used, or a disk
channel launched by RMAN if a tape library is not being used
ch23.indd 19ch23.indd 19 7/11/2005 4:05:55 PM7/11/2005 4:05:55 PM

All-in-1 / Oracle Database 10g OCP Certification All-in-One / Watson, Bersinic / 5790-3
Oracle Database 10g OCP Certification All-in-One Exam Guide
20
8. Which of the following objects can be backed up by RMAN? (Select all
that apply.)
A. Archive logs
B. Controlfile
C. Datafiles
D. Dynamic parameter file
E. Online logs
F. Password file
G. Static parameter file
H. Tables
I. Tablespaces
J. Tempfiles
9. How can you control the size of the files RMAN generates for backup sets?
(Choose the best answer.)
A. You can’t; backup set size is unpredictable
B. CONFIGURE MAXSETSIZE;
C. CONFIGURE CHANNEL…MAXSETSIZE;
D. CONFIGURE MAXPIECESIZE;
E. CONFIGURE CHANNEL...MAXPIECESIZE;
10. If you configure the controlfile auto-backup feature, to where will the backup
be made?
A. It will be included in all backup sets
B. To the Recovery Catalog, if it exists
C. To the flash recovery area
D. To the BACKGROUND_DUMP_DEST directory
Answers
1. B. CLEARing the retention policy returns it to the default of REDUNDANCY 1.
2. B. The repository is always in the target’s controlfile, and by default the
connection will be in NOCATALOG mode.
3. C. The repository is always written to the target’s controlfile, and optionally
stored in a Recovery Catalog database as well. D, the target database parameter
file, is irrelevant to the RMAN repository.
ch23.indd 20ch23.indd 20 7/11/2005 4:05:55 PM7/11/2005 4:05:55 PM

All-in-1 / Oracle Database 10g OCP Certification All-in-One / Watson, Bersinic / 5790-3
Chapter 23: Getting Started with Oracle Recovery Manager (RMAN)
21
PART II
4. The answers are as follows:
A-b. An auxiliary database is one created by RMAN.
B-f. Disk type channel processes are launched by RMAN to write to disk.
C-c. The flash recovery area is a default location for RMAN backups.
D-d. The RMAN metadata is (optionally) stored in the Recovery Catalog.
E-h. RMAN metadata is stored in the RMAN repository.
F-i. The RMAN executable controls all other RMAN processes.
G-g. SBT type channels are launched by RMAN to write to tape devices.
H-e. Tape devices are controlled by a tape library driver.
I-a. Targets are databases backed up by RMAN.
5. C. CONTROL_FILE_RECORD_KEEP_TIME defaults to seven days.
6. C. Read-only tablespaces need only be backed up once. A tablespace that
needs to be available 24 × 7 should certainly not be excluded, and neither
should an UNDO tablespace. Temporary tablespaces cannot be backed up
by RMAN.
7. C. It is the channel that actually does the backup, and channels are launched
against the target.
8. A, B, C, D, I. The correct objects are archive logs; the controlfile; the datafiles;
the dynamic parameter file, or spfile; and tablespaces.
9. E. MAXPIECESIZE is the option to restrict the size of the pieces into which
a backup set is divided.
10. C. Controlfile auto-backups go by default to the flash recovery area. This is
the well-known location that RMAN will use, unless you have specifically
redirected it elsewhere.
ch23.indd 21ch23.indd 21 7/11/2005 4:05:56 PM7/11/2005 4:05:56 PM

All-in-1 / Oracle Database 10g OCP Certification All-in-One / Watson, Bersinic / 5790-3 Blind folio p.22
ch23.indd 22ch23.indd 22 7/11/2005 4:05:57 PM7/11/2005 4:05:57 PM

All-in-1 / Oracle Database 10g OCP Certification All-in-One / Watson, Bersinic / 5790-3/Ch24
CHAPTER 24
Using RMAN to
Back Up Databases
In this chapter you will learn how to
• Use the RMAN BACKUP command to create backup sets and image copies
• Enable block change tracking
• Manage the backups and image copies taken with RMAN with the LIST and
REPORT commands
1
ch24.indd 1ch24.indd 1 7/11/2005 4:17:09 PM7/11/2005 4:17:09 PM

All-in-1 / Oracle Database 10g OCP Certification All-in-One / Watson, Bersinic / 5790-3
Oracle Database 10g OCP Certification All-in-One Exam Guide
2
There are four interfaces for using the Recovery Manager (RMAN). First, and the most
accessible, is the graphical interface provided by Database Control. Using Database
Control for backup and recovery is covered in Chapters 19 and 20. Second, there is a
batch mode: using a command file when invoking RMAN from the operating system
prompt, or from an operating system scheduler such as cron on Unix or AT on Windows.
This will be covered briefly in this chapter. Third, the pipe interface launches an RMAN
session and allows another session to control it by issuing appropriate PL/SQL calls.
There is a brief description of this technique, but the detail is beyond the scope of the
OCP examination. Last, there is the RMAN executable. This is the tool that most DBAs
will use. Once the backup routines are well established, they may be formalized as
scripts, either command file scripts to be launched from an operating system prompt
and run in batch mode or RMAN scripts stored within a Recovery Catalog database.
This chapter concentrates on using the RMAN executable to create both full and
incremental backup sets and image copies, and to produce various reports of what
needs to be backed up, what backups have been taken, and what backups can be
safely deleted.
RMAN in Batch Mode
Consider a hypothetical backup regime. It has been agreed with the users that every
evening a full online backup should be taken of the database and that this backup
should be stored on disk as an image copy, so that it can be restored with minimal
delay if necessary. Before this daily backup is taken, the previous day’s backup should
be moved from disk to tape. The archive logs generated during the day should be
migrated to tape at the same time. All the commands necessary to implement this
regime can be stored within a text file and invoked by the operating system’s scheduler.
The file of RMAN commands could be
run {
allocate channel t1 type sbt_tape;
allocate channel t2 type sbt_tape;
backup copy of database delete input;
backup archivelog all delete all input;
release channel t1;
release channel t2;
allocate channel d1 type disk;
allocate channel d2 type disk;
backup as copy database;
release channel d1;
release channel d2;}
This block of commands first launches two tape channels. The choice of two will
be the result of discussions with the system administrators about how the tape library
can be used most efficiently. Then these channels are used to back up any existing
copies of the database (remember that image copies can be made only to disk
destinations) and delete them. This has the effect of transferring the disk backup to
tape, where it will be stored as a backup set. Following that, all archive logs are backed
ch24.indd 2ch24.indd 2 7/11/2005 4:17:42 PM7/11/2005 4:17:42 PM

All-in-1 / Oracle Database 10g OCP Certification All-in-One / Watson, Bersinic / 5790-3
Chapter 24: Using RMAN to Back Up Databases
3
PART II
up to tape. The DELETE ALL INPUT command instructs RMAN to delete the logs from
all the archive log destinations when they have been backed up. Then the tape channels
are released, and two disk channels launched. These then take an image copy of the
database.
TIP When launching tape channels, both SBT and SBT_TAPE are
acceptable syntax.
The script does not include any specification for the name and location of the files
generated, nor are there any limits on the size of the backup pieces. These settings will
be read from the repository, as configured defaults for the disk and tape type channels.
If the script is saved as daily.rcv, it can be invoked from an operating system
prompt thus:
rman target / @'daily.rcv'
or the command can be registered as a cron job on Unix, or an AT job on Windows.
The RMAN Pipe Interface
One of the many PL/SQL packages supplied with the database is DBMS_PIPE. This is
a set of procedures that allow one database session to communicate with another, by
creating a data structure in the SGA—the pipe—that one session can put messages on
for another session to remove. By using DBMS_PIPE, you can launch an RMAN session
and then control it programmatically from another session. All the input of commands
that RMAN needs will be written to a pipe by the controlling session; RMAN will read
the commands from this pipe, execute them, and write all its output messages to a
second pipe that the controlling session will read from.
To use the pipe interface, launch RMAN from the operating system prompt,
specifying the PIPE keyword, a name for the pipe, and a target database connect
string. For example,
rman PIPE rmpipe target sys/oracle@ocp10
This will cause RMAN to connect to the target and create two pipes in the instance:
the pipe ORA$RMAN_RMPIPE_IN will be monitored by RMAN for user commands,
and ORA$RMAN_RMPIPE_OUT will be used by RMAN to write its output. No data
will be read from or written to the shell that launched the RMAN executable. The
controlling process must use the DBMS_PIPE.PACK and DBMS_PIPE.SEND_MESSAGE
procedures to send commands to the ORA$RMAN_RMPIPE_IN pipe, which the RMAN
session will read and act upon. The controlling session uses the DBMS_PIPE.RECEIVE_
MESSAGE and DBMS_PIPE.UNPACK procedures to read RMAN’s output from the
ORA$RMAN_RMPIPE_OUT pipe.
This technique, which is fully described in the Oracle Database Backup and Recovery
Advanced User’s Guide, lets you develop a programmatic interface to RMAN.
ch24.indd 3ch24.indd 3 7/11/2005 4:17:43 PM7/11/2005 4:17:43 PM

All-in-1 / Oracle Database 10g OCP Certification All-in-One / Watson, Bersinic / 5790-3
Oracle Database 10g OCP Certification All-in-One Exam Guide
4
Backing Up with the RMAN Executable
RMAN can be controlled by the methods just described or by scripts stored within a
Recovery Catalog, but whatever method you use, the commands are the same. Before
any command can be issued, it is necessary to connect to the target. Throughout this
section it is assumed that a connection has been made.
Many commands must be qualified with keywords that will control what the
command does. In some cases, these qualifiers can be specified in advance as
configured defaults and therefore need not be specified for any one operation. In all
the examples that follow, it is assumed that no modifications have been made to the
out-of-the-box configuration; the output of the SHOW ALL command would be
RMAN> show all;
using target database controlfile instead of recovery catalog
RMAN configuration parameters are:
CONFIGURE RETENTION POLICY TO REDUNDANCY 1; # default
CONFIGURE BACKUP OPTIMIZATION OFF; # default
CONFIGURE DEFAULT DEVICE TYPE TO DISK; # default
CONFIGURE CONTROLFILE AUTOBACKUP OFF; # default
CONFIGURE CONTROLFILE AUTOBACKUP FORMAT FOR DEVICE TYPE DISK TO '%F'; # default
CONFIGURE DEVICE TYPE DISK PARALLELISM 1 BACKUP TYPE TO BACKUPSET; # default
CONFIGURE DATAFILE BACKUP COPIES FOR DEVICE TYPE DISK TO 1; # default
CONFIGURE ARCHIVELOG BACKUP COPIES FOR DEVICE TYPE DISK TO 1; # default
CONFIGURE MAXSETSIZE TO UNLIMITED; # default
CONFIGURE ARCHIVELOG DELETION POLICY TO NONE; # default
CONFIGURE SNAPSHOT CONTROLFILE NAME TO
'/oracle/product/10.1.0/dbs/sncfocp10g.ora'; # default
RMAN>
Stand-Alone and Job/Command Block Commands
A minor point that can cause confusion is the use of the command block with RMAN
commands. Some commands must be executed directly from the RMAN prompt,
but others do not make sense unless they are part of a block of two or more
commands, known as a command block or a job. A command block is started with
RUN and delimited with brackets, “{...}”. A simple block of two commands is
run {
allocate channel d1 type disk;
backup database;}
An example of a stand-alone command is CONNECT. It is completely self-
contained and can even be specified on the operating system command line when
you invoke the RMAN executable. Other stand-alone commands are the commands
that manipulate the Recovery Catalog, if you have one. Commands that can be
specified only as part of a job include ALLOCATE CHANNEL. There is no sense in
allocating a channel unless you intend to use it, so ALLOCATE CHANNEL must be
used in a job, where it will be followed by a command that will read or write tapes
or disks, such as BACKUP or RESTORE.
ch24.indd 4ch24.indd 4 7/11/2005 4:17:43 PM7/11/2005 4:17:43 PM

All-in-1 / Oracle Database 10g OCP Certification All-in-One / Watson, Bersinic / 5790-3
Chapter 24: Using RMAN to Back Up Databases
5
PART II
Some commands can, however, be issued either stand-alone or within a command
block. The BACKUP command is an example. It is impossible to run a backup unless
a channel has been allocated, but if automatic channel allocation has been configured
as a default, then a BACKUP command can be issued from the RMAN prompt. But if
the configured default is not what you want for a particular operation, then you can
create a job that includes an ALLOCATE CHANNEL command and then a BACKUP
command. The BACKUP command will use the channel allocated within the job rather
than those configured as defaults, as in the preceding example of a job.
Creating Backup Sets
Objects can be backed up by RMAN in two ways: as image copies or as backup sets.
An image copy backup (detailed in the next section) is identical to the original file. A
backup set is a proprietary format that can be manipulated only by RMAN and can be
written to disk or (unlike image copies) to tape. The objects that can be backed up as
backup sets are the controlfile, the spfile, datafiles, archive logs, image copies, and other
backup sets. The syntax for creating backup sets also permits backing up a tablespace,
which is implemented as a backup of the datafiles making up the tablespace, or the
complete database, which becomes a backup of all the datafiles and the controlfile
and spfile.
The choice between backup sets and image copies is generally constrained by
available disk resources, and by the requirement for fast restore and recovery. These
two constraints will often be in conflict. As a rule, it will be quicker to restore and
recover if the backups are image copies. But image copies can be made only to disk,
and keeping the necessary disk resources available will not always be possible. By
contrast, tape storage capacity is effectively unlimited—but it isn’t as fast. However,
backup sets have features that make them more attractive: in particular, the ability to
make incremental backups. Furthermore, a backup set is always smaller than an image
copy. Backup sets of datafiles never include blocks that have not been used, whereas
an image copy of necessity includes the complete file. It is possible to reduce the space
needed even further by using RMAN’s compression capability.
An example of a job to create backup sets would be
run {
allocate channel d1 type disk;
backup as compressed backupset
format '/u06/ocp10g/backup/%d_%u.dbf'
duration 8:00 minimize load
filesperset 1
database;
sql 'alter system archive log current';
backup as compressed backupset
format '/u06/ocp10g/backup/%d_%u.arc'
duration 8:00 minimize time
archivelog all delete all input;}
This job first launches a single disk channel. The channel will back up the whole
database over an eight-hour period. The files produced will be backup sets, compressed
ch24.indd 5ch24.indd 5 7/11/2005 4:17:44 PM7/11/2005 4:17:44 PM

All-in-1 / Oracle Database 10g OCP Certification All-in-One / Watson, Bersinic / 5790-3
Oracle Database 10g OCP Certification All-in-One Exam Guide
6
with RMAN’s binary compression algorithm. The backup sets will be written to a disk
directory and uniquely named according to variables that will generate the database
name (%d) and an eight-character string that will guarantee uniqueness (%u). The
MINIMIZE LOAD keywords instruct RMAN to control the speed of the backup such
that it will not finish in less than eight hours; this is to reduce the impact of excessive
disk I/O on users. For the same reason, only one channel was launched; parallelizing
the backup might make it run more quickly, which would increase the load on the
database server. Each database file will be written to its own backup set, which will
consist of one piece. Then the job continues by issuing a command to the target that
will force a log switch and an archive. A second backup command backs up all existing
archive log files into one backup set, removing them from the archive destinations as
it does so. This will be done as fast as possible; it is assumed that I/O on archive log
destinations will have no impact on users. Both the backup commands will throw an
error if the backup does not complete within eight hours; this could be avoided by
including the keyword PARTIAL.
Backup sets can also be written directly to tape, as in this example:
run (
allocate channel t1 type sbt;
allocate channel t2 type sbt;
allocate channel t3 type sbt;
allocate channel t4 type sbt;
backup format '%d_%u.dbf.arc'
database plus archivelog;}
The job launches four channels, capable of writing to the tape library. The number of
channels should be related to the number of tape drives in the library. As a rule, it is
good practice to write to tape devices as fast as possible, hence the use of multiple
channels to parallelize the backup, and no speed restrictions. It is not necessary to
specify that the backup should be AS BACKUP SET, because this is the only option
when using SBT channels. Image copies cannot be made to tape, though image
copies can be backed up as backup sets to tape.
Each channel will generate its own backup set, and they will be generated in
parallel. RMAN will apportion the files making up the database and the archive logs
across the four channels, and there will be multiple files in each backup set. The
job does not specify compression because it is generally more efficient to enable
compression within the tape library. The DATABASE PLUS ARCHIVELOG specification
instructs RMAN to do the following:
1. Issue an ALTER SYSTEM ARCHIVELOG CURRENT command.
2. Run BACKUP ARCHIVELOG ALL.
3. Back up the whole database.
4. Issue ALTER SYSTEM ARCHIVELOG CURRENT again.
5. Back up the archive logs generated during Step 3 and Step 4.
ch24.indd 6ch24.indd 6 7/11/2005 4:17:44 PM7/11/2005 4:17:44 PM

All-in-1 / Oracle Database 10g OCP Certification All-in-One / Watson, Bersinic / 5790-3
Chapter 24: Using RMAN to Back Up Databases
7
PART II
Archive logs can also be backed up individually, or according to the date they were
made. The following command will back up all archive logs that are more than a week
old to tape:
run {
allocate channel t1 type sbt;
backup as backupset archivelog
until time 'sysdate - 7';}
The preceding examples are of online backups, but RMAN can also do offline
backups, which are essential if the target is in noarchivelog mode. An RMAN offline
backup is done in mount mode. A user-managed offline backup done with operating
system utilities is always done when the instance is shut down, because otherwise you
cannot guarantee that the datafile and controlfile copies will be read-consistent, but
RMAN needs the target database controlfile to be mounted in order to get to its
repository. For this reason, RMAN offline backups are done in mount mode. The
controlfile backup is taken by making a snapshot read-consistent copy of the controlfile,
which is then backed up. This snapshot copy can be controlled by using CONFIGURE
SNAPSHOT CONTROLFILE NAME TO.... An example of an offline backup is
run {
shutdown immediate;
startup mount;
backup as backupset database;
alter database open;}
This job does a clean shutdown (necessary for an offline RMAN backup), mounts the
database, and then backs it up as a backup set. (Remember that in NOARCHIVELOG
mode only whole backups are possible.) Finally, the job reopens the database.
EXAM TIP Offline backups are done in mount mode, but the database must
have been cleanly shut down first. The backup will fail if the shutdown were a
crash or a SHUTDOWN ABORT.
Exercise 24-1: Creating Backup Sets
Use RMAN to create backup sets of various database objects.
1. Connect to your database using RMAN with operating system authentication,
in the default NOCATALOG mode. From an operating system prompt, enter
rman target / nocatalog
2. Display the physical structure of the database with the REPORT SCHEMA
command. The output will resemble Figure 24-1.
ch24.indd 7ch24.indd 7 7/11/2005 4:17:45 PM7/11/2005 4:17:45 PM
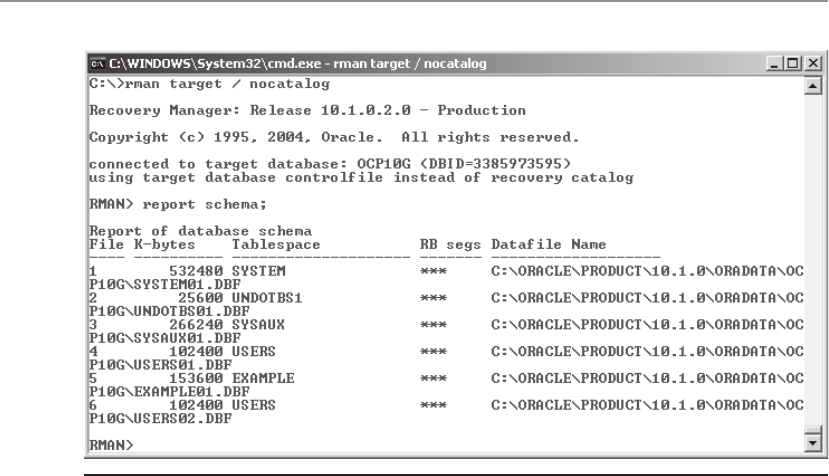
All-in-1 / Oracle Database 10g OCP Certification All-in-One / Watson, Bersinic / 5790-3
Oracle Database 10g OCP Certification All-in-One Exam Guide
8
3. Select a datafile by number (in the examples that follow it is file 6, part of
the USERS tablespace) and back it up to a compressed disk backup set in
an appropriate directory using one channel. Use a hard-coded name for the
backup piece. For example,
RMAN> run {
allocate channel d1 type disk;
backup as compressed backupset
format 'C:\ORACLE\PRODUCT\10.1.0\BACKUPS\OCP10G\file6.bus'
datafile 6;}
4. Perform a tablespace-level backup of the tablespace that the file is a member
of. Use system-generated names for the backup pieces, and limit their size to
50MB each. For example,
RMAN> run {
allocate channel d1 type disk
maxpiecesize 50m;
backup as compressed backupset
format 'C:\ORACLE\PRODUCT\10.1.0\BACKUPS\OCP10G\%U.dbf'
tablespace users;}
5. Confirm that the file has been backed up twice with the LIST command (as in
Figure 24-2) and study the output.
6. Back up the current controlfile into a backup set.
RMAN> run {allocate channel d1 type disk;
backup as backupset format 'C:\ORACLE\PRODUCT\10.1.0\BACKUPS\OCP10G\%U.ctl'
current controlfile;}
7. Confirm that the backup was created with the LIST command.
RMAN> list backup of controlfile;
Figure 24-1 The Recovery Manager REPORT SCHEMA command
ch24.indd 8ch24.indd 8 7/11/2005 4:17:45 PM7/11/2005 4:17:45 PM
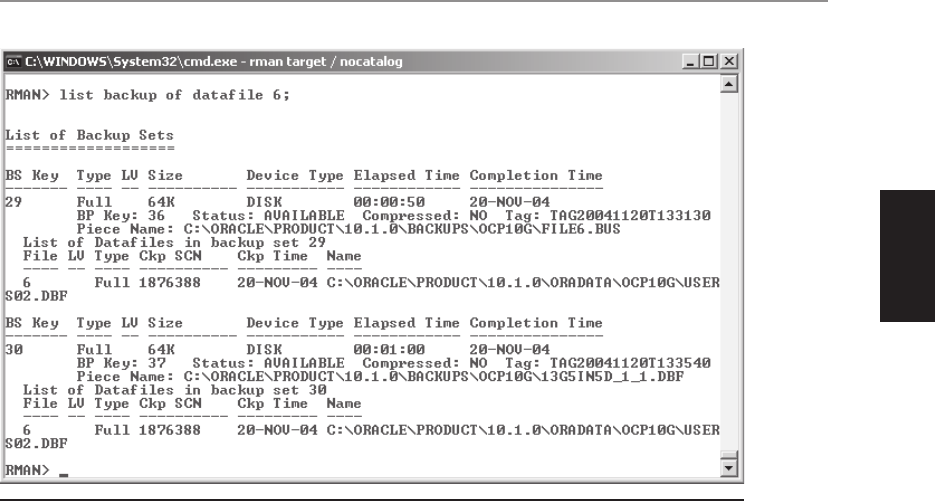
All-in-1 / Oracle Database 10g OCP Certification All-in-One / Watson, Bersinic / 5790-3
Chapter 24: Using RMAN to Back Up Databases
9
PART II
Making Image Copies
An image copy of a file is a byte-for-byte identical copy of an individual datafile,
controlfile, or archive log file. The result is exactly as though the file had been copied
with an operating system utility, though the mechanism is different: RMAN reads and
writes in Oracle blocks, not operating system blocks. This means that many of the
great features of backup sets (such as incremental backup, compression, writing
directly to tape, or controlling the size of the output pieces) cannot be used. But it
does mean that a restore can be very fast, because there is no need to extract the file
from a backup set. The target database controlfile can be updated to address the
image copy instead of the damaged file; in effect, no restore is actually needed if a
recent image copy is available. Oracle Corporation’s advice is to keep a whole image
copy of the database, plus archive logs made since the backup was taken, available in
the flash recovery area; this will mean that a full restore is virtually instantaneous, and
recovery will be fast as well. However, the economics of disk storage may not make
this possible.
Tape channels cannot be used for image copies, but if multiple files are to be
copied, then parallelism can be considered. However, thought needs to be put into
the degree of parallelism to be used. If all the copies are going to a single nonstriped
disk, then there is little point in launching more than one disk channel. Also, the
speed of backup to disk can have a negative impact on your users. A full-speed image
copy will take up a significant amount of CPU and I/O capacity; this can be avoided
by deliberately slowing down the backup process.
Figure 24-2 Listing the backups of a datafile
ch24.indd 9ch24.indd 9 7/11/2005 4:17:46 PM7/11/2005 4:17:46 PM

All-in-1 / Oracle Database 10g OCP Certification All-in-One / Watson, Bersinic / 5790-3
Oracle Database 10g OCP Certification All-in-One Exam Guide
10
Image copies can be made of datafiles, the controlfile, and archive logs. Image
copies cannot be made of the spfile.
Although image copies are made on a file-for-file basis, RMAN does let you copy
many files with one command. To back up the entire database,
RMAN> backup as copy database;
If the configured defaults are on default, this command will launch one disk channel
and copy all the datafiles and the controlfile to the flash recovery area. The follow-up
command would be
RMAN> backup as copy archivelog all delete all input;
which will move all the archive log files to the flash recovery area.
Using Tags for Backup Sets and Image Copies
A tag is a logical name used to reference a backup set or a set of image copies. Whenever
a backup set or image copy is made, it is assigned a tag. In earlier Figure 24-2 the first
backup set listed, backup set number 29, has been given the tag TAG20041120T133130.
The system-generated tags are of little value, but you can override these and specify
your own tags. In this example,
run {
allocate channel d1 type disk;
backup as compressed backupset
tablespace system,sysaux tag=dd_backup;}
the two tablespaces that make up the data dictionary, SYSTEM and SYSAUX, are backed
up into one compressed backup set, which is tagged DD_BACKUP. When this backup
is no longer required, it can be deleted by tag:
RMAN> delete backupset tag=dd_backup;
Since tags can be reused, it becomes possible to write generic scripts. For example,
if the requirement is to take a whole backup once a month to be kept until the next is
taken, then this job can be run at every month end:
run {
allocate channel t1 type sbt;
delete backupset tag monthly;
backup as backupset
database tag=monthly;}
Incremental Backups
Incremental backups are an example of why RMAN is superior to user-managed backups.
When backing up with operating system utilities, the granularity of the backup is the
datafile. Datafiles may be many gigabytes in size, and if even one block has been
ch24.indd 10ch24.indd 10 7/11/2005 4:17:47 PM7/11/2005 4:17:47 PM

All-in-1 / Oracle Database 10g OCP Certification All-in-One / Watson, Bersinic / 5790-3
Chapter 24: Using RMAN to Back Up Databases
11
PART II
changed, the whole file must be backed up. To make full backups, which include all
datafile blocks that have been used, is the default behavior with RMAN, but because
RMAN is an Oracle-aware product, it can also make incremental backups.
Many system administrators (irrespective of whether the system is Oracle) dislike
the idea of incremental backups, because of the bookkeeping that is necessary. When
restoring, you have to know which whole backup to restore, then which cumulative
and incremental backups to apply. This can make a restore operation quite complicated,
and one thing you want to avoid when doing this type of work is complexity. But
RMAN solves the bookkeeping problem by use of its repository. When you issue the
command RESTORE DATABASE, RMAN will search the repository and determine
which whole backup to use, and then which incrementals to apply. If RMAN is linked
to a tape library, this process will be completely automatic: RMAN will load the
appropriate tapes and extract whatever files it needs without any human intervention.
TIP Do not confuse “whole” and “partial,” meaning all of the database or
a part of it, with “full” and “incremental,” meaning every block of the object
or only changed blocks. Either a whole or a partial backup can be full or
incremental.
The mechanism for incremental backups is based on the system change number,
or SCN. Whenever a data block is updated, the block header is updated with the current
SCN. Whenever a backup is taken, the backup is marked in the repository as having
been taken at a particular SCN. Thus when making an incremental backup, all RMAN
has to do is compare the SCNs in the blocks of the datafile with the SCN of the last
backup of the datafile to determine if the block has been changed and should therefore
be included in an incremental backup. Clearly, incremental backups apply only to
datafile backups, not controlfile or archive log backups. Image copies are always full
backups; an incremental image copy could not be an image copy of the original.
Why should you consider incremental backups? There are three major reasons:
time, space, and the impact on end users. The time for a backup to complete may not
be important to the users, but it can be very important to the system administrators.
Automated tape libraries are very expensive pieces of equipment and may well be
used for backing up systems other than the Oracle databases. If the time required for
an RMAN backup can be reduced, there will be savings in the tape library resources
needed. Even though the default operation of RMAN is to scan the whole datafile
when backing it up incrementally in order to identify which blocks have changed,
there will still be time savings because in virtually all cases it is the writing to tape
that is the bottleneck, not the reading of the files. By enabling block change tracking
(detailed later in the next section), which obviates the need to scan the whole file, the
time for the backup can be reduced dramatically. The volume of an incremental
backup will usually be substantially less than the volume of a full backup. As
discussed previously, backup sets are always smaller than the source files, or image
copies, because they never include empty blocks that have never been written to and
can, optionally, be compressed. But incremental backups may well be just a small
ch24.indd 11ch24.indd 11 7/11/2005 4:17:47 PM7/11/2005 4:17:47 PM

All-in-1 / Oracle Database 10g OCP Certification All-in-One / Watson, Bersinic / 5790-3
Oracle Database 10g OCP Certification All-in-One Exam Guide
12
fraction of the size of a full backup set. This will reduce the impact on the tape library
or the disk resources needed. The impact on users is largely dependent on the
excessive disk I/O needed for a full backup. When block change tracking is enabled,
an incremental backup can use direct access to changed blocks, which will reduce the
strain on disk I/O resources substantially.
Incremental backups come in three forms. An incremental level 0 backup isn’t
incremental at all. Level 0 means a full backup, which will contain every used datafile
block. The difference comes with subsequent incrementals: a full backup can’t be used
as the base for a level 1 backup. A differential level 1 backup, which is the default type
of incremental, contains only data blocks modified since the last incremental level 1
backup (cumulative or differential), or blocks modified since the last level 0 backup
if there has not been an intervening level 1 backup. A cumulative level 1 incremental
backup will contain only the blocks modified since the last level 0 backup.
TIP Previous releases of RMAN used incremental levels 0–4 to give similar
functionality to the DIFFERENTIAL and CUMULATIVE options. These still
work but are provided only for backward compatibility.
As an example of an incremental backup strategy, consider this diagram:
The cycle starts on day 1 with a level 0 incremental backup. This will be used as
a base for subsequent level 1 backups and could be made as follows:
RMAN> backup incremental level 0 database;
ch24.indd 12ch24.indd 12 7/11/2005 4:17:48 PM7/11/2005 4:17:48 PM

All-in-1 / Oracle Database 10g OCP Certification All-in-One / Watson, Bersinic / 5790-3
Chapter 24: Using RMAN to Back Up Databases
13
PART II
On days 2, 3, 4, and 5 a differential backup will capture just the blocks changed in
one day:
RMAN> backup incremental level 1 differential database;
On day 6 a cumulative backup will capture all changes since the level 0 backup:
RMAN> backup incremental level 1 cumulative database;
On days 7, 8, 9, and 10 repeat the differential backup before starting another ten-
day cycle on day 11 with a new level 0 backup.
Should a restore be necessary, RMAN will extract files from the level 0 backup and
apply incrementals in whatever is the most efficient way to re-create the damaged
datafiles. This strategy ensures that there will never be more than one day of archive
logs to be applied following a restore operation, even though the time and volume of
the daily backups is substantially reduced from what it would be if full backups were
taken each day. This example does not include backup of the archive logs; they will
also have to be protected, but the assumption is that the last day’s logs are still on
disk in the archive log destinations.
Combining Incremental Backups and Image Copies
It is possible to apply incremental backups to image copies. This is an extremely
powerful technique for minimizing restore and recovery time, while still getting the
benefits of incremental backups.
The fastest way to restore is to take image copies, because you don’t actually have
to restore at all. If a datafile is damaged, you simply tell Oracle to use the copy
instead. But image copies can only be full backups, not incremental, and you may
not wish to inflict the workload of a full whole database copy on your users very
frequently. But with infrequent image copies, a large amount of redo may have to be
applied from archive logs if the backup is ever needed. The answer is to take just one
database copy—this is the only copy you will ever need to make—and then update it
from incremental backup sets. The result is an image copy that is regularly updated,
meaning that you will be able to restore and recover without having to extract files
from backup sets, and having to apply only a minimum of archive logs.
The original copy is taken as usual, with the exception that a tag is required:
RMAN> backup as copy incremental level 0
database tag db_whole_copy;
Then on a regular basis (typically, daily) perform an incremental backup and
apply it to the copy. An example of the syntax is
run{
allocate channel d1 type disk;
backup incremental level 1
for recover of copy with tag db_whole_copy
database tag db_copy_upd;
recover copy of database with tag db_whole_copy;
delete backupset tag db_copy_upd;}
ch24.indd 13ch24.indd 13 7/11/2005 4:17:48 PM7/11/2005 4:17:48 PM

All-in-1 / Oracle Database 10g OCP Certification All-in-One / Watson, Bersinic / 5790-3
Oracle Database 10g OCP Certification All-in-One Exam Guide
14
This job first launches a disk channel. (It does not make sense to work with tape
channels for this type of operation.) Then it takes an incremental backup of the
database, applies it to the copy, and deletes the incremental backup set. The use of
tags to identify the backups relevant to the image copy means that this process will
not interfere with a normal backup schedule of datafiles and archive logs.
Block Change Tracking
Incremental backups will always be smaller than full backups, but the time saving
may not be as great as you might expect. This is because the default behavior of an
incremental backup is to scan the entire datafile being backed up in order to determine
which blocks need to be extracted. There is an advantage to this: it allows RMAN to
check for block corruption, as discussed in Chapter 30, but there are many occasions
when you would prefer that the incremental backup proceed much faster. This can be
done by enabling block change tracking.
Block change tracking relies on starting an additional background process: the
Change Tracking Writer, or CTWR. This process records the address of each block that
has been changed in a file called the change tracking file. If block change tracking has
been enabled, then RMAN will read the change tracking file when doing an incremental
backup to determine which blocks need to be backed up. This is far faster than scanning
the whole file.
The change tracking file will be created in a location specified by the DBA, or by
default it will go to the DB_CREATE_FILE_DEST directory. It is initially sized at 10MB
and will grow in 10MB increments, but unless the database is over one terabyte or is
a clustered database, 10MB will be adequate. The file size is not proportional to the
amount of update activity. Changed block addresses are stored long enough to allow
fast incremental backup of up to eight level 0 backups. There may be a minimal
performance overhead to enabling block change tracking, but if incremental backups
are being used, Oracle Corporation advises enabling it.
To enable and monitor block change tracking, use the ALTER DATABASE command
and the V$BLOCK_CHANGE_TRACKING view, as in Figure 24-3.
Figure 24-3 Block change tracking
ch24.indd 14ch24.indd 14 7/11/2005 4:17:49 PM7/11/2005 4:17:49 PM

All-in-1 / Oracle Database 10g OCP Certification All-in-One / Watson, Bersinic / 5790-3
Chapter 24: Using RMAN to Back Up Databases
15
PART II
Managing and Monitoring RMAN Backups
The RMAN executable provides facilities for reporting on what backups have been
made and what backups are required. The same information can also be obtained
through the Database Control interface, or it is possible to query the RMAN repository
directly by querying various views that are populated from it. If you are using a
Recovery Catalog, this is another source of information. RMAN can also physically
remove backups from tape and disk.
The LIST, REPORT, and DELETE Commands
As a general rule, LIST tells you about backups that have been made, whereas
REPORT tells you what needs to be backed up. The following table shows some
examples of LIST:
Command Function
RMAN> list backup; List all your backup sets.
RMAN> list copy; List all your image copies.
RMAN> list backup of database; List all your whole database backup sets,
whether full or incremental.
RMAN> list backup of datafile 1;
RMAN> list backup of tablespace
users;
List the backup sets that include datafile 1 and
the backups that include the USERS tablespace.
RMAN> list backup of archivelog
all;
List all archive log backup set backups. Use this
command or the next to investigate backups of
archive logs.
RMAN> list copy of archivelog
from time='sysdate - 7';
List all image copies of archive logs generated
in the last 7 days.
RMAN> list backup of archivelog
from sequence 1000 until
sequence 1050;
List all backup sets containing archive logs of
log switch sequence numbers 1000–1050.
As you can see, there is a wide range of keywords and syntax available. At any stage,
BACKUP and COPY are interchangeable, depending on whether you want to list
backup set backups or image copy backups. Note that LIST makes no distinction
between whether the backups are on disk or tape. Any of the preceding examples can
be suffixed with VERBOSE, which is applied by default, or SUMMARY, as shown in
Figure 24-4.
To change the format of the dates and times in the output of LIST, set the
environment variable NLS_DATE_FORMAT before launching the RMAN executable.
For example, on Unix,
$ export NLS_DATE_FORMAT=dd-mm-yy hh24:mi:ss
or on Windows,
C:\> set NLS_DATE_FORMAT=dd-mm-yy hh24:mi:ss
will change the date/time display to the European standard.
ch24.indd 15ch24.indd 15 7/11/2005 4:17:50 PM7/11/2005 4:17:50 PM
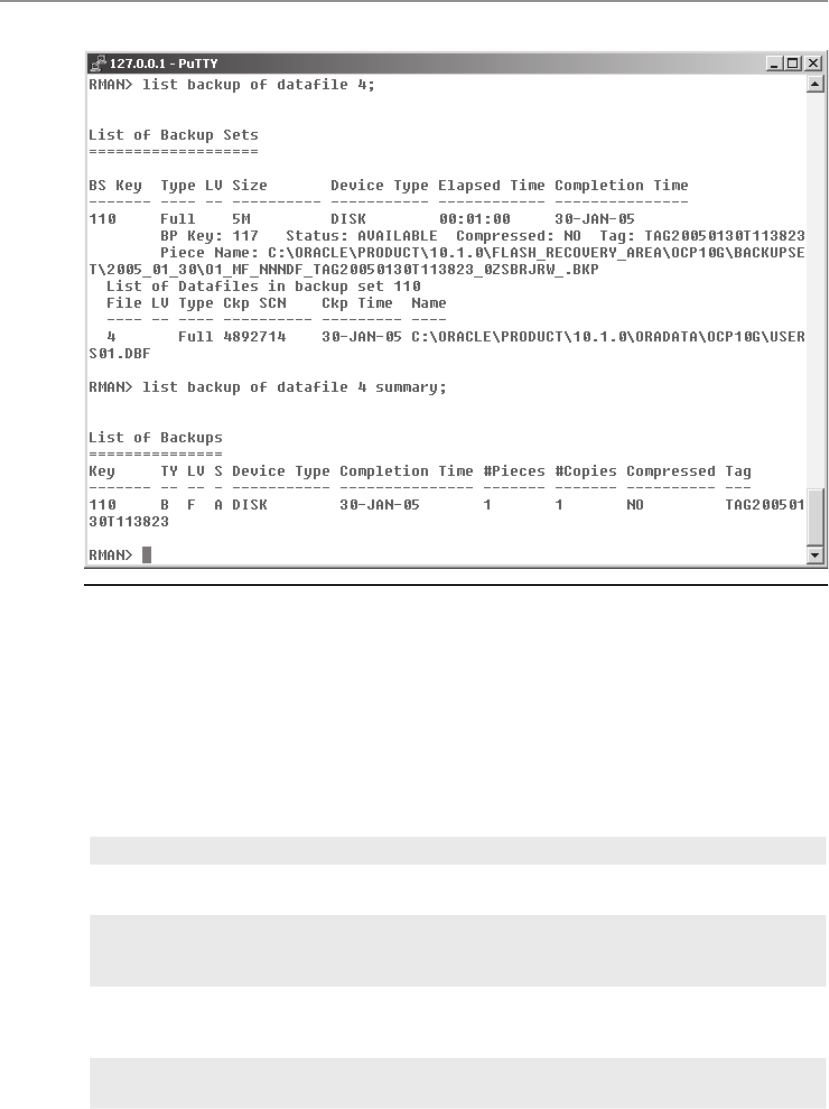
All-in-1 / Oracle Database 10g OCP Certification All-in-One / Watson, Bersinic / 5790-3
Oracle Database 10g OCP Certification All-in-One Exam Guide
16
The REPORT command interrogates the target database to determine what needs
to be backed up. This requires contrasting the physical structure of the database and
the archived logs that have been generated with the backup sets and copies as recorded
in the repository, and applying a retention policy. The retention policy can be that
configured as a default, or it can be specified as part of the REPORT command. This
table shows some examples:
Command Function
RMAN> report schema; List the datafiles (but not the controlfile or
archived logs) that make up the database.
RMAN> report need backup; Apply the configured retention policy and list
all the datafiles and archive log files that need
at least one backup to conform to the policy.
RMAN> report need backup days 3; List all objects that haven’t been backed up
for three days. Use this command or the next
to ignore the configured retention policy.
RMAN> report need backup
redundancy 3;
List all files of which there are not at least
three backups.
Figure 24-4 Use of the VERBOSE and SUMMARY keywords
ch24.indd 16ch24.indd 16 7/11/2005 4:17:50 PM7/11/2005 4:17:50 PM

All-in-1 / Oracle Database 10g OCP Certification All-in-One / Watson, Bersinic / 5790-3
Chapter 24: Using RMAN to Back Up Databases
17
PART II
The REPORT OBSOLETE command takes things a step further: it contrasts the
RMAN backups that have been taken with the retention policy and lists all those
that can be deleted because they are no longer required. This command works in
conjunction with DELETE OBSOLETE, which will remove the records of any such
backups from the repository and physically remove the backup files from disk or
tape. For example,
RMAN> report obsolete;
will apply the configured retention policy and list all copies and backup sets that are
no longer required. Then,
RMAN> delete obsolete;
will remove the backups deemed surplus to requirements.
RMAN> report obsolete redundancy 2;
lists all backups that take the number of backups of an object to three or more. Then
to remove the superfluous backups,
RMAN> delete obsolete redundancy 2;
The DELETE command can also be used to remove individual backups, by
number or by tag:
RMAN> delete backupset 4;
RMAN> delete copy of datafile 6 tag file6_extra;
The Dynamic Views
A number of views populated from the target database controlfile can be used to
report on RMAN’s backups. By querying these, you can develop your own reports,
rather than relying on RMAN’s LIST command.
View Displays
v$backup_files One row for each file that has been backed up, which may
be a datafile, the spfile, the controlfile, or an archive log.
Also, one row for each piece that RMAN has created. The
column FILE_TYPE distinguishes which type of file the row
refers to.
v$backup_set One row per backup set
v$backup_piece One row per backup piece
v$backup_redolog One row for each archived log that has been backed up
v$backup_spfile One row for each backup that has been made of the spfile
v$backup_device Names of SBT devices that have been linked to RMAN
v$rman_configuration One row for every configuration setting, excluding all
those on default
ch24.indd 17ch24.indd 17 7/11/2005 4:17:51 PM7/11/2005 4:17:51 PM

All-in-1 / Oracle Database 10g OCP Certification All-in-One / Watson, Bersinic / 5790-3
Oracle Database 10g OCP Certification All-in-One Exam Guide
18
Join columns in the various views will let you construct comprehensive reports on
what has been backed up, where the backups are located, and the volume and type of
each backup.
Exercise 25-2: Managing Backups
After setting RMAN qualifiers back to defaults, use the BACKUP, LIST, REPORT, and
DELETE commands to create and remove backups.
1. Connect to your database with RMAN, in the default NOCATALOG mode.
From an RMAN prompt,
RMAN> connect target /
2. Ensure that your retention policy is set to the default, REDUNDANCY 1.
RMAN> configure retention policy clear;
3. Delete all your backup sets and image copies.
RMAN> delete backupset all;
RMAN> delete copy all;
If any backups are listed, enter YES to confirm deletion.
4. List the items that need backing up, according to the configured retention
policy.
RMAN> report need backup;
will list all your datafiles.
5. Choose a datafile, and back it up. In the example that follows, file 6 has been
chosen:
RMAN> backup datafile 6;
Repeat the command to take a second backup of the same file.
6. Repeat the command from Step 4. The file that has been backed up will not
be listed.
7. List your backups with
RMAN> list backup;
8. Report and delete the backup that is unnecessary according to the configured
retention policy.
RMAN> report obsolete;
RMAN> delete obsolete;
Chapter Review
Concentrating on the use of the RMAN executable, this chapter detailed how to make
backups with Recovery Manager. Backups can be online or offline, whole or partial,
full or incremental, and taken as backup sets or image copies. Incremental backups
can be greatly accelerated by enabling block change tracking. A particularly useful
feature is the ability to apply an incremental backup set to an image copy of the
ch24.indd 18ch24.indd 18 7/11/2005 4:17:51 PM7/11/2005 4:17:51 PM

All-in-1 / Oracle Database 10g OCP Certification All-in-One / Watson, Bersinic / 5790-3
Chapter 24: Using RMAN to Back Up Databases
19
PART II
database, enabling you to keep an up-to-date image copy of the database to satisfy
subsequent recovery requirements.
The LIST command queries the repository to give details of what backups have
been taken. The REPORT command details what backups need to be taken, and what
backups are considered obsolete. The DELETE command can remove backups, either
individually on demand, or intelligently by applying the retention policy.
Finally, if the RMAN LIST command is not good enough, various views based
on the target database controlfile let you query the repository directly.
Questions
1. Which tool or tools can be used as interfaces to the Recovery Manager?
(Choose all that apply.)
A. Database Control
B. The DBMS_PIPE package
C. iSQL*Plus
D. The RMAN executable
E. SQL*Plus
2. Why will this command block fail? (Choose the best answer.)
run {
connect target sys/oracle@ocp10g;
backup database including current controlfile;}
A. A connection as SYS must be as SYSDBA.
B. Specifying INCLUDE CURRENT CONTROLFILE cannot be done when the
whole database has already been specified.
C. CONNECT cannot appear in a command block.
D. There is no ALLOCATE CHANNEL command.
3. Some attributes of a backup apply only to backup sets, only to image copies,
or to both. Mark the following attributes as being applicable to backup sets
only; image copies only; or both.
A. Can be updated from incremental backups.
B. Can be incremental backups.
C. Can be written to tape.
D. Can be made without requiring tablespace hot backup mode.
E. Can include all blocks of a datafile.
F. Can be of the controlfile.
4. You issue the RMAN command,
BACKUP AS BACKUPSET DATAFILE 1 PLUS ARCHIVELOG;
ch24.indd 19ch24.indd 19 7/11/2005 4:17:52 PM7/11/2005 4:17:52 PM

All-in-1 / Oracle Database 10g OCP Certification All-in-One / Watson, Bersinic / 5790-3
Oracle Database 10g OCP Certification All-in-One Exam Guide
20
What will happen if there is a log switch during the backup? (Choose the best
answer.)
A. The filled logfile group will not be archived until the backup has
completed.
B. The filled logfile group will be archived but not included in the backup.
C. The filled logfile group will be archived and included in the backup.
D. The syntax is wrong: archive logs must be backed up into their own
backup set.
5. Which of the following statements, if any, are correct about RMAN offline
backups? (Choose all correct answers.)
A. The database must be in NOMOUNT mode.
B. The database must be in MOUNT mode.
C. The backup will fail if the shutdown mode was SHUTDOWN
IMMEDIATE.
D. NOARCHIVELOG databases can only be backed up offline.
E. ARCHIVELOG databases cannot be backed up offline.
F. Offline backups can be incremental.
6. You are running this command block daily:
run {
allocate channel t1 type sbt;
backup as backupset archivelog all delete input;}
and you notice that some archive logs remain on disk. What could be the
cause of this? (Choose the best answer.)
A. Tape channels cannot write to disks, and they therefore cannot delete
from them.
B. You need two channels, one to copy and one to delete.
C. There are multiple archive log destinations.
D. The retention policy does not permit immediate deletion.
7. You perform a full backup on Sunday, an incremental level 0 backup
on Monday, an incremental level 1 differential backup on Tuesday, an
incremental level 1 cumulative backup on Wednesday, and an incremental
level 1 cumulative backup on Thursday. Which blocks will be included in
the Thursday backup? (Choose the best answer.)
A. All blocks changed since Sunday
B. All blocks changed since Monday
C. All blocks changed since Tuesday
D. All blocks changed since Wednesday
ch24.indd 20ch24.indd 20 7/11/2005 4:17:52 PM7/11/2005 4:17:52 PM

All-in-1 / Oracle Database 10g OCP Certification All-in-One / Watson, Bersinic / 5790-3
Chapter 24: Using RMAN to Back Up Databases
21
PART II
8. When you enable block change tracking, which process is responsible for
recording blocks that have been changed? (Choose the best answer.)
A. Database writer
B. Log writer
C. The server process making the change
D. A new background process
9. Which of the following commands will tell you about backup sets that are no
longer needed according to your retention policy? (Choose the best answer.)
A. LIST EXPIRED BACKUPSET;
B. LIST OBSOLETE BACKUPSET;
C. REPORT EXPIRED BACKUPSET;
D. REPORT OBSOLETE;
E. None of the above
10. Which of the following is correct about the REPORT SCHEMA command?
(Choose the best answer).
A. It will list the schema objects in the database.
B. It will list the datafiles of the database.
C. It will list the datafiles and controlfile of the database.
D. It will list the schema objects and the datafiles.
11. You issue this command:
BACKUP AS COPY DATABASE PLUS ARCHIVELOG DELETE INPUT;
What will happen? (Choose the best answer.)
A. There will be an error, because DELETE INPUT is not valid for a backup of
anything other than archive logs.
B. The backup will succeed, and the database and archive logs will be
deleted.
C. The backup will succeed, and all the archive logs will be deleted.
D. The backup will succeed, and only the archive logs in the primary
destination will be deleted.
12. You have issued the command
configure device type disk parallelism 3;
and then execute this job:
run {
allocate channel t1 type disk;
allocate channel t2 type disk;
backup format '/backup/%U'
datafile 1,2,3,4,5;}
ch24.indd 21ch24.indd 21 7/11/2005 4:17:53 PM7/11/2005 4:17:53 PM

All-in-1 / Oracle Database 10g OCP Certification All-in-One / Watson, Bersinic / 5790-3
Oracle Database 10g OCP Certification All-in-One Exam Guide
22
What degree of parallelism will you get? (Choose the best answer.)
A. Three parallel streams, because the configured default is greater than the
number of channels requested
B. Two parallel streams, because only two channels will be launched
C. One stream only, because there is only one format specifier for the
output file
D. Five parallel streams, because there are five files nominated and a total
of five channels: three configured default channels, and two manually
allocated
13. A number of V$ views can be queried to report on RMAN backups. Where is
the information for these views stored?
A. In the target database controlfile only
B. In the target database controlfile only, unless there is a Recovery Catalog
C. In the Recovery Catalog controlfile only, if you are using a Recovery
Catalog
D. In the Recovery Catalog controlfile and the target database controlfile, if
you are using a Recovery Catalog
Answers
1. A, B, and D. The Database Control, the DBMS_PIPE package, and the RMAN
executable are all possible interfaces to the Recovery Manager.
2. C. CONNECT is a stand-alone command and cannot appear in a command
block.
3. Only image copies can be updated from incremental backups (A) or will
contain all blocks of a datafile (E). Only backup sets can be incremental (B)
or written to tape (C). Either type can be made without requiring hot backup
mode (D) and can be made of the controlfile (F).
4. C. Archiving will continue as normal and the archive will be included in the
backup.
5. B, D, and F. RMAN offline backups are done in MOUNT mode.
NOARCHIVELOG databases can only be backed up offline, but for
ARCHIVELOG databases it is always a possibility. Finally, the incremental
mechanism can work whether the database is open or mounted.
6. C. To remove logs from all destinations, you must specify ...DELETE ALL
INPUT;.
7. B. All blocks changed since Monday will be included. The catch is that a full
backup cannot be used as a base for an incremental backup: only a level 0
incremental backup (which will be the same as a full backup) can be used.
ch24.indd 22ch24.indd 22 7/11/2005 4:17:53 PM7/11/2005 4:17:53 PM

All-in-1 / Oracle Database 10g OCP Certification All-in-One / Watson, Bersinic / 5790-3
Chapter 24: Using RMAN to Back Up Databases
23
PART II
8. D. The new background process is the Change Tracking Writer, or CTWR,
which is responsible for recording blocks that have been changed.
9. D. REPORT OBSOLETE does this by contrasting the RMAN backups that have
been taken with the retention policy.
10. B. “Schema” is an ambiguous term in the Oracle environment. In the RMAN
context, it refers to the datafiles, not the objects owned by a user.
11. D. Unless you specify DELETE ALL INPUT, only the archive logs in the
primary destination will be deleted. The DELETE command can be specified
for, but is never applied to, datafile backups.
12. B. The configured default is ignored if there is an ALLOCATE CHANNEL
command.
13. A. The V$ views associated with the RMAN repository are populated from
the target database controlfile, and nowhere else.
ch24.indd 23ch24.indd 23 7/11/2005 4:17:54 PM7/11/2005 4:17:54 PM

All-in-1 / Oracle Database 10g OCP Certification All-in-One / Watson, Bersinic / 5790-3 Blind folio p. 24
ch24.indd 24ch24.indd 24 7/11/2005 4:17:54 PM7/11/2005 4:17:54 PM

All-in-1 / Oracle Database 10g OCP Certification All-in-One / Watson, Bersinic / 5790-3/ch25
CHAPTER 25
Diagnosing Oracle
Database Issues
In this chapter you will learn how to
• Use the alert log and database trace files for diagnostic purposes
• View alerts using Enterprise Manager
• Adjust thresholds for tracked metrics
• Control the size and location of trace files
1
ch25.indd 1ch25.indd 1 7/11/2005 9:42:22 AM7/11/2005 9:42:22 AM

All-in-1 / Oracle Database 10g OCP Certification All-in-One / Watson, Bersinic / 5790-3
Oracle Database 10g OCP Certification All-in-One Exam Guide
2
There are two distinct sources of alert information in the Oracle database. First, the
various background processes will generate trace files when they encounter certain
error conditions. Associated with these trace files is the alert log, which contains
messages regarding certain significant events that do not warrant generating an actual
error report. You as DBA have minimal control over these trace and alert files: the
background processes write to them when necessary. Second, there is the alert system
running within the database. This is completely configurable, though in many cases
the out-of-the-box configuration will be adequate. It is also possible to generate trace
files of an individual session. These can be used to analyze user activity, in particular
to diagnose the efficiency of the code that is being run.
The Alert Log
From the moment an instance is started, a stream of critical messages, as well as
certain informational ones, is written out to the alert log. The location is determined
by the BACKGOUND_DUMP_DEST parameter, but the name cannot be changed. It is
alert_<SID>.log
where <SID> is the name of the instance.
The parameter is dynamic, meaning it can be changed without shutting down the
instance. The directory must exist, and the operating system Oracle owner must have
write permission to it: Oracle will verify this by creating a new alert logfile immediately
in the nominated directory. Also, the directory may not be the root directory.
EXAM TIP The alert log, along with any background trace files, is written to
the destination specified by the BACKGROUND_DUMP_DEST parameter.
The informational messages in the alert log will include these items:
• All startup and shutdown commands, with the time and mode of the operation.
The startup times will include the timings of the transitions from NOMOUNT
to MOUNT to OPEN, which are of vital importance for assessing whether the
mean-time-to-recover figure matches standards agreed with the users.
• All operations involving physical structures: ALTER DATABASE commands
such as creating, dropping, and renaming datafiles and redo logs. Resize
operations on datafiles and taking datafiles on and offline are also recorded.
• Tablespace operations, such as DROP and CREATE. Also putting tablespaces
into and out of hot backup mode for user-managed backups.
• All log switches and archives, including the names of the affected files.
• The nondefault initialization parameters used to start the instance. Also any
subsequent ALTER SYSTEM commands that change parameters.
Thus the alert log contains a continuous history of operations affecting the structure
of the database and the instance. It does not include any standard SQL statements,
such as DML or DDL commands. It will, however, include some warnings and errors.
The more common of these follow:
ch25.indd 2ch25.indd 2 7/11/2005 9:42:56 AM7/11/2005 9:42:56 AM

All-in-1 / Oracle Database 10g OCP Certification All-in-One / Watson, Bersinic / 5790-3
Chapter 25: Diagnosing Oracle Database Issues
3
PART II
• Checkpoint incomplete Make no mistake—checkpoints always complete.
But if your database is performing log switches so frequently that Oracle wants
to start a checkpoint before the previous checkpoint has completed, then this
error will be signaled. It is indicative of logfiles being far too small and will
result in the database hanging until the checkpoint does finish.
• Unable to open file This will occur at the transition from NOMOUNT
to MOUNT if there is a problem with any copy of the controlfile, or while
transitioning from MOUNT to OPEN if there is a problem with an online
logfile member or a datafile.
• Corrupt block Not a nice message! If a block of a datafile is found to be damaged,
its address (file number and the block number within the file) is written out.
• Problems with archiving These include an archive log destination being full
or unavailable.
• Deadlocks Such events occur when badly written software sets up a logically
impossible situation, causing two sessions to block each other.
The alert log can be viewed from an operating system prompt, by navigating to the
directory specified as the BACKGROUND_DUMP_DEST and opening it with any editor
you wish. Consider this extract from an alert log:
Wed Oct 20 14:48:16 2004
ORA-00202: controlfile:
'C:\ORACLE\PRODUCT\10.1.0\ORADATA\OCP10G\CONTROL01.CTL'
ORA-27041: unable to open file
O/S-Error: (OS 2) The system cannot find the file specified.
Wed Oct 20 14:48:16 2004
Controlfile identified with block size 0
Wed Oct 20 14:48:19 2004
ORA-205 signalled during: alter database mount exclusive...
Wed Oct 20 14:48:37 2004
Shutting down instance (abort)
This depicts something you hope you will never see: an instance terminating
because a controlfile copy has been destroyed. The error stack begins with ORA-00202,
which says that there is a problem with a controlfile. Then ORA-27041 expands on
this by saying that the problem is with opening the file. The error descends to the
operating system error, which is Windows error 2: the file cannot be found. As any
problem with a controlfile results in the instance being terminated immediately, the
message stream concludes with an “abort.”
Many of the messages in the alert log will include references to a trace file that will
give more detailed information. For example, this extract from an alert log depicts a
problem with a corrupted block:
Thu Oct 21 14:45:36 2004
Hex dump of (file 7, block 93) in trace file
c:\oracle\product\10.1.0\admin\ocp10g\udump\ocp10g_ora_3688.trc
Corrupt block relative dba: 0x01c00009 (file 7, block 93)
Bad header found during buffer read
Data in bad block:
type: 32 format: 0 rdba: 0x20202020
ch25.indd 3ch25.indd 3 7/11/2005 9:42:56 AM7/11/2005 9:42:56 AM
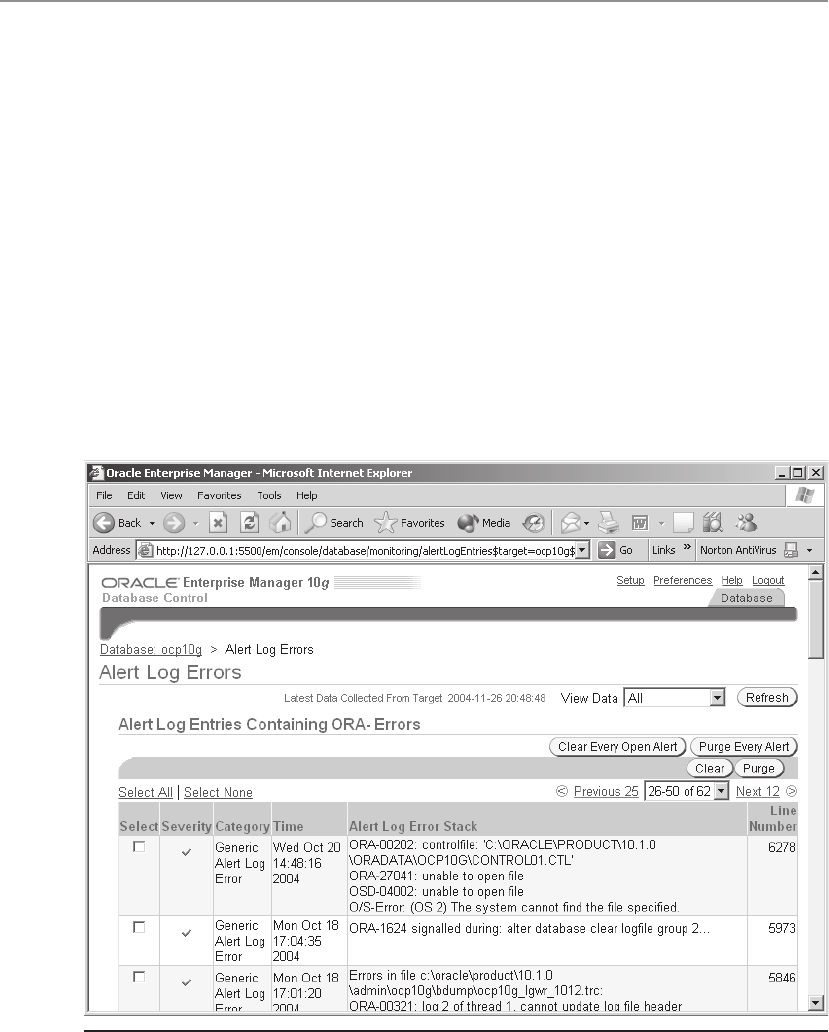
All-in-1 / Oracle Database 10g OCP Certification All-in-One / Watson, Bersinic / 5790-3
Oracle Database 10g OCP Certification All-in-One Exam Guide
4
last change scn: 0x2020.20012020 seq: 0x7 flg: 0x20
spare1: 0x20 spare2: 0x20 spare3: 0x1020
consistency value in tail: 0x20202020
check value in block header: 0x2020
block checksum disabled
Reread of rdba: 0x01c00009 (file 7, block 93) found same corrupted data
The block with the problem is the ninety-third block of datafile 7. By querying the
DBA_EXTENTS view, you can work out which segment this block is a part of; this may
be significant when planning how to recover from this situation. A full block dump,
which may have some information that can be used to reconstruct the damaged data,
is written to a trace file in the USER_DUMP_DEST directory.
An alternative method of viewing the alert log is to use Database Control. From
the database home page, the Alert Log link in the Diagnostic Summary section shows
a parsed form of the alert, with all errors displayed and formatted in a helpful manner
(see Figure 25-1).
Figure 25-1 Database Control view of alert log error messages
ch25.indd 4ch25.indd 4 7/11/2005 9:42:57 AM7/11/2005 9:42:57 AM

All-in-1 / Oracle Database 10g OCP Certification All-in-One / Watson, Bersinic / 5790-3
Chapter 25: Diagnosing Oracle Database Issues
5
PART II
Background Trace Files
The background processes that make up an Oracle instance will write out trace files to
the BACKGROUND_DUMP_DEST directory whenever they encounter problems. Here
is an example of such a file:
Dump file c:\oracle\product\10.1.0\admin\ocp10g\bdump\ocp10g_dbw0_3100.trc
Thu Oct 21 14:40:56 2004
ORACLE V10.1.0.2.0 - Production vsnsta=0
vsnsql=13 vsnxtr=3
Oracle Database 10g Enterprise Edition Release 10.1.0.2.0 - Production
With the Partitioning, OLAP and Data Mining options
Windows XP Version V5.1 Service Pack 2
CPU : 1 - type 586
Process Affinity: 0x00000000
Memory (A/P) : PH:253M/510M, PG:1588M/2019M, VA:1803M/2047M
Instance name: ocp10g
Redo thread mounted by this instance: 1
Oracle process number: 4
Windows thread id: 3100, image: ORACLE.EXE (DBW0)
*** SERVICE NAME:() 2004-10-21 14:40:56.738
*** SESSION ID:(168.1) 2004-10-21 14:40:56.738
ORA-01157: cannot identify/lock data file 7 - see DBWR trace file
ORA-01110: data file 7:
'C:\ORACLE\PRODUCT\10.1.0\ORADATA\OCP10G\NONCRIT.DBF'
ORA-27041: unable to open file
OSD-04002: unable to open file
O/S-Error: (OS 2) The system cannot find the file specified.
All trace files have a header giving the name of the file and information about the
release of Oracle that generated it and the operating system. Following that is the actual
error; in this case, DBWn is reporting that a file is missing. The naming convention
for trace files is the name of the instance (“ocp10g” in the example), the name of the
process that generated it (“dbw0,” the first database writer), the operating system
process number on Unix or thread number on Windows of the generating process
(3100 in the preceding example), and a suffix of “.trc”.
Unlike the alert log, trace files always mean an error—often a critical one. For
instance, if a controlfile copy is damaged, the process detecting the problem will
write out a trace file and then the instance will terminate.
The only control the DBA has over trace files is where to put them, and a limit
on their maximum size. They will be written to the directory specified by the
BACKGROUND_DUMP_DEST parameter, and another parameter, MAX_DUMP_
FILE_SIZE, sets an upper limit to their size. The MAX_DUMP_FILE_SIZE parameter
defaults to UNLIMITED, or it can be set to an integer or a string value. If it is just an
integer, Oracle will use the operating system block size as the units. Alternatively,
the string can be an integer suffixed with K or M, in which case the integer will be
interpreted as kilobytes or megabytes. Thus, if your operating system block size is 512
bytes and you want to limit trace files to 5MB, these are equivalent:
SQL> alter system set max_dump_file_size=10000;
SQL> alter system set max_dump_file_size='5m';
ch25.indd 5ch25.indd 5 7/11/2005 9:42:58 AM7/11/2005 9:42:58 AM

All-in-1 / Oracle Database 10g OCP Certification All-in-One / Watson, Bersinic / 5790-3
Oracle Database 10g OCP Certification All-in-One Exam Guide
6
Note that this maximum file size does not apply to the alert log; that will continue
to grow until you trim or delete it.
Server-Generated Alerts
The server-generated alert system is a completely configurable mechanism that monitors
the database, the instance, and user’s sessions and issues warnings when certain limits
are reached and when certain events occur. The monitoring is internal to the instance
and based on a large number of metrics that are calculated and observed continuously.
The background process that does this is the manageability monitor (or MMON)
process, assisted by the manageability monitor light (or MMNL) process.
A “metric” is a statistic converted into a meaningful figure. Most statistics are
useless on their own. For example, the number of disk reads is a statistic; what you
need to know is the number of disk reads per second, which is a metric. Similarly,
knowing that segments in a tablespace occupy so many gigabytes may be interesting,
but what you really need to know is when the space used reaches a certain proportion
of the space available, which requires comparing the space used with the total available
space. In earlier releases of the database the conversion of statistics to useful metrics
usually had to be done by the DBA; now Oracle does it for you, storing the results in
the Automatic Workload Repository, or AWR, in the SYSAUX tablespace.
Different metrics are calculated with different frequencies. The tablespace space
usage metric is one of the less frequently calculated figures: only every ten minutes,
because space problems do not usually emerge suddenly. By contrast, CPU usage
per second is indeed computed every second. Metrics data is generally written to the
AWR every hour, but if the memory structures in the SGA used for staging the metrics
information fill up within the hour, then the write to the AWR will be more frequent.
This is a case where the MMNL process would take action.
Alert Types
Alerts are classed as threshold and nonthreshold. A threshold alert refers to a situation
that builds up over time. Tablespace usage is a threshold alert: you could configure
the alert system to send you a warning alert when a tablespace becomes 95 percent
full, and a critical alert when it reaches 99 percent full. These alerts are also referred
to as “stateful” alerts because they persist for some time until cleared, either because
the problem resolves itself or because you take appropriate action, such as adding
more space to the tablespace. Nonthreshold alerts inform you of events that occurred
unpredictably. Such an alert is the “ORA-1555: snapshot too old”, error that is
signaled when a query fails because the undo data it needs has been overwritten.
When this type of error occurs, it is resolved immediately—in the case of ORA-1555,
by canceling the query—and the alert becomes a historical record. Nonthreshold
alerts are also referred to as “stateless” alerts, because they do not persist: they occur,
and are gone.
ch25.indd 6ch25.indd 6 7/11/2005 9:42:58 AM7/11/2005 9:42:58 AM

All-in-1 / Oracle Database 10g OCP Certification All-in-One / Watson, Bersinic / 5790-3
Chapter 25: Diagnosing Oracle Database Issues
7
PART II
The metrics for which alerts can be configured are listed in the view V$ALERT_
TYPES; there are more than a hundred of them. Many of the more useful metrics are
“x per second”–type metrics; these all have names suffixed “_ps”. To list them,
SQL> select internal_metric_name from v$alert_types where
internal_metric_name like '%_ps';
INTERNAL_METRIC_NAME
------------------------------
transactions_ps
physreads_ps
physwrites_ps
physreadsdir_ps
physwritesdir_ps
physreadslob_ps
physwriteslob_ps
redosize_ps
logons_ps
<output truncated....>
Warning and critical alerts can be configured for all of these, and for many more.
The Alert System Architecture
The instance itself accumulates the statistics used by the alert system. There is no
overhead to collecting these statistics, and they will be collected automatically if the
initialization parameter STATISTICS_LEVEL is set to TYPICAL, which it should always
be. Setting STATISTICS_LEVEL to BASIC will disable collection of these statistics, and
much more, with no performance benefit. The only possible performance hit involved
in collecting this information is when it is written to the AWR on disk, but as that will
happen only once an hour, it is not an issue. Setting STATISTICS_LEVEL to ALL will
enable the collection of fantastically detailed information about SQL executions; it is
possible that this may impact on performance, and therefore it would not normally
be done at the instance level but rather at the session level when carrying out advanced
SQL statement tuning exercises.
Retrieving the statistics for calculating metrics is done by the background process
MMON. As this process is part of the instance, it has direct access to the data structures
storing the information. This bypasses the overhead of having, for instance, to populate
views in response to a query.
While monitoring the statistics and calculating the metrics, MMON will compare
the metrics to the configured alert thresholds. If a metric breaks a threshold, MMON
will write an appropriate message to a queue. If a stateless alert event occurs, MMON
will also write a message to a queue. Queues are a feature of the database that allows
sessions to communicate with each other. A queue is implemented as a table with an
object column: the definition of the object defines the structure of the message. Any
session (with appropriate permissions) can subscribe to a queue, meaning that it can
de-queue (or read) the messages and take action based upon them. The queue used
for alerts is a predefined queue called ALERT_QUE. This is a multiconsumer queue,
ch25.indd 7ch25.indd 7 7/11/2005 9:42:59 AM7/11/2005 9:42:59 AM

All-in-1 / Oracle Database 10g OCP Certification All-in-One / Watson, Bersinic / 5790-3
Oracle Database 10g OCP Certification All-in-One Exam Guide
8
meaning that many sessions can subscribe to the queue and de-queue messages from
it. The message will be purged from the queue only after all subscribers have received
it. The principle consumer of the ALERT_QUE is the Database Control Enterprise
Manager Daemon, and the action it will take (apart from displaying the alerts it has
de-queued on the database home page) could be to send an e-mail message or an
SMS to the DBA. In an advanced environment, you could write your own alert handler
by creating another subscriber to ALERT_QUE.
It should now be clear why the server alert system is so efficient. It uses in-memory
statistics that are accessed directly; there is no need to transfer the information to
a session via a V$ view, as is the case when you query views yourself. The alerts are
written out to a queue that any subscribing client can read and take action upon.
So the server is monitoring itself—internally, and automatically.
One final point to note is that if there is a problem with a queue, the alert system
can still function: the message will be written to the alert log instead. This is the only
point of contact between the alert log and the server alert system.
EXAM TIP The alert log is completely separate from the server alert system.
Viewing Alert Information
Alert information can be viewed by querying two data dictionary views. DBA_
OUTSTANDING_ALERTS will list all stateful alerts that have been raised and not yet
dealt with. Once cleared, the alerts are removed from this view and entered into DBA_
ALERT_HISTORY. Stateless alerts go directly to DBA_ALERT_HISTORY. This query,
SQL> select reason,object_type type,object_name name from
dba_outstanding_alerts;
REASON TYPE NAME
-------------------------------------------------- ---------- -----
Metrics "Current Open Cursors Count" is at 1266 SYSTEM SYSTEM
Tablespace [USERS] is [99 percent] full TABLESPACE USERS
shows two outstanding alerts. The first refers to the number of open cursors, which
is an alert relating to the system, or instance, and the second states that the USERS
tablespace is 99 percent full. These alerts will remain in this view until cleared by
the number of open cursors reducing (perhaps as sessions disconnect) or by space
becoming available in the tablespace, either by adding space to it or by dropping
or shrinking some of the objects within it.
An alternative view of the alerts is given by Database Control. Figure 25-2 shows
how alert information is displayed by the Database Control on the database home
page. The system alerts are shown in the alerts section, and space management alerts
are indicated in the space usage section. To drill down to the detail of a system alert,
double-click on the message for the alert to see the detail, as shown in Figure 25-3.
ch25.indd 8ch25.indd 8 7/11/2005 9:42:59 AM7/11/2005 9:42:59 AM
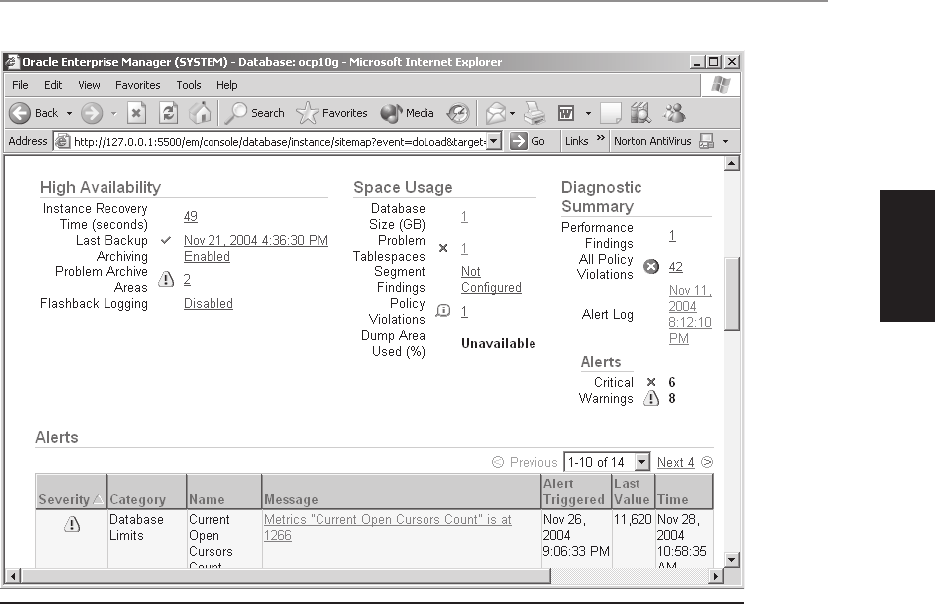
All-in-1 / Oracle Database 10g OCP Certification All-in-One / Watson, Bersinic / 5790-3
Chapter 25: Diagnosing Oracle Database Issues
9
PART II
To drill down to the space problems, take the Numeric link (value 1 in the example
shown in Figure 25-2) next to the text “Problem Tablespaces” to see the detail of the
problems (see Figure 25-4).
Setting Up Notification Rules
It is all very well to be able to view alerts by querying views or using Database Control,
but a better technique is to enable the alert notification mechanism, which will
typically send e-mails to the DBA when certain alerts are raised. This is configured
within Database Control. From the database home page, take the Preferences link at
the top right. In the Preferences window, shown in Figure 25-5, enter all the e-mail
addresses that might need to receive notifications.
Then take the Rules link. A wizard (Figure 25-6) will walk you through the process
of creating or editing rules that will be used to determine the action Database Control
will take when an alert is raised: selecting the metrics (and their severities) for which
you would like to be e-mailed notifications.
Figure 25-2 Alert information on the database home page
ch25.indd 9ch25.indd 9 7/11/2005 9:43:00 AM7/11/2005 9:43:00 AM
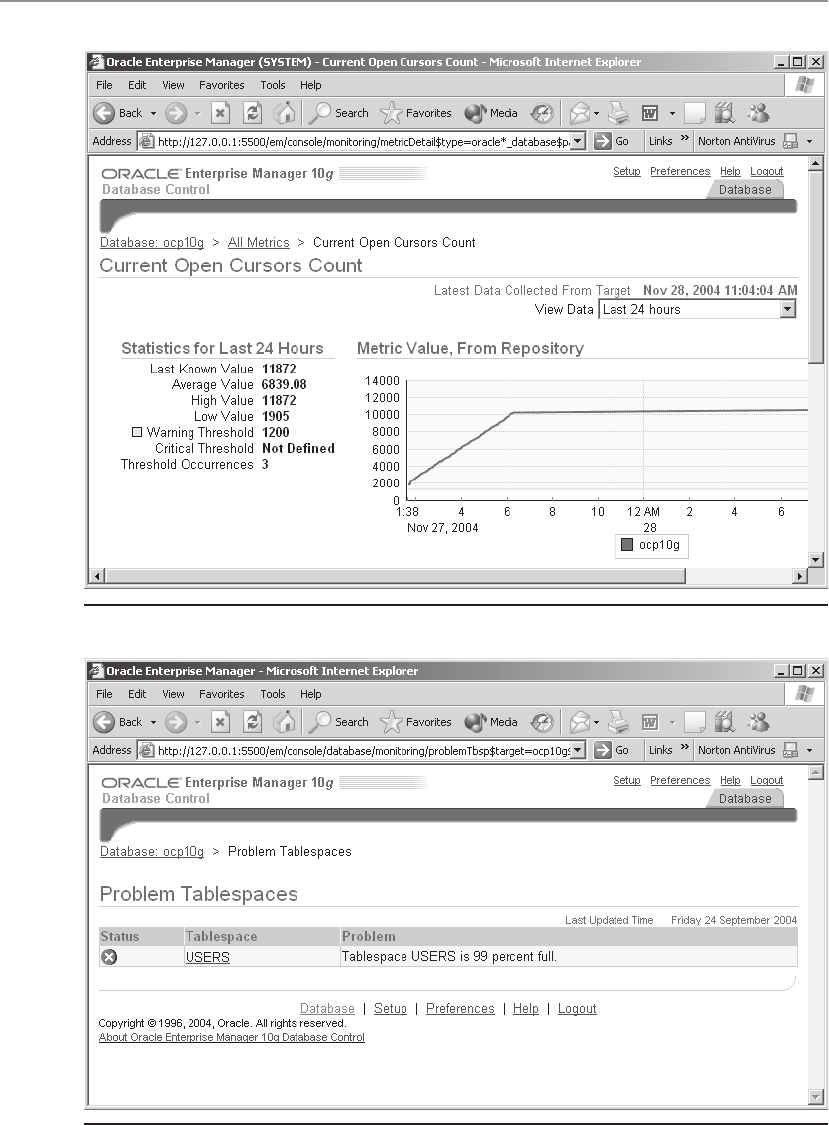
All-in-1 / Oracle Database 10g OCP Certification All-in-One / Watson, Bersinic / 5790-3
Oracle Database 10g OCP Certification All-in-One Exam Guide
10
Figure 25-3 Detail of the open cursors alert
Figure 25-4 Detail of a space problem
ch25.indd 10ch25.indd 10 7/11/2005 9:43:00 AM7/11/2005 9:43:00 AM
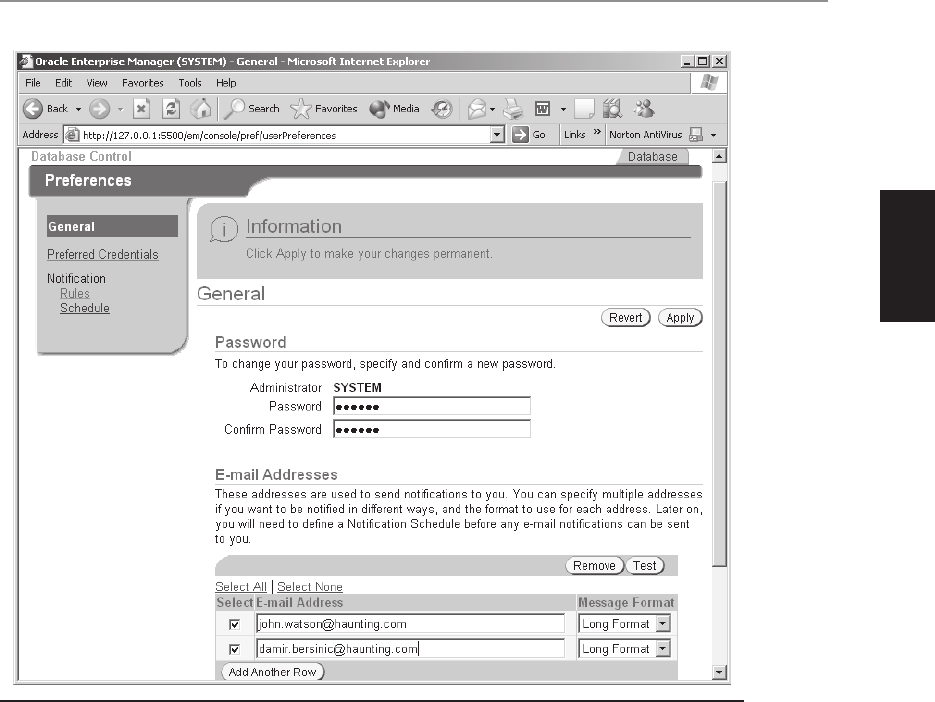
All-in-1 / Oracle Database 10g OCP Certification All-in-One / Watson, Bersinic / 5790-3
Chapter 25: Diagnosing Oracle Database Issues
11
PART II
Editing Thresholds
The standard alerts come with preconfigured thresholds. For tablespace usage, a
warning alert will be issued when a tablespace is 85 percent full, and a critical alert
will be issued when it is 97 percent full. To view all the alerts and any thresholds that
have been set, from the Database Control home page, take the Manage Metrics link in
the Related Links section. An alternative interface is provided by the DBMS_SERVER_
ALERT package, which includes a procedure SET_THRESHOLD that can be used to
set the criteria for issuing warning and critical alerts. Using the procedure requires
extensive use of constants to define the metric to be evaluated, the operators (such
as “greater than...”) and the values; these are detailed in the PL/SQL Packages and
Types Reference manual. In the following exercise, you will work with three constants:
• dbms_server_alert.tablespace_pct_full Nominates which metric to monitor
• dbms_server_alert.operator_ge A comparison operator, “greater than or
equal to”
• dbms_server_alert.object_type_tablespace The type of object being
monitored
Figure 25-5 Setting e-mail addresses for alert notifications
ch25.indd 11ch25.indd 11 7/11/2005 9:43:01 AM7/11/2005 9:43:01 AM
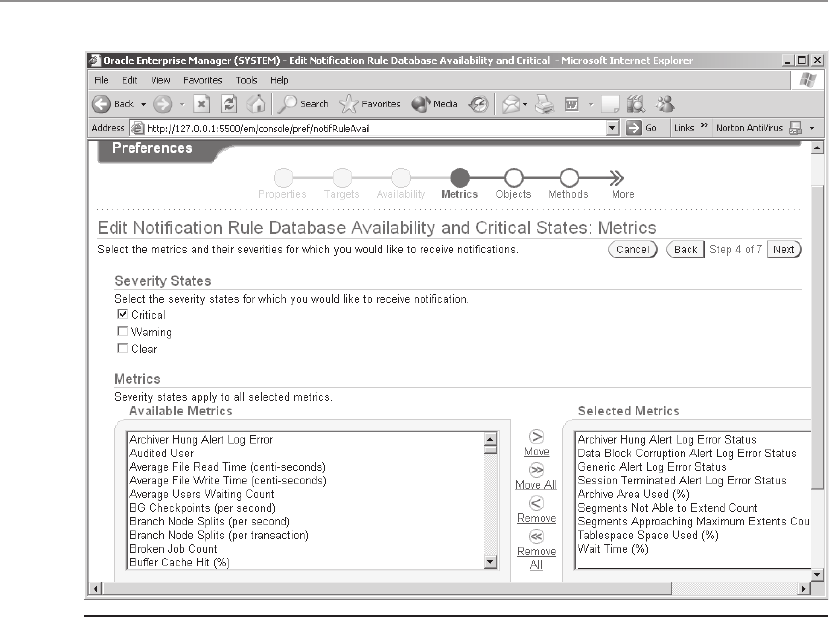
All-in-1 / Oracle Database 10g OCP Certification All-in-One / Watson, Bersinic / 5790-3
Oracle Database 10g OCP Certification All-in-One Exam Guide
12
Exercise 25-1: Setting, Viewing,
and Clearing Alerts
Use both the DBMS_SERVER_ALERT API and Database Control to manage the alert
system.
1. Connect to your database with SQL*Plus as user SYSTEM, and create a
tablespace that is 1MB big.
SQL> create tablespace small datafile 'small.dbf' size 1m;
2. Set the warning and critical alerts for this tablespace to 50 percent and
75 percent respectively.
SQL> execute dbms_server_alert.set_threshold(-
metrics_id=>dbms_server_alert.tablespace_pct_full,-
warning_operator=>dbms_server_alert.operator_ge,-
warning_value=>'50',-
critical_operator=>dbms_server_alert.operator_ge,-
critical_value=>'75',-
observation_period=>1,consecutive_occurrences=>2,-
instance_name=>null,-
object_type=>dbms_server_alert.object_type_tablespace,-
object_name=>'SMALL');
Figure 25-6 Selection of metrics for notification
ch25.indd 12ch25.indd 12 7/11/2005 9:43:02 AM7/11/2005 9:43:02 AM
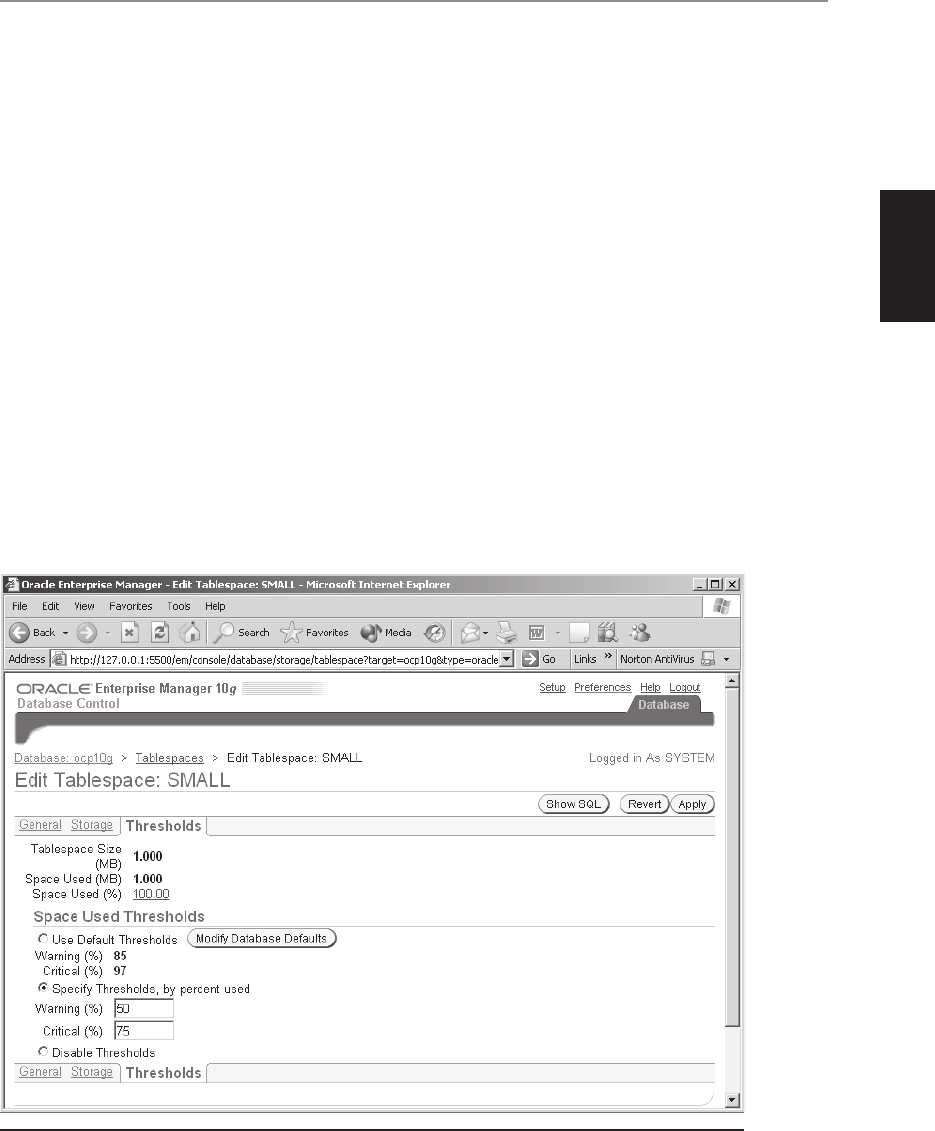
All-in-1 / Oracle Database 10g OCP Certification All-in-One / Watson, Bersinic / 5790-3
Chapter 25: Diagnosing Oracle Database Issues
13
PART II
This will signal an alert when the SMALL tablespace usage is greater than or
equal to 50 percent and 75 percent, if the situation persists for more than one
minute and occurs in two consecutive observation periods.
3. Create a table and insert sufficient rows to cause space usage to exceed the
warning threshold.
SQL> create table toobig (c1 char(1000)) tablespace small;
SQL> begin
for n in 1..500 loop
insert into toobig values('a row');
end loop;
commit;
end;
/
4. Connect to your database as user SYSTEM with Database Control. From the
database home page, take the Administration tab and then the Tablespaces
link in the Storage section to reach the Tablespaces page.
5. Click the SMALL link and then the Thresholds tab to display the current
settings, as in Figure 25-7.
6. Return to the database home page, and in the Alerts section look for a
warning about space usage for the SMALL tablespace. It may be necessary
to wait a few minutes and refresh the screen, as tablespace usage is checked
only every ten minutes.
Figure 25-7 Tablespace usage thresholds
ch25.indd 13ch25.indd 13 7/11/2005 9:43:03 AM7/11/2005 9:43:03 AM

All-in-1 / Oracle Database 10g OCP Certification All-in-One / Watson, Bersinic / 5790-3
Oracle Database 10g OCP Certification All-in-One Exam Guide
14
7. From your SQL*Plus session, run this query:
SQL> select object_name,reason from dba_outstanding_alerts;
and note that the SMALL tablespace is listed as being over-full.
8. Fix the problem by adding a datafile to the tablespace.
SQL> alter tablespace small add datafile 'small2.dbf' size 2m;
9. Refresh the Database Control screen, and note that the alert has disappeared.
Again, it may be necessary to wait a few minutes.
10. Confirm that the row has also been removed from the DBA_OUTSTANDING_
ALERTS view by repeating the query from Step 7.
11. Confirm that the alert has been transferred to the alert history view.
SQL> select object_name, reason,suggested_action,resolution from
dba_alert_history where object_name='SMALL';
12. Tidy up by dropping the tablespace.
SQL> drop tablespace small including contents and datafiles;
User Trace Files
Background trace files are generated automatically when a problem occurs. User trace
files are only generated on demand, when you want to track exactly what a session
is doing. Usually trace files are used to help with application tuning. If a user is
complaining that his session is running slowly, the problem may be with the SQL
that he is running. Tracing the session will allow you to see what he was doing and
how he was doing it. This information can then be used to identify the SQL that
might be causing problems, and these problem statements can be referred back to
the programmers for tuning.
In a dedicated client/server environment, tracing is simple. The connection
between a user process and a server process is persistent and defines the session.
All that is necessary is to identify the user’s session and enable tracing for that
session. If you are using shared server, each session will be cut across all the shared
servers, which means that any one session’s trace will be distributed in the trace
files generated by each shared server process. In a web environment, it can be more
complicated still. Generally speaking, a web application will not establish one database
session for each user; rather, the application itself will create a relatively small pool
of persistent database sessions, which may be dedicated server or shared server, and
multiplex a large number of user sessions over this pool. The user session to the
application server may be persistent, but the application server will route any one
user request over any available database session, which (if using shared server) may
then be serviced by any shared server process.
By using the more advanced tracing capabilities, it is possible to trace all activity,
one database session’s activity, or one logical session through an application server
that may have been multiplexed over a pool of database sessions. It is also possible
to trace activity per program module, or per application service.
ch25.indd 14ch25.indd 14 7/11/2005 9:43:04 AM7/11/2005 9:43:04 AM

All-in-1 / Oracle Database 10g OCP Certification All-in-One / Watson, Bersinic / 5790-3
Chapter 25: Diagnosing Oracle Database Issues
15
PART II
Instance-Level SQL Tracing
There are two instance parameters that control tracing. SQL_TRACE, which defaults to
FALSE, can be set to enable tracing of every SQL statement executed against the instance.
USER_DUMP_DEST specifies the directory to which the trace files will be written. Each
server process will generate its own stream of trace information, corresponding to a
session in a dedicated server environment. In a shared server environment there will
be one trace file per shared server, which will contain tracing information for all the
statements executed by that shared server for all the sessions it has been servicing. To
enable instance-wide tracing,
SQL> alter system set sql_trace=true;
The trace files generated will be named <SID>_ora_<SPID>.trc, where <SID> is
the name of the instance and <SPID> is the Unix process number, or Windows thread
number, of the server process that is generating the trace. To identify the session
responsible for generating any particular trace file, join the views V$SESSION to
V$PROCESS as follows:
SQL> select s.username,s.sid,p.spid from v$session s, v$process p
where s.paddr=p.addr;
Then use the spid value to find the trace file relevant to each session.
TIP Think long and hard before enabling tracing for the whole instance. The
volume of trace generated will be immense.
Session-Level SQL Tracing
Tracing for one session can be enabled interactively by the session itself, or for any
session programmatically. Whatever method is used, the trace file will be generated
in the USER_DUMP_DEST directory and named with the process ID number of the
server process, as just described. To enable tracing for your session, give the command
SQL> alter session set sql_trace=true;
run whatever SQL statements you are interested in, and then switch off tracing with
SQL> alter session set sql_trace=false;
But this is no use when a user reports a problem. S/he will not be working with
SQL*Plus, but with package software that will not permit issuing commands such as
this. To enable tracing for any one user’s session, find the session’s identifier and serial
ch25.indd 15ch25.indd 15 7/11/2005 9:43:05 AM7/11/2005 9:43:05 AM

All-in-1 / Oracle Database 10g OCP Certification All-in-One / Watson, Bersinic / 5790-3
Oracle Database 10g OCP Certification All-in-One Exam Guide
16
number and then use the DBMS_MONITOR package. For example, if user JOHN
complains that his session is running slowly, run this query to identify his session:
SQL> select sid,serial# from v$session where username='JOHN';
SID SERIAL#
---------- ----------
162 14
Of course, if JOHN is logged on several times, you may need to select additional
columns, such as PROGRAM and TERMINAL, from V$SESSION to make sure you get
the right session. Then use the SID and SERIAL# as follows:
SQL> execute dbms_monitor.session_trace_enable( -
session_id=>162,serial_num=>14);
This will cause the session to start writing out trace information until you issue
SQL> execute dbms_monitor.session_trace_disable( -
session_id=>162,serial_num=>14);
TIP Analyzing the content of a trace file is a complex task, but essential
to working out exactly what a user was doing, and how he was doing it.
Tracing with Database Control
The DBMS_MONITOR package has procedures that will let you enable tracing at
these levels:
• Session level As just described, any one database session can be traced. But
if in a web environment many application server sessions are being serviced
by a small number of database sessions, this may not be precise enough to
identify which users are actually impacting on system performance.
• Module level Different program modules will be generating different levels
of activity.
• Client ID level In a web environment, the database may not know who
the user that executes any particular statement is, because many end-user
application server sessions are being multiplexed through a pool of database
sessions. But the application server does know, by assigning an application
client ID to each client session. It is possible to trace activity per client ID,
even though one client ID’s statements will be serviced by any and all of the
pool of database sessions.
• Service level Users may be connecting to the database through different
service names registered with the Database Listener. Service tracing will
identify which service name is being most heavily used, and therefore
which groups of users are taking the most resources.
ch25.indd 16ch25.indd 16 7/11/2005 9:43:05 AM7/11/2005 9:43:05 AM
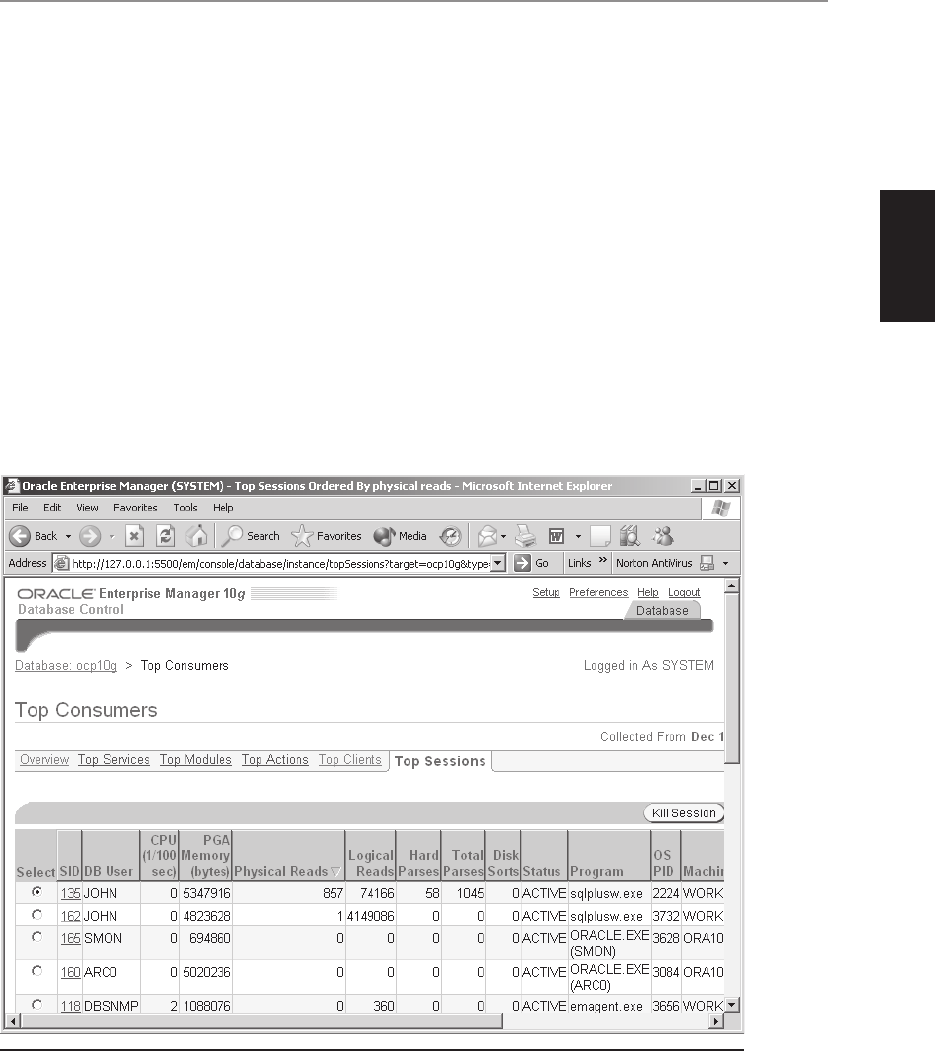
All-in-1 / Oracle Database 10g OCP Certification All-in-One / Watson, Bersinic / 5790-3
Chapter 25: Diagnosing Oracle Database Issues
17
PART II
• Action The work done by a particular PL/SQL procedure can be tracked,
no matter who is executing it.
While it is possible to trace at these levels using DBMS_MONITOR, it is much easier
to enable tracing through Database Control. From the database home page, take the
Performance tab and then the Top Consumers link in the Additional Monitoring Links
section. From there, you can view activity by session, module, service name, web client
ID, or PL/SQL procedure. To gain the full benefit if this, your programmers will have
to use the DBMS_APPLICATION_INFO package to name their modules and actions,
but once this is done each can be traced.
In Figure 25-8, it can be seen that two sessions (both using database username
JOHN) are responsible for most of the physical and logical I/O. Not visible in the
figure because they are scrolled off to the right are buttons for enabling and disabling
tracing. The other tabs will show activity per service, per module, per action, or per
web client.
Figure 25-8 Session monitoring with Database Control
ch25.indd 17ch25.indd 17 7/11/2005 9:43:06 AM7/11/2005 9:43:06 AM

All-in-1 / Oracle Database 10g OCP Certification All-in-One / Watson, Bersinic / 5790-3
Oracle Database 10g OCP Certification All-in-One Exam Guide
18
Chapter Review
The Oracle database will generate a great deal of diagnostic information by default. This
includes the alert log: a chronological list of certain critical events, such as startup and
shutdown, and any physical changes to the database or changes to instance parameters.
Then there are the background trace files, generated by the background processes
when they detect errors. You as DBA have no control over what is written to the alert
log or to background trace files: Oracle writes out whatever it needs to write out.
For proactive monitoring, you can use the server alert system. This is preconfigured
with alerts for a number of metrics, such as tablespace usage, but can be configured
to monitor and report on many more metrics. The alerts raised can be viewed through
data dictionary views on the Automatic Workload Repository or through Database
Control, or they can be e-mailed to a list of nominated e-mail addresses.
Finally, if necessary you can enable tracing of database activity by each database
user, or by individual program modules no matter which users are using them. There
is an API, DBMS_MONITOR, and a graphical user interface available to support this
tracing functionality.
Questions
1. The location of the alert log is controlled by a parameter. Which one? (Choose
the best answer.)
A. AUDIT_FILE_DEST
B. BACKGROUND_DUMP_DEST
C. CORE_DUMP_DEST
D. DB_CREATE_FILE_DEST
E. USER_DUMP_DEST
2. What will be written to a background trace file? (Choose the best answer.)
A. Critical errors
B. Informational messages about background process activity
C. User activity information
D. It will depend on whether the SQL_TRACE parameter has been set
3. If a “stateless,” or “nonthreshold,” alert condition is raised, where will it be
displayed? (Choose the best answer.)
A. In the alert log
B. In a background trace file, generated by the process that detected it
C. In a user trace file, generated by the session that detected it
D. In the DBA_OUTSTANDING_ALERTS view
E. In the DBA_ALERT_HISTORY view
ch25.indd 18ch25.indd 18 7/11/2005 9:43:06 AM7/11/2005 9:43:06 AM

All-in-1 / Oracle Database 10g OCP Certification All-in-One / Watson, Bersinic / 5790-3
Chapter 25: Diagnosing Oracle Database Issues
19
PART II
4. To enable collection of metrics for all the server alerts, what should the
STATISTICS_LEVEL parameter be set to? (Choose the best answer.)
A. BASIC
B. TYPICAL
C. ALL
D. Either TYPICAL or ALL
E. Any of BASIC, TYPICAL, or ALL
5. When the server alert system raises an alert, what will it do? (Choose all
that apply.)
A. Write it out to the alert log.
B. E-mail the alert to registered alert recipients.
C. Record the alert in the Automatic Workload Repository.
D. Invoke the appropriate procedure in DBMS_SERVER_ALERT.
6. Which of the following commands will be written to the alert log? (Choose
four answers.)
A. ALTER SESSION SET SQL_TRACE=TRUE;
B. ALTER SYSTEM SET SHARED_POOL_SIZE=400M;
C. ALTER TABLESPACE USERS BEGIN BACKUP;
D. ALTER DATABASE DATAFILE 10 RESIZE 1000M;
E. DROP TABLESPACE EXAMPLE CASCADE;
F. DROP USER SCOTT CASCADE;
G. DROP TABLE HR.EMPLOYEES;
H. SET AUTOTRACE ON;
7. Your users are connecting to the database through the shared server
mechanism, and you want to trace one user’s session. How can this
be done? (Choose the best answer.)
A. Enable tracing for his user process.
B. Trace the dispatcher servicing his session.
C. You can trace his session if you can identify the session’s SID and SERIAL#.
D. You cannot trace individual sessions through shared server.
8. Which process is responsible for updating metrics? (Choose the best answer.)
A. MMON, the manageability monitor
B. SMON, the system monitor
C. PMON, the process monitor
D. The server processes
ch25.indd 19ch25.indd 19 7/11/2005 9:43:07 AM7/11/2005 9:43:07 AM

All-in-1 / Oracle Database 10g OCP Certification All-in-One / Watson, Bersinic / 5790-3
Oracle Database 10g OCP Certification All-in-One Exam Guide
20
9. Under which of the following circumstances must you subscribe to the
ALERT_QUE queue? (Choose the best answer.)
A. To receive e-mail notifications of alerts
B. To view alerts in Database Control
C. To write your own alert handler
D. To clear alerts from the ALERT_QUE queue manually
10. A SHUTDOWN ABORT is issued. By default, where will this be recorded?
(Choose the best answer.)
A. As an alert in the ALERT_QUE queue
B. In the alert log
C. As a user trace file
D. As background trace file
Answers
1. B. The alert log is written to the BACKGROUND_DUMP_DEST.
2. A. Background trace files are generated when a background process
encounters a severe problem, critical to the running of the instance.
3. E. Stateless alerts are displayed in the DBA_ALERT_HISTORY view. They are
never in the DBA_OUTSTANDING_ALERTS view, because they are solved as
soon as they occur.
4. D. Either TYPICAL or ALL will enable collection of the metrics used by the
server alert system. BASIC will disable the server alert system.
5. B and C. Server alerts are recorded in the AWR and mailed to anyone
registered to receive them.
6. B, C, D, and E. All ALTER SYSTEM and ALTER DATABASE commands are
written out to the alert log, so B and D are correct. Tablespace operations are
also written out, so C and E are correct too.
7. C. A shared server session is still a session, so you enable tracing for the SID
and SERIAL# that uniquely identify the session.
8. A. It is the manageability monitor that updates the AWR with metrics.
9. C. Subscribing to the queue is only needed if you want to write your own
routines to capture alert.
10. B. All SHUTDOWN commands are recorded in the alert log, and nowhere else.
ch25.indd 20ch25.indd 20 7/11/2005 9:43:08 AM7/11/2005 9:43:08 AM

All-in-1 / Oracle Database 10g OCP Certification All-in-One / Watson, Bersinic / 5790-3
CHAPTER 26
Recovering from
Noncritical Losses
In this chapter you will learn how to
• Recover temporary tablespaces
• Recover a redo log group member
• Recover index tablespaces
• Recover read-only tablespaces
• Re-create the password file
1
ch26.indd 1ch26.indd 1 7/6/2005 11:05:22 AM7/6/2005 11:05:22 AM

All-in-1 / Oracle Database 10g OCP Certification All-in-One / Watson, Bersinic / 5790-3
Oracle Database 10g OCP Certification All-in-One Exam Guide
2
This is the first of several chapters that go into detail on the various techniques for
recovering from disasters, either man-made or out of your control. Never forget that the
mechanism of redo and rollback used for instance recovery, as detailed in Chapter 18,
makes it absolutely impossible to corrupt an Oracle database. This is not just something
said by salesmen—it is a fact. This reliability is why people use the Oracle database
(and why it isn’t cheap). But if there is media damage—damage to the disks storing
the database files—it is possible to lose data. You can protect against this by running
your database in archivelog mode; by multiplexing your controlfile, online redo log
files, and archive log files; and by backing up your datafiles and archive log files.
Loss of any number of any database files is no excuse for losing data. An adequate
backup regime will always let you restore and recover without loss of a single row of
committed data, but the restore and recovery cycle may be time consuming and may
involve downtime. There are some files whose loss can be tolerated without going
through the restore and recover process: known as “noncritical” losses, such losses
are covered in this chapter.
EXAM TIP Loss of undo data is definitely critical. Just because undo data
is transient, that doesn’t mean that it doesn’t matter.
Recovering from Loss of a Temporary Tablespace
A temporary tablespace is one used for storing “temporary” data. It is not necessary
to back up temporary tablespaces, and indeed RMAN will never back them up. If you
try to put a temporary tablespace into hot backup mode with ALTER TABLESPACE...
BEGIN BACKUP; you will get an error. Since temporary tablespaces cannot be backed
up, if damaged they cannot be restored—they must be replaced, instead.
Temporary Data
What is temporary data? It is data that exists only for the duration of one database
session, possibly for less than that. It is private to the session and totally inaccessible
to any other users. Temporary data usually comes in two forms: sort data and global
temporary tables.
Sort data is generated when an operation requiring rows to be sorted, such as the
use of the ORDER BY clause in a select statement or when creating indices, cannot
proceed completely in memory. In an ideal world all sorts will occur in memory,
but if memory is limited and the volume of data to be sorted is large, then the sort
operation must process rows in batches and write out each sort run to disk before
sorting the next batch. Then the multiple sort runs on disk are merged to produce a
final listing of all the data, in the correct order. The sort runs are private to the session
doing the sort—there is no possible reason for any other session to access them, and
indeed this is impossible.
ch26.indd 2ch26.indd 2 7/6/2005 11:05:53 AM7/6/2005 11:05:53 AM

All-in-1 / Oracle Database 10g OCP Certification All-in-One / Watson, Bersinic / 5790-3
Chapter 26: Recovering from Noncritical Losses
3
PART II
Global temporary tables are a powerful feature of Oracle that your programmers
can use. A global temporary table’s definition is visible to all sessions (hence “global”)
and can be populated with rows by any and all sessions, but the rows are visible only
to the session that inserted them. Many sessions can make use of the temporary table’s
definition at once, but each session will see only its own rows. Global temporary
tables are cleared when the session terminates. If only a few rows are inserted into
a global temporary table, it will be stored in the session’s memory, but if a large
amount of data is being manipulated in global temporary tables, then—just as with
sort data—it will be written out to a temporary tablespace.
Since temporary data persists only for the duration of the session that created it,
there is no requirement to save the data permanently, or to recover it in the event of
a disaster. For this reason, temporary data is not written to the regular tablespaces
that store permanent objects. It is stored, for the duration of the session that created
it only, in temporary segments in temporary tablespaces.
EXAM TIP Working with temporary data does not generate undo or redo.
Temporary Space Configuration
To list your temporary tablespaces and their tempfiles and sizes, run this query:
SQL> select t.name,d.name,d.bytes from v$tablespace t, v$tempfile d
where t.ts#=d.ts#;
An alternative query against a data dictionary view would be
SQL> select tablespace_name,file_name,bytes from dba_temp_files;
Every database will have one temporary tablespace nominated as the default
temporary tablespace. This is the one used by all users who have not been specifically
assigned a temporary tablespace. To identify it,
SQL> select property_value from database_properties where
property_name='DEFAULT_TEMP_TABLESPACE';
Each user will have a designated temporary tablespace, possibly the database
default temporary tablespace. To list them,
SQL> select username,temporary_tablespace from dba_users;
The dynamic performance view V$TABLESPACE and the data dictionary view
DBA_TABLESPACES list all tablespaces, whether temporary or permanent. DBA_
TABLESPACES does, however, have a column CONTENTS that distinguishes
between them.
ch26.indd 3ch26.indd 3 7/6/2005 11:05:54 AM7/6/2005 11:05:54 AM

All-in-1 / Oracle Database 10g OCP Certification All-in-One / Watson, Bersinic / 5790-3
Oracle Database 10g OCP Certification All-in-One Exam Guide
4
EXAM TIP The files that make up temporary tablespaces are listed in the
dynamic performance view V$TEMPFILE and the data dictionary view DBA_
TEMP_FILES. The files of permanent tablespaces are listed in V$DATAFILE and
DBA_DATA_FILES. Both types of tablespace are included in V$TABLESPACE
and DBA_TABLESPACES.
Damage to a Tempfile
The tempfiles that make up temporary tablespaces are used very differently from
the datafiles that make up permanent tablespaces. All writing to datafiles is done
by the DBWn process, and if a datafile is damaged or not available when the database
is opened, the database will not open—it will remain in mount mode. Tempfiles are
not written to by the DBWn, or indeed by any background process—they are written
to by the server processes servicing the sessions that need some temporary space. For
this reason, even if a tempfile is not available at startup time, the database will still
open. DBWn will, however, write a message such as this to the alert log:
Fri Dec 03 20:27:23 2004
Errors in file /oracle/admin/ocp10g/bdump/ocp10g_dbw0_2228.trc:
ORA-01186: file 202 failed verification tests
ORA-01157: cannot identify/lock data file 202 - see DBWR trace file
ORA-01110: data file 202: '/oracle/oradata/tempfiles/ts1.dbf'
This message indicates that the tempfile is damaged; the trace file will give more
detailed information. As far as users are concerned, the database will appear to be
functioning normally. The problem will only become apparent when a session requires
some temporary space:
ocp10g> create global temporary table gt1 as select * from sh.sales;
*
create global temporary table gt1 as select * from sh.sales
ERROR at line 1:
ORA-01157: cannot identify/lock data file 202 - see DBWR trace file
ORA-01110: data file 202: '/oracle/oradata/tempfiles/ts1.dbf'
In this example, a session tries to create and populate a global temporary table, but
the attempt fails because the table is too large to be accommodated in the session’s
private memory and must be written to the user’s temporary tablespace. The session
detects that the tempfile making up the temporary tablespace is not available, and
returns an error.
TIP It is possible for an application to run for some time without users’
becoming aware that there is a problem with a temporary file. However,
you as DBA should pick up the problem immediately from monitoring the
alert log.
ch26.indd 4ch26.indd 4 7/6/2005 11:05:54 AM7/6/2005 11:05:54 AM
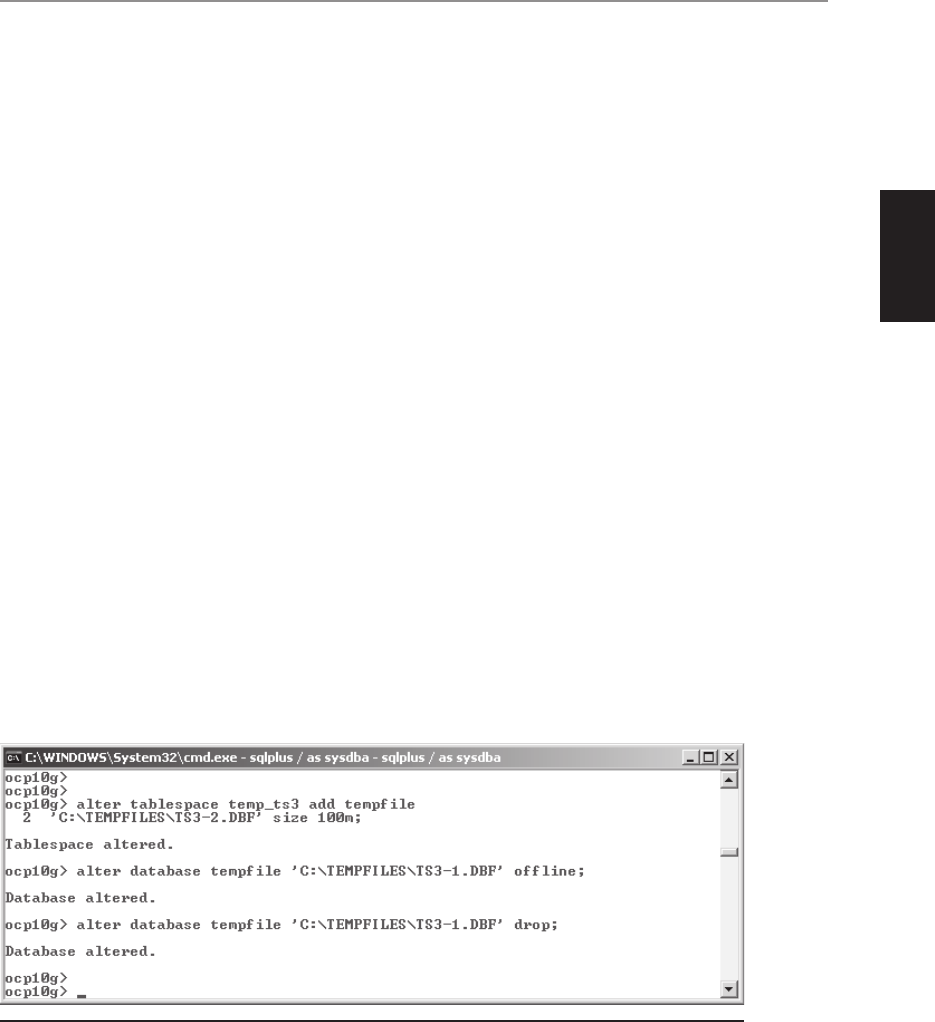
All-in-1 / Oracle Database 10g OCP Certification All-in-One / Watson, Bersinic / 5790-3
Chapter 26: Recovering from Noncritical Losses
5
PART II
Restoring a Temporary Tablespace
Temporary tablespaces, and the tempfiles that make them up, cannot be backed up.
The Recovery Manager, RMAN, ignores them completely; if you run the REPORT
SCHEMA command to show the files that make up the database, the tempfiles will
not be listed. For user-managed backups, if you attempt to put a temporary tablespace
into hot backup mode, you will get an error:
ocp10g> alter tablespace temp_ts1 begin backup;
alter tablespace temp_ts1 begin backup
*
ERROR at line 1:
ORA-03217: invalid option for alter of TEMPORARY TABLESPACE
So if you can’t back up a tempfile, how can you restore it? The answer is that you
can’t—but you can re-create it as shown in Figure 26-1:
1. Add another tempfile to the damaged temporary tablespace.
2. Take the damaged tempfile offline.
3. Drop the damaged file.
An alternative approach would work at the tablespace level, rather than the
datafile level, as shown in Figure 26-2:
1. Create a new temporary tablespace.
2. Switch your users over to the new temporary tablespace via the ALTER
DATABASE command.
3. Drop the damaged tablespace.
Figure 26-1 Replacing a damaged tempfile
ch26.indd 5ch26.indd 5 7/6/2005 11:05:55 AM7/6/2005 11:05:55 AM
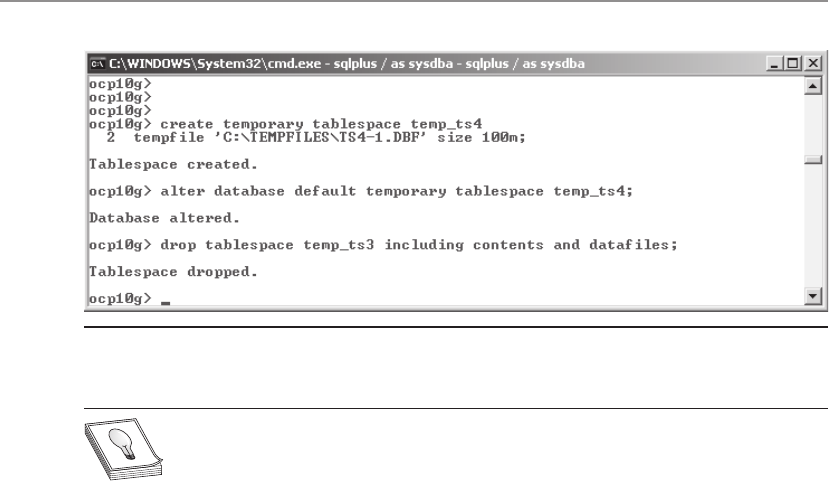
All-in-1 / Oracle Database 10g OCP Certification All-in-One / Watson, Bersinic / 5790-3
Oracle Database 10g OCP Certification All-in-One Exam Guide
6
TIP Creating temporary tablespaces and tempfiles is very fast, because the
files are not formatted. A multigigabyte tempfile will be created in seconds.
Recovering from Loss of an Online Redo Log File
An Oracle database requires at least two online log file groups, each with at least one
valid member, to function. You may need more than two groups for performance
reasons, and you should certainly have more than one member per group for security.
Not just data security—your job security, as well. Provided that the groups do have
multiple members, the database will survive the loss of any member. Since online log
files cannot be backed up, if a member gets damaged it cannot be restored—but it can
be replaced.
Online Redo Log File Configuration
Two views describe the configuration of your online redo log. V$LOG has one row per
group, and V$LOGFILE has one row per member.
The first query in Figure 26-3 shows that the database has three logfile groups,
numbered 1, 2, and 3. There is no technical reason for the numbers being consecutive,
and they will not necessarily be used in numerical order: these are merely the numbers
that happened to be chosen when the groups were created. The SEQUENCE# column
shows which log switch number each group is at; the group with the highest number
will be the current group, while the lowest number belongs to the group that will be
overwritten at the next log switch. Each group is 10MB—remember that the size is
specified at the group level, not at the member level. Each group is multiplexed: two
members. Then you can see that the database is configured for archivelog mode, and
that only the current group is not archived. The status column informs you that right
now the LGWR is streaming out redo to group 2. Group 3, however, is still ACTIVE.
Figure 26-2 Replacing a damaged temporary tablespace
ch26.indd 6ch26.indd 6 7/6/2005 11:05:56 AM7/6/2005 11:05:56 AM
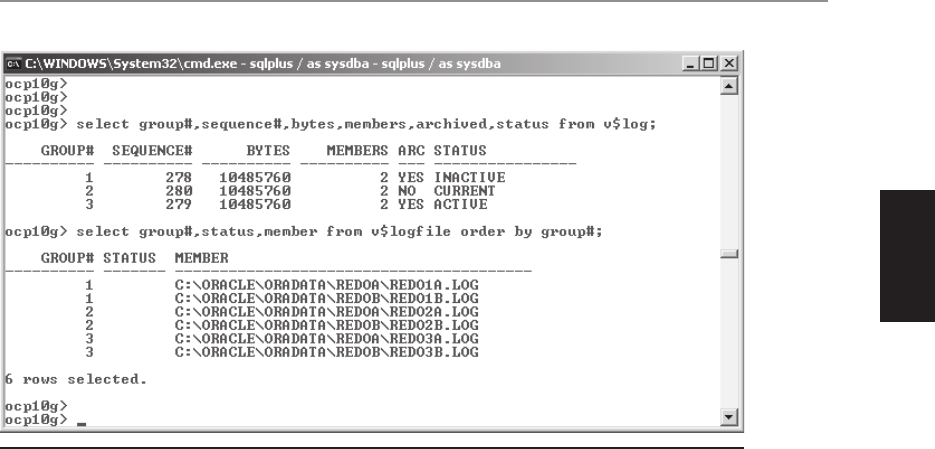
All-in-1 / Oracle Database 10g OCP Certification All-in-One / Watson, Bersinic / 5790-3
Chapter 26: Recovering from Noncritical Losses
7
PART II
This means that changes exist in group 3 referring to blocks in the database buffer
cache that have not yet been written to disk by the DBWR: they are still “dirty,” and
so in the event of an instance failure, these changes in group 3 would be needed for
instance recovery. In due course, those blocks will be written to disk, and then group
3 will become INACTIVE.
The second query in Figure 26-3 shows the individual logfile group members. You
already know from V$LOG that each group has two members, but now you can see
their names and that they are in different directories. Ideally, they would be on
different devices. The STATUS column for each member is NULL, meaning that the
member is fine. The STATUS column in V$LOG tells you what is happening to the
members of a group, but it is the STATUS column in V$LOGFILE that tells you
whether any one member is actually usable.
Damage to an Online Redo Log File Member
Your online redo log is the guarantee that the database will never be corrupted.
Provided that there is at least one valid member of the current group (and of any
previous group that is still ACTIVE), you will never have a corrupted database. If the
redo log file groups are multiplexed, then damage to an individual member is not
critical—the database will even remain open. But this is a risky position to be in.
Presumably, you have company standards that state, for example, “all production
databases must have an online redo log multiplexed to three destinations on different
devices.” If a member gets damaged, you need to diagnose the problem and take
appropriate action immediately in order to re-comply with the standard.
Figure 26-3 Logfile configuration
ch26.indd 7ch26.indd 7 7/6/2005 11:05:56 AM7/6/2005 11:05:56 AM

All-in-1 / Oracle Database 10g OCP Certification All-in-One / Watson, Bersinic / 5790-3
Oracle Database 10g OCP Certification All-in-One Exam Guide
8
If all copies of the current logfile group are damaged, the instance will terminate
immediately. It will also terminate if at a log switch all copies of the group being
made current are damaged. If there is still a valid member of the group, the instance
will remain open, and your users will not be aware of any problem—but there will
be indications that something is wrong. First, the view V$LOGFILE will show the
damaged or missing member as being INVALID. Second, the background processes
will report the problem. Consider this extract from an alert log:
Sat Dec 04 11:01:09 2004
Errors in file c:\oracle\admin\ocp10g\bdump\ocp10g_lgwr_3216.trc:
ORA-00316: log 1 of thread 1, type 0 in header is not log file
ORA-00312: online log 1 thread 1: 'C:\ORACLE\ORADATA\REDOA\REDO1A.LOG'
Sat Dec 04 11:08:20 2004
Private_strands 7 at log switch
Thread 1 advanced to log sequence 282
Current log# 3 seq# 282 mem# 0: C:\ORACLE\ORADATA\REDOA\REDO3A.LOG
Current log# 3 seq# 282 mem# 1: C:\ORACLE\ORADATA\REDOB\REDO3B.LOG
Sat Dec 04 11:08:21 2004
ARC1: Evaluating archive log 1 thread 1 sequence 281
Sat Dec 04 11:08:21 2004
Errors in file c:\oracle\admin\ocp10g\bdump\ocp10g_arc1_1080.trc:
ORA-00313: open failed for members of log group 1 of thread 1
Sat Dec 04 11:08:21 2004
Errors in file c:\oracle\admin\ocp10g\bdump\ocp10g_arc1_1080.trc:
ORA-00313: open failed for members of log group 1 of thread 1
Committing creation of archivelog
'C:\ORACLE\ARCHIVE2\ARCH_C9D1DB5B_1_537705766_281.LOG'
Committing creation of archivelog
'C:\ORACLE\ARCHIVE1\ARCH_C9D1DB5B_1_537705766_281.LOG'
At 11:01:09, the LGWR detected a problem with the header of a log file member:
this is the ORA-00316 message. The file exists but is damaged; the ORA-00312 message
tells you that the damaged file is C:\ORACLE\ORADATA\REDOA\REDO1A.LOG, which
is part of group 1. LGWR also produced a trace file, which may have more detailed
information. But the instance remains open. Then at 11:08:20 there was a log switch,
to group 3 at sequence number 282. Both members of this group open successfully. If
the database were not in archivelog mode, the errors would stop here (at least, until
group 1 were needed again—at which point they would be repeated), but in this
database, once the log switch completes the archive process ARC1 attempts to archive
group 1, at 11:08:21. It too detects the problem, and it writes out a trace file. Note that
the archive does succeed. The archiver process generates the archive log file (two
copies, to two different directories) from the surviving member of group 1.
Re-creating a Damaged Online Log File Member
You have two options: either drop the damaged member and add a replacement
member, or clear the group. Figure 26-4 demonstrates both techniques, continuing
the preceding example. First the damaged member is dropped, and then the physical
file is deleted from disk. Then a new member is added. This will have fixed the
problem. The alternative approach is to use the CLEAR LOGFILE command, which
ch26.indd 8ch26.indd 8 7/6/2005 11:05:57 AM7/6/2005 11:05:57 AM
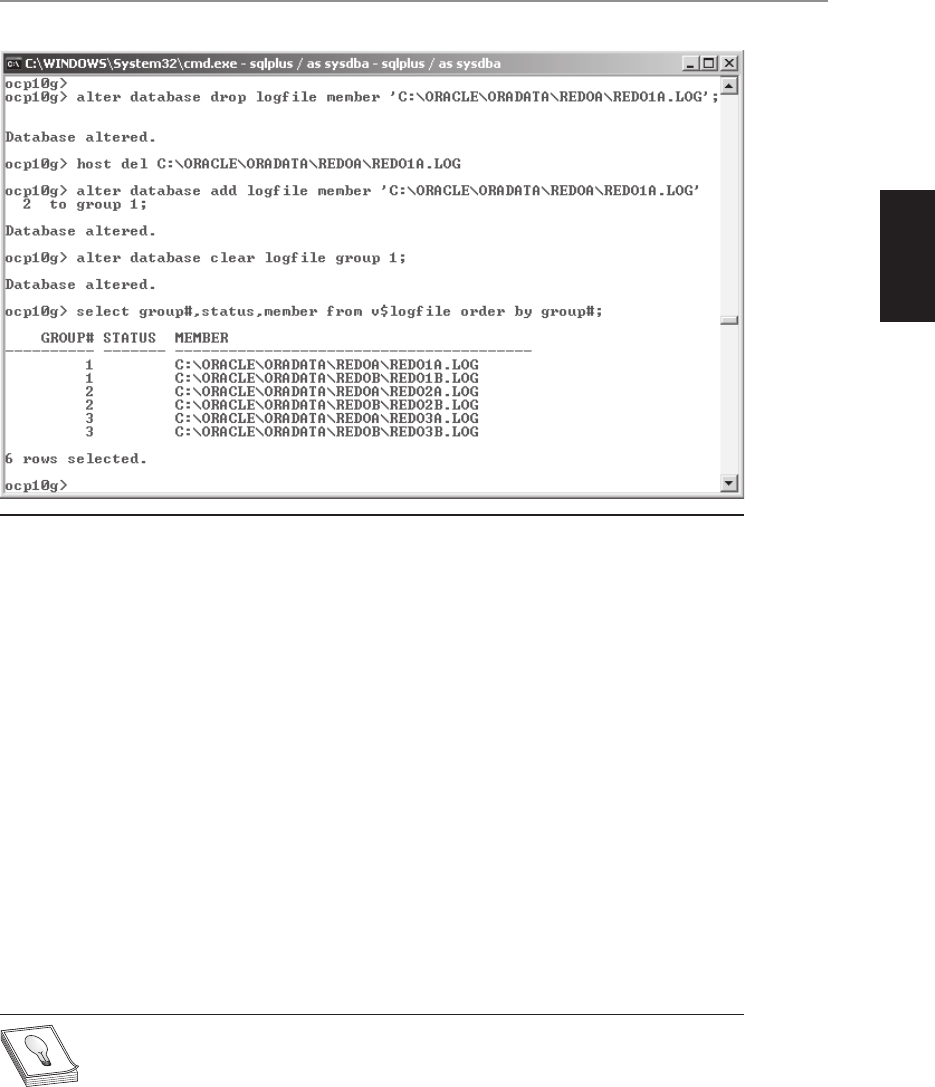
All-in-1 / Oracle Database 10g OCP Certification All-in-One / Watson, Bersinic / 5790-3
Chapter 26: Recovering from Noncritical Losses
9
PART II
will create a new group by replacing all the members and reusing the old members’
filenames. Either way, the end result is a fully functional group.
The choice between DROP/ADD and CLEAR will usually be dictated by
circumstances. If there is no damage at all to the disks, only to the file, then CLEAR
is simpler and devoid of any chance of error. Oracle will not let you clear a logfile
group that needs to be archived, or one that is still current or active. But if there is
damage to the disk, then the CLEAR will fail because Oracle will not be able to re-
create the file in its original location. This is when you will DROP the original member,
physically delete it if it still exists, and then ADD a replacement member in a different
disk location. The danger comes with the manual deletion of the damaged file—it is
frighteningly easy to make a mistake and delete the wrong file.
It is also possible to DROP and ADD log file members through database control.
From the database home page, take the Administration tab, and the Redo Log Groups
link in the Storage section. Select the radio button for the group with the problem,
and click Edit. This will take you to the Edit Redo Log Group window shown in
Figure 26-5, where the damaged member can be removed and a replacement added.
TIP Database Control will not physically delete old files from disk. You must
still do that by hand.
Figure 26-4 Replacing damaged online logfile members
ch26.indd 9ch26.indd 9 7/6/2005 11:05:58 AM7/6/2005 11:05:58 AM
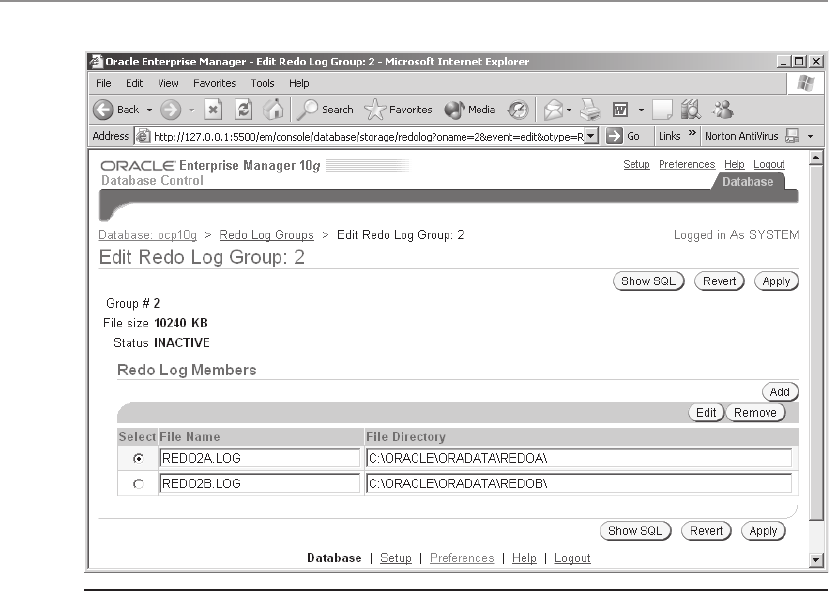
All-in-1 / Oracle Database 10g OCP Certification All-in-One / Watson, Bersinic / 5790-3
Oracle Database 10g OCP Certification All-in-One Exam Guide
10
Recovering from Loss of an Index Tablespace
Index data is real data that must be protected. Any transaction affecting a table will
also affect the indexes on the table; all actions on indexes generate undo and redo,
in exactly the same manner that actions on tables generate undo and redo. The only
exception is index creation and rebuild, where you can switch off redo generation by
using the NOLOGGING option.
Where index data may be different from table data is that it can be regenerated
from the base tables. This does not mean that index data is not important. Indexes are
as important a part of your database as any other, and vital for maintaining data
integrity and database performance. Furthermore, if an index is not available, the table
will be locked for nearly all DML operations: you will not be able to do any inserts or
deletes, and updates will fail if they affect the indexed column(s). Sure, you can still
query the table—but performance may be appalling, because without an index all
access will be through full table scans. Nonetheless, there may be circumstances when
you decide that it would be quicker and easier to re-create indexes than to restore and
recover the tablespace containing them. In this sense, indexes can be considered
“noncritical” data and need not be included in your backup and recovery routines.
Figure 26-5 Managing online redo log file members with Database Control
ch26.indd 10ch26.indd 10 7/6/2005 11:05:59 AM7/6/2005 11:05:59 AM

All-in-1 / Oracle Database 10g OCP Certification All-in-One / Watson, Bersinic / 5790-3
Chapter 26: Recovering from Noncritical Losses
11
PART II
The Index Tablespace(s)
For indexes to be considered noncritical, it is vital to create one or more tablespaces
specifically for your index segments. This is generally considered to be good practice,
anyway. Under normal working conditions, your user sessions will be accessing tables
and indexes concurrently. If the tables and indexes are in the same tablespace, they
will share the same datafiles, and this will limit the degree of concurrency that the
operating system and hardware can provide. If they are in separate tablespaces with
separate datafiles (ideally, on separate physical devices), performance will improve.
Most applications will already be structured in this manner. For example, the Oracle
E-Business Suite of applications (up to release 11.5.9) is, by default, structured with
two tablespaces per module: one for the tables, the other for the associated indexes.
Enforcing the rule that only indexes go into the index tablespaces will be a matter of
discipline, and you must check regularly that the rule is being adhered to by running
queries such as the following:
SQL> select owner,segment_name,segment_type from dba_segments where
tablespace_name='INDX' and segment_type <> 'INDEX';
(This example, like all following examples, assumes that the index tablespace is called
INDX.)
If you are confident that index data is the only data in a particular tablespace, then
you can exclude it from your backup routines. This decision is not to be embarked
upon lightly, and you must compare the time it would take to rebuild all the indexes
with the time it would take to restore and recover any damaged datafiles.
TIP Index-organized tables are indexes! But do not put them in the index
tablespace: they must be backed up, restored, and recovered along with regular
heap tables.
If the database is running in noarchivelog mode, then index tablespaces are the
only case where, in the event of damage to a datafile, you do not need to do a full
restore and lose all the work done since the backup. Remember that in noarchivelog
mode, there is no such concept as recovery: all you can do is whole backups, and
whole restores. This is the exception: if the damage is restricted to index tablespaces,
then you can drop and re-create them and keep the database current.
Damage to an Index Tablespace
If an index is not available because of media damage, your end users will receive
messages along these lines:
ocp10g> insert into hr.regions values (99,'United Kingdom');
insert into hr.regions values(99,'United Kingdom')
*
ERROR at line 1:
ORA-00376: file 7 cannot be read at this time
ORA-01110: data file 7: '/oracle/oradata/indexdata/indx_01.dbf'
ch26.indd 11ch26.indd 11 7/6/2005 11:05:59 AM7/6/2005 11:05:59 AM

All-in-1 / Oracle Database 10g OCP Certification All-in-One / Watson, Bersinic / 5790-3
Oracle Database 10g OCP Certification All-in-One Exam Guide
12
This message will be generated whenever any insert or delete operation is attempted
against a table with an index in the damaged tablespace, and updates will succeed only
if they do not affect the indexed columns. In effect, you can consider the tables locked.
Queries will generate errors if they attempt to use the missing indexes. The problems
will also extend to constraints. DML against a child table in a foreign key relationship
requires that the primary key index of the parent table be available. If it
is not, then the child table will be locked for DML as well, even if its indexes are still
available. The only exception is updates that do not affect the constrained columns.
Apart from errors being reported to user sessions, damage to an index tablespace
datafile will also show up through the usual messages in the alert log and background
trace files, and entries in the dynamic performance views. To investigate the preceding
error further, query the dynamic performance views V$DATAFILE and V$RECOVER_
FILE as follows:
SQL> select name,status from v$datafile where file#=7;
NAME STATUS
-------------------------------------------- -------
/oracle/oradata/indexdata/indx_01.dbf RECOVER
SQL> select online_status,error from v$recover_file where file#=7;
ONLINE_STATUS ERROR
------------- --------------------------------
OFFLINE FILE NOT FOUND
The first query tells you that the file is in trouble; the second tells you what is wrong.
Note that the file has been taken offline automatically. With previous versions of the
database, it was necessary to do this manually.
It may be that the index tablespace consists of several datafiles, only one of which
is damaged. In these circumstances, the effects on your application will depend very
precisely on where any particular index happens to have extents. Generally, to have
predictable results, it is advisable to take the whole tablespace offline if any one file
is damaged:
SQL> alter tablespace INDX offline immediate;
The IMMEDIATE keyword instructs Oracle to take the tablespace offline without
attempting to flush any dirty buffers from the tablespace to disk. This is usually a
requirement; otherwise, the OFFLINE command will fail when Oracle finds that it
cannot write to the datafile. Taking the tablespace offline is in any case a precursor
to the rebuilding operation.
EXAM TIP OFFLINE IMMEDIATE is allowed only when ARCHIVELOGMODE
is enabled.
Recovering an Index Tablespace
An index tablespace can be restored and recovered like any other tablespace, provided
that you are running the database in archivelog mode. This section describes an
alternative approach: rather than repairing the damage through restore and recover,
ch26.indd 12ch26.indd 12 7/6/2005 11:06:00 AM7/6/2005 11:06:00 AM

All-in-1 / Oracle Database 10g OCP Certification All-in-One / Watson, Bersinic / 5790-3
Chapter 26: Recovering from Noncritical Losses
13
PART II
simply drop the tablespace, re-create it, and regenerate the indexes. Bear in mind that
this may be a very time-consuming operation. Indexing tables of many millions or
billions of rows can take hours, even days. The routine is as follows:
1. Take the damaged tablespace offline.
2. Determine which indexes were in the damaged tablespace.
3. Drop the tablespace and delete its datafiles.
4. Create a new tablespace.
5. Generate all the indexes in it.
To determine which indexes were in the tablespace, query the data dictionary view
DBA_SEGMENTS:
SQL> select owner,segment_name from dba_segments where
tablespace_name='INDX' and segment_type='INDEX';
To drop the tablespace, use
SQL> drop tablespace indx including contents and datafiles;
which will drop all references to the tablespace and its datafiles from the data
dictionary and the controlfile, drop all the objects in the tablespace, and remove
the physical files from disk.
Create a new tablespace with whatever characteristics are appropriate. For
example,
SQL> create tablespace indx datafile
'/oracle/oradata/indexdata/indx_01.dbf' size 100m
extent management local uniform size 128k
segment space management auto
nologging;
The generation of the indexes is the hardest part. Just how good is your application
documentation? Do you have scripts ready-written for exactly this circumstance?
Many applications will have some kind of “system maintenance” menu, which will
include an option to rebuild indexes. If so, you do not have a problem. Just run it. If
your documentation includes all the index creation scripts, again you do not have a
problem.
But if there is no documentation or you suspect that it may not be accurate, you
can still construct scripts to rebuild the indexes. This is because the DDL describing
indexes is stored in the data dictionary, not in the index, and is therefore still available
even though the indexes and their tablespace have been destroyed. As a last resort,
you can run queries joining the views DBA_INDEXES to DBA_IND_COLUMNS to
work out what columns of what table each index was built on, and also retrieve
what type (B*Tree or bitmap) of index it was, and any other characteristics, such as
UNIQUE or COMPRESSED. But if this is necessary, it must have been done before
the drop of the tablespace: the INCLUDING CONTENTS clause will drop the index
definitions from the data dictionary.
ch26.indd 13ch26.indd 13 7/6/2005 11:06:01 AM7/6/2005 11:06:01 AM

All-in-1 / Oracle Database 10g OCP Certification All-in-One / Watson, Bersinic / 5790-3
Oracle Database 10g OCP Certification All-in-One Exam Guide
14
A technique that may be better is to use Data Pump to extract the index creation
statements, again before the drop of the tablespace. This command will use Data
Pump export to extract all the index definitions in the HR schema to a Data Pump
dump file to be located in whatever directory DP_DIR maps onto:
$ expdp hr/hr directory=dp_dir dumpfile=ind.dmp include=index
Then this Data Pump import will extract the DDL for creating the indexes from the
dump file and write it out to a file IND.SQL, again in the DP_DIR directory:
$ impdp hr/hr directory=dp_dir dumpfile=ind.dmp sqlfile=ind.sql
Having acquired the necessary index creation statements by one means or another,
run them—but don’t forget to check that they all nominate the correct, newly created,
tablespace. To speed up the creation, consider the use of PARALLEL and NOLOGGING.
To enable parallelism, specify PARALLEL and optionally a degree in the index
creation statement:
SQL> create index hr.rname_idx on hr.regions(region_name)
tablespace indx parallel 8;
Enabling parallelism in index creation allows the server session that is building
the index to take a number of parallel execution servers (eight in the example) and
divide the work among them. A “producer” group of parallel servers will read the
table, each scanning a range of rows, and pass them to a “consumer” set of parallel
servers that will sort the rows, each producing their own index. Then the resulting
index pieces are merged to produce the final complete index. The number of parallel
servers to be used can be hard-coded (as in the example) or not specified, in which
case the database optimizer will make an intelligent guess as to how many parallel
servers to use in order to generate the index in the shortest possible time. Demanding
too many parallel servers is not good; it will impact adversely on other users and may
indeed slow down the index creation. Unless you are confident in your ability to tune
parallelism (bearing in mind such matters as the disk configuration, the number of
CPUs, the structure of the table, and the workload on the system), it is generally better
to trust the optimizer.
The NOLOGGING attribute can be specified in addition to or instead of the
PARALLEL keyword:
SQL> create index hr.rname_idx on hr.regions(region_name)
tablespace indx nologging;
This instructs Oracle not to generate redo during the index creation. Of course, all
subsequent DML against the index will generate redo—you can never switch off redo
generation for normal work—but disabling redo generation during the index creation
will make the creation run much faster.
As soon as an index is created, Oracle will start using it. In earlier releases of the
database, it was necessary to analyze the newly created indexes to gather optimizer
statistics on them, but release 10g will gather these statistics automatically during the
index creation.
ch26.indd 14ch26.indd 14 7/6/2005 11:06:01 AM7/6/2005 11:06:01 AM

All-in-1 / Oracle Database 10g OCP Certification All-in-One / Watson, Bersinic / 5790-3
Chapter 26: Recovering from Noncritical Losses
15
PART II
Exercise 26-1: Using Index Tablespaces
Create an index tablespace, simulate its loss, and recover without using a backup.
1. Connect to your database with SQL*Plus as user SYSTEM.
2. Create a tablespace for indexes. Specify any convenient directory for the
datafile. For example,
SQL> create tablespace indx datafile 'c:\oracle\oradata\indx01.dbf'
size 10m;
3. Create a table in the default tablespace, and an index in the new tablespace.
SQL> create table indtest (c1 number);
SQL> create index ind1 on indtest(c1) tablespace indx;
4. Simulate the loss of the datafile.
SQL> alter database datafile 'c:\oracle\oradata\indx01.dbf' offline drop;
5. Demonstrate that the index is not available, and that DML can no longer
proceed against the table.
SQL> insert into indtest values(1);
ERROR at line 1:
ORA-00376: file 7 cannot be read at this time
ORA-01110: data file 7: 'C:\ORACLE\ORADATA\INDX01.DBF'
6. Drop the index tablespace.
SQL> drop tablespace indx including contents and datafiles;
7. Show that the table is usable, now that the index has been dropped.
SQL> insert into indtest values(1);
8. Re-create the index tablespace and the index.
SQL> create tablespace indx datafile 'c:\oracle\oradata\indx01.dbf'
size 10m;
SQL> create index ind1 on indtest(c1) tablespace indx;
9. Tidy up.
SQL> drop tablespace indx including contents and datafiles;
SQL> drop table indtest;
Recovering from Loss of a Read-Only Tablespace
Making a tablespace read-only prevents any DML operations against the objects in
that tablespace. You can’t create objects in it either, but you can drop them. From the
DBA’s point of view, the purpose of making a tablespace read-only is to eliminate
the need for regular backup of a large volume of static information thereafter. From the
applications view, it is to ensure that historical data cannot be modified. Whatever
the reason, the effect within the controlfile is to freeze the file headers of the datafiles
making up the tablespace. When the command ALTER TABLESPACE...READ ONLY;
is issued, the datafiles are checkpointed (all dirty buffers written to disk), the current
system change number or SCN is noted, and the file headers (which store that SCN)
are frozen.
A requirement for a file to be usable is that it should be synchronized with the
rest of the database: the SCN in its header must be up-to-date. Read-only tablespace
datafiles are the exception to this rule. Oracle will open a read-only tablespace datafile,
ch26.indd 15ch26.indd 15 7/6/2005 11:06:02 AM7/6/2005 11:06:02 AM

All-in-1 / Oracle Database 10g OCP Certification All-in-One / Watson, Bersinic / 5790-3
Oracle Database 10g OCP Certification All-in-One Exam Guide
16
even though the SCN is out-of-date. But it won’t let you write to it. Remember that
absolutely nothing happens to the files at the operating system level. The read-only
attribute is set purely within the Oracle environment and has nothing to do with
operating system access modes.
EXAM TIP You can drop objects from read-only tablespaces. Why? Because
a DROP updates the data dictionary, not the object itself. And the data
dictionary certainly isn’t in a read-only tablespace.
Backing Up a Read-Only Tablespace
Read-only tablespaces need to be backed up only once, and this should be done
immediately after changing the tablespace status. It is still perfectly possible to back
up the datafiles on a regular schedule, but there is no point. If you are using user-
managed backups, you can’t put the tablespace into hot backup mode. Issuing ALTER
TABLESPACE...BEGIN BACKUP; will generate the error
ORA-01642: begin backup not needed for read only tablespace....
The RMAN Recovery Manager can also back up read-only tablespaces, but if you
enable backup optimization with
RMAN> CONFIGURE BACKUP OPTIMIZATION ON;
then RMAN will back up the files only to whatever is required by the RETENTION
POLICY setting. For example, if your retention policy is “redundancy 3,” RMAN will
back it up three times, and never again. If your retention policy is a recovery window,
RMAN will back it up only once.
Recovering a Read-Only Tablespace
The problem with restoring and recovering a read-only tablespace is how the
controlfile handles it. If the tablespace is read-only at the time the damage to its
datafile occurs, and if the backup of the datafile was made while the tablespace was
read-only, then there is no problem: just restore the backup over the damaged file.
There is no possible loss of data, and nothing else needs to be done apart from
bringing the file online, if indeed it ever went offline. This is why loss of a read-only
tablespace is considered noncritical.
Where you will run into trouble is if the status of the tablespace was changed from
read-only to read/write, or the other way round, between the backup being made and
the damage occurring that requires a restore.
Imagine a situation where a tablespace is made read-only on 1 January and later
backed up. Then on 1 July it is made read/write, perhaps to move another table into
it. Then something goes wrong, and a file gets damaged. You know very well that the
only redo that needs to be applied to the file to make it current is the few hours of
redo generated since the tablespace was made read-Write. But when you restore the
backup, Oracle will demand every archive log generated from 1 January. This is
because the file header was frozen back then, and as far as Oracle is concerned, the
ch26.indd 16ch26.indd 16 7/6/2005 11:06:03 AM7/6/2005 11:06:03 AM
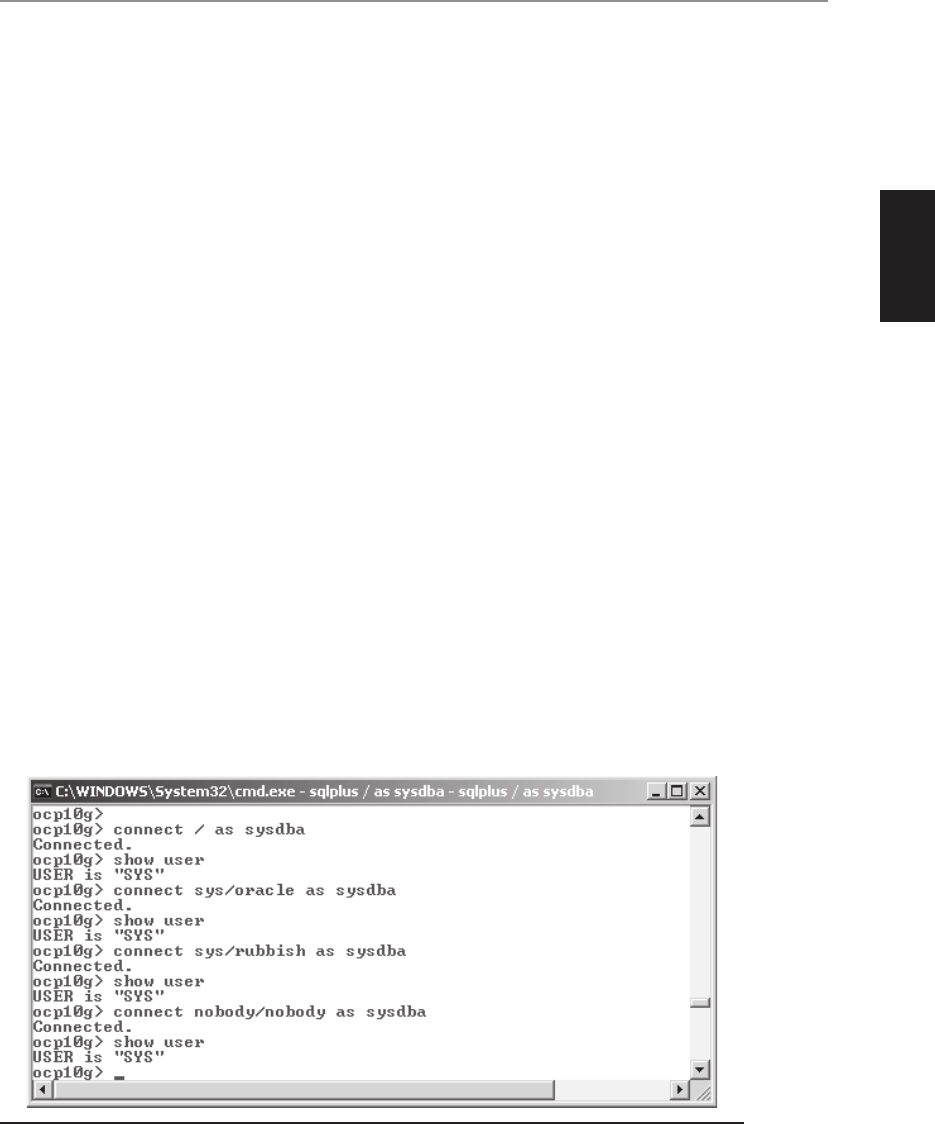
All-in-1 / Oracle Database 10g OCP Certification All-in-One / Watson, Bersinic / 5790-3
Chapter 26: Recovering from Noncritical Losses
17
PART II
backup you have restored is six months old and must be made current. Do you have
those six months of archive logs? You had better hope so, because otherwise the
datafiles can never be brought online. Even if the tablespace has been backed up
during the six months, that will not help you, because every backup will have the
same 1 January SCN in its file header.
The solution is that you must always take a fresh backup of a tablespace the
moment you change its status from read-only to read/write.
Recovering from Loss of the Password File
The password file is one of the files that cannot be backed up by RMAN. This is not
a limitation of RMAN—it is a logical impossibility. When RMAN connects you to a
database, you will usually be connecting with the SYSDBA privilege, which requires
either operating system authentication or a password file. For RMAN to restore the file
it uses to establish a database connection would not make any sense.
The password file on Unix is
$ORACLE_HOME/dbs/orapw<SID>
and on Windows it is
%ORACLE_HOME%\database\PWD<SID>.ora
where <SID> is the name of the instance. On Windows, it is possible to control the
location and name of the password file with the ORA_<SID>_PWFILE Registry variable.
Damage to the Password File
Loss of the password file is not critical. It is always possible to connect to a database
with the SYSDBA privilege with operating authentication; a password file provides a
secondary means of authentication, if operating system authentication is not possible.
Operating system authentication takes precedence: as Figure 26-6 illustrates, if you are
Figure 26-6 Operating system authentication overrides password file authentication.
ch26.indd 17ch26.indd 17 7/6/2005 11:06:03 AM7/6/2005 11:06:03 AM

All-in-1 / Oracle Database 10g OCP Certification All-in-One / Watson, Bersinic / 5790-3
Oracle Database 10g OCP Certification All-in-One Exam Guide
18
logged onto the server machine as a member of the operating system group that owns
the Oracle software, you can always connect with SYSDBA privileges no matter what
username and password you supply.
Nonetheless, a password file is generally considered necessary for most databases.
To gain a SYSDBA connection across a network, it is essential. If you are running
SQL*Plus on your PC and administering a database on the other side of the planet,
you will never actually log on to the operating system of the machine hosting the
database, so operating system authentication is not an option. Database Control
itself—even though the daemon runs on the same machine as the database—connects
over Oracle Net, so it too needs a password file.
If the password file is damaged, the database will continue to function as normal,
except that remote SYSDBA connections will not be possible. But if the database is
shut down, then startup will fail when the instance tries to read the password file. To
get around the problem in the short term, set the REMOTE_LOGIN_PASSWORDFILE
instance parameter to NONE. This will prevent Oracle from looking for a password
file, and the instance will open normally. This is a static parameter, so to change it,
while in nomount mode you must use
SQL> alter system set remote_login_passwordfile=none scope=spfile;
and then restart.
Replacing the Password File
It is possible to back up the password file with normal operating system backup
procedures. Your system administrators’ regular backups of the ORACLE_HOME
directory will have copies of it, and so you can restore it with no problems. An
alternative is to re-create it, by re-running the command used to create it in the first
place. If you cast your mind back to the scripts generated by the Database Configuration
Assistant when you created the database, you will remember that the database creation
scripts include a call to the utility that creates the password file, but if you no longer
have a copy of those scripts, it is a simple matter to run it again:
orapwd file=<filename> password=<password> entries=<max_users>
where <filename> is the name of the file to be created, as detailed near the start of the
section “Recovering from Loss of the Password File,” <password> is the password to
be embedded in the file for the user SYS (it can be changed later), and <max_users>
is an optional parameter that limits the maximum number of names you are allowed
to insert into the password file: the default is four. You will insert names into the
password file by granting users the SYSDBA or SYSOPER privilege.
Having re-created the password file, reset the REMOTE_LOGIN_PASSWORDFILE
parameter to use it. The usual setting is EXCLUSIVE, meaning one password file for
each instance running off the ORACLE_HOME. Setting it to SHARED means that all
instances running off the ORACLE_HOME will use the same password file, which can
be considered a security risk.
ch26.indd 18ch26.indd 18 7/6/2005 11:06:04 AM7/6/2005 11:06:04 AM

All-in-1 / Oracle Database 10g OCP Certification All-in-One / Watson, Bersinic / 5790-3
Chapter 26: Recovering from Noncritical Losses
19
PART II
EXAM TIP Unless REMOTE_LOGIN_PASSWORDFILE is set to SHARED
or EXCLUSIVE, the password file is ignored.
Chapter Review
Media failure is damage to the files that make up the database. Some files can be
damaged without necessitating the use of restore and recovery routines, and without
causing the instance to terminate. Such losses are known as “noncritical.” Noncritical
files can be replaced, rather than being restored. The noncritical files are temporary
tablespace tempfiles, multiplexed online redo log files, and perhaps files from
tablespaces dedicated to index data. Read-only tablespaces can also be considered
noncritical, in the sense that they do not need to be backed up according to the same
schedules as the rest of the database. Finally, the password file is noncritical, because
it can always be re-created when necessary.
Questions
1. Some files can be damaged without causing the instance to crash. Which?
(Select all that apply.)
A. A multiplexed controlfile copy
B. A multiplexed online log file
C. A multiplexed archive log file
D. A nonmultiplexed archive log file
E. A nonmultiplexed online log file, if there are at least two other logfile
groups
2. If a tempfile is missing, what will happen at instance startup? (Choose the
best answer.)
A. The file will be re-created automatically.
B. The database will not open.
C. The database will open, but an error will be signaled when the tempfile
is needed.
D. The database will open, but all sorts will proceed in memory.
3. Which types of file can be considered noncritical? (Choose the best answer.)
A. Temporary datafiles
B. Undo datafiles
C. Multiplexed controlfiles
D. All of the above
ch26.indd 19ch26.indd 19 7/6/2005 11:06:05 AM7/6/2005 11:06:05 AM

All-in-1 / Oracle Database 10g OCP Certification All-in-One / Watson, Bersinic / 5790-3
Oracle Database 10g OCP Certification All-in-One Exam Guide
20
4. If a log file member is damaged, how will you know? (Choose two answers.)
A. The STATUS column of V$LOG
B. The STATUS column of V$LOGFILE
C. The STATUS column of V$LOGFILE_MEMBER
D. The alert log will have a message to this effect
E. The Database Control Redo Log Groups window will show the error
5. If an index tablespace is unavailable, what will be the effect on the associated
tables? (Choose the best answer.)
A. All DML will fail, but you will be able to SELECT from them.
B. Some DML will succeed, and some index searches will fail.
C. UNIQUE and PRIMARY KEY constraints will not be enforced.
D. Both SELECT and DML can continue, but with reduced performance.
6. You make a tablespace read-only. Which of the following commands will
succeed against objects in the tablespace? (Choose the best answer.)
A. INSERT
B. UPDATE
C. DELETE
D. DROP
E. None of the above
7. Which of these statements is correct? (Choose all the correct answers.)
A. Writing to a temporary tablespace does not generate REDO.
B. Generating UNDO data does not generate REDO.
C. Specifying NOLOGGING for an index disables REDO for DML against
the index.
D. Specifying NOLOGGING for a tablespace disables REDO for all objects
in the tablespace.
8. The password file is damaged. Which of the following statements is correct?
(Choose the best answer.)
A. You can still connect as SYSDBA using data dictionary authentication.
B. You cannot connect as SYSDBA unless you set the REMOTE_LOGIN_
PASSWORDFILE parameter to NONE.
C. You must re-create the password file before you can connect as SYSDBA.
D. You can always use operating system authentication instead of password
file authentication.
9. If a read-only tablespace is damaged, how should it be recovered? (Choose
the best answer.)
A. Read-only tablespaces can be re-created if necessary.
ch26.indd 20ch26.indd 20 7/6/2005 11:06:05 AM7/6/2005 11:06:05 AM

All-in-1 / Oracle Database 10g OCP Certification All-in-One / Watson, Bersinic / 5790-3
Chapter 26: Recovering from Noncritical Losses
21
PART II
B. Restore the datafiles, and apply archive redo logs.
C. Restore the datafiles, and bring them online.
D. Making a tablespace read-only means that the datafile cannot be damaged.
10. An index tablespace is damaged and you choose to use the DROP/RECREATE
approach. Which of the following steps are not necessary to recover it?
(Choose two answers.)
A. Drop the indexes.
B. Take the tablespace offline.
C. Drop the tablespace.
D. Create the tablespace.
E. Recover the tablespace.
F. Create the indexes.
Answers
1. B, C, and D. The instance will survive the loss of a multiplexed logfile or any
archive log file. Damage to any controlfile will cause the instance to crash,
as will loss of a nonmultiplexed online redo log file.
2. C. The database will open, but an error will be written to the alert log. The
first time the tempfile is needed for a disk sort, an error will be generated:
sorts that can proceed in memory will be fine.
3. A. Of the file types listed, only temporary files are noncritical. The files making
up the undo tablespace are definitely critical: undo data is as important as any
other data. Any controlfile damage will immediately cause the instance to
terminate.
4. B and D. It is the V$LOGFILE view that tells you whether a log file member is
invalid, and a message also goes to the alert log.
5. A. Some queries will continue, if they do not attempt to use the indexes. Any
DML involving the indexed columns will fail, because Oracle will not be able
to maintain the indexes. Therefore the tables will be locked.
6. D. You can’t change objects in read-only tablespaces, but you can drop
them because a DROP affects only the data dictionary, not the tablespace
containing the object.
7. A. All DML against any permanent objects generates REDO and UNDO, but
you can disable these for index creation. Undo and redo are not generated
for temporary objects. Changes to undo segments generate REDO, as for any
other permanent object. Setting NOLOGGING at the tablespace level sets a
default that redo should not be generated for the creation of tables, partitions,
and indexes in the tablespace.
8. D. Operating system authentication is always available.
ch26.indd 21ch26.indd 21 7/6/2005 11:06:06 AM7/6/2005 11:06:06 AM

All-in-1 / Oracle Database 10g OCP Certification All-in-One / Watson, Bersinic / 5790-3
Oracle Database 10g OCP Certification All-in-One Exam Guide
22
9. C. All that is needed is to restore the files; no application of redo is necessary.
10. B and E. You do not have to take the tablespace offline, nor do you have to
recover it. You must drop the indexes and the tablespace, though this can
in fact be done with one command: DROP TABLESPACE...INCLUDING
CONTENTS. Creating the tablespace and the indexes are the other required
steps.
ch26.indd 22ch26.indd 22 7/6/2005 11:06:07 AM7/6/2005 11:06:07 AM

All-in-1 / Oracle Database 10g OCP Certification All-in-One / Watson, Bersinic / 5790-3
CHAPTER 27
Incomplete Database Recovery
In this chapter you will learn how to
• Recover the controlfile
• Explain reasons for incomplete recovery
• Perform incomplete recovery using Enterprise Manager
• Perform incomplete recovery using RMAN
• Perform incomplete recovery using SQL
• Perform database recovery following a RESETLOGS operation
1
ch27.indd 1ch27.indd 1 7/6/2005 11:06:43 AM7/6/2005 11:06:43 AM

Oracle Database 10g OCP Certification All-in-One Exam Guide
2
All-in-1 / Oracle Database 10g OCP Certification All-in-One / Watson, Bersinic / 5790-3 Chapter 27
Whenever the database is damaged, you have a choice to make: are you going to try
for a complete recovery, meaning no loss of data, or an incomplete recovery, meaning
that you will lose data? In most circumstances, you will do a complete recovery. To
commit to an incomplete recovery is a very serious decision.
This chapter begins with a review of the procedure for a complete recovery,
followed by a discussion of when an incomplete recovery may be necessary. Then
all the options for incomplete recovery are detailed and the various tools and
techniques examined. The controlfile is a special case for recovery. Depending
on circumstances, sometimes it can be recovered with no effect on the rest of the
database, but sometimes it requires the technique used for incomplete recovery.
Either way, no data will actually be lost.
Complete Recovery
If a backup of the datafiles and copies of all necessary archive logs, the online redo
logs, and the controlfile are available, then the database can survive damage to any
number of any datafiles without losing any data. The logs—both online and archived—
and the controlfile should always be available because they should be multiplexed to
different devices. Backups can also be multiplexed automatically if made with RMAN,
but if your backups are user-managed, then they must be protected by your system
administrators.
There are four steps to complete recovery:
1. Take the damaged datafile(s) offline.
2. Restore the damaged datafile(s).
3. Recover the damaged datafile(s).
4. Bring the recovered datafile(s) online.
This routine assumes that the datafiles damaged do not include files that are part
of either the SYSTEM tablespace or the currently active UNDO tablespace. Damage to
either of these will result in the instance terminating. In that case, the first and fourth
steps—taking the files offline and bringing them back online—are not necessary,
because the restore and recovery must be done with the database in mount mode.
Another variation is if the datafiles must be restored to a different location—in that
case, the files will need to be renamed within the controlfile before the recovery. Restore
and recover can also be done at the tablespace level, rather than at the datafile level.
For complete recovery, the controlfile should be the current controlfile. This is
because the current controlfile will have all the details needed for the complete
recovery: the location of the archive log files and the current system change number.
All the archive log files generated since the backup was taken will be needed to apply
changes to the restored files, and the online log files will be needed to apply the
remaining changes not yet archived. If any logfiles are missing, the complete recovery
will fail. If the current controlfile is missing, the situation is not irretrievable—but the
recovery will be more awkward, because the information describing the current state
of the database will not be available.
ch27.indd 2ch27.indd 2 7/6/2005 11:07:20 AM7/6/2005 11:07:20 AM

Chapter 27: Incomplete Database Recovery
3
PART II
All-in-1 / Oracle Database 10g OCP Certification All-in-One / Watson, Bersinic / 5790-3 Chapter 27
The restore of the damaged files results in files that are out-of-date, unsynchronized
with the rest of the database. The recovery applies all the redo since the backup was
made: both committed and uncommitted changes are applied to the restored files.
The final stage of recovery is rolling back the uncommitted changes. This occurs
automatically and makes the restored files fully consistent with the rest of the database.
This is an RMAN command block that will do a complete recovery of one tablespace,
called EXAMPLE:
RMAN> run {
sql "alter tablespace example offline immediate";
restore tablespace example;
recover tablespace example delete archivelog;
sql "alter tablespace example online";}
The first command takes the whole tablespace offline. This is not essential but
is generally good policy. It might be that only one of several files that make up the
EXAMPLE tablespace is damaged, and strictly speaking it is only that one file that
needs to be offlined; but to leave the other datafiles and the tablespace online can
give unpredictable results, as some of the objects in the tablespace may then be
available while others are not. Taking a tablespace offline will cause Oracle to
checkpoint the tablespace. This means that DBWn will write all dirty blocks for that
tablespace to the datafiles. This will fail if a datafile is damaged—hence the use of the
keyword IMMEDIATE, which instructs Oracle not to checkpoint the tablespace. The
second command instructs RMAN to restore the most recent backup of the EXAMPLE
tablespace: all the datafiles for the tablespace will be restored. The third command
will restore any archive logs needed that are no longer on disk, apply them, and delete
them. It will also apply redo from the online log files as necessary and then roll back
any changes that were uncommitted at the time the file was damaged. The fourth
command makes the completely recovered tablespace available for use. This whole
restore and recover can be done while the database is open and in use.
TIP If you take a tablespace offline while the database is open, how will your
application react? Is it possible to run the application in these circumstances?
Your system documentation should cover this eventuality. If it doesn’t, the
documentation needs to be improved by someone—probably you.
When Is Incomplete Recovery Necessary?
An incomplete recovery means losing data. The whole database is taken back in time
by a restore of all the datafiles, and then it is not completely recovered. Rather than
applying all the redo generated since the backup was taken, you deliberately stop the
application of redo at some point, to produce a version of the database that is not
up-to-date. All work done from that point is lost. There are only two reasons for
performing an incomplete recovery: either complete recovery is impossible or you
deliberately decide to lose data.
ch27.indd 3ch27.indd 3 7/6/2005 11:07:21 AM7/6/2005 11:07:21 AM

Oracle Database 10g OCP Certification All-in-One Exam Guide
4
All-in-1 / Oracle Database 10g OCP Certification All-in-One / Watson, Bersinic / 5790-3 Chapter 27
Complete recovery will not be possible unless all archive logs generated from the
time of the backup are available, as well as the online redo logs. If an archive log is
missing or corrupted, then recovery will stop at that point.
TIP It may in fact be possible to continue recovery after a corruption is
encountered in an archive log, but some data blocks will be marked corrupted.
This is an advanced procedure that is not covered in the OCP exam.
Complete recovery should never fail because of missing archive or online log files.
Both file types can and should be multiplexed to different devices, making their total
loss impossible, but it can happen. If so, incomplete recovery up to the point at which
the missing or damaged redo data is needed is your only option.
EXAM TIP Incomplete recovery is necessary if there is a missing archive log,
or if all copies of the current online redo log are missing.
To decide to lose data deliberately is a course of action taken after user error. It
may be that a user has committed a transaction that is inappropriate to the business
requirements. Such errors could include perfectly normal mistakes—we all make
mistakes—while using package software, but more commonly they are errors when
using tools such as SQL*Plus. Omitting a WHERE clause when issuing an UPDATE
or DELETE statement will result in the whole table being affected, not just one row;
if this change is committed, perhaps by exiting from the tool, then the changes are
irreversible. As far as Oracle is concerned, it is a committed transaction and can
never be rolled back. Worse still is issuing DDL commands. These include an implicit
COMMIT statement. It is frighteningly easy to, for example, drop a table in one
schema when you think you are connected to another.
Following a user error, you can restore the whole database and recover it up to
the point just before the error, thus producing a version of the database without the
mistake, but also, without all the correct work done since.
EXAM TIP It is not possible to skip the recovery of a bad transaction and
recover all other work.
A special case of incomplete recovery is recovery of the controlfile. Ideally, all
recovery operations will be conducted using the current controlfile, but there are
circumstances when this isn’t possible and a backup of the controlfile must be
restored. There are two possible reasons for this: either all copies of the current
controlfile have been lost and it is not possible to run a CREATE CONTROLFILE
command to re-create it, or the current controlfile does not accurately describe
the version of the database you want to restore, typically, because changes such as
dropping tablespaces have occurred since taking the backup. The syntax for recovery
using a backup controlfile does include the UNTIL keyword, which would usually
indicate an incomplete recovery—even though the recovery may in fact be complete.
ch27.indd 4ch27.indd 4 7/6/2005 11:07:22 AM7/6/2005 11:07:22 AM

Chapter 27: Incomplete Database Recovery
5
PART II
All-in-1 / Oracle Database 10g OCP Certification All-in-One / Watson, Bersinic / 5790-3 Chapter 27
The Method for Incomplete Recovery
Whether you are using user-managed backup and recovery procedures or RMAN, there
are four steps to incomplete recovery:
1. Mount the database.
2. Restore all the datafiles, and optionally the controlfile.
3. Recover the database UNTIL a time, sequence, or change number.
4. Open with RESETLOGS.
The first contrast with complete recovery is that complete recovery can be done with
the database open, unless the damaged files are critical. The critical files are those
making up the SYSTEM tablespace and the active UNDO tablespace. Incomplete
recovery can be done only in mount mode.
All incomplete recovery operations begin with a restore of all datafiles. This is the
second contrast with complete recovery: for complete recovery, you restore only the
damaged datafiles; for incomplete recovery you must restore them all. The datafiles
do not have to be restored from the same backup, but they must all be older than
the point to which you wish to recover. Do not, under any circumstances, restore the
online redo logs. If you followed the advice given in earlier chapters, you will not
have backed up the online redo logs, so it is impossible to restore them even by
accident, but if you have backed up the online logs, restoring them may be disastrous.
The controlfile will have to be restored as well if the physical structure of the
current database is different from the structure of the version being restored. For
example, if a tablespace has been accidentally dropped, the current controlfile will
know nothing about it. Restoring the datafiles that make up the tablespace won’t
help: the current controlfile will ignore them, and not include them in the recovery.
Do not restore the controlfile unless you have to; it may complicate matters if you do.
Apply redo from archive and (if necessary) online logs to the desired point. This
is the third contrast with complete recovery. For complete recovery, you apply all the
redo to bring the restore right up-to-date; for incomplete recovery, you stop the recovery
at whatever point you want. There are options for specifying the point to which you
want to recover.
Finally, open the database with RESETLOGS. This will reinitialize the online redo
log files, creating a new incarnation of the database. An incarnation of a database is a
version of the database with a new thread of redo, beginning at log switch sequence
number 1. This is the final contrast with complete recovery. After a complete recovery,
the database is exactly as it was before the problem occurred, but after an incomplete
recovery it is a different incarnation. Backups and archive logs are specific to an
incarnation and those generated by one incarnation must be kept separate from
those generated by a previous incarnation.
EXAM TIP You must be connected AS SYSDBA to do an incomplete
recovery. No normal user, and not even a SYSOPER user, can do this.
ch27.indd 5ch27.indd 5 7/6/2005 11:07:22 AM7/6/2005 11:07:22 AM

Oracle Database 10g OCP Certification All-in-One Exam Guide
6
All-in-1 / Oracle Database 10g OCP Certification All-in-One / Watson, Bersinic / 5790-3 Chapter 27
Incomplete Recovery Options
Having mounted the database and restored all the datafiles and (if necessary) the
controlfile, you have three options for incomplete recovery:
• Until time
• Until system change number
• Until log sequence number
The UNTIL TIME option will apply redo to roll the datafiles forward until a
particular time. The precision is to the second. This option would usually be used
to correct user error. If a user made an irreversible mistake and the time the mistake
was made is known, then a time-based recovery to just before the mistake may be
the best option.
The UNTIL SCN option (it is UNTIL CHANGE for user-managed backups, UNTIL
SCN when using RMAN—but the results are the same) can be used if the exact system
change number when the error was made is known. By using advanced tools such as
the Log Miner utility or by using the Flashback capability to be detailed in Chapter 29,
it is possible to identify exactly the SCN at which a transaction was committed. The
recovery can be stopped precisely before the problem, thus losing the minimum
possible amount of data.
The UNTIL SEQUENCE option (it is UNTIL CANCEL when using user-managed
backups, UNTIL SEQUENCE when using RMAN) is used if an archive log file or an
online log file group is missing; it will recover all work up to the log switch into the
missing file or group.
EXAM TIP The syntax for incomplete recovery differs between SQL*Plus and
RMAN. SQL*Plus uses UNTIL CANCEL and UNTIL CHANGE, where RMAN
would use UNTIL SEQUENCE and UNTIL SCN. They both use UNTIL TIME.
Incomplete Recovery Best Practices
As with complete recovery, the best practice is indeed to practice. The procedure is
completely reliable, but the slightest mistake may be disastrous. It is vital to follow
all the steps with great care. When doing an incomplete recovery, you do not want
to have any doubts about the procedure to be followed; it is frequently said that
most problems with incomplete recovery are caused by the DBA making a mistake.
Before starting an incomplete recovery, if at all possible perform a whole closed
backup of the database. This means that whatever happens during the restore and
recover operation, you will be no worse off than before and can try again. At the very
least, back up all the archive logs. The backup should be closed in order to prevent
any users doing any work, because such work will be lost after the incomplete recovery.
For this reason, it is vital to close the database as soon as you decide that an incomplete
recovery is needed.
ch27.indd 6ch27.indd 6 7/6/2005 11:07:23 AM7/6/2005 11:07:23 AM

Chapter 27: Incomplete Database Recovery
7
PART II
All-in-1 / Oracle Database 10g OCP Certification All-in-One / Watson, Bersinic / 5790-3 Chapter 27
After a successful incomplete recovery, carry out another whole backup. With
release 10g of the database, this is not strictly speaking necessary (it was essential
with earlier releases) but is still good policy.
Check that the incomplete recovery really was successful. For example, it may be
that the user says the error occurred at 10:00, and so you recover until 09:59. But then
you find that the user’s watch is not synchronized with the server’s clock, and that in
fact as far as the database is concerned the error occurred at 09:58, and your recovery
has repeated it. Check that the operation was successful before allowing users to
connect, perhaps by opening the database with STARTUP RESTRICT. You do not
want them to lose more work, if you have to repeat the exercise.
Remove any archive logs from the previous incarnation of the database (you
should have backed them up already) to prevent any possibility of mixing up logs
from before and after the recovery.
Incomplete Recovery
with User-Managed Backups
If you are making user-managed backups, then you must restore with operating system
commands and recover with SQL*Plus. Whenever an incomplete recovery is necessary,
shut down the database straight away, and if possible back it up. Then follow the four
steps described at the beginning of the preceding section, “The Method for Incomplete
Recovery,” using whatever recovery option is appropriate. The examples that follow
assume that the controlfile does not need to be restored: that the current controlfile
does correctly describe both the current database and the version of the database that
is to be restored. This will be the case unless datafiles have been created, renamed, or
dropped between the time of the backup and the time of the problem being detected.
If the controlfile must be restored, then alternative syntax is needed.
UNTIL TIME Recovery
A time-based incomplete recovery is typically needed after user error, such as
committing a bad transaction or dropping a database object. In order to minimize
the loss of data, close the database immediately after the problem is reported. There
is no point in even letting users finish their transactions, because they will be lost
anyway.
Assume that investigation shows that the problem occurred at thirty-five minutes
past six in the afternoon, on the tenth of December 2004. First shut down and mount
the database:
SQL> shutdown immediate;
SQL> startup mount;
Then use whatever operating system utility is appropriate to restore all the datafiles.
You must also restore any archive log files that will be needed and are no longer
available on disk. Then,
SQL> recover database until time '2004-12-10:18:34:00';
ch27.indd 7ch27.indd 7 7/6/2005 11:07:24 AM7/6/2005 11:07:24 AM

Oracle Database 10g OCP Certification All-in-One Exam Guide
8
All-in-1 / Oracle Database 10g OCP Certification All-in-One / Watson, Bersinic / 5790-3 Chapter 27
This command will cause Oracle to inspect the restored datafiles and request all
the archive logs generated from the time of the oldest restored file up to the time
specified. If the archive logs are still available in the location(s) that the ARCn process
put them, or if you have restored them to those same location(s), you can accept the
default filenames that Oracle presents you with. You can even use “RECOVER
AUTOMATIC DATABASE UNTIL...,” which will automatically look for the archive log
files in the default location and not prompt you for anything. Otherwise, you will
have to specify the files by name. If the recovery is up to a very recent time (which one
hopes it is) the recovery will also need to extract redo from the current online log file
group as well; Oracle will locate and apply that last bit of redo automatically.
Note that there are no options for the format of the UNTIL TIME. It must be
CCYY-MM-DD:HH24:MI:SS, irrespective of your session’s NLS_DATE_FORMAT
setting. Finally,
SQL> alter database open resetlogs;
and now users can connect.
UNTIL CANCEL Recovery
A cancel-based recovery is typically needed after a complete recovery has failed: the
complete recovery required an archive or online log that was missing. In that case,
your only option is incomplete recovery, up to (but not including) the log switch
sequence number of the missing log. This number will have been reported when
you attempted the complete recovery.
Assume that a datafile was damaged, and during complete recovery you were
asked for an archive log of sequence number 10305. You attempted to restore it
from tape, but it was corrupted. Perform the first two steps of incomplete recovery
as already described, but then the RECOVER command will be
SQL> recover database until cancel;
As you are prompted for the archive logs, apply them until you are prompted for
sequence number 10305. At that point, instead of entering the name of the file or
accepting the name suggested, enter the word CANCEL. Recovery will stop, following
which you can open the database with RESETLOGS.
This procedure is also used if all copies of the current redo log file group are lost.
After a disaster such as that, the database will crash immediately. On restarting, it will
stop in mount mode. Query the view V$LOG to ascertain the sequence number of the
current, missing, logfile group and perform an UNTIL CANCEL recovery up to that
number.
UNTIL CHANGE Recovery
Recovery until an exact system change number is required for some advanced Oracle
options unrelated to loss of data, such as instantiating a replicated database or a
standby database. It is rarely used as part of normal system maintenance, because you
ch27.indd 8ch27.indd 8 7/6/2005 11:07:24 AM7/6/2005 11:07:24 AM

Chapter 27: Incomplete Database Recovery
9
PART II
All-in-1 / Oracle Database 10g OCP Certification All-in-One / Watson, Bersinic / 5790-3 Chapter 27
do not usually know the exact SCN when a problem occurred. The syntax to recover
up to (but not including) a system change number is, for example,
SQL> recover database until change 309121;
EXAM TIP Recovery stops at the SCN before the one specified. The SCN
given is not applied.
Incomplete Recovery Using RMAN
Conceptually, incomplete recovery with RMAN is the same as with user-managed
backups: it is the same four steps. But it is much easier. If RMAN is integrated with
a Recovery Catalog database and an automated tape library, you do not have to worry
at all about the names and locations of the backups of the datafiles or of the archive
logs, and it is impossible to make mistakes. Even without these features, RMAN is still
simple and totally reliable. The following examples assume that you are not using a
Recovery Catalog and that the backups are still available where RMAN put them.
Use of a Recovery Catalog would mean that RMAN could go further back in time
than if you are relying on the controlfile-based repository, which is limited to the
number of days specified by the CONTROLFILE_RECORD_KEEP_TIME instance
parameter. If there is no tape library, then you will have to load the appropriate
tapes manually.
RMAN will automatically apply restore optimization. This means that if an
appropriate version of the file is already available, then RMAN will not restore it.
Thus you will generally find that read-only tablespaces and archive logs that are
still on disk where the ARCn process put them don’t get restored.
UNTIL TIME Recovery
This RMAN command block will perform the full incomplete recovery cycle up to
a specified time:
RMAN> run{
allocate channel d1 type disk;
allocate channel t1 type sbt_tape;
shutdown immediate;
startup mount;
sql "alter session set nls_date_format=''dd-mon-yyyy hh24:mi:ss''";
set until time '10-dec-2004 18:34:00';
restore database;
recover database;
alter database open resetlogs;}
Note that unlike SQL*Plus when used for incomplete recovery, RMAN is aware
of your session setting for the NLS_DATE_FORMAT parameter, which will be picked
up from environment variables or, to prevent any possibility of confusion, can be
specified in the run block. In the example there are two channels allocated, one for
disk and one for tape, so that RMAN can access backups on both media types.
ch27.indd 9ch27.indd 9 7/6/2005 11:07:25 AM7/6/2005 11:07:25 AM

Oracle Database 10g OCP Certification All-in-One Exam Guide
10
All-in-1 / Oracle Database 10g OCP Certification All-in-One / Watson, Bersinic / 5790-3 Chapter 27
As with any RMAN restore and recover operation, RMAN will automatically select
the most efficient method. This will mean restoring the full backup of each datafile
that is closest to (but not after) the recovery time specified. Then RMAN will apply
any incremental backups that will bring the files closer to the time, and finally it will
apply any archive and online redo logs needed to reach the time exactly. As a rule, it
is quicker to apply incrementals than to apply archive logs. RMAN will consider both
image copies and backup sets when planning the recovery strategy. Any backup sets of
archive logs on tape are first extracted from tape and the archive logs restored to disk,
and then the logs are applied to the database.
UNTIL SEQUENCE Recovery
This example assumes that a logfile of sequence number 10305 is missing. This could
be because the sole archive log destination disk was damaged before the archive log
was migrated to tape, or it could be that a disaster destroyed all copies of the current
logfile group. In the former case, the problem would become apparent during an
attempted complete recovery; in the latter case, the database instance would crash
immediately and the problem would be seen at the next attempted startup. Either way,
this run block will do the incomplete recovery:
RMAN> run {
shutdown immediate;
startup mount;
set until sequence 10305 thread 1;
restore database;
recover database;
alter database open resetlogs;}
In this example, there are no allocate channel commands: you are using the
configured default channels. RMAN will consult its repository to identify backups
of all the datafiles that predate log switch sequence number 10305, and restore them.
Then it will restore and apply all the archive log files up to (but not including) 10305
and open the database with RESETLOGS.
The specification of UNTIL SEQUENCE must include both the log switch sequence
number and the thread number. For a single instance environment, the thread number
is always 1, but in a clustered environment each instance will generate its own thread
of redo, which will have its own series of log switch sequence numbers, so the thread
must be specified as well to identify which sequence you are referring to.
EXAM TIP The log sequence number specified is not applied; recovery stops
at the end of the previous log.
UNTIL SCN Recovery
The recovery until an exact system change number (SCN) is rarely used as part of
normal restore and recover procedures, simply because it is unusual to know the
SCN when a problem occurred. The technique is, however, required when creating
copies of databases to be used in a Replication, Data Guard, or Streams environment.
ch27.indd 10ch27.indd 10 7/6/2005 11:07:26 AM7/6/2005 11:07:26 AM

Chapter 27: Incomplete Database Recovery
11
PART II
All-in-1 / Oracle Database 10g OCP Certification All-in-One / Watson, Bersinic / 5790-3 Chapter 27
These advanced capabilities (which are beyond the scope of the Oracle Certified
Professional examination, but are included in the more advanced Oracle Certified
Master practicum) require a copy of the primary database that is synchronized to
an exact, known SCN, so the propagation of transactions from the primary database
can be started from that same point.
For completeness, if recovery to an exact system change number is needed, the
syntax is the same as for time- or cancel-based recovery, with the exception of the
UNTIL clause:
RMAN> run{
...
set until scn 309121;
...
}
Exercise 27-1: Performing an Incomplete
Recovery with RMAN
Perform a full backup, simulate a user error, and then perform an incomplete recovery
to a time just before the error. Test that the recovery was successful after opening the
database.
1. Connect to your database as user SYSTEM with SQL*Plus.
2. Ensure that your database is in archivelog mode with archiving enabled.
SQL> select log_mode from v$database;
SQL> select archiver from V$INSTANCE;
If these queries do not return ARCHIVELOG and STARTED, follow the steps
in Exercise 18-3 in Chapter 18 to correct the situation.
3. Enable the display of the time in the SQL*Plus prompt.
SQL> set time on;
10:23:15 SQL>
4. Create a table.
10:24:01 SQL> create table test_rec as select * from all_users;
5. Connect to your database with RMAN as user SYS using operating system
authentication.
rman target /
6. Carry out a full backup, using your configured defaults.
RMAN> backup database;
7. In your SQL*Plus session, note the time, and then drop the table and confirm
its absence.
10:35:30 SQL>
10:35:30 SQL> drop table test_rec;
Table dropped.
10:35:44 SQL> select count(*) from test_rec;
select count(*) from test_rec
*
ERROR at line 1:
ORA-00942: table or view does not exist
ch27.indd 11ch27.indd 11 7/6/2005 11:07:26 AM7/6/2005 11:07:26 AM

Oracle Database 10g OCP Certification All-in-One Exam Guide
12
All-in-1 / Oracle Database 10g OCP Certification All-in-One / Watson, Bersinic / 5790-3 Chapter 27
8. In your RMAN session, run this command block, recovering to just before the
drop of the table:
RMAN> run {
2> shutdown immediate;
3> startup mount;
4> sql "alter session set nls_date_format=''yy-mm-dd hh24:mi:ss''";
5> set until time '04-12-11 10:35:30';
6> restore database;
7> recover database;
8> alter database open resetlogs;}
9. In your SQL*Plus session, reconnect as user SYSTEM (your session will have
been terminated by the SHUTDOWN) and confirm that the table has been
recovered, and that the log switch sequence number has been reset.
10:49:25 SQL> select count(*) from test_rec;
COUNT(*)
----------
33
10:49:56 SQL> select group#,sequence#,status from v$log;
GROUP# SEQUENCE# STATUS
---------- ---------- ----------------
1 0 UNUSED
2 1 CURRENT
3 0 UNUSED
10. In your RMAN session, carry out a fresh backup by repeating Step 8.
11. Tidy up by dropping the table.
10:50:05 SQL> drop table test_rec;
Incomplete Recovery Using Enterprise Manager
The Recovery Wizard in Enterprise Manager Database Control can also do an
incomplete recovery. First, it is necessary to connect to Database Control as a user
with the SYSDBA privilege, as in Figure 27-1. No normal user can perform an
incomplete recovery. Not even a user with the SYSOPER privilege can do this
(although a SYSOPER user can do a complete recovery).
From the database home page, select the Maintenance tab and then the Perform
Recovery link in the Backup/Recovery section to reach the Perform Recovery: Type
window, as in Figure 27-2. Here you must select Whole Database in the Object Type
drop-down box, and the radio button for “Recover to the current time or a previous
point-in-time.” You must also supply an operating system logon with appropriate
permissions on any hardware device that will be used, if you have not already saved
your preferred credentials.
On the Perform Recovery: Point-in-time window, shown in Figure 27-3, you can
choose the time, system change number, or log switch sequence number up to which
to recover. Then the Review window (Figure 27-4) shows the RMAN script that will be
executed.
ch27.indd 12ch27.indd 12 7/6/2005 11:07:27 AM7/6/2005 11:07:27 AM
Chapter 27: Incomplete Database Recovery
13
PART II
All-in-1 / Oracle Database 10g OCP Certification All-in-One / Watson, Bersinic / 5790-3 Chapter 27
Figure 27-1 Connect to Database Control with the SYSDBA privilege.
Figure 27-2 Initiate the incomplete recovery procedure.
ch27.indd 13ch27.indd 13 7/6/2005 11:07:28 AM7/6/2005 11:07:28 AM
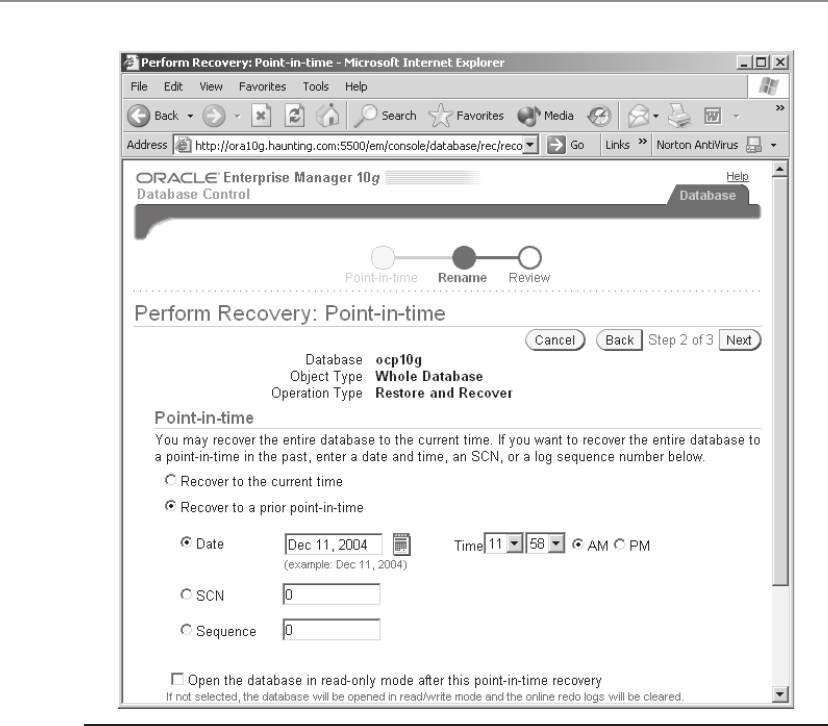
Oracle Database 10g OCP Certification All-in-One Exam Guide
14
All-in-1 / Oracle Database 10g OCP Certification All-in-One / Watson, Bersinic / 5790-3 Chapter 27
Recovery of the Controlfile
One point to emphasize right away is that recovery of the controlfile should be a very
rare occurrence. The controlfile is (or should be) protected by multiplexed copies on
different devices. It should be impossible to lose all copies of the controlfile. But if all
copies of the current controlfile are lost, it can either be restored from a backup or be
re-created.
If you are using user-managed backups and have the appropriate script available,
re-creation is the simplest option: just issue a CREATE CONTROLFILE command.
Restoring a backup of the controlfile requires applying redo to synchronize the restored
controlfile with the rest of the database. Following a datafile restore, this is simple—
Figure 27-3 Select the incomplete recovery time, sequence, or SCN.
ch27.indd 14ch27.indd 14 7/6/2005 11:07:28 AM7/6/2005 11:07:28 AM
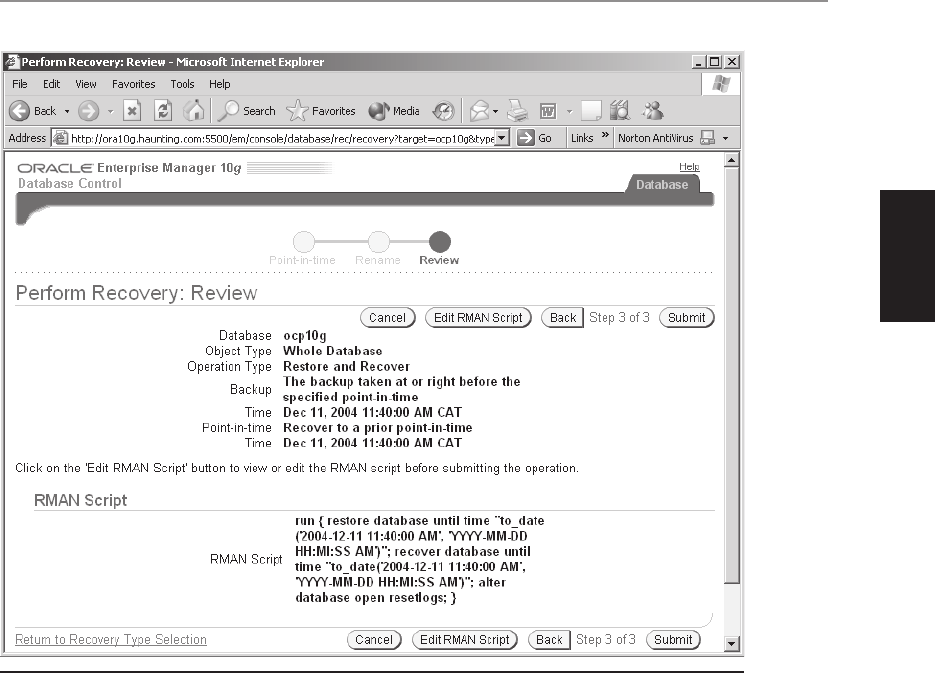
Chapter 27: Incomplete Database Recovery
15
PART II
All-in-1 / Oracle Database 10g OCP Certification All-in-One / Watson, Bersinic / 5790-3 Chapter 27
because the current controlfile knows what archive logs are needed and where they
are. But if you have restored the controlfile, it won’t know anything about changes
since it was backed up. Oracle will do its best and make intelligent guesses about
archive logs, but it can get confused. In particular, if the final stage of the restore
requires the online redo logs, you will have to tell the recovery process which ones
to apply.
If you are using RMAN backups, restore and recovery of the database using a
backup controlfile is simple. RMAN can work out what to do—probably better than
you can.
A special case when restoring the controlfile is necessary even if it has not been
damaged is when doing an incomplete recovery of the database to a point in time
when the physical structure of the database was different from current. This would
be the case if a tablespace has been dropped.
Figure 27-4 Submit the restore and recovery job.
ch27.indd 15ch27.indd 15 7/6/2005 11:07:29 AM7/6/2005 11:07:29 AM

Oracle Database 10g OCP Certification All-in-One Exam Guide
16
All-in-1 / Oracle Database 10g OCP Certification All-in-One / Watson, Bersinic / 5790-3 Chapter 27
Creating a New Controlfile
Issuing this command should be part of your regular maintenance routine:
SQL> alter database backup controlfile to trace;
This will inspect the current controlfile and generate a trace file in the directory
specified by the USER_DUMP_DEST instance parameter. This trace file will contain a
CREATE CONTROLFILE command that will, if executed, re-create the control as it is
right now. As with all user trace files, the name will be of the form
<SID>_ora_<SPID>.trc
where <SID> is the name of the instance, and <SPID> is the Unix process number, or
Windows thread number, of the server process for your session. The trace file is well
documented, with comments describing its purpose and how and when to use the
CREATE CONTROLFILE command within it. Here is an example of the CREATE
CONTROLFILE command:
CREATE CONTROLFILE REUSE DATABASE "OCP10G" NORESETLOGS ARCHIVELOG
MAXLOGFILES 16
MAXLOGMEMBERS 3
MAXDATAFILES 100
MAXINSTANCES 8
MAXLOGHISTORY 454
LOGFILE
GROUP 1 (
'/u01/oradata/ocp10g/redo1b.log',
'/u01/oradata/ocp10g/redo1a.log'
) SIZE 10M,
GROUP 2 (
'/u01/oradata/ocp10g/redo2b.log',
'/u01/oradata/ocp10g/redo2a.log'
) SIZE 10M
-- STANDBY LOGFILE
DATAFILE
'/u01/oradata/ocp10g/system01.dbf',
'/u01/oradata/ocp10g/undotbs01.dbf',
'/u01/oradata/ocp10g/sysaux01.dbf’,
'/u01/oradata/ocp10g/users01.dbf',
'/u01/oradata/ocp10g/example01.dbf',
'/u01/oradata/ocp10g/users02.dbf’
CHARACTER SET US7ASCII
;
This command will create new controlfiles in the locations specified by the
CONTROL_FILES instance parameter. Note that the command does not include any
mention of read-only tablespaces or of temporary tablespaces. There are additional
commands in the trace file to generate these.
TIP Always generate a CREATE CONTROLFILE trace whenever you make
any changes to the physical structure of the database, and keep the files
somewhere safe. Then you will always be able to create a controlfile that
can be used with any restored version of the database.
ch27.indd 16ch27.indd 16 7/6/2005 11:07:30 AM7/6/2005 11:07:30 AM

Chapter 27: Incomplete Database Recovery
17
PART II
All-in-1 / Oracle Database 10g OCP Certification All-in-One / Watson, Bersinic / 5790-3 Chapter 27
Re-creating the controlfile may be necessary for reasons other than recovery. In the
preceding example, the MAXDATAFILES setting is 100. It may be that the database is
expanding, and the number of datafiles is already into the nineties. In that case, at
your next maintenance window, you should generate the script, edit it to increase the
MAXDATAFILES setting, and re-create the controlfile. This can be done only during
a maintenance slot, because the command can only be run with the instance in
NOMOUNT mode. Another reason would be to change the database name, which
can be done by inserting the SET keyword before DATABASE in the CREATE
CONTROLFILE command and specifying a new name.
Restoring a Controlfile with User-Managed Backups
To back up the controlfile with user-managed backups, either the database must be
closed, or you must use this command:
SQL> alter database backup controlfile to '<FILENAME>';
where <FILENAME> is the name of the backup to be created. This will create a binary
copy of the controlfile, identical to the controlfile at the time you ran the command.
You cannot back up the controlfile of an open database in any other way. This is
because, unlike datafiles, the controlfile is not protected by redo; it is therefore
necessary to get a read-consistent version of the file, which cannot be guaranteed
if you copy it with operating system utilities.
To restore a backup of the controlfile, copy it to the locations specified by the
CONTROL_FILES instance parameter and start the database in mount mode with
STARTUP MOUNT. Then issue this command:
SQL> recover database until cancel using backup controlfile;
You will be prompted for archive logs: apply them until recovery fails. It will
fail because you will be prompted for an archive log that does not exist: this is the
sequence number of the current online log, which has not yet been archived. At
that point you must enter the name of one of the members of the current online
log group. If you do not know which group was current, try a member of each
group in turn; eventually, you will name the correct one and the recovery will
complete. Then you can open the database with RESETLOGS, without losing any
data. Loss of the controlfile is where the incomplete recovery syntax does in fact
result in a complete recovery, though you do still have to create a new incarnation
of the database.
The RECOVER DATABASE UNTIL...USING BACKUP CONTROLFILE syntax is
also used when doing an incomplete recovery if the structure of the database being
restored is different from current. If that is the case, you must restore the controlfile
as well as all the datafiles. The application of redo until the point desired will then
proceed as normal.
ch27.indd 17ch27.indd 17 7/6/2005 11:07:31 AM7/6/2005 11:07:31 AM

Oracle Database 10g OCP Certification All-in-One Exam Guide
18
All-in-1 / Oracle Database 10g OCP Certification All-in-One / Watson, Bersinic / 5790-3 Chapter 27
Restoring the Controlfile with RMAN
RMAN can back up the controlfile in several ways:
RMAN> backup as copy current controlfile;
RMAN> backup as backupset current controlfile;
RMAN> backup tablespace system include current controlfile;
RMAN> configure controlfile autobackup on;
The first two commands will back up the controlfile as an image copy or in a backup
set. The controlfile can also be included in a backup set by appending INCLUDE
CURRENT CONTROLFILE to the specification of a datafile or a tablespace backup,
as in the third example. The controlfile cannot be included in a backup of archive
logs. The fourth command will configure RMAN to make an automatic backup of the
controlfile and the spfile to a well-known filename and location whenever any other
backup operation is run.
RMAN stores its repository in the target database’s controlfile. So if the controlfile
cannot be mounted, RMAN can’t read its repository—and therefore, it is completely
crippled. It is a recursive problem: you need the repository to perform a restore, but
you need to perform the restore to get to the repository. There are two ways around
this. First, if you have a separate Recovery Catalog database, that will have a copy of
the repository. It is then trivial for RMAN to locate the controlfile backups and to
restore and recover them. If you do not have a Recovery Catalog database, then it is
vital that you configure the controlfile auto-backup facility. By default, the auto-
backup will go to the flash recovery area, if it is configured. Failing that, it will use a
platform-specific location (for instance, it is the $ORACLE_HOME/dbs directory on
Unix). If you wish, you can use CONFIGURE CONTROLFILE AUTOBACKUP
FORMAT... to nominate a directory and filename for the auto-backups, but if you do
this, you must record it, as RMAN will not be able to locate it automatically when you
need to restore.
The RMAN code is kernelized: you can run RMAN even with the database in
nomount mode, which is as far as you can get without a controlfile. This means
that you always have access to the command
RMAN> restore controlfile from autobackup;
RMAN will go to the default location and attempt to locate the most recent auto-
backup. The system-generated name of the auto-backup backup-set has embedded
within it the timestamp of the backup and the database identifier number, or DBID.
If only one database makes auto-backups to the destination, RMAN will automatically
retrieve the most recent and restore it. If multiple databases share the same auto-
backup destination (as would be the case if several databases have a common flash
recovery area), then you must provide the DBID so that RMAN can restore the correct
controlfile.
To find your DBID,
SQL> select dbid from v$database;
DBID
----------
3385973595
ch27.indd 18ch27.indd 18 7/6/2005 11:07:31 AM7/6/2005 11:07:31 AM

Chapter 27: Incomplete Database Recovery
19
PART II
All-in-1 / Oracle Database 10g OCP Certification All-in-One / Watson, Bersinic / 5790-3 Chapter 27
This should be part of your most basic documentation. Then to restore and recover
the controlfile,
RMAN> run {
startup nomount;
set dbid 3385973595;
restore controlfile from autobackup;
alter database mount;
recover database;
alter database open resetlogs;}
As when restoring from a user-managed backup, you have to finish the operation
with a resetlogs, creating a new incarnation of the database—but in fact the recovery
is complete, in the sense that no data will have been lost.
Exercise 27-2: Carrying Out Controlfile
Auto-backup and Restore
Use RMAN to configure controlfile auto-backup, simulate loss of the controlfile, and
restore it.
1. Connect to your database with RMAN, using operating system authentication.
RMAN> connect target /
2. Configure the auto-backup facility.
RMAN> configure controlfile autobackup on;
3. Perform a full backup and exit from RMAN.
RMAN> backup database;
RMAN> exit;
Note that at the end of the database backup, the controlfile and spfile are
backed up into a separate backup set.
4. Connect to your database as SYSDBA with SQL*Plus.
SQL> connect / as sysdba;
5. Locate your controlfiles and note your database identifier.
SQL> select name from v$controlfile;
SQL> select dbid from v$database;
6. Abort the instance.
SQL> shutdown abort;
7. Using an operating system command, delete the controlfile(s) listed in Step 5.
If you are working on Windows, you may have to stop the Windows service to
do this, and then start it again.
8. Attempt to open the database. It will stop in nomount mode.
SQL> startup;
9. Connect with RMAN, as in Step 1.
ch27.indd 19ch27.indd 19 7/6/2005 11:07:32 AM7/6/2005 11:07:32 AM

Oracle Database 10g OCP Certification All-in-One Exam Guide
20
All-in-1 / Oracle Database 10g OCP Certification All-in-One / Watson, Bersinic / 5790-3 Chapter 27
10. Issue this command block,
RMAN> run {
shutdown abort;
startup nomount;
set dbid 3385973595;
restore controlfile from autobackup;
alter database mount;
recover database;
alter database open resetlogs;}
substituting your DBID, listed in Step 5, for the example DBID of 3385973595.
11. From an operating system prompt, confirm that the controlfiles you deleted
in Step 7 have been restored.
Recovery Through RESETLOGS
With all versions of the Oracle database prior to release 10g, incomplete recovery
required a fifth step: a full backup. This was because all backups and archive logs
were specific to a database incarnation, and it was not possible to use a backup made
before a resetlogs operation after the resetlogs. Make no mistake about this: before
10g, this backup was absolutely essential and was part of the incomplete recovery
procedure. Until the backup was made, you were at risk of losing more data.
With release 10g, you can use backups taken before an incomplete recovery;
backups and redo from a previous incarnation are valid for the current incarnation.
This means that if a datafile is damaged shortly after an incomplete recovery and
before the next backup, you can restore the datafile again from the backup used for
the incomplete recovery, apply redo from the archive logs of the previous incarnation
up to the point of the incomplete recovery, and then apply redo from the current
incarnation to do a complete recovery.
For recovery through a resetlogs to work, it is vital that the names generated for
the archive log files let Oracle distinguish between logs produced by the different
incarnations. These names are controlled by the instance parameter LOG_ARCHIVE_
FORMAT. A reasonable setting would be
SQL> alter system set log_archive_format='arch_%d_%t_%r_%s.log';
These are the variables:
• %d The DBID, in hexadecimal
• %t The thread number (always 1, unless it is a clustered database)
• %r The incarnation number
• %s The log switch sequence number
To assist you in tracking what has been happening with resetlogs operations,
various views now include a column, RESETLOGS_ID, to identify which incarnation
the row refers to. Of particular importance, this is present in V$DATABASE, where it
will show you the current incarnation number, and V$ARCHIVED_LOG, where each
archive is flagged as belonging to a particular incarnation.
ch27.indd 20ch27.indd 20 7/6/2005 11:07:32 AM7/6/2005 11:07:32 AM

Chapter 27: Incomplete Database Recovery
21
PART II
All-in-1 / Oracle Database 10g OCP Certification All-in-One / Watson, Bersinic / 5790-3 Chapter 27
Chapter Review
Incomplete recovery is a serious, irreversible, procedure. There are usually only two
reasons for doing this: either you deliberately want to lose data, or you tried a complete
recovery and it failed. You will want to lose data if the data is erroneous: a user made
a mistake. Remember that “mistakes” can include DBA-type errors, such as accidentally
dropping tables or even tablespaces. A complete recovery will fail if an archive log file
is missing, or if all copies of the current online log file are missing.
Incomplete recovery consists of four steps:
1. Mount the database.
2. Restore all the datafiles.
3. Recover the database until the desired point.
4. Open the database with a resetlogs.
Depending on circumstances, you may need to restore the controlfile as well as
the datafiles. Never restore the online logs. The three options for the recovery step
are until a time, until a log switch sequence number, or until a system change number.
The resetlogs command option creates a new database incarnation: a new stream
of redo.
You can do an incomplete recovery whether you are using user-managed backups
or RMAN, but RMAN is undoubtedly easier and less error prone. The graphical
interface provided for RMAN by Database Control may make it even simpler.
Restoring and recovering the controlfile is a special topic. It is often easier to
re-create than to restore, because the restore requires the syntax for incomplete
recovery and the use of archive and online redo logs. No data should be lost, though.
Finally, an important new feature of release 10g of the database is that you can
now do a subsequent complete recovery using backups and redo from a previous
incarnation, if you are unfortunate enough to have to do this. But it is still considered
good policy to make a full backup as soon as possible after an incomplete recovery.
Questions
1. Which of the following file types are not restored when doing an incomplete
recovery? (Choose all that apply.)
A. Controlfile
B. Datafiles for permanent tablespaces
C. Datafiles for undo tablespaces
D. Online redo log files
E. Server parameter file
F. Tempfiles for temporary tablespaces
ch27.indd 21ch27.indd 21 7/6/2005 11:07:33 AM7/6/2005 11:07:33 AM

Oracle Database 10g OCP Certification All-in-One Exam Guide
22
All-in-1 / Oracle Database 10g OCP Certification All-in-One / Watson, Bersinic / 5790-3 Chapter 27
2. It is now 15:00, on Tuesday. A bad transaction was committed in your database
at about 14:30. Investigation shows that the tables and indexes affected were
on just two tablespaces: the rest of the database is fine. The two tablespaces
and several others were backed up last night, but some tablespaces are backed
up only on the weekend. Your database is in archivelog mode, with log
switches about every ten minutes. Which of the following statements is
correct? (Choose the best answer.)
A. You can do an incomplete restore and recovery to 14:29, of just the two
tablespaces. The loss of data will be about 30 minutes of work in those
tablespaces.
B. You must restore the whole database from the weekend backup and
recover to 14:29. You will lose about 30 minutes of work.
C. You must restore the whole database and do an incomplete recovery
canceling the application of the archive log that was active at 14:30.
You will lose about ten minutes of work.
D. You can restore some tablespaces from last night, the others from the
weekend, and recover to 14:29. You will lose about 30 minutes of work.
3. You are doing a point-in-time recovery with SQL*Plus. What format should
you use for the date/time in your RECOVER DATABASE UNTIL... statement?
(Choose the best answer.)
A. yyyy-mm-dd:hh24:mi:ss
B. mm-dd-yyyy:hh24:mi:ss
C. It will depend on your NLS_DATE_FORMAT setting
D. It will depend on your NLS_TERRITORY setting
4. Under which of the following circumstances is an incomplete recovery
necessary? (Choose two answers.)
A. You lose all copies of your current online log file group.
B. You lose a critical tablespace: SYSTEM, and/or the currently active UNDO
tablespace.
C. A user makes a bad transaction, and the instance crashes before he can
issue the ROLLBACK statement.
D. A datafile is created, used, and destroyed before it gets backed up.
E. You back up a tablespace, drop it, and then want to get to the objects that
were in it.
5. Which of the following are valid syntax for the UNTIL clause of the RECOVER
DATABASE command when it is issued from SQL*Plus? (Choose three answers.)
A. ...UNTIL CANCEL;
B. ...UNTIL CHANGE <system change number>;
C. ...UNTIL SCN <system change number>;
ch27.indd 22ch27.indd 22 7/6/2005 11:07:34 AM7/6/2005 11:07:34 AM

Chapter 27: Incomplete Database Recovery
23
PART II
All-in-1 / Oracle Database 10g OCP Certification All-in-One / Watson, Bersinic / 5790-3 Chapter 27
D. ...UNTIL SEQUENCE <sequence number>;
E. ...UNTIL TIME <time>;
F. ...UNTIL XID <transaction number>;
6. To do an incomplete recovery, what open mode must the database be in?
(Choose the best answer.)
A. Incomplete recovery can be done only with the database CLOSED.
B. Incomplete recovery can be done only in NOMOUNT mode.
C. Incomplete recovery can be done only in MOUNT mode.
D. Incomplete recovery can be in OPEN mode, if the database is in
archivelog mode.
E. SQL*Plus can do incomplete recovery only in CLOSED mode; RMAN
can do it in any mode.
7. Which of these RMAN RECOVER commands will apply all redo for a
nonclustered database up to and including that in log switch number 90?
(Choose the best answer.)
A. RECOVER DATABASE UNTIL SEQUENCE 90;
B. RECOVER DATABASE UNTIL SEQUENCE 91;
C. RECOVER DATABASE UNTIL SEQUENCE 90 THREAD 1;
D. RECOVER DATABASE UNTIL SEQUENCE 91 THREAD 1;
8. You lose your controlfile while the database is open, and it is not multiplexed.
What should you do? (Choose the best answer.)
A. Restore the datafiles and controlfile, and perform an incomplete recovery.
You will not lose any data.
B. Restore the datafiles and controlfile, and perform a complete recovery.
You will not lose any data.
C. Re-create the controlfile. You will not lose any data.
D. You can restore the controlfile or re-create it, but you must do an
incomplete recovery because losing all copies of the controlfile will
mean losing data.
9. Examine the following RMAN script carefully. Which line will result in an
error? (Choose the best answer.)
A. run {
B. sql "alter session set nls_date_format=''dd-mm-yyyy
hh24:mi:ss''";
C. restore database;
D. recover database until time '10-12-2004 15:30:00';
E. alter database open resetlogs;}
ch27.indd 23ch27.indd 23 7/6/2005 11:07:34 AM7/6/2005 11:07:34 AM

Oracle Database 10g OCP Certification All-in-One Exam Guide
24
All-in-1 / Oracle Database 10g OCP Certification All-in-One / Watson, Bersinic / 5790-3 Chapter 27
10. Which users can perform an incomplete recovery? (Choose the best answer.)
A. Only SYS
B. Only SYS or SYSTEM
C. Any user connected with operating system authentication
D. Any user who has the SYSDBA privilege
E. Any user with either the SYSDBA or the SYSOPER privilege
11. When using RMAN to restore a controlfile auto-backup, you may need
to supply a piece of information. What? (Choose the best answer.)
A. The database name
B. The approximate time of the latest backup
C. The database ID
D. The instance name
E. The instance number
12. You are using RMAN to perform incomplete recovery. Which of the following
is the best sequence to follow? (Choose the best answer.)
A. shutdown abort / backup / startup mount / restore / recover / open resetlogs
B. shutdown abort / startup mount / restore / recover / open resetlogs / backup
C. shutdown immediate / backup / startup mount / restore / open resetlogs /
recover
D. shutdown immediate / backup / restore / recover / open resetlogs / backup
E. shutdown immediate / backup / startup nomount / restore / recover /
open resetlogs / backup
13. You issue the command ALTER DATABASE BACKUP CONTROLFILE TO
TRACE;. Where will the trace file be generated? (Choose the best answer.)
A. In the flash recovery area, if it has been configured
B. In the BACKGROUND_DUMP_DEST directory
C. In the USER_DUMP_DEST directory
D. In a platform-specific location, such as $ORACLE_HOME/dbs on Unix
14. After a RESETLOGS, what will have changed? (Choose all that apply.)
A. There will be a new database incarnation number.
B. The system change number will be reset.
C. The log switch sequence number will be reset.
D. The database ID will be changed.
E. The instance number will be changed.
F. All previous backups and archive logs will be invalid.
ch27.indd 24ch27.indd 24 7/6/2005 11:07:35 AM7/6/2005 11:07:35 AM

Chapter 27: Incomplete Database Recovery
25
PART II
All-in-1 / Oracle Database 10g OCP Certification All-in-One / Watson, Bersinic / 5790-3 Chapter 27
15. You issue the command
alter system set log_archive_format='arch_%d_%t_%r_%s.log';
For each of the variables that will be used in the archive log file names, choose
one of the descriptions.
Variable Description
a. %d A. The database name
b. %t B. The redo log file group number
c. %r C. The SCN where the archive log starts
d. %s D. The database ID
E. The checkpoint number where the archive log starts
F. The thread number of the instance
G. The incarnation of the database
H. The log switch sequence number
Answers
1. A, B, and C. You must restore all the datafiles and, depending on
circumstances, the controlfile.
2. D. The files do not have to come from the same backup, and recovery will
be faster if you restore your most recent backups of each datafile. Incomplete
recovery means restoring the whole database and then applying redo to bring
all the files forward to the same point.
3. A. When doing incomplete recovery with SQL*Plus, you have no options with
the date format.
4. A and E. If you lose all copies of the current logfile group, you will have to do
an incomplete recovery up to the last log switch, so A is correct. E is the other
correct answer, because you cannot completely recover some tablespaces while
leaving others as of a previous time.
5. A, B, and E. When using SQL*Plus, you can RECOVER UNTIL CANCEL or
CHANGE or TIME. SCN and SEQUENCE are used in RMAN, and it is not
possible to recover until a particular transaction number.
6. C. It doesn’t matter what tool you use; incomplete recovery is done in
MOUNT mode.
7. D. The sequence number specified is not applied, so the SEQUENCE must be
91. Even if the database is single-instance, not RAC, you must still specify the
thread number.
8. C. The best option is to re-create the controlfile. A would also work but is not
the best answer because of the difficulty and downtime.
ch27.indd 25ch27.indd 25 7/6/2005 11:07:36 AM7/6/2005 11:07:36 AM

Oracle Database 10g OCP Certification All-in-One Exam Guide
26
All-in-1 / Oracle Database 10g OCP Certification All-in-One / Watson, Bersinic / 5790-3 Chapter 27
9. D. The error is in the RECOVER DATABASE command. In RMAN, you must
first use SET UNTIL... and then simply RECOVER DATABASE;.
10. D. The SYSDBA privilege is required, granted either with operating system
authentication or password file authentication. The user is immaterial.
SYSOPER can do complete recovery, but not incomplete recovery.
11. C. If multiple databases are making controlfile auto-backups to the same
destination (typically, a shared flash recovery area), then you have to supply
the database ID.
12. B. The only sequence that will work is B. Remember that the database must be
in mount mode for any RMAN operation. The backup at the end is optional,
but good practice.
13. C. The trace file is generated in response to a command issued by your user
process; therefore, it goes to the USER_DUMP_DEST.
14. A and C. RESETLOGS resets the log switch sequence number and changes the
database incarnation number. In previous versions, all previous backups and
archive logs were rendered useless, but this is no longer the case. The SCN
continues unchanged, and the database ID and the instance number are not
affected.
15. a-D. The variable %d is the database ID, in hexadecimal.
b-F. The variable %t is the instance thread number.
c-G. The variable %r is the database incarnation number.
d-H. The variable %s is the log switch sequence number.
ch27.indd 26ch27.indd 26 7/6/2005 11:07:36 AM7/6/2005 11:07:36 AM

All-in-1 / Oracle Database 10g OCP Certification All-in-One / Watson, Bersinic / 5790-3/Ch28
CHAPTER 28
Using Oracle Flashback
Database
In this chapter you will learn how to
• Determine which flashback technology to use for each recovery situation
• Configure and use Flashback Database
• Monitor the Flashback Database
• Use the Enterprise Manager Recovery Wizard to flash back a database
• Manage (or maintain) the llash recovery area
1
ch28.indd 1ch28.indd 1 7/11/2005 9:53:54 AM7/11/2005 9:53:54 AM

All-in-1 / Oracle Database 10g OCP Certification All-in-One / Watson, Bersinic / 5790-3
Oracle Database 10g OCP Certification All-in-One Exam Guide
2
A long time ago (in a galaxy far away...also known as Oracle 5) every version of every
data block could be logged to a Before Image file. This provided the rollback function,
which was handled at the block level rather than the transaction level. It did give the
capability to “roll back” the entire database, but the performance overhead was
generally unacceptable. In Oracle 6 the mechanism was replaced with the transaction
level before image logging in rollback (nowadays, “undo”) segments. This method
writes out pre-update versions of data in a row-oriented rather than blocked-based
fashion; the undo segments contain the bare minimum of information needed to
construct SQL statements that will reverse the effect of the original SQL statements.
Block-level logging is now provided again in release 10g as Flashback Database, but in
a fashion that has minimal performance overhead. The Flashback Database capability
lets you “rewind” the database to some point in the past, by backing out (in reverse
chronological order, at the block level) all the changes made to the datafiles.
This chapter deals with Flashback Database, but there are also other flashback
technologies available. These are summarized here in order to position Flashback
Database correctly; they are dealt with in detail in Chapter 29.
The Different Flashback Technologies
There are three distinct flashback technologies available, each implemented with
a different underlying architecture. Each technology has different capabilities and
limitations, but there is overlapping functionality between them. The typical reason
for using any type of flashback technology is to correct mistakes; it is vital to
understand what type of flashback technology is appropriate for correcting
different types of errors.
Flashback Database
Flashback Database is, by analogy, like pressing a rewind button on the database. The
current database is taken as the starting point, and it is taken back in time, change by
change, reversing all work done sequentially. The end result is as if you had done an
incomplete recovery: all work subsequent to the flashback point is lost, and indeed
the database must be opened with RESETLOGS. Clearly, this is a very drastic thing to
do. It allows you to back out changes that resulted in corruptions in a business sense:
inappropriate transactions, such as running your year-end archive-and-purge routines
before running your end-of-year reports.
If you have experienced physical corruption within the database or loss of media,
Flashback Database will not help; for that, you must use traditional, complete, recovery
methods. Flashback Database is an alternative to incomplete recovery following user
error—perhaps a more flexible and much faster alternative.
EXAM TIP Flashback Database will not back out physical corruption, only
logical corruption caused by user error.
ch28.indd 2ch28.indd 2 7/11/2005 9:54:26 AM7/11/2005 9:54:26 AM

All-in-1 / Oracle Database 10g OCP Certification All-in-One / Watson, Bersinic / 5790-3
Chapter 28: Using Oracle Flashback Database
3
PART II
Flashback Query: Versions, Transaction, and Table
There are three flashback techniques based on the use of undo segments. The first
flashback capability was initially introduced with release 9i of the database and is
substantially enhanced in release 10g. Flashback Query (the release 9i feature) lets
you query the database as it was at some time in the past, either for one select
statement or by taking your session temporarily back in time so that all its queries
will be against a previous version of the database. This can be used to see the state
of the data before a set of transactions was committed. What did the tables look like
half an hour ago? This can be invaluable in tracking down the cause of business
data corruptions, and it can also be used to correct some mistakes: by comparing
the current and previous versions of a table, you can see what was done incorrectly.
Flashback Versions makes it possible to select all versions of a row over a period of
time, to show a history of what has happened to the row, when it happened, who
did it, and the transaction identifiers of the transactions that made each change.
The second technique, Flashback Transaction, automates the repair process. Once
you have used Flashback Versions Query to identify which transaction caused the
problem, Oracle can construct SQL statements that will reverse the changes. This is
not the same as rolling back a committed transaction! It is impossible to roll back a
committed change, because the rules of a relational database do not permit this. But
it is possible to construct another transaction that will reverse the effect of the first,
erroneous, transaction. Unlike Flashback Database, Flashback Transaction does not
mean data loss: all other work done remains in effect, and the database stays current.
The third flashback technique based on undo data is Flashback Table. Having
determined that inappropriate work has been committed against one table, you can
instruct Oracle to reverse all changes made to that table since a particular point in
time, while leaving all other tables current.
Throughout any Flashback Query operation, the database remains open and all
objects (including those involved in the flashback) are available for use. Transactional
integrity and constraints are always enforced, which means that the flashback operation
might fail. For example, if a flashback of a transaction requires doing an insert, then
the primary key must not be in use. Flashing back one table may not be possible if it
has foreign key constraints; you will have to flash back all the related tables in one
operation.
EXAM TIP Flashback Query, in all its variations, relies on the use of UNDO
segments.
Flashback Drop
It is now possible to “un-drop” a table. This is implemented by mapping the DROP
command onto a RENAME command. Rather than actually being dropped, the table
is renamed to a system-generated name; it is only actually dropped later, when its
storage space is needed for a live object. If necessary, and if its storage space has not
ch28.indd 3ch28.indd 3 7/11/2005 9:54:26 AM7/11/2005 9:54:26 AM

All-in-1 / Oracle Database 10g OCP Certification All-in-One / Watson, Bersinic / 5790-3
Oracle Database 10g OCP Certification All-in-One Exam Guide
4
been reused, the object can be renamed back to its original name and thus restored.
Without this capability, the only way to get a table back after a drop was to do an
incomplete recovery to the point in time just before the table was dropped. This was
usually time consuming and meant the loss of all work done subsequently. The new
Flashback Database capability achieves the same result as incomplete recovery and
should be much faster, but work done on other tables following the drop is lost and
the database will be unavailable until the operation is completed.
Flashback Drop lets you reinstate the table as it was at the time that it was dropped,
with no loss of data whatsoever; the database remains current. This does not require
any use of backups, and neither is there any downtime for users. Note that Flashback
Drop is specifically for the DROP command; you cannot flash back a TRUNCATE
command. Along with the table itself, any associated indexes and permissions will
also be restored.
EXAM TIP You cannot flash back a table truncation, only a table drop.
When to Use Flashback Technology
Human error has always been the most difficult type of error from which to recover.
This is because as far as the database is concerned, human error is not an error at all.
The “error” is just another committed transaction, and the rules of a relational database
(the D for “Durable” of the ACID test) do not allow Oracle to back out committed
transactions. Depending on the nature of the error, the different Flashback technologies
may help you to recover, while minimizing downtime and loss of data.
The most drastic flashback technique is Flashback Database. Consider using this
only when you would also consider using incomplete recovery; the effect is the same,
though the downtime will typically be much less. Examples would include dropping a
user or a tablespace on the production system when you thought you were connected
to the test system. A table truncation (though not a table drop) would also be a time
to use Flashback Database.
Flashback Drop will restore a table (together with its indexes and grants) to the
state it was in at the time of the drop. Note that this will not restore a truncated table,
only one that has been completely dropped. There is no downtime involved, other
than the obvious fact that until the table is un-dropped, no one can get to it, and no
work will be lost. Unlike Flashback Database, Flashback Drop does not require any
configuration; it is always available, unless you specifically disable it.
For finer granularity of recovery, consider Flashback Table and Flashback Transaction.
These should not affect the users at all, other than that the work reversed is gone—
which is presumably the desired outcome. Like Flashback Drop, the Flashback Query,
Transaction, and Table facilities are always available without any configuration other
than granting appropriate privileges. They may, however, require some tuning of undo
management.
In some cases, you will have a choice of Flashback technologies. Consider an
example where a batch job is run twice. Perhaps you import a few hundred thousand
ch28.indd 4ch28.indd 4 7/11/2005 9:54:27 AM7/11/2005 9:54:27 AM

All-in-1 / Oracle Database 10g OCP Certification All-in-One / Watson, Bersinic / 5790-3
Chapter 28: Using Oracle Flashback Database
5
PART II
invoices into your accounting system from your billing system every day, and through
some mistake and lack of validation the same billing run is imported twice. If the
import is done as one huge transaction, then Flashback Transaction will reverse it. But
if it is done as many small transactions, rather than reversing them all it may be easier
to do a table-level flashback of all the tables affected. It may be that some of the billing
system interface tables are dropped after the run, but Flashback Drop will recover them.
But if the run involves a truncation, the only option is Flashback Database. Also, it may
be that the error was not discovered for some time and a significant amount of work has
been done on the basis of the erroneously imported data; then Flashback Database may
be the only way to ensure that you end up with
a database that is consistent in business terms.
When choosing a Flashback technique, always remember that Oracle will guarantee
transactional integrity, but that the results in business terms may not be what you want.
Flashback Database, or indeed incomplete recovery, is the only way to guarantee
absolutely the integrity of the database and conformity with your business rules, but
the price in lost time and data may be very high.
EXAM TIP In the case of media damage, such as losing a datafile, no flashback
technology can help. That is what the standard backup, restore, and recovery
procedures are for.
Flashback Database Architecture
Once Flashback Database is enabled, images of altered blocks are copied from time
to time from the database buffer cache to a new memory area within the SGA, the
flashback buffer. This flashback buffer is flushed to disk, to the flashback logs, by a new
background process: the Recovery Writer, or RVWR. There is no change to the usual
routine of writing changes to the log buffer, which the LGWR then flushes to disk;
flashback logging is additional to this. Unlike the redo log, flashback logging is not
a log of changes; it is a log of complete block images.
EXAM TIP Unlike redo logs, the flashback logs cannot be multiplexed and are
not archived. They are created and managed automatically.
Critical to performance is that not every change is copied to the flashback buffer,
only a subset of changes. If all changes to all blocks were copied to the buffer, then
the overhead in terms of memory usage and the amount of extra disk I/O required to
flush the buffer to disk would be crippling for performance. Internal algorithms limit
which versions of which blocks are placed in the flashback buffer, in order to restrict
its size and the frequency with which it will fill and be written to disk. These algorithms
are intended to ensure that there will be no performance hit to enabling Flashback
Database: they guarantee that even very busy blocks are logged only infrequently.
When conducting a database flashback, Oracle will read the flashback logs to
extract the versions of each changed database block, and copy these versions back
into the datafiles. As these changes are applied to the current database in reverse
ch28.indd 5ch28.indd 5 7/11/2005 9:54:27 AM7/11/2005 9:54:27 AM

All-in-1 / Oracle Database 10g OCP Certification All-in-One / Watson, Bersinic / 5790-3
Oracle Database 10g OCP Certification All-in-One Exam Guide
6
chronological order, this has the effect of taking the database back in time, by
reversing the writes that the DBWn process has done.
Since not every version of every changed block is copied into the flashback buffer
and hence to the flashback logs, it is not possible to flash back to an exact point in
time. It may be that a block was changed many times, but that the flashback log has
only a subset of these changes. Consider the case where block A was changed at 10:00
and again at 10:05, but that only the 10:00 version is in the flashback log. Block B was
changed at 10:05 and at 10:20, and both versions are in the flashback log. All the
changes have been committed. It is now 11:00, and you want to flash back to 10:15.
The flashback operation will restore the 10:00 version of block A and the 10:05
version of block B: it will take each changed block back as close as it can to, but no
later than, the desired time. Thus Flashback Database constructs a version of the
datafiles that is just before the time you want. This version of the datafiles may well
be totally inconsistent: as in this example, different blocks will be at different system
change numbers, depending on what happened to be available in the flashback log.
To complete the flashback process, Oracle then uses the redo log. It will recover all the
blocks to the exact time requested (in the example, only block A needs recovery), thus
synchronizing all the datafiles to the same SCN. The final stage is to roll back any
transactions that were uncommitted at the point, exactly as occurs at the last stage
of an incomplete recovery.
So database flashback is in fact a combination of several processes and data
structures. First, you must allocate some memory in the SGA (which will be
automatic—you cannot control how large the buffer is) and some space on disk to
store the flashback data, and start the RVWR process to enable flashback logging.
Then when doing a flashback, Oracle will use the flashback logs to take the database
back in time to before the time you want, and then apply redo logs (using whatever
archive redo log files and online redo log files are necessary) in the usual fashion for
incomplete recovery to bring the datafiles forward to the exact time you want. Then
the database can be opened with a new incarnation, in the same manner as following
a normal incomplete recovery.
EXAM TIP Flashback Database requires archivelog mode and the use of
ALTER DATABASE OPEN RESETLOGS to create a new incarnation of the
database.
Flashback Database requires archivelog mode, because without the availability of
the archive log stream it would not be possible to convert the inconsistent version of the
database produced by application of flashback logs to a consistent version that can be
opened. So what is the benefit of Flashback Database over incomplete recovery, which
also requires archivelog mode? It is in the speed and convenience with which you can
take the database back in time.
An incomplete recovery is always time consuming, because part of the process is
a full restore. The time for an incomplete recovery is to a large extent proportional to
the size of the database. By contrast, the time needed for a database flashback is largely
proportional to the number of changes that need to be backed out. In any normal
environment, the volume of changed data will be tiny when compared to the total
ch28.indd 6ch28.indd 6 7/11/2005 9:54:28 AM7/11/2005 9:54:28 AM

All-in-1 / Oracle Database 10g OCP Certification All-in-One / Watson, Bersinic / 5790-3
Chapter 28: Using Oracle Flashback Database
7
PART II
volume of data, so a flashback should be many times faster. Furthermore, Flashback
Database is very easy to use. Once configured, flashback logging will proceed completely
unattended, and a database can be flashed back very easily with one command. There
are none of the possibilities for error inherent in a traditional restore and recover
operation.
Configuring Flashback Database
Configuring a database to enable Flashback Database does require downtime: there is
a command that can be issued only while the database is in mount mode. To configure
Flashback Database, follow these steps:
1. Ensure that the database is in archivelog mode.
Archivelog mode is a prerequisite for enabling Flashback Database. Confirm
this by querying the V$DATABASE view:
SQL> select log_mode from v$database;
2. Set up a flash recovery area.
The flash recovery area is the location for the flashback logs. You have
no control over them other than setting the flash recovery area directory
and limiting its size. It is controlled with two instance parameters: DB_
RECOVERY_FILE_DEST specifies the destination directory; DB_RECOVERY_
FILE_DEST_SIZE restricts the maximum amount of space in bytes that it can
take up. Remember that the flash recovery area is used for purposes other than
flashback logs, and it will need to be sized appropriately. For example,
SQL> alter system set db_recovery_file_dest='/flash_recovery_area';
SQL> alter system set db_recovery_file_dest_size=8G;
3. Set the lifespan for the flashback retention target.
This setting is controlled by the DB_FLASHBACK_RETENTION_TARGET
instance parameter, which specifies a time in minutes (the default is one
day). The flashback log space is reused in a circular fashion, older data being
overwritten by newer data. This parameter instructs Oracle to keep flashback
data for a certain number of minutes before overwriting it:
SQL> alter system set db_flashback_retention_target=240;
It is only a target (four hours in this example), and if the flash recovery area is
undersized, Oracle may not be able to keep to it. But in principle, you should
be able to flash back to any time within this target.
4. Cleanly shut down and mount the database.
SQL> shutdown immediate;
SQL> startup mount;
5. Enable flashback logging.
While in mount mode,
SQL> alter database flashback on;
This will start the RVWR process and allocate a flashback buffer in the SGA.
The process startup will be automatic from now on.
ch28.indd 7ch28.indd 7 7/11/2005 9:54:28 AM7/11/2005 9:54:28 AM
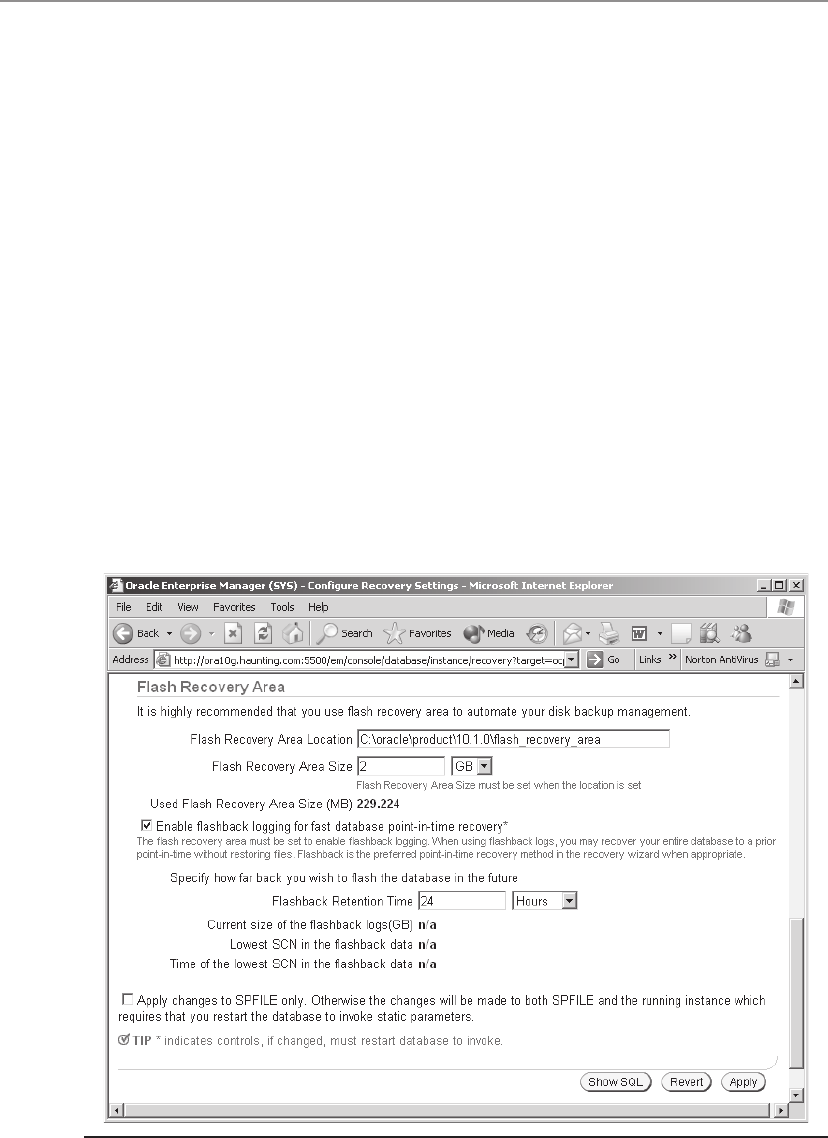
All-in-1 / Oracle Database 10g OCP Certification All-in-One / Watson, Bersinic / 5790-3
Oracle Database 10g OCP Certification All-in-One Exam Guide
8
6. Open the database.
SQL> alter database open;
Logging of data block images from the database buffer cache to the flashback
buffer will be enabled from now on.
The preceding steps configure Flashback Database using SQL*Plus. It can also be
done through Database Control.
Exercise 28-1: Configuring Flashback Database
with Database Control
Use Database Control to enable Flashback Database.
1. Connect to your database with Database Control as user SYS.
2. From the database home page, take the Maintenance tab, then the Configure
Recovery Settings link in the Backup/Recovery section.
3. In the Flash Recovery Area section shown in Figure 28-1, nominate a directory
for the flash recovery area and a maximum size. Check the Enable Flashback
Logging check box, and specify a flashback retention time.
4. Click Apply. This will lead to a prompt to restart the database, which you
must accept to complete the configuration.
Figure 28-1 Enabling Flashback Database with Database Control
ch28.indd 8ch28.indd 8 7/11/2005 9:54:29 AM7/11/2005 9:54:29 AM
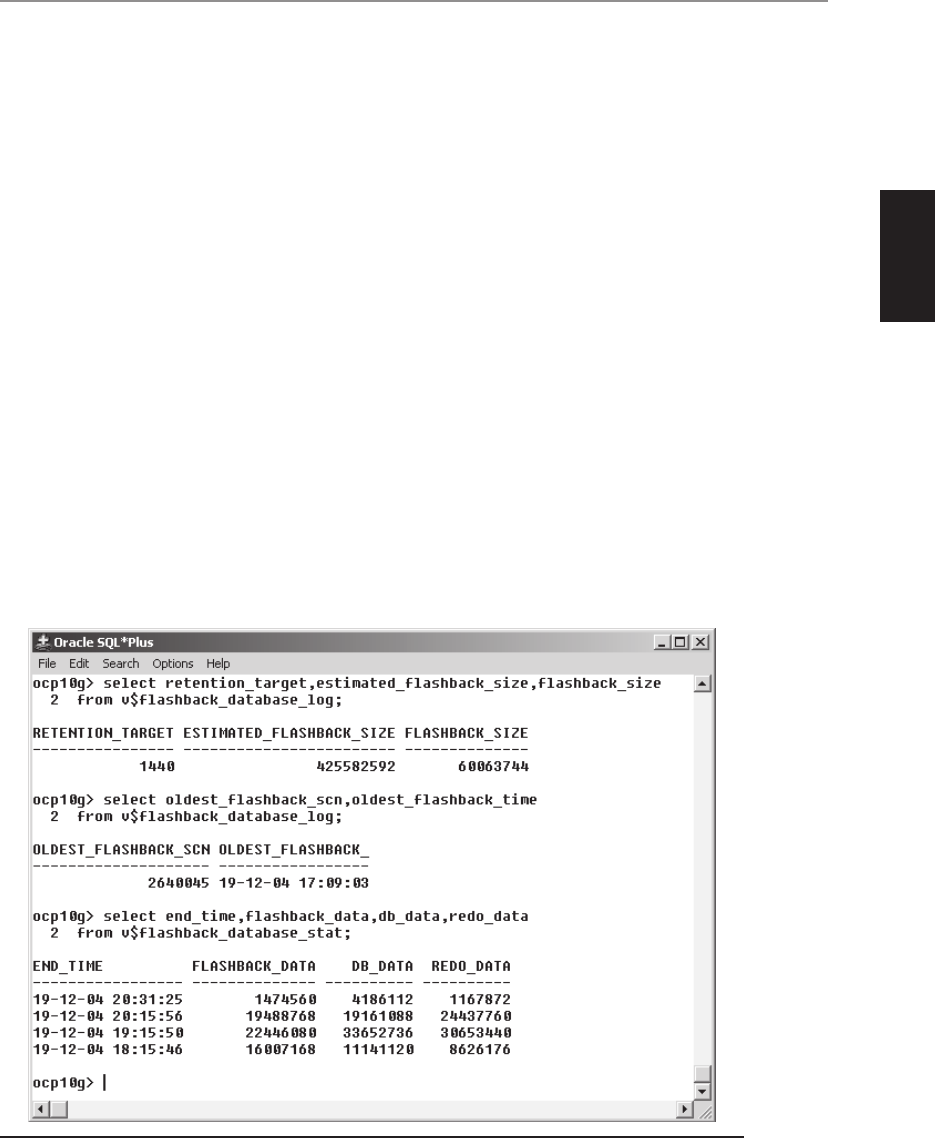
All-in-1 / Oracle Database 10g OCP Certification All-in-One / Watson, Bersinic / 5790-3
Chapter 28: Using Oracle Flashback Database
9
PART II
Monitoring Flashback Database
The flashback retention target is only a target; there is no guarantee that you could
actually flash back to a time within it. Conversely, you might be able to flash back to
beyond the target. The possible flashback period is a function of how much flashback
logging information is being generated per second, and how much space is available
to store this information before overwriting it with more recent data.
The most basic level of flashback monitoring is to confirm that it is actually
enabled:
SQL> select flashback_on from v$database;
On Unix you can see the RVWR process as an operating system process; on Windows
it will be another thread within the ORACLE.EXE process.
To monitor the current flashback capability and estimate the space needed for
flashback logs to meet your target, query the V$FLASHBACK_DATABASE_LOG view.
V$FLASHBACK_DATABASE_STAT gives a historical view of the rate of disk I/O for the
datafiles, the online redo log files, and the flashback log files.
In Figure 28-2, the first query shows the setting for the retention target in minutes,
as specified by the DB_FLASHBACK_RETENTION_TARGET instance parameter. Then
there is the actual space being taken up by flashback log data, and an estimate (based
on recent patterns of activity) of the space needed to meet the target. In order to keep
to the target of one day (1440 minutes), 425MB of flashback log would be needed,
but currently there is only 60MB of data.
Figure 28-2 Monitoring Flashback Database
ch28.indd 9ch28.indd 9 7/11/2005 9:54:30 AM7/11/2005 9:54:30 AM

All-in-1 / Oracle Database 10g OCP Certification All-in-One / Watson, Bersinic / 5790-3
Oracle Database 10g OCP Certification All-in-One Exam Guide
10
The second query shows exactly which SCN and time the flashback logs could take
the database back to. If the flash recovery area is sized appropriately and the retention
target is realistic, then there will be a sensible relationship between the time shown in
this query and the current time less the retention target.
The third query shows the price you are paying for enabling Flashback Database,
in terms of the bytes of I/O that it necessitates per hour. The top row will always be
an incomplete hour, up to the current time. In the example, the database is generating
about 20MB of flashback data per hour, which is consistent with the estimate of the
first query. The impact of this on performance will need to be discussed with your
system administrators, bearing in mind whether the system is I/O bound or not. For
comparison, the view also shows the I/O related to normal database activity. The view
will have one row per hour since the instance was started.
The size of the flashback buffer is outside the DBA’s control, but to see the current
size, query the V$SGASTAT view:
SQL> select * from v$sgastat where name like 'flashback%';
POOL NAME BYTES
------------ -------------------------- ----------
shared pool flashback generation buff 1493012
Flashback Database can also be monitored through Database Control. Navigate
to the Configure Recovery Settings window as in Exercise 28-1, and you will see the
equivalent information, with the exception of the flashback buffer size.
Using Flashback Database
There are three interfaces to Flashback Database: SQL*Plus, RMAN, and Database
Control. Whichever tool you choose to use, the method is the same:
1. Shut down the database.
2. Mount the database.
3. Flash back to a time, an SCN, or a log switch sequence number.
4. Open the database with RESETLOGS.
Provided that all archive logs required are available, a flashback operation will
proceed completely automatically.
Flash Back with SQL*Plus
The SQL*Plus flashback syntax will accept either a timestamp or a system change
number argument; unlike RMAN, it will not accept a date or a log switch
sequence number.
If you are not sure exactly what time you need to go back to (you will be very
fortunate if you know the exact timestamp or SCN), you can have several attempts,
by combining flashback with recovery. Consider this scenario:
ch28.indd 10ch28.indd 10 7/11/2005 9:54:30 AM7/11/2005 9:54:30 AM

All-in-1 / Oracle Database 10g OCP Certification All-in-One / Watson, Bersinic / 5790-3
Chapter 28: Using Oracle Flashback Database
11
PART II
It is 20 December 2004. At about 10:00 a junior DBA dropped an important schema
on the production database, when s/he thought s/he was logged on to the test database.
The error is noticed within ten minutes, but it is a big, busy database in a call center,
used for taking orders, and every second of processing counts. The first step is to shut
down the database:
SQL> shutdown abort;
There is no point in using any other type of shutdown; all work in progress is
going to be lost anyway, and you need to minimize the downtime. Then take the
database back to 10:00 as follows:
SQL> startup mount;
SQL> flashback database to timestamp
to_timestamp('20-12-04 10:00:00','dd-mm-yy hh24:mi:ss');
SQL> alter database open read only;
Note that unlike RECOVER DATABASE UNTIL TIME, this command is sensitive to
NLS settings for the timestamp format. While the database is in READ ONLY mode,
you can run a query against the dropped schema. If you discover that the schema is
still there, perhaps you can recover a bit more user data:
SQL> shutdown abort;
SQL> startup mount;
SQL> recover database until time '2004-12-20:10:02:00';
SQL> alter database open read only;
You run your test query again, and you discover that after recovering two more
minutes of data the schema is gone: it must have been dropped between 10:00 and
10:02. So you split the difference:
SQL> shutdown abort;
SQL> startup mount;
SQL> flashback database to timestamp
to_timestamp('20-12-04 10:01:00','dd-mm-yy hh24:mi:ss');
SQL> alter database open read only;
If the schema is not there now, flash back a few seconds further. If it is there, do
a few seconds of recovery. You can repeatedly issue flashback and recover commands
until you find the time that you want, testing by running queries while in read-only
mode. When you get to a point you are satisfied with, do one final shutdown and
open with RESETLOGS to create a new incarnation of the database that can be
opened for normal use:
SQL> shutdown abort;
SQL> alter database open resetlogs;
This method will minimize the loss of data and may take only a few minutes. An
incomplete recovery might take hours, particularly if you need to have several tries
before you get to the right time.
ch28.indd 11ch28.indd 11 7/11/2005 9:54:31 AM7/11/2005 9:54:31 AM

All-in-1 / Oracle Database 10g OCP Certification All-in-One / Watson, Bersinic / 5790-3
Oracle Database 10g OCP Certification All-in-One Exam Guide
12
Flash Back with RMAN
Within the Recovery Manager environment you have three options: you can flash back
to a time, to an SCN, or to a log switch sequence number, as in these examples:
RMAN> flashback database to time =
to_date('20-12-04 10:00:00','yy-mm-dd hh24:mi:ss');
RMAN> flashback database to scn=2728665;
RMAN> flashback database to sequence=2123 thread=1;
Apart from the minor changes in syntax, RMAN flashback is the same as SQL*Plus
flashback. In particular, you can use the same technique of repeatedly applying flashback
and recovery until you find the optimal point to open the database.
Flash Back with Database Control
If Flashback Database has been enabled, then Database Control will be aware of this.
If you request a point-in-time recovery, Database Control will suggest flashback by
default if there is sufficient information in the flashback logs, but you can elect to
do an incomplete recovery instead if you wish. The assumption is that flashback is
generally much faster than incomplete recovery.
The options for database flashback are to a time, to an SCN, or to a log switch
sequence number. The only limitation to be aware of is that the granularity of the
time-based flashback with Database Control is only to the minute, whereas RMAN
can flash back to a second and SQL*Plus can flash back to a timestamp, which can
be to a millionth of a second.
Exercise 28-2: Using Flashback Database
with Database Control
Simulate a bad transaction against a table, and flash back the database to before the
transaction. This exercise assumes that Exercise 28-1 has been completed, so that
flashback logging is running.
1. Connect to your database with SQL*Plus as user SYSTEM.
2. Create a table, and count the rows within it.
SQL> create table test as select * from from dba_users;
SQL> select count(*) from test;
3. Note the current system time, and delete all rows from the table, as in
Figure 28-3.
4. Connect to your database with Database Control as user SYS.
5. From the database home page take the Maintenance tab, and the Perform
Recovery link in the Backup/Recovery section.
ch28.indd 12ch28.indd 12 7/11/2005 9:54:32 AM7/11/2005 9:54:32 AM
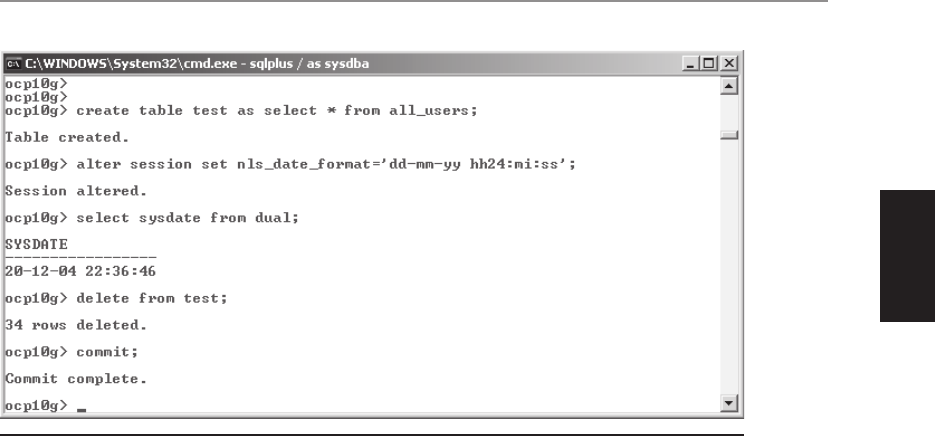
All-in-1 / Oracle Database 10g OCP Certification All-in-One / Watson, Bersinic / 5790-3
Chapter 28: Using Oracle Flashback Database
13
PART II
6. In the Perform Recovery: Type window, select Whole Database in the Object
Type drop-down box, and the “Recover to the current time or a previous
point-in-time” radio button. Click Next to continue.
7. Accept the request to restart the database, and when prompted click
Perform Recovery to reach the Perform Recovery: Type window. Click
Next to continue.
8. In the Perform Recovery: Point-in-Time window shown in Figure 28-4,
review the details regarding flashback. Select the “Recover to a prior point-
in-time” radio button, and enter the time noted in Step 3. Click Next to
continue.
9. In the Perform Recovery: Flashback window shown in Figure 28-5, accept
the default to use flashback rather than incomplete recovery. Click Next to
continue.
10. In the Perform Recovery: Review window, study the RMAN script that will be
executed and click Submit.
11. When the flashback operation is compete, return to your SQL*Plus session
and re-run the query in Step 2 to confirm that the table is as it was before the
bad transaction.
Figure 28-3 Simulate a bad transaction.
ch28.indd 13ch28.indd 13 7/11/2005 9:54:32 AM7/11/2005 9:54:32 AM
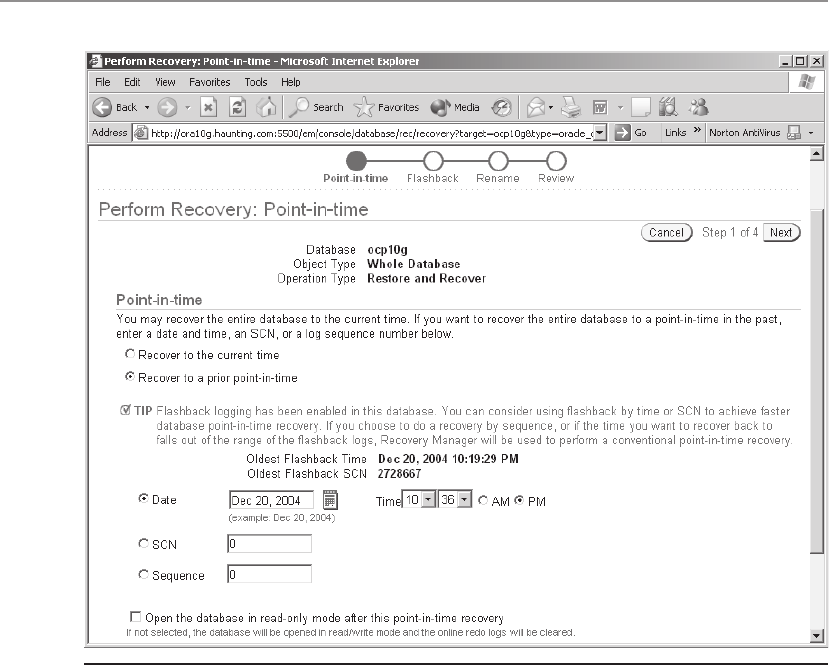
All-in-1 / Oracle Database 10g OCP Certification All-in-One / Watson, Bersinic / 5790-3
Oracle Database 10g OCP Certification All-in-One Exam Guide
14
Managing the Flash Recovery Area
The flash recovery area is a default location for all recovery-related files. These can
include archive logs, RMAN backups, controlfile auto-backups, multiplexed controlfile
and redo log copies, and the flashback log files. All these files can be redirected
elsewhere if you wish, except for the flashback logs; the DBA has no control over these,
and a flash recovery area must be defined if Flashback Database is enabled. The flash
recovery area can be located in either a file system directory (Oracle will create its own
subdirectories within this) or an ASM disk. The flash recovery area can only be a disk
destination; therefore, you must monitor its usage and back it up to tape.
Space Usage Within the Flash Recovery Area
The maximum size that the flash recovery area can grow to is limited by the parameter
DB_RECOVERY_FILE_DEST_SIZE. If the flash recovery area fills, the effect on the
database will depend on how it is being used. If archive logs are being written to the
Figure 28-4 Flashback recovery
ch28.indd 14ch28.indd 14 7/11/2005 9:54:33 AM7/11/2005 9:54:33 AM
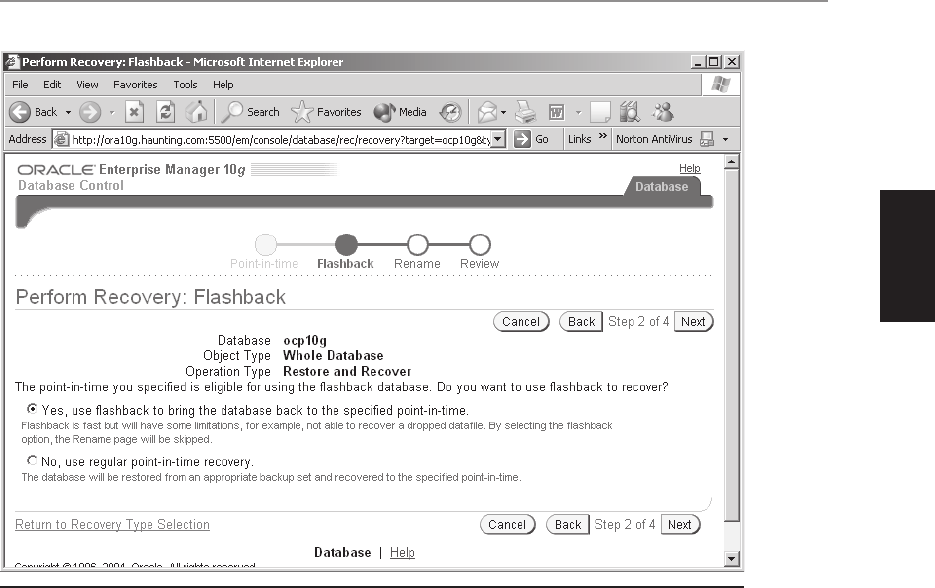
All-in-1 / Oracle Database 10g OCP Certification All-in-One / Watson, Bersinic / 5790-3
Chapter 28: Using Oracle Flashback Database
15
PART II
flash recovery area, then all DML will cease because archiving will become impossible.
If only RMAN backups are going to the flash recovery area, then the database will not
be affected at all, though the backups will fail. If Flashback Database has been enabled,
when the flash recovery area fills then DML will not be affected, but the flashback
capability will be reduced because Oracle will not be able to retain enough flash
data to meet the defined DB_FLASHBACK_RETENTION_TARGET.
The view V$RECOVERY_FILE_DEST gives an overall picture of space usage:
NAME SPACE_LIMIT
-------------------------------------------------- -----------
SPACE_USED SPACE_RECLAIMABLE NUMBER_OF_FILES
---------- ----------------- ---------------
C:\oracle\product\10.1.0\flash_recovery_area 2147483648
1278850560 300611072 73
In this example, the size of the flash recovery area has been limited to 2GB. The
files in the area, 73 of them, take up 1279MB, of which 301MB is “reclaimable,”
meaning that the space is occupied by backup files considered to be obsolete,
according to the RMAN retention policy.
Figure 28-5 Choice of flashback as against incomplete recovery
ch28.indd 15ch28.indd 15 7/11/2005 9:54:33 AM7/11/2005 9:54:33 AM
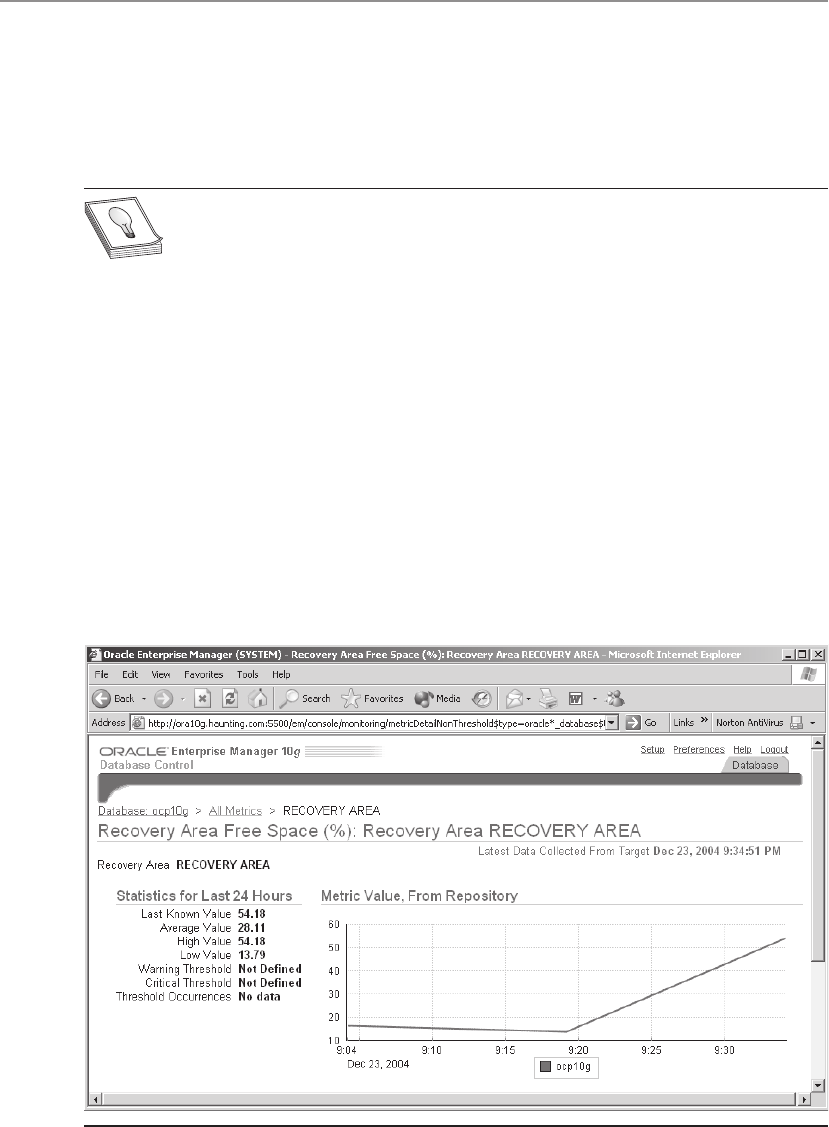
All-in-1 / Oracle Database 10g OCP Certification All-in-One / Watson, Bersinic / 5790-3
Oracle Database 10g OCP Certification All-in-One Exam Guide
16
Database Control also shows flash recovery area information, as a metric. This
shows the proportion of space used over the last twenty-four hours (or since instance
startup). From the database home page, take the Maintenance tab, then the All Metrics
link in the Related Links section. This can display a graph of the percentage of space
used, as in Figure 28-6.
TIP The “space used” figure is space used by your database. If you have put
non-database files in the flash recovery directory, Oracle will know nothing
about them.
To make the space considered “reclaimable” available for use, from an RMAN
prompt execute
RMAN> delete obsolete;
This will physically delete all backups that RMAN no longer deems necessary
according to its retention policy.
Certain backup commands can also clear files off disk as they execute:
RMAN> backup ... delete input;
Here, the DELETE INPUT keywords instruct RMAN to remove files as they are backed
up. This would normally be used when backing up archive log files to tape, or when
migrating disk backup sets to tape.
Figure 28-6 Space used in the flash recovery area
ch28.indd 16ch28.indd 16 7/11/2005 9:54:34 AM7/11/2005 9:54:34 AM

All-in-1 / Oracle Database 10g OCP Certification All-in-One / Watson, Bersinic / 5790-3
Chapter 28: Using Oracle Flashback Database
17
PART II
It is possible (and sometimes convenient) to use the same physical directory as
the flash recovery area for several databases. In that case, you will have to monitor the
overall disk usage with operating system utilities. Each database will know about its
own allowance of space, as set by the DB_RECOVER_FILE_DEST_SIZE parameter,
and its current space usage, but there is no way for the databases to be aware of each
others’ activity.
Oracle Corporation advises that the flash recovery area should be large enough for
your most recent full whole backup, plus any incremental backups and archive logs
needed to recover the backup. In other words, you should be able to store enough
information in the recovery area to perform a restore and recover without needing
to use tapes. In addition, there will need to be space for flashback logs, multiplexed
controlfile and online redo log files, and a controlfile auto-backup.
Backing Up the Flash Recovery Area
The flash recovery area is not intended for long-term storage, only a short-term store
of data needed for immediate, very fast, recovery, either complete or incomplete, or
for use by Flashback Database. For long-term backups, the contents of the flash recovery
area should be migrated to tape.
It is possible to back up some files in the flash recovery area using operating system
utilities, so long as you take care that the files are not actually in use while you do it.
For the flashback logs, this is impossible unless you actually shut down the database.
For the other file types, it is a matter of coordinating the backup with other work. But
it will always be easier to back up the flash recovery area with RMAN.
There are two RMAN commands relevant to the flash recovery area. The first,
RMAN> backup recovery area:
backs up all recovery files created in the flash recovery area that can be backed up:
• Full and incremental backup sets
• Datafile and archive log file image copies
• Controlfile auto backups
• Archive logs
It will not back up the following file types:
• Flashback logs
• Current controlfile
• Online redo log files
Flashback logs cannot be backed up, other than by using operating system
utilities with the database closed. The current controlfile must be backed up using
the appropriate RMAN or SQL*Plus commands. Online redo log files are never
backed up.
ch28.indd 17ch28.indd 17 7/11/2005 9:54:35 AM7/11/2005 9:54:35 AM
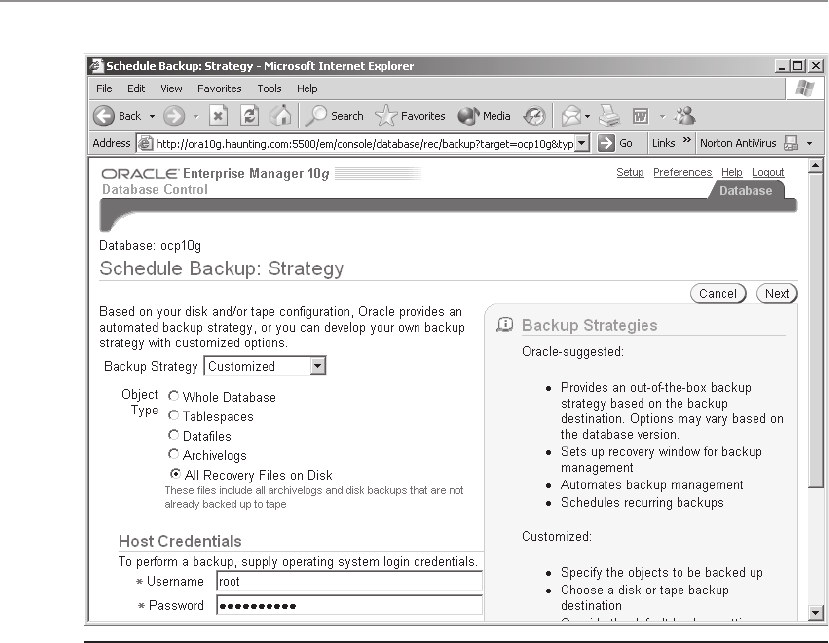
All-in-1 / Oracle Database 10g OCP Certification All-in-One / Watson, Bersinic / 5790-3
Oracle Database 10g OCP Certification All-in-One Exam Guide
18
The second RMAN command related to the flash recovery area,
RMAN> backup recovery files;
extends the first command to include all recovery files, whether or not they are in the
flash recovery area. Both commands in the examples assume that there are configured
defaults for the channels. The commands can be suffixed with DELETE ALL INPUT to
free up the disk space.
Database Control also has an interface to recovery file backup. From the database
home page, take the Maintenance tab, and then the Schedule Backup link in the
Backup/Recovery section. From the Schedule Backup: Strategy page shown in
Figure 28-7, select a Customized backup strategy and the All Recovery Files On
Disk radio button.
Limiting the Amount of
Flashback Data Generated
Enabling Flashback Database may have an effect on online performance. The algorithm
Oracle uses to restrict the amount of data written out to the flashback logs is designed
to minimize the impact on performance, but (particularly on a system that is I/O
Figure 28-7 Backing up recovery files with Database Control
ch28.indd 18ch28.indd 18 7/11/2005 9:54:35 AM7/11/2005 9:54:35 AM

All-in-1 / Oracle Database 10g OCP Certification All-in-One / Watson, Bersinic / 5790-3
Chapter 28: Using Oracle Flashback Database
19
PART II
bound) you may want to restrict it further. In some circumstances, you could also find
that the volume of flashback data generated to meet the target is excessive. It is possible
to exclude tablespaces from flashback logging, but the recovery process is then a little
more complex.
Excluding Tablespaces from Flashback
By default, if Flashback Database is enabled then flashback data is recorded for all
tablespaces, but you can set the attribute with
SQL> alter tablespace <tablespace_name> flashback off;
which can be executed at any time, or
SQL> alter tablespace <tablespace_name> flashback on;
which can be executed only when the database is in mount mode. To view the status
of flashback, there is a column in the V$TABLESPACE view:
SQL> select tablespace_name,flashback_on from v$tablespace;
Note that the information is displayed in a dynamic performance view, not the data
dictionary view DBA_TABLESPACES, because flashback is enabled through the
controlfile, not the data dictionary.
Candidate tablespaces for excluding from flashback are tablespaces where you
can tolerate a long period of downtime in comparison to the rest of the database;
tablespaces you can drop whenever you please; or tablespaces that can be restored
and recovered very quickly.
Flash Back When Tablespaces
Are Not Logging Flashback Data
If one or more tablespaces are not generating flashback data, then before carrying out
a flashback operation the files making up the tablespaces must be taken offline. Then
the flashback, including the implicit recovery, can proceed as normal. Remember that
offline datafiles are ignored by RECOVER; it is the same with FLASHBACK.
You will not be able to open the database (with or without RESETLOGS) until you
have either dropped the datafiles making up the offlined tablespaces or restored and
recovered them to the same point as the flashback. To drop them is a drastic action,
but if it is a tablespace that you can just drop and re-create, and reinstantiate the objects
within it, then this will minimize the downtime. Otherwise, after the flashback bring
the datafiles making up the tablespace online. Then restore them, and do an incomplete
recovery up to the time to which you flashed back. This will synchronize all the datafiles,
and you can then open with RESETLOGS.
Excluding some tablespaces from flashback logging will help with online
performance, but the price you pay is that you will have to do a partial restore as
part of the recovery process. This will generally still be quicker than the full restore
needed for an incomplete recovery.
ch28.indd 19ch28.indd 19 7/11/2005 9:54:36 AM7/11/2005 9:54:36 AM

All-in-1 / Oracle Database 10g OCP Certification All-in-One / Watson, Bersinic / 5790-3
Oracle Database 10g OCP Certification All-in-One Exam Guide
20
Chapter Review
This chapter covered Flashback Database. It is a powerful capability, allowing you
to “rewind” the database: to back out all work done, in reverse order, and take the
database back in time. The end result is as though you had done an incomplete
recovery, but whereas incomplete recovery is a process that may take hours, a
flashback might take only a few minutes.
Enabling Flashback Database will start a new background process: the Recovery
Writer, or RVWR. There will also be a flashback buffer allocated in the SGA, and from
then on block images will be written out to a new disk-based data structure, the
flashback logs. You have no control over any of these components beyond setting the
location of the flash recovery area, which will be used (among other things) for the
flashback logs. You can instruct Oracle to retain enough flashback data to flash back
for a certain period, but whether Oracle can actually do that will be dependent on the
space available in the flash recovery area.
You must monitor the flash recovery area to see how full it is getting, and reclaim
space regularly by deleting no longer needed backups and archive logs. It must also be
backed up regularly to stable storage.
Questions
1. Under which of these circumstances might Flashback Database be of use?
(Choose the best answer.)
A. To recover a dropped table
B. To recover a dropped schema
C. To recover a damaged datafile
D. To reverse a bad transaction
E. All of the above
2. Which of the following is correct about Flashback Database? (Choose two
correct answers.)
A. You should set the FLASHBACK_BUFFER_SIZE parameter.
B. You must create the flashback log files.
C. You must set the DB_RECOVERY_FILE_DEST parameter.
D. You must issue ALTER SYSTEM FLASHBACK ON.
E. You must issue ALTER DATABASE FLASHBACK ON.
3. Why is archivelog mode required to enable Flashback Database? (Choose the
best answer.)
A. Because the redo log data is needed to reverse changes
B. To recover to an exact time after flashback
C. Because ARCn processes are needed to write flashback data
D. Archivelog mode is optional, it is not required
ch28.indd 20ch28.indd 20 7/11/2005 9:54:37 AM7/11/2005 9:54:37 AM

All-in-1 / Oracle Database 10g OCP Certification All-in-One / Watson, Bersinic / 5790-3
Chapter 28: Using Oracle Flashback Database
21
PART II
4. What state must the database be in to turn on the Flashback Database feature?
(Choose the best answer.)
A. Shutdown
B. Nomount
C. Mount
D. Open
5. Which of the following commands is not necessary for a Flashback Database
operation? (Choose all that apply.)
A. Alter database open readonly
B. Alter database open resetlogs
C. Flashback database to...
D. Recover database until...
E. Shutdown
F. Startup mount
6. What tool(s) can be used to perform a database flashback? (Choose the
best answer.)
A. Database Control and RMAN
B. Database Control and SQL*Plus
C. RMAN and SQL*Plus
D. Database Control, RMAN, and SQL*Plus
7. You have set the DB_FLASHBACK_RETENTION_TARGET to one day, but the
flash recovery area does not have room for this much flashback data. What
will happen? (Choose the best answer.)
A. The database will hang until space is freed up.
B. It will depend on whether AUTOEXTEND has been enabled for the flash
recovery area.
C. The database will continue to function, but flashback operations
may fail.
D. If any backups in the flash recovery area are not needed according to the
retention policy, they will be automatically removed.
8. A user error has occurred, but the effects are limited to one tablespace. You
want to flash back this one tablespace, but not the others. What must you do?
(Choose the best answer.)
A. Execute ALTER TABLESPACE...FLASHBACK OFF for all the other
tablespaces, and then flash back the database.
B. Take the other datafiles offline, flash back the database, and bring the
other datafiles online.
ch28.indd 21ch28.indd 21 7/11/2005 9:54:37 AM7/11/2005 9:54:37 AM

All-in-1 / Oracle Database 10g OCP Certification All-in-One / Watson, Bersinic / 5790-3
Oracle Database 10g OCP Certification All-in-One Exam Guide
22
C. Flash back the whole database, and then do complete recovery of the other
tablespaces.
D. It is not possible to flash back one tablespace and leave the rest of the
database current.
9. Within RMAN, you issue the command BACKUP RECOVERY AREA. What
files in the recovery area will be backed up? (Choose all that apply.)
A. RMAN backup sets
B. RMAN image copies
C. Archive redo logs
D. Multiplexed online redo logs
E. Multiplexed controlfile copies
F. Controlfile auto-backups
G. Flashback logs
10. You have enabled Flashback Database, but you suspect that flashback logging
is impacting adversely on performance. What could you do? (Choose the best
answer.)
A. Reduce the DB_FLASHBACK_RETENTION_TARGET parameter.
B. Tune the frequency of RVWR writes.
C. Stop flashback logging for some tablespaces.
D. Investigate the flashback log multiplexing and archiving strategy.
E. Tune the flashback buffer.
Answers
1. B. The only way to recover a dropped schema (other than incomplete
recovery) is Flashback Database. No flashback technology will help with
physical corruption. A dropped table would be better fixed with Flashback
Table, and a bad transaction, with Flashback Transaction.
2. C and E. The DB_RECOVERY_FILE_DEST instance parameter permits the
instance to use a recovery area, and ALTER DATABASE FLASHBACK ON starts
the Recovery Writer. There is no such parameter as FLASHBACK_BUFFER_
SIZE, and the flashback logs are created automatically. Remember too that
flashback is an attribute of the database, not the instance.
3. B. Flashback is only approximate; redo is needed to reach the precise point
required. Note that redo can never be used to reverse changes, only to redo
them, and that the flashback data is written by the RVWR process, not by the
archiver processes.
ch28.indd 22ch28.indd 22 7/11/2005 9:54:38 AM7/11/2005 9:54:38 AM

All-in-1 / Oracle Database 10g OCP Certification All-in-One / Watson, Bersinic / 5790-3
Chapter 28: Using Oracle Flashback Database
23
PART II
4. C. No options here, the database must be in mount mode to issue ALTER
DATABASE FLASHBACK ON.
5. A and D. The optional steps are to OPEN READONLY and to RECOVER
DATABASE UNTIL.
6. D. Any of the three tools listed can be used: Database Control, RMAN, and
SQL*Plus.
7. C. The retention target is only a target, and Oracle will continue to function
even if it cannot be met—but your flashbacks may fail. The database will
hang, though, if it is not possible to archive logs. AUTOEXTEND is an
attribute that can be applied to datafiles, not the flash recovery area. Backups
will be automatically removed only if you instruct RMAN to do it.
8. D. The whole database must be synchronized before it can be opened.
Executing ALTER TABLESPACE...FLASHBACK OFF restricts tablespaces from
generating flashback data. The other alternatives won’t work because the other
datafiles will not be synchronized.
9. A, B, C, and F. The file types that cannot be backed up with this command
are online logs and the flashback logs (which are never backed up), and
the current controlfile (for which you must use the BACKUP CURRENT
CONTROLFILE command).
10. C. This will reduce the volume of flashback data written to disk, but will also
mean that flashback operations may take a little longer and be a little more
complicated. Reducing the DB_FLASHBACK_RETENTION_TARGET parameter
will not have an effect on performance, only on how far you can flash back.
The tuning options are impossible; Oracle controls these. And investigating
the strategy is useless because flashback logs cannot be multiplexed or
archived.
ch28.indd 23ch28.indd 23 7/11/2005 9:54:38 AM7/11/2005 9:54:38 AM

All-in-1 / Oracle Database 10g OCP Certification All-in-One / Watson, Bersinic / 5790-3 / Blind folio p. 24
ch28.indd 24ch28.indd 24 7/11/2005 9:54:39 AM7/11/2005 9:54:39 AM

All-in-1 / Oracle Database 10g Certification All-in-One / Watson & Bersinic / 5790-3 /Chapter 29
CHAPTER 29
Recovering from User Errors
In this chapter you will learn how to
• Recover a dropped table using Flashback technology
• Manage the recycle bin
• Perform a Flashback Table operation
• Recover from user errors using Flashback Versions Query
• Perform transaction-level recovery using Flashback Transaction Query
1
ch29.indd 1ch29.indd 1 7/6/2005 10:43:27 AM7/6/2005 10:43:27 AM

Oracle Database 10g OCP Certification All-in-One Exam Guide
2
All-in-1 / Oracle Database 10g Certification All-in-One / Watson & Bersinic / 5790-3 /Chapter 29
The previous chapter introduced Flashback Database, a powerful but drastic feature
that is functionally equivalent to an incomplete recovery. This chapter covers the other
flashback technologies available in an Oracle 10g database. These are not as extreme
as Flashback Database in that they do not entail either downtime or loss of data. They
are still, however, very powerful techniques for recovering from errors by backing out
changes that you would prefer not to have been committed.
The flashback technologies discussed here are, first, Flashback Drop, enabled by
the way the DROP TABLE command is used and implemented, and second, various
ways of exploiting the UNDO capability: Flashback Versions Query, Flashback Table
Query, and Flashback Transaction Query.
Flashback and the ACID Test
Remember the ACID test, described in Chapter 9. This is part of the rules to which a
relational database must conform, and is critical to an understanding of the flashback
technologies: both their capabilities and their limitations.
All DML transactions are terminated with either a COMMIT or a ROLLBACK
statement. Until then, while the transaction is in progress, the principle of transaction
isolation (the I of the ACID test) as implemented by Oracle guarantees that no one,
other than the session carrying out the transaction, can see the changes it has made.
Furthermore, the principle of atomicity (the A of the ACID test) guarantees that
the session can terminate the transaction with a ROLLBACK, which will reverse the
changes completely; no other session will have any knowledge that the changes were
ever made. If the transaction is terminated with a COMMIT, then the changes will be
immediately visible to all other sessions. The only exception to this is any sessions
that for reasons of read consistency (the C of the ACID test) need to be protected
from the changes. Furthermore, once a transaction is committed, it must be
absolutely impossible for the database to lose the changes; this is the D, for durable,
of the ACID test.
In many ways, DDL commands are transactions like any other. The rules of a
relational database require that the effect of committed DDL can never be reversed,
and all DDL is committed, automatically. You have no control over this; the COMMIT
is an integral part of all DDL commands.
Flashback Drop provides a means whereby you can reverse the effect of a DROP
TABLE command, but there is no guarantee that it will succeed. This will depend on
other activity in the database since the DROP was executed. You can use the various
Flashback Query commands to reverse DML commands, but again, whether this will
succeed will depend on what other activity has occurred in the intervening time. It is
impossible to roll back a committed transaction, whether DML or DDL. The ACID
test does not permit this. The flashback technologies rely on constructing another
ch29.indd 2ch29.indd 2 7/6/2005 10:44:00 AM7/6/2005 10:44:00 AM

Chapter 29: Recovering from User Errors
3
PART II
All-in-1 / Oracle Database 10g Certification All-in-One / Watson & Bersinic / 5790-3 /Chapter 29
transaction that will reverse the impact of the original transaction, but it may be that
this new transaction will fail, because of other, incompatible committed changes.
Flashback Drop
Accidentally dropping a table is terrifyingly easy to do. It is not just that you can drop
the wrong table because of a typing error; it could be the right table, but you are
connected to the wrong schema, or logged onto the wrong instance. You can reduce
the likelihood of this by setting your SQL*Plus prompt, for example,
SQL> set sqlprompt "_user'@'_connect_identifier> "
SYSTEM@ocp10g>
TIP To set your sqlprompt automatically for all SQL*Plus sessions, put the
preceding command into the glogin.sql file, in the ORACLE_HOME/sqlplus
/admin directory.
Flashback Drop lets you reinstate a previously dropped table (but not a truncated
table!) exactly as it was before the drop. All the indexes will also be recovered, and
also any triggers and grants. Unique, primary key, and not-null constraints will also be
recovered, but not foreign key constraints.
EXAM TIP The Flashback Drop command applies only to tables, but all
associated objects will also be recovered, except for foreign key constraints.
The Implementation of Flashback Drop
In earlier releases of the Oracle Database, when a table was dropped all references to
it were removed from the data dictionary. If it were possible to see the source code for
the old DROP TABLE command, you would see that it was actually a series of DELETE
commands against the various tables in the SYS schema that define a table and its
space usage, followed by a COMMIT. There was no actual clearing of data from disk,
but the space used by a dropped table was flagged as being unused and thus available
for reuse. Even though the blocks of the table were still there, there was no possible
way of getting to them because the data dictionary would have no record of which
blocks were part of the dropped table. The only way to recover a dropped table was to
do a point-in-time recovery, restoring a version of the database from before the drop
when the data dictionary still knew about the table.
In release 10g of the Oracle database, the implementation of the DROP TABLE
command has been completely changed. Tables are no longer dropped at all; they are
renamed.
ch29.indd 3ch29.indd 3 7/6/2005 10:44:00 AM7/6/2005 10:44:00 AM
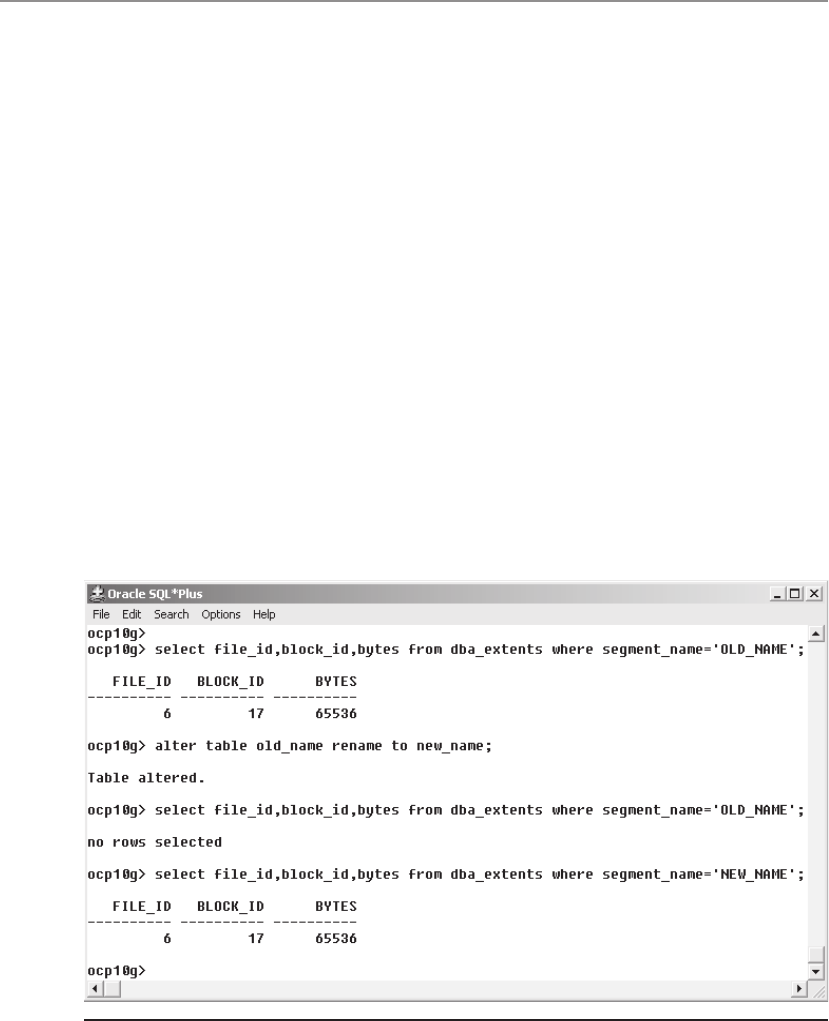
Oracle Database 10g OCP Certification All-in-One Exam Guide
4
All-in-1 / Oracle Database 10g Certification All-in-One / Watson & Bersinic / 5790-3 /Chapter 29
In Figure 29-1, you can see that a table, OLD_NAME, occupies one extent of 64KB,
which starts in the seventeenth block of file six. After the rename to NEW_NAME,
the storage is exactly the same; therefore, the table is the same. Querying the view
DBA_OBJECTS would show that the table’s object number had not changed either.
The release 10g implementation of the DROP TABLE command has been mapped
internally onto a RENAME command, which affects the table and all its associated
indexes, triggers, and constraints, with the exception of foreign key constraints, which
are dropped. Foreign key constraints have to be dropped for real. If they were maintained,
even with a different name, then DML on the non-dropped parent table would be
constrained by the contents of a dropped table, which would be absurd.
Grants on tables do not have names, so they can’t be renamed. But even though
when you grant a privilege you specify the object by name, the underlying storage of
the grant references the object by number. As the object numbers don’t get changed
by a RENAME operation, the grants are still valid.
As far as normal SELECT and DML statements are concerned, a dropped table is
definitely dropped. There is no change to any other commands, and all your software
will assume that a dropped table really is gone. But now that DROP is in fact a
RENAME, it becomes possible to un-drop, by renaming the table back to its original
name. However, this is not guaranteed to succeed. It may be that the space occupied
by the dropped table has been reused. There are also complications if in the interim
period another table has been created, reusing the same name as the dropped table.
Figure 29-1 Renaming tables with SQL*Plus
ch29.indd 4ch29.indd 4 7/6/2005 10:44:01 AM7/6/2005 10:44:01 AM

Chapter 29: Recovering from User Errors
5
PART II
All-in-1 / Oracle Database 10g Certification All-in-One / Watson & Bersinic / 5790-3 /Chapter 29
The dropped objects can be queried, by looking at the “recycle bin” to obtain their
new names. This is a listing of all objects that have been dropped, mapping the original
table and index names onto the system-generated names of the dropped objects. There
is a recycle bin for each user, visible in the USER_RECYCLEBIN data dictionary view,
or for a global picture, you can query DBA_RECYCLEBIN. The space occupied by the
recycle bin objects will be reused automatically when a tablespace comes under space
pressure (after which time the objects cannot be recovered), or you can manually force
Oracle to really drop the objects with the PURGE command.
TIP There are no guarantees of success with Flashback Drop, but it may well
work. The sooner you execute it, the greater the likelihood of success.
Using Flashback Drop
Consider the example in Figure 29-2. This is the most basic use of Flashback Drop.
The DROP command renames the table to a system-generated name, and Flashback
Drop brings it back. Variations in syntax are
SQL> drop table <table_name> purge;
SQL> flashback table <table_name> to before drop rename to <new_name>;
The first command really will drop the table. The PURGE keyword instructs Oracle
to revert to the true meaning of DROP: all references to the table are deleted, and it
can never be brought back. The second command will flash back the table but give it
a new name. This would be essential if, between the drop and the flashback, another
table had been created with the same name as the dropped table. Note that although
a table can be renamed during a flashback, it cannot change the schema: all flashback
operations occur within the schema to which the object belongs. The indexes, triggers,
and constraints that are flashed back along with the table keep their recycle bin
names. If you want to return them to their original names, you must rename them
manually after the flashback.
There are two points to emphasize here. First, Flashback Drop can only recover
from a DROP. It cannot recover from a TRUNCATE. Second, if you drop a user with,
for example,
SQL> drop user scott cascade;
you will not be able to recover any of SCOTT’s tables with flashback. The drop of the
schema means that Oracle cannot maintain the objects at all, even in the recycle bin,
because there is no user to connect them to.
Database Control also has an interface to Flashback Drop. From the database
home page, take the Maintenance tab and then Perform Recovery in the Backup/
Recovery section. In the drop-down box for Object Type, select Tables, and then the
ch29.indd 5ch29.indd 5 7/6/2005 10:44:02 AM7/6/2005 10:44:02 AM
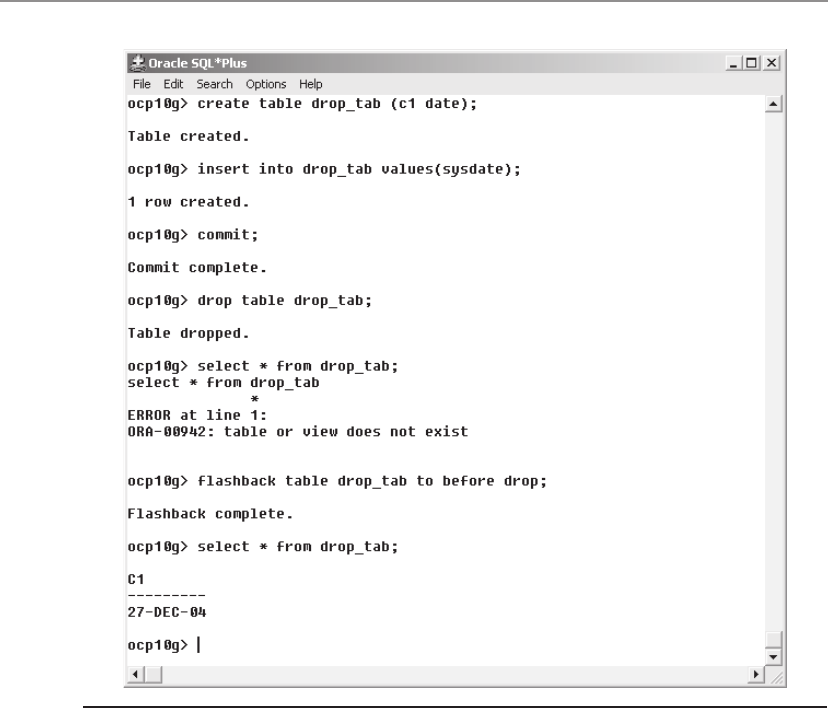
Oracle Database 10g OCP Certification All-in-One Exam Guide
6
All-in-1 / Oracle Database 10g Certification All-in-One / Watson & Bersinic / 5790-3 /Chapter 29
radio button for Flashback Dropped Tables. This will take you to the Perform Recovery:
Dropped Objects Selection window, where you can view all the dropped tables in
your database. From here you can select from the dropped tables or go on to recover
them, as shown in Figure 29-3.
If a table is dropped and then another table is created with the same name and
then also dropped, there will be two tables in the recycle bin. They will have different
recycle bin names, but the same original name. By default, a Flashback Drop
command will always recover the most recent version of the table, but if this is not
the version you want, you can specify the recycle bin name of the version you want
recovered, rather than the original name. For example,
SQL> flashback table "BIN$sn0WEwXuTum7c1Vx4dOcaA==$0" to before drop;
Figure 29-2 Using Flashback Drop
ch29.indd 6ch29.indd 6 7/6/2005 10:44:02 AM7/6/2005 10:44:02 AM
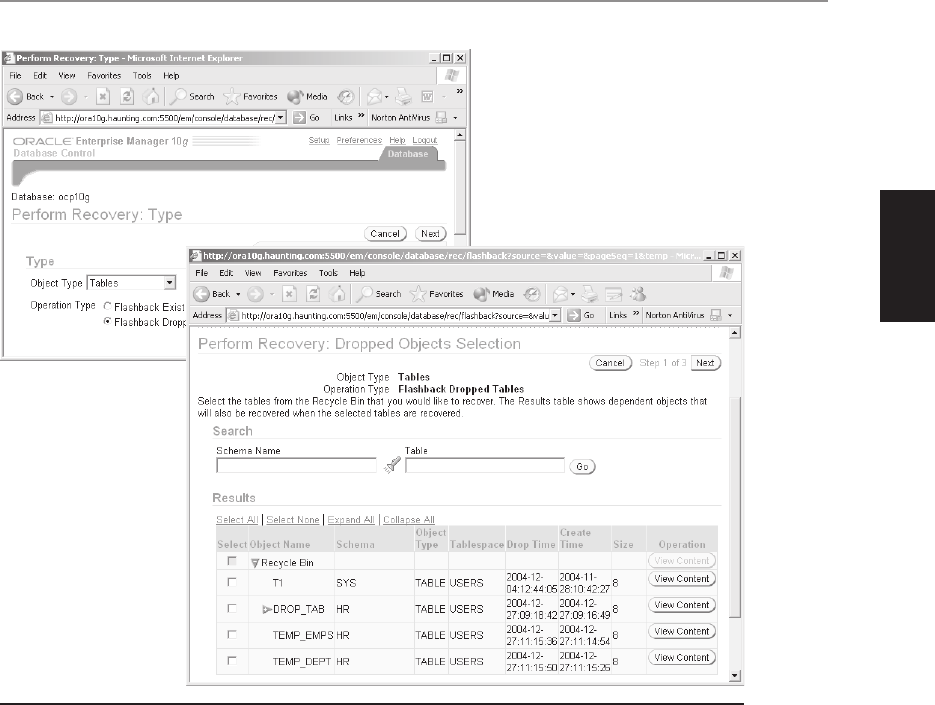
Chapter 29: Recovering from User Errors
7
PART II
All-in-1 / Oracle Database 10g Certification All-in-One / Watson & Bersinic / 5790-3 /Chapter 29
Exercise 29-1: Using Flashback
Drop with SQL*Plus
Create a new schema, and a table within it. Drop the table, and then recover it with
Flashback Drop.
1. Connect to your database as user SYSTEM with SQL*Plus.
2. Create a user for this exercise.
SQL> create user dropper identified by dropper;
SQL> grant connect,resource to dropper;
SQL> connect dropper/dropper;
Figure 29-3 The Database Control interface to Flashback Drop
ch29.indd 7ch29.indd 7 7/6/2005 10:44:03 AM7/6/2005 10:44:03 AM
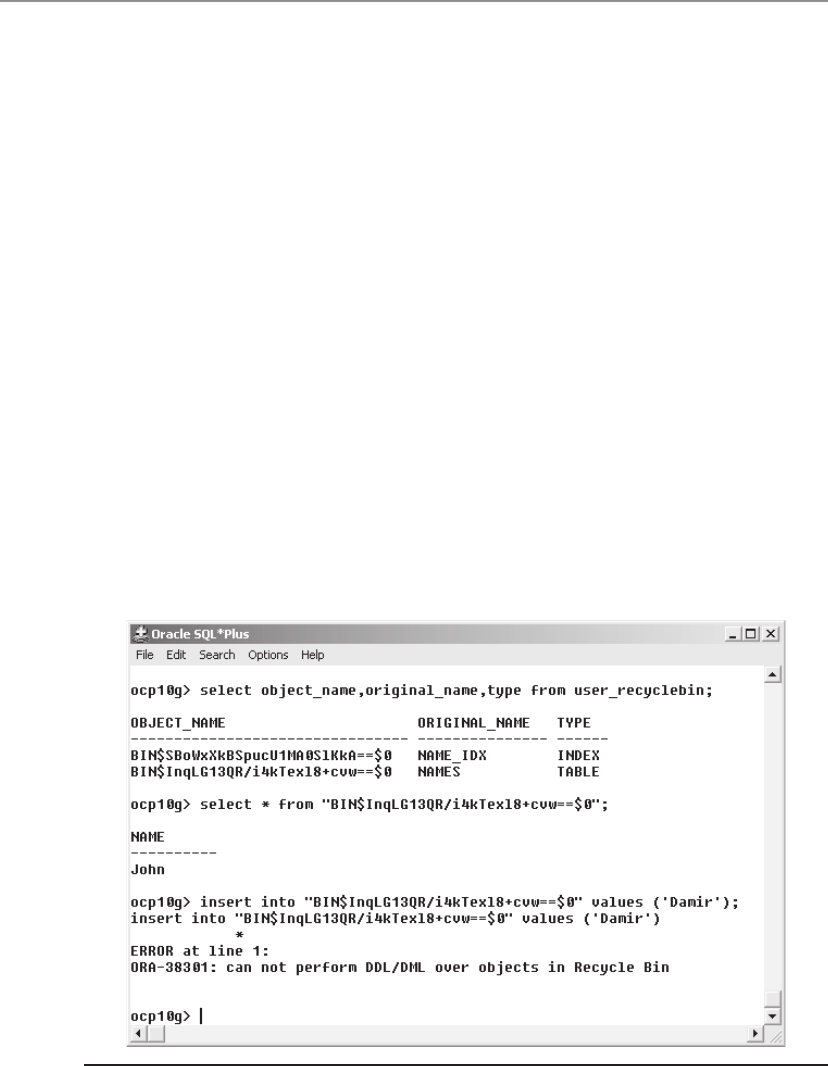
Oracle Database 10g OCP Certification All-in-One Exam Guide
8
All-in-1 / Oracle Database 10g Certification All-in-One / Watson & Bersinic / 5790-3 /Chapter 29
3. Create a table, with an index and a constraint, and insert a row.
SQL> create table names (name varchar2(10));
SQL> create index name_idx on names(name);
SQL> alter table names add (constraint name_u unique(name));
SQL> insert into names values ('John');
SQL> commit;
4. Confirm the contents of your schema.
SQL> select object_name,object_type from user_objects;
SQL> select constraint_name,constraint_type,table_name from user_constraints;
5. Drop the table.
SQL> drop table names;
6. Re-run the queries from Step 4. Note that the objects and the constraints do
still exist but that they now have system-generated names, all prefixed with BIN$.
7. Query your recycle bin to see the mapping of the original name to the recycle
bin names.
SQL> select object_name,original_name,type from user_recyclebin;
8. Demonstrate that it is possible to query the recycle bin but that you cannot do
DML against it, as in Figure 29-4. Note that the table name must be enclosed
in double quotes to allow SQL*Plus to parse the nonstandard characters
correctly.
9. Recover the table with Flashback Drop.
SQL> flashback table names to before drop;
Figure 29-4 Querying the recycle bin
ch29.indd 8ch29.indd 8 7/6/2005 10:44:04 AM7/6/2005 10:44:04 AM

Chapter 29: Recovering from User Errors
9
PART II
All-in-1 / Oracle Database 10g Certification All-in-One / Watson & Bersinic / 5790-3 /Chapter 29
10. Re-run the queries from Step 4. Note that the index and the constraint have
retained their recycle bin names.
11. Rename the index and constraint to the original names. In these examples,
substitute your own recycle bin names:
SQL> alter index "BIN$SBoWxXkBSpucU1MA0SlKkA==$0" rename to name_idx;
SQL> alter table names rename constraint "BIN$PfhO1XqPTrewRb5+ToED1Q==$0"
to name_u;
12. Confirm the success of the operation by re-running the queries from Step 4.
13. Connect as user SYSTEM, and drop the DROPPER schema.
SQL> connect system/oracle;
SQL> drop user dropper cascade;
14. Query the DBA_RECYCLEBIN view to demonstrate that all the objects owned
by user DROPPER really are gone.
SQL> select count(*) from dba_recyclebin where owner='DROPPER';
Managing the Recycle Bin
The recycle bin is a term given to the storage space used by dropped objects. You can
ignore the recycle bin completely—its management is automatic, both in terms of
transferring objects into it when they are dropped, and removing them permanently
when the space is needed in the tablespace for live objects. But there may be
circumstances when you will need to be aware of the contents of the recycle bin and
how much space they are taking up.
TIP The recycle bin can be disabled with a hidden parameter.
Querying the Recycle Bin
Each user has his own recycle bin: s/he can always view dropped tables in his or her
own schema. The simplest way is the SHOW RECYCLEBIN command:
SQL> show recyclebin;
ORIGINAL NAME RECYCLEBIN NAME OBJECT TYPE DROP TIME
------------- ------------------------------ ------------ -----------
DROP_TAB BIN$vWMhmt3sTcqJ9WhSREM29g==$0 TABLE 2004-12-27:09:18:42
TEMP_DEPT BIN$OLp3r9zPRRe6KSjs7Ee3gQ==$0 TABLE 2004-12-27:11:15:50
TEMP_EMPS BIN$DKaQ10DDSty8hXQH2Xniwg==$0 TABLE 2004-12-27:11:15:36
This shows that the current user has three dropped tables: their original names,
their recycle bin names, and the time they were dropped. For more detailed information,
query the data dictionary view USER_RECYCLEBIN, or DBA_RECYCLEBIN for a
global view:
SQL> select owner,original_name,type,droptime,can_undrop, space from
dba_recyclebin;
ch29.indd 9ch29.indd 9 7/6/2005 10:44:05 AM7/6/2005 10:44:05 AM

Oracle Database 10g OCP Certification All-in-One Exam Guide
10
All-in-1 / Oracle Database 10g Certification All-in-One / Watson & Bersinic / 5790-3 /Chapter 29
OWNER ORIGINAL_NAME TYPE DROPTIME CAN SPACE
---------- --------------- ------ ------------------- --- -------
SYS T1 TABLE 2004-12-04:12:44:05 YES 8
DROPPER T1 TABLE 2004-12-27:11:23:21 YES 8
HR DROP_TAB TABLE 2004-12-27:09:18:42 YES 8
HR TEMP_EMPS TABLE 2004-12-27:11:15:36 YES 8
HR TEMP_DEPT TABLE 2004-12-27:11:15:50 YES 8
The critical column is CAN_UNDROP. Oracle is under no obligation to keep
dropped tables or indexes: the Flashback Drop facility is purely a convenience that
Oracle provides; it is not part of the relational database standard. If Oracle needs the
space being occupied by a dropped object to allocate more space to a live object, it
will take it; from that point, the dropped object can no longer be recovered with
Flashback Drop, and it will be removed from the view. The SPACE column (in units
of datafile blocks) shows how much space is taken up by the dropped object.
Having identified the dropped table’s name in the recycle bin, it can be queried
like any other table, though you will have to enclose its name in double quotes
because of the nonstandard characters used in recycle bin names. But always
remember that you have a limited (and unpredictable) time during which you
can do this. If you think it is likely that a dropped table will be needed, you
should recover it immediately.
EXAM TIP Flashback Drop is not enabled for tables stored in the SYSTEM
tablespace: such tables will not be reported by the queries described in the
preceding text, because they are dropped and purged immediately.
Reclaiming Space from the Recycle Bin
Space taken up by dropped objects is in an ambiguous state: it is assigned to the
object, but Oracle can overwrite it at will. The normal diagnostics regarding space
usage will ignore space occupied by the recycle bin. This means that your “tablespace
percent full” alerts will not fire until the warning and critical space usage levels are
reached by live objects. Furthermore, if your datafiles have the AUTOEXTEND
attribute enabled, Oracle will not in fact autoextend the datafiles until all space
occupied by dropped objects has been reassigned: it will overwrite the recycle bin
in preference to increasing the datafile size.
Consider this example: a 1MB tablespace, called SMALL, has been completely
filled by one table, called LARGE. The space usage alerts will have fired, and querying
DBA_FREE_SPACE reports no space available. Then the table is dropped. The alert
will clear itself and DBA_FREE_SPACE will report that the whole tablespace is empty,
but querying the recycle bin, or indeed DBA_SEGMENTS, will tell the truth, as in
Figure 29-5.
This apparently contradictory state is resolved by Oracle reusing space as it needs
it. If space is required in the tablespace for a new segment, then it will be taken, and
it will no longer be possible to retain the dropped table. If there are many deleted
objects in the recycle bin, Oracle will overwrite the object that had been in there for
ch29.indd 10ch29.indd 10 7/6/2005 10:44:06 AM7/6/2005 10:44:06 AM
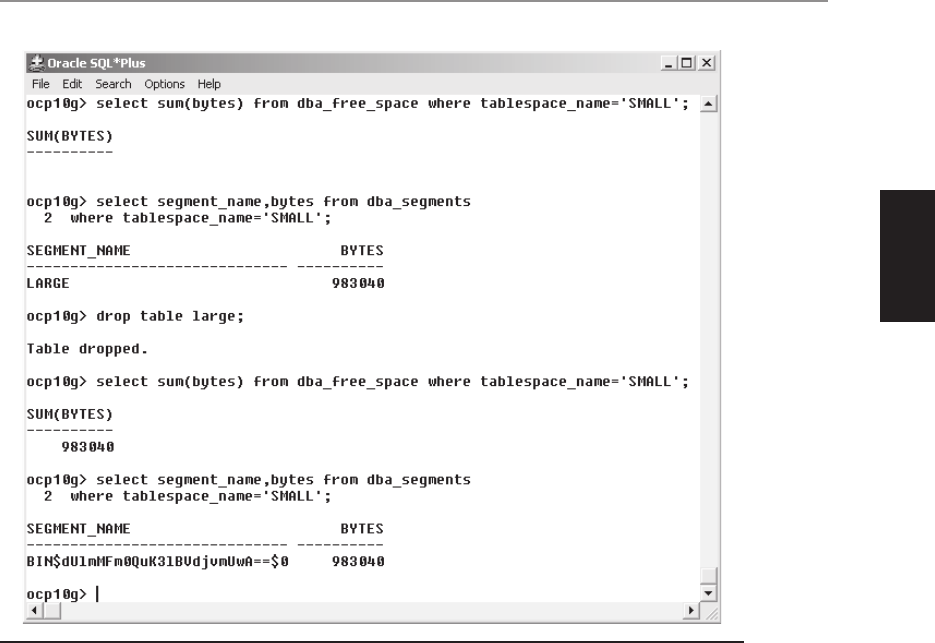
Chapter 29: Recovering from User Errors
11
PART II
All-in-1 / Oracle Database 10g Certification All-in-One / Watson & Bersinic / 5790-3 /Chapter 29
the longest time. This FIFO, or first in, first out, algorithm assumes that objects dropped
recently are most likely candidates for a flashback.
It is also possible to remove deleted objects permanently using the PURGE command
in its various forms:
drop table <table_name> purge
means drop the table and do not move it to the recycle bin, and
purge table <table_name>
means remove the table from the recycle bin. If there are several objects with the same
original name, the oldest is removed. Avoid this confusion by specifying the recycle
bin name instead. Use
purge index <index_name>
Figure 29-5 Recycle bin space usage
ch29.indd 11ch29.indd 11 7/6/2005 10:44:06 AM7/6/2005 10:44:06 AM

Oracle Database 10g OCP Certification All-in-One Exam Guide
12
All-in-1 / Oracle Database 10g Certification All-in-One / Watson & Bersinic / 5790-3 /Chapter 29
to remove an index from the recycle bin; again, you can specify either the original
name, or the recycle bin name. The form
purge tablespace <tablespace_name>
means remove all dropped objects from the tablespace; the form
purge tablespace <tablespace_name> user <user_name>
means remove all dropped objects belonging to one user from the tablespace; the form
purge user_recyclebin
means remove all your dropped objects; and the form
purge dba_recyclebin
means remove all dropped objects. You will need DBA privileges to execute this.
Flashback Query
The basic form of Flashback Query has been available since release 9i of the Oracle
Database: you can query the database as it was at some time in the past. The principle
is that your query specifies a time that is mapped onto a system change number, an
SCN, and that whenever the query hits a block that has been changed since that SCN,
it will go to the undo segments to extract the undo data needed to roll back the
change. This rollback is strictly temporary and only visible to the session running the
Flashback Query. Clearly, for a Flashback Query to succeed, the undo data must be
available.
In release 10g of the database, Flashback Query has been enhanced substantially,
and it can now be used to retrieve all versions of a row, to reverse individual
transactions, or to reverse all the changes made to a table since a certain time. It is also
possible to guarantee that a flashback will succeed, but there is a price to be paid for
enabling this: it may cause transactions to fail.
EXAM TIP All forms of Flashback Query rely on undo data to reconstruct
data as it was at an earlier point in time.
Basic Flashback Query
Any one select statement can be directed against a previous version of a table. Consider
this example:
ocp10g> select sysdate from dual;
SYSDATE
-----------------
27-12-04 16:54:06
ocp10g> delete from regions where region_name like 'A%';
ch29.indd 12ch29.indd 12 7/6/2005 10:44:07 AM7/6/2005 10:44:07 AM

Chapter 29: Recovering from User Errors
13
PART II
All-in-1 / Oracle Database 10g Certification All-in-One / Watson & Bersinic / 5790-3 /Chapter 29
2 rows deleted.
ocp10g> commit;
Commit complete.
ocp10g> select * from regions;
REGION_ID REGION_NAME
--------- -------------------------
1 Europe
4 Middle East and Africa
ocp10g> select * from regions as of timestamp to_timestamp('27-12-04
16:54:06','dd-mm-yy hh24:mi:ss');
REGION_ID REGION_NAME
--------- -------------------------
1 Europe
2 Americas
3 Asia
4 Middle East and Africa
ocp10g> select * from regions as of timestamp to_timestamp('27-12-04
16:54:06','dd-mm-yy hh24:mi:ss') minus select * from regions;
REGION_ID REGION_NAME
--------- -------------------------
2 Americas
3 Asia
First, note the time. Then delete some rows from a table and commit the change.
A query confirms that there are only two rows in the table, and no rows where the
REGION_NAME begins with A. The next query is directed against the table as it was
at the earlier time: back then there were four rows, including those for “Asia” and
“Americas.” Make no mistake about this: the two rows beginning with A are gone;
they were deleted, and the delete was committed. It cannot be rolled back. The
deleted rows you are seeing have been constructed from undo data. The final query
combines real-time data with historical data, to see what rows have been removed.
The output of this query could be used for repair purposes, to insert the rows back
into the table.
While being able to direct one query against data as of an earlier point in time
may be useful, there will be times when you want to make a series of selects. It is
possible to take your whole session back in time by using the DBMS_FLASHBACK
package:
ocp10g> execute dbms_flashback.enable_at_time(-
> to_timestamp('27-12-04 16:54:06','dd-mm-yy hh24:mi:ss'));
PL/SQL procedure successfully completed.
ocp10g>
From this point on, all queries will see the database as it was at the time specified.
All other sessions will see real-time data, but this one session will see a frozen version
of the database, until the flashback is cancelled:
ocp10g> execute dbms_flashback.disable;
PL/SQL procedure successfully completed.
ocp10g>
While in flashback mode, it is impossible to execute DML commands. They will throw
an error. Only SELECT is possible.
ch29.indd 13ch29.indd 13 7/6/2005 10:44:07 AM7/6/2005 10:44:07 AM

Oracle Database 10g OCP Certification All-in-One Exam Guide
14
All-in-1 / Oracle Database 10g Certification All-in-One / Watson & Bersinic / 5790-3 /Chapter 29
How far back you can take a Flashback Query (either one query, or by using
DBMS_FLASHBACK) is dependent on the contents of the undo segments. If the undo
data needed to construct the out-of-date result set is not available, then the query will
fail with an “ORA-08180: no snapshot found based on specified time” error.
The syntax for enabling Flashback Query will accept either a timestamp or an
SCN. If you use an SCN, then the point to which the flashback goes is precise. If you
specify a time, it will be mapped onto an SCN with a precision of three seconds.
EXAM TIP You can query the database as of an earlier point-in-time, but you
can never execute DML against the older versions of the data.
Flashback Table Query
Conceptually, a table flashback is simple. Oracle will query the undo segments to
extract details of all rows that have been changed, and then it will construct and
execute statements that will reverse the changes. The flashback operation is a separate
transaction that will counteract the effect of all the previous transactions, if possible.
The database remains online and normal work is not affected, unless row locking is
an issue. This is not a rollback of committed work; it is a new transaction designed to
reverse the effects of committed work. All indexes are maintained, and constraints
enforced: a table flashback is just another transaction, and the usual rules apply. The
only exception to normal processing is that by default triggers on the table are
disabled for the flashback operation.
A table flashback will often involve a table that is in a foreign key relationship. In
that case, it is almost inevitable that the flashback operation will fail with a constraint
violation. To avoid this problem, the syntax permits flashback of multiple tables with
one command, which will be executed as a single transaction with the constraint
checked at the end.
The first step to enabling table flashback is to enable row movement on the tables.
This is a flag set in the data dictionary that informs Oracle that rowids may change. A
rowid can never actually change, but a flashback operation may make it appear as
though it has. For instance, in the case of a row that is deleted, the flashback
operation will insert it back into the table: it will have the same primary key value,
but a different rowid.
In the example that follows, there are two tables: EMP and DEPT. There is a
foreign key relationship between them, stating that every employee in EMP must be
a member of a department in DEPT.
First, insert a new department and an employee in that department, and note the
time:
ocp10g> insert into dept values(50,'SUPPORT','LONDON');
1 row created.
ocp10g> insert into emp values(8000,'WATSON','ANALYST',7566,'27-DEC-
04',3000,null,50);
1 row created.
ch29.indd 14ch29.indd 14 7/6/2005 10:44:08 AM7/6/2005 10:44:08 AM

Chapter 29: Recovering from User Errors
15
PART II
All-in-1 / Oracle Database 10g Certification All-in-One / Watson & Bersinic / 5790-3 /Chapter 29
ocp10g> commit;
Commit complete.
ocp10g> select sysdate from dual;
SYSDATE
-----------------
27-12-04 18:30:11
Next delete the department and the employee, taking care to delete the employee
first to avoid a constraint violation:
ocp10g> delete from emp where empno=8000;
1 row deleted.
ocp10g> delete from dept where deptno=50;
1 row deleted.
ocp10g> commit;
Commit complete.
Now attempt to flash back the tables to the time when the department and
employee existed:
ocp10g> flashback table emp to timestamp to_timestamp('27-12-04
18:30:11','dd-mm-yy hh24:mi:ss');
flashback table emp to timestamp to_timestamp('27-12-04 18:30:11','dd-mm-yy
hh24:mi:ss')
*
ERROR at line 1:
ORA-08189: cannot flashback the table because row movement is not enabled
This fails because by default row movement, which is a prerequisite for table
flashback, is not enabled for any table, so enable it, for both tables:
ocp10g> alter table dept enable row movement;
Table altered.
ocp10g> alter table emp enable row movement;
Table altered.
and now try the flashback again:
ocp10g> flashback table emp to timestamp to_timestamp('27-12-04
18:30:11','dd-mm-yy hh24:mi:ss');
flashback table emp to timestamp to_timestamp('27-12-04 18:30:11','dd-mm-yy
hh24:mi:ss')
*
ERROR at line 1:
ORA-02091: transaction rolled back
ORA-02291: integrity constraint (SCOTT.FK_DEPTNO) violated - parent key not
found
This time the flashback fails for a more subtle reason. The flashback is attempting
to reverse the deletion of employee 8000 by inserting him, but employee 8000 was in
department 50, which has been deleted and so does not exist. Hence the foreign key
violation. You could avoid this problem by flashing back the DEPT table first, which
would insert department 50. But if your flashback involves many tables and many
ch29.indd 15ch29.indd 15 7/6/2005 10:44:09 AM7/6/2005 10:44:09 AM

Oracle Database 10g OCP Certification All-in-One Exam Guide
16
All-in-1 / Oracle Database 10g Certification All-in-One / Watson & Bersinic / 5790-3 /Chapter 29
DML statements, it may be logically impossible to find a sequence that will work.
The answer is to flash back both tables together:
ocp10g> flashback table emp,dept to timestamp to_timestamp('27-12-04
18:30:11','dd-mm-yy hh24:mi:ss');
Flashback complete.
This succeeds because both the tables are flashed back in one transaction, and the
constraints are only checked at the end of that transaction, by which time, the data is
logically consistent.
The flashback could still fail for other reasons:
• Primary key violations will occur if a key value has been reused between a
delete and the flashback.
• An “ORA-08180: no snapshot found based on specified time” will be raised if
there is not enough undo information to go back to the time requested.
• If any rows affected by the flashback are locked by other users, the flashback
will fail with “ORA-00054: resource busy and acquire with NOWAIT specified.”
• The table definitions must not change during the period concerned; flashback
cannot go across DDLs. Attempting to do this will generate “ORA-01466:
Unable to read data – table definition has changed.”
• Flashback does not work for tables in the SYS schema. Try to imagine the
effect of flashing back part of the data dictionary....
If a table flashback fails for any reason, the flashback operation will be cancelled:
any parts of it that did succeed will be rolled back, and the tables will be as they were
before the flashback command was issued.
Variations in the syntax allow flashback to a system change number, and firing of
DML triggers during the operation:
SQL> flashback table emp,dept to scn 6539425 enable triggers;
Table flashback can also be initiated by Database Control. From the database
home page, take the Maintenance tab and then the Perform Recovery link in the
Backup/Recovery section. Select Tables in the Object Type drop-down box, and then
the Flashback Existing Tables radio button to invoke the Flashback Table Wizard.
However table flashback is initiated, it is always recorded in the alert log.
Flashback Versions Query
A row may have changed several times during its life. Flashback Versions Query lets
you see all the committed versions of a row (but not any uncommitted versions),
including the timestamps for when each version was created and when it ended. You
can also see the transaction identifier of the transaction that created any given version
of a row, which can then be used with Flashback Transaction Query. This information
is exposed by a number of pseudo-columns that are available with every table.
ch29.indd 16ch29.indd 16 7/6/2005 10:44:09 AM7/6/2005 10:44:09 AM
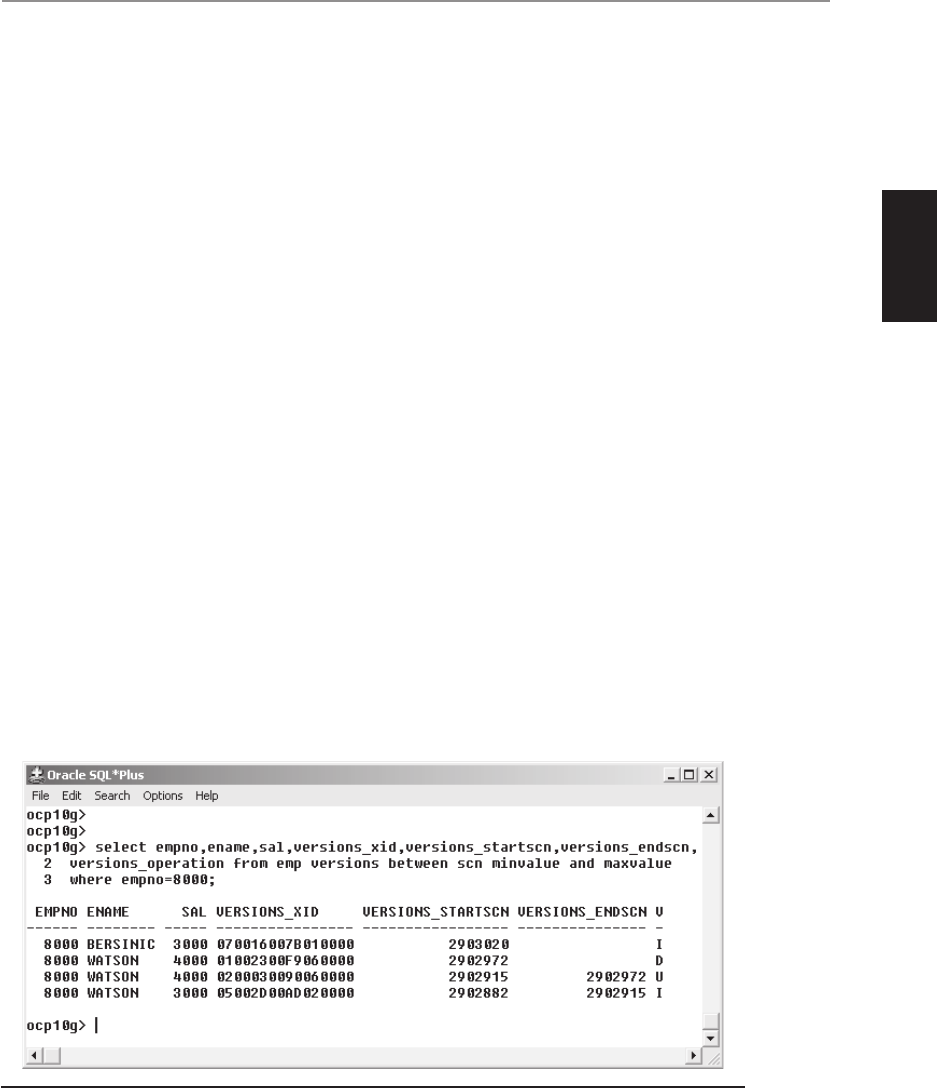
Chapter 29: Recovering from User Errors
17
PART II
All-in-1 / Oracle Database 10g Certification All-in-One / Watson & Bersinic / 5790-3 /Chapter 29
Pseudo-columns are columns appended to the row by Oracle internally; they are not
part of the ISO standards for a relational database, but they can be very useful. One
pseudo-column is the row ID: the unique identifier for every row in the database, that
is used in indexes as the pointer back to the table. These pseudo-columns are relevant
to flashback:
• VERSIONS_STARTSCN The SCN at which this version of the row was
created, either by INSERT or by UPDATE
• VERSIONS_STARTTIME The timestamp at which this version of the row was
created
• VERSIONS_ENDSCN The SCN at which this version of the row expired,
either because of DELETE or UPDATE
• VERSIONS_ENDTIME The timestamp at which this version of the row
expired
• VERSIONS_XID The unique identifier for the transaction that created this
version of the row
• VERSIONS_OPERATIONS The operation done by the transaction to create
this version of the row, either INSERT or UPDATE or DELETE
To see these pseudo-columns, you must include the VERSIONS BETWEEN
keywords in your query. For example, Figure 29-6 shows all versions of the row for
employee 8000.
The versions are sorted in descending order of existence: they must be read from
the bottom up. The bottom row shows that employee 8000 was inserted (the I in
the last column) at SCN 2902882 by transaction number 05002D00AD020000. The
employee was given an ENAME of WATSON and a SAL of 3000. This version of the
row existed until SCN 2902915, which takes us to the third row. At this SCN, the row
Figure 29-6 Flashback Versions Query
ch29.indd 17ch29.indd 17 7/6/2005 10:44:10 AM7/6/2005 10:44:10 AM

Oracle Database 10g OCP Certification All-in-One Exam Guide
18
All-in-1 / Oracle Database 10g Certification All-in-One / Watson & Bersinic / 5790-3 /Chapter 29
was updated (the U in the last column) with a new salary. This version of row
persisted until SCN 2902972, when it was deleted, as shown in the second row. The
VERSIONS_ENDSCN column is always null for a deletion. The top row of the result
set shows a new insertion, which reuses the employee number. For this row, the
VERSIONS_ENDSCN is also null, because the row still exists, in that version, as at
the end of the time range specified in the query.
In the example in Figure 29-6, the VERSIONS BETWEEN uses two constants for
the SCN. MINVALUE instructs Oracle to retrieve the earliest information in the undo
segments; MAXVALUE will be the current SCN. In other words, the query as written
will show all versions that can possibly be retrieved, given the information available.
The syntax will also accept a range specified with two timestamps:
SQL> select empno,ename,sal,versions_xid,versions_starttime,
versions_endtime,versions_operation from emp versions between
timestamp to_timestamp(systimestamp - 1/24) and systimestamp
where empno=8000;
This example will select all versions of employee number 8000 that existed during the
last hour.
Flashback Transaction Query
Flashback Table Query and Flashback Versions Query use undo data for an object.
Flashback Transaction Query analyzes the undo by a different dimension: it will
retrieve all the undo data for a transaction, no matter how many objects it affects.
The critical view is FLASHBACK_TRANSACATION_QUERY, described here:
ocp10g> describe flashback_transaction_query
Name Null? Type
----------------------------------- -------- ---------------------
XID RAW(8)
START_SCN NUMBER
START_TIMESTAMP DATE
COMMIT_SCN NUMBER
COMMIT_TIMESTAMP DATE
LOGON_USER VARCHAR2(30)
UNDO_CHANGE# NUMBER
OPERATION VARCHAR2(32)
TABLE_NAME VARCHAR2(256)
TABLE_OWNER VARCHAR2(32)
ROW_ID VARCHAR2(19)
UNDO_SQL VARCHAR2(4000)
Because the data in this view may be sensitive, it is protected by a privilege: you
must have been granted SELECT ANY TRANSACTION before you can query it. By
default, this privilege is granted to SYS and to the DBA role. There will be one or more
rows in this view for every transaction whose undo data still exists in the undo
segments, and every row will refer to one row affected by the transaction. Table 29-1
describes the columns.
ch29.indd 18ch29.indd 18 7/6/2005 10:44:10 AM7/6/2005 10:44:10 AM

Chapter 29: Recovering from User Errors
19
PART II
All-in-1 / Oracle Database 10g Certification All-in-One / Watson & Bersinic / 5790-3 /Chapter 29
Column Name Description
XID The transaction identifier. This is the join column to the pseudo-
column VERSIONS_XID displayed in a Flashback Versions Query
START_SCN The system change number at the time the transaction started
START_TIMESTAMP The timestamp at the time the transaction started
COMMIT_SCN The system change number at the time the transaction was
committed
COMMIT_TIMESTAMP The timestamp at the time the transaction was committed
LOGON_USER The Oracle username of the session that performed the transaction
UNDO_CHANGE# The undo system change number. This is not likely to be relevant to
most work
OPERATION The DML operation applied to the row: INSERT, UPDATE, or DELETE
TABLE_NAME The table to which the row belongs
TABLE_OWNER The schema to which the table belongs
ROW_ID The unique identifier of the row affected
UNDO_SQL A constructed statement that will reverse the operation. For example,
if the OPERATION were a DELETE, then this will be an INSERT
A one-line SQL statement might generate many rows in FLASHBACK_TRANSACTION_
QUERY. This is because SQL is a set-oriented language: one statement can affect many
rows. But each row affected will have its own row in the view. The view will show
committed transactions and also transactions in progress. For an active transaction,
the COMMIT_SCN and COMMIT_TIMESTAMP columns are NULL. Rolled-back
transactions are not displayed.
Take an example where a salary was multiplied by eleven, rather than being
incremented by ten percent:
SQL> update emp set sal =sal*11 where empno=7902;
1 row updated.
SQL> commit;
Commit complete.
Later, it is suspected that there was a mistake made. So query the versions of the row:
SQL> select ename,sal,versions_xid from emp versions between scn
2 minvalue and maxvalue where empno=7902;
ENAME SAL VERSIONS_XID
---------- ---------- ----------------
FORD 33000 06002600B0010000
FORD 3000
This does indicate what happened, and it gives enough information to reverse the
change. But what if the transaction affected other rows in other tables? To be certain,
query FLASHBACK_TRANSACTION_QUERY, which will have one row for every row
Table 29-1 Flashback Transaction Query Columns
ch29.indd 19ch29.indd 19 7/6/2005 10:44:11 AM7/6/2005 10:44:11 AM

Oracle Database 10g OCP Certification All-in-One Exam Guide
20
All-in-1 / Oracle Database 10g Certification All-in-One / Watson & Bersinic / 5790-3 /Chapter 29
affected by the transaction. A minor complication is that the XID column is type RAW,
whereas the VERSIONS_XID pseudo-column is hexadecimal, so you must use a type-
casting function to make the join:
SQL> select operation,undo_sql from flashback_transaction_query
where xid=hextoraw('06002600B0010000');
OPERATION UNDO_SQL
---------- -----------------------------------------------------
UPDATE update "SCOTT"."EMP" set "SAL" = '3000' where ROWID =
'AAAM+yAAEAAAAAeAAM';
This query returns only one row, which confirms that there was indeed only one
row affected by the transaction, and provides a statement that will reverse the impact
of the change. Note the use of a ROWID in the UNDO_SQL statement. Provided that
there has been no reorganization of the table, this will guarantee that the correct row
is changed.
Exercise 29-2: Using Flashback Query
with Database Control
Create a table, execute some DML, and then investigate and reverse the changes.
1. Connect to your database as user SYSTEM using SQL*Plus.
2. Create a table and enable row movement for it.
SQL> create table countries (name varchar2(10));
SQL> alter table countries enable row movement;
3. Insert some rows as follows.
SQL> insert into countries values('Zambia');
SQL> insert into countries values('Zimbabwe');
SQL> insert into countries values ('Zamibia');
SQL> commit;
Correct the spelling mistake, but omit the WHERE clause.
SQL> update countries set name= 'Namibia';
SQL> commit;
4. Connect to your database as user SYSTEM with Database Control.
5. From the database home page, take the Maintenance tab and then the
Perform Recovery link in the Backup/Recovery section to reach the Perform
Recovery: Type window.
6. In the Object Type drop-down box, choose Tables, and select the Flashback
Existing Tables radio button. Click Next to reach the Perform Recovery: Point-
in-time window.
7. Select the “Evaluate row changes and transactions to decide on point in time”
radio button, and enter SYSTEM.COUNTRIES as the table, as in Figure 29-7.
Click Next to reach the Perform Recovery: Flashback Versions Query Filter
window.
ch29.indd 20ch29.indd 20 7/6/2005 10:44:12 AM7/6/2005 10:44:12 AM
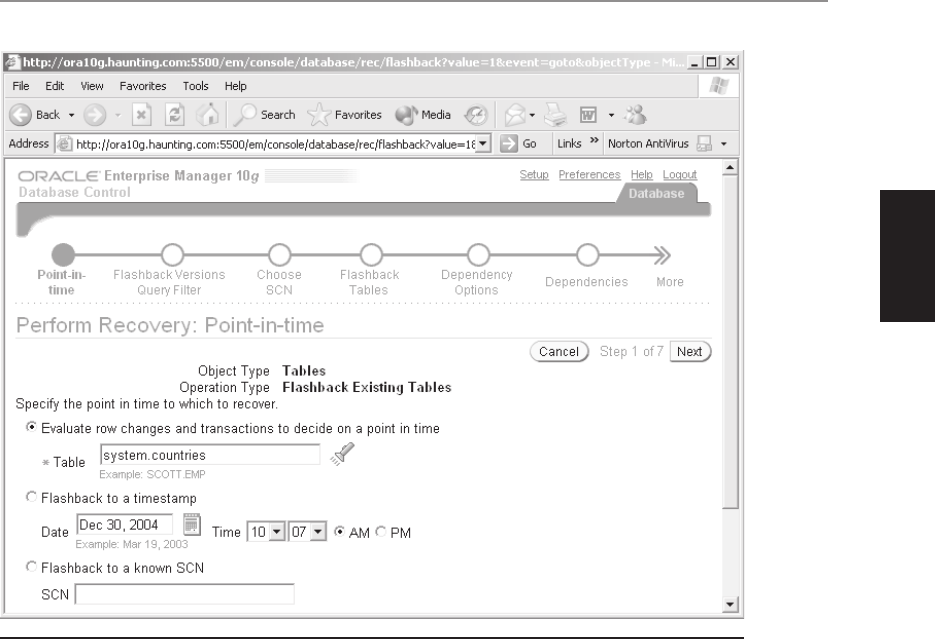
Chapter 29: Recovering from User Errors
21
PART II
All-in-1 / Oracle Database 10g Certification All-in-One / Watson & Bersinic / 5790-3 /Chapter 29
8. In the “Step 1” section, highlight the column NAME and click the Move link
to select it for the query. In the “Step 2” section, enter WHERE NAME LIKE
'%' in order to see all rows. In the “Step 3” section, select the Show All Row
History radio button.
Click Next to reach the Perform Recovery: Choose SCN window shown in
Figure 29-8.
9. Note that there are two transactions: the first did the three inserts; the second
updated the rows. Select the radio button for one of the “Namibia” rows, and
click Next to reach the Perform Recovery: Flashback Tables window.
10. Click Next to reach the Perform Recovery: Review window. Click Show Row
Changes to see what will be done by this operation, and Show SQL to see the
actual FLASHBACK TABLE statement. Click Submit to execute it.
11. In your SQL*Plus session, confirm that the rows are now back as when first
inserted, complete with the spelling mistake.
SQL:> select * from countries;
12. Tidy up.
SQL> drop table countries;
Figure 29-7 Select a table for Flashback Query.
ch29.indd 21ch29.indd 21 7/6/2005 10:44:12 AM7/6/2005 10:44:12 AM
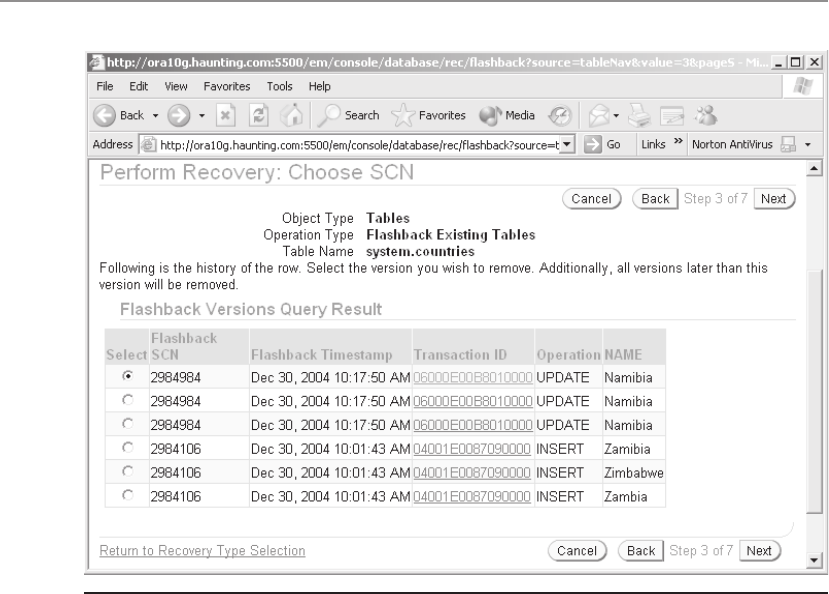
Oracle Database 10g OCP Certification All-in-One Exam Guide
22
All-in-1 / Oracle Database 10g Certification All-in-One / Watson & Bersinic / 5790-3 /Chapter 29
Flashback and Undo Data
Flashback query in its various forms relies entirely on undo data. You are asking
Oracle to present you a version of the data as it was some time ago; if the data has
been changed since that time, Oracle must roll back the changes. To do this, Oracle
needs the undo data that protected the change. Whether the query will succeed will
depend on whether that undo data is still available. Consider Figure 29-9. The first
query asks for a view of the table as it was forty minutes ago, and it succeeds. This is
because there is at least forty minutes of undo data available in the undo segments.
The second query attempts to go back forty days, and it fails. In virtually all databases,
it would be completely unrealistic to expect Flashback Query to work over such a long
period. You would need an undo tablespace the size of Jupiter to store that much
undo data.
Undo data is generated as necessary according to the transaction workload: at
busy times of day you may be generating many megabytes of undo per second; at
other times you may be generating virtually no undo at all. As undo data can be
overwritten once the transaction is completed, the age of the oldest undo data available
in the undo tablespace will vary depending on workload. A comprehensive discussion
Figure 29-8 Flashback Versions Query
ch29.indd 22ch29.indd 22 7/6/2005 10:44:13 AM7/6/2005 10:44:13 AM
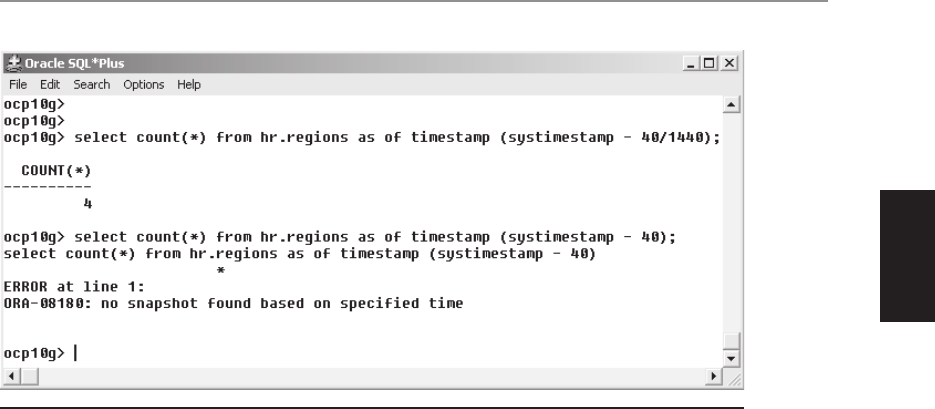
Chapter 29: Recovering from User Errors
23
PART II
All-in-1 / Oracle Database 10g Certification All-in-One / Watson & Bersinic / 5790-3 /Chapter 29
of this was included in Chapter 16 with reference to the “ORA-1555: snapshot too
old” error, and this is equally relevant to Flashback Query.
To guarantee that a Flashback Query will always succeed for a given period, set the
RETENTION GUARANTEE attribute for the undo tablespace, in conjunction with the
UNDO_RETENTION instance parameter. This will ensure that you can always flash
back the number of seconds specified, but the price you will pay is that if your undo
tablespace is not sized adequately for the transaction workload, then the database
may hang for DML. As discussed in Chapter 16, you must monitor the V$UNDOSTAT
view to calculate the necessary size.
Chapter Review
The Flashback technologies detailed in this chapter have been Flashback Drop and the
various options for Flashback Query. These are completely different from the Flashback
Database described in Chapter 28.
Flashback Drop lets you “undrop” a table, together with any associated objects. It
is actually implemented by renaming dropped objects rather than physically dropping
them, which puts them in the recycle bin. They are only actually dropped when the
space they occupy is needed for live objects, or by the use of the PURGE command.
There is no guarantee that a Flashback Drop will succeed; this will depend on whether
the space used by the dropped object has been reused.
Flashback Query allows you to query the database as it was at some time in the
past; it is implemented by the use of undo data. The simplest version of Flashback
Query is to use the AS OF keyword in a SELECT statement. Flashback Versions Query
displays all versions of a row between two times, with various pseudo-columns to
identify what happened. Flashback Table Query uses the Flashback Versions Query
Figure 29-9 Flashback Query and undo data
ch29.indd 23ch29.indd 23 7/6/2005 10:44:14 AM7/6/2005 10:44:14 AM

Oracle Database 10g OCP Certification All-in-One Exam Guide
24
All-in-1 / Oracle Database 10g Certification All-in-One / Watson & Bersinic / 5790-3 /Chapter 29
data to reverse changes made to a table; Flashback Transaction Query uses it to reverse
changes made by a transaction. By default there is no guarantee that a Flashback
Query will succeed, but by setting the RETENTION GUARANTEE attribute for your
undo tablespace, you can change this.
These Flashback technologies are online operations; your end users will not notice
that they are in progress. They are enabled automatically and are always available
when the applicable privileges have been granted.
Questions
1. Different Flashback technologies use different data structures. For each
technology, A to G, choose the data structure, i to v, upon which it relies.
A. Use of DBMS_FLASHBACK i. The redo log (online and/or archive)
B. Flashback Database ii. Undo segments
C. Flashback Drop iii. The recycle bin
D. Flashback Table Query iv. The flashback log
E. Flashback Transaction Query v. RMAN backups, in the flash recovery area
F. Flashback Version Query
G. SELECT ... AS OF ....
2. When you drop a table, what objects will go into the recycle bin? (Select all
that apply.)
A. The table
B. Grants on the table
C. Indexes on the table
D. All constraints on the table
E. All constraints on the table except foreign key constraints
3. After dropping a table, how can you access the rows within it? (Choose the
best answer.)
A. Query the table using the AS OF syntax.
B. Query the table using the BEFORE DROP syntax.
C. Query the table using its recycle bin name.
D. You can’t query it until it has been recovered.
4. If a table has been dropped and then another table created with the same
name, which of the following statements is correct? (Choose the best answer.)
A. You must rename the new table before you can flash back the dropped one.
B. You can flash back the dropped table if you specify a new name for it.
ch29.indd 24ch29.indd 24 7/6/2005 10:44:14 AM7/6/2005 10:44:14 AM

Chapter 29: Recovering from User Errors
25
PART II
All-in-1 / Oracle Database 10g Certification All-in-One / Watson & Bersinic / 5790-3 /Chapter 29
C. You can flash back the dropped table into a different schema.
D. You must drop the new table before flashing back the old one.
5. Under which of the following circumstances will Flashback Drop work?
(Choose the best answer.)
A. When a table has been truncated
B. When a table has been purged
C. When a user has been dropped
D. When an index has been dropped
E. None of the above
6. There are two tables in the recycle bin with the same original name. What
will happen if you issue a FLASHBACK TABLE <original_name> TO BEFORE
DROP command? (Choose the best answer.)
A. The command will return an error.
B. The oldest recycle bin table will be recovered.
C. The newest recycle bin table will be recovered.
D. You can’t have two tables in the recycle bin with the same original name.
7. If a Flashback Table operation violates a constraint, what will happen?
(Choose the best answer.)
A. The row concerned will not be flashed back, but the rest of the operation
will succeed.
B. The flashback operation will hang until the problem is fixed.
C. The flashback operation will be rolled back.
D. You must disable constraints before a table flashback.
8. What is the best technique to flash back two tables in a foreign key
relationship? (Choose the best answer.)
A. Flash back the child table, and then the parent table.
B. Flash back the parent table, and then the child table.
C. Flash back both tables in one operation.
D. This is not an issue; foreign key constraints are not protected by flashback.
9. Why and when must you enable row movement on a table before a flashback
operation? (Choose the best answer.)
A. Flashback Drop requires row movement, because all the rows in the table
will have a different object number.
B. Flashback Query requires row movement, because the rows will have new
ROWIDs picked up from the undo segment.
ch29.indd 25ch29.indd 25 7/6/2005 10:44:15 AM7/6/2005 10:44:15 AM
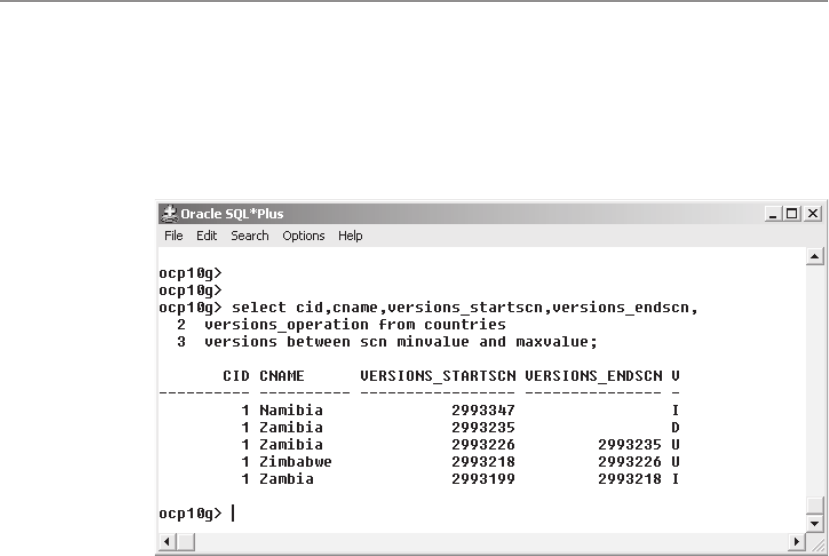
Oracle Database 10g OCP Certification All-in-One Exam Guide
26
All-in-1 / Oracle Database 10g Certification All-in-One / Watson & Bersinic / 5790-3 /Chapter 29
C. Flashback Transaction requires row movement, because any affected rows
may be moved as the transaction is reversed.
D. Flashback Table requires row movement, because any affected rows may be
moved as the changes are reversed.
10. Study the following screen. Which statements are correct? (Choose two answers.)
A. The delete of Zamibia and the insert of Namibia are uncommitted
changes.
B. There cannot be a unique constraint on CID for this sequence to be
possible.
C. There is currently only one row in the table.
D. If another session queried the table, it would see Zambia.
E. If another session queried the table, it would see Namibia.
11. What information can you extract from the pseudo-columns displayed by a
Flashback Versions Query? (Choose all that apply.)
A. The timestamps marking the beginning and end of a version’s existence
B. The SCNs marking the beginning and end of a version’s existence
C. The DML operation that created the version
D. The Oracle user that executed the DML
E. The transaction that the DML was part of
F. The statement necessary to reverse the DML
G. The statement necessary to repeat the DML
ch29.indd 26ch29.indd 26 7/6/2005 10:44:15 AM7/6/2005 10:44:15 AM

Chapter 29: Recovering from User Errors
27
PART II
All-in-1 / Oracle Database 10g Certification All-in-One / Watson & Bersinic / 5790-3 /Chapter 29
12. Which of the following statements are correct about flashback, undo, and
retention? (Choose two answers.)
A. Setting RETENTION GUARANTEE on a user data tablespace will ensure
that a Flashback Drop will succeed, if carried out within the UNDO_
RETENTION period.
B. Setting RETENTION GUARANTEE on an undo tablespace will ensure
that a Flashback Query will succeed, if carried out within the UNDO_
RETENTION period.
C. RETENTION GUARANTEE defaults to true for undo tablespaces, and false
for user data tablespaces.
D. Flashback Database will always succeed, if the DB_FLASHBACK_
RETENTION_TARGET instance parameter is less than the RETENTION_
GUARANTEE period.
E. Setting the RETENTION_GUARANTEE attribute can cause DML to fail.
13. Which view will display details of all transactions, as extracted from the undo
segments? (Choose the best answer.)
A. ALL_TRANSACTIONS
B. DBA_TRANSACTIONS
C. FLASHBACK_TRANSACTION_QUERY
D. UNDO_TRANSACTION_QUERY
14. Which tools can be used to flash back the drop of a table? (Choose all that
apply.)
A. SQL*Plus
B. Database Control
C. RMAN
D. All of the above
15. A Flashback Table operation needs to update a row that another user is
already updating. What will happen?
A. The session doing the flashback will hang until the other session commits
or rolls back his change.
B. The flashback operation will not start unless it can get exclusive access to
the table.
C. The flashback operation will complete, but with an error message stating
that the row could not be flashed back.
D. The flashback operation will fail, with error message stating that a row or
table was locked.
ch29.indd 27ch29.indd 27 7/6/2005 10:44:16 AM7/6/2005 10:44:16 AM

Oracle Database 10g OCP Certification All-in-One Exam Guide
28
All-in-1 / Oracle Database 10g Certification All-in-One / Watson & Bersinic / 5790-3 /Chapter 29
16. When querying DBA_OBJECTS, you see that a user owns an object whose
name is BIN$Af3JifupQXuKWSpmW0gaGA==$0. What is true about this
object? (Choose the best answer.)
A. It is the user’s recycle bin and contains his dropped tables.
B. It is the user’s recycle bin and contains his deleted rows.
C. It is a dropped table or index and will be purged automatically when its
space is needed.
D. It is a dropped table or index and should be purged manually, because it is
taking up space that may be needed for other objects.
Answers
1. A, D, E, F, and G-ii. Of the seven technologies, five rely on undo segments
and are all variations of Flashback Query.
B-iv. Flashback Database, B, uses the flashback logs (iv).
C-iii. Flashback Drop, C, uses the recycle bin (iii).
Neither the redo log (i) nor your backups (v) have anything to do with
flashback.
2. A and C. The only items that go into the recycle bin are the table and its
indexes. Grants are preserved, but they remain in the data dictionary. The
same is true of constraints, except for foreign key constraints, which are
dropped.
3. C. You can query the table using its system-generated name.
4. B. The table must be renamed as part of the flashback to avoid a conflict.
5. E. The FLASHBACK DROP command can be applied only to tables, not
indexes. Furthermore, the table must not have been purged. Note that you
cannot flash back a TRUNCATE, because a truncation does not put anything
in the recycle bin.
6. C. Oracle will recover the most recent table.
7. C. Table flashbacks are implemented as one transaction, which (like any other
transaction) will be rolled back if it hits a problem. To disable constraints
would be a way around the difficulty but is certainly not a requirement for
flashback, and probably not a good idea.
8. C. The only way to guarantee success is to flash back both tables together.
9. D. Only Flashback Table requires row movement.
10. C and E. There is no WHERE clause in the query, so you are seeing the whole
table. Versions of rows are always sorted with the newest (or current) version
first, so starting from the bottom you can see that a row was inserted; updated
twice; deleted; and then another inserted.
ch29.indd 28ch29.indd 28 7/6/2005 10:44:17 AM7/6/2005 10:44:17 AM

Chapter 29: Recovering from User Errors
29
PART II
All-in-1 / Oracle Database 10g Certification All-in-One / Watson & Bersinic / 5790-3 /Chapter 29
11. A, B, C, and E. The information is in the columns VERSIONS_STARTTIME,
VERSIONS_ENDTIME, VERSIONS_STARTSCN, VERSIONS_ENDSCN,
VERSIONS_OPERATIONS, and VERSIONS_XID. D and F can be extracted
with a Flashback Transaction Query, but G cannot be done with any flashback
technology.
12. B and E. Enabling the retention guarantee ensures that flashback queries will
succeed, even if that means blocking DML.
13. C. The other views do not exist.
14. A and B. Flashback Drop can be accessed through SQL*Plus or Database
Control only. RMAN can do Flashback Database, but no other flashback
operations.
15. D. Table flashback requires row locks on every affected row, but unlike with
normal DML, if the lock cannot be obtained, rather than waiting it will cancel
the whole operation and roll back what work it did manage to do.
16. C. This is the naming convention for dropped tables and indexes, which are
overwritten when the tablespace comes under space pressure.
ch29.indd 29ch29.indd 29 7/6/2005 10:44:17 AM7/6/2005 10:44:17 AM

All-in-1 / Oracle Database 10g Certification All-in-One / Meyers / 5790-3
ch29.indd 30ch29.indd 30 7/6/2005 10:44:18 AM7/6/2005 10:44:18 AM

All-in-1 / Oracle Database 10g Certification All-in-One / Watson & Bersinic / 5790-3 /Chapter 23
CHAPTER 30
Detecting and Recovering
from Database Corruption
In this chapter you will learn how to
• Define block corruption and list its causes and symptoms
• Detect database corruptions using the utilities ANALYZE and DBVERIFY
• Detect database corruptions using the DBMS_REPAIR package
• Implement the DB_BLOCK_CHECKING parameter to detect corruptions
• Repair corruptions using RMAN
1
ch30.indd 1ch30.indd 1 7/6/2005 10:28:17 AM7/6/2005 10:28:17 AM

Oracle Database 10g OCP Certification All-in-One Exam Guide
2
All-in-1 / Oracle Database 10g Certification All-in-One / Watson & Bersinic / 5790-3 /Chapter 30
Sometimes the Oracle blocks that make up a datafile get corrupted. You may be
fortunate enough to go though your whole career and never see a corrupted block—
or you may be hit by any number of them tomorrow. It is impossible for the DBA to
prevent corruptions from occurring, but he can detect them and perhaps mitigate the
impact of them on end users. And provided that an adequate backup strategy is in
place, he can repair the damage.
It is also possible for a block of an online redo log file, an archive redo log file, or
even the controlfile to be corrupted, but managing this is totally beyond the control
of the DBA. These files are protected by multiplexing, which should be sufficient. The
level of redundancy is specified by your organization’s standards, and any further fault
tolerance, such as RAID mirroring, is a matter for your system administrators.
This chapter deals with datafile corruption. Although the cause of datafile corruption
may be beyond your control, surviving it with no loss of data (and possibly with no
downtime either) is certainly within the DBA domain.
Block Corruption and Its Causes
Blocks may be corrupted in two ways: either media corruption or logical (also known
as “software”) corruption.
A media-corrupt block is a block where the contents of the block make no sense
whatsoever: its contents do not match the format expected by Oracle, according to the
formatting rules for the tablespace and the objects within it. When a datafile is
created, it is formatted into Oracle blocks, of whatever block size was chosen for the
tablespace. This is the first level of formatting. A second level occurs when the block is
actually used. When an object is allocated an extent, the blocks in the extent are not
further formatted, but as the high-water mark of the object is advanced into the new
extent, then the blocks receive a second level of formatting, as they take on the
characteristics required for that particular segment. If, because of damage to the disks,
this formatting is lost, then the block will be “media corrupt.”
A logically corrupt block is a block where the Oracle formatting is correct—the
block does have the correct header area and a data area—but the contents of the block
are internally inconsistent. For example, the block header of a table block includes a
row directory, stating where each row begins. If when attempting to find a row, there
isn’t one, this will be a logical corruption—an Oracle internal error, rather than a
media problem.
If the causes of block corruption were fully known, the problem would never
occur. As a general rule, block corruption is a hardware or operating system problem.
A problem in the I/O system can mean that somewhere in the chain of cause and
effect between the DBWn process instructing the operating system to write a block to
disk and a server process receiving the block from the operating system in response to
a read request, the block has been damaged. It is also possible for a fault in memory
to be flushed, accurately, to disk. If block corruptions are reported consistently, then
the problem is almost certainly hardware or operating system related.
ch30.indd 2ch30.indd 2 7/6/2005 10:28:46 AM7/6/2005 10:28:46 AM

Chapter 30: Detecting and Recovering from Database Corruption
3
PART II
All-in-1 / Oracle Database 10g Certification All-in-One / Watson & Bersinic / 5790-3 /Chapter 30
Logical corruption is also usually hardware related, but it is possible—though
extremely rare—for a bug within Oracle itself to cause Oracle to create an inconsistent
block. If the hardware and operating system diagnostics do not show any problems,
then check the Metalink web site for any known problems with your release of the
server software. Any bugs relating to block corruption will have been widely reported,
and a patch will be available.
Parameters Relating to Block Corruption
There are two instance parameters that will assist in detecting corrupted blocks: DB_
BLOCK_CHECKSUM, which defaults to TRUE, will help detect damage introduced by
the disk or I/O systems. DB_BLOCK_CHECKING, which defaults to FALSE, will help
detect damage introduced by faulty memory.
With DB_BLOCK_CHECKSUM on TRUE, whenever the DBWn process writes a
block to disk it will compute a checksum for the block and include it in the block
header. When a server process reads a block, if the checksum is present it will recalculate
it and compare. This will mean that any damage occurring in the time between the
DBWn writing the block and its being read back will be detected. For normal running
on reliable hardware, this should be adequate and will have only a minimal impact
on performance. Oracle Corporation advises leaving this parameter on default, so
that any damage caused while the block is on disk, or corruptions introduced during
the write and read process, will be detected. Even when this parameter is on false,
checksumming is still enabled for the SYSTEM tablespace.
EXAM TIP Checksumming and block checking are always enabled for the
SYSTEM tablespace, no matter to what these parameters are set.
Setting DB_BLOCK_CHECKING to TRUE will have an impact on performance,
and Oracle Corporation advises leaving it on default unless there are specific
problems related to corruptions occurring in memory. When set to TRUE, the Oracle
processes will check the block for consistency every time the buffer containing the
block is accessed. This will mean that if corruptions are occurring in memory, they
will be detected immediately, but the price is high—perhaps as much as 10 percent of
processing capacity. As with checksumming, block checking is always enabled for the
SYSTEM tablespace irrespective of the setting of this parameter.
TIP Oracle Corporation advises leaving both these parameters on default,
unless instructed otherwise by Oracle Support.
ch30.indd 3ch30.indd 3 7/6/2005 10:28:47 AM7/6/2005 10:28:47 AM
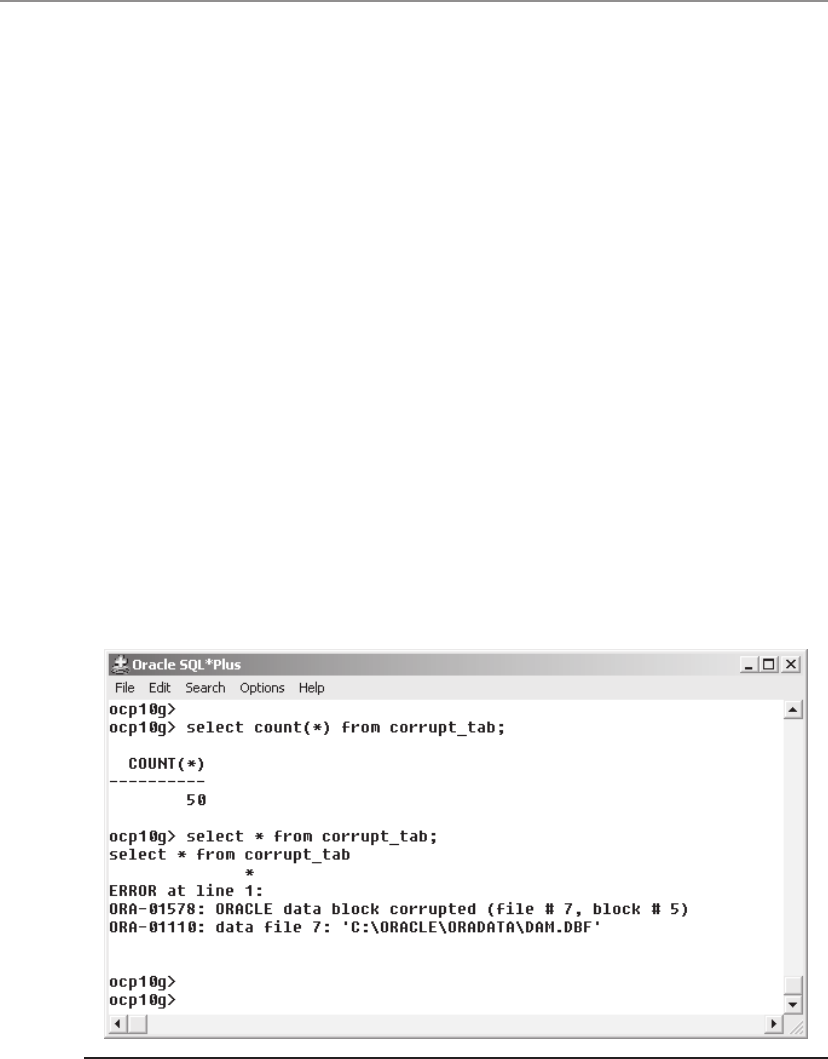
Oracle Database 10g OCP Certification All-in-One Exam Guide
4
All-in-1 / Oracle Database 10g Certification All-in-One / Watson & Bersinic / 5790-3 /Chapter 30
Detecting Block Corruptions
A corrupted block may be detected by your users when they try to read it, but ideally
you will have detected it before any user notices the problem. There are utilities that
will help with this.
The examples that follow are from a Windows system, based on a tablespace
called DAMAGED with a datafile DAM.DBF. The tablespace was created and a table,
CORRUPT_TAB, created within it, and a primary key constraint added. This caused
the creation of an index, called CORR_PK, on the constrained column. Then the file
was deliberately damaged by using an editor to change a few bytes of some blocks of
the CORRUPT_TAB table. This is a reasonable simulation of either media or logical
corruption: the file still exists and is of the correct size, but the contents have been
damaged externally to Oracle. The index, however, is not directly affected.
The Corrupted Block Error Message
Figure 30-1 shows the message you hope you will never see, an ORA-01578 telling
you that there is a corrupted block.
The first query succeeds. This is because although the query appears to request a
full table scan, in fact Oracle can execute the query without reading the table at all.
There is a primary key constraint on the table, which means that Oracle can count the
number of rows by scanning the index, not the table. It will usually be quicker to do
this. The second query, which requires reading the table itself, fails with an ORA-
01578 error message that lists the address of the corrupted block. The message is
Figure 30-1 A corrupt block encountered during a full table scan
ch30.indd 4ch30.indd 4 7/6/2005 10:28:47 AM7/6/2005 10:28:47 AM

Chapter 30: Detecting and Recovering from Database Corruption
5
PART II
All-in-1 / Oracle Database 10g Certification All-in-One / Watson & Bersinic / 5790-3 /Chapter 30
returned to the session that detected the problem, but there is also this message in the
alert log:
Hex dump of (file 7, block 5) in trace file
c:\oracle\product\10.1.0\admin\ocp10g\udump\ocp10g_ora_3508.trc
Corrupt block relative dba: 0x01c00004 (file 7, block 5)
Bad header found during buffer read
Data in bad block:
type: 16 format: 2 rdba: 0x01c02004
last change scn: 0x2020.20267bf9 seq: 0x2 flg: 0x04
spare1: 0x20 spare2: 0x20 spare3: 0x2020
consistency value in tail: 0x7bf91002
check value in block header: 0x2cbf
computed block checksum: 0x0
Reread of rdba: 0x01c00004 (file 7, block 5) found same corrupted data
Thu Dec 16 14:25:40 2004
Corrupt Block Found
TSN = 21, TSNAME = DAMAGED
RFN 7, BLK = 5, rdba = 29360132
OBJN = 52077, OBJD = 52077, OBJECT= , SUBOBJECT =
Segment Owner= , Segment Type =
This tells you again the file and block number, and at the end another vital piece
of information: the number of the object that the block is part of, in this case object
number 52077. To identify the object, run
SQL> select owner,object_name,object_type from dba_objects where object_id=52077;
An alternative query to identify the object would be to match the data block
address against the DBA_EXTENTS view. To identify which segment includes an extent
that covers the fifth block of the seventh datafile,
ocp10g> select owner,segment_name,segment_type from dba_extents where
2 file_id=7 and 5 between block_id and block_id + blocks;
OWNER SEGMENT_NAME SEGMENT_TYPE
-------------------- --------------- ------------------
HR CORRUPT_TAB TABLE
This is an example of a problem that could have existed for some considerable time.
Unless the corruption is in the header blocks of the datafile, it will only be detected
when the block is read by a server process. Generally, you should aim to detect such
problems before a user hits them.
The DBVERIFY Utility
DBVERIFY is an external utility run from an operating system prompt to verify datafiles
(see Figure 30-2). It can be run against files while they are in use, or against image
copies made with user-managed backups or by RMAN. It cannot verify online or
archive redo logs, nor the controlfile, nor RMAN backup sets. The files to be verified
can exist on a conventional file system, or on Automatic Storage Management disks,
or on raw devices; the syntax is identical except that for a raw device you must tell
DBVERIFY a range of blocks to look at, because it will have no other way of knowing
ch30.indd 5ch30.indd 5 7/6/2005 10:28:48 AM7/6/2005 10:28:48 AM
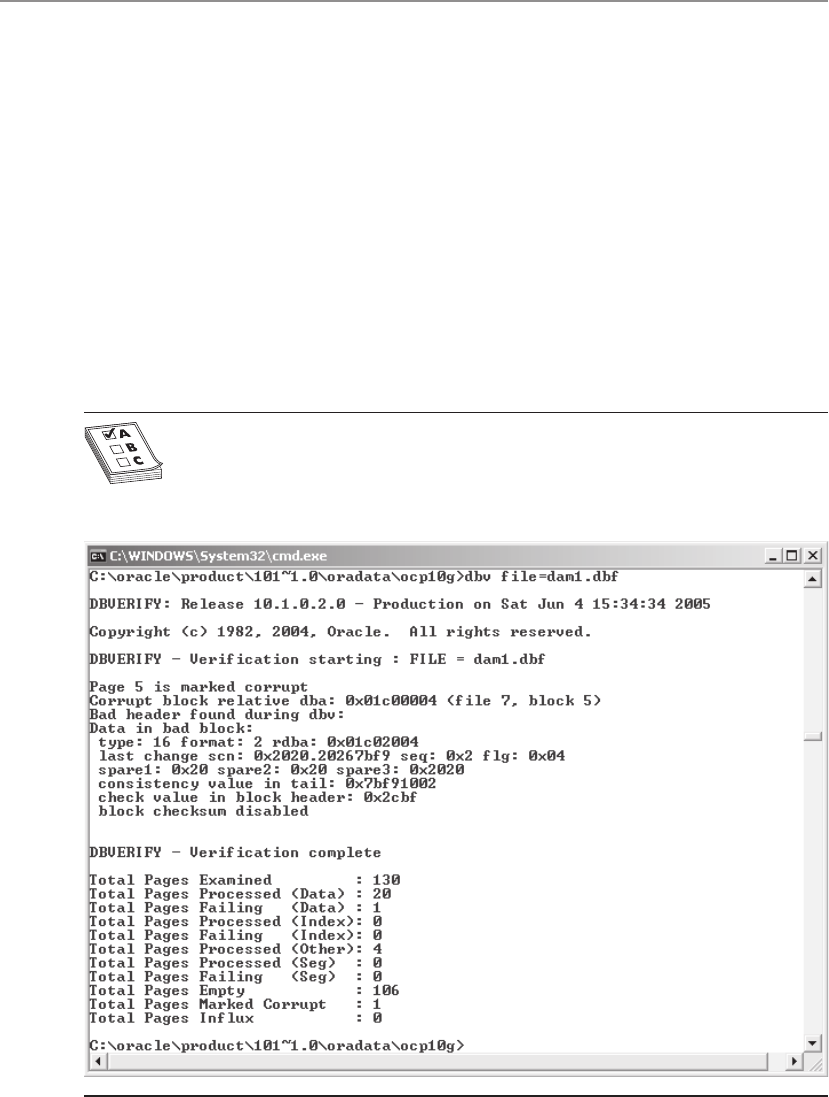
Oracle Database 10g OCP Certification All-in-One Exam Guide
6
All-in-1 / Oracle Database 10g Certification All-in-One / Watson & Bersinic / 5790-3 /Chapter 30
where the file ends. The only required argument is the name of the file to verify—the
optional arguments START and END let you specify a range of blocks to be verified.
The executable for DBVERIFY is $ORACLE_HOME/bin/dbv on Unix, %ORACLE_
HOME%\bin\dbv.exe on Windows. In the output, a block is referred to as a page. The
output (with the possible exception of “Total Pages Influx”) is self-explanatory: details
of every block found to be corrupt, followed by a summary of the state of all blocks.
If “Total Pages Influx” is greater than zero, it is not an indication of any problem; it
merely shows that while DBVERIFY was running against an open file, it encountered a
block that was currently being written to by the DBWn process. When that happens, it
will re-read the block until it gets a consistent image. “Total Pages Influx” is the
number of times it had to do this.
If you are using RMAN to back up your datafiles, DBVERIFY is not needed, because
RMAN will perform its own verification. DBVERIFY is essential if you are using user-
managed backups, in order to determine that the backups are actually usable.
EXAM TIP DBVERIFY works against datafiles, live or backup, but nothing else.
Figure 30-2 Running DBVERIFY
ch30.indd 6ch30.indd 6 7/6/2005 10:28:48 AM7/6/2005 10:28:48 AM

Chapter 30: Detecting and Recovering from Database Corruption
7
PART II
All-in-1 / Oracle Database 10g Certification All-in-One / Watson & Bersinic / 5790-3 /Chapter 30
The ANALYZE Command
The primary purpose of ANALYZE is to gather statistics that will be used by the
optimizer to work out the most efficient way of executing a SQL statement. But it does
have another use: checking whether a table or an index is corrupted. There are three
forms of the command:
SQL> analyze table <tablename> validate structure;
SQL> analyze index <indexname> validate structure;
SQL> analyze table <tablename> validate structure cascade;
When validating the structure of a table, ANALYZE verifies the integrity of each of
the data blocks and rows; when validating the structure of an index, it verifies the
integrity of the data blocks and the index keys. The CASCADE option will verify both
the table and any associated indexes. The check will be of all blocks below the high-
water mark of the segments, so unlike DBVERIFY it will not warn you of problems in
space not yet used.
TIP CASCADE can be a very time-consuming process for large objects
because it checks to ensure each index entry points to a valid table row.
Two side effects of ANALYZE...VALIDATE STRUCTURE are that for partitioned
tables it will check that rows are in the correct partition, and for indexes it will
compute the ratio of space devoted to active index entries and space wasted because
the index entries refer to deleted rows. To see the latter information, query the view
INDEX_STATS.
The DBMS_REPAIR Package
DBMS_REPAIR is a set of procedures that will check objects for problems and make
the objects usable again.
Before you can do anything with it, you must create a table that DBMS_REPAIR
uses to store its output:
SQL> exec dbms_repair.admin_tables(-
table_name=>'REPAIR_CORRUPT_TAB',-
table_type=>dbms_repair.repair_table,-
action=>dbms_repair.create_action);
This procedure call creates a table REPAIR_CORRUPT_TAB, which will store
details of any problems encountered when checking a table. The table’s name must
be prefixed with REPAIR_ and will be created in the SYS schema. Then invoke the
CHECK_OBJECT procedure as in Figure 30-3.
If any blocks in a table are found to be corrupted, the details of which block and
the object affected will be written out to the repair table. There will also be a suggestion
as to how to repair the damage: in the example, by marking the block as “software
corrupt.” This would not repair the damage in the sense of correcting the damage, but
ch30.indd 7ch30.indd 7 7/6/2005 10:28:49 AM7/6/2005 10:28:49 AM
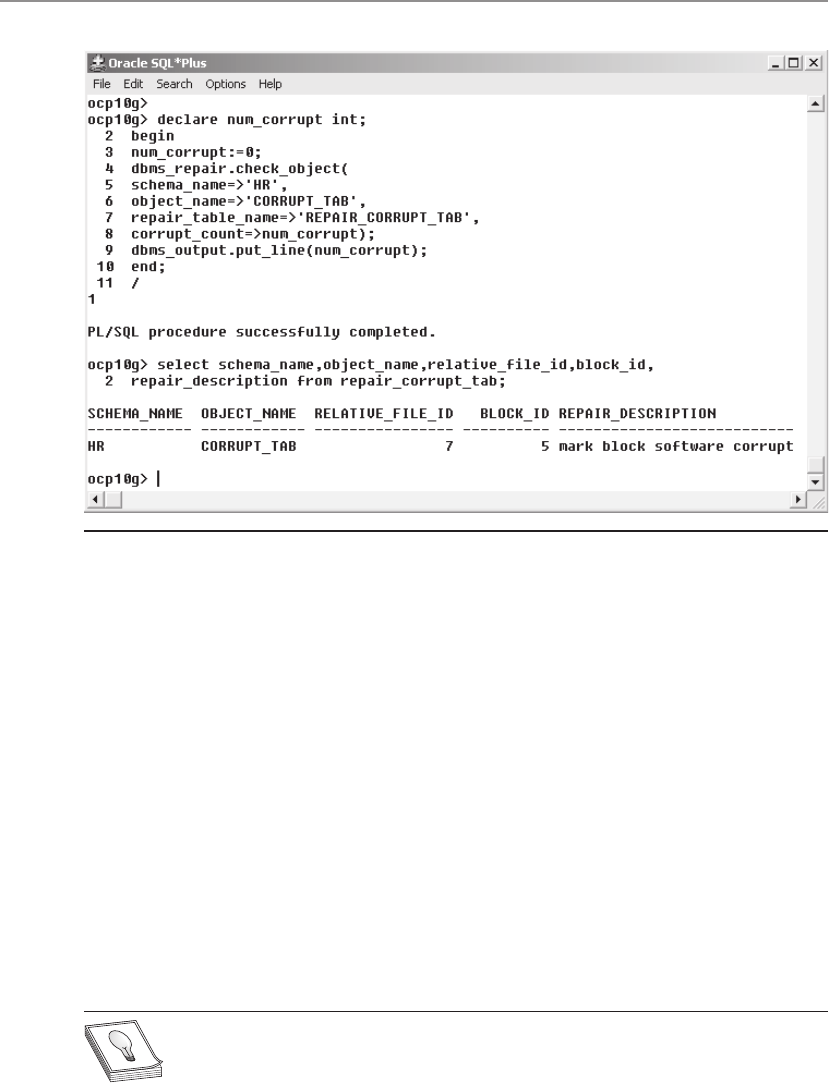
Oracle Database 10g OCP Certification All-in-One Exam Guide
8
All-in-1 / Oracle Database 10g Certification All-in-One / Watson & Bersinic / 5790-3 /Chapter 30
it would make the object usable again, which may be better than having statements
fail repeatedly with ORA-01578.
To follow the advice, use DBMS_REPAIR.FIX_CORRUPT_BLOCKS to mark the
damaged blocks as corrupted, then DBMS_REPAIR.SKIP_CORRUPT_BLOCKS to
instruct Oracle to ignore any blocks so marked. This will allow sessions to access the
object without any errors, though the data in the damaged blocks will be missing.
This can result in unexpected effects, as in Figure 30-4.
The routine in the figure has made the table usable, in the sense that it can now be
scanned without errors—but some data is missing. In the example, every row is gone.
But as far as the index is concerned, the rows still exist. This imbalance should be
corrected by rebuilding all the table’s indexes with ALTER INDEX...REBUILD ONLINE.
Before you do this, consider the possibilities of interrogating the indexes by running
queries that only select the indexed columns, to retrieve as much information as
possible regarding the missing rows. Depending on the degree of redundancy between
indexes and table (how many columns are actually included in one index or another?),
you may be able to reconstruct a significant amount of each missing row.
TIP DBMS_REPAIR provides a way of making damaged tables usable without
any downtime, but the price you pay is losing the data. Before deciding to
do this, consider the extent of the damage, the effect on the business, and
whether a restore and recover operation would be more appropriate.
Figure 30-3 Using DBMS_REPAIR to verify a table
ch30.indd 8ch30.indd 8 7/6/2005 10:28:50 AM7/6/2005 10:28:50 AM
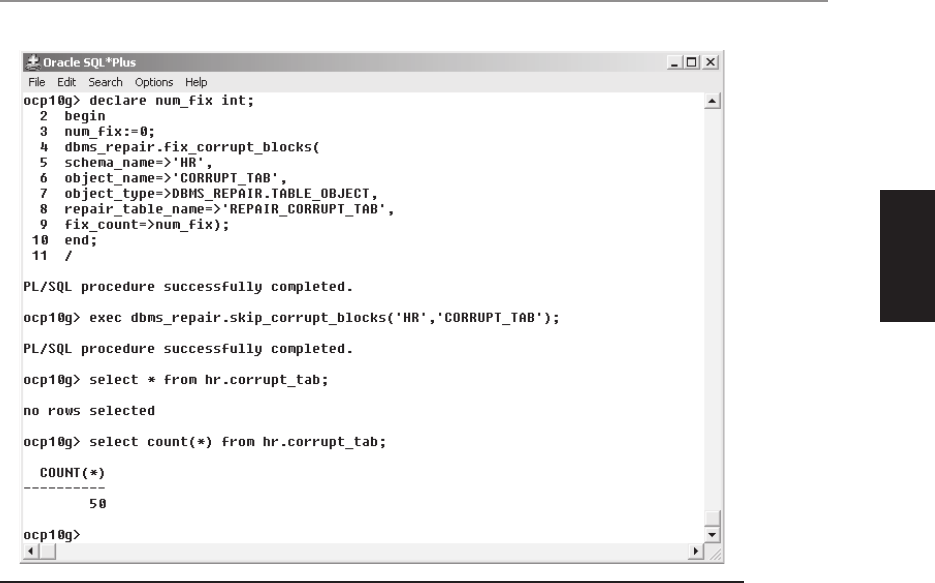
Chapter 30: Detecting and Recovering from Database Corruption
9
PART II
All-in-1 / Oracle Database 10g Certification All-in-One / Watson & Bersinic / 5790-3 /Chapter 30
Exercise 30-1: Checking for Block Corruptions
Create a tablespace and a table, and confirm that there are no corrupt blocks.
1. Connect to your database with SQL*Plus as user SYSTEM.
2. Create a tablespace called NEW_TBS. For example, on Unix,
SQL> create tablespace new_tbs datafile
'/oracle/oradata/new_tbs.dbf' size 2m;
or on Windows,
SQL> create tablespace new_tbs datafile
'\oracle\oradata\new_tbs.dbf' size 2m;
3. Create a table within the new tablespace, and identify which blocks in which
files the table is occupying.
SQL> create table new_tab tablespace new_tbs as
select * from all_users;
Table created.
SQL> select extent_id,file_id,block_id,blocks from dba_extents
2 where owner='SYSTEM' and segment_name='NEW_TAB';
EXTENT_ID FILE_ID BLOCK_ID BLOCKS
---------- ---------- ---------- ----------
0 9 9 8
SQL>
Figure 30-4 Repairing a table with corrupted blocks
ch30.indd 9ch30.indd 9 7/6/2005 10:28:50 AM7/6/2005 10:28:50 AM

Oracle Database 10g OCP Certification All-in-One Exam Guide
10
All-in-1 / Oracle Database 10g Certification All-in-One / Watson & Bersinic / 5790-3 /Chapter 30
In this example, the table has just one extent, extent_id 0, which is in file
number 9, the new datafile. The extent begins at block number 9 and is
8 blocks big. Your results may differ from this.
4. Connect as SYS, and use DBMS_REPAIR to create the repair table.
SQL> exec dbms_repair.admin_tables(-
table_name=>'REPAIR_TABLE',-
table_type=>dbms_repair.repair_table,-
action=>dbms_repair.create_action,-
tablespace=>'NEW_TBS');
5. Check the NEW_TAB table for corruptions.
SQL> declare num_corrupt int;
2 begin
3 dbms_repair.check_object(
4 schema_name=>'SYSTEM',
5 object_name=>'NEW_TAB',
6 repair_table_name=>'REPAIR_TABLE',
7 corrupt_count=>num_corrupt);
8 end;
9 /
PL/SQL procedure successfully completed.
6. To confirm that there are no corruptions, query the table REPAIR_TABLE.
There will be no rows.
7. From an operating system prompt, use DBVERIFY to verify the table. For
example, on Unix,
$ dbv file=/oracle/oradata/new_tbs.dbf blocksize=8192
or on Windows,
C:\> dbv file=\oracle\oradata\new_tbs.dbf blocksize=8192
The output will resemble this:
DBVERIFY - Verification complete
Total Pages Examined : 256
Total Pages Processed (Data) : 1
Total Pages Failing (Data) : 0
Total Pages Processed (Index): 0
Total Pages Failing (Index): 0
Total Pages Processed (Other): 10
Total Pages Processed (Seg) : 0
Total Pages Failing (Seg) : 0
Total Pages Empty : 245
Total Pages Marked Corrupt : 0
Total Pages Influx : 0
Recovering Corrupt Blocks with RMAN
If you are making user-managed backups, you cannot perform a block recovery,
because the granularity of a user-managed restore is the datafile. If one block of a file
many gigabytes big is corrupted, you must restore and recover the entire datafile through
the usual routine:
• Take the damaged file offline.
ch30.indd 10ch30.indd 10 7/6/2005 10:28:51 AM7/6/2005 10:28:51 AM

Chapter 30: Detecting and Recovering from Database Corruption
11
PART II
All-in-1 / Oracle Database 10g Certification All-in-One / Watson & Bersinic / 5790-3 /Chapter 30
• Restore the file from a backup made before the corruption occurred.
• Recover the file completely.
• Bring the recovered file online.
This can be done with zero data loss, but the impact on your users, in terms of
downtime, may be enormous. RMAN backups open the possibility of block-level
restore and recovery, perhaps with no downtime at all.
EXAM TIP Block media recovery is applicable only to datafile blocks. If a
block of an online log file, an archive log file, or a controlfile is corrupted,
you must have a multiplexed copy available if you ever need to recover.
Detection of Corrupt Blocks
RMAN will detect corrupt blocks as it performs backup operations. A user-managed
backup routine will generally detect a hardware corruption, because the operating
system utility you are using will have a problem reading the file, but it cannot detect
software corruption: damage where the file is still readable by the operating system
but the contents would not make sense to Oracle. RMAN, being an Oracle-aware tool,
will verify the contents of data blocks as it reads them; unless instructed otherwise, it
will terminate the backup as soon as it hits a corrupt block. If you wish, you can run
RMAN backups that specify a tolerance for corrupted blocks. If this is done, then
rather than throwing an error and terminating the backup immediately when a
corruption is detected, RMAN will continue to back up the datafile but will record the
addresses of any corruptions it encounters in its repository. This example instructs
RMAN to continue a backup as long as no more than one hundred corrupt blocks are
encountered:
RMAN> run {
set maxcorrupt for datafile 7 to 100;
backup datafile 7;}
The details of corrupt blocks are visible in two places. The view V$DATABASE_
BLOCK_CORRUPTION shows the address of the cause of the problem: the datafile
file number and block number. The address of the block in the backup is recorded in
V$BACKUP_CORRUPTION for backup set backups, or in V$COPY_CORRUPTION if
the backup were to an image copy. In normal running, you would not use the SET
MAXCORRUPT keywords. Without them, the backup will fail and you will thus be made
aware of the problem immediately. Then re-run the backup with SET MAXCORRUPT
and after completion query the views to determine the extent of the damage.
By default, RMAN will always check for physical corruption, known as “media
corruption” in the non-RMAN world. An example of this would be a block that
Oracle cannot process at all: an invalid checksum, or a block full of zeros. RMAN can
also be instructed to check for logical corruption, also known as “software corruption,”
ch30.indd 11ch30.indd 11 7/6/2005 10:28:52 AM7/6/2005 10:28:52 AM

Oracle Database 10g OCP Certification All-in-One Exam Guide
12
All-in-1 / Oracle Database 10g Certification All-in-One / Watson & Bersinic / 5790-3 /Chapter 30
as well. These checks will occur whenever a file is backed up, whether as an image
copy or into a backup set. To override the defaults,
RMAN> backup nochecksum datafile 7;
will not check for physical corruption, and
RMAN> backup check logical datafile 6;
will check for logical as well as physical corruption.
Block Media Recovery
If RMAN has detected a block corruption, it can do Block Media Recovery, or BMR.
BMR changes the granularity of a restore and recovery operation from the datafile to
just the damaged blocks. This has two huge advantages over file restore and recover:
first, the file does not have to be taken offline; normal DML can continue. Second, the
mean time to recover is much reduced, since only the damaged blocks are involved in
the operation, not the whole file. The only downtime that will occur is if a session
happens to hit a block that is actually damaged and has not yet been recovered.
The BMR mechanism provides RMAN with a list of one of more blocks that need
recovery. RMAN will extract backups of these blocks from a backup set or an image
copy and write them to the datafile. Then RMAN will pass through the archive logs
generated since the backup and extract redo records relevant to the restored blocks
and apply them. The recovery will always be complete—it would be logically
impossible to do an incomplete recovery; incomplete recovery of just one block
would leave the database in an inconsistent state. If a session hits a corrupted block
before the BMR process has completed, then it will still receive an ORA-01578 error,
but it is quite possible that the BMR operation will be complete before any users are
aware of the problem.
EXAM TIP BMR can be applied to any data block whatsoever. Unlike DBMS_
REPAIR, it is not restricted to tables and indexes; LOB and UNDO segments
can also be block-recovered.
The BLOCKRECOVER Command
The BLOCKRECOVER command always specifies a list of one or more blocks to be
restored and recovered, and it optionally specifies the backup from which the restore
should be made. For example, this command,
RMAN> blockrecover datafile 7 block 5;
Instructs RMAN to restore and recover the one specified block from the most recent
backup set or image copy of the file (see Figure 30-5). The syntax would also accept a
list of blocks in several files:
RMAN> blockrecover datafile 7 block 5,6,7 datafile 9 block 21,25;
ch30.indd 12ch30.indd 12 7/6/2005 10:28:52 AM7/6/2005 10:28:52 AM
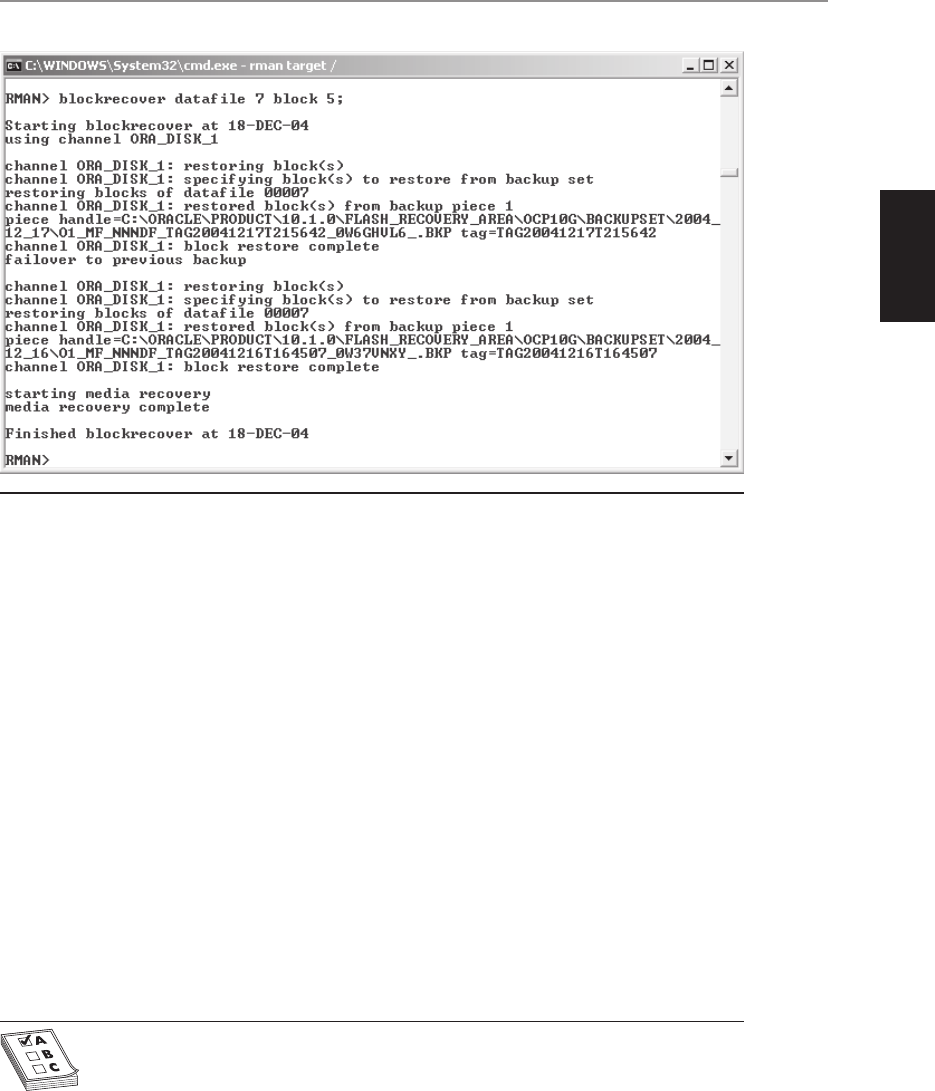
Chapter 30: Detecting and Recovering from Database Corruption
13
PART II
All-in-1 / Oracle Database 10g Certification All-in-One / Watson & Bersinic / 5790-3 /Chapter 30
There may be doubt regarding the integrity of the backups. In that case, you can
instruct RMAN to restore the block(s) from a backup that is known to be good:
RMAN> blockrecover datafile 7 block 5 from backupset 1093;
will restore from the nominated backup set, which could also be specified by a tag:
RMAN> blockrecover datafile 7 block 5 from tag monthly_whole;
If the damage is more extensive, then two other options for BMR will simplify the
process. First, provided that RMAN has populated the view V$DATABASE_BLOCK_
CORRUPTION by running a backup with MAXCORRUPT set to greater than zero,
then the CORRUPTION LIST option will instruct RMAN to restore and recover every
block listed in the view. Second, to ensure that the backup(s) used for the restore are
from a time before the corruption occurred, there is the UNTIL option. For example,
RMAN> blockrecover corruption list until time sysdate - 7;
instructs RMAN to restore and recover every block that has been discovered to be damaged
by a previous backup operation, using only backups made at least one week ago.
EXAM TIP In the BMR context, the keyword UNTIL does not denote an
incomplete recovery! It means that the restore must be from a backup made
before a particular date (or sequence number or SCN).
Figure 30-5 Block media recovery with RMAN
ch30.indd 13ch30.indd 13 7/6/2005 10:28:53 AM7/6/2005 10:28:53 AM

Oracle Database 10g OCP Certification All-in-One Exam Guide
14
All-in-1 / Oracle Database 10g Certification All-in-One / Watson & Bersinic / 5790-3 /Chapter 30
Exercise 30-2: Carrying Out a Block
Media Recovery
1. Connect to your database with RMAN, using operating system authentication.
rman target /
2. Back up the datafile created in Exercise 30-1, Step 2, either by name or by
specifying the file number listed by the query in Exercise 30-1, Step 3, and tag
the backup. For example,
RMAN> backup datafile 9 tag file9;
3. From your SQL*Plus session, force a log switch and archive.
SQL> alter system archive log current;
4. Perform a block recovery of some of the blocks assigned to the NEW_TAB
table. Choose any blocks covered by the extent listed by the query in Exercise
30-1, Step 3. For example,
RMAN> blockrecover file 9 block 10,11,12 from tag 'file9';
5. Tidy up by dropping the tablespace.
SQL> drop tablespace new_tbs including contents and datafiles;
Dealing with Corruptions
The first step is to identify that a corruption has in fact occurred. You could wait for
users to report ORA-01578 errors, or you can detect corruptions in advance by
running DBVERIFY against your live datafiles and your user-managed backups. RMAN
will also detect corruptions: by default, the RMAN backup will fail when it hits a
corrupted block.
Having located one or more corrupt blocks, you must identify the object to which
they belong. Or if you know the object that is damaged, then the DBMS_REPAIR
.CHECK_OBJECT procedure can scan the object to identify the corrupted blocks.
Once the extent of the damage is known, you can decide what action to take.
Provided that you have an adequate backup strategy in place, either user-managed or
with RMAN, you will always be able to carry out a complete recovery. The only exception
would be if the corruption occurred so long ago that it is included in all your backups.
By default this is not possible with RMAN, but it could occur with user-managed
backups if you don’t ever verify them with DBVERIFY. A normal complete recovery
involves downtime: any objects with extents in the datafile being restored and recovered
will not be available for use until the recovery is finished. There are other techniques
that will avoid this.
If the damage is limited to an index, you can drop the index and re-create it. This
may be transparent to your end users, though if the index is used for enforcing a
unique or primary key constraint, the constraint will have to be disabled and the
table locked for DML until the index is rebuilt by re-enabling the constraint:
ch30.indd 14ch30.indd 14 7/6/2005 10:28:54 AM7/6/2005 10:28:54 AM

Chapter 30: Detecting and Recovering from Database Corruption
15
PART II
All-in-1 / Oracle Database 10g Certification All-in-One / Watson & Bersinic / 5790-3 /Chapter 30
ocp10g> alter table corrupt_tab disable validate constraint corr_pk;
Table altered.
ocp10g> delete from corrupt_tab;
delete from corrupt_tab
*
ERROR at line 1:
ORA-25128: No insert/update/delete on table with constraint
(HR.CORR_PK) disabled and validated
ocp10g> alter table corrupt_tab enable validate constraint corr_pk;
Table altered.
ocp10g>
If the damage is to a table, you can consider using the DBMS_REPAIR package to
fix the table. This will make the table usable, but the rows in the damaged blocks will
be gone. Also you must rebuild all associated indexes, but this can be done online.
This decision to lose data is a grave one, but the zero downtime may sometimes make
it the best option.
Finally, if you are using RMAN for your backups, you have the possibility of a
complete block recovery, with no downtime. This is often the best answer.
While fixing the data damage caused by a corruption, you must also identify and
fix the cause of the problem. This problem is likely to be due to faults occurring in the
server machine’s I/O systems, on its disks, or in its memory: this type of error is outside
the database administration domain. Your system administrators will have appropriate
diagnostic tools to check all of these. There is also a remote possibility that some
releases of the Oracle database software on some platforms may have bugs that can
cause software corruptions; these will be documented on Metalink, and there will be
patches available to correct the problem.
Chapter Review
Database block corruption should never occur. But it does happen. Oracle will, by
default, detect media corruptions that occurred during a block’s sojourn on disk; by
setting the DB_BLOCK_CHECKING parameter, you can extend its checking to include
software corruptions, or with DB_BLOCK_CHECKSUM you can disable the physical
check. If a server process detects an error, it will return an ORA-01578 message to the
session, and a message goes to the alert log.
A good DBA will proactively detect corruptions before the users hit them, by using
DBVERIFY to scan datafiles, or by monitoring the success of his RMAN backups. Then,
depending on the extent of the damage and the objects damaged, he has the choice
between a restore and complete recovery of the datafiles affected; or simply marking
the damaged blocks as corrupted with DBMS_REPAIR; or dropping and re-creating
the object. A better solution, if using RMAN for backups, may be block media
recovery.
ch30.indd 15ch30.indd 15 7/6/2005 10:28:54 AM7/6/2005 10:28:54 AM

Oracle Database 10g OCP Certification All-in-One Exam Guide
16
All-in-1 / Oracle Database 10g Certification All-in-One / Watson & Bersinic / 5790-3 /Chapter 30
Questions
1. You have these parameter settings:
DB_BLOCK_CHECKSUM=true
DB_BLOCK_CHECKING=false
Which of these statements are correct? (Choose all the correct answers.)
A. Checksums will be calculated and checked whenever a block is accessed in
the database buffer cache.
B. Checksums will be calculated and checked whenever a block is accessed
on disk.
C. Blocks of the SYSTEM tablespace will always be checked for internal
consistency.
D. Blocks of the SYSTEM, SYSAUX, and active UNDO tablespaces will always
be checked for internal consistency.
E. No blocks will be checked for internal consistency.
2. If a table has corrupted blocks but the primary key index does not, what will
be the effect on SELECT statements? (Choose two correct answers.)
A. Index searches may succeed, depending on what columns are selected.
B. Index searches may succeed, depending on what rows are selected.
C. Full table scans may succeed, depending on what columns are selected.
D. Full table scans may succeed, depending on what rows are selected.
3. Which of the following file types can DBVERIFY verify? (Choose three answers.)
A. Offline datafiles
B. Online datafiles
C. Datafile image copies
D. RMAN backup sets
E. Online redo log files
F. Archive redo log files
4. DBVERIFY reports that a block is INFLUX. What does this mean? (Choose the
best answer.)
A. It is an error denoting a type of corruption.
B. DBVERIFY could not check the block because it was in use.
C. DBVERIFY did check the block after a retry.
D. It indicates that the image of the block on disk is not the same as the
image in memory.
5. You issue the command
analyze table tab1 cascade;
What will be analyzed? (Choose the best answer.)
ch30.indd 16ch30.indd 16 7/6/2005 10:28:55 AM7/6/2005 10:28:55 AM

Chapter 30: Detecting and Recovering from Database Corruption
17
PART II
All-in-1 / Oracle Database 10g Certification All-in-One / Watson & Bersinic / 5790-3 /Chapter 30
A. The table TAB1 and any child tables related to it by a foreign key constraint
B. The table TAB1 and any parent tables related to it by a foreign key
constraint
C. The table TAB1 and all tables, parent or child, to which it is related
D. The table TAB1 and its indexes
E. The table TAB1 and all its partitions
F. All of the above
6. Which of the following is true about the DBMS_REPAIR package? (Choose the
best answer.)
A. You can use it to reconstruct the data contained within a corrupted block
by block media recovery.
B. You can use it to reconstruct the data contained within a corrupted block
by extracting data from relevant index blocks.
C. You can use it to scan datafiles, but not individual objects.
D. It can make objects usable, but it cannot retrieve lost data.
7. You want to repair a table with corrupted blocks using DBMS_REPAIR. This
requires four procedure calls. Put them in the correct order:
A. DBMS_REPAIR.ADMIN_TABLES
B. DBMS_REPAIR.CHECK_OBJECT
C. DBMS_REPAIR.FIX_CORRUPT_OBJECT
D. DBMS_REPAIR.SKIP_CORRUPT_BLOCKS
8. Which of the following statements are correct about Block Media Recovery
(BMR)? (Choose two answers.)
A. BMR can be performed only with RMAN.
B. BMR can be performed only with SQL*Plus.
C. Both RMAN and SQL*Plus can be used for BMR.
D. BMR is always a complete recovery.
E. BMR is always an incomplete recovery.
F. BMR can be either complete or incomplete; the DBA decides.
9. If, during an RMAN backup, a corrupt block is encountered, what will
happen? (Choose the best answer.)
A. The backup will fail.
B. The backup will succeed.
C. It depends on the MAXCORRUPT setting.
ch30.indd 17ch30.indd 17 7/6/2005 10:28:55 AM7/6/2005 10:28:55 AM

Oracle Database 10g OCP Certification All-in-One Exam Guide
18
All-in-1 / Oracle Database 10g Certification All-in-One / Watson & Bersinic / 5790-3 /Chapter 30
D. If the corruption is in the SYSTEM tablespace, the backup will fail;
otherwise, it will continue, but the address of the corrupt block will be
written to the RMAN repository.
10. To what file types is BMR applicable? (Choose the best answer.)
A. Archive log files
B. Controlfiles
C. Datafiles
D. Online logfiles
E. Tempfiles
F. All of the above
11. What will be the effect of issuing this command:
blockrecover corruption list until time sysdate - 7;
(Choose the best answer.)
A. The recovery will be up to but not including the system change number of
the time specified.
B. The recovery will be up to and including the system change number of the
time specified.
C. The recovery will be complete, but the restore will be from before the time
specified.
D. The recovery will be of all blocks entered onto the corruption list before
the time specified.
E. The recovery will be of all blocks entered onto the corruption list after the
time specified.
12. You are running BMR against some corrupted blocks of a table, while the
database is open. What will be the effect on users’ work? (Choose three correct
answers.)
A. Index searches may succeed, depending on what columns are selected.
B. Index searches may succeed, depending on what rows are selected.
C. Full table scans may succeed, depending on what columns are selected.
D. Full table scans may succeed, depending on what rows are selected.
E. If a session hits a block being recovered, it will hang until the recovery
completes.
F. If a session hits a block being recovered, it will report an ORA-01578 error.
ch30.indd 18ch30.indd 18 7/6/2005 10:28:56 AM7/6/2005 10:28:56 AM

Chapter 30: Detecting and Recovering from Database Corruption
19
PART II
All-in-1 / Oracle Database 10g Certification All-in-One / Watson & Bersinic / 5790-3 /Chapter 30
Answers
1. B and C. DB_BLOCK_CHECKSUM enables calculation and checking of
checksums as they are read from and written to disk, not memory. Irrespective
of the DB_BLOCK_CHECKING setting, internal consistency checking is
always enabled for the SYSTEM tablespace, but for others only when the
parameter is on TRUE.
2. A and B. Index searches will succeed if they only need rows from valid blocks
or if the query can be satisfied solely from the columns on the index.
3. A, B, and C. DBVERIFY can verify any datafile: online, offline, or a backup
copy, but nothing else.
4. C. An INFLUX block is one that DBWn was writing while DBVERIFY was
trying to verify it. This is not an error, and DBVERIFY will try again until it gets
a consistent read.
5. D. In the ANALYZE context, CASCADE means the table plus its indexes. If the
table happens to be partitioned, all partitions are always checked.
6. D. Perhaps unfortunately, DBMS_REPAIR can only make objects usable—it
cannot actually repair damaged data.
7. A, B, C, and D. The order is alphabetical: A creates the table used to store
block addresses. B checks all the blocks. C marks corrupted blocks. D instructs
Oracle to ignore blocks so marked.
8. A and D. The BLOCKRECOVER command is only available through RMAN,
and either recovery is complete or it fails.
9. C. By default, RMAN will fail when it hits a corrupt block, but you can
override this by setting MAXCORRUPT to a number greater than zero.
10. C. BMR is solely applicable to datafiles; they are the only file type to which
redo can be applied.
11. C. BMR is always complete, and UNTIL specifies the age of the backups to be
restored.
12. A, B, and F. The index searches will succeed if they can be satisfied purely with
the indexed columns, or if they do not include rows in the corrupted blocks. If
a session hits a block that is being recovered, it will throw an error.
ch30.indd 19ch30.indd 19 7/6/2005 10:28:56 AM7/6/2005 10:28:56 AM

All-in-1 / Oracle Database 10g Certification All-in-One / Meyers / 5790-3
ch30.indd 20ch30.indd 20 7/6/2005 10:28:57 AM7/6/2005 10:28:57 AM

All-in-1 / Oracle Database 10g Certification All-in-One / Watson & Bersinic / 5790-3 /Chapter 31
CHAPTER 31
Tools for Oracle Database 10g
Tuning
In this chapter you will learn how to
• Use the database advisors to gather information about your database
• Use the SQL Tuning Advisor to improve database performance
• Use automatic undo retention tuning
1
ch31.indd 1ch31.indd 1 7/7/2005 5:16:59 PM7/7/2005 5:16:59 PM

All-in-1 / Oracle Database 10g Certification All-in-One / Meyers / 5790-3 /Chapter 23
Oracle Database 10g OCP Certification All-in-One Exam Guide
2
Database tuning is an extremely skillful task requiring many years of experience. Apart
from an understanding of the Oracle instance and database architecture, it also requires
intimate knowledge of the hardware, the operating system, and the application.
Tuning is a holistic exercise: you cannot tune one aspect of the environment without
considering all other aspects.
To assist the DBA with tuning, Oracle collects a vast amount of statistical
information about database activity and performance. Interpreting this information
correctly is the heart of the tuning process. Oracle database release 10g includes
several “advisors” that will assist the novice DBA in this interpretation and also save
experienced DBAs from the necessity of checking for certain common, and basic,
performance problems.
The Advisor Methodology
The advisors will help to identify the causes of performance problems, and suggest
solutions. It is vital to distinguish between causes and symptoms: much effort can be
wasted on treating symptoms rather than causes. For example, a simple statistical
analysis of activity on the database might show that disk I/O is the bottleneck—the
one part of the environment that is slowing down everything else. At first sight, it
would seem reasonable to attempt to optimize the disk I/O; one could restructure the
physical storage to change the RAID striping strategy, or even install faster disks. But
this is tuning the symptom, not the cause. The cause of the problem is not the disks;
the cause is the need for disk I/O. It could be that the database is running queries that
are doing full table scans, rather than indexes: adding an index might eliminate the
need for the disk I/O, which is a far better solution than merely making excessive disk
I/O happen a bit faster.
The advisors attempt to perform a root cause analysis. They identify a problem
and suggest a solution by following an expert system perfected over many years by
enumerable DBAs. At the heart of the tuning methodology is the use of wait events.
A wait event is something that causes either one session or the whole instance to
hang. There are more than eight hundred different wait events in a 10g database, but
for convenience they are grouped into classes.
To see which event class has caused the bulk of the problems, query the
V$SYSTEM_WAIT_CLASS view:
ocp10g> select wait_class,total_waits,time_waited
2 from v$system_wait_class order by time_waited;
WAIT_CLASS TOTAL_WAITS TIME_WAITED
------------------------------ ----------- -----------
Network 33 0
Commit 31 84
Configuration 8185 116
Concurrency 19 307
Other 271 3822
System I/O 2319 4860
User I/O 5425 29780
Idle 8612 3185078
8 rows selected.
ch31.indd 2ch31.indd 2 7/7/2005 5:17:14 PM7/7/2005 5:17:14 PM

All-in-1 / Oracle Database 10g Certification All-in-One / Meyers / 5790-3 /Chapter 23
Chapter 31: Tools for Oracle Database 10g Tuning
3
PART II
This query shows that the worst problem by far is “Idle” events. However, idle events
are not a problem; they represent processes hanging because they don’t have anything
to do. For example, a server process will be idle if it is waiting to receive an instruction
from a user process. So of the real problems, disk I/O, both for user sessions and for
background processes, is the worst.
The advisors attempt to go beyond simple statements of symptoms, as in the
preceding query, by identifying possible causes of the problems: in the case just
described, they might suggest restructuring the SGA to allow more memory for the
database buffer cache, or creating additional indexes; either of these could reduce
the need for disk I/O, which might be a better solution than just speeding up the disk
subsystem. The advisors take this broader view of the situation by considering the
whole instance and the activity within it.
All performance tuning is based on statistics. The level of detail of statistics
gathered is controlled by the instance parameter STATISTICS_LEVEL. This has three
possible settings: BASIC, TYPICAL, and ALL. TYPICAL is the default. The TYPICAL
level of statistics will gather all statistics that can be collected without an impact on
performance; this is usually the level that is sufficient for tuning. Setting the parameter
to ALL will force collection of additional statistics that may be of value for advanced
SQL statement tuning, but the collection of which may also slow down statement
execution. The BASIC setting prevents most statistics collection but will not significantly
improve performance.
TIP Leave the STATISTICS_LEVEL instance parameter on default. This will
collect all the statistics usually required, without any performance impact.
Set it to ALL only for short periods when you are doing particularly detailed
analysis.
The Automatic Database Diagnostic
Monitor (ADDM)
A background process called the manageability monitor, or MMON, flushes statistics
from memory to disk on a regular schedule, by default, every sixty minutes. MMON
writes statistics to the tables in the SYSAUX tablespace that make up the Automatic
Workload Repository, the AWR. This is known as a statistics “snapshot.” Whenever a
snapshot is taken, the MMON also runs the ADDM. This will generate a report on
activity and possible problems between this snapshot and the time of the last snapshot,
so by default, you have access to tuning reports covering every hour.
The default frequency of snapshots is hourly, with a retention period of seven
days. These defaults can be changed through database control, or through the DBMS_
WORKLOAD_REPOSITORY API. To change the retention to two weeks and the
frequency to every twenty minutes, from a SQL*Plus prompt run this command (note
that the units are minutes):
ocp10g> execute dbms_workload_repository.modify_snapshot_settings(-
> retention=>20160,interval=>20);
ch31.indd 3ch31.indd 3 7/7/2005 5:17:14 PM7/7/2005 5:17:14 PM
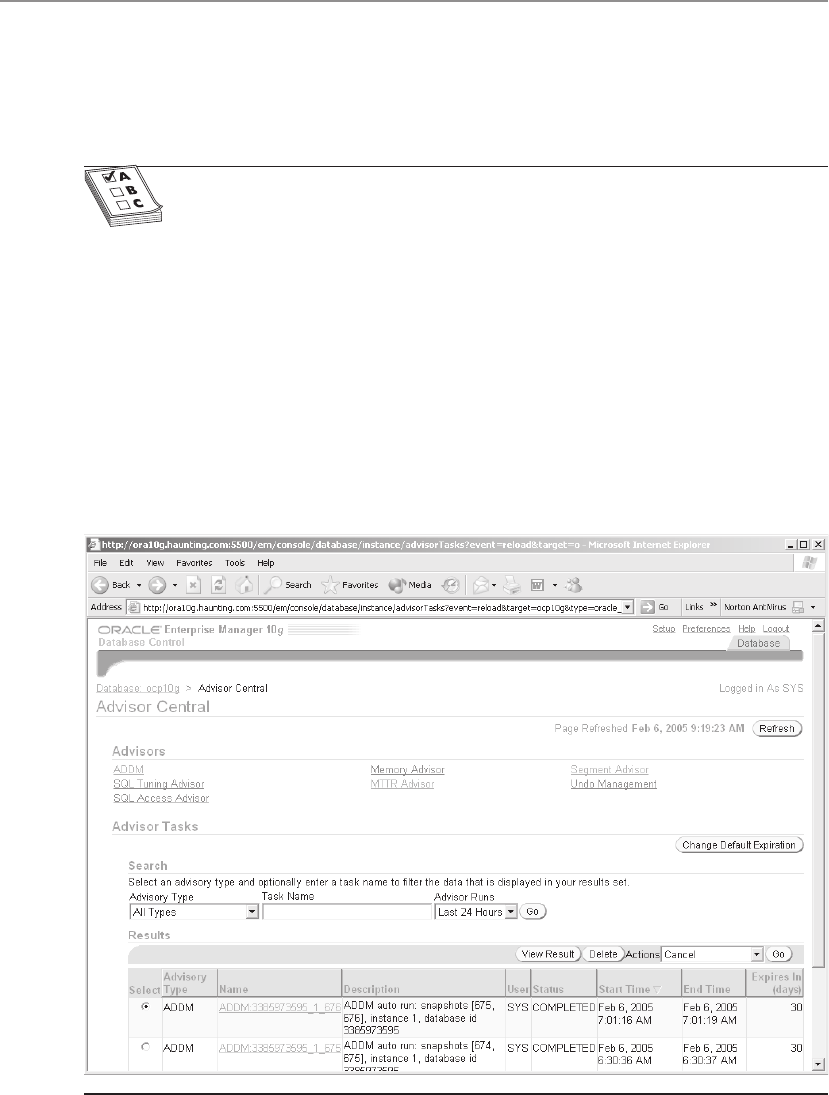
All-in-1 / Oracle Database 10g Certification All-in-One / Meyers / 5790-3 /Chapter 23
Oracle Database 10g OCP Certification All-in-One Exam Guide
4
To return to the default values, execute the procedure with NULLs for the two
arguments. To view or change these settings through Database Control, from the
Administration page take the Automatic Workload Repository link in the Workload
section, and click Edit.
EXAM TIP Snapshots are by default gathered by MMON and saved to the
AWR every hour; therefore the ADDM runs, by default, every hour.
To view the ADDM reports, from any Database Control screen take the Advisor
Central link in the Related Links section at the bottom of the page. The Advisor
Central window gives access to all the advisors and recent reports, as in Figure 31-1.
Select a report to see the results. Figure 31-2 shows the summary for an ADDM
report. This shows that the most serious problem detected, responsible for nearly 90
percent of waits, has to do with writing to the online redo log files. The next most
serious problem is excessive disk I/O on datafiles, caused by the database buffer cache
being undersized. For each problem, clicking the description will lead to a window
giving more detail on the problem and suggestions of what to do about it.
You can also generate an ADDM report covering the time between any two snapshots,
either through Database Control or by using the DBMS_ADVISOR API.
Figure 31-1 Advisor Central
ch31.indd 4ch31.indd 4 7/7/2005 5:17:14 PM7/7/2005 5:17:14 PM
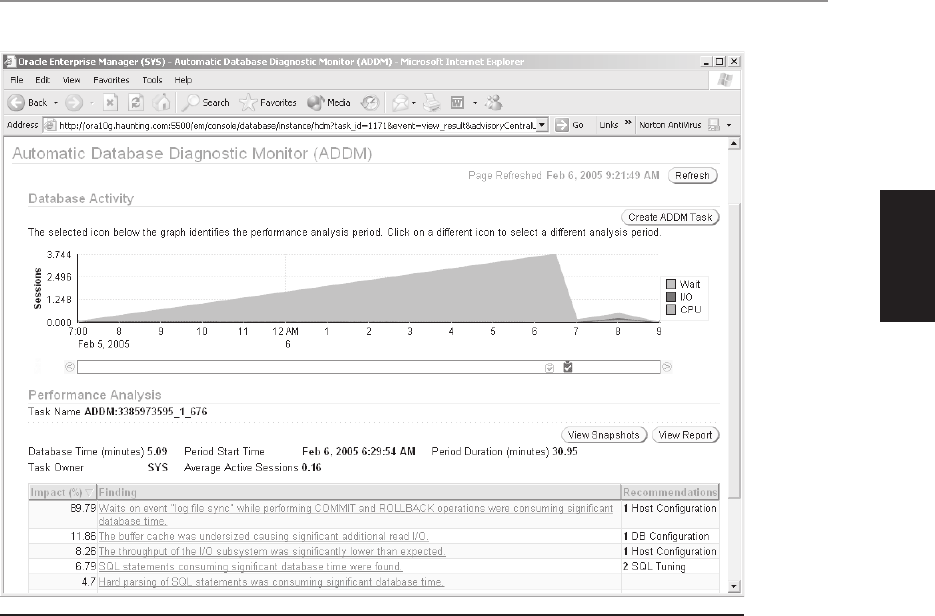
All-in-1 / Oracle Database 10g Certification All-in-One / Meyers / 5790-3 /Chapter 23
Chapter 31: Tools for Oracle Database 10g Tuning
5
PART II
The Advisors
The ADDM is one of several tools to be used for tuning a database, but it will usually
be the first. Frequently, its recommendations will include a suggestion that you run
one or more other advisors. There are six advisors:
• SQL Tuning Advisor Inspects SQL statements and the objects they address,
and makes recommendations regarding possibly inefficient coding methods
and missing or incorrect object statistics.
• SQL Access Advisor Generates suggestions for changing the indexing and
materialized view strategy, in an attempt to reduce the number of block visits
that will be necessary to run certain statements.
• Memory Advisor Predicts the effect on disk I/O of resizing the database
buffer cache and the PGA aggregate target, and can also compute the optimal
size for the shared pool.
• MTTR (Mean Time to Recover) Advisor Estimates the effect on disk I/O of
demanding various minimum startup times after an instance crash.
Figure 31-2 An ADDM report
ch31.indd 5ch31.indd 5 7/7/2005 5:17:15 PM7/7/2005 5:17:15 PM

All-in-1 / Oracle Database 10g Certification All-in-One / Meyers / 5790-3 /Chapter 23
Oracle Database 10g OCP Certification All-in-One Exam Guide
6
• Segment Advisor Inspects segments and recommends which could benefit
from a shrink operation. It can also be used for estimating the space that will
be required for tables and indexes at segment creation time, depending on the
anticipated number of rows.
• Undo Advisor Determines how large the undo tablespace needs to be in
order to guarantee that transactions will not run out of undo space, and that
queries will not fail with read consistency errors.
The SQL Tuning Advisor
It is often said that SQL statement tuning is the most important part of database
tuning. There is little point in optimizing disk and memory usage to make a query
that addresses several million blocks run more quickly, if the query could be rewritten
to address just a few dozen blocks. With regard to SQL tuning, Oracle Corporation
makes a clean break between the DBA’s domain and the developers’ domain: the DBA
is responsible for identifying the SQL statements that are causing problems. These are
the statements that are being executed many times (perhaps millions of times an
hour), the statements that are consuming a substantial amount of CPU time, and the
statements that are responsible for the bulk of the memory I/O and the disk I/O. Then
it is the developers’ responsibility to tune them. In practice, these two roles often
overlap: your developers will need assistance in writing efficient SQL.
The SQL Tuning Advisor takes as its input one or more SQL statements. These can
come from four sources:
• Top SQL This is the SQL cached in the SGA right now.
• SQL tuning sets This is a set of statements that can be built up from a
number of sources, such as the current SGA; a snapshot in the AWR; or a
group of statements entered by hand.
• Snapshots Included in the information written to the AWR by the MMON
are the high-load SQL statements running during the period.
• Preserved snapshots Regular AWR snapshots are only stored for a period,
but preserved snapshots, also known as “baselines,” are stored in the AWR
indefinitely and can also be used as input to the SQL Tuning Advisor.
The Advisor can make recommendations in four areas:
• Optimizer statistics The Advisor will inspect the statistics on the objects
being used by the statements, and if any have missing or out-of-date statistics,
it will recommend an analysis.
• SQL profiling This is a highly advanced capability of the advisor: it will
partially run the statements to test various execution plans, and gather
execution statistics to be used in conjunction with the object statistics.
ch31.indd 6ch31.indd 6 7/7/2005 5:17:15 PM7/7/2005 5:17:15 PM
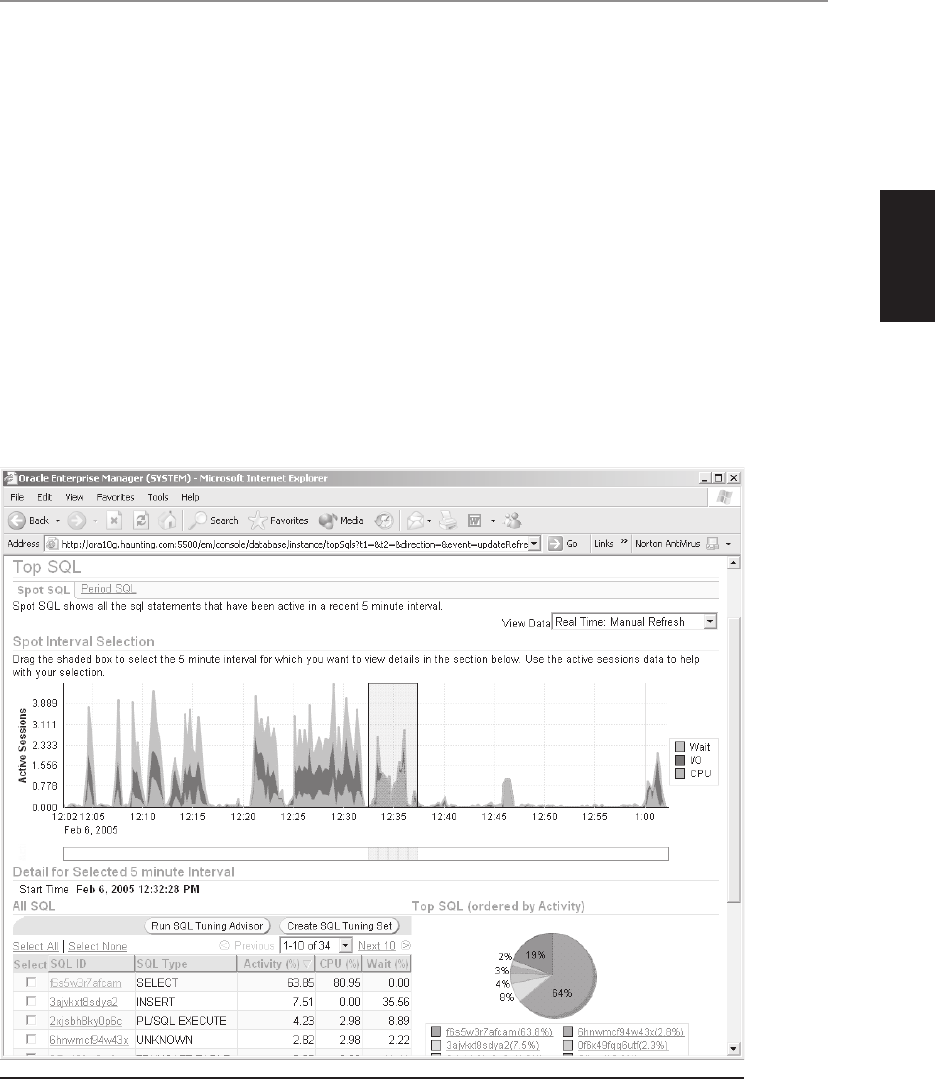
All-in-1 / Oracle Database 10g Certification All-in-One / Meyers / 5790-3 /Chapter 23
Chapter 31: Tools for Oracle Database 10g Tuning
7
PART II
• Access path analysis The Advisor will investigate the possibilities of using
extra indexes. The recommendations may include running the SQL Access
Advisor, which can do a more comprehensive analysis.
• SQL structure analysis There are certain constructs that are known to be
inefficient compared to others that will deliver the same result. The advisor
will identify such constructs and suggest alternative ways of structuring the
statement.
To run the SQL Tuning Advisor, take its link from the Advisor Central window, and
select a source (in the example following, the source is “Top SQL,” the SQL currently
in the SGA) and a time period, as in Figure 31-3.
In Figure 31-3, one SELECT statement consumed 64 percent of resources in a five-
minute period. This statement needs to be tuned. Click it to run the Advisor against it.
An example of typical recommendations is given in Figure 31-4, which suggest that a
table should be analyzed and an index created. Note that the second recommendation
is an instruction to run the Access Advisor.
Figure 31-3 The Top SQL window of the SQL Tuning Advisor
ch31.indd 7ch31.indd 7 7/7/2005 5:17:15 PM7/7/2005 5:17:15 PM
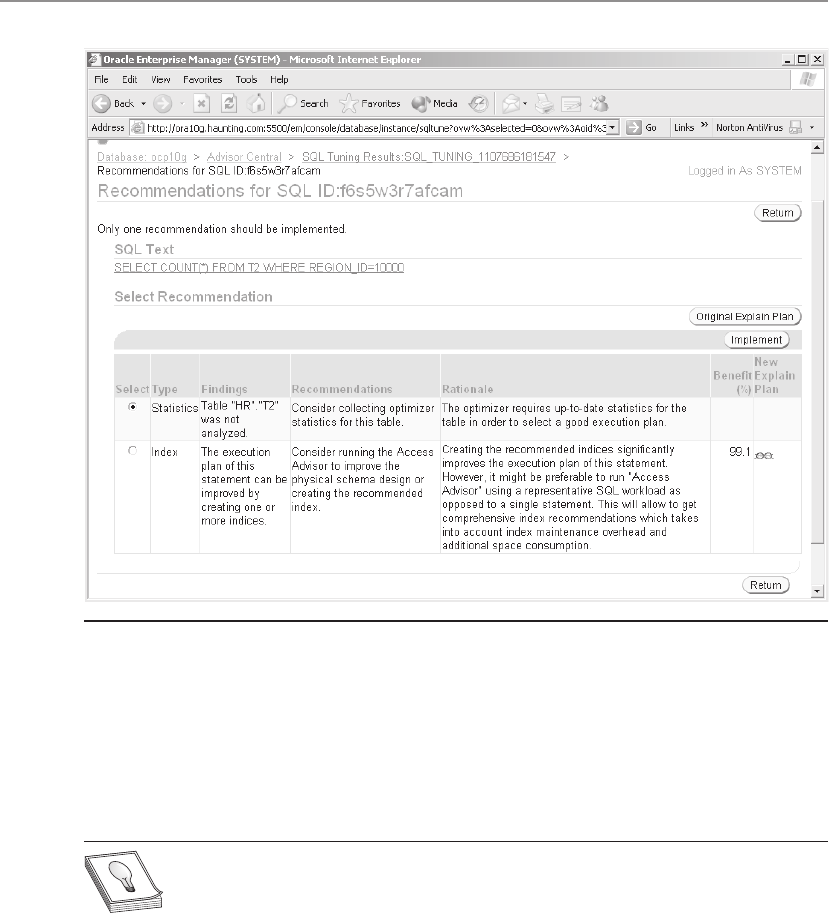
All-in-1 / Oracle Database 10g Certification All-in-One / Meyers / 5790-3 /Chapter 23
Oracle Database 10g OCP Certification All-in-One Exam Guide
8
The SQL Access Advisor
As does the SQL Tuning Advisor, the Access Advisor takes a workload from the current
SGA, a snapshot, or a SQL tuning set. The analysis will test the effect of using additional
indexes and (if requested) materialized views. It also considers storage characteristics,
and dropping unused indexes and materialized views.
TIP Materialized views are an advanced capability of the database, which in
effect pre-run all or part of a query and save the results so that they can be
used subsequently for all queries that address the same data.
The recommendations include scripts that can be used to generate any suggested
indexes and materialized views.
The Memory Advisor
More detail on sizing memory structures for optimal performance will be given in
Chapter 34; for now, concentrate on the graphical tools provided by Database Control.
Figure 31-4 SQL Tuning Advisor recommendations
ch31.indd 8ch31.indd 8 7/7/2005 5:17:16 PM7/7/2005 5:17:16 PM
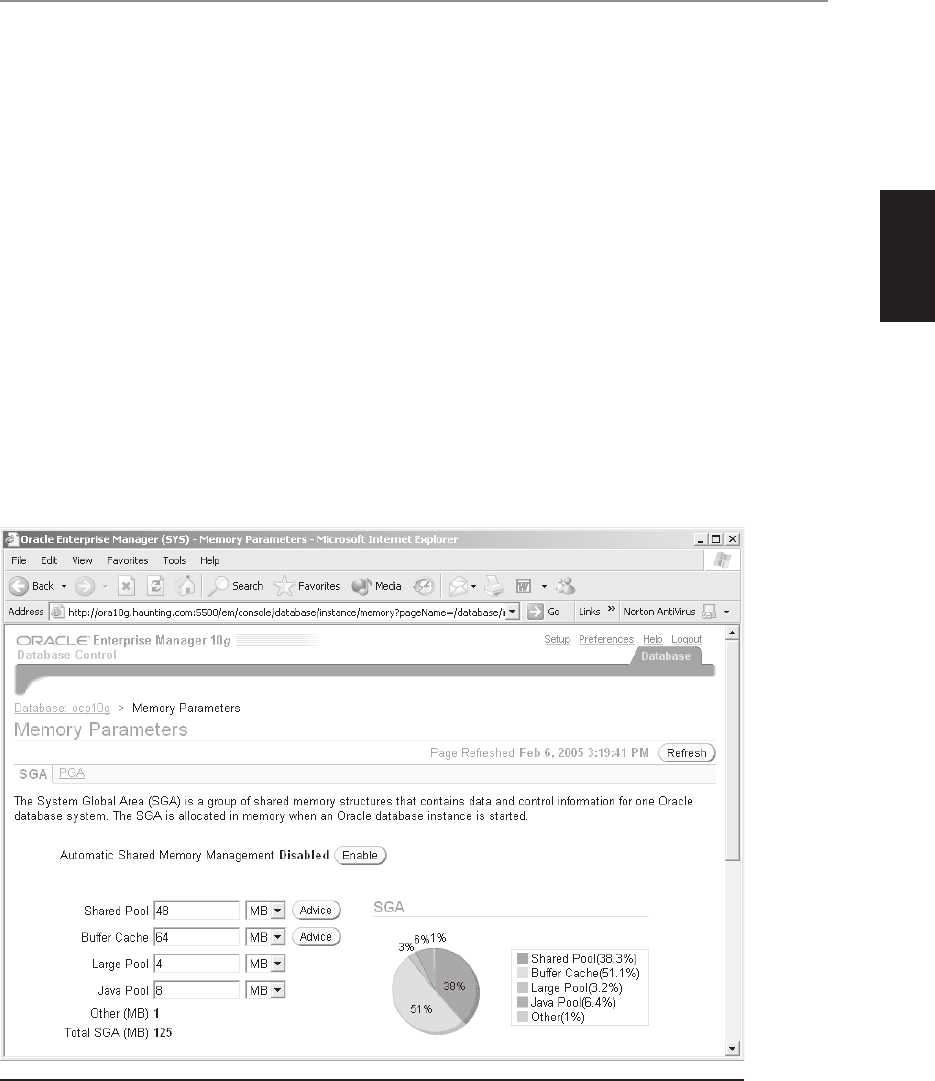
All-in-1 / Oracle Database 10g Certification All-in-One / Meyers / 5790-3 /Chapter 23
Chapter 31: Tools for Oracle Database 10g Tuning
9
PART II
There are three memory advisors: the Shared Pool Advisor, the Database Buffer Cache
Advisor, and the Program Global Area Advisor. To reach these advisors, first take the
Memory Advisor link from the Advisor Central window, as in Figure 31-5.
This shows the current settings for the most important system global area components.
Note that Automatic Shared Memory Management is “Disabled.” Only as long as it is
disabled do you have access to the SGA memory advisors. Once you enable it (as you
will in Chapter 34), the Advice buttons will disappear. After that, you can still get to
the advisors—but only through views and an API, not through Database Control.
Taking the Advice button for the shared pool will generate a graph, as shown in
Figure 31-6.
The Shared Pool Advisor plots estimates of parse time saved against various sizes
of the shared pool. A significant amount of time is taken up in an instance by parsing
SQL statements, and if the shared pool is large enough to cache already parsed code,
then the code can be reused, thus saving time that would be required to parse it again.
In the preceding example, it can be seen that increasing the shared pool to 90MB
would help, but at that point the benefits level off. It can also be seen from the shape
of the curve that reducing the size of the shared pool would be bad; if it is necessary
to reduce the size of the SGA (perhaps because the system is swapping), it might be
preferable to look for savings elsewhere.
Figure 31-5 Setting memory parameters
ch31.indd 9ch31.indd 9 7/7/2005 5:17:16 PM7/7/2005 5:17:16 PM
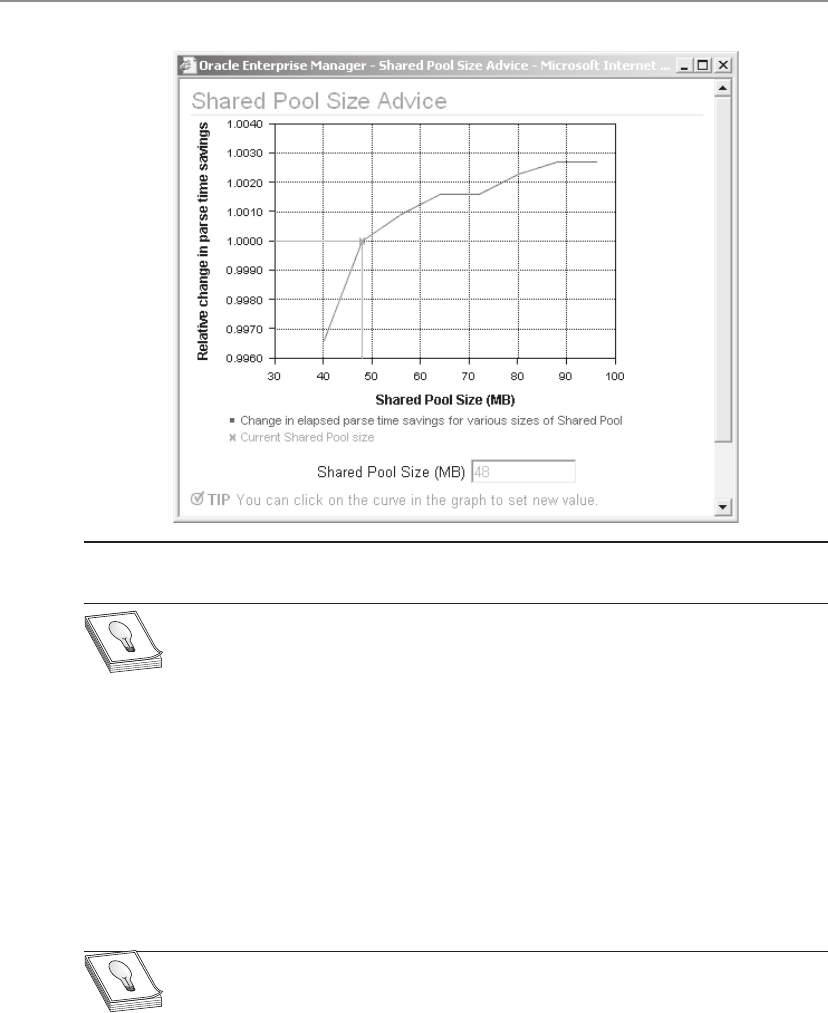
All-in-1 / Oracle Database 10g Certification All-in-One / Meyers / 5790-3 /Chapter 23
Oracle Database 10g OCP Certification All-in-One Exam Guide
10
TIP An oversized shared pool is bad for performance, so do not make it
larger than the advisor suggests. An oversized shared pool requires excessive
resources for management and can impact on search times to retrieve objects.
Taking the Advice button for the database buffer cache will generate a graph
plotting the estimated relative change in disk I/O for various buffer cache sizes. In
general, a larger cache will reduce disk I/O as more data is kept available in memory.
In the example shown in Figure 31-7, you can see that the database buffer cache
is already optimally sized: making it larger would not have an impact on disk I/O.
Indeed, it could be reduced by several megabytes without causing problems, but too
great a reduction would cause disk I/O to increase exponentially.
The PGA Advisor gives similar advice on how much memory Oracle should be
permitted to use for session memory.
TIP Always remember that your computer will have limits on the amount
of RAM available for Oracle to use. There is little point in assigning memory
to the Oracle structures, if the operating system is going to have to page (or
swap) it out to disk.
Figure 31-6 Advice on the shared pool
ch31.indd 10ch31.indd 10 7/7/2005 5:17:17 PM7/7/2005 5:17:17 PM
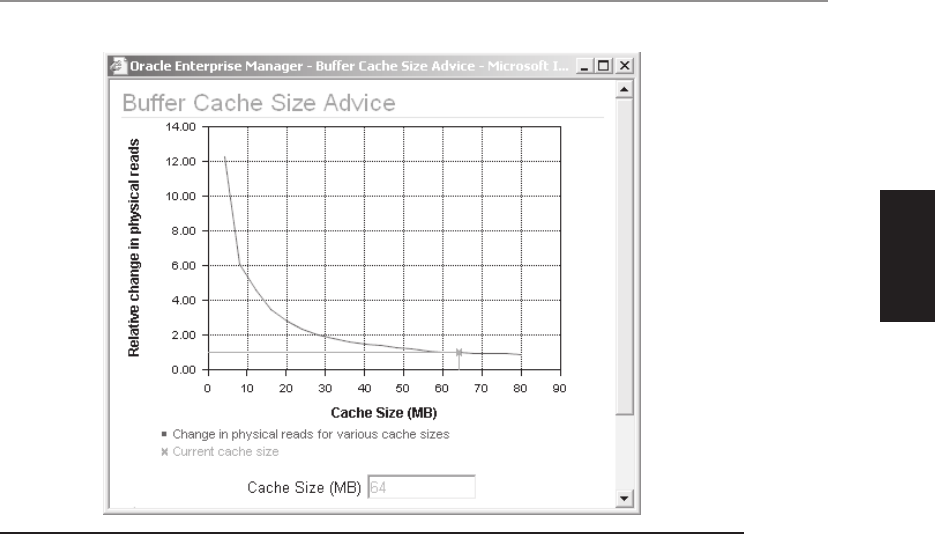
All-in-1 / Oracle Database 10g Certification All-in-One / Meyers / 5790-3 /Chapter 23
Chapter 31: Tools for Oracle Database 10g Tuning
11
PART II
The Mean Time to Recover Advisor
As you know from earlier chapters, it is impossible to corrupt an Oracle database
through any sort of instance failure. Any damage that occurs because of a crash is
always repaired on the next startup by the SMON, through the mechanism of using
the online logfiles to reinstantiate all work in progress at the time of the crash that
had not yet been written to disk. This recovery occurs during the transition of the
database from MOUNT to OPEN, and until it has been completed, users cannot
connect. But even though the instance recovery is automatic and guarantees no
corruptions, it can be a slow process requiring a considerable amount of downtime.
If a database is being run to a service level agreement with a clause such as “in the
event of a power failure, the database must be available for logon within X minutes of
power being restored,” then it is vital to limit the downtime needed for instance
recovery. This time is dependent on two factors: how much redo will have to be read,
and how many I/O operations will be necessary on datafiles. To reduce these factors,
Oracle must write out dirty buffers from the database buffer cache to disk: only those
buffers that were dirty at the time of the crash need to be reconstructed by reading them
off disk, applying the redo changes, and finally cleaned by writing them back to disk.
In normal running, the DBWn will write out dirty buffers according to algorithms
designed to maximize performance (these are detailed in Chapter 34), but if this
would result in a too-long recovery time, you can set the instance parameter FAST_
START_MTTR_TARGET. This is set in seconds and instructs the DBWn to write out
Figure 31-7 The Database Buffer Cache Advisor
ch31.indd 11ch31.indd 11 7/7/2005 5:17:17 PM7/7/2005 5:17:17 PM

All-in-1 / Oracle Database 10g Certification All-in-One / Meyers / 5790-3 /Chapter 23
Oracle Database 10g OCP Certification All-in-One Exam Guide
12
dirty blocks at a rate sufficient to ensure that recovery would take no longer than the
time nominated. But there is a price to pay: a possible performance drop caused by
the disk I/O that Oracle would not otherwise have done. To see the estimates, query
the V$INSTANCE_RECOVERY view:
ocp10g> select recovery_estimated_ios ios, actual_redo_blks redo,
target_mttr, estimated_mttr, writes_mttr from v$instance_recovery;
IOS REDO TARGET_MTTR ESTIMATED_MTTR WRITES_MTTR
---------- ---------- ----------- -------------- -----------
642 18081 180 172 900
This query shows that if the instance were to crash right now, on startup the
recovery process would have to perform 642 I/O operations on datafiles and apply
18081 blocks of redo. The target mean time to recover has been set to 180 seconds,
but in fact Oracle would need 172 seconds. The number of database writes that DBWn
has done (in addition to those it would normally do) in its efforts to keep to the
target is 900.
The Segment Advisor
The Segment Advisor is in three parts.
Size estimates can be generated when creating tables and indexes, based on the
DDL defining the objects and the anticipated number of rows. This is an option when
you create a table through Database Control.
After creation, growth trend estimates can be generated subsequently by Database
Control, using information stored in the AWR.
Recommendations on whether a segment should be shrunk can be generated
based on the statistics on the object, which include the amount of free space in the
blocks allocated to it. By making use of historical information stored in the AWR, the
Advisor can make an intelligent decision about whether free space within the segment
should be kept (rather than being returned to the tablespace through a shrink)
because it is likely to be needed again.
The Undo Advisor
Your undo tablespace should always be large enough to guarantee that transactions
have enough space for their undo data, and enough additional space that long-running
queries can always retrieve the data they need for read consistency. The Undo Advisor
tells you exactly how large it should be.
The advisor can be viewed through Database Control by taking the appropriate
link from the Advisor Central window, but it is also very easy to see from the SQL
prompt. The V$UNDOSTAT view tells you all you need to know:
ocp10g> select begin_time,end_time, undoblks, maxquerylen,
ssolderrcnt,nospaceerrcnt from v$undostat;
BEGIN_TI END_TIME UNDOBLKS MAXQUERYLEN SSOLDERRCNT NOSPACEERRCNT
-------- -------- ---------- ----------- ----------- -------------
20:51:31 20:58:06 2221 12 0 0
20:41:31 20:51:31 107347 177 0 0
ch31.indd 12ch31.indd 12 7/7/2005 5:17:17 PM7/7/2005 5:17:17 PM

All-in-1 / Oracle Database 10g Certification All-in-One / Meyers / 5790-3 /Chapter 23
Chapter 31: Tools for Oracle Database 10g Tuning
13
PART II
20:31:31 20:41:31 48349 678 0 0
20:21:31 20:31:31 3716 23 0 0
20:11:31 20:21:31 6020 4 0 0
20:01:31 20:11:31 88123 1223 0 0
19:51:31 20:01:31 94407 65 0 0
19:41:31 19:51:31 5312 5 0 0
19:31:31 19:41:31 4401 0 0 0
19:21:31 19:31:31 5184 67 0 0
19:11:31 19:21:31 21793 187 0 0
The V$UNDOSTAT view displays statistics for ten-minute intervals, from instance
startup time. The preceding query selects the number of blocks of undo generated per
ten minutes, and also the longest query that completed in the ten minutes. Also selected
are the number of snapshot-too-old errors that will have caused queries to fail and
no-space errors that will have caused transactions to fail—zero in both cases.
The Undo Advisor graphs the space required to support queries of varying length
according to the highest rate of undo generation, using the algorithm detailed in
Chapter 16 on managing undo.
Exercise 31-1: Using the SQL Tuning Advisor
Simulate identifying an extremely inefficient statement, and observe the advisor’s
recommendations.
1. Connect to your database using SQL*Plus as user system.
2. Create a table, and then insert some rows into it.
ocp10g> create table t1 (c1 number, c2 char(1000));
Table created.
ocp10g> begin
2 for i in 1..5000 loop
3 insert into t1 values (i,'a');
4 end loop;
5 commit;
6 end;
7 /
PL/SQL procedure successfully completed.
3. Flush all buffers from the database buffer cache, and run a query against the
table.
ocp10g> alter system flush buffer_cache;
System altered.
ocp10g> select max(c1) from t1;
MAX(C1)
----------
5000
4. Determine the SQL_ID of the statement. The SQL_ID is the unique identifier
for any SQL statement in the library cache of the SGA.
ocp10g> select sql_id from v$sql where sql_text='select max(c1) from t1';
SQL_ID
-------------
62hp8nsjwjgvm
ch31.indd 13ch31.indd 13 7/7/2005 5:17:17 PM7/7/2005 5:17:17 PM
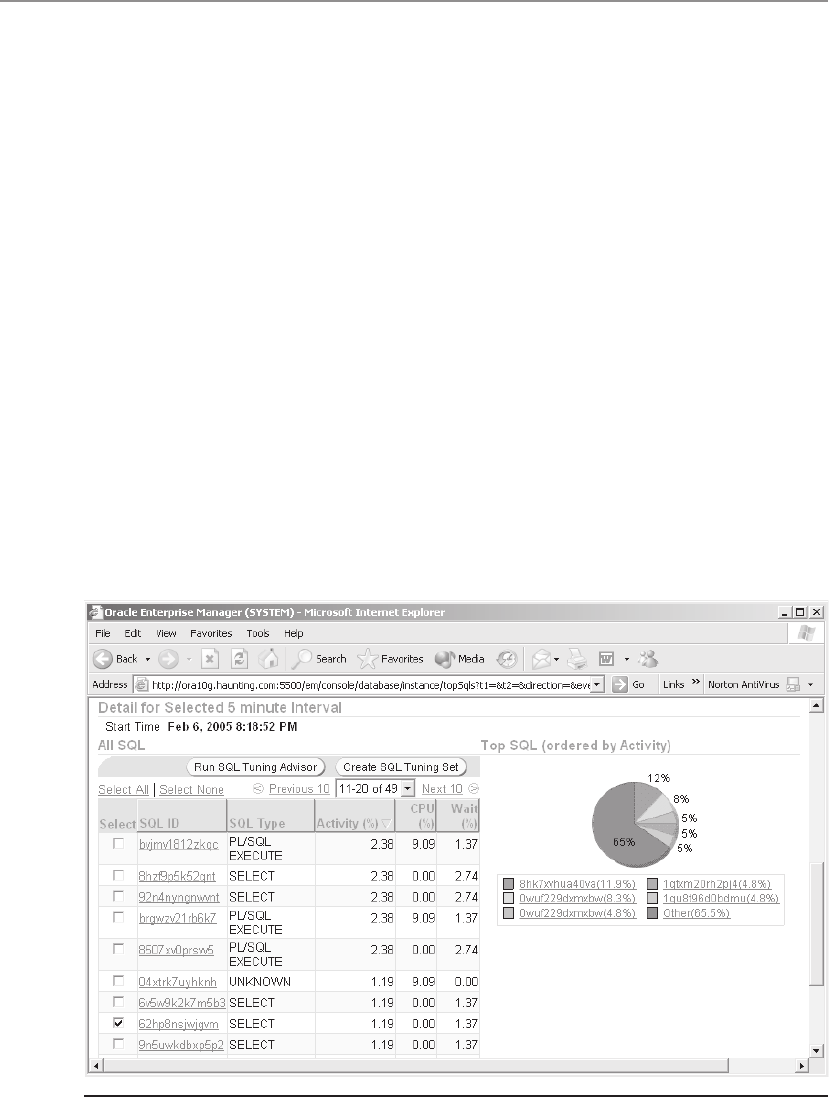
All-in-1 / Oracle Database 10g Certification All-in-One / Meyers / 5790-3 /Chapter 23
Oracle Database 10g OCP Certification All-in-One Exam Guide
14
5. Connect to your database with Database Control as user SYSTEM.
6. Take the Advisor Central link in the Related Links section, and then the link
SQL Tuning Advisor. Take the SQL Tuning Sets link.
7. In the SQL Tuning Sets window, select Spot SQL in the Create SQL Tuning Set
From drop-down box, and click Go. You will see your statement’s SQL_ID,
though not necessarily in the first statements shown. In the example shown in
Figure 31-8, it is in the second page of statements. Select its check box, and
click the Run SQL Tuning Advisor button.
8. In the Schedule Advisor window, leave everything on default and click OK.
9. When the advisor has completed, click View Recommendations. The
recommendations will vary depending on how your database is configured;
typically, they will include analyzing the table or building an index (see
Figure 31-9).
10. Follow the advice, and repeat Steps 3–8. Note that the recommendations
should change, or that the advisor will report that no further
recommendations can be made.
11. Tidy up by dropping the table.
ocp10g> drop table t1;
Table dropped.
Figure 31-8 Creating a SQL Tuning Advisor job
ch31.indd 14ch31.indd 14 7/7/2005 5:17:17 PM7/7/2005 5:17:17 PM

All-in-1 / Oracle Database 10g Certification All-in-One / Meyers / 5790-3 /Chapter 23
Chapter 31: Tools for Oracle Database 10g Tuning
15
PART II
Automatic Undo Retention Tuning
Undo data is stored in the undo tablespace, the tablespace nominated by the UNDO_
TABLESPACE instance parameter. This tablespace should be sized according to the rate
at which undo data is being generated and the length of the queries running in the
database, as detailed in Chapter 16. But even if the undo tablespace is inadequately
sized and therefore comes under space pressure, automatic undo retention tuning will
tend to minimize problems.
Undo data generated by a transaction must always be kept until the transaction
commits. This is an absolute; under no circumstances will Oracle ever overwrite undo
data that might be needed to roll back a transaction. This data is known as “active”
undo data. Once a transaction has committed, its undo data is no longer active, but it
could still be needed to support long-running queries that began before the transaction.
Data that may be needed for this purpose is known as “unexpired” undo data. “Expired”
undo is data that is no longer needed either to roll back a transaction or to be read by
queries.
Active undo will never be overwritten, and ideally expired undo can be safely
overwritten at any time. Unexpired undo can be overwritten, but at the risk (not the
certainty) of causing queries to fail with the “ORA-1555: snapshot too old” error. The
point at which data transitions from “unexpired” to “expired” is controlled by the
instance parameter UNDO_RETENTION. With release 9i of the Oracle database,
Figure 31-9 SQL Tuning Advisor recommendations
ch31.indd 15ch31.indd 15 7/7/2005 5:17:18 PM7/7/2005 5:17:18 PM

All-in-1 / Oracle Database 10g Certification All-in-One / Meyers / 5790-3 /Chapter 23
Oracle Database 10g OCP Certification All-in-One Exam Guide
16
Oracle would overwrite any expired undo. This meant that if the UNDO_RETENTION
parameter were not set appropriately (or not set at all, in which case it defaults to 900
seconds), there would be great danger of ORA-1555 errors. Release 10g of the database
effectively ignores the UNDO_RETENTION parameter; it will always overwrite the
oldest bit of undo data. This means that in a sense there is no longer any difference
between expired and unexpired undo, and that the UNDO_RETENTION instance
parameter is redundant, because undo retention is automatically tuned for the longest
possible query.
TIP The UNDO_RETENTION parameter is still important if you intend to
enable the retention guarantee capability of an undo tablespace, as discussed
in Chapter 16.
To monitor the automatic undo retention tuning, query the view V$UNDOSTAT:
select begin_time,end_time,tuned_undoretention from v$undostat;
This query will show, in ten-minute intervals, how old (in seconds) the oldest block
of inactive undo data was. Provided that no query started earlier than that, you will
never receive a snapshot-too-old error. The larger the undo tablespace is, and the less
the transaction workload is, the further back the TUNED_UNDORETENTION will be.
Chapter Review
Database tuning is a skilled and time-intensive process, but the advisors provided
with release 10g of the Oracle database can assist. The starting point should be the
ADDM. This runs every time a snapshot of statistics is collected, by default, every
hour. The ADDM will highlight any performance problems, either giving specific
advice or suggesting that you run one of the other advisors to drill down further to
the root cause of the problem.
The provided advisors are as follows:
• The SQL Tuning Advisor
• The SQL Access Advisor
• The Segment Advisor
• The Mean Time to Recover Advisor
• The Undo Advisor
• The Memory Advisor
All the advisors, and the ADDM, rely on information stored in the Automatic
Workload Repository, the AWR. This is updated with snapshots of statistical information
at regular intervals by the manageability monitor (the MMON) background process,
which also runs the ADDM automatically every time a snapshot is created.
ch31.indd 16ch31.indd 16 7/7/2005 5:17:18 PM7/7/2005 5:17:18 PM

All-in-1 / Oracle Database 10g Certification All-in-One / Meyers / 5790-3 /Chapter 23
Chapter 31: Tools for Oracle Database 10g Tuning
17
PART II
Questions
1. When are ADDM reports generated? (Choose the best answer.)
A. On demand, through Database Control or the Advisor API
B. Automatically, whenever a snapshot is collected
C. Both on demand and automatically when a snapshot is collected
D. ADDM does not generate reports; it recommends running other advisors
2. To enable the use of the Automatic Database Diagnostic Monitor and all the
tuning advisors, to what must the STATISTICS_LEVEL instance parameter be
set? (Choose the best answer.)
A. NONE
B. BASIC
C. TYPICAL
D. ALL
E. BASIC, TYPICAL, or ALL
F. TYPICAL or ALL
3. Which advisors can recommend index segment creation? (Choose two correct
answers.)
A. The SQL Tuning Advisor
B. The SQL Access Advisor
C. The Segment Advisor
D. The Automatic Database Diagnostic Monitor
4. For which memory structures are there advisors? (Choose all that apply.)
A. Database buffer cache
B. Large pool
C. Log buffer
D. Program global areas
E. Shared pool
5. The ADDM and the advisors use snapshot statistics. Where are these stored?
(Choose the best answer.)
A. In the SYSTEM tablespace
B. In the SYSAUX tablespace
C. They are stored by Database Control
D. They are accumulated in memory and cleared on shutdown
ch31.indd 17ch31.indd 17 7/7/2005 5:17:18 PM7/7/2005 5:17:18 PM

All-in-1 / Oracle Database 10g Certification All-in-One / Meyers / 5790-3 /Chapter 23
Oracle Database 10g OCP Certification All-in-One Exam Guide
18
Answers
1. C. ADDM generates reports automatically whenever an AWR snapshot is
collected, and you can also generate reports covering other periods on demand.
2. F. To enable the advisors, the STATISTICS_LEVEL must be either TYPICAL or ALL.
3. A and B. Both the SQL Tuning Advisor and the SQL Access Advisor can
recommend index creation. The Segment Advisor advises on existing
segments, not new ones, and the ADDM does not itself recommend index
creation, though it may advise using another advisor that will.
4. A, B, D, and E. There is no log buffer advisor.
5. B. Snapshots are stored in the Automatic Workload Repository, in the SYSAUX
tablespace.
ch31.indd 18ch31.indd 18 7/7/2005 5:17:19 PM7/7/2005 5:17:19 PM

All-in-1 / Oracle Database 10g OCP Certification All-in-One / Watson, Bersinic / 5790-3/Ch32
CHAPTER 32
Monitoring and
Managing Storage
In this chapter you will learn how to
• Tune redo writing and archiving operations
• Issue statements that can be suspended upon encountering space condition errors
• Reduce space-related error conditions by proactively managing tablespace usage
• Reclaim wasted space from tables and indexes using the segment shrink functionality
• Estimate the size of new tables and indexes
• Use different storage options to improve the performance of queries
• Rebuild indexes online
1
ch32.indd 1ch32.indd 1 7/11/2005 10:07:37 AM7/11/2005 10:07:37 AM

All-in-1 / Oracle Database 10g OCP Certification All-in-One / Watson, Bersinic / 5790-3
Oracle Database 10g OCP Certification All-in-One Exam Guide
2
Space management is a major part of a DBA’s day-to-day work. You must ensure that
there is enough storage space available for all the Oracle segments. If a segment fills
and cannot expand, users will receive errors; also, poor space management can also
have performance implications.
In previous releases of the Oracle database, space management was to a large extent
a manual process that required constant monitoring. A good DBA would automate
this process as far as possible by writing a suite of scripts to generate regular reports
on space usage, picking up potential problems before they occurred. Release 10g of
the database includes many tools for automating this monitoring, and for generating
advice on how performance can be improved.
Chapter 3 summarizes Oracle’s storage architecture: how tablespaces abstract
the physical data storage in datafiles from the logical data storage in segments, and
more detail is provided in Chapters 6 and 8. This chapter shows how to monitor
and optimize storage, in order to prevent errors and improve performance.
Online and Archive Redo Log File Storage
The redo log has a dual purpose: the online log files are essential to prevent database
corruptions in the event of an instance failure, and the archive log files are required
for recovery in the event of media failure. You cannot run a database safely without
multiplexed copies of your redo log. But a poorly configured redo log can also cause
performance degradation and can even cause the whole instance to hang. Throughout
this section, it is assumed that your database is running in archivelog mode, with two
logfile groups of two members each, and archiving to two destinations.
Disk I/O and the Online Redo Log Files
The discussion of commit processing in Chapter 9 details when the LGWR process
will write redo data in memory to the online redo log files on disk. The performance-
critical aspect of the LGWR process is that when a user issues a commit statement,
the session will hang until the LGWR has flushed the log buffer to disk. This is one
of the ultimate bottlenecks in the Oracle environment: you cannot do DML faster
than the log writer can flush the log buffer to disk.
Whenever the LGWR process flushes the log buffer to disk, it issues a parallel
write request to the operating system. If the multiplexed copies of the online log file
group are on separate physical disk devices, then the operating system can in fact do
a parallel write—but if both members are on the same device, then the write will have
to be sequential: first one member, then the other. This contention for disk I/O will
double the time required before the operating system can return “write complete.” It
will also reduce the fault tolerance of the system; if you lose one disk, you will lose
both members of the group.
On a high-throughput system, your system administrators should optimize the
performance of the devices used for online redo log file members. Because they are
(or should be) protected by multiplexing, they are perfectly suited to RAID 0 striping,
but the ideal is RAID 0+1, as discussed in Chapter 33.
ch32.indd 2ch32.indd 2 7/11/2005 10:08:09 AM7/11/2005 10:08:09 AM

All-in-1 / Oracle Database 10g OCP Certification All-in-One / Watson, Bersinic / 5790-3
Chapter 32: Monitoring and Managing Storage
3
PART II
TIP Store your online log file members on separate devices, and use
operating system striping to optimize performance.
If possible, do not locate online log files on the same devices as datafiles, because
that too will cause contention. You do not want the situation where the one LGWR
process is contending for access to its logfiles with hundreds of server processes and
the DBWn that are accessing the datafiles.
Log Switches and Performance
Another problem that can occur with the online log is not directly related to file I/O.
This is the effect of a log switch. The LGWR writes out redo data in very nearly real
time, and when you say COMMIT, it is real time. The DBWn, however, writes on a
very lazy algorithm: as little as possible, as rarely as possible. This gap between LGWR
and DBWn is the amount of redo data that will have to be processed to back out
corruptions in the event of an instance crash. To control the length of the gap, use the
FAST_START_MTTR_TARGET instance parameter. The smaller the figure you set this
to, the faster your recovery time will be—but the more performance will deteriorate,
because DBWn is forced to write out blocks faster.
One guarantee that Oracle provides is that if the instance crashes, there will always
be enough redo data available in the online log files to bring the database forward in
time to the point of the crash. To ensure this, the LGWR is not allowed to overwrite a
logfile group before the DBWn has written all the data blocks that were affected by
changes in the logfile to disk. DBWn must therefore write out dirty buffers from
the database buffer cache with each log switch, to advance the checkpoint position
through the time that the log switch occurred. A side effect of this is that frequent
log switches force DBWn to do a lot more disk I//O than it would do otherwise.
If the logfiles are small, then there will be frequent log switches: this forces DBWn
to write out dirty buffers to the datafiles, with a resultant deterioration in performance.
The ideal situation is that DBWn writes should be driven by your requirements for
recovery time, not by log switching. Database Control includes an advisor that will
check whether the frequency of log switching is forcing DBWn to write out data blocks
faster than it would do otherwise.
To reach this advisor, take the Administration tab on the database home page, then
the Redo Logs link in the Storage section. Select Sizing Advice in the Actions drop-down
box, and the advisor will present a recommended size for the groups, based on recent
activity, that will ensure that log switches will not be any more frequent than the need
to meet the FAST_START_MTTR_TARGET setting (see Figure 32-1). Your logfile groups
should be at least this size; making them larger will not degrade performance, but
making them smaller definitely will.
Archive Log Files and Performance
Online redo log files must be copied to archive redo log files when they fill. It is not
possible to overwrite an online log until it has been archived. In a high-throughput
system, you will locate your online redo log files on your fastest devices; therefore,
your archive redo log files will be on slower devices. This situation is unavoidable,
ch32.indd 3ch32.indd 3 7/11/2005 10:08:09 AM7/11/2005 10:08:09 AM
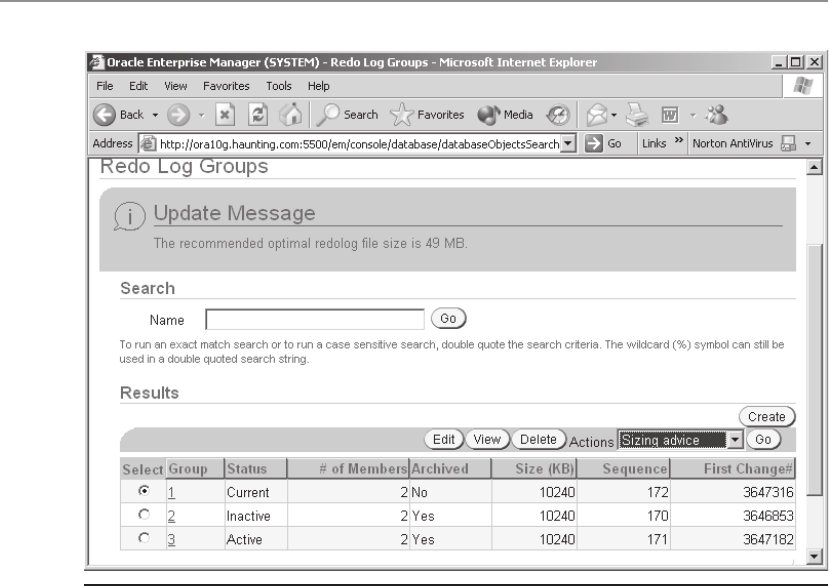
All-in-1 / Oracle Database 10g OCP Certification All-in-One / Watson, Bersinic / 5790-3
Oracle Database 10g OCP Certification All-in-One Exam Guide
4
and it may well be that at times of peak activity you are generating online redo faster
than it can be copied to archive redo. If the archiver processes cannot keep up with
the log writer process, the instance will hang until the archiver catches up.
To minimize the effects of this, first, never locate archive log files on the same
devices as online log files. To do so would be a guarantee of contention: the LGWR
process would be trying to write to the same disk that the ARCn process was writing to.
Second, always launch at least as many archiver processes as you have archive
destinations. The number of ARCn processes is controlled by the instance parameter
LOG_ARCHIVE_MAX_PROCESSES, which defaults to 2.
Third, if there are still problems, add more online log file groups. This will give
you more time before any one group must be overwritten, and it will help the database
over a sudden burst of high activity.
Space Errors and Resumable Statements
Users should never experience errors to do with space: proactive monitoring of space
usage should avoid the problem. But it does happen. The default behavior in the
event of a statement hitting a space problem is that the statement is rolled back
and an error is returned to the session. This behavior can be modified such that
the statement will suspend, giving the DBA an opportunity to fix the problem. The
statement will then resume and (one hopes) run to completion.
Figure 32-1 The redo log file sizing advisor
ch32.indd 4ch32.indd 4 7/11/2005 10:08:10 AM7/11/2005 10:08:10 AM

All-in-1 / Oracle Database 10g OCP Certification All-in-One / Watson, Bersinic / 5790-3
Chapter 32: Monitoring and Managing Storage
5
PART II
Common Space-Related Errors
When a segment fills up, Oracle will automatically allocate another extent to it in
one of the datafiles that make up the tablespace the segment resides within. If all the
datafiles are full, the extent allocation will fail and an error will be returned to the
user. If a datafile has the AUTOEXTEND attribute set, rather than generating an error,
Oracle will go to the operating system and increase the size of the datafile, allocating
the new extent in the newly acquired space. This will continue until the file reaches its
maximum size or the disk fills up. Then the user will receive an error.
Segments in dictionary-managed tablespaces may have a MAXIMUM EXTENTS
setting; if a segment fills and it has reached this limit, an error will be generated. This
does not occur for segments in locally managed tablespaces, because in a locally
managed tablespace this setting is always on UNLIMITED.
Undo space can also be a problem. Even if the segments a user is working on have
plenty of space, if the undo tablespace has no more free space (i.e., space that is not
required for protecting active transactions), there will be an error. This should not
occur if you are using automatic undo management and the undo tablespace is sized
correctly, as described in Chapter 16.
Even SELECT statements can generate space errors. This happens if the statement
requires a sort that spills to disk, and the user’s temporary tablespace fills up. This
should be avoided by using automatic PGA memory management (as described in
Chapter 34) and sizing the temporary tablespaces appropriately.
Whenever a space-related error occurs, the statement that caused it will be rolled
back. If the statement is part of a multistatement transaction, the rest of the transaction
will remain intact. Well-written code will have exception clauses that catch space
errors and handle them in an elegant manner, but no exceptions clause can prevent
the rollback.
Some of the most costly space errors occur during database administration work.
Consider the case where you have to create an index on a large table. This might take
hours and then fail before completion because the tablespace fills up. So you extend
the tablespace and try again. After a few more hours, it fails because the undo
tablespace fills up. So you extend that and try a third time. This time it fails because
of temporary space. Repeated space errors can waste a phenomenal amount of time.
Autoextension of Datafiles
Either at datafile creation time or subsequently with the ALTER DATABASE DATAFILE
<file_name> AUTOEXTEND ON command you can specify that a file will automatically
extend when full. To see whether and how AUTOEXTEND is enabled for a file, query
the DBA_DATA_FILES view:
SQL> select file_name,bytes,autoextensible,increment_by,maxbytes
from dba_data_files;
FILE_NAME BYTES AUT INCREMENT_BY MAXBYTES
--------------------- ---------- --- ------------ ---------------
/oradata/users01.dbf 102629376 NO 0 0
/oradata/undo01.dbf 524288000 YES 1 34359721984
/oradata/users02.dbf 1048576 YES 128 10485760
/oradata/bigfile1.dbf 1048576 YES 1 35184372064256
<output truncated...>
ch32.indd 5ch32.indd 5 7/11/2005 10:08:10 AM7/11/2005 10:08:10 AM

All-in-1 / Oracle Database 10g OCP Certification All-in-One / Watson, Bersinic / 5790-3
Oracle Database 10g OCP Certification All-in-One Exam Guide
6
This query shows that the file /oradata/users01.dbf is currently 100MB. It will not
automatically extend.
The file /oradata/undo01.dbf is currently 500MB and will autoextend in increments
of one block up to a maximum size of 32GB. If autoextension is enabled with no
controls, a datafile in a small file tablespace will extend in units of one block up to
a maximum of the block size (in this case, 8KB) multiplied by 4194304.
The datafile /oradata/users02.dbf is also autoextensible, but in a controlled
fashion. It is currently 1MB big, and when full, it will extend in units of 128 blocks
(or 1MB) up to a maximum size of 10MB.
The final example is of a datafile that makes up a bigfile tablespace, created as
autoextensible with no controls. The default upper limit is again dependent on the
block size; for 8KB blocks, it is 32TB.
TIP Enabling autoextension may avoid errors, but should not be necessary in
a well-managed database. If you must do it, always specify sensible values for
the increment size and the maximum size.
To modify a datafile to enable autoextension, use an ALTER DATABASE command
such as
SQL> alter database datafile '/oradata/users01.dbf' autoextend on
next 10m maxsize 200m;
This command instructs Oracle to increase the file size in units of 10MB, up to a
maximum size of 200MB.
Enabling autoextension of datafiles will avoid a large number of space errors, but
a far better option is to prevent them occurring at all by proactive management.
Resumable Statements
A session, or indeed the whole instance, can be configured to suspend statements that
hit space problems, rather than reversing them and generating an error. To the user, it
will appear as though the statement is hanging in the middle of execution. The DBA
can then fix the problem (for example, by adding more space to a datafile), and the
statement will then start running again. It will carry on from where it had left off, with
no loss of processing time other than the time for which it was suspended. By default,
statements will be suspended for two hours. If the problem has not been fixed in that
time, the error will be generated and the statement rolled back.
TIP While a statement is suspended, any row locks it may be holding will
be maintained. It will also hold any undo or temporary space it has already
acquired. Remember this when setting the resumable timeout.
To enable resumable statements, use an ALTER SESSION command, such as
SQL> alter session enable resumable timeout 60 name 'AR archive';
ch32.indd 6ch32.indd 6 7/11/2005 10:08:11 AM7/11/2005 10:08:11 AM

All-in-1 / Oracle Database 10g OCP Certification All-in-One / Watson, Bersinic / 5790-3
Chapter 32: Monitoring and Managing Storage
7
PART II
The optional keywords TIMEOUT and NAME let you specify how long, in seconds, to
suspend operations before generating an error and a name for the suspended session.
The example here will suspend any statements that hit space problems for up to one
minute. If the problem is resolved in that time, the statement will resume. If not, the
error will be generated. The name “AR archive” will be used as a label in the view
describing the suspended session. Reissuing the ENABLE RESUMABLE command at
various points in a process with different names will help identify the point in the
code at which the problem occurred. Because a suspended session may be tying up
resources and could therefore impact on other users, a user must be granted the
RESUMABLE privilege before he can enable resumable statements.
To enable resumable statements at the instance level, set the instance parameter
RESUMABLE_TIMEOUT. This will cause all sessions that hit space problems to hang
for the duration of the timeout given, unless the problem is fixed first. This is the
only way to enable resumable statements other than interactively: there is no API that
lets you enable resumable statements programmatically, for your own session or for
anyone else.
To track statement suspension, you can either query views or make use of a trigger.
Whenever a statement is suspended, a row is entered into the DBA_RESUMABLE view.
This view will give details of the statement, the problem, and the timings:
ocp10g> desc dba_resumable;
Name Null? Type
------------------------------------ -------- -----------------
USER_ID NUMBER
SESSION_ID NUMBER
INSTANCE_ID NUMBER
COORD_INSTANCE_ID NUMBER
COORD_SESSION_ID NUMBER
STATUS VARCHAR2(9)
TIMEOUT NUMBER
START_TIME VARCHAR2(20)
SUSPEND_TIME VARCHAR2(20)
RESUME_TIME VARCHAR2(20)
NAME VARCHAR2(4000)
SQL_TEXT VARCHAR2(1000)
ERROR_NUMBER NUMBER
ERROR_PARAMETER1 VARCHAR2(80)
ERROR_PARAMETER2 VARCHAR2(80)
ERROR_PARAMETER3 VARCHAR2(80)
ERROR_PARAMETER4 VARCHAR2(80)
ERROR_PARAMETER5 VARCHAR2(80)
ERROR_MSG VARCHAR2(4000)
There will be one row in this view for every statement that has been, or is currently,
suspended. The first two columns identify the username and session; the next three,
the instances involved (only relevant in a RAC database, where several instances may
be running different parts of a parallel operation). The STATUS of the statement tells
you whether it is currently suspended, or it is running again after a problem occurred
and was fixed, or the statement did in fact terminate because the problem wasn’t
fixed within the timeout. The START/SUSPEND/RESUME_TIME columns show when
the statement started to run and the most recent suspension and resumption times.
ch32.indd 7ch32.indd 7 7/11/2005 10:08:11 AM7/11/2005 10:08:11 AM

All-in-1 / Oracle Database 10g OCP Certification All-in-One / Watson, Bersinic / 5790-3
Oracle Database 10g OCP Certification All-in-One Exam Guide
8
A statement might be suspended and resumed many times, but you can see only the
current or last suspension. The NAME column is the name given in the ENABLE
RESUMABLE statement. The SQL_TEXT is the statement itself. Finally, there are the
details of the error condition that was raised. This is the error that would have been
returned to the session, and that will be returned if the problem is not fixed within
the TIMEOUT. If you do not wish to fix the problem, use the DBMS_RESUMABLE
.ABORT procedure to terminate the statement and return the error message to the
session immediately.
Information is also visible in the V$SESSION view. The EVENT column of a
suspended session will be populated with “statement suspended, wait error to be
cleared” while a suspension is in progress.
When a session is suspended, a system event is raised: the AFTER SUSPEND event.
This can be used to fire a database trigger. The action the trigger takes can be merely
informative, such as sending an alert message to the DBA, or it can investigate the
cause of the problem and attempt to fix it. For example,
SQL> create trigger suspend_message
2 after suspend on database
3 begin
4 utl_mail.send(
5 sender=>'suspend alert',
6 recipients=>'dba@haunting.com',
7 message=>'session suspended!');
8 end;
9 /
This trigger uses the UTL_MAIL package to send a simple e-mail whenever a
session is suspended. The trigger must be created in the SYS schema.
TIP Before using UTL_MAIL, you must set the SMTP_OUT_SERVER instance
parameter to nominate the address of your e-mail server.
To investigate the cause of the error, the trigger must use the DBMS_RESUMABLE
.SPACE_ERROR_INFO function, which will return details of the problem:
FUNCTION SPACE_ERROR_INFO RETURNS BOOLEAN
Argument Name Type In/Out
------------------------------ ----------------------- ------
ERROR_TYPE VARCHAR2 OUT
OBJECT_TYPE VARCHAR2 OUT
OBJECT_OWNER VARCHAR2 OUT
TABLE_SPACE_NAME VARCHAR2 OUT
OBJECT_NAME VARCHAR2 OUT
SUB_OBJECT_NAME VARCHAR2 OUT
Depending on the ERROR_TYPE and the OBJECT_TYPE, the trigger could take action
appropriate to the object, such as resizing a datafile.
TIP Test an AFTER SUSPEND trigger thoroughly, not forgetting that the
trigger itself could run into a space management problem. For example, if
the disk is full, the trigger will not be able to extend a datafile.
ch32.indd 8ch32.indd 8 7/11/2005 10:08:12 AM7/11/2005 10:08:12 AM

All-in-1 / Oracle Database 10g OCP Certification All-in-One / Watson, Bersinic / 5790-3
Chapter 32: Monitoring and Managing Storage
9
PART II
Exercise 32-1: Using Resumable Statements
Simulate a space error, and demonstrate how enabling resumable statements avoids it.
1. Connect to your database as user SYSTEM with SQL*Plus.
2. Create a small tablespace.
SQL> create tablespace small datafile 'small1.dbf' size 1m;
3. Create a table in the tablespace.
SQL> create table toobig (c1 char(1000)) tablespace small;
4. Force an error by filling the tablespace.
ocp10g> begin
2 for i in 1..1000 loop
3 insert into toobig values('a');
4 end loop;
5 end;
6 /
begin
*
ERROR at line 1:
ORA-01653: unable to extend table SYSTEM.TOOBIG by 8 in tablespace SMALL
ORA-06512: at line 3
5. Enable resumable statements for your session.
SQL> alter season enable resumable;
6. Reissue the anonymous PL/SQL block of Step 4. The session will hang.
7. In another window, connect as user SYSTEM and query the DBA_RESUMABLE
view.
SQL> select error_msg,status,sql_text from dba_resumable;
ERROR_MSG
----------------------------------------------------------------------
STATUS SQL_TEXT
--------- ------------------------------
ORA-01653: unable to extend table SYSTEM.TOOBIG by 8 in tablespace SMALL
SUSPENDED INSERT INTO TOOBIG VALUES('a')
8. Fix the problem by adding a datafile to the SMALL tablespace.
SQL> alter tablespace small add datafile 'small2.dbf' size 10m;
9. In your first session, note that the insert has now completed successfully.
10. Tidy up.
SQL> drop tablespace small including contents and datafiles;
Use of Alerts to Monitor Tablespace Usage
Far better than either enabling autoextension of datafiles or relying on resumable
statements is ensuring that tablespaces never fill up in the first place. To do this, you
must monitor tablespace usage. To see the amount of free space in your tablespaces,
query the DBA_FREE_SPACE view:
SQL> select tablespace_name, sum(bytes) from dba_free_space
group by tablespace_name;
ch32.indd 9ch32.indd 9 7/11/2005 10:08:13 AM7/11/2005 10:08:13 AM
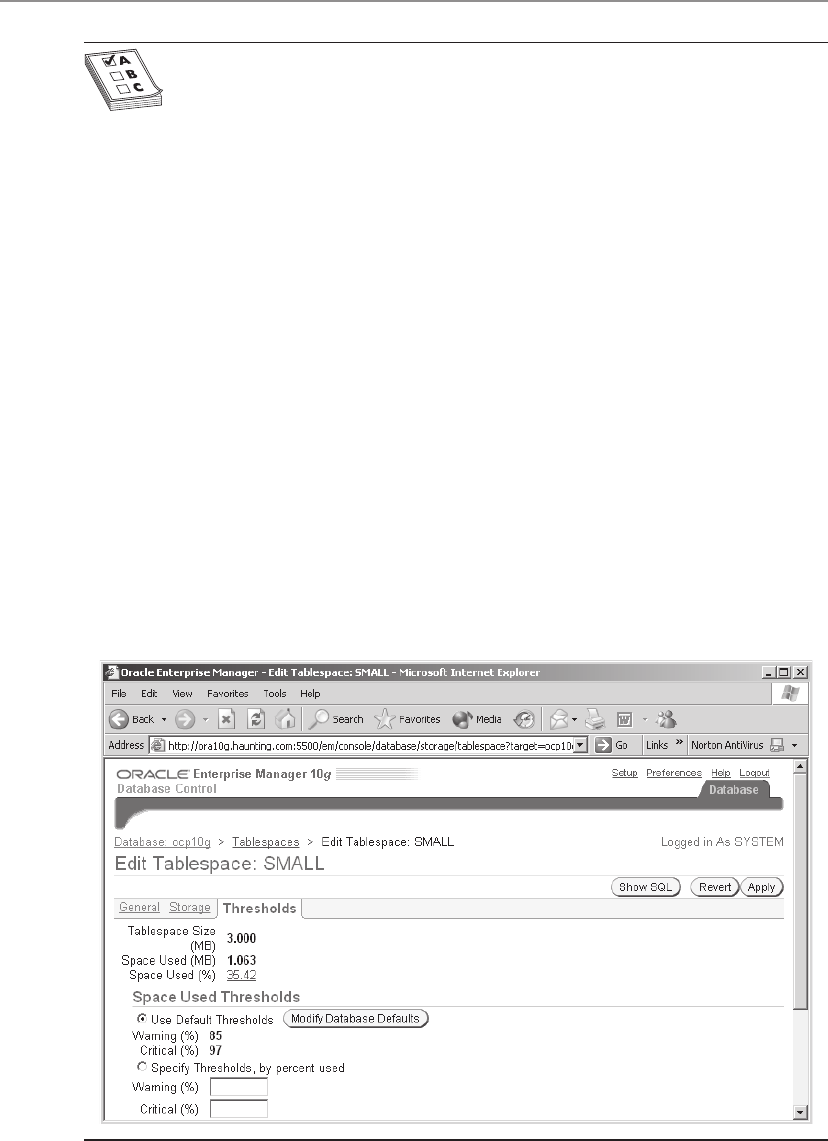
All-in-1 / Oracle Database 10g OCP Certification All-in-One / Watson, Bersinic / 5790-3
Oracle Database 10g OCP Certification All-in-One Exam Guide
10
EXAM TIP Space occupied by recycle bin objects is reported as “free” in the
DBA_FREE_SPACE view.
Monitoring free space used to be a regular part of a DBA’s job, but with release 10g
of the database it can be automated by the alert system. The alert system is enabled by
the manageability monitor, or MMON, background process. Management information
is accumulated in memory during normal running and periodically flushed to disk by
the MMON process. The data is stored on disk in the Automatic Workload Repository,
a set of tables in the SYSAUX tablespace.
The alert system comes preconfigured with thresholds on tablespace usage that will
trigger a warning alert when a tablespace reaches 85 percent full and a critical alert
when it becomes 97 percent full. The mechanism is intelligent enough to consider
space currently in use for temporary tablespaces and undo tablespaces, rather than the
actual space occupied by temporary or undo segments. For regular tablespaces, it will
ignore space occupied by recycle bin objects. The tablespace usage alert is checked
every ten minutes. If the datafiles of a tablespace are autoextensible, then the alert is
based on a comparison of the used space with the maximum size of the files, not the
current size.
The thresholds of 85 percent and 97 percent are a database-wide default, which can
be changed either globally or for individual tablespaces. There is no way to adjust the
ten-minute frequency of monitoring. To set thresholds for a tablespace with Database
Control, from the database home page take the Administration tab, and then the
Tablespaces link in the Storage section. Selecting the Tablespace radio button and
clicking Edit will take you to the Edit Tablespace window shown in Figure 32-2, where
you can set the thresholds for the one tablespace or adjust the database-wide defaults.
Figure 32-2 Setting tablespace usage thresholds
ch32.indd 10ch32.indd 10 7/11/2005 10:08:13 AM7/11/2005 10:08:13 AM

All-in-1 / Oracle Database 10g OCP Certification All-in-One / Watson, Bersinic / 5790-3
Chapter 32: Monitoring and Managing Storage
11
PART II
EXAM TIP The 85 percent and 97 percent values are default alert thresholds
for all tablespaces. You can change this database default or override it for
individual tablespaces.
Alerts may be seen in various ways. It is, for example, possible to configure the
database to send e-mails or pages when an alert is raised. The default behavior is
merely to report the alert through Database Control. All recent alerts are displayed
on the database home page. Alerts can also be viewed in the DBA_OUTSTANDING_
ALERTS view. When an alert is cleared—for example, by adding another file to a full
tablespace—the alert is removed from the DBA_OUTSTANDING_ALERTS view and
transferred to the DBA_ALERT_HISTORY view.
Exercise 32-2: Using Tablespace Usage Alerts
Create a tablespace, and make use of the alert system to monitor its usage.
1. Connect to your database as user SYSTEM with SQL*Plus.
2. Create a tablespace with one small datafile.
SQL> create tablespace small datafile 'small.dbf' size 1m;
3. Create a table in the tablespace.
SQL> create table toobig (c1 char(1000)) tablespace small;
4. Fill the tablespace by inserting some rows into the table.
SQL> begin
2 for i in 1..1000 loop
3 insert into toobig values('a');
4 end loop;
5 end;
6 /
This will cause an ORA-01653 error, because the table will have filled the
tablespace.
5. Connect to your database as user SYSTEM with Database Control.
6. On the database home page, note the “Problem Tablespaces” in the Space
Usage section. This will say that there is (at least) one problem tablespace,
shown as a link. You may have to wait a few minutes and refresh the screen
before this is updated, due to the ten-minute gap between space usage checks.
Then take the link to see the problem tablespace, as in Figure 32-3.
7. In your SQL*Plus session, query the outstanding alerts view.
SQL> select object_name,reason from dba_outstanding_alerts;
OBJECT_NAME REASON
--------------- ----------------------------------------
SMALL Tablespace [SMALL] is [93 percent] full
8. Fix the problem by adding a second datafile to the tablespace.
SQL> alter tablespace small add datafile 'small2.dbf' size 2m;
ch32.indd 11ch32.indd 11 7/11/2005 10:08:14 AM7/11/2005 10:08:14 AM
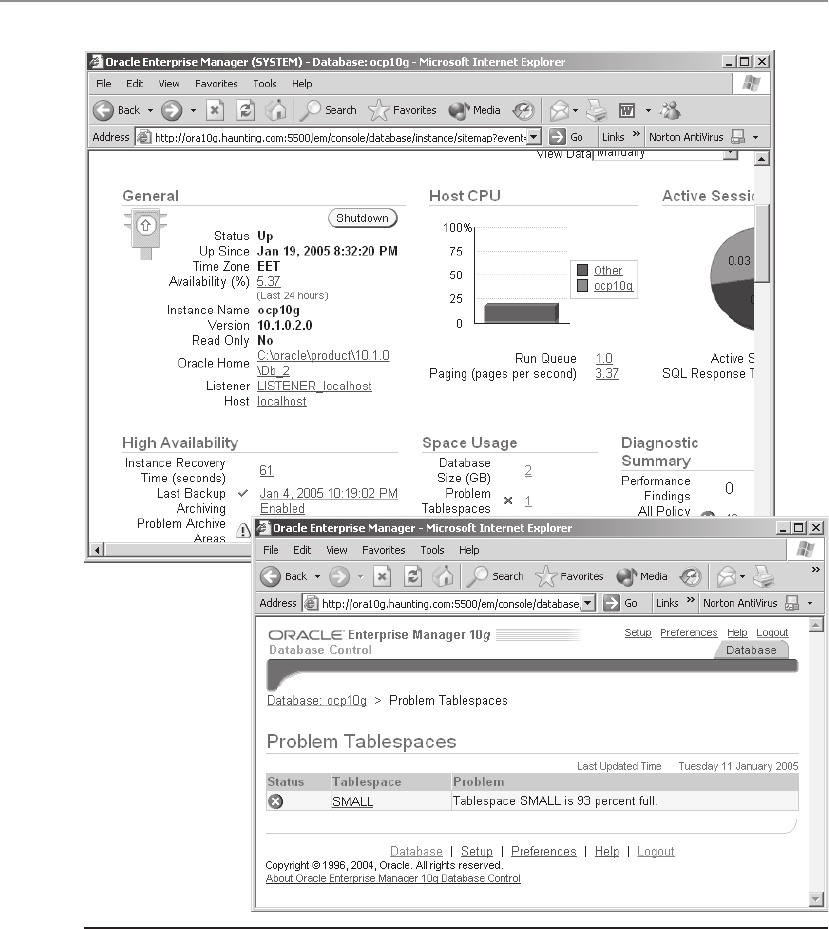
All-in-1 / Oracle Database 10g OCP Certification All-in-One / Watson, Bersinic / 5790-3
Oracle Database 10g OCP Certification All-in-One Exam Guide
12
9. Refresh the Database Control window and re-run the query of Step 7, and
you will see that the alert has been cleared. Again, there may be a delay of
up to ten minutes.
10. Tidy up.
SQL> drop tablespace space small including contents and datafiles;
Figure 32-3 Identifying tablespaces under space pressure
ch32.indd 12ch32.indd 12 7/11/2005 10:08:15 AM7/11/2005 10:08:15 AM

All-in-1 / Oracle Database 10g OCP Certification All-in-One / Watson, Bersinic / 5790-3
Chapter 32: Monitoring and Managing Storage
13
PART II
Monitoring and Managing Segment Sizes
As rows are inserted into a table, Oracle will allocate more extents to the table as
necessary. When rows are deleted, these extents are not deallocated. They remain
part of the table. This mechanism gives rise to two possible problems.
First, while extents can be allocated dynamically, it will generally be more efficient
to allocate enough space to the table in the first place. If you know that a table will
grow to 100GB, it will be better to allocate 100GB of space initially than to rely on
Oracle to add many extents as the segment grows. But it is difficult to estimate the
physical size that a table will grow to, even if you do have an estimate for the number
of rows. The Database Control Segment Advisor can do this for you.
Second, because deletions do not deallocate space, it is possible for a table to
occupy far more space than the actual number of rows currently in it requires. This is
not only a waste of storage, it can also impact badly on performance. A full table scan
must scan the whole table, whether or not the rows have been deleted.
Indexes face similar problems. It is extremely difficult to estimate in advance the
size of an index, and large amounts of DML will result in an index whose efficiency
has deteriorated.
Database control includes advisors that can scan objects and recommend whether
they are occupying far more space than necessary; at segment creation time the advisors
can estimate the amount of space that a segment will require, given its structure and
the number of rows expected.
Estimating Segment Sizes
When you create a table or an index with Database Control, an advisor can estimate
the space that will be needed. When creating a table, after defining the columns take
the Estimate Table Size button and enter the number of rows expected in the page
shown in Figure 32-4. A similar option is available in the wizard for creating indexes.
Shrinking Table Segments
As rows are inserted into a table, the extents that make up the table will fill. When
all the extents are full, Oracle will allocate another extent, and so on. The high water
mark, or HWM, is a marker in a segment for the last block that has ever been used.
When a table is created, the HWM is set to the beginning of the segment. As rows are
inserted, the HWM is pushed up. When the HWM reaches the end of the initial extent,
a new extent is added to the table. More inserts will push the HWM up through the
new extent. This is normal table growth.
As rows are deleted, space is freed up within the segment, but the segment itself
retains the space it has been allocated, and the HWM does not move. Extents are not
returned to the tablespace and made available for other segments. New insertions
can reuse the space below the HWM that has been freed up by deletions, but in many
cases segments will end up occupying far more space than is needed for their current
contents because the blocks below the HWM are very sparsely populated. This results
in a waste of storage capacity and also causes performance problems. Full table scans
always scan up to the HWM.
ch32.indd 13ch32.indd 13 7/11/2005 10:08:15 AM7/11/2005 10:08:15 AM
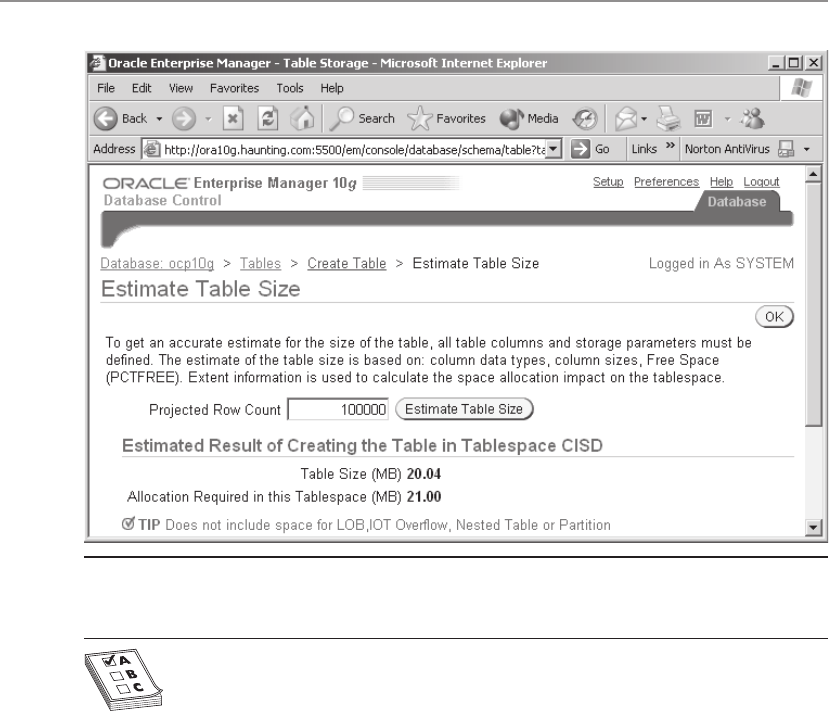
All-in-1 / Oracle Database 10g OCP Certification All-in-One / Watson, Bersinic / 5790-3
Oracle Database 10g OCP Certification All-in-One Exam Guide
14
EXAM TIP A full table scan takes several hours to complete. You delete all
the rows, and scan again. How long will the second scan take? Exactly as long
as the first.
The ALTER TABLE SHRINK SPACE command will reorganize a table in order to
compact rows into as few blocks as possible. Rows in blocks toward the end of the table
are moved to free space in blocks toward the beginning of the table. Once all possible
movements have been done, the HWM is moved down as far as it can go and all extents
above the newly positioned HWM are returned to the tablespace. The result is a table
that has a much smaller number of blocks than before, all of which are packed with
rows as tightly as possible. This minimizes the space required and optimizes the
performance of full table scans.
A segment shrink operation is implemented internally as a series of insert and
delete DML operations. To move a row, a copy of the row is inserted into a new
location and deleted from its original location. It follows from this that indexes will
be maintained, and that row locks will be required while the move is in progress—but
these locks are only transitory, and the segment remains available for use by other
users. Unless another session happens to require access to a row while it is being
moved, no one will notice that a shrink is in progress. If another session does hit
a row that is being moved, there will be a momentary delay until the move is
completed and the lock is released.
Figure 32-4 Table size estimate
ch32.indd 14ch32.indd 14 7/11/2005 10:08:16 AM7/11/2005 10:08:16 AM

All-in-1 / Oracle Database 10g OCP Certification All-in-One / Watson, Bersinic / 5790-3
Chapter 32: Monitoring and Managing Storage
15
PART II
The final stage of a shrink operation is a DDL operation. Once all rows possible
have been moved from the end of the segment toward the beginning, there will be a
large number of blocks (one hopes, many extents) toward the end of the segment that
are completely empty. The shrink ends by moving the HWM from its current position
to the last block that is now in use, and deallocating all extents above the new HWM
position. This will minimize the space usage of the segment and optimize full table
scans.
Insert and delete triggers do not fire as a result of segment shrink operations,
because the data itself does not change. Before a shrink can be done, row movement
must be enabled for the table, as it must be for enabling table flashback. A segment
shrink can only be applied to heap structured tables, which must be in tablespaces
that use automatic segment space management (ASSM). These are standard tables,
partitioned tables, materialized view container tables, and materialized view log
tables. There are also some limitations on the datatypes of the table.
In summary, only tables in ASSM tablespaces can be shrunk, and of those, these
cannot be shrunk:
• Clustered tables (described later)
• Tables with columns of type LONG
• LOB segments (though the table itself can be shrunk)
• Tables with on-commit materialized views (because triggers are disabled)
• Tables with ROWID materialized views (because rowids change)
• IOT mapping tables and IOT overflow segments (described later)
• Tables with function-based indexes
• Heap tables for which row movement has not been enabled
A table shrink can be initiated from Database Control or the SQL*Plus command
line. There are two options that can be specified on the command line, CASCADE and
COMPACT. CASCADE will shrink the table and its indexes. COMPACT stops the shrink
after the row compaction phase and before the shift of the HWM. The HWM move
may be noticed by your end users, because it does require a (very brief) table lock.
To avoid this impact, shrink your tables in normal running time with the COMPACT
keyword, and then repeat the shrink without COMPACT at your next maintenance
slot. The second shrink will be very fast, because the work of moving the rows has
already been done. Figure 32-5 demonstrates shrinking a table in one operation.
Shrinking Index Segments
As DML is applied to indexed columns, the indexes tend to become inefficient due
to wasted space. This is because of the manner in which Oracle’s B*Tree indexes are
maintained: once space is allocated in a block for an index entry, even if the row to
which the index entry refers is deleted, the space remains assigned. It may well be that
after a protracted period there are many blocks in an index that are only partially full
of live entries, the rest of the space being taken up by deleted entries. This means that
ch32.indd 15ch32.indd 15 7/11/2005 10:08:17 AM7/11/2005 10:08:17 AM
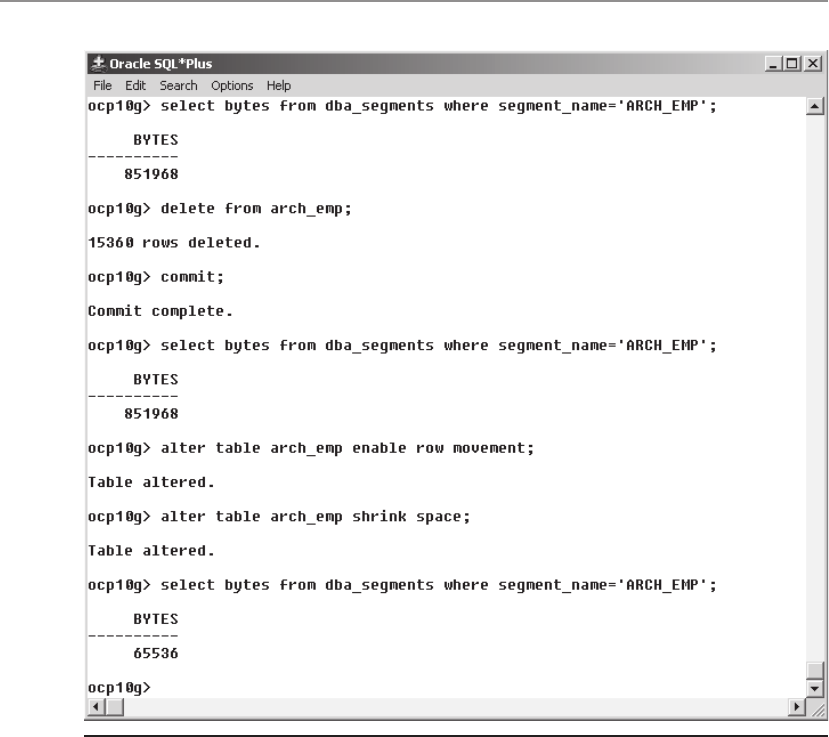
All-in-1 / Oracle Database 10g OCP Certification All-in-One / Watson, Bersinic / 5790-3
Oracle Database 10g OCP Certification All-in-One Exam Guide
16
even though there is “unused” space in the blocks that are already part of the index,
new insertions will require new blocks to be assigned. To see if this is a problem,
analyze the index with the VALIDATE STRUCTURE option and then query the
INDEX_STATS view:
ocp10g> analyze index i1 validate structure;
Index analyzed.
ocp10g> select lf_rows_len,del_lf_rows_len from index_stats
2 where name='I1';
LF_ROWS_LEN DEL_LF_ROWS_LEN
----------- ---------------
283780 144516
This shows that about 280KB of space is devoted to index entries, but that about
half of it is in fact used by entries that refer to deleted rows. The effect of an index
Figure 32-5 Using the SHRINK SPACE command
ch32.indd 16ch32.indd 16 7/11/2005 10:08:17 AM7/11/2005 10:08:17 AM

All-in-1 / Oracle Database 10g OCP Certification All-in-One / Watson, Bersinic / 5790-3
Chapter 32: Monitoring and Managing Storage
17
PART II
shrink (which in previous releases of the database was known as a “coalesce”) is to
make the space used by deleted entries available for reuse. The mechanism of moving
rows by paired inserts and deletes that shrinks a table cannot be applied to an index,
because the index keys must remain in the same place relative to each other: you
cannot actually move anything. The shrink, or coalesce, scans the leaf blocks of the
index and by compacting the entries for live rows makes the space previously used for
deleted rows available for reuse:
ocp10g> alter index i1 shrink space;
Index altered.
ocp10g> analyze index i1 validate structure;
Index analyzed.
ocp10g> select lf_rows_len,del_lf_rows_len from index_stats
2 where name='I1';
LF_ROWS_LEN DEL_LF_ROWS_LEN
----------- ---------------
139264 0
After the shrink, no space is occupied by deleted entries, but if you were to query
the DBA_SEGMENTS view, you would find that the size of the segment had not
changed. Applying the SHRINK SPACE command to indexes will prevent unnecessary
growth of the index but does not actually reduce the size of the index. To do that, you
must rebuild it, which is a much more serious operation.
The SHRINK command, when applied to an index, is functionally identical to the
older COALESCE command:
ocp10g> alter index i1 coalesce;
Index altered.
Rebuilding Index Segments
An index shrink, or coalesce, may help with releasing space within an index, but it
does not actually return any space to the tablespace. It is, however, a quick and easy
operation. An index rebuild creates a completely new index. This will be as efficient
as it can be: occupying the minimum amount of space, and having the shallowest
possible depth.
To rebuild an index, use the ALTER INDEX...REBUILD ONLINE command:
ocp10g> select bytes from dba_segments where segment_name='I1';
BYTES
----------
327680
ocp10g> alter index i1 rebuild online;
Index altered.
ocp10g> select bytes from dba_segments where segment_name='I1';
BYTES
----------
262144
If you do not specify ONLINE, the table will be locked for DML for the duration
of the rebuild, which on a large table could mean hours of downtime. During the
ch32.indd 17ch32.indd 17 7/11/2005 10:08:18 AM7/11/2005 10:08:18 AM

All-in-1 / Oracle Database 10g OCP Certification All-in-One / Watson, Bersinic / 5790-3
Oracle Database 10g OCP Certification All-in-One Exam Guide
18
course of the rebuild you will need up to twice the storage, because both the original
and the rebuilt versions of the index coexist while the rebuild is in progress.
TIP If you have the storage space, always rebuild an index rather than
dropping and re-creating it. Index creation requires a sort, but a rebuild
can use the keys in the old index, which are already in order.
It is also possible to rebuild an index into a different tablespace. This command,
ocp10g> alter index i1 rebuild online tablespace idx_ts;
will move the index from its present location into the IDX_TS tablespace.
Monitoring Index Usage
Indexes can improve the performance of queries dramatically, but they can be
bad for the performance of DML operations. Whenever the value of an indexed
column is changed, not only must the block containing the row be read into
memory and changed, but blocks of the index must be manipulated as well. As
a general rule, a DBA aims to have only the minimum number of indexes needed
to support queries.
Many databases will have indexes that are not being used. For instance, they may
have been created for reports that are no longer generated, or perhaps to support
certain once-off operations, and have never been dropped. It may also be that the
optimizer has realized that for some tables it is actually quicker to use full table scans
rather than indexes; this would typically be the case if the tables were small, or if the
number of distinct values in the indexed column were low. Every unused index is
slowing down the database, for no purpose.
To find out if an index is being used, enable monitoring for the index. Wait for a
period, and then check whether it has been used within that period by querying the
V$OBJECT_USAGE view. This will have one row for every index in your schema whose
usage is being monitored. If the index has not been used, consider dropping it. Take
care with the period you choose. It might be that an index is not used during the week
but is vital for end-of-week reporting, so leave monitoring running for a full workload
cycle before making any decisions. Bear in mind, however, that if an index is used
only rarely, it may be worth creating it when needed and dropping it afterward, rather
than maintaining it at all times.
EXAM TIP The index monitoring facility tells you only if an index has been
used, not when, or how often, or by which statements.
The example in Figure 32-6 demonstrates enabling monitoring for an index,
checks whether the index was used by a query, and then disables monitoring.
ch32.indd 18ch32.indd 18 7/11/2005 10:08:18 AM7/11/2005 10:08:18 AM
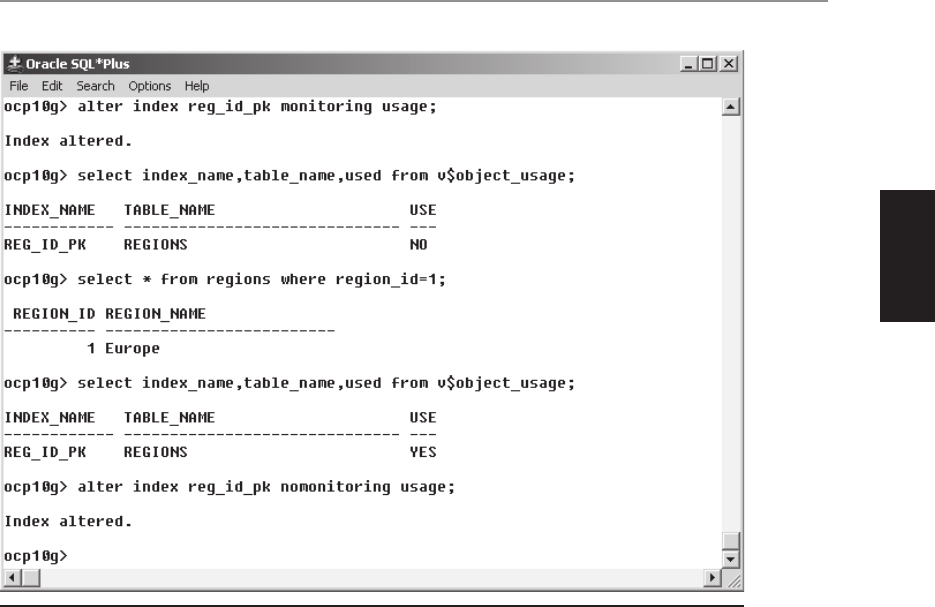
All-in-1 / Oracle Database 10g OCP Certification All-in-One / Watson, Bersinic / 5790-3
Chapter 32: Monitoring and Managing Storage
19
PART II
Exercise 32-3: Using the Database Control
Segment Advisor to Shrink a Table
Simulate space wastage within a table, and use Database Control to diagnose and fix
the problem.
1. Connect to your database with SQL*Plus as user SYSTEM.
2. Create an ASSM tablespace, a large table within it, and delete all the rows.
SQL> create tablespace assm_ts datafile 'assm_ts.dbf'
size 10m segment space management auto;
SQL> create table wasted_space tablespace assm_ts as
select * from dba_objects;
SQL> delete from wasted_space;
SQL> commit;
3. Check the size of the object.
SQL> select bytes from user_segments where segment_name = 'WASTED_SPACE';
4. Connect to your database with Database Control as user SYSTEM.
5. From the database home page, take the Advisor Central link in the Related
Links section, and then the link for Segment Advisor.
Figure 32-6 Using index monitoring
ch32.indd 19ch32.indd 19 7/11/2005 10:08:19 AM7/11/2005 10:08:19 AM
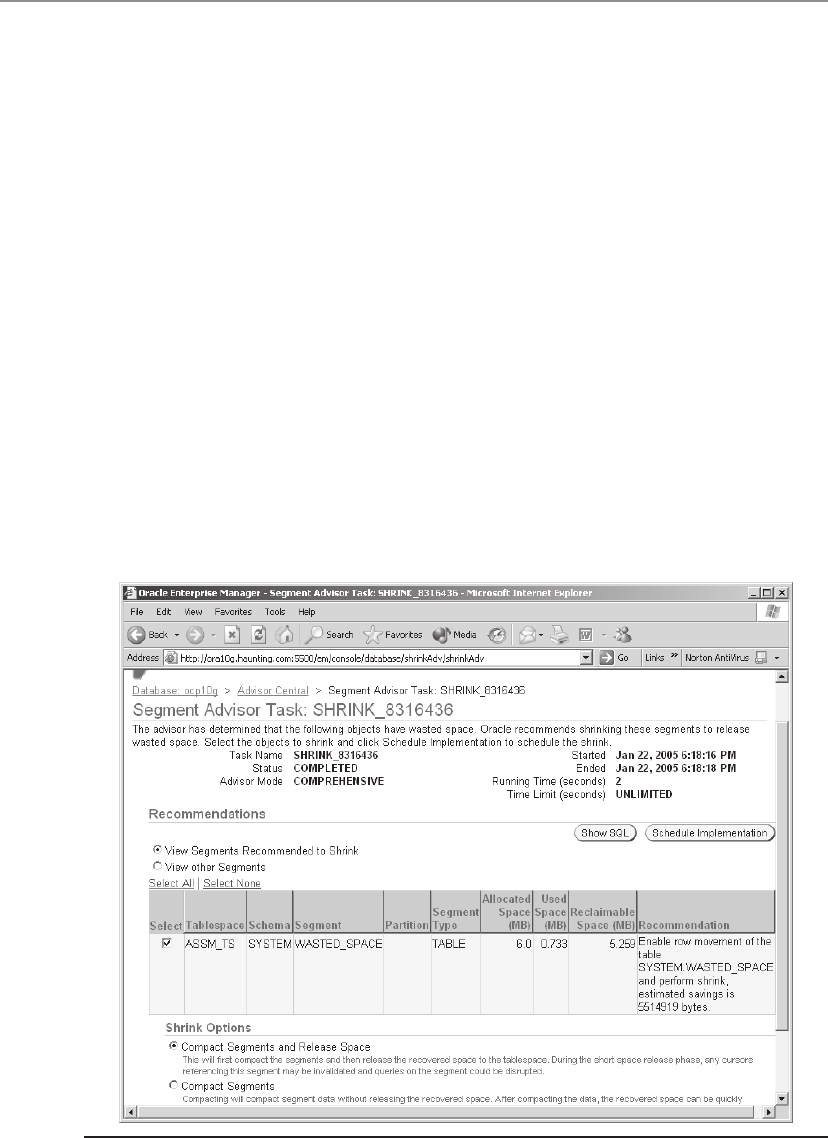
All-in-1 / Oracle Database 10g OCP Certification All-in-One / Watson, Bersinic / 5790-3
Oracle Database 10g OCP Certification All-in-One Exam Guide
20
6. In the Segment Advisor window, select the radio buttons for Schema Objects
and Complete Analysis Of All Segments, and click Continue.
7. In the Segment Advisor: Schema Objects window, click Add.
8. In the Schema Objects: Add window, enter SYSTEM as the Schema, and
WASTED_SPACE as the Object Name, and click Search. When the object
is retrieved, check its check box and click OK and Next.
9. In the Segment Advisor: Options window, leave everything on default and
click Next.
10. In the Segment Advisor: Schedule window, select Standard in the Schedule
Type drop-down box. Leave everything else on default, and click Next.
11. In the Segment Advisor: Review window, click Submit to run the task, and
return to the Advisor Central window.
12. In the Advisor Central window, you will see that your Segment Advisor task
has been created. Click Refresh to see that it has completed.
13. Click the radio button for your task, and the View Results button.
14. Study the result of the advisor task, as in Figure 32-7, which recommends that
the table be shrunk. Note the space that would be reclaimed if the segment
were shrunk. Also, take the Show SQL button to see the statements that are
required.
Figure 32-7 Results of a Segment Advisor task
ch32.indd 20ch32.indd 20 7/11/2005 10:08:20 AM7/11/2005 10:08:20 AM

All-in-1 / Oracle Database 10g OCP Certification All-in-One / Watson, Bersinic / 5790-3
Chapter 32: Monitoring and Managing Storage
21
PART II
15. Click Schedule Implementation, and submit the job to run immediately.
16. When the job has completed, return to your SQL*Plus session and run the
query from Step 3 to confirm that the segment’s size has been reduced.
17. Tidy up.
SQL> drop tablespace assm_ts including contents and datafiles;
Alternative Table Storage Structures
The standard table type in the Oracle database is the heap table. A heap consists of
variable-length rows in random order; there is no structure to the physical storage.
When you create a table, you can demand a heap, but there is little point in doing
so because it is what you will get by default anyway. The syntax is
SQL> create table heap_tab (c1 date) organization heap;
Oracle provides other, more advanced, table structures that can yield significant
performance and manageability benefits. These are the index-organized table, or IOT,
and three forms of clustered table: index clusters, hash clusters, and sorted hash
clusters. Selection of table type is a matter for the DBA and the system designers. Your
users, the programmers, have no way of knowing whether a table is a heap or a more
sophisticated structure; their code will run unchanged.
TIP Although the benefits of using these table types can be enormous, it is
vital to get it right. Selecting a structure that is inappropriate can be disastrous.
Oracle also supports partitioning of tables. Partitioning divides one logical table
into multiple physical segments. There are a number of partitioning options available
that can give vast manageability and performance benefits in large databases, but as
partitioning is available only as a separately licensed add-on to the Enterprise Edition
of the database, it is not covered in the OCP curriculum.
Index-Organized Tables (IOTs)
An index-organized table (IOT) looks like a table to the programmers, but the segment
structure used to store it is an index. The leaf blocks of a normal B*Tree index segment
hold index key values, in order, matched with ROWIDs. These ROWIDs are pointers
to the physical addresses of the rows in a heap table segment. An IOT is a B*Tree
index, but the leaf blocks contain the key values, followed by the rest of the row; the
row itself is stored in the index, and there is no heap table.
Access to rows in an IOT is faster than access to a heap table through an index:
rather than searching an index to retrieve a ROWID pointer to a table and then
retrieving the row, one operation—the index search—does it all. There are also space
savings, in that only one segment is needed, not two.
A more subtle advantage of IOTs over heaps is that the REBUILD ONLINE
functionality of an index can be applied to the table. When a heap table is
reorganized with the MOVE TABLE command, the table is locked for the duration
ch32.indd 21ch32.indd 21 7/11/2005 10:08:21 AM7/11/2005 10:08:21 AM

All-in-1 / Oracle Database 10g OCP Certification All-in-One / Watson, Bersinic / 5790-3
Oracle Database 10g OCP Certification All-in-One Exam Guide
22
of the move, and all its indexes must be rebuilt afterward. For an IOT, you can issue
MOVE TABLE <table name> ONLINE and there will be no table lock, because the
operation is actually implemented as an online index rebuild. Secondary indexes
will also survive intact.
There are some limitations on IOTs:
• The table must be created with a primary-key, nondeferrable, constraint. This
is used to create the index that holds the table.
• An IOT cannot be a clustered table.
• Composite partitioning cannot be applied to an IOT.
• Columns of type LONG cannot be defined in an IOT.
Access to rows in an IOT by the primary key is extremely fast. Access through
secondary keys can be less than optimal, depending on the DML that has been
applied to the table. This is because of the way ROWIDs are used. All rows in heap
tables are uniquely identified throughout the whole database by a ROWID. This is
a pseudo-column that you can select if you wish:
ocp10g> select rowid,region_id,region_name from hr.regions;
ROWID REGION_ID REGION_NAME
------------------ ---------- -------------------------
AAAMAcAAFAAAAANAAA 1 Europe
AAAMAcAAFAAAAANAAB 2 Americas
AAAMAcAAFAAAAANAAC 3 Asia
AAAMAcAAFAAAAANAAD 4 Middle East and Africa
Every row has a physical location: it is in a certain block of a certain file. Encrypted
within the ROWID is information that can be used to find this. Rows in an IOT do
not have a ROWID; they exist only in the index. This means that there is no ROWID
for an index entry in a secondary index to point to. Since version 8i of the database,
this problem has been solved. You can create secondary indexes on IOTs, but they
may not be very efficient. The secondary index structure contains the key value as
usual, and then a “guess” as to the physical location of the row. This guess will have
been correct when the index was created, but as the IOT undergoes DML, the guess
may become wrong, because natural maintenance of the IOT will have caused leaf
nodes to split as inserts are done; unlike rows in a heap table, rows in IOTs do not
have a fixed location. To cover up for this, a secondary IOT index also stores the
primary key value of the row. So when you use an IOT’s secondary index, your server
process searches the secondary index to retrieve the guess for the physical address of
the row, and if the row is still there, you read it immediately. If it is not there, your
session reverts to using the primary key to locate the row. So in effect, you may have
to search two indexes: first the secondary index, and then the IOT itself.
The primary key–based row identifier is known as the Universal Rowid, the
UROWID data type. UROWIDs are also used to store references for rows in remote,
non-Oracle, databases. To see them, query the ROWID pseudo-column as in the
preceding example. It is not possible for a row to have both a ROWID and a UROWID,
so the one pseudo-column is used for both.
ch32.indd 22ch32.indd 22 7/11/2005 10:08:21 AM7/11/2005 10:08:21 AM

All-in-1 / Oracle Database 10g OCP Certification All-in-One / Watson, Bersinic / 5790-3
Chapter 32: Monitoring and Managing Storage
23
PART II
When UROWIDs become out-of-date, the performance of the secondary indexes on
IOTs will become less efficient. To correct this situation, either rebuild the secondary
index with the usual ALTER INDEX...REBUILD ONLINE command or try the less
resource-intensive ALTER INDEX...UPDATE BLOCK REFERENCES command.
A normal B*Tree index will usually have many index entries per leaf block of the
index. This is because an index entry consists of only the key columns of the table,
plus the ROWID pointer. If the key columns are only a few bytes long, Oracle will be
able to pack dozens or even hundreds of them into each index block. This changes
with an IOT, because the whole row must go into the index blocks. An index with
only a few key values per block will be very large, and the searches will not be fast. To
avoid this problem, IOTs can be created with an “overflow” segment. The assumption
is that in most cases, your programmers will require access to only a few of the table’s
columns on a regular basis. These columns are stored in the IOT. The remaining,
rarely accessed, columns are stored in a separate segment.
Consider an example of a table of employees. The HR application will continuously
search this table on employee number for validation that the number exists, and to
retrieve the employees’ names. It is vital that access to the name by number should be
as fast as possible. It is only rarely that the application requires the other columns.
The table could be created as follows:
ocp10g> create table emp_iot
2 (emp_no number,
3 emp_name varchar2(20),
4 emp_dept number,
5 emp_address varchar2(500),
6 emp_hist varchar2(1000),
7 constraint emp_pk primary key(emp_no))
8 organization index
9 including emp_name
10 tablespace hr_tabs
11 overflow tablespace hr_over;
The first seven lines are a standard table creation, including the definition of a
primary key constraint. Line 8 overrides the heap default and is the only requirement
for creating an IOT. Line 9 specifies that only the columns up to and including the
column EMP_NAME, that is to say just the employees’ names and numbers, should
actually be stored in the IOT; all remaining columns will be stored in a separate
overflow segment. Note that it is possible for the overflow segment to be in a different
tablespace.
With this structure, all employee number lookups that retrieve only the employee
name can be satisfied from the IOT, and the IOT entries will be small; therefore, there
will be many of them per block. Only if a query retrieves additional columns is it
necessary to go to the overflow segment.
An alternative syntax is to specify PCTTHRESHOLD rather than INCLUDING.
This specifies that no more than a certain percentage of a block should be occupied
by any one row; any columns that do not fit in this percentage will go to the overflow
segment. Setting PCTTHRESHOLD to 20 will guarantee at least five rows per leaf
block of the IOT.
ch32.indd 23ch32.indd 23 7/11/2005 10:08:22 AM7/11/2005 10:08:22 AM

All-in-1 / Oracle Database 10g OCP Certification All-in-One / Watson, Bersinic / 5790-3
Oracle Database 10g OCP Certification All-in-One Exam Guide
24
TIP How often do you see "SELECT *" in code? One hopes, never! You
should always select columns by name if possible, particularly when using
IOTs. "SELECT *" against an IOT means that you will always go to the
overflow segment, so you might as well not have bothered to make it an
IOT in the first place.
The storage of an overflow segment is actually a heap table. To see the full logical
and physical structures involved in IOTs, you must query a number of data dictionary
views. Continuing the example of the IOT we just created,
ocp10g> select table_name,tablespace_name,iot_name,iot_type
from user_tables;
TABLE_NAME TABLESPACE_NAME IOT_NAME IOT_TYPE
-------------------- --------------- --------------- ---------------
EMP_IOT IOT
SYS_IOT_OVER_53978 HR_OVER EMP_IOT IOT_OVERFLOW
A query against DBA_TABLES shows that the table created, EMP_IOT, does not
in fact have any physical existence; it does not exist in a tablespace, only as a logical
structure. The table that does exist is the overflow segment, with a system-generated
name.
ocp10g> select index_name,tablespace_name,index_type,table_name
from user_indexes;
INDEX_NAME TABLESPACE_NAME INDEX_TYPE TABLE_NAME
--------------- --------------- --------------- ----------------
EMP_PK HR_TABS IOT - TOP EMP_IOT
There is an entry in the DBA_INDEXES view for an index named after the primary
key constraint. This is in fact the actual IOT. A query against DBA_SEGMENTS will
show what is really going on:
ocp10g> select segment_name,tablespace_name,segment_type from
user_segments;
SEGMENT_NAME TABLESPACE_NAME SEGMENT_TYPE
-------------------- --------------- ------------------
EMP_PK HR_TABS INDEX
SYS_IOT_OVER_53978 HR_OVER TABLE
A final topic to cover with IOTs is the use of secondary bitmap indexes. Secondary
B*Tree indexes became possible with release 8i, secondary bitmap indexes, with release
9i. But it is necessary to create another segment, the mapping table. The mapping
table is a heap-organized table that stores logical rowids of the index-organized table;
each mapping table row stores one logical rowid for the corresponding index-organized
table row. Then the bitmap indexes are in fact built on this mapping table, not on the
underlying IOT. As with B*Tree secondary indexes, if the logical rowids become out-
of-date, the efficiency of the index will deteriorate as Oracle has to revert to a primary
key index search to retrieve the row. To create a mapping table, either specify
MAPPING TABLE when you create the table or add it later with a move command:
ocp10g> alter table emp_iot move mapping table;
Table altered.
ch32.indd 24ch32.indd 24 7/11/2005 10:08:22 AM7/11/2005 10:08:22 AM

All-in-1 / Oracle Database 10g OCP Certification All-in-One / Watson, Bersinic / 5790-3
Chapter 32: Monitoring and Managing Storage
25
PART II
This will reorganize the IOT and generate a mapping table. If the mapping
table already exists, it will be rebuilt with updated UROWIDs. To see the physical
implementation,
ocp10g> select segment_name,tablespace_name,segment_type from
user_segments;
SEGMENT_NAME TABLESPACE_NAME SEGMENT_TYPE
-------------------- --------------- ------------------
SYS_IOT_MAP_53978 HR_TABS TABLE
EMP_PK HR_TABS INDEX
SYS_IOT_OVER_53978 HR_OVER TABLE
It will now be possible to create a secondary bitmap index:
ocp10g> create bitmap index emp_dept_idx on emp_iot(emp_dept);
Index created.
Creation and management of IOTs, in all their variations, are fully supported by
Database Control. Clusters, described next, are not.
Index-Clustered Tables
An index cluster is a group of tables stored in one physical segment. All the tables must
be linked by a common key; typically, an index cluster will be used to denormalize
tables in foreign key relationships. It may well be that rows in a child table are only
ever accessed through the foreign key; in that case, storing both the parent and the
child table in one cluster will improve performance. A cluster is created with a cluster
index, and then the tables created within the cluster must have columns that can be
mapped onto the columns of the cluster index.
As with IOTs, the programmers need know nothing about clusters. They will address
the tables as usual, including join conditions. But internally, Oracle will store the child
rows with the parent rows, and it will therefore not need to perform the join. For
example, consider this worked example of a table of staff members and a separate
table of address lines:
ocp10g> create cluster staff_clust (sno number) index;
Cluster created.
ocp10g> create index staff_idx on cluster staff_clust;
Index created.
ocp10g> create table staff(
2 sno number,
3 sname varchar2(20),
4 constraint staff_pk primary key (sno))
5* cluster staff_clust (sno);
Table created.
ocp10g> create table address_lines(
2 sno number constraint addr_fk references staff,
3 lno number,
4 ltext varchar2(100))
5 cluster staff_clust (sno);
Table created.
ch32.indd 25ch32.indd 25 7/11/2005 10:08:23 AM7/11/2005 10:08:23 AM

All-in-1 / Oracle Database 10g OCP Certification All-in-One / Watson, Bersinic / 5790-3
Oracle Database 10g OCP Certification All-in-One Exam Guide
26
First, the cluster segment and the index are created. These will be the only
segments. Then two tables, parent and child, are created in the cluster. To see the
logical storage that the programmers will address,
ocp10g> select table_name,tablespace_name,cluster_name from user_tables;
TABLE_NAME TABLESPACE_NAME CLUSTER_NAME
-------------------- --------------- ---------------
STAFF USERS STAFF_CLUST
ADDRESS_LINES USERS STAFF_CLUST
and to see the physical storage,
ocp10g> select segment_name,tablespace_name,segment_type from user_segments;
SEGMENT_NAME TABLESPACE_NAME SEGMENT_TYPE
-------------------- --------------- ------------------
STAFF_PK USERS INDEX
STAFF_CLUST USERS CLUSTER
STAFF_IDX USERS INDEX
Access to the lines of an address will only ever be through the staff number, so
clustering the address lines with the staff records makes perfect sense. Note that there
is no need for an index on the ADDRESS_LINES table with this structure; the cluster
index will be all that is needed.
Hash-Clustered Tables
Like index clusters, hash clusters can be used to denormalize tables, but in many cases
they will be used for single tables. This is because the hash cluster access method is
totally different from normal index access, and it can give huge benefits irrespective
of any advantages to be gained from denormalizing data.
A hash cluster is created with a cluster key, as is an index cluster, but rather than
creating an index on this key, Oracle will use it to construct a hashing algorithm.
Whenever a row is inserted into a table in the hash cluster, Oracle will assign a physical
location based on the hash value of the key. This results in the fastest possible method
of retrieval: hash key access. When you search for a row on the key column, rather
than having to search an index to find the location of the row, Oracle can calculate its
location from the hash value. This is CPU intensive rather than I/O intensive and will
be far faster.
The drawback with hash clusters is that hash key retrieval is only efficient if you
search for rows using the equality predicate on the key. Range searches, or get-next-
record type operations, will almost certainly result in a full cluster scan, because the
hashing of rows will have spread them randomly throughout the cluster. It is also
inadvisable to use hash clusters if you do not have a reasonably accurate idea of the
number of rows you expect to insert. The syntax for cluster creation requires an
estimate of how many rows, and this is used to construct the hashing algorithm.
If you specify a thousand rows and then insert a million rows, the efficiency of the
cluster will degrade dramatically, because the hash buckets will be too large. The
same problem may arise if the distribution of key values is very uneven.
ch32.indd 26ch32.indd 26 7/11/2005 10:08:23 AM7/11/2005 10:08:23 AM

All-in-1 / Oracle Database 10g OCP Certification All-in-One / Watson, Bersinic / 5790-3
Chapter 32: Monitoring and Managing Storage
27
PART II
To work with the same example used previously, consider this command:
ocp10g> create cluster staff_clust(sno number)
2 hashkeys 10000;
Cluster created.
This cluster will operate efficiently for up to 10,000 distinct key values. Use the same
statements as in the previous example to create the tables.
Sorted Hash-Clustered Tables
The sorted hash cluster is conceptually similar to a hash cluster. The cluster segment is
created with a hashing algorithm, tables created in the cluster, and the inserted rows
randomly distributed according to the value of the column mapped onto the cluster
key. The difference is that when creating the cluster, in addition to specifying the
columns to be used for the cluster key, you also nominate one or more columns to
be used for ordering rows with the same cluster key. This guarantees that the rows
will always be returned in the correct order, without the need for any sorting. In the
example of the ADDRESS_LINES table, both the index cluster and the hash cluster
described in preceding sections will give very efficient retrieval, but the lines will have
to be sorted to get them in the correct order. Using a sorted hash cluster, that is no
longer necessary:
ocp10g> create cluster addr_clust(sno number, lno number sort)
2 hashkeys 10000 single table;
Cluster created.
ocp10g> create table address_lines(
2 sno number,
3 lno number,
4 ltext varchar2(100))
5 cluster staff_clust (sno,lno);
Table created.
Using these structures, you can select the address lines for a staff member, in the
correct order, without the use of any indexes or any sorting. It is undoubtedly the
fastest way to retrieve and order data, provided that you access the table using an
equality predicate on the cluster key columns. In the example, the cluster is a SINGLE
TABLE cluster. Specifying this is optional, but if you do intend to put only one table
in the cluster, using this clause will let Oracle construct the cluster more efficiently.
As with the other cluster types, your programmers need know nothing about
these structures; they will write normal code with the usual ORDER BY clauses, but
no sorting will actually happen.
Chapter Review
This chapter opened with a discussion of the redo log and performance. First,
multiplexed online and archive log files should be distributed across devices to
avoid contention. Second, online log files should be adequately sized to prevent
too-frequent log switches from forcing excessive DBWn activity.
ch32.indd 27ch32.indd 27 7/11/2005 10:08:24 AM7/11/2005 10:08:24 AM

All-in-1 / Oracle Database 10g OCP Certification All-in-One / Watson, Bersinic / 5790-3
Oracle Database 10g OCP Certification All-in-One Exam Guide
28
Moving on to tablespaces and datafiles, these should be adequately sized for the
anticipated size of the objects that will be created within them. The default behavior
if a session hits a space-related problem is for the statement to be rolled back, and an
error returned to the user process. You can change this by enabling the suspension of
statements that hit space problems through the ENABLE RESUMABLE command at
the session level, or for the whole instance with the RESUMABLE_TIMEOUT instance
parameter.
It is, however, better to ensure that space problems never arise in the first place.
One approach for this is to enable automatic extension of datafiles, but the best
method is to monitor your tablespace usage and take appropriate action before
an error occurs. The preconfigured tablespace usage alerts will help with this.
As tables undergo DML, they may acquire more space than they actually need.
Indexes also will tend to deteriorate in efficiency with use. Oracle provides the table
shrink capability, which will reorganize the space within a table to minimize the
wasted space. Indexes too can be reorganized, either by coalescing or by rebuilding.
It may indeed be that some indexes serve no purpose and can be dropped; you can
identify such indexes by enabling index usage monitoring.
The final section of the chapter is a discussion of various possible table structures.
The programmers have no knowledge of these, but they can give huge performance
improvements if used appropriately.
IOTs give extremely fast primary key–based access to tables, but there are some
restrictions. They can be used with secondary B*Tree indexes, and even bitmapped
indexes, but the efficiency of these may deteriorate through their reliance on Universal
Rowids.
Index clusters are an excellent structure for storing tables in foreign key relationships,
provided you only ever get to the child table through the foreign key. Hash clusters
offer the fastest possible data retrieval, if you use the equality predicate on the primary
key. Range searches will be bad. Sorted hash clusters are optimal where access is not
by primary key and rows should be returned in a particular order.
Questions
1. There is a redo log file advisor. What sort of advice will it give you? (Choose
the best answer.)
A. The maximum advisable size for your online log file members
B. The minimum advisable size for your online log file members
C. Recommendations on multiplexing for fault tolerance
D. Recommendations on the number of logfile groups
E. All of the above
2. How can you enable the suspension and resumption of statements that hit
space errors? (Choose all the correct answers, if any.)
A. Issue an ALTER SESSION ENABLE RESUMABLE command.
B. Issue an ALTER SYSTEM ENABLE RESUMABLE command.
ch32.indd 28ch32.indd 28 7/11/2005 10:08:24 AM7/11/2005 10:08:24 AM

All-in-1 / Oracle Database 10g OCP Certification All-in-One / Watson, Bersinic / 5790-3
Chapter 32: Monitoring and Managing Storage
29
PART II
C. Set the instance parameter RESUMABLE_STATEMENTS.
D. Set the instance parameter RESUMABLE_TIMEOUT.
E. Use the DBMS_RESUMABLE.ENABLE procedure.
F. None of the above.
3. If a statement is suspended because of a space error, what will happen when
the problem is fixed? (Choose the best answer.)
A. After the resumable timeout has expired, the statement will continue
executing from the point it had reached.
B. After the resumable timeout has expired, the statement will start executing
from the beginning again.
C. The statement will start executing from the beginning immediately after
the problem is fixed.
D. The statement will continue executing from the point it had reached
immediately after the problem is fixed.
4. You receive an alert warning you that a tablespace is nearly full. What action
could you take to prevent this becoming a problem, without any downtime
for your users? (Choose two correct answers.)
A. Purge all recycle bin objects in the tablespace.
B. Shrink the tables in the tablespace.
C. Shrink the indexes in the tablespace.
D. Move one or more tables to a different tablespace.
E. Move one or more indexes to a different tablespace.
5. Which process is responsible for sending the alert when a tablespace usage
critical threshold is reached? (Choose the best answer.)
A. Database Control
B. The DBMS_SERVER_ALERT package
C. MMON, the manageability monitor process
D. The server process of the session that detected the problem
E. DBWn, the Database Writer, when it detects the problem
6. A tablespace has reached its critical usage threshold. What will happen
to the alert message? (Choose the best answer.)
A. The alert will be sent every ten minutes, until it is cleared.
B. The alert will remain in the DBA_OUTSTANDING_ALERTS view for
a maximum of twenty-four hours.
C. The alert will be reported every twenty-four hours, if it is not cleared.
D. The alert will be posted to DBA_ALERT_HISTORY after it has been reported.
E. The alert will be posted to DBA_ALERT_HISTORY once it is cleared.
ch32.indd 29ch32.indd 29 7/11/2005 10:08:25 AM7/11/2005 10:08:25 AM

All-in-1 / Oracle Database 10g OCP Certification All-in-One / Watson, Bersinic / 5790-3
Oracle Database 10g OCP Certification All-in-One Exam Guide
30
7. What must you do before executing a table shrink operation? (Choose the
best answer.)
A. Compact the table.
B. Disable triggers on the table.
C. Disable row movement for the table.
D. Enable row movement for the table.
E. Disable the primary key constraint on the table.
8. Which of the following statements describe the effect of the command
alter table emp shrink space compact cascade;
(Choose the best answer.)
A. The table EMP will be compacted and reduced in size, as will all associated
indexes, materialized views, and materialized view logs.
B. The table EMP will be compacted only, as will all associated indexes,
materialized views, and materialized view logs.
C. The operation will apply to the EMP table and its indexes only. No space
will be returned to the tablespace.
D. The statement will fail because you cannot specify both COMPACT and
CASCADE in one SHRINK command.
9. Which of the following will cause a table shrink to fail? (Choose four answers.)
A. The tablespace is not ASSM.
B. The table does not have a primary key.
C. The table has a column of type LONG.
D. The table has a column of type BLOB.
E. Row movement has not been enabled for the table.
F. The table has indexes, and you do not specify CASCADE.
G. It is an index-organized table.
H. It is a clustered table.
10. What tool is provided to tell you how often an index segment is being used?
(Choose the best answer.)
A. The Segment Advisor in Database Control
B. The ALTER INDEX MONITORING USAGE facility
C. The INDEX_STATS view
D. There is no tool for this
11. How can you reduce the amount of space that an index segment is occupying?
(Choose the best answer.)
A. Coalesce the index.
B. Shrink the index.
ch32.indd 30ch32.indd 30 7/11/2005 10:08:25 AM7/11/2005 10:08:25 AM

All-in-1 / Oracle Database 10g OCP Certification All-in-One / Watson, Bersinic / 5790-3
Chapter 32: Monitoring and Managing Storage
31
PART II
C. Rebuild the index.
D. Shrink the index’s table, with the CASCADE option.
12. Suppose you create a table with this command:
create table emp_iot
(emp_no number,
emp_name varchar2(20),
emp_address varchar2(500),
emp_hist varchar2(1000),
constraint emp_pk primary key(emp_no))
organization index
including emp_name
overflow
mapping table;
How many segments will be created? (Choose the best answer.)
A. 1
B. 2
C. 3
D. 4
E. None, the command will fail because no tablespaces are specified
13. What will happen if you query a table in a sorted hash cluster and include an
ORDER BY clause to sort the data on the column(s) specified as the cluster
sort key? (Choose the best answer.)
A. The statement will fail because you cannot use an ORDER BY clause on
the columns used as the cluster sort key.
B. The rows will be sorted.
C. There will be no sort performed, because the cluster index will be used
to return the rows in sorted order.
D. The ORDER BY clause will be ignored.
14. If you create an index cluster and a cluster index, and then a table in the
cluster and an index on the table, how many segments will you have?
(Choose the best answer.)
A. 1
B. 2
C. 3
D. 4
Answers
1. B. The redo log advisor will calculate the minimum size of the online log file
groups needed to avoid excessive checkpointing activity.
2. A and D. Resumable statements can be enabled interactively for one session
or for all sessions with the RESUMABLE_TIMEOUT instance parameter.
ch32.indd 31ch32.indd 31 7/11/2005 10:08:26 AM7/11/2005 10:08:26 AM

All-in-1 / Oracle Database 10g OCP Certification All-in-One / Watson, Bersinic / 5790-3
Oracle Database 10g OCP Certification All-in-One Exam Guide
32
3. D. If resumable statements have been enabled, then a statement that hits
a problem will hang either until the problem is fixed, in which case it will
continue from where it stopped, or until the resumable timeout is reached,
in which case it will be aborted.
4. B and E. Both shrinking tables and moving indexes (which can be done
online) to a different tablespace will solve the problem with no downtime.
It won’t help to purge recycle bin objects because dropped objects are not
counted as used space by the alert system. Shrinking the indexes will not
help because an index shrink doesn’t return space to the tablespace; only a
rebuild will do that. Moving the tables would solve the problem, but with
downtime—there would be a table lock, and the indexes would be broken.
5. C. Alerts are sent by MMON. Database Control reports alerts; it doesn’t
generate them. DBMS_SERVER_ALERT is used to configure the alert system.
Server processes can detect a problem, but only reports it to the session. And
DBWn has no connection to the alert system.
6. E. Alert messages are visible in DBA_OUTSTANDING_ALERTS until they are
cleared, when they go to DBA_ALERT_HISTORY.
7. D. The only requirement is to enable row movement. Compaction is part of
the shrink process, and disabling triggers is unnecessary because the shrink
itself will take care of not firing triggers. Primary key constraints are not
relevant to shrinking.
8. C. The COMPACT keyword instructs Oracle not to shift the HWM and free
up space, and the CASCADE keyword means shrink the indexes too, but
neither of these will return space to the tablespace. The first two choices are
both wrong because they assume that CASCADE will affect objects other than
indexes.
9. A, C, E, and H. ASSM and row movement are requirements for shrinking, but
the shrink will still fail if the table contains LONG columns or is clustered.
10. D. There is no tool that will tell you how often an index has been used. The
closest to a correct answer is B, but index monitoring will tell you only if an
index has been used, not how often.
11. C. A rebuild is the only way to reclaim space from an index. The other answers
are all the same: they will free space within the index, not reduce its size.
12. C. There will be three segments: the IOT index segment, the mapping table
heap segment, and the overflow heap segment.
13. D. The ORDER BY clause will be ignored because the rows will be returned
in order anyway. No sort is needed.
14. C. There will be three segments: the cluster segment, the cluster index
segment, and the index segment.
ch32.indd 32ch32.indd 32 7/11/2005 10:08:26 AM7/11/2005 10:08:26 AM

All-in-1 / Oracle Database 10g OCP Certification All-in-One / Watson, Bersinic / 5790-3
CHAPTER 33
Managing Storage with
Automatic Storage Management
In this chapter you will learn how to
• Set up initialization parameter files for ASM and database instances
• Execute SQL commands with ASM filenames
• Start up and shut down ASM instances
• Administer ASM disk groups
• Use RMAN to migrate your database to ASM
1
ch33.indd 1ch33.indd 1 7/6/2005 10:18:31 AM7/6/2005 10:18:31 AM

All-in-1 / Oracle Database 10g OCP Certification All-in-One / Watson, Bersinic / 5790-3
Oracle Database 10g OCP Certification All-in-One Exam Guide
2
Automatic Storage Management, or ASM, is a facility provided with the Oracle
database for managing your disks. It is an Oracle-aware logical volume manager,
or LVM, that can stripe and mirror database files and recovery files across a number
of physical devices. This is an area where the database administration domain
overlaps with the system administration domain.
Many databases will not use ASM: they will store their files on the volumes
provided by the operating system, which may well be managed by an LVM. But if you
do not have a proper logical LVM, as will probably be the case with low-end systems
running on, for example, Linux or Windows, then ASM provides an excellent (and
bundled) alternative to purchasing and installing one. On high-end systems, ASM
can work with whatever LVM is provided by the operating system.
NOTE Most of the examples in this chapter are for Windows. This is because
ASM on Windows functions perfectly with a standard installation of Oracle
straight out of the box. On Linux, there may be some additional steps; these
are beyond the scope of the OCP examination but are briefly described at
the end of the chapter.
Before going into the details of ASM architecture and configuration, following is a
brief discussion of logical and physical volume management. This is not intended to
be any sort of comprehensive treatment (which is not necessary for the OCP exam) but
rather the minimum information needed to appreciate the purpose of ASM.
The Purpose of a Logical Volume Manager
Your database server machine will have one or more disks, either internal to the
computer or in external disk arrays. These disks are the physical volumes. In virtually
all modern computer installations, there is a layer of abstraction between these physical
volumes and the logical volumes. Logical volumes are virtual disks, or file systems,
that are visible to application software, such as the Oracle database. Physical volumes
are presented to the software as logical volumes by the operating system’s logical
volume manager, or LVM.
Even the simplest computer nowadays will probably be using some sort of LVM,
though it may be extremely limited in its capabilities. In the case of a Windows PC,
you may well have only one disk, partitioned into two logical drives: perhaps a C:
drive formatted with the FAT32 file system, and a D: drive formatted with the NTFS
file system. Thus one physical volume is presented to you by Windows as two logical
volumes. Larger installations may have dozens or hundreds of disks. By using an LVM
to put these physical volumes into arrays that can be treated as one huge disk area and
then partitioned into as many (or as few) logical volumes as you want, your system
administrators can provide logical volumes of whatever size, performance, and fault
tolerance is appropriate.
ch33.indd 2ch33.indd 2 7/6/2005 10:19:04 AM7/6/2005 10:19:04 AM

All-in-1 / Oracle Database 10g OCP Certification All-in-One / Watson, Bersinic / 5790-3
Chapter 33: Managing Storage with Automatic Storage Management
3
PART II
RAID Levels
If the physical volumes are mapped one-to-one onto logical volumes, the performance
and fault tolerance of the logical volumes is exactly that of the physical volumes.
RAID, in its various levels, is intended to enhance performance and fault tolerance by
exploiting the presence of multiple physical volumes. There are four levels to consider
in most environments.
RAID level 0 is optimal for performance but suboptimal for fault tolerance. A
RAID 0 array consists of one or more logical volumes cut across two or more physical
volumes. Theoretically, this will improve logical disk I/O rates and decrease fault
tolerance by a proportion equal to the number of physical volumes. For example, if
the array consists of four disks, then it will be possible to read and write all them
concurrently; a given amount of data can be transferred to the logical volume in
a quarter of the time it would take if the logical volume were on only one disk. But
if any of the four disks is damaged, the logical volume will be affected, so it is four
times more likely to fail than if it were on only one disk.
RAID level 1 is optimal for fault tolerance. There may be performance gains, but
that is not why you use it. Where RAID 1 is definitely suboptimal is cost. A RAID 1
array consists of one or more logical volumes mirrored across two or more disks:
whenever data is written to the logical volume, copies of it will be written concurrently
to two or more physical volumes. If any one physical volume is lost, the logical volume
will survive because all data on the lost physical volume is available on another
physical volume. There may be a performance improvement for read operations if it is
possible to read different data from the mirrors concurrently; this will depend on the
capabilities of the LVM. The cost problem is simply that you will require double
the disk capacity—more than double, if you want a higher degree of mirroring.
In the four-disk example, the logical volume will be equivalent in size to only two
of the physical disks, but you can lose any one disk, and possibly two disks, before
the logical volume is damaged.
RAID level 5 is a compromise between the performance of RAID 0 and the fault
tolerance of RAID 1. The logical volume is cut across multiple physical volumes (so
concurrent read and writes are possible), and a checksumming algorithm writes out
enough information to allow reconstruction of the data on any one physical volume,
if it gets damaged. Thus you do not get all the performance gain of RAID 0, because of
the checksumming overhead; in particular, write operations can be slow because each
write operation needs to calculate the checksum before the write can take place. You
do not get all the fault tolerance of RAID 1, because you can survive the loss of only
one disk. In the four-disk example, the logical volume will be equivalent in size to three
physical volumes, and if any one of the four is lost, the logical volume will survive.
RAID 0+1 is optimal for both fault tolerance and performance: you mirror your
striped disks. In the four-disk example, your system administrators would create one
logical volume striped across two of the physical disks and mirror this to the other
two disks. This should result in double the performance and double the safety (and
double the price) of mapping one logical volume directly onto one physical volume.
ch33.indd 3ch33.indd 3 7/6/2005 10:19:04 AM7/6/2005 10:19:04 AM

All-in-1 / Oracle Database 10g OCP Certification All-in-One / Watson, Bersinic / 5790-3
Oracle Database 10g OCP Certification All-in-One Exam Guide
4
Volume Sizes
Physical volumes have size restrictions. A disk is a certain size, and this cannot be
changed. Logical volumes may have no size restrictions at all. If your LVM allows you
to put a hundred disks of 100GB each into a RAID 0 array, then your logical volume
will be 10TB big. (It will also perform superbly, but it will not be very tolerant against
disk failure.) Furthermore, logical volumes can usually be resized at will, while the
system is running.
Choice of RAID Level
Many system administrators will put all their physical volumes into RAID 5 arrays.
This is simple to do and provides a certain amount of fault tolerance and perhaps a
small performance improvement, but this may not be the best practice for an Oracle
database. As the DBA, you should take control of the RAID strategy and apply different
levels to different file types.
Some files are critical to the database remaining open: the files that make up the
SYSTEM tablespace, the active UNDO tablespace, and the controlfile copies. Damage
to any of these will cause the database to crash. Some files are critical for performance:
the online redo log files and the controlfiles. I/O on these can be a serious bottleneck.
By considering the characteristics of each file, a RAID strategy should become apparent.
For example, the SYSTEM and UNDO tablespaces should be on RAID 1 volumes, so
that they will always be available. The online redo logs are protected by multiplexing,
so you don’t have to worry about hardware fault tolerance, but performance is vital,
so put them on RAID 0 volumes. The controlfile copies are critical for performance,
but if any copy is damaged, the database will crash; thus, RAID 0+1 could be
appropriate. Your other datafiles could perhaps go on RAID 5 volumes, unless
they are particularly important or volatile.
ASM Compared with Third-Party LVMs
ASM has a huge advantage over other logical volume managers: it is aware of the
nature of Oracle database files. This means it can make more intelligent decisions
about how to manage the files than a third-party product.
First, when a logical volume is cut across several physical volumes in what are
called “stripes,” a decision must be made on the size of the stripe. Different file types
will perform better with different stripe sizes: ASM is aware of this and will stripe
them appropriately.
Second, ASM can handle files individually, whereas all other LVMs work at the
volume level: they are not aware of the files within the volume. So with a third-party
LVM, you have to specify RAID attributes per volume. ASM can specify the attributes
per file, so you can for instance have three-way mirroring for your SYSTEM tablespace
datafiles but no mirroring at all for your temporary tablespaces’ tempfiles, all within
the same logical volume.
Third, ASM is in principle the same on all platforms, and it is bundled with the
database. You do not have to learn (and perhaps purchase) different volume managers
ch33.indd 4ch33.indd 4 7/6/2005 10:19:05 AM7/6/2005 10:19:05 AM

All-in-1 / Oracle Database 10g OCP Certification All-in-One / Watson, Bersinic / 5790-3
Chapter 33: Managing Storage with Automatic Storage Management
5
PART II
for different platforms. Any configuration you do is portable, within the limits of
device naming conventions.
Fourth, there is the question of availability. Some operating systems come with
an LVM as standard. With AIX on IBM hardware, for example, use of the LVM is not an
option—it is compulsory. With other vendor’s operating systems, the LVM may be a
separately licensed option, or there may not be one at all—you will have to buy a
third-party product. ASM is always available and should bring significant performance
and manageability benefits to systems that do not have an LVM; on those that do, it
will add an extra, Oracle-aware, layer to space management that will further enhance
performance while reducing the management workload.
The ASM Architecture
Implementing ASM requires a change in the instance architecture. It even requires
another instance. There is an instance parameter INSTANCE_TYPE that defaults to
RDBMS. An RDBMS instance is a normal instance, used for opening a database and
accepting user sessions. Setting this parameter to ASM will start an Automatic Storage
Management instance, which is very different. An ASM instance is not used by end
users; it controls access to ASM files stored on ASM disk groups, on behalf of the
RDBMS instances. These files are functionally the same as non-ASM database files:
they are datafiles, controlfiles, logfiles, and recovery files, but they are stored in the
ASM logical volume manager environment, not in the file systems provided by your
operating system.
The ASM Disks and Disk Groups
An ASM disk group is a pool of ASM disks managed as one logical unit. As with any
other LVM, ASM takes a number of physical volumes and presents them to Oracle as
one or more logical volumes. The physical volumes can be actual disks, or they can
be volumes managed by a volume manager that is part of your operating system. Either
way, they will not be formatted with any file system; they must be raw devices. ASM
will take the raw devices and put them into a number of ASM disk groups. A disk
group is the logical volume.
EXAM TIP ASM disks must be raw devices, without a file system, but they do
not need to be actual disks. They can be disks, partitions of a disk, or logical
volumes managed by an LVM.
For example, on a Linux system you might have six SCSI disks, of 36GB each. You
could decide to use one of them, /dev/sda, for the root file system and utilities. Then
use /dev/sdb for the $ORACLE_HOME directories, and then /dev/sdc, /dev/sdd, /dev
/sde, and /dev/sdf for the database files. You would create a file system on each disk
and format it—probably as ext3—and then mount the file systems onto directory
mount points in the root file system. This is all very well, but you are wasting the
performance potential of the machine. It will be extremely difficult to balance the I/O
ch33.indd 5ch33.indd 5 7/6/2005 10:19:05 AM7/6/2005 10:19:05 AM

All-in-1 / Oracle Database 10g OCP Certification All-in-One / Watson, Bersinic / 5790-3
Oracle Database 10g OCP Certification All-in-One Exam Guide
6
evenly across the four disks used for the database, and you will have to monitor which
files have the most activity and try to keep them separate. Also, one disk may fill up
while the others have plenty of space.
The equivalent Windows example would be drive C: for Windows itself, and drive
D: for the ORACLE_HOME. Then drives E:, F:, G:, and H: would be dedicated to
database files. Probably all the disks would be formatted as NTFS.
If you were to put the four disks dedicated to the database into one RAID 0 logical
volume, you would get better performance, and a system that requires much less
monitoring and management. But it may be that you do not have a logical volume
manager. Enter ASM....
To use ASM, you would not format the four disks to be used for database files.
The root file system and the ORACLE_HOME file system must be managed as normal;
you cannot use ASM volumes for anything other than database files. Then you would
launch an ASM instance and set instance parameters such that it will find the four raw
volumes and place them into one ASM disk group. This group will contain the database,
with whatever RAID characteristics you want.
EXAM TIP You can use ASM only for database files, not for your Oracle home
or for anything else.
The size of the ASM disk group is the sum of the size of the ASM disks, but
depending on what degree of fault tolerance is specified, the size available for use
will be less. The default fault tolerance is single mirror, meaning that, to continue our
example, the end result will be 72GB of space available for the database. This degree
of mirroring can be changed for the whole group, or for individual files within it.
Disks can be added and removed from a disk group dynamically, within certain
limits. In general, if the operating system and hardware can handle adding or
removing disks while the computer is running, then ASM can handle this as well.
The ASM Instance
When using non-ASM files, an RDBMS instance will locate and open its files itself. In
the ASM environment, these tasks are carried out by an ASM instance on behalf of the
RDBMS instance. But even in an ASM environment, the RDBMS instance will always
do its own I/O; its server processes will read the datafiles, its DBWn process will write
to the datafiles, and the LGWR will write to the online redo log files.
EXAM TIP Normal disk activity does not go through the ASM instance. ASM
is a management and control facility that makes the files available; it does not
do the actual I/O work.
In some respects, an ASM instance is an instance like any other. It has an SGA and
some of the usual background processes. But it cannot mount or open a database; all
it can do is locate and manage ASM disks. Many instance parameters are not legal for
an ASM instance. Usually, the parameter file (which may be a dynamic spfile or a
ch33.indd 6ch33.indd 6 7/6/2005 10:19:06 AM7/6/2005 10:19:06 AM

All-in-1 / Oracle Database 10g OCP Certification All-in-One / Watson, Bersinic / 5790-3
Chapter 33: Managing Storage with Automatic Storage Management
7
PART II
static pfile) will have only half a dozen parameters. Because it cannot mount or open
a database, it will never be able to read a data dictionary; for this reason, you can only
connect to it with password file or operating system authentication, as SYSOPER or as
SYSDBA.
It is possible to have more than one ASM instance running on one computer, but
there is no value in doing this. You should create one ASM instance per computer
and use it to manage all the ASM disks available to that computer on behalf of all the
RDBMS instances running on the computer.
An ASM instance will have two background processes in addition to the usual
processes. These are the RBAL and the ARBn processes, used to handle rebalancing
activity—the movement of data between ASM disks in an ASM disk group, in response
to adding or removing a disk to or from the group. If a new device is added to a group,
ASM will detect this and initiate an operation to bring the disk into use. This will
mean moving data onto the disk, to take account of the increased possibilities for
striping and to include the new disk in spreading the I/O workload evenly. The RBAL
process coordinates this rebalancing, and the ARBn processes (several of these may be
launched automatically) do the work. Also, if a disk leaves an ASM disk group, either
by design or because of a hardware failure, a rebalancing operation is necessary. In
either case, the redistribution of data will occur without users being aware of the
problem.
To create and configure disk groups, you must first connect to the ASM instance
and start it. Having created the groups, the ASM instance will then wait for requests
from RDBMS instances for access to files.
The RDBMS Instance
An RDBMS instance that is using ASM files functions as normal, except that it will
have two additional background processes: RBAL and ASMB. The RBAL process opens
the ASM disks, which it will locate through the ASM instance. The ASMB process
connects to the ASM instance by creating a session against it, via a server process.
This session is responsible for the continuing communication between the RDBMS
instance and the ASM instance; in effect, the RDBMS instance becomes a client to
the ASM server. The information passed over this session will be requests for physical
changes, such as file creation, deletion, or resizing, and also various statistics and
status messages.
It is not necessary to inform the RDBMS instance of the name of the ASM instance.
When an ASM instance starts, it registers its name and the names of the ASM disk
groups it is managing with the Cluster Synchronization service. This is why the Oracle
cluster services must be running, even if the node and instance are not clustered. The
RDBMS instance does know the names of the disk groups that it is using; these names
are embedded in the ASM filenames stored (like any other filenames) in the RDBMS
instance’s controlfile, and this lets the ASMB process instance locate the ASM instance
managing those groups by interrogating the Cluster Synchronization service.
Commonly, an RDBMS instance will require access to only two disk groups: one
for its live database files, the other for its flash recovery area.
ch33.indd 7ch33.indd 7 7/6/2005 10:19:06 AM7/6/2005 10:19:06 AM

All-in-1 / Oracle Database 10g OCP Certification All-in-One / Watson, Bersinic / 5790-3
Oracle Database 10g OCP Certification All-in-One Exam Guide
8
The ASM Files
Files in ASM disk groups are managed by the ASM instance on behalf of the RDBMS
instances. They are created, read, and written by the RDBMS instances. The files types
that will commonly be stored as ASM files include any or all of these:
• Controlfile
• Initialization parameter file
• Online redo log files
• Archive redo log files
• Datafiles
• Tempfiles
• RMAN backup sets
• RMAN image copies
• Flashback logs
• Controlfile autobackups
• Data Pump dump files
As this list shows, the whole database can be stored on ASM disks, as can all recovery-
related files; you can direct the flash recovery area to an ASM disk group.
EXAM TIP ASM does not manage the Oracle binaries, nor the alert log, trace
files, or password file.
All ASM files are striped across all the ASM disks in the group. The allocation of
space is by allocation unit, or AU. The standard AU size is 1MB, and for files where data
access tends to take the form of reasonably large disk I/O operations, such as datafiles
or archive log files, the striping is also in 1MB units. This is known as “coarse” striping.
For files where read and write requests are generally for smaller units of I/O, such as
online logs and the controlfile, the AUs themselves are striped across the disks in
128KB stripes, in what is known as “fine” striping. Thus there will be lower latency
in satisfying the (typically, small) requests for reads and writes of these file types,
because the one small request can be split up into several even smaller requests
directed to each disk in parallel.
The syntax for creating and managing ASM files is exactly the same as for file
system–based files. All ASM files are created and managed by the RDBMS instance,
using the usual commands. The only difference is in the filename: when creating a
database file, you specify only the name of the disk group to which the file should be
directed, and ASM will generate the actual filename and manage the physical locations.
There is a one-to-one relationship between a database file and an ASM file. If your
database has 200 datafiles using conventional file system storage, it will still have 200
datafiles when you convert to ASM. But they will no longer exist as individual files
that you can see with operating system utilities. In fact, normal operating system
commands will not be able to see anything at all within the ASM disks, because they
ch33.indd 8ch33.indd 8 7/6/2005 10:19:07 AM7/6/2005 10:19:07 AM

All-in-1 / Oracle Database 10g OCP Certification All-in-One / Watson, Bersinic / 5790-3
Chapter 33: Managing Storage with Automatic Storage Management
9
PART II
are not formatted with a file system. This means that the only way to get at ASM files
is through Oracle utilities. This is not a problem at all, but it does mean that you must
use RMAN to back up your ASM datafiles, archive logs, and controlfiles.
ASM files can coexist with files stored within file systems. There is no reason why
a tablespace should not consist of one ASM file and one conventional file, but there
would be no purpose in such an arrangement. However, this does mean that it is
possible to migrate a database to ASM over time, by moving the various files whenever
convenient. Because you cannot write to an ASM disk group with any operating system
tools, for datafiles this move must be accomplished with RMAN through a backup
and restore operation. To move online logs, create new members in an ASM disk
group and drop the old members.
Creating Raw Devices
Your system administrators will be responsible for creating the raw devices to be given
to ASM. These may be whole disks, partitions of a disk, or RAID devices provided by
a logical volume manager. Whatever they are, there will be an operating system syntax
that lets Oracle address them: a Unix raw device will be addressed through a block
device driver in the /dev directory; Windows will address it through a \\.\ path
name. On a Windows PC, you could use the Microsoft Management Console Disk
Management snap-in to create the devices. On a Linux PC, you could use the fdisk
utility. Larger systems will have an LVM, either part of the operating system or a
third-party product such as Veritas.
Exercise 33-1: Creating Raw Devices (Windows)
On a Windows PC, create two raw partitions. The examples that follow are only
suggestions; your Windows administrators will be able to advise on the details for
your computer.
1. From the Start button, navigate to Settings | Control Panel | Administrative
Tools | Computer Management | Disk Management.
Figure 33-1 shows a PC with one disk, Disk 0. The disk has three partitions.
The first is just 24MB, formatted with the FAT32 file system. The second
partition is 24.41GB, formatted with NTFS. The third partition is 3.91GB,
and Windows can’t understand it (in fact, it is a Linux ext3 partition). And
then there is 8.91GB of disk space that is not allocated at all.
NOTE If your PC does not have any unallocated space, use a partition
management tool such as PartitionMagic from Symantec to reduce the size of
an existing partition to provide some unallocated space, or install another disk.
2. Right-click the unallocated space, and launch the New Partition Wizard. Click
Next to proceed.
3. When prompted to create a partition, choose to create an extended partition,
not a primary partition. Click Next to continue.
ch33.indd 9ch33.indd 9 7/6/2005 10:19:07 AM7/6/2005 10:19:07 AM
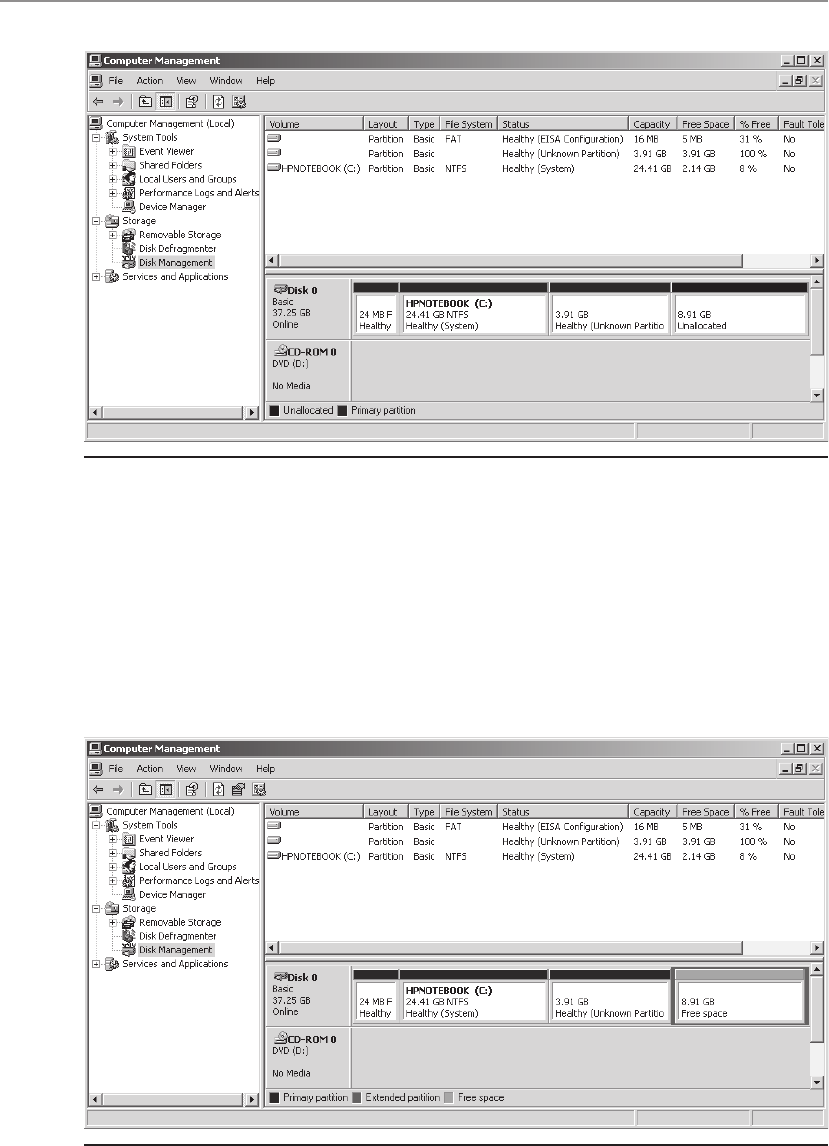
All-in-1 / Oracle Database 10g OCP Certification All-in-One / Watson, Bersinic / 5790-3
Oracle Database 10g OCP Certification All-in-One Exam Guide
10
4. When prompted for the size of the partition, choose the maximum size
available. Click Next to continue, and Finish to see the partition information
shown in Figure 33-2.
5. Right-click the free space in the new partition, and select New Logical Drive
to launch the New Partition Wizard again, and click Next to continue.
6. Select the radio button for Logical Drive. Click Next to continue.
7. When prompted for a partition size, enter a size that is less than half of the
maximum space available; 4000MB in this example. Click Next to continue.
Figure 33-1 Windows disk partitions
Figure 33-2 An empty extended partition
ch33.indd 10ch33.indd 10 7/6/2005 10:19:08 AM7/6/2005 10:19:08 AM
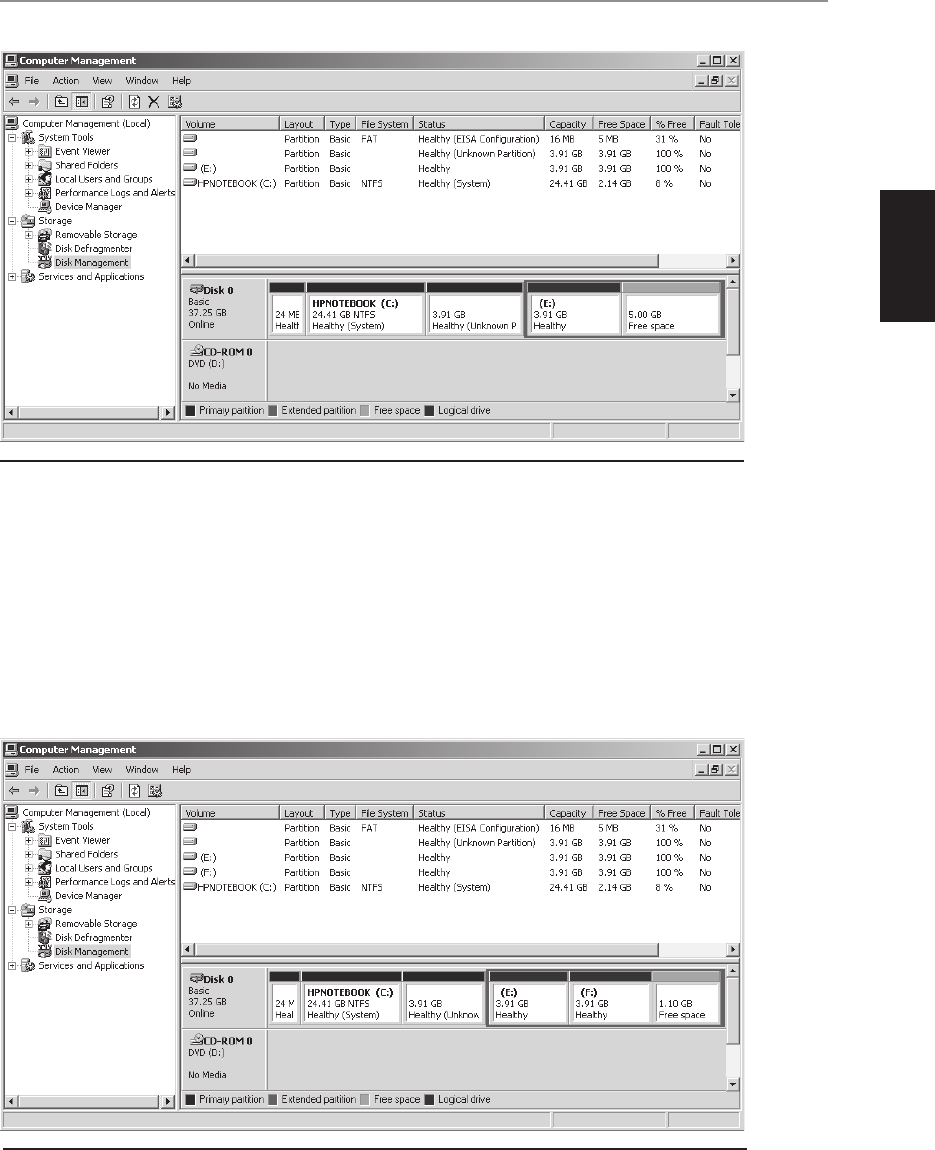
All-in-1 / Oracle Database 10g OCP Certification All-in-One / Watson, Bersinic / 5790-3
Chapter 33: Managing Storage with Automatic Storage Management
11
PART II
8. Select the radio button to assign a drive letter, and accept whatever letter is
suggested. Click Next to continue.
9. Select the radio button for Do Not Format This Partition, and click Next to
continue.
10. Click Finish to confirm. The logical drive, with no file system, will appear as
in Figure 33-3.
11. Repeat Steps 5–10 to create a second unformatted logical drive in the
extended partition (see Figure 33-4).
Figure 33-3 A drive E:, with no file system
Figure 33-4 Two unformatted logical drives, E: and F:, of 4GB each
ch33.indd 11ch33.indd 11 7/6/2005 10:19:09 AM7/6/2005 10:19:09 AM

All-in-1 / Oracle Database 10g OCP Certification All-in-One / Watson, Bersinic / 5790-3
Oracle Database 10g OCP Certification All-in-One Exam Guide
12
Creating, Starting, and Stopping
an ASM Instance
An ASM instance is controlled by an instance parameter file, as is an RDBMS instance,
but there are strict limits on the parameters that can be included. Many will cause an
ASM instance to have errors on startup, so keep the parameter file as small as possible.
The parameters most likely to be needed (and often all that are required) are in the
table that follows:
Parameter Required? Description
instance_type Yes Must be ASM for an ASM instance. Default is RDBMS
instance_name No Must be prefixed with “+”. Defaults to the ORACLE_SID
environment variable
asm_power_limit No Controls resources to be used for rebalancing
operations. Default is 1, the lowest
asm_diskstring Yes List of paths identifying the disks to be given to ASM
asm_diskgroups No Disk groups to be mounted on startup. Default is NULL
An ASM parameter file for Windows might take this form:
instance_name='+asm'
instance_type='asm'
asm_diskstring='\\.\*:'
asm_diskgroups=dgroupA,dgroupB
background_dump_dest='d:\oracle\admin\dump\asm'
The instance name must be prefixed with a “+” symbol, on all platforms. On
Windows, this must also be specified when creating the Windows service for the
instance. The syntax for the ASM_DISKSTRING will be platform specific. In the
example, Oracle will find every device, as indicated with the “\\.\” characters, that
includes the “:” character in its name. All Windows disk devices that have been
assigned a drive letter will have a “:” in their name. The two nominated disk groups
must exist; if this is the first startup of the ASM instance, omit this parameter and set
it only after the groups have been created. Many databases will require only two disk
groups: one for the live database files, the other for the flash recovery area. Wildcard
characters (such as the asterisk in the preceding example) can be used to let ASM find
a number of devices without having to name them all individually.
A Linux parameter file might look like this:
instance_name='+asm'
instance_type='asm'
asm_diskstring='/dev/md2','/dev/md3','/dev/md4','/dev/md5'
asm_diskgroups=dgroupA,dgroupB
remote_login_passwordfile=exclusive
This time the disk string has four distinct values, rather than using wildcards, which
will let it find four named RAID devices. The two nominated disk groups must exist
and be composed of the RAID volumes named in diskstring. In this example,
there are no wildcards, but they could be used if desired.
ch33.indd 12ch33.indd 12 7/6/2005 10:19:10 AM7/6/2005 10:19:10 AM

All-in-1 / Oracle Database 10g OCP Certification All-in-One / Watson, Bersinic / 5790-3
Chapter 33: Managing Storage with Automatic Storage Management
13
PART II
To start the instance, you must connect to it as SYSDBA and issue a STARTUP
command. The connection can be made by setting the ORACLE_SID environment
variable to the instance name (not forgetting that it must be prefixed with a “+”
symbol), or if a password file has been created and enabled as in the preceding
example, you can connect with password file authentication. The startup will first go
through NOMOUNT, where the instance is built in memory. Then the MOUNT will
locate the disks found by the ASM_DISKSTRING and open the disk groups specified
by ASM_DISKGROUPS. There is no OPEN for an ASM instance.
TIP The size of an ASM instance can, as in the preceding examples, be left
completely on default. This will result in an instance of about 100MB. In most
circumstances this is both sufficient and necessary.
RDBMS instances use files in disk groups managed by the ASM instance. If the ASM
instance has not started and mounted the disk groups, then the RDBMS instances
cannot open. It is therefore necessary to ensure, through your operating system utilities,
that the ASM instance starts before the RDBMS instances that are dependent upon it.
Similarly, if the ASM instance shuts down, then the dependent RDBMS instances must
shut down also. When a SHUTDOWN command is issued to an ASM instance, before
it shuts down the command is propagated to all dependent RDBMS instances. They
will then shut down with the same mode, and only then will the ASM instance shut
down. The exception to this rule is SHUTDOWN ABORT. Issuing this to an ASM
instance will terminate it immediately, and the RDBMS instances will then terminate
with ABORT when they detect that the ASM instance is no longer available.
EXAM TIP If an RDBMS instance fails, the ASM instance will not be affected.
If an ASM instance fails, the RDBMS instances will abort.
Exercise 33-2: Creating an ASM Instance
(Windows)
Create a parameter file and use it to start an ASM instance. All this exercise should be
done from an operating system prompt.
1. From an operating system prompt, run the ORADIM utility to create a
Windows service for the ASM instance.
C:\> oradim -new -asmsid +ASM -startmode manual
2. In your ORACLE_HOME\database directory, use Windows Notepad to create
a file called INIT+ASM.ORA with just these three lines:
instance_name='+asm'
instance_type='asm'
asm_diskstring='\\.\*:'
3. Set your ORACLE_SID environment variable to the ASM instance name.
c:\> set ORACLE_SID=+ASM
ch33.indd 13ch33.indd 13 7/6/2005 10:19:11 AM7/6/2005 10:19:11 AM

All-in-1 / Oracle Database 10g OCP Certification All-in-One / Watson, Bersinic / 5790-3
Oracle Database 10g OCP Certification All-in-One Exam Guide
14
4. Connect to the ASM instance with SQL*Plus as SYSDBA, and start the
instance.
C:\>sqlplus / as sysdba
SQL*Plus: Release 10.1.0.2.0 - Production on Mon Jan 3 22:52:26 2005
Copyright (c) 1982, 2004, Oracle. All rights reserved.
Connected to an idle instance.
SQL> startup
ASM instance started
Total System Global Area 100663296 bytes
Fixed Size 787648 bytes
Variable Size 99875648 bytes
Database Buffers 0 bytes
Redo Buffers 0 bytes
ORA-15110: no diskgroups mounted
SQL>
5. Confirm that ASM has found the disks.
SQL> select path,total_mb from v$asm_disk;
PATH TOTAL_MB
---------- ----------
\\.\E: 4000
\\.\F: 4000
\\.\C: 24999
In this example, the ASM_DISKSTRING parameter specified every device with a
colon in its name, so the instance has found the three logical drives C:, E:, and F:.
Creating ASM Disk Groups
Disk groups are created by an ASM instance and then used by an RDBMS instance.
To create a disk group, as a minimum give the group a name and a list of disks that
have been discovered by the ASM disk string and are therefore visible in the V$ASM_
DISK view:
SQL> create diskgroup dg1 disks '/dev/sdc', '/dev/sdd', '/dev/sde', '/dev/sdf';
If you nominate a disk that is already part of a disk group, the command will fail.
The default level of redundancy provided by ASM is “normal” redundancy, meaning
that each AU is mirrored once. All files will be striped across all the disks for maximum
performance. For normal redundancy, the group must have at least two disks, and the
effective size of the group will be half the total space allocated.
In the preceding example, which continues the Linux four-SCSI-disk example
discussed earlier, the result will be a disk group with an effective size of 72GB. Every
file created in the group will (unless specified otherwise) be striped and mirrored with
RAID 0+1. The stripe size will be selected by ASM according to the type of file: online
redo log files and controlfile copies will be fine striped; datafiles and archive logs will
be coarse striped.
To override the default NORMAL redundancy, meaning single mirror, add the
keywords HIGH REDUNDANCY or EXTERNAL REDUNDANCY to the CREATE
DISKGROUP command. HIGH REDUNDANCY will create three copies of every
allocation unit (and therefore requires a minimum of three disks), and EXTERNAL
ch33.indd 14ch33.indd 14 7/6/2005 10:19:11 AM7/6/2005 10:19:11 AM

All-in-1 / Oracle Database 10g OCP Certification All-in-One / Watson, Bersinic / 5790-3
Chapter 33: Managing Storage with Automatic Storage Management
15
PART II
REDUNDANCY will not mirror at all: the assumption is that there is an underlying
LVM that is doing whatever level of RAID is deemed appropriate.
Redundancy can be taken a step further by putting ASM disks within a disk group
into failure groups. When ASM mirrors extents, it will never mirror an extent to another
disk in the same failure group. This means that you are better protected against the
failure of multiple disks. By default, each disk is considered to be its own failure group;
this gives ASM complete freedom to mirror that disk’s data onto any other disk in the
group. However, if some disks are connected at the hardware level, typically by being
attached to the same controller, you would not want ASM to mirror between them.
Using failure groups forces ASM to create mirrors on a different subset of the disks
within the group. An example of this is
SQL> create diskgroup dgroupa normal redundancy
failgroup controller2 disk '/dev/rdsk/c2*'
failgroup controller3 disk '/dev/rdsk/c3*';
This command creates a disk group consisting of all the disk devices matched by
the wildcards given, which is all the disks hanging off the second and third controllers.
But the use of failure groups instructs ASM never to mirror data between two disks
that are on the same controller.
Exercise 33-3: Creating a Disk Group (Windows)
Use the ASM instance created in Exercise 33-2 to create a disk group with the two raw
volumes created in Exercise 33-1.
1. From an operating system prompt, set your ORACLE_SID environment
variable to the ASM instance.
C:\> set ORACLE_SID=+ASM
2. Connect to your ASM instance with SQL*Plus with the SYSDBA privilege
using operating system authentication.
c:\> sqlplus / as sysdba
3. Create a disk group, nominating the two raw volumes.
SQL> create diskgroup dg1 disk '\\.\E:','\\.\F:';
4. Confirm the creation of the group by querying the relevant views.
SQL> select name,group_number,type,state,total_mb from v$asm_diskgroup;
NAME GROUP_NUMBER TYPE STATE TOTAL_MB
-------- ------------ ------ ----------- ----------
DG1 1 NORMAL MOUNTED 8000
SQL> select path,group_number,total_mb from v$asm_disk;
PATH GROUP_NUMBER TOTAL_MB
-------- ------------ ----------
\\.\C: 0 24999
\\.\E: 1 4000
\\.\F: 1 4000
In this example, the group has NORMAL redundancy, so the total space
available, 8GB, will be effectively halved. The group is MOUNTED, meaning
that it is available for use. The second query shows that of the three disk devices
discovered, E: and F: have been assigned to a disk group.
ch33.indd 15ch33.indd 15 7/6/2005 10:19:12 AM7/6/2005 10:19:12 AM

All-in-1 / Oracle Database 10g OCP Certification All-in-One / Watson, Bersinic / 5790-3
Oracle Database 10g OCP Certification All-in-One Exam Guide
16
5. To ensure that the disk group is mounted automatically when the ASM
instance starts, add this line to the ASM instance parameter file created
in Exercise 33-2, Step 2:
asm_diskgroups=dg1
EXAM TIP The views V$ASM_DISK and V$ASM_DISKGROUP are only
populated in an ASM instance. They are always empty in an RDBMS instance.
Creating and Using ASM Files
The ASM disk groups are created in the ASM instance; the ASM files are created in the
RDBMS instance. The normal commands for creating datafiles, tempfiles, and logfiles
can all take a disk group name in place of a filename. For example,
SQL> create tablespace new_tbs datafile '+dg1' size 100m;
SQL> alter tablespace system add datafile '+system_dg' size 1000m;
SQL> alter database add logfile group 4 '+dg_log1','+dg_log2' size 100m;
The first of these commands creates a new tablespace with one datafile in the disk
group DG1. The second command adds a datafile to the SYSTEM tablespace, in a
disk group created specially for the SYSTEM datafiles; this will probably be a disk
group created with HIGH redundancy. The third command creates a new online
logfile group, with two members in different disk groups; these will be groups with
EXTERNAL redundancy, because you can rely on the multiplexing to provide fault
tolerance.
To direct archive logs to ASM, set the LOG_ARCHIVE_DEST parameters to point
to disk groups:
SQL> alter system set log_archive_dest_1='location=+dg_arc1';
SQL> alter system set log_archive_dest_2='location=+dg_arc2';
It is also possible to direct the flash recovery area to an ASM disk group:
SQL> alter system set db_recovery_file_dest='+dg_flash';
In all these examples, you do not specify a filename, only a disk group. ASM will
generate the actual filenames according to its own conventions. If you wish, you can
see the names by querying views such as V$DATAFILE, V$LOGFILE, or V$ARCHIVED_
LOG, but there is little value in this. A feature of ASM is that it gives you complete
independence from the physical storage: there is no reason for you to want to know
the actual filenames. It is possible to interpret the system-generated names, but they
are not any sort of physical path.
Exercise 33-4: Using ASM for Datafiles
Create a tablespace in the disk group created in Exercise 33-3.
1. Connect to your RDBMS instance with SQL*Plus as user SYSTEM. Ensure that
your ORACLE_SID environment variable is set to the name of your RDBMS
instance first.
ch33.indd 16ch33.indd 16 7/6/2005 10:19:13 AM7/6/2005 10:19:13 AM

All-in-1 / Oracle Database 10g OCP Certification All-in-One / Watson, Bersinic / 5790-3
Chapter 33: Managing Storage with Automatic Storage Management
17
PART II
2. Create a tablespace with a datafile in your ASM disk group.
SQL> create tablespace new_tbs datafile '+dg1' size 100m;
3. Find the filename of the new datafile.
SQL> select file_name from dba_data_files where tablespace_name='NEW_
TBS';
FILE_NAME
----------------------------------------
+DG1/ocp10g/datafile/new_tbs.257.1
Note that the system-generated filename is prefixed with the name of the disk
group, followed by the database name, the type of file, the tablespace name, and a
unique numeric identifier.
ASM and RMAN
Since ASM files are created on raw devices managed by Oracle, there is no way that
you can back up ASM files with operating system utilities: no regular operating system
command or utility can see the contents of an ASM disk, because it has no file system
installed upon it. You must use RMAN. The RMAN backup and restore and recover
commands do not change at all when using ASM; wherever you would use a filename,
enter the ASM filename. If your backup scripts specify tablespace names, or the whole
database, then they will run unchanged.
Apart from being required for regular backup and recovery procedures, RMAN is
also the only tool available for migrating a database from conventional file system
storage to ASM storage. The examples that follow assume that you have three disk
groups: group dgroup1 is for your datafiles; groups dgroup2 and dgroup3 are for
control and online log files.
To migrate the controlfile, change the CONTROLFILES instance parameter to
point toward your disk groups and then shut down the database and start it in
NOMOUNT mode:
SQL> alter system set controlfiles='+dgroup2','+dgroup3' scope=spfile;
SQL> shutdown immediate;
SQL> startup nomount;
Then launch RMAN, and restore the controlfile from its original location:
RMAN> restore controlfile from '/u1/ocp10g/ctrl1.con';
From an RMAN prompt, this script will migrate all your datafiles to an ASM disk
group:
shutdown immediate;
startup mount;
backup as copy database format '+dgroup1';
switch database to copy;
alter database open;
To migrate the redo logs, create new members in your disk groups and drop the
old members:
SQL> alter database add logfile member '+dgroup2','+dgroup3' to group 1;
SQL> alter database drop logfile member
'/u02/ocp10g/log1a.rdo','/u03/ocp10g/log1b.rdo';
ch33.indd 17ch33.indd 17 7/6/2005 10:19:13 AM7/6/2005 10:19:13 AM

All-in-1 / Oracle Database 10g OCP Certification All-in-One / Watson, Bersinic / 5790-3
Oracle Database 10g OCP Certification All-in-One Exam Guide
18
Finally, you must move your temporary tablespace tempfiles. Since these cannot
be backed up, the technique is to drop them and create new files on a disk group. It
may be simpler just to drop the whole temporary tablespace and create a new one.
EXAM TIP RMAN is the only tool you can use to back up ASM files. User-
managed backups are not possible.
ASM and Linux
The code that implements ASM is the ASMLib library. For Linux, this library is
implemented as a set of Linux packages, some of which may be specific to different
releases of the Linux operating system. Generally, this means that to use ASM on
Linux, you must do some research on Metalink to locate the correct version of the
ASMLib for your Linux installation. For example, there are different packages for Red
Hat AS 3 and SLES 8. Do not worry about reliability—ASM on Linux works as well as
on any other platform; the issues are only to do with getting it installed.
The URL to obtain the various versions of the ASM libraries (correct as of the time
of writing) is
http://www.oracle.com/technology/tech/linux/asmlib/index.html
Once the ASMLib is installed, ASM will function exactly as on any other platform.
A workaround is to use operating system files that simulate raw disks. This is not a
supported routine but is adequate for learning or demonstration purposes:
1. From a Linux prompt, create the files.
$ dd if=/dev/zero of=_file_disk1 bs=1k count=1000000
$ dd if=/dev/zero of=_file_disk2 bs=1k count=1000000
These commands will create two virtual disk files of 1GB each.
$ ls -l
total 200208
-rw-r--r-- 1 oracle dba 1024000000 Mar 19 23:58 _file_disk1
-rw-r--r-- 1 oracle dba 1024000000 Mar 19 23:58 _file_disk2
2. As the root user, associate loop devices with the files.
# losetup /dev/loop1 _file_disk1
# losetup /dev/loop2 _file_disk2
3. Bind raw devices to the loop devices.
# raw /dev/raw/raw1 /dev/loop1
/dev/raw/raw1: bound to major 7, minor 1
# raw /dev/raw/raw2 /dev/loop2
/dev/raw/raw2: bound to major 7, minor 1
4. Change the ownership and mode of the raw devices.
# chown oracle:dba /dev/raw/raw1
# chown oracle:dba /dev/raw/raw2
# chmod 660 /dev/raw/raw1
# chmod 660 /dev/raw/raw2
ch33.indd 18ch33.indd 18 7/6/2005 10:19:14 AM7/6/2005 10:19:14 AM

All-in-1 / Oracle Database 10g OCP Certification All-in-One / Watson, Bersinic / 5790-3
Chapter 33: Managing Storage with Automatic Storage Management
19
PART II
5. Create an ASM instance as normal, setting the ASM_DISKSTRING instance
parameter to point to the simulated raw devices.
asm_diskstring='/dev/raw/raw1','/dev/raw/raw2'
Chapter Review
ASM is an Oracle-aware logical volume manager. It can work with logical volumes
created by an operating system–provided LVM, or it can work with raw devices. To
use ASM, this is the sequence:
1. Using operating system utilities, create the raw devices.
2. Create and start the ASM instance.
3. In the ASM instance, create the ASM disk groups, using the raw devices.
4. In the RDBMS instance, create datafiles in the ASM disk groups.
The first step is platform specific. Subsequent steps are the same on all platforms.
ASM files are, by default, striped with the equivalent of RAID 0+1; all files are cut
across all disks in the group to maximize performance, and every allocation unit is
mirrored onto two disks. The stripe size is determined by the type of file: coarse stripes
of 1MB for datafiles and archive logs, where I/O operations tend to be large, and fine
stripes of 128KB for online redo logs and the controlfile, where I/O operations tend
to be smaller.
An ASM instance is a type of instance dedicated to managing ASM disk groups. You
can connect to it only as SYSDBA or SYSOPER, because it never mounts and opens a
database; it mounts disk groups, which are then available to RDBMS instances. If the
ASM instance shuts down, the RDBMS instances that are using it will also shut down.
The only tool for backing up, or indeed for migrating to, ASM files is RMAN.
ASM is available for all platforms, but the details of installation may vary. For
example, on Windows ASM works straight out of the box, but on Linux you may
have to do some extra configuration.
Questions
1. What mode must an ASM instance be in before an RDBMS instance can access
ASM files? (Choose the best answer.)
A. NOMOUNT
B. MOUNT
C. OPEN
D. Either MOUNT or OPEN
2. What file types and directories can be stored with ASM? (Choose all that apply.)
A. Alert log
B. Controlfiles
ch33.indd 19ch33.indd 19 7/6/2005 10:19:14 AM7/6/2005 10:19:14 AM

All-in-1 / Oracle Database 10g OCP Certification All-in-One / Watson, Bersinic / 5790-3
Oracle Database 10g OCP Certification All-in-One Exam Guide
20
C. Datafiles
D. Online redo log files
E. Oracle home directory
3. Which of the following recovery files can be stored with ASM? (Choose all
that apply.)
A. Archive redo log files
B. RMAN backup sets
C. RMAN image copies
D. User-managed backups
E. The flash recovery area
4. Which of the following parameters is required for an ASM instance? (Choose
the best answer.)
A. ASM_DISKGROUPS
B. ASM_POWER_LIMIT
C. INSTANCE_NAME
D. INSTANCE_TYPE
5. How should you migrate your online redo logs to ASM storage? (Choose the
best answer.)
A. Copy the files to an ASM disk group, and use RENAME to update the
controlfile.
B. Use RMAN to transfer them to an ASM disk group, and SWITCH to update
the controlfile.
C. Create new members in an ASM disk group, and drop the old members.
D. Online logs cannot use ASM storage.
6. If you abort an ASM instance, what will be the effect on RDBMS instances that
make use of disk groups managed by the aborted instance? (Choose the best
answer.)
A. ASM is a single point of failure, and therefore the RDBMS instances will
also abort.
B. The RDBMS instances will remain open, but any ASM datafiles will be
inaccessible.
C. RDBMS instances that have already opened ASM files will not be affected,
but no new RDBMS instances will be able to open.
D. The RDBMS instances will hang until the ASM instance is restarted.
7. What are the default characteristics of ASM files? (Choose the best answer.)
A. The files will be striped for performance but not mirrored for safety.
B. The files will be mirrored for safety but not striped for performance.
ch33.indd 20ch33.indd 20 7/6/2005 10:19:15 AM7/6/2005 10:19:15 AM

All-in-1 / Oracle Database 10g OCP Certification All-in-One / Watson, Bersinic / 5790-3
Chapter 33: Managing Storage with Automatic Storage Management
21
PART II
C. The files will be both striped and mirrored.
D. The files will be neither striped nor mirrored.
8. What happens when you open an ASM instance? (Choose the best answer.)
A. The ASM disk groups are made available to RDBMS instances.
B. The ASM disks are opened.
C. The ASM files are opened.
D. You cannot open an ASM instance.
9. What statement is correct about ASM and logical volume managers (LVMs)?
(Choose the best answer.)
A. ASM is itself an LVM and cannot work with a third-party LVM.
B. ASM can use LVM volumes, if they are formatted with a file system.
C. You can use ASM for striping, and the LVM for mirroring.
D. You can use ASM for mirroring, and the LVM for striping.
10. What does the RBAL process do? (Choose the best answer.)
A. It rebalances data across the disks in an ASM disk group when a disk
is added or removed.
B. It coordinates rebalancing activity.
C. It opens and closes ASM disks.
D. It depends on whether it is the RBAL process of an ASM instance or of an
RDBMS instance.
11. Which of the following techniques is valid for backing up files on ASM disks?
(Choose all that apply.)
A. If the files are mirrored, split the mirror, back up the split copy, and re-
instantiate the mirror.
B. Put the tablespaces into hot backup mode, and copy the ASM datafiles.
C. Connect to the ASM instance with RMAN, and back up as normal.
D. Connect to the RDBMS instance with RMAN, and back up as normal.
12. How can you connect to an ASM instance? (Choose the best answer.)
A. By using operating system authentication only
B. By using password file authentication only
C. By using data dictionary authentication only
D. None of the above are correct
13. What does ASM stripe? (Choose the best answer.)
A. Files across all disk groups
B. Disks across all disk groups
C. Disk groups across all disks
ch33.indd 21ch33.indd 21 7/6/2005 10:19:16 AM7/6/2005 10:19:16 AM

All-in-1 / Oracle Database 10g OCP Certification All-in-One / Watson, Bersinic / 5790-3
Oracle Database 10g OCP Certification All-in-One Exam Guide
22
D. Files across all disks in a group
E. Allocation units across all disks in a group
14. Some operations can only be carried out when connected to an ASM instance,
while others can only be carried out when connected to an RDBMS instance.
Mark each of these operations as being “ASM” or “RDBMS.”
A. Creating ASM datafiles
B. Creating ASM disk groups
C. Backing up ASM datafiles
D. Mounting the ASM instance
15. If an RDBMS instance that is using ASM files crashes, what will the ASM
instance do? (Choose the best answer.)
A. The ASM instance will abort.
B. The ASM instance will recover the files that the RDBMS instance had open,
and remain available for other RDBMS instances.
C. The ASM instance will recover the files that the RDBMS instance had open,
and shut down cleanly.
D. Nothing.
Answers
1. B. An ASM instance must be mounted before an RDBMS instance can use
the ASM files. You cannot open an ASM instance.
2. B, C, and D. You can use ASM for database files, such as the controlfile,
datafiles, and online log files. Your Oracle home and the alert and trace files
must be on conventional storage.
3. A, B, C, and E. Archive logs, RMAN backups, and indeed the whole flash
recovery area can be on ASM. You cannot direct user-managed backups to
ASM, because operating system utilities cannot write to ASM devices.
4. D. The only essential parameter is INSTANCE_TYPE.
5. C. The only method is to create new files, because you can’t copy to an ASM
disk group, and RMAN cannot back up online log files.
6. A. The ABORT command will be propagated to all the RDBMS instances.
7. C. By default, files are both striped and mirrored. You can disable the
mirroring, but not the striping, by using the EXTERNAL REDUNDANCY
option when you create the disk group.
8. D. You cannot open an ASM instance.
9. C. This is probably the best way to use ASM: to rely on an LVM to provide
fault tolerance and ASM to provide Oracle-aware striping performance.
ch33.indd 22ch33.indd 22 7/6/2005 10:19:16 AM7/6/2005 10:19:16 AM

All-in-1 / Oracle Database 10g OCP Certification All-in-One / Watson, Bersinic / 5790-3
Chapter 33: Managing Storage with Automatic Storage Management
23
PART II
10. D. There is an RBAL process in both an ASM instance and the RDBMS instances
that are using it. A describes the ARBn process, B is RBAL in an ASM instance, and
C is RBAL in an RDBMS instance.
11. D. Absolutely normal RMAN backups, when you are connected to the RDBMS
instance as the target, are the only way to back up ASM files.
12. D. ASM instances do not open a database, so you cannot use data dictionary
authentication, but either password file or operating system authentication
will work.
13. D. ASM stripes files across all disks in the group.
14. B and D; A and C. The ASM instance operations are B and D; the RDBMS
operations are A and C.
15. D. An ASM instance operates independently of the RDBMS instances that are
using it.
ch33.indd 23ch33.indd 23 7/6/2005 10:19:17 AM7/6/2005 10:19:17 AM

All-in-1 / Oracle Database 10g OCP Certification All-in-One / Watson, Bersinic / 5790-3
ch33.indd 24ch33.indd 24 7/6/2005 10:19:17 AM7/6/2005 10:19:17 AM

All-in-1 / Oracle Database 10g Certification All-in-One / Watson & Bersinic / 5790-3 /Chapter 34
CHAPTER 34
Monitoring and Managing
Memory
In this chapter you will learn how to
• Implement Automatic Shared Memory Management
• Manually configure SGA parameters for various memory components in the SGA
• Use Automatic PGA Memory Management
1
ch34.indd 1ch34.indd 1 7/6/2005 12:23:23 PM7/6/2005 12:23:23 PM

Oracle Database 10g OCP Certification All-in-One Exam Guide
2
All-in-1 / Oracle Database 10g Certification All-in-One / Watson & Bersinic / 5790-3 /Chapter 34
An Oracle instance consists of memory structures and processes. An understanding of
the purpose of the various memory structures and how they are used by the processes
is a vital part of a database administrator’s knowledge. Appropriate configuration of
memory usage is vital for performance.
This chapter discusses the memory structures that make up an Oracle instance: the
shared memory that is the System Global Area, or SGA, and the Program Global Area,
or PGA, that is private to each session. These memory structures can be controlled
manually (which was the only option in earlier releases of the Oracle database), or
you can enable self-tuning mechanisms. If you enable the automatic management of
SGA and PGA, you should be able to ensure that all available memory is used to the
best effect, while guaranteeing that the server will never need to swap.
The System Global Area
In operating system terms, the System Global Area (SGA) is shared memory. The
implementation of shared memory is platform specific. For example, on Solaris
your system administrators must configure shared memory by kernel settings in the
/etc/system file and any changes require a reboot to take effect; but on Linux shared
memory can be configured dynamically with the sysctl utility. The memory that makes
up the SGA is shared by all background and server processes.
The SGA is divided into several memory structures. There are three required
components of the SGA:
• The shared pool
• The log buffer
• The database buffer cache default pool
There are also a number of optional SGA components:
• The large pool
• The streams pool
• The Java pool
• The database buffer cache keep pool
• The database buffer cache recycle pool
• The database buffer cache nK block size pools
All of these are detailed in the following sections. As with all components of the
instance, the SGA memory structures are controlled by instance parameters. Many of
these are dynamic, meaning that to an extent (and within certain limitations) the SGA
can be reconfigured without any downtime. Some can even be controlled automatically, by
enabling the Automatic Shared Memory Management capability. Others are static and
ch34.indd 2ch34.indd 2 7/6/2005 12:23:56 PM7/6/2005 12:23:56 PM

Chapter 34: Monitoring and Managing Memory
3
PART II
All-in-1 / Oracle Database 10g Certification All-in-One / Watson & Bersinic / 5790-3 /Chapter 34
cannot be changed without shutting down the instance. SGA configuration is critical to
performance; there are advisors that will assist in determining what sizes are appropriate
for some of the SGA memory structures.
The overall size of the SGA can be determined by querying the V$SGASTAT view:
SQL> select sum(bytes)/(1024*1024) size_in_mb from v$sgastat;
The size of the SGA can vary as components are resized, but it can never exceed the
limit set by the instance parameter SGA_MAX_SIZE. The actual size will always be
equal to or less than this parameter. If this parameter is not set, then it defaults to the
size of the SGA at startup, so by default, the SGA can shrink but not expand. The effect
at the operating system level of the SGA_MAX_SIZE parameter is platform specific.
For example, on Linux Oracle will take virtual memory up to the SGA_MAX_SIZE
setting when the instance starts, and then if the current size of the SGA is less than
SGA_MAX_SIZE, Oracle instructs Linux to page out all the difference. So you will
find that your system appears to be swapping, but this is not a problem because only
memory that is allocated but not needed is swapped out. On Windows, the memory
allocated is that actually used, so if SGA_MAX_SIZE is greater than the SGA, this has
no significance at all.
TIP Give yourself some room to maneuver by setting the SGA_MAX_SIZE
instance parameter to a figure greater than that you think you need, but
remember that there may be side effects of which your system administrators
need to be aware.
SGA components are, with the exception of the log buffer, sized in granules.
A granule is an area of contiguous memory. The granule size is platform specific and
varies according to the total size of the SGA. Typical granule sizes are 4MB if the total
SGA is no bigger than 1000MB or 16MB if it is larger, but there are platform variations.
For instance, on Windows, the granule size is 8MB for an SGA greater than 1GB.
TIP You can query the V$SGAINFO view to see the granule size that is being
used by an instance.
When setting the instance parameters that control the size of SGA components
you can specify any figure you please, but what you get will be a multiple of granules:
the figure will be rounded up to the next whole granule. The exception is the log buffer:
since this will usually need to be smaller than one granule, for performance reasons,
what you ask for is what you get.
The Shared Pool
The shared pool is a required element of the SGA. It is sized according to the SHARED_
POOL_SIZE instance parameter, rounded up to the next granule boundary. However,
ch34.indd 3ch34.indd 3 7/6/2005 12:23:56 PM7/6/2005 12:23:56 PM

Oracle Database 10g OCP Certification All-in-One Exam Guide
4
All-in-1 / Oracle Database 10g Certification All-in-One / Watson & Bersinic / 5790-3 /Chapter 34
there are certain limitations at the lower end of the size range. If you try to set it to an
impossibly low value, the instance will not start:
ocp10g> alter system set shared_pool_size=2m scope=spfile;
System altered.
ocp10g> startup force
ORA-00371: not enough shared pool memory, should be at least 62198988 bytes
ocp10g>
In this example, a shared pool of at least 60MB is necessary before the instance can start.
TIP If you find yourself with an instance that cannot start (as in this example),
use the CREATE PFILE FROM SPFILE command to generate a text parameter
file, edit it to change the parameter that is preventing the startup, and then use
CREATE SPFILE FROM PFILE to generate an spfile that will work.
The shared pool is divided into a number of memory structures. The DBA has no
control over the sizing of these; Oracle itself will manage the shared pool structures
dynamically within the limit specified by the SHARED_POOL_SIZE instance parameter.
To view the current memory allocations, query the V$SGASTAT view as in Figure 34-1.
In Figure 34-1, the shared pool consists of thirty-six components. These are some
of the more important ones:
• The sql area and the library cache Together, these make up what will often
be the largest part of the shared pool. This is a cache of recently executed
SQL statements, both the text of the statements and the parsed forms with an
execution plan.
• The row cache This cache, also commonly referred to as the data dictionary
cache, is made up of data dictionary information (table structures, users,
constraints, grants, and more) that are being used to parse SQL statements.
• The ASH (Active Session History) buffers This is information regarding
recent activity by users. Used for performance diagnosis, it is regularly flushed
to the Automatic Workload Repository in the SYSAUX tablespace.
• Various PL/SQL areas PL/SQL code, including triggers, is loaded into the
shared pool from the data dictionary for execution.
• The flashback generation buffers This is memory used for the flashback
database buffers, before they are flushed to the flashback logs.
All the shared pool components are sized automatically by the instance; you have no
control over the size of any one component.
A shared pool that is too small is very bad for performance, but do not make it
larger than necessary. An oversized shared pool is also bad for performance. To
determine how large the shared pool should be, use the Shared Pool Advisor. This
concentrates on the library cache. The algorithms Oracle uses to allocate memory in
the shared pool favor the library cache the least, so if there is enough memory for an
ch34.indd 4ch34.indd 4 7/6/2005 12:23:57 PM7/6/2005 12:23:57 PM

Chapter 34: Monitoring and Managing Memory
5
PART II
All-in-1 / Oracle Database 10g Certification All-in-One / Watson & Bersinic / 5790-3 /Chapter 34
optimally sized library cache, you can assume that there is enough memory for everything
else. To enable the advisor, set the instance parameter STATISTICS_LEVEL to TYPICAL,
which is the default, and query the V$SHARED_POOL_ADVICE view:
SQL> select shared_pool_size_for_estimate "size",
2 shared_pool_size_factor "factor",
3 estd_lc_time_saved "saving"
4 from v$shared_pool_advice;
size factor saving
---------- ---------- ----------
400 .5 788,794
480 .6 790,444
560 .7 791,191
640 .8 791,589
720 .9 791,793
Figure 34-1 SGA memory allocations
ch34.indd 5ch34.indd 5 7/6/2005 12:23:58 PM7/6/2005 12:23:58 PM

Oracle Database 10g OCP Certification All-in-One Exam Guide
6
All-in-1 / Oracle Database 10g Certification All-in-One / Watson & Bersinic / 5790-3 /Chapter 34
800 1.0 791,917
880 1.1 792,013
960 1.2 792,070
1,040 1.3 792,106
1,120 1.4 792,122
1,200 1.5 792,139
1,280 1.6 792,156
1,360 1.7 792,171
1,440 1.8 792,181
1,520 1.9 792,187
1,600 2.0 792,199
20 rows selected.
This view shows the amount of library cache parsing time that would be saved if
the shared pool were a certain size, returning up to twenty rows for estimates from
half the current size to double the current size. You should set the SHARED_POOL_
SIZE instance parameter to the value where the time saving stabilizes. In the preceding
example the shared pool is currently 800MB, which is clearly much bigger than
necessary: it can be halved to 400MB without any significant deterioration in the time
saved.
This advisor can also be accessed through Database Control, by clicking the Advice
button shown in Figure 34-2 in the section “Automatic Shared Memory Management”
later in this chapter.
The Database Buffer Cache
Server processes copy datafile blocks into the database buffer cache. If blocks in the cache
are changed, the DBWn process will write them back to the datafiles. This process was
described in Chapter 9, which detailed what happens in memory and on disk when
DML commands are executed. The default instance configuration treats the database
buffer cache as one area of memory used for caching blocks of all segments, but it is
possible to optimize the use of the database buffer cache by dividing it into different
areas, known as pools, and caching blocks of different segments in these different
pools. But before going into this, you will read more about the algorithms that Oracle
uses to determine which buffers to copy blocks into, and which buffers to write back
to disk.
EXAM TIP All the database buffer cache sizing parameters are dynamic, but
the SGA_MAX_SIZE parameter limits the amount of space you can allocate
to the cache without having to downsize other SGA components or restart
the instance.
The LRU List and the Checkpoint Queue
Every buffer in the database buffer cache will be in one of three states: pinned, dirty,
or free.
ch34.indd 6ch34.indd 6 7/6/2005 12:23:59 PM7/6/2005 12:23:59 PM

Chapter 34: Monitoring and Managing Memory
7
PART II
All-in-1 / Oracle Database 10g Certification All-in-One / Watson & Bersinic / 5790-3 /Chapter 34
A pinned buffer is a buffer that is in use. At this precise moment, a process is
working on the block in the buffer, and until it has finished with the block, no other
process can get to it.
A dirty buffer is a buffer containing a block whose image in the buffer is not the
same as the image on disk. The block has been copied into the cache, it has been
updated, but it has not yet been written back to disk. It is possible for a server process
to gain access to the block (to pin it) and to apply another update, but it is not possible
for a server process to copy another block from disk over a dirty buffer. It must first be
cleaned, by DBWn writing it back to disk.
A free buffer is a negative definition: it is neither dirty, nor pinned. This means
that it is either unused or clean. When the instance first starts, all the buffers will be
unused, but within minutes every buffer will have something in it. In practice, there
are no unused buffers. A clean buffer is one containing a block whose image in the
buffer is the same as the image on disk. Either the block has been copied into the
cache and not changed, or it has been changed (“dirtied”) and subsequently the DBWn
process has cleaned it by writing it back to disk.
When a server process needs to read data into memory, it must find the block on
disk and then find a free buffer in the database buffer cache into which to copy it.
Blocks cannot be copied into pinned buffers, because they are protected by a locking
mechanism, and they cannot be copied into dirty buffers, because if they were, the
changes made to the dirty buffer would be overwritten. Free buffers can be overwritten,
because the data they contain is also available on disk. Once a dirty buffer has been
cleaned by DBWn, it becomes free.
There will be many free buffers in the cache at any time. Which one will a server
process choose to overwrite when it needs to copy a block into memory? This is critical
for performance. The selection is based on the Least Recently Used, or LRU, list. Every
buffer has an address, and the LRU list has an entry for every buffer. The LRU list sorts
the entries according to when they were last accessed. So a buffer that was accessed
just a moment ago will be at the most recently used end of the LRU list, and the
buffer that hasn’t been touched for the longest time will be at the least recently used
end of the LRU list. Some buffers will be very busy, because many server processes are
reusing the blocks they contain; these buffers may be pinned, dirty, or free, but they
will always be toward the most recently used end of the LRU list. The blocks at the
least recently used end of the list are occupying space for no purpose; a session must
have needed the blocks once, or they wouldn’t be in the cache, but no servers need
them now. When a server needs to copy a block into memory, it goes to the least
recently used end of the LRU list and takes the first free buffer that it finds. This
means that popular data is always in memory; only buffers that hold data that is not
in frequent use are overwritten.
A second list of buffers is the checkpoint queue. This is a list of dirty buffers,
waiting to be written to disk by the DBWn process. It is populated by server processes
searching for free buffers. When a server process looks for a free buffer, starting at the
least recently used end of the LRU list, whenever it finds a dirty buffer in the course of
its search it will transfer its address to the checkpoint queue. So the checkpoint queue
ch34.indd 7ch34.indd 7 7/6/2005 12:23:59 PM7/6/2005 12:23:59 PM

Oracle Database 10g OCP Certification All-in-One Exam Guide
8
All-in-1 / Oracle Database 10g Certification All-in-One / Watson & Bersinic / 5790-3 /Chapter 34
is a list of buffers that are dirty and also not recently used. From time to time, the
DBWn will copy all buffers on the checkpoint queue to disk, thus making them clean,
or free, and available for reuse. This means that a very busy buffer, one that is being
continuously updated, will never be written to disk, because it will always be at the
most recently used end of the LRU list and thus never found by a server process
searching for a free buffer. This very simple mechanism allows Oracle to keep disk I/O
to a minimum: DBWn will write only data that is both static and dirty. Unchanged
buffers are never written to disk, and dirty buffers are written only if they haven’t been
touched for some time.
In normal running, the DBWn will clean the checkpoint queue for one of two
reasons. First, a server process may take too long to find a free buffer (“too long” is
controlled by internal parameters), in which case it will signal the DBWn to flush the
buffers on the checkpoint queue to disk. Second, the checkpoint queue may have
become too long: no one server process has had a problem, but overall a large number
of dirty buffers have been found by server processes searching for free buffers. Either
way, once DBWn has copied the buffers on the checkpoint queue to disk, they become
free and the server processes can then use them. If the database is static, with no
searches for free buffers occurring, another mechanism comes into play. DBWn has
a three-second time-out: every three seconds it will copy some dirty buffers to disk,
irrespective of whether they have been encountered by servers looking for free buffers.
It will traverse the LRU list, writing first the dirty buffers that have not been recently
used. But eventually, the whole cache will be cleaned.
The end result of these algorithms is that DBWn writes as little data as it can get
away with—and always writes relatively static data in preference to volatile data.
The only time that all dirty buffers get written to disk in one operation is when
a database checkpoint occurs. This is signaled by an orderly shutdown, or when you
issue the ALTER SYSTEM CHECKPOINT command. Tablespace checkpoints, where all
the dirty buffers for one tablespace get written to disk, occur automatically as a result
of certain tablespace operations:
• Dropping the tablespace
• Making the tablespace read-only
• Putting the tablespace into hot backup mode
• Taking the tablespace offline
EXAM TIP Many people think that a log switch triggers a checkpoint.
It doesn’t. It used to, but that behavior changed with release 8i, when
incremental checkpointing was introduced. Now the checkpoint position
continues to advance smoothly according to the algorithms described in
the preceding section, with no special activity at log switch time.
ch34.indd 8ch34.indd 8 7/6/2005 12:24:00 PM7/6/2005 12:24:00 PM

Chapter 34: Monitoring and Managing Memory
9
PART II
All-in-1 / Oracle Database 10g Certification All-in-One / Watson & Bersinic / 5790-3 /Chapter 34
The Default, Keep, and Recycle Pools
The database buffer cache can be divided into up to three “pools.” A pool is a distinct
area in the database buffer cache used for caching particular objects: any one segment
will be cached in only one pool. Each pool has its own LRU list and checkpoint queue.
All instances must have a database buffer cache default pool. This is the pool sized
by the DB_CACHE_SIZE instance parameter. The default pool is the only required
pool, and all segments (whether table, index, undo, lob, or any other segment type)
are by default cached in the default pool. In some circumstances, having only one
pool can be a limitation on performance, because the blocks of all the segments will
be cached within it; they will be competing for space in the cache.
In most database systems, there will be some segments where many sessions are
accessing the same blocks repeatedly, and other segments where the blocks are accessed
only once. For example, it may be that a large fact table is being read by many sessions,
but that any one block of the table is being accessed only once. But the small-dimension
tables hanging off the fact table will be repeatedly scanned by all the sessions. There is
little point in retaining the blocks of the fact table in memory, because they aren’t
being reaccessed, whereas the dimension tables would ideally be in memory all the
time. A similar situation can arise with indexes: all users scan the index, but they each
require different blocks of the table. For optimal memory usage, the index blocks
would be kept in the cache permanently, but the table blocks would be read into
memory, and then the buffer would be either flushed back to disk or overwritten
immediately.
With one pool, the default pool, Oracle treats all segments equally: blocks are
read into memory, and if they are not accessed repeatedly they will—eventually—
drop down the LRU list to the least recently used end of the list, and the buffer will be
reused. The ideal situation would be that blocks of segments that are repeatedly accessed
are always in memory, and blocks that are unlikely to be reaccessed drop straight
down to the bottom of the LRU list and so are reused immediately. This behavior
can be forced by creating multiple buffer cache pools.
To ensure that the blocks of some segments are always kept in memory, create a
database buffer cache “keep” pool, and instruct Oracle to cache those segments in this
keep pool. The keep pool is created by setting the DB_KEEP_CACHE_SIZE instance
parameter. The keep pool should be large enough to store all the objects that you
intend to cache in it. This means that the stable running state of the instance will have
all the blocks of the keep pool segments in memory all the time. Suitable candidate
objects for the keep pool might be small-dimension tables or indexes on large fact
tables.
To ensure that blocks that are unlikely to be reaccessed are pushed out of memory
as quickly as possible, create a database buffer cache “recycle” pool by setting the DB_
RECYCLE_CACHE_SIZE instance parameter. This should be relatively small, so that a
block that is read into memory will be overwritten very soon.
Having created keep or recycle buffer cache pools by setting the DB_KEEP_CACHE_
SIZE and DB_RECYCLE_CACHE_SIZE parameters, you can specify that a particular
ch34.indd 9ch34.indd 9 7/6/2005 12:24:00 PM7/6/2005 12:24:00 PM

Oracle Database 10g OCP Certification All-in-One Exam Guide
10
All-in-1 / Oracle Database 10g Certification All-in-One / Watson & Bersinic / 5790-3 /Chapter 34
segment should be cached in them at segment creation time, or for an existing segment
with an ALTER command, by using the STORAGE clause:
SQL> alter table emp(storage buffer_pool recycle);
SQL> alter index emp_name_idx(storage buffer_pool keep);
SQL> create index emp_mgr_idx on emp(mgr) storage(buffer_pool keep);
TIP Using keep and recycle pools can be very good for performance, but
it is important to know how your data is being accessed. To put this into
perspective, use of keep and recycle pools is not supported by Oracle
Corporation for the Oracle E-Business Suite.
The Nonstandard Block Size Pools
Oracle permits the use of multiple block sizes within a database, but for every block
size you use you must create a pool of cache buffers of that size: you cannot cache an
8KB block in a 4KB buffer. The possible block sizes are 2KB, 4KB, 8KB, 16KB, and 32KB.
The choice of the standard block size is made at database creation time and can never
be changed. If it is unsuitable, you must create a new database with a more appropriate
block size. It is set by the DB_BLOCK_SIZE parameter, which defaults to 2KB. The
DB_BLOCK_SIZE is used for formatting the SYSTEM and SYSAUX tablespace datafiles.
After database creation, tablespaces can be formatted into other block sizes, provided
that a database buffer cache pool of buffers of that size has been created.
To create these additional pools, set one or more of these parameters:
• DB_2K_CACHE_SIZE
• DB_4K_CACHE_SIZE
• DB_8K_CACHE_SIZE
• DB_16K_CACHE_SIZE
• DB_32K_CACHE_SIZE
EXAM TIP You cannot set the DB_nK_CACHE_SIZE parameter, where n
is your standard block size. This will throw an error. The standard block size
cache is set with DB_CACHE_SIZE, DB_RECYCLE_CACHE_SIZE, and DB_
KEEP_CACHE_SIZE.
Support for multiple block sizes means that you can create tablespaces with different
block sizes in an attempt to optimize performance. For example, the standard block
size might be 8KB, which is often said to be a good choice for most databases. But if
you are storing audio CDs in the database as BLOBs, then each access to a CD will be
a continuous read/write of up to 700MB. This type of access may be more efficient if
the blocks are 32KB, so you could create a tablespace formatted into 32KB blocks and
use that to store the LOB segments.
ch34.indd 10ch34.indd 10 7/6/2005 12:24:01 PM7/6/2005 12:24:01 PM

Chapter 34: Monitoring and Managing Memory
11
PART II
All-in-1 / Oracle Database 10g Certification All-in-One / Watson & Bersinic / 5790-3 /Chapter 34
TIP Block size support is platform specific. For instance, the largest block size
possible on Windows is 16KB.
Use of multiple block sizes also means that it is possible to transport tablespaces
of different block sizes from one database to another. For example, you might have
one database using a 4KB standard block size, and another using 8KB standard block
size. By creating additional buffer pools formatted in the other block size, you will be
able to copy tablespaces between the databases.
TIP Oracle Corporation advises that the primary reason for supporting
the use of multiple block sizes is for transportable tablespaces, not for
performance tuning.
To create a tablespace of a nonstandard block size, specify the block size in the
tablespace creation command:
ocp10g> create tablespace ts_16k datafile 'ts_16k.dbf' size 400m
2 blocksize 16k;
create tablespace ts_16k datafile 'ts_16k.dbf' size 400m
*
ERROR at line 1:
ORA-29339: tablespace block size 16384 does not match configured block sizes
This fails because there is no buffer cache pool formatted into 16KB buffers.
To create one,
ocp10g> alter system set db_16k_cache_size=4m;
System altered.
This will succeed provided the increase in size of the SGA (only 4MB in the example)
does not take it over the limit set by the SGA_MAX_SIZE parameter. If the SGA is
already at that limit, then either another SGA component must be reduced in size,
or the change will require a shutdown.
Then create the tablespace by reissuing the preceding command. All objects
created in the tablespace will be formatted in 16KB blocks and cached in the 16KB
buffer cache pool. You can use nonstandard block sizes for user data tablespaces and
undo tablespaces, but not temporary tablespaces.
EXAM TIP Only the standard block size pool can be divided into default,
keep, and recycle. The nonstandard block size pools are default only.
Sizing the Database Buffer Cache
As a general rule, the larger the database buffer cache is, the more data blocks can
be cached in memory and therefore the less disk I/O will be needed. Disk I/O is the
limiting factor in performance of many database systems. But the structure of the
application and the nature of the work being done will limit the benefits of a large
ch34.indd 11ch34.indd 11 7/6/2005 12:24:02 PM7/6/2005 12:24:02 PM

Oracle Database 10g OCP Certification All-in-One Exam Guide
12
All-in-1 / Oracle Database 10g Certification All-in-One / Watson & Bersinic / 5790-3 /Chapter 34
database buffer cache. If users are not going to reaccess blocks, then there is no point
in caching them. The cache should be large enough to cache blocks that are repeatedly
accessed, but not so large that it caches blocks that are used only once. To assist in
estimating how large the cache should be, you can consult a Database Buffer Cache
Advisor.
Provided that the STATISTICS_LEVEL parameter is on TYPICAL or ALL, you have
access to the Database Buffer Cache Advisor through the V$DB_CACHE_ADVICE
view, which will have twenty rows for each pool you have created. Each row predicts
the estimated number of physical reads that would be necessary if the cache were a
certain size, ranging from one tenth of the current size to double the current size:
SQL> select name,size_for_estimate, size_factor, estd_physical_reads
from v$db_cache_advice;
NAME SIZE_FOR_ESTIMATE SIZE_FACTOR ESTD_PHYSICAL_READS
---------- ----------------- ----------- -------------------
DEFAULT 80 .1 3296,275,577
DEFAULT 160 .2 1197,244,495
DEFAULT 240 .3 571,762,504
DEFAULT 320 .4 258,223,630
DEFAULT 400 .5 178,347,651
DEFAULT 480 .6 146,103,881
DEFAULT 560 .7 131,742,725
DEFAULT 640 .8 127,894,451
DEFAULT 720 .9 124,493,254
DEFAULT 800 1 122,117,170
DEFAULT 880 1.1 118,988,621
DEFAULT 960 1.2 116,470,955
DEFAULT 1040 1.3 114,001,803
DEFAULT 1,120 1.4 111,294,674
DEFAULT 1,200 1.5 108,580,193
DEFAULT 1,280 1.6 106,112,377
DEFAULT 1,360 1.7 103,996,510
DEFAULT 1,440 1.8 102,112,565
DEFAULT 1,520 1.9 100,159,402
DEFAULT 1,600 2 100,018,331
20 rows selected.
This example shows that there is only one pool configured, the default pool, and
that it is currently 800MB. If memory on the server is tight, the pool could be reduced
to perhaps 600MB without the disk I/O increasing excessively, but taking it lower than
400MB would be disastrous. If there is spare memory on the server, the default pool
could certainly be increased to perhaps 1200MB, but there would be minimal benefit
from going much above that.
This advisor can also be accessed through Database Control, by taking the Advice
button shown in Figure 34-2 in the section “Automatic Shared Memory Management”
later in this chapter.
The Log Buffer
The use of the log buffer was covered in detail in Chapter 9. It is used as a very short
term staging area for all changes applied to blocks in the database buffer cache by
ch34.indd 12ch34.indd 12 7/6/2005 12:24:02 PM7/6/2005 12:24:02 PM

Chapter 34: Monitoring and Managing Memory
13
PART II
All-in-1 / Oracle Database 10g Certification All-in-One / Watson & Bersinic / 5790-3 /Chapter 34
server processes, before they are streamed to disk by the LGWR process. Remember
what will cause LGWR to write:
• When a user commits a transaction. This is the guarantee that data can never
be lost; the user’s session will hang until the write is complete.
• When the log buffer is one-third full. This is for performance: to force the
LGWR to write in near real time, even if transactions are not committing.
• Just before the DBWn writes. This is to prevent corruption: DBWn is not
allowed to write anything, unless the changes are already in the redo log on
disk.
• Every three seconds. There is a three-second time-out, so that in the highly
unlikely event that none of the three preceding triggers has fired, LGWR will
still write in close to real time.
The log buffer is sized by the LOG_BUFFER parameter, which is static. The default
is platform specific and related to the number of CPUs. On Windows, for example, if
CPU_COUNT is set to one, the LOG_BUFFER will default to 256K, but with CPU_COUNT
on eight the LOG_BUFFER will default to 2MB.
Other SGA Areas
The shared pool, the database buffer cache default pool, and the log buffer are the
three required components of the SGA. The following components are optional.
The Large Pool
The purpose of the large pool is to reduce the strain on the shared pool. If you create
a large pool, then various processes that would otherwise use shared pool memory
will automatically use the large pool instead. Among these are the following
processes:
• Shared server processes As discussed in Chapter 13, if you configure the
shared server, the session UGAs will be stored in the large pool.
• Parallel execution servers If you have enabled parallel query and DML, the
parallel servers will communicate via the large pool.
• I/O slave processes If you have enabled database writer slaves or tape I/O
slaves, they will communicate through the large pool.
• RMAN The RMAN channel processes use the large pool for caching buffers
during backup and restore operations.
If you do not create a large pool, your instance will still function—but perhaps
not as efficiently. The large pool is sized by the LARGE_POOL_SIZE parameter, which
is dynamic. To monitor large pool usage, query the V$SGASTAT view:
ch34.indd 13ch34.indd 13 7/6/2005 12:24:03 PM7/6/2005 12:24:03 PM

Oracle Database 10g OCP Certification All-in-One Exam Guide
14
All-in-1 / Oracle Database 10g Certification All-in-One / Watson & Bersinic / 5790-3 /Chapter 34
ocp10g> select * from v$sgastat where pool='large pool';
POOL NAME BYTES
------------ -------------------------- ----------
large pool free memory 6258688
large pool CTWR dba buffer 61440
large pool krcc extent chunk 2068480
If there is consistently a large amount of free memory, you could consider reducing
the size of the pool. In this example, note that some space has been allocated to the
“CTWR dba buffer.” This is memory used by the Change Tracking Writer process,
needed to allow RMAN to do fast incremental backups.
If the LARGE_POOL_SIZE instance parameter has not been explicitly set, the default
depends on other parameters. For example, if parallelism has been enabled within the
database, a large pool will be created.
The Java Pool
The Java pool is optional, in that you do not need it if you do not run any stored Java
procedures. However, a number of standard Oracle-supplied components are written
in Java, so the Java pool is usually considered a necessary part of the instance.
Java stored procedures are loaded from the data dictionary into the shared pool, as are
PL/SQL stored procedures. The purpose of the Java pool is to provide room for the run-
time memory structures used by a Java application, in particular the heap space needed to
instantiate Java objects. The Java pool is controlled by three instance parameters:
• JAVA_POOL_SIZE This parameter creates the Java pool. It is dynamic, within
the limits imposed by the SGA_MAX_SIZE. The default is 24MB.
• JAVA_MAX_SESSIONSPACE_SIZE This is a static parameter, restricting the
amount of space in the Java pool that any one session is allowed to occupy.
• JAVA_SOFT_SESSIONSPACE_LIMIT This too is static, and it may help with
monitoring Java pool usage before imposing a hard limit with JAVA_MAX_
SESSIONSPACE_SIZE. If a session’s Java pool memory usage goes above the
soft limit, a message is written out to a trace file.
To monitor Java pool usage, query the V$SGASTAT view:
ocp10g> select * from v$sgastat where pool='java pool';
POOL NAME BYTES
------------ -------------------------- ----------
java pool joxs heap 233856
java pool free memory 15266240
java pool joxlod exec hp 5471424
The Streams Pool
Streams is an advanced capability of the database that is not part of the OCP curriculum.
This is a very brief summary, all that is necessary to complete the description of the SGA.
ch34.indd 14ch34.indd 14 7/6/2005 12:24:03 PM7/6/2005 12:24:03 PM

Chapter 34: Monitoring and Managing Memory
15
PART II
All-in-1 / Oracle Database 10g Certification All-in-One / Watson & Bersinic / 5790-3 /Chapter 34
All changes made to the database are captured in the redo log as physical change
records: changes to be applied to blocks. Physical change records are not ordered or
grouped in any fashion that can be applied to logical structures such as tables; they
can be applied only to the physical datafiles. Streams processes the redo log to extract
logical change information, such as the changes applied to tables by transactions,
from the redo log stream. These changes are stored as logical change records that
can be propagated to other databases and so applied to tables at remote sites.
The instance parameter STREAMS_POOL_SIZE creates an area of memory that is
used by the Streams processes for both the capture and the application of logical
change records.
Automatic Shared Memory Management
Tuning the SGA is one of the most critical aspects of performance tuning. There are
advisors available within the database to assist with tuning the SGA (as displayed in
the views V$SHARED_POOL_ADVICE and V$DB_CACHE_ADVICE), but tuning the
SGA manually is still a time-consuming task. Furthermore, different SGA configurations
may be suited to different patterns of work. It may well be that an SGA that is perfectly
tuned for a normal daytime workload will not be optimal for nighttime reporting
runs or end-of-month batch processing. For the OLTP workload, a large database
buffer cache will minimize the disk I/O, but the reporting and batch processing jobs
might benefit more from a large pool, needed for parallel processing.
Inappropriate memory allocations can cause more serious problems than performance
issues—they can cause processes to fail. If there is not enough space in the shared
pool for an operation, it will fail with an “ORA-04031: unable to allocate n bytes
of shared memory” error. The same will occur if the large pool runs out of space.
The Automatic Shared Memory Management capability (introduced with release
10g of the database) relieves the DBA of the burden of having to monitor the usage
and manage the sizing of the major SGA components. Once an overall target for the
size of the SGA has been set, Oracle itself will monitor memory usage and adjust
the sizing of various SGA components automatically in response to the workload.
Four memory structures that are often referred to as auto-tune components are
managed by Automatic Shared Memory Management:
• Database buffer cache default pool, DB_CACHE_SIZE
• Shared pool, SHARED_POOL_SIZE
• Large pool, LARGE_POOL_SIZE
• Java pool, JAVA_POOL_SIZE
If the parameters controlling these structures are not set or are set to zero, then
Oracle has complete freedom to resize them, dynamically, up or down according to
demand. If they have been set, the settings given specify a minimum level below which
automatic management will not reduce them.
ch34.indd 15ch34.indd 15 7/6/2005 12:24:04 PM7/6/2005 12:24:04 PM

Oracle Database 10g OCP Certification All-in-One Exam Guide
16
All-in-1 / Oracle Database 10g Certification All-in-One / Watson & Bersinic / 5790-3 /Chapter 34
These other structures must always be sized manually:
• Database buffer cache keep pool, DB_KEEP_CACHE_SIZE
• Database buffer cache recycle pool, DB_RECYCLE_POOL_SIZE
• Database buffer cache nonstandard block size pools, DB_nK_CACHE_SIZE
• Streams pool, STREAMS_POOL_SIZE
• Log buffer, LOG_BUFFER
To enable Automatic Shared Memory Management, set the instance parameter
SGA_TARGET. This specifies a total size for the SGA. At instance startup time, Oracle
will allocate memory for SGA structures according to the parameters given, both for
the automatically managed components and the manually managed components; any
missing parameters will be set on defaults. If the total size of the SGA thus created
exceeds the SGA_TARGET, then automatic memory management is disabled. If the
total at startup is less than the target, Oracle will resize the four automatically managed
components upward on demand until the target is reached. From then on, Oracle will
monitor the usage of the four components and if necessary transfer memory from one
to another in order to ensure that the distribution is optimal for performance and to
avoid ORA-04031 errors.
The behavior on subsequent startups depends on the initialization parameter file
being used. If the instance was started with a dynamic spfile, then Oracle will write to
the file the current settings of the parameters for the four automatically managed
components. This allows Oracle to “remember” the settings, and at the next startup
they will be used. This saves the running time needed for Oracle to determine what
the best settings are. If the instance was started with a static pfile, then automatic
memory management will still work, but the current settings will be lost at shutdown,
and the self-tuning process will have to start from the beginning at the next startup.
Enabling Automatic Shared Memory Management by setting the SGA_TARGET
instance parameter starts an additional background process: the Memory Manager, or
MMAN. MMAN observes the system and the workload to determine the ideal memory
distribution. The checks are made every few minutes.
EXAM TIP Automatic Shared Memory Management requires that the
STATISTICS_LEVEL instance parameter to be on TYPICAL, the default, or ALL.
Without this, the information MMAN needs will not be gathered.
To enable Automatic Shared Memory Management through Database Control,
from the database home page take the Administration tab, and the Memory Parameters
link in the Instance section, as in Figure 34-2.
In this window you can set the parameters for the various memory structures,
or view the advisors. Clicking the Enable button will prompt for a value for the
SGA_TARGET, and once set, the automatic management will take over.
ch34.indd 16ch34.indd 16 7/6/2005 12:24:04 PM7/6/2005 12:24:04 PM
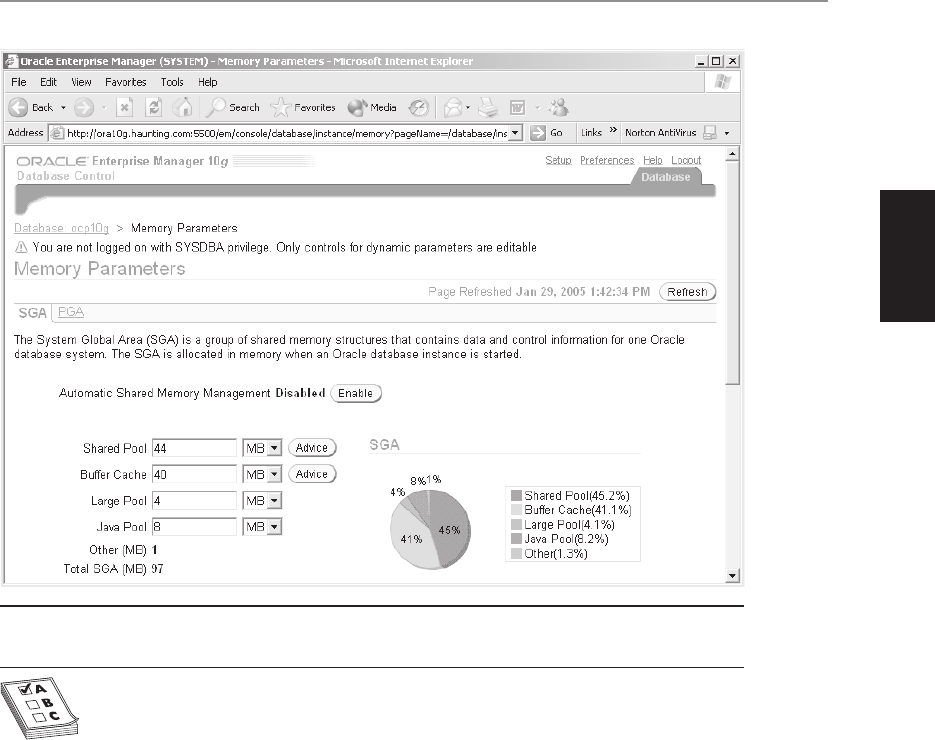
Chapter 34: Monitoring and Managing Memory
17
PART II
All-in-1 / Oracle Database 10g Certification All-in-One / Watson & Bersinic / 5790-3 /Chapter 34
EXAM TIP The SGA_TARGET is the total size of the whole SGA, including
any manually managed components—not just the total size of the four
automatically managed components.
The SGA_TARGET is the size that the SGA will be—this may well be less than the
SGA_MAX_SIZE instance parameter. SGA_TARGET is a dynamic parameter, but you
cannot raise it above the SGA_MAX_SIZE setting. If you attempt to set the SGA_TARGET
above the SGA_MAX_SIZE for a running instance, the command will fail:
ocp10g> alter system set sga_target=200m scope=memory;
alter system set sga_target=200m scope=memory
*
ERROR at line 1:
ORA-02097: parameter cannot be modified because specified value is invalid
ORA-00823: Specified value of sga_target greater than sga_max_size
If you set the parameter in the spfile by using the SCOPE=SPFILE clause, the
command will succeed, and at the next startup the SGA_MAX_SIZE will be adjusted to
the SGA_TARGET.
Figure 34-2 SGA sizing with Database Control
ch34.indd 17ch34.indd 17 7/6/2005 12:24:05 PM7/6/2005 12:24:05 PM

Oracle Database 10g OCP Certification All-in-One Exam Guide
18
All-in-1 / Oracle Database 10g Certification All-in-One / Watson & Bersinic / 5790-3 /Chapter 34
To disable Automatic Shared Memory Management, set the SGA_TARGET to zero.
The automatically managed components will retain their current size until the next
restart, when they will revert to the values specified by their parameters, or to their
defaults if the parameters have been removed from the initialization file.
Exercise 34-1: Using Automatic Shared
Memory Management
Clear all manual SGA settings, and enable Automatic Shared Memory Management.
This exercise requires the use of an spfile.
1. Connect to your database with SQL*Plus as user SYS with the SYSDBA
privilege.
SQL> connect / as sysdba;
2. Confirm that you are using an spfile.
SQL> show parameters spfile;
If this does not return a filename, convert your instance to use an spfile.
SQL> create spfile from pfile;
SQL> shutdown abort;
SQL> startup;
3. Remove the SGA memory settings from the spfile for the automatically
managed components.
SQL> alter system reset shared_pool_size scope=spfile sid='*';
SQL> alter system reset large_pool_size scope=spfile sid='*';
SQL> alter system reset java_pool_size scope=spfile sid='*';
SQL> alter system reset db_cache_size scope=spfile sid='*';
4. Determine the current size of the SGA.
SQL> select sum(bytes) from v$sgastat;
5. Set the SGA_TARGET to a value similar to that returned by the query in Step 4.
In this example, 100MB.
SQL> alter system set sga_target=100m scope=spfile sid='*';
6. Restart the instance, and again check the size of the SGA.
SQL> startup force;
ORACLE instance started.
Total System Global Area 134217728 bytes
Fixed Size 787828 bytes
Variable Size 91224716 bytes
Database Buffers 41943040 bytes
Redo Buffers 262144 bytes
Database mounted.
Database opened.
ocp10g> select sum(bytes) from v$sgastat;
SUM(BYTES)
----------
101713268
ch34.indd 18ch34.indd 18 7/6/2005 12:24:06 PM7/6/2005 12:24:06 PM

Chapter 34: Monitoring and Managing Memory
19
PART II
All-in-1 / Oracle Database 10g Certification All-in-One / Watson & Bersinic / 5790-3 /Chapter 34
Note that in this example the SGA size reported by the STARTUP command
is 128MB. This is not the current size of the SGA; it is the value of the SGA_
MAX_SIZE parameter and is the largest that the SGA can grow to. The actual
allocated SGA is 100MB, as specified by the SGA_TARGET.
7. Display the sizes of the various SGA components.
SQL> show parameters db_cache_size;
NAME TYPE VALUE
------------------------------------ ----------- ------
__db_cache_size big integer 40M
db_cache_size big integer 0
Note that the parameter DB_CACHE_SIZE is on zero, as specified in Step 3,
but that there is another parameter: the strangely named __DB_CACHE_SIZE.
This double-underscore parameter is the internal setting maintained by
MMAN: it is the current size of the database buffer cache default pool, and if
the instance is shut down, this value (which may be changed by MMAN at any
time) will be used as the starting point for self-tuning subsequently.
8. Repeat the SHOW command for the other automatically managed parameters.
SQL> show parameters large_pool_size;
NAME TYPE VALUE
------------------------------------ ----------- ----------
__large_pool_size big integer 4M
large_pool_size big integer 0
SQL> show parameters shared_pool_size;
NAME TYPE VALUE
------------------------------------ ----------- ----------
__shared_pool_size big integer 44M
shared_pool_size big integer 0
SQL> show parameters java_pool_size;
NAME TYPE VALUE
------------------------------------ ----------- ----------
__java_pool_size big integer 8M
java_pool_size big integer 0
9. Reconcile the actual memory usage to the target by summing up the values
for the four double-underscore parameters. In the preceding output, they
come to 96MB. This is 4MB, or one granule, less than the SGA target. The
“spare” granule will contain the log buffer, along with the structures known
as the “fixed size” element of the SGA. If your instance has any of the non-
automatically managed SGA components configured, remember to include
them in the calculation.
The Program Global Area
Every session has access to the shared SGA, but it will also have access to a block of
memory that is private to the session. This is the Program Global Area, or PGA. The
PGA stores data and control information for each session and is used only by the server
process servicing the session. A PGA is created when a session starts. The information
ch34.indd 19ch34.indd 19 7/6/2005 12:24:07 PM7/6/2005 12:24:07 PM

Oracle Database 10g OCP Certification All-in-One Exam Guide
20
All-in-1 / Oracle Database 10g Certification All-in-One / Watson & Bersinic / 5790-3 /Chapter 34
in the PGA includes bind information; session variables; stack space; cursors; and
(perhaps most important) the sort space used for sorting, joining, and aggregating rows.
When using shared server, a large part of the PGA (the part known as the UGA)
goes into the large pool (or the shared pool, if the large pool has not been configured).
This was discussed in Chapter 13. However, the majority of Oracle installations do
not need the shared server, so each session has its own PGA, taken from the operating
system’s free memory pool.
PGAs are of variable size; the amount of PGA space that a session needs at any
given moment is dependent on the nature of the work it is doing. With earlier releases
of the database, PGA management was very crude and could result in extremely
inefficient use of memory, but from release 9i onward it can be automated. There
are two parameters to set:
• WORKAREA_SIZE_POLICY This should be set to AUTO, which is now the
default (the default was MANUAL in release 9i).
• PGA_AGGREGATE_TARGET This is the total amount of memory that Oracle
will use for all the sessions’ PGAs; it defaults to 20 percent of the SGA size.
In discussion with your system administrators, you will come to a decision about
the amount of memory that can be allocated to Oracle before system performance
will degrade because of swapping. After subtracting the amount needed for the SGA,
you can set the PGA_AGGREGATE_TARGET to the remainder.
As sessions require PGA memory, Oracle will allocate them memory until the total
allocated PGA across all sessions is equal to the PGA_AGGREGATE_TARGET. From
this point on, if a session requires more PGA, or if a new session connects, Oracle will
take memory from another session’s PGA that is no longer required by that session.
As the need for PGA is usually transient, this mechanism should ensure that every
session has access to the memory it needs, when it needs it.
If a session needs more PGA than it currently has, the total allocation is already
at the target, and no session has unused PGA that can be reassigned, there are two
possibilities. If the memory requirement is invariable, as for example when a session
requires stack space, then Oracle will allocate it and break the target. This should be
avoided at all costs; it implies that the target is far too low. If the requirement is not
absolute, then Oracle will refuse to allocate more memory, and the session will make
use of temporary space in the session’s temporary tablespace instead. This impacts on
performance, through the extra disk I/O, and should be avoided if possible.
To monitor PGA usage, there are two critical views. V$PGASTAT gives an overall
picture of PGA usage:
ocp10g> select * from v$pgastat;
NAME VALUE UNIT
-------------------------------------- ---------- ------
aggregate PGA target parameter 104857600 bytes
aggregate PGA auto target 75497472 bytes
global memory bound 524288 bytes
total PGA in use 25165824 bytes
total PGA allocated 53518336 bytes
maximum PGA allocated 64432128 bytes
ch34.indd 20ch34.indd 20 7/6/2005 12:24:07 PM7/6/2005 12:24:07 PM

Chapter 34: Monitoring and Managing Memory
21
PART II
All-in-1 / Oracle Database 10g Certification All-in-One / Watson & Bersinic / 5790-3 /Chapter 34
total freeable PGA memory 524288 bytes
PGA memory freed back to OS 0 bytes
total PGA used for auto workareas 0 bytes
maximum PGA used for auto workareas 483328 bytes
total PGA used for manual workareas 0 bytes
maximum PGA used for manual workareas 0 bytes
over allocation count 3266
bytes processed 273463296 bytes
extra bytes read/written 0 bytes
cache hit percentage 100 percent
16 rows selected.
These are some rows to highlight:
• Aggregate PGA target parameter This is set to 100MB.
• Aggregate PGA auto target Of the 100MB, only 74MB can be automatically
managed; the rest is non-negotiable, for example, stack space.
• Total PGA in use At this moment, only about one quarter of the PGA is
actually being used.
• Total PGA allocated About half the PGA is allocated—more than the
previous figure, implying that some could be reassigned if necessary.
• Total freeable PGA memory If necessary, 0.5MB of allocated PGA could be
reassigned, or returned to the operating system.
• Over allocation count This should always be zero: it is the number of times
that Oracle had to go over the target. Raise the target if this figure is increasing.
• Cache hit percentage This should be tending toward 100 percent. It reflects
the number of times sessions could work purely in PGA, without having to
use temporary space on disk. Raise the target if this figure is increasing and the
system has spare memory.
V$PGA_TARGET_ADVICE makes predictions regarding the effect of changing the
target:
ocp10g> select pga_target_for_estimate "size",
2 pga_target_factor "factor",
3 estd_extra_bytes_rw/1000000 "extra Mb r/w",
4 estd_overalloc_count "over alloctions"
5 from v$pga_target_advice;
size factor extra Mb r/w over allocations
---------- ---------- ------------- ----------------
128 0.1 119.558.2 10,590
256 0.3 112,984.8 7,657
512 0.5 96,472.4 5,528
768 0.8 78,932.9 3,824
1,024 1.0 13,997.6 0
1,229 1.2 9,019.4 0
1,434 1.4 8,281.3 0
1,638 1.6 7,352.9 0
1,843 1.8 6,525.9 0
2,048 2.0 6,048.9 0
3,072 3.0 6,048.9 0
4,096 4.0 6,048.9 0
ch34.indd 21ch34.indd 21 7/6/2005 12:24:08 PM7/6/2005 12:24:08 PM

Oracle Database 10g OCP Certification All-in-One Exam Guide
22
All-in-1 / Oracle Database 10g Certification All-in-One / Watson & Bersinic / 5790-3 /Chapter 34
6,144 6.0 6,048.9 0
8,192 8.0 6,048.9 0
In this example, the PGA aggregate target is currently 1GB. This is the absolute
minimum for performance: if it were reduced, Oracle would not be able to stick to
it—as shown by the predictions regarding over-allocations. If the target were raised,
the amount of disk I/O on temporary tablespaces would reduce by many gigabytes, as
more operations could proceed in memory—but there would be no point in raising
the target above 2GB, because there is no further improvement from then on.
The PGA Advisor can also be accessed through Database Control, by taking the
PGA tab shown in Figure 34-2. This will show a graphical representation of the
V$PGA_TARGET_ADVICE view.
It is possible to disable automatic PGA management, by setting the WORKAREA_
SIZE_POLICY instance parameter to MANUAL. You can do this at the session level, as
well as for the whole instance. In this case, the size of a PGA is limited by these parameters:
SORT_AREA_SIZE
HASH_AREA_SIZE
BITMAPMERGE_AREA_SIZE
CREATE_BITMAP_AREA_SIZE
These parameters are ignored when using automatic PGA management. Apart
from the difficulty of predicting suitable values for these settings, a far worse problem
is that PGAs managed in this manner grow but never shrink. Oracle cannot reassign
memory from one PGA to another, unless automatic PGA management is enabled.
Oracle Corporation strongly advises using automatic PGA management.
Chapter Review
This chapter has covered memory management: the SGA and the PGA.
The SGA is an area of shared memory accessed by all the background and server
processes. The required components of the SGA are the shared pool, the log buffer,
and the database buffer cache default pool. Optional components are the large pool,
the Java pool, the streams pool, and the other pools within the database buffer cache.
A PGA is private to a session. It contains the session data: call stack, cursors, session
variables, bind information, and SQL work areas such as sort space.
Both the SGA and the PGAs can be manually configured, but a better option is to
use automatic management.
Automatic management of the SGA is enabled by setting the SGA_TARGET parameter;
the MMAN process will then resize SGA components dynamically to achieve the optimal
distribution of memory between components. Only four components can be automatically
managed: the shared pool, the large pool, the Java pool, and the database buffer cache
default pool.
PGA automatic management is enabled by default. Oracle resizes all the PGAs up
(according to demand) and down (as memory is needed elsewhere) in an attempt to
ensure that all sessions have as much memory as they need, without taking the total
allocation over the limit set by the PGA_AGGREGATE_TARGET.
ch34.indd 22ch34.indd 22 7/6/2005 12:24:08 PM7/6/2005 12:24:08 PM

Chapter 34: Monitoring and Managing Memory
23
PART II
All-in-1 / Oracle Database 10g Certification All-in-One / Watson & Bersinic / 5790-3 /Chapter 34
Questions
1. Some SGA components are required; others are optional. Which of the
following are required? (Choose all that apply.)
A. Database buffer cache default pool
B. Database buffer cache keep pool
C. Database buffer cache recycle pool
D. Java pool
E. Large pool
F. Log buffer
G. Shared pool
H. Streams pool
2. Some SGA components can be dynamically resized, while others can be
changed only by a shutdown/startup of the instance. Which of the following
parameters are static? (Choose all that apply.)
A. DB_CACHE_SIZE
B. DB_KEEP_CACHE_SIZE
C. DB_RECYCLE_CACHE_SIZE
D. JAVA_POOL_SIZE
E. LARGE_POOL_SIZE
F. LOG_BUFFER
G. SGA_MAX_SIZE
H. SGA_TARGET
I. SHARED_POOL_SIZE
3. If you enable Automatic Shared Memory Management, which SGA components
will be managed automatically? (Choose four correct answers.)
A. Database buffer cache default pool
B. Database buffer cache keep pool
C. Database buffer cache recycle pool
D. Java pool
E. Large pool
F. Log buffer
G. Shared pool
H. Streams pool
ch34.indd 23ch34.indd 23 7/6/2005 12:24:09 PM7/6/2005 12:24:09 PM

Oracle Database 10g OCP Certification All-in-One Exam Guide
24
All-in-1 / Oracle Database 10g Certification All-in-One / Watson & Bersinic / 5790-3 /Chapter 34
4. Which of the following commands will force a database checkpoint? (Choose
two correct answers.)
A. ALTER SYSTEM CHECKPOINT
B. ALTER SYSTEM SWITCH LOGFILE
C. STARTUP FORCE
D. SHUTDOWN IMMEDIATE
5. Your database was created with the DB_BLOCK_SIZE parameter on the
default of 2048. You have decided that this is too small, and that 8KB would
be better. What can you do? (Choose the best answer.)
A. Set the parameter DB_8K_CACHE_SIZE to create a buffer cache pool of
8KB buffers, and use the DBMS_SPACE_ADMIN package to convert the
tablespaces.
B. Export the whole database, change the DB_BLOCK_SIZE to 8196, restart
the instance, and import the database back in.
C. Export the whole database, create a new database with a DB_BLOCK_SIZE
of 8196, and import the database into it.
D. You can convert all the tablespaces, except for SYSTEM and temporary
tablespaces.
6. Space in the SGA is allocated in granules. If the granule size is 4MB and you
attempt to start an instance with the parameter setting DB_CACHE_SIZE=5M,
how big will your database buffer cache be? (Choose the best answer.)
A. 4MB
B. 5MB
C. 8MB
D. The instance will not start, because SGA components must be a multiple
of the granule size
7. Space in the SGA is allocated in granules. If the granule size is 4MB and you
attempt to start an instance with the parameter setting LOG_BUFFER=1048576,
how big will your log buffer be? (Choose the best answer.)
A. 1MB
B. 4MB
C. It will revert to the default size for the platform and number of CPUs
D. The instance will not start
8. The log writer flushes the log buffer to disk. What will cause it to do this?
(Choose three correct answers.)
A. A user committing a transaction
B. When the buffer is two-thirds full
ch34.indd 24ch34.indd 24 7/6/2005 12:24:09 PM7/6/2005 12:24:09 PM

Chapter 34: Monitoring and Managing Memory
25
PART II
All-in-1 / Oracle Database 10g Certification All-in-One / Watson & Bersinic / 5790-3 /Chapter 34
C. When the buffer is one-third full
D. When there are too many dirty buffers
E. A three-second timeout
F. Issuing an ALTER SYSTEM FLUSH LOG_BUFFER command
9. You set parameters as follows:
SGA_MAX_SIZE=256m
SGA_TARGET=128m
SHARED_POOL_SIZE=64m
DB_CACHE_SIZE=64m
KEEP_CACHE_SIZE=32m
LARGE_POOL_SIZE=32m
What will happen when you attempt to start the instance? (Choose the best
answer.)
A. The instance will not start, because the memory requested for the
components is above the SGA_TARGET.
B. The instance will not start, because you cannot specify component sizes if
you enable Automatic Shared Memory Management with SGA_TARGET.
C. The instance will start, but the components will be reduced in size by
Automatic Shared Memory Management to limit the total size to the
SGA_TARGET.
D. The instance will start, with the components sized as requested.
10. You set parameters as follows:
SGA_MAX_SIZE=800m
SGA_TARGET=1000m
DB_KEEP_CACHE_SIZE=400m
and leave the other SGA sizing parameters on default. How much memory
can Oracle assign to the auto-tuned components? (Choose the best answer.)
A. 400MB
B. 600MB
C. 800MB
D. 1000MB
11. If you set the sizes for the four automatically tuned SGA components, which
of the following is true? (Choose the best answer.)
A. Automatic Shared Memory Management is disabled.
B. The sizes given will be the minimum size of the components, if you enable
Automatic Shared Memory Management.
C. The sizes given will be the maximum size of the components, if you
enable Automatic Shared Memory Management.
D. You must set the sizes to zero before enabling Automatic Shared Memory
Management.
ch34.indd 25ch34.indd 25 7/6/2005 12:24:10 PM7/6/2005 12:24:10 PM

Oracle Database 10g OCP Certification All-in-One Exam Guide
26
All-in-1 / Oracle Database 10g Certification All-in-One / Watson & Bersinic / 5790-3 /Chapter 34
12. Which process is responsible for Automatic Shared Memory Management?
(Choose the best answer.)
A. MMAN
B. MMON
C. MMNL
D. PMON
E. SMON
13. To what must the STATISTICS_LEVEL parameter be set if you are to enable
Automatic Shared Memory Management? (Choose the best answer.)
A. BASIC
B. TYPICAL
C. ALL
D. TYPICAL or ALL
E. BASIC, TYPICAL, or ALL
14. Which of the following statements is correct about Automatic PGA Management?
(Choose two correct answers.)
A. Servers can share access to PGAs.
B. PGA memory usage will never go above the PGA_AGGREGATE_TARGET
setting.
C. PGAs will grow and shrink according to demand.
D. You can have some sessions’ PGAs automatically managed, and others
manually managed.
15. Which of the following is not part of the PGA? (Choose the best answer.)
A. Bind information
B. Parsing information
C. Session variables
D. Sort space
Answers
1. A, F, and G. The required components of the SGA are the database buffer cache
default pool, the log buffer, and the shared pool. The others are optional,
though by default you will get a Java pool and (depending on other parameters)
possibly a large pool.
2. F and G. The static parameters are LOG_BUFFER and SGA_MAX_SIZE.
3. A, D, E, and G. The four automatically managed components are the database
buffer cache default pool, the Java pool, the large pool, and the shared pool.
ch34.indd 26ch34.indd 26 7/6/2005 12:24:11 PM7/6/2005 12:24:11 PM

Chapter 34: Monitoring and Managing Memory
27
PART II
All-in-1 / Oracle Database 10g Certification All-in-One / Watson & Bersinic / 5790-3 /Chapter 34
4. A and D. Database checkpoints can be forced with ALTER SYSTEM CHECKPOINT
and will occur naturally upon an orderly shutdown, such as SHUTDOWN
IMMEDIATE. A log switch will not trigger a checkpoint with the 10g release.
STARTUP FORCE includes a SHUTDOWN ABORT, so there is no checkpoint.
5. C. You can never change the DB_BLOCK_SIZE after database creation, so the
only option is to create a new database. There is no way to convert a tablespace
from one block size to another.
6. C. The cache will be 8MB because the requested size of 5MB will be rounded
up to the next granule boundary.
7. A. The log buffer will be 1MB, as requested. It is the one SGA component that
is not sized in granules.
8. A, C, and E. Log writer will write on COMMIT, when the log buffer is one-
third full, and every three seconds. Too many dirty buffers is a trigger for the
database writer, not the log writer. There is no such command as ALTER
SYSTEM FLUSH LOG_BUFFER, though there are commands ALTER SYSTEM
FLUSH SHARED_POOL and ALTER SYSTEM FLUSH BUFFER_CACHE.
9. D. The settings for the components take precedence over the setting for the
target, which will be ignored.
10. B. The SGA_TARGET includes both automatically and manually managed
components, so the 400MB assigned to the keep pool must be subtracted
from the 1000MB total. So the best answer is 600MB. It is the “best” answer,
but possibly not completely accurate—there will be a granule required for,
among other things, the log buffer.
11. B. Manually setting sizes for automatically tuned components sets a minimum
size below which MMAN will not reduce the components.
12. A. MMAN, the Memory Manager, is responsible for implementing Automatic
Shared Memory Management. MMON, manageability monitor, is responsible
for writing statistics to the Automatic Workload Repository and generating
ADDM reports. MMNL, Manageability Monitor Light, flushes ASH data to the
AWR. PMON monitors sessions, and SMAN monitors the instance.
13. D. Automatic Shared Memory Management requires a STATISTICS_LEVEL of
TYPICAL or ALL.
14. C and D. Automatic PGA management lets PGAs grow and shrink. It can be
set for the instance or per session. The other choices are wrong because PGAs
are always private to the session and because the target is only a target—there
may be times when Oracle cannot keep to it.
15. B. Parsing information is stored in the shared pool, where all sessions have
access to it.
ch34.indd 27ch34.indd 27 7/6/2005 12:24:11 PM7/6/2005 12:24:11 PM

All-in-1 / Oracle Database 10g Certification All-in-One / Meyers / 5790-3
ch34.indd 28ch34.indd 28 7/6/2005 12:24:12 PM7/6/2005 12:24:12 PM

All-in-1 / Oracle Database 10g Certification All-in-One / Watson & Bersinic / 5790-3 /Chapter 35
CHAPTER 35
Managing Oracle Database
Resources
In this chapter you will learn how to
• Configure the Resource Manager
• Assign users to Resource Manager groups
• Create resource plans within groups
• Specify directives for allocating resources to consumer groups
1
ch35.indd 1ch35.indd 1 7/6/2005 3:20:05 PM7/6/2005 3:20:05 PM

Oracle Database 10g OCP Certification All-in-One Exam Guide
2
All-in-1 / Oracle Database 10g Certification All-in-One / Watson & Bersinic / 5790-3 /Chapter 35
Many computer systems will have several groups of users, each with different standards
for the level of service they require. If the system as a whole is highly stressed, it may
be impossible to deliver the desired level of service to all groups. But if a priority
structure can be negotiated, then it should be possible to guarantee a certain level
of service to certain groups—perhaps at the expense of other groups.
In a mainframe environment, the operating system itself handles allocating
resources to tasks. A transaction processing (TP) monitor will ensure that high-priority
jobs get the processing power they need. But simpler operating systems such as Unix
or Windows may not have proper resource scheduling capabilities. Oracle’s Resource
Manager brings mainframe-style resource management capabilities to all supported
Oracle platforms, meaning that you as DBA can guarantee that certain groups of
database users will always receive a certain level of service, no matter what the overall
workload on the database may be.
The Need for Resource Management
Operating systems like Unix or Windows use a very simple algorithm to assign resources
to different processes: round-robin time slicing. To the operating system, there is
really no difference between any of the background processes that make up the Oracle
instance and any of the many server processes that support user sessions: as far as the
operating system is concerned, a process is a process; it will be brought onto CPU,
given a few cycles of CPU time, and then switched off CPU so that the next process
can be brought on. The operating system has no way of knowing that one server
process is supporting a session doing completely trivial work, while another server process
is supporting a session doing work critical to the survival of the organization. A more
immediate problem that all DBAs come across is that one bad query can kill the
database. The Resource Manager provides a mechanism whereby the operating
system’s time-slicing algorithm can be adjusted, to ensure that some users receive
more processing capacity than others—and to ensure that the one query does not
destroy performance for everyone else. The underlying mechanism is to place a
cooperative multitasking layer controlled by Oracle on top of the operating system’s
preemptive multitasking system.
Throughout this chapter, the environment is assumed to be that of a telesales
organization. There are several groups of users: of particular interest are the data entry
clerks and the management accountants.
There may be two hundred data entry clerks in the call center, taking orders over
the telephone. If their database sessions are running slowly, this is disastrous for the
company. Customers will dial in only to be told “you are number 964 in the queue,
your call is important to us, please do not hang up....” This is happening because the
data entry clerks cannot process calls fast enough: they take an order, they click the
Submit button, and then they wait...and wait...and wait...for the system to respond.
This is costing money.
ch35.indd 2ch35.indd 2 7/6/2005 3:20:37 PM7/6/2005 3:20:37 PM

Chapter 35: Managing Oracle Database Resources
3
PART II
All-in-1 / Oracle Database 10g Certification All-in-One / Watson & Bersinic / 5790-3 /Chapter 35
On the other hand, the management accountants’ work is not so urgent. Perhaps
an advertisement has been run on one local radio station, and the response in terms
of sales inquiries needs to be evaluated before running the advertisement nationwide.
This is important work, but it doesn’t have to be real time. If the reports take ten
minutes to run instead of five, does it really matter?
TIP Do not adjust the priorities of Oracle processes by using the Unix nice
command, or the Windows equivalent. Oracle assumes that the operating
system is treating all processes equally, and if you interfere with this there
may be unexpected (and disastrous) side effects.
What is needed is a technique for ensuring that if the database sessions supporting
the data entry clerks need computing resources, they get them—no matter what. This
could mean that at certain times of day when the call center is really busy, the clerks
need 100 percent of computing resources. The Resource Manager can handle this, and
during that time of peak usage the sessions supporting the management accountants may
hang completely. But during other times of day, when the call center is not busy, there
will be plenty of resources available to be directed to the management accountants’ work.
At month end, another task will become top priority: the end-of-month billing
runs, and the rollover of the ledgers into the next accounting period. The Resource
Manager needs to be versatile enough to manage this, too.
Clearly, the Resource Manager is only necessary in highly stressed systems, but
when you need it, there is no alternative.
The Resource Manager Architecture
Users are placed in Resource Manager consumer groups, and Resource Manager plans,
consisting of a set of directives, control the allocation of resources across the groups.
You are using the Resource Manager whether you know it or not; it is configured by
default in all databases from release 8i onward, but the default configuration has no
effect on normal work.
Consumer Groups
A Resource Manager consumer group is a set of users with similar resource requirements.
One group may contain many users, and one user may be a member of many groups,
but at any given moment, each session will have one group as its effective group. When
a user first creates a session, his default consumer group membership will be active,
but if he is a member of multiple groups, he can switch to another group, activating
his membership of that group.
In the telesales example, the two hundred data entry clerks could be in a group
called OLTP, and the half-dozen management accountants could be in a group called
DSS. Some users could be in both groups; depending on what work they are doing,
they will activate the appropriate group membership. Other groups might be BATCH,
ch35.indd 3ch35.indd 3 7/6/2005 3:20:38 PM7/6/2005 3:20:38 PM

Oracle Database 10g OCP Certification All-in-One Exam Guide
4
All-in-1 / Oracle Database 10g Certification All-in-One / Watson & Bersinic / 5790-3 /Chapter 35
to be given top priority for month-end processing, and LOW for people who happen
to have accounts on the system but are of no great significance.
There are five groups created by default when a database is created:
• SYS_GROUP This is a group intended for the database administrators. By
default, the SYS and SYSTEM users only are in this group.
• DEFAULT_CONSUMER_GROUP This is a group for all users who have not
been specifically granted membership of any other group. By default, all users
other than SYS and SYSTEM are in this group, and this membership is active
when they first create a session.
• OTHER_GROUPS This is a group that all users are members of, used as a
catch-all for any sessions that are in groups not listed in the active Resource
Manager plan.
• LOW_GROUP This group is intended for low-priority sessions.
• AUTO_TASK_CONSUMER_GROUP This group is intended for running
system maintenance jobs.
To view the groups in your database, query the views DBA_RSRC_CONSUMER_
GROUPS and DBA_USERS. The latter shows the initial consumer group set for each
user at connect time (see Figure 35-1).
Resource Manager Plans
A Resource Manager plan is of a certain type. The most basic (and most common)
type of plan is one that allocates CPU resources, but there are other resource allocation
methods. Many plans can exist within the database, but only one plan is active at any
one time. This plan applies to the whole instance: all sessions are controlled by it.
Figure 35-1 Resource Manager consumer groups
ch35.indd 4ch35.indd 4 7/6/2005 3:20:38 PM7/6/2005 3:20:38 PM

Chapter 35: Managing Oracle Database Resources
5
PART II
All-in-1 / Oracle Database 10g Certification All-in-One / Watson & Bersinic / 5790-3 /Chapter 35
In the telesales example, there could be three plans. A daytime plan would give
top priority to the OLTP group. At times of peak activity, with the system working to
full capacity, it is possible that the sessions of users in other groups would hang. At
night, a different plan would be activated that would guarantee that the DSS jobs
would run, though perhaps still not with the priority of the OLTP group. A month-
end plan would give 100 percent of resources to the BATCH group.
A plan consists of a number of directives. Each directive assigns resources to a
particular group at a particular priority level. Three plans are configured at database
creation time:
• The INTERNAL_PLAN has only one directive, which has no practical effect. It
states that the group OTHER_GROUPS can have 100 percent of CPU resources
at priority level 1. All plans must have a directive for OTHER_GROUPS, which
picks up all users in groups not specifically allocated any resources by the plan.
So this plan, enabled by default, will result in all users having equal priority.
• The SYSTEM_PLAN has three directives (see Figure 35-2). The first states that
at priority level 1, the highest priority, the SYS_GROUP consumer group can
take 100 percent of CPU resources. At level 2, OTHER_GROUPS can have 100
percent, and at level 3 the LOW_GROUP can take 100 percent. This plan
ensures that if SYS or SYSTEM needs to do something, it will get whatever
resources it needs to do it. Any resources it does not need will “trickle down”
to the OTHER_GROUPS.
• The INTERNAL_QUIESCE plan has a particular purpose covered at the end of
the chapter: it will freeze all sessions except those of the SYS_GROUP members.
To enable a plan, use the RESOURCE_MANAGER_PLAN instance parameter. By
default, this parameter is NULL, which means that the INTERNAL_PLAN is the plan
in effect. This has no effect on priorities.
EXAM TIP The instance parameter RESOURCE_LIMITS has nothing to do
with the Resource Manager. It pertains to the older method of controlling
resources, through database profiles.
Resource Manager Configuration Tools
There is an API that can be used to administer the Resource Manager; it also provides
a Database Control interface. The API consists of two packages: DBMS_RESOURCE_
MANAGER_PRIVS and DBMS_RESOURCE_MANAGER. DBMS_RESOURCE_MANAGER_
PRIVS is used to put users into consumer groups and also to grant the system privilege
necessary to administer the Resource Manager (see Figure 35-3).
To give user JOHN the capability of administering the Resource Manager,
SQL> execute dbms_resource_manager_privs.grant_system_privilege
(->'JOHN', 'ADMINISTER_RESOURCE_MANAGER', FALSE);
ch35.indd 5ch35.indd 5 7/6/2005 3:20:39 PM7/6/2005 3:20:39 PM
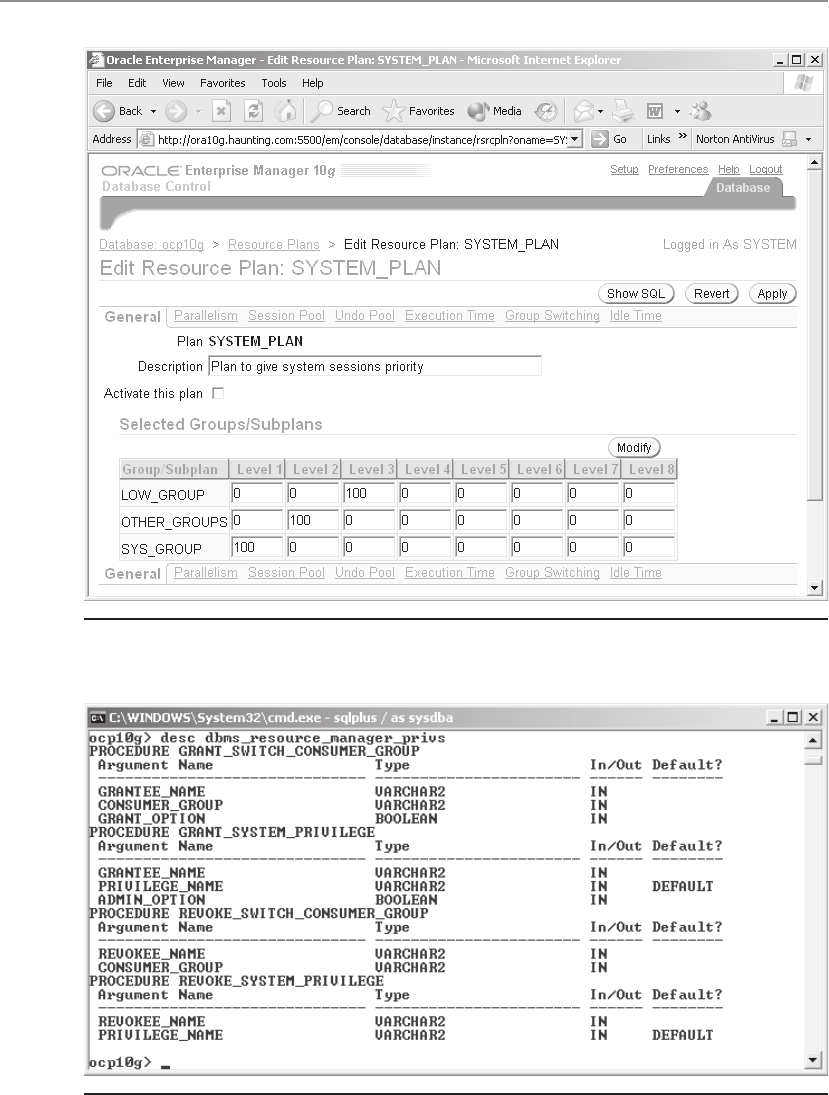
Oracle Database 10g OCP Certification All-in-One Exam Guide
6
All-in-1 / Oracle Database 10g Certification All-in-One / Watson & Bersinic / 5790-3 /Chapter 35
Figure35-2 The SYSTEM_PLAN, displayed with Database Control
Figure35-3 The DBMS_RESOURCE_MANAGER_PRIVS package
ch35.indd 6ch35.indd 6 7/6/2005 3:20:40 PM7/6/2005 3:20:40 PM

Chapter 35: Managing Oracle Database Resources
7
PART II
All-in-1 / Oracle Database 10g Certification All-in-One / Watson & Bersinic / 5790-3 /Chapter 35
DBMS_RESOURCE_MANAGER is used to create consumer groups, plans, and
directives. It is also used to create the “pending area.” Before any work can be done
with Resource Manager objects, you must create a pending area. This is an area of
memory in the SGA, used for storing the objects while they are being configured.
A plan may consist of many directives, and each directive is created independently;
it would therefore be possible to create a totally impossible plan, one that might, for
example, allocate 500 percent of CPU. The pending area is provided to prevent this
possibility: the plan is created in the pending area, and then when complete it is
validated to check that it does make sense. Only then does the plan get saved to the
data dictionary.
To reach the Database Control interface to the Resource Manager, from the
database home page take the Administration tab, and then follow the links in
the Resource Manager section.
Managing Users and Consumer Groups
A pending area is needed to create consumer groups, but not to put users into groups.
If you use Database Control, the pending area will be managed for you; if you use the
API directly, you must explicitly create it. Database Control does itself use the API, but
the GUI front end makes it much simpler to use and has validations that should make
it impossible to create a logically inconsistent Resource Manager environment.
At connect time, a session will pick up the initial consumer group assigned to that
user. If the user is a member of multiple consumer groups, the session can be switched
to a different consumer group later on. This can be done either manually or by using
more advanced techniques automatically according to the work that the session is doing.
Any user can switch his active consumer group to any of the groups of which he is
a member by using the SWITCH_CURRENT_CONSUMER_GROUP procedure in the
DBMS_SESSION package. Alternatively, a user with the privilege to administer the
Resource Manager can switch another session over, by using one of two procedures in
the DBMS_RESOURCE_MANAGER package. The SWITCH_CONSUMER_GROUP_
FOR_USER procedure will switch all sessions logged on with a particular username,
or SWITCH_CONSUMER_GROUP_FOR_SESS will switch one particular session,
identified by SID and SERIAL#:
SQL> exec dbms_resource_manager.switch_consumer_group_for_sess(-
session_id=>209,session_serial=>10223,consumer_group=>’OLTP’);
EXAM TIP The DBMS_RESOURCE_MANAGER_PRIVS package includes the
procedure to put someone in a group, but it is procedures in DBMS_SESSION
and DBMS_RESOURCE_MANAGER that can change a user’s active consumer
group.
ch35.indd 7ch35.indd 7 7/6/2005 3:20:41 PM7/6/2005 3:20:41 PM

Oracle Database 10g OCP Certification All-in-One Exam Guide
8
All-in-1 / Oracle Database 10g Certification All-in-One / Watson & Bersinic / 5790-3 /Chapter 35
Exercise 35-1: Managing Users in Resource
Consumer Groups
Create some users and consumer groups, view the configuration, and test the consumer
group switching for a user who is a member of multiple groups.
1. Connect to your database as user SYSTEM using SQL*Plus.
2. Create some users and grant them the CONNECT role.
SQL> grant connect to clerk identified by clerk;
SQL> grant connect to acct identified by acct;
SQL> grant connect to batch identified by batch;
SQL> grant connect to mgr identified by mgr;
3. Connect to your database as user SYSTEM using Database Control.
4. From the database home page, take the Administration tab, and then the
Resource Consumer Groups link in the Resource Manager section, to see
the five default groups.
5. Click Create to reach the Create Resource Consumer Group window.
6. Enter OLTP for the consumer group name, and group for telesales clerks as
the description. Click Add to display a listing of all users in the database.
7. Check the selection boxes for users CLERK and MGR, and click Select to
return to the Create Resource Consumer Group window.
8. Check the Initial Group box for the CLERK user, but not for the MGR user.
9. Click Show SQL, and study the output (see Figure 35-4). Note the use of the
pending area. Click Return to return to the Create Resource Consumer Group
window.
10. Click OK to create the group, and assign the users to it.
11. Create two more groups, with users as follows:
Group DSS, members ACCT and MGR, initial group for ACCT
Group BATCH, members BATCH and MGR, initial group for BATCH
12. From your SQL*Plus session, check the groups and the memberships.
SQL> select CONSUMER_GROUP,COMMENTS from dba_rsrc_consumer_groups;
CONSUMER_GROUP COMMENTS
------------------------- ----------------------------------------
OTHER_GROUPS consumer group for users not included in
any group in the active top-plan
DEFAULT_CONSUMER_GROUP consumer group for users not assigned to
any group
SYS_GROUP Group of system sessions
LOW_GROUP Group of low priority sessions
AUTO_TASK_CONSUMER_GROUP System maintenance task consumer group
OLTP group for telesales clerks
DSS group for management accountants
BATCH group for batch jobs
SQL> select * from DBA_RSRC_CONSUMER_GROUP_PRIVS;
ch35.indd 8ch35.indd 8 7/6/2005 3:20:41 PM7/6/2005 3:20:41 PM
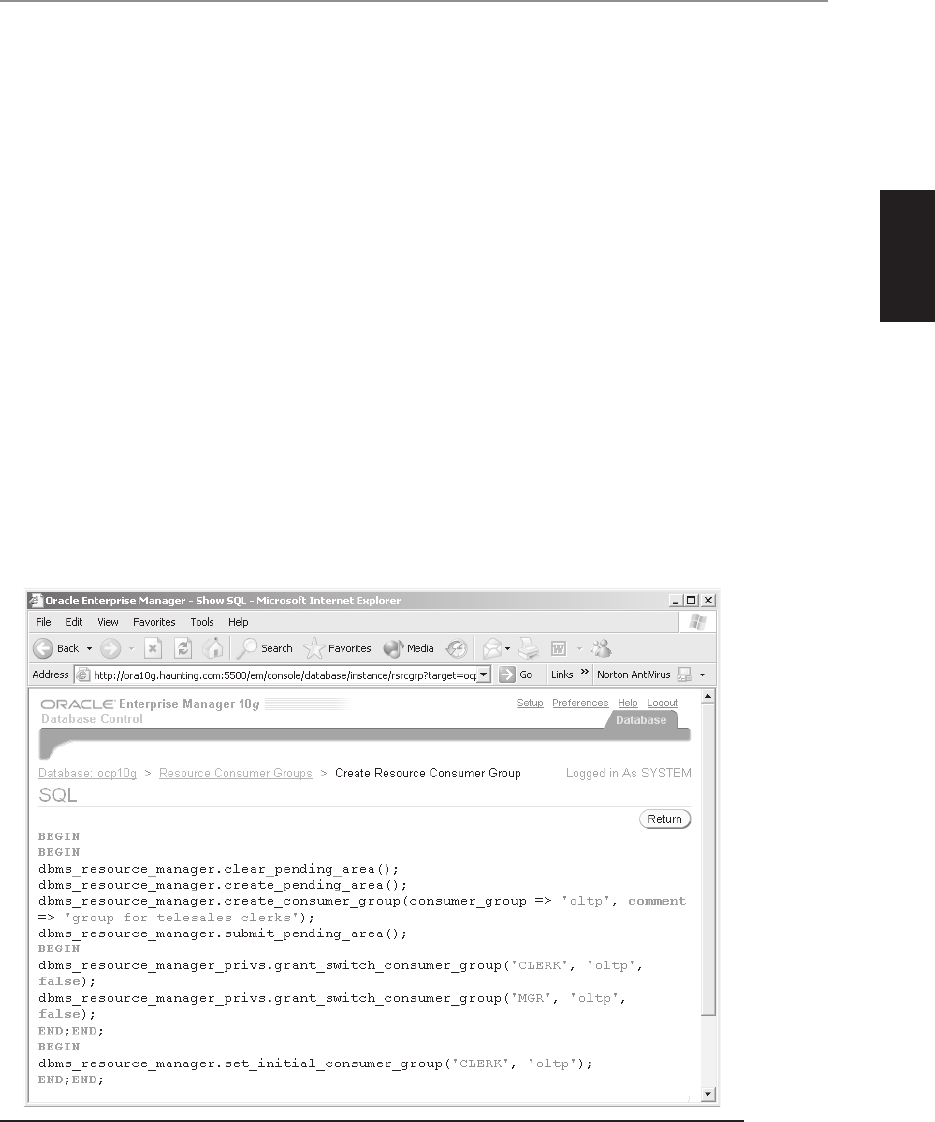
Chapter 35: Managing Oracle Database Resources
9
PART II
All-in-1 / Oracle Database 10g Certification All-in-One / Watson & Bersinic / 5790-3 /Chapter 35
GRANTEE GRANTED_GROUP GRANT_OPTION INITIAL_GROUP
---------- ---------------------- ------------ -------------
MGR DSS NO NO
MGR OLTP NO NO
MGR BATCH NO NO
ACCT DSS NO YES
BATCH BATCH NO YES
CLERK OLTP NO YES
PUBLIC LOW_GROUP NO NO
PUBLIC DEFAULT_CONSUMER_GROUP YES YES
SYSTEM SYS_GROUP NO YES
13. In your SQL*Plus session, start the Resource Manager by enabling the
SYSTEM_PLAN.
SQL> alter system set resource_manager_plan=system_plan;
14. In a second SQL*Plus session, connect as user CLERK.
15. In the first session, confirm that CLERK’s consumer group is DSS.
SQL> select username,resource_consumer_group from v$session;
16. In the second session, connect as user MGR and run this code block to activate
your membership of the DSS group:
SQL> declare old_grp varchar2(30);
2 begin
3 dbms_session.switch_current_consumer_group('DSS',old_grp,TRUE);
4 end;
5 /
Figure 35-4 Use of the Resource Manager API to manage groups and users, as generated by
Database Control
ch35.indd 9ch35.indd 9 7/6/2005 3:20:42 PM7/6/2005 3:20:42 PM

Oracle Database 10g OCP Certification All-in-One Exam Guide
10
All-in-1 / Oracle Database 10g Certification All-in-One / Watson & Bersinic / 5790-3 /Chapter 35
17. In the first session, repeat the query of Step 15 to confirm that MGR is in the
DSS group.
18. In the first session, switch the MGR user over to the OLTP group.
SQL> execute
dbms_resource_manager.switch_consumer_group_for_user('MGR','OLTP');
19. In the first session, repeat the query of Step 15 to confirm that MGR has been
switched over to the OLTP group.
Resource Manager Plans
A plan consists of a set of directives that divide resources between consumer groups.
There are several principles that can be used to control this:
• CPU method
• Number of active sessions
• Degree of parallelism
• Operation execution time
• Idle time
• Volume of undo data
It is also possible to enable automatic consumer group switching by combining
operation execution time with CPU usage: a session that initiates a long-running job
that will impact adversely on other users can be downgraded to a lower priority. The
CPU method is known as an “emphasis” method, because the effect will vary depending
on system activity. The other methods are “absolute” methods, meaning that you
define a hard limit, which is always enforced exactly as written.
CPU Method
Continuing the telesales example, the daytime plan would give maximum resources
to the OLTP group. All other sessions will hang, if the OLTP users really do need the
whole machine. The only exception is the SYS_GROUP. You should always give the
SYS_GROUP priority over anything else: if you, the DBA, need to do something on the
production system (such as rebuilding a broken index, or doing a restore and recover),
then you should be able to do it as fast as possible. The plan could look like this:
Priority Level Group CPU %
1 SYS_GROUP 100
2 OLTP 100
3 DSS
BATCH
50
50
4 OTHER_GROUPS 100
ch35.indd 10ch35.indd 10 7/6/2005 3:20:43 PM7/6/2005 3:20:43 PM

Chapter 35: Managing Oracle Database Resources
11
PART II
All-in-1 / Oracle Database 10g Certification All-in-One / Watson & Bersinic / 5790-3 /Chapter 35
There are eight possible priority levels; this plan uses four of them. All CPU
resources not used at one level trickle down to the next level. When this plan is active,
the SYS_GROUP at level 1 can, if necessary, take over the whole machine; all other
sessions will hang. But this shouldn’t happen; in normal running, no CPU cycles will
be taken by the SYS_GROUP, so the whole machine will be available at level 2, where
the OLTP users can use it all. Any CPU resources they do not need drop down to level
3, where they are divided 50/50 between the DSS and the BATCH sessions. If, after
they have taken what they need, there is still some capacity left, it will be available to
members of other groups. It is possible, at times when the OLTP users are working
nonstop and CPU usage has hit 100 percent, that the DSS and BATCH sessions will hang.
EXAM TIP The total CPU allocated at each level cannot exceed 100 percent.
If it does, the pending area will fail to validate and the plan will not be saved
to the data dictionary. It is possible to have a plan that allocates less than 100
percent at a level, but there is little purpose in doing this.
The nighttime plan will have different settings:
Priority Level Group CPU %
1 SYS_GROUP 100
2OLTP
DSS
BATCH
50
25
25
3 OTHER_GROUPS 100
As with the daytime plan, if the SYS_GROUP needs to do something, it will get
top priority. But at level 2, the DSS and BATCH users are guaranteed processing time.
They still do not have as high a priority as the OLTP group, but their sessions will not
hang. The month-end plan might change this further:
Priority Level Group CPU %
1 SYS_GROUP 100
2 BATCH 100
3 DSS
OLTP
50
50
4 OTHER_GROUPS 100
When this plan is active, the BATCH jobs will take priority over everyone else,
taking the whole machine if necessary. This would be advisable if the month-end
processing actually means that the system is not usable, so it is vital to get it done
as fast as possible.
ch35.indd 11ch35.indd 11 7/6/2005 3:20:43 PM7/6/2005 3:20:43 PM

Oracle Database 10g OCP Certification All-in-One Exam Guide
12
All-in-1 / Oracle Database 10g Certification All-in-One / Watson & Bersinic / 5790-3 /Chapter 35
TIP If the CPU is not running at 100 percent usage, then these plans will have
no effect. They have an impact only if the CPU capacity cannot satisfy
the demands upon it.
A variation on the CPU method is that the “group” can itself be a plan. It is possible
by this method to set up a hierarchy, where a top-level plan allocates resources between
two or more subplans. These subplans can then allocate resources between consumer
groups. A case where this might be applicable would be an application service provider.
Perhaps you have installed an application such as an accounting suite, and you lease
time on it to several customers. Each customer will have his own groups of users. Your
top-level plan will divide resources between subplans for each customer, perhaps
according to the amount they are paying for access to the service. Then within that
division, the customers can each allocate resources between their consumer groups.
EXAM TIP Every plan must include a directive for the group OTHER_
GROUPS; otherwise, the validation will fail and you cannot save the plan
from the pending area to the data dictionary.
To create a plan such as the daytime plan just described requires a series of
procedure calls through the API. The first step is to create the pending area:
SQL> exec dbms_resource_manager.create_pending_area;
You then create the plan:
SQL> exec dbms_resource_manager.create_plan(-
plan=>'DAYTIME',comment=>'plan for normal working hours');
and the directives within it:
SQL> exec dbms_resource_manager.create_plan_directive(-
plan=>'DAYTIME',group_or_subplan=>'SYS_GROUP',cpu_p1=>100,-
comment=>'give sys_group users top priority');
SQL> exec dbms_resource_manager.create_plan_directive(-
plan=>'DAYTIME',group_or_subplan=>'OLTP',cpu_p2=>100,-
comment=>'give oltp users next priority');
SQL> exec dbms_resource_manager.create_plan_directive(-
plan=>'DAYTIME',group_or_subplan=>'DSS',cpu_p3=>50,-
comment=>'dss users have half at level 3');
SQL> exec dbms_resource_manager.create_plan_directive(-
plan=>'DAYTIME',group_or_subplan=>'BATCH',cpu_p3=>50,-
comment=>'batch users have half at level 3');
SQL> exec dbms_resource_manager.create_plan_directive(-
plan=>'DAYTIME',group_or_subplan=>'OTHER_GROUPS',cpu_p4=>100,-
comment=>'if there is anything left, the others can have it');
Finally, validate the pending area and (if the validation returns successfully) save the
plan to the data dictionary:
SQL> exec dbms_resource_manager.validate_pending_area;
SQL> exec dbms_resource_manager.submit_pending_area;
ch35.indd 12ch35.indd 12 7/6/2005 3:20:44 PM7/6/2005 3:20:44 PM
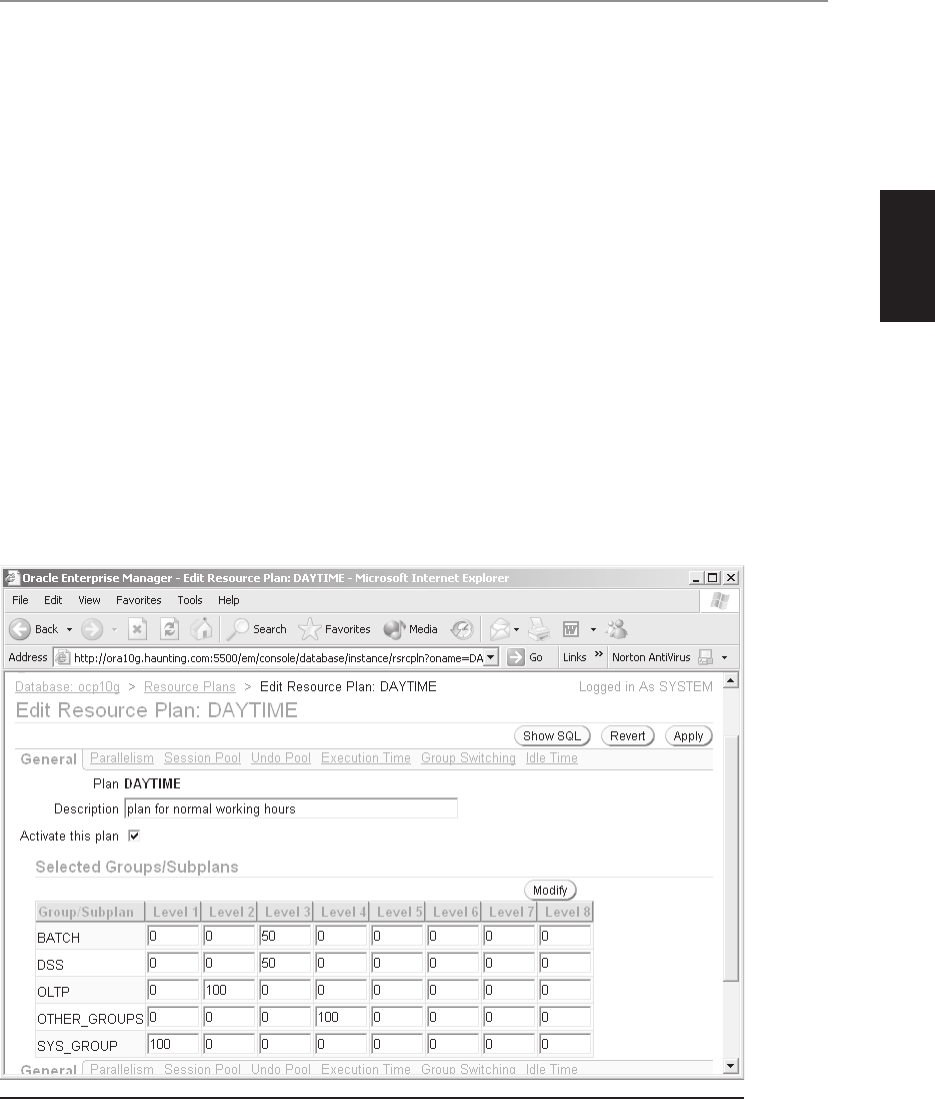
Chapter 35: Managing Oracle Database Resources
13
PART II
All-in-1 / Oracle Database 10g Certification All-in-One / Watson & Bersinic / 5790-3 /Chapter 35
To activate the plan,
SQL> alter system set resource_manager_plan=daytime;
This plan will be displayed in Database Control as in Figure 35-5.
The Active Session Pool Method
It may be that investigation has shown that a certain number of jobs can be run
concurrently by one group of users with no problems, but that if this number is
exceeded, then other groups will have difficulties. For example, it might be that the
telesales company has six management accountants, logging on with Oracle usernames
in the DSS group. If one, two, or even three of them generate reports at the same time,
everything is fine, but if four or more attempt to run reports concurrently, then the
OLTP users begin to suffer.
The active session pool method of the Resource Manager lets the DBA limit the
number of statements that will run concurrently for one group, without restricting the
actual number of logins. To continue the example, all six accountants can be connected,
and if three of them submit reports, they will all run, but if a fourth submits a job, it
will be queued until one of the other three finishes. The nighttime plan would remove
all restrictions of this nature.
Figure 35-5 The daytime plan, using the CPU method
ch35.indd 13ch35.indd 13 7/6/2005 3:20:45 PM7/6/2005 3:20:45 PM
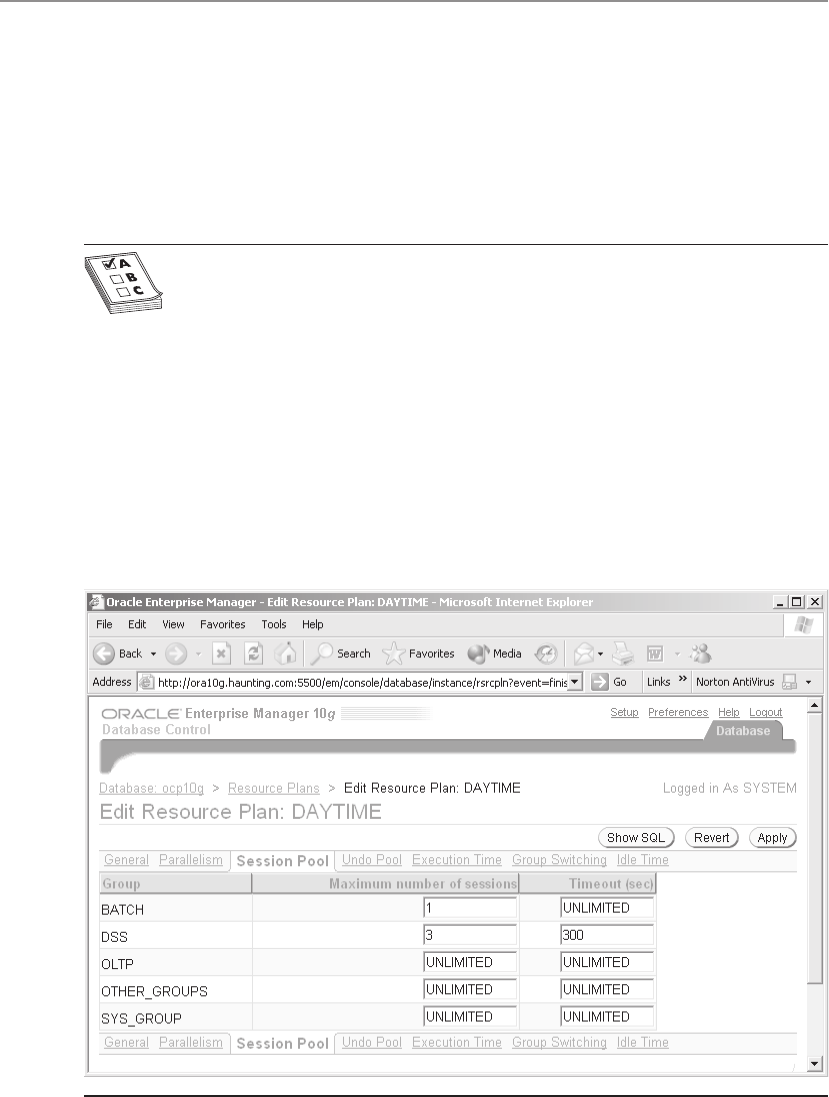
Oracle Database 10g OCP Certification All-in-One Exam Guide
14
All-in-1 / Oracle Database 10g Certification All-in-One / Watson & Bersinic / 5790-3 /Chapter 35
An active session is defined as a session that is running a query, or a session that is
in an uncommitted transaction. If parallel processing has been enabled, the individual
parallel processors do not count against the session pool; rather, the entire parallel
operation counts as one active session. By default, a session will be queued indefinitely,
but if you wish, you can set a time limit. If a session from the pool does not become
available within this limit, the statement is aborted and an error returned to the session
that issued it.
EXAM TIP A session that is not actually doing anything will still count
against the active session pool for the group if it has made a change and not
committed it.
To enable the active session pool, either use the API directly or go through
Database Control, as in Figure 35-6. In this example, when the daytime plan is active,
BATCH users are limited to only one active session. If a second BATCH user issues any
kind of SQL statement before the first has completed, it will be queued until the first
statement has finished. DSS users are limited to three concurrent statements, but they
are queued for only five minutes. If a session waits longer than that, an error will be
returned.
To monitor the effect of the active session pool, a column CURRENT_QUEUE_
DURATION in V$SESSION will show for every queued session the number of seconds
Figure 35-6 Enabling active session pools
ch35.indd 14ch35.indd 14 7/6/2005 3:20:45 PM7/6/2005 3:20:45 PM

Chapter 35: Managing Oracle Database Resources
15
PART II
All-in-1 / Oracle Database 10g Certification All-in-One / Watson & Bersinic / 5790-3 /Chapter 35
it has been waiting. The view V$RSRC_CONSUMER_GROUP gives a global picture,
showing how many sessions for each group are queued at any given moment.
Limiting the Degree of Parallelism
Parallel processing, both for SELECT statements and for DML, can greatly enhance the
performance of individual statements, but the price you pay may be an impact on
other users. To enable parallel processing, you must, as a minimum
• Create a pool of parallel execution servers, with the PARALLEL_MAX_
SERVERS instance parameter.
• Enable parallelism for each table, with the ALTER TABLE <table name>
PARALLEL command.
• Enable parallel DML for your session with ALTER SESSION ENABLE
PARALLEL DML (parallel query will be enabled automatically for the session,
if parallelism is set for the table).
• Either set the instance parameter PARALLEL_AUTOMATIC_TUNING=TRUE or
specify a degree of parallelism with hints in each statement.
The problem is that once you enable parallel processing, you cannot stop anyone
from using it. It may be that your management accountants have discovered that if
they run a query with the degree of parallelism set to fifty (and you cannot control
this—it is done by hints in the code they write), then the report generates faster. But
do you really want one session to take fifty parallel execution servers from the pool?
That may not leave enough for other work. Furthermore, the query may now run
faster but cripple the performance of the rest of the database. The Resource Manager
can control this, by setting a hard limit on the number of parallel processors that each
session of any one group is allowed to use. In the daytime plan, for instance, you
might limit the DSS and BATCH groups to no more than five per session, even if they
ask for fifty. The nighttime plan would remove this restriction.
As with all Resource Manager limits, this can be set through the API or through
Database Control, as Figure 35-7 illustrates.
Controlling Jobs by Execution Time
The problem of one large job killing performance for everyone else is well known
in the database world. The Resource Manager solves this by providing a mechanism
whereby large jobs can be completely eliminated from the system at certain times.
In Figure 35-8, for the daytime plan severe limits have been placed on the maximum
execution time of statements submitted by all users except the SYS_GROUP. Any jobs
submitted by the DSS or BATCH users will be cancelled if they would not complete in
one minute. An even more severe restriction is applied to the OLTP group. Because
OLTP has been given a much higher priority at the CPU level, a large job submitted
by an OLTP user would be much more serious than one submitted by other users (the
ch35.indd 15ch35.indd 15 7/6/2005 3:20:46 PM7/6/2005 3:20:46 PM
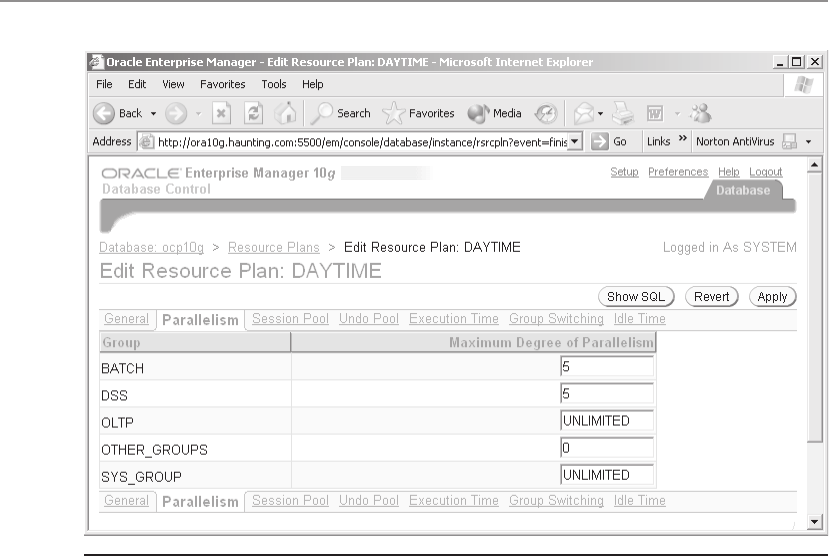
Oracle Database 10g OCP Certification All-in-One Exam Guide
16
All-in-1 / Oracle Database 10g Certification All-in-One / Watson & Bersinic / 5790-3 /Chapter 35
OLTP sessions are meant to be used for running small, fast queries and transactions),
so this setting will eliminate any job that would take more than ten seconds to complete.
The length of time that a statement will take is estimated by the optimizer. This
relies on the statistics on the tables and is another reason for making sure that all your
tables do have valid statistics. If the statistics are not accurate, the Resource Manager
could make mistakes: it might block jobs that would in fact be quick, and permit jobs
that are long-running.
The nighttime plan would remove these restrictions, so that the long-running
queries and batch jobs could go through when online performance is less important.
Terminating Sessions by Idle Time
Sessions that are not doing anything waste machine resources. Every session consists,
on the server side, of a server process and a PGA. Even if the session is not executing
a statement, the operating system must still bring it onto the CPU according to its
round-robin time-slicing algorithm. This is known as a context switch. Every context
switch forces the computer to do a lot of work as registers are loaded from main
memory, the state of the session checked, and then the registers cleared again. If the
PGA has been paged to disk, that too must be reloaded into main memory. The shared
server mechanism, detailed in Chapter 15, will help to reduce idle processes, but it
can’t do anything about the number of sessions. The UGAs (in the SGA, remember)
Figure 35-7 Restricting parallelism
ch35.indd 16ch35.indd 16 7/6/2005 3:20:47 PM7/6/2005 3:20:47 PM
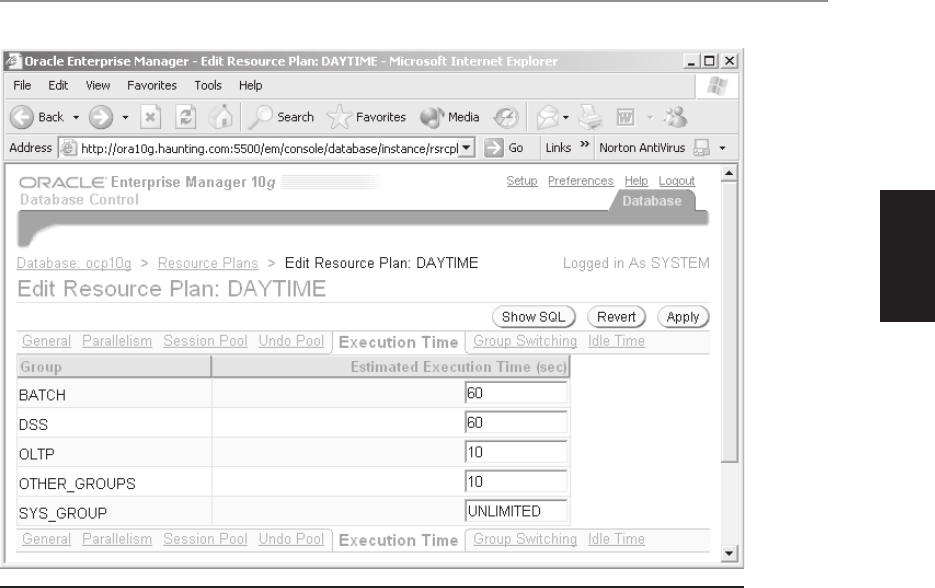
Chapter 35: Managing Oracle Database Resources
17
PART II
All-in-1 / Oracle Database 10g Certification All-in-One / Watson & Bersinic / 5790-3 /Chapter 35
will still be taking up memory, and Oracle still has to check the state of the session on
a regular basis.
The Resource Manager can disconnect sessions that are not working, according to
two criteria. The first is simply idle time: how long is it since the session executed a
statement? The second is more sophisticated: it not only checks how long since a
session executed a statement, but also whether the session is holding any record or
table locks that are blocking other sessions, which is a much more serious problem.
Remember from Chapter 17 that a record lock enqueue held by one session will
cause another session that needs to lock the same row to hang indefinitely; this can
cause the whole database to grind to a halt. It is possible for the DBA to detect this
problem, identify the session that is holding the lock, and kill it—but this is a tricky
procedure. By using the Resource Manager, you can configure automatic killing of any
sessions that block other sessions for more than a certain length of time.
An important point is that “idle time” is time that the server process has been idle,
not time that the user process has been idle. For example, your management accountant
might be using a spreadsheet as his user process: he will have downloaded some
information to it, to work on locally before saving it back to the database. While this
is going on, the server process is indeed idle, but the user could be working flat-out in
the spreadsheet. He will not be pleased if, when tries to pass the information back, he
finds that you have disconnected him and perhaps lost all his work in progress.
Figure 35-8 Controlling execution times
ch35.indd 17ch35.indd 17 7/6/2005 3:20:47 PM7/6/2005 3:20:47 PM
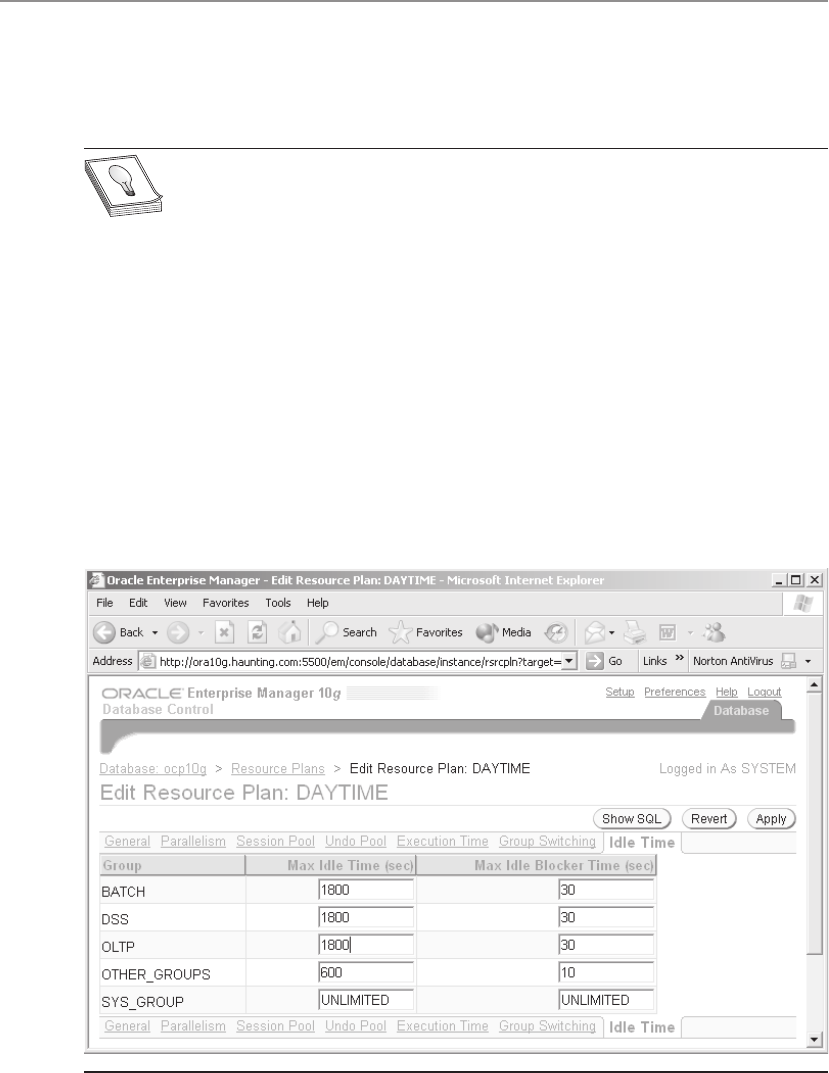
Oracle Database 10g OCP Certification All-in-One Exam Guide
18
All-in-1 / Oracle Database 10g Certification All-in-One / Watson & Bersinic / 5790-3 /Chapter 35
In Figure 35-9, all groups except SYS_GROUPS have been given reasonable amounts
of idle time before being disconnected, but much more aggressive settings if they are
blocking other sessions.
TIP It is also possible to disconnect sessions by using profiles, which you
must enable with the instance parameter RESOURCE_LIMITS. However, the
Resource Manager is a better tool for this.
Restricting Generation of Undo Data
Management of undo data was covered in Chapter 16. All DML statements must
generate undo data, and this data must be stored until the transaction has been
committed or rolled back. Oracle has no choice about this; it is according to the rules
of a relational database. If you have configured the UNDO_RETENTION instance
parameter and set the RETENTION GUARANTEE attribute for your undo tablespace,
then the undo data may well be kept for some considerable time after the transaction
has committed.
All your undo data will be written to a single undo tablespace, unless (against
Oracle Corporation’s advice) you are using the outdated rollback segment method of
undo management. This means that transactions from all users are sharing a common
Figure 35-9 Configuring idle time disconnection with Database Control
ch35.indd 18ch35.indd 18 7/6/2005 3:20:48 PM7/6/2005 3:20:48 PM

Chapter 35: Managing Oracle Database Resources
19
PART II
All-in-1 / Oracle Database 10g Certification All-in-One / Watson & Bersinic / 5790-3 /Chapter 35
storage area. A potential problem is that one badly designed transaction could fill this
storage area, the undo tablespace.
Programmers should not design large, long-running transactions. In business
terms, though, huge transactions may be necessary to preserve the integrity of the
system. For example, an accounting suite’s nominal ledger cannot be partly in one
accounting period, and partly in the next: this is an impossibility in accountancy. So
the rollover from one period to the next could mean updating millions of rows in
thousands of tables over many hours, and then committing. This will require a huge
undo tablespace and will also cause record-locking problems as the big transaction
blocks other work. The answer is to break up the one business transaction into many
small database transactions programmatically. If this is a problem, go back to the
developers; there is nothing you as DBA can do to fix it.
As DBA, however, you can prevent large transactions by one group of users from
filling up the undo tablespace. If your batch routines do not commit regularly, they
will write a lot of undo data that cannot be overwritten. If too many of these batch
jobs are run concurrently, the undo tablespace can fill up with active undo. This will
cause all transactions to cease, and no more transactions can start, until one of them
commits. The Resource Manager provides a mechanism whereby the undo tablespace
can in effect be partitioned into areas reserved for different consumer groups.
Your calculations on undo generated per second and your desired undo retention
(as derived from the V$UNDOSTAT view, and your requirements for the flashback
query capability) might show that the undo tablespace should be, for example, 8GB.
To be safe, you size it at 12GB. But to ensure that the small OLTP transactions will
always have room for their undo data, you can limit the space used by the BATCH
group to, say, 6GB during normal working hours by assigning an undo pool in a
Resource Manager plan. To calculate the undo space necessary for individual transactions,
you can query the view V$TRANSACTION while the transaction is in progress. The
column USED_UBLK shows how much undo is being used by each active transaction.
EXAM TIP The undo pool per group has nothing to do with tablespace
quotas, which are assigned per user. You cannot even grant quotas on undo
tablespaces.
When the amount of active undo data generated by all sessions of a certain
consumer group hits its pool limit (which you can set through Database Control, as
shown in Figure 35-10), it will no longer be possible for members of that group to
add more undo to current transactions or to start new transactions: they will hang
until one transaction commits, thus freeing up space within the pool. Meanwhile,
other groups can continue working in the remainder of the undo tablespace. This
restricts the effect of generating too much undo to one group, rather than having it
impact on all users.
ch35.indd 19ch35.indd 19 7/6/2005 3:20:49 PM7/6/2005 3:20:49 PM
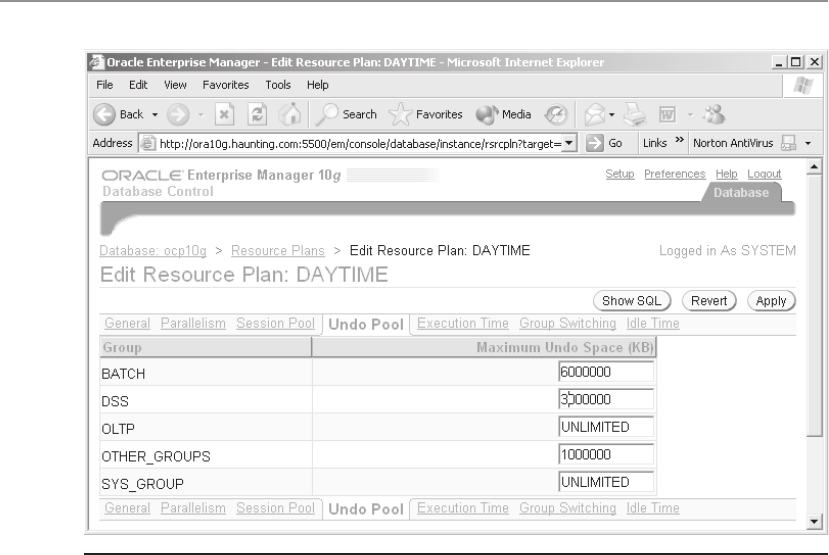
Oracle Database 10g OCP Certification All-in-One Exam Guide
20
All-in-1 / Oracle Database 10g Certification All-in-One / Watson & Bersinic / 5790-3 /Chapter 35
Automatic Consumer Group Switching
In the discussion of consumer groups, you saw that one user can be a member of
multiple groups, and that either the user himself or the system administrator can
switch a user’s session from one consumer group to another.
Why would one wish to do this? From the user’s point of view, he will presumably
want to activate his membership in the group that has the highest priority at any given
time. So if the daytime plan gives priority to OLTP and the nighttime plan gives priority
to DSS, then if you are a member of both groups, you will switch between them as
the different plans are activated. So whichever plan is enabled, you will always have the
highest priority available to you.
The DBA is going to switch users’ sessions for a very different reason: to reduce the
impact one session is having on others. This will mean identifying sessions that are
causing problems and downgrading them, rather than upgrading them, which is what
the user himself would like. It may well be that a job that kills the database if run at
normal priority, can run without impacting other sessions if its priority is reduced.
Of course, it will take longer to complete, but that may not be a problem (at least,
not to everyone else). To do this manually would be extremely difficult, requiring
continuous monitoring of sessions and workload. This is exactly what the Resource
Manager can do.
Figure 35-10 Configuring undo pools with Database Control
ch35.indd 20ch35.indd 20 7/6/2005 3:20:49 PM7/6/2005 3:20:49 PM

Chapter 35: Managing Oracle Database Resources
21
PART II
All-in-1 / Oracle Database 10g Certification All-in-One / Watson & Bersinic / 5790-3 /Chapter 35
Exercise 35-2: Configuring and Testing
Automatic Consumer Group Switching
Set up a mechanism that will automatically downgrade all large jobs to a low priority.
Do this with Database Control, but whenever possible click the Show SQL button and
study the API calls being generated.
1. Connect to your database as user SYSTEM with Database Control.
2. Take the Administration tab on the database home page, and then the
Resource Consumer Groups link in the Resource Manager section.
3. Click Create to reach the Create Resource Consumer Group window.
4. Enter HIGH as the name of the group, and click Add to display a list of all
users.
5. Select the check boxes for the four users you created earlier: ACCT, BATCH,
CLERK, and MGR. Click Select.
6. Select the Initial Group check box for all four users, so that when any of them
log on they will be in the HIGH group. Click OK to create the group and
return to the Resource Consumer Groups window.
7. Click Create to create another group. Name it MEDIUM, and again make your
four users members of the group. Do not make it the initial group for any of
them.
8. Create a third group called LOW, and again make your four users members of
the group. Do not make it the initial group for any of them.
9. Navigate to the Resource Plans window, and click Create to reach the Create
Resource Plan window. Enter AUTO_SWITCH as the name of the plan, and
click Modify to reach the Select Groups/Subplans window.
10. One by one, select your HIGH, MEDIUM, and LOW groups and move them
to the Selected Groups/Subplans section. Click OK to return to the Create
Resource Plan window.
11. Enter priorities for the consumer groups at level 1, as shown in Figure 35-11.
12. Take the Group Switching link, and configure switching as in Figure 35-12.
This will switch users from their initial group of HIGH down to MEDIUM if
a job takes more than ten seconds, and then down to LOW priority if it takes
more than a minute at MEDIUM.
13. Click OK to execute the configuration, and return to the Resource Plans
window.
14. Select the radio button for the AUTO_SWITCH group, and Activate in the
Actions drop-down box. Click Go to activate your new plan. This has the
effect of altering the RESOURCE_MANAGER_PLAN instance parameter.
15. In a SQL*Plus session, connect as user CLERK.
ch35.indd 21ch35.indd 21 7/6/2005 3:20:50 PM7/6/2005 3:20:50 PM
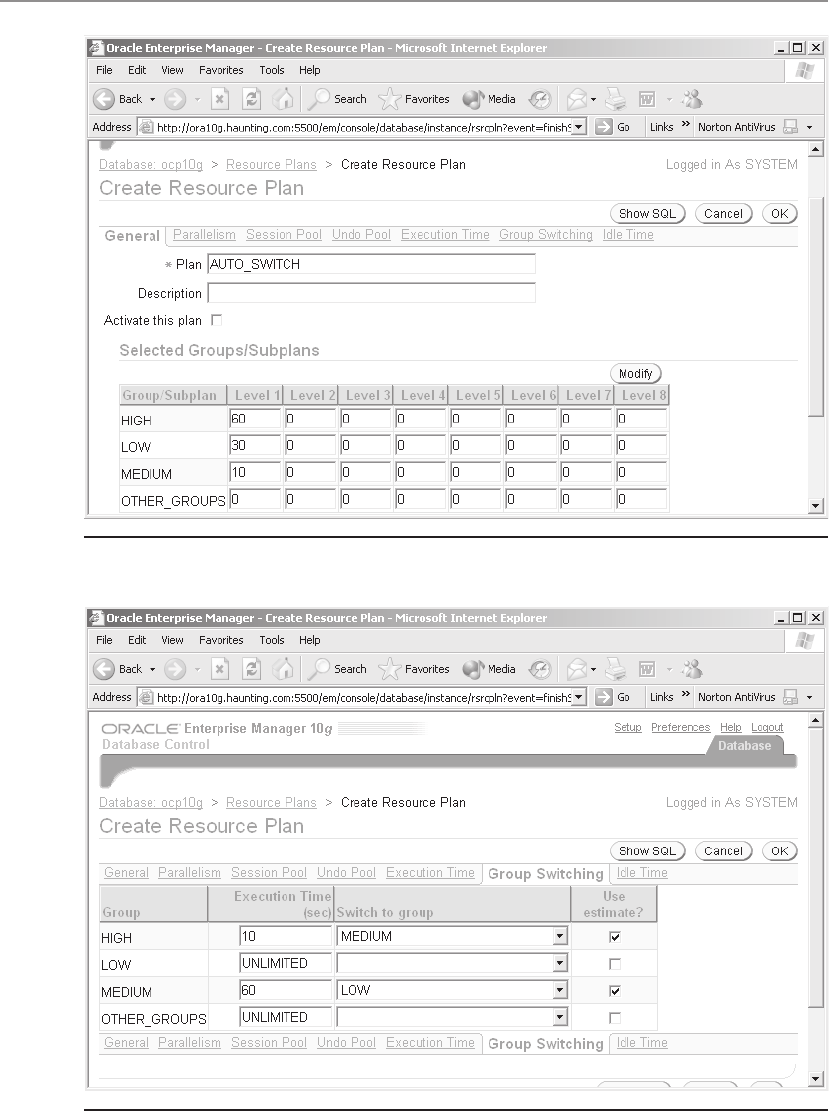
Oracle Database 10g OCP Certification All-in-One Exam Guide
22
All-in-1 / Oracle Database 10g Certification All-in-One / Watson & Bersinic / 5790-3 /Chapter 35
Figure 35-11 Priorities for the AUTO_SWITCH plan
Figure 35-12 Settings for automatic consumer group switching
ch35.indd 22ch35.indd 22 7/6/2005 3:20:51 PM7/6/2005 3:20:51 PM

Chapter 35: Managing Oracle Database Resources
23
PART II
All-in-1 / Oracle Database 10g Certification All-in-One / Watson & Bersinic / 5790-3 /Chapter 35
16. In a second SQL*Plus session, connect as user SYSTEM and confirm that
CLERK’s active group is HIGH.
SQL> select resource_manager_group from v$session where
username='CLERK';
17. In the CLERK session, simulate launching a large job by running a query that
does a Cartesian join based on a view with many rows.
SQL> select count(*) from all_objects,all_objects;
18. While the query is running, in your second session reissue the query in Step
16 a few times, and you will see the CLERK session being downgraded from
HIGH to MEDIUM, and then to LOW.
19. Tidy up.
SQL> alter system set resource_manager_plan='';
Additional Features
The Resource Manager is an extremely powerful tool. This final section picks up a few
peripheral features, most of which are not available through the Database Control
interface.
Quiescing the Database
You have already seen how setting an active session pool can restrict the number of
running statements from any consumer group. What if the active session pool were
set to zero for all groups? The result would be that all sessions would hang. This is in
fact a very useful capability, and it is used by the command ALTER SYSTEM QUIESCE
RESTRICTED.
This command activates the Resource Manager plan INTERNAL_QUIESCE, which
sets the active session pool for all groups other than the SYS_GROUP to zero. The
effect is that statements in progress will continue until they finish, but that no one
(other than members of the SYS_GROUP) can issue any more statements. If they do,
the session will hang. In effect, the database is frozen for all but the administrators.
This can be invaluable to get a stable system for a moment of maintenance work.
To cancel the quiesce, issue ALTER SYSTEM UNQUIESCE.
The quiesce will fail unless one resource plan or another has been active continuously
since instance startup. For this reason, you should always set a plan, such as the
SYSTEM_PLAN, in your initialization file.
Consumer Group Switching for One Call
Automatic consumer group switching switches a session permanently—unless it is
switched back manually. In some cases, this would not be desirable. Consider the case
where a large number of users are connected to an application server, which is funneling
their application server sessions through a small number of shared database sessions.
ch35.indd 23ch35.indd 23 7/6/2005 3:20:52 PM7/6/2005 3:20:52 PM

Oracle Database 10g OCP Certification All-in-One Exam Guide
24
All-in-1 / Oracle Database 10g Certification All-in-One / Watson & Bersinic / 5790-3 /Chapter 35
In this environment, each user will issue a series of commands through the
application server, which may be picked up by any of the database sessions; there is
not a persistent link between any one application server session and any one database
session. If the Resource Manager is configured as in Exercise 35-2, and if a user issues
a long-running job, the database session he happens to be using for that statement
will be switched down. This is fine, until the job finally finishes. But having been
downgraded, the session will remain downgraded—which will impact on all statements
sent through it subsequently, even though they may be short jobs from a different
application server user that should be run at high priority.
This problem is unavoidable if you use Database Control to configure the Resource
Manager, because of the way Database Control configures the Resource Manager. This
is the specification of the DBMS_RESOURCE_MANAGER.CREATE_PLAN_DIRECTIVE
procedure:
PROCEDURE CREATE_PLAN_DIRECTIVE
Argument Name Type In/Out Default?
-------------------------- ------------- ------ --------
PLAN VARCHAR2 IN
GROUP_OR_SUBPLAN VARCHAR2 IN
COMMENT VARCHAR2 IN
CPU_P1 NUMBER IN DEFAULT
CPU_P2 NUMBER IN DEFAULT
CPU_P3 NUMBER IN DEFAULT
CPU_P4 NUMBER IN DEFAULT
CPU_P5 NUMBER IN DEFAULT
CPU_P6 NUMBER IN DEFAULT
CPU_P7 NUMBER IN DEFAULT
CPU_P8 NUMBER IN DEFAULT
ACTIVE_SESS_POOL_P1 NUMBER IN DEFAULT
QUEUEING_P1 NUMBER IN DEFAULT
PARALLEL_DEGREE_LIMIT_P1 NUMBER IN DEFAULT
SWITCH_GROUP VARCHAR2 IN DEFAULT
SWITCH_TIME NUMBER IN DEFAULT
SWITCH_ESTIMATE BOOLEAN IN DEFAULT
MAX_EST_EXEC_TIME NUMBER IN DEFAULT
UNDO_POOL NUMBER IN DEFAULT
MAX_IDLE_TIME NUMBER IN DEFAULT
MAX_IDLE_BLOCKER_TIME NUMBER IN DEFAULT
SWITCH_TIME_IN_CALL NUMBER IN DEFAULT
When configuring automatic group switching, Database Control uses the
SWITCH_TIME argument, which causes the Resource Manager to switch the session
permanently. If you configure automatic switching through the API, you can use the
SWITCH_TIME_IN_CALL argument instead. This will downgrade the session to the
SWTICH_GROUP only for the duration of the statement, returning it to its original
group when the slow statement finishes.
ch35.indd 24ch35.indd 24 7/6/2005 3:20:52 PM7/6/2005 3:20:52 PM

Chapter 35: Managing Oracle Database Resources
25
PART II
All-in-1 / Oracle Database 10g Certification All-in-One / Watson & Bersinic / 5790-3 /Chapter 35
Use of the Ratio CPU Method
There is an alternative technique for allocating CPU resources. Rather than coding
CPU usage as a percentage, as in the examples earlier in this chapter, you can specify
ratios—and let Oracle work out the percentages.
In the telesales example at the start of this chapter, the CPU resources at level 2 for
the nighttime plan were
OLTP 50%
DSS 25%
BATCH 25%
If you decide to add a fourth group (call it WEB) and want to make it equal in priority
to OLTP, and to double DSS and BATCH, you will have to change all the directives to
achieve this:
OLTP 33%
WEB 33%
DSS 17%
BATCH 17%
The ratio method lets you specify proportions. The absolute values have no
significance. For example, the original ratios could have been
OLTP 20
DSS 10
BATCH 10
and now, to add the WEB group with a priority equal to OLTP, you only have to add
one new directive,
WEB 20
and leave the others unchanged.
Creating a Simple Plan
Historically, the Resource Manager was a mission to set up. It is a very powerful
feature of the database, and powerful features are not necessarily easy to use. The
Database Control interface provided with release 10g certainly simplifies things in
comparison to using the API directly, but there is one procedure call that simplifies
it even further. With this one procedure, you can create a plan, the groups, and the
directives:
SQL> exec dbms_resource_manager.create_simple_plan(-
simple_plan=>'daytime',-
consumer_group1=>'oltp',group1_cpu=>50,-
consumer_group2=>'dss',group2_cpu=>25,-
consumer_group3=>'batch',group3_cpu=>25);
ch35.indd 25ch35.indd 25 7/6/2005 3:20:53 PM7/6/2005 3:20:53 PM

Oracle Database 10g OCP Certification All-in-One Exam Guide
26
All-in-1 / Oracle Database 10g Certification All-in-One / Watson & Bersinic / 5790-3 /Chapter 35
This call will create a plan, in this case DAYTIME, which always gives the SYS_GROUP
100 percent of CPU at priority level 1, and the OTHER_GROUPS 100 percent at level
3. Level 2 is divided according to the arguments given. The arguments can create up to
eight groups (only three—OLTP, DSS, and BATCH—in the example) and assign them
percentages of CPU at level 2.
All other resources, such as parallelism, active sessions, and undo pool, are not
configured.
EXAM TIP The CREATE_SIMPLE_PLAN procedure will do everything. You do
not even need to create, validate, and submit a pending area. All you need to
do afterward is put users in the groups and activate the plan.
Adaptive Consumer Group Mapping
The default method for assigning sessions to consumer groups is through the Oracle
username, as specified by the INITIAL_RSRC_CONSUMER_GROUP displayed in
DBA_USERS. The initial group can be changed at any time, either manually or by the
automatic consumer group switching capability based on the workload of the
statements being executed.
A consumer group can be applied initially according to a number of login attributes
and later changed by a number of run-time attributes. By default, only EXPLICIT and
ORACLE_USER are available—but there are others. The table that follows lists them
all, in order: the first to match is applied. Thus, an explicit setting will always take
precedence, but if that has not been done (either manually or automatically), then
the Resource Manager will try them in order until it finds one that has been configured.
1 EXPLICIT Switch to a group either by using the API or by using
automatic consumer group switching.
2 SERVICE_MODULE_ACTION Switch to a group according to the action name being
executed, the program module, and the service used
to connect.
3 SERVICE_MODULE Switch to a group according to the service name used
to connect and the program module.
4 MODULE_NAME_ACTION Switch to a group according to the program module
and the action within it being executed.
5 MODULE_NAME Switch to a group according to the program module.
6 SERVICE_NAME Activate a group at login according to the service
name used to connect.
7 ORACLE_USER Activate a group at login according to Oracle user ID
used to connect.
8 CLIENT_PROGRAM Activate a group at login according to the user process
being used to connect.
ch35.indd 26ch35.indd 26 7/6/2005 3:20:53 PM7/6/2005 3:20:53 PM

Chapter 35: Managing Oracle Database Resources
27
PART II
All-in-1 / Oracle Database 10g Certification All-in-One / Watson & Bersinic / 5790-3 /Chapter 35
9 CLIENT_OS_USER Activate a group at login according to the operating
system ID on the client machine.
10 CLIENT_MACHINE Activate a group at login according to the name of the
client machine.
To use either MODULE or ACTION as the mapping attribute, your programmers
must embed calls in their code to the DBMS_APPLICATION_INFO package to name
the modules and the actions within them. This allows the Resource Manager to switch
priorities according to what code is being executed. This is invaluable in a Web application,
where typically everyone is connecting with the same Oracle username through the
same application server.
To use the SERVICE as the mapping attribute, you must ensure that some users
connect through one database service, and some through another. This will require
setting up multiple service names in the SERVICE_NAMES instance parameter, and
configuring the client side of Oracle Net such that different users will request a
different service.
The order of the attributes in the preceding table is critical, and it can be changed.
Consider a user connected to Oracle from a PC in the management accountants’
office (with the machine name DSS_PC1) as Oracle user CLERK. You can use the
Resource Manager API to map both the Oracle username and the machine name to
a consumer group:
SQL> exec dbms_resource_manager.set_consumer_group_mapping(-
(dbms_resource_manager.oracle_user,'CLERK','OLTP');
SQL> exec dbms_resource_manager.set_consumer_group_mapping(-
dbms_resource_manager.client_machine,'DSS_PC1','DSS');
By default, according to the preceding table, the user will be assigned to the OLTP
group, because his Oracle username takes precedence over the location he has connected
from. This could be changed by swapping the order around:
SQL> exec dbms_resource_manager.set_consumer_group_mapping_pri(-
EXPLICIT => 1, -
SERVICE_MODULE_ACTION => 2, -
SERVICE_MODULE => 3, -
MODULE_NAME_ACTION => 4, -
MODULE_NAME => 5, -
SERVICE_NAME => 6, -
ORACLE_USER => 10, -
CLIENT_PROGRAM => 8, -
CLIENT_OS_USER => 9, -
CLIENT_MACHINE => 7,);
From now on, the machine that the user is working from will determine his active
Resource Manager group, no matter what Oracle username he logs in as. The current
order of precedence is displayed in the view DBA_RSRC_MAPPING_PRIORITY.
To manage mapping through Database Control, take the Resource Consumer
Group Mappings link in the Resource Manager section under the Administration tab.
ch35.indd 27ch35.indd 27 7/6/2005 3:20:54 PM7/6/2005 3:20:54 PM

Oracle Database 10g OCP Certification All-in-One Exam Guide
28
All-in-1 / Oracle Database 10g Certification All-in-One / Watson & Bersinic / 5790-3 /Chapter 35
Chapter Review
This chapter introduced one of the more advanced features of the Oracle database: the
ability to control the resources allocated to different database sessions. Oracle does
not do preemptive multitasking: it adds a layer on top of the preemptive multitasking
provided by the operating system. This layer lets Oracle guarantee a certain level of
service to some database users, perhaps at the expense of others. It is not simple to
set up, but then it is a very powerful facility.
A Resource Manager plan allocates resources to consumer groups, according to a
set of directives. The principle of allocation is, by default, CPU usage, but there are
other algorithms that can be used. Users are mapped to groups according, by default,
to their username, but again there are other techniques. The active group membership
for a session can be changed after login, either manually or automatically. The automatic
switch can be based on the length of time a statement will take to execute, or by using
a number of other attributes (such as the program module being executed).
Large jobs can be eliminated entirely from the system by a plan, or by using active
session pools they can be queued such that no more than a certain number are
running at once.
Questions
1. There are several steps involved in setting up the Resource Manager. Put these
in the correct order:
A. Assign users to consumer groups.
B. Create consumer groups.
C. Create directives.
D. Create a pending area.
E. Create a plan.
F. Submit the pending area.
G. Validate the pending area.
2. Which of the following statements, if any, are correct about users and
consumer groups? (Choose all that apply.)
A. One user can only be a member of one consumer group.
B. One user can be a member of many consumer groups.
C. The SYS_GROUP is reserved for the user SYS.
D. By default, the initial group for all users is DEFAULT_CONSUMER_GROUP.
3. Which of the following statements, if any, are correct about Resource Manager
plans? (Choose all that apply.)
A. The default plan is the SYSTEM_PLAN.
B. The RESOURCE_MANAGER_PLAN instance parameter is static.
ch35.indd 28ch35.indd 28 7/6/2005 3:20:55 PM7/6/2005 3:20:55 PM

Chapter 35: Managing Oracle Database Resources
29
PART II
All-in-1 / Oracle Database 10g Certification All-in-One / Watson & Bersinic / 5790-3 /Chapter 35
C. Different consumer groups can have different active plans.
D. Any one plan can manage up to 16 priority levels.
E. None of the above.
4. Some actions in the Resource Manager API are done with procedures in the
package DBMS_RESOURCE_MANAGER_PRIVS, and others, with procedures
in the package DBMS_RESOURCE_MANAGER. Mark the following actions
accordingly:
A. Granting the privilege to administer the Resource Manager
B. Placing users in groups
C. Removing users from groups
D. Switching your active group
E. Creating consumer groups
F. Configuring how to map sessions to groups
5. Resource Manager plans can use a number of methods to control resources.
Which of the following are possible? (Choose three correct answers.)
A. CPU usage
B. Tablespace quota usage
C. Number of active sessions
D. Number of idle sessions
E. Volume of redo data generated
F. Volume of undo data generated
6. A CPU method plan allocates resources at two levels as follows:
Level 1: SYS_GROUP, 50% OLTP, 50%
Level 2: DSS, 50% BATCH, 50%
If the only users logged on are from the BATCH group, what percentage of
CPU can they use? (Choose the best answer.)
A. 12.5%
B. 25%
C. 50%
D. 100%
E. The plan will not validate because it attempts to allocate 200% of CPU
resources
7. You create a Resource Manager plan limiting the active session pool for the
group DSS to 3. What will happen if three members of the group are logged
on, and a fourth member attempts to connect? (Choose the best answer.)
A. The new session will not be able to connect until an existing session
disconnects.
ch35.indd 29ch35.indd 29 7/6/2005 3:20:55 PM7/6/2005 3:20:55 PM

Oracle Database 10g OCP Certification All-in-One Exam Guide
30
All-in-1 / Oracle Database 10g Certification All-in-One / Watson & Bersinic / 5790-3 /Chapter 35
B. The new session will be able to connect but will hang immediately.
C. The new session will be able to connect but will only be able to run
queries, not DML statements.
D. Any statements the new session issues may hang, depending on other
activity.
8. If the active Resource Manager plan specifies that sessions belonging to a
particular group may only have four parallel execution servers, what will
happen if a session in that group issues a statement that requests six parallel
execution servers? (Choose the best answer.)
A. The statement will not run.
B. The statement will run with four parallel servers.
C. It will depend on the setting of the PARALLEL_MIN_PERCENT instance
parameter.
D. It will depend on the setting of the PARALLEL_AUTOMATIC_TUNING
instance parameter.
9. If the active Resource Manager plan limits the time that a statement is allowed
to run, what will happen if a statement is allowed to start executing and does
not complete within the time? (Choose the best answer.)
A. The statement will be terminated and, if it was a DML statement, rolled back.
B. The statement will be terminated, and if the session is in a transaction, the
whole transaction will be rolled back.
C. The statement will continue to run to completion.
D. The statement will stop running, but any work it has done will remain intact.
10. If a session exceeds the idle time permitted by the Resource Manager, what
will happen? (Choose the best answer.)
A. The session will issue an auto-commit and terminate.
B. The session will roll back an active transaction and terminate.
C. If the session is not in a transaction, it will terminate immediately;
otherwise, it will terminate when the transaction completes.
D. It depends on whether the instance parameter RESOURCE_LIMITS is on
TRUE or FALSE.
11. When you use the Resource Manager to define an undo pool, what happens?
(Choose the best answer.)
A. If a user exceeds his quota on the undo tablespace, his session will hang.
B. If a user exceeds his quota on the undo tablespace, the statement running
will be rolled back but the rest of the statement will remain intact.
C. If a group fills its undo pool, all the group’s transactions will hang until
one session commits, rolls back, or is terminated.
ch35.indd 30ch35.indd 30 7/6/2005 3:20:56 PM7/6/2005 3:20:56 PM

Chapter 35: Managing Oracle Database Resources
31
PART II
All-in-1 / Oracle Database 10g Certification All-in-One / Watson & Bersinic / 5790-3 /Chapter 35
D. The effect depends on whether RETENTION GUARANTEE is enabled for
the undo tablespace.
12. Which of the following statements is correct regarding automatic consumer
group switching? (Choose the best answer.)
A. If a group exceeds its permitted CPU usage, one or more of its sessions will
be downgraded.
B. Switching can be triggered only by SQL statement execution time.
C. Switching can be triggered by SQL statement execution time, degree of
parallelism, or CPU usage.
D. You can configure whether the switch is permanent, or for one transaction,
or for one statement.
13. Your session has been downgraded by the Resource Manager, using automatic
consumer group switching. Which of the following statements are correct?
(Choose two answers.)
A. You can only reactivate your original group if you have been granted the
appropriate privilege.
B. If the downgrade was only for one call, you need do nothing.
C. The system administrator can return your session to your original group
using a procedure in DBMS_SESSION.
D. You can return your session to your original group using a procedure in
DBMS_SESSION.
E. You must disconnect and connect again to reactivate your initial group.
14. The pending area is an area of memory used to configure the Resource
Manager before saving the configuration to the data dictionary. For which
of these operations must you create, validate, and submit a pending area?
(Choose the best answer.)
A. Adding users to consumer groups
B. Creating consumer groups
C. Using the CREATE_SIMPLE_PLAN procedure
D. None of the above
15. There are a number of session attributes that can be used to map a session to
a particular consumer group, other than the Oracle username. Which of the
following is not a valid attribute for this purpose? (Choose the best answer.)
A. The operating system ID on the client machine
B. The name of the program module being executed
C. The time of the session logon
D. The user process
ch35.indd 31ch35.indd 31 7/6/2005 3:20:56 PM7/6/2005 3:20:56 PM

Oracle Database 10g OCP Certification All-in-One Exam Guide
32
All-in-1 / Oracle Database 10g Certification All-in-One / Watson & Bersinic / 5790-3 /Chapter 35
Answers
1. D, B, E, C, G, F, and A. The order is D, create a pending area; B, create
consumer groups; E, create a plan; C, create directives; G, validate the pending
area; F, submit the pending area; A, assign users to groups.
2. B. There can be a many-to-many relationship between users and groups.
3. E. The default plan is the INTERNAL_PLAN, so A is wrong. B is also wrong,
because the parameter is dynamic. C is wrong because the active plan applies
to the whole instance. D is wrong too; one plan can have up to eight levels.
So none of the answers is correct.
4. A, B, and C. DBMS_RESOURCE_MANAGER_PRIVS is used for A, B, and C.
D, E, and F. DBMS_RESOURCE_MANAGER handles D, E, and F.
5. A, C, and F. Of the methods listed, CPU usage, active sessions, and undo
data are possible. You cannot have a plan based on tablespace quotas or
redo data. Also, although you can disconnect idle sessions, you cannot
have a plan that limits the number of idle sessions.
6. D. If no other sessions are connected, then all CPU resources will be available
to the connected sessions.
7. D. When a session pool is full of active sessions, more sessions can connect—
but they will hang immediately until an active session completes its statement.
8. B. The statement will run, but with only the number of PX servers permitted
by the Resource Manager.
9. C. This is an example of the Resource Manager making a mistake, presumably
because of poor statistics. The job will continue until completion.
10. B. The session will terminate, and any transaction will be rolled back.
11. C. Undo pools refer to whole groups, not to individual users or sessions. If a
group fills its pool, all sessions that are part of the group will hang until one
commits.
12. B. Automatic switching is based on a single statement, and you can configure
it for that one statement, or for the whole session.
13. B and D. B is correct because if the downgrade were for one call, by using the
SWITCH_TIME_IN_CALL argument, the session will return to its original
group when the statement is complete, and D is correct because the procedure
to switch your own session is in DBMS_SESSION.
14. B. You need to create, validate, and submit a pending area when creating
consumer groups.
15. C. There is no way to activate a group membership based on the time the
login happened.
ch35.indd 32ch35.indd 32 7/6/2005 3:20:57 PM7/6/2005 3:20:57 PM

All-in-1 / Oracle Database 10g Certification All-in-One / Watson & Bersinic / 5790-3 /Chapter 36
CHAPTER 36
Automating Administrative
Tasks
In this chapter you will learn how to
• Simplify management tasks by using the Scheduler
• Create a job, program, schedule, and window
• Reuse Scheduler components for similar tasks
• View information about job executions and job instances
1
ch36.indd 1ch36.indd 1 7/6/2005 3:39:18 PM7/6/2005 3:39:18 PM

Oracle Database 10g OCP Certification All-in-One Exam Guide
2
All-in-1 / Oracle Database 10g Certification All-in-One / Watson & Bersinic / 5790-3 /Chapter 36
There will be many occasions when you as DBA, or your users, need to automate the
scheduling and running of jobs. These jobs could be of many kinds—for example,
maintenance work, such as database backups; data loading and validation routines;
report generation; collecting optimizer statistics; or executing business processes. The
Scheduler is a facility that can be used to specify tasks to be run at some point in the
future.
The Scheduler can be coupled to the Resource Manager. It can activate Resource
Manager plans and run jobs with the priorities assigned to various Resource Manager
consumer groups.
In earlier releases of the database, job scheduling capabilities were provided through
the DBMS_JOB facility. This is still supported for backward compatibility, but it is not
nearly as versatile as the Scheduler.
The Scheduler Architecture
The data dictionary includes a table that is a storage point for all Scheduler jobs. You
can query the table through the DBA_SCHEDULER_JOBS view. The job coordinator
process, the CJQ0 process, monitors this table and when necessary launches job slaves,
the Jnnn processes, to run the jobs. The CJQ0 process is launched automatically when
a job is due; it is deactivated after a sustained period of Scheduler inactivity. The Jnnn
processes are launched on demand, though the maximum number is limited by the
JOB_QUEUE_PROCESSES instance parameter; this defaults to 0, but if that value is
used, the Scheduler will not function.
The job coordinator picks up jobs from the job queue table and passes them to
slaves for execution. It also launches and terminates the slaves according to demand.
To see the processes currently running, query the V$PROCESS view. In a Windows
instance,
ocp10g> select program from v$process where program like '%J%';
PROGRAM
------------------------------------------
ORACLE.EXE (CJQ0)
ORACLE.EXE (J000)
ORACLE.EXE (J001)
In a Unix instance, the processes will be separate operating system processes; in a
Windows instance, they are threads in the ORACLE.EXE image.
EXAM TIP The JOB_QUEUE_PROCESSES instance parameter must be
greater than zero or the Scheduler cannot run. It is zero by default.
An advanced feature of the Scheduler is to associate it with the Resource Manager.
It may be that certain jobs should be run with certain priorities, and this can be achieved
by linking a job to a Resource Manager consumer group. It is also possible to use the
ch36.indd 2ch36.indd 2 7/6/2005 3:39:49 PM7/6/2005 3:39:49 PM

Chapter 36: Automating Administrative Tasks
3
PART II
All-in-1 / Oracle Database 10g Certification All-in-One / Watson & Bersinic / 5790-3 /Chapter 36
Scheduler to activate a Resource Manager plan, rather than having to change the
RESOURCE_MANAGER_PLAN instance parameter manually.
The Scheduler can be configured and monitored with an API—the DBMS_
SCHEDULER package—or through Database Control.
Scheduler Objects
The most basic object in the Scheduler environment is a job. A job can be completely
self-contained: it can define the action to be taken, and when to take it. In a more
advanced configuration, the job is only a part of the structure consisting of a number
of Scheduler objects of various types.
Jobs
A job specifies what to do, and when to do it. The “what” can be a single SQL statement,
a PL/SQL block, a PL/SQL stored procedure, a Java stored procedure, an external
procedure, or any executable file stored in the server’s file system: either a binary
executable or a shell script. The “when” specifies the timestamp at which to launch
the job, and a repeat interval for future runs.
There are several options when creating a job, as can be seen from looking at the
DBMS_SCHEDULE.CREATE_JOB procedure. This procedure is overloaded; it has no
less than four forms. Figure 36-1 is a part of the output from a DESCRIBE of the
DBMS_SCHEDULER package.
All forms of the CREATE_JOB procedure must specify a JOB_NAME. This must be
unique within the schema that the job is created.
Then, taking the first form of the procedure, the JOB_TYPE must be one of
PLSQL_BLOCK, STORED_PROCEDURE, or EXECUTABLE. If JOB_TYPE is PLSQL_
BLOCK, then JOB_ACTION can be either a single SQL statement or a PL/SQL block.
If the JOB_TYPE is STORED_PROCEDURE, then JOB_ACTION must name a stored
procedure, which can be PL/SQL, JAVA, or an external procedure written in C, as
described in Chapter 22. If the JOB_TYPE is EXECUTABLE, then the JOB_ACTION
can be anything that could be run from an operating system command-line prompt: a
command, an executable binary file, or a shell script or batch file. The NUMBER_OF_
ARGUMENTS parameter states how many arguments the JOB_ACTION should take.
The first form of the procedure continues with details of when and how frequently
to run the job. The first execution will be on the START_DATE; the INTERVAL defines
a repeat frequency, such as daily, until END_DATE. JOB_CLASS is to do with priorities
and integration of the Scheduler with the Resource Manager. The ENABLED argument
determines whether the job can actually be run. Perhaps surprisingly, this defaults to
FALSE. If a job is not created with this argument on TRUE, it cannot be run (either
manually, or through a schedule) without enabling it first. Finally, AUTO_DROP
controls whether to drop the job definition after the END_TIME. This defaults to TRUE.
ch36.indd 3ch36.indd 3 7/6/2005 3:39:49 PM7/6/2005 3:39:49 PM
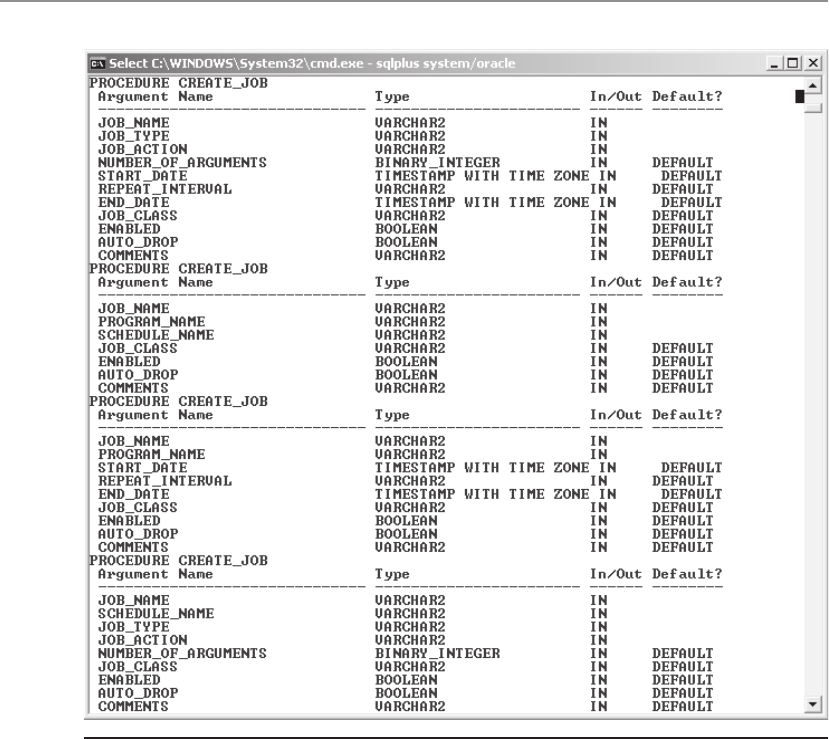
Oracle Database 10g OCP Certification All-in-One Exam Guide
4
All-in-1 / Oracle Database 10g Certification All-in-One / Watson & Bersinic / 5790-3 /Chapter 36
If a job is created with no scheduling information, it will be run as soon as it is enabled,
and then dropped immediately if AUTO_DROP is on TRUE, which is the default.
The third form of the CREATE_JOB procedure has the job details (the JOB_TYPE,
JOB_ACTION, and NUMBER_OF_ARGUMENTS) replaced with a PROGRAM_NAME
that points to a program, which will provide these details. The fourth form has the
scheduling details (START_DATE, REPEAT_INTERVAL, and END_DATE) replaced with
a SCHEDULE_NAME that points to a schedule, which will manage the timing of the
runs. The second, and briefest, form of the procedure uses both a program and a
schedule.
Figure 36-1 The specification of the CREATE_JOB procedure
ch36.indd 4ch36.indd 4 7/6/2005 3:39:50 PM7/6/2005 3:39:50 PM

Chapter 36: Automating Administrative Tasks
5
PART II
All-in-1 / Oracle Database 10g Certification All-in-One / Watson & Bersinic / 5790-3 /Chapter 36
Programs
Programs provide a layer of abstraction between the job and the action it will perform.
They are created with the DBMS_SCHEDULER.CREATE_PROGRAM procedure:
PROCEDURE CREATE_PROGRAM
Argument Name Type In/Out Default?
---------------------- ------------------- ------ --------
PROGRAM_NAME VARCHAR2 IN
PROGRAM_TYPE VARCHAR2 IN
PROGRAM_ACTION VARCHAR2 IN
NUMBER_OF_ARGUMENTS BINARY_INTEGER IN DEFAULT
ENABLED BOOLEAN IN DEFAULT
COMMENTS VARCHAR2 IN DEFAULT
By pulling the “what” of a job out of the job definition itself and defining it in a
program, it becomes possible to reference the same program in different jobs, and
thus to associate it with different schedules and job classes, without having to
define it many times. Note that (as for a job) a program must be ENABLED before it
can be used.
Schedules
A schedule is a specification for when and how frequently a job should run. It is
created with DBMS_SCHEDULER.CREATE_SCHEDULE procedure:
PROCEDURE CREATE_SCHEDULE
Argument Name Type In/Out Default?
----------------- ------------------------ ------ --------
SCHEDULE_NAME VARCHAR2 IN
START_DATE TIMESTAMP WITH TIME ZONE IN DEFAULT
REPEAT_INTERVAL VARCHAR2 IN
END_DATE TIMESTAMP WITH TIME ZONE IN DEFAULT
COMMENTS VARCHAR2 IN DEFAUL
The START_DATE defaults to the current date and time. This is the time that any
jobs associated with this schedule will run. The REPEAT_INTERVAL specifies how
frequently the job should run, until the END_DATE. Schedules without an END_DATE
will run forever.
The REPEAT_INTERVAL argument can take a wide variety of calendaring expressions.
These consist of up to three elements: a frequency, an interval, and possibly several
specifiers. The frequency may be one of these values:
YEARLY
MONTHLY
WEEKLY
DAILY
HOURLY
MINUTELY
SECONDLY
ch36.indd 5ch36.indd 5 7/6/2005 3:39:50 PM7/6/2005 3:39:50 PM

Oracle Database 10g OCP Certification All-in-One Exam Guide
6
All-in-1 / Oracle Database 10g Certification All-in-One / Watson & Bersinic / 5790-3 /Chapter 36
The specifiers can be one of these:
BYMONTH
BYWEEKNO
BYYEARDAY
BYMONTHDAY
BYHOUR
BYMINUTE
BYSECOND
Using these elements of a REPEAT_INTERVAL makes it possible to set up schedules
that should satisfy any requirement. For example,
repeat_interval=>'freq=hourly; interval=12'
will run the job every 12 hours, starting at the START_DATE. The next example,
repeat_interval=>'freq=yearly; bymonth=jan,apr,jul,oct; bymonthday=2'
will run the job on the second day of each of the named four months, starting as early
in the day as resources permit. A final example,
repeat_interval=>'freq=weekly; interval=2; byday=mon; byhour=6; byminute=10'
will run the job at ten past six on alternate Mondays.
EXAM TIP One schedule can be applied to many jobs; one program can be
invoked by many jobs.
Job Classes
A job class is used to associate one or more jobs with a Resource Manager consumer
group, and also to control logging levels. Create a class with the DBMS_SCHEDULER.
CREATE_JOB_CLASS procedure:
PROCEDURE CREATE_JOB_CLASS
Argument Name Type In/Out Default?
------------------------- ----------------- ------ --------
JOB_CLASS_NAME VARCHAR2 IN
RESOURCE_CONSUMER_GROUP VARCHAR2 IN DEFAULT
SERVICE VARCHAR2 IN DEFAULT
LOGGING_LEVEL BINARY_INTEGER IN DEFAULT
LOG_HISTORY BINARY_INTEGER IN DEFAULT
COMMENTS VARCHAR2 IN DEFAULT
The JOB_CLASS_NAME is the name to be referenced by the JOB_CLASS argument
of the CREATE_JOB procedure. The RESOURCE_CONSUMER_GROUP nominates the
group whose resource allocations should be applied to the running job, as determined by
the Resource Manager plan in effect whenever the job happens to run. The SERVICE
has significance only in a RAC database: you can restrict the job to run only on an
ch36.indd 6ch36.indd 6 7/6/2005 3:39:51 PM7/6/2005 3:39:51 PM

Chapter 36: Automating Administrative Tasks
7
PART II
All-in-1 / Oracle Database 10g Certification All-in-One / Watson & Bersinic / 5790-3 /Chapter 36
instance with a particular service name. The details of logging can also be specified
per class.
Windows
A schedule specifies exactly when a job should be launched. Windows extend the concept
of schedules, by giving Oracle more freedom to decide when to run the job. A window
opens at a certain time and closes after a certain duration: jobs specified to run in a
window may be launched, at Oracle’s discretion, at any time during the window. The
window itself can open repeatedly according to a schedule. Use of windows is of
particular value when combined with classes and the Resource Manager: Oracle can
schedule jobs to run within a window according to their relative priorities. Windows
also activate Resource Manager plans.
Create windows with the DBMS_SCHEDULER.CREATE_WINDOW procedure:
PROCEDURE CREATE_WINDOW
Argument Name Type In/Out Default?
------------------- ----------------------- ------ --------
WINDOW_NAME VARCHAR2 IN
RESOURCE_PLAN VARCHAR2 IN
START_DATE TIMESTAMP WITH TIME ZONE IN DEFAULT
REPEAT_INTERVAL VARCHAR2 IN
END_DATE TIMESTAMP WITH TIME ZONE IN DEFAULT
DURATION INTERVAL DAY TO SECOND IN
WINDOW_PRIORITY VARCHAR2 IN DEFAULT
COMMENTS VARCHAR2 IN DEFAULT
The RESOURCE_PLAN nominates the Resource Manager plan that will be activated
when the window opens. The window will open on the START_DATE and reopen
according to the REPEAT_INTERVAL until the END_DATE. The procedure is overloaded;
there is a second form that lets you nominate a precreated schedule rather than
specifying the schedule here with these three arguments.
The DURATION is an INTERVAL DAY TO SECOND datatype. This will allow a
time span to be specified in days, hours, minutes, and seconds. The basic syntax for an
INTERVAL DAY TO SECOND column is
'<days> <hours>:<minutes>: seconds>'
Note that that there is a space between the days and the hours, and colons between
the hours, minutes, and seconds. So this,
'1 2:3:4'
specifies a time gap of one day, two hours, three minutes, and four seconds.
The PRIORITY argument is intended to manage circumstances where windows
overlap, and has two possible values: LOW (the default) or HIGH. Only one window
can be in effect at a time, and it will be the window with the higher priority. If two or
more overlapping windows have the same priority, the window that opened first will
take priority.
ch36.indd 7ch36.indd 7 7/6/2005 3:39:52 PM7/6/2005 3:39:52 PM

Oracle Database 10g OCP Certification All-in-One Exam Guide
8
All-in-1 / Oracle Database 10g Certification All-in-One / Watson & Bersinic / 5790-3 /Chapter 36
Windows share the same namespace as schedules. It is therefore impossible to
create a window with the same name as a schedule, but this does mean that wherever
you can refer to a schedule, you can also refer to a window. So looking back to the
second and fourth forms of the CREATE_JOB procedure in earlier Figure 36-1, it
becomes clear that a job can be created to run at any time within a named window,
rather than at the precise times specified by a schedule. The window itself will open
and close according to a schedule, either a schedule defined within the window or a
precreated schedule object.
Privileges
All Scheduler privileges are granted and revoked with the usual GRANT and REVOKE
syntax. There are a number of Scheduler-related privileges:
• CREATE JOB
• CREATE ANY JOB
• EXECUTE ANY PROGRAM
• EXECUTE ANY CLASS
• MANAGE SCHEDULER
• EXECUTE ON <job, program, or class>
• ALTER ON <job, program, or schedule>
• ALL ON <job, program, schedule, or class>
Before a user can create any jobs, schedules, or programs, s/he must be granted the
CREATE JOB privilege; this includes the ability to create and use his/her own programs
and schedules. To create jobs in other schemas, the user will need CREATE ANY JOB.
To use Scheduler objects in other schemas, you need the EXECUTE privilege on them.
The MANAGE SCHEDULER privilege is needed to create job classes and windows,
and to force windows to open or close irrespective of their schedules.
The ready-made role SCHEDULER_ADMIN includes the first five privileges just
listed. It is granted to SYSTEM with ADMIN by default.
Creating and Scheduling Jobs
To create and schedule a job with one procedure call, use the CREATE_JOB procedure.
For example,
begin
dbms_scheduler.create_job(
job_name=>'system.inc_backup',
job_type=>'executable',
job_action=>'/home/usr/dba/rman/whole_inc.sh',
start_date=>trunc(sysdate)+23/24,
repeat_interval=>'freq=weekly;byday=mon,tue,wed,thu,fri;byhour=23',
comments=>'launch weekday incremental backup script');
end;
ch36.indd 8ch36.indd 8 7/6/2005 3:39:52 PM7/6/2005 3:39:52 PM

Chapter 36: Automating Administrative Tasks
9
PART II
All-in-1 / Oracle Database 10g Certification All-in-One / Watson & Bersinic / 5790-3 /Chapter 36
This will create a job that will call a Unix shell script at eleven o’clock every
weekday evening, starting today. The job is created in the SYSTEM schema. The
operating system permissions on the script will have to be set such that the Oracle
owner can run it.
Exercise 31-1: Creating a Job
with the Scheduler API
Use the DBMS_SCHEDULER package to create a job, and confirm that it is working.
1. Connect to your database as user SYSTEM using SQL*Plus.
2. Create a table to store times, and set your date format to show the date and
time.
SQL> create table times (c1 date);
SQL> alter session set nls_date_format='dd-mm-yy hh24:mi:ss';
3. Create a job to insert the current time into the table every minute.
SQL> begin
2 dbms_scheduler.create_job(
3 job_name=>'savedate',
4 job_type=>'plsql_block',
5 job_action=>'insert into times values(sysdate);',
6 start_date=>sysdate,
7 repeat_interval=>'freq=minutely;interval=1',
8 enabled=>true,
9 auto_drop=>false);
10 end;
11 /
PL/SQL procedure successfully completed.
4. Query the job table to see that the job is scheduled.
SQL> select job_name,enabled,to_char(next_run_date,'dd-mm-yy
hh24:mi:ss'),run_count from user_scheduler_jobs;
JOB_NAME ENABL TO_CHAR(NEXT_RUN_ RUN_COUNT
------------------------- ----- ----------------- ----------
SAVEDATE TRUE 15-01-05 14:58:03 2
5. Query the times table to demonstrate that the inserts are occurring.
SQL> select * from times;
6. Disable the job.
SQL> exec dbms_scheduler.disable('savedate');
7. Re-run the queries from Steps 4 and 5 to confirm that the job is disabled, and
that no more inserts are occurring.
8. Drop the job:
SQL> exec dbms_scheduler.drop_job('savedate');
ch36.indd 9ch36.indd 9 7/6/2005 3:39:53 PM7/6/2005 3:39:53 PM
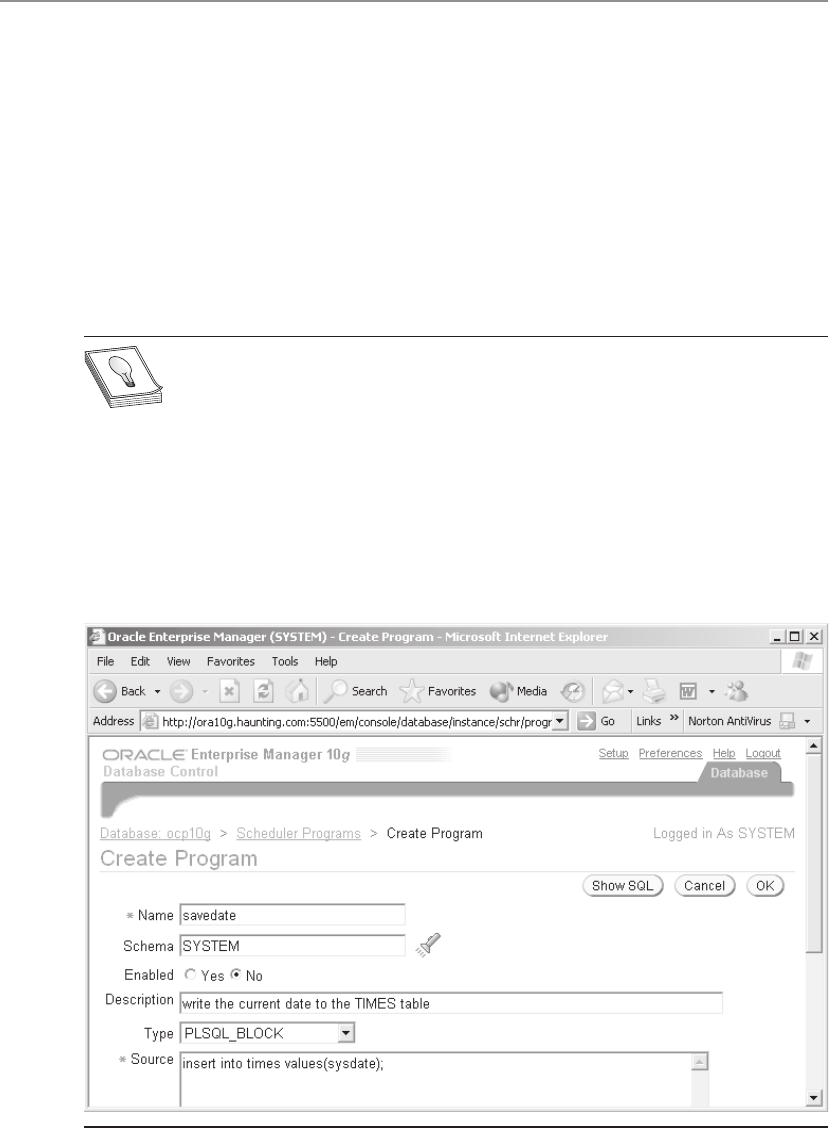
Oracle Database 10g OCP Certification All-in-One Exam Guide
10
All-in-1 / Oracle Database 10g Certification All-in-One / Watson & Bersinic / 5790-3 /Chapter 36
Using Programs and Schedules
Programs and schedules let you reuse Scheduler components for similar tasks. Rather
than defining each job as a self-contained entity, you create programs and schedules,
each of which can be used by many jobs.
The job created in Exercise 36-1 could be split up into a job, a program, and a
schedule. To do this through Database Control, from the database home page take the
Administration tab. Then in the Scheduler section take the Programs link, click Create,
and enter the code you want executed as in Figure 36-2. This can be as long and
complicated as you want (bearing in mind that the datatype for PROGRAM_ACTION
is VARCHAR2 and so is limited to 4KB).
TIP Keep your JOB_ACTIONs and PROGRAM_ACTIONs as short as
possible, preferably just one statement. Do all the work in a procedure
invoked by that statement. This will be far easier to maintain than having a
large amount of SQL or PL/SQL in your job and program definitions.
If you create a program with the CREATE_PROGRAM procedure, then (just as with
jobs) the program will be disabled by default. Change this default either by specifying
the ENABLED argument as TRUE when you create the program or by using the ENABLE
procedure subsequently:
SQL> exec dbms_scheduler.enable('program1');
Figure 36-2 Creating a program with Database Control
ch36.indd 10ch36.indd 10 7/6/2005 3:39:53 PM7/6/2005 3:39:53 PM
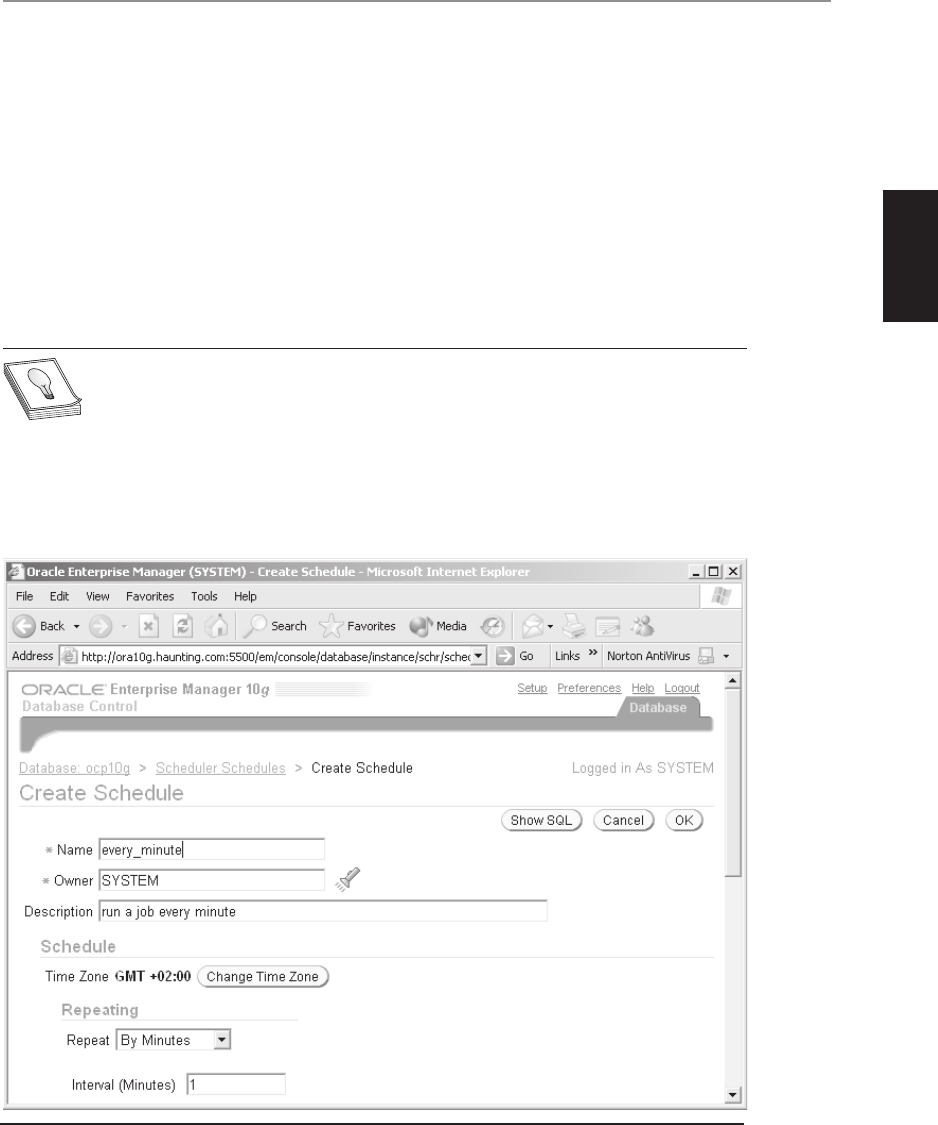
Chapter 36: Automating Administrative Tasks
11
PART II
All-in-1 / Oracle Database 10g Certification All-in-One / Watson & Bersinic / 5790-3 /Chapter 36
To create a schedule, take the Schedules link from the Scheduler section, and click
Create to view the page shown in Figure 36-3. The GUI interface does not give access
to some of the more complicated interval possibilities, such as every third Tuesday,
which would be
'freq=weekly;interval=3;byday=tue'
but it gives access to all that will usually be required.
To create a job, take the Jobs link. The initial window (shown in Figure 36-4)
assumes that the job is a PL/SQL block. Taking the Change Command Type button
will let you nominate your program. The Schedule link lets you tie the job to a
precreated schedule, rather than defining the schedule within the job.
TIP Programs share the same namespace as jobs: you cannot have a program
with the same name as a job. The same is true for schedules and windows.
It is also possible to run a job independently of a schedule, by using the RUN_JOB
procedure:
SQL> exec dbms_scheduler.run_job('savedate');
Figure 36-3 Creating a schedule with Database Control
ch36.indd 11ch36.indd 11 7/6/2005 3:39:54 PM7/6/2005 3:39:54 PM
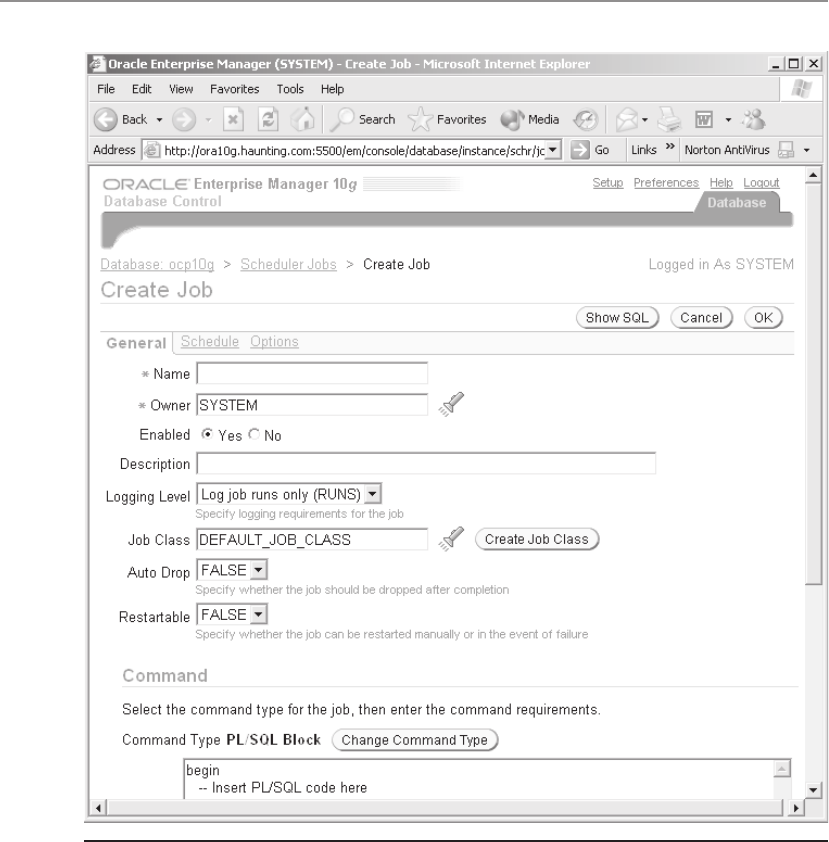
Oracle Database 10g OCP Certification All-in-One Exam Guide
12
All-in-1 / Oracle Database 10g Certification All-in-One / Watson & Bersinic / 5790-3 /Chapter 36
Using Classes, Windows,
and the Resource Manager
The more advanced capabilities of the Scheduler let you integrate it with the Resource
Manager, to control and prioritize jobs. These are the relevant components:
• Job classes Jobs can be assigned a class, and a class can be linked to a Resource
Manager consumer group. Classes also control the logging level for their jobs.
Figure 36-4 Creating a job with Database Control
ch36.indd 12ch36.indd 12 7/6/2005 3:39:55 PM7/6/2005 3:39:55 PM

Chapter 36: Automating Administrative Tasks
13
PART II
All-in-1 / Oracle Database 10g Certification All-in-One / Watson & Bersinic / 5790-3 /Chapter 36
• Consumer groups Resource Manager consumer groups are restricted in the
resources they can use, being limited in, for instance, CPU usage or the number
of active sessions.
• Resource plans A Resource Manager plan defines how to apportion resources
to groups. Only one plan is active in the instance at any one time.
• Windows A window is a defined (probably recurring) period of time, during
which certain jobs will run and a certain plan will be active.
• Window groups It is possible to combine windows into window groups, for
ease of administration.
Prioritizing jobs within a window is done at two levels. Within a class, jobs can be
given different priorities by the Scheduler, but because all jobs in a class are in the
same consumer group, the Resource Manager will not distinguish between them. But
if jobs in different classes are scheduled within the same window, the Resource Manager
will assign resources to each class according to the consumer groups for that class.
Using Job Classes
Create a class with Database Control, or through the API. For example,
SQL> exec dbms_scheduler.create_job_class(-
job_class_name=>'daily_reports',-
resource_consumer_group=>'dss',-
logging_level=>dbms_scheduler.logging_full);
Then assign the jobs to the class, either at job creation time by specifying the JOB_
CLASS attribute, or by modifying the job later. To assign a job to a class with the API,
you must use the SET_ATTRIBUTE procedure. To put the job REPORTS_JOB into the
class just created,
SQL> exec dbms_scheduler.set_attribute(-
name=>'reports_job',-
attribute=>'job_class',-
value=>'daily_reports');
If there are several jobs in the one class, prioritize them with more SET_
ATTRIBUTE calls:
SQL> exec dbms_scheduler.set_attribute(-
name=>'reports_job',-
attribute=>'job_priority',-
value=>2);
If several jobs in the same class are scheduled to be executed at the same time,
the job priority determines the order in which jobs from that class are picked up for
execution by the job coordinator process. It can be a value from 1 through 5, with 1
being the first to be picked up for job execution. The default for all jobs is 3. This
could be critical if, for example, the class’s consumer group has an active session pool
ch36.indd 13ch36.indd 13 7/6/2005 3:39:56 PM7/6/2005 3:39:56 PM

Oracle Database 10g OCP Certification All-in-One Exam Guide
14
All-in-1 / Oracle Database 10g Certification All-in-One / Watson & Bersinic / 5790-3 /Chapter 36
that is smaller than the number of jobs: those jobs with the highest priority will run
first, while the others are queued.
EXAM TIP It is not possible to assign priorities by any means other than the
SET_ATTRIBUTE procedure of the API.
Logging levels are also controlled by the job’s class. There are three options:
• DBMS_SCHEDULER.LOGGING_OFF No logging is done for any jobs in
this class.
• DBMS_SCHEDULER.LOGGING_RUNS Information is written to the job
log regarding each run of each job in the class, including when the run was
started and whether the job ran successfully.
• DBMS_SCHEDULER.LOGGING_FULL In addition to logging information
about the job runs, the log will also record management operations on the
class, such as creating new jobs.
To view logging information, query the DBA_SCHEDULER_JOB_LOG view:
SQL> select job_name,log_date,status from dba_scheduler_job_log;
JOB_NAME LOG_DATE STATUS
------------ ------------------------------ ------------
PURGE_LOG 16-JAN-05 13-00-03 SUCCEEDED
TEST_JOB 16-JAN-05 11-00-00 FAILED
NIGHT_INCR 16-JAN-05 01-00-13 SUCCEEDED
NIGHT_ARCH 16-JAN-05 01-00-00 SUCCEEDED
More detailed information is written to the DBA_SCHEDULER_JOB_RUN_DETAILS
view, including the job’s run duration and any error code it returned.
Logging information is cleared by the automatically created PURGE_LOG job.
By default, this runs daily and will remove all logging information more than thirty
days old.
Using Windows
Create windows either through Database Control or with the CREATE_WINDOW
procedure. For example,
SQL> exec dbms_scheduler.create_window(-
window_name=>'daily_reporting_window',-
resource_plan=>'night_plan',-
schedule=>'weekday_nights',-
duration=>'0 08:00:00',-
window_priority=>'low',-
comments=>’for running regular reports’);
This window activates a Resource Manager plan called NIGHT_PLAN. This might
be a plan that gives priority to the DSS consumer groups over the OLTP group. It opens
according to the schedule WEEKDAY_NIGHTS, which might be Monday through Friday
ch36.indd 14ch36.indd 14 7/6/2005 3:39:56 PM7/6/2005 3:39:56 PM
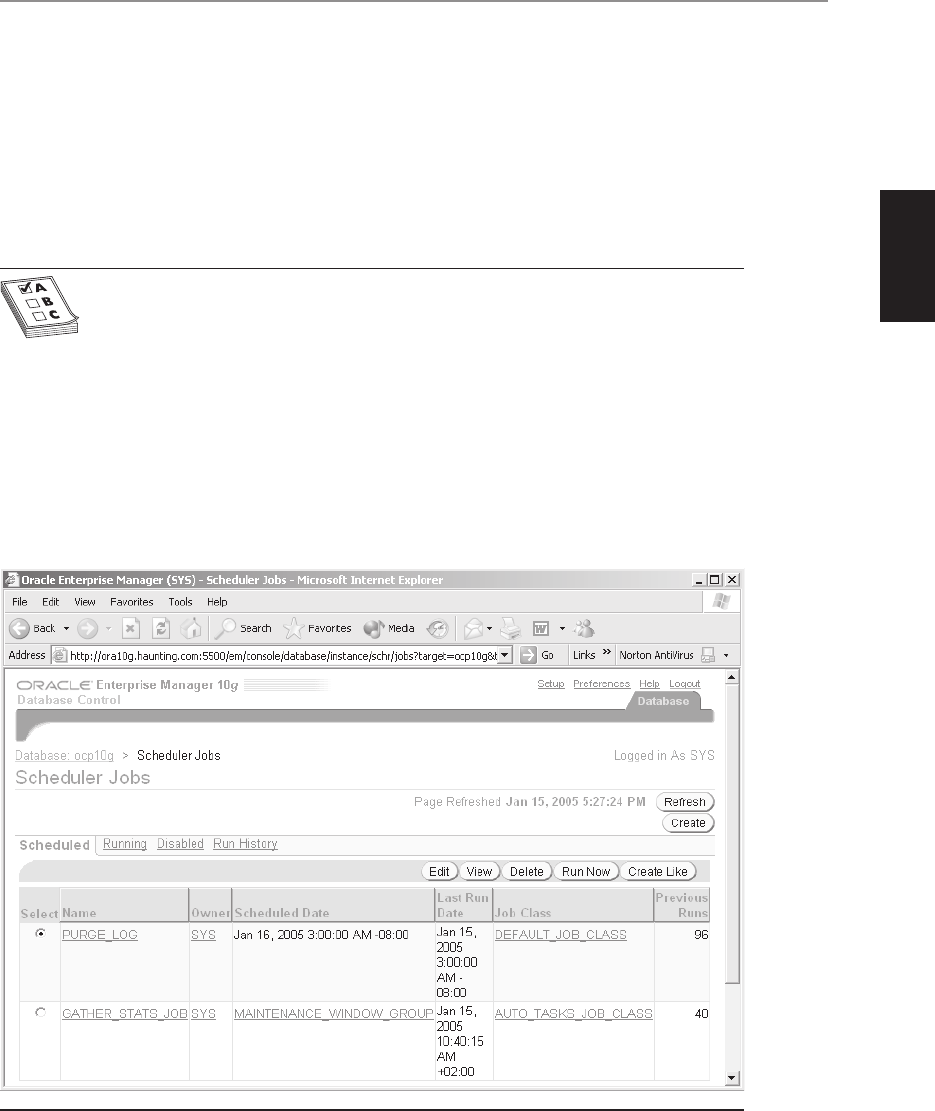
Chapter 36: Automating Administrative Tasks
15
PART II
All-in-1 / Oracle Database 10g Certification All-in-One / Watson & Bersinic / 5790-3 /Chapter 36
at 20:00. The window will remain open for eight hours; the DURATION argument
accepts an INTERVAL DAY TO SECOND value, as does the REPEAT_INTERVAL for a
schedule. Setting the priority to LOW means that if this window overlaps with another
window, then the other window will be allowed to impose its Resource Manager plan.
This would be the case if you created a different window for your end-of-month processing,
and the end-of-month happened to be on a weekday. You could give the end-of-month
window HIGH priority, to ensure that the end-of-month Resource Manager plan, which
could give top priority to the BATCH group, does come into effect.
EXAM TIP Even if a job has priority 1 within its class, it might still only run
after a job with priority 5 in another class—if the second job’s class is in a
consumer group with a higher Resource Manager priority.
Preconfigured Jobs
There are two jobs configured by default: the PURGE_LOG job that cleans out the
Scheduler log, and the GATHER_STATS_JOB that analyzes the database to gather
optimizer statistics. To see these jobs, you must connect as user SYS. Using Database
Control, take the Administration tab from the database home page, and then the Jobs
link in the database section to view the page shown in Figure 36-5.
Figure 36-5 The preconfigured jobs
ch36.indd 15ch36.indd 15 7/6/2005 3:39:57 PM7/6/2005 3:39:57 PM
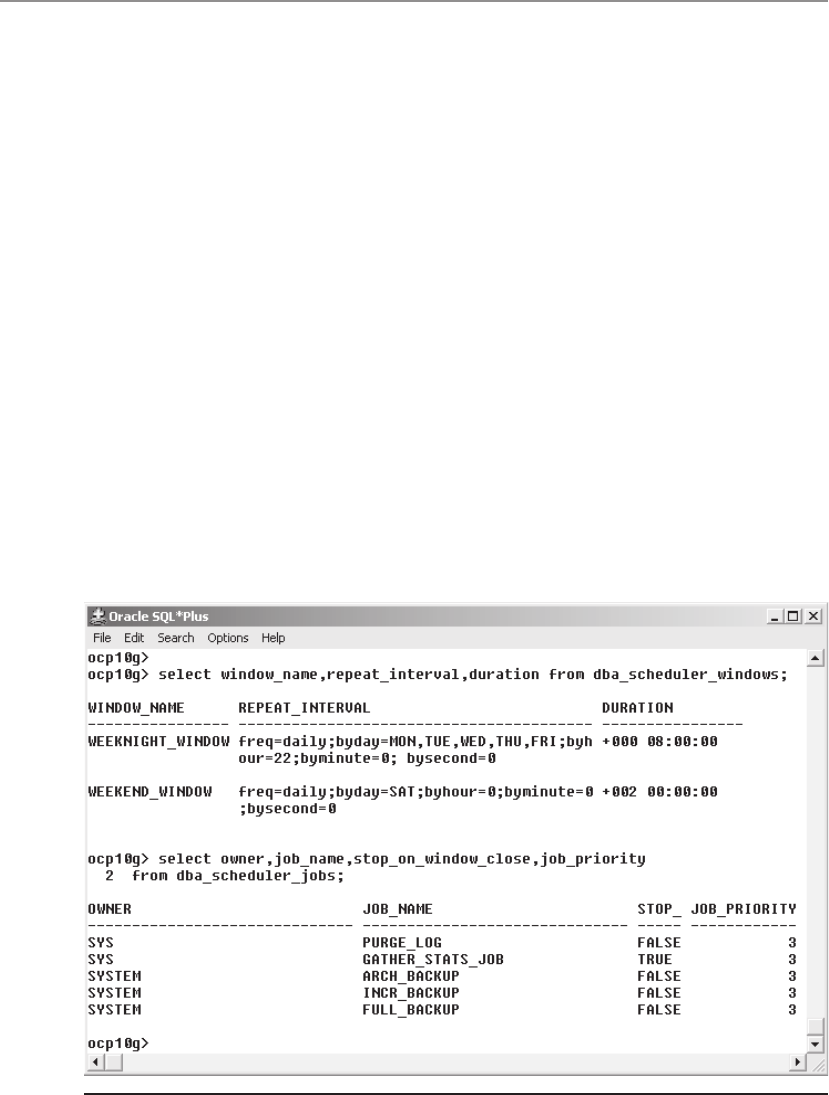
Oracle Database 10g OCP Certification All-in-One Exam Guide
16
All-in-1 / Oracle Database 10g Certification All-in-One / Watson & Bersinic / 5790-3 /Chapter 36
The PURGE_LOG job deletes entries from the Scheduler log, on a daily schedule.
The GATHER_STATS_JOB is much more important and is configured in a more
sophisticated manner. It is set up to use the preconfigured MAINTENANCE_WINDOW_
GROUP, which consists of two windows: the WEEKEND_WINDOW and the WEEKNIGHT_
WINDOW. To see the details of these windows, take the link in Database Control or
query the DBA_SCHEDULER_WINDOWS view as shown in Figure 36-6.
The first query in the figure shows the two windows that are created by default.
The WEEKNIGHT_WINDOW opens at ten in the evening on weekdays and stays open
for eight hours. The WEEKEND_WINDOW opens on Saturday at midnight (that is, on
Friday night) and stays open for two days. The GATHER_STATS_JOB will run in both
of these windows.
What happens if a window closes before a job that is run in the window has
completed? The default behavior is that the job will continue until it finishes, but this
can be overridden by setting an attribute. The second query in Figure 36-6 shows all
the Scheduler jobs in the database, including the attribute STOP_ON_WINDOW_
CLOSE. To change this attribute, use the SET_ATTRIBUTE procedure:
SQL> exec dbms_scheduler.set_attribute(name=>'full_backup',-
attribute=>'stop_on_window_close',-
value=>'true');
This will cause the FULL_BACKUP job to abort if it has not finished by the time its
window closes.
Figure 36-6 Querying the Scheduler views
ch36.indd 16ch36.indd 16 7/6/2005 3:39:58 PM7/6/2005 3:39:58 PM

Chapter 36: Automating Administrative Tasks
17
PART II
All-in-1 / Oracle Database 10g Certification All-in-One / Watson & Bersinic / 5790-3 /Chapter 36
EXAM TIP The GATHER_STATS_JOB will stop if it has not completed by the
time the window it is running in (WEEKNIGHT_WINDOW or WEEKEND_
WINDOW) closes.
Chapter Review
The Scheduler is a tool for running jobs at some point in the future. The jobs can be
operating system executable commands or files, or stored PL/SQL or Java procedures,
or external procedures. The jobs can be run as a one-off or repeatedly according to a
schedule. The basic Scheduler object is the job, though for administrative convenience
and to allow reuse of components, the “what” of the job can be pulled out and stored
as a program, and the “when” of the job can be stored as a separate schedule.
To integrate the Scheduler with the Resource Manager, assign jobs to classes. These
are associated with a Resource Manager group. Then by using windows rather than
schedules, you can activate a particular Resource Manager plan for a period of time.
There are two preconfigured jobs. The PURGE_LOG job clears out the Scheduler
log; the default level of logging is to log each run of a job. This job runs according to
a daily schedule. The GATHER_STATS_JOB is the job that gathers optimizer statistics;
this job runs in one of two windows: the WEEKNIGHT_WINDOW or the WEEKEND_
WINDOW. They are part of the preconfigured MAINTENANCE_WINDOW group.
Questions
1. When a job is due to run, what process will run it? (Choose the best answer.)
A. A CJQn process
B. A Jnnn process
C. A server process
D. A background process
2. Which of the following is a requirement if the Scheduler is to work? (Choose
the best answer.)
A. The instance parameter JOB_QUEUE_PROCESSES must be set.
B. A Resource Manager plan must be enabled.
C. A schedule must have been created.
D. All of the above.
E. None of the above.
3. A Scheduler job can be of several types. Choose all that apply:
A. Anonymous PL/SQL block
B. Executable operating system file
C. External C procedure
D. Java stored procedure
ch36.indd 17ch36.indd 17 7/6/2005 3:39:58 PM7/6/2005 3:39:58 PM

Oracle Database 10g OCP Certification All-in-One Exam Guide
18
All-in-1 / Oracle Database 10g Certification All-in-One / Watson & Bersinic / 5790-3 /Chapter 36
E. Operating system command
F. Operating system shell script (Unix) or batch file (Windows)
G. PL/SQL stored procedure
4. You create a job with this syntax:
exec dbms_scheduler.create_job(-
job_name=>'j1',-
program_name=>'p1',-
schedule_name=>'s1',-
job_class=>'c1');
and find that it is not running when expected. What might be a reason for
this? (Choose the best answer.)
A. The schedule is associated with a window, which has not opened.
B. The job has not been enabled.
C. The class is part of the Resource Manager consumer group with low
priority.
D. The permissions on the job are not correct.
5. What are the possible priority levels of a job within a class? (Choose the best
answer.)
A. 1 to 5
B. 1 to 999
C. HIGH or LOW
D. It depends on the Resource Manager plan in effect
6. There is a preconfigured job to gather optimizer statistics, the GATHER_
STATS_JOB job. This is scheduled to run in both the WEEKNIGHT_WINDOW
and the WEEKEND_WINDOW. What will happen if it fails to complete before
the window closes? (Choose the best answer.)
A. It will continue to run to completion.
B. It will terminate and continue the next time either window opens.
C. It will terminate and restart the next time either window opens.
D. The behavior will vary depending on whether it was running in the
WEEKNIGHT_WINDOW window or the WEEKEND_WINDOW window.
7. You want a job to run every thirty minutes. Which of the following
possibilities for the REPEAT_INTERVAL argument are correct syntactically and
will achieve this result? (Choose two answers.)
A. 'freq=minutely;interval=30'
B. 'freq=hourly;interval=1/2'
C. '0 00:30:00'
D. 'freq=minutely;byminute=30'
E. 'freq=byminute;interval=30'
ch36.indd 18ch36.indd 18 7/6/2005 3:39:59 PM7/6/2005 3:39:59 PM

Chapter 36: Automating Administrative Tasks
19
PART II
All-in-1 / Oracle Database 10g Certification All-in-One / Watson & Bersinic / 5790-3 /Chapter 36
8. You create a job class, and you set the LOGGING_LEVEL argument to
LOGGING_RUNS. What will be the result? (Choose the best answer.)
A. There will be a log entry for each run of each job in the class, but no
information on whether the job was successful.
B. There will be a log entry for each run of each job in the class, and
information on whether the job was successful.
C. There will be a single log entry for the class whenever it is run.
D. You cannot set logging per class, only per job.
9. Which of the following statements (if any) are correct regarding how
Scheduler components can be used together? (Choose all that apply.)
A. A schedule can be used by many jobs.
B. A job can use many programs.
C. A class can have many programs.
D. Job priorities can be set within a class.
E. Consumer groups control priorities within a class.
F. A Resource Manager plan can be activated by a schedule.
10. Which view will tell you about jobs configured with the Scheduler? (Choose
the best answer.)
A. DBA_JOBS
B. DBA_SCHEDULER
C. DBA_SCHEDULED_JOBS
D. DBA_SCHEDULER_JOBS
11. If two windows are overlapping and have equal priority, which window(s)
will be open? (Choose the best answer.)
A. Both windows will be open.
B. Windows cannot overlap.
C. Whichever window opened first will remain open; the other will remain
closed.
D. Whichever window opened first will be closed, and the other will open.
12. How long will Scheduler logging records be visible in the DBA_SCHEDULER_
JOB_LOG view? (Choose the best answer.)
A. They will remain until the PURGE_LOG job is run.
B. By default, they will be kept for thirty days.
C. By default, they will be kept for one day.
D. By default, the view will be cleared every thirty days.
ch36.indd 19ch36.indd 19 7/6/2005 3:40:00 PM7/6/2005 3:40:00 PM

Oracle Database 10g OCP Certification All-in-One Exam Guide
20
All-in-1 / Oracle Database 10g Certification All-in-One / Watson & Bersinic / 5790-3 /Chapter 36
Answers
1. B. Jobs are run by a job slave process. The CJQ0 process is the job queue
coordinator, which passes the jobs to the slave for execution.
2. A. The only requirement for the Scheduler to function is that there must be
at least one job slave process, created with the JOB_QUEUE_PROCESSES
parameter. Resource Manager plans and schedules are optional.
3. A, B, C, D, E, F, and G. All the answers are correct.
4. B. As written, the procedure call will not enable the job, so it can’t run at all.
5. A. Within a class, jobs can have priority 1–5.
6. C. The GATHER_STATS_JOB is configured to stop when its window closes.
At the next window, it will start again.
7. A and B. Either will give a half-hour repeat interval.
8. B. With logging set to LOGGING_RUNS, you will get records of each run of
each job, including the success or failure. The other possible logging levels
are NONE, in which case there will be no logging at all, or FULL, which
records details for each run and also administrative actions, such as enabling
or disabling jobs.
9. A. One job can use only one schedule, but one schedule can be used by
many jobs
10. D. The DBA_SCHEDULER_JOBS view externalizes the data dictionary jobs
table, with one row per scheduled job.
11. C. If two windows overlap and have equal priority, then the one that opens
earlier will be the open window.
12. B. The standard configuration for the PURGE_LOG job is to run every day and
delete all records more than thirty days old.
ch36.indd 20ch36.indd 20 7/6/2005 3:40:00 PM7/6/2005 3:40:00 PM

All-in-1 / Oracle Database 10g OCP Certification All-in-One / Watson, Bersinic / 5790-3/ Glossary
GLOSSARY
Glossary of Acronyms
1
glossary.indd 1glossary.indd 1 7/12/2005 9:53:56 AM7/12/2005 9:53:56 AM

All-in-1 / Oracle Database 10g OCP Certification All-in-One / Watson, Bersinic / 5790-3
Oracle Database 10g OCP Certification All-in-One Exam Guide
2
Full explanations of all the terms used in the Oracle environment can be found in the
Oracle Database 10g Documentation. This is available on a CD delivered with your
Oracle software, or through the World Wide Web on Oracle Corporation’s web site.
Issue the URL
http://otn.oracle.com
and navigate to the database documentation pages; one volume, the Oracle Database
Master Glossary, summarizes most of the Oracle-specific terms. Many third-party web
sites also offer dictionaries of terms used in computing. Of particular interest to Oracle
DBAs is the glossary included on the well-known ORAFAQ web site,
http://www.orafaq.com
This web site is one of the most comprehensive sources of information on the Oracle
database in the world.
Following is a list of the acronyms used throughout this book.
ACID Atomicity, Consistency, Isolation, and Durability. Four characteristics that
a relational database must be able to maintain for transactions.
ADDM Automatic Database Diagnostic Monitor. A tool that generates performance
tuning reports based on snapshots in the AWR.
ANSI American National Standards Institute. A U.S. body that defines a number
of standards relevant to computing.
API Application Programming Interface. A defined method for manipulating data,
typically implemented as a set of PL/SQL procedures in a package.
ASCII American Standard Code for Information Interchange. A standard (with
many variations) for coding letters and other characters as bytes.
ASH Active Session History. A category of information in the AWR, that records
details of session activity.
ASM Automatic Storage Management. An LVM provided with the Oracle database.
ASSM Automatic Segment Space Management. The method of managing space
within segments by use of bitmaps.
AWR Automatic Workload Repository. A set of tables in the SYSAUX tablespace,
populated with tuning data gathered by the MMON process.
BLOB Binary Large Object. A LOB data type for binary data, such as photographs
and video clips.
BMR Block Media Recovery. An RMAN technique for restoration and recovery
of individual data blocks, rather than complete data files.
glossary.indd 2glossary.indd 2 7/12/2005 9:54:12 AM7/12/2005 9:54:12 AM

All-in-1 / Oracle Database 10g OCP Certification All-in-One / Watson, Bersinic / 5790-3
Glossary of Acronyms
3
CET Central European Time. A time zone used in much of Europe (although not
Great Britain) that is one hour ahead of UTC with daylight saving time in effect during
the summer months.
CKPT The Checkpoint Process. The background process responsible for recording
the current redo byte address—the point in time up to which the DBWn has written
changed data blocks to disk—and for signaling checkpoints, which force DBWn to
write all changed blocks to disk immediately.
CLOB Character Large Object. A LOB data type for character data, such as text
documents, stored in the database character set.
CPU Central Processing Unit. The chip that provides the processing capability
of a computer, such as an Intel Pentium or a Sun SPARC.
CTWR Change Tracking Writer. The optional background process that records the
addresses of changed blocks, to enable fast incremental backups.
DBA Database Administrator. The person responsible for creating and managing
Oracle databases—you!
DBCA The Database Configuration Assistant. A GUI tool for creating, modifying,
and dropping instances and databases.
DBID Database Identifier. A unique number for every database, visible in the DBID
column of the V$DATABASE dynamic performance view.
DBMS Database Management System, often used interchangeably with RDBMS.
DBWn or DBWR The Database Writer. The background process responsible for
writing changed blocks from the database buffer cache to the datafiles. An instance
may have up to ten database writer processes, DBW0 through DBW9.
DDL Data Definition Language. The subset of SQL commands that change object
definitions within the data dictionary: CREATE, ALTER, DROP, and TRUNCATE.
DHCP Dynamic Host Configuration Protocol. The standard for configuring the
network characteristics of a computer, such as its IP address, in a changing
environment where computers may be moved from one location to another.
DMnn Data Pump Master process. The process that controls a Data Pump job—one
will be launched for each job that is running.
DML Data Manipulation Language. The subset of SQL commands that change data
within the database: INSERT, UPDATE, DELETE, and MERGE.
DNS Domain Name Service. The TCP mechanism for resolving network names into
IP addresses.
glossary.indd 3glossary.indd 3 7/12/2005 9:54:12 AM7/12/2005 9:54:12 AM

All-in-1 / Oracle Database 10g OCP Certification All-in-One / Watson, Bersinic / 5790-3
Oracle Database 10g OCP Certification All-in-One Exam Guide
4
DSS Decision Support System. A database, such as a data warehouse, optimized for
running queries, as against a database optimized for OLTP work, which will tend to
be more transaction oriented.
DWnn Data Pump Worker process. One or more of these will be launched for each
Data Pump job that is running.
EBCDIC Extended Binary Coded Decimal Interchange Code. A standard developed
by IBM for coding letters and other characters in bytes.
FGA Fine-Grained Auditing. A facility for tracking user access to data, based on the
rows that are seen or manipulated.
GMT Greenwich Mean Time. Now referred to as UTC, this is the time zone of the
meridian through Greenwich Observatory in London.
GUI Graphical User Interface. A layer of an application that lets users work with the
application through a graphical terminal, such as a PC with a mouse.
HTTP Hypertext Transfer Protocol. The protocol that enables the World Wide Web
(both the protocol and the web were invented at the European Organization for
Nuclear Research in 1989), this is a layered protocol that runs over TCP/IP.
HWM High-Water Mark. This is the last block of a segment that has ever been used;
blocks above this are part of the segment but are not yet formatted for use.
IBM International Business Machines. A well-known computer hardware, software,
and services company.
I/O Input/Output. The activity of reading from or writing to disks—often the
slowest point of a data processing operation.
IOT Index-Organized Table. A table type where the rows are stored in the leaf blocks
of an index segment.
IP Internet Protocol. Together with the Transmission Control Protocol, TCP/IP, the
de facto standard communications protocol used for client/server communication
over a network.
IPC Inter-Process Communication Protocol. The platform-specific protocol,
provided by your OS vendor, used for processes running on the same machine
to communicate with each other.
ISO The International Organization for Standardization. A group that defines many
standards, including SQL.
J2EE Java 2 Enterprise Edition. The standard for developing Java applications.
glossary.indd 4glossary.indd 4 7/12/2005 9:54:13 AM7/12/2005 9:54:13 AM

All-in-1 / Oracle Database 10g OCP Certification All-in-One / Watson, Bersinic / 5790-3
Glossary of Acronyms
5
JVM Java Virtual Machine. The run-time environment needed for running code
written in Java. Oracle provides a JVM within the database, and one will be provided
by your operating system.
LDAP Lightweight Directory Access Protocol. The TCP implementation of the
X.25 directory standard, used by the Oracle Internet Directory for name resolution,
security, and authentication. LDAP is also used by other software vendors, including
Microsoft and IBM.
LGWR The Log Writer. The background process responsible for flushing change
vectors from the log buffer in memory to the online redo log files on disk.
LOB Large Object. A data structure that is too large to store within a table. LOBs
(Oracle supports several types) are defined as columns of a table but physically stored
in a separate segment.
LRU Least Recently Used. LRU lists are used to manage access to data structures,
using algorithms that ensure that the data that has not been accessed for the longest
time is the data that will be overwritten.
LVM Logical Volume Manager. A layer of software that abstracts the physical storage
within your computer from the logical storage visible to an application.
MMAN The Memory Manager background process, which monitors and reassigns
memory allocations in the SGA for automatically tunable SGA components.
MML Media Management Layer. Software that lets RMAN make use of automated
tape libraries and other SBT devices.
MMNL Manageability Monitor Light. The background process responsible
for flushing ASH data to the AWR, if MMON is not doing this with the necessary
frequency.
MMON The Manageability Monitor background process, responsible for gathering
performance-monitoring information and raising alerts.
MTBF Mean Time Between Failure. A measure of the average length of running
time for a database between unplanned shutdowns.
MTS Shared Server. Formerly (before release 9i) called Multi-Threaded Server, this
is the technique whereby a large number of sessions can share a small pool of server
processes, rather than requiring one server each.
MTTR Mean Time to Recover. The average time it takes to make the database
available for normal use after a failure.
NCLOB National Character Large Object. A LOB data type for character data, such
as text documents, stored in the alternative national database character set.
glossary.indd 5glossary.indd 5 7/12/2005 9:54:14 AM7/12/2005 9:54:14 AM

All-in-1 / Oracle Database 10g OCP Certification All-in-One / Watson, Bersinic / 5790-3
Oracle Database 10g OCP Certification All-in-One Exam Guide
6
NetBEUI NetBIOS Extended User Interface. An enhanced version of NetBIOS.
NetBIOS Network Basic Input Output System. The network communications
protocol that was burnt onto the first network card that IBM ever produced.
NLS National Language Support. The capability of the Oracle database to support
many linguistic, geographical, and cultural environments—now usually referred to as
Globalization.
OC4J Oracle Containers for J2EE. The control structure provided by the Oracle
Internet Application Server for running Java programs.
OCA Oracle Certified Associate. The qualification you will have after passing the
first of the two Database 10g examinations, covered in Part I one of this book.
OCI Oracle Call Interface. An API, published as a set of C libraries, that
programmers can use to write user processes that will use an Oracle database.
OCP Oracle Certified Professional. The qualification you will have after passing the
second exam, which is covered in Part II of this book.
ODBC Open Database Connectivity. A standard developed by Microsoft for
communicating with relational databases. Oracle provides an ODBC driver that
will allow clients running Microsoft products to connect to an Oracle database.
OLAP Online Analytical Processing. Work which is select intensive, rather than
transactional, involving running queries against a (usually) large database. Oracle
provides OLAP capabilities as an option, in addition to the standard query facilities.
OLTP Online Transaction Processing. A pattern of activity within a database
typified by a large number of small, short, transactions.
OS Operating System. Typically, in the Oracle environment, this will be a version
of Unix (perhaps Linux) or Microsoft Windows.
PGA Program Global Area. The variable-sized block of memory used to maintain
the state of a database session. PGAs are private to the session, and controlled by the
session’s server process.
PL/SQL Procedural Language / Structured Query Language. Oracle’s proprietary
programming language, which combines procedural constructs, such as flow control,
and user interface capabilities with SQL.
PMON The Process Monitor. The background process responsible for monitoring
the state of users’ sessions against an instance.
RAC Real Application Clusters. Oracle’s clustering technology, which allows several
instances on different machines to open the same database for scalability, performance,
and fault tolerance.
glossary.indd 6glossary.indd 6 7/12/2005 9:54:14 AM7/12/2005 9:54:14 AM

All-in-1 / Oracle Database 10g OCP Certification All-in-One / Watson, Bersinic / 5790-3
Glossary of Acronyms
7
RAID Redundant Array of Inexpensive Disks. Techniques for enhancing performance
and/or fault tolerance by using a volume manager to present a number of physical
disks to the operating system as a single logical disk.
RAM Random Access Memory. The chips that make up the real memory in your
computer hardware, as against the virtual memory presented to software by the
operating system.
RDBMS Relational Database Management System, often used interchangeably
with DBMS.
RMAN Recovery Manager. Oracle’s backup and recovery tool.
RVWR The Recovery Writer background process, an optional process responsible
for flushing the flashback buffer to the flashback logs.
SBT System Backup to Tape. An RMAN term for a tape device.
SCN System Change Number. The continually incrementing number used to track
the sequence and exact time of all events within a database.
SGA System Global Area. The block of shared memory that contains the memory
structures that make up an Oracle instance.
SID System Identifier. The name of an instance, which must be unique on the
computer the instance is running on. (2) Session Identifier. The number used to
identify uniquely a session logged on to an Oracle instance.
SMON The System Monitor. The background process responsible for opening
a database and monitoring the instance.
SQL Structured Query Language. An international standard language for extracting
data from and manipulating data in relational databases.
SSL Secure Sockets Layer. A standard for securing data transmission, using
encryption, checksumming, and digital certificates.
TCP Transmission Control Protocol. Together with the Internet Protocol, TCP/IP,
the de facto standard communication protocol used for client/server communication
over a network.
TCPS TCP with SSL. The secure sockets version of TCP.
TNS Transparent Network Substrate. The heart of Oracle Net, a proprietary layered
protocol running on top of whatever underlying network transport protocol you choose
to use, probably TCP/IP.
UGA User Global Area. The part of the PGA that is stored in the SGA for sessions
running through shared servers.
glossary.indd 7glossary.indd 7 7/12/2005 9:54:15 AM7/12/2005 9:54:15 AM

All-in-1 / Oracle Database 10g OCP Certification All-in-One / Watson, Bersinic / 5790-3
Oracle Database 10g OCP Certification All-in-One Exam Guide
8
UI User Interface. The layer of an application that communicates with end users,
nowadays frequently graphical: a GUI.
URL Uniform Resource Locator. A standard for specifying the location of an object
on the Internet, consisting of a protocol; a host name and domain; an IP port number;
a path and filename; and a series of parameters.
UTC Coordinated Universal Time, previously known as Greenwich Mean Time
(GMT). UTC is the global standard time zone; all others relate to it as offsets, ahead
or behind.
X As in X Window System, the standard GUI environment used on most computers,
except those that run Microsoft Windows.
XML Extensible Markup Language. A standard for data interchange using documents,
where the format of the data is defined by tags within the document.
glossary.indd 8glossary.indd 8 7/12/2005 9:54:15 AM7/12/2005 9:54:15 AM
